VN122020
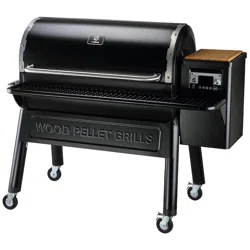
WOOD PELLET GRILLS
ZPGD-1100 2B
OWNER’S MANUAL
MON TO FRI, 8:00 A.M. - 5:00 P.M. PACIFIC STANDARD TIME
SERVICE CONTACT: 1-833-947-4557/1-833-ZGRILLS
EMAIL: support@zgrills.com
WEBSITE: www.zgrills.com

1
C
O
N
T
E
N
T
S
IMPORTANT SAFETY INFO
3
COMPONENT LIST
6
ASSEMBLY INSTRUCTIONS
8
INITIAL FIRING INSTRUCTIONS
18
SUBSEQUENT START-UP
19
OPERATING TIPS
20
MAINTENANCE & CLEANING
21
TROUBLESHOOTING
23
GRILL CONTROL BOARD INTRODUCTION
25
Z GRILLS SUPPORT
32
3-Y LIMITED WARRANTY
33

2
SAVE THIS MANUAL FOR FUTURE REFERENCE

3
IMPORTANT SAFETY INFO
GENERAL WARNINGS
Please read this entire manual before installation and use of the pellet fuel-burning
appliance. Failure to follow these instructions could result in property damage, bodily
injury or even death.
Contact local building or fire officials about restrictions and installation inspection
requirements in your area.
This grill is for outdoor use only. DO NOT use it in any enclosed area.
DO NOT store or use combustible materials or liquids near this appliance.
Keep children away while it is in use.
Maintain a safe distance between your grill and any combustible material.
DO NOT move your grill while operating or while it is hot. Wait until the grill is
completely cold.
If a grease fire occurs, turn “off” and leave lid closed until the fire is extinguished. DO
NOT unplug the power cord. DO NOT throw water on it. DO NOT try to smother the
fire.
Clean and maintain your grill after each use.
DO NOT use your grill on rainy days.
DO NOT touch any part of your grill while it is hot. Serious bodily injury could result.
We suggest the use of heat-resistant gloves when operating this grill.
We suggest that you should wrap the Grease Drain Pan with heavy-duty aluminum
foil before using because it is easy to clean.
For convenient and safe assembly, use at least two people to assemble the grill.
Make sure the power cord is disconnected before performing any service or
maintenance.

4
DO NOT place anything heavy on top of hopper lid. It is not a shelf and is a tip hazard.
Never use gasoline, gasoline-type lantern fuel, kerosene, charcoal lighter fluid, or
similar liquids to start or ‘freshen up’ a fire in this appliance. Keep all such liquids
well away from the appliance when in use.
Do not use accessories not specified for use with this appliance.
NOTE: A MAJOR CAUSE OF FIRES IS FAILURE TO MAINTAIN REQUIRED
CLEARANCES (AIR SPACES) TO COMBUSTIBLE MATERIALS. IT IS OF
UTMOST IMPORTANCE THAT THIS PRODUCT BE INSTALLED ONLY IN
ACCORDANCE WITH THESE INSTRUCTIONS.

5
PELLET RESTRICTIONS
This grill is designed for use of wood pellets only designed for burning in wood pellet
grills. Do Not Use Pellet Fuel Labeled As Having Additives.
We suggest that you use Z GRILLS BBQ WOOD PELLETS, which are specifically
made to work in our grills. There is no guarantee that other brands of pellets are
suitable for use in Z GRILLS. And Z GRILLS assumes no liability for any loss, damage
or injury caused by the use of any other brands of pellets.
Always keep the Pellet Hopper dry, the wood pellets will expand greatly, break apart
and even jam the feed system if the pellets get wet or are exposed to high humidity.
CARBON MONOXIDE WARNING
Follow these guidelines to prevent this colorless, odorless gas from poisoning you,
your family or others.
Know the symptoms of carbon monoxide poisoning: headache, dizziness, weakness,
nausea, vomiting, sleepiness, and confusion. Carbon monoxide reduces the blood’s
ability to carry oxygen. Low blood oxygen levels can result in loss of consciousness
and death.
See a doctor if you or others develop cold or flu-like symptoms while cooking or in
the vicinity of this appliance. Carbon monoxide poisoning, which can easily be
mistaken for a cold or flu, is often detected too late.
Alcohol consumption and drug use increase the effects of carbon monoxide
poisoning.
Carbon monoxide is especially toxic to mother and child during pregnancy, infants,
the elderly, smokers, and people with blood or circulatory system problems, such as
anemia, or heart disease.
6
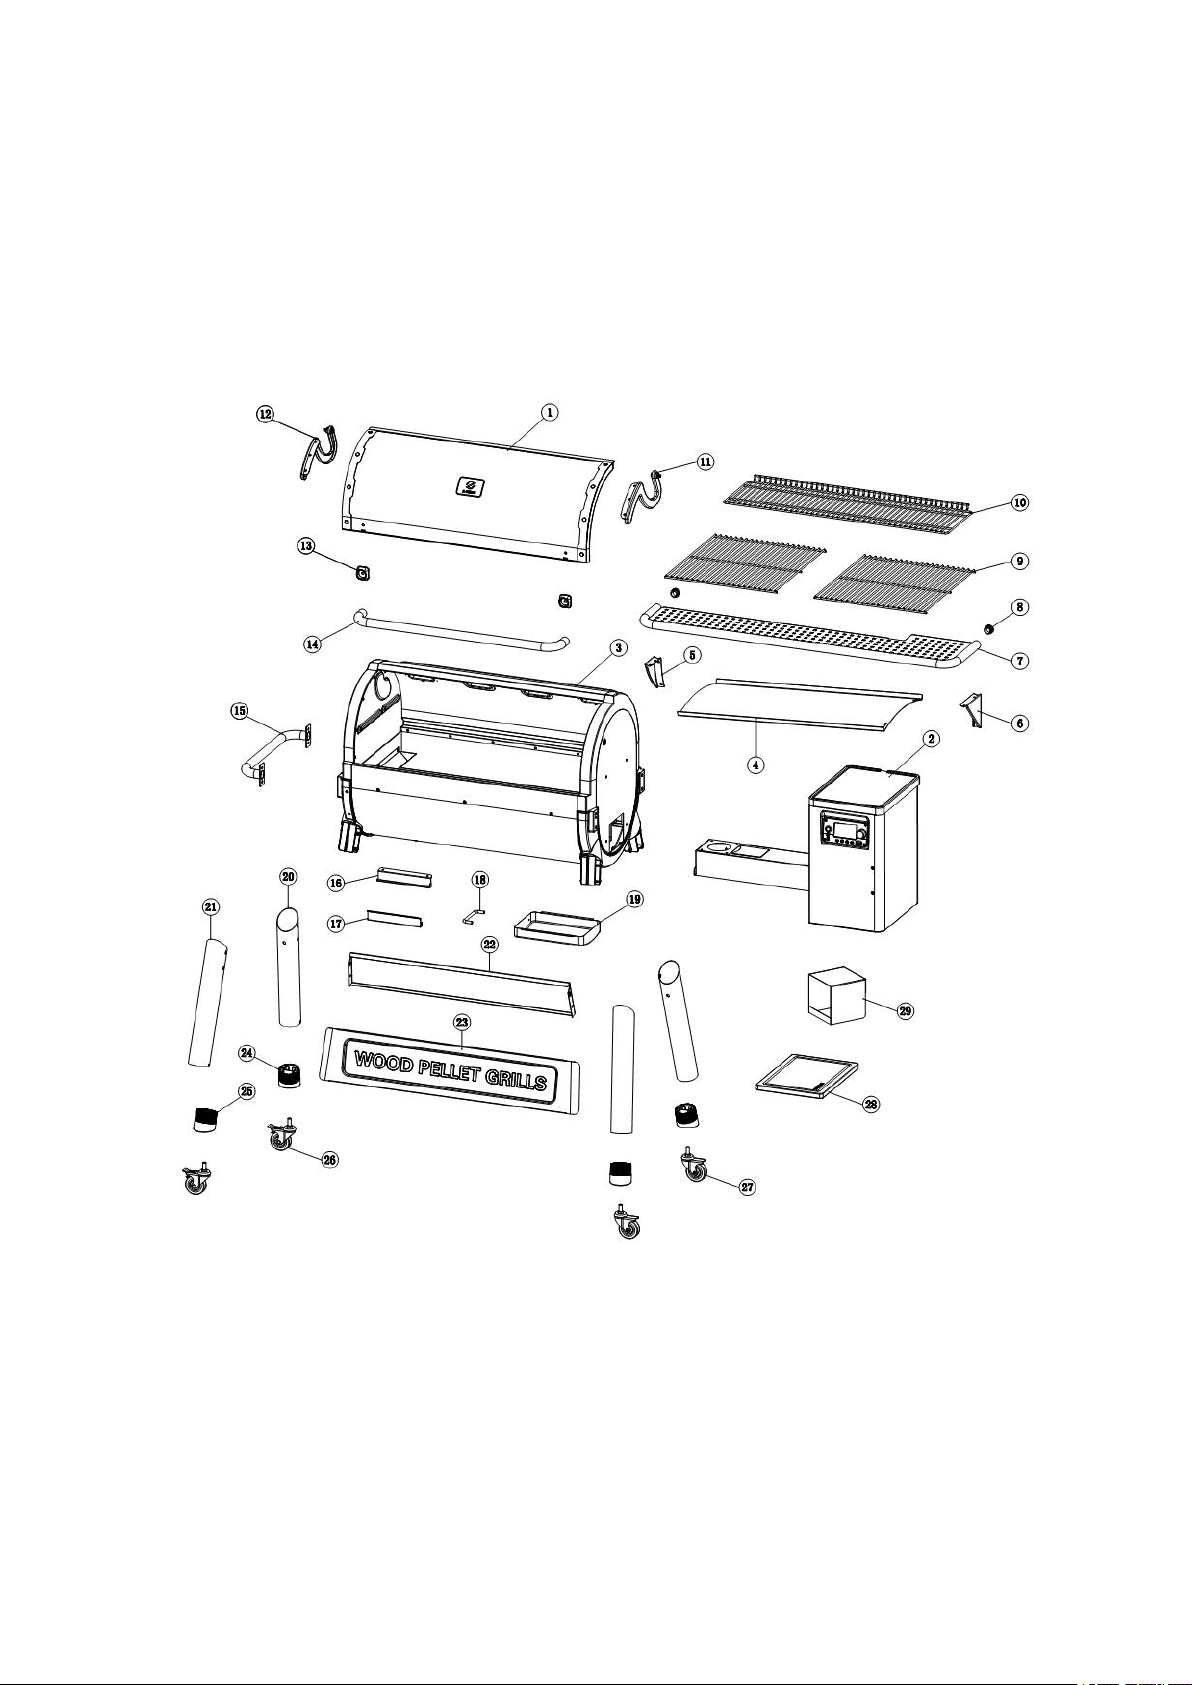
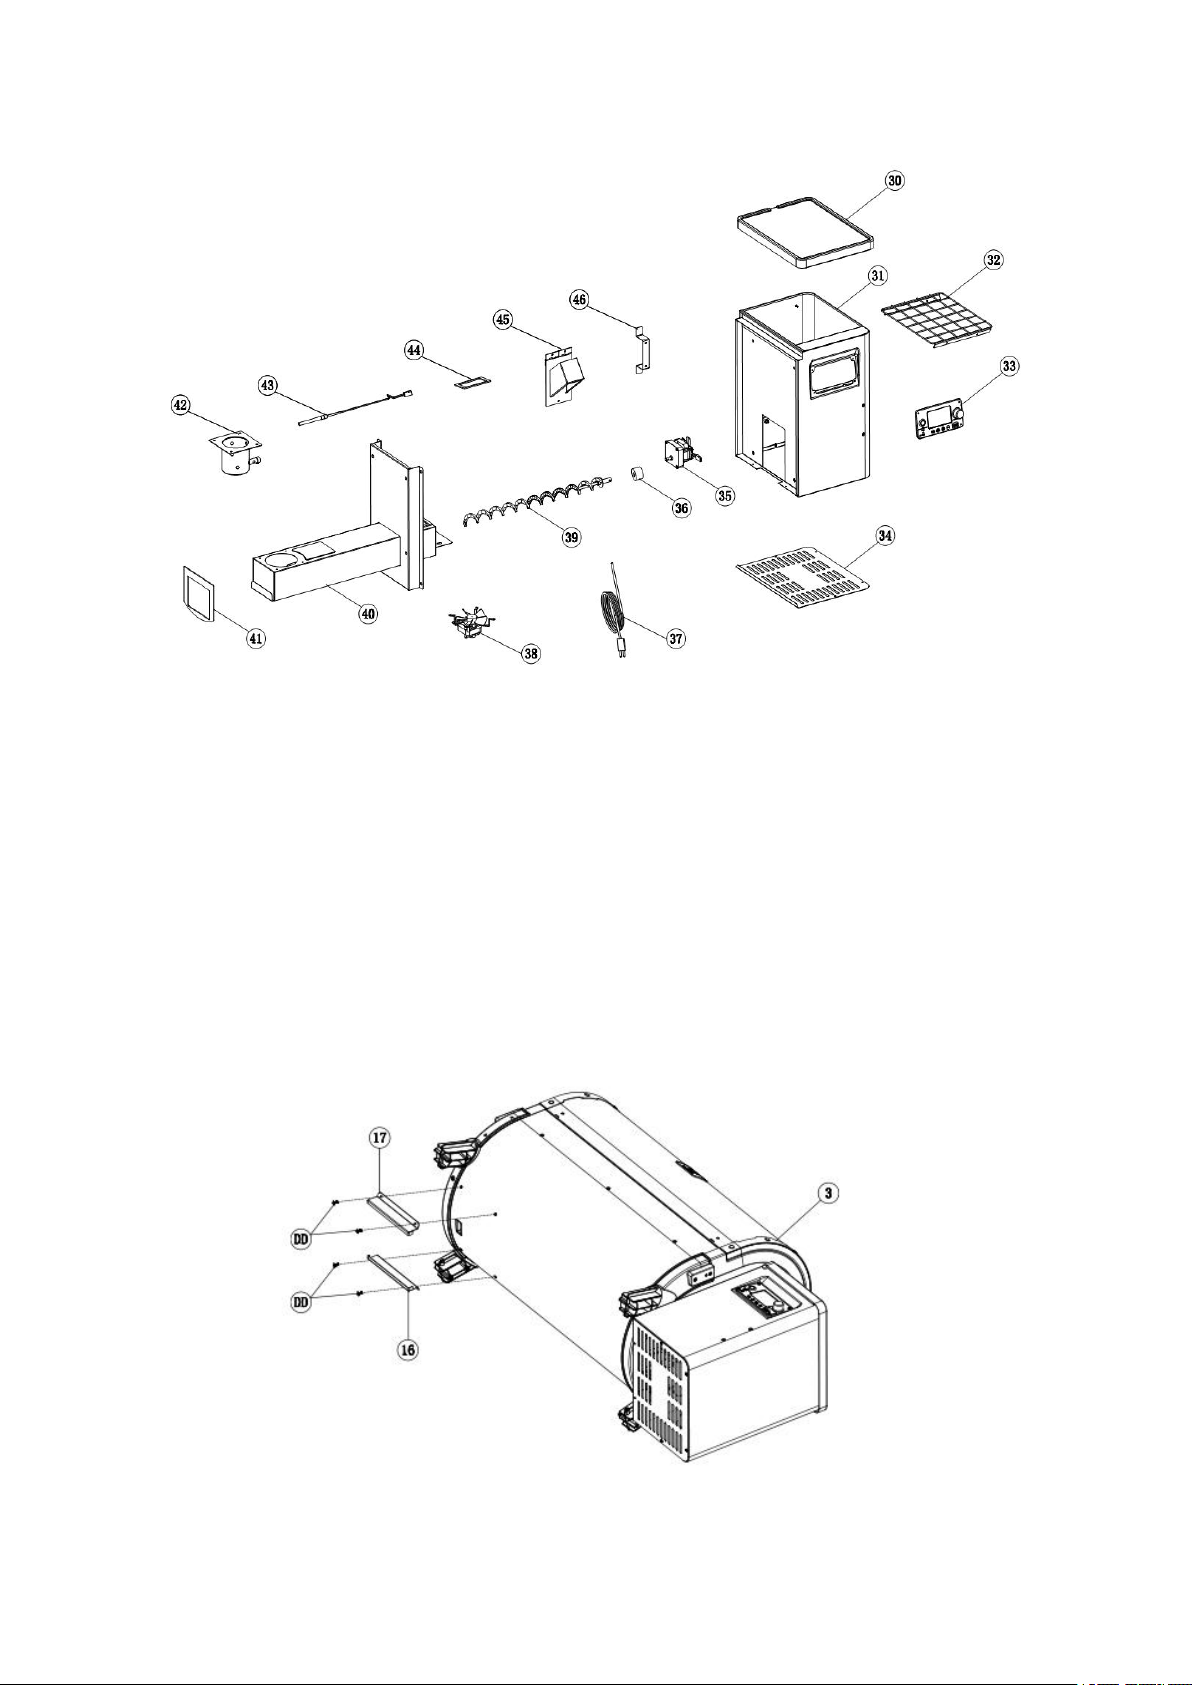
COMPONENT LIST
ITEM
QTY
DESCRIPTION
ITEM
QTY
DESCRIPTION
1
1
Chamber Lid
25
2
Front Foot pad
2
1
Hopper Assembly
26
2
Wheels(with brake)
3
1
Grill Chamber Assembly
27
2
Wheels(without brake)
4
1
Grease Drain Pan
28
1
Cutting Board
5
1
Front Shelf Left Bracket
29
1
Heat Baffle
6
1
Front Shelf Right Bracket
30
1
Hopper Lid
7
1
Front Shelf
31
1
Hopper Burner Assembly
8
2
Tube Sealing
32
1
Upper Hopper Safety Grate
9
2
Porcelain Cooking Grates
33
1
Digital Control
10
1
Warming Rack
34
1
Lower Hopper Safety Grate
11
1
Right Hook
35
1
Auger Drive Motor
12
1
Left Hook
36
1
Auger Nylon Ring
13
2
Handle Base
37
1
Power Cord
14
1
Lid Handle
38
1
Fan
15
1
Side Handle
39
1
Auger
16
1
Rear Guide Track
40
1
Hopper Frame
17
1
Front Guide Track
41
1
Hopper Insulation Cotton
18
1
Box Handle
42
1
Firepot Assembly
19
1
Grease Box
43
1
Hot Rod (Ignitor)
20
2
Rear Leg
44
1
Thick Gasket
21
2
Front Leg
45
1
Pellet Cleanout Door
22
1
Back Plate
46
1
Cord Hook
23
1
Front Plate
47
2
Meat Probe
24
2
Rear Foot pad
7
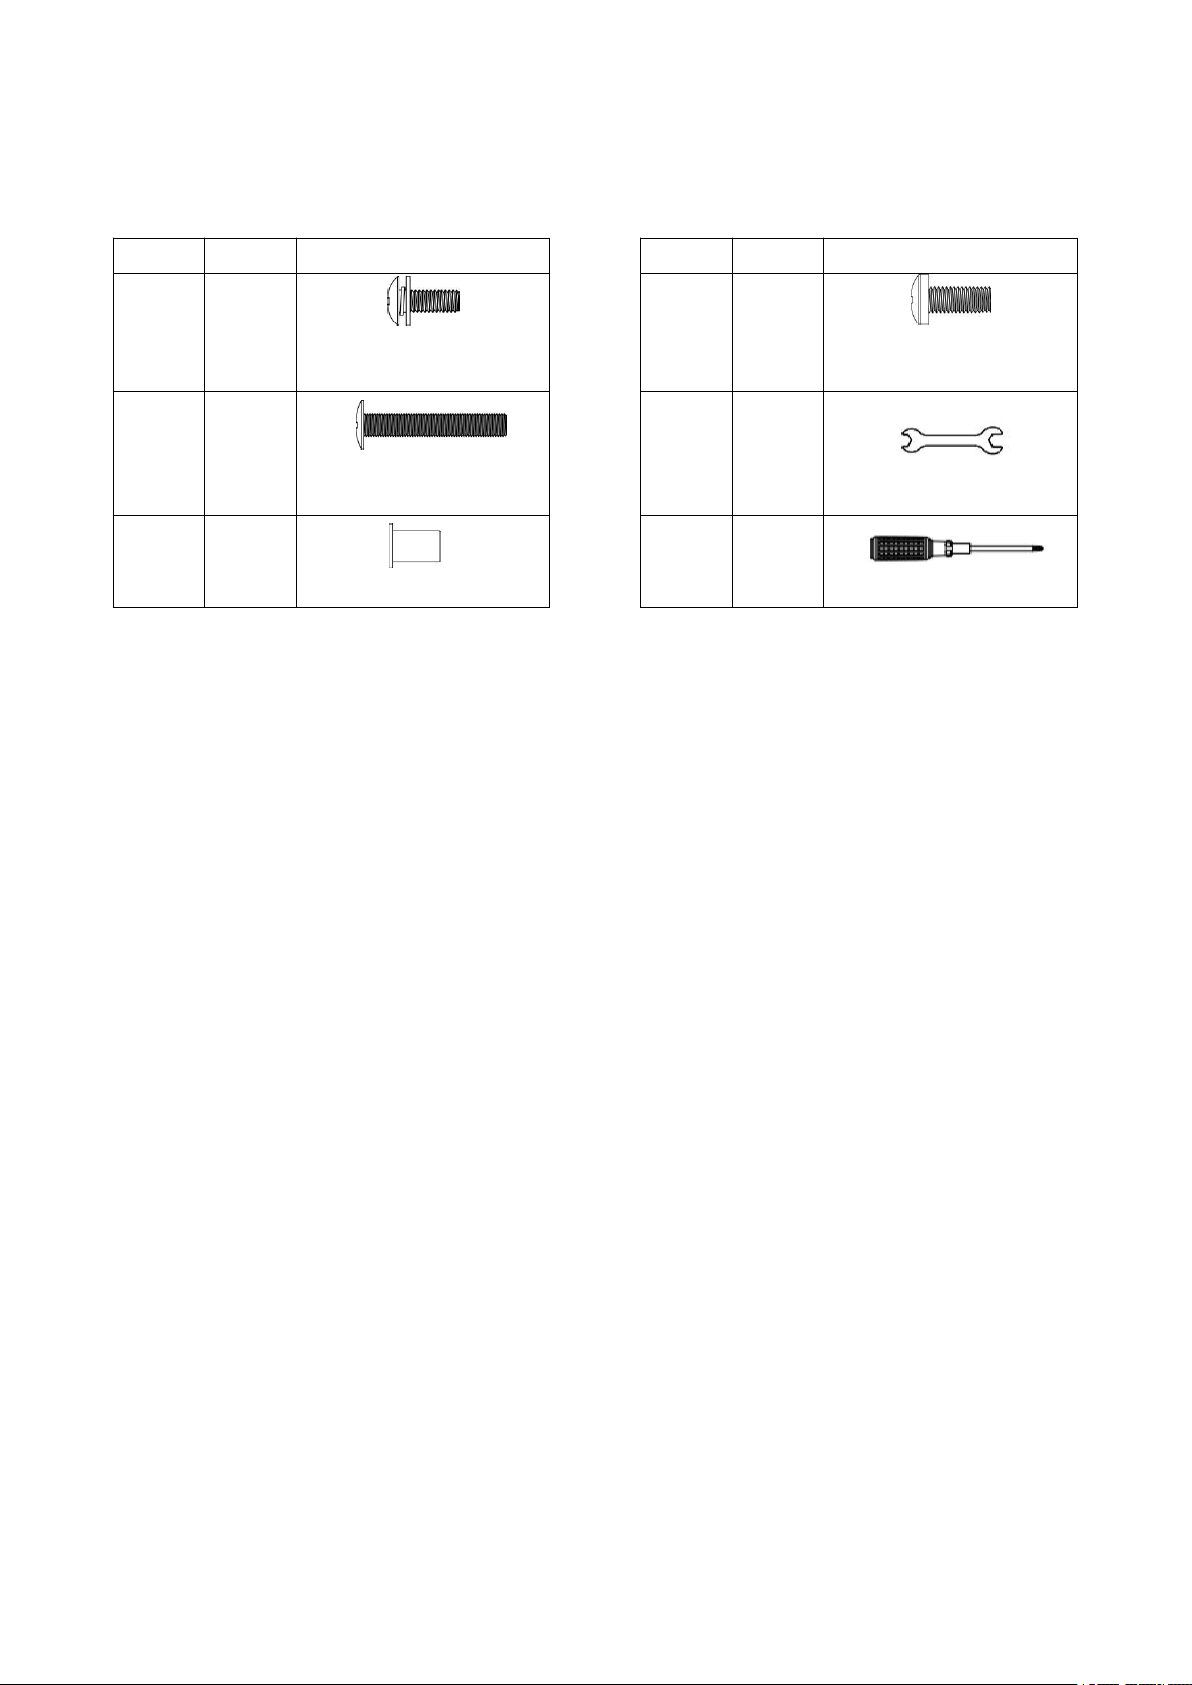
HARDWARE PACKAGE LIST
I
T
E
M
Q
T
Y
D
E
S
C
R
I
P
T
I
O
N
I
T
E
M
Q
T
Y
D
E
S
C
R
I
P
T
I
O
N
A
A
24
P
h
i
l
l
i
p
s
H
e
a
d
L
o
c
k
S
c
r
e
w
1
/
4
-
2
0
×
5
/
8
D
D
8
Phillips Head Screw
8
-
3
2
×
3
/
8
B
B
2
P
h
i
l
l
i
p
s
H
e
a
d
S
c
r
e
w
1
/
4
-
2
0
x
1
-
3
/
5
EE
1
W
r
e
n
c
h
C
C
2
Handle Base Tube
F
F
1
Screwdriver
8
ASSEMBLY INSTRUCTIONS
PARTS DIAGRAM
:
HOPPER BURNER ASSEMBLY:
9
1
.
M
O
U
N
T
I
N
G
T
H
E
B
O
D
Y
F
R
A
M
E
1
.
U
n
p
a
c
k
a
l
l
t
h
e
i
t
e
m
s
,
i
n
c
l
u
d
i
n
g
t
h
e
p
a
r
t
s
p
a
c
k
e
d
i
n
t
h
e
G
r
i
l
l
C
h
a
m
b
e
r
(
3
)
.
T
u
r
n
t
h
e
b
o
d
y
side and place upon the original Styrofoam packing material from the carton.
(CAUTION: Grill is heavy and requires two people to lift.)
2
.
I
n
s
e
r
t
S
c
r
e
w
s
(
D
D
)
t
h
r
o
u
g
h
R
e
a
r
G
u
i
d
e
T
r
a
c
k
(
1
6
)
i
n
t
o
t
h
e
G
r
i
l
l
C
h
a
m
b
e
r
A
s
s
e
m
b
l
y
(
3
)
.
3
.
R
e
p
e
a
t
S
t
e
p
s
2
f
o
r
F
r
o
n
t
G
u
i
d
e
T
r
a
c
k
(
1
7
)
.
U
s
e
t
h
e
s
c
r
e
w
d
r
i
v
e
r
(
F
F
)
t
o
t
i
g
h
t
e
n
.
10
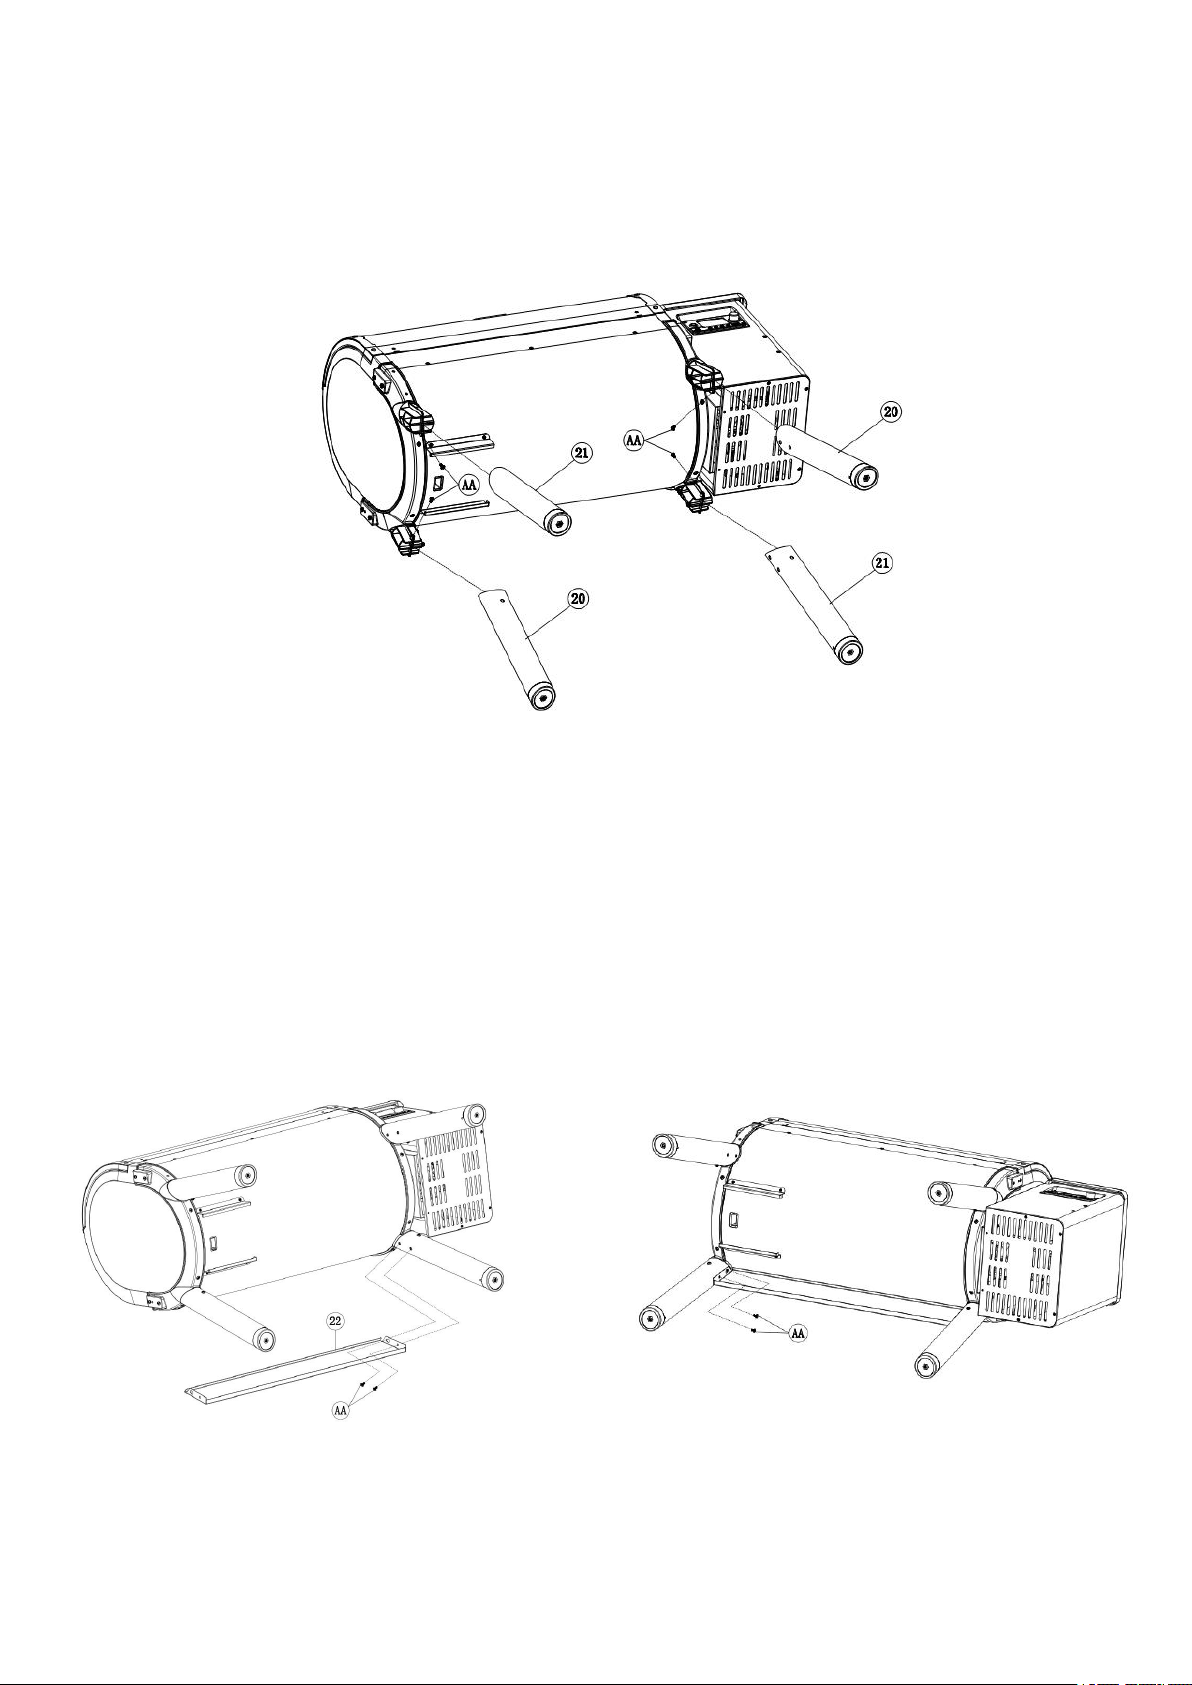
4.Take the Rear & Front Legs (20)(21) and use the Screws (AA) to assemble the grill body
through the holes. As shown.
5.Attach the Back Plate (22) on Rear Leg (20) and Front Leg (21) by using the Screws (AA).
The two positions are installed in the same manner, as shown. Use Screwdriver (FF) to
tighten them.
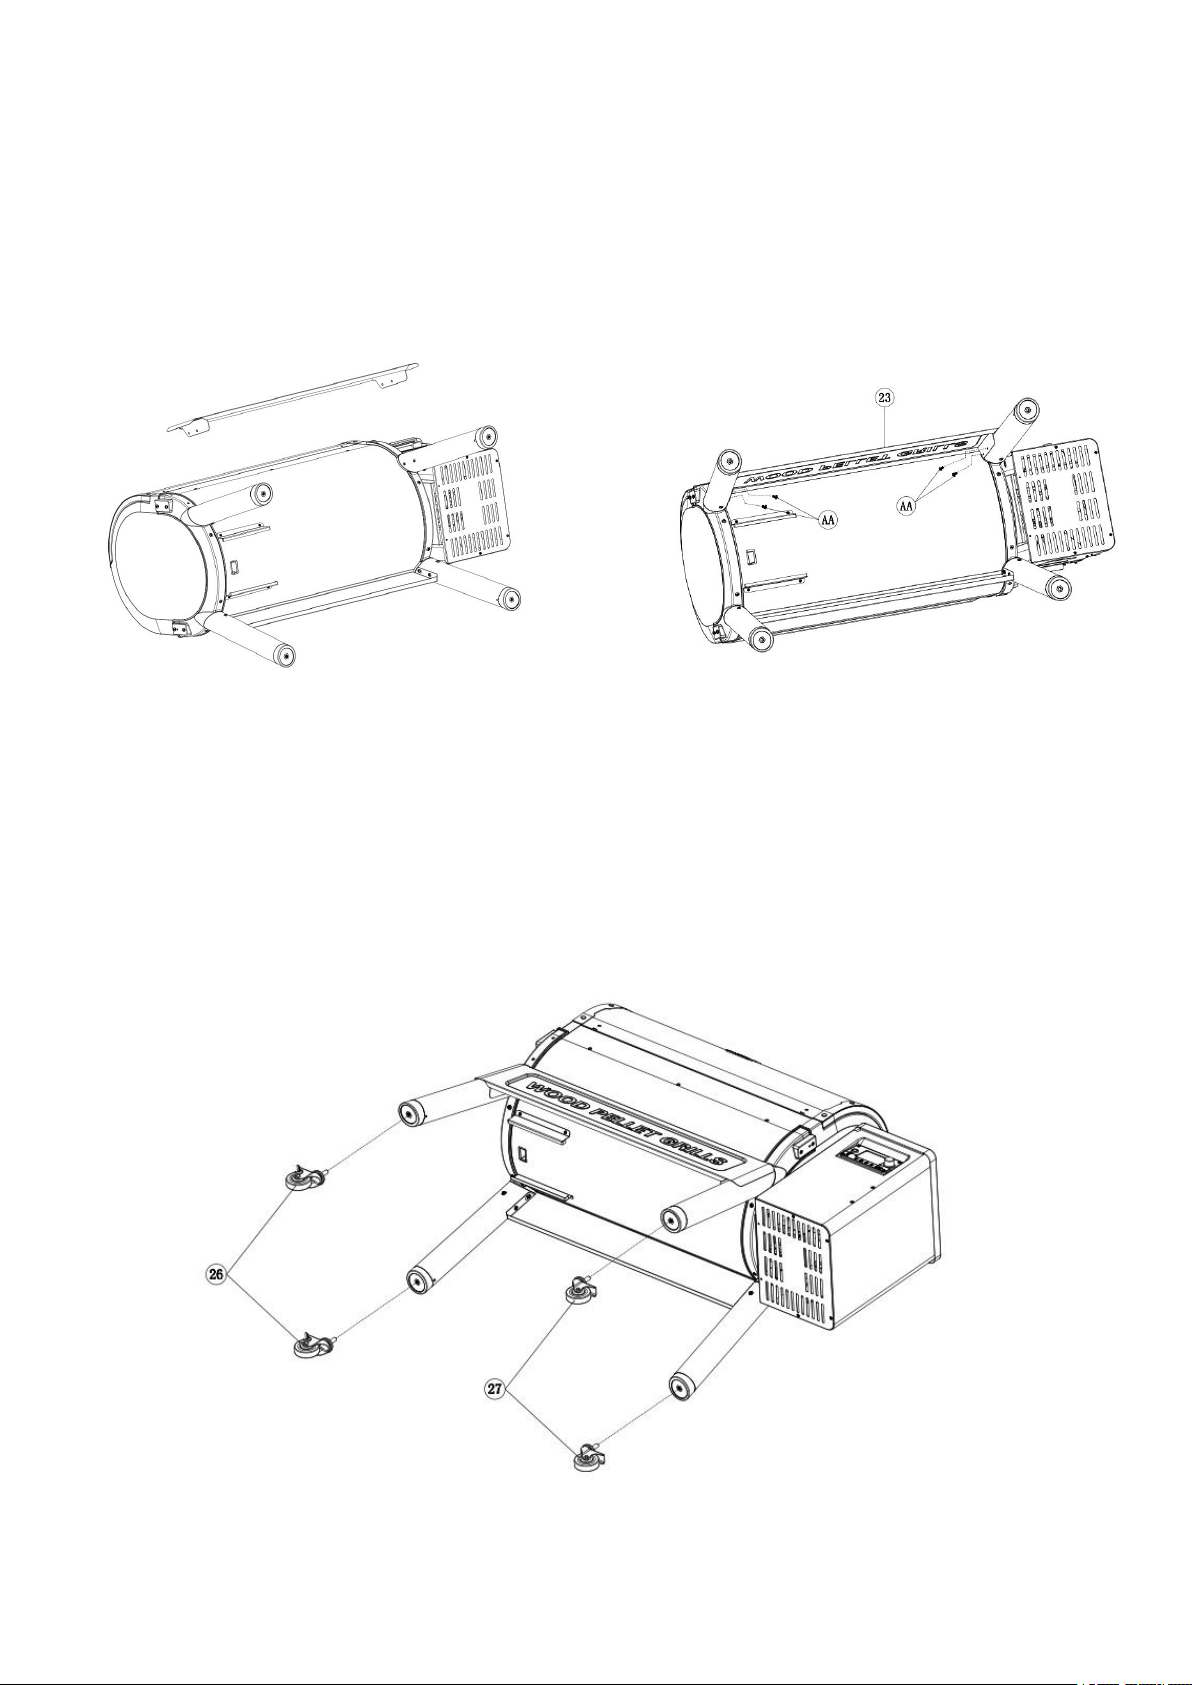
11
6.Attach the Front Plate (23) on Rear Leg (20) and Front Leg (21) by using the Screws (AA).
The two positions are installed in the same manner, as shown.
7.Assemble the wheels (with brake)(26) & the wheels (without brake)(27) on the Legs
(20)(21) respectively. Use Wrench (EE) to tighten them, as shown.
12
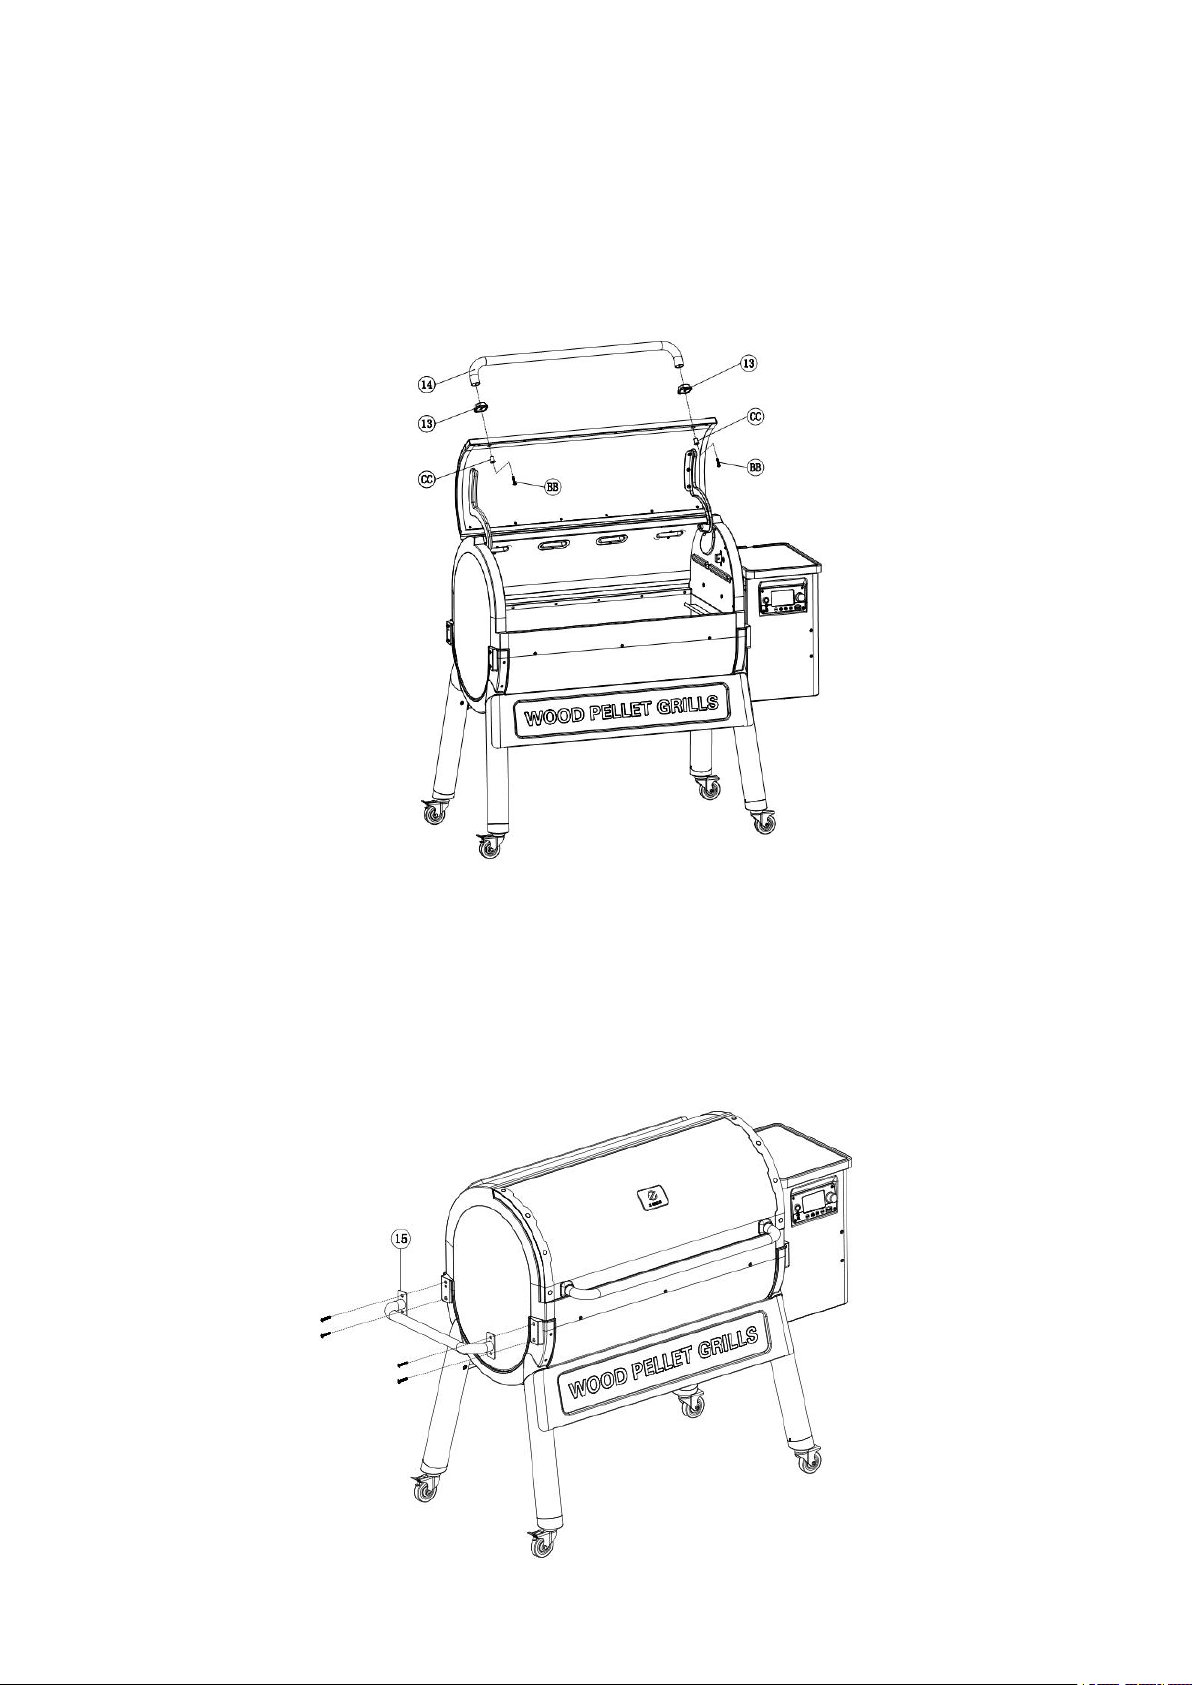
2.ATTACHING THE CHAMBER LID HANDLE
From the inside of the raised lid, push the Screws (BB) through the Handle Base Tube (CC)
and then through the lid (1) and Handle Base (13). Handle should sit inside the depression in
the guide. Thread Screws (BB) into Handle (14) and tighten with Screwdriver (FF).
3.ATTACHING THE SIDE HANDLE
Remove the Screws assembled on the Side Handle (15). Use the Screws to pass through
the Side Handle (15) and use Screwdriver (FF) to tighten, as shown.
13
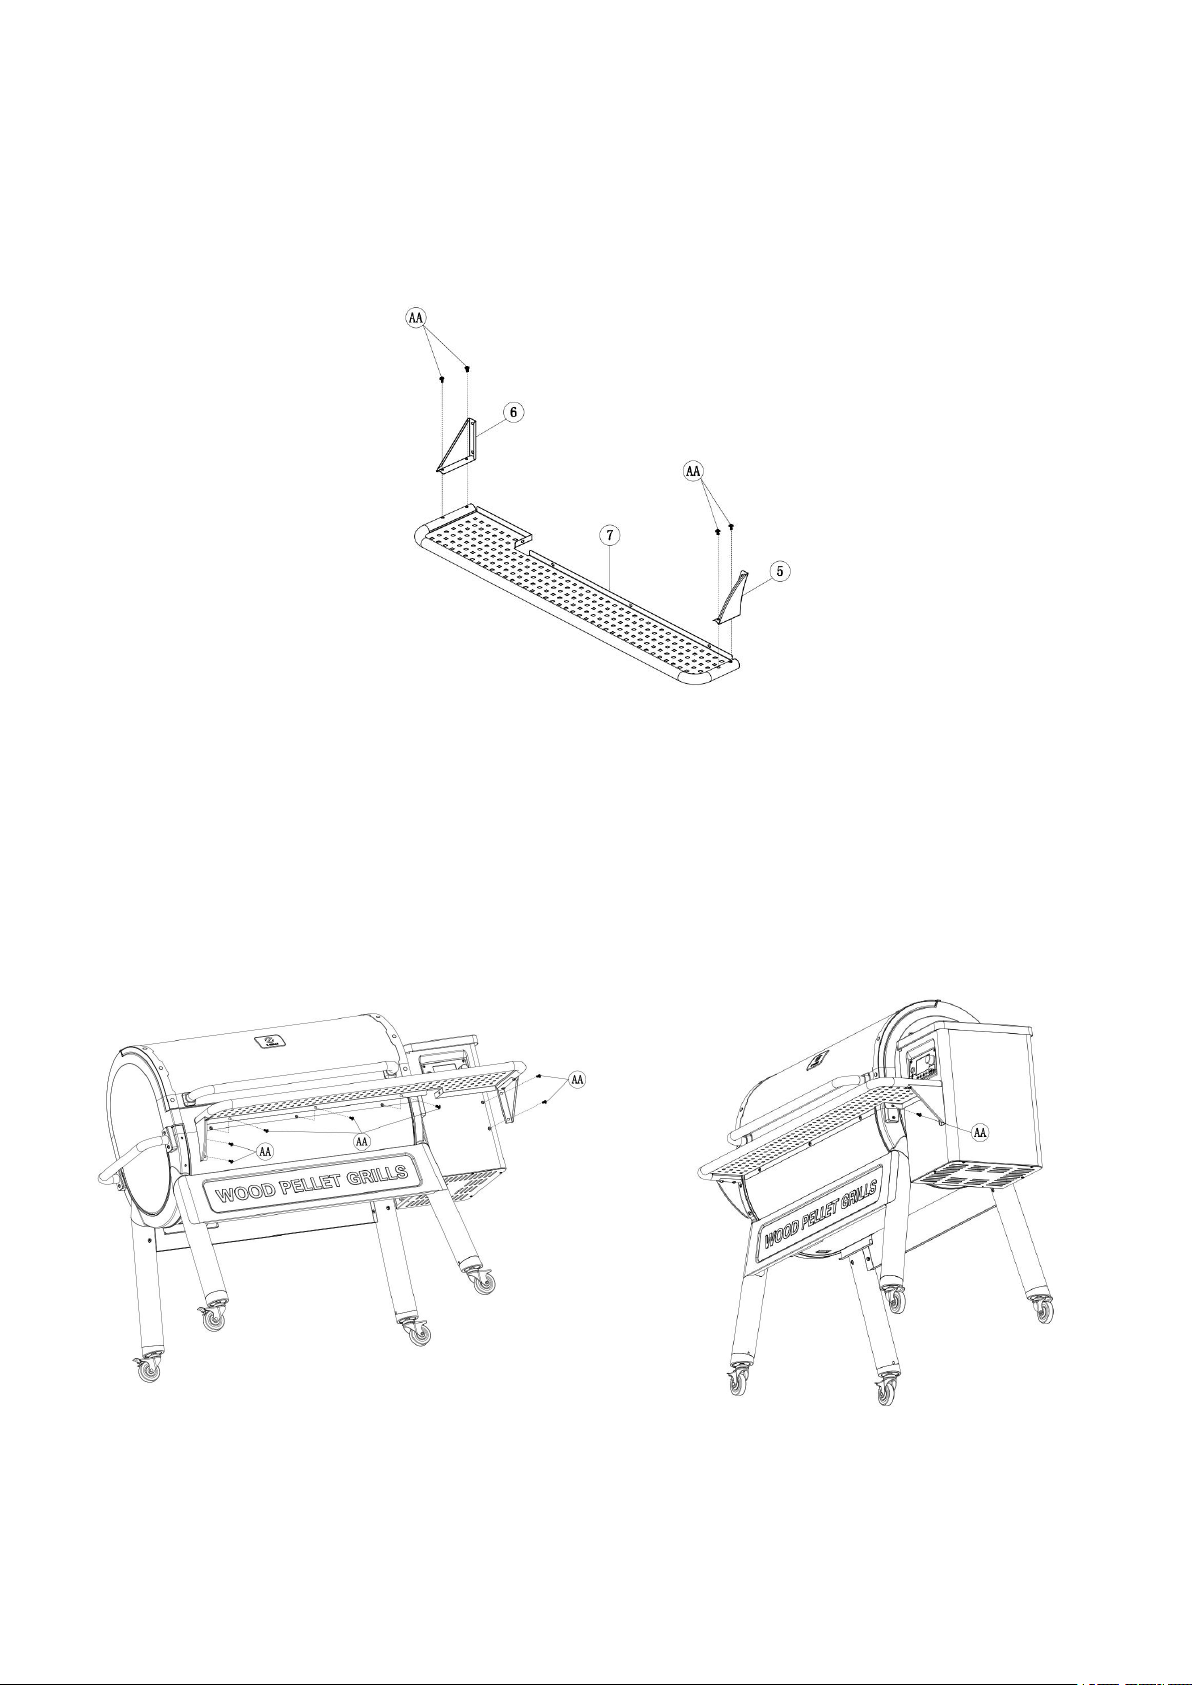
4.FRONT SHELF ASSEMBLY
1.Insert Screws (AA) through the Front Table Left Bracket (5) and into the Front Shelf (7).
2.Repeat Steps 1 for Front Table Right Bracket (6). Use the screwdriver (FF) to tighten.
5.ATTACHING THE FRONT SHELF
Insert Screws (AA) through the Front Table Left & Right Brackets (5)(6) into the Grill
Chamber Assembly (3), as shown. Use the screwdriver (FF) to tighten.
14
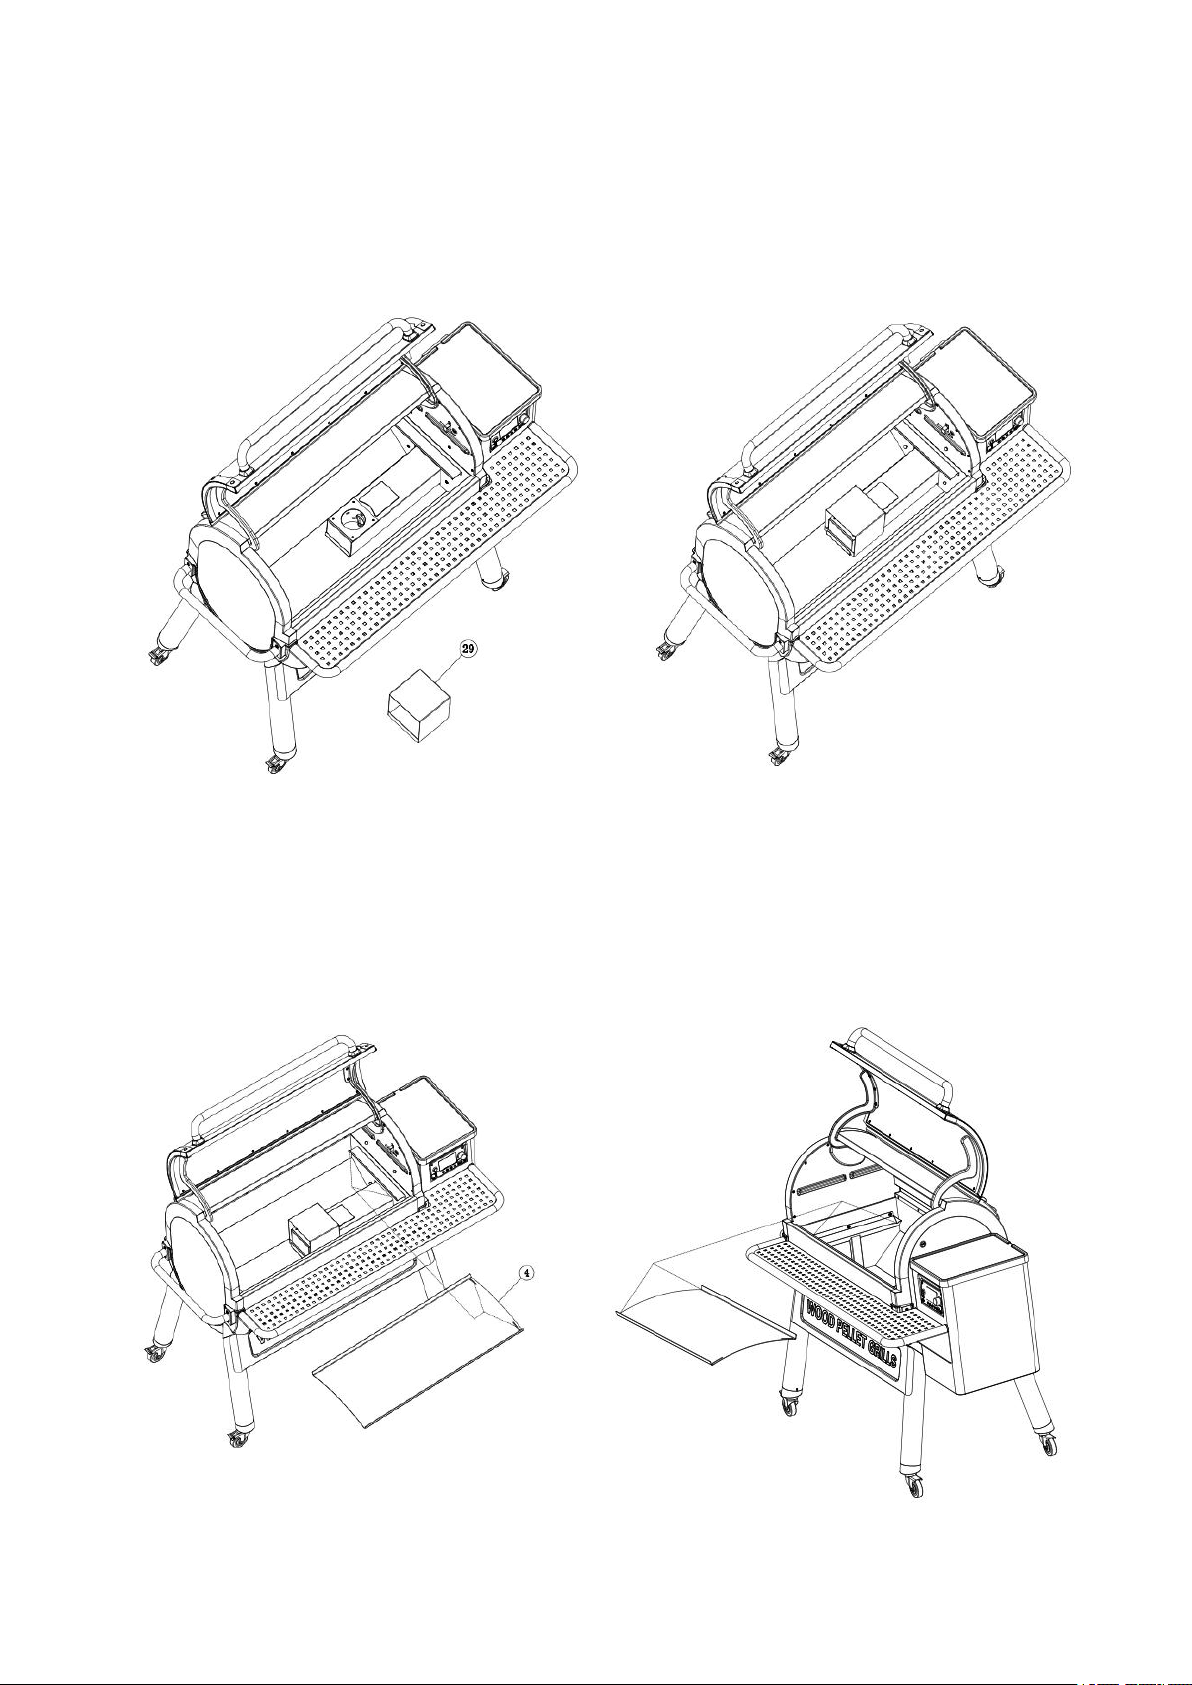
6.ATTACHING HEAT BAFFLE
Attaching the Heat Baffle (29) on the Firepot.
7.POSITIONING THE GREASE DRAIN PAN
Install the Grease Drain Pan (4) over the Heat Baffle (29) facing downward to fit onto the
locating brackets so that the grease can flow into the Grease Box.
15
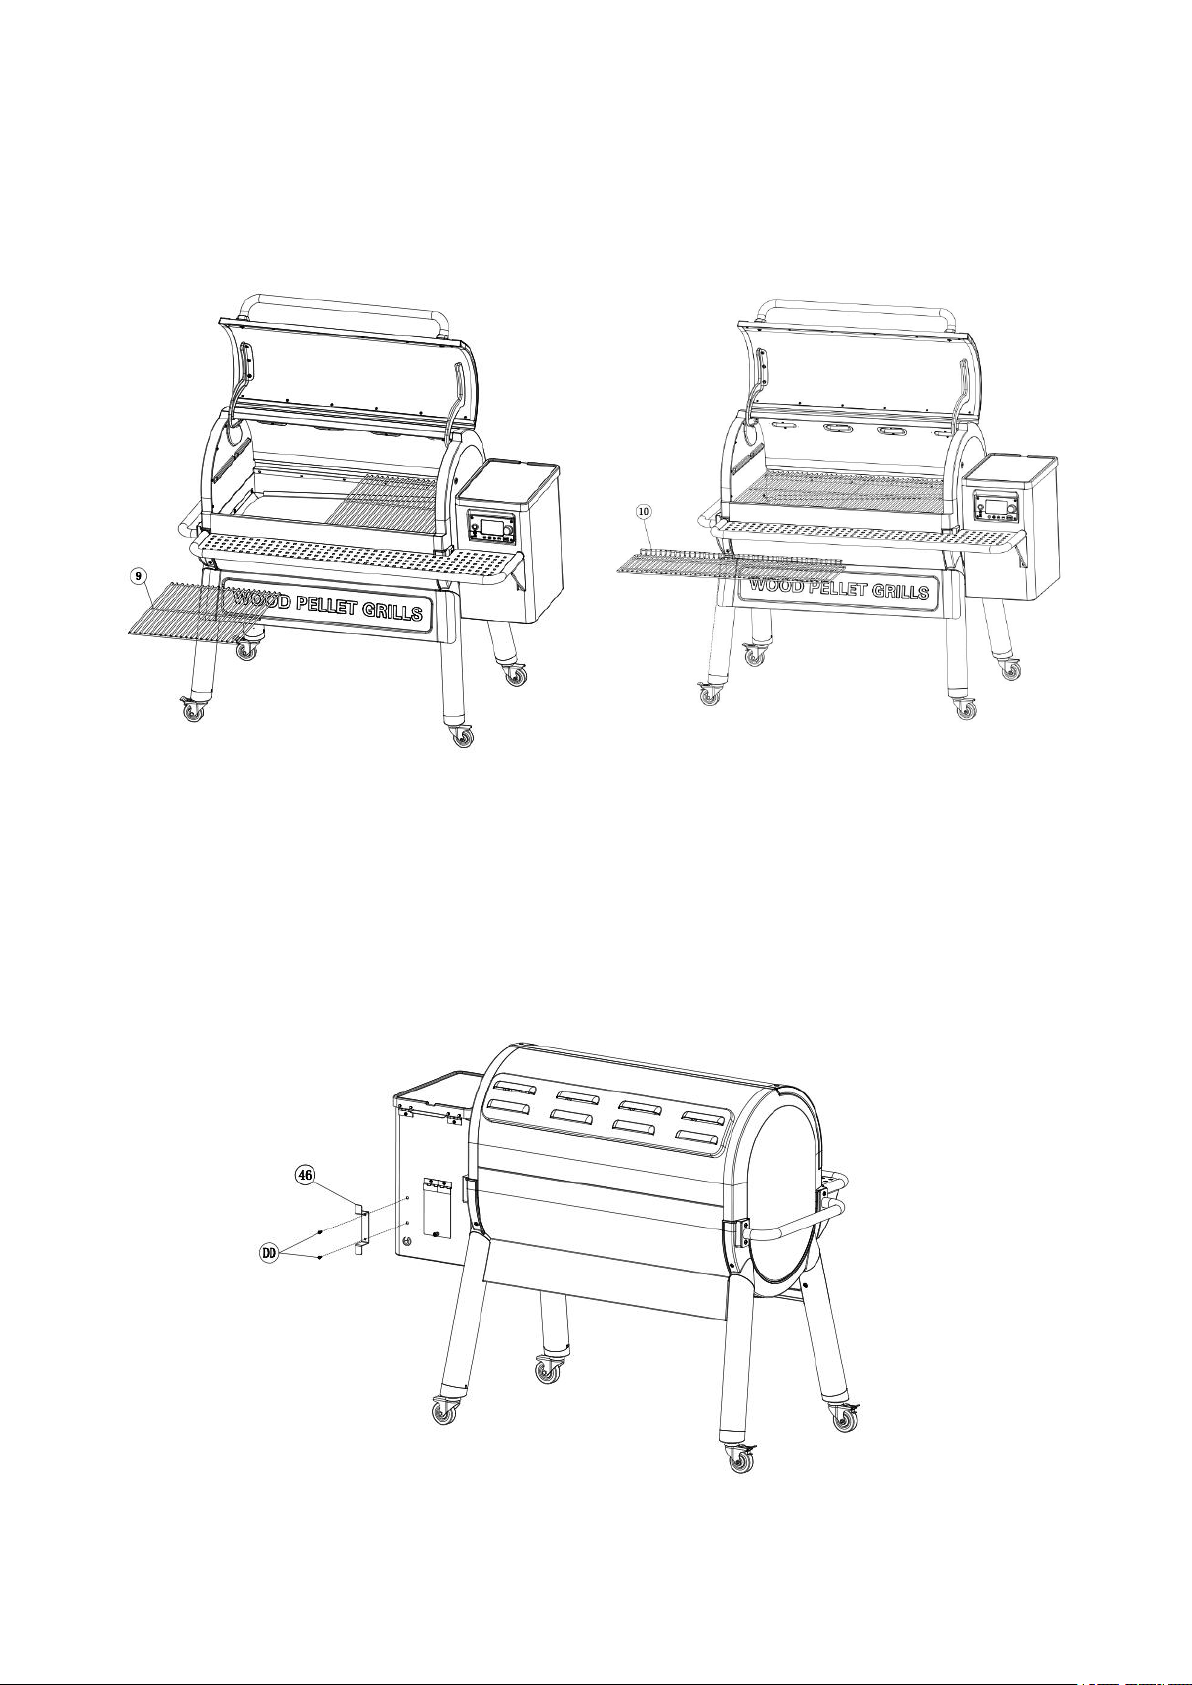
8.ATTACHING COOKING GRATE AND WARMING RACK
Attaching the Porcelain Cooking Grates (9) and Warming Rack (10) in the Chamber.
9. ATTACHING THE CORD HOOK
Insert Screws (DD) through the Cord Hook (46) into the Hopper Assembly, as shown. Use
the screwdriver (FF) to tighten.
16
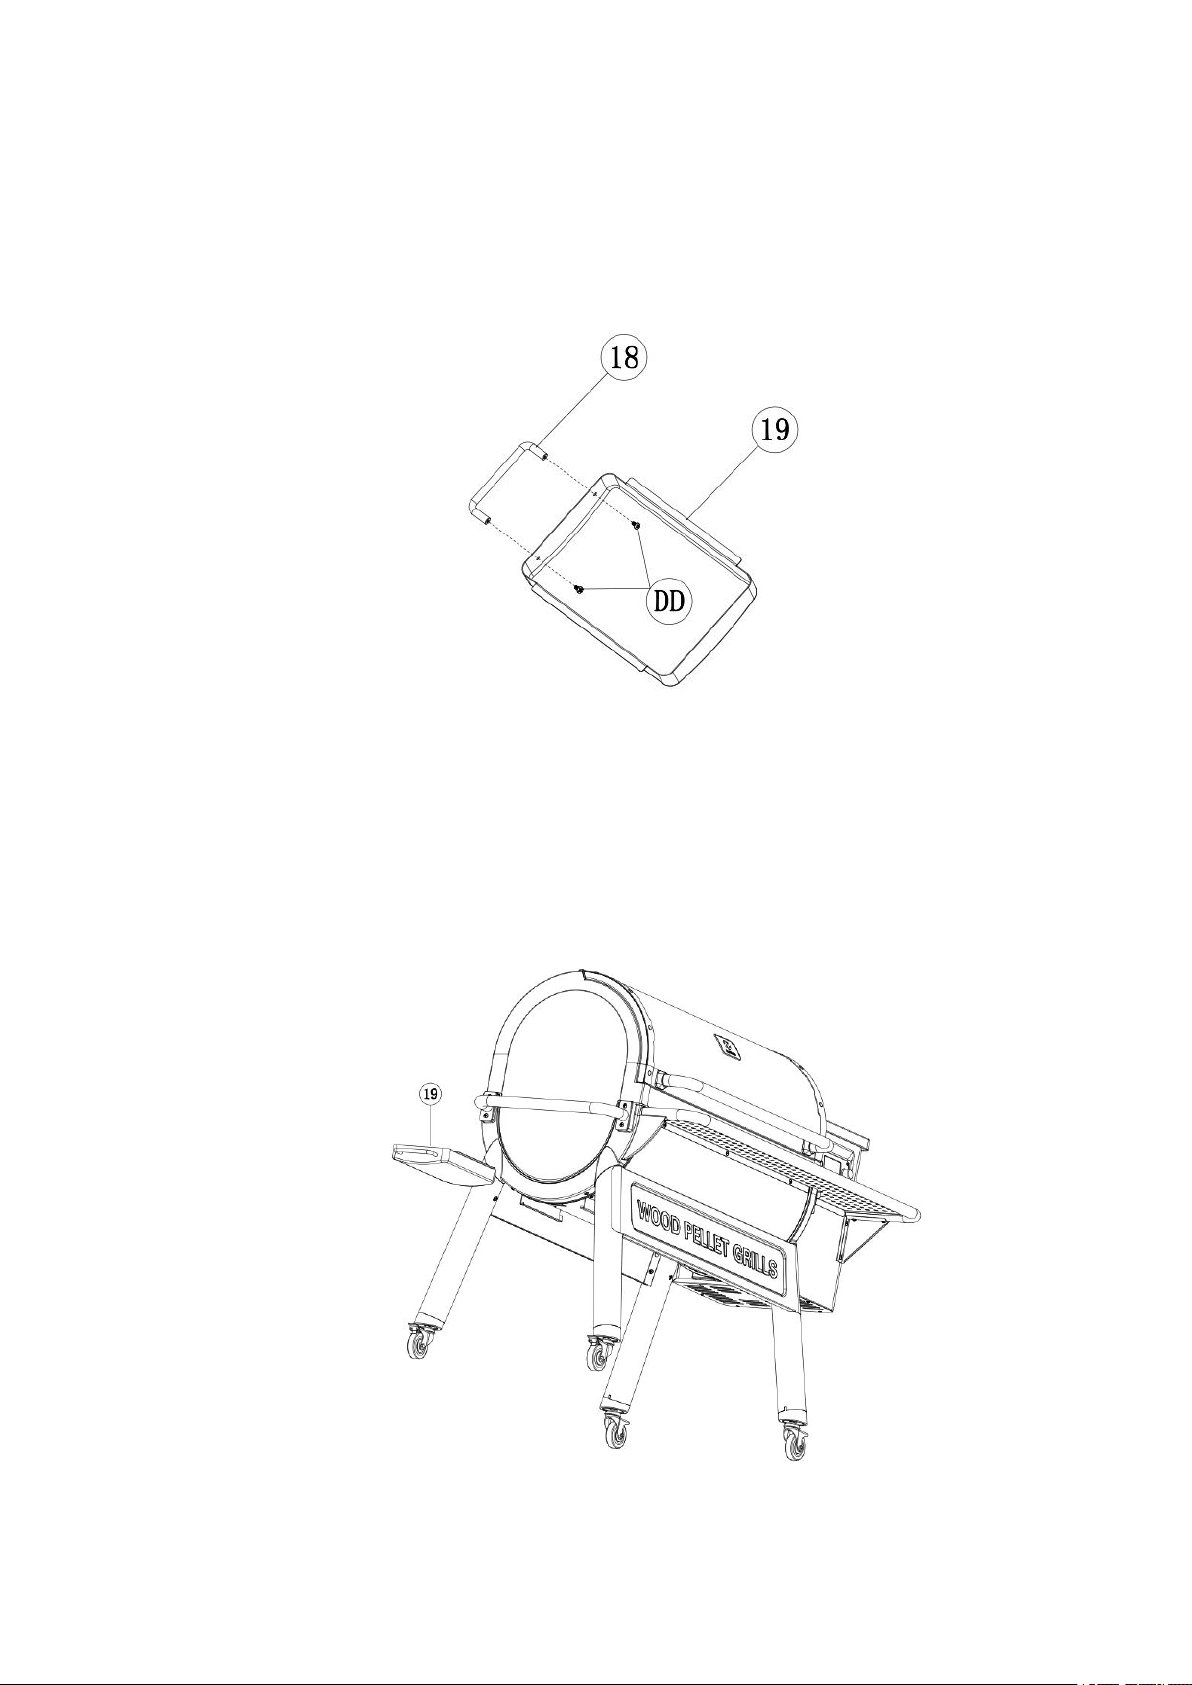
10.BOX HANDLE ASSEMBLY
Insert Screws (DD) through the Grease Box (19) into the Box Handle (18), as shown. Use
the screwdriver (FF) to tighten.
11.POSITIONING THE GREASE BOX
Insert the Grease Box (19) into the Guide-track groove.
17
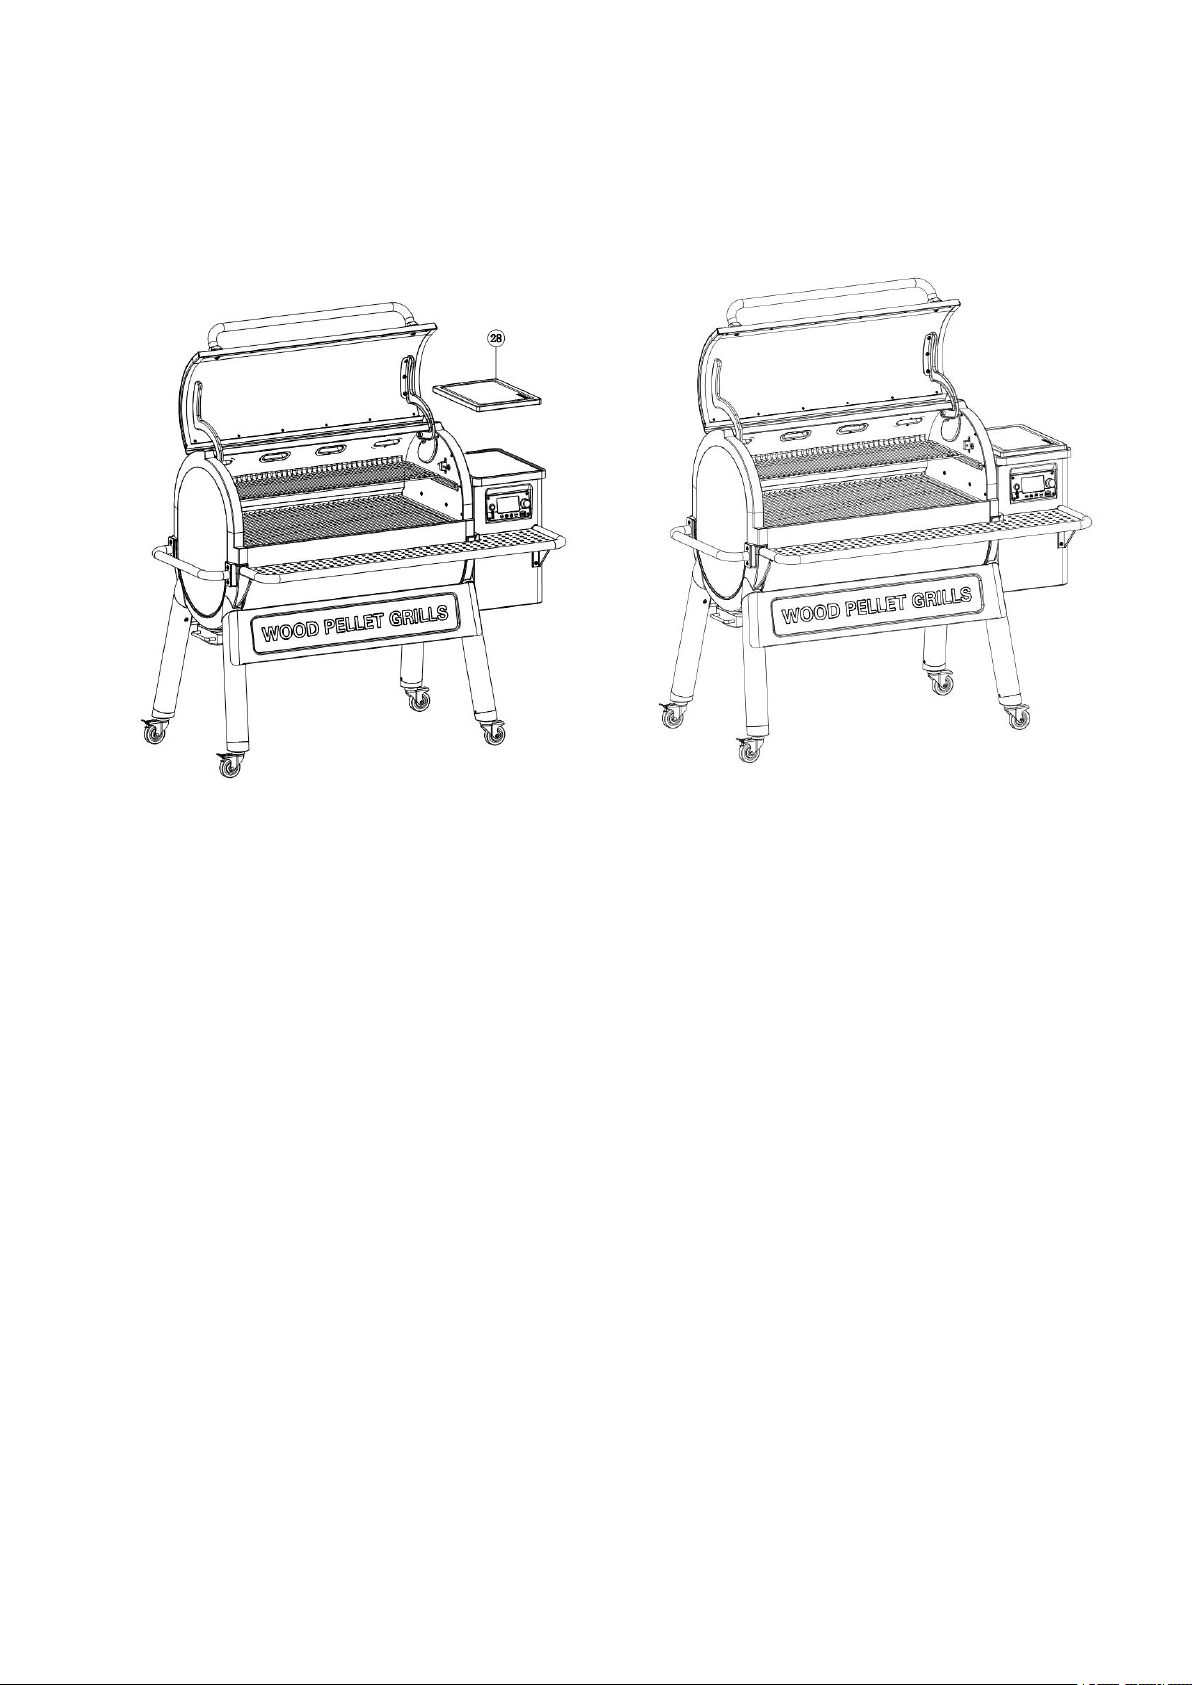
12.POSITIONING THE CUTTING BOARD
Place Cutting Board (28) on the recess of the hopper lid.

INITIAL FIRING INSTRUCTIONS
This Only Applies to ZPGD-1100 2B/ ZPGD-705 2B/ ZPGD-705 2B2/ ZPGD-705 2B3
Please read this manual carefully and follow it step by step before starting your
Z Grills for the first time and each time the grill runs out of pellets.
1.Remove the Porcelain Grills, Warming Rack, Grease Drain Pan and Heat Baffle from the
interior of the grill.
2.Open the Pellet Hopper Lid, make sure there are no foreign objects in the Auger and
Hopper.
3.With the Switch in the OFF(O) position, plug the power cord into a 110 Volt AC grounded
outlet.
4.After POWER BUTTON is pressed down, press START button to activate the startup
process of control board, which sets temperature in 275F automatically. Please check the
following things:
(WARNING: Please do not touch it!)
Confirm the Auger is turning. (Wait for 1-2 minutes.)
Hold your fingers above the Firepot to confirm the fan is blowing air through the Firepot.
The hot rod will heat up and you should be able to sense the heat coming from it. (It takes
approximately 1-2 minutes.)
You should see a temperature number displayed on your LED DISPLAY. If you see
something different displayed, it is an ERROR CODE. NOTE: PLEASE SEE
TROUBLESHOOTING FOR DETAILS ON ERROR CODES.
5.Press and hold START in 3 seconds to activate the grill shutdown process.
(Please note the draft fan will stay on for 10 minutes in this mode.)
6.Fill the Pellet Hopper with Pellets. Then turn the Temperature Dial to HIGH. It takes some
time for the Pellets to travel through the tube, when the Pellets start to drop, Press and hold
START in 3 seconds. Leave grill until it shuts off automatically.
7.Press START button . Allow the Pellets to come to full flame. Once flames are coming out
of the Firepot, press and hold START in 3 seconds and let the grill cool down.
8.Place components back in place. Open the lid and press START button. A few minutes
later, when you see whitish-gray smoke coming out of the grill, close the lid and turn the
Temperature Dial to any cooking setting desired.
9.Set Temperature Dial to HIGH and let grill run for 45 minutes at this setting to rid it of any
foreign matter. This step must be done before cooking any food.
10.Please preheat the grill for 10 minutes before adding food. This makes your grill heat up
faster and quickly reach your desired cooking temperature. Adding food sooner will slow
down the heating process.
ALWAYS START THE GRILL ON START BUTTON WITH THE LID OPEN !
After the Pellets are ignited, you can turn the Temperature Dial to any cooking temperature
desired.
18

19
SUBSEQUENT START-UP
ATTENTION: If the grill fails to light or the fire in the Firepot goes out while cooking, it is vital
to follow these steps when sufficient pellets are still in the Pellet Hopper. Failure to follow the
steps may cause a hazardous “over-firing” of your grill due to an excess of unburned pellets
in the Firepot.
1.Turn OFF the appliance and unplug the Power Cord. After the grill cools down, remove all
food, the Porcelain Grills, Warming Rack, Grease Drain Pan and the Heat Baffle.
2.Remove all unburned pellets and ash from inside and around the Firepot (See instruction
for proper handling and disposal of ash).
3.Plug the Power Cord and turn on the grill. Pellets should fall into the Firepot and the Hot
Rod should begin to heat (it will start to turn red).
4.If this step is successful, you will see flames come out of the Firepot.
Then turn the Temperature Dial to SHUT DOWN CYCLE and let it cool down. Next, put
components back in place, open the lid and turn the Temperature Dial to SMOKE. Wait a
few minutes until you see whitish-gray smoke coming out of the grill, then close the lid and
turn the Temperature Dial to any cooking setting desired.
5.If this step is not successful, see TROUBLESHOOTING or contact Z GRILLS Technical
Support to help diagnose the problem.
SHUTDOWN CYCLE/START
Auger turns off
Fan continues to run for 10 minutes
After you have finished cooking, turn the Temperature Dial to Shutdown Cycle position. The
function of this setting is to leave the Draft Induction Fan running for 10 minutes to burn
redundant pellets in the firepot. After the fan runs for 10 minutes, the fan will stop and the
controller will power off.
CAUTION: The main power switch will shut the power off to the controller and the
Temperature Dial Knob switch will cut off power to the grill components only. When servicing
the controller or any parts ensure that the power supply is disconnected by unplugging the
grill to avoid a shock hazard.

20
OPERATING TIPS
1.Like all grills, the actual temperature of this grill and the cooking times will be affected by
external temperature, humidity, wind conditions, quality of pellets, etc.
2.It is beneficial to shelter your grill from the wind. This will aid in temperature output, heat
retention and heat recovery time when the lid is open.
3.Do not open the lid frequently, it will increase your cooking time. You can open the lid
when you want the grill to cool down quickly.
4.Please preheat the grill for 10 minutes before adding food. This will allow your grill to heat
up quickly and return to your desired temperature once food is added.
5.Never move your grill while in use.
6.Never put water into the Pellet Hopper or Firepot.
7.WARNING: NEVER ADD PELLETS TO THE FIREPOT DIRECTLY. IT IS DANGEROUS.
If you run out of pellets and lose your fire while cooking, let the grill cool down and start
again with the INITIAL FIRING INSTRUCTIONS.
8.We recommend you cover your Grease Drain Pan with heavy-duty aluminum foil and
change it frequently. This is the simplest way to clean your Grease Drain Pan. Failure to
clean the Grease Drain Pan, V-shaped Grease Drain and Grease Drain Tube may cause
grease fires. If this situation happens, turn the Temperature Dial to SHUT DOWN CYCLE
and keep the lid open until the fire is completely out. AT THE SAME TIME, BE CAREFUL
NOT TO BURN YOURSELF. When the grill is completely cool, clean any grease
accumulation from the V-shaped Grease Drain and the Grease Drain Pan. Replace the foil
on the Grease Drain Pan. Then restart the grill and resume cooking.

21
MAINTENANCE & CLEANING
Your Z GRILL requires regular maintenance.
Make sure your grill is OFF, unplugged and completely cold before performing any
maintenance and cleaning.
Grease
1.Clean the Grease box of the grill periodically.
2.It is easier to remove accumulated grease when the grill is still warm (not hot).
BE CAREFUL NOT TO BURN YOURSELF. Heat-resistant gloves are recommended.
If too much grease is allowed to build up in the V-shaped Grease Drain or is allowed to plug
the Grease Drain Tube, a grease fire could result. It is necessary to clean these area
regularly. You can scarp the grease accumulation from inside the V-shaped Grease Drain
and Grease Drain Tube by using a stiff, nonmetallic tool. Much of the loosened grease can
be pushed down through the Grease Drain Tube and fall into the Grease Bucket. Wipe up
remaining grease residue with paper towels or disposable rags.
Flue Pipe(Smoke Stack)
Remove the Chimney Cap Assembly, clean it with warm soapy water. Scrape the creosote
and grease accumulation from inside of the vertical and horizontal sections of the Flue Pipe
by using a stiff, nonmetallic tool such as a wooden paint stir stick. Once the creosote and
grease residue has been loosened from the Flue Pipe Lining, much of it can be cleaned with
paper towels or disposable rags. Do not spray water or other liquid cleaners onto the inside
of the grill.
Outside surfaces
1.Use warm soapy water to wipe away grease. Do not use oven cleaner, abrasive cleansers
or abrasive cleaning pads on the outside grill surfaces.
2.It is highly recommended that you use Z GRILLS Cover to protect your grill .
3.You can use a high-quality car wax on the outside surfaces of your grill to protect it’s finish.
Internal component
1.To clean the Porcelain-coated Grill Grates we recommend using a long-handled cleaning
brush designed for Porcelain-coated Grates.
2.It is recommended that you clean your Grill Grates after each use.
3.Clean the inner RTD temperature probe after each use.

22
Ash
Clean the ash from the interior of the grill periodically. If excessive ash is in the firepot, it may
cause the fire to go out. This is especially true in the SMOKE setting. A shop vac is an
excellent tool to use for removing the ash. WARNING: MAKE SURE THE GRILL FIRE IS
OUT, THE UNIT IS OFF, UNPLUGGED AND COLD BEFORE ATTEMPTING TO CLEAN
ASH FROM THE GRILL.

23
TROUBLESHOOTING
CAUTION: Make sure the grill is completely cool and unplugged before you do any
inspection, cleaning, maintenance or service work.
Problem
Potential
Cause
Solution
Grill does not work properly
Power
Make sure the power cord is plugged
in. Verify there is power at the electrical
outlet.
Fuse
Remove the digital control, check the
fuse on the back. Replace the fuse if
blown.
Hot Rod
If both of the Draft Inducer Fan and the
Auger Driver Motor are operating, the
Hot Rod needs to be replaced. If one or
both are not operating, please contact
customer support.
Wires &
Connections
Check the wires and connectors to
make sure they are fastened securely
and not damaged. Contact customer
support if you need help.
Auger Drive
Motor
Locate the small fan motor blade on
the back of the auger drive motor. Turn
unit on. If the fan does not turn on then
the Auger Drive Motor needs to be
replaced.
Fire goes out
Too much ash
Clean the ash. Refer to
MAINTENANCE & CLEANING.
How to start
START setting
Start your grill on the START setting
with the lid open. After 5 minutes, close
the lid and turn to any temperature
setting desired. Read the INITIAL
FIRING INSTRUCTIONS carefully.

24
ERROR CODES
LEr (Low Temperature Alarm )
Grill temperature was below 120℉ for more than 6 minutes.
HEr (High Temperature Alarm )
Grill temperature reached 580℉.
Er 1
Ensure temperature probe is properly connected to the controller board.
Er 2
The grill fails to start the Running Cycle after 4 attempts.
Press START button for 3 seconds , turn off the grill and then turn it on.(The grill is OK.)
[The Er2 Code is not gone]:
Turn off the power and check if there is too much ash in the firepot. (Please clean the ash.)
See if the hot rod is heated up within 3 minutes.(If not heated, please replace it.)
WARNING: DO NOT TURN OFF THE SWITCH WHILE THE FAN IS STILL WORKING ON
THE SHUT DOWN CYCLE, THE GRILL WILL AUTOMATICALLY SHUT OFF WHEN THE
CYCLE IS DONE. INTERRUPTION OF THE SHUT DOWN CYCLE COULD RESULT IN A
FIRE IN THE HOPPER CHAMBER.
Unexpected grill temperature is
displayed
External Factor
Grill temperature is influenced by
environmental factors such as high
temperature, wind and direct sun.
Place unit in shaded area. Open the lid
to reduce inside temperature. After
start your grill in 40 minutes, the grill
will reach your desired temperature.
Excess or discolored smoke
Pellets
Replace moist pellets with fresh dry
pellets.
Get your new parts
Contact
Z GRILLS
Customer
Service or your
Z GRILLS
dealer to place
an order
When contacting customer support
please have the following information
available: Your authorized Z Grills
dealer, your name, phone number,
address, your Z Grill serial number and
part identification number. Your part
number is listed on the COMPONENT
LIST.
25
GRILL CONTROL BOARD INTRODUCTION
CONTROL PANEL
Button Functions:
- POWER BUTTON
Press the POWER BUTTON to power ON the grill, once the grill is connected to a power
source:
POWER BUTTON is pressed down, the digital LCD screen will flash a time and off. The
power is connected to grill, but Motor, fan and hot rod are kept off.
Press the button up, which shut grill off. No power resource is connected to grill.

26
- START
After the grill is connected to power, press START button to activate the startup process of
grill, which ignites the pellet automatically.
Press and hold in 3 seconds to activate the grill shutdown process. The fan will be kept
running to burn pellets up and cool the grill down.
- SELECT AND PUSH BUTTON
Push button to activate the grill target temperature flashing. Increases the setting in
clockwise and decreases in counterclockwise. Press down the knob to confirm the setting.
push button again to activate the probe setting in flashing. Increases the setting in clockwise
and decreases in counterclockwise.
The setting will be:
- Grill temperature setting;
- P1 temperature setting;
- P2 temperature setting;
- PRIME
Feed pellets into the fire pot. Pressing and holding the feed button will activate an extra feed
of pellets to the fire pot. Release “FEED” to stop feeding pellets.
27
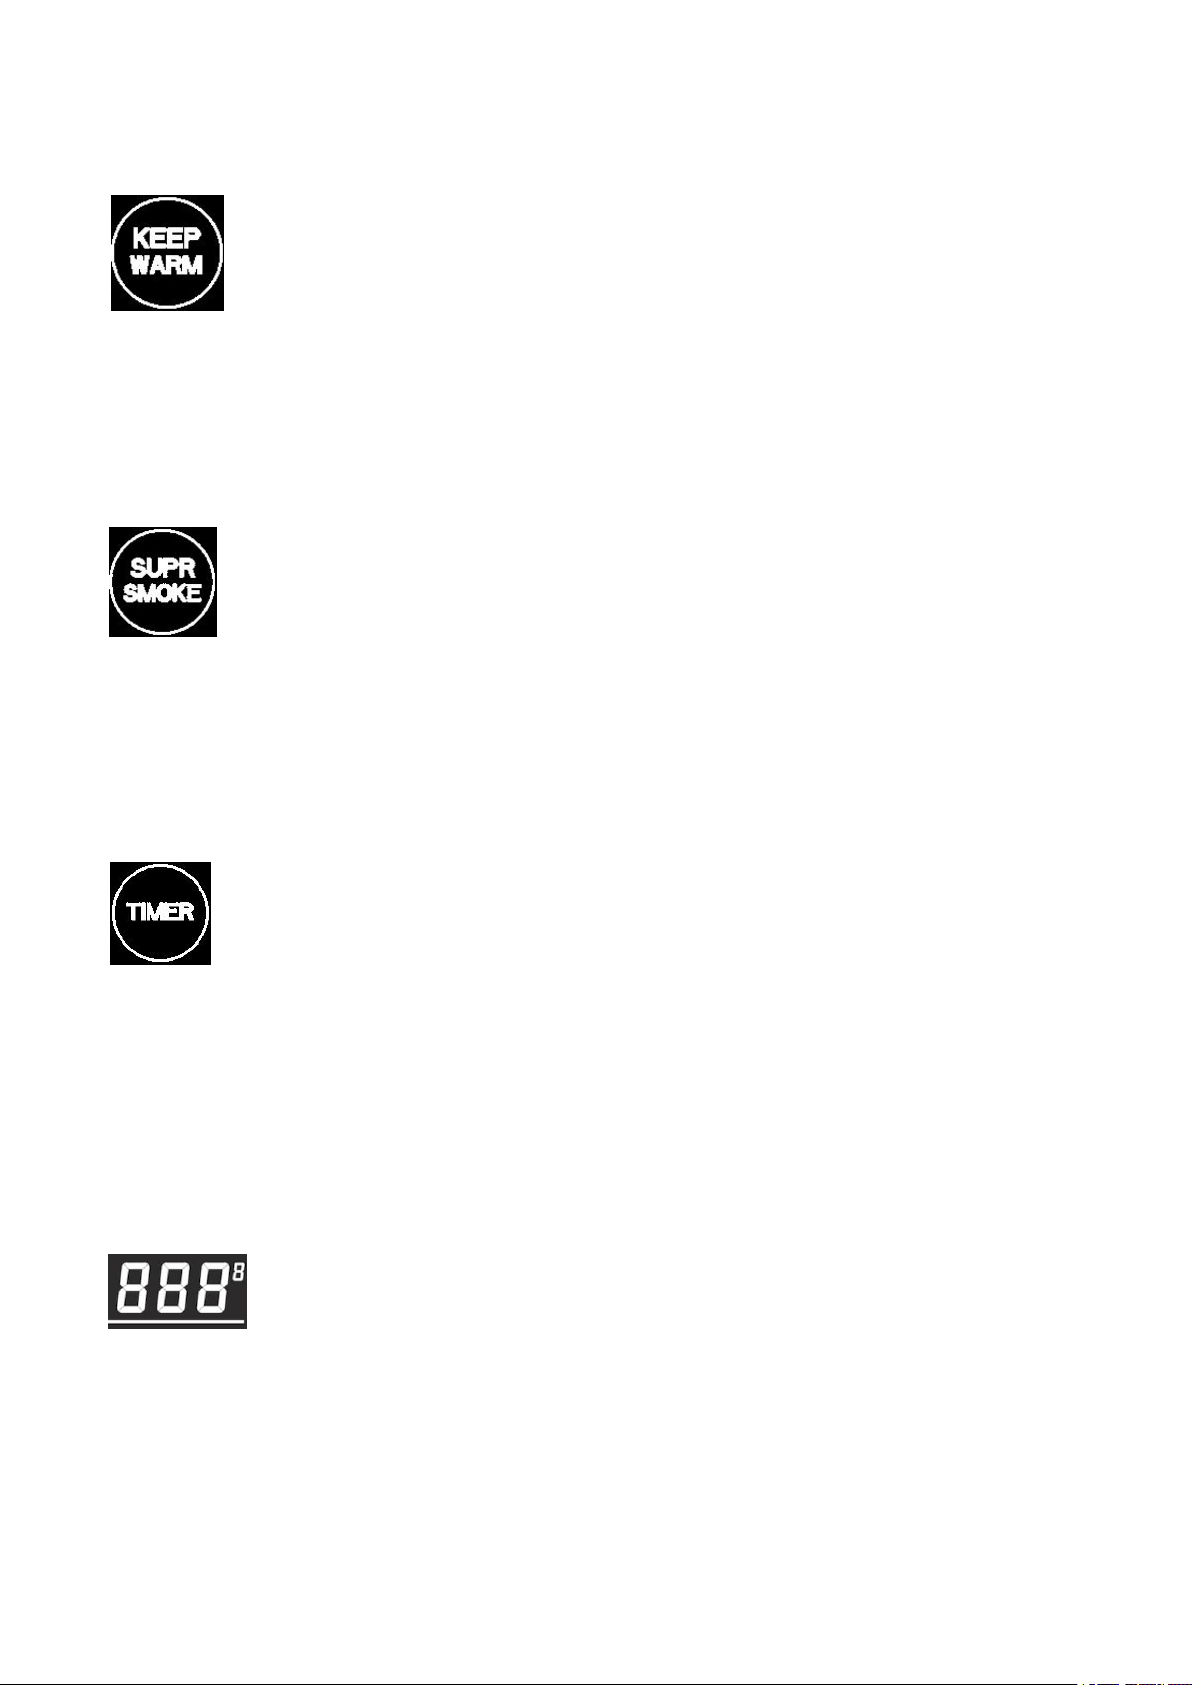
- KEEP WARM
Press button, the grill will be run as target temperature setting in 165F. Press twice, the grill
will be back to last setting.
- SUPER SMOKE
Press button to allow grill to generate super smoke. press twice to return the last setting of
grill.
- TIMER
Press the button to activate timer setting.
Pressing once can stop or keep timing.
Press and hold button to clear up timer setting.
- TARGET TEMPERATURE INDICATOR
The indicator shows target temperature setting; When button of “Select and push” is pressed,
it is flashing. The grill is ready for setting, which fault setting is 275F. The setting will be
increased or decreased by turning button in clockwise or anticlockwise. When the target is
reached, the controller will feed minimal pellet into fire pot to maintain stable temperature in
grill.
Shown in Unit of F.
28
-
A
C
T
U
A
L
T
E
M
PERATU
R
E
I
N
D
I
C
A
T
O
R
T
h
e
i
n
d
i
c
a
t
o
r
s
h
o
w
s
t
e
m
p
e
r
a
t
u
r
e
i
n
g
r
i
l
l
,
w
h
i
c
h
i
s
i
n
u
n
i
t
o
f
F
.
-
P
R
O
B
E
I
N
D
I
C
A
T
O
R
T
h
e
i
n
d
i
c
a
t
o
r
s
h
o
w
s
t
a
r
g
e
t
t
e
m
p
e
r
a
t
u
r
e
s
e
t
t
i
n
g
;
W
h
e
n
b
u
t
t
o
n
o
f
“
S
e
l
e
c
t
a
n
d
p
u
s
h
”
i
s
p
r
e
s
s
e
d
,
i
t
i
s
f
l
a
s
h
i
n
g
.
T
h
e
p
r
o
b
e
i
s
r
e
a
d
y
f
o
r
s
e
t
t
i
n
g
,
w
h
i
c
h
f
a
u
l
t
s
e
t
t
i
n
g
i
s
r
o
o
m
t
e
m
p
e
r
a
t
u
r
e
.
T
h
e
s
e
t
t
i
n
g
w
i
l
l
b
e
i
n
c
r
e
a
s
e
d
o
r
d
e
c
r
e
a
s
e
d
b
y
t
u
r
n
i
n
g
b
u
t
t
o
n
i
n
c
l
o
c
k
w
i
s
e
o
r
a
n
t
i
c
l
o
c
k
w
i
s
e
.
W
h
e
n
the target is reached, the control will give flashing and auto- adjust setting into warm model
b
y
f
e
e
din
g
m
i
n
i
m
a
l p
e
l
l
e
t
t
o
m
ai
n
t
a
i
n
t
h
e wa
r
m
m
o
d
e
l
.
U
s
a
g
e
o
f
t
h
e
M
e
a
t
P
r
o
b
e
P
u
t
t
h
e
p
l
u
g
o
f
t
he Meat P
r
o
b
e
i
n
t
o
t
h
e
c
o
n
t
r
o
l
p
a
n
e
l
(
P
R
O
BE1 o
r
P
R
O
B
E
2
)
I
n
s
e
r
t
t
h
e
Pro
b
e
i
n
t
o
t
h
e
f
ood
t
o
m
e
a
s
u
r
e
the
tempe
r
a
t
u
r
e
T
h
e
P
1
t
emp
e
r
a
t
u
r
e
o
f
the
c
o
n
t
r
o
l
p
a
nel
i
s
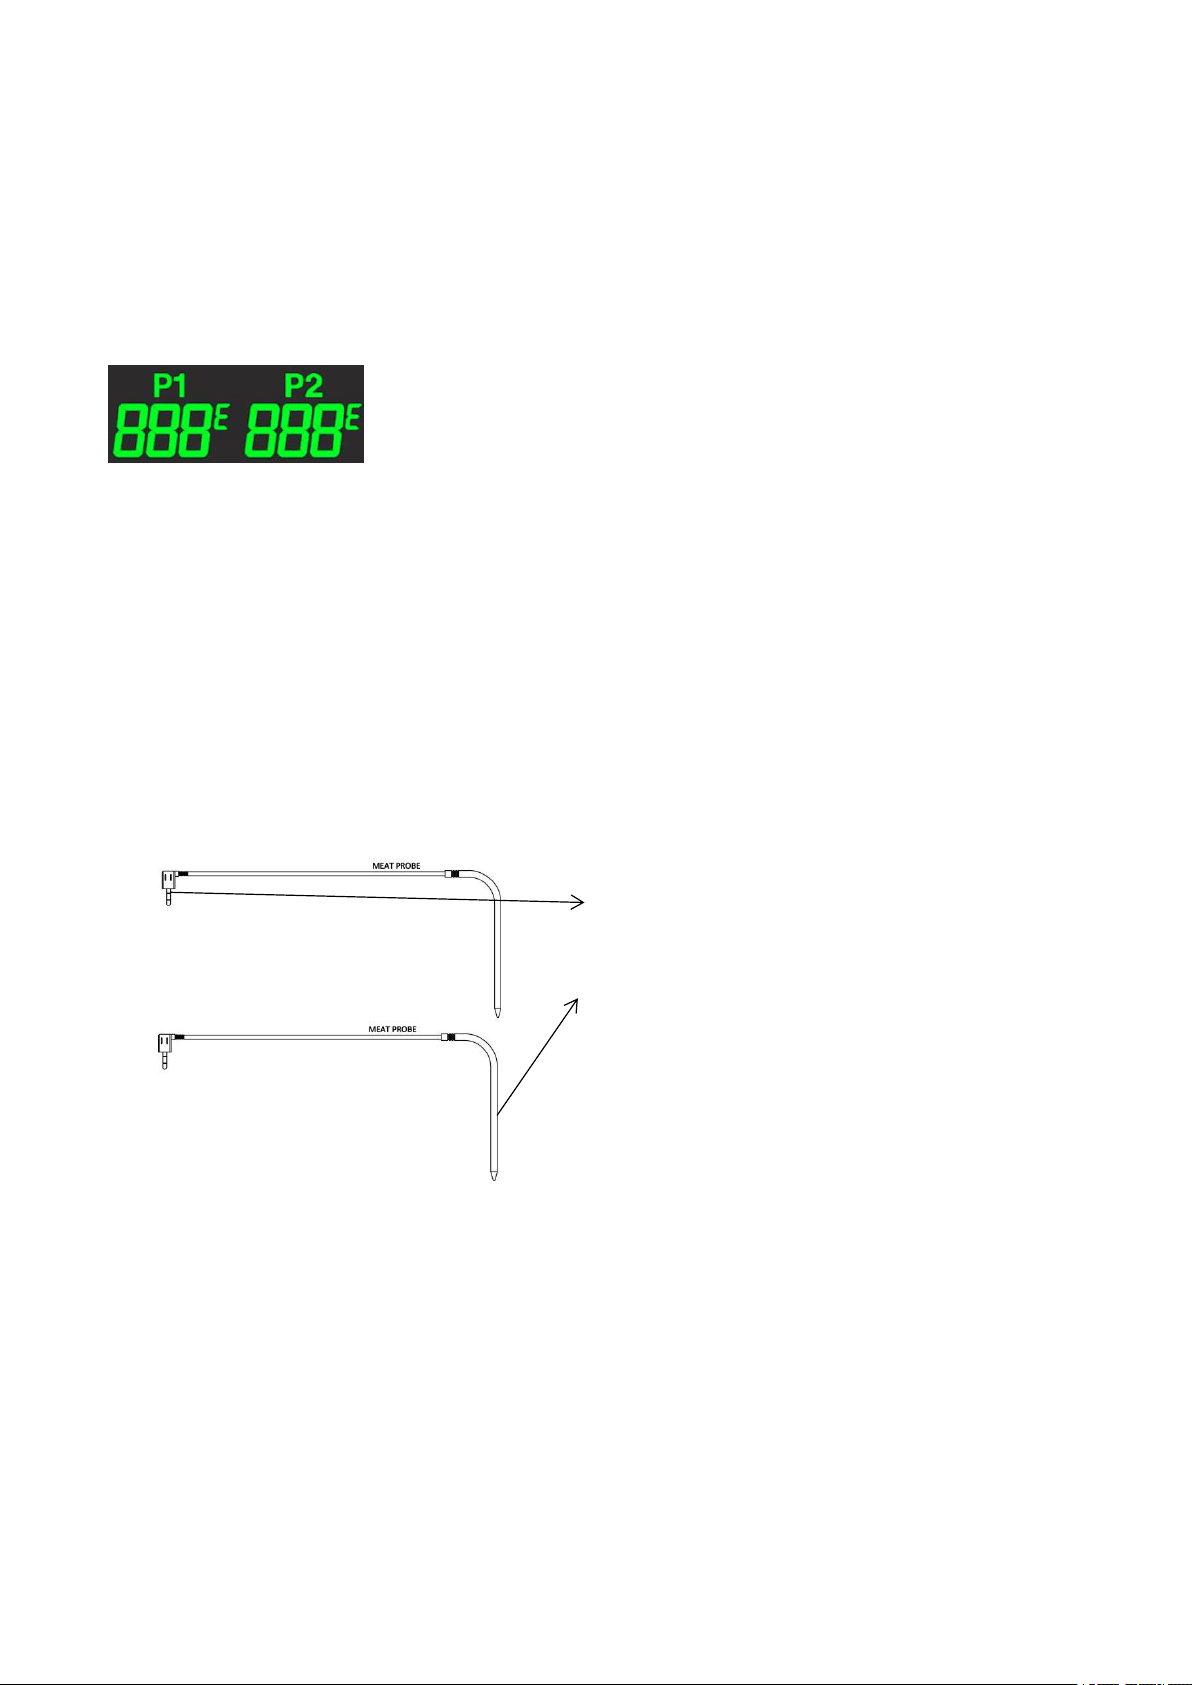
displayed as the temperature of PROBE1,
while the P2 temp is displayed as the temp of
P
R
O
B
E
2
29
GRILL ELECTRIC SYSTEM
Inputs:
Input 1 - 120V 2A 60 Hz
Input 2 - Probes- P1 and P2
Input 3 – Grill temperature sensor
Outputs:
Output 1 - Hot Rod
Output 2 - Auger Motor
Output 3 - Fan Motor
Output 4 - Probe and grill temperature display
All temperatures are displayed in Fahrenheit

30
Operation Flow:
Step 1. The power cord is connected. At this point, the LCD display is powered off.
Motor, fan and hot rod are kept off.
Step 2. Press power button, which powers the grill on. LCD display is till turned off
and press the start button the grill will begin its Startup Cycle.
Motor, fan and hot rod will automatically activate during Startup Cycle.
The whole Startup process takes 6 minutes. If the grill is successfully ignited, it would
automatically begin it’s Running Cycle.
STARTUP - After the initial Startup Cycle begins, the temperature dial can be adjusted
without resetting the Startup Cycle.
1. The hot rod heats up within 6 minutes.
2. The auger motor runs in algorithm of PID.
3. The fan is always on.
At the end of the Startup Cycle, the RTD sensor would automatically run a temperature
check inside of the grill. The startup process is successful if the temperature is increased by
more than 40F or the temperature exceeds 120F. If the grill fails the Startup process, it will
automatically restart from step 1.
The grill will attempt the startup cycle a total of 4 times. If any of the following temperature
changes accurse: grill temperature is increased by 40F or internal temperature reaches
120F the grill will start its Running Cycle. If the grill fails to start the Running Cycle after 4
attempts, the display will show “Er2”.
The auger motor, fan and hot rod will shut down automatically.
Step 3. Use the knob to set desired temperature of the grill. At the end of the Startup
Cycle, the grill will automatically begin its Running Cycle.
The motor, fan and hot rod are will run according to set temperature.
Running Cycle - Fan is always on, auger is running in algorithm of PID according to set
temperature, hot rod is deactivated)
The display will show the actual temperature inside the grill and the probe temperature in P1
and/or P2 if probes are connected at all times.

31
SET THE DESIRED GRILL TEMPERATURE
Use temperature dial to set desired temperature.
The temperature settings of the grill start from SMOKE to HIGH.
At those settings, the auger motor is running, and feeds pellets into the fire pot according to
set temperature.
HIGH, allows the grill to use its full power and can reach temperatures up to 500F or higher
grill using hardwood pellets.
Auger keeps running, fan is on and hot rod is OFF.
Automatic Re-Light
At any time during operation, would the grill temperature drop below 120F for 10 minutes,
the Digital Control Center will activate the Automatic Re-Light mode. This mode will
re-activate the Startup Cycle, and all its features.
If it fails, the display will show “Er2”.
The “Re-Light” mode aids in ensuring that a small fire is maintained during use in lower
temperatures. It also helps to re-light a fire that may have gone out when going from an
extremely HIGH temperature to LOW temperature. If it fails to ignite, the display will show
Er2.
Step 4. Shutdown Cycle
If the start button is pressed down for 3 seconds the grill will activate its
Shutdown Cycle. The fan will be kept on to let the fire burn out and to cool down the grill.
After 5 minutes the grill control system will do an automatic temperature check.
During the Shutdown Cycle - the display, Auger motor and Hot rod will be OFF. Fan will be
ON.

32
Z GRILLS SUPPORT
Thank you for purchasing a Z GRILL!
If you have any question, please contact customer support or your Z GRILL dealer.
Z GRILLS, INC. offers the best technical and sales support in the industry.
When calling customer please be prepared to provide the following information:
1.Dealer's name and date of purchase
2.Purchaser's name, phone number and address
3.Z GRILLS model number, serial number and part identification numbers
4.Please be prepared to describe your problem accurately so we can help you resolve your
issue
5.Providing pictures or videos is beneficial
Z GRILLS CUSTOMER SERVICE
MON TO FRI, 8:00 A.M. - 5:00 P.M. PACIFIC STANDARD TIME
SERVICE CONTACT: 1-833-947-4557/1-833-ZGRILLS
EMAIL: s[email protected]
WEBSITE: www.zgrills.com

33
Z GRILLS
3-YEAR LIMITED WARRANTY
Z GRILLS, Inc. provides a 3-year warranty from the date of purchase by the original owner.
This warranty applies to defects in all materials and workmanship. During the warranty
period, Z GRILLS, Inc. will at its option repair or replace defective parts or units.
This limited warranty does not apply to paint, firepot, grill cover or damage caused from
corrosion. Z Grills shall not be liable for transportation charges, labor costs or export duties.
Z GRILLS, Inc. takes every precaution to utilize materials that retard rust including the use of
high-temperature paint where advisable. Even with these safeguards, the protective coating
can be compromised by various substances and conditions beyond Z Grills' control. Humid
environment, high temperature, chlorine, insecticide, salt and disinfectant are some of the
substances that can affect paint and metal coatings. For these reasons, the limited
warranties do not cover rust or oxidization, unless there is loss of structural integrity on the
grill components.
Z GRILLS, Inc. shall not be liable if you install, operate, clean or maintain your grill without
following the owners' manual instructions. Misuse, abuse, alteration and natural disasters
are not included in this warranty.