Xenon Puck Light Installation Instructions
Installation instructions for Models 346-8010, 346-8011, 346-6705,
346-6712, 346-6713, 346-6714, 346-6719, 346-6720 and 346-6721
WARNING:
These products may represent a possible shock or fire hazard if improperly installed or attached in any way.
Products should be installed in accordance with these instructions, current electrical codes and/or the current
National Electric Code (NEC). Disconnect power to the unit prior to installation.
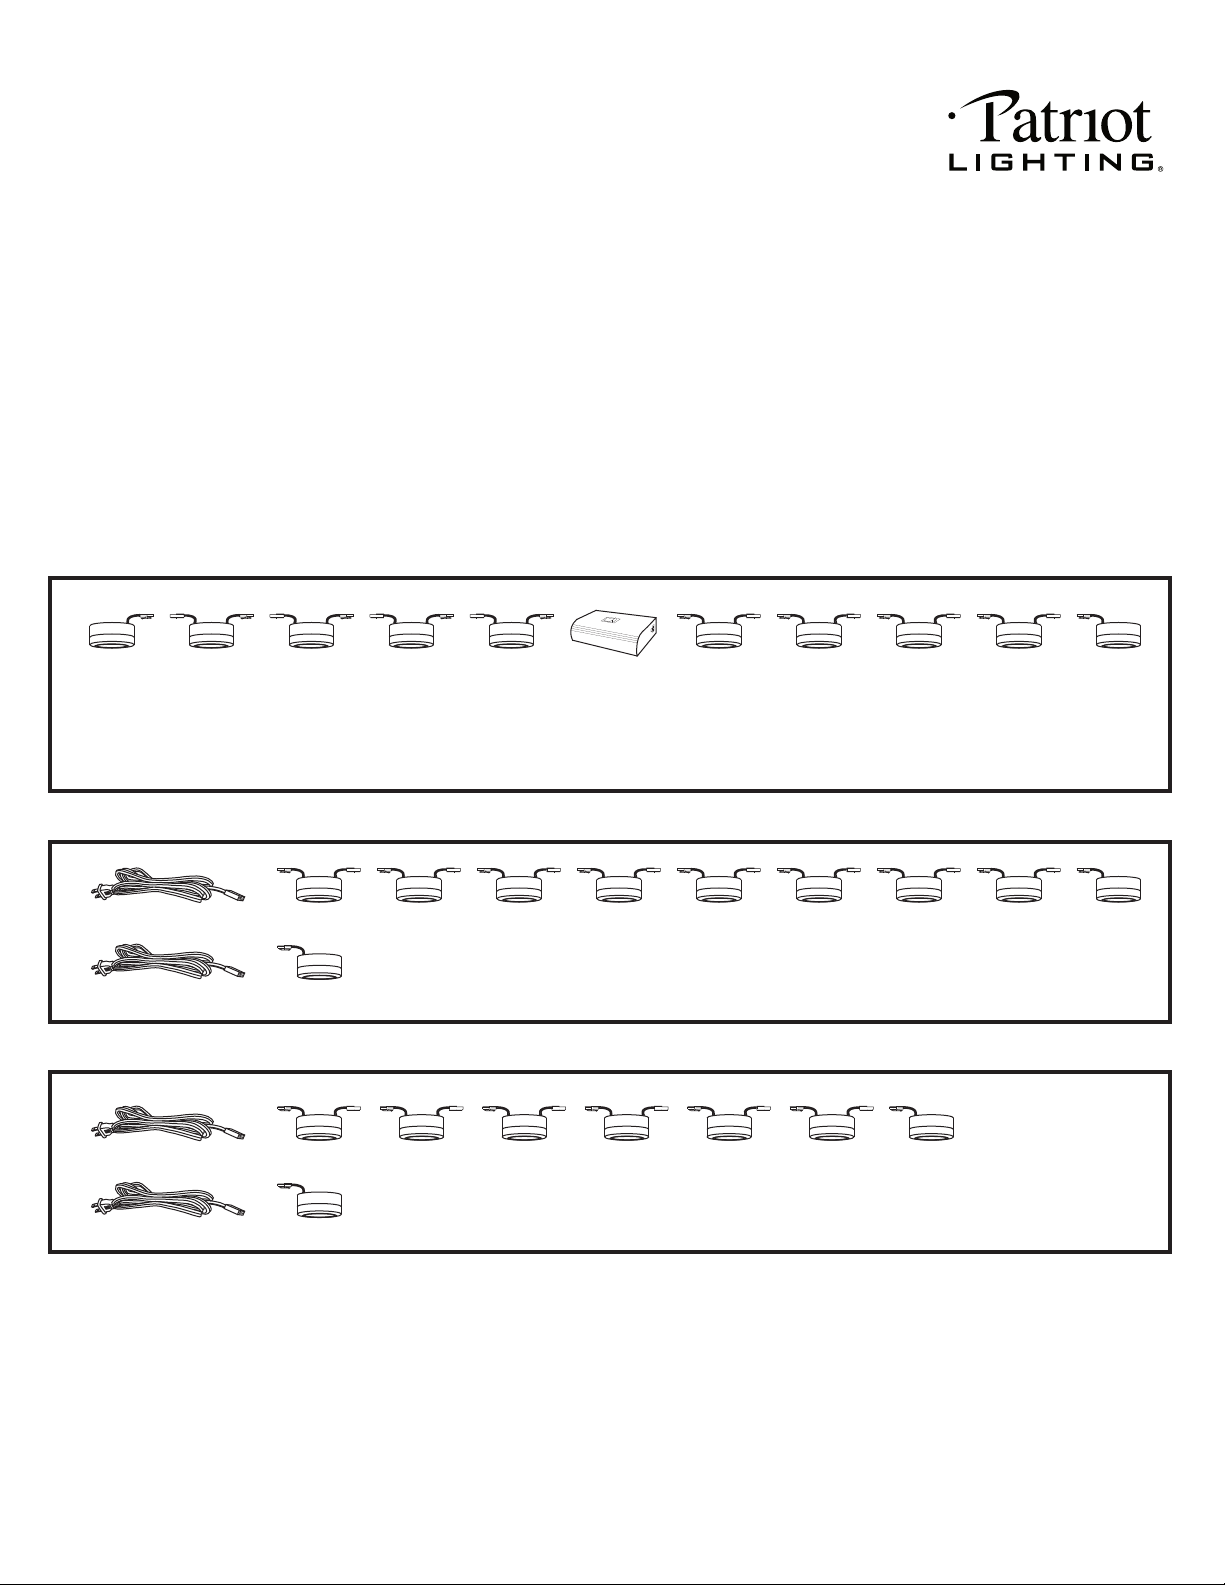
NOTE: Puck light kits are not extendable. The maximum number of pucks that can be powered from one power
cord or hardwire junction box (Patriot Lighting part number 346-6472, sold separately) is limited by the fact that one
puck in each kit will have a lead wire only (no tail wire). A single puck kit contains a puck light with only a lead wire
and therefore it cannot be used to extend other kits (to create a series of pucks powered by one power cord).
Please see illustrations below as examples for 3-pack and 5-pack combinations to create longer runs, however,
note that when combining more than two packs, do not exceed ten puck lights in a single run.
©2011 Distributed by Menard, Inc
Eau Clarie, WI 54703 Made in China
A centrally located hardwire junction box (Patriot Lighting part number 346-6472, sold separately)
used in conjunction with two 5-pack puck light sets will allow ten puck lights to be powered by a single
power source. Note: In this example, two power cords (one included with each kit) are not used.
Also, 12” extensions (included with each kit) are required between pucks but are not shown.
Two 5-pack puck light sets can be recombined to create one series of
nine puck lights and a separate single puck light set. Note: 12” extensions
(included with each kit) are required between pucks but are not shown.
A 3-pack and a 5-pack can be recombined to create one series of
seven puck lights and a separate single puck light set. Note: 12” extensions
(included with each kit) are required between pucks but are not shown.
IMPORTANT SAFETY INSTRUCTIONS: PLEASE SAVE!
This fixture has a polarized plug (one blade is wider than the other) as a safety feature to reduce the risk of
electric shock. This plug will fit in a polarized outlet only one way. If the plug does not fit fully in the outlet,
reverse the plug. If it still does not fit, contact a qualified electrician. Never use with an extension cord unless
the plug can be fully inserted. Do not alter the plug.
CONTINED ON NEXT PAGE
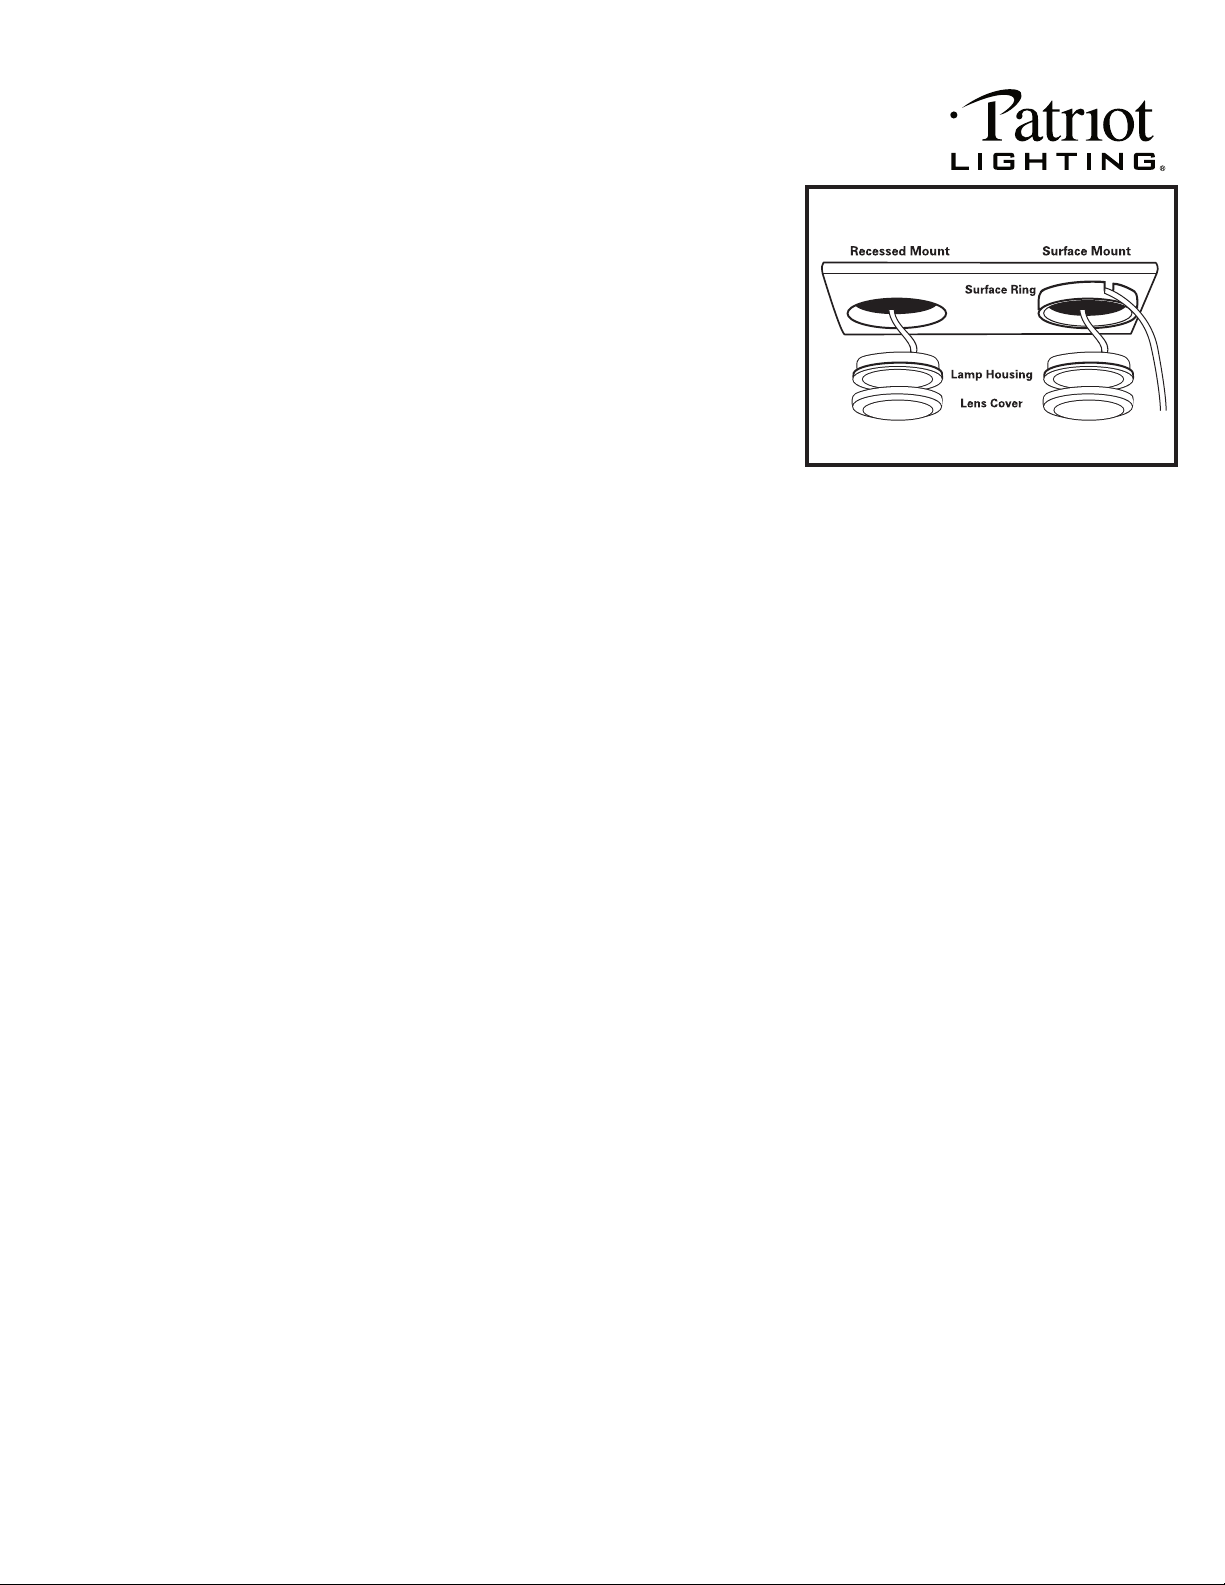
SURFACE MOUNTING: See Figure 1
1. Locate desired position for the cabinet light.
2. Remove the lens cover from housing by rotating counter-clockwise.
3. Route the wire through surface ring notch, or if desired drill a hole
through the mounting surface and route wires through hole. Be sure
to position the surface ring so the notch faces the rear of the cabinet.
4. Make sure there is no contact between the hot lamp, lampholder, or
reflector, and any combustible material such as plastic or paper goods,
or the wire insulation.
5. Mount surface ring and housing assembly with the two wood screws
provided.
6. Replace lens cover by rotating clockwise.
7. Route unit's wire to "Wire Plug". CAUTION: Do not route wires and
extension cords through walls. Use for external cabinet applications only.
8. Not intended for permanent hardwire installation inside built-in furnishings such as kitchen cabinets or trophy
cases without the use of the hardwire junction box sold separately (346-6472). Note: The hardwire junction
box has two output connection ports, one on each end. One box can support two separate runs, each up to
the puck light quantity sold in kits (or up to ten with multiple kits recombined as outlined on previous page).
Each run from the hardwire junction box will require an additional 12” or 24“ extension (sold separately) to
reach from junction box to the first puck light.
9. Route plug to nearest convenience outlet. Do not conceal power supply cord (or direct wire box) inside walls,
ceilings, or floors.
10. Multiple pucks can be linked together with 12" (included with kits) and 24" extensions (sold separately).
11. Use the puck light with no tail wire as the last puck in the series.
RECESSED MOUNTING: See Figure 1
CAUTION!
Risk of fire! Install as recessed only where top of cabinet is not enclosed.
1. Drill a 2-1/8" hole in the desired location.
2. Remove the lens cover from housing by rotating counter-clockwise.
3. The surface ring is not used for recessed applications. This can be discarded.
4. Feed wires through hole and push light housing into hole. Make sure there is no contact between the hot lamp,
lampholder, or reflector, and the wire or any combustible material such as plastic or paper goods. Using the
cord clips included, secure the light supply leads to avoid the likelihood of the leads contacting the cabinet light.
5. Replace lens cover by rotating clockwise.
6. Route power cord to nearest convenience outlet. CAUTION: Do not route wires and extension cords through
walls. Use for external cabinet applications only.
7. Not intended for permanent hardwire intallation inside built-in furnishings such as kitchen cabinets or trophy
cases without the use of the direct wire box sold separately (346-6472). Note: The hardwire junctionbox has
two output connection ports, one on each end. One box can support two separate runs, each up to the puck
light quantity sold in kits (or up to ten with multiple kits recombined as outlined on previous page). Each run
from the hardwire junction box will require an additional 12” or 24” extension (sold separately) to reach from
junction box to the first puck light.
8. Do not conceal power supply cord (or direct wire box) inside walls, ceilings, or floors.
9. Multiple pucks can be linked together with 12" (included with 3-pack sand 5-packs) and 24" extensions (sold
separately).
10. Use the puck light with no tail wire as the last puck in the series.
CONTINED ON NEXT PAGE
©2011 Distributed by Menard, Inc
Eau Clarie, WI 54703 Made in China
Figure 1

DIMMING: Xenon Puck Lights are dimmable with most brands of standard
incandescent wall dimmers (sold separately). For plug-in installations, connect
the wall dimmer to a switched outlet branch circuit. For installations with the
hardwire junction box, connect the wall dimmer to control the branch circuit to the hardwire box.
WARNING! LIGHTED LAMP IS HOT! To reduce the risk of fire, electric shock, exposure to excessive
UV radiation, or injury to persons, follow these directions:
TO REPLACE BULB:
1. Unplug unit or turn roll switch to "off" position and allow lamp to cool before replacing bulb.
2. Use only 120V, 20 watt maximum Xenon bulb (Zilotek item 0002-0007).
3. Twist lens cover counter-clockwise to remove.
4. Insert bulb, using a soft cloth. Do not touch bulb with fingers.
5. Replace lens with a slight clockwise motion.
ADDITIONAL SAFETY MEASURES:
1. Bulb gets hot quickly. Contact only switch/plug when turning on.
2. Do not touch hot lens, lens holder or enclosure.
3. Do not remain in light if skin feels warm.
4. Do not look directly at lighted bulb.
5. Keep lamp away from curtains, draperies and similar materials that may burn.
6. Do not operate lamp with a missing or damaged lens.
PATRIOT LIGHTING® XENON PUCK LIGHT WARRANTY
5-YEAR LIMITED WARRANTY:
This PATRIOT LIGHTING® brand light fixture carries a five (5) Year Limited Warranthe original purchaser. If,
during normal use, this PATRIOT LIGHTING® light fixture fails due to a defect in material and workmanship
within five (5) years from the date of purchase, simply bring this light fixture with your original sales receipt back
to your nearest MENARDS® retail store. At its discretion, PATRIOT LIGHTING® agrees to have the lighting
fixture replaced with the same or similar PATRIOT LIGHTING® product free of charge, within the stated warranty
period, when returned by the original purchaser with original sales receipt. Notwithstanding the foregoing, this
limited warranty does not cover damage or failure caused by misuse or abuse including but not limited to
improper installation, accident, unauthorized repair, maintenance, or modifications of the merchandise. This
warranty: (1) excludes expendable parts including but not limited to light bulbs, batteries; (2) carries a 2-year
finish warranty protecting finish against tarnishing, flaking, and discoloration; (3) shall be void if this lighting
fixture is not installed in the U.S.A; (4) does not cover products installed within three miles of saltwater coastline
or any area prone to salt spray; and (5) does not cover any losses, labor, injuries to persons/property or costs.
This warranty does give you specific legal rights and you may have other rights, which vary from state to state.
Be careful, it is recommended that installation be done by a qualified professional; the purchaser has sole
responsibility for proper installation in compliance with all state and local code requirements. Seller’s employees
are not qualified to advise you on the use of this Merchandise. Any oral representation(s) made will not be
binding on seller or its employees. The rights under this limited warranty are to the original purchaser of the
Merchandise and may not be transferred to any subsequent owner. This limited warranty is in lieu of all warran-
ties, expressed or implied including warranties or merchantability and fitness for a particular purpose. Seller
shall not be liable for any special, incidental, or consequential damages. The sole exclusive remedy against the
seller will be for the replacement of any defects as provided herein, as long as the seller is willing or able to
replace this product or is willing to refund the purchase price as provided above.
For questions / comments, technical assistance or repair parts –
Please call toll free at: 1-800-285-8051 (M-F 8am – 5pm, CST)
SAVE YOUR RECEIPTS. THIS WARRANTY IS VOID WITHOUT THEM.
©2011 Distributed by Menard, Inc
Eau Clarie, WI 54703 Made in China