Loading ...
Loading ...
Loading ...
en Cleaning function
26
.Cleaning function
Cl eani ng f unct i on
Use the "Pyrolytic self-cleaning" function to clean the
cooking compartment.
Pyrolytic self-cleaning
Use the "Pyrolytic self-cleaning" function to clean the
cooking compartment.
You can choose from three cleaning settings.
The dirtier the cooking compartment and the longer the
dirt has been there, the higher the cleaning setting
should be. It is sufficient to clean the cooking
compartment every two to three months. If required, you
can clean the oven more frequently. A cleaning cycle
requires only approx. 2.5 – 4.7 kilowatt hours.
Notes
■ For safety reasons, the appliance door locks
automatically once a certain temperature is reached.
It cannot be reopened until the n symbol for the
locking mechanism on the display goes out.
■ The interior lighting does not come on during the
cleaning function.
:Warning
Risk of burns!
■ The cooking compartment becomes extremely hot
during the cleaning function. Never open the
appliance door. Allow the appliance to cool down.
Keep children away from the appliance.
Risk of burns!
■ ; The appliance becomes very hot on the outside
during the cleaning function. Never touch the
appliance door. Allow the appliance to cool down.
Keep children at a safe distance.
:Warning
Risk of harm to health!
The cleaning function heats up the cooking
compartment to a very high temperature so that food
remnants left over from roasting, grilling and baking will
burn off.This process releases vapours, which can
irritate the mucous membranes. While the cleaning
function is running, keep the kitchen well ventilated. Do
not remain in the room for long periods. Keep children
and pets away. Follow the instructions even when using
the Delayed start function with a delayed end time.
Before running the cleaning function
The shelf supports and pull-out rails can also be
cleaned at the same time. Remove the any coarse food
remnants manually before starting the cleaning function.
Remove accessories and cookware from the cooking
compartment. Only by doing this will you ensure that
you achieve good cleaning results throughout the entire
cooking compartment.
Clean the appliance door and along the edges of the
cooking compartment in the area around the seal. Do
not scrub or remove the seal.
Clean the inner door panel using hot soapy water and a
dish cloth. Dry with a soft cloth. If the cooking
compartment is heavily soiled, use oven cleaner.
:Warning
Risk of fire!
■ Loose food remnants, fat and meat juices may catch
fire when the cleaning function is in progress. Before
you start the cleaning function, always remove the
worst of the food residues and remnants from the
cooking compartment.Do not use the cleaning
function for cleaning accessories.
Risk of fire!
■ The appliance will become very hot on the outside
during the cleaning function. Never hang
combustible objects, e.g. tea towels, on the door
handle. Do not place anything against the front of
the appliance. Keep children away from the
appliance.
Risk of fire!
■ If the door seal is damaged, a large amount of heat
will be generated around the door. Do not scrub or
remove the seal. Never operate the appliance if the
seal is damaged or missing.
:Warning – Risk of serious harm to health!
The appliance becomes very hot when the cleaning
function is in progress. The non-stick coating on baking
trays and tins is destroyed and noxious gases are
released. Never clean non-stick baking trays or baking
tins using the cleaning function. In general, you must
not use the cleaning function for cleaning accessories.
Setting the cleaning function
Before setting the cleaning function, ensure that you
have followed all instructions for preparation.
The duration of each cleaning setting is preset and
cannot be changed.
1. Touch the menu field.
The list of operating modes is displayed.
2. Touch the "Cleaning" text field.
3. Touch the "Pyrolytic self-cleaning" text field.
The cleaning setting is highlighted in white on the
display.
4. Turn the rotary selector to set the cleaning setting.
The end time is calculated automatically at the same
time.
5. Press the l Start/Stop button to start.
The cooking time counts down on the display. The
heating line does not appear for the cleaning
function.
The cleaning function starts.
Ventilate the kitchen when the cleaning function is
running.
The appliance door locks shortly after the function starts
running.A message and the n symbol appear on the
display.
When the cleaning function has ended, an audible
signal sounds. The cooking time 00 m 00 s is shown on
the display. Press the ÿ On/Off button to switch off the
appliance.
Setting Cleaning level Duration
1 Light Approx. 1 hour, 15 minutes
2 Medium Approx. 1 hour, 30 minutes
3 Intensive Approx. 2 hours
Rails en
27
The appliance door cannot be reopened until the
n symbol for the locking mechanism goes out.
Setting a later end time
You can set a later end time. Before starting the
appliance, touch the "End" text field and set a later end
time using the rotary selector.
The appliance switches to standby after it is started. The
end time can no longer be changed.
Changing and cancelling
After starting the appliance, the cleaning setting can no
longer be changed.
If you would like to cancel the cleaning function, switch
the appliance off using the ÿ On/Off button. You can
no longer pause the operation using the l Start/Stop
button.
The appliance door remains locked until the n symbol
for the locking mechanism on the display goes out.
Once the cleaning function has ended
Once the cooking compartment has cooled down, use
a damp cloth to wipe off the ash that has been left
behind in the cooking compartment, on the shelves and
around the appliance door.
Notes
■ During cleaning, the frame on the inside of the
appliance door may discolour. This is normal and
does not affect performance. The discolouration can
only be removed using a stainless-steel cleaning
agent.
■ Very bad soiling may cause white deposits to remain
on the enamel surfaces. This is residue from the
food and is harmless. It does not affect performance.
You can remove these residues using lemon juice if
required.
Drying
Dry the cooking compartment after operation to ensure
that no moisture remains.
Starting drying
To dry the cooking compartment, it is heated up so that
the moisture in the cooking compartment evaporates.
You will then need to open the appliance door to allow
the steam to escape from the cooking compartment.
Caution!
Enamel damage: Do not start any operations when
there is water on the cooking compartment floor. Before
operation, wipe away the water from the cooking
compartment floor.
1. Leave the appliance to cool down.
2. Remove the worst dirt from the cooking
compartment immediately and wipe away moisture
from the cooking compartment floor.
3. If necessary, press the # On/Off button to switch on
the appliance.
4. Touch the Menu field.
The options for selecting an operating mode are
displayed.
5. Touch the "Cleaning" text field.
6. Touch the "Drying" text field.
The duration is displayed. It cannot be changed.
7. Press the l Start/Stop button to start.
The drying function starts and ends automatically
after 10 minutes.
8. Open the appliance door and leave it open for 1 to 2
minutes so that the moisture in the cooking
compartment can escape.
Drying the cooking compartment by hand
1. Allow the appliance to cool down.
2. Remove any food remnants from the walls of the
cooking compartment.
3. Dry the cooking compartment with a sponge.
4. Leave the appliance door open for 1 hour so that the
cooking compartment dries completely.
pRails
Ra i l s
With good care and cleaning, your appliance will retain
its appearance and remain fully functional for a long
time to come. This will tell you how to remove the
shelves and clean them.
Detaching and refitting the rails
:Warning – Risk of burns!
The rails become very hot. Never touch the hot rails.
Always allow the appliance to cool down. Keep children
away from the appliance.
Detaching the rails
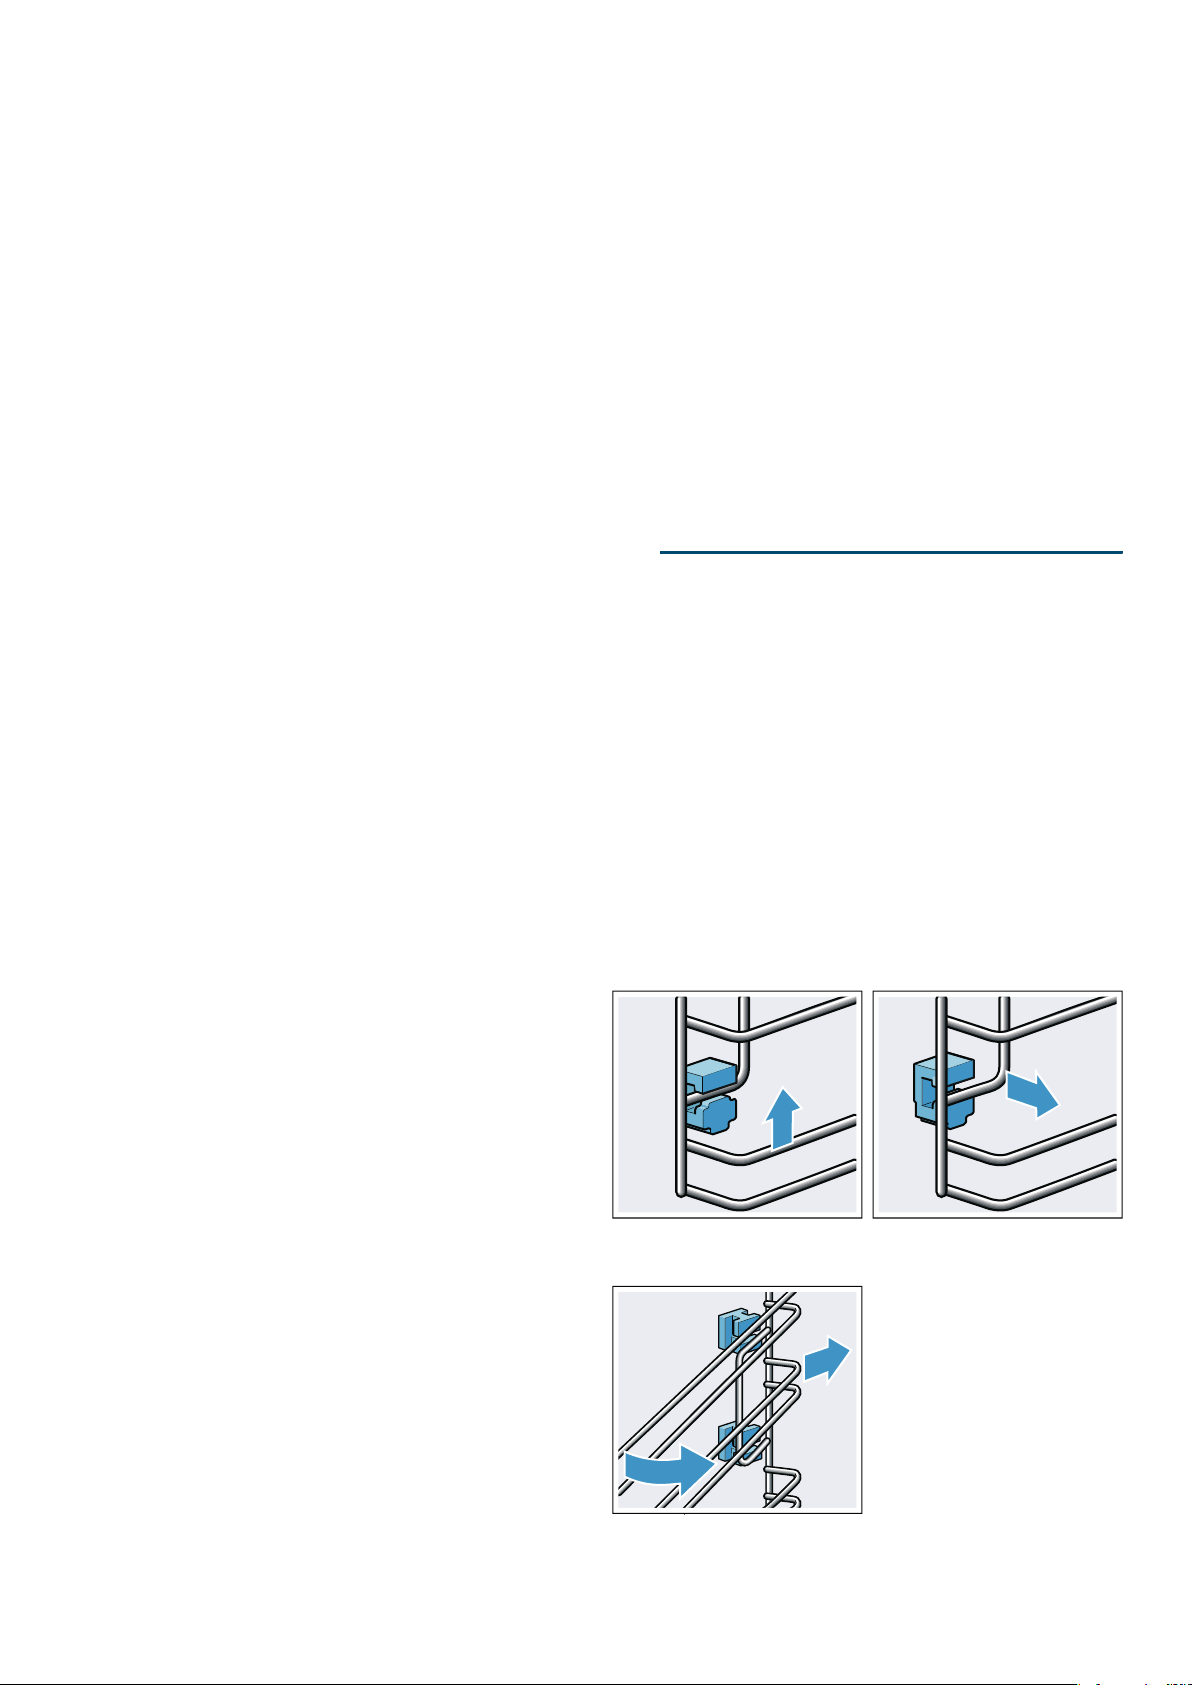
1. Push the rail to the front and up (fig. !)
2. and detach it (fig. ").
3. Then swing the entire rail outwards ‚ and detach it
at the rear ƒ (fig. #).
Clean the rails with cleaning agent and a sponge. For
stubborn deposits of dirt, use a brush.
21
D
D
E
Loading ...
Loading ...
Loading ...