Loading ...
Loading ...
Loading ...
en Getting to know your appliance
8
*Getting to know your
appliance
Get t i ng to k now your appl i ance
In this section, we will explain the display and
controls.You will also find out about the various
functions of your appliance.
Note: Depending on the appliance model, individual
details and colours may differ.
Control panel
You can set your appliance's various functions on the
control panel. The current settings are shown on the
display.
The overview shows the control panel when the
appliance is switched on with a clock time that has
been set.
Controls
You will find a brief explanation of the various buttons
below. These buttons allow you to set your appliance
simply and directly.
Buttons and their meaning
You will find a brief explanation of the various buttons
below.
--------
Rotary selector
The rotary selector is used to alter the default values
and set values.
The rotary selector is retractable. Press on the rotary
selector to lock it in or out.
Automatic door opening
The appliance door springs open if you activate the
automatic door opening. You can fully open the
appliance door manually.
The automatic door opening does not work in the event
of a power cut. You can open the door manually.
Notes
■ If you open the appliance door during operation, the
operation is paused.
■ When you close the appliance door, the operation
does not continue automatically. You must restart
the operation manually.
■ If the appliance has been switched off for a long
time, the appliance door will open after a time delay.
Cooling fan
The appliance is equipped with a cooling fan. The fan
may run on even if the oven has been switched off.
Notes
■ The cooking compartment remains cold during
microwave operation. The cooling fan will still switch
on. The fan may run on even when microwave
operation has ended.
(
Display
For clock and cooking times
0
Rotary selector
For setting the clock and cooking times or for
setting automatic programmes
8
Buttons
PLQ
K
NJ
#
@
Automatic door opening button
Buttons Meaning
Symbol
start Start the appliance
0
Setting the time
stop Stop or pause the appliance
90 Select a microwave power output of 90 watts
180 Select a microwave power output of 180 watts
360 Select a microwave power output of 360 watts
600 Select a microwave power output of 600 watts
900 Select a microwave power output of 900 watts
h
Select a weight for the programmes
%
Select automatic programmes
i
Select the memory
v
Open appliance door
Accessories en
9
■ Condensation may appear on the door window,
interior walls and floor. This is normal and does not
adversely affect microwave operation. Wipe away the
condensation after cooking.
Changing the signal duration
You will hear a signal when the appliance is switched
off. You can change the duration of the acoustic signal.
Press the "start" button for approx. 6 seconds.
The new signal duration is adopted.
The clock reappears.
The following are possible:
Short signal duration - 3 tones
Long signal duration - 30 tones.
_Accessories
Acces sor i es
Below, you will find an overview of the accessories
included and information on how to use them correctly.
Caution!
When removing dishes, make sure that the turntable
does not move. Make sure that the turntable is properly
locked. The turntable can turn left or right.
Special accessories
Special accessories can be purchased from our after-
sales service, from specialist retailers, or online. You
will find a comprehensive range of products in our
brochures and online.
Their availability and whether it is possible to order
them online varies from country to country. Please see
our sales brochures for more details.
Note: Not all special accessories are suitable for every
appliance. When purchasing, please always quote the
exact identification number (E-no.) of your appliance.
~ "Customer service" on page 16
KBefore using for the first
time
Bef or e usi ng f or t he f i r st ti me
This section tells you what you need to do before using
your microwave to prepare food for the first time. Read
the section entitled "Safety information" beforehand.
~ "Important safety information" on page 4
Before you can use your new appliance, you will need
to put the turntable in place correctly. You must also
clean the cooking compartment and accessories.
Cleaning the cooking compartment and
putting the turntable in place
Before using the appliance to prepare food for the first
time, you must clean the cooking compartment and
accessories.
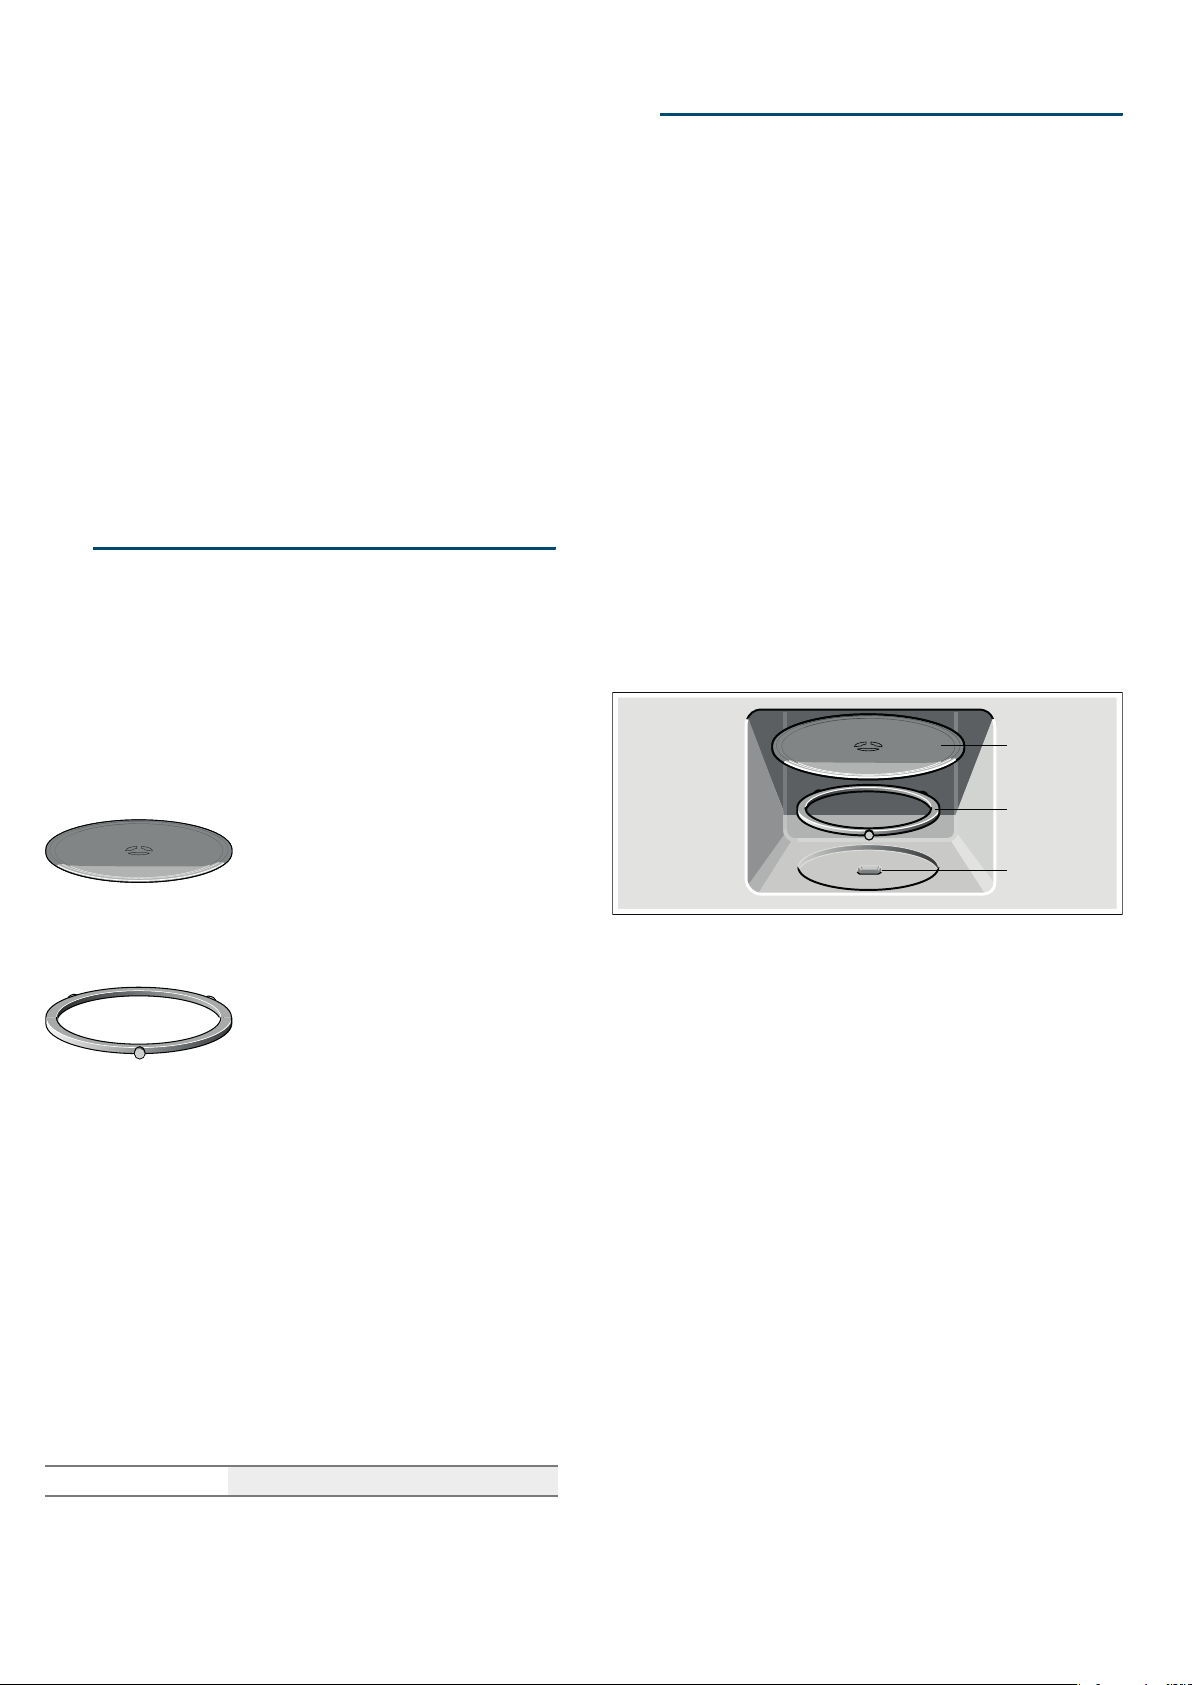
How to put the turntable in place
1. Place the roller ring a into the recess in the cooking
compartment.
2. Make sure that the turntable b engages in the drive c
in the centre of the cooking compartment floor.
Note: Never use the appliance without the turntable.
Make sure that it is properly engaged.The turntable can
turn clockwise or anti-clockwise.
Setting the clock
When the appliance is first connected or after a power
cut, three zeros will appear in the display panel.
1. Press the 0 button.
‚ƒ:‹‹
œ
appears in the display and the indicator
lamp above the 0 button lights up.
2. Set the clock using the rotary selector.
3. Press the 0 button again.
The current time is set.
Hiding the clock
Press the 0 button and then press Stop.
The display is blank.
Resetting the clock
Press the 0 button.
"12:00" appears in the display. Make settings as
detailed in points 2 and 3.
Change the clock, e.g. from summer to winter time
Set as described in point 1 to 3.
Turntable
Note: Never use the appliance
without the turntable.Make sure
that it is properly engaged. The
turntable can turn clockwise or
anti-clockwise.
Roller ring
Steaming utensils For cooking rice, potatoes and vegetables
E
D
F
Loading ...
Loading ...
Loading ...