Loading ...
Loading ...
Loading ...
en Microwave
10
Cleaning the cooking compartment and
accessories
To eliminate the new-appliance smell, wipe down the
cooking compartment with hot soapy water when it is
empty.~ "Cleaning" on page 14
Tip: Make sure that there is no leftover packaging, such
as polystyrene pellets, in the cooking compartment.
Wipe the smooth surfaces in the cooking compartment
with a soft, damp cloth.
Cleaning the accessories
Clean the accessories thoroughly using soapy water
and a dish cloth or soft brush.
^Microwave
Mi c r owav e
You can use the microwave to cook, heat up or defrost
food quickly.
To ensure optimum use of the microwave, please
observe the notes on cookware and familiarise yourself
with the data in the application tables at the end of the
instruction manual. ~ "Tested for you in our cooking
studio" on page 17
Try out the microwave straight away. You could heat up
a cup of water for your tea, for example.
Use a large cup without any decorative gold or silver
trim and place a teaspoon in it. Place the cup
containing the water on the turntable, slightly off-centre.
1. Press 900 W.
2. Use the rotary selector to set to 1:30 minutes.
3. Press the "Start" button.
A signal sounds after 1 minute and 30 seconds. The
water is hot.
:Warning – Risk of scalding!
There is a possibility of delayed boiling when a liquid is
heated. This means that the liquid reaches boiling
temperature without the usual steam bubbles rising to
the surface. Even if the container only vibrates a little,
the hot liquid may suddenly boil over and spatter. When
heating, always place a spoon in the container. This will
prevent delayed boiling.
Cookware
Not all cookware is microwavable. So that your food is
heated and the appliance is not damaged, only use
microwavable cookware.
Suitable cookware
Heat-resistant cookware made of glass, glass ceramic,
porcelain, ceramic or heat-resistant plastic are suitable.
These materials allow microwaves to pass through.
You can also use serving dishes. This saves you having
to transfer food from one dish to another. You should
only use cookware with decorative gold or silver trim if
the manufacturer guarantees that they are suitable for
use in microwaves.
Unsuitable cookware
Metal cookware is unsuitable. Metal does not allow
microwaves to pass through. Food in covered metal
containers will remain cold.
Caution!
Creation of sparks: Metal – e.g. a spoon in a glass –
must be kept at least 2 cm from the cooking
compartment walls and the inside of the door. Sparks
can irreparably damage the glass on the inside of the
door.
Cookware test
Never switch on the microwave unless there is food
inside. The short cookware test is the only exception to
this rule.
Perform the following test if you are unsure whether
your cookware is suitable for use in the microwave.
1. Heat the empty cookware at maximum power for ½
to 1 minute.
2. Check the temperature of the cookware during this
time.
The cookware should remain cold or warm to the touch.
The cookware is unsuitable if it becomes hot or sparks
are generated.
In this case, stop the test.
:Warning – Risk of burns!
The accessible parts become very hot when in
operation. Never touch hot parts. Keep children at a
safe distance.
Microwave power settings
Microwave power
setting
Suitable for
90 W Defrosting delicate foods
180 W Defrosting and continued cooking
360 W Cooking meat and heating delicate foods
Memory en
11
Note: You can set the 900 W microwave power setting
for 30 minutes, 600 W for 1 hour, the other power
settings for 1 hour and 39 minutes respectively.
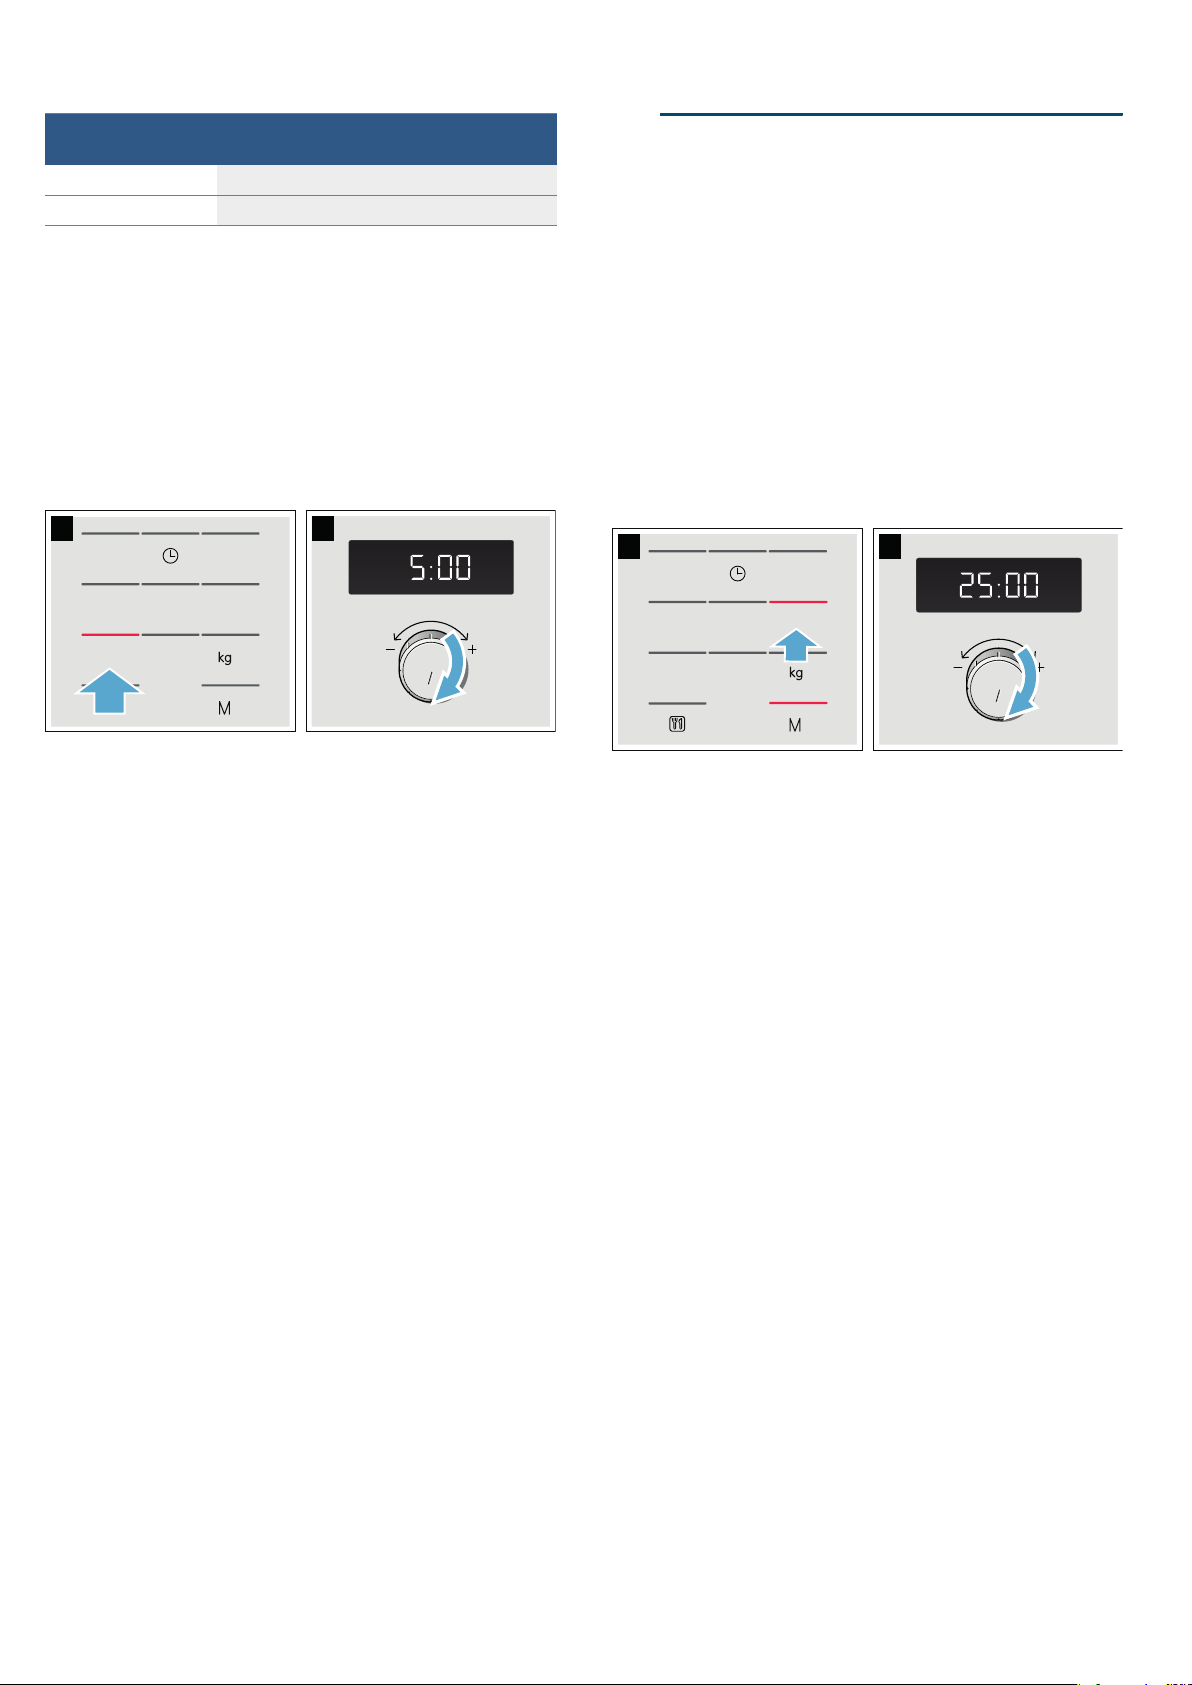
Setting the microwave
Example: Microwave power output 600 W, cooking time
5 minutes
1. Press the required microwave power setting.
The indicator light above the button lights up.
2. Use the rotary selector to set a cooking time.
3. Press the "Start" button.
The cooking time counts down in the display.
The cooking time has elapsed
A signal sounds. Open the appliance door or press
Stop. The clock reappears.
Changing the cooking time
This can be done at any time. Change the cooking time
using the rotary selector.
Pausing the appliance
Press the Stop button once or open the appliance door.
This pauses the appliance. The indicator above the
Stop button will light up.After closing the door, press the
Start button again.
Cancelling operation
Press the Stop button twice, or open the door and
press the Stop button once.
Note: You can also adjust the cooking time first and
then the microwave power setting.
BMemory
Memor y
The memory function allows you to save the setting for
a dish and call it up at any time.
The memory function is useful if you prepare one dish
particularly frequently.
Saving memory settings
Example: 360 W, 25 minutes
1. Press the i button.
The indicator light above the button lights up.
2. Press the required microwave power setting.
The indicator light above the button lights up and
"1:00 min" appears in the display.
3. Use the rotary selector to set the cooking time.
4. Confirm by pressing the i button.
The clock reappears. The setting has been saved.
Notes
■ You cannot save several microwave power settings
one after the other.
■ You cannot save automatic programmes.
■ You can save the memory settings and start the
appliance immediately. When finishing, instead of
pressing
i, press Start.
■ Saving a new setting in the memory: press the
i button. The old settings appear. Save the new
programme as described in steps 1-4.
Starting the memory
It is very easy to start the saved programme. Place your
meal into the appliance. Close the appliance door.
1. Press the i button.
The saved settings are displayed.
2. Press the "Start" button.
The cooking time counts down in the display.
The cooking time has elapsed
A signal sounds. Open the appliance door or press
Stop. The clock reappears.
Pausing the appliance
Touch the Stop button once or open the appliance
door. This pauses the appliance. The indicator above
the Stop button will light up.After closing the door, touch
the Start button again.
600 W Heating and cooking food
900 W Heating liquids
Microwave power
setting
Suitable for
VWRSVWDUW
PLQ
NJ
PLQ
VWRSVWDUW
PLQ
NJ
PLQ
Loading ...
Loading ...
Loading ...