Operator's Manual
®
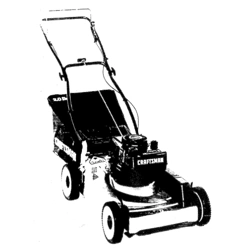
21" LAWN MOWER
Model No. 247.37000
CAUTION: using
this product, read this
manual and folmow aml
safety fumes and operating
instructions,
®SAFETY
®ASSEMBLY
®OPERATION
® MAINTENANCE
® PARTS LIST
® ESPANOL, p. 33
Sears Brands Management Corporation, Hoffman Estates, IL 60179, U.S.A.
Visit our website: www.craftsman.com FORMNO.769=07571
11/23/2011
WarrantyStatement..................................Page2
SafetyRnstructions....................................Pages3-6
SUopeGuide..............................................Page7
AssemMy..................................................Pages8-11
Operation..................................................Pages12-13
ServiceandMaintenance.........................Pages14-17
Off-SeasonStorage..................................Page18
TroubUeshooting........................................Page19
PartsList...................................................Page20-29
Espa_oU.....................................................Page33
ServiceNumbers......................................BackCover
Craftsman TwoYear Full Warranty
FORTWOYEARSfromthedateofpurchase,thisproductiswarrantedagainstanydefectsinmaterialorworkmanship.DefectiveproductwiiI
receivefreerepairorfreereplacementifrepairisunavaiiabb.
Forwarrantycoveragedetailstoobtainrepairorreplacement,visitthewebsite:www.craftsman.com.
ThiswarrantycoversONLYdefectsinmaterialandworkmanship.WarrantycoveragedoesNOTinclude:
, Expendabbitemswhichcanwearoutfromnormalusewithinthewarrantyperiod,suchasmowerbhdes,bladeadapters,belts,filters,or
sparkpBgs.
, Productdamageresultingfromuserattemptsatproductmodificationorrepairorcausedbyproductaccessories.
, Repairsnecessarybecauseofaccidentorfailuretooperateormaintaintheproductaccordingtoallsuppliedinstructions.
, Preventativemaintenanceorrepairsnecessaryduetoimproperfuelmixture,contaminatedorstalefuel.
Thiswarrantyisvoidifthisproductiseverusedwhileprovidingcommercialservicesorifrentedtoanotherperson.
Thiswarrantygivesyouspecificlegalrights,andyoumayalsohaveotherrightswhichvaryfromstatetostate.
SearsBrandsManagementCorporation,NoffmanEstates,IL60179
EngineOilType: SAE30
EngineOil Capacity: 15ounces
Fuel: UnleadedGasoline
SparkHug: Champion@RC12YC
Engine: Briggs& Stratton
Model Number.................................................................
Seriat Number.................................................................
Dateof Purchase .............................................................
Recordthe modelnumber,serialnumber
anddateof purchaseabove
@Sears Brands,LLC 2
Thissymbolpointsout importantsafetyinstructionswhich,if not
followed,couldendangerthepersonalsafetyand/orpropertyof
yourselfandothers. Readand followall instructionsin this manual
beforeattemptingto operatethismachine.Failureto complywith
theseinstructionsmayresultin personalinjury.Whenyou seethis
symbol,HEEDiTS WARNING!
CAUFORNIA PROPOSiTiON 65
EngineExhaust,someof itsconstituents,andcertainvehicle
componentscontainoremit chemicalsknownto Stateof California
to causecancerand birthdefects orother reproductiveharm.
Batteryposts,terminals,and relatedaccessoriescontainleadand
leadcompounds,chemicalsknownto the Stateof Californiato
causecancerand reproductiveharm.Washhandsafterhandling.
Thismachinewas builtto be operatedaccordingto the safeopera-
tion practicesinthis manual.As withanytypeof powerequipment,
carelessnessor erroron the partof the operatorcan resultin serious
injury.Thismachineis capableof amputatingfingers,hands,toes
andfeet andthrowingdebris.Failureto observethe followingsafety
instructionscouldresultin seriousinjuryor death.
Your Responsibility--Restrict the use of thispowermachineto
personswho read,understandand followthewarningsand instruc-
tionsin thismanualand on the machine.
SAVE THESE NSTRUCT ONS!
GENERAL OPERATUON
, Readthisoperator'smanual carefullyin itsentiretybefore
attemptingto assemblethis machine.Read,understand,and
followall instructionsonthe machineand inthe manualsbefore
operation.Keepthismanualina safe placefor futureand regular
referenceandfor orderingreplacementparts
, Becompletelyfamiliarwiththe controlsand the properuseof this
machinebeforeoperatingit.
, Thismachineis a precisionpieceof powerequipment,not a
plaything.Therefore,exerciseextremecautionat alltimes.This
machinehas beendesignedto performonejob: to mowgrass.
Do not useit for anyother purpose.
, Neverallowchildrenunder14 yearsof ageto operatethis
machine.Children14andover shouldreadandunderstandthe
instructionsand safeoperationpracticesin thismanualandon
the machineandshouldbetrainedand supervisedbyan adult.
, Only responsibleindividualswhoarefamiliarwiththese rubs of
safeoperationshouldbe allowedto usethis machine.
, Thoroughlyinspectthe area wherethe equipmentis to be used.
Removeallstones,sticks,wire, bones,toysand otherforeign
objects,whichcould betrippedoverorpicked upand thrownby
the blade.Thrownobjectscancauseseriouspersonalinjury.
, Planyour mowingpatternto avoiddischargeof materialtoward
roads,sidewalks,bystandersand the like.Also,avoiddischarg-
ingmaterialagainsta wall orobstruction,whichmay cause
dischargedmaterialto ricochetbacktowardthe operator.
, Tohelpavoidbladecontactor a thrownobjectinjury, stayin
operatorzonebehindhandlesand keepchildren,bystanders,
helpersandpets at bast 75feet frommowerwhileit is in opera-
tion.Stopmachineif anyoneentersarea.
, Alwayswear safetyglassesor safetygogglesduringoperation
andwhile performingan adjustmentor repairto protectyoureyes.
Thrownobjectswhich ricochetcancause seriousinjuryto the
eyes.
, Wearsturdy,rough=soledwork shoesandclose-fittingslacks
and shirts.Shirtsand pantsthatcoverthe arms andlegsand
steePtoedshoesare recommended.Neveroperatethis machine
inbare feet,sandals,slipperyor light=weight(e.g.canvas)shoes.
, Donot put handsor feetnear rotatingpartsor underthe cutting
deck. Contactwith bladecan amputatefingers,hands,toesand
feet.
, A missingor damageddischargecovercan causeNade contact
or thrownobject injuries.
, Manyinjuriesoccuras a resultof the mowerbeingpulledoverthe
footduring afall causedby slippingor tripping.Do not holdon to
the mowerif you arefalling: releasethe handleimmediately.
, Neverpullthe mowerbacktowardyouwhileyou arewalking,if
you mustback the mowerawayfroma wallor obstructionfirst
lookdownandbehindto avoidtrippingandthen followthese
steps:
1. Stepbackfrom mowerto fullyextendyourarmsforwar&
2. Be sureyouare wellbalancedwith surefooting.
3. Pullthe mowerback slowly,no morethan half waytoward
you.
4. Repeatthese stepsas nee@&
, Donot operatethe mowerwhileunderthe influenceof alcoholor
drugs.
, Donot engagethe seBpropelledmechanismon machinesso
equippedwhilestartingengine.
3
, The bladecontrolhandleis a safetydevice.Neverattemptto
bypassits operation.Doingso makesthe safetydeviceinoperao
fiveand mayresultin personalinjurythroughcontactwith the
rotatingblade.The bladecontrolhandlemustoperateeasily
in bothdirectionsandautomaticallyreturnto the disengaged
positionwhenreleased.
, Neveroperatethe mowerinwet grass.Alwaysbe sureof your
footing. A slip and fall cancause seriouspersonalinjury.If you
feelyou are losingyourfooting,releasethe bladecontrolhandle
immediatelyandthe bladewill stop rotatingwithinthreeseconds.
, Mowonly in daylightor good artificiallight.Walk,neverrun.
, Stopthe bladewhencrossinggraveldrives,walksor roads.
, Ifthe equipmentshouldstart to vibrateabnormally,stopthe
engineandcheckimmediatelyfor the cause.Vibrationis gener-
allya warningof trouble.
, Shutthe engineoff and waituntilthe bladecomesto a complete
stopbeforeremovingthe grass catcheror uncloggingthe chute.
Thecuttingbladecontinuesto rotatefor afewsecondsafterthe
bladecontrolis released.Neverplaceany partof the body in the
bladeareauntilyou are surethe blade hasstoppedrotating.
, Neveroperatemowerwithoutpropertrail shield,dischargecover,
grasscatcher,bladecontrolhandleor othersafetyprotectivedeo
vicesin placeand working.Neveroperatemowerwith damaged
safetydevices.Failureto do socan resultin personalinjury.
, Mufflerandengine becomehotand can causea burn.Do not
touch.
, Neverattemptto makea wheelor cuttingheightadjustmentwhile
theengine is running.
, Onlyuse partsand accessoriesmadeforthis machineby the
manufactureras listedin the Partspagesof this Operator's
Manual.Failureto do so can resultin personalinjury.
, Whenstartingengine,pullcordslowlyuntil resistanceis felt,then
pullrapidly.Rapidretractionof startercord (kickback)willpull
handandarm towardenginefasterthanyoucan let go. Broken
bones,fractures,bruisesor sprainscould result.
, If situationsoccurwhichare not coveredinthis manual,usecare
andgoodjudgement.Contact1-800-4MY-HOME®for information
andassistance.
SLOPE OPERATION
Slopesare amajorfactor relatedto slipand fall accidents,whichcan
resultin severeinjury.Operationon slopesrequiresextracaution.If
youfeel uneasyon a slope,do not mowit. Foryour safety,usethe
SlopeGuideincludedas partof thismanualto measureslopesbefore
operatingthis machineon a slopedor hillyarea. If the slopeis greater
than 15degrees,donot mowit.
Do:
o
Mowacrossthefaceof slopes;neverup anddown.Exercise
extremecautionwhenchangingdirectiononslopes.
, Watchfor holes,ruts, rocks,hiddenobjects,or bumpswhich can
causeyou to slip ortrip. Tallgrass can hideobstacles.
, Alwaysbesureof yourfooting.A slipandfall can causeserious
personalinjury.If you feelyou are losingyourbalance,release
the bladecontrolhandleimmediatelyand the bladewillstop
rotatingwithinthree (3) seconds.
Do Not:
, Donot mow neardrop-ells,ditchesor embankments,because
you couldloseyourfootingor balance.
, Donot mow slopesgreaterthan 15degreesas shownon the
slopeguide.
, Donot mowon wetgrass.Unstablefootingcouldcauseslipping.
Tragicaccidentscan occurif the operatoris not alertto the presence
of children.Childrenare oftenattractedto themowerandthe mowing
activity.Theydo not understandthe dangers.Neverassumethat
childrenwill remainwhereyou last sawthem.
, Keepchildrenout of the mowingarea andunderwatchfulcareof
a responsibleadultotherthanthe operator.
, Bealertandturn moweroffif a child entersthe area.
, Beforeand whilemovingbackwards,look behindanddown for
smallchildren.
, Useextremecare whenapproachingblindcorners,doorways,
shrubs,trees,orotherobjectsthatmayobscureyourvision of a
child whomay runintothe mower.
, Keepchildrenawayfrom hot or runningengines.They can suffer
burnsfrom a hot muffler.
, Neverallowchildrenunder14yearsof ageto operatethis
machine.Children14andovershouldreadand understandthe
instructionsand safeoperationpracticesinthis manualandon
the machineand be trainedand supervisedby an adult.
Safe Handing Of Gasolne:
, Toavoid personalinjuryor propertydamageuseextremecare
in handlinggasoline.Gasolineis extremelyflammableandthe
vaporsareexplosive.Seriouspersonalinjurycanoccurwhen
gasolineis spilledon yourselfor yourclothes,whichcan ignite.
Washyour skinand changeclothesimmediately.
, Useonly anapprovedgasolinecontainer.
, Neverfill containersinsidea vehicleoron atruck ortrailer bed
witha plasticliner.Alwaysplacecontainerson thegroundaway
fromyourvehiclebeforefiling.
, Removegas-poweredequipmentfrom thetruck or trailerand
refuelit on the ground,if this is notpossible,then refuelsuch
equipmenton a trailer witha portablecontainer,ratherthanfrom
a gasolinedispensernozzle.
, Keepthe nozzleincontactwith the rimof the fueltankor
containeropeningat all timesuntilfuelingis complete.Donot use
a nozzlelock-opendevice.
4
, Extinguishall cigarettes,cigars,pipesandothersources
of ignition.
, Neverfuelmachineindoorsbecauseflammablevaporswill
accumulateinthe area.
, Neverremovegas cap or addfuel whileengineis hotor running.
Allowengineto coolat leasttwo minutesbeforerefueling.
, Neverover-fillfuel tank.Toallowfor expansionof the fuel, donot
fill abovethe bottomof the fueltankneck.
, Replacegasolinecapand tightensecurely.
, If gasolineis spilled,wipe it off the engineandequipment.Move
machineto anotherarea.Wait5 minutesbeforestartingengine.
, Neverstorethe machineor fuel containernearan openflame,
sparkor pilot lightas on a waterheater,spaceheater,furnace,
clothesdryer or othergas appliances.
, Toreducefirehazard,keepmachinefreeof grass,leaves,or
otherdebrisbuild-up.Cleanup oil or fuel spillageand removeany
fuel-soakeddebris.
, Allowmachineto cool at least5 minutesbeforestoring.
GeneralService:
, Neverrunanengine indoorsor ina poorlyventilatedarea.Engine
exhaustcontainscarbonmonoxide,anodorlessand deadlygas.
, Beforecleaning,repairing,or inspecting,makecertainthe
bladeandall movingpartshavestopped.Disconnectthe spark
plugwireandgroundagainstthe engineto preventunintended
starting.
, Checktheblade andenginemountingbolts at frequentintervals
for propertightness.Also, visuallyinspectbladefordamage(e.g.,
bent,cracked,worn). Replacebladewith theoriginalequipment
manufacture's(O.E.M.)bladeonly,listedin the Partspagesof this
manual.Useof partswhich donot meetthe originalequipment
specificationsmayleadto improperperformanceandcompro-
misesafety!
, Mowerbladesare sharpand can cut. Wrapthe bladeor wear
gloves,and use extracautionwhen servicingthem.
, Keepall nuts,bolts,andscrewstightto be suretheequipmentis
in safeworkingcondition.
, Nevertamperwithsafetydevices.Checktheirproperoperation
regularly.
, Afterstrikinga foreignobject, stopthe engine,disconnectthe
sparkplugwireand groundagainstthe engine.Thoroughly
inspectthe mowerfor anydamage.Repairthe damagebefore
startingand operatingthe mower.
, Neverattemptto makea wheelor cuttingheightadjustmentwhile
the engineis running.
, Grasscatchercomponents,dischargecover,and trailshieldare
subjectto wearand damagewhichcouldexposemovingparts or
allowobjectsto be thrown.Forsafetyprotection,frequentlycheck
componentsand replaceimmediatelywith originalequipment
manufacturer's(O.E.M.)parts only,listedin the Partspages
of thismanual.Useof partswhich do notmeetthe original
equipmentspecificationsmayleadto improperperformanceand
compromisesafety!
, Donot changethe engine'sgovernorsettingor over-speedthe
engine.Thegovernorcontrolsthe maximumsafeoperatingspeed
of the engine.
, Checkfuel line,tank,cap,and fittingsfrequentlyfor cracksor
leaks.Replaceif necessary.
, Donot crankenginewith sparkplugremoved.
, Maintainor replacesafetyand instructionlabels,as necessary.
, Observeproperdisposallawsand regulations,improperdisposal
of fluidsand materialscan harmthe environment.
, Accordingto theConsumerProductsSafetyCommission(CPSC)
andthe U.S.EnvironmentalProtectionAgency(EPA),this product
hasan Average Usefu!Lifeof seven(7)years,or 140hoursof
operation.At the endof theAverageUsefu/Lifehavethe machine
inspectedannuallyby a Searsor otherqualifiedservicedealer
to ensurethat allmechanicaland safetysystemsareworking
properlyand notwornexcessively.Failureto do so can resultin
accidents,injuriesor death.
DO NOT MODIFY ENGINE
Toavoidseriousinjuryor death,do not modifyengine inany way.
Tamperingwiththe governorsettingcanleadto a runawayengineand
causeit to operateat unsafespeeds.Nevertamperwithfactorysetting
of enginegovernor.Doingso will voidthe productwarranty.
NOTICE REGARDING EMISSIONS
Engineswhich arecertifiedtocomplywith Californiaandfederal
EPAemissionregulationsfor SORE(SmallOff RoadEquipment)are
certifiedto operateon regularunleadedgasoline,and mayinclude
the followingemissioncontrol systems:EngineModification(EM) and
ThreeWay Catalyst(TWO)if so equipped.
SPARK ARRESTOR
Thismachineis equippedwith aninternalcombustionengineand
shouldnotbe usedon or nearany unimprovedforest-covered,
brush-coveredor grass-coveredlandunlessthe engine'sexhaust
systemis equippedwitha sparkarrestormeetingapplicablelocalor
statelaws (if any).
if a sparkarrestoris used, it shouldbe maintainedin effectiveworking
orderby theoperator,inthe Stateof Californiathe aboveis required
bylaw (Section4442 of the CaliforniaPublicResourcesCode). Other
statesmayhavesimilarlaws. Federallawsapplyonfederallands.
A spark arrestor(Part No.398067)for the muffleris availablethrough
your nearestSears PartsandRepairService Center.
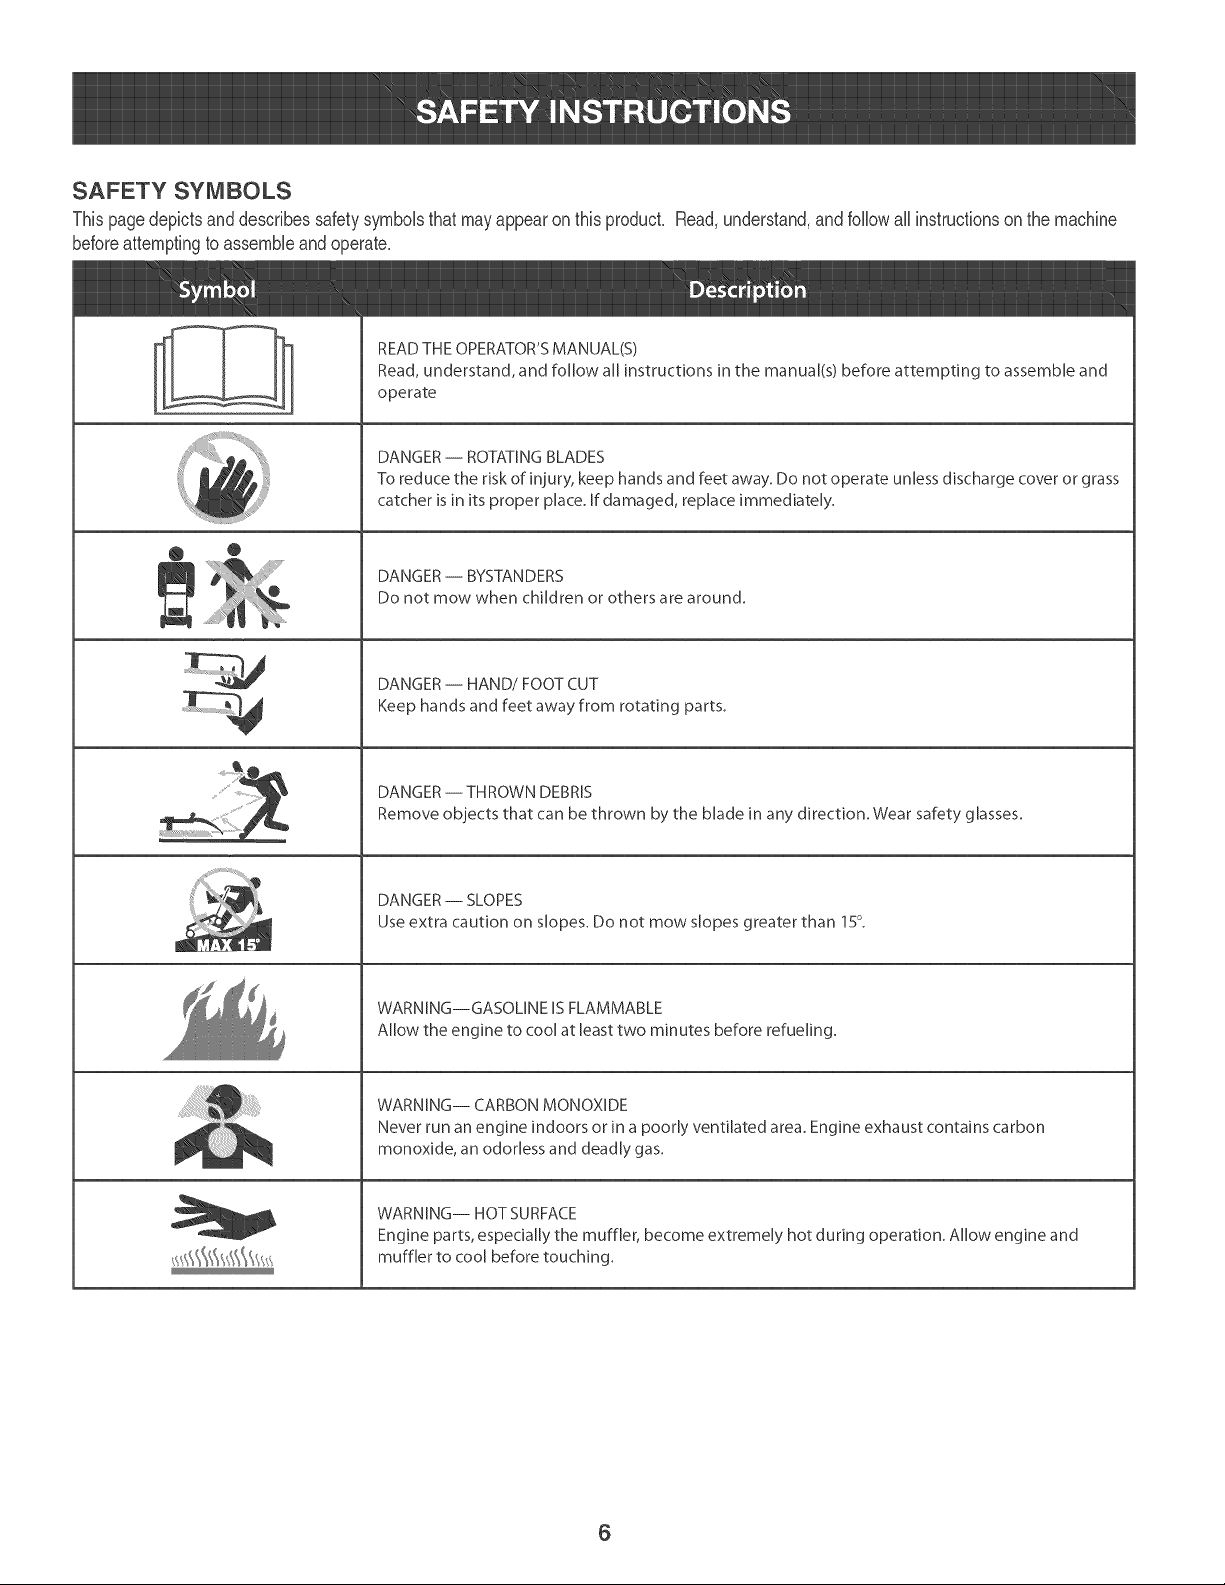
SAFETY SYMBOLS
Thispagedepictsanddescribessafetysymbolsthat mayappearon thisproduct. Read,understand,andfoIDwall instructionson the machine
beforeattemptingto assemNeand operate.
i
READ THE OPERATOR'S MANUAL(S)
Read, understand, and follow all instructions in the manual(s) before attempting to assemble and
operate
DANGER -- ROTATING BLADES
To reduce the risk of injury, keep hands and feet away. Do not operate unless discharge cover or grass
catcher is in its proper place. If damaged, replace immediately.
DANGER -- BYSTANDERS
Do not mow when children or others are around.
DANGER-- HAND/FOOT CUT
Keep hands and feet away from rotating parts.
DANGER-- THROWN DEBRIS
Remove objects that can be thrown by the Made in any direction. Wear safety glasses.
DANGER -- SLOPES
Use extra caution on slopes. Do not mow slopes greater than 15%
WARNING--GASOLINE ISFLAMMABLE
Allow the engine to cool at least two minutes before refueling.
WARNING-- CARBON MONOXIDE
Never run an engine indoors or in a poorly ventilated area. Engine exhaust contains carbon
monoxide, an odorless and deadly gas.
WARNING-- HOT SURFACE
Engine parts, especially the muffler, become extremely hot during operation. Allow engine and
muffler to cool before touching.
6
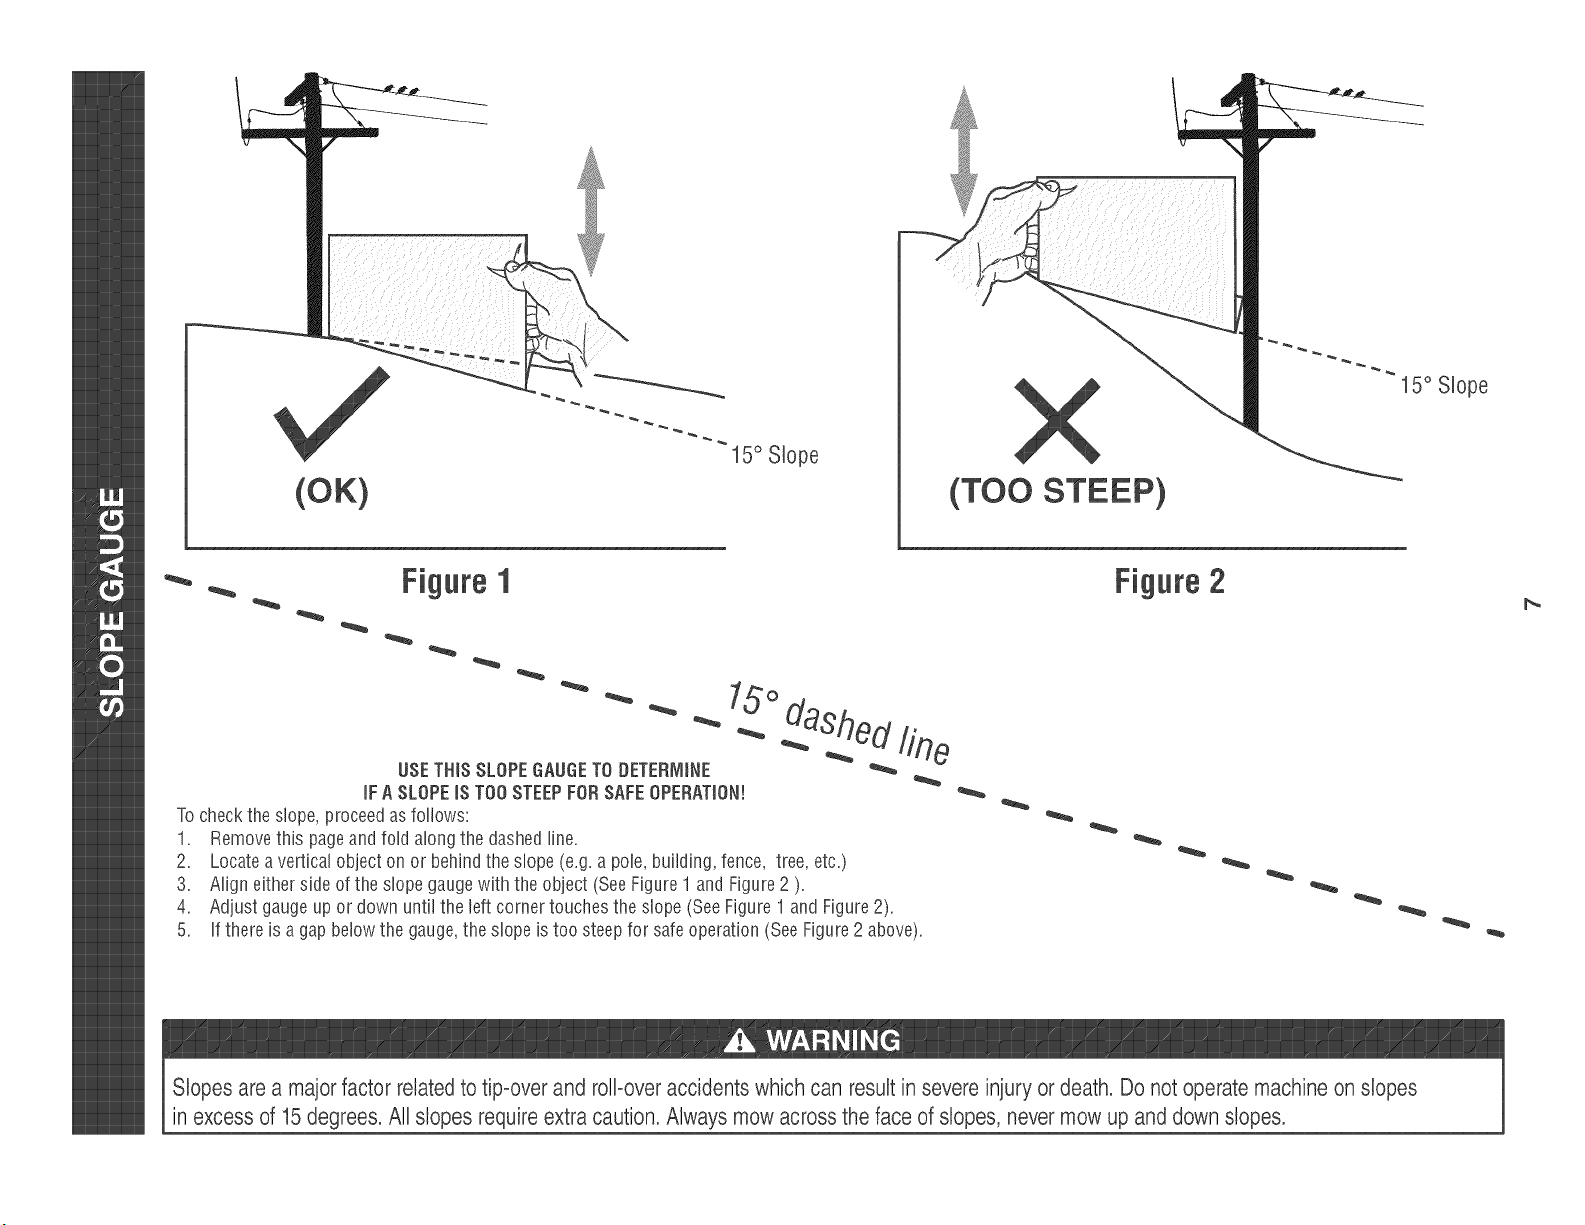
15° Slope
(TO0 STEEP)
15° Slope
_, FigureI
"_ "_ _" "_ S"odn
._ line
USETHINSSLOPEGAUGETO DETERJ_IiNE
iFA SLOPEiS TOOSTEEPFORSAFEOPERATJONJ
Tocheckthe slope, proceedas follows:
1. Removethis pageandfold alongthe dashedline.
2_ Locateavertical object on or behindthe slope(e.g_a pole, building,fence, tree, etc.)
3. Align either side of the slope gaugewith the object(SeeFigure1 andFigure2 ).
4. Adjust gaugeup or down until the left cornertouchesthe slope (SeeFigure1 and Figure2).
5. If there is a gap belowthe gauge,the slope is too steepfor safeoperation(SeeFigure2 above).
Figure 2
b-
Slopes are a majorfactor related to tip-over and roll-overaccidents which can result in severe injury or death. Do not operate machine on slopes
in excess of 15degrees. All slopes requireextra caution.Always mow across the face of slopes, never mow up and down slopes.
IMPORTANT:This unit is shippedwithoutgasolineor oil in the engine.
Becertain to serviceenginewithgasolineandoilas instructedin the
Operationsectionbeforestartingor runningyourmachine.
NOTE:Referenceto rightand bft hand sideof the LawnMoweris
observedfromthe operatingposition.
OPENUNG CARTON
1. Cuteachcornerof the cartonvertbaiiy fromtop to bottom.
2. Removeaiiiooseparts.
3. Removeioosepackingmaterial.
REMOVUNG UNUT FROM CARTON
1. Liftunit from the rearto detachit from underlyingcarton material
androiIunit out of carton.
2. Checkcarton thorougNyfor anyotherlooseparts.
LOOSE PARTS UNCARTON
, SideDischargeCover
o
f
f
Figure2
J
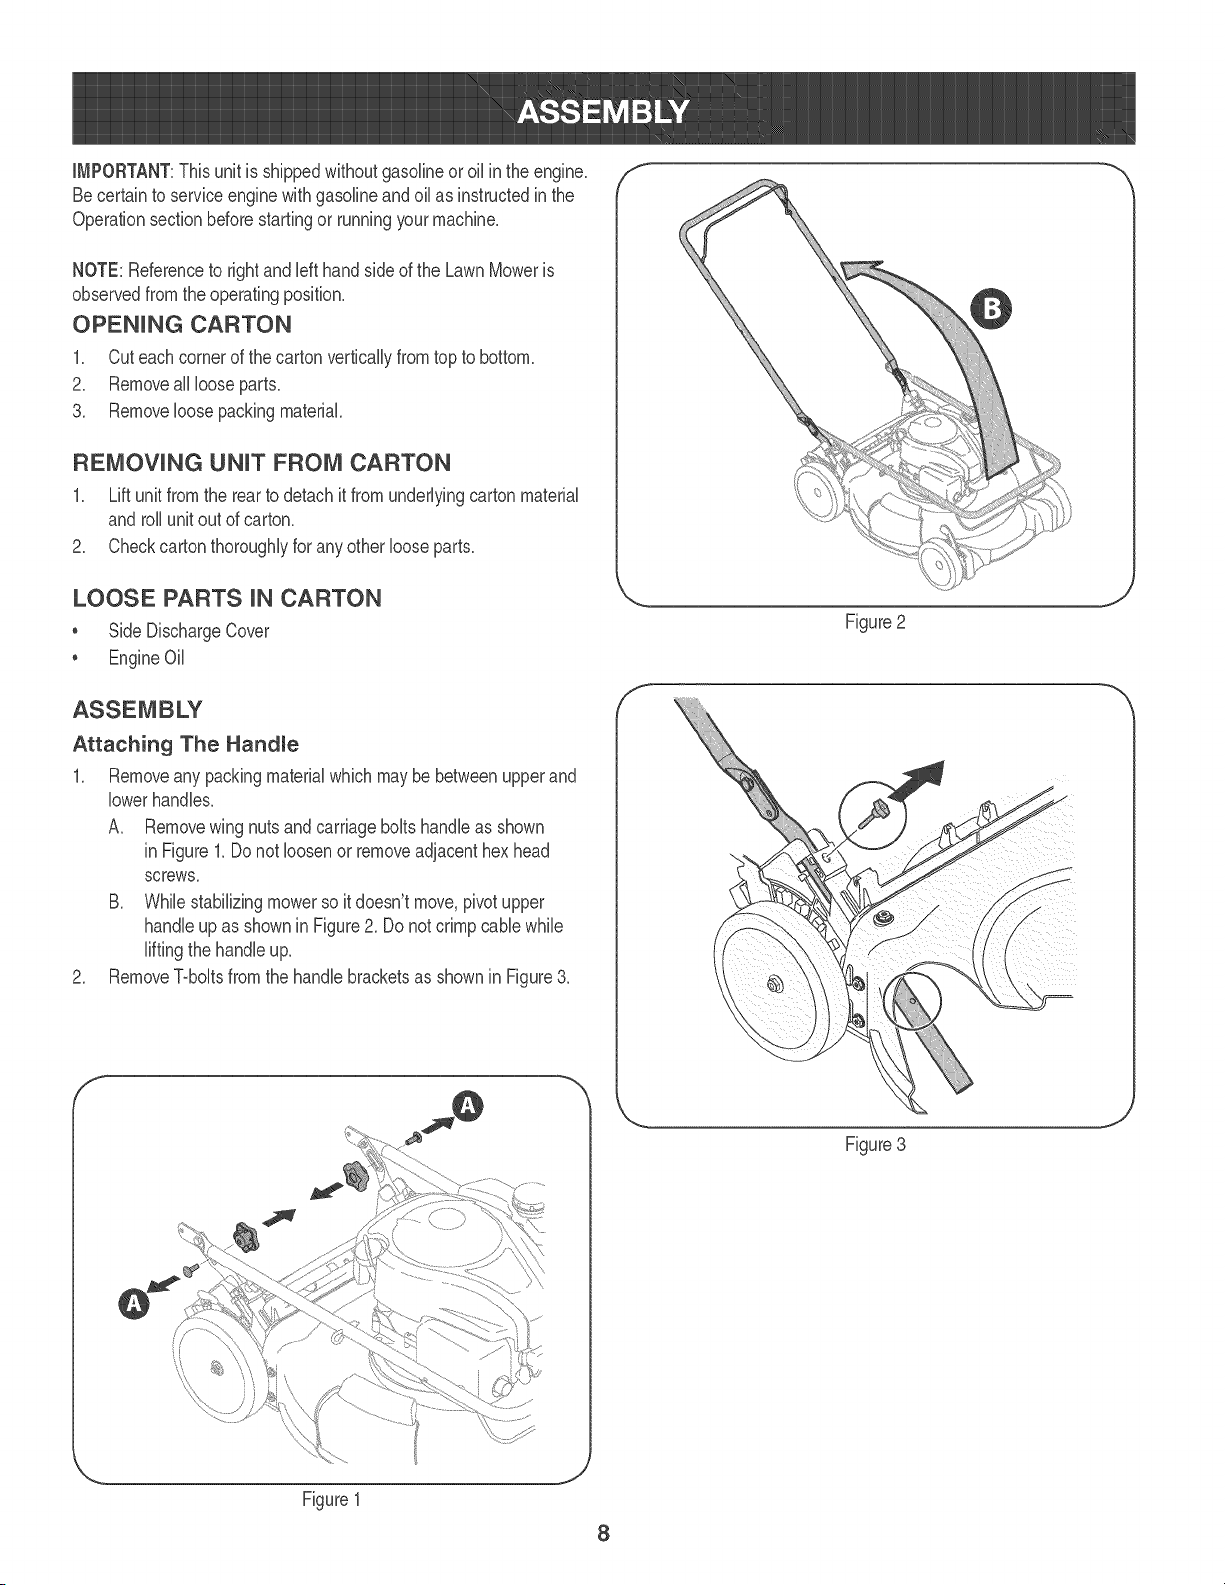
Attaching The Handme
1. Removeany packingmaterialwhichmaybe betweenupperand
lowerhandles.
A. Removewing nuts andcarriagebolts handleas shown
in Figure1_Do not loosenor removeadjacenthexhead
screws.
B. Whilestabilizingmowerso it doesn't move,pivot upper
handleupas shownin Figure2. Do notcrimpcane while
liftingthe handleuF
2. RemoveT_boltsfromthe handlebracketsas shownin Figure3.
/
\\
Figure3
Figure1
8
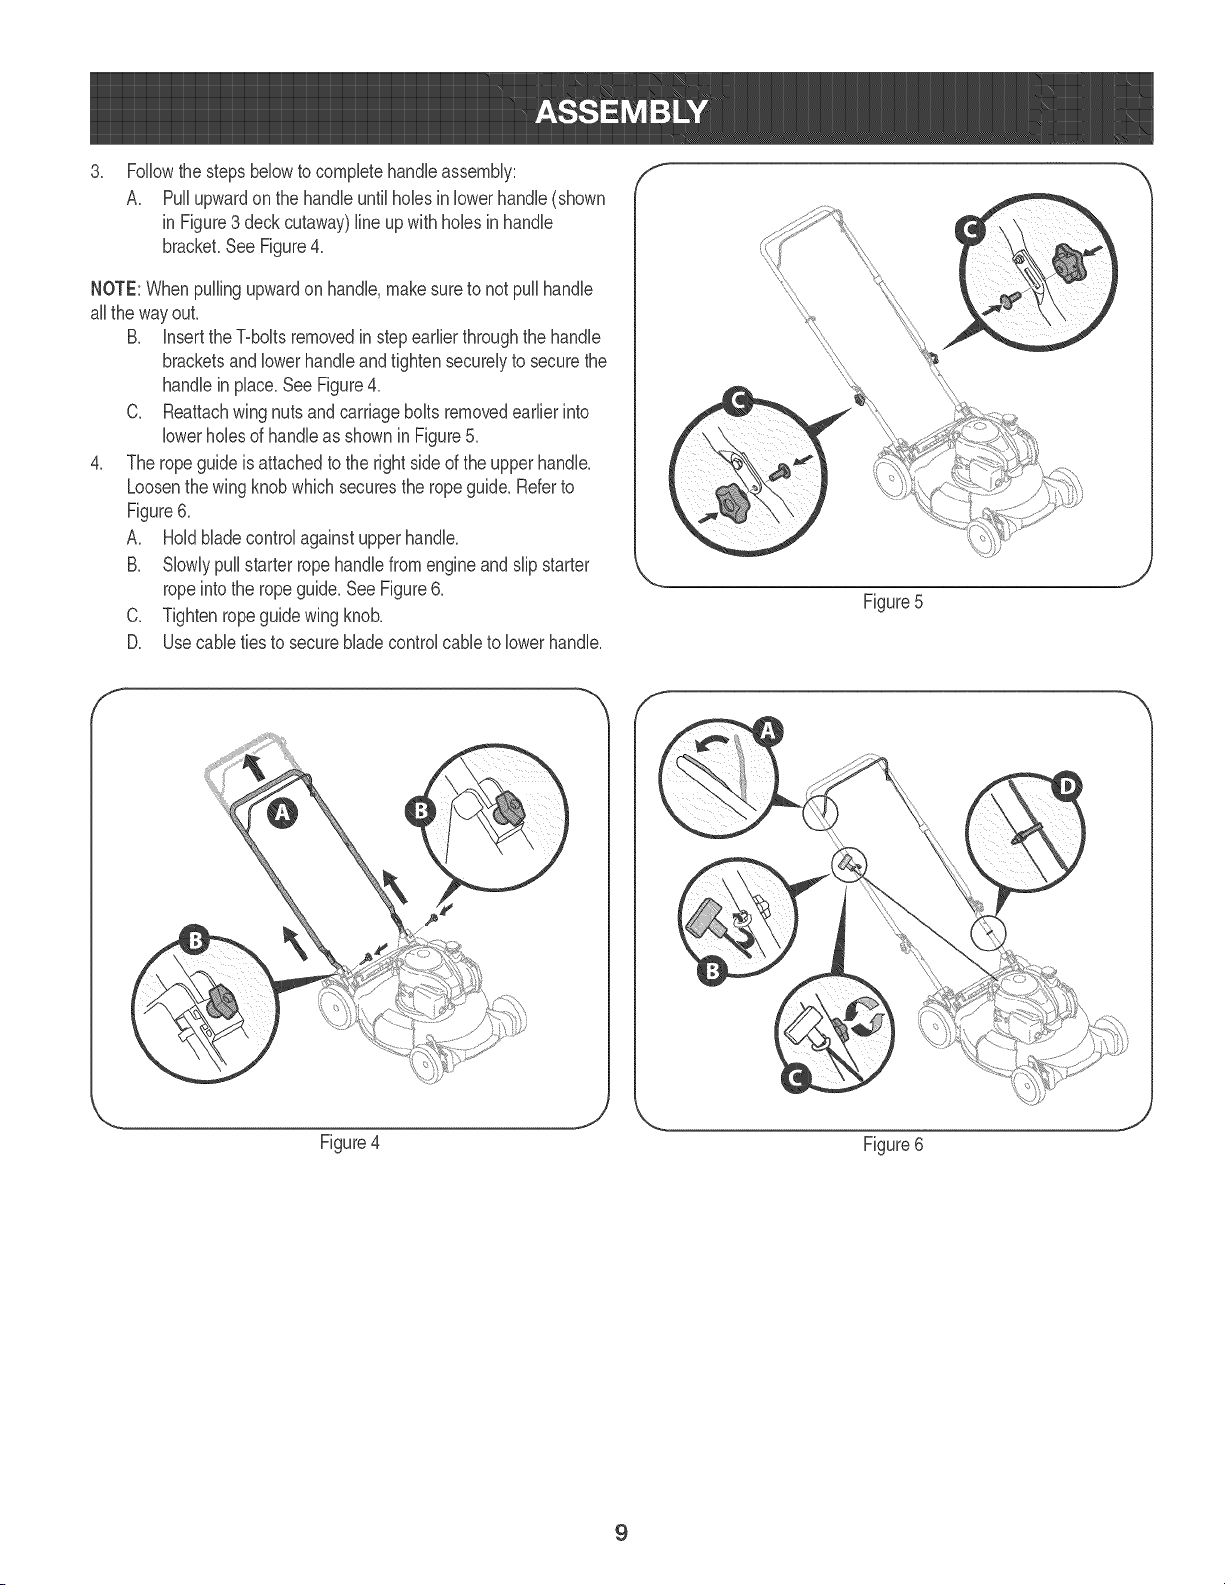
Followthe stepsbelowto completehandleassembly:
A. Pullupwardon the handleuntilholesin lowerhandle (shown
in Figure3 deckcutaway)line upwith holesin handle
bracket.SeeFigure4.
NOTE:Whenpullingupwardonhandle,makesureto not pullhandle
allthe way out.
B. bsert the T-boltsremovedin stepearlierthroughthe handle
bracketsandlowerhandleandtightensecurelyto securethe
handlein place.See Figure4.
C. Reattachwing nutsand carriagebolts removedearlierinto
lowerholesof handleas shownin Figure5.
4. The ropeguideis attachedto the right sideof the upperhandle.
Loosenthe wingknobwhichsecuresthe rope guide.Referto
Figure6.
A. Holdblade controlagainstupperhandle.
B. Slowlypullstarterropehandlefromengineand slip starter
ropeintothe rope guide.See Figure6.
C. Tightenropeguidewing knob.
D. Usecableties to securebladecontrolcableto lowerhandle.
.,. J
Figure5
f_ N_
Figure4
Figure6
9
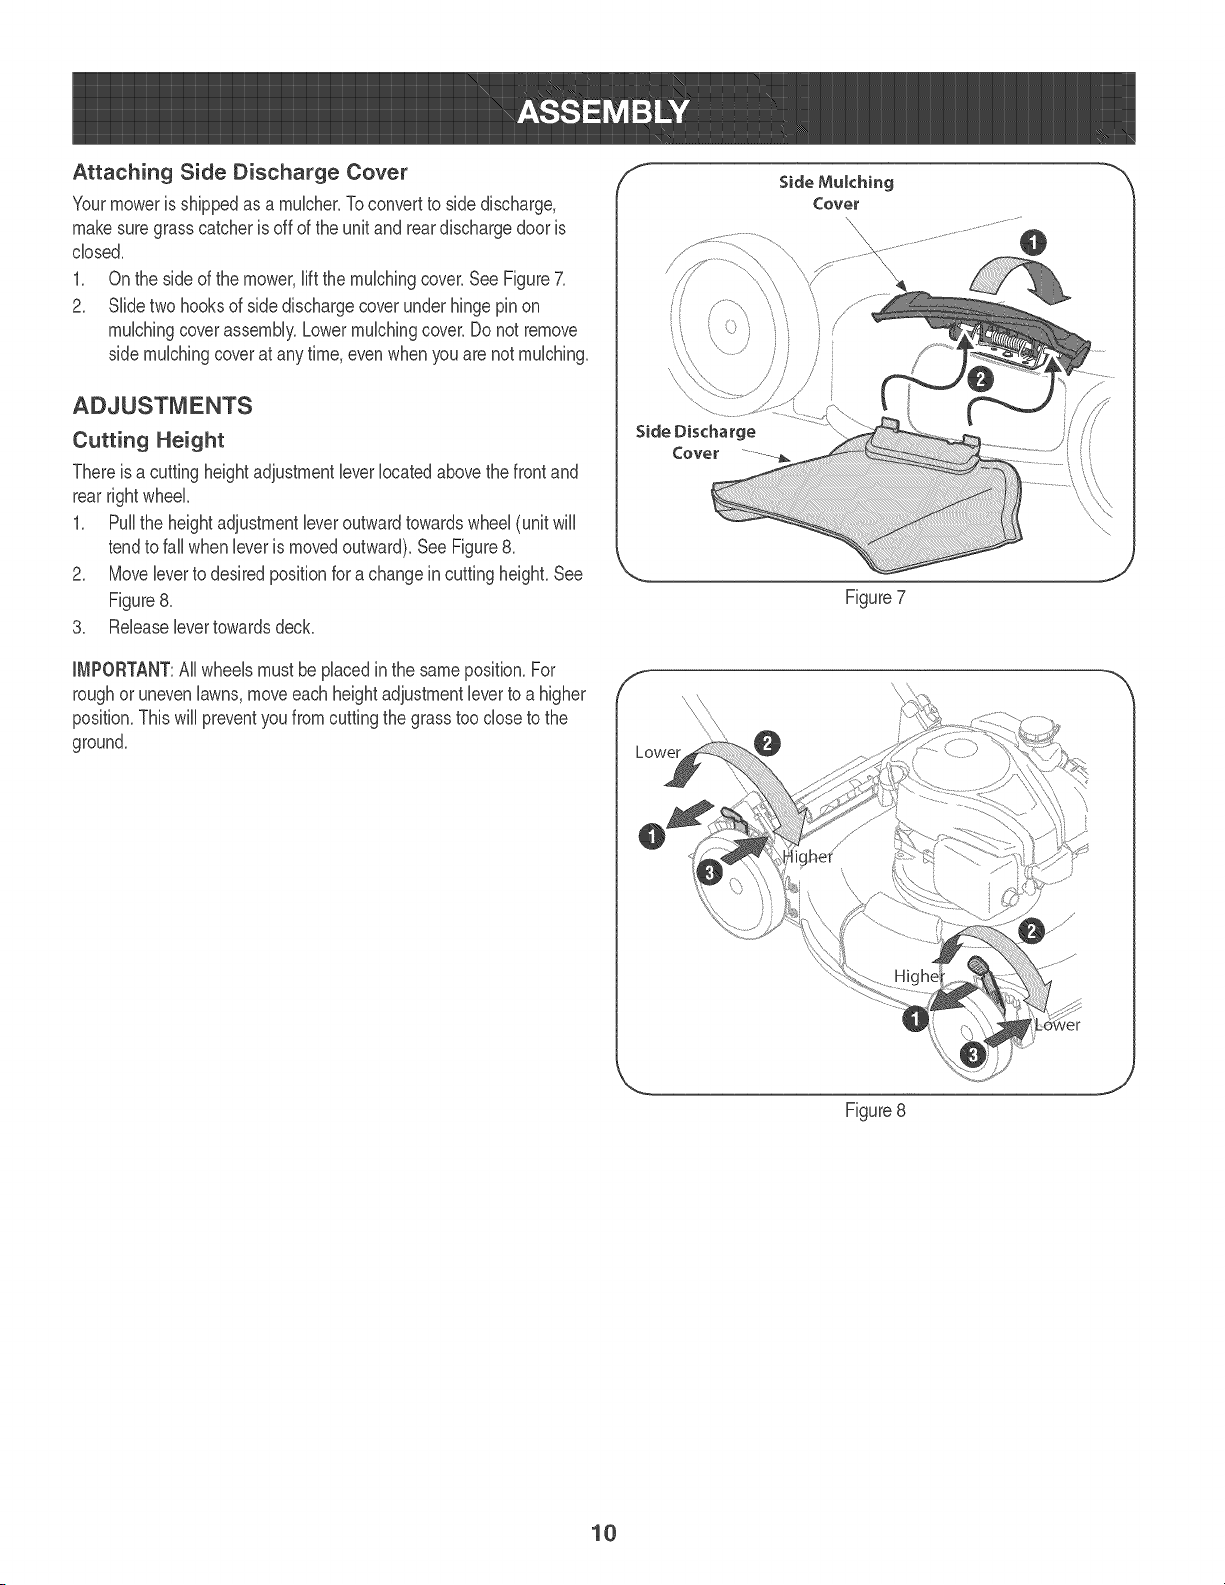
Attaching Side Discharge Cover
Yourmoweris shippedas a mubher.Toconvertto side discharge,
makesuregrass catcheris off of the unitand reardischargedooris
dosed.
1. Onthe sideof themower,lift the mubhingcover.See Figure7.
2. Slidetwo hooksof side dischargecoverunderhingepinon
mubhingcoverassembly.Lowermubhingcover.Do not remove
side mubhingcoverat anytime, evenwhen youarenot mubhing.
Cutting Height
Thereis a cuttingheightadjustmentbver locatedabovethe frontand
rearrightwheel.
1. PuiIthe heightadjustmentbver outwardtowardswheel(unitwiiI
tendto fail whenbver is movedoutward).See Figure8.
2. Movebver to desiredpositionfor a changeincuttingheight.See
Figure8.
3. Releaselevertowardsdeck.
iMPORTANT:Allwheels mustbe placedin the sameposition_For
roughor unevenlawns,moveeachheightadjustmentleverto a higher
position_Thiswill preventyoufromcuttingthe grass tooclose to the
ground_
f
Side Discharge
Cover
f
Side Mulching
Cover
Figure7
Figure8
10
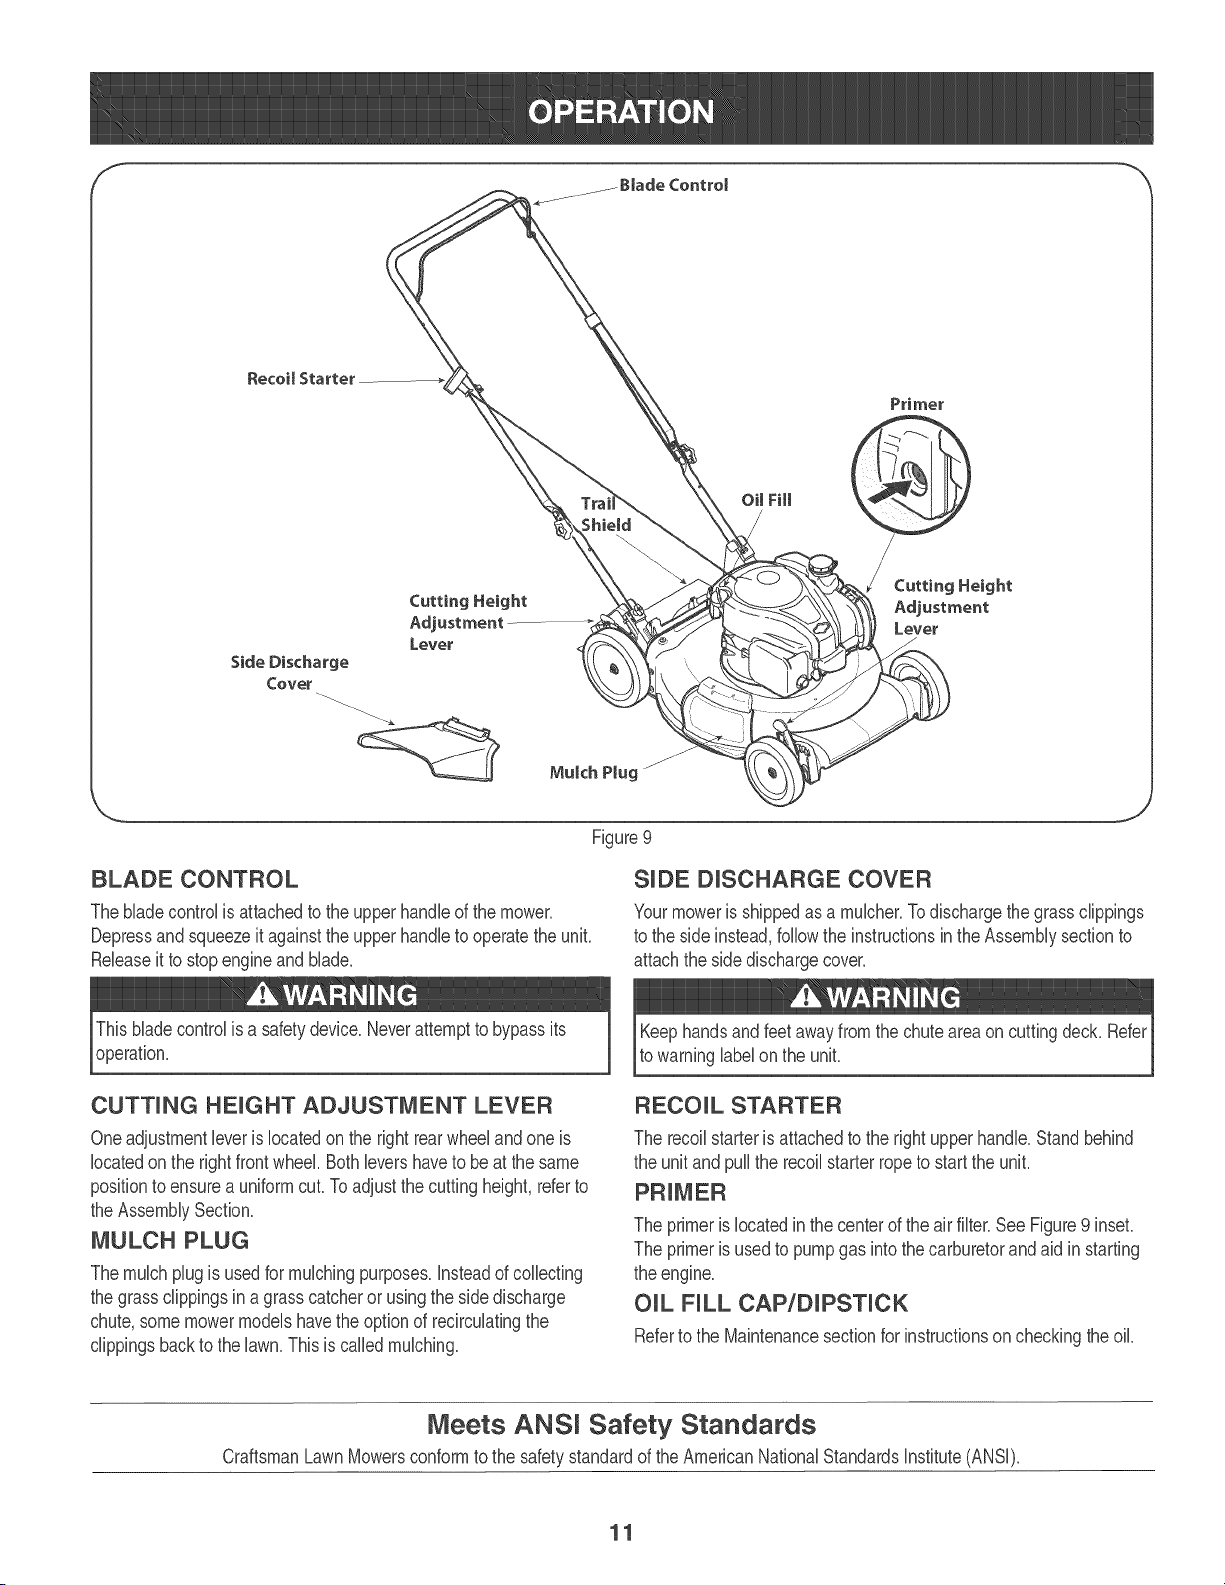
Figure9
BLADE CONTROL
Theblade controlis attachedto the upper handb of the mower.
Depressand squeezeit againstthe upperhandb to operatethe unit.
Rebase it to stop engineandblade.
SUDE DUSCHARGE COVER
Yourmoweris shippedas a mubher.Todischargethegrassclippings
to the side instead,followthe instructionsin the Assemblysectionto
attachthe sidedischargecover.
Thisbladecontrolis a safetydevice.Neverattemptto bypassits
operation.
CUTTUNG HEUGHT ADJUSTMENT LEVER
Oneadjustmentleveris locatedon the right rearwheeland oneis
locatedonthe rightfrontwheel.Bothlevershaveto beat the same
positionto ensurea uniformcut.To adjustthe cuttingheight,referto
the AssemblySection.
MULCH PLUG
Themulch plugis usedfor mulchingpurposes.Insteadof collecting
the grassclippingsin a grasscatcheror usingthe sidedischarge
chute,somemowermodelshavetheoptionof recirculatingthe
clippingsbackto the lawn.This is calledmulching.
Keephandsand feetawayfrom the chuteareaon cuttingdeck. Refer
to warninglabelon the unit.
RECOUL STARTER
The recoilstarteris attachedto the right upperhandle.Standbehind
the unit andpull the recoilstarterropeto startthe unit.
PRIMER
The primeris locatedin the centerof the air filter.See Figure9 inset.
The primeris usedto pumpgas intothe carburetorand aidin starting
the engine.
OIL FILL CAP/DIPSTICK
Referto the Maintenancesectionfor instructionsoncheckingthe oil
Meets ANSi Safety Standards
CraftsmanLawnMowersconformto the safetystandardof the AmericanNationalStandardsInstitute(ANSI).
11
GAS AND OUL FULL-UP f
IMPORTANT:This unit is shippedwithoutgasolineor oil in the engine.
Becertain to serviceenginewithgasolineandoilas instructedin this
sectionbeforestartingor runningyourmachine.
0[[ (one 15 ounce bottmeshipped with unit)
First Time Use
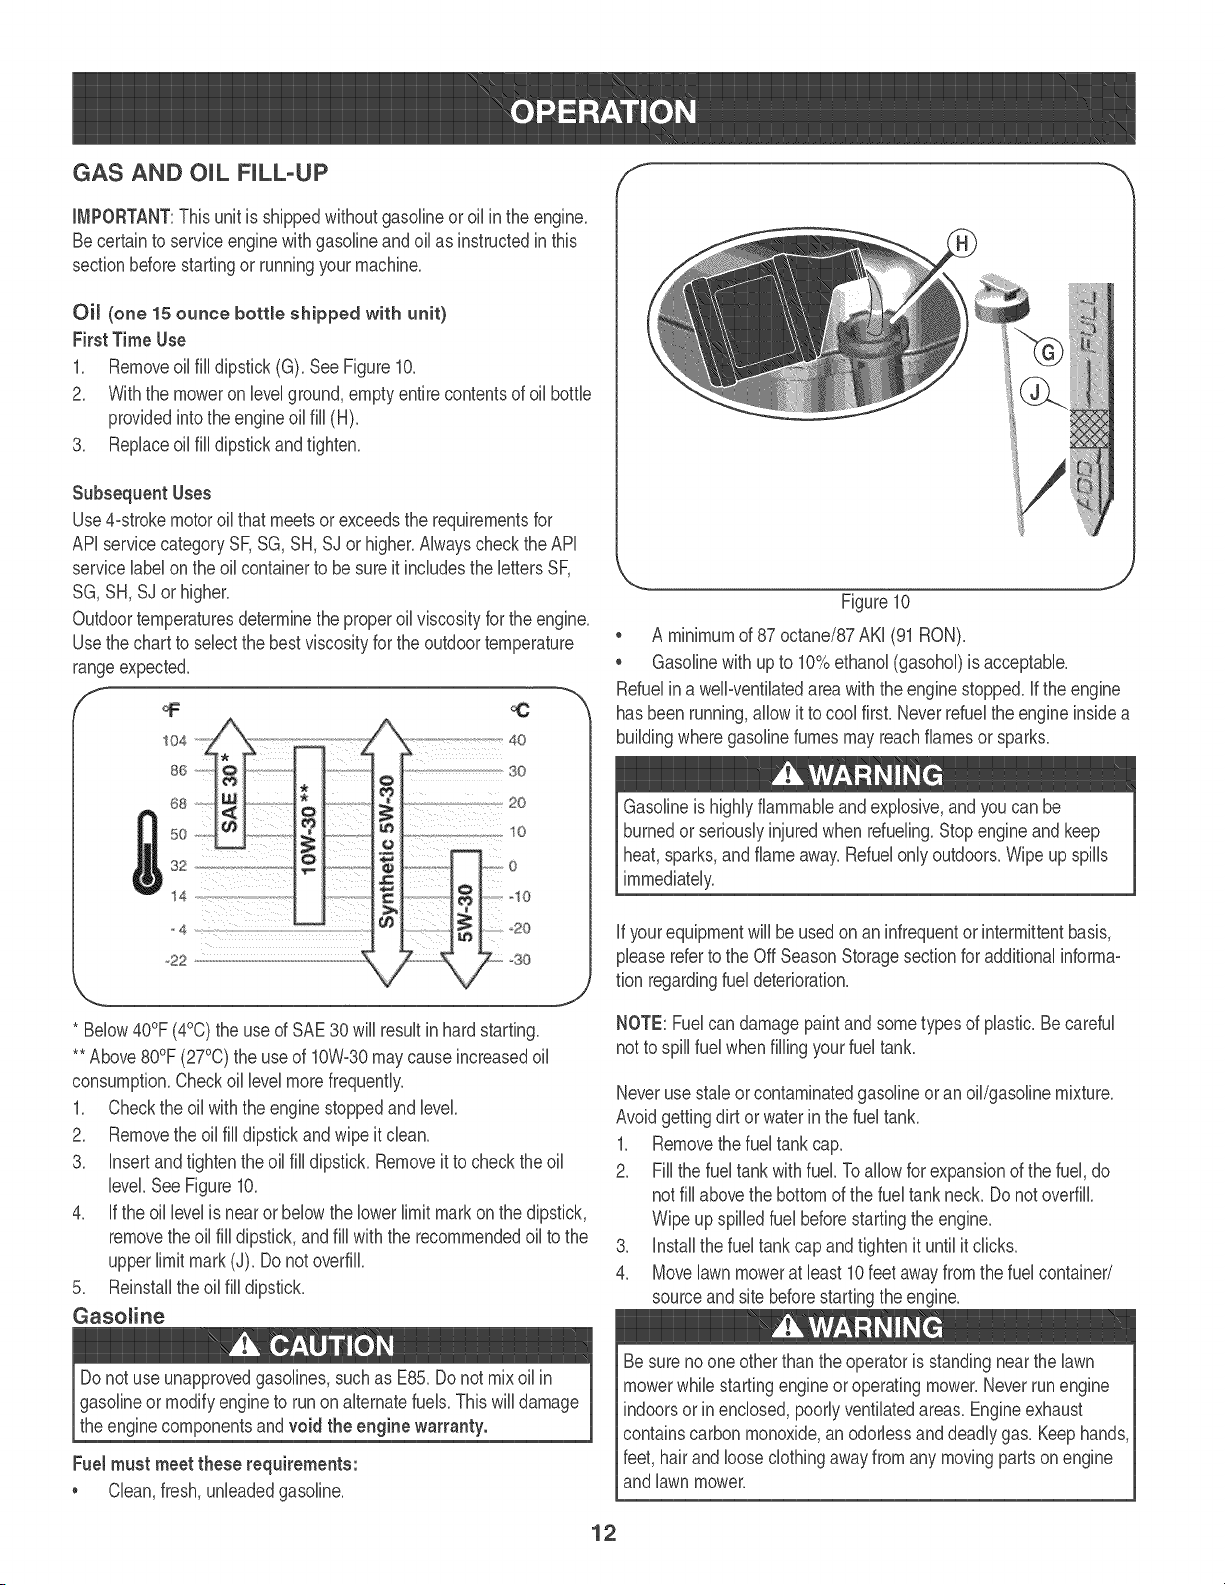
1. Removeoil fill dipstick(G). See Figure10.
2. Withthe moweron bveI ground,emptyentirecontentsof oil bottb
providedintothe engineoil fill (H).
3. Replaceoil fill dipstickand tighten.
Subsequent Uses
Use4-strokemotoroil thatmeetsor exceedsthe requirementsfor
APIservicecategorySK SG, SH, SJ orhigher.Alwayscheckthe API
servicelabelon the oilcontainerto be sure it includesthe lettersSR
SG,SH, SJ or higher.
Outdoortemperaturesdeterminethe properoil viscosityfor the engine.
Usethechartto selectthe best viscosityfor the outdoortemperature
rangeexpected.
o4 ...... _ Z
68 o
50 _ _
o
14 C
U
40
30
20
.....................t0
o
qO
20
-30
* Below40°F (4°C)the use of SAE30 will resultin hard starting.
**Above80°F(27°0) the use of 10%30 maycauseincreasedoil
consumption.Checkoil levelmorefrequently.
1. Checkthe oil withthe enginestoppedand level.
2. Removethe oil fill dipstickandwipeit clean.
3. insertand tightenthe oilfill dipsticL Removeit to checkthe oil
level.SeeFigure10.
4. if the oil levelis near or belowthe lowerlimitmarkon the dipstick,
removethe oil fill dipstick,and fill withthe recommendedoil to the
upperlimitmark (J). Do notoverfill
5. Reinstallthe oil fill dipsticL
Gasoline
Do notuse unapprovedgasolines,such as E85.Do not mixoil in
gasolineor modifyengineto runon alternatefuels.This will damage
theenginecomponentsand void the engine warranty.
Fuel must meet these requirements:
, Clean,fresh,unleadedgasoline.
\ J
Figure10
, A minimumof 87 octane/87AKI (91 RON).
, Gasolinewith upto 10%ethanol(gasohol)is acceptable.
Refuelina welPventilatedareawith the enginestoppe& if the engine
hasbeen running,allowit to cool firsL Neverrefuelthe engineinsidea
buildingwheregasolinefumesmayreachflamesor spark&
Gasolineis highlyflammableand explosive,andyoucan be
burnedor seriouslyinjuredwhenrefueling.Stopengineand keep
heat,sparks,and flameaway.Refuelonly outdoor&Wipe up spills
immediately.
if yourequipmentwill be usedon an infrequentor intermittentbasis,
pleasereferto the Off SeasonStoragesectionfor additionalinformao
tion regardingfuel deterioration.
NOTE:Fuelcandamagepaintand sometypesof plastic.Becareful
notto spill fuelwhenfilling yourfueltank.
Neverusestab or contaminatedgasolineor anoil/gasolinemixture.
Avoidgettingdirt or waterin the fueltanL
1. Removethe fuel tankcaF
Z Fillthe fuel tankwithfuel. To allowforexpansionof the fuel, do
notfill abovethe bottomof the fuel tank necL Do notoverfill
Wipe upspilledfuel beforestartingtheengine.
3. Installthe fuel tank capand tightenit until it clicks.
4. Movelawnmowerat bast 10feet awayfromthe fuel container/
sourceandsite beforestartingthe engine.
Besurenooneotherthan theoperatoris standingnearthe lawn
mowerwhilestartingengineoroperatingmower.Neverrun engine
indoorsor in enclose& poorlyventilatedareas.Engineexhaust
containscarbonmonoxide,an odorlessand deadlygas. Keephands,
feet, hairand looseclothingawayfrom any movingpartson engine
andlawn mower.
12
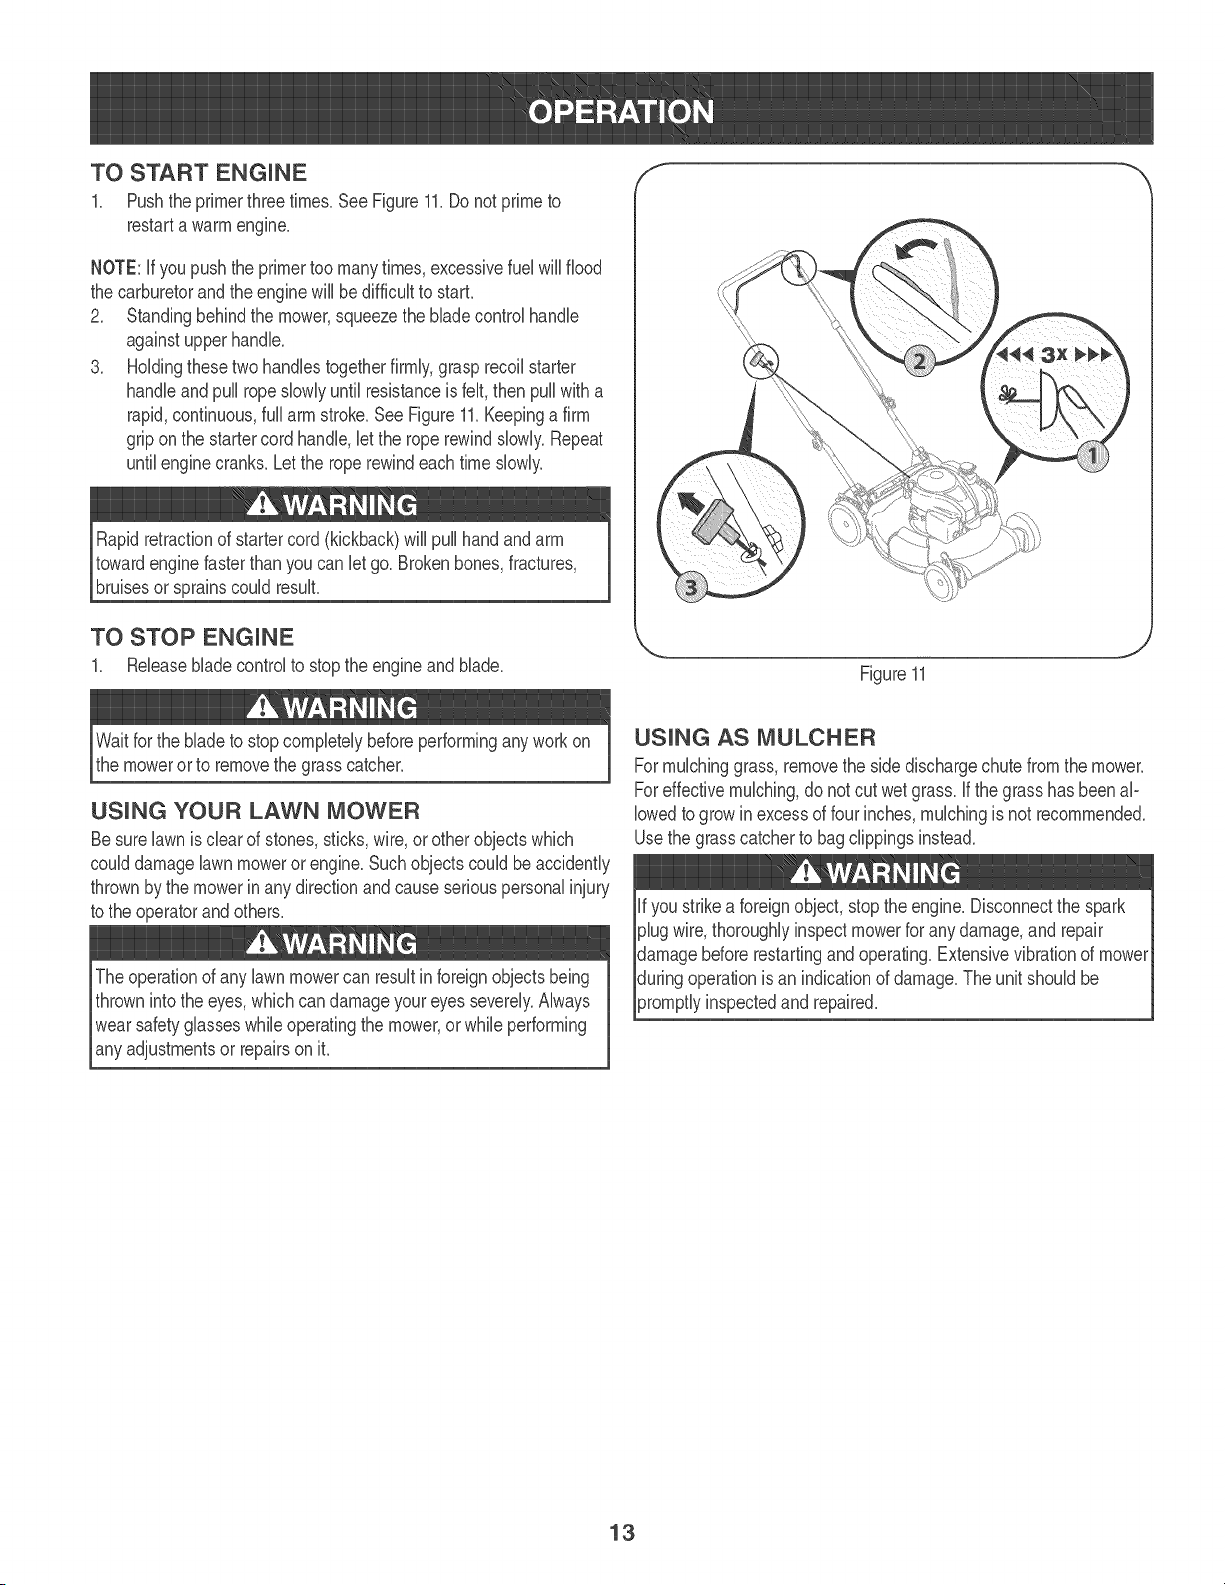
TO START ENGUNE
1. Pushthe primerthreetimes.SeeFigure11.Do notprimeto
restarta warmengine.
NOTE:If you pushthe primertoomanytimes,excessivefuel wiiIflood
the carburetorandthe enginewiiI bedifficult to start.
2_ Standingbehindthe mower,squeezethe bbde controlhandb
againstupperhandb.
& Holdingthese twohandbs togetherfirmly,grasprecoilstarter
handb and puiI ropeslowlyuntil resistanceis felt, then puiIwitha
rapid,continuous,fuiI arm stroke.SeeFigure11_Keepinga firm
gripon the startercord handb, let the rope rewindslowly.Repeat
untilenginecrank& Letthe rope rewindeachtimeslowly.
Rapidretractionof startercord (kickback)will pullhandand arm
towardenginefasterthan youcan let go. Brokenbones,fractures,
bruisesorsprainscould resuL
TO STOP ENGUNE
1_ Releasebladecontrolto stopthe engineandbbde_
Figure11
Waitfor the bladeto stopcompletelybeforeperforminganyworkon
the moweror to removethe grass catcher.
USUNG YOUR LAWN MOWER
Besure lawnis clearof stones,sticks,wire, orotherobjectswhich
coulddamagelawnmoweror engine.Suchobjectscouldbe accidently
thrownby themowerin anydirectionand causeseriouspersonalinjury
to the operatorand others.
USUNG AS MULCHER
Formulchinggrass,removethe sidedischargechute fromthe mower.
Foreffectivemulching,do not cutwet grass,if thegrasshas beenal-
lowedto growin excessof fourinches,mulchingis not recommende&
Usethe grasscatcherto bag clippingsinstead.
13

MAUNTENANCESCHEDULE
Beforeperforminganytype ofmaintenance/sewice,disengageall
controlsand stoptheengine.Waituntilall movingpartshavecometo
acompletestop.Disconnectsparkplugwireandgroundit againstthe
enginetopreventunintendedstarting.
Followthe maintenanceschedulegivenbelow.Thischartdescribes
serviceguidelinesonly. Usethe ServiceLogcolumnto keeptrackof
completedmaintenancetask& Tolocatethe nearest Sears Service
Center or to schedule service, simply contact Sears at
1-800-4-MY-HOME®.
EachUse
1stMonthor 5 hours
Annually
BeforeStorage
.
2.
3.
4.
2.
3.
2.
Engineoillevel
Looseor missinghardware
Aircleaner
Unitand engine.
Engineoil
Aircleanerl-
Controllinkages/pivotsandwheels
Undersideof mowerdeck
Engineoill-l-
Sparkplug
AirCleaner
Fuelsystem
Cleanmoreoften underdustyconditionsor whenairbornedebrisis
1. Check
2. Tightenor replace
3. Check
4. Clean
1. Change
1. Clean
2. Lubewithlight oil
3. Clean
1. Change
1. Replace
2. Replace
1. Runengineuntil it stopsfromlackof
fuel,or addstabilizerto a full tankof
freshfuel priorto storage.
)resent.Replaceair cleanerif very dirty.
1-1-Changeoil every25 hourswhenoperatingthe engineunderheavyloador in hightemperature&
14
Alwaysstop engine,disconnectsparkplugwire, andgroundagainst
enginebeforeperformingany type of maintenanceon yourmachine.
GENERAL RECOMMENDATUONS
, Alwaysobservesafetyrubs whenperformingany maintenance_
, Thewarrantyon thislawnmowerdoesnot coveritemsthat have
beensubjectedto operatorabuseor negligence.To receivefull
valuefromwarranty,operatormustmaintainthe equipmentas
instructedhere.
, Changingof engine=governedspeedwill voidenginewarranty.
, Alladjustmentsshouldbecheckedat bast onceeach season.
, Periodicallycheckall fastenersandmake suretheseare tighL
ENGUNE MAUNTENANCE
Spark Pmug
Forgood performance,the sparkplug mustbe properlygappedand
freeof deposits.Replacethe spark plugannually.
1_ Disconnectthe cap fromthe spark plug,and removeanydirt from
the sparkplugarea.
2_ Usethe propersize sparkplugwrenchto removethe spark plug.
NOTE: Replacewitha ChampionRC12YCspark plug.
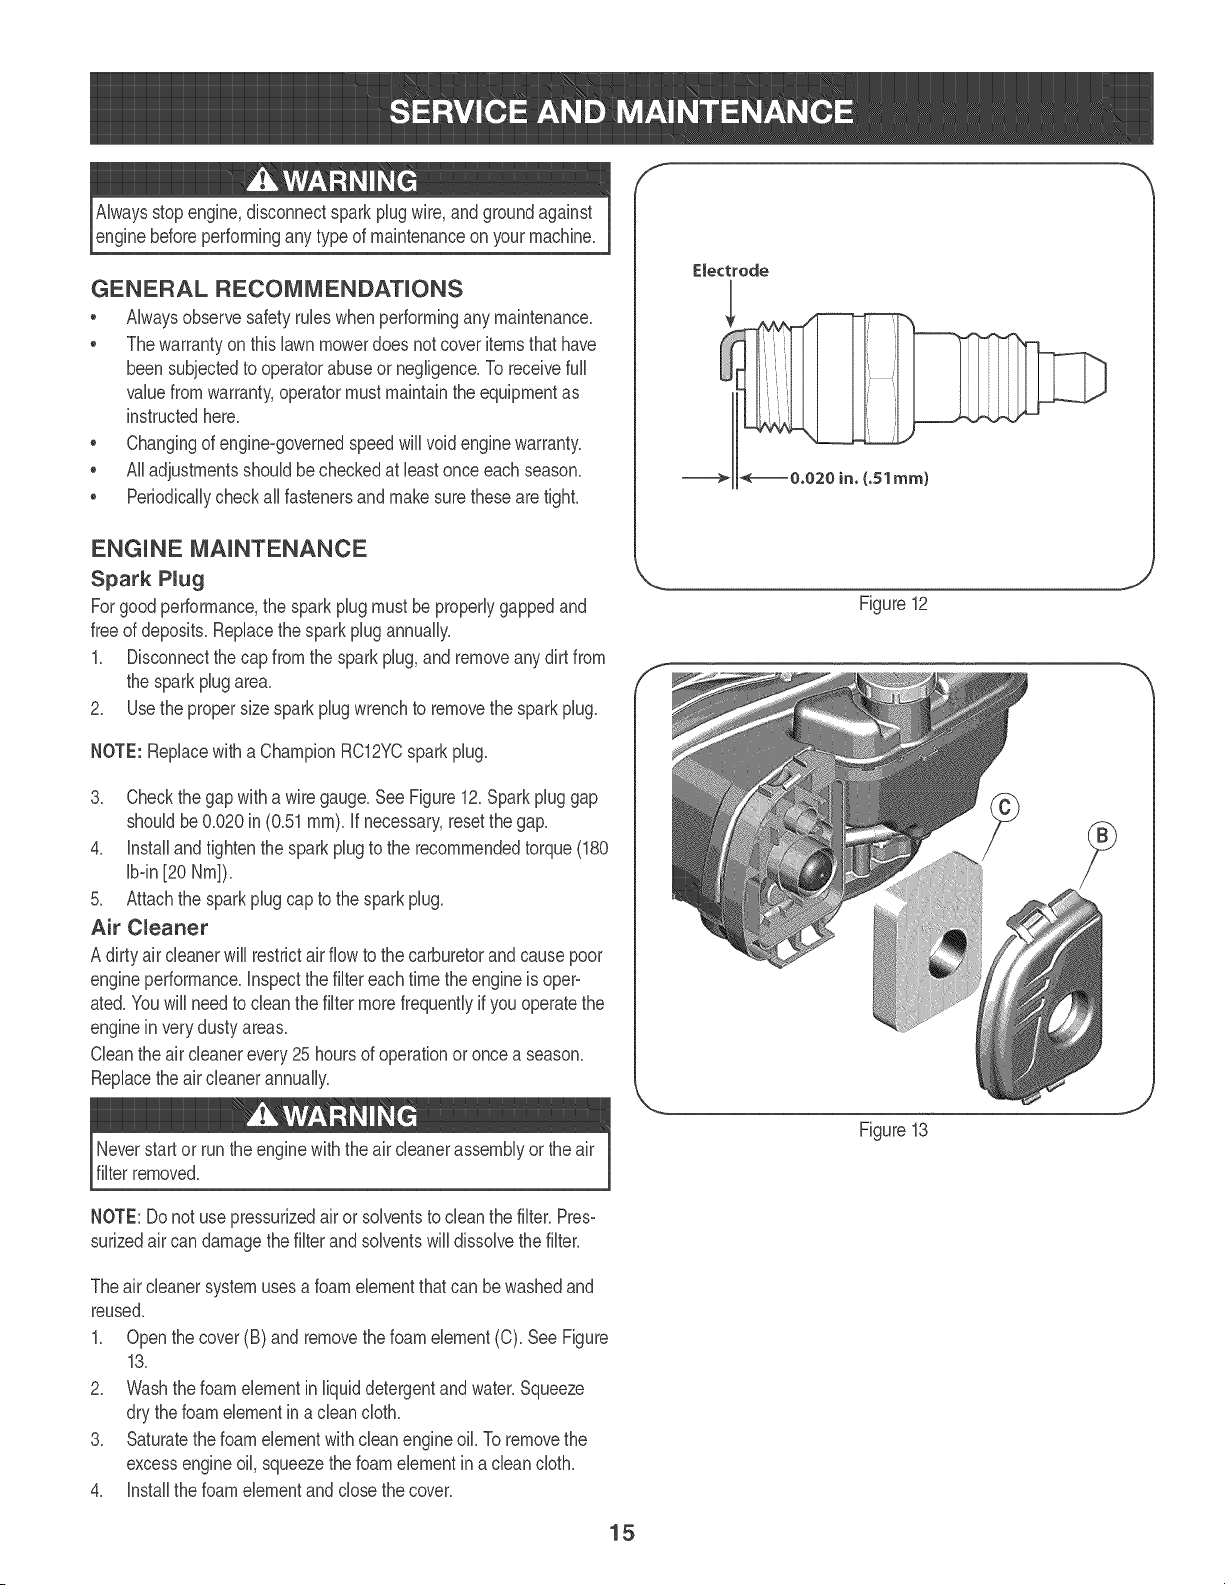
3. Checkthegapwitha wire gauge.See Figure1£ Sparkpluggap
shouldbe 0.020in (0.51ram). if necessary,resetthe gap.
4. Installand tightenthe sparkplugto the recommendedtorque(180
Ib-in[20 Nm]).
5. Attachthe sparkplugcapto thesparkplug.
Air Cmeaner
A dirty aircleanerwiil restrictair flowto the carburetorand causepoor
engineperformance,inspectthe filter eachtime theengine is oper-
ated.Youwill needto cleanthe filter morefrequentlyif youoperatethe
enginein verydusty areas.
Cleantheair cleanerevery 25hoursof operationor once a season.
Replacetheair cleanerannually.
f
Electrode
Figure12
Neverstartor runthe enginewith the aircleanerassemblyor theair
filterremoved.
Figure13
NOTE:Do notuse pressurizedairor solventsto cleanthe filter.Pres-
surizedair can damagethefilterandsolventswill dissolvethefilter.
Theair cleanersystemusesa foamelementthatcan be washedand
reused.
1. Openthe cover(B) and removethefoamelement(C). See Figure
18.
2. Washthe foamelementin liquiddetergentandwater.Squeeze
dry thefoam elementina cleancloth.
3. Saturatethe foamelementwithcleanengineoik Toremovethe
excessengineoil, squeezethe foamelementin acleancloth.
4. Installthefoamelementandclosethe cover.
15
Check Engine O1
Checkoil levelbeforeeachoperation.Besureoil levelis maintained.
1. Checkthe oil withthe enginestoppedand level.
2. Removethe oil fill dipstickandwipeit clean.
3. Insertand tightendipstick.Removeit to checkthe oillevel.
4. Ifthe oil levelis near or belowthe lowerlimitmarkon the dipstick,
removethe oil fillercap/dipstick,andfill with the recommendedoil
to the upperlimitmark.Do not overfill.
5. Reinstallthe oil fill dipstick.
Change Engine O1
Gasolineand itsvaporsare extremelyflammableand explosive.
Fireor explosioncancause severeburnsor death.
Changeengineoil afterthefirst five hoursof operation,and everyfifty
hoursor once a seasonthereafter.
Whenyou drainthe oil fromthetop oil fill tube,the fuel tankmustbe
emptyor fuel canleak outand resultin a fire or explosion.Toempty
the fuel tank, runthe engineuntilit stopsfromlackof fuel.
1. Withengineoff butstill warm,disconnectthe spark plugwireand
keepit awayfrom the sparkplug.
2. Placea suitablecontainernextto the engineto catchthe usedoil.
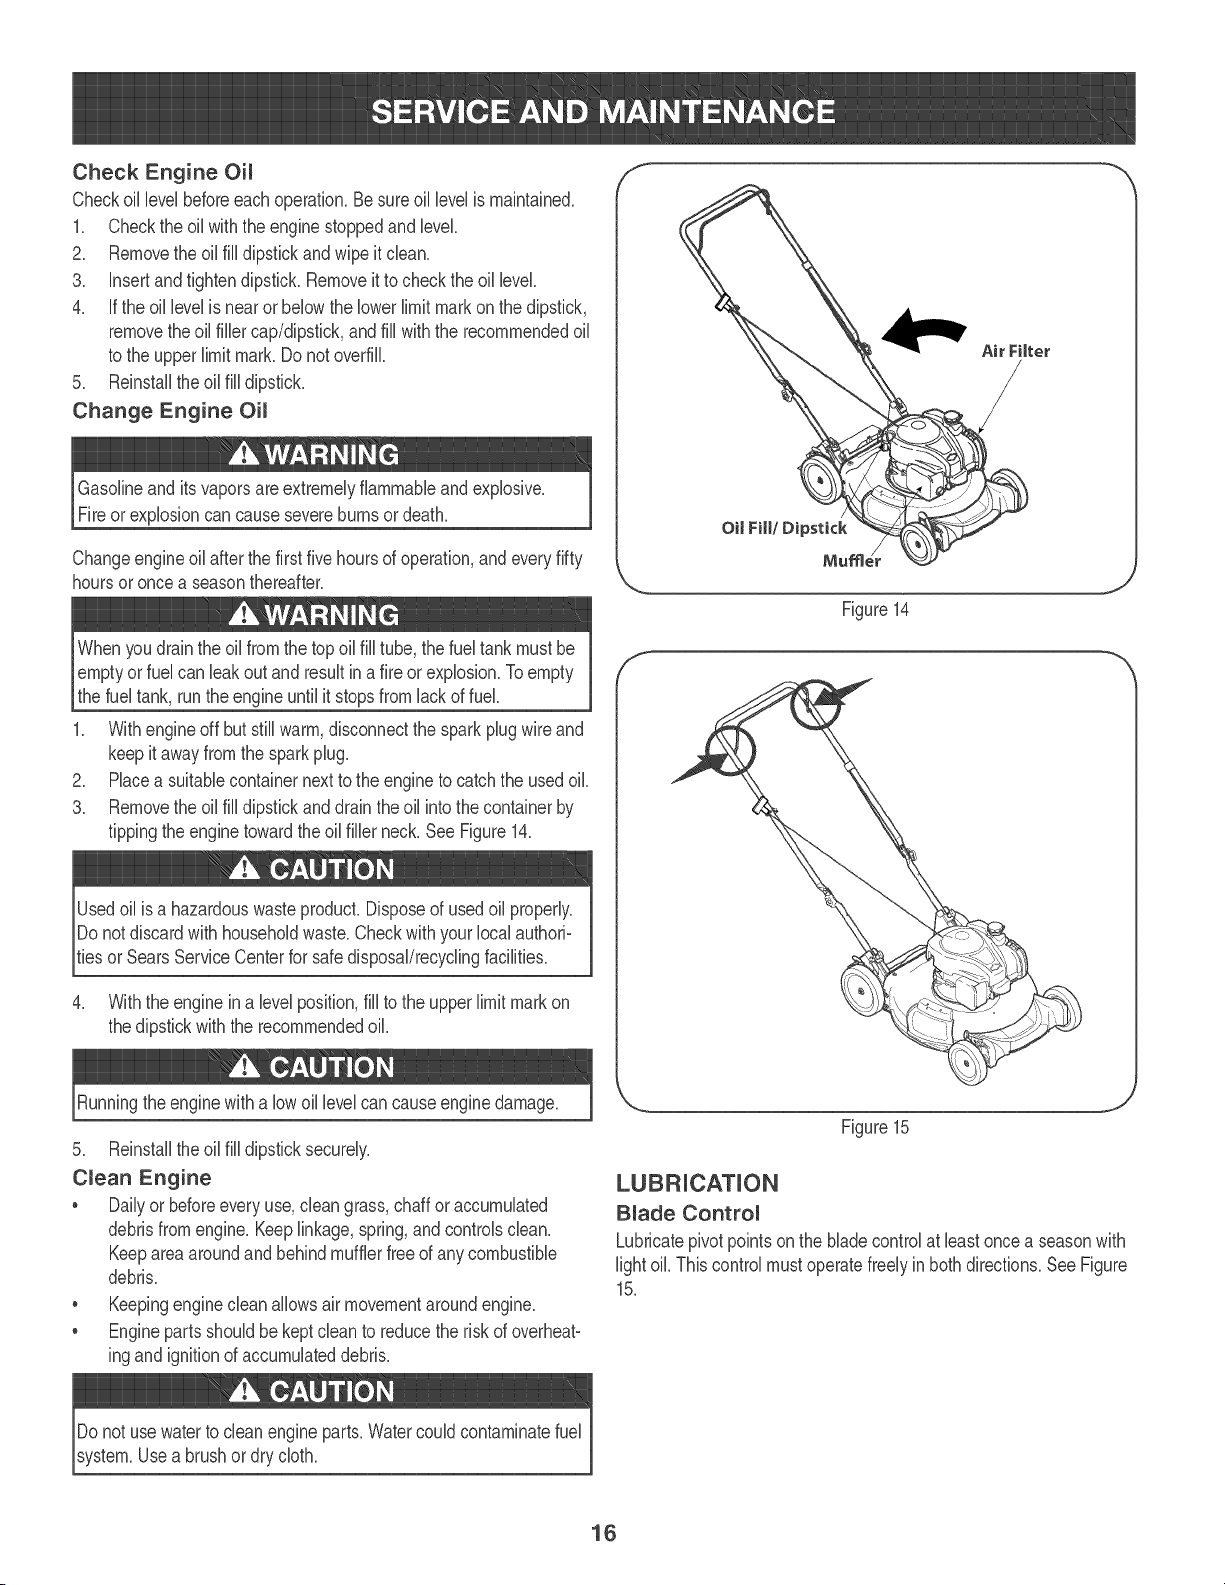
3. Removethe oil fill dipstickanddrain theoil into thecontainerby
tippingtheenginetowardthe oil fillerneck.See Figure14.
Usedoil is a hazardouswasteproduct.Disposeof usedoil properly.
Do not discardwithhouseholdwaste.Checkwith yourlocalauthori-
tiesor SearsServiceCenterfor safedisposal/recyclingfacilities.
4. Withthe enginein a levelposition,fill to the upperlimit markon
thedipstick withthe recommendedoil.
Runningthe enginewith a lowoil levelcan causeenginedamage.
5. Reinstallthe oil fill dipsticksecurely.
C(ean Engine
, Dailyor beforeevery use,cleangrass,chaffor accumulated
debrisfromengine.Keeplinkage,spring,andcontrolsclean.
Keepareaaroundand behindmufflerfreeof any combustible
debris.
, Keepingenginecleanallowsairmovementaroundengine.
, Enginepartsshouldbe keptcleanto reducethe risk of overheat-
ingand ignitionof accumulateddebris.
f
Ol Fil/Dipstick
J
Figure14
\ j
Figure15
B(ade Contro(
Lubricatepivotpointson the bladecontrolat leastoncea seasonwith
light oil.This controlmustoperatefreelyin bothdirections.See Figure
15.
Do not usewaterto cleanengineparts.Watercouldcontaminatefuel
system.Usea brushor dry cloth.
16
CLEANUNGDECK
Cban undersideof the mowerdeck once aseasonto preventbuild-up
of grassclippingsor otherdebris. Followstepsbelowfor thisjob.
1. Runengine untilit stopsfrom lackof fuel DisconnectsparkpBg
wire.
2_ Tip mowersothat it restson the housing,keepingthe mufflerside
down_Referbackto Figure14_Hold mowerfirmly_
Nevertip the mowermorethan 900in any directionanddo not leave
the mowertippedfor any lengthof time. Oil candrain into the upper
partof the enginecausinga startingproblem.
3. Scrapeandcleanthe undersideof thedeck witha suitabletool
Donot spraywith water.
iMPORTANT:Donot usea pressurewasheror gardenhoseto clean
youruniL Thesemaycausedamageto bearings,orthe engine_The
useof waterwill resultin shortenedlife andreduceserviceability_
4. Putthe mowerback on its wheelsonthe ground.
BLADE CARE
f
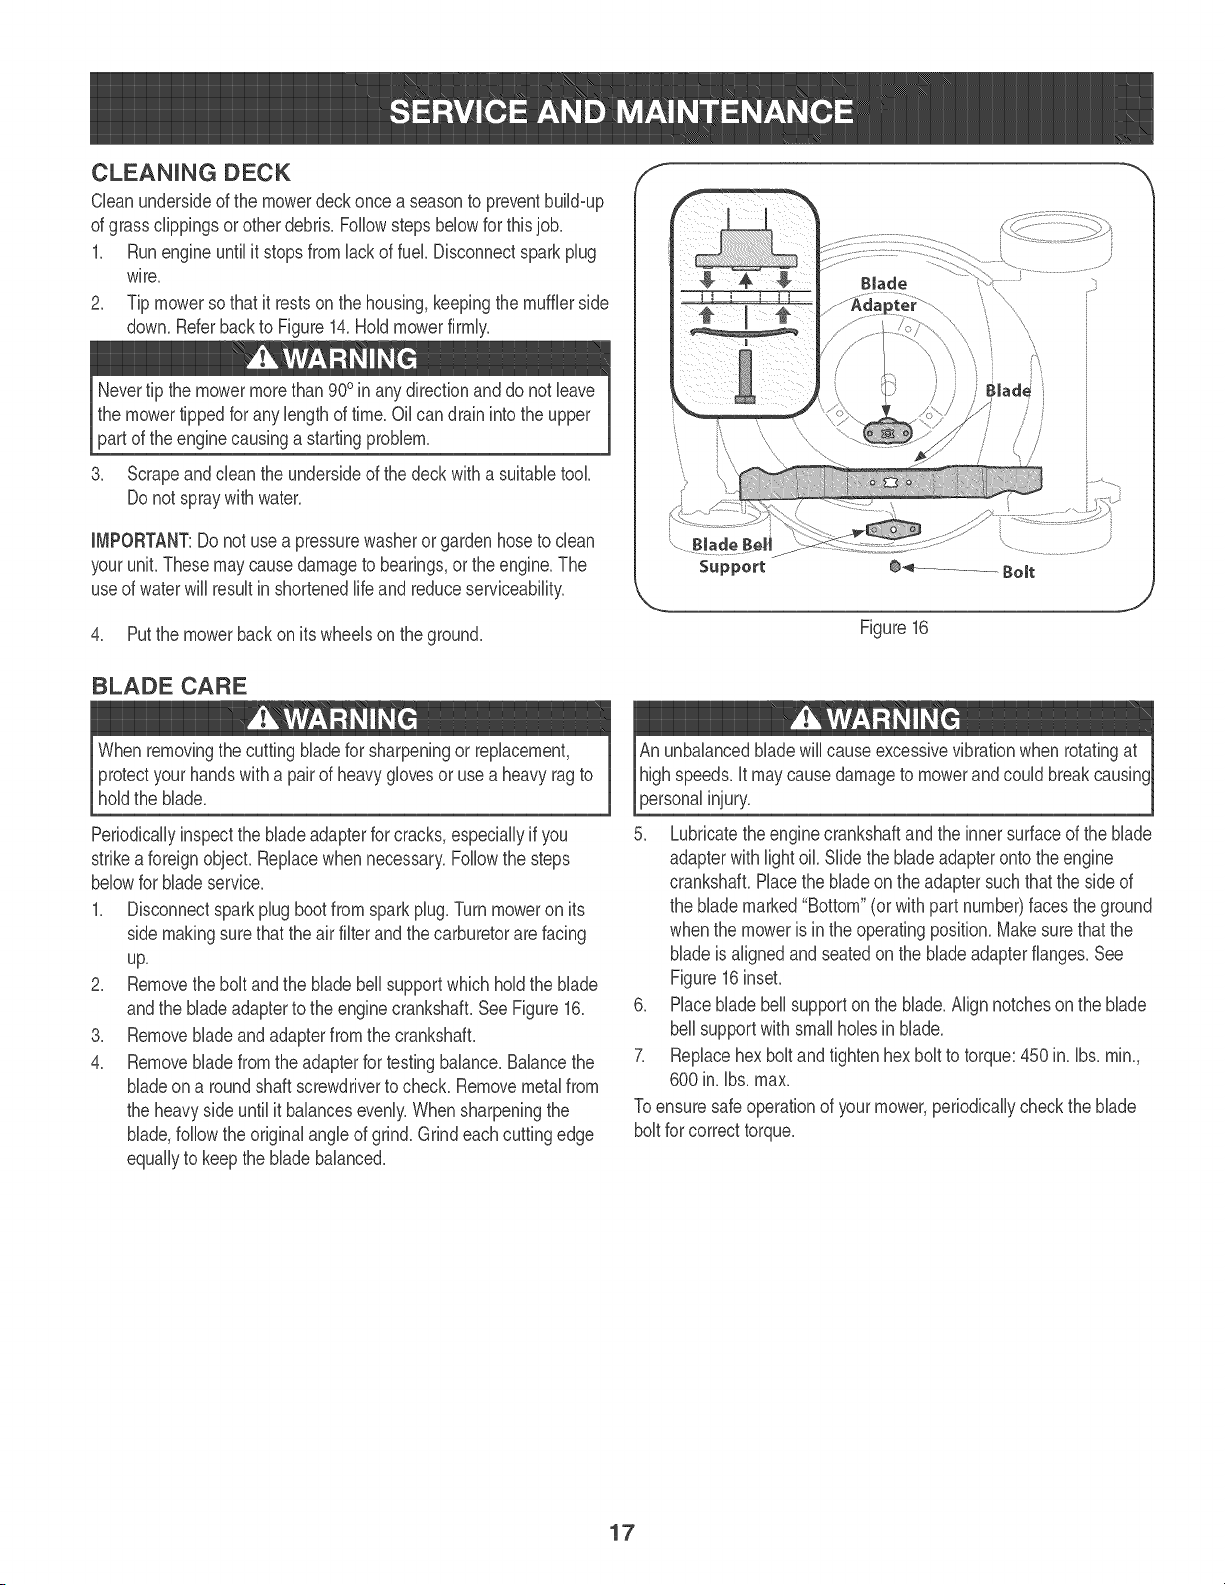
Support ¢_ ................. Bolt
Figure16
Whenremovingthe cuttingbladefor sharpeningor replacement,
protectyour handswith a pairof heavyglovesor use a heavy ragto
holdthe blade.
Periodicallyinspectthe blade adapterfor cracks,especiallyif you
strikea foreignobjecL Replacewhennecessary.Followthe steps
belowfor bladeservice.
1_ Disconnectsparkplug bootfrom sparkplug.Turnmoweron its
side makingsurethat theair filterand thecarburetorare facing
up.
2_ Removethe boltand the bladebell supportwhichholdthe blade
andthe bladeadapterto theenginecrankshafLSeeFigure16_
3_ Removebladeandadapterfrom the crankshafL
4_ Removebladefromthe adapterfor testingbalance.Balancethe
bladeon a roundshaft screwdriverto check.Removemetalfrom
the heavyside untilit balancesevenly.Whensharpeningthe
blade,followthe originalangleof grind.Grindeachcuttingedge
equallyto keepthe bladebalanced.
An unbalancedbladewill causeexcessivevibrationwhen rotatingat
highspeeds,it may causedamageto mowerand couldbreakcausin(
personalinjury.
5. Lubricatetheenginecrankshaftandthe inner surfaceof the blade
adapterwith lightoil Slidethe bladeadapterontothe engine
crankshafLPlacethe bladeon the adaptersuchthat the sideof
the blademarked"Bottom"(orwithpart number)facestheground
whenthe moweris in the operatingposition.Makesurethatthe
bladeis alignedandseatedon thebladeadapterflanges.See
Figure16inseL
6. Placeblade bellsupporton theblade.Alignnotcheson the blade
bellsupportwith smallhobs in blade.
7. Replacehex boltandtightenhex boltto torque:450in. Ibs.ram,
600 in. Ibs.max.
Toensuresafeoperationof yourmower,periodicallycheckthe blade
boltfor correcttorque.
17
Neverstorelawnmowerwith fuel intank indoorsor in poorly
ventilatedareaswherefuel fumesmayreachan openflame,spark,
or pilot lightas on a furnace,water heater,clothesdryer,or gas
appliance.
PREPARUNG THE ENGUNE
Forenginesstoredover30days:
1_ Topreventgum from forminginfuel systemor on carburetor
parts,run engineuntilit stopsfromlackof fuel or adda gasoline
additiveto thegas in thetanL if youuse a gas additive,runthe
enginefor severalminutesto circulatethe additivethroughthe
carburetor--afterwhichthe engineandfuel canbe storedupto
24months.
2_ Whileengineis still warm,changethe oik
3_ Cleanengineof surfacedebris.
PREPARUNG THE LAWN MOWER
, Cleanandlubricatemowerthoroughlyas describedin the lubrica-
tion instructions.
, Donot usea pressurewasheror gardenhoseto cleanyour uniL
, Coatmower'scuttingbladewithchassisgreaseto prevent
rusting.
, Referto PREPARINGTHE ENGINEfor correctenginestorage
instructions.
, Store mowerin a dry,cleanarea. Do notstorenextto corrosive
materials,suchas fertilizer.
Whenstoringany type of powerequipmentin a poorlyventilatedor
metalstorageshed,care shouldbe takento rust_prooftheequipmenL
Usinga lightoil orsilicone,coat the equipment,especiallycablesand
all movingpartsof yourlawnmowerbeforestorage.
18
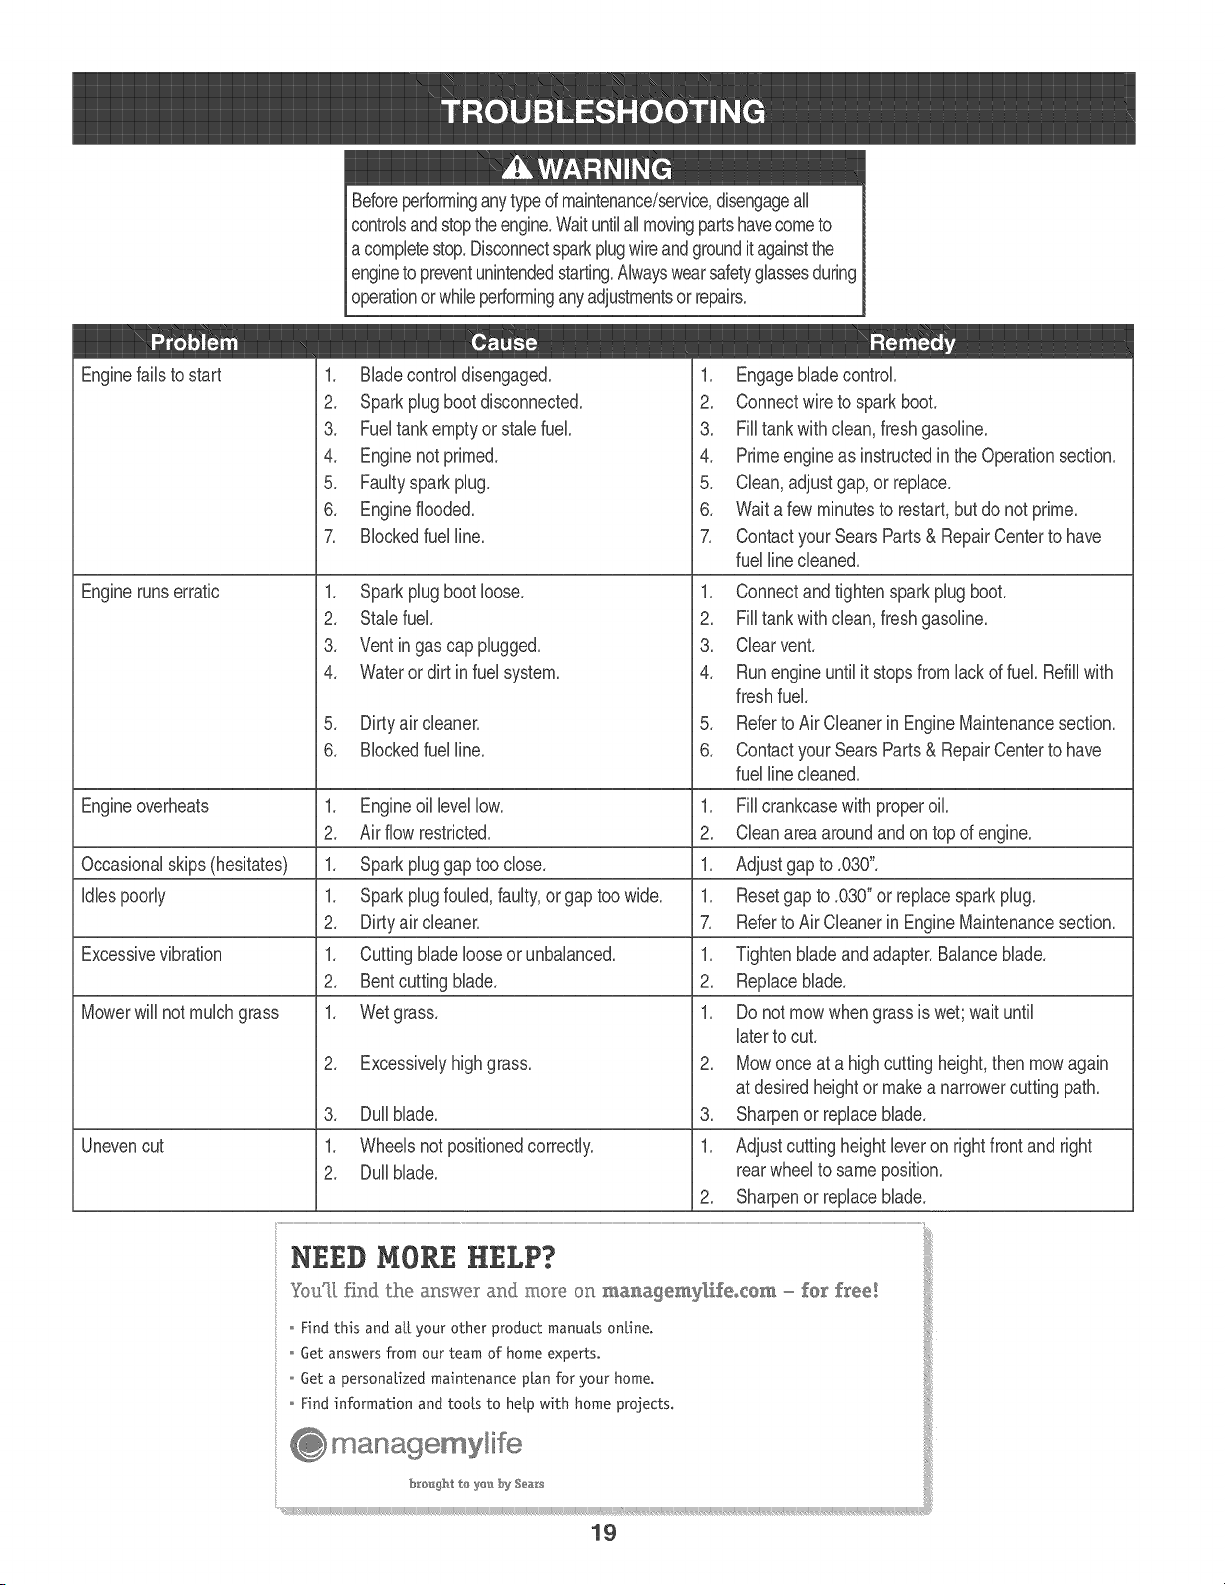
Enginefailsto start
Enginerunserratic
1. Bladecontroldisengaged.
2. Sparkplug bootdisconnected.
3. Fueltank emptyor stab fuel.
4. Enginenot primed.
5. Faultyspark plug.
6. Engineflooded.
7. BIockedfuel line.
1. Sparkplug bootloose.
2. Stab fuel.
3. Ventin gas cap plugged.
4. Wateror dirt infuel system.
5. Dirtyair cleaner.
6. BIockedfuel line.
1. Engineoillevellow. 1.
2. Airflow restricted. 2.
Occasionalskips(hesitates) 1. Sparkpluggaptoo close. 1.
Idlespoorly 1. Sparkplugfouled,faulty,or gaptoo wide. 1.
2. Dirtyair cleaner. 7.
Excessivevibration 1. Cuttingbladelooseor unbalanced. 1.
2. Bentcuttingblade. 2.
Mowerwillnot mulchgrass 1. Wetgrass. 1.
Uneven cut
.
3. Dullblade.
1. Wheelsnotpositionedcorrectly.
2. Dullblade.
'_
1. Engagebladecontrol.
2. Connectwireto spark boot.
3. Filltankwithclean,fresh gasoline.
4. Primeengineas instructedin the Operationsection.
5. Clean,adjustgap,or replace.
6. Waita fewminutesto restart,butdo not prime.
7. Contactyour SearsParts& RepairCenterto have
fuel linecleaned.
1. Connectand tightensparkplug boot.
2. Filltankwithclean,fresh gasoline.
3. Clear vent
4. Runengineuntil it stopsfromlackof fuel. Refillwith
freshfuel.
5. Referto Air Cleanerin EngineMaintenancesection.
6. Contactyour SearsParts& RepairCenterto have
fuel linecleaned.
Fillcrankcasewith properoil.
Cleanarea aroundandon top of engine.
Adjustgap to .030".
Resetgap to .030"or replacesparkplug.
Referto AirCleanerinEngineMaintenancesection.
Tightenbladeand adapter.Balanceblade.
Replaceblade.
Do notmow whengrassis wet; wait until
laterto cut.
2. Mowonce at a highcuttingheight,then mowagain
at desiredheightor makea narrowercuttingpath.
3. Sharpenor replaceblade.
1. Adjustcuttingheightleveron rightfront andright
rearwheelto sameposition.
2. Sharpenor replaceblade.
NEED MORE HELP?
Yotf[[ find the answer and more on ma_agemy/ifeocem _ for free!
o Rnd this and at[ your other product manuats on[ineo
o Get answers from our team of home experts.
o Get a personalized maintenance plan for your home.
o Find information and toots to help with home projects.
managemylife
b_o_h_ tQ y_u by Sea_s
19

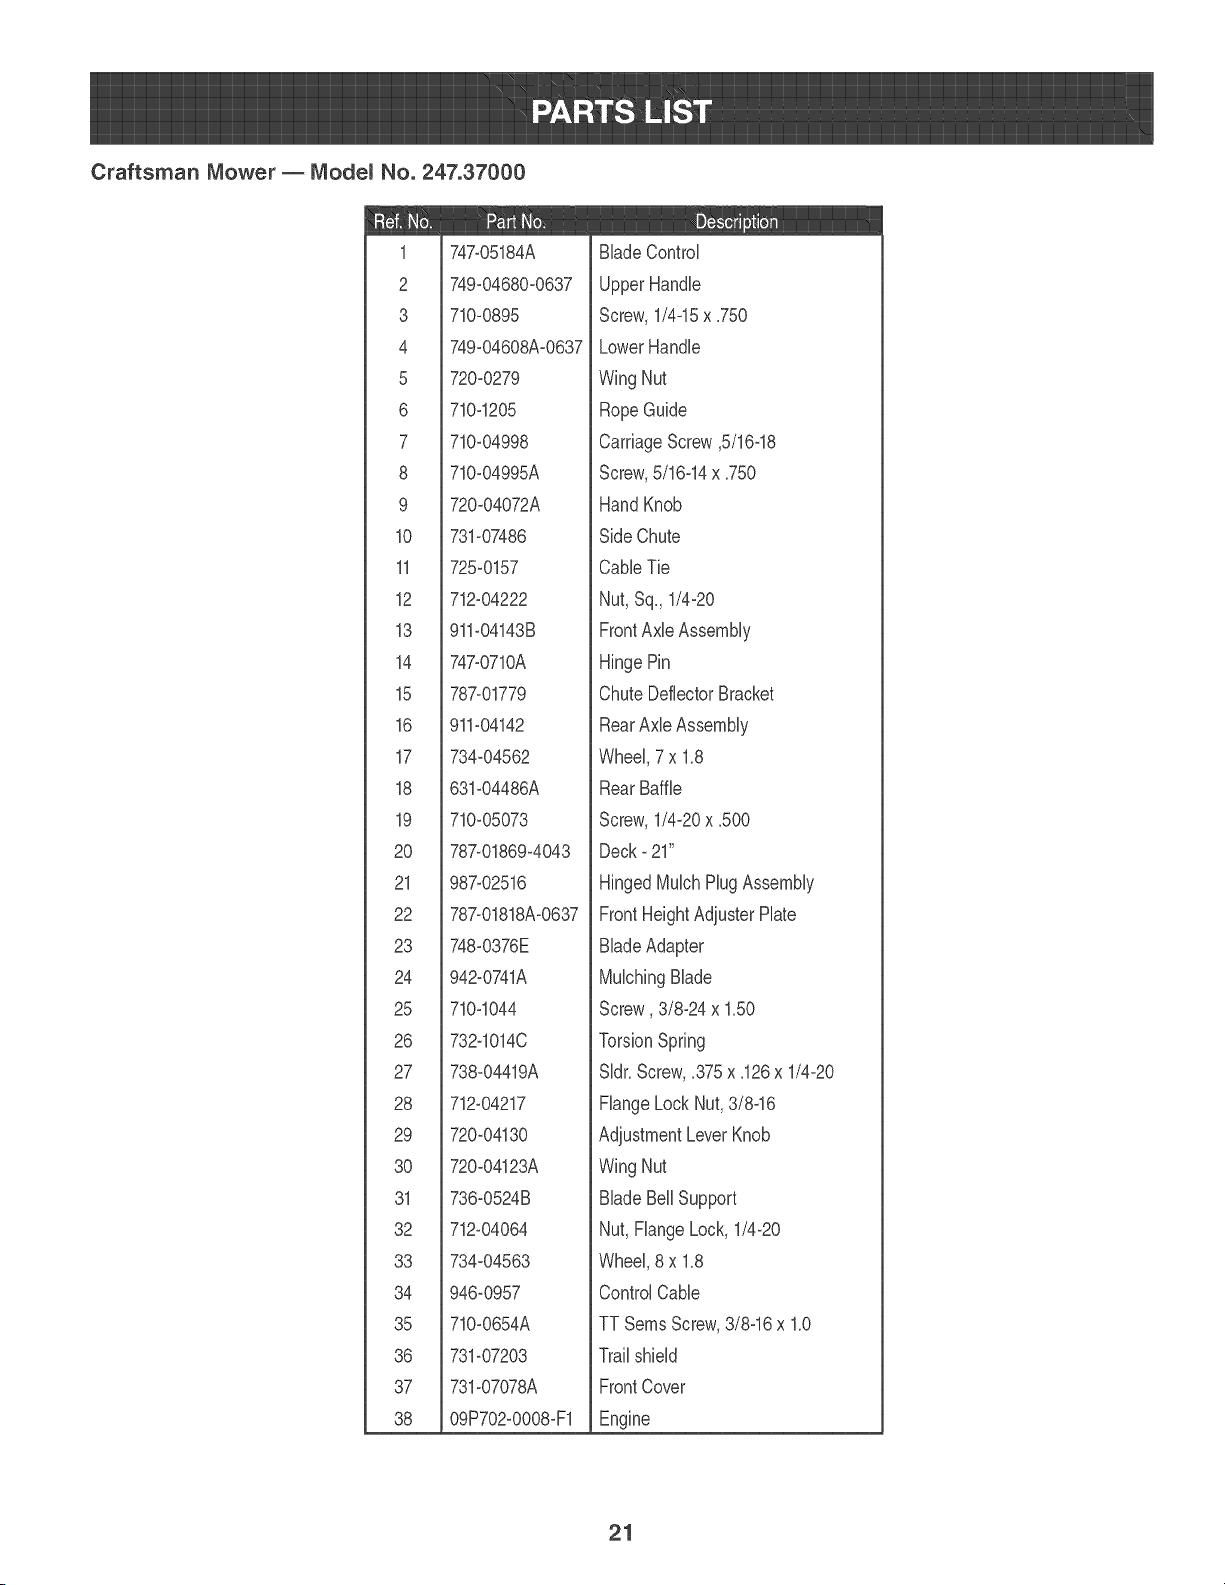
Craftsman Mower _ Modem No. 247.37000
21
2O
Craftsman Mower _ Modem No. 247.37000
1
i
10
11
12
13
14
15
16
17
18
19
2O
21
22
23
24
25
26
27
28
29
30
31
32
33
34
35
36
37
747-05184A
749-04680-0637
710-0895
749-04608A-0637
720-0279
710-1205
710-04998
710-04995A
720-04072A
731-07486
725-0157
712-04222
911-04143B
747-0710A
787-01779
911-04142
734-04562
631-04486A
710-05073
787-01869-4043
987-02516
787-01818A-0637
748-0376E
942-0741A
710-1044
732-1014C
738-04419A
712-04217
720-04130
720-04123A
736-0524B
712-04064
734-04563
946-0957
710-0654A
731-07203
731-07078A
09P702-OOO8-F1
BladeControl
UpperHandle
Screw,1/4-15x .750
LowerHandle
WingNut
RopeGuide
CarriageScrew ,5/16-18
Screw,5/16-14x .750
HandKnob
SideChute
CableTie
Nut, Sq.,1/4-20
FrontAxle Assembly
HingePin
ChuteDeflectorBracket
RearAxleAssembly
Wheel,7 x 1.8
RearBaffle
Screw,1/4-20x .500
Deck- 21"
HingedMulchPlug Assembly
FrontHeightAdjusterPlate
BladeAdapter
MulchingBlade
Screw, 3/8-24x 1.50
TorsionSpring
Sldr.Screw,.375x .126x 1/4-20
FlangeLock Nut,3/8-16
AdjustmentLeverKnob
WingNut
BladeBell Support
Nut, FlangeLock, 1/4-20
Wheel,8 x 1.8
ControlCable
TT SeresScrew,3/8-16x 1.0
Trailshield
FrontCover
Engine
21
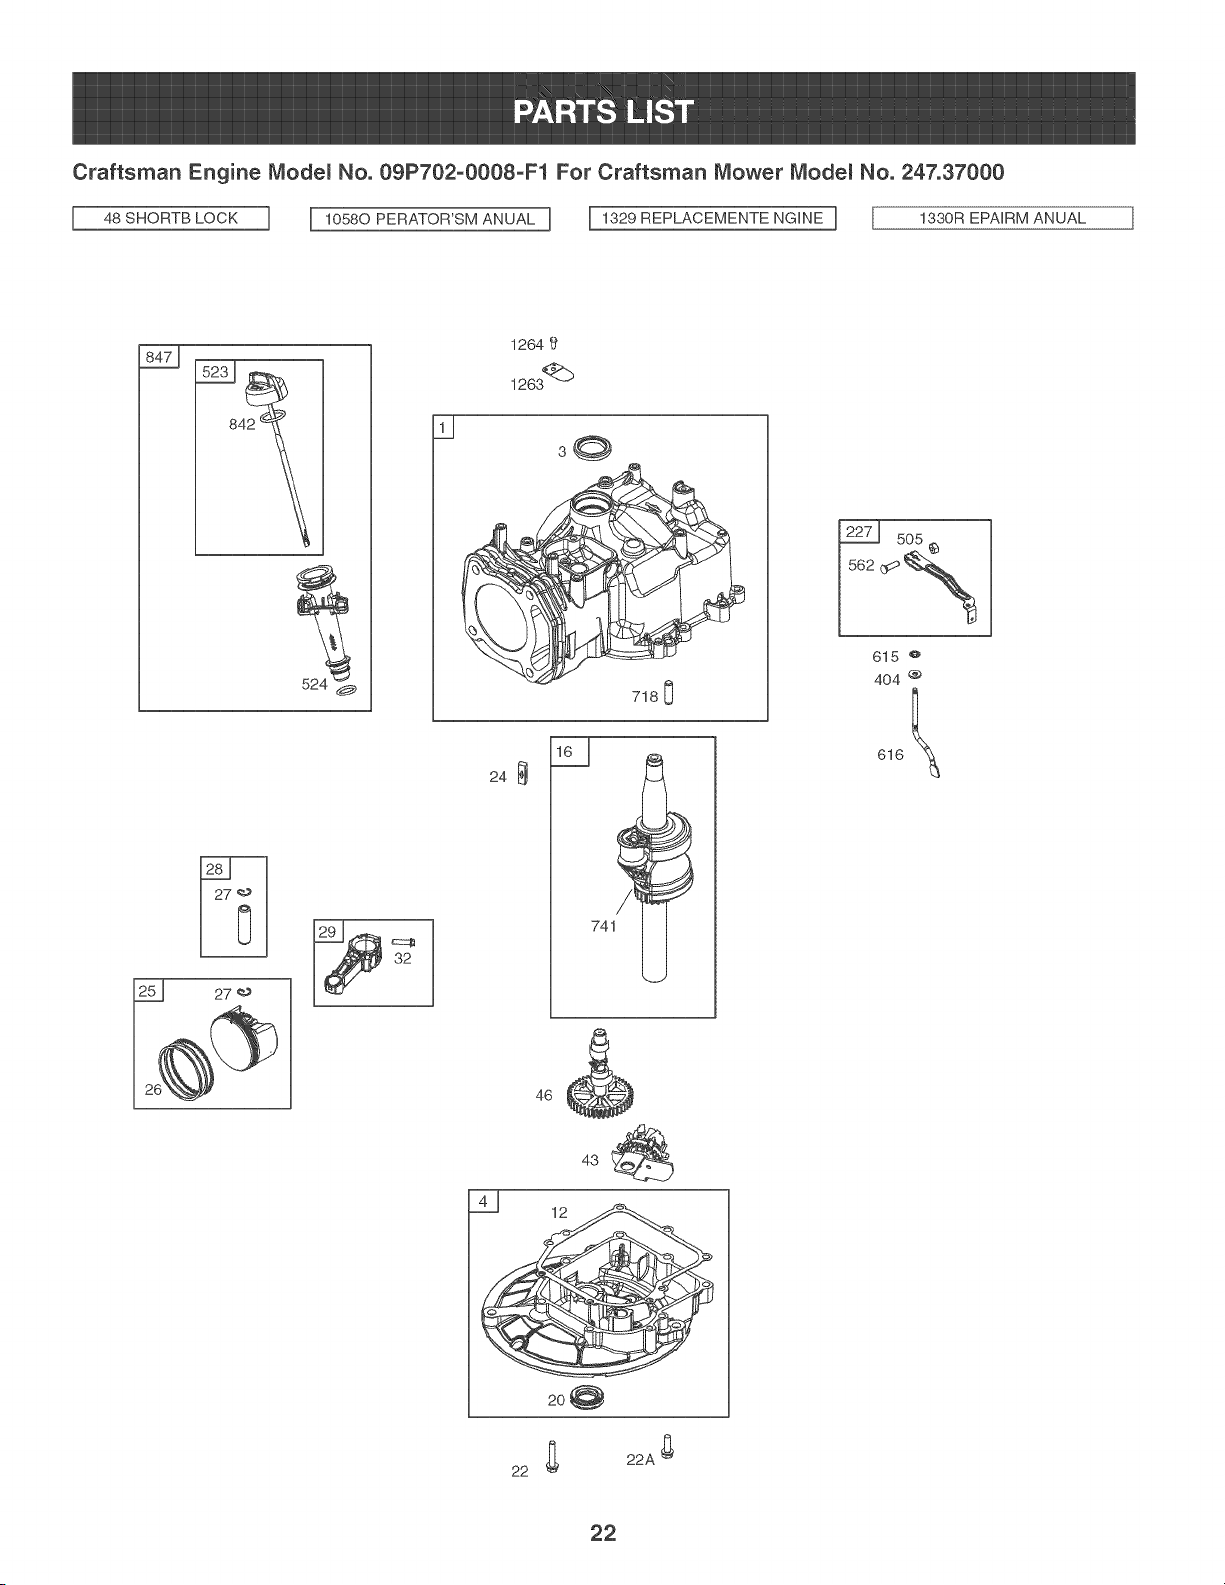
Craftsman Engine Modem No. 09P702-0008-F1 For Craftsman Mower Modem No. 247.37000
3O
24
741
46
2o@
22
22A _
615 _
404 ®
616
22

Craftsman Engine Modem No. 09P702-0008oF1 For Craftsman Mower Modem No. 247.37000
305
7 J 60
93O
58
1036 EMISSIONSL ABEL ]
332
7454_ 745A_ 75 _
92_J 455
922
78 _,
85o
23
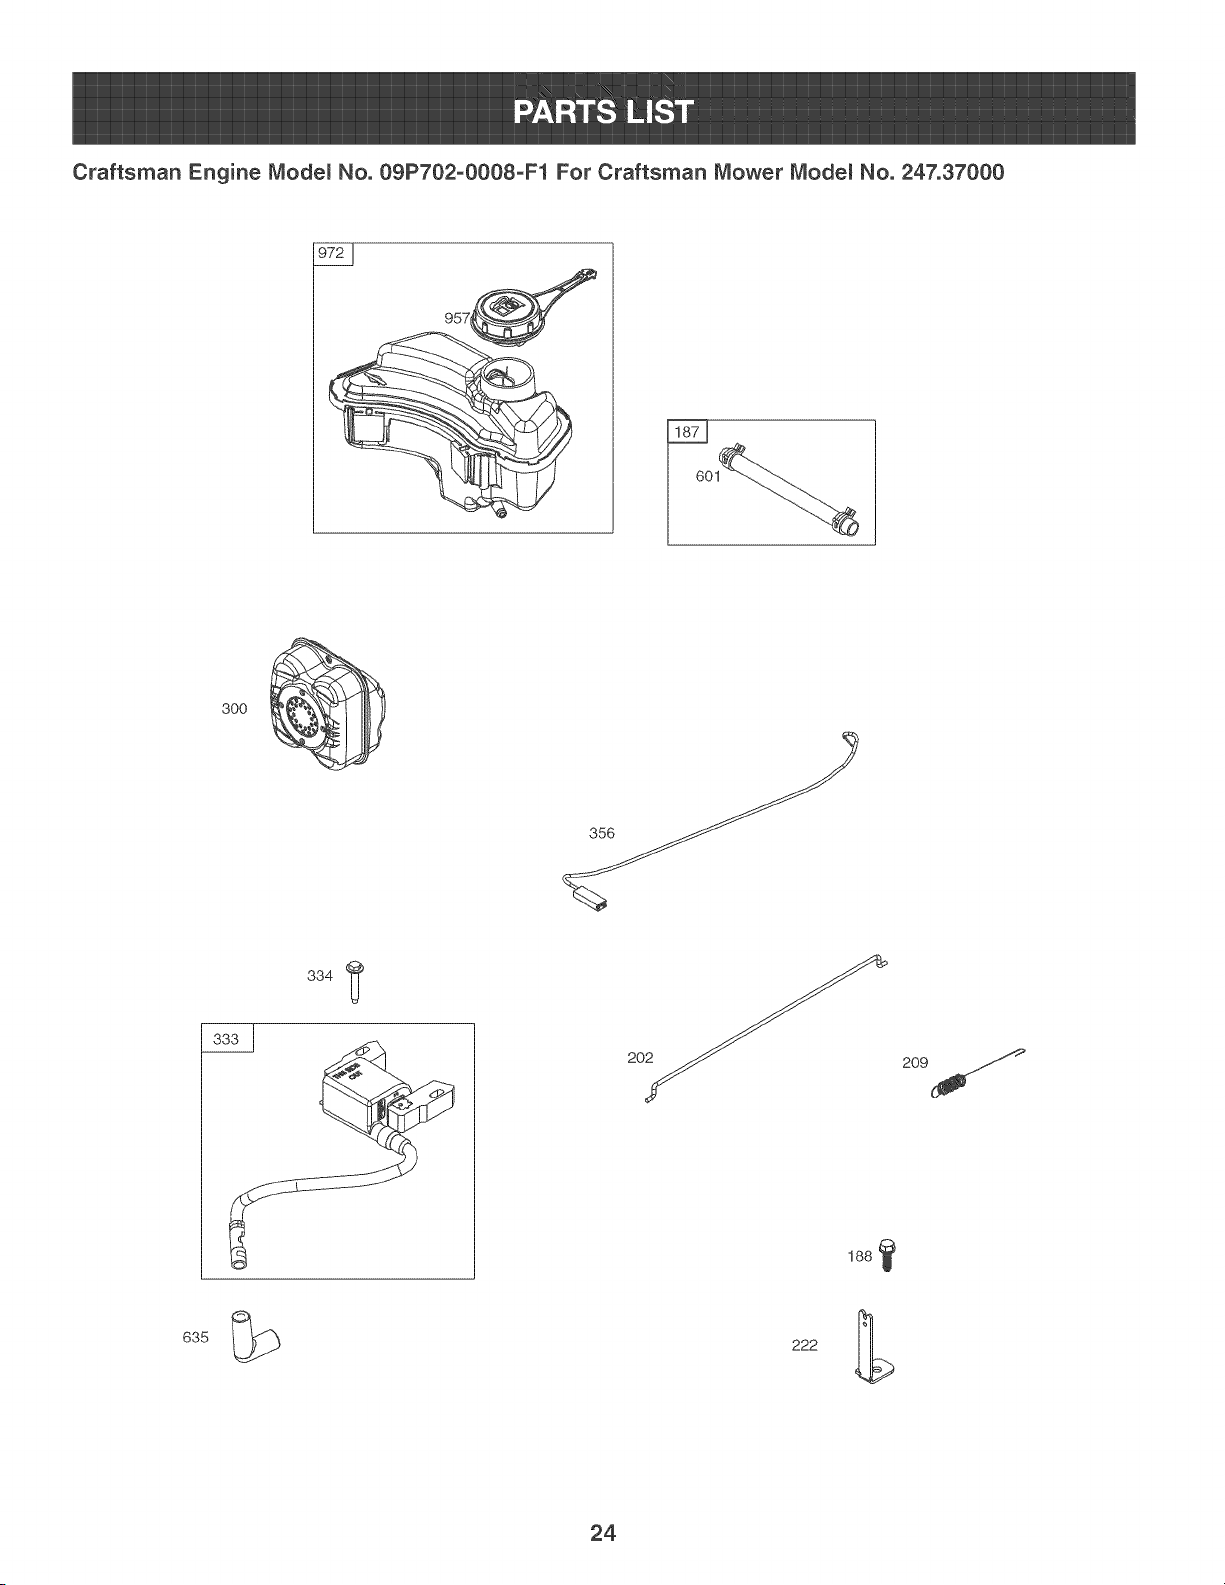
Craftsman Engine Modem No. 09P702-OOO8-F1 For Craftsman Mower Modem No. 247.37000
3OO
188
222
24
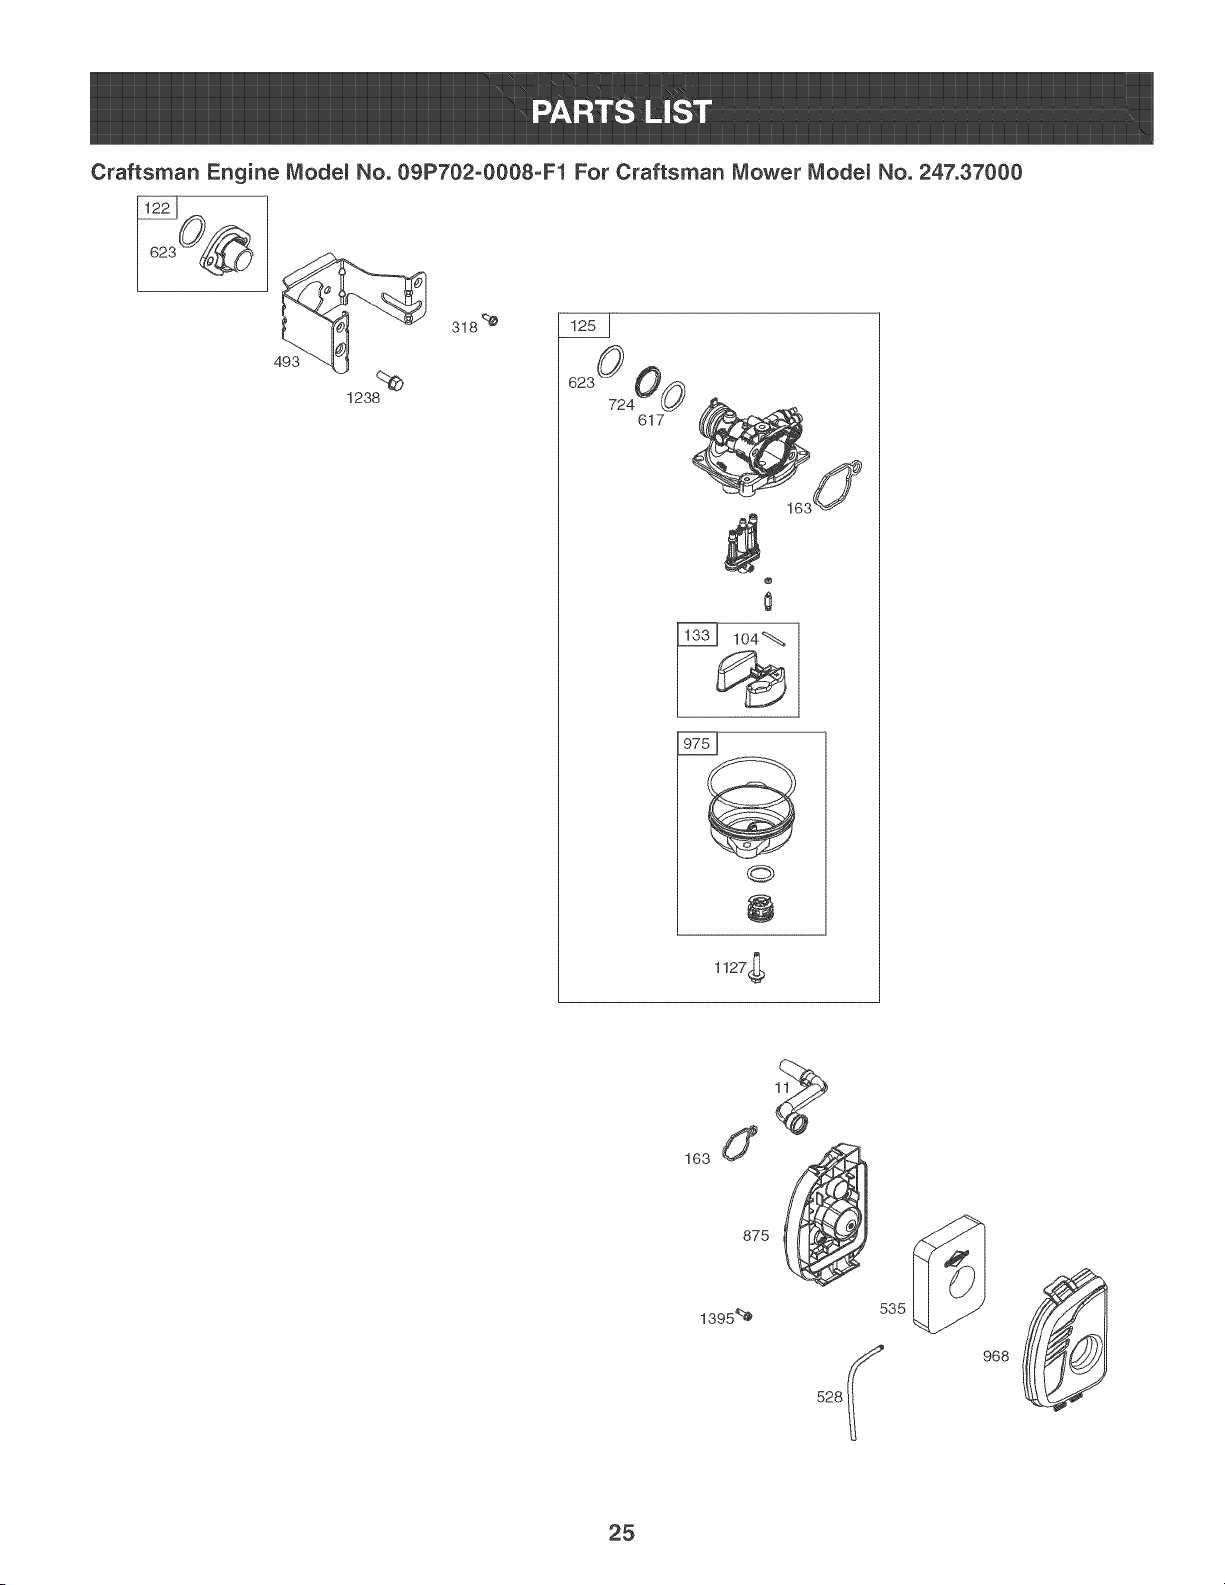
Craftsman Engine Modem No. 09P702-0008-F1 For Craftsman Mower Modem No. 247.37000
_e
1238
318 <:_
623_400
617
®
104°_
©
@
1127_;;_
875
1395_q_
535
25
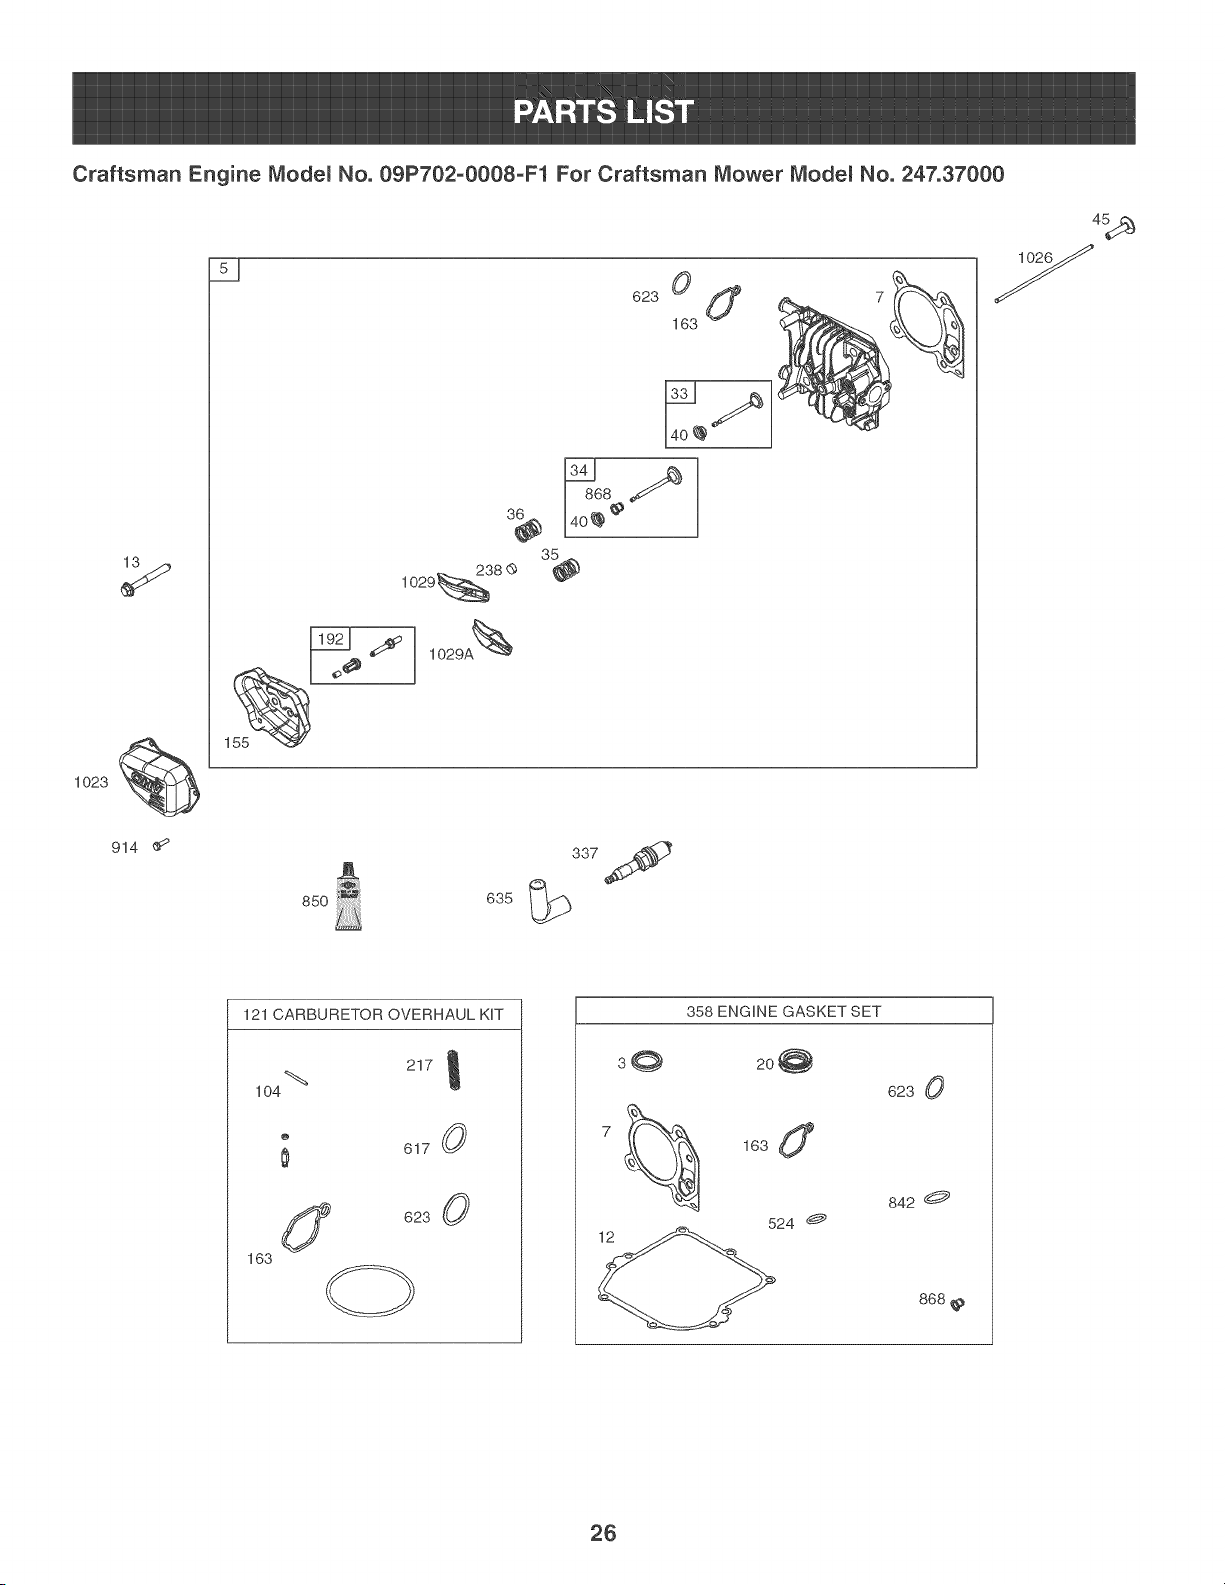
Craftsman Engine Modem No. 09P702-OOO8-F1 For Craftsman Mower Modem No. 247.37000
1o23
i
1029A%
914 ¢_
850 635
337
121 CARBURETOR OVERHAUL KF
1o4
o
d
163
217
617 0
623 0
358 ENGHNE GASKET SET
2o@
163 G
524 _
623 0
842 _
868_
26

Craftsman Engine Modem No. 09P702-0008-F1 For Craftsman Mower Modem No. 247.37000
590519 CylinderAssemNy
3 299819s Kit_Bushing/Seal(MagnetoSide)
4 590569 Sump-Engine
5 590525 Head-Cylinder
7 799586 Gasket_CylinderHead
11 590522 Tube-Breather
12 799587 Gasket-Crankcase
13 590512 Screw(CylinderHead)
16 590538 Crankshaft
20 391483s SeaFOil(PTOSide)
22 692551 Screw(CrankcaseCover/Sump)(1/4-
20xl .19)
22A 590763 Screw(CrankcaseCover/Sump)(1/4-20
x.78)
23 590544 Hywheel
24 222698s Key-Hywheel(Aluminum)
25 590521 PistonAssemNy(Standard)
26 590523 RingSet (Standard)
27 691588 Lock-PistonPin
28 699659 Pin-Hston
29 590518 Rod-Connecting
32 691664 Screw(ConnectingRod)
33 590531 Valve-Exhaust
34 590530 Valve-Intake
35 590532 Spring-Valve(Intake)
36 590532 SpringoValve(Exhaust)
37 590582 Guard-Hywheel
40 590528 Retainer:Valve
43 697799 Slinger_Governor/Oil
45 590514 Tappet_Valve
590524 Camshaft
48 N/A ShortBlock (NotAvailableAt This Printing)
58 591108 Rope-Starter
60 691915 Grip-StarterRope
60A 799716 Grip-StarterRope
75 590546 Washer(Flywheel)
78 793480 Screw(FlywheelGuard)
104 590558 PimFIoatHinge
121 590589 Kit-CarburetorOverhaul
122 590549 Spacer-Carburetor
125 590556 Carburetor
130 691190 Valve-Throttle(OriginalCarburetor)
133 591120 Hoat-Carburetor
155 590529 Plate-CylinderHead
163 799580 Gasket-AirCleaner
187 791766 Line-Fuel(CutTo RequiredLength)
188 793480 Screw(ControlBracket)
192 590535 Adjuster-RockerArm
202 590517 Link-MechanicalGovernor
209 590541 SpringoGovernor(Purple)
222 590560 BrackeFControl
227 590520 Lever-GovernorControl
238 590533 Cap-Valve
300 590565 Muffler
305 590586 Screw(BlowerHousing)
318 793480 Screw(MountingBracket)
332 690662 Nut(Flywheel)
333 799582 Armature-Magneto
334 691061 Screw(MagnetoArmature)
337 491055s Hug_Spark
27

Craftsman Engine ModemNo. 09P702-0008-F1For Craftsman Mower ModemNo. 247.37000
692390 Wire-Stop
358 590590 GasketSet-Engine
404 690272 Washer(GovernorCrank)
455 590545 Cup-Flywheel
493 590551 Bracket-Mounting(Carburetor)
505 793515 Nut(GovernorControlLever)
523 796503 Dipstick
524 691876 SeaPDipsfickTube
528 793006 Hose-Primer(FuelTank)(CutToRequired
Length)
535 799579 FiitePAirCbaner Foam
562 793514 Bolt (GovernorControlLever)
601 791850 Clamp-Hose(Green)
613 590562 Screw(Muffler)
615 690340 Retainer-GovernorShaft
616 590516 Crank-Governor
617 270344s SeaPORing(IntakeManifold)
621 692310 Switch-Stop
623 799581 SeaPORing(CarburetorSpacer)
635 692076 Boot-SparkPlug
718 690959 Pin-Locating(Cylinder)
724 697478 RetainePSeal
741 796210 Gear-Timing
745 691146 Screw(Brake)(#10-32x.86)
745A 690859 Screw(Brake)(#10-32x.5)
770 590588 KbRewind/BiowerHousing
830 590536 Stud-RockerArm
842 691031 SeaPORing(Dipstick)
847 590572 Dipstick/TubeAssembly
850 100106 Seaiant-%cone
868 590534 SeaPValve
875 590584 Base-AirCleaner
914 591103 Screw(RockerCover)
922 692135 Spring-Brake
923 691487 Brake
930 590585 Guard-Rewind
957 591003 Cap-Fuel
968 590581 Cover-AirCleaner
972 590568 FuePTank
975 591116 Bowl-Float
1023 590513 Cover-Rocker
1026 590515 Rod-Push
1029 590526 Arm-Rocker(Exhaust)
1029A 590527 Arm-Rocker(Intake)
1036 Label-Emissions(AvailableFromA Briggs&
StrattonAuthorizedDealer)
1058 380406TRI Operator'sManual
1127 590554 Screw(Float Bowlto CarburetorBody)
1238 590550 Screw(CarburetorSpacer)
1263 697124 Reed-Breather
1264 793453 Screw(BreatherReed)
1329 N/A ReplacementEngine(Not AvailableAt This
Printing)
1330 N/A RepairManual(Not AvailableAt This
Printing)
1395 590552 Screw(Air CleanerBaseto Carburetor)
CarburetorOverhaulKit KeyNo. 121
EngineGasketSet KeyNo.358
28
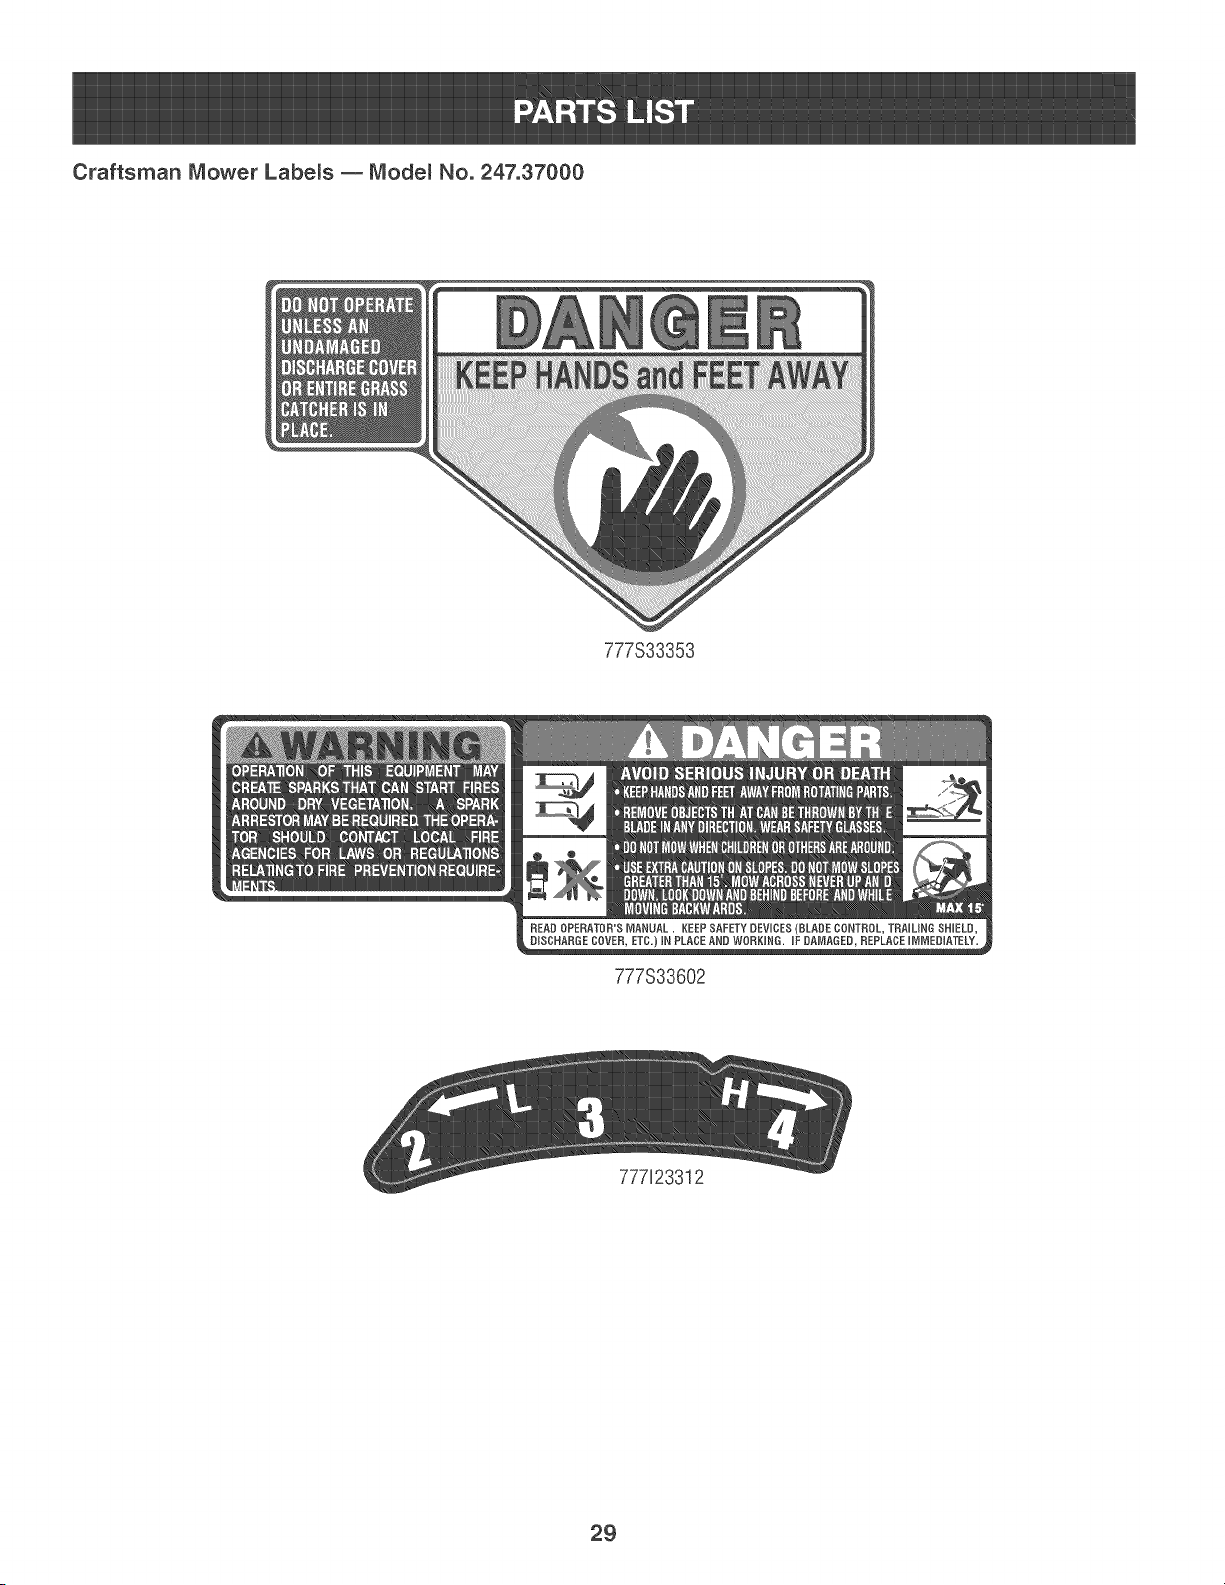
Craftsman Mower Labems _ Modem No. 247.37000
777S33353
DISCHARGE COVER, ETC.) IN PLACE AND WORKING. UFDAMAGED REPLACEIMMEDIATELY.
777%3602
777123312
29
'1
(This page applicable in the U.S.A. and Canada only.)
Sears Brands Management Corporation (Sears), the California Air Resources Board (CARB)
and the United States Environmental Protection Agency (U°S° EPA)
Emission Contro_ System Warranty Statement (Owner's Defect Warranty Rights and Obligations)
EMiSSiONCONTROLWARRANTYCOVERAGEiS APPLICABLETOCERTI- YEAR 1997AND LATERENGINESWHICHARE PURCHASEDAND USED
FlED ENGINESPURCHASEDiN CALiFORNiAiN 1995ANDTHEREAF- ELSEWHEREiN THE UNITEDSTATES(ANDAFTERJANUARY1,2001 iN
TER,WHICHARE USED iNCALiFORNiA,ANDTOCERTiFiEDMODEL CANADA),
California and United States Emission Control Defects Warranty Statement
The CaliforniaAir ResourcesBoard(CARB),U.S.EPAand Searsare pleased engklefor theperiodsoftime Ibted below,providedthere has been noabuse,
to explainthe EmissionControlSystemWarrantyon your modelyear 2000and neglector impropermaintenanceof your smalloff-roadengine.Youremis-
latersmalloff-roadengine(SORE).in California,newsmall off-roadengines sion controlsystemincludespartssuch as the carburetor,air cleaner,ignition
mustbedesigned,builtand equippedto meettheState'sstringentanti-smog system,mufflerand catalyticconverter.Also includedmaybe connectorsand
standards.Elsewherein theUnitedStates, newnon-road,spark-ignition otheremissionrelatedassemblies.Wherea warrantabbconditionexists,Sears
enginescertifiedfor modelyear 1997and latermustmeetsimilarstandardsset will repairyour smalloff-roadengineat no costto you includingdiagnosis,parts
forth bythe U.S.EPA.Sears mustwarranttheemissioncontrol systemon your and labor.
Sears Emission Control Defects Warranty Coverage
Smalloff-roadenginesarewarrantedrelativeto emissioncontrol partsdefects parton yourengineis defective,the part willbe repairedor replacedbySears.
fora period of one year,subjectto provisionsset forthbelow.Ifany covered
Owner's Warranty Responsibilities
Asthe smalloff-roadengine owner,you are responsibbfor theperformanceof provedmodifications.Youare responsibbfor presentingyour smalloff-road
therequiredmaintenancelistedin yourOperatingand MaintenanceInstruc- engineto an AuthorizedSearsServiceDeabr as soonas a probbmexists.The
tions.Searsrecommendsthatyou retain all yourreceiptscoveringmaintenance undisputedwarrantyrepairsshouldbe compbted ina reasonabb amountof
on yoursmalloff-roadengine,butSears cannotdenywarrantysobly for the time,notto exceed30 days. Ifyou haveany questionsregardingyourwarranty
lackof receiptsor for yourfaiBre to ensuretheperformanceof all schedubd rightsand responsibilities,you shouldcontacta SearsService Representative
maintenance.As the smalloff-roadengineowner,you shouldhoweverbe at 1-800-469-4663.The emissionwarrantyis a defectswarranty.Defectsare
awarethat Searsmay denyyou warrantycoverageif your smalloff-roadengine judged on normalengineperformance.The warrantyis notrelatedto an in-use
ora part hasfaibd dueto abuse,negbct, impropermaintenanceor unap- emissiontest.
Sears Emission Control Defects Warranty Provisions
Thefollowingare specificprovisionsrelativeto your EmissionControlDefectsWarrantyCoverage.It is in additionto the Searsenginewarrantyfor nomregulated
enginesfoundin theOperatingand MaintenanceInstructions.
1. WarrantedParts 3. NoCharge
Coverageunderthis warrantyextendsonly to the parts listedbelow (the Repairor replacementof anyWarrantedPartwill beperformedat no
emissioncontrolsystemsparts)to the extentthese partswere presenton chargeto the owner,includingdiagnosticlabor whichleadsto the
theengine purchased, determinationthata WarrantedPartis defective,ifthe diagnosticwork is
a. FuelMeteringSystem performedat an AuthorizedSears ServiceDealer.For emissionswarranty
• Cold start enrichmentsystem servicecontact yournearestAuthorizedSears ServiceDeabr as listed in
• Carburetorand internalparts the "YellowPages"under"Engines,Gasoline,""GasolineEngines,""Lawn
• FuelPump Mowers,"orsimilarcategory.
b. Air inductionSystem 4. Claimsand CoverageExclusions
• Air cleaner Warrantyclaimsshall be flied in accordancewiththe provisionsof the
• intakemanifold Sears EngineWarrantyPolicy.Warrantycoverageshall be excludedfor
c. ignitionSystem failuresof WarrantedPartswhichare notoriginal Sears partsor because
of abuse, neglector impropermaintenanceas setforth inthe Sears
• Spark plug(s) EngineWarrantyPolicy.Searsis notliableto coverfailuresof Warranted
• Magnetoignitionsystem Partscausedby theuse of add-on,nomoriginal,or modifiedparts.
d. CatalystSystem 5. Maintenance
• Catalyticconverter Any WarrantedPart whichis notscheduledfor replacementas required
• Exhaustmanifold maintenanceor whichis scheduledonly for regularinspectionto the effect
• Air injectionsystemor pulsevalve of "repairor replace as necessary"shallbe warrantedas to defectsfor the
e. Miscellaneousitems Usedin AboveSystems warrantyperiod.Any WarrantedPartwhich is scheduledfor replacement
• Vacuum,temperature,position,timesensitivevalves as requiredmaintenanceshallbewarrantedas to defectsonly forthe
andswitches periodof time up to the firstschedubd replacementfor that part. Any
. Connectorsandassemblies replacementpart that is equivalentin performanceand durabilitymay
2. Lengthof Coverage be usedin the performanceof any maintenanceor repairs.The owneris
Searswarrantsto the initialownerand eachsubsequentpurchaserthat responsibleforthe performanceof all requiredmaintenance,as definedin
theWarrantedPartsshallbe free fromdefects in materialsandworkman- the SearsOperatingand Maintenanceinstructions.
shipwhich causedthefailure of the WarrantedPartsfor a periodof one 6. ConsequentialCoverage
yearfrom the datethe engineis deliveredto a retailpurchaser. Coveragehereundershallextend to the failure of any engine components
caused bythe failureof any WarrantedPartstill underwarranty.
inthe USAandCanada,a 24 hour hotline, 1o800o469o4663,has a menu of pre-recordedmessagesofferingyou enginemaintenanceinformation.
GDOC-100188Rev.B
'1
30
Look For ReUevant Emissions DurabiUity Period and
Air Unde× Unformation On Your Engine Emissions LabeU
Engines that are certified to meet the California Air Resources Board (CARB) Tier 2 Emission Standards must
display information regarding the Emissions Durability Period and the Air index. Sears Brands Management
Corporation makes this information available to the consumer on our emission labels.
The Emissions Durability Period describes the number of hours of actua_ running time for which the engine is
certified to be emissions compliant, assuming proper maintenance in accordance with the Operating & Mainte-
nance instructions. The following categories are used:
Moderate: Engine is certified to be emission compliant for 125 hours of actual engine running time.
mntermediate: Engine is certified to be emission compliant for 250 hours of actual engine running time.
Extended: Engine is certified to be emission compliant for 500 hours of actual engine running time.
For example, a typical walk-behind lawn mower is used 20 to 25 hours per year. Therefore, the Emissions
Durability Period of an engine with an intermediate rating would equate to 10 to 12 years.
The Air mndex is a calculated number describing the relative level of emissions for a specific engine family. The
lower the Air mndex, the cleaner the engine. This information is displayed in graphical form on the emissions label.
After July 1,2000, Look For Emissions Compliance Period
On Engine Emissions CompUiance LabeU
After July 1, 2000 certain Sears Brands Management Corporation engines wiii be certified to meet the United
States Environmental Protection Agency (USEPA) Phase 2 emission standards. For Phase 2 certified engines, the
Emissions Compliance Period referred to on the Emissions Compliance label indicates the number of operating
hours for which the engine has been shown to meet Federal emission requirements.
For engines less than 225 cc displacement, Category C = 125 hours, B = 250 hours and A = 500 hours.
For engines of 225 cc or more, Category C = 250 hours, B = 500 hours and A = 1000 hours.
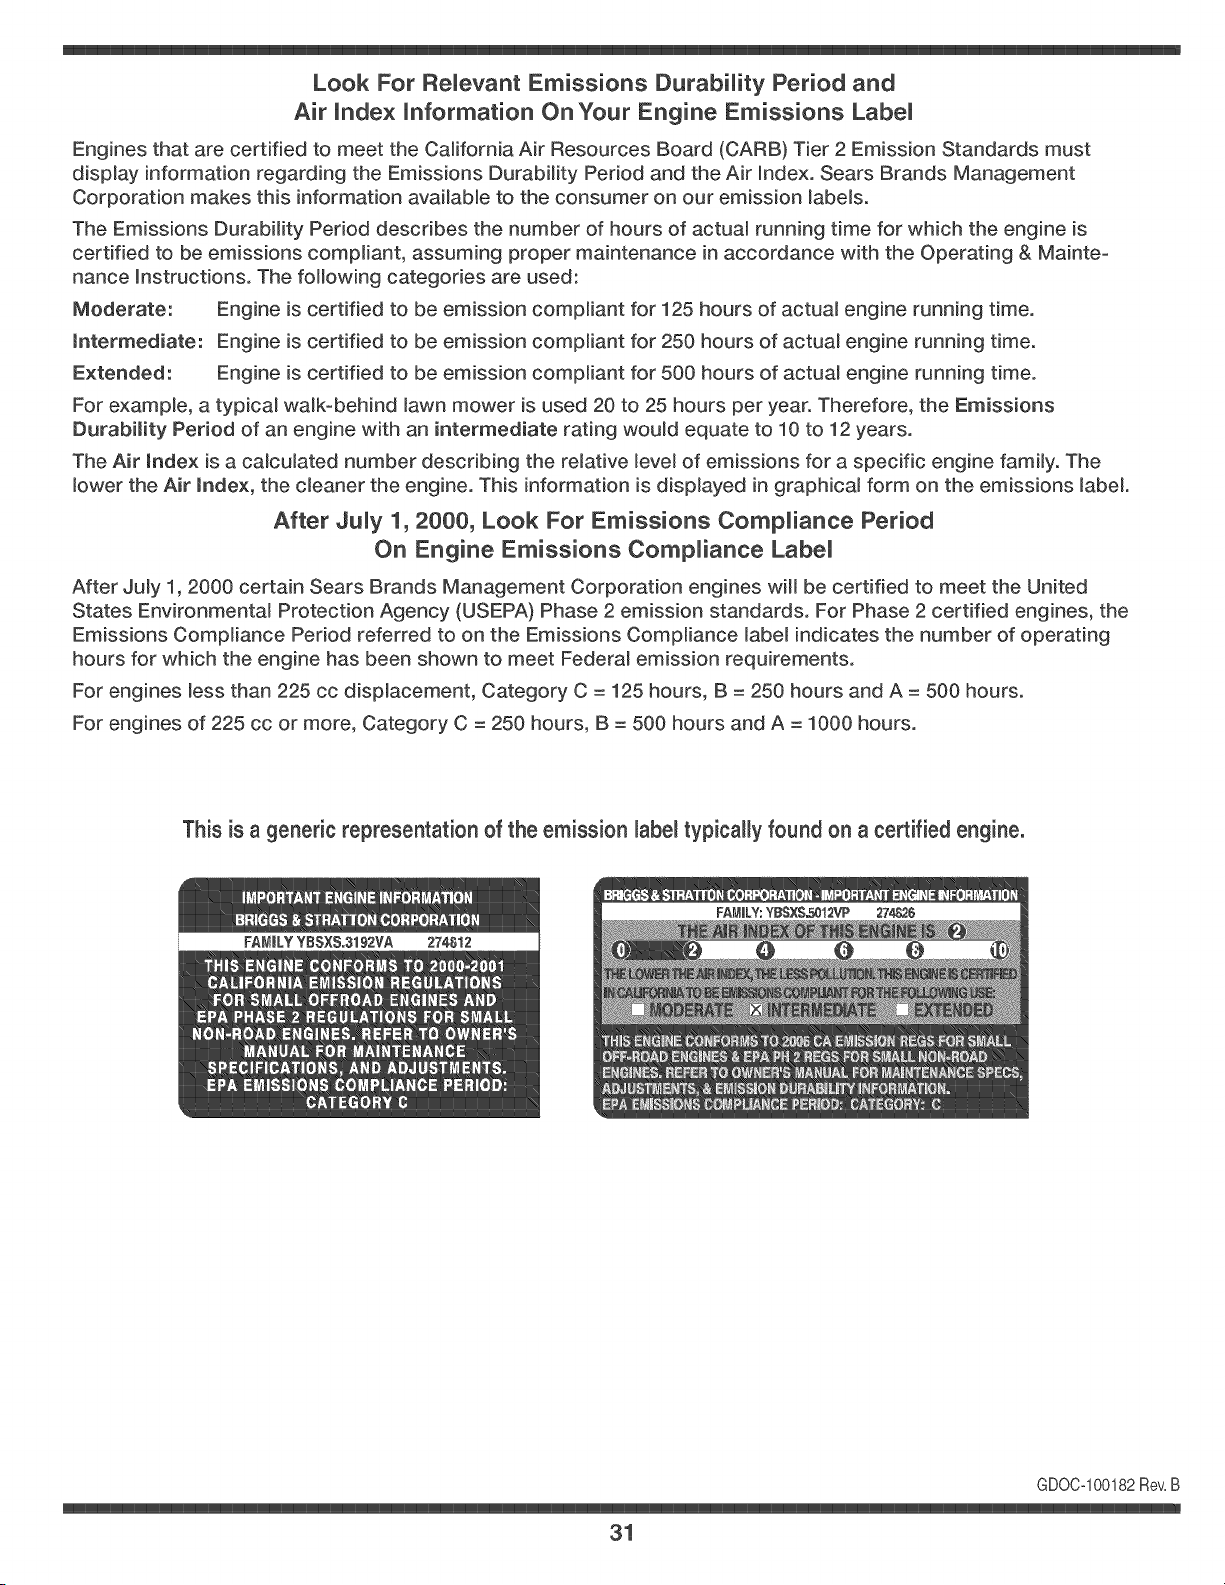
This is a generic representation of the emission labe_typically found on a certified engine.
GDOC-100182Rev.B
31

Congratulations on making a smart purchase. Your new Craftsman® product is designed and
manufactured for years of dependable operation. But like all products, it may require repair
from time to time. That's when having a Repair Protection Agreement can save you money and
aggravation.
Here's what the Repair Protection Agreement* incUudes:
[_ Expert service by our 10,000 professional repair specialists
[_ UnUimited service and no charge for parts and labor on all covered repairs
[_ Product repUacement up to $1500 if your covered product can't be fixed
[_ Discount of 25% from regular price of service and related installed parts not covered by the
agreement; also, 25% off regular price of preventive maintenance check
[_ Fast heUp by phone - we call it Rapid Resolution - phone support from a Sears representative.
Think of us as a "talking owner's manual."
Once you purchase the Repair Protection Agreement, a simple phone cal! is al! that it takes for you
to schedule service. You can call anytime day or night, or schedule a service appointment online.
The Repair Protection Agreement is a risk-free purchase. If you cancel for any reason during the
product warranty period, we will provide a full refund. Or, a prorated refund anytime after the
product warranty period expires. Purchase your Repair Protection Agreement today!
Some Uimitations and exclusions appUy. For prices and additionaU information in the U.S.A.
call 1-800-827-6855.
*Coverage in Canada varies on some items. For full detaiUs call Sears Canada at 1-800-361-
6885.
Sears installation Service
For Sears professiona/insta//ation of home appliances, garage door openers, water heaters, and
other major home items, in the U.S.A. or Canada call 1-800-4-MY-HOME®.
32
DeclaraciOn de garantia .................................................. 33
Instrucciones de segundad ....................................... 34-38
Gu[a de cuesta ................................................................ 39
Montaje ..................................................................... 40-43
Operaci6n .................................................................. 44-45
Servicio y Mantenimiento ......................................... 46-50
AImacenamiento fuera de temporada ............................ 51
SoluciOn de problemas ................................................... 52
NOmero de servicio ............................... Cubierta posterior
GARANTJA COMPLETA CRAFTSMAN POR DOS ANOS
PORDOSANOSaparfir de la fechade lacompra,esteproductoestagarantizadopor defectosen los materialesy la manodeobra.
Los productosdefectuososseranreparadossin costoo reemphzadossin costosi la reparad6nnoesta disponiNe.
Paraobtener informaci6nsobre el alcance de la garantiay solicitar la reparaci6n o el reemplazo,visite el sitio Web:www.craftsman.com.
Esta garantia cubre UNiCAMENTElos defectos en Josmateriales y en la mano de obra. Estagarantia NOcubre:
, Arficulosde duraci6nlimitadaque puedendesgastarsebajocondicionesnormalesdeuso duranteel periododegarantia,tales como
cucHlas de cortadora,adaptadoresparacucHlas, correas,filtrosdeaire,y bujiasdeencendido.
, Productodafiosresultantesde los intentosdelusuariodemodificaci6ndel producto,reparaci6no causadosporaccesoriosde productos.
, Reparacionesnecesariasdebidoal accidenteo por no operaro mantenerel productosegOnlas instruccionesprovistas.
, Mantenimientopreventivoo reparacionesnecesariasdebidoa mezdade combustibleimpropia,combustiblecontaminadoo afiejo.
La presentegarantiase anula si se utilizaesteproductoalgunavezparaprestarservicioscomercialeso si se Ioalquilaa otra persona.
Estagarantiale otorgaderechoslegalesespecificos,pero ustedpodriagozardeotrosderechosen raz6nde su lugarde residencia.
Sears Brands Management Corporation, Hoffman Estates, IL 60179
Aceitedelmotor: SAE30
Capacidaddeaceitedel motor: 15onzas
Combustible: Gasolinasin plomo
Bujia: Champion®RC12YC
Motor: Briggs& Stratton
N(_merode mode!o ..........................................................
Nemero de serie ..............................................................
Fechade compra .............................................................
Registreel nOmerode modelo,nOmerode seriey fechade compra
mb.sarriba.
© SearsBrands,LLC 33
Lapresendade estesimboIoindba que setratade instrucdones
importantesde seguridadquese @ben respetarpara evitar
ponerenpeiigrosu seguridadpersonaly/o materialy lade otras
personas.Lea y sigatodas lasinstrucdonesdeestemanualantes
de poneren fundonambntoestambquina.Si no respetaestas
instrucdonespodriaprovocarbsiones personabs.Cuandoveaeste
simboIo,ipresteatend6na la advertenda!
PROPOSICI6N 65 DE CALIFORNmA
Estambquinafueconstruidaparaseroperadadeacuerdocon
las regiasde seguridadcontenidasen estemanual.AI iguaIque
concuaiqubr fipo de equipomotorizado,un descuidoo error por
partedel operadorpuedeproducirbsiones graves.Estambquina
es capazde amputarmanosy piesy dearrojarobjetoscon gran
fuerza.De no respetarlas instruccionesde seguridadsiguientesse
puedenproducirbsiones graveso la muerte.
Elescapedel motorde este producto,algunosde suscomponentes
y algunoscomponentesdel vehiculocontieneno liberansustancias
quimicasque elestadode Californiaconsideraque puedenproducir
cancer,defectosde nacimientou otrosprobbmas reproductivos.
Losbornesdela bateriay losaccesoriosafines contienenplomoy
compuestosde plomo,sustanciasquimicasquesegOnIoestabbci-
do por el Estadode Californiacausancancery daSosen el sistema
reproductivo.Ldvese@smanos despu_sde estar en contacto
con estoscomponentes.
Su responsabilidad--Restrinja el usode estambquina
motorizadaalas personasque lean,comprendany respetenlas
advertenciase instruccionesque aparecenen estemanualyen la
maquina.
iGUARDEESTASINSTRUCaONES!
FUNCUONAMUENTO
Funcionamiento generat:
, Leay siga todaslas instruccionescontenidasen estemanual
antesde intentarensamblaresta m&quina_Lea,cornprenday
sigatodas las instruccionesque figuranen la mbquinayen el o
los manualesantesde intentaroperarla.Familiaricesecompletao
mentecon loscontrolesy conel uso apropiadodeestambquina
antesde operarla.Guardeestemanualenun lugarseguropara
referenciasfuturasy regulatesy parasolicitarrepuestos.
, Estambquinaes unapiezade equipode precisi6n,no un juguete.
Pot tanto,tengala maximaprecauci6nen todomomento.Su
unidadha sidodiseSadapararealizarunatarea:cortarel c_sped.
No la utilicecon ningOnotto prop6sito.
, No permitanuncaque losniSosmenoresde 14aSosoperenesta
mbquina.Los niSosde 14aSosy mb.sdeben leery comprender
las instruccionescontenidasen estemanualy debenset
capacitadosy supervisadospot unode los padres.Onicamente
los individuosresponsablesque se hayanfamiliarizadocon
estasreglasdeseguridadpara laoperaci6ndeberb.nusaresta
mbquina.
, Inspeccioneminuciosamenteel b.reaendonde utilizarb,el equipo.
Saquetodaslas pie@as,palos,cables,huesos,juguetesy otros
objetosextraSoscon los que podriatropezaro quepodrianset
arrojadospor la cuchilla.Losobjetosarrqados porla mbquina
puedenproducirlesionesgraves.Planifiqueel patr6nen el que
va air descargandoel recorteparaevitarquela descargade
materialse realicehacialoscaminos,las veredas,losobservao
dotes,etc_Eviteademb.sdescargarmaterialcontralas paredesy
obstruccionesque podrianprovocarqueel materialdescargado
rebotecontrael operador.
, Paraayudara evitarel contactocon la cuchillao una lesi6npot
un objetoarrqado, mant6ngaseen la zonadel operadordetrb.s
de las manijasy mantengaa los niSos,observadores,ayudantes
y mascotasapartadosal menos25 metrosde la podadora
mientrasesta en operaci6n.Detengala mbquinasi alguienentra
en la zona.
, Paraprotegerselosqos utilicesiempreanteojoso antiparras
de seguridadmientrasoperala mbquinao mientrasla ajusta
o repara.Losobjetosarrojadosquerebotanpuedenlesionar
gravementela vista.
, Utilicezapatosde trabajoresistentes,de suelafuerte y pantao
Ionesy camisasajustados.Se recomiendautilizarcamisasy
pantalonesquecubranlos brazosy las piernas,asi comocalzado
con puntasreforzadasen acero.Nuncaopereesta maquinacon
los pies desnudos,sandalias,o conzapatosligeroso con losque
se puedaresbalar(por ejemplo,calzadode Iona).
, Noponga las manoso los piescercade las piezasrotatoriaso
en la tolvade lacortadora.Elcontactocon las cuchillaspuede
producirla amputaci6nde manosy pies.
34
, Unacubiertade descargafaltanteo da_adapuedeprovocarel
contactocon la cucHb o lesionesporobjetosarrojados.
, Muchaslesionesocurrencomoresultadode pasarla cortadora
sobrelos piesduranteunacaida provocadapor derrapeso
tropiezos.No se sostengade la podadorasi se esta cayendo,
suelteb manijainmediatamente.
, Nuncatire haciaustedlapodadoramientrascamina.Si debe
retrocederla podadorapara evitarunaparedu obstAculo,mire
primeroabajoy atrAsparaevitar tropezarsey luegosigaestos
pasos:
1. Retrocedade la podadorahastaesfirar completamentesus
brazos.
2. AsegOreseque esta bienequilibradoy bien parado.
3. Tirede b podadoralentamentehaciausted,nomAsaliAde b
mitadde la distanda entreustedy lapodadora.
4. Repitaestospasoscomose requiera.
, No opereestamAquinaestandobajolosefectosdelalcoholo de
drogas.
, No embragueel mecanismode autopropuM6nen unidadescon
esteequipomientrasarrancael motor.
, El mecanismodecontrol dela cuchilb es un dispositivode
seguridad.Nuncaintentedesviarsede su funcionamiento.De
hacedono funcionarianlos dispositivosde seguridady podrian
producirselesionespersonalespotel contactocon bs cuchilbs
giratorias.Lasmanijasdecontrolde la cuchilladebenfuncionar
bienen ambasdireccionesy regresarautomAticamentea b
posici6ndedesengranecuandose bs suelta.
, Nuncaopereb podadoraen c6spedhOmedo.Siempreest_
segurode su equilibrio.Si tropiezay cae puedelesionarse
gravemente.Sisienteque pierdeelequilibrio,suelte inmediatao
mentela manijade controlde b cuchilb y b cuchilb dejarAde
giraren tressegundos.
, Corteel c6spedsobmentecon luz dedia o con unabuenabz
artificial.Camine,nuncacorra.
, Detengala cucHb cuandocruce caminosde gravilb, pasoso
andadores.
, Si b mAquinacomenzaraa vibrarde maneraanormal,detenga
el motor,y busqueinmediatamenteb causa.La vibraci6nporIo
generales unaadvertenciadealgOnproblema.
, Apagueelmotory esperehastaqueb cucHb se detenga
completamenteantesde retirarla guardaparael recortede
c6spedo desatorarla tolva. LacucHb continOagirando por
unoscuantossegundosdespu_squeel motorse haapagado.
Nuncacoloqueningunapartedel cuerpoen elAreade b cucHb
hastaqueest_ seguroque lacucHb hadetenidosu movimiento
rotatorio.
, Nuncaopereb cortadorasin bs guardasapropiadas,cubiertade
descarga,guardapara recorte,manijade controlde la cucHb
y otrosdispositivosde seguridady protecci6nensu bgar y
funcionando.Nuncaopereb cortadorasi los dispositivosde
seguridadestan da_ados.Si no Io hace,estopuedetenercomo
resultadolesiones.
, Elsilenciadory el motorse calientany puedenproducirquemao
duras.Nolos toque.
, Utilicesobmente partesy accesoriosfabricadosespecialmente
paraestamaquina,originalesdel fabricante(OEM). Sino Io
hace,estopuedetenercomoresultadolesionespersonales.
, Paraencenderel motor,jale dela cuerdalentamentehastaque
sientaresistencia,luegojale rapidamente.Elreplieguerapidode
lacuerdadearranque(tensi6nde retroceso)le jabra lamanoy
el brazohaciael motormas rapidode Ioque ustedpuedesoltar.
Elresultadopuedenser huesosrotos,fracturas,hematomaso
esguinces.
, Sise presentansituacionesque noestan previstaseneste
manualseacuidadosoy useel sentidocomOn.Contacto1_800-
659-5917parainformaci6ny asistencia.
Laspendientessonun factorimportantequese rebcionacon los
accidentesproducidosporderrapesy caidasy que puedenproducir
lesionesgraves.La operaci6nen pendientesrequieremayorpreo
cauci6n.Si no se sienteseguroen unapendiente,nola pode.Para
seguridad,use el medidorde pendientesquese induye como partede
estemanualparamedirla pendienteantesde operarla unidaden una
zonaindinada. Si lapendientesuperalos 15grados,nola pode.
Haga1osiguiente:
, Muevala podadoraa trav6sde bs carasde la pendiente,nunca
haciaarriba y abajo.Tengacuidadocuandocambiededireccidn
cuandooperela maquinaen pendientes.
, Est_atentoa los agujeros,raices,rocas,objetosocultoso
abultamientosquepuedanprovocarque sederrapeo se tropiece.
Elc_spedalto puedeocultarobstAculos.
, Siempreest_ segurode su equilibrio.Si tropiezay cae puede
lesionarsegravemente.Si sienteque pierdeel equilibrio,suelte
inmediatamenteb manijade controlde b cucHb y b cucHb
dejarade giraren tres(3) segundos.
No haga1osiguiente:
, Nocorte el c_spedcercade pozos,hundimientos,bancos,podria
perderel equilibrio.
, Nopode pendientesmayoresde 15gradoscomoIo indicael
medidorde pendientes.
, Nopode el c6spedhOmedo.Si noesta firmementeparado,puede
resbabrse.
35
Puedenocurriraccidentestrb.gicossi el operadornoest,. atentoa la
presenciade niios. Pot Iogenerala los niios les atraenlas podadoras
y la actividadde podarel c6sped.Noentiendenlos riesgosni los
peligros.Nuncad_pot sentadoquelos niios permanecerb.nen el
mismolugardonde losvio pot Oltimavez.
, Mantengaa los niios fuera delAreadetrabajoy bajoestricta
vigilanciade un adultoresponsableademb.sdeloperador.
Est_alerta y apaguela podadorasi un niio ingresaal Area.
Antesy mientasse est,. moviendohaciaatrb.s,mirehaciaatrb.sy
cuideque no hayaniios.
, Tengaextremaprecaucidncuandoseaproximea esquinas
degas,entradasde puertas,b.rbolesu otrosobjetosque puedan
obstaculizarlelavista de un niio que pudiesecotter haciala
podadora.
, Mantengaalejadosa los niios delos motoresen marchao
calientes.Puedensufrirquemadurascon un silenciadorcaliente.
, Nuncapermitaqueniios menoresde 14aios operenesta
mb.quina.Los niios mayoresde 14 aios debenleer y entender
las instruccionesde operacidny reglasdeseguridadcontenidas
eneste manualy debenset entrenadosy supervisadospot sus
padres.
Manejo seguro de la gasolina:
, Paraevitarlesionespersonaleso dafiosmaterialessea
sumamentecuidadosoal manipularla gasolina.Lagasolinaes
altamenteinflamabley losvaporesson explosives.Sepuede
lesionargravementesi derramagasolinasobreustedo sobrela
ropaya quese puedeencender.
, Utilices61orecipientesparagasolinaautorizados.
, NuncaIlenelos contenedoresenel interiorde unvehiculo
ocami6n ocaja de camionetacon recubrimientosplb.sticos.
Coloquesiemprelos recipientesenel pisoy lejosdelvehiculo
antesde Ilenarlos.
, Retireel equipoa gasolinadelcami6no remolquey II_neloen
el piso.Si estono es posible,entoncesIlenedichoequipoenun
remolquecon un recipienteportatil,en vezde desdeun dispen-
sadorde gasolina.
, Mantengala boquillade Ilenadoencontactocon el bordede la
entradadel tanquede gasolinaocontenedoren todomemento
hastaqueest_ Ileno.No utiliceun dispositivoparaabrir/cerrarla
boquilla.
, Apaguetodoslos cigarrillos,cigarros,pipasy otras fuentesde
combusti6n.
, Nuncacarguecombustibleen lamb.quinaen interioresporque
Losvaporesinflamablespodrianacumularseen elb.rea.
, Nuncasaquela tapadel gasni agreguecombustiblemientrasel
motorest,.calienteo en marcha.Dejequeel motorse enfrieper
Io menosdos minutesantesde velveta cargarcombustible.
, Nuncarecargueel tanquede combustible.Lleneel tanqueno
m_.sde 1 pulgadaper debajodela basedel cuellode Ilenado
paradejar espacioparala expansi6ndel combustible.
, Vuelvaa colocarlatapade la gasolinay ajOstelabien.
, Limpiela gasolinaderramadasobreel motory el equipo.Traslade
la mb.quinaa otrazona. Espere5 minutesantesde encenderel
motor.
, Nuncaalmacenela m_.quinao el recipientede combustibleen
unespaciocerradodondehayafuego,chispaso aparatoscon
pilotocomo pot ejemplo,calentadoresde agua,calentadores,
hornos,secadoresde ropau otrosaparatosa gas.
, Parareducirel riesgode incendiomantengala mb.quinalimpia
de paste,hojasy deacumulaci6nde otrosescombros.Limpielos
derramesde aceiteo combustibley saquetodos losdesechos
embebidoscon combustible.
, Dejeque la mb.quinase enfrie5 minutespot Iomenosantesde
almacenarla.
Funcionamientogeneral:
, Nuncaenciendaun motoren espacioscerradoso en una zona
con pocaventilaci6n.El escapedel motorcontienemon6xidode
carbono,ungas inodoroy letal.
• Antesde Iimpiar,repararo inspeccionarla mbquina,compruebe
que la cuchillay todaslas partesque se muevense handetenido.
Desconecteel cablede la bujiay p6ngalode maneraque haga
masacontrael motorparaevitarque se enciendade manera
accidental.
, Reviselos pernosde montajede la cuchillay delmotora
intervalosfrecuentesparaverificarqueest_nbienapretados.
Inspeccioneadem_.svisualmentela cuchillaenbuscade dales
(abolladuras,desgaste,roturas,etc.). Reemplacela cuchillacon
equipooriginaldel fabricante(OEM)Iistadoeneste manual.La
utilizaci6nde partesqueno cumplancon lasespecificacionesde
equiposoriginalespodriatenetcomoresultadoun rendimiento
incorrectoy ademb.sla seguridadpodriaestar comprometida.
, Lascuchillasde las podadorasson muyafiladasy podrian
cortarlo.Envuelvala cuchillao utilice guantesy extremeprecau-
clonescuandole de servicio.
, Mantengatodoslos pernos,tuercasy tornillosbien ajustados
paraasegurarseque la mb.quinaseencuentraen condiciones
segurasdeoperaci6n.
, Nuncamanipulelosdispositivosde seguridadde manera
imprudente.Controleperi6dicamentequefuncionende forma
adecuada.
36
, Despu_sdegolpearcon alg0nobjetoextraSo,detengael motor,
desconecteelcane de la bujia y conecteel motoramas&
Inspeccioneminuciosamentela mb.quinaparadeterminarsiesta
daSada.Repareel daSoantesdeencenderlay operarl&
, Nuncatratedeajustaruna ruedao laalturade corte mientrasel
motorestaen march&
, Loscomponentesde latolva pararecorte,cubiertade descargay
escudode riel,estansujetosa desgastey da_osquepodriadejar
expuestaspartesquese mueveno permitirquese arrojenobjeo
tos. Paraprotegersu seguridad,verifiquefrecuentementetodos
los componentesy reemplb.celoss61ocon partesde losfabri-
cantesde equiposoriginales(O.EM) listadaseneste manual.
La utilizaci6nde partesque nocumplancon las especificaciones
deequiposoriginalespodriatenercomo resultadoun rendimiento
incorrectoy ademb.slaseguridadpodriaestar comprometid&
, No cambiela configuraci6ndel reguladordelmotorni acelere
demasiadoelmismo. Elreguladorcontrolala velocidadmb.xima
segurade operaci6ndel motor.
, Verifiquefrecuentementela lineade combustible,el tanque,el
tap6n,y losaccesoriosbuscandorajaduraso p6rdidas.Recto-
placede ser necesario.
, No d6 arranqueal motorsi noesta la bujia deencendido.
, Mantengao reemplacelasetiquetasde seguridad,seg0nsea
necesario.
, Observelasleyesy normasaplicablesparadisponeradecu-
adamentedelos desechos.La descargainapropiadadeliquidos
o materialespuededaSarel medioambiente.
, SegOnla Comisi6nde Seguridadde Productospara el Consu-
midorde los EstadosUnidos(CPSC)y la Agenciade Protecci6n
Ambientalde los EstadosUnidos(EPA),esteproductotiene una
vidadti! media desiete (7)a_os, 6 140horasdefuncionamiento.
AI finalizarla vida dtilmedia, adquieraunamaquinanuevao
hagainspeccionaranualmente_staSearsporunou otrodis-
tribuidorde serviciosparacerciorarsedeque todoslos sistemas
mecanicosy de seguridadfuncionancorrectamentey no tienen
excesivodesgaste.Si no Io hace,puedenproducirseaccidentes,
lesionesomuerte.
NO MODUFUQUE EL MOTOR
Paraevitarlesionesgraveso la muerte,no rrlodifiqueel motorbajo
ningunacircunstancia.Si cambiala configuraci6ndel reguladordel
motorelmotor puededescontrolarsey operara velocidadesinsegu-
ras.Nuncacambiela configuraci6nde fb.bricadel reguladordel motor.
AVUSO REFERUDO A EMUSUONES
Losmotoresque estancertificadosy cumplencon las regulaciones
de emisionesfederalesEPAy de Californiapara SORE(Equipos
pequeSostodoterreno)estancertificadosparaoperarcon gasolina
comOnsinplomoy puedenincluirlossiguientessistemasde control
de emisiones:Modificaci6nde motor(EM) y catalizadorde tresvias
(TWO)si estanequipadosde esa manera.
GUARDACHUSPAS
Sise utilizaun amortiguadordechispasel operadorIo debemantener
en condicionesde usoadecuadas.Enel Estadode California las
medidasanteriormentemencionadassonexigidaspor ley (Articulo
4442del C6digode RecursosPOblicosde California).Es posible
queexistanleyessimilaresenotros estados.Lasleyesfederalesse
aplicanen territoriosfederales.
Puedeconseguirelamortiguadorde chispasparael silenciadora
trav6sde sudistribuidorautorizadode motoreso poni6ndoseen
contactocon elcentrode servicioSears.
37
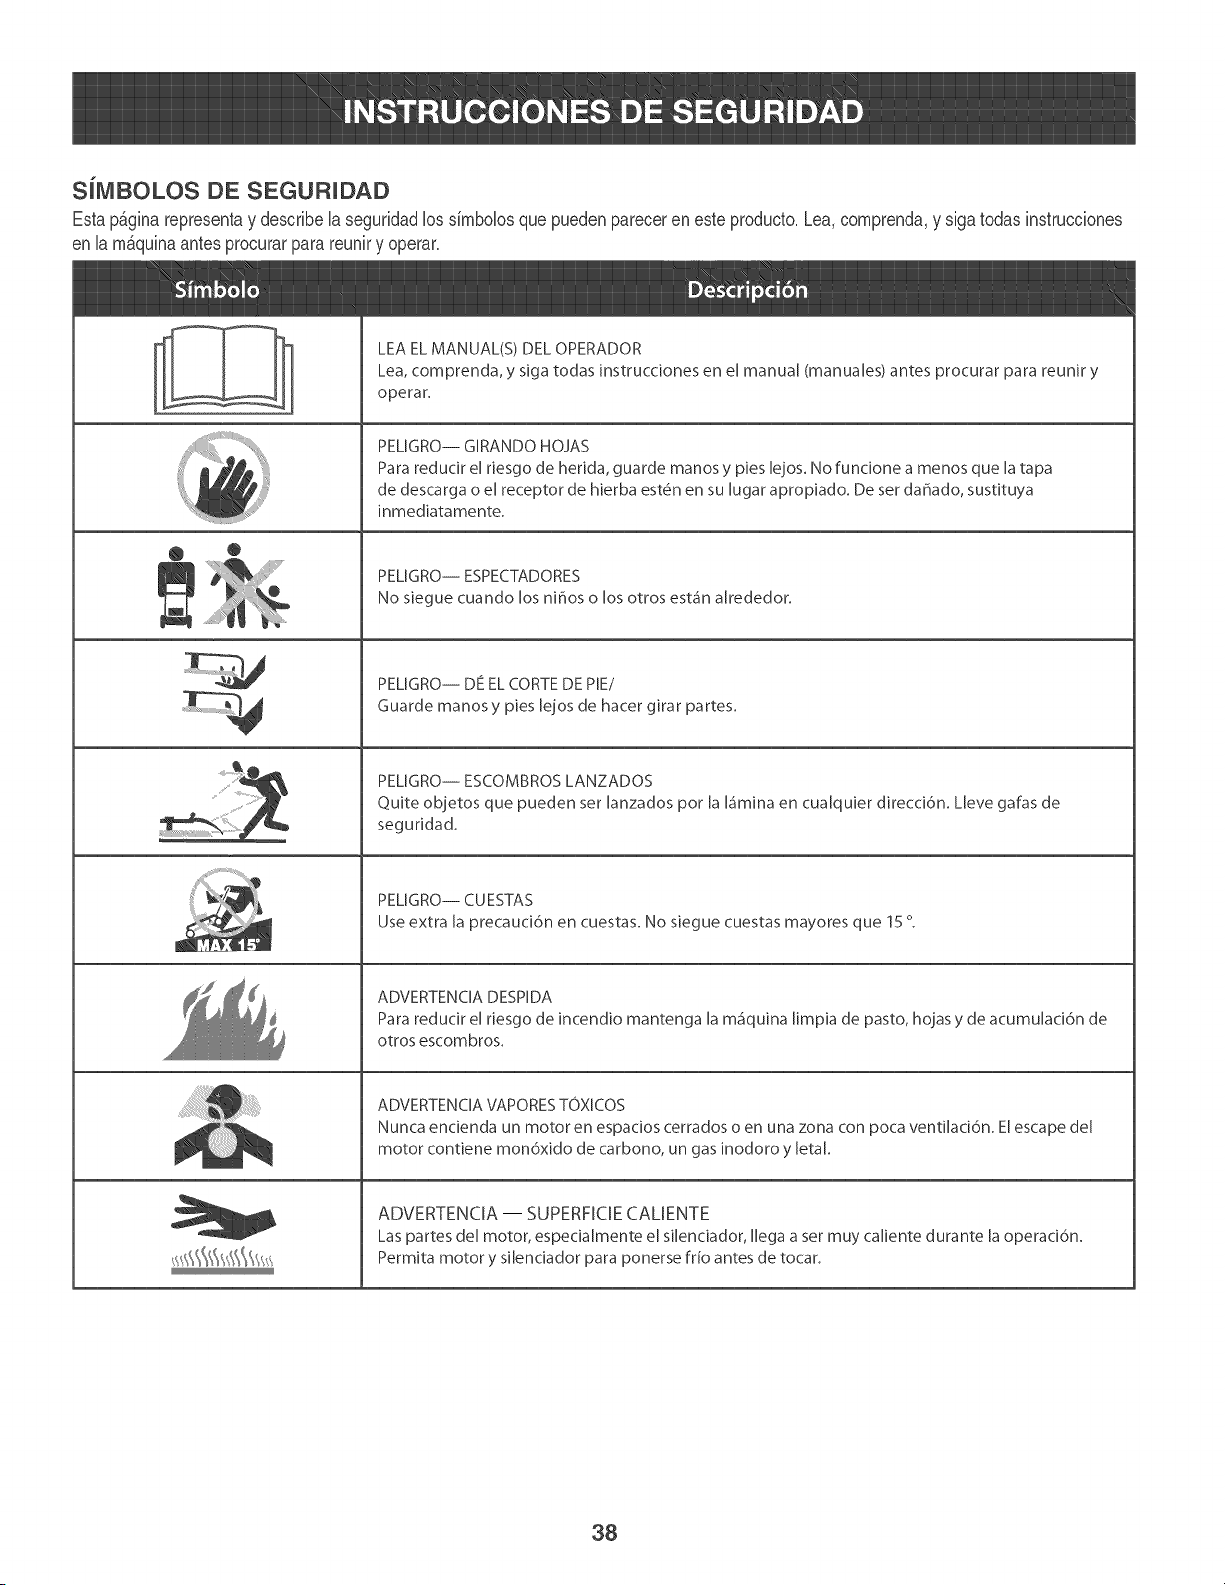
SiMBOLOS DE SEGURUDAD
Estapaginarepresentay describela seguridadlos simbolosque puedenpareceren esteproducto.Lea,cornprenda,y sigatodasinstrucdones
en la rnaquinaantesprocurarpara reuniry operar.
°
i
LEA EL MANUAL(S) DEL OPERADOR
Lea, comprenda, y siga todas ]nstrucdones en el manual (manuales) antes procurar para reunir y
operar.
PELiGRO-- GiRANDO HOJAS
Para redudr e[ r]esgo de herida, guarde manos y pies [ejos. No funcione a menos que [a tapa
de descarga o e[ receptor de hierba est_n en su [ugar apropiado. De set da_ado, sustituya
[nmediatamente.
PELIGRO-- ESPECTADORES
No siegue cuando los nitros o los otros est_in alrededor.
PELIGRO-- DE EL CORTE DE PiE/
Guarde manos y pies iejos de hacer gJrar partes.
PELiGRO-- ESCOMBROS LANZADOS
Quite objetos que pueden set lanzados pot la Limina en cuaiquier direcc]6n. Lieve gafas de
seguridad.
PELiGRO-- CUESTAS
Useextra [a precauc]6n en cuestas. No siegue cuestas mayores que 15 °.
ADVERTENCIA DESPiDA
Para reducir el riesgo de ]ncend[o mantenga [a m_iquina [[mpia de pasto, hojas y de acumuiad6n de
otros escombros.
ADVERTENCiAVAPORESTOXICOS
Nunca encienda un motor en espados cerrados o en una zona con poca ventilad6n. Elescape del
motor contJene mon6xJdo de carbono, un gas Jnodoro y ietai.
ADVERTENCIA -- SUPERFICIE CALIENTE
Las partes del motor, especialmente el silenciador, Ilega a ser muy cal]ente durante la operaci6n,
Perm]ta motor y s]lendador para ponerse frio antes de tocar,
38
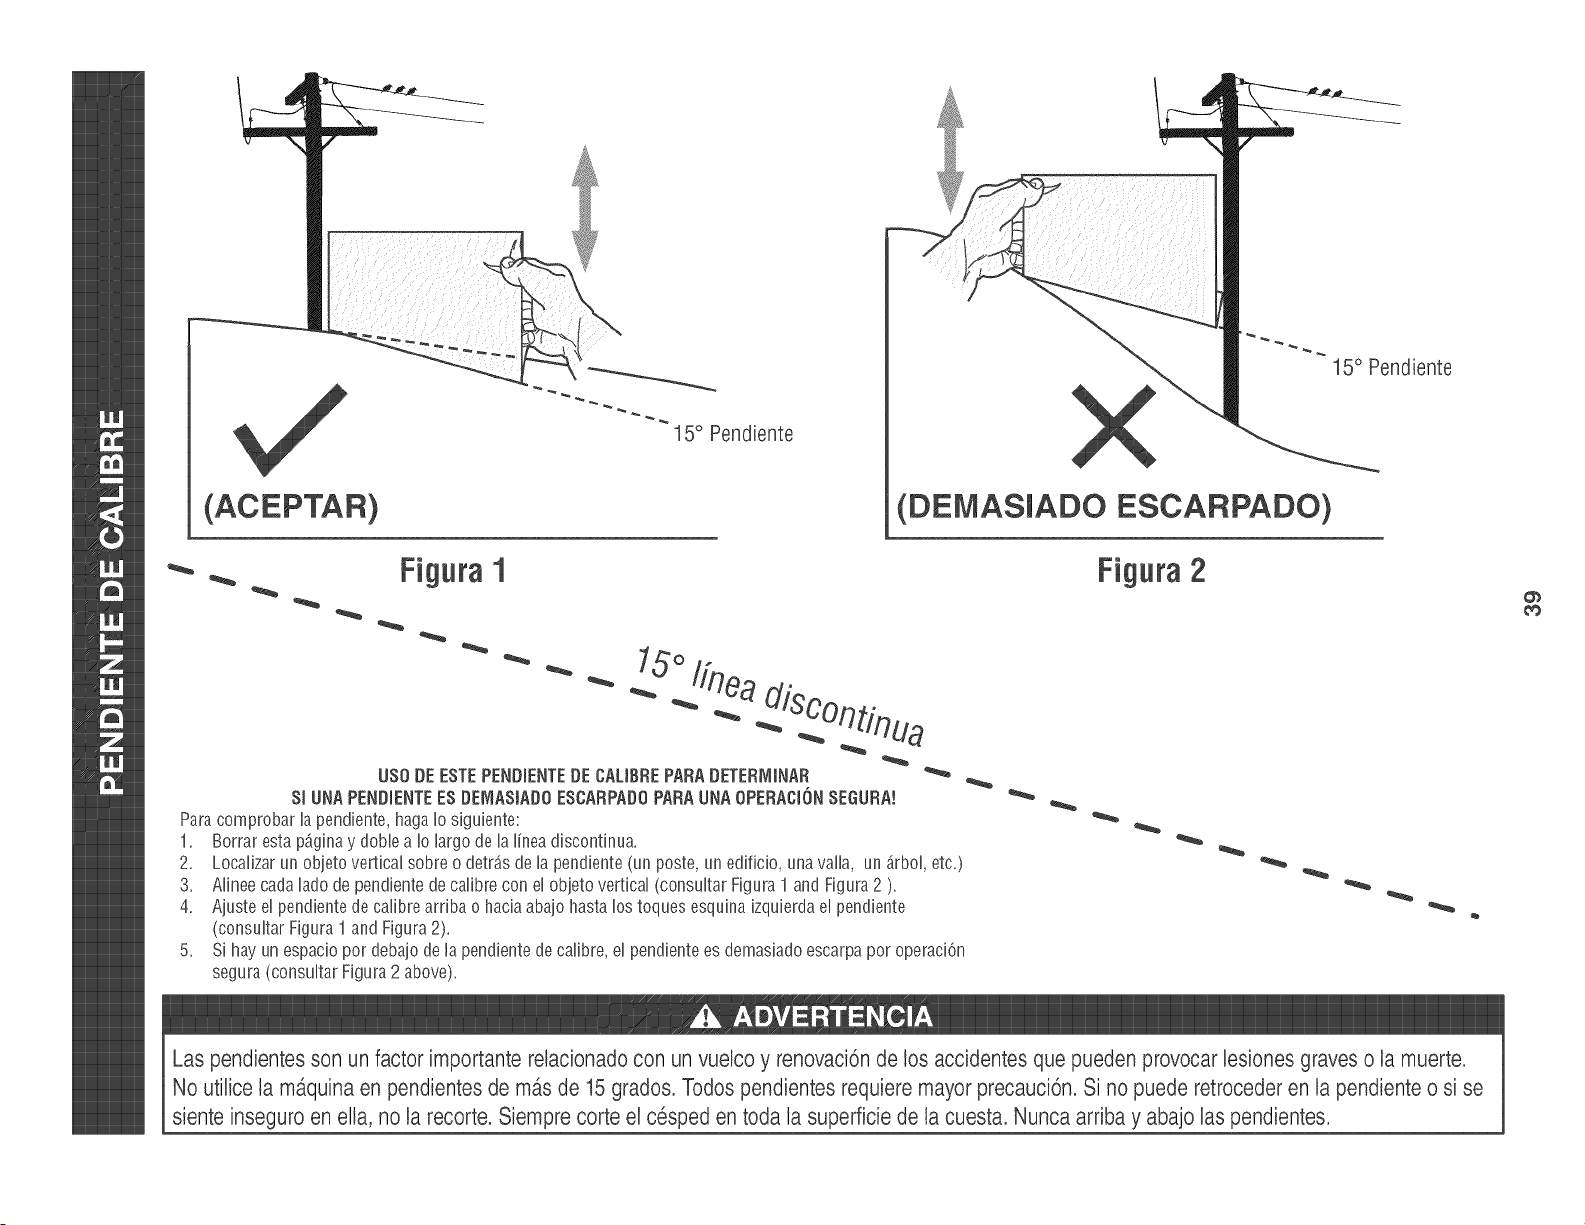
•'- ,,. Figura I
t5 ° Pendiente
15° Pendiente
(DEMAStADO ESCARPADO)
Figura 2
¢'O
US0DEESTEPENDIENTEDECALIBREPARADETERB-_iNAR
Si UNA PENDiENTEES DEMASiADOESCABPADOPABA UNA OPEBACiONSEGUBA!
Paracomprobarlapendiente,hagaIo siguiente:
1.
2.
3.
4.
5.
Borrarestap_.ginay domea Io largode la lineadiscontUnua.
Localizarunobjetoverticalsobreo detr_.sde h pendiente(un poste,un edificio,unavafla, un_.rbol,etc.)
Afineecadaladodependientedecalibreconelobjetovertical(consultarFigura1and Figura2 ).
Ajusteel pendientede calibrearribao haciaabajohastalostoquesesquinaizquierdael pendiente
(consultarFigura1 andFigura2).
Sihay unespaciopor debajodela pendientede calibre,el pendientees demasiadoescarpapor operaciOn
segura(consultarFigura2 above).
Las pendientesson un factor importante relacionadocon un vuelco y renovaci6nde los accidentes que pueden provocar lesiones graves o ta muerte.
No utilice ta maquina en pendientes de m_.sde 15grados. Todos pendientesrequiere mayor precauci6n.Si no puede retrocederen ta pendiente o si se
siente inseguro en ella, no ta recorte. Siempre corte el cesped en toda la superficie de la cuesta. Nunca arriba y abajo las pendientes.
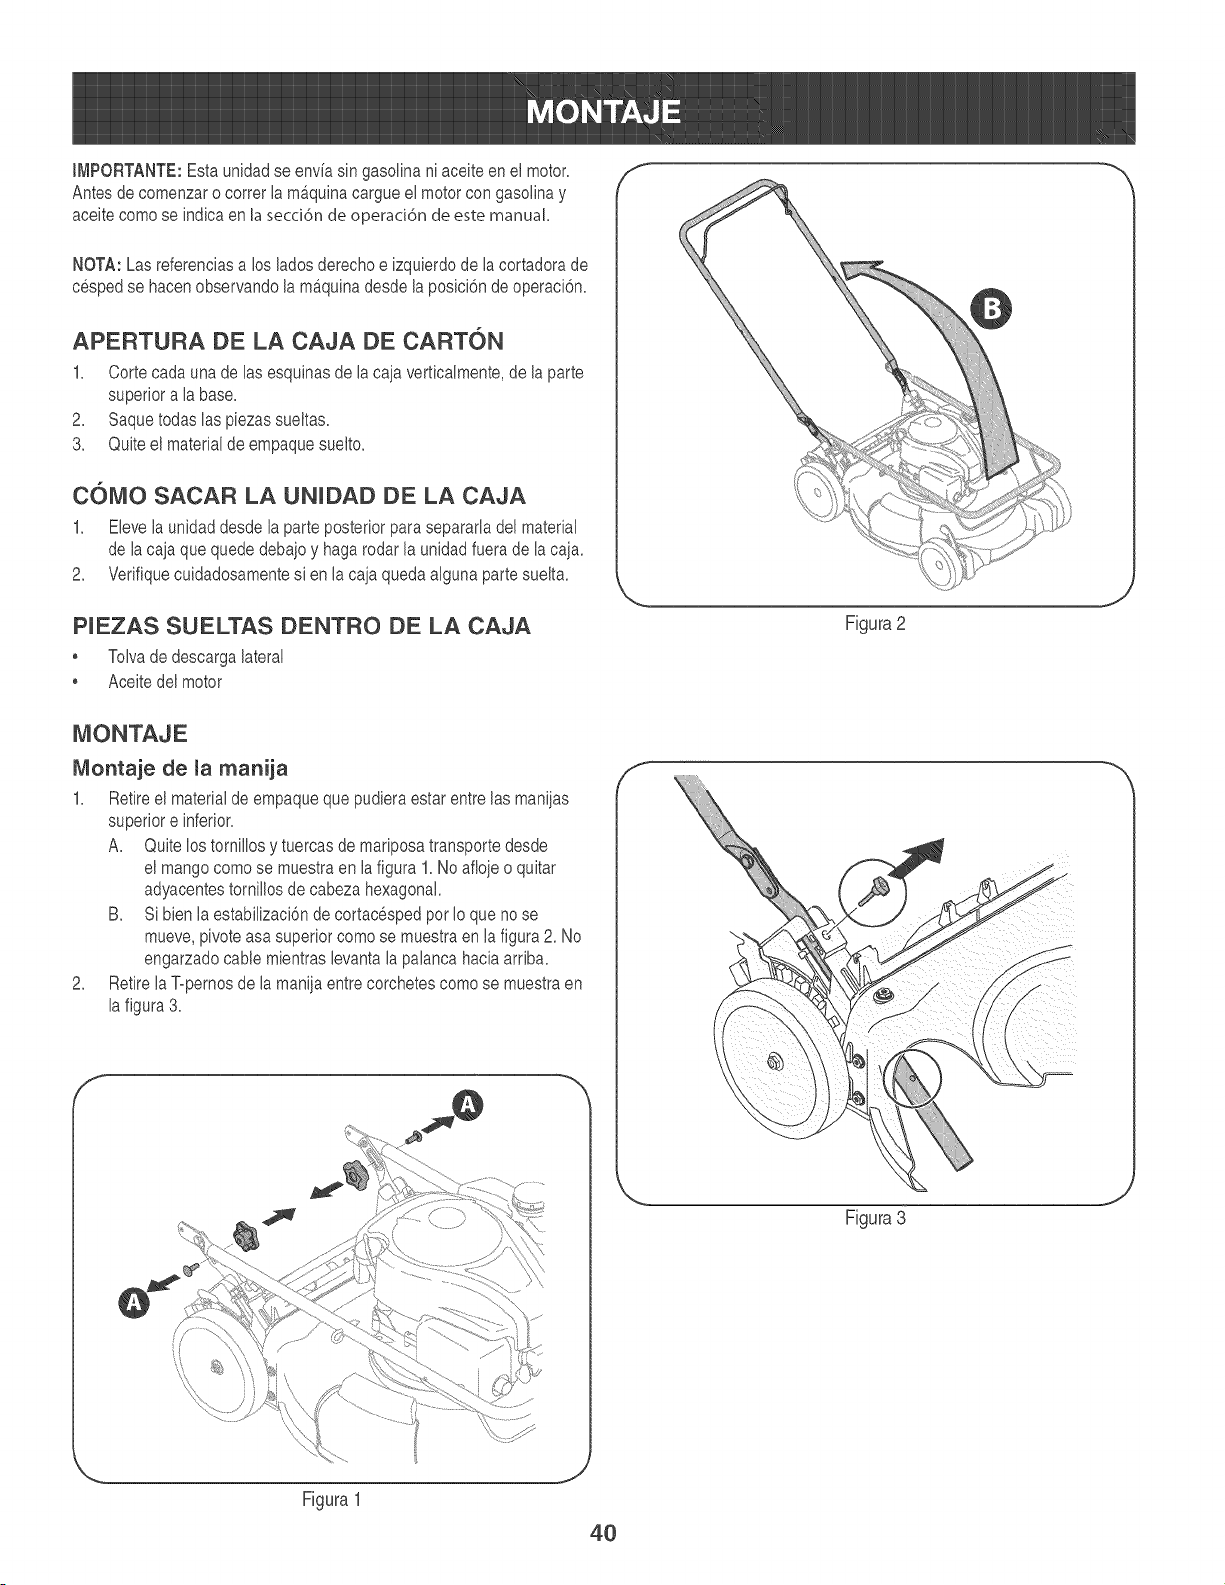
IMPORTANTE: Esta unidad se env[a sin gasoiina ni aceite en ei motor.
Antes de comenzar o cotter ia maquina cargue el motor con gasoiina y
aceite como se indica en [a secc]6n de operad6n de este manual
NOTA: Las referencias a los lados derecho e izquierdo de ia cortadora de
cesped se hacen observando la m_.quinadesde la posici6n de operaci6n.
APERTURA DE LA CAJA DE CART6N
1. Oorte cada una de Ias esquinas de la caja verticaimente, de la parte
superior a Ia base.
2. Saquetodas ias piezas sueitas.
3. Quite el material de empaque suelto.
C6MO SACAR LA UNUDAD DE LA CAJA
1. Eleve Ia unidaddesde Ia parte posterior para separaria del materiai
de Ia caja que quede debajo y haga rodar la unidad fuera de Ia caja.
2. Verifique cuidadosamente si en la caja queda alguna parte sueita.
PUEZAS SUELTAS DENTRO DE LA CAJA
Tolvade descarga laterai
Aceite dei motor
f
Figura2
J
Montaje de la manija
1. Retire el material de empaque que pudiera estar entre las manijas
superior e inferior.
A. Quite los torniiios y tuercas de mariposa transporte desde
el mango como se muestra en Ia figura 1. No afioje o quitar
adyacentes torniilos de cabeza hexagonal.
B. Si bien ia estabiiizaci6n de cortacesped pot Io que no se
mueve, pivoteasa superior como se muestra en ia figura 2. No
engarzado cable mientras levanta la paianca haciaarriba.
2. Retire ia Topernosde la manija entre corchetes como se muestraen
la figura 3.
f
Figura 3
J
Figura 1
40
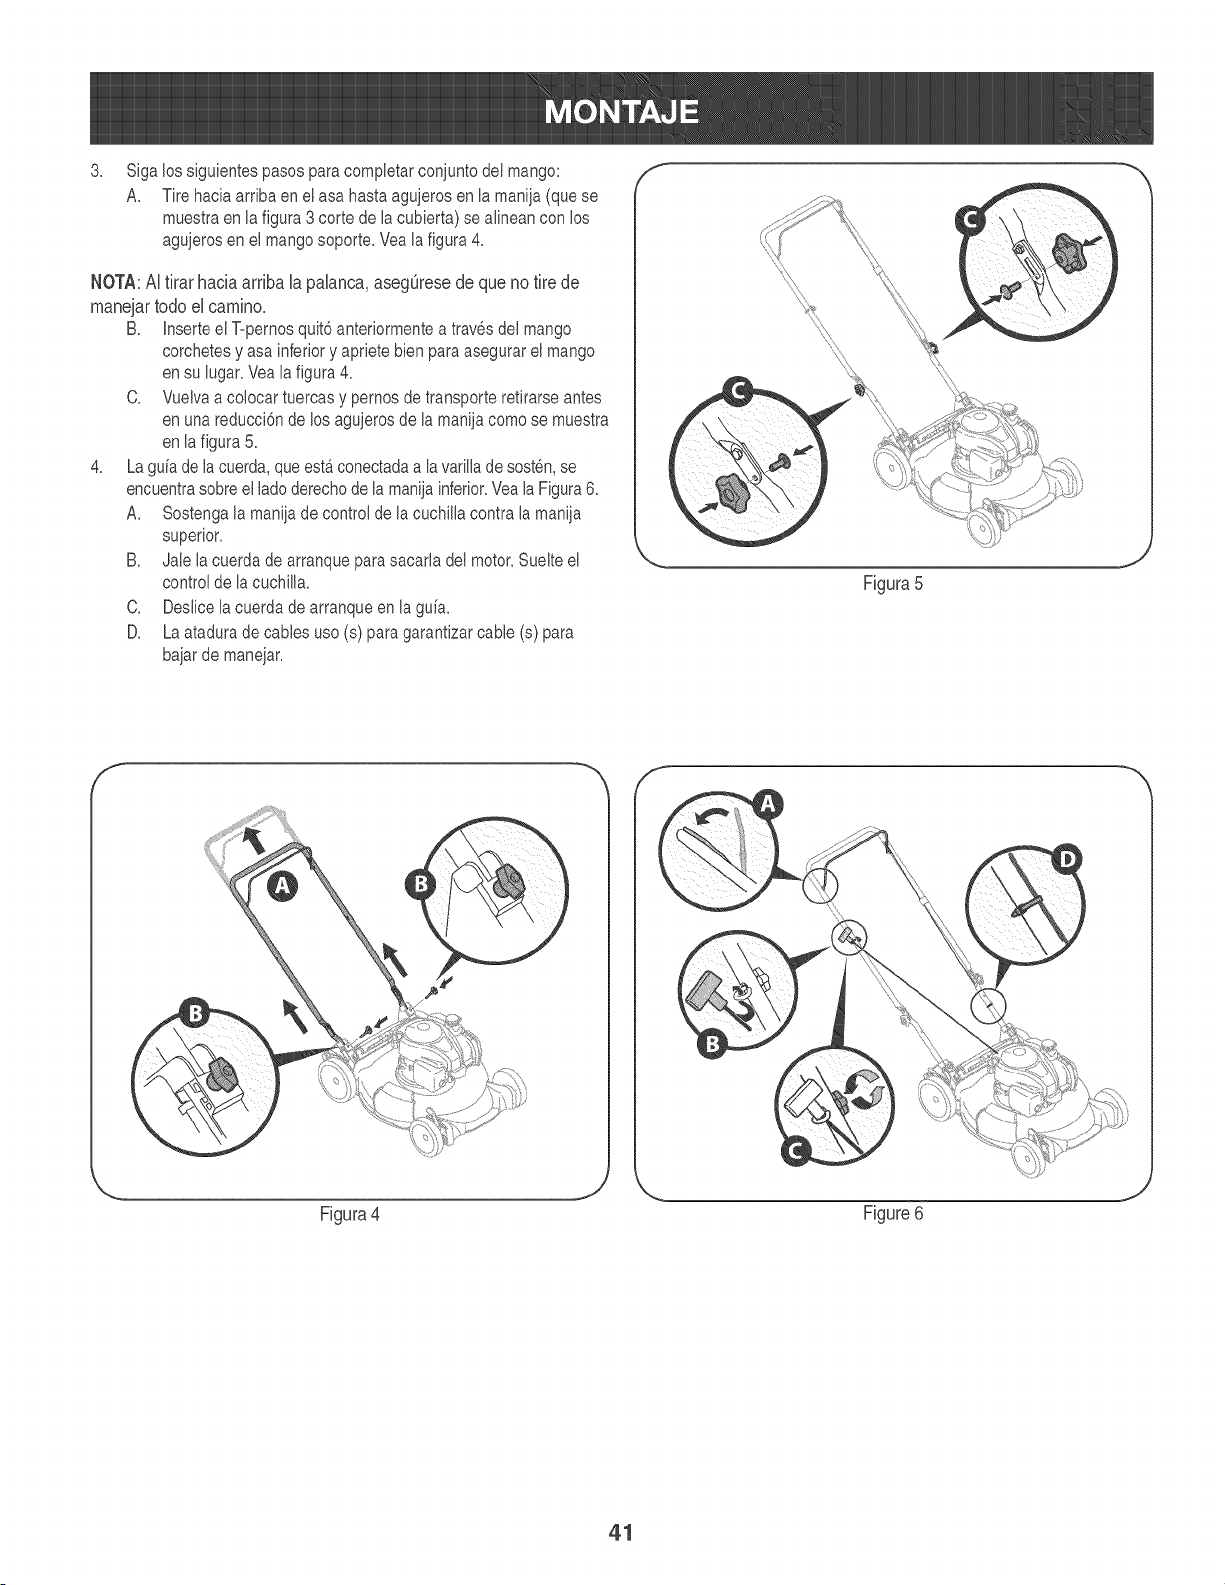
3.
Siga los siguientes pasos para compietar conjuntodeI mango:
A. Tire hacia arriba en eI asa hasta agujeros en Ia manija (que se
muestra en la figura3 torte de Ia cubierta) se alinean con los
agujeros en el mango soporte. Vea Jafigura 4.
NOTA: AI firar hacia arfiba la palanca, aseg@ese de que no tire de
mane]ar todo el camino.
B. Inserte ei Topernosquit6 anteriormente a traves dei mango
corchetes y asa inferior y apriete bien paraasegurar el mango
en su iugar. Veaia figura 4.
C. VueJvaa coiocar tuercas y pernos de transporte retirarse antes
en una reducci6n de Josagujeros de Jamanija como se muestra
en ia figura 5.
4. La gu[a de ia cuerda, que esta.conectada a iavariiia de sosten, se
encuentrasobre ei iadoderecho de ia manija inferior.Vea ia Figura6.
A. Sostenga ia manija de control de ia cuchilla contra ia manija
superior.
B. Jab Jacuerda de arranque parasacarla del motor. SueJteel
controJde ia cuchiJla.
C. Desiice ia cuerda de arranque en ia gu[a.
D. La atadura de cabJesuso (s} para garantizar cabJe(s) para
bajar de manejar.
Figura5
f
J
Figura 4 Figure6
41
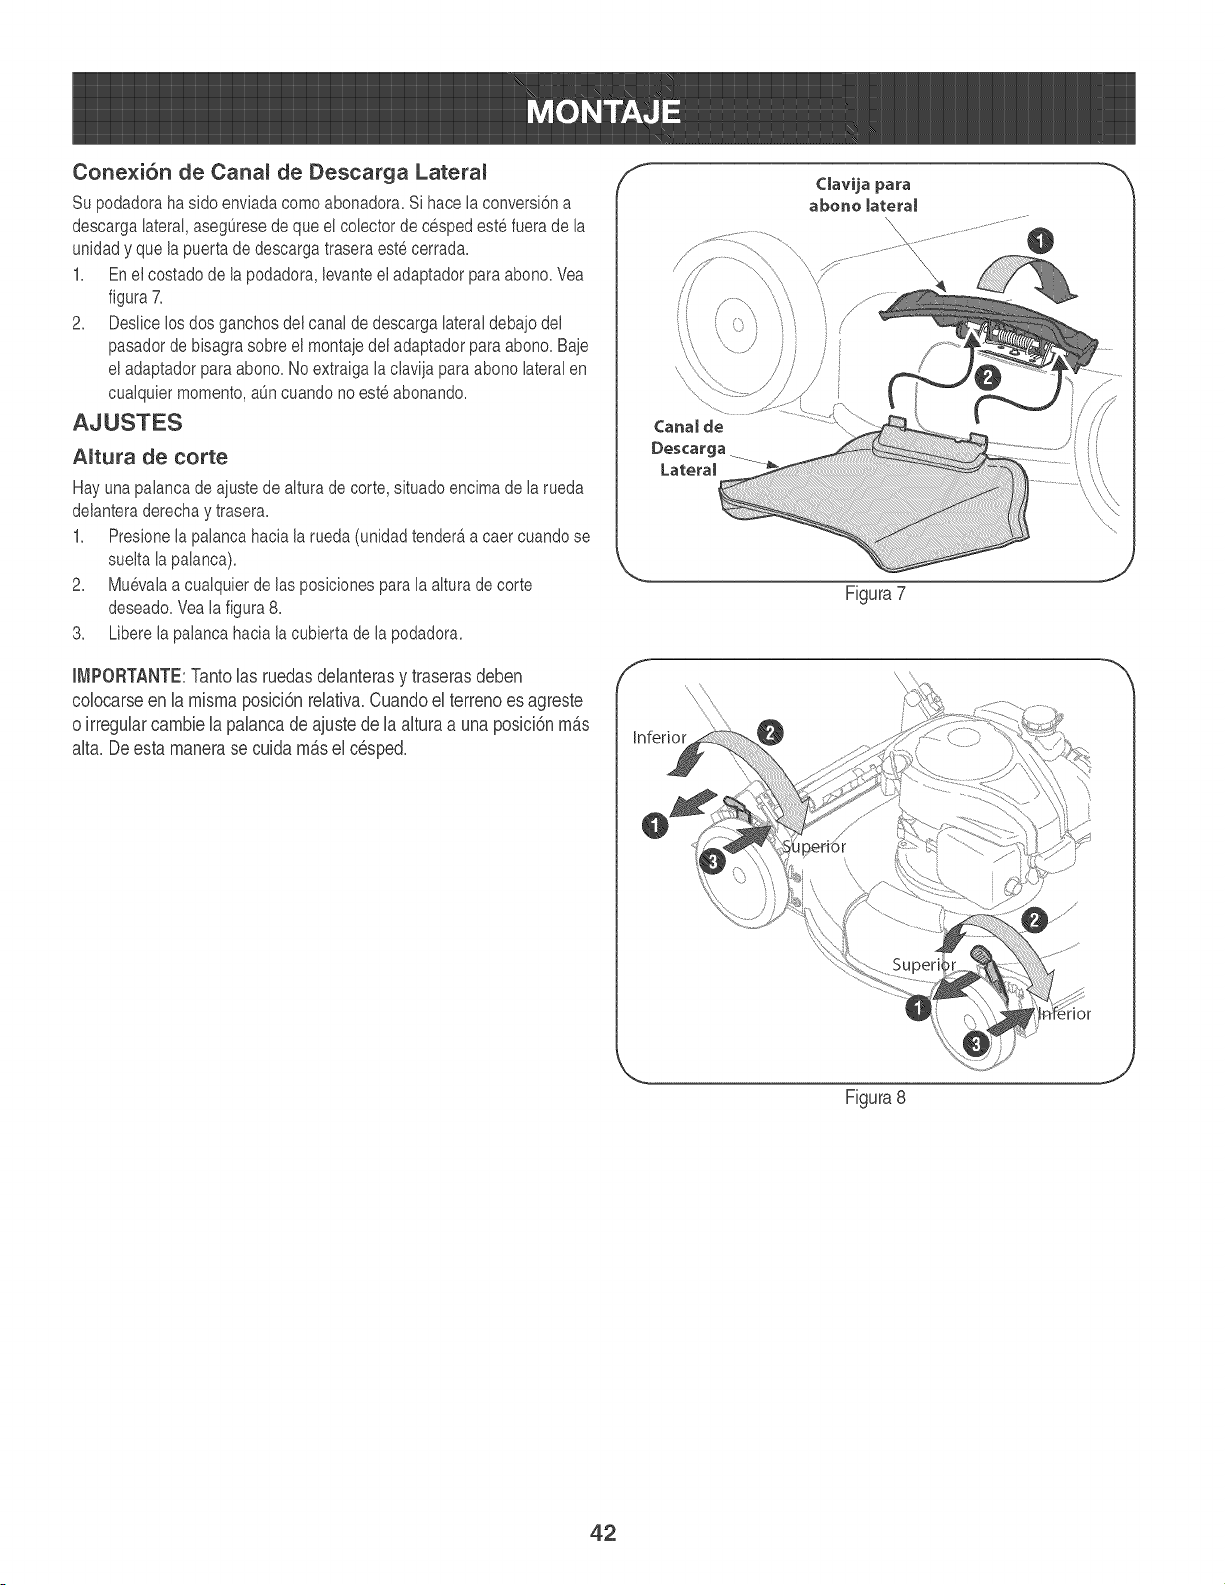
Cone×i6n de Canam de Descarga Lateram
Su podadora ha sido enviada como abonadora. Si hace ia conversi6n a
descarga lateral,aseg0rese de que ei coiector de cesped est_ fuera de la
unidad y que la puerta de descarga traseraest_ cerrada.
1. En ei costado de la podadora, levante ei adaptador para abono. Vea
figura 7.
2. Desiice los dos ganchos del canal de descarga lateral debajo dei
pasador de bisagrasobre el montaje dei adaptador para abono. Baje
el adaptador para abono. No extraiga la ciavija para abono lateral en
cuaiquier momento, aOncuando no est_ abonando.
AJUSTES
Amtura de corte
Hay una palanca de ajuste de aitura de corte, situado encima de ia rueda
delantera derecha y trasera.
1. Presione la palanca hacia la rueda (unidad tendera,a caer cuando se
suelta Ia palanca).
2. Muevaiaa cuaiquier de las posiciones para la aitura de corte
deseado. Vea ia figura 8.
3. Libere la paianca hacia la cubierta de la podadora.
IMPORTANTE:Tantolas ruedasdelanterasy traserasdeben
colocarseen la mismaposM6nrelativa.Cuandoelterrenoes agreste
o irregularcambiela palancade ajustede la alturaa unaposici6nmb.s
alta.Deesta manerase cuidamb.selc6sped.
f
f
.....................................
Figura7
[nfer
Figure8
42
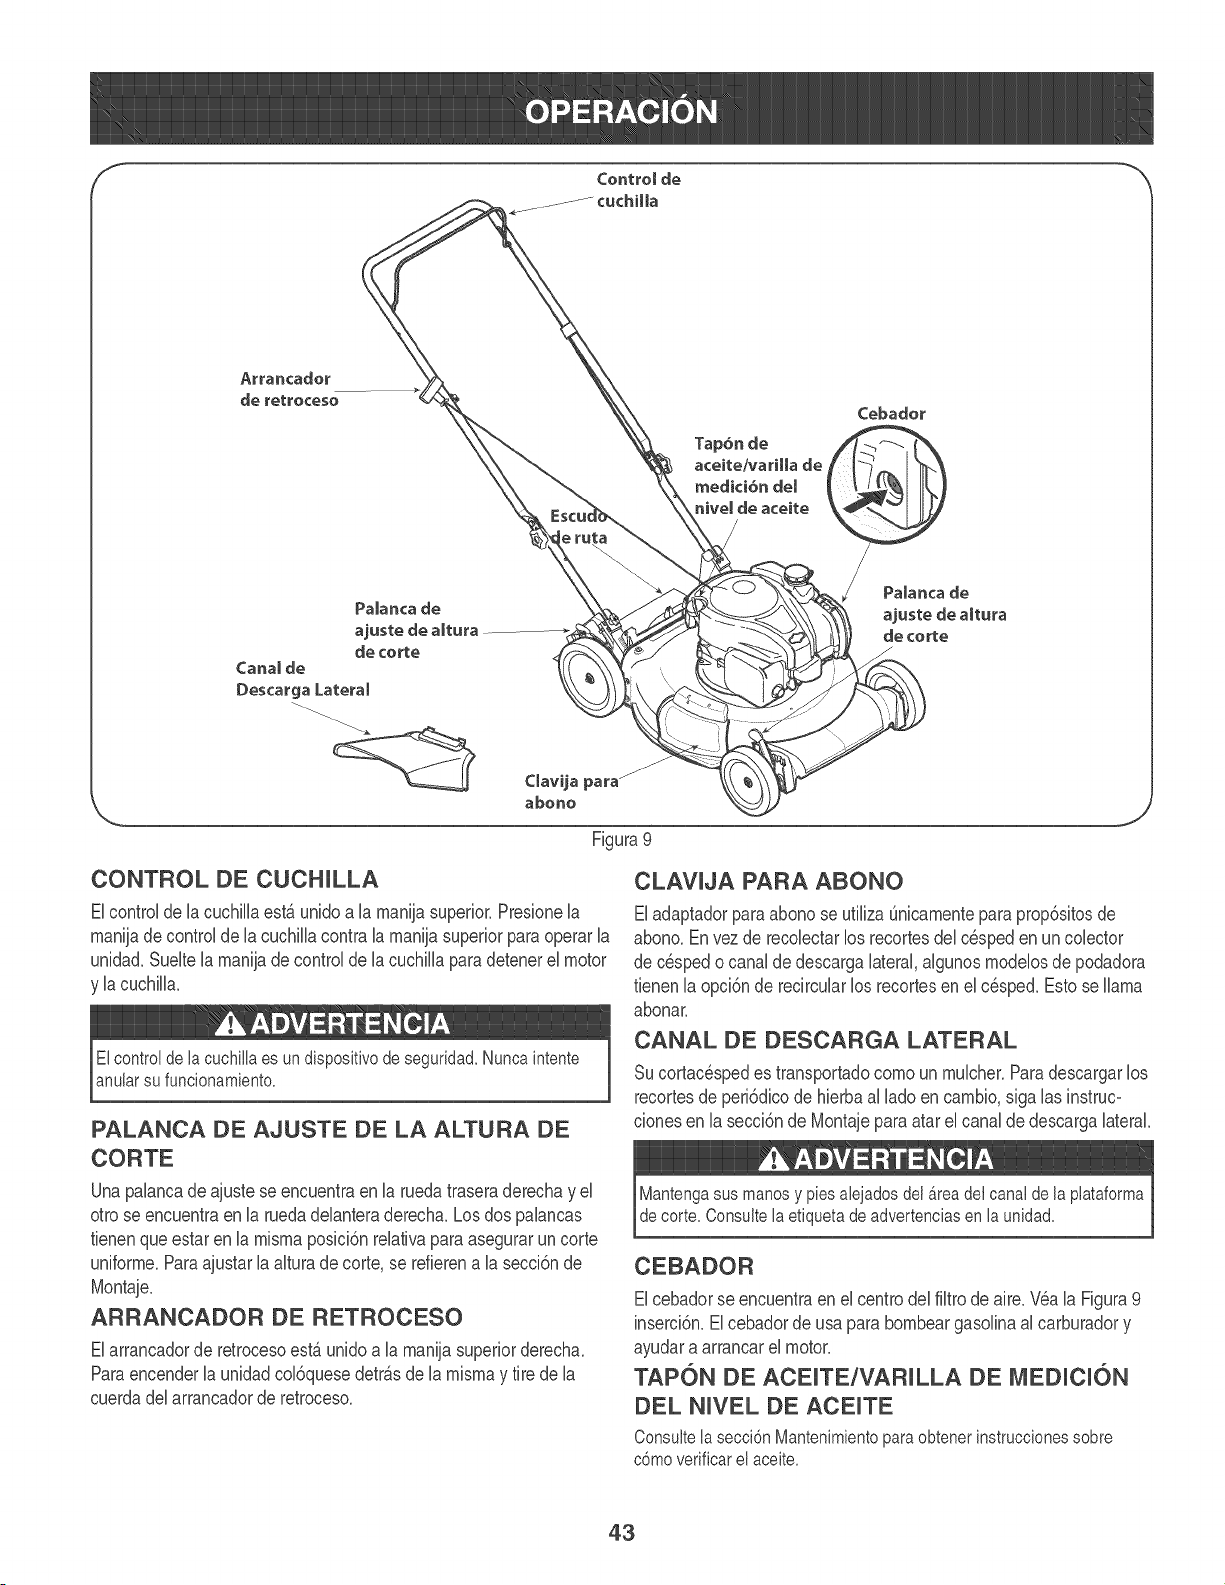
CONTROL DE CUCHULLA
Elcontrolde la cuchillaesta unidoa la manijasuperior.Presionela
manijade controlde la cuchillacontrala manijasuperiorpara operarla
unidad.Sueltela manijade controlde lacuchillapara detenerel motor
y la cuchilla.
El control de ia cuchiiia es un dispositivo de seguridad. Nunca intente
anular su funcionamiento.
PALANCA DE AJUSTE DE LA ALTURA DE
CORTE
Unapalancade ajustese encuentraen la ruedatraseraderechay el
ottose encuentraen la ruedadelanteraderecha.Losdos palancas
tienenque estaren la mismaposici6nrelativapara aseguraruncorte
uniforme.Paraajustarla alturade corte,se refierena la secci6nde
Montaje.
ARRANCADOR DE RETROCESO
Elarrancadorde retrocesoesta unidoa la manijasuperiorderecha.
Paraencenderla unidadcol6quesedetrb.sde la mismay tirede la
cuerdadel arrancadorde retroceso.
CLAWJA PARA ABONO
Eladaptadorparaabono seutiliza Onicamenteparaprop6sitosde
abono.En vezde recolectarlos recortesdel c6spedenun colector
de c6spedo canalde descargalateral,algunosmodelosde podadora
tienenla opci6nde recircularlos recortesen el c_sped.Estose llama
abonar.
CANAL DE DESCARGA LATERAL
Sucortac6spedes transportadocomoun mulcher.Paradescargarlos
recortesde peri6dicode hierbaal ladoen cambio,siga las instruc=
clonesen la secci6nde Montajeparaatar elcanalde descargalateral.
Mantenga sus manosy pies abjados deIa.readel canal de la piataforma
de corte. Consulte la etiqueta de advertencias en la unidad.
CEBADOR
Elcebadorse encuentraen elcentrodel filtrode aire.V_a la Figura9
inserci6n.El cebadorde usa parabombeargasolinaal carburadory
ayudara arrancarel motor.
TAPON DE ACEUTE/VARULLA DE MEDUCKSN
DEL NWEL DE ACEUTE
Consuite ia secci6n Mantenimbnto para obtener instrucciones sobre
c6mo verificar ei aceite.
43
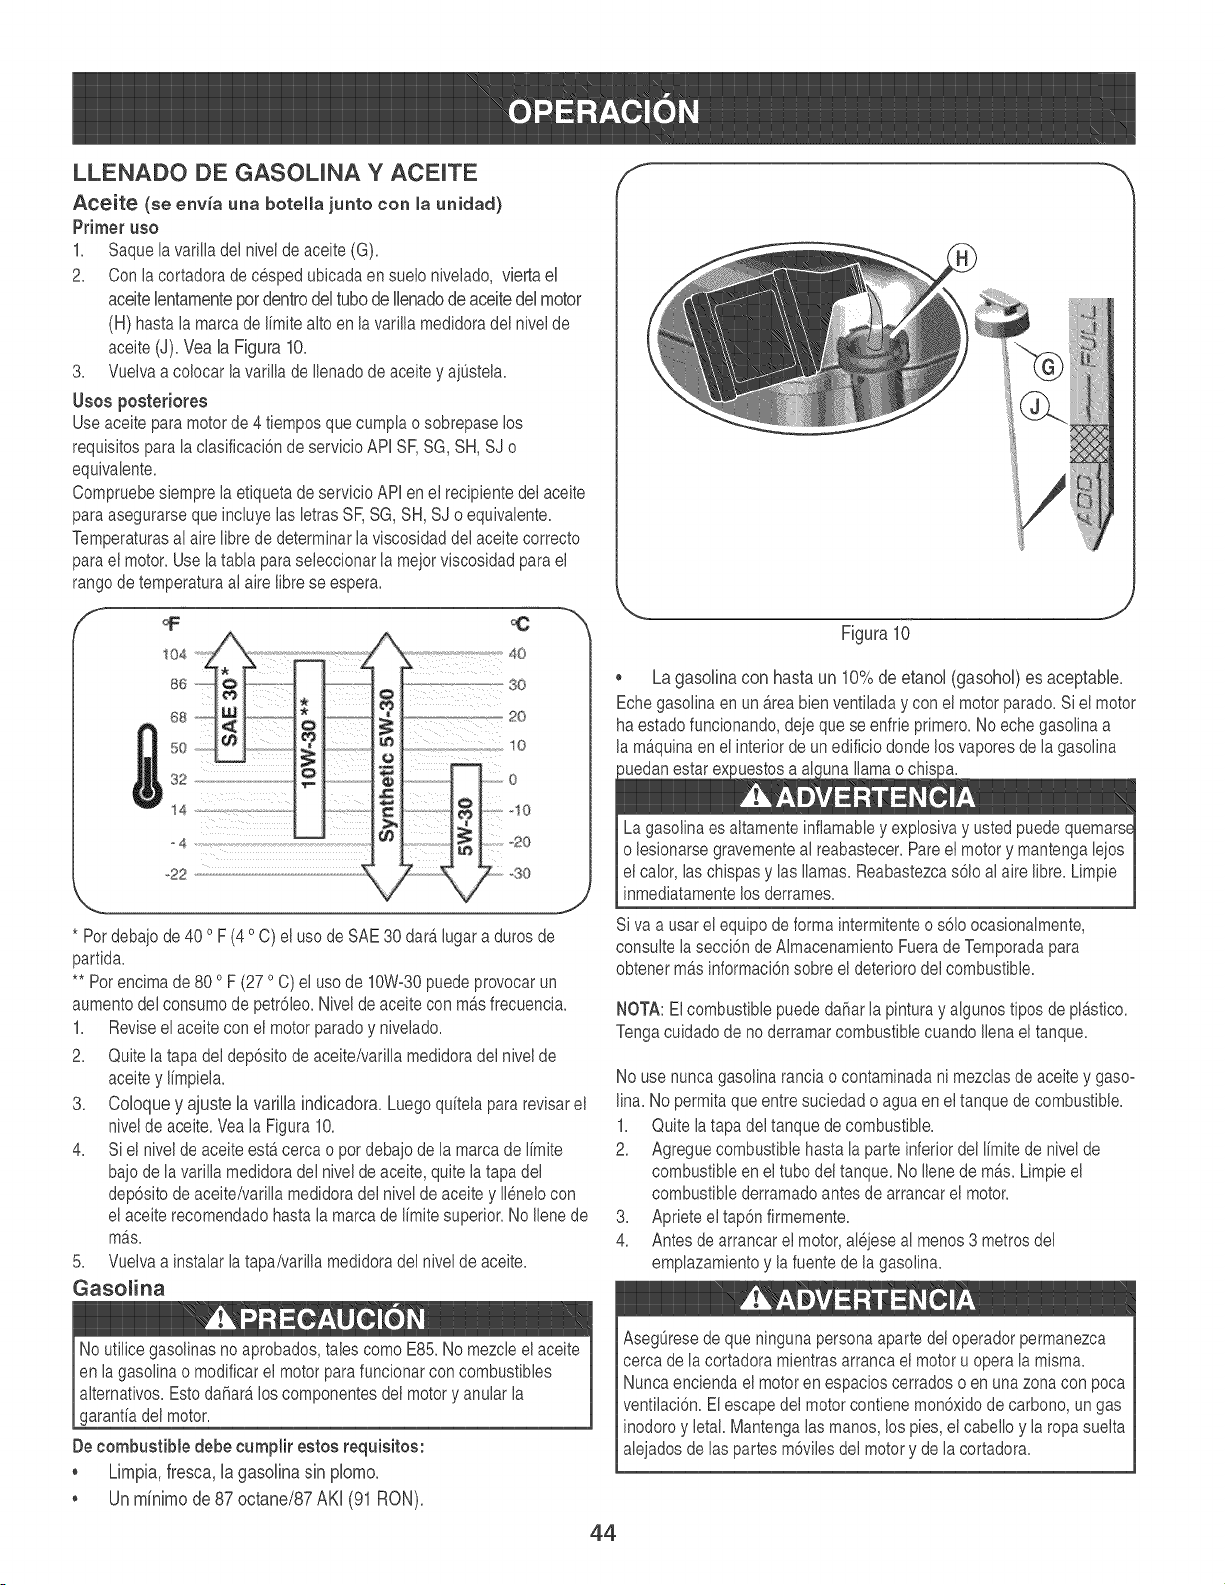
LLENADO DE GASOUNA Y ACEUTE
Aceite (se env_a una boteHa ]unto con la unidad)
Primer uso
1. Saque ia variila del nivei de aceite (G).
2. Con la cortadora de cesped ubicada en sueio nivelado, vbrta eI
aceRebntamente per dentro deI tube de Ibnado de aceRedeI motor
(H) hasta Ia marca de I[mite alto en la varilla medidora del nivel de
aceite (J). Vea la Figura 10.
3. Vueiva a colocar la varilla de Ilenadode aceite y ajOstela.
Usos posteriores
Use aceite para motor de 4 tiempos que cumpia o sobrepase los
requisitos para Ia clasificaci6n de servicio API SK SG, SH, SJ o
equivaiente.
Compruebe siempre ia etiqueta de servicio API en ei recipiente deI aceite
para asegurarseque inciuye Ias IetrasSK SG, SH, SJ o equivalente.
Temperaturasai aire iibre de determinar ia viscosidad dei aceite correcto
para eI motor. Use Ia tabla para seleccionar Ia mejor viscosidad para el
tango de temperatura ai aire libre se espera.
f
_o4 ,[[ 40
4 ........................................................................................................................................................_ _20
--22.................................................................................................................,,,,,,,:, ,:, -30
* Pot debajo de 40 oF (4 oO) el uso de SAE30 data. lugar a duros de
partida.
** Pot encima de 80 oF (27 o C} el uso de 10W-30puede provocar un
aumentodei consumo de petr6leo. NiveJde aceite con m_.sfrecuencia.
1. Revise ei aceite con eJmotor parado y nivelado.
2. Quite ia tapa dei dep6sito de aceite/varilla medidora dei niveJde
aceite y I[mpieJa.
3. Coloque y ajuste la varilla indicadora. Luego quitela para revisar el
niveJde aceite. Vea ia Figura 10.
4. Si et nivel de aceite estfi cerca o pot debajo de Ia marca de I[mite
bajo de Ia varilIa medidora deI nivel de aceite, quite Ia tapa dei
dep6sito de aceite/varilla medidoradeJnivei de aceite y II@elo con
ei aceite recomendado hasta la marca de I[mitesuperior. No Ilene de
mas.
5. VueJvaa instalar la tapa/varilla medidora dei niveJde aceite.
GasoJina
No utilice gasolinas no aprobados, tales como E85. No mezcie el aceite
en ia gasoiina o modificar ei motor para funcionar con combustibles
aiternativos. Esto da_iara,los componentes dei motor y anuiar ia
garanfia deI motor.
De combustible debe cumptir eetoe requbitoe:
, Limpia, fresca, la gasoiina sin piomo.
, Un minimo de 87 octane/87 AKI (91 RON).
f --,,,
Figura10
, La gasolina con hasta un 10% de etanol (gasohol) es aceptable.
Eche gasolina en un a.reabien ventiiada y coneJmotor parado. Si el motor
ha estado funcionando, deje que se enfrie primero. No eche gasolina a
la mfiquina en ei interior de unedificio donde los vapores de la gasolina
)uedan estar @ _uestosa alcuna Ilama o chis _a.
La gasolina es aitamente infiamabie y expiosiva y usted puede
o lesionarse gravementeal reabastecer. Pare eJmotor y mantenga Iejos
eJcaior, ias chispas y ias llamas. Reabastezcas6lo ai aire libre. Limpie
inmediatamente los derrames.
Si va a usar ei equipo de forma intermitente o s61oocasionaimente,
consuJteia secci6n de Aimacenamiento Fuerade Temporada para
obtener m_.sinformaci6nsobre ei deterioro dei combustible.
NOTA: El combustible puede dahar ia pintura y aigunos tipos de pla.stico.
Tenga cuidado de no derramar combustible cuando Ilena ei tanque.
No use nunca gasolina rancia o contaminada ni mezclas de aceite y gaso-
Iina.No permita que entre suciedad o agua en el tanque de combustible.
1. Quite ia tapa dei tanque de combustible.
2. Agregue combustible hasta ia parte inferior dei i[mite de nivel de
combustible en ei tubo dei tanque. No Ilene de m_.s.Limpieei
combustible derramado antes de arrancar ei motor.
3. Aprieteeitap@ firmemente.
4. Antes de arrancar et motor,alejese aI menos 3 metros del
emplazamiento y la fuente de la gasolina.
AsegOresede que ninguna persona aparte dei operador permanezca
cerca de ia cortadora mientras arranca el motor u opera ia misma.
Nunca encienda ei motor en espacios cerrados o en una zona con poca
ventiiaci6n. Ei escape dei motor contiene mon6xido de carbono, ungas
inodoro y ietak Mantenga ias manos, los pies, ei cabeiio y la ropa sueita
alejados de las partes m6viles del motor y de la cortadora.
44

PARA ENCENDER EL MOTOR
1_ Empujeet cebador tres veces_Veaia Figura 11_No cebe el motor
caiiente para reiniciarlo luego de una detenci6n breve.
NOTA: Si se pulsa el primer demasiadas veces, excesivo de combus _
tible se inundara el carburador y el motor va a ser dificil para empezar.
2. CoI6quese detr_.sde Ia podadora, apriete Ia manija de control de la
cuchilIay sostengala contra Ia manija superior.
3. Sostenga firmemente Ias dos manijas juntas, tome Ia manija del
arrancador de retroceso y tire de iacuerda para sacaria con un
movimiento ra.pidoy continuo. Vea la Figura 11.Mantenga firme ia
manija dei arrancador, deje que Ia cuerda regrese IentamenteaI
arrancador.Repitahasta que ei motor este en marcha. Deje que la
cuerda se enrosque lentamente de regreso.
De retracci6n rapida detcord6n de arranque (soborno) tirara de mano y
el brazo haciael motor m_tsr_.pidode Io que puede dejar ir. Las fracturas
de huesos, fracturas, contusiones o esguinces podr[a resultar.
PARA DETENER EL MOTOR
1. Suelte Ia manija de control de la cuchilla para detener el motor y la
cuchilla.
Figura11
Espere a que ia cuchiiia se haya detenido pot compieto antes de hacer
cualquier trabajo en la cortadora o de retirar el colector de cesped.
USO DE LA CORTADORA DE CO:SPED
AsegOresede que et cesped est&Iibrede piedras,palos, cablesu otros
objetos que pudiesenda_ar Ia cortadorao el motor.Dichos objetos pueden
serarrojadosaccidentalmentepot la cortadoraen cualquier direcci6ny
provocariesionespersonaiesgravesai operadory a otras personas.
AI operar una cortadora de cesped es posibte que objetos extra_os sean
arrojados a Ios ojos, Io cuaI puede da_arlos gravemente. Utilice siempre
l gafas de seguridaddurante la operaci6n de la cortadora de cesped o
I mientras la ajusta o repara.
USO COMO ABONADORA
Para abonar eUc6sped, quite eUcanaUde descarga UateraUde Ua
mb.quina.Para un abono eficiente, no corte c@spedhOmedo.Si el
c6sped ha creddo mb.sde 10,2 cm. (4 pulg.) no se recomienda el
uso de la podadora como abonadora. En ese caso, use el colector de
c6sped para embolsar los recortes.
Si goipea un objeto extraho, detenga ei motor. Retire ei cable de ia
buj[a, inspeccione detenidamente Ia cortadora para vet que no tenga
da_os, y repare el da_o antes de voiver a encender y operar. Eiexceso
de vibraci6n de ia cortadora durante la operaci6n es una indicaci6n de
daho. Se debe nspecc onar y reparar a un dad o antes posb e.
45
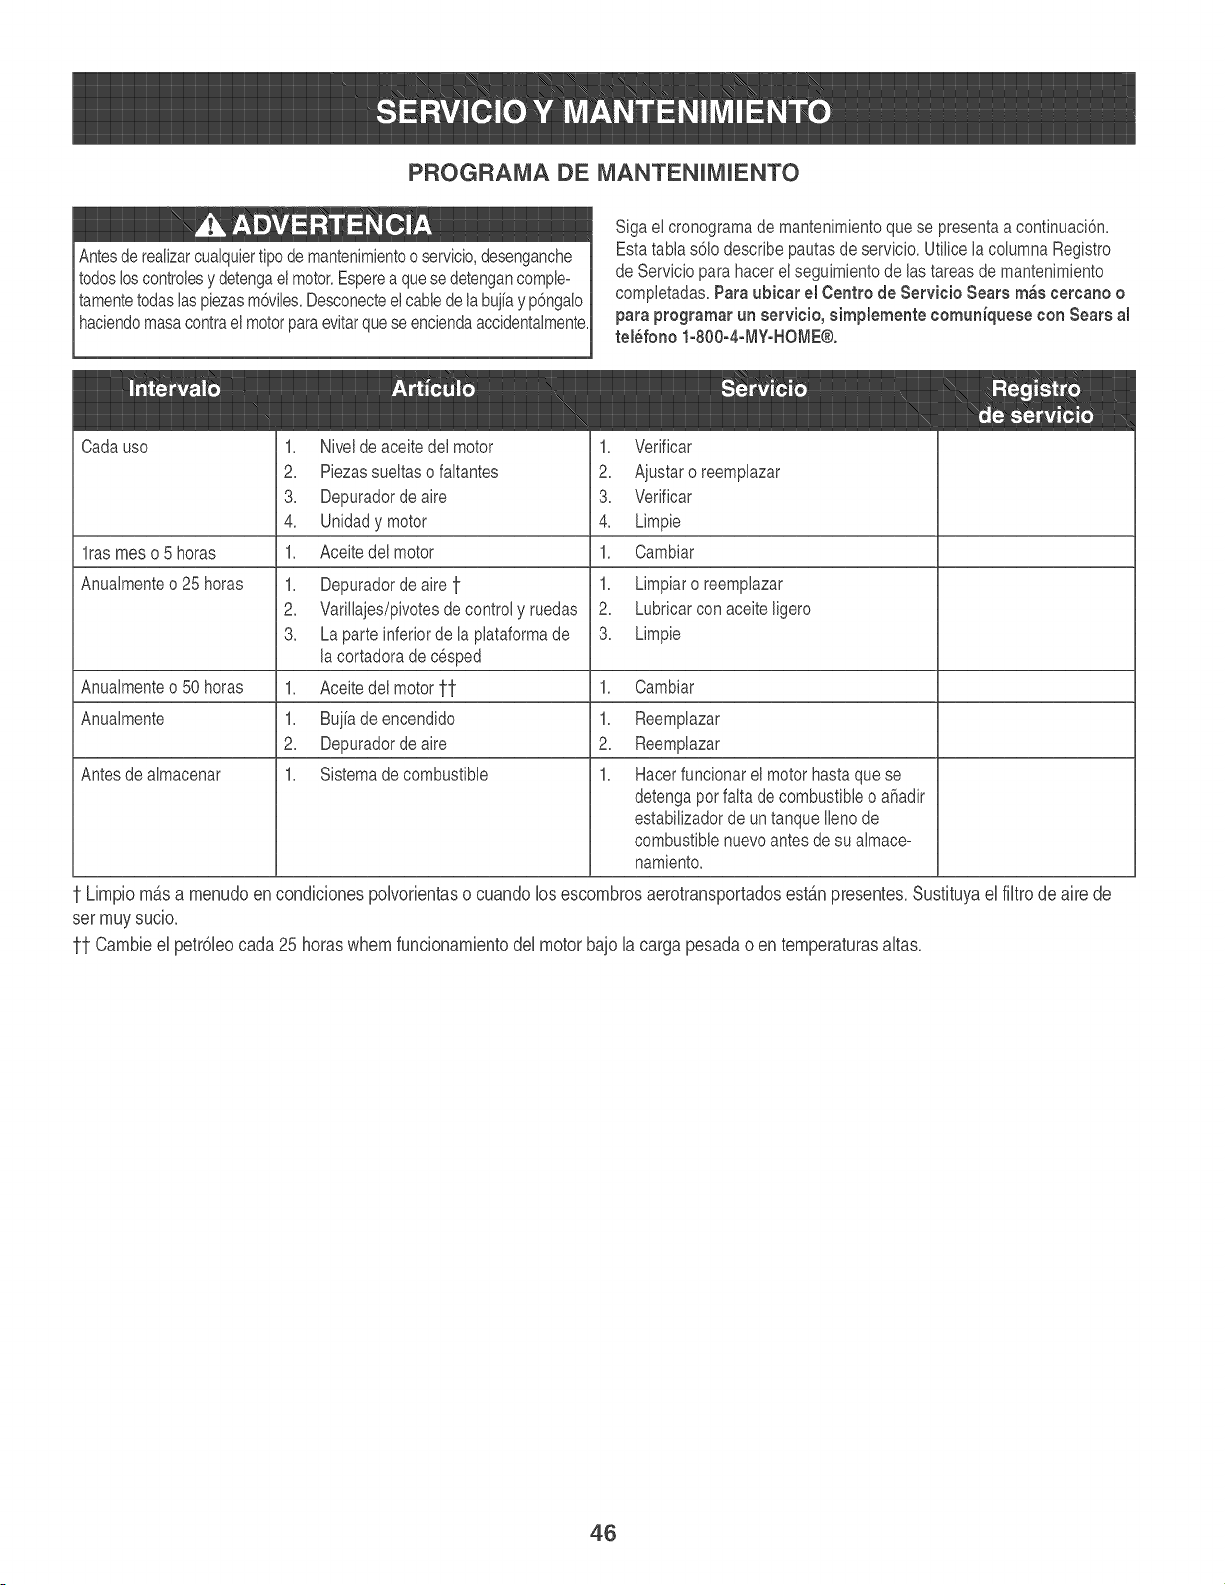
PROGRAMA DE MANTENUMUENTO
Antesde roaiizarcuaiquiertipo de mantenimientoo servicio,desongancho
todos loscontrolesy detengaot motor.Esperoa que sedotengancompie-
tamentetodas Iaspiezasm6viles.Dosconecteetcablede labuj[ay p6ngalo
hac ondo masacontrae motorparaevtarque so enc enda accdenta mente.
Siga oi cronograma de mantonimientoque se prosonta a continuaci6n.
Esta tabla s61odescribe pautasde sorvicio. Utiiice ia coiumna Registro
de Sorvicio para hacor oi soguimiontode las taroas de mantenimionto
compiotadas. Para ubicar el Contro de Servicio Sears m_s oeroano o
para programar un servicio, simpmementecomuniquese con Sears al
tel_fono 1=800=4=MY=HOME®°
Oada uso
lras rues o 5 horas
Anuaimonte o 25 horas
1. Verificar
2. Ajustaroroomplazar
3. Vorificar
4. Limpio
1. Cambiar
1. Limpiaroroomplazar
2. Lubricarcon acoiteligoro
3. Limpio
1. Nivelde aceitedel motor
2. Piozassueitaso faitantes
3. Dopuradordeairo
4. Unidad y motor
1. Aceitedoi motor
1. Dopuradordeairo t
2. Varillajos/pivotes de control y ruedas
3. La parto inferior de ia piataforma de
la cortadora de cesped
Aceito dol motor ft
Buj[a de oncondido
Dopurador de airo
Sistema de combustible
Anuaimonteo 50 horas 1. 1. Cambiar
Anuaimonte 1. 1.
2. 2.
Antes de aimaconar 1. 1.
Reemplazar
Reempiazar
Hacer funcionar oi motor hasta que so
detenga pot fatta de combustible o anadir
ostabiiizador de un tanquo iiono de
combustible nuevo antes de su aimaco-
namionto.
Limpiomb.sa menudoen condMonespolvorientaso cuandolos escombrosaerotransportadosestan presentes.Susfituyaelfiltro de aire de
ser muysudo.
1-1-Cambieel petr61eocada25 horaswherefundonamientodel motorbajo lacargapesadaoen temperaturasaltas.
46
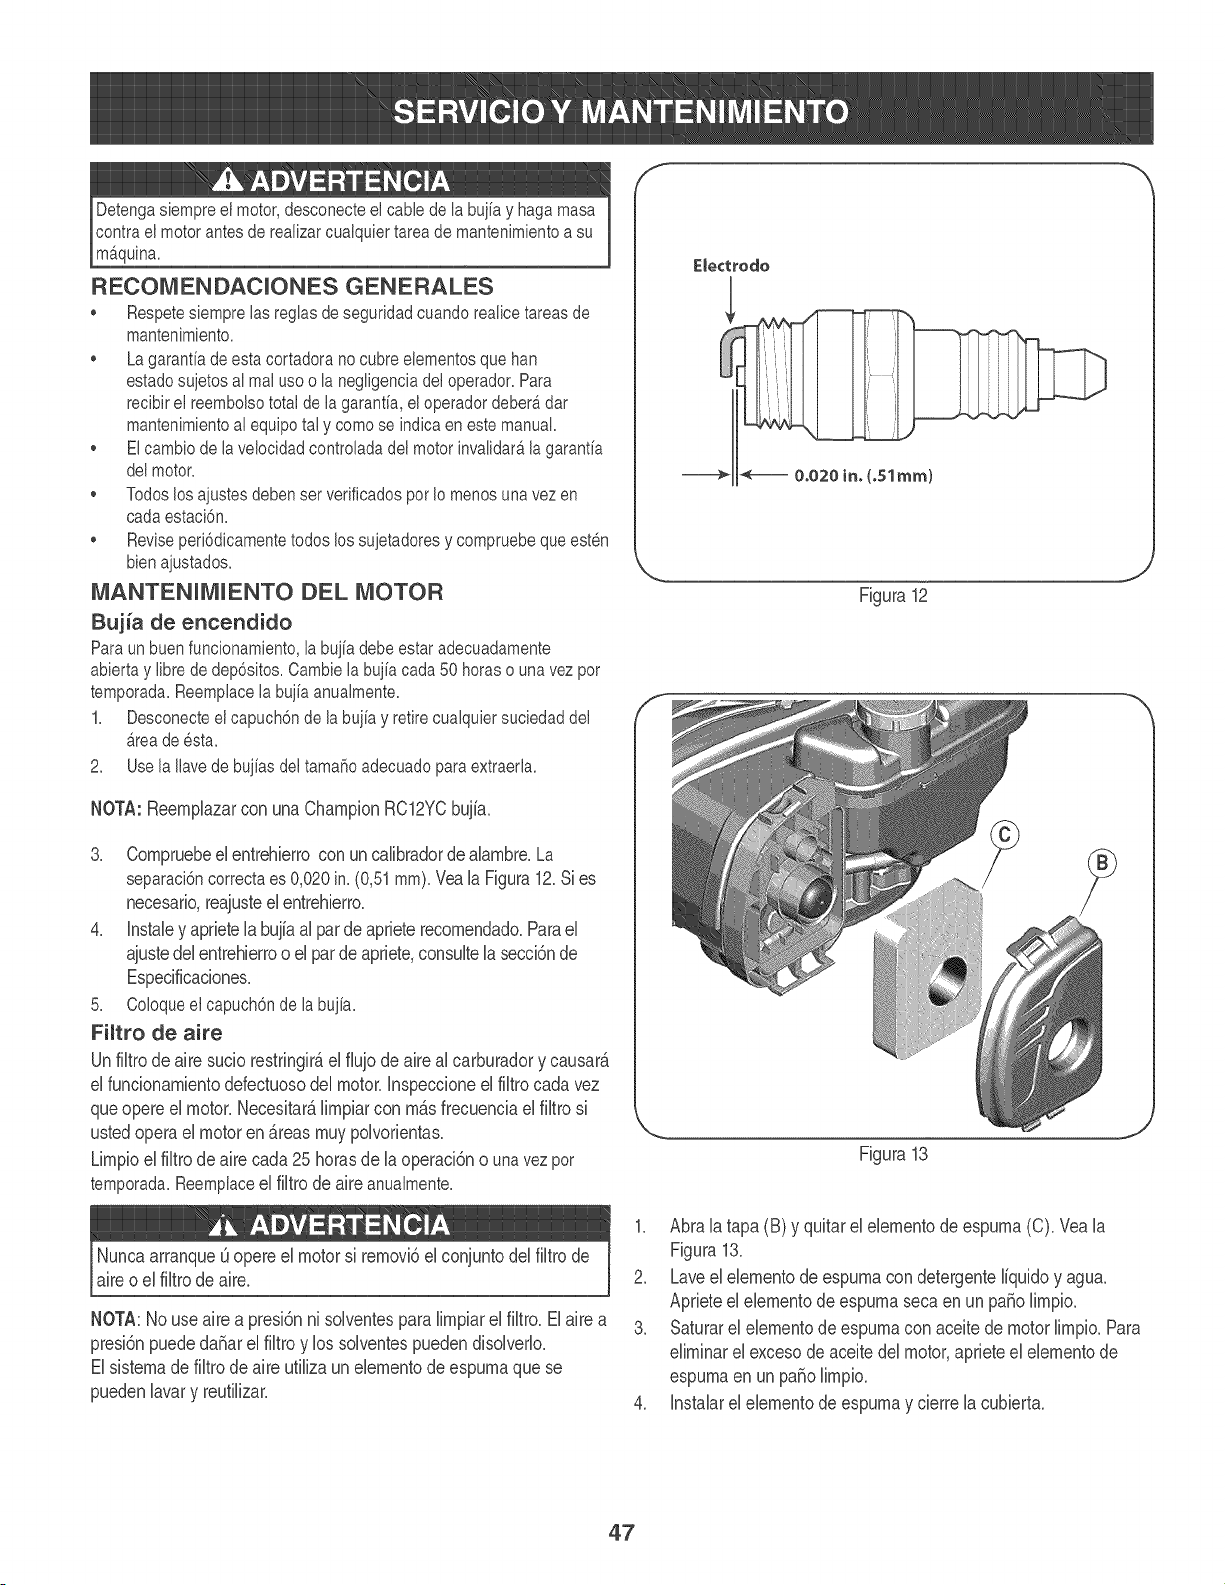
Detengasiempreelmotor,desconecteeicane de ia buj[ay hagamasa
contraeimotorantesde reaiizarcuaiquiertareade mantenimientoa su
ma.quina.
RECOMENDACUONES GENERALES
• RespetesiempreIasregiasde seguridadcuandoreaiicetareasde
mantenimiento.
Lagaranfiadeestacortadoranocubreelementosquehan
estadosujetosaImaIusooIa negligenciadeioperador.Para
recibirei reembolsototaldeia garanfia,eloperadordebera,dar
mantenimientoai equipotai y comoseindicaenestemanual.
Elcambiode lavelocidadcontroladadei motorinvaiidara,lagaranfia
deimotor.
Todoslosajustesdebenset verificadospotIo menosunavez en
cadaestaci6n.
Reviseperi6dicamentetodoslossujetadoresy compruebequeest_n
bienajustados.
MANTENUMUENTO DEL MOTOR
Bujia de encendido
Paraunbuenfuncionamiento,Iabuj[adebeestaradecuadamente
abiertay Iibrededep6sitos.CambieIabuj[acada50 horaso unavezpot
temporada.ReemplaceIa buj[aanualmente.
1. DesconecteeIcapuch6nde labuj[ay retirecualquiersuciedaddel
a.readeesta.
2. Usela Ilavedebuj[asdel tamahoadecuadoparaextraerla.
NOTA:Reemplazarcon unaChampionRC12YCbujia.
3. Compruebeel entrehierroconun calibradorde alambre.La
separaci6ncorrectaes 0,020in.(0,51mm).Veala Figura12.Si es
necesario,reajusteel entrehierro.
4. Instaley aprietela bujiaal parde aprieterecomendado.Parael
ajustedelentrehierroo el pardeapriete,consultela secci6nde
Espedficaciones.
5. ColoqueeI capuch6ndela buj[a.
Fimtro de aire
Un filtrode aire suciorestringirb,el fiujo deake al carburadory causarb.
el funcionamientodefectuosodel motor.Inspeccioneel filtrocada vez
queopereel motor.Necesitar_.limpiarcon mb.sfrecuenciael filtro si
ustedoperael motorenb.reasmuy polvorientas.
Limpioel filtrode aire cada25horasde laoperaci6no unavezpot
temporada.Reemplaceel filtro deaire anualmente.
Nuncaarranqueuopere el motorsi removi6el conjuntodelfiltro de
aireo el filtrode aire.
NOTA:Nouse aire a presidnni solventesparalimpiarel filtro.El airea
presidnpuededatar el filtroy los solventespuedendisolverlo.
Elsistemade filtrode aireutilizaun elementodeespumaque se
puedenlavary reutilizar.
f
Electtodo
J
Figura 12
Figura13
1. Abrala tapa(B) y quitarel elementode espuma(C). Veala
Figura13.
2. Laveel elementode espumacon detergenteliquidoy agu&
Aprieteel elementodeespumaseca enun patiolimpio.
3. Saturarel elementode espumacon aceitede motorlimpio.Para
eliminarel excesode aceitedel motor,aprieteel elementode
espumaen un patio limpio.
4. Instalarel elementode espumay cierrela cubiert&
47
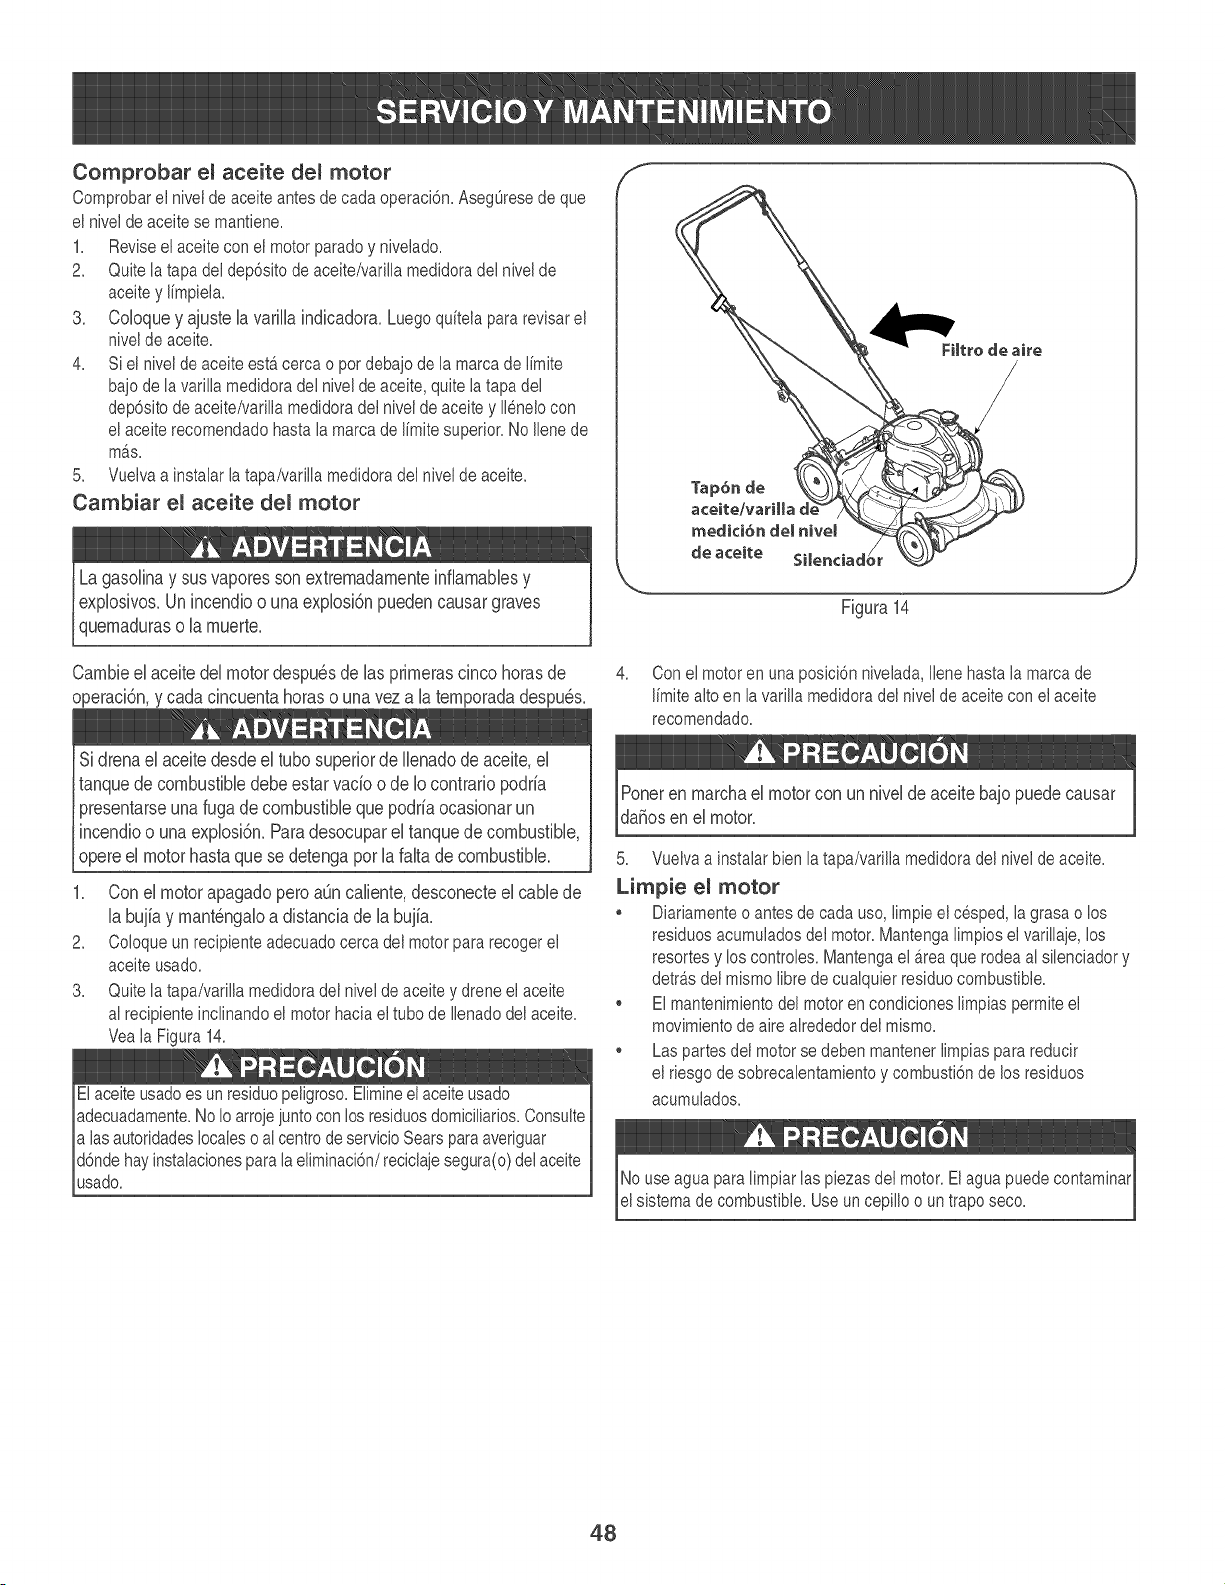
Comprobar eJ aceite deJ motor
Comprobar ei nivei de aceite antes de cada operacbn. Aseg@esede que
el nivei de aceite se mantiene.
1. Revise eJaceite con eJmotor parado y niveJado.
2. Quite ia tapa dei dep6sito de aceite/varilla medidora del niveJde
aceite y I[mpiela.
3. CoIoque y ajuste la variiia indbadora. Luego qdtela para revisarel
niveJde aceite.
4. Si et nivei de aceite esta.cerca o por debajo de Ia marcade I[mite
bajo de Ia varilIa medidora deI nivel de aceite, quite Ia tapa dei
dep6sito de aceite/varilla medidoradei nivei de aceite y II@elo con
ei aceite recomendado hasta la marca de I[mitesuperior. No Ilene de
ma.s.
5. Vueiva a instaiar la tapa/variiia medidora dei nivei de aceite.
Cambiar eJ aceite del motor
Lagasoiinay sus vaporessonextremadamenteinfiamabbsy
expiosivos.Unincendioo unaexplosi6npuedencausargraves
quemaduraso Uamuerte.
Cambbel aceitedel motordespu6sdelas primerascinco horasde
operaci6n,y cadacincuentahoraso unavez a la temporadadespu6s.
f
Tap6n de
acelte/variHa de
medici6n deJ niveJ
de aceJte
Figura 14
4. Con el motoren una posici6n niveJada,iiene hasta ia marcade
I[mitealto en la varilla medidora dei niveJde aceite con ei aceite
recomendado.
1. Con el motor apagado pero aOncaliente, desconecte el cable de
la bujia y mant_ngalo a distancia de la bujia.
2. Coloque un recipiente adecuadocerca del motor para recoger ei
aceite usado.
3. Quite ia tapa/variila medidora dei nivei de aceite y drene ei aceite
ai recipiente inclinando ei motor hacia ei tubo de Ilenadodei aceite.
Vea ia Figura 14.
El aceite usadoes un residuo peligroso.Eiimineei aceite usa@
adecuadamente.No Io arroje juntocon Ios residuosdomiciliarios.Consulte
aias autoridades locales o ai centrode servicioSears paraaveriguar
md6ndehay instalacionesparala eliminaci6n/reciclaje segura(o)del aceite
_usado.
Ponerenmarchael motorcon unnivelde aceitebajopuedecausar
daSosen el motor.
5. Vueiva a instaiar bien la tapa/varilla medidora del niveJde aceite.
Limpie eJ motor
Diariamenteo antes de cada uso, iimpie el cesped, la grasa o los
residuos acumuladosdel motor. Mantenga Iimpios el varilIaje, Ios
resortes y los controie& Mantenga el area que rodea ai siienciador y
detra.sdei mismo iibre de cuaiquier residuo combustible.
Ei mantenimientodel motor en condiciones Iimpias permite ei
movimiento de aire airededor dei mismo.
Las partes dei motor se deben mantener iimpias para reducir
el riesgo de sobrecalentamiento y combusti6n de los residuos
acumulado&
No use agua para iimpiar ias piezas dei motor. Elagua puede contaminar
ei sistema de combustible. Use un cepillo o un trapo seco.
48

Control de la cuchiHa
Lubriquecon aceite Iigero los puntos de pivote deI control de ia cuchiiia aI
menos una vez cada estaci6n. Estecontrole debe funcionar libremente en
ambas direcciones. Vea la Figura 15.
UMPUEZA DE LA PLATAFORMA
Debeiimpiar ia parte inferior de ia ptataformade ia cortadora de cesped
una vez una temporada para prevenir ia acumuiaci6n de recortes de
cesped u otros desechos. Siga los pasosque aparecen debajo para
reaiizar esta tarea.
1. Opere el motor hasta que se detenga pot la falta de combustible.
Desconecteei cable de Ia buj[a.
2. Incline ia cortadora de cesped de modo que quede apoyada sobre
aI alojamiento, mantenga ei silenciador de costado hacia abajo.
Refierasea la figura 14.Sostenga firmemente la cortadora.
Nunca incline ia cortadora de cesped m6.sde 90oen ninguna direcci6n
y no deje la unidad inclinada. Se puede filtrar aceite dentro de la parte
superior dei motor y causar problemas de arranque.
3. Raspe y iimpie ia parte inferior de ia plataforma mediante el uso de
una herramienta adecuada. No la rode con agua.
IMPORTANTE: No utilice una lavadora a presi6n o manguerade jard[n
para Iimpiarsu unidad. Pueden producir dahos a los rodamientos o ai
motor. El uso de agua acortara,la vida Otilde la m_.quinay reducira,su
capacidad de servicio.
4. Vuelva a colocar la cortadora de cesped sobre sus ruedas en ei
suelo.
\
Figura15
49
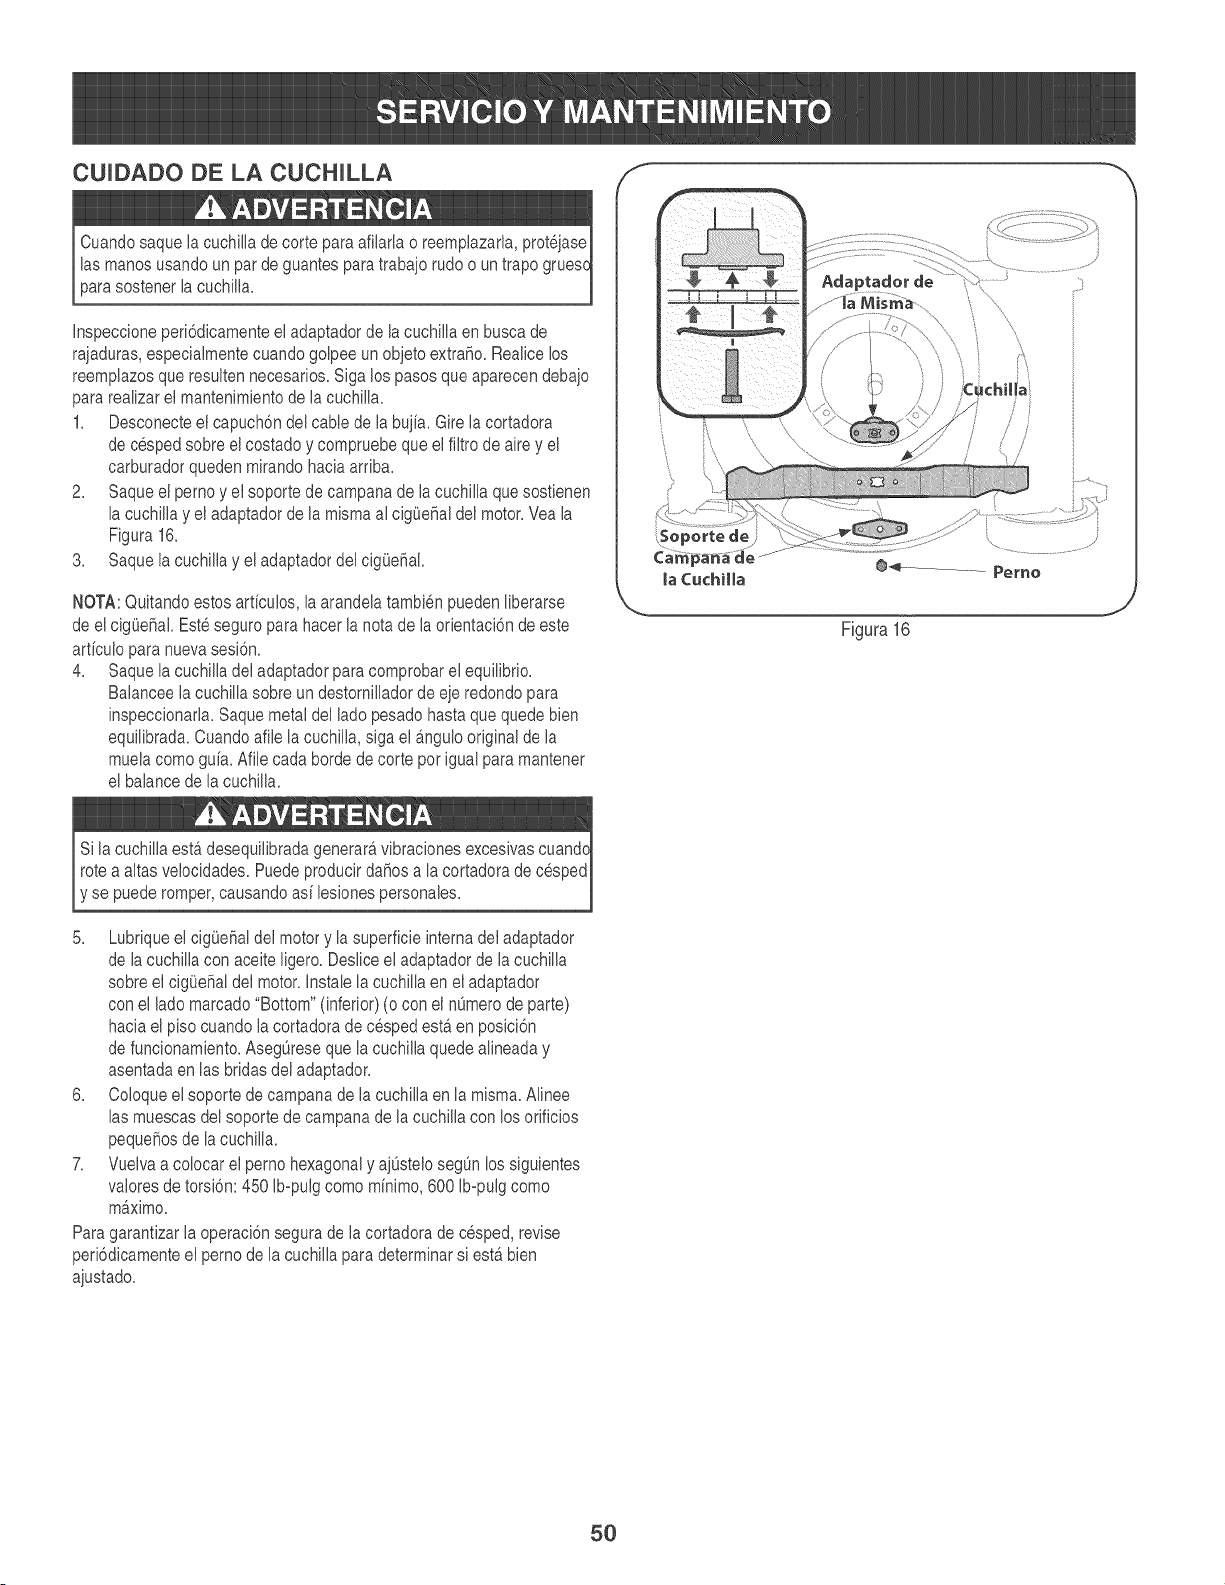
CUUDADODE LA CUCHULLA _ ""
Cuandosaque ia cuchilia de corte para afilaria o reempiazarla, prot_jase
las manos usando un par de guantes para trabajo rudo o un trapo gruesc
para sostener la cuchilla.
Inspeccione peri6dicamente ei adaptadorde la cuchiiia en busca de
rajaduras, especialmente cuando golpee un objeto extra_o. Realice los
reemplazos que resulten necesarios. Siga los pasos que aparecen debajo
para reaiizar ei mantenimiento de la cuchiiia.
1. Desconecte ei capuch6n del cable de Ia buj[a. Gire la cortadora
de cesped sobre el costado y compruebe que ei filtro de aire y ei
carburador queden mirando haciaarriba.
2. Saque ei perno y ei soporte de campana de ia cuchilla que sostienen
la cuchilla y ei adaptador de la misma al cigOe_aldei motor. Vea la
Figura 16.
3. Saque la cuchilla y ei adaptador dei cigOeiiak
NOTA: Quitando estos arficuios, la arandela tambi@ pueden iiberarse
de ei cigOehakEste seguro para hacer la nota de laorientaci6n de este
arficuio para nuevasesi6n.
4. Saque ia cuchilla dei adaptador para comprobar ei equiiibrio.
Balancee Ia cuchilIa sobre un destornillador de eje redondo para
inspeccionaria. Saque metal dei lado pesado hasta que quede bien
equilibrada. Cuando afile Ia cuchilIa, siga ei angulo original de Ia
mueia como gu[a. Afiie cada horde de corte pot igual para mantener
el balance de la cuchilla.
Ja Cuchilla
\ .....
@_-................... Peme
J
Figura 16
Si la cuchiiia esta.desequiiibradagenerara,vibraciones excesivas cuandc
rote a aitas veiocidades. Puede producirda_os a ia cortadora de cesped
y se puede romper, causando as[ lesiones personales.
5. Lubrique ei cigOdiai dei motor y ia superficie interna del adaptador
de ia cuchiiia con aceite Iigero. Desiiceei adaptadorde ia cuchiila
sobre ei cigOdiai dei motor. Instaie ia cuchiiia en ei adaptador
con el lado marcado "Bottom" (inferior) (o con el nOmerode parte)
hacia ei piso cuando ia cortadora de cesped esta.en posici6n
de funcionamiento.AsegOreseque ia cuchilla quede aiineaday
asentada en ias bridas dei adaptador.
6. Coioque ei soporte de campana de ia cuchiiia en ia misma. Aiinee
las muescas dei soporte de campana de la cuchilla con los orificios
pequefios de Ia cuchilIa.
7. Vueiva a colocar el perno hexagonal y ajOstelosegOnIos siguientes
vaiores de torsi6n: 450 Ib-pulg como m[nimo,600 Ib-pulg como
m_.ximo.
Para garantizar ia operaci6n segura de la cortadora de cesped, revise
peri6dicamente el perno de la cuchilla para determinar si esta.bien
ajustado.
5O
Nunca almacene ia cortadora de cesped con combustible en ei tanque
en un espacio cerrado o en a.reascon poca ventiiaci6n, donde los
gases dei combustible puedan aicanzar ei fuego, chispaso una iuz
piiotocomo la que tienen aigunos hornos, caientadores de agua,
secadores de ropa o aigOnotto dispositivo a gas.
PREPARACU6N DEL MOTOR
Yaque HosmotoresaHmacenaronmb.sde30 dias:
1. Paraimpedira Hagomaformarseen eHsistemade combusfibHe
o en partesdecarburador,dirijaseHmotorhastaque estose
parea faHtadellcombustibHeo aSadirunadifivode gasoHinaaM
gas eneHtanque.Si ustedusa un adifivodegas, dirigeeHmotor
durantevarios minutosparaponeren drcuHaci6neHadifivoporeH
carburador-- despu_sque eHmotoryeHcombustibHepuedenser
aHmacenadoshasta24 meses.
2. MientraseHmotores todaviacaHiente,cambioeHpetr6Heo.
3. LimpieeHmotordeescombrossuperfMaHes.
PREPARACU6N DE LA CORTADORA DE
Limpie y iubrique la cortadora como se describe en las instrucciones
de lubricaci6n.
• No utiiice una Iavadora a presi6n ni una manguera de jard[n para
limpiar su unidad.
• Cubra ia cuchilla de la cortadora con grasa para chasis para impedir
la oxidaci6n.
• Refierasea Ia PREPARACHONDEL MOTOR para instrucciones de
almacenaje de motor correctas.
,, Almacene Ia unidad en una zona limpia y seca. No Ia almacene
cerca de materiales corrosivos como por ejemplo fertilizantes.
Cuando aimacene cuaiquier tipo de equipo motorizadoen un gaip6n
de dep6sito metaiico o con poca ventiiaci6n, tenga especial cuidado
de reaiizarie un tratamiento antioxidanteai equipo. Use aceite iigero o
silicona para recubrir ei equipo, especialmente los cables y partes m6viles
de su cortadora antes de aimacenarla.
51
hayanvenidoa unaparadacompleta.Desconecteel alambrede bujiay b_.selocontrael motorparaprevenirel comienzoinvolun-
ario. SiempreIlevepuestoscristalesinastillablesdurantelaoperaci6no realizandocualquierajusteo reparaciones.
Elmotor no arranca
Eimotor funciona de
manera erra.tica
Elmotor recaiienta
1. Control de Ia cuchiiia desenganchado.
2. Se ha desconectado el capuch6n de ia bujfa.
3. El dep6sito de combustible esta.vado o ei
combustible se ha echado a perder.
4. El motor no esta.cebado.
5. La buj[a nofunciona correctamente.
6. El motorsedesbord6.
7. Unea decombustibie bioqueada.
1. El capuch6n de Ia buj[a esta.fiojo.
2. El combustible se ha echado a perder.
3. La ventiiaci6n de la tapa dei combustible esta.
obstruida.
4. Agua o suciedad enei sistema dei combustible.
5. El filtro de aire esta.sucio.
6. Unea decombustibie bioqueada.
1. El niveI de aceite deI motor est,. bajo
2. Flujodeairerestringido
1. Engrane e! control de la cuchiila.
2. Oonecteel cable ai capuch6n de la buj[a.
3. Liene el tanque con gasolina Iimpiay nueva.
4. Cebe ei motor tai como se explica en la secci6n de
Funcionamiento.
5. Limpie, ajuste Ia separaci6n, o cambie Ia buj[a.
6. Esperar unos minutos para reactivarse,pero no cebe.
7. Contacte con su centro de partes y reparaciones Sears.
1. Conecte y ajuste ei capuch6n de la buj[a.
2. Liene el tanque con gasolina Iimpiay nueva.
3. Destape laventilaci6n.
Elmotor vaciia a alas 1. Poca separaci6n de los electrodos de la buj[a 1.
revoluciones
Elmotor funciona maI 1. Buj[a atorada,averiada o exceso de separaci6n. 1. Limpie, reemplaceo reajuste Ia separaci6n a .030".
en marcha lenta 2. El filtro de aire esta.sucio 2. Consulte la secci6n Mantenimientodei manual.
Demasiadavibraci6n 1. Cuchilla de corte floja o descentrada. 1. Apriete ia cuchiiia y el adaptador Baiancee ia cuchiiia.
2. Cuchiiia aboiiada. 2. Cambielacuchilla.
1. Cesped hOmedo.
La cortadora de
cesped no regresa
ei recorte de cesped
como abono
2. Cesped demasiadoaito.
4. Vac[e ei tanque de combustible. Carguecombustible
nuevo en el dep6sito.
5. Consulte la secci6n Mantenimientodei manual.
6. Contacte con su centro de partes y reparaciones Sears.
1. Llene el motor con la cantidad y tipo de aceite adecuado.
2. Limpie los residuosde airededor de ias aietas de
refrigeraci6n del motor y del alojamiento del soplador.
Ajuste la separaci6n a .030".
1.
2.
No corte el cesped cuando este mojado, espere hasta
que sea mas tarde para hacerlo.
Corte una vez a aitura de corte elevada, iuego vuelva a
cortar a la aitura deseada o haga un sendero de corte
m_.sangosto.
Afile o cambie la cuchilla.3. La cuchilla de la cortadora no esta.afilada. 3.
Corte desiguai 1. La posici6n de ias ruedas no es correcta. 1. Coioque las cuatro ruedas en ia misma posici6n de aitura.
2. La cuchiiia de ia cortadora no esta.afiiada. 2. Afile o cambie ia cuchiiia.
52
(Esta pAgina se aplica s61oen EE.UU. y CanadA).
Sears Brands Management Corporation, el Consejo de Recursos Ambientaies de California (CARB)
y la Agencia de Protecci6n Ambientai de los Estados Unidos (EPA)
Deciaraci6n de garantia dei sistema de control de emisiones (derechos y obiigaciones de la garantia de defectos dei propi-
etario)
LA COBERTURADE LA GARANTiADE CONTROLDEEMISIONESES Y PARALOSMODELOSCERTIRCADOSDELANO 1997Y POSTERIORES,
APLICABLEA LOSMOTORESCERTIFICADOSCOMPRADOSENCALIFOR- QUESE COMPRENY UTILICENENCUALQUERPARTEDE LOSESTADOS
NIA EN 1995Y POSTERIORMENTE,QUESE UTlUZANENCALIFORNIA, UNIDOS(Y A PARTIRDEL 1 DE ENERODE 2001 ENCANADA).
Dedaraci6n de garantia sobre defectos en el control de emisiones para California y los Estados Unidos
ElConseiode RecursosAmbientalesde California(CARB),la EPA(Agencia
de Protecci6nAmbientalde los EE.UU.)y Searstienenel gusto de explicarla
garanfiadel sistemade control de emisionespara motoresdelaSo2000y para
elfuturo con relaci6na motorespequeSostodo terreno(SORE).En California,
los nuevosmotorespequeSostodo terrenodebenestar diseSados,construidos
y equipadosparacumplircon las rigurosasnormasanti-smogdelestado.En
el restode los EstadosUnidos,losmotoresnuevostodoterrenode encendido
porchispacertificadosparael aSo1997debencumplirest&ndaressimilares
establecidospor la EPA.Sears debegarantizarel sistemade control de emis-
ionesde su motorparalosperiodosde tiempo enumeradosa continuaci6n,
siemprequeno hayaabuso,negligenciao mantenimientoindebidode su
motortodoterrenopeque_o.Su sistemade controlde emisionespuedeincluir
piezastalescomoel carburador,el filtro de aire, elsistemade encendido,el
silenciadoryel conversorcatalitico.Tambienpuedeincluirconectoresyotras
unidadesrelacionadascon lasemisiones.Dondeexistaunacondici6ncubierta
por la garanfia,Searsreparar_su peque_omotortodo terrenosin costoalguno
incluyendodiagn6stico,piezasy manodeobra
Cobertura de la garantia Sears para defectos en el control de emisiones
Los motorestodo terrenopequeSosest&ngarantizadosen Io relativoa!control alas disposicionesque se indiquena continuaci6n.Si una partede su motor
de emisionesparadefectosen piezasduranteun periodode dos aSos,suieto cubiertapor lagaranfiaes defectuosa,Sears reparar&o sustituir&dicha parte.
Responsabilidades dei propietario en reiaci6n con la garantia
Comopropietariodel motortodo terrenopeque_o,Ud.es responsablede la
realizaci6ndel mantenimientorequeddoquese incluyeen las instrucciones
de operaci6ny mantenimiento.Searsrecomiendaquese conserventodoslos
recibosrelativosal mantenimientode su motortodoterrenopeque_o,pero
no pude denegarla garantiasimplementepor la faltade los mismos,o por su
incumplimientodel mantenimientoprogramatic.Comopropietariodel motor
peque_otodoterrenodebe saberque, sinembargo,Sears lepuedenegar
lacoberturade lagarantiasi su motortodoterrenopeque_oo una piezadel
mismohanfalladodebido a abuso,negligencia,mantenimientoindebidoo
a modificacionesno aprobadas.Ud.es responsablede presentarsu motor
todoterrenopeque_oa un distribuidorde serviciosSearsautorizadotan pronto
comoaparezcaun problema.Las reparacionesde la garantiasinconfiicto
debencompletarseen un plazode tiempo razonable,no superiora 30 dias.Si
tienealgunapreguntarespectoa sus derechosy responsabilidadesreferem
tes a la garanfia,debe contactarcon un representantede serviciosSearsal
1--800--469n4663.La garanfiade emisioneses unagaranfiapor defectos.Los
defectosse iuzgandeacuerdocon elfuncionamientonormalde un motor.La
garanfiano est_relacionadacon unapruebade emisionesen uso.
Disposiciones de la garantia Sears para defectos en el control de emisiones
Las siguientesson disposicionesespedficas relacionadascon la coberturade lagaranfia paradefectosen el controlde emisiones.Esun aSadidoa lagaranfiade
motorSearsparamotoresno reguladosque seencuentraen lasinstruccionesde funcionamientoy mantenimiento.
1. Piezascon garantia
La coberturade esta garantiase extiendeOnicamentea laspiezas
queaparecena continuaci6n(las partesde lossistemasde control de
emisiones),siempreque dichaspiezasestuvieranya en el motoren el
momentode su compra.
a. Sistemade medici6n de combustible
• Sistema de enriquecimientopara arranqueen frio
• Carburadory partesinternas
• Bombade combustible
b. Sistemade inducci6nde aire
• Filtrode aire
• Colector de admisi6n
c. Sistemadeencendido
• Buj[a(s)de encendido
• Sistema de encendidomagneto
d. Sistemadelcatalizador
• Convertidorcatal[tico
• Colector de escape
• Sistema de inyecci6nde aireo v_lvulade impulsos
e. Elementosvariadosusadosen lossistemasanteriores
• Valvulasde vado, sensiblesa temperatura,posici6ny fiempo
e interruptores
• Conectoresy montajes
2. AIcancede la cobertura
Searsgarantizaal poseedorinicialy a loscompradoressubsiguientes
quelas piezas con garanfiano tendr_n defectosen materialesni mano
de obraque provoquenla falla de las mismasduranteun periodode
dos aSosa parfirde la fechaen queel motorse entregaa un comprador
particular.
3. Sin cargo
La reparaci6no reemplazodecualquierpartecongaranfia se realizar_
sin cargoalguno parael poseedor,incluyendotareasde diagn6sticoque
permitandeterminarsi una partecon garanfiaes defectuosa,siempreque
dichodiagn6sticose realiceenun distribuidorde serviciosSearsautoriza-
do. Parael serviciode lagarantia de emisiones,contacteal distribuidorde
serviciosSearsautorizadom_scercanoincluidoen las"P_ginasamarillas"
en lascategorias"Motores,gaso%a","Motoresde gaso%a","Podadoras
de cesped",o similares.
4. Reclamacionesy exdusiones a la cobertura
Las reclamacionesde lagaranfiadebenenviarsedeacuerdocon las
disposicionesde la pol[ticade garanfia paramotoresSears. La cobertura
de lagarantiaexcluir_,defectosen piezascon garanfia queno sean partes
originalesSears,o abuso,negligenciao mantenimientoincorrecto,tal y
como se estableceen lapol[ticadegaranfia para motoresSears.Searsno
es responsablede lasfallas en piezascon garanfia provocadaspor el uso
de partesa_adidas,que no seanoriginaleso quese hayan modificado.
5. Mantenimiento
Cualquierpartecon garanfiaque no esteprogramadaparaset reem-
plazadacomomantenimientorequerido,o que s61odebainspeccionarse
regularmentealefecto de "inspeccioneo reemplacesegOnsea necesario",
estar_garantizadacontradefectosduranteel per[odode la garanfia.Todas
las piezasgaranfizadasqueesten programadaspara su reemplazopara
cumplir con los requisitosde mantenimientoestarangarantizadass61o
por el per[odoanterioral primerreemplazoprogramadoparadicha pieza.
Cualquierpiezade recambioquesea equivalenteen funcionamientoy
durabilidadpuedeusarsepararealizarmantenimientoo reparaciones.El
propietarioes responsablede realizartodoel mantenimientorequerido,tal
y comose define en las instruccionesde funcionamientoy mantenimiento
Sears
6. Coberturaindirecta
Porla presente,la coberturase extiendea la falla de cualquiercomponente
de motorprovocadapor lafalla de unapieza con garanfiaque est_ todav[a
en per[ododegaranfia.
En los EstadosUnidosy Canad_hay unaI[neade atenci6nde24 horas,1-800o469-o4663,quecuentacon unmenOcon mensaiespre-grabadosque confienen
informaci6npara el mantenimientode motores.

Busque e( per(odo de duraci6n de emisiones importantes y(a informaci6n de c(asificaci6n de aire en
meetiqueta de emisiones de su motor
Los motores cuyo cumpiimiento con los est&ndares de emisi6n Tier 2 de la Comisi6n de Recursos Ambientales de California (CARB)
est6 certificado deben exhibir la informaci6n reiacionada con el per(odo de duraci6n de las emisiones y la ciasificaci6n de aire. Sears
Brands Management Corporation ponen esta informaci6n a disposici6n del consumidor en nuestras etiquetas de emisiones.
El Per(odo de Duraci6n de las Emisiones describe el nQmero de horas de tiempo real de funcionamiento para el cual se certifica que
el motor cumpie con las regias de emisi6n, descontando el mantenimiento adecuado del mismo segQn las instrucciones de opero
aci6n y mantenimiento. Se utiiizan las siguientes categodas:
Moderado:Se certifica que el motor cumpie con las regias de emisi6n durante 125 horas de tiempo real de funcionamiento del motor.
mnmediato:Se certifica que el motor cumpie con las regias de emisi6n durante 250 horas de tiempo real de funcionamiento del motor.
Extendido:Se certifica que el motor cumpie con las regias de emisi6n durante 500 horas de tiempo real de funcionamiento del motor.
Por ejemplo, una cortadora de c6sped t(pica que se empuja desde atr&s se usa entre 20 y 25 horas por a_o. Por Io tanto, el Per_odo
de Duraci6n de E-'misiones de un motor con una ciasificaci6n intermedia seda equivaiente a entre 10 y 12 a_os.
Laciasificaci6n de aire es un nQmero caicuiado para describir el nivel reiativo de emisiones para un grupo de motores en particular.
Cuanto menor sea la ciasificaci6n de aire, mayor es la limpieza del motor. La informaci6n se presenta de forma grafica en la etiqueta
de emisiones.
Oespu_s del 1 de juiio de 2000, busque el pedodo de cumpiimiento de las regias de
emisiones en la etiqueta de cumpiimiento de las regias de emisiones del motor
Despu_s del 1 de juiio de 2000 se certificara que determinados motores Sears Brands Management Corporation cumpien
con los estandares de emisiones de la fase 2 de (a Agencia de Protecci6n Ambiental de los Estados Unidos (USEPA). Para
los motores certificados para la etapa 2, el pedodo de cumpiimiento con (as regias de emisiones al cua( se hace referencia
en la etiqueta de cumpiimiento con las regias de emisiones indica el nQmero de horas de funcionamiento para el cual se ha
demostrado que el motor cumpie con los requerimientos federaies de emisi6n.
Para los motores con despiazamiento inferior a 225 cc, Categoda C = 125 horas, B = 250 horas y A = 500 horas.
Para los motores con despiazamiento de 225 cc o m_s, Categoda C = 250 horas, B = 500 horas y A = 1000 horas.
El despiazamiento de los motores de la serie modelo 150112 es 249 cc.
La presente es una representaci6n gen_rica de la etiqueta de emisi6n que se encuentra generaimente en un
motor certificado.
GDOC-100182Rev.A
54
Fdicitaciones pot haber realizado una adquMci4n intdigente. El producto Craftsman® que ha
adquirido esta disenado y fabdcado para bdndar muchos anos de funcionamiento confiabb. Pero
como todos los productos a veces puede requedr de reparaciones. Es en ese momento cuando el
disponer de un Acuerdo de protecci6n para reparaciones le puede ahorrar dinero y probbmas.
A con%uaci6n se detaHanbs puntos incbidos en eUAcuerdo:
Servicio experto prestadopot nuestros 10,000 especblbtas en reparaciones profesionabs
Servicio ilimitado sin cargo para bs piezasy la mano de obra en todas bs reparacionescubiertas
Reemplazo del producto hasta 1500 d6bres si no es posibb reparar el producto cubierto
Descuento de 25% del precio normal del servicio y de bs piezas rebcionadas con el mismo que no esten cubiertas
pot el acuerdo; ademAs,25% del precio normal de laverificaci6n de mantenimientopreventivo
Ayuda rApida pot tel_fono - Io Ibmamos Resobci6n RApida- el apoyo tebf6nico de un Chamusca al representante.
Piense en nosotros como el manual "de un duefio habbdor."
Una vez adquirido el Acuerdo, puede programar el servicio con tan s61orealizar una Ilamadatebf6nica. Puede Ilamar en
cualquier momentodel dia o de la noche o programar un servicio en linea.
ElAcuerdo de Protecci6nde Reparaci6nes una compra sin riesgo. Si usted anula pot alguna raz6n duranteel periodo de
garantia de producto, proporcionaremos un reembolso Ibno. O, un reembolso prorrateado en cualquier momentodespues
del periodo de garantia de producto expira, iAdquiera hoy su acuerdode protecci6n para reparaciones!
Se aplican determinadas limitaciones y exclusiones. Para obtener informaci6n adicional y precios en los Estados
Unidos Hameal 1-800-827-6(}55.
El *Coverage en Canada vada en algunos articulos. Para detaHes Henos la Hamada Chamusca Canada en 1-800-
361-6665.
Servicio de instalaci6n de Sears
Si desea so%itar la instabci6n profesionalde Sears de aparatosdomesticos, dispositivos paraabrir portones, cabntado-
res de agua y otros articulos domesticos importantes, en los Estados Unidos o Canada Ibme al 1-800-4-MY-HOME®.
55

Your Home
For troubleshooting, product manuals and expert advice:
managernylife
www.managemylife.com
For repair - in your home - of all major brand appliances,
lawn and garden equipment, or heating and cooling systems,
no matter who made it, no matter who sold it!
For the replacement parts, accessories and
owner's manuals that you need to do-it-yourself.
For Sears professional installation of home appliances
and items like garage door openers and water heaters.
1-800-4-MY-HOME ® (1-800-469-4663)
Call anytime, day or night (U.S.A. and Canada)
www.sears.com www.sears.ca
Our Home
For repair of carry-in items like vacuums, lawn equipment,
and electronics, call anytime for the location of your nearest
Sears Parts & Repair Service Center
1-800-488-1222 (U.S.A.) 1-800-469-4663 (Canada)
www.sears.com www.sears.ca
To purchase a protection agreement on a product serviced by Sears:
1-800-827-6655 (U.S.A.) 1-800-361-6665 (Canada)
Para pedir servicio de reparaci6n
a domicilio, y para ordenar piezas:
1-888-SU-HOGAR ®
(1-888-784-6427)
www.sears.com
Au Canada pour service en frangais:
1-800-LE-FOYER Mc
(1-800-533-6937)
www.sears.ca
® Registered Trademark / TMTrademark of KCD IP, LLC in the United States, or Sears Brands, LLC in other countries
® Marca Registrada ! TMMarca de Fabrica de KCD IP, LLC en Estados Unidos, o Sears Brands, LLC in otros paises
MCMarque de commerce ! MDMarque deposee de Sears Brands, LLC