Loading ...
Loading ...
Loading ...
t ii i i
iiiii ii Nil
D. CHAIN TENSION
• Chain tension isvery Important:
_A loose chain willwear thebar and itself.
-- A loosechaincanjumpoffthe bar whileyouare
cutting
-- A tightchaincan damagethe saw and/orbreak.
e. The chain stretches during.use,especially when
new. Check tension:
-- each lime the saw is used
--more frequently when thechain is new
--as the chain warms up to normal operating
temperature.
&WARNING.
r_VOld accidental sta_ing. Always.unplug the _..I '
Irrom the power source before adjusting chain l
tension, i
• It is recommended that the saw be turned upside
down for chain tensioning,
• Chain tensioning procedure:
NOTE: The bar clamp nuts must be no more than
finger tightto tension the chain correctly.
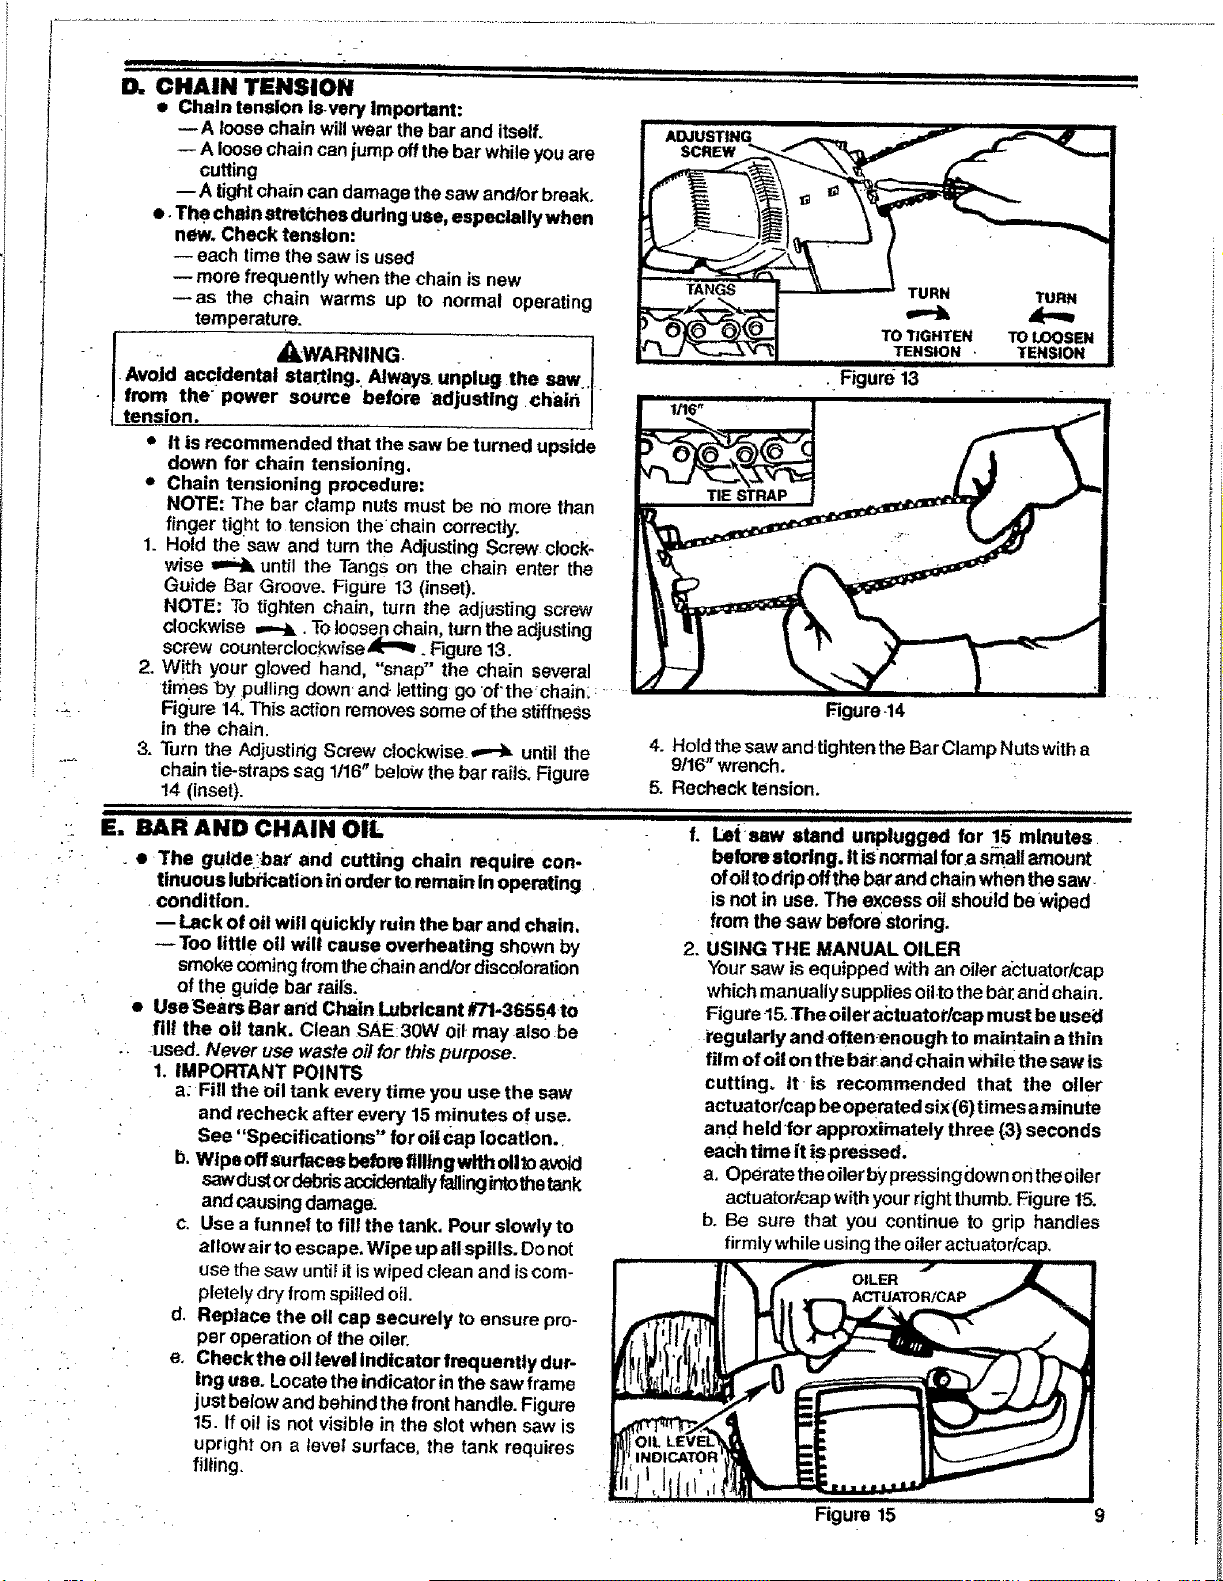
1. Hold the saw and turn the AdjustingScrew clocl<.
wise _ until the Tangson the chain enter the
Guide Bar Groove. Figure 13 (inset).
NOTE: To tighten chain, turn the adjusting screw
clockwise ,,--._. Toloosenchain,turnthe adjusting
screw counterclockw_se_l[-"_. Figure13.
2. With your g_oved hand, "snap" the chain several
times by pulling down and. letting go of'the_chain:: -
Figure 14.This action removes some ofthe stiffness
in the chain.
3. Turn the Adjusting Screw clockwise.,,--_ until the
chaintie-straps sag 1116"below the bar railS. Figure
!4 (inset).
E. BAR AND CHAIN OIL
. • The gut_lebal' and cutting chain require con-
tinuous lubrication in order toremain inoperating
•condition.
-- Lack of oil will quickly ruin the bar and chain.
Too little oil will cause overheating shownby
smokecomingfrom thechainand/ordiscoloration
of the guide bar rails. . .
e UseSearsBarand Chain Lubricant #'/1-36554to
ADJUSTING
SCREW
TANGS
TURN
TO TIGHTEN
TENSION .
, Figure 13
Figure 44
TURN
ak-,,
TO LOOSEN
TENSION
ill! the oil tank. Clean SAE30W oil may alsobe
:used. Never use wasteoil for thispurpose.
1. IMPORTANT POINTS
a: Fill the oil tank everytime you use the saw
and recheck after every 15 minutes of use.
See "Specifications" for oil Caplocation.
b. Wipe offsurfaces beforefilling with olltoavoid
sawdustordebdsaccidentallyfa/lingintothetank
and causingdamage.
c. Use a funnel to fill the tank. Pour slowly to
allow air toescape, Wipe up all spills. Donot
use the saw until itiswipedclean and iscom-
pletely dry fromspilled oil
d. Replace the otl cap securely toensure pro-
per operation ofthe oiler.
e. Checktheotllevellndicatorfrequenttydur.
ing use. Locatetheindicatorinthe saw frame
just belowandbehind thefronthandle.Figure
15. If of!is not visible in the slot when saw is
upright on a level surface, the tank requires
filling.
4. Hold the saw and.tighten the BarClampNuts witha
9116"wrench.
5. Recheck tension.
,,,,,, III ,,,,,,,,,,,;,i,,,,,,,, .........
f. I._tsaw stand unplugged for 15 minutes •
before storing. Itis'normalfora smallamount
ofoiltodripoffthebarand chainwhenthesaw
isnot in use. The excessoil shouldbewiped
from the saw beforestoring.
USING THE MANUAL OILER
Your saw is equipped with an oiler actuator/cap
whiohmanuallysuppliesoil.totheb_ andchain.
Figuce"15.The oiler actuatoi'/cap must beusei_
i'egularly andoffen_enough to maintain athin
film of oil on the barand chain while the saw is
cutting. It is recommended that the oiler
actuator/cap beoperated six(6) times aminute
and held'for approximately three (.3)seconds
each time itispressed.
a. Operate theoilerbypressingclownontheoiler
actuator/capwith yourrightthumb.Figure15.
b. Be sure that you continue to grip handles
firmly while usingthe oileractuatortcap.
, , Figure 15 9
Loading ...
Loading ...
Loading ...