Loading ...
5
INTRODUCTION
ThankyouforchoosingaDe’Longhiproduct.Pleasetakeafew
momentstoreadtheinstructionstoavoidrisksordamagetothe
appliance.
DESCRIPTION
Description of the appliance (see page 3 - Fig. A)
A1 airoutletgrille
A2 controlpanel
A3 handles
A4 castorwheels
A5 BioSilverlter
A6 airintakegrille
A7 airexhausthosehousing
A8 airintakegrille
A9 powercable
A10drainagehosewithcap
A11remotecontrolsignalreceiver
A12remotecontrolcompartment
Description of the accessories (see page 3 - Fig. B)
B1 wallangewithcap
B2 assembledairexhausthose
B3 windowoutlet
B4 windowbracketwithpins
B5 additionalwindowbracketwithpins
B6 waterdrainhosewithcap
B7 remotecontrol
B8 endofseasondustcover
B9 endofseasonaccessoriesbag
Electrical connection
Before plugging the appliance into the electrical receptacle,
checkthat:
• Theoutlet’s powersupplycorrespondsto thevalue indi-
catedontheratinglabelonthebackoftheappliance;
• Theoutletandelectricalcircuitareadequatefortheappli-
ance;
• Theoutletisa3-holegroundedoutlet .Ifthisisnot
thecase,youmustchooseanotheroutlet.Failuretofollow
theseimportantsafetyinstructionsabsolvesthemanufac-
turerofallliability.
If it becomes necessary, the power cable must be re-
placed by a qualied professional only.
Theinstructionsbelowwillenableyoutoprepareyouraircon-
ditionerforoperationasecientlyaspossible.Beforeuse,make
suretheairintakeandoutletgrillesareunobstructed.
USE
AIR CONDITIONING WITHOUT INSTALLATION
For optimal results set-up in a double-hung window:
1) Placethebracket inthe window sill,extendthe bracket
fullywithinthewindowframe,xthebracketbyusingthe
pinthenlowerthewindowontothebracket.(Shouldthe
windowbracketbetoolargeforthewindow.Theplastic
canbecutwithasawbyaqualiedprofessional.)
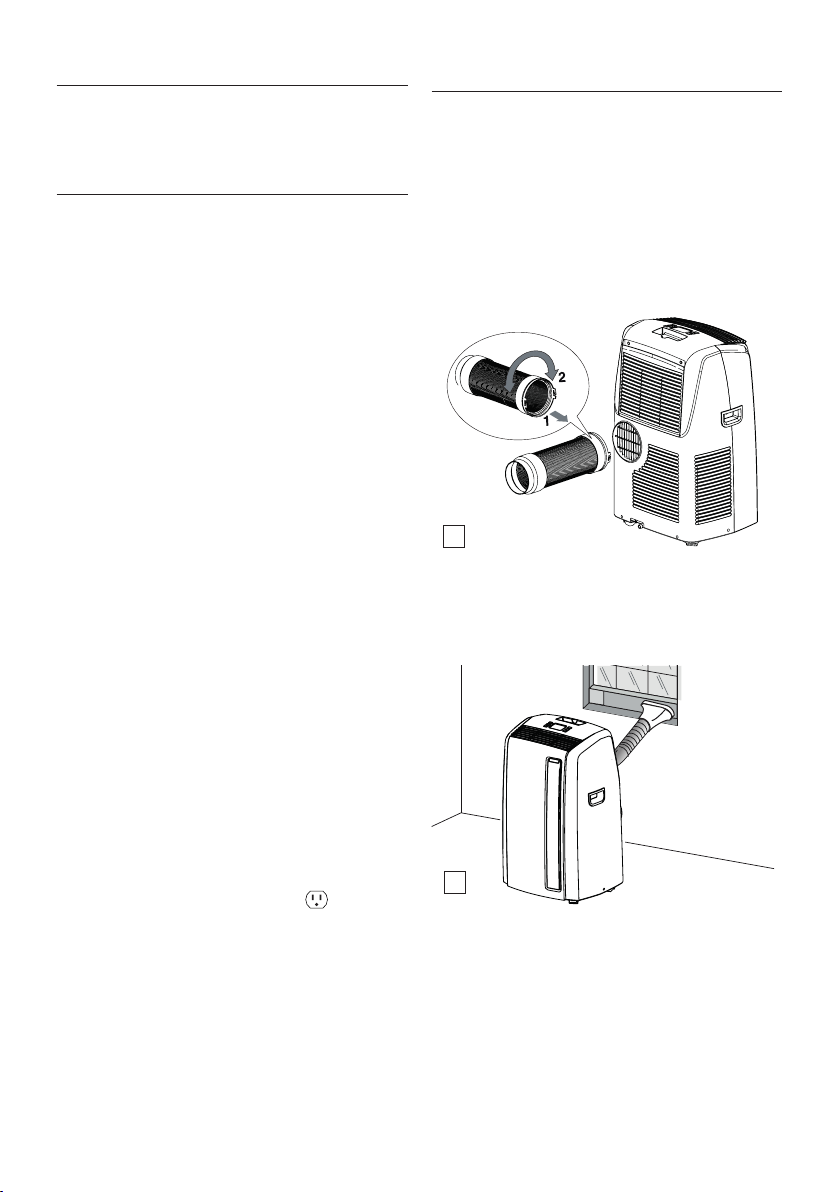
2) FittheairexhausthoseB2inthehousingatthebackofthe
appliance.Insertitasshowningure1.
3) ConnectthewindowoutletB3totheotherendoftheex-
hausthose.
4) Insertthewindowoutletendoftheexhausthoseintothe
slotofthewindowbracket(g.2).
Other set-up methods:
• Thankstothelockingpins,it’spossibletousethewindow
bracketalsoforslidingwindows.Positiontheholeofthe
bracketsotoallowacorrectinstallationoftheexhausthose
(seegure3).
1
2
Loading ...
Loading ...
Loading ...