
WASHERS
SAFETY INFORMATION ...........3
USING THE WASHER
Getting Started ...................... 5
WiFi Connect ........................14
Loading .............................15
CARE AND CLEANING ........... 16
INSTALLATION
INSTRUCTIONS
.....................18
Reversing The Door Swing (Optional) .....23
TROUBLESHOOTING TIPS ......27
LIMITED WARRANTY ............31
CONSUMER SUPPORT .......... 32
GFW850
GFW650
GFW550
GFW510
OWNER’S MANUAL &
INSTALLATION
INSTRUCTIONS
Write the model and serial
numbers here:
Model # _________________
Serial # _________________
You can find them on a label
inside the washer door.
ENGLISH/FRANÇAIS/
ESPAÑOL
GE is a trademark of the General Electric Company. Manufactured under trademark license.
0020508637A 49-3000217 Rev 2 10-19 GEA

2 49-3000217 Rev 2
THANK YOU FOR MAKING GE APPLIANCES A PART OF YOUR HOME.
Whether you grew up with GE Appliances, or this is your first, we’re happy to have you in the family.
We take pride in the craftsmanship, innovation and design that goes into every GE Appliances
product, and we think you will too. Among other things, registration of your appliance ensures that we
can deliver important product information and warranty details when you need them.
Register your GE appliance now online. Helpful websites and phone numbers are available in the
Consumer Support section of this Owner’s Manual. You may also mail in the pre-printed registration
card included in the packing material.

49-3000217 Rev 2 3
IMPORTANT SAFETY INFORMATION
READ ALL INSTRUCTIONS BEFORE USING THE APPLIANCE
SAFETY INFORMATION
READ AND SAVE THESE INSTRUCTIONS
To reduce the risk of death, fire, explosion, electric shock, or injury to persons when using
your appliance, follow basic precautions, including the following:
Ŷ
Read all instructions before using the appliance.
Ŷ
Follow all fabric care instructions and warnings to prevent melting of garments or damage to the appliance.
Ŷ
DO NOT wash or dry articles that have been previously cleaned in, washed in, soaked in or spotted with
gasoline, dry-cleaning solvents, or other flammable or explosive substances, as they give off vapors that could
ignite or explode.
Ŷ
DO NOT add gasoline, dry-cleaning solvents, or other flammable or explosive substances to the wash water.
These substances give off vapors that could ignite or explode.
Ŷ
Under certain conditions, hydrogen gas may be produced in a hot-water system that has not been used for
2 weeks or more. HYDROGEN GAS IS EXPLOSIVE. If the hot water system has not been used for such a
period, before using a washing machine, turn on all hot-water faucets and let the water flow from each for
several minutes. This will release any accumulated hydrogen gas. As the gas is flammable, DO NOT smoke
or use an open flame during this time.
Ŷ
DO NOT allow children to play on or in this appliance. Close supervision of children is necessary when this
appliance is used near children. Before the washer is removed from service or discarded, remove the door or
lid. Failure to follow these instructions may result in death or injury to persons.
Ŷ
DO NOT reach into the appliance if the tub or agitator is moving to prevent accidental entanglement.
Ŷ
DO NOT install or store this appliance where it will be exposed to the weather.
Ŷ
DO NOT tamper with controls, repair or replace any part of this appliance or attempt any servicing unless
specifically recommended in the user maintenance instructions or in published user repair instructions that you
understand and have the skills to carry out.
Ŷ
DO NOT climb or stand on this unit.
Ŷ
DO NOT operate this appliance if it is damaged, malfunctioning, partially disassembled, or has missing or
broken parts including a damaged cord or plug.
Ŷ
Unplug the appliance or turn off the circuit breaker before servicing. Pressing the Power pad DOES NOT
disconnect power.
Ŷ
See “ELECTRICAL REQUIREMENTS” located in the Installation Instructions for grounding instructions.
WARNING

4 49-3000217 Rev 2
SAFETY INFORMATION
READ AND SAVE THESE INSTRUCTIONS
PROPER INSTALLATION
This washer must be properly installed and located in accordance with the Installation Instructions before it is used.
Ŷ
Ensure that the hot water hose is connected to the “H” valve and the cold water hose is connected to the “C”
valve.
Ŷ
Install or store where it will not be exposed to temperatures below freezing or exposed to the weather, which
could cause permanent damage and invalidate the warranty.
Ŷ
Properly ground washer to conform with all governing codes and ordinances. Follow details in the Installation
Instructions.
Ŷ
Ensure washer is properly leveled and washer legs are adjusted such that unit is stable.
Ŷ
Optional drain hose extension recommended for discharging heights from 60” - 96”.
Ŷ
GE Appliances strongly recommends the use of factory specified parts. A list of factory hoses available for
purchase are listed. These hoses are manufactured and tested to meet GE Appliances specifications.
Ŷ
GE Appliances strongly recommends the use of new water supply hoses. Hoses degrade over time and need
to be replaced every 5 years to reduce the risk of hose failures and water damage.
IMPORTANT SAFETY INFORMATION
READ ALL INSTRUCTIONS BEFORE USING THE APPLIANCE
PARTS AND ACCESSORIES
Order on-line at GEApplianceparts.com today,
24 hours a day or by phone at 877.959.8688 during
normal business hours. In Canada, visit your local
GE Appliances parts distributor or call 800.661.1616
or
GEAppliances.ca/en/products/parts-filters-accessories.
Part Number Accessory
WX14X10011 6 ft stainless steel washer hoses with
90° elbows; 2-pack
WH49X316 Washer drain hose extension kit
WX10X10011 Tide
®
Washing Machine Cleaner*
PM7X2 Universal low profile washer floor tray
GFA28KITN Stack Bracket Kit (to stack dryer on top)
GFP1528S 28” width Pedestal with drawer – White
GFP1528P 28” width Pedestal with drawer – Colors
*Tide
®
is a registered trademark of Procter & Gamble
WHEN NOT IN USE
Ŷ
Turn off water faucets to minimize leakage if a break or rupture should occur. Check the condition of the fill
hoses; GE Appliances recommends changing the hoses every 5 years.
49-3000217 Rev 2 5
USING THE WASHER
Throughout this manual, features and appearance may vary from your model.
Step 4 Step 5Step 1
To reduce the risk of fire, electric shock, or injury to persons, read the IMPORTANT SAFETY
INFORMATION before operating this appliance.
WARNING
(cycle options
vary by model)
Load clothes into your
washer and close the
door.
If the screen is dark,
press the Power pad or
turn the knob to “wake
up” the display.
Turn the knob to
select the desired
cycle.
Open the dispenser and add
detergent, bleach and fabric
softener, as desired. Models
with SmartDispense™ only
require that you select the
SmartDispense pad once the
tank has been filled.
Press Start to begin the
wash cycle. The machine
will weigh your clothes and
add the proper amount of
water. When the wash cycle
is finished, the door will
unlock.
Step 2
Step 3
Quick Start:
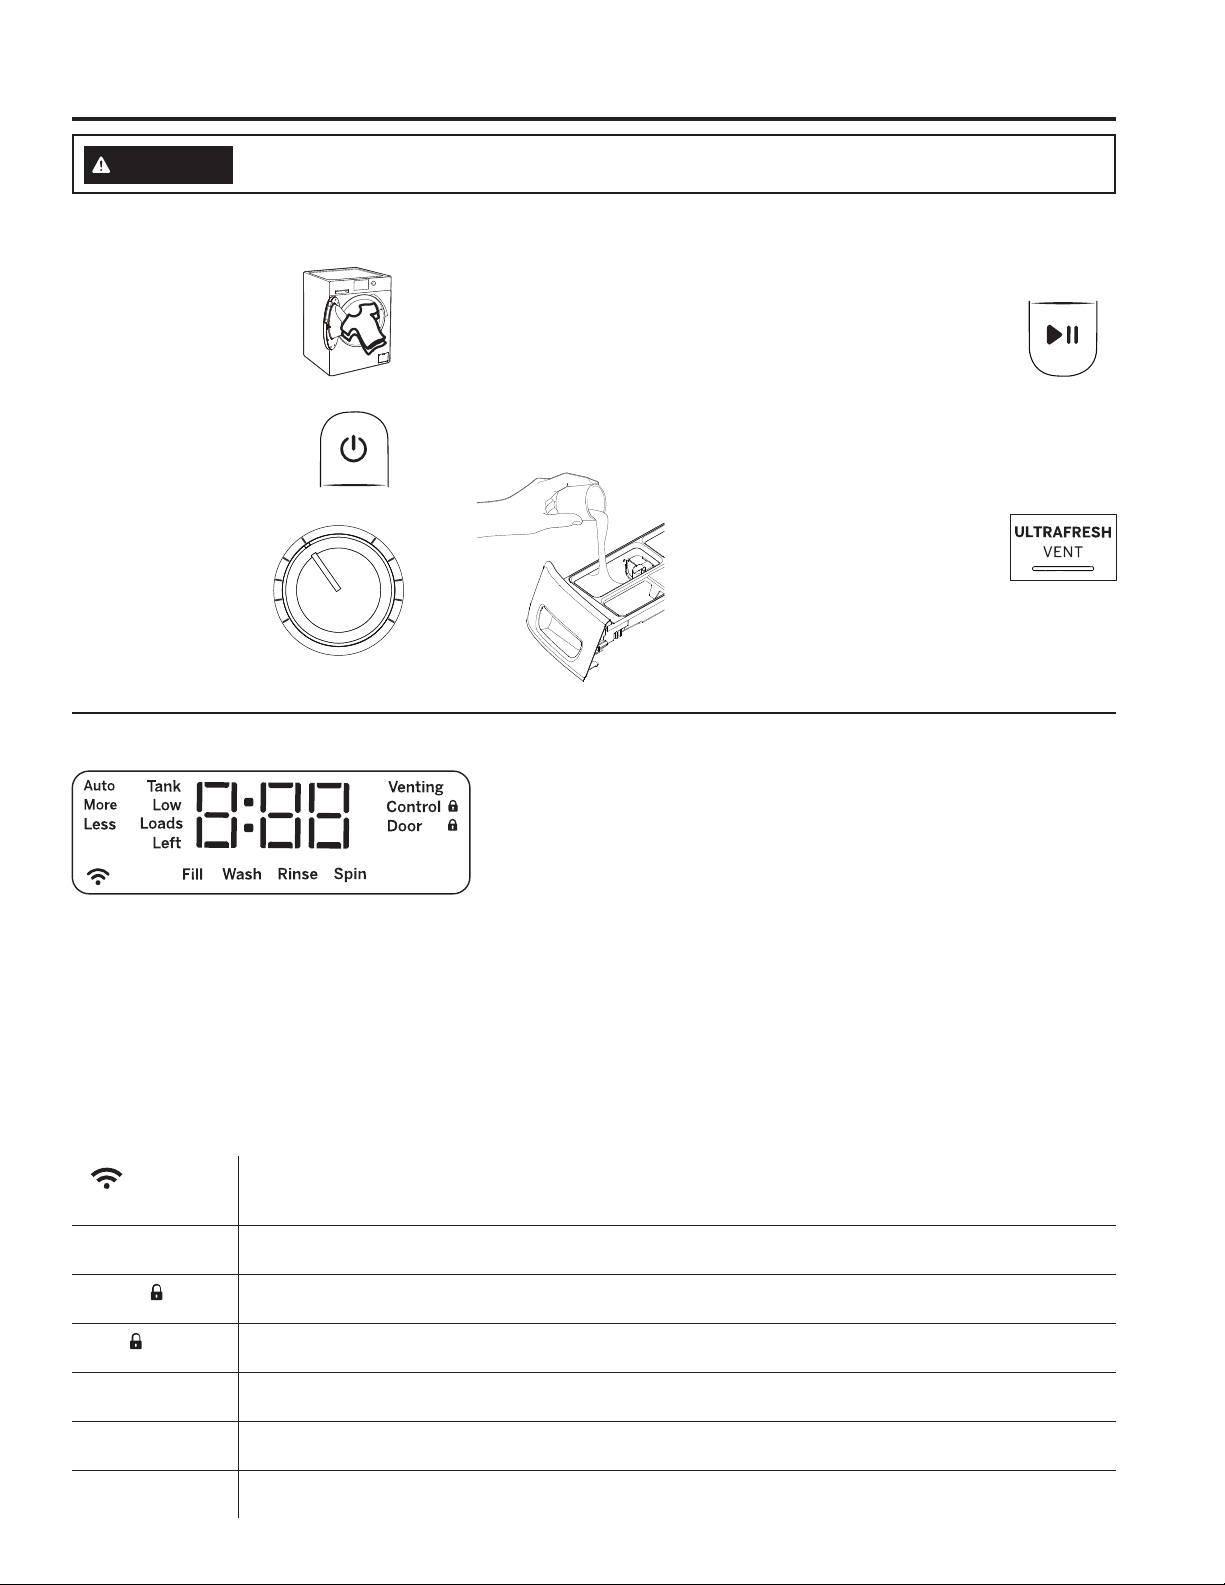
Display and Status Lights (Features and appearance will vary)
The display shows the approximate time remaining until the end of the cycle and the washer cycle status (Fill, Wash,
Rinse and Spin).
NOTE: The cycle time is affected by how long it takes the washer to fill. This depends on the water pressure in your
home. The “smart” timer “learns” the amount of time it takes to fill your washer and adjusts the total time accordingly.
If an out-of-balance condition is detected by the washer, the Spin light will blink during the remaining portion of the
cycle and will stay illuminated for a short time after cycle completion. When this occurs, the washer is taking actions
to correct the out-of-balance condition and complete the cycle normally. In some cases, the washer may not be able
to balance the load and spin up to full speed. If you notice the load is more wet than usual at the end of the cycle,
redistribute the load evenly in the wash tub and run a Rinse & Spin cycle.
In addition, the display will show:
(WiFi)
Will allow your appliance to communicate with your smartphone for remote appliance monitoring,
control and notifications. It stays lit whenever the washer is on and is connected. It will blink during the
commissioning process or if it loses connection to the network.
Venting Venting will blink to indicate that you can select the ULTRAFRESH VENT feature at the end of the cycle. It
then stays illuminated once selected until venting is complete.
Control
The controls on the washer are locked when this icon is illuminated. You must press and hold the Control
Lock pad to unlock the controls.
Door
This icon will illuminate while the door is locked and will blink while the washer is in the process of pausing
and then unlocking.
Auto, More, Less
(on some models)
The SmartDispense will automatically dose detergent according to the weight and soil level of the clothes. You
can adjust this feature to dose 40% MORE or40% LESS detergent or turn it OFF to manually dose detergent.
Tank Low
(on some models)
Will display when the SmartDispense tank needs to be re-filled. Typically, this first lights up when there are
approximately 8 - 10 loads of detergent remaining.
Loads Left
(on some models)
Displays the estimated number of wash loads left for the amount of detergent in the SmartDispense tank.
Getting started
Step 6
After the wash cycle
is completed and the
clothes unloaded, select
ULTRAFRESH VENT™ to
help eliminate the excess
moisture in your washer so
you can close the door.
6 49-3000217 Rev 2
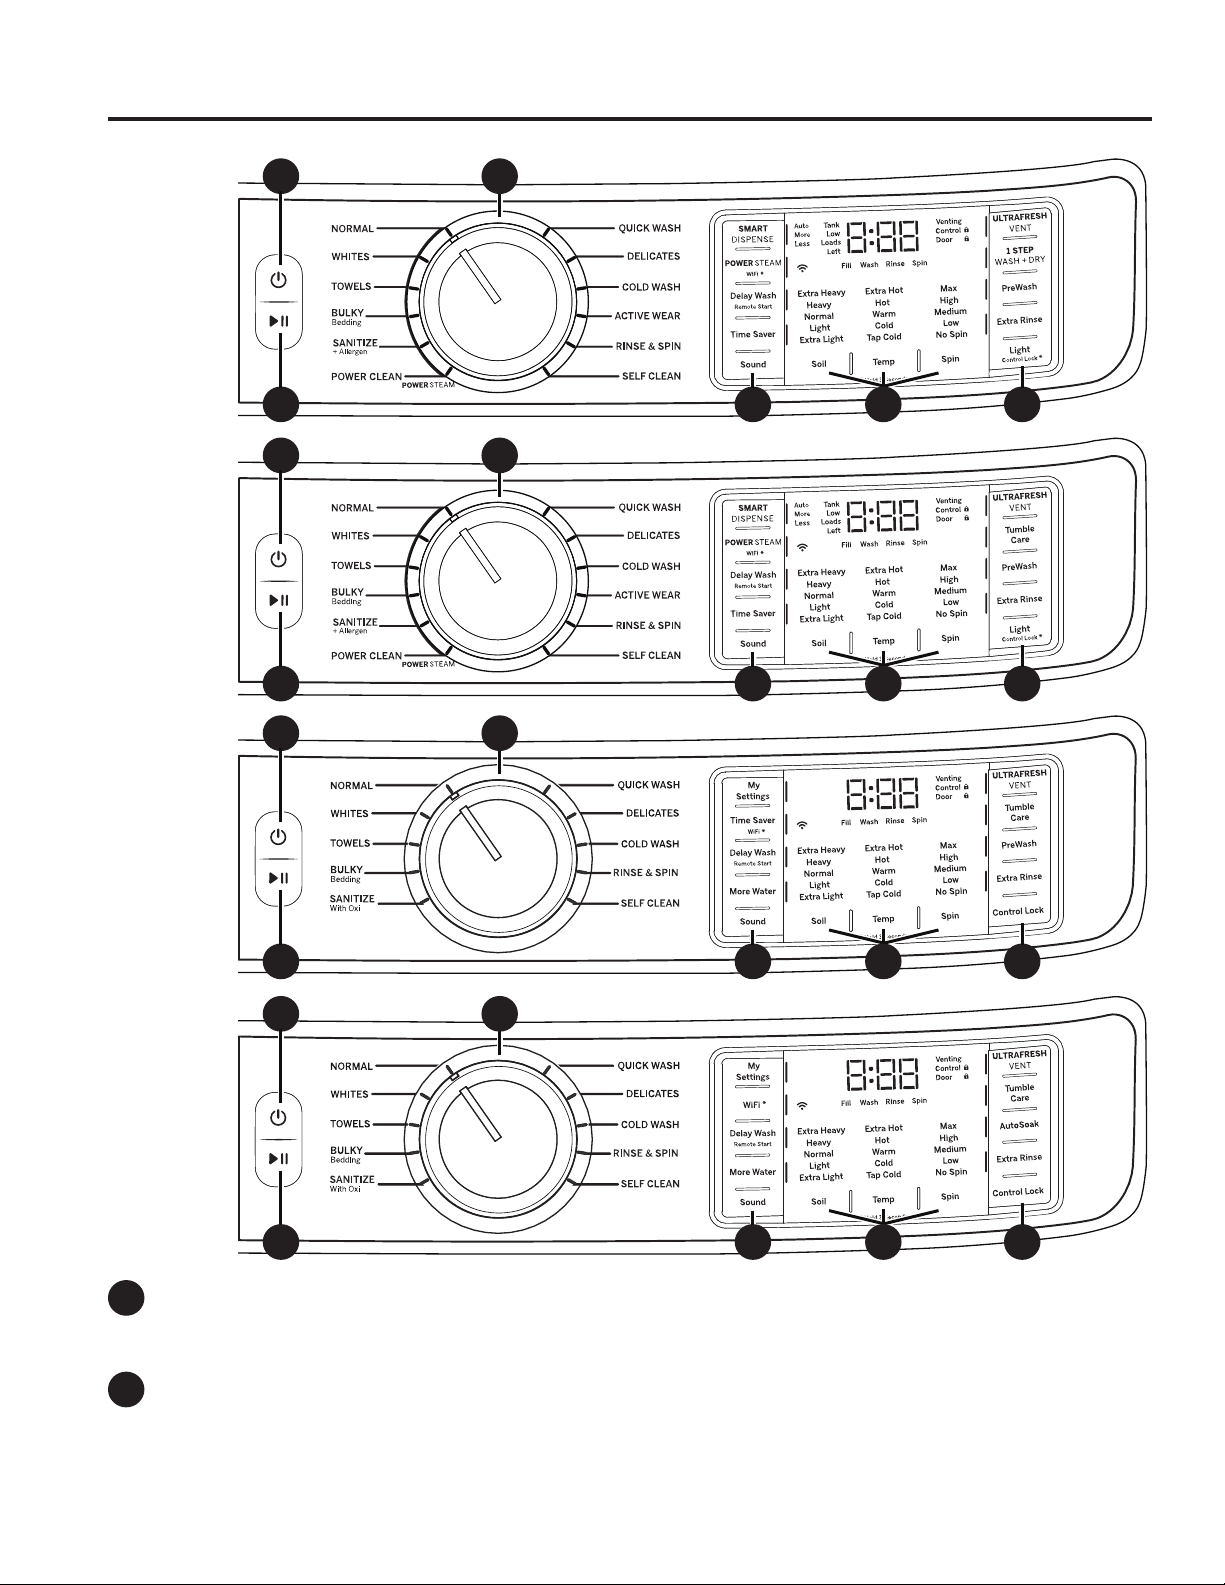
A
B
Power
Press to “wake up” the display. If the display is active, press to put the washer into standby “OFF” mode.
NOTE: Pressing Power does not disconnect the appliance from the power supply.
Start and Pause
Press to start a wash cycle. If the washer is running, pressing it once will pause the washer and unlock the door.
It will take a few seconds for the door to unlock after pressing Pause. Press again to restart the wash cycle.
NOTE: If washer is paused and cycle is not restarted within 15 minutes, the current wash cycle will be cancelled.
NOTE: The washer performs automatic system checks after pressing the Start pad. Water will flow in 45
seconds or less. You may hear the door lock and unlock and the pump activate before water flows.
Getting started
USING THE WASHER
Features and appearance will vary.
CA
B E ED
Models:
GFW850
CA
B E ED
Models:
GFW650
CA
B E ED
Models:
GFW550
CA
B E ED
Models:
GFW510

49-3000217 Rev 2 7
C
USING THE WASHER
Getting started
Wash Cycles
The wash cycles are optimized for specific types of wash loads. The chart below will help you match the items
to be washed with the best wash cycle settings. For optimal performance, select the cycle that most closely
matches the items being washed. Selections and options shown in bold are the suggested settings for that cycle.
Delay Wash/Remote Start is available on all cycles.
Wash
Cycle
Items to Wash Soil Level
Wash
Temp
Spin
Selection
Options Available
Normal Cycle for normal,
regular, or typical use
for washing up to a full
load of normally soiled
cotton clothing.
Extra Heavy
Heavy
Normal
Light
Extra Light
Extra Hot
Hot
Warm
Cold
Tap Cold
Max
High
Medium
Prewash* or Autosoak*
Power Steam*
Time Saver*
Extra Rinse
Tumble Care* or 1 Step Wash + Dry*
Whites Whites and household
linens.
Extra Heavy
Heavy
Normal
Light
Extra Light
Extra Hot
Hot
Warm
Cold
Tap Cold
Max
High
Medium
Low
Prewash* or Autosoak*
Power Steam*
Time Saver*
More Water*
Extra Rinse
Tumble Care* or 1 Step Wash + Dry*
Towels Towels, sheets,
pillowcases and dish
rags.
Extra Heavy
Heavy
Normal
Light
Extra Light
Hot
Warm
Cold
Tap Cold
Max
High
Medium
Low
Prewash* or Autosoak*
Power Steam*
Time Saver*
More Water*
Extra Rinse
Tumble Care* or 1 Step Wash + Dry*
Bulky
Bedding
Large coats, bed
spreads, mattress
covers, sleeping bags,
and similar large bulky
items.
Extra Heavy
Heavy
Normal
Light
Extra Light
Hot
Warm
Cold
Tap Cold
Max
High
Medium
Low
Prewash* or Autosoak*
Power Steam*
Time Saver*
More Water*
Extra Rinse
Tumble Care* or 1 Step Wash + Dry*
Sanitize+
Allergen*
Heavily soiled colorfast
items with the need for
sanitization.
Extra Heavy
Heavy
Extra Hot Max
High
Medium
Low
Prewash
Power Steam*
Extra Rinse
Tumble Care* or 1 Step Wash + Dry*
Sanitize
With Oxi*
Heavily soiled colorfast
items with the need for
sanitization.
Extra Heavy
Heavy
Extra Hot Max
High
Medium
Low
Prewash* or Autosoak*
Extra Rinse
Tumble Care
*Some cycles and options may not be available on some models.
NOTE:
The SANITIZE + Allergen cycle’s water temperatures CANNOT be changed. This cycle utilizes elevated water
temperature and a longer wash cycle to kill dust mites and reduce 99% of common bacteria from fabrics. A pump
purge and extended rinse is incorporated for the purpose of removing contaminants and allergens, such as pet
dander.
The SANITIZE With Oxi cycle’s water temperatures CANNOT be changed. This cycle, when using an Oxi additive
along with your detergent, is designed to remove 99% of bacteria found in home laundry. Measure the detergent and
the Oxi products carefully. Using the amounts appropriate for a large heavily soiled load in a front load washer, follow
the detergent and the Oxi product label instructions. The washer hot water supply connection must provide a minimum
of 120°F to ensure the effectiveness of this cycle.
Only the SANITIZE + Allergen and SANITIZE With Oxi cycles have been designed to meet the requirements of
sanitizing effectiveness.

8 49-3000217 Rev 2
Getting started
USING THE WASHER
C
Wash Cycles - Continued
The wash cycles are optimized for specific types of wash loads. The chart below will help you match the items
to be washed with the best wash cycle settings. For optimal performance, select the cycle that most closely
matches the items being washed. Selections and options shown in bold are the suggested settings for that cycle.
Delay Wash/Remote Start is available on all cycles.
Wash
Cycle
Items to Wash Soil Level
Wash
Temp
Spin
Selection
Options Available
Power
Clean*
For heavily soiled items
which require extra
cleaning power.
Extra Heavy
Heavy
Normal
Extra Hot
Hot
Warm
Cold
Tap Cold
Max
High
Medium
Low
Prewash
Power Steam
Extra Rinse
Tumble Care* or 1 Step Wash + Dry*
Quick
Wash
Small loads of lightly
soiled items that are
needed in a hurry.
Normal
Light
Extra Light
Hot
Warm
Cold
Tap Cold
Max
High
Medium
Low
More Water*
Extra Rinse
Tumble Care* or 1 Step Wash + Dry*
Delicates Lingerie and special
care fabrics with light
soil.
Normal
Light
Extra Light
Warm
Cold
Tap Cold
Medium
Low
No Spin
Prewash* or Autosoak*
Time Saver*
More Water*
Extra Rinse
Tumble Care* or 1 Step Wash + Dry*
Cold
Wash
Cycle for normal,
regular, or typical use
for washing up to a full
load of normally soiled
cotton clothing using
only cold water.
Extra Heavy
Heavy
Normal
Light
Extra Light
Cold
Tap Cold
Max
High
Medium
Low
Prewash* or Autosoak*
More Water*
Extra Rinse
Tumble Care* or 1 Step Wash + Dry*
Active
Wear*
Medium to lightly soiled
athletic wear items of
technical or synthetic
fabrics.
Extra Heavy
Heavy
Normal
Light
Extra Light
Warm
Cold
Tap Cold
Medium
Low
No Spin
Prewash
Time Saver
Extra Rinse
Tumble Care* or 1 Step Wash + Dry*
Rinse &
Spin
For items that need
only to be rinsed, use
this cycle.
Max
High
Medium
Low
No Spin
More Water*
Extra Rinse
Tumble Care* or 1 Step Wash + Dry*
Self
Clean
Cleaning the basket of
residue and odor. No
clothes to be washed
using this cycle.
Medium
*Some cycles and options may not be available on some models.

49-3000217 Rev 2 9
USING THE WASHER
Getting started
D
Settings
Individual settings for soil level (Level), water temperature (Temp) and spin speed (Spin) can be set from the
minimum to maximum. In general, the higher up the column, the more energy will be used.
Soil
Changing the Soil level increases or decreases the wash time to remove different amounts of soil.
To change the Soil level, press the Soil level pad until you have reached the desired setting. You can choose
between Extra Light, Light, Normal, Heavy or Extra Heavy soil levels on most cycles.
Temp
Adjust to select the proper water temperature for the wash cycle. The AutoSoak and PreWash rinse water is
always cold to help reduce energy usage and reduce setting of stains and wrinkles.
Follow the fabric manufacturer’s care label when selecting the wash temperature.
To change the wash temperature, press the Temp pad until you have reached the desired setting. You can
choose between Tap Cold, Cold, Warm, Hot or Extra Hot on most cycles. By design, to protect fabrics, not all
wash temperatures are available for certain wash cycles. Extra Hot temperatures are enabled by the internal
heater on models equipped with Steam capabilities.
NOTE: The first 10 seconds of the wash fill is always cold. This feature assists in conditioning the fabric and
preventing stains from setting on garments.
Spin
Adjusting the Spin speed changes the final spin speed of the cycles. Always follow the garment manufacturer’s
care label when changing the Spin speed.
To change the Spin speed, press the Spin speed pad until you have reached the desired setting. You can
choose between No Spin, Low, Medium, High or Max. Higher spin speeds are not available on certain cycles,
such as DELICATES and ACTIVE WEAR.
Higher spin speeds remove more water from the clothes and will help reduce dry time, but may also increase
the possibility of setting wrinkles on some fabrics.
NOTE: This washer features a dBT™ (Dynamic Balancing Technology) system. This patented onboard sensing
technology enables real-time balancing of the spin cycle for each load, saving time and providing a quiet wash. This
should lead to more consistent wash times and an overall reduction in noise and vibration. If the washer should
experience any excessive noise, vibration or shaking, simply Pause the washer, open the door, and manually
redistribute the load before restarting the cycle.
E
Options
SMARTDISPENSE™ (on some models)
When selected, this feature will automatically add detergent to the wash, eliminating the need to add detergent
for each load. See the SmartDispense section for details.
MY SETTINGS (on some models)
To save your favorite settings, set the desired settings for wash cycle, soil level, spin speed and wash temp settings
and hold down the My Settings pad for 3 seconds. A beep will sound to indicate the cycle has been saved.
To use your custom settings, press the My Settings pad before washing a load.
To change the saved settings, set the desired settings and hold down the My Settings pad for 3 seconds.
POWER STEAM (on some models)
Power Steam adds steam into the washer before the wash cycle begins to assist with loosening stains on the
NORMAL, WHITES, TOWELS, BULKY Bedding, SANITIZE+Allergen and POWER CLEAN cycles.
To use:
1. Press the Power pad to “wake up” the washer and select a wash cycle.
2. Press the POWER STEAM pad to activate steam.
3. Press the Start/Pause pad.
WiFi (may be a shared pad with other options)
Press and hold the WiFi* pad for 3 seconds to activate. See the WiFi Connect section for details on how to
get stated with WiFi connection.

10 49-3000217 Rev 2
Getting started
USING THE WASHER
E
Options
Delay Wash/Remote Start
You can delay the start of a wash cycle for up to 24 hours or remote start the washer by using the Delay Wash/
Remote Start feature. Press to step by hours or hold to scroll the Delay Wash pad to set the amount of time
you want to delay the start of the wash cycle. If you have connected your washer to WiFi, the first selection,
“APP”, can be selected to enable remote starting of your washer from the GE Appliance Smartphone app. Or,
if you select a delay time in hours, the machine will count down and start automatically following this period.
Press the Start pad once you have configured the Delay Wash to the proper setting to enable this feature. To
cancel this option, simply power off and power on the controls.
NOTE: If you forget to fully close the door, a reminder signal will beep reminding you to do so.
NOTE: If you open the door when the delay is counting down, the machine will enter the pause state. You must
close the door and press Start again in order to restart the countdown.
Time Saver (on some models)
This option reduces the overall washer cycle time by optimizing the wash, rinse and spin actions and/or
gently raising the wash temperature to get clothes cleaned faster. Option is available on NORMAL, WHITES,
TOWELS, DELICATES, BULKY Bedding and ACTIVE WEAR cycles. Total wash time will vary based on
cycle chosen and options selected.
To use:
1. Turn power on and select a wash cycle which has Time Saver as an option.
2. Press the Time Saver pad to reduce the overall wash time.
3. Press the Start/Pause pad.
More Water (on some models)
This option adds approximately 3 gallons to the wash and rinse portions of the cycle. If the option is selected
before the cycle starts, the water will be added from the beginning of the wash cycle and later to the rinse. If
the option is selected during the wash portion, more water will be added at this point and later to the rinse.
Likewise, if the More Water option is selected after the wash portion has completed, the washer will add more
water to the rinse only. If wash and rinse have completed, the More Water pad will no longer be active.
ULTRAFRESH VENT System with ODORBLOCK™
The ULTRAFRESH VENT System with OdorBlock was designed to eliminate excess moisture in the washer
following a wash cycle to help prevent odors from developing. This washer was designed to drain water at the
end of the cycle more effectively. Following the wash cycle, the user can then choose to leave the door open
or select the ULTRAFRESH VENT feature to assist with drying out the gasket and other areas of the washer.
The OdorBlock system features multiple components which are manufactured with Microban
®
antimicrobial
technology.* Microban is a safe and effective antimicrobial technology that will last the life of your washer. For
more information, please visit www.microban.com/geappliances.
ULTRAFRESH VENT is available after the wash cycle is complete and you have removed your cleaned
laundry. Once the door is closed, a notification tune will play and the ULTRAFRESH VENT pad LED will blink.
Upon pressing the pad, ULTRAFRESH VENT will begin.
To select ULTRAFRESH VENT at any other point, power on the washer, ensure a cycle is
not actively running, and remove any garments from the basket, then press and release the
ULTRAFRESH VENT pad so that the notification tune plays and the ULTRAFRESH VENT pad
LED begins to blink. Then press the ULTRAFRESH VENT pad again to start the feature.
During the operation of ULTRAFRESH VENT the door will remain locked and the washer will intermittently spin
at low speeds for up to 8 hours.
If garments are detected in the basket during ULTRAFRESH VENT, the washer will instead run TUMBLE
CARE or 1 STEP WASH + DRY, based on option availability for your model.
The ULTRAFRESH VENT feature may be cancelled at any time by pressing the POWER pad, turning the cycle
knob, or pressing the ULTRAFRESH VENT pad.
*Microban
®
is a registered trademark of Microban International, Ltd.

49-3000217 Rev 2 11
USING THE WASHER
Getting started
E
Options
1 STEP WASH + DRY (on some models)
This option is available on all cycles except Self Clean.
The 1 STEP WASH + DRY is intended for small loads only. Use when clothes need to be washed, dried and
ready to wear or finished the next morning. This feature will tumble clothes and introduce a constant stream of
air into the washer compartment upon completion of select wash cycles. Although the drying portion is set to 8
hours, the clothes can be removed at any time by pressing Pause or Power to cancel the cycle.
Tumble Care (on some models)
Freshly tumbles your garments periodically for up to 8 hours after the wash cycle is complete to lessen the
setting of wrinkles and creases when you are not able to move clothing to the dryer right away.
At the end of the cycle, the display will scroll “END” and after ten minutes the Tumble Care will begin. It can be
stopped at any time by pressing the Power pad.
PreWash (on some models)
Prewash is an extra wash before the main wash. Use it for heavily soiled clothes or for clothes with a care label
that recommends prewashing before washing. Be sure to add liquid or powder high-efficiency detergent, or the
proper wash additive to the prewash dispenser. Washers equipped with SmartDispense will automatically add
the proper amount of detergent for prewash based on the load size.
PreWash must be selected prior to pressing Start.
The PreWash feature will fill the washer (adding the prewash detergent), tumble the clothes, drain and spin.
Then the washer will run the selected wash cycle.
NOTE: In some special cycles, the prewash is selected automatically as the default. You can modify this
selection at any time.
AutoSoak (on some models)
For soaking your garments prior to the wash cycle. This option begins with a brief tumble and then proceeds to
soak the clothes with water and detergent for a specified period of time. Once complete, the cycle will continue
automatically. AutoSoak must be selected prior to pressing the start pad. The AutoSoak time will add an
additional 15 minutes, 30 minutes, 1 hour or 2 hours to the overall wash time. High-efficiency detergent from the
main wash compartment in the dispenser is used for the AutoSoak period and main wash cycle.
Extra Rinse
This option allows for an extra rinse during a cycle to remove excess dirt and detergent from soiled loads.
Press the Extra Rinse pad to select.
NOTE: On Rinse & Spin cycle, a drain and spin cycle can be achieved by pressing the Extra Rinse pad until the
LED is no longer illuminated.
Light (on some models)
The basket light will turn on and remain on for 5 minutes when the door opens, Start/Pause pad is pressed, or
by pressing the Light pad.
The basket light can be turned off by pressing and holding the Light pad.
Sound
To change the loudness of the end of cycle signal and the press pad volume, press the Sound pad as many
times as needed to reach the desired volume. There are four sound levels including off.
Control Lock (Light-Control Lock pad) (depending on model)
You can lock the controls to prevent any selections from being made. Or you can lock or unlock the controls
after you have started a cycle.
Children cannot accidentally start the washer by touching pads with this option selected.
To lock/unlock the washer, press and hold the Control Lock/Light-Control Lock pad for 3 seconds. A sound
is made to indicate the lock/unlock status. The control lock icon on the display will light up when it is on.
NOTE: The Power pad can still be used when the machine is locked.
12 49-3000217 Rev 2
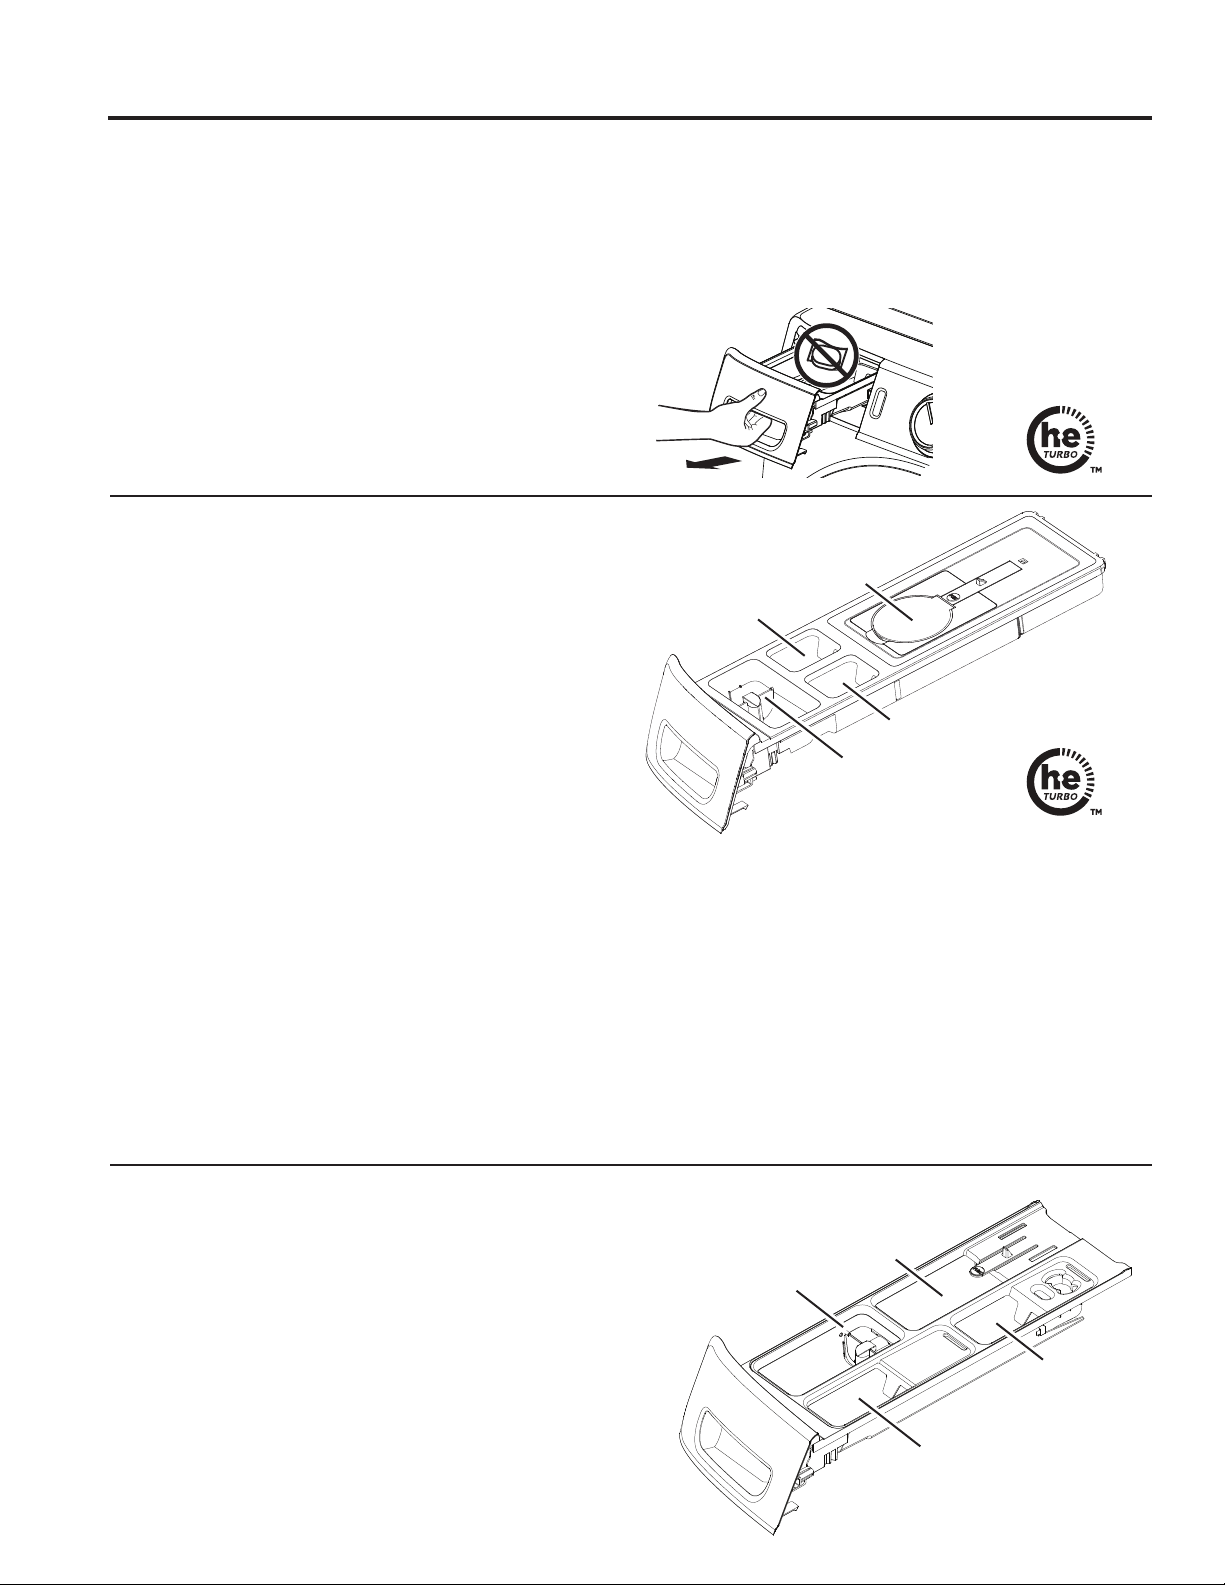
Dispenser Drawer
Slowly open the dispenser drawer by pulling it out until
it stops. After adding laundry products, slowly close the
dispenser drawer. Closing the drawer too quickly could
result in early dispensing of the bleach, fabric softener or
detergent.
You may see water in the detergent, bleach and fabric
softener compartments at the end of the cycle. This is a
result of the flushing/siphoning action and is part of the
normal operation of the washer.
Do NOT put detergent packets in the dispenser drawer.
NOTE: Use only liquid or powder HE detergents and
additives in the dispenser drawer. Laundry detergent
packets should only be added directly to the wash
basket following the manufacturer’s directions.
Getting started
USING THE WASHER
Use only HE
High-Efficiency
detergent
SmartDispense™ (on some models)
When selected, this feature will automatically add
detergent to the wash, eliminating the need to add
detergent for each load.
The detergent amount selection on the control
panel will default to AUTO when first powering up
the washing machine. When AUTO is selected, the
amount of detergent needed for each laundry load will
automatically be determined based on the size of the
load the machine senses.
For AUTO, the washer will dispense approximately 1.5 oz
of detergent for an 8 lb normal load. For other loads,
it will adjust proportionally based on the size of load
and garment type. If you select LESS, the amount of
detergent will be reduced by 40%. This may be desired
for higher concentrate detergents or if you have very soft
water. For heavily soiled loads, you may want to select
MORE to add 40% more detergent than the AUTO level.
NOTE: Not all cycles will allow the use of the
SmartDispense feature. If the light is not illuminated
and pressing the SMART DISPENSE pad results in a
beeping tone, then SmartDispense is not allowed for the
cycle that has been selected. Detergent will need to be
added directly to the detergent compartment for these
cycles.
If it is desired to manually select the amount of
detergent for a given load, this can be done by
pressing the SMART DISPENSE pad on the control
panel to select detergent for a Small or Large load.
Small will provide less detergent than average and
Large will provide more detergent than average.
NOTE: If it is desired to manually add detergent for a
load, that detergent will need to be added directly to
the basket, and the SMART DISPENSE set to off for
that particular load.
The smart dispense feature can be disabled by pressing
the SMART DISPENSE pad until off is selected.
Use only HE
High-Efficiency
detergent
Softener
Detergent
Flap Selector
Bleach
SmartDispense
Prewash Compartment (on some models)
Only use the prewash compartment if you are selecting
the PreWash or AutoSoak cycle for heavily soiled clothes.
Add measured detergent or prewash additive to the back
left prewash compartment of the dispenser drawer.
• Detergent or prewash additive is flushed from the
dispenser in the PreWash or AutoSoak cycle (if
selected).
• Detergent usage may need to be adjusted for water
temperature, water hardness, size and soil level of the
load. Avoid using too much detergent in your washer
as it can lead to over sudsing and detergent residue
being left on the clothes.
Softener
Detergent
Flap Selector
Bleach
Add PreWash to
this compartment
49-3000217 Rev 2 13
USING THE WASHER
Getting started
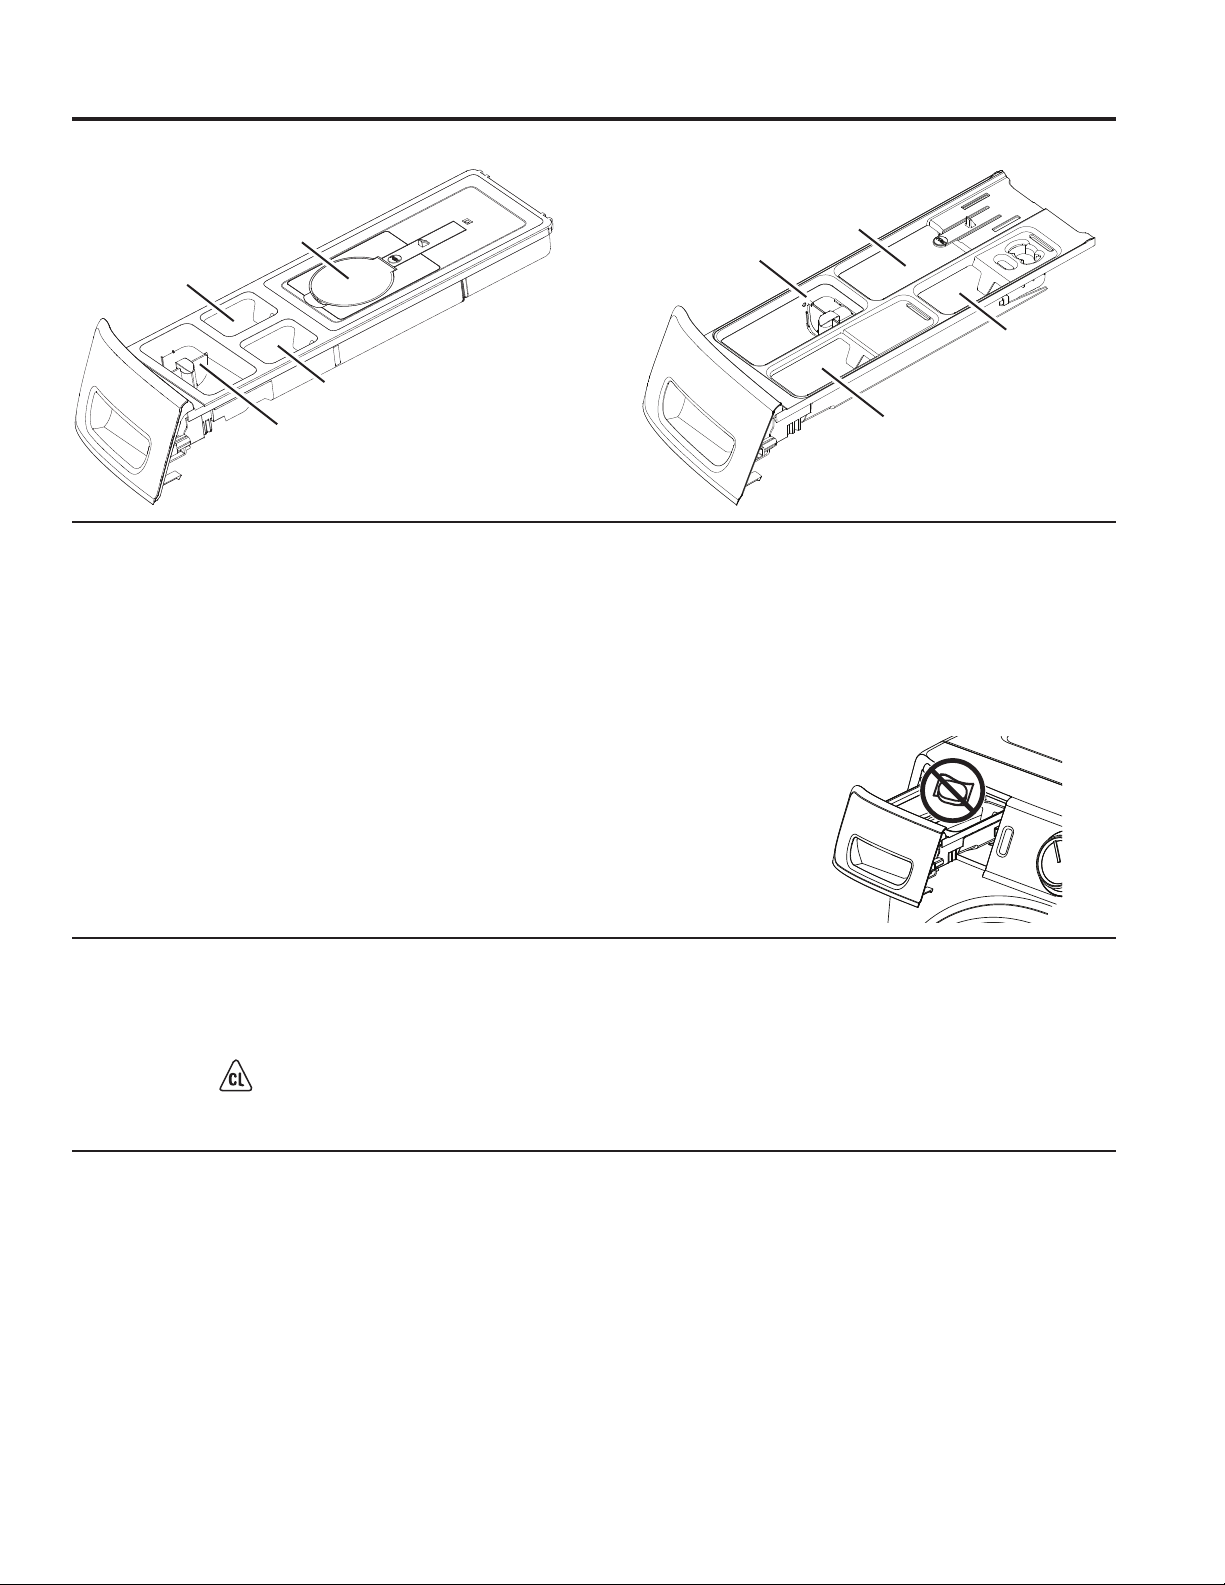
Detergent Compartment
Only use high-efficiency detergent in this washer.
Do NOT fill high-efficiency detergent over the MAX
line. Use detergent manufacturer’s recommended
amount.
• Powder Detergent – Lift the flap up for powder
detergent. This must be done to dissolve and flush
detergent properly. Follow the detergent manufacturer’s
instructions when measuring the amount of powder
detergent to use.
• Liquid Detergent – Keep the flap down for liquid
detergent. This retains the liquid detergent until it
automatically flushes at the start of the wash cycle.
Follow the detergent manufacturer’s instructions when
measuring the amount of liquid detergent to use.
Detergent usage may need to be adjusted for water
temperature, water hardness, size and soil level of the
load. Avoid using too much detergent in your washer as
it can lead to oversudsing, detergent residue being left
on the clothes, and could extend wash times.
Do not put clumped detergent in the dispenser. Clumped
detergent can cause a leak.
Do NOT put detergent
packets in the dispenser
drawer.
Softener
Detergent
Flap Selector
Bleach
SmartDispense
Softener
Detergent
Flap Selector
Bleach
Add PreWash to
this compartment
On models with SmartDispense: On models without SmartDispense:
Liquid Bleach Compartment
If desired, measure out the recommended amount of
liquid bleach, not to exceed 1/3 cup (80 ml) and pour into
the compartment labeled “LIQUID BLEACH” marked
with this symbol .
It is recommended to use High-Efficiency (HE) bleach in
this front-load washer.
Do not exceed the maximum fill line. Overfilling can
cause early dispensing of the bleach which could result
in damaged clothes.
NOTE: Do not use powdered bleach or laundry
detergent/additive packets in the dispenser.
Fabric Softener Compartment
If desired, pour the recommended amount of liquid
fabric softener into the compartment labeled “FABRIC
SOFTENER”.
Use only liquid fabric softener in the dispenser.
Dilute with water to the maximum fill line.
Do not exceed the maximum fill line. Overfilling can
cause early dispensing of the fabric softener, which
could stain clothes.
NOTE: Do not pour fabric softener directly on the wash
load.

14 49-3000217 Rev 2
Getting started
USING THE WASHER
WiFi Label Location
WiFi Connect (For customers in the United States only - on some models)
Your washer is GE Appliances WiFi Connect enabled.
Visit geappliances.com/connect and enter your model number to
show you the proper steps to connect your appliance.
Please visit GEAppliances.com/connect to learn more about
connected appliance features, to learn what connected appliance
app’s will work with your smartphone.
WiFi Connectivity: For assistance with the appliance or the
ConnectPlus network connectivity, please call GE Appliances at
800.GE.CARES.
49-3000217 Rev 2 15
USING THE WASHER
Loading
Always follow fabric manufacturer’s care label when laundering.
DO NOT wash fabrics soiled with flammable liquids or cleaning solvents.
No washer can completely remove oil.
DO NOT wash or dry anything that has been soaked in or spotted with any type of oil (including cooking oils).
DO NOT reach into the washer until all moving parts have stopped.
Doing so can result in death, explosion, fire or amputation.
Sorting Wash Loads
Sort by color (whites, lights, colors), soil level, fabric type (sturdy cottons, easy care, delicates) and whether the
fabric produces lint (terry cloth, chenille) or collects lint (velveteen, corduroy). Wash lint producers such as cotton
towels and socks separate from lint collectors including synthetic garments and dress pants.
Loading the Washer
The wash drum may be fully loaded with loosely added items.
To add items after the washer has started, press Start/Pause and wait until the door is unlatched. The washer may
take up to 30 seconds to unlock the door after pressing Start/Pause, depending on the machine conditions. Do not
try to force open the door when it is locked. After the door unlocks, open gently. Add items, close the door and press
Start/Pause to restart.
WARNING
- Fire Hazard
Loading Examples
WORKWEAR LINENS MIXED LOAD DELICATES* QUICK WASH
(2–3 GARMENTS)
4 Jeans
5 Work Wear
Shirts
3 Work Wear
Pants
2 Bath
Sheets
10 Bath
Towels/
12
Washcloths
7 Hand
Towels/
2 Terrycloth
Bath Mats
OR
2 Flat
Queen-Sized
Sheets
2 Fitted
Queen-Sized
Sheets
4
Pillowcases
4 Pillowcases
2 Hand Towels
2 Flat Sheets/
2 Fitted Sheets
2 Bath Towels/
4 Washcloths
OR
6 Shirts (Men’s or
Women’s)
4 Pair Pants (Khakis or
Twills)
5 T-shirts
7 Pairs of Boxers
4 Pairs of Shorts
OR
6 T-shirts
4 Pairs of Sweatpants
4 Sweatshirts
2 Hoodies
7 Pairs of Socks
7 Bras
7 panties
3 Slips
2 Camisole
4 Nightgowns
* Using a nylon mesh
bag for small items is
recommended.
2 Casual Wear Work Shirts
1 Pair Casual Wear Work Pants
OR
3 Soccer Uniforms
16 49-3000217 Rev 2
Care and cleaning
CARE AND CLEANING
Self Clean
To clean the interior of the washer, select
the SELF CLEAN feature on the control
panel. This Self Clean cycle should
be performed, at a minimum, once
per month or about every 30-40 wash
cycles. This cycle will use more water,
in addition to bleach, to control the
rate at which soils and detergents may
accumulate in your washer.
NOTE: Read the instructions below
completely before starting Self Clean cycle.
1. Remove any garments or objects from the washer and
ensure the washer basket is empty.
2. Open the washer door and pour
one cup or 250 ml of liquid bleach
or other washing machine cleaner
into the basket.
3. Close the door and select the SELF CLEAN cycle.
Push the Start pad.
4. When the Self Clean cycle is working, the display will
show the estimated cycle time remaining. The cycle
will complete in about 90 minutes. Do not interrupt the
cycle.
5. After the cycle is complete, the washer will automatically
start an ULTRAFRESH VENT operation so that the door
can remain closed until the next time you use the washer.
If for any reason the cycle needs to be interrupted, the
door will not open immediately. Forcing open the door at
this stage may cause water to flood. The door will open
after the water is drained to a level where it would not
flood the floor.
Self Clean may be interrupted by pressing the Start pad
in between cycles. A power outage in the house might
also interrupt the cycle. When the power supply is back,
the Self Clean cycle resumes where it had stopped.
When interrupted, be sure to run a complete Self Clean
cycle before using the washer. If the Power pad is
pressed during Self Clean, the cycle will be lost.
IMPORTANT:
• Run Self Clean with 1 Cup (250 ml) of bleach once a
month.
• After the completion of a Self Clean cycle, the interior
of your washer may have a bleach smell.
• It is recommended to run a RINSE & SPIN or a light
color load after the Self Clean cycle.
Exterior
Immediately wipe off any spills. Wipe with damp cloth. Wipe or dust spills or washing compounds with a damp cloth.
Washer control panel and finishes may be damaged by some laundry pretreatment and stain remover products.
Apply these products away from the washer. The fabric may then be washed and dried normally. Damage to your
washer caused by these products is not covered by your warranty. Do not hit surface with sharp objects.
Interior
Dry around the washer door opening, flexible gasket (including attached hoses) and door glass. These areas should
always be clean to ensure a watertight seal. You will notice if you regularly use the ULTRAFRESH VENT System that
this will not be required as often. It is recommended to rinse the washer at least once per month with 1 cup of bleach
(or other commercially available product manufactured for this purpose, such as Tide
®
Washing Machine Cleaner)
poured directly into the basket without clothes and using the Self Clean Cycle.
Water Supply Hoses
Hoses connecting washer to faucet should be replaced every 5 years.
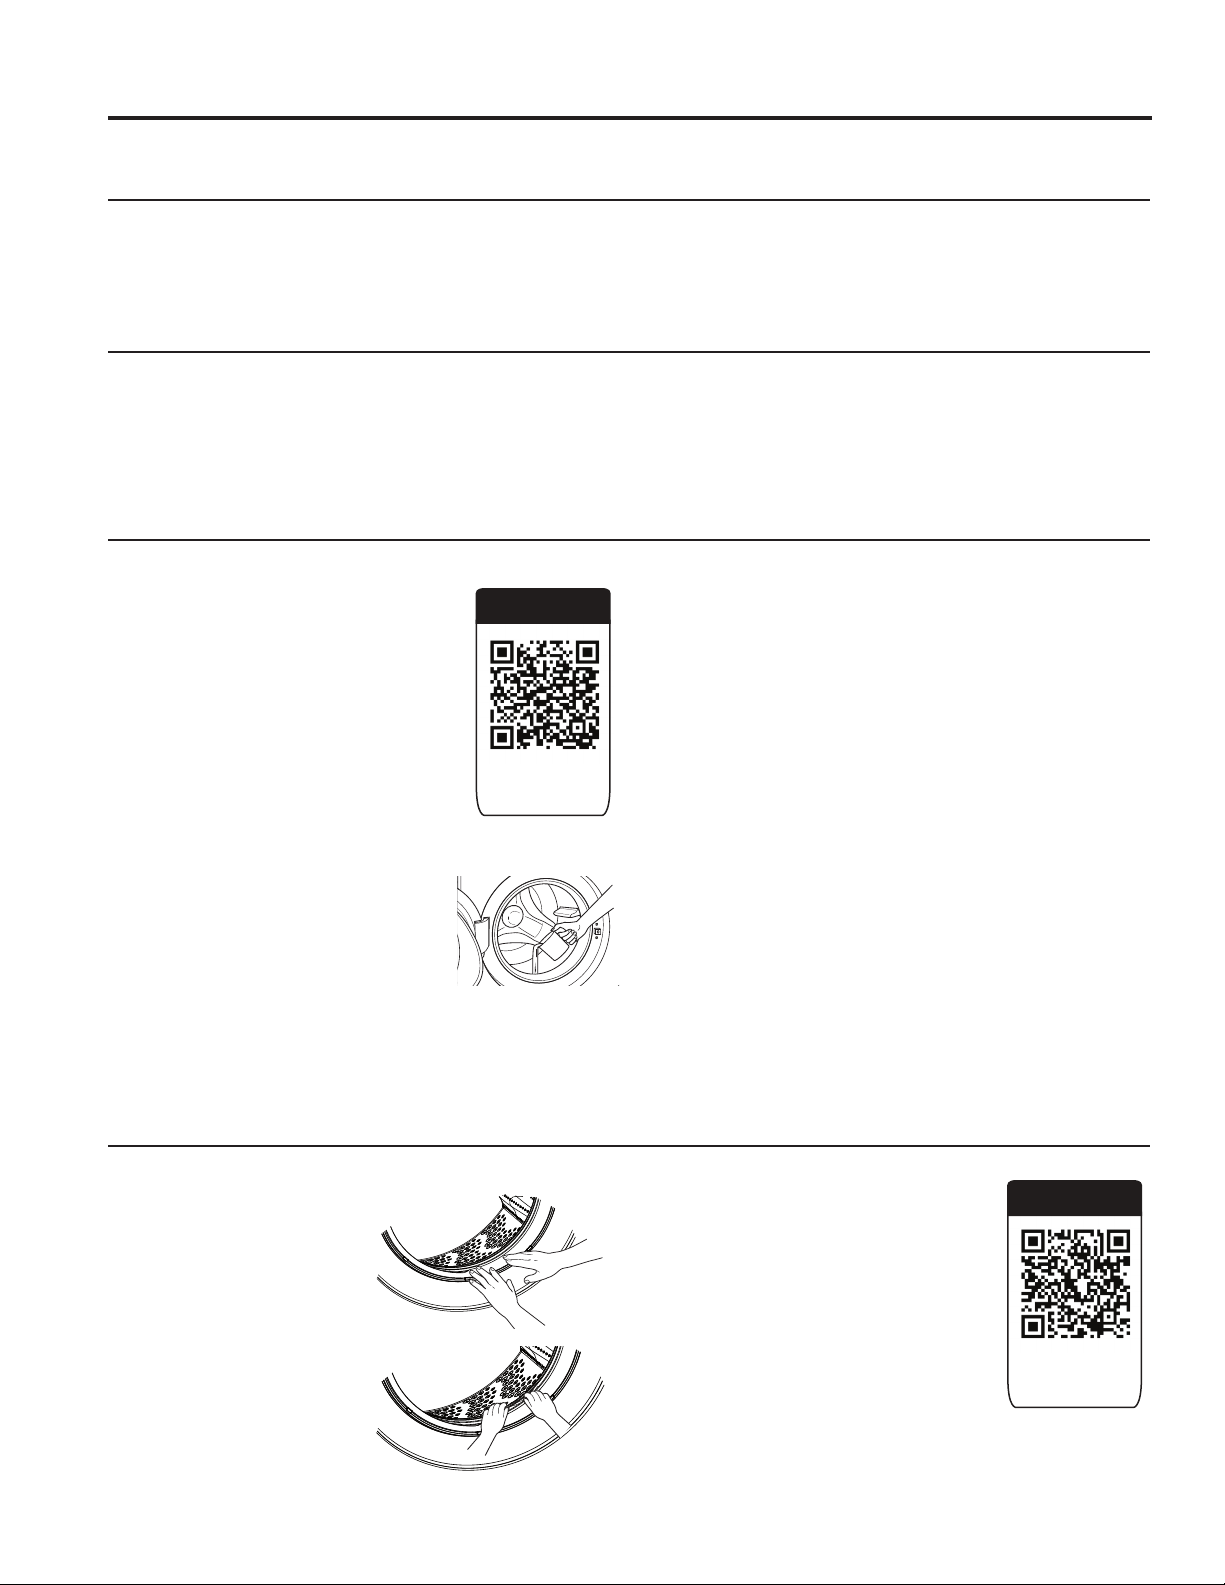
Door Gasket
Open the washer door.
Using both hands, press
down the door gasket.
Remove any foreign objects
if found trapped inside the
gasket. Make sure there is
nothing blocking the holes
behind the gasket.
While holding down the door
gasket, inspect the interior
of the gasket by pulling
it down with your fingers.
Remove any foreign objects if found
trapped inside this gasket. Make sure
there is nothing blocking the holes
behind the gasket.
When you are finished cleaning the
door gasket, release it and the gasket
will return to the operating position.
Video
Scan this code
to watch a video
on this topic.
Video
Scan this code
to watch a video
on this topic.
49-3000217 Rev 2 17
CARE AND CLEANING
Care and cleaning
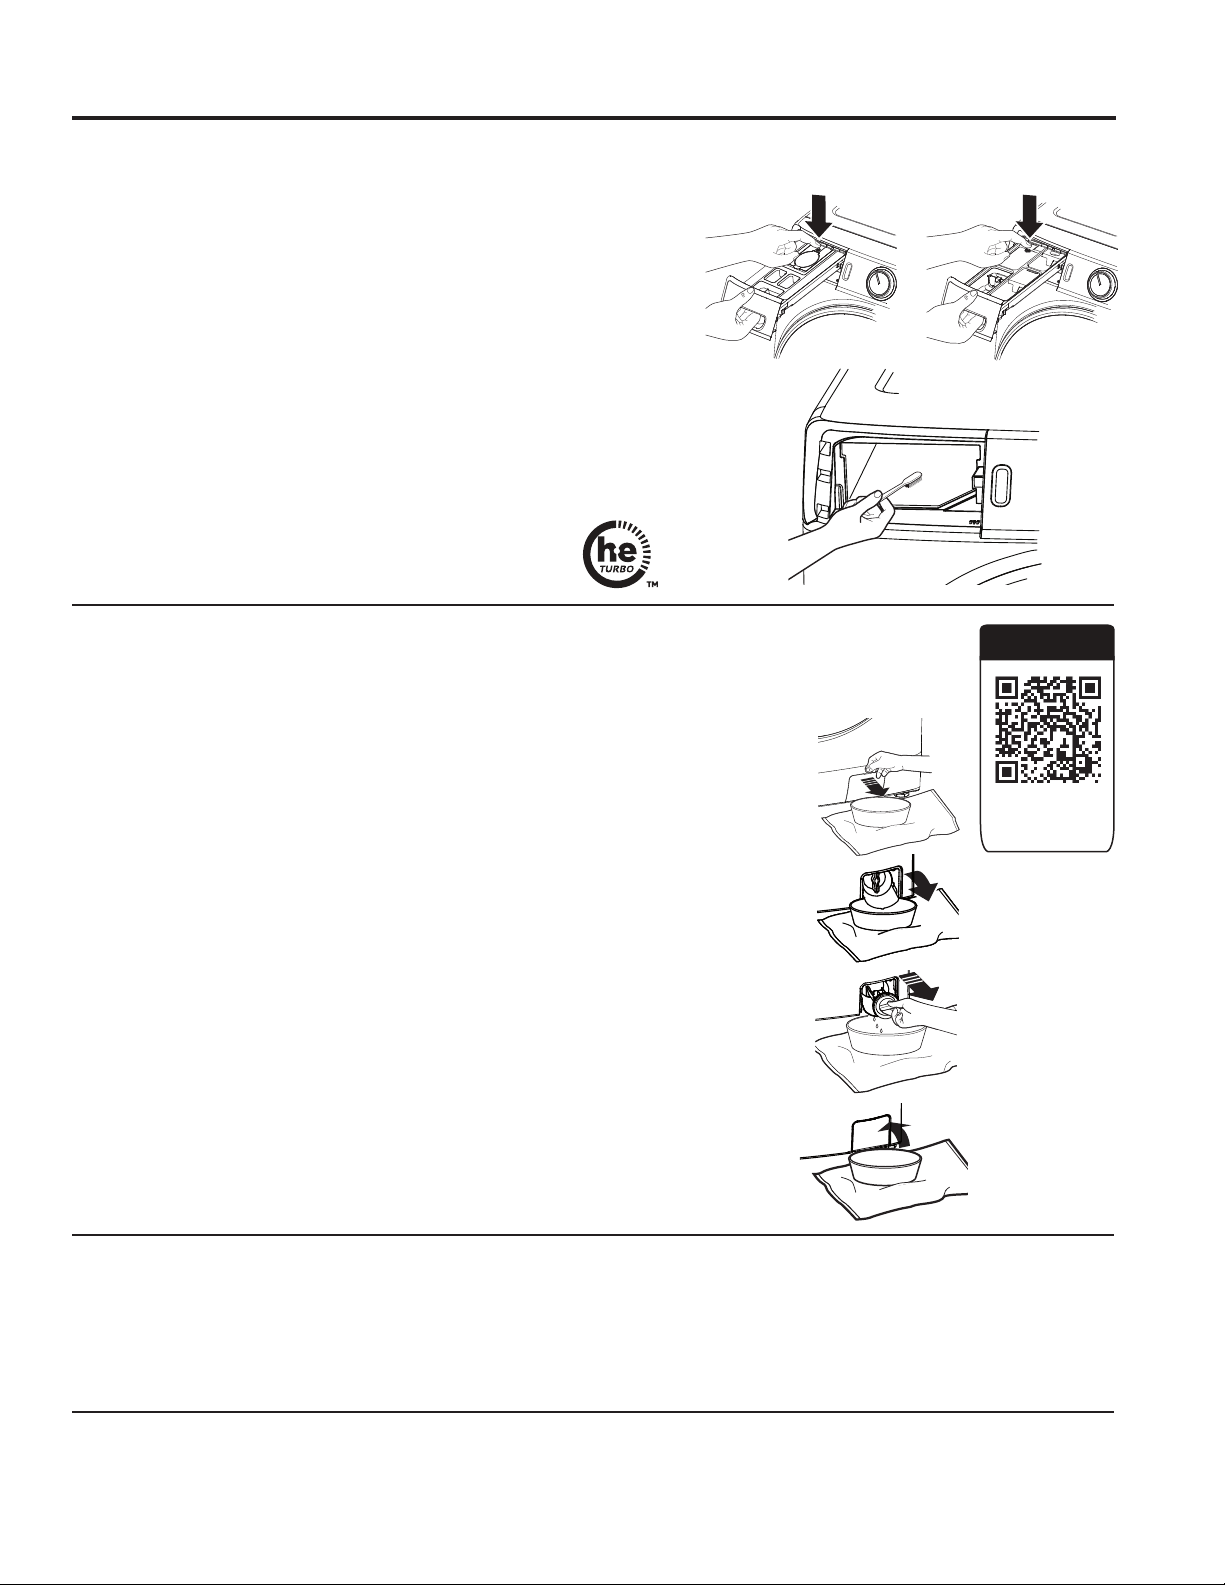
Dispenser Drawer Area
Detergent and fabric softener may build up in the dispenser drawer.
Residue should be removed once or twice a month.
• Remove the drawer by first pulling it out until it stops. Then reach
back into the rear of the drawer cavity and press down firmly on the
lock tab, pulling out the drawer.
• Rinse the drawer with hot water to remove traces of accumulated
laundry products.
• To clean the drawer opening, use a small brush to clean the recess.
Remove all residue from the upper and lower parts of the recess.
• Replace the dispenser drawer.
• To reduce buildup in the Dispenser Drawer area:
Moving and Storage
Ask the service technician to remove water from drain pump and hoses. Do not store the washer where it will be exposed
to the weather. When moving the washer, the tub should be kept stationary by using the shipping bolts removed during
installation. See Installation Instructions in this manual. If these parts are not available, they can be ordered by visiting
our Website at GEApplianceparts.com or by calling GE Appliances at 877.959.8688. In Canada, visit your local
GE Appliances parts distributor or call 800.661.1616 or GEAppliances.ca/en/products/parts-filters-accessories.
Long Vacations
Be sure water supply is shut off at faucets. Drain all water from hoses and water filter pump area if weather will be
below freezing.
On models with
SmartDispense:
On models without
SmartDispense:
Use only HE
High-Efficiency
detergent
1. Using a small flathead screwdriver or coin, open the access door.
2. Place a shallow pan or dish under the pump access door and towels on the
floor in front of the washer to protect the floor. It is normal to catch about a cup
of water when the filter is removed.
3. Pull down the pour spout.
4. Turn the pump filter counterclockwise and remove the filter slowly, controlling
the flow of the draining water.
5. Remove the filter and clean the debris from the filter.
6. Replace the filter and turn clockwise. Tighten securely.
7. Flip up the pour spout.
8. Close the access door by hooking the bottom tabs first, then rotating the
access door shut.
Video
Scan this code
to watch a video
on this topic.
Pump Filter
Due to the nature of the front-load washer, it is sometimes possible for small articles to pass to the
pump. The washer has a filter to capture lost items so they are not dumped to the drain. To retrieve
lost items, clean out the pump filter.
18 49-3000217 Rev 2
Installation
Washer
Instructions
If you have any questions, call GE Appliances at 800.GE.CARES (800.432.2737) or visit our
Website at: GEAppliances.com
In Canada, call 800.561.3344 or visit GEAppliances.ca
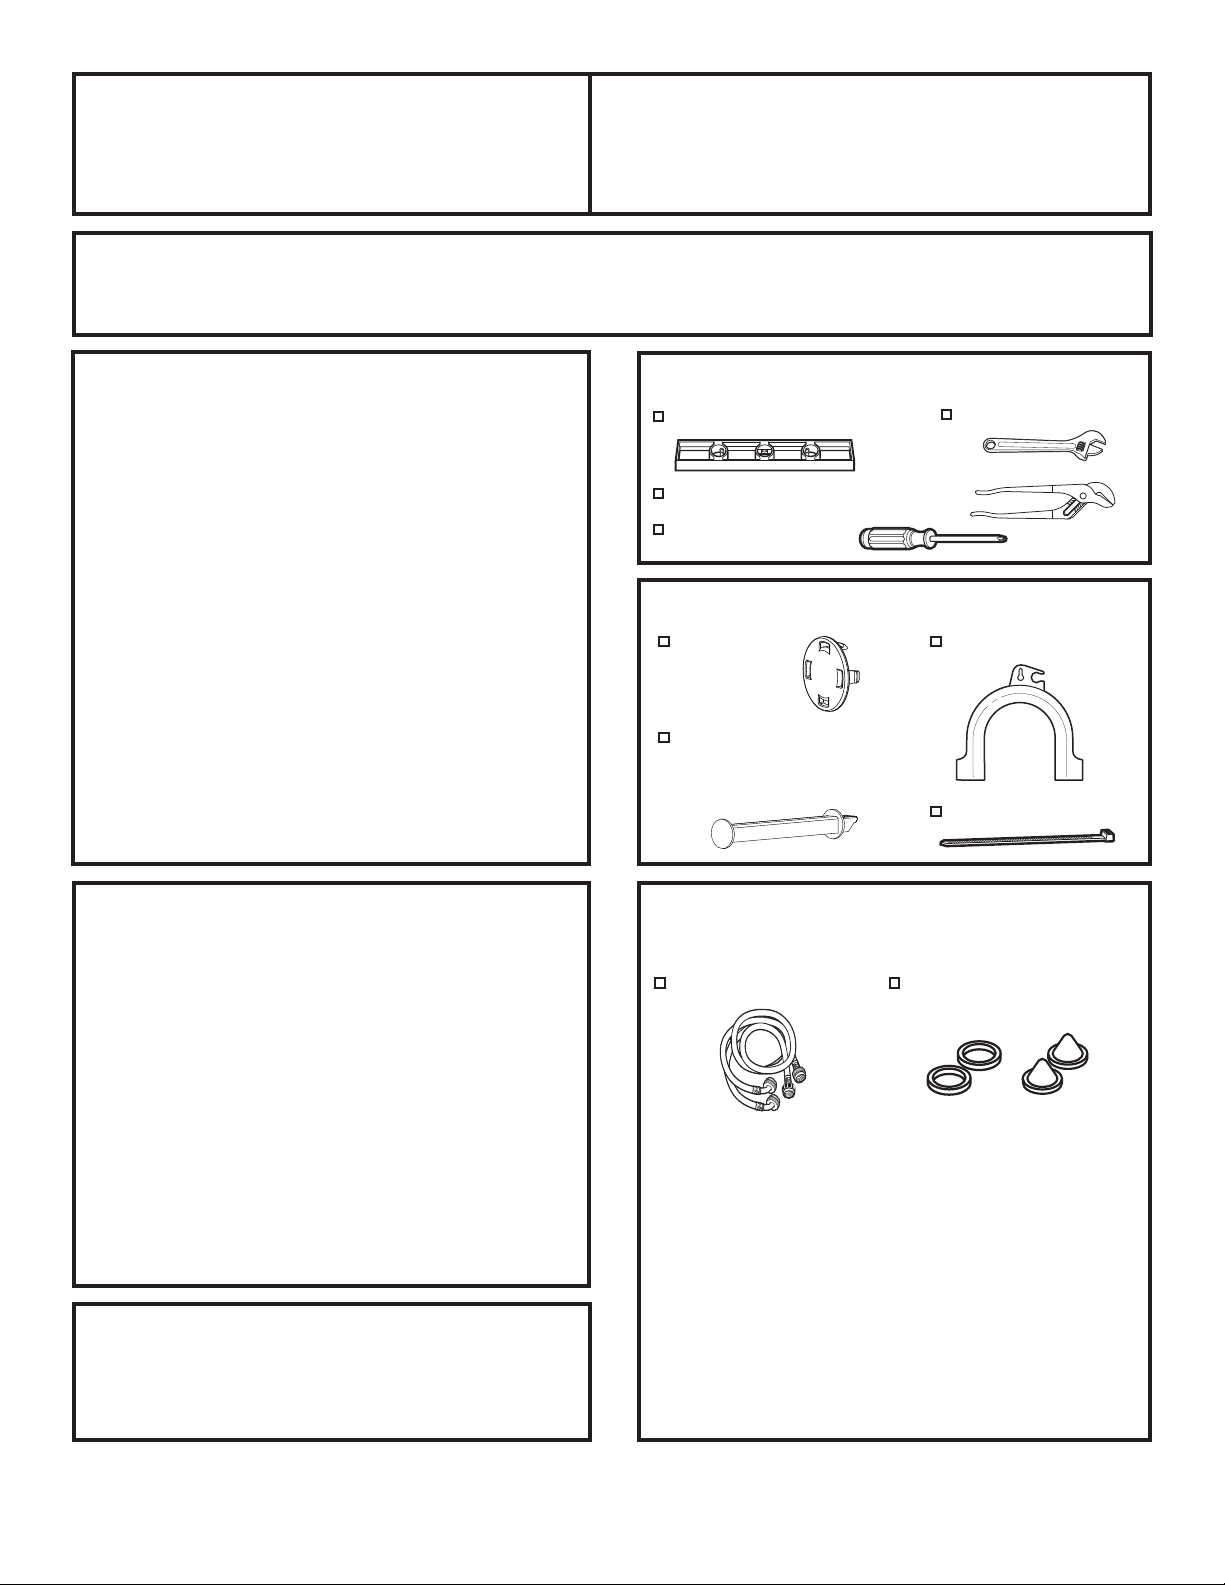
TOOLS REQUIRED
Level
Adjustable wrench
Channel-lock adjustable pliers
Phillips screwdriver
PARTS SUPPLIED
BEFORE YOU BEGIN
Read these instructions completely and carefully.
• IMPORTANT – Save these
instructions for local inspector’s use.
• IMPORTANT – Observe all
governing codes and ordinances.
• Note to Installer – Be sure to leave these
instructions with the Consumer.
• Note to Consumer – Keep these
instructions for future reference.
• Skill level – Installation of this appliance requires
basic mechanical and electrical skills.
• Completion time – 1-3 hours
• Proper installation is the responsibility of the
installer.
• Product failure due to improper installation is not
covered under the Warranty.
Shipping
Bolt Covers
Drain Hose Guide
DO NOT Install the Washer:
1. In an area exposed to dripping water or outside weather
conditions. The ambient temperature should never be
below 60°F (15.6°C) for proper washer operation.
2. In an area where it will come in contact with curtains
or drapes.
3. On carpet. The floor MUST be a hard surface with
DPD[LPXPVORSHRIƎSHUIRRWFPSHU
cm). To make sure the washer does not vibrate or
move, you may have to reinforce the floor.
NOTE:,IIORRULVLQSRRUFRQGLWLRQXVHƎLPSUHJQDWHG
plywood sheet solidly attached to existing floor
covering.
LOCATION OF YOUR WASHER
MOBILE HOME INSTALLATION:
Installation must conform to Standard for Mobile Homes,
ANSI A119.1 and National Mobile Home Construction
and Safety Standards Act of 1974 (PL93-383).
Lock Bar (Retain for
Reversing the Door
Swing option)
Cable Tie
PARTS REQUIRED (Sold separately
or included with the GFW510 model)
Water Hoses (2)
Rubber Washers (2) and
Strainer Screens (2)
GE Appliances Parts and Accessories
Order on-line at GEApplianceparts.com today,
24 hours a day or by phone at 877.959.8688 during
normal business hours. In Canada, visit your local
GE Appliances parts distributor or call 800.661.1616
or GEAppliances.ca/en/products/parts-filters-
accessories.
Part Number Accessory
WX14X10011 6 ft stainless steel washer hoses with
90° elbows; 2-pack
WH1X2267 Rubber Washer (1) and Screen (1)
49-3000217 Rev 2 19
ACCESSORIES:
Order on-line at GEApplianceparts.com, 24 hours a day or
by phone at 877.959.8688 during normal business hours.
Follow the Installation Instructions included in the Kit for all
clearances and installation requirements.
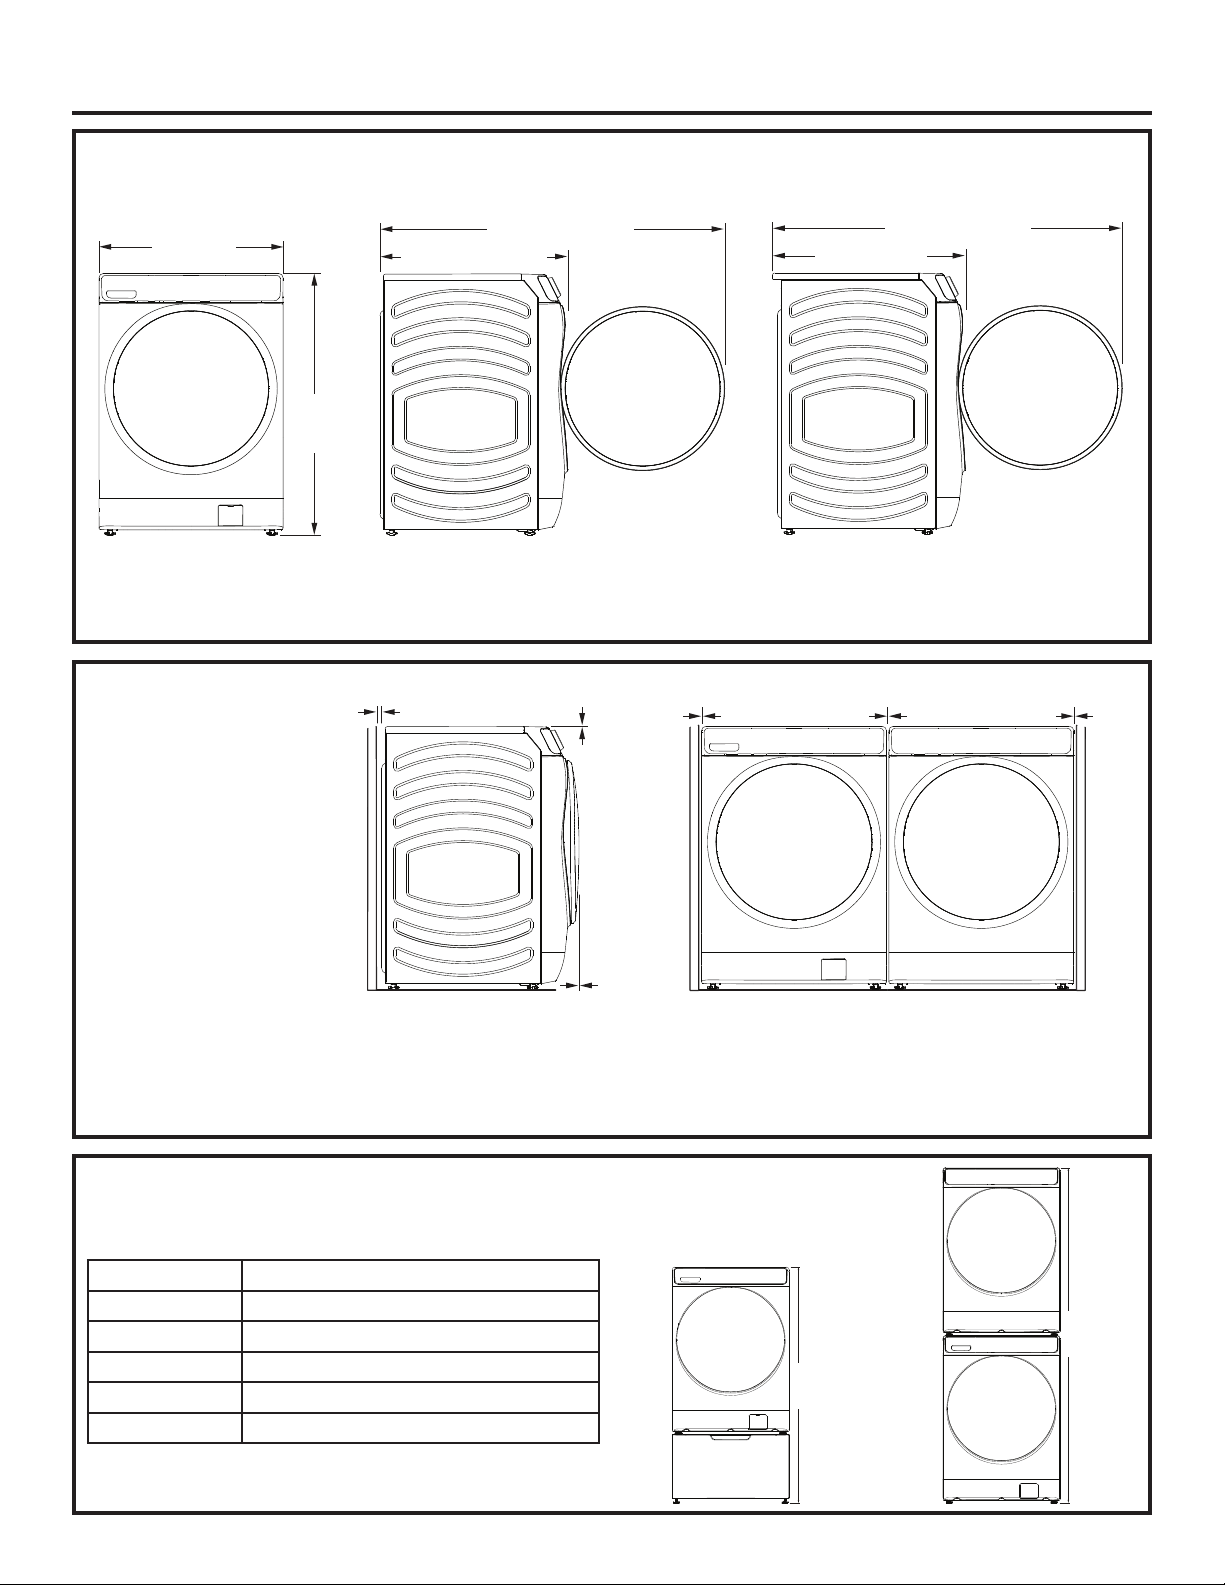
Installation Instructions
WASHER
DIMENSIONS
Side View
32” (81.3 cm)
54-1/2” (138.4 cm)
Models - GFW650, GFW550, GFW510:
Side View
34” (86.4 cm)
56-1/2” (143.8 cm)
Model - GFW850:
28”
(71.2 cm)
*39-3/4”
(101 cm)
Front View
NOTE:
With leveling legs retracted: 39-3/4 (101 cm).
With leveling legs fully extended: 40-5/8 (103.1 cm).
MINIMUM
CLEARANCES
0”
0”
0”
Alcove or Closet
• Rear = 0”*
• Sides = 0”
• 7RS Ǝ
• )URQW Ǝ
0”0”0”
Part Number Accessory
GFP1528SNWW
White Pedestal
GFP1528PNSN
Satin Nickel Pedestal
GFP1528PNRS Royal Sapphire Pedestal
GFP1528PNDG Diamond Gray Pedestal
GFA28KITN Stacking Kit for Dryer over Washer
Stacked:
79-1/2”*
(202 cm)
Pedestal:
55-7/8”*
(141.8 cm)
• Consideration must be given to provide adequate clearance for installation and service.
• Closet doors must be louvered or otherwise ventilated and have at least 60 square inches (387.1 cm
2
) of open area. If the
closet contains both a washer and a dryer, doors must contain a minimum of 120 square inches (774.2 cm
2
) of open area.
* To enable 0” clearance on the back of the washer, you must use 90° elbow hoses. Otherwise you may require some
additional clearance to avoid rubbing of the hoses against the back wall.
20 49-3000217 Rev 2
Installation Instructions
1. Cut and remove all packaging straps.
2. While it is in the carton, carefully lay the washer on its
side. DO NOT lay the washer on its front or back.
3. Turn down the bottom flaps. Remove all base packaging
including the styrofoam base.
4. Carefully return the washer to an upright position and
remove the carton by lifting it upward.
5. Carefully move the washer to within 4 feet (122 cm)
of the final location.
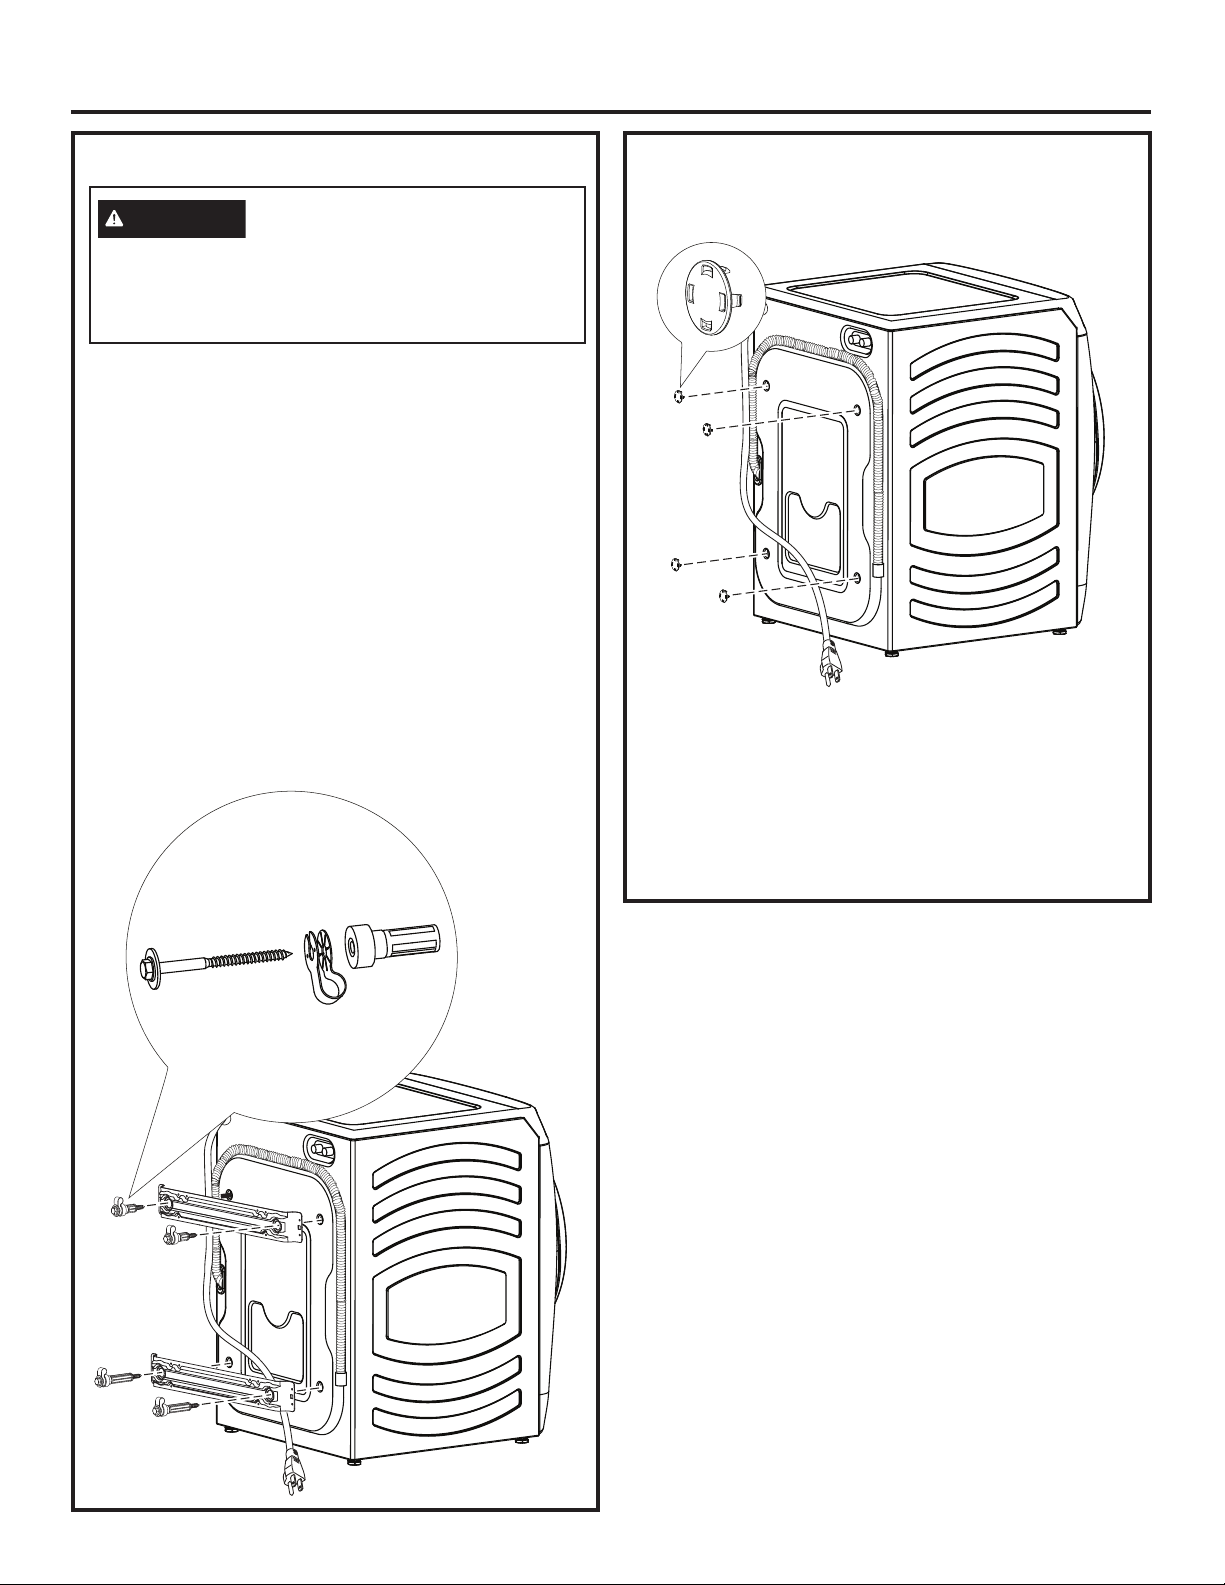
6. Remove the following from the back side of the washer:
4 bolts
4 plastic spacers (including power cord retainers and
rubber grommets)
2 brackets
NOTE: Do NOT remove the screw or clip holding the
hose.
UNPACKING THE WASHER UNPACKING THE WASHER (cont.)
7. Insert shipping bolt hole covers into shipping bolt
holes.
Recycle or destroy the carton and
plastic bags after the washer is
unpacked. Make materials inaccessible to children.
Children might use them for play. Cartons covered
with rugs, bedspreads or plastic sheets can become
airtight chambers causing suffocation.
WARNING
NOTES:
• Failure to remove the shipping braces can cause
the washer to become severely unbalanced.
• IMPORTANT: Save all bolts for future use.
If you must transport the washer at a later date,
you must reinstall the shipping support hardware to
prevent shipping damage. Keep the hardware in the
plastic bag provided.
49-3000217 Rev 2 21
Installation Instructions
ELECTRICAL REQUIREMENTS
CIRCUIT – Individual, properly polarized and grounded
15 or 20 amp circuit breaker or time-delay fuse.
POWER SUPPLY – 2 wire plus ground, 120 Volt, single
phase, 60 Hz, alternating current.
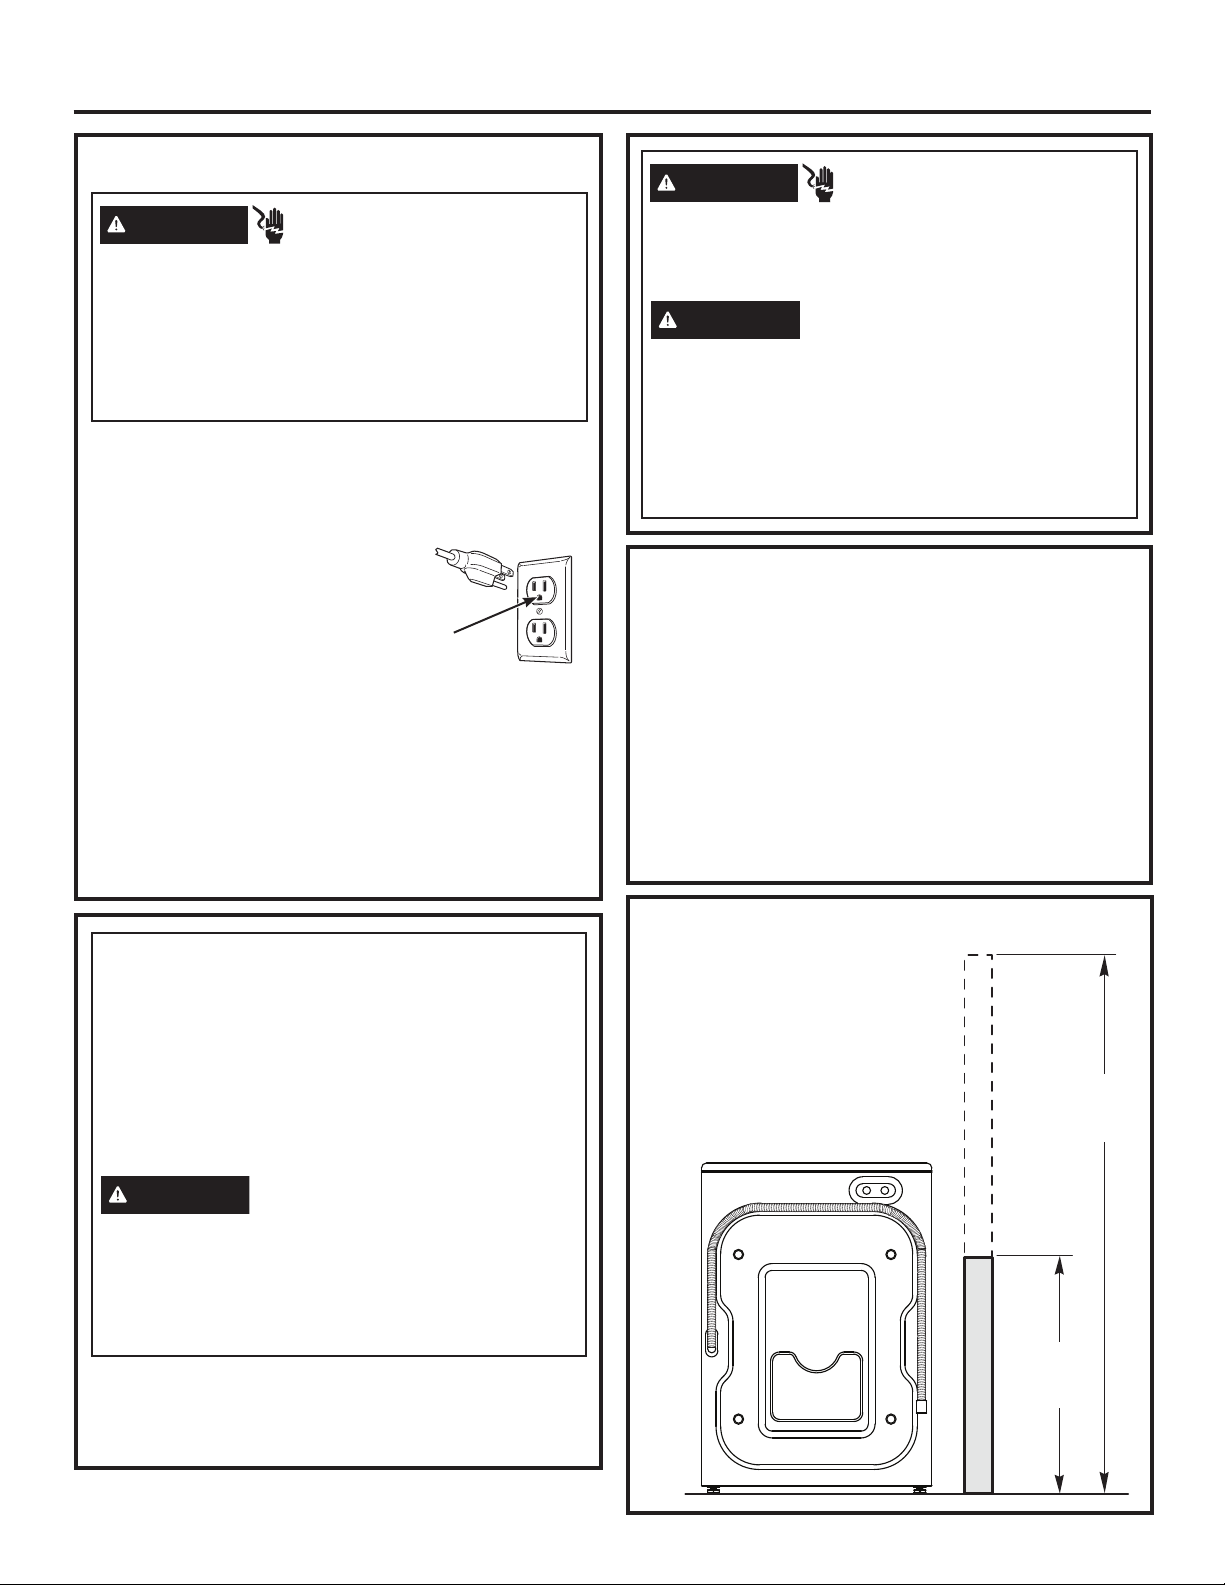
Outlet Receptacle – Properly
grounded 3-prong receptacle to
be located so the power cord is
accessible when the washer is in
an installed position. If a 2-prong
receptacle is present, it is the
owner’s responsibility to have a
licensed electrician replace it with
a properly grounded 3-prong grounding type receptacle.
Washer must be electrically grounded in accordance with
local codes and ordinances, or in the absence of local
codes, with latest edition of the NATIONAL ELECTRICAL
CODE, ANSI/NFPA NO. 70 or CANADIAN ELECTRICAL
CODE, CSA C22.1. Check with a licensed electrician if you
are not sure that the washer is properly grounded.
Ensure proper
ground exists
before use.
Plug into a grounded 3-prong outlet.
DO NOT remove ground prong.
DO NOT use an adapter.
DO NOT use an extension cord.
Failure to follow these instructions can result in death,
fire or electrical shock.
- Electrical Shock Hazard
WARNING
If required by local codes, an external 18 gauge or larger
copper ground wire (not provided) may be added. Attach
to washer cabinet with a #10-16 x
1/2
” sheet metal screw
(available at any hardware store) to rear of washer.
GROUNDING INSTRUCTIONS
This appliance must be grounded. In the event of
malfunction or breakdown, grounding will reduce the risk
of electric shock by providing a path of least resistance
for electric current. This appliance is equipped with a
cord having an equipment- grounding conductor and
a grounding plug. The plug must be plugged into an
appropriate outlet that is properly installed and grounded
in accordance with all local codes and ordinances.
Improper connection of the equipment-
grounding conductor can result in a
risk of electrical shock. Check with a qualified electrician,
or service representative or personnel, if you are in
doubt as to whether the appliance is properly grounded.
DO NOT modify the plug on the power supply cord. If it
will not fit the outlet, have a proper outlet installed by a
qualified electrician.
WARNING
1. Drain capable of eliminating 10
gallons (38 L) per minute.
2. A standpipe diameter of 1-1/4”
(3.18 cm) minimum.
3. The standpipe height above the
floor should be:
Minimum height: 24” (61 cm)
Maximum height: 96” (244 cm)
DRAIN REQUIREMENTS
Hot and cold water faucets MUST be installed within
42 inches (107 cm) of your washer’s water inlet. The
faucets MUST be 3/4” (1.9 cm) garden hose-type so
inlet hoses can be connected. Water pressure MUST be
between 10 and 120 pounds per square inch. Your water
department can advise you of your water pressure. The
hot water temperature should be set to deliver water at
120° to 140°F (48°–60°C) to provide proper Automatic
Temperature Control (ATC) performance.
NOTE: A water softener is recommended to reduce
buildup of scale inside the steam generator if the home
water supply is very hard.
WATER SUPPLY REQUIREMENTS
Disconnect power supply before servicing.
Replace all parts and panels before operating.
Failure to do so can result in death or electrical shock.
WARNING
- Shock Hazard
Certain internal parts are intentionally not grounded
and may present a risk of electric shock only during
servicing.
Service personnel – DO NOT contact the following
parts while the appliance is energized: water valve,
drain pump, NTC, heater, door lock, inverter board,
motor and MC board.
- Electrical Shock Hazard
WARNING
96”
(244 cm)
Max.
24”
(61 cm)
Min.
BACK
22 49-3000217 Rev 2
Installation Instructions
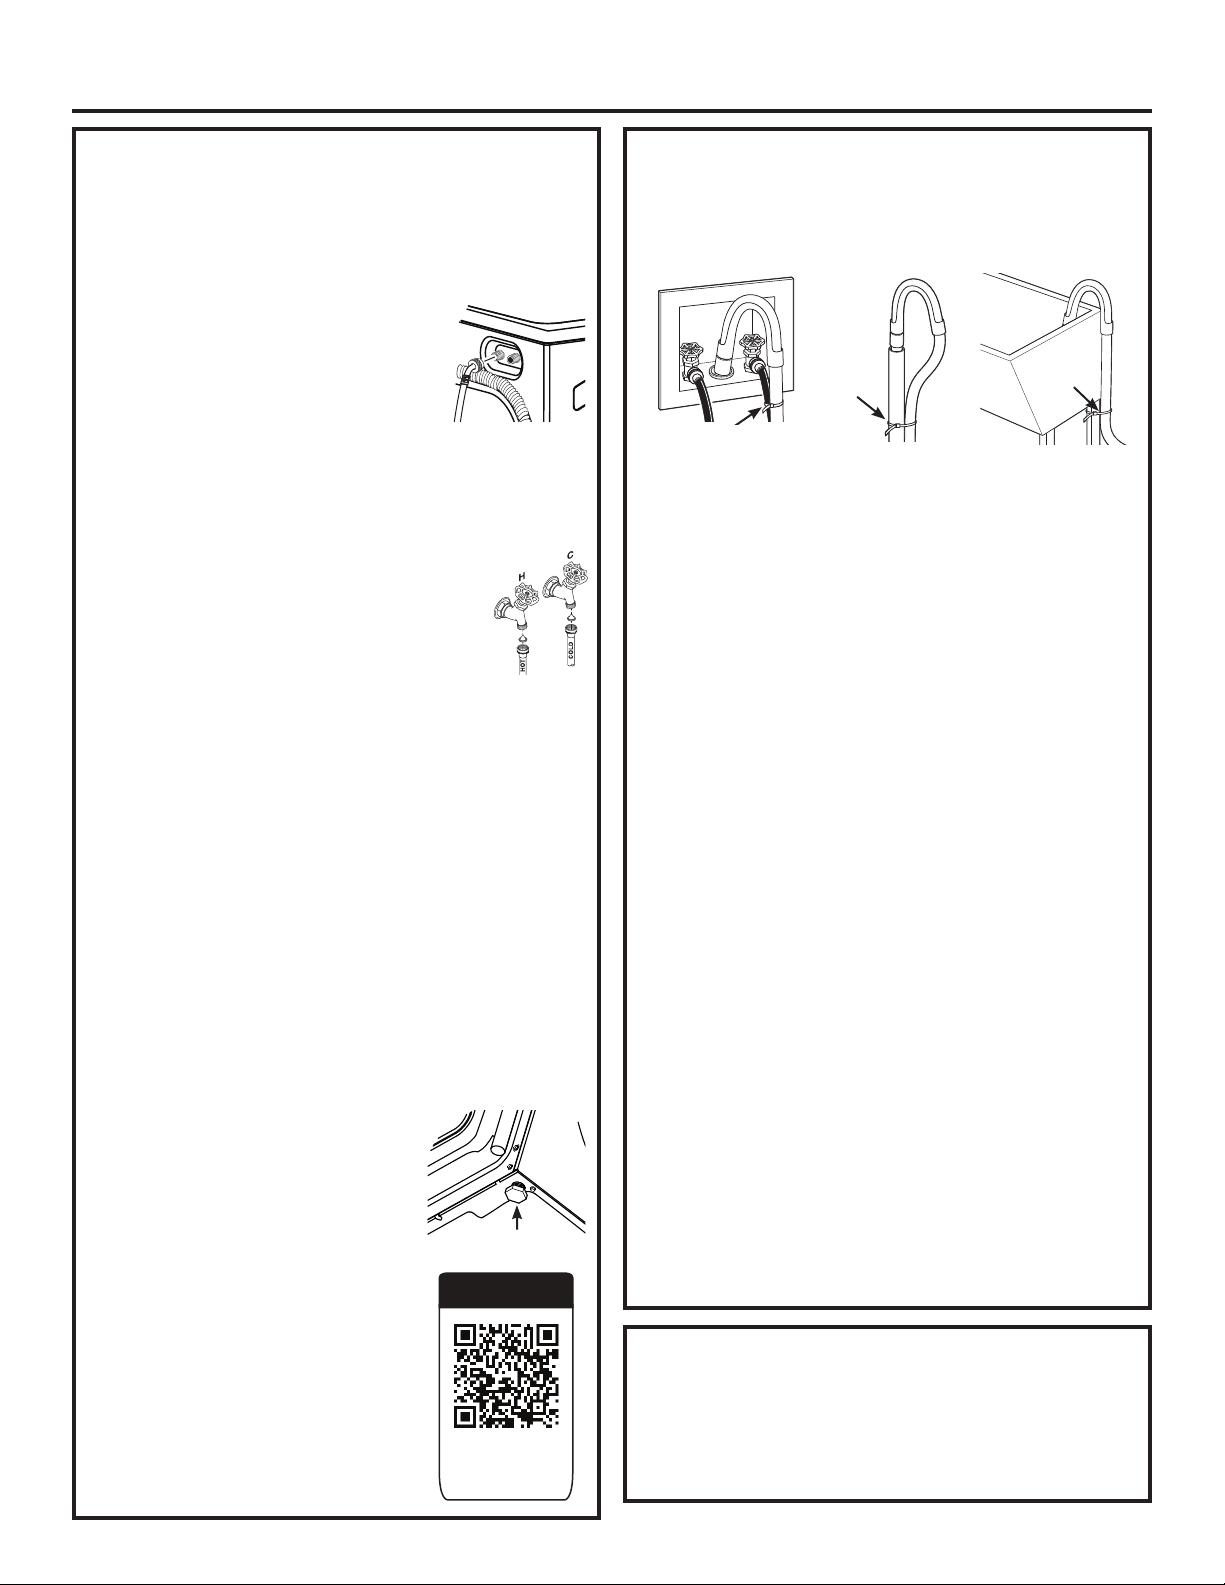
1. Run some water from the hot and cold faucets to
flush the water lines and remove particles that might
clog the inlet hose and water valve screens.
2. Remove the inlet hoses from the packaging (whether
supplied with the washer or sold separately).
3.
(90° elbow end) Ensure there is a
rubber washer in the 90° elbow end of
the HOT and COLD hoses. Reinstall
the rubber washer into the hose fitting
if it has fallen out during shipment.
Carefully connect the inlet hose
marked HOT to the outside “H” outlet of the water valve.
Tighten by hand, then tighten another 2/3 turn with pliers.
Carefully connect the other inlet hose to the inside “C”
outlet of the water valve. Tighten by hand; then tighten
another 2/3 turn with pliers. Do not crossthread or
over-tighten these connections.
4. If inlet hose screen washers are not
already inserted into the inlet hoses,
install them by inserting into the free
ends of the HOT and COLD inlet hoses
with protruded side facing the faucet.
5. Connect the inlet hose ends to the HOT and COLD
water faucets tightly by hand, then tighten another 2/3
turn with pliers. Turn the water on and check for leaks.
6. Carefully move the washer to its final location.
Gently rock the washer into position. It is important
not to damage the rubber leveling legs when moving
your washer to its final location. Damaged legs
can increase washer vibration. It may be helpful to
spray window cleaner on the floor to help move your
washer into its final position.
NOTE: To reduce vibration, ensure that all four rubber
leveling legs are firmly touching the floor. Push and pull
on the back right and then back left of your washer.
NOTE: Do not use the dispenser drawer or door to
lift the washer.
NOTE: If you are installing into a drain pan, you can
use a 24-inch long 2x4 to lever the washer into place.
7. With the washer in its final position,
place a level on top of the washer
(if the washer is installed under
a counter, the washer should not
be able to rock). Adjust the front
leveling legs up or down to ensure
the washer is resting solidly. Turn
the lock nuts on each leg up toward
the base of the washer and snug
with a wrench.
NOTE: Keep the leg extension at
a minimum to prevent excessive
vibration. The farther out the
legs are extended, the more the
washer will vibrate.
If the floor is not level or is damaged,
you may have to extend the rear
leveling legs.
INSTALLING THE WASHER
8. Attach U-shaped hose guide to the end of the drain
hose. Place the hose in a laundry tub or standpipe
and secure it with the cable tie provided in the
enclosure package.
NOTE: Placing the drain hose too far down the drain
pipe can cause a siphoning action. No more than
7 inches of hose should be in the drain pipe. There
must be an air gap around the drain hose. A snug fit
can cause a siphoning action.
9. Plug the power cord into a grounded outlet.
NOTE: Check to be sure the power is off at the
circuit breaker/fuse box before plugging the power
cord into an outlet.
10. Turn on the power at the circuit breaker/fuse box.
11. Read the rest of this Owner’s Manual. It contains
valuable and helpful information that will save you
time and money.
12. Before starting the washer, check to make sure:
Main power is turned on.
The washer is plugged in.
The water faucets are turned on.
The unit is level and all four leveling legs are firmly
on the floor.
The shipping support hardware is removed
and saved.
The drain hose is properly tied up.
There are no leaks at the faucet, drain line
or washer.
13. Run the washer through a complete cycle.
Check for water leaks and proper operation.
14. If your washer does not operate, please review
the Before You Call For Service section before
calling for service.
15. Place these instructions in a location near the
washer for future reference.
INSTALLING THE WASHER (cont.)
If replacement parts are needed for your washer, they can
be ordered in the United States by visiting our Website
at GEApplianceparts.com or by calling GE Appliances
at 877.959.8688. In Canada, visit GEAppliances.ca/en/
products/parts-filters-accessories or call 800.661.1616.
REPLACEMENT PARTS
Video
Scan this code
to watch a video
on Step 7.
Leveling Leg
Cable
Tie
Cable
Tie
Cable Tie
49-3000217 Rev 2 23
Installation Instructions
REVERSING THE DOOR SWING (Optional)
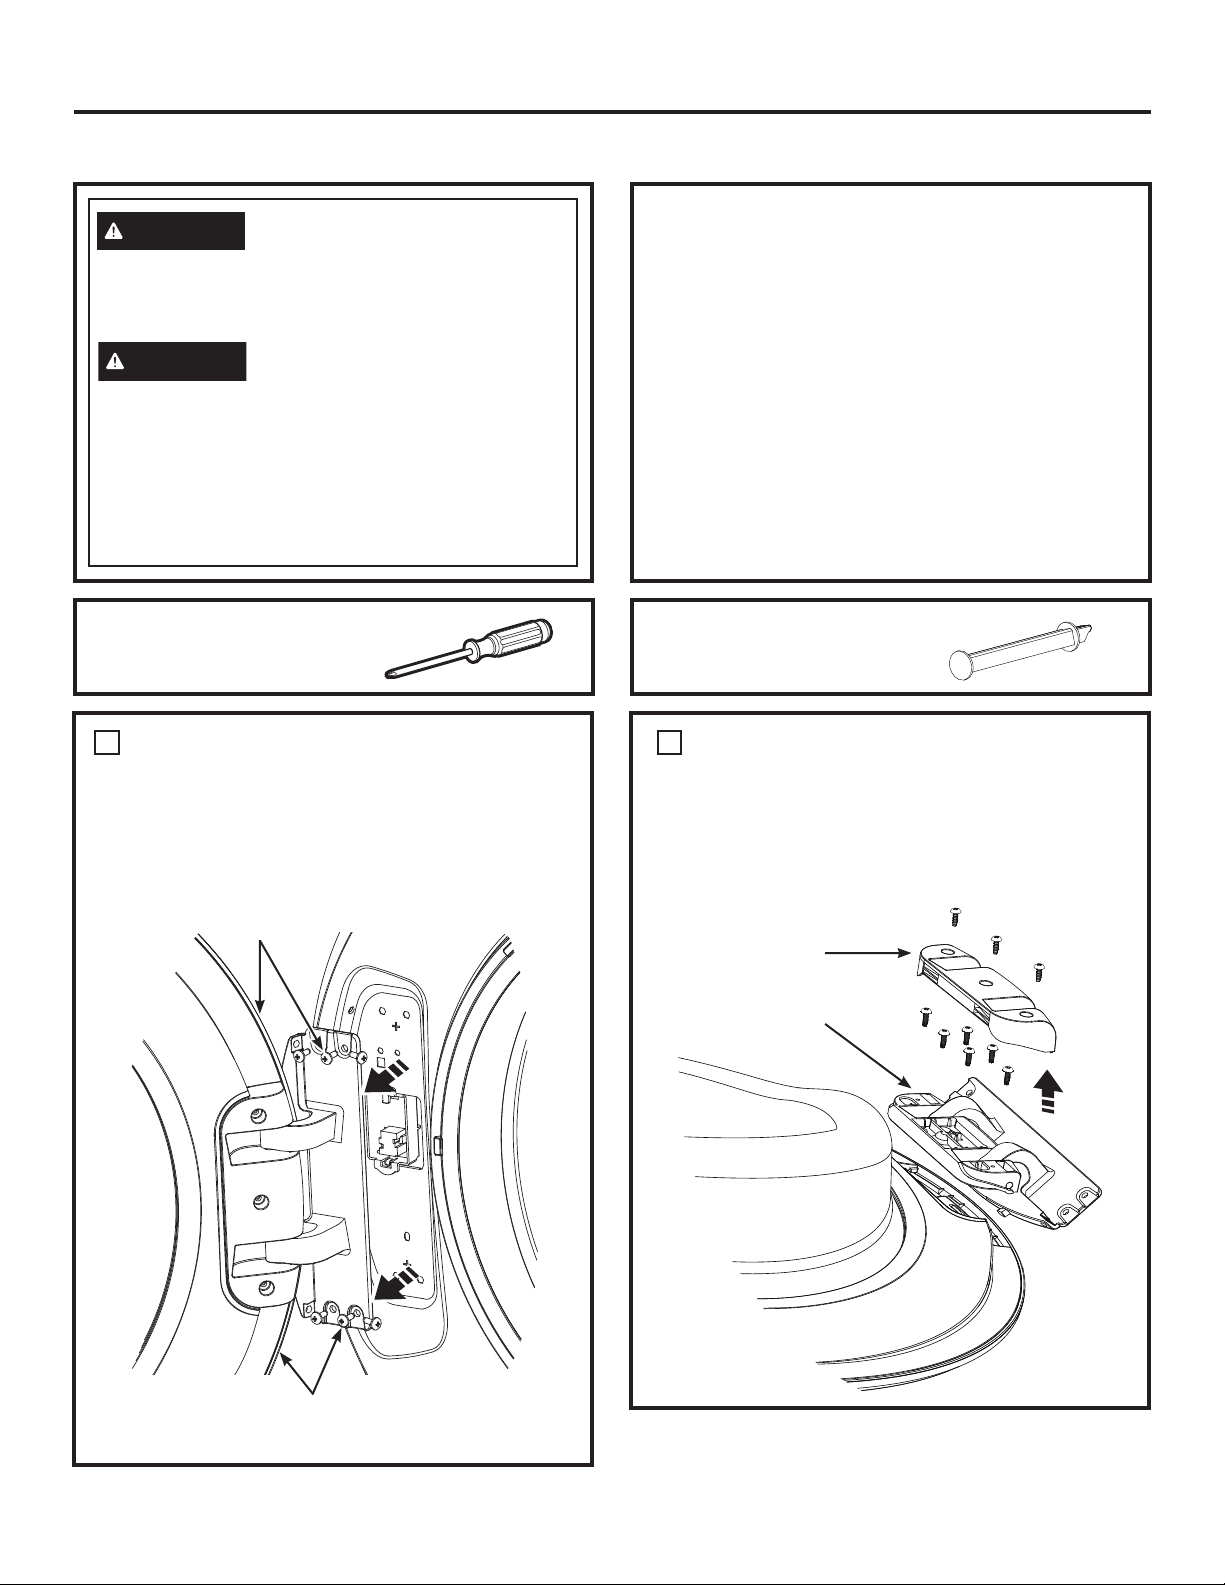
REMOVE THE DOOR HINGE
COVER AND THE DOOR HINGE
• Remove the 3 screws from the hinge cover and
remove the cover.
• Remove the 6 screws from the hinge and remove
the hinge from the door.
2
Hinge Cover
Hinge
Unplug the appliance or turn off the circuit breaker
before servicing. Pressing the Power pad DOES
NOT disconnect power.
WARNING
- Shock Hazard
Certain internal parts are intentionally not grounded
and may present a risk of electric shock only during
servicing.
Service personnel – DO NOT contact the following
parts while the appliance is energized: water valve,
drain pump, NTC, heater, door lock, inverter board,
motor and MC board.
WARNING
REMOVE THE DOOR ASSEMBLY
• Open the washer door.
• While supporting the door, remove the 6 screws
from the hinge in the washer face.
• Lift the door assembly to remove it from the washer
face and set it on a protective surface.
1
Hold the Door and
Remove Hinge Screws
from the Washer
Door and Hinge
Assembly
Phillips-head screwdriver
TOOL YOU WILL NEED
PART SUPPLIED
Lock Bar
IMPORTANT NOTES
• Handle parts carefully to avoid scratching paint.
• Provide a non-scratching work surface for the
door.
• Set screws down by their related parts to avoid
using them in the wrong places.
• Once you begin, do not move the cabinet until
door-swing reversal is completed.
• These instructions are for changing the hinges
from the left side to the right side—if you ever
want to switch them back to the right side, follow
these same instructions and reverse all references
to the left and right.
24 49-3000217 Rev 2
Installation Instructions
REVERSING THE DOOR SWING (Optional)
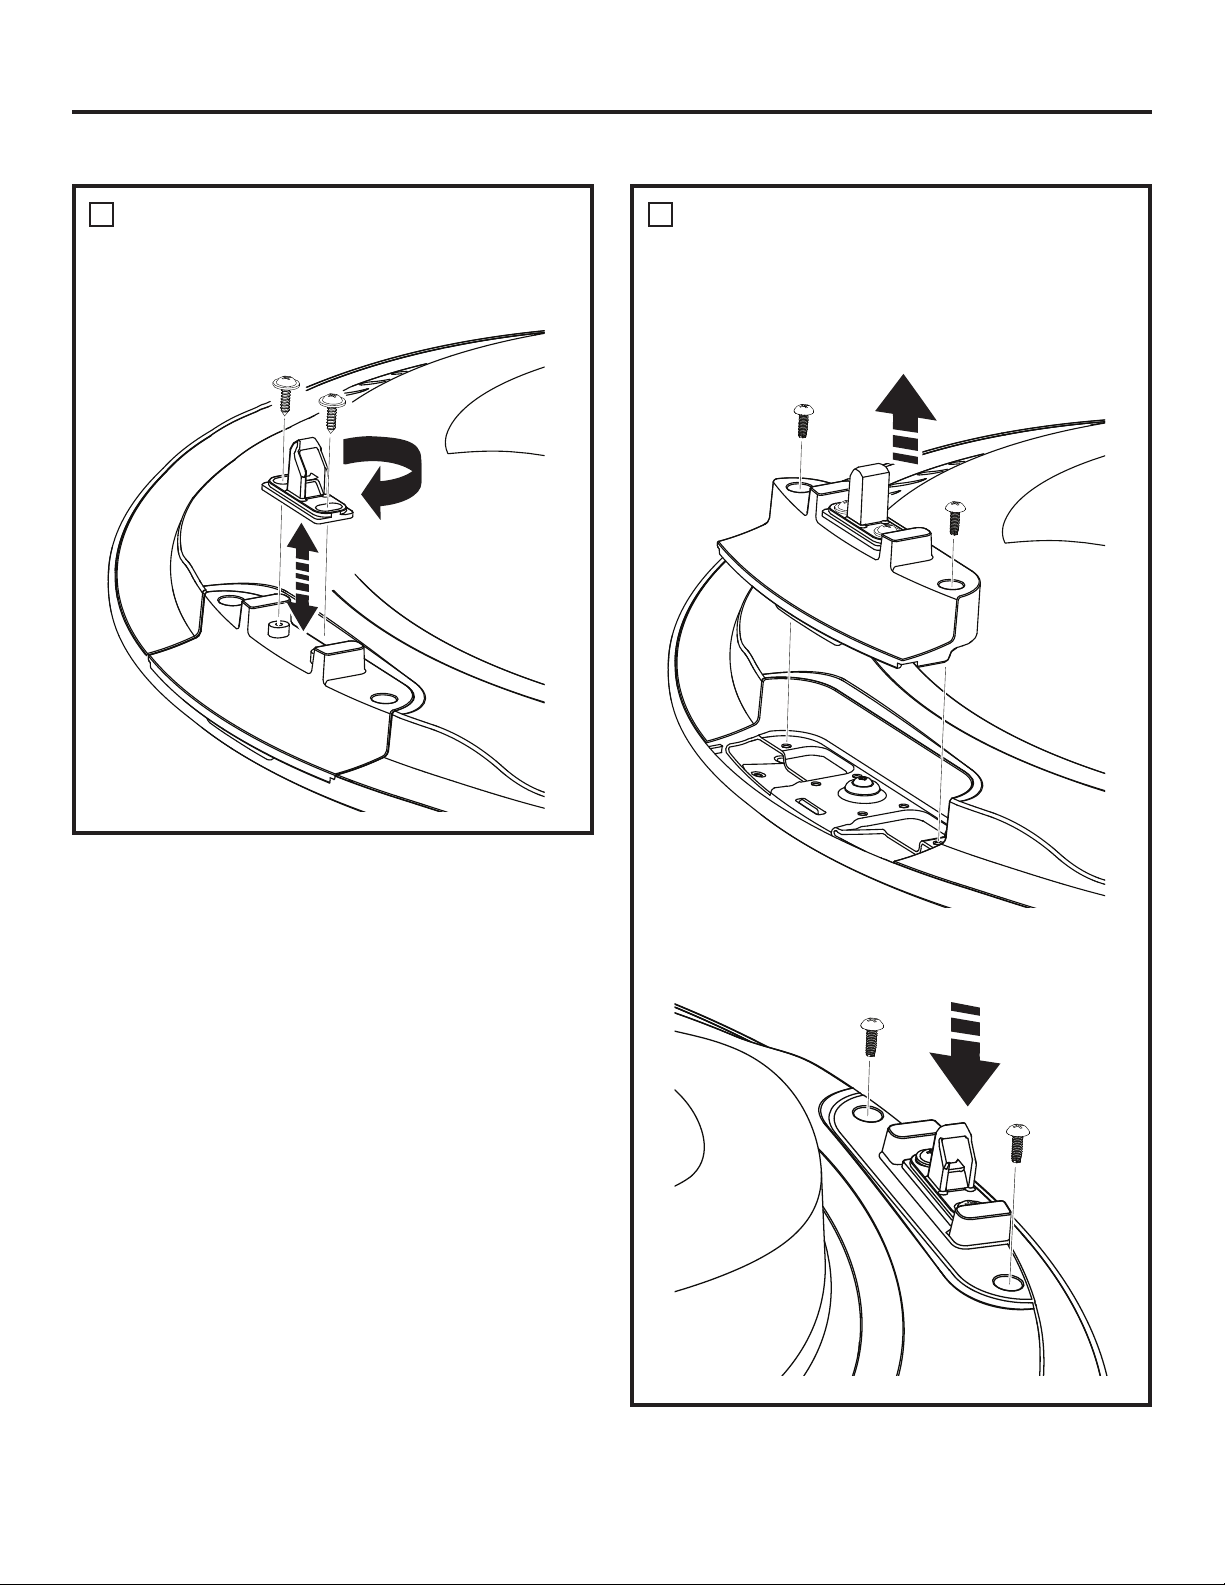
REMOVE, REVERSE AND
REPLACE THE DOOR STRIKER
• Remove the 2 screws from the striker. Rotate the
striker 180° and reinstall the striker with its screws.
3
REMOVE THE DOOR STRIKER
ASSEMBLY AND REPLACE ON
THE OPPOSITE SIDE
4
• Remove the 2 screws from the striker assembly and
remove the assembly by pulling it toward the center,
pushing it up and pulling it out.
• Rotate the striker assembly and replace it on the
opposite side with its screws.
49-3000217 Rev 2 25
Installation Instructions
REVERSING THE DOOR SWING (Optional)
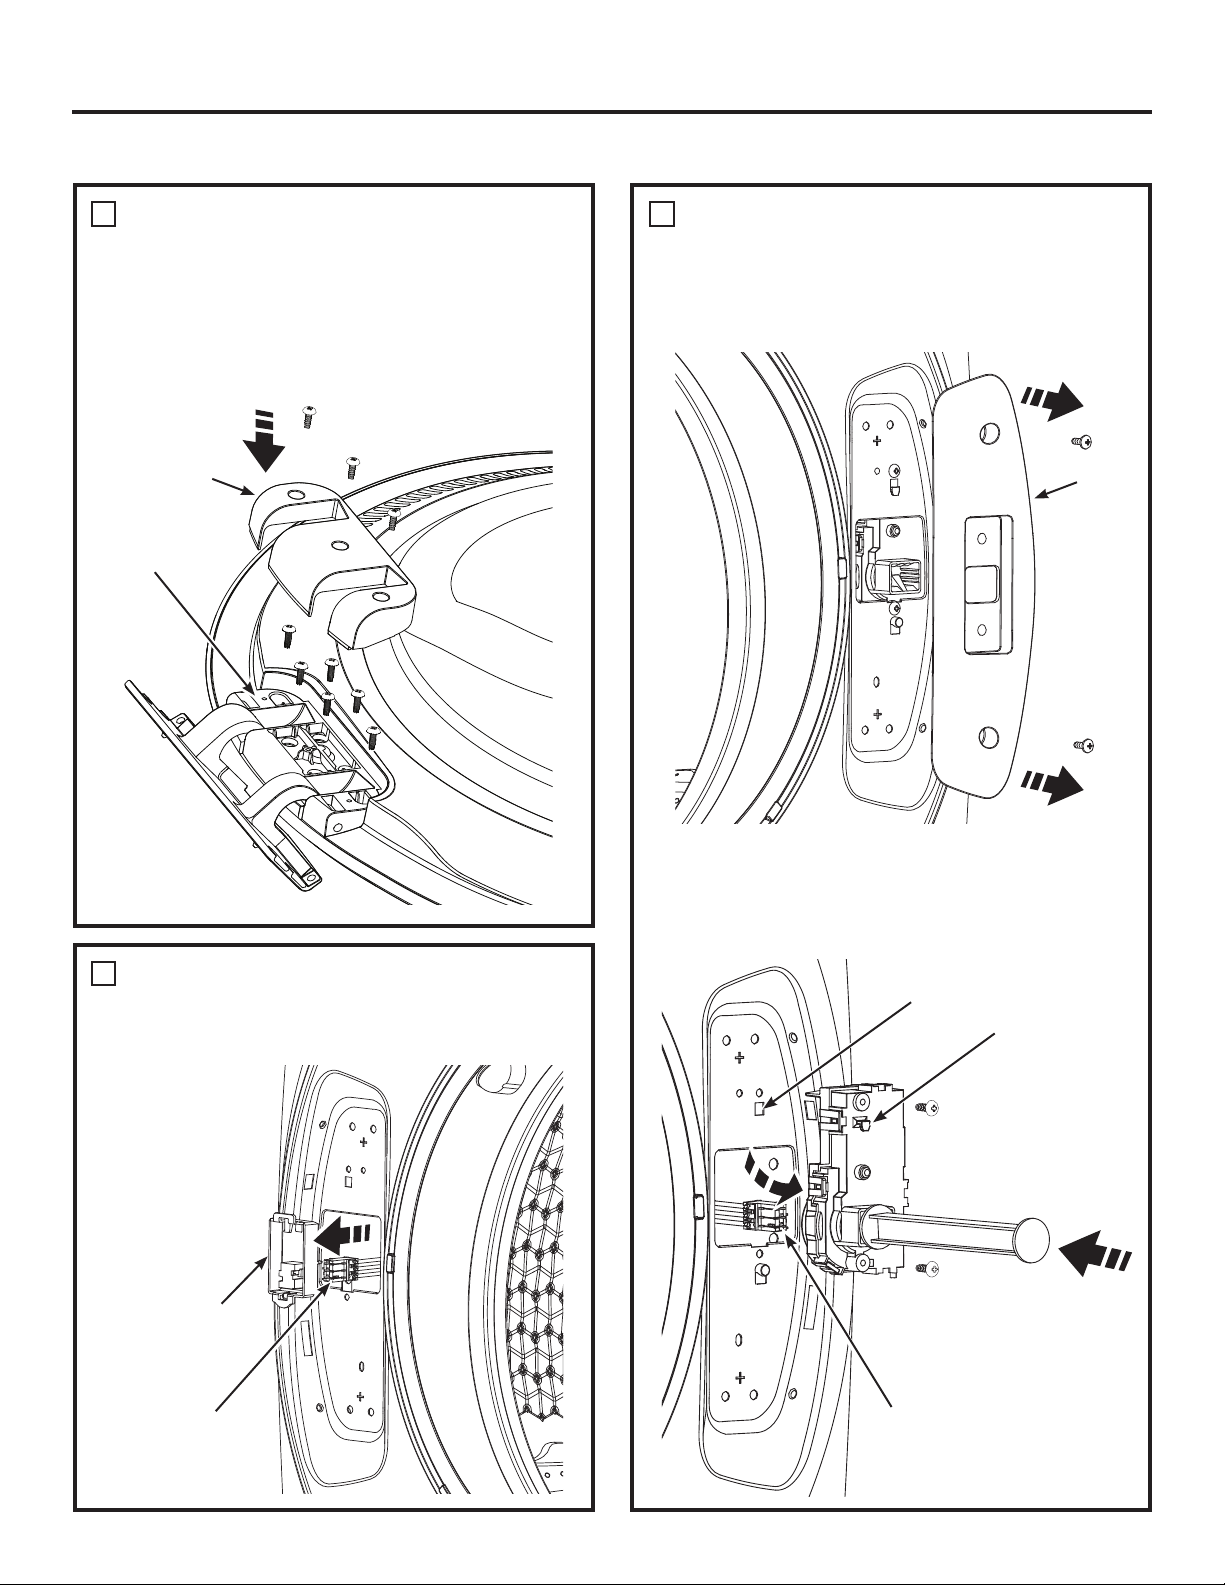
REPLACE THE DOOR HINGE
AND THE DOOR HINGE COVER
ON THE OPPOSITE SIDE
• Rotate the door hinge and replace it on the opposite
side with its screws.
• Rotate the door hinge cover and replace it on the
opposite side with its screws.
5
REMOVE LOCK ASSEMBLY AND
INSTALL ON OPPOSITE SIDE OF
WASHER
• Remove the 2 screws from the lock cover and
remove it from the washer face.
7
REMOVE THE TERMINAL
HOLDER AND DISCONNECT THE
PIN CONNECTOR FROM WASHER
• Using your
fingers, pry the
terminal holder
from the washer
face.
• Disconnect the
pin connector.
6
Hinge Cover
Hinge
Terminal Holder
Pin Connector
• Insert the provided lock bar into the lock mechanism
in the washer face. Remove the lock assembly by
removing its two screws, using the lock bar to lift it
up to unhook, tilting and pulling it out of the washer
face. Disconnect its pin connector by unsnapping its
locks.
Insert Lock Bar
Remove
Assembly
Pin Connector
Lock
Cover
Hook Window
Hook
26 49-3000217 Rev 2
Installation Instructions
REVERSING THE DOOR SWING (Optional)
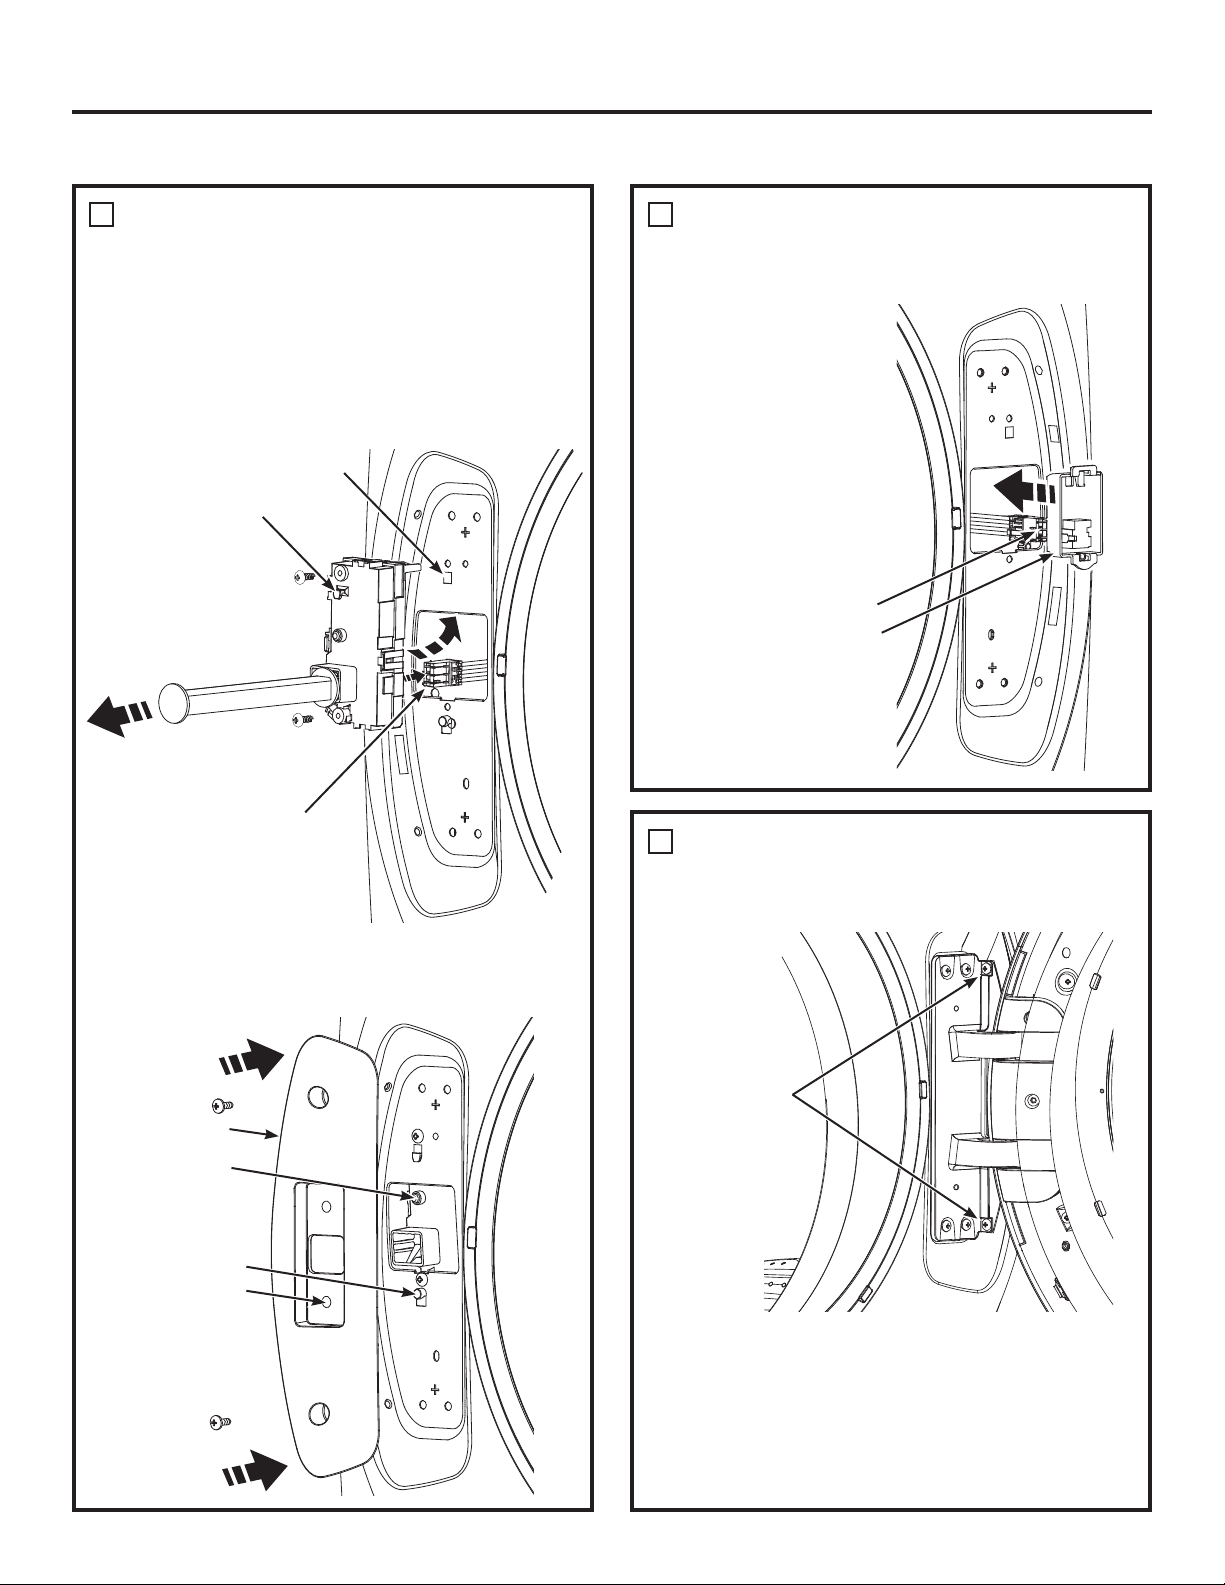
REMOVE LOCK ASSEMBLY AND
INSTALL ON OPPOSITE SIDE OF
WASHER (CONTINUED)
• Do NOT rotate lock assembly. Move it to the opposite
side of the washer and connect the pin connector making
sure it is fully snap locked together. Tilt and insert
the lock assembly into the washer face, lift it up and
latch its hook into its window. Replace its screws.
Remove the lock bar from the assembly and retain
for future use.
7
RECONNECT
PIN CONNECTOR
FROM THE WASHER AND REPLACE
THE TERMINAL HOLDER
8
• Reconnect the
pin connector and
press the terminal
holder back into
the washer face on
the opposite side.
Remove lock bar
Replace
Assembly
Pin Connector
• Install the lock cover over the lock assembly, making
sure the locating post fits into the locating hole and
that the lock switch operates freely. Replace its screws.
Pin Connector
Terminal Holder
REPLACE THE DOOR ASSEMBLY
9
• Lift the door assembly into place and secure it onto
the washer face with its 6 screws.
Replace 6 screws
into the hinge and
secure into the
washer face
• Close the washer door.
NOTE: Make sure the door opens and closes
correctly. If not, repeat all steps making sure all
parts and screws are securely seated.
• Connect power cord and turn on the breaker.
• Run the washer through a complete cycle to verify
proper operation.
Hook Window
Hook
Locating Post
Lock Cover
Locating Hole
Lock Switch
49-3000217 Rev 2 27
Troubleshooting Tips... Before you call for service
TROUBLESHOOTING TIPS
Problem Possible Cause What To Do
Not draining
Not spinning
Not tumbling
Load is out of balance Redistribute clothes and run Rinse & Spin.
Increase load size if washing small load containing heavy and
light items.
Pump filter may be clogged See the Care and Cleaning section on how to clean the Pump
Filter.
Drain hose is kinked or
improperly connected
Straighten drain hose and make sure washer is not sitting on it.
Household drain may be
clogged
Check household plumbing. You may need to call a plumber.
Drain hose siphoning; drain
hose pushed too far down
the drain
Ensure there is an air gap between hose and drain.
Leaking water Door gasket is damaged Check to see if gasket is seated and not torn. Objects left in
pockets may cause damage to the washer (nails, screws, pens,
pencils)
Water may drip from the door when the door is opened. This is a
normal operation.
Carefully wipe off rubber door seal. Sometimes dirt or clothing is
left in this seal and can cause a small leak
Check back left of washer
for water
If this area is wet, you have oversudsing condition. Use less
detergent.
Fill hoses or drain hose is
improperly connected
Make sure hose connections are tight at washer and faucets and
make sure end of drain hose is correctly inserted in and secured
to drain facility.
Household drain may be
clogged
Check household plumbing. You may need to call a plumber.
Dispenser clogged Powder soap may cause clogs inside the dispenser and cause
water to leak out the front of the dispenser. Remove drawer and
clean both drawer and inside of dispenser box. Please refer to
Care and Cleaning section.
Incorrect use of detergent Use only HE and correct amount of detergent.
Dispenser box cracked If new installation, check for crack on inside of dispenser box.
Clothes too
wet
Load is out of balance Redistribute clothes and run Rinse & Spin.
Increase load size if washing small load containing heavy and
light items.
The machine will slow the spin speed down to 410 rpm if it has a
hard time balancing the load. This speed is normal.
Pump filter may be clogged See the Care and Cleaning section on how to clean the Pump
Filter.
Overloading The dry weight of the load should be less then 16 lbs.
Drain hose is kinked or
improperly connected
Straighten drain hose and make sure washer is not sitting on it.
Household drain may be
clogged
Check household plumbing. You may need to call a plumber.
Drain hose siphoning; drain
hose pushed too far down
the drain
Ensure there is an air gap between hose and drain.

28 49-3000217 Rev 2
TROUBLESHOOTING TIPS
Troubleshooting Tips... Before you call for service
Problem Possible Cause What To Do
Incomplete cycle or
timer not advancing
Automatic load
redistribution
Timer adds 3 minutes to cycle for each rebalance. 11 or
15 rebalances may be done. This is normal operation.
Do nothing; the machine will finish the wash cycle.
Pump filter may be clogged See the Care and Cleaning section on how to clean the
Pump Filter.
Drain hose is kinked or
improperly connected
Straighten drain hose and make sure washer is not sitting
on it.
Household drain may be
clogged
Check household plumbing. You may need to call a
plumber.
Drain hose siphoning; drain
hose pushed too far down
the drain
Ensure there is an air gap between hose and drain.
Loud or unusual
noise; vibration or
shaking
Cabinet moving Washer is designed to move 1/4” to reduce forces
transmitted to the floor. This movement is normal.
All rubber leveling legs are
not firmly touching the floor
Push and pull on the back right and then back left of your
washer to check if it is level. If the washer is uneven,
adjust the rubber leveling legs so they are all firmly
touching the floor and locked in place.
Unbalanced load Pause unit, open door and manually redistribute load. To
check machine, run rinse and spin with no load. If normal,
unbalance was caused by load.
Pump filter may be clogged See the Care and Cleaning section on how to clean the
Pump Filter.
No power/washer not
working or dead
Washer is unplugged Make sure cord is plugged securely into a working outlet.
Water supply is turned off Turn both hot and cold faucets fully on.
Circuit breaker/fuse is
tripped/blown
Check house circuit breakers/fuses. Replace fuses or
reset breaker. Washer should have separate outlet.
Automatic self system
checks
First time the washer is plugged in, automatic checks
occur. It may take up to 20 seconds before you can use
your washer. This is normal operation.
Snags, holes, tears,
rips or excessive
wear
Overloaded Do not exceed maximum recommended load sizes.
See recommended maximum load sizes in the Loading
section.
Pens, pencils, nails, screws
or other objects left in
pockets
Remove loose items from pockets.
Pins, snaps, hooks, sharp
buttons, belt buckles, zippers
and sharp objects left in
pockets
Fasten snaps, hooks, buttons and zippers.
Control time wrong
or changes
This is normal During spin the washer may need to rebalance the load
sometimes to reduce vibrations. When this happens, the
estimated time is increased causing time left to increase
or jump.
Not enough water This is normal Horizontal washers do not require the tub to fill with water
like top-load washers.
49-3000217 Rev 2 29
Troubleshooting Tips... Before you call for service
TROUBLESHOOTING TIPS
Problem Possible Cause What To Do
Washer pauses
or has to be
restarted, or
washer door is
locked and will
not open
Pump filter may be clogged See the Care and Cleaning section on how to clean the
Pump Filter.
Door unlocks
or press Start
and machine
doesn’t operate
This is normal
Front-load washers start up differently than top-load washers, and
it takes several seconds to check the system. The door will lock
and unlock.
Incorrect operation Simply open and close the door firmly; then press Start.
Water does not
enter washer or
enters slowly
Automatic self system
checks
After Start is pressed, the washer does several system
checks. Water will flow
several
seconds after Start is pressed.
Water valve screens are
stopped up
Turn off the water source and remove the water connection
hoses from the upper back of the washer. Use a brush or
toothpick to clean the screens in the machine. Reconnect the
hoses and turn the water back on.
Inlet hose screen washers
are stopped up
Turn off the water source and remove the inlet hoses from
the wall faucets. Use a brush or toothpick to clean the screen
washers in the end of the hoses. Reconnect the hoses and
turn the water back on.
Pump filter may be clogged See the Care and Cleaning section on how to clean the
Pump Filter.
Fill hoses may be kinked Check that fill hoses are not kinked or clogged.
Water supply is turned off Turn on both hot and cold faucets fully.
Energy efficiency This is an energy-efficient washer. As a result, the temperature
settings for this washer may be different than for a non-energy-
efficient washer.
Insufficient water supply Make sure that the water supply is turned on. Make sure that
the water faucets are turned to their completely open position.
The washer door is open The washer door must be closed for all washer cycle
operations. If the door is opened during the washer operation,
all functions will stop, including water filling.
Incorrect fill hose connection Make sure that the fill hoses connect the hot water supply to
the hot inlet on the washer and the cold water supply to the
cold inlet on the washer (hot to hot, cold to cold).
Wrinkling Improper sorting Avoid mixing heavy items (like work clothes) with light items
(like blouses).
Overloading Load your washer so clothes have enough room to move
freely.
Incorrect wash cycle Match cycle selection to the type of fabric you are washing
(especially for easy care loads).
Repeated washing in water
that is too hot
Wash in warm or cold water.
30 49-3000217 Rev 2
TROUBLESHOOTING TIPS
Troubleshooting Tips... Before you call for service
Problem Possible Cause What To Do
Grayed or
yellowed
clothes
Not enough detergent Use correct amount of detergent.
Not using HE (high
efficiency) detergent
Use only HE detergent.
Hard water Use hottest water safe for fabric.
Use a water conditioner like Calgon brand or install a water
softener.
Water is not hot enough Make sure water heater is delivering water at 120°–140°F
(48°–60°C).
Detergent is not dissolving Try a liquid HE detergent.
Dye transfer Sort clothes by color. If fabric label states wash separately,
unstable dyes may be indicated.
Colored spots Incorrect use of fabric
softener
Check fabric softener package for instructions and follow
directions for using dispenser.
Dye transfer Sort whites or lightly colored items from dark colors.
Promptly remove wash load from washer.
Water
temperature
is incorrect
Water supply is improperly
connected
Make sure hoses are connected to correct faucets.
House water heater is not set
properly
Make sure house water heater is delivering water at 120°–
140°F (48°–60°C).
Bad odor inside
your Washer
Washer unused for a
long time, not using
recommended quality of HE
detergent or used too much
detergent
Regularly use ULTRAFRESH VENT between uses.
In case of strong odor, you may need to run the Self Clean
cycle more than once.
Use only the amount of detergent recommended or adjust
SmartDispense to LOW.
Use only HE (high efficiency) detergent.
Always remove wet items from the washer promptly after it
stops running or use 1 Step Wash + Dry or Tumble Care.
If you choose to not use the ULTRAFRESH VENT System,
leave the door slightly open for the washer to air dry. Close
supervision is necessary if this appliance is used by or near
children. Do not allow children to play on or in this appliance.
Detergent leak This is normal It is normal operation to see detergent leak on door gasket
about 20 seconds after filling the dispenser.
Improper
dispensing
of softener
or bleach
Dispenser clogged Monthly clean the dispenser drawer to remove buildup of
chemicals.
Softener or bleach is filled
above the max line
Make sure to have the correct amount of softener.
Dispenser
drawer not
dispensing
properly
Laundry detergent packet
placed in dispenser drawer
Laundry detergent packets should not be used in the
dispenser. They should only be added directly to the wash tub
following the manufacturer's directions.
Pump running
while washer is
not in use
Clog in sump drain This is normal. Drain sump is detecting an undesired water
fill level from a potential open faucet. Shut off water valve and
inspect water valve for blockage.
49-3000217 Rev 2 31
LIMITED WARRANTY
GE Appliances Washer Limited Warranty
Staple your receipt here. Proof of the original purchase
date is needed to obtain service under the warranty.
GEAppliances.com
All warranty service is provided by our Factory Service Centers, or an authorized Customer Care
®
technician. To schedule
service online, visit us at GEAppliances.com/service, or call GE Appliances at 800.GE.CARES (800.432.2737). Please
have your serial number and your model number available when calling for service.
Servicing your appliance may require the use of the onboard data port for diagnostics. This gives a GE Appliances factory
service technician the ability to quickly diagnose any issues with your appliance and helps GE Appliances improve its
products by providing GE Appliances with information on your appliance. If you do not want your appliance data to be
sent to GE Appliances, please advise your technician not to submit the data to GE Appliances at the time of service.
Extended Warranties: Purchase a GE Appliances extended warranty and learn about special discounts that are
available while your warranty is still in effect. You can purchase it online anytime at
GEAppliances.com/extended-warranty
or call 800.626.2224 during normal business hours. GE Appliances Service will still be there after your warranty expires.
In the United States:
This limited warranty is extended to the original purchaser and any succeeding owner for products purchased for home use
within the USA. If the product is located in an area where service by a GE Appliances Authorized Servicer is not available,
you may be responsible for a trip charge or you may be required to bring the product to an Authorized GE Appliances
Service location for service. In Alaska, the limited warranty excludes the cost of shipping or service calls to your home.
Some states do not allow the exclusion or limitation of incidental or consequential damages. This limited warranty
gives you specific legal rights, and you may also have other rights which vary from state to state. To know what your
legal rights are, consult your local or state consumer affairs office or your state’s Attorney General.
Warrantor: GE Appliances, a Haier Company, Louisville, KY 40225
EXCLUSION OF IMPLIED WARRANTIES
Your sole and exclusive remedy is product repair as provided in this Limited Warranty. Any implied warranties,
including the implied warranties of merchantability or fitness for a particular purpose, are limited to one year or the
shortest period allowed by law.
In Canada:
This limited warranty is extended to the original purchaser and any succeeding owner for products purchased in Canada
for home use within Canada. If the product is located in an area where service by a GE Appliances Authorized Servicer is
not available, you may be responsible for a trip charge or you may be required to bring the product to an Authorized
GE Appliances Service location.
Some provinces do not allow the exclusion or limitation of incidental or consequential damages. This limited warranty
gives you specific legal rights, and you may also have other rights which vary from province to province. To know what
your legal rights are, consult your local or provincial consumer affairs office.
Warrantor: MC Commercial Inc., Burlington, ON, L7R 5B6
For the period of: We will replace:
One year
From the date of the
original purchase
Any part of the washer which fails due to a defect in materials or workmanship.
During this limited one-year warranty, we will also provide, free of charge, all labor
and related service to replace the defective part.
Ten years
From the date of the
original purchase
The motor, if it should fail due to a defect in materials or workmanship. During this
additional nine-year limited warranty, you will be responsible for any labor and
related service costs.
What is not covered:
Ŷ
Service trips to your home to teach you how to use
the product.
Ŷ
Improper installation, delivery or maintenance.
Ŷ
Failure of the product if it is abused, misused, or used for
other than the intended purpose or used commercially.
Ŷ
Replacement of house fuses or resetting of circuit
breakers.
Ŷ
Products which are not defective or broken, or which
are working as described in the Owner’s Manual.
Ŷ
Damage to the product caused by accident, fire,
floods or acts of God.
Ŷ
Incidental or consequential damage caused by
possible defects with this appliance.
Ŷ
Defects or damage due to operation in freezing
temperatures.
Ŷ
Damage caused after delivery.
Ŷ
Product not accessible to provide required service.

32 49-3000217 Rev 2
CONSUMER SUPPORT
Consumer Support
GE Appliances Website
Have a question or need assistance with your appliance? Try the GE Appliances Website 24 hours a day, any day
of the year! You can also shop for more great GE Appliances products and take advantage of all our on-line support
services designed for your convenience. In the US: GEAppliances.com.
In Canada: GEAppliances.ca.
Register Your Appliance
Register your new appliance on-line at your convenience! Timely product registration will allow for enhanced
communication and prompt service under the terms of your warranty, should the need arise. You may also mail in the
pre-printed registration card included in the packing material. In the US: GEAppliances.com/register.
In Canada: Prodsupport.mabe.ca/crm/Products/ProductRegistration.aspx.
Schedule Service
Expert GE Appliances repair service is only one step away from your door. Get on-line and schedule your service at
your convenience any day of the year. In the US: GEAppliances.com/service or call 800.432.2737 during normal
business hours.
In Canada: GEAppliances.ca/en/support/service-request or call 800.561.3344.
Extended Warranties
Purchase a GE Appliances extended warranty and learn about special discounts that are available while your
warranty is still in effect. You can purchase it on-line anytime. GE Appliances Services will still be there after your
warranty expires. In the US: GEAppliances.com/extended-warranty or call 800.626.2224 during normal business
hours.
In Canada: GEAppliances.ca/en/support/purchase-extended-warranty or call 866.277.9842.
Remote Connectivity
For assistance with wireless network connectivity (for models with remote enable), in the US visit our website at
GEAppliances.com/connected-home-smart-appliances/ or call 800.220.6899.
In Canada: http://www.geappliances.ca/en/news-and-promotions/what-is-hot/wifi-connect/.
Parts and Accessories
Individuals qualified to service their own appliances can have parts or accessories sent directly to their homes
(VISA, MasterCard and Discover cards are accepted). Order on-line today 24 hours every day.
In the US: GEApplianceparts.com or by phone at 877.959.8688 during normal business hours.
In Canada: GEAppliances.ca/en/products/parts-filters-accessories or call 800.661.1616.
Instructions contained in this manual cover procedures to be performed by any user. Other servicing
generally should be referred to qualified service personnel. Caution must be exercised, since improper
servicing may cause unsafe operation.
Contact Us
If you are not satisfied with the service you receive from GE Appliances, contact us on our Website with all the
details including your phone number, or write to:
In the US: General Manager, Customer Relations | GE Appliances, Appliance Park | Louisville, KY 40225
GEAppliances.com/contact.
In Canada: Director, Consumer Relations, MC COMMERCIAL INC. | Suite 310, 1 Factory Lane | Moncton, N.B. E1C 9M3
GEAppliances.ca/en/contact-us.
Printed in China

LAVEUSES
GUIDE DE
L’UTILISATEUR
ET INSTRUCTION
D’INSTALLATION
Inscrivez ici les numéros
de modèle et de série :
Modèle # ________________
Série # __________________
Vous les trouverez sur une
étiquette placée à intérieur
de la porte.
CONSIGNES DE SÉCURITÉ ......3
UTILISATION DE LA LAVEUSE
Comment démarrer ................... 5
Connectivité WiFi .....................14
Chargement ..........................15
ENTRETIEN ET
NETTOYAGE ........................ 16
INSTRUCTIONS
D’INSTALLATION ...................18
Inversion de l’ouverture de la porte
(Optionnel) ..........................23
CONSEILS DE
DÉPANNAGE .....................27
GARANTIE LIMITÉE ..............31
SOUTIEN
AU CONSOMMATEUR .......... 32
GE est une marque déposée de General Electric Company. Fabriqué sous licence de marque.
GFW850
GFW650
GFW550
GFW510
FRANÇAIS
0020508637A 49-3000217 Rev 2 10-19 GEA

2 49-3000217 Rev 2
NOUS VOUS REMERCIONS D’ACCUEILLIR GE APPLIANCES CHEZ VOUS
Que vous ayez grandi avec GE Appliances ou qu’il s’agisse de votre première acquisition, nous
sommes heureux de vous accueillir dans notre famille.
Nous sommes fiers du savoir-faire, de l’innovation et de l’esthétique qui composent chaque appareil
GE Appliances, et nous pensons que vous le serez aussi. Dans cette optique, nous vous rappelons
que l’enregistrement de votre électroménager vous assure la communication de renseignements
importants sur le produit et la garantie lorsque vous en avez besoin.
Enregistrez votre électroménager GE en ligne dès maintenant. Des sites Web et des numéros de
téléphone utiles figurent dans la section Soutien au consommateur de ce manuel d’utilisation. Vous
pouvez aussi poster la fiche de garantie préimprimée incluse dans l’emballage.

49-3000217 Rev 2 3
CONSIGNES DE SÉCURITÉ
CONSIGNES DE SÉCURITÉ IMPORTANTES
LIRE TOUTES LES CONSIGNES AVANT D’UTILISER L’APPAREIL
LIRE ET
CONSERVEZ CES DIRECTIVES
Pour réduire les risques de décès, d'incendie, d'explosion, de choc électrique ou de
blessures lorsque vous utilisez votre appareil, suivez les mesures de sécurité de
base, notamment :
Ŷ
Lisez toutes les instructions avant d'utiliser l'appareil.
Ŷ
Suivez toutes les instructions et avertissements de soin des tissus pour éviter que les vêtements fondent ou
des dommages à l’appareil.
Ŷ
NE nettoyez et NE séchez PAS d'articles qui ont été nettoyés, lavés, trempés ou tachés avec de l'essence,
du solvant pour nettoyage à sec ou d'autres produits combustibles ou substances explosives, car ces derniers
peuvent dégager des vapeurs qui pourraient s'enflammer ou exploser.
Ŷ
N'ajoutez PAS de l'essence, du solvant pour nettoyage à sec ou d'autres produits combustibles ou
substances explosives à l'eau de lavage. Ces substances peuvent dégager des vapeurs qui pourraient
s'enflammer ou provoquer une explosion.
Ŷ
Dans certaines conditions, de l'hydrogène peut se former dans un circuit d'eau chaude qui n'a pas été utilisé
pendant deux semaines ou plus. L'HYDROGÈNE EST UN GAZ EXPLOSIF. Si le circuit d'eau chaude n'a pas
été utilisé pendant une telle période, ouvrez tous les robinets d'eau chaude et laissez l'eau couler pendant
plusieurs minutes avant d'utiliser votre laveuse. Ainsi, l'hydrogène accumulé sera évacué du système. Ce gaz
étant inflammable, NE fumez PAS et n'utilisez pas de flamme nue pendant cette opération.
Ŷ
NE laissez PAS les enfants jouer sur ou à l'intérieur de cet appareil. La présence d'enfants près de cet
appareil lorsqu'il est en marche doit faire l'objet d'une étroite supervision. Avant de mettre la laveuse au rebut
ou hors service, retirez la porte ou le couvercle. Le non-respect de ces instructions peut entraîner le décès ou
des blessures.
Ŷ
NE mettez PAS la main dans l'appareil lorsque le tambour ou l'agitateur est en mouvement pour éviter d'être
happé accidentellement.
Ŷ
N'installez ou n'entreposez PAS cet appareil dans un endroit où il sera exposé aux intempéries.
Ŷ
NE modifiez PAS les commandes, ne réparez ou ne remplacez pas de pièce de cet appareil et ne tentez
pas d'effectuer une réparation, sauf si cette procédure est recommandée expressément dans les instructions
d'entretien de l'utilisateur ou dans les instructions de réparation de l'utilisateur et que vous possédez les
connaissances et les aptitudes requises pour le faire.
Ŷ
ABSTENEZ-VOUS de grimper ou de vous tenir sur l’appareil.
Ŷ
N'utilisez PAS cet appareil s'il est endommagé, s'il fonctionne mal, s'il est partiellement démonté ou si
certaines de ses pièces manquent ou sont cassées (y compris le cordon d'alimentation ou la fiche).
Ŷ
Débranchez l'appareil ou fermez son disjoncteur avant de procéder à l'entretien. Appuyer sur le bouton
d'alimentation Power de l'appareil NE le déconnecte PAS de l'alimentation.
Ŷ
Consultez la section sur le « EXIGENCES ÉLECTRIQUES » des instructions d'installation pour obtenir les
procédures de mise à la terre.
AVERTISSEMENT

4 49-3000217 Rev 2
CONSIGNES DE SÉCURITÉ
LIRE ET CONSERVEZ CES DIRECTIVES
CONSIGNES DE SÉCURITÉ IMPORTANTES
LIRE TOUTES LES CONSIGNES AVANT D’UTILISER L’APPAREIL
INSTALLATION APPROPRIÉE
Cette laveuse doit être installée conformément aux instructions d’installation avant d’être utilisée.
Ŷ
Assurez-vous que le boyau d’eau chaude est raccordé au robinet « H » et que le boyau d’eau froide est
raccordé au robinet « C ».
Ŷ
Installez ou entreposez l’appareil à un endroit où il ne sera exposé ni à des températures en dessous du point de
congélation ni aux intempéries; l’appareil pourrait subir des dommages permanents et la garantie serait annulée.
Ŷ
Mettez la laveuse à la terre conformément aux codes et règlements en vigueur. Suivez les instructions
détaillées de la section « Instructions d’installation ».
Ŷ
Veillez à ce que la laveuse soit bien de niveau et que les pieds soient correctement réglés pour que cet
appareil soit stable.
Ŷ
Une rallonge de tuyau d’évacuation optionnelle est recommandée pour les hauteurs d’évacuation allant de 60
à 96 po (152,4 à 243,8 cm).
Ŷ
GE Appliances recommande fortement d’utiliser les pièces spécifiées du fabricant. Une liste de boyaux
manufacturés disponibles pour l’achat est indiquée. Ces boyaux ont été fabriqués et testés afin de répondre
aux spécifications de GE Appliances.
Ŷ
GE Appliances recommande fortement d’utiliser de nouveaux boyaux d’alimentation en eau. Les boyaux se
dégradent avec le temps et doivent être remplacés tous les cinq ans afin de réduire le risque de bris de boyau
et de dégâts d’eau.
PIÈCES ET ACCESSOIRES
Consultez votre annuaire local pour un détaillant de
pièces authorisé ou applez-nous au 800.661.1616
ou Electromenagersge.ca/fr/produits/filtres-et-
accessoires.
Numéro de pièce Accessoire
WX14X10011 6 ft stainless steel washer hoses with
90° elbows; 2-pack
WH49X316 Washer drain hose extension kit
WX10X10011 Nettoyant pour laveuse Tide
®
*
PM7X2 Universal low profile washer floor tray
GFA28KITN
Trousse de support d’empilement
(pour empiler la sécheuse sur le dessus)
GFP1528S 28” width Pedestal with drawer – White
GFP1528P 28” width Pedestal with drawer – Colors
*Tide® est une marque déposée de Procter & Gamble
LORSQUE L’APPAREIL N’EST PAS UTILISÉ
Ŷ
Fermez les robinets d’eau pour réduire les fuites en cas de tuyau cassé. Vérifiez l’état des tuyaux de remplissage.
GE Appliances recommande de les remplacer tous les 5 ans.
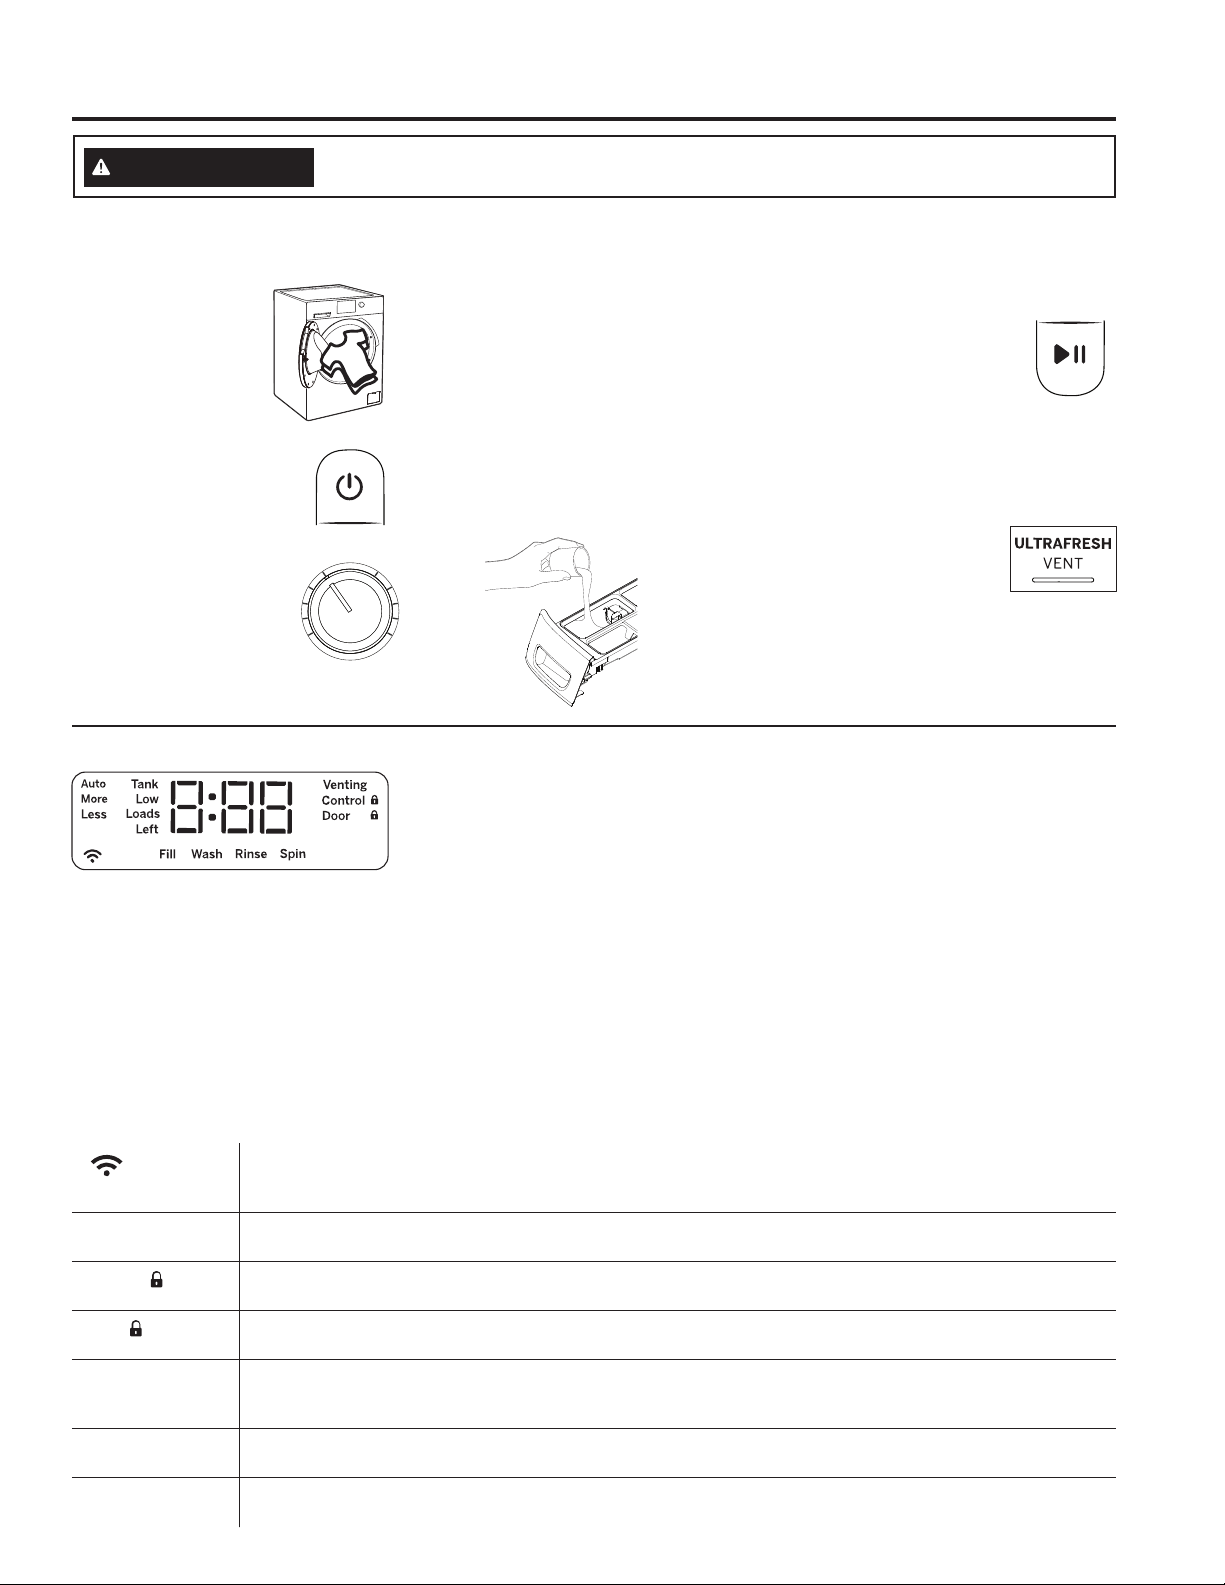
49-3000217 Rev 2 5
UTILISATION DE LA LAVEUSE
Les caractéristiques et l'apparence de la cuisinière montrée dans ce manuel peuvent varier selon le modèle.
Pour réduire le risque d’incendie, de choc électrique ou de blessure, lisez les
CONSIGNES DE SÉCURITÉ IMPORTANTES avant de faire fonctionner cet appareil.
AVERTISSEMENT
Étape 4
Étape 5
Étape 1
Chargez les
vêtements dans
votre laveuse et
fermez la porte.
Si l’écran est obscur,
appuyez sur le bouton
Power (alimentation) ou
tournez le bouton pour
activer l’afficheur.
Tournez le bouton
sur le cycle désiré.
Ouvrez le distributeur et ajoutez
le détergent, le javellisant et
le produit assouplissant, au
besoin. Avec les modèles
avec SmartDispense™, vous
devez presser la touche
SmartDispense seulement
après que le réservoir a été
rempli.
Appuyez sur Start (Démarrer)
pour commencer le cycle
de lavage. L’appareil va peser
vos vêtements et ajouter la
quantité d’eau appropriée. La
porte se déverrouille une fois
le cycle de lavage terminé.
Étape 2
Étape 3
(Les options de cycle
varient selon le modèle)
Démarrage rapide :
Affichage et voyants d’état (Las características y apariencia variarán)
L’écran affiche le temps approximatif restant avant la fin du programme l’état du cycle (Fill, Wash, Rinse et Spin).
REMARQUE : La durée du cycle varie selon la durée du remplissage de la laveuse. La vitesse de remplissage dépend à
son tour de la pression d’eau à votre domicile. La minuterie « intelligente » tient compte du temps de remplissage et ajuste
la durée totale du cycle en conséquence.
Si une condition de déséquilibre est détectée par la laveuse, le voyant d’essorage (Spin) clignotera pendant le restant
du cycle et restera allumé pendant une courte période de temps une fois le cycle terminé. Lorsque cela se produit, la
laveuse prend des mesures pour corriger la condition de déséquilibre et terminer le cycle normalement. Dans certains
cas, il est possible que la laveuse ne puisse pas être en mesure d’équilibrer la charge et essorer à pleine vitesse. Si
vous remarquez que la charge est plus humide que normalement à la fin du cycle, répartissez la charge uniformément
dans le panier de lavage et commencez un cycle Rinse & Spin (Rinçage & Essorage).
De plus, cet écran affiche :
Comment démarrer
(WiFi)
Ce module permettra à votre électroménager de communiquer avec votre téléphone intelligent pour la
surveillance, la commande et la réception d’avis à distance. Son voyant reste allumé chaque fois que la laveuse
est sous tension (ON) et connectée. Il clignote durant la mise en service ou s’il perd la connexion au réseau.
Venting Le mot « Venting » (Ventilation) clignote pour indiquer que vous avez choisi la fonction ULTRAFRESH VENT à
la fin du cycle. Une fois sélectionné, il reste allumé jusqu’à la fin de la ventilation.
Control
Les commandes sur la laveuse sont verrouillées lorsque cette icône est allumée. Vous devez maintenir une
pression sur la touche Control Lock (Verrouillage des commandes) pour déverrouiller les commandes.
Door
Cette icône s’allume quand la porte est verrouillée et clignote quand la laveuse est à l’étape de pause
suivie du déverrouillage.
Auto, More, Less
(sur certains modèles)
La fonction SmartDispense dose automatiquement le détergent en fonction du poids et du degré de saleté
des vêtements. Vous pouvez régler cette fonction pour doser 40 % PLUS ou 40 % MOINS de détergent, ou
désactivez-la (OFF) pour doser le détergent manuellement.
Tank Low
(sur certains modèles)
S’affichera lorsqu’il faudra remplir le réservoir de distribution intelligente. Généralement, ces mots s’affichent la
première fois lorsqu’il reste du détergent pour environ 8 à 10 brassées.
Loads Left
(sur certains modèles)
Affiche le nombre estimatif de brassées de lavage qui restent pour la quantité de détergent dans le réservoir de
distribution intelligente.
Étape 6
Une fois le cycle de lavage
terminé et les vêtements
retirés, sélectionnez
ULTRAFRESH VENT™
pour éliminer l’humidité
excédentaire dans votre
laveuse de façon que vous
puissiez fermer la porte.
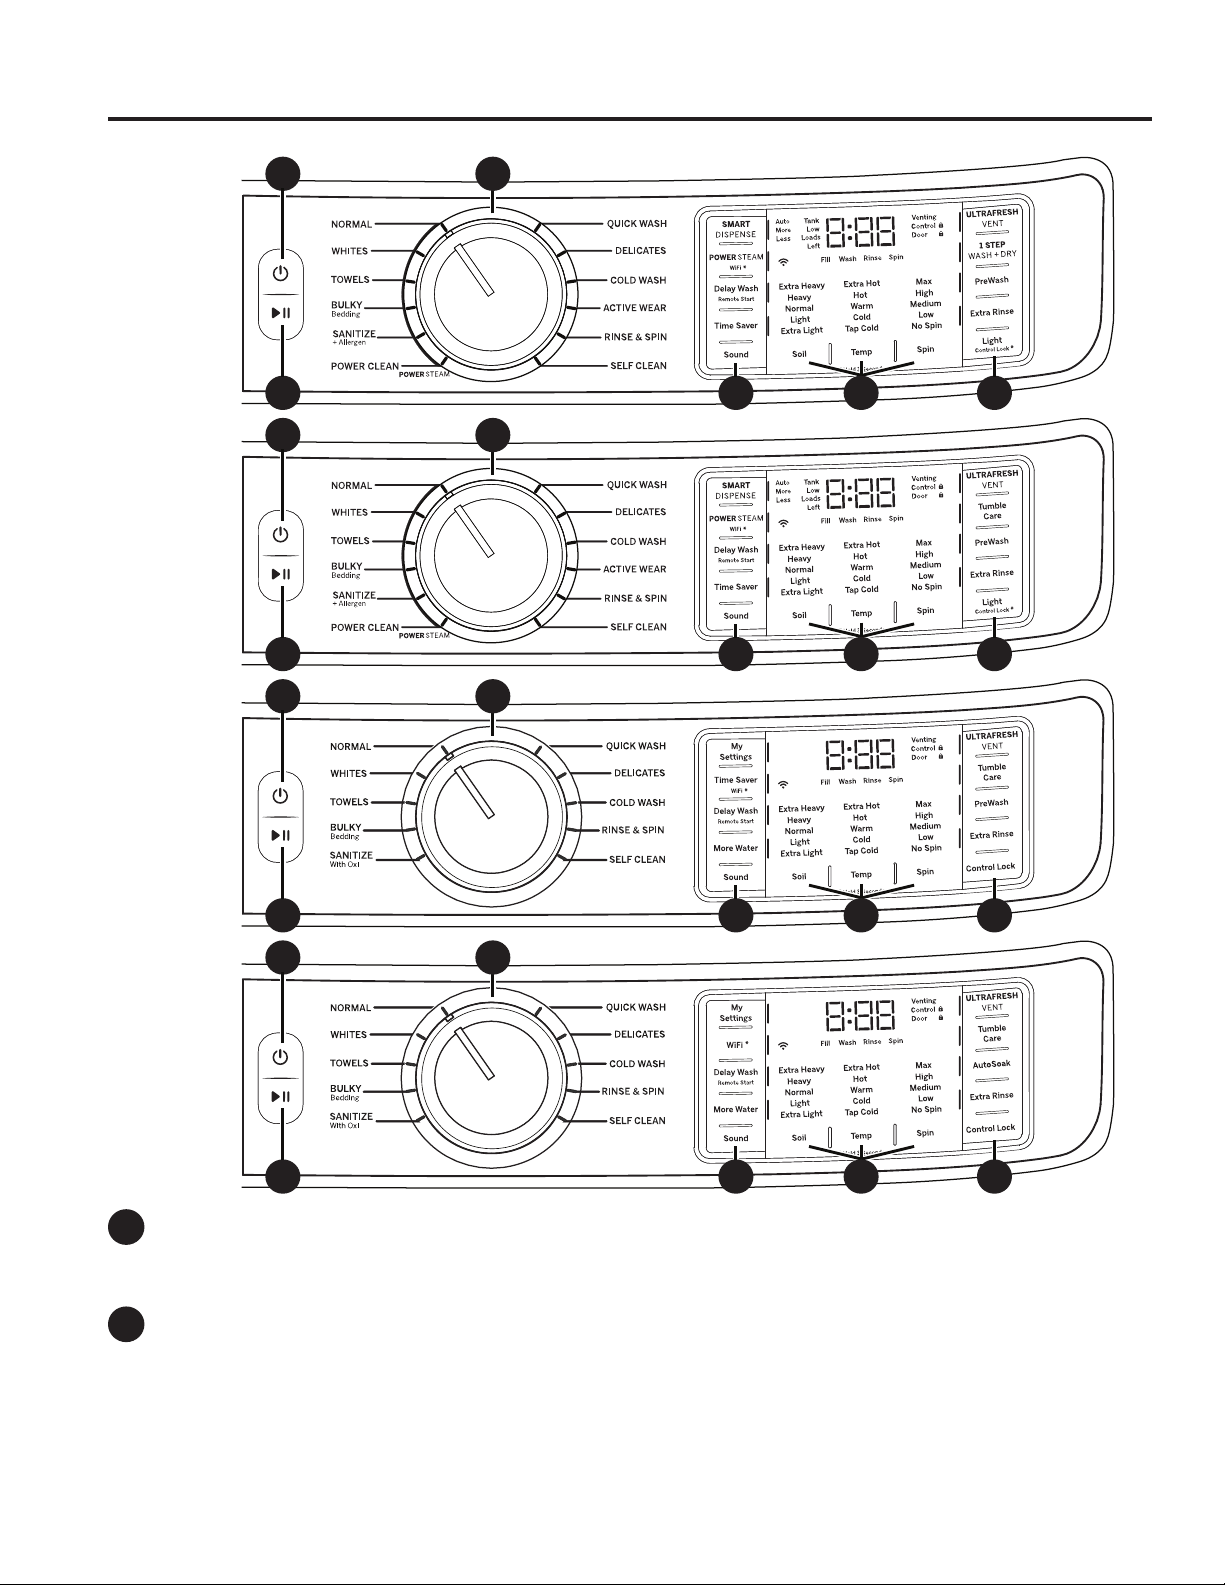
6 49-3000217 Rev 2
A
B
Power
(
alimentation
)
A
ppuyez pour activer l’affichage. Si l’affichage est actif, appuyez pour mettre la laveuse en mode d’attente « Off ».
NOTE : Vous ne débranchez pas votre appareil de l’alimentation électrique en appuyant sur Power (alimentation).
Start/Pause (Départ/Pause)
A
ppuyez pour mettre en marche un cycle de lavage. Si la laveuse fonctionne, vous l’arrêtez en appuyant une
fois et déverrouillez la porte. Après avoir appuyer sur Pause (Pause), il s’écoulera quelques secondes avant
que la porte ne s’ouvre. Appuyez à nouveau pour remettre en marche le cycle de lavage.
NOTE : En arrêtant la laveuse et en ne remettant pas en marche le cycle dans les 15 minutes qui suivent,
vous annulez le cycle de lavage actuel.
NOTE : La laveuse procède à des vérifications automatiques du système une fois que vous avez appuyé sur
le bouton Start (Départ). L’eau se mettra à couler dans un délai de 45 secondes ou moins. Vous entendrez
peut-être la porte se verrouiller et se déverrouiller et la pompe active avant que l’eau ne coule.
Comment démarrer
UTILISATION DE LA LAVEUSE
Les caractéristiques et l’apparence varieront.
CA
B E ED
Modèles :
GFW850
CA
B E ED
Modèles :
GFW650
CA
B E ED
Modèles :
GFW550
CA
B E ED
Modèles :
GFW510

49-3000217 Rev 2 7
Comment démarrer
UTILISATION DE LA LAVEUSE
C
Cycles de lavage
Les cycles sont optimisés pour des catégories particulières de charges de lavage. Le tableau ci-dessous vous
aidera à apparier les articles à laver avec les meilleurs réglages des cycles de lavage. Pour un rendement
optimal, sélectionnez le cycle qui s’approche le plus des articles à laver. Les sélections et les options en gras
sont les réglages du cycle suggérés. Delay Wash/Remote Start est disponible pour tous les cycles.
Cycle de
lavage
Articles à laver
Degré de
saleté
Temp de
lavage
Sélection
d’essorage
Options disponibles
Normal Cycle pour un lavage
normal, régulier,
typique d’une pleine
brassée de vêtements
de coton normalement
sales
Extrêm. sale
Très sale
Normal
Légèr.
Très légèr.
Très chaud
Chaud
Tiède
Froid
Froid robinet
Max
Haut
Moyen
Prélavage* ou trempage auto*
Vapeur puissante*
Économiseur de temps*
Rinçage suppl.
Culbutage antifroissage* ou
1 Step Wash + Dry*
Whites
(Blancs)
Vêtements blancs et
linge de maison.
Extrêm. sale
Très sale
Normal
Légèr.
Très légèr.
Très chaud
Chaud
Tiède
Froid
Froid robinet
Max
Haut
Moyen
Bas
Prélavage* ou trempage auto*
Vapeur puissante*
Économiseur de temps*
Plus d’eau*
Rinçage suppl.
Culbutage antifroissage* ou
1 Step Wash + Dry*
Towels
(Servi-
ettes)
Serviettes, draps, taies
d’oreiller et lavettes.
Extrêm. sale
Très sale
Normal
Légèr.
Très légèr.
Chaud
Tiède
Froid
Froid robinet
Max
Haut
Moyen
Bas
Prélavage* ou trempage auto*
Vapeur puissante*
Économiseur de temps*
Plus d’eau*
Rinçage suppl.
Culbutage antifroissage* ou
1 Step Wash + Dry*
Bulky
Bedding
(Literie
volu-
mineuse)
Grands manteaux,
couvre-lits, couvre-
matelas, sacs de
couchage et articles
volumineux similaires.
Extrêm. sale
Très sale
Normal
Légèr.
Très légèr.
Chaud
Tiède
Froid
Froid robinet
Max
Haut
Moyen
Bas
Prélavage* ou trempage auto*
Vapeur puissante*
Économiseur de temps*
Plus d’eau*
Rinçage suppl.
Culbutage antifroissage* ou
1 Step Wash + Dry*
Sanitize+
Allergen*
(Désinfec-
tion + al-
lergènes)
Articles grand teint très
sales qui nécessitent
une désinfection.
Extrêm. sale
Très sale
Très chaud Max
Haut
Moyen
Bas
Prélavage
Vapeur puissante*
Rinçage suppl.
Culbutage antifroissage* ou
1 Step Wash + Dry*
Sanitize
With Oxi*
(Désinfec-
tion Oxi)
Articles grand teint très
sales qui nécessitent
une désinfection.
Extrêm. sale
Très sale
Très chaud Max
Haut
Moyen
Bas
Prélavage* ou trempage auto*
Rinçage suppl.
Culbutage antifroissage
*Certains cycles et options ne sont pas offerts sur tous les modèles.
REMARQUE :
Les températures d’eau du cycle SANITIZE + Allergen (Désinfecter + Allergène) NE SONT PAS modifiables. Ce
cycle utilise une température élevée et un cycle de lavage plus long pour éliminer les acariens des poussières et
réduit 99 % des bactéries communes des tissus. Une purge de la pompe et un rinçage prolongé sont intégrés dans le
but de retirer les contaminants et les allergènes tels que les squames d’animaux.
Les températures d’eau du cycle SANITIZE With Oxi (Désinfecter avec Oxi) NE SONT PAS modifiables. Ce cycle,
utilisé avec un additif Oxi et du détergent, est conçu pour éliminer 99 % des bactéries présentes dans la blanchisserie
domestique. Mesurez le détergent et les produits Oxi avec soin. Tout en utilisant les quantités appropriées pour une
grande brassée très sale chargée dans une laveuse à chargement frontal, suivez les instructions des étiquettes du
détergent et du produit Oxi. L’alimentation d’eau chaude de la laveuse doit atteindre un minimum de 120 °F pour
assurer l’efficacité de ce cycle.
Seuls les cycles SANITIZE + Allergen et SANITIZE With Oxi ont été conçus pour répondre aux exigences relatives à
l’efficacité de la désinfection.

8 49-3000217 Rev 2
Comment démarrer
UTILISATION DE LA LAVEUSE
C
Cycles de lavage - Suite
Les cycles sont optimisés pour des catégories particulières de charges de lavage. Le tableau ci-dessous vous
aidera à apparier les articles à laver avec les meilleurs réglages des cycles de lavage. Pour un rendement
optimal, sélectionnez le cycle qui s’approche le plus des articles à laver. Les sélections et les options en gras
sont les réglages du cycle suggérés. Delay Wash/Remote Start est disponible pour tous les cycles.
Cycle de
lavage
Articles à laver
Degré de
saleté
Temp de
lavage
Sélection
d’essorage
Options disponibles
Power
Clean*
(Nettoy-
age puis-
sant)
Pour articles très
sales qui exigent
une puissance
de nettoyage
additionnelle.
Extrêm. sale
Très sale
Normal
Chaud
Tiède
Froid
Froid robinet
Max
Haut
Moyen
Bas
Prélavage
Vapeur puissante
Rinçage suppl.
Culbutage antifroissage* ou
1 Step Wash + Dry*
Quick
Wash
(Lavage
rapide)
Pour les petites
brassées d’articles
légèrement sales
dont on a besoin
rapidement.
Normal
Légèr.
Très légèr.
Chaud
Tiède
Froid
Froid robinet
Max
Haut
Moyen
Bas
Plus d’eau*
Rinçage suppl.
Culbutage antifroissage* ou
1 Step Wash + Dry*
Delicates
(Délicats)
Pour la lingerie et les
tissus délicats avec
degré de saleté léger à
normal.
Normal
Légèr.
Très légèr.
Tiède
Froid
Froid robinet
Moyen
Bas
Pas d’essorage
Prélavage* ou trempage auto*
Économiseur de temps*
Plus d’eau*
Rinçage suppl.
Culbutage antifroissage* ou
1 Step Wash + Dry*
Lavage à
froid
Cycle pour un lavage
normal, régulier,
typique d’une pleine
brassée de vêtements
de coton normalement
sales sales en utilisant
uniquement de l’eau
froide.
Extrêm. sale
Très sale
Normal
Légèr.
Très légèr.
Froid
Froid robinet
Max
Haut
Moyen
Bas
Prélavage* ou trempage auto*
Plus d’eau*
Rinçage suppl.
Culbutage antifroissage* ou
1 Step Wash + Dry*
Active
Wear*
(Tenue
active)
Tenue athlétique
légèrement à
moyennement sale
fabriquée de tissus
techniques ou
synthétiques.
Extrêm. sale
Très sale
Normal
Légèr.
Très légèr.
Tiède
Froid
Froid robinet
Moyen
Bas
Pas d’essorage
Prélavage
Économiseur de temps*
Rinçage suppl.
Culbutage antifroissage* ou
1 Step Wash + Dry*
Rinse
& Spin
(Rinçage
et essor-
age)
Utilisez ce cycle
pour les articles qui
nécessitent seulement
un rinçage.
Max
Haut
Moyen
Bas
Pas d’essorage
Plus d’eau*
Rinçage suppl.
Culbutage antifroissage* ou
1 Step Wash + Dry*
(Autonet-
toyage)
Nettoyage du panier
pour éliminer les
résidus et les odeurs.
Aucun vêtement à
laver avec ce cycle.
Moyen
*Certains cycles et options ne sont pas offerts sur tous les modèles.

49-3000217 Rev 2 9
UTILISATION DE LA LAVEUSE
Comment démarrer
D
Settings (Réglages)
On peut choisir des réglages précis allant du minimum au maximum pour le degré de saleté (Level), la
température de l’eau (Temp) et la vitesse d’essorage (Spin). En général, la consommation d’énergie
augmentera avec la hauteur dans la colonne.
Soil (Saleté)
En changeant le Soil level (niveau de saleté), vous augmentez ou diminuez la durée de lavage pour enlever
divers montants de saleté.
Pour changer le Soil level (niveau de saleté), appuyez sur le bouton Soil level (niveau de saleté) jusqu’au
réglage désiré. Vous pouvez choisir entre Extra Light (très peu sale), Light (peu sale), Normal (normal) ou
Heavy Soil (vraiment sale) sur la plupart des cycles.
Temp (Température)
Ajustez pour choisir la bonne température de l’eau pour le cycle de lavage. L’eau de AutoSoak (Remojo
Automático) et PreWash (Prélavage) de rinçage est toujours froide pour réduire l’utilisation d’énergie et
diminuer la fixation des taches et les froissements.
Suivez l’étiquette du fabricant pour choisir la température de lavage.
Pour changer la température de lavage, appuyez sur le bouton Temp (Température) jusqu’au réglage désiré.
Vous pouvez choisir entre Tap Cold (Froide du robinet), Cold (Froide), Warm (Tiède), Hot (Chaude) ou Extra
Hot (Très chaude) sur la plupart des cycles. Pour protéger les tissus, certains cycles ne donnent pas accès à
toutes les températures de lavage. Les températures très chaudes sont possibles grâce à un élément chauffant
interne sur les modèles équipés de la fonction Steam (Vapeur).
NOTE : Pendant les dix premières secondes du remplissage, l’eau est toujours froide. Cela aide à conditionner
les tissus et empêche la fixation des taches sur les vêtements.
Spin (Essorage)
En changeant la Spin (Vitesse d’essorage), vous changez la vitesse de l’essorage final des cycles. Suivez toujours les
instructions de l’étiquette du vêtement pour changer la Spin (Vitesse d’essorage).
Pour changer la Spin (Vitesse d’essorage), appuyez sur le bouton Spin (Vitesse d’essorage) jusqu’au réglage désiré.
Vous pouvez choisir entre No Spin (Pas d’essorage), Low (Lent), Medium (Modéré), High (Rapide) ou Max. Les
vitesses d’essorage les plus rapides ne sont pas offertes pour certains cycles, comme le cycle Delicates (Délicats)
ou Active Wear (Tenue active). Les vitesses d’essorage plus rapides enlèvent plus d’eau des vêtements, et aident à
réduire le temps de séchage, mais augmentent également la possibilité de froisser certains tissus.
REMARQUE : Cette laveuse est équipée d’un système dBT™ Dynamic Balancing Technology (dBT™
Technologie d’équilibrage dynamique). Cette technologie de détection embarquée et brevetée procure un équilibrage
en temps réel du cycle d’essorage pour chaque brassée, d’où une économie de temps et un lavage silencieux.
Il devrait en résulter des durées de lavage plus constantes et une réduction générale du bruit et des vibrations.
Si la laveuse devait générer des bruits, des vibrations ou des secousses excessives, il suffit de mettre la laveuse sur
Pause, d’ouvrir la porte et de redistribuer la brassée manuellement avant de redémarrer le cycle.
E
Options
SMARTDISPENSE (Distribution intelligente) (sur certains modèles)
Cette fonction ajoute automatiquement du détergent au lavage, éliminant le besoin de l’ajouter pour chaque
brassée. Voir la section SmartDispense pour plus de détails.
MY SETTINGS (Favori) (sur certains modèles)
Pour sauvegarder un cycle favori, choisissez le réglage désiré pour le cycle de lavage, le degré de souillure,
la vitesse d’essorage et la température de l’eau et appuyez sur le bouton My Settings (Favori) pendant 3
secondes. Un signal sonore se fait entendre pour indiquer que le cycle est sauvegardé.
Pour utiliser votre cycle personnalisé, appuyez sur le bouton My Settings (Favori) avant de laver une charge.
Pour changer le cycle sauvegardé, choisissez le réglage désiré et appuyez sur le bouton My Settings
(Favori) pendant 3 secondes.
POWER STEAM (Vapeur puissante) (sur certains modèles)
L’option Power Steam ajoute de la vapeur dans la laveuse avant le début du cycle de lavage pour contribuer à
assouplir les taches pour les cycles NORMAL, WHITES, TOWELS, BULKY Bedding, SANITIZE+Allergen et
POWER CLEAN. Mode d’emploi :
1. Pressez la touche Power (Alimentation) pour « réveiller » la laveuse et sélectionner un cycle de lavage.
2. Pressez la touche POWER STEAM (Vapeur puissante) pour activer la vapeur.
3. Pressez la touche Start/Pause (Départ/Pause)
.
WiFi (peut être une touche partagée avec d’autres options)
Maintenez une pression sur la touche WiFi, POWER STEAM/WiFi* o Time Save/WiFi* (selon le modèle)
durant 3 secondes pour activer. Voyez la section sur la Wi-Fi Connect pour savoir comment établir une
connexion Wi-Fi.

10 49-3000217 Rev 2
Comment démarrer
UTILISATION DE LA LAVEUSE
E
Options - Suite
Delay Wash (Laver retardée)/Remote Start (Démarrage à distance)
Vous pouvez différer le démarrage d’un cycle de lavage de jusqu’à 24 heures ou démarrer la laveuse à distance en
utilisant la fonction Delay Wash/Remote Start (Lavage différé/Démarrage différé). Appuyez sur cette touche pour
augmenter par unités de 1 heure ou maintenez-la enfoncée pour faire défiler la durée du délai précédant le démarrage
du cycle de lavage. Si vous avez connecté votre laveuse au réseau Wi-Fi, la première sélection, « APP », peut être
choisie pour activer le démarrage à distance de votre laveuse depuis l’application GE Appliance Smartphone. Ou, si
vous réglez un délai en nombre d’heures, l’appareil exécutera un décompte et démarrera automatiquement après cette
période. Une fois le réglage du Delay Wash (Lavage différé) terminé, appuyez sur la touche Start pour activer cette
fonction. Pour annuler cette option, éteignez puis rallumez simplement les commandes.
NOTE : Si vous oubliez de fermer complètement la porte, un signal sonore de rappel se fait entendre pour vous
rappeler de le faire.
NOTE : Si vous ouvrez la porte pendant que la machine compte à rebours le temps qui reste avant la mise en
marche, la machine fait une pause. Vous devez refermer la porte et appuyer à nouveau sur le bouton Start (Départ)
pour recommencer le compte à rebours.
Time Saver (Sauve-temps) (sur certains modèles)
Cette option réduit le temps total du cycle en optimisant le lavage, le rinçage et le culbute et / ou en augmentant
doucement la température de lavage pour obtenir des vêtements nettoyés plus rapidement. Cette option
est disponible dans les cycles NORMAL (Normal), WHITES (Blancs), TOWELS (Serviettes), DELICATES
(Délicats), BULKY Bedding (Articles volumineux) et ACTIVE WEAR (Tenue active). Le temps de lavage total
variera en fonction du cycle choisi et les options sélectionnées.
Utilisation :
1. Mettez la laveuse en marche et sélectionnez le cycle de lavage offrant l’option Time Saver (Sauve-temps).
2. Appuyez sur le bouton Time Saver (Sauve-temps) pour réduire la durée générale du lavage.
3. Appuyez sur le bouton Start/Pause (Mise en marche/Pause).
More Water (Plus d’eau) (sur certains modèles)
Cette option ajoute environ 3 gallons (11 L) aux étapes de lavage et de rinçage du cycle. Si vous sélectionnez
l’option avant le démarrage du cycle, l’eau sera ajoutée à partir du début du cycle et plus tard au rinçage. Si
vous sélectionnez l’option pendant l’étape du lavage, plus d’eau sera ajoutée à partir de ce moment et plus
tard au rinçage. D’une façon similaire, si l’option More Water (Plus d’eau) est sélectionnée une fois l’étape
du lavage terminée, la laveuse ajoutera plus d’eau pour le rinçage seulement. Si le lavage et le rinçage sont
terminés, la touche More Water (Plus d’eau) ne sera plus active.
ULTRAFRESH VENT System with ODORBLOCK
TM
(Ventilation Ultrafresh Système avec
ODORBLOCK
TM
)
Le système ULTRAFRESH VENT avec OdorBlock a été conçu pour éliminer l’excès d’humidité dans la laveuse
suivant le cycle de lavage afin de prévenir le développement des odeurs. Cette laveuse a été conçue pour
évacuer l’eau plus efficacement à la fin du cycle. Après le cycle de lavage, l’utilisateur peut alors choisir de
laisser la porte ouverte ou sélectionner la fonction ULTRAFRESH VENT pour contribuer au séchage du joint
d’étanchéité et d’autres zones de la laveuse. Le système OdorBlock comporte plusieurs composants fabriqués
au moyen de la technologie antimicrobienne Microban®.* Microban est une technologie antimicrobienne sûre et
efficace qui accompagnera votre laveuse durant toute sa durée de vie. Pour plus de renseignements, veuillez
visiter www.microban.com/geappliances.
La fonction ULTRAFRESH VENT est disponible après le cycle de lavage et le retrait de la brassée propre.
Une fois la porte fermée, une mélodie jouera pour vous aviser et le voyant de la touche ULTRAFRESH VENT
clignotera. ULTRAFRESH VENT démarrera dès la touche appuyée.
Pour sélectionner ULTRAFRESH VENT à tout autre moment, mettez la laveuse sous tension
(ON), assurez-vous qu’aucun cycle n’est actif, retirez tout vêtement du panier, puis pressez
et relâchez la touche ULTRAFRESH VENT de façon à entendre la mélodie d’avis et voir le
voyant de la touche ULTRAFRESH VENT clignoter. Ensuite, appuyez de nouveau sur la touche
ULTRAFRESH VENT pour démarrer la fonction.
Durant le fonctionnement de la fonction ULTRAFRESH VENT, la porte demeurera fermée et la laveuse va
essorer par intermittence à basse vitesse durant jusqu’à 8 heures.
Si des vêtements sont détectés dans le panier pendant la ventilation ULTRAFRESH, la laveuse va plutôt
passer en TUMBLE CARE (culbutage antifroissage) ou 1 STEP WASH + DRY (lavage et séchage en 1 étape),
selon la disponibilité des options sur votre modèle.
On peut annuler la fonction ULTRAFRESH VENT à tout moment de trois façons : presser la touche POWER
(Alimentation), tourner le cadran des cycles ou presser la touche ULTRAFRESH VENT.
*Microban® est une marque déposée de Microban International, Ltd.

49-3000217 Rev 2 11
UTILISATION DE LA LAVEUSE
Comment démarrer
E
Options - Suite
1 STEP WASH + DRY (Lavage + séchage en 1 étape) (sur certains modèles)
Cette option est disponible sur tous les cycles sauf Self Clean (Auto nettoyant).
La fonction 1 STEP WASH + DRY est destinée aux petites brassées seulement. Utilisez-la lorsque les
vêtements doivent être lavés, séchés et prêts à porter ou rangés le lendemain matin. Cette fonction culbute les
vêtements et introduit un écoulement d’air constant dans la cuve de la laveuse à la fin des cycles de lavage
sélectionnés. Même si l’étape du séchage est réglée pour 8 heures, les vêtements peuvent être retirés à tout
moment en appuyant sur Pause ou Power pour annuler le cycle.
Tumble Care (Nettoyage par culbute) (sur certains modèles)
Les vêtements sont culbutés périodiquement pendant près de 8 heures après la fin du cycle de lavage pour
assouplir les plis et faux-plis si vous ne pouvez pas mettre immédiatement les vêtements dans la sécheuse.
À la fin du cycle, l’afficheur indiquera « END » (fin du cycle) puis le cycle de Tumble Care (Nettoyage par
culbute) commencera après 10 minutes. Vous pouvez arrêter le culbutage en appuyant sur le bouton Power
(mise en marche) à n’importe quel moment.
PreWash (Pré-lavage) (sur certains modèles)
Prélavage est un lavage supplémentaire avant le lavage principal. Utilisez-le pour les vêtements très sales
ou pour les vêtements dont l’étiquette recommande un prélavage avant le lavage. Assurez-vous d’ajouter du
détergent liquide ou en poudre à rendement élevé ou le bon additif de lavage au distributeur de prélavage.
Les laveuses dotées de la SmartDispense (distribution intelligente) vont automatiquement ajouter la quantité
appropriée de détergent pour le prélavage en fonction de la taille de la brassée.
PreWash (Pré-lavage) doit être sélectionné avant d’appuyer sur Start (Marche).
La fonction de PreWash (Pré-lavage) déclenche les étapes suivantes : remplissage de la laveuse (ajout du
détersif de prélavage), culbutage des vêtements, évacuation et essorage. Ensuite, la laveuse exécute le cycle
de lavage sélectionné.
NOTE : Pour certains cycles spéciaux, le prélavage est présélectionné par défaut. Vous pouvez modifier cette
sélection en tout temps.
AutoSoak (Trempage automatique) (sur certains modèles)
Pour tremper vos vêtements avant le cycle de lavage. Cette option débute par un bref culbutage suivi d’un
trempage d’une durée déterminée dans une solution d’eau et de détergent. Une fois l’opération terminée,
le cycle se poursuivra automatiquement. Il faut sélectionner AutoSoak avant de presser la touche Start. Le
AutoSoak ajouter 15 minutes, 30 minutes, 1 heure ou 2 heures supplémentaires au temps de lavage total. Un
détergent haute efficacité dans le compartiment principal du distributeur est utilisé durant l’étape AutoSoak et le
cycle de lavage principal.
Extra Rinse (Rinçage supplémentaire)
Cette option procure un rinçage supplémentaire durant un cycle afin d’éliminer la saleté excédentaire et le détersif
des brassées sales. Appuyez sur le bouton Extra Rinse (Rinçage supplémentaire) pour le sélectionner.
REMARQUE : Sur le cycle Rinse & Spin (Rinçage et Essorage), un cycle vidange et essorage peut être obtenu
en appuyant sur le bouton Extra Rinse (Rinçage supplémentaire) jusqu’à ce que le LED ne soit pas éclairé.
Light (Voyant de Panier) (sur certains modèles)
Le voyant de panier s’allume et reste allumé pendant 5 minutes lorsque la porte s’ouvre, que le bouton Start/
Pause (Départ/Pause) est appuyé ou en appuyant sur le bouton de Light (Voyant) appuyé pendant.
Le voyant de panier peut être éteint en appuyant sur le bouton de Light (Voyant) et en le maintenant appuyé pendant.
Sound (volume sonore)
Pour modifier l’intensité sonore du signal de fin de cycle et le volume du pavé tactile, appuyez sur ce bouton autant
de fois nécessaires afin d’atteindre l’intensité sonore désirée. Il y a quatre niveaux d’intensité incluant la sourdine.
Control Lock (Light-Control Lock pad)/Verrouillage de contrôle (Voyant-Verrouillage de
contrôle bouton)
(selon modèle)
Vous pouvez verrouiller les contrôles pour empêcher tout choix de cycle, ou vous pouvez verrouiller les
contrôles après avoir commencé un cycle.
Les enfants ne peuvent pas mettre accidentellement en marche la laveuse en appuyant sur des touches quand
vous choisissez cette option.
Pour verrouiller/déverrouiller les contrôles de la laveuse, appuyez sur le bouton Control Lock/(Light-Control
Lock pad)/Verrouillage de contrôle (Voyant-Verrouillage de contrôle bouton) et tenez-la appuyée pendant 3
secondes. Un son retentit pour indiquer l’état verrouillé/déverrouillé. L’icône de contrôle de verrouillage de
l’affichage s’allume quand il est branché.
NOTE : Vous pouvez encore utiliser le bouton Power (Alimentation) quand la machine est verrouillée.

12 49-3000217 Rev 2
Comment démarrer
UTILISATION DE LA LAVEUSE
Compartiment de prélavage (certains modèles)
N’utilisez le compartiment de prélavage que si vous
choisissez le cycle de P
reWash (Prélavage)
ou Auto
Soak
(Prétrempage)
pour des vêtements très sales. Ajoutez le
détergent mesuré ou l’additif de prélavage au compartiment de
prélavage situé à l’arrière gauche du tiroir distributeur.
•
Le détergent ou l’additif de prélavage est évacué du
distributeur pendant le cycle de P
reWash (Prélavage)
ou
Auto
Soak (Prétrempage)
(si vous l’avez choisi).
•
Vous devez ajuster la quantité de détergent à la température
de l’eau, à la dureté de l’eau, à la taille de la charge et à
son niveau de saleté. Évitez d’utiliser trop de détergent
dans votre laveuse car cela peut provoquer des traces de
détergent et de mousse sur les vêtements.
Adoucisseur
Sélecteur du
volet à détergent
Javel
Ajouter le(s) produit(s)
de prélavage dans ce
compartiment
Tiroir distributeur
Ouvrez lentement le tiroir distributeur en le tirant jusqu’à
son arrêt final. Après avoir ajouté vos produits de
lavage, fermez lentement le tiroir distributeur. Si vous
fermez le tiroir trop vite, vous risquez de distribuer l’eau
de Javel, l’adoucissant ou le détergent trop tôt.
Vous pouvez voir de l’eau dans les compartiments d’eau
de détergent, javel et d’adoucissant à la fin du cycle.
C’est occasionné par l’action de vidange/siphonnage et
cela fait partie du fonctionnement normal de la laveuse.
Ne mettez PAS de sachets de détersif dans le tiroir
distributeur.
REMARQUE : Utilisez seulement des détersifs liquides
ou en poudre haute efficacité dans le tiroir distributeur.
Les sachets de détersifs doivent être ajoutés
directement dans la cuve de lavage, conformément aux
directives du fabricant.
Utilisez seulement
le détergent à haute
efficacité HE.
SmartDispense
TM
(certains modèles)
Cette fonction ajoute automatiquement du détergent
au lavage, éliminant le besoin de l’ajouter pour
chaque brassée.
La sélection de la quantité de détergent sur le panneau de
commande s’affiche à AUTO (automatique) par défaut lors
de la première mise sous tension de la laveuse. Lorsque
AUTO est sélectionné, la quantité de détergent nécessaire
pour chaque brassée est automatiquement déterminée en
fonction de la charge détectée par l’appareil.
Avec AUTO, la laveuse va distribuer environ 1,5 oz (44
ml) de détergent pour une brassée normale de 8 lb (3,6
kg). Pour les autres brassées, la quantité sera ajustée
en proportion de la taille de la brassée ou du type de
vêtement. Si vous sélectionnez LESS (Moins), la quantité
de détergent sera réduite de 40 %. Ceci peut être
souhaitable avec des détergents à haute concentration
ou si l’eau domestique est très douce. Pour les brassées
très sales, on peut souhaiter de choisir MORE (Plus) pour
ajouter 40 % plus de détergent que ne le procure AUTO.
REMARQUE : La SmartDispense (Distribution
intelligente) n’est pas disponible pour tous les cycles.
Si le voyant ne s’allume pas et qu’une pression sur
SMART DISPENSE provoque l’émission de bips, alors la
fonction Smart Dispense n’est pas permise pour le cycle
choisi. Pour ces cycles, le détergent devra être ajouté
directement dans son compartiment.
Si l’on désire sélectionner manuellement la quantité de
détergent à ajouter dans une brassée, on peut presser
le bouton SMART DISPENSE (Distribution intelligente) sur
le panneau de commande pour sélectionner le détergent
pour une Small (Petite) ou Large (Grande) brassée.
L’option Small procure moins de détergent que la moyenne
et Large, davantage que la moyenne.
REMARQUE : Si l’on souhaite ajouter le détergent
manuellement à la brassée, il faudra le mettre
directement dans le panier et désactiver la
distribution intelligente éteindre pour cette brassée.
On peut désactiver la fonction de SMART DISPENSE
(Distribution intelligente) en pressant le bouton
Detergent Dispense jusqu’à sélectionner éteindre.
Utilisez seulement
le détergent à haute
efficacité HE.
Adoucisseur
Sélecteur du volet
à détergent
Javel
Distribution
intelligente
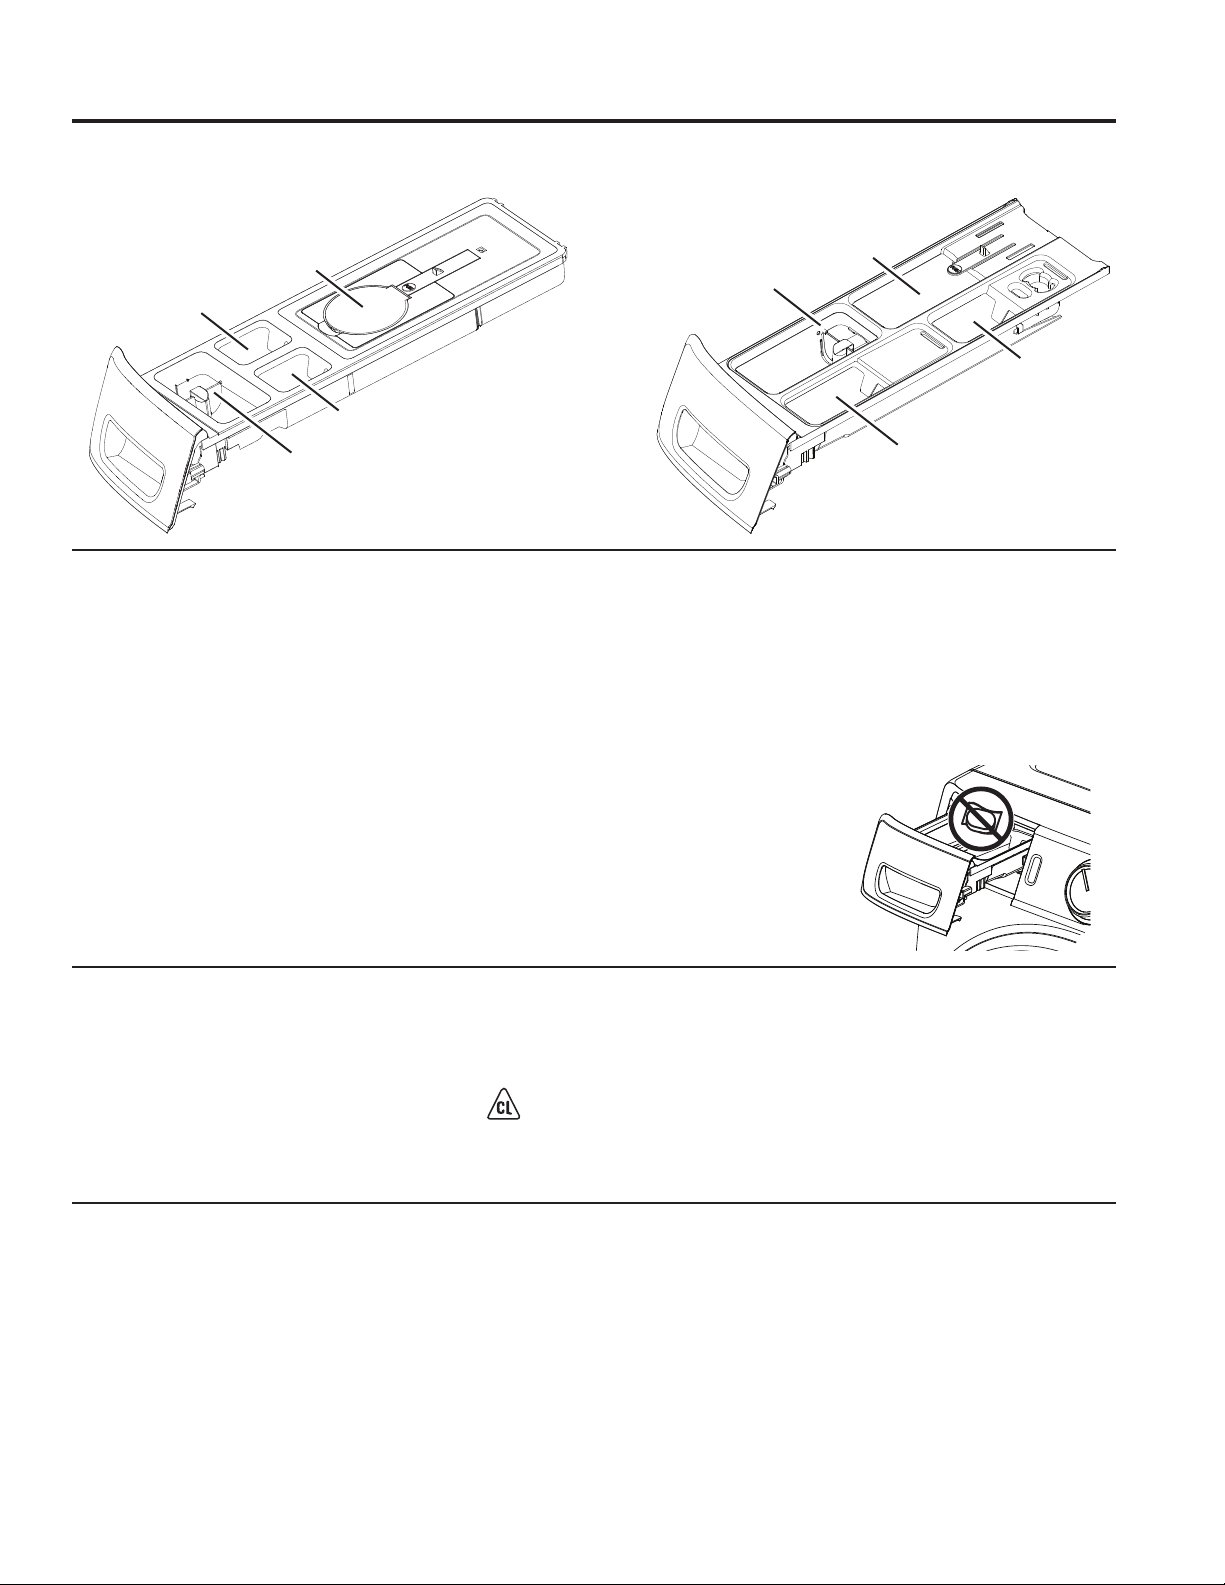
49-3000217 Rev 2 13
UTILISATION DE LA LAVEUSE
Comment démarrer
Compartiment de détergent
Utilisez seulement du détergent haute efficacité
dans cette laveuse. NE PAS remplir de ce détergent
au-delà de la ligne MAX. Utilisez la quantité
recommandée par le fabricant du détergent.
• Détergent en poudre – Levez le volet pour le
détergent en poudre. Cela est nécessaire pour
dissoudre et rincer le détergent correctement.
Respectez les instructions du fabricant de détergent
pour la mesure de la quantité de poudre.
• Détergent liquide – Maintenez le volet baissé pour
le détergent liquide. Cela retient le détergent liquide
jusqu’à son rinçage automatique au début du cycle
de lavage. Respectez les instructions du fabricant de
détergent pour la mesure de la quantité de liquide.
Vous devrez peut-être ajuster la quantité de détergent
en fonction de la température et de la dureté de l’eau
ainsi que du volume et du degré de saleté de la charge.
Évitez d’utiliser trop de détergent dans votre laveuse
car cela causer un débordement savonneux, laisser des
traces de détergent et de mousse sur les vêtements, et
allonger la durée du lavage.
Ne versez pas de détergent
grumeleux dans le
distributeur, au risque de
causer une fuite.
Ne mettez PAS de sachets
de détersif dans le tiroir
distributeur.
Adoucisseur
Sélecteur du volet à
détergent
Javel
Distribution
intelligente
Adoucisseur
Sélecteur du volet
à détergent
Javel
Ajouter le(s) produit(s)
de prélavage dans ce
compartiment
Sur les modèles avec distribution
intelligente (Smart Dispenser) :
Sur les modèles sans distribution
intelligente :
Compartiment d’eau de Javel liquide
Si vous le désirez, mesurez le montant recommandé
d’eau de Javel, ne dépassant pas 1/3 de tasse (80 ml)
et versez-le dans le compartiment étiqueté LIQUID
BLEACH (Eau de Javel) et portant le symbole .
Il est recommandé d’employer un javellisant à haute
efficacité (HE) pour cette laveuse à chargement frontal
Ne dépassez jamais la ligne de remplissage maximum.
Si vous mettez trop d’eau de Javel, cela risque de
provoquer une distribution prématurée de l’eau de Javel,
qui peut occasionner des dommages à vos vêtements.
REMARQUE : N’utilisez pas de javellisant en poudre ni
de détersifs ou d’additifs pour lessive en sachets dans le
distributeur.
Compartiment d’adoucissant
Si vous le désirez, versez le montant recommandé
d’adoucissant liquide dans le compartiment étiqueté
FABRIC SOFTENER (Adoucissant).
N’utilisez que de l’adoucissant liquide dans le
distributeur.
Diluez dans de l’eau jusqu’à la ligne maximum de
remplissage.
Ne dépassez jamais la ligne maximum de remplissage.
Si vous mettez trop d’adoucissant, cela risque de
provoquer une distribution prématurée d’adoucissant, qui
peut tacher vos vêtements.
REMARQUE : Ne mettez jamais d’adoucissant
directement dans la charge à laver.
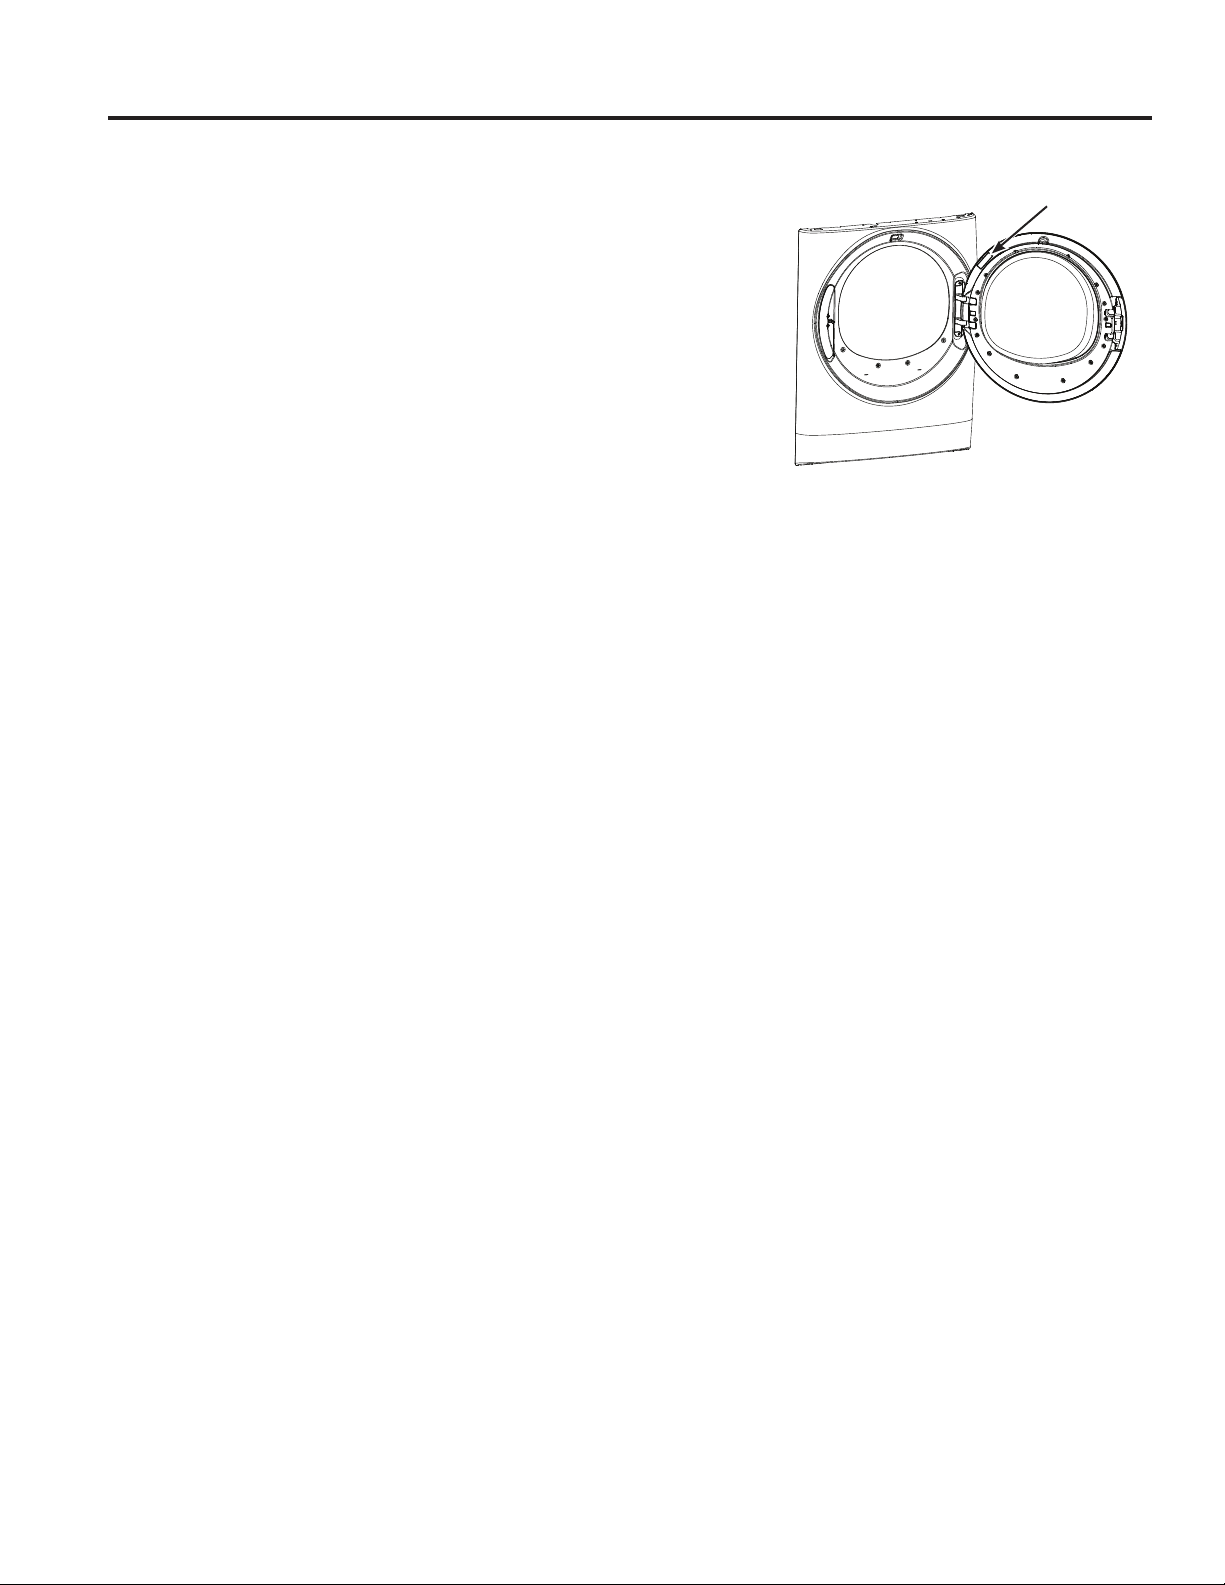
14 49-3000217 Rev 2
Comment démarrer
UTILISATION DE LA LAVEUSE
Emplacement de l’étiquette WiFi
WiFi Connect (Connectivité WiFi) (Clients aux États-Unis seulement)
Votre laveuse est soit dotée de la connectivité GE Appliances WiFi
Connect.
Visitez geappliances.com/connect et entrez votre numéro de
modèle pour voir les étapes de connexion se rapportant à votre
électroménager.
Veuillez visiter GEAppliances.com/connect pour en apprendre
davantage sur les fonctions de connectivité des électroménagers et les
applications compatibles avec votre téléphone intelligent.
Connectivité WiFi : Pour de l’assistance concernant l’électroménager
ou la
connectivité en réseau ConnectPlus, veuillez communiquer avec
GE Appliances au 800.GE.CARES.
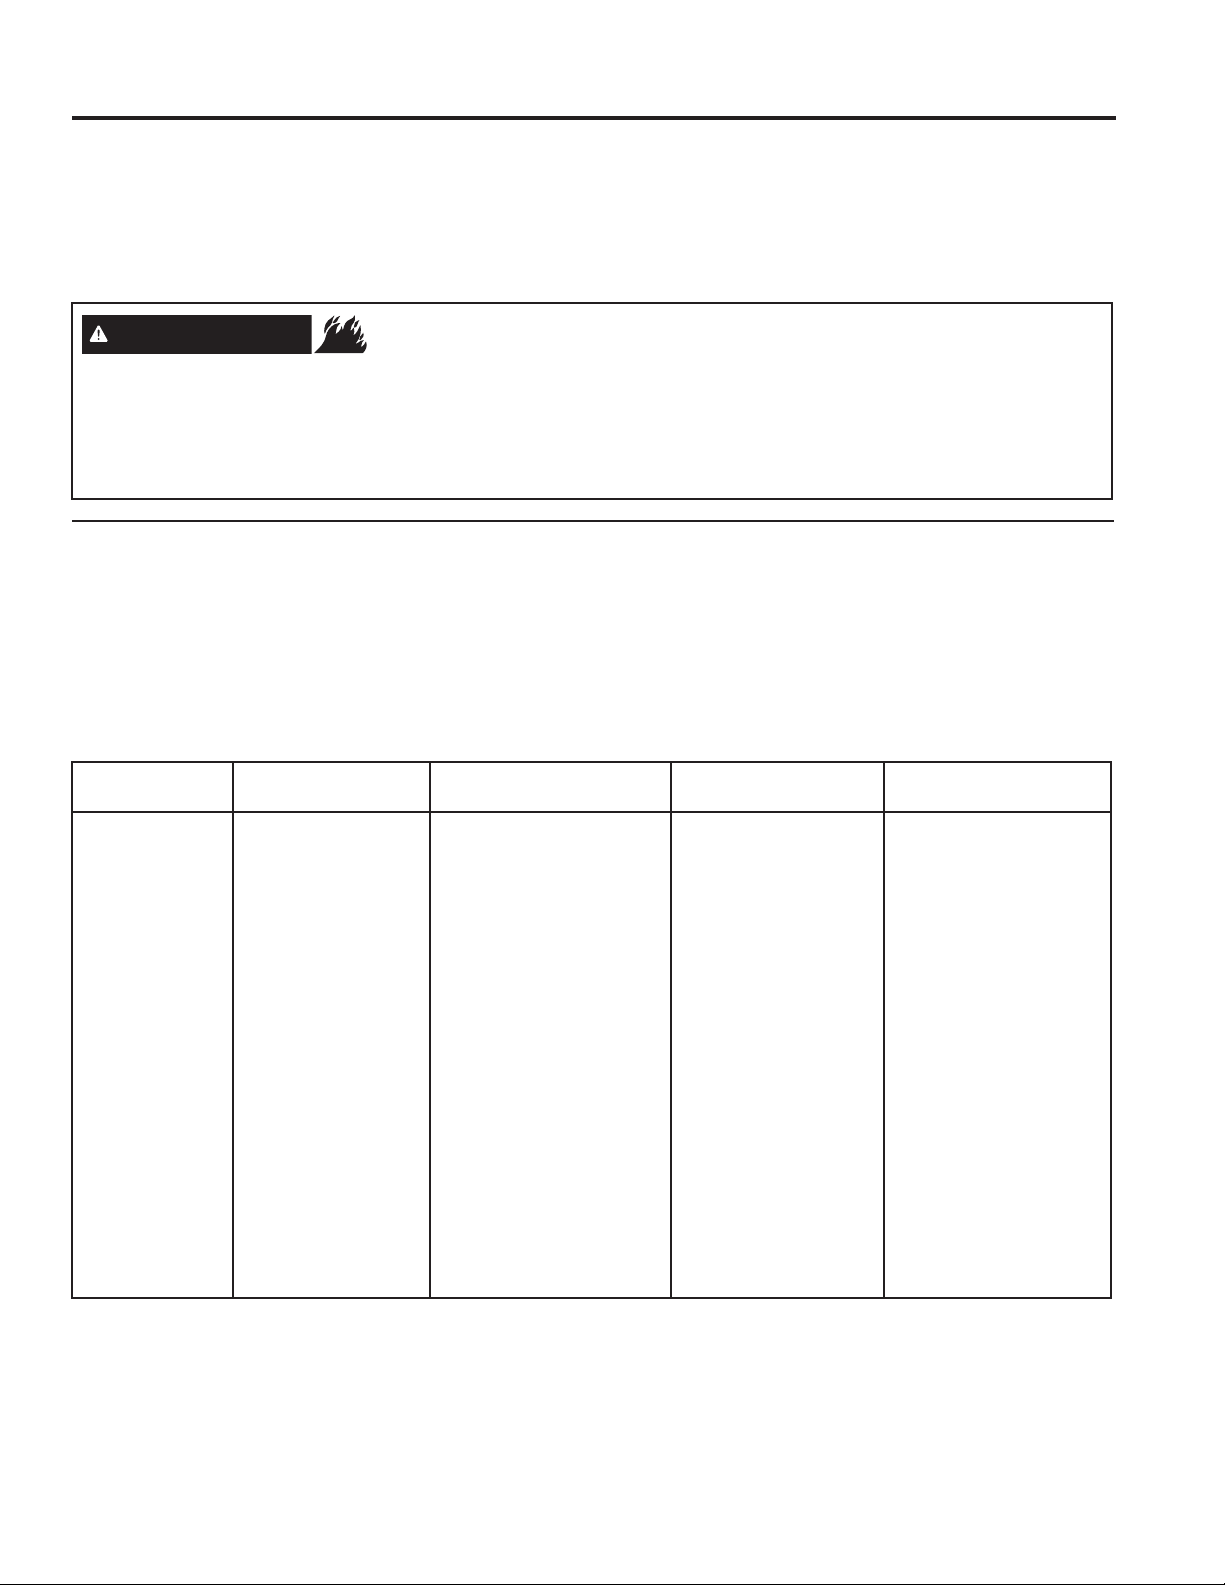
49-3000217 Rev 2 15
UTILISATION DE LA LAVEUSE
Chargement
Respectez toujours l’étiquette d’entretien du fabricant lors de la lessive.
NE lavez PAS les tissus contaminés avec des liquides inflammables ou des solvants de nettoyage.
Aucune laveuse ne peut éliminer l’huile totalement.
NE lavez ou séchez RIEN qui a été trempé ou éclaboussé avec tout type d’huile (y compris les huiles de cuisson).
NE mettez PAS à la main dans la machine à laver jusqu’à ce que toutes les pièces mobiles soient arrêtées.
Cela peut entraîner la mort, une explosion, un incendie ou une amputation.
Tri du linge
Triez le linge par couleur (blancs, clairs, couleurs), degré de saleté, type de tissu (coton robuste, tissu à entretien
facile, tissu délicat) et en fonction de la charpie qu’il produit (tissu éponge, tissu chenille) ou qu’il ramasse (velvétine,
velours côtelé). Lavez les articles qui génèrent de la charpie, tels que les serviettes de coton et les bas, séparément
des articles qui la collecte, par exemple les vêtements synthétiques et les pantalons habillés.
Chargement de la laveuse
Vous pouvez charger complètement le tambour de lavage en ajoutant les articles lachement.
Pour ajouter des articles après avoir mis en marche la laveuse, appuyez sur Start/Pause (Mise en marche/ Pause)
et attendez que la porte soit déverrouillée. La laveuse peut prendre jusqu’à 30 secondes pour déverrouiller sa porte
après que vous ayez appuyé sur Start/Pause (Mise en marche/ Pause), selon les conditions. N’essayez pas de
forcer la porte pour l’ouvrir quand elle est verrouillée. Quand la porte est déverrouillée, ouvrez doucement. Ajoutez
les articles, refermez la porte et appuyez sur Start/Pause (Mise en marche/ Pause) pour remettre en marche.
- Risque d’incendie
AVERTISSEMENT
Exemples de brassées
VÊTEMENTS
DE TRAVAIL
LINGE DE
MAISON
BRASSÉES MIXTES TISSUS DÉLICATS* LAVAGES RAPIDES
(2 à 3 vêtements)
4 Jeans
5 chemises de
travail
3 pantalons de
travail
2 draps de bain
10 serviettes de
bain/
12 débarbouillettes
7 essuie-mains/
2 tapi de baignoires
en tissu éponge
OU
2 draps plat format
grand lit
2 draps-housse
format grand lit
4 taies d’oreiller
4 taies d’oreiller
2 essuies-main
2 draps plats
2 draps-housse
2 serviettes de bain/
4 débarbouillettes
OU
6 chemises (homme
ou femme)
4 pantalons (kakis ou
tissus croisés)
5 tee-shirts
7 boxeurs
4 caleçons
OU
6 tee-shirts
4 pantalons molletonnés
4 pulls molletonnés
2 kangourous
7 paires de bas
7 soutiens-gorge
7 culottes
3 slips
2 camisoles
4 chemises de nuit
* On recommande
de placer les petits
articles dans un sac
en filet de nylon.
2 chemises sport
1 pantalon sport
OU
3 uniformes de soccer
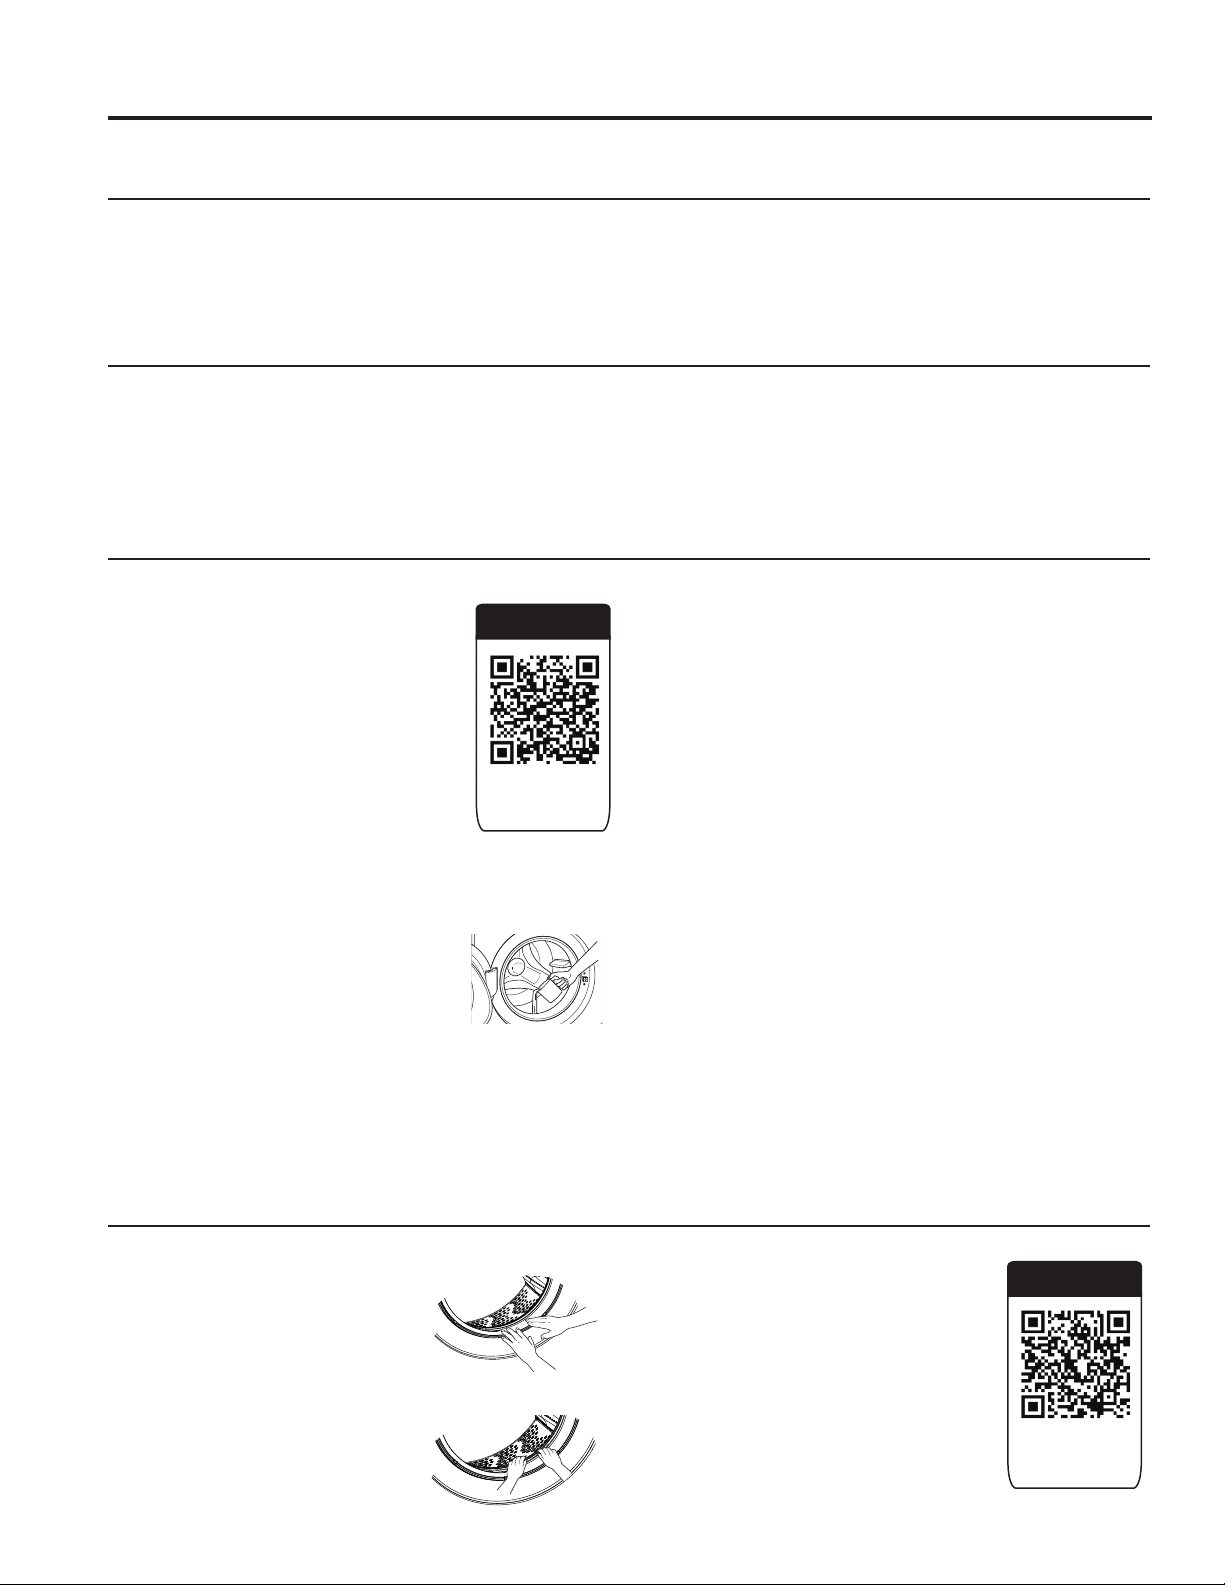
16 49-3000217 Rev 2
Entretien et nettoyage
ENTRETIEN ET NETTOYAGE
Self Clean (Auto nettoyant)
Pour nettoyer l’intérieur de la laveuse,
choisissez la fonction SELF CLEAN sur
le panneau de commande. Le cycle Self
Clean doit être exécuté au minimum
une fois par mois ou environ tous les 30
à 40 cycles de lavage. Ce cycle utilise
plus d’eau, en plus du javellisant, afin
de contrôler le taux d’accumulation de la
saleté et du détersif dans votre laveuse.
REMARQUE : Lisez les instructions
ci-dessous en entier avant de démarrer
le cycle de Self Clean.
1. Enlevez tout vêtement ou objet dela laveuse et
assurez-vous que le panier de la laveuse est vide.
2. Ouvrez la porte de la laveuse et
versez une tasse ou 250 ml de
javellisant liquide ou autre nettoyant
de laveuse dans le panier.
3. Fermez la porte et choisissez le cycle de SELF
CLEAN. Appuyez sur la touche Start.
4. Lorsque le cycle Self Clean (Auto nettoyant),
l’affichage indiquera la durée résiduelle estimée
du cycle. Le cycle se terminera dans 90 minutes.
N’interrompez pas le cycle.
5. Une fois le cycle terminé, la laveuse va démarrer une
ventilation ULTRAFRESH de façon que la porte puisse
rester fermée jusqu’à la prochaine utilisation de la
laveuse.
Si pour une raison quelconque le cycle doit être interrompu,
la porte ne s’ouvrira pas immédiatement. Forcer la porte à
s’ouvrir à ce stade peut causer un débordement d’eau. La
porte s’ouvrira lorsque l’eau aura été vidée à un niveau ou
elle ne débordera pas sur le plancher.
Vous pouvez interrompre le cycle de Self Clean (Auto
nettoyant) en appuyant sur la touche Start (Mise en
marche) entre les cycles. Une panne de courant peut
également interrompre le cycle. Au retour du courant,
le cycle de Self Clean (Auto nettoyant) Reprend là où il
s’était arrêté. Lorsque le cycle est interrompu, assurez-
vous de reprendre un cycle complet de auto nettoyant
avant d’utiliser la laveuse. Si vous appuyez sur la
touche Power (Alimentation) durant le Self Clean (Auto
nettoyant), le cycle sera perdu.
IMPORTANT:
• Effectuez le Self Clean (Auto nettoyant) avec 250 ml
(1 tasse) de javellisant une fois par mois.
• Lorsque le cycle Self Clean (Auto nettoyant) est
terminé, l’intérieur de votre laveuse peut avoir une
odeur de javellisant.
• Il est recommandé de laver une RINSE & SPIN ou
brassée de couleur pâle après le cycle de Self Clean.
Extérieur
Essuyez immédiatement tout débordement. Essuyez avec un linge humide. Essuyez ou époussetez les
renversements ou les produits de lavage avec un linge humide. Le panneau de commande et le fini de la laveuse
peuvent être endommagés par certains détachants et produits de prétraitement. Appliquez ces produits à l’écart de
la laveuse. Le tissu peut ensuite être lavé et séché normalement. Les dommages à votre laveuse causés par ces
produits ne sont pas couverts par votre garantie. Ne frappez jamais la surface avec des objets aiguisés.
Intérieur
Séchez autour de l’ouverture de la porte de la laveuse, du joint flexible (y compris les tuyaux) et de la porte en verre.
Ces surfaces doivent être toujours propres pour assurer que le joint soit bien imperméable. Vous noterez que ceci
n’est pas requis aussi souvent si vous utilisez régulièrement le système ULTRAFRESH VENT. Il est recommandé
de rincer la machine à laver au moins une fois par mois avec 1 tasse (250 ml) d’eau de javel (ou tout autre produit
disponible dans le commerce fabriqué à cet effet, tel que le nettoyant pour laveuse Tide
®
) versée directement dans
le panier sans vêtements et en utilisant le cycle Self Clean (Nettoyage de la Cuve).
Flexibles d’alimentation d’eau
Les Flexibles d’alimentation d’eau connectant la laveuse au robinet devraient être remplacer tous les cinq ans.
Joint d’étanchéité de la porte
Ouvrez la porte de la laveuse. Avec
les deux mains, poussez le joint
d’étanchéité vers le bas. Enlevez
tout objet étranger qui pourrait se
trouver dans le joint. Assurez-vous
que rien ne bloque les orifices derrière le joint.
Tout en maintenant le joint en
position basse, inspectez-en
l’intérieur en tirant vers le bas avec
les doigts.
Enlevez tout objet étranger qui pourrait
se trouver dans le joint. Assurez-vous
que rien ne bloque les orifices derrière
le joint.
Une fois le nettoyage terminé, retirez
vos mains et les joints retourneront à
ses positions normales.
Video
Scan this code
to watch a video
on this topic.
Video
Scan this code
to watch a video
on this topic.

49-3000217 Rev 2 17
ENTRETIEN ET NETTOYAGE
Entretien et nettoyage
Emplacement du tiroir distributeur
Le détergent et l’adoucisseur peuvent s’amasser dans le tiroir
distributeur. Il faut enlever ces résidus une ou deux fois par
mois.
• Enlevez le tiroir en le tirant d’abord jusqu’à ce qu’il s’arrête.
Puis atteignez le arrière de la cavité du tiroir et appuyez
fermement sur la patte de verrouillage, en tirant le tiroir.
• Rincez à le tiroir pour faire disparaître les traces de produits
de lavage qui se sont accumulées.
• Pour nettoyer l’ouverture du tiroir, utilisez une petite brosse
pour l’intérieur. Enlevez tout résidu en haut et en bas de
l’intérieur.
• Remettez en place le tiroir de distribution.
• Pour réduire l’accumulation dans le tiroir de distribution :
Déménagement et rangement
Demandez au technicien de service d’enlever l’eau de la pompe et des tuyaux de vidange. Ne rangez jamais la laveuse
dans un endroit où elle est exposée au mauvais temps. Quand vous déménagez la laveuse, vous devez immobiliser le
bassin de lavage en utilisant les boulons d’expédition enlevés pendant l’installation. Consultez les Instructions d’installation
dans ce manuel. Si vous n’avez pas ces pièces, vous pouvez les commander en visitant notre site web à l’adresse
Electromenagersge.ca/fr/produits/filtres-et-accessoires ou en appellant le numéro de telephone 800.661.1616.
Longues vacances
Assurez-vous de fermer tous les robinets d’alimentation de l’eau. Vidangez toute l’eau des tuyaux si la température
risque de descendre en dessous de celle de gel.
On models with a
Smart Dispenser:
On models without
a Smart Dispenser:
Utilisez seulement
un détergent à
haute efficacité HE.
1. Ouvrez la porte d’accès à l’aide d’un petit tournevis à tête plate ou pièce de
monnaie.
2. Placez un plat ou un bac peu profond sous la porte d’accès à la pompe et
des serviettes sur le sol devant la laveuse pour protéger le sol. Il est normal
de recueillir environ une tasse d’eau lorsque le filtre est retiré.
3. Tirez sur le bec verseur
4. Tournez le filtre de la pompe dans le sens inverse des aiguilles d’une montre
et retirez lentement le filtre, en contrôlant le débit de l’eau évacuée.
5. Retirez le filtre et nettoyez les débris du filtre.
6. Remettez le filtre en place et tournez dans le sens des aiguilles d’une
montre. Serrez fermement.
7. Relevez le bec verseur
8. Fermez la porte d’accès en accrochant d’abord les languettes inférieures,
puis en tournant la porte d’accès pour la fermer.
Video
Scan this code
to watch a video
on this topic.
Filtre de la pompe
En raison de la nature de la laveuse à chargement frontal, il est parfois possible pour les petits
articles d’atteindre la pompe. La laveuse présente un filtre pour piéger les articles perdus pour qu’ils
ne tombent pas dans le drain. Pour récupérer les articles perdus, nettoyez le filtre de la pompe.
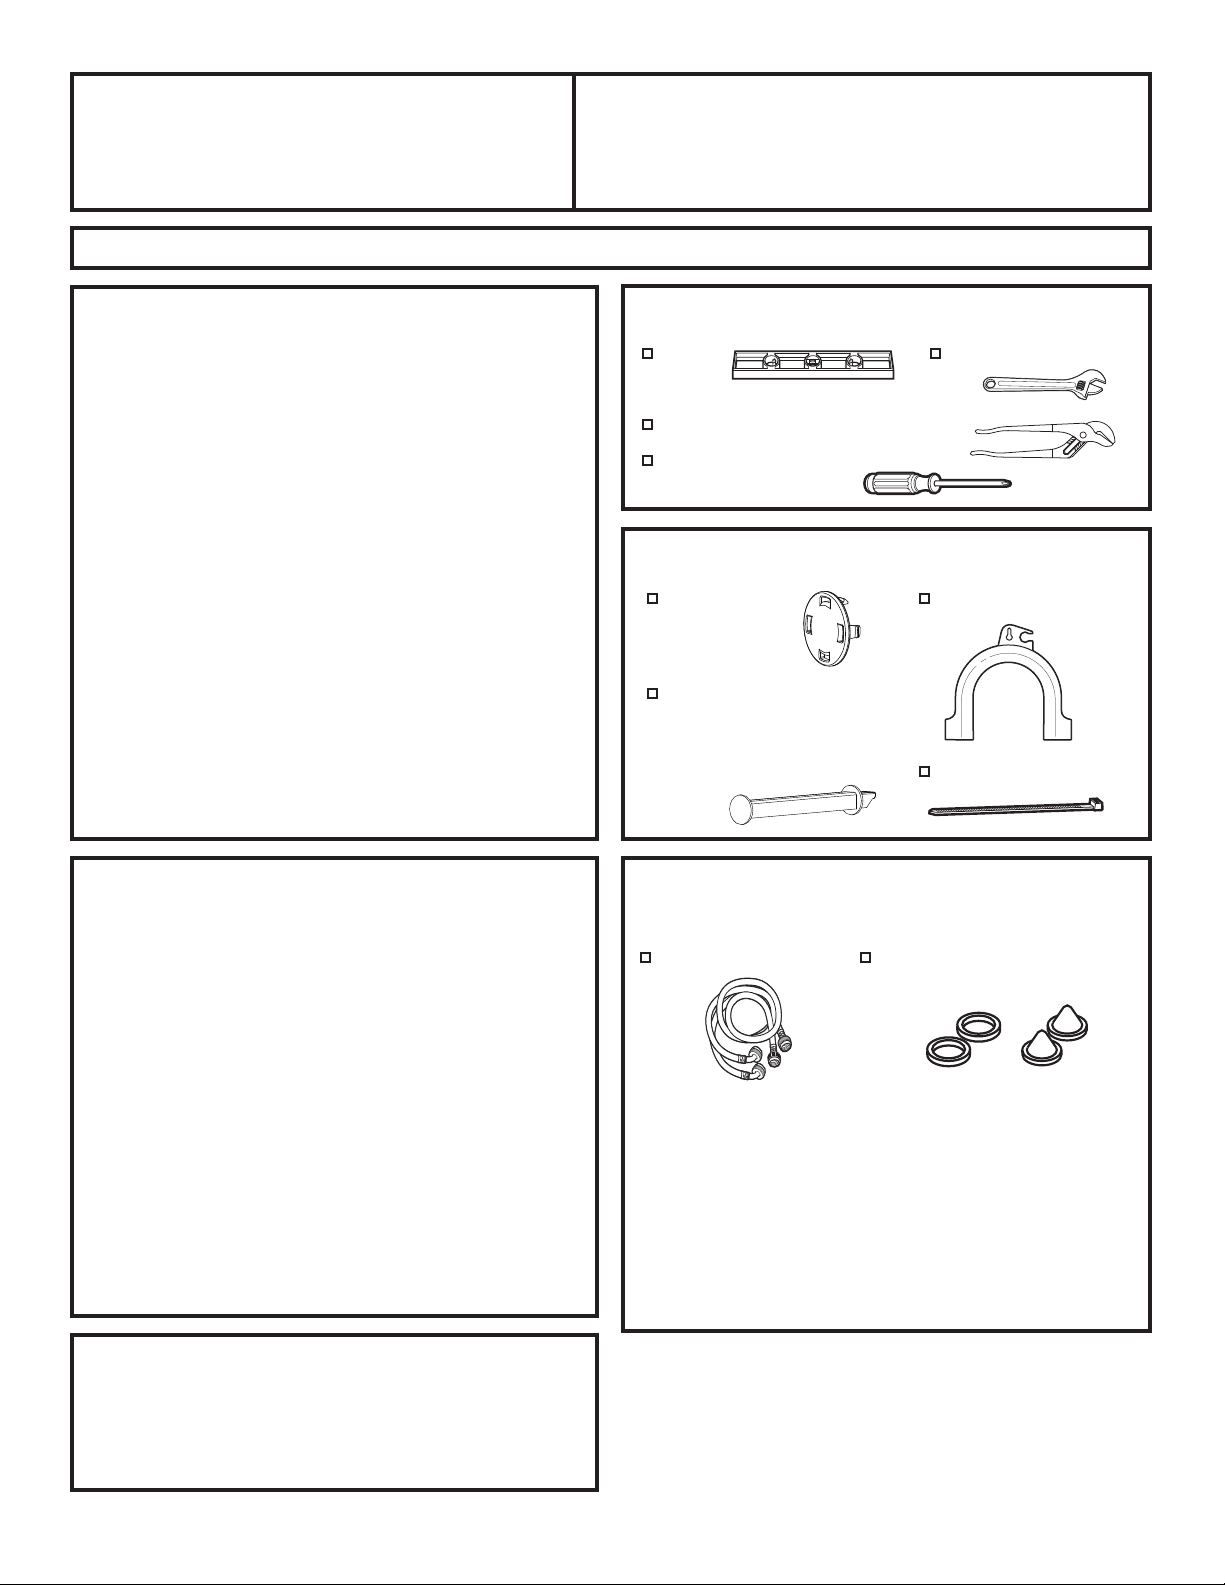
18 49-3000217 Rev 2
Instructions
Laveuse
d’installation
Des questions? Appelez le 800.561.3344 ou Visitez notre site Web à l’adresse : electromenagersge.ca
AVANT DE COMMENCER
Lisez ces instructions entièrement et
soigneusement.
•
IMPORTANT – Conservez ces
instructions pour l’inspecteur local.
•
IMPORTANT – Observez tous les
codes et les ordonnances en vigueur.
• Note à l’installateur – Assurez-vous de
laisser ces instructions au consommateur.
• Note au consommateur – Conservez ces
instructions à titre de référence.
• Niveau de compétences – L’installation de
cet appareil électoménager nécessite des
compétences mécaniques et électriques de base.
• Temps d’installation – 1-3 heures
• L’installateur est responsable de bien installer
cet appareil.
• Toute panne de produit due à une mauvaise
installation n’est pas couverte par la garantie.
OUTILS NÉCESSAIRES
Niveau Clé à molette
Pince multiprise à crémaillère
Tournevis cruciforme
PIÈCES FOURNIES
Guide de tuyau
EMPLACEMENT DE VOTRE LAVEUSE
N’installez jamais votre laveuse :
1. Dans un endroit exposé à de l’eau qui coule ou aux
conditions climatiques extérieures. La température
ambiante ne doit jamais être inférieure à 15,6°C (60°F)
pour que la laveuse fonctionne bien.
2. Dans un endroit où elle entre en contact avec des
tentures ou des rideaux.
3. Sur un tapis. Le sol DOIT être une surface dure avec
une pente maximum de 1,27 cm per 30 cm (1/2 pouce
par pied). Pour vous assurer que la laveuse ne vibre
pas ou ne bouge pas, il est possible que vous deviez
renforcer le plancher.
REMARQUE : Si le plancher est en mauvais état,
utilisez une feuille de contreplaqué traité de 3/4 po. fixé
solidement à la couverture de plancher actuelle.
INSTALLATION EN MAISON MOBILE :
L’installation doit satisfaire les normes suivantes :
Standard for Mobile Homes, ANSI A119.1 et National
Mobile Home Construction and Safety Standards Act of
1974 (PL93-383).
Attache de câble
Couvercles
de boulons
d’expédition
Barre de verrouillage
(Conserver pour l’option
Inversion de l’ouverture
de la porte)
PIÈCES REQUISES (vendues séparément
ou inclus avec le modèle GFW510)
Pièces et accessoires GE Appliances
Consultez votre annuaire local pour un détaillant de
pièces authorisé ou applez-nous au 800.661.1616 ou
Electromenagersge.ca/fr/produits/filtres-et-accessoires.
Numéro de pièce
Accessoire
WX14X10011
Tuyaux 6 pi pour laveuse en acier
inoxydable avec coudes 90°; paquet de 2
WH1X2267 Rondelles en caoutchouc et grillages
Flexibles d’eau (2)
Rondelles en caoutchouc (2)
et grillages pour crépine (2)
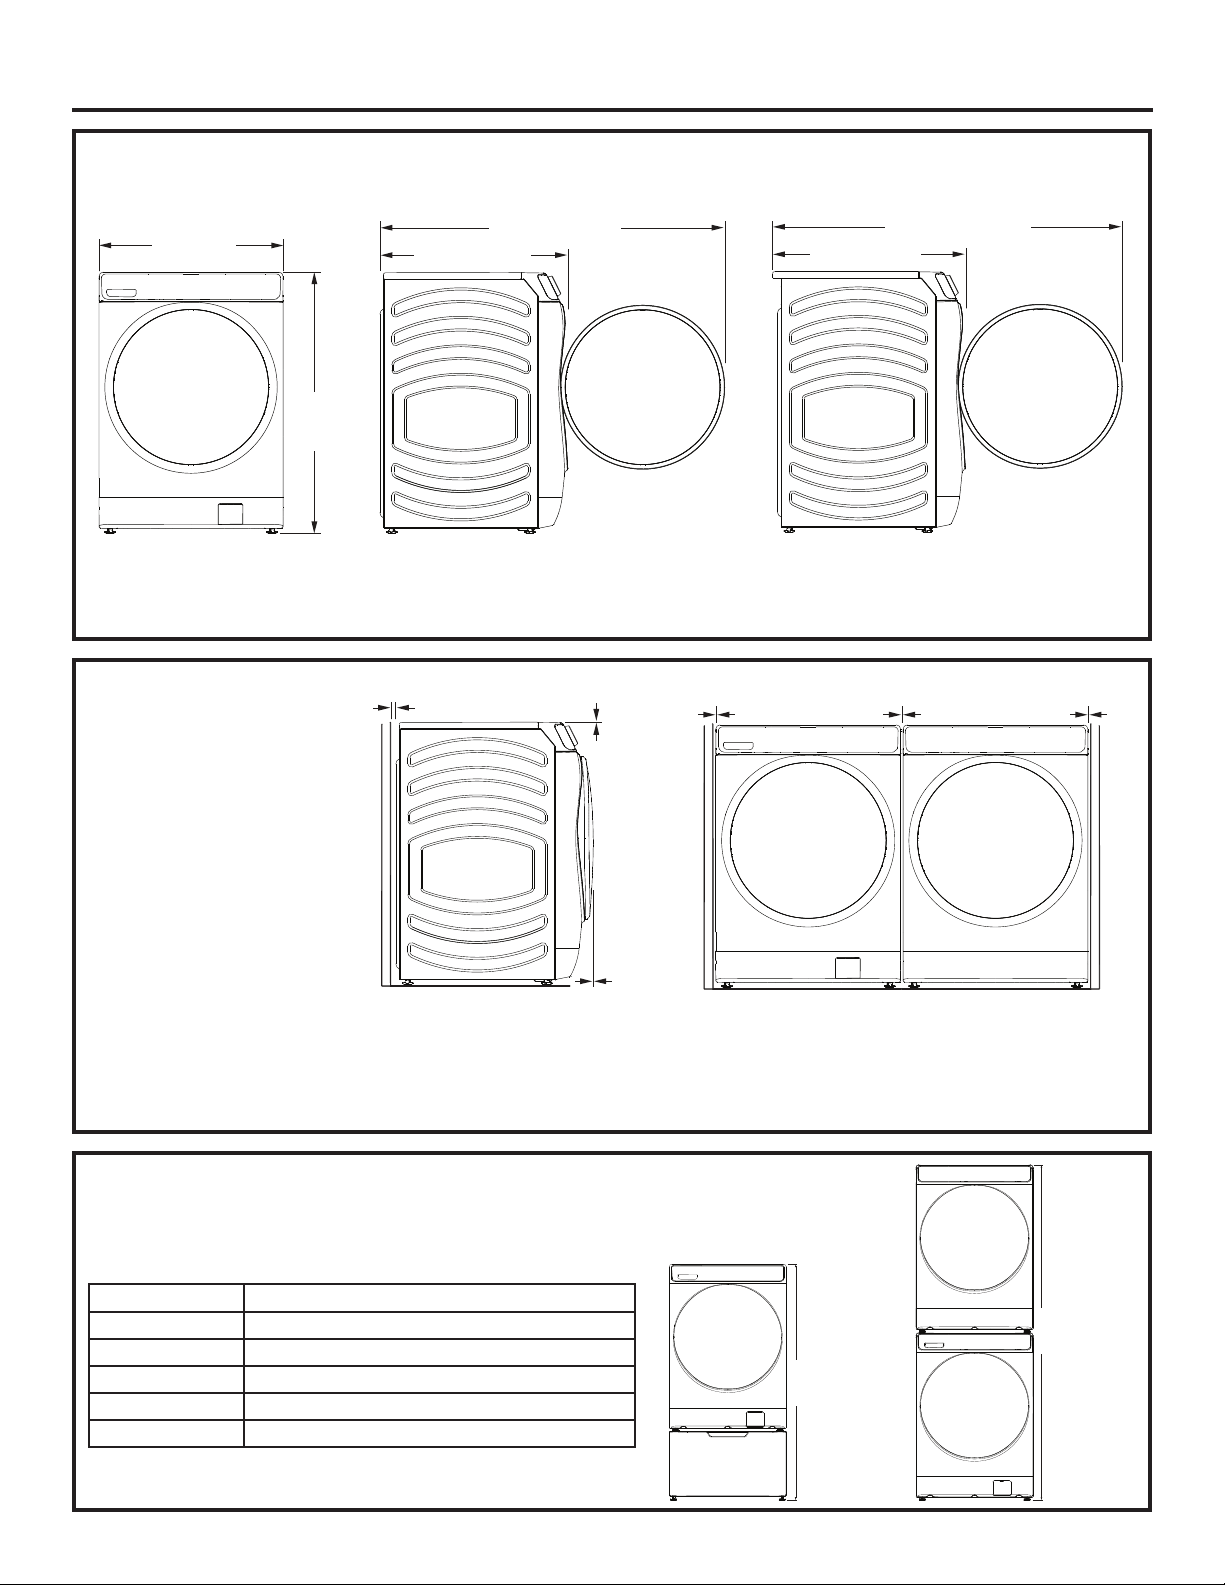
49-3000217 Rev 2 19
Instructions d’installation
ACCESSORIES :
Commandez en ligne sur www.electromenagersge.ca 24 heures
par jour ou en téléphonant au 800 561-3344 durant les heures
normales d’affaire.
Suivez les instructions d’installation incluses dans la trousse
pour l’ensemble des dégagements et spécifications.
DIMENSIONS DE LA LAVEUSE
Vue latérale
32” (81.3 cm)
54-1/2” (138.4 cm)
Modèles - GFW650, GFW550, GFW510:
Vue latérale
34” (86.4 cm)
56-1/2” (143.8)
Modèle - GFW850:
28”
(71.2 cm)
*39-3/4”
(101 cm)
Vue avant
NOTE:
Avec pieds de nivellement rétractés : 39-3/4 (101 cm).
Avec pieds de nivellement complètement sortis : 40-5/8 (103.1 cm).
ESPACES LIBRES
MINIMUM
Alcôve ou Placard
• Arrière = 0”*
• Côtés = 0”
• +DXW Ǝ
• $YDQW Ǝ
0”0”0”
• Il faut veiller à procurer le dégagement nécessaire à l’installation et aux interventions de service.
• Les portes du placard doivent être perforées ou bien ventilées et disposer d’au moins 387,1 cm
2
(60 pouces carrés) d’espace. Si le
placard abrite une laveuse et une sécheuse, les portes doivent disposer de 774,2 cm
2
(120 pouces carrés) au minimum d’espace ouvert.
* Pour permettre un dégagement 0 po à l’arrière de la laveuse, vous devez utiliser des tuyaux avec coude 90°. Autrement, un
dégagement supplémentaire peut être nécessaire pour éviter le frottement des tuyaux contre le mur arrière.
Superposé :
79-1/2”*
(202 cm)
* Voir
NOTE
ci-dessus.
Piédestal :
55-7/8”*
(141.8 cm)
* Voir
NOTE
ci-dessus.
No. de pièce Accessoire
GFP1528SNWW
Piédestal blanc
GFP1528PNSN
Piédestal Nickel satiné
GFP1528PNRS
Piédestal Saphir royal
GFP1528PNDG
Piédestal Gris diamant
GFA28KITN
Kit d’empilage d’une sécheuse sur une laveuse
0”
0”
0”
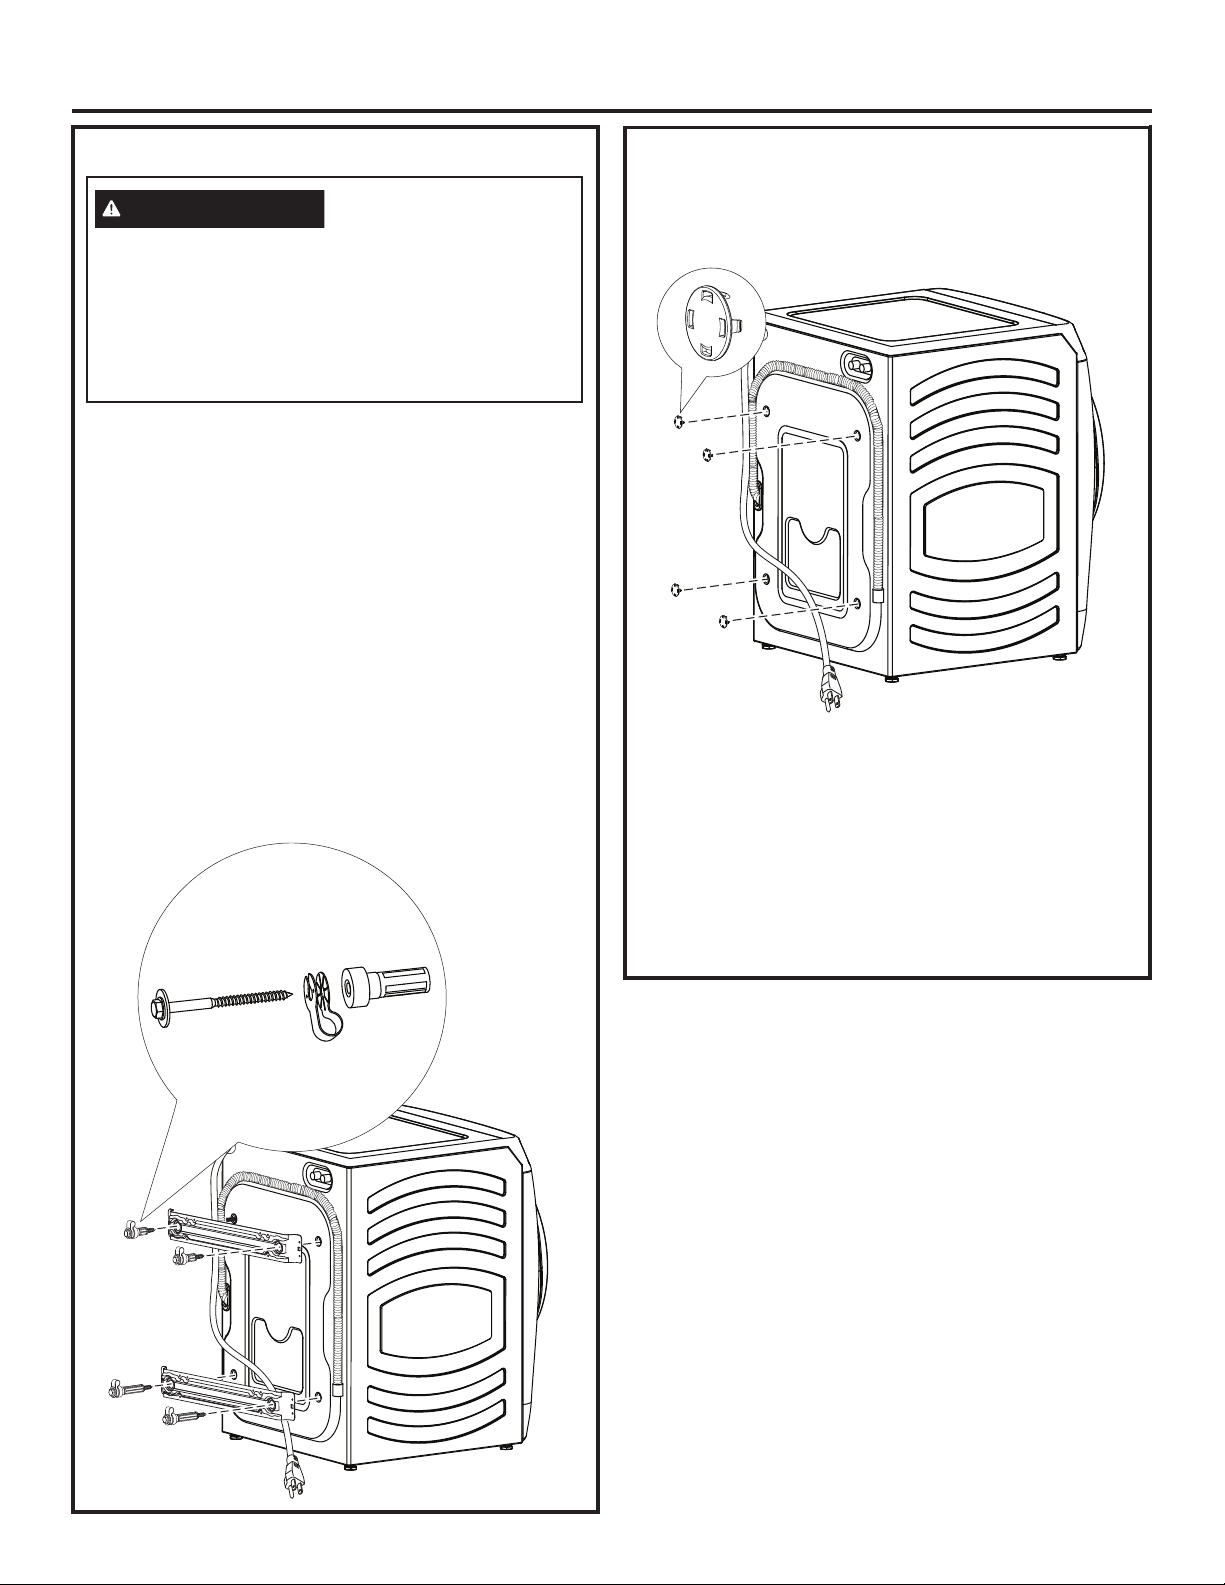
20 49-3000217 Rev 2
Instructions d’installation
1. Coupez et enlevez toutes les sangles d’emballage.
2. Alors qu’elle est dans le carton, posez avec soin la
laveuse sur son côté. NE LAISSEZ JAMAIS reposer la
laveuse sur son avant ou son arrière.
3. Tournez vers le bas les rebords du bas–enlevez tout
l’emballage de base, y compris la base en styrofoam.
4. Remettez soigneusement soin la laveuse debout et
enlevez le carton.
5. Amenez soigneusement la laveuse à moins de 4
pieds (122 cm) de son emplacement final.
6. Enlevez les pièces suivantes de l’arrière de la laveuse :
4 boulons
4 bagues en matière plastique (compris les dispositifs
de retenue du cordon d’alimentation et les anneaux en
caoutchouc)
2 supports
NOTE : NE retirez PAS la vis ou le clip tenant le tuyau.
DÉBALLAGE DE VOTRE LAVEUSE DÉBALLAGE DE VOTRE LAVEUSE
(suite)
7. Insérez les capuchons des trous de boulons
d’expédition dans les trous des boulons d’expédition.
NOTES :
• Si vous n’enlevez pas les cales d’expédition, vous
risquez de déséquilibrer sérieusement la laveuse.
• IMPORTANT : Conservez tous les boulons pour
un usage futur.
Si vous devez transporter la laveuse à une date
future, vous devez remettre en place la quincaillerie
de soutien d’emballage pout éviter tout dommage
pendant le transport. Conservez la quincaillerie dans
le sac en matière plastique fourni.
Recyclez ou détruisez
le carton et les sacs en
matière plastique après avoir déballé votre laveuse.
Mettez ces matériaux hors de la portée des enfants.
Les enfants peuvent être tentés de les utiliser pour
jouer. Les cartons recouverts de tapis, de couve-lit,
ou de drap en matière plastique peuvent devenir des
chambres hermétiquement closes risquant d’étouffer
des enfants.
AVERTISSEMENT
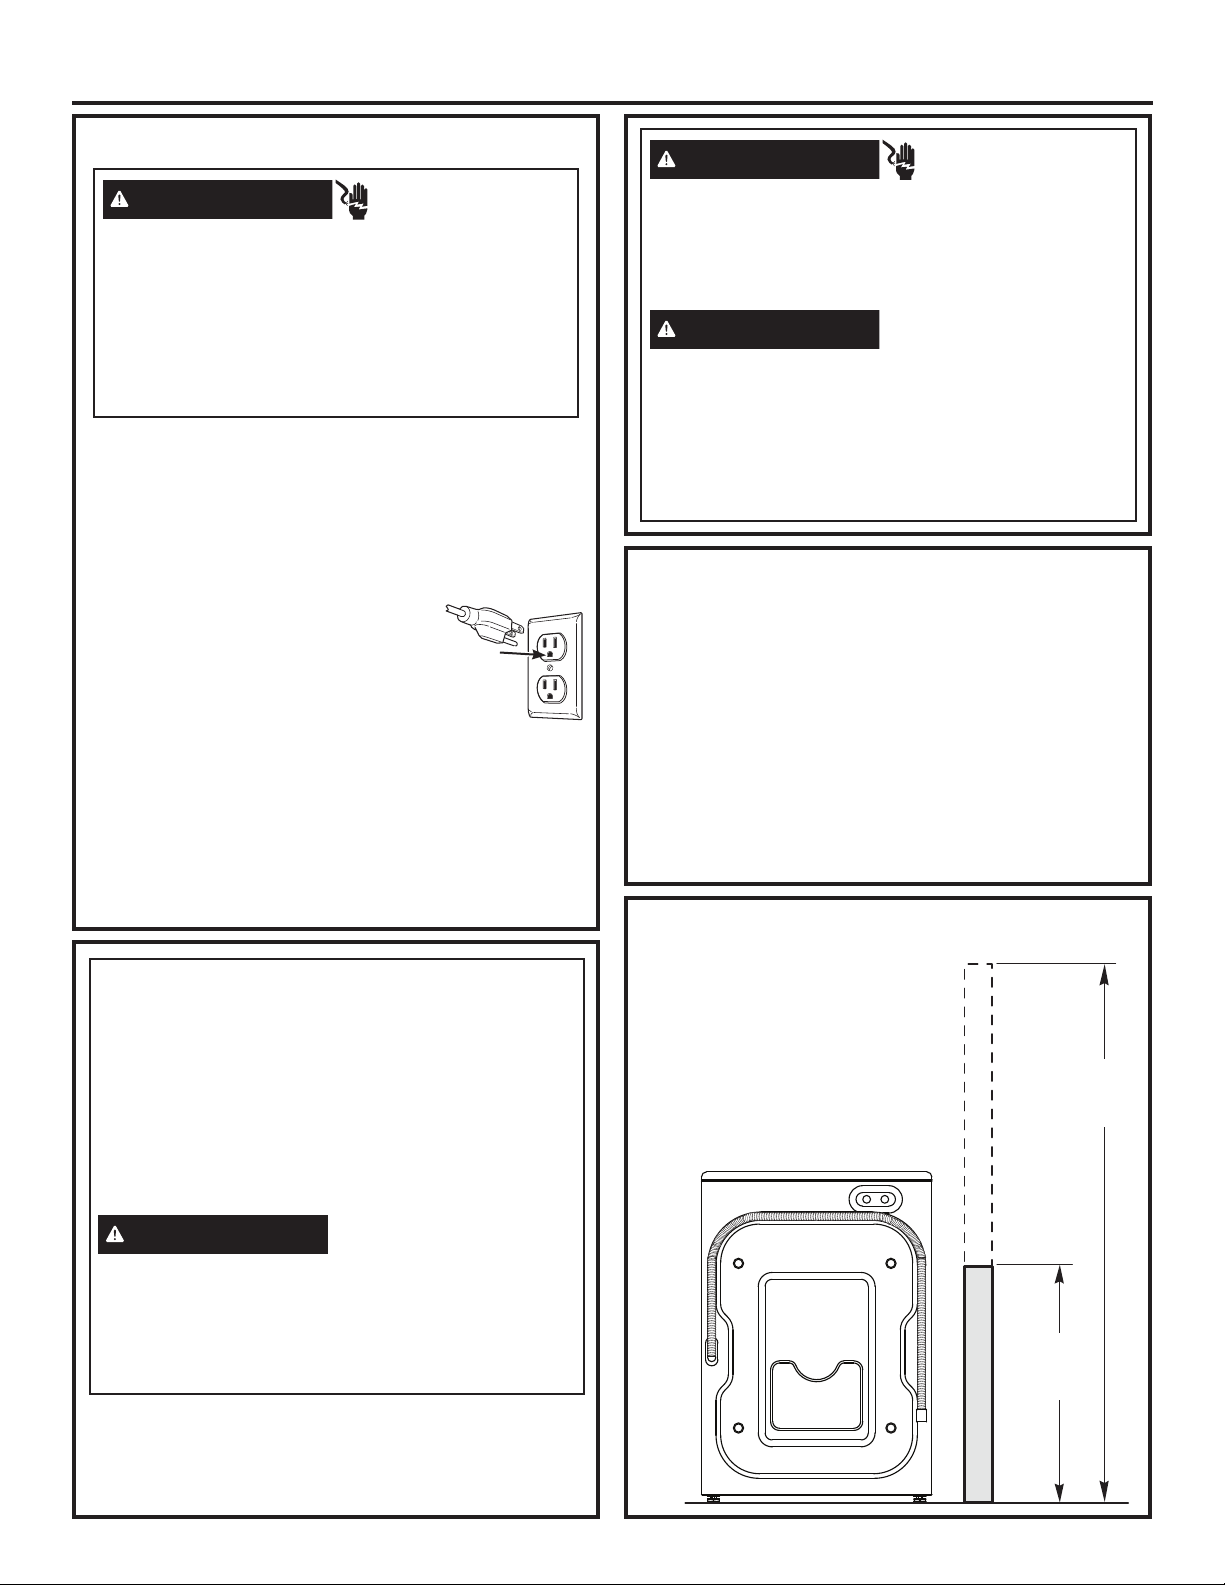
49-3000217 Rev 2 21
Instructions d’installation
1. Une vidange capable d’éliminer
38 L (10 gallons) par minute.
2. Un diamètre minimum de tuyau
ascendant de 3,18 cm (1 1/4 po.)
3. La hauteur du tuyau ascendant
au dessus du plancher doit être
la suivante :
Hauteur minimum : 61 cm (24 po.)
Hauteur maximum : 244 cm (96 po.)
EXIGENCES DE VIDANGE
Vous DEVEZ installer des robinets d’eau chaude et froide
à moins de 42 pouces (107 cm) de l’entrée d’eau de votre
laveuse. Les robinets DOIVENT être des robinets de jardin de
1,9 cm (3/4 po.), pour pouvoir brancher les tuyaux d’entrée. La
pression de l’eau DOIT être entre 10 et 120 livres par pouce
carré. Votre service d’eau peut vous indiquer votre pression
d’eau. La température de l’eau chaude doit être réglée de
manière à fournir de l’eau à une température de 48°C à 60°C
(120°F à 140°F) pour obtenir un rendement adéquat de la
commande de température automatique (ATC).
NOTE : L’utilisation d’un adoucisseur d’eau est recommandée
pour réduire l’accumulation de calcaire à l’intérieur du
générateur de vapeur si votre eau est très dure.
EXIGENCES D’ALIMENTATION D’EAU
EXIGENCES ÉLECTRIQUES
CIRCUIT - Individuel, correctement polarisé et mis à la
terre, disjoncteur ou fusible temporisé de 15 ou 20 ampères.
ALIMENTATION ÉLECTRIQUE – 2 fils plus la mise à la
terre, 120 volts, monophasé, 60 Hz, courant alternatif.
PRISE ÉLECTRIQUE – Prise à 3 voies correctement
mise à la terre située de façon à ce que le cordon
soit accessible lorsque la
laveuse est installée dans sa
position définitive. Si la prise
n’est qu’à 2 voies, il est de la
responsabilité du propriétaire
de demander à un électricien
agréé de la remplacer par une
prise à 3 voies correctement mise à la terre.
La laveuse doit être correctement mise à la terre
conformément aux codes locaux de l’électricité, ou
dans l’absence de codes locaux, à la dernière édition
du Code Électrique National, ANSI/NFPA NO. 70 ou au
Code Électrique Canadien CSA C22.1. Demandez à un
électricien agréé de vérifier la connexion si vous n’êtes pas
certain que la laveuse est correctement mise à la terre.
Brancher à une prise de courant à 3 broches mise à
la terre.
NE PAS retirer la broche de contact de mise à la terre.
N’UTILISEZ pas de rallonge électrique.
N’UTILISEZ pas d’adaptateur de prise.
Le non-respect de ces instructions pourrait entraîner
un décès, un incendie ou un choc électrique.
AVERTISSEMENT
- Risque
d’électrocution
Assurez-vous au préalable
qu’une
mise à la
terre existe bien
et qu’elle fonctionne
correctement.
Si les codes locaux l’exigent, un fil de terre extérieur en
cuivre de calibre 18 ou supérieur (non fourni) peut être
ajouté. Fixer à l’enceinte de la laveuse à l’aide d’une vis
à tôle #10-16 x
1/2
po (dans toute bonne quincaillerie) à
l’arrière de la laveuse.
INSTRUCTIONS DE MISE À LA TERRE
Cet appareil doit être mis à la terre. Dans l’éventualité
d’un malfonctionnement ou d’une panne, la mise à la
terre réduit le risque de choc électrique en procurant un
circuit de moindre résistance au courant électrique. Cet
appareil comporte un cordon doté d’un conducteur de
mise à la terre de l’appareillage et d’une fiche de mise
à la terre. La fiche doit être branchée dans une prise
compatible correctement installée et mise à la terre
conformément à tous les codes et règlements en vigueur.
Une connexion incorrecte du
conducteur de mise à la terre
de
l’appareillage peut poser un risque de choc électrique.
Consultez un électricien ou réparateur qualifié si vous
doutez que l’appareil soit correctement mis à la terre. NE
modifiez PAS la fiche du cordon d’alimentation. Si elle ne
s’insère pas dans la prise, demandez à un électricien agréé
de poser une prise appropriée.
AVERTISSEMENT
Débranchez l’alimentation électrique avant la réparation.
Remettez toutes les pièces et panneaux en place
avant d’utiliser l’appareil.
L’omission de prendre ces précautions peut provoquer
la mort ou l’électrocution.
- Risque
d’électrocution
Certaines pièces internes sont intentionnellement non
mises à la terre et peuvent présenter un risque de
choc électrique lors d’un entretien.
Personnel de réparateur – NE PAS toucher aux
composants suivants lorsque l’appareil est sous tension :
robinet d’eau, pompe de vidange, NTC, élément chauffant,
verrou de porte, carte d’onduleur, moteur et carte MC.
AVERTISSEMENT
- Risque
d’électrocution
AVERTISSEMENT
244 cm
(96 po)
Max.
61 cm
(24 po)
Min.
ARRIÈRE
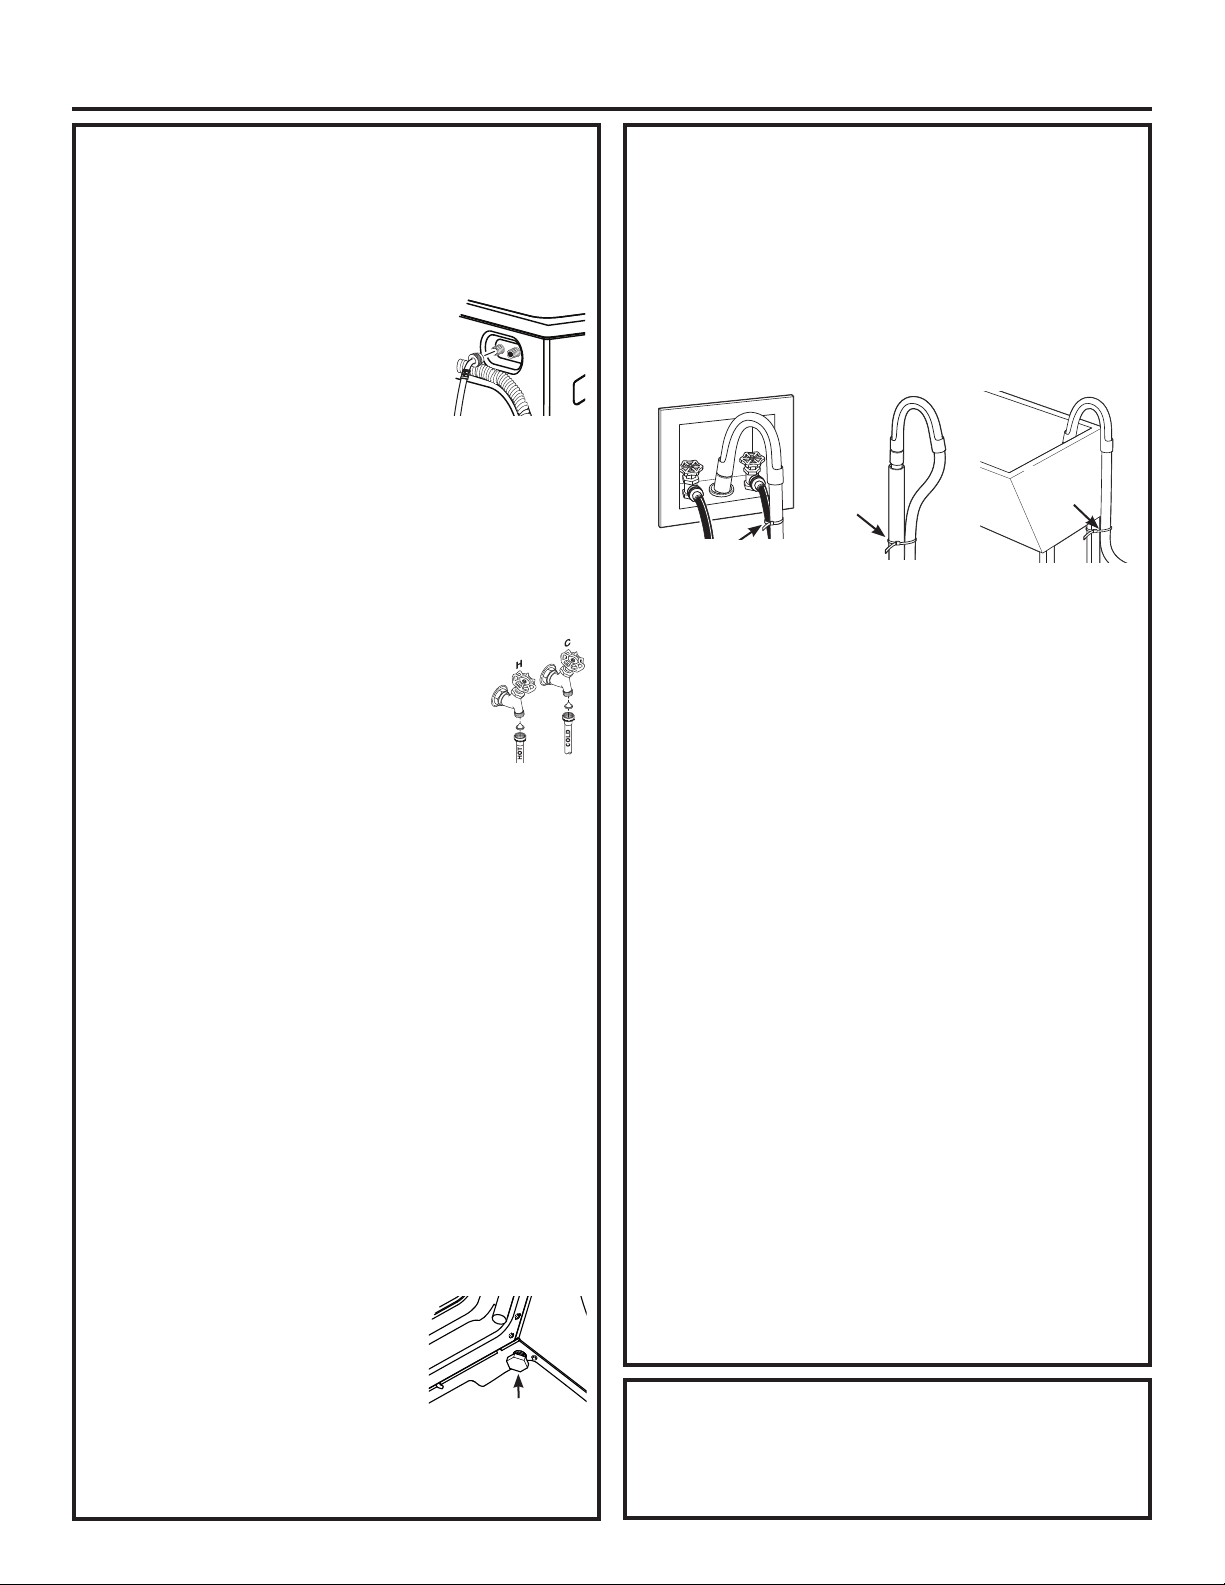
22 49-3000217 Rev 2
Instructions d’installation
1. Faites couler un peu d’eau chaude et froide des
robinets pour purger les tuyaux d’entrée d’eau et
enlever les particules qui peuvent boucher les filtres
des robinets et des tuyaux d’entrée d’eau.
2. Enlevez les tuyaux d’entrée d’eau du conditionnement.
3. (extrémité coudée 90°) Assurez-
vous de la présence de la rondelle
de caoutchouc aux extrémités
des coudes de 90° des tuyaux
d’eau chaude et froide (HOT et
COLD). Réinstallez les rondelles
de caoutchouc aux extrémités des tuyaux si ces
dernières sont tombées lors du transport. Branchez
soigneusement le tuyau d’entrée marqué HOT (chaud)
à la sortie extérieure du robinet d’eau marquée H.
Serrez à la main, puis serrez encore 2/3 de tour avec
des pinces. Branchez soigneusement l’autre tuyau
d’entrée à la sortie intérieure du robinet d’eau marquée
C. Serrez à la main, puis serrez encore 2/3 de tour
avec des pinces. Ne faussez pas le filetage ou ne
serrez pas trop ces branchements.
4.
Si les rondelles grillagées pour flexibles ne
sont pas déjà insérées dans les flexibles
d’admission d’eau, insérez-les dans
les extrémités libres des flexibles d’eau
CHAUDE et FROIDE en orientant la face
bombée vers le robinet.
5. Branchez les extrémités du tuyau d’entrée aux robinet
d’eau CHAUDE et FROIDE, en serrant légèrement à
la main, puis en serrant encore 2/3 de tour avec des
pinces. Ouvrez l’eau et vérifiez qu’il n’y ait pas de fuite.
6. Amenez soigneusement la laveuse dans son
emplacement final. Mettez gentillement la laveuse à
sa place, en la balançant. Il est important de ne pas
endommager les pattes de nivellement en caoutchouc
lorsque vous déplacez la laveuse vers sa position
finale. Des pattes endommagées peuvent accroître
les vibrations produites par la laveuse. La vaporisation
de nettoyant à vitres sur le plancher peut faciliter le
déplacement de la laveuse vers sa position finale.
NOTE : Afin de réduire les vibrations, assurez-vous que
les quatre pattes de nivellement reposent fermement au
plancher. Poussez et tirez sur l’arrière de la laveuse du
côté droit, puis du côté gauche pour ajuster les pattes.
NOTE : N’essayez jamais de soulever la laveuse par
sa porte ou par son tiroir distributeur.
NOTE : Si vous installez dans un bac de vidange, vous
pouvez utiliser un 2 x 4 long de 24 po. pour bien mettre
à l’horizontale la laveuse.
7. La laveuse dans son emplacement
final, placez un niveau à bulle sur
la laveuse (si elle est installée
sous un comptoir, elle ne doit
pas bouger). Ajustez les pattes
de nivellement avant vers le haut
ou vers le bas pour vous assurer
qu’elle ne bouge pas. Tournez les contre-écrous de
chaque patte vers la base de la laveuse et serrez
avec une clé anglaise.
INSTALLATION DE LA LAVEUSE
NOTE : Conservez les extensions des pattes à un
minimum pour empêcher les vibrations. Plus les
pattes sont tirés, et plus la laveuse vibre.
Si le plancher n’est pas bien horizontal ou est
endommagé, il est possible que vous deviez allonger
les pattes de nivellement arrière.
8. Attachez le guide de tuyau en U à l’extrémité du
tuyau de vidange. Placez le tuyau dans une cuve à
lessive ou un tuyau vertical et liez-le avec la ligature
de câble fournie dans le paquet.
NOTE: Placer le tuyau de vidange trop en bas du
conduit d’évacuation peut causer un siphonage. Il
ne doit pas y avoir plus de 18 cm de tuyau dans le
conduit d’évacuation. Il doit y avoir un espace d’air
autour du tuyau de vidange. Un ajustement trop serré
peut causer un siphonage.
9. Branchez le cordon d’alimentation dans une prise
mise à la terre.
NOTE : Vérifiez que le courant est coupé au niveau
du disjoncteur ou de la boîte à fusibles avant de
brancher le cordon d’alimentation à une prise.
10. Branchez le courant au niveau du disjoncteur ou de
la boîte à fusibles.
11. Lisez le reste de ce Manuel du propriétaire. Il
contient des renseignements précieux et utiles qui
vous feront économiser du temps et de l’argent.
12. Avant de mettre en marche la laveuse, vérifiez
que tout est en ordre :
L’alimentation principale de courant est branchée.
La laveuse est branchée à la prise.
Les robinets d’eau sont ouverts.
L’appareil est bien horizontal et les quatre pattes
de nivellement reposent fermement sur le plancher.
La quincaillerie de soutien pour l’expédition est
enlevée et mise de côté.
Le tuyau de vidange est bien attaché.
Le robinet, les rondelles et le tuyau de vidange ne
fuient pas.
13. Faites marcher la laveuse pendant un cycle
complet. Vérifiez qu’il n’y a aucune fuite d’eau et
qu’elle fonctionne bien.
14. Si votre laveuse ne fonctionne pas, nous vous
prions de consulter la section Avant d’appeler un
réparateur, avant d’appeler le service.
15. Rangez ces instructions dans un emplacement
proche de la laveuse pour référence future.
INSTALLATION DE LA LAVEUSE
Si vous avez besoin de pièces de rechange pour votre
laveuse, vous pouvez les commander au Canada en
visitant notre site web www.electromenagersge.ca ou en
appelant le 800.561.3344.
PIÈCES DE RECHANGE
Pattes de
nivellement
Ligature
de câble
Ligature
de câble
Ligature de câble
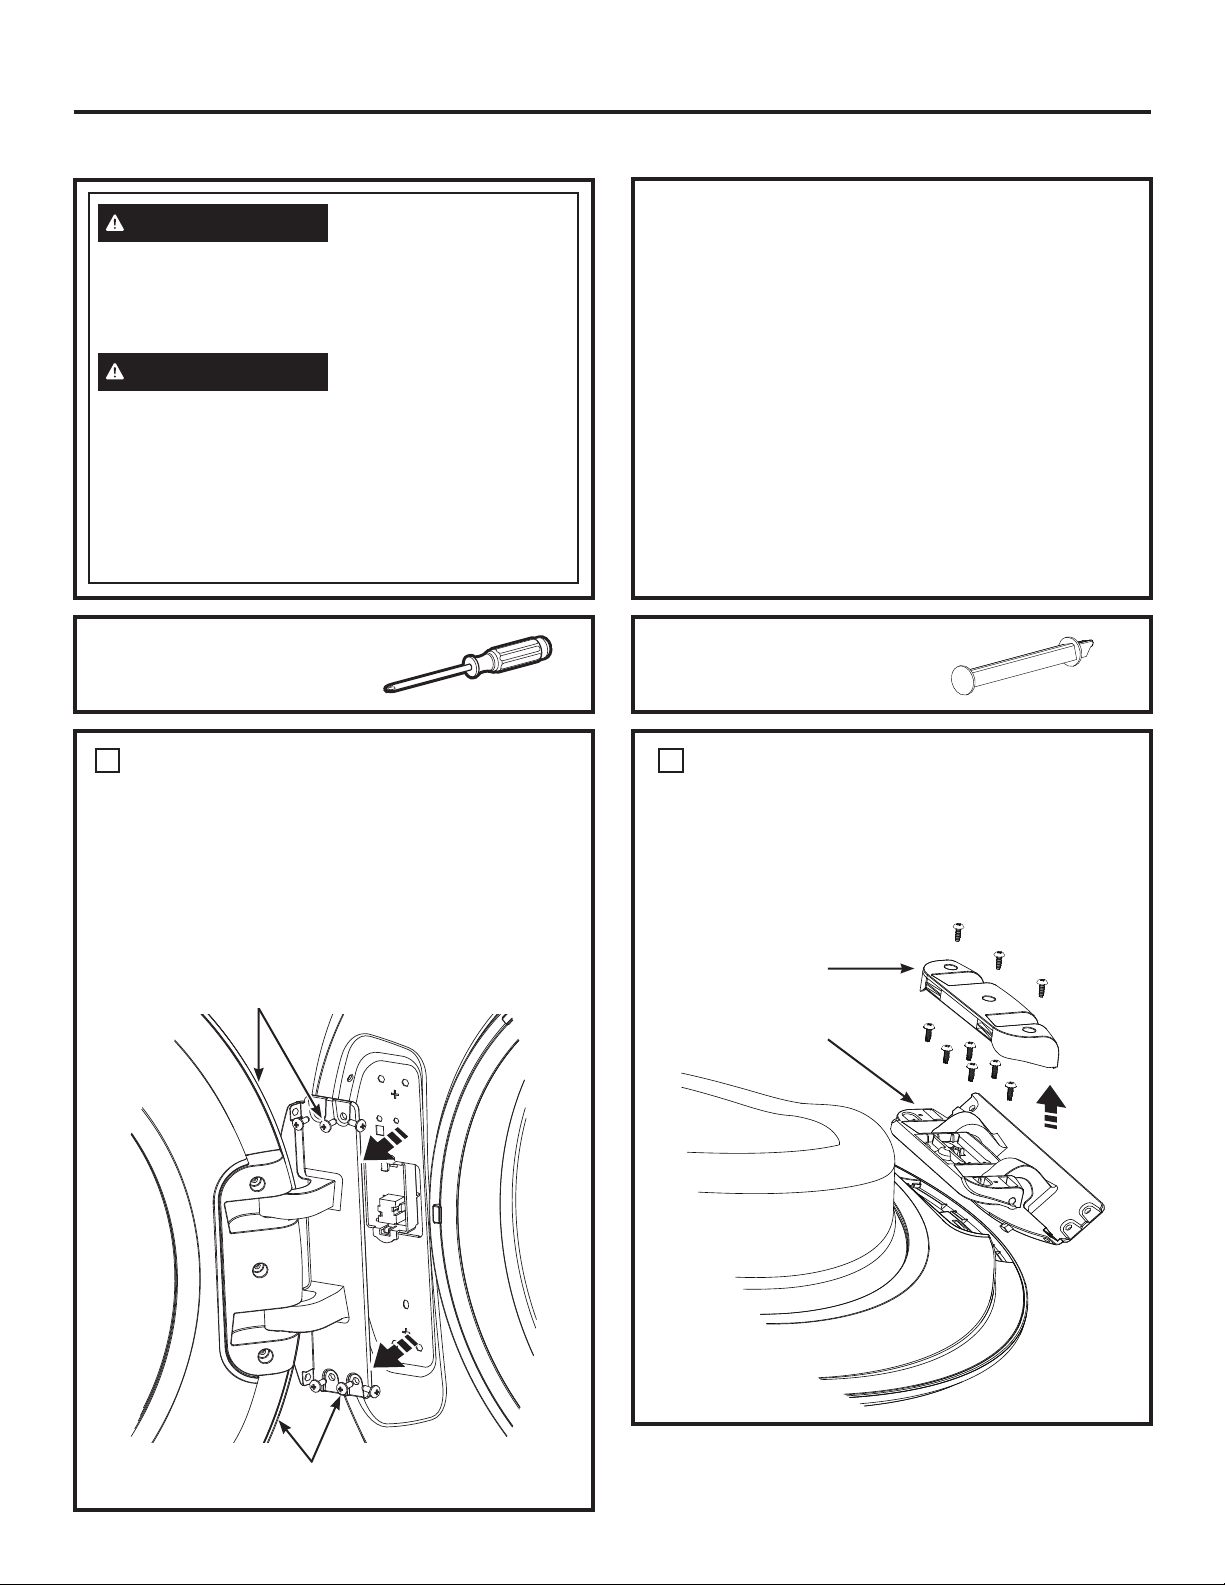
49-3000217 Rev 2 23
Instructions d’installation
INVERSION DE L’OUVERTURE DE LA PORTE (Optionnel)
RETIREZ L’ASSEMBLAGE DE
PORTE
• Ouvrez la porte de la laveuse.
• Tout en supportant la porte, retirer les 6 vis de la
charnière sur la face de la laveuse.
• Soulevez l’assemblage de porte pour le retirer de
la face de la laveuse et la mettre de côté sur une
surface protectrice.
1
RETIREZ LA CHARNIÈRE DE
PORTE
2
REMARQUES IMPORTANTES
• Manipulez les pièces avec soin afin d’éviter d’abîmer
la peinture.
• Prévoyez une surface non abrasive pour les
portes.
• Posez les vis à côté de leurs pièces respectives afin
d’éviter de les utiliser aux mauvais endroits.
• Après avoir commencé, ne déplacez pas la
sécheuse avant que l’inversion de l’ouverture de la
porte n’ait été effectuée.
• Ces instructions permettent de transférer les
charnières le côté gauche vers du côté droit. Si
vous souhaitez les réinstaller du côté droit, veuillez
suivre ces mêmes instructions et inversez toutes les
références aux termes gauche et droite.
Tournevis cruciforme
OUTIL NÉCESSAIRE
Barre de verrouillage
PIÈCE FOURNIE
Tenir la porte et retirer les vis de
charnière de la laveuse
Charnière et assemblage de porte
• Retirez les 3 vis du couvercle de charnière puis
retirez le couvercle.
• Retirez les 6 vis de la charnière puis retirez la
charnière de la porte.
Couvercle de
charnière
Charnière
Débranchez l’appareil ou fermez son disjoncteur
avant de procéder à l’entretien. Appuyer sur le
bouton d’alimentation Power de l’appareil NE le
déconnecte PAS de l’alimentation.
- Risque
d’électrocution
Certaines pièces internes sont intentionnellement
non mises à la terre et peuvent présenter un risque
de choc électrique lors d’un entretien.
Personnel de réparateur – NE PAS toucher aux
composants suivants lorsque l’appareil est sous
tension :
robinet d’eau, pompe de vidange, NTC,
élément chauffant,
verrou de porte, carte d’onduleur,
moteur et carte MC.
AVERTISSEMENT
AVERTISSEMENT
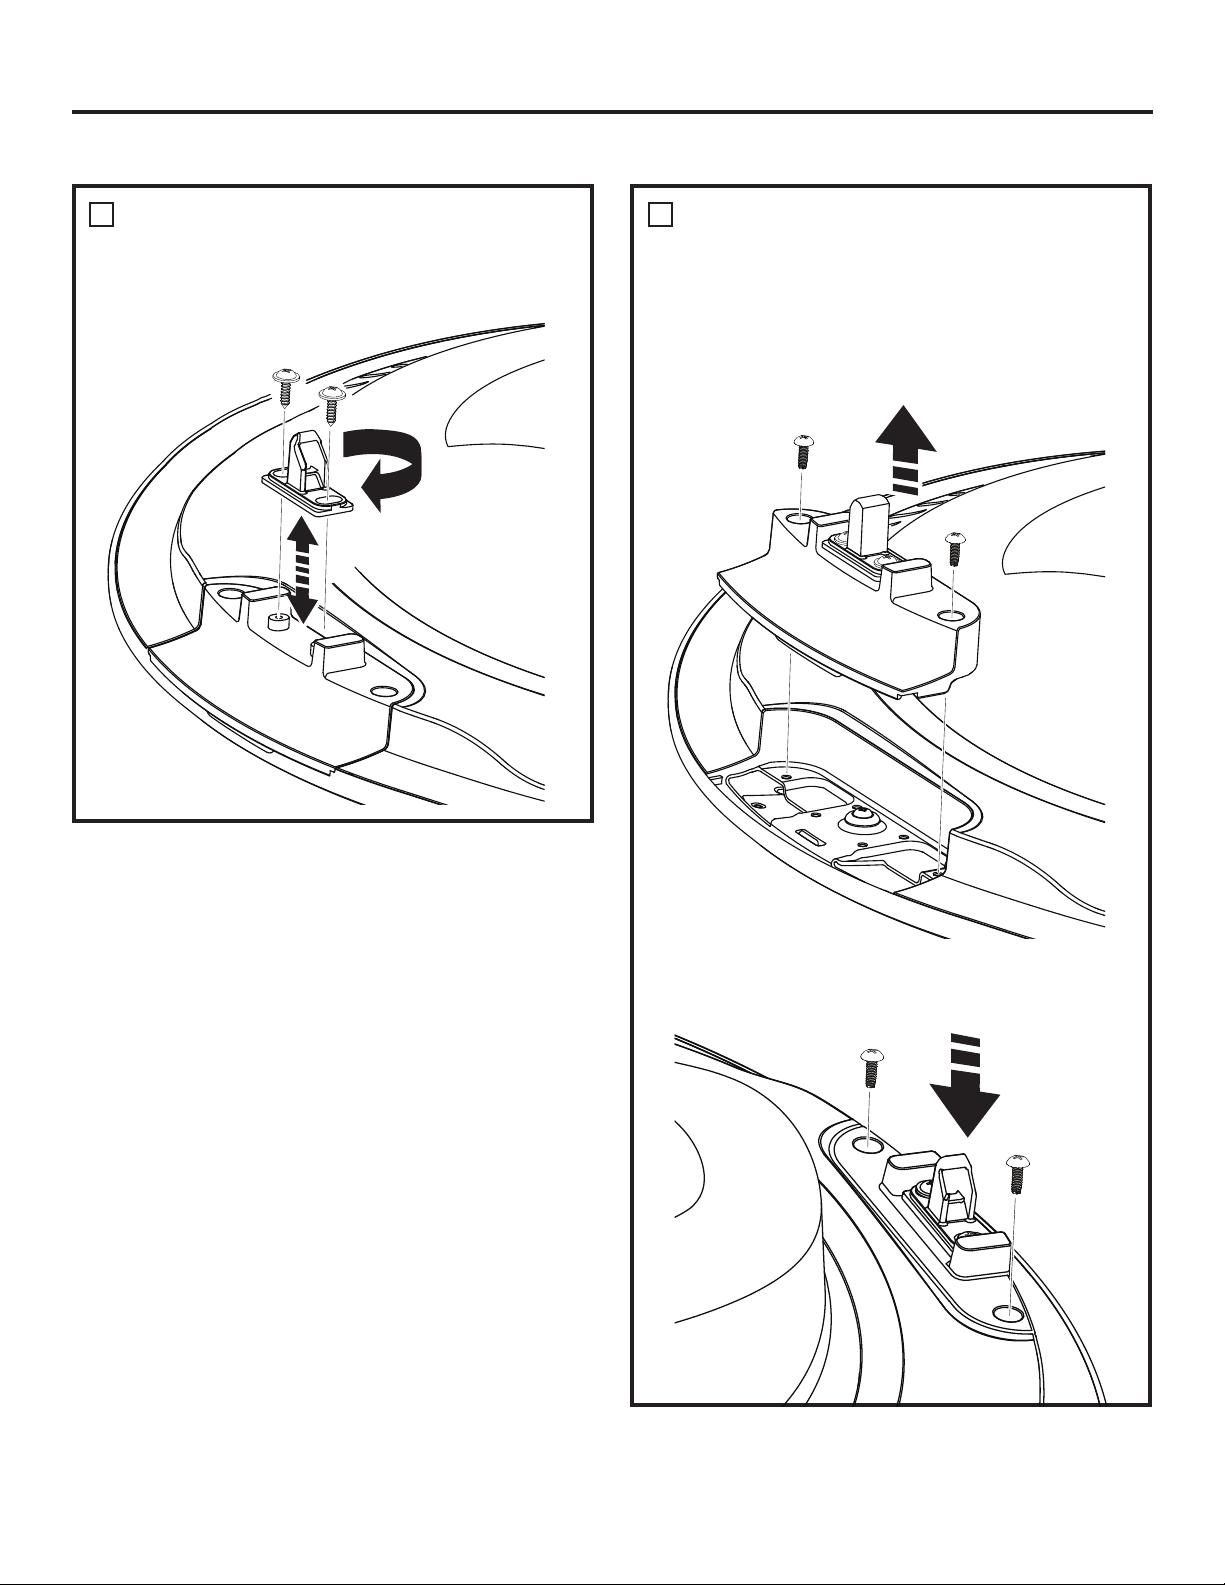
24 49-3000217 Rev 2
Instructions d’installation
INVERSION DE L’OUVERTURE DE LA PORTE (Optionnel)
RETIREZ, INVERSEZ ET
REPLACEZ LA GÂCHE DE PORTE
• Retirez les 2 vis de la gâche. Faites pivoter la
gâche de 180° et réinstallez-la avec ses vis.
3
RETIREZ L’ASSEMBLAGE
DE GÂCHE DE PORTE ET
REPLACEZ-LA SUR LE CÔTÉ
OPPOSÉ
4
• Retirez les 2 vis de l’assemblage de gâche et retirez
l’assemblage en le tirant vers le centre, le poussant
vers le haut puis l’extérieur.
• Faites pivoter l’assemblage de gâche et replacez-le
sur le côté opposé avec ses vis.

49-3000217 Rev 2 25
Instructions d’installation
INVERSION DE L’OUVERTURE DE LA PORTE (Optionnel)
REPLACEZ LA CHARNIÈRE
DE PORTE ET LE COUVERCLE
DE CHARNIÈRE SUR LE CÔTÉ
OPPOSÉ
• Faites pivoter la charnière et replacez-la sur le côté
opposé avec ses vis.
• Faites pivoter le couvercle de charnière et replacez-le
sur le côté opposé avec ses vis.
5
RETIREZ LE SUPPORT DE
BORNIER ET DÉBRANCHEZ LE
CONNECTEUR À BROCHES DE
LA LAVEUSE
• Avec vos doigts,
dégagez le
bornier de
la face de la
laveuse.
• Débranchez le
connecteur à
broches.
6
Couvercle de
charnière
Charnière
Support de
bornier
Connecteur à
broches
RETIREZ L’ASSEMBLAGE DE
VERROU ET INSTALLEZ-LE
SUR LE CÔTÉ OPPOSÉ DE LA
LAVEUSE
• Retirez les 2 vis du couvercle de verrou puis
retirez-le de la face de la laveuse.
7
• Insérez la barre de verrouillage fournie dans le
mécanisme du verrou situé dans la face de la
laveuse. Retirez l’assemblage de verrou en retirant
ses deux vis; utilisez la barre de verrouillage
pour soulever l’assemblage afin de le décrocher,
puis inclinez et tirez-le à l’écart de la face de la
laveuse. Débranchez son connecteur à broches en
décliquetant ses pattes de verrouillage.
Couvercle
de verrou
Insérer la barre
de verrouillage
Retirez
l’assemblage
Connecteur à
broches
Fenêtre d’accrochage
Crochet
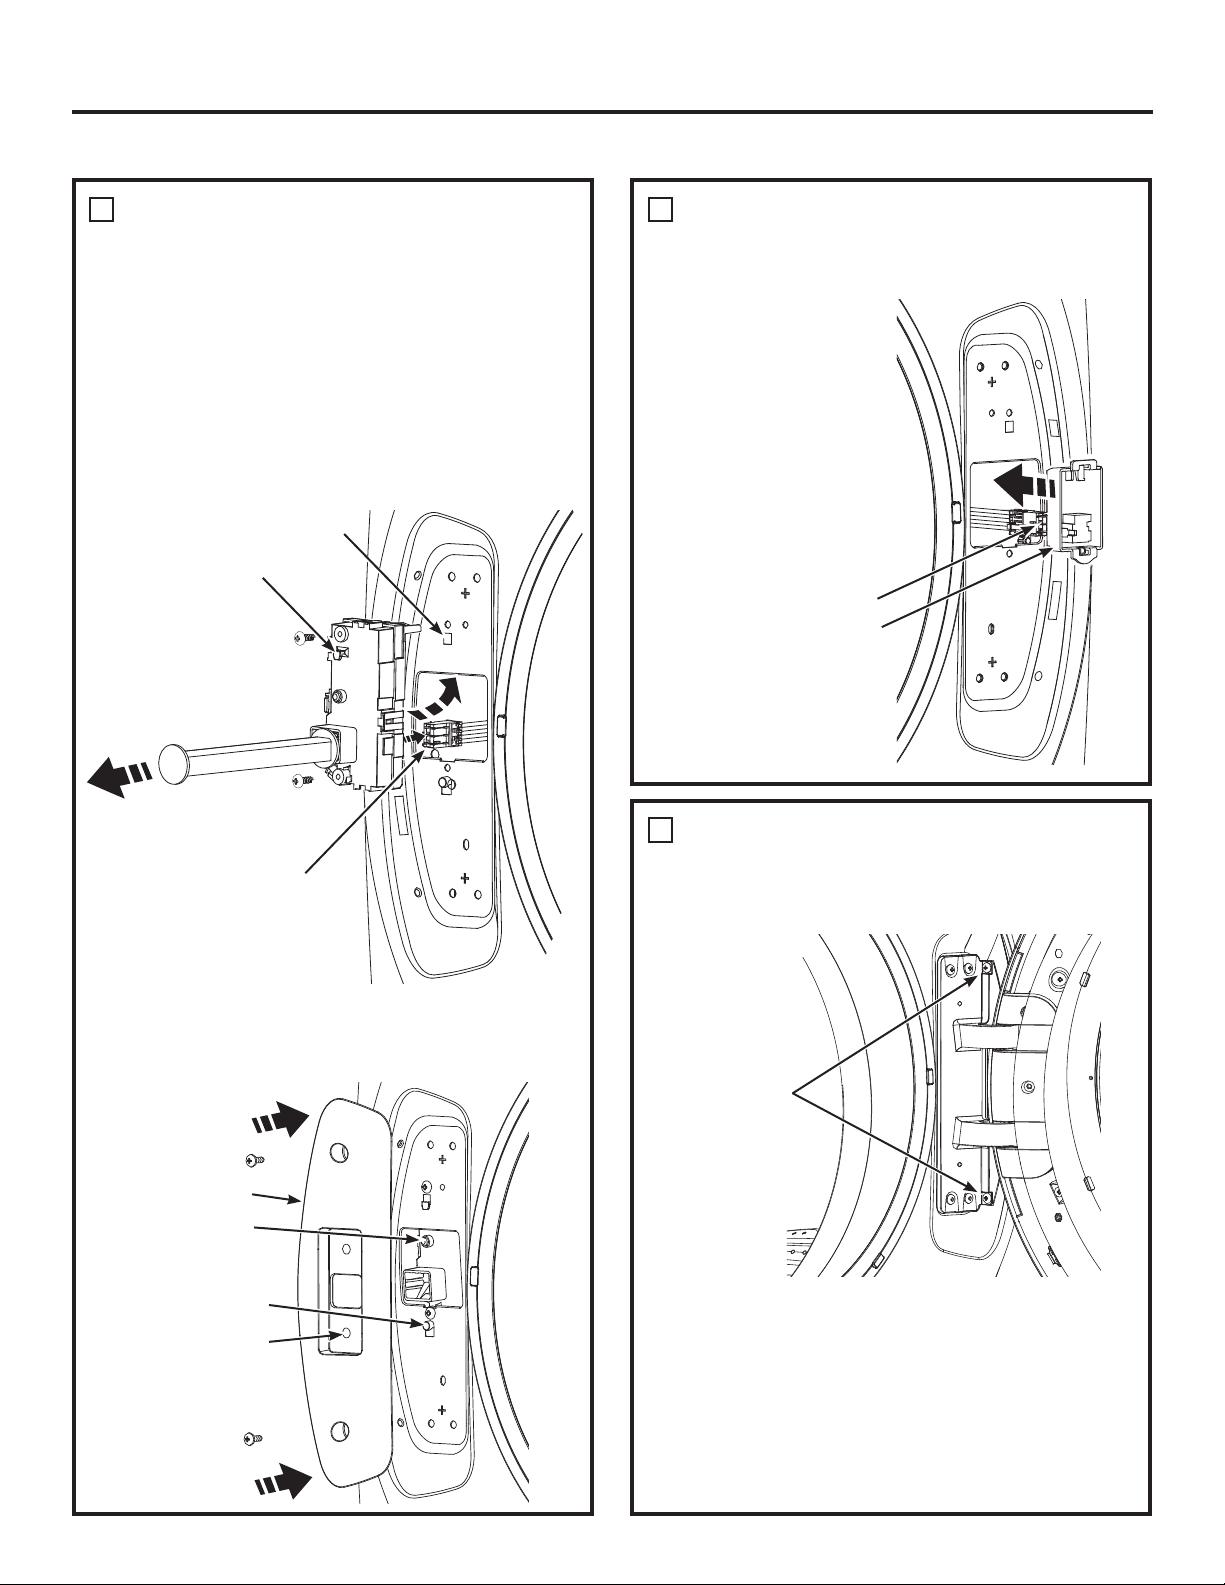
26 49-3000217 Rev 2
REBRANCHEZ LE CONNECTEUR
À BROCHES DE LA LAVEUSE
ET REPLACEZ LE SUPPORT DE
BORNIER
8
• Rebranchez le
connecteur à
broches et pressez
le bornier dans la
face de la laveuse
sur le côté opposé.
Connecteur à broches
Support de bornier
REPLACEZ L’ASSEMBLAGE DE
PORTE
9
• Soulevez l’assemblage de porte en place et fixez-le
sur la face de la laveuse avec ses 6 vis
• Fermez la porte de la laveuse.
REMARQUE : Assurez-vous que la porte s’ouvre
et se ferme correctement. Si ce n’est pas le cas,
répétez toutes les étapes en vous assurant que
toutes les pièces et vis sont solidement fixées.
• Branchez le cordon d’alimentation et réenclenchez
le disjoncteur.
• Faites fonctionner la laveuse durant un cycle
complet pour vérifier son bon fonctionnement.
Réinstaller 6 vis
dans la charnière
et fixer sur la face
de la laveuse
Instructions d’installation
INVERSION DE L’OUVERTURE DE LA PORTE (Optionnel)
RETIREZ L’ASSEMBLAGE DE
VERROU ET INSTALLEZ-LE
SUR LE CÔTÉ OPPOSÉ DE LA
LAVEUSE (SUITE)
• NE faites PAS pivoter l’assemblage de verrou.
Déplacez-le du côté opposé de la laveuse et
branchez le connecteur à broches en vous assurant
qu’il s’insère à fond. Inclinez et insérez l’assemblage
de verrou dans la face de la laveuse, soulevez-le et
accrochez son crochet dans sa fenêtre. Réinstallez
ses vis. Retirez la barre de verrouillage de
l’assemblage et conservez-la pour usage ultérieur.
7
Enlever la barre
de verrouillage
Reemplace el
ensamble
Connecteur à
broches
Fenêtre d’accrochage
Crochet
• Installez le couvercle du verrou sur le verrou, en
vous assurant que le tenon de repérage rentre dans
le trou de repérage et que l’interrupteur du verrou
bouge librement. Réinstallez ses vis.
Tenon de repérage
Couvercle
du verrou
Trou de repérage
Interrupteur
du verrou
49-3000217 Rev 2 27
Conseils de Dépannage...Avant d’appeler un réparateur
CONSEILS DE DÉPANNAGE
Problème Causes possibles Correctifs
Pas de
vidange
Pas
d’essorage
Pas de
culbutage
La charge est déséquilibrée Redistribuez les vêtements et faites un Rinse & Spin
(Rinçage & Essorage).
Augmentez la taille de la charge si vous lavez une petite
charge contenant des articles légers et lourds.
Le filtre de la pompe à eau est
peut-être bouché
Reportez-vous Entretien et nettoyage pour le nettoyage du
Filtre de la pompe.
Le tuyau de vidange est tortillé
ou mal connecté
Redressez le tuyau de vidange et assurez-vous que la
laveuse n’est pas dessus.
Le siphon d’évacuation de la
maison peut être bouché
Vérifiez la plomberie de la maison. Vous pouvez avoir besoin
d’appeler un plombier.
Siphonage du tuyau de
vidange; tuyau de vidange
enfoncé trop bas dans le drain.
Assurez-vous qu’il y a un espace d’air entre le tuyau et le
drain.
Fuite d’eau Le joint de la porte est
endommagé
Vérifiez si le joint est bien en place et s’il n’est pas déchiré.
Les objets oubliés dans les poches peuvent endommager la
laveuse (clous, vis, stylos, crayons).
L’eau peut dégoutter de la porte lorsque celle-ci est ouverte.
Il s’agit d’un fonctionnement normal.
Essuyez soigneusement le joint de porte en caoutchouc.
Parfois de la saleté ou des vêtements coincés dans le joint
peuvent causer une petite fuite.
Vérifiez la présence d’eau à
la partie arrière gauche de la
laveuse
Si cette partie est mouillée, cela indique la présence d’un
surplus de mousse savonneuse. Utilisez moins de détergent.
Les tuyaux d’entrée de l’eau ou
le tuyau de vidange ne sont pas
bien branchés
Assurez-vous que les tuyaux soient bien branchés au niveau
des robinets et la laveuse et assurez-vous que le tuyau de
vidange soit bien inséré et fixé à l’installation de vidange.
La vidange de la maison est
peut-être bloquée
Vérifiez la plomberie de la maison. Il est possible que vous
ayez besoin d’appeler un plombier.
Distributeur colmaté Le savon en poudre peut causer des colmatages à l’intérieur
du distributeur et causer une fuite d’eau à l’avant du
distributeur. Retirez le tiroir et nettoyez le tiroir et l’intérieur de
la boîte de distributeur. Reportez-vous à la section Entretien
et nettoyage.
Utilisation incorrecte de
détergent
Utilisez du détergent HE uniquement et en bonne quantité.
Compartiment de distributeur
fissuré
Dans le cas de nouvelle installation, recherchez les fissures
sur l’intérieur du distributeur.
Vêtements
trop mouillés
La charge est déséquilibrée Redistribuez les vêtements et faites un Rinse & Spin
(Rinçage & Essorage).
Augmentez la taille de la charge si vous lavez une petite
charge contenant des articles légers et lourds.
La machine ralentit la vitesse d’essorage à 410 tr/min si elle
a du mal à équilibrer la charge. Cette vitesse est normale.
Le filtre de la pompe à eau est
peut-être bouché
Reportez-vous Entretien et nettoyage pour le nettoyage du
Filtre de la pompe.
Surcharge Le poids à sec de la charge doit être inférieur à 16 lbs.
Le tuyau de vidange est tortillé
ou mal connecté
Redressez le tuyau de vidange et assurez-vous que la
laveuse n’est pas dessus.
Le siphon d’évacuation de la
maison peut être bouché
Vérifiez la plomberie de la maison. Vous pouvez avoir besoin
d’appeler un plombier.
Siphonage du tuyau de
vidange; tuyau de vidange
enfoncé trop bas dans le drain.
Assurez-vous qu’il y a un espace d’air entre le tuyau et le
drain.
28 49-3000217 Rev 2
CONSEILS DE DÉPANNAGE
Conseils de Dépannage...Avant d’appeler un réparateur
Problème Causes possibles Correctifs
Cycle incomplet ou
minuterie arrêtée
Redistribution automatique de
la charge
La minuterie ajoute 3 minutes au cycle pour chaque rééquilibrage.
11 ou 15 rééquilibrages peuvent être effectués. C’est un
fonctionnement normal.
Ne faites rien, la machine terminera le cycle de lavage.
Le filtre de la pompe à eau est
peut-être bouché
Reportez-vous Entretien et nettoyage pour le nettoyage du Filtre
de la pompe.
Le tuyau de vidange est tortillé
ou mal connecté
Redressez le tuyau de vidange et assurez-vous que la laveuse
n’est pas dessus.
Le siphon d’évacuation de la
maison peut être bouché
Vérifiez la plomberie de la maison. Vous pouvez avoir besoin
d’appeler un plombier.
Siphonage du tuyau de
vidange; tuyau de vidange
enfoncé trop bas dans le drain.
Assurez-vous qu’il y a un espace d’air entre le tuyau et le drain.
Secousses,
vibrations ou bruits
forts ou inhabituels
Déplacement d’armoire La laveuse est conçue pour bouger de 6 mm pour réduire les forces
transmises au sol. Ce mouvement est normal.
Tous les pieds de mise à niveau
en caoutchouc ne touchent pas
fermement le sol
Poussez tirez sur l’arrière droit puis sur l’arrière gauche de la laveuse
pour vérifier qu’elle est de niveau. Si elle ne l’est pas, réglez les pieds
de mise à niveau en caoutchouc pour qu’ils touchent fermement le sol
et qu’ils se bloquent en place.
Charge déséquilibrée Mettez l’appareil en pause, ouvrez la porte et redistribuez
manuellement la charge. Pour inspecter la machine, exécutez un
rinçage et un essorage à vide. Si tout est normal, le déséquilibre était
causé par la charge.
Le filtre de la pompe à eau est
peut-être bouché
Reportez-vous Entretien et nettoyage pour le nettoyage du Filtre
de la pompe.
Pas de puissance/
la laveuse ne
fonctionne pas ou
semble hors tension
La laveuse est débranchée Assurez-vous que le cordon est bien branché dans une prise sous
tension.
L’arrivée d’eau est coupée Ouvrez à fond les robinets d’eau chaude et d’eau froide
Le disjoncteur est déclenché/le
fusible a sauté
Inspectez les disjoncteurs/fusibles de la maison. Remplacez les
fusibles ou réarmez le disjoncteur. La laveuse doit présenter une
prise distincte.
Vérifications automatiques du
système
La première fois que la laveuse est branchée, des vérifications
automatiques se produisent. Il peut être nécessaire d’attendre
20 secondes avant de pouvoir utiliser la laveuse. C’est un
fonctionnement normal.
Accrocs, trous,
déchirures, ou usure
excessive
Surcharge Ne dépassez pas les tailles de charge maximum recommandées
Reportez-vous aux tailles de charge maximum recommandées
dans la section Chargement.
Stylos, crayons, clous, vis ou
autres objets égarés dans les
poches
Retirez les objets égarés dans les poches.
Aiguilles, boutons pressions,
agrafes, boutons à bord vif,
boucles de ceinture, fermetures à
glissière et objets à bord vif égarés
dans les poches
Fermez les boutons pressions, agrafes, boutons et fermetures à
glissière
Temps de contrôle
incorrect ou variations
C’est normal. Pendant l’essorage, la laveuse peut avoir besoin de rééquilibrer la
charge parfois pour réduire les vibrations. Lorsque cela se produit,
le temps estimé est augmenté, ce qui cause une augmentation du
temps qui reste.
Pas assez d’eau
C’est normal. Les laveuses horizontales ne nécessitent pas que la cuve se
remplisse d’eau contrairement aux laveuses à charge par le haut
49-3000217 Rev 2 29
Conseils de Dépannage...Avant d’appeler un réparateur
CONSEILS DE DÉPANNAGE
Problème Causes possibles Correctifs
La laveuse fait une
pause ou doit être
redémarrée ou la
porte de la laveuse
est verrouillée et ne
s’ouvre pas
Le filtre de la pompe à eau est
peut-être bouché
Reportez-vous Entretien et nettoyage pour le nettoyage du
Filtre de la pompe.
La porte se
débloque ou
la machine ne
fonctionne pas
lorsque vous
appuyez sur Start
C’est normal. Les laveuses à chargement frontal démarrent différemment de
celles à chargement par le haut, et il faut plusieurs secondes pour
vérifier le système. La porte se verrouille et se déverrouille
Fonctionnement incorrect Ouvrez et fermez simplement la porte fermement, puis appuyez
sur Start (Marche).
L’eau ne rentre pas
dans la laveuse ou
entre lentement
Vérifications automatiques du
système
Une fois Start (Marche) appuyé, la laveuse fait plusieurs
vérifications du système. L’eau coule plusieurs secondes après
que Start (Marche) soit appuyé
Les tamis de vanne d’eau sont
colmatés
Coupez l’arrivée d’eau et retirez les tuyaux de connexion d’eau en
haut à l’arrière de la laveuse. Utilisez une brosse ou un cure-dent
pour nettoyer les tamis dans la machine. Reconnectez les tuyaux
et rouvrez l’arrivée d’eau.
Les rondelles à grille de
l’admission d’eau sont bloqués
Fermez l’eau et enlevez les tuyaux d’admission des robinets
muraux. Utilisez une brosse ou un cure-dent pour nettoyer les
rondelles à grille au bout des tuyaux. Reconnectez les tuyaux et
ouvrez l’eau.
Le filtre de la pompe à eau est
peut-être bouché
Reportez-vous Entretien et nettoyage pour le nettoyage du
Filtre de la pompe.
Tuyaux de remplissage pliés Vérifiez que les tuyaux de remplissage ne sont pas pliés ni
bouchés.
L’arrivée d’eau est coupée Ouvrez à fond les robinets d’eau chaude et d’eau froide.
Efficacité énergétique Comme cette laveuse est éconergétique, ses réglages de
température peuvent différer par rapport à une laveuse qui ne
l’est pas.
Alimentation d’eau insuffisante Assurez-vous que l’alimentation d’eau est ouverte et que les
robinets d’eau sont tournés à la position d’ouverture maximale.
La porte de la laveuse est ouverte La porte de la laveuse doit être fermée pendant tous les cycles
de lavage. Si la porte est ouverte pendant une cycle de lavage,
toutes les fonctions s’arrêteront, y compris le remplissage d’eau.
Raccordement de tuyaux de
remplissage incorrect
Vérifiez que les tuyaux de remplissage relient l’alimentation d’eau
chaude à l’entrée d’eau chaude de la laveuse et l’alimentation
d’eau froide à l’entrée d’eau froide de la laveuse (chaude avec
chaude, froide avec froide).
Froissement Tri incorrect Évitez de mélanger des articles lourds (comme des vêtements de
travail) avec des articles légers (comme des chemisiers).
Surcharge Chargez la laveuse pour que les vêtements aient assez de place
pour bouger librement.
Cycle de lavage incorrect Assortissez la sélection de cycle au type de tissus que vous lavez
(surtout pour les charges à entretien facile).
Lavage répété dans de l’eau trop
chaude
Lavez dans l’eau froide ou chaude.
30 49-3000217 Rev 2
CONSEILS DE DÉPANNAGE
Conseils de Dépannage...Avant d’appeler un réparateur
Problème Causes possibles Correctifs
Vêtements grisâtres
ou jaunâtres
Pas assez de détergent Utilisez la bonne quantité de détergent.
Détergent utilisé pas HE (haute
efficacité)
Utilisez du détergent HE uniquement.
Eau calcaire Utilisez l’eau la plus chaude possible pour le tissu.
Utilisez un conditionneur d’eau comme la marque Calgon ou
installez un adoucisseur d’eau.
L’eau n’est pas assez chaude Assurez-vous que le chauffe-eau distribue de l’eau entre 48 et
60°C.
Le détergent ne se dissout pas Essayez un HE détergent liquide
Transfert de colorant Triez les vêtements par couleur. Si l’étiquette du vêtement indique
de laver séparément, cela peut indiquer des colorants instables.
Taches colorées Utilisation incorrecte
d’assouplisseur
Inspectez le sachet d’assouplisseur de tissu pour des instructions
et suivez les directives d’utilisation du distributeur.
Transfert de colorant Séparez le blanc et les couleurs claires des couleurs foncées.
Sortez rapidement le linge de la laveuse.
La température de
l’eau est incorrecte
L’arrivée d’eau est mal connectée Assurez-vous que les tuyaux sont connectés aux bons robinets.
Le chauffe-eau de la maison est
mal réglé
Assurez-vous que le chauffe-eau distribue de l’eau entre 48 et
60°C.
Odeur désagréable
dans la laveuse
Laveuse inutilisée pendant
longtemps, pas d’utilisation
du détergent HE de la qualité
recommandée ou utilisation
d’une quantité excessive de
détergent
Utilisez régulièrement ULTRAFRESH VENT entre les lavages.
En cas d’odeur forte, vous devrez peut-être exécuter le cycle Self
Clean (Autonettoyage) plus d’une fois.
Utilisez uniquement la quantité de détergent recommandée ou
réglez SmartDispense à LOW.
Utilisez uniquement du détergent HE (haute efficacité)
Retirez toujours rapidement les vêtements humides de la laveuse
après arrêt de la machine ou utiliser 1 Step Wash + Dry ou
Tumble Care.
Si vous choisissez de ne pas utiliser le système ULTRAFRESH
VENT, laissez la porte légèrement ouverte pour sécher la laveuse
à l’air. Une surveillance étroite est requise pour tout appareil
utilisé par des enfants ou à leur proximité. NE laissez pas les
enfants jouer sur ou à l’intérieur de cet appareil.
Fuite de détergent C’est normal Il est normal de voir le détergent fuir sur le joint de la porte environ
20 secondes après remplissage du distributeur.
Distribution
incorrecte de
l’assouplisseur
ou de l’agent
blanchissant
Distributeur colmaté Nettoyez une fois par mois le tiroir distributeur pour retirer les
dépôts de produits chimiques.
Assouplisseur ou agent
blanchissant au-dessus du trait
max
Assurez-vous de mettre la bonne quantité d’assouplisseur.
Le tiroir distributeur
ne distribue pas
correctement
Sachet de détersif placé dans le
tiroir distributeur
Les sachets de détersif ne doivent pas être utilisés dans le
distributeur. Ils doivent être ajoutés directement dans le panier de
lavage conformément aux directives du fabricant.
La pompe
fonctionne alors
que la laveuse n’est
pas utilisée
Obstruction dans le drain de
puisard
Ce phénomène est normal. Le puisard détecte un niveau d’eau
indésirable causé probablement par un robinet ouvert. Fermez la
vanne d’eau et vérifiez si elle reste bloquée.
49-3000217 Rev 2 31
www.electromenagersge.ca
Toutes les réparations sous garantie limitée seront effectuées par nos centres de réparation ou nos réparateurs autorisés.
Pour planifier un service en ligne, rendez-vous sur Electromenagersge.ca/fr/soutien/demande-de-service ou appelez le
800.561.3344. Veuillez fournir le numéro de série et le numéro de modèle lorsque vous appelez pour obtenir le service.
Pour le diagnostic, la réparation de votre appareil peut nécessiter l’utilisation du port de données embarqué. Celui-ci
permet au technicien de réparation GE Appliances de diagnostiquer rapidement des problèmes avec votre appareil. Il
permet également à GE Appliances d’améliorer ses produits en fournissant à ces derniers des informations sur votre
appareil. Si vous ne voulez pas que les données de votre appareil soient envoyées à GE Appliances, veuillez demander
à votre technicien de NE PAS soumettre les données à GE Appliances pendant la réparation.
GARANTIE LIMITÉE
Garantie limitée de la laveuse GE Appliances
Agrafez le reçu d’achat ici. Pour obtenir le service sous
garantie, vous devrez fournir la preuve de l’achat original.
Cette garantie limitée est offerte à l’acheteur initial, ainsi qu’à tout propriétaire subséquent d’un produit acheté
au Canada en
vue d’une utilisation domestique au Canada. Si le produit se situe dans une zone où aucun
réparateur agréé
par GE Appliances n’est disponible, vous devrez peut-être assumer les frais de déplacement de
celui-ci ou apporter le
produit à un atelier de réparation agréé par GE Appliances.
Dans certains États ou province, il est interdit d’exclure ou de limiter les dommages indirects ou accessoires. Il est
alors possible que les limitations ou exclusions ci-dessus ne s’appliquent pas dans votre cas. La présente garantie
limitée vous confère des droits juridiques spécifiques. Vous pouvez bénéficier d’autres droits, qui varient d’un État
ou d’une province à l’autre. Pour connaître les droits dont vous bénéficiez, communiquez avec le bureau des Relations
avec les
consommateurs de votre région ou de votre province.
Garant : MC Commercial Inc., Burlington, ON, L7R 5B6
EXCLUSION DES GARANTIES IMPLICITES :
Votre seul et unique recours est de faire réparer le produit dans le cadre de cette garantie limitée. Toute garantie
implicite, incluant la garantie de qualité marchande ou d’adaptabilité du produit à un usage particulier, est limitée à
un an ou à la période la plus courte autorisée par la loi.
Pendant la période de : Nous remplacerons :
Un an
À compter de la date
d’achat d’origine
Toute pièce défectueuse en raison d’un vice de matériau ou de fabrication. Au cours
de cette garantie limitée d’un an, nous fournirons également, sans frais, les pièces
et la main-d’œuvre pour remplacer la pièce défectueuse.
Dix ans
À compter de la date
d’achat d’origine
Le moteur, si celui-ci se révèle défectueux en raison d’un vice de matériaux ou de
fabrication. Pendant cette garantie limitée complémentaire de neuf ans, vous serez
responsable des frais de main-d’œuvre et de service associés.
Ce qui n’est pas couvert :
Ŷ
Toute visite à votre domicile pour vous expliquer le
fonctionnement de l’appareil.
Ŷ
L’installation, la livraison ou l’entretien inadéquats de
l’appareil.
Ŷ
Toute défectuosité du produit attribuable à une
utilisation abusive ou inadéquate, s’il a été utilisé à
toute autre fin que celle pour laquelle il a été conçu,
ou s’il a été utilisé à des fins commerciales.
Ŷ
Le remplacement des fusibles ou le réenclenchement
des disjoncteurs de votre domicile.
Ŷ
Les produits qui ne sont pas défectueux ou brisés,
ou qui fonctionnent tel que décrit dans le Manuel de
l’utilisateur.
Ŷ
Tout dommage au produit attribuable à un accident,
un incendie, une inondation ou une catastrophe
naturelle.
Ŷ
Tout dommage accessoire ou indirect, causé par des
défaillances possibles de l’appareil.
Ŷ
Les défectuosités ou les dommages causés par une
utilisation de l’appareil à des températures situées
sous le point de congélation.
Ŷ
Tout dommage causé après la livraison.
Ŷ
Tout produit auquel il n’est pas possible d’accéder
pour effectuer les réparations nécessaires.

32 49-3000217 Rev 2
SOUTIEN AU CONSOMMATEUR
Soutien au consommateur
Site Web de GE Appliances
Vous avez une question ou vous avez besoin d’aide pour votre appareil électroménager? Visitez le site Web de
GE Appliances 24 heures par jour, tous les jours de l’année! Vous pouvez aussi y trouver d’autres formidables produits
GE Appliances et tirer avantage de tous nos services d’assistance en ligne. Au Canada : ElectromenagersGE.ca/fr.
Enregistrez votre électroménager
Enregistrez votre nouvel appareil en ligne au moment qui vous convient le mieux! L’enregistrement de votre produit
dans les délais prescrits permet une meilleure communication et un service rapide, selon les modalités de votre
garantie, si besoin est. Vous pouvez également envoyer par courrier la carte d’enregistrement pré-imprimée qui se
trouve dans l’emballage de votre appareil.
Au Canada : Prodsupport.mabe.ca/crm/Products/ProductRegistration.aspx.
Service de réparation
Un service de réparation expert GE Appliances se trouve à quelques pas de chez vous. Rendez-vous sur notre site
et programmez, à votre convenance, une visite de réparation à n’importe quel jour de l’année.
Au Canada : electromenagersge.ca/fr/soutien/demande-de-service ou composez le 800.561.3344.
Prolongation de garantie
Procurez-vous une prolongation de garantie GE Appliances et informez-vous des rabais spéciaux en vigueur pendant
la durée de votre garantie. Vous pouvez vous la procurer en ligne en tout temps. Les services GE Appliances seront
toujours disponibles après l’expiration de la garantie.
Au Canada : electromenagersge.ca/fr/soutien/achat-d-une-garantie-prolongee ou composez le 866.277.9842.
Connectivité à distance
Pour de l’assistance concernant la connectivité au réseau sans fil (pour les modèles équipés de cette fonction), visitez
notre site Web au http://www.electromenagersge.ca/fr/nouvelles-et-promotions/nouveautes/wifi-connect/.
Pièces et accessoires
Les personnes ayant les compétences requises pour réparer elles-mêmes leurs appareils peuvent recevoir
directement à la maison des pièces ou accessoires (les cartes VISA, MasterCard et Discover sont acceptées).
Commandez en ligne 24 heures par jour.
Au Canada : Electromenagersge.ca/fr/produits/filtres-et-accessoires ou composer le 800.661.1616.
Les instructions contenues dans le présent manuel comportent des procédures que tout utilisateur peut
effectuer. Les autres types de réparation doivent généralement être confiés à un technicien qualifié. Usez de
prudence : une réparation ou un entretien mal effectués peuvent rendre l’utilisation de l’appareil dangereuse.
Communiquez avec nous
Si vous n’êtes pas satisfait du service après-vente de GE Appliances, communiquez avec nous depuis notre site Web
en fournissant tous les détails dont votre numéro de téléphone, ou écrivez à :
Au Canada : Director, Consumer Relations, MC COMMERCIAL INC. | Suite 310, 1 Factory Lane | Moncton, N.B. E1C 9M3
electromenagersge.ca/fr/contactez-nous.
Imprimé en Chine

LAVADORAS
MANUAL DEL
PROPIETARIO
E INSTALACIÓN
Escriba el número de modelo
y de serie aquí:
N.º de modelo # __________
N.º de serie # ____________
Usted puede encontrarlos
en una etiqueta dentro de
la puerta.
INFORMACIÓN
DE SEGURIDAD .....................3
USAR LA LAVADORA
Puesta en Marcha ......................5
Conexión WiFi ........................14
Carga ...............................15
CUIDADO Y LIMPIEZA ............ 16
INSTRUCCIONES DE
INSTALACIÓN .......................18
Cambiar el sentido de apertura de la puerta
(Opcional) ...........................23
CONSEJOS PARA LA SOLUCIÓN
DE PROBLEMAS ..................27
GARANTÍA LIMITADA ............31
ATENCIÓN AL CLIENTE ..........32
GE es una marca registrada de General Electric Company. Fabricado bajo licencia de marca.
GFW850
GFW650
GFW550
GFW510
ESPAÑOL
0020508637A 49-3000217 Rev 2 10-19 GEA

2 49-3000217 Rev 2
GRACIAS POR HACER QUE GE APPLIANCES SEA PARTE DE SU HOGAR.
Ya sea que haya crecido usando GE Appliances, o que ésta es su primera vez, nos complace
tenerlo en la familia.
Sentimos orgullo por el nivel de arte, innovación y diseño de cada uno de los electrodomésticos de
GE Appliances, y creemos que usted también. Entre otras cosas, el registro de su electrodoméstico
asegura que podamos entregarle información importante del producto y detalles de la garantía
cuando los necesite.
Registre su electrodoméstico GE ahora a través de Internet. Sitios Web y números telefónicos útiles
están disponibles en la sección de Soporte para el Consumidor de este Manual del Propietario.
También puede enviar una carta en la tarjeta de inscripción preimpresa que se incluye con
el material embalado.

49-3000217 Rev 2 3
INFORMACIÓN DE SEGURIDAD
INFORMACIÓN IMPORTANTE DE SEGURIDAD
LEA TODAS LAS INSTRUCCIONES ANTES DE USAR
LEA Y GUARDE ESTAS INSTRUCCIONES
Para reducir el riesgo de muerte, incendio, explosión, descargas eléctricas o lesiones sobre
las personas al usar su electrodoméstico, siga las precauciones básicas, incluyendo lo
siguiente
Ŷ
Lea todas las instrucciones antes de usar este electrodoméstico.
Ŷ
Siga todas las instrucciones y advertencias de cuidado de tejidos para evitar el derretimiento de las prendas o
daños al aparato.
Ŷ
NO lave ni seque prendas que en forma previa hayan sido secadas, lavadas, mojadas o manchadas con gasolina,
solventes de limpieza en seco, u otras sustancias inflamables o explosivas, ya que despiden vapores que se podrían
encender o explotar.
Ŷ
NO agregue gasolina, solventes de limpieza en seco, u otras sustancias inflamables o explosivas al agua de
lavado. Estas sustancias despiden vapores que se podrían prender fuego o explotar
.
Ŷ
Bajo ciertas condiciones, se podrá producir gas de hidrógeno en un sistema de agua caliente que no fue usado por
2 semanas o más. EL GAS DE HIDRÓGENO ES UN EXPLOSIVO. Si el sistema de agua caliente no fue usado
por dicho período, antes de usar una lavadora, abra todos los grifos de agua caliente y deje que corra agua de
cada uno durante varios minutos. Esto liberará cualquier gas de hidrógeno acumulado. Debido a que el gas es
inflamable, NO fume ni use una llama abierta durante este proceso
.
Ŷ
NO permita que los niños jueguen sobre o dentro de este electrodoméstico. Cuando el electrodoméstico se
use cerca de niños, será necesario supervisarlos de cerca
.
Antes de dejar la lavadora fuera de servicio o de
deshacerse de ésta, quite la puerta o la tapa
. Si no se siguen estas instrucciones, se podrá producir la muerte o
lesiones personales.
Ŷ
NO introduzca las manos en el electrodoméstico si el tambor o agitador se encuentra en movimiento a fin de evitar
enredos accidentales.
Ŷ
NO instale ni guarde este electrodoméstico donde quede expuesto a los factores climáticos
.
Ŷ
NO manipule indebidamente los controles,
reparar ni reemplazar cualquier parte del electrodoméstico o realizar
cualquier otro trabajo técnico, a menos que esto sea específicamente recomendado en las instrucciones de
mantenimiento del usuario o en instrucciones publicadas sobre reparaciones del usuario, que entienda y para
las cuales posea las destrezas necesarias.
Ŷ
NO se trepe ni se pare sobre la unidad.
Ŷ
NO intente usar este electrodoméstico si se encuentra dañado, funcionando mal, parcialmente desensamblado, o si
tiene partes faltantes o rotas, incluyendo un cable o enchufe dañado
.
Ŷ
Desenchufe el electrodoméstico o apague el disyuntor antes de realizar el servicio técnico. Presionar el botón
Power (Encendido) NO desconecta el encendido.
Ŷ
Para acceder a las instrucciones de conexión a tierra, lea los “REQUISITOS ELÉCTRICOS” ubicados en las
Instrucciones de Instalación
.
ADVERTENCIA

4 49-3000217 Rev 2
LEA Y GUARDE ESTAS INSTRUCCIONES
INFORMACIÓN DE SEGURIDAD
INFORMACIÓN IMPORTANTE DE SEGURIDAD
LEA TODAS LAS INSTRUCCIONES ANTES DE USAR
INSTALACIÓN CORRECTA
La lavadora se debe instalar y colocar correctamente de acuerdo con las instrucciones de instalación, antes de utilizarla.
Ŷ
Asegúrese de que la manguera de agua caliente esté conectada a la válvula “H” y que la manguera de agua
fría esté conectada a la válvula “C”.
Ŷ
Instale o almacene la lavadora en un lugar donde no esté expuesta a temperaturas bajo cero ni a las
inclemencias climáticas, ya que esto puede provocar daños irreversibles e invalidar la garantía.
Ŷ
Conecte correctamente a tierra la lavadora de conformidad con todos los códigos y ordenanzas regulatorias.
Siga la información de Instrucciones de instalación.
Ŷ$VHJ~UHVHGHTXHODODYDGRUDHVWpFRUUHFWDPHQWHQLYHODGD\TXHVXVSDWDVHVWpQDMXVWDGDVGHPRGRTXHOD
unidad se encuentre estable.
Ŷ6HUHFRPLHQGDXQDH[WHQVLyQRSFLRQDOGHODPDQJXHUDGHGUHQDMHSDUDGHVFDUJDVHQDOWXUDVGH´D´
Ŷ
GE Appliances recomienda enfáticamente el uso de piezas especificadas de fábrica. A continuación se
encuentra una lista de mangueras de fábrica disponibles para la compra. Estas mangueras están fabricadas y
probadas para cumplir con las especificaciones de GE Appliances.
Ŷ
GE Appliances recomienda enfáticamente el uso de mangueras nuevas de suministro de agua. Las
mangueras se desgastan con el tiempo y deben reemplazarse cada 5 años para reducir el riesgo de fallas en
las mangueras y daños provocados por el agua.
PIEZAS Y ACCESORIOS
Solicítelos on-line hoy mismo a GEApplianceparts.com,
las 24 horas del día o por teléfono al 877.959.8688 en
horario normal de trabajo.
Número de Pieza Accesorio
:;; 0DQJXHUDVSDUDODYDGRUDGHSLHVGH
DFHURLQR[LGDEOHFRQFRGRVGH
unidades
:+; .LWGHH[WHQVLyQGHPDQJXHUDGH
desagüe para lavadora
:;; /LPSLDGRU7LGH
®
para lavadoras*
PM7X2 Bandeja de piso para lavadora de
escala reducida universal
*)$.,71 .LWGH6RSRUWHSDUD$SLODUSDUDDSLODUOD
secadora en la parte superior)
*)36 3HGHVWDOGHGHDQFKRFRQFDMyQ
Blanco
*)33 3HGHVWDOGHGHDQFKRFRQFDMyQ
Colores
*Tide
®
es una marca registrada de Procter & Gamble.
CUANDO NO ESTÉ EN USO
Ŷ
Cierre las llaves de paso minimizar las fugas en caso de que se produzca una rotura o grieta. Compruebe el
HVWDGRGHODVPDQJXHUDVGHOOHQDGR*($SSOLDQFHVUHFRPLHQGDHOFDPELRGHODVPDQJXHUDVFDGDDxRV
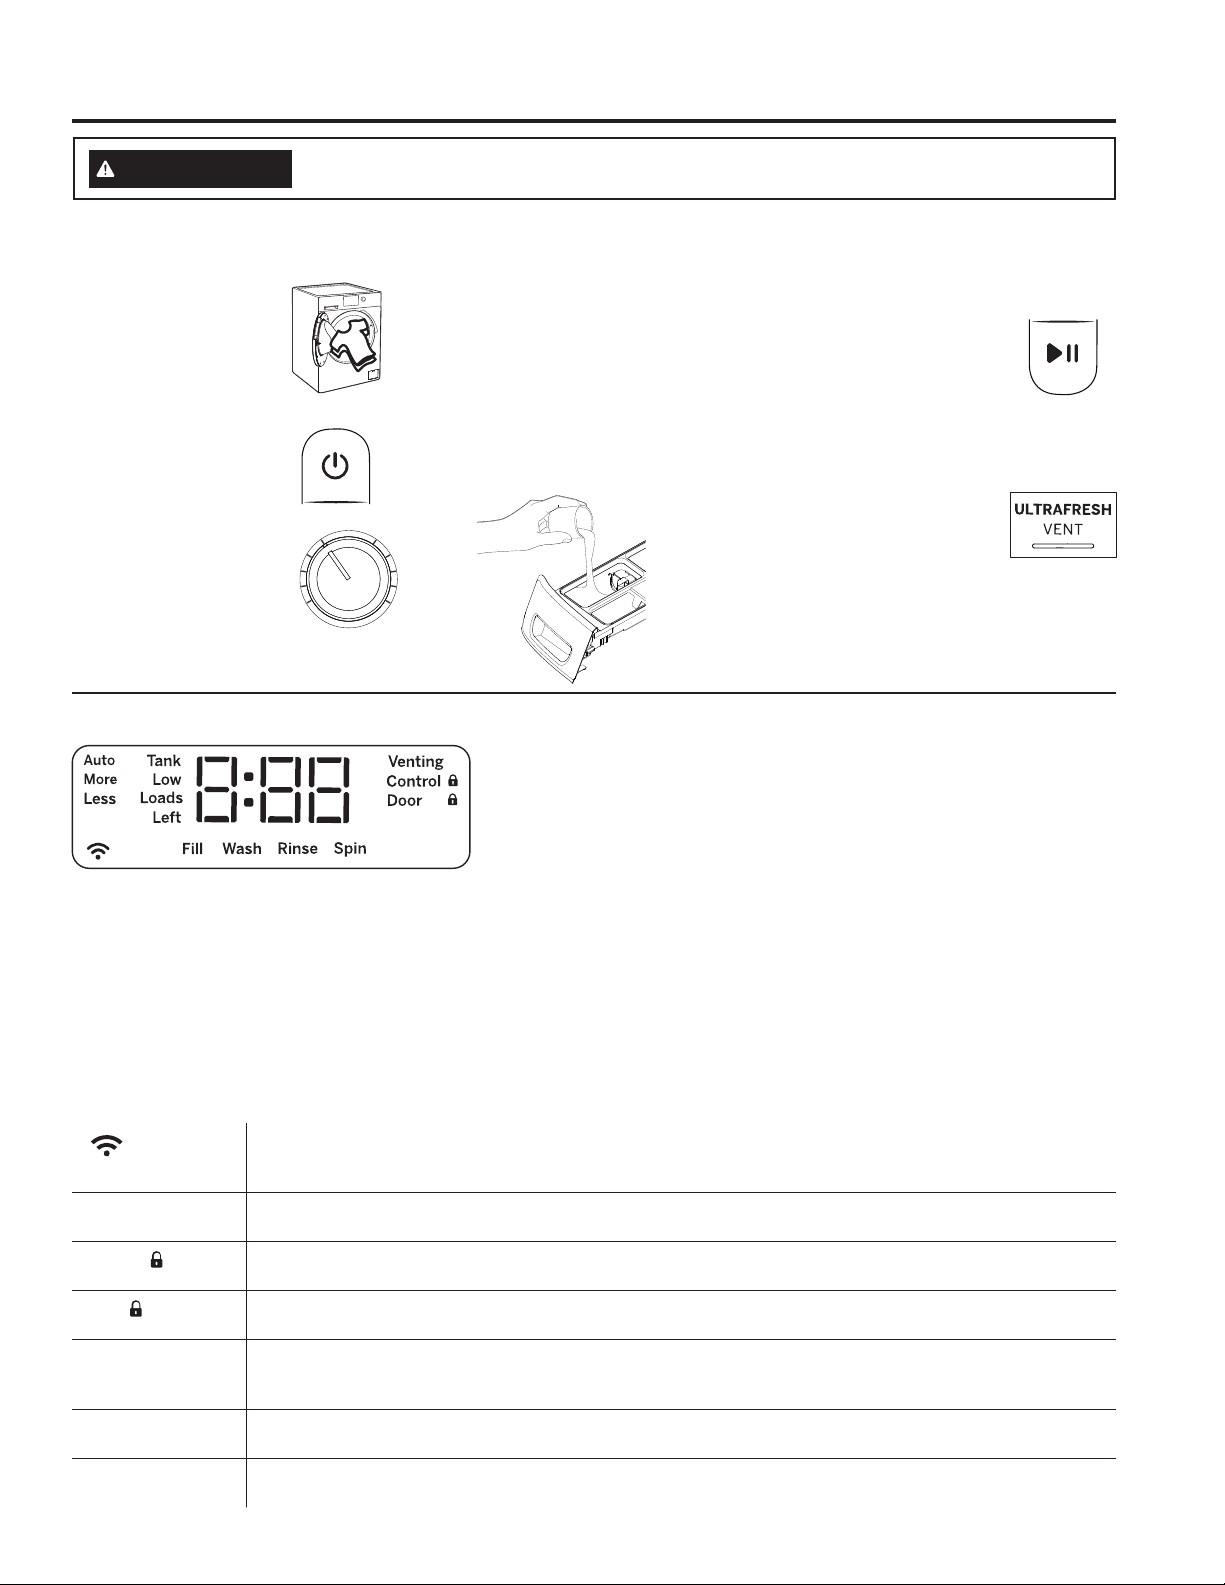
49-3000217 Rev 2 5
USAR LA LAVADORA
Es posible que las funciones y apariencias varíen con relación a su modelo a lo largo del manual.
Para reducir el riesgo de incendios, descargas eléctricas o heridas, lea las INFORMACIÓN
IMPORTANTE DE SEGURIDAD antes de utilizar este electrodoméstico.
ADVERTENCIA
Paso 4
Paso 5
Paso 1
Cargue la ropa en la
lavadora y cierre la
puerta.
Si la pantalla se
encuentra oscura,
presione el botón Power
(encendido/apagado)
o gire la perilla para
“despertar” la pantalla.
Gire la perilla hasta el
ciclo deseado.
Abra el dispensador y agregue
detergente, blanqueador y
suavizante para tela, según lo desee.
Los modelos con SmartDispense™
sólo requieren que seleccione la
tecla SmartDispense (Dispensado
Inteligente) una vez que el tanque se
encuentre lleno.
Presione Start (Inicio) para
comenzar el ciclo de lavado.
La máquina pesará la ropa y
agregar la cantidad de agua
correspondiente. Una vez
finalizado el ciclo de lavado, la
puerta se destrabará.
Paso 2
Paso 3
(Las opciones de los ciclos
varían de acuerdo al modelo)
Inicio rápido:
Pantalla y las luces de estatus (Las características y apariencia variarán)
Presione para “activar” la pantalla. Si la pantalla está activa, púlselo para poner la lavadora en modo de espera.
NOTA: El tiempo del ciclo es afectado por el tiempo que toma llenar la lavadora. Esto depende de la presión del agua en su
hogar. El temporizador “inteligente” “registra” la cantidad de tiempo que tarda en llenarse la lavadora y ajusta el tiempo total de
forma consecuente.
Si un problema de desbalance es detectado por la lavadora, la luz de Spin (Centrifugado) titilará durante la parte restante del
ciclo y permanecerá iluminada durante un período de tiempo corto luego de que se complete el ciclo. . Cuando esto sucede, la
lavadora está realizando acciones para corregir el problema de desbalance y completar el ciclo normalmente. En algunos casos,
es posible que la lavadora no logre equilibrar la carga y que gire a toda velocidad. Si observa que la carga está más mojada que
lo habitual al finalizar el ciclo, redistribuya la carga de forma pareja en el tubo de la lavadora y haga correr un ciclo de Rinse &
Spin (Enjuague & Centrifugado).
Además, esta pantalla mostrará:
Puesta en Marcha
(WiFi)
Permitirá a tu aparato comunicarse con su teléfono celular por control remoto y recibir notificaciones.
Permanecerá encendido siempre que la lavadora esté encendida y que éste sea conectado. Parpadeará
durante el proceso de puesta en marcha o si pierde conexión con la red.
Venting La ventilación parpadeará para indicar que usted seleccionó la función ULTRAFRESH VENT (Ventilación
Ultra Fresca) al final del ciclo. Luego permanecerá iluminada una vez seleccionada hasta haber completado la ventilación.
Control
Los controles de la lavadora están bloqueados cuando esté ícono se ilumina. Se deberá mantener presionada
la tecla Control Lock (Bloqueo del Control) para desbloquear los controles.
Door
Este ícono se iluminará mientras la puerta es bloqueada y parpadeará mientras la lavadora se encuentre
en el proceso de pausa y luego de desbloqueo.
Auto, More, Less
(en algunos modelos)
SmartDispense (Dispensado Inteligente) agregará una dosis de detergente de forma automática, de acuerdo
FRQHOSHVR\HOQLYHOGHVXFLHGDGGHODURSD8VWHGSXHGHDMXVWDUHVWDIXQFLyQSDUDXQDGRVLVGHXQ0È6
RXQ0(126GHGHWHUJHQWHRSDUD$3$*$5GHIRUPDPDQXDOODGRVLVGHGHWHUJHQWH
Tank Low
(en algunos modelos)
Se exhibirá cuando sea necesario volver a llenar el tanque del dispensador inteligente. Típicamente, las
SULPHUDVOXFHVVHHQFLHQGHQFXDQGRKD\DSUR[LPDGDPHQWHHQWUH\FDUJDVGHGHWHUJHQWHUHVWDQWHV
Loads Left
(en algunos modelos)
Exhibe el número estimado de cargas de lavado restantes en relación a la cantidad de detergente que hay en
el tanque del dispensador inteligente.
Paso 6
Una vez completado el ciclo
de lavado y que la ropa haya
sido descargada, seleccione
ULTRAFRESH VENT™ para
ayudar a eliminar el exceso
de humedad en su lavadora, de
modo que pueda cerrar la puerta.
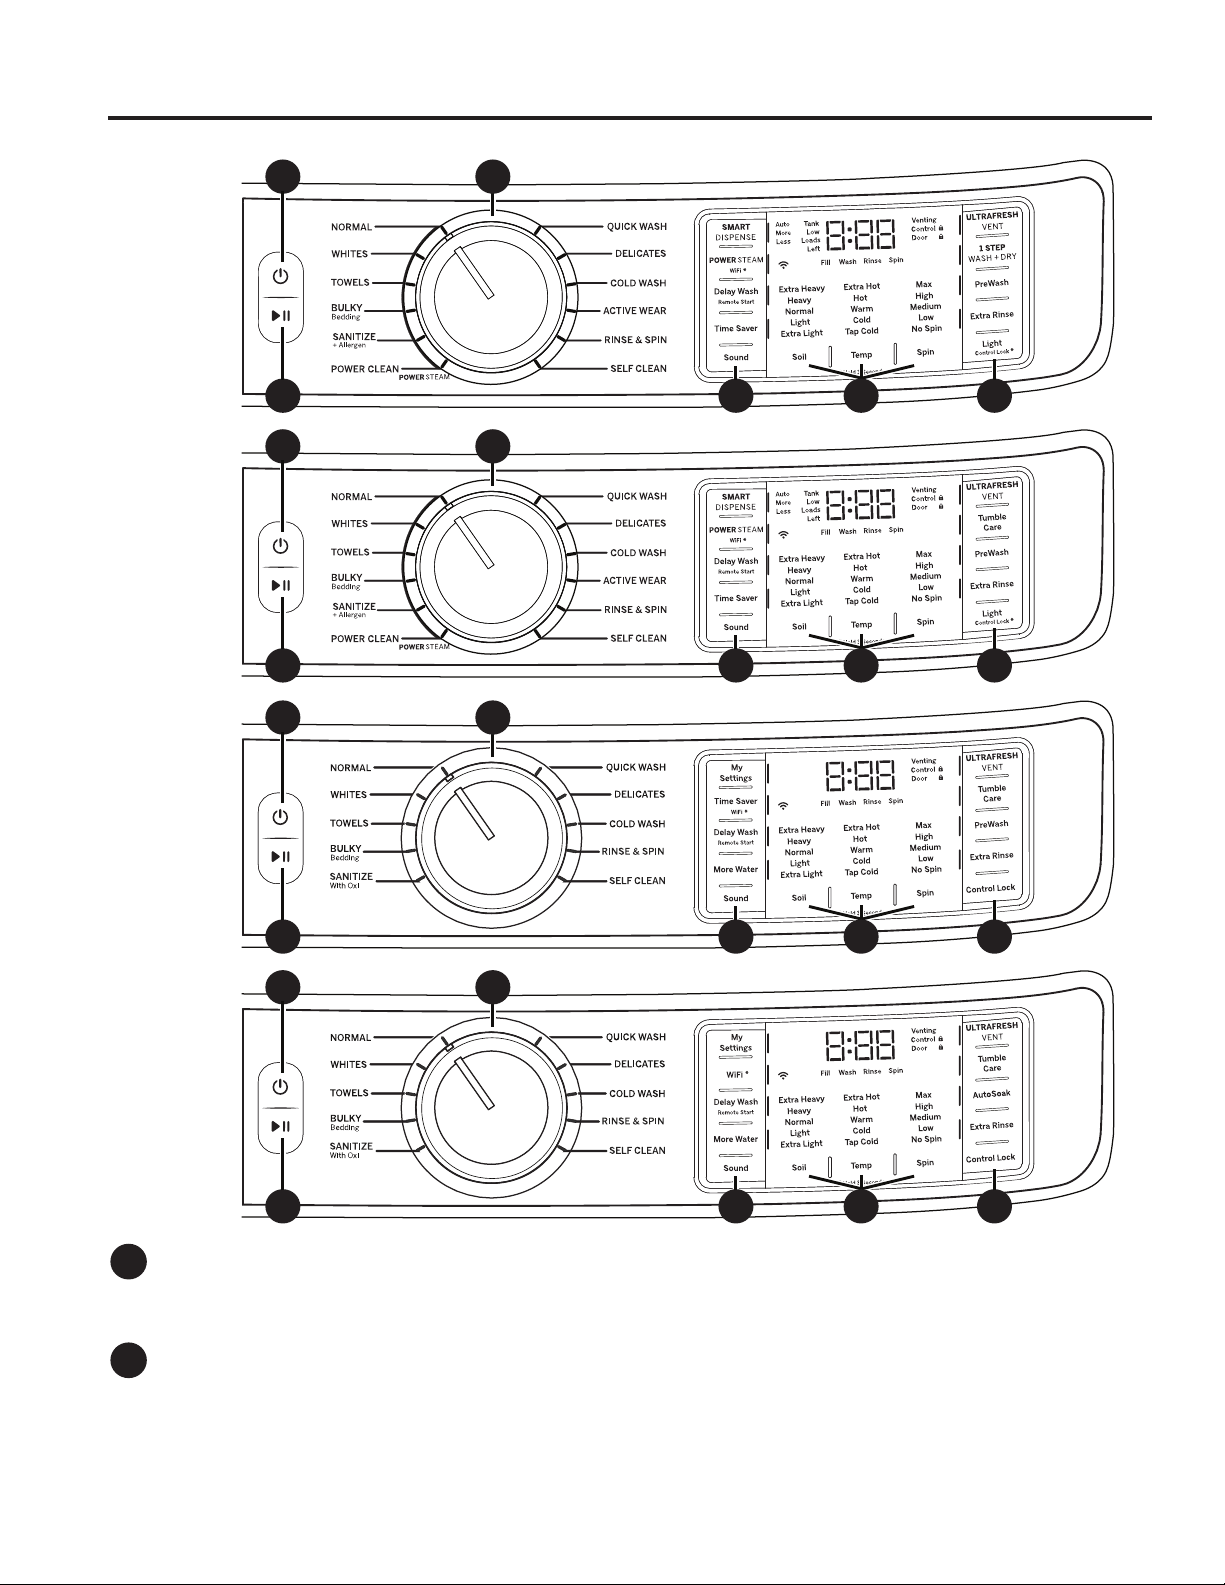
49-3000217 Rev 2
Power (Encendido/Apagado)
Presione para “activar” la pantalla. Si la pantalla está activa, púlselo para poner la lavadora en modo de espera “Off” (Apagado).
NOTA: Presionar Power (Encendido) no desconecta el electrodoméstico del suministro de corriente.
Start and Pause (Inicio y Pausa)
Pulse este botón para iniciar un ciclo de lavado. Si la lavadora está en funcionamiento, al pulsarlo una vez, la lavadora
se detendrá y se desbloqueará la puerta. La puerta tardará unos segundos en destrabarse después de presionar Pause
(Pausa). Vuelva a pulsar el botón para reiniciar el ciclo de lavado.
NOTA: Si la lavadora está detenida y el ciclo no se reinicia en 15 minutos, se cancelará el ciclo de lavado actual.
NOTA: La lavadora realiza revisiones automáticas del sistema después de presionar el botón Start (Inicio). El flujo de agua
se iniciará en 45 segundos o antes. Podrá escuchar la puerta al trabarse y destrabarse y la bomba se activa antes de que
comience a fluir el agua.
A
B
Puesta en Marcha
USAR LA LAVADORA
Las características y apariencia variarán.
CA
B E ED
Modelos:
GFW850
CA
B E ED
Modelos:
GFW650
CA
B E ED
Modelos:
GFW550
CA
B E ED
Modelos:
GFW510

49-3000217 Rev 2 7
Puesta en Marcha
USAR LA LAVADORA
C
Ciclos de lavado
Los ciclos de lavado se han optimizado para tipos específicos de cargas de lavado. El siguiente cuadro le ayudará a
encontrar la mejor combinación entre las prendas que serán lavadas y las mejores configuraciones de ciclos de lavado. Para
un rendimiento óptimo, seleccione el ciclo más conveniente para las prendas que serán lavadas. Las selecciones y opciones
en negrita son configuraciones sugeridos para ese ciclo. Delay Wash/Remote Start está disponible en todos los ciclos.
Ciclo de
Lavado
Ítems a Lavar
Nivel de
Suciedad
Temperatura de
Lavado
Selección de
Giro
Opción disponible
Normal Ciclo de uso normal, regular
o típico para lavar hasta
una carga completa de ropa
de algodón con un nivel de
suciedad normal.
Extra Pesada
Pesada
Normal
Liviana
Extra Liviana
Extra Caliente
Caliente
Tibia
Fría
Ligeramente Fría
Max
Alto
Medio
Prelavado* o RemojoAuto.*
Energía de Vapor*
Ahorro de Tiempo*
Enjuague Adicional
Cuidado en el Giro* o
1 Step Wash + Dry*
Blancos Blancos y ropa de casa. Extra Pesada
Pesada
Normal
Liviana
Extra Liviana
Extra Caliente
Caliente
Tibia
Fría
Ligeramente Fría
Max
Alto
Medio
Bajo
Prelavado* o RemojoAuto.*
Energía de Vapor*
Ahorro de Tiempo*
Mas agua*
Enjuague Adicional
Cuidado en el Giro* o
1 Step Wash + Dry*
Toallas Toallas, sábanas, fundas
de almohadas y paños de
cocina.
Extra Pesada
Pesada
Normal
Liviana
Extra Liviana
Caliente
Tibia
Fría
Ligeramente Fría
Max
Alto
Medio
Bajo
Prelavado* o RemojoAuto.*
Energía de Vapor*
Ahorro de Tiempo*
Mas agua*
Enjuague Adicional
Cuidado en el Giro* o
1 Step Wash + Dry*
Ropa de Cama
Voluminosa
Abrigos de cama grandes,
colchas, fundas de
colchones, bolsas de
dormir e ítems voluminosos
similares.
Extra Pesada
Pesada
Normal
Liviana
Extra Liviana
Caliente
Tibia
Fría
Ligeramente Fría
Max
Alto
Medio
Bajo
Prelavado* o RemojoAuto.*
Energía de Vapor*
Ahorro de Tiempo*
Mas agua*
Enjuague Adicional
Cuidado en el Giro* o
1 Step Wash + Dry*
Desinfección +
Alérgeno*
Ítems que no destiñen que se
encuentran muy sucios y es
necesario desinfectarlos.
Extra Pesada
Pesada
Extra Caliente Max
Alto
Medio
Bajo
Prelavado
Energía de Vapor*
Enjuague Adicional
Cuidado en el Giro* o
1 Step Wash + Dry*
Desinfectar
con Oxi*
Ítems que no destiñen y que
al encontrarse muy sucios es
necesario desinfectarlos.
Extra Pesada
Pesada
Extra Caliente Max
Alto
Medio
Bajo
Prelavado o Lavado
Automático
Energía de Vapor
Enjuague Adicional
Lavado Retrasado
Cuidado en el Giro
*Es posible que algunos ciclos y opciones no estén disponibles en algunos modelos.
NOTA:
Las temperaturas del agua del ciclo Sanitize + Allergen (Desinfectar + Alérgenos) NO PUEDEN ser modificadas. Este ciclo utiliza
XQDWHPSHUDWXUDHOHYDGDGHODJXD\XQFLFORGHODYDGRPiVSURORQJDGRDILQGHPDWDUiFDURVGHOSROYR\UHGXFLUHOGHODV
bacterias que comúnmente están presentes en las telas. Se incorporó una purga de la bomba y un enjuague prolongado con el
propósito de eliminar contaminantes y alérgenos, tales como la caspa de mascotas.
Las temperaturas del agua del ciclo Sanitize With Oxi (Desinfectar con Oxi) NO PUEDEN ser modificadas. Este ciclo, cuando
HVXVDGRFRQXQDGLWLYRGH2[LMXQWRFRQVXGHWHUJHQWHIXHGLVHxDGRSDUDHOLPLQDUHOGHODVEDFWHULDVHQFRQWUDGDVHQOD
lavandería hogareña. Mida el detergente y los productos de Oxi cuidadosamente. Al usar las cantidades adecuadas para una
carga grande y con mucha suciedad en lavadoras de carga frontal, siga las instrucciones de las etiquetas del detergente y del
SURGXFWRGH2[L/DFRQH[LyQGHOVXPLQLVWURGHDJXDFDOLHQWHGHODODYDGRUDGHEHUiEULQGDUXQPtQLPRGH)SDUDDVHJXUDUOD
efectividad de este ciclo.
Sólo los ciclos SANITIZE + Allergen (Desinfectar + Alérgeno) y SANITIZE With Oxi (Desinfectar con Oxi) fueron diseñados para
reunir los requisitos de efectividad sobre la desinfección.

8 49-3000217 Rev 2
Puesta en Marcha
USAR LA LAVADORA
C
Ciclos de lavado - Continuado
Los ciclos de lavado se han optimizado para tipos específicos de cargas de lavado. El siguiente cuadro le ayudará a
encontrar la mejor combinación entre las prendas que serán lavadas y las mejores configuraciones de ciclos de lavado. Para
un rendimiento óptimo, seleccione el ciclo más conveniente para las prendas que serán lavadas. Las selecciones y opciones
en negrita son configuraciones sugeridos para ese ciclo. Delay Wash/Remote Start está disponible en todos los ciclos.
Ciclo de
Lavado
Ítems a Lavar
Nivel de
Suciedad
Temperatura
de Lavado
Selección de
Giro
Opción disponible
Limpieza
Potente*
Para prendas con mucha
suciedad que requieren una
limpieza adicional y con mayor
potencia.
Extra Pesada
Pesada
Normal
Extra Caliente
Caliente
Tibia
Fría
Ligeramente
Fría
Max
Alto
Medio
Bajo
Prelavado
Energía de Vapor
Enjuague Adicional
Cuidado en el Giro* o
1 Step Wash + Dry*
Lavado
Rápido
Para pequeñas cantidades de
prendas con poca suciedad que
se necesitan de forma rápida.
Normal
Liviana
Extra Liviana
Caliente
Tibia
Fría
Ligeramente
Fría
Max
Alto
Medio
Bajo
Mas agua*
Enjuague Adicional
Cuidado en el Giro* o
1 Step Wash + Dry*
Prendas
Delicadas
Lencería y telas que requieren
cuidado especial con poca
suciedad.
Normal
Liviana
Extra Liviana
Tibia
Fría
Ligeramente
Fría
Medio
Bajo
Sin Giro
Prelavado* o RemojoAuto.*
Ahorro de Tiempo*
Mas agua*
Enjuague Adicional
Cuidado en el Giro* o
1 Step Wash + Dry*
Lavado en
Frío
Ciclo de uso normal, regular o
típico para lavar hasta una carga
completa de ropa de algodón con
un nivel de suciedad normal sólo
con agua fría.
Extra Pesada
Pesada
Normal
Liviana
Extra Liviana
Fría
Ligeramente
Fría
Max
Alto
Medio
Bajo
Prelavado* o RemojoAuto.*
Mas agua*
Enjuague Adicional
Cuidado en el Giro* o
1 Step Wash + Dry*
Ropa
Deportiva*
Ropa de uso atlético con
suciedad entre media y leve de
textiles técnicos o sintéticos.
Extra Pesada
Pesada
Normal
Liviana
Extra Liviana
Tibia
Fría
Ligeramente
Fría
Medio
Bajo
Sin Giro
Prelavado
Ahorro de Tiempo
Enjuague Adicional
Cuidado en el Giro* o
1 Step Wash + Dry*
Enjuagar y
Girar
Para ítems que sólo necesitan
enjuague use este ciclo.
Max
Alto
Medio
Bajo
Sin Giro
Mas agua*
Enjuague Adicional
Cuidado en el Giro* o
1 Step Wash + Dry*
Limpieza
Automática
Limpieza de residuos y olores
de la canasta No se deberá usar
este ciclo para lavar ropa.
Medio
*Es posible que algunos ciclos y opciones no estén disponibles en algunos modelos.

49-3000217 Rev 2
USAR LA LAVADORA
Puesta en Marcha
D
Configuraciones
Configuraciones individuales para el nivel de suciedad (Level), temperatura de agua (Temp) y Velocidad de centrifugado
(Spin) se pueden configurar desde el mínimo al máximo. En general, cuanto más arriba en la columna, más energía se
usará.
Soil (Suciedad)
Al cambiar el Soil level (Nivel de suciedad), aumenta o disminuye el tiempo de lavado con el fin de eliminar las distintas
cantidades de suciedad.
Para cambiar el Soil level (Nivel de suciedad), pulse el botón Soil level (Nivel de suciedad) hasta obtener el valor deseado. Puede
elegir entre los niveles de suciedad Extra Light (Muy poca), Light (Poca), Normal o Heavy (Mucha) en la mayoría de los ciclos.
Temp (Temperatura)
Ajuste este control para seleccionar la temperatura del agua adecuada para el ciclo de lavado. El agua de AutoSoak (Remojo
Automático
) y PreWash (Prelavado) enjuagado está siempre fría para poder reducir el consumo de energía y las manchas y
arrugas. Siga las indicaciones de la etiqueta de cuidado del fabricante del tejido al seleccionar la temperatura de lavado.
Para cambiar la temperatura de lavado, pulse el botón Temp (Temperatura) hasta obtener el valor deseado. Puede
elegirse entre Tap Cold (frío de grifo), Cold (frío), Warm (tibio), Hot (caliente) o Extra Hot (Muy caliente) en la mayoría de
los ciclos.
Por diseño, a fin de proteger las telas, no todas las temperaturas de lavado están disponibles para ciertos ciclos
de lavado.
El calentador interno permite temperaturas Extra Calientes en aquellos modelos equipados con capacidades de Vapor.
NOTA:/RVSULPHURVVHJXQGRVGHODWRPDGHDJXDVLHPSUHHVWiIUtD(VWDIXQFLyQSHUPLWHDFRQGLFLRQDUHOWHMLGR\
evitar que las manchas se adhieran a las prendas.
Spin (Centrifugado)
Al cambiar la Spin (Velocidad de centrifugado), cambia la velocidad final de centrifugado de los ciclos. Siga siempre las
indicaciones de la etiqueta de cuidado del fabricante de la prenda al cambiar la Spin (Velocidad de centrifugado).
Para cambiar la Spin (Velocidad de centrifugado), pulse el botón Spin (Velocidad de centrifugado) hasta obtener el valor
deseado. Puede elegirse entre No Spin (sin centrifugado), Low (bajo), Medium (medio), High (alto) o Max. Las velocidades
de centrifugado más rápidas no están disponibles en determinados ciclos, como Delicates (Delicadas) o Active Wear
(Ropa Deportiva). Con dichas velocidades, se elimina más agua de las prendas y se reduce el tiempo de secado, aunque
también puede aumentar la posibilidad de que se formen arrugas en algunos tejidos.
NOTA: Esta lavadora cuenta con un sistema dBT™ (Tecnología de Equilibrio Dinámico). Esta tecnología de sensor patentado
e incorporado permite un equilibrio en tiempo real del ciclo de giro para cada lavado, ahorrando tiempo y brindando un lavado
suave. Esto debería permitir tiempos de lavado más consistentes y una reducción general de ruido y vibraciones. Si la lavadora
experimenta cualquier ruido, vibración o temblor excesivos, simplemente Pause la lavadora, abra la puerta, y de forma manual
redistribuya la carga antes de reiniciar el ciclo.
E
Opciones
SMARTDISPENSE (Dispensado inteligente) (en algunos modelos)
Cuando sea seleccionada, de forma automática esta función agregará detergente al lavado, eliminando la necesidad de
agregar detergente a cada carga. Vea la sección SmartDispense para más detalles.
MY SETTINGS (Mis configuraciones) (en algunos modelos)
Para guardar el ciclo que prefiera, establezca los valores deseados para los ajustes de ciclo de lavado, nivel de suciedad,
velocidad de giro y temperatura de lavado y mantenga pulsado el botón My Settings (Mis configuraciones) durante 3
segundos. Sonará un pitido para indicar que el ciclo se ha guardado.
Para utilizar el ciclo personalizado, pulse el botón My Settings (Mis configuraciones) antes de lavar una carga.
Para cambiar el ciclo guardado, establezca los valores deseados y mantenga pulsado el botón My Settings (Mis
configuraciones) durante 3 segundos.
POWER STEAM (Energía de vapor) (en algunos modelos)
Power Steam (Energía de Vapor) le agrega vapor a la lavadora antes de que comience el ciclo de lavado como ayuda para
aflojar manchas en los ciclos NORMAL (Normal), WHITES (Blancos) TOWELS (Toallas), BULKY Bedding (Ropa de
Cama Voluminosa), SANITIZE+Allergen (Desinfectar + Alérgeno) y POWER CLEAN (Limpieza Potente).
Para usar:
1. Presione la tecla Power (Encendido) para “despertar” la lavadora y seleccione un ciclo de lavado.
2. Presione la tecla POWER STEAM (Energía de Vapor) para activar el vapor.
3. Presione la tecla Start/ Pause (Iniciar/ Pausar).
WiFi (puede ser una tecla compartida con otras opciones)
Mantenga presionada la WiFi, POWER STEAM/WiFi* or Time Save/WiFi* durante 3 segundos para activar esta función.
Para acceder a más detalles sobre cómo iniciar la conexión WiFi, consulte la sección de Conexión WiFi.

49-3000217 Rev 2
Puesta en Marcha
USAR LA LAVADORA
E
Opciones - Continué
Delay Wash (Retrasar lavar)/Remote Start (Inicio Remoto)
Usted puede retrasar el inicio de un ciclo de lavado hasta durante 24 horas o iniciar la lavadora de forma remota usando
la función Delay Wash/Remote Start (Retraso del Lavado/ Inicio Remoto). Presione la tecla para cambiar por horas o
mantenga presionada la tecla Delay Wash (Lavado con Retraso) para configurar la cantidad de tiempo que desea retrasar
el inicio del ciclo de lavado. Si conectó su lavadora al WiFi, la primera selección, “APP” (Aplicación), puede ser realizada
para activar el inicio remoto de su lavadora desde la aplicación de teléfono inteligente GE Appliance. O, si seleccionó un
tiempo de retraso en horas, la máquina realizará la cuenta regresiva y comenzará de forma automática luego de este
período. Presione la tecla Start (Iniciar) una vez que haya configurado la función Delay Wash (Lavado con Retraso) hasta
la configuración apropiada, a fin de activar esta función. Para cancelar esta opción, simplemente apague y encienda los
controles.
NOTA: Si olvida cerrar por completo la puerta, sonará una señal para recordárselo.
NOTA: Si abre la puerta durante la cuenta regresiva, la lavadora entrará en estado de pausa. Debe cerrar la puerta y
pulsar de nuevo Start (Iniciar) para reiniciar la cuenta regresiva.
Time Saver (Ahorro de Tiempo) (en algunos modelos)
Esta opción reduce el tiempo total del ciclo de lavado mediante la optimización del lavado, enjuague y centrifugado y / o
suavemente levantando el la temperatura de lavado para conseguir ropa limpiada más rápido. Esta opción está disponible en los
ciclos NORMAL (Normal), WHITES (Blanca), TOWELS (Toallas), DELICATES (Delicadas), BULKY Bedding (Prendas Voluminosas) and
ACTIVE WEAR (Ropa Informal). El tiempo total de lavado puede variar en función del ciclo elegido y las opciones seleccionadas.
Para usar:
1. Presione el encendido y seleccione un ciclo de lavado que posea Time Saver (Ahorro de Tiempo) como opción.
2. Presione el botón Time Saver (Ahorro de Tiempo) para reducir el tiempo total de lavado.
3. Presione el botón Start/Pause (Iniciar/Pausar).
More Water (Más Agua) (en algunos modelos)
Esta opción añade aproximadamente 3 galones a las partes de lavado y enjuague del ciclo. Si la opción es seleccionada
antes del inicio del ciclo, el agua será agregada desde el comienzo del ciclo del lavado y más tarde en el enjuague. Si
la opción es seleccionada durante la parte del lavado, se agregará más agua en este punto y luego en el enjuague.
Asimismo, si se selecciona la opción More Water (Más Agua) una vez que se haya completado la parte del lavado, la
lavadora agregará más agua al enjuague únicamente. Si se completó el lavado y el enjuague, la tecla More Water (Más
Agua) ya no estará activa.
ULTRAFRESH VENT System with ODORBLOCK
TM
(Ventilación Ultra Fresca Sistema con
ODORBLOCK
TM
)
El Sistema ULTRAFRESH VENT (Ventilación Ultra Fresca) con OdorBlock fue diseñada para eliminar el exceso de
humedad de la lavadora luego de un ciclo de lavado, a fin de evitar que se produzcan olores. Esta lavadora fue diseñada
para drenar agua al final del ciclo de forma más efectiva. Luego del ciclo de lavado, el usuario podrá entonces elegir
dejar la puerta abierta o seleccionar la función ULTRAFRESH VENT (Ventilación Ultra Fresca) como ayuda para secar la
canasta y otras áreas de la lavadora. El sistema OdorBlock cuenta con múltiples componentes, que son fabricados con
tecnología antimicrobial Microban®. *Microban es una tecnología antimicrobial segura y efectiva que durará toda la vida útil
de su lavadora. Para más información, por favor visite www.microban.com/ geappliances.
La función ULTRAFRESH VENT (Ventilación Ultra Fresca) estará disponible una vez que se haya completado el ciclo de
lavado y se haya retirado la ropa limpia. Una vez cerrada la puerta, se emitirá un tono de notificación y la tecla con LED
ULTRAFRESH VENT (Ventilación Ultra Fresca) parpadeará. Al presionar esta tecla, se iniciará la función ULTRAFRESH
VENT (Ventilación Utra Fresca).
Para seleccionar UTRAFRESH VENT (Ventilación Ultra Fresca) en cualquier otro punto, encienda la
lavadora, asegúrese de que el ciclo no esté funcionando de forma activa, y retire cualquier prenda de la
canasta, luego presione y libere la tecla ULTRAFRESH VENT (Ventilación Ultra Fresca), de modo que
el tono de notificación suene y la tecla LED ULTRAFRESH VENT (Ventilación Ultra Fresca) comience a
parpadear. Luego presione la tecla ULTRAFRESH VENT (Ventilación Ultra Fresca) nuevamente para iniciar dicha función.
Durante el funcionamiento de ULTRAFRESH VENT (Ventilación Ultra Fresca), la puerta permanecerá bloqueada y la
lavadora girará de forma intermitente en velocidades bajas hasta durante 8 horas.
Si se detectan prendas en la canasta durante la función ULTRAFRESH VENT (Ventilación Ultra Fresca), la lavadora
activará en cambio TUMBLE CARE (Cuidado en el Giro) o 1 STEP WASH + DRY (Lavado + Secado en 1 Paso),
dependiendo de la opción disponible para su modelo.
La función ULTRAFRESH VENT (Ventilación Ultra Fresca) podrá ser cancelada en cualquier momento presionando la tecla
POWER (Encendido), girando la perilla de ciclo, o presionando la tecla ULTRAFRESH VENT (Ventilación Ultra Fresca).
*Microban® es una marca registrada de Microban International, Ltd.

49-3000217 Rev 2 11
USAR LA LAVADORA
Puesta en Marcha
E
Opciones - Continué
1 STEP WASH + DRY (Lavado - secado en 1 paso) (en algunos modelos)
Esta opción está disponible en todos los ciclos, excepto Self Clean (Autolimpieza).
La función 1 STEP WASH + DRY (Lavado + Secado en 1 Paso) es usada para cargas pequeñas únicamente. Use esta
función cuando necesite que la ropa sea lavada, secada y esté lista para su uso a la mañana siguiente. Esta función hará
girar la ropa e introducirá una corriente de aire constante en el compartimiento de la lavadora luego de completar ciclos de
lavado selectos. Aunque la parte del secado está configurada en 8 horas, la ropa se podrá retirar en cualquier momento
presionando Pause (Pausa) o Power (Encendido) para cancelar el ciclo.
Tumble Care (Cuidado por agitacion) (en algunos modelos)
Hace girar sus prendas de forma periódica para que se mantengan frescas hasta durante 8 horas, hasta que el ciclo de
lavado se haya completado, a fin de reducir el nivel de arrugas y pliegues cuando no pueda mover la ropa a la secadora
de forma inmediata.
Al final del ciclo, en la pantalla aparecerá “END” (Fin), y luego de diez minutos se iniciará la función Tumble Care (Cuidado
por agitacion). Se puede detener en cualquier momento, presionando el botón Power (Encendido).
PreWash (Prelavado) (en algunos modelos)
El prelavado es un lavado adicional que se realiza antes del lavado principal. Utilícelo con prendas muy sucias o con
aquellas prendas en cuyas etiquetas de cuidado se recomiende realizar un prelavado. Asegúrese de añadir detergente
de alta eficacia líquido o en polvo o la sustancia de lavado correspondiente en la cubeta de prelavado. Las lavadoras
equipadas con SmartDispense (Dispensado Inteligente) agregarán de forma automática la cantidad apropiada de
detergente para lavado previo en base al tamaño de la carga.
PreWash (Prelavado) se debe de seleccionar antes de presionar Start (Iniciar).
La característica de PreWash (Prelavado) llenará la lavadora (agregando el detergente de prelavado), girará la ropa,
efectuará el desagüe y el centrifugado. Luego la lavadora realizará el ciclo de lavado seleccionado.
NOTA: En algunos ciclos especiales, el prelavado se selecciona automáticamente por defecto. Esta selección puede
modificarse en cualquier momento.
Auto Soak (Remojo Automático) (en algunos modelos)
Para remojar las prendas antes del ciclo de lavado. Esta opción comienza con un giro breve y luego procede a remojar la
ropa con agua y detergente durante un período de tiempo específico. Una vez completado, el ciclo continuará automática.
AutoSoak (Remojo Automático) deberá ser seleccionado antes de presionar la tecla de inicio. El tiempo de AutoSoak
(Remojo Automático)DJUHJDUiPLQXWRVDGLFLRQDOHVPLQXWRVKRUDRKRUDVDOWLHPSRGHODYDGRWRWDO6HXVDUi
detergente de alto nivel de eficiencia desde el compartimiento de lavado del dispensador para el período de AutoSoak
(Remojo Automático) y el ciclo de lavado principal.
Extra Rinse (Enjuague Adicional)
Esta opción permite un enjuague adicional durante un ciclo a fin de eliminar suciedad y detergente excesivo de cargas con
suciedad. Para seleccionarlo, presione el botón Extra Rinse (Enjuague Adicional).
NOTA: En el ciclo RINSE & SPIN (Enjuague y Giro), se podrá lograr un ciclo de drenaje y giro presionando el botón Extra
Rinse (Enjuague Adicional) hasta que el LED no haya luz.
Light (Luz del tambor) (en algunos modelos)
La luz del tambor se encenderá y permanecerá activada durante 5 minutos cuando la puerta se abra, se presione el botón
Start/Pause (Iniciar/Pausa), o presionando Light (Luz).
La luz del tambor puede apagarse presionando y sosteniendo el botón de Light (Luz).
Sound (Sonido)
Para cambiar el nivel de volumen de la señal de final del ciclo y el volumen del botón de presión, presione el botón tantas
veces como sea necesario hasta llegar al volumen deseado. Hay cuatro niveles de sonido, incluyendo apagado.
Control Lock (Light-Control Lock pad)/ Bloquear de control (Luz-Bloquear de control botón)
(según modelo)
Puede bloquear los controles para impedir que se realice cualquier selección. O bien puede bloquear los controles después
de haber iniciado un ciclo.
Con esta opción seleccionada, los niños no podrán poner en marcha la lavadora de manera fortuita aunque toquen el panel.
Para bloquear/desbloquear la lavadora, mantenga pulsado el botón Control Lock (Light-Control Lock pad)/ Bloquear de
control (Luz-Bloquear de control botón) durante 3 segundos. Se escuchará un sonido que indica la condición de bloqueado/
desbloqueado. El icono de bloqueo de los controles que aparece en la pantalla se encenderá cuando esté activado.
NOTA: El botón Power (Encendido/Apagado) puede seguir utilizándose cuando la lavadora está bloqueada.
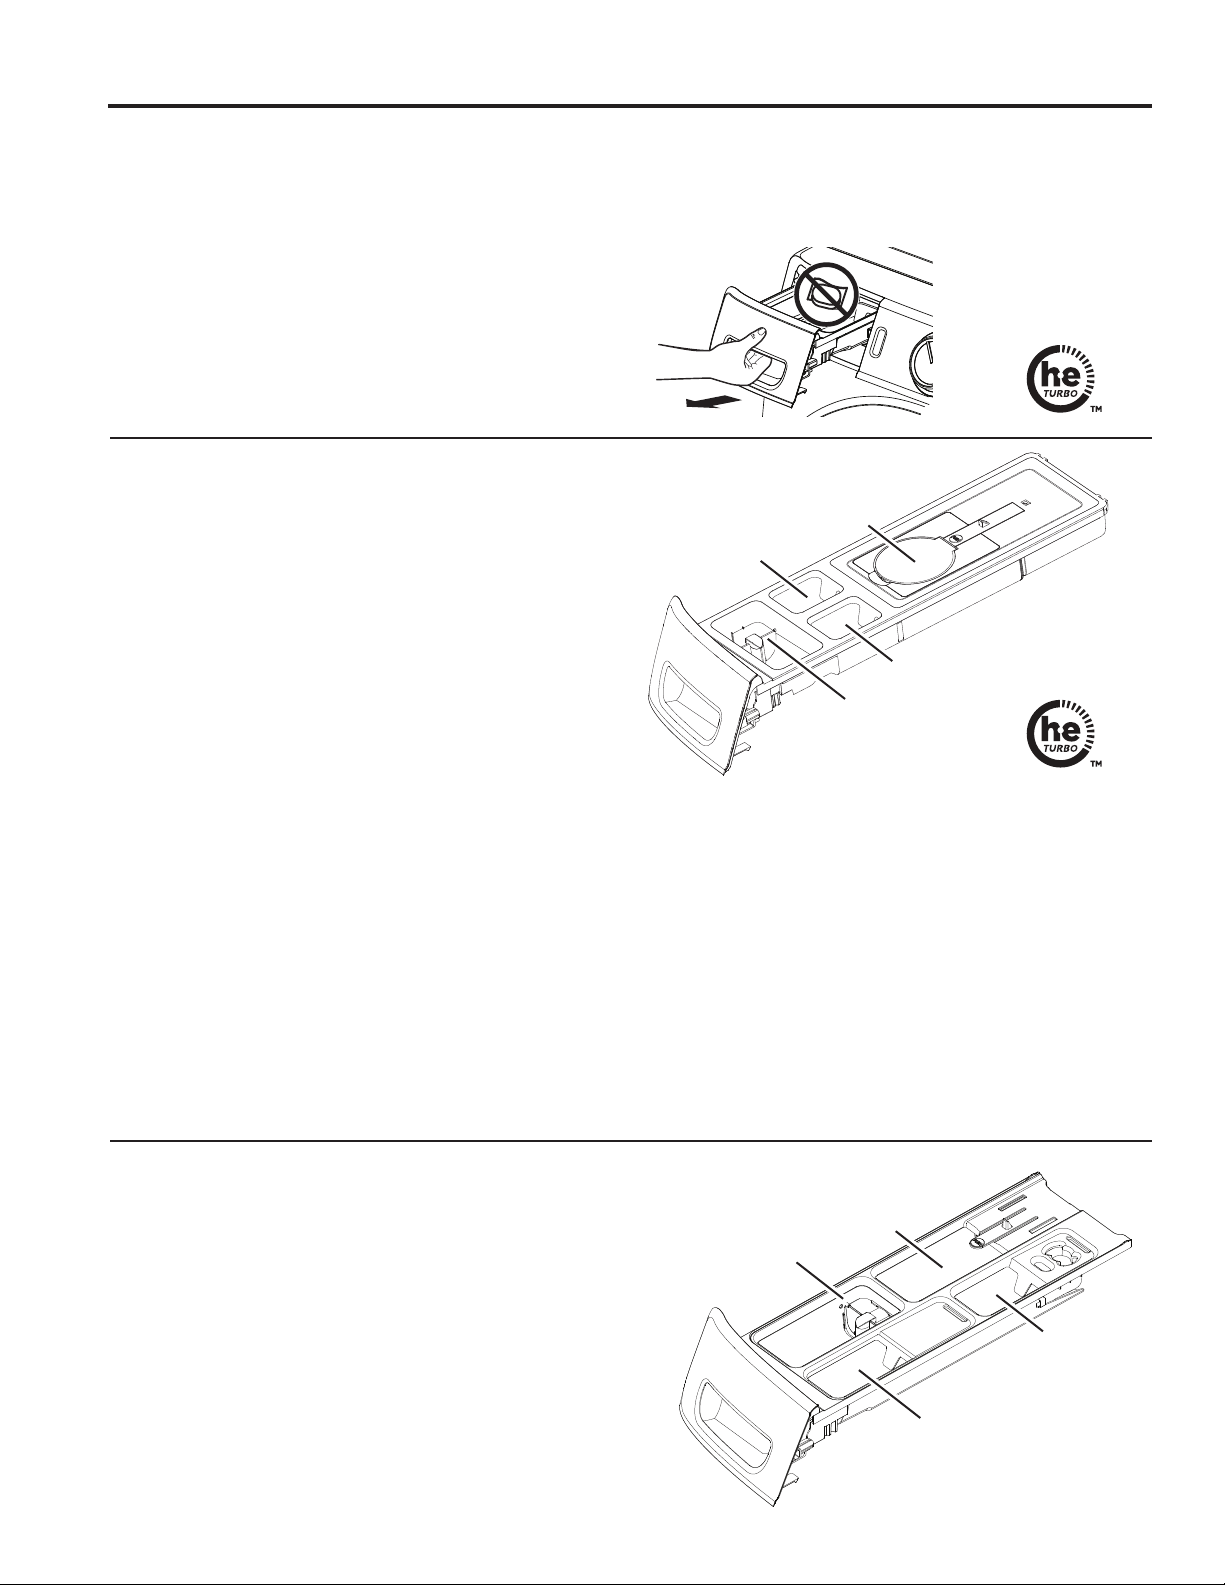
12 49-3000217 Rev 2
Puesta en Marcha
USAR LA LAVADORA
Compartimento de prelavado (algunos modelos)
Utilice sólo el compartimento de prelavado si va
a seleccionar el ciclo de PreWash (Prelavado) o
AutoSoak (Auto remojo) para prendas muy sucias.
Añada la cantidad de detergente o de sustancia de
prelavado al compartimento de prevalado situado en la
parte posterior izquierda del depósito de detergente.
•
El detergente o la sustancia de prelavado se añaden desde
el depósito durante el ciclo de PreWash (Prelavado) o
AutoSoak (Auto remojo) (en caso de que se seleccione).
• Es posible que haya que ajustar el uso de detergente
a la temperatura del agua, a la dureza de la misma, al
tamaño y al nivel de suciedad de la carga. Evite utilizar
demasiado detergente en la lavadora ya que puede
producir demasiado jabón y dejar restos en las prendas.
Suavizante
Selector de la aleta
para detergente
Blanqueador
Agregue PreWash (Lavado
Previo) a este compartimiento
Depósito de detergente
Abra lentamente el depósito de detergente tirando de él
hasta que se detenga. Tras añadir los productos de lavado,
ciérrelo despacio. Si cierra el depósito demasiado rápido,
puede provocar que la lejía, el suavizante o el detergente se
administren antes de tiempo.
Es posible que observe agua en los compartimentos de
detergente, lejía y suavizante al final del ciclo. Este es
el resultado de la acción de trasvase y forma parte del
funcionamiento normal de la lavadora.
NO coloque paquetes de detergente en el cajón dispensador.
NOTA: Use sólo detergentes y aditivos HE líquidos o en polvo
en el cajón dispensador. Los paquetes de detergente para
ropa sucia sólo se deberían agregar directamente al tubo de la
lavadora, siguiendo las instrucciones del fabricante.
Use sólo detergente
de alta
eficiencia HE
SmartDispense
TM
(algunos modelos)
When selected, this feature will automatically add
detergent to the wash, eliminating the need to add
detergent for each load.
La selección de la cantidad de detergente en el panel de
control estará en AUTO por omisión cuando se encienda la
lavadora por primera vez. Cuando se seleccione AUTO, la
cantidad de detergente necesario para cada carga de lavado
será determinada de forma automática en base al tamaño de
la carga que la máquina determine.
Para activar la función AUTO (Automático), la lavadora
dispensará aproximadamente 1.5 onzas de detergente para una
carga normal de 8 libras. Para otras cargas, hará un ajuste de
forma proporcional en base al tamaño de la carga y el tipo de
prendas. Si seleccionó LESS (Menos), la cantidad de detergente
VHUiUHGXFLGDHQXQ(VSRVLEOHTXHVHGHVHHHVWRFXDQGR
se cuente con detergente más concentrado o si cuenta con agua
muy blanda. Para cargas con mucha suciedad, es posible que
desee seleccionar MORE0iVSDUDDJUHJDUXQPiVGH
detergente que en el nivel AUTO (Automático).
NOTA: No todos los ciclos permitirán el uso de la función
SMART DISPENSE (Dispensador inteligente). Si la luz no
aparece iluminada y presionar el botón SMART DISPENSE
(Dispensador Inteligente) produce un pitido, entonces no es
posible usar la función SmartDispense (Dispensado Inteligente)
en el ciclo que fue seleccionado. Se deberá agregar el
detergente directamente en el compartimiento de detergente
para estos ciclos.
Si se desea seleccionar manualmente la cantidad de
detergente para una carga dada, esto puede ser realizado
presionando el botón SMART DISPENSE (Dispensador inteligente)
en el panel de control, a fin de seleccionar el detergente para
una carga Small (Pequeña) o Large (Grande). Small (Pequeña)
brindará menos detergente que la cantidad promedio y Large
(Grande) brindará más detergente que la cantidad promedio.
NOTA:Si se desea agregar detergente de forma manual
en una carga, dicho detergente deberá ser agregado
directamente a la canasta, y SMART DISPENSE
(dispensador inteligente) deberá estar en apagar en esa
carga específica.
La función de dispensado inteligente podrá ser deshabilitada
presionando el botón
SMART DISPENSE
(Dispensador de
Detergente) hasta que la función apagar sea seleccionada.
Use sólo detergente
de alta
eficiencia HE
Suavizante
Selector de
la Aleta para
Detergente
Blanqueador
Dispensador
inteligente
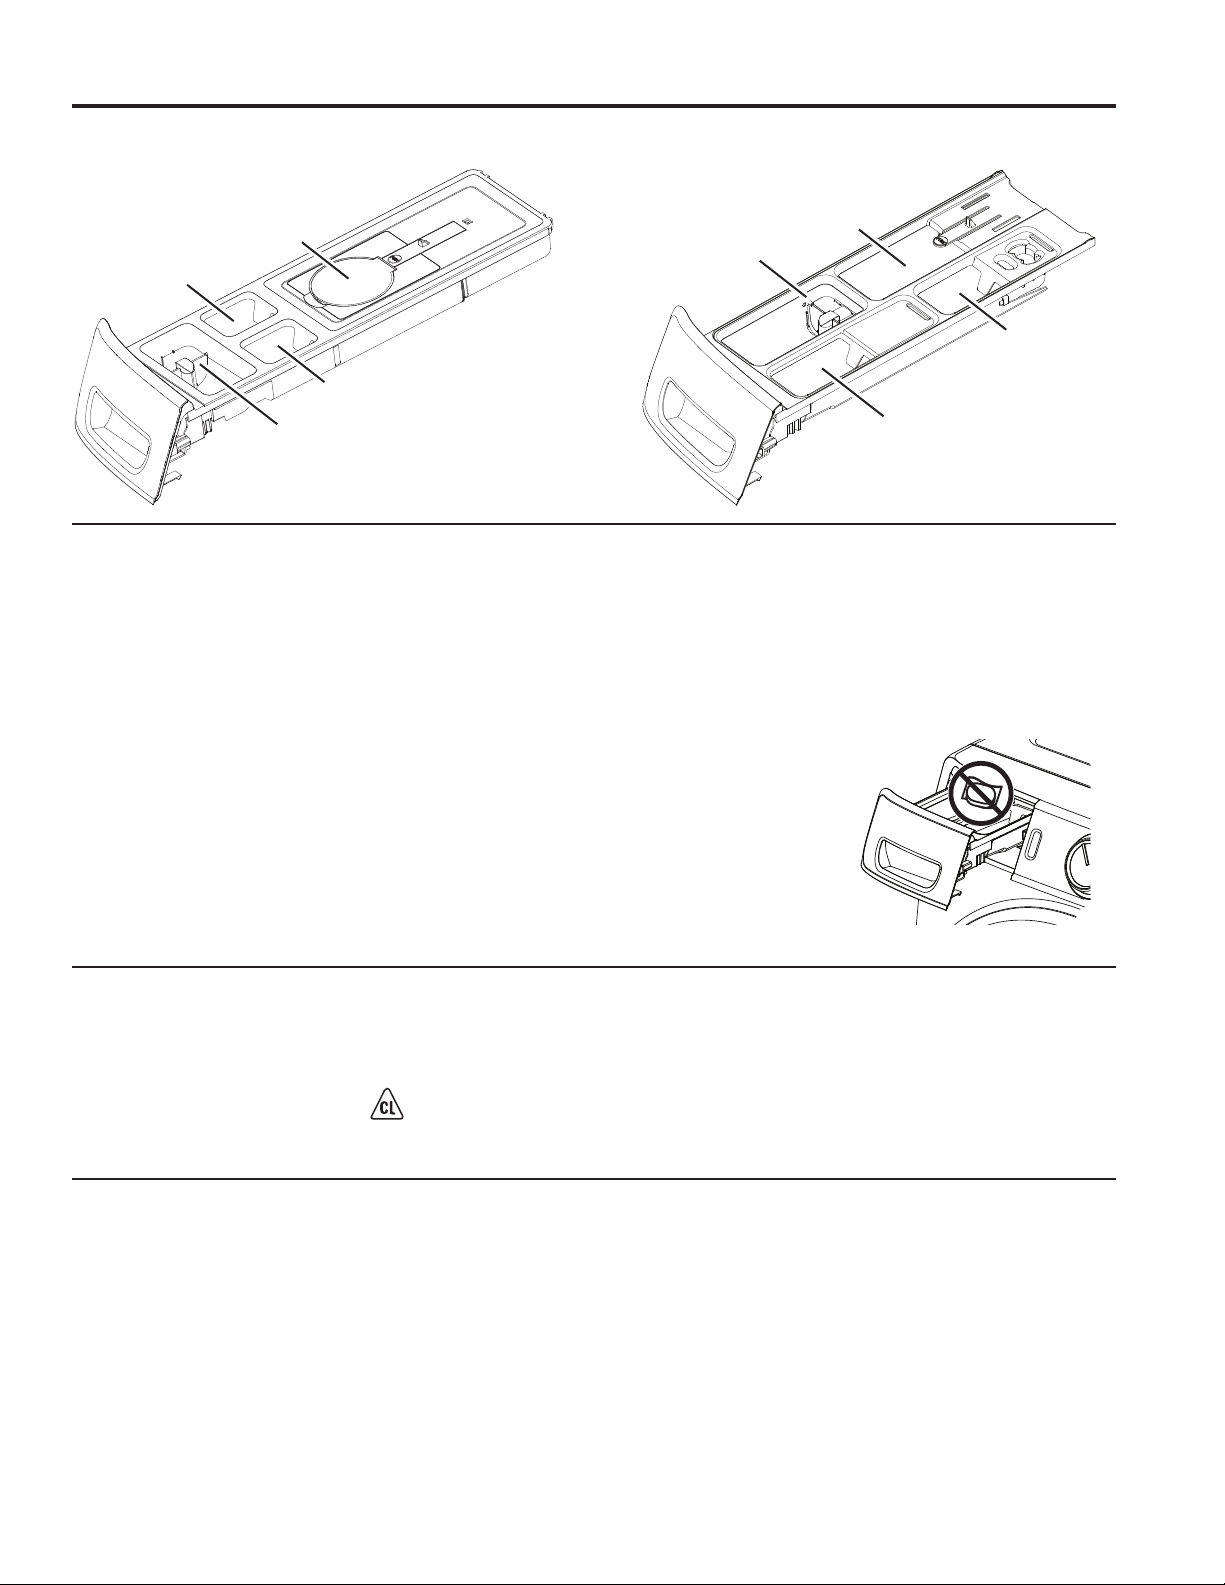
49-3000217 Rev 2 13
USAR LA LAVADORA
Puesta en Marcha
Suavizante
Selector de la aleta
para detergente
Blanqueador
Dispensador
inteligente
Suavizante
Selector de la aleta
para detergente
Blanqueador
Selector de la Aleta
para Detergente
En modelos con Dispensador
Automático:
En modelos sin Dispensador
Automático:
Compartimento para el detergente
Use sólo detergente con alto nivel de eficiencia en
esta lavadora. NO supere la línea MAX al colocar el
detergente con alto nivel de eficiencia. Use la cantidad
de detergente recomendada por el fabricante.
• Detergente en Polvo – Levante la aleta para el
detergente en polvo. Esto deberá ser realizado para
disolver y descargar el detergente de forma apropiada.
Siga las instrucciones del fabricante de detergente al
medir la cantidad de polvo a usar.
• Detergente Líquido – Mantenga la aleta hacia abajo
para el detergente líquido. Esto retiene el detergente
líquido hasta que se descarga automáticamente al
comenzar el ciclo de lavado. Siga las instrucciones del
fabricante de detergente al medir la cantidad de líquido
a usar.
Es posible que el uso del detergente se deba ajustar
con relación a la temperatura del agua, dureza del agua,
tamaño y nivel de suciedad de la carga. Evite usar
demasiado detergente en la lavadora, ya que puede
producir exceso de jabón, residuos de detergente en la
ropa, y podría extender los tiempos de lavado.
No use grandes cantidades de
detergente en el dispositivo de
suministro de jabón, ya que
pueden provocar escapes.
NO coloque paquetes de
detergente en el cajón
dispensador.
Compartimento para lejía líquida
Si lo desea, mida la cantidad recomendada de lejía líquida,
TXHQRVREUHSDVHGHOUHFLSLHQWHPO\YLpUWDODHQHO
compartimento central con la etiqueta “Liquid Bleach” (Lejía
líquida) marcado con este símbolo .
Se recomienda el uso de lejía de alta eficiencia (HE) con
esta lavadora de carga frontal.
No sobrepase la línea de llenado máximo. Un llenado
excesivo puede hacer que la lejía se administre
demasiado pronto y, como resultado, dañe las prendas.
NOTA: No use paquetes de blanqueador en polvo ni de
detergente/ aditivo para ropa sucia en el dispensador.
Compartimento para el suavizante
Si lo desea, vierta la cantidad recomendada de
suavizante líquido en el compartimento con la etiqueta
“Fabric Softener” (Suavizante).
Utilice sólo suavizante líquido en el depósito.
Dilúyalo con agua hasta la línea de llenado máximo.
No sobrepase la línea de llenado máximo. Un llenado
excesivo puede hacer que el suavizante se administre
demasiado pronto y manche las prendas.
NOTA: No vierta directamente el suavizante sobre la
carga.
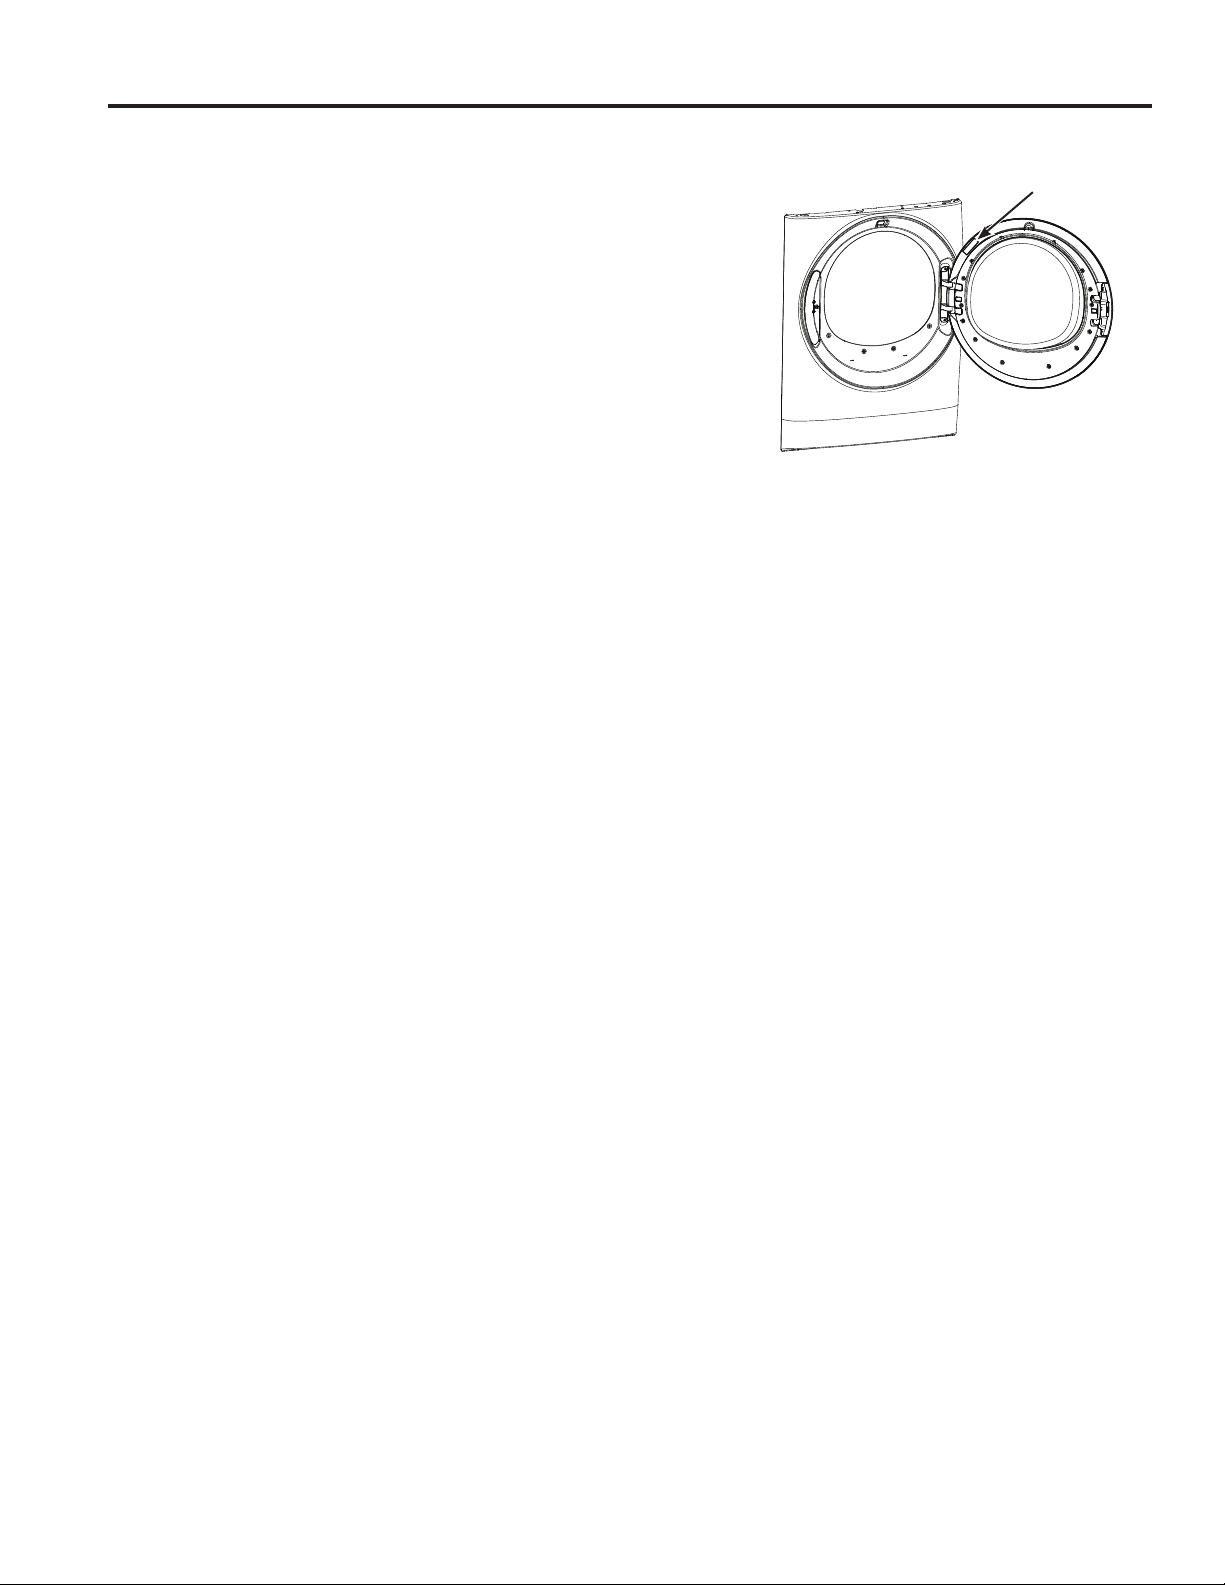
14 49-3000217 Rev 2
Puesta en Marcha
USAR LA LAVADORA
Ubicación de la etiqueta de WiFi
WiFi Connect (Conexión WiFi) (Sólo para clientes en los Estados Unidos)
Su lavadora está habilitada para GE Appliances WiFi Connect.
Visite www.geappliances.com/connect e ingrese su número de
modelo para mostrarle los pasos apropiados para conectar su aparato.
Para aprender más sobre las funciones del electrodoméstico
conectado, para saber qué aplicaciones del electrodoméstico
conectado funcionarán con su teléfono inteligente.
Conectividad WiFi: Para recibir asistencia en relación al
electrodoméstico o la conectividad de red de ConnectPlus,
comuníquese GE Appliances al 800.GE.CARES.
49-3000217 Rev 2 15
USAR LA LAVADORA
Carga
Siempre siga las instrucciones del fabricante de la ropa cuando lave.
NO lave tejidos sucios con líquidos inflamables o disolventes de limpieza.
Ninguna lavadora puede eliminar el aceite por completo.
NO lave o seque cualquier cosa remojada o salpicada con cualquier tipo de aceite (incluyendo aceites de cocina).
NO toque el interior de la lavadora antes de que todas las partes en movimiento se hayan detenido.
Si lo hace, eso puede ocasionar la muerte, explosión, incendio o amputación.
Separación de cargas
Separe por color (blancos, claros, colores), nivel de suciedad, tipo de tela (algodones rústicos, limpieza fácil,
delicados) y si la tela produce pelusa (tela de toalla, felpilla) o junta pelusa (terciopelo, pana). Lave los productores
de pelusas tales como toallas de algodón y medias aparte de los recolectores de pelusas, incluyendo prendas
sintéticas y pantalones de vestir.
Carga de la lavadora
Puede que el tambor de la lavadora esté totalmente lleno con prendas sueltas que se añadan.
Para añadir prendas una vez que la lavadora esté en marcha, pulse Start/Pause (Iniciar/Pausa) y espere hasta que
VHGHVEORTXHHODSXHUWD/DODYDGRUDSXHGHWDUGDUXQRVVHJXQGRVHQGHVEORTXHDUODSXHUWDGHVSXpVGHSXOVDU
Start/Pause (Iniciar/Pausa), dependiendo de las condiciones de la misma. No intente forzar la puerta para abrirla
cuando esté bloqueada. Una vez que se desbloquee, ábrala con cuidado. Añada prendas, cierre la puerta y pulse
Start/Pause (Iniciar/Pausa) para reiniciar el funcionamiento.
- Riesgo de incendio
ADVERTENCIA
Ejemplos de carga
ROPA
DE TRABAJO
ROPA
DE CAMA
CARGA MIXTA DELICADOS* LAVADO RÁPIDO
(2–3 PRENDAS)
4 Jeans
5 camisas
de trabajo
3 pantalones
de trabajo
2 toallons
grande
WRDOODVGH
baño/
12 toallitas
7 toalla de
mano/
2 alfombras
de baño de
toalla
O
2 sábanas
rectas
tamaño
Queen
2 sábanas
ajustables
tamaño
Queen
4 fundas
de almohada
4 fundas de almohada
2 toallas de mano
2 sábanas rectas/
2 sábanas ajustable
2 toallas de baño/
4 toallitas
O
FDPLVDVGHKRPEUH
o de mujer)
SDQWDORQHV.KDNLVR
de sarga)
5 camisetas
7 boxers
4 shorts
O
FDPLVHWDV
4 pantalones
de gimnasia
4 sudaderas
2 sudadera
con capucha
7 pares de medias
7 sostenes
7 pantaletas
3 enaguas
2 camisolas
4 camisones
* Se recomienda el uso de
una bolsa de malla de nylon
para elementos pequeños
2 camisas de trabajo
informales
1 pantalón de trabajo
informal
O
3 uniformes
de fútbol
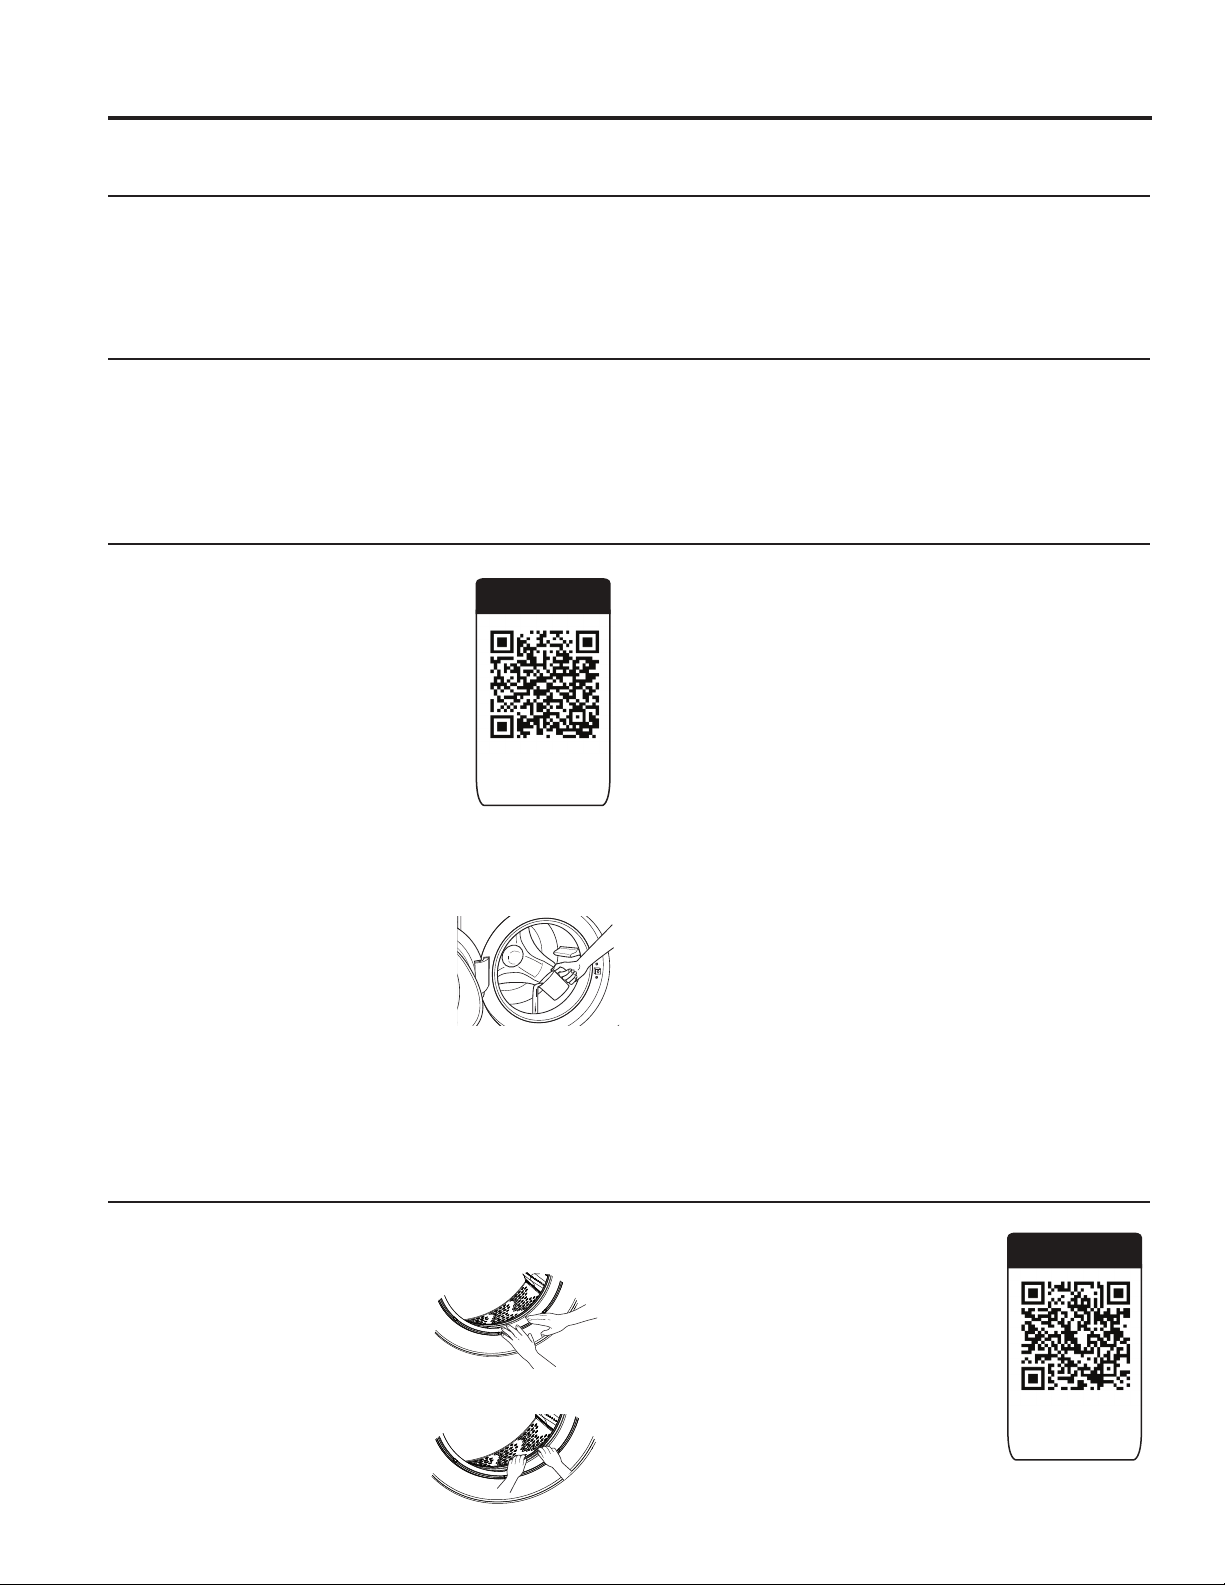
49-3000217 Rev 2
Cuidado y limpieza
CUIDADO Y LIMPIEZA
Self Clean (Autolimpieza)
Para limpiar la parte interna de la
lavadora, seleccione la característica
SELF CLEAN del panel de control.
Este ciclo Self Clean debería ser
activado, como mínimo, una vez por
PHVDSUR[FDGDFLFORVGHODYDGR
Este ciclo usará más agua, además de
blanqueador, para controle el nivel en
el cual las suciedades y detergentes se
podrá acumular en la lavadora.
NOTA: Lea las instrucciones por completo antes de
comenzar el ciclo Self Clean (Autolimpieza).
1. Quite las prendas u objetos de la lavadora y verifique
que el tambor de la lavadora se encuentre vacío.
2. Abra la puerta de la lavadora y
YLHUWDHQODFDQDVWDXQDWD]DR
ml de líquido blanqueador u otro
limpiador para lavadoras.
3. Cierre la puerta por completo y
vuelva a iniciar el ciclo SELF CLEAN (AUTOLIMPIEZA).
Presione el botón Start (Inicio).
4. Cuando el ciclo Self Clean (Autolimpieza) esté
funcionando, la pantalla mostrará el tiempo restante
estimado del ciclo. El ciclo se completará en alrededor
GHPLQXWRV1RLQWHUUXPSDHOFLFOR
5. Una vez completado el ciclo, la lavadora iniciará de
forma inmediata el funcionamiento de ULTRAFRESH
VENT (Ventilación Ultra Fresca), de modo que la puerta
pueda permanecer cerrada hasta la próxima vez que
use la lavadora.
Si por alguna razón debe interrumpirse el ciclo, la puerta
no se abrirá de inmediato. Tratar de abrir la puerta en
esta etapa puede hacer que el agua se derrame. La
puerta se abrirá después de que el agua haya drenado
hasta un nivel en el que no inunde el piso.
Self Clean (Autolimpieza) puede interrumpirse
presionando el botón Start (Inicio) entre ciclos. Un corte
de energía en el hogar también puede interrumpir el
ciclo. Cuando se reanuda el servicio eléctrico, el ciclo
Self Clean (Autolimpieza) continúa desde el punto
en el que se había detenido. Cuando se interrumpe,
asegúrese de realizar un ciclo completo de Self Clean
(Autolimpieza) antes de utilizar la lavadora. Si se
presiona el botón Power (Encendido) durante Self
Clean (Autolimpieza), el ciclo se perderá.
IMPORTANTE:
• Haga funcionar el ciclo Self Clean (Autolimpieza) con
WD]DPOGHOHMtDXQDYH]SRUPHV
• Después de finalizar un ciclo Self Clean (Autolimpieza),
la parte interior de su lavadora puede tener olor a lejía.
• Se recomienda lavar una RINSE & SPIN o carga de
colores claros después del ciclo Self Clean.
Exterior
Limpie inmediatamente cualquier vertido. Limpie con un paño húmedo. Limpie los derrames o compuestos de
limpieza con un paño húmedo. El panel de control y los acabados de la lavadora pueden resultar dañados por
productos utilizados como tratamiento previo al lavado y removedores de manchas. Aplique estos productos lejos
de la lavadora. La tela luego puede lavarse y secarse de manera normal. Los daños provocados a su lavadora por
estos productos no están cubiertos por la garantía. No aplique objetos afilados a la superficie.
Interior
Seque alrededor de la abertura de la puerta de la lavadora, así como la junta obturadora elástica (incluidas las
tuberías conectadas) y el cristal de la puerta. Estas zonas deben estar siempre limpias para garantizar un sellado
hermético frente al agua. Si utiliza el sistema ULTRAFRESH VENT (Ventilación Ultra Fresca) de forma regular,
observará que esto no será requerido con mucha frecuencia. Se recomienda enjuagar la lavadora al menos una vez
por mes con 1 taza de cloro (u otro producto disponible comercialmente fabricado para este fin, tal como el limpiador
de lavadora Tide
®
) vertido directamente en la canasta sin ropa y usando el ciclo Self Clean (Limpieza de tambor).
Mangueras de suministro de aguas
Las mangueras que conectan la lavadora al grifo deben cambiarse cada 5 años.
Junta de la puerta
Abra la puerta de la lavadora. Usando ambas manos,
presione la junta de la puerta hacia
abajo. Quite los objetos extraños
que encuentre atrapados dentro
de la junta. Asegúrese de que no
haya ningún objeto bloqueando los
orificios ubicados detrás de la junta.
Mientras presiona la junta de la
puerta hacia abajo, inspeccione la
junta interior jalándola hacia abajo
con los dedos.
Quite los objetos extraños que
encuentre atrapados dentro de esta
junta. Asegúrese de que no haya
ningún objeto bloqueando los orificios
ubicados detrás de la junta.
Cuando haya terminado de limpiar la
junta de la puerta, quite las manos y
las juntas volverán a la posición de
funcionamiento.
Video
Scan this code
to watch a video
on this topic.
Video
Scan this code
to watch a video
on this topic.
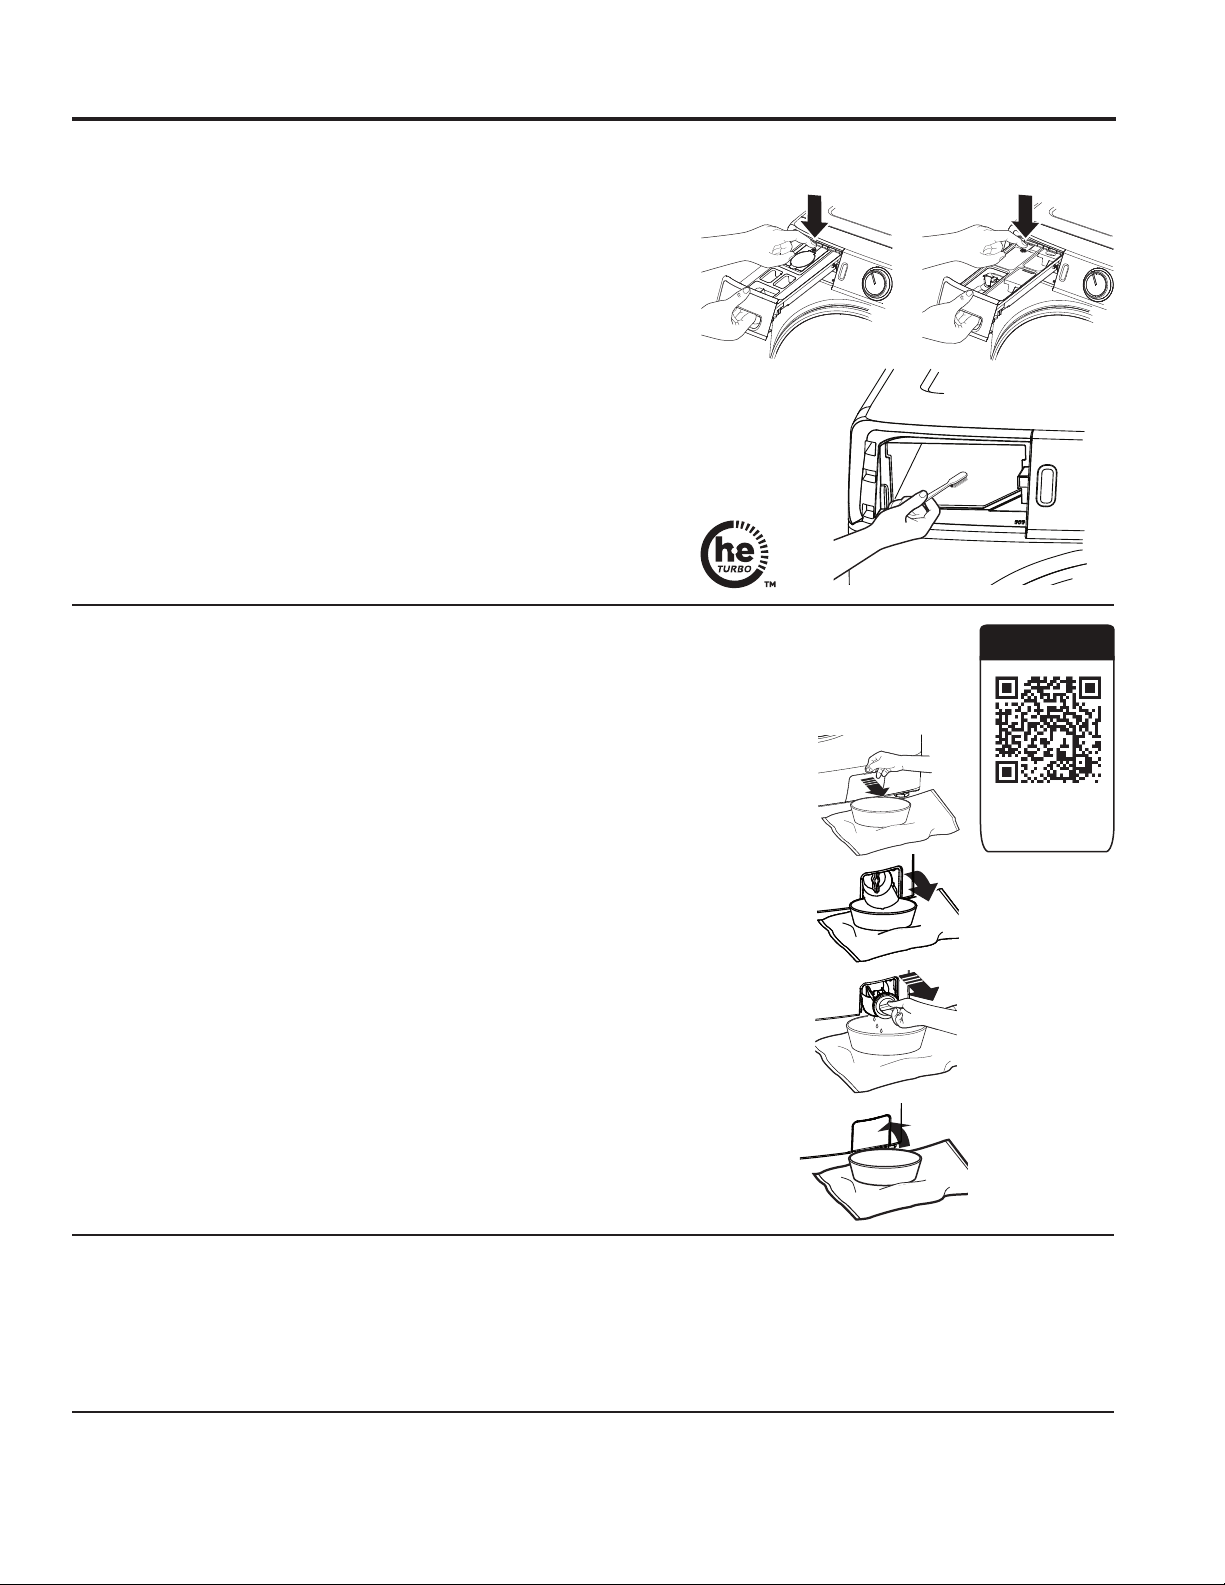
49-3000217 Rev 2 17
CUIDADO Y LIMPIEZA
Cuidado y limpieza
Zona del depósito de detergente
El detergente y el suavizante pueden acumularse en el depósito de
detergente. Los residuos deben eliminarse una o dos veces al mes.
• Saque el depósito tirando de él hasta que se detenga. Luego
acerque la mano a la parte trasera de la cavidad del cajón y presione
firmemente sobre la lengüeta de bloqueo, quitando el cajón.
• Enjuague el cajón con agua caliente para quitar los restos
acumulados de productos de lavado.
• Para limpiar la abertura del depósito, utilice un cepillo pequeño a fin
de limpiar el hueco. Retire todos los restos de las partes superior e
inferior del hueco.
• Introduzca de nuevo el depósito de detergente.
• Para reducir la acumulación en la zona del depósito de detergente:
Desplazamiento y almacenamiento
Pida al técnico de servicio que elimine el agua de las tuberías y la bomba de desagüe. No guarde la lavadora en un lugar
donde esté expuesta a las inclemencias climáticas. Al mover la lavadora, la cuba debe mantenerse estable utilizando los
pernos de transporte que se han extraído durante la instalación. Consulte las Instrucciones de instalación en este manual.
Si estas piezas no están disponibles, se pueden solicitar a través del sitio Web GEApplianceparts.com o llamando
GE Appliances al 877.959.8688.
Largas vacaciones
Asegúrese de cortar el agua de todas las llaves de paso. Vacíe todas las tuberías de agua si la temperatura va a
encontrarse por debajo de punta de congelación.
On models with a
Smart Dispenser:
On models without
a Smart Dispenser:
Use sólo detergente
de alta eficiencia
HE
1. Utilizando un destornillador de lados planos o una moneda, abra la puerta de
acceso.
2. Coloque una bandeja o plato poco profundo bajo la puerta de acceso y toallas
en el piso frente a la lavadora para proteger el piso. Es normal que salga
alrededor de una taza de agua cuando se quita el filtro.
3. Baje el pico vertedor.
4. Gire el filtro de la bomba en sentido contrario a las agujas del reloj y quite el
filtro lentamente, controlando el flujo del agua que sale.
5. Quite el filtro y limpie las suciedades.
6. Vuelva a colocar el filtro y gire en sentido de las agujas del reloj. Ajuste bien.
7. Eleve el pico vertedor.
8. Close the access door by hooking the bottom tabs first, then rotating the
access door shut.
Video
Scan this code
to watch a video
on this topic.
Filtro de la bomba
Debido a la naturaleza de la lavadora de carga frontal, es posible que a veces pasen partículas
pequeñas a la bomba. La lavadora cuenta con un filtro para capturar los elementos perdidos y que
no caigan en el drenaje. Para recuperar los elementos perdidos, limpie el filtro de la bomba.
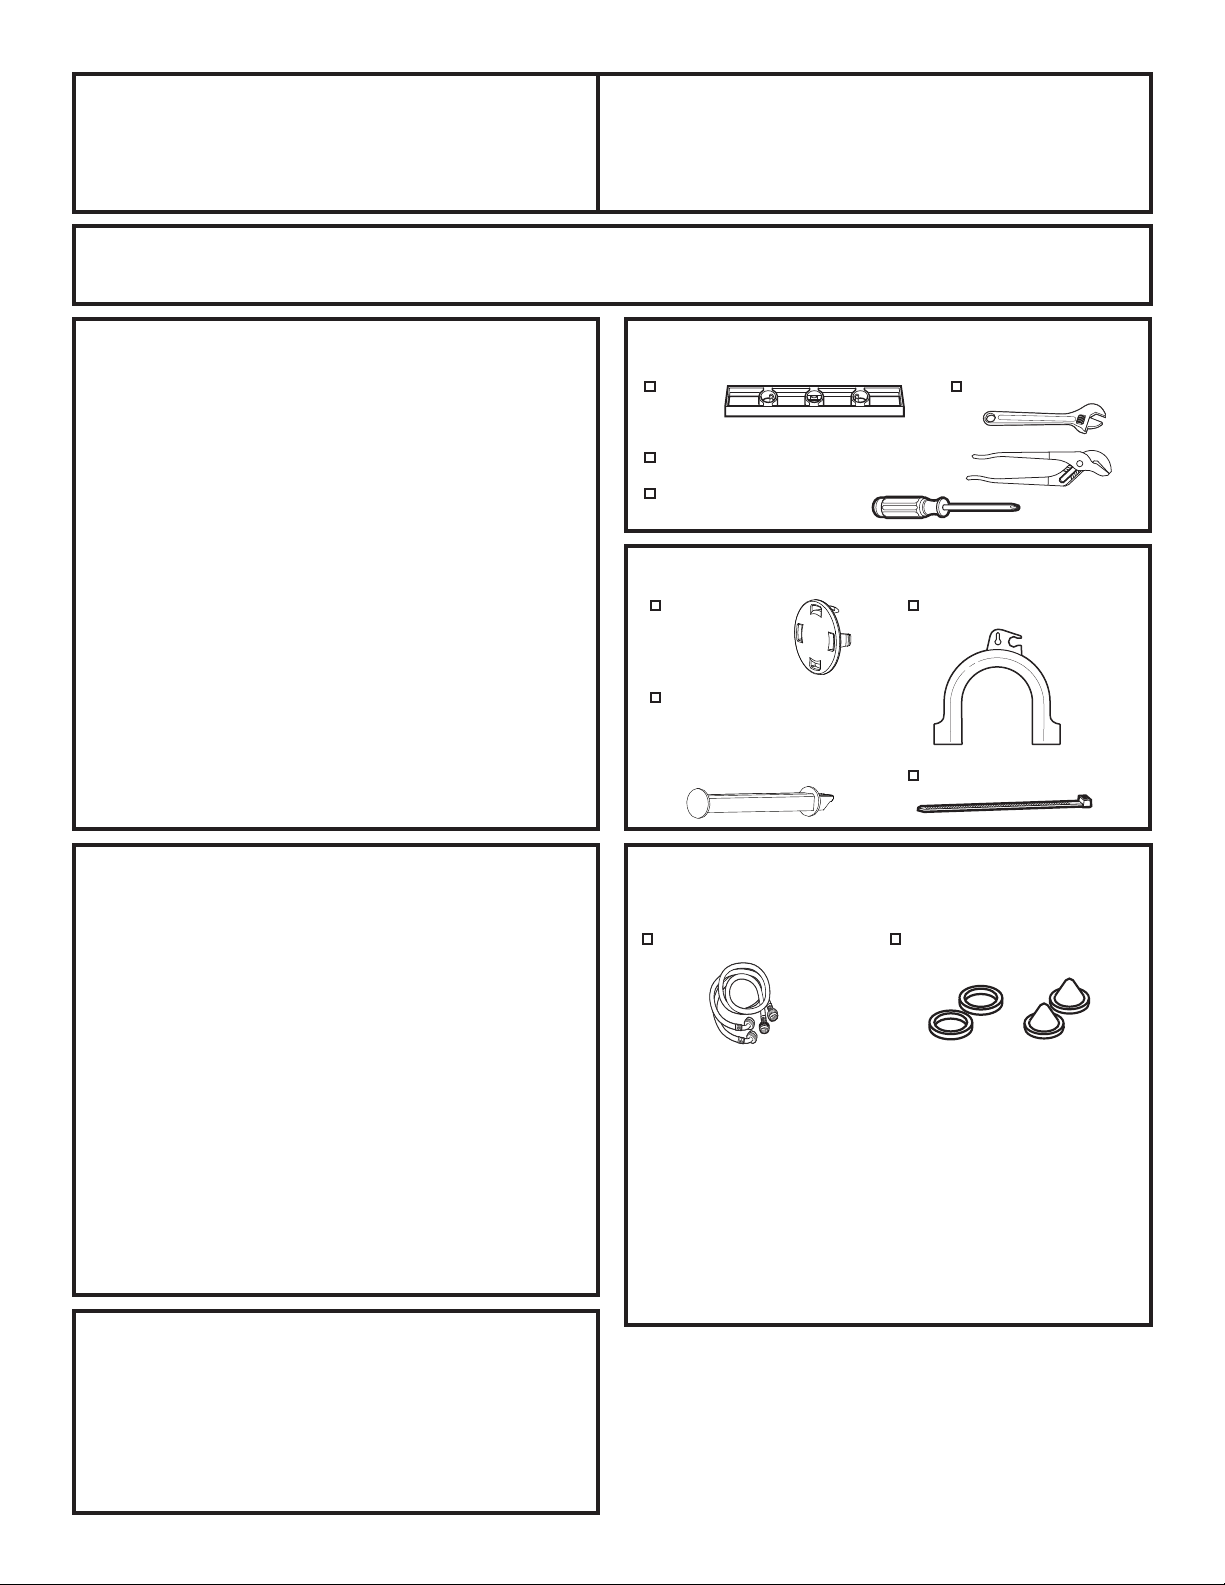
18 49-3000217 Rev 2
Instrucciones
Lavadora
de instalación
ANTES DE COMENZAR
Lea detenidamente todas las instrucciones.
•
IMPORTANTE – Guarde estas
instrucciones para uso del inspector local.
•
IMPORTANTE – Cumpla todos los
códigos y ordenanzas regulatorias.
• Nota al instalador – Asegúrese de dejar
estas instrucciones al usuario.
• Nota al usuario – guarde estas instrucciones
para consultas futuras.
• Nivel de habilidad – la instalación de este
electrodoméstico requiere habilidades mecánicas
y eléctricas básicas.
• Duración – de 1 a 3 horas
• La instalación adecuada es responsabilidad del
instalador.
• La garantía no cubre fallas producidas por la
instalación inadecuada del producto.
Si tiene alguna pregunta, llame GE Appliances a 800.GE.CARES (800.432.2737) o visite nuestro sitio
Web en: GEAppliances.com
HERRAMIENTAS NECESARIAS
Nivel Llave ajustable
Alicates ajustables Channel-lock
Destornillador Phillips
PIEZAS INCLUIDAS
Guía de tuberías
UBICACIÓN DE LA LAVADORA
NO instale la lavadora:
1. En un área expuesta a goteras o a las condiciones del
exterior. La temperatura ambiente no debe ser nunca
LQIHULRUD)&SDUDTXHODODYDGRUDIXQFLRQH
correctamente.
2. En una zona en la que pueda entrar en contacto con
cortinas u otras telas.
3. Sobre una alfombra. El suelo DEBE ser una superficie
dura con una inclinación máxima de 1/2” por pie
FPSRUFDGDFP3DUDDVHJXUDUVHGHTXHOD
lavadora no vibre ni se mueva, es posible que tenga
que reforzar el suelo.
NOTA: Si el suelo se encuentra en mal estado, utilice
una plancha con 3/4” de contrachapado bien fija al
revestimiento existente en el suelo.
INSTALACIÓN EN CASAS
RODANTES
La instalación se deberá realizar conforme con la Ley de
Estándar para Casas Rodantes (Standard for Mobile Homes),
$16,$\GH(VWiQGDUHV1DFLRQDOHVGH&RQVWUXFFLyQ
y Seguridad de Casas Rodantes (National Mobile Home
&RQVWUXFWLRQDQG6DIHW\6WDQGDUGV$FWGH3/
Tapas de los
Tornillos de
Embalaje
Barra de Bloqueo
(Conservar para la
opción de Invertir la
apertura de la puerta)
Abrazadera de cable
PIEZAS NECESARIAS (Se adquiere por
separado o incluido con el modelo GFW510)
GE Appliances Piezas y accesorios
Solicítelos on-line hoy mismo a GEApplianceparts.com,
las 24 horas del día o por teléfono al 877.959.8688 en
horario normal de trabajo.
Número de Pieza Accesorio
:;; 0DQJXHUDVGHODYDGRUDGHSLHVGH
DFHURLQR[LGDEOHFRQFRGRVGH
unidades
:+; Arandelas de Caucho y Pantallas
suministro de agua (2)
Arandelas de Caucho (2)
y Pantallas de Filtro (2)

49-3000217 Rev 2
Instrucciones de instalación
ACCESORIOS:
Ordene hoy a través de Internet en GEApplianceparts.com,
las 24
horas del día o en forma telefónica llamando al 877.959.8688,
durante el horario comercial habitual.
6LJDODVLQVWUXFFLRQHVGHLQVWDODFLyQLQFOXLGDVHQHO.LWSDUD
conocer todos los requisitos de despeje e instalación.
DIMENSIONES DE LA LAVADORA
Visión lateral
32” (81.3 cm)
54-1/2” (138.4 cm)
Modelos - GFW650, GFW550, GFW510:
Visión lateral
´FP
´FP
Modelos - GFW850:
28”
(71.2 cm)
´
FP
Visión frontal
DISTANCIAS
MÍNIMAS DE
SEPARACIÓN
”
”
”
Alcoba o Armario
• 5HDU ´*
• 6LGHV ´
• 7RS Ǝ
• )URQW Ǝ
”””
• Se deberá considerar que se debe brindar el despeje adecuado para la instalación y el servicio técnico.
• /DVSXHUWDVGHODUPDULRGHEHQFRQWDUFRQUHMLOODVXRWURWLSRGHYHQWLODFLyQ\WHQHUSRUORPHQRVSXOJDGDVFXDGUDGDVFP
2
)
GHHVSDFLRDELHUWR6LHODUPDULRLQFOX\HXQDODYDGRUD\XQDVHFDGRUDODVSXHUWDVGHEHQFRQWHQHUXQPtQLPRGHSXOJDGDV
cuadradas (774,2 cm
2
) de espacio abierto.
* 3DUDTXHHOHVSDFLROLEUHHQODSDUWHWUDVHUDGHODODYDGRUDVHDGH´GHEHUiXVDUPDQJXHUDVFRQFRGRVGH'HRWUDIRUPD
podrá necesitar cierto espacio libre adicional a fin de evitar que las mangueras rocen contra la pared trasera.
Apilada:
”*
FP
Pedestal:
55-7/8”*
(141.8 cm)
NOTA:
Con las patas niveladoras retraídas:FP
Con las patas niveladoras completamente extendidas:FP
Número de Pieza
Accesorio
GFP1528SNWW
Pedestal blanco
GFP1528PNSN
Pedestal de Níquel Satinado
GFP1528PNRS Pedestal de Zafiro Real
GFP1528PNDG Pedestal de Diamante Gris
*)$.,71 .LWSDUDDSLODU6HFDGRUDVREUH/DYDGRUD
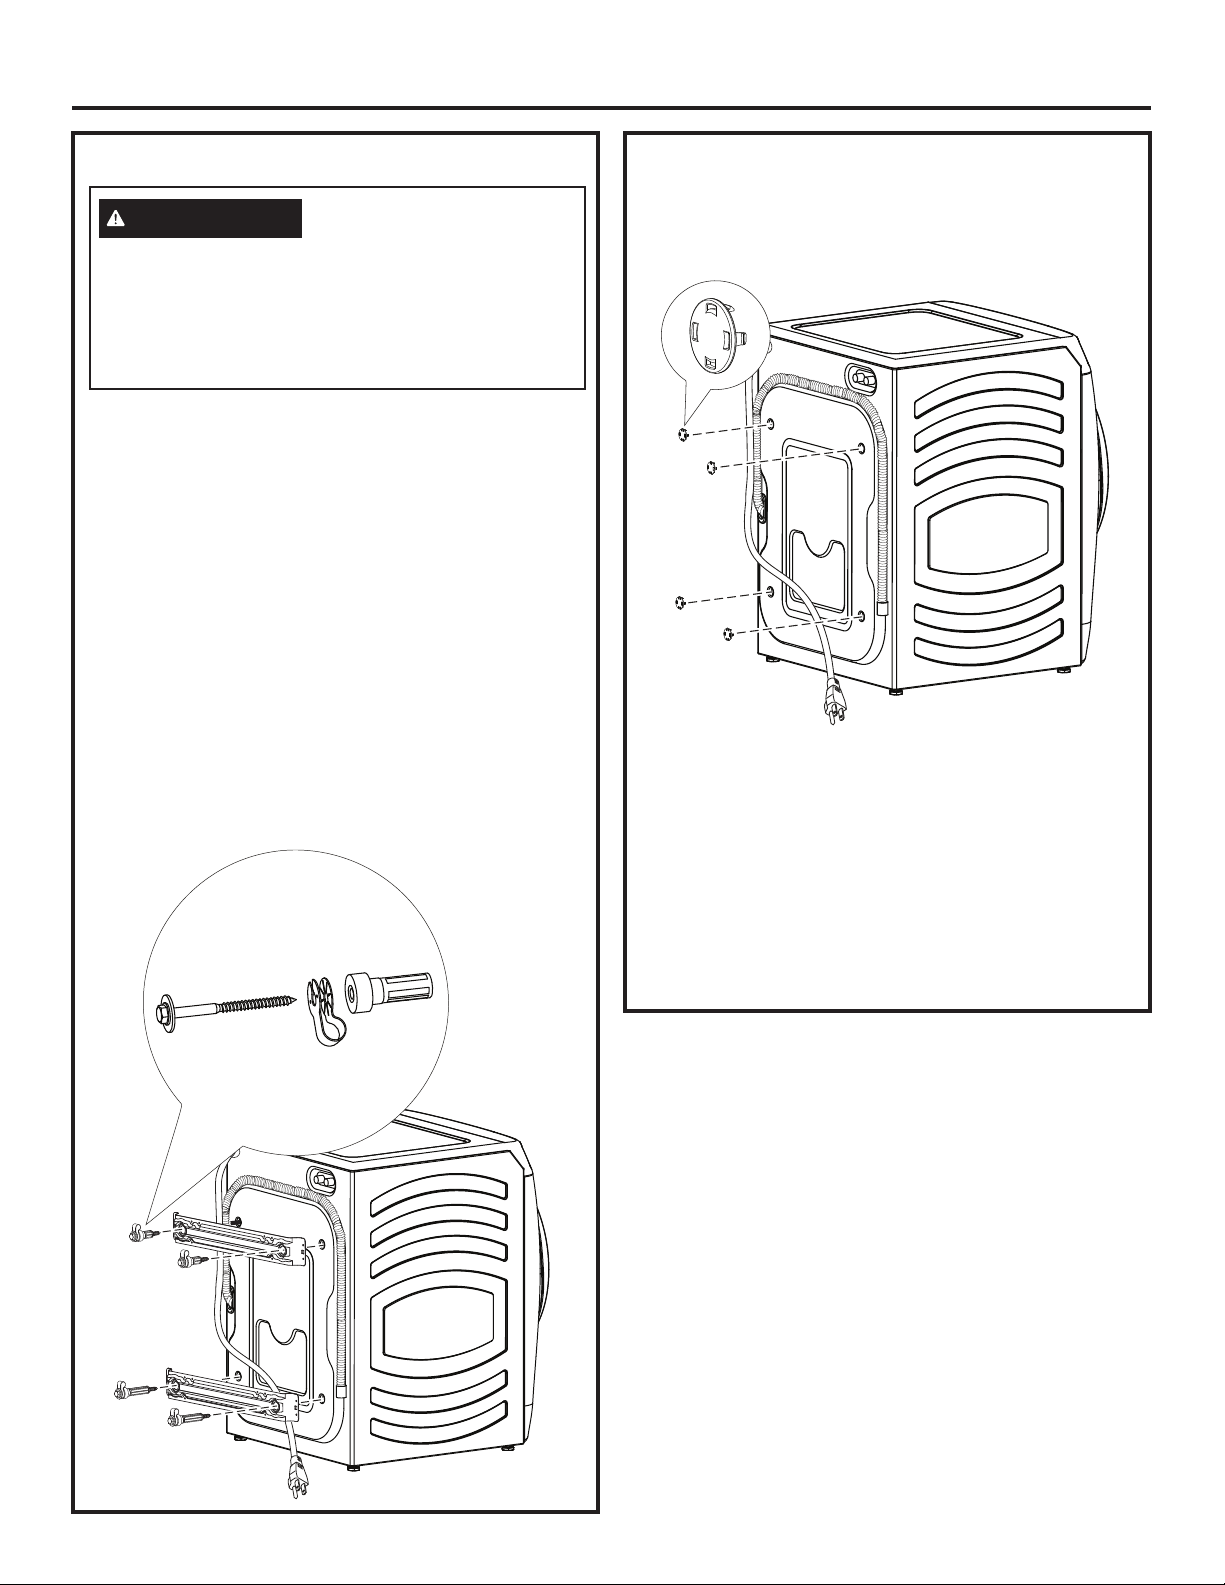
49-3000217 Rev 2
Instrucciones de instalación
1. Corte y elimine todas las cintas de embalaje.
2. Mientras se encuentre dentro de la caja, coloque con
cuidado la lavadora sobre el costado de la misma. NO
la tumbe por la parte delantera ni trasera.
3. Abra las tapas inferiores y retire todo el embalaje de
la base, incluido la base de la cuba de espuma de
poliestireno.
4. Vuelva a levantar la lavadora con cuidado y retire la
caja de cartón.
5. Desplace poco a poco la lavadora hasta 4 pies (122
cm) de su ubicación definitiva.
6. Quite las siguientes piezas de la parte trasera de la
lavadora:
4 pernos
4 separadores de plástico (incluidas las retenedores
de cable de alimentación y arandelas de goma)
2 soportes
NOTA: NO retire el tornillo o pinza que sostiene la
manguera.
DESEMBALAJE DE LA LAVADORA DESEMBALAJE DE LA LAVADORA
(cont.)
7. Introduzca los tapones para orificios de pernos de
embalaje en los orificios.
NOTAS:
• Si se retiran incorrectamente los pernos de
transporte, puede que la lavadora se vea
gravemente desequilibrada.
• IMPORTANTE: Guarde todos los pernos para uso
futuro.
Si necesitara transportar la lavadora posteriormente,
debe volver a colocar las piezas de sujeción para
el transporte con el fin de evitar daños durante el
mismo. Guarde dichas piezas en la bolsa de plástico
que se incluye.
Recicle o deseche la caja
de cartón y las bolsas de
plástico una vez que haya desembalado la lavadora.
Mantenga estos materiales fuera del alcance de los
niños, pues éstos podrían utilizarlos para jugar. Las
cajas de cartón cubiertas con mantas, colchas o
láminas de plástico pueden convertirse en cámaras
de aire herméticas y producir asfixia.
ADVERTENCIA
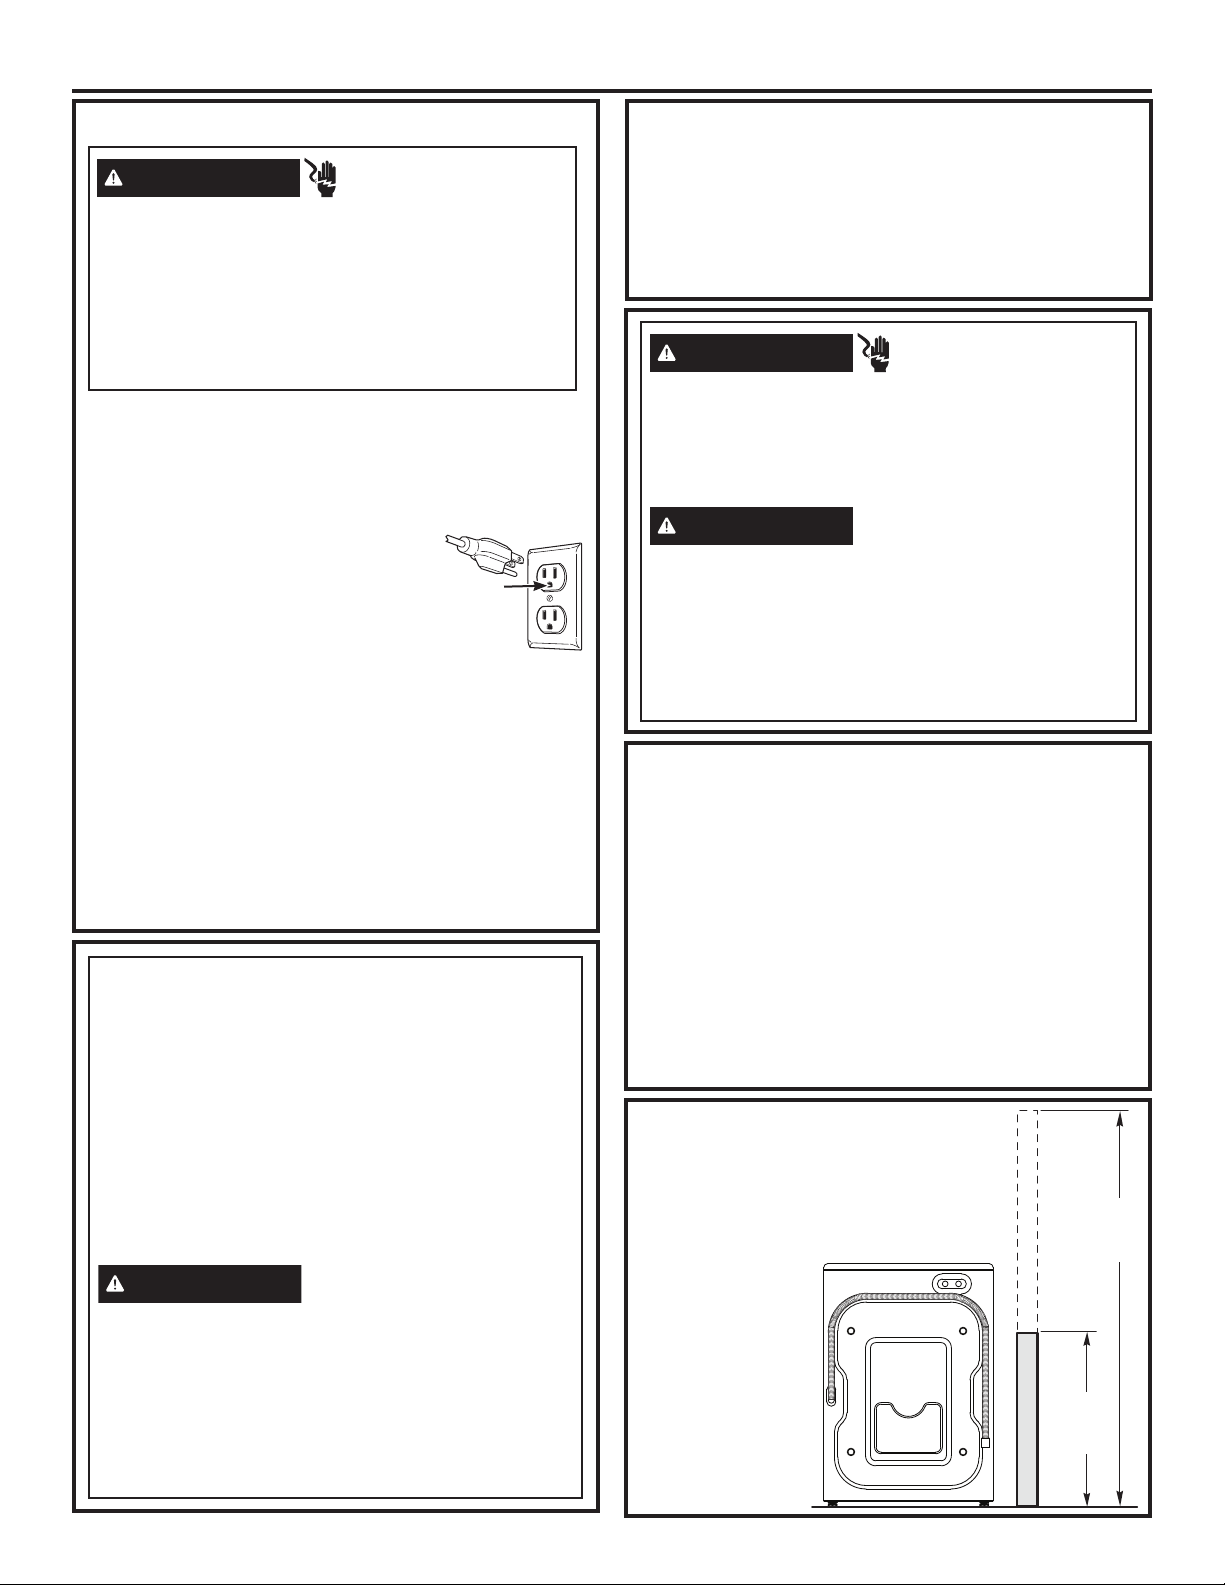
49-3000217 Rev 2 21
Instrucciones de instalación
REQUISITOS ELÉCTRICOS
CIRCUITO – individual, correctamente polarizado y
FRQHFWDGRDXQGLV\XQWRUGHRDPSHUHVRDXQ
fusible con retardo.
SUMINISTRO DE CORRIENTE – 2 cables y conexión a
WLHUUDYROWLRVIDVHVLPSOH+]FRUULHQWHDOWHUQD
Receptáculo Externo – receptáculo
de 3 clavijas correctamente
conectado a tierra, ubicado de
modo que el cable de corriente esté
accesible cuando la lavadora esté
en una posición instalada. Si hay un
receptáculo de 2 clavijas, es responsabilidad del propietario
solicitar a un electricista matriculado que reemplace el
mismo por un receptáculo de 3 clavijas con conexión a
tierra, que esté correctamente conectado a tierra.
La lavadora deberá estar correctamente conectada a
tierra de acuerdo con los códigos y ordenanzas locales, o
en ausencia de códigos locales, con la última edición del
&yGLJR(OpFWULFR1DFLRQDO$16,1)3$12RHO&yGLJR
Eléctrico Canadiense, CSA C22.1. En caso de no estar
seguro de que la lavadora esté correctamente conectada
a tierra, consulte a un electricista matriculado.
Enchufe a un tomacorriente de 3 clavijas con
conexión a tierra.
NO retire la terminal de tierra.
NO UTILICE un cable de extensión.
NO UTILICE un enchufe adaptador con este artefacto.
Si no se siguen estas instrucciones, se podrá
producir la muerte, incendio o descargas eléctricas.
ADVERTENCIA
- Riesgo de Descarga
Eléctrica
Verifique
que haya una
conexión a tierra
adecuada antes
del uso.
INSTRUCCIONES DE CONEXIÓN
A TIERRA
Este electrodoméstico deberá estar conectado a tierra.
En caso de avería o mal funcionamiento, la conexión a
tierra reducirá el riesgo de descargas eléctricas al brindar
un camino con una resistencia menor para la corriente
eléctrica. Este electrodoméstico está equipado con un
cable con un conductor para la conexión a tierra del
equipo y un enchufe con conexión a tierra. El enchufe
deberá estar conectado a un tomacorriente instalado en
forma adecuada y con conexión a tierra de acuerdo con
todos los códigos y ordenanzas locales.
Una conexión
inapropiada
del conductor
de conexión a
tierra del equipo puede provocar riesgos de descargas
eléctricas. Consulte a un
electricista calificado o personal
o representantes del servicio técnico si tiene dudas de
que el electrodoméstico se encuentre
conectado a tierra
apropiadamente. NO modifique el enchufe en el cable
de suministro de corriente. Si no coincide con la
toma de
corriente, contrate a un electricista calificado para que
instale una toma de corriente en forma adecuada.
ADVERTENCIA
1. Desagüe capaz de
HOLPLQDUJDOORQV
(38 l) por minuto.
2. Diámetro mínimo
de tubería vertical
de 1 1/4”
(3,18 cm).
3. La altura de la
tubería vertical
desde el suelo
debe ser:
Altura mínima:
´FP
Altura máxima:
´FP
REQUISITOS DE DESAGÜE
INSTRUCCIONES DE CONEXIÓN A
TIERRA (cont.)
Si los códigos locales lo requieren, se podrá agregar
un cable a tierra externo de cobre de calibre 18 o más
grande (no provisto). Adhiera el gabinete de la lavadora
con un tornillo
de chapa metálica Nº[1/2” (disponible en
cualquier
tienda de
repuestos) a la parte trasera de la lavadora.
Las llaves de paso de agua caliente y fría DEBEN encontrarse
DSXOJDGDVFPFRPRPi[LPRGHODWRPDGHDJXD
GHODODYDGRUD/DVOODYHVGHSDVR'(%(1VHUGH´
cm) y tipo jardín para que se puedan conectar las tuberías de
HQWUDGD/DSUHVLyQGHODJXD'(%(HVWDUHQWUH\OLEUDV
por pulgada cuadrada. La compañía de agua puede informarle
de la presión del agua. La temperatura del agua caliente se
debe establecer para suministrar agua a una temperatura de
HQWUH\)±&SDUDEULQGDUXQGHVHPSHxR
adecuado del control automático de temperatura (ATC).
NOTA: Se recomienda el uso de un suavizante de agua
para reducir la acumulación de sarro dentro del generador
de vapor si el suministro doméstico contiene agua muy dura.
REQUISITOS DE SUMINISTRO DE AGUA
Desconecte el suministro de corriente antes de realizar
el servicio técnico.
Reemplace todas las piezas y paneles antes de utilizar.
Si no cumple con esto, se podrá producir la muerte o
descarga eléctrica.
- Riesgo de Descarga
Eléctrica
Ciertas piezas internas no tienen conexión a tierra en
forma intencional y pueden presentar un riesgo de
descarga eléctrica sólo durante la reparación.
Personal de reparación – NO toque las siguientes
piezas cuando el aparato esté recibiendo energía:
válvula aqua, bomba de desague, NTC, calentador,
traba de la puerta, tablero inversor, motor y tablero MC.
ADVERTENCIA
- Riesgo de Descarga
Eléctrica
ADVERTENCIA
´
(244 cm)
Max.
24”
FP
Min.
PARTE TRASERA
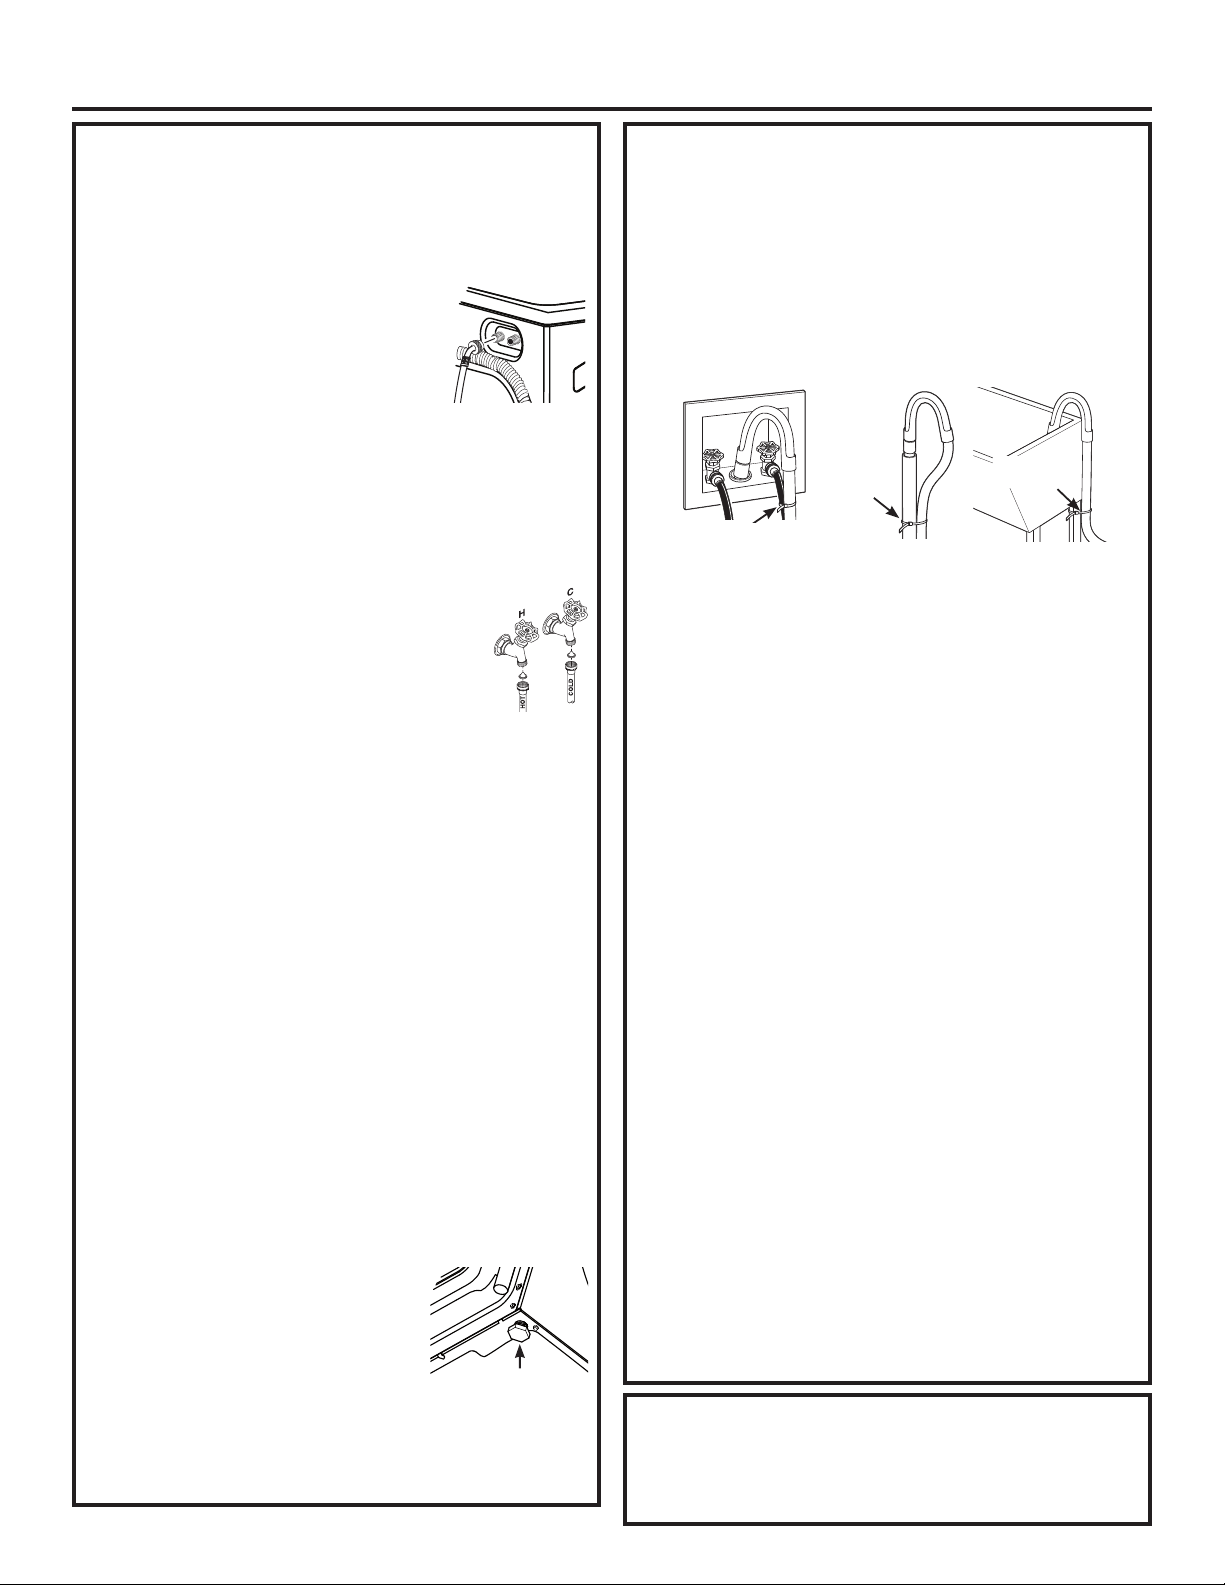
22 49-3000217 Rev 2
Instrucciones de instalación
Si se necesitan piezas de repuesto para la lavadora,
se pueden solicitar en Estados Unidos a través del
sitio Web GEApplianceparts.com o llamando GE
$SSOLDQFHVD
PIEZAS DE REPUESTO
1. Deje correr un poco de agua de los grifos de agua
caliente y fría para purgar las tuberías de agua y
eliminar las partículas que puedan obstruir la tubería
de entrada y los filtros de la válvula de agua.
2. Saque las tuberías de entrada de la embalaje.
3.([WUHPRDFRGDGRGH9HULILTXH
que haya una arandela de goma
HQHOH[WUHPRDFRGDGRGHGH
las tuberías HOT (caliente) y COLD
(fría). Vuelva a instalar la arandela de
goma en el accesorio de la tubería
si se ha caído durante el envío.Conecte con cuidado
la tubería de entrada marcada con HOT (Caliente) a la
salida “H” exterior de la válvula de agua. Apriete con
la mano y, a continuación, apriete 2/3 de vuelta con
los alicates. Conecte con cuidado la otra tubería de
entrada a la salida “C” interior de la válvula de agua.
Apriete con la mano y, a continuación, apriete 2/3 de
vuelta con los alicates. No pase las roscas ni apriete
excesivamente estas conexiones.
4.
Si los filtros de pantalla de la manguera
de entrada no se encuentran insertados
en las mangueras de entrada, instale
los mismos insertando estos en los
extremos libres de las mangueras de
entrada HOT (Caliente) y COLD (Fría) con los
extremos protuberantes enfrentados hacia el grifo.
5. Conecte los extremos de la tubería de entrada a las
tomas de agua CALIENTE y FRÍA ajustándolos con la
mano y, a continuación, apriete de nuevo 2/3 de vuelta
con los alicates. Abra la llave de paso y compruebe que
no hay ninguna fuga.
6. Desplace la lavadora con cuidado hasta su ubicación
final. Mueva suavemente la lavadora para situarla en
su lugar. Es importante no dañar las patas niveladoras
de caucho al trasladar su lavadora a su ubicación final.
Si las patas se dañan podría aumentar la vibración de
la lavadora. Podría ser útil rociar el piso con limpiador
para ventanas a fin de trasladar más fácilmente su
lavadora a su ubicación final.
NOTA: Para reducir la vibración, asegúrese de que
cada una de las cuatro patas niveladoras estén en
contacto con el piso. Empuje y tire de la parte posterior
derecha y luego de la parte posterior izquierda de su
lavadora.
NOTA: No utilice el depósito de detergente ni la puerta
para levantar la lavadora.
NOTA: Si se instala en un depósito de desagüe, puede
utilizar una tabla 2x4 de 24 pulgadas de longitud para
colocar la lavadora en su lugar haciendo palanca.
7. Una vez situada la lavadora en
su posición final, coloque un
nivel en la parte superior de la
misma (si está instalada debajo
de un contador, la lavadora no
debería vibrar). Ajuste las patas
niveladoras delanteras hacia arriba o hacia abajo
para asegurarse que la lavadora se apoya en una
superficie sólida. Gire las contratuercas de cada
pata hacia la base de la lavadora y apriételas con
una llave.
INSTALACIÓN DE LA LAVADORA
NOTA: Mantenga la extensión de los soportes al
mínimo para evitar una vibración excesiva. Cuanto
más se extiendan las patas, más vibrará la lavadora.
Si el suelo no está nivelado o está dañado, puede que
sea necesario extender las patas niveladoras traseras.
8. Coloque la guía de la tubería en forma de U en el
extremo de la tubería de desagüe. Coloque la tubería
en una pila de lavar o tubería vertical y sujétela con
la abrazadera de cable que se proporciona en el
paquete adjunto.
NOTA: Colocar la manguera de drenaje muy debajo
de la tubería de drenaje puede provocar un efecto
de sifón. No debe haber más de 7 pulgadas de
manguera en la tubería de drenaje. Debe haber un
espacio de aire alrededor de la manguera de drenaje.
Si la manguera está muy ajustada, también puede
provocarse un efecto de sifón.
9. Enchufe el cable de alimentación en una salida de
conexión a tierra.
NOTA: Asegúrese de que la alimentación está cortada
en un interruptor/caja de fusibles antes de enchufar el
cable de alimentación a una toma de corriente.
10. Conecte la alimentación a un interruptor/caja de
fusibles.
11. Lea el resto del Manual del propietario. Contiene
información valiosa y útil que supondrá un ahorro
de tiempo y dinero.
12. Antes de poner en funcionamiento la lavadora,
asegúrese de comprobar lo siguiente:
La alimentación está conectada.
La lavadora está enchufada.
Las llaves de paso están abiertas.
La lavadora está nivelada y que cada una de las cuatro
patas niveladoras estén en contacto con el piso.
Las piezas de sujeción para el transporte se han
quitado y guardado.
La tubería de desagüe se ha asegurado
correctamente.
No existe ninguna fuga en la llave de paso, la tubería
de desagüe ni la lavadora.
13. Ponga en funcionamiento la lavadora en un ciclo
completo. Compruebe que no haya fugas de agua y
que funcione correctamente.
14.
Si la lavadora no funciona, revise la sección Antes
de
llamar al servicio de asistencia técnica antes de ponerse
en contacto con el servicio de asistencia técnica.
15. Coloque las instrucciones en un lugar próximo a la
lavadora para futuras consultas.
INSTALACIÓN DE LA LAVADORA
Patas niveladoras
Abrazadera
de cable
Abrazadera
de cable
Abrazadera de cable
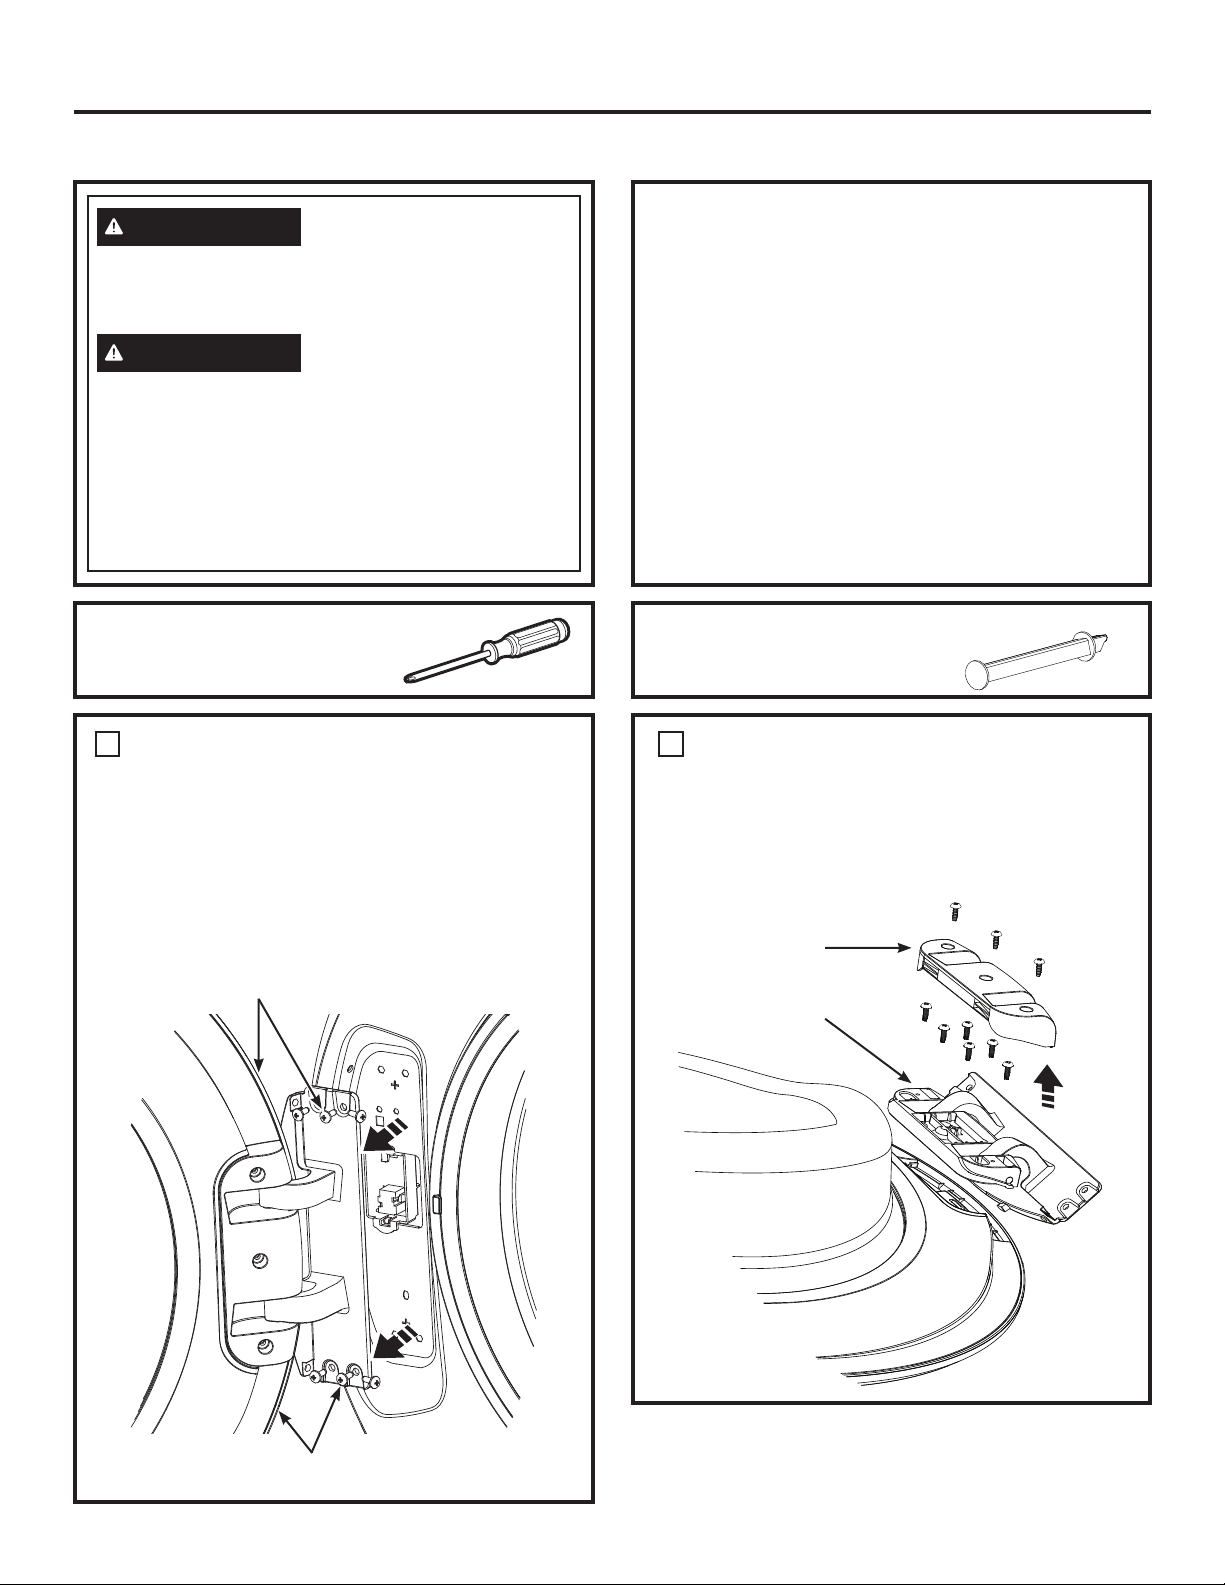
49-3000217 Rev 2 23
Instrucciones de instalación
CÓMO INVERTIR LA APERTURA DE LA PUERTA (Opcional)
RETIRE EL ENSAMBLE DE LA
PUERTA
• Abra la puerta de la lavadora.
• 0LHQWUDVVRVWLHQHODSXHUWDUHWLUHORVWRUQLOORVGH
la bisagra sobre la cara de la lavadora.
• Levante el ensamble de la puerta para retirar la
misma de la cara de la lavadora y deje el ensamble
a un costado sobre una superficie de protección.
1
NOTAS IMPORTANTES
• Manipule las piezas con cuidado para no rayar la
pintura.
• Coloque las puertas sobre una superficie de trabajo
que no raye.
• Separe los tornillos por sus piezas relacionadas para
evitar usarlos en lugares equivocados.
• Una vez que haya comenzado, no mueva el
gabinete hasta haber finalizado la inversión de la
apertura de la puerta.
• Estas instrucciones son para cambiar las bisagras
ODGRL]TXLHUGRDOGHOODGRGHUHFKRVLDOJXQDYH]
desea cambiarlas de nuevo al lado derecho, siga las
mismas instrucciones e invierta todas las referencias
de izquierda a derecha.
Tournevis cruciforme
HERRAMIENTA NECESARIA
Barra de Bloqueo
PIEZA INCLUIDA
Sostenga la Puerta y Retire los Tornillos
de la Bisagra de la lavadora
Bisagra y ensamble de la puerta
RETIRE LA BISAGRA DE LA
PUERTA
2
• Retire los 3 tornillos de la tapa de la bisagra y retire
la tapa.
• 5HWLUHORVWRUQLOORVGHODELVDJUD\UHWLUHODELVDJUD
de la puerta.
Tapa de la
Bisagra
Bisagra
Desenchufe el electrodoméstico o apague el disyuntor
antes de realizar el servicio técnico. Presionar el botón
Power (Encendido) NO desconecta el encendido.
- Riesgo de Descarga
Eléctrica
Ciertas piezas internas no tienen conexión a tierra en
forma intencional y pueden presentar un riesgo de
descarga eléctrica sólo durante la reparación.
Personal de reparación – NO toque las siguientes
piezas cuando el aparato esté recibiendo energía:
válvula aqua, bomba de desague, NTC, calentador,
traba de la puerta, tablero inversor, motor y tablero
MC.
ADVERTENCIA
ADVERTENCIA
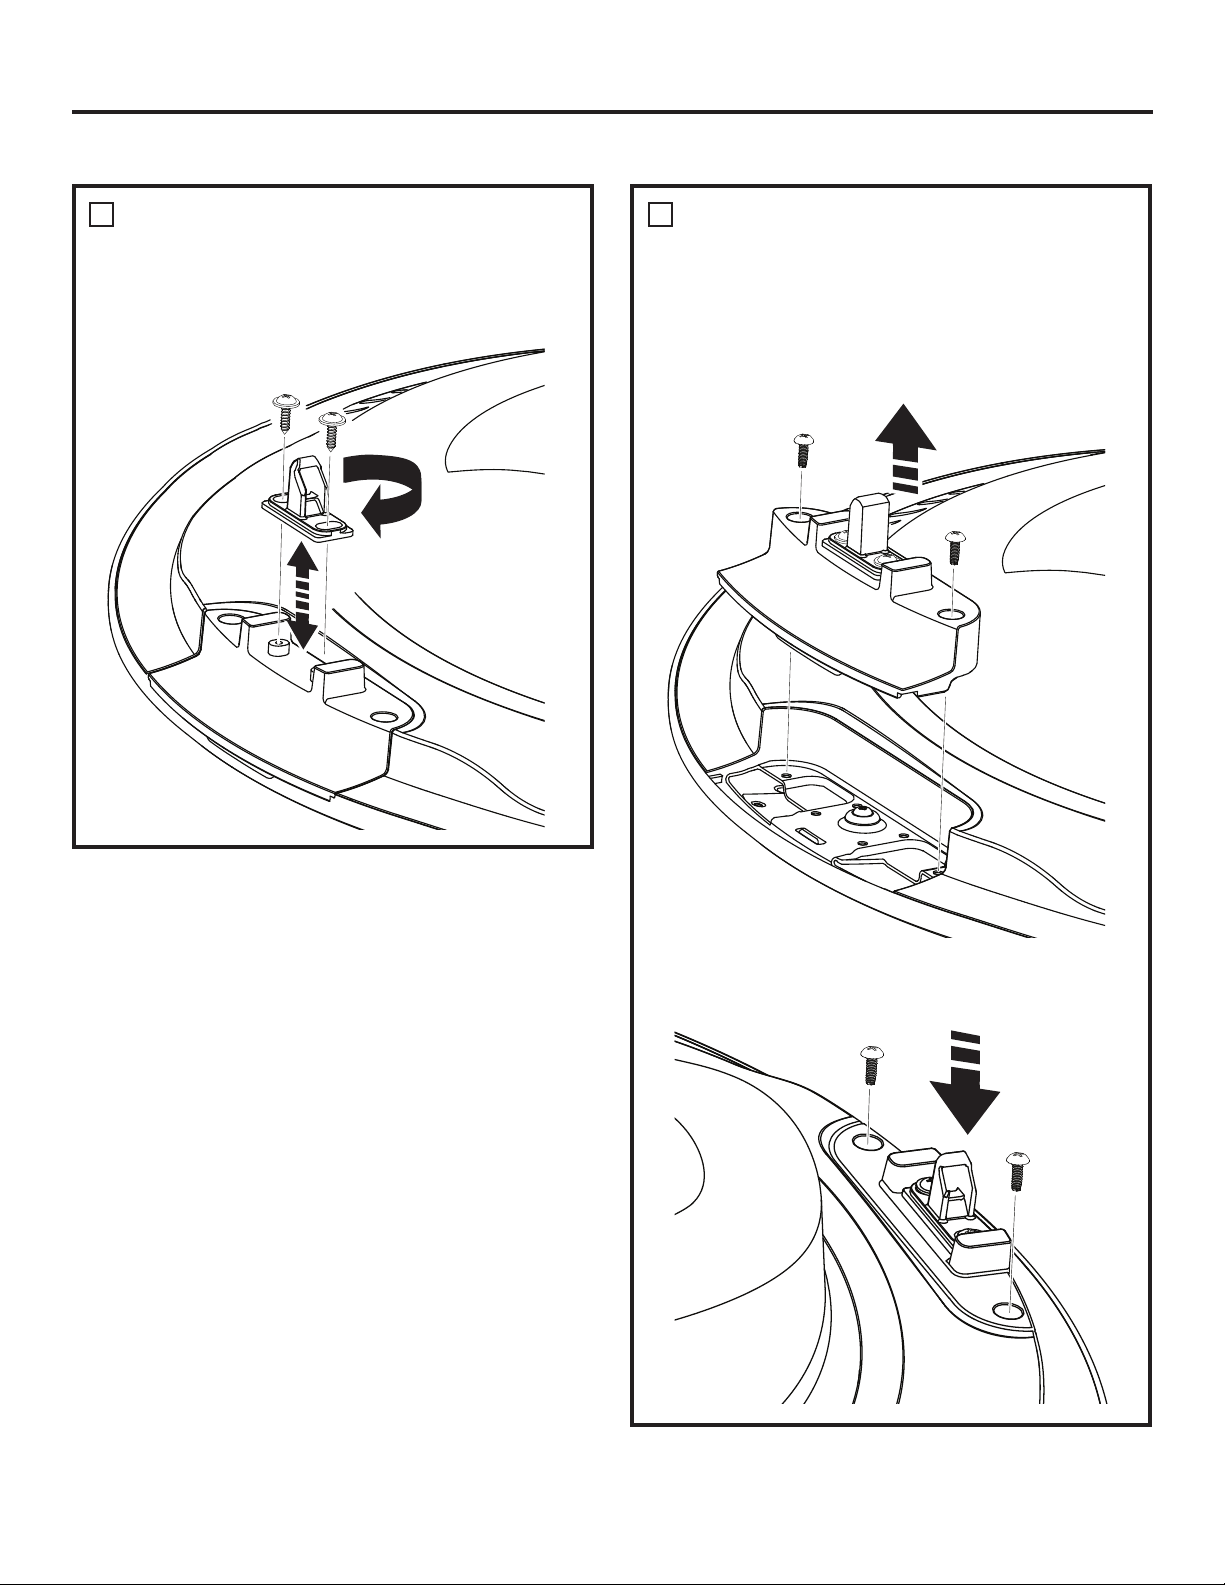
24 49-3000217 Rev 2
Instrucciones de instalación
CÓMO INVERTIR LA APERTURA DE LA PUERTA (Opcional)
RETIRE, INVIERTA, Y
REEMPLACE EL TOPE DE LA
PUERTA
• 5HWLUHORVWRUQLOORVGHOWRSH*LUHHOWRSH\
vuelva a instalar el tope con sus tornillos.
3
RETIRE EL ENSAMBLE DEL
TOPE DE LA PUERTA Y
REEMPLACE EL MISMO DEL
LADO OPUESTO
4
• Retire los 2 tornillos del ensamble del tope y retire
el ensamble empujando el mismo hacia el centro,
empujando hacia arriba y luego hacia afuera.
• Gire el ensamble del tope y reemplace el mismo
del lado opuesto con sus tornillos.
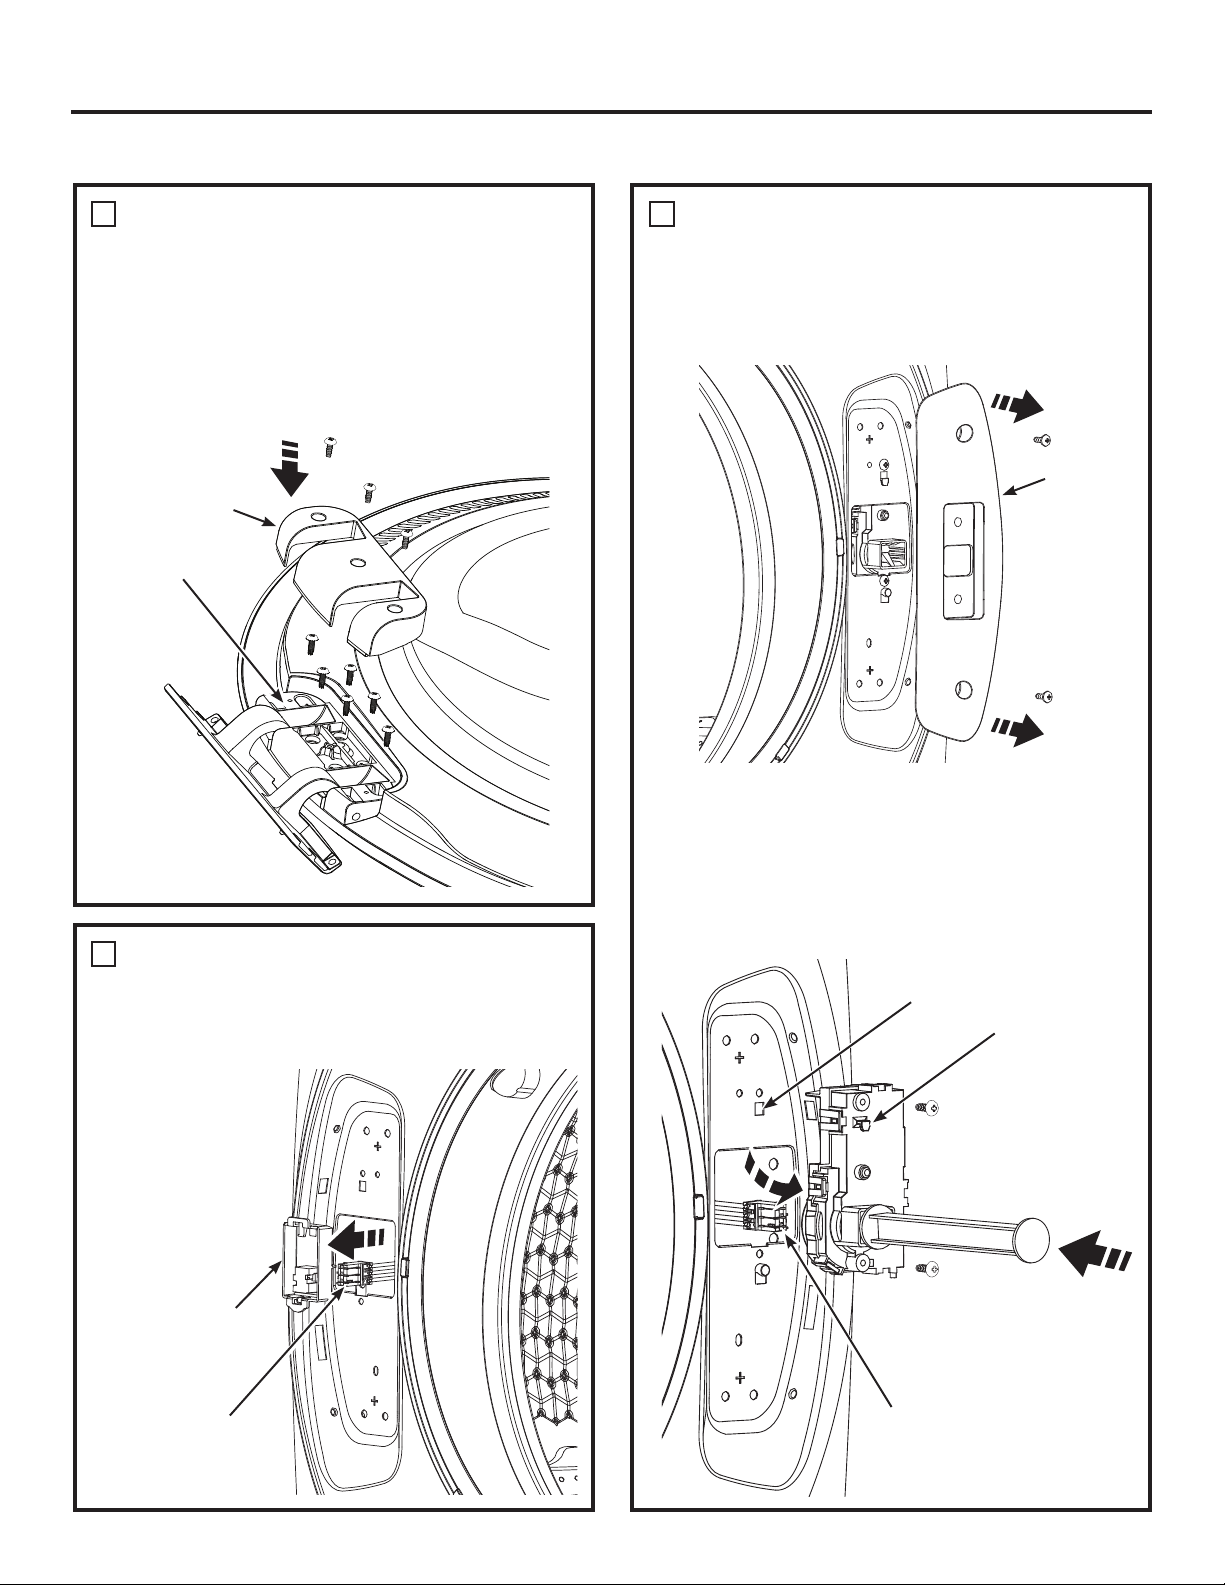
49-3000217 Rev 2 25
Instrucciones de instalación
CÓMO INVERTIR LA APERTURA DE LA PUERTA (Opcional)
REEMPLACE LA BISAGRA DE
LA PUERTA Y LA TAPA DE LA
BISAGRA DE LA PUERTA DEL
LADO OPUESTO
• Gire el ensamble de la puerta y reemplace el mismo
del lado opuesto con sus tornillos.
• Gire el tapa de la bisagra y reemplace el mismo del
lado opuesto con sus tornillos.
5
RETIRE EL SUSPENSOR DE LA
TERMINAL Y DESCONECTE EL
CONECTOR DE LA CLAVIJA DE
LA LAVADORA
• Usando los
dedos, presione
el suspensor de
la terminal fuera
de la cara de la
lavadora.
• Desconecte el
conector de la
clavija.
6
• Retire los 2 tornillos de la tapa de bloqueo y retire la
misma de la cara de la lavadora.
7
• Inserte la barra de bloqueo provista en el
mecanismo de bloqueo sobre la parte frontal
de la lavadora. Retire el ensamble de bloqueo
retirando sus dos tornillos, usando la barra de
bloqueo para levantar el mismo hasta que quede
desenganchado, inclinando y empujando éste hacia
afuera desde el frente de la lavadora. Desconecte
su conector de la clavija destrabando sus bloqueos.
Tapa de
Bloqueo
Inserte la Barra
de Bloqueo
Retire el
ensamble
Conector de la
Clavija
Ventana del Gancho
Gancho
Tapa de la
Bisagra
Bisagra
Suspensor
Terminal
Conector de la
Clavija
RETIRE EL ENSAMBLE DEL
BLOQUEO E INSTALE EL MISMO
DEL LADO OPUESTO DE LA
LAVADORA
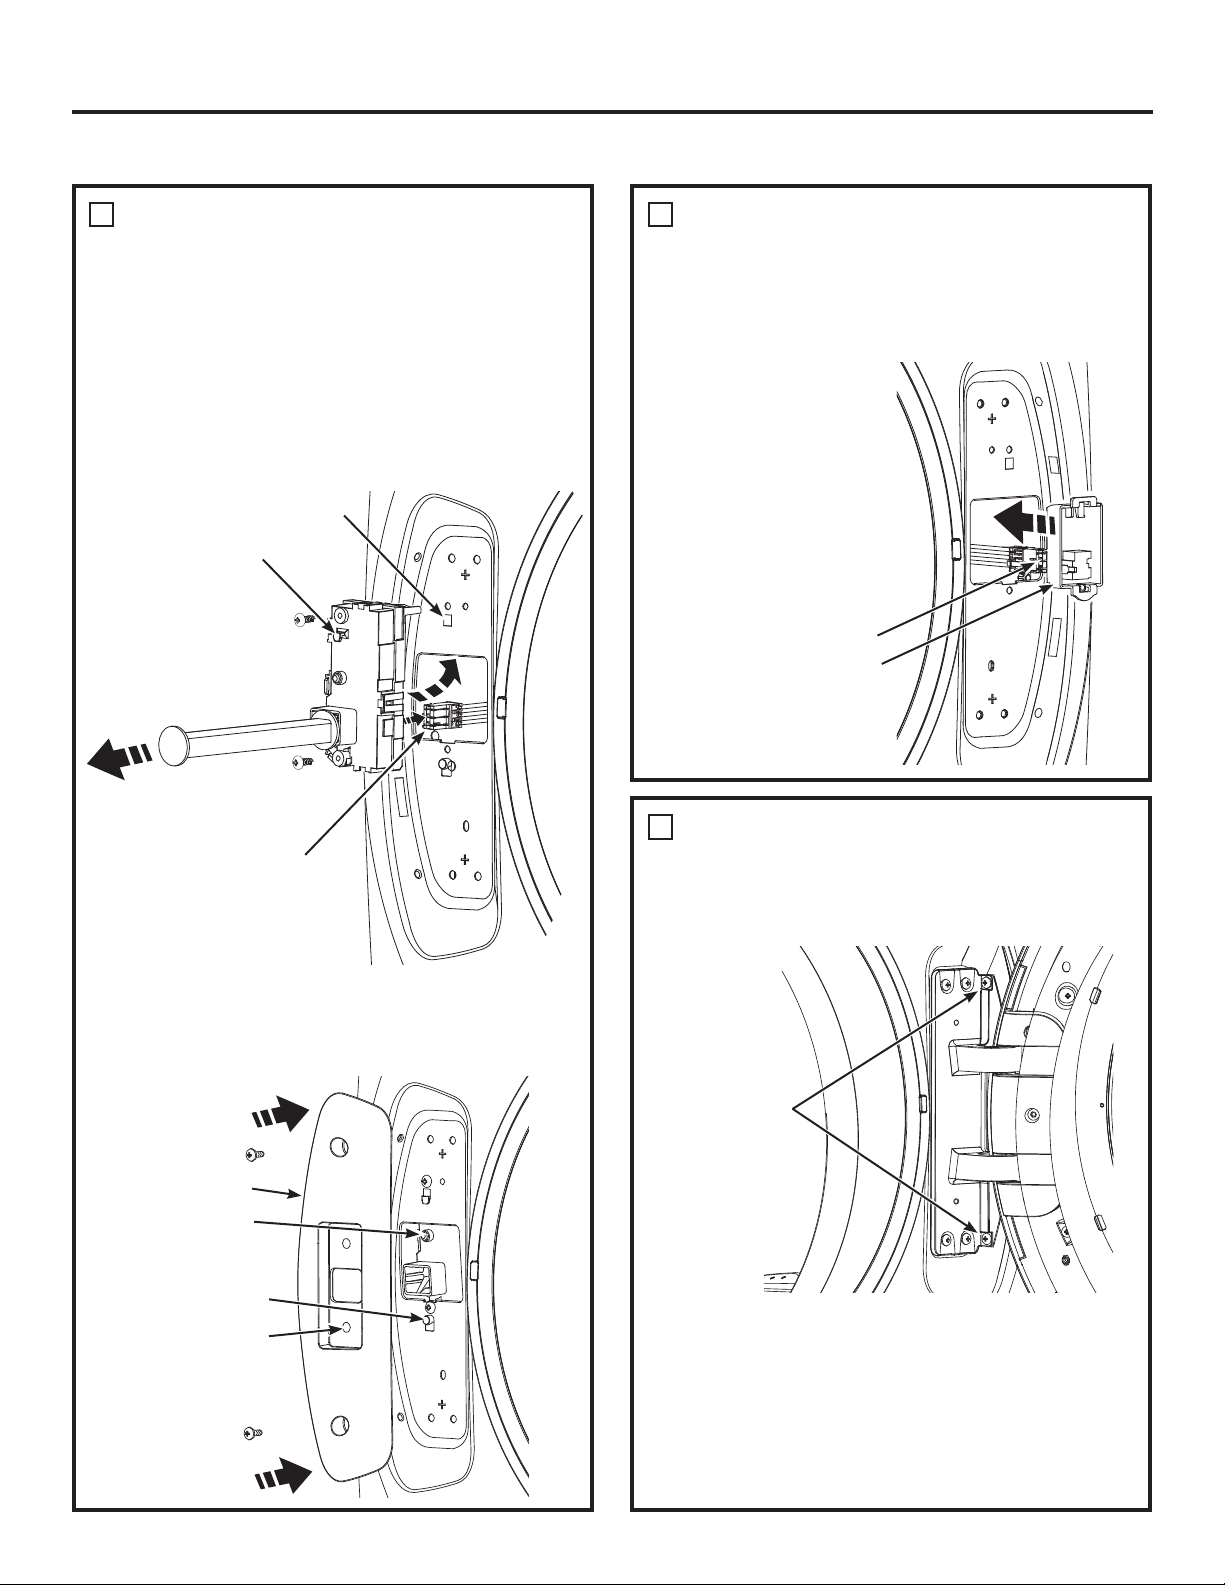
49-3000217 Rev 2
Instrucciones de instalación
CÓMO INVERTIR LA APERTURA DE LA PUERTA (Opcional)
VUELVA A CONECTAR EL
CONECTOR DE LA CLAVIJA
DESDE LA LAVADORA Y
REEMPLACE EL SUSPENSOR
DE LA TERMINAL
8
• Vuelva a conectar
el conector de la
clavija y vuelva
a presionar el
suspensor de la
terminal sobre la
cara de la lavadora,
del lado opuesto.
Conector de la Clavija
Suspensor Terminal
RETIRE EL ENSAMBLE DE LA
PUERTA
9
• Levante el ensamble de la puerta hasta su posición
y asegure el mismo sobre la cara de la lavadora con
VXVWRUQLOORV
• Cierre la puerta de la lavadora.
NOTA: MAsegúrese de que la puerta se abra y se
cierre de forma correcta. De no ser así, repita todos
los pasos y asegúrese de que todas las partes y
tornillos queden posicionados de forma segura.
• Conecte el cable de corriente y encienda el disyuntor.
• Haga que la lavadora realice un ciclo completo, a fin
de verificar que su funcionamiento sea correcto.
Reemplace los
WRUQLOORVGHOD
bisagra y asegure
los mismos sobre
la cara de la
lavadora
• NO gire el ensamble del bloqueo. Mueva el mismo
hasta el lado opuesto de la lavadora y conecte el
conector de la clavija, asegurándose de que calcen
completamente juntos. Incline e inserte el ensamble
del bloqueo en el frente de la lavadora, levante
el mismo y asegure su gancho en su ventana.
Reemplace sus tornillos. Retire la barra de bloqueo
del ensamble y conserve la misma para uso futuro.
7
Retire la barra
de bloqueo
Reemplace el
ensamble
Conector de la
Clavija
Ventana del Gancho
Gancho
• Instale la tapa del bloqueo sobre el ensamble del
bloqueo, asegurándose de que el enlace de la
ubicación calce en el agujero de ubicación y que
el interruptor del bloqueo funcione de forma libre.
Reemplace sus tornillos.
RETIRE EL ENSAMBLE DEL
BLOQUEO E INSTALE EL MISMO
DEL LADO OPUESTO DE LA
LAVADORA (CONTINUA)
Enlace de Ubicación
Tapa del
Bloqueo
Agujero de Ubicación
Interruptor
del Bloqueo
49-3000217 Rev 2 27
Consejos para la solución de problemas
ANTES DE SOLICITAR EL SERVICIO TÉCNICO
Problema Causas posibles Solución
No hay drenaje
No hay rotación
No hay giro
La carga está desequilibrada Redistribuya las prendas y accione el Rinse & Spin
(Enjuague & Centrifugado).
Aumente el tamaño de la carga si lava una carga pequeña
que contiene elementos pesados y livianos.
El filtro de la bomba podría estar obstruido Ver la Cuidado y limpieza sobre cómo limpiar el Filtro de
la bomba.
La manguera de drenaje está torcida o mal
conectada
Enderece la manguera de drenaje y verifique que la
lavadora no la esté aplastando.
El drenaje de la vivienda puede estar
obstruido
Controle la cañería de la vivienda. Quizás deba llamar a
un plomero
La manguera de drenaje hace efecto sifón;
la manguera de drenaje se ha empujado muy
profundamente dentro del drenaje
Verifique que haya un espacio de aire entre la manguera y
el drenaje
Fugas de aguar La junta de la puerta está desbalanceada Revise que la junta esté colocada en su sitio y que no se
haya roto. Los objetos dejados en los bolsillos podrían causar
daños a la lavadora (clavos, tornillos, lápices, bolígrafos).
El agua podría gotear de la puerta cuando la misma está
abierta. Esto forma parte del funcionamiento normal.
Con cuidado limpie el sellado de goma de la puerta. A veces
quedan suciedades o prendas en este sellado y pueden
provocarse pequeñas pérdidas.
Revise la parte posterior izquierda de la
lavadora para verificar si hay presencia de
agua
Si esta área se encuentra mojada, existe una condición
haya roto. Los objetos dejados en los bolsillos podrían
detergente
Las tuberías de toma de agua la tubería de
desagüe no se han conectado correctamente
Asegúrese de que se han apretado correctamente las
conexiones de las tuberías de la lavadora y las llaves de paso
y que el extremo de la tubería de desagüe se ha introducido y
fijado correctamente al desagüe.
Puede que la tubería de desagüe de la
vivienda esté obstruida
Compruebe las tuberías de la vivienda. Puede que sea
necesario llamar a un plomero.
Depósito tapado El jabón en polvo puede provocar atascos dentro del
depósito y hacer que salga agua desde el frente del
depósito. Quite el cajón y límpielo, al igual que la parte
interna de la caja del depósito.Consulte la sección de
Cuidado y limpieza.
Uso incorrecto del detergente Use sólo detergente HE en la cantidad correcta.
Rotura en la caja del depósito Si la instalación es nueva, controle que no haya roturas en
la parte interna de la caja del depósito.
Las prendas
están muy
mojadas
La carga está desequilibrada Redistribuya las prendas y accione el Rinse & Spin
(Enjuague & centrifugado).
Aumente el tamaño de la carga si lava una carga pequeña
que contiene elementos pesados y livianos.
/DPiTXLQDUHGXFLUiODYHORFLGDGGHOFHQWULIXJDGRDUSP
si le cuesta equilibrar la carga. Esta velocidad es normal.
El filtro de la bomba podría estar obstruido Ver la Cuidado y limpieza sobre cómo limpiar el Filtro de
la bomba.
Carga excesiva Cargue la lavadora de manera que haya suficiente espacio
para que las prendas se muevan libremente.
La manguera de drenaje está torcida o mal
conectada
(OSHVRVHFRGHODFDUJDGHEHVHUPHQRUDOE
El drenaje de la vivienda puede estar
obstruido
Enderece la manguera de drenaje y verifique que la
lavadora no la esté aplastando
El drenaje de la vivienda puede estar
obstruido
Controle la cañería de la vivienda. Quizás deba llamar a
un plomero.
La manguera de drenaje hace efecto sifón; la
manguera de drenaje se ha empujado muy
profundamente dentro del drenaje.
Verifique que haya un espacio de aire entre la manguera y
el drenaje.

28 49-3000217 Rev 2
ANTES DE SOLICITAR EL SERVICIO TÉCNICO
Consejos para la solución de problemas
Problema Causas posibles Solución
Ciclo incompleto o el
emporizador no avanza
Redistribución de carga
automática
El temporizador agrega 3 minutos al ciclo por cada reequilibrio.
Pueden efectuarse 11 o 15 reequilibrios. Esto es una operación
QRUPDO1RKDJDQDGDODPiTXLQDILQDOL]DUiHOFLFORGHODYDGR
El filtro de la bomba podría
estar obstruido
Ver la Cuidado y limpieza sobre cómo limpiar el Filtro de la
bomba.
La manguera de drenaje está
torcida o mal conectada
Enderece la manguera de drenaje y verifique que la lavadora
no la esté aplastando.
El drenaje de la vivienda puede
estar obstruido
Controle la cañería de la vivienda. Quizás deba llamar a un
plomero.
La manguera de drenaje hace
efecto sifón; la manguera de
drenaje se ha empujado muy
profundamente dentro del
drenaje
Verifique que haya un espacio de aire entre la manguera y el
drenaje.
Ruido fuerte o inusual;
vibración o movimiento
Se mueve el gabinete La lavadora está diseñada para moverse 1/4” para reducir las
fuerzas transmitidas al piso. Este movimiento es normal.
Las patas de nivelación
de goma no tocan el piso
firmemente
Presione y tire en la parte trasera derecha y luego en la
parte trasera izquierda de su lavadora para verificar que esté
nivelada. Si la lavadora está desequilibrada, ajuste las patas
de nivelación de goma para que estén firmemente en contacto
con el piso y trabadas en su lugar.
Carga desequilibrada
Pausar la unidad, abra la puerta y redistribuya la carga
manualmente. Para controlar la máquina, accione el enjuague
y centrifugado sin carga. Si es normal, el desequilibrio fue
provocado por la carga.
El filtro de la bomba podría
estar obstruido
Ver la Cuidado y limpieza sobre cómo limpiar el Filtro de la
bomba.
No hay suministro
eléctrico/la lavadora no
está en funcionamiento
La lavadora está desconectada Asegúrese de que el cable esté enchufado de manera segura
en un enchufe funcional.
El suministro de agua está
cerrado
Abra por completo las llaves de paso de agua fría y caliente.
El interruptor/fusible se ha
quemado/saltado
Compruebe los interruptores/fusibles de la vivienda. Cambie
los fusibles o restablezca el interruptor La lavadora debe tener
una toma individual.
Revisiones automáticas del
sistema
La primera vez que se enchufa la lavadora, se efectúan las
YHULILFDFLRQHVDXWRPiWLFDV3RGUtDQSDVDUKDVWDVHJXQGRV
antes de que pueda utilizar su lavadora. Esto forma parte del
funcionamiento normal.
Enganchones, agujeros,
Ver rotos, rasgaduras o
deterioro excesivo
Sobrecargado No supere los tamaños máximos recomendados de carga. Ver
la sección de Carga para los tamaños máximos recomendados
de carga.
Lápices, bolígrafos, clavos,
tornillos u otros objetos
dejados en los bolsillos
Retire todos los elementos sueltos de los bolsillos.
Alfileres, broches, corchetes,
botones en punta, hebillas
de cinturones, cremalleras y
objetos puntiagudos olvidados
en los bolsillos
•
Abroche los corchetes, broches, botones y cremalleras.
Error o cambios en el
control de tiempo
Esto es normal Durante el giro, es posible que en ocasiones se necesite volver
a equilibrar la carga de la lavadora a fin de reducir vibraciones.
Cuando esto sucede, se produce como consecuencia una
prolongación en el tiempo estimado de lavado.
Cantidad de agua
insuficiente
Esto es normal Las lavadoras horizontales no requieren que el tubo se llene de
agua, como sí ocurre con las lavadoras con carga superior.
49-3000217 Rev 2
Consejos para la solución de problemas
ANTES DE SOLICITAR EL SERVICIO TÉCNICO
Problema Causas posibles Solución
La lavadora se
detiene o se
debe reiniciar
o la puerta de
la lavadora
lavadora está
bloqueada y no
se abre
El filtro de la bomba podría estar obstruido Ver la Cuidado y limpieza sobre cómo limpiar el Filtro de
la bomba.
La puerta no
se destraba o
presiona Start
(inicio) y la
máquina no
funciona
Esto es normal Las lavadoras con tapa frontal comienzan su
funcionamiento de manera diferente que las lavadoras con
carga superior, y toma varios segundos realizar un control
del sistema. La puerta se bloqueará y desbloqueará.
Funcionamiento incorrecto Simplemente abra y cierre la puerta firmemente y luego
presione Start (Iniciar).
El agua no
ingresa a la
lavadora o
ingresa muy
lentamente
Auto-controles automáticos del sistema Después de presionar Start (Iniciar), la lavadora realiza
varios controles del sistema. El agua comenzará a correr
varios segundos después de presionar Start (Iniciar).
Los filtros de válvula de agua quedaron
trabados
Cierre el suministro de agua y quite las mangueras de
conexión de agua de la parte superior trasera de la
lavadora. Utilice un cepillo o escarbadientes para limpiar
los filtros de la máquina. Vuelva a conectar las mangueras
y abra el suministro de agua.
Arandelas del filtro de entrada de agua
están obstruidos
Cierre la llave de paso y quite las tuberías de conexión de
agua de la parte trasera superior de la lavadora. Utilice un
cepillo o un palillo de dientes para limpiar los filtros de la
lavadora. Vuelva a conectar las tuberías y abra la llave de
paso.
El filtro de la bomba podría estar obstruido Ver la Cuidado y limpieza sobre cómo limpiar el Filtro de
la bomba.
Las mangueras de llenado puede estar
torcida
Verifique que las mangueras de llenado no se encuentren
torcidas o tapadas.
El suministro de agua está cerrado Abra por completo los grifos de agua caliente y fría.
Eficiencia de energía Esta es una lavadora con buen rendimiento de energía.
Como resultado, las configuraciones de temperatura para
esta lavadora pueden ser diferentes a las de una lavadora
común sin esta característica.
Suministro de agua insuficiente Asegúrese de que el suministro de agua esté accionado.
Verifique que los grifos de agua estén abiertos por
completo.
La puerta de la lavadora está abierta La puerta de la lavadora debe estar cerrada durante todas
las operaciones de ciclo de lavado. Si se abre la puerta
durante una operación de lavado, todas las funciones se
detendrán, incluyendo el ingreso de agua.
Conexión incorrecta de la manguera de
llenado
Asegúrese de que las mangueras de llenado conecten el
suministro de agua caliente a la entrada de agua caliente
de la lavadora y el suministro de agua fría a la entrada de
agua fría (caliente a caliente, fría a fría).
Formación de
arrugas
Clasificación inadecuada No mezcle elementos pesados (como prendas de trabajo)
con prendas livianas (como blusas).
Carga excesiva Cargue la lavadora de manera que haya suficiente
espacio para que las prendas se muevan libremente.
Ciclo de lavado incorrecto Coincida la selección del ciclo con el tipo de tela que está
lavando (especialmente para cargas de cuidado fácil).
Lavados repetidos en agua demasiado
caliente
Lave con agua tibia o fría.
49-3000217 Rev 2
ANTES DE SOLICITAR EL SERVICIO TÉCNICO
Consejos para la solución de problemas
Problema Causas posibles Solución
Prendas grises o
amarillentas
No se colocó suficiente detergente Use la cantidad correcta de detergente.
No se usó detergente HE (alta eficiencia) Use sólo detergente HE.
Agua dura Utilice agua caliente segura para las telas.
Utilice un acondicionador de agua como Calgon o instale
un suavizante de agua.
El agua no está lo suficientemente caliente Verifique que el calentador de agua esté suministrando
DJXDD±)±&
El detergente no se disuelve Pruebe con un detergente HE líquido.
Transferencia de colores Divida las prendas por color. Si la etiqueta de la tela dice
“lavar por separado”, puede indicarse colores inestables.
Manchas de
color
Uso incorrecto del suavizante de telas Consulte el paquete del suavizante de telas sobre las
instrucciones y siga las indicaciones de uso del depósito.
Dye transfer Separe los blancos o los colores claros de los colores
oscuros.
Quite rápidamente la carga de la lavadora.
La temperatura
del agua es
incorrecta
El suministro de agua está mal conectado Verifique que las mangueras estén conectadas a los grifos
correctos
El calentador de agua de la vivienda no está
bien configurado
Verifique que el calentador de agua de la vivienda esté
VXPLQLVWUDQGRDJXDD±)±&
Mal olor dentro
de la lavadora
La lavadora no se usó durante un período
prolongado, no se utiliza una calidad
recomendada de detergentes HE (alta
eficiencia) o se está usando demasiado
detergente
De forma regular use UTRAFRESH VENT (Ventilación
Utra Fresca) entre usos.
En caso de un fuerte olor, puede necesitarse el
funcionamiento del ciclo Self Clean (Limpieza de tambor)
más de una vez.
Use sólo la cantidad de detergente recomendada o ajuste
SmartDispense (Dispensado Inteligente) en LOW (Bajo).
Use sólo detergente HE (alta eficiencia).
Retire siempre los artículos húmedos de la lavadora
inmediatamente después de que la máquina deje de
funcionar o usar 1 Step Wash + Dry o Tumble Care.
Si elije no usar el Sistema UTRAFRESH VENT
(Ventilación Utra Fresca), deje la puerta entornada de
modo que la lavadora se seque con el aire. Se requiere
una supervisión estricta cuando este aparato es utilizado
por niños o en su cercanía. NO permita que los niños
jueguen sobre o dentro de este electrodoméstico.
Pérdida de
detergente
Esto es normal Es normal ver una pérdida de detergente sobre la junta de
ODSXHUWDDOUHGHGRUGHVHJXQGRVGHVSXpVGHOOHQDUHO
depósito.
Dosificación
inadecuada de
suavizante o
blanqueador
Depósito tapado Monthly clean the dispenser drawer to remove buildup of
chemicals.
Se colocó suavizante o blanqueador por
encima de la línea máxima de llenado.
Asegúrese de contar con la cantidad correcta de
suavizante.
El cajón
dispensador
no dispensa de
forma adecuada
El paquete de detergente para ropa sucia se
colocó en el cajón dispensador
Los paquetes de detergente de ropa sucia no deberían
ser usados en el dispensador. Sólo se deberían agregar
directamente a la canasta de la lavadora, siguiendo las
instrucciones del fabricante.
La bomba
funciona
mientras la
lavadora no se
encuentra en
uso
Atascada en el drenaje del sumidero Esto es normal. El drenaje del sumidero está detectando
un nivel de llenado de agua no deseado desde un
grifo posiblemente abierto. Cierre la válvula de agua e
inspeccione que no haya bloqueos en la misma.

49-3000217 Rev 2 31
GEAppliances.com
Todo el servicio de garantía es provisto por nuestros Centros de Servicio de Fabricación, o un técnico autorizado de
Servicio al Cliente (Customer Care®). Para programar una visita del servicio técnico, visítenos a través de Internet en
GEAppliances.com/serviceROODPH*($SSOLDQFHVDO*(&$5(6&XDQGROODPHSDUDVROLFLWDUHO
servicio, tenga los números de serie y modelo disponibles.
Para realizar el servicio técnico de su electrodoméstico se podrá requerir el uso de datos del puerto de abordaje para
su diagnóstico. Esto da al técnico del Servicio de Fábrica de GE Appliances la habilidad de diagnosticar de forma rápida
cualquier problema con su electrodoméstico, y de ayudar a GE Appliances a mejorar sus productos al brindarle a
GE
Appliances la información sobre su electrodoméstico. Si no desea que los datos de su electrodoméstico sean enviados a
GE Appliances, solicitamos que le indique a su técnico NO entregar los datos a GE Appliances en el momento del servicio.
GARANTÍA LIMITADA
Garantía limitada de la lavadora GE Appliances
Esta garantía limitada se extiende al comprador original y a cualquier propietario subsecuente para productos comprados
para uso doméstico dentro Estados Unidos. Si el producto está situado en un área que no dispone de servicio por parte
de un proveedor de servicio autorizado de GE Appliances, podría tener que hacerse cargo de los costes de envío o bien
podría solicitársele que lleve el producto a un centro de servicio de GE Appliances autorizado para realizar la reparación.
En Alaska, la garantía limitada excluye el costo de envío o las visitas de servicio a su casa.
Algunos estados no permiten la exclusión o limitación de daños imprevistos. Esta garantía limitada le da sus derechos
legales específicos, y es posible que usted tenga otros derechos legales que varian de estado a estado. Para informarse
de cuáles son sus derechos legales, consulte a su oficina de asuntos del consumidor local o estatal o póngase en
contacto con la Oficina de su Procurador General.
Garante: GE Appliances, a Haier company, Louisville, KY 40225
EXCLUSIÓN DE GARANTÍAS IMPLÍCITAS
Su única y exclusiva alternativa es la reparación del producto, como se indica en la Garantía Limitada. Las garantías
implícitas, incluyendo garantías implícitas de comerciabilidad o conveniencia sobre un propósito particular, se limitan
a un año o al período más corto permitido por la ley.
Abroche su recibo aquí. Para acceder al servicio técnico de acuerdo con
la garantía deberá contar con la prueba de la fecha original de compra.
Garantías Extendidas: Adquiera una garantía extendida de GE Appliances y conozca los descuentos especiales que
están disponibles mientras su garantía aún está vigente. Puede acceder a la misma a través de Internet en cualquier
momento en
geappliances.com/extended-warranty
ROODPDQGRDOGXUDQWHHOKRUDULRFRPHUFLDO/RV6HUYLFLRVSDUDORV*($SSOLDQFHVD~QHVWDUiQ
disponibles cuando su garantía caduque.
Por el Período de: Se sustituirá:
Un Año
Desde la fecha de
compra original
Cualquier pieza de la lavadora que falle debido a un defecto de los materiales o la mano de
obra. Durante esta garantía limitada de un año, también ofrecemos, en forma gratuita, toda
la mano de obra y los costos de servicio para reemplazar la pieza defectuosa.
Diez años
Desde la fecha de
compra original
El motor, si falla debido a un defecto de fabricación o de mano de obra. Durante estos
nueve años adicionales de garantía limitada, usted será responsable por cualquier trabajo
y los costos relacionados con el servicio técnico.
Qué No Cubrirá GE Appliances:
Ŷ
Viajes del personal de servicio a su casa para
enseñarle cómo usar su producto.
Ŷ
Instalación, entrega o mantenimiento
inapropiada.
Ŷ
Fallas del producto si es maltratado, mal usado,
o usado para un propósito diferente del que se
creó o si es usado para usos comerciales.
Ŷ
Cambio de los fusibles de su casa o reajuste del
circuito de interruptores.
Ŷ
Productos sin defectos o rotos, o los cuales se
encuentran funcionando como se indica en el
Manual del propietario.
Ŷ
Daños al producto causados por accidentes,
incendios, inundaciones o actos de la naturaleza.
Ŷ
Daños imprevistos resultantes causados por
posibles defectos con este electrodoméstico.
Ŷ
Defectos o daños debido a la puesta en
funcionamiento a temperaturas de congelación.
Ŷ
Daños causados después del envío.
Ŷ
Producto no accesible para facilitar el servicio
requerido.

32 49-3000217 Rev 2
SOPORTE PARA EL CONSUMIDOR
Soporte para el Consumidor
Sitio Web de GE Appliances
¿Desea realizar una consulta o necesita ayuda con su electrodoméstico? ¡Intente a través del Sitio Web de
GE Appliances las 24 horas del día, cualquier día del año! Usted también puede comprar más electrodomésticos
maravillosos de GE Appliances y aprovechar todos nuestros servicios de soporte a través de Internet, diseñados
para su conveniencia. GEAppliances.com.
Registre su Electrodoméstico
¡Registre su electrodoméstico nuevo a través de Internet, según su conveniencia! Un registro puntual de su producto
permitirá una mejor comunicación y un servicio más puntual de acuerdo con los términos de su garantía, en caso
de surgir la necesidad. También puede enviar una carta en la tarjeta de inscripción preimpresa que se incluye con el
material embalado. GEAppliances.com/register.
Servicio Programado
El servicio de reparación de expertos de GE Appliances está a sólo un paso de su puerta. Conéctese a través de
Internet y programe su servicio a su conveniencia cualquier día del año.
GEAppliances.com/service
RFRPXQtTXHVHDOGXUDQWHHOKRUDULRGHDWHQFLyQFRPHUFLDO
Garantías Extendidas
Adquiera una garantía extendida de GE Appliances y conozca los descuentos especiales que están disponibles
mientras su garantía aún está vigente. La puede adquirir en cualquier momento a través de Internet. Los servicios
de GE Appliances aún estarán allí cuando su garantía caduque.
GEAppliances.com/extended-warranty
RFRPXQtTXHVHDOGXUDQWHHOKRUDULRGHDWHQFLyQFRPHUFLDO
Conectividad Remota
Para solicitar asistencia para la conectividad de red inalámbrica (para modelos con acceso remoto), visite nuestro
sitio web en GEAppliances.com/connected-home-smart-appliances/RFRPXQtTXHVHDO
Piezas y Accesorios
Aquellos individuos calificados para realizar el servicio técnico de sus propios electrodomésticos podrán solicitar el
envío de piezas o accesorios directamente a sus hogares (se aceptan las tarjetas VISA, MasterCard y Discover).
Ordene hoy a través de Internet durante las 24 horas, todos los días. GEApplianceparts.com o de forma telefónica
DOGXUDQWHHOKRUDULRGHDWHQFLyQFRPHUFLDO
Las instrucciones que figuran en este manual cubren los procedimientos que serán realizados por cualquier
usuario. Otros servicios técnicos generalmente deben ser derivados a personal calificado del servicio. Se
deberá tener cuidado, ya que una reparación indebida podrá hacer que el funcionamiento no sea seguro.
Contáctenos
Si no se encuentra satisfecho con el servicio que recibió de GE Appliances, comuníquese con nosotros a través de
nuestro sitio Web con todos los detalles, incluyendo su número telefónico, o escriba a:
*HQHUDO0DQDJHU&XVWRPHU5HODWLRQV_*($SSOLDQFHV$SSOLDQFH3DUN_/RXLVYLOOH.<
GEAppliances.com/contact.
Printed in China