JENN.AIR
Use and Care Manual
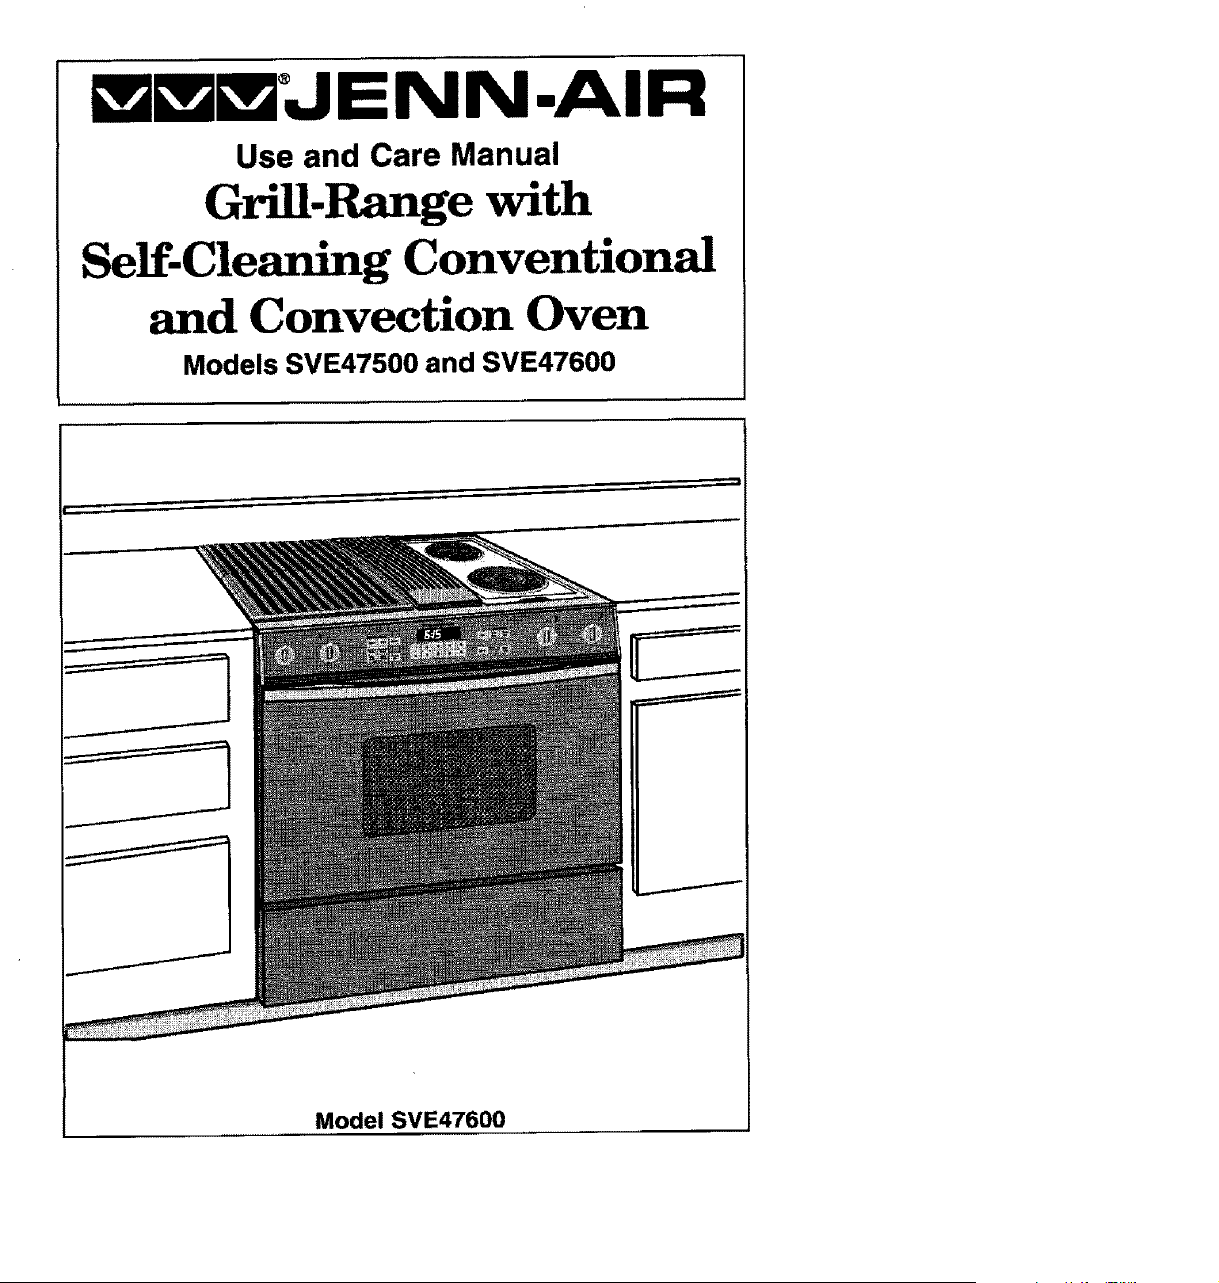
Grill-Range with
Self-Cleaning Conventional
and Convection Oven
Models SVE47500 and SVE47600
Model SVE47600

Congratulations on your choice of a Jenn-Air grill-range. The indoor grilling
of meats, fish or fowl is one of the most attractive and succulent methods
of preparing these foods ... a unique flexibility made possible by Jenn-Air's
patented integral ventilation system.
Your Jen n-Ai r serf-cleaning oven combines the best of four cooking methods,
conventional baking or roasting, convection baking, convection roasting and
broiling. (Note: Only Model SVE47600 has the convection options.)
The Jen n-Air convection oven is actually a conventional oven that circulates
heated air within the oven. As both bake and broil heating elements cycle on
and off with the thermostat, a fan keeps the heated air circulating around the
food. The constantly recimulating heated air in the convection oven strips
away the layer of cooler air that surrounds the food. Consequently, many
foods cook more quickly. Evenly distributed heat makes multiple rack
cooking possible. Convection roasted meats retain their natural flavor and
juiciness with less shrinkage than conventional roasting.
In addition to the many exclusive benefits of convection cooking, your Jenn-
Air oven is also a fine full featured conventional bake and broil oven. You can
cook your "old favorite" recipes as you have in the past. The conventional
bake oven also gives you the flexibility of preparing various foods when
convection cooking may not be as beneficial, as when cooking foods in
covered casseroles or clay pots. The broil element is convenient for top
browning and oven broiling of foods.
Before you begin cooking with your new range, please take a few minutes to
read and become familiar with the instructions inthis book. On the following
pages you will find a wealth of information regarding all aspects of using your
new range. By following the instructions carefully, you will be able to fully
enjoy and properly maintain your range and achieve excellent results with the
food you prepare.
Should you have any questions about using your Jenn-Air range or need a
Use and Care manual for your cooktop cartridge, write to us. Be sure to
provide the model number.
Jenn-Air Customer Assistance
c/o Maytag Customer Service
P.O. Box 2370
Cleveland, TN 37320-2370
Appliance Usage
BeforeYou Cal! for Service .......................................................................................... 46-48
Caring for yourRange
AccessPane! ............................................................................................................. 44
AdjustOven Temperature .......................................................................................... 44
Child ProtectionLock ................................................................................................. 43
Cleaning Other Parts of Your Range ..................................................................... 42-43
Oven Light Bulb ......................................................................................................... 45
RangeComponents ............................................................................................................. 8
Safety Precautions ........................................................................................................... 4-7
Using the Cooktop and Grill
Accessories .................................................................................................................. 50-51
Cooktop Cartridges
Home Canning ........................................................................................................... 11
Installation ................................................................................................................. 1 t
Cookware .......................................................................................................................... 12
Ducting Information ........................................................................................................... 49
Grilling
C_eaning ................................................................................................................ 16-17
GdUing Guide .............................................................................................................. 15
Grilling Tips ................................................................................................................ 16
Installation .................................................................................................................. 13
Usage ......................................................................................................................... 14
Sudaq, e Controls ................................................................................................................ 10
Ventilation System ............................................................................................................... 9
Using the Oven
Baking
Baking Chart .............................................................................................................. 27
Causes of Cake Failure ............................................................................................. 28
Convect Baking ..................................................................................................... 28-29
General Recommendations ....................................................................................... 26
Broiling ......................................................................................................................... 34.35
Clock Controls
Clock Controlled Baking or Roasting .................................................................... 24-25
Time of Day Clock ..................................................................................................... 22
_mer ......................................................................................................................... 23
Oven Cleaning
Self-Cleaning Process .......................................................................................... 3641
Oven Operation
Oven Control Panei ............................................................................................... !8-19
Rack Positions ........................................................................................................... 21
Setting Controls ......................................................................................................... 20
Roasting
Convect Roasting ...................................................................................................... 32
Frozen Convenience Foods ....................................................................................... 33
Roasting Chart ........................................................................................................... 31
General Roasting Recommendations ........................................................................ 30
3

Read before operating your range
All appliances -- regardless of the manufacturer -- have the potential
through improper or careless use to create safety problems. There-
fore the following safety precautions should be observed:
1. Be sure your appliance is properly installed and grounded by a
qualified technician.
2, Never use your appliance for warming or heating the room.
3. Children should not be left alone or unattended in area where
appliance is in use. They should never be allowed to sit or stand
on any part of the appliance.
4. Wear proper apparel. Loose-fitting or hanging garments should
never be worn while using the appliance.
5, Do not repair or replace any part of the appliance unless
specifically recommended in this manual, All other servicing
should be referred to an authorized Jenn-Air Service Contractor.
6, Flammable materials should not be stored in an oven or near
surface units.
7, Do not use water on grease fires. Smother fire or flame or use
dry chemical or foam-type extinguisher.
8. Use only dry potholders. Moist or damp potholders on hot
surfaces may result in burns from steam. Do not let potholder
touch hot heating elements. Do not use a towel or other bulky
cloth.
9, Use proper pan size. Many appliances are equipped with one
or more surface units of different size. Select cookware having
flat bottoms large enough to cover the surface unit heating
element. The use of undersized cookware will expose a portion
of the heating element to direct contact and may result in
ignition of clothing. Proper relationship of cookware to heating
element will also improve efficiency and performance,
10. Never leave surface units unattended at high heat settings. Boil
over causes smoking and greasy spitlovers that may ignite.
11.Glazed cookware -- only certain types of glass, glass-ceramic,
ceramic, earthenware or other glazed cookpots are suitable for
rangetop surface without breaking due to the sudden change
intemperature. Use only such cookware as you know has been
approved for this purpose.
12.Cookware handles should be turned inward and not extend
over adjacent surface heating elements to avoid bums, ignition
of flammable materials and spillage due to unintentional contact
with the cookware.
13.CAUTION -- Do not store items of interest to children in
cabinets above a range or on the backguard of a range --
children climbing on the range to reach items could be seriously
injured.
14.Do not soak or immerse removable heating elements in water.
15. Do not touch surface units or areas near units, heating elements
or interior surfaces of oven. Surface units or heating elements
may be hot even though they are dark in color. Areas near
surface units and interior surfaces of an oven may become hot
enough to cause burns. During and after use, do not touch or
let clothing or other flammable materials contact these areas
until they have had sufficient time to cool. Other surfaces may
become hot enough to cause burns --among these surfaces
are the cooktop, the upper door frame and glass, oven vent
opening and surfaces near the opening, and the top edge of the
control panel.
16. Use care when opening oven door. Let hot air or steam escape
before removing or replacing food.
17.Do not heat unopened food containers. Build-up of pressure
may cause container to burst and result in injury.
18. Keep oven vent ducts unobstructed. The oven vent is located
underneath the air grille.
19.Always place oven racks in desired location while oven is cool.
If rack must be moved while oven is hot, do not let potholder
contact hot heating element in oven.
20.Do not clean door gasket. The door gasket is essential for a
good seal. Care should be taken not to rub, damage or move
the gasket.
21.Do not use oven cleaners. No commercial oven cleaner or
oven liner protective coating of any kind should be used in or
around any part of the oven.
22.Clean only parts listed in this manual and use procedures
recommended.
23. CAUTION: BEFORE SELF-CLEANING THE OVEN, REMOVE
FOOD, BROILER PAN AND OTHER UTENSILS.
24. Listen for fan. A fan noise should be heard during the broil and
cleaning cycles. If not, call a serviceman before self-cleaning
again.
25. Do not cook on glass-ceramic cooking surface if the cooktop is
broken. Cleaning solutions and spillovers may penetrate the
broken cooktop and create a shock hazard. Contact an
authorized Jenn-Air Service Contractor.
26.Clean glass-ceramic cooktops with caution. If wet sponge or
cloth is used to wipe spills on a hot cooking area, be careful to
avoid steam burns. Some cleansers can produce noxious
fumes if applied to a hot surface.
27.Do not operate with damaged cooking element after any
product malfunction until proper repair has been made.
28.Keep all switches "OFF' when unit is not in use.
29. Do not allow aluminum foil to contact heating elements.
30.On conventional element cartridges make sure that drip pans
are in place. Absence of these pans during cooking may
subject wiring or components underneath to damage.
31. Do not use aluminum foil to line surface unit drip pans, grill basin
or oven bottom. Installation of these liners may result in electric
shock or fire hazard.
32.WARNING; To reduce the risk of tipping of the appliance, the
appliance must be secured by properly installed anti-tip devices.
To check if devices are installed properly, remove the access
panel and verify that the anti-tip devices are engaged.
33.This appliance has been tested for safe performance using
conventional cookware. Do not use any devices or accessories
that are not specifically recommended in this manual. Do not
use eyelid covers for the surface units, stovetop grills, or add-
on convection systems. The use of devices or accessories that
are not expressly recommended in this manual can create
serious safety hazards, result in performance problems, and
reduce the life of the components of the appliance.
34.PREPARED FOOD WARNING: Follow food manufacturer's
instructions. If a plastic frozen food container and/or its film
cover distorts, warps or is otherwise damaged during cooking,
immediately discard the food and its container. The food could
be contaminated.
IMPORTANT SAFETY NOTICE AND WARNING
The California Safe Drinking Water and Toxic Enforcement Act of 1986
(Proposition 65) requires the Governor of California to publish a list of
substances known to the State of California to cause cancer or repro-
ductive harm, and requires businesses to warn customers of potential
exposures to such substances. Users of this appliance are hereby
warned that when the range is engaged in the self-clean cycle, there
may be some low level exposure to some of the listed substances,
including Carbon Monoxide. Exposure to these substances can be
minimized by properly venting the range to the outdoors during the
self-clean cycle.
-SAVE THESEINSTRUCTIONS-
7

OvenVent
Oven
Controls
Surface, ;urface
Indicator Indicator
Lights Lights
Controls
Controls
• Use to capture smoke and steam. (See p. 9.)
• Will glow when a surface unit is on. (See p. 10,)
• Usetoprovideflexibilityinsettingselectionwhen usingthecooktopelementsorgrilf
elements. (See p. 10.)
• Use the electronic touch controls to set Clock or Oven functions. (Crock - see pp.
22-25, Oven Operation - see pp. 18-21.)
Thebuilt-inventilationsystemremovescookingvapors,odorsandsmokefrom foodsprepared
on the cooktop, grill and gril!accessories. Regular use of this system will insure a more
comfortableandlesshumidkitchenwhichisfree ofheavycookingodors andfumes thatnormally
create a frequent need for cleaning and redecorating.
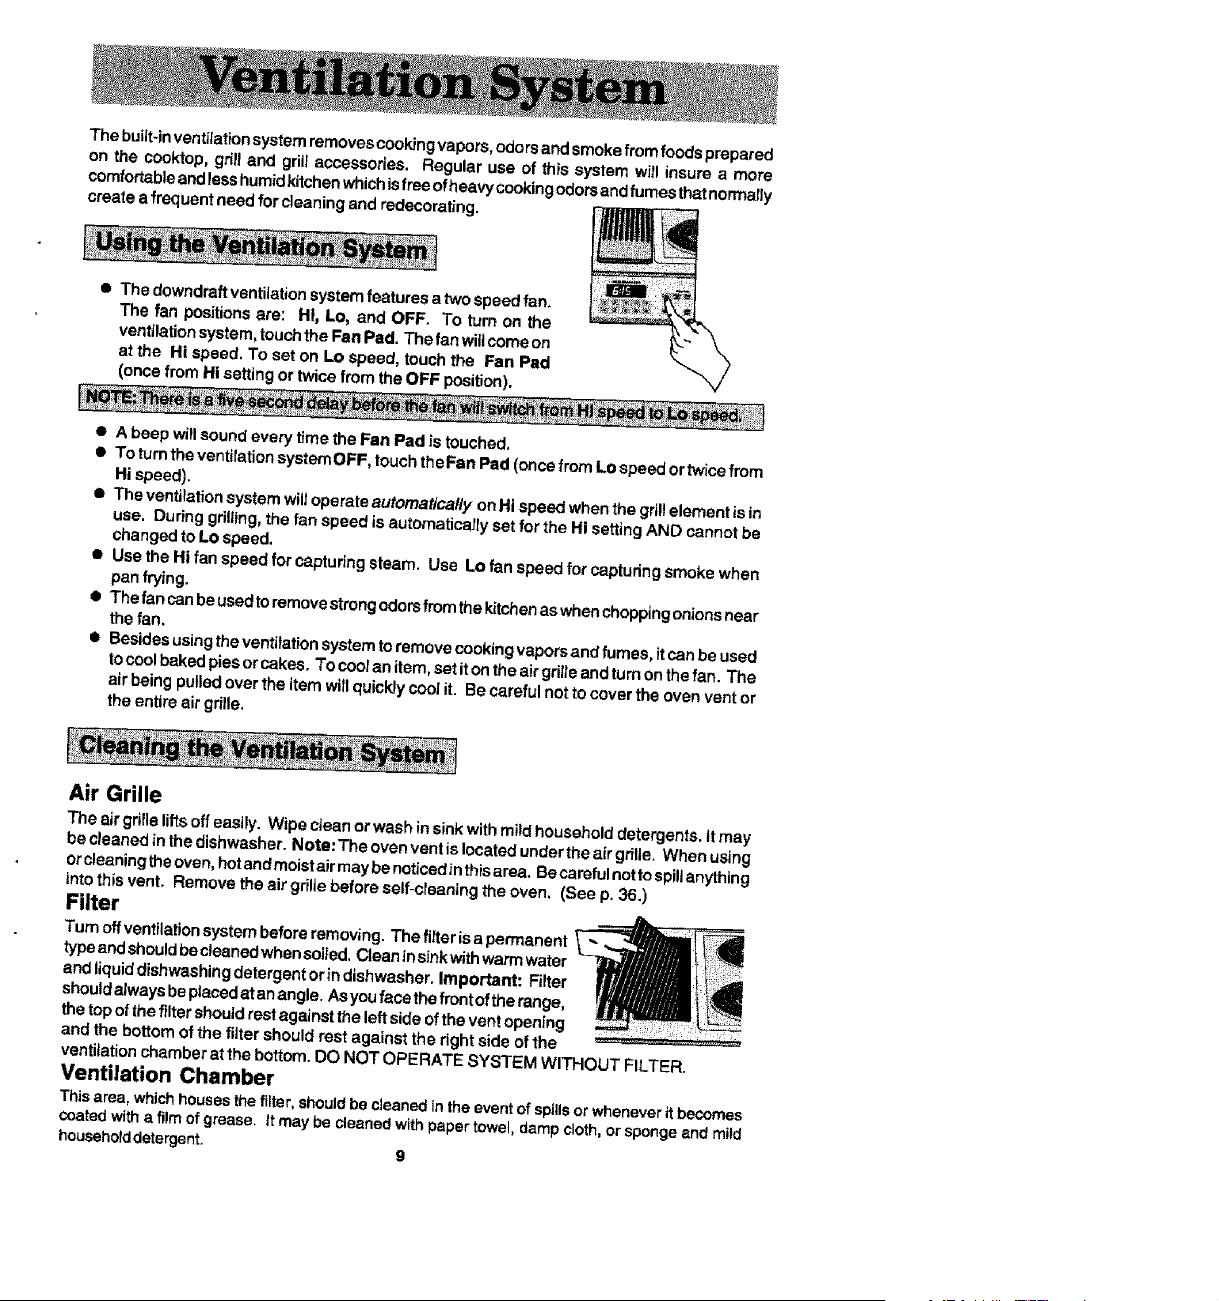
• The downdraffventitationsystemfeatures a two speedfan.
The fan positionsare: HI, Lo, and OFF. To turn on the
ventilationsystem,touch theFan Pad. The fan wiUcome on
at the Hi speed. To set on Lo speed, touch the Fan Pad
(once from Hi settingor twicefrom the OFF position).
• A beep wiltsound every time the Fan Pad is touched=
• To turn the ventilationsystemOFF, touchtheFan Pad (once fremLo speed or twice from
Hi speed).
• The ventilationsystem will operate automatica/ly onHi speed when the grillelement isin
use. Dudng grilling,the fan speed is automaticallyset for the Hi setting AND cannot be
changed to Lo speed.
• Use theHi fan speed for capturing steam. Use Lo fan speed for capturing smoke when
panfrying.
• Thefancanbeusedtoremovestrongodorsfmmthekitchenaswhenchoppingonionsnear
the fan.
• Besides using the ventilation system to remove cookingvapors and fumes, it can be used
to coolbaked pies or cakes, To cootan item, set it on the air grilleand tum on the fan. The
air being pulledover the item will quickly cool it. Be careful not to cover the oven vent or
the entire air grille.
Air Grille
The air grilleliftsoffeasily. Wipe cfean or wash insinkwith mild household detergents, Stmay
be cleaned inthe dishwasher. Note:Theovenventislocated undertheairgri|le, When using
or cleaningthe oven, hotandmoistair may be noticed_nthis area. Be careful notto spillanything
intothis vent, Remove the air grille beforeself-cleaning the oven. (See p. 36.)
Filter
Turn offventilationsystem beforeremoving. The fitter is a permanent
typeand shouldbecleaned whensoiied.Clean in sinkwithwarm water
and liquiddishwashing detergent or indishwasher. Important: Filter
shouldalwaysbeplacedat an angle. Asyou face the front of the range,
the top ofthe filtershouldrest against theleft side ofthe vent opening
and the bottom of the filter should rest against the right side of the
ventilationchamberat the bottom.DO NOT OPERATE SYSTEM WITHOUT FILTER.
Ventilation Chamber
Thisarea, whichhouses the filter,shouldbe cleanedinthe event of spillsor wheneverit becomes
coated witha filmof grease, It may be cleanedwith papertowel, dampcloth,or spongeand mild
householddetergent, 9
• Since the controlsare a push-turntype, theymust bepushed down beforetuming_To set
(from the OFF position), pushdown on the control knob and turn in either direction to
desired setting.
• When thecontrol is in any position,other than OFF, it may be turned inanydirectionwithout
pushingdown,
• A green indicator lightwill glowwhen a surface heating element is ON. There are four
indicatorlights,one for each element.
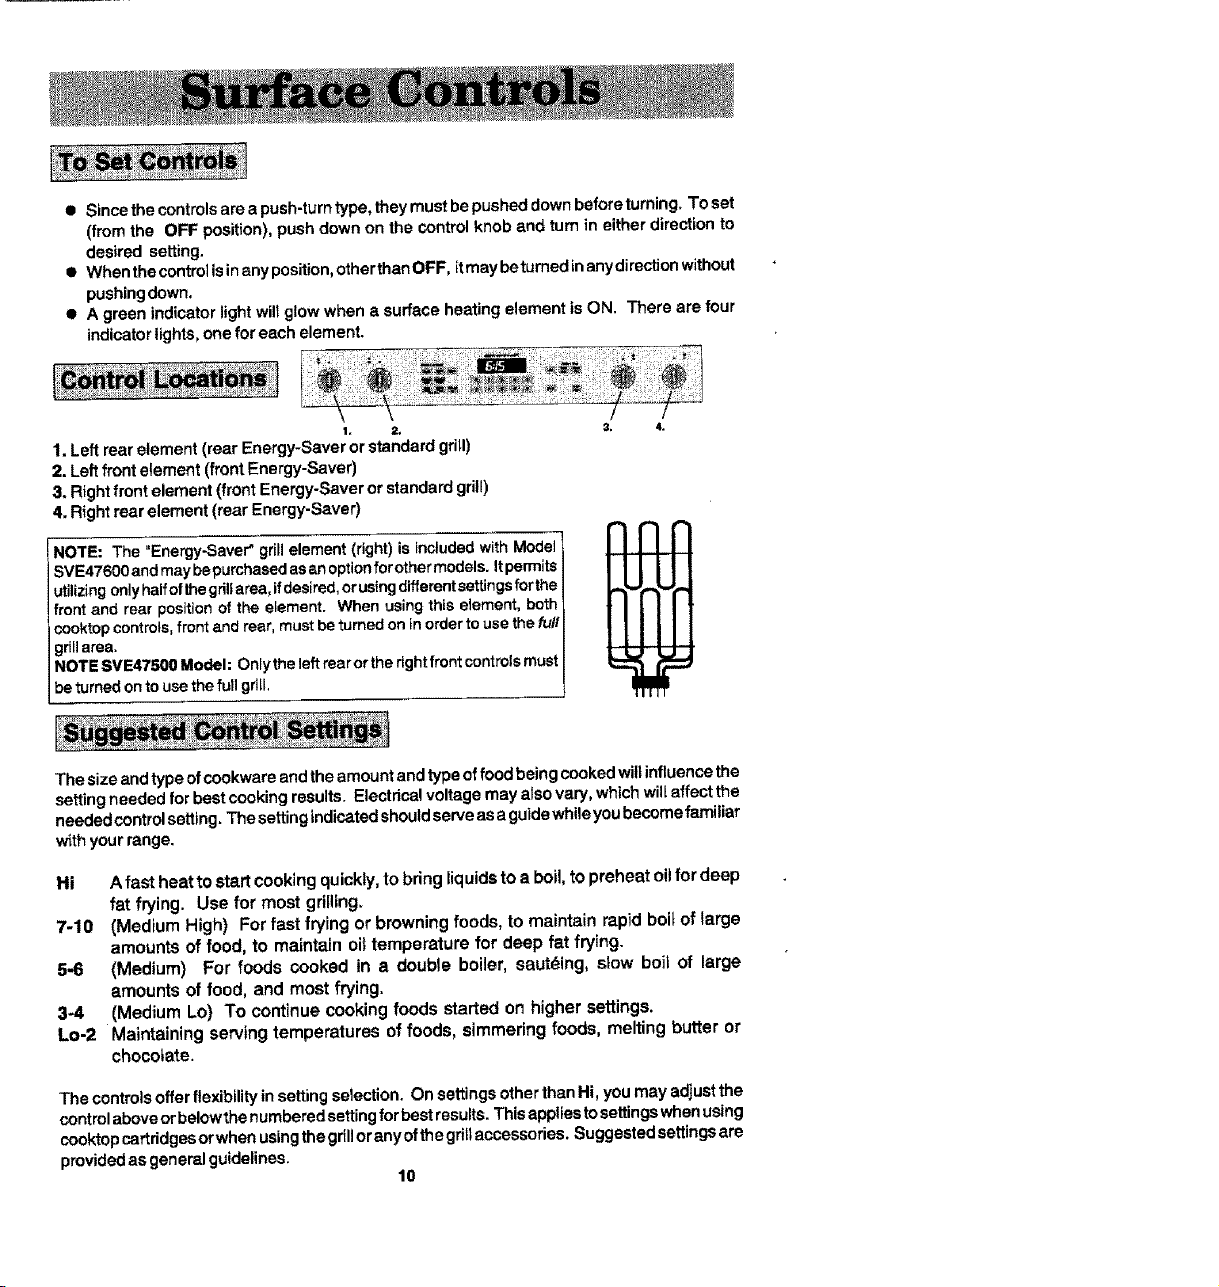
1. Left rear element (rear Energy-Saver or standard grill)
2. Leftfront element (front Energy-Saver)
3. Rightfront element (front Energy-Saver or standard grill)
4. Rightroar element (rear Energy-Saver)
NOTE: The "Energy-Saver" grill element (right) is Included with Model
SVE47600 and may bepurchased as an option forother models, it permits
utilizing only halfof the grillarea, ifdesired, orusing dlfferentsettings forths
front and rear position of the element. When using this element, both
cooktop controls, front and rear, must be turned on in order to use the fu/!
grillarea.
NOTE SVE47500 Model: Only the left rear or the rightfront controls must
be turned on to use the full grill.
3. 4.
The size andtype ofcookware and theamount andtype of food being cooked willinfluence the
settingneeded for best cookingresults. Electdca!voltage may alsovary, which will affect the
needed controlsetting. Thesetting{ndic.atedshouldserve as a guidewhileyou becomefamiliar
w_thyour range.
Hi A fast heat to start cooking quickty, to bring liquids to a boil, to preheat oUfor deep
fat frying. Use for most grtlllng.
7-10 (Medium High) For fast frying or browning foods, to maintain rapid boil of large
amounts of food, to maintain oi_temperature for deep fat frying.
5-6 (Medium) For foods cooked in a double boiler, sauteing, slow boil of large
amounts of food, and most frying.
34 (Medium Lo) To continue cooking foods started on higher settings.
Lo-2 Maintaining serving temperatures of foods, simmering foods, melting butter or
chocolate.
The controlsoffer flexibilityinsetting selection. On settings otherthan Hi, you may adjustthe
controlaboveorbelowthe numberedsettingfor bestresults. This appliesto settingswhenusing
cooktop cartridgesorwhen usingthe grillorany ofthe grillaccessories. Suggestedsettingsare
providedas general guidelines.
10

Cooktopcartridges,either conventional coil, halogen, radiant or solid element, can be
installed on either side ofthe range. (See page 51 for all available cartridges and model
numbers.)
To Install Cartridges
1. If the grill e_ement, grill-rocks or grates are in place, remove before installing a
cooktop cartridge. Clean porcelain basin pan of any grease accumulation. (See
page 17 for cleaning recommendations.)
2. To install any of the optional cooktop cartridges, be sure controls are turned OFF.
Positionthe cartridge terminal plug towards the terminal receptacle. This receptacle
is located at the front of the left side and at the back of the right side of the range.
3, Siide the cartridge towards the receptacle until the cartridge terminal plug is
completely engaged.
4. Lower the opposite end of the cartridge into the rangetop until it is flush with the
surface. Your range is now ready to use.
To Remove Cartridges
1. Controls must be OFF and the cartridge should be cool.
2. Lift up on the "tab" located on the cartridge until top of cartridge clears the opening
on the range by about 2 inches. Lifting the cartridge too high while still engaged in
the receptacle could damage the terminal plug.
3. To disengage terminal, hold cartridge by the sides and slide away from the terminal
receptacle. Lift out when fully unplugged.
4. A storage tray, Model A350, is available and can be used for storing a cartridge.
5. Do not stack cartridges where they may fall or be damaged. Never store other
materials on top of the glass-ceramic cartridges since this could damage or scratch
the surface.
Canning should be done on the conventional coil cartridge only. Canning element
accessory, Model A145A, makes it possible to use large canners with the conventional
coil cartridge.
11

• Select heavy gauge cookpots. Usually heavy gauge cookpots will not change
shape when heated.
• Use cookpots with flat, smooth bottoms. The two ways to determine if cookpots
have a flat, smooth bottom are the ruler test and the cooking test.
Ruler Test
1. Place the edge of ruler across the bottom
of the pot.
2. Hold up to the light.
3. No light should be visible under the ruler.
Cooking Test
1° Put 1 inch of water into the cookpot.
2. Place cookpot on the element. Turn control to the Hi setting,
3. Observe the bubble formation to determine the heat distribution, if the bubbles
are uniform across the cookpot, the cookpot will perform satisfactorily. If the
bubbles are not uniform, the bubbles will indicate the hot spots.
• Match the size of the cookpot to the size of the element, ideally the cookpot
will be the same size or slightly larger.
Heavy gauge cookpots with fiat, smooth bottoms will usually work in a similar way.
However, there are some differences in the cooking performance of various materials.
• Aluminum cookpots heat quickly and evenly. Best suited for simmering, braising,
boiling and frying.
• Stainless steel cookpots will evenly distribute heat if constructed of tri-ply or
combined with other metals such as aluminum and copper. Use for cooking
functions similar to aluminum.
• Cast iron cookpots are slow to heat but cook more evenly once temperature is
reached. Use for long term low heat cooking or for browning and frying,
• Glass ceramic, earthenware, heat-proof glass or glazed cookpots can be used if
recommended by the manufacturer for cookpot cooking. Do not use with trivets.
Best used on low to medium control settings.
• Porcelain enamel-on-stee! or porcelain enamel-on-cast iron should be used
according to manufacturer's directions. Do not allow to boil dry.
12
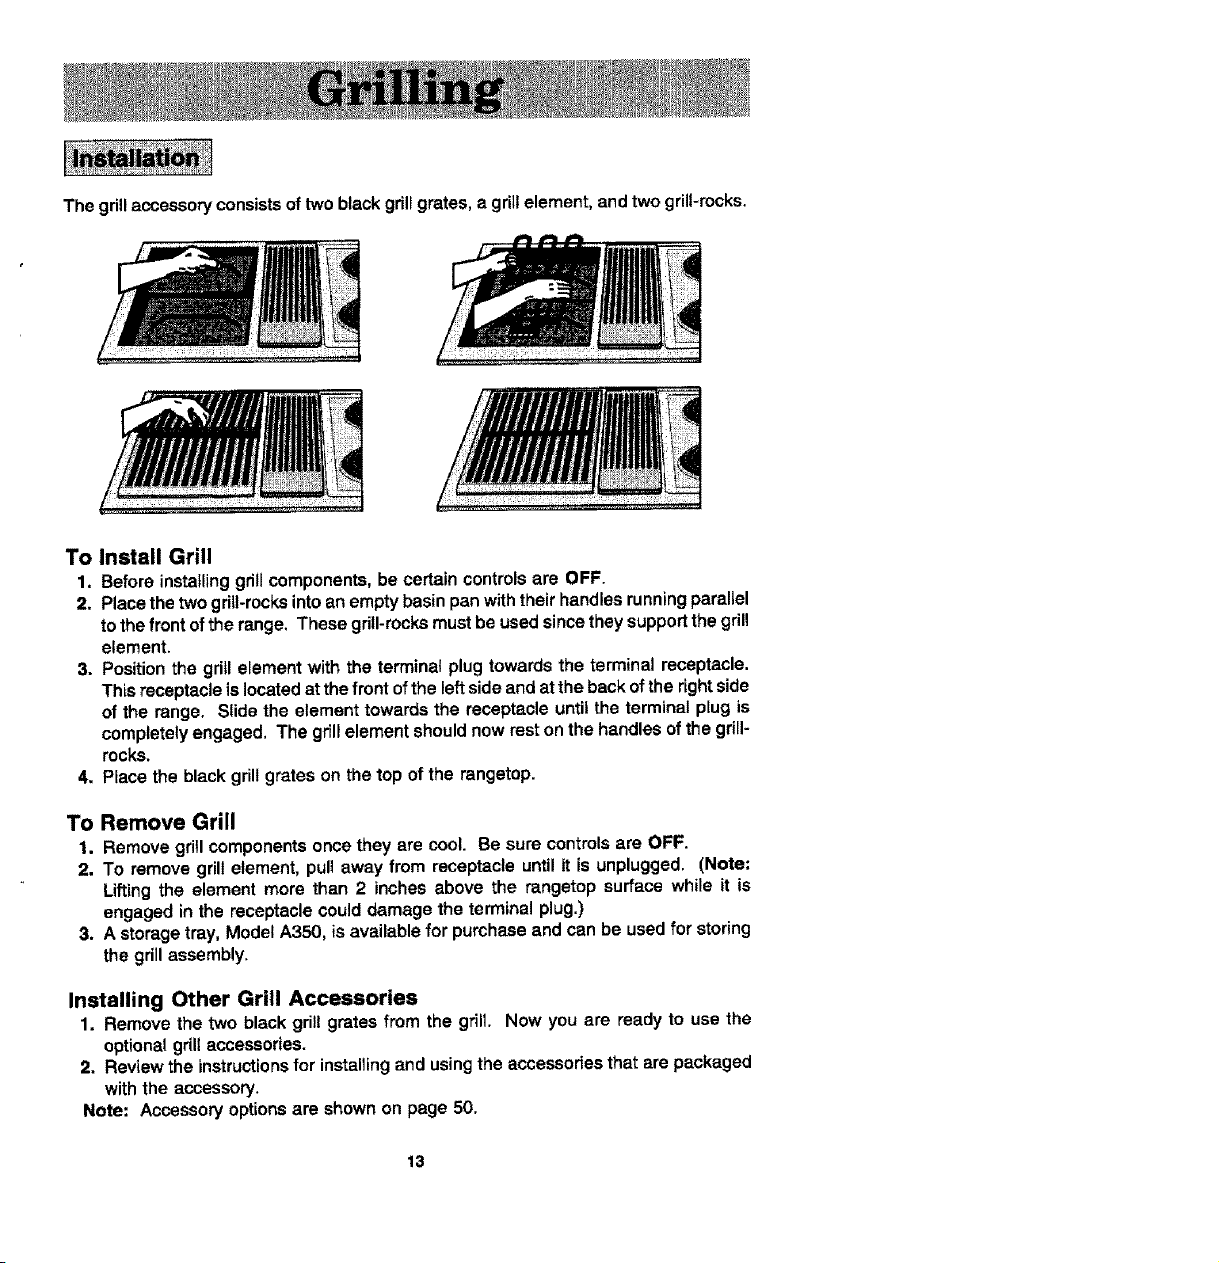
Thegrillaccessoryconsistsoftwoblackgrillgrates,agrillelement,and two grill-rocks.
To Install Grill
1, Before installing grill components, be certain controls are OFF.
2. Place the two grill-rocks into an empty basin pan with their handlas running parallel
to the front of the range, These grill-rocks must be used since they support the grill
element.
3, Position the grill element with the terminat plug towards the terminal receptacle.
This receptacle is located at the front of the left side and at the back of the right side
of the range. Slide the element towards the receptacle until the terminal plug is
completely engaged. The grill element should now rest on the handles of the grill-
rocks.
4. Place the black grill grates on the top of the rangetop.
To Remove Grill
1. Remove grill components once they are cool. Be sure controls are OFF.
2. To remove grill element, pull away from receptacle until it is unplugged. (Note;
Lifting the element more than 2 inches above the rangetop surface while it is
engaged in the receptacle could damage the terminal plug.)
3. A storage tray, Model A350, is available for purchase and can be used for storing
the grill assembly.
Installing Other Grill Accessories
1. Remove the two black grill grates from the grill. Now you are ready to use the
optional grill accessories.
2. Review the instructions for installing and using the accessories that are packaged
with the accessory.
Note: Accessory options are shown on page 50.
13
• Before the first use, wash your new grill grates in hot soapy water, rinse and dry,
Then "season" the surface by wiping on a thin coating of cooking oil. Remove
excess oil by wiping again with another paper towel. This procedure should be
repeated when either: a) cleaning in the dishwasher since the detergent may
remove seasoning, or b) anytime a sugar-based marinade (for example, barbecue
sauce) is going to be used.
• Preheat the grill on Hi for 5 minutes. Preheating improves the f_avor and
appearance of meats and quickly sears the meat to help retain the juices, The
heating element should glow a bright cherry red,
• Use nonmetallic spatulas or utensils to prevent damaging the Excalibur ® nonstick
gnT/grate finish.
• Excessive amounts of fat should be trimmed from meats. Only a normal amount
is necessary to produce the smoke needed for that smoked, "outdoor" ftavor.
Excessive fat can create cleaning and flare-up problems.
• Allowing excessive amounts of grease or drippings to constantly flame voids the
warranty on the grillgrates. Excessive flare-ups indicate that either the grill interior
needs to be cleaned or that excessive amounts of fat are in the meat or the meat
was not properly tdmmed.
• Grease drLppingswi!l occasionally ignite to produce harmless puffs of flame for a
second or two. This is a normal part of the cooking process.
• NEVER LEAVE GRILL UNATTENDED DURING GRILL OPERATION,
Should excess grease cause sustained flare-up
1. Turn on FAN manually.
2. Immediately turn grill control(s) to OFF,
3. Remove meat from grill.
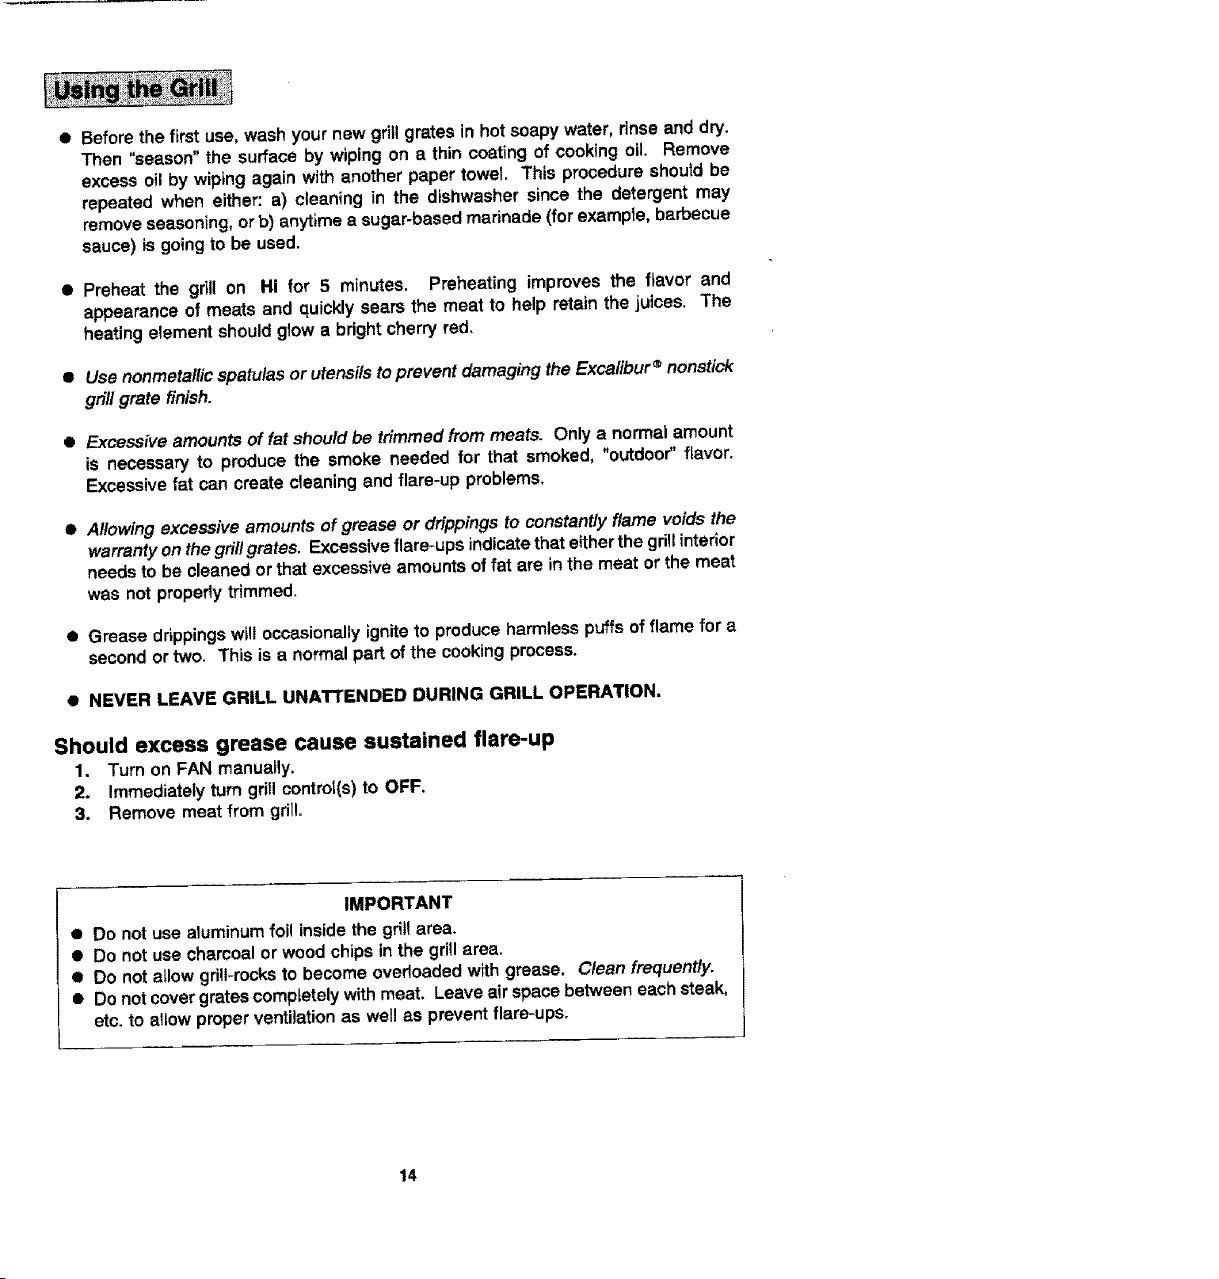
IMPORTANT
• Do not use aluminum foi! inside the grill area.
• Do not use chamoal or wood chips in the grill area.
• Do not a_low grill-rocks to become overloaded with grease. Clean frequently.
• Do not cover grates completely with meat. Leave air space between each steak,
etc. to allow proper ventilation as well as prevent flare-ups.
14
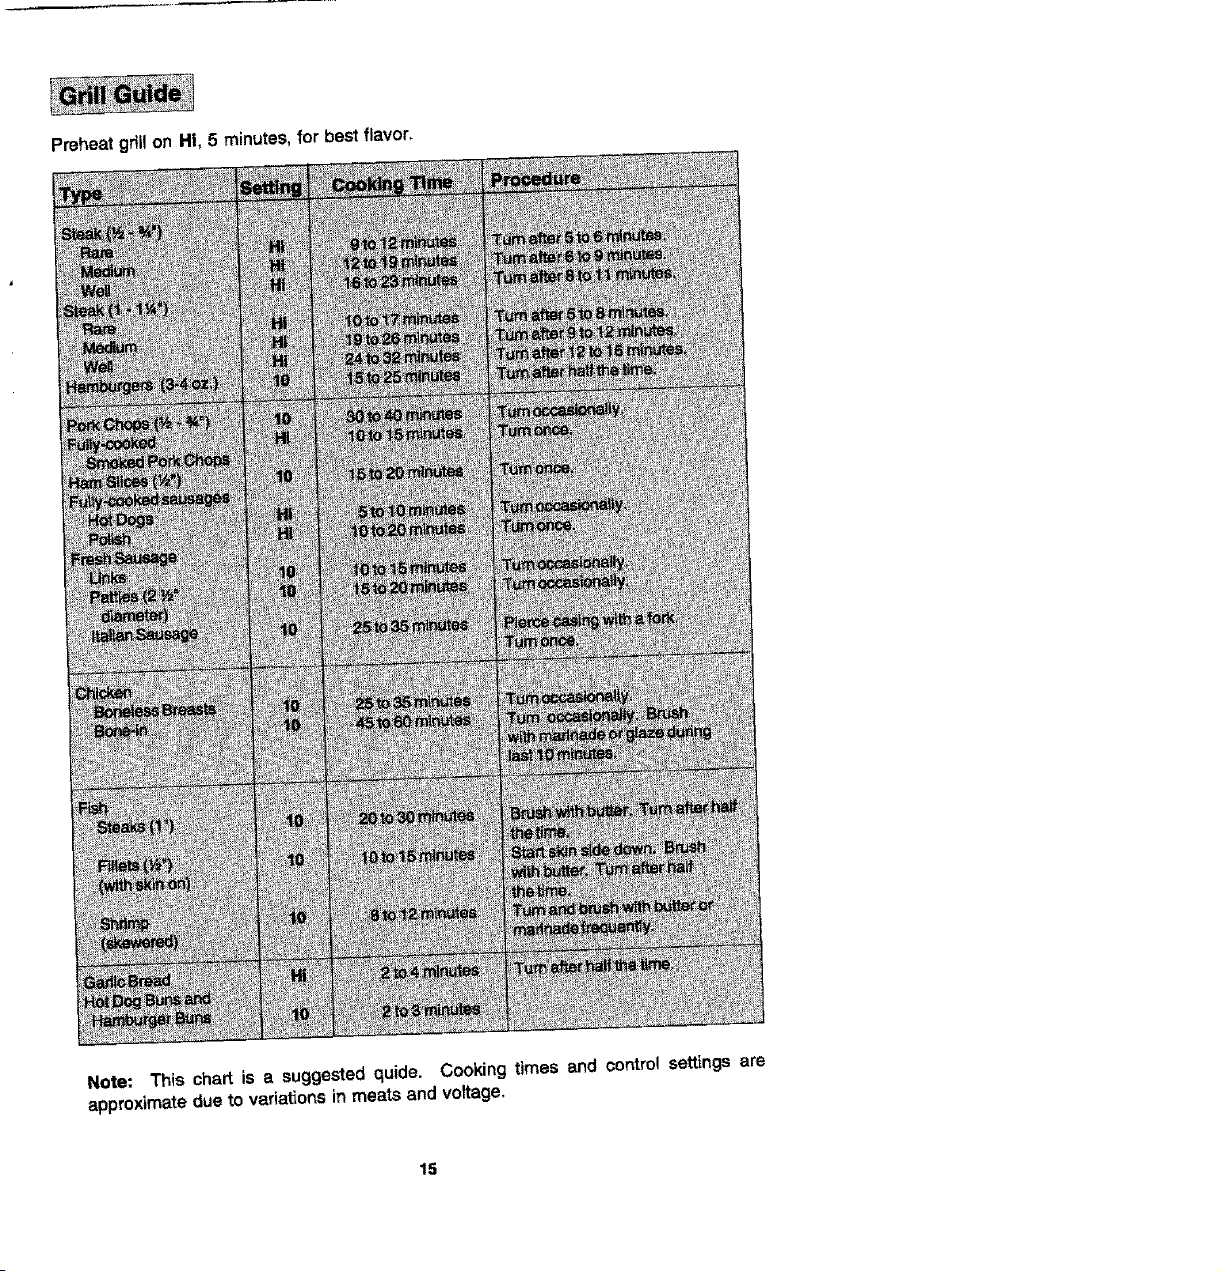
Preheat gril! on HI, 5 minutes, for best flavor,
Note: This chart is a suggested quide. Cooking times and control settings are
approximate due to variations in meats and voltage,
15

WithyourJenn-Air grilland accessories, literallyany food you've considered "at its best" when
preparedoutdoorscan now be prepared indoorswithlessfuss and greatflavor. The following
suggestionsare good rulesto follow and will increaseyour enjoyment of the equipment.
• Besureto folrowdirectionson page 14 for usingthe gdfi.
• Suggestedcookingttmesandcentrolsettingsareapproximateduetovariationsinmeats.
Experience will quickly indicate cooking times as wellas whichsettings work best.
• Use the Energy-Saver grillelement forgrillingsmall amountsof food on halfofthe grillor
for keepingcookedfoods warm orpreparingfoods requiringdifferent contrelsettings.Note
SVE47500 Owners: The Energy-Saver gdll element can be purchased as an optional
accessory. (See p.50.)
• For best results,buy topgrade meat. Meat that is at least s_inchthickwill grill betterthan
thinnercuts.
• Scon_fat on edges of steak, but do not cut into meat, to prevent cudJngwhi_ecooking.
• For the attractive '_branded"look on steaks, be sure grillis preheated. Mow one side of
meat tocookto desireddoneness, or untiljuicesappear on thetopsurface, beforeturning.
Tum steaks and hamburgersjust once. Manipulatingfood causes loss of juices.
• Whenbastingmeatsorapptyingsaucestofoods, rememberthatexcessiveamountswind
up _nsideyour grilland do not improvethe food flavor. Apply sauces during the last 15 to
20 minutesof cookingtime unlessrecipespecifiesotherwise. Sugar-based sauces,when
used excessively,will carmelize on the grill-rocksand create extra cleaning.
• Therearemanymeatmarinadeswhichwiflhelptenderizelessexpensivecutsofmeatfor
cookingon the grill.
• Certain foods, such as poultry and non-oilyfish, may need some extrafat. Brushwithoil
or melted butter occasionallywhile grilling.
• Usetongswith longhandlesorspatulasfor turuing meats. Do notuse forks as these pierce
the meat, allowingjuices to be lost.
• To help retainmeat juices, salt after cooking is completed.
• Should grilled foodsbe prepared and ready before you're ready to serve, turncontrolto a
lowsettingand covermeat witha singlesheet ofaluminum foil. Foodwillcontinuetocook.
Be sure the grillis cool and controls are OFF.
Grill Grates
These are made from cast aluminumandare coated with the Excalibur_ nonstickfinish.
• Afterthe grillgrates havecooled, wipe off grateswitha paper towel Wash coolgrates(DO
NOT IMMERSEHOTGRILL GRATES IN WATER) withsoapordetergent inhotwaterinthe
sink orwashthem inthe dishwasher.Be sureto removeall foodresiduebeforecookingon
the grillgratesagain.
• Remove stubbornspotswith a plasticmesh puffor pad. For best results,use onlythose
cleaningproducts which state they are recommended for use when cleaning nonstick
surfaces.
• if grates were washed in the dishwasher, season with oil priorto gri!ling, (See p. 14.)
• Donotusemetalbrushesorabrasivescouringpadsorotherscrubbersintendedtoc/ean
outdoor charcoalgrills. These willremove the finish as wetlas scratchthe grates. Do not
clean in self-cleaning oven or use oven cleaners on the grates.
16
Grill Element
Foflowinstructionson page "r3 forremoving the grillelement. The grillelement should never
be immersed inwater. Most soil will burn offduring use. The terminal block may be cleaned
with a soapy sponge, Dry thoroughly before reinserting In the range.
Grill-Rocks
These are made from cast-iron which have been coated with porcelain enamel.
• The gri!l-rocksshould be cleaned frequently or after any excessive build-up of grease.
To clean tight soit, use detergent and a plasticscrubber, such as Tufty, or wash in the
dishwasher if burnedon residueisfirst removed, For heavy soil,soakinhot, soapywater
to which a cleanser, such as household ammonia, has been added. Stubborn spotson
grill-rocks,such as burned on residue from sauces, can be scrubbed witha stiff bristle
brush.
• Anoven cleaner, suchas Easy-Off, can be usedfor burnedon soil. Fotlowmanufacturer's
directions;spray on cleaner and let soak overnight. Do not clean grill-rocksin the self-
cleaning oven.
Porcelain Basin Pan
This area located under the grill-rocks and/or cartridges. Ctean after each use of the grill.
• To remove light soil, clean with soapy water or spray withcleansers such as Fantastik
or 409, For easier cleanup: a) spray with a household cleanser; b) cover with paper
towels; c) add small amount of hot water to keep the paper towels moist; d) cover and
wait 15 minutes; and e) wipe clean.
• To remove moderate soil, scrub with Comet, Bon Ami, a soft scrub cleanser or plastic
scrubber.
• To remove stubborn soil, spray with an oven cleaner such as Easy-Off; let soak
overnight, wipe clean, rinse and dry.
Note: Clean the grease drain after each use. To clean: Pour about lt3 cup of very hot tap
water mixed with 1 teaspoon dish detergent down the drain. In the event the drainis clogged,
due to large food particles being trapped, use the nylon string that was packaged with your
range. To use the nylon string,simplyinsert one end into the drain opening in the basin pan.
Feed the nylon stringdown until it isvisible under the range. Now pull up on the end extending
out from the top while holding a paper towel around the string, to clean the stringas it is being
pulled. Thisshould freeanytrapped particlesoffood. Pouranotherl/3cupofveryhotwater
mixed with dish detergent to assure the drain is opened and clear.
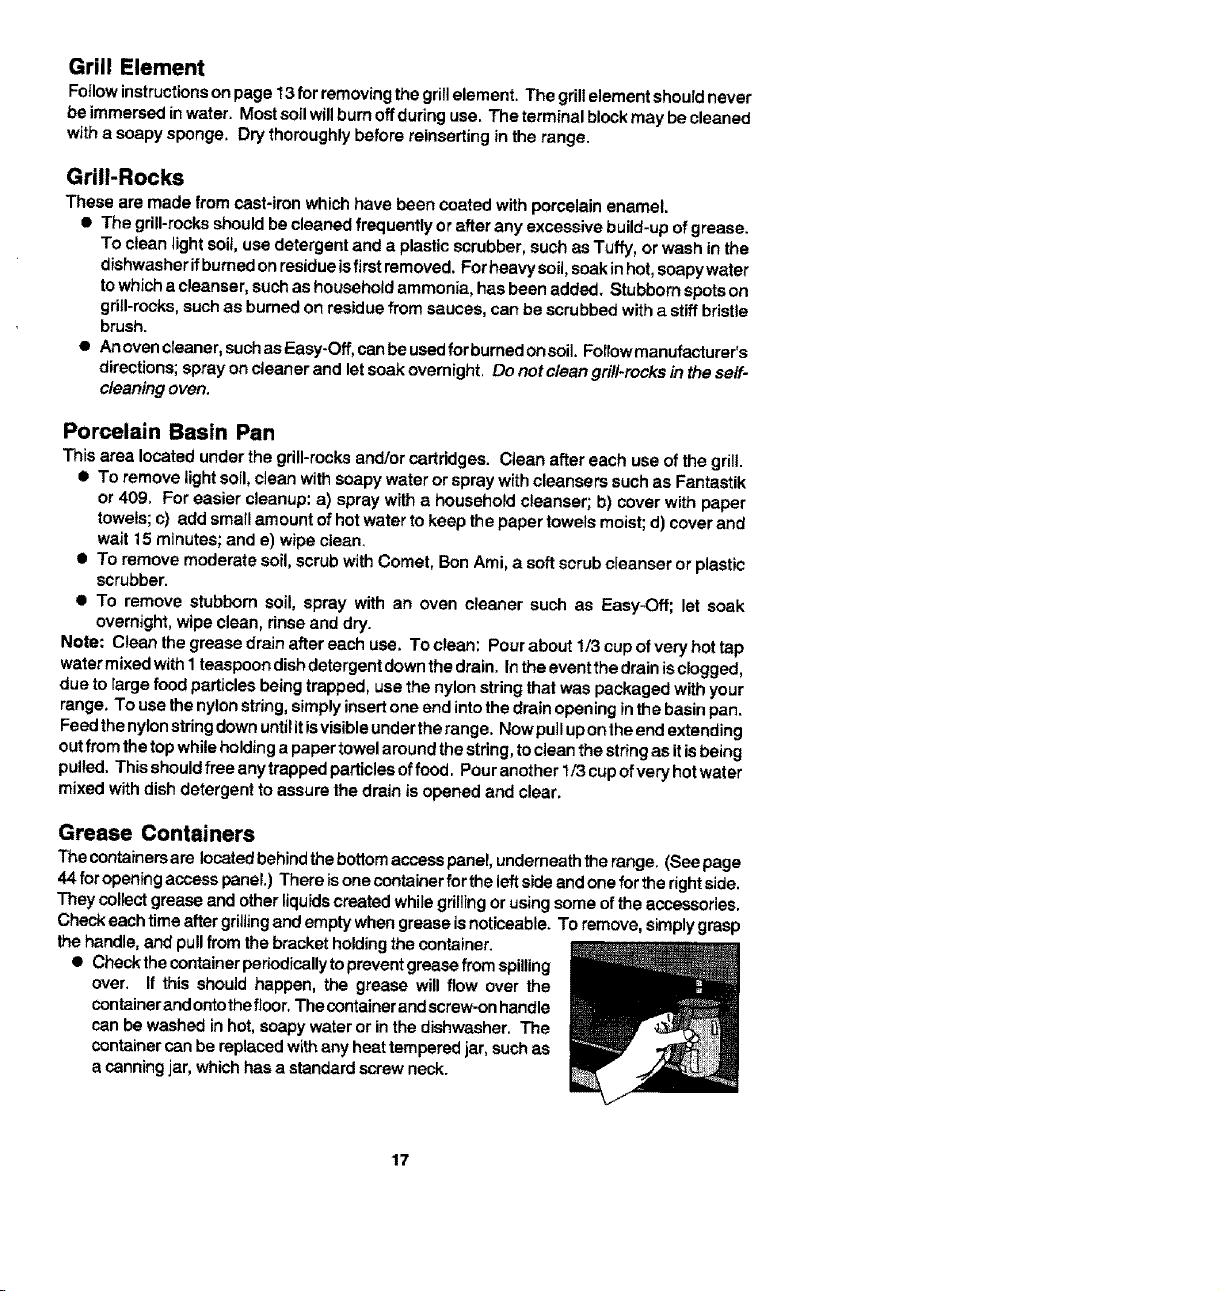
Grease Containers
The conta_ers are locatedbehind the bottom access panel, underneath the range. (See page
44 foropening access panel.) There is one containerfor the left sideand one forthe rightside.
They collectgrease and other liquids created while grillingor usingsome of the accessories.
Check each time after gdJlingand empty when grease is noticeable. To remove, simplygrasp
the handle,and pull from the bracket holdingthe container.
• Checkthe container periodicaUyto prevent grease from spilling
over. If this should happen, the grease will flow over the
containerand ontothe floor,The containerandscrew-on handle
can be washed in hot, soapy water or inthe dishwasher, The
containercan be replacedwith any heat tempered jar, such as
a canningjar, which has a standard screw neck.
17
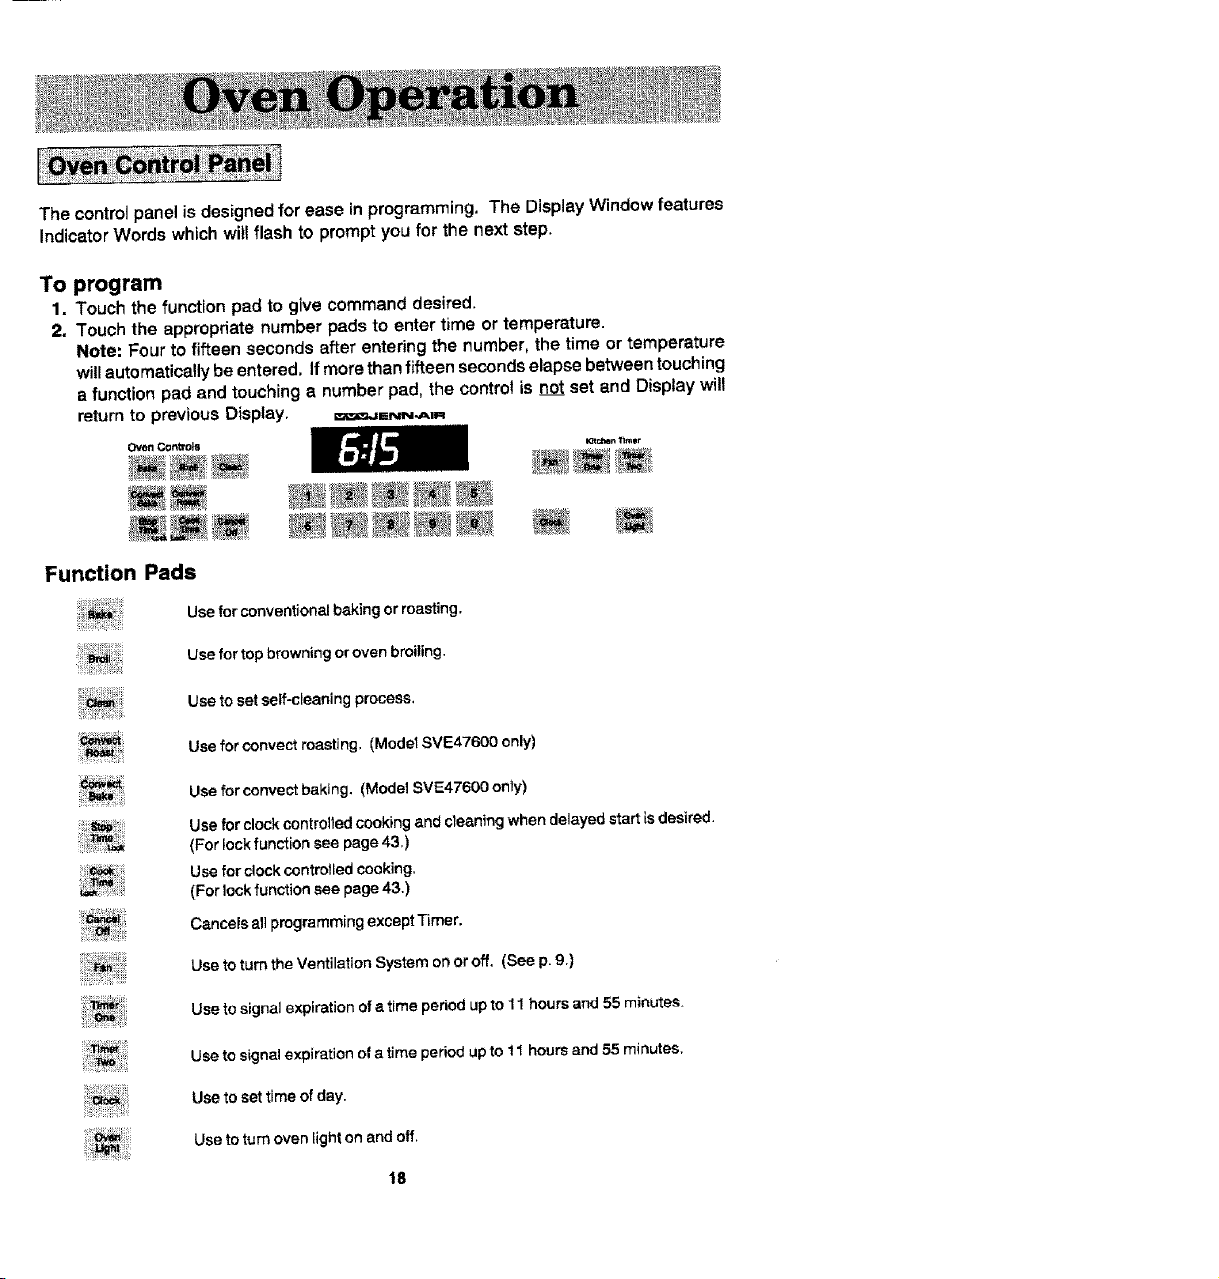
The control panel is designed for ease in programming, The Display Window features
Indicator Words which will flash to prompt you for the next step.
To program
1. Touch the function pad to give command desired.
2, Touch the appropriate number pads to enter time or temperature.
Note: Four to fifteen seconds after entering the number, the time or temperature
will automatically be entered. If more than fifteen seconds elapse between touching
a function pad and touching a number pad, the contro! is not set and Display will
return to previous Display. =_=_.aF-NN-A_
Oven Con_o_
Function Pads
IGtcben 11mor
Use for conventional baking or roasting.
Use for top browning or oven broiling.
Use to set self-cleaning process,
Uee for convect roaeting, (Model SVE47600 only)
Use for convect baking. (Model SVE47600 only)
Use for dock controlled cooking and cleaning when delayed start is desired.
(For lock function see page 43,)
Use for clock controtled cooking.
(For lock function see page 43.)
Cancels all programming except Timer.
Use to turn the Ventilation System on or off. (See p. 9,)
Use to signal expiration of a time period up to 11 hours and 55 minutes.
Use to signal expiration of a time period up to 11 hours and 55 minutes,
Use to set time of day.
Use to turn oven light on and off,
18
Number Pads
Use to set time or temperature.
Oven Light Pad (Control Panel)
The oven light automatically comes on whenever the oven door is opened. When door
is closed, touch the Oven Light Pad to turn oven light on or off.
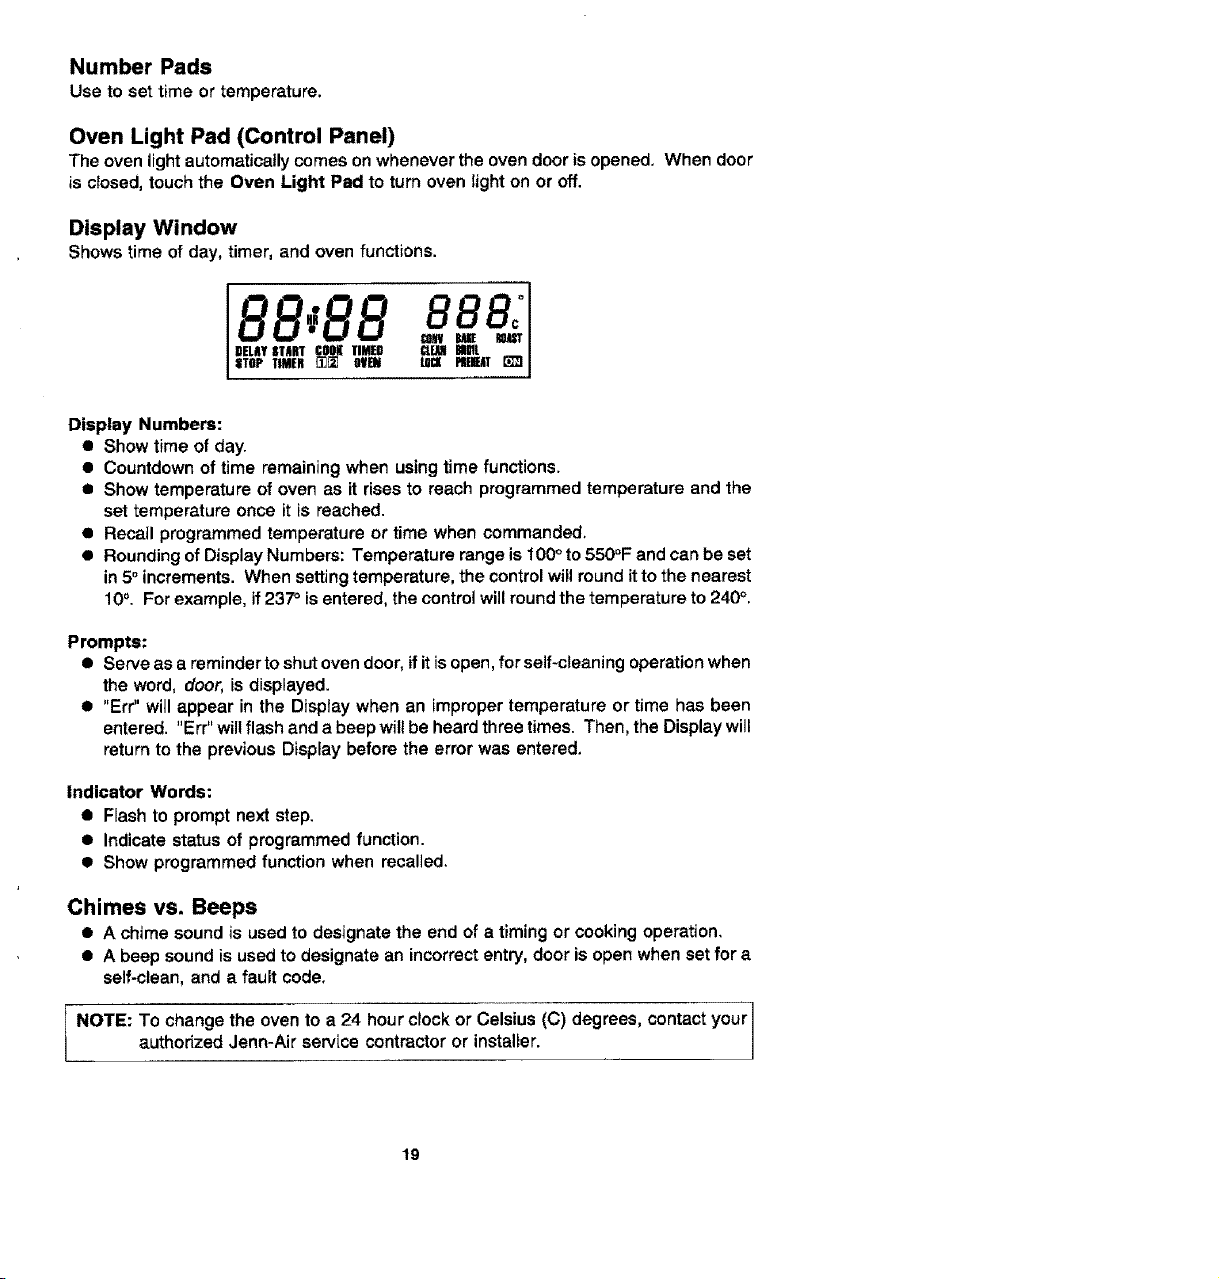
Display Window
Shows time of day, timer, and oven functions.
I DELAYSTART COOSTIMED
STOP TIMER _][] OVEN A
Display Numbers:
• Show time of day.
• Countdown of time remaining when using time functions.
• Show temperature of oven as it rises to reach programmed temperature and the
set temperature once it is reached.
•Recatl programmed temperature or time when commanded.
• Rounding of Display Numbers: Temperature range is 100° to 550°F and can be set
in 5° increments. When setting temperature, the control will round it to the nearest
10°. For example, if237 ° is entered, the control will round the temperature to 240 °.
Prompts:
• Serve as a reminder to shut oven door, if it is open, for self-cleaning operation when
the word, door, is displayed.
• "Err" will appear in the Display when an improper temperature or time has been
entered. "Err" willflash and a beep will be heard three times. Then, the Display will
return to the previous Display before the error was entered.
Indicator Words:
• Flash to prompt next step.
• Indicate status of programmed function.
• Show programmed function when recalled.
Chimes vs. Beeps
• A chime sound is used to designate the end of a timing or cooking operation.
• A beep sound is used to designate an incorrect entry, door is open when set for a
self-clean, and a fault code,
!
NOTE: To change the oven to a 24 hour clock or Celsius (C) degrees, contact your I
authorized Jenn-Air service contractor or installer.
1
19
To set oven on Bake or Convect Bake or Convect Roast
1. Place oven racks on proper rack positions° (See p. 21.)
2, Touch Bake Pad or Conveet Bake Pad or Convset Roast Pad,
Indicator Words BAKE or CONV BAKE or CONV ROAST wi|l flash and three
dashes will be shown.
Note: If more than fifteen seconds elapse between touching a pad and touching a
number pad, Display will return to previous Display.
3. Touch the appropriate number pads for desired oven temperature,
Allowable temperature range is 100°to 550°F. After four seconds the oven wilt begin
to preheat. The Indicator Words ON, PREHEAT, and either BAKE or CONV BAKE
or CONV ROAST will appear in the Display. The temperature shown will be 100_
or the oven temperature whichever is higher.
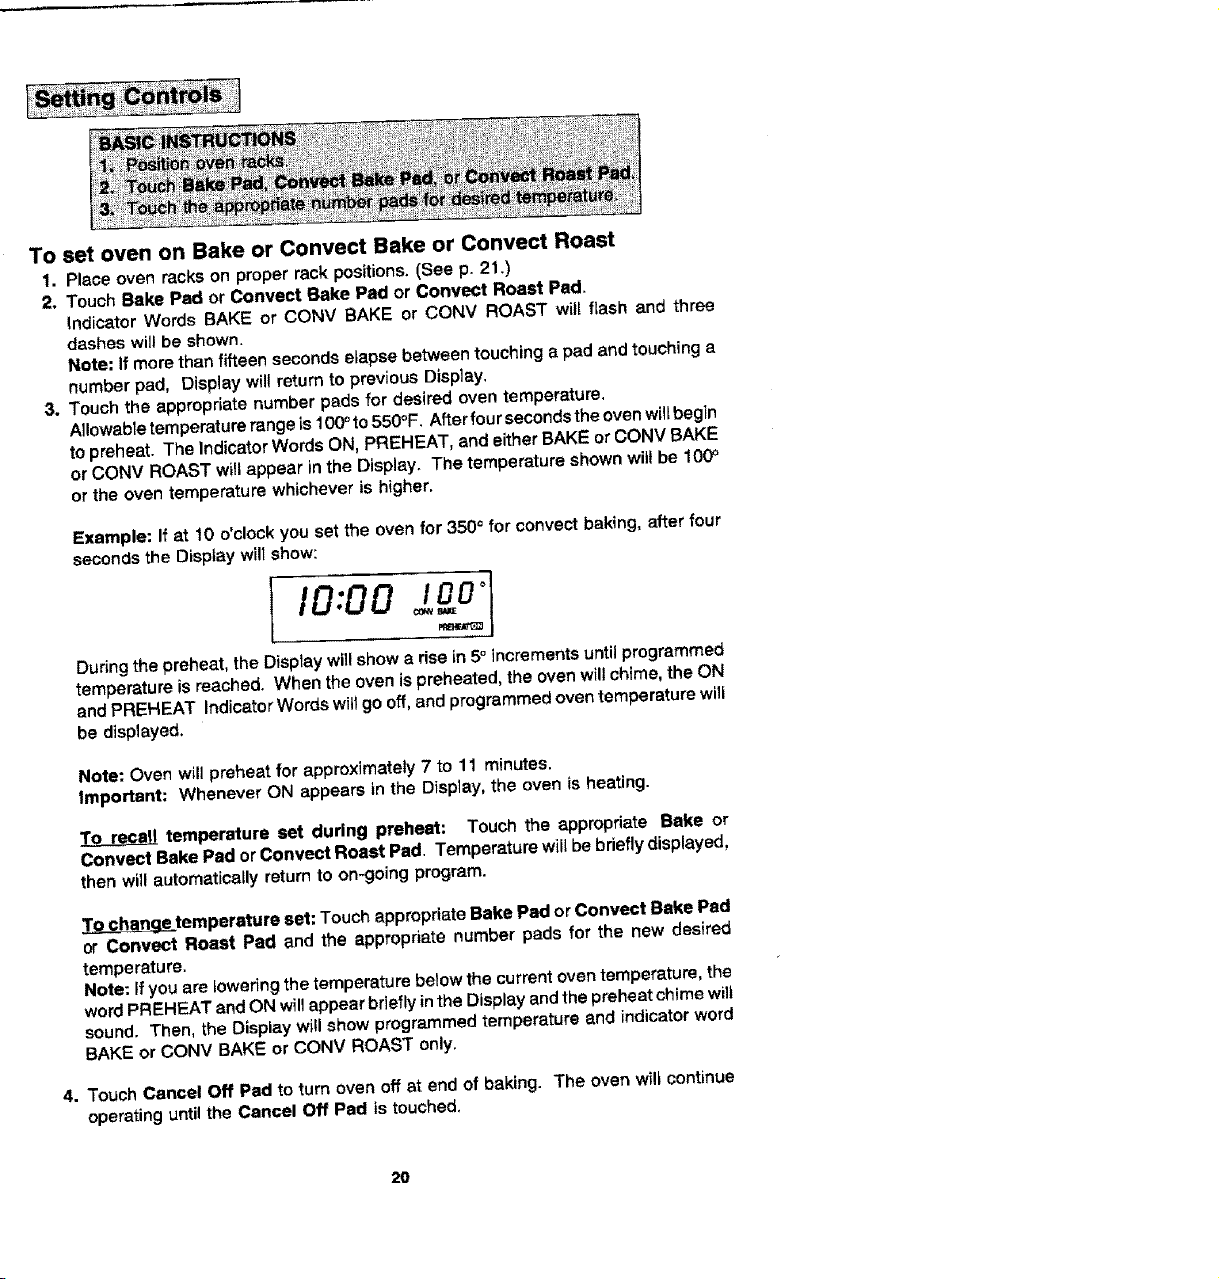
Example: If at 10 o'clock you set the oven for 3500 for convect baking, after four
seconds the Display wilt show:
j o;oo
During the preheat, the Display will show a rise in 5° increments until programmed
temperature is reached. When the oven is preheated, the oven will chime, the ON
and PREHEAT Indicator Words will go off, and programmed overt temperature will
be displayed,
Note: Oven will preheat for approximately 7 to 11 minutes.
Important: Whenever ON appears in the D_splay, the oven is heating.
temperature set during preheat: Touch the appropriate Bake or
Convect Bake Pad or Convect Roast Pad, Temperature will be briefly displayed,
then will automatically return to on-going program.
_temperature set: Touch appropriate Bake Pad or Convect Bake Pad
or Convect Roast Pad and the appropriate number pads for the new desired
temperature.
Note: If you are _owedng the temperature below the current oven temperature, the
word PREHEAT and ON will appear briefly in the Display and the preheat chime will
sound. Then, the Display will show programmed temperature and indicator word
BAKE or CONV BAKE or CONV ROAST only.
4. Touch Cancel Off Pad to turn oven off at end of baking. The oven wilt continue
operating until the Cancel Off Pad is touched,
20
The rack positions noted are generally recommended for the best browning results and
most efficient cooking times. For many food items, excellent results can be achieved
when using one of severai different rack positions. Refer to baking and roasting sections
for recommendations for specific foods.
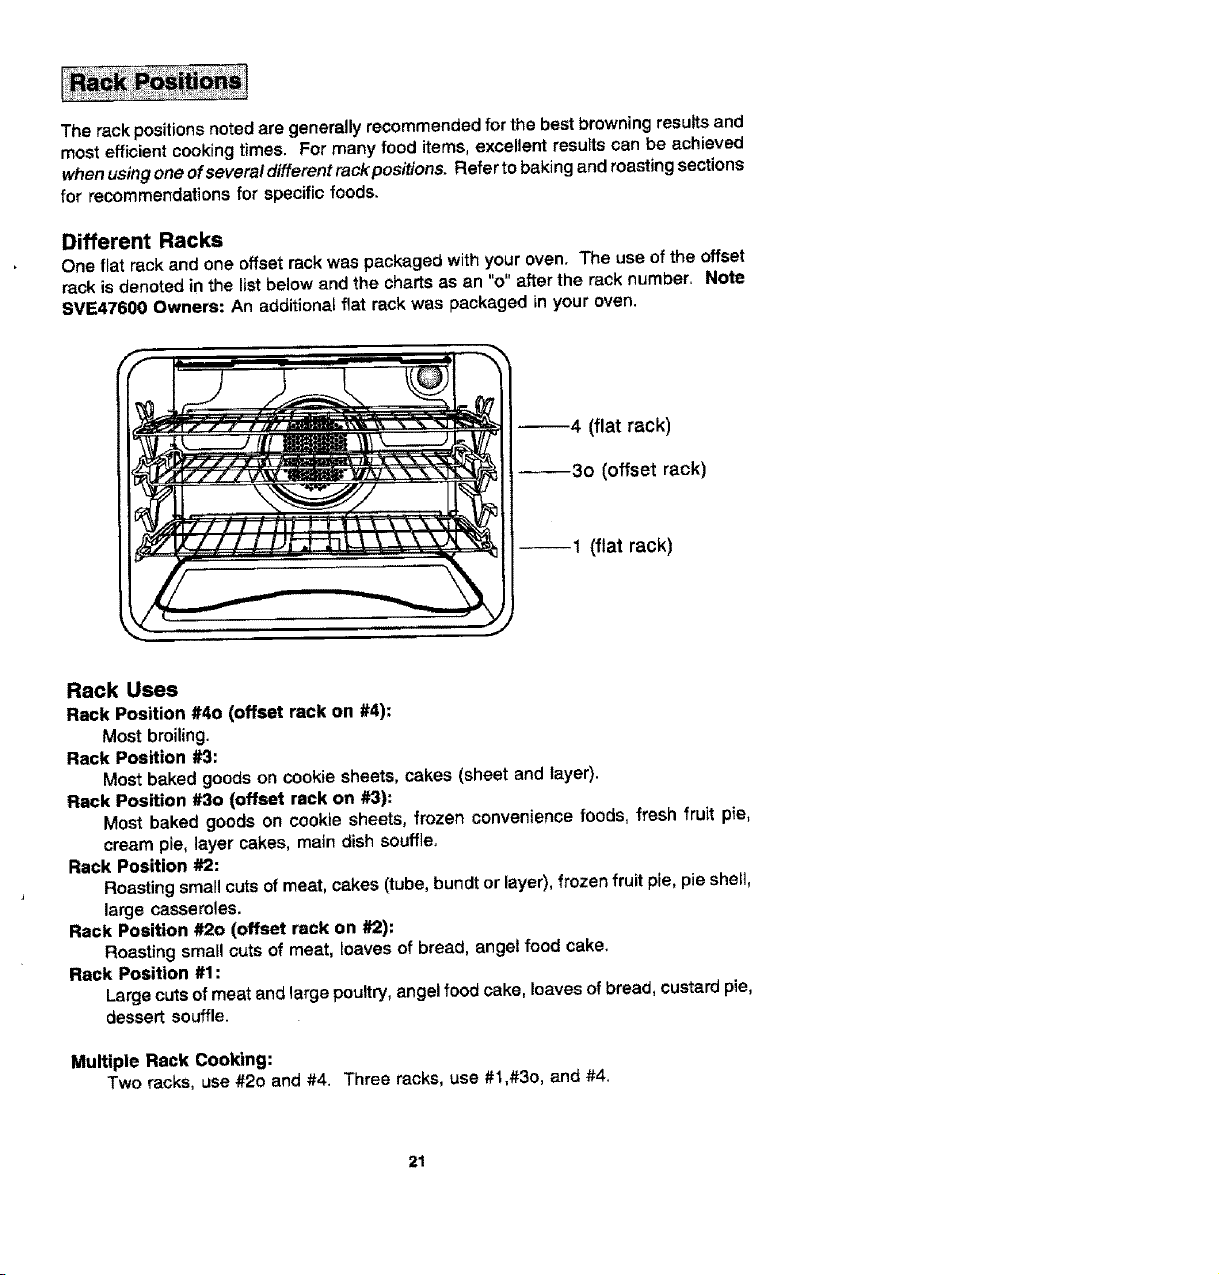
Different Racks
One fiat rack and one offset rack was packaged with your oven. The use of the offset
rack is denoted in the list below and the charts as an "o" after the rack number. Note
SVE47600 Owners: An additional fiat rack was packaged in your oven.
--4 (flat rack)
_3o (offset rack)
--1 (flat rack)
Rack Uses
Rack Position #40 (offset rack on #4):
Most broiling.
Rack Position #3:
Most baked goods on cookie sheets, cakes (sheet and layer).
Rack Position #30 (offset rack on #3):
Most baked goods on cookie sheets, frozen convenience foods, fresh fruit pie,
cream pie, layer cakes, main dish souffle,
Rack Position #2:
Roasting small cuts of meat, cakes (tube, buno_or layer), frozen fruit pie, pie shelt,
large casseroles.
Rack Position #2o (offset rack on #2):
Roasting small cuts of meat, loaves of bread, angel food cake.
Rack Position #1:
Large cuts of meat and large poultry, angel food cake, loaves of bread, custard pie,
dessert souffle.
Multiple Rack Cooking:
Two racks, use #20 and #4. Three racks, use #1,#3o, and #4.
21
When electrical power is supplied or after power interruption, the last clock time
displayed before power was interrupted will flash. Time will advance and continue to
flash until clock is reset.
To set Time of Day
1, Touch Clock Pad.
IndicatorwordTIMEwiltflashandtimedigitswillappearintheDisplay, (If morethan
fifteen seconds elapse between touching Clock Pad and touching a number pad,
the Clock Pad must be touched again in order to set clock.)
2. Touch the appropriate number pads until correct time of day appears in Display.
Note: Four to fifteen seconds after touching the number pads, the time of day will
automatically be entered.
IMPORTANT
• To recall time of day when another time function is showing: Touch Clock Pad.
I Clock time cannot be changed when oven has been programmed for Timed Bake,
Timed Convect Bake, Timed Cenvect Roast orSelf-clean. Cancel program before
reprogramming clock.
22
Important: This interval Timer can be used to remind you when a period, up to 11 hours
and 55 minutes, expires. It can be used independently of any other oven activity and
can be set while another oven function is operating. The Timer does not control the oven.
To set Timer
1. Touch a Timer Pad,
The indicator Word Timer and either 1 or 2 flashes and "0Hr:00" appears in the
Display,
2. Touch the appropriate number pads until the desired number of minutes or hours
and minutes appear in the Display.
Note: if more than fifteen seconds elapse between touching a Timer Pad and a
number pad, the Timer Pad must be touched again,
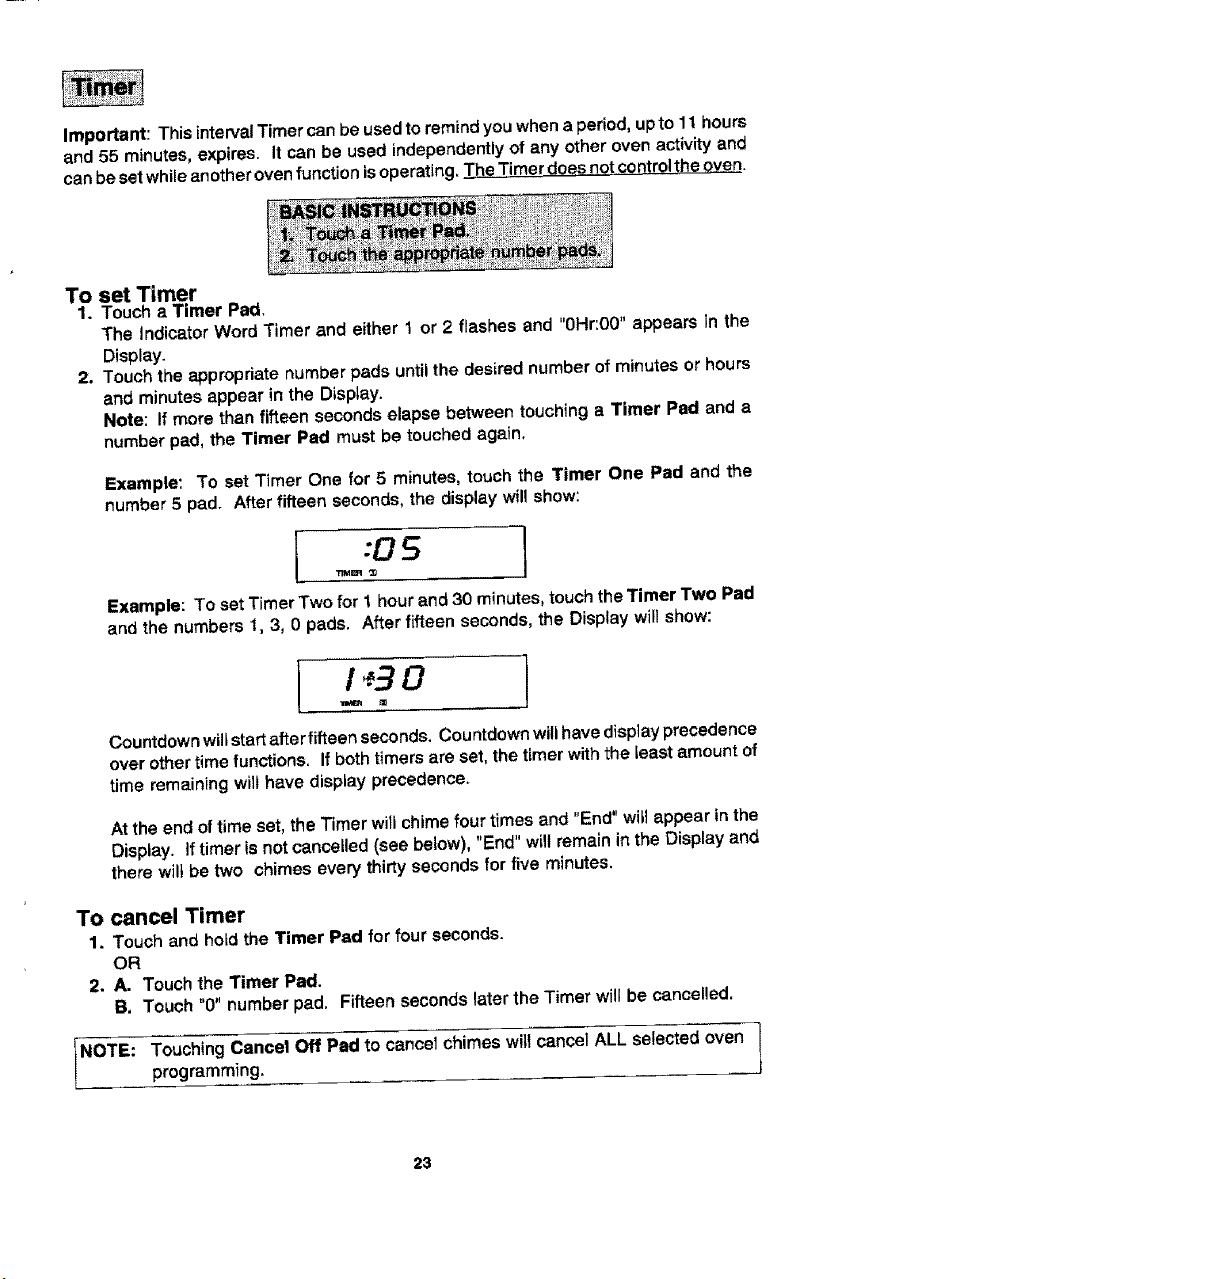
Example: To set Timer One for 5 minutes, touch the Timer One Pad and the
number 5 pad. After fifteen seconds, the display will show:
I :OS
Example: To set Timer Two for 1 hour and 30 minutes, touch the Timer Two Pad
and the numbers 1, 3, 0 pads. After fifteen seconds, the Display will show:
Countdown will start after fifteen seconds, Countdown will have display precedence
over other time functions. If both timers are set, the timer with the teast amount of
time remaining wilt have display precedence.
At the end of time set, the Timer will chime four times and "End" wilt appear in the
Display. If timer is not cancelled (see below), "End" will remain in the Display and
there will be two chimes every thirty seconds for five minutes.
To cancel Timer
1. Touch and hotd the Timer Pad for four seconds.
OR
2. A, Touch the Timer Pad,
B. Touch "0" number pad, Fifteen seconds later the Timer will be cancelled,
NOTE: ouchingCancel Off Pad to cancel chimes wittcancelALL selected oven
programming.
23
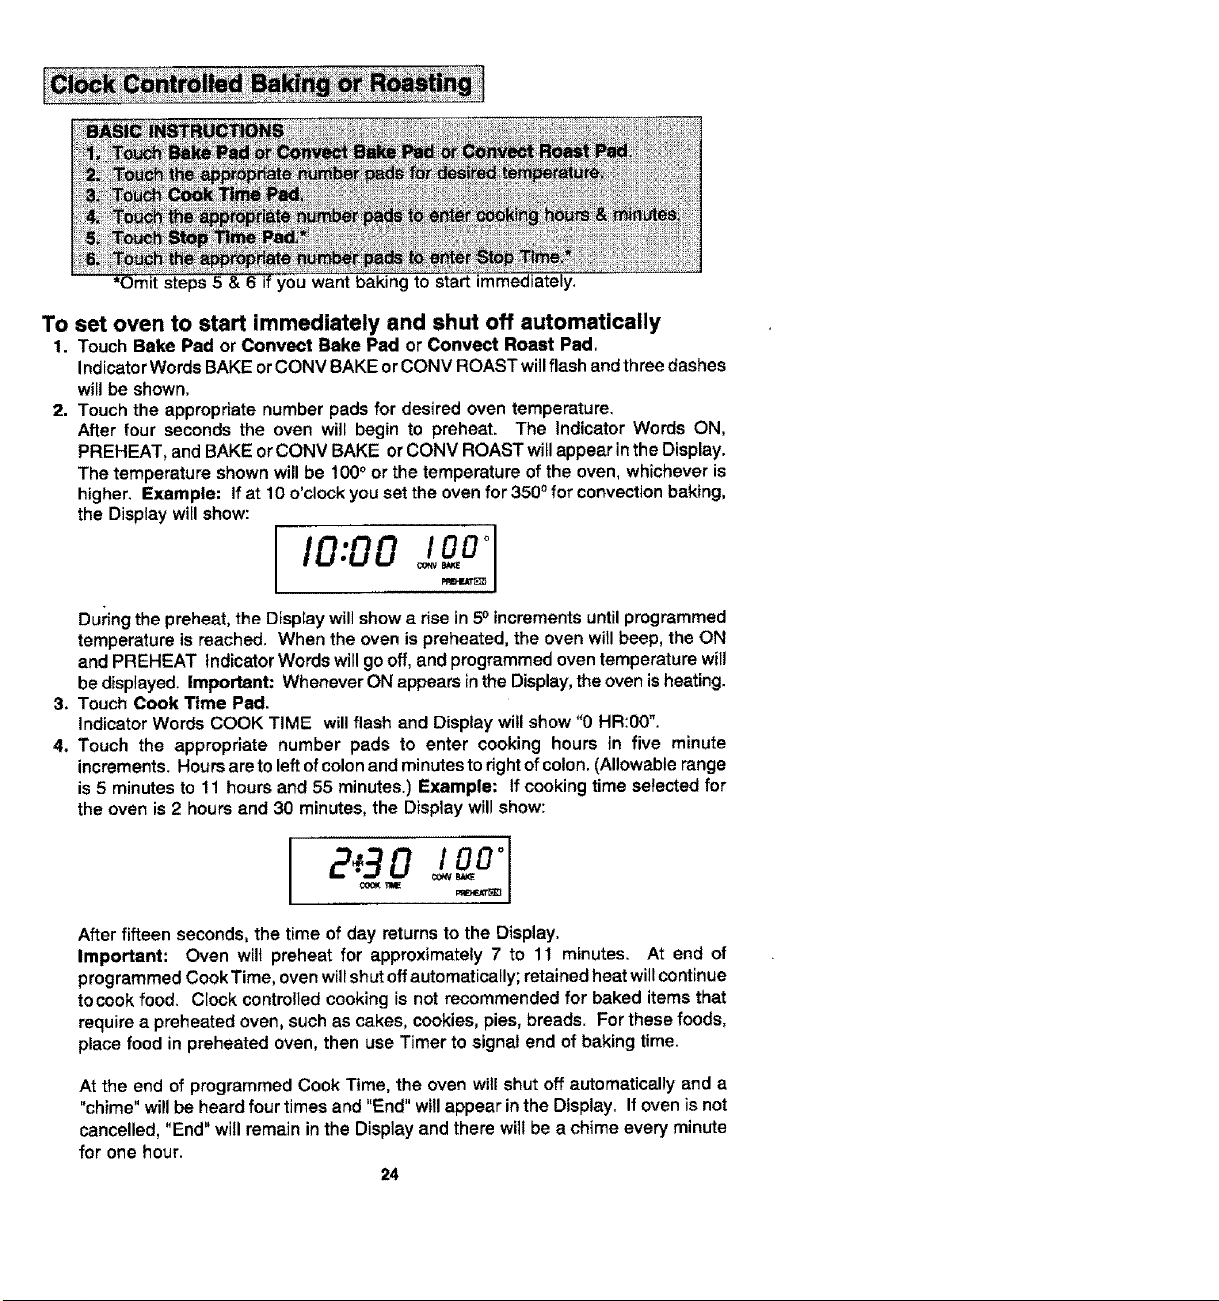
t steps5
kgto start immediately.
To set oven to start immediately and shut off automatically
1. Touch Bake Pad or Conveet Bake Pad or Convect Roast Pad,
Indicator Words BAKE or CONV BAKE or CONV ROAST will flash and three dashes
will be shown.
2. Touch the appropriate number pads for desired oven temperature.
After four seconds the oven will begin to preheat. The Indicator Words ON,
PREHEAT, and BAKE or CONV BAKE or CONV ROAST witl appear in the Display.
The temperature shown will be 100 ° or the temperature of the oven, whichever is
higher. Example: If at 10 o'clock you set the oven for 3500 for convection baking,
the Display will show:
During the preheat, the Olspray will show a rise in 50 increments until programmed
temperature is reached. When the oven is preheated, the oven will beep, the ON
and PREHEAT Indicator Words will go off, and programmed oven temperature will
be displayed. Important: Whenever ON appears in the Display, the oven is heating.
3, Touch Cook Time Pad.
Indicator Words COOK TIME will flash and Display will show "0 HR:00".
4, Touch the appropriate number pads to enter cooking hours in five minute
increments. Hours are to left of colon and minutes to right of colon. (Allowable range
is 5 minutes to 11 hours and 55 minutes.) Example: If cooking time selected for
the oven is 2 hours and 30 minutes, the Display will show:
After fifteen seconds, the time of day returns to the Display.
Important: Oven wilt preheat for approximately 7 to 11 minutes. At end of
programmed Cook Time, oven will shut off automatically; retained heat will continue
tocook food. Ciock controlled cooking is not recommended for baked items that
require a preheated oven, such as cakes, cookies, pies, breads. For these foods,
place food in preheated oven, then use Timer to signal end of baking time.
At the end of programmed Cook Time, the oven will shut off automatically and a
"chime" will be heard four times and "End" will appear in the Display. If oven is not
cancelled, "End" will remain in the Display and there wilt be a chime every minute
for one hour.
24
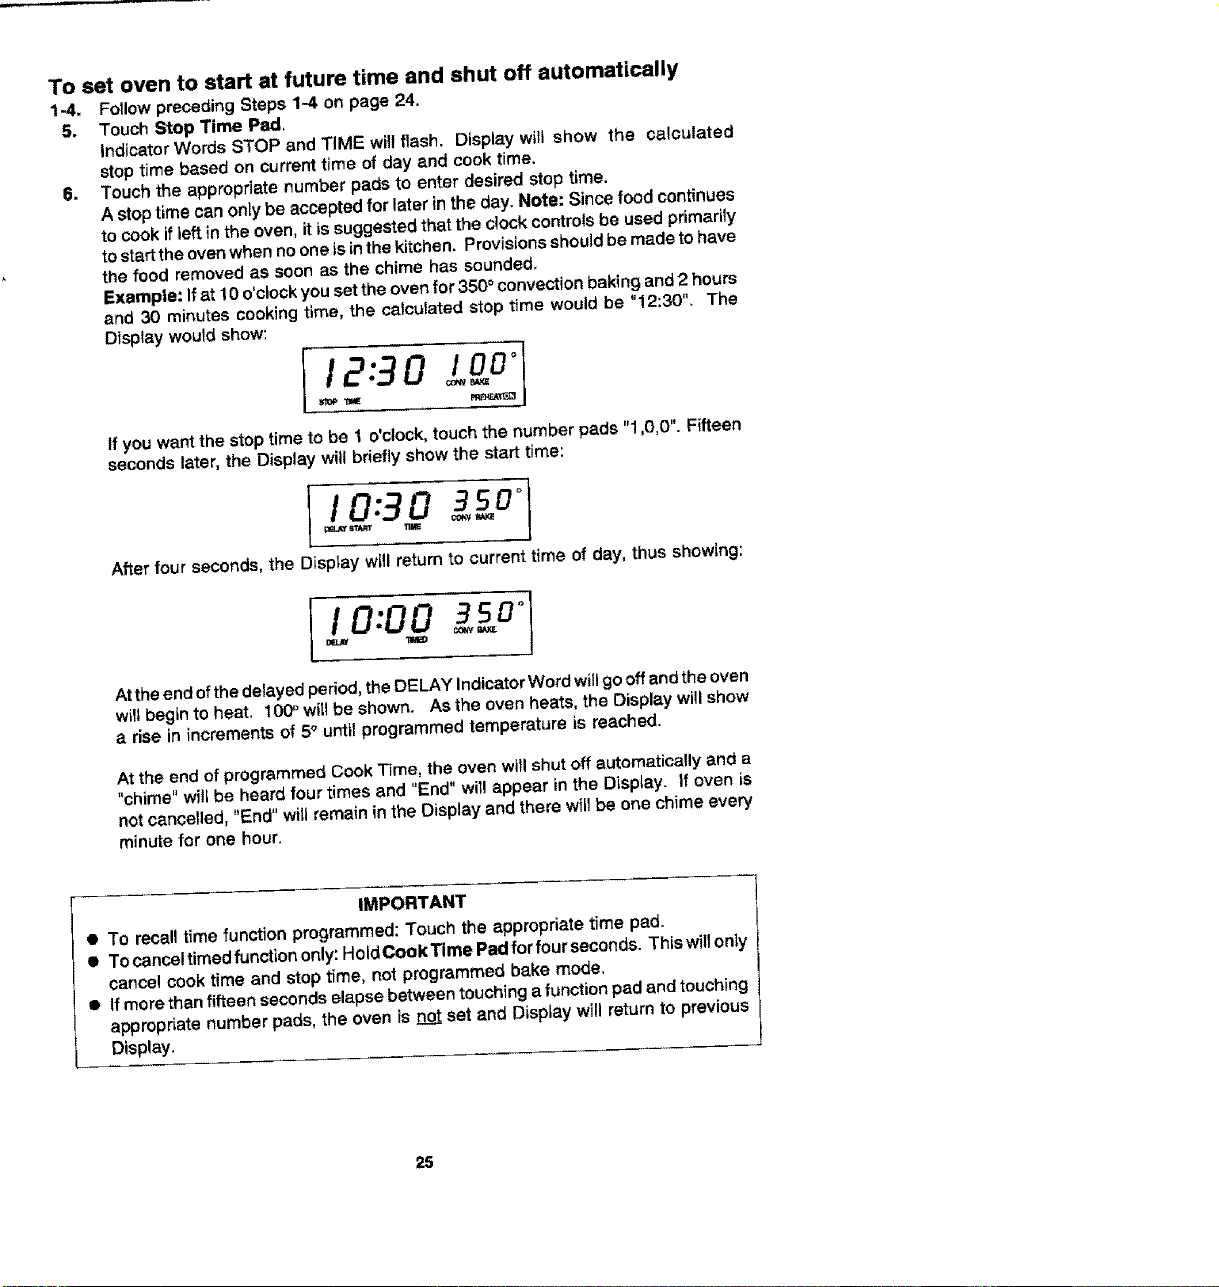
To set oven to start at future time and shut off automatically
1-4. Follow preceding Steps 1-4 on page 24.
5. Touch Stop Time Pad,
Indicator Words STOP and TiME will flash. Display will show the calculated
stop time based on currant time of day and cook time.
6. Touch the appropriate number pads to enter desired stop time.
A stop time can only be accepted for later in the day. Note: Since food continues
to cook if teft in the oven, it is suggested that the clock controls be used primarily
to startthe oven when no one is in the kitchen. Provisions should be made to have
the food removed as soon as the chime has sounded.
Example: If at 10 o'clock you set the oven for 350 ° convection baking and 2 hours
and 30 minutes cooking time, the calculated stop time would be "!2:30". The
Display would show:
12:90 !oo"
If you want the stop time to be 1 o'clock, touch the number pads "1,0,0". Fifteen
seconds later, the Display will briefly show the start time:
I / 0:3 0 1
After four seconds, the Display will return to current time of day, thus showing:
I 0:00 °
Be.l#
At the end of the delayed period, the DELAY Indicator Word will go off and the oven
will begin to heat. 10(P will be shown. As the oven heats, the Display will show
a rise in increments of 5° until programmed temperature is reached,
At the end of programmed Cook Time, the oven will shut off automatically and a
"chime" will be heard four times and "End" wi[! appear in the Display. If oven is
not cancelled, "End" will remain in the Display and there will be one chime every
minute for one hour.
IMPORTANT
• To recall time function programmed: Touch the appropriate time pad.
• Tocanceltimedfunctiononly:HoldCookTimePadforfourseconds. Thiswillonly
cancel cook time and stop time, not programmed bake mode.
• If more than fifteen seconds elapse between touching a function pad and touching
appropriate number pads, the oven is not set and Display will return to previous
Display.
25
e
j
f
• When cooking foods for the first time in your new oven, use recipe cooking times
and temperatures as a guide.
• Use tested recipes from reliable sources.
• Preheat the oven only when necessary. For baked foods that rise and for richer
browning, a preheated oven is better. Casseroles can be started in a cold oven.
Preheating takes from 7 to 11 minutes; place food in oven after PREHEAT Indicator
Word cycles off.
• Arrange oven racks before turning on oven. Follow suggested rack positions on
page 21 and in various baking charts.
• Allow about I to f½ inches of space between the oven side waits and pans to allow
proper air cimulation.
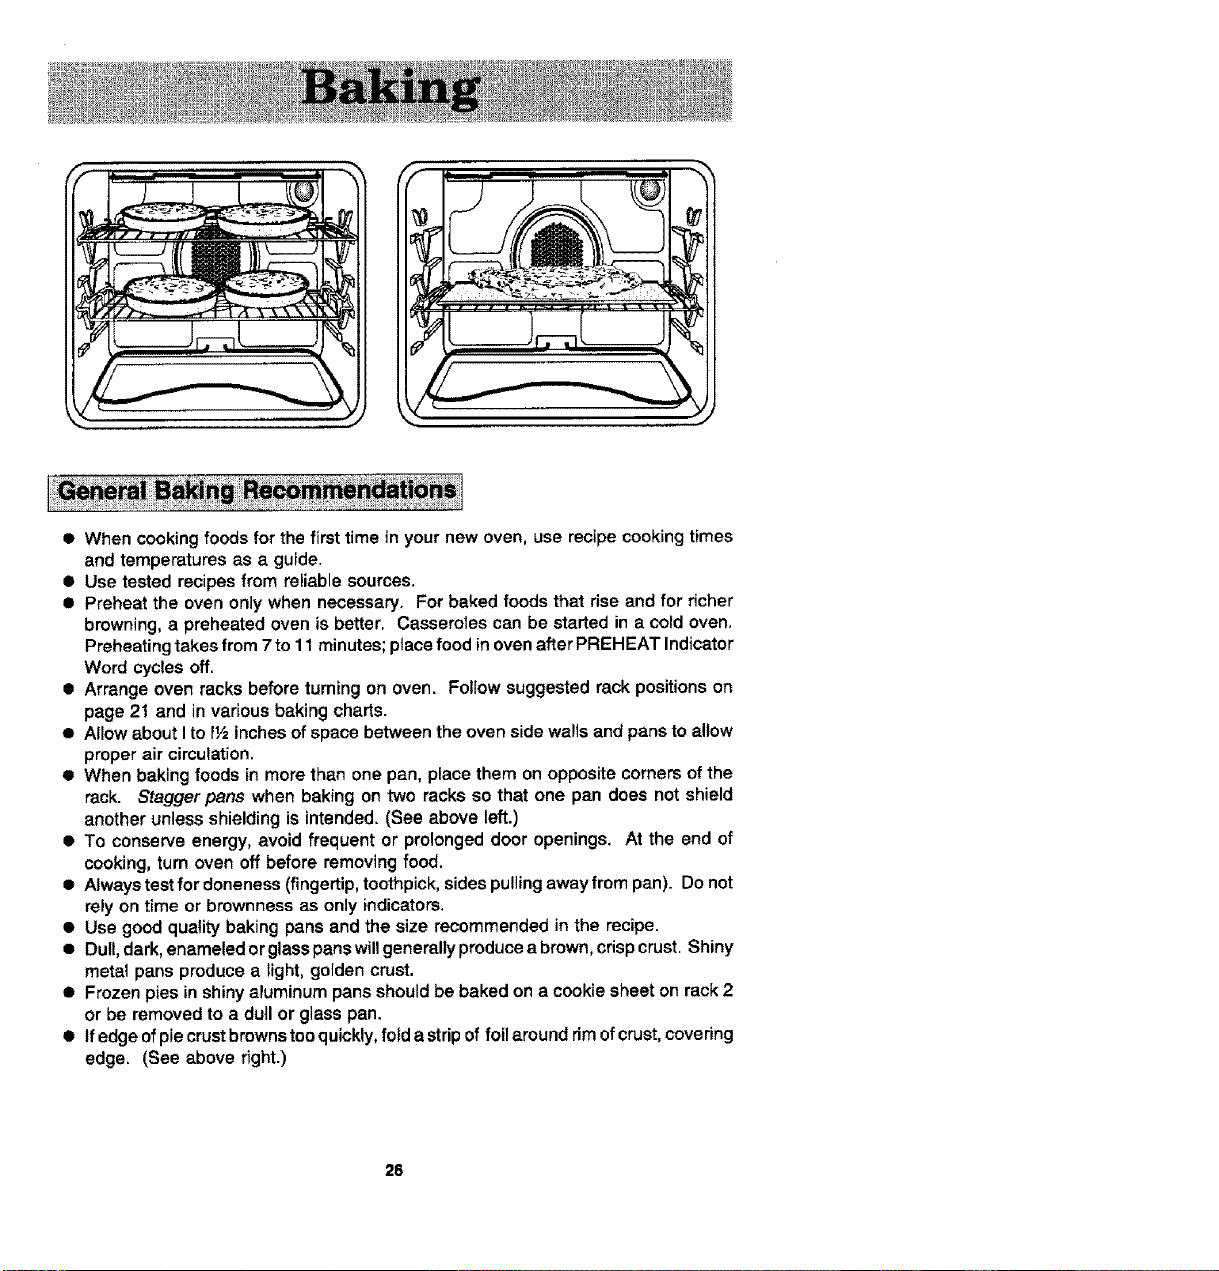
• When baking foods in more than one pan, place them on opposite corners of the
rack. Stagger pans when baking on two racks so that one pan does not shield
another unless shielding is intended. (See above left.)
• To conserve energy, avoid frequent or prolonged door openings. At the end of
cooking, turn oven off before removing food.
• Always test for doneness (fingertip, toothpick, sides pulling away from pan). Do not
rely on time or brownness as only indicators.
• Use good quality baking pans and the size recommended in the recipe.
• Dull, dark, enameled or glass pans will generally produce a brown, crisp crust. Shiny
metat pans produce a light, golden crust•
• Frozen pies in shiny aluminum pans should be baked on a cookie sheet on rack 2
or be removed to a dull or glass pan.
• Ifedgeofpiecrustbrewnsteoquickly, fold a strip of fotlaround rim ofcrust, covering
edge. (See above right.)
26
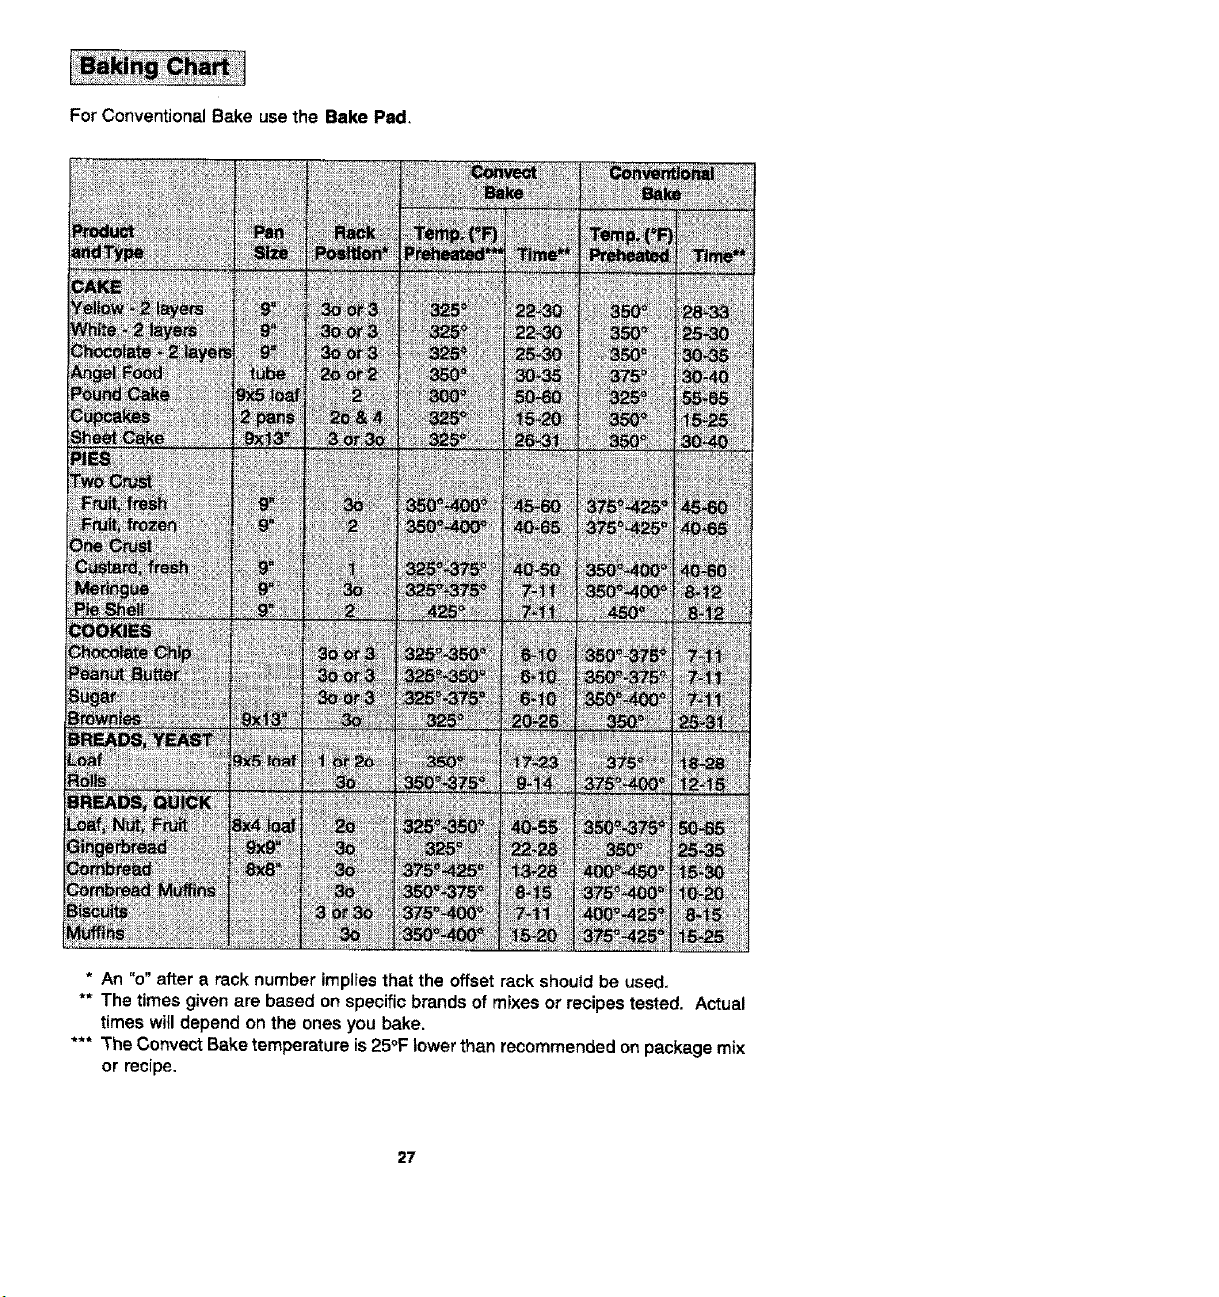
For Conventional Bake use the Bake Pad.
i!!!i_i!!_i!iiiiill
* An "o" after a rack number implies that the offset rack should be used.
** The times given are based on specific brands of mixes or recipes tested, Actual
times will depend on the ones you bake.
*** The Convect Bake temperature is 25°F lower than recommended on package mix
or recipe.
27
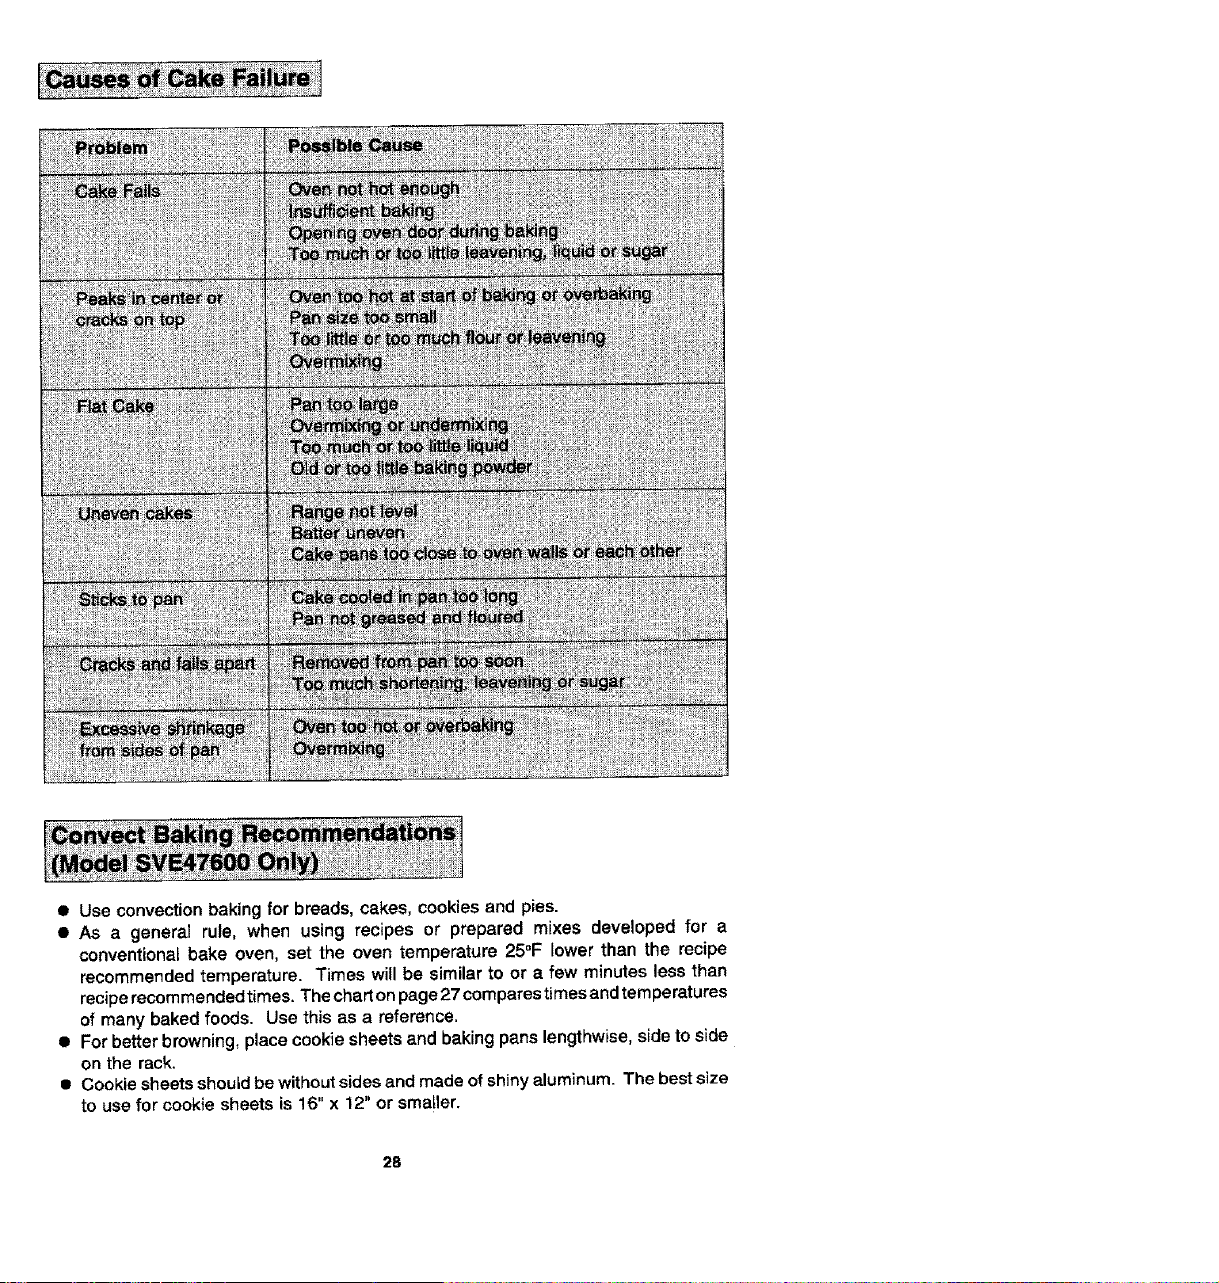
• Use convection baking for breads, cakes, cookies and pies.
• As a general rule, when using recipes or prepared mixes developed for a
conventional bake oven, set the oven temperature 25°F lower than the recipe
recommended temperature. Times will be similar to or a few minutes less than
recipe recommended times. The chart on page 27 compares tJmesand temperatures
of many baked foods. Use this as a reference.
• For better browning, place cookie sheets and baking pans lengthwise, side to side
on the rack.
• Cookie sheets should be without sides and made of shiny aluminum. The best size
to use for cookie sheets is 16"x 12" or smatler.
28

For best results, bake foods on one rack at a time as described in this manual. However,
very good resuffs can be obtained when baking quantities of foods on multiple racks.
Quantity cooking provides both time and energy savings.
Convect Bake is suggested for most multiple rack cooking, especially three rack
cooking, because the circulating heated air results in more even browning, For two rack
cooking, the conventional bake oven provides very good baking results especially when
pans can be staggered, such as with layer cakes and fresh pies.
Many foods can be prepared on three racks at the same time. These are just a few
examples: cookies, cupcakes, roils, biscuits, muffins, pies, pizzas, appetizers, and
snack foods.
To obtain the best resu}ts in multiple rack cooking, follow these suggestions:
• Use temperature and times in this manual as a guide for best results.
• For two rack baking, rack positions #20 and 4 are best for most baked products but
positions #2 and 4 also provide acceptable results.
• For three rack baking use positions #1, 3o and 4. One exception is pizza. (See p.
33.)
• Since foods on positions #1 and 4 will usually be done before foods on position #3o,
additional cooking time will be needed for browning foods on the middle rack. An
additional minute is needed for thin foods such as cookies. For foods such as
biscuits, roils, or muffins, allow 1 to 2 more minutes. Frozen pies and pizzas, which
should be baked on a cookie sheet, need about 2 to 4 more minutes,
• Stagger small pans, such as layer cake pans, in the oven.
• Frozen pies in shiny aluminum pans should be placed on cookie sheets and baked
on rack positions #!, 3o and 4.
Coek'le sheets should be placed lengthwise, side to side, Lnfront of the fan for more
even browning.
• Oven meals are recommended for energy conservation. Use rack positions #t and
3o or #2o and 4 and Convect Roast.
29
• Preheating is not necessary.
• For open pan roasting, p_ace meat or poultry on the slotted portion of the two-piece
pan included with the oven. Do not add water to the pan. Use open pan roasting
for tender cuts of meat. Less tender cuts of meat need to be cooked by moist heat
{n a covered pan.
• For best results, a meat thermometer is the most accurate guide to degree of
aloneness. The tip of the thermometer should be _ocated in the thickest part of a
roast, not touching fat, bone, or gristle. For turkeys and large poultry products,
insert the tip of the thermometer into the thickest part of the inner thigh.
• Place roast fat side up to alJow self basting of meat during roasting.
• Since meats contLnueto cook after being removed from the oven, remove roast
from oven when it reaches an Internal temperature about 5 degrees below the
temperature desired.
• For less loss of juices and easier carving, allow about 15 minutes "standing time"
after removlng meat from oven.
• For best results in roasting poultry, thaw completely. Due to the structure of poultry,
partially thawed poultry will cook unevenly.
• If preferred, tender cuts of meat can be roasted in the conventional bake oven by
following the general recommendations given above. However, meats wilt roast
more quickly in the convect oven using Convect Roast.
• Conventional bake is best for less tender cuts of meat that.require a longer, moist
heat method of cooking, Follow your recipe for times and temperatures for covered
meats.
• Meats cooked in oven cooking bags, dutch ovens, or covered roasting pans are best
cooked in the conventional bake oven using the Bake Pad.
• Use meat roasting charts in standard cookbooks for recommended times and
temperatures for roasting in a conventional bake oven.
3O
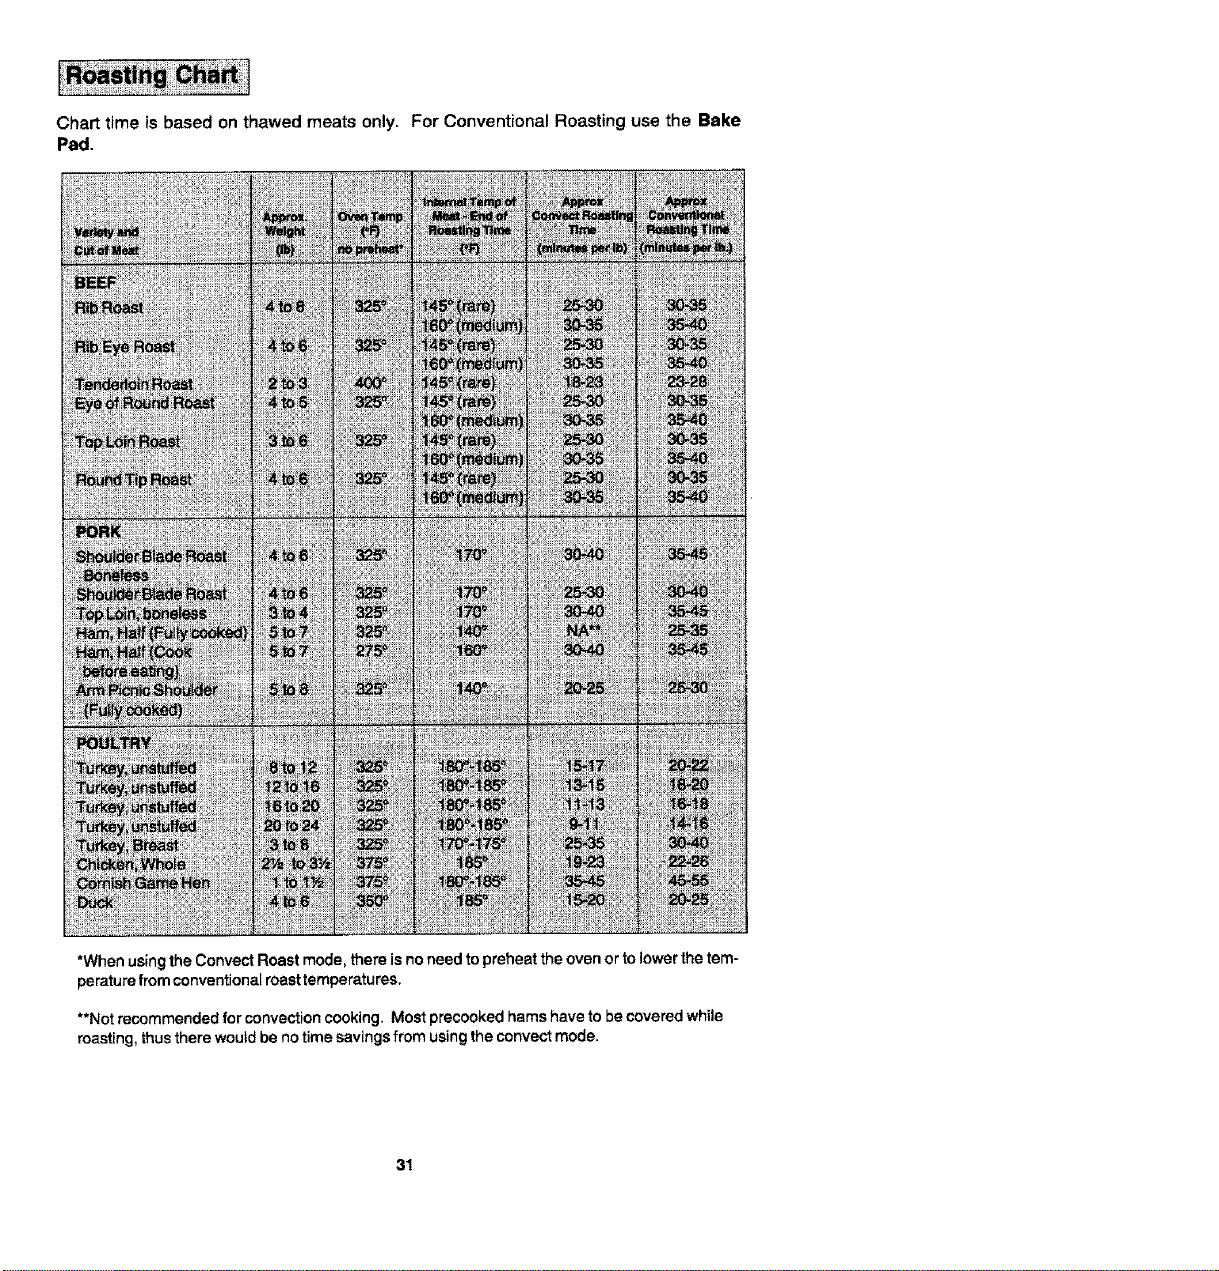
Chart time is based on thawed moats only. For Conventional Roasting use the Bake
Pad,
_to_
*When usingtheConvectRoastmode, thereis noneedto preheatthe ovenor tolowerthe tem-
peraturefrom conventionalroasttemperatures,
**Not recommended for convection cooking. Most precooked hams have to be covered while
roasting, thus there would be no time savings from using the convect mode.
31
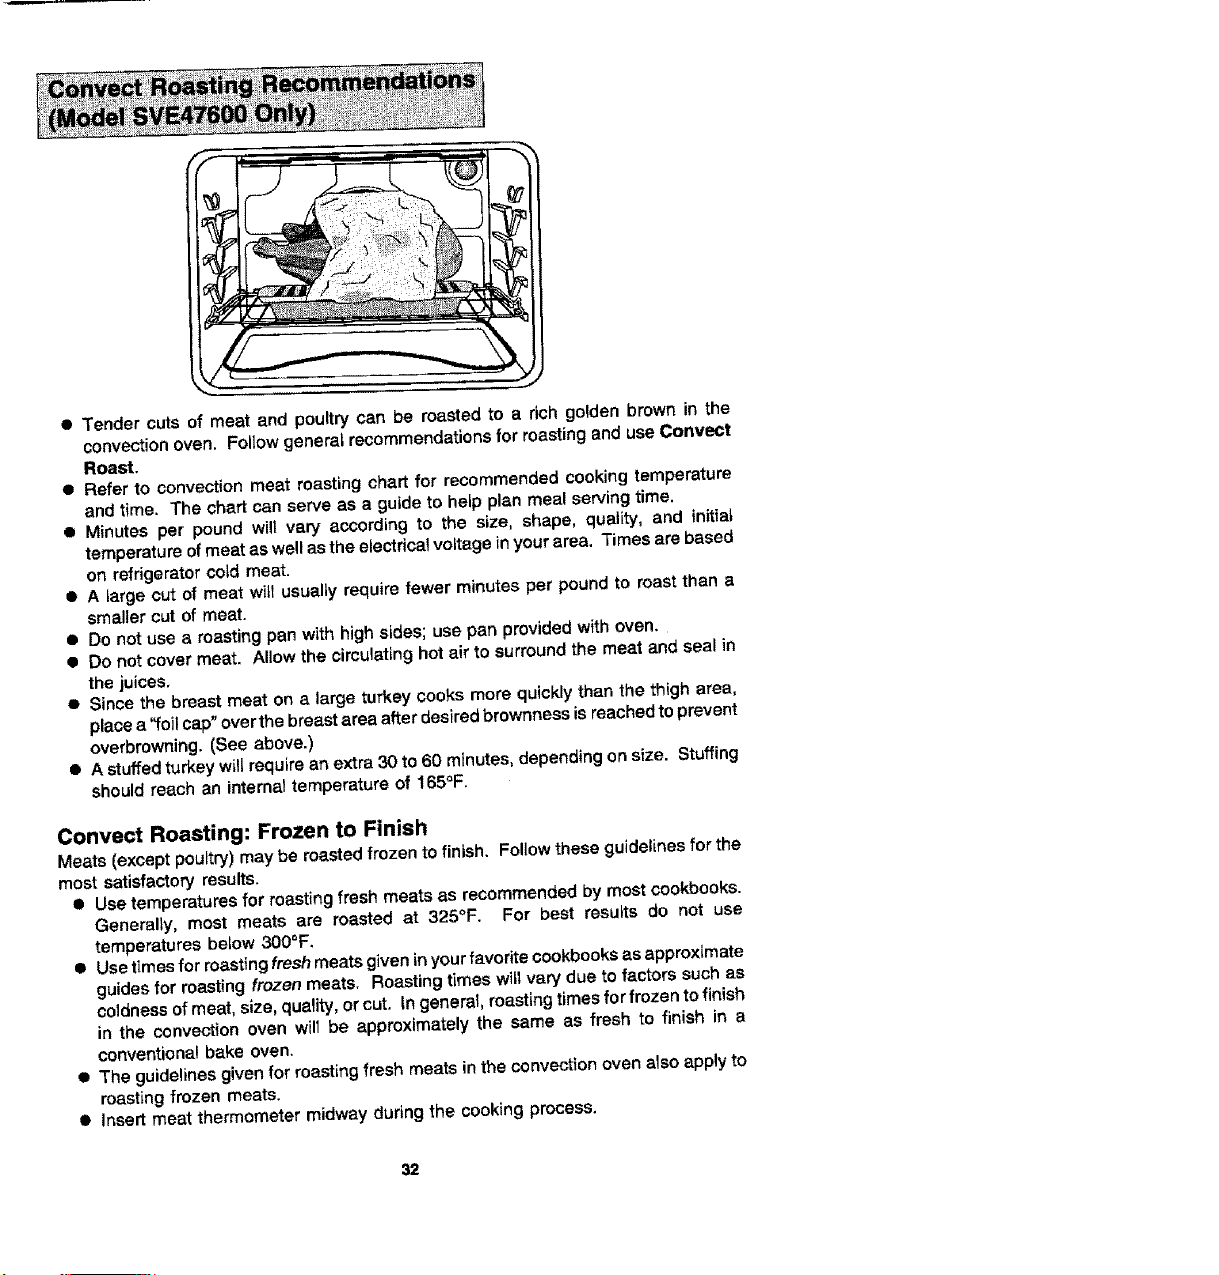
• Tender cuts of meat and poultry can be roasted to a rich golden brown in the
convection oven, Follow genera_ recommendations for roasting and use Convect
Roast,
• Refer to convection moat roasting chart for recommended cooking temperature
and time. The chart can serve as a guide to help plan meal serving time.
• Minutes per pound will vary according to the size, shape, quality, and initial
temperature of meat as well as the electdcal voltage in your area. Times are based
on refrigerator cold meat.
• A targe out of meat wilt usually require fewer minutes per pound to roast then a
smaller cut of meat.
• Do not use a roasting pan with high sides; use pan provided with oven.
• Do not cover meat. Allow the circulating hot air to surround the meat and seal in
the juices.
• Since the breast meat on a large turkey cooks more quickly than the thigh area,
place a '!=oi_cap" over the breast area after desired brownnass is reached to prevent
overbmwning. (See above.)
• A stuffed turkey will require an extra 30 to 60 minutes, depending on size. Stuffing
should reach an internal temperature of 165°F.
Convect Roasting: Frozen to Finish
Meats (except poultry) may be roasted frozen to finish. Follow these guidelines for the
most satisfactory results.
• Use temperatures for roasting fresh meats as recommended by most cookbooks.
Generally, most meats are masted at 325°F. For best resutts do not use
temperatures betow 300°F.
• Usetimesforroastingfreshmeatsgiveninyourfavoritecookbooksasapproximate
guides for roasting frozen meats. Roasting times will vary due to factors such as
coldness of meat, size, quality, or cut. In general, roasting times for frozen to finish
in the convection oven will be approximately the same as fresh to finish in a
conventional bake oven.
• The guidelines given for roasting fresh meats in the convection oven also apply to
roasting frozen meats.
• Insert meat thermometer midway during the cooking process.
32
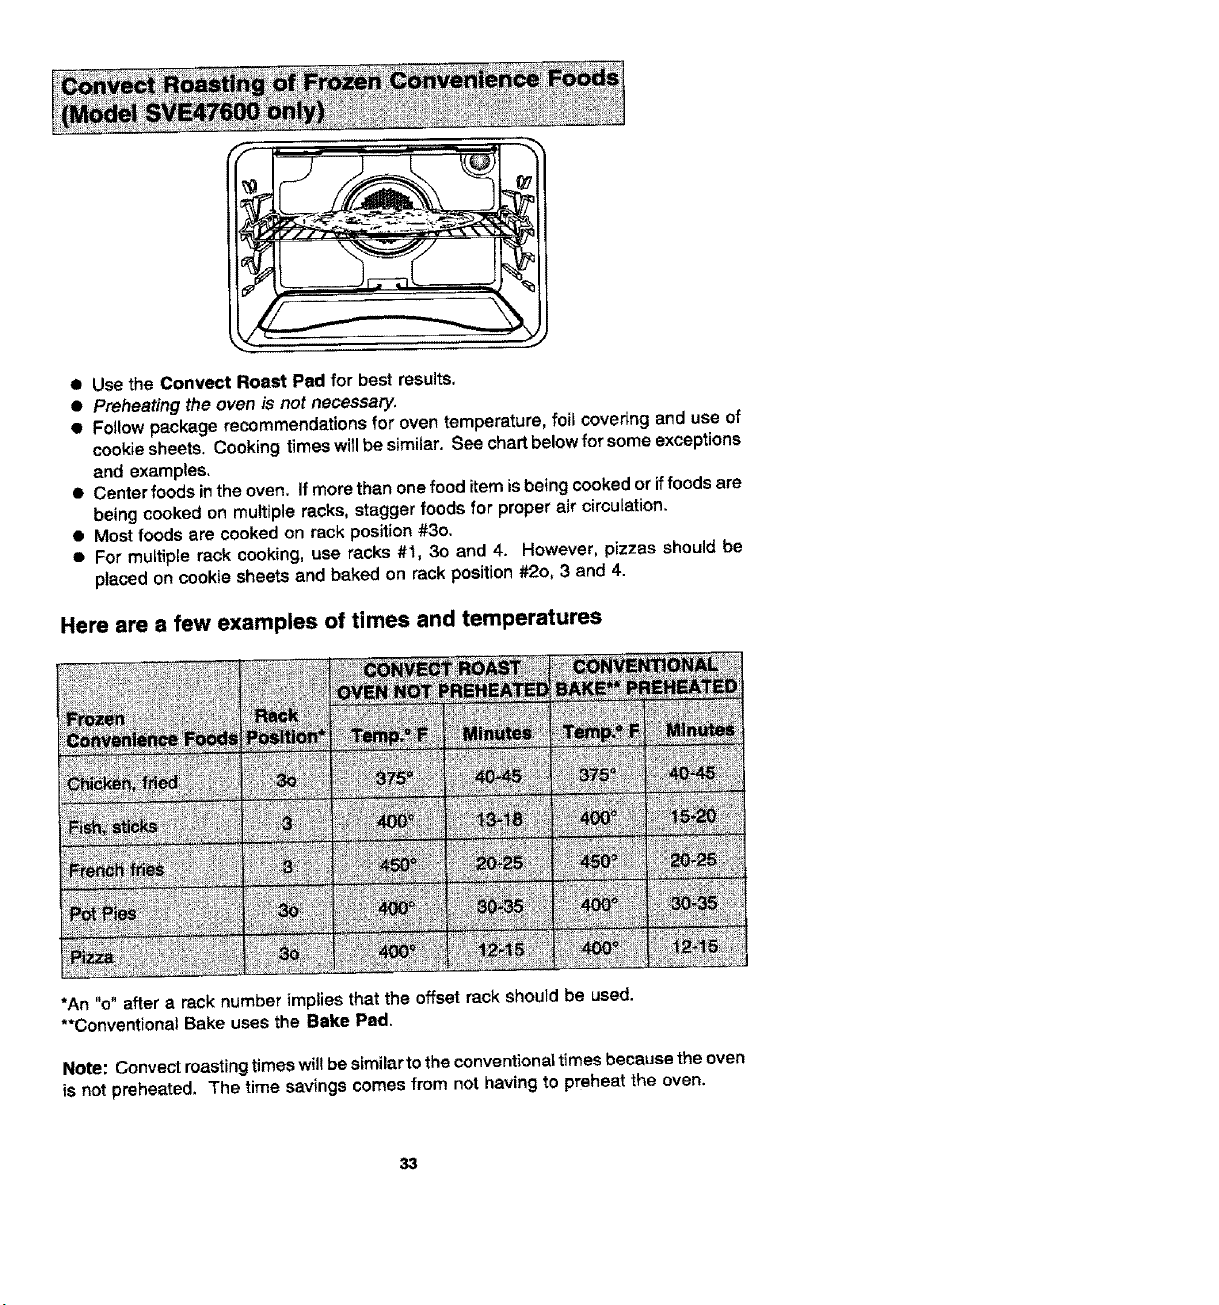
• Usethe Convect Roast Pad for best results,
• Preheating the oven is not necessary.
• Follow package recommendations for oven temperature, foil covering end use of
cookie sheets. Cooking times will be similar. See chart below for some exceptions
and examples.
• Center foods inthe oven. If more than one food item is being cooked or if foods are
being cooked on multiple racks, stagger foods for proper air circulation.
• Most foods ere cooked on rack position #3o.
• For multfpte rack cooking, use racks #t, 30 and 4. However, pizzas should be
placed on cookie sheets and baked on rack position #2o, 3 and 4.
Here are a few examples of times and temperatures
*An "o" after a reck number implies that the offset rack should be used.
**Conventional Bake uses the Bake Pad.
Note: Convect roasting times wil! be similar to the conventional times beceuse the oven
is not preheated. The time savings comes from not having to preheat the oven.
33
1. Place oven rack on the rack position suggested in the chart on page 35.
Distance from broiling element depends on foods being prepared, Rack position
40 (offset rack in position #4) is usually recommended unless otherwise stated,
2, Touch Broil Pad.
Indicator Word BROIL will flash and Display will show three dashes.
Note: If more than fifteen seconds elapses between touching Broil Pad and
touching a number pad, the oven is _ set and Display wil! return to previous
Display.
3. Touch the appropriate number pad(s),
The first number pad touched witl enter "HI" in the Display.
The oven has a variable broil feature which means that a lower temperatu re can be
selected. After "HI" appears inthe Display, touch the appropriate number pads for
the desired temperature. Temperature can be entered in 5° increments.
Fifteen seconds after entedng "HI" or four seconds after entering a temperature,
the broil element will come on and the Indicator Words BROIL and ON will remain
in the Display. If the vadable broit feature was selected, the Indicator Word ON will
cycle with the element.
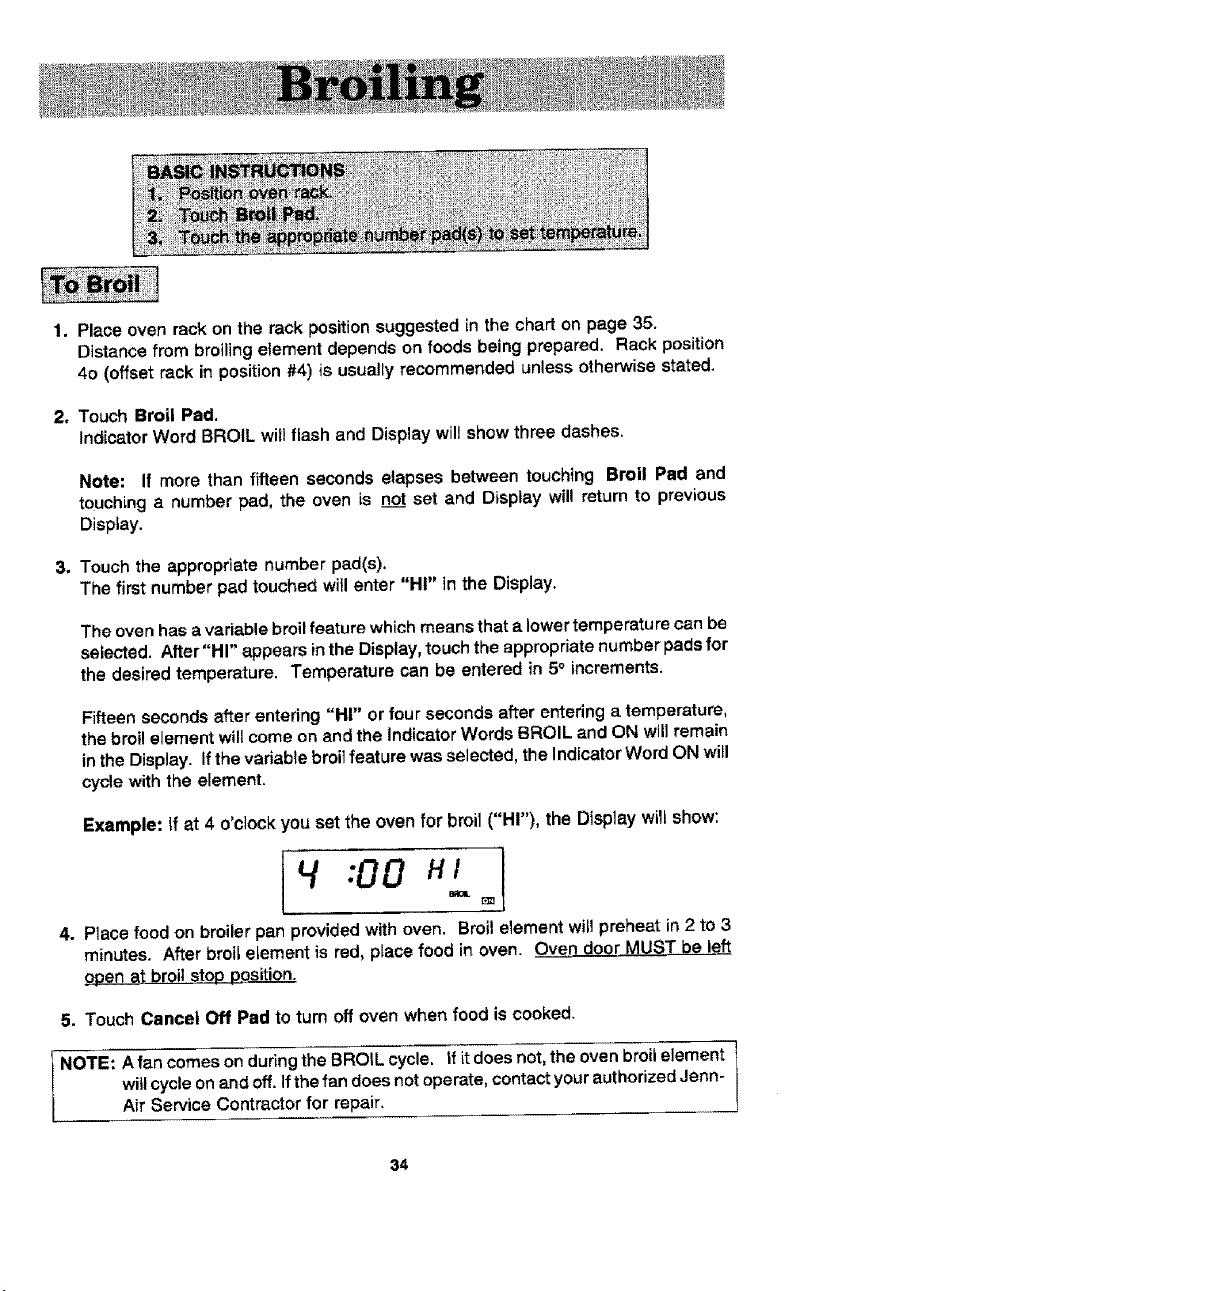
Example: ff at 4 o'clock you set the oven for broil ("HI"), the Display will show:
14:00 "1oi
4. P_ace food on broiler pan provided with oven. Broit element wilJpreheat in 2 to 3
minutes. After broil element is red, place food in oven. Oven door MUST be left
open at broil stop position.
5. Touch Cancel Off Pad to turn off oven when food is cooked.
NOTE: A fan comes on during the BROIL cycle, if it does not, the oven broil element
will cycle on and off. If the fan does not operate, contact your authorized Jenn-
Air Service Contractor for repair.
34
• Tender cuts of meat or marinated meats are best for breiting. This includes rib and
loincuts of steak, ground beef, ham steaks, poultry pieces or fish. For best results,
steaks should be at least 1" thick. Thinner steaks should be pan-broiled.
• Do not cover broiier grid with foil since this prevents fat drippings from draining into
bottom of pan,
• Before broiling, remove excess fat from meat and score edges of fat (do not cut into
meat) to prevent meat from curling. Salt after cooking.
• To prevent dry surface on fish or lean meats, brush melted butter on top,
• Foods that require turning should be turned only once during broiling. Turn meat
with tongs to avold piercing and loss of juices.
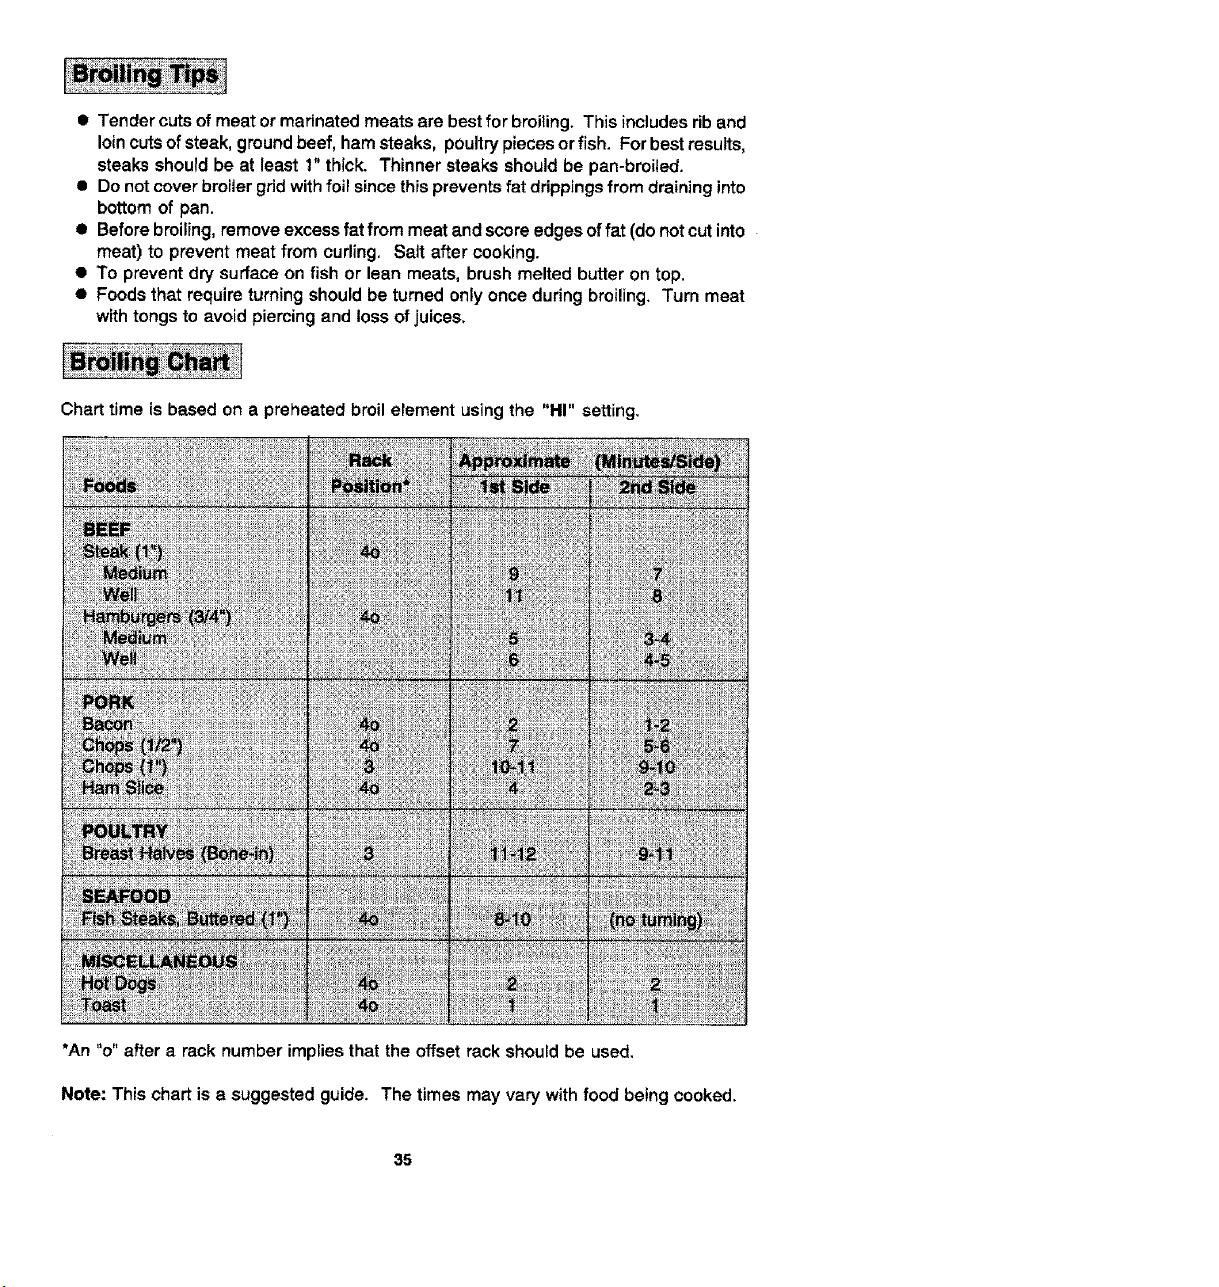
Chart time is based on a preheated broil element using the "HI" setting.
*An "o" after a rack number implies that the offset rack should be used.
Note: This chart is a suggested guide. The times may vary with food being cooked.
35
When the oven controls are set to CLEAN, the oven heats to temperatures that are
higher than those used for cooking. The high temperatures cause food soi! to burn off
and substantially disappear. While this occurs, a device in the oven vent helps to
consume normaJ amounts of smoke. The oven is vented through an opening under the
air gdlle.
I Remove the broiler pan and any other utensils from the oven. These utensils cannot
withstand the high temperatures of the cleaning process.
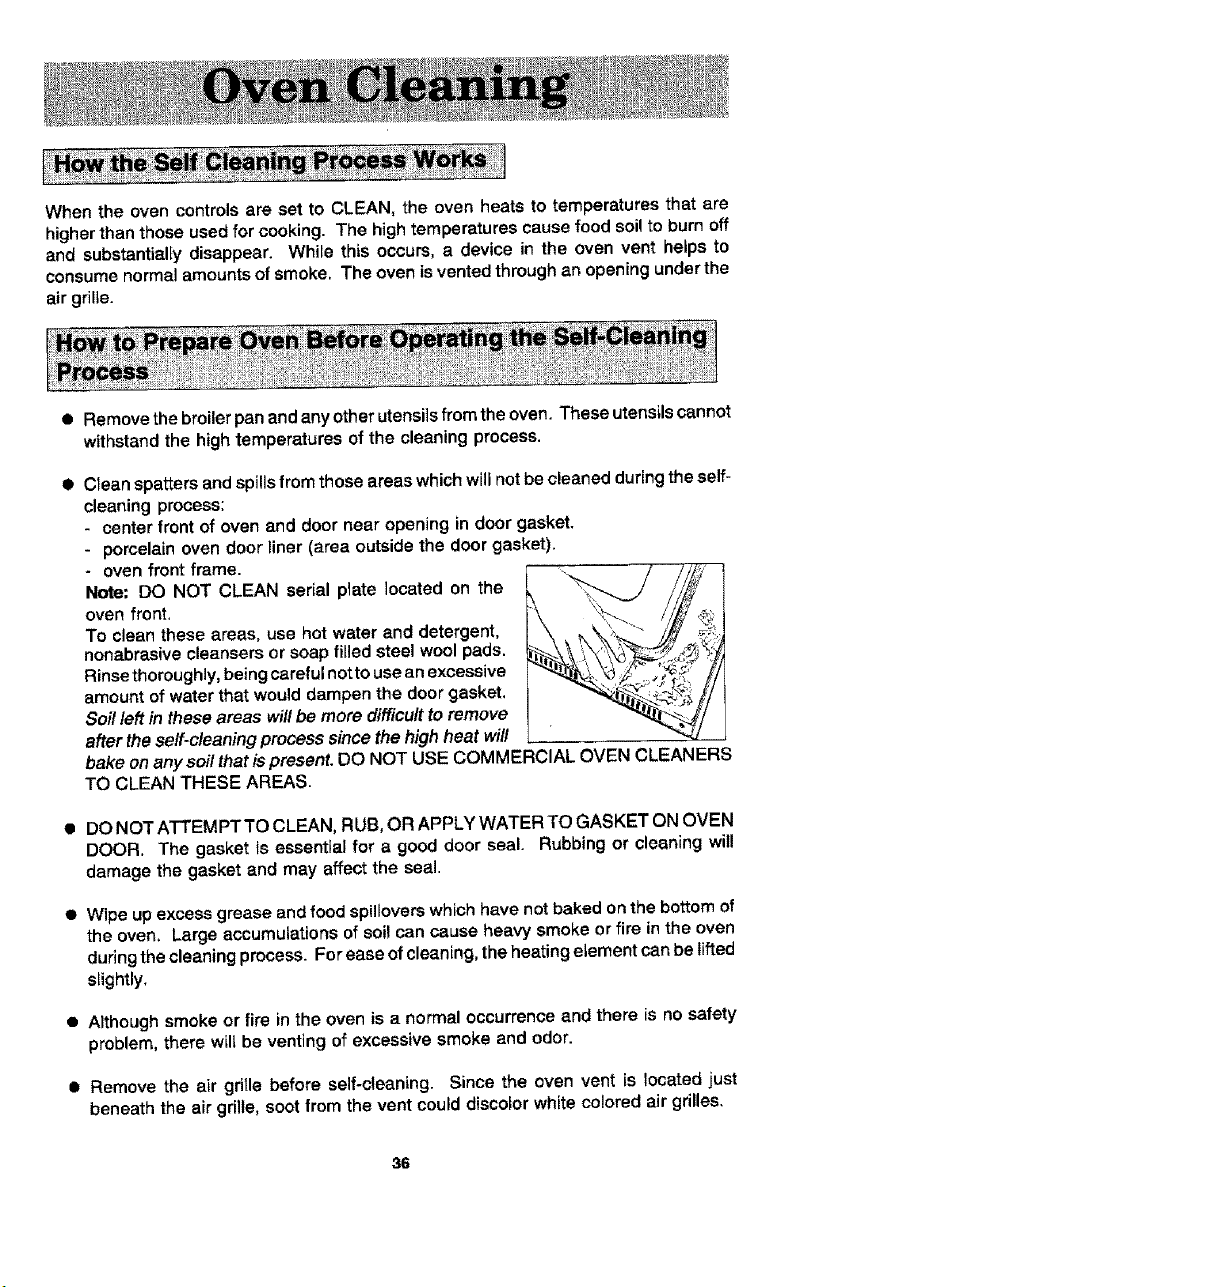
• Clean spatters and spills from those areas which will not be cleaned during the self-
cleaning process:
- center front of oven and door near opening in door gasket.
- porcelain oven door liner (area outside the door gasket).
- oven front frame.
Note: DO NOT CLEAN serial plate located on the
oven front,
To clean these areas, use hot water and detergent,
nonabrasive cleansers or soap filled steel wool pads.
Rinse thoroughly, being careful not to use an excessive
amount of water that would dampen the door gasket.
Soil left in these areas will be more difficult to remove
after the self-cleaning process since the high heat wi/I
bake on anysoil that is present. DO NOT USE COMMERCIAL OVEN CLEANERS
TO CLEAN THESE AREAS.
• DO NOT ATTEMPTTO CLEAN, RUB, OR APPLY WATER TO GASKET ON OVEN
DOOR. The gasket is essential for a good door seal. Rubbing or cleaning will
damage the gasket and may affect the seal.
• Wipe up excess grease and food spillovers which have not baked on the bottom of
the oven, Large accumulations of soil can cause heavy smoke or fire in the oven
during the cleaning process. For ease of cleaning, the heating element can be lifted
slightly.
• Although smoke or fire in the oven is a normal occurrence and there is no safety
problem, there will be venttng of excessive smoke and odor.
• Remove the air grille before self-cleaning. Since the oven vent is located just
beneath the air grille, soot from the vent could discolor white colored air grilles.
36

• The oven racks can be cleaned in the oven. However, the oven racks will discolor,
lose shininess, and become difficult to slide in and out if left in the oven during the
cleaning process. REMOVE RACKS FROM OVEN IF THIS DISCOLORATION
WILL BE OBJECTIONABLE. As a suggestion, do not leave the racks in the oven
during each self-cleaning process if they do not need to be cleaned since they will
discolor to a dull silver after one cleaning. Moderately soited racks can be cleaned
with a soapy S.O.S. pad or Scotch-Brite scour pad, Stubborn stains need to be
removed inthe self-cleaning process. Be sure to read specialtips on page 40 if oven
racks are cleaned during the self-cleaning process.
*Omit steps 4 & 5 if you wish cleaning to begin immediately,
To set oven to start cleaning immediately
1, Close the oven door,
2. Touch Clean Pad.
Indicator Words CLEAN TIME witl flash and Display wig show" _ : _ _._
3. Touch the appropriate number pad(s).
The first number pad touched will enter "3:00" in the Display for an average soiled
oven. The cleaning time can be varied depending on the amount of soil. Set "2:00"
for light soil or "4:00" for heavy soil.
Note: If more than fifteen seconds elapse between touching a Clean Pad and
touching a number pad, the oven is _ set and time of day wil| automatically return
to the Display.
Example: If at 9 o'clock youselected to self-clean your oven for3 hours, the Display
will show:
I3
Fifteen seconds after entering "3:00" or four seconds after entering a different time,
the oven door will start to automatically latch and the cooling fan will come on. The
LOCK Indicator Word will come on when the door is latched.
Note: If oven door was left open, "door" will flash in Display and a signal will
continuously beep until the door is closed and the Clean Pad is touched.
The Indicator Word ON comes on when the door is latched and will remain until the
clean temperature is reached. The Indicator Word ON will cycle with the elements
to maintain the clean temperature.
37
Whenthecleanfunctionhas been completed, the Indicator Words CLEAN and ON
will go off. The Indicator Word LOCK and the cooling fan will remain on until the oven
has cooled down and the door has unlocked.
To set oven to start cleaning at a later time
1-3. Follow Steps 1-3 in previous section on page 37.
4. Touch Stop Time Pad.
Indicator Words STOP TIME will flash in the Display, The Indicator Word CLEAN
and the calculated stop time will also appear in Display.
5. Touch the appropriate number pads to enter stop time,
A stop time can only be accepted for later in the day. If an unacceptable stop time
is entered, "Err" wiltflash briefly inthe Display and then Display will return to previous
acceptable Stop Time.
Example: If at 9 o'clock you set the oven to clean for three hours, the calculated
stop time would be "12:00". The Display would show:
12:00
T_E
If you want the stop time to be t o'clock, touch the number pads "1,0,0". Fifteen
seconds later, the Display would show Start Time:
I I 0:00
After four seconds, the display will return to current time of day, thus showing:
9:00 I
The LOCK Indicator Word will come on and the cooling fan will go off as soon as
the oven door has latched.
When the oven begins to clean, the Indicator Word ON and the cooling fan will come
on and the Indicator Word DELAY will go off.
When the clean time has been completed, the indicator Words CLEAN and ON will
go off. The Indicator Word LOCK and the cooting fan will remain on until the oven
has cooled down and the door has un_ocked.
38
To cancel self-clean
• Touch Cancel Off Pad,
• The oven door will be locked while the LOCK Indicator Word remains in the Display.
Depending on the length of time the oven had been self-cleaning, it may take up to
45 minutes for the oven to cool down, the door to unlock and cooling fan to turn off.
IMPORTANT
• _ cleaning time or stop time: Touch the appropriate pad (Clean Pad orStop
Time Pad),
!
• _ cleaning time or stop time before cteaning begins: Repeat the preceding
steps.
• When the Clean Pad is touched, a fan comes on. If this fan is net operating, the
oven will go through the cleaning process at a reduced oven temperature and the
oven will not clean effectively. If the fan does not operate, contact your authorized
Jenn-Air Service Contractor for service.
39
• A slight odor may be detected, and if an oven is heavily soiled, some smoke may
be visible. Some smoke and odor dudng the cleaning process is a normal
occurrence. Since the oven vent is located under the air grille, vapors, moisture,
etc+ may be seen coming from this area, If the odor is strong or objectionable, turn
on the ventilation system to exhaust odors to the outdoors+ (See p. 9.)
• During the cleaning process, do not be alarmed ff an occasional flame Lsvisible
through the oven window. This is caused by excessive food soil that was not
removed before the oven was set to clean.
• SINCE THE DOOR AND WINDOW OF THE OVEN WILL GET WARM DURING
THE SELF-CLEANING PROCESS, AVOID CONTACT.
• Some types of soil may disintegrate but leave a light film or heavier deposit of ash+
The amount of ash depends on the amount of soil which was in the oven. After oven
has cooled, this ash may be removed with a damp sponge. If other dark deposits
remain after wiping with a sponge, the time set for the length of cleaning was not
enough. Increase the cleaning time for future cleanings or dean more frequently.
The normal cleaning time is 3 hours. A maximum of 4 hours may be selected if
necessary.
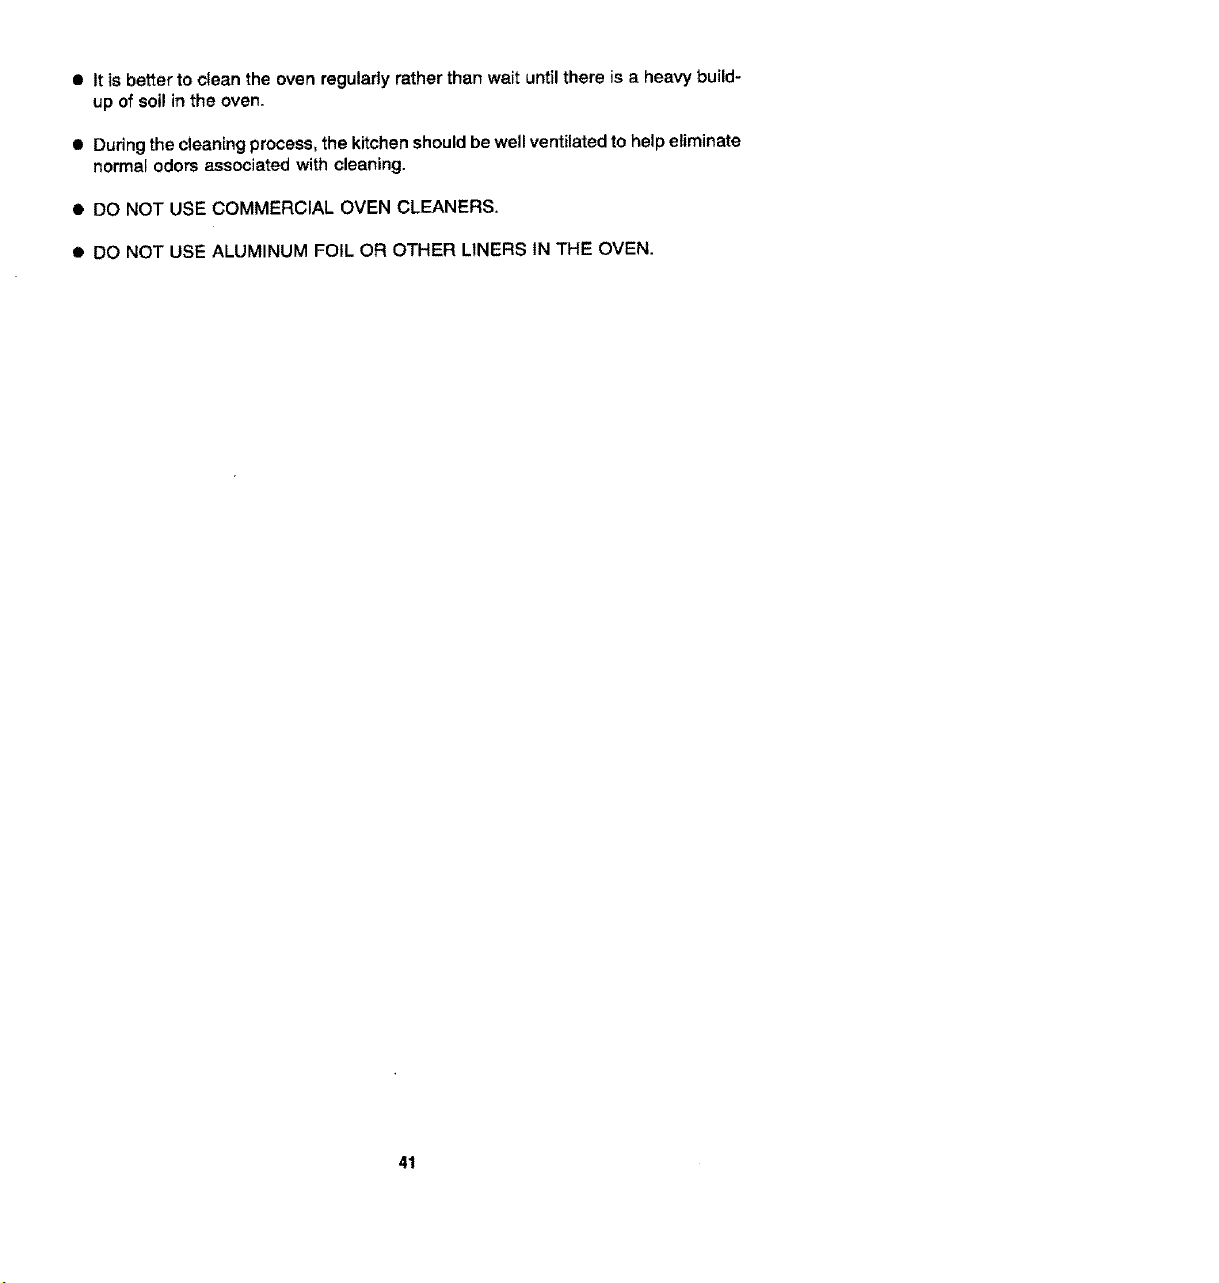
• If racks have been left in oven during the cleaning process, they shouJd be treated
as follows. After the cleaning process is completed and the oven has cooled, buff
the underside of rack edges with Scotch+Brite scour pad or rub lighUythe underside
of rack edges with a coating of vegetable oiL. Use a light application of oi! so it does
not soil the oven. This will make the cleaned racks slide more easily.
• To remove occasional spiUovers between cleanings, use a soap-filled scouring pad
or mild cleanser; dnse well.
40
• It is better to clean the oven regularly rather than wait until there is a heavy build-
up of soi! in the oven.
• Dudng the cleaning process, the kitchen should be well ventilated to help eliminate
normal odors associated with cleaning.
• DO NOT USE COMMERCIAL OVEN CLEANERS,
• DO NOT USE ALUMINUM FOIL OR OTHER LINERS IN THE OVEN.
41
Stainless Steel Rangetop
On the white ranges, the top of the range (the trim around the porcelain basin areas),
is made of stainless steel.
• To clean light soil, wipe with soapy cloth or nonabrasive cleanser, such as Soft
Scrub. Rinse, buff with soft cloth; polish with glass cleaner if necessary.
• To clean moderate soil or discoloration of the surface (excessive heat will cause a
golden discoloration), clean with Zud, Bar Keepers Friend, or Luneta (Jenn-Air
Model A912, Part No. 712191 ). With a sponge or cloth, rub cleanser wfth the grain
to avoid streaking the surface. Rinse welt, buff dry; polish with a glass cleaner if
necessary to remove cleanser residue and smudge marks.
• Heavy soil, such as burned on food soil, can be removed by firstcleaning as per the
instructions for moderate soil. Stubborn stains can be removed with a damp
Scotch-Brite scour pad; rub evenly with the grain to avoid streaking the surface.
Rinse well, buff with dry cloth; polish with glass cleaner if necessary to remove
cleanser residue and smudge marks. Scotch-Brite is also useful in buffing and
removing minor scratches.
• Stubborn food stains may also be removed by spraying with an oven cleaner. Allow
to set overnight, then rinse. If stains remain, clean with recommended cleansers
such as Zud, Luneta (Jenn-Air Model A912, Part No. 712191), or Scctch-Brite
Scour pad.
Textured Black Rangetops
On the black ranges, the top of the range (the trim around the porcelain basin areas),
is made of painted steel.
• To clean light soil, wipe with a soapy cloth or nonabrasive cleanser, such as
Fantastik or 409.
• To clean moderate to heavy soil, spray the area with a household cleaner, such as
Fantastik or 409 and allow to soak. If necessary, spray the area with cleanser, cover
with plastic wrap and allow to soak for a few hours. Do not use any abrasive
cleansers, oven cleaners, or scrub with any abrasive materi_ls, such as S_Q.S.
Scotch*Bdte pads. etc.
42

Control Knobs
The knobs on the control panel can be removed with the controls in the OFF position.
Pull each knob straight from the shaft. Wash knobs in warm soapy water or dishwasher;
do not use abrasive cleansers or materials. To replace each knob, match flat part of
knob opening with the spring on the shaft, returning in OFF position.
Control Panel Area and Display Window
Wipe with paper towels dampened with soapy water or glass cleaner, Do not spray any
cleaning solutions directly onto the display window or use large amounts of soap and
water, Do not scrub with S.O,S pads or abrasive cleansers.
Glass on Oven Door Front
Use any suitable glass cleaner or soapy water.
Oven Door Trim
S_ightlydampen a cloth or paper towel with soapy water or glass cleaner. Do not use
excessive amounts of water or allow water to run down through the air vents in the door
since this will cause streaks which will be visible through the glass door.
The oven operation controls can be locked in the "OFF" position dudng cleaning or to
prevent a child from accidentally turning them on. The oven functions which can be
locked in the "OFF" position are: Bake, Convect Bake, Convect Roast, Broil and Clean.
The control functions which can always be used regardless of lockout are: Timer, Clock,
Fan and Oven Light.
To set
Touch and hold the Cook Time Pad and the Stop Time Pad slmultaneousiy for four
seconds. The Indicator Word "OFF" wil! appear and remain in the temperature digits
for fifteen seconds.
Note: If an oven function is currentiy being used, the contmts cannot be locked off.
Note: If someone touches an oven function pad, the Indicator Word "OFF" will again
appear in the temperature digits for fifteen seconds.
To cancel
Touch and hold the Cook Time Pad and the Stop Time Pad simultaneously for four
seconds. The Indicator Word "OFF" will appear briefly inthe temperature digits and then
go off.
43
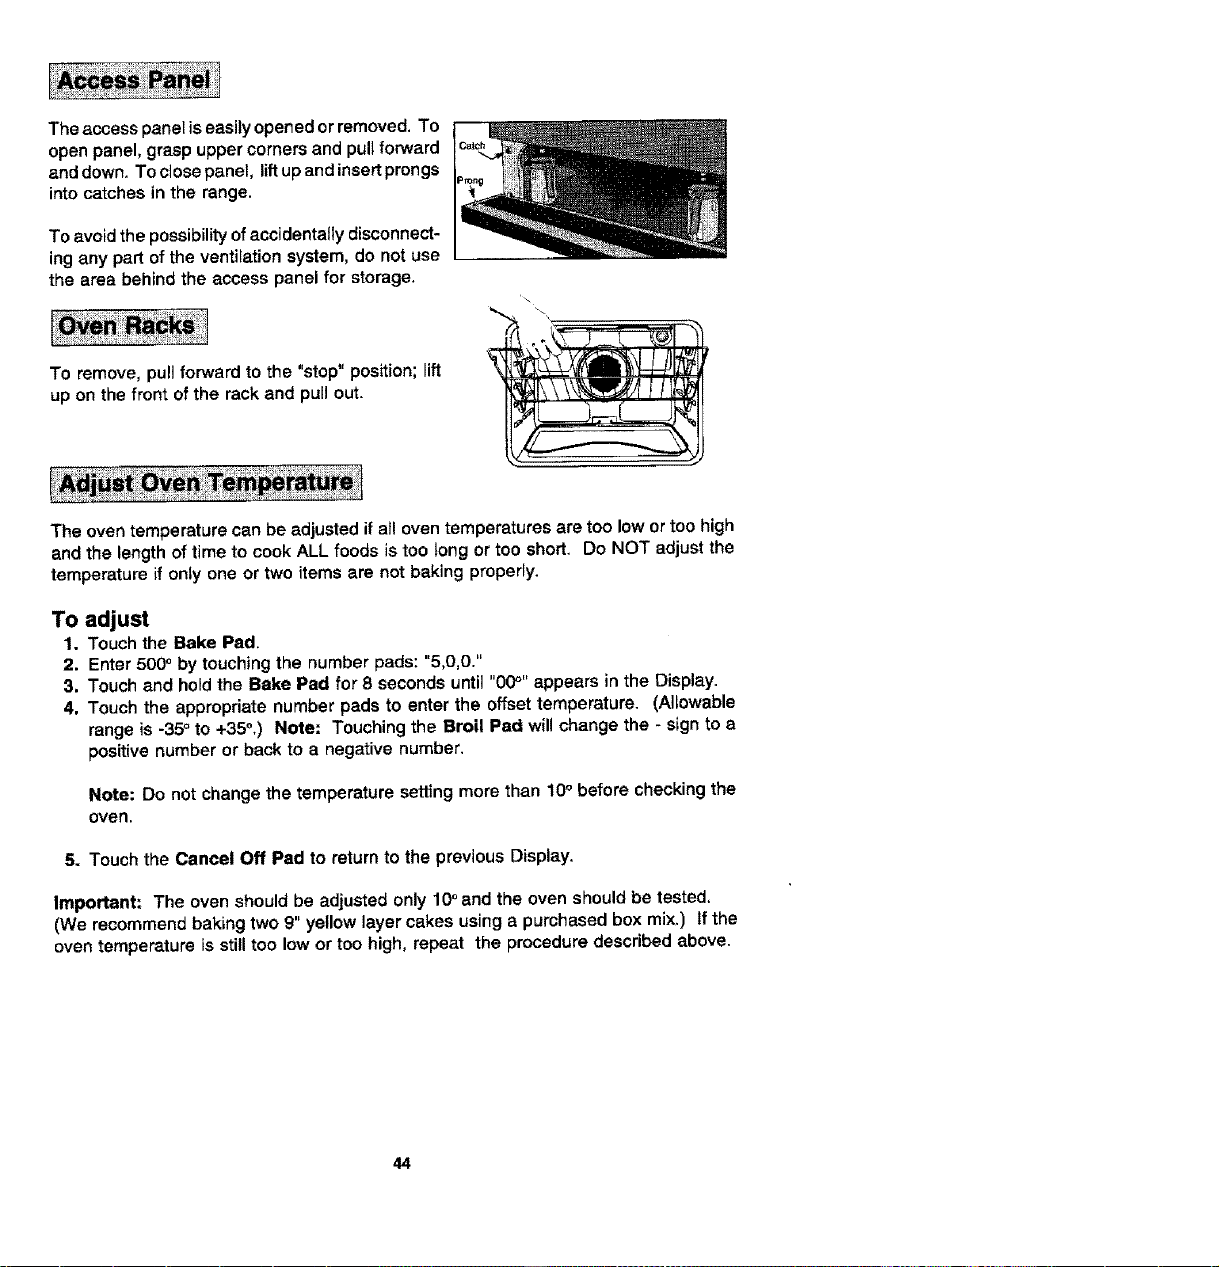
Theaccesspaneliseasilyopenedorremoved. To
open panel, grasp upper corners and pull forward
and down. To close panel, lift up and insert prongs
into catches tn the range.
To avoid the possibility of accidentally disconnect-
ing any part of the ventilation system, do not use
the area behind the access panel for storage.
To remove, pull forward to the "stop" position; lift
up on the front of the rack and purl out.
The oven temperature can be adjusted if all oven temperatures are too low or too high
and the length of time to cook ALL foods is too tong or too short. Do NOT adjust the
temperature if only one or two items are not baking properly.
To adjust
1. Touch the Bake Pad.
2. Enter 500° by touching the number pads: "5,0,0."
3. Touch and hold the Bake Pad for 8 seconds until "00_'' appears in the Display.
4. Touch the appropriate number pads to enter the offset temperature. (Allowable
range is -35° to +35°,) Note: Touching the Broil Pad will change the - sign to a
positive number or back to a negative number.
Note: Do not change the temperature setting more than 10° before checking the
oven.
5. Touch the Cancel Off Pad to return to the previous Display.
Important: The oven Should be adjusted only 10o and the oven should be tested,
(We recommend baking two 9" yellow layer cakes using a purchased box mix.) If the
oven temperature is still too low or too high, repeat the procedure described above.
44
Before replacing bulb, disconnect power to oven at the main fuse or circuit breaker panel
andat the electric receptacle. Be sure that the entire oven cavity including the light bulb
is coo_ before attempting to remove.
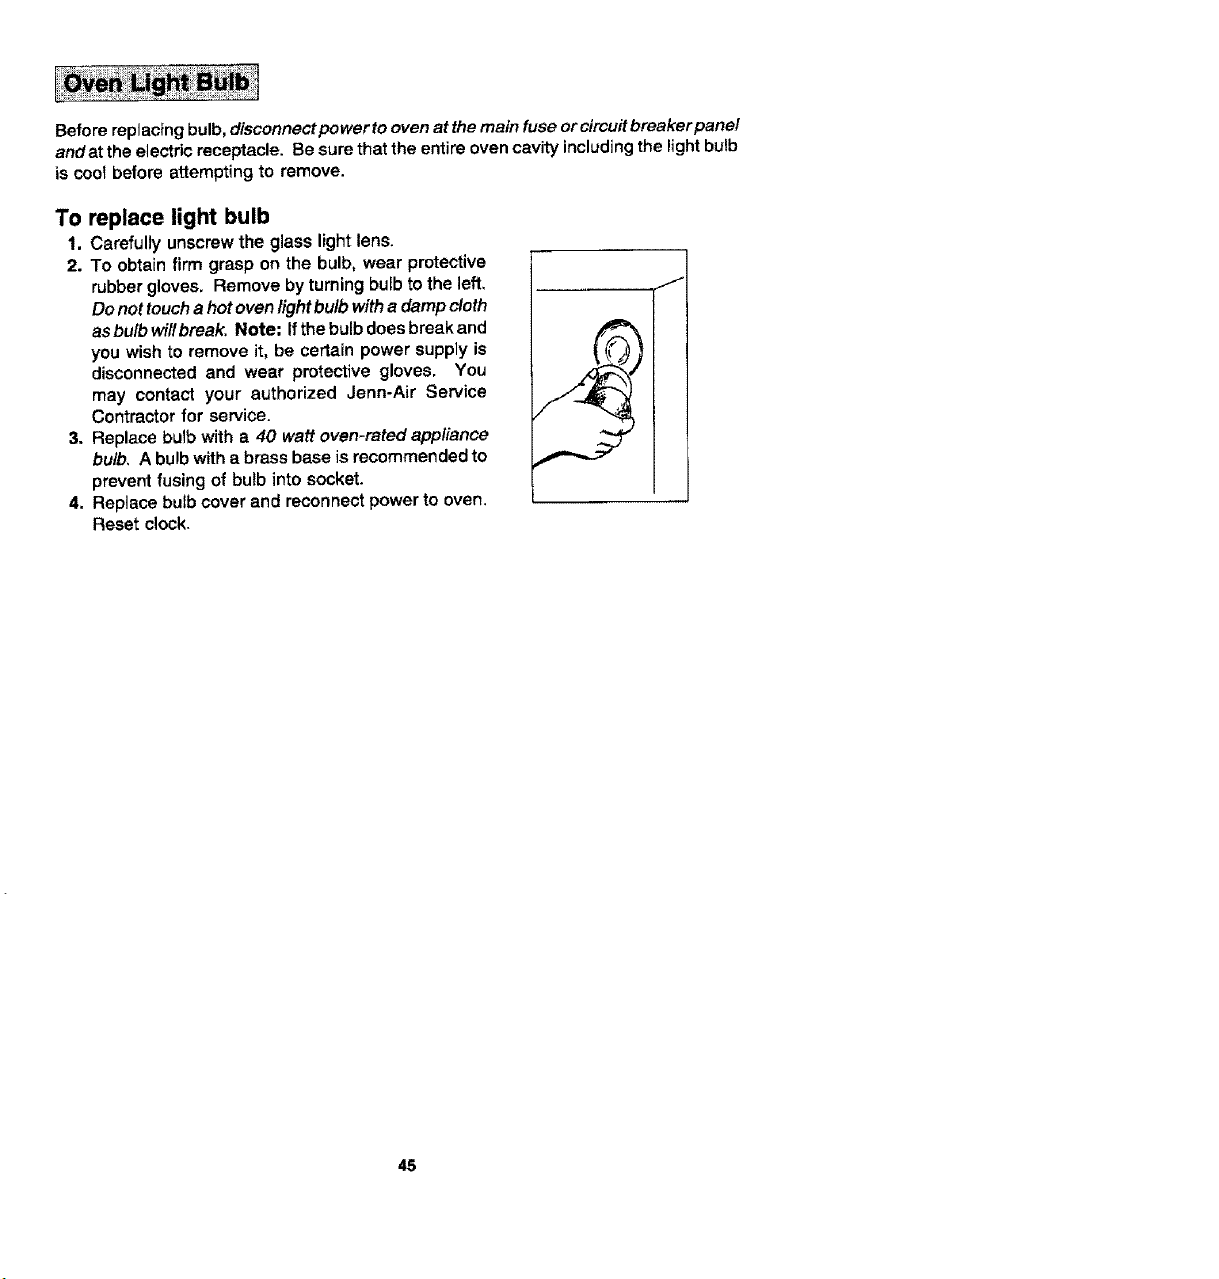
To replace light bulb
1, Carefully unscrew the glass light lens.
2. To obtain firm grasp on the bulb, wear protective
rubber gloves, Remove by turning bulb to the left,
Do not touch a hot oven fight bulb witha damp cloth
as bulb wil! break. Note: If the bulb does break and
you wish to remove it, be certain power supply is
disconnected and wear protective gloves, You
may contact your authorized Jenn-Air Service
Contractor for service.
3. Replace butb with a 40 watt oven-rated appliance
bulb, A bulb with a brass base is recommended to
prevent fusing of bulb into socket.
4. Replace bulb cover and reconnect power to oven,
Reset c!ock.
45
Check the following list to be sure a service call is really necessary. A quick reference
of this manual may prevent an unneeded service call.
If nothing on the range operates:
• check for a blown circuit fuse or a tripped main circuit breaker.
• check if range is proper_yconnected to electric circuit in house.
if ventilation fan does not operate but everything else on the range
does:
• check behind lower access panel if power cord to blower assembly has been
disconnected.
If grill heating element or cooktop does not get hot enough:
a check if heating element is plugged in solidly.
• surface controls may not be set pr0pedy.
• voltage to house may be low.
If ventilation system is not capturing smoke efficiently:
• check on cross ventilation in room or make up air.
a excessive amount of smoke is being created; check instructions for grilling,
trimming meats, (See pp. 14-16.)
• outside wail cap may be trapped shut.
• range may be impropedy installed; check ducting information. (See p. 49.)
• air filter may be improperly installed (See p. 9.)
If oven does not heat:
• the oven controis may be set incorrectly.
s clock controls may be set for detayed start of oven,
If the oven light does not work:
• the light bulb is loose or defective.
• oven light does not work during self-cleaning process.
if oven will not go through self-cleaning process:
• controls may be improperly set,
• check the clock controlled settings and the current time of day on the clock,
If oven did not clean properly:
• oven may need longer cleaning time.
• excessive spitls were not removed prior to self-cleaning process.
46
If oven door will not unlock:
• oven may not have cooled to safe temperature after serf-cleaning process,
s electric current coming into the oven may be off.
If foods do not broil properly:
• the oven controls may not be set properly.
• check rack position.
• voltage into house may be low.
If baked food is burned or too brown on top:
• food may be positioned incorrectly in oven.
• oven not preheated properly.
If foods bake unevenly:
• the range may be installed improperly.
S check the oven rack with a level.
• stagger pans, do not allow pans to touch each other or oven wall.
• check instructions for suggested ptacement of pans on oven rack.
If oven baking results are less than expected:
• the pans being used may not be of the size or material recommended for best
results.
• there may not be sufficient room around sides of the pans for proper air circulation
in the oven.
• check instructions for preheating, rack position and oven temperature.
• oven vent may have been blocked or covered.
If baking results differ from previous oven:
• oven thermostat calibration may differ between 07dand new ovens. Follow recipe
and use and care directions before calling for service since the calibration on the
previous oven may have drifted to atoo high ortoo tow setting, (See p. 44- Adjusting
Oven Temperature.)
Fault Codes
• Fault codes are shown in the Display as "F" and a number. If a fault code appears
inthe Display and a continuous beep sounds, touch theCancel Off Pad. |f the fault
code reappears, disconnect power to the range and call an authorized Jenn-Air
Service Contractor.
47

48
Jenn-Air's ventilation system is designed to capture both cooking fumes and smoke
while grilling. If the system does not, these are some ducting installation situations to
check:
• 6" diameter round or 3 114" x 10" rectangular ducting should be used. Note: 5"
diameter round ductfng may be used if the duct length is 10' or less.
• No more than three 90 ° elbows should be used. Distance between elbows should
be at least 18".
• Recommended Jenn-Air wal_cap should be used. Make sure damper moves freely
when ventilation system is operating.
• There should be a minimum clearance of 6" for coektop installed near a side wall.
If there is not an obvious improper installation, there may be a concealed problem such
as a pinched joint, obstruction in the pipe, etc. Installation is the responsibility of the
installer and questions should be addressed first by the installer. The installer should
very carefully check the ducting installation instructions.
49

Griddle
Model A302
Self-draining grldd{e
makes many favorite
foods easier to fix.
Family-sized surface lets
you cook several
pancakes, hamburgers,
or grilled sandwiches at
atime. Has a black non-
stick finish.
Grill Accessory
Model A1=38
Grill accessory includes
two grill-rocks, Energy-
Saver grill element, and
two black nonstick gritl
grates. 2800 watt grill
element permits you to
control temperatures
under front and rear grills
independently.
Grill Cover
Model A341
Attractive gd_tcover
protects grill when
not in use, Tex-
tured steel in black
or white with
molded handles,
Cooker-Steamer
Model A335
Ideal for anything you
steam, blanch, poach or
stew. Includes a dual-posi-
tion basket and see-through
cover. Attractive black non-
stick finish.
Rotiss-Kebab
Model A312
Enjoy the great flavor of
rotissed foods indoors all
year around and make par-
ties more fun by serving at-
tractive shish kebabs. In-
cludes chrome finish motor,
rotiss, shish kebab skewers
and all brackets. Folds for
easy storage.
50
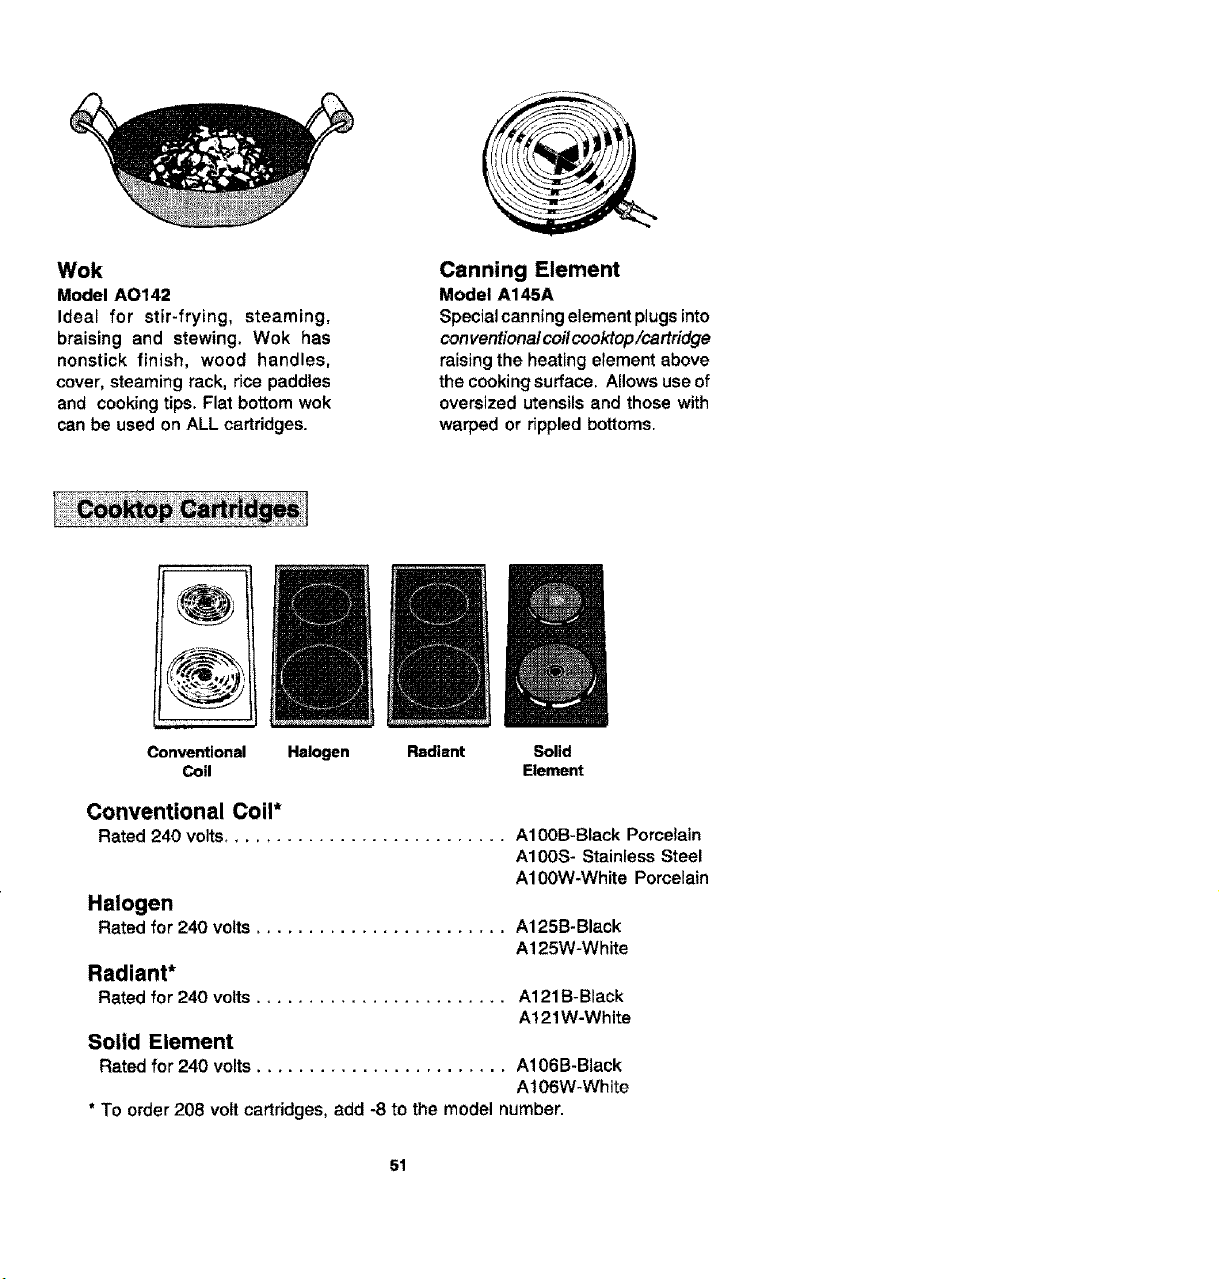
Wok
Model AO142
Ideal for stir-frying, steaming,
braising and stewing. Wok has
nonstick finish, wood handles,
cover, steaming rack, rice paddles
and cooking tips. Flat bottom wok
can be used on ALL cartridges.
Canning Element
Model A145A
Special canning element plugs into
conventiona/ coilcooktop/cartridge
raising the heating etement above
the cooking surface. Allows use of
oversized utensils and those with
warped or rippled bottoms.
Conventional
Coil
Halogen Radiant Solid
Element
Conventional Coil*
Rated 240 volts........................... A100B-Black Porcelain
A100S- Stainless Steel
A100W-White Pomelain
Halogen
Rated for 240 volts ........................ A125B-Black
A125W-White
Radiant*
Rated for 240 volts ........................ A121B-Black
A121 W-White
Solid Element
Rated for 240 volts ........................ A106B-Black
Al06W-White
* To order 208 volt cartridges, add -8 to the model number.
51