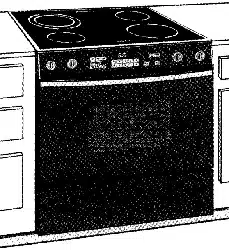
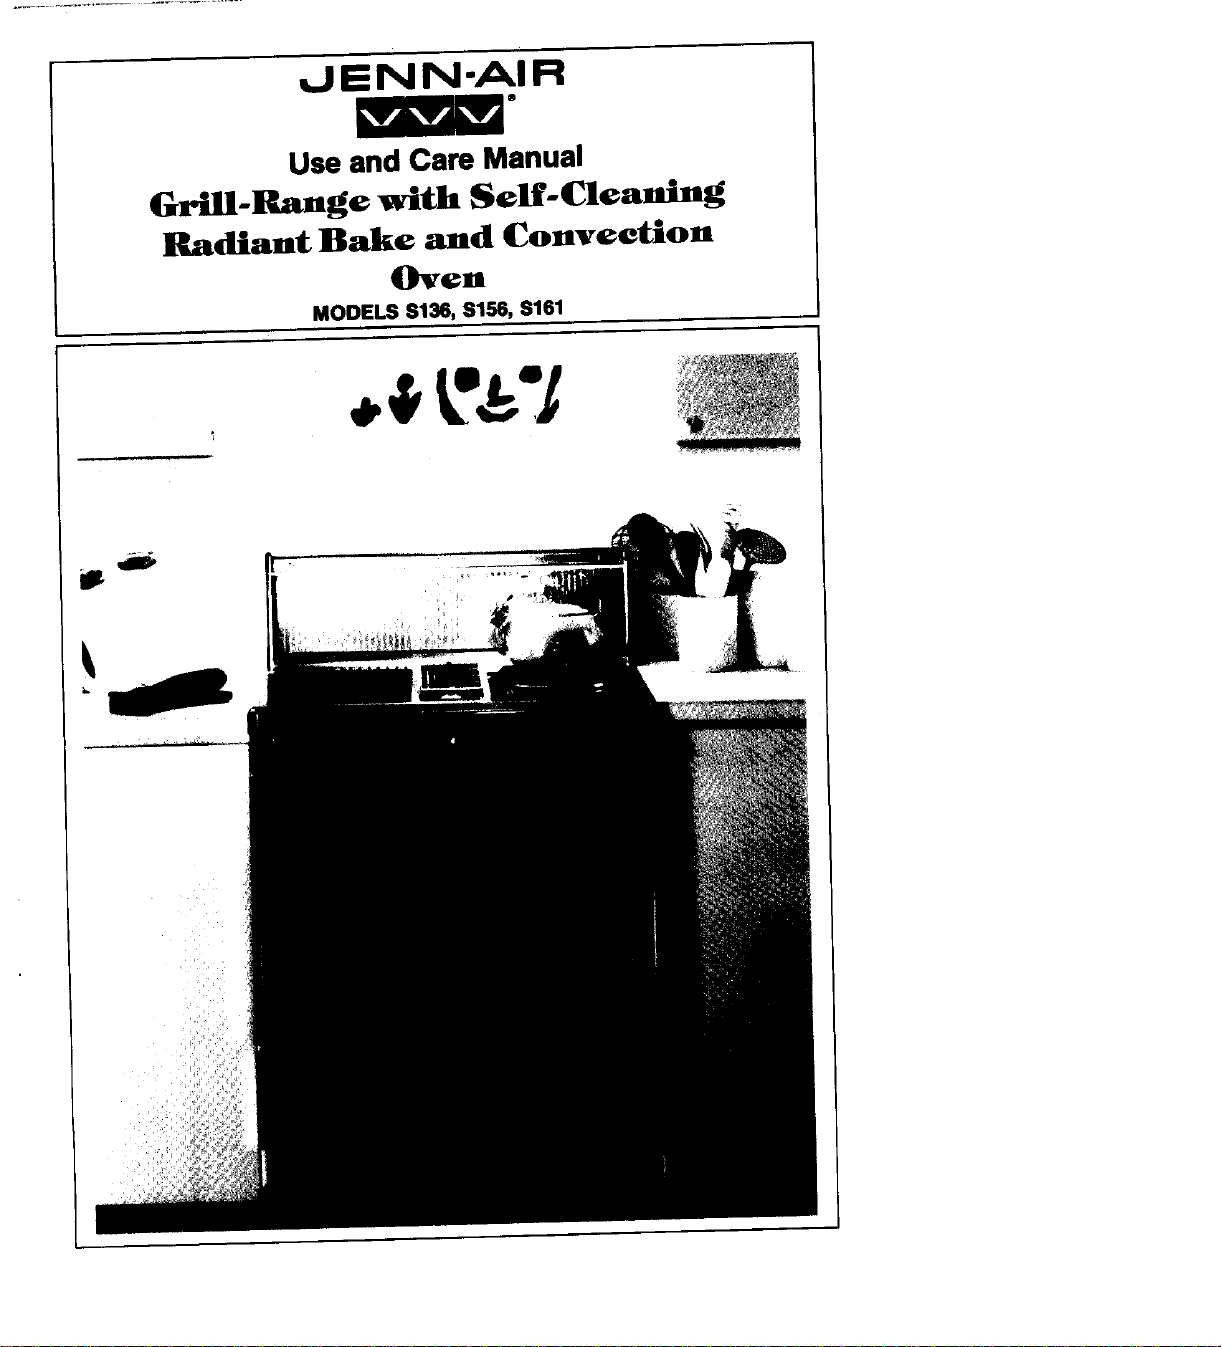
_JEN N-AI R
Useand CareManual
Grill-Range with Self-Cleaning
Radiant Bake and Convection
Oven
MODELS $136,S156,$161
About Your
Jenn-Air
Congratulations on your choice of a Jenn-Air Grill-Range.The indoor
grilling of meats,fish or fowl isoneofthe mostattractiveandsucculent
methodsof preparingthesefoods.., a uniqueflexibilitymadepossible
by Jenn-Air's patentedintegral ventilation system.
Your Jenn-AJrself-cleaning oven combines the best of two cooking
methods, convection and radiant bake (conventional) baking or
roasting. (Note: Only Models S156 and $161 have the convection
option.)
The Jenn-Air convection oven is actually a conventional oven that
circulates heatedair within the oven.As both bakeand broil heating
elementscycleon and offwith the thermostat,afan keepsthe heated
air circulating around the food.
The constantly recireulating heatedair in the convection oven strips
away the layerof cooler air that surrounds food. Consequently,many
foods cook more quickly. Distributed heat makes multiple rack
cooking possible.Convection roastedmeatsretaintheir natural flavor
and juiciness with lessshrinkage than radiant bakeroasting.
In addition to the many exclusive benefits of convection cooking,
your Jenn-Air oven isalso a fine full featured "bakeand broil" oven.
You can cook your "old favorite" recipes as you have in the past.
Theradiantbakeovenalsogivesyou theflexibility of preparingvarious
foods when convection cooking may not be as beneficial, as when
cooking foods in coveredcasserolesor clay pots.
The broil element is convenient for top browning and oven broiling
of foods.
Before you begin cooking with your new grill-range, pleasetake a
few minutes to read and become familiar with the instructions in
this book. Onthe following pagesyou will find awealth of information
regarding all aspects of using your new grill-range. Byfollowing the
instructions carefully, you will be able to fully enjoy and properly
maintain your grill-range and achieve excellent resultswith the food
you prepare.
Shouldyou haveanyquestions about using your Jenn-Air grill-range
or need a use and care manual for your cooktop cartridge, write
to us.Be sureto providethe modelnumber.
ConsumerRe|atlonsDepartment
Jenn-AIrCompany
3035Shadeland Avenue
Indianapolis, IN 46226-0901

Index
Using the Cooktop and Grill
Accessories.................. Installing..................................... 12
Optional................................... 46-47
Cleaning..................... Other RangeParts............................. 17
Cooktop and Grill Controls................................................... 8
Cooktop Cartridge Installing, Removing....................................... 11
Ducting Information........................................................ 44
Grill ......................... Cleaning..................................... 16
Installing..................................... 12
Usageand Grilling Tips..................... 13-15
HomeCanning............................................................. 11
Surface Controls........................................................... 10
Ventilation System............ Operation and Cleaning......................... 9
Using the Oven
Baking...................... General Recommendations..................... 24
Convection Baking......................... 25-28
Baking Charts.............................. '..26
Broiling ................................................................. 32-33
Cleaning..................... AUTO-CLEAN ................................ 35
Self-Cleaning Process...................... 34-39
Other CleaningTips ........................ 40-41
Clock-Controlled Baking or Roasting...................................... 22-23
Clock Controls............................................................. 20
Light Bulb Replacement..................................................... 40
Minute Timer............................................................... 21
OvenControls and Operation............................................. 18-19
OvenThermostat Knob Adjustment .......................................... 41
RackPositions............................................................. 19
Roasting..................... General Recommendations..................... 29
Convection Roasting........................ 30-31
Appliance Usage
Safety Precautions......................................................... 5-7
ServiceInformation ...................................................... 42-43
MODELNUMBER
SERIALNUMBER
(Numbersappearontheserialplateontheovenfrontframe.)
DatePurchased
JENN-AIRDEALERFROM WHOM PURCHASED
ADDRESS
CITY
PHONE
AUTHORIZEDJENN-AIRSERVICECONTRACTOR
ADDRESS
CITY
PHONE.
IMPORTANT:Retainproofof purchasedocumentsfor warrantyservice
SAFETY
PRECAUTIONS
Readbefore operating your range
All appliances -- regardlessof the manufacturer-- havethe
potentialthroughimproperorcarelessusetocreatesafetyprob-
lems.Thereforethe following safety precautionsshould be
observed:
1. Besureyourapplianceisproperlyinstalledandgrounded
bya qualifiedtechnician.
2. Neveruseyourapplianceforwarmingorheatingtheroom.
3. Childrenshouldnot be left alone or unattendedin area
whereapplianceisinuse.Theyshouldneverbeallowedto
sitorstandonanypartoftheappliance.
4. Wearproperapparel.Loose-fittingor hanginggarments
shouldneverbewornwhileusingtheappliance.
5. Do notrepairor replaceanypart of the applianceunless
specificallyrecommendedinthismanual.Allotherservicing
should be referred to an authorized Jenn-Air Service
Contractor.
6. Flammablematerialsshouldnot be storedin an oven or
nearsurfaceunits.
7. Do not usewateron greasefires. Smotherfire or flame
orusedrychemicalorfoam-typeextinguisher.
8. Useonlydrypotholders.Moistordamppotholderson hot
surfacesmay result in burns from steam. Do not let
potholdertouchhotheatingelements.Do not usea towel
orotherbulkycloth.
9. Useproperpan size.Manyappliancesare equippedwith
oneormoresurfaceunitsofdifferentsize.Selectcookware
havingflat bottomslargeenoughtocoverthesurfaceunit
heating element.The use of undersizedco(_kwarewill
exposea portionof the heatingelementto directcontact
and may resultin ignitionof clothing.Properrelationship
ofcookwareto heatingelementwillalsoimproveefficiency
andperformance.
10. Neverleavesurfaceunitsunattendedat highheatsettings.
Boil overcausessmokingand greasyspilloversthat may
ignite.
11. On conventionalelementrangesmakesurethatdrip pans
are in place.Absenceof thesepansduringcookingmay
subjectwiringorcomponentsunderneathto damage.
12. Do not usealuminumfoil to line surfaceunit drippans,
grill basinorovenbottom.Installationoftheselinersmay
resultinanelectricshockorfirehazard.
13. Glazed cookware-- only certain types of glass,glass-
ceramic,ceramic,earthenware,or otherglazedcookpots
are suitablefor range top surfacewithout breakingdue
to the sudden change in temperature.Use only such
cookwareasyouknowhavebeenapprovedforthispurpose.
14. Oookwarehandlesshouldbeturnedinwardandnotextend
over adjacentsurface heating elementsto avoidburns,
ignitionofflammablematerialsandspillageduetouninten-
tionalcontactwiththecookware.
15. Do not soak or immerseremovableheatingelementsin
water.
16. CAUTION -- Do notstoreitemsof interestto childrenin
cabinetsabovea rangeor on the backguardof a range
--children climbingon the rangeto reach itemscould be
seriouslyinjured.
17. Do not touchsurfaceunits or areasnear units,heating
elementsor interiorsurfacesof oven. Surface units or
heatingelementsmay be hoteventhoughthey are dark
in color.Areasnearsurfaceunitsand interiorsurfacesof
an oven may become hot enough to cause bums. During
and after use, do not touch or let clothing or other flammable
materials contact these areas until they have had sufficient
time to cool. Other surfaces may become hot enough to
cause burns -- among these surfaces are the cooktop, the
upper door frame and glass, oven vent opening and surfaces
near the opening, and the top edge of the control panel.
18. Use care when opening oven door. Let hot air or steam
escape before removing or replacing food.
19. Do not heat unopened food containers. Build-up of pres-
sure may cause container to burst and result in injury.
20. Keep oven vent ducts unobstructed.
21. Always place oven racks in desired location while oven
is cool. If rack must be moved while oven is hot, do not
let potholder contact hot heating element in oven.
22. Do not clean door gasket. The door gasket is essential
for a good seal. Care should be taken not to rub, damage
or move the gasket.
23. Do not use oven cleaners. No commercial oven cleaner
or oven liner protective coating of any kind should be used
in or around any part of the oven.
24. Clean only parts listed in this manual and use procedures
recommended.
25. Before self-cleaning the oven, remove broiler pan and other
utensils.
26. Listen for fan. A fan noise should be heard during the
cleaning cycle. If not, call a serviceman before self-cleaning
again.
27. Do not cook on glass-ceramic cooking surface if the cook-
top is broken. Cleaning solutions and spillovers may pene-
trate the broken cooktop and create ashock hazard. Contact
an authorized Jenn-Air Service Contractor.
28. Clean glass-ceramic cooktops with caution. If wet sponge
or cloth is used to wipe spills on a hot cooking area, be
careful to avoid steam burns. Some cleansers can produce
noxious fumes if applied to a hot surface.
29. Do not operate with damaged cooking element after any
product malfunction until proper repair has been made.
30. Keep all switches "OFF" when unit is not in use.
31. Do not allow aluminum foil or meat probes to contact
heating elements.
32. WARNING: To reduce the risk of tipping of the appliance,
the appliance must be secured by properly installed anti-
tip devices. To check if devices are installed properly,
remove the access panel and verify that the anti-tip devices
are engaged.
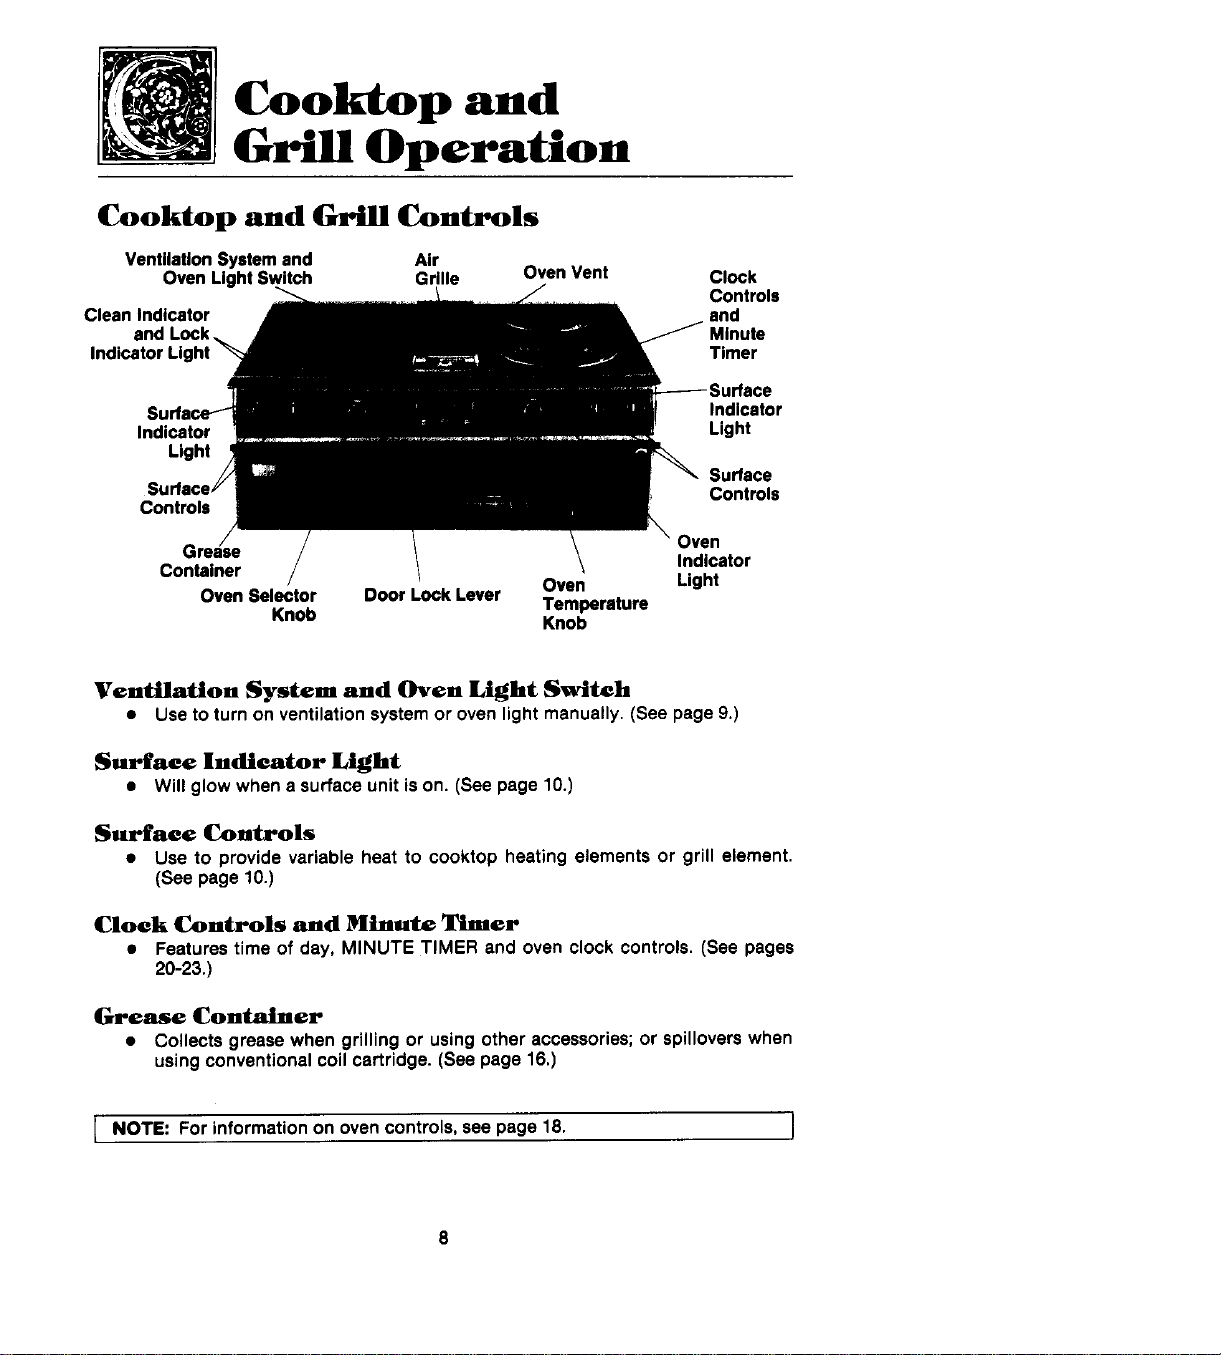
Cooktopand
Grill Operation
oktop and Grill Cntrols
Ventilation System and Air
Oven Light Switch Grille Oven Vent Clock
Controls
Clean Indicator and
and Minute
Indicator Light Timer
Indicator
Indicator Light
Light
Surface
Controls
Controls
Oven
Grease Indicator
Container
Oven Selector Door Lock Lever Oven Light
Temperature
Knob Knob
Ventilation System and Oven Light Switch
• Use to turn on ventilation system or oven light manually. (See page 9.)
Surface Indicator Light
• Will glow when a surface unit ison. (See page 10.)
Surface Controls
• Use to provide variable heat to cooktop heating elements or grill element.
{See page 10.)
CIo=k Controls and Minute Timer
• Features time of day, MINUTE TIMER and oven clock controls. (See pages
20-23.)
Grease Container
• Collects grease when grilling or using other accessories; or spillovers when
using conventional coil cartridge. (See page 16.)
[ NOTE: For information on oven controls, see page 18. I
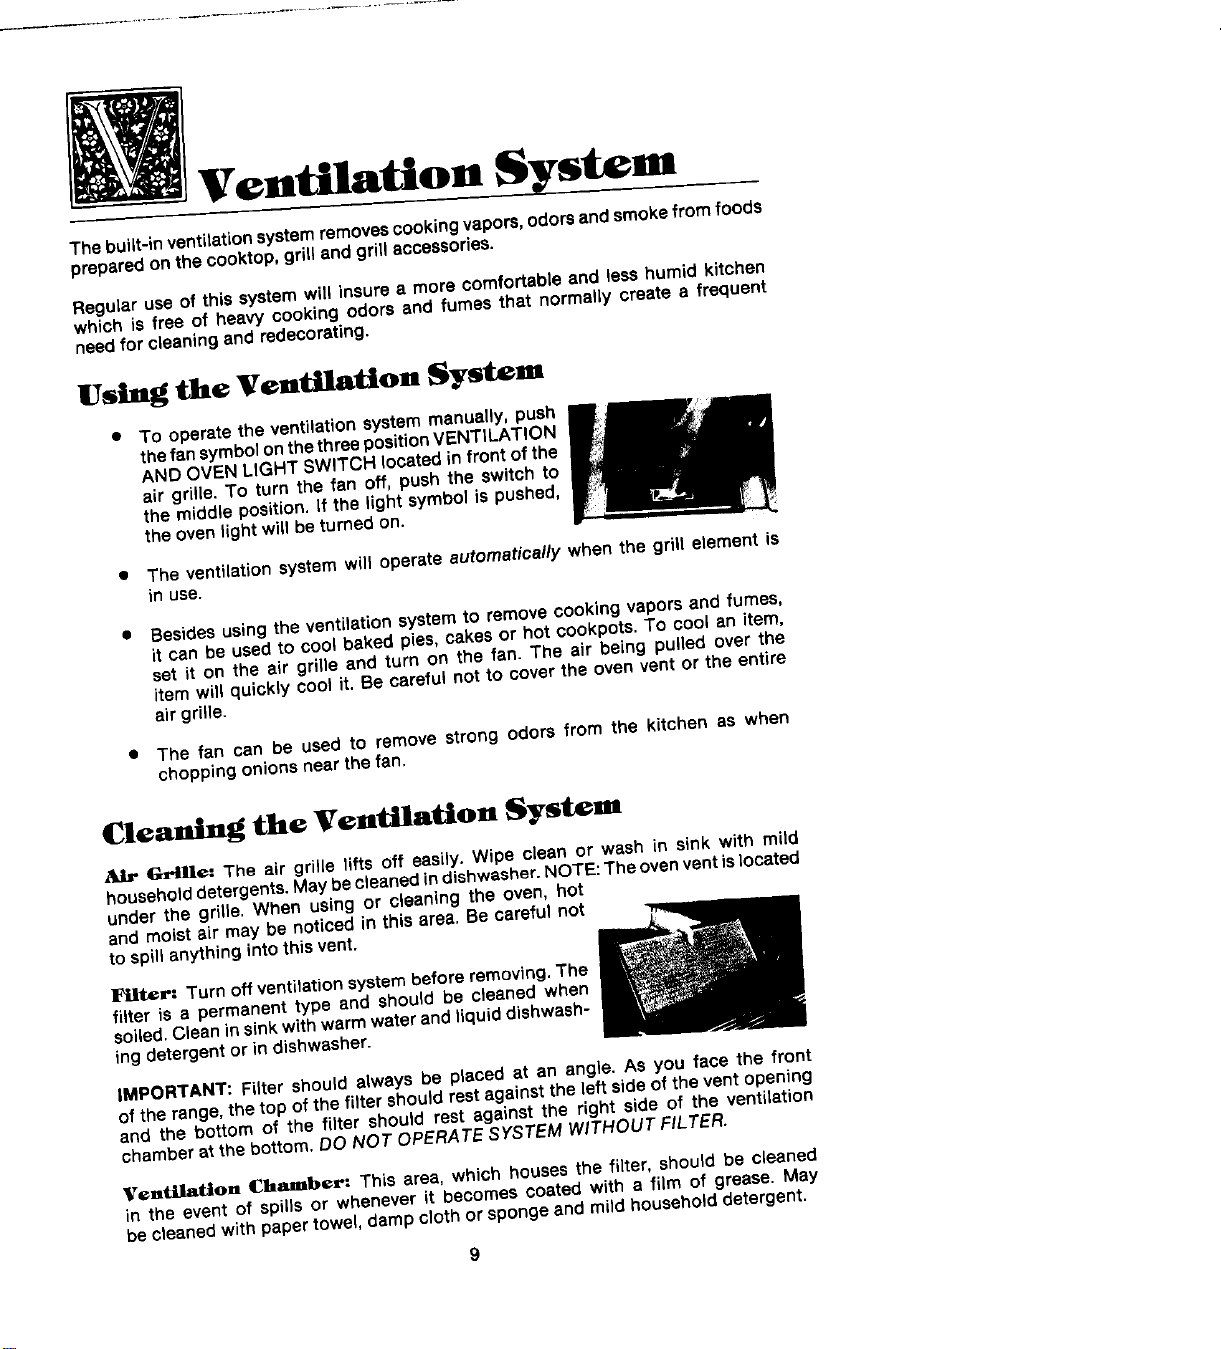
Ventilation System
Thebuilt-in ventilationsystemremovescookingvapors,odorsandsmokefromfoods
preparedonthe cooktop,grill andgrillaccessories.
Regularuseofthis systemwill insurea more comfortableand lesshumid kitchen
whichis free of heavycookingodors and fumes that normally createa frequent
needfor cleaningand redecorating,
Using the Ventilation System
• To operate theventilationsystemmanually,push
thefansymbolonthethreepositionVENTILATION
AND OVENLIGHT SWITCHlocatedin frontofthe
air grille. To turn the fan off, pushthe switch to
the middleposition.If the lightsymbolis pushed,
theovenlightwillbeturnedon.
• The ventilationsystemw(Itoperateautomatically when the grill element is
in use.
• Besidesusingthe ventilationsystemto removecook{ngvaporsand fumes,
it canbe usedto cool bakedpies,cakesor hotcookpots.To coolan item,
set it on the air grille and turn on the fan. The air being pulled over the
itemwill quicklycool it. Becareful not to coverthe ovenventor the entire
airgrille.
• The fan can be used to removestrong odors from the kitchen as when
choppingonionsnearthefan.
Cleaning the Veniation Syste===
t_Uc: The air grille lifts off easily.Wipe clean or wash in sink with mild
householddetergents.Maybe cleanedindishwasher.NOTE:The ovenventislocated
under the gri|le. When using or cleaningthe oven, hot
and moistair may be noticedin thisarea, Be carefulnot
to sp(f(anything intothisvent.
]E_Lltcr:Turn off ventilationsystembeforeremoving.The
filter is a permanenttype and should be cleaned when
soiled.Cleaninsinkwithwarmwaterandliquiddishwash-
ingdetergentor indishwasher.
IMPORTANT: Filter shouldalways be placed at an angle. As you face the front
of therange,thetop ofthefiltershouldrestagainsttheleft sideofthe ventopening
and the bottom of the filter should rest againstthe right side of the ventilation
chamberatthe bottom.DO NOT OPERATESYSTEM WITHOUT FILTER.
VcntElation Chamber= Thisarea, which housesthe filter, shou(dbe cleaned
in the event of spills or whenever it becomescoated with a film of grease. May
becleanedwith papertowel, dampclothor spongeand mild householddetergent.
9
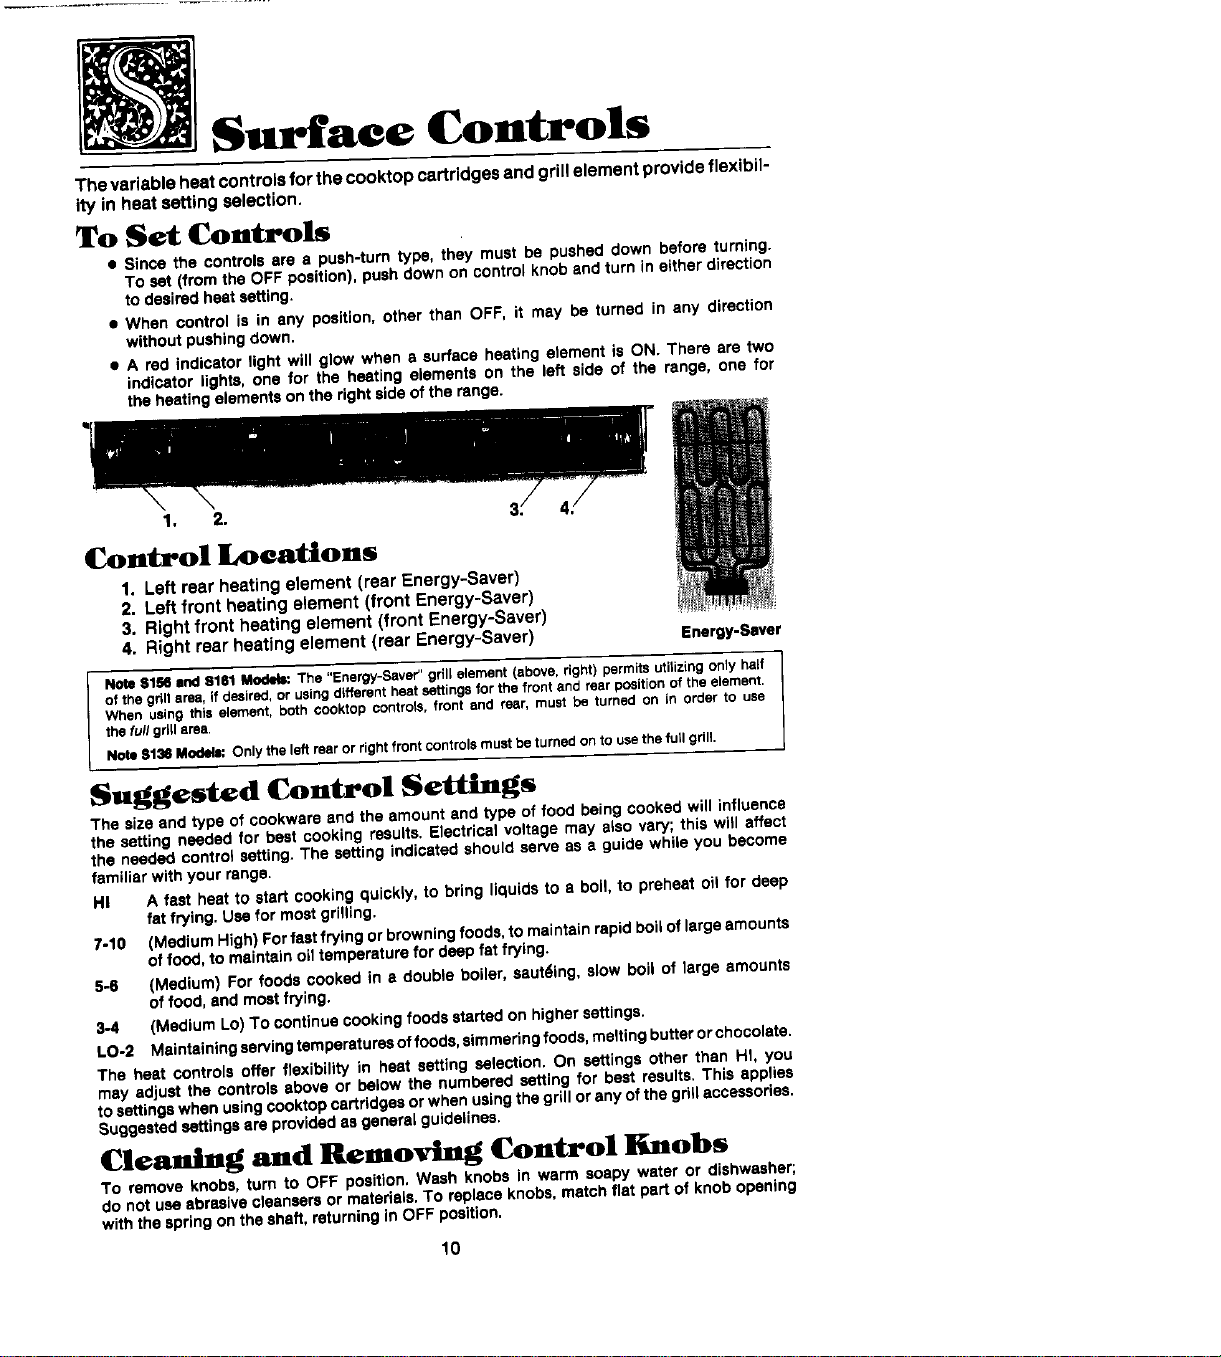
Surface Controls
The variable heat controls for the cooktop cartridges and grill element provide flexibil-
ity in heat setting selection.
To Set Controls
• Since the controlsere a push-turntype, they must be pushed down before turning.
To set (fromthe OFF position),pushdownon controlknobandturn in eitherdirection
todesiredheatsetting.
• When control is in any position,other than OFF, it may be turned in any direction
withoutpushingdown.
• A red indicatorlightwill glow when s surfaceheatingelement is ON. There are two
indicator lights,one for the heating elements on the left side of the range, one for
the heatingelementson the rightsideof the range.
1, 2.
Control Loeations
1. Left rear heating element (rear Energy-Saver)
2. Left front heating element (front Energy-Saver)
3. Right front heating element (front Energy-Saver)
4. Right rear heating element (rear Energy-Saver) Energy-Saver
Noteel_ endS161Mode_ The"Energy-Saver"grfl[element(above,right)permitsutilizingonlyhalf
ofthegrillarea,ifdesired,orusingdifferentt_atsettingsforthefrontandrearpositionoftheelement.
Whenusingthiselement,bothcooktopcontrols,frontandrear,mustbe turnedoninorderto use
thefullgrlgarea.
NoteS136Mocki: Onlytheleftrearorrightfrontcontrolsmustbeturnedontousethefullgrill.
Suggested Control Settings
The sizeand typeof cookwareand the amountandtype of food beingcookedwill influence
the settingneededfor bestcooking results.Electricalvoltagemay also vary;this will affect
the needed controlsetting.The setting indicatedshouldserveas a guide whileyou become
familiarwithyour range.
HI A fast heat tostart cookingquick_y,to bring liquidsto a boil, to preheatoil for deep
fat frying.Use formostgrilling.
7-10 (MediumHigh)Forfastfrying orbrowningfoods,to maintainrapidboiloflargeamounts
offood,to maintainoiltemperaturefor deepfatfrying.
5-6 (Medium) For foodscooked in a double boiler,sauteing,slow boil of large amounts
offood,end mostfrying.
3-4 (MediumLo)To continuecookingfoodsstartedon highersettings.
LO-2 Maintainingservingtemperaturesoffoods,simmeringfoods,meltingbutterorchocolate.
The heat controlsoffer flexibility in heatsetting selection. On settings other than HI, you
may adjustthe controlsaboveor belowthe numberedsetting for bestresults.This applies
tosettingswhenusingcooktopcartridgesor whenusingthegrilloranyofthe grillaccessories.
Suggestedsettingsereprovidedas generalguidelines,
Cleaning and Removing Control Knobs
To remove knobs, turn to OFF posit)on,Wash knobs Jnwarm soapywater or dishwasher;
do notuse abrasivecleansersor materials,TOreplaceknobs,matchflat part of knobopening
withthe springonthe shaft,returningin OFF position.
10
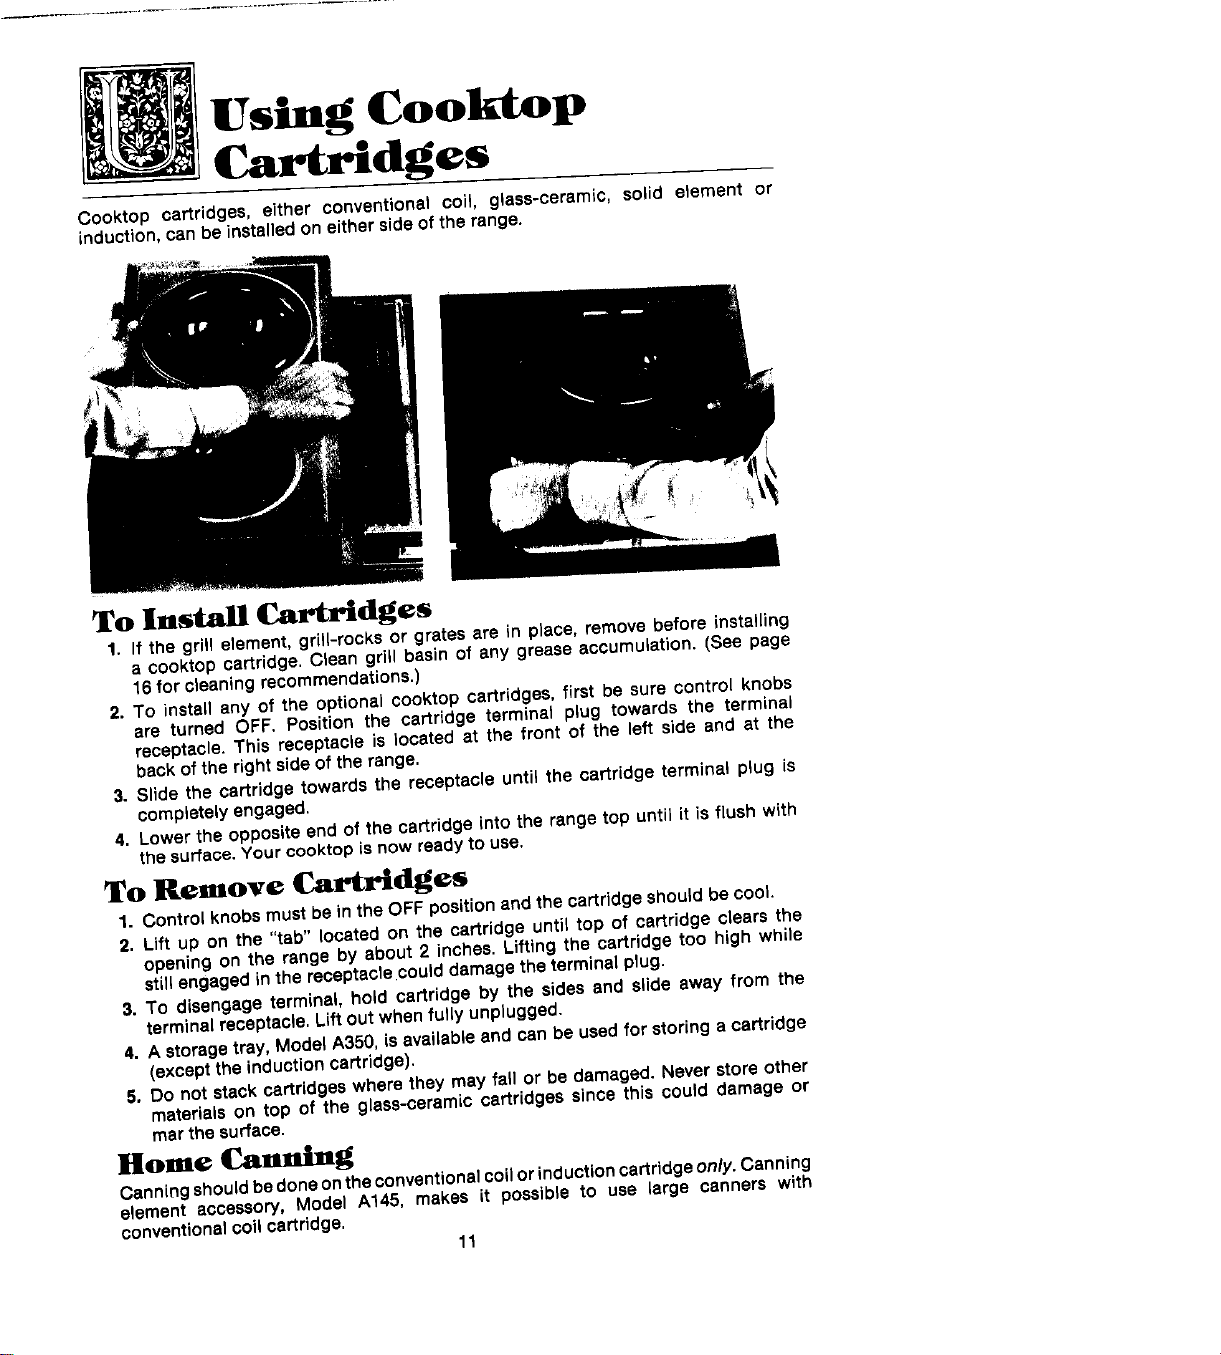
Using.Cooktop
Cartridges
Cooktop cartridges, either conventional coil, glass-ceramic, solid element or
induction,canbeinstalledoneithersideof the range.
To Install Cartridges
1. If the grill element, grill-rocks or grates are in place, removebefore installing
a cooktop cartridge. Clean grill basin of any grease accumulation. (See page
16for cleaning recommendations.)
2. To install any of the optional cooktop cartridges, first be sure control knobs
are turned OFF. Position the cartridge terminal plug towards the terminal
receptacle. This receptacle is located at the front of the left side and at the
backof the right sideof the range.
3. Slide the cartridge towards the receptacle until the cartridge terminal plug is
completelyengaged.
4. Lowerthe oppositeend of the cartridgeinto therangetop until it isflush with
thesurface.Yourcooktopis now readyto use.
To Remove Cartridges
1. Controlknobs mustbein the OFF positionandthe cartridge shouldbe cool
2. Lift up on the "tab" located on the cartridge until top of cartridge clears the
opening on the range by about 2 inches. Lifting the cartridge too high while
st(l(engaged (nthe receptaclecould damagethe terminal plug.
3. To disengage terminal, hold cartridge by the sides and slide away from the
terminal receptacle.Lift out when fully unplugged.
4. A storage tray, Model A350,is availableand can be usedfor storing a cartridge
(except the induction cartridge).
5. Do not stack cartridges where they mayfall or be damaged. Never store other
materials on top of the glass-ceramiccartridges since this could damage or
marthe surface.
Home Canning
Cann{ngshouldbedoneonthe conventionalcoil orinductioncartridgeonly. Canning
element accessory, Model A145, makes it possible to use large canners with
conventionalcoilcartridge,
11
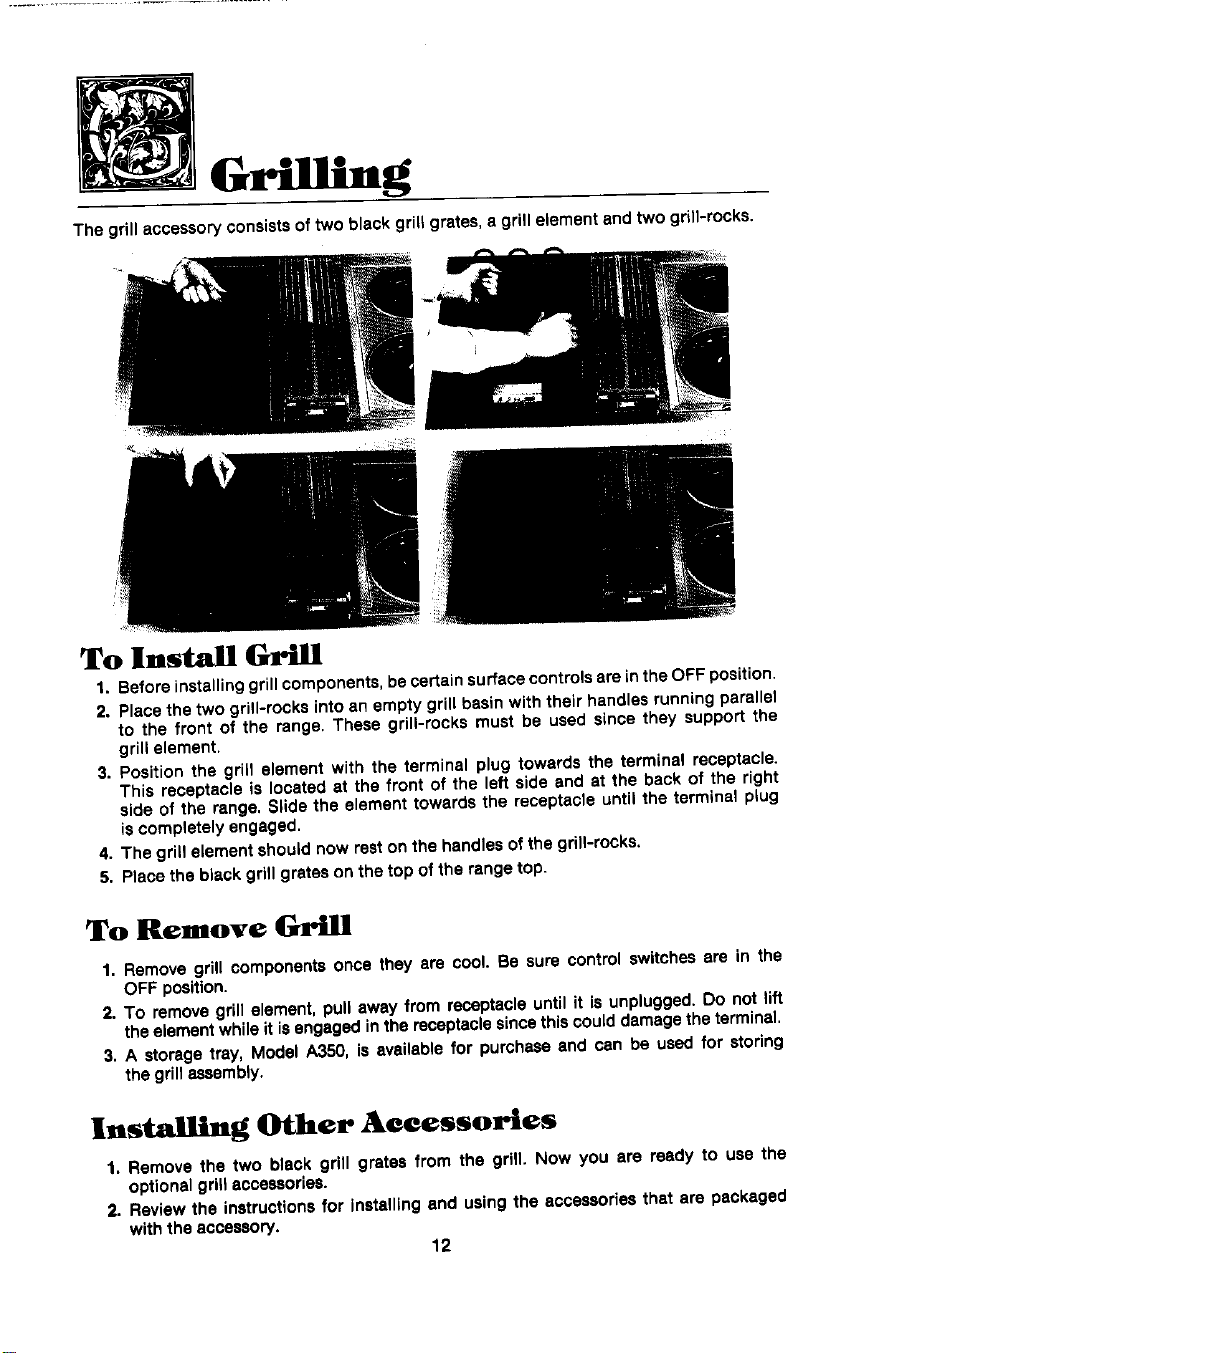
The grill accessory consistsof two black grill grates,a grill element and two grill-rocks.
To Install Grill
1. Before installing grill components, be certainsurface controls arein the OFF position.
2. Place the two grill-rocks into an empty grillbasin with their handles running parallel
to the front of the range. These grill-rocks must be used since they support the
grill element.
3. Position the grill element with the terminal plug towards the terminal receptacle.
This receptacle is located at the front of the left side end at the back of the right
side of the range. Slide the element towards the receptacle until the terminal plug
iscompletely engaged.
4. The grillelement should now reston the handles of the grill-rocks.
5. Place the black grillgrates on the topof the rangetop.
To Remove Grill
1. Remove grill components once they are cool. Be sure control switches ere in the
OFF position.
2. To remove gdll element, pull away from receptacle until it Is unplugged. Do not lift
theelement while it isengaged inthe receptaclesincethis coulddamage the terminal.
3. A storage tray, Model A350, is availablefor purchase and can be used for storing
thegdll assembly.
Installing Other Accessories
1. Remove the two black grill grates from the grill. Now you are ready to use the
optional grill accessories.
2. Review the instructionsfor installing and using the accessoriesthat are packaged
with the accessory,
12
Using the Grill
• Before using the gdll for the first time, wash grill grates in hot soapy water; rinse
and dry.
• Precondition new grates and grill-rocks by brushing with vegetable oil or spraying
with a nonstick coating such as Pare. This procedure should be repeated after
cleaning in a dishwasher sincethe detergent removes seasoning.
• For easier clean-up, as well as preventing meats from sticking to grates until
they are seasoned, spray grates, grill-rocks and grill basinwith a nonstick coating.
• Preheat grill on HI setting for 5 minutes. Preheating improves the flavor and
appearance of meats and quickly sears the meat to help retain the juices. The
heating element should glow a bright cherry red.
• Excessive amounts of fat should be trimmed from meats. Only a normal amount
is necessary to produce the smoke needed for that smoked, "outdoor" flavor.
Excessivefat can createcleaning and flame-up problems.
• Allowing excessive amounts of grease or,drippings to constantly flame voids the
warranty on gri//grates. Excessive flame-ups indicate that either the grill interior
needs to be cleaned or that excessive amounts of fat are in the meat or the
meat was not properly trimmed.
• Grease drippings will occasionally ignite to produce harmless puffs of flame for
a second or two. This is a normal part of the cooking process.
• NEVER LEAVE GRILL UNATTENDED DURING GRILL OPERATION.
Should excess grease cause sustained flame-up=
1. Turnon FANmanually.
2. Immediatelyturn grillheatcontrolswitchto OFF position.
3. Removemeatfromgrill,
IMPORTANT
• Do notusealuminumfoil (r_sidethe grillarea.
• Donotusecharcoalorwoodchipsin thegrillarea.
• Donotallowgrill-rockstobecomeoverloadedwithgrease.Cleanfrequently,
• Do not covergratescompletelywith meat.Leaveair space betweeneach steak,etc.
toallowproperventilationaswellaspreventflame-ups.
13
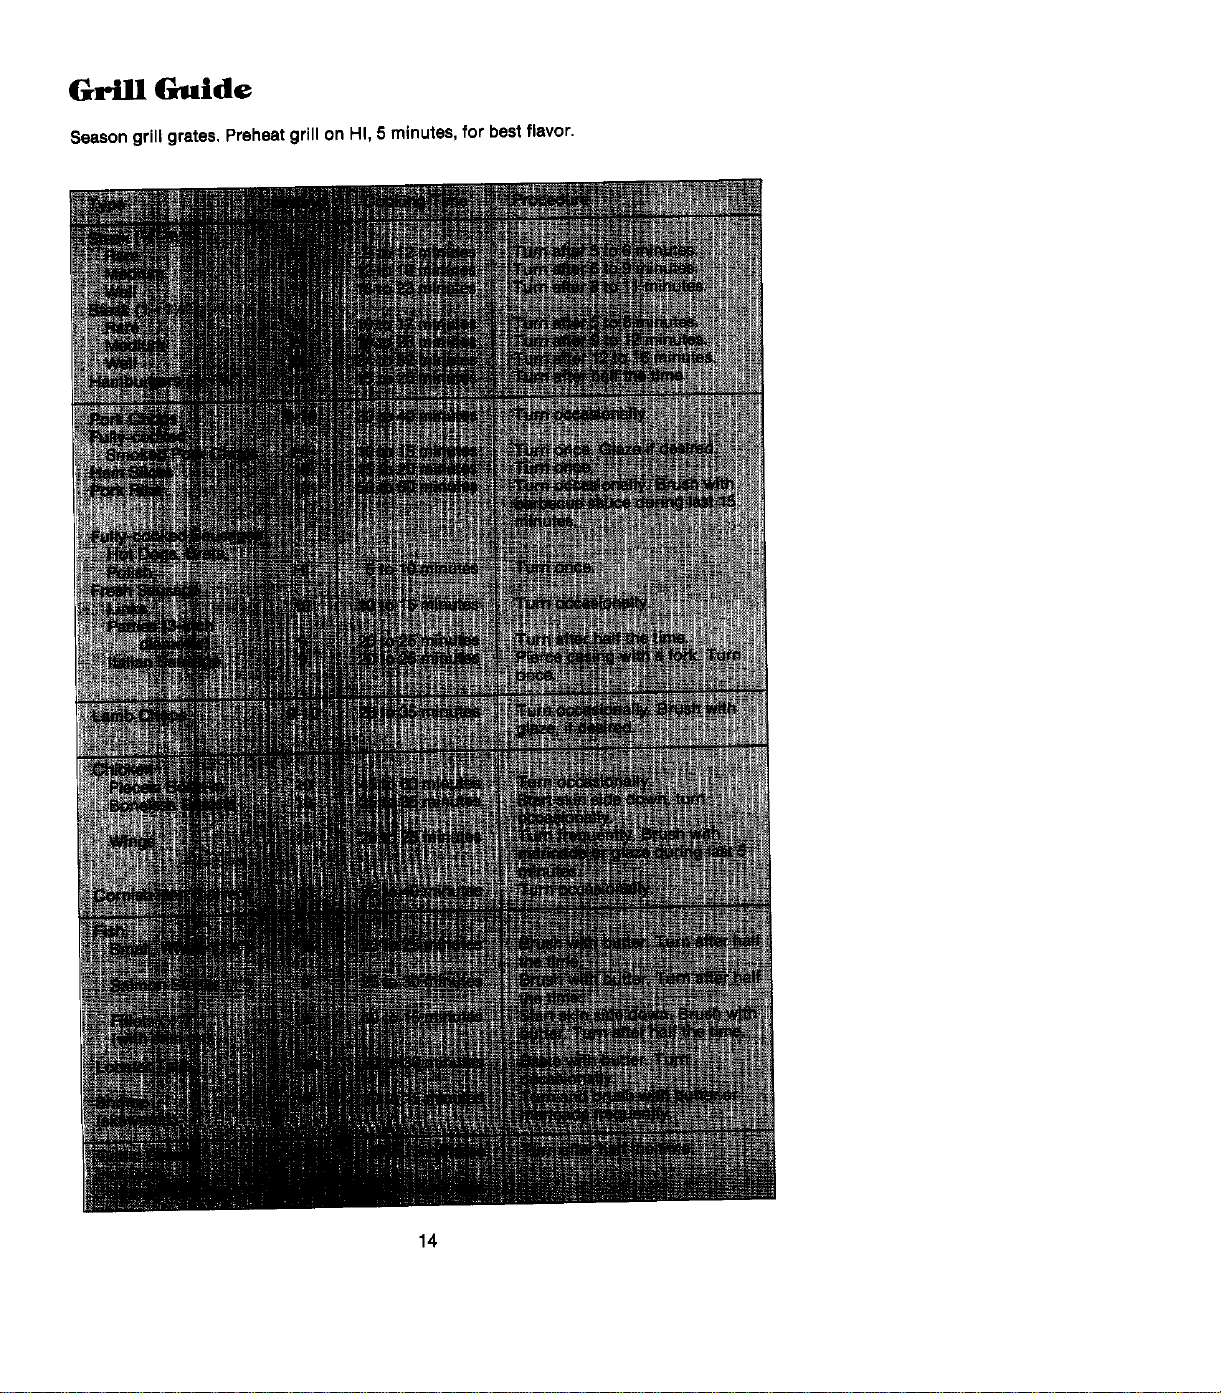
Grill Guide
Seasongrill grates,Preheatgrill on HI,5 minutes,forbestflavor.
14
Grilling Tips
With your Jenn-Air grill and accessories,literally any food you've considered "at
itsbest"when preparedoutdoorscan now be preparedindoorswith lessfussand
greatflavor.
Manygrillingideasarecontainedin Jenn-Air'sCookbook,Comp/ete Cooking With
Jenn-Air, Mode/No. A905.There are alsomanycookbookscontainingrecipesfor
outdoorgrillingwhichcanbeusedon a Jenn-Air.
The followingsuggestionsaregood rulestofollowandwillincreaseyourenjoyment
of theequipment.
• Be sureto follow directionsonpage 13for usingthe grill.
• SuggestedcookingtimesandcontrolsettJngsareapproximateduetovariations
in meatsand electrical voltage. Experiencewill quickly indicate cooking times
aswell as which settingswork best.
• Usethe Energy-Savergrill element for grilling small amountsof food on half
of the grill or for keeping cooked foods warm or preparing foods requiring
different heat control settings. (Note S136 Owners: The Energy-Saver grill
elementcan be purchased asan optional accessory.Seep. 45.)
• For best results, buy top grade meat. Meat that is at least3/4-inch will grill
better than thinner cuts.
• Score fat on edges of steak, but do not cut into meat, to prevent curling
while cooking.
• For the attractive "branded" look on steaks,be sure grill is preheated. Allow
one side of meat to cook to desired doneness, or until juices appear on the
top surface, before turning. It takes fewer minutes to cook the second side.
Turn steaksand hamburgersjustonce. Manipulating food causeslossofjuices.
• When basting meats or applying sauces to foods, remember that excessive
amounts wind up inside your grill and do not improve the food flavor. Apply
saucesduring the last15to 20 minutesof cooking time unlessrecipe specifies
otherwise. Sugar-basedsauces,excessivelyused,will caramelizeon the grill-
rocks and will create a cleaning chore.
• There are many meat marinadeswhich will help tenderize lessexpensivecuts
of meat for cooking on the grill.
• Certain foods, such as poultry and non-oily fish, may need some extra fat.
Brush with oil or melted butter occasionally while grilling.
• Usetongs with long handles or spatulasfor turning meats.Do not use forks
asthesepierce the meat,allowing juicesto be lost.
• To helpretainmeatjuices,saltafterturning meatorafter cookingiscompleted.
• Shouldgrilledfoodsbepreparedand readybeforeyou'rereadyto serve,turn
heatcontrolto a low settingand covermeatwith a singlesheetof foil. Food
will continuetocook.
15
Cleaning the Grill
Grates: These are madefrom cast aluminum. Model $161: the grates have been
anodized. This coating will fade with use. Models $136 and $156: the grates have a nonstick
finish.
• The grates should be cleaned after each use.They can be cleaned with detergent and
a plastic scrubber, such as Tufty, or washed in the dishwasher if burned on residue
is first removed. For heavy soil, grates can be soaked in hot, soapy water to which
acleanser,suchashouseholdammonia,hasbeenadded.
• Do not use metal brushes or abrasive scouring pads or other scrubbers intended to
clean outdoor charcoal grills. Thesewill remove the finish aswell as scratch the grates.
Do not clean in the self-cleaning oven or useovencleaners onthe grates.
GrEBoROeI_J: These aremadefrom cast-iron which havebeencoated with porcelain enamel.
• The grill-rocks should be cleaned frequently or after any excessivebuild-up of grease.
To clean light soil, use detergent and a plastic scrubber, such as Tufty, or wash in
the dishwasher if burned on residue is first removed. For heavysoil, soak in hot, soapy
water to which a cleanser, such as household ammonia, has been added. Stubborn
spots on grill-rocks, such as burned on residue from sauces,can be scrubbed with
a stiff bristle brush.
• An ovencleaner,such asEasy-Off,can beusedfor burned onsoil. Follow manufacturer's
directions; spray on cleaner and let soak overnight. Do not clean grill-rocks in the
self-cleaning oven.
Grill Element: Follow instructions on page 12 for removing the grill element. The grill
element should never be immersed in water. Most soil will burn off during use.The terminal
block may be cleanedwith soapy S.O.S.pad. Dry thoroughly before reinserting in the range.
Peals, in Grill Basin: This area, located under the grill-rocks, should be cleaned after
eachheavyuse of the grill.
• To remove light soil, clean area with soapy water or spray with cleansers such as409
or Grease Relief. For easier clean-up, lay paper towels in grill basin, spray with a
household cleanser,andsoakfor at least a half-hour or longer.
• To remove moderate soil, scrub with Comet, Ben Ami, a soft scrub cleanser or plastic
scrubber.
• To removestubborn soil,spray with anoven cleaner suchasEasy-Oft;let soak overnight,
wipe clean, rinse and dry.
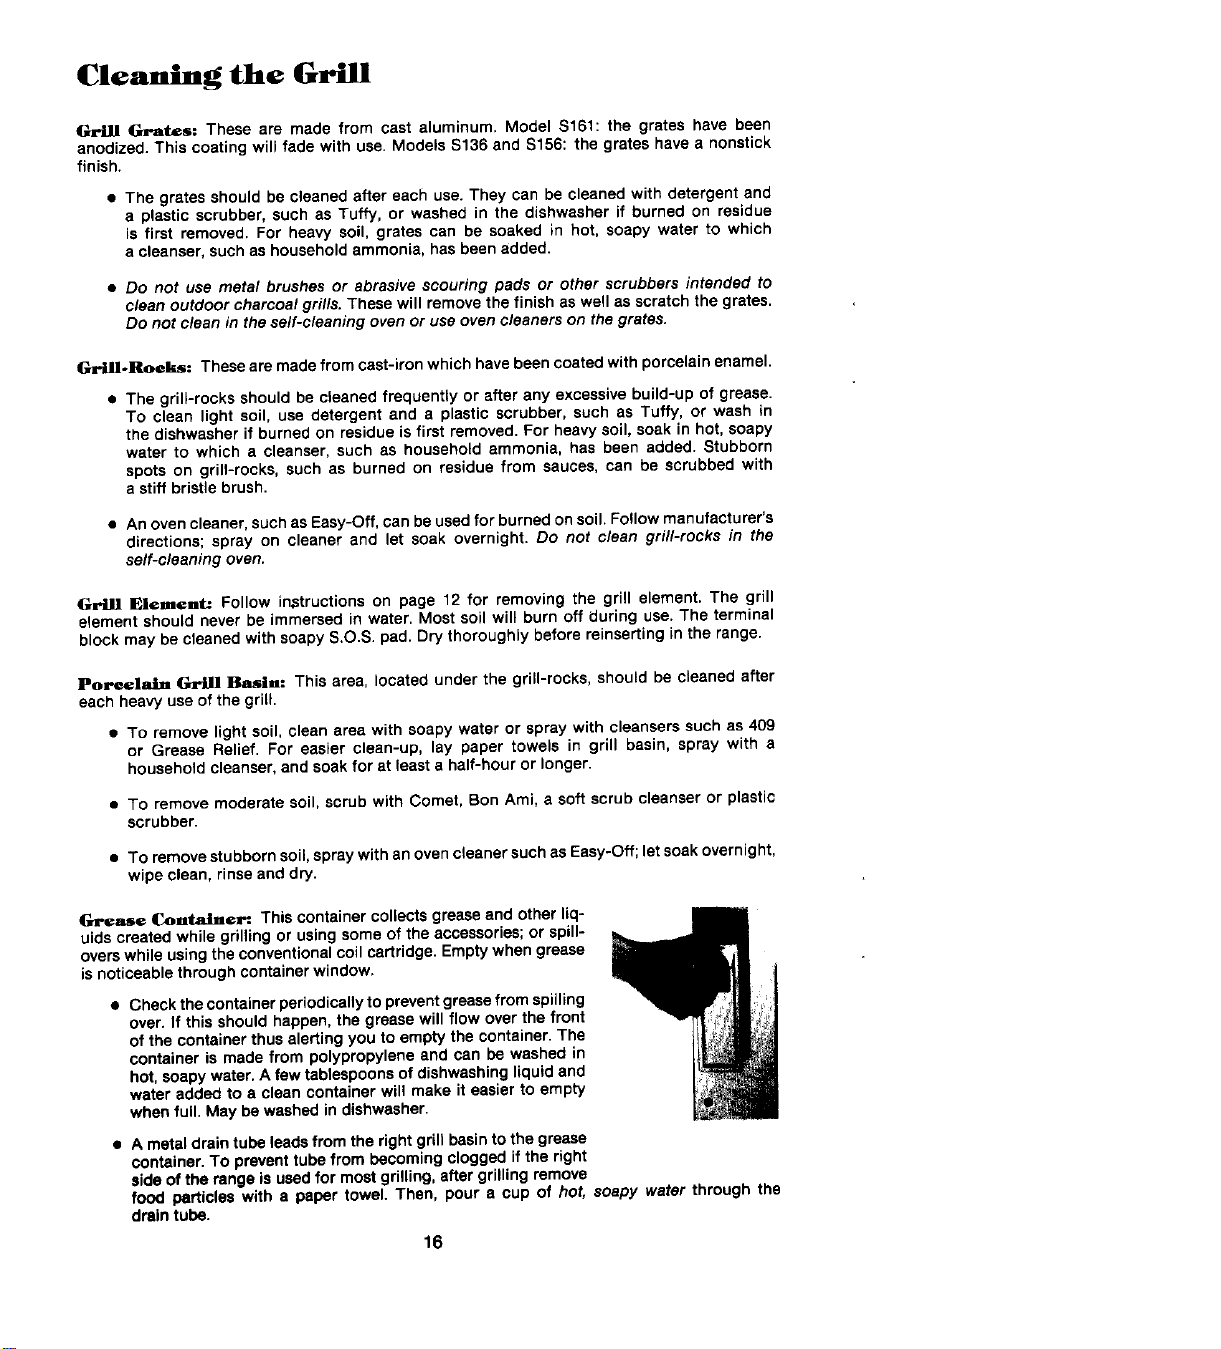
Grease Cont=LIn¢_ Thiscontainercollects greaseand otherliq-
uidscreatedwhile grillingor usingsomeof the accessories;or spill-
overswhileusingtheconventionalcoil cartridge.Emptywhengrease
isnoticeablethroughcontainerwindow,
• Checkthecontainerperiodicallyto preventgreasefromspilling
over.If thisshouldhappen,thegreasewill flowoverthefront
of the containerthusalertingyou toempty the container.The
containerismadefrom polypropyleneand can be washedin
hot,soapywater.A fewtablespoonsof dishwashingliquidand
wateradded to a cleancontainerwill makeiteasierto empty
whenfull. May bewashedindishwasher.
• A metaldraintubeleadsfromthe rightgrill basintothe grease
container.To preventtubefrom becomingcloggedifthe right
aideof therangeisusedfor mostgrilling,after grillingremove
food particleswith a papertowel. Then, pour a cup of hot, soapy water throughthe
draintube.
16
Cleaning Other Parts
of Your Range
Control Dial Area
Use mild cleansers,suchassoapywater,glasscleanersor mild liquid sprays,such
as 409. Wipe with sponge, damp cloth or paper towel.Do not scrub with S.O.S.
pads or abrasivecleansers.
Clock Control Surface
Wipewith papertowelsdampenedwith soapywateror glasscleaner.Do not scrub
with S.O.S.pads or abrasive cleansers.
Glass on the Oven Door Front
Useany suitableglasscleaneror soapywater.
Oven Door Trim
Slightly dampen a cloth or paper towel with a nonabrasive cleanser, such as Bon
Ami,soapywateror glasscleaner.Do not useexcessiveamountsof wateror allow
water to run down throughthe air ventsin the door sincethis will causestreaks
whichwill bevisiblethroughthe glassdoor.
Stainless Steel Areas
The top of the range(the trim area aroundthe grill basinareas) is madeof stainless
steel.
• To clean light soil, wipe with soapy cloth or nonabrasivecleanser, such as Soft
Scrub. Rinse,buffwith soft cloth; polish with glasscleaner if necessary.
• To clean moderate soil or discoloration of the surface (excessiveheat will cause
a golden discoloration), clean with Zud, Sar Keepers Friend, or Luneta (Jenn-
Air Model A912,Part No. 712191).With a sponge or cloth, rub cleanser with the
graintoavoidstreakingthe surface.Rinsewelt,buff dry;polishwith aglasscleaner
if necessarytoremovecleanserresidueandsmudgemarks.
• Heavy soil, such as burned on food soil, can be removedby first cleaning as
per the instructionsfor moderatesoil. Stubborn stainscan be removed with a
damp Scotch-Brite scour-pad;rub evenly with the grain to avoidstreakingthe
surface. Rinsewell, buff with dry cloth;polish with glass cleaner if necessary
toremovecleanserresidueandsmudgemarks.Scotch-Briteisalsousefulinbuffing
and removingminorscratches.
• StubbornfoodstainsmayalsoberemovedbysprayingwithEasy-Offovencleaner.
Allow to set overnight,then rinse. If stains remain,clean with recommended
cleanserssuchasZud,Luneta(Jenn-AirModelA912,Part No.712191),or Scotch-
Britescour-pad.CAUTION: When usingEasy-Off,avoidsprayingareasother than
the stainless steel such as the air grille, control knob area, and areas around
cooktop. Immediately wipe up any spray from these areas with a damp cloth.
Readthe manufacturer'sprecautionson usingovencleaners.The caustic materials
in these products will discolor materials such as aluminum, brushed or chrome
plate.Hint: Easy-Offcan be usedto cleanthe porcelain grill basin area.
• Hint: for ease in cleaning the stainless steel cooktop cartridge when it is
moderately or heavily soiled, remove cartridge from range top and work near
the sink area. Do not immerse the cartridge or heating elements in water. Be
very careful not to get cleanseror water into the wiring in the receptaclearea.
17
Oven Operation
Oven Controls (picturedon page 8)
Ventilation System and Oven Light Switch
• The oven light automatically comes on whenever the oven door is opened. When
the door is closed, the oven light may be turned on by pushing the light symbol
on thethree positionswitch.To turn ovenlightoff, push switchto the middleposition.
Light cannot be turned on during the self-cleaning process. If the fan symbol is
pushed,the ventilationsystemwill be turned on.
"Clean Indicator Light
• Indicates when all controls have been properly set for the self-cleaning process.
Light will remain on during the entire cleaning process and until the timer has
advanced through the setcleaning time.
Lock Indicator Light
• Will glow after the oven door has been automatically locked (after the oven
temperature is over 550°F). Door cannot be opened until oven temperature drops
below 550°F and the lock indicator light goes off.
Selector Knob
• This knob controlsthe oven operation. To operate the oven, turn to desired setting
and turn TEMPERATURE knobto desired setting.
The settings are=
OFF The ovenwillnot operatewhenknob ison this setting.Keep knob
onthispositionwhen ovenisnotisuse,
BAKE Usefor radiantbake(conventional)bakingor roasting.(Seepages
24,26and 29.)
TIME BAKE Use with clock controlsfor automaticallystartingand stopping
ovenwhenbakingorroastinginthe radiantbakeoven.(Seepages
22-23.)
CONVECT Usefor convectionbakingor roasting.(Seepages25-31.)(Models
$156and $161 only.)
TIME CONVECT Use with clock controlsfor automaticallystarting and stopping
ovenwhen bakingor roastingin the convectionoven.(See pages
22-23.) (Models$156 and$161 only.)
BROIL Use for top browningor ovenbroiling of foods. (See pages32-
33.)
CLEAN Usefor self-cleaningprocess.(Seepages34-39.)
Door Lock Lever
• Use to lock oven for self-cleaning process. (Can only be locked when temperature
knob ison CLEAN setting.)
Oven Indicator Light
• Indicateswhen ovenisturned toan operating positionotherthan the CLEAN setting.
Light will glow until the desired temperature is reached. It will cycle on and off
as this temperature is maintained during cooking.
Temperature Knob
• Use to set oven temperature. Be sure the indicator line is in line with the exact
temperature desired. This knob is used with all oven operation settings noted on
the SELECTOR knob.
18
Oven Operation
Baking or Roasting
1. Locate oven rackson properrackpositions.
2. Turn TEMPERATUREknobtodesiredtemperature.
3. Turn SELECTORknobto BAKEor CONVECT setting.WhentheOVEN INDICA-
TOR LIGHT cyclesoff,the ovenispreheatedto theselectedtemperature.Place
the food in the oven. The OVEN INDICATOR LIGHT will cycle on and off
throughoutthe baking process. Preheat only when necessary. Refer to baking
and roastingsectionsastowhenpreheatingisrecommended.
4. After baking,turnbothTEMPERATUREandSELECTORknobsto OFF position.
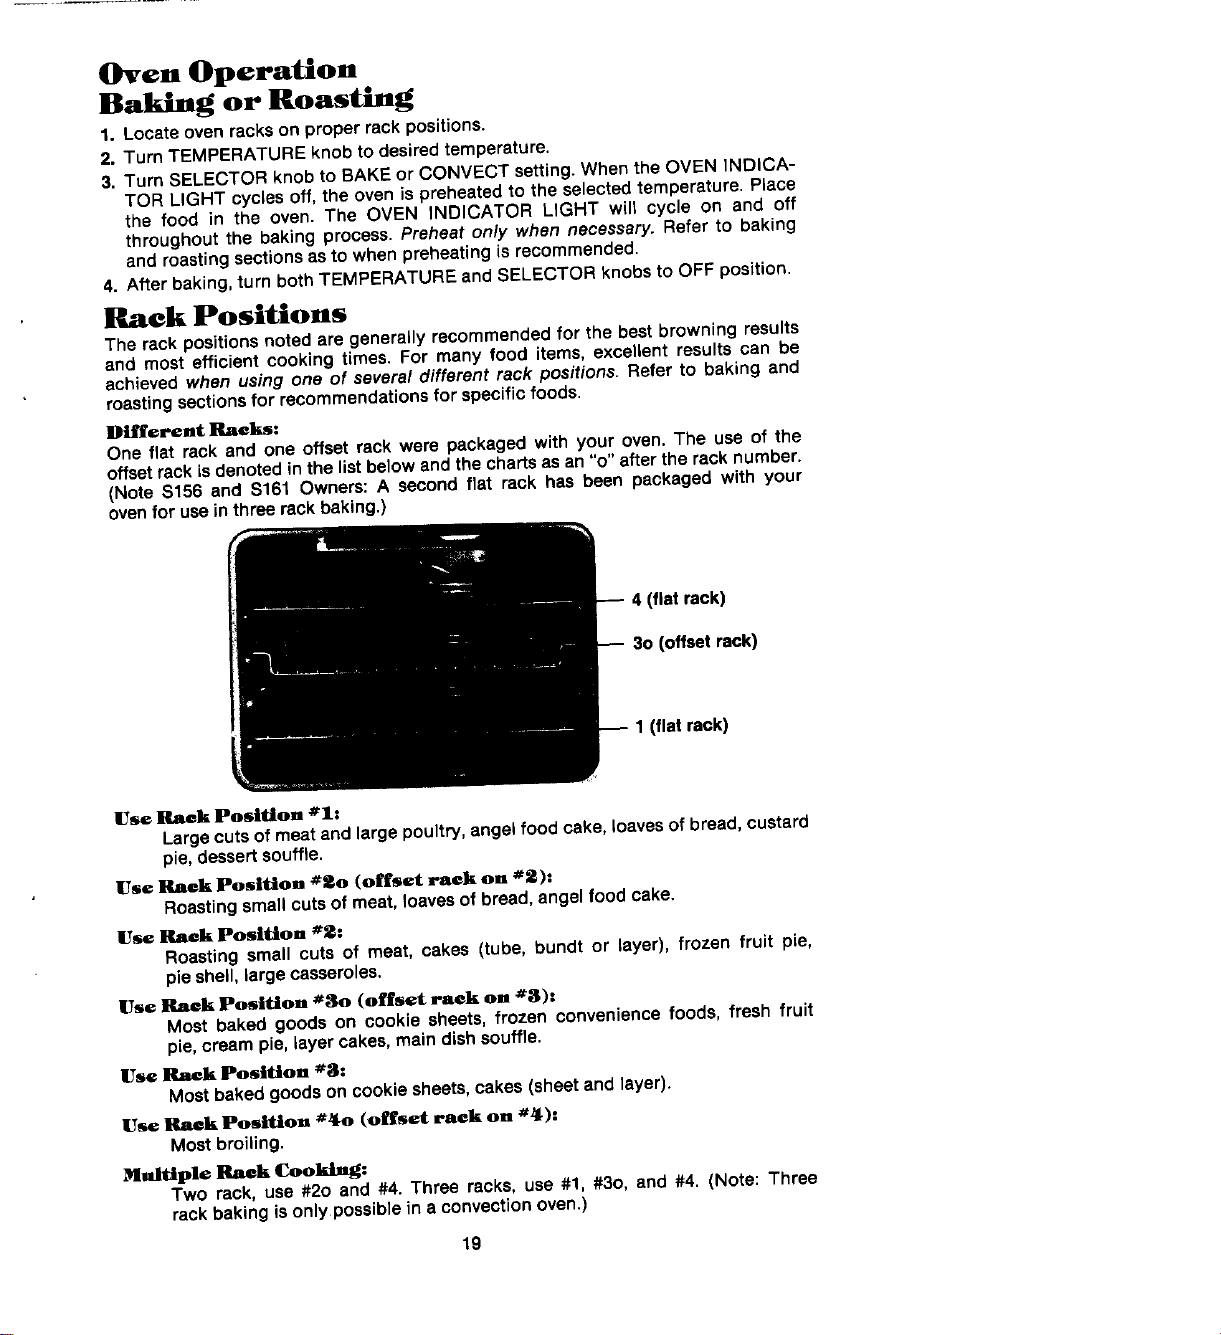
Rack Positions
The rack positionsnoted are generally recommended for the best browning results
and mostefficient cookingtimes. For many food items,excellent resultscan be
achievedwhen using one of several different rack positions. Refer to baking and
roastingsectionsfor recommendationsforspecificfoods.
Different ]l¢_clu_:
One flat rack and one offsetrackwere packagedwith your oven.The use of the
offsetrackisdenotedin thelistbelowandthechartsasan"o" afterthe racknumber.
(Note $156 and $161 Owners:A secondflat rack has been packagedwith your
ovenfor usein three rackbaking.)
II
I
4 (flat rack)
30 (offset rack)
1 (flatrack)
Use Raek Position #1:
Large cuts of meat and large poultry, angelfoodcake,loavesof bread,custard
pie,dessertsouffle,
Use Rack Position #_o (offset raek on #_):
Roastingsmall cuts of meat,loavesof bread,angelfood cake.
Use Rack Position #2:
Roasting smafl cuts of meat, cakes (tube, bundt or layer), frozen fruit pie,
pieshell,largecasseroles.
Use Raek Position #80 (offset raek on #3):
Most baked goodson cookie sheets,frozen conveniencefoods, fresh fruit
pie,creampie, layercakes,maindishsouffle.
Use lhzck Position #3-
Most bakedgoods on cookiesheets,cakes(sheetand layer).
Use Rack Position #40 (offset raek on #4):
Mostbroiling.
Multiple Rack Cooking:
Two rack, use#20 and #4. Three racks, use#1, #30, and #4. (Note: Three
rackbakingisonlypossibleina convectionoven.)
19
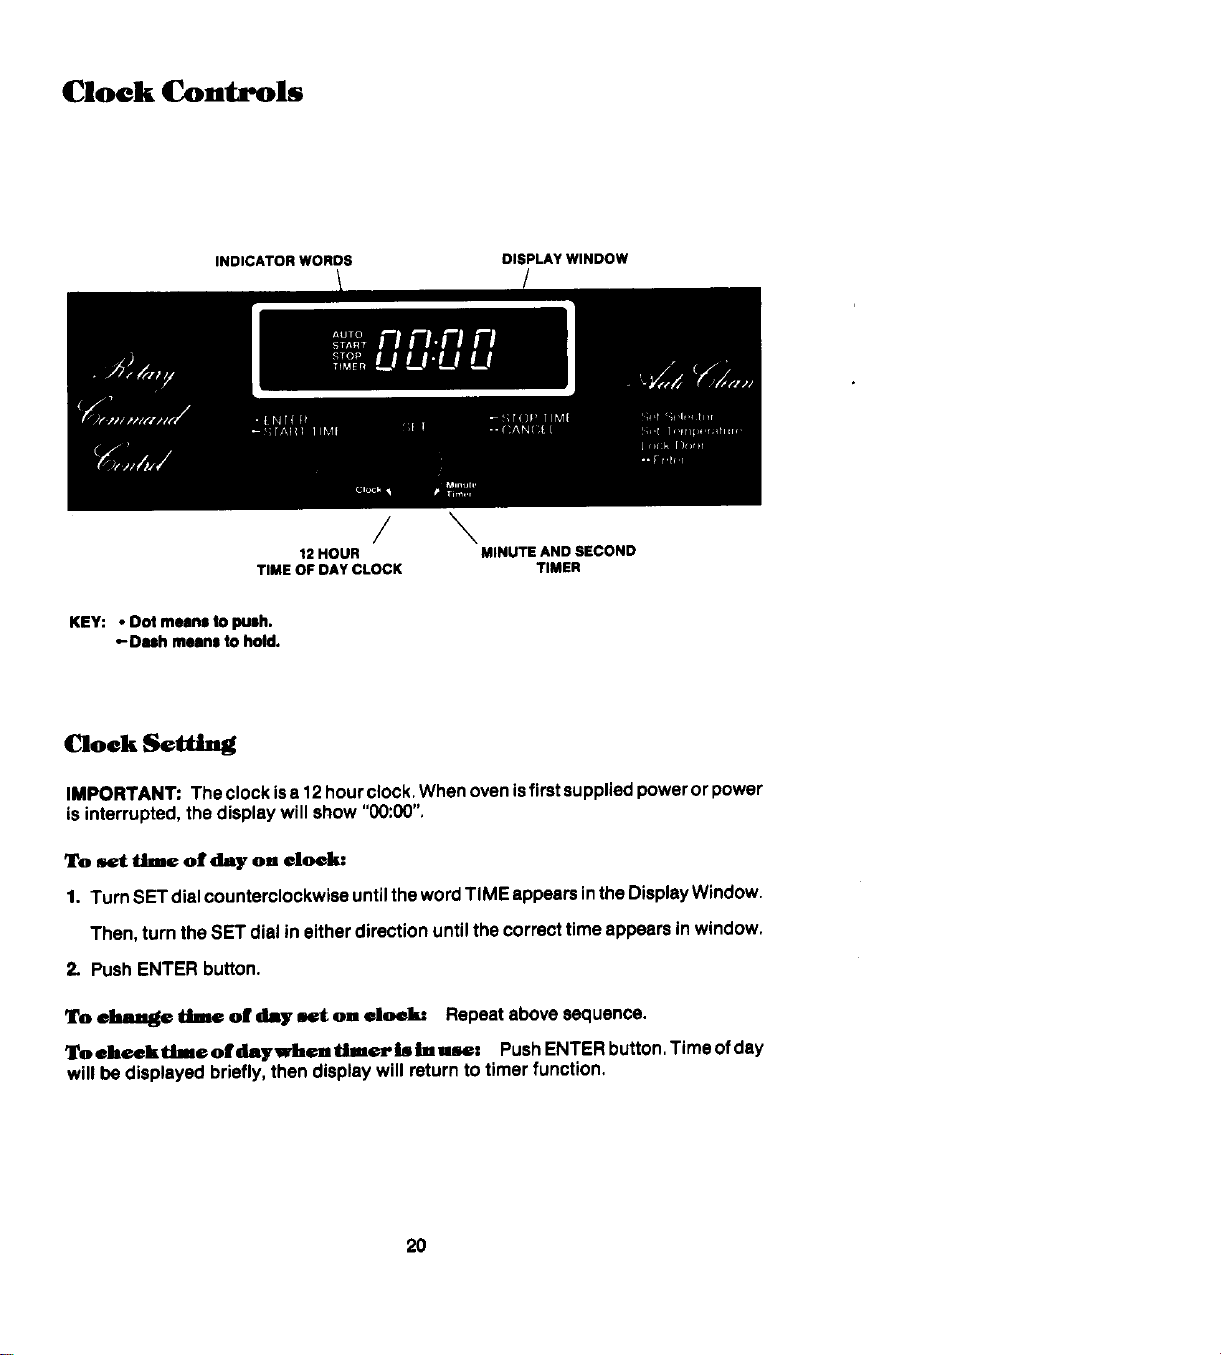
Cloek Controls
INDICATOR WORDS DISPLAYWINDOW
/
/ \
12HOUR MINUTE ANDSECOND
TIME OFDAYCLOCK TIMER
KEY: *Dotmeanstopush.
•-Dashmeanstohold.
Clock Sgttlng
IMPORTANT: Theclockisa 12hourclock,Whenovenisfirstsuppliedpowerorpower
isinterrupted,thedisplaywillshow"00:00".
To se( |line of day on eloek:
1. Turn SETdial counterclockwise until thewordTIMEappearsintheDisplayWindow.
Then,turntheSETdialineitherdirectionuntilthecorrecttimeappearsinwindow.
2. PushENTERbutton.
To elban_ _--¢ of day set on eloek= Repeatabovesequence.
To ehcekdm¢ of daywhen thucr llsI,, use: PushENTERbutton.Timeofday
willbedisplayedbriefly,thendisplaywillreturntotimerfunction.
20
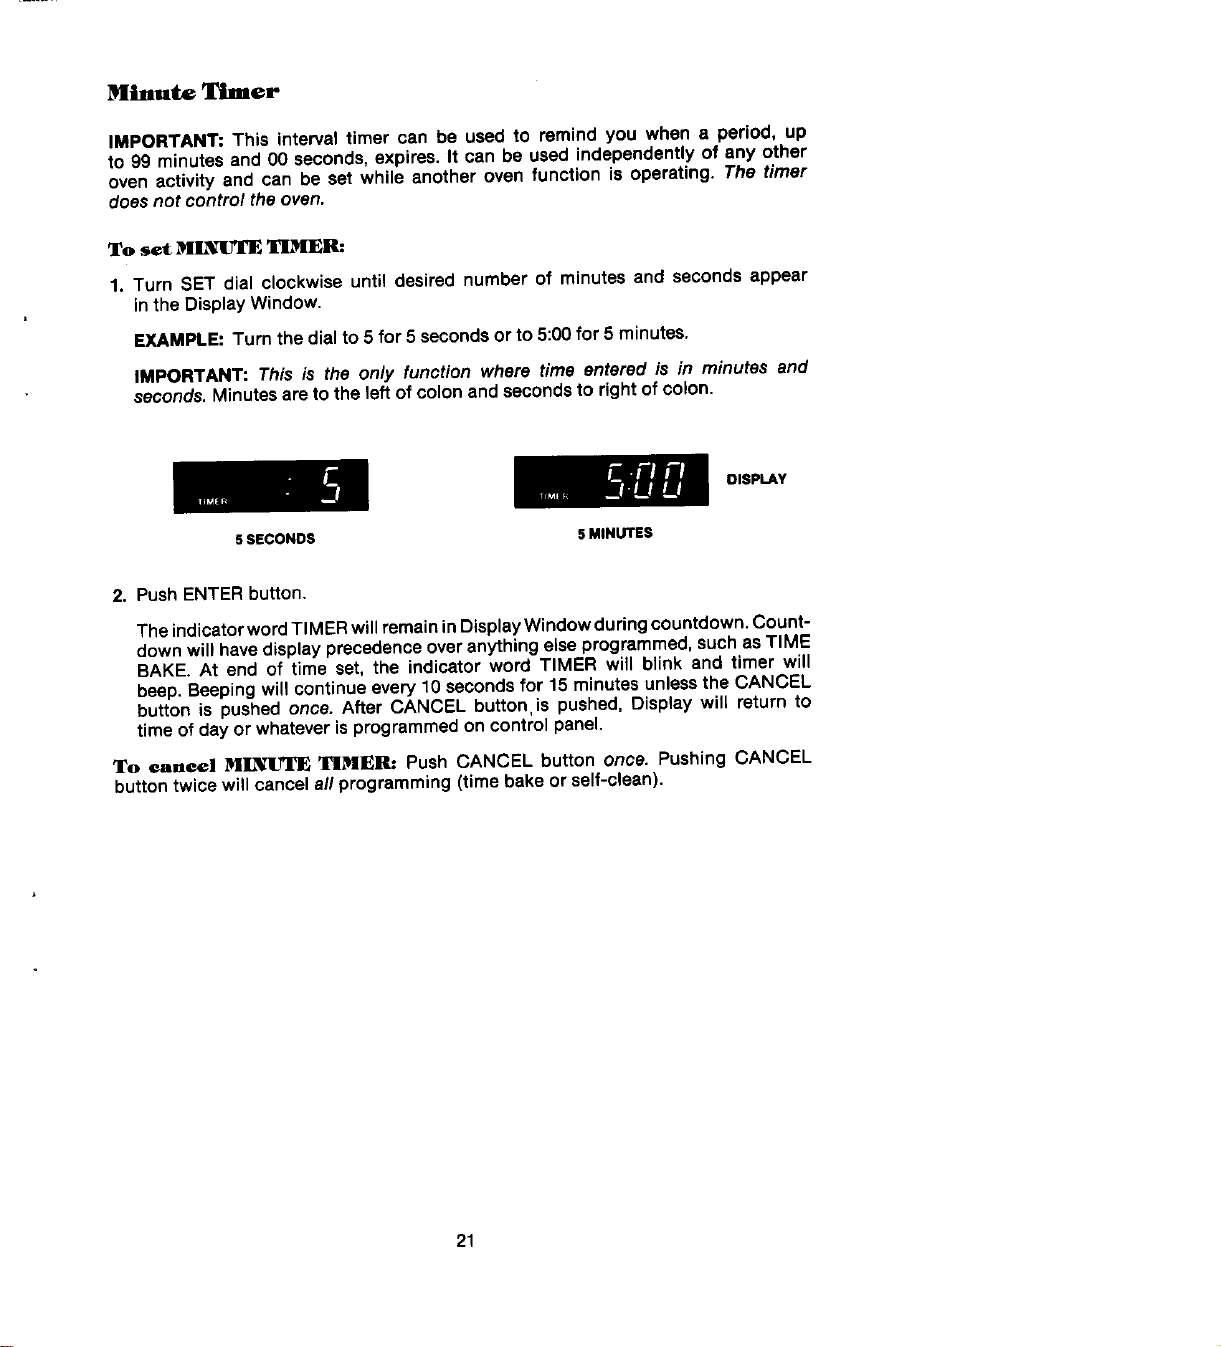
Mimute Timer
IMPORTANT: This intervaltimer can be used to remind you when a period, up
to 99 minutesand 00 seconds,expires.It can be usedindependentlyof any other
oven activity and can be set while anotheroven function is operating. The timer
doesnot control the oven.
To set MINlYrI_ TIMER:
1. Turn SET dial clockwiseuntil desired number of minutesand secondsappear
intheDisplayWindow.
EXAMPLE:Turn thedialto 5 for5 secondsor to5:00for5 minutes.
IMPORTANT: This is the only function where time entered is in minutes and
seconds.Minutesaretotheleft ofcolonand secondsto rightof colon.
DISPLAY
SSECONDS 5MINUTES
2. PushENTERbutton.
The indicatorwordTIMERwillremaininDisplayWindowduringcountdown.Count-
downwillhavedisplayprecedenceoveranythingelse programmed,suchasTIME
BAKE.At end of time set, the indicatorword TIMER will blink and timer will
beep.Beepingwillcontinueevery10 secondsfor 15minutesunlessthe CANCEL
button is pushedonce. After CANCEL buttonis pushed,Displaywill return to
timeof dayor whateverisprogrammedon controlpanel.
To cancel M]I_IlJTI_ TIMER: Push CANCEL button once. PushingCANCEL
buttontwicewillcancelall programming(timebakeor self-clean).
21
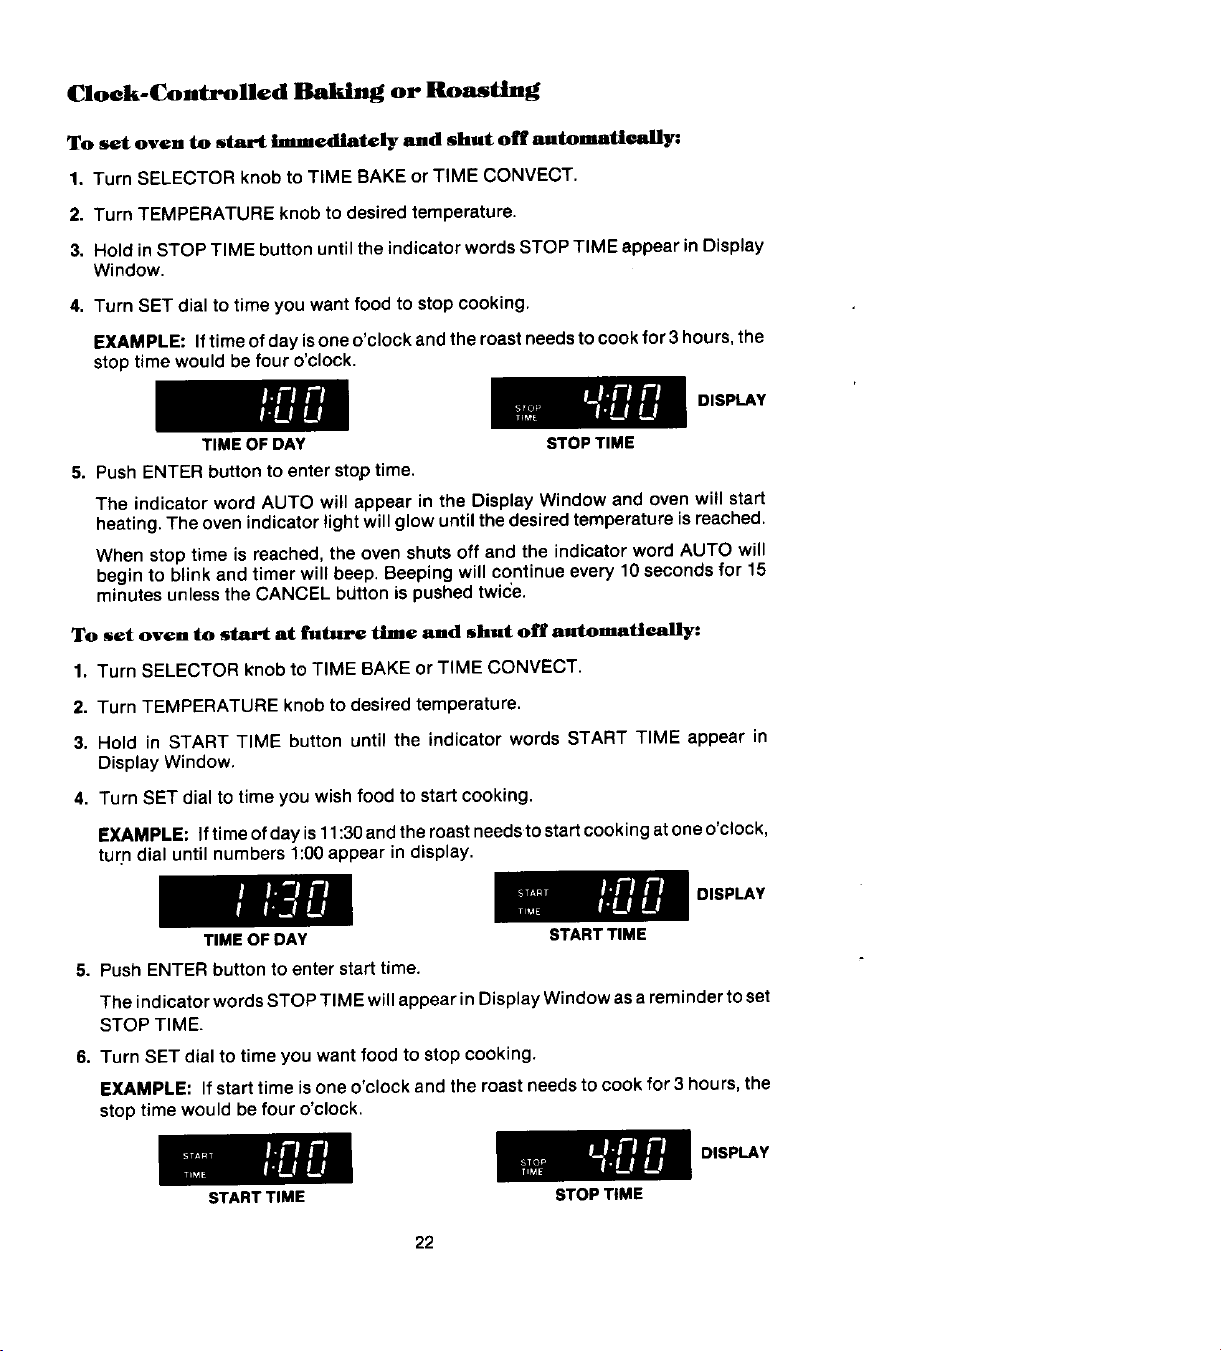
Clock-Controlled Baking or Roasting
To set oven to start Immediately and shut off automatir_ally:
1. Turn SELECTOR knob to TIME BAKE or TIME CONVECT.
2. Turn TEMPERATURE knob to desired temperature.
3. Hold in STOP TIME button until the indicator words STOP TIME eppear in Display
Window.
4. Turn SET dial to time you want food to stop cooking.
EXAMPLE." Iftime of day is one o'clock and the roast needs to cook for 3 hours, the
stop time would be four o'clock.
I.FI i"l
I.U U
DISPLAY
TIME OF DAY STOPTIME
5. Push ENTER button to enter stop time.
The indicator word AUTO will appear in the Display Window and oven will start
heating. The oven indicator light will glow until the desired temperature is reached.
When stop time is reached, the oven shuts off and the indicator word AUTO will
begin to blink and timer will beep. Beeping will continue every 10 seconds for 15
minutes unless the CANCEL button is pushed twice.
To set oven to start at future time and shut off automatically:
1. Turn SELECTOR knob to TIME BAKE or TIME CONVECT.
2. Turn TEMPERATURE knob to desired temperature.
3. Hold in START TIME button until the indicator words START TIME appear in
Display Window.
4. Turn SET dial to time you wish food to start cooking.
EXAMPLE: If time of day is 11:30 and the roast needs to start cooking at one o'clock,
turn dial until numbers 1:00 appear in display.
DISPLAY
TIME OF DAY STARTTIME
5. Push ENTER button to enter start time.
The indicator words STOP TIME will appear in Display Window as areminder to set
STOP TIME.
6. Turn SET dial to time you want food to stop cooking.
EXAMPLE: If start time isone o'clock and the roast needs to cook for 3 hours, the
stop time would be four o'clock.
I.i-I rl
i.u u
DISPLAY
STARTTIME STOPTIME
22

7. Push ENTERbutton toenter stoptime.
The indicator word AUTO will blink in the Display Window. When start time
is reached,the indicatorwordAUTO will remainin DisplayWindow.The oven
indicatorlightwillglowuntilthedesiredtemperatureis reached.
When stop time is reached,the oven shuts off and the indicator word AUTO
will begin to blink and timer will beep.Beepingwill continueevery 10 seconds
for 15minutesunlesstheCANCEL buttonispushedtwice.
To cheek ST_¢"I _11[MIR.before C_)oking begins: Hold in START TIME
button until the wordsSTART TIME appear in the Display Window. The start time
' willbe displayed briefly, then Displaywill return to timeof day.
To change START TIME before cooking begins:
' 1. Hold in STARTTIME button until the wordsSTART TIME appearin the Display
Window.
2. Turn SETdial to desiredtime.
3. Push ENTER button twice to enter new start time and stop time previously
programmed.
To check STOP TIME: Hold inSTOP TIME button until the words STOP TIME
appear in the Display Window. The stop time will be displayed briefly, then Display
will return to on-going program.
To change STOP TIME:
1. Hold in STOP TIME button until the words STOP TIME appear in the Display
Window.
2. Turn SETdial to desired time.
3. Push ENTERbutton to enter stop time.
To Cancel function programmed: Push CANCEL button twice to cancel
function, during programmed time or after time hasexpired.
NOTE: After clock-controlled baking, turn SELECTORand TEMPERATURE knobs
to OFF position.
NOTE; Since food continues to cook if left in the oven, it is suggested that the
clock controls be used primarily to start the oven when no one is in the
• kitchen. Provisionsshould be madeto havethe food removedas soon
asthesignalhassounded.
NOTE: If morethan 7 secondselapsesbetweenholding in STARTTIME button
or STOP TIME button and turningthe SET dial, the displaywindow
willautomaticallyreturntoon-goingprogram.
NOTE: If morethan 1 minuteelapsesbetweenturning SETdial to a newtime
and enteringnew START TIME and STOP TIME, the entire program
willbecancelledanddisplaywillreturntotimeof dayclock.
23
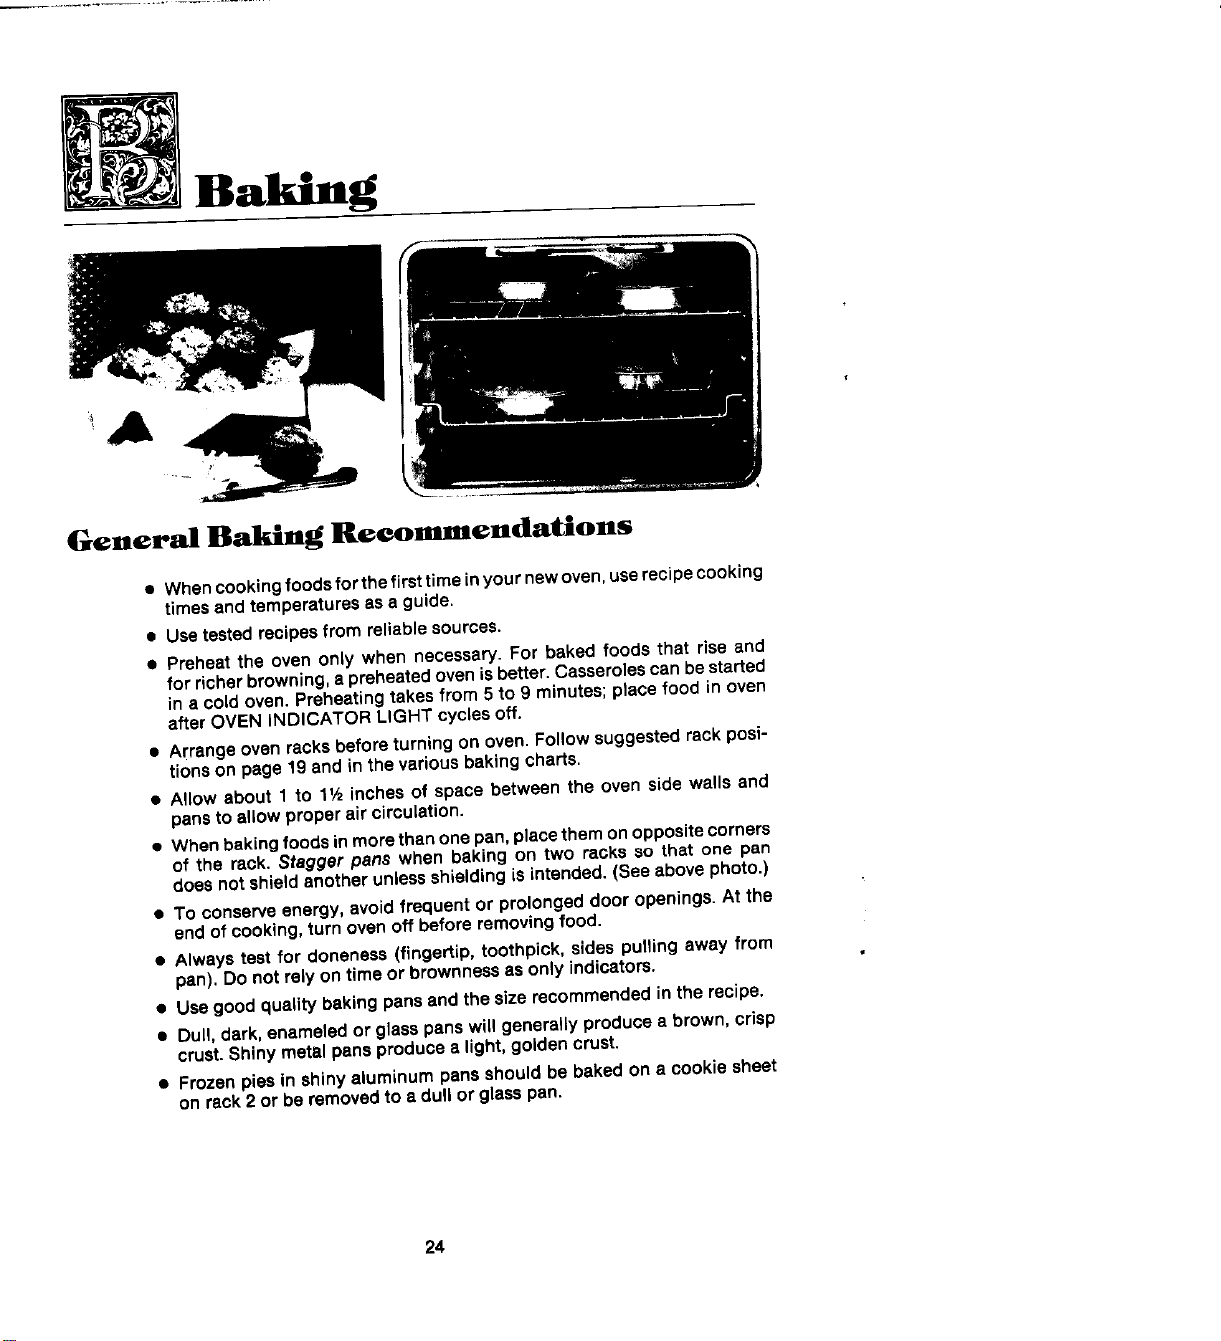
Baking
General Baking Recomendations
• Whencookingfoodsforthefirsttimeinyournewoven, userecipecooking
timesandtemperaturesas a guide.
• Usetestedrecipesfromreliablesources.
• Preheatthe oven only when necessary.For baked foods that rise and
for richerbrowning,a preheatedovenisbetter.Casserolescanbestarted
in a coldoven.Preheatingtakesfrom 5to 9 minutes;placefood in oven
afterOVENINDICATOR LIGHT cyclesoff.
• Arrangeovenracksbeforeturningon oven.Followsuggestedrackposi-
tionson page19 andin the variousbakingcharts.
• Allow about 1 to 1½ inchesof space between the oven side walls and
pansto allowproperair circulation.
• Whenbakingfoodsinmorethanonepan,placethemonoppositecorners
of the rack. Stagger pans when baking on two racksso that one pan
doesnotshieldanotherunlessshieldingis intended.(Seeabovephoto.)
• To conserveenergy,avoidfrequentor prolongeddooropenings.At the
end of cooking,turnovenoffbeforeremovingfood.
• Alwaystestfor doneness(fingertip,toothpick,sidespullingaway from
pan),Do not rely ontimeor brownnessas only indicators.
• Use goodqualitybakingpansandthesizerecommendedin therecipe.
• Dull, dark,enameledor glasspanswill generallyproducea brown,crisp
crust.Shinymetalpansproducea light,goldencrust.
• Frozenpiesin shinyaluminumpansshouldbe bakedon a cookiesheet
on rack2 or beremovedtoa dullorglasspan.
24
Convection Baking Recommendations
(Models $156 and S161 Only)
• Asa general rule,when usingrecipesor preparedmixesdevelopedfor a radiant
bakeoven,settheoventemperature25°F lowerthanthe reciperecommended
temperature.Timeswill besimilarto or a few minuteslessthan reciperecom-
mendedtimes. The chart on page26 comparestimes and temperaturesof
manybakedfoods.Usethisasa reference..
• Forbetter browning,largepanssuch as cookiesheets,or rectangularbaking
pans shouldbe placed/engthwise, front to back, on the rack. This centers
the food in front of the convectionfan for better air circulation which gives
betteroverallbrowning.
• Cookie sheetsshould be without sides and made of shiny aluminum. The
bestsizeto useforcookiesheetsandjellyrollpansis151hx 12-inches(overall
size,includeshandles).
Causes of Cake Failure
25
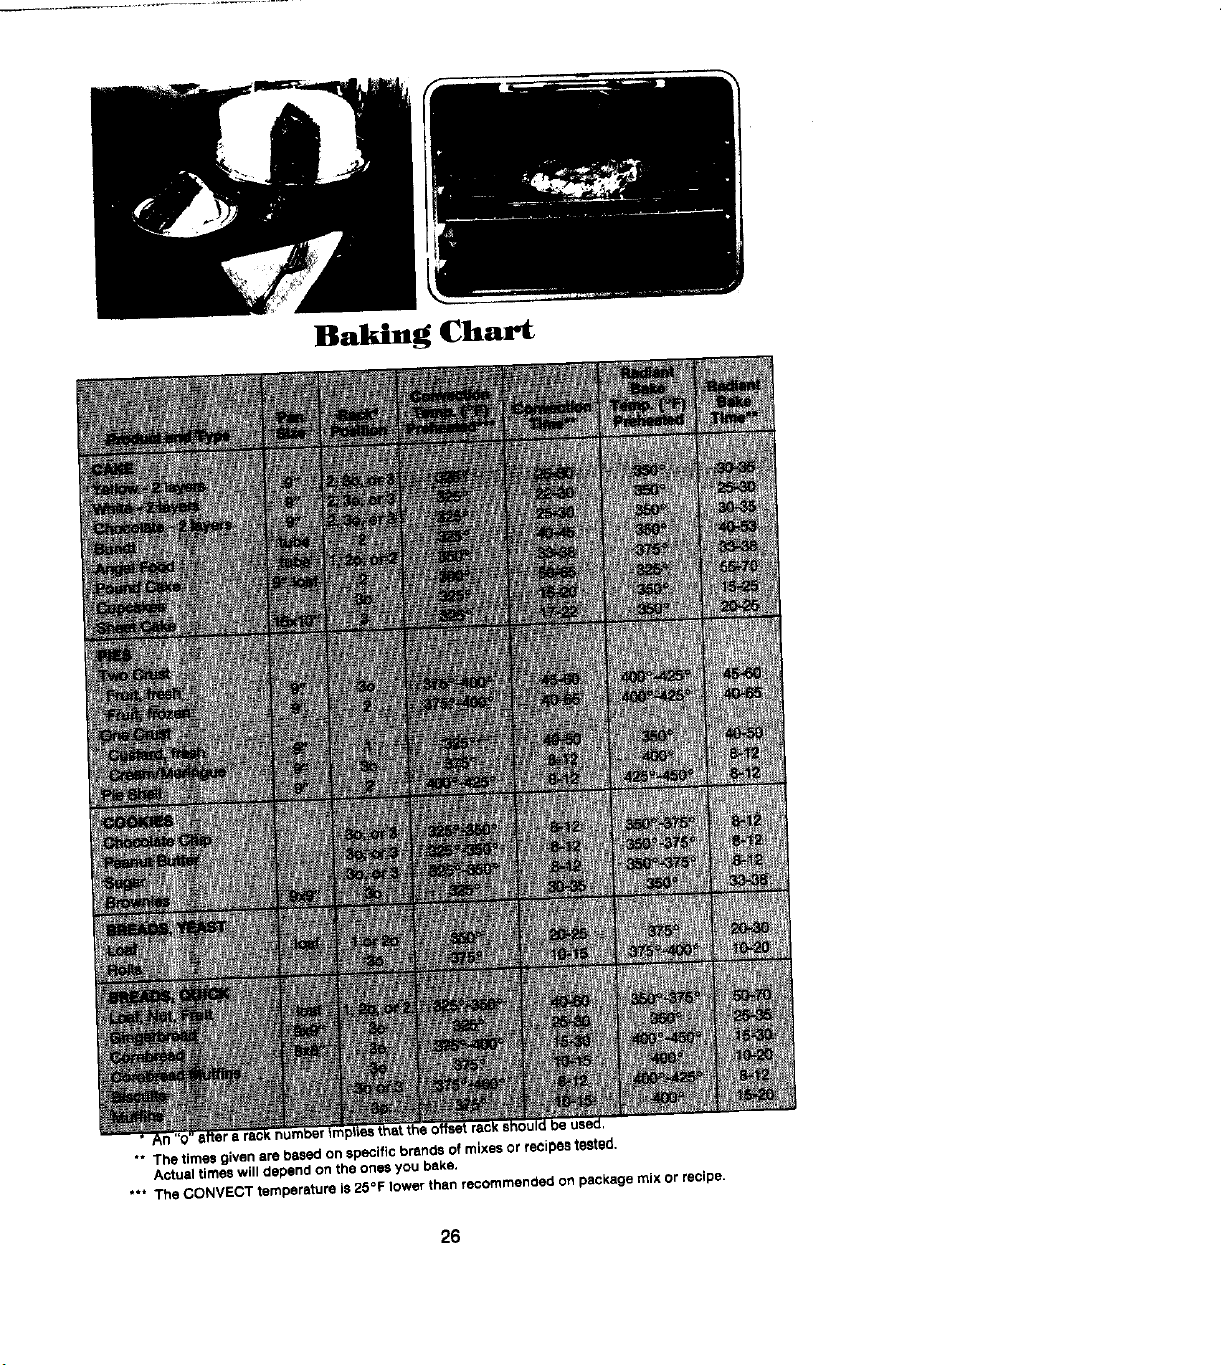
Baking Chart
** The timesgivenarebasedon Specificbrandsof mixesorrecipeBtested,
Actualtimeswilldependonthe onesyou bake.
*** The CONVECTtemperature is25°F lowerthenrecommendedonpackagemix orrecipe.
26
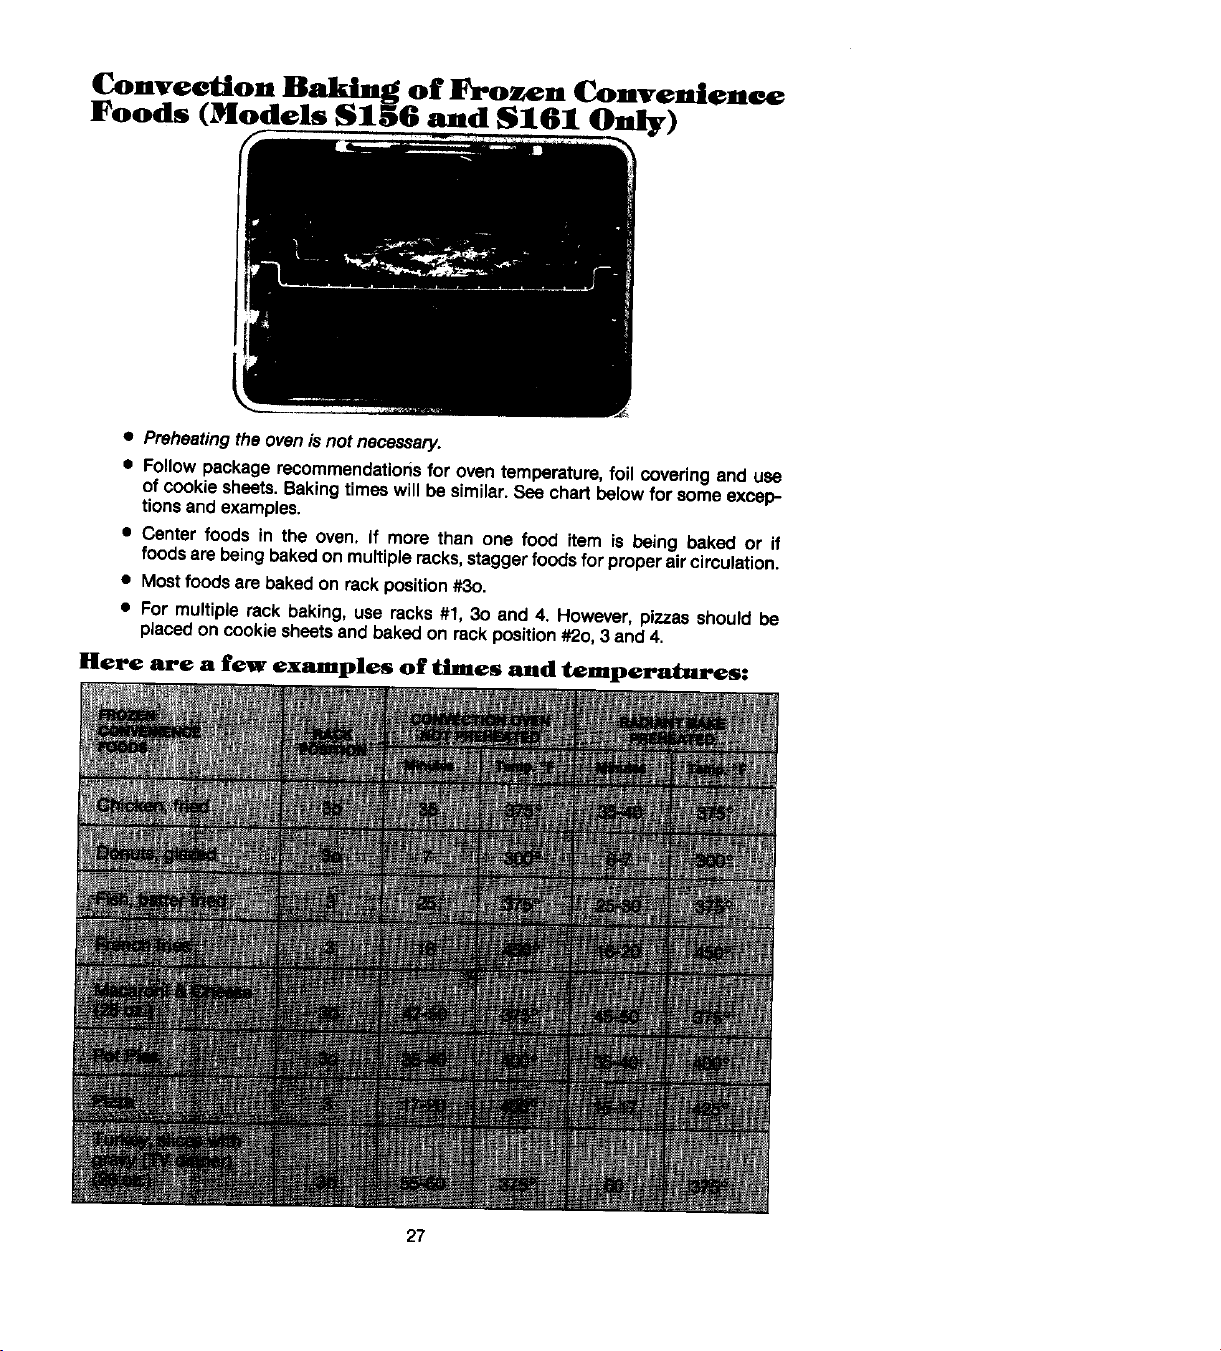
Conve_tion Baking of Frozen Convenlenee
Foods (Models $156 and $161 Only)
• Preheatingtheovenisnot necessary.
• Followpackagerecommendatior_sfor oventemperature,foilcoveringand use
of cookiesheets.Bakingtimeswillbesimilar.Seechartbelowfor someexcep-
tionsandexamples.
• Center foods in the oven. If more than one food item is being bakedor if
foodsarebeingbakedon multipleracks,staggerfoodsforproperaircirculation.
• Mostfoodsarebakedon rackposition#3o.
• Formultiplerackbaking,use racks#1,3o and 4. However,pizzasshouldbe
placedon cookiesheetsand bakedon rackposition#2o,3 and4.
Here are a few examples of dines and temperatures:
27
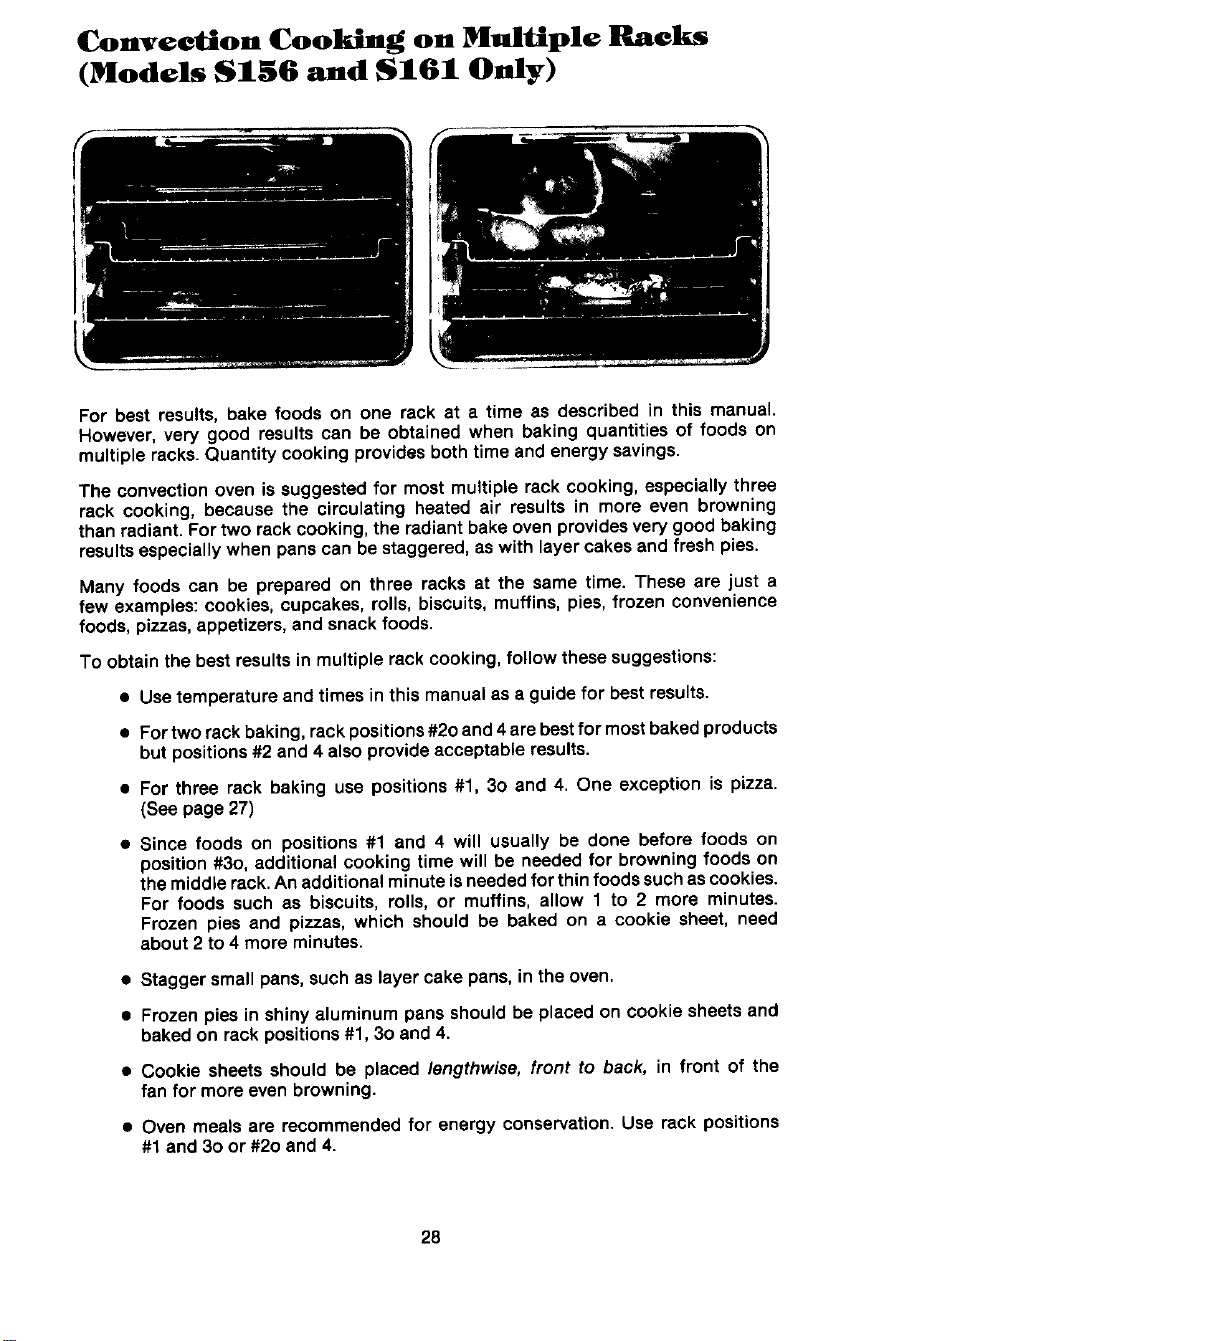
Convection Cooking on Multiple Rack
(Models S156 and S161 Only)
For best results,bake foods on one rack at a time as described in this manual.
However,very good resultscan be obtainedwhen baking quantitiesof foods on
multipleracks.Quantitycookingprovidesbothtimeand energysavings.
The convectionoven issuggestedfor mostmultiplerack cooking,especiallythree
rack cooking, becausethe circulating heated air resultsin moreeven browning
than radiant.Fortworackcooking,the radiantbakeovenprovidesvery goodbaking
resultsespeciallywhen panscan bestaggered,as withlayercakesand freshpies.
Many foodscan be preparedon three racksat the same time. These are just a
few examples:cookies,cupcakes,rolls,biscuits,muffins,pies,frozen convenience
foods,pizzas,appetizers,and snackfoods.
To obtainthebestresultsin multiplerackcooking,followthesesuggestions:
• Usetemperatureandtimesin thismanualasa guidefor bestresults.
• Fortworackbaking,rackpositions#2oand4arebestformostbakedproducts
but positions#2 and4 alsoprovideacceptableresults.
• For three rack baking use positions#1, 3o and 4. One exception is pizza.
(See page27)
• Since foods on positions#1 and 4 will usually be done before foods on
position#3o, additionalcookingtimewill be neededfor browningfoods on
themiddlerack.Anadditionalminuteisneededforthinfoodssuchascookies.
For foods such as biscuits, rolls,or muffins, allow 1 to 2 more minutes.
Frozenpies and pizzas,which should be baked on a cookie sheet, need
about2 to4 more minutes.
• Staggersmallpans,suchas layercakepans,in theoven.
• Frozenpiesin shinyaluminumpansshouldbe placedon cookiesheetsand
bakedon rackpositions#1,3o and4.
• Cookie sheetsshouldbe placed lengthwise, front to back, in front of the
fan formoreevenbrowning.
• Oven mealsare recommendedfor energyconservation.Use rack positions
#1 and3oor #2oand 4.
28
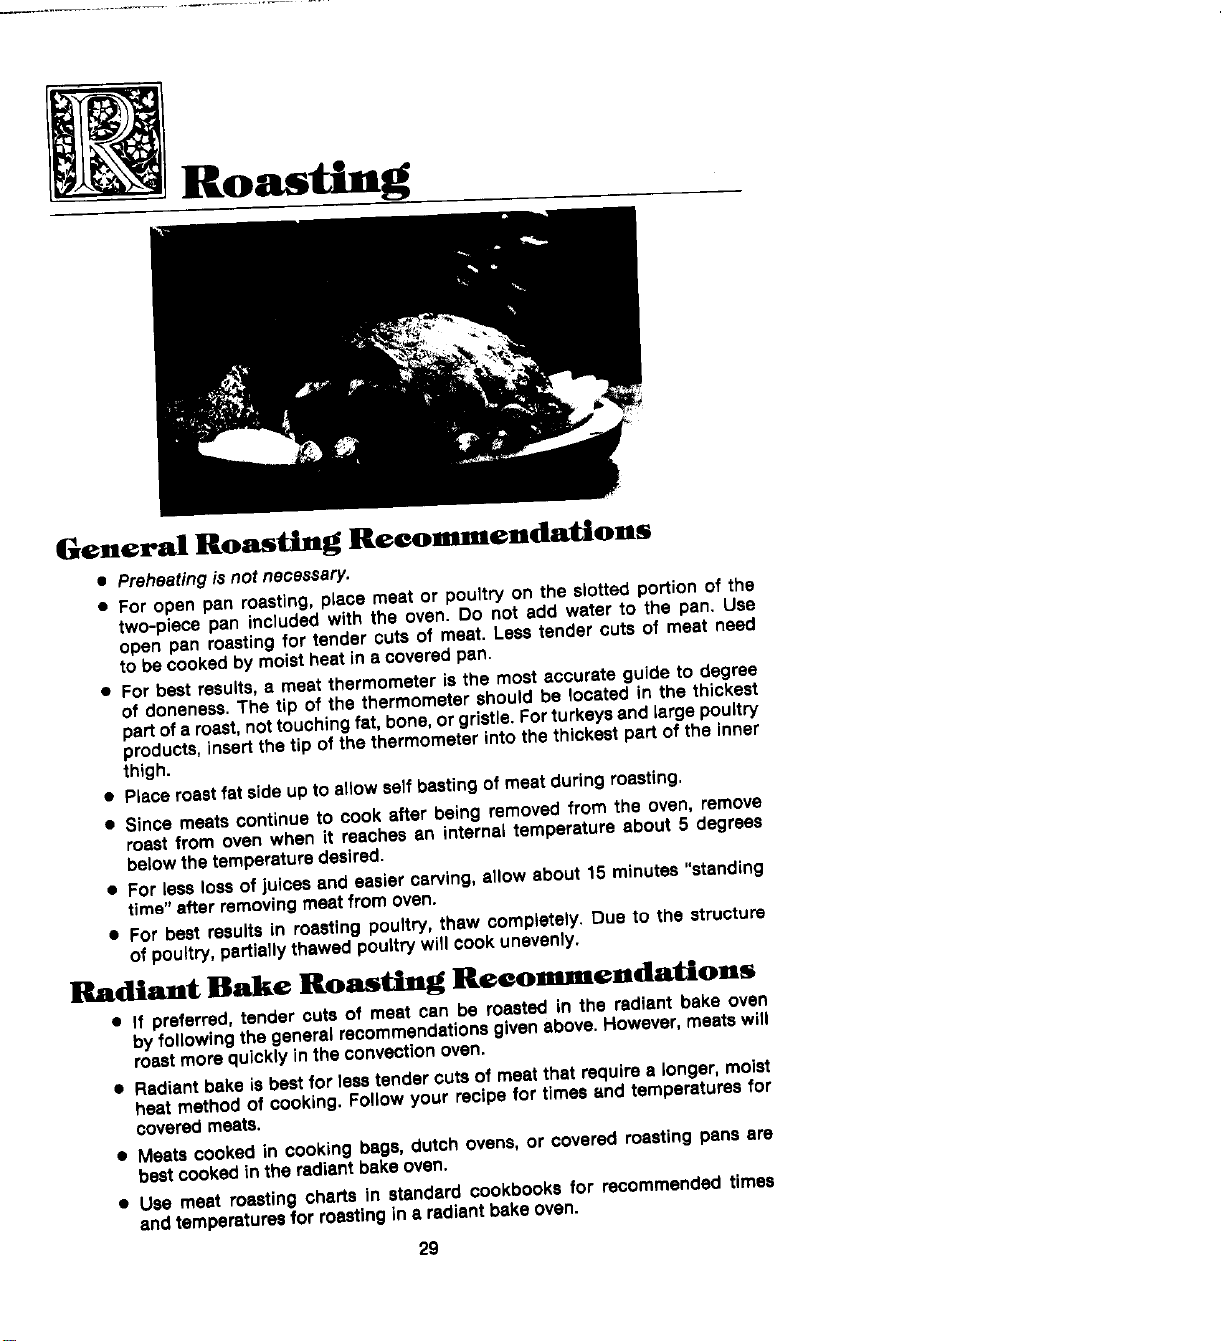
Roasting
General Roasting Reco_,,mendatlons
s Preheating is not necessary.
• For open pan roasting,place meat or poultryon the slottedportionof the
two-piecepan includedwith the oven. Do not add water to the pan. Use
open pan roastingfor tender cuts of meat.Lesstendercuts of meat need
to be cookedbymoistheatin a coveredpan.
• For bestresults,a meat thermometeris the mostaccurateguideto degree
of doneness.The tip of the thermometershouldbe locatedin the thickest
part of a roast,nottouchingfat,bone,or gristle.Forturkeysand largepoultry
products,insertthe tip ofthethermometerintothethickestpartofthe inner
thigh.
• Placeroastfatsideup toallowself bastingofmeatduringroasting.
• Since meatscontinueto cook after being removedfrom the oven,remove
roast from oven when it reachesan internaltemperatureabout 5 degrees
belowthetemperaturedesired.
• For lesslossof juicesand easiercarving,allowabout15 minutes"standing
time"afterremovingmeatfrom oven.
a For best resultsin roastingpoultry, thawcompletely.Due to the etructure
of poultry,partiallythawedpoultry willcookunevenly,
Radiant Bake Roas¢tng Reeommendattons
• If preferred,tender cutsof meat can be roastedin the radiant bake oven
by followingthegeneralrecommendationsgivenabove.However,meatswill
roastmorequicklyintheconvectionoven.
• Radiantbakeis bestfor lesstendercutsof meatthatrequirea longer,moist
heat methodof cooking.Followyour recipefor timesand temperaturesfor
coveredmeats.
• Meatscookedin cookingbags,dutchovens,or coveredroastingpans are
bestcookedin theradiantbakeoven.
• Use meat roastingcharts in standardcookbooksfor recommendedtimes
and temperaturesfor roastingin• radiantbakeoven.
29
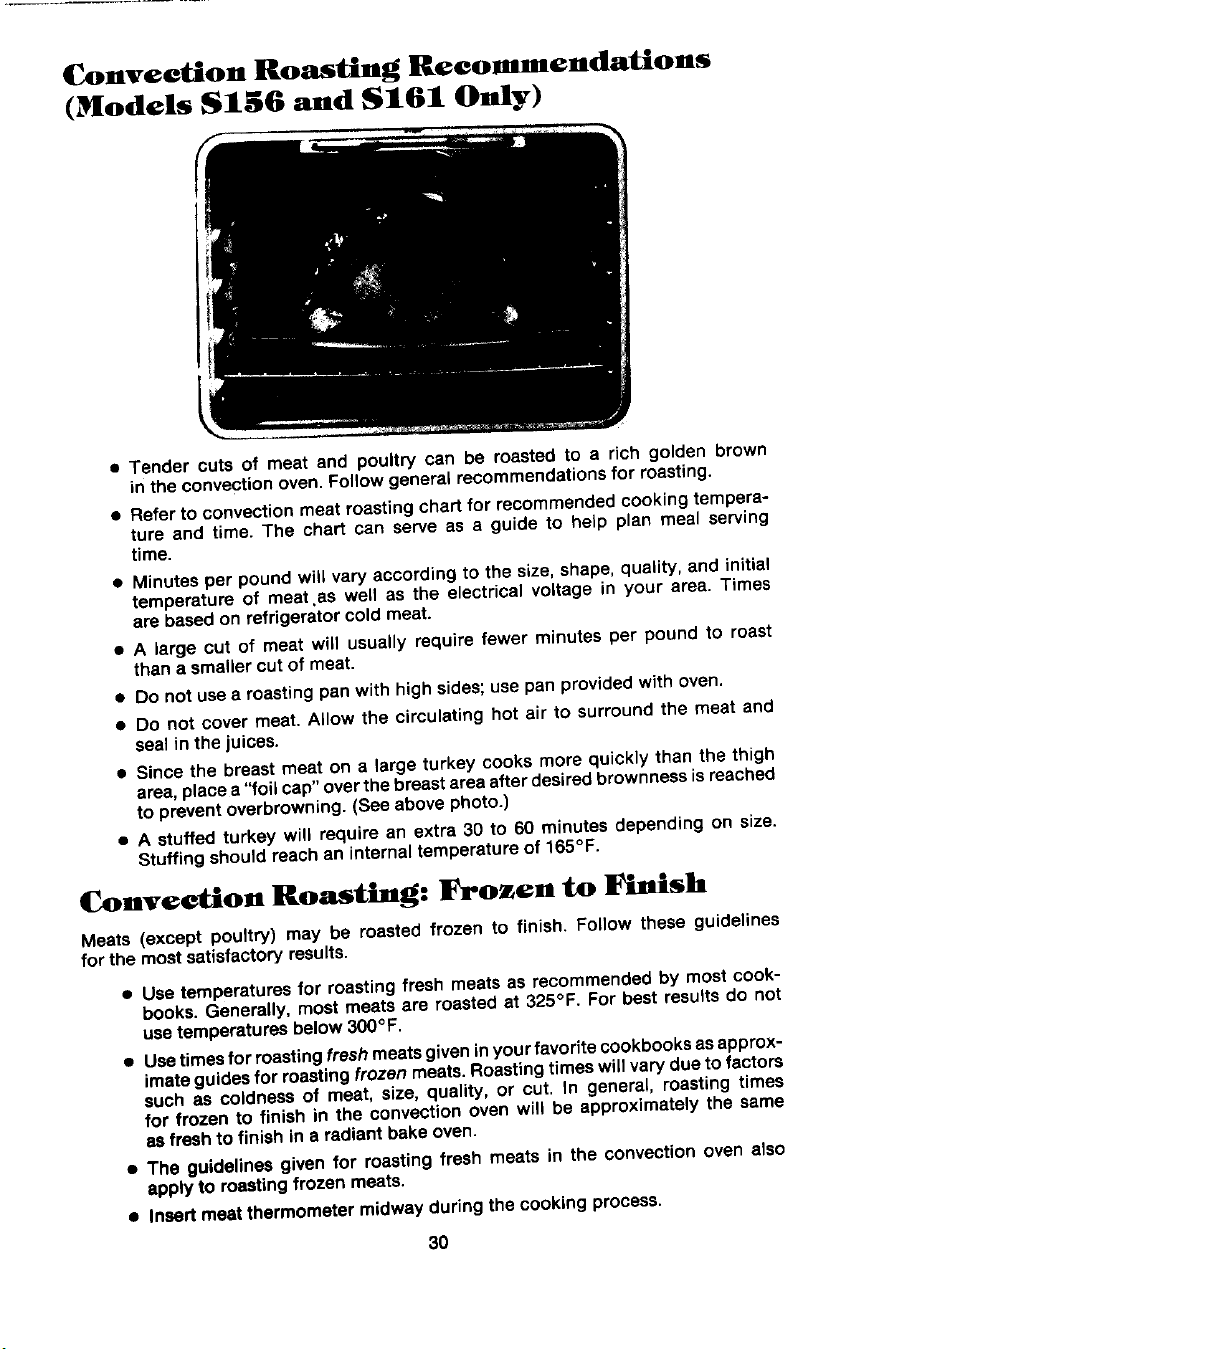
Convection Roasting Recom-endations
(Models S156 and $161 Only)
• Tender cuts of meat and poultry can be roasted to a rich golden brown
inthe convectionoven,Followgeneralrecommendationsfor roasting.
• Referto convectionmeatroastingchartfor recommendedcookingtempera-
ture and time. The chart can serve as a guide to help plan meal serving
time.
• Minutesper poundwill varyaccordingto the size,shape,quality, and initial
temperatureof meat,as well as the electricalvoltage in your area. Times
arebasedon refrigeratorcoldmeat.
• A large cut of meat will usually requirefewer minutes per pound to roast
thana smallercutof meat.
• Do not usea roastingpan withhigh sides;usepan providedwith oven.
• Do not cover meat.Allow the circulatinghot air to surroundthe meat and
seal in the juices.
• Since the breastmeaton a large turkey cooksmore quicklythan the thigh
area,placea"foilcap" overthebreastareaafterdesiredbrownnessisreached
to preventoverbrowning.(Seeabovephoto.)
• A stuffedturkey will require an extra 30 to 60 minutesdependingon size.
Stuffingshouldreachan internaltemperatureof 165°F.
Convection Roasting: Frozen to Finish
Meats (except poultry) may be roastedfrozen to finish. Follow these guidelines
forthe mostsatisfactoryresults.
• Use temperaturesfor roastingfresh meatsas recommendedby mostcook-
books.Generally,mostmeatsare roastedat 325°F. Forbestresultsdo not
usetemperaturesbelow300°F.
• Usetimesfor roastingfresh meatsgiveninyourfavoritecookbooksasapprox-
imateguidesforroastingfrozen meats.Roastingtimeswill varyduetofactors
such as coldnessof meat, size, quality, or cut. In general, roasting times
for frozen to finish in the convectionoven will be approximatelythe same
asfreshtofinishin a radiantbakeoven.
• The guidelines givenfor roastingfresh meats in the convectionoven also
applyto roastingfrozenmeats.
• Insert meatthermometermidwayduringthecookingprocess.
30
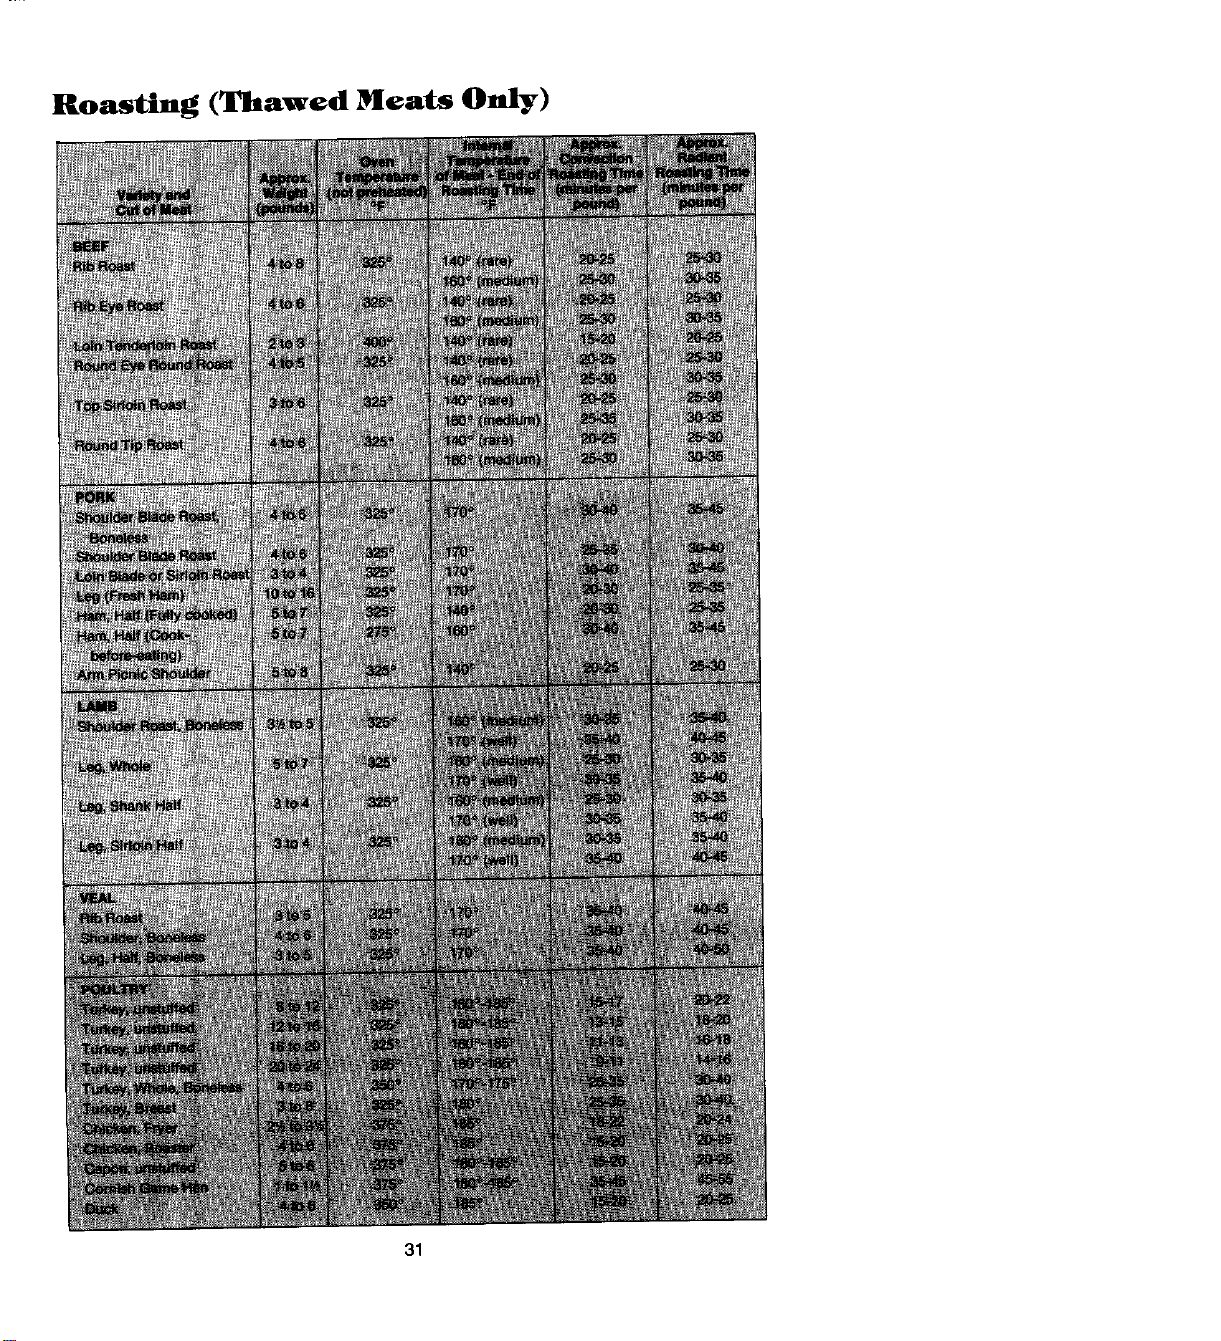
Roasting _Thawed Meats Only_
31
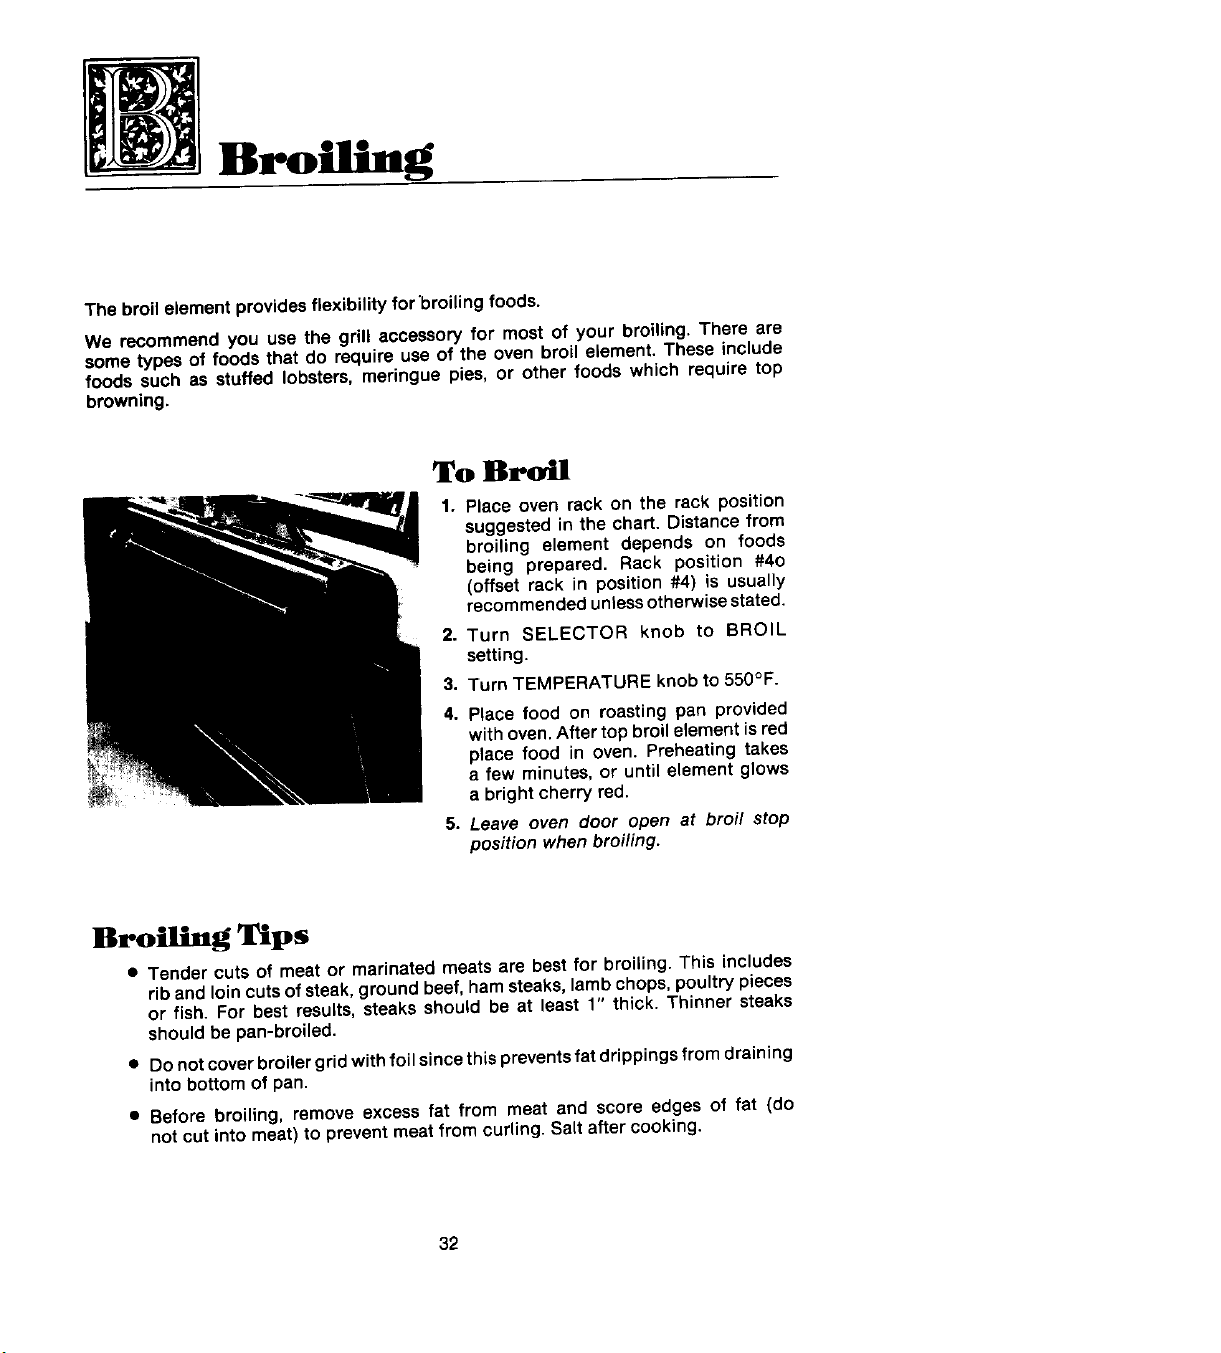
The broilelementprovidesflexibilityfor'broilingfoods.
We recommend you use the grill accessoryfor mostof your broiling.There are
sometypes of foods that do requireuseof the oven broilelement.These include
foods such as stuffed lobsters,meringuepies, or other foodswhich requiretop
browning.
To Broil
1. Place oven rack on the rack position
suggestedin the chart. Distancefrom
broiling element depends on foods
being prepared. Rack position #40
(offset rack in position#4) is usually
recommendedunlessotherwisestated.
2. Turn SELECTOR knob to BROIL
setting.
3. TurnTEMPERATUREknobto550°F.
4. Place food on roastingpan provided
withoven.After topbroilelementisred
place food in oven. Preheatingtakes
a few minutes,or until element glows
a brightcherryred.
5. Leave oven door open at broi/ stop
position whenbroiling.
Broiling Tips
• Tender cuts of meat or marinatedmeats are best for broiling. This includes
ribandloincutsof steak,ground beef,ham steaks,lambchops,poultry pieces
or fish. For bestresults,steaksshould be at least 1" thick. Thinner steaks
shouldbepan-broiled.
• Donotcoverbroilergridwithfoilsincethispreventsfatdrippingsfromdraining
intobottomof pan.
• Before broiling, remove excessfat from meat and score edges of fat (do
not cutintomeat)to preventmeatfromcurling.Salt aftercooking.
32
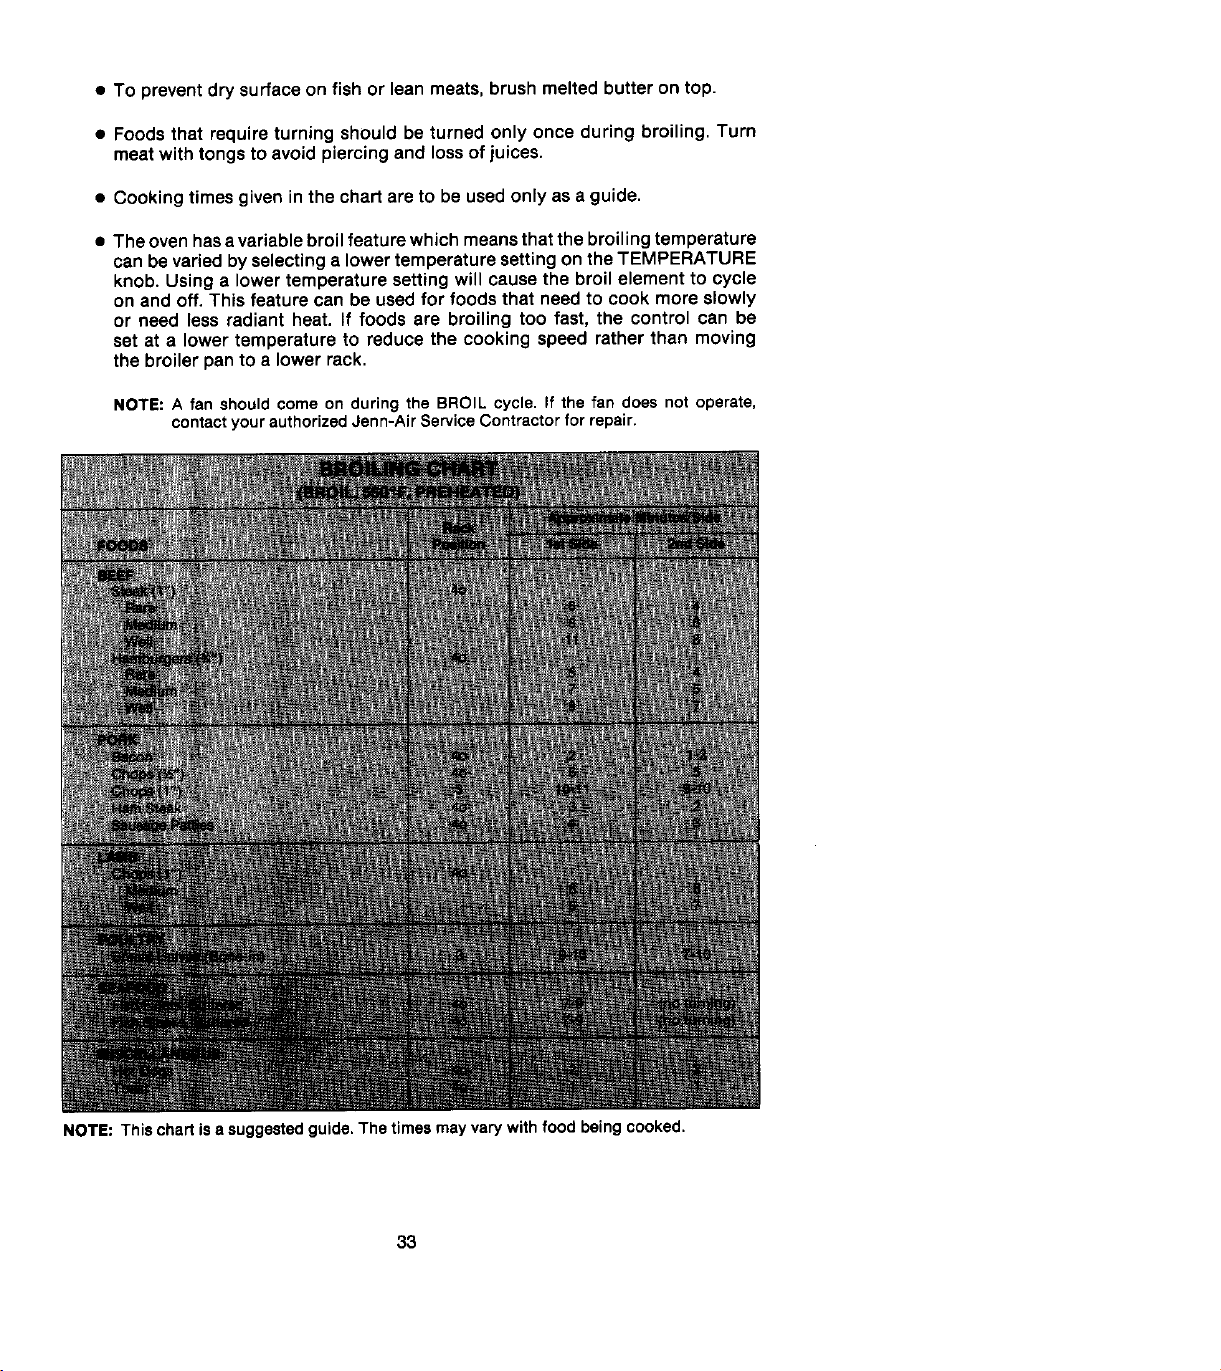
• To preventdrysurfaceonfish or lean meats,brush meltedbutteron top.
• Foodsthat requireturningshouldbe turnedonlyonce during broiling.Turn
meatwithtongstoavoidpiercingand lossof juices.
• Cookingtimesgiven inthechartareto beusedonlyas a guide.
• Theovenhasavariablebroilfeaturewhichmeansthatthebroilingtemperature
canbevariedbyselectinga lowertemperaturesettingontheTEMPERATURE
knob. Usinga lowertemperaturesettingwillcausethe broilelementto cycle
on and off.Thisfeaturecanbe usedfor foodsthat needto cookmore slowly
or need lessradiant heat. If foods are broilingtoo fast, the control can be
set at a lowertemperatureto reducethe cookingspeed ratherthan moving
thebroilerpantoa lowerrack.
NOTE:A fanshouldcomeonduringtheBROILcycle.If thefandoesnotoperate,
contactyourauthorizedJenn-AirServiceContractorforrepair.
NOTE:Thischartisasuggestedguide.Thetimesmayvarywithfoodbeingcooked.
33
Oven Cleaning
How the Self-Cleaning Process Work
When the oven controls are set to CLEAN, the oven heatsto temperaturesthat
are higherthan those used for cooking. The high temperaturescausefood soil
to burn off and substantiallydisappear.While this occurs,a device in the oven
vent helpsto consumenormalamountsofsmoke. The oven is ventedthroughan
openingundertheair grilleon thetop of the range.
How to pare Oven Before Operating
Jhe Self Cleaning Process
• Removetheroastingpanandany otherutensilsfromtheoven.Theseutensils
cannotwithstandthe hightemperaturesofthecleaningprocess.
• The oven rockscan be cleaned in the oven.However, the oven rackswill
discolor,lose shininess,and becomedifficult to slide in and out if left in
the oven during the cleaningprocess.REMOVE RACKS FROM OVEN IF
THIS DISCOLORATION WILL BE OBJECTIONABLE.As a suggestion,do
not leavethe racksin the oven during each self-cleaningprocessif they
do not needto be cleanedsincetheywilldiscolorto a dull silverafter many
cleanings.Moderatelysoiled rackscan be cleanedwith a soapyS.O.S. pad
or Scotch-Britescour-pad.Stubbornstainsneed to be removedin the self-
cleaningprocess.Be sure to readspecialtipson page 39 if ovenracksare
cleanedduringtheself-cleaningprocess.
• Cleanspattersandspillsfromthoseareas
whichwillnot becleanedduringthe self-
cleaningprocess:
--center frontof ovenanddoornearopen-
ingindoorgasket.
--porcelain ovendoor liner (areaoutside
thedoor gasket).
--stainlesssteelovenfrontframe.
NOTE: DO NOT CLEAN serial plate
locatedon theovenfront.
To clean theseareas, usehot water and
detergent,nonabrasivecleansersor soap
filledsteelwoolpads(rubwiththe brushed
grain on the ovenfront frameto prevent
scratching).Rinsethoroughly,beingcare-
fulnottouseanexcessiveamountof water
thatwould dampenthedoor gasket.So#
taft in these areas wi// be more difficuH to remove after the serf-cleaning
process since the high heat will bake on any soil that is present. DO NOT
USECOMMERCIAL OVENCLEANERSTO CLEANTHESE AREAS.
• If youintendto usegrillwhencleaningtheoven,makesuregreasecontainer
isemptytopreventa possibleoverflow.
34
• DO NOT ATTEMPTTO CLEAN, RUB,OR APPLYWATER TO QASKETON
OVENDOOR.The gasketisessentialfora gooddoorseal.Rubbingor cleaning
willdamagethegasketandmayaffecttheseal.
• Wipeupexcessgreaseandfoodspilloverswhichhavenotbakedonthebottom
of the oven. Largeaccumulationsof soil can causeheavy smokeor fire in
theovenduringthecleaningprocess.Foreaseofcleaning,theheatingelement
canbe liftedslightly.
• Althoughsmokeor fire in the oven is a normal occurrenceand there is no
safetyproblem,there will be ventingof excessivesmokeand odor. Smoke
andodorcanbe removedfromthekitchenby turningontheventilationsystem.
Auto Clean Feature
This modelfeatures AUTO CLEAN to simplify cleaningan average soiled oven.
To use,merelysetSELECTORandTEMPERATUREknobstoCLEAN,LOCKDOOR,
and push ENTER buttontwice. The oven will clean for 2_ hours (plus cool-down
time). For a heavilysoiledovenor to startcleaningat a later time, referto section
below.
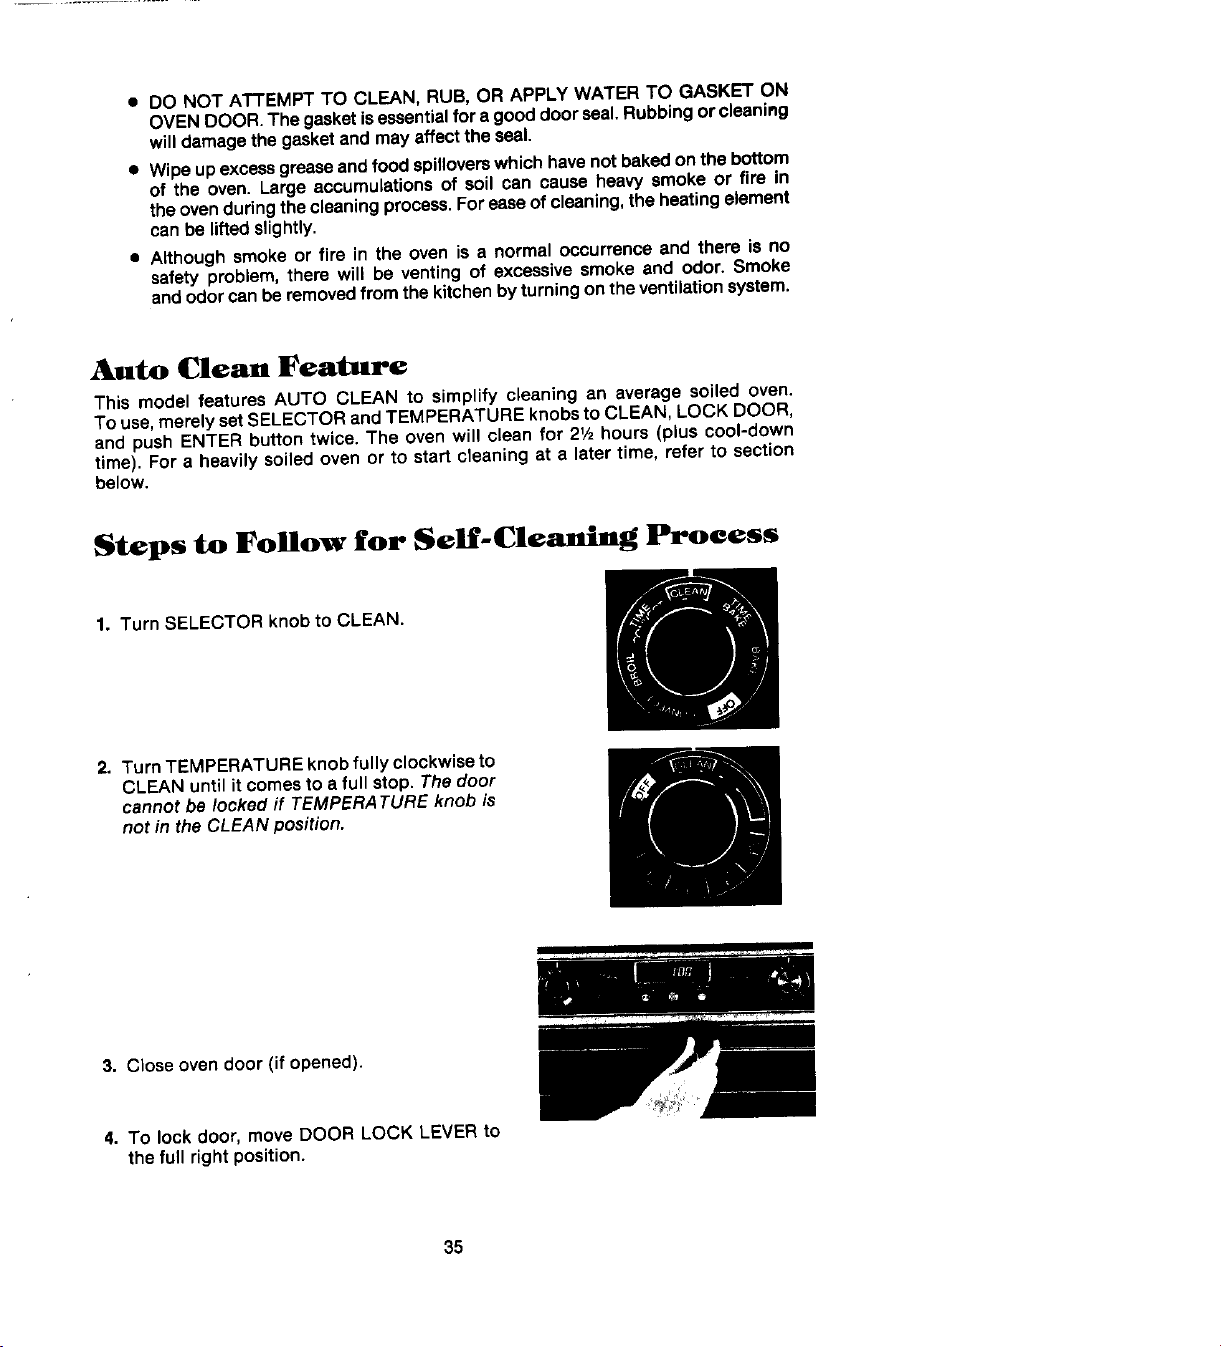
Steps to Follow for Self-Cleaning Process
1. Turn SELECTOR knob toCLEAN.
2. Turn TEMPERATUREknobfully clockwiseto
CLEANuntil itcomesto a full stop. Thedoor
cannot belocked if TEMPERATUREknob is
not in the CLEAN position.
3. Closeovendoor (if opened).
4. To lock door, moveDOOR LOCK LEVERto
the full right position.
35

5. Setclockcontrolstocleanovenusingoneofthefollowingprocedures:
To set oven to start cleaning Immediately:
An automaticprogramof 2_ hours is preset for an averagesoiled oven. For a
heavilysoiledoven,programcanbeextendedupto4 hours.
a. PushENTERbuttontoenterstarttime.
The indicatorwordsSTOP TIME will appear in Displayand the time will be
21/2hourslaterthantimeofday.
b. Foran averagesoiledoven:PushENTERbuttonto enterstoptime.The oven
will beepand indicatorword AUTOwillappearandremainintheDisplayWindow.
For a heavilysoiled oven:Turn SET dial in clockwise direction to desired time
(maximum 4 hour clean cycle). Push ENTER button to enter stop time. The
oven will beep and the indicator word AUTO will appear and remain in Display
Window,
To set oven to start cleaning at a later time:
An automaticprogram of 21/2hours is preset for an averagesoiled oven. For a
heavilysoiled oven,programcan beextended up to 4 hours.
a. Turn SETdial to desiredstarttime.
b. Push ENTER button to enter START TIME. The indicator words STOP TIME
will appearin Displayand the time will be 21/2hourslaterthanthe starttime.
c. Foran average=lolledoven:PushENTERbutton to enter stop time. The oven
will beepand the wordAUTO willblink,When starttime isreached,theoven
willbeepandthe wordAUTO willremainin DisplayWindowduringthecleaning
cycle.
For a heavilysoiledoven:Turn set dialin a clockwisedirectionto desiredtime
(maximum4 hourscleaningcycle).PushENTERbuttonto enterstoptime.The
ovenwill beepand the word AUTO willblink. Whenstart time is reached, the
oven will beep and the word AUTO will remain in Display Window during the
cleaningprocess.
6. TheovenCLEANINDICATORLIGHTwillglowwhenallstepsarecompletedproperly,
exceptwhenset fora delayedstart.The lightgoesoffwhenstop timeisreached.
7. The cleaning process begins immediately unless the self-cleaning process has
been set for a delayed start. When the oven temperature reaches 550°F, the
LOCK INDICATOR LIGHT will glow and the door cannot be opened until the
temperature drops below 550°F. DO NOT TRY TO UNLOCK THE DOOR WHILE
LOCK INDICATOR LIGHT IS ON. The normal cleaning process takes the time
selected on the clock plus about 45 minutes for the ovento cool down before
the LOCK INDICATOR LIGHT goes out and the door can be opened.
36
8. Atendoftimeset,ovenwillstopautomaticallyand notbeep.
9. Afterthe LOCK INDICATOR LIGHT goes out, movethe DOOR LOCK LEVER
to the left. The ovendoor can nowbe opened.
10. Turn the SELECTOR AND TEMPERATURE knobs from CLEAN to OFF after
the door is unlocked.
IMPORTANT: IF THE TEMPERATURE KNOB IS TURNED TO OFF BEFORE
THE DOOR IS UNLOCKED, THE DOOR WILL NOT OPEN. Forcing the lock
will damagethe lock mechanism.ReturnTEMPERATUREknob to CLEAN,unlock
thedoor, then turn TEMPERATURE knob OFF.
NOTE: A fan comes on whenever the SELECTORknob isseton CLEAN; there-
fore, the fan will continue to operate at the end of the cleaning process until
the SELECTOR knob is turned OFF. The fan will also start as soon as the
controls are setfor a delayed startof the self-cleaning process,
To eheck ST_llCT '][I_BI_before elesnlng begins: Hold in START TIME
button until the words START TIME appear in the DisplayWindow. The start time
will bedisplayedbriefly,then Displaywill returntotime of day.
To change START TIME before cleaning begins:
1. Hold in START TIME button until the words START TIME appear in the Display
Window.
2. Turn SET dialto time desired.
3. Push ENTERbutton to enter new start time.
The indicator wordsSTOP TIME and a new stop time will appear in Display
Window.The newstop timewill be 21,_hourslater than the newstarttime,
For a heavily soiled oven, the stop time will need to be changed by turning the
SETdial,
4. Push ENTERbutton to enter new stop time.
To eheek STOP TIME: Hold in STOP TIME button until the words STOPTIME
appear in the DisplayWindow. The stop time will be displayed briefly, then Display
will return to on-going program.
To change STOP TIME before ele_,.I,,_ begins:
1. Hold In STOPTIME butonuntilwordsSTOP TIMEappearin theDiaplayWindow.
2. TurnSETdial todesiredSTOPTIME.
37

3. PushENTERbuttontoenternewstoptime.
NOTE: If more than 7 secondselapse between holdingin START TIME button
or STOP TIME button and turning the SET dial, the display window will
automaticallyreturntoon-goingprogram.
NOTE: If more than 1 minuteelapsesbetweenturning SETdial to a newtimeand
entering new START TIME and STOP TIME, the entire programwill be
cancelledanddisplaywillreturnto timeof dayclock.
To stop elga_ln_ pro_ss before lock indicator light Comes on:
1. MovetheDOOR LOCKLEVERto theleft.
2. Turn SELECTORand TEMPERATUREknobsfromCLEAN toOFF.
3. PushCANCEL buttontwice.
To stop cleaning process after lock indicator light comes on:
1. Push CANCELbuttontwice.
2. Leavethe TEMPERATUREand SELECTORknobsinthe CLEANposition.
3. Allowovento cool untilthe LOCK INDICATOR LIGHT goesout.This may take
upto45 minutes,dependingonhow longtheovenhasbeenon.
4. After LOCK INDICATOR LIGHT goes off, movethe DOOR LOCK LEVER to
the left.
5. Turn SELECTORandTEMPERATUREknobsfromCLEAN toOFF.
NOTE: WhenSELECTORknobisturnedto CLEAN,a fan comeson. If thisfan
is notoperating,the ovenwill go throughthe self-cleaningprocessat a reduced
oventemperatureandtheovenwillnotcleaneffectively.Ifthefandoesnotoperate,
contactyourJenn-AirAuthorizedServiceContractorfor service.
38
More Information on the
Self-Cleaning Process
• A slight odor may bedetected,and if an ovenis heavilysoiled,somesmoke
maybevisible.Somesmokeandodorduringthecleaningprocessisa normal
occurrence.Since the oven vent is located under the air grille, vapors,
moisture,etc. may be seencoming from this area. If the odor is strongor
objectionable,turn on theventilationsystemto exhaustodors outdoors.
• During the cleaning process, do not be alarmed if an occasional flame is
visible through the oven window. This is caused by excessive food soil that
wasnot removedbefore the ovenwassetto clean.
• SINCETHE DOOR AND WINDOW OF THE OVEN AND OVENVENT WILL
GETWARMDURING THE SELF-CLEANING PROCESS,AVOID CONTACT,
• Some types of soil may disintegrate but leavea light film or heavier deposit
of ash. The amount of ash depends on the amount of soil which was in
the oven. After oven has cooled, this ash may be removed with a damp
sponge.If otherdark depositsremainafter wiping with a sponge,the time
set for the lengthof cleaningwas not enough. Increasethe cleaningtime
for future cleaningsor clean morefrequently.The normal cleaningtime is
21/2hours.A maximumof 4 hoursmaybeselectedifnecessary.
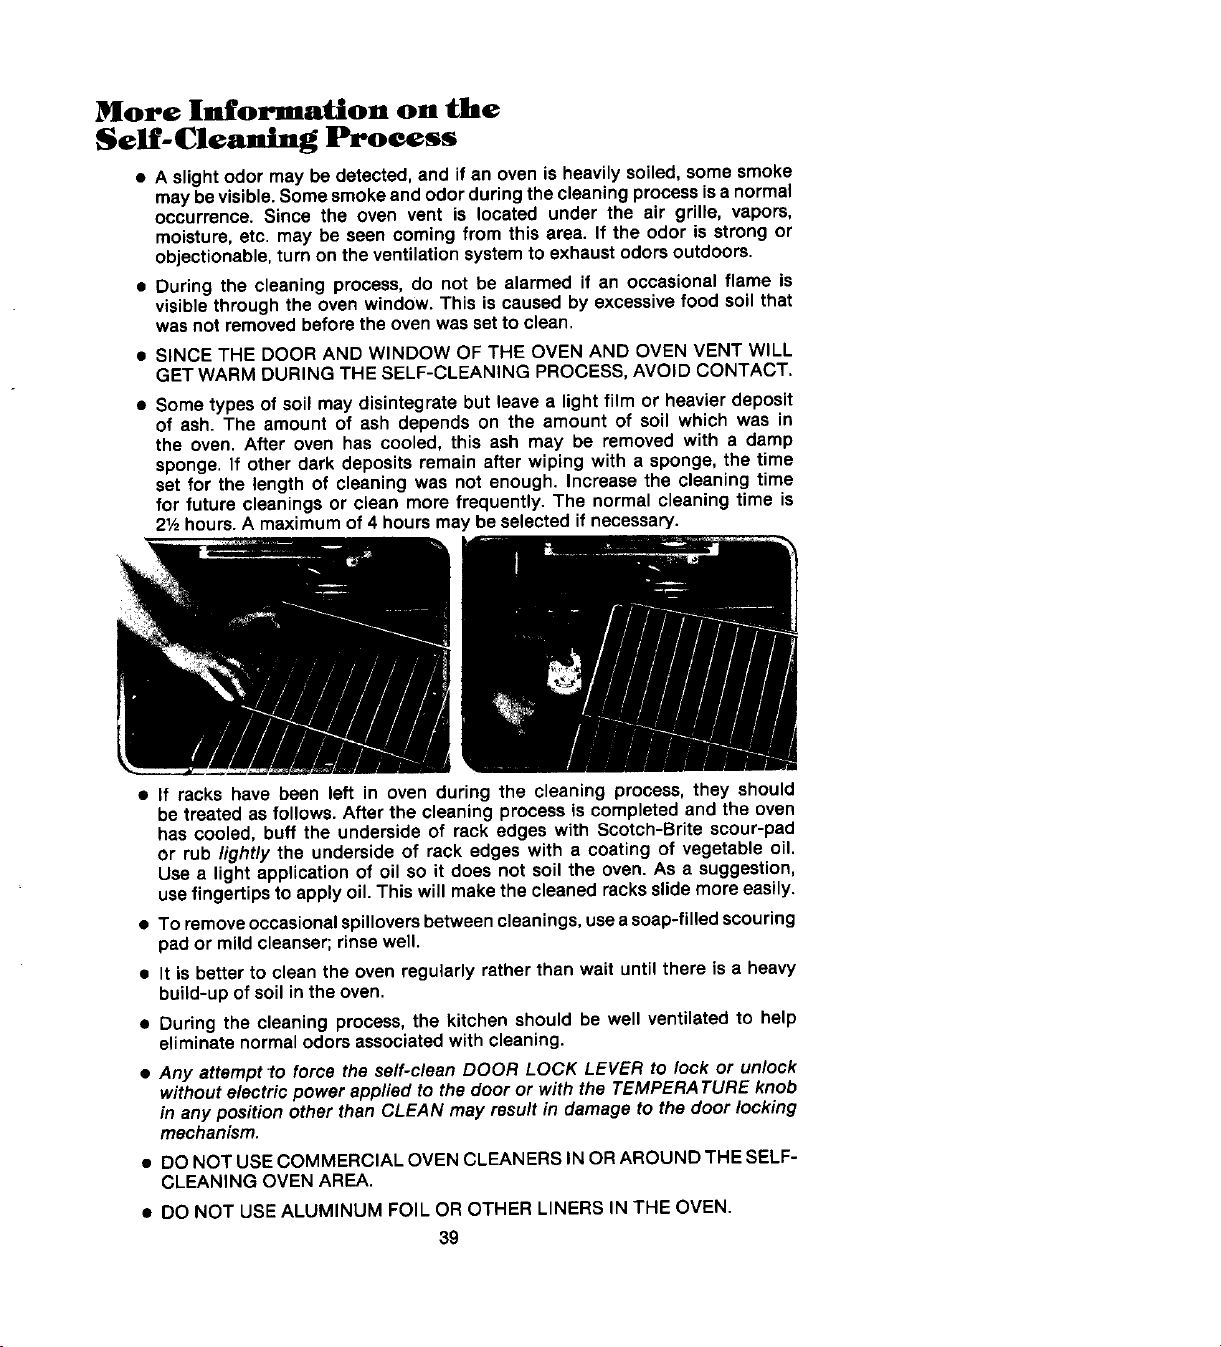
• If racks have been left in oven during the cleaning process, they should
betreatedas follows.After the cleaningprocessiscompletedand the oven
has cooled, buff the undersideof rack edges with Scotch-Britescour-pad
Or rublightly the undersideof rack edgeswith a coating of vegetableoil.
Usea light applicationof oil so it does not soilthe oven.As a suggestion,
usefingertipsto apply oil. This will make the cleanedracks slide more easily.
• To removeoccasionalspillovers betweencleanings, useasoap-filled scouring
pad or mild cleanser;rinse well.
• It is better to clean the oven regularly rather than wait until there is a heavy
build-up of soil in the oven.
• During the cleaning process,the kitchen should be well ventilated to help
eliminate normal odors associatedwith cleaning.
• Any attempt to force the self-clean DOOR LOCK LEVER to lock or unlock
without electric power applied to the door or with the TEMPERATUREknob
In any position other than CLEAN may result in damage to the door locking
mechanism.
• DONOT USECOMMERCIAL OVENCLEANERSINORAROUND THE SELF-
CLEANING OVENAREA.
• DO NOT USEALUMINUM FOIL OR OTHERLINERS IN THE OVEN.
39
Other Hints on
Carin for Your Ran e
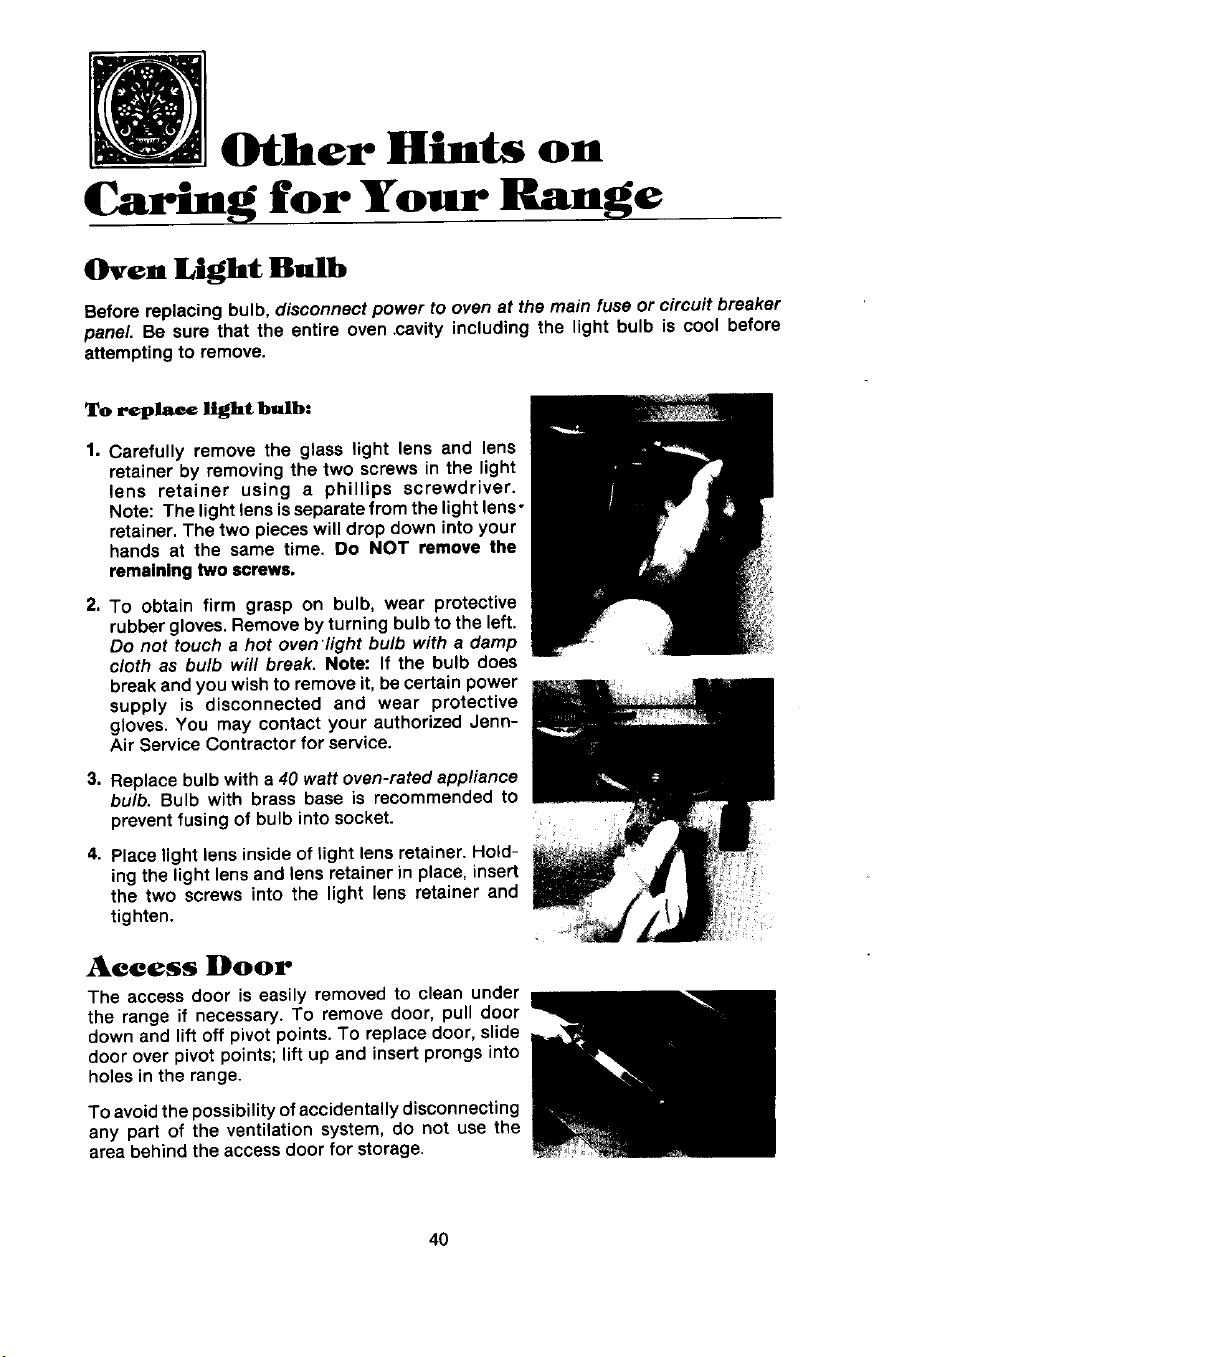
Oven Light Bulb
Before replacing bulb, disconnect power to oven at the main fuse or circuit breaker
panel. Be sure that the entire oven.cavityincludingthe light bulb is cool before
attemptingto remove.
To replace light bulb:
1. Carefully remove the glass light lens and lens
retainerby removingthe two screwsin the light
lens retainer using a phillips screwdriver.
Note: Thelightlensisseparatefromthelightlens-
retainer.The twopieceswilldropdown intoyour
hands at the same time. Do NOT remove the
remainingtwoscrews.
2. To obtain firm grasp on bulb, wear protective
rubbergloves.Removeby turningbulbtotheleft,
Do not touch ahot even'light bulb with a damp
cloth as bulb will break, Note: If the bulb does
breakandyouwishto removeit,becertainpower
supply is disconnected and wear protective
gloves.You may contactyour authorizedJenn-
AirServiceContractorfor service.
3. Replacebulbwitha 40 watt oven-rated appliance
bulb. Bulb with brass baseis recommendedto
preventfusingof bulbintosocket.
4. Placelightlensinsideof _ightlensretainer.Hold-
ingthe lightlensand lensretainerin place,insert
the two screwsinto the light lens retainer and
tighten. ;;
Access Door
The accessdoor is easily removed to clean under
the range if necessary. To remove door, pull door
down and lift off pivot points. To replace door, slide
door over pivot points; lift up and insert prongs into
holes in the range.
To avoidthe possibility ofaccidentally disconnecting
any part of the ventilation system, do not use the
area behind the access door for storage.
40
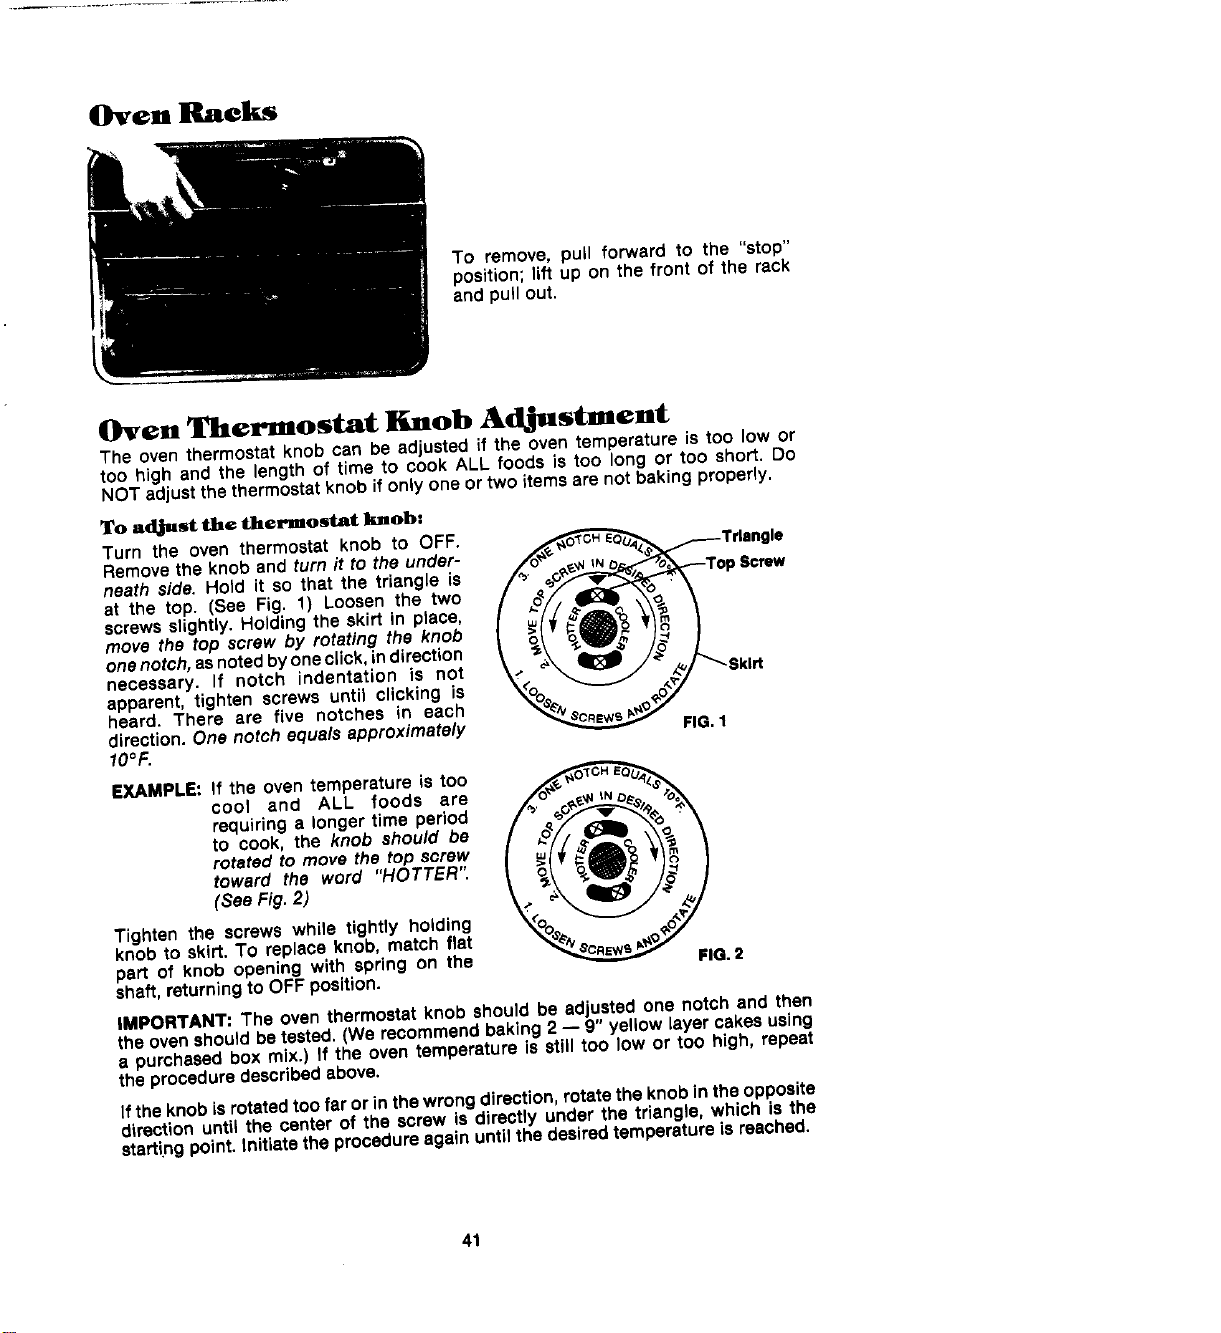
Oven
To remove, pull forward to the "stop"
position; lift up on the front of the rack
and pull out.
Oven Thermostat Knob AdjustJ-ent
The oventhermostat knob can be adjusted if the oven temperatureis too low or
too high and the length of time to cook ALL foods is too long or too short. Do
NOT adjustthethermostatknobJfonlyone ortwo itemsarenotbakingproperly.
To adjust tit*=thermostat knob:
Turn the oven thermostat knob to OFF. _ _-Trlsngle
Removethe knob and turn it to the under-
neathside. Hold itsothatthetdangle is l _'q_ _T°p screw_"_*__[ _' Z
at the top. (See Fig. 1) Loosen the two _ _
screwsslightly. Holding the skirt in place, " "
move the top screw by rotating the knob _
onenotch,asnotedbyoneclick,indirection
necessary. If notch indentation is not _/ _--Sklrt
apparent, tighten screws until clicking is
heard. There are five notches in each .__c,_vo^___,_o_
direction. One notch equals approximately _ FIG.1
lOOF.
EXAMPLE:if the oven temperature is too F°____o'__ 1
cool and ALL foods are
requiring a longer time period
rotated to move the top screw ;o
toward the word "HOTTER".
(SeeFig. 2)
Tighten the screws while tightly holding '_oo '"_/ q
knob to skirt. To replaceknob, matchfiat
part of knob opening with spring on the FIG.2
shaft,returningto OFFposition.
IMPORTANT: The oven thermostatknobshould be adjustedone notchand then
theovenshouldbetested.(We recommendbaking2 -- 9" yellow layercakesusing
a purchasedbox mix.) If theoven temperatureis still too low or too high, repeat
theproceduredescribedabove.
Ifthe knobisrotatedtoo faror inthewrongdirection,rotatetheknobintheopposite
directionuntil the centerof the screw is directly underthe triangle, which is the
startingpoint.Initiatethe procedureagainuntilthedesiredtemperatureis reached.
41
Before You Callfor Service
Checkthefollowinglistto besureaservicecall isreallynecessary.A quickreference
ofthis manual,as well as reviewingadditionalinformationon itemsto check, may
preventan unneededservicecall.
If nothing on the range operates:
• check for a blown circuit fuse or a tripped main circuit breaker.
• checkif rangeisproperlyconnectedto electriccircuitin house.
If ventilation fan does not operate but everything else on the range
does:
• check behind lower accessdoor if power cord to blower assembly has been
disconnected.
If grill heating element or eooktop does not get hot enough:
• check if heating element isplugged insolidly.
• surface controls may not be set properly.
• voltage to house may be low.
If ventilation system Is not capturing smoke efficiently:
• check on crossventilationin roomor make up air.
• excessiveamountof smoke is being created;check instructionsfor grilling,
trimmingmeats.(Seep. 13.)
• outsidewall capmaybe trappedshut.
• rangemaybe improperlyinstalled;checkductinginformation(seep. 44).
• airfilter maybe improperlyinstalled(seep.9).
If oven does not heat:
• the SELECTORand/or TEMPERATURE knobsmaybeset incorrectly.
• clockcontrolsmaybesetfor delayedstartofoven.
If the oven light does not work:
• the light bulb islooseor defective.
• ovenlightdoesnotwork duringself-cleaningprocess.
If oven will not go through self-cleaning proeess:
• controls may be improperly set.
• door may not be locked.
• check the clock controlled settings and the current time of dayon the clock.
If oven did not clean properly:
• oven may needlongercleaningtime.
• excessivespillswere not removed prior to self-cleaningprocess.
• one or severalcontrols may havebeen turned from GLEANto another position
after self-cleaning process started.
42
If oven door _ not nnloel_
• ovenmay nothavecooledtosafe temperatureafter se)f.-cleaningprocess.
• TEMPERATUREknobmayhavebeenswitchedfromCLEAN position.
• electriccurrentcomingintothe ovenmay beoff.
If food• do not broil properly:
• the SELECTORand/or TEMPERATUREknobsmay notbe set properly.
• check rackposition.
• voltageintohousemay be low.
if baked food is burned or too brown on top:
• the SELECTORknob may be in the BROIL position.
• food maybepositionedincorrectlyin oven.
• ovennot preheatedproperly.
If foods bake unevenly:
s the range may be installedimproperly.
• checktheovenrackwitha level.
• staggerpans;do notallowpanstotoucheachotheror ovenwall.
• checkinstructionsfor suggestedplacementofpanson ovenrack.
if oven bnklu_ results are less than _xpemd:
• the pans being used may not be of the size or material recommendedfor
bestresults.
• theremaynotbesufficientroomaroundsidesofthepansfor properaircircula-
tionin theoven.
• checkinstructionsfor preheating,rackpositionand oventemperature.
• ovenventmay havebeenblockedor covered.
If bakl--_ rest_ts diner from previous oven:
• oven thermostatcalibration may differ between old and new ovens. Follow
recipeanduseandcaredirectionsbeforecallingforservicesincetheoalibretion
on thepreviousovenmayhavedriftedto atoo highor too low setting.
43
Information
Jenn-Air'sventilationsystemis designedto captureboth cookingfumesand smoke
from any placeon the grillsurface.If the systemdoesnot,thesearesomeducting
installationsituationsto check:
• 6" diameterround or 31_'' x 10" rectangularductingshouldbe used. Note:5"
diameter round ducting may be used for venting stra_'ghtout the back of the
cooktopand directlythroughthewallfor 10' or less.
• No morethanthree90° elbowsshouldbe used.Distancebetweenelbowsshould
beat least18".
• RecommendedJenn-Air wall cap shouldbe used.Make sure dampermoves
freely whenventilationsystemisoperating.
• There shouldbe a minimumclearanceof 6" for cooktopinstallednear a side
wall,
If there isnot an obviousimproperinstallation,there may bea concealedproblem
suchas a pinchedjoint,obstructionin the pipe,etc. installationisthe responsibility
of theinstallerandquestionsshouldbeaddressedfirstbytheinstaller.The installer
shouldverycarefullychecktheductinginstallationinstructions.
44
Notes
Accessories
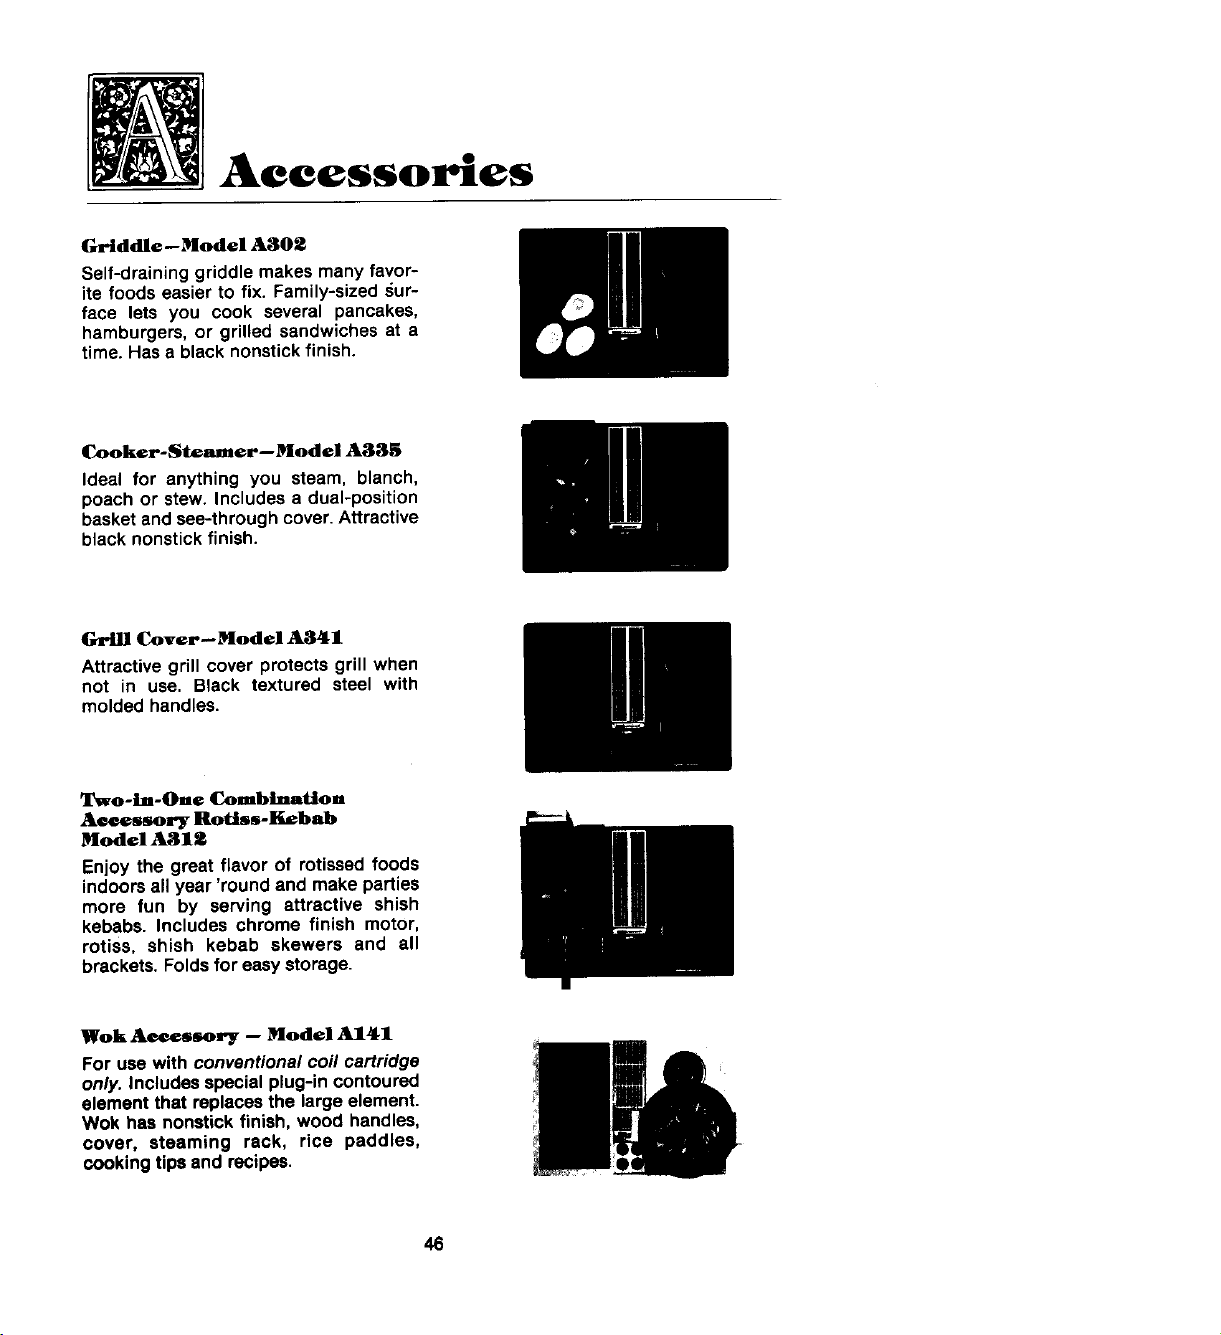
Griddle--Model A302
Self-draining griddle makes many favor-
ite foods easier to fix. Family-sized sur-
face lets you cook several pancakes,
hamburgers, or grilled sandwiches at a
time. Hasa black nonstick finish.
Cooker-Steamer--Model A335
Ideal for anything you steam, blanch,
poachor stew.Includesa dual-position
basketandsee-throughcover.Attractive
blacknonstickfinish.
GriLl Cover--Model A341
Attractive grill cover protectsgrill when
not in use. Black textured steel with
moldedhandles.
Two-in-One Combination
Ae_essory Rottss-lT_bab
Model A31_
Enjoy the great flavor of rotissedfoods
indoorsall year'roundand makeparties
more fun by serving attractive shish
kebabs. Includes chrome finish motor,
rotiss, shish kebab skewers and all
brackets,Foldsfor easystorage.
Wok Aeeessory -- Model A141
For use with conventional coil cartridge
only. Includesspecialplug-incontoured
elementthat replacesthe largeelement.
Wok has nonstickfinish,wood handles,
cover, steaming rack, rice paddles,
cookingtipsandrecipes.
46
Assembly
Grill assemblies include one plug-in
element, two grill-rocks and two black
aluminum grates to convert either side
of your cooktop to a grill. A storage tray
is included. (Tray is not included with
grill shipped with your range.)
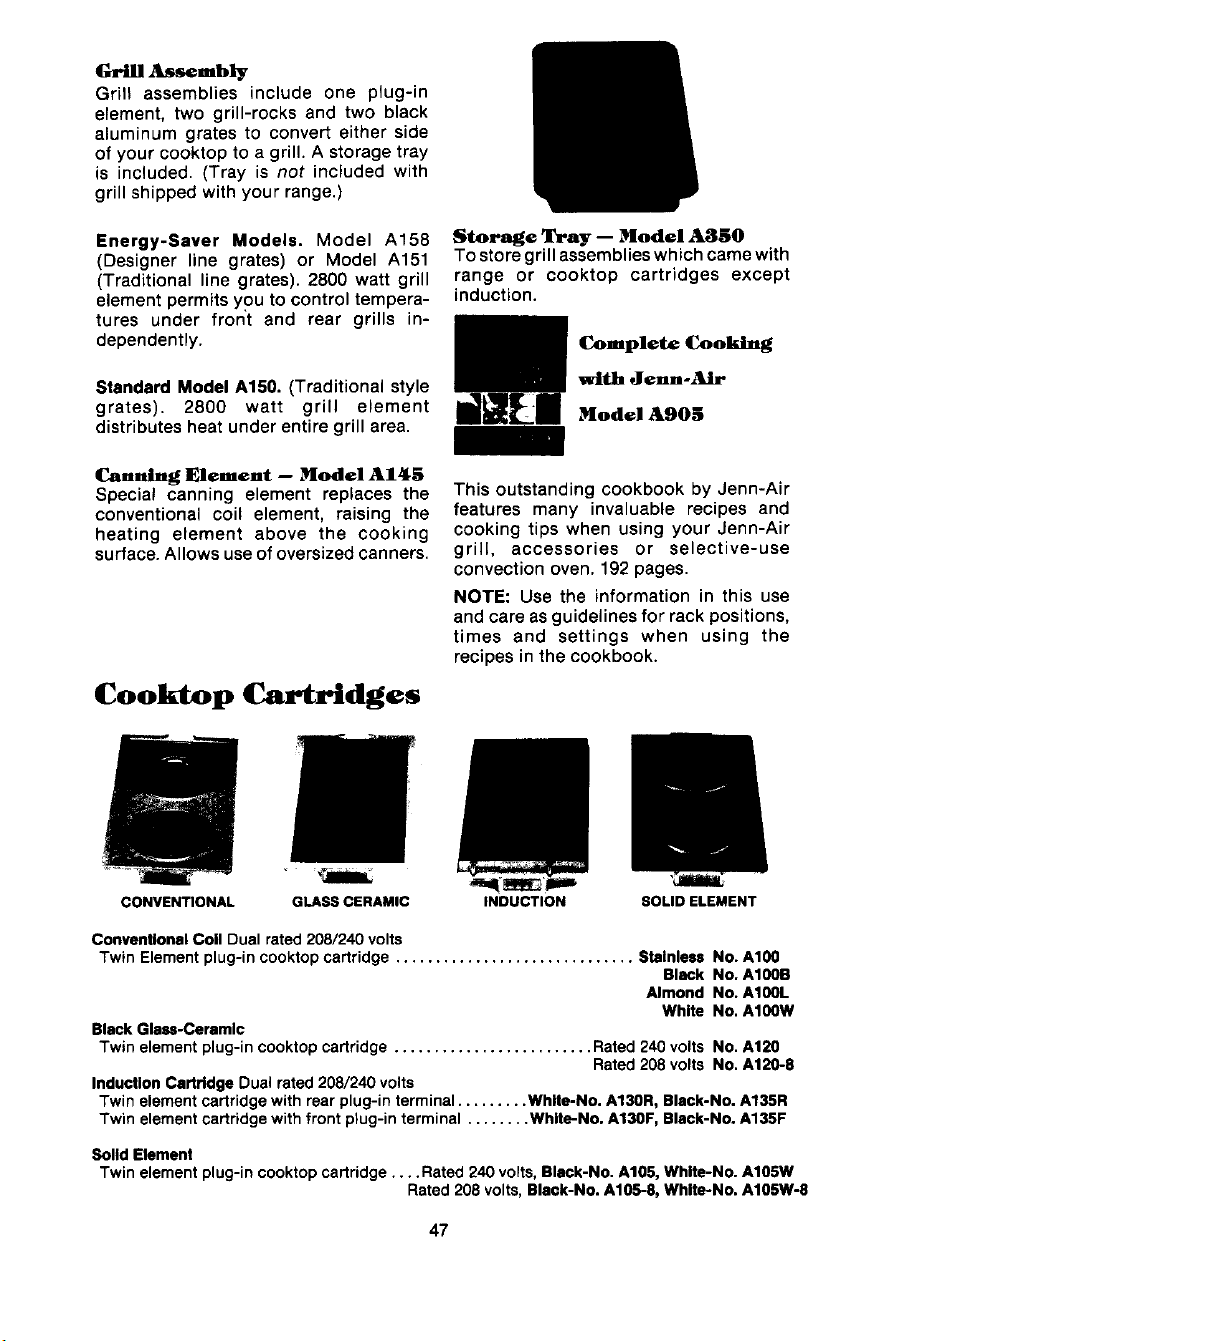
Energy-Saver Models. Model A158 Storage Tray -- Model A850
(Designer line grates) or Model A151 Tostoregrillassemblieswhichcamewith
(Traditional line grates). 2800 watt grill range or cooktop cartridges except
element permits you to control tempera- induction.
tures under front and rear grills in-
dependently. Complete Cooking
Standard Model A150. (Traditional style with Jenn-Air
grates). 2800 watt grill element ModelAg05
distributes heat under entire grill area.
Cau.ing Element -- Model A145
Special canning element replaces the This outstanding cookbook by Jenn-Air
conventional coil element, raising the features many invaluable recipes and
heating element above the cooking cooking tips when using your Jenn-Air
surface. AIIows useof oversizedcanners, grill, accessories or selective-use
convection oven.192pages.
NOTE: Use the information in this use
and care asguidelines for rack positions,
times and settings when using the
recipes in the cookbook.
Cooktop Cartridges
CONVENTIONAL GLASSCERAMIC INDUCTION SOLIDELEMENT
ConventionalCollDualrated208/240volts
TwinElementplug-incooktopcartridge.............................. StalnlessNo.A100
BlackNo.A100B
AlmondNo.A100L
WhlteNo.AI00W
BlackGlass-Ceramlc
Twinelementplug-incooktopcartridge......................... Rated240voltsNo.A120
Rated208voltsNo.A120-8
InductionCartddgeDualrated208/240volts
Twinelementcartridgewithrearplug-interminal......... White-No.A130R,Black-No.A135R
Twinelementcartridgewithfrontplug-interminal........ White-No.A130F,Black-No.A135F
SolidElement
Twinelementplug-incooktopcartridge.... Rated240volts,Black-No.A105,White-No.A105W
Rated208volts,Black-No.A105-8,White-No.A105W-8
47