Loading ...
Loading ...
Loading ...
02 OPERATING01 SETTING UP
Setting up _11
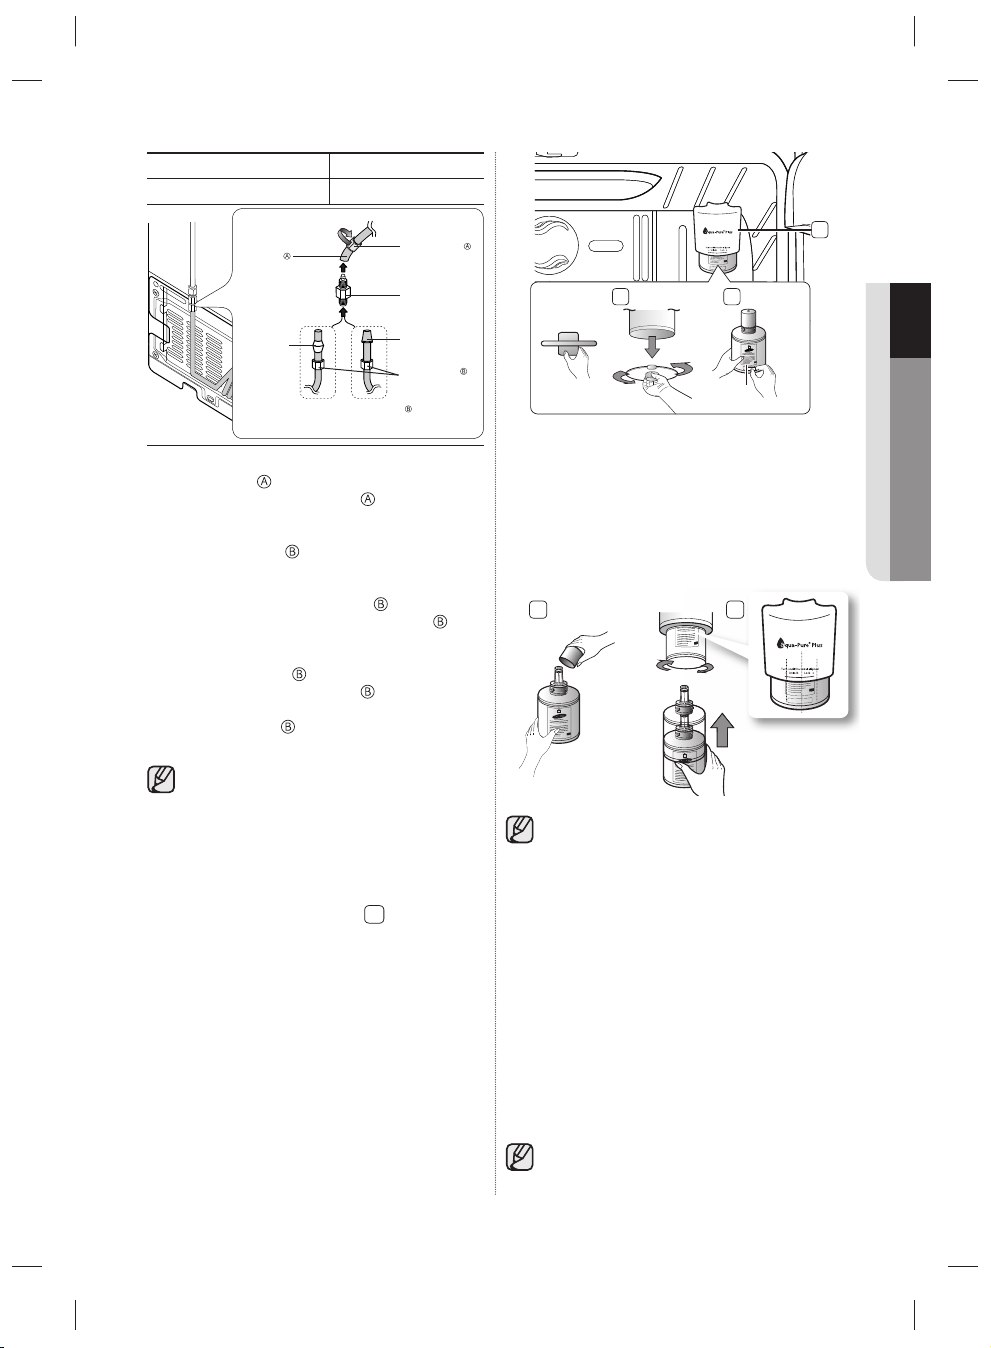
1. Slip the compression nut through the supplied
plastic tubing .
2. Tighten the compression nut
onto the
6.35 mm compression fi tting.
-
If you are using copper tubing, slip the
compression nut (not included) and ferrule
(not included) on copper tubing (not included) as
shown.
- If you are using plastic tubing , insert the
molded end(Bulb) of the plastic tubing into
the compression fi tting.
Do not use without the molded end(Bulb) of
the plastic tubing .
3. Tighten the compression nut onto the
compression fi tting. Do not over-tighten the
compression nut .
4. Turn water on and check for any leakage.
Only connect the water line to a drinkable
water source. If you have to repair or
disassemble the water line, cut off 6.35mm of the
plastic tubing to make sure you get a snug, leak-
free connection.
Installing the water fi lter.
1. Remove the water fi lter cover
1
.
2. Remove the fi xed cap by turning it counter
clockwise. Keep the cap in a safe place for later
use if you don’t use the fi lter.
3. Remove the water fi lter from the box and put
a replacement indicator sticker on the fi lter as
shown. Place the sticker on the fi lter that dates
six months in the future. For example, if you
install the water fi lter in March, put the “SEP”
sticker on the fi lter to remind you to replace it
in September. That way you’ll know when it is
time to replace the fi lter. Normally, a fi lter life is
about 6 months.
4. Remove the fi lter cap and insert the fi lter into
the fi lter housing.
5. Slowly turn the water fi lter 90º clockwise to
align with the printing mark on the cover,
locking the fi lter in position.
Make sure to align the water fi lter label mark
with center of cover fi lter printing as illustrated.
Remember, do not overtighten.
You should remove the right side upper
glass shelf before installing the water fi lter.
Removing any residual matter inside
the water supply line after installing
the water fi lter.
1. Turn ON the main water supply & turn OFF the
valve to the water supply line.
2. Run water through the dispenser until the water
runs clear (approx. 6-7 minutes). This will clean
the water supply system and remove air from
the lines.
3. Additional fl ushing may be required in some
households.
4. Open the Refrigerator door and make sure
there are no water leaks coming from the water
fi lter.
Be sure to fl ush the dispenser thoroughly
or water may leak from it. This is due to the
fact that there is still air in the line.
Plastic tubing
(Supplied)
Ferrule
(Not supplied)
Compression nut
(6.35 mm) (Supplied)
Compression fi tting
(Supplied)
Bulb
Compression nut
(6.35 mm) (Not
supplied)
Copper tubing
or
Plastic tubing
(Not supplied) (Not supplied)
Household water line
Refrigerator
Refrigerator
1
2 3
Sticker
(month indicator)
• 6.35 mm compression nut • copper tubing
• plastic tubing • ferrule
Turn until
the label is
aligned.
Separation
of red cap.
Cover fi lter
4 5
DA99-03403A(0.5).indd Sec4:11DA99-03403A(0.5).indd Sec4:11 2012.5.25 1:27:38 PM2012.5.25 1:27:38 PM
Loading ...
Loading ...
Loading ...