wwwJgservice.com
LG
Window-Type Air Conditioner
OWNER'S MANUAL
MODELS: L WHD8OOOR, L WHD8OOOR Y5, L VVHDI O00R
after
para el futuro
,o
FOR "{OUR RECORDS
Write the mode_ and sedai numbers here:
Model #
_ria! #
You can fir_d the humors on a _abel on the side of the
product,
Dealer's Name
Date Purchased
[] Stap# your receipt to this pa_ in t_ _ent you need it
to prove date of purchase or for warra_ly issues,
READ THIS MANUAL
Inside you will find many helpful hints on how to use and
maintain your air conditioner pro_rly: Just a little preventive
care on your part can save you a great dea_ of time and
mor_y over the life of your air cond_ioner,
You'll flr_J many answers to common problems in the chin1
d troubleshooting tips, I_ you _ev#w ou_ chart of
Troubleshooting Tips first, you may not aeed _o call f(_
serv_e at aE
PRECAUTION
, Contact an Authorized Service Center for repair or
maintenance of this unit. Call 1-800-243-0000 to
locate the neare_ ASC.
,This air conditioner is not intended for use by young
children or tnvafids without supervision_
,Young children should be su_tvised to ensure that
they do not play with the air conditioner.
,ff the power cord requires replacement have an
Authorized Servicer install an exact rep|acement part.
, |nstallation work must he performed in accordance
with the Nations| E_ectric Code by qualified and
authorized personnet on|y:
2 Room Air Conditioner
To prevent injury to the user or other _ople and property damage, the following instructions
must be foIFowed.
[] _n_rrect operation due to ignoring instructions wfl] cause harm or damage. The seriousness
is classified b,y the foi]]o,wing indications.
[] B_ause of the weight of the product, it is recommend_ that you have a hel_r to assist in
the instaHatiion.
• Meanings of sym_]s used in this manual are as shown bel_.
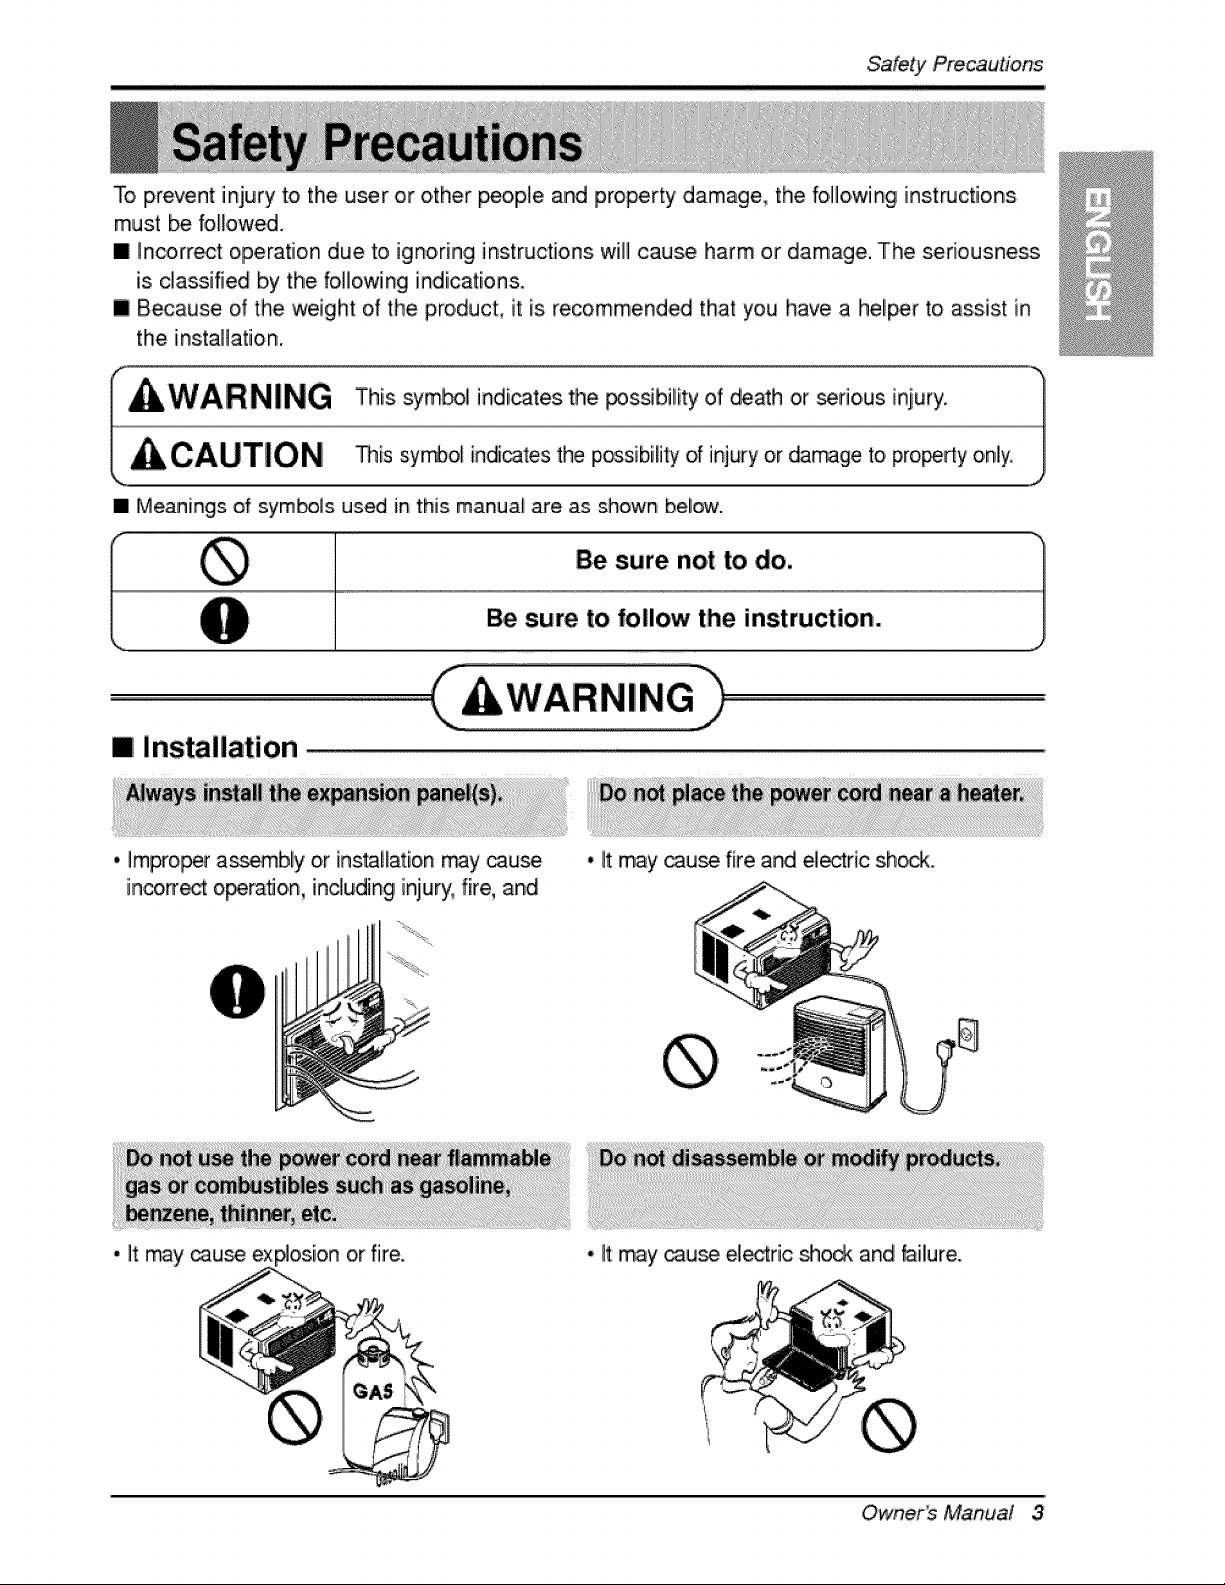
Be sure not to do.
Be sure to follow the instruction.
mi installation
* Improper as_mbly or ins_lfation rray _use
inco_ operation, including iniury, fire, and
• It may cau_ fire and _ectric sh_
• It may _u_ ex or fiire. * lit may cau_ el_fic :_oc_ and failure.
Owner_ Manual 3
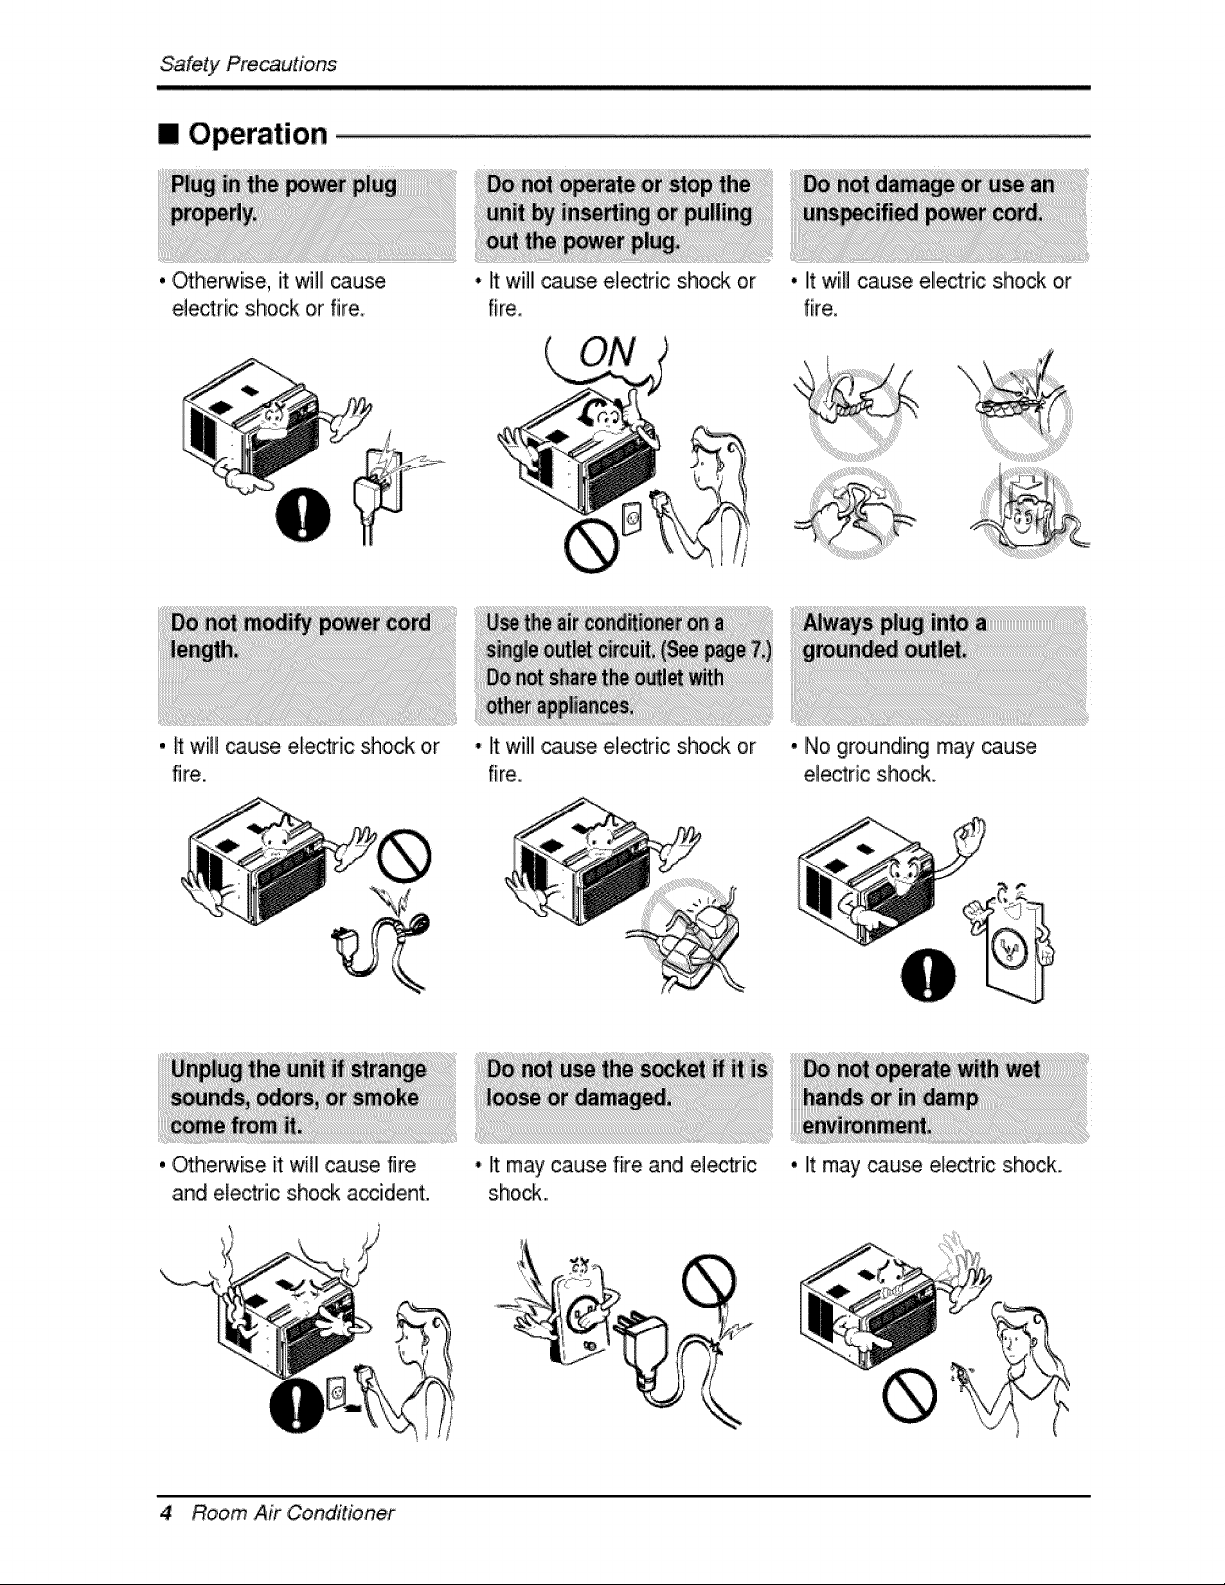
[] Operation
. ._he_ise, it will cause
electric shock or fire
, _ will _use electric shock or
fire.
, ,_herwise it will cause fire
and electric shock accident.
4 Room Air Conditioner
• It willl cause e_ectric shock or
fire.
• It will cause ele_ric sho_ or
fire.
• It may cause fire and electri.c
shock...
• litwiill cause ellectric shock or
fire.
• No grounding may _use
ele_ric sho_.
• It may cause electric shock.
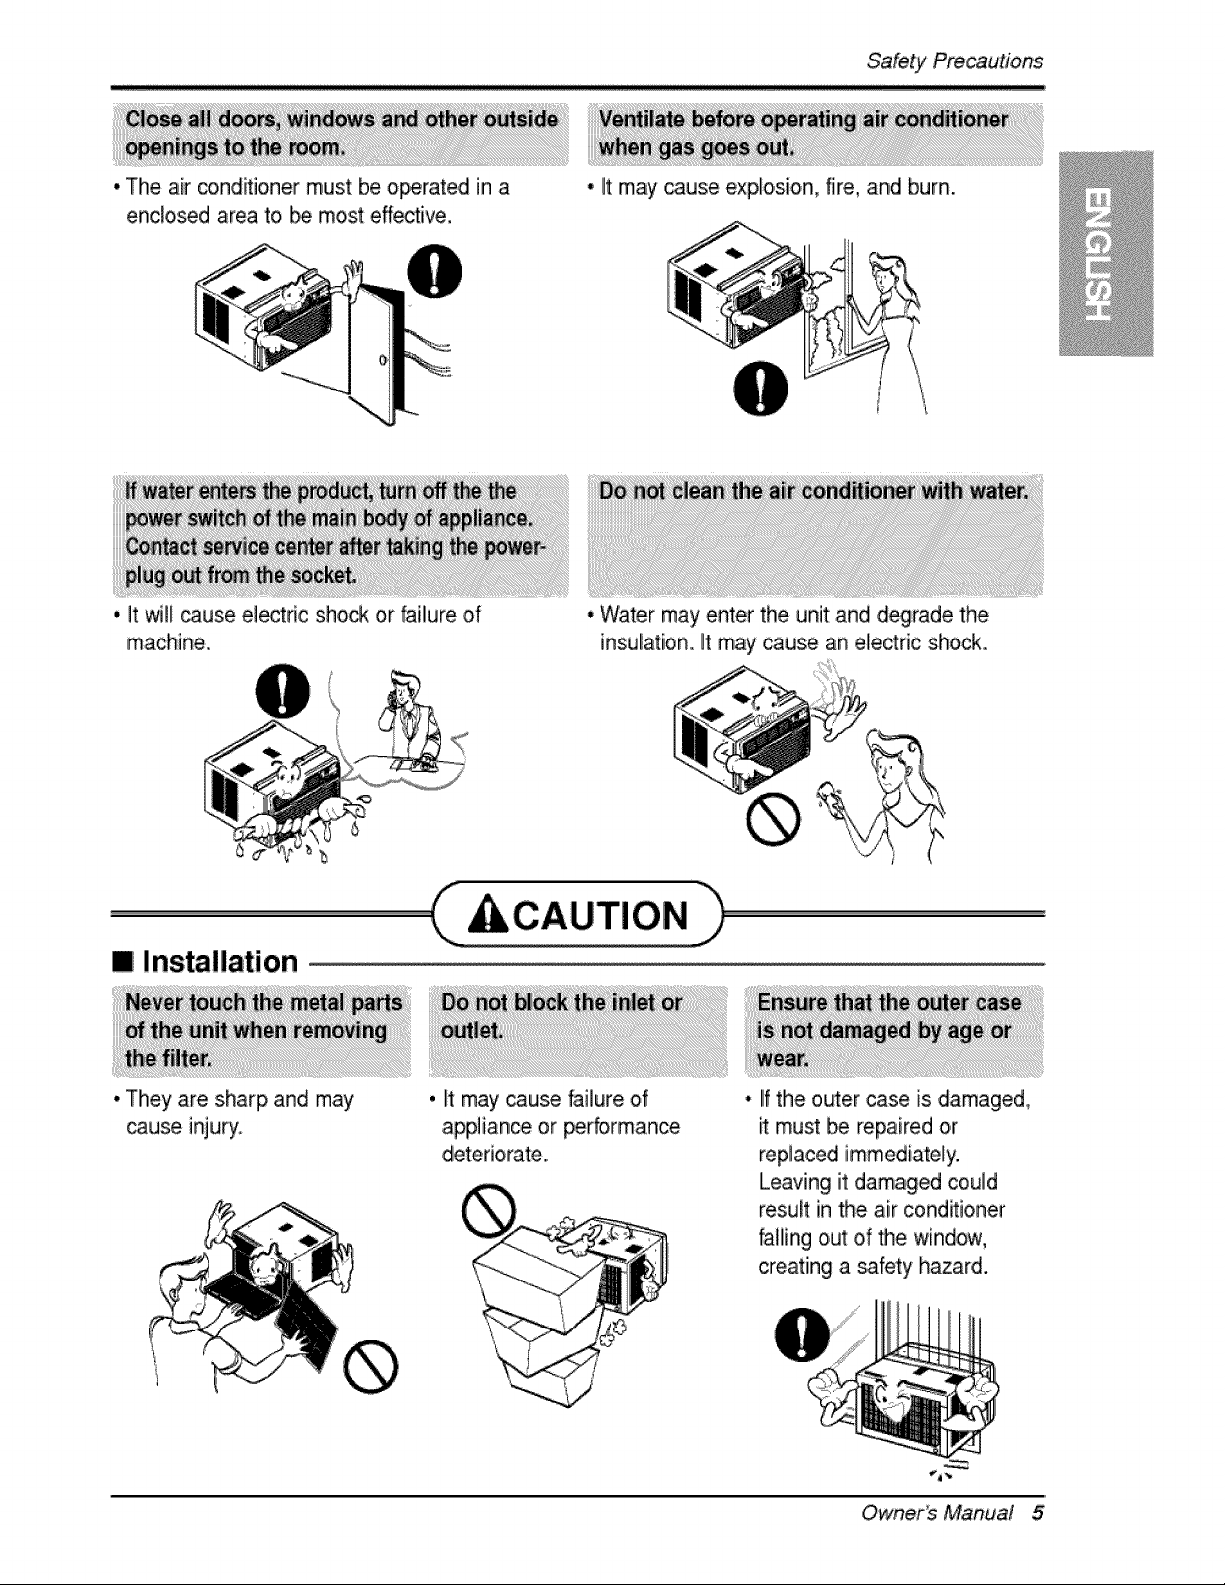
* The air co,nd_ioner must be operated in a
enclosed area to _ most effective,
* It may cause explosion, fire, and burn.
'i _t _I cause ele_ric sho_ or faillure of
machine..
[] Installation
* They are sharp and may
cause inju_.
* Water may enter the unit and degrade the
insulation. It may cause an electric shock..
,CC.UT,O.h
, It may cause failure of
appliance or performance
• IIfthe outer case is damaged,
must be repaired or
replaced immediately.
Leaving it damaged could
result in the air cond_ioner
falling out of the window,
creating a safety hazard.
Owner_ Manual 5
m Operation
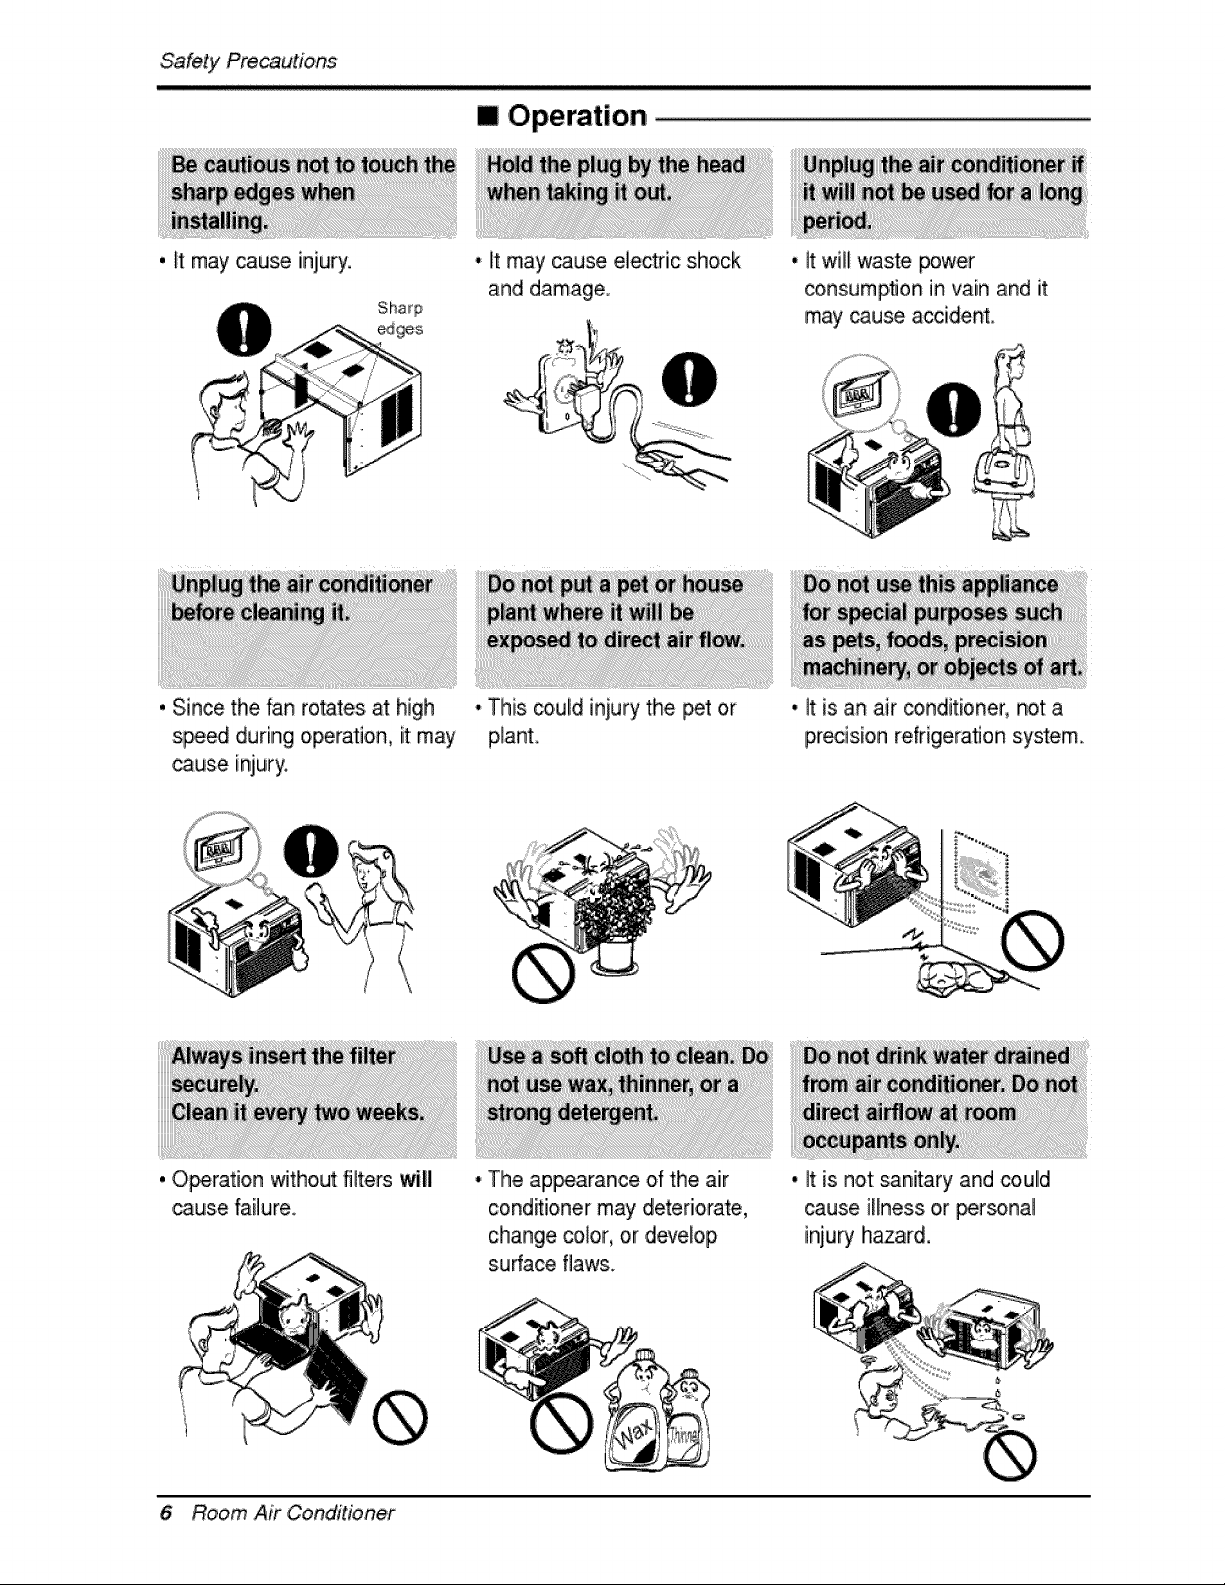
. It may cause iniury • It may cause electric shock
and damage
, it will waste power
consumption in vain and it
may cause accident,
, Since the fan rotates at high
spe_ during operation, it may
cause injury
, Operation without riflers will
cause failure
• This _uld iniury the _t or
plant
• It is an air _nditioner, not a
precision refrigeration system
• Tlhe ap_arance of the air
c:ond_i,onermay deteriorate,
change color, or develop
s.ufface flaws.
, It is not sanitary and coulld
cause illness or _r_nal
injury hiazard
6 Room Air Conditioner
Before, Operation
1. Plug in the power cord properly.
i ¸?
2. Use a dedicated circuit. Ovedoadiing the line could create a fire, Ihazard.
3. Do not use an extension cord. See page 10 for more details.
4. Do not start/stop operation by plugging/unplugging the power cord.
5. If the power co_d is damaged and requires replacement, Ihave an Authorized
Servicer install an exact replacement part.
ii _i_(i_i!_!_!_!_!__ I
i. Being exposed to direct aidlow for an extended p,eriodl of time could Ibe
hazardous to your health. Do not expose occupants, pets, or plants to direct
airflow for extended periods of tiime.
2. Due to the possibility of oxygen deficiency, ventilate the room when used
together with stoves or other heating devices,
3 Do not use this air conditioner for non-specified sp,ecia! purposes (e.g_
preserving precision devices, food, pets, plants, and art objects). Such usage
co,uid damage the items.
4 The air conditioner is a consumer comfort appliance, not a precision climate
control system.
1. Do not touch the metal parts of the unit when removing the filter. Injuries can
occur when handling sharp metal edges.
2. Do not use water to clean inside the air conditioner. Exposure to water can
destroy the insulation, leading to, p,ossible electric shock.
3. When cleaning the unit, first make sure that the power and breaker are turned
off. The fan rotates at a very high speed during operation. There iisa
possibility of injury if the unit's power is accidentally triggered on while
cleaning inner parts o,f the unit.
For repair .and maintenance, contact an Authorized Service Center. See the
warranty page for details or cal! (800) 243-0000. Have your model number and
serial number available. They should be written on page 2 of this manual.
Owner_ Manual 7

/ntrodu'c#on
This symbol alerts you to the risk of electric shock.
This symbol alerts you to hazards that could cause harm to the
air conditioner.
This symbol indicates s_cial notes.
WARNING: This appliance should be install_ in accordance with the
National El_tric C_e.
Upper Guide
Cabinet
Front Grille
Air Filter
Horizontal Air Deflector
(Horizontal Louver)
Ve_ica! Air Deflector
(Vertical Louver),
Air Diischarge
Brace
Evaporator
Control Board
Remote Controi][er ...............................................
Compressor
Condenser
Base Pan
Power Cord
8 Room Air Conditioner
Elect'ricalSafety,
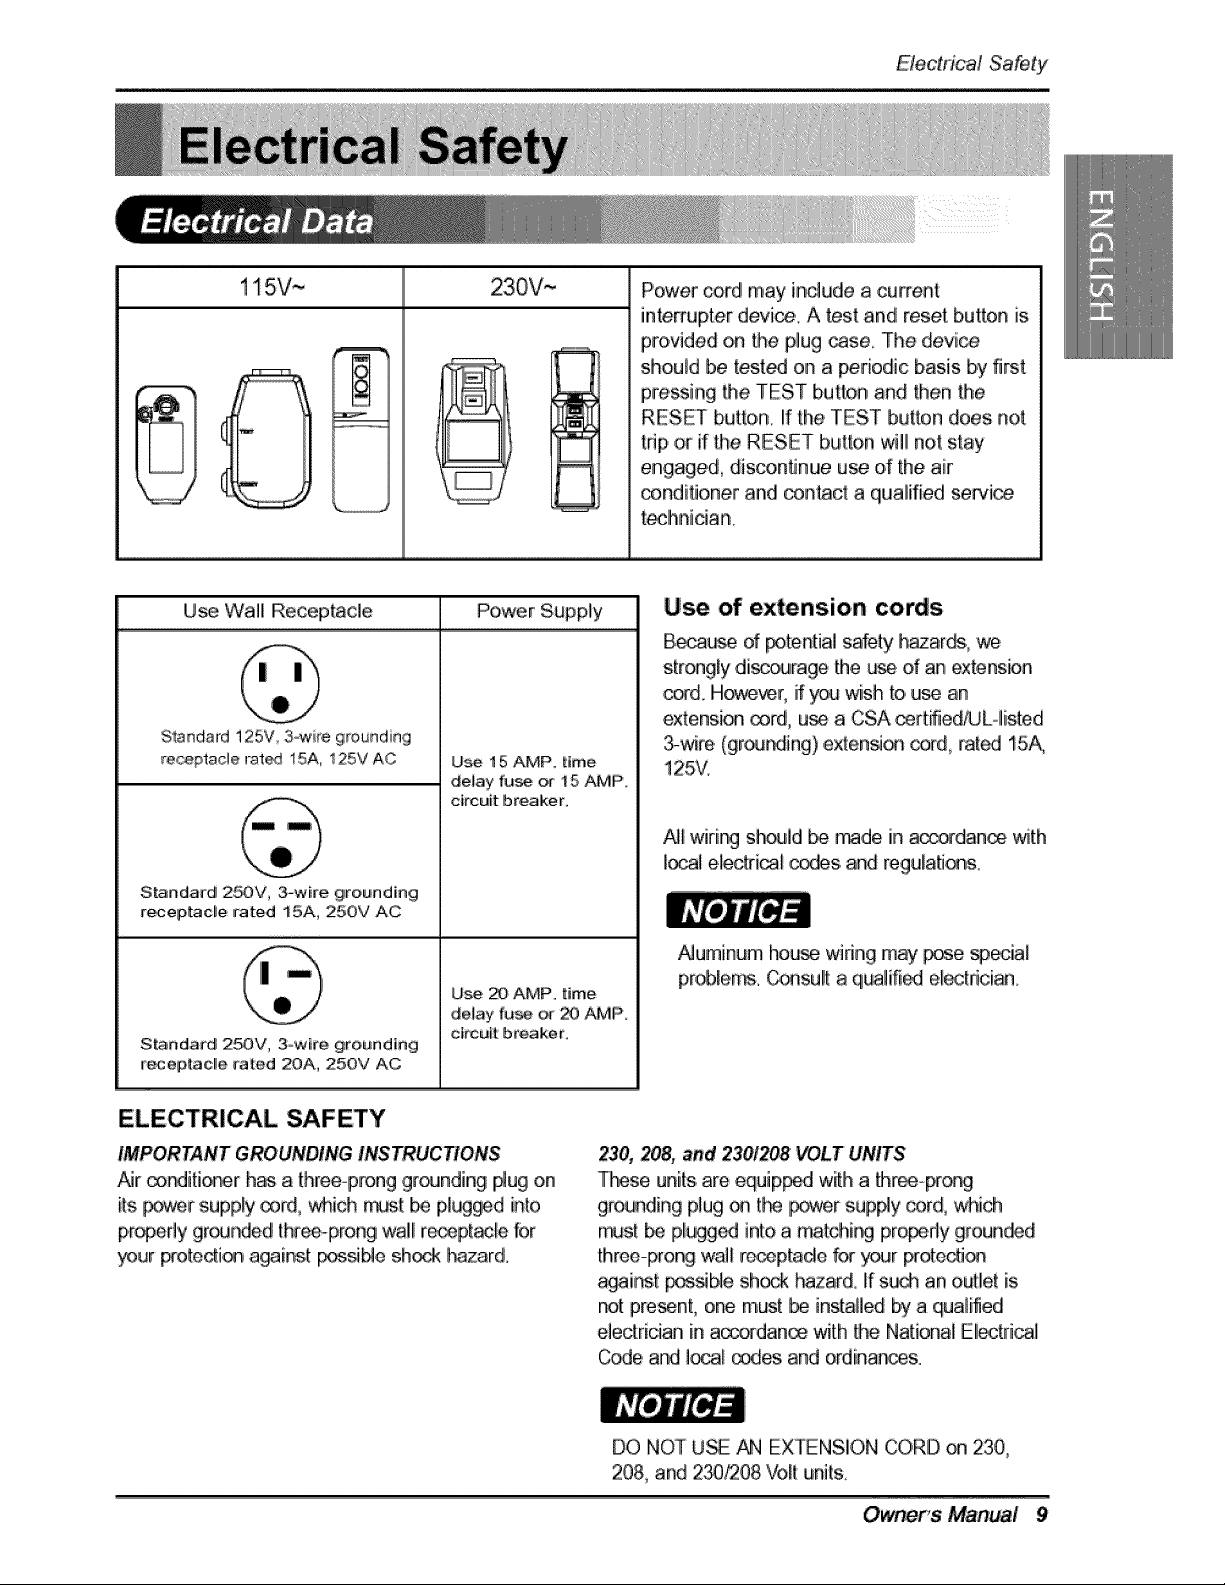
115V~ 230V,--
Power cord may include a current
interrupter d_i_,. A _st and reset button is
provided on the plug _se, The device
should be tes,t_ on a _riodic basis b_ first,
p_,ssing the TEST button and then Me
RESET button, If the TEST button does not
trip ,oirif the RESET button will not stay
engaged, disco,nfinue use d' the air
conditioner and _n_ct a qualified sewic_
teclhnician.
Use Wall Receptacle Power Supply
Standard125V 3_ire grounding
re_pta,cle rat_ 15A, t25V AC
Standa#d 25OV, 3-wire grounding
receptac_,e rated 15A, 250V AC
S_ndard 25OV, 3ow#e grouted[rig
_%epiacl!e _'ated 2OA, 25OV AC
U_ 15 AMP, titme
de_ay fu_ _ 15 AMP,
circuit breaker.
Use 20 AMP. time
de_ay fu_ _ _ AMP.
ckcutt: breaker.
Use of extension cords
B_u,=_ d _tential safety _zar_,, we
strongly di_lrage the _ d an extension
or_d_H_ver, if you wish to, u_ an
extension _rd, u_ a CSA _rt_ie_L-,,listed
3-wire, (grou_ing),exten_on exit,rat_ 15A,
125V.
_'J_w#ing sh_]d _ made in a_danoe with
local elecM_ _s, and regulatJ_s.
Numinum house,wiring may pose sp_ial
privies. Co_sult a qt_Jifi_ e[_tdcian.
ELECTRICAL SAFETY
IMPORTANT GROUNDING INSTRUCTIONS
Nr _rditi_r has a threeop_onggr(_Jnding #ug on
its p_r :supply _rd,, which n_t b_ plugged into
p,r_pefly gr_Jr_e,d three-prong wall re_pt_[e for
_ur preterit} a_in,st pestle sh_ [i-,3zard.
230, 208, =nd 230!_38 VOLT UNITS
These units,are equip_ w_h a _reeo_o_
g[ound[ng plug _ tL_ _er sup#y cord, which
_st _ pli_g_ into a match#_ pro_dy grounded
three-prong wai! re_ptade for _r Fotecti_
a_i_,t F_Me shock L_zard. If s_ an outlet is
not present, one must _ installed by a qualified
e]edrician in accofdan_ with the National Eliectfi_J
C_e and ]_ _es, and ordinances.
DO NOT U_ AN EXTENSION CORD on 230,
208, and 2_I208 Volt units
Owner, s' Manual 9
WARNING: This appliance must be properly grounded.
The power cord of this appliance is equipped with a three-prong grounding plug.
To miinimize the risk of electric shock, use the plug with a standard three-slot
grounding wall power ,outlet. If the power ,outlet does not include a grounding slot,
have a qualified eiectrician replace the outlet before you use the room air
conditio, ner_
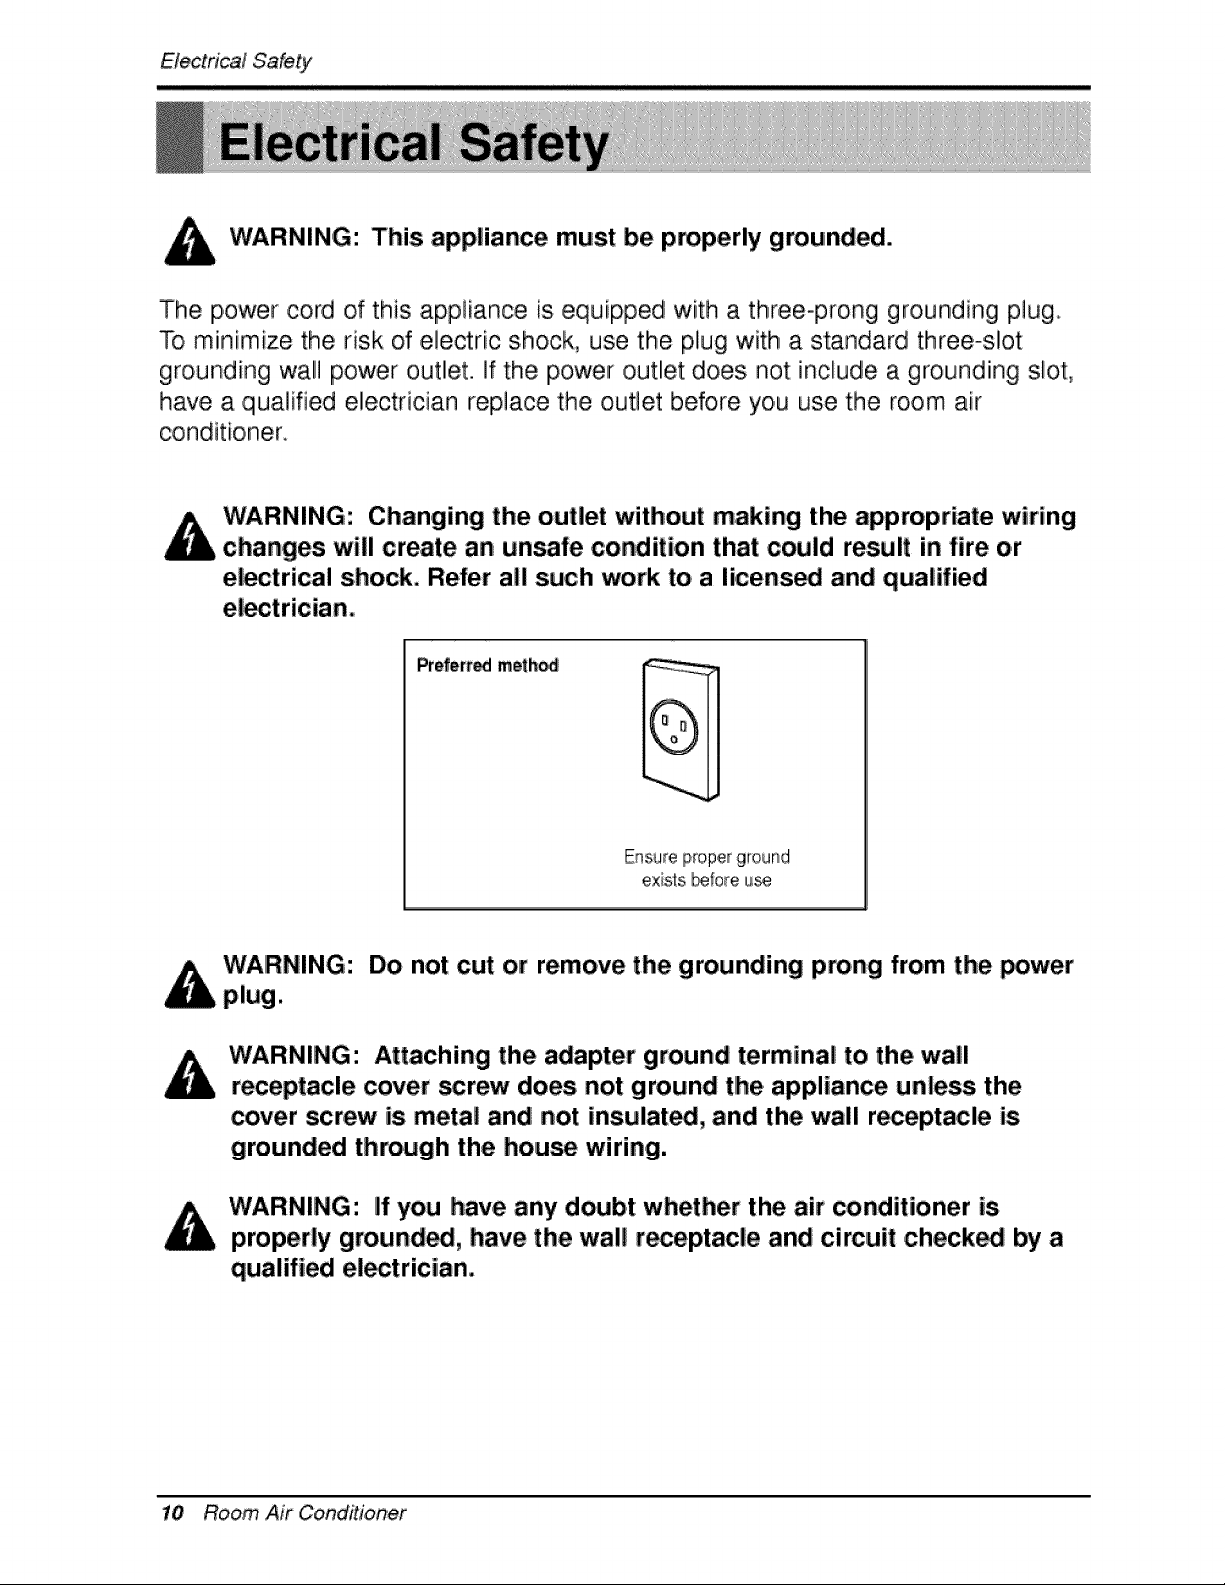
Changing the outlet without making the appropriate wiring
changes will create an unsafe condition that could result in fire o.r
el_trical shock, Refer all such work to a li.cens_ and qualified
Prefert_ meth_
exists _:ore u_
Do not cut or remove the grounding prong from the _wer
WARNING: Attaching the adapter ground terminal to the wall
receptacle cover _rew does not ground tlhe appliance unless the
cover screw is metal and not insulate, and the wall receptacle is
grounded through the house wiring.
WARNING: If you have any doubt whether the air conditioner is
properly ground_, have the wall r_eptacle and circuit checked by a
qualified el_trician.
10 Room Air Conditioner
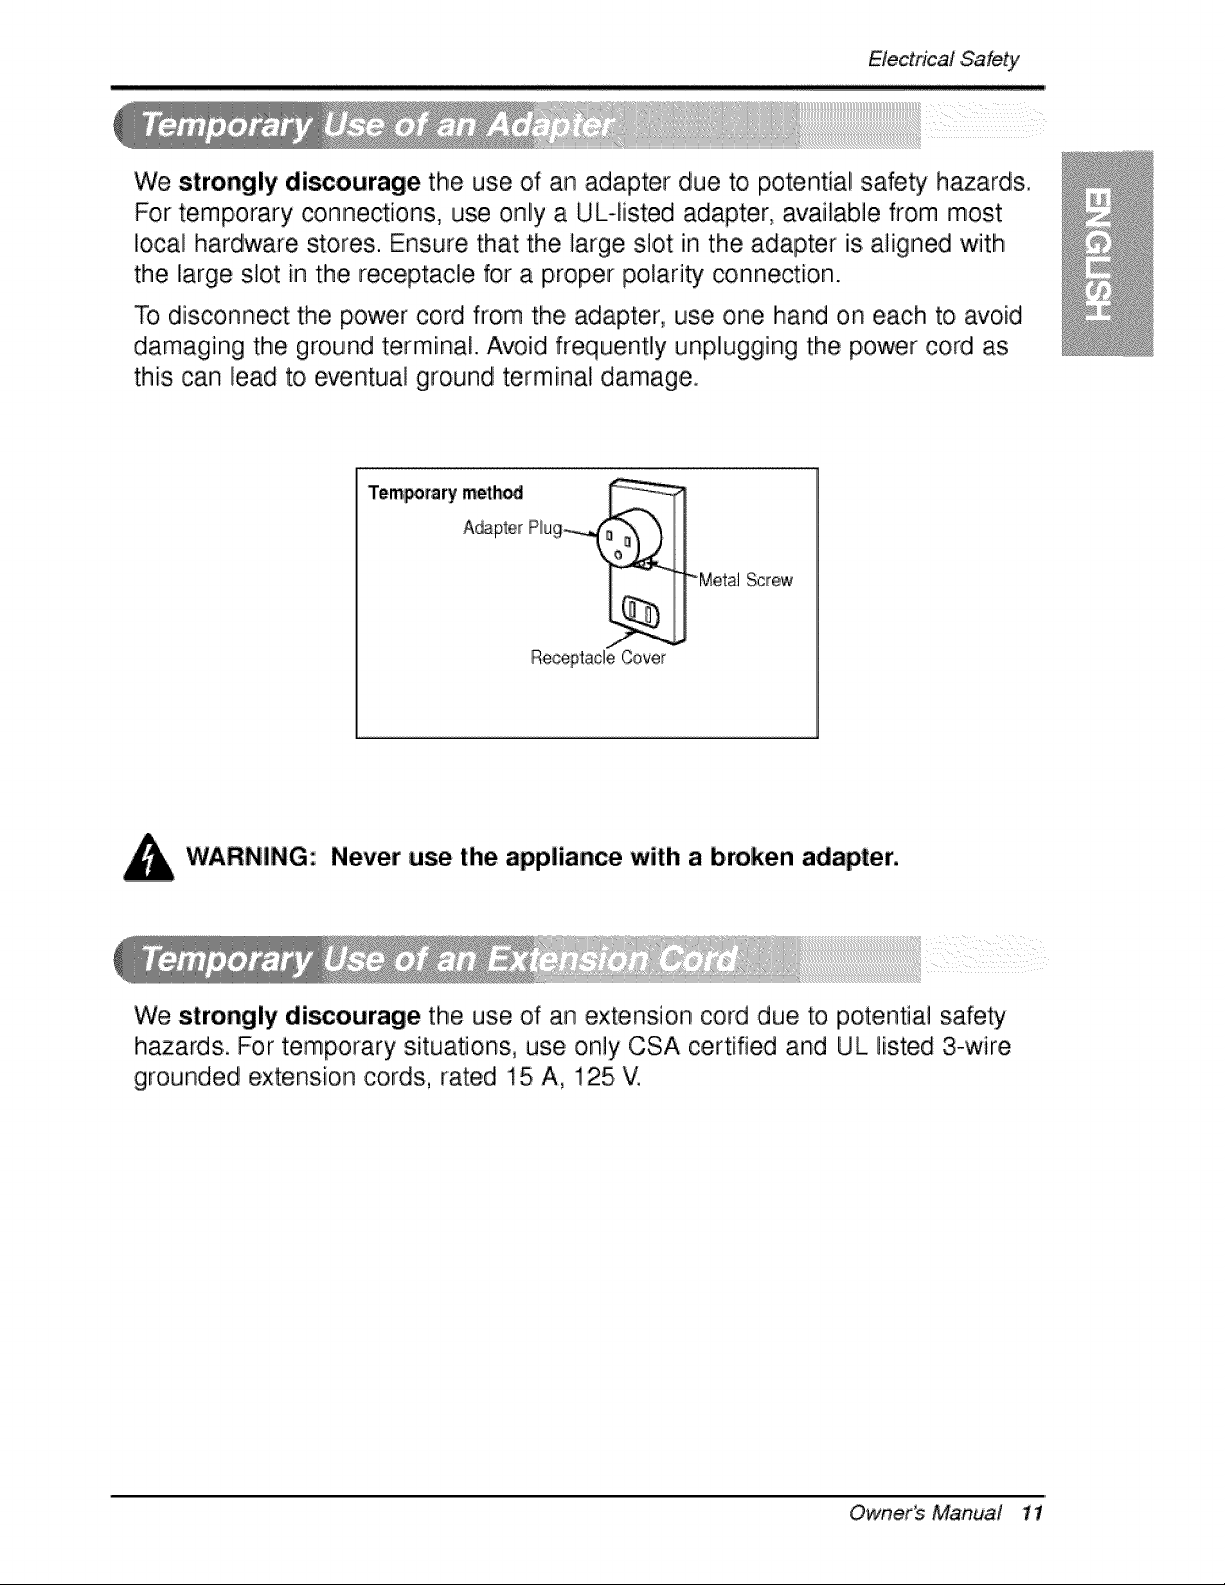
We strongly discourage the use of an adapter due to potential :safety h_ards.
For temporary connections, use only a UL-fisted adapter, available from most
local hardware stores. Ensure that the, large sbt in the adapter is aligned with
the large slot in the receptacle for a proper polarity connection.
To disconnect the power cord from the adapter, use one hand on each to avoid
damaging the ground terminal. Avoid frequently unplugging the p,ower cord as
this can lead to eventual ground terminal damage.
Temporary meth_ ,_,(_ __..i, .i
A_p_e_ Rug
ReceptacleCover
-Metal Screw
Never use the ,appliance with a broken adapter,
We strongly discourage the use, of an extension cord due to potential safety
hazards. For temporary situations, use only CSA certified and UL listed 3-wire
grounded extensio, n cords, rated 15 A, 125 V.
Ownerb Manud 11
tnstafla#on
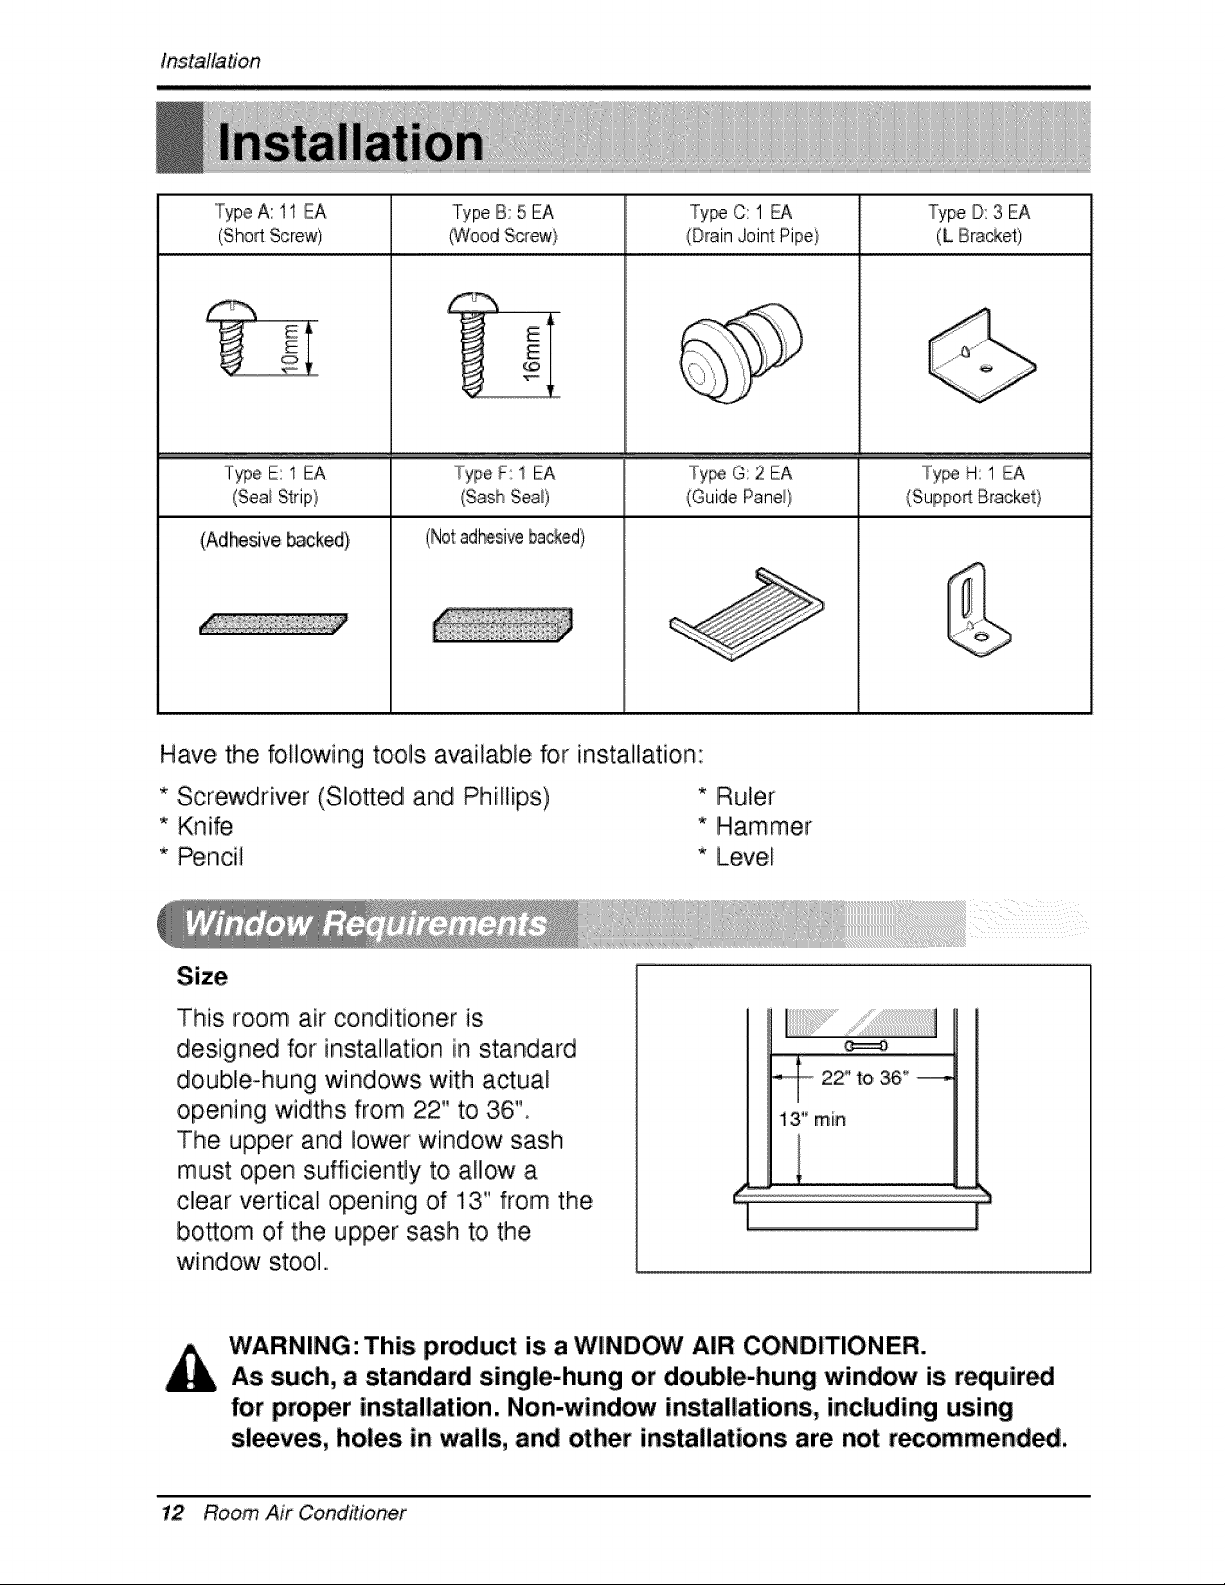
TypeA: 11 EA Type B: 5 EA Ty_ C: 1 _ Type D: 3 EA
(ShodScrew) (Wood Scr@a_} (Drain Joint Pipe) (L Bra_et)
E
lype E: 1 EA Type F: 1 EA Tyipe G: 2 EA ..../°y_ H: 1 EA
(Seai Strip} (Guide Pane_} /Suppo_ Briacket/
(Adlr_ve _cked} (Not:ad_sive backed)
Have, the following tools available for installation:
* Screwdriver (Slott:edl and Phillips) * Ruler
* Knife * Hiammer
* Pencil * Level
This room air conditioner is
designed for insta!lation iin standard
double°hung windows with actual
opening widths from 22" to 36"
The upper and Io'wer window sash
must open sufficiently to allow a
clear vertical opening of 13" from the
bosom of the upper sash to the
window sto,ol.,
- 22" to 36" ---,
13'_rain
WARNING: This product is a WINDOW AIR: CONDITIONER.
As such, a standard single-hung or double-hung window is requir_i
for proi_r installation. Non-window installations, including using
sleeves, holes in wails, and other installations are not recommendS.
12 Room Air Conditioner
bstdtation
Proper clearance enhances the cooling efficiency of the unit and prevents heat
radiation of the condenser.
1. If a storm window presents interference, fasten a 2" wide wood strip, to the inner
window sill across the full width of the sill. The wood strip should be thick
enough to, raise the height of the window sill so that the unit can be installed
without interference by" the storm window frame.
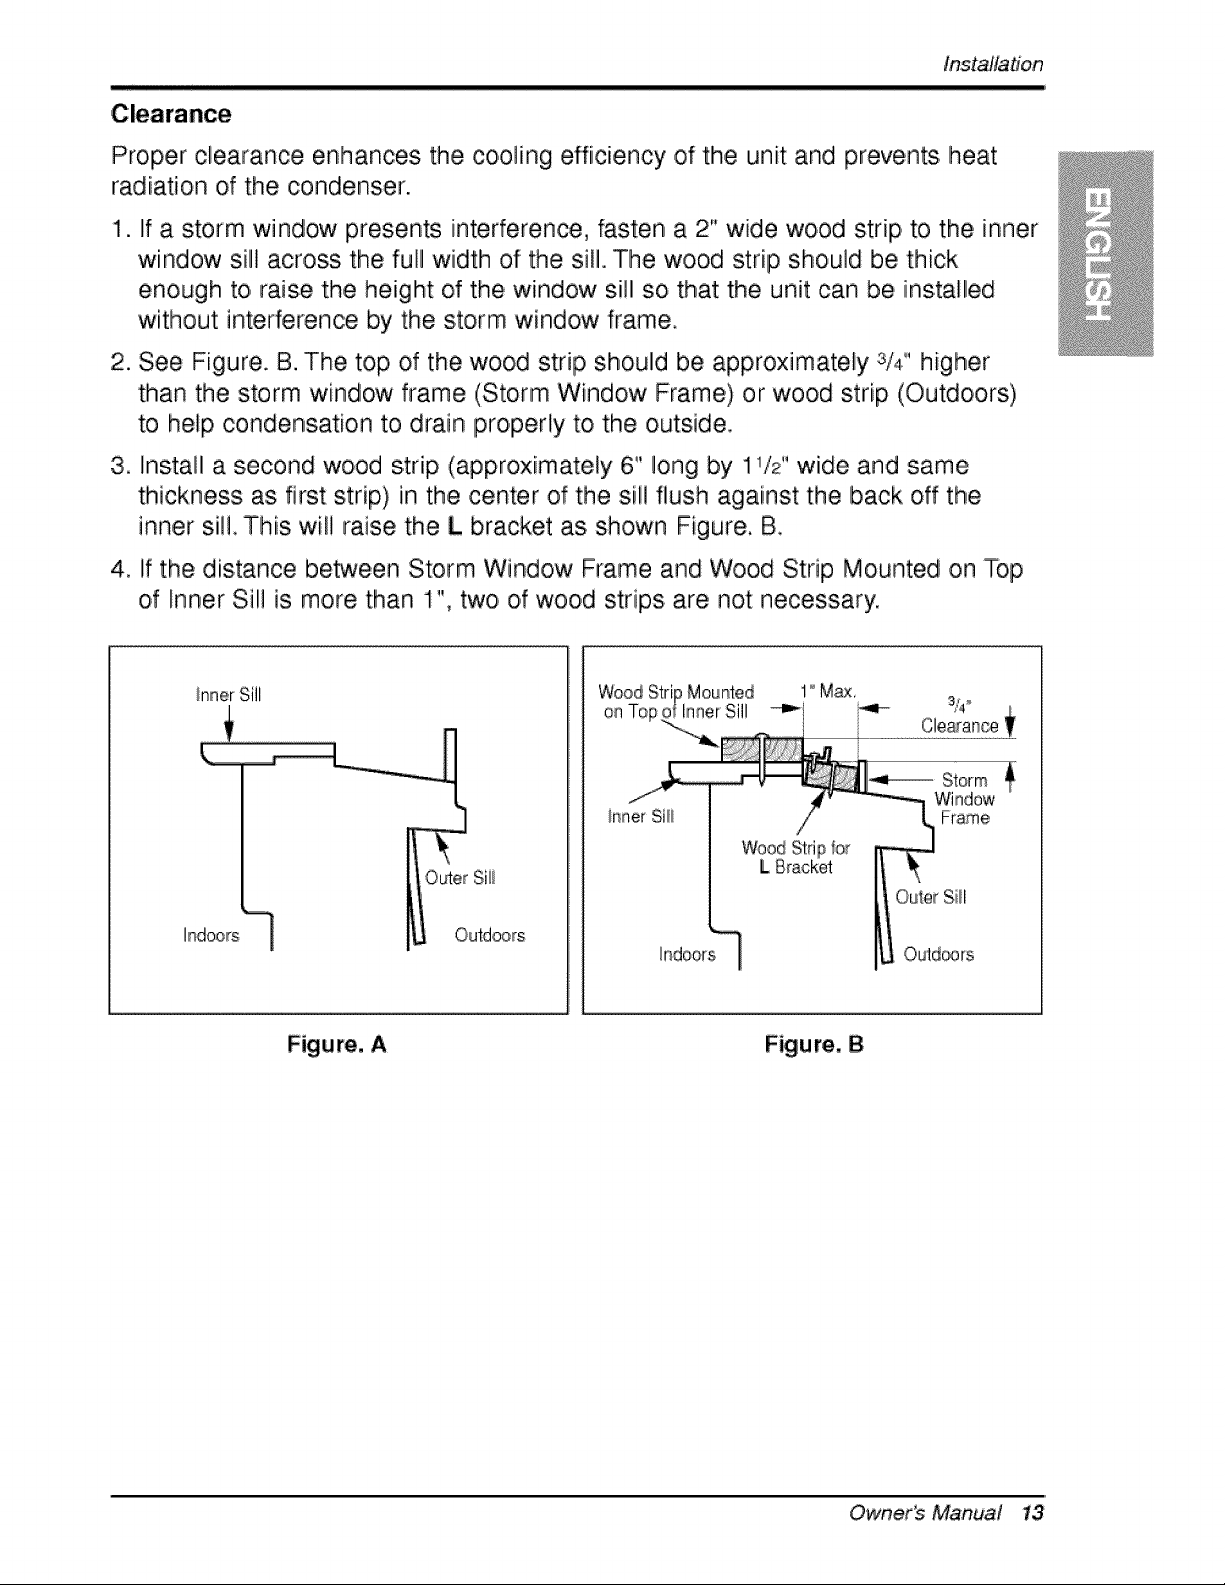
2. See Figure. B. The top, of the wood strip should be approximately 3/4" higher
than the storm window frame (Storm Window Frame) or wood strip (Outdoors.)
to help condensation to drain properly to the outside
3. Install a second wood strip (approximately 6" long by 1 /2 wide and same
thickness as first strip,) in the center of the sill flush against the back off the
inner sil! This. wil! raise the L bracket as shown Figure, B,
4. if the distance between Storm Window Frame and Wood Strip Mounted on Top
of Inner Sill is more than 1", two, o,f wood strips are not necessary.
hndoors
on
ir'iner Sill
Wood :Stripfor
L 8[iack@t
_ndoors
Outer %
Outd®rs
Figure, A Figure, 8
Owner_ Manud 13
installation
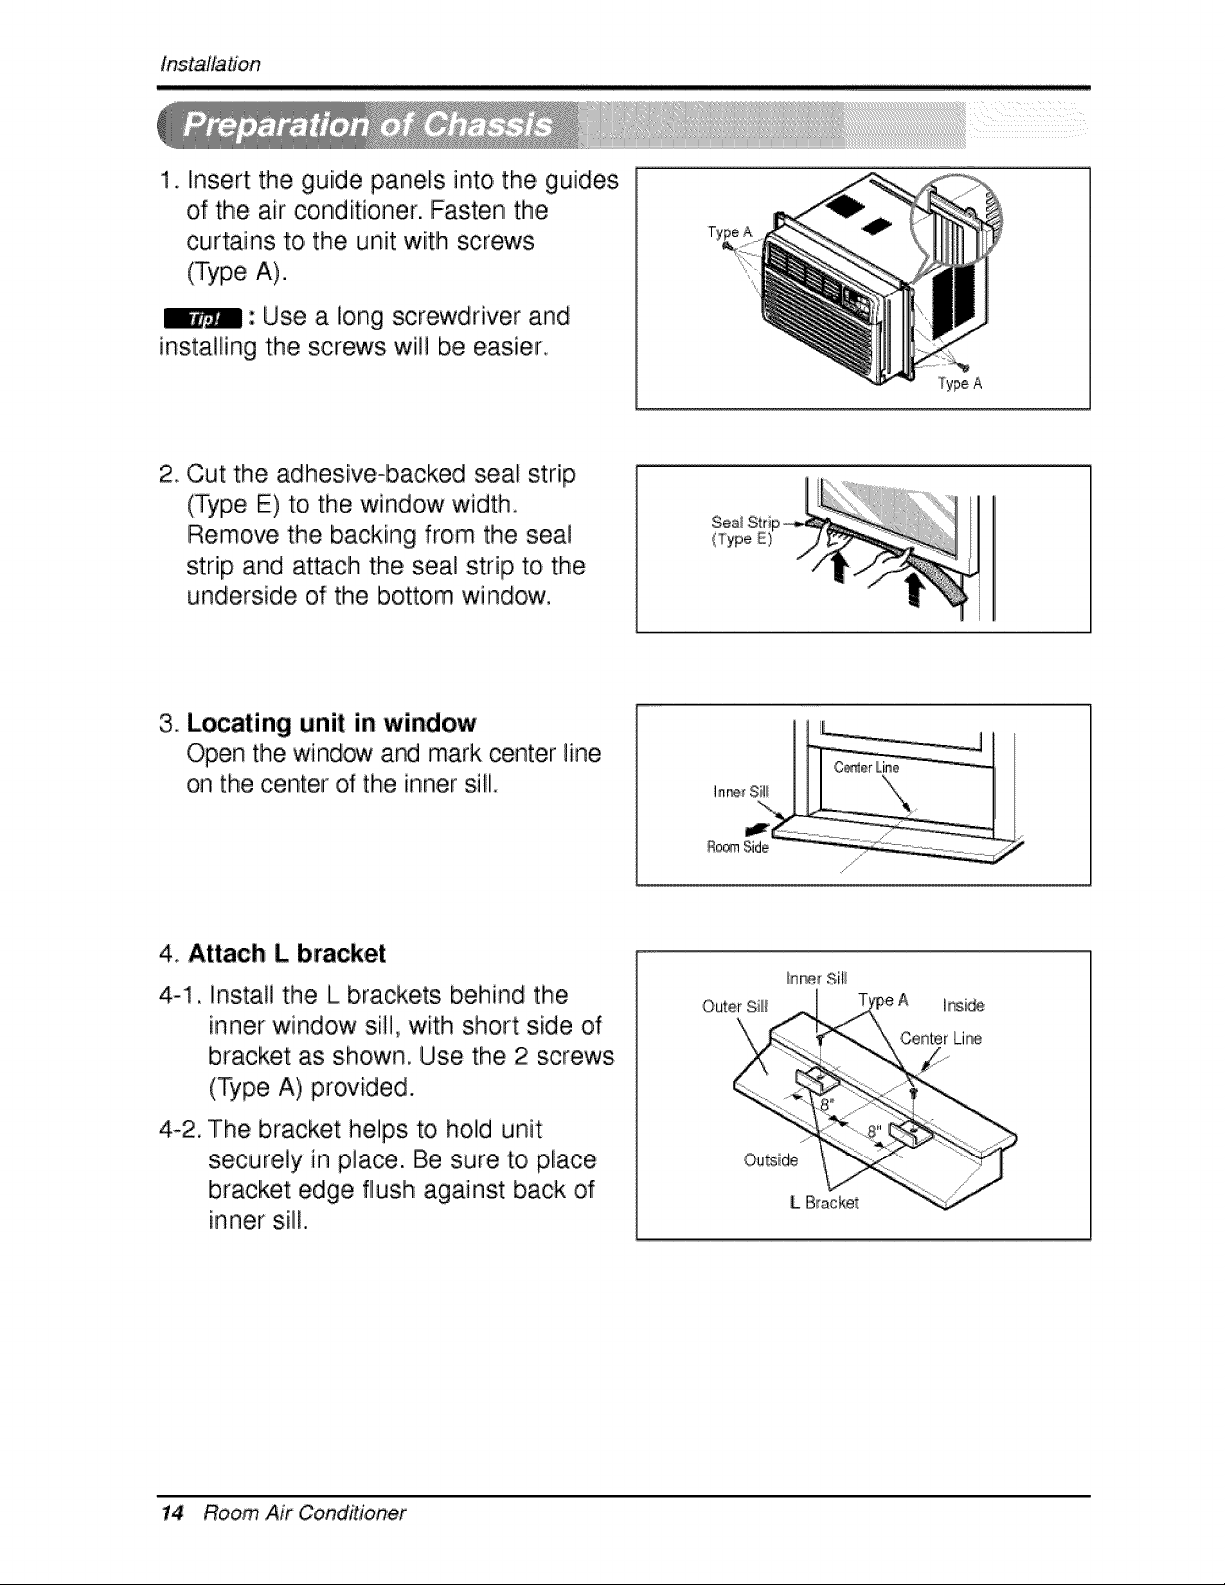
1. Insert the guide panels into,the, guide,s
of the air conditioner. Fasten the
curtains to, the unit with screws
(Type A).
: Use a long screwdriver and
installing the screws will be easier,
2 Cut the adhesive-backed seal strip
(Type E) to the window width.
Remove the backing from the seal
strip and attach the seal strip to the
underside of the bottom window.
(Type
3. Locating unit in window
Open the window ar'd mark center line
on the center of the inner sill.
Ro_ Side
,4. Attach L bracket
4-1, Install the L brackets behind the
inner window sill, with short side of
bracket as shown, Use the 2 screws
(Type A), provided.
4-2. The bracket helps to hold unit
securely in place. Be sure toi place
bracket edge flush against back of
inner sill.
Outer Sili
hsi,_
Center Lir_
Ou_ide
L Bracket
14 Room Air CoinditioRef
instalfa#on
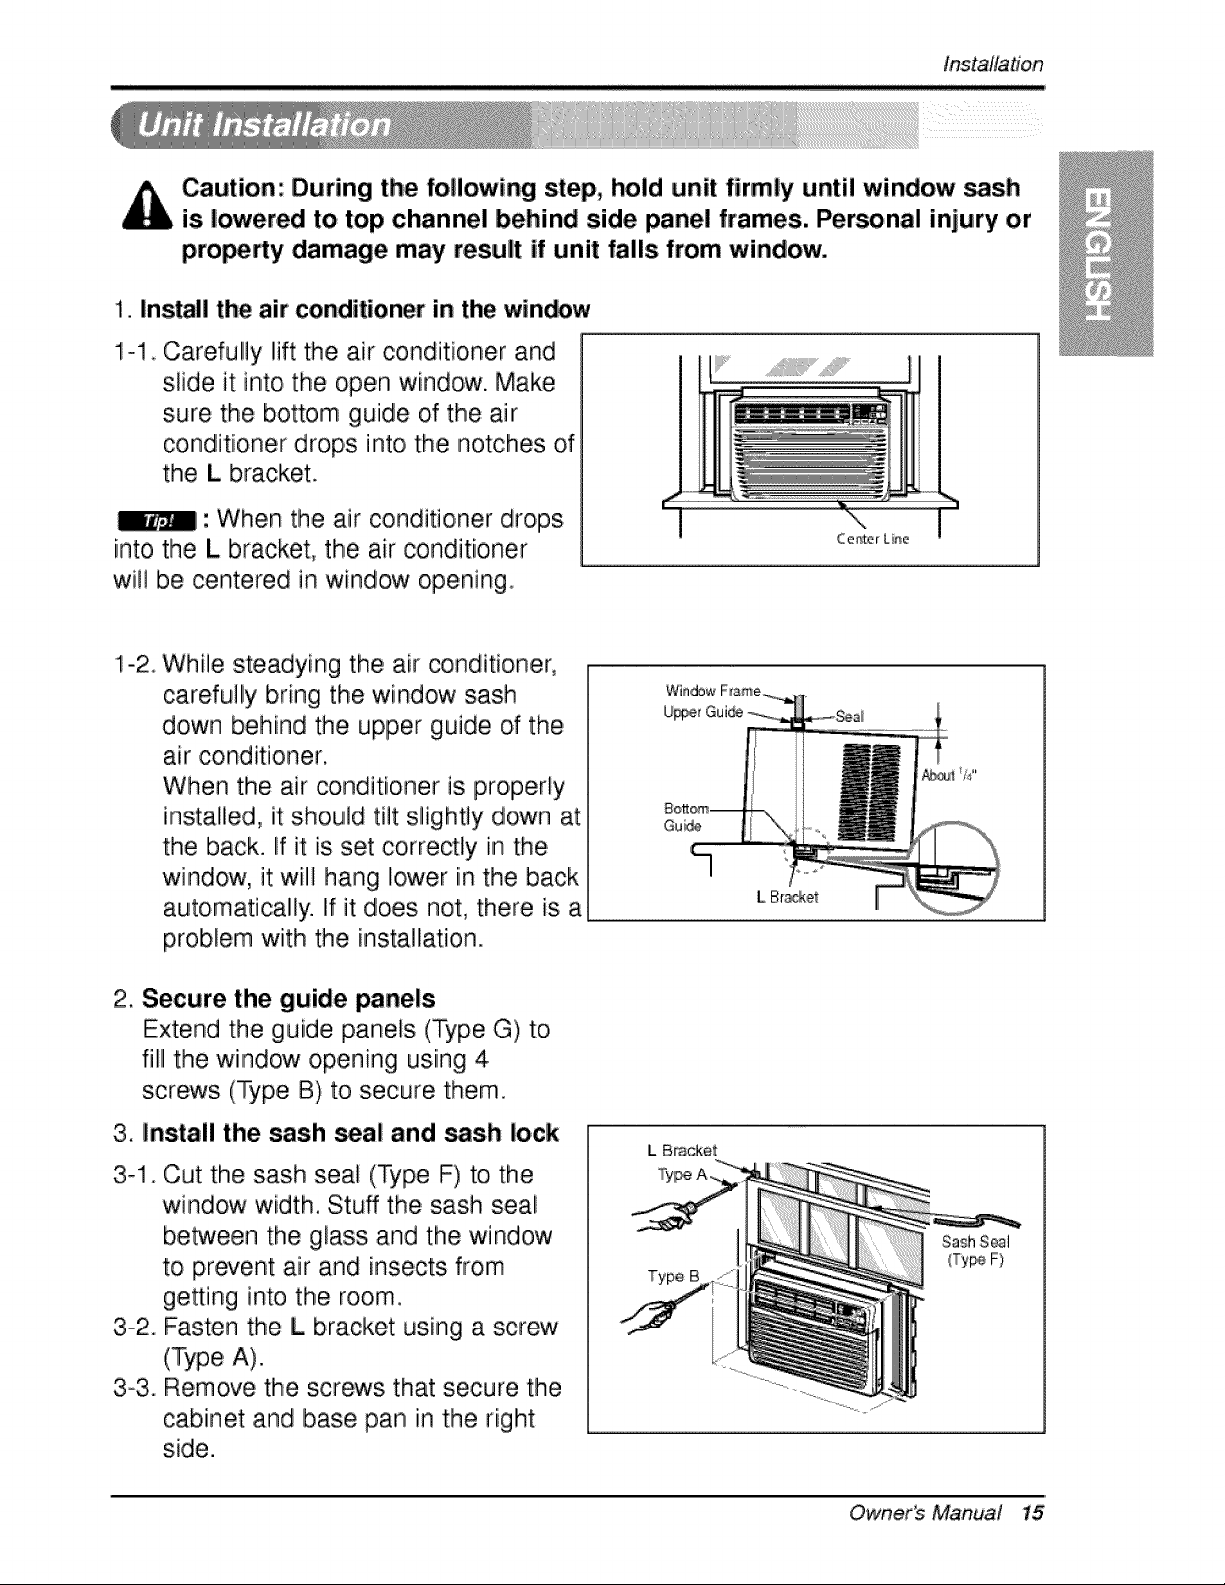
Caution: During the following step, hold unit firmly until window sash
is lowered to top channel behind side panel frames. Personal injury or
p.ro_dy diamage may result if unit falls from window.
1. Install the air conditioner in the win,_w
1-1 Carefully Iiiftthe air conditioner and
slide it into the open window. Make
sure the bottom guide of the lair
conditioner drops into, the notches of
the L bracket.
_1: When tihe air conditioner drops.
into the L bracket, the air conditioner
will be centered in window opening.
.....................!!'iiii................................II
While steadying the, air conditioner,
carefully bring the window sash
down behind the upper guide of the
air conditioner.
When the air ,conditioner is properly
installlied, it should tilt slightly down at
the back. If it is set correctly in the
window, it will hang Ilower in the back
automatically. If it does not, there is a
problem with the insta]lati,on.
2. Secure the guide panels
Extend the guide panels (Type G) to,
filll the window opening usiing 4
screws (Type B) to secure them.
3. Install the sash _al and _sh lock
3_1_
3-2°
Cut the sash seal (Type F) to the
window width. Stuff the sash seai
between the glass and the window
to prevent air and insects from
geeing into the room.
Fasten the L bracket using a screw
(Type A).
3-3. Remove the screws that secure the
cabinet and base pan in the right
side.
Gui_
IL Bracket
Type B
SashSeal
{Ty_ F)
Owner_ Manual 15
installation
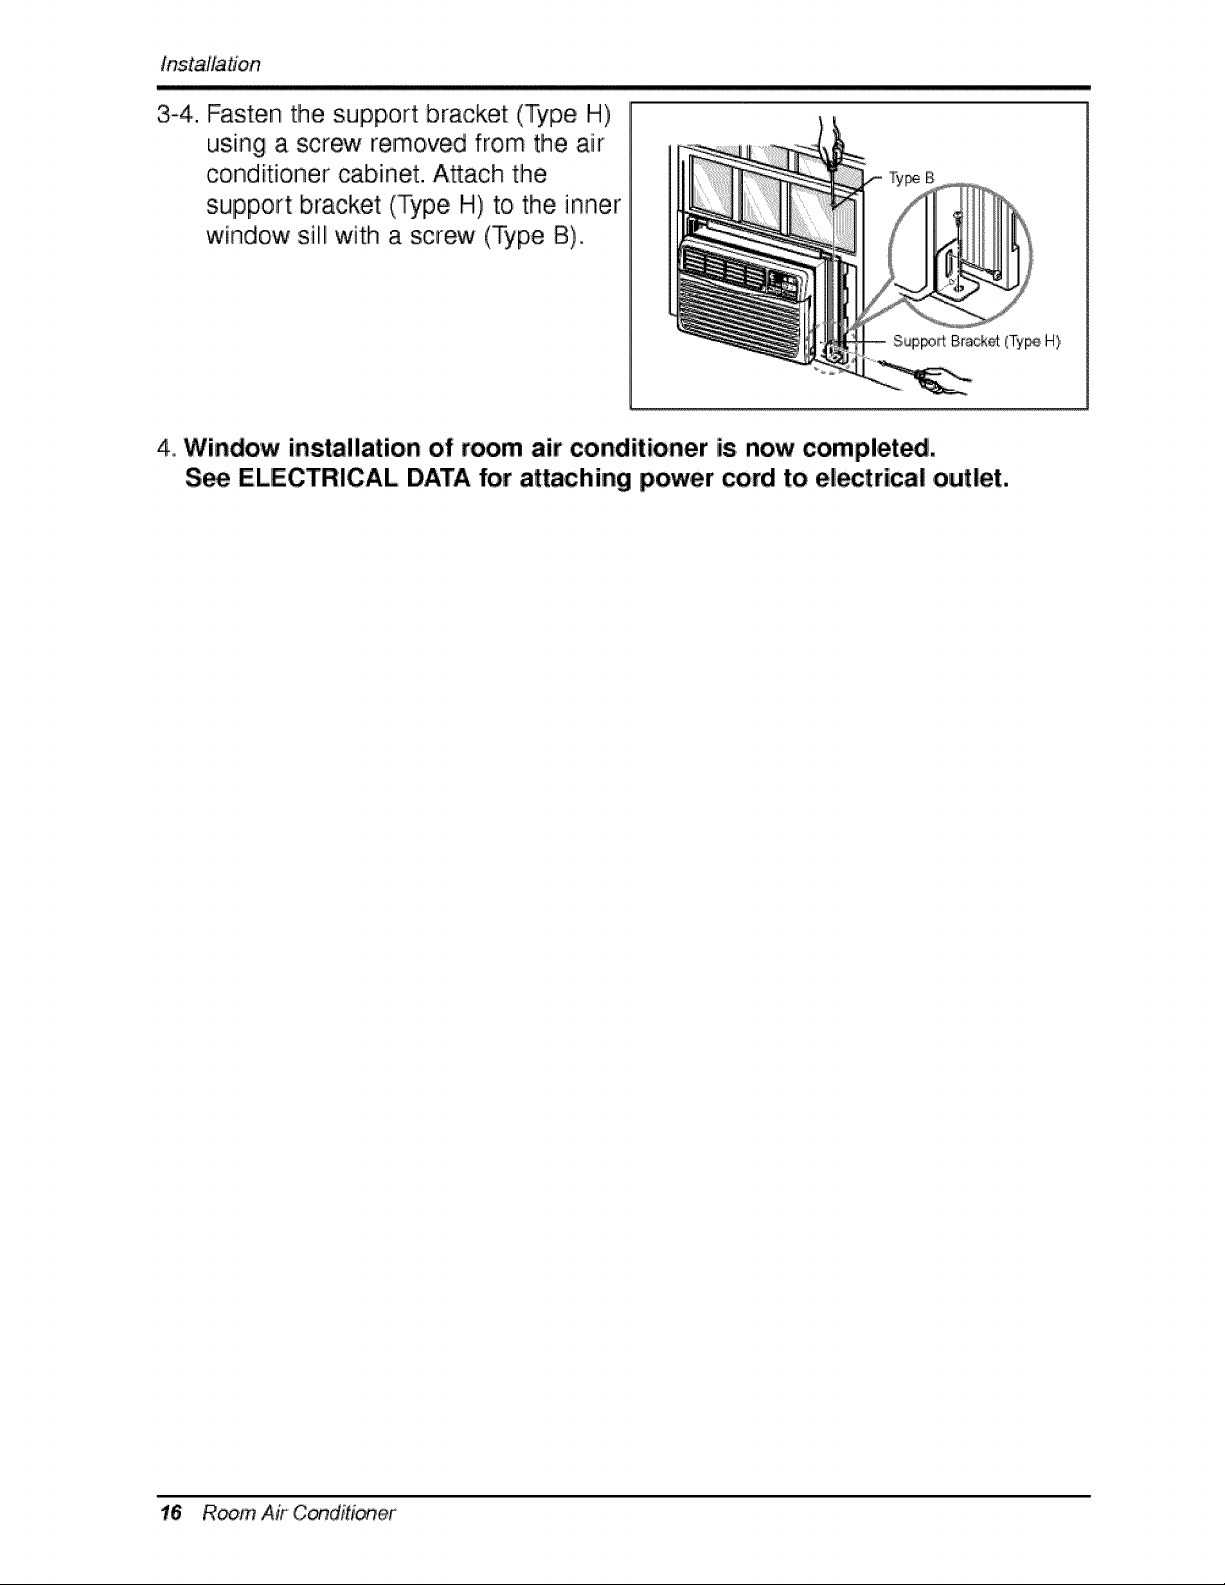
3-4. Fasten the support bracket (Type H)
using a screw removed from the air
conditioner cabinet. Attach the
support bracket (Type H) to the inner
window sill with a screw (Type B),
SupF#_Brackd (Ty_, H}
4,,Window installation of room air conditioner is=now completed,
S_ ELECTRICAL DATA for attaching power cord to electrical outlet.
16 R_m Air C_ditioner
Operating Instructions
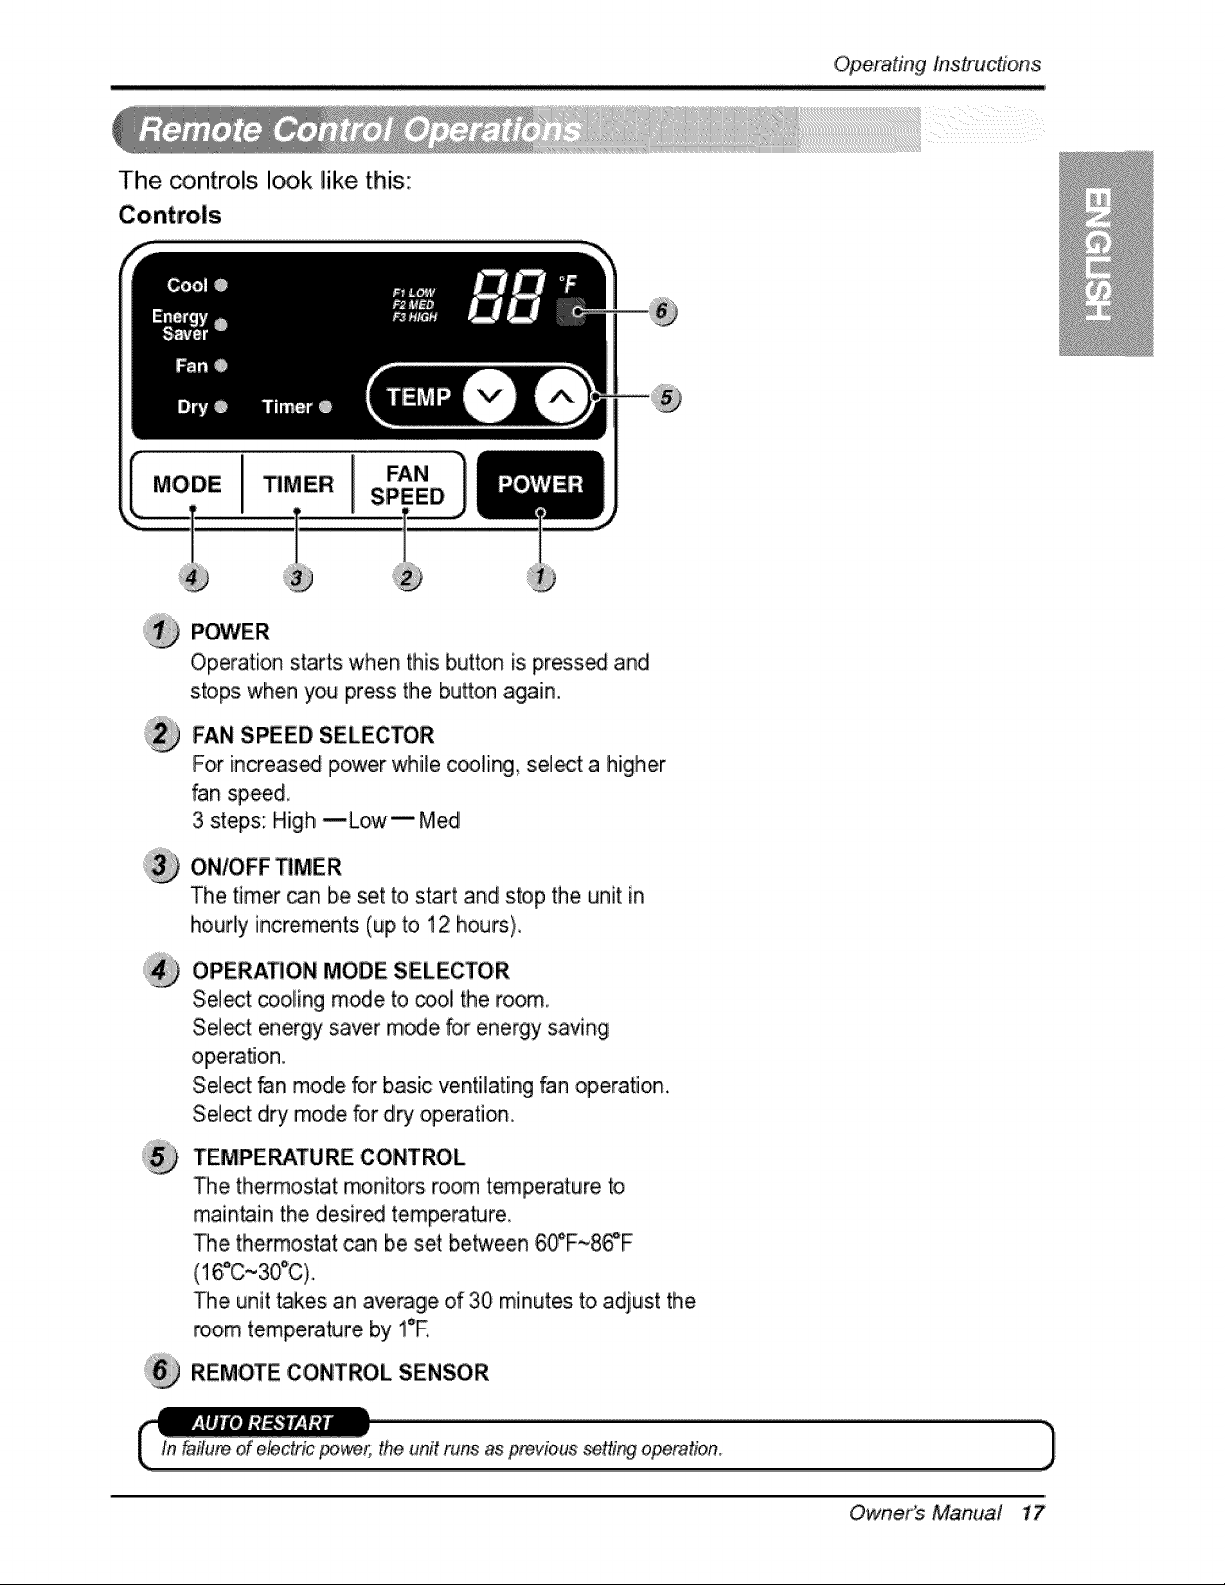
The controls I_k like this:
P_ER
Operation starts when this button is press_ and
stops when you press the button again.
FAN SPEED SELECTOR
For increas_ power while co,oling, select a higher
fan speed,
3 steps: High --Low i Med
The timer _n be set to start and stop the unit in
hourly increments (up to 12 hours),
OPERATION MODE SELECTOR
Select cooling mode to o3ol the room.
Select energy saver mode for energy saving
operation,
Select fan mode for basic ventilating fan operation.
Select dry mode for dry operation,
TEMPERATURE CONTROL
The thermostat monitors morn temperature to
main_in the desired tempera_re
The thermostat can be set between 6_F~86_F
(16°C~30°C).
The unit takes an average of 30 minutes to adjust the
_om temperature by !°E
REMOTE CONTROL SENSOR
the unit runs as previous setting operation.
Owner's Manuai 17

Operating Ins#_uctions
CAUTION: Tlhe Remote Controller will not _nction pro_rly if strong
light strikes the sensor wind_ of the air conditioner or if there are
obs_c|es be_een the Remote Controller and the air conditioner.
Operation sta_s when this button is pressed and
stops when you press the button again
Temperature Control
The thermostat monitors room temperature to
maintain the desired temperature,
The thermostat can be set between 60°F-86°F
(16°C~30°C).
The unit takes ;anaverage of 30 minutes to adjust the
room temperature by i F,
Fan Speed
For in,eased power while coolling, select a higher
fan speed.
3 steps: High-Low-Med
On/Off Timer
The timer can be set to sta_ and stop the unit in
houdy increments (up to 12 hours),
Operation Mode Selector
SeLect c_ling mode to coo,i the room,
Select energy saver mode for energy saving
Select fan mode for basic ventilating fan operation,
Select d_ mode for dry operation.,
How to Inse_ Batteries
1.,Remove the cover from the back d the remote
c_ntro,ller
2, Inse_ _ batteries,
sure of _e polarity when installing the
batteries.
Be sure that _th bakeries are new,
3, Re-attach the cover,
Do, not use rechargieab_e
batteries;, Such batteries
d_er from standard dry _lls
Jn sha_, dimensions, and
_rformance.
Remove the batteries from
the remote controller if the air
_n,diti,oner is not going to,
used for an extended length
of time,
18 R_ Air C(_itioner
Operatingins#'ucfions
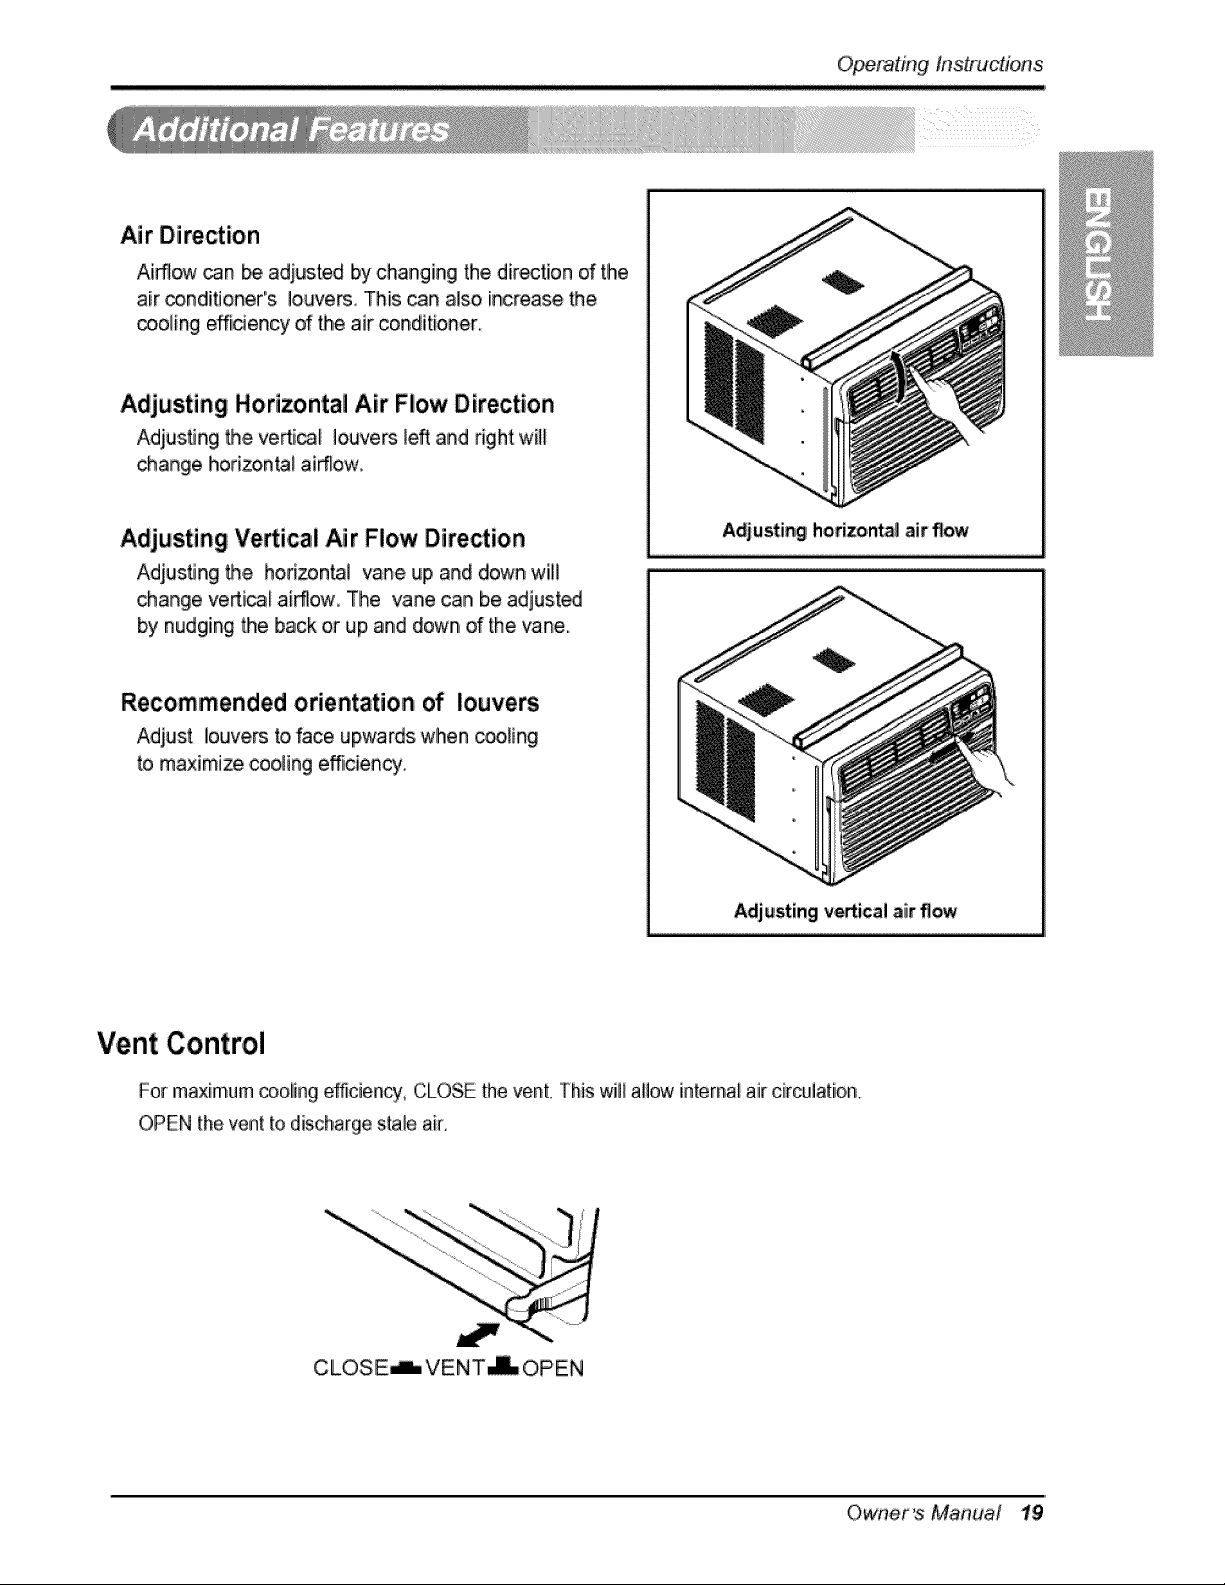
Air Direction
Airflow _n _ adjusted by chang ing the dir_tiion of the
air _nd!itJoner"s Iouve_ This ,can also increase the
_,oling e_dency of the air conditioner
Adjusting Horizontal Air Flow Direction
Adjusting Me ve_ica_ louvers _eft and right will
change horizon_l .airTlow.
Adjusting Verticali Air Flow Direction
Adius.ting the hori_n_J vane up and down will
change veAi_l airflow_ The vane can be adjusit_
by nudging Me back or rup,and down, of the 'vane.
Recommended orientation of louvers
Adiust louvers to,face upwards when cooting
to maximize coo_ing efficient.
Adjusting horizonta_air flow
Adjusting vertical air 'flow
Vent Control
For maximum cooilin,gefficiency, CLOSE the venL This will allow internat air circuiation_
OPEN the ven[ to discharge stale air,
CLOSE_VENT_O, PEN
Owner's Manual 19
Operating InstnJctions
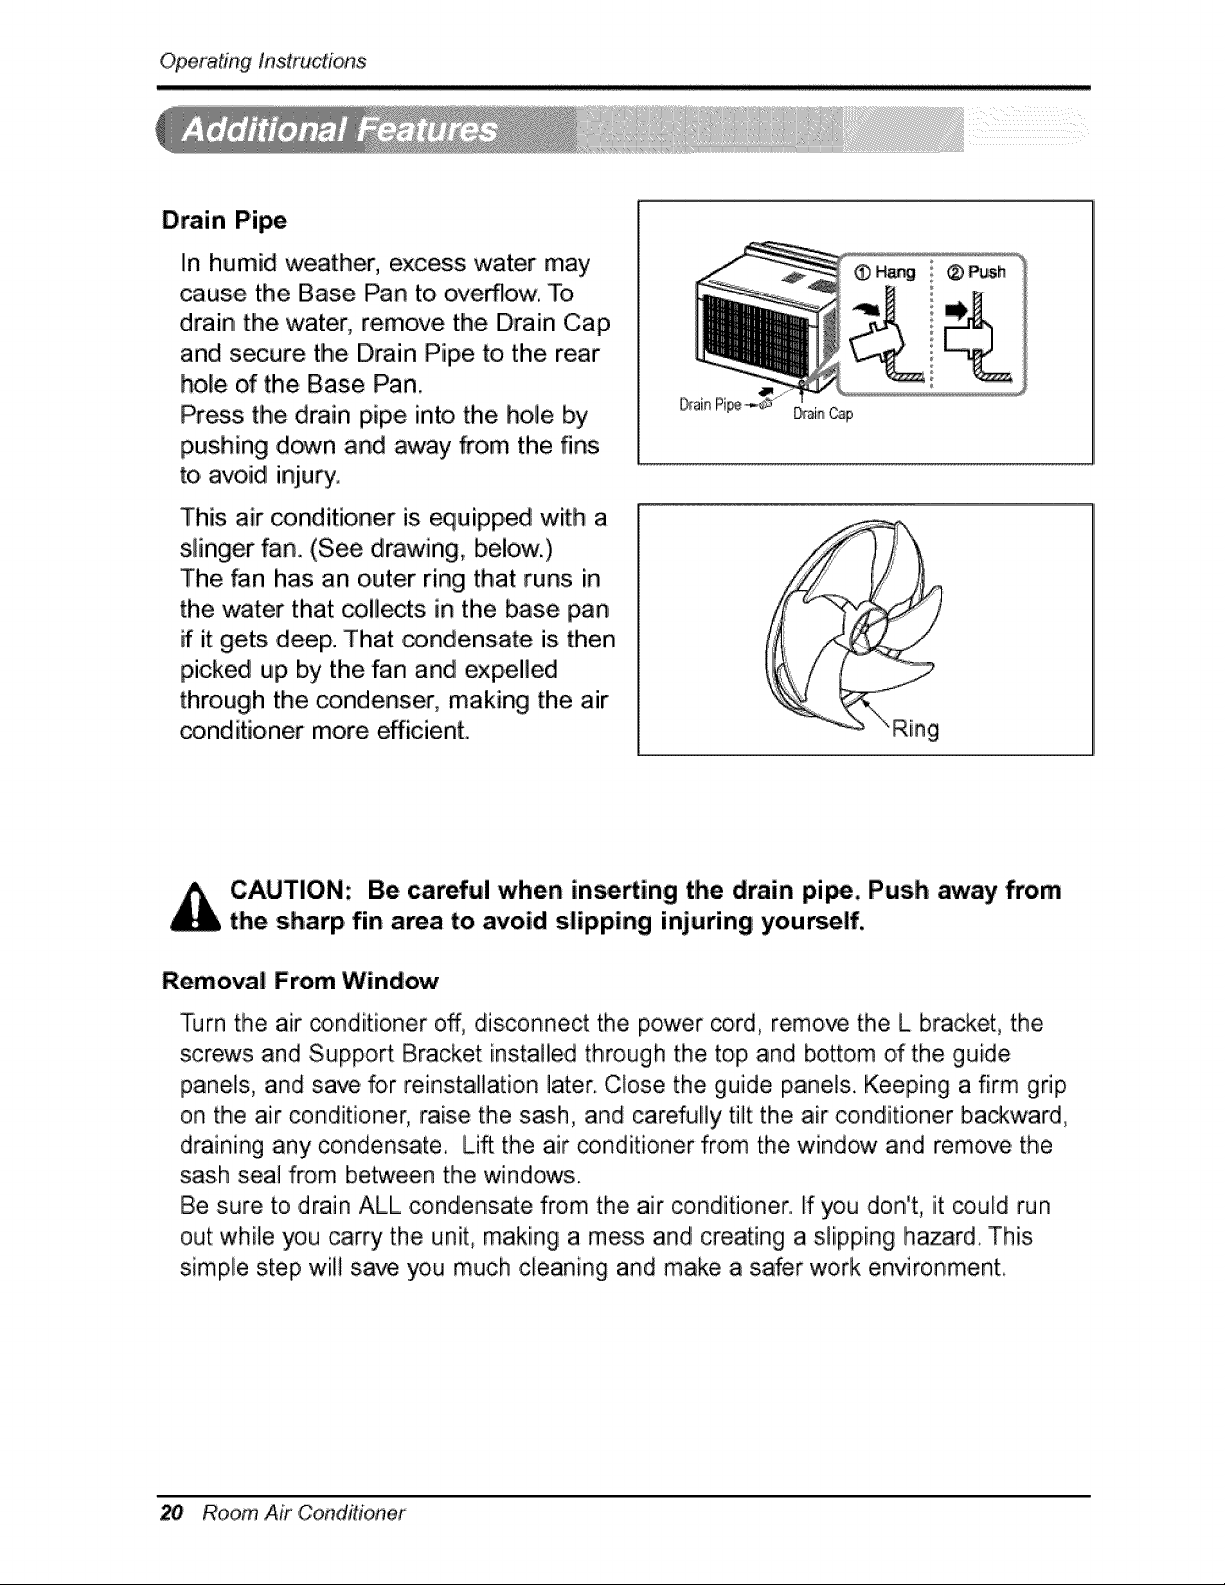
Drain Pipe
In humid weather, excess water may
cause the Base Pan to overflow. To
drain the water, remove the Drain Cap
and secure tlhe Drain Pipe to the rear
hole of the Base Pan,
Press the drain pipe into the hole by
pushing down and away _o,m the fins
to avoid injury.
This air _nditioner is equipped with a
slinger fan. (See d_awing, below.)
The fan has an outer ring that runs in
the water that collects in the base pan
if it gets deep. That _ndensate is then
picked up by the fan and expelled
through the condenser, making the air
conditioner more efficient.
CAUTION: Be careful when in.fling the drain pi_, Push arway from
the sharp fin area to avoid slipping injuring yourself.
Removal From Wind_
Turn the air _nd[tioner off, disconnect the power _rd, remove the L bracket, the
screws and Support Bracket installied through the top and bottom of the guide
panels, and save for reinstallation later. ,Close the guide panels. Keeping a firm grip
on the air conditioner, raise the sash, and carefully tilt the air conditioner ba_ward,
draining any condensate. Lift the air conditioner from the window and remove the
sash seal from between the windows.
Be sure to ,drain ALL condensate from the air conditioner. Ifyou don't, lit could run
out while you carry the unit, making a mess and creating a slipping hazard. This
simple step will save you much cleaning and make a safer work environment.
20 Room Air ,Condidonet
Maintenan_ and Service
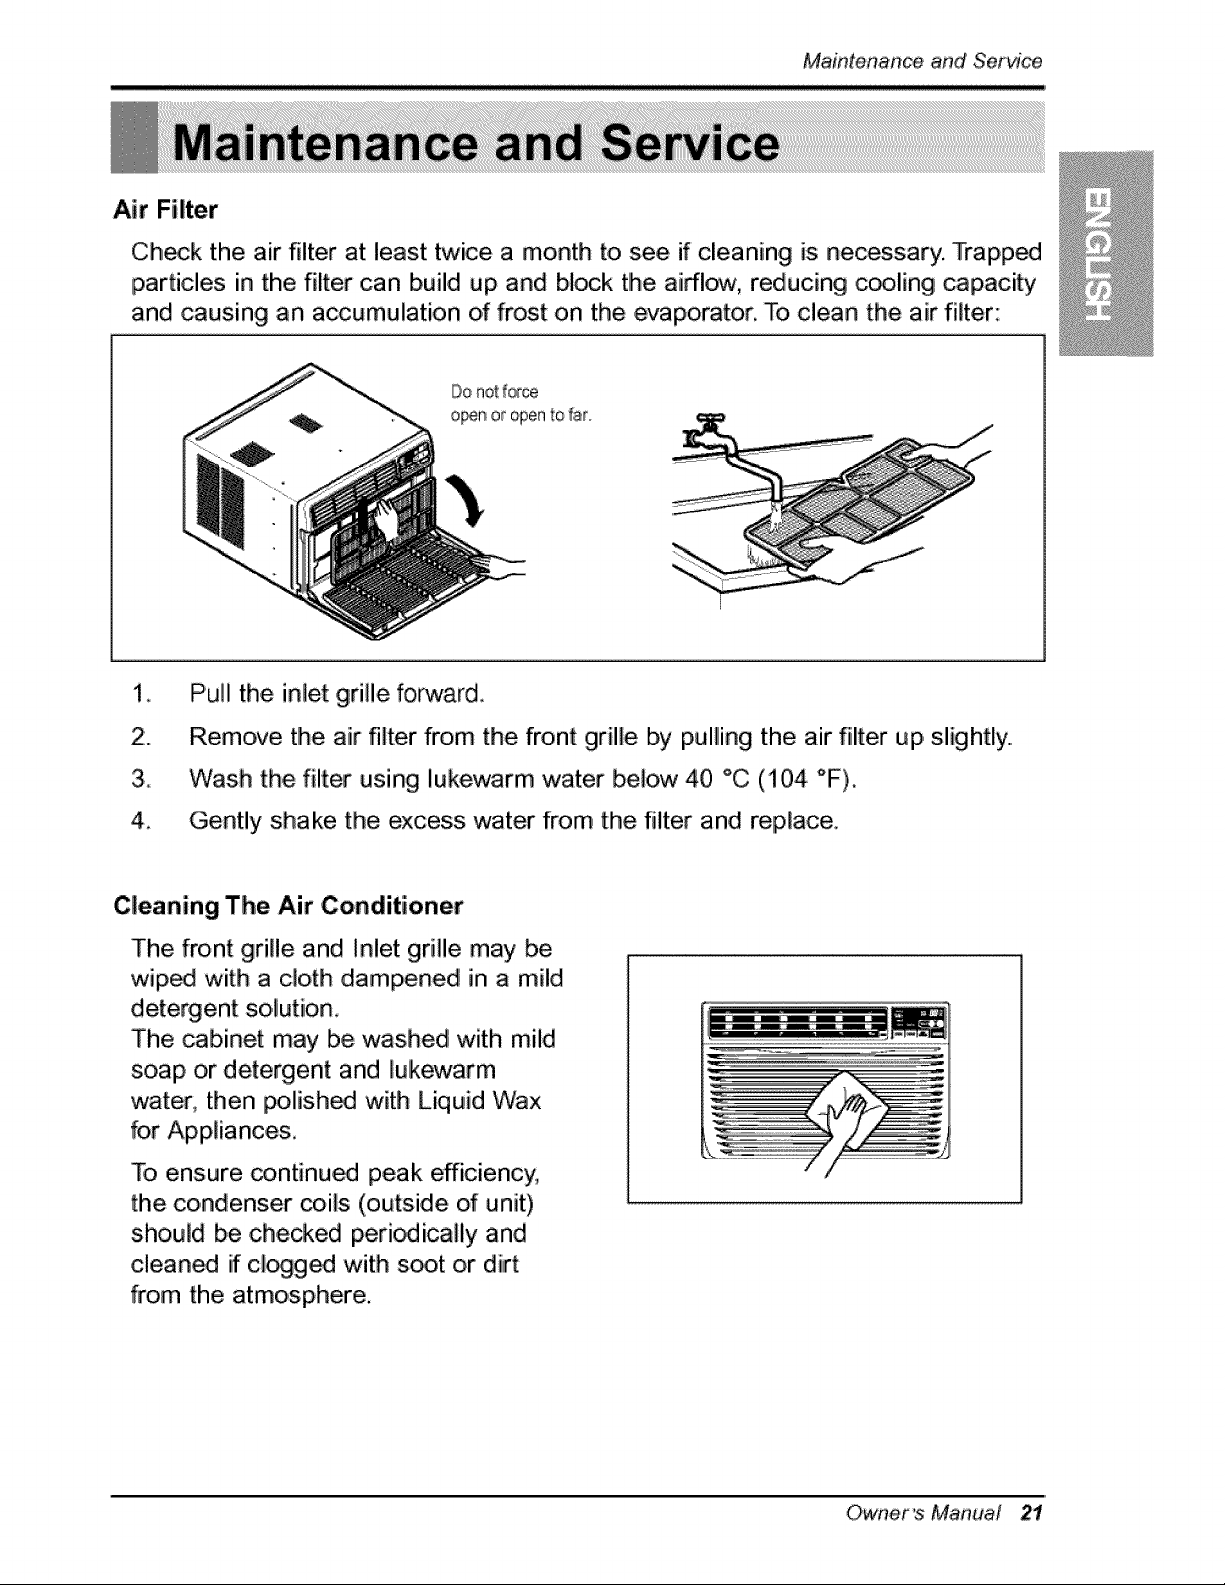
Air Filter
Ch,_lk the air filter at least twice a month to see if cleaning is necessary. Trapp_
particles in the filter can build up and block tlhe airflcrw, reducing c_ling capacity
and causing an accumulation of frost on the evaporator. To clean the air filter:
2:.
3_
4_
P'uJlithe inlet grille forwardi
Remove the air filter from the front grille by pulling the air filter up, slightly.,
Wash the filter using lukewarm water below 40 °C (i04 "F),
Gently shake the ,excess water from the filter and replace,
,Cleaning The Air Conditioner
The front grille and Inlet grille may be
wiped with a cloth dampened in a mild
detergent so lution_
The cabinet may be washed with mild
soap or detergent and lukewarm
water, then polish_ with Liquid 'Wax
for Appliances,
To ensure _ntinu_ peak efficiency,
the condenser _ils (outside of unit)
shouid be chewed peri_ically and
cleaned if cl_g_ with s_t or dirt
from the atmosphere.
Owner's Manual 21
Maintenance ,and Service
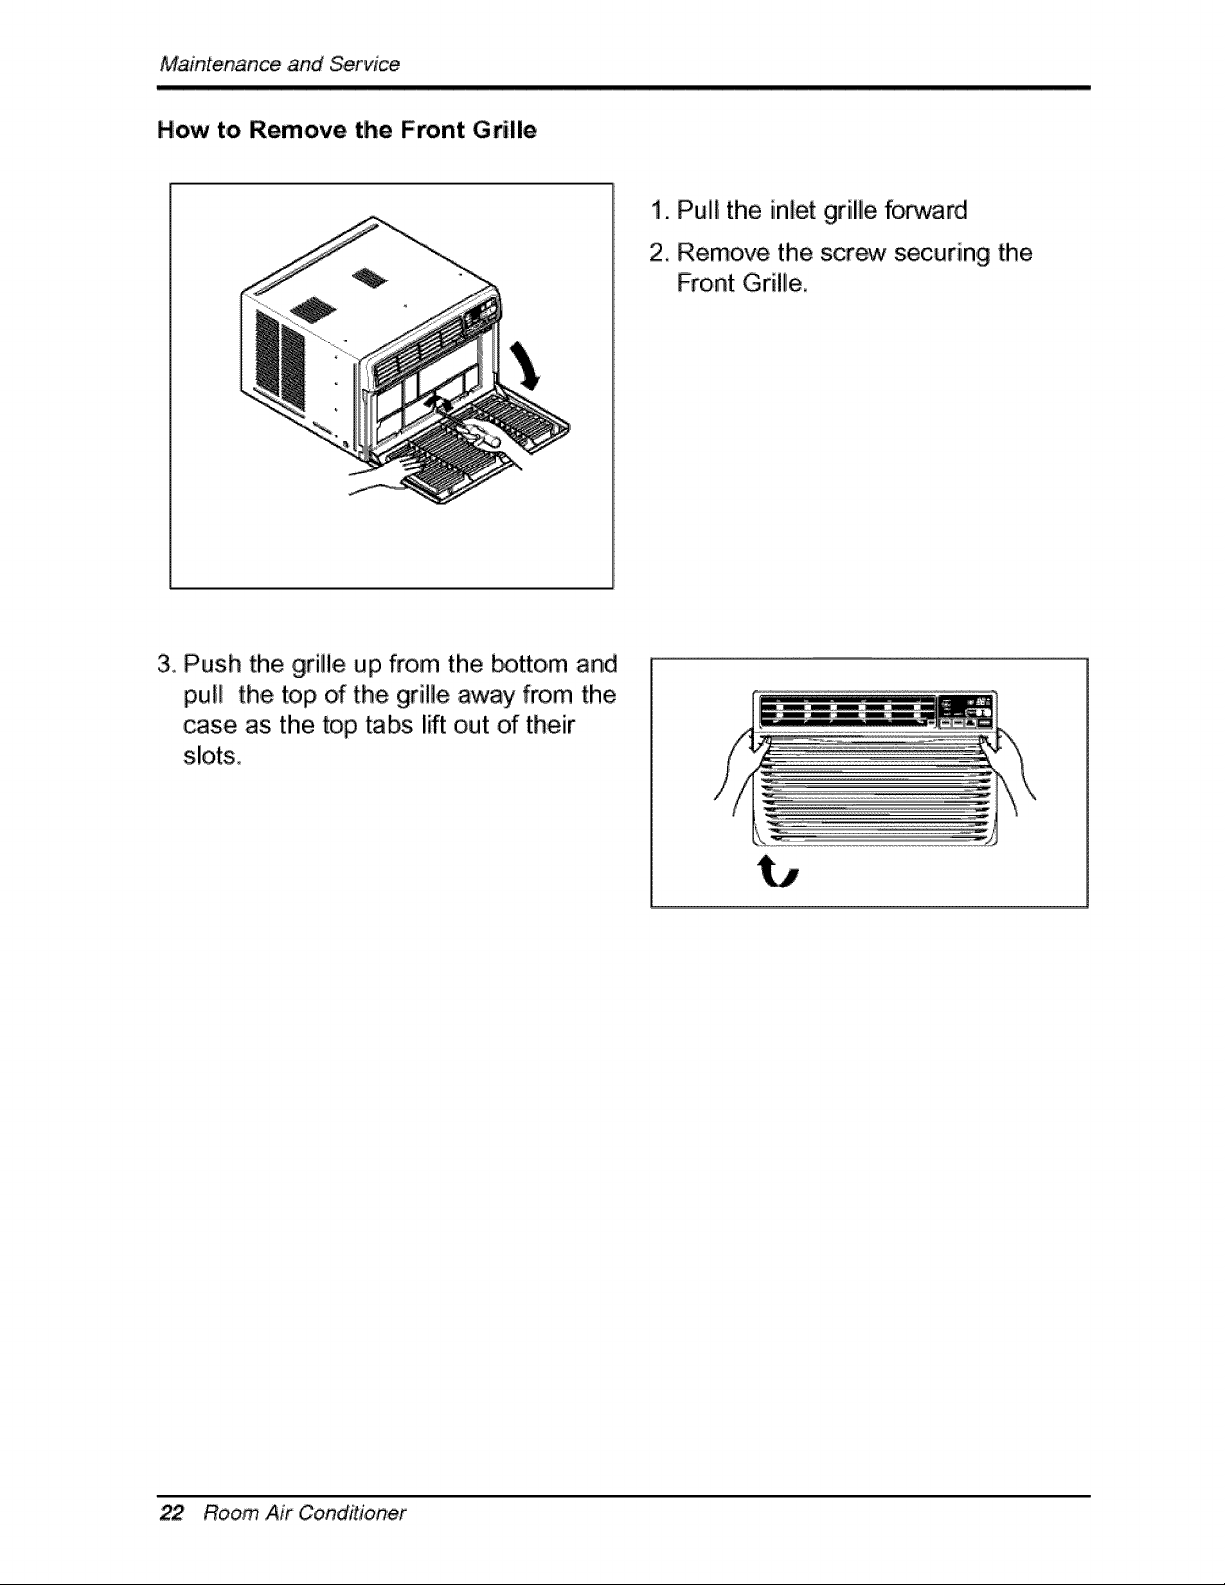
How to Remove the Front Grille
i. Pulll the inlet grille forward
2. Remove the scr_ securing the
Front Grille.
3. Push the grille up from the _tto, m and
pull the top of the grille away from the
case, as the top tabs lift out of their
slots.
22 Room Air OoinditJoRer
MaintenanceandSe_ice
Before Calling for _rvice
Lf you have problems with your air conditioner, read the following information and
try to solve the probliem, If you cannot find a solution, turn off the air conditioner
and contact your dealer,
Air conditioner d_s not operate
1. Ensure that the air conditioner is plugged into a proper outlet.
2. Check the fuse or circuit breaker,
3. Check whether the voltage is unusually high or low:
Air does not feel co!d enough on the cooling setting
1. Ensure that the temperature settings are correct,
2. Check to see if tlhe air filter is clogged with dust. If so, clean the filter.
3. Ensure that the air flow from the outside is not obstructed and that there is a
clearance of over 20" between the back of the air conditioner and the wall or
fence behind it.
4. Close all doors and windows and check for any source of heat in the room.
Before calling for service, please review the following list of ,common
problems and solutions.
The air conditioner is operating norma//y when:
• You hear a pinging noise, This is caused by water being picked up by the fan on
rainy day's or in highly humid conditions... This feature is designed to help remo_e
moisture in the air and improve cooling efficiency.
See the section on Slinger Fan, page 19,
, You Ihear the thermostat click. Thiis is caused by the compressor cyclle starting
and stopping.
, You see water dripping from the rear o,f the unit. Water may be collected in the
base pan in highly humid ,conditions or on rainy days. This. water oved:lo,ws and
drips from the rear of the unit.
• You hear the fan running while the compressor is silent. This is a normal
operationali feature.
Owner_ Manual
MaintenanceandServic_
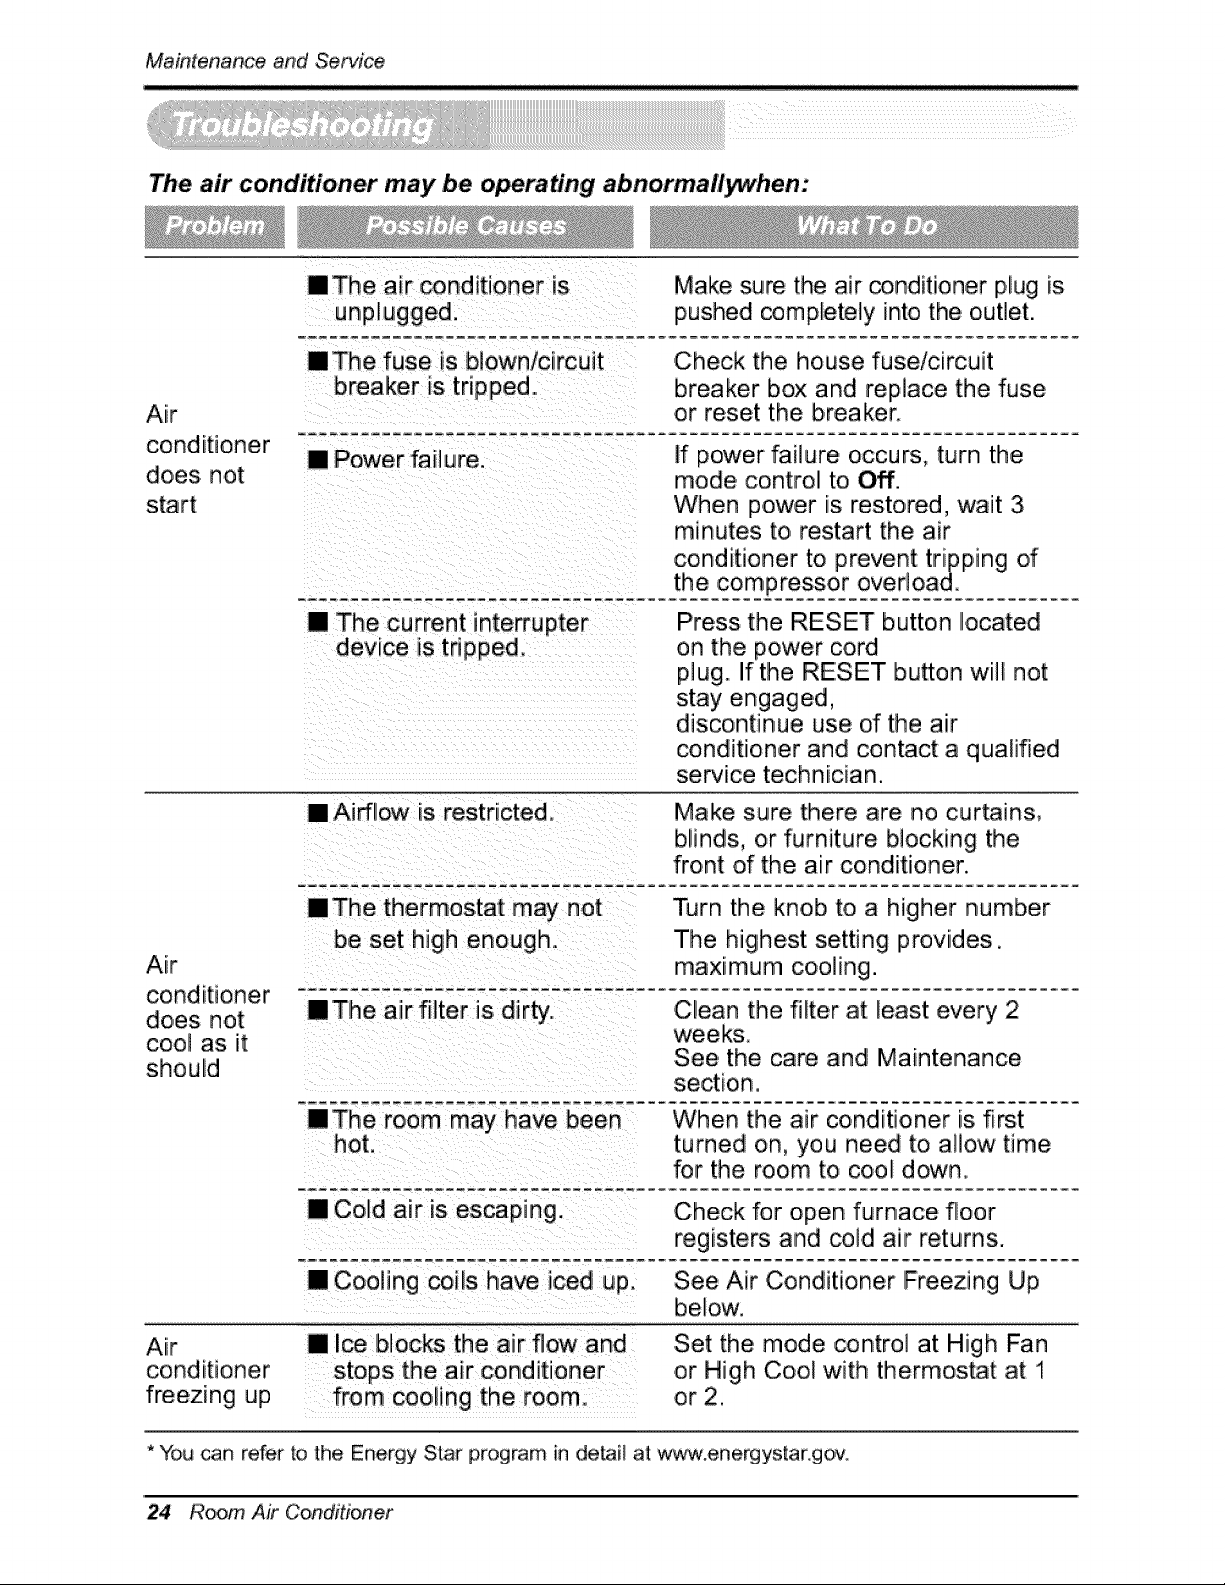
The air cond#ioner may be o_rating abnormallywhen:
Air
conditioner
does not
start
nThe air _nditioner is Make sure the air conditioner plug is
unplugged, pushed completely into the outlet.
raThe fuse is blown/circuit
breaker is tripped
,Check the house fuse/circuit
breaker box and replace the fuse
or reset the breaker.
[] Power failure. If power failure occurs, turn the
mode control to Off.
When power is restored, wait 3
minutes to restart the air
conditioner to prevent tripping of
the -compressor overload.
[] The current interrupter
device is tripped.
Press the RESET button located
on the power cord
plug. If the RESET bu_on will not
stay engaged,
discontinue use d the air
conditioner and contact a qualified
service technician.
Air
conditioner - _ _e- a,Jr_f]lter- g d-ir ty,.-......
does not
cool as it
should
[] Airflow is restricted. Make sure there are no curtains,
blinds, or furniture blocking the
front of the air conditioner.
nThe thermostat my not Turn the knob to a higher number
be set high enough. The highest setting provides.
maximum cooling.
Clean the filter at least every 2
weeks.
See the care and Maintenance
Air
conditioner
freezing up
When the air conditioner is first
hot. turned on, you need to allow time
for the room to cool down.
[] Cold air is escaping. Check for open furnace floor
registers and cold air returns.
[] Coding coils have iced up. See Air Conditioner Freezing Up
below.
[] Ice blocks the air flow and
from cooling the room
Set the mode control at High Fan
or High Cool with thermostat at 1
or 2.
* You can refer to the Energy Star program in detai_ at: w_',_.energystar go,v,
24 Room Air Conditioner
Memo
Owner's Manual 25
Memo
26 RoomAir Conditioner
Precauciones de Segutidad ..........28
Antes de _ner en march_ .............32
Int_uccibn .................................. 33
Simbolos L:_il_zad_ en
Este Manual................................. 33
Caracteristi_s ........................... 33
_guridad El_rica ..................... 34
Use Trans_orio de un
A_ptador ..........................................36
Use Temporal de un
Cable A]a_ado[ .......................... 36
Instalacibn .......................................37
Insta_c_6n de] gabinete ................39
Ins_cciones de
Funcionam iento ...............................42
In.racoons de Contro_
Remote ....................................... 42
Control Rernoto ............................43
Adiciena]es e Caracteri_cas .......44
La Direccisn de] Aite ................ 44
Centro_de ven_laci[n ............... 44
T_ de Desag(_e ..................... 45
Remover_ode la Ventana ........ 45
Mantenimiento y Servicio ............. 46
Fibre de Aire ......................... 4&
Limpieza del Aire
Acondicionado .......................... 46
Come Remover ]a PadHa
Fro_] ........................................ 47
Probiemas y So]uciones
Habitua]es .................................... 48
Resa]uciSn de proNemas ............. 49
,o
PARA SUS ARCHIVES
Escdba aqui e] modelo y nt)mero de serie:
Mode|e n _ :
_rie n ° :
Puede e_ontrar los nBmeros en la etiqueta de la pa_e
latera_ del producto
Nombre de_ distribuidor':
Fecha de compra:
Ill Adjunte su reci_ a esta pagina con ]a gr_adora _ra
el mome[_to que b necesite para pmbar la _echa de su
adquisici6n o r_ra _a validacbn de la garant_a.
LEA ESTE MANUAL
En s.t_#'lterbr encon_rar_ muchos, c¢_)sei_ Qtiles _e
ulilizaci6n y rnanlenimienlo de su acorldicionadof de aire,
Unos p_ cu[dados per su par/o le [pueden ahorrar
mucho tiempo y dine_o dutante la vida de su
acondicionador de aire.
En la tab]a de consejos para la soluci6n r&pida de,
pr_lemas enco_t_ar,_ m_has re_)u_tas a I_ pr_lemas
m_s habituales, Si revisa primero r_uest_a Tabla de
Coa_les pata la solu,ci6n rapida de pr_Aflernas, lal '_..z r_
necesite Hamar nunca a] sewicio tecni¢&
PRECAUC!ON
• Cor_t_cte_ _ C_tro de Se_tc_ A_tot[z_o, _am re.tar o
re_H_t el m_nten_m_r4o de est_ _n_d, Ll_ _ 1.800-24_0_
para _b[_r el CSA m_s cetcano,,
• _l a_ acondlc]onado_o _ apto _t_ set usado _t n_5os
_e_o_ o d_c_c_t_o¢ sin la supervisionad,ecuada.
• Los niSos_e_ d_ =er s_p-_vis_los p=ra _eg_rat _ue
no iueg_en con el ai_ acondic_nado.
• Si hay que cambiarel c_b]ede aliment_n, _o_ic_ea un_ni¢o
de seattle _e _nstale_n re,eatablee_cto,
• E( tt_bajo de (a tnst_)_c[6_debe set t_itz_do de _erdo a)
C_[go EIb:trtcoN_nal _ic_m_te pot e_personalcaltfic_o y
Manual del Propietario 27
Pre_uciones de, Seguridad
Para prevenir tanto ]esiones al usuar[o u otras personas como daSos matefiales, es preciso
segu[r estas instru_[ones...
III La in,_rrecta o_ci6n die] apara_o como co,nsecuencia die ignorar las [nstrucciones.
provocarA daS_os o lesiones..
m A cause del peso _sado del proiducto, se re_mienda que usted tenga a un ayudante a
pa_[cipa en la instalaci6n,
I ADVERTENC:IA
PRECAUCION
Este simbob indica _aposib,il[dad de les[,ones mortales o graves,.
Este sim_illo indi_ ]a posibilidad de ]esiones o daSos matedoales.
| El signifi_do de los s_mbo!os ut:[lizados ,en este manual se indi_ a conflnuac[6,n,
I A_gurese de no hacer!o,
As_urese de s_uir las instrucciones.
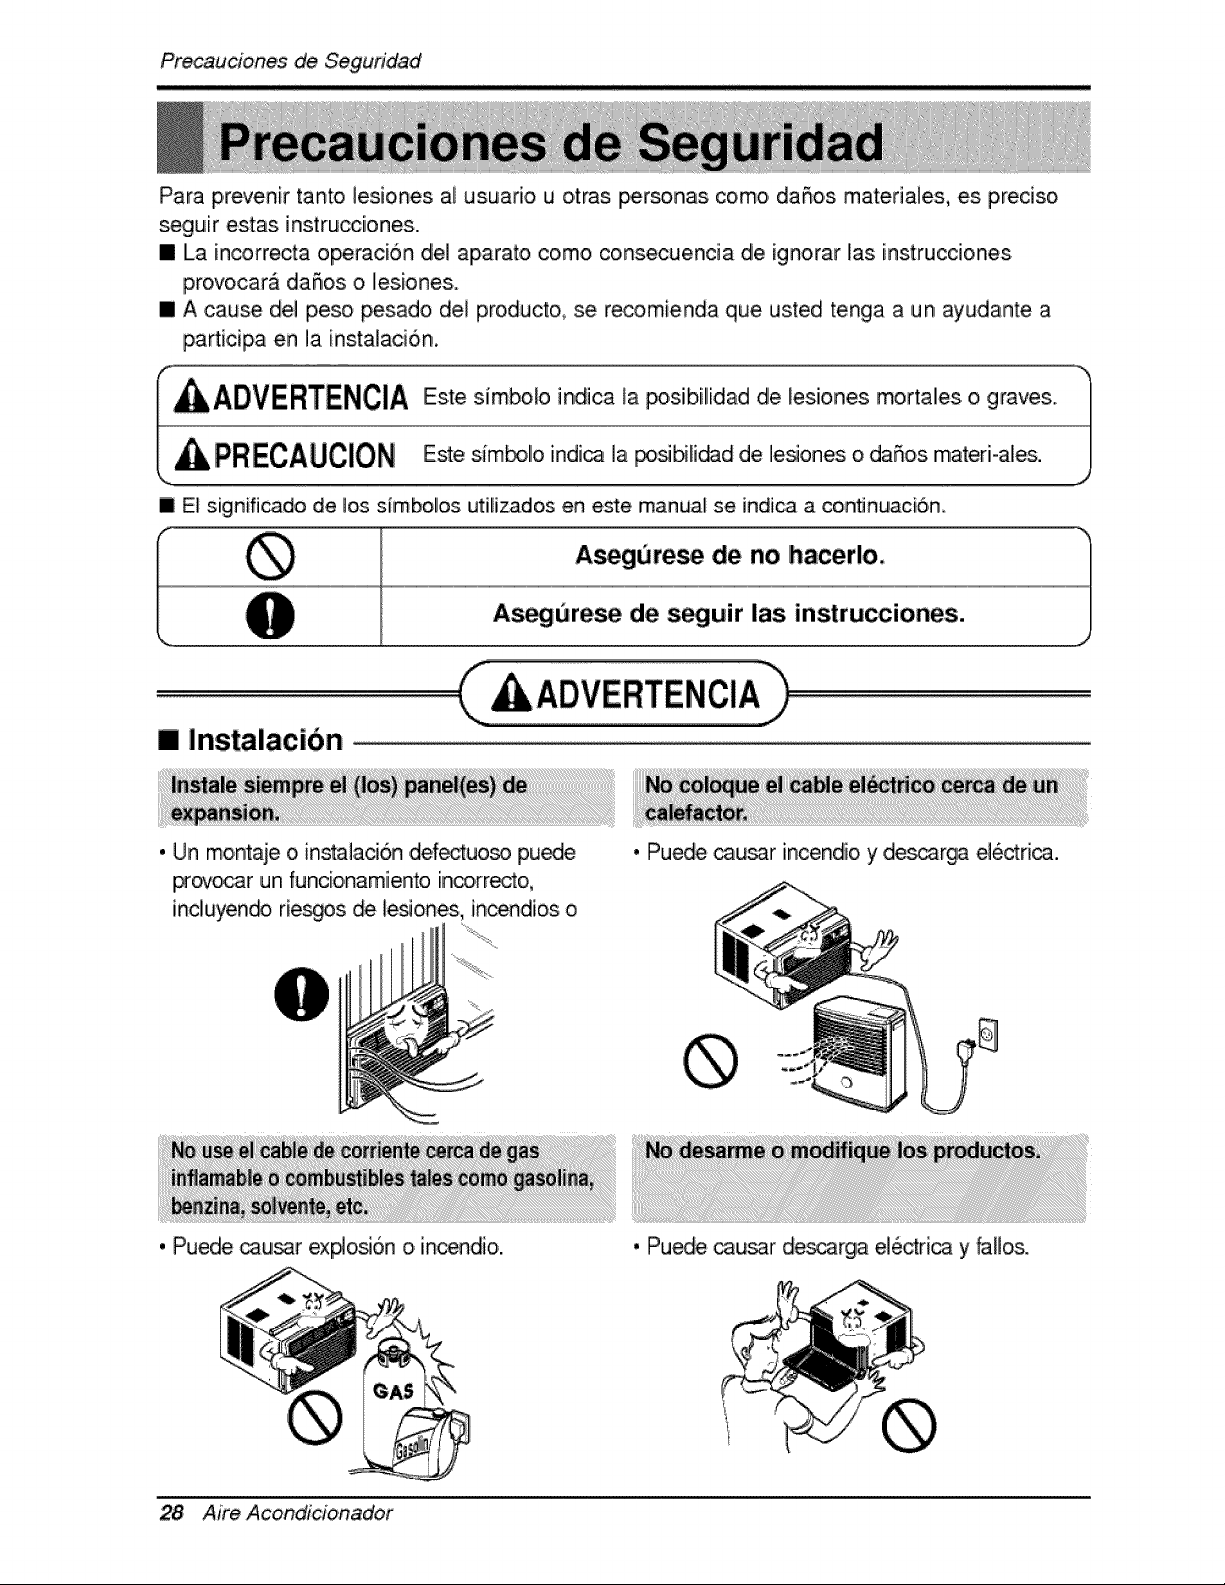
[] Instalacibn
. Un mo,ntaie o,insta]ac[6n ,defectuoso pu_e
provo_r un funcio,namiento [n_,rr_t, o,
incliuyen_ rie_s _ les_ones, incendios o
• Puede _u_r incendio y de_arga ei6_ri_.
. Puede cau!_r ex#o_6n o incendio.
28 Aim Acond_cionador
• Puede _u_r _scarga e]edr[ca y faHos,
Precauciones de Seguridad
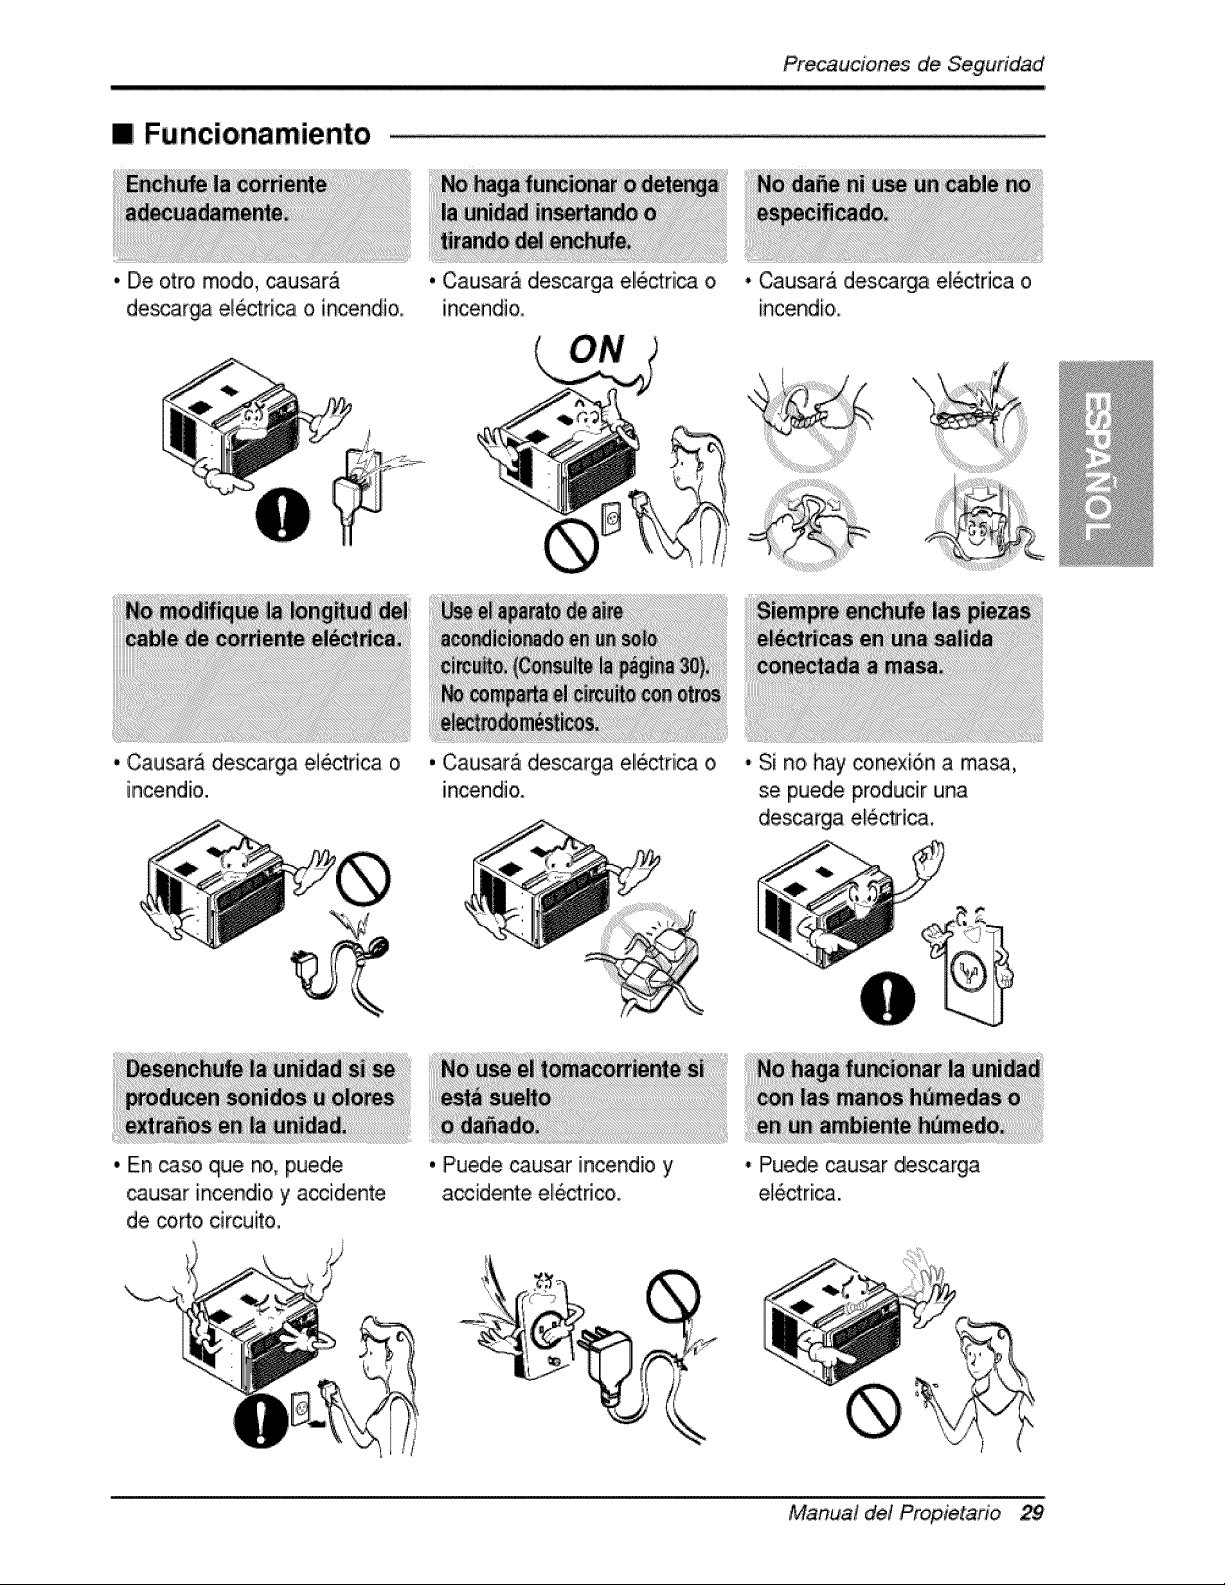
[] Funcio, namiento
,,,De otro modo, _usarA
descarga electrica o incendi&
,, Causara de_arga el_trica o
incendio.
,. En _so que no, puede
. Cau_ra dles_rga ell6ctrii_ o
incendi&
, Causar_ desca[gia, eliectrica o
incendio.
• Causar_ d,es_rga ele,ctrica o
incendio,
• Si no hay coRexion a masa,
se puede producir una
des_rga e_6ctdca.
causar incendio y ac,cid,ente
de corto,drcu_o.
, Piu.ede cau_r incendio y
accidente electric.
• Puede causar descarga
e_ctri_.
®
Manual de! Propietario 29

Pr_auciones de, Seguridad
. E] aparato de air.e acondicionado de_
o_rarse en un _reia ce_.ada para set m_s
.efec_vo.
. Causara descarga electdca o incend[o.
• Puede caus.ar explosi6n, [nc.endio.,
quemaduras.
• Pu,ed,e entr,ar agua en I,aurfidad y disminu[r la
aislaci6n. Puede _usar un,a des_rga
e_e_ricao
[] Instaiacibn
. Son fi]os.as y pueden causar
les[.ones.
,, Pu_e #o_r el fa]lo de
e]ectrodo_st[co o _ter[orad6n
de _ rer',dl[miento.
A
/
I
/
30 Aire Acond_cioinador

Pre_uciones de Seguridad
[] Funcionamiento
I'i Hay riesgo, de lesiiones
piersonales,
• Puedle causar des_rga
eli_trica y daSo.
• Gastara energia en vano y
podria provocar un accidente.
Como ei ventilador gira a aila
ve!ocidad cuando est&funcionando
puede causar tesiones._
• El Nnci,onamiento sin filtros
puede daSar la uRidiad,
, Este pu_e ca.usar lesiones o
daffos en la miasoota o la
planta.
• Pu_e causar da5o a los
animales o vegetaUes y
_rdida de objetos.
, _ uni@d ,dellaire acon_cionado
pu_ deteriorarse,cam_ de
cc4o_,o d_l_ m_ch_; en
liasuperfide.
• No es sano y _dria provo,car
enfermedades o peligros de
lesiones IFersona_es.
Manual del Propietario 31
Previo at Funcionamiento
1..Coloque ell enchufe correctamente.
2_ Use un Onico circuito para este aparato. R.ecargar ,e! c[rcuito p,odria provocar
un r[esgo de incendios.
3. No ut[iice un alargador. Consulte Iiapag[na 33. para mas detalles,
4. No arranque/detenga el func[onamiento enchufandoidesench_ufando el cable
de corriente electric&
5. Si eli alargador esta da_ado y iha de, ser recambiado, solicite a un tecn4co
auto,rizado que instale un recambio exact&
1.. Estar expuesto al flujo directo de aire por un periodoi largo de tiempo puede
constituir un riesgo para su sislud. No exponga a las personas, mascotas ,o
pUantas a] flujo directo pot periodos largos de tiempo.
2. D,ebid,o a la posibilidad de falta de oxigeno, ventile la habitaci6n cuando se
use al mismo tiempo qlue es.tufas u otros dispositivos die calefacciOn.
3. No use este acondicionador de aire para propositos determinados no
especificados (pot ej.: preservar dispositivos de precision, alimentos,
cachorros, plantas y objetos de arte). Tales usios puede da_ar los elementos.
4. El aparato de .aire acondicionado es un apa_ato dise_.ado para el confort del
consumidor, No es un sistema aclimatizador.
1. No toque las partes de metal de la unidad cuando quiite el filtro. Puede
lastimarse cuando manipule bordes fiiosos de metal.
2. No use agua para I[mpiar adentro del a,condicioniador. La expos[c[6n all agua
puede destruir la aislaci6n y esto, a su vez provocar una descarga el6ctrica.
3. Cuando limpie la unidad, asegOrese que la cordente y el interruptor esten
desconectados. El ventillador gira a muy alta velocidad cuando es.ta
func[onando Existe la po,sibilidad de lesionars.e si la energ[a se conecta
acc[dentaimente cuando este Ilimpiando las piezas internas de la unidad
Para reparaciones y mantenim[ento,, pongase en contacto con un centro de
serv[c[o autor[zado. Consulte la p_g[na de garantia o, Ilame al nOmero (800) 243-
0000. Tenga su nOmeor d emodelo, y nOmero de s.erie a mano. Los encontrar_
en la pagin,a 25, de este manual.
32 Aire Acond_cioinadof
fntroduccion
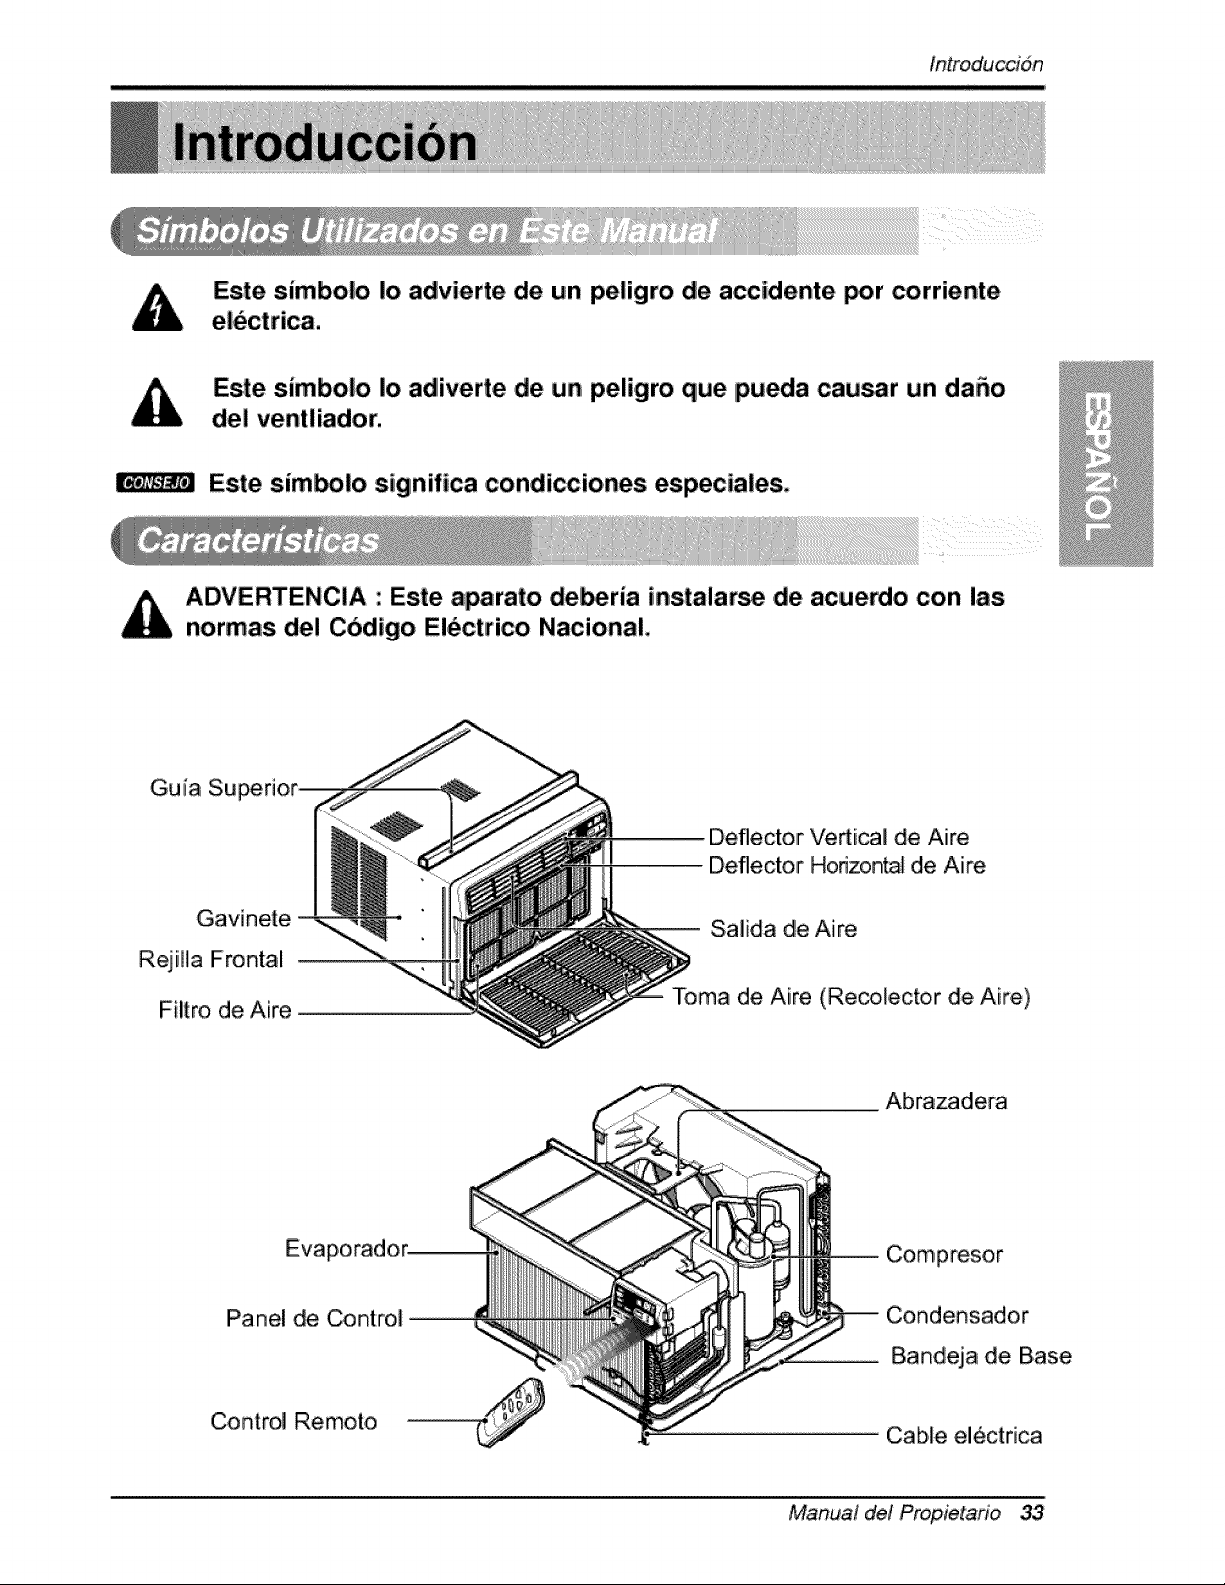
Este simbolo Io advierte de un peligro de accidente por corriente
Este simbolo Io adliverte ,deun peligro que pueda cau_r un da_o
del ventliador.
Este sim_lo significa condiccioReis especiaies,
iADVERTENCIA : Este a_rato de_ria instalarse ,de acue_,o con las
normas de! Cbdigo Electrico Nacional,
Gui[a Su
Gavinete
R,ejiHa Frontal
Filtro de Aire
Deflector Vedical de Aire
Deflector Horizontal de Aire
Salida de Aire
Toma de Aire (Recotector de Aire)
EVa
Panel de Control
Control Remoto
Abrazadera
Compresor
Bandeja de Base
Cable el_ctrica
Manual de! Propietafio 33

Se,quraida EI6ctrica
2) Ei c_ie de alime_c_ _ede induir ,un
dis_itlvo ilintemupt_- _ _ente.
carcasa d_ en_e _enta _n un _ de
pru_ba y oL,o de reinlcio. El dis_it_,ro d_
_mprobarse _6di_ente pr_ionando i
pdmero el botdn TEST y d_p_s RESET Si
el _ _ST_ so des_n_ o si el bo_n
_SET no _,_a_ active, s_nda el
d_ _ a_ndi_ona_ y p6c_ en
_ntacto con un tecnlco _ ser¢_c_
cu_ifica_.
WI_ e| en_ufe de la pared _sum_ de E.ne_la
$1_ !25V, ench_ de 3
Lin_ _ 15A, 125V AC
_i !_5V, e_hufe de 3
Ur_ _ 15A, t25V AC
250V, ench_ de 3
Une_ _ 20A, _0Y AC
_tce _ fu_e
i5_P, o un
_te_u_ deI_P.
20AMP.o un
_te_ de_P:
SEGURIDAD ELECTRICA
NSTRU_!ONES_ _!ON A _
El ai_ acondic_onado _ene una ciavija _e
conexi6n a tie_a _ t,,'es paras en su ca_e de
s_mins_ro de energ_a, q_ _r& enchL_ en
un to_co_e_e de pared de tres _r_
conectado, a _erra adecuadamente _a st=
Wote_iSn _ntra on posi_e _'i_._ de
eiectro_clSn.
USO BE CORBONES DE EXTENSION
Debido .al potencial de _igro .a su
seguddad b_jo _ertas circunstan_as
recomendamos encaredidamente no utiliar
,condones de extensi6n. Sin embargo, si
usted decide u_r un _,_6,n de extensid,n,
es absotut_mente ne_sarie que _.te sea
un cord6n iistado bajo UiL de tres espigas
con conexi6n a _erra caiificado !5A, !25V.
mo_ ell ca_,ado i de_ reali_ de
ac_er_ _n _s c_ig_)s y reg_am_n_os
el_ct_ _ales.
E[ cab[eado dom6stico, de aluminio
podr[a _sionar proMemas es_iales.
_nsu_to a un electricis'[a cali'ficadlo.
L_V_ES DE2_, _j,-_ __
Estas uni_d_ esb_n _uip_as c_ u_ da;_ja de
_i6n a tierta de Ltes paras en el _e de
sumin_tro de e_,_gla que de_ enc_Jfar-_ en un
to_com_ ,de p_ pare tres _s _r_ a
fle_a ad_amente (vet _s ilu_mci_ a
_lntin_d_) _a _ pr_ecci6n _m un _ible
des_ _ electrocution, Si no tie_ un _iiente
_n estas _ra_sticas, un el_id_ ca|if_do
d_r& instalaruno de acue_o ,_ _ _igo i
El_eo N_i_ y los _i_ y no_ _,
34 Aire Acondicionador
No use un _e de extens_n,
Seguridad Eiectrica
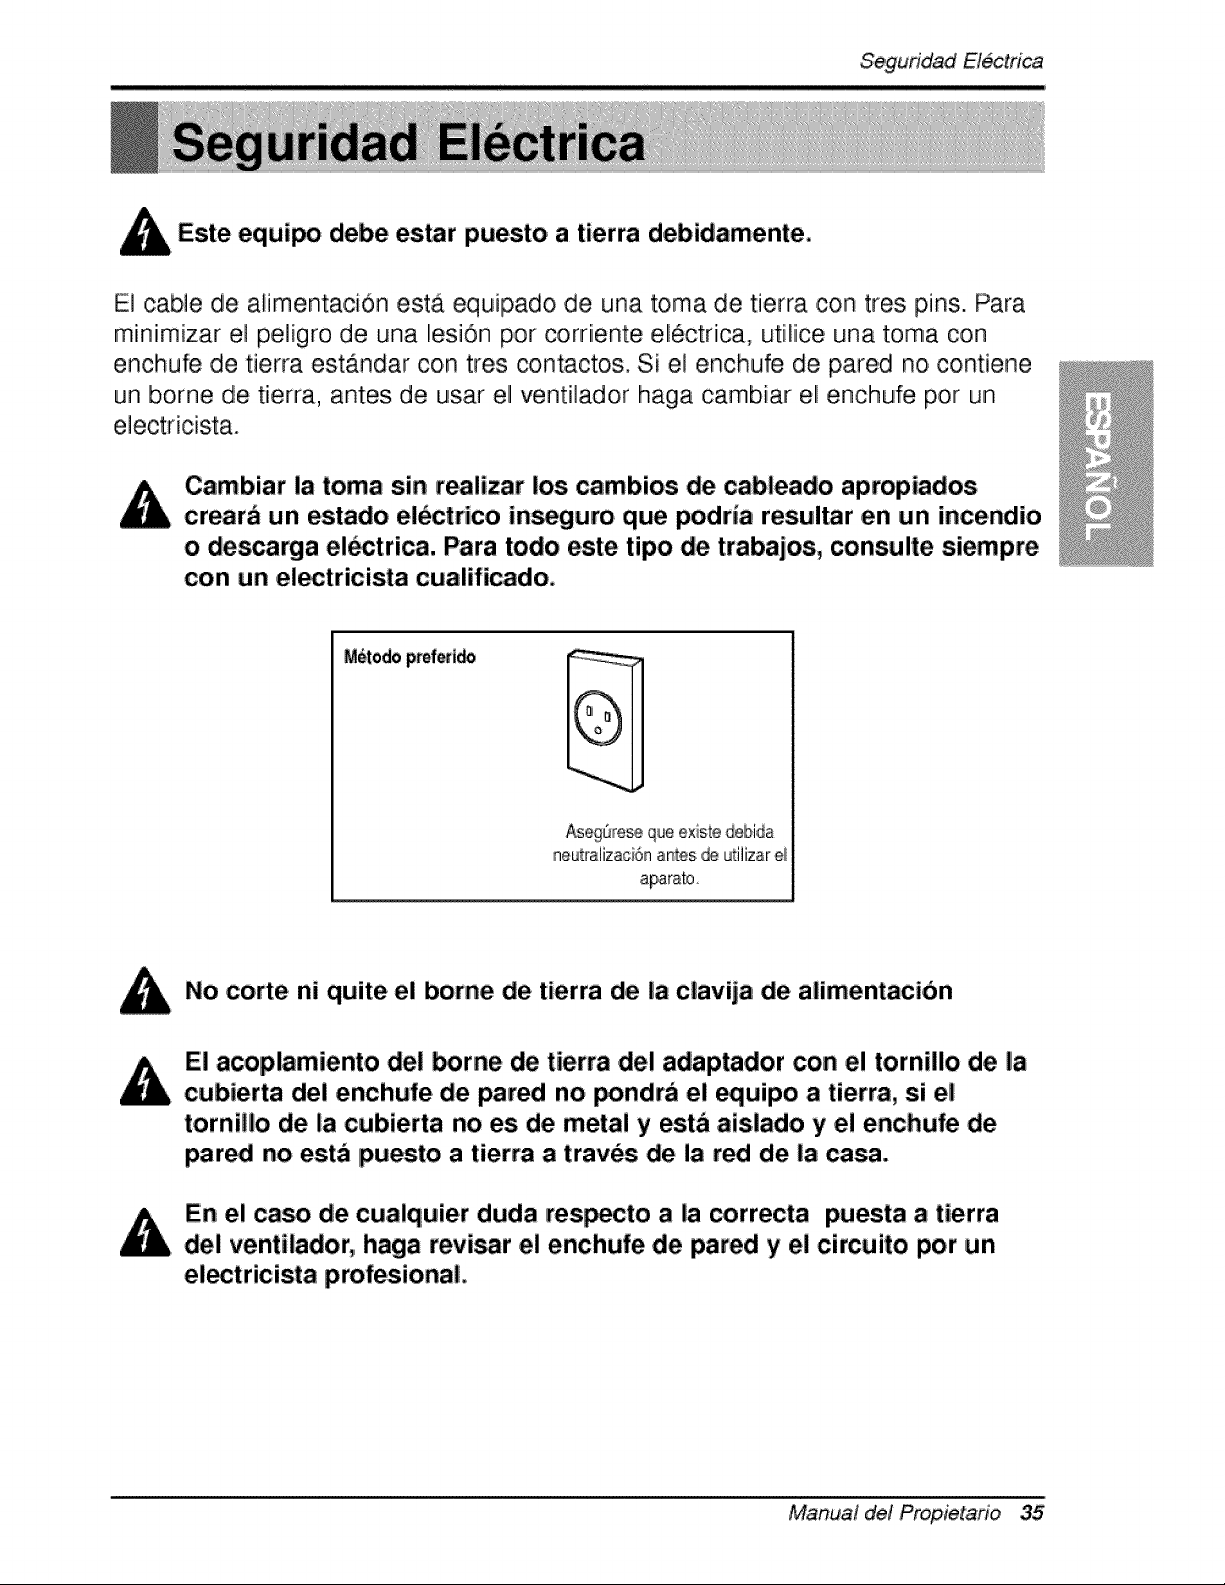
Este equipo debe es.tar puesto a tierra debidamente.
E] cable de alimentaciOn esta equipado de una toma de tierra ,con tres pins. Para
miiniim[zar el pe]igro de una I!esi6n pot corriiente eli6ctrica, ut[liice una t,oma con
enchufe de tierra estandar con tres contactos. Si e] enchufe de pared no, contiene
un borne de t[erra, antes ,de usiar el vent[]ador haga cambiar eli enchufe pot un
Cambiar la toma sin realizar los, cambios de cableado apropiados
crearb un estado el_ctrico in,gum que podria resultar en un incendio
o de_arga el_trica. Para todo este tipo de trabajos, consulte siempm
con un e!_tricista cuaiificado,
Aseg_re_ que e×iste debida
neutraiizaci6n antes ,_ L_iiizare_
aparato,
No corte ni quite el borne de tierra de la clavija de alimentacibn
El ac.oplamiento de! _rne. de tierra del adaptador con e! tornillo de la
cubierta dei enchufe de pared no _ndra el equipo a tierm, si el
tornil!o de la cubierta no es de metal y esta aislado y el enchufe de
par_ no esta ipuesto a tierra a traves de la red dei la casa.
En el ca_ de cu,alquier duda res_cto a la correcta puesta a tierra
del ventUador, haga revi_r el enchufe de pared y el circuito por un
el_tricista profesio, nal,
Manual de! Propietario 35
Seguridad E/_trica
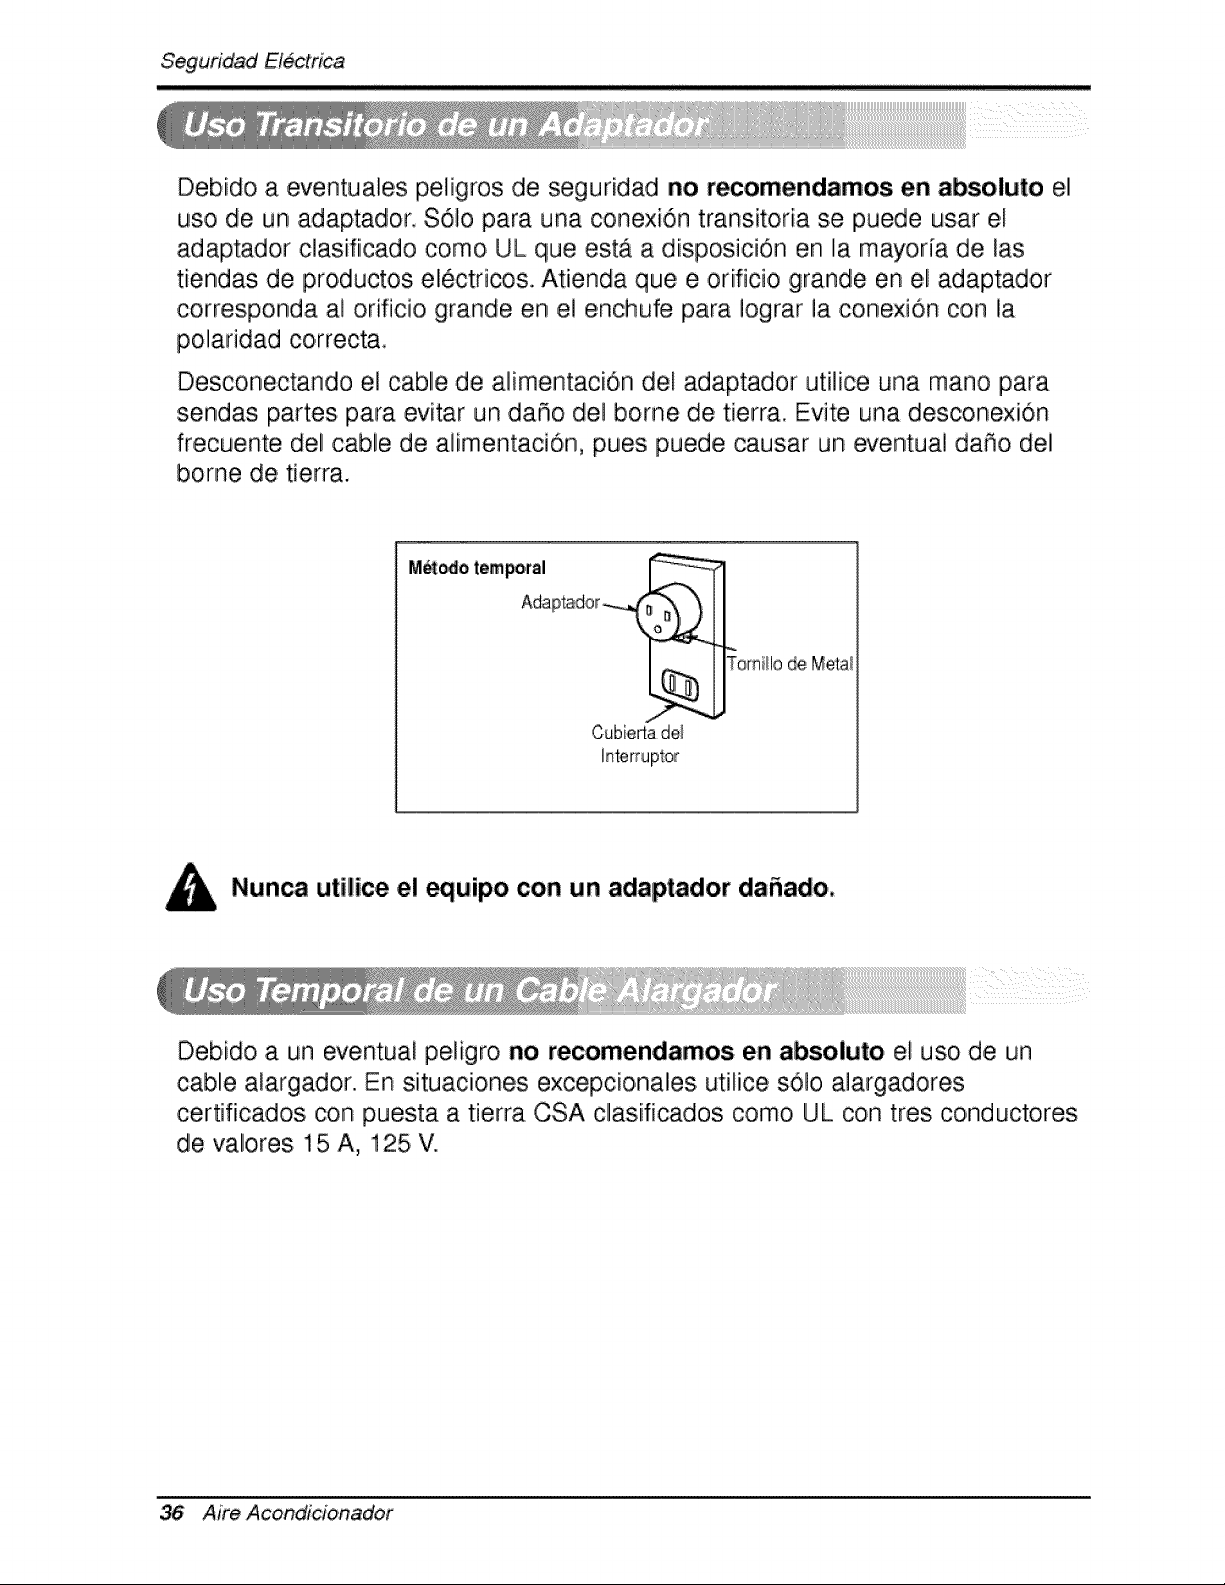
Debido a eventuales peligros de seguridad no recomendamos en absoluto el
uso de un adaptador, $6]o para una conexi6n transitoria se puede usar el
adaptador c]asifiicado como UL que estA a disposiciOn en la mayoria de las
tiendas de productos el6ctricos., Atienda que e, orificio grande en el adaptador
corresponda al orificio grande en el enchufe para iograr la conexion con la
polaridad correcta,
Desconectando el cable de alimentaciOn del adaptador ut[][ce una mano para
sendas partes para evitar un daS,o de! borne de tierra. Evite una desconex[On
frecuente del cable de al[mentaciO, n, pues puede causar un eventual daSo del
borne de t[erra.
M_odo tempo,rsI
II
Tomi!lo de M,eta!
Cubierla de_
Nunca utilice el equipo con un adaptador dafiado,,
Deb[do a un eventua! peligro no recomendamos en absoluto el uso de un
cable alargador. En s[tuac[ones excepcionales utilice s01o a]argadores
certificados con puesta a tierra CSA clasiificados como UL con tres conductores
de valores 15 A, 125 V.
36 Aim Acond_cionador
Inst'alacidn
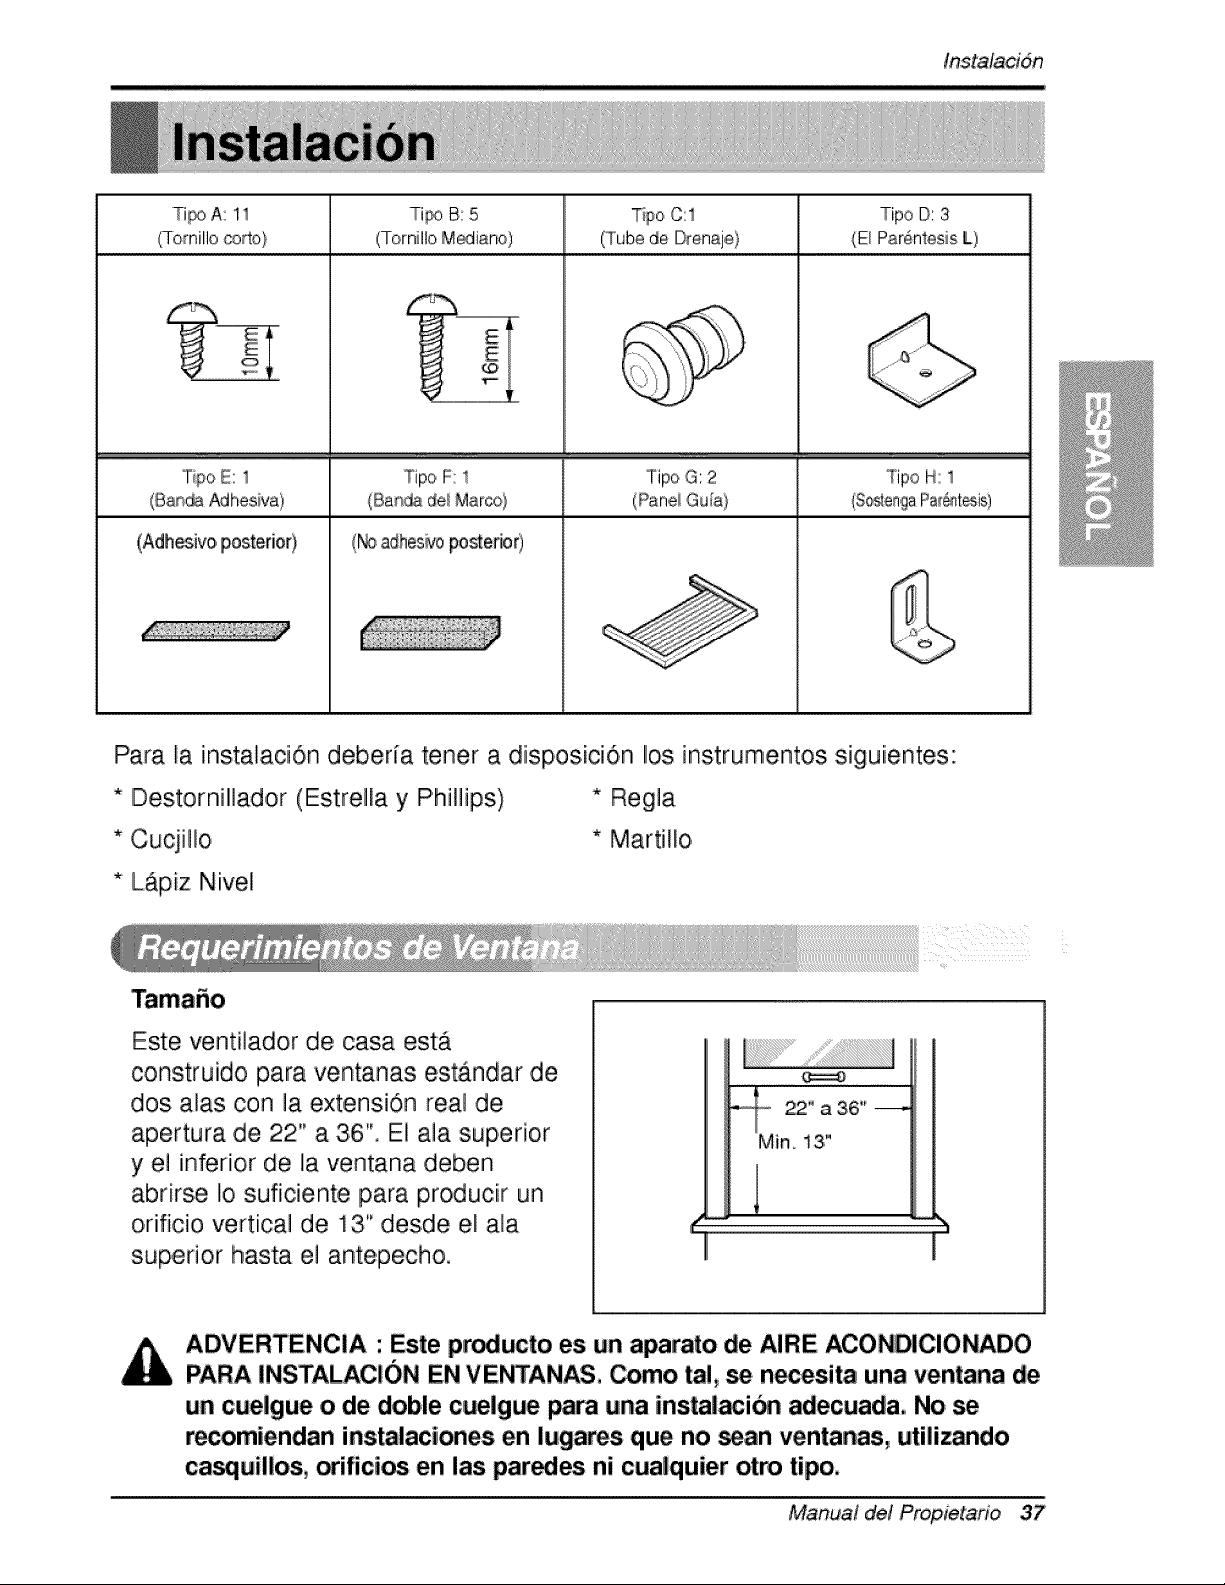
Ti_) A: 1i Tipo B: 5
(Tomillo ®_o} (Tornilto Mediano)
G%-
_i E _i
Tipo C:1 Tipo D: 3
(Tubede DreniAj,e) (E_Piar@ntosis[)
°ripo G: 2 TipoH: 1
(Panei GuA}
°l°ipo E: 1 Tipo F: 1
(Bandadel Marco}
(Adh_ivo posterie0 (_ adhes_/oposterior)
Para la iinsitalaci6n ,deberia tener a dispos.ici6n Ilos instrumentosi siguiientes:
* IDestornill]ador (Estrella y IPhiHipsi) * Regia
* Cucjillo * Martillo
* LApiz Nivel
Este venti]ador de, cas.a esta
construido para ventanas est,_ndar de
dos alas con la extension real de
apertura de 22" a 3i6". El .a]a superior
y e] inferior de la ventana deben
abrirse Io suficiente para producir un
orifici,o vertical de 13" desde el ala
superior hasta e] antepecho.
_,o 22" a 36"
Min 13,"
iADVERTENCIA : Este pr_ucto es un aparato de iAIRE ACONDICIONADO
PARA INSTALAC!ON EN VENTAN_, Como _!, se n_esita una ventana de
un cuelgue o de doble cuelgue _ra una inst_i_ adecuacla.. No se
r_omiendan ins_laciones en lugares que no scan ventanas, uti|i_ndo
ca_uil|os, orifici_ e.n ias parses ni cua|quier otto tipo.
Manual del Propietario 37
in,stalacidn
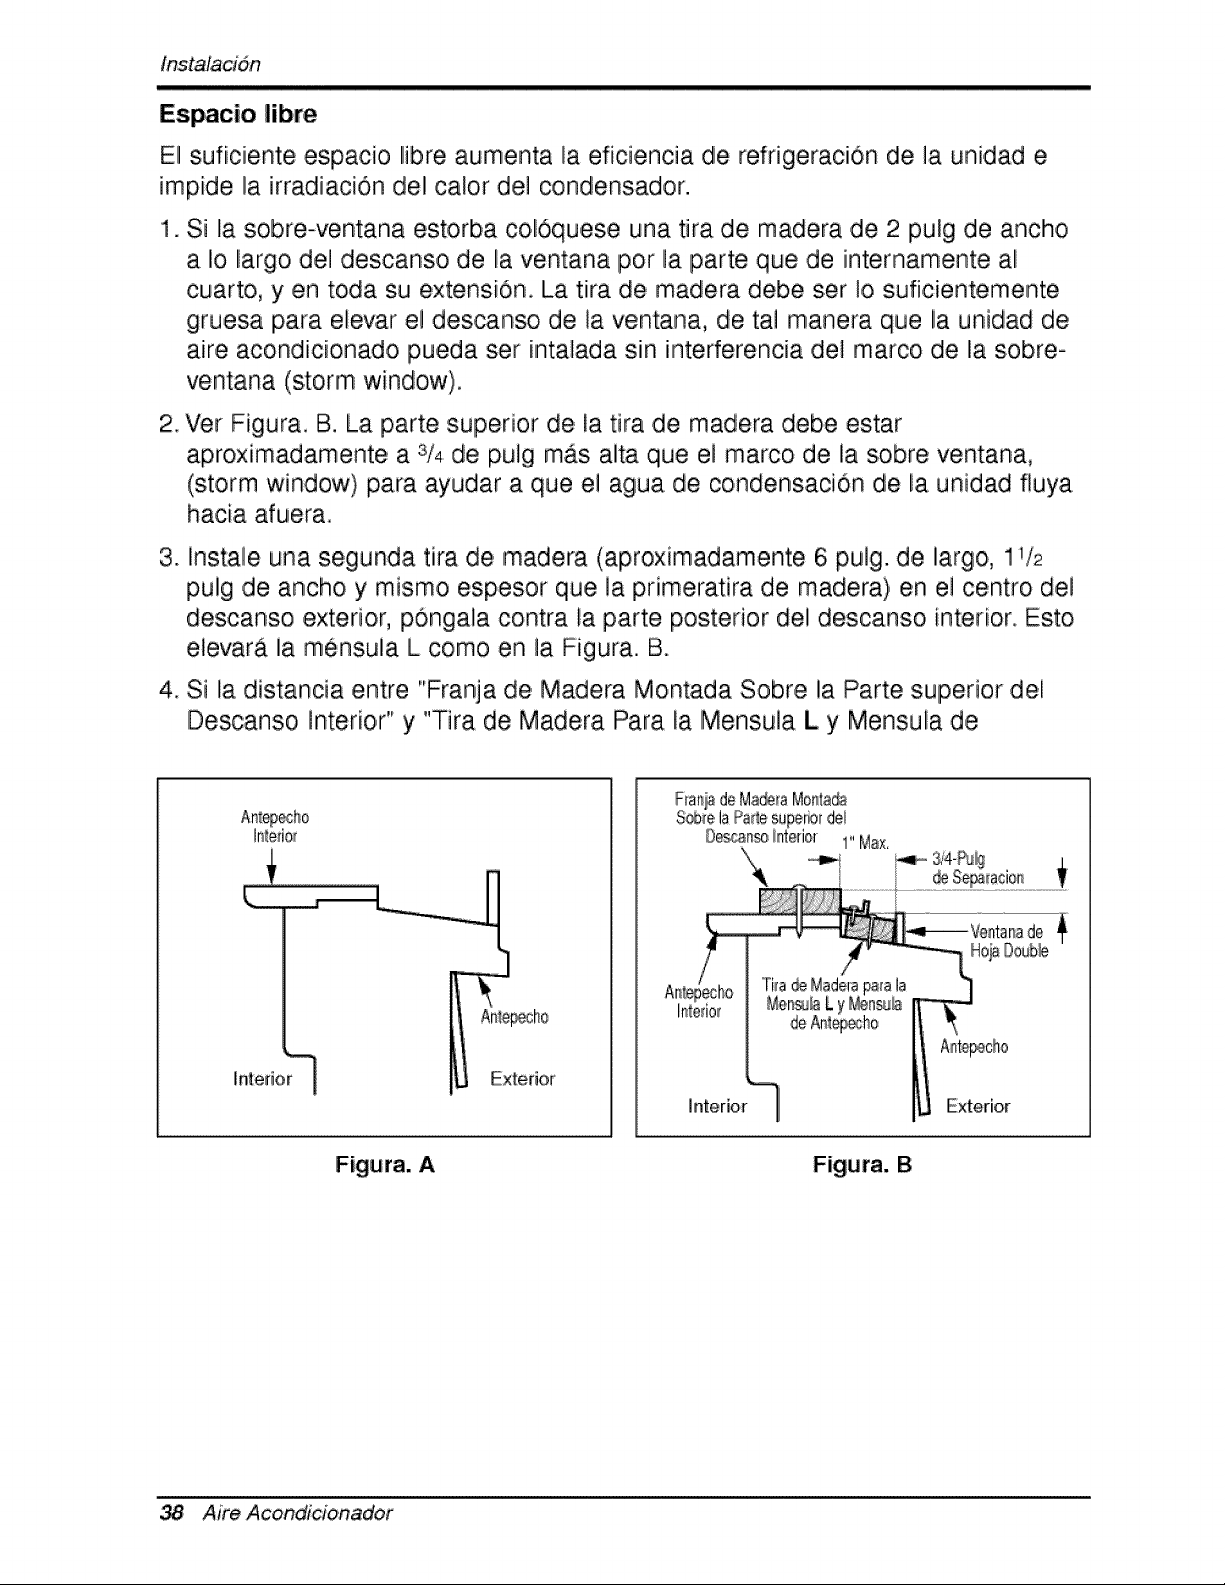
Espacio |ibre
El suficiente espacio libre aumenta la eficiencia de refrigeraciOn de ]a un[dad e
impide la irradiation del calor del condensador.
1. Si la sobre-ventana estorba col6quesie una tira de madera de 2 pulg de ancho
a Io liargo del descanso de ra ventana por la parte que de internamente all
cuarto, y ,en toda su extensidn. La tira de madera debe ser Io suficientemente
gruesa para eievar el descanso de la ventana, de, tal manera que la unidad de
aire acondiicionado pueda set inta]ada sin interferencia de] marco ,de lia sobre o
ventana (storm window).
2. Ver Figura, B. La parte superior de !.atira de madera debe estar
aproximadamente a 3/4 de pulg mas alta qiue e] marco de !a sobre ventana,
(storm window) para ayudar a que el agua de co,ndensacion de la unidad fluya
haci.a afuera
3_
instale una segunda tira de madera (aproximadamente 6;pu]g. de largo, 11/2
pulig de ancho y mismo espesor que la pdmeratira de madera) en e! centro de]
descans.o exterior, p6ngala contra la parte posterior del descanso, interior. Esto
elevara la mensula L como en la Figura. B.
,4.Si la distancia entre "Franja de Madera Montada Sob,re IlaParte superior dei
Descanso interior" y "Tira de Madera Para la iMensula L y Mensula de
Ir:_edo_
F_ari_de Made_aMorfl:a_
S_e, la Pa_esuperiordel
O_aln_ i[nterior 1" Max.
]ntedor Exterior
Figura. A Figura. B
38 Aire Acond_cioinador
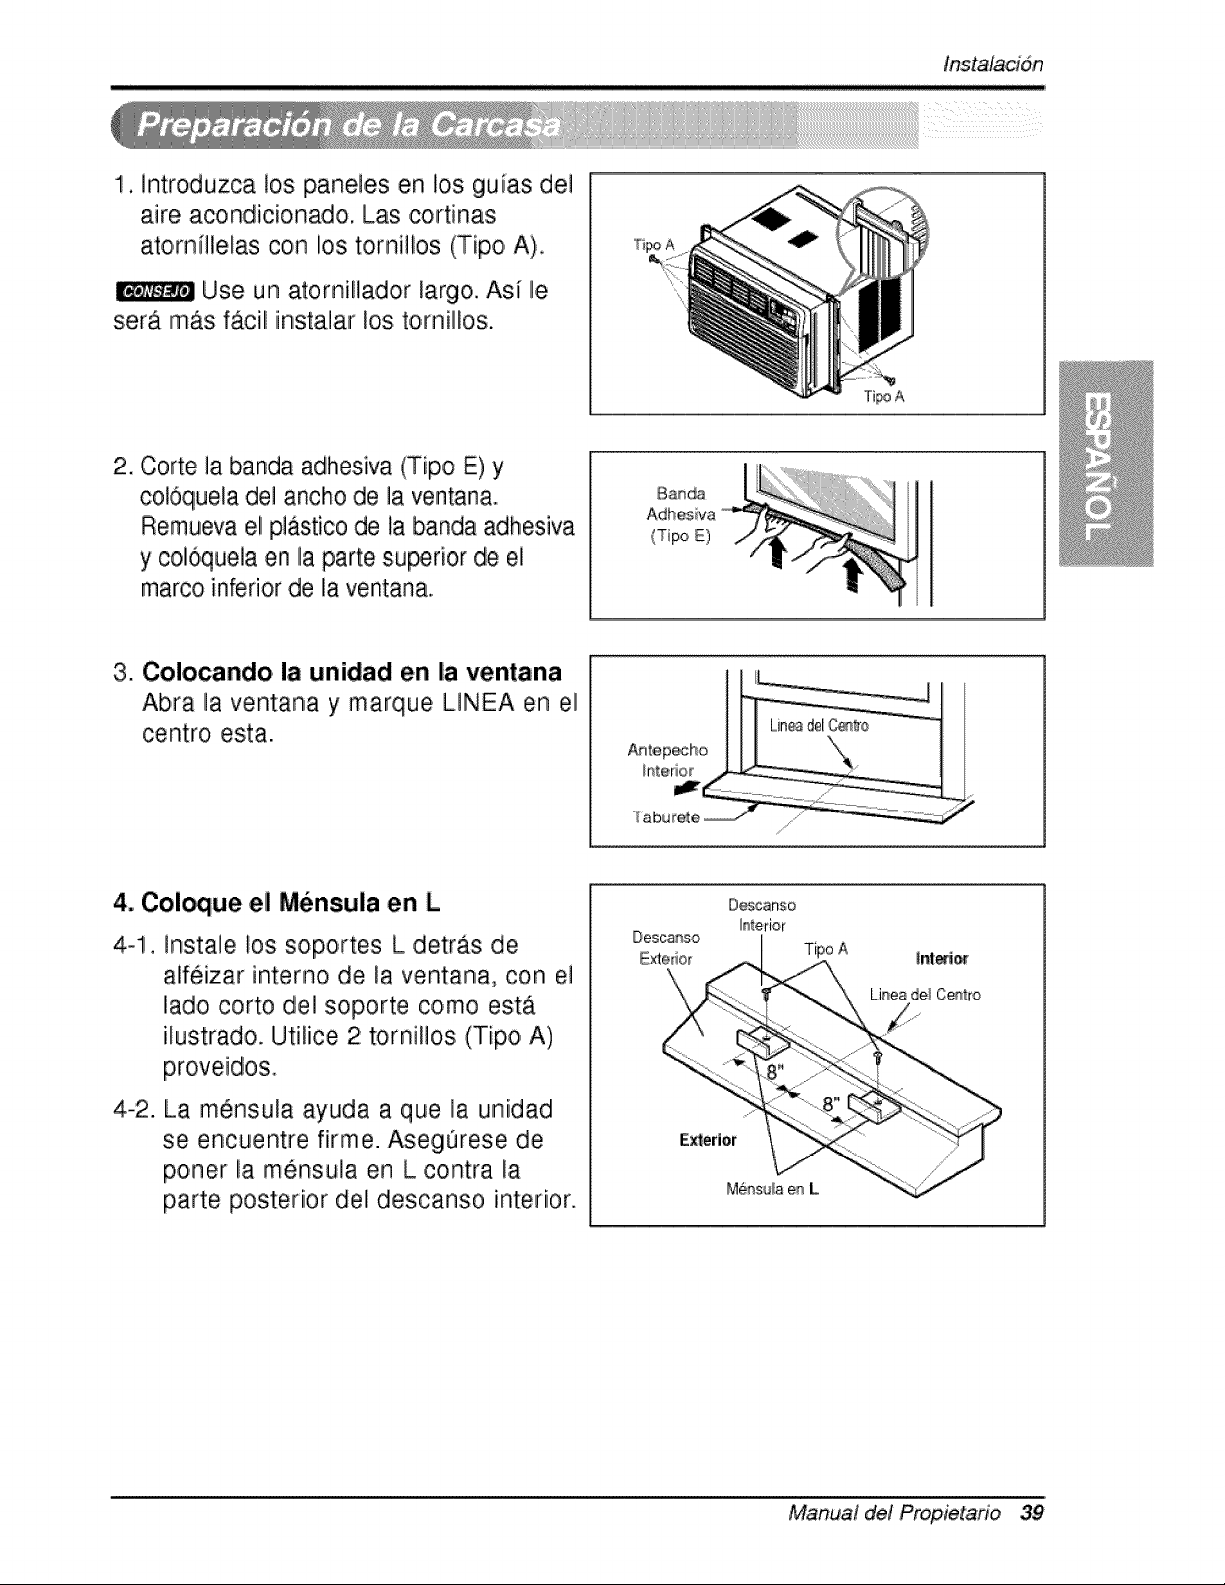
!, introduzca los pane.les en !o,s guias del
,aire acondi,cionado, Las cortinas
ato,mfllelas con Iios tornillos (Tip,o,A),
Use un atornilla,dor largo,. Asi lie
ser_ m&s f&cili iinsta]ar los to,rnillos.
"f_poA
Ti_ A
2. Corte ]a banda adhesiva (T[po E) y
col6quela de] ancho de ]a ventana°
Remu,eva e! pJastico de la banda adhesiva
y col6que]a en [laparte su_rior de ei
marco inferior de la ventana..
Baada
(Tipo E)
3. Colocando la unidad en |a ventana
Abra la ventana y marque LINEA en el
centro esta.
4. Col_ue el Mensula en L
4-1. insta]e los soportes L detras de
alifeizar interno de la ventana, con e]
lado corto de] soporte como est_
ilustrado. Utilice 2 tornillos (Tipo, A)
proveidos,
4-2. La m6nsula ayuda a que ]a unidad
se encuentre firme. Aseg0rese de
p,oner la mensu]a en L contra la
parte posterior del descanso interior.
Desca_so
Exte[iOLr
Tipo A
E_erior
Manual del Propietafio 39
tns,talacidn
IPrecautibn: En las siguientes instrucciones, sostenga la unidad fiirmemente
hasta que la pa_e corr_iza de la v_tana descans,e sobre la _rte superior
de! canal y por .detras del marco de los paneles corredizos, Pu_e haber
lesiones o daSos si la unidad se cae ,deia ventana.
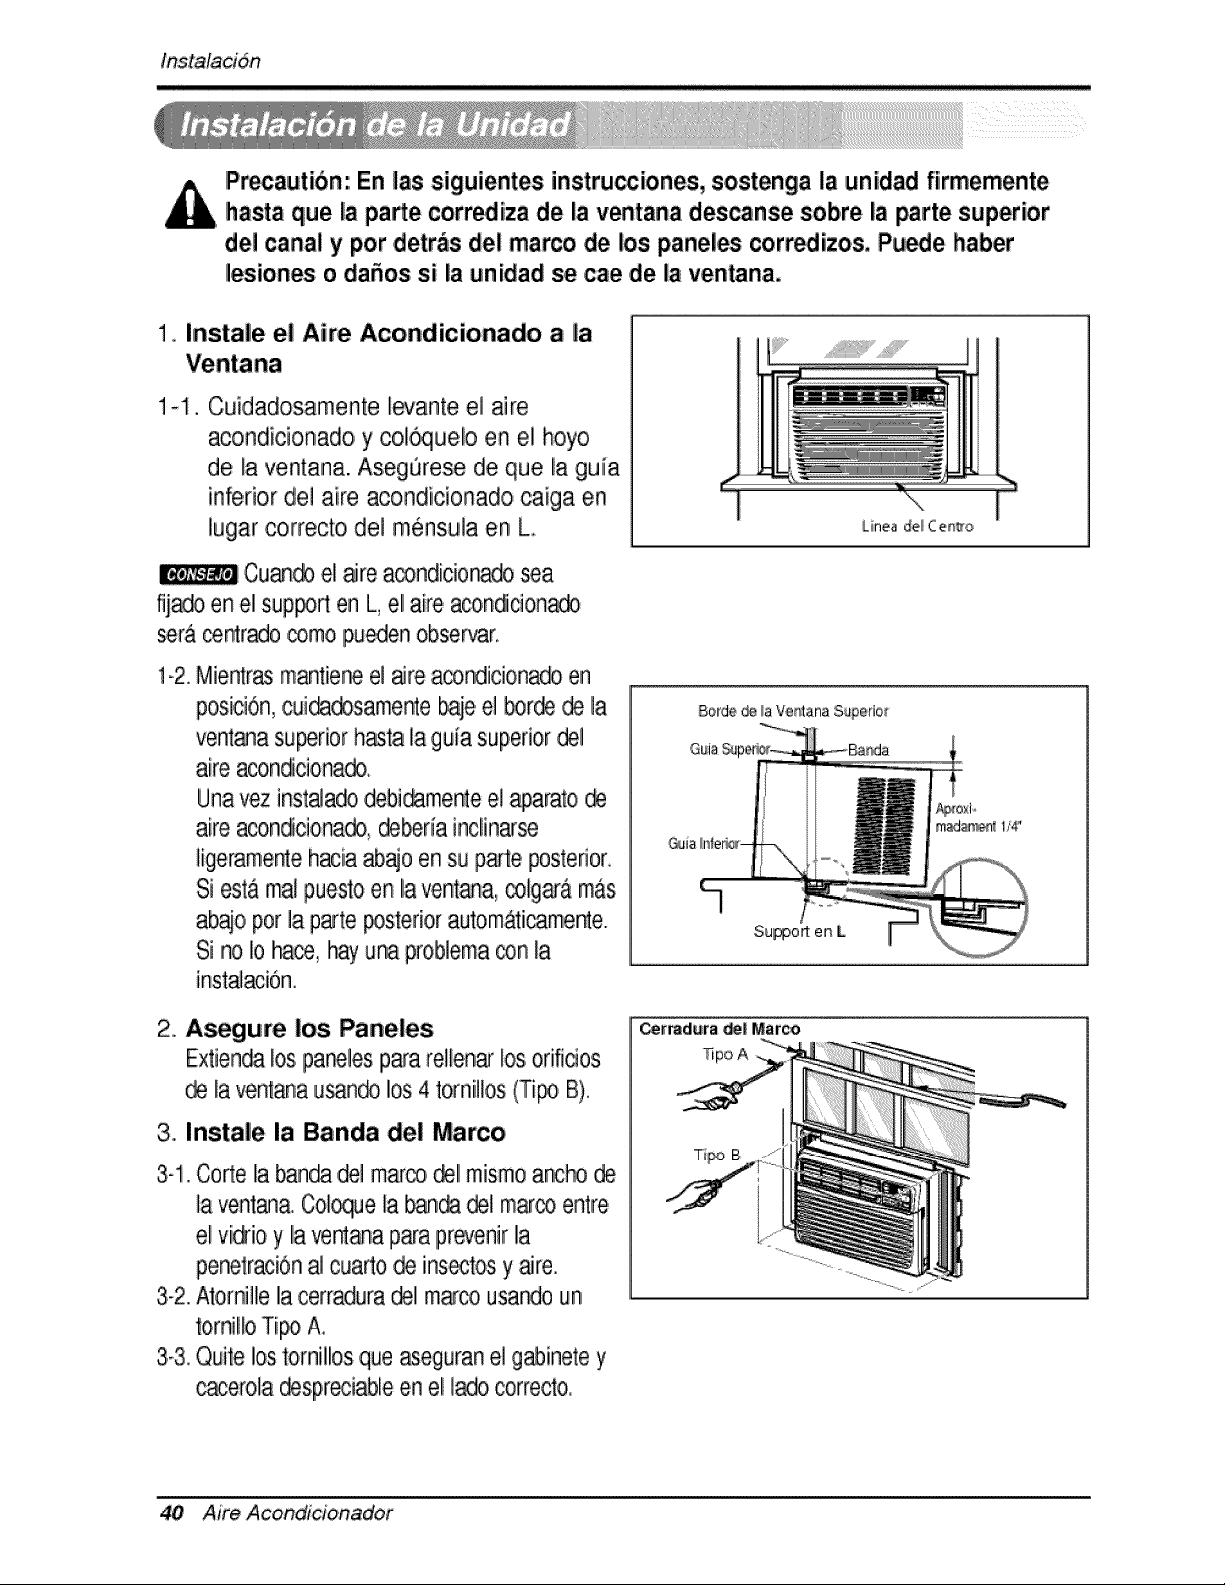
!. Instale el Aire Acondicionado a la
1-I. Cuidadosamente l_ante el aire
acondicionado y col®uelo en el hoyo
de la ventana. Aseg_rese de que la guia
inferior de! aire acondicionado caiga en
lugarcorrecto del mensula en Lo
Cu_ el are a_ndicio_o _a
fij_o en el sup_d en L,el aire aconddon_
_r_ ce_r._o ,_mo,pu_en observar.
1-2.Mi.e_rasmantieneel aJreacondiciona_ en
posiciOn,cuidadosamenteb@eel borde_ la
ventanasu_rior hastala guia superiordel
aire acon_cionado.
Unavez instaJado,debi_mente e! @arato @
aire aco,n_cionado_@_ria inclinarse
ligerame_e hacia_o en su parte posterior.
Si esta malpuestoen la ventana,colga-&mas
ab_o,pot la parteposteriorautom&ticame_e.
Si no Io hace,hayuna problema®n la
inst_acion.
2. A_gure los Paneles
Extiendalos.panelesp_a re!lenarlosorificios
@ la ve_ana u_n® los 4 tomillos (Ti_ B).
3.. Instale la Banda del Marco
3-1.CorteIia_ndla,del marco_11mismoancho@
la vent_a. Col_ue la ban_ @,lm_co entre,
e! vi@ioy la ventaqap_a pr_venirla
peretraci6n_ cuado de insectosy _re.
3-2.A'_o,rnille la cerradura,_1 marco,usa_o un
_ornJlloTi_ A,
3.-3_Quitelos tomillosque _eguran el g_inete y
_erola @spreciableen e! lado,correcto,,
L
LinJea _e_ C et_,o
40 Aire Acondi'doin_dof
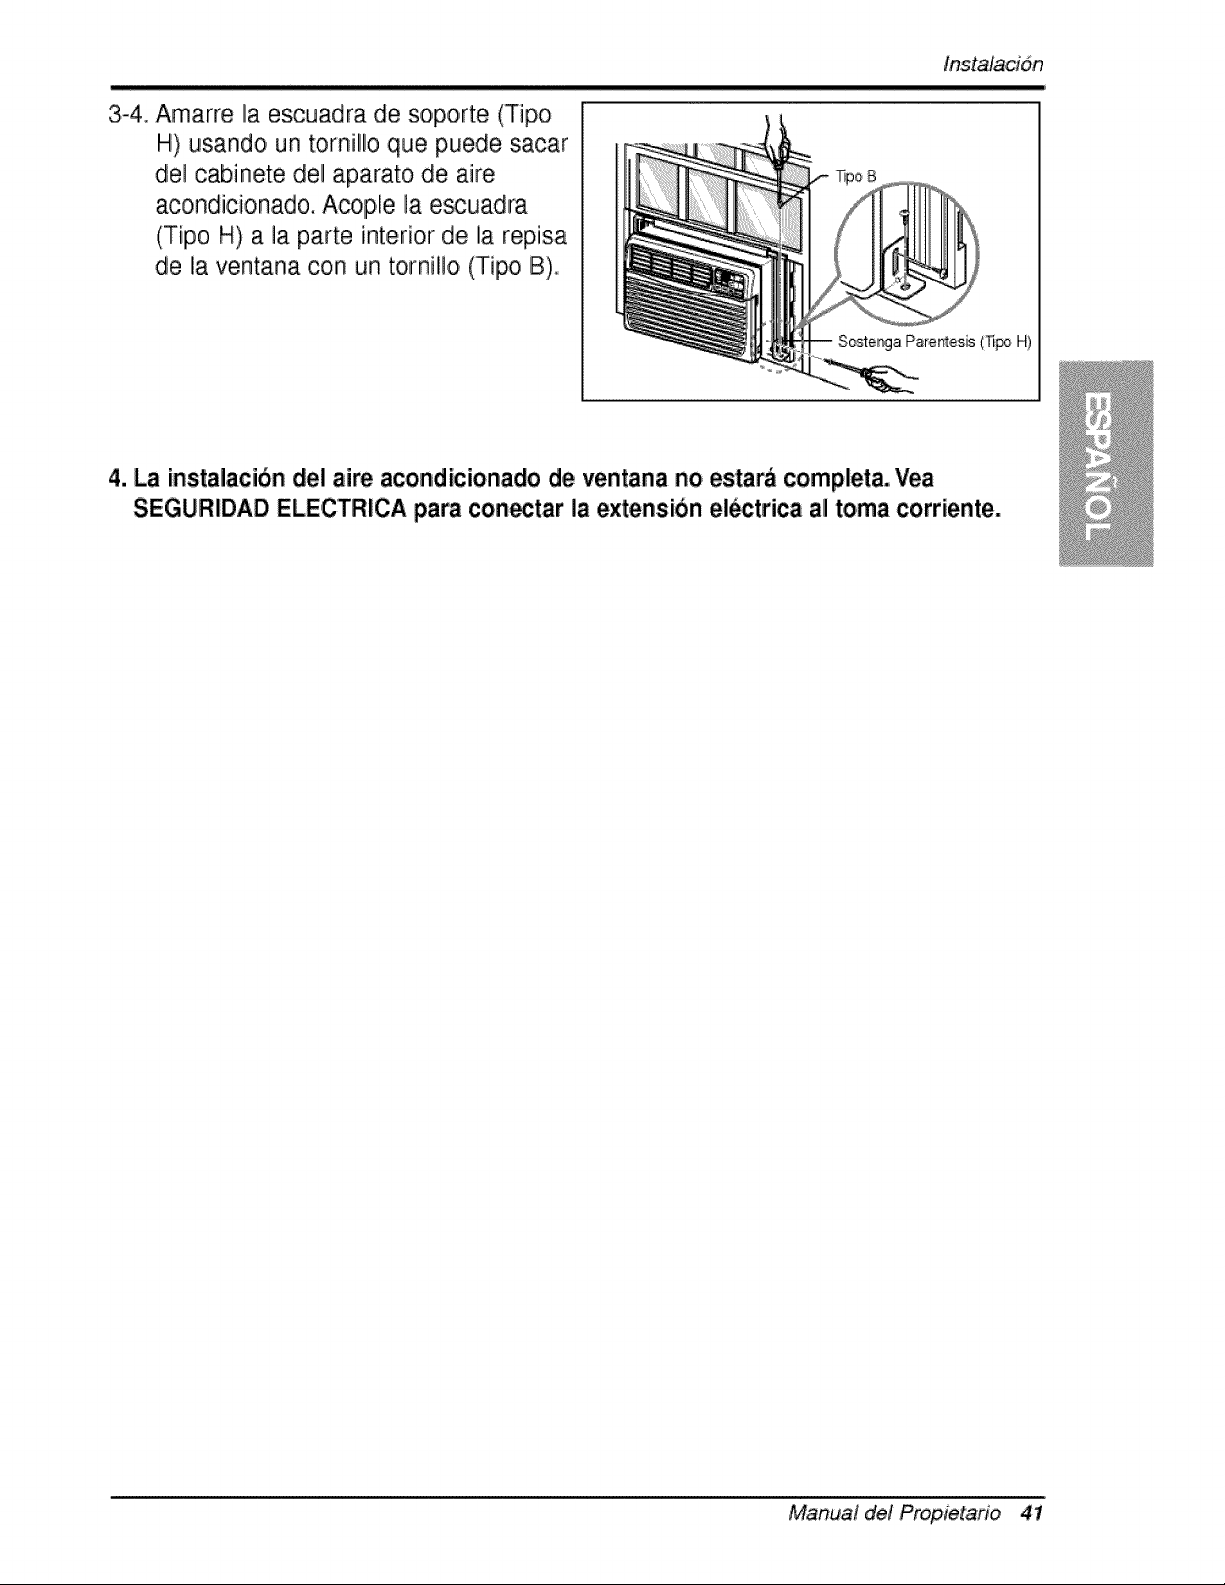
tnstalacion
3-4. Amarre la escuadra de soporte (Tipo
H) usando un tornillo que puede sacar
del cabinete del aparato de aire
acondicionado. Aco,ple la e_uadra
(Tipo H) a la parte interior de la repisa
de la ventana con un tornillo (Tipo B)
4. La instalacibn del aire aco,ndicionado d,eventana no estarb complet& Vea
SEGURIDAD ELECTRICA para con_tar la extensibn el_trica all toma corriente.
Manual de! Propietario 41
instrucciones de funcion,amiento
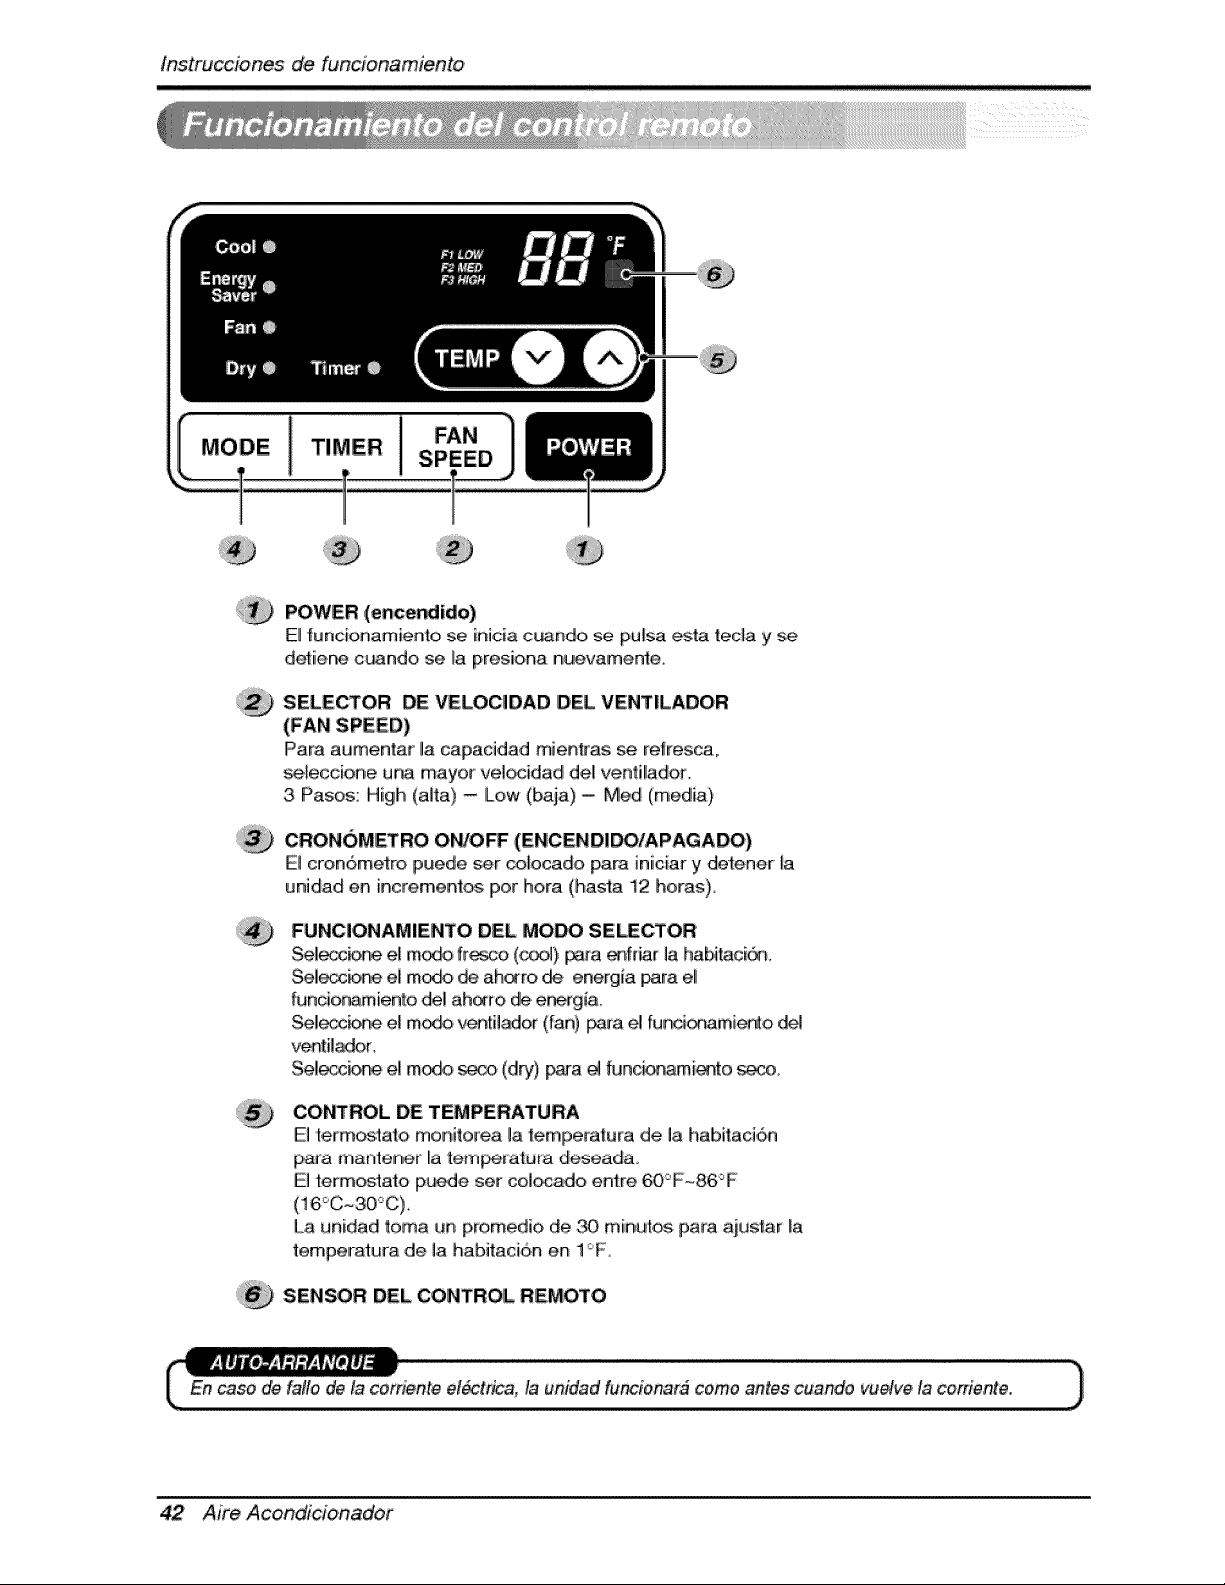
POWER (encer_ido)
El funcionamiento se inicia c_ndo, se pu[sa ,_ta teda y se
detiiene c_ndo se La presiona nuevamente,
SELECTOR DE VELOCIDAD DEL VENTILADOR
(FAN SPEED)
IPara at,Jm,entar la capacidad mienkas se refresca.
se,_eccione una mayor vel_idadl deU ventil!ador,
3 Pasos: High (alta) - [Low (baja) = Med (media)
,CRON6METRO OWO_ (ENCENDIDO/APAGADO)
El cron6metro puede ser _ocado para iniciar y det:ener [a
unidad en increment_ Ipor hera (hasta 12 betas),
FUNC|ONAM|ENTO DEL MOW SE_CTOR
Sel_ e! m_, ff_co (_) _a, _fdar la, habi_ci_
Selecc_ el m_ _ ah_ro de energia para eli
funcior_mienk3 del ah_ro de e_gia,,
Se!_c_% el m_, v_til,_or (fan) _ra _ fur_ionamie_o
ventilador,
Se!_c_ el m_ _ (dry), pa_'a _ thJncb_mi_-_to _..o.
CONTROL DE TEMPERATURA
El termos_ato monitore,a la te,mlPeratura de, I,a habitaci6n
paJa mante_n,er Ila {em_atura deseadao
E] term_tato ip_e set col_do entre 60_F~86°F
La unidad toma un prom ,,d_,ode _ miinut,_ para ait,,tstar [a
temperatura de la habitaci6n en 1F,
SENSOR DEL CONTROL REMOTO
En case de fa#o de la cerriente el_trica, la unidad fu'_ionar# come antes cuando vu_ve ta cotffente.
42 Aire Acondlcioinadof
lnstrucciones de, funcion,am,iento
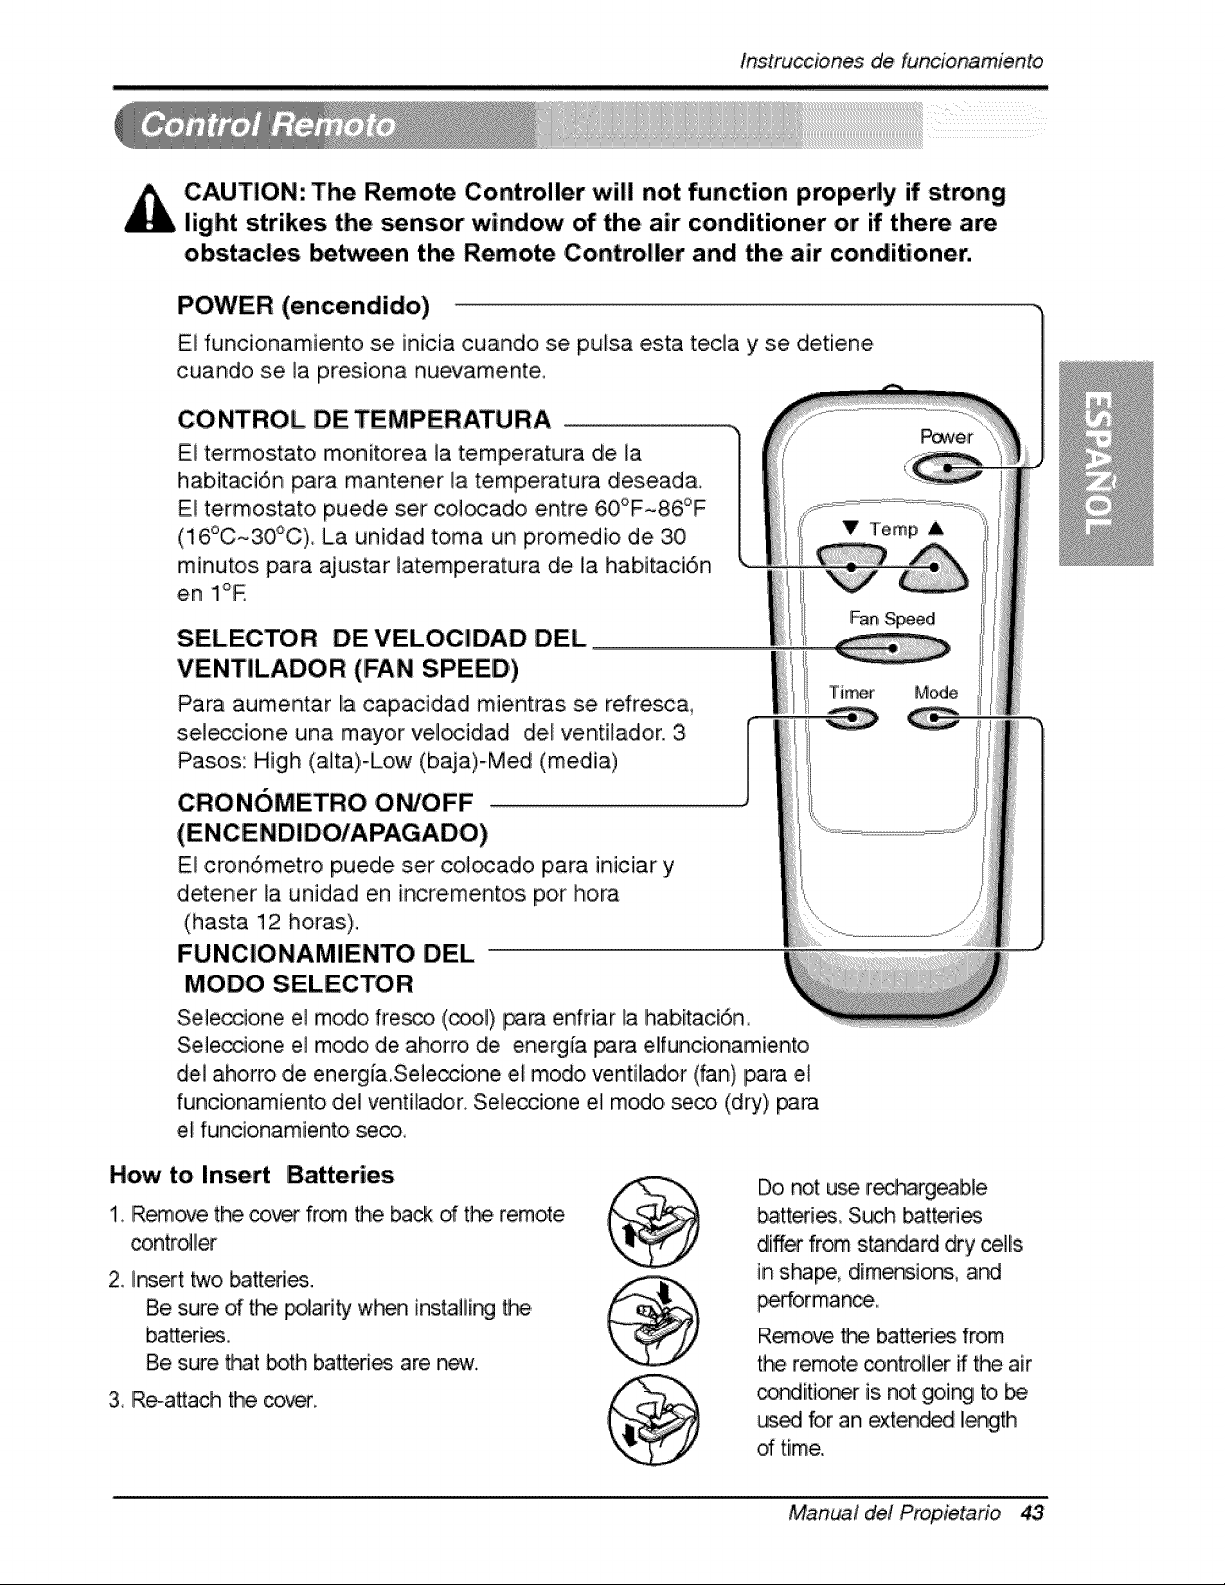
CAUTION: The Remote Controller will not function properly if strong
light strikes the _nsor window of the air conditioner or if there are
obstacles _tween the Remote Co,ntro|ler and the air conditioner.
POWER (encendido)
El funcionamiento se inicia cuando se pulsa esta teda y se detiene
cuando se la presiona nuevamente.
CONTROL DE TEMPERATURA
El termostato monitorea la temperatura de la
habitaci6n para mantener _a temperatura desead&
Eli te,rmostato puede set col_ado entre 60°F~86°F
(16°C~30_C) La unidad toma un promedio de 30
minutos para ajustar latemperatura de la habitaci6n
en Ii°R
SELECTOR DEVELOCIDAD DEL
VENTILADOR (FAN SPEED')
Para aumentar la capaci,dad mientras se refresc&
sel_cione una mayor vel_idad del ventilador, 3,
Pasos: High (aita)-Low (baja)-Med (media)
CRONOMETRO ON/OFF ..............................................................................................................................................................................
I Fan, Speed
{
I TiHr Mode
E! cron6metro puede set col_ado para iniciar y
d,etener la unidad en inc#e, mentos por hora
(hasta 12 horas),
FUNCIONAMIENTO DEL
MODO SELECTOR
Sele_ione el rn_o fre_, ,(_l) para enfnar la habitaci6n
Seleosione el modo de aho, rro, de energ{a para elfuncionamiento
del ahorro de energ[a,Seleocione el modo ventilador (fan) Ipara el
funcionamiento del ventilador. Sele,_ione el modo seco (dry) _ra
el funoionamiento se_,
How to Insert Batteries
1, IRemove the _ from the back d t_ remote
contro_l_
2, II_ert two batteries.
Be sure d the pdarity w_ instaliir_ _
batteri_,
Be sure, _t both batteries are n_.
3, Re-attach the cover.
Do, not u_ recbargeab,le
batteri_, S_ batted_
differ fr_ s_ndard dry ,cells
in shape, dimension& ard
_orman_,,
R_ove tP_ batteries from
the remoCecontro_ier ff the air
con,dition_ is not going to be
_ for an extended II_th
of time,
Manual del Propietafio 43
tns,trucciones _ funcionamien,to
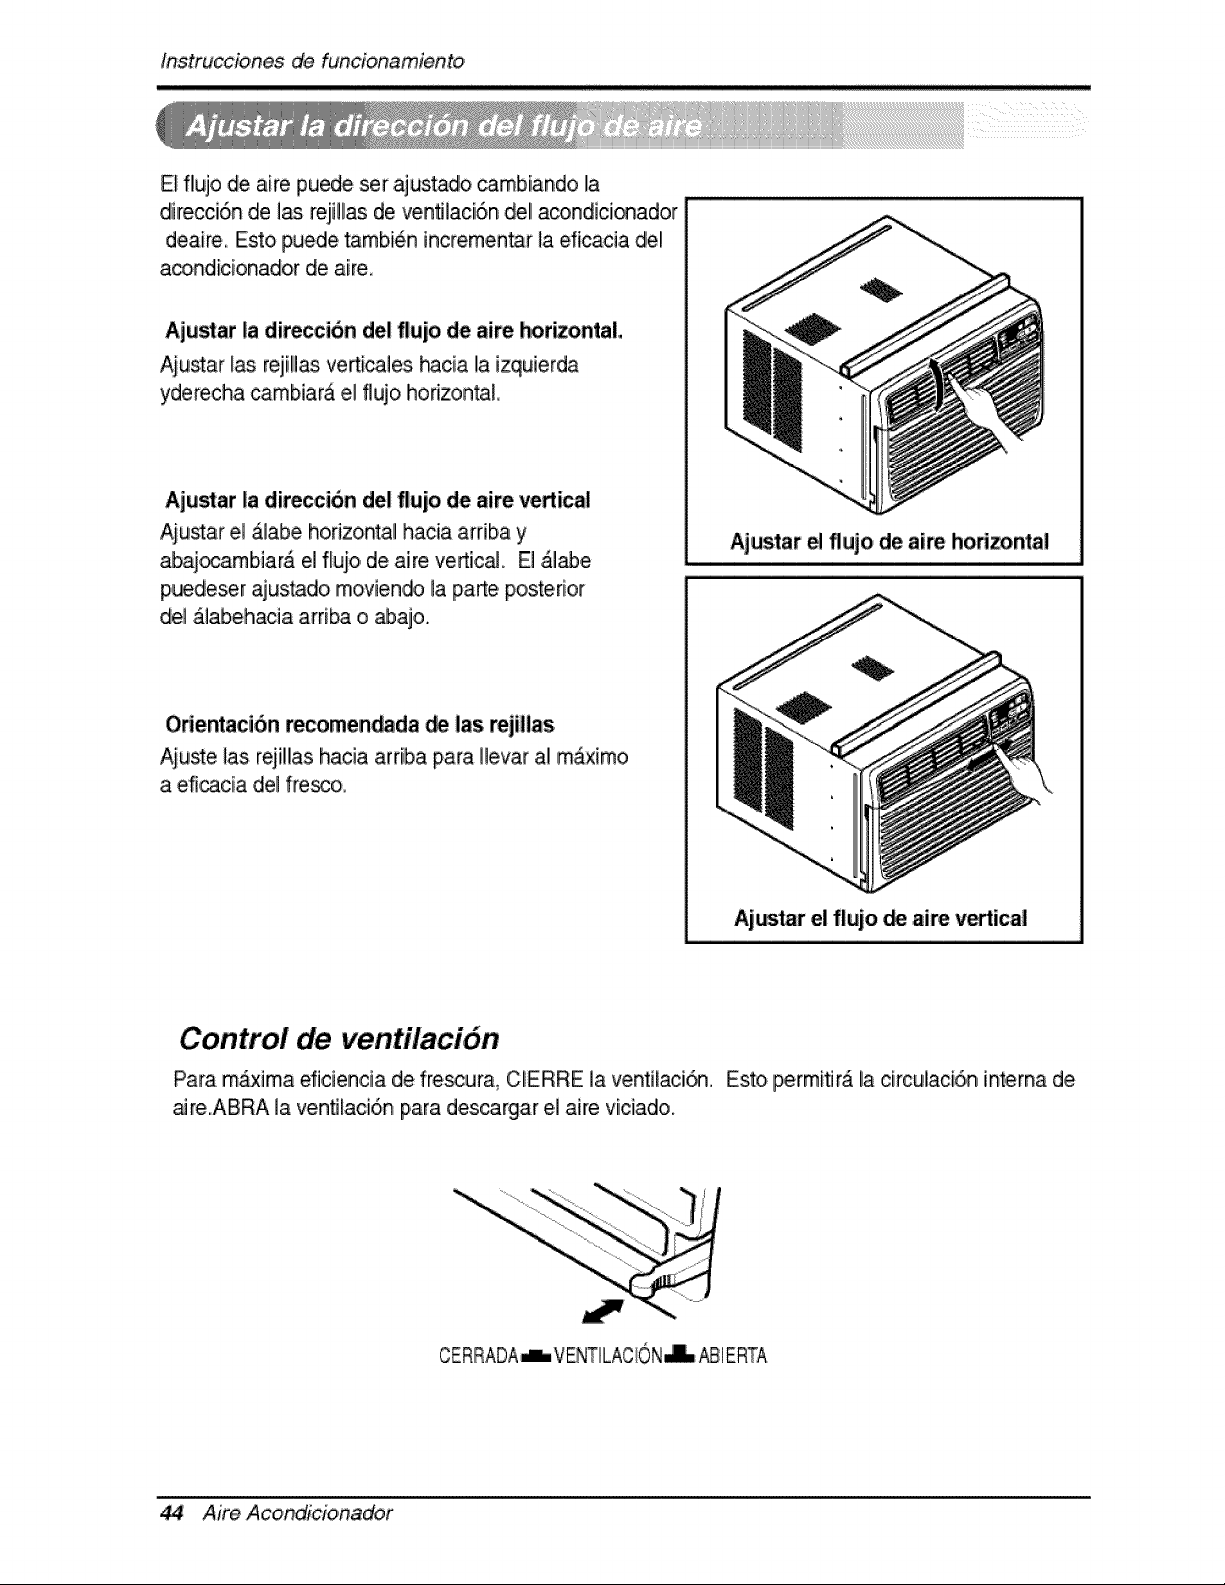
E_flujo de aire puede set ajustadlo _mbiando la
direcci6n de 1_ reji!las de venfllaci6n de! acondici_ador
deaire, Esto puede tambi6n incremen_r la ,dicacia del
a_ndicionador de aire,
Aju_at la diteccion del flujo de aire horizontal
Aiu_ar _as rejill_ verticales hacia la izquierda
yderecha cambiara el flujo horizon_L
Aju_at la direccion del flujo de aire vertica!
Aiustar el &labe horizontal hacia arriba y Ajustar e flujo de aire Ihorizontal
abai_arnbiar& el flujo, de aire vertic_. El &l_e
p,uedeser ajus_do rnoviendo la parte posterior
del _labehacia arri_ o _ajo.
Odentaci6n _comen_da _ las rejillas
Aiuste ]as rejillas hacia arriba para Hevar al m_x[mo
a eficacia del fre_o,
Ajar el flujo _ aire vutical
Control de ven,tilaci6n
Para m_xima eficien,cia de frescura_ CERRE la ventilaci_ Esto permiflr_ la circulaci6,n int,erna d,e
aJre.ABRA la venfllaci6n piara descargar e,i aire viciado.
CERRADA-L, VENTILACION_ _1 ERTA
44 Aire Acondicioina_r
O_rating Instrucbbns
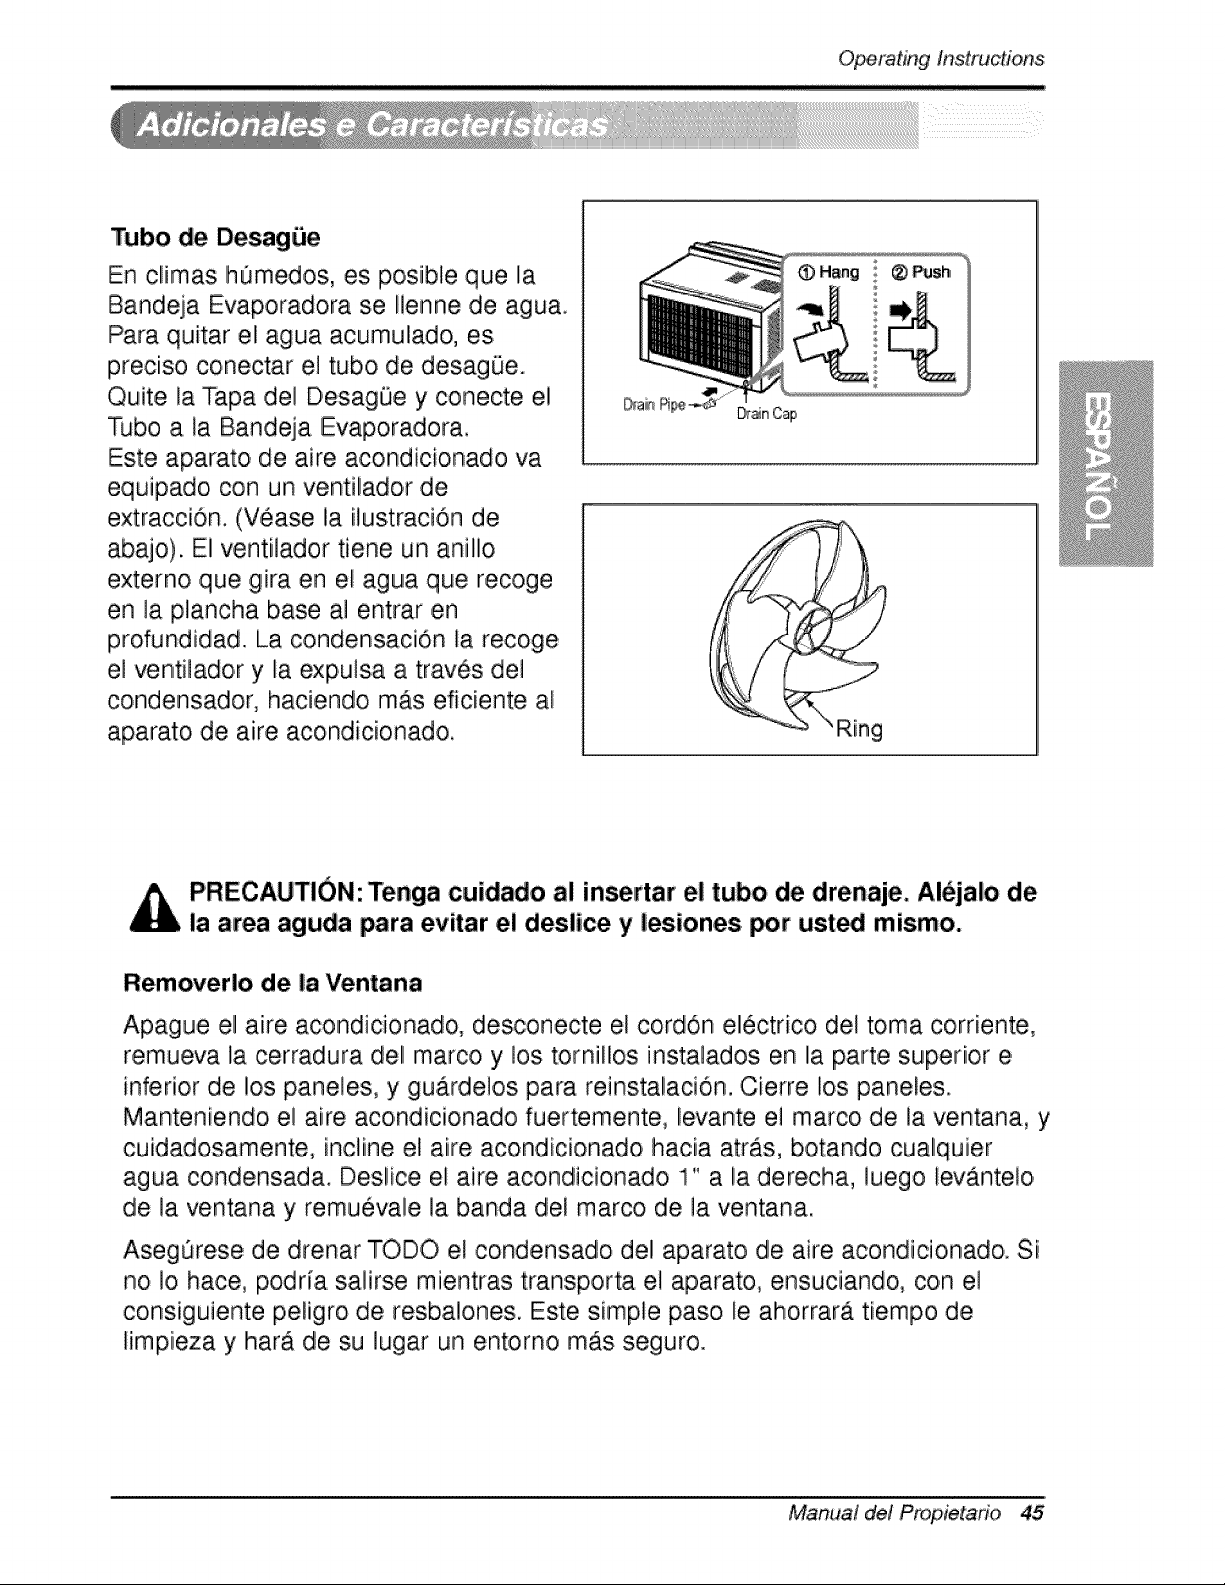
Tubo de Desag_e
En climas h0medos, esi po,sible que la
Bandeja Evaporadora se Ilenne de agua.
Para quitar eli agua acumulado, es
preciiso conectar el tubo de desag0e.
Quite la Tapa del DesagOe y conecte el
Tubo a la Bandeja Evaporadora.
Este aparato de aire acondicionado va
equipado, con un ventilador de
extraccion. (Vease la ilustracion de
abajo). El ventilador tiene un anillo
externo que gira en el agua que recoge
en la plancha base al entrar ,ca
profundidad. La condensacion la recoge
el ventilador y la expulsa a traves del
condensadlor, haciendo mAs eficiente al
aparato de aire acondicio, nado,
Dr_nCap
PRECAUTION: Tenga cuidado al insertar el tubo de drenaje, iAl_jalo de
la area aguda para evitar e! deslice y lesiones, _r ust_ mismo.
Removerlo de la Ventana
Apague el aire acondicionado, desconecte el cordon electrico del toma corriente,
remueva la cerradura del marco y los tornillos instala,dos en la parte superior e
inferior de los paneles, y gu.ardelos para reinstalacion. Cierre los paneles.
Manteniendo el aire acondicionado fuertemente, levante el marco de la ventana, y
cuidadosamente, incline el aire acondicionado hacia arras, botando cualquier
agua condensada. Deslice el aire acondicionado 1" a la derecha, luego levAnteio
de la ventana y remuevale la banda del marco de la ventana.
Aseg_rese de drenar TODO el condensado del aparato de aire acondicio, nad& Si
no !o hace, podria sa!irse mientras transporta e! aparato, ensuciando, con ,e!
consiguiente p eligro de resbalones. Este simple paso le ahorrara tiempo de
limpieza y harA de su lugar un entorno mAs seguro.
Manua! de! P_opietado 45

Mante_imiento y servJcio
Filtro de Aire
Revise por io menos dos veces ,a]rues si no es necesar[o ][mpiar e] fi]tro de aire.
Las p,articulas detenidiad se pueden a,cumu]ar en el fi]tro impid[endo e] flujo diel
aire, limitandio e] rendimiento de enfr[amiento y causando ]a acumulaci6n de hielo
en el evaporador. Proceder de la limp[eza de] filltro de a[re:
Node_ forzara abe#
oabri[ a Io iejos.
1, Levante [a r_ilila de entrada
2. Saque e] filitro de aire de la rejiHa dlelantera sacAndollo ]igeramente hacia ardba.
3 ILave el filtro con agua tibia de temperatura menor de 40°0 (104_).
4. Escurra ligeramente el agua sobrante del filtro y vuelva a instalado.
Limpieza del Aire Aco,ndicionado
La parr[Ha frontal pu_e set limp[ada con
un trio humedo mojad,o en un
detergente suave.
E] g_[nete pu_e set lavado con jabOn
suave o detergente y agua tibia, entonces
pulido Cera Liqu[da para aparato&
Para asegurarsie una efic[encia continua,
las bobinas del condensador (del lado
expuesto al exterior) debe ser revisado y
lavado periOdicamente sea pot que se
tranque con basura o polvo de la
atmosfedco.
46 Aire Acondi'cionador

,Mantenimie, n,itoy servicio
C:omo Remover la P'arilla Frontal
1 Tire de la rejilla de entrada hacia
delante agarrando ambas lengQetas
y tire del filtro del aire hasta sacado.
2_ Saqiue el tornillo que asegura la
Parrilla [Frontal,
3. Suelte el lado izqiuierdo pdmero.
Despues cuidadosamente ha!e
desde la parte de arnba y empuje
hacia la derecha. Las lengQetas
est_n aseguradas.
Manual de! Propietano 47
Mantenimientoy servJcie
Antes de Llamar el Servicio de Asistencia T_cnica
S[ tiene problemas con su ventilador, lea las informaciones siiguientes y trate de
resolver el problem& S[ no puede encontrar Iia so]uci6n, desconecte el ventillador
y dirijase a su suministrador.
El ventilador no funciona
1. Compruebe que eli ventillador est6 conectado en un enchufe correcto.
2. Revise el fusible.
3. Compruebe que la tension no sea demasiado a]ta o baja.
AI ajustarse el enfriamiento, el aire no parece frio |o suficiente
1. Revise si los ajustes de la temperatura son correctos
2. Revise si el fi]tro de aire no estA atascado de polvo. En el caso de que si,
camb[e eli filltro.
3. Compruebe que afuera no haya un obstAcu]o del flujo de aire y si entre la
parte trasera ,del ventillador y la pared o Ila barrera haya espacio Ilibre de po,r ]o
menos I metro (20").
4. Cierre todas ]as puertas y ventanas y compruebe que n,o haya una fuente de
ca]or e,n la hab[taci6n.
Antes de ]lamar al servicio, tenga a bien revisar la siguiente ]ista de
problemas y sus soluciones.
E/acondiciona_r de, aire esta funcionando norrnalmente cuando:
• Escucha un sonido metalico, Lo causa el agua que recoge el condensador en
dias Huvioso,s o en condicio, nes de mucha humedad. Esta caracteristica esta
diseSada para ayudar a ,quitar la humedad en el aire y mejorar la capacidad de
enfriamiiento,.
Consulte la secciOn del Venti]ador de extracci,On en la p_gina 42.
, Oye un clic en el termostato. Lo causa e,]ciclo del compresor que co,mienza y se
- Ve gotear agua de [la parte posterior de la unidad. E] agiua puede ser recogida
en Iia bandeja de base en condiciones de mucha humedad o dias de Iiluvia. Esta
agua desborda y gotea desde Ila parte posterior de la un[dad.
• Oye funcio, nar el ventilador mientras el comp, resor estA si]encioso. Esto es una
caracteristica operativa normal.
Aim Acond_cionador
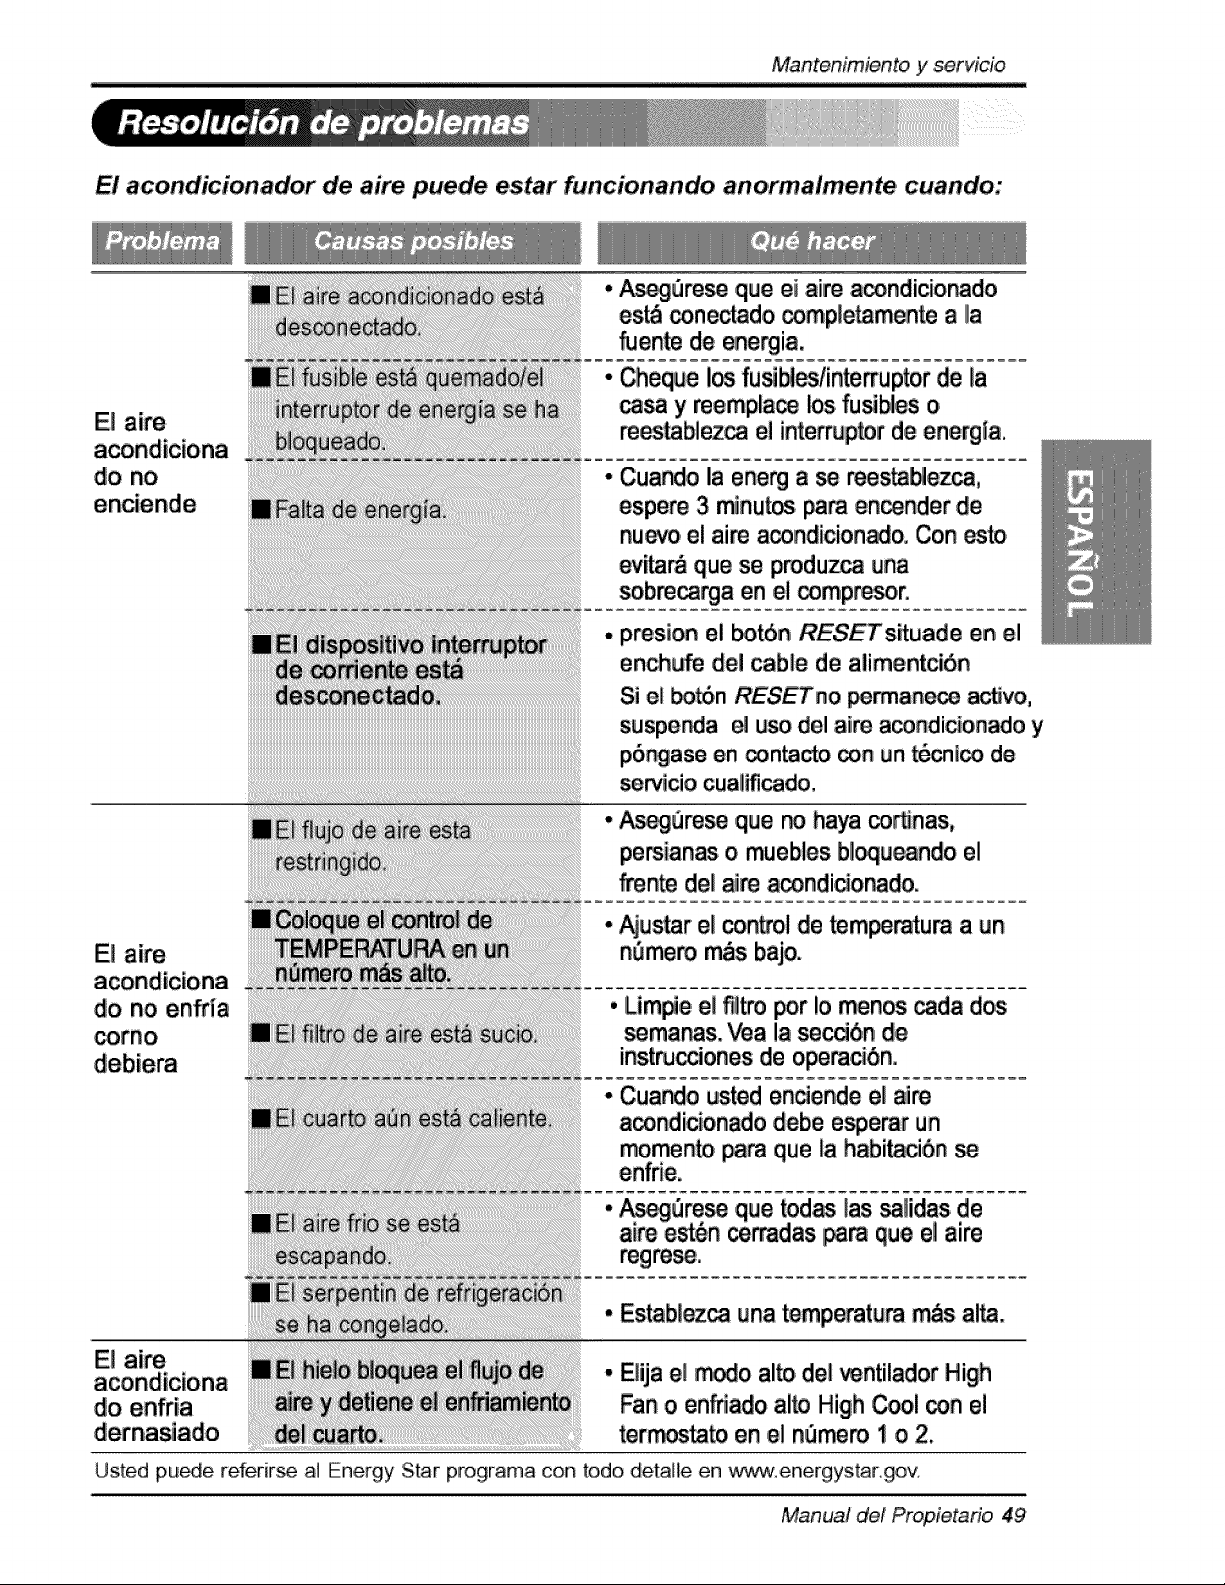
Mantenimientoy servicio
El acondicionador de aire puede estar funcion,ando anoirmalmente cuando:
E! aire
do no en_ia
corno
El aim
do enffia
A_3re_ q,uleei aiirea_ndicior_do
es_ _nectado _mpletamente a Ila
fuen_ de energia.
Cheque I_ fusibles/in_uptor de la
_ y mempla_ los fu_Nes o
re_ablez_ el interruptor de energ_a.
Cuando la ene_ a se mes_ezca,
espere 3 minu_ _m en_nder de
nuevo el aim acondicion_o. Con esto
_r& que se produz_ _na
sobm_a en el _mpr_or.
presion el _n RESETs_uade en el
ench_e del cable de alimentci6n
Si e_ _n RESETno _anece a_vo,
suspe_ia el uso del aim a_ndicionado y
p6_ase en _n_ _n _n t6_l_ de
servicio cuaUficado.
Asegure_ ,q_e no haya corSnas,
persianas o muebles b_u_ndo el
fmn_ de_aim a_ndicio_do.
• _s_r el con_ol de _m_ratura a _n
n_mero m_s bajo.
• Lim#,e e! t_!itropor !o menos _da dos
semanas. _a !a se_6,n de
inst_cciones de operac_nii.
• Cuando usted enciende el aire
a_ndicionado debe esperar un
momento pa_ que _ahabi_ci6n
• _Qre_ q_e todas las _!iidasi de
aim e_6n ce_dias,ip_ que ellaire
• Estab{ez_ ,unatemperature _s a!_.
• EHjae{ _o al_ del _ntilad,or High
Fan o enfnado ai_ High Cool con el
terror.to en el n_mem 1 o 2.
Usted pu_e referir_ aI Energy Star programa con todo detalie en ,_,"_,,-w.energys.tar.gov
Manual d,el Propieta6o 49
Nota
50 Aire Acondicionador
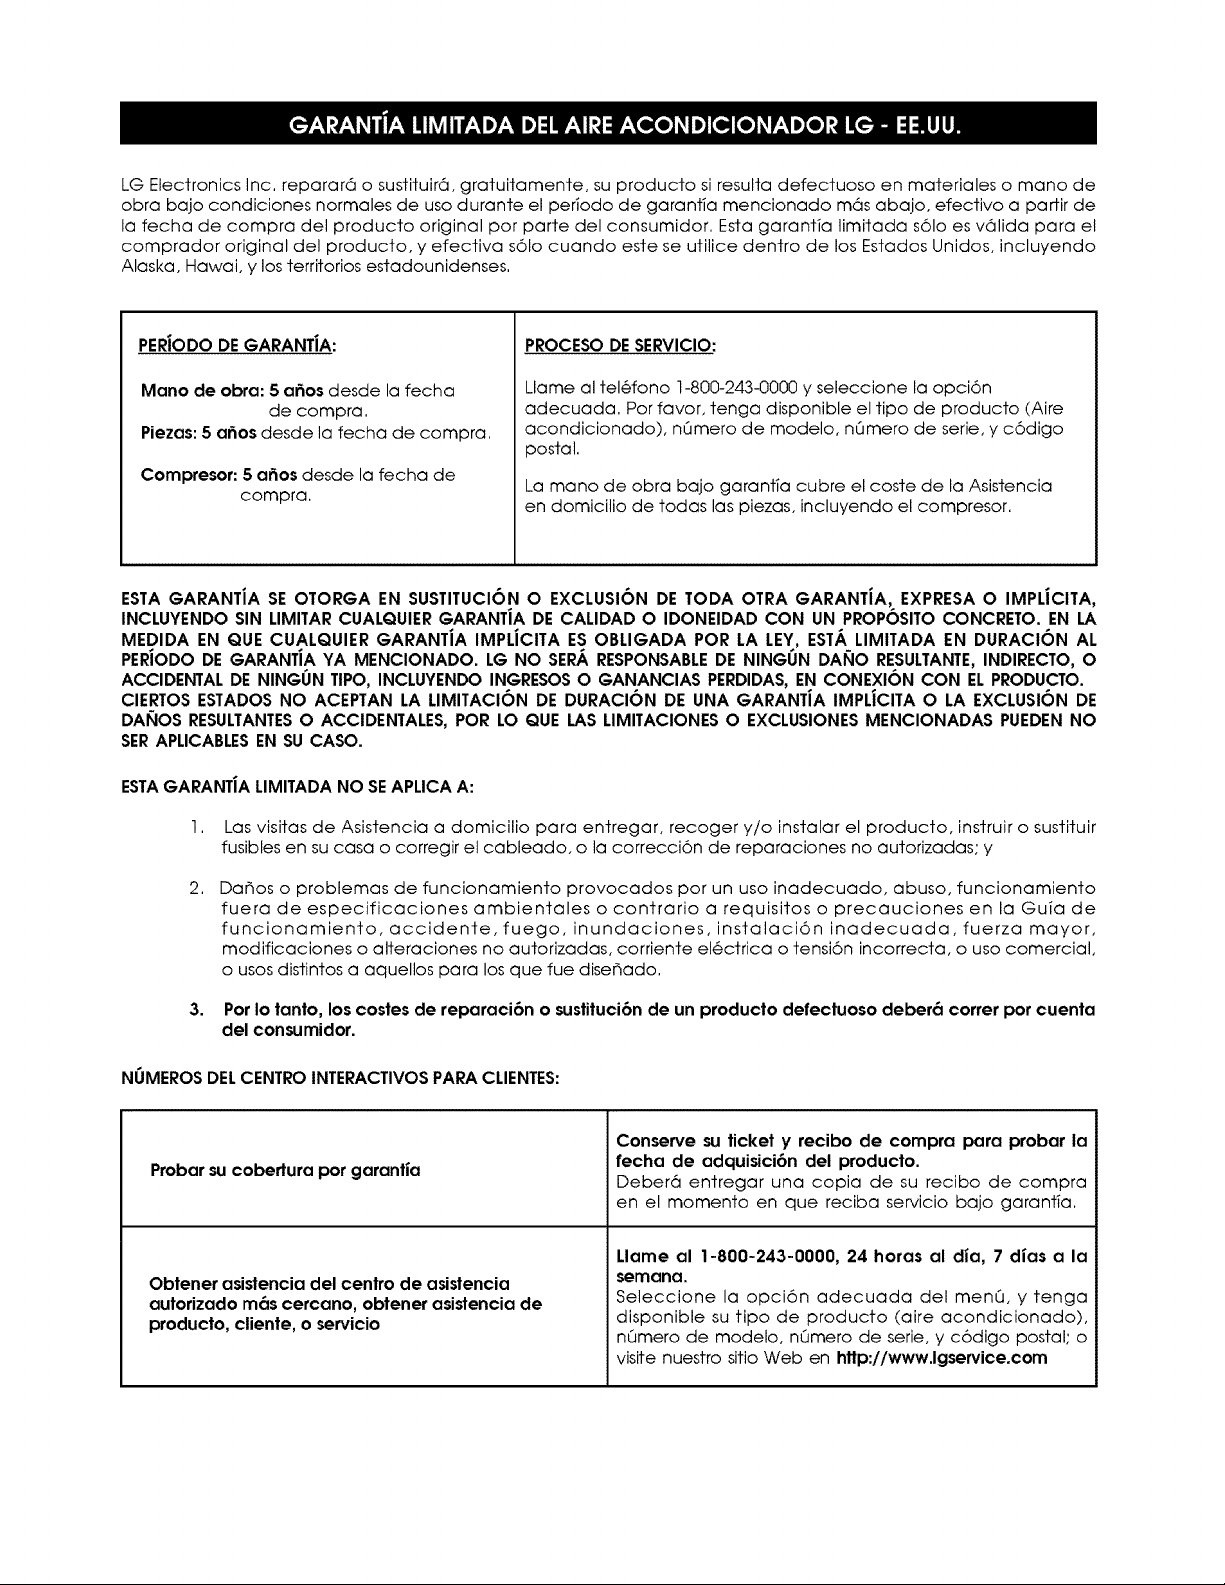
LG Electronics Inc, reparar6 o sustituir6, gratuitamente, su producto si resulta defectuoso en materiales o mano de
obra bajo condiciones normales de uso durante el per_odo de garantia mencionado m6s abajo, efectivo a partir de
la fecha de compra del producto original por parte del consumidor. Esta garanfia limitada s61o es v61ida para el
comprador original del producto, y efectiva s61o cuando este se utilice dentro de los Estados Unidos, incluyendo
Alaska, Hawai, y los territorios estadounidenses.
PERJODODEGARANT|A:
Mano de obra: 5 a6os desde la fecha
de compra.
Piezas: 5 a6os desde la fecha de compra.
Compresor: 5 a_os desde la fecha de
compra.
PROCESO DE SERVICIO:
Llame al tel6fono 1-800-243-0000 y seleccione la opci6n
adecuada. Por favor, tenga disponible el tipo de producto (Aire
acondicionado), nQmero de modelo, nQmero de serie, y c6digo
postal.
La mano de obra bajo garant_a cubre el coste de la Asistencia
en domicilio de todas las piezas, incluyendo el compresor.
ESTA GARANTiA SE OTORGA EN SUSTITUCION O EXCLUSI6N DE TODA OTRA GARANTIA, EXPRESA O IMPLJCITA,
INCLUYENDO SIN LIMITAR CUALQUIER GARANTiA DE CALIDAD O IDONEIDAD CON UN PROPOSITO CONCRETO. EN LA
MEDIDA EN QUE CUALQUIER GARANTiA IMPLiCITA ES OBLIGADA POR LA LEY, ESTA LIMITADA EN DURACI6N AL
PERIODO DE GARANTiA YA MENCIONADO. LG NO SERA RESPONSABLEDE NINGUN DAI_IO RESULTANTE,INDIRECTO, O
ACCIDENTAL DE NINGUN TIPO, INCLUYENDO INGRESOSO GANANCIAS PERDIDAS,EN CONEXI6N CON EL PRODUCTO.
CIERTOS ESTADOS NO ACEPTAN LA LIMITACION DE DURACION DE UNA GARANTIA IMPLJCITA O LA EXCLUSION DE
DAI_IOS RESULTANTESO ACCIDENTALES, POR LO QUE LAS LIMITACIONES O EXCLUSIONES MENCIONADAS PUEDEN NO
SERAPLICABLESEN SU CASO.
ESTAGARANT|A LIMITADA NO SEAPLICA A:
I.
2.
3,
Las visitas de Asistencia a domicilio para entregar, recoger y/o instalar el producto, instruir o sustituir
fusibles en su casa o corregir el cableado, o la correcci6n de reparaciones no autorizadas; y
Da_os o problemas de funcionamiento provocados por un uso inadecuado, abuso, funcionamiento
fuera de especificaciones ambientales o contrario a requisitos o precauciones en la Guia de
funcionamiento, accidente,fuego, inundaciones, instalaci6n inadecuada,fuerza mayor,
modificaciones o alteraciones no autorizadas, corriente el6ctrica o tensi6n incorrecta, o uso comercial,
o usos distintos a aquellos para los que fue dise_ado.
Por Io tanto, los costes de reparaci6n o sustituci6n de un producto defectuoso deber6 correr por cuenta
del consumidor.
NUMEROS DELCENTRO INTERACTIVOS PARA CLIENTES:
Probar su cobertura por garantJa
Obtener asistencia del centro de asistencia
autorizado m6s cercano, obtener asistencia de
producto, cliente, o servicio
Conserve su ticket y recibo de compra para probar la
fecha de adquisici6n del producto.
Deber6 entregar una copia de su recibo de compra
en el momento en que reciba servicio bajo garant;a,
Llame al 1-800-243-0000, 24 horas al dia, 7 dJas a la
semana,
Seleccione la opci6n adecuada del menQ, y tenga
disponible su tipo de producto (aire acondicionado),
nQmero de modelo, nQmero de serie, y c6digo postal; o
visite nuesfro sitio Web en http:I/www.lgservice.com
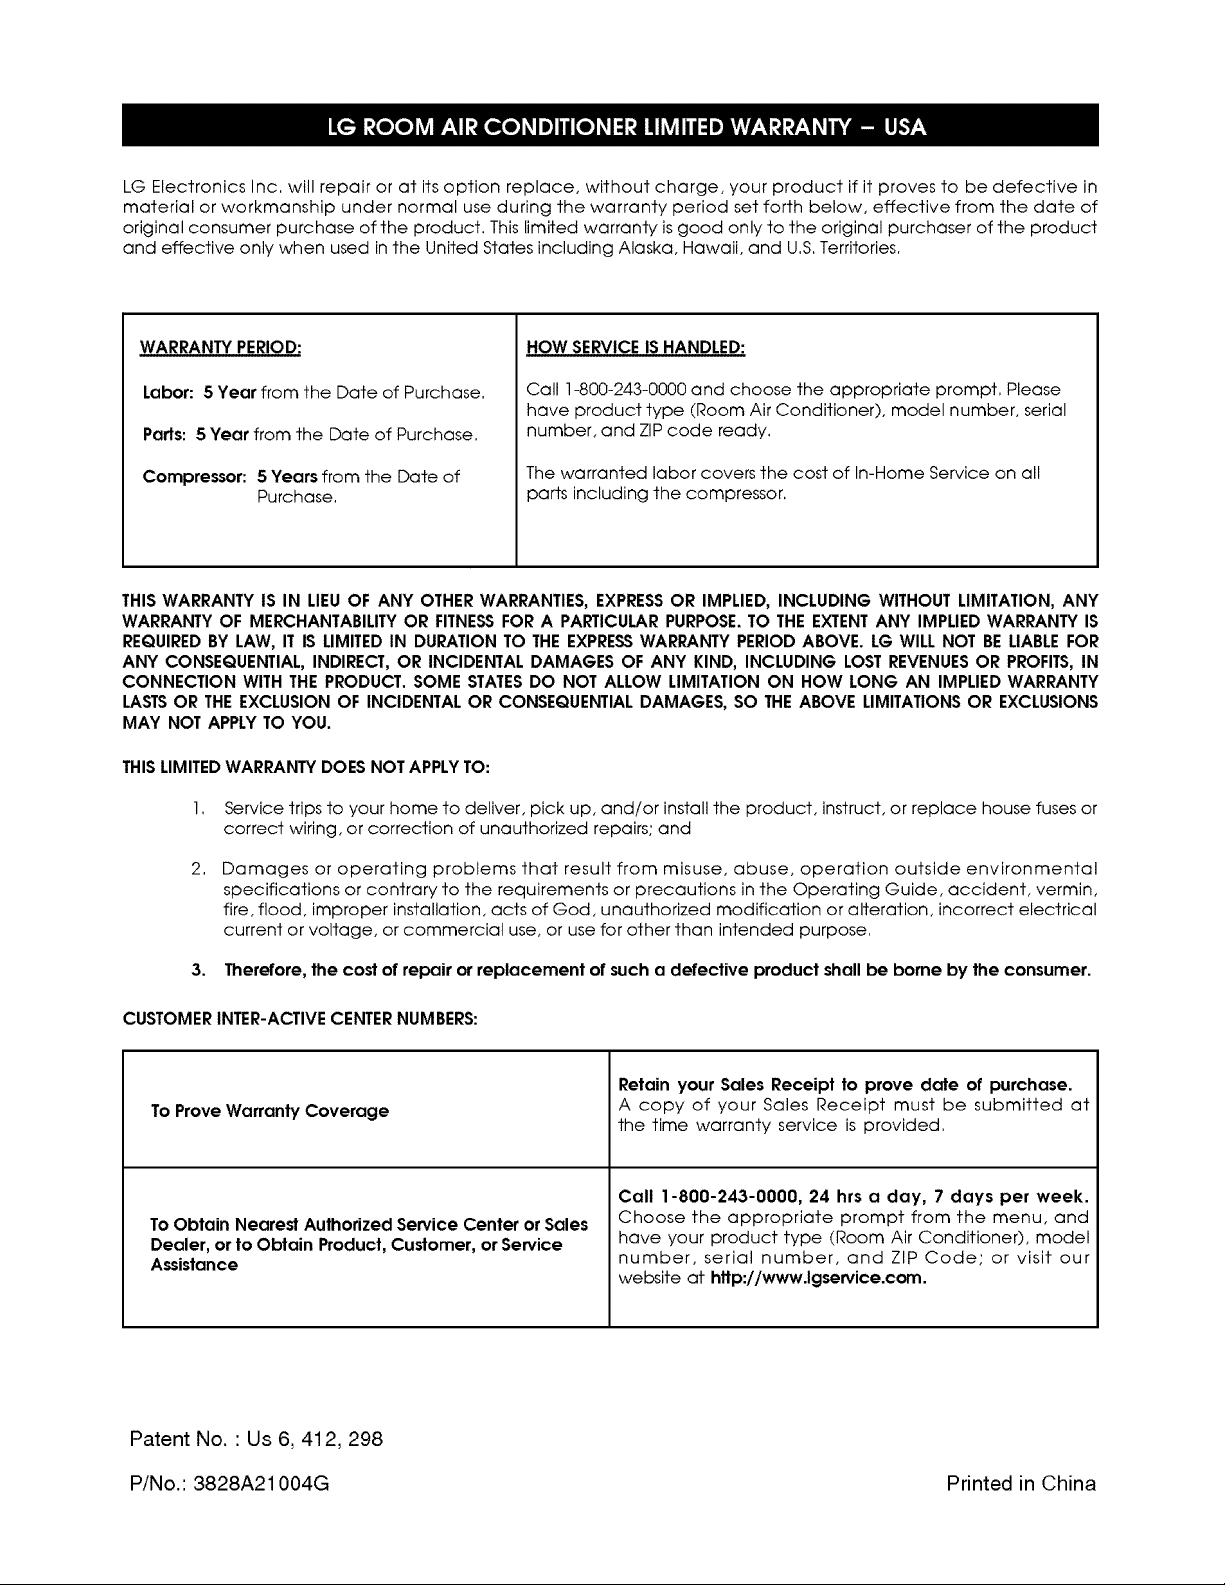
LG Electronics Inc, will repair or at its option replace, without charge, your product if it proves to be defective in
material or workmanship under normal use during the warranty period set forth below, effective from the date of
original consumer purchase of the product, This limited warranty is good only to the original purchaser of the product
and effective only when used in the United States including Alaska, Hawaii, and U,S,Territories,
WARRANTY PERIOD:
Labor: 5 Year from the Date of Purchase.
Parts: 5 Year from the Date of Purchase,
Compressor: 5 Years from the Date of
Purchase.
HOW SERVICE IS HANDLED:
Call 1-800-243-0000 and choose the appropriate prompt, Please
have product type (Room Air Conditioner), model number, serial
number, and ZIP code ready,
The warranted labor covers the cost of In-Home Service on all
parts including the compressor.
THIS WARRANTY IS IN LIEUOF ANY OTHERWARRANTIES, EXPRESSOR IMPLIED, INCLUDING WITHOUT LIMITATION, ANY
WARRANTY OF MERCHANTABILITYOR FITNESSFOR A PARTICULARPURPOSE.TO THE EXTENTANY IMPLIED WARRANTY IS
REQUIREDBY LAW, IT IS LIMITED IN DURATION TO THE EXPRESSWARRANTY PERIOD ABOVE. LG WILL NOT BE LIABLEFOR
ANY CONSEQUENTIAL, INDIRECT, OR INCIDENTAL DAMAGES OF ANY KIND, INCLUDING LOST REVENUESOR PROFITS,IN
CONNECTION WITH THE PRODUCT. SOME STATESDO NOT ALLOW LIMITATION ON HOW LONG AN IMPLIED WARRANTY
LASTSOR THEEXCLUSION OF INCIDENTAL OR CONSEQUENTIALDAMAGES, SO THE ABOVE LIMITATIONS OR EXCLUSIONS
MAY NOT APPLY TO YOU.
THISLIMITEDWARRANTY DOES NOT APPLYTO:
2,
Service trips to your home to deliver, pick up, and/or install the product, instruct, or replace house fuses or
correct wiring, or correction of unauthorized repairs; and
Damages or operating problems that result from misuse, abuse, operation outside environmental
specifications or contrary to the requirements or precautions in the Operating Guide, accident, vermin,
fire, flood, improper installation, acts of God, unauthorized modification or alteration, incorrect electrical
current or voltage, or commercial use, or use for other than intended purpose,
3. Therefore, the cost of repair or replacement of such a defective product shall be borne by the consumer.
CUSTOMER INTER-ACTIVE CENTERNUMBERS:
To Prove Warranty Coverage
To Obtain Nearest Authorized Service Center or Sales
Dealer, or to Obtain Product, Customer, or Service
Assistance
Retain your Sales Receipt to prove date of purchase.
A copy of your Sales Receipt must be submitted at
the time warranty service is provided.
Call 1-800-243-0000, 24 hrs a day, 7 days per week.
Choose the appropriate prompt from the menu, and
have your product type (Room Air Conditioner), model
number, serial number, and ZIP Code; or visit our
website at http://www.lgservice.com.
Patent No. ' Us 6, 412, 298
P/No.: 3828A21004G Printed in China

