Loading ...
Loading ...
Loading ...
B
FLUSH MOUNT
Canopy
Rubber Ring
Motor
Canopy
Yoke Screws
& Washers
Rubber
f.
g.
Bushing
- Place canopy on Motor housing, align the 3 smaller holes on canopy to
holes on Motor housing.
- Secure Canopy to the Motor housing by replacing 3 screws and washers in
the 3 smaller holes in canopy.
- Remove rubber ring from canopy.
- Remove the 3 screws from the Motor cover housing.
- Place rubber bushing on Motor housing while aligning the 3 smaller holes.
PAGE: 7 / 12 PAGE: 8 / 12
ASSEMBLY INSTRUCTIONS (continued) ASSEMBLY INSTRUCTIONS (continued)
3. INSTALL MOUNTING BRACKET
- Install J-Hook through center of outlet box and into the wooden joist.
- Secure mounting bracket and rubber gaskets to outlet box.
- Hang downrod mount, fan on mounting bracket by aligning tab on mounting bracket
figure (b.) with groove in hanger ball on downrod.
- For flush mount, hang fan using supplied temporary hook, figure(c.).
- Hang the safety cable onto the J-hook.
Diagram b is for Downrod Mount.
Diagram c is for Flush Mount.
WARNING: To Reduce The Risk Of Fire, Electric Shock, Or Personal Injury, Mount
To UL/CSA Listed Outlet Box Marked Acceptable For Fan Support And Use Mounting
Screws Provided With The Outlet Box.
Wood
Joist
Outlet
Box
Rubber
Gasket
Mounting
Bracket
Outlet box screws
(not provided)
Ceiling
J-Hook
4. ELECTRICAL HOOK-UP
A
a.
Canopy
Safety
Cable
c.
Temporary
Hook
CAUTION
SEE SAFETY PRECAUTIONS ON
PG. #4 BEFORE WIRING
Green Wire - GROUND
Black Wire (Fan) - POWER
White Wire (Fan) - COMMON
Red or Blue Wire (Light Kit) - POWER
- There are several different wiring combinations that can be used in
controlling your ceiling fan to meet your specific requirements. Should
the following method not meet your requirements call or visit your nearest
distributor for a full list of fan accessories.
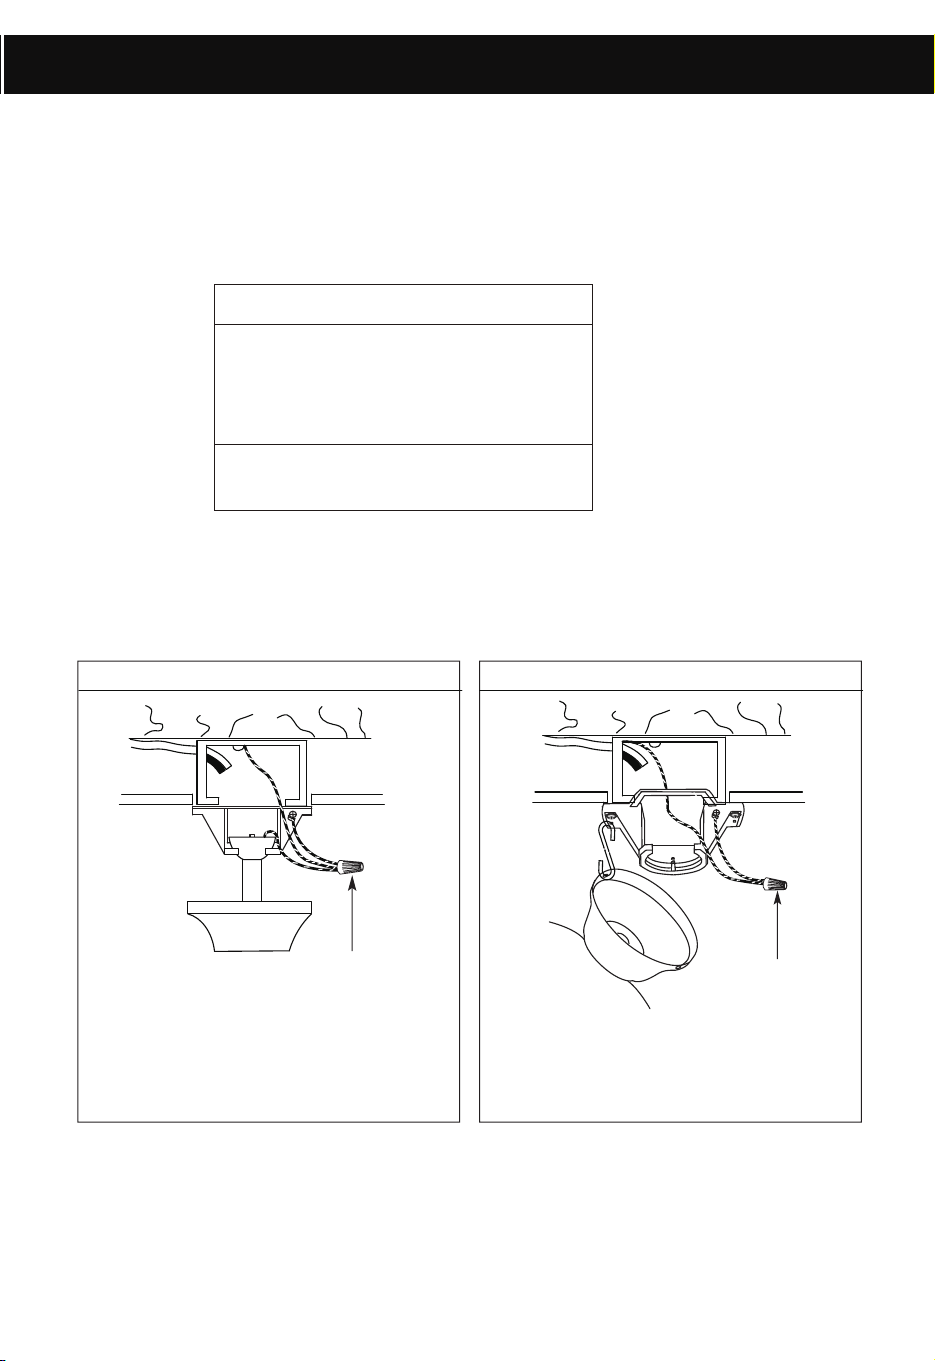
- Connect ground wires as shown in the figure below (A). Ensure the splices after
being made are turned upward and pushed carefully up into the outlet box.
NOTE: Once ground wires are connected, carefully tuck wires and into the
outlet box making sure that the wires are clear of the hemisphere and
downrod when positioned in mounting bracket (Downrod Mount Only).
wire nuts
DOWNROD MOUNT
FLUSH MOUNT
- Connect ground wire from outlet box
to green wire from mounting bracket
and downrod using a wire nut
(not supplied).
-
Connect ground wire from outlet box
to green wire from mounting bracket
using a (not supplied).
wire nut
Wire Nut
A
a.
b.
CONNECTING THE (GREEN) GROUND WIRE
Canopy
J-Hook
Safety
Cable
b.
Wire Nut
Loading ...
Loading ...
Loading ...