Documents: Go to download!
- Owner's manual - (English, French, Spanish)
- Important safeguard
- AIR CONDITIONING INSTALLATION
- SELF-DIAGNOSIS
- TIPS FOR CORRECT USE
- CLEANING
- LIMIT CONDITIONS
- TROUBLESHOOTING
Table of contents
PORTABLE AIR CONDITIONER
Instructions for use. Keep these instructions
ELECTRIC CHARACTERISTICS
115 V~ 60 Hz
Important safeguard
The appliance is not intended for use by persons (including children) with reduced physical. sensory or mental capabilities. or lack of experience and knowledge. unless they have been given supervision or instruction concerning use of the appliance by a person responsible for their safety. Children should be supervised to ensure that they do not play with the appliance. If the SUPPLY CORD is damaged. it must be replaced by the manufacturer. its service agent or similarly qualified persons in order to avoid a hazard. The appliance shall be installed in accordance with national wiring regulations.
As the appliance is powered by electricity. the possibility of electrical shock cannot be excluded.
- The following safety precautions must therefore be followed:
- After removing the packaging. check the condition of the appliance.
- If in doubt. do not use the appliance and contact professionally qualified personnel.
- Before use. always check the condition of the power cord.
- It is dangerous to modify or alter the characteristics of the appliance in any way.
- This appliance must be connected to an efficient “grounding” system. Have the electrical system checked by a qualified electrician.
- Before each cleaning or maintenance operation. always disconnect the plug from the power outlet.
- Never submerge the appliance in water.
- Do not use the appliance outdoors.
- Do not obstruct the entrances and exits of air.
- When the appliance is connected to the mains. keep the following safety rules in mind:
- Do not touch the appliance with wet or damp hands;
- Do not use the appliance with bare or wet feet;
- Do not pull on the power cord or appliance to detach the plug from the power outlet;
- Do not move the appliance by pulling the power cable. keep the appliance far from the reach of children;
- Do not insert foreign bodies into the appliance;
- Do not insert metal objects into the apertures.
Danger! Rotating parts; contact with the internal fan could cause electric shock or injury. do not leave the appliance exposed to atmospheric agents; If you wish to permanently eliminate the appliance. after disconnecting the plug from the power outlet it is recommended to make it unusable by severing the power cord. In the event of a fault and/or malfunction. turn the appliance off without tampering with it.
For all repairs. contact an authorized technical service center only and request the use of original spare parts and accessories. Avoid the use of power cord extensions.
Designated use
This appliance must be used exclusively in domestic environment and for the intended purpose for which it was designed. All other uses are considered improper and therefore hazardous. The manufacturer shall not be held liable for any damage caused by improper. erroneous and irresponsible use. and/or due to repairs made by unqualified personnel.
Installing the appliance
- The appliance must be installed in compliance with national standards regulating electrical systems.
- Do not operate your air conditioner in a wet room such as a bathroom or laundry room.
- Do not install the appliance in rooms containing gas. oil or sulphur or near sources of heat.
- Do not use the appliance on sloping surfaces.
- Keep the appliance at least 20” (50 cm) away from flammable substances (alcohol. etc.) or pressurized containers (e.g. aerosol cans).
- Do not rest objects on top of the appliance.
- When transporting. the appliance must be kept upright. If this is not possible secure the unit at an angle, do not lie it horizontally.
- • Before transporting the unit, drain the unit.
- • After transportation, wait at least 6 hours before
- • switching the unit on.
Specific information regarding appliances with R32 refrigerant gas
Thoroughly read all of the warnings. When defrosting and cleaning the appliance. do not use any tools other than those recommended by the manufacturing company. The appliance shall be stored in a well-ventilated area; The appliance shall be stored in a room without continuously operating open flames (for example an operating gas appliance) and ignition sources (for example an operating electric heater). Do not burn any part of the appliance. Refrigerant gases can be odorless. This appliance contains R32 refrigerant gas. (For more details on the refrigerant. see back cover). Do not puncture any part of the refrigerant circuit. The servicing shall be performed only as recommended by the manufacturer. The appliance must be stored in a safe place in order to prevent damage to the unit. Individuals who operate or work on the refrigerant circuit must have the appropriate certification issued by an accredited organization that ensures competence in handling refrigerants according to a specific evaluation recognized by associations in the industry. Repairs must be performed based on the recommendations from the manufacturing company. Maintenance and repairs that require the assistance of other qualified personnel must be performed under the supervision of
1. GENERAL INFORMATION
1.1 Instruction for Use
Read all the Instruction for Use carefully before using the appliance. Failure to follow this Instruction for Use may result in burns or damage to the appliance.
The manufacturer is not liable for damage deriving from failure to respect this Instruction for Use.
WARNING: Changes or modifications not expressly approved by the party responsible for compliance could void the user’s authority to operate the equipment.
Please note: These safety warnings are valid for all De’Longhi air conditioners.
If the appliance is passed to other persons. they must also be provided with this Instruction for Use.
This appliance is fitted with a special safety device. When the compressor switches off. this device prevents it from switching on again for at least 3/4 minutes.
2. BEFORE USE Important!
Store the packaging material (plastic bags. styrofoam) far from the reach of children.
CHOKING HAZARD. The appliance might contain small parts. Some of those small parts might be required to get disassembled during cleaning and maintenance operations. Handle with care and keep small parts out of reach of children.
2.1 Checking the appliance
After removing the packaging. make sure the product is complete and undamaged and that all accessories are present. Do not use the appliance if it is visibly damaged. contact DeLonghi Customer Service.
Save these instructions This product is for household use only
INTRODUCTION
Thank you for choosing this De’Longhi product. Please take a few minutes to read these instructions. This will prevent running any risks of or damaging the appliance.
DESCRIPTION
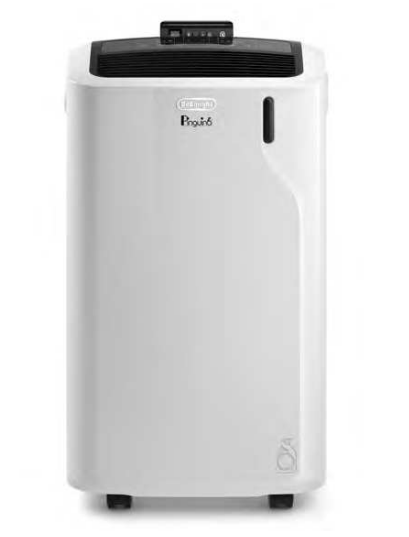
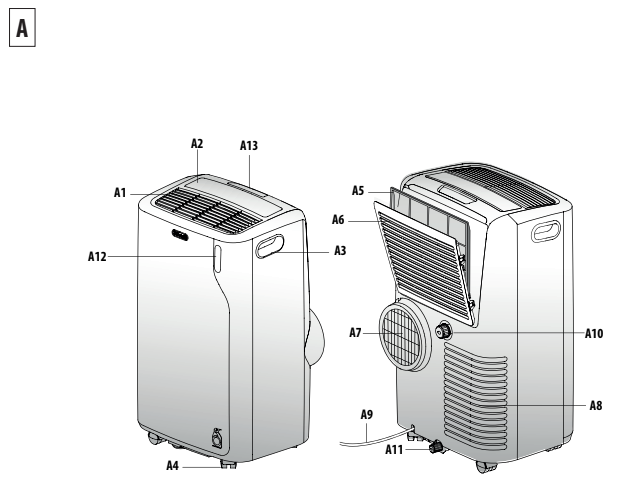
Description of the appliance (see page 2 - A)
- A1 Air outlet grille
- A2 Control panel
- A3 Handles
- A4 Wheels
- A5 Filter
- A6 Air intake grille
- A7 Air exhaust hose housing
- A8 Air intake grille
- A9 Power supply cable
- A10 Upper drainage outlet with cap
- A11 Lower drainage outlet with cap
- A12 Remote control signal receiver
- A13 Remote control compartment.
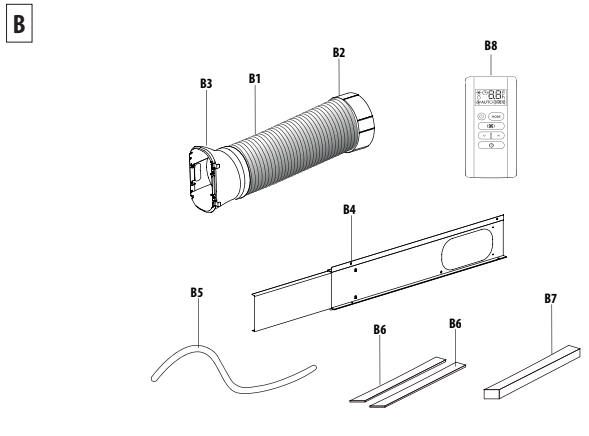
Description of accessories (See page 2 - B)
- B1 Air exhaust hose
- B2 Hose adapter
- B3 Adapter for extendable window bracket/ window
- B4 Extendable window bracket with screws
- B5 Drainage hose
- B6 Self adhesive strips foam (2 pieces)
- B7 Non adhesive strip foam
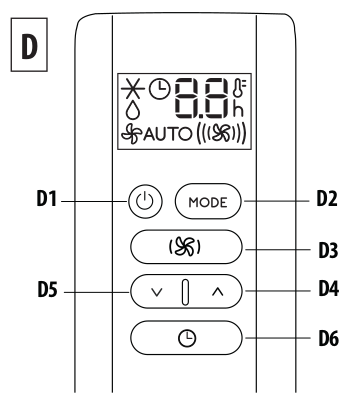
- B8 Remote control.
ELECTRICAL CONNECTION
Before plugging into the outlet. check the following: the outlet voltage is the same as that indicated on the plate on the back of the appliance; the socket and electrical line are sized to support the load required; the socket is the proper type for the plug. otherwise. re place the socket; the socket is connected to an efficient grounding sys tem. The manufacturer is not responsible in the event of non-compliance with these injury prevention standards. The power cable must only be replaced by special ized technicians.
USE
The instructions below will enable you to prepare your air con ditioner for operation as efficiently as possible. Before use. make sure the air intake and outlet grilles are unobstructed.
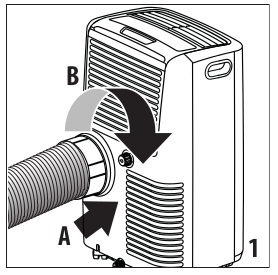
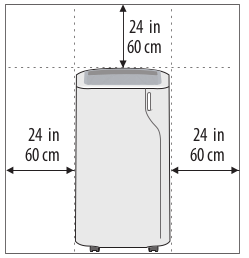
Maintain a minimum distance of 2ft/60 cm from walls and ob stacles. In air conditioning and dehumidification mode the air exhaust hose (B1) must be applied (see figure 1).
Please note: This appliance is provided with an auto-evapora tion feature for condensate removal during cooling and dehu midifying mode.
AIR CONDITIONING INSTALLATION
For optimal results see the figures below for the suggested minimum distances.
NOTE: Philips head screwdriver required for installation of win dow kit.
DOUBLE-HUNG WINDOW
If you have a double-hung window proceed as follows: Fit the air exhaust hose (B1) in the relevant housing located on the rear side of the appliance (fig. 1).
Depending on the need. place the self adhesive strips foam or non adhesive strip foam on the window as shown in figure 2.
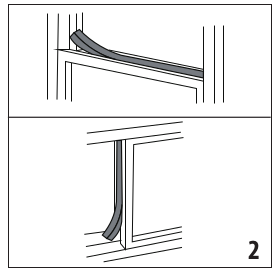
- Cut the adhesive strip foam to the desired length and place it on the window.
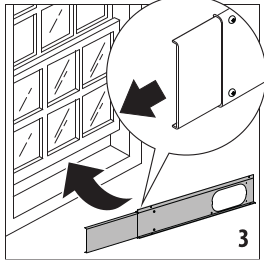
- Position the extendable window bracket on the window sill and fully extend the extendable window bracket inside the window frame (fig.3). The portion of the window bracket with the greater depth should be placed along the bottom.
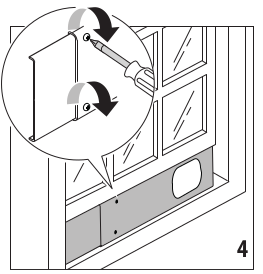
- Adjust the extendable window braket and then fix the length with two screws (fig. 4) (If the extendable window bracket is too large. it is possible to cut the plastic using a saw.
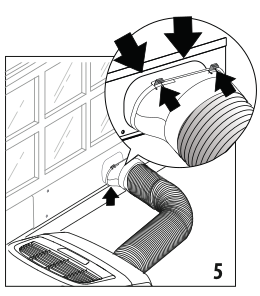
- Hook the adapter for extendable window (B3) to the win dow bracket as shown in fig. 5 inserting the bottom of the adapter first then pushing in the top to secure into place.
CONTROL PANEL
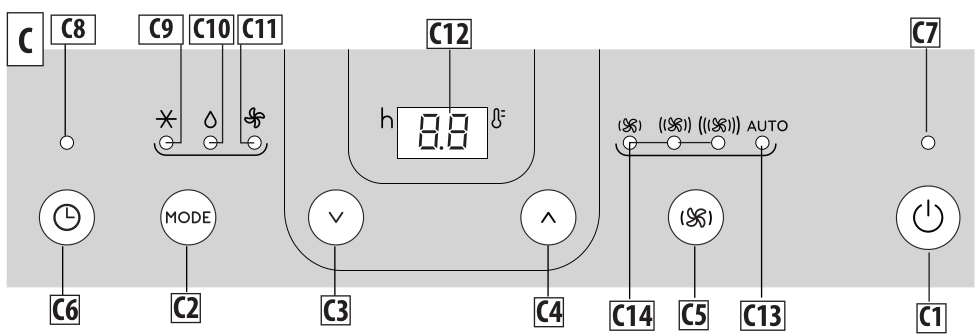
DESCRIPTION OF THE CONTROL PANEL (C)
- C1 ON/STAND-BY (on/off) button
- C2 Mode selection key (air conditioning. dehumidifying. fan)
- C3 Decrease key
- C4 Increase key
- C5 Ventilation speed selection key
- C6 Timer button
- C7 Stand-by indicator
- C8 Timer indicator
- C9 Air conditioning mode indicator
- C10 Dehumidifying mode indicator
- C11 Fan mode indicator
- C12 Set temperature values. programmed on/off timer
- C13 Auto ventilation speed indicator
- C14 Ventilation speed indicator (min. med. max)
TURNING THE APPLIANCE ON AND OFF
Before connecting the plug to the power outlet. make sure that the drainage hose caps (A10) (A11) located on the back of the appliance are correctly inserted. Once plugged into the power outlet. the stand-by indicator lights up. Press the Power (C1) key to turn on the appliance. When the appliance turns on it will be activated with the last function set before it was shut off.
To turn the appliance off. press the  key.
key.
Please note: If start-up is not continued. after a few minutes the display light dims in order to reduce energy consumption.
Please note: Never turn off the air conditioner by simply pulling the plug. Press the  key in order to put your air conditioner in stand-by and wait a few minutes before pulling the plug. In this manner. the appliance can perform operating status checks.
MODE SELECTION
To select the desired operating mode. press repeatedly the MODE key (C2) until the desired function is selected.
AIR CONDITIONING MODE
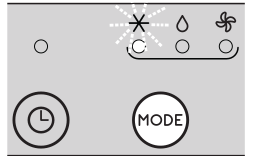
This is ideal for hot and humid weather when the room needs to be both cooled and dehumidified.
To correctly set this mode:
- Press repeatedly the MODE key (C2) until the air conditioning
 indicator (C9) appears.
 - The display (C12) will show the desired temperature.
- To change the temperature to be reached. press the
 (C3) or
  (C4) key.
 - Select the desired fan speed by pressing the
 (C5) key.
The speeds available are:
 Minimum air flow: when maximum quiet operation is desired.
 Medium air flow: when the noise level needs to be low but with a good comfort level.
 Maximum air flow: to reach the desired temperature as soon as possible.
 The appliance automatically chooses the best fan speed based on the temperature selected and the environmental conditions.
The most suitable temperatures during the summer range from 75 to 80°F (24 to 27°C). However. setting the temperature significant ly lower than the outdoor temperature is not recommended.
 DEHUMIDIFYING MODE

This is ideal for reducing humidity in the room (spring and au tumn. damp rooms. rainy periods. etc). For this type of use. the appliance must be set up the same as for air conditioning mode.
That is. the air exhaust hose (B1) must be fitted to the appliance to allow the humidity to be discharged outside.
To correctly set this mode:
- Press repeatedly the MODE key (C2) until the dehumidifying indicator
 (C10) appears.
 - The appliance will automatically choose the best air flow.
It cannot be adjusted manually. Also. temperature cannot be selected in dehumidifier mode so digital display will not appear.
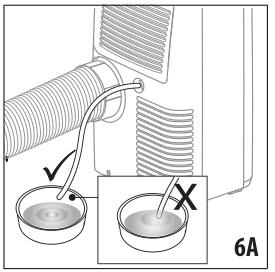
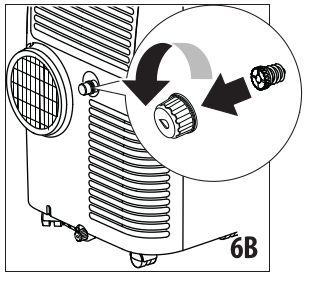
Note: in case of high ambient humidity. it is possible to drain the condensate continuously by applying the hose supplied (B5) to the upper drainage hose (A10) and thus allowing the water to flow into a container. Remove the external AND internal caps before connecting the hose (see Fig. 6B). Pay attention the wa-ter does not overflow onto the floor and the drainage tube is not obstructed (Fig. 6A).
FAN MODE
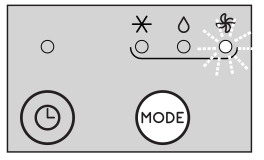
When using this mode. the air exhaust hose (B1) does not need to be attached to the appliance.
To correctly set this mode:
- Press repeatedly the MODE (C2) key until the fan indicator appears.
- Press repeatedly the (C5) key to select the desired air flow.
The air flows available are:
- Minimum air flow: when maximum quiet operation is desired.
- Medium air flow: when the noise level needs to be low but with a good comfort level.
- Maximum air flow: for maximum performance.
SELECTING THE TEMPERATURE SCALE
The temperature can be displayed in °C or °F.
To change the temperature unit of measure select the air con ditioning mode then press both the decrease (C3) and in crease (C4) keys at the same time for about 3 seconds. You must follow these steps on both the unit itself AND the remote control.
SETTING THE TIMER
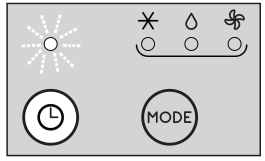
The timer allows the delayed start up or shut down of the appli ance. This function will prevent wasting electricity by optimizing the operating periods.
How to program delayed shut down
- While the appliance is on in any operating mode. delayed shut down can be programmed.
- Press the Timer button (C6): the timer indicator C8 (C8) and hours light up.
- Use the buttons (C3) or (C4) to set the number of hours until the appliance should shut down.
A few seconds after the timer is set. the setting is acquired. the display shows the operating mode and the timer symbol stays lit. At the pre-set time. the air conditioner goes into standby.
To cancel the timer program. press the timer button (C6) twice.
The timer indicator (C8) will go off.
How to program delayed start up
- Plug in the appliance and set to stand-by.
- Press the timer button (C the timer indicator (C8) and hours light up.
- Set with the buttons (C3) or (C4) the number after
OPERATION USING THE REMOTE CONTROL
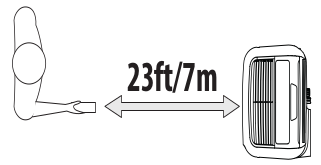
Aim the remote control at the receiver (A12) on the air con ditioner. The maximum distance between the remote con trol and the appliance is 23ft/ 7 metres (with no obstacles between the remote and the receiver).
The remote control should be handled with extreme care. without dropping it or exposing it to direct sunlight and keeping it away from heat sources.
OPERATING FROM THE REMOTE CONTROL INSERTING OR REPLACING THE BATTERIES
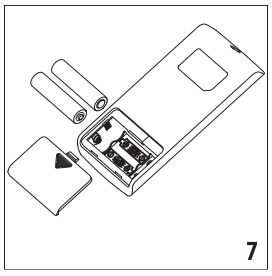
- Remove the cover on the rear of the remote control.
- Insert or replace the batteries with two new LR03 “AAA” 1.5V batteries. inserting them correctly (see the directions inside the battery compartment) (see figure 7);
- Replace the cover.
Please note: If the remote control unit is replaced or discarded. the batteries must be removed and disposed of in accordance with current legislation as they are harmful to the environment.
Do not mix old and new batteries. Do not mix alkaline. standard (carbon-zinc) or rechargeable (nickel-cadmium) batteries. Do not dispose of batteries in fire. Batteries may explode or leak.
If the remote control is not be used for a certain length of time. remove the batteries.
DESCRIPTION OF THE REMOTE CONTROL
- D1. ON/STAND-BY button
- D2. MODE button
- D3. Fan speed selection button
- D4. Increase button
- D5. Decrease button
- D6. Timer button
TURNING THE APPLIANCE ON/OFF USING THE REMOTE CONTROL
- Plug into the outlet.
- Press the ON/STAND-BY button (D1). When turned on. the air conditioner starts operating in the same mode as when it was turned off.
- Press the ON/STAND-BY button (D1) again to switch the appliance off.
Please note: Never switch the appliance off by removing the plug. Always switch it off by pressing the ON/STAND-BY button (D1) and waiting few minutes before removing the plug. The appliance will only perform the standard checks if the appliance is switched off following this process. Pressing any button the remote control will automatically sync to the unit itself and whatever appears on the remote control display will now also appear on the unit display.
SELECTING THE OPERATING MODES
The operating modes available on the remote control through the MODE button (D2) correspond to those on the appliance control panel (C).
SELECTING THE TEMPERATURES
In air conditioning mode press (D4) or (D5) button to select the desired temperature.
SELECTING THE AIR FLOW
- Minimum air flow: when maximum quiet operation is desired.
- Medium air flow: when the noise level needs to be low but with a good comfort level.
- Maximum air flow: for maximum performance.
- Auto air flow: the appliance automatically chooses the air flow based on the temperature selected and the environmental conditions. This selection is only avail able in air conditioning mode.
SELECTING THE TEMPERATURE SCALE
The temperature can be displayed in °C or °F. To change the tem perature unit of measure select the air conditioning mode then press both the decrease (D5) and increase (D4) keys for about 3 seconds.
SETTING THE TIMER
The timer allows the delayed start up or shut down of the appli ance. This function will prevent wasting electricity by optimizing the operating periods.
How to program delayed shut down
- While the appliance is on in any operating mode. delayed shut down can be programmed.
- Press the timer button (D6). the timer symbol is dis played and the hours light up.
- Press the (D5) and (D4) buttons until the desired number of hours to shut down appears on the display.
A few seconds after the timer is set. the setting is acquired. the display shows the operating mode and the timer symbol stays lit. Once the set time is elapsed. the air conditioner goes into standby. To cancel the timer program. press the timer button (D6) twice. The timer indicator will go off.
How to program delayed start up
- Plug in the appliance and set to standby.
- Press the timer button (D6). the timer symbol is dis played and the hours light up.
- Press the (D5) and (D4) buttons until the desired number of hours to start up appears. Start up can be pro grammed at anytime within the next 24 hours.
When the set time is elapsed. the appliance will start to operate in the same operating mode that was previously set.
To cancel the timer program. press the timer button (D6) twice. The timer indicator will go off.
Note: This equipment has been tested and found to comply with the limits for a Class B digital device. pursuant to part 15 of the FCC Rules. These limits are designed to provide reasonable protection against harmful interference in a residential installation.
This equipment generates, uses and can radiate radio fre- quency energy and, if not installed and used in accordance with the instructions, may cause harmful interference to radio communications. However, there is no guarantee that interference will not occur in a particular installation. If this equipment does cause harmful interference to radio or tele- vision reception, which can be determined by turning the equipment off and on, the user is encouraged to try to correct the interference by one or more of the following measures:
Reorient or relocate the receiving antenna.
Increase the separation between the equipment and receiver.
Connect the equipment into an outlet on a circuit differ- ent from that to which the receiver is connected.
Consult the dealer or an experienced radio/TV technician for help.
Changes or modifications not expressly approved by the party responsible for compliance could void the user’s au- thority to operate the equipment.
This device complies with Part 15 of the FCC Rules. Opera- tion is subject to the following two conditions: (1) this de- vice may not cause harmful interference, and (2) this device must accept any interference received, including interfer- ence that may cause undesired operation.
This Class B digital apparatus complies with Canadian CAN ICES-3 (B) / NMB-3 (B).
SELF-DIAGNOSIS
The appliance has a self diagnosis system to identify a number of warning/malfunctions. Error messages are displayed on the appli ance display.
IF IS DISPLAYED.

“Low Temperature” (Frost prevention)
WHAT SHOULD I DO?
The appliance is fitted with a frost protection device to avoid excessive formation of ice.
The appliance starts up again automatically when the defrosting process is completed.
IF IS DISPLAYED.

“Probe Failure” (Probe damaged)
WHAT SHOULD I DO?
If this is displayed. requires service. Con tact DeLonghi Customer Service in the US at 1-800-322-3848 or in Canada at 1-888 335-6644.
IF IS DISPLAYED.

“High Level” (Internal tray full)
WHAT SHOULD I DO?
Empty the internal tank following the instructions in the section “End of season operations”.
TIPS FOR CORRECT USE
To ensure optimal results from your air conditioner. follow these recommendations: Close the windows and doors in the room to be air condi tioned. When installing the air conditioner semi-perma nently. you should leave a door slightly open (as little as 0.4 in/1cm) to guarantee proper ventilation. Never use the appliance in very damp rooms (laundries for example). Protect the room from direct exposure to the sun by par tially closing curtains and/or blinds to make the appliance much more economical to run. Never use the appliance outdoors. Make sure there are no heat sources in the room. Make sure the air conditioner is standing on a level surface.
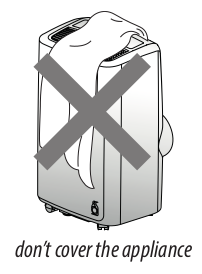
Never rest objects of any kind on the air conditioner. Never obstruct the air intake or air outlet flap.
CLEANING
Before cleaning or maintenance. turn the appliance off by pressing the C1, then unplug from the outlet.
CLEANING THE CABINET
You should clean the appliance with a slightly damp cloth then dry with a dry cloth. For safety reasons. never wash the air con ditioner with water.
Attention! Never use alcohol or solvents to clean the appliance. Never spray insecticide liquids or similar.
CLEANING THE AIR FILTER
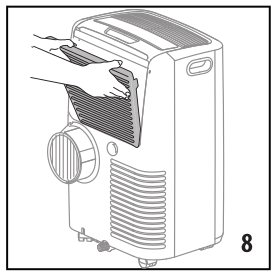
To maintain the efficiency of the air conditioner. it is recom mended to clean the dust filter after every week of use. The filter is located near the intake grille and the grille is located on the filter housing. To clean the filter. it must be removed as shown in figure 8. Then. remove filter from air inlet grille (A6) as shown in figure 10.
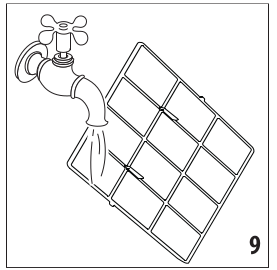
Use a vacuum cleaner to remove any dust. If it is very dirty. sub merge it in warm water and rinse it several times (fig. 9).
The water temperature must be kept below 104°F/ 40°C. After washing the filter. allow it to dry. To replace. put the filter back in its housing (fig. 10).

CHECKS AT THE BEGINNING OF THE SEASON
Make sure the power cable and socket are in perfect condition and make sure the ground system is sufficient. Comply strictly with the installation standards.
END OF SEASON OPERATIONS
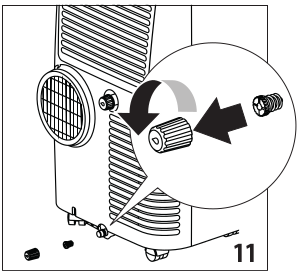
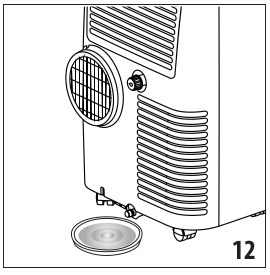
To completely drain the water from the internal circuit. remove the cap from the lower drainage hose. turning it counter clock wise. then remove the internal cap (figure 11).
Drain the water completely into a basin (fig.12). When it is total ly drained. replace the caps. making sure they are closed. Clean the filter as indicated previously. The filter must be dry before reinserting it.
LIMIT CONDITIONS
Room temperature for air conditioning 64° - 95°F (18° - 35°C)
Transporting. loading. cleaning. recovery and disposal of the refrigerant must only be performed by technical ser vice centers authorized by the manufacturing company.
The appliance must only be disposed by specialized per sonnel authorized by the municipality in which you live.
Attention! TO AVOID DAMAGE TO THE UNIT: NEVER TRANSPORT OR TURN THE APPLIANCE UPSIDE DOWN OR ON ITS SIDE. IF THIS OCCURS. WAIT 6 HOURS BEFORE TURNING THE APPLIANCE ON. 24 HOURS IS RECOMMENDED. After the unit has been on its side. oil needs to return to the compressor to en sure proper function. Without allowing the unit this time (6-24 hours) the unit may function for only a short time. and then the compressor will break down from lack of oil.
TROUBLESHOOTING
PROBLEM CAUSE SOLUTION
The air conditioner does not come on
It is not plugged into the outlet
- plug into the outlet
there is no current
- wait for power to be restored
LCDI plug on the power cord could be tripped
- push reset buton on LCDI plug
The air conditioner works for a short time only
There are bends or kinks in the air exhaust hose
- position the air hose correctly, keeping it as short and free of curves as possible to avoid bottlenecks
something is preventing the air from being discharged
- Check and remove any obstacles
obstructing air discharge
The air conditioner works. but does not cool the room
Windows. doors and/or curtains open
- close doors. windows and curtains. bearing in mind the “TIPS FOR CORRECT USE” given above
there are heat sources in the room (e.g. oven, etc.)
- eliminate the heat sources
the air exhaust hose is detached from the fit the air exhaust hose in the housing at appliance
- fit the air exhaust hose in the housing at appliance the back of the appliance (fig. 1).
filter clogged
- clean or replace the filter as described above
During operation. there is an unpleasant smell in the room filter clogged clean the filter as described above
filter clogged
- clean the filter as described abov
The air conditioner does not operate immediately after restarting it
An internal safety device prevents the appliance from being restarted until three/four minutes have elapsed since it was last turned off
- Wait approximately three minutes and try again. This delay is part of normal operation.
“HL” frequently appears on the display
High ambient humidity
- we suggest you to apply the hose sup plied (B5) to the upper drainage hose (A10) and thus allowing the water to flow into a container. Pay attention the water does not overflow onto the floor.
The scripts Lt/PF/HL appear on display.
the appliance has a self diagnosis system to identify a number of malfunctions.
- see the SELF-DIAGNOSIS chapter
There is no display showing in my remote control
Batteries are exhausted
- Replace batteries
There are two dashes (- -) appearing on remote control but it is not working
Remote is not “ON”
- Press ON/OFF key on remote control
See other models: PACEM369S-6ALWH PACEM370-6ALWH PACEM367-6ALWH PACEL376HGRFK-6ALBK PACEL376HGRFK-6ALWH
