Loading ...

(12)
(13)
(14)
– At the end of the machine’s working life, or when it can no longer be repaired, ensure that it is
disposed of according to national regulations.
– Contact your local authority for details of collection schemes in your area.
In all circumstances:
Do not dispose of power tools with domestic waste.
Do not incinerate.
Do not abandon in the environment.
Do not dispose of WEEE* as unsorted municipal waste.
* Waste Electrical & Electronic Equipment.
1. TITLE PAGE
1.1 INTRODUCTION:
USER MANUAL FOR: 360° Rotating Self-Levelling Laser Level Kit
Stock No: 88640
Part No: LLK3
As our user manuals are continually updated, users should make sure that they use
the very latest version.
Downloads are available from: http://drapertools.com/manuals
Draper Tools Limited
Hursley Road
Chandler’s Ford
Eastleigh
Hampshire
SO53 1YF
UK
Website: drapertools.com
Product Helpline: +44 (0) 23 8049 4344
General Fax: +44 (0) 23 8026 0784
1.3 UNDERSTANDING THIS MANUALS SAFETY CONTENT:
WARNING! – Information that draws attention to the risk of injury or death.
CAUTION! – Information that draws attention to the risk of damage to the product or
surroundings.
1.4 COPYRIGHT © NOTICE:
Copyright © Draper Tools Limited.
Permission is granted to reproduce this publication for personal and educational use
only. Commercial copying, redistribution, hiring or lending is prohibited.
No part of this publication may be stored in a retrieval system or transmitted in any
other form or means without written permission from Draper Tools Limited.
In all cases this copyright notice must remain intact.
1.2 REVISIONS:
Date first published June 2017 .
(1)
(2)
(3)
(4)
(6)
(7)
(8)
(9)
(10)
(11)
(5)
(3)
(6)
(11)
(1)
(2)
(3)
(4)
(5)
(6)
(7)
(8)
(9)
(10)
(11)
(5)
(12)
(13)
(14)
Slide the battery compartment cover (5) up slightly
before lowering it down to remove it. Insert the 3 x AA
batteries, taking note of the polarity indicated inside the
compartment. Replace the cover securely.
Ensure the laser beam aperture is covered to
avoid accidental beam exposure during battery
installation/replacement.
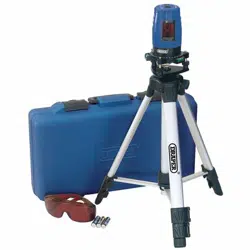
Remove the tripod from the case, extend all the legs and place the tripod into position.
Ensure the locking screw on the side of the tripod is tight. Adjust the height of each leg individually
to align the bubble on the top of the tripod as near as possible to the centre of the circle.
Remove the rotary base and screw onto the tripod taking care not to disturb its position. Using the
three adjusters, align the bubble on the rotary base as near to the centre of the circle as possible
then align the bubble on the self-levelling laser level as near to centre of both vials.
To fine tune the rotary base, place the level centrally into the clamp and tighten. Rotate the level
clockwise until it is directly over one of the three adjusters. Turn the adjuster until the horizontal
vial is level. Rotate the level a further 120° clockwise and adjust it to horizontal. Rotate the level a
further 120° to complete the final adjustment.
If the location of the height of the tripod is changed these adjustments must be repeated.
Loosen the transportation lock (11) prior to use.
Select the vertical line with button (3) or the horizontal
line with button (6) or both for a cross.
Wearing the goggles supplied will enhance the
laser beam. The beam will remain level providing the
error margin does not exceed 6°(+/-).
Do not dispose of WEEE*
unsorted municipal waste.
Loading ...
Loading ...
Loading ...