Loading ...
Loading ...
Loading ...
10
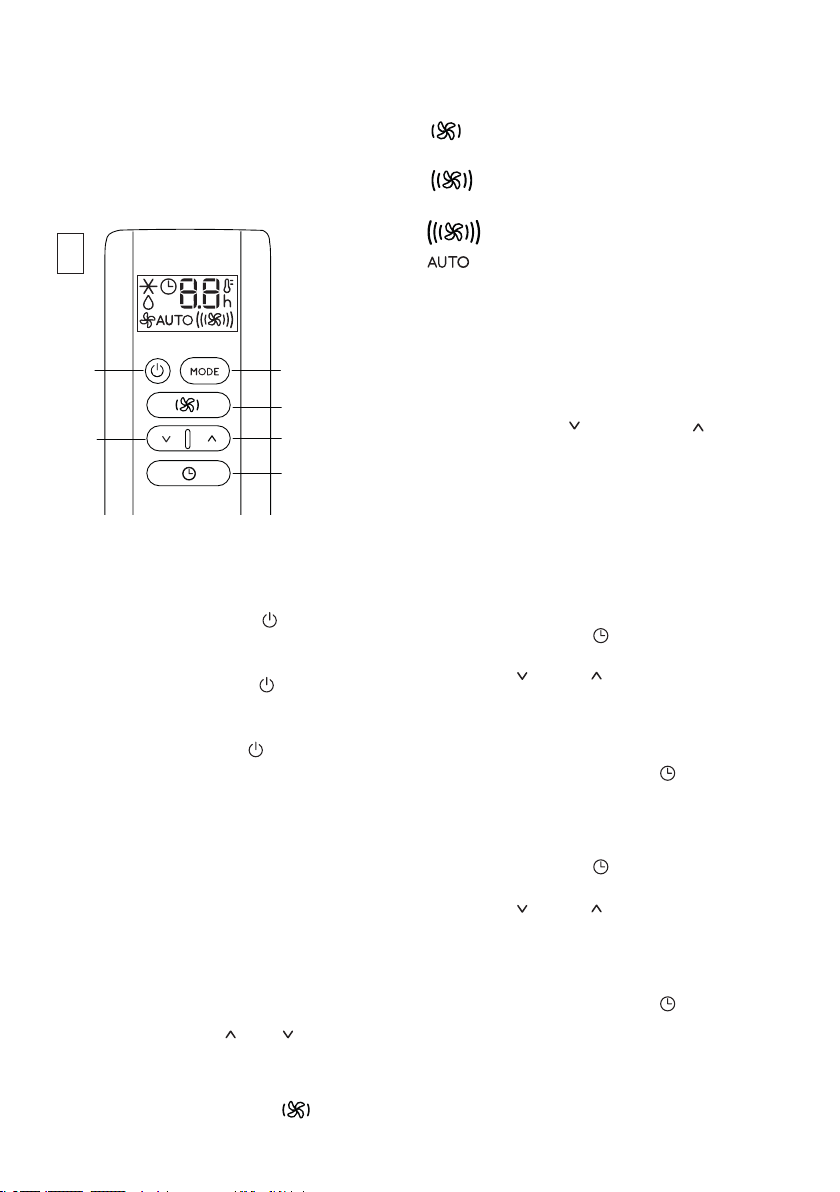
DESCRIPTION OF THE REMOTE CONTROL
D1. ON/STAND-BY button
D2. MODE button
D3. Fan speed selection button
D4. Increase button
D5. Decrease button
D6. Timer button
D1
D5
D2
D4
D6
D3
TURNING THE APPLIANCE ON/OFF USING THE
REMOTE CONTROL
• Plug into the outlet.
• Press the ON/STAND-BY button
C1C2
C4
C13
C12
C9
C7
C5
C6
C3
C14
C10
C15
C11
C8
(D1). When turned on,
the air conditioner starts operating in the same mode as
when it was turned o.
• Press the ON/STAND-BY button
C1C2
C4
C13
C12
C9
C7
C5
C6
C3
C14
C10
C15
C11
C8
(D1) again to switch the
appliance o.
Please note: Never switch the appliance o by removing the plug.
Always switch it o by pressing the
C1C2
C4
C13
C12
C9
C7
C5
C6
C3
C14
C10
C15
C11
C8
ON/STAND-BY button (D1)
and waiting few minutes before removing the plug. The appliance
will only perform the standard checks if the appliance is switched
o following this process. Pressing any button the remote control
will automatically sync to the unit itself and whatever appears
on the remote control display will now also appear on the unit
display.
SELECTING THE OPERATING MODES
The operating modes available on the remote control through
the MODE button (D2) correspond to those on the appliance
control panel (C).
SELECTING THE TEMPERATURES
In air conditioning mode press (D4) or (D5) button to select
the desired temperature.
SELECTING THE AIR FLOW
button (D3)
to select the desired air flow.
The air flows available are:
Minimum air flow: when maximum quiet operation
is desired.
Medium air flow: when the noise level needs to be
low but with a good comfort level.
Maximum air flow: for maximum performance.
Auto air flow: the appliance automatically chooses
the air flow based on the temperature selected and the
environmental conditions. This selection is only avail-
able in air conditioning mode.
SELECTING THE TEMPERATURE SCALE
The temperature can be displayed in °C or °F. To change the tem-
perature unit of measure select the air conditioning mode then
press both the decrease
(D5) and increase (D4) keys for
about 3 seconds.
SETTING THE TIMER
The timer allows the delayed start up or shut down of the appli-
ance. This function will prevent wasting electricity by optimizing
the operating periods.
How to program delayed shut down
• While the appliance is on in any operating mode, delayed
shut down can be programmed.
• Press the timer button
C1C2
C4
C13
C12
C9
C7
C5
C6
C3
C14
C10
C15
C11
C8
(D6), the timer symbol is dis-
played and the hours light up.
• Press the (D5) and (D4) buttons until the desired
number of hours to shut down appears on the display.
A few seconds after the timer is set, the setting is acquired, the
display shows the operating mode and the timer symbol stays lit.
Once the set time is elapsed, the air conditioner goes into standby.
To cancel the timer program, press the
C1C2
C4
C13
C12
C9
C7
C5
C6
C3
C14
C10
C15
C11
C8
timer button (D6)
twice. The timer indicator will go o.
How to program delayed start up
• Plug in the appliance and set to standby.
• Press the timer button
C1C2
C4
C13
C12
C9
C7
C5
C6
C3
C14
C10
C15
C11
C8
(D6), the timer symbol is dis-
played and the hours light up.
• Press the (D5) and (D4) buttons until the desired
number of hours to start up appears. Start up can be pro-
grammed at anytime within the next 24 hours.
When the set time is elapsed, the appliance will start to operate
in the same operating mode that was previously set.
To cancel the timer program, press the
C1C2
C4
C13
C12
C9
C7
C5
C6
C3
C14
C10
C15
C11
C8
timer button (D6)
twice. The timer indicator will go o.
Note:
• This equipment has been tested and found to comply with the
limits for a Class B digital device, pursuant to part 15 of the FCC
Rules. These limits are designed to provide reasonable protec-
D
In air conditioning and fan modes press
Loading ...
Loading ...
Loading ...