Loading ...
Loading ...
Loading ...
Electrical Connection
Appmiances which require emectricai
power are equipped with a three=
prong grounding plug which must be
pHuggeddirectHyinto a propedy grounded
three-hoNe 120vog dectricd outHet.
A/ways ch_connectpower to app/iance before servicing.
The three-prong grounding pHugoffers protection against
shock hazards. DO NOT CUT OR REMOVE THE TNmRD
GROUNDmNG PRONG FROM THE POWER CORD PLUG.
If an ungrounded, two-hoNe or other type dectricd outHetis
encountered, it is the personal responsibility of the
appliance owner to have the outlet replaced with a
properly grounded three=hole electrical outlet.
Remova of Gas Appmiance
Gas appliance connectors used to connect this appliance to
the gas supply are not designed for continuous movement.
Once installed, DO NOT repeatedly move this gas appliance
for cleaning or to relocate. If this appliance has to be moved
and/or removed for servicing, follow the procedure described
in the installation instructions. For information, contact
Customer Assistance at 1-800-688-1120 USA,and Canada.
To prevent range from accidentally tipping, range must be
secured to the floor by sliding rear leveling leg into the anti-
tip bracket.
the two tabs on the burner assembly into the two slots on the
burner support bracket which is mounted to the burner
bottom. {NOTE: If the tabs are not properly inserted into the
slots, the assembly may rock and the burners may not light
properly.}
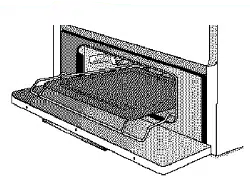
Storage Drawer (select models:)
Do not store p!astic, paper products, food or flammab!e
for these items when the oven is in use,
The storage drawer can be removed to allow you to clean
To remove:
1. Empty'drawer and pull out to the first stop position.
2. Lift up the front of the drawer.
3. Pull out to the second stop position.
4. Grasp sides and lift drawer up and out.
To replace:
1. Fit the ends of the drawer glides into the rails in the range.
2. Lift up the front of the drawer and gently push in to the
first stop position.
3. Lift drawer up again and push until drawer is closed.
Conventional Surface Burners
(select models:)
Under no circumstances are the surface burner assemblies to
be taken apart for cleaning. The surface burner assembly can
be removed to clean the burner box area=
Freestanding range only:
The two surface burner assemblies are secured in place
during transportation with screws. Once the range is installed,
these screws may be removed to allow quick and easy
removal of the burner assemblies.
To remove:
Allow the burner assembly to cool. Lift up cooktop. Grasp the
burner assembly and rotate it slightly toward the left to
release the two tabs on the assembly. Then lift the assembly
and pull toward the back of the cooktop until the air shutter
ends on the assembly release from the valves.
To replace:
Insert the air shutter ends on the burner assembly over the
valves and lower the assembly into place. Be sure to secure
Oven Bottom
Protect oven bottom against spillovers, especially acidic or
sugary spills, as they may discolor the porcelain enamel. Use
the correct pan size to avoid spillovers and boilovers.
The oven bottom may be removed for easier cleaning.
To remove:
from oven,
To replace:
Fit the front edge of the oven bottom into the oven front
frame. Lower the rear of the oven bottom and slide the two
catches back to lock the oven bottom in place.
24
Loading ...
Loading ...
Loading ...