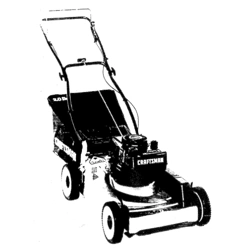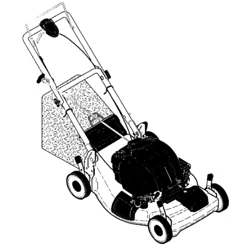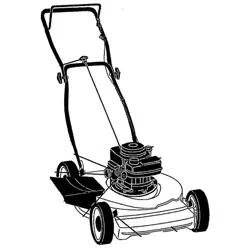
Owner's Manual
JCRAFTSMAN'J
5.5 HORSEPOWER
21" MULTI-CUT
POWER PROPELLED
ROTARY LAWN MOWER
Model No.
917.378210
• Safety
• Assembly
• Operation
• Maintenance
• Espafiol
• Repair Parts
CAUTION:
Read and follow all
Safety Rulesand Instructions
beforeoperatingthisequipment
Warranty ................................................. 2 Product Specifications.......................... 12
Safety Rules ........................................ 2-4 Service and Adjustments................. 14-15
Assembly ................................................ 5 Storage ............................................ 15-16
Operation ........................................... 6-10 Troubleshocting .............................. 16o17
Maintenance Schedule ........................ 11 Repair Parts.......................................... 37
Maintenance .................................... 11-15 Parts Ordedng ........................ Back Cover
LIMITEDTWOYEAR WARRANTY ON CRAFTSMAN POWER MOWER
For two years from date of purchase, when this Craftsman Lawn Mower Is maintained,
lubricated,and tuned up according to the operating and maintenance instructionsin
the owner's manual, Seers will repair free of charge any defect in matedal or workman-
ship.
If this Craftsman Lawn Mower is used for commercial or rental purposes, this warranty
appliesfor only 90 days from the date of purchase.
This Warranty does not cover:
• Expandable items which become worn during normal use, such as rotary mower
blades, blade adapters, belts, air cleaners and spark plug.
• Repairs necessary because of operator abuse or negligence, includingbent
crankshafts and the failure to maintain the equipment according to the instructions
contained in the owner's manual.
Warranty service is available by returning the Craftsman power mower to the nearest
Sears Service Canter/Department in the United States. This warranty applies only
while thisproduct is in use in the United States.
This Warranty gives you specific legal dghts, and you may also have other dghts which
varyfrom state to state.
Sears, Roebuck and Co., D/817 WA, Hoffrcan Estates, Illinois 60179
IMPORTANT: This cuttingmachine is capable of amputating handsand feet and
throwing objects, Failure to observe the following safety instructionscould result in
sedous injury or death.
I, GENERAL OPERATION
• Read, understand, and follow all
instructionson the machine and in the
manual(s) before starting. Be thor-
oughly familiar with the controls and
the proper use of the machine before
starting.
• Do not pat hands or feet near or under
rotatingparts. Keep clear of the
discharge opening at all times.
• Only allow responsible individuals,
who are familiar with the instructions,to
operate the machine.
• Clear the area of objects such as
rocks,toys, wire, bones, sticks, etc.,
which could be picked up and thrown
by the blade.
• Be sure the area is clear of other
people before mowing. Stop machine if
anyone enters the area.
• Do not operate the mower when
barefoot or weedng open sandals.
Always wear substantial foot wear.
• Do not pull mower backwards unless
absolutely necessary. Always look
down and behind before and while
moving backwards.
• Do not operate the mower without
proper guards, plates, grass catcher or
other safety protective devices in place.
• See manufacturer's instructionsfor
proper operation and installation of
accessories. Only use acoessodes
approved by the manufacturer.
• Stop the blade(s) when crossing gravel
drives, walks, or roads.
• Stop the engine (motor) whenever you
leave the equipment, before cleaning
the mower or unclogging the chute.
• Shut the engine (motor) off and wait
untilthe blade comes to complete stop
before removing grass catcher.
• Mow only n daylight or good artificia
light.
• Do not operate the macNne wNle
under the influence of alcohol or drugs.
• Never operate machine in wet grass.
Always be sure of your foot!ng: keep a
firm hold on the handle ana walk; never
ran.
• Disengage the self.propened mecha-
nism or drive clutchon mowers so
equipped before starting the engine
(motor),
• Iftheequipmentshouldstarttovibrate
abnormally,stoptheengine(motor)
and checkimmediatelyforthecause,
Vibrationisgenerallya wamlng of
trouble.
• Always wear safety goggles or safety
glasses with side shields when
operating mower.
II. SLOPE OPERATION
Slopes are a major factor related to slip
and fall accidents which can rasultin
severe injury. All slopes require extra
caution. If you feel uneasy on a slope, do
notmow it.
DO:
• Mow across the face of slopes: never
up and down. Exercise extreme caution
when changing direction on slopes.
• Remove obstacles such as rocks,tree
limbs, etc.
• Watch for holes, ruts, or bumps. Tall
grass can hide obstacles.
DO NOT."
• Do not trim near drop-offs, ditches or
embankments. The operator could lose
footing or balance.
• Do not tdm excessively steep slopes.
• Do not mow on wet grass. Reduced
footing could cause slipping.
II1. CHILDREN
Tragic accidents can occur if the operator
isnot alert to the presence of children.
CNk:kan are oflen attracted to the
machine and the mowing activity.Never
assume that children will remain where
you last saw them.
• Keep children out ofthe tdmming area
and under the watchful care of another
responsible adult.
• Be alert and turn machine off ifchildren
enter the area.
• Before and while wa_ng backwards,
look behind and down for small
children.
• Never allow children to operate the
machine.
• Use extra care when approaching blind
comers, shrubs, trees, or other objects
that may obscure vision.
IV. SERVICE
• Use extra care in handling gasoline
and other fuels. They are flammable
and vapors are explosive.
-Use only an approved container.
-Never remove gas cap or add fuel
with the engine running. Allow
engine to cool before refueling.
Do notsmoke.
. Never refuel the machine indoors.
- Never store the machine or fuel
ccntalnerInside where there is an
open flame, such as a water heater.
• Never run a machine inside a closed
area.
• Never make adjustments or repairs with
the engine (motor) running. Disconnect
the spark plug wire, and keep the wire
away from the plugto prevent acclden-
tat starting.
• Keep nuts and bolts, especially blade
attachment bolts, tight and keep
equipment in good condition.
• Never tamper with safety devices.
Check their proper operation regularly.
• Keep machine free of grass, leaves, or
other debds build-up. Clean oilor fuel
spillage. Allow machine to cool before
stodng.
• Stop and inspect the equipment if you
stdke an object. Repair, if necessary,
before restarting.
• Never attempt to make wheel height
adjustments while the engine (motor) is
running.
• Grass catcher components are subject
to wear, damage, and detedoralton,
which could expose moving parts or
allow objects to be thrown. Frequently
check components and replace with
manufacturer's recommended parts,
when necessary,
• Mower blades are sharp and can cut.
Wrap the blade(s) or wear gloves, and
use extra caution when servicingthem.
• Do not change the engine governor
setting or overspeed the engine.
3
A,Look for this symbol to point out
• importantsafety precautions. It means
CAUTIONItl BECOME ALERTIII YOUR
SAFETY IS INVOLVED.
& CAUTION: In order to prevent
accidental starting when setting up,
transporting, adjusting or making repairs,
always disconnect spark plug wire and
placewire where it cannot contact spark
plug•
&WARNING: Engine exhaust, some of its
constituents,and certain vehicle
components contain or emit chemicals
known to the State of California to cause
cancer and birthdefects or other
reproductive harm.
&WARNING: Battery posts, terminals and
related accessories contain lead and lead
compounds, chemicals known to the State
of California to cause cancer and birth
defectsor other reproductiveharm. Wash
hands after handling.
A CAUTION: Muffler and other engine
parts become extremely hotduring
operationand remain hot after engine has
stopped. To avoid severe burns on
contact,stay away fromthese areas.
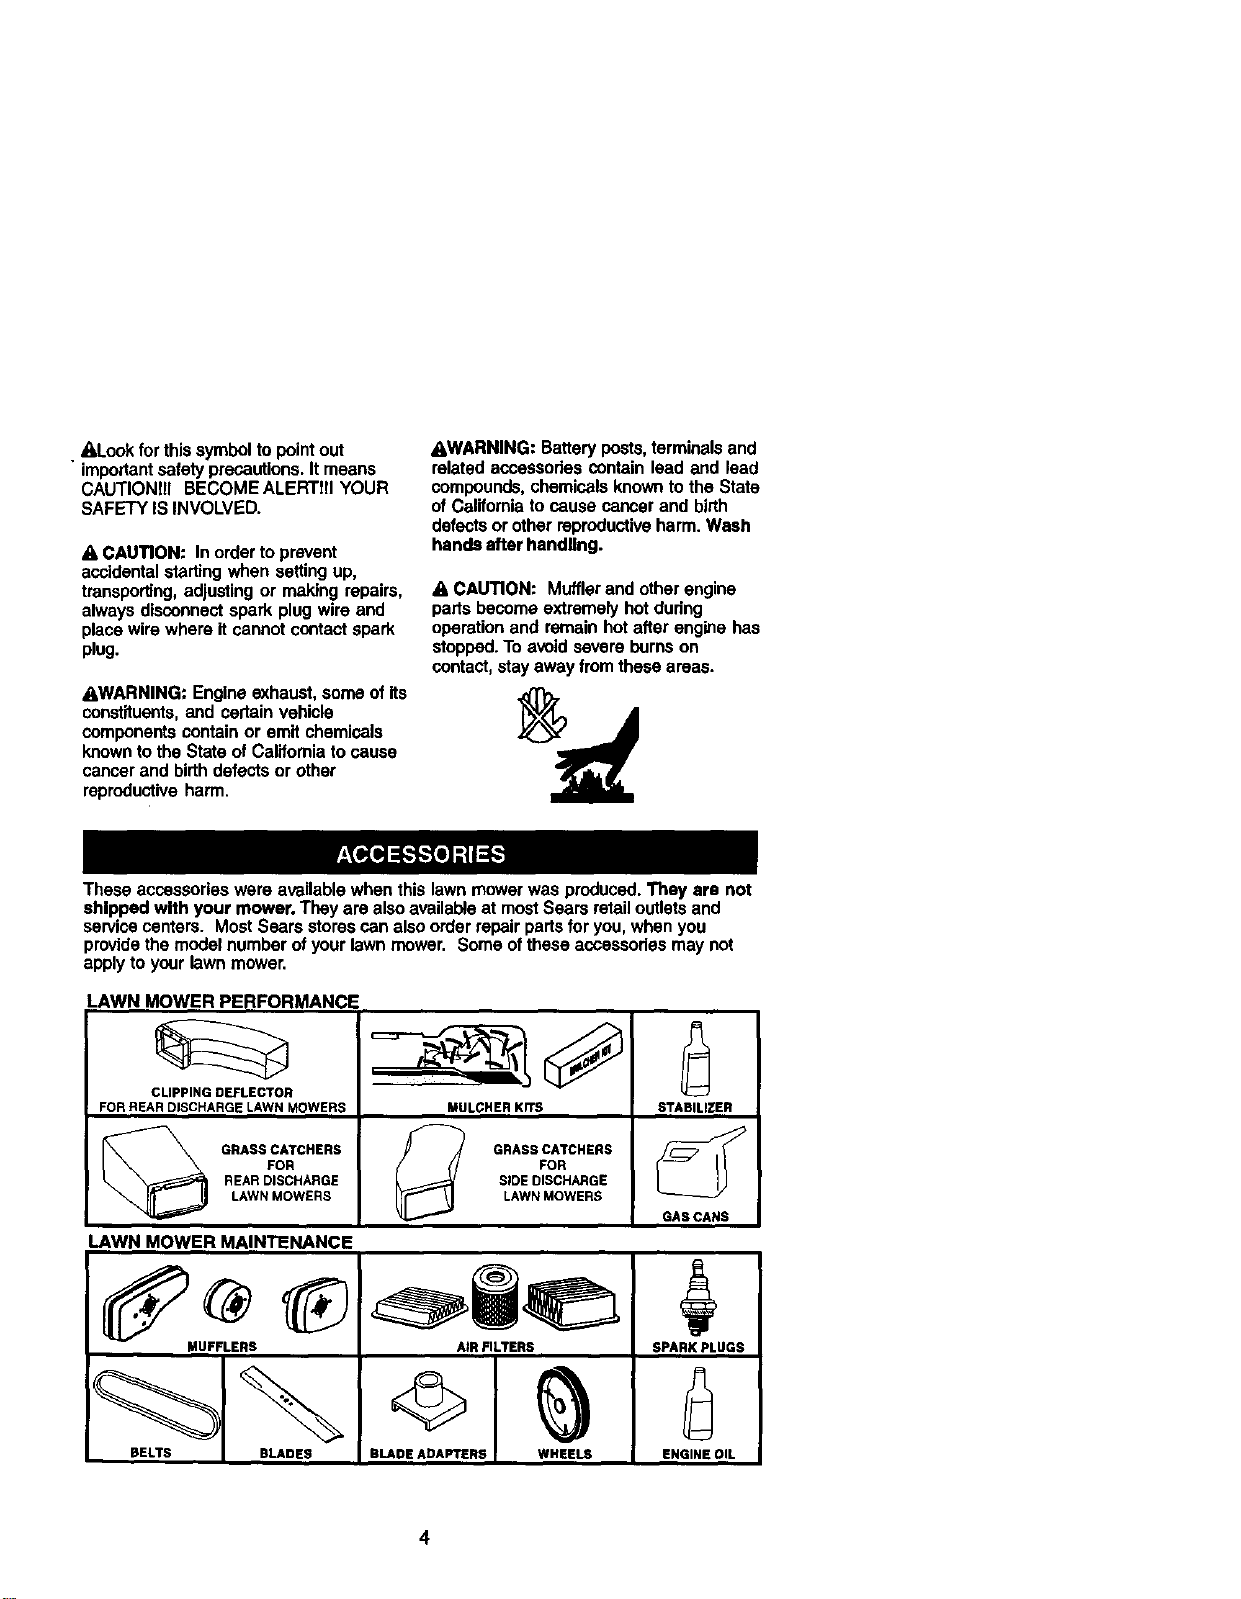
These accessories were available when this lawn mower was produced. They are not
shipped with your mower. They are also available at most Sears retail outletsand
service centers. Most Sears stores can also order repair parts for you, when you
providethe model number of your lawn mower. Some of these acoessodes may not
apply to your lawn mower•
LAWN MOWER PERFORMANCE
FOR REAR DISCHARGE LAWN MOWERS MULCRER KiTS STABILIZER
REAR DISCHARGE SIDE DISCHARGE
LAWN MOWERS LAWNMOWERS
GAS CANS
LAWN MOWER MAINTENANCE
MUFFLERS
BELTS BLADES
AIR FILTERS
BLADE ADAPTERS WHEELS
SPARK PLUGS
ENGINE OIL
4
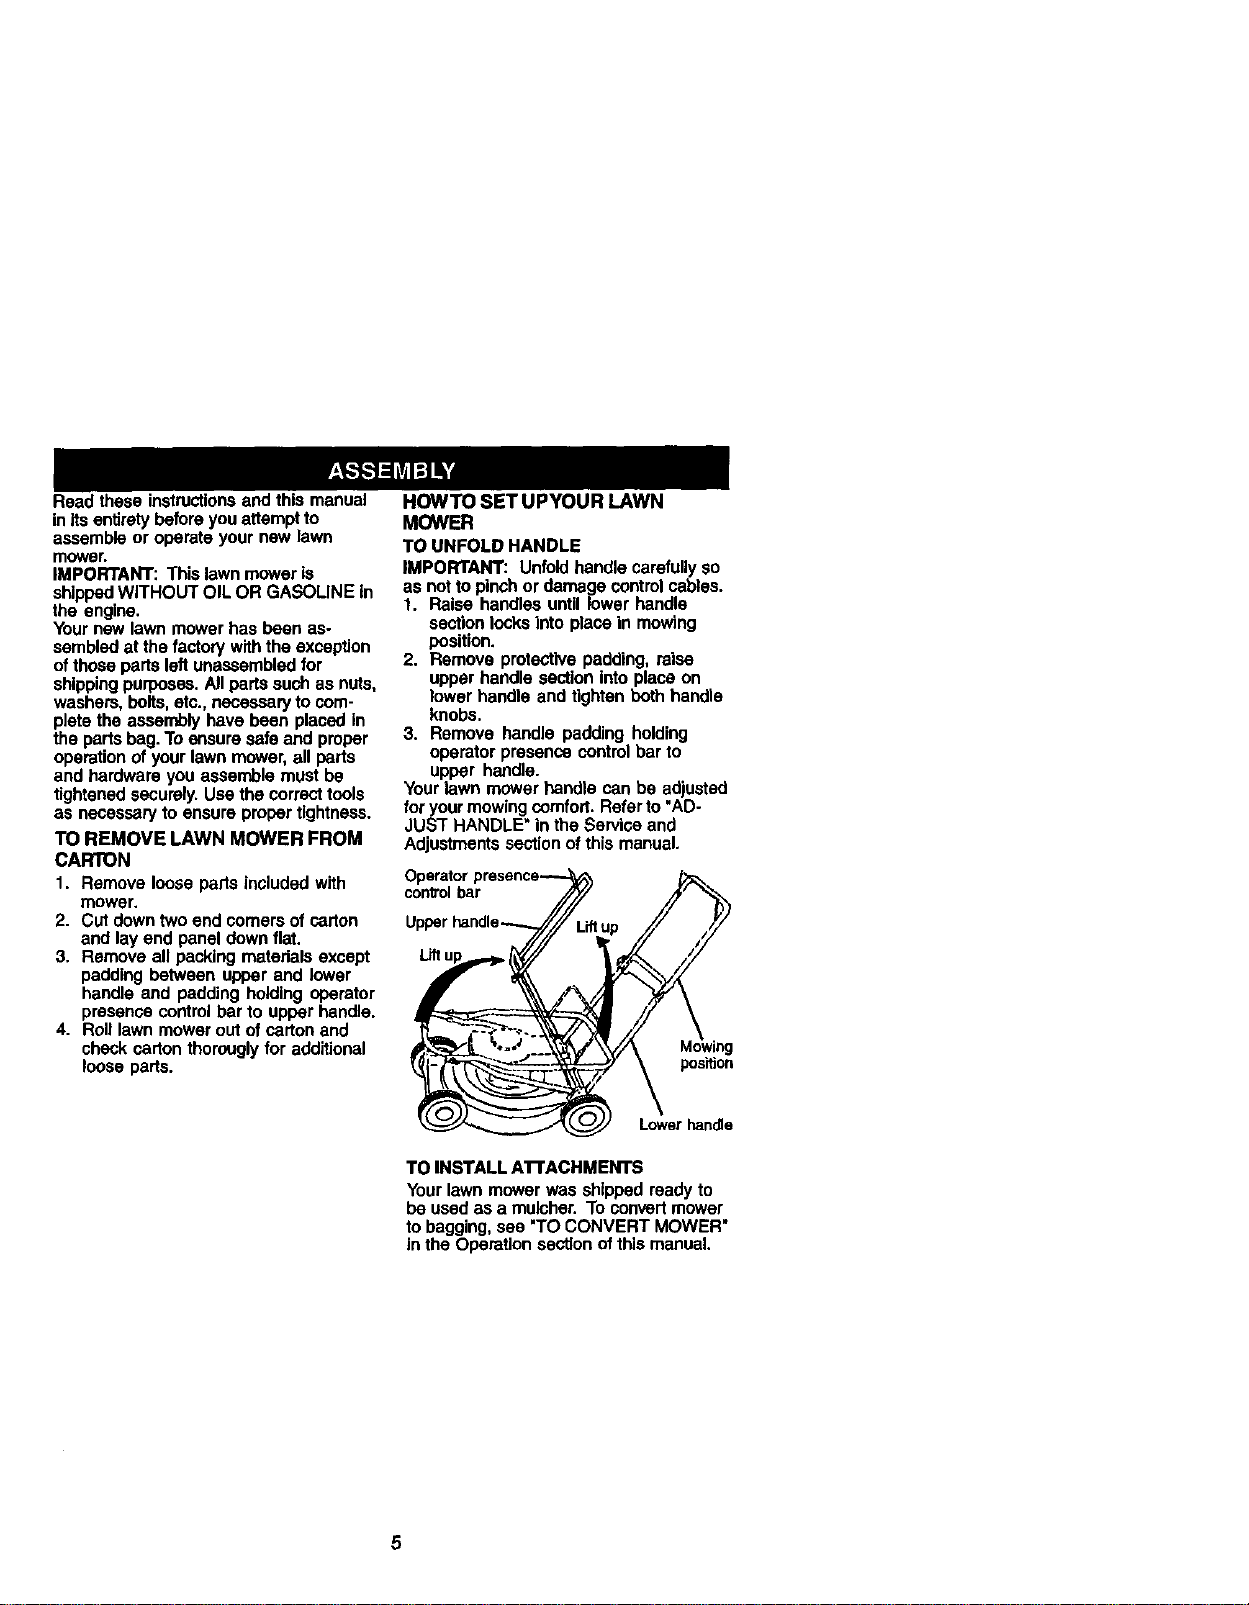
Read these instructionsand this manual
in its entirety before you attempt to
assemble or operate your new lawn
mower.
IMPORTANT: This lawn mower is
shippedWITHOUT OIL OR GASOLINE in
the engine.
Your new lawn mower has been as-
sembled at the factory withthe exception
ofthose ports left unassembled for
shippingpurposes. All parts such as nuts,
washers, bolts, etc., necessary to com-
plete the assembly have been placed in
the ports hag. Toensure safe and proper
operationof your lawn mower, all parts
and hardware you assemble must be
tightened securely. Use the correct tools
as necessary to ensure proper tightness.
TO REMOVE LAWN MOWER FROM
CARTON
1. Remove loose parts included with
mower.
2. Cut down two end comers of carton
and lay end panel down flat.
3. Remove all hacking materials except
padding between upper and lower
handle and padding holding operator
presence control bar to upper handle.
4. Roll lawn mower outof carton and
check carton thorougly for additional
loose parts.
HOWTO SET UPYOUR LAWN
MOWER
TO UNFOLD HANDLE
IMPORTANT: Unfold handle carefully so
as notto pinch or damage control cables.
1. Raise handles until lower handle
section locks into place in mowing
position.
2. Remove protective padding, raise
upper handle section into place on
lower handle and tighten both handle
knobs.
3. Remove handle padding holding
operator presence controlbar to
upper handle.
Your lawn mower handle can be adjusted
for your mowing comfort. Referto "AD.
JUST HANDLE _in the Service and
Adjustments section of this manual.
control bar
L_ltL
Lower handle
TO INSTALL ATTACHMENTS
Your lawn mower was shipped ready to
be used as a mulcher. To convertmower
to bagging, see 'TO CONVERT MOWER"
in the Operation section of this manual.
5
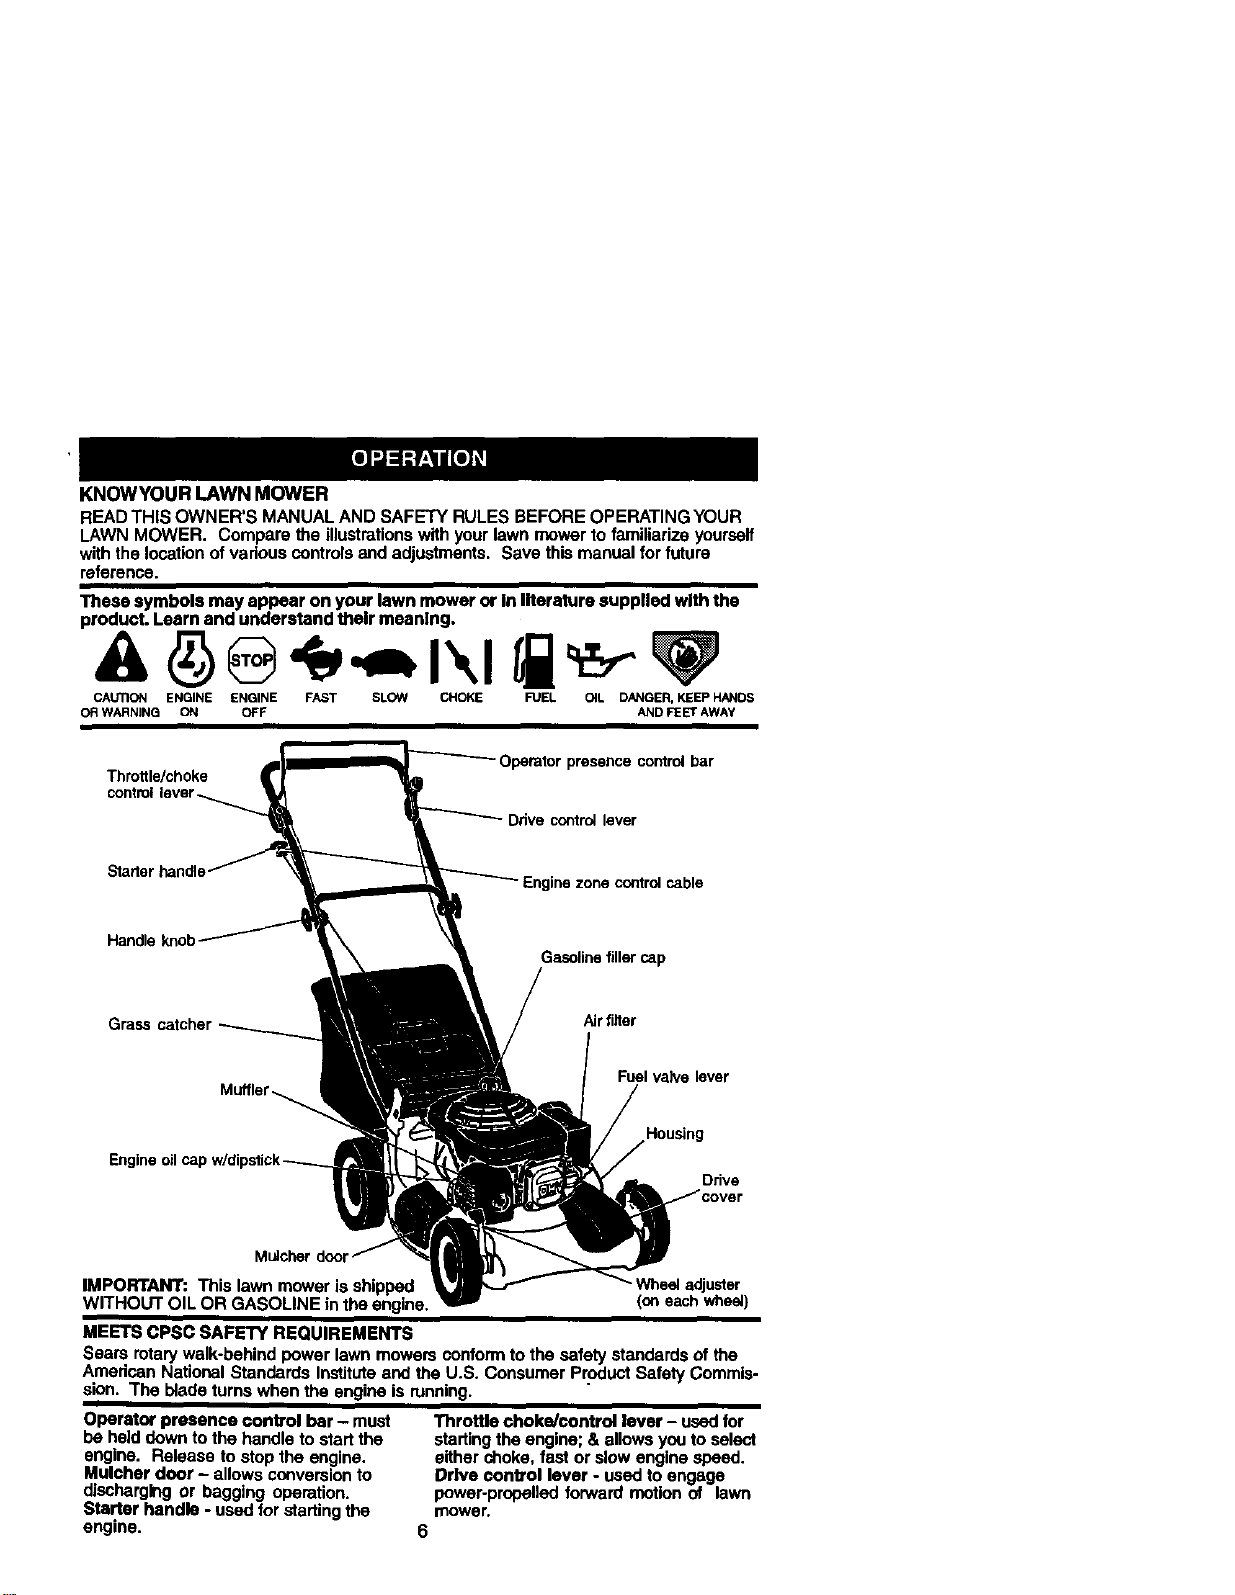
KNOWYOUR LAWN MOWER
READ THIS OWNER'S MANUAL AND SAFETY RULES BEFORE OPERATING YOUR
LAWN MOWER. Compare the illustrationswith your lawn mower to familiarize yourself
with the locationof vadous controlsend adjustments. Save this manual for future
reference.
These symbols may appear on your lawn mower or In Iltaratura supplied with the
product. Learn and understand their meaning.
CAUTION ENGINE ENGINE FAST SLOW CHOKE FUEL OIL DANGER,KEEP HANDS
ORWARNING ON OFF AND FEETAWAY
Throttle/choke
Operator presence control bar
Drive control lever
Starter handle
Handle knob
Gasoline filler cap
Grass Airfilter
Fuel valve lever
Engine
Housing
Ddve
IMPORTANT: This lawn mower is shipped Wheeladjuster
WITHOUT OIL OR GASOLINE in the engine. (oneach whesi)
MEETS CPSC SAFETY REQUIREMENTS
Sears rotary walk-behind power lawn mowers conformto the safety standards of the
Amedsan National Standards Instituteand the U.S. Consumer Product Safety Commis-
sion. The blade turns when the engine is running.
Operator presence control bar - must
be helddown to the handle to startthe
engine. Release to stop the engine.
Mulcher door - allows conversion to
discharging or bagging operation.
Starter handle - used for starting the
engine.
Throttle choke/control lever - used for
starting the engine; & allows you to select
either choke, fast or slow engine speed.
Drive control lever - used to engage
power-propellod forward motion of lawn
mower.
6
The operation of any lawn
mower con result in foreign
objectsthrown intothe
i eyes, which con result in
severe eye damage.
Alwayswear safety glasses or eye
shields while operating your lawn mower
or performingany adjustments or repairs.
We recommend a wide vision safety
mask over spectacles or standard safety
glasses.
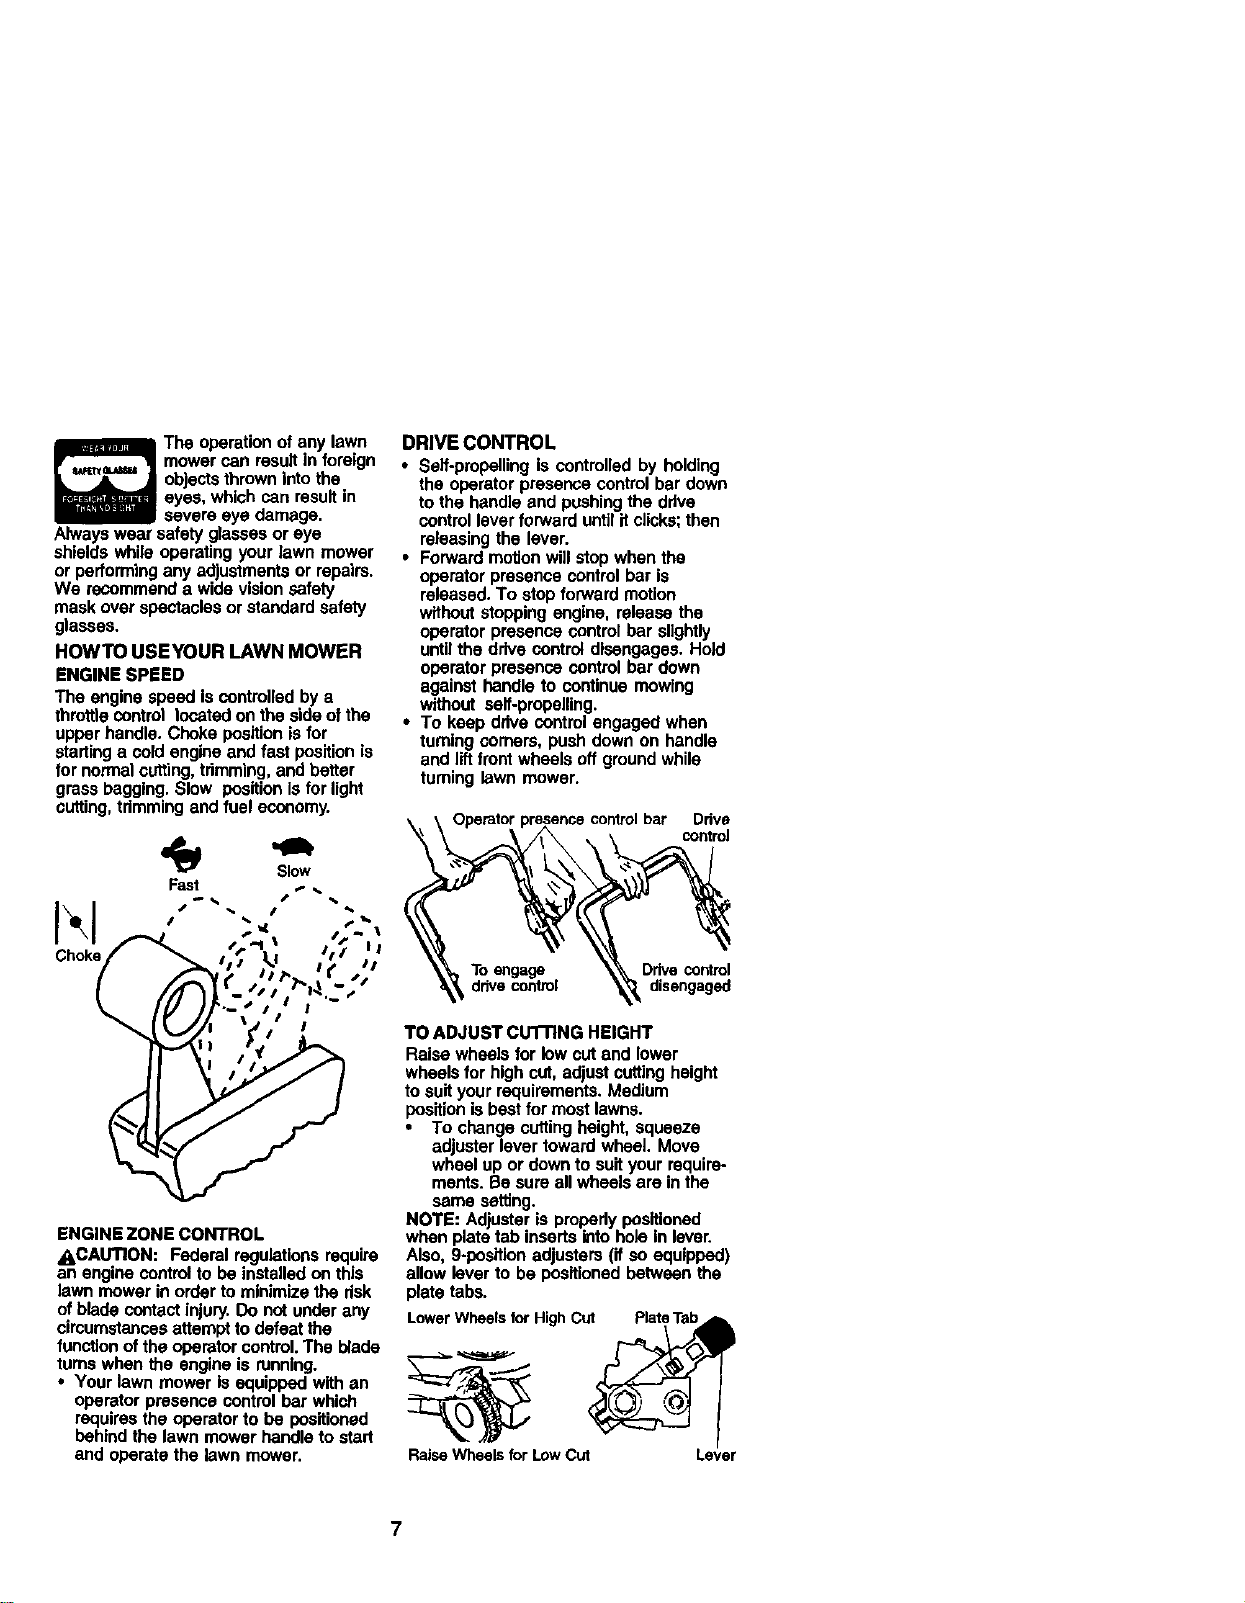
HOWTO USEYOUR LAWN MOWER
ENGINE SPEED
The engine speed is contmllad by a
throttlecontrol located on the side ofthe
upper handle. Choke position is for
starting a cold engine and fast position is
for normal cutting,trimming,and better
grass bagging. Slow position Isfor light
cutting,tdmming and fuel economy.
4_ Slow
Fast ,. ,.
• ,:-,
I i I I "
ENGINE ZONE CONTROL
_,CAUTION: Federal regulations require
an engine control to be installed on this
lawn mower in order to minimize the dsk
of blade contact Injury. Do not under any
circumstances attempt to defeat the
functionof the operator control. The blade
turns when the engine is running.
• Your lawn mower is equipped with an
operator presence control bar which
requires the operator to be positioned
behind the lawn mower handle to start
and operate the lawn mower.
DRIVE CONTROL
• Serf-propelling is controlled by holding
the operator presence control bar down
to the handle and pushing the ddve
control lever forward untilit clicks;then
releasing the lever.
• Forward motionwill stop when the
operator presence control bar is
released. To stop forward motion
without stopping engine, release the
operator presence control bar slightly
untilthe drive control disengages. Hold
operator presence control bar down
against handle to continue mowing
without serf-propelling.
• To keep drive control engaged when
turning corners, push down on handle
and liftfront wheels off groundwhile
turning lawn mower.
Drive
control
To engage Drive control
drive control disengaged
TO ADJUST CuI-nNG HEIGHT
Raise wheels for low cut and lower
wheels for high cut, adjust cuttingheight
to suit your requirements. Medium
position is best for most lawns.
• To change cuttingheight, squeeze
adjuster lever toward wheel. Move
wheel up or down to suit your require-
ments. Be sure all wheels are in the
same setting.
NOTE: Adjuster is properly positioned
when plate tab inserts into hole in lever.
Also, 9-positlan adjusters (if so equipped)
allow lever to be positioned batwsen the
plate tabs.
L_ver WheelsforHighCut Plat_Ta_
Z
RaiseWheelsforLowCut Lever
7
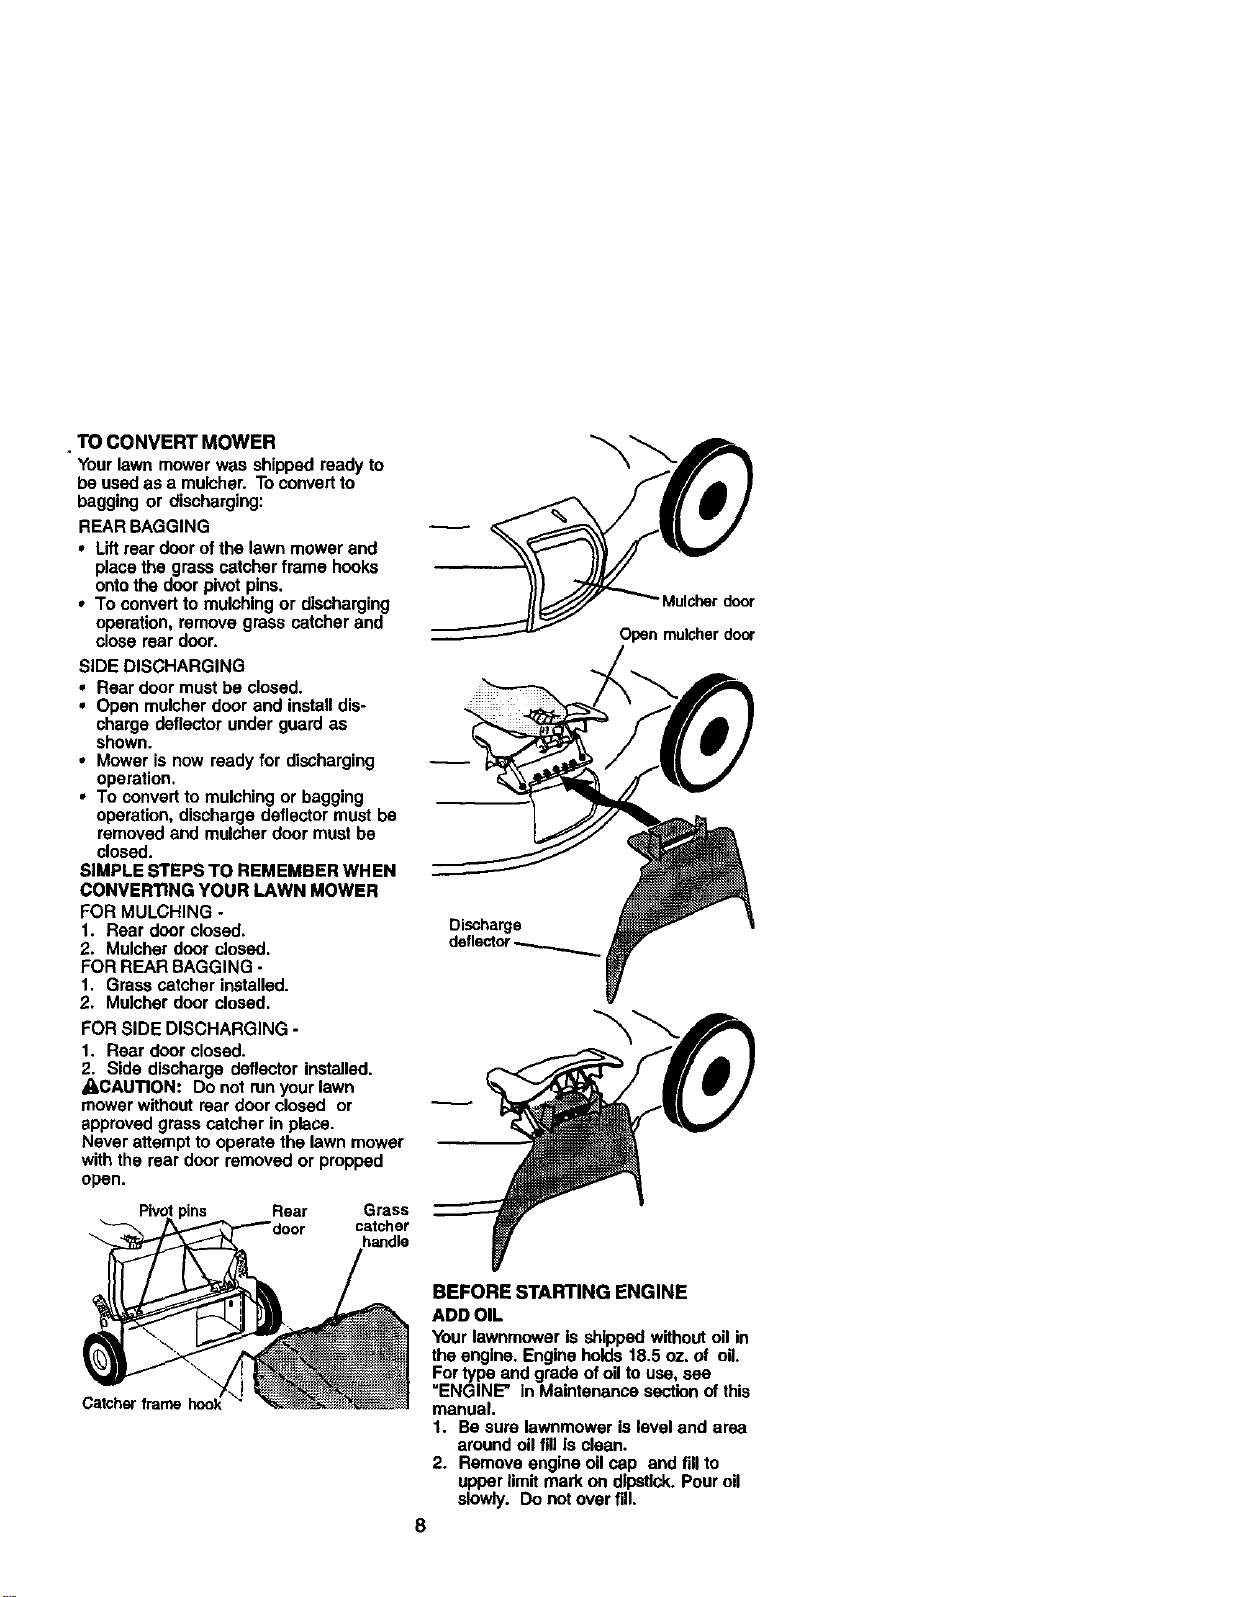
• TO CONVERT MOWER
Your lawn mower was shipped ready to
be used as a mulcher. To convertto
bagging or discharging:
REAR SAGGING
• Liftrear door of the lawn mower and
place the grass catcher frame hooks
onto the door pivot pins.
• To convert to mulching or discharging
operation, remove grass catcher and
close rear door.
SIDE DISCHARGING
• Rear door must be closed.
• Open mulcher door and install dis-
charge deflector under guard as
shown.
• Mower is now ready for discharging
operation.
• To convert to mulching or bagging
operation, discharge deflector must ba
removed and mulcher door must be
closed.
SIMPLE STEPS TO REMEMBER WHEN
CONVERTING YOUR LAWN MOWER
FOR MULCHING.
1. Rear door closed.
2. Mulcher door closed.
FOR REAR BAGGING -
1. Grass catcher installed.
2. Mulcher door closed.
FOR SIDE DISCHARGING -
1. Rear door closed.
2. Side discharge deflector installed.
_(_,CAUTION: Do not run yourlawn
mower without rear door closed or
approved grass catcher in place.
Never attempt to operate the lawn mower
with the rear door removed or propped
open.
Pivot pins Rear Grass
catcher
handle
Discharge
Open mulcher door
BEFORE STARTING ENGINE
ADD OIL
Your lawnmower is shipped without oil in
the engine. Engine holds 18.5 oz. of oil.
For type and grade of oilto use, see
"ENGINE" in Maintenance section ofthis
manual.
1. Be sure lawnmower is level and area
around oil fill is clean.
2. Remove engine oil cap and fill to
upper limit mark on dipstick.Pour oil
slowly. Do not over fill.
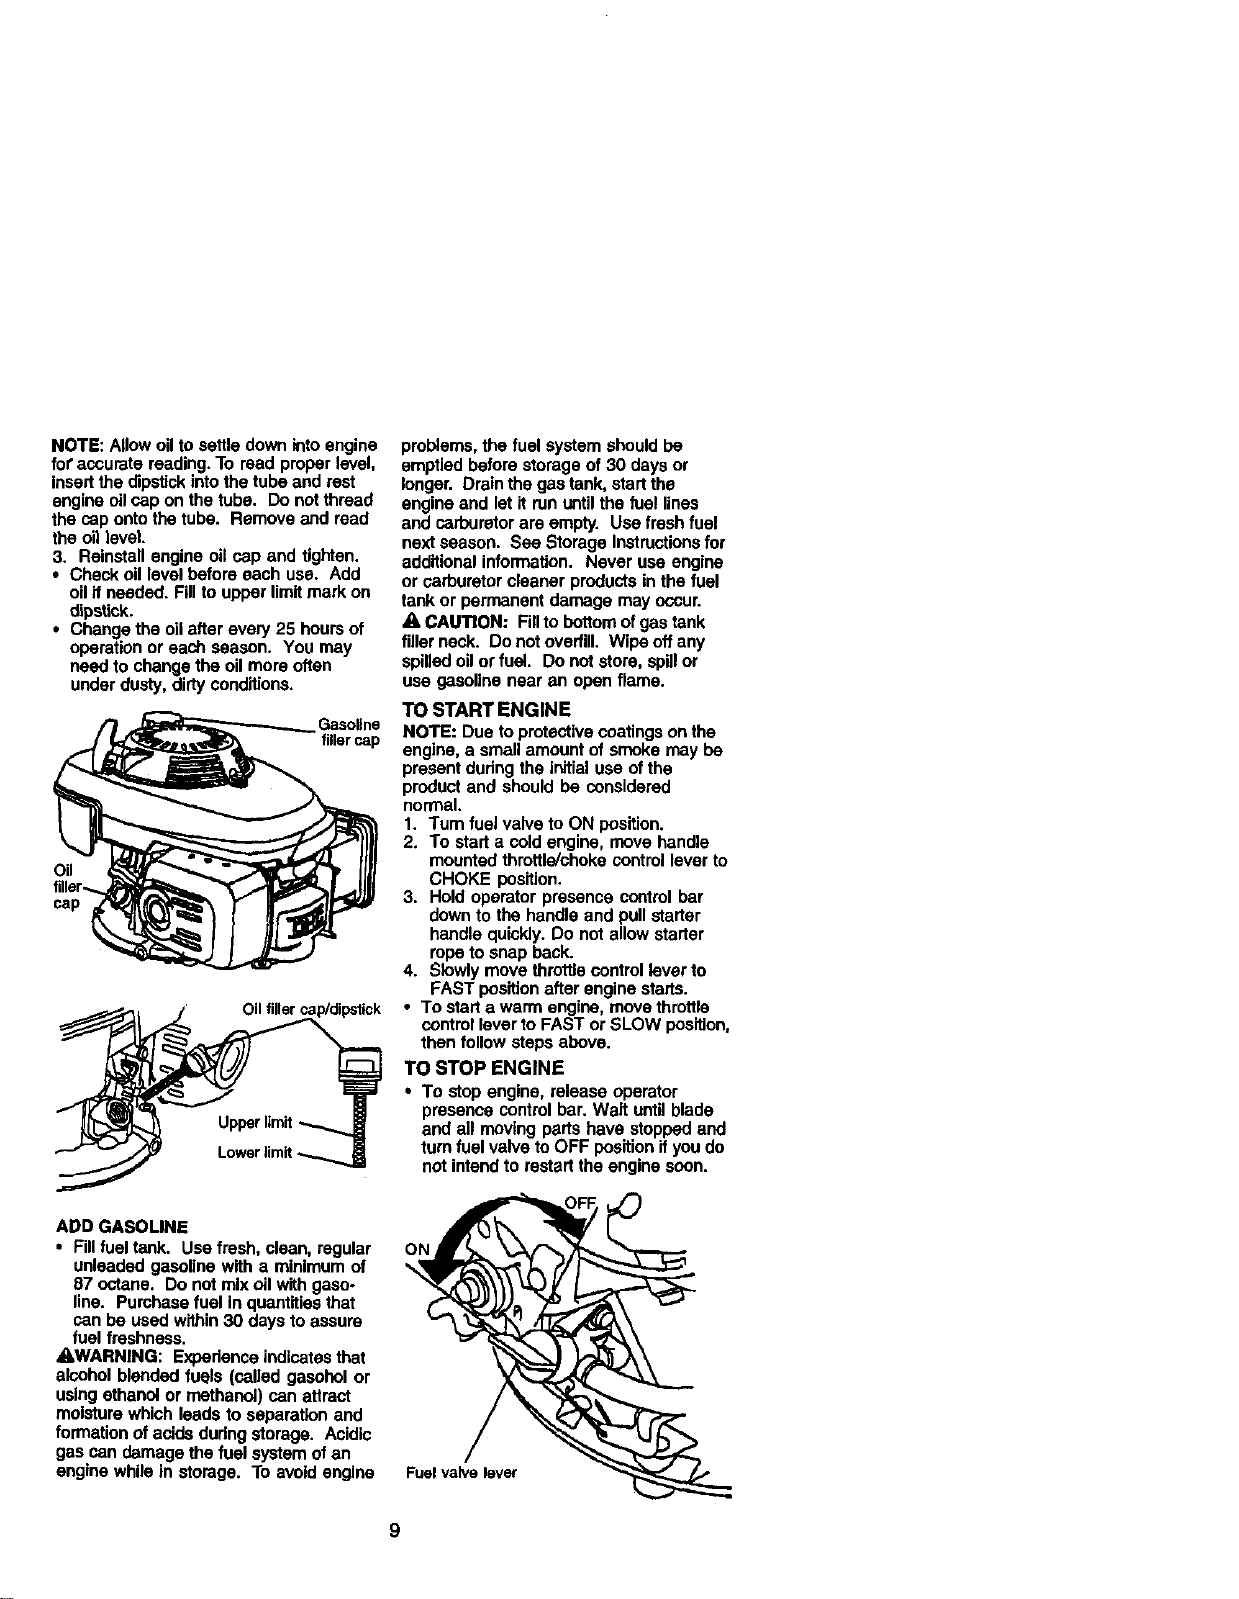
NOTE:Allowoiltosettledownintoengine
foraccuratereading.Toreadproperlevel,
insertthedipstickintothetubeand rest
engine oil cap on the tube. Do not thread
the cap onto the tube. Remove and read
the oil level.
3. Reinstall engine oil cap and tighten.
• Check oil level before each use. Add
oil if needed. Fillto upper limit mark on
dipstick.
• Change the oil after every 25 hours of
operation or each season. You may
need to change the oil more often
under dusty, dirty conditions.
Gasoline
tiller cap
Oil
cap
Oil filler cap]dipstick
problems, the fuel system should be
emptied before storage of 30 days or
longer. Drain the gas tank, start the
engine and let it run untilthe fuel lines
and carburetor are empty. Use fresh fuel
nextseason. See Storage Instructionsfor
additional information. Never use engine
or carburetor cleaner products in the fuel
tank or permanent damage may occur.
A CAUTION: Fillto bottom of gas tank
filler neck. Do not overfill. Wipe off any
spilled oil or fuel. Do notstore, spillor
use gasoline near an open flame.
TO START ENGINE
NOTE: Due to protective coatings onthe
engine, a small amount of smoke may be
present dudng the initial use of the
product and should be considered
normal.
1. Turn fuel valve to ON position.
2. To start a cold engine, move handle
mounted throttle/choke control lever to
CHOKE position.
3. Hold operator presence control bar
down to the handle and pull starter
handle quickly. Do not allow starter
rope to snap back.
4. Slowly move throttle control lever to
FAST position after engine starts.
• To start a warm engine, move throttle
control lever to FAST or SLOW position,
then follow steps above.
TO STOP ENGINE
• To stop engine, release operator
presence control bar. Wait untilblade
and all moving parts have stopped and
turn fuel valve to OFF position if you do
not intend to restart the engine soon.
ADD GASOLINE
• Fillfuel tank. Use fresh, clean, regular
unleaded gasoline with a minimum of
87 octane. Do not mix oil with gaso-
line. Purchase fuel in quantities that
can be used within30 days to assure
fuel freshness.
_,WARNING: Expedenca indicates that
alcohol blended fuels (called gasohol or
using ethanol or methanol) can attract
moisture which leads to separation and
formation of acids dudng storage. Acidic
gas can damage the fuel systemof an
engine while in storage. To avoid engine
ON
Fuel valve lever
9

• MOWlNGTIPS
• Under certain conditions, such as very
tall grass, it may be necessary to raise
the height of cut to reduce pushing
effort and to keep from overloadingthe
engine and leaving clumps of grass
clippings. It may also be necessary to
reduce ground speed and/or run the
lawn mower over the area a second
time.
• For extremely heavy cutting, reduce the
width of cut by overlapping previously
cut path and mow slowly.
• For better grass bagging and most
cuttingconditions, the engine speed
should be set in the fast position.
• Pores in cloth grass catchers can
become filled with dirt and dust with
use and catchem willcollect less grass.
To prevent this, regulady hose catcher
off with water and let dry before using.
• Keep top of engine around starter clear
and clean of grass clippings and chaff.
This will help engine air flow and
extend engine life.
MULCHING MOWINGTIPS
IMPORTANT: Forbest performance,
keep mower housing free of built-up
grass and trash. See =CLEANING" in the
Maintenance section of this manual.
• The special mulching blade will recut
the grass clippingsmany times and
reduce them in size so that as they fall
onto the lawn they will disperse intothe
grass and not be noticed. Also, the
mulched grass will biodegrade quickly
to provide nutrientsfor the lawn.
Always mulchwith your highest engine
(blade) speed as this will provide the
best recuttlng action of the blades.
• Avoid cuttingyour lawn when it iswet.
Wet grasstends to formclumps and
interferes with the mulching action.
The besttime to mow your lawn is the
eady aftemcon. At thistime the grass
has dded and the newly cut area will
not be exposed to the direct sun.
• For best results, adjustthe lawn mower
cuttingheight so that the lawn mower
cuts off onlythe top one-thirdof the
grass blades. Ifthe lawn is overgrown
it will be necessary to raise the height
of cut to reduce pushing effortand to
keep from overloading the engine and
leaving dumps of mulched grass. For
extremely heavy mulching, reduce your
width of cut by overlapping previously
cut path and mow slowly.
• Certain types of grass and grass
conditionsmay require that an area be
mulched a second time to completely
hide the clippings. When doing a
second cut, mow across or perpendicu-
larto the first cut path.
• Change your cutting paffem from weak
to week. Mow north to south one week
then change to east to west the next
week. This will help prevent matting
and graining of the lawn•
10

MAINTENANCE SCHEDULE
FILL IN DATES
AS YOU COMPLETE
REGULAR SERVICE SERVICE DATES
Check lor Loose FaSteners "M / l" M/
Clearvln ;e_ctGrass Catcher i'
IIfEqu]p I/ _ I
CleanLawnMowe_ I_
CleanunderDriveCover
(Power-Propelled Mowers) ft/
Checkdrivebelt/ Ileys
(power.propell_t_owers) ft/
CheclVSharpen,1%placeBlade I,/3
LubricationChart fl/ it/
Clean Battety/Recha_
IElectricStartMowers I/' I/4
Check Engine 011Level V/
Change Engine Oil II/1_
CleanAirFilter I_' 2
Inspect Muffler
v'
Clean or Replace Spark Plug
Replace Air Filter Paper Cartridge it/2
1 - Cl'_e more _ v_heqoperating undera heavy loador in hk_l arn_enl t_e_at um,_
2 - Sewk_ morn onee _ opetaUngIndl_y ordL_ _ondttk_eL
3 *Re_ dades more o_en _4w_ mowieg Imunoy soil
4 - Cl'arge 48 Ilours at e_d of uaso_.
GENERAL RECOMMENDATIONS
The warranty on this lawn mower does
notcover items that have been subjected
to operator abuse or negligence. To
receive full value from the warranty,
operator must maintain mower as
instructedin this manual.
Some adjuslments will need to be made
periodically to prapedy maintain your
unit.
All adjus_ents in the Service and
Adjustments sectionof this manual
should be checked at least once each
season.
• Once a year, replace the spark plug,
clean or replace air filter element and
check blade for wear. A new spark
plug and clean/new air filter element
assure proper air-fuel mixture and help
your engine run better and last longer.
• Follow the maintenance schedule in
this manual.
BEFORE EACH USE
1. Check engine oil level.
2. Check for loose fasteners.
LUBRICATION
Keep unitwell lubdcated (See "LUBRI-
CATION CHART').
LUBRICATION CHART
ne oil
door hinge
pin
Rear door
hinge
(_) Handlebracketmountingpins
(_) Spray lubricant
_) See "ENGINE" in Maintenance section.
11
IMPORTANT: Do not oil or grease
plastic wheel bearings. Viscous
lubdcantswill attractdust and dirtthat
will shortenthe life of the seff-lubdceto
Ing bearings, ff you feel they must be
lubdcated, use only a dry, powdered
graphite type lubricant spedngly.
. PRODUCT SPECIFICATIONS
SERIALNUMBER:
DATEOF PURCHASE:
IASOLINE CAPACITY/TYPE: 1.0 QUARTS UNLEADED REGULAR
OILTYPE (API-SF-SJ): SAE 30 (ABOVE 32°F); SAE 5W-30 (BELOW 32°F
OIL CAPACITY: 18.5 OUNCES
SPARK PLUG (GAP: .030") NGK BPR6ES
BLADE BOLTTORQUE: 35-40 FT. LBS.
• The model and serial numbers will be found on a decal attached to the rear ofthe
lawn mower housing. Record beth serial number and date of purchase in the space
provided above.
LAWN MOWER
Always observe safety rules when
performing any maintenance.
"RRES
• Keep tires free of gasoline, oil,or insect
control chemicals which con harm
rubber.
• Avoid stumps, stones, deep ruts, sharp
objects and other hazards that may
cause tire damage.
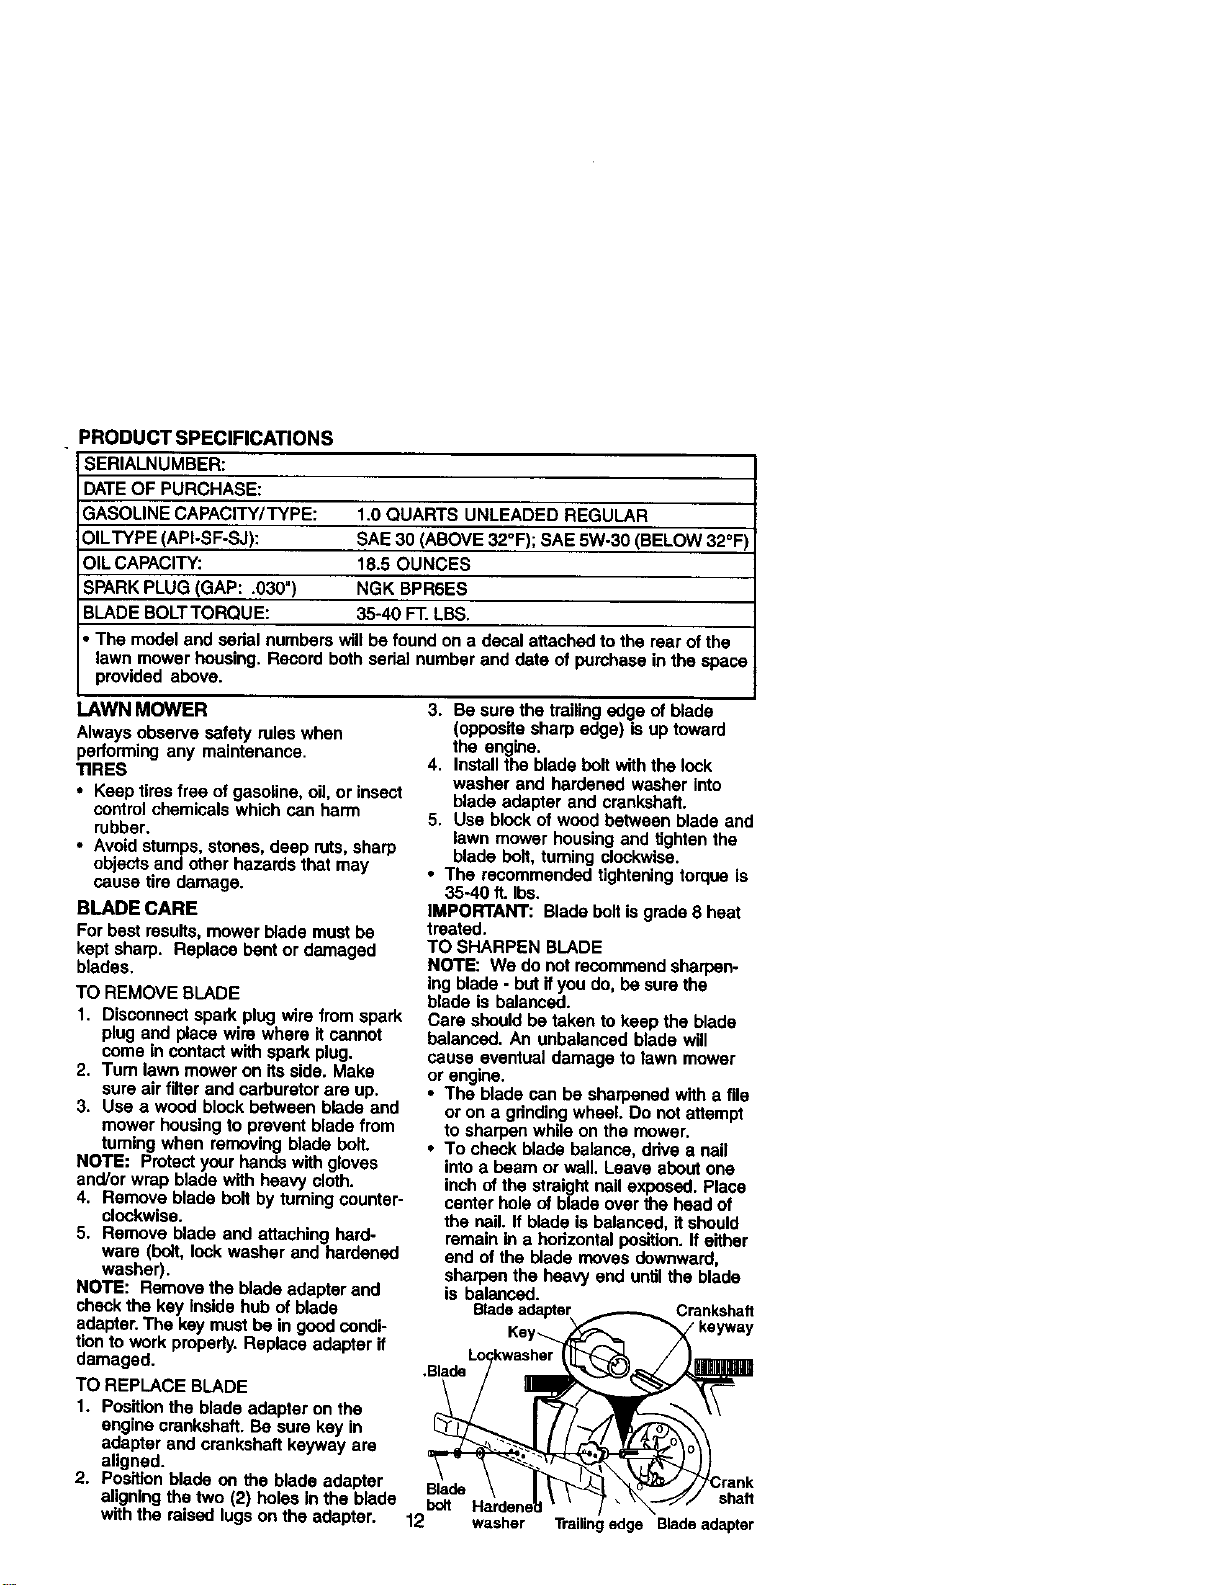
BLADE CARE
For best results, mower blade must be
kept sharp. Replace bent or damaged
blades.
TO REMOVE BLADE
1. Disconnect spark plug wire from spark
plug and place wire where it cannot
come in contact with spark plug.
2. Turn lawn mower on its side. Make
sure air filter and carburetor are up.
3. Use a wood block between blade and
mower housing to prevent blade from
taming when removing blade belt.
NOTE: Protect yourhands with gloves
and!or wrap blade with heavy cloth.
4. Remove blade belt by tuming counter-
clockwise.
5. Remove blade and attaching hard-
ware (bolt, lock washer and hardened
washer).
NOTE: Remove the blade adapter and
check the key inside hub of blade
adapter. The key most be in good condi-
tian to work propedy. Replace adapter if
damaged.
TO REPLACE BLADE
1. Positionthe blade adapter on the
engine crankshaft. Be sure key in
adapter and crankshaft keyway are
aligned.
2. Pos_on blade on the blade adapter
aligning the two (2) holes in the blade
with the raised lugson the adapter.
3. Be sure the trailing edge of blade
(opposite sharp edge) is up toward
the engine.
4. Install the blade bolt with the lock
washer and hardened washer into
blade adapter and crankshaft.
5. Use block of wood between blade and
lawn mower housing and tighten the
blade belt, turning clockwise.
• The recommended tighteningtorque is
35-40 ft. Ibs.
IMPORTANT: Blade belt is grade 8 heat
treated.
TO SHARPEN BLADE
NOTE: We do not recommend sharpen-
ing blade - but if you do, be sure the
blade is balanced.
Care should be taken to keep the blade
balanced. An unbalanced blade will
cause eventual damage to lawn mower
or engine.
• The blade can be sharpened with a file
or on a gdnding wheel. Do not attempt
to sharpen while on the mower.
• To check blade balance, drive a nail
into a beam or wall. Leave about one
inch of the straight nail exposed. Place
center hole of blade over the head of
the nail. If blade is balanced, it should
remain in a horizontal position, it either
end of the blade moves downward,
sharpen the heavy end untilthe blade
is balanced.
Crankshaft
Key-_. / keyway
,Blade
Blade
bolt shaft
12 washer Trailing edge Blade adapter

GRASS CATCHER
• 1"he gross catcher may be hosed with
water, but must be drywhen used.
• Check your grass catcher often for
damage or detedorotion. Through
normal use it willwear. If catcher
needs replacing, replace only with a
manufacturer approved replacement
catcher. Give the lawn mower model
number when ordering.
DRIVE WHEELS
Check front drive wheels each time
before you mow to be sure they move
freely.
The wheels not turningfreely means
trash, grass cuttings, etc. are in the drive
wheel area and must be cleaned to free
ddve wheels.
if necessary to clean the drive wheels, be
sure toclean both front wheels.
1. Remove hubcaps, hairpin cotters and
washers.
2. Remove wheels from wheel adjusters.
3. Remove any trash or grass cuttings
from insidethe dust cover, pinion end/
or drive wheel gear teeth.
4. PUtwh_s back in place.
NOTE: If after cleaning, the drive wheels
do notturn freely,contacta Sears or other
qualified sewice center.
GEAR CASE
• To keep your drive system working
properly, the gear case and area
around the drive should be kept clean
and free of trash build-up. Clean under
the drive covertwice a season.
• The gear case isfilled with lubricantto
the proper level at the factory. The only
time the lubricantneeds attention is if
service has been performed on the
gear case.
• it lubricantis required, use only Texaco
Starplex Premium 1 Grease, Part No.
750369. Do notsubstitute.
ENGINE
LUBRICATION
Use only high quality detergent oilrated
with API service classificationSF-SJ.
Select the oil's SAE viscosity grade
according to your expected operating
temperature.
SAt[ VISCOSITY GRADES
TF._FI_RAI_RE I:_NG _ ,¢NTICIPATF_) EI_I:O_[ NED(T OL (_#l_E
NOTE: Although multi-viscosityoils
(5W30, 10W30 etc.) improve starting in
cold weather, these multi.viscosityoils
will result in increased oil consumption
when used above 32°F. Check your
engine oil level more frequently to avoid
possible engine damage from running
low on oil.
Change the oil after every 25 hours of
operationor at least once a year ifthe
lawn mower is not used for 25 hours in
one year.
Check the crankcase oil level before
starting the engine and after each five (5)
hours of continuoususe. Tighten oil plug
securely each time you check the oil
level.
TO CHANGE ENGINE OIL
NOTE: Before tippinglawn mower to
drain oil, drain fuel tank by running
engine untilfuel tank is empty.
1. Disconnect spark plug wire from spark
plug and place wire where it cannot
6ome in contact with spark plug.
2. Remove engine oilcap; lay aside on a
clean surface.
3. T'_olawn mower on its side as shown
and drain oil into a suitable container.
Rocklawn mower back and forth to
remove any oil trapped inside of
engine.
4. Wipe off any spilled oil from lawn
mower or side of engine.
5. Fillengine with oil. (See =ADD OIL" in
the Operation section of this manual.)
6. Reconnect spark plug wire to spark
plug.
__pstic_liU_p.p_. r
Lower
imit
13

AiR FILTER
- Your engine will not run properly and may
be damaged by using a dirty air filter.
Replace the air filler every 100 hours of
ogeratJonor every season, whichever
occursfirst. Service air cleaner more
often under dusty conditions.
TO CLEAN AIR FILTER
1. Remove cover.
2. Carefully remove cartddge.
3. Clean by gently tapping on a flat
surface. If very dirty, replace cartridge.
41CAUTION: Petroleum solvents,such
as kerosene, are not to be used to clean
cartridge. They may cause deterioration of
the cartridge. Do not oilcartddge. Do not
use pressurized air to dean or dry
cartridge.
4. Install cartridge, then replace cover.
FUler Filter
Cover
Tabs
MUFFLER Tabs
Inspect and replace corroded muffler as it
could create a fire hazard and/or dam-
age.
SPARK PLUG
Replace spark plugs at the beginning of
each mowing season or after every 100
hours of operation, wNchever occurs first.
Spark plug type and gap setting are
shown in "PRODUCT SPECIFICATIONS"
in Maintenance section of this manual.
CLEANING
iMPORTANT: For best performance,
keep mower housingfreeofbuill-up
grass and trash. Clean the underside of
your mower after each use.
A,CAUTION: Disconnect spark plug wire
from spark plug end place wire where it
cannot come in contact with the spark
plug.
• Clean the underside of your lawn
mower by scraping to remove build-up
of grass and trash.
• Clean engine often to keep trash from
accumulating. A clogged engine runs
hotter and shortens engine life.
• Keep finished surfaces and wheels free
of all gasoline, oil, etc.
• We do not recommend using a garden
hose to clean lawn mower unless the
electricalsystem, muffler, air filler and
carburetor are covered to keep water
out. Water in engine can result in
shortened engine life.
CLEAN UNDER DRIVE COVER
Clean under drive cover at least twice a
season. Scrape underside of cover with
putty knife or similartool to remove any
build-up of trash or grass on underside of
drive cover.
ACAUTION: Before performingany
service or adjustments:
1. Release control bar and stop engine,
2. Make sure the blade and all moving
parts have completely stopped.
3. Disconnect spark plug wire from spark
plug and place where it cannot come
in contact with plug.
LAWN MOWER
TO ADJUST CUTFING HEIGHT
See "TO ADJUST cUTrlNG HEIGHT" in
the Operation section of this manual.
REAR DEFLECTOR
The rear deflector, attached between the
rear wheels of your mower, is providedto
minimize the possibility that objects will
ha thrown out of the rear ofthe mower
intothe operator mowing position. If the
deflector becomes damaged, if should be
replaced.
TO REMOVE/REPLACE DRIVE BELT
1. Remove drive cover. Remove bell
from gearcase pulley by pushing
down on pulley and rollingbell off it.
2. Tum lawn mower on its side with air
filler and carburetor up.
3.. Remove blade.
4. Remove debris shield.
5. Remove bell from engine pulley on
crankshaft.
6. Install new belt by reversing above
steps.
7. Always use factoryapproved bell to
assure fitand long life.
14
Drive
cover
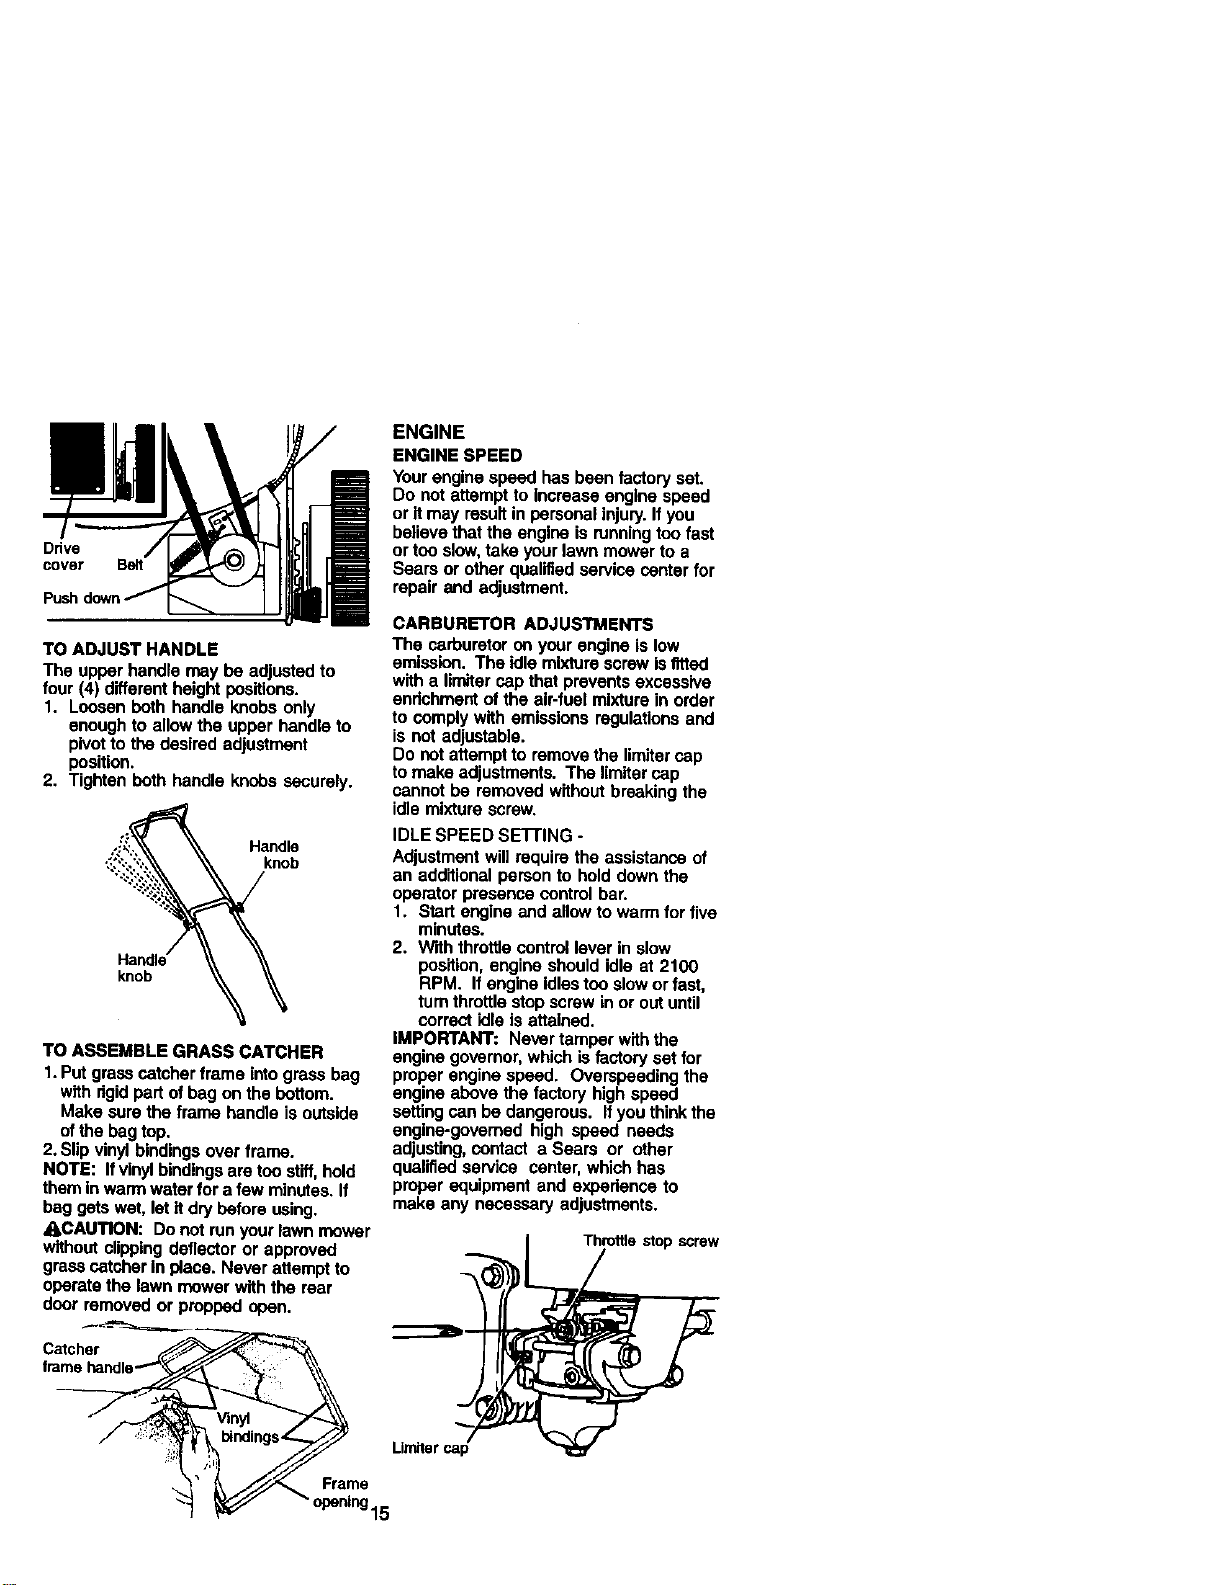
TO ADJUST HANDLE
The upper handle may be adjusted to
four (4) different height positions.
1. Loosen both handle knobs only
enough to allow the upper handle to
pivot to the desired adjustment
position.
2. Tighten beth handle knobs securely.
Handle
knob
knob
TO ASSEMBLE GRASS CATCHER
1.Put grass catcher frame intograss bag
with rigidpart ofbag on the bettom.
Make sere the frame handle is outside
ofthe bag top.
2. Slip vinyl bindingsover frame.
NOTE: If vinyl bindingsare too stiff,hold
them in warm water for a few minutes. If
bag gets wet, let itdry before using.
ACAUTION: Do not run your lawn mower
without clippingdeflector or approved
grass catcher in place. Never attempt to
operate the lawn mower with the rear
door removed or propped open.
Catcher
ENGINE
ENGINE SPEED
Your engine speed has been factoryset.
Do not attempt to increase engine speed
or it may resultin personal injury. If you
believe that the engine is runningtoo fast
or too slew,take your lawn mower to a
Sears or other qualified service center for
repair end adjustment.
CARBURETOR ADJUSTMENTS
The carburetor on your engine is low
emission. The idle mixture screw isfitted
with a Iimitar cap that prevents excessive
endchment of the air-fuel mixture in order
to comply with emissions regulations and
is not adjustable.
Do notattempt to removethe limitercap
tomake adjustments. The limitercap
cannot be removed without breaking the
idle mixture screw.
IDLE SPEED SE'I-rlNG -
Adjustment will require the assistance of
an additional person to hold down the
operator presence control bar.
1. Start engine and allow to warm for five
minutes.
2. With throttle control lever in slow
position, engine should idle at 2100
RPM. If engine idles too slow orfast,
turnthrottlestop screw in or out until
correct idle is attained.
IMPORTANT: Never tamper withthe
engine governor,which isfactory set for
proper engine speed. Overspeeding the
engine above the factory high speed
setting can be dangerous. If you think the
engine-governed high speed needs
adjusting,contact a Sears or other
qualified service center, which has
proper equipment and experience to
make any necessary adjustments.
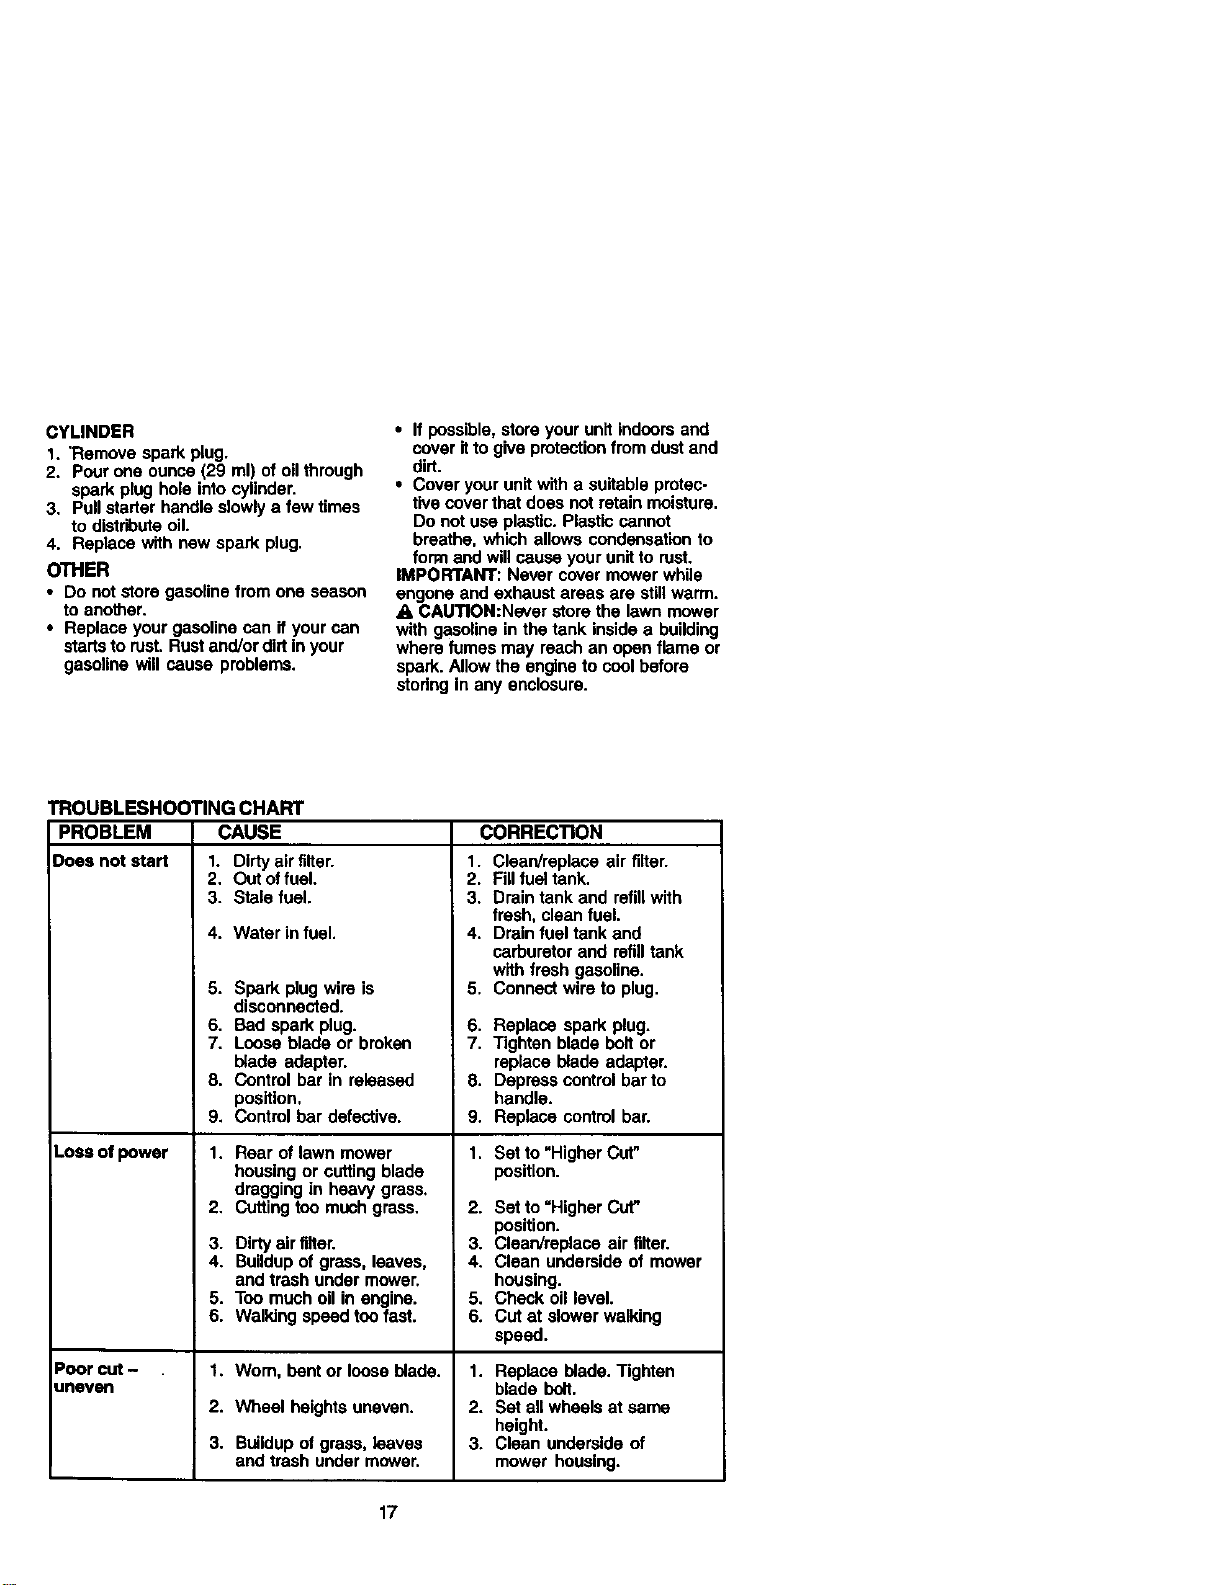
Throttle stop screw
Limiter cap
Frame
_Pening15

Immediately prepare your lawn mower for
storage at the end of the season or if the
unitwill not be used for 30 days or more.
LAWN MOWER
When lawn mower is to be stored for a
periodof time, clean it thoroughly, remove
all dirt, grease, leaves, etc. Store in a
clean, dry area.
1. Clean entire lawn mower (See
"CLEANING" in the Maintenance
section of this manual).
2. Lubdsate as shown in the Mainte-
nance section of this manual.
3. Be sure that all nuts, bolts, screws,
and pins are securely fastened.
Inspect moving partsfor damage,
breakage and wear. Replace if
necessary.
4. Touch up all rusted or chipped paint
surfaces; sand lightly before painting.
HANDLE
You can fold your lawn mower handle for
storage.
1. Squeeze the bottom ends of the lower
handle toward each other untilthe
lower handle clears the handle
bracket, then move handle forward.
2. Loosen upper handle mounting bolts
enough to allow upper handle to be
folded back.
IMPORTANT: When foldingthe handle
for storage or transportation,be sure to
fold the handle as shown or you may
damage the control cables.
• When setting up your handle from the
storage position, the lower handle will
automatically lock intothe mowing
position.
handle
Squeeze to fold
Handle
Mounting pin"
control bar Fold
Lower
Fold
backward
position
ENGINE
FUEL SYSTEM
IMPORTANT: It isimportantto prevent
gum deposits from forming in essential
fuel system parts such as carburetor,fuel
filter,fuel hose, or tank daring storage.
Also, exbedence indicatesthat alcohol
blended fuels (called gasohol or using
ethanol or methanol) can attract moisture
which leads to separation and formation
ofacids dudng storage. Acidic gas can
damage the fuel system of an engine
while in storage.
1. Drain the fuel tank.
2. Start the engine and let it run untilthe
fuel lines and carburetor are empty.
• Never use engine or carburetor cleaner
products in the fuel tank or permanent
damage may occur.
• Use fresh fuel nextseason.
NOTE: Fuel stabilizer is an acceptable
alternative in minimizing the formation of
fuel gum depos'itsduringstorage. Add
stabilizer to gasoline in fuel tank or
storage container. Always followthe mix
ratio found on stabilizer container. Run
engine at least 10 minutes after adding
stabilizer to allow the stabilizer to reach
the carburetor. Do not drain the gas tank
and carburetor if using fuel stabilizer.
ENGINE OIL
Drain oil (with engine warm) and replace
with clean engine oil. (See "ENGINE" in
the Maintenance section of this manual).
16
CYLINDER
1. "Removespark plug.
2. Pour one ounce (29 ml) of oil through
spark plug hole intocylinder.
3. Pullstarter handle slowly a few times
to distributeoil.
4. Replace with new spark plug.
OTHER
• Do not store gasoline from one season
to another.
• Replace your gasoline can if your can
startsto rust. Rust and/or dirtin your
gasoline will cause problems.
• If possible,store your unit indours and
cover itto give protectionfrom dust and
dirt.
• Cover your unitwith a suitable protec-
tive cover that does not retain moisture.
Do not use plastic. Plastic cannot
breathe, which allows condensation to
form end will cause your unitto rest.
IMPORTANT: Never cover mower while
engone and exhaust areas are stillwarm.
A CAUTION:Never store the lawn mower
with gasoline in the tank inside a building
where fumes may reach an open flame or
spark. Allow the engine to cool before
stodng in any enclosure.
TROUBLESHOOTING CHART
PROBLEM CAUSE
Does not start 1. Dirty air filter.
2. Out offuel.
3. Stale fuel.
4. Water in fuel.
5. Spark plug wire is
disconnected.
6, Bad spark plug.
7. Louse blade or broken
blade adapter.
8. Control bar in released
position.
9. Control bar defective.
Loss of power 1. Rear of lawn mower
housing or cuttingblade
dragging in heavy grass,
2. Curling too much grass.
3. Dirty air filter.
4. Buildupof grass, leaves,
and trash under mower.
5. Too much oil in engine.
6. Walking speed too fast.
Poor cut - 1. Wom, bent or loose blade.
uneven
2. Wheel heights uneven.
3. Buildupof grass, leaves
and trash under mower.
CORREC_ON
1. Clean/replaca air filter.
2. Fillfuel tank.
3. Drain tank and refillwith
fresh, clean fuel.
4. Drain fuel tank and
carburetor and refill tank
with fresh gasoline.
5. Connect wire to plug.
6. Replace spark plug.
7. Tighten blade bolt or
replace blade adapter.
8. Depress control bar to
handle.
9. Replace control bar.
1. Set to "Higher Cut"
position.
2. Set to =Higher Cut"
position.
3. Cleaniroplace air filter.
4. Clean underside of mower
housing.
5. Check oillevel.
6. Cut at slower walking
speed.
1. Replace blade. Tighten
blade bolt.
2. Sat aUwheels at same
height.
3. Clean underside of
mower housing.
17
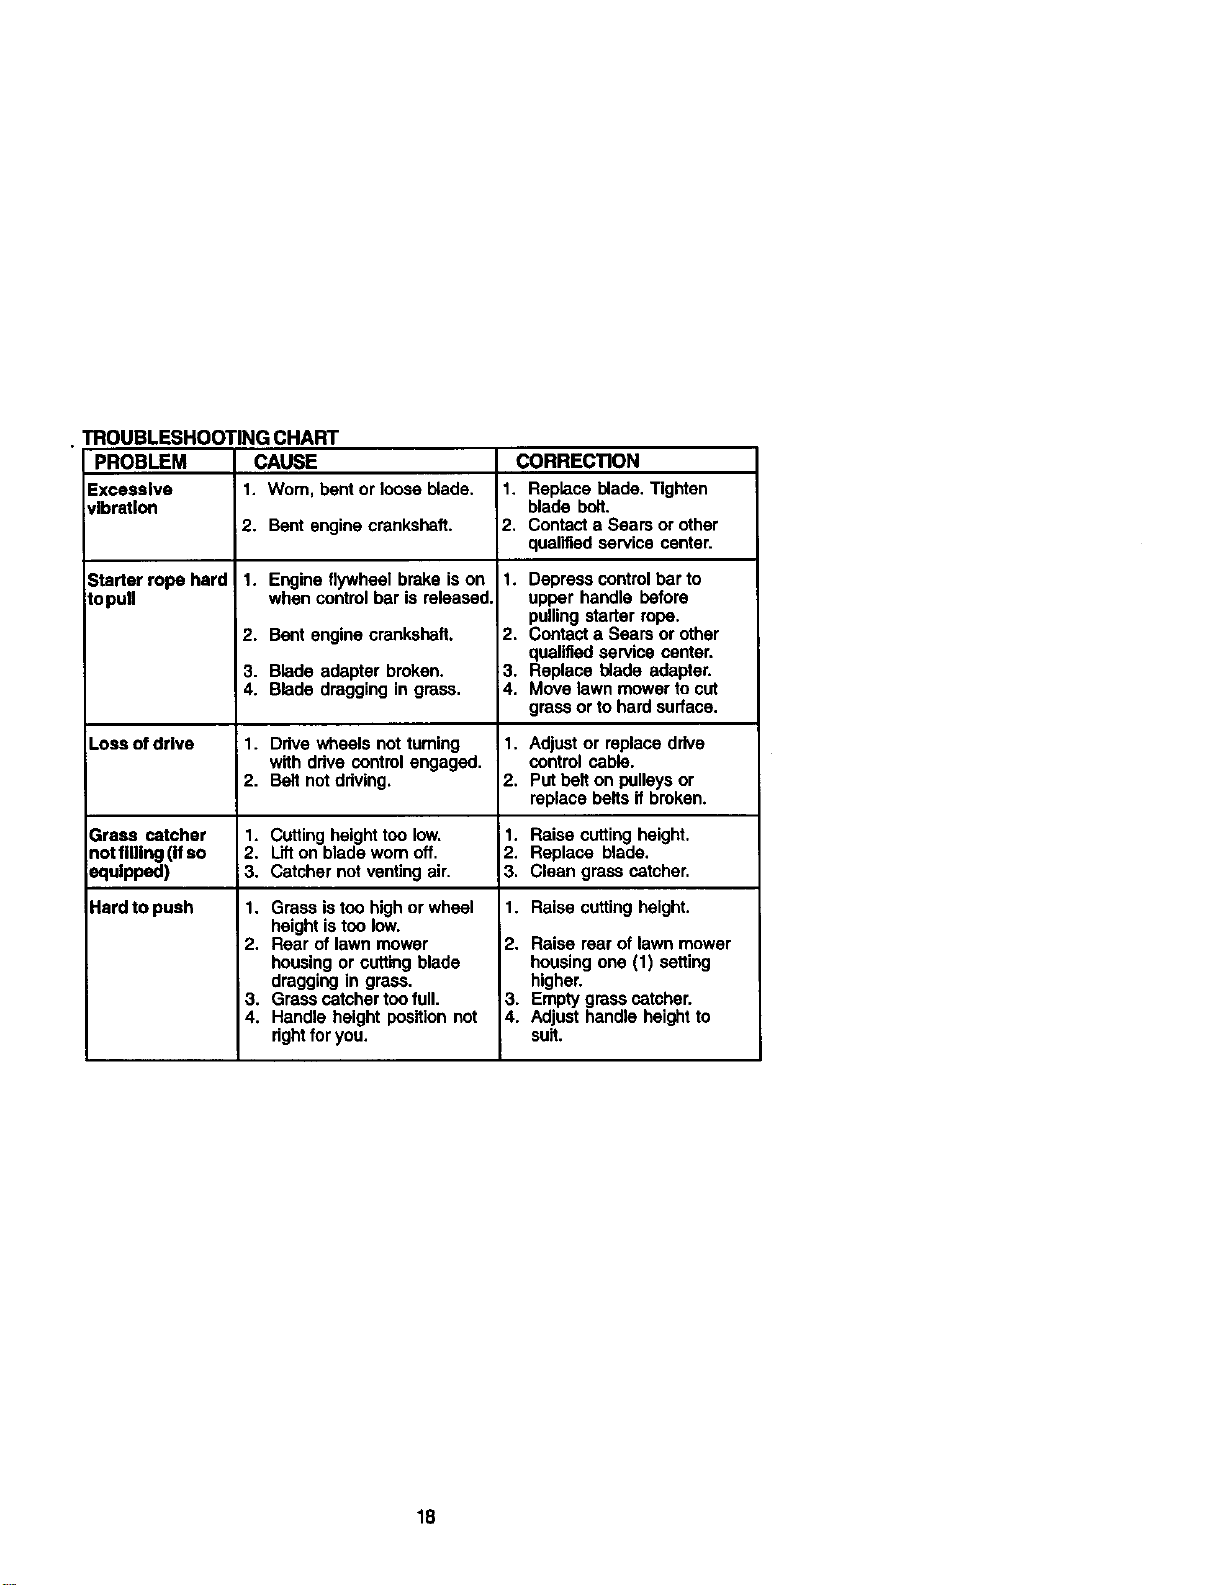
TROUBLESHOOTING CHART
PROBLEM CAUSE CORRECTION
Excesslva I. Worn, bent or loose blade. 1. Replace blade. Tighten
dbratlon blade bolt.
2. Bent engine crankshaft. Contact a Sears or other
qualified service center.
Starter rope hard
topull
1. Engine flywheel brake is on
when controlbar is released.
2. Bent engine crankshaft.
3. Blade adapter broken.
4. Blade dragging in grass.
Depress controlbar to
upper handle before
pulling starter rope.
Contact a Sears or other
qualified service center.
Replace blade adapter.
Move lawn mower to cut
grass or to hard surface.
Loss of drive 1. Drive wheels not tuming Adjust or replace drive
with ddve control engaged, control cable.
2. Belt not ddving. Put bait on pulleys or
replace baits it broken.
Grass catcher 1. Cutting height too low. Raise cuttingheight.
notflitlng (If so 2. Lift on blade worn off. Replace blade.
;equipped) 3. Catcher not ventingair. Clean grass catcher.
I-lardto push Raise cutting height.
2,
1.
2.
3.
4.
1.
2.
1.
2.
3.
1.
2.
3.
4.
1. Grass istoo highor wheel
height istoo low.
2. Rear of lawn mower
housing or cuttingblade
dragging in grass.
3. Grass catcher too full.
4. Handle height position not
rightfor you.
Raise rear of lawn mower
housing one (1) setting
higher.
Empty grass catcher.
Adjust handle height to
suit.
18
Garantla ................................................ 19
Reglas de Seguddad ...................... 19-21
Montaje ................................................. 22
Operacibn ........................................ 23-27
Mantenimiento ...................................... 28
Programa de Mantenimiento ........... 28-31
Especificaciones del Producto............. 29
Servicio y Adjustes .......................... 32-33
Almacenamiento ............................. 33-34
Identificacibn de problemas ............ 35-36
Partes de repuesto ............ Vea el manual
ingl6,sdel due_o
GARANTI'A LIMITADA DE DOS AI_IOS PAPA LA SEGADOPA A MOTOR CRAFTSMAN
par dos (2) aP_os,a pertir de [a fecha de compra, cuando esta Segadom Craftsman se
mantanga, lubdque y Mina segdn [as instrucclonas para [a operaci6n y el raantanira[anto en el
manual del dueRo, Sears reparard gratis todo delecto an el material y [a mano de obra.
Si la Segadora Craftsman se usa para fines comarc[alos o de ardendo, esta gamnt[a sblo se
apllca per noventa (90) dias a pertir de la fecha de compm.
Esta Garant[a no cubre:
• Arifculos que se desgostan durante el uso normal 1ales como las cuchil[as segadoras
rotatodas, los adaptadoms de la cuchil[a, las correas, los tiifros de aire y las buj[as.
• Reperaciones necesadas debido al abuso o a la negligenc[a del oparador, incluydndose a los
cigt3ehalesdoblados y a la telta de raantenimiento del equip<)segdn [as instrucclones qua se
incluyen en el manual del due_o.
EL SERVICIO DE GARANT(A ESTA DISPONIBLE el devolver la segadora a motor Craftsman al
Centro/Departmanto de Serviclo Sears rnas carcano en los Estados Unidos. Esta garantia se
aplica solarnente raienlras el produoto este en uso en los Eslados Unidos.
Esta Garant[a le otorga derechos legelea especlficos, y puede qua tambi_n tenga otros
derechos qua varian de estado a estado.
Sears, Roebuck and Co., D/817 WA, Hoffman Estates, Illinois 60179 USA
IMPORTANTIE: Esta maquina cortadeora es capaz de amputar las manos y los manos y los
pies y de [anzar objetos. Si no se obsen_an las instrucclonesde seguddad siguientes se pueden
producir lesiones graves o [a muerte.
L OPERACION
• Antes de empazar, debe familiarizarae
completamente con los controles y el uao
correcto de [a maquina. Para esto, depa lear
y comprender todas [as instrucciones qua
aparecen en [a rnaquina y an los manualea
de operacibn.
• No panga [as manos o los pies cerca o
debajo de [as partea rotatodas. Mantdngase
elempre [aJos de la abertura de [a descarga.
• Permita que solamente [as personas
responsab[as que estdn famiUartzadas con
las lostrucclones operan Is mdquina.
• Despaje el =_reade objetos tales como
pie@as, juguetes, elarabres, huesos, palos,
etc. qua pueden ser recogidos y lanzados
pot las cuchillas.
• Aeag,',rese qua el _rea no se hallen
personas, antes de segar. Pare [a radquina
si elguian entra en el drea.
• No opera la rnaquina sin zapatos o con
sandal[as abier[as. P6ngase s[ampre
zapatos sblidos.
• No tire de [a segadom hacia atr_s a menos
qna sea absotutamente necesado. Mire
s[ampre hacia abajo y hacia detrds antes y
mientras qua se mueve hac[a atrds.
• No opare [a segadora sin los respaclJvos
resguardos, [as p[acas, el recogedor de
c_spad u otros aditamentos dise ados para
su pmtecckSn y seguddad.
• Refidrase a las lostrucclonea del fabricante
para el funcionam[anto e instelaelbn de
accesorios. Use dnicamente accesorios
aprobados per el fabdcante.
• Detenga la cuchilla o las cuchillas cuando
cruce pot calzadas, cal[as o ceminos de
grava.
• Parar el motor cads vaz qna na abandona
el aparato, antes de lirapiar [a segadora o de
remover residuos del tubo.
• Apagar el motor y esperar hasta qua las
cuchil[as est_n completamante parades
antes de remover el receptor de hlerba.
• Segar so[amente con loz del d[a o con una
buena luz artificial
• No opera larn_quina bajo la influencia del
19 alcohol o de [as drogas.
• Nuncaoperelamaquinacuandoli hierba
est_ moJada, AsegOrese siempre de taner
buena tmccibn en sus pies; mantonga el
mango firmemente y camine; nunca corm.
• Desconectar el mecanismo de propulslbn
autbnoma o el embmgue de transrnisibn en
lis segadores que lo tienen antes de pouer
en marcha el motor.
• Si el equipo empezam a vibmr de una
manera anormal, pare el motor y revise de
inrnediatopara avedguar li causa.
Generalrnente ta vibraci6n suele indicar que
existo alguna aveda.
• Slimpre use gafas de seguddad o anteojos
con pmtaccibn literal cuando opere li
segadora.
I1. OPERAClON SOBRE [.AS CUESTAS
Los accidentes ocgrren con rods frecuencli
en las cuestas. Estos accidentas ocurren
debido a resbaladas o cafdas, las cuales
pueden resultar en groves lesiones. Operar li
recortadora en cuestas requiere mayor
concentmcibn. Si se elenta inseguro en una
cuesta, no la recorlo.
HACER:
• Puede recortar a traves de li superficle de
li cuesta, nunca hacia ardba y hacli ahajo.
Proceda con extrema precaucibn cuando
cambli de direscibn en lis cuestas.
• Renueva todos los objetos extrafios, tales
como guijarros, ramas, etc.
• Dede prestar atancidn a hoyos, baches o
pmtuberanctas. Recuerde que la hierba alta
puede esconder obstdculos.
NO HACER:
• No recorte cerca de pendientes, zanjas o
terraplenes. El operador puede perder la
tresci6n en los pies o el equilibrlo.
• No recorli cuestas demesiado inclinadas.
• NO recorte en hJerbamojada. La mduccibn
en la tmccibn de la pisada puede causar
resbelones.
Ill.NIl;lOS
Se pueden producir accidentas trdgicos si el
operador no presta atancibn a la presencia de
los ni_os. A menudo, los niSos se sientan
atraidos por li n_quina y per la actividad de la
sliga. Nunca suponga que los nifios van a
permanecer en el mismo lugar donde lo_ vio
per dltima vez.
• Mantanga a losniRos alojados del drea de la
siega y bajo el culdado estdcto de otra
persona adulta respcosable.
• Est8 alorta y apague la m_quina si hay niSos
que entmn al _rea.
• Antes y cuando este retrocediendo, mire
hacli atr_tsy hacia abaJo.para verfficar si
hay nihos pequehos.
• Nunca permita que los nlSos operen li
mdquina.
• Tenga un cuidedo extra cL_ndo se acerque
a esquinas donde no hay visibilidad, a los
arbustos, _rboles u otros objetos que
pueden intededr con su linea de visi(_.
IV. SERVICIO
• Tenga cuidade extra el manejar la gasolina
y los dernds combustibles. Son inflarnables
y los gases son exldosivos.
- Use solamente us envase aprobado.
. Nunca remueva la tapa del depbsito de
gasolloa o agregue combustible con el
rnotorlunelonando. Permha que el motor
se entde antes de votver a pone
combuslible. No fume.
- Nunca vuelva a poner combustible en li
rndqulna en recintos cerrado_s.
. Nunca almacene li rndquinao el envase
del combustible dentin de algdn lugar en
donde haya una llama expuesta, tal como
li del calestador de agua.
• Nunca haga funcionar una rn_quina dentro
de un ,_rea cerrada.
• Nurtca haga ajustes o repamciones
mientras el motor est_ en marcha.
Desconecta el cable de la bujli, y
mantSngalo a ulerta distancia de _sta para
prevenir un ananque accidental.
• Mantanga les tuercas y los pemos,
especialmenta los pernos del accesodo de
li cuchJlla,apretadue y mantanga el equipo
en buenas ccodiclones.
• Nunca manipule de forrna indebida los
dispositivosde seguddad. Contrele
regularrnente su funcionamlonto correcto.
• Mantanga la rndquinafibre de hierba, hojas
u otms acumulacioues de desperdicio.
Umpie los derrames de acelte o combus-
tible. Perrnita que la rn_qulna se enfde antes
de almacenada.
• Pare e inspecclone el equipo si le pega a un
objeto. Rep_elo, si es necesarlo, antes de
hacedo arrancar.
• En ningdn caso hay que regular la altura de
lis ruedas mientras el motor estd en
marcha.
• Los componentes del receptor de la hierba
van sujetos a desgaste, da_os y detedom,
que pueden expcoer las partes es
movimiento o permi_r que objetos sean
disparados. Controlir frecuentamente y
cuando sea necesado sustituir con partes
acons_jadas per el tabdcanto.
• Las cuchinas de la segadora est='lnafilidas
y pueden cortar. Cubrir las hojas o nevar
guantas, y utilizar precausiones espesliles
cuando se efectda mantenimiento sobre las
mJsmes.
• No cambie el ajuste del regulador del motor
ni exceda su velocidad.
_Bqsqueesteelntx_ queser_abs.prgcaudo-
nesde".segpddeddeimp_rtanda.Qulerddedr-
iliATENCIC_NIHIliESTE ALERTOtH SU
SEGURIDAD ESTA COMPROMETIDA.
CAtJO(_: Sie_nl_ descouecloel
_=_e( delabujlayp_galoderidenopueda
entraren contacto_n h bujla,paraevitarel
an'anquepor aculdente,durante la preparack_n,el
transporte,el ajusto o cuandose hacen
reparaclones,
2O
_M_ERllF.NCIA: E]tubodeescapedelmotor,
akjunosdesuscanslbJy_esy a_
cornponentesdelvehlculocon1_r_no
_omn_ _uct_ _frnk_ c_ en el
d_ _ nadrnier_uotrosda_
mprodu_ivos.
_ADVERTEN(NA: L_ homes, tem_nales y
_ _ de la bateda contienenplomo
o compuest_de plomo,productosqulm_os
conoddosenelEstadedeC,_omiaco,nocausa
de c_er y defectosalnacut_entou_os da_os
reproductivos.Lavf las manos despu_sde
manlpuladoL
A_aRIECAUCI6N: El silenciador y otras piezas
del motor Ilegan a ser exlremadamente
catientes durante la operaci6n y siguen siendo
calientes despuELsde que el motor haya
pamdo. Para evitar quemaduras sevems,
permanezca lejos de estas dress.
Estos accesorios estaban disponiblescuando se produjo la segadora. No son
facllltados Junto al eortacesped. Tambi6n estdn disponiblesen la mayoda de las
tiendas de Sears yen loscentros de servlclo. La mayorla de las tlendas Sears
tambi6n pueden rnandar a pedir partes de repuesto para usted, si lee proporclonael
ndmero del modelo de su segadora. Algunos de estos accesodos tal vez no se
apliquen a su segadom.
RENDIMIENTO DE LA SEGADORA
DESVIADOR DE RECORTES
PARA SEGADORAS CON DESCARGA TRASERA
RECOREDOR
PAPA
SEGADORAS
CON DESCARGA
TRASERA
JUEGOS PARA LA ACOLCHADORA
RECOREDOR
PAPA
I SEGADORAS
CONDESCARGA
LATERAL
ESTABIUZADORES
ENVAS_i
DE GASOL_IA
MANTENIMIENTO DE LA SEGADORA
SILENI_DORES RL'm I_ DE _RE BUJ_S
CORREAS CUCHILLA, S DE CUCHILLA RUEDAS DEL MOTOR
21
Lea estas instrucciones y el manual
completamente antes de tratar de montar u
oporar su sogadora ng6va.
IMPORTANTE: ESTE CORTACESPED VIENE
SIN ACEITE O GASOLINA EN EL MOTOR.
Su segadora nueva ha side rnontada en la
f_bdca con la excepci6n de aquellas partes
que se dejaron sin montar por razones de
envio. Todas las partes como las tuercas, 1as
amndelas, los pemos, etc., que son
neossarias para completar el montaje han side
colocadas en la bolsa de partes. Para
asegurarse que su segadora funcione en
forma segura y adecuada, todas las partes y
los art|culos de ferretoda que se montan
tienen que ser apretados seguramente. Use
]as herramienlas correctas, como sea
necesado, para asegurar que se aprieten
adecuadamente.
PARA REMOVER LA SEGADORA DE
LA CAJA DE CART(_N
1. Remueva las partes sueltas que se
incluyen con la segadora.
2. Corte las dos esquloas de tos extremos de
la caja de cartbn y tianda el panel del
extrerno piano.
3. Remueva todo el matedal de empaque,
excepto la cuba entre el mango superior y
dl infedor, y la cuba que sujeta la I_rra de
los control que exige la presencia del
oparador junto con el mango superior.
4. Hega rodar la segadora hacia afuera de la
caja de cartbn y revisela cuidadosamente
para verificar si todavfa quedan partes
suettas adicionaJes.
COMO PREPARAR SU SEGAOORA
PARA DESDOBLAR EL MANGO
IMPORTANTE: Desp#egue el mango con
mucho cuidado para no paUizcar o da_ar los
cables de control.
1. Levante los mangos hasta que la secclbn
del mango inferior se asegure en su lugar,
en la posicibn para segar.
2. Remueva la cuSa protentora, levante ta
secci_ del mango supedor basra su lugar
en el mango lofedor, y apdete ambas
manillas del mango.
3. Remueva la curia del mango que sujeta la
barra de los controlque exigo la presancia
del operader junto cos el mango superior.
El mango de la segadora puede ajustarse
segQn le acomode para segar. Refi6rase a
=AJUSTE DEL MANGO" en la Secdbn de
Servicio y Ajustes de este manual.
Barradecontrolquesxlgelapresencladeloperador
Mangosupede_" "J
MangoInfedo_ Levantar
Levar2ar //
PARA INSTALAR LOS ACCESORIOS
Su segadera rue enviada lista para userse
como una acolchadora de capa vegetal, para
osnvertirla de mode que pueda ensacar,
refidrase a =PARA CONVERIR LA
SEGADORA _ en la Seccibn de Operacibn de
este manual.
22

FAMILIARICESE CON SU SEGADORA
LEA ESTE MANUAL DEL DUEI_IO Y I.AS REGLAS DE SEGURIDAD ANTES DE OPERAR SU
SEGADORA. Compare las ilustraclones con su segadom para fandliadzarse con la ubicacibn de
los diversos contmles y ajuates. Guarde este manual para referencla en el future,
Estos slmbolos pueden apareser sobre su eagadom o en la Ilteratura proporclonada con
el producto. Apmnda y compreada sus slgnlflcados.
A"FrlENCIONO MOTOR MOTOR RAP_DO LENTO E_U COM- ACEmE PIELIGRO. G_E LAS
ADVERTENCIA ENCENDIDO APAGADO LACI_N BL_'IBLE M,_YLO6FIESLEJOS
Conbolde
aceleraci_
Barra de control qu_ exlge
hapresenda del operador
Contrc4de impulslbn
Cable decontrol
de zona del motor
Manilla ¢k31mango
SIlendadm
Tapa del deposlto de
acelte del motor con
vadlla indic,adore
FIItrodealre
Vdlvutadel
Cublerta de
. _aImpulslde
Puertade laacolchadora
IMPORTANT: Este cortacesped viene
SIN ACEITE O GASOLINA en el motoi_ (encadaruede)
CUMPLE CON LOS REQUISITOS DE SEGURIDAD DIE LA CPSC
I.as segadoras a motor, que se conducen desde la parte de atrds, rotatodas, Sears, cumplen
con los eat4ndares de seguddad del American National Standards Institute y de la U.S. Con-
sumer Product Safety Commission. La cuchilla gira cuando el motor estd tunclonando.
Barra de control que exlge la pr_encladel
operador -tiene que sujatar-se abajo, junto
con al mango, para hacer arrancar el motor.
Sudltela para parar el m_or.
Control de acelerclon/estrangulaclon - se
usa para ha_er arrancar el motor y le permile
selecolonar la velocidad del motor de ya sea
estrangulacibn, rdpida o leata.
Puerta de acolchadora - pmmite la
conversk_ pare la operack_n de descarga o
ensacado.
Cord6n arreacador - se usa para hacer
armncor el motor.
Palanca de control do la Impulslbn - se
usa para enganchar la segadera para
movimiento hacia adelante impulsade a motor.
23
La opemci6n de cualqu_er
segadom puede hacer que
salten objetos exb'aSos dentro
de sus ojos, Io que puede
producir dafios graves en *_stos.
Siempra use anteojos de seguddad o
protecci6n para los ojos mientras opere su
segadora o cuando haga ajustes o
peparaciones. Recomendamos una mascara
de seguridad de visibn amplia, para uso
espejuelos o anteojos de seguddad
estandarte.
COMO USAR SU SEGADORA
VELOClDAD DEL MOTOR
La velccided del motor se contmla por medio
de un control de aceleracibn ubicado en el
lado del mango supedor. La posici6n de
estrangulacibn se usa para hacer arrancar el
motor fdo, la posicidn de r_tpidoes para el
corte normal, mcorte, y un major
ensacamiento del c_sped. La posicibn lenlo es
para corte liviano, recorte y para economizar
combustible.
" "
_/t J _l I• Ii
/ _( s,,/-p, • st
,=S I I
I \# ii I
CONTROL DE ZONA DEL MOTOR
_,PRECAUCI6N: Las mgulaciones fedemles
exigen que se Instele un control para el motor
en esta segadora para reducir a un mlnimo el
desgo de lesionarse debido el contacto con la
cuchilla. Por ningSn motivo 1rate de eliminar la
funcibn del controldel operador. La cuchilla
gira cuando el motor estd funcionando.
• Su segadom viene equipada con una ba,rra
de contmles que exigen la presencia del.
operador, Io que requiera que el operador
est6 detr_.sdel mango de la segadora para
haceda arrancar y operarla.
CONTROL DE LA IMPULSI(_N
• La autoimpulsibnse contmla el sujetar la
barra de control que exige la presencia del
operador hacia abajo en el mango y al
empujar la palanca de control de la
impulsibn haela adelante hasta que suene
"clic; luego se suelta la palar_a.
• El movimiento hacia adelante pamrd cuando
la barra de control que exige la presencia
del operador se suelta. Para parar el
movimiento hacia adelante sin parar el
motor,suelte la barra de contro;que exige la
pmsencia del operador un poco basra que
se desenganche el control de la impulsi6n.
Sujete la barra de controlque exige la
pmsencia del
operador abajo en contm del mango para
continuar segando sin aotoimpulsibn.
• Pare mantener el control de ]a impulsibn
enganchado cuando se de vuelta en las
esquinas, empuje el mango hacia abajo y
levante las ruedas delantems luem del
suelo al girar la segadora.
Barrade controlqueexlgelapresencladeloperador
Controldela
\ Impulsk_n
PARA AJUSTAR LA ALTURA DE
CORTE
Levante las ruedas para el corte bajo y baje
las ruedas para el corte aJto.,ajuste la altura
de corte para que se acomode a sus
rsquisitos. La posici_ del madio es la mojor
para la mayoria de los c0spedes.
• Para cambiar la altum de co(le, empuje la
pelanca del ajustador hada la rueda. Mueva
la ruede hacia ardba o hacla abajo de mode
que se acomode a sus requisitos.
Asegdrese que todas las ruedes queden
igualmente ajustad_s.
AVISO: El ajustador esta correctamente
colocado cuando las orejas de la placa est_n
inserladas en el agujero del mango. Tambidn,
los ajustes de 9 posiclones (si equipado)
penniten que el mango puede ser movido
entre las orejas de la placa.
Para uncodebaJo,levantelasraeda_ Mango
24
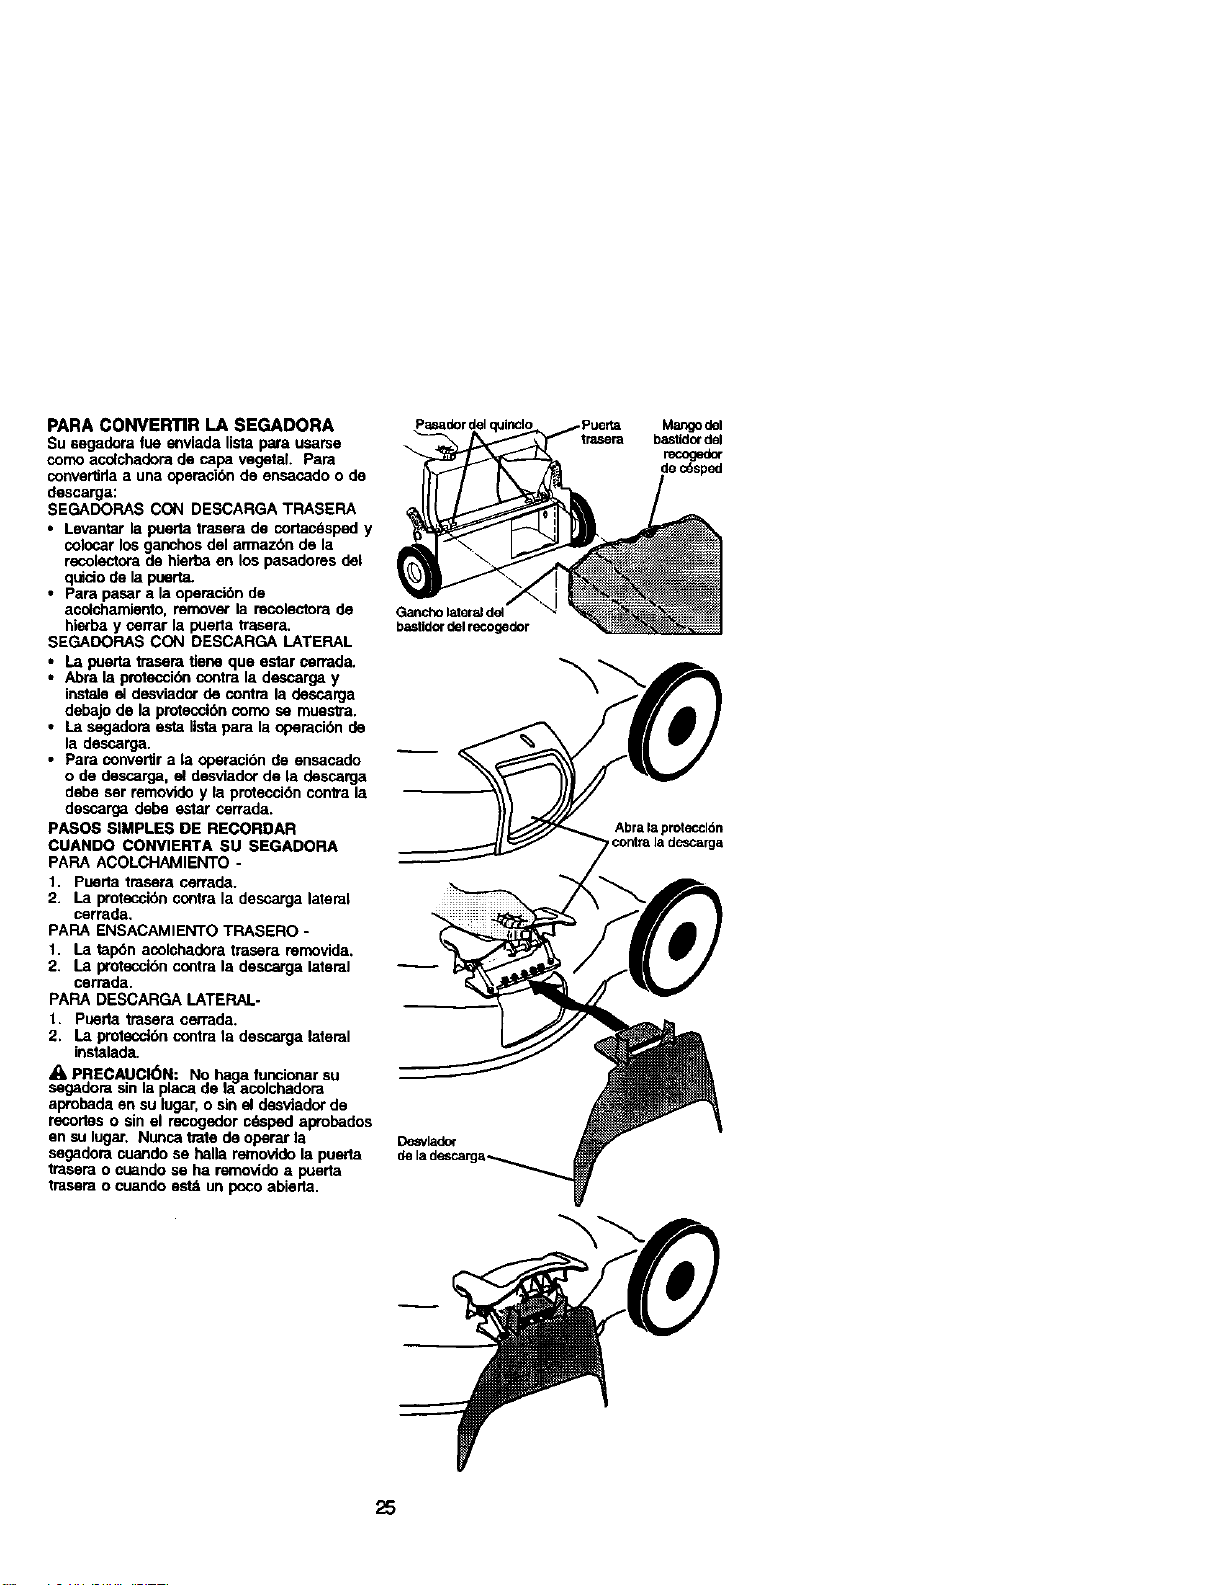
PARA CONVERTIR LA SEGADORA
Su segadora tue enviada lista para usarse
como acolchadom de calm vegetal. Para
conve_da a una operacibn de ensacado o de
descarga:
SEGADORAS CON DESCARGA TRASERA
• Levantar la puerla trasera de cortac_sped y
colocar los ganchos del armaz6n de la
recolectora de hierba en los pasadores del
quiciode la puerta.
• Para pasar a la operacibn de
acolchamiento, remover la mcolectora de
hierba y cerrar la puerta trasera,
SEGADORAS CON DESCARGA LATERAL
• La puerta trasem tlene que estar cerrada,
• Abra la protecci6n contm la descarga y
instale el desviador de contm la descarga
debajo de la proteccibn como se muestra.
• La segadora esta listapara la operaci6n de
la descarga.
• Para convertir a la operacibn de ensacado
o de descarga, el desvlador de la descarga
debe ser removido y la protecci6n con_'a la
descarga debe estar cerrada.
PASOS SIMPLES DE RECORDAR
CUANDO CONVIER'rA SU SEGADORA
PAPA ACOLCHAMIENTO -
I. Puerta tmsera cerrada.
2. La proteccibn contra la descarga lateral
cerrada,
PAPA ENSACAMIENTO TRASERO -
I. La tap_n acolchadora trasera removida.
2. La proteccibn contra la descarga lateral
cerrada.
PARA DESCARGA LATERAL-
I. Puerla trasera cerrada.
2. La protecck_ncontra la descarga lateral
instalada.
PRECAUCI_N: No haga funcionar su
segadora sin la placa de la acolchadora
aprobada en su lugar, o sin el desviador de
recortes o sin el recogedor cdsped aprobados
en su lugar. Nunca tmte de operar la
segadora cuando se halla removldo la puerta
tmsem o cuando se ha rernovido a puerta
tmsem o cuando estd un poco abierta.
Gancho lateral del
basUdordel recogedor
De_vlador
Mangod_l
basUdordel
recoged=
de c_sped
Abra la proteccl6n
contra la descarga
25
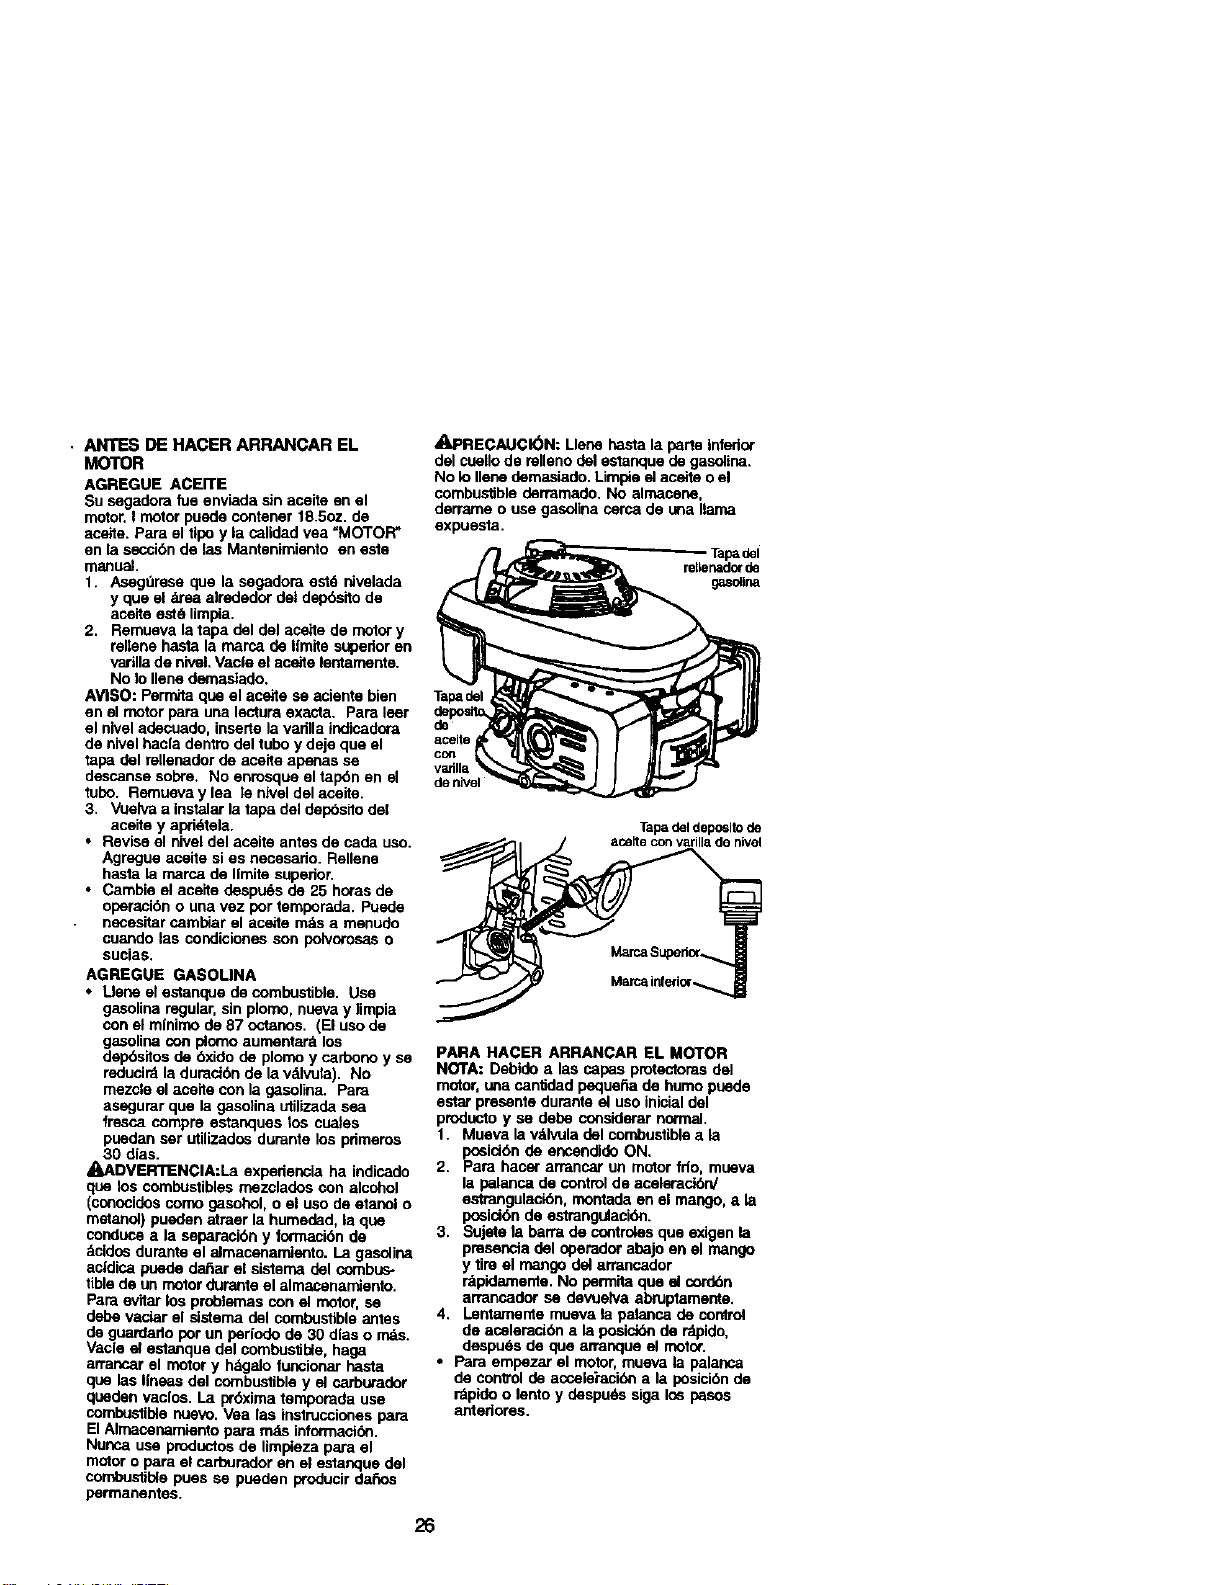
• ANTES DE HACER ARRANCAR EL
MOTOR
AGREGUE ACEITE
Su segadora rue enviada sin aceite en el
motor.I motor punde contener 18.5oz. de
anelte. Para el tlpo y la calidad vea "MOTOR"
en la sancibn de las Manteniraianto en este
manuel.
1. Asegt_rese qua la segadora estd rdvelada
y qua el _ea alrededor del depbsito de
aceite est_ limpia.
2. Rerausva la taps del del acelte de motor y
relXanehasta la marca de Ifraite supedor en
varilla de nivel. Vacle el anelte lentarnente.
No lo liens demasiado.
AVISO: Permita qua el acelte se aciente bien
en el motor pars una lectura exacta. Pars leer
el nlvel adecuado, inserts la varilla indicadora
de nivel hacla dentro del tubo y deje que el
taps del rellenador de aceite apanas se
descanse sobre. No enmsque el tap_n en el
tubu. Rernueva y lea le nivel del aceite.
3. Vuelva a instelar la taps del dep_sito del
acelte y apridtela.
• Revise el nivel del anelte antes de cads uso.
Agregue aceite si es necesado. Rellene
hasta la rnarca de Ilraite superior.
• Carabie el aceite despu_s de 25 horas de
uperanibn o una vez por terapornda. Punde
nacoeltar carablar el acelte m_s a raanudo
cuando las condiciones son polvorosas o
sucias.
AGREGUE GASOLINA
• Uene el estanque de combustible. Use
gasolina regular, sin plomo, nueva y limpia
con el ralnimo de 87 octanos. (El uso de
gasolina con plomo aumontar_ los
depbsitos de bxido de plomo y carbono y se
rnduci_ la dumcibn de la v_lvufa). No
mezcle el acelte con la gasolina. Pars
as6gurar que la gaselina utilizade sea
fresca compre estanques los cuales
pueden ser utilizados durante los pdmeros
30 dlas.
_DVERTENCIA:La expedencia ha indicado
qua los combustibles rnezclados con alcohol
(co_ocidos como gasohol, o el uso de etanol o
rastanol) pueden a_raer la huraedad, la qua
conduce a la separaci6n y tofl_acibn de
dbldosduraote el elraacanamlento. La gaselina
acldica puede dahar el sisteraa del combus-
tible de un motordurante el almacenamiento.
Pars evitar los problemas con el motor, se
debe vaclar el sistema del combustible antes
de guardarlo por un perlodo de 30 dlas o rr_s.
Vacle el estanque del corabustible, hags
arrancar el motor y hdgelo funcionar hasta
qua las Ilneas del combustible y el carburader
queden vaclos. La prbxima temporada use
combustible nuevo. Vea las instrucclones pars
El Alraacenaraiento pars ratLs informaci6n.
Nunca use produotos de limpieza pars el
motor o para el carbumdor en el estanque del
combustible puss se pueden producir da_os
permanentes.
_I_PRECAUCK_N: Liens hasta la parts inferior
del cuello de relleno del estanque de gasolina.
No lo liens demaelado. Limpie el acelto o el
combustible den_mado. No almacane,
derrarne o use gasolina corca de una llama
expuesta.
Tapa del
rellenade¢de
gasdina
Taps del
aceite
de nlvel
Tapa del depo_lto de
acalte con varJllade nivel
PARA HACER ARRANCAR EL MOTOR
NOTA: Debido alas capas pmteotoras del
motor, una canlJdad peque_a de humo puede
estar presents duraote el uso iniciel del
produoto y se debe considerar nonnel.
1. Muava lavdlvula del combustible a la
posici6n de encendido ON.
2. Para hacer arrancar un motor fdo, mueva
la palanca de control de aceleracibn,/
estrangulacibn, montada en el mango, a la
poeld6n de estrangulacidn.
3. Sujele la barfs de controles que exigen la
presencia del operador abajo en el mango
y tire el mango del arrancador
r_pidamente. No permits qua el corden
arrancador se devuelva abruptameote.
4. Lentamente mueva la palanca de control
de aceleranibn a la posiclon de rdpido,
despu_s de que arranque el motor.
•Para empezar el motor, mueva la palanca
de control de accele'racibna la posicibnde
rdpidoo lento y despuSs siga los pasos
antedores.
26

pARA PARAR EL MOTOR
• Para parar el motor y sino intenta ponerlo
en marcha de nuevo, elivie la barra de
controlque exige la presencia del opemdor.
Espem hasta que la cuchilla y todas las
piezas m6viles se ha,an pamdo y mueva la
v_lvula del combustible a la posicion OFF.
V_dvuladel carburador
CONSEJOS PARA SEGAR
• Bajo cierles condiciones, tal como c6sped
muy alto, puede ser nesesario el elevar la
altura del corte pare reducir el esfuerzo
necesario para empujar la segadora y para
esitar sobreca_ar el motor, dejando
montones de recortes de c6sped. Puede
que sea neceserio reducir la velocidad del
recorddo y/o haga funcionar la segadom
sobre el ,_rea pot segunda vez.
• Pare un corte muy pesado, reduzca el
ancho del corte pasendo pamialmente pot
ermirnadel lugar antedormente cortado y
siegue le_tamente.
• Pare un mejor ensacado del crisped y para
la mayoda de las condiciones de corte, la
velocidad del motor debe ajustarse a la
posid6n de rdpido.
• LOs polos en los mcugedores de c6sped
de tela pueden llenarse con mugre y ix)No
con el uso y los recogedores recaudar_
menos c_sped. Para evltar 6ste, rocfe el
recogedor con la manguera de agua,
regulannente, y d6jelo secarse antes de
usarto.
• Mantenga la parte superior del motor,
alradedor del armncador, despejada y sin
recortes de c6sped y paja. Esto ayudar_ el
flujo del aim del motor y extendar_t su
duraci_n.
CONSEJOS PARA SEGAR Y ACOLCHAR
IMPORTANTE: Pare obtener el mejor
rendimointo montenga la caja de la segador a
sin acumlacion de cesped y basura. Vea
=LIMPIEZA" en seccion de Mantenimento de
este manual
• La cuchilla acolchadora especial va a
velvar a corlar los mcortes de cdsped
muchas veces, y los reduce en tarnaSo, de
modo que si se caen en el c6sped se van a
dispesar entre 6ste y no se van a no_r.
Tambi_n, el c_sped aculchado se va a
deshacer rdpidamenle entregando
substancias nufritivas pare el c6sped.
Siempre acolche con la velocidad del m=or
(cuchilla) rods alta, pues asi se oblendr'_ la
mejor accibn de recorte de las cuchillas.
• Evite cortar el c6sped cuando est6 moJado.
El c6sped rnojado tiende a lormar montoses
e interliem con la acci6n de acolchado. La
mejor horn para segar el c_sped es
tempmno en la tarde, A esa hora dste se ha
secado y el drea mcidn cortada no queda_
expuesta al sol diresto.
• Para obtener los mejoms resultados, ajuele
la altara del corte de la segadora de modo
que _sta corte selamente el tercio superior
de las hojas de c_sped. En el caso de que
el cdsped haya crecido dernasiado, puede
ser nesesado el elevar la altura del corte
para reducir el esfuerzo necesario para
empujar la segadom y pare evitar
sobrecargar el motor, dejando montones de
recortes de cdsped, Pare un acelchamJento
muy pesado, reduzca el ancho del corte
pasando por encima del lugar antedormente
codado y slegue lentamente.
• Cierlos tipos de c6sped y sus condidones
pueden exigir que un drse tenga que sar
acolchada por segunda vez para esconder
completamente los recortes. Cuando se
haga el segundo corte, siegue a_'avesado o
en forma perpendicular a la pasada del
primer corte.
• Cambie su patrbn de corte de semana a
semana. Siegue de notre a sur una semana
y luego cambie de este a oeste la prdxlma
semana. Esto evitarA que el c6sped se
enrede y cambie de direscibn.
27

PROGRAMADE MANTENIMIENTO
LLENE LAS FEGHAS A MEDIOA
CUE COMPLETE SU SERVICIO REGULAR
FECHASDE SERVIClO
Revlsar s/hay sujetador_ sueltos ll_
Llmpiar/Inspecclonar el recoged_r de
(elvk,no_u_oado) t/ I/ I,/
LImpiar_asegadora f_ li/
Lira_ardebaJodelacublertadelatmns-
mis_ (segaderas con poder propubor)
Revlsarlascorreasy18spoleasimnpulul-
,/
sades(segademsconpoderpropLdsor)
Revlsar c4afllarlcambiar la cuc hilla _4_i
Tabladelubrlcad6n t// ql/
Llmplarlabsted_drecetgar
(sagadoras con arranquo e_ctrlco) _ _4
Revlsarelnlvoldelacelte V/
Cambiarelaceitedelmotor liIeT._
Umpktr el_trodeaim I_'=
Inspecctonar elsilenclader V/
LImpiar o/camblarlabujla
Cambiarel_duchodepapal delfi_o V'2
deaim
1 - C.mld_r rm_ a mmudo ¢ual_lo se opera t_o catga peuda 0 e_ arnlY,emt_ _=n alias tempmatums.
2 - Dat 8_Nk::lori_s a Icer.t_o cuandcJse opere eti OCIKI_ igJcias0 potvoro_
3 - Camble bmcuch_lla8n_s a monudo oJando sJegueen _0 arenoeo,
4 - Car_r por48 hora8 alfin de la _,
RECOMENDACIONES GENERALES
La garamla de esta segadora no cubm los
artfculos que han estado sujetos al abuso o a
la negligencia del operador. Para recibir todo el
valor de la garantia, el operador tiene que
mantener la segadora segdn las instmcciones
descritas en este manual.
Hay algunos aJustesque se lJenen que hacer
en forma pedbdica para poder mantener su
unidad adecuadamente.
Todos los ajustes en la secck_n de Servicio y
Ajustes de este manual tienen que ser
revisados por Io menos un vez por cada
temporada.
• Una vez al al_o,cambie labujfa, limple o
camble el elemento del filtro de airs y revise
si la cuchilla est,1desgastada. Una bujla
nueva y un elememo del filtrode aim limpio/
nuevo ase_umn la mezcla de airs-
combuslJbleadecuada y ayudan a que su
motor funcione mejor y qse dure rods.
• Siga el progmma de mamenimiento en este
manuel.
ANTES DE CADA USO
I. Revise el nivel del aceite del motor.
2. Revise sl hay sujetaderes sseltos.
LUBRICACI(_N
Mamenga la unidad bien lubdcada (yea la
"TABLA DE LUBRICACI(_N").
TABLA DE LUBRICACI(_N
dela meda
del motor
Bisagra
de la puerta
de la
acolchadora
-- -- -- J ,{_) Bisegrade
la pueMa
traser
@
(_ RocJmolIubricanto
V_ "MOTOR" en la secclon de Mant_lknlento
28
IMPORTANTE: No acelte o engrase los
rodamientos de la meda de plastico. Los
lubrlcantes viscosos atearan polvo y
mugre, Io acortara la duraelon de los
rodamientos autolubdcardes. Si cree que
tienen que lubdcarse, use Iosamente un
lubricante tipo orafito, de polvo seco, en
forma modemda.
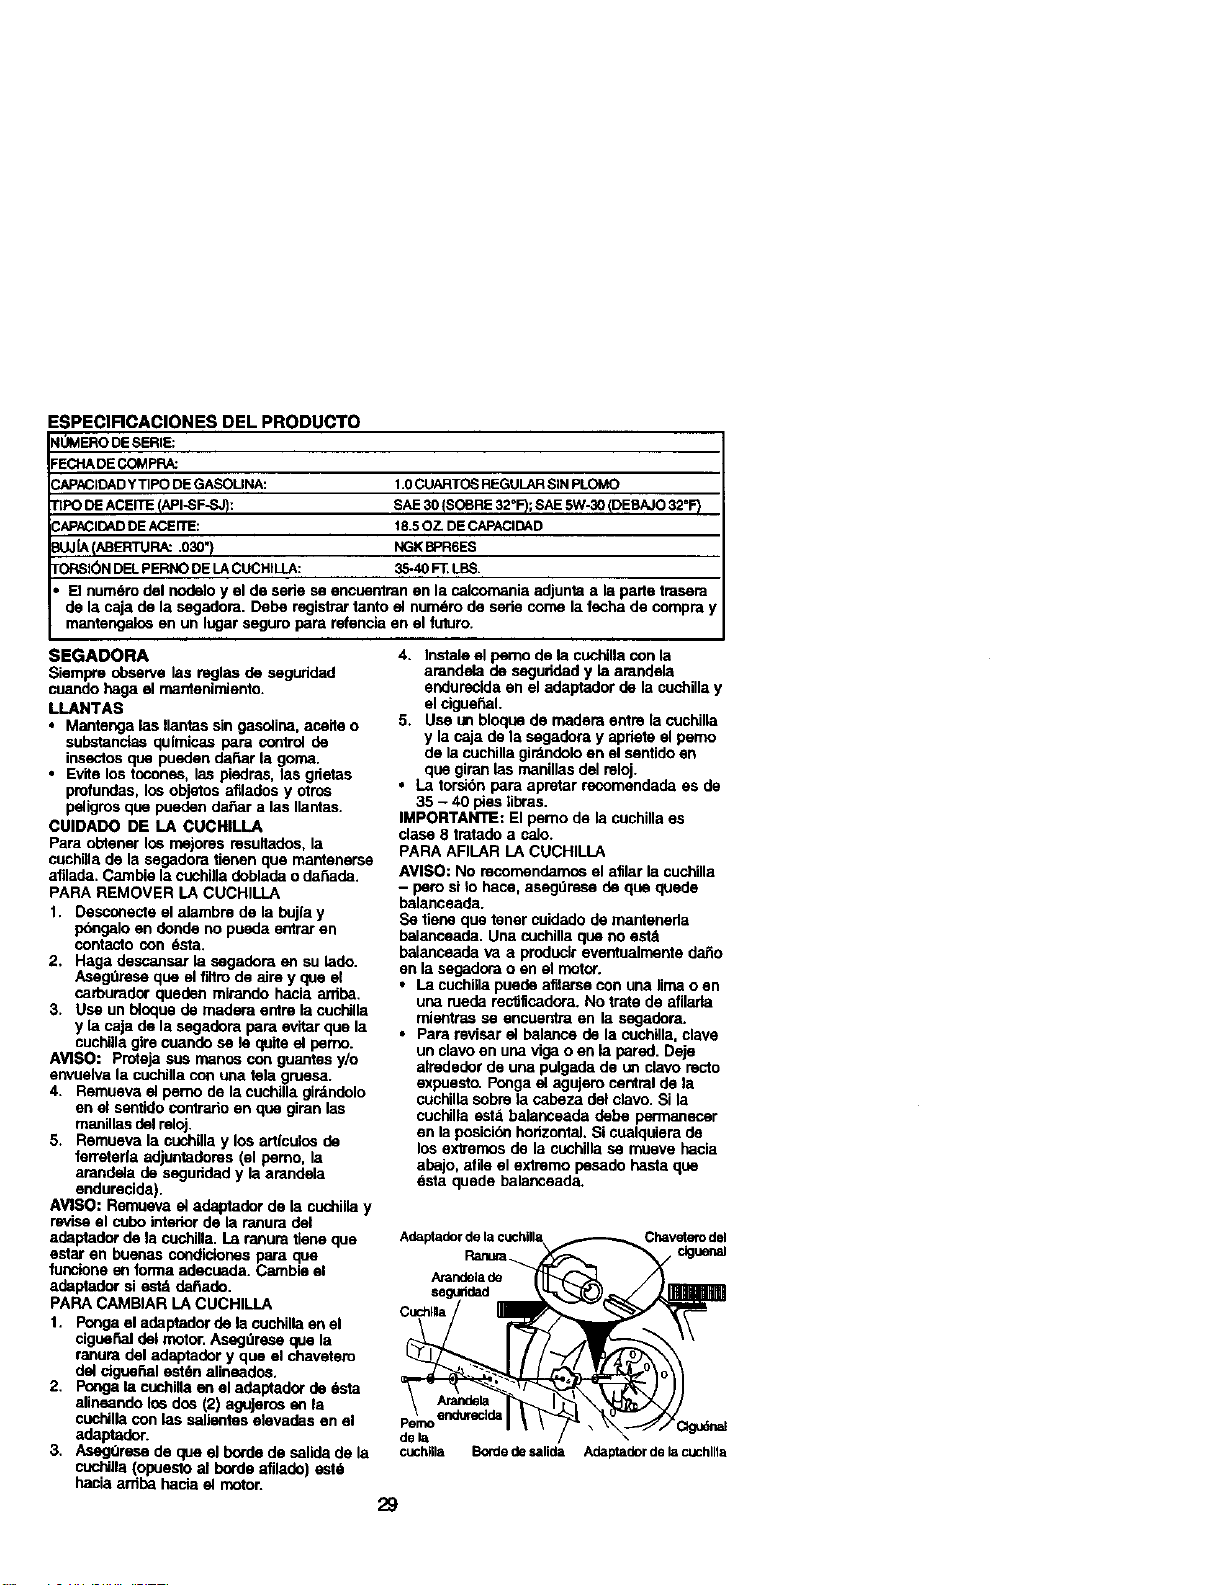
ESPECIFICACIONES DEL PRODUCTO
_IOMERODESERIF-:
FECHADECOMPRA:
CAPACtDADYT1PODEGASOLINA:
TIPODEACEITE(API-SF-_:
CAPACIDADDEACEn'E:
TORSIC_NDELPERNODELACUCHILLA:
• [] numSro del nodelo y el de serie se encuentmn an la calcomania adjunta a la parte tmsem
de la caja de la segadom. Debe registrar tanto e_numdro de serie come la fecha de compm y
mantengelos en un lugar seguro para refencia en el fuluro.
1.0 CUARTOS REGULAR SIN PLOMO
SAE 30 (SOBRE 32°1=);SAE 5W'30 (DEBhJO 32_F_
18.5 07- DE CAPACIDAD
NGK BPR6ES
35-40 FE LBS.
SEGADORA
Siempre observe las reglas de seguflded
cuando haga el mantenimiento.
LLANTAS
• Mantenga las llantas sin gasolina, aceite o
sub_-tandas qulmicas para control de
insentosque pueden dafiar la goma.
• Evite los tocones, las piedras, las grietas
profundas, los objetos afilados y otros
peligms que pueden daSar alas Ilanttas.
CUlDADO DE LA CUCHILLA
Para obtener los rnejores resullados, la
cuchilla de la segadom tienen que mantenerse
afilada. Cambie la cuchilla doblada o dai_ada.
PARA REMOVER LA CUCHILLA
1. Desconecte el alambre de la bujfa y
pdngalo en donde no pueda entrar en
contacto con _sta.
2, Hega descansar la segadom en su lado.
AsegOrese que el filtro de abe y que el
carbumdor queden mirando hacia arriba.
3. Use un bloque de madera entre la cuchilla
y la caja de la segadom pare evitar que la
cuchilla gire cuando sele quite el perno.
AVISO: Proteja sus rnanos con guantes y/o
envuelva la cuchilla con una tela gruesa.
4. Remueva el perno de la cuchilla girdndolo
en el sentido contrado en qua giran las
manillas del reloj.
5. Remueva la cuchilla y los artfculos de
feITeterla adjuntadores (el pemo, la
amndela de seguddad y la arandela
endurecida).
AVISO: Remueva el adaptador de la cuchilla y
revise el cubo interior de la ranum del
adeptador de la cuchilla. La ranum tiene qua
estar en buenas condicioses para clue
funciono en forma edecueda. Cambie el
adeptador si est_ da_ado.
PARA CAMBIAR LA CUCHILLA
1. Ponga el adeptador de la cuchilla en el
cigueF'=aldel motor. Asegdrese que la
ranura del adaptador y que el chavetero
del ciguefial est6n alineados.
2, Ponga la cuchilla en el adaptador de 6sta
alineando los dos (2) agujeros e_lla
cuchilla con las salientes elevades en el
adaptador.
3. Aseg0rese de qua el bo_le de salida de la
cuchilla (opuesto al borde afilado) est_
hacia ardba hacia el motor.
4. Instale el pemo de la cuchilla con la
arandela de seguddad y la amndela
endurecida an el edaptador de la cuchillay
el cigue_al.
5. Use un bloque de madam emre la cuchilla
y la caja de la segadora y apriete el pemo
de la cuchilla girdndolo en el sentido an
qua giran las manillas del reloj.
• La torsibn para apretar recomendada es de
35 - 40 pies libras.
IMPORTANTE: El pemo de la cuchilla es
clase 8 tratado a calo.
PARA AFILAR LA CUCHILLA
AVlSO: No recornendamos el afilar la cuchilla
- paro si !o hace, asegdrese de qua quede
balanceada.
Se tiene qua tener cuidedo de manteneda
balanceada. Una cuchilla qua no estd
belanseeda va a producir eventualmente da6o
en la segadora o en el motor.
• La cuchilla puede afltarse con una lima o en
una rueda rentilicadora. No irate de afileda
mientras se encuentra en la segadora.
• Para revisar el balance de la cuchilla, clave
un clavo en una viga o en la pared. Deje
elrededor de una pulgada de un clavo recto
expuesto. Ponga el agujero central de la
cuchilla sobre la cabeza del clavo. Si la
cuchilla estb balanceeda debe permanecer
en la posicibn hodzontal. Si cualquiera de
los exb'emos de la cuchilla se mueve hacla
abajo, afile el extremo pasado basra qua
esta quede balanseada.
Adaptador de la cuchilla
Amndela de
segurided
Cud111a
Chaveterodel
• ciguensl
Amnde_
Pernoendurec_da
de la
cuchllla Borde de salida
Adeptador de lacuchllla
29
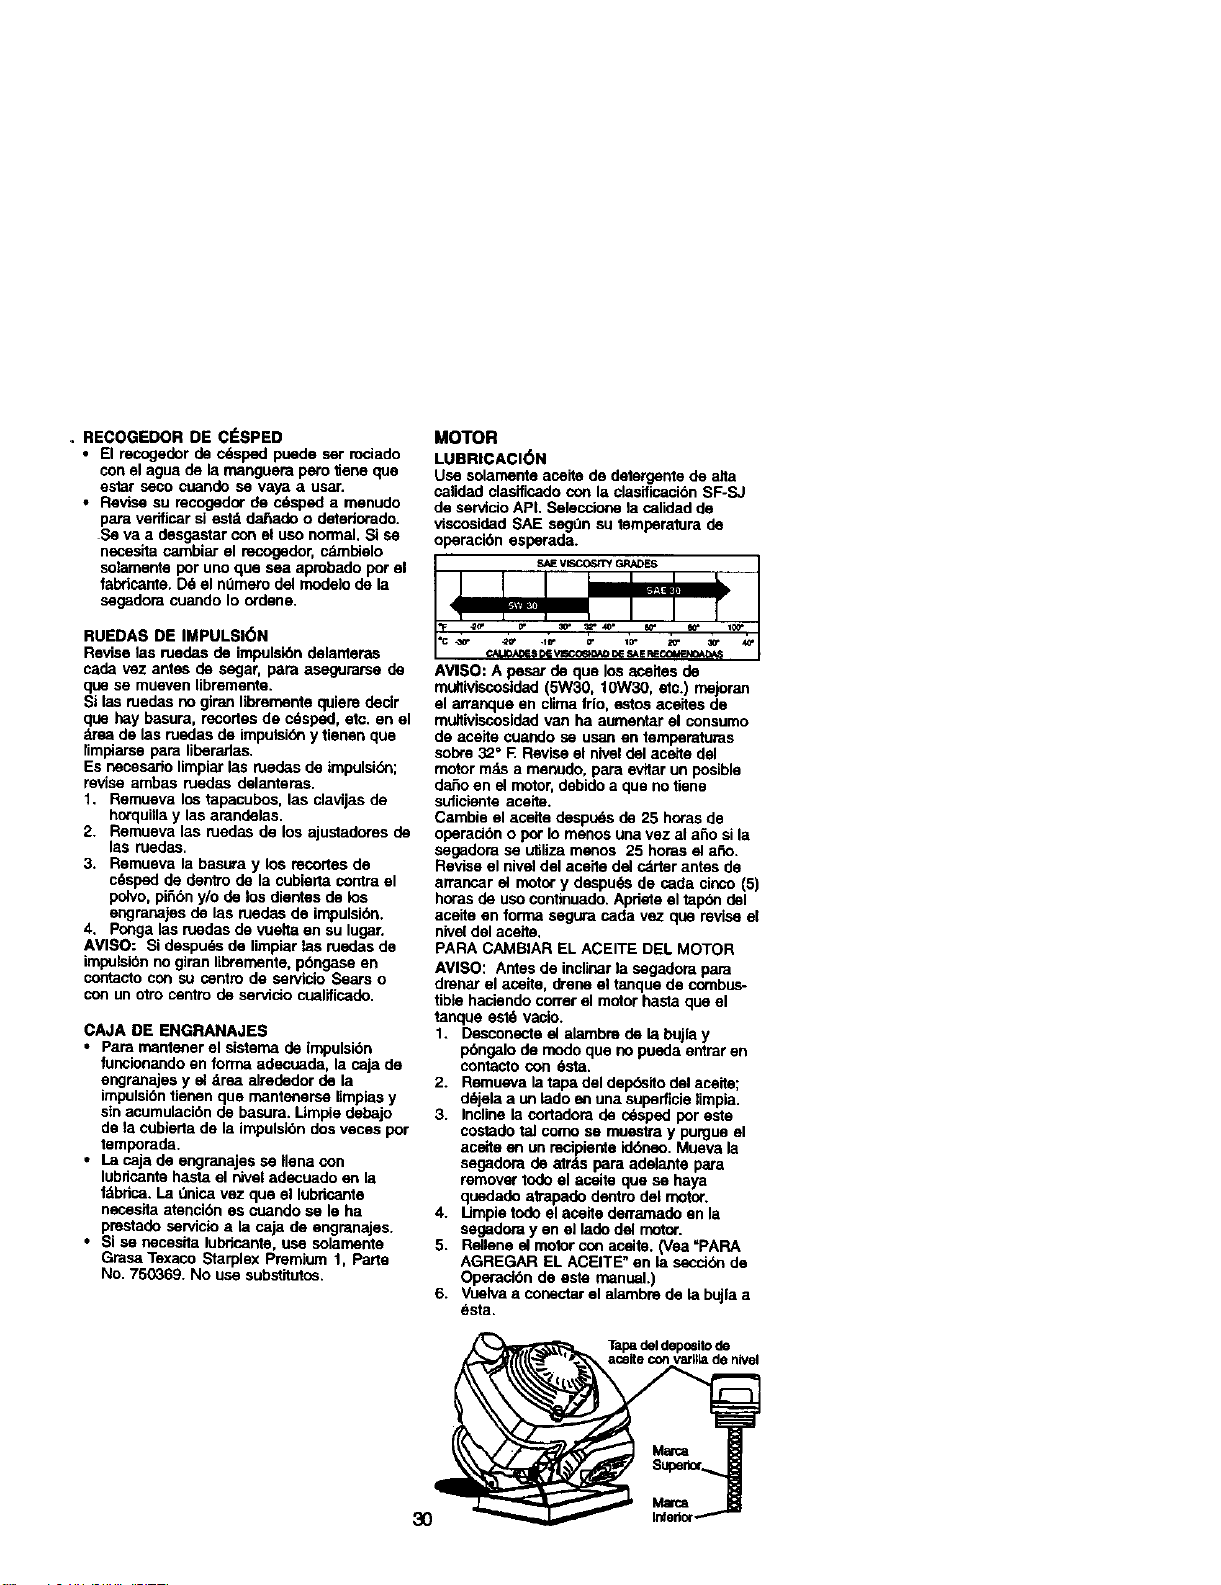
. RECOGEDOR DE ClaSPED
• El recogeder de cdsped puede ser rociado
con el agua de la manguera pero tlene qua
estar seco cuando se vaya a usar.
• Revise su recogedor de crisped a menudo
para verifiser si est_ da_ado o detedorado.
Se va a desgastar con el uso normal, Si se
necesita cambiar el recogedor, cdmbielo
sotamente por uno qua sea aprobado por el
fabrloante, Dd el ndmero del modeto de la
segadom cuando Io ordone.
RUEDAS DE IMPULSI(SN
Revise las ruedas de impulsibn delanteras
cada vez antes de segar, para asegumrse de
qua se mueven libremente.
Si las ruedas no giran libremente quiere decir
qua hay basura, recortes de c6sped, eto. en el
drse de las rusdas de impulsi_ y tienan que
fimpiarse para liberarlas.
Es necesario limpiar las ruedes de impulskYn;
revise ambas ruedas delanteras.
1. Remueva los tapacubos, las clavijas de
horquiila y las arandelas.
2. Rernueva las ruedos de los ajustadores de
las ruedas,
3. Ramueva la basura y los recortes de
cdsped de dentro de la cubiarta contra el
pelvo, pi_bn y/o de los dientes de los
engranajes de las ruedas de impulsi6n.
4, Pnoga las ruedas de vuelta en su lugar,
AVIS{): Si despu_Lsde limpiar las ruedas de
impulsibnno giran Iibremente, pbngase en
contacto con su ceotm de sewiclo Sears o
con un otro centro de servido cu_lificado.
CAJA DE ENGRANAJES
• Para mantener el sistema de impulsi6n
funcionando en forrna adecuada, la caja de
engranajes y el drea alrededor de la
impulsiontienen qua mantenerse limpias y
sin acumulacibn de basura. Limpie debajo
de la cubterta de la impulslbn dos veces por
temporada,
• La caja de engranajes se liana con
lubdcante hasta el n_veladecuado en la
tdbdca. La _nica vez qua el lubrloante
necesita atenci6n es cuando se le ha
pmstado serviclo a la caja de engranajes.
• Si se necesita lubrtsente, use solamente
Grasa Texaco Starplex Premium 1, Perte
No. 750369. No use substitutos.
3O
MOTOR
LUBRICACI(_N
Use solamente aceite de detergents de alta
calided clasificado con la clasificacibn SF-SJ
de servicio APL Seleccione la candad de
viscosidad SAE segQn su tomperatura de
operacidn esperada.
S_J_Vi_=COS_YGRADES
AVISO: A pesar de que los _eites de
multiviscosided (5W30, 10W30, etc.) mejoran
el arranque en clima frio, estos aceites de
multiviscosldad van ha aumentar el consumo
de aceite cuando se usan an temperaturas
sob_e 32° R Revise el niveldel acede del
motor rods a menodo, para evitar un posibla
dafio en el motor, debido a qua notiene
suficiente aceite.
Cambie el acelte despu_s de 25 horas de
operad6n o pot Io menos una vez al a_o si la
segadora se utiliza menos 25 horas el ano.
Revise el nivet del aceile del cdrter antes de
arrancar el motor y despu_s de cada cinco (5)
horas de uso contlouado. Apdete el tapbn del
aceite en forma segura cada vez qua revise el
nivel del aceite,
PARA CAMBIAR EL ACEITE DEL MOTOR
AVISO: Antes de inclinarla segadora papa
dmnar el aseile, drene el lanque de combus-
tible haciendo coffer el motor hasta que el
tanque estd vaclo.
1. Desconecte el alambm de la bujla y
pbngalo de modo qua no pueda eotrar an
contacto con 8sta.
2. Remueva la tapa del dep_elto dal aceite;
ddjela a un lado en una superficie limpia.
3. Incline la cortadora de cdsped por asia
costado taJcomo se muestm y purgue el
acelta en un recipiente id6neo. Mueva la
segadom de a_rds para adelante para
remover todo el aceite que se haya
quedade atrapado dentro del motor.
4. Utopia todo el aseite derramado en la
segadora yen el lade del motor.
5. Rellene el motor con acelte. (Vea "PARA
AGREGAR EL ACEITE" an la secci6n de
Operacibn de aste manual.)
6. Vuetva a coosctar el alarnbre de la bujla a
esta.
Tapa del deposito de
aceite con var_ia de nNel
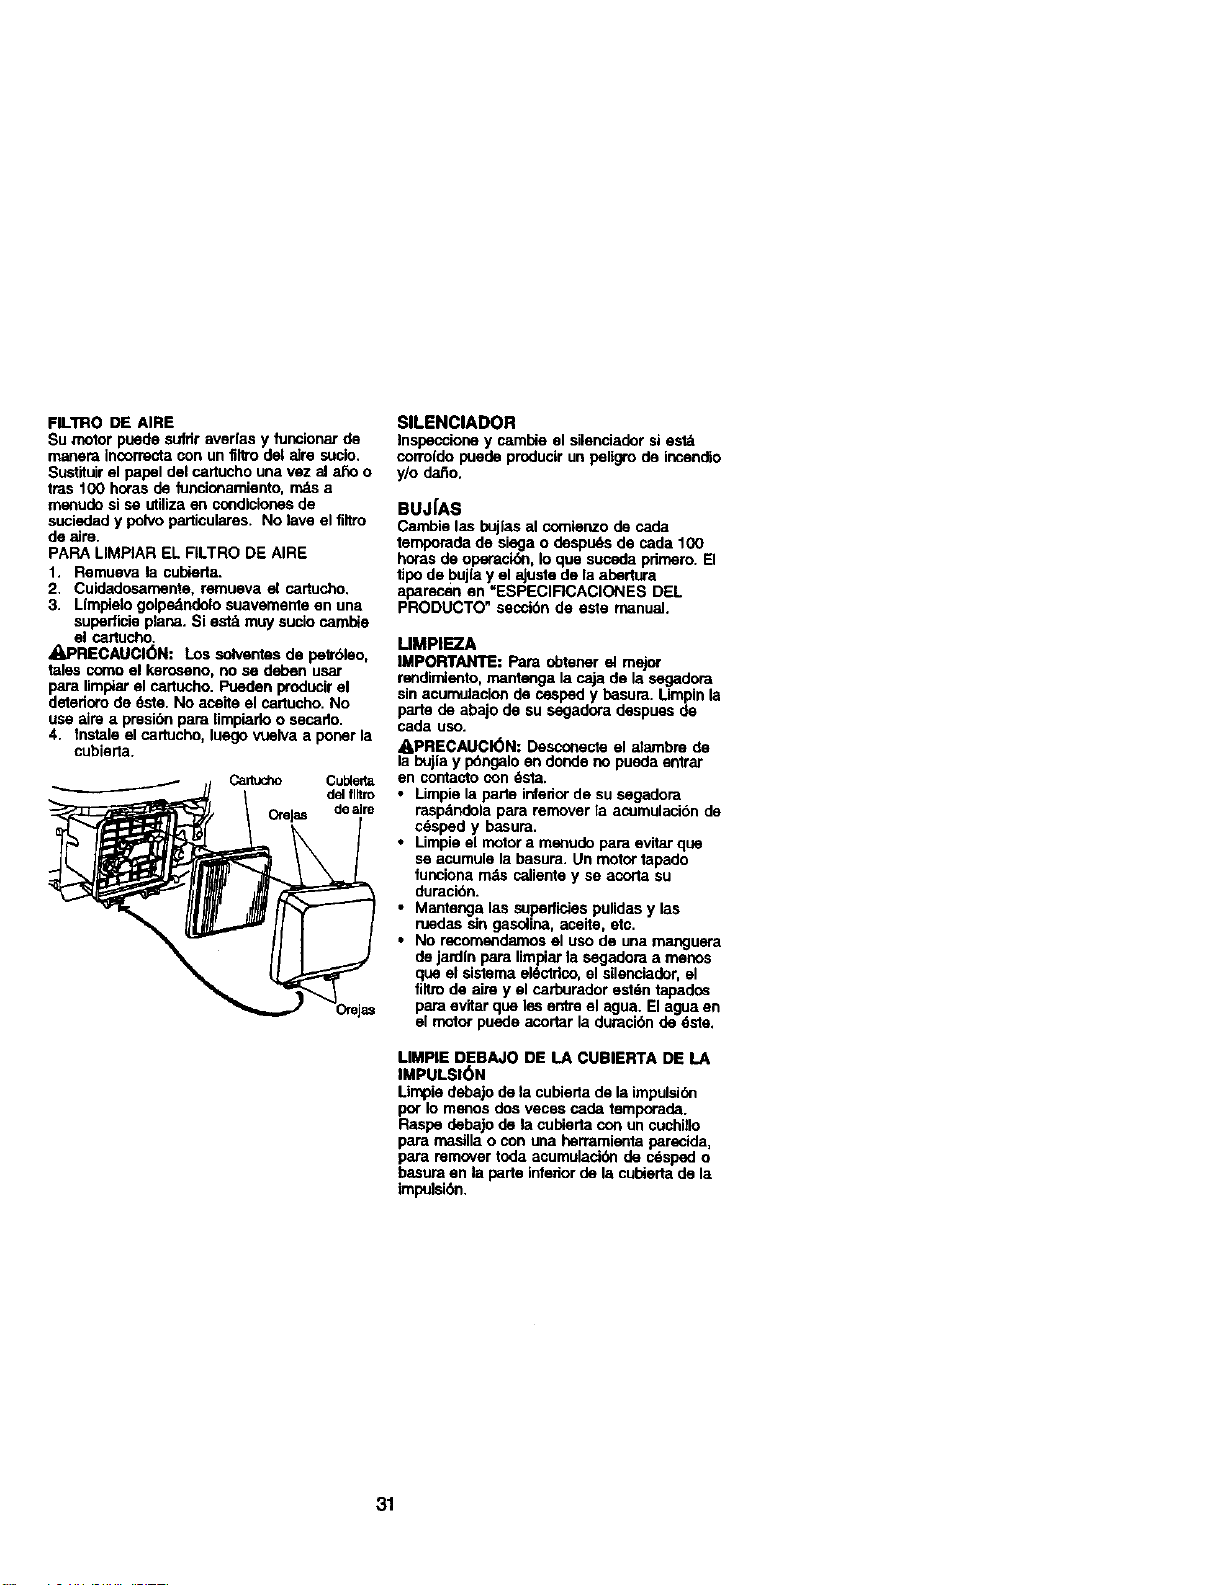
FILTRO DE AIRE
Su motor puede sufrir averlas y funcionar de
manera incorrecta con un flltro del aire sucio.
Sustituir el papel del cartucho una vez al a_o o
tras 100 horas de _uncionamiento, rnds a
menudo si se utiliza en co_diciones de
suciedad y polvo particulares. No lave el filtro
de elre.
PAPA LIMPIAR EL FILTRO DE AIRE
1. Remueva la cubierta.
2. Cuidadosamente, remueva el cartucho.
3. Limpielo golpedndolo suavemente en una
superficie plana. Si est_tmuy sucio cambie
el ca_ucho.
_RECAUCI(_N: Los solventes de pelrbleo,
tales corno el keroseno, no se deben usar
para limpiarel cartucho. Pueden producir el
detedoro de 6ste. No aceite el cartucho. No
use aim a presibn para limpiado o secado.
4. Tnstale el cartucho, luego vuelva a poner la
cubierta.
Cul_erta
del flltm
de aim
SlLENClADOR
]nspeccione y cambie el silenciador si est_
corrofdo puede producir un peligro de incendio
y/ode_o.
BUJ[AS
Cambie las buj|as al comlenzo de cada
temporada de siega o despuds de cada 100
horas de operack_n,Io que suceda pdmero. El
tipo de bujfa y el aJustede la aberlura
aparecen en =ESPECIRCACIONES DEL
PRODUCTO" secel6n de este manual.
UMPIEZA
IMPORTANTE: Para obtener el mejor
rendimlento, mantenga la caja de la segadora
sin acumulacion de cesped y basura. Limpin la
parte de abajo de su segadora despues de
cada uso.
A.PRECAUCI_N: Desconecte el alambm de
la bujia y p_ngalo en donde no pueda entrar
en contacto con dsta.
• Limpie la parte infedorde su segadora
rasp8ndola para remover la acumulacibn de
cesped y basura.
• Limpie el motora menudo para evitar que
se acumule la basura. Un motor tapado
tunciona n_s celiente y se acorta su
duraci6n.
• Mantenga las superficies pulidas y las
ruedas sin gaselina, aceite, etc.
• No recomendamos el uso de una manguera
de jardln para limpiarla segadora a menos
qua el sistema el6ctdco, el ellenciader, el
filtm de aim y el carburador est6n tapados
para evitar que les entre el agua. El agua en
el motor puede acortar la duraci6n de *Iste.
LIMPIE DEBAJO DE LA CUBIERTA DE LA
IMPULSI(_N
Limpie debajo de la cubieda de la impulsidn
por Io menos dos veces Cade temporade.
Raspe debajo de la cubierta con un cuchUlo
para masilla o con una herramlenta parecida,
para remover toda acumulacJbnde c_sped o
basura en la parte infedorde la cubierta de la
impulsibn.
31

_PRECAUCI_N: Antes de dar calquier
servico o de hacer ajustes:
1. Suelte la barra de control y pare el motor.
2. Aseg0rese que la cuchilla y que todas las
partes movibles se hayan detenido
completamente.
3. Desco_ecte el atambre de la bujia y
pbngalo en donde no pueda eldrar en
contacto con 6sta.
SEGADORA
PARA AJUSTAR LA ALTURA DE CORTE
Vea =PAPA AJUSTAR LA ALTURA DE
CORTE" en la seccibn de Operaci_ de este
manual.
DESVIADOR TRASERO
Se proporciona un desviador trasero, adjunto
entre las ruedas traseras de su segadora,
para reducir a un mlnimo la posibilidad que
objetos sean lanzados hacia afuera de la parte
trasera de la segadora, en la posicibnen
donde se encuentra el operador. Si se daSa el
desviador debe cambiarse.
PARA REMOVER/CAMBIAR LA CORREA
DE IMPULSION
1. Remueva la cubierla de la impulsibn.
Remueva la correa empujando hacia abajo
en la polea de la caja de engranajes.
2 Haga descansar la segadora en su lado
con el filtro de aim y el carburador mirando
hacia amba.
3. Remueva la cuchilla.
4. Remueva ta defensa en contra del
desperdicio.
5. Remueva la correa de la polea del motor
en el cigue_aL
6. Instale la correa nueva siguiendo los
pasos antedores an el orden inverso.
7. Siempre use la correa aprobada por la
fdbdca para asegurarse que calce y dure.
Cublertadela
_rnpuls_on
PARA AJUSTAR EL MANGO
El mango superior quede ser aJustado a
cuatro (4) dislntas posiciones de altura.
1. Afloje ambas perillas del mango solamente
bastante pera permitir que el mango
superior gire a la posickSndeseada.
2. Apriete ambas pedllas del mango con
seguddad.
Mani_lade
mango
demango
PARA MONTAR Y ADJUNTAR EL
RECOGEDOR DE ClaSPED
1. Ponga el bastidor del recogedor de c6sped
en la bolsa del c6sped con la parte rigida
de la bolsa en la parte inferior.AsegOrese
que el mango del bastidor est6 en el
exterior de la parte supedor de la bolsa.
2. Deslice los sujetadores de vinilo sobre el
bastidor.
AVISO: Si los suJetadoresde vinilo es_n muy
duros, rn6talos en agua caliente por algunos
minutos. Si se moja la bolsa, d_jela que se
seque antes de usada.
A PRECAUCl6N: No hao,a funcionar su
segadora sin el desviador _e recortes o sin el
recogedor de cdsped, aprobados, en su
lugar. Nunca irate de operar la segadora
cuando se ha removido la puerla trasera o
cuando est_ un poco abierta.
MOTOR
VELOClDAD DEL MOTOR
La velocldad del mot_ ha sido ajustada en la
fdbdca. No trate de aumentar la velocidad del
motor pues se pueden produdr lesiones
personales. SI cree que el motor est_
funcionando demasiado rdpidoo demasiado
lento, Ileve su segadora a mas con su centro
de servicio Sears o co_ un obo centro de
servlcio cualHicado.
32
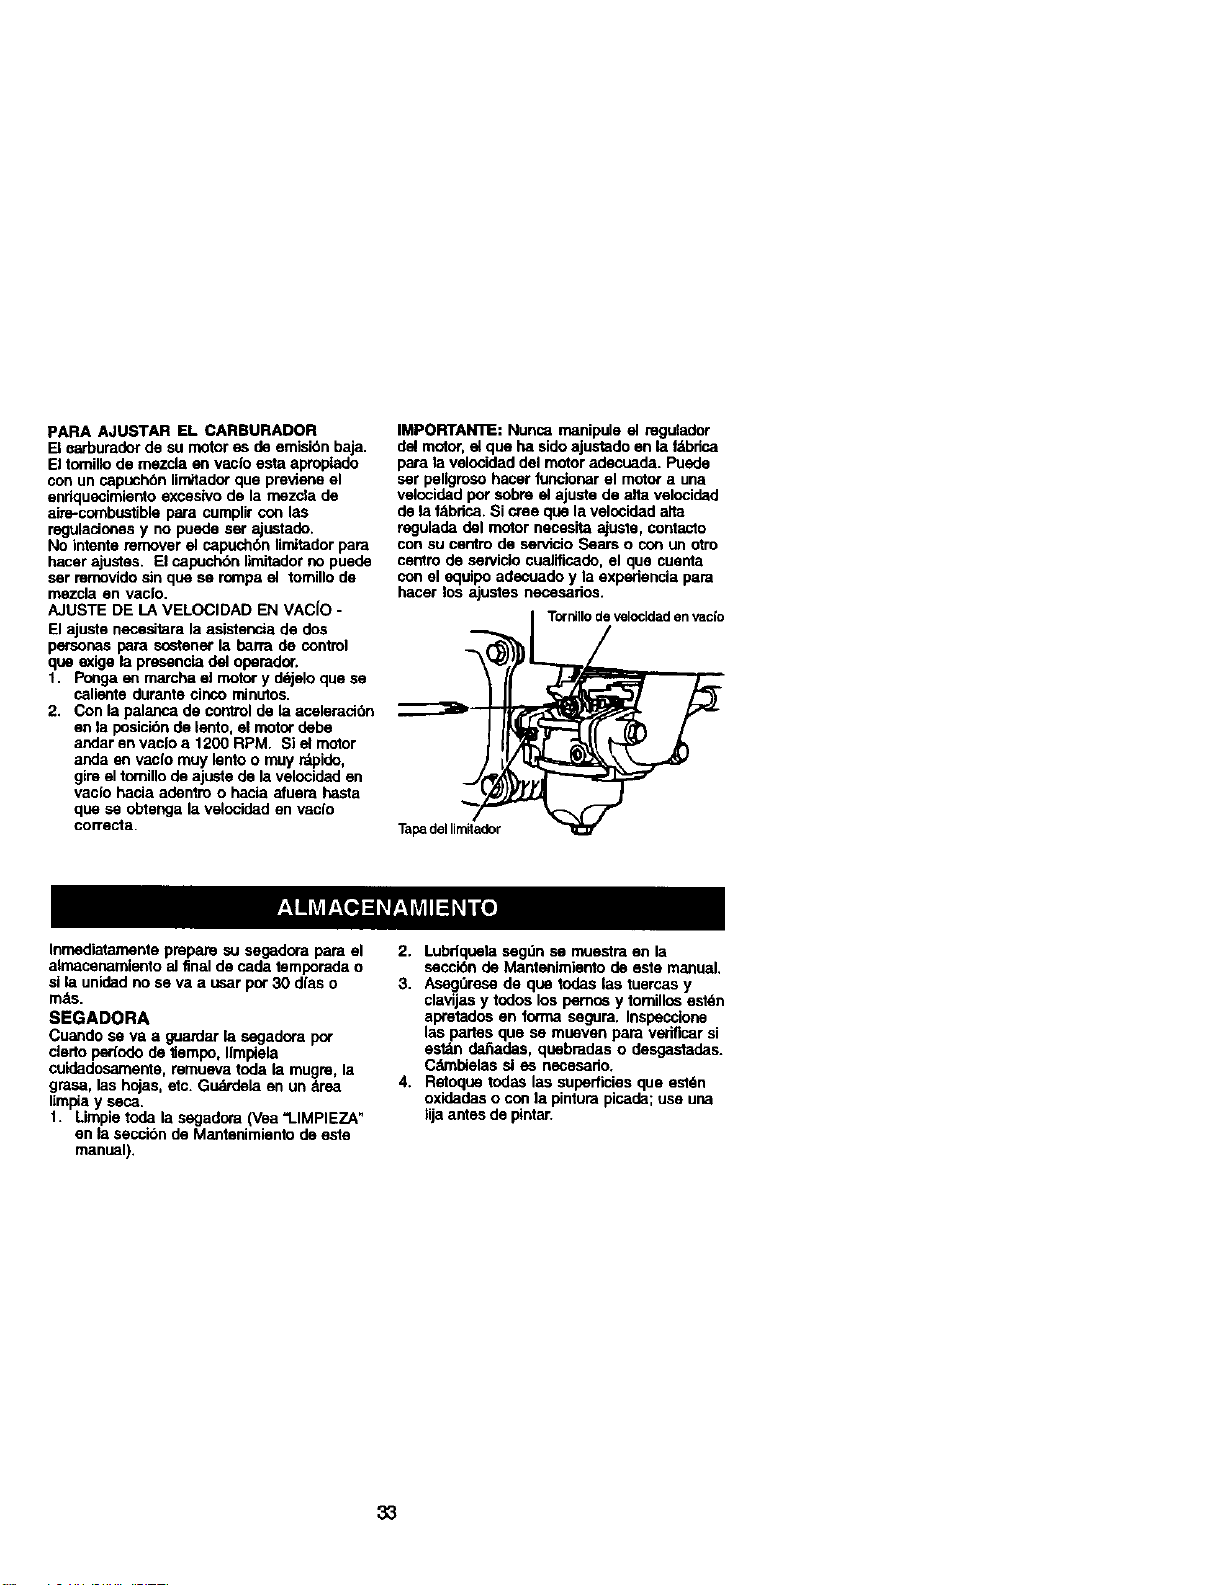
PARA AJUSTAR EL CARBURADOR
[] earbumdor de su motor es de emisi6n baja.
Eltomillo de mezcla en vaclo esta aproplado
con un capuch6n limitador que previene el
enriquecimiento excesivo de la mezela de
aim-combustible para cumplir con las
regulaclo_es y no puede set ajustado.
No intente remover el capuch6n lirnitador para
hacer ajustes. El capuch6n limitadorno puede
ser removido sin que se rompa el tornillo de
mezcla en vaclo.
AJUSTE DE LA VELOCIDAD EN VAC(O -
El ajuste necesitara la asistancia de dos
personan para soetener la barra de control
que e0<igela presencia del opemdor.
1. Ponga en marcha el motor y ddjelo que se
caliante durante cinco minutos.
2. Con la pelanca de control de la aceleraci6n
an la posicibnde lento, el motor debe
andar en vac|o a 1200 RPM. Si el motor
anda en va_lo muy lento o muy r_pido,
gire el tomillo de ajuste de la velocidad en
vaclo hacia adentm o hacia afuera hasta
que se obtenga la velocided en vaclo
corre_a.
IMPORTAN11E: Nunca manipule el regulador
del motor,el que ha sido ajustado en la fdbdca
para la velocided del motor adecuada. Puede
ser peligroso hacer funclonar el motor a usa
velocidad por anbre el ajuete de alta velocided
de la fdbdca. Si oree que la velocidad alta
regulada del motor necanita ajuste, contaoto
con su centro de servicio Sears o con un otro
centro de servicio cualificado, el que cuanta
con el equipo adecuado y la expedencia para
hacer los ajustes necesados.
Totn_llodevelocLdadenvacio
Tapa del Ilmitador
Inmediatarnente prepare su segadora para el
almacenamlento el final de cada temporada o
si la unided no se va a usar pot 30 dfas o
m_s.
SEGADORA
Cuando se va a guardar la segadora pot
clerto pedodo de tiempo, Ilmpiela
cuidadosameote, remueva toda la mugre, la
grasa, las hojas, etc. Gudrdela an un _rea
limpia y seca.
1. Limpie toda la segadora (Vea =LIMPIEZA"
en la seccion de Mantenimiento de este
manual).
2. Lubriquela segdn se muestm en la
secci6n de Mantanimiento de este manual.
3. AsegOrese de que todas las tuercas y
clavijas y todos los pernos y tomillos estdn
awetados en forma segum. Inspeccione
las partes que se mueven pare verificar si
est_n da_adas, quebradas o desgasladas.
Cdmbielas sl es necesade.
4. Retoque todas las superficies que est6n
oxidadas o con la pintum picada; use una
lijaantes de pintar.
33
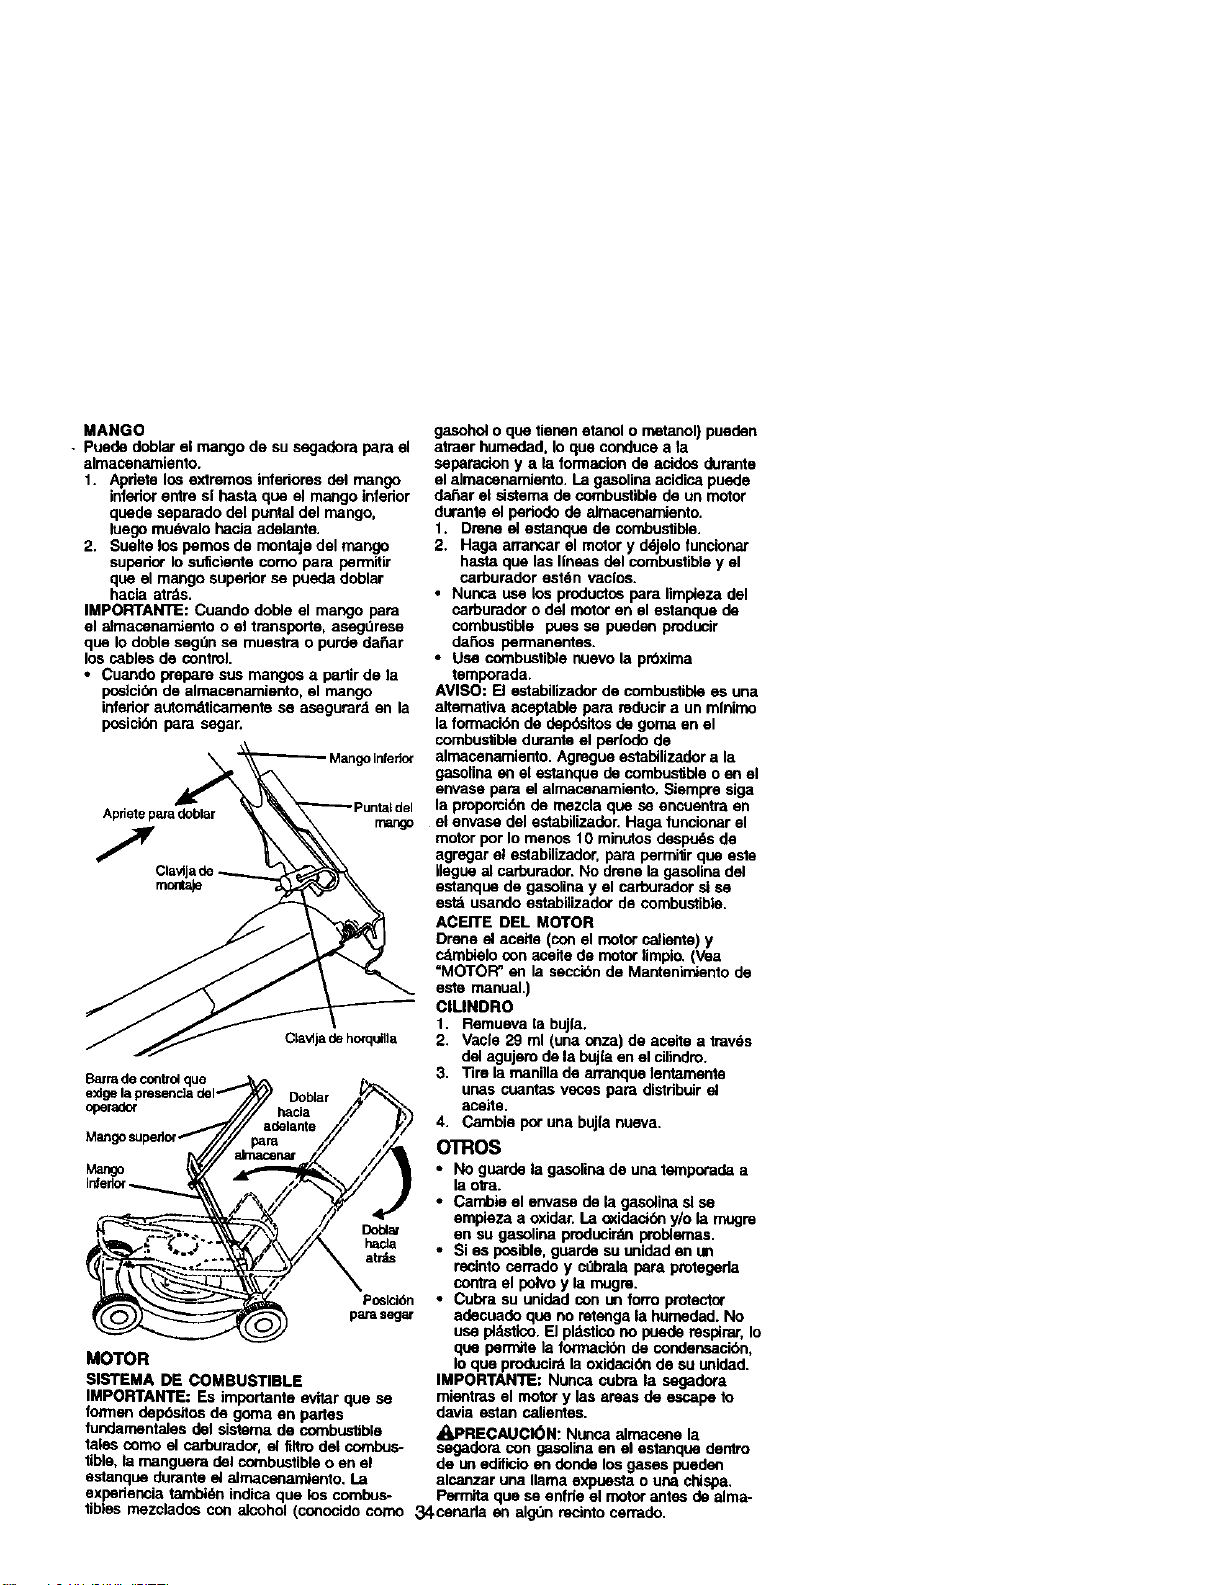
MANGO
• Puede doblar el mango de su segadora para el
almacenamlento.
1. Apdete los extremos inferlores del mango
inferiorentre sl basra qua el mango inferior
quede separado del puntal del mango,
luegomu*_valo hacia adelanto.
2. Suelte los pemos de montaje del mango
supedor lo sufialento como para permitir
qua el mango superior se pueda doblar
hacia atrds.
IMPORTANTE: Cuando doble el mango pare
el almacenamiento o el transporte, asegt_rese
qua Io doble segdn se muestra o purde daSar
los cables de control.
• Cuando prepare sus mangos a partir de la
poelci_ de almacenamieoto, el mango
inferior automdticamente se asegurard en la
posicibn para segar.
o infeder
Apdeteparadoblar LEdel
C_a'Ajade horqui]la
Barm de control qua
exige la Doblar
operader
Mango s_
Mango
Poslci6n
para segar
MOTOR
SISTEMA DE COMBUSTIBLE
IMPORTANTE: Es importante evitar qua se
fonnen depbaltos de goma an partes
fundamentales del sistema de combustible
tales como el carburador, el filtro del combus-
tible, la manguara del combustible o en el
estanqua duranto el elmasenamlanto. La
gasohol o qua tJenenetanol o metanol) pueden
atraer humedad, Io que conduce a la
separacion y a la formaclon de acidca durante
el almacenamianto. La gasolina acidica puede
dal_arel sistema de combustible de un motor
durante el periode de elmacanaralento.
1. Drene el estanque de combustible.
2. Haga arrancar el motor y d_jelo funcionar
hasto que las Ilneas del combustible y el
carburador est6n vaclos.
• Nunoa use los productos para limpleza del
carbumdor o del motor an el estanque de
combustible pues se pueden producir
da6os permanentes.
• Use combustible nuevo la prbxima
tempomda.
AVISO: [] estabilizador de combustible es una
altemativa aceptable para reducir a un mlolmo
la fonnaci(_n de depdsitos de goma en el
combustible durante el perlodo de
elmacenamiento. Agregue estobilizador a la
gasolina an el estanque de combuslible o an el
envase para el alrnacenamiento. Siempre siga
la propomk_nde rsezcla qua se encuentra an
el envase del estabilizador. Hago funcionar el
motor par Io menos 10 minutos de.spudsde
agregar el estabilizador, para permilir qua este
Ilegue al carbumdor. No drene la gasolina del
estanque de gasolina y el carburador si se
esta usando estabilizador de combustible.
ACEITE DEL MOTOR
Drene el aceito (con el motor caliente) y
cdrnblelo con aseite de motor limpio. (Vea
"MOTOR' en la secci6n de Mantenirn_entode
este manual.)
ClLINDRO
1. Remueva la buj|a.
2. Vacle 29 ml (una onza) de acelte a trav6s
del agujem de la buj|a en el cilindm.
3. Tire la manilla de arranque lontamanle
unas ccantas veces para distdbuir el
acelte.
4. Cambie par una bujla noeva.
OTROS
• No guarde la gasolina de una temporade a
la ova.
• Cambie el envase de la gasolina el se
empieza a oxidar. La c_idaal_n y/o la mugre
an su gasolina producir_ problemas.
• Si es paelble, guarde su unidad en an
recinto can-ado y cdbmla para protegerla
cantm el polvo y la mugm.
• Cubra su unided con an fono protector
adecuado qua no retanga la humedad. No
use pldstico. El pldstico no puede mspirar, Io
qua permits la formacibn de condensack_n,
Io qua produci_ la oxidaci_ de su anidad,
IMPORTANTE: Nunca cubra la segadora
mientras el motor y las areas de escape to
davia estan calleotes,
_RECAUCl6N: Nunca almacene la
segadom con gasolina an el estanque dentro
de an edificio en donde los gases pueden
alcanzar una llama expuesta o una chispa,
expedencia tarnbidn indica que los combus- Permita qua se enfrie el motor antes de elma-
tiblos mazcladGs con alcohol (conocido como 34canada an alg0n recJntocerrado,
IDENTIFICACION DE PROBLEMAS
P'ROBLEMA CAUSA
No arranca 1. Rltro de aim sucio.
2. Sin combustil_e.
3. Combustible rancio.
4. Agua en el combustible.
5. Alambre de la bujla
desconectado.
6. Bujla mala.
7. Cuchilla suelta o adaptador
de la cuchgla quebrado.
L Barra de control en la
posicidn suelta.
). Barra de control defectuosa.
Falta de fuerza 1. Cuchilla desgastada, dobtada
o suelta.
2. Altura de las nJedas dispareja.
3. Velocidad del motor lenta.
4. Acumulacibn de crisped,
hojas o basura debajo
de la segadom.
5. Demasiado acelte en
el motor.
6. Velocidad de recorddo
demasiado rdpida.
Mal cort_ 1. Cuchilla desgastada, doblada
dlspareJo o suelta.
2. Altura de las ruedas dispareja.
3. Acumulacibn de crisped,
hojas o basura debajo
de la ssgadora.
CORRECCI6N
1. Limple/cambie el flllro de aire.
2. Llene el estanque de combus
tible.
3. Drene el estanque y vuelva a
Ilenado con combustible limpio
y nuevo.
4. Drene el estanque de combus
tible y el carburador y vuelva a
Ilenar el estanque con gasolina
nueva.
5. Conecte el alambre a la bujia.
6. Camble la bujla.
7. Apriete el perno de la cuchiUa
cambie el adaptador de !a
cuchilla.
8. Presione ta barra de control
hacia el mango.
9. Cambie la barra de control.
1. Ajus_ea la posici6n de =Corte
m_Lsalto."
2. Ajuste a la posicibnde =Corte
m_ afro."
3. Limpie/cambie el liltro de aire.
4. Limpie la parte in_edorde la
caJa de la segadom.
5. Revise el nivel del aceite.
6. Corte a una velocidad de
recorddo m_s lenta.
1. Cambie la cuchilla. Apdete el
pemo de la cuchilla.
2. Ajuste todas las ruedas a la
misma altura.
3. Limple la parte Infedor de la
caja de la
segadora.
35
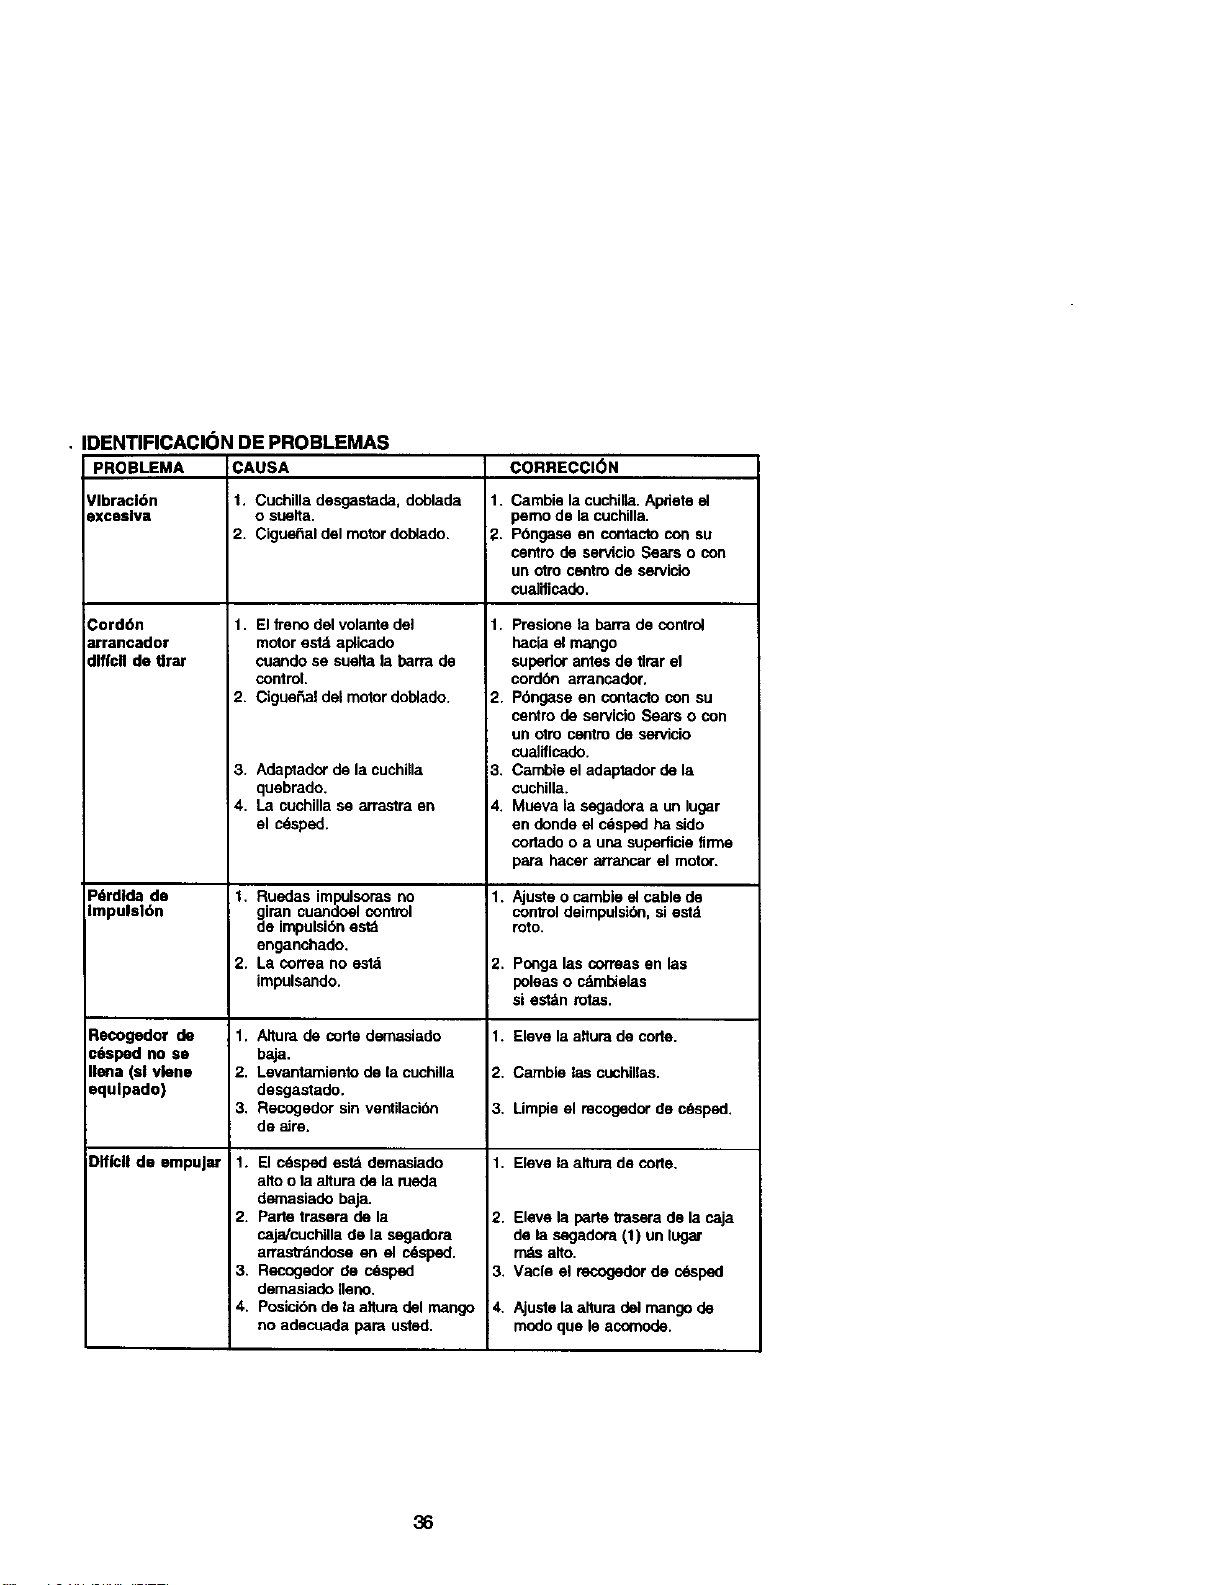
• IDENTIFICACI(3N DE PROBLEMAS
PROBLEMA CAUSA
Vlbracl6n 1. Cuchilla desgastada, doblada
exceslva o suelta.
2. Ciguer_aldel motor doblado.
Cord6n
arrancador
dlf|clt de tlrar
Pdrdida de
Impulsl6n
Recogedor de
cGsped no se
Ilena (s| vlene
equlpado)
Dfffcll de empuJar
1. Elfreno del volante del
motor estd aplicado
cuando se suelta la barra de
control.
2. Cigue_al del motor doblado.
3. Adaptador de la cuchilla
quebrado.
4. La cuchilla se arrastra en
el cdsped.
1. Ruedas impulsoras no
giran cuandoel control
de impulsibn estd
enganchado.
2. La correa no estd
impulsando.
1. Altura de corte demasiado
baja.
2. Levantamiento de [a cuchilla
desgastado.
3. Recogedor sin ventilacibn
de aJre.
1. El cdsped estd demasiado
alto o la altura de la meda
demasiado baja.
2. Parte trasera de la
caja/cuchilla de la segadora
an'aslrdndose en el cdsped.
3. Recogedor de crisped
demasiado Ileno.
4. Posicibn de la altura del mango
no adecuada para usted.
CORRECCION
1. Cambie la cuchilia. Apriete el
pemo de la cuchilla.
2. Pbngase en contacto con su
centre de servicio Sears o con
un otro centro de servicio
cualificado.
1. Presione la barra de control
hacia el mango
supedor antes de tlrar el
cordbn arrancador.
2. P6ngase en contacto con su
centro de servicio Sears o con
un otro centro de servicio
cualificado.
3. Cambie el adaptador de la
cuchilla.
4. Mueva la segadora a un lugar
en donde el c6sped ha sido
cortado o a una supedicie firme
para hacer arrancar el motor.
1. Ajuste o cambie el cable de
conlrol deimpulsk_n,si estd
roto.
2. ponga las cormas en las
poleas o cdmbielas
si est_n mtas.
1. Eleve la attura de code.
2. Cambie las cuchinas.
3. Limpie el mcogedor de cdsped.
1. Eleve la altum de corte.
2. Eleve la parte trasera de la caja
de la segadora (1) un lugar
matsalto.
3. Vacle el recogedor de c_sped
4. Ajuste la altum del mango de
rnodoque le acomode.
36
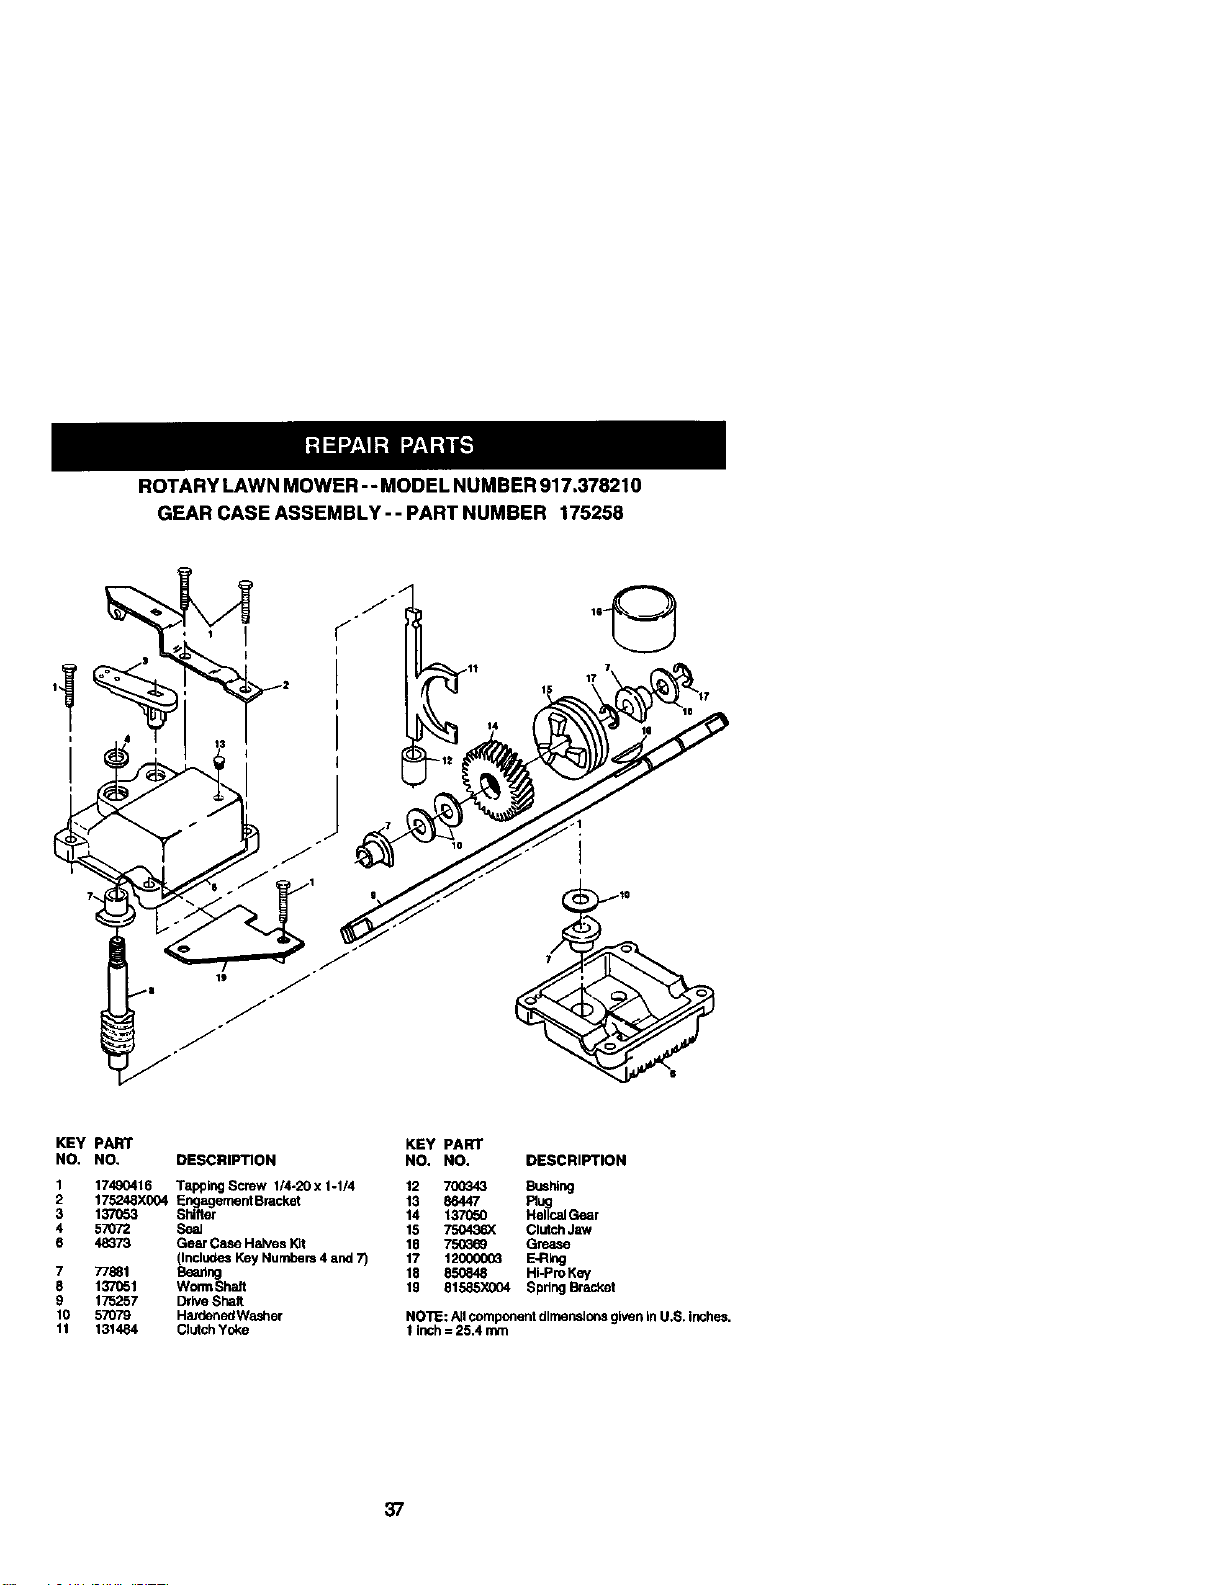
ROTARYLAWNMOWER--MODELNUMBER917.378210
GEARCASEASSEMBLY--PARTNUMBER175258
1
I
17
KEY PART
NO. NO, DESCRIPTION
1 17490416 Tapping Screw 1/4-20 x 1-I/4
2 175248X004 Engagement Bracket
3 137053 Shifter
4 57072 SeaJ
6 48373 Gear Case Halves Kit
(Includes Key Numbers 4 and 7)
7 77881 Bearing
8 137061 Wont1Shait
9 175257 Drh/e Sha/t
10 57079 HardenedWasher
11 131484 Clutch Yoke
KEY PART
NO. NO. DESCRIPTION
12 700343 Bushing
13 86447 FJug
14 137050 Helical Gear
15 75043_( Clutch Jaw
18 750369 Grease
17 12OO0O03 E-Rklg
18 _ Hi-ProKey
lg 81585X004 Spring Bracket
NOTE: Atlcomponent dlrnepadonsgiven In U,S. inches.
1 inch = 25.4 mm
37

1
29
33
19
ROTARY LAWN MOWER -- MODEL NUMBER 917.378210
36j
21
13
31
24
31
44
27
38
|
13
28 84
F
83 88
25
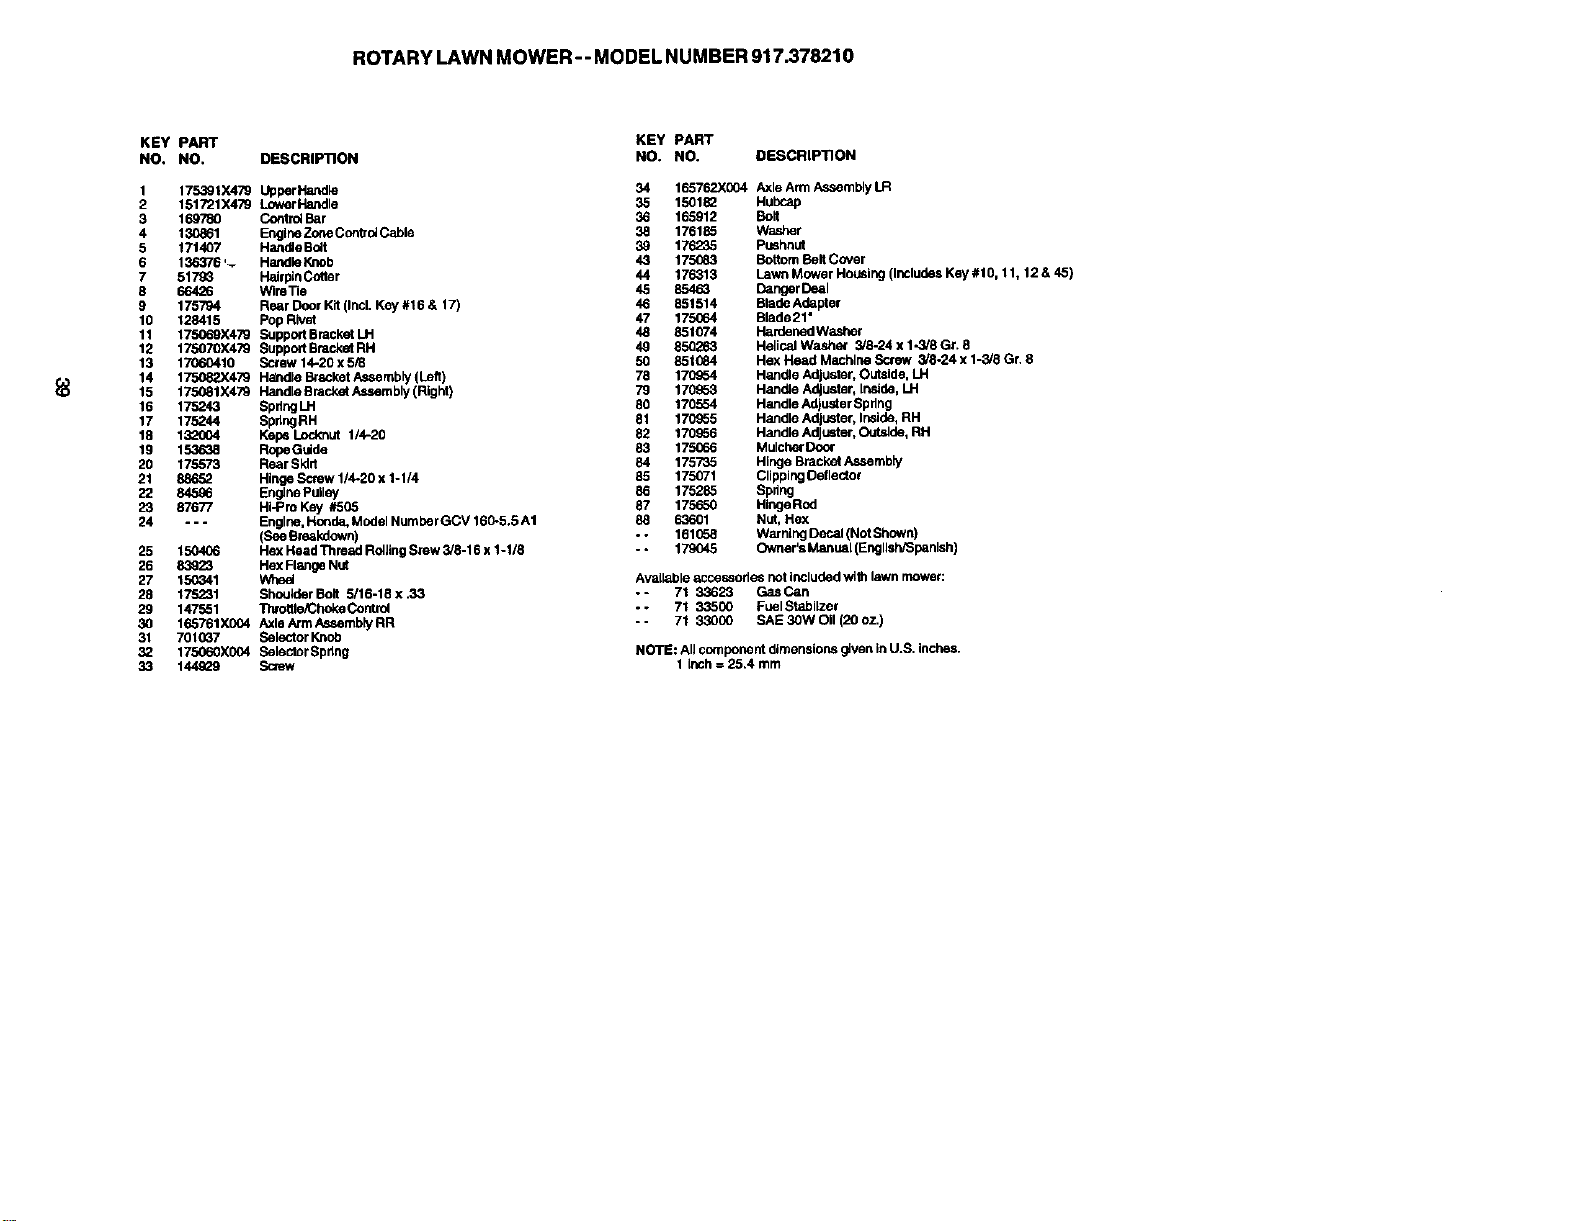
ROTARY LAWN MOWER- - MODEL NUMBER 917.378210
KEY PART
NO. NO. DESCRIPllON
1 175391X479 UpderHandle
2 151721X479 Lower Handle
3 169780 Cont rdlBar
4 130861 Engine Zone ContTdlCable
5 171407 HandleBolt
6 136376 ,_ HandleKnob
7 51793 HairpinCotter
8 66426 WireTie
9 175794 Rear Door Kit(Incl. Key #16 & 17)
10 128415 Pop Rivet
11 175069X479 Support Bracket LH
12 175070X479 Support Bracknt RH
13 17060410 Screw 14-20 x 5/8
14 175082X479 Ha(ndleBracket Assembly (Left)
15 175081X479 Handle Bracknt Assembly (Right)
16 175243 SpdngLH
17 175244 SpdngRH
18 132004 Keps Locl_ut 1/4-20
19 153638 RopoGuide
29 175573 Rear Sldrt
21 88652 Hinge Barew 1/4-20 x 1-1/4
22 84596 Engine Pulley
23 87677 HI-Pro Key #505
24 --- Engine, Honda, Model Numher GCV 160-5.5 A1
(See Breakdown)
25 150406 Hex Head Thread RdlJlngS_ew 3/8-16 x 1-1/8
26 83923 Hex FIsnge NUt
27 150341 Wheel
28 175231 Shoulder Boit 5/16-18 x .33
29 147551 Ttarnt6eiChokeControl
30 165761X004 AxleArm Assembly RR
31 701037 Selector Knob
32 175060X004 Balector Spdng
33 144929 Scxew
KEY PART
NO. NO. DESCRIPTION
34 165762X(:X_4 Axle Arm Assembly LR
35 150182 Hubcap
36 165912 Boll
38 176185 Washer
39 176235 Pushnut
43 175(_83 Bottom Belt Cover
44 176313 Lawn Mower Housing (Includes Key #10, 11, 12 & 45)
#5 85463 D;zngerI:)eal
46 851514 Blade Adepter
47 175(To4 Blade21"
48 851074 I-kzpdenedWasher
49 850263 Helical Washer 3/8-24 x 1-3/8 Gr. 8
50 851_84 Hex Head Mech_rmScrew 3/8-24 x 1-3/8 Gr. 8
78 170854 Handle Adjuster, Outside, LH
79 170853 Handle Adjuster, Inside, LH
80 170554 Handle Adjuster Spflng
81 170855 Handle Adjuster, Inside, RH
82 1_ Handle Adjuster, Outside, RH
83 175066 MulcherDoor
84 175735 Hinge Bracknt Assembly
85 175071 ClippingDeflector
86 175285 Spdng
87 175650 HingeRod
88 63601 Nut, Hex
- - 161(58 Warnlng Decal (Not Shown)
-. 179045 Owner's Manual (EngllsWS panlsh)
AvaiLablee,cceasohes not included will1lawn mower:
-- 71 33623 GasP,an
-- 71 33500 Fuel Stabllzer
-- 71 33000 SAE 30W Oil (20 oz.)
NOTE: All component dimensions g_venin U.S. inches.
1 Inch = 25.4 mm
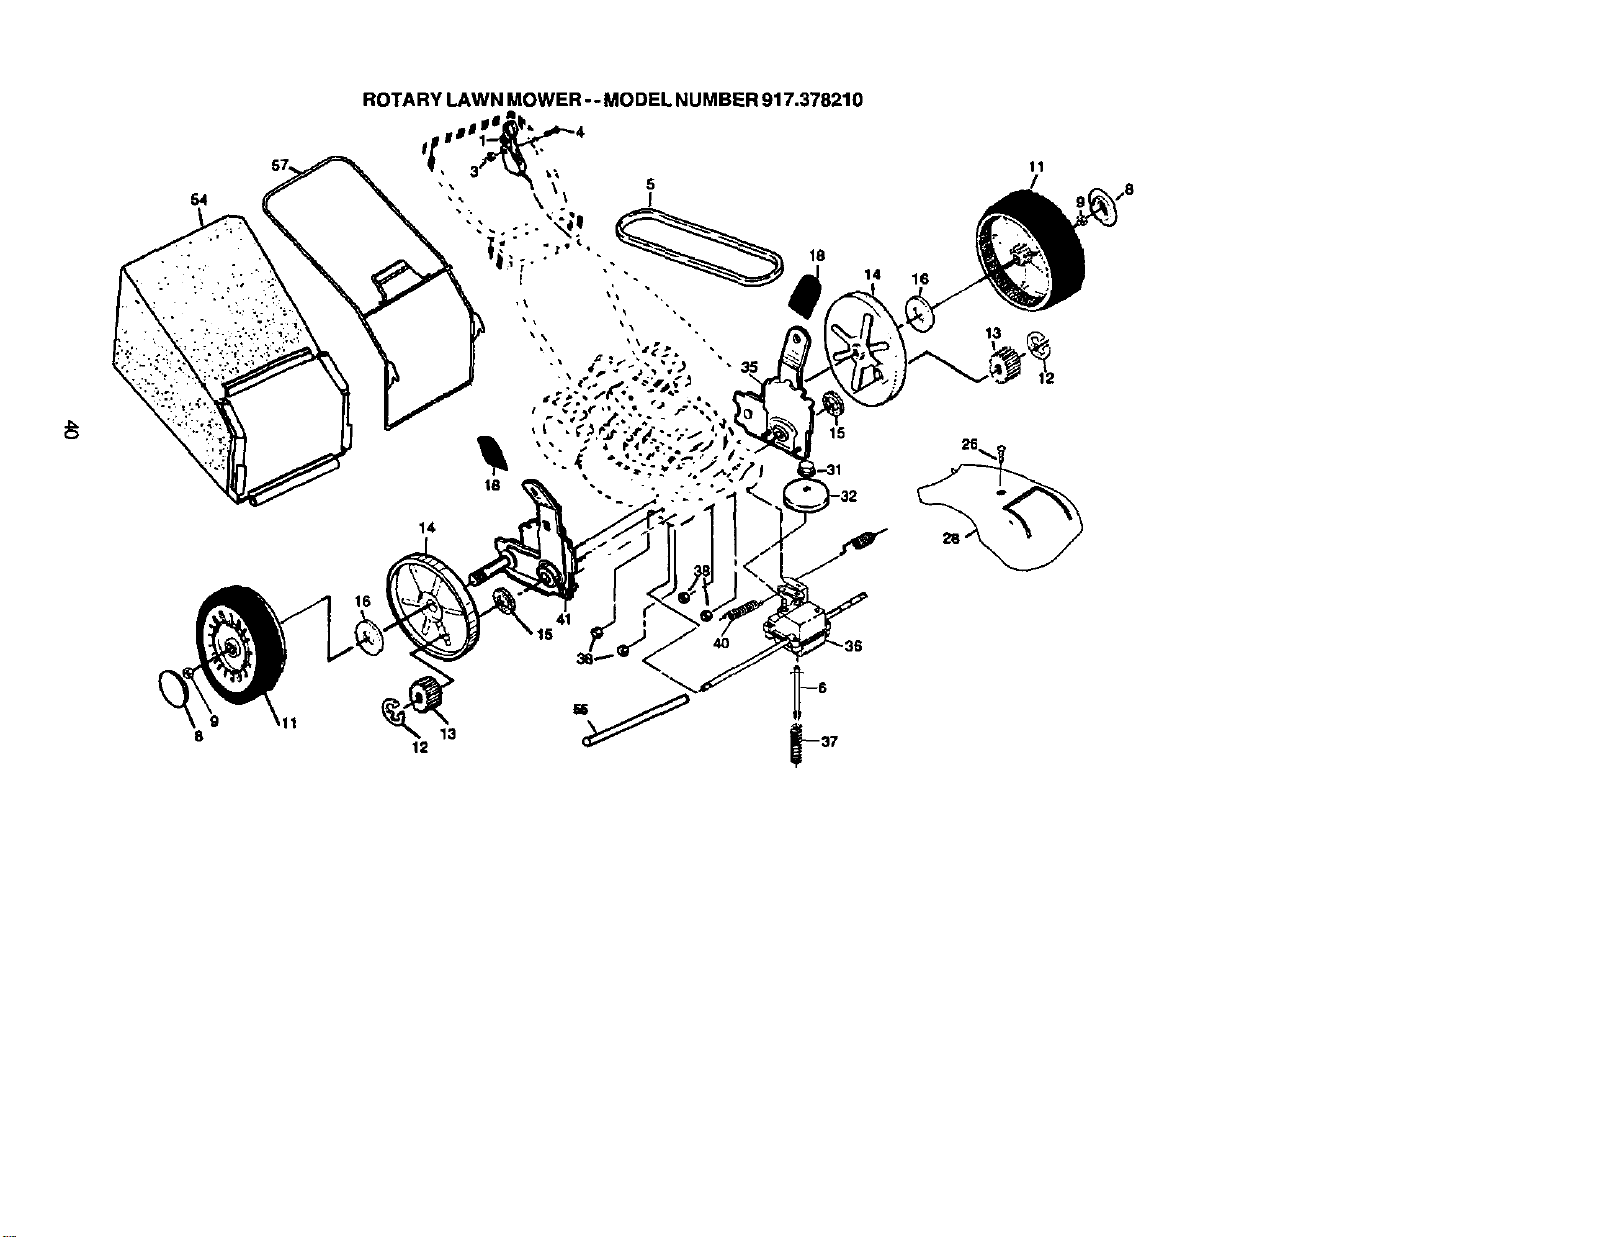
ROTARY LAWN MOWER --MODEL NUMBER 917.378210
18
14
15
14
16
11

ROTARY LAWN MOWER -- MODEL NUMBER 917.378210
KEY
NO.
1
3
4
5
6
8
9
11
12
13
14
15
16
18
26
PART
NO.
14,5738
751152
158755
175436
1504E_
150182
145212
150340
12000_8
137384
88060
88110
67725
7010_'
175262
I_-Y PART
DESCRIPTION NO. NO. DESCRIPTION
Control Cable Assembly 28 1_
Locknut #10-24 31 132010
Hex Washer Head Screw 1/4-20 x 2.12 37 137052
V-Belt 38 151521
Spdng Retainer 36 175258
Hubcap 37 137090
Locknut 38 63601
Wheel & Tim Assembly 40 751_
E-Ring 41 151520
pinion 54 179047
Dust Cover 38 175739
Felt Washer 57 175058
Washer 1/2x1-1/2 x,134
Selector Knob
Pan Head Tapping Screw #10-24 x 2-3/4
DriveCover
Hex Flange Nut
Drive Pulley
Wheet Adjuster Assembly (Left)
Gear Case Assembly
spring
Lockrtut 11420
Spring
Wheel Adjuster Assembly (Right)
Grassbag Assembly
Drive,shaftCover
Frame
NOTE: All component dimensions given in U.S. inches.
1 inch = 25.4 mm

• HONDA 4-CYCLE ENGINE
MODEL NUMBER GCVI60-5.5-A1
co.,.o_l
CAMSHAFTJ
CARBURETOR .J
3_ 1_ _11)_:_ ._
s1 " "_1
_,, 1.__ 1_21_1_1_5 __ 6 1_0_9 7
13_ _ 12 4
11
f
14
42

HONDA 4-CYCLE ENGINE
MODEL NUMBER GCV160-5.5-A1
CONTROL CARBURETOR
KEY PART KEY pART
NO. NO. DESCRIPTION NO, NO.
1 5580311 Arm, Govemor 1 3088416
2 5580329 Rod, Governor 2 5580162
3 5580345 Spring, Governor 3 4930756
4 5580352 Spdng, Throttle Retom 4 4481818
5 4439428 Spring, Lever 5 1441518
6 0800466 Holder, Cable 6 5580170
7 5580378 Base Comp., Control Use up 7 5664552
to sn 1177559. 8 5580212
7 6094122 Base Comp., Control Use 9 5580220
from sn 1177560. 10 5580238
8 5580386 Rod, Choke 11 5580246
9 2418671 Bolt, Governor Arm 12 4581120
10 5580998 Bolt, Range (6x45) (ct2OO) 13 5580253
11 0145557 Screw, Pan (5x16) 14 5580535
12 0471623 Nut, Flange (6rnm) 15 0639419
15 3344520
16 0635474
CAMSHAFT PULLEY 16 0635482
16 0636126
KEY PART
NO. NO. DESCRIPTION
1 5580055 pulley Comp., Camshaft
2 5580063 Shaft, Cam Pulley
3 5580071 Belt,TIming
4 5580089 Arm In.Valve Rocker
5 5580097 Arm, Ex. Valve Rocker
6 5580105 Shaft Rocker Arm
7 5580113 Valve, In.
8 5580121 Valve, Ex.
5580139 Spdng, Valve
0 1426980 Retainer,In. Valve Spring
11 0294819 Screw, Tappet Adj.
12 0004598 Nut, Tappet Adj.
13 0018044 O-ring
13 2373447 O-ring
DESCRIPTION
Gasket Bet
Float Bet
Chamber Set, Float
Screw Set
Screw Set
Screw Set
Carburetor assy.
Valve Float
Nozzle Main
Insulator, Carburetor
Gasket, Insulator
Gasket, Carburetor
Gasket, Carburetor
Gukle Comp., air
Screw, Pan (5x6
Screw, Pan (5x6
Jet, Main #60 (optional)
Jet, Main #62 (optional)
Jet, Main #65 (optional)
43
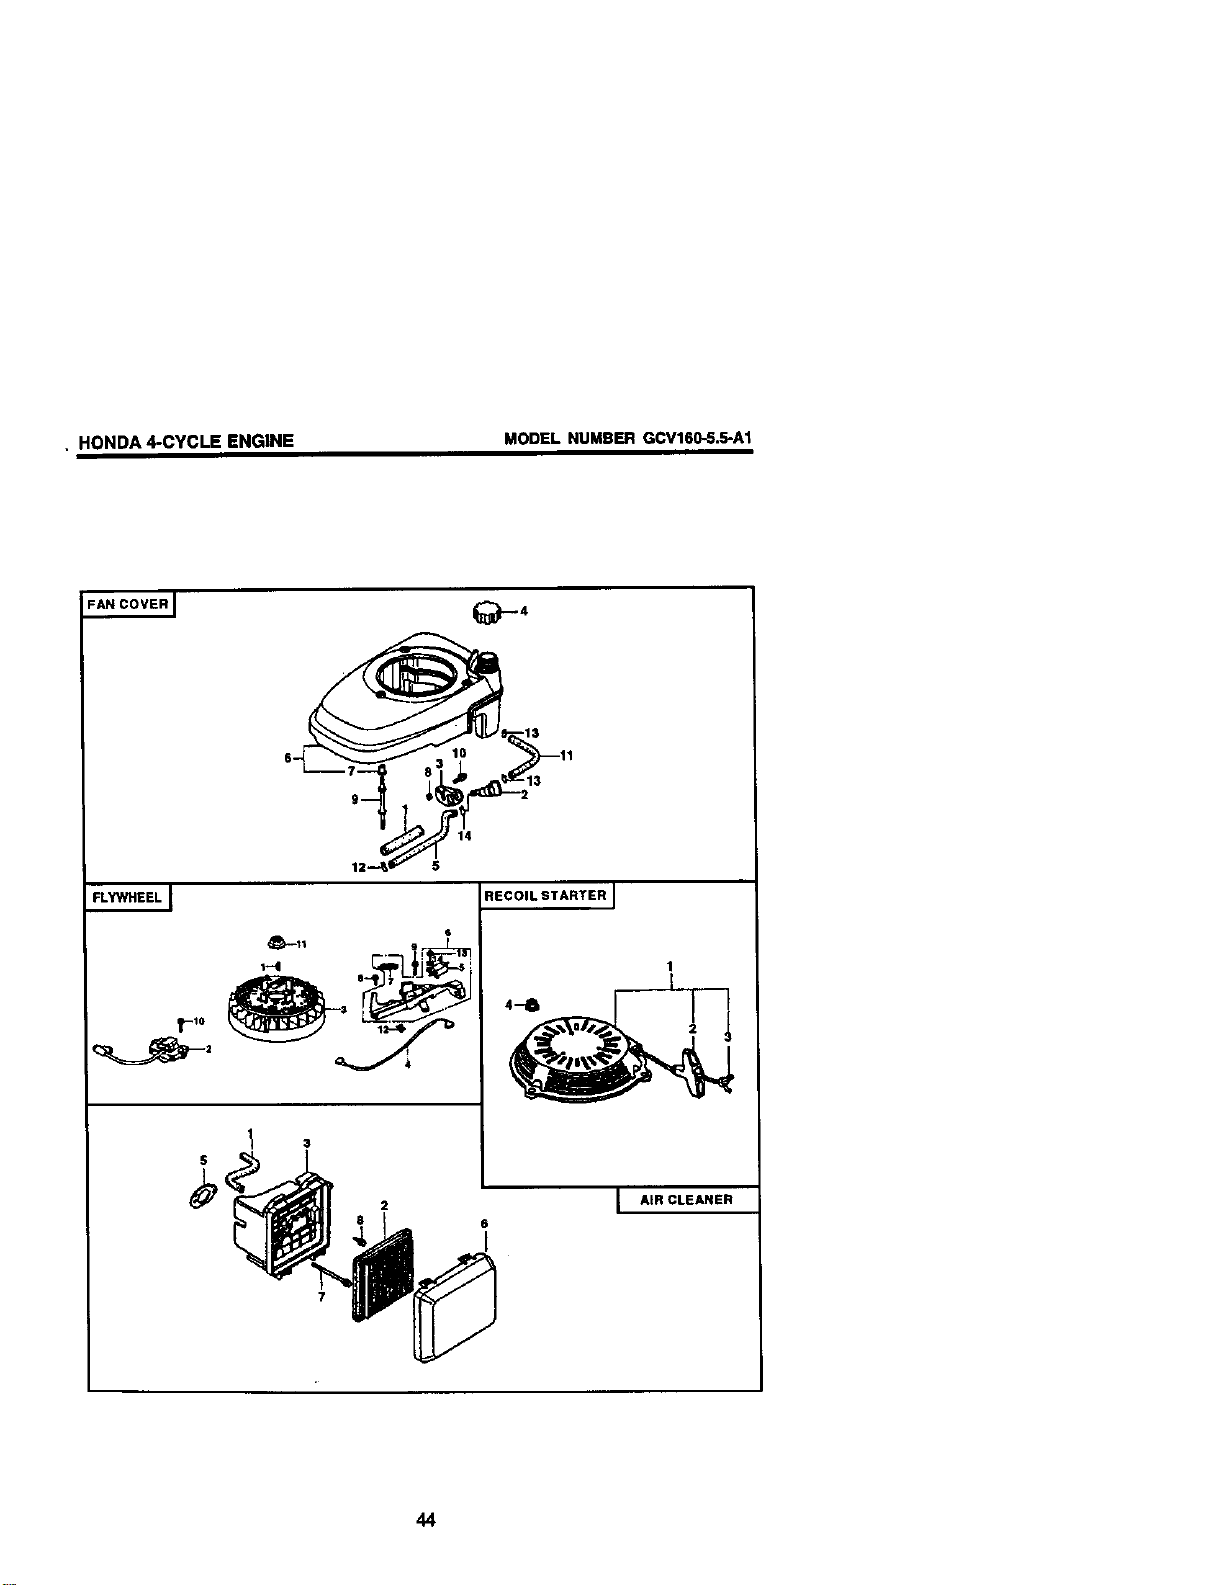
• HONDA 4-CYCLE ENGINE
MODEL NUMBER GCV160-5.5-A1
FAN COVER I
_4
13
14
E
FLYWHEEL
RECOIL STARTER J
AIR CLEANER
6
I
44
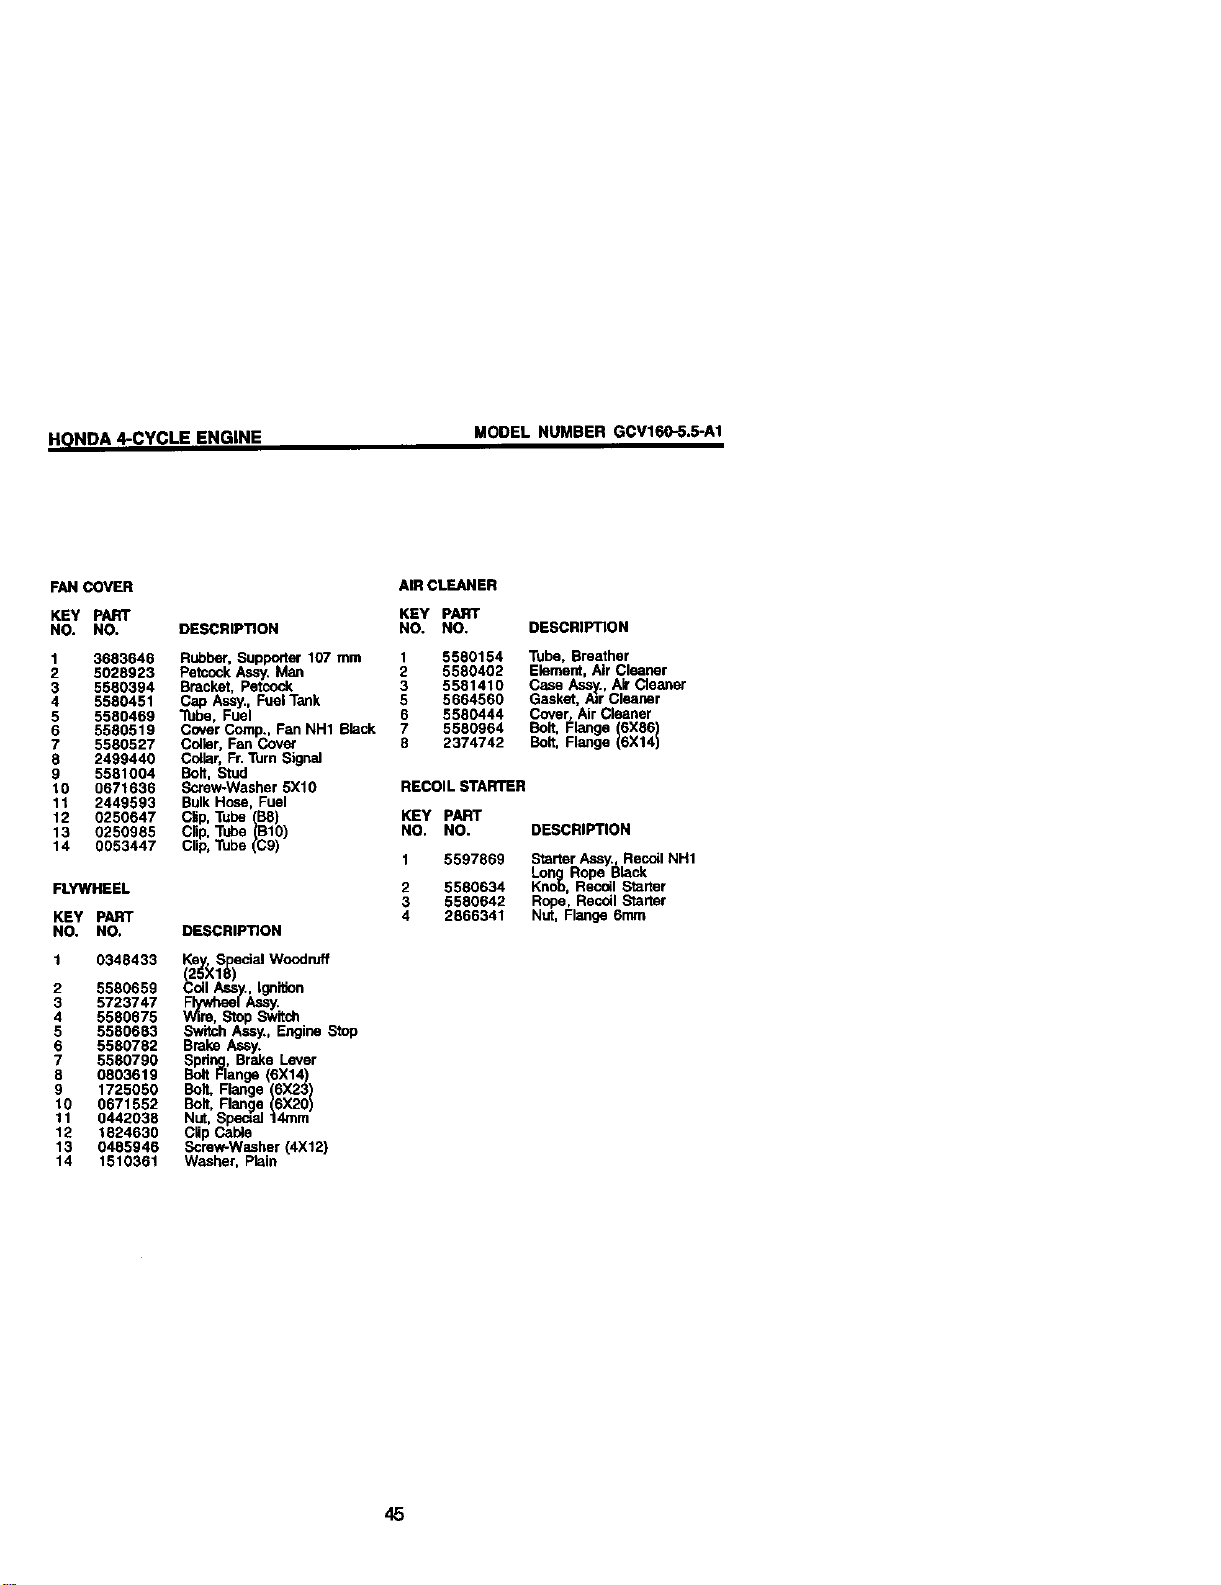
H_)NDA 4-CYCLE ENGINE
MODEL NUMBER GCV160-5.5_1
FAN COVER
KEY PART
NO. NO. DESCRIPTION
1 3683646
2 5028923
3 5580394
4 5580451
5 5580469
6 5580519
7 5580527
8 2499440
9 5581004
10 0671636
11 2449593
12 0250647
13 0250985
14 0053447
FLYWHEEL
KEY pART
NO. NO.
1 0348433
2 5580659
3 5723747
4 5580675
5 5580683
6 5580782
7 5580790
8 0803619
9 1725050
10 0671552
11 0442038
12 1624630
13 0485946
14 1510361
AIR CLEANER
KEY PART
NO. NO. DESCRIPTION
Rubber. Supporter 107 mm 1 5580154 Tube, Breather
PetcockAssy. Man 2 5580402 Element, Air Cleaner
Bracket. Petcock 3 5581410 Case Assy., Ak Cleaner
Cap Assy.,Fuel Tank 5 5664560 Gasket. Air Cleaner
Tube, Fuel 6 5580444 Cover, Air Cleaner
Cover Comp., Fan NH1 Black 7 5580964 Bolt, Flange (6X86)
Caller, Fan Cover 8 2374742 Bolt, Flange ()6X14
Collar,Fr.Turn Signal
Bolt. Stud
Screw.Washer 5X10 RECOIL STARTER
BulkHose, Fuel
Ctp, Tube (B8) KEY PART
Clip, Tube (B10) NO. NO. DESCRIPTION
Clip,Tube (C9)
1 5597869 Starter Assy., Recoil NH1
Lonng Rope Black
2 5580634 KnoS, Recoil Starter
3 5580642 Rope, Recoil Starter
4 2866341 Nut, Flange 6ram
DESCRIPTION
Ke. S ecial Woodruff
Coil Assy.,Ignition
F /Assy.
_p _itdl
Switch A_y., Engine Stop
Brake A_y.
Spd_, Brake Lever
BoltRange (6X14)
Bolt, Flange (6X23)
Bolt, Flange (6X20)
Nut, Special 14ram
Clip Cable
Screw-Washer (4X12)
Washer, Plain
45

HONDA 4-CYCLE ENGINE
MODEL NUMBER GCV160-5.5-A1
CYLINDER BARREL ]
OiL PAN
:RANKSHAFT J
1
_'_5
4
MUFFLER
4
46
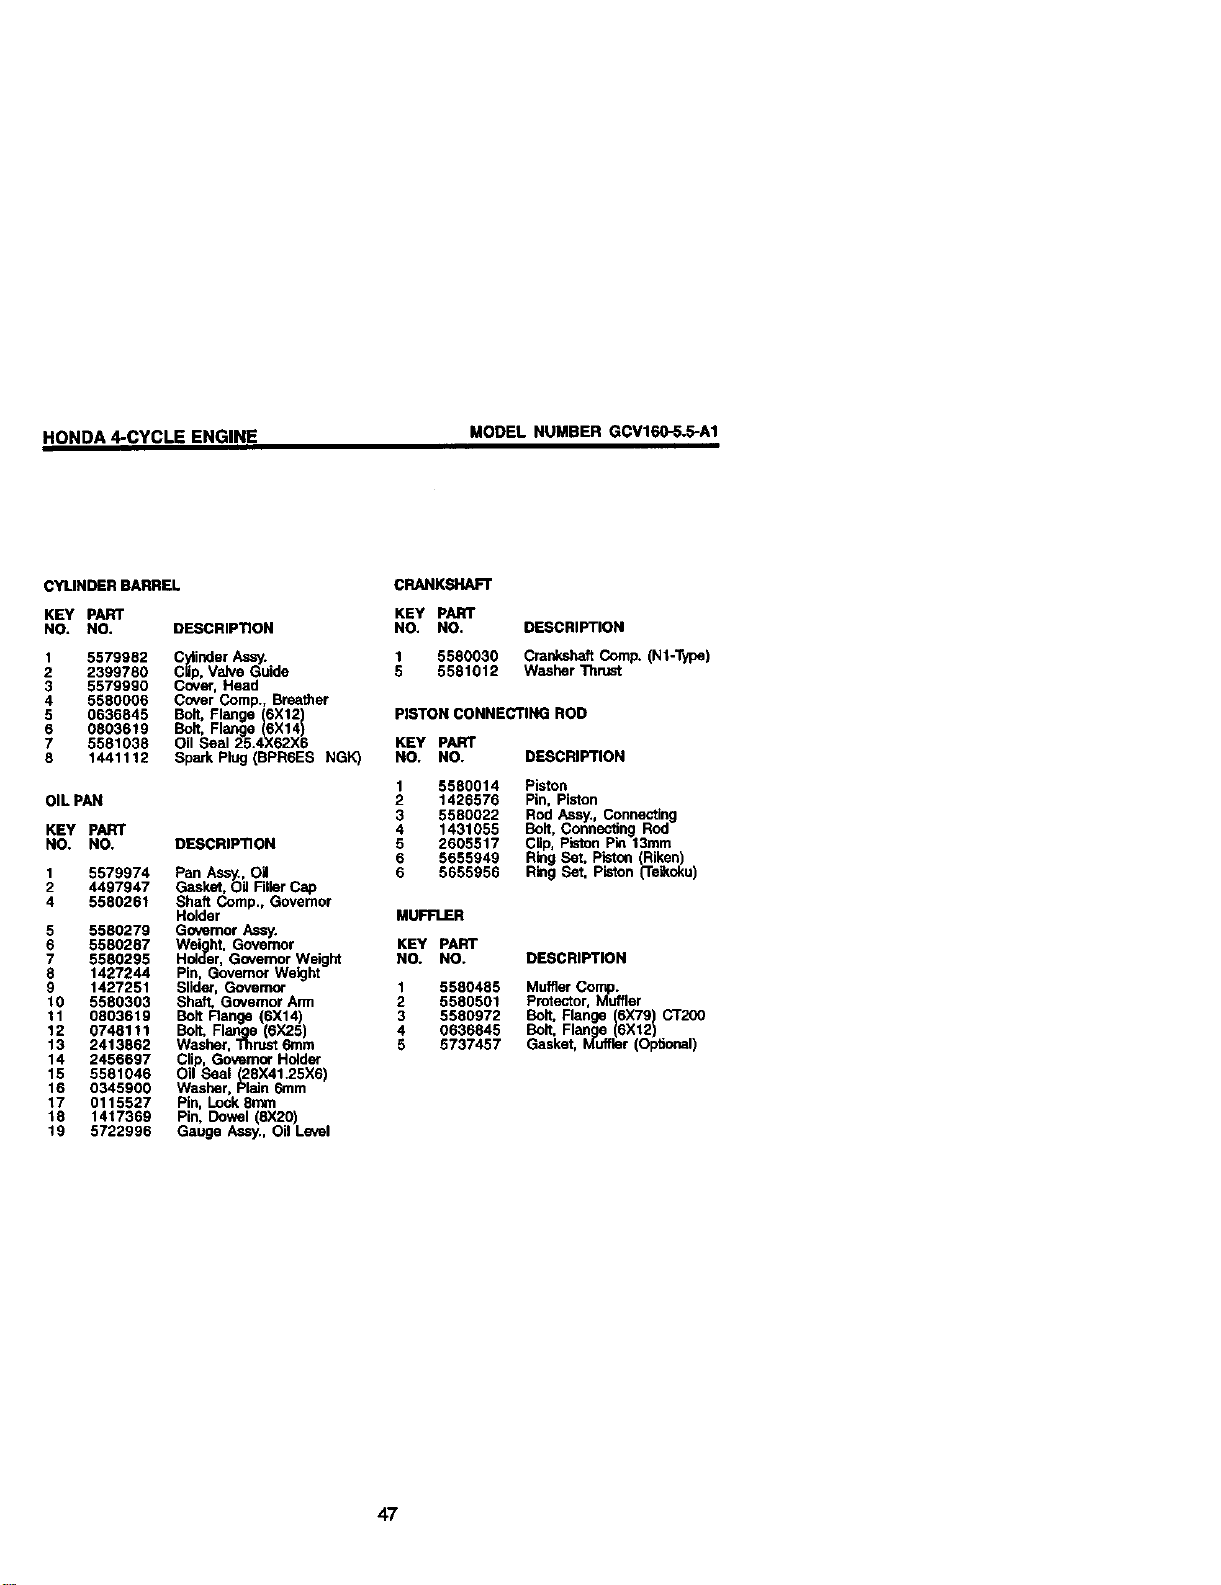
HONDA 4-CYCLE ENGINE
MODEL NUMBER GCV160-5.5-A1
CYLINDER BARREL
KEY PART
NO, NO. DESCRIPTION
1 5579982 CylinderAss,/.
2 2399780 CUp,Valve Guide
3 5579990 Cover, Head
4 5580006 Cover Comp., Breather
5 0636845 Bolt, Flange (6X12)
6 0803619 Bolt, Flange (6X14)
7 5581038 Oil Seal 25.4X62X6
8 1441112 Spark Plug (BPR6ES NGK)
OIL PAN
KEY PART
NO. NO. DESCRIPTION
1 5579974 Pan Assy., Oil
2 4497947 Gasket, Oil FillerCap
4 5580261 Shaft Comp., Governor
Holder
5 5580279 Governor Assy.
6 5580287 We'zgrht,Governor
7 5580295 Holder, Govemor Weight
8 1427244 Pin, Governor Weight
9 1427251 Slider, Governor
10 5580303 Shaft. Govemor Ann
11 0803619 Bolt Range (6X14)
12 0748111 Bolt. Flange (6X25)
13 2413862 Washer, Thrust 6rnm
14 2456697 Clip, Governor Holder
15 5581046 Oil Seal (28X41.25X6)
16 0345900 Washer, Plain 6ram
17 0115527 Pin, Lock8rnm
18 1417369 Pin, Bowel 8X20)
19 5722996 Gauge Assy., O Leve
CRANKSHAFT
KEY PART
NO. NO.
1 5580030
5 5581012
DESCRIPTION
CrankshaftCornp. (N1-Tyge)
Washer Thrust
PISTON CONNECTING ROD
KEY PART
NO. NO. DESCRIPTION
1
2
3
4
5
6
6
5580014 Piston
1426576 Pin, Piston
5580022 Rod Assy.,Connecting
1431055 Bolt, Connecting Rod
2605517 Clip, Piston Pin 13ram
5655949 RingSet, Piston (Riken)
5655956 RingSet, Pistont mikoku)
MUFFLER
KEY PART
NO. NO. DESCRIPTION
1 5580485 Muffler Comp..
2 5580501 Protector,Muffler
3 5580972 Bolt. Flange 16X791CT200
4 0636845 Bolt, Flange 6X12
5 5737457 Gasket, Muffler (Ol_onal)
47
ForrepairofmajorbrandeppliancesInyour own home...
no mattorwhomadeit,nomatterwhosoldiU
1-800-4-MY-HOME @ An,/m_day_ night
0_) (u.sAandCanada)
VA_q_,.qem'_CGfn '*qlNW.$e4_LC8
Forrepairofcamj-inproductslikevacuums,lawnequipment,and
electronics,ca_forthenearestSearsPartsand RepairCenter.
1-800-488-1222 An,Arne,dayorni_ (U.S.A.m_)
_.searlLc_/n
Forthereplacementpads,accessoriesandowner'smanuals
thatyouneedtodo-it-yourself,callSearsPartsDirect_!
1-800-366-PART 6a.m.- 11p.m+,7 _ys awe6k
0_c0_7278) (u.sJ_orgy)
wwwJ_amcom_0atdrect
To purchaseor inquireabouta SearsSewice Agreement
or SearsMaintenanceAgreement:
1-800-827-8655 (U.S.A.) 1-800-361-8665 (Canada)
7am. - 5 p.n_,CST,Mo_ - SaL 9aJn.- 8 pJ_ EST, M- F, 4p.m.Sat
Parapedrseni_iode mparac_ a
dxnul_yparaordererp_,a_
l-,a88-StH-IOGAR_
(1_88-_
©Sea_ Roetx_ mdCo.
AuCanacrapourserviceen_
1.800-LE-FOYER_
_hvw_eazsJ:a
Horr _,entml®J
® Registered Trademark I TM Trademark I sMService Mark ol Sears, Roebuck and Co.
® MarCa Reglslrade I TM Mama de Fdbdca I sMMama de Servlclo de Sears, Roebuck and Co.
MCMarque de commerce / L,_Marque deposde de Sears, Roebuck and Co.
179045 03.09.01 BY Printed in U.S.A.