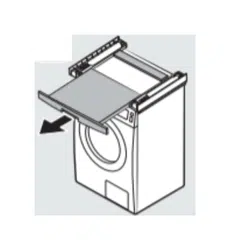
Stacking Kit Installation Guide (SKK-9MC*)
CAUTION
• Risk of personal injury. The dryer is large and heavy. Have at least two people move the dryer. Otherwise, it
may result in personal injury or death.
• Risk of product damage during installation. The dryer must be firmly installed on top of the washer. Do not
install the washer on top of the dryer. Otherwise, it may result in personal injury, death, or property damage.
• Risk of electric shock. You must disconnect the power cord before installing the product. Otherwise, it may
result in severe personal injury or death.
• When installing the dryer on top of the washer, make sure the drain hose in the rear is connected directly to
a drain and not to a water tank.
NOTE
This Stacking Kit is compatible with Samsung BESPOKE front-load washers and dryers released after 2022.
Check the compatibility of the stacking kit before installing it. You can check the compatible washer and dryer
models at the Samsung website (www.samsung.com).
Accessories
Hex-head screws (4)
6002-001431 (M5, L16)
Washers (4)
DC60-00044A (ID5, OD10)
Phillips-pan head
screws (8)
6002-000213 (M4, L12)
Phillips-pan head
screws (2)
6002-000215 (M4, L16)
<H
>
#
:
9
($
=H
8
#
:
;(
$
R
R
5.0cf
23kg
4.6cf
21kg
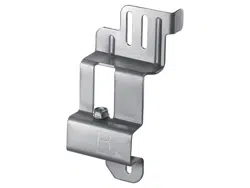
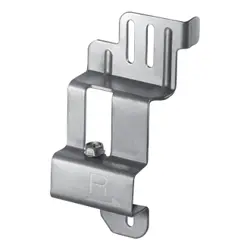
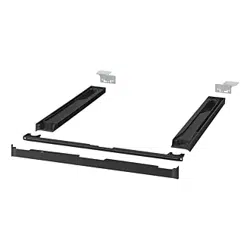
Installation guide Left side top cover bracket Right side top cover
bracket (with multi-
connection cable
attached)
Front cover
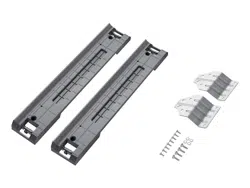
Bracket guide Stacking guide (L/R)
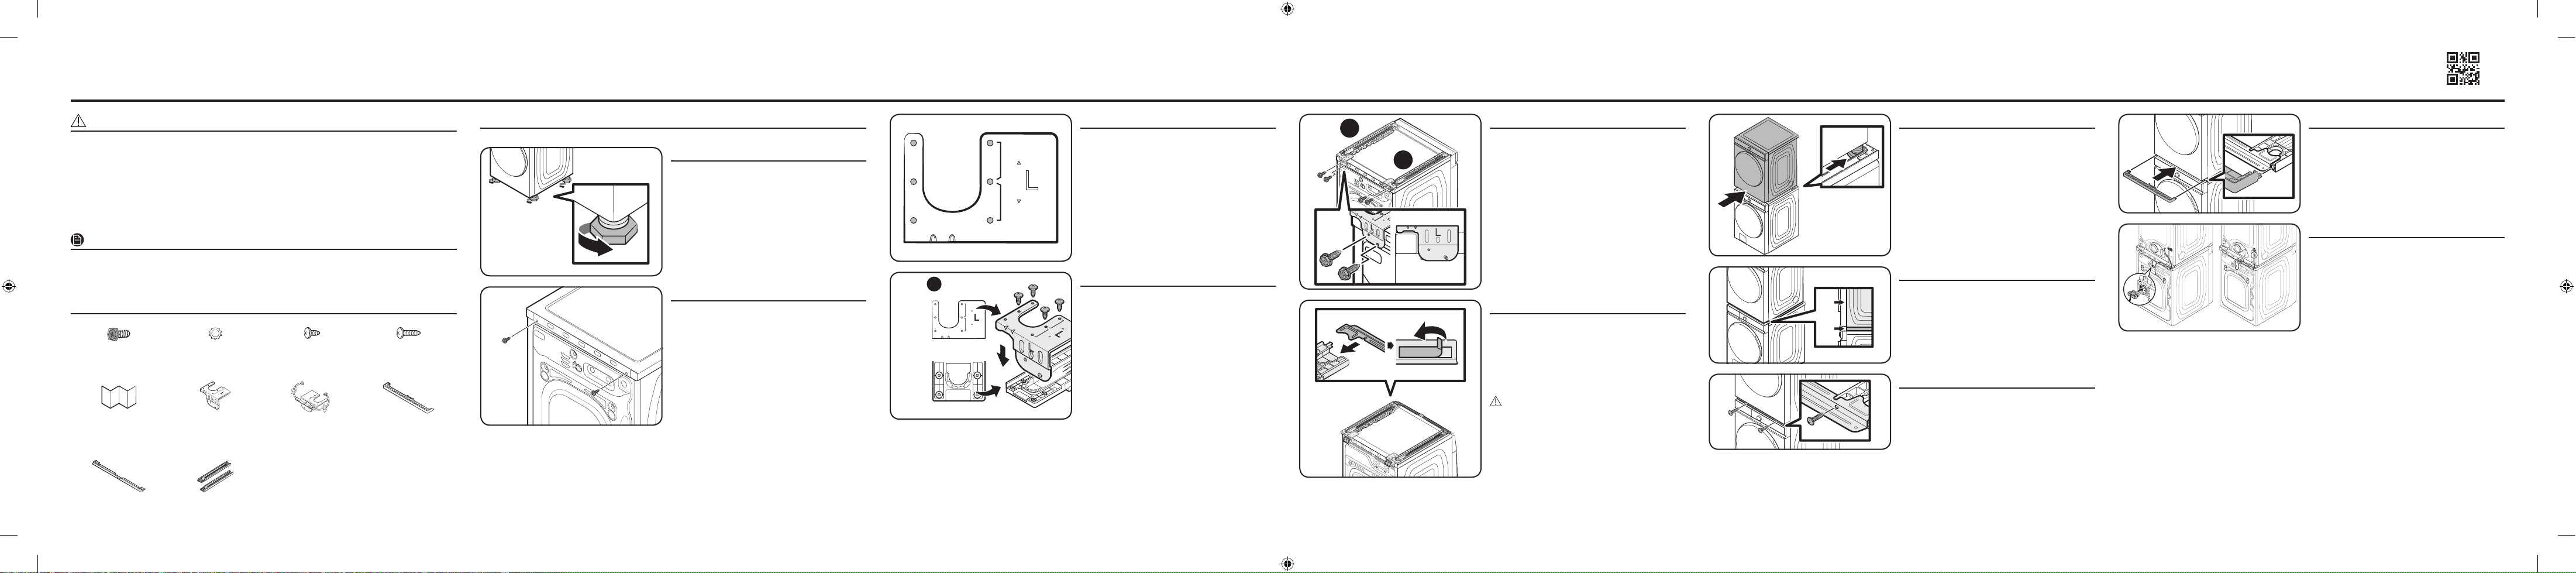
Installation
STEP 1
Tighten the four leveling feet of the dryer all the way.
• Level the dryer using a level.
STEP 2
Slightly pull out the installed washer to gain access to
its rear.
Unfasten the two screws attached at the back of the
washer.
=H8 #
:;($
<H> #
:9($
STEP 3
Check the capacity of your washer (5.0 cf and over or
4.6 cf and less) and locate the correct assembly holes on
the top cover bracket (L/R).
<H> #
:9($
=H8 #
:;($
=H8 #
:;($
<H> #
:9($
Top cover bracket
Stacking guide
STEP 4
Fasten the top cover brackets (L/R) to their
corresponding stacking guides (L/R) using four M4 x L12
Phillips-Pan head screws.
• Check and make sure each top cover brackets are on
the correct sides (left/right) of the stacking guides
before fastening them.
R
R
4.5cf
21kg
5.0cf
23kg
4.5cf
21kg
5.0cf
23kg
L
4.5cf
21kg
5.0cf
23kg
R
STEP 5
Position the assembled stacking guides (L/R) on the
curved edges of the washer’s top cover. Fasten the
assembled stacking guides (L/R) using four washers and
M5 x L16 hex-head screws.
:9
(
$
Ꮭ
:;
(
$
Ꮫ
:9
($
Ꮬ
:;
($
Ꮪ
STEP 6
Assemble the bracket guide to the stacking guides at
the front end and check the alignment. Remove the
release liner from the double-sided tape attached
to the bottom of the stacking guides and attach the
stacking guides to the washer as shown in the figure.
Then, disassemble the bracket guide from the stacking
guides.
CAUTION
• Make sure the bottom curvature of the stacking
guide is aligned with the curvature of the washer’s
top cover.
• Attach the stacking guides after making sure they
are perfectly parallel with the washer’s top cover.
• After attaching the stacking guides, reattach the
bracket guide and double-check to make sure the
stacking guides are parallel.
STEP 7
Have at least two people lift the dryer and place it on
the stacking guide, and then push the dryer until the
rear two legs are properly locked into the stacking
guides’ U-shaped slot.
STEP 8
If installed correctly, the front edges of the stacking
guides should be perfectly aligned with the front edges
of the dryer’s side frames.
• Check to make sure the front edges of the dryer’s
side frame are not sticking out past the stacking
guides.
STEP 9
Attach the bracket guide to the stacking guides and
secure it in place using the M4 x L16 Phillips-Pan head
screws, as shown in the figure.
STEP 10
Hold the front cover with the letter ‘UP’ facing upward.
Align the hooks on the front cover with the holes on
the stacking guides as shown in the figure. Then, fully
insert the hooks to attach the front cover to the staking
guides.
<
H
=
#
:
9(
$
=H
8
#
:
;
($
<
H
=
#
:
9($
=H
8
#
:
;
(
$
<
H
=
#
:
9($
=H
8
#
:
;
(
$
<
H=
#
:
9($
=H
8
#
:
;
(
$
STEP 11
Open the connector port covers on the dryer and the
washer. Then, connect the multi-connection cable on
both ports and close both connector port covers.
Attach each wire holder to the designated slots on the
dryer and the washer.
DC68-03859G-00
SKK-9MC_StackingKit_IG_DC68-03859G-00_EN+CFR+MES.indd 1 2022-04-25 5:13:48

Guía de instalación del kit de apilamiento (SKK-9MC*)
PRECAUCIÓN
• Riesgo de lesiones físicas. La secadora es grande y pesada. Se necesitan dos personas como mínimo para mover
la secadora. De lo contrario, podrían producirse lesiones físicas o incluso la muerte.
• Riesgo de daños del producto durante la instalación. La secadora debe instalarse firmemente sobre la lavadora.
No instale la lavadora encima de la secadora. De lo contrario, podrían producirse daños materiales, lesiones
físicas o incluso la muerte.
• Riesgo de descarga eléctrica. Debe desconectar el cable de alimentación antes de instalar el producto. De lo
contrario, podrían producirse lesiones físicas graves o incluso la muerte.
• Cuando instale la secadora sobre la lavadora, asegúrese de que la manguera de drenaje en la parte posterior esté
conectada directamente a un desagüe y no a un tanque de agua.
NOTA
Este kit de apilamiento es compatible con las secadoras y las lavadoras de carga frontal Samsung BESPOKE
comercializadas después de 2022. Verifique la compatibilidad del kit de apilamiento antes de instalarlo. Puede
verificar los modelos compatibles de lavadoras y secadoras en el sitio web de Samsung (www.samsung.com).
Accesorios
Tornillos de cabeza
hexagonal (4)
6002-001431 (M5, L16)
Arandelas (4)
DC60-00044A (ID5, OD10)
Tornillos Phillips de cabeza
plana (8)
6002-000213 (M4, L12)
Tornillos Phillips de cabeza
plana (2)
6002-000215 (M4, L16)
Guía de instalación Ménsula de la cubierta
superior del lado izquierdo
Ménsula de la cubierta
superior del lado derecho
(con cable de conexión
múltiple incorporado)
Cubierta frontal
Guía para ménsula Guía de apilamiento
(izquierda/derecha [L/R]
Instalación
PASO 1
Ajuste completamente las cuatro patas niveladoras de la secadora.
• Nivele la secadora usando un nivel.
PASO 2
Jale ligeramente de la lavadora instalada para poder acceder a la parte posterior.
Afloje los dos tornillos instalados en la parte posterior de la lavadora.
PASO 3
Verifique la capacidad de su lavadora (5.0 cf y superior o 4.6 cf e inferior) y ubique los orificios de ensamblaje
correctos en la ménsula de la cubierta superior (izquierda/derecha [L/R]).
PASO 4
Ajuste las ménsulas de la cubierta superior (izquierda/derecha [L/R]) a sus guías de apilamiento correspondientes
(izquierda/derecha [L/R]) con los cuatro tornillos Phillips de cabeza plana M4 x L12.
• Verifique y asegúrese de que cada ménsula de la cubierta superior esté en los lados correctos (izquierda/derecha)
de las guías de apilamiento antes de ajustarlas.
PASO 5
Ubique las guías de apilamiento (izquierda/derecha [L/R]) instaladas en los extremos curvos de la cubierta superior
de la lavadora. Ajuste las guías de apilamiento (izquierda/derecha [L/R]) instaladas con las cuatro arandelas y los
tornillos de cabeza hexagonal M5 x L16.
PASO 6
Instale la guía para ménsula en las guías de apilamiento en el extremo frontal y verifique la alineación. Quite el
papel desprendible de la cinta bifaz adherida a la parte inferior de las guías de apilamiento e instale las guías en la
lavadora como se muestra en la figura. Luego, quite la guía para ménsula de las guías de apilamiento.
PRECAUCIÓN
• Asegúrese de que la curvatura inferior de la guía de apilamiento esté alineada con la curvatura de la cubierta
superior de la lavadora.
• Coloque las guías de apilamiento luego de asegurarse de que estén perfectamente paralelas a la cubierta
superior de la lavadora.
• Luego de colocar las guías de apilamiento, vuelva a colocar la guía para ménsula y revise una vez más para
asegurarse de que las guías de apilamiento estén paralelas.
PASO 7
Se necesitan dos personas como mínimo para levantar la secadora y colocarla en la guía de apilamiento, para luego
empujarla hasta que las dos patas traseras traben bien en las ranuras con forma de U de las guías de apilamiento.
PASO 8
Si se instaló bien, los extremos frontales de las guías de apilamiento deberían estar perfectamente alineados con los
extremos frontales de los marcos laterales de la secadora.
• Asegúrese de que los extremos frontales del marco lateral de la secadora no sobresalgan de las guías de
apilamiento.
PASO 9
Coloque la guía para ménsula en las guías de apilamiento y fíjela con los tornillos Phillips de cabeza plana M4 x L16,
como se muestra en la figura.
PASO 10
Sostenga la cubierta frontal con las letras ‘UP’ hacia arriba.
Alinee los ganchos de la cubierta frontal con los orificios de las guías de apilamiento como se muestra en la figura.
Luego, inserte por completo los ganchos para sujetar la cubierta frontal a las guías de apilamiento.
PASO 11
Abra las tapas de los puertos de conexión en la secadora y la lavadora. Luego, conecte el cable en ambos puertos y
cierre las tapas.
Fije cada soporte para cable a las ranuras designadas en la secadora y la lavadora.
Guide d’installation du kit de superposition (SKK-9MC*)
ATTENTION
• Risque de blessures corporelles. Le sèche-linge est volumineux et lourd. Comptez au moins deux personnes pour
déplacer le sèche-linge. Sinon, cela risque d’entraîner des blessures corporelles voire la mort.
• Risque d’endommagement de l’appareil durant l’installation. Le sèche-linge doit être installé fermement par-
dessus le lave-linge. N’installez pas le lave-linge par-dessus le sèche-linge. Sinon, cela risque d’entraîner des
blessures corporelles, la mort ou des dommages matériels.
• Risque d’électrocution. Vous devez débrancher le cordon d’alimentation avant d’installer l’appareil. Sinon, cela
risque d’entraîner des blessures corporelles graves voire la mort.
• Lors de l’installation du sèche-linge par-dessus le lave-linge, assurez-vous que le tuyau de vidange est
directement relié à la vidange et non à un réservoir d’eau.
REMARQUE
Ce kit de superposition est compatible avec les sèche-linge et les lave-linge Samsung BESPOKE à chargement
frontal commercialisés après 2022. Vérifiez la compatibilité du kit de superposition avant de l’installer. Vous pouvez
vérifier les modèles de lave-linge et sèche-linge compatibles sur le site Web Samsung (www.samsung.com).
Accessoires
Vis à tête hexagonale (4)
6002-001431 (M5, L16)
Rondelles (4)
DC60-00044A (ID5, OD10)
Vis Phillips à tête
cylindrique (8)
6002-000213 (M4, L12)
Vis Phillips à tête
cylindrique (2)
6002-000215 (M4, L16)
Guide d'installation Support de capot supérieur
de côté gauche
Support de capot supérieur
de côté droit (avec câble
multi-connexion monté)
Capot avant
Guide de support Guide de superposition
(G/D)
Installation
ÉTAPE 1
Serrez complètement les quatre pieds réglables du sèche-linge.
• Mettez le sèche-linge à niveau à l’aide d’un niveau.
ÉTAPE 2
Tirez légèrement le lave-linge installé pour accéder à sa partie arrière.
Dévissez les deux vis fixées à l’arrière du lave-linge.
ÉTAPE 3
Vérifiez la capacité de votre lave-linge (5,0 cf minimum ou 4,6 cf maximum) et repérez les trous d’assemblage
adéquats sur le support de capot supérieur (G/D).
ÉTAPE 4
Fixez les supports de capot supérieur (G/D) à leurs guides de superposition (G/D) correspondants à l’aide de quatre
vis Phillips à tête cylindrique M4 x L12.
• Vérifiez et assurez-vous que chaque support de capot supérieur se trouve du côté approprié (gauche/droite) des
guides de superposition avant de les serrer.
ÉTAPE 5
Positionnez les guides de superposition (G/D) assemblés sur les bords incurvés du capot supérieur du lave-linge.
Fixez les guides de superposition (G/D) assemblés à l’aide de quatre rondelles et de vis à tête hexagonale M5 x L16.
ÉTAPE 6
Assemblez le guide de support sur les guides de superposition à l’extrémité avant et vérifiez l’alignement. Retirez
la bande anti-adhésive de la bande double-face fixée à la partie inférieure des guides de superposition et fixez les
guides de superposition sur le lave-linge, comme illustré sur la figure. Puis, retirez le guide de support des guides de
superposition.
ATTENTION
• Vérifiez que la courbure inférieure du guide de superposition est alignée avec la courbure du capot supérieur du
lave-linge.
• Fixez les guides de superposition après vous être assuré qu’ils sont parfaitement parallèles au capot supérieur du
lave-linge.
• Après avoir fixé les guides de superposition, fixez à nouveau le guide de support et assurez-vous à nouveau que
les guides de superposition sont parallèles.
ÉTAPE 7
Avec l’aide d’au moins deux personnes, soulevez le sèche-linge et positionnez-le sur le guide de superposition, puis
poussez le sèche-linge jusqu’à ce que ses deux pieds arrière soient correctement bloqués dans l’encoche en U des
guides de superposition.
ÉTAPE 8
S’ils sont correctement installés, les bords avant des guides de superposition seront parfaitement alignés avec les
bords avant des cadres latéraux du sèche-linge.
• Vérifiez que les bords avant du cadre latéral du sèche-linge ne dépassent pas des guides de superposition.
ÉTAPE 9
Fixez le guide de support sur les guides de superposition et verrouillez-le à l’aide de vis Phillips à tête cylindrique M4
x L16, comme illustré sur la figure.
ÉTAPE 10
Maintenez le capot avant avec le mot UP (HAUT) dirigé vers le haut.
Alignez les crochets du capot avant avec les orifices des guides de superposition, comme illustré sur la figure. Puis,
insérez complètement les crochets pour fixer le capot avant aux guides de superposition.
ÉTAPE 11
Ouvrez les caches des ports du connecteur sur le sèche-linge et le lave-linge. Puis, branchez le câble sur les deux
ports et refermez les caches des deux ports du connecteur.
Fixez chaque support de câble aux encoches correspondantes du sèche-linge et du lave-linge.
SKK-9MC_StackingKit_IG_DC68-03859G-00_EN+CFR+MES.indd 2 2022-04-25 5:13:49