®
Operating & Installation
Instructions
Washing Machine
(Household Use)
Model No.
NA-120VX6
NA-120VG6
Thank you for purchasing this product.
- Read these instructions carefully for optimum
performance and safety before use.
- Keep this manual for future reference.
Contents
SAFETY PRECAUTIONS
4
Before Using
8
Washing
14
Optional Functions
22
Maintenance
27
Troubleshooting
30
Installation / Others
34
NA-120VX6_EN(New Zealand).indd 1 2017-9-29 14:45:33
2
Before Using
SAFETY PRECAUTIONS
Washing
Optional Functions
Safety Precautions ...........4
Checking Your Washing
Machine....................8
Before Washing..............9
Control Panel...............10
Detergent..................12
Washing
Basic Method
........14
Programme List.............16
Details of Programmes .......18
Washing Tips...............20
Changing Programme
Settings ...................22
y Changing the temperature
[
Water Temp] ...........22
y Changing the water level
[
Water Level] ...........22
y Changing the spin speed
[ Spin Speed]...........23
y Setting the programme
end time
[
Preset]................23
Washing with Optional
Functions..................24
y Select and run processes
[
Mode]................24
y Prewash
[
Prewash] .............24
y Rinse thoroughly
[ Extra Rinse]............25
Contents
NA-120VX6_EN(New Zealand).indd 2 2017-9-29 14:45:37

3
Maintenance
Troubleshooting
Installation / Others
(Ask the installation to service
person)
Changing Appliance
Settings...................26
y Cancelling the buzzer .......26
y Setting the Child Lock
[Child Lock]...............26
y Cancelling the “Active Foam”
function..................26
Maintenance ...............27
y Water supply filter..........27
y If the water supply hose is
frozen ...................27
y Appliance ................27
y Drum....................28
y Detergent drawer ..........28
y Drain filter . . . . . . . . . . . . . . . . 29
Troubleshooting.............30
Error Display ...............33
Choosing the Right Location. . . 34
Moving and Installing.........35
Connecting the Hoses........37
Checking after Installation.....39
Power and Water
Consumption...............41
Specifications ..............42
Images in these instructions are of the NA-120VX6, unless otherwise indicated.
NA-120VX6_EN(New Zealand).indd 3 2017-9-29 14:45:37

4
Safety Precautions
Read and follow these safety precautions.
May cause serious injury or death.
For the safety of you and your family
z This appliance is not intended for use by persons
(including children) with reduced physical, sensory or
mental capabilities, or lack of experience and knowl-
edge, unless they have been given supervision or
instruction concerning use of the appliance by a person
responsible for their safety.
z Children should be supervised to ensure that they do
not play with the appliance.
z Keep away from fire. Do not put flammable materials
or clothes with such things attached in the drum. Keep
them away from the appliance. (To prevent explosion
RU¿UH
For example: Kerosene, gasoline, benzine/thinner,
alcohol, etc.
z To prevent injury, do not touch the drum until it com-
pletely stops.
Ground the appliance
zBe sure to have your dealer perform grounding work.
If not provided a ground, electric shock may occur in
electric leakage
WARNING
NA-120VX6_EN(New Zealand).indd 4 2017-9-29 14:45:38

5
SAFETY PRECAUTIONS
To prevent electric shock, overheating,
FRPEXVWLRQRU¿UH
z8VHDVRFNHWWKDWVDWLV¿HVWKHUDWLQJUHTXLUHPHQWVROHO\
for this appliance. Do not use a plug adaptor or exten-
sion cord.
z Do not use a power cord or plug that is damaged. If
the power cord is damaged, it must be replaced by the
PDQXIDFWXUHULWVVHUYLFHDJHQWRUVLPLODUO\TXDOLILHG
persons in order to avoid a hazard.
z Do not plug in or unplug the power cord with wet
hands.
z Always fully insert the power plug into the socket.
z Do not hold or pull on the cord when removing the plug
from the socket.
z Unplug the power cord before cleaning.
Repairs
zNever disassemble, repair or modify the appliance
yourself.
In case of malfunction or failure, immediately stop use,
unplug the power cord, and ask your nearest service
centre for repair.
WARNING
NA-120VX6_EN(New Zealand).indd 5 2017-9-29 14:45:39
6
Safety Precautions (continued)
CAUTION
May cause injury or property damage.
Correct use
z This appliance is only suitable for textiles labelled
washing machine washable.
z Do not connect to a hot water supply.
z Do not obstruct the openings of the bottom face with
carpet, etc.
To prevent water leaks
z New hose-sets supplied with the appliance are to be
used and old hose-sets should not be reused.
z Turn off the tap if the appliance is not going to be used
for a prolonged period, such as during a holiday. Water
could leak while you are away and cause damage to
household goods.
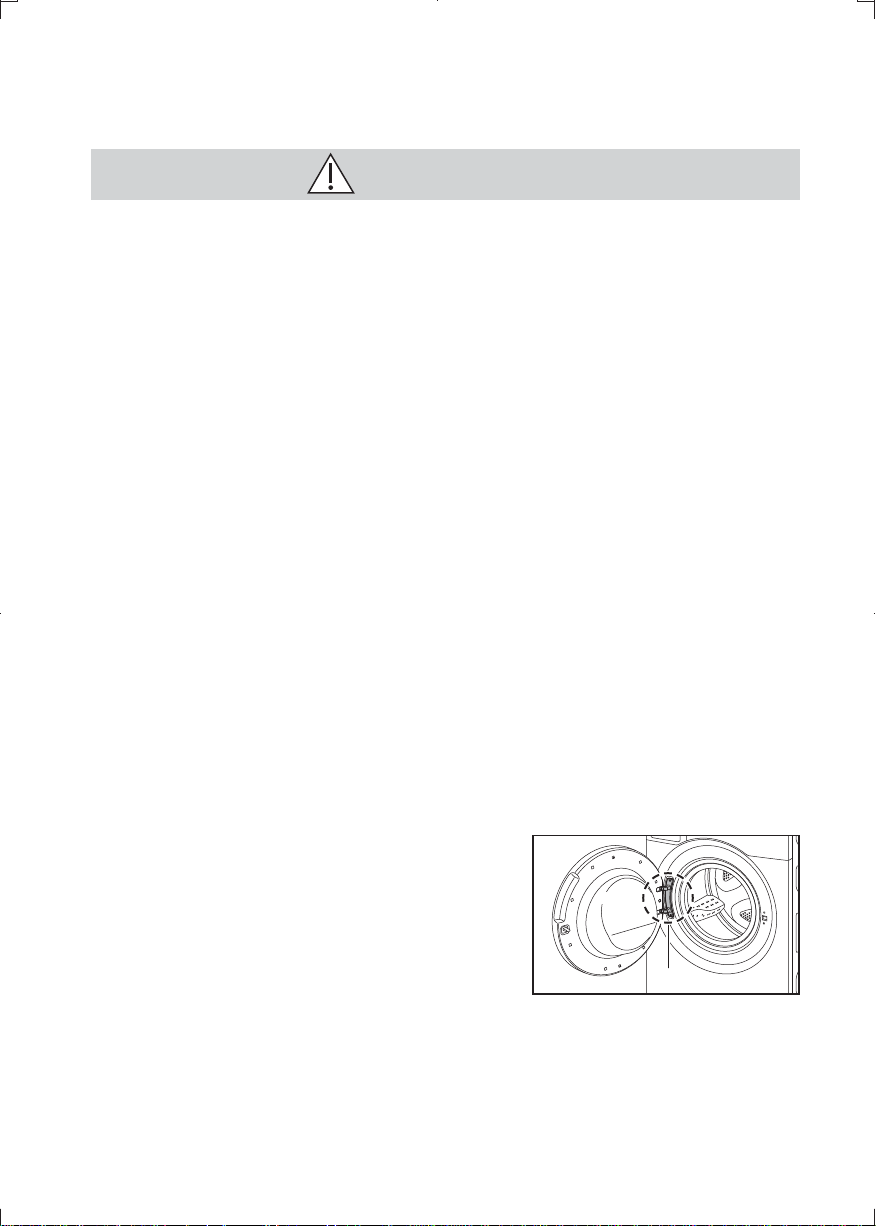
To prevent injury and burns
z.HHS\RXU¿QJHUVDZD\IURPWKH
door hinge when opening and
closing the door.
z Do not climb onto the appliance.
Hinge
NA-120VX6_EN(New Zealand).indd 6 2017-9-29 14:45:39
7
SAFETY PRECAUTIONS
z When washing at high temperature, be careful not to
burn yourself. Drain hose, drum, door glass, and laun-
dry will be hot.
To prevent damage to the appliance and laundry
z Do not operate the appliance with the anchor bolts still
¿WWHG7KLVPD\FDXVHH[FHVVLYHYLEUDWLRQRIWKHDSSOL
ance.
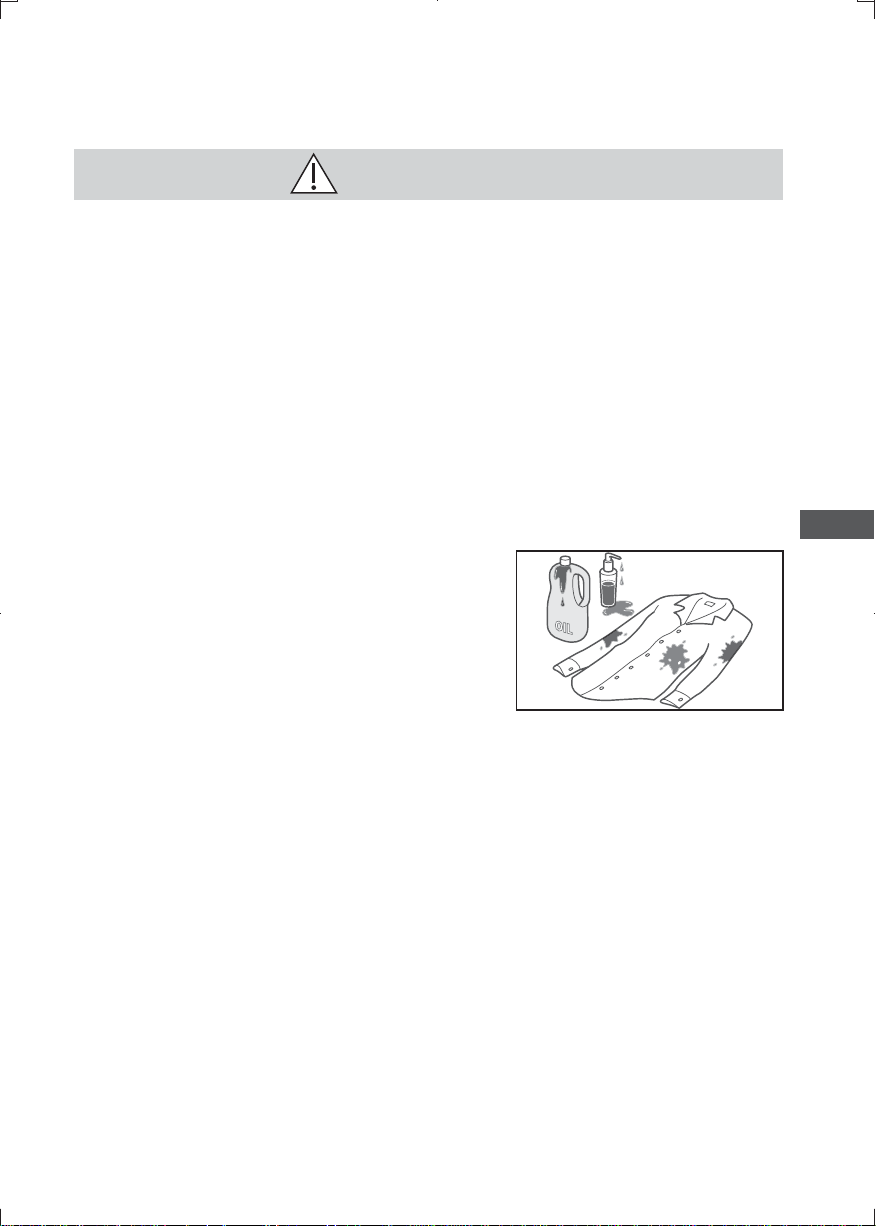
z Do not wash clothes that are
stained with a lot of vegetable
oil, cosmetic oil, etc. The oil can
get hot and deform the door
seal, leading to water leakage.
z Do not wash, rinse, or spin waterproof sheets or
clothes.Intense vibration during spin or falling of the
appliance may result in injury, damage to the main unit,
ZDOOÀRRUODXQGU\RUZDWHUOHDNDJH
For example: Raincoats, wet suits, etc.
z7KHLQVWDOODWLRQVKDOOEHLQDFFRUGDQFHZLWKWKHUHTXLUH
ments of AS/NZS 3500.1.
CAUTION
NA-120VX6_EN(New Zealand).indd 7 2017-9-29 14:45:40
8
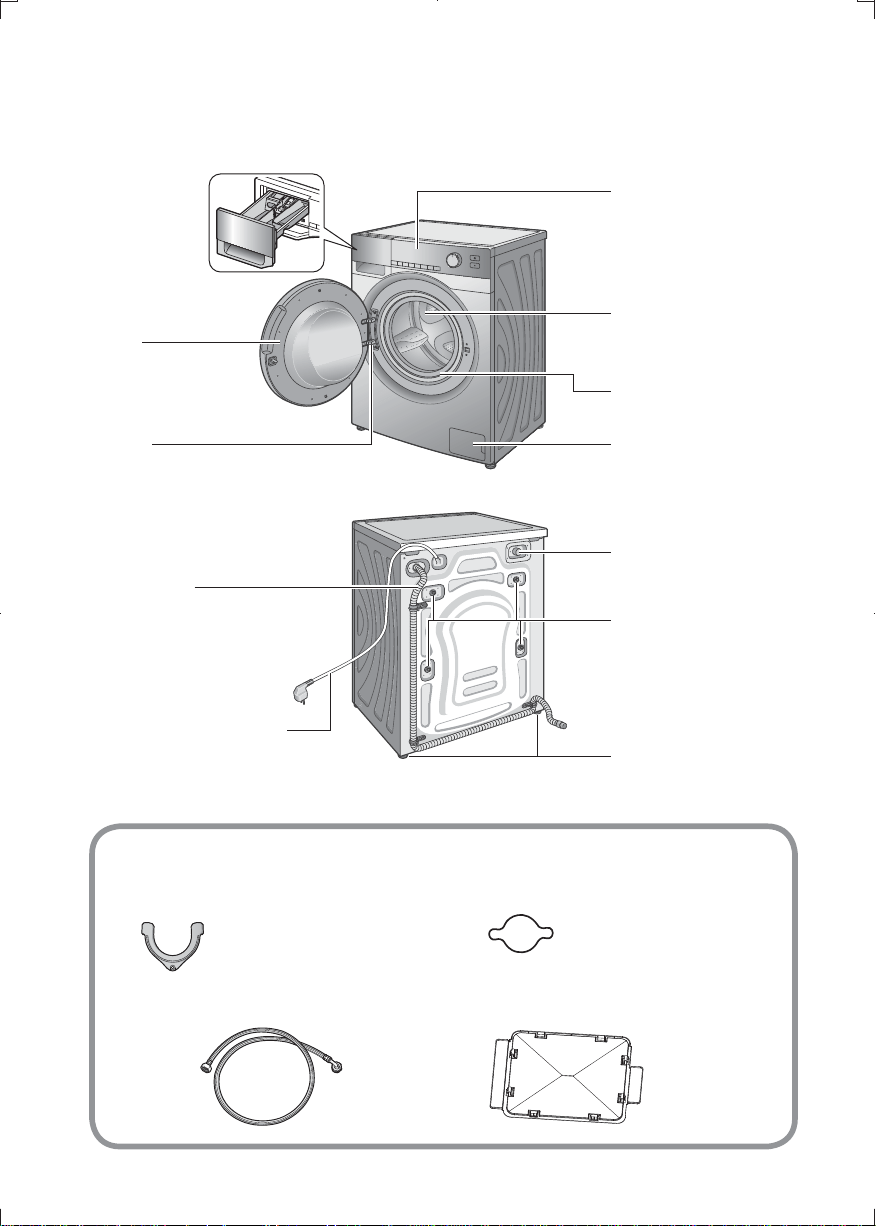
Checking Your Washing Machine
Adjustable feet
(P. 36)
Drain hose
(P. 37, 38)
Power cord and plug*
* The plug shape varies
with the region.
Water inlet (P. 38)
Anchor bolts
(P. 36)
(Rear of appliance)
Accessories
Detergent drawer (P. 12)
Hinge
'UDLQ¿OWHUFRYHU
(P. 29)
Door seal
Drum
(Washing/spin-drying
tub)
Control panel
(P. 10)
Door
Elbow (P. 38) Cover caps (4) (P. 36)
Water supply hose
(P. 37, 38)
Bottom plate (P. 35)
NA-120VX6_EN(New Zealand).indd 8 2017-9-29 14:45:44
9
Before Using
Before Washing
Check before use
:KHQ¿UVWXVLQJRUDIWHUDORQJWLPHRI
non-use, check the following.
zThe water supply hose and drain
hose are connected properly.
( P. 37, 38)
zThere is no problem in the water
supply hose connection, when
turning on the tap.
zThe power plug is plugged in.
%HIRUH¿UVWXVH
There may be drops of water, or
condensation, in the appliance due to
the factory inspection process before
shipment. To rinse away any residues
etc., operate as follows:
- “Cotton” programme
- Default setting 40 °C
- No detergent, no clothing
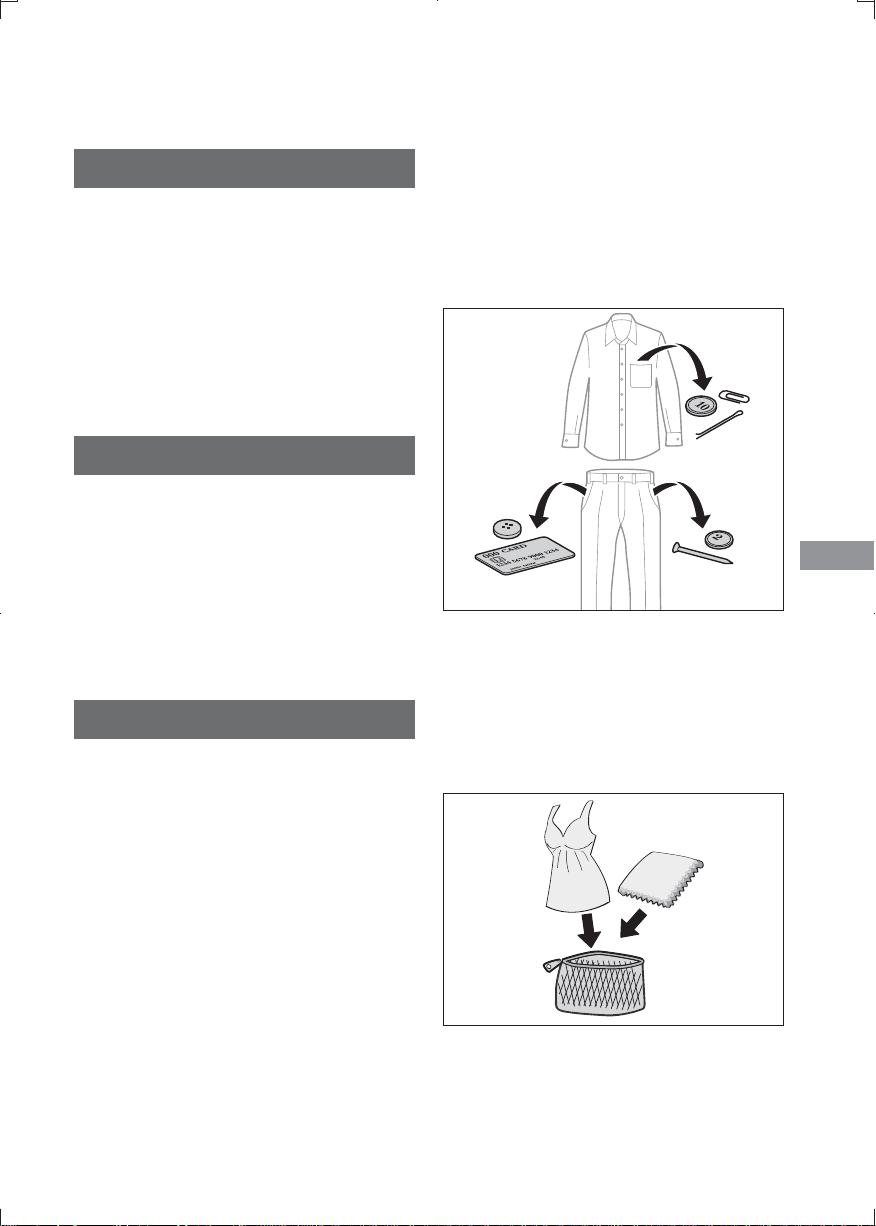
Preparing laundry
Read the washing labels of clothes,
and sort them by colour, fabric, and
degree of soiling. This helps you
choose a suitable programme and
temperature.
Stained items
z Apply stain remover to any stains.
z “StainMaster+” programmes
(P. 17) are recommended for
removing stains. (Only for 120VX6)
Sorting
z Wash separately clothes that
are not colour fast. (denim, dark
coloured items, etc.)
Before put clothes in drum
To prevent damaging clothes or
appliance malfunction, carry out the
following steps.
zRemove foreign objects (coins,
pins, clips, nails) from laundry.
zTie strings on aprons, etc.
zClothing with raised fabric: Turn
inside out.
zClothing with zippers: Pull up
zippers, and turn inside out.
zSmall items, wired bras, and lace
items: Put in a laundry net.
zBrush off hair, animal fur, sand etc.
before washing
zHeavy dirt or deep stains: Wash
OLJKWO\E\KDQG¿UVW
NA-120VX6_EN(New Zealand).indd 9 2017-9-29 14:45:45
10
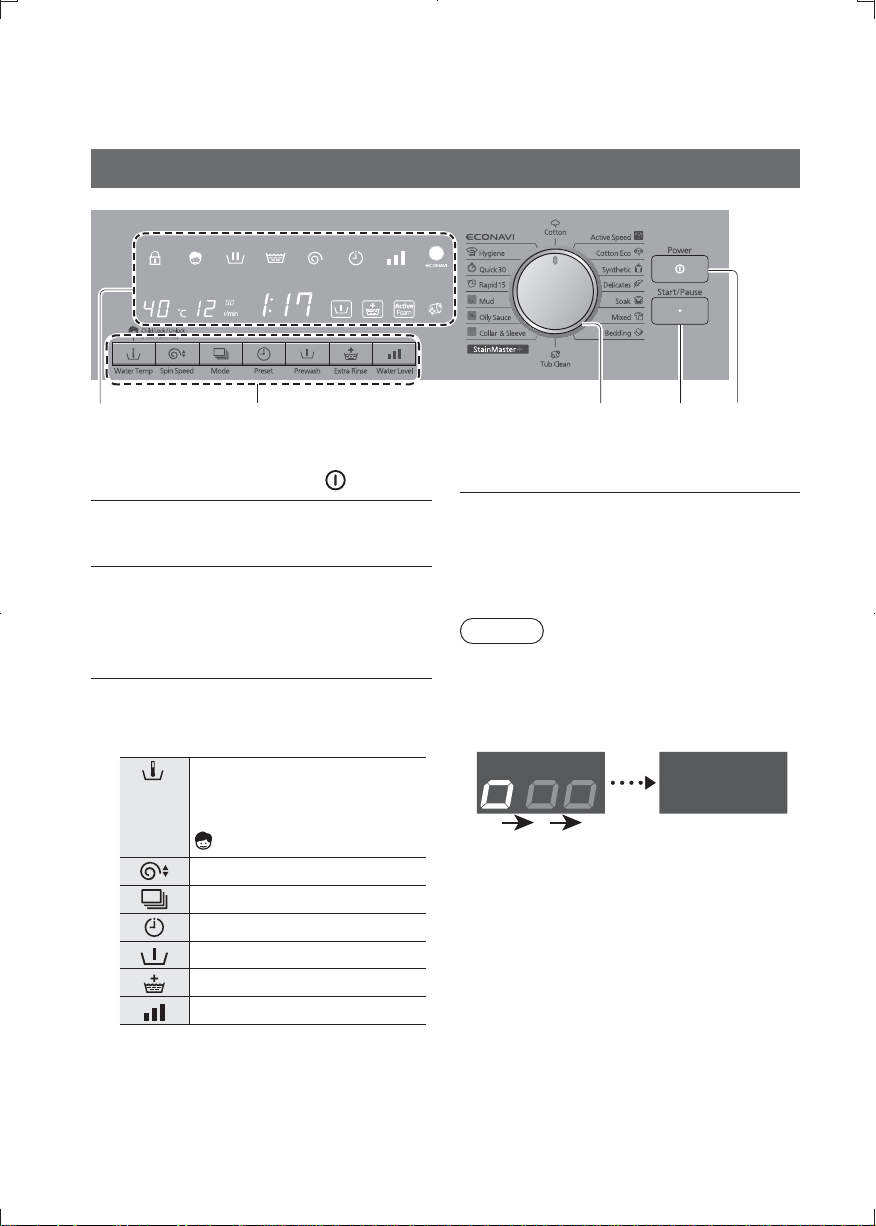
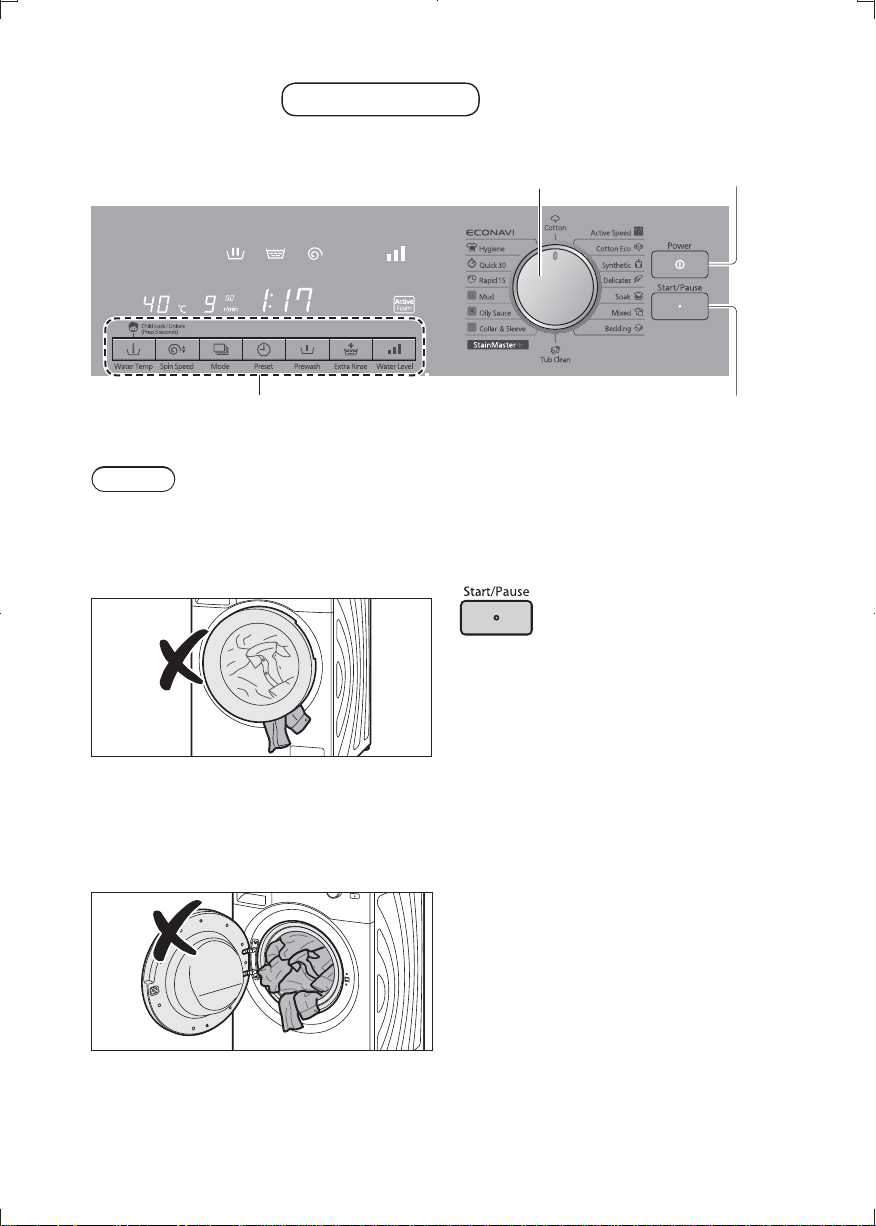
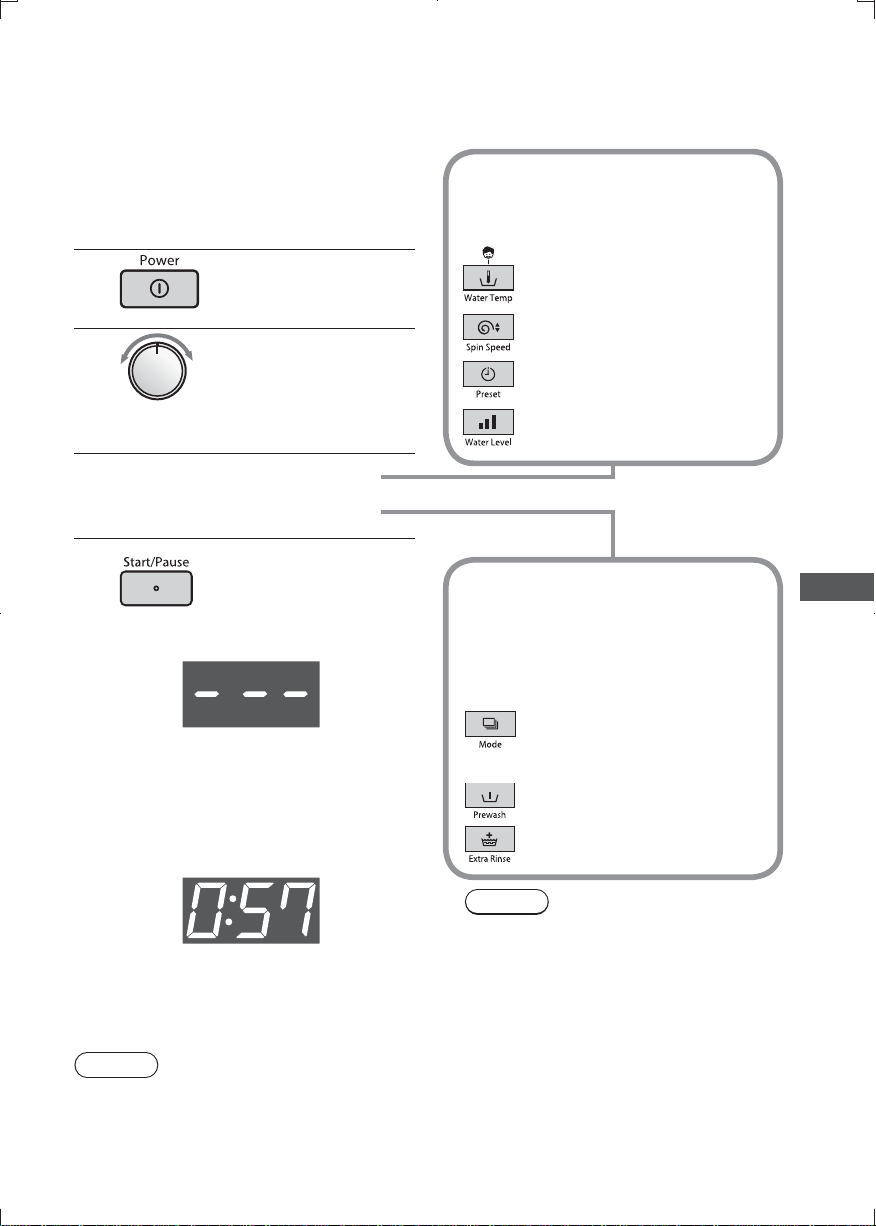
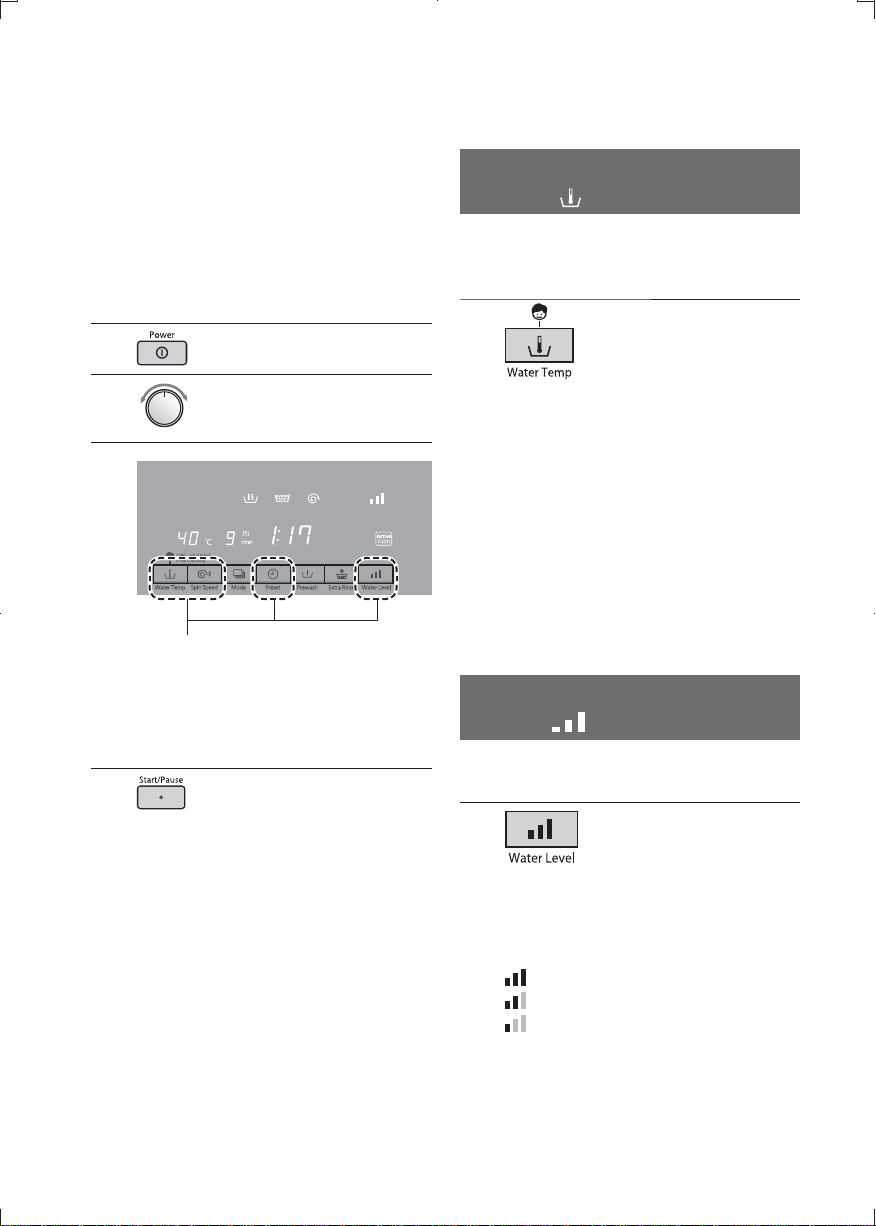
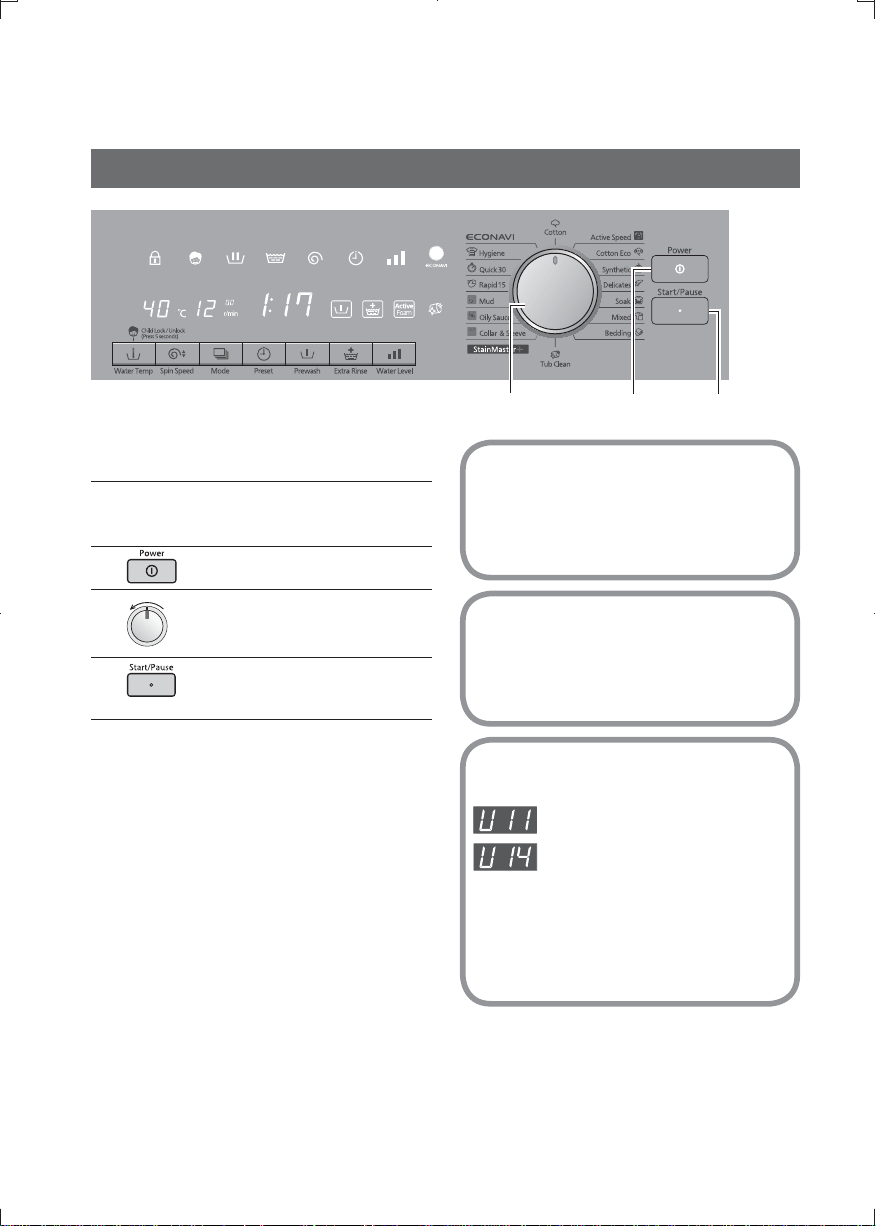
Control Panel
Controls
2354 1
1. Power button [Power ]
2. Start/Pause button [Start/Pause]
To start or pause the operation.
3. Programme selection dial
Use this dial to choose a
programme suitable for the
laundry. ( P. 16)
4. Control buttons
To change washing settings or to
select optional functions.
Water temperature
( P. 22)
Child Lock*
1
( P. 26)
Spin speed ( P. 23)
Mode (P. 24)
Preset (P. 23)
Prewash (P. 24)
Extra Rinse (P. 25)
Water Level (P. 22)
5. Display ( P. 11)
*1 Child Lock: Press and hold the
button for at least 5 seconds to lock
the door and other buttons.
NOTE
zTo turn the power off and back on,
press “Power” to switch off and
make sure the display has gone off,
before turning back on.
For about
3 seconds
Goes off
zIf you do not press “Start/Pause”
within 10 minutes of powering on
the unit, the appliance automatically
switches itself off.
NA-120VX6_EN(New Zealand).indd 10 2017-9-29 14:45:47
11
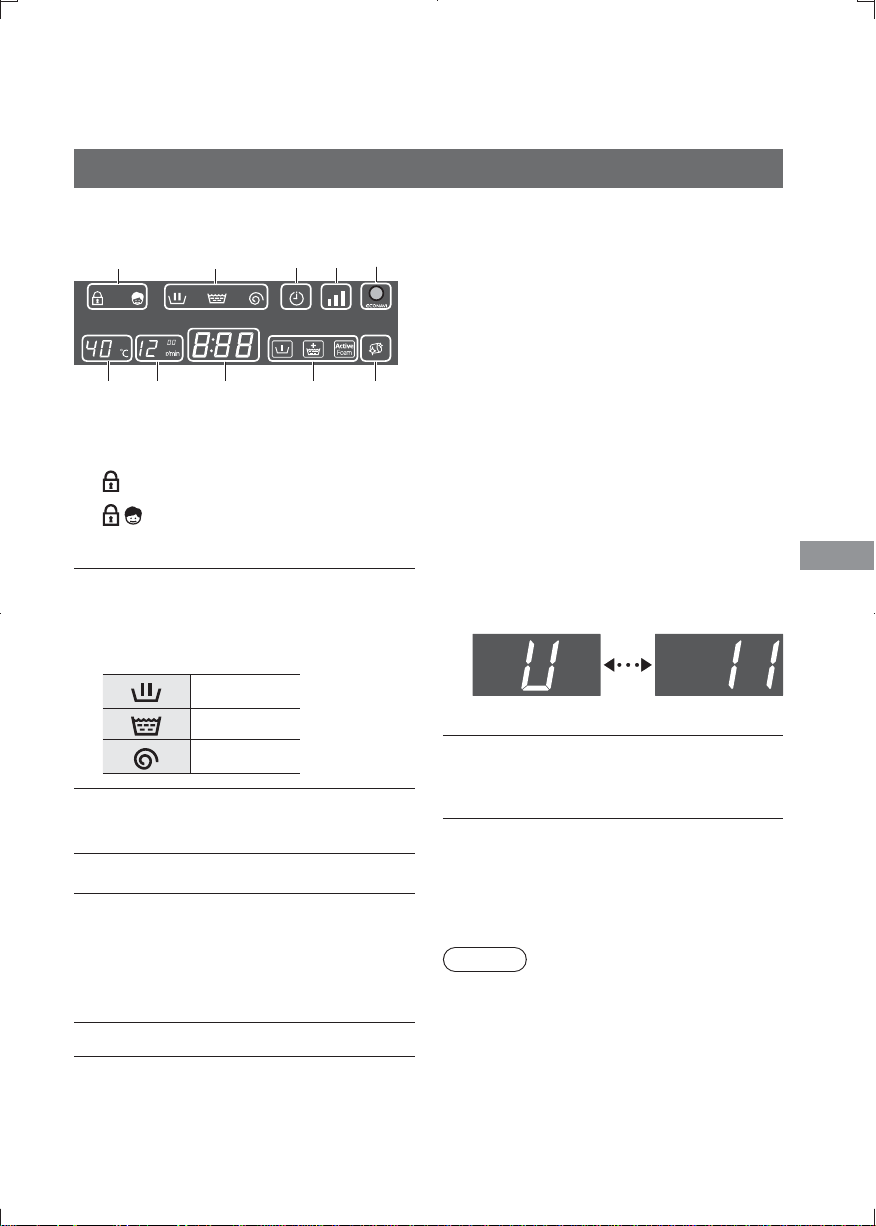
Before Using
Display
This illustration shows all indications for explanation purposes.
67 8 9
12 435
1. Lock
: The door is locked
: The door and buttons are
all locked (Child Lock)
2. Process
(DFKLQGLFDWRUÀDVKHVWRVKRZWKH
current process, and goes off when
WKHSURFHVV¿QLVKHV
wash
rinse
spin
3. Preset
( P. 23)
4. Water level
5. ECONAVI lamp
Lights up while the “ECONAVI”
programme is selected. Flashes
during the ECONAVI detection.
( P. 21)
6. Water temperature
7. Spin speed
8. Remaining time
This indicator shows the
approximate time until the
RSHUDWLRQ¿QLVKHV
Error display
An error is displayed if the
appliance malfunctions. ( P. 33)
(e.g. U11)
9. Optional functions
Selected optional functions are
displayed. ( P. 24, 25)
10. Tub Clean notice
Flashes to give notice of the time
of drum cleaning after operation is
performed 50 times. (P. 28)
NOTE
zIn case of a power failure during
operation, the appliance resumes
the process from the interrupted
point after the power comes back.
(Auto Restart)
10
NA-120VX6_EN(New Zealand).indd 11 2017-9-29 14:45:48
12
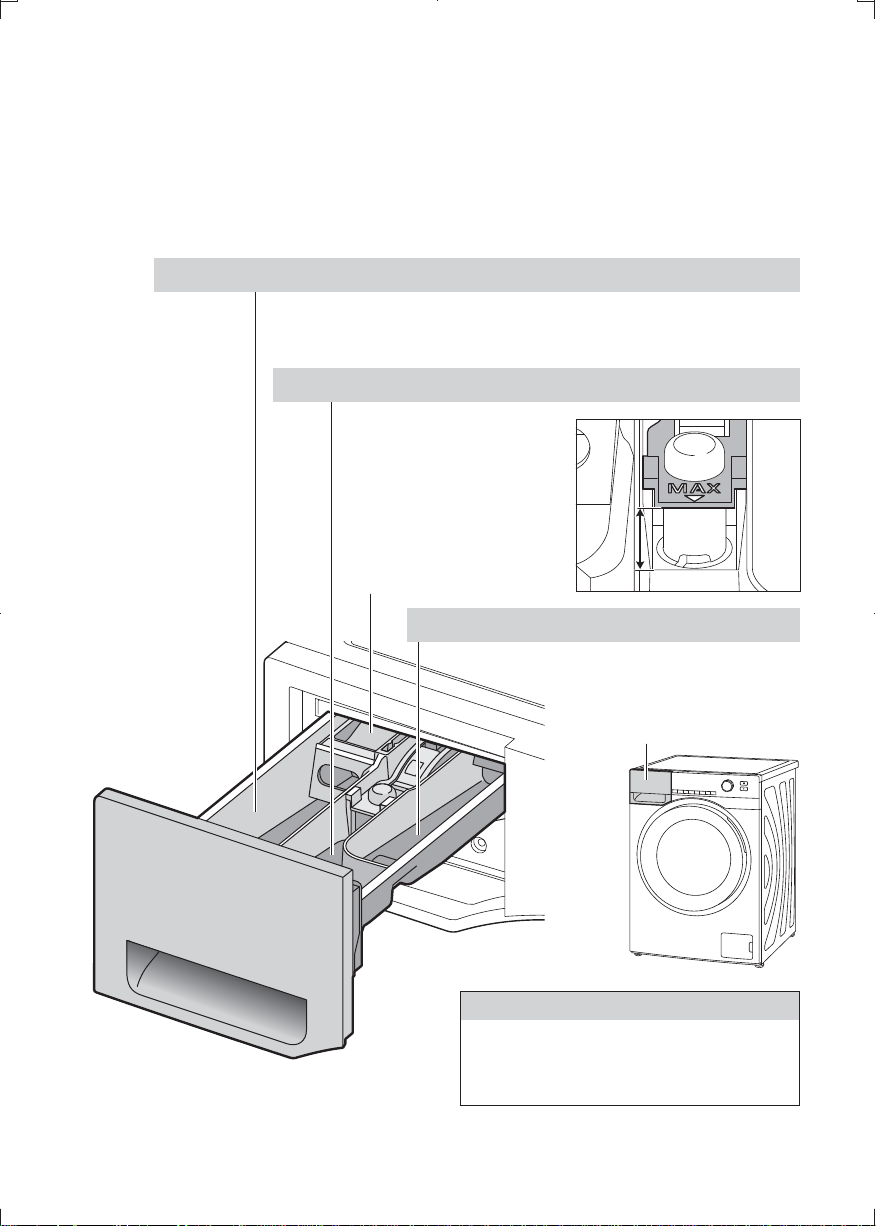
Detergent
zAdd detergent, etc. before pressing “Start/Pause”.
zRead instructions on the packet of detergent or other agent, for correct
TXDQWLW\GHSHQGLQJRQWKHDPRXQWRIODXQGU\GHJUHHRIVRLOLQJDQGZDWHU
hardness.
Fabric softener
Detergent for prewashing
It’s automatically added
WRODXQGU\GXULQJ¿QDO
rinsing.
zDo not let it exceed
“MAX” (130 ml) line.
Detergent drawer
Foam generator
CAUTION
Do not operate this appliance
with detergent drawer detached.
It will leak water.
When using “Prewash”
function (P. 24)
zWhen using a tub cleaning detergent, also put it in this
compartment. ( P. 28)
Detergent, water softener, bleach, stain remover
NA-120VX6_EN(New Zealand).indd 12 2017-9-29 14:45:50
13
Before Using
Detergent
Use a low foam detergent.
zTo prevent powdered detergent
from remaining in detergent drawer:
Dry inside the detergent drawer
with a cloth.
Break up lumps in powdered
detergent.
If powder still remains in drawer,
put it directly in drum instead.
z
If you forget to add detergent before
starting a wash, drain water out of
the drum and start again.
NOTE
zDo not put detergent in the
detergent drawer, if the
instructions on the package
advise that it should be put
directly in the drum.
7KHGHWHUJHQWPD\QRWÀRZIUHHO\
and some may remain in the
GUDZHUFDXVLQJZDWHUWRRYHUÀRZ
from the drawer.
zDo not put detergent in the foam
generator.
Prewashing
zYou need separate detergent for
prewash and main wash.
zUse powdered detergent for main
ZDVK/LTXLGGHWHUJHQWZDVKHV
away in prewash.
Water softening agent
If you live in a hard water area
(1.3 mmol/L hardness or more), we
recommend using a water softening
agent. This reduces the detergent
UHTXLUHGDQGSUHYHQWVOLPHVFDOH
which damages the appliance.
NOTE
zFor information on water hardness,
contact a specialist near you.
Fabric softener
Prevents laundry static.
z
To avoid residue build up:
Dilute the fabric softener prior to
pouring into the machine.
(do not exceed the max amount)
Fabric
softener
Water
z
If any softener remains in the
detergent drawer after operation,
you should rinse and wipe clean
regularly.
NA-120VX6_EN(New Zealand).indd 13 2017-9-29 14:45:50
14
Washing
3
21
Changing settings,
using optional functions
NOTE
zDo not get laundry caught in the
door.
It can cause damage to the door
seal.
zDo not put too much laundry into
the drum.
It can cause excessive vibration
or damage to the appliance, or
damage to the door seal.
To open the door during
operation
(The door is locked during
operation)
Press “Pause”.
(The lock is released
with a click)
zDuring spinning process, it may
take about 1 minute for the drum to
stop rotating.
Basic Method
NA-120VX6_EN(New Zealand).indd 14 2017-9-29 14:45:51
15
Washing
Preparing
zSort the laundry and put it into the
drum. (P. 9)
zAdd the detergent. (P. 12)
1
Turn on the power.
2
Select a programme.
( P. 16, 17)
7KHUHTXLUHGWLPHLVGLVSOD\HG
Changing settings
Using optional functions
3
Start operation.
zWeighing (about 30 seconds)
Some programmes do
not weigh the laundry.
(P. 16, 17)
(Display of
weighing)
.............................
X
z5HTXLUHGWLPHGLVSOD\
(recalculated)
(e.g.)
................
X
2SHUDWLRQ¿QLVKHV
(The buzzer sounds and the door
lock is released.)
NOTE
zColours can run between clothes,
so remove coloured laundry soon
DIWHUWKHSURJUDPPH¿QLVKHV
Changing settings
After selecting a programme, you
can change the following settings.
Water temperature
( P. 22)
Spin speed ( P. 23)
Preset timer ( P. 23)
Water level ( P. 22)
Using optional functions
After selecting a programme, you
can add the following optional
functions.
Mode ( P. 24)
(Select and run the wash,
rinse or spin process)
Prewash ( P. 24)
Extra Rinse ( P. 25)
NOTE
zThe range of settings you
can change and the optional
functions you can add vary
depending on the programme.
( P. 18)
NA-120VX6_EN(New Zealand).indd 15 2017-9-29 14:45:54
16
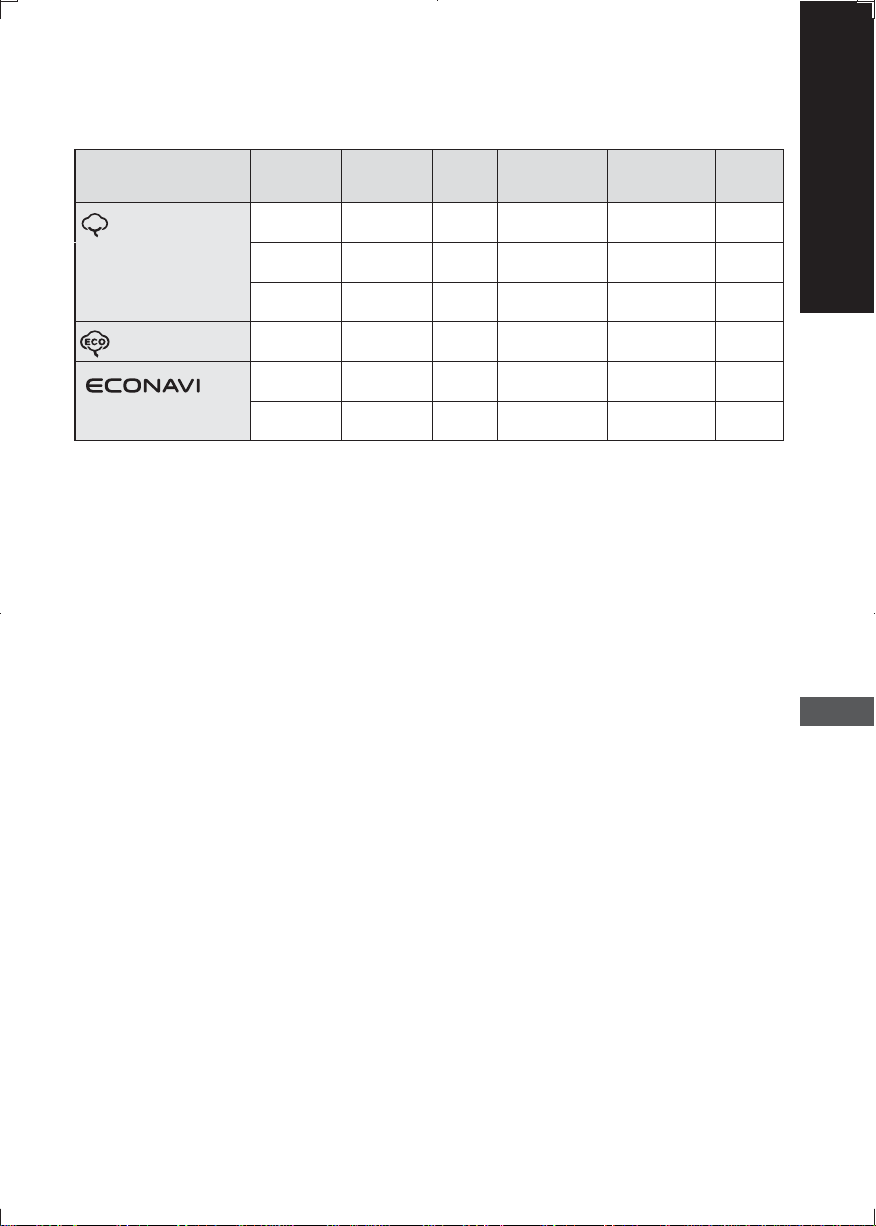
Programme Description Max load (kg) Time*
1
Cotton
For daily items of cotton,
linen and cotton blends, e.g.
T-shirt, underwear, towel, and
tablecloth.
10.0 0:57 - 1:17
Cotton Eco
Takes longer but consumes
less energy and water than the
Cotton programme.
10.0 3:23 - 5:03
Synthetic*
2
:DVKHVFKHPLFDO¿EUHVJHQWO\
5.0 0:53
Delicates*
2
For underwear and machine-
washable silk clothes. Gentler
than the Wool programme.
2.0 0:41
Soak
For heavily-soiled clothes.
5.0 1:47
Mixed
For blended fabrics, e.g. cotton,
OLQHQDQGV\QWKHWLF¿EUHV
10.0 1:12 - 1:47
Bedding*
2
For large items such as
blankets, curtains and
bedspreads.
3.0 1:21
Wool*
2
Washes gently hand washable
and machine washable wool
and wool blend clothes.
2.0 0:40
Shirts*
2
For shirts and women’s
blouses.
2.0 1:11
Drain
Drains water out of the drum.
No clothing 0:02
NOTE
zThe reTXLUHGWLPHYDULHVGHSHQGLQJRQWHPSHUDWXUHZDWHUSUHVVXUHGUDLQDJH
condition, and load size.
Programme List
NA-120VX6_EN(New Zealand).indd 16 2017-9-29 14:45:58
17
Washing
Programme Description Max load (kg) Time*
1
For items with mixed fabric,
for example, cotton, linen and
V\QWKHWLF¿EUHV)RUGHWDLOV
see page 21)
10.0 1:18 - 2:23
Active Speed
Washes faster than the Cotton
programme with small load.
5.0 0:49
Quick 30*
2
PLQTXLFNZDVKIRUOLJKWO\
soiled cotton and linen blends.
5.0 0:30
Rapid 15*
2
15 min. full rapid wash for a
small amount of lightly soiled
items.
2.0 0:15
Hygiene
Washes infants’ clothing,
tablecloths and sheets.
10.0 1:43 - 1:58
Tub Clean
Cleaning the drum.
No clothing 3:36
StainMaster+
Suitable for
removing stains.
Mud
For mud
stains.
10.0 2:27 - 3:12
Oily
Sauce
For stains of
oily sauce.
10.0 2:07 - 2:47
Collar &
Sleeve
For collar and
sleeve stains.
10.0 2:17 - 3:02
*1 For each programme’s default water temperature.
*2 The load is not weighed after “Start/Pause” is pressed. Operation starts
straight away.
NA-120VX6_EN(New Zealand).indd 17 2017-9-29 14:46:00
18
Details of Programmes
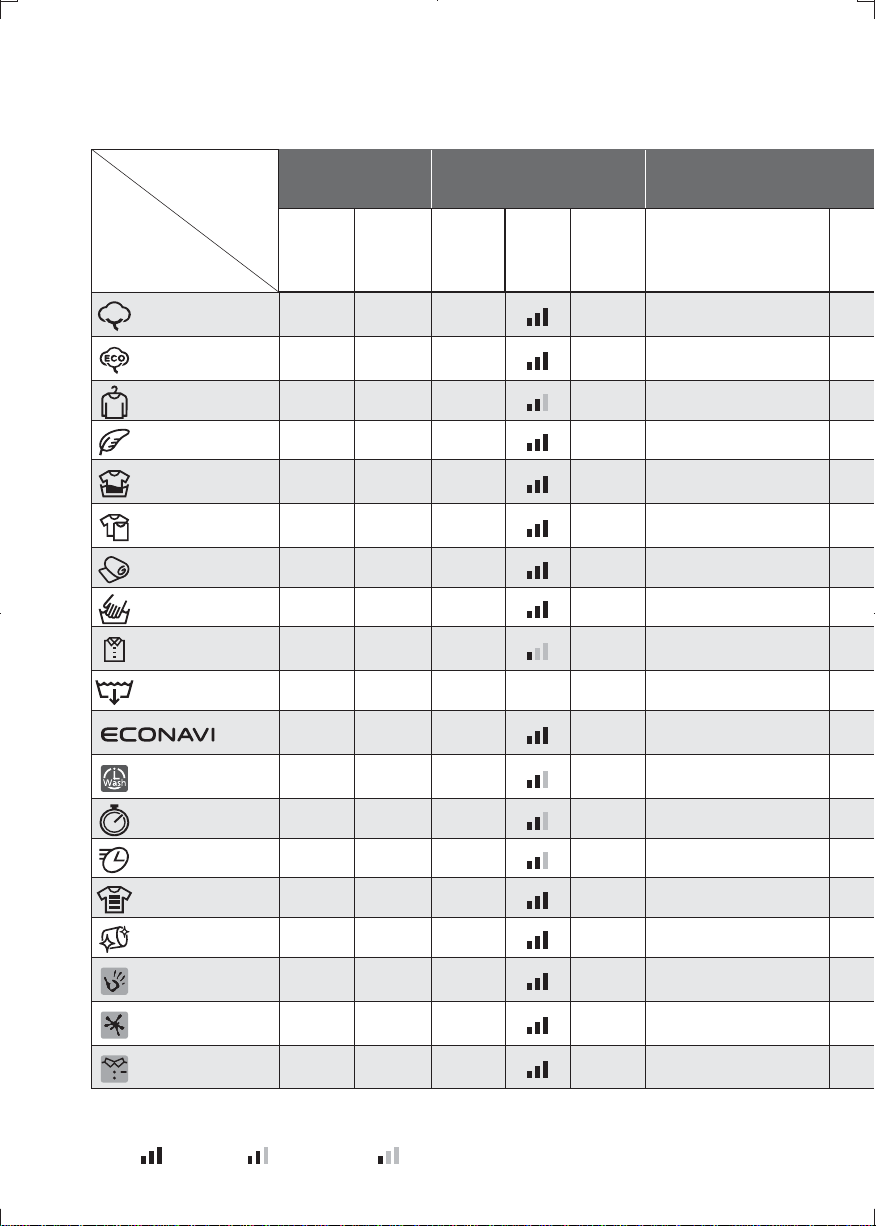
Settings
Programme
Available
models
Auto setting
120VX6 120VG6
Water
Temp
(°C)*
1
Water
level
Spin
speed
(r/min)
Water Temp
(°C)*
1
Cotton
99
40 900
Cold, 30, 40, 50,
60
Cotton Eco
99
40 1200
Cold, 30, 40, 50,
60
Synthetic
99
30 700 Cold, 30, 40
Delicates
99
30 500 Cold, 30, 40
Soak
99
40 900 Cold, 30, 40
Mixed
99
40 1000 Cold, 30, 40
Bedding
99
Cold 700 Cold, 30
Wool –
9
Cold 500 Cold, 30
Shirts –
9
40 500
Cold, 30, 40, 50,
60
Drain –
9
––– –
99
Cold 1000
Cold, 30, 40, 50,
60
Active Speed
99
40 900 Cold, 30, 40
Quick 30
99
Cold 900 Unchangeable
Rapid 15
99
Cold 900 Unchangeable
Hygiene
99
90 900 60, 90
Tub Clean
99
40 900 Unchangeable
Mud
9
–40 900 Unchangeable
Oily Sauce
9
–40 900 Unchangeable
Collar & Sleeve
9
–40 900 Unchangeable
*1 When the “Cold” is selected, nothing is displayed on the temperature
indication.
*2 H:
High, M: Medium, L: Low
NA-120VX6_EN(New Zealand).indd 18 2017-9-29 14:46:06

19
Washing
Setting range Optional functions
Water level*
2
Spin speed
(r/min)
Mode Prewash
Extra
Rinse
Active
Foam*
3
H, M, L
500, 700, 900, 1000,
1200
9999
H, M, L
500, 700, 900, 1000,
1200
9999
H, M, L 500, 700, 900
9999
Unchangeable Unchangeable
9
–
9
–
H, M
500, 700, 900, 1000,
1200
9
–
99
H, M, L
500, 700, 900, 1000,
1200
9999
H, M 500, 700
9
–
99
Unchangeable Unchangeable
9
–
9
–
H, M, L 500, 700
9999
Unchangeable Unchangeable – – – –
Unchangeable 900, 1000, 1200 – – –
9
M, L
500, 700, 900, 1000,
1200
9
––
9
H, M, L 500, 700, 900
9
––
9
H, M, L 500, 700, 900 – – –
9
H, M, L 500, 700, 900 – –
9
–
Unchangeable Unchangeable – – – –
Unchangeable
500, 700, 900, 1000,
1200
9999
Unchangeable
500, 700, 900, 1000,
1200
9999
Unchangeable
500, 700, 900, 1000,
1200
9999
³$FWLYH)RDP´ZRUNVDXWRPDWLFDOO\ZLWKWKHVSHFL¿HGSURJUDPPHV
NA-120VX6_EN(New Zealand).indd 19 2017-9-29 14:46:08
20
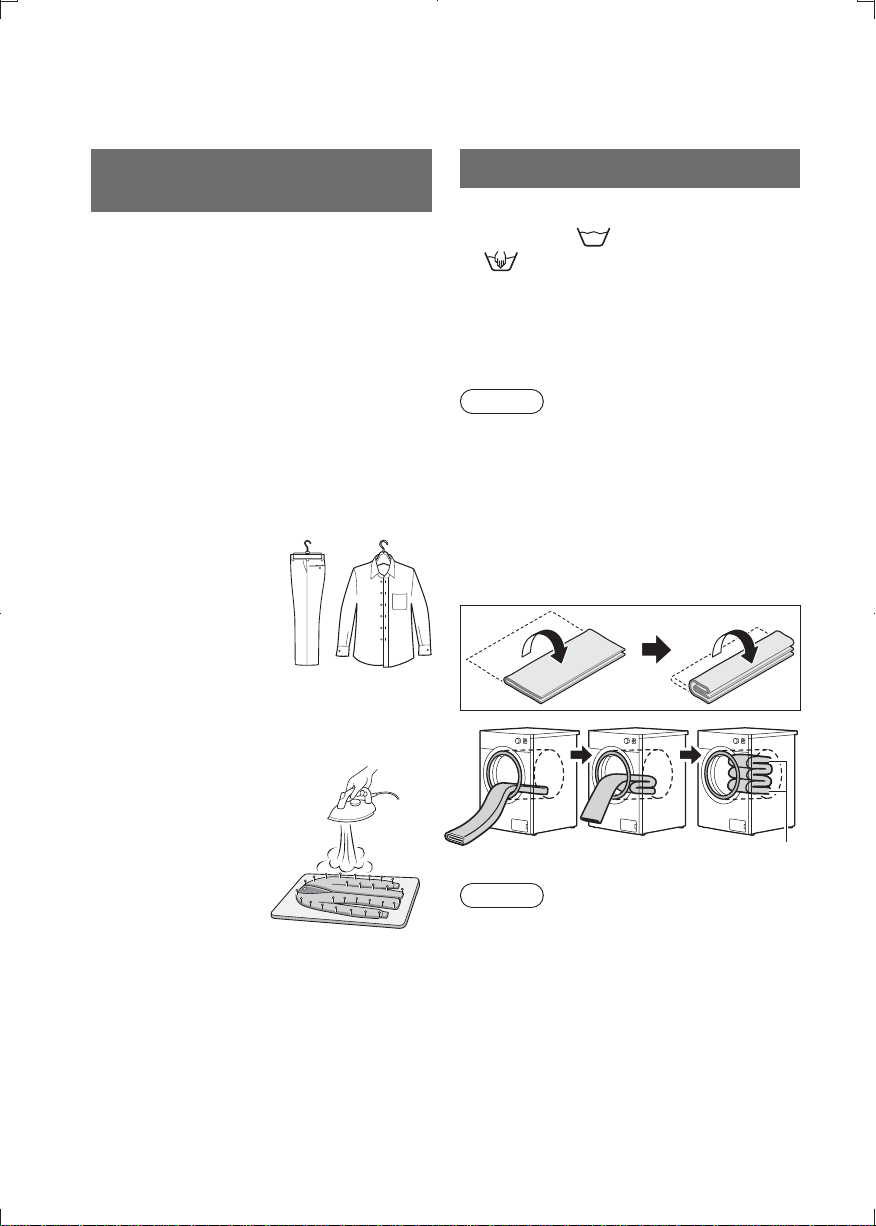
Washing Tips
“Wool” and “Delicates”
programmes
When washing
z3ODFHLWHPVÀDWRQWRSRIHDFKRWKHU
inside the drum.
z)RUZRROLWHPVXVHDPLOGOLTXLG
detergent.
zTo rinse fully, use the “Extra Rinse”
function. (P. 25)
When drying
z/D\RXWZRRODQGQ\ORQLWHPVÀDW
zHang out white or light-coloured
wool and nylon items in the shade.
(away from direct sunlight)
zUse hangers for
shirts, blouses
and trousers.
If items shrink in the wash
1 Spread the item to its original size
on an ironing board.
2 Use dress pins
to hold the size
and shape.
3 Iron using a lot
of steam and
then leave the
item to dry.
“Bedding” programme
Washable items
zItems with
(Wash) or
(Handwash) on label.
zBlankets, 100 % synthetic and
100 % cotton
zSheets zBedspreads
zUndersheets, 100 % synthetic
NOTE
zYou can only wash 1 item at a time.
zYou cannot wash items made of
wool, silk or long-pile fake fur.
zYou cannot wash electric blankets.
zDo not use a laundry net. (It
prevents drum rotation.)
Putting blankets into the drum
Both ends at the back of the drum
NOTE
zDo not roll blankets or bedspreads
into balls or fold haphazardly.
This may cause excessive vibration,
damaging the appliance or laundry.
NA-120VX6_EN(New Zealand).indd 20 2017-9-29 14:46:10

21
Washing
“ECONAVI” programme
This programme detects the water
temperature, the laundry amount and
PDWHULDOFRWWRQFKHPLFDO¿EUHHWF
and determines the best suited wash
time and water amount to save energy
and water.
You can save time and energy more
with smaller amount of laundry, or with
larger amount of clothes that easily
GU\VXFKDVFKHPLFDO¿EUHRUZLWK
higher water temperature.
NOTE
zIt is recommended that only dry
items are put into the drum. If many
wet items are loaded, ECONAVI
sensing may not work properly.
“Active Foam”
The “Active Foam” works with the
VSHFL¿HGSURJUDPPHVDVPHQWLRQHG
on page 19.
lights up when the “Active Foam”
LVVHWDQGÀDVKHVZKLOHZRUNLQJ
NA-120VX6_EN(New Zealand).indd 21 2017-9-29 14:46:11
22
Changing Programme Settings
Preparing
zSort the laundry and put it into the
drum. ( P. 9)
zAdd the detergent. ( P. 12)
1
Turn on the power.
2
Select a programme.
( P. 16, 17)
3
Change settings of the
programme.
zThe setting range depends on
the programme.
(P. 18)
4
Start operation.
Changing the temperature
Water Temp
You can change the washing
temperature according to the type of
laundry or the degree of soiling.
3
Press.
The temperature indication
displayed changes with each
press.
Setting guide
zHigher temperature:
Whites, cottons, heavily soiled
items
zLower temperature:
Colours, items that shrink
easily, lightly soiled items
Changing the water level
Water Level
You can change the washing water
amount.
3
Press.
The water level indication
displayed changes with each
press.
: High (H)
: Medium (M)
: Low (L)
NA-120VX6_EN(New Zealand).indd 22 2017-9-29 14:46:12
23
Optional Functions
Changing the spin speed
Spin Speed
Change the spin speed to dry laundry
more thoroughly or reduce wrinkles in
laundry.
3
Press.
The spin speed indication
displayed changes with each
press.
Setting guide
zHigher speed:
To dry more thoroughly
zLower speed:
To reduce wrinkling
NOTE
zYou can change the spin speed
after the programme starts and until
the wash process ends. Pause the
programme and do the steps 3 and
4.
Setting the programme end time
Preset
You can set how may hours later the
washing will end.
3
Press.
The time indication displayed
changes with each press.
Holding down “ Preset”
changes the time continuously.
Setting range
Up to 24 hours (in increments
of 1 hour)
To check a preset time
Press.
To cancel settings
Turn off the power.
(All settings are cancelled)
NOTE
zBe sure to close the door and
press “Start/Pause” to activate the
“Preset”.
zDo not use a detergent that is
GLI¿FXOWWRGLVVROYHEHFDXVHLWPD\
cake up before the wash starts and
QRWÀRZLQWRWKHGUXP
zYou cannot set the end time for the
“Wool”, “Delicates”, “Tub Clean”, or
“Drain” programme.
NA-120VX6_EN(New Zealand).indd 23 2017-9-29 14:46:13
24
Washing with Optional Functions
You can use combinations of optional
functions with each programme.
Preparing
zSort the laundry and put it into the
drum. ( P. 9)
zAdd the detergent. ( P. 12)
1
Turn on the power.
2
Select a programme.
( P. 16, 17)
3
Add optional function.
zThe options available differ
depending on the programme.
(P. 18)
zAn alarm sounds if you select
an option that is
unavailable.
4
Start operation.
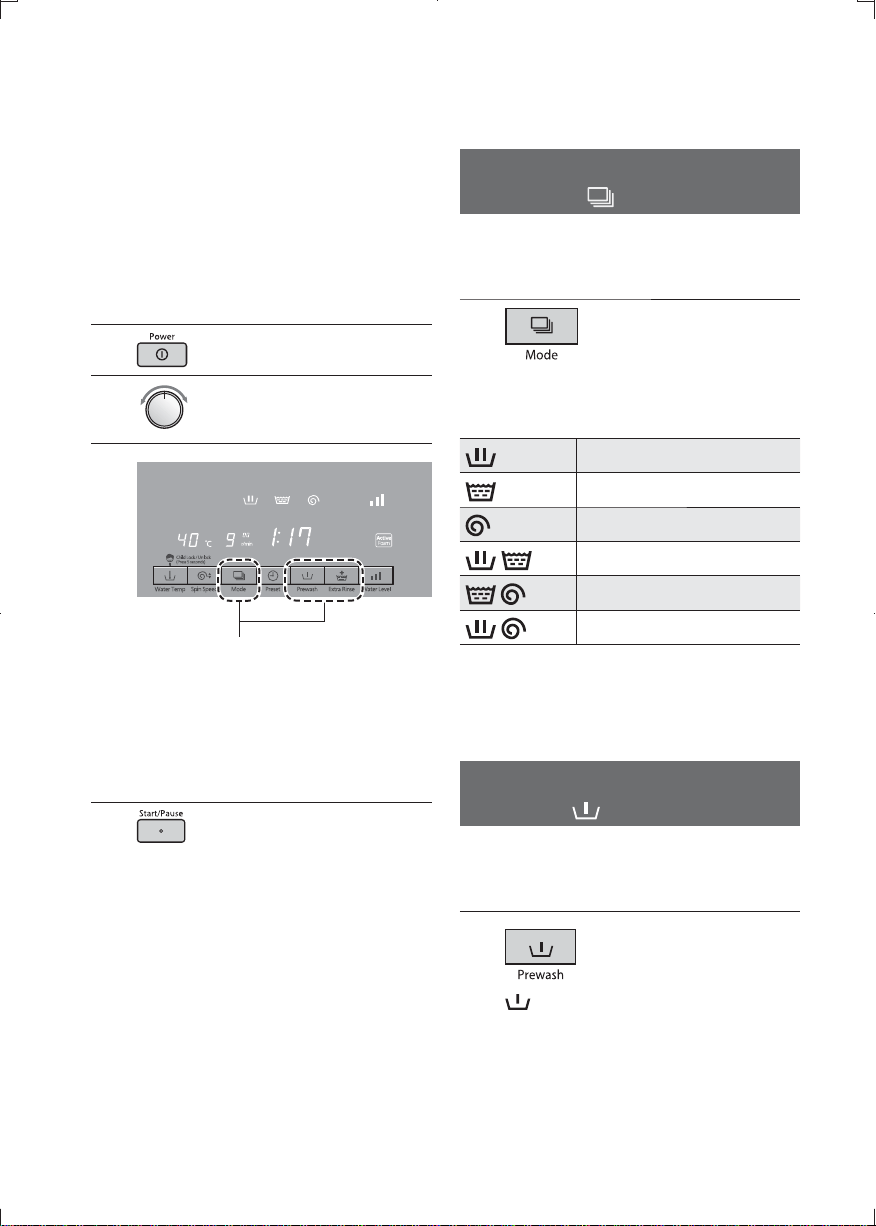
Select and run processes
Mode
You can select and run a combination
of wash, rinse and spin processes.
3
Press.
The indication displayed
changes with each press.
*
2
Washes
*
1
Rinses
*
1
Spins
Washes and rinses
*
1
Rinses and spins
Washes and spins
'UDLQV¿UVWLIWKHUHLVZDWHULQWKH
drum.
*2 Water will remain.
Prewash
Prewash
You can wash laundry twice by adding
the prewash option. This is good for
heavily soiled items.
3
Press.
lights (activated) or goes out
with each press.
NA-120VX6_EN(New Zealand).indd 24 2017-9-29 14:46:15
25
Optional Functions
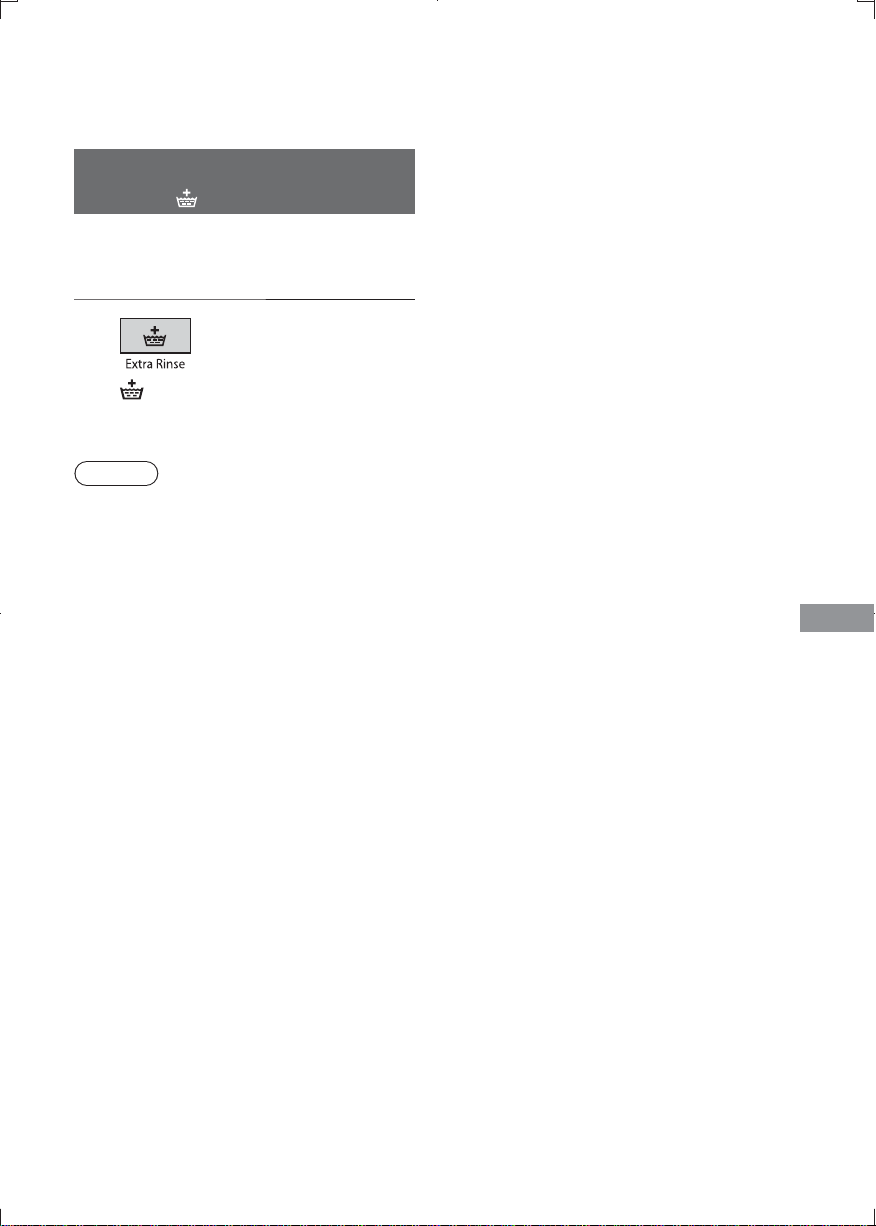
Rinse thoroughly
Extra Rinse
If you are concerned that some
detergent may remain in your laundry,
you can add an extra rinse process.
3
Press.
lights (activated) or goes out
with each press.
NOTE
zYou can change the “Extra Rinse”
setting after the programme starts
and until the wash process ends.
Pause the programme and do the
steps
3 and 4.
NA-120VX6_EN(New Zealand).indd 25 2017-9-29 14:46:15
26
Cancelling the buzzer
You can turn off the buzzer that
sounds at the end of the programme.
1
Turn on the power.
2
Press for at least 5
seconds.
The buzzer setting is cancelled
after a beep.
To activate
Do the same operation as you did
for cancelling. The buzzer setting is
activated after two beeps.
Setting the Child Lock
Child Lock
You can lock the door to prevent
children from opening it themselves.
This also locks the control buttons.
1
Turn on the power.
2
Press for at least
5 seconds.
(
lights up.)
To deactivate
Press for at least
5 seconds.
(
disappears.)
zIgnore the beeps and keep
pressing until the Child Lock is
deactivated.
Cancelling the “Active
Foam” function
You can disable the “Active foam”
function.
1
Turn on the power.
2
Select “Tub Clean”.
3
Press for at least
3 seconds.
(“002” is displayed and
lights up.)
4
Press.
(“002” is still on and
disappears.)
5
Press.
(The setting is complete
and the power turns off)
To activate
Do the same operation as you did
for cancelling.
lights up in step 4.
Changing Appliance Settings
NA-120VX6_EN(New Zealand).indd 26 2017-9-29 14:46:16
27
Optional FunctionsMaintenance
Maintenance
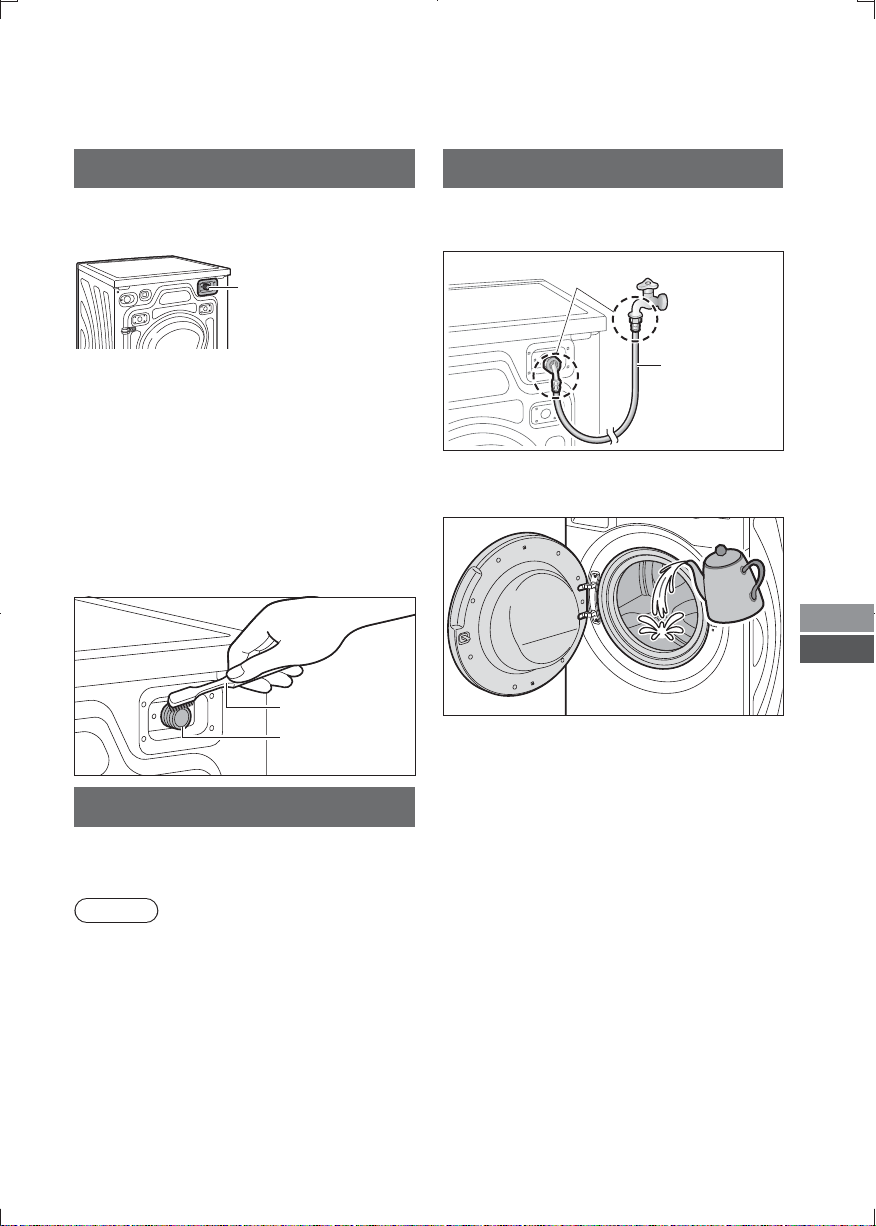
:DWHUVXSSO\¿OWHU
&OHDQWKH¿OWHULIZDWHULVQRWVXSSOLHG
properly.
:DWHUVXSSO\¿OWHU
1 Turn off the tap.
2 Turn on the power and start the
“Cotton” programme without any
laundry or detergent inside the
drum.
3 After 1 minute, turn off the power.
Water has drained out of the water
supply hose.
4 Remove the water supply hose and
FOHDQWKHZDWHUVXSSO\¿OWHU
Water supply
¿OWHU
Brush etc.
Appliance
Use a soft cloth to wipe off any water
or dirt.
NOTE
zDo not splash water.
zDo not use gritty cleaners thinners,
nor products containing alcohol or
SDUDI¿QRLO
Door seal and window
Wipe off any lint or foreign objects.
Appliance
Wipe with a cloth and mild kitchen
detergent.
If the water supply hose is frozen
1 Wrap warm towels around the joints
of the water supply hose.
Joints
Water
supply hose
2 Put 2 to 3 litres of hot water (about
50 °C) into the drum.
3 Wait for about 10 minutes, select
and run the spin process in “Mode”
function (P. 24).
NA-120VX6_EN(New Zealand).indd 27 2017-9-29 14:46:17
28
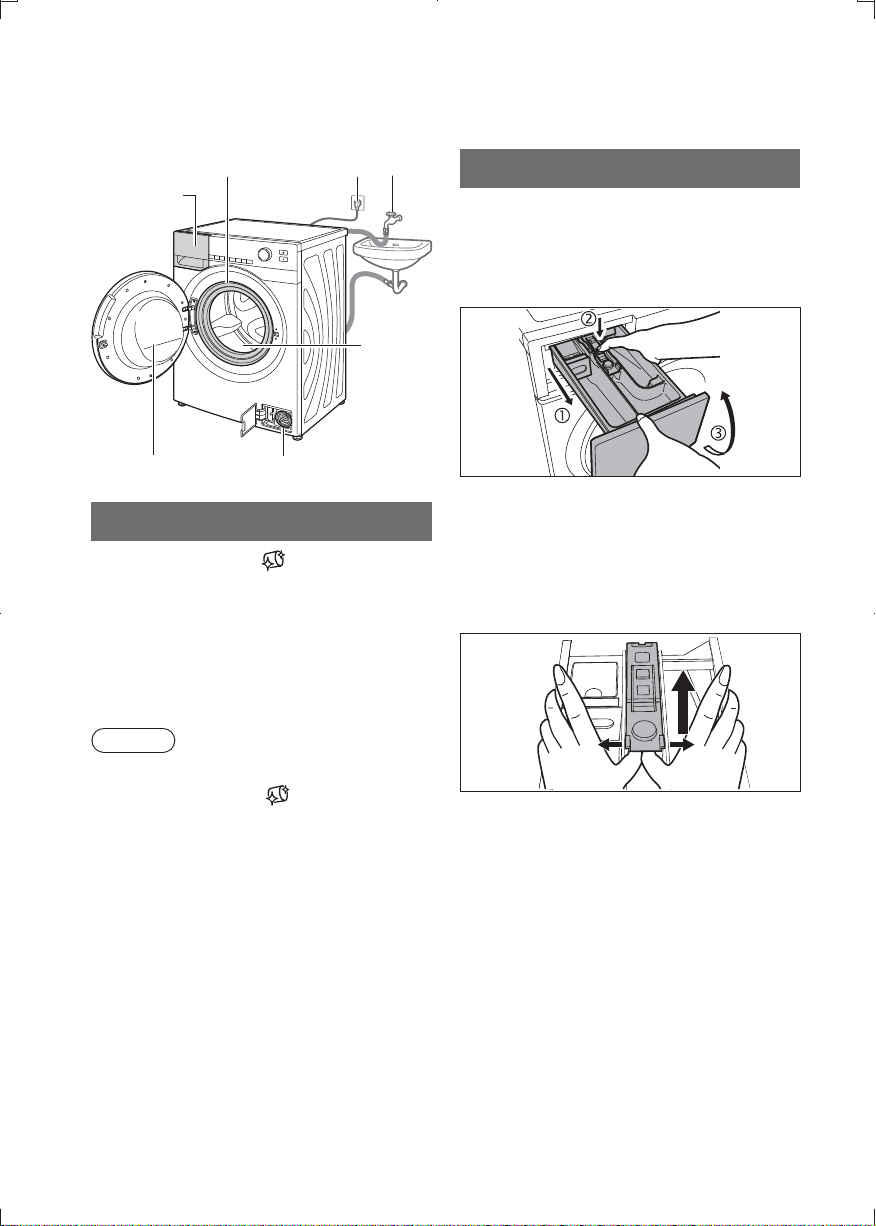
Maintenance (continued)
Door seal
Detergent
drawer
Power plug
Drum
Window
Tap
'UDLQ¿OWHU
Drum
Once a month or if ÀDVKHVUXQ
the “Tub Clean” programme with a
drum cleaning detergent commercially
available. The indicator goes off
ZKHQWKHSURFHVV¿QLVKHV,WLVDOVR
recommended to clean the detergent
GUDZHUDQGWKHGUDLQ¿OWHU
NOTE
zIf the “Tub Clean” programme is not
run, the indicator
goes off when
other programme is run 3 times.
zFollow the instructions of the drum
cleaning detergent.
zIf you use a scale remover, follow
the manufacturer’s instructions.
Detergent drawer
Wash the detergent drawer with water.
A build-up of detergent can develop
mould.
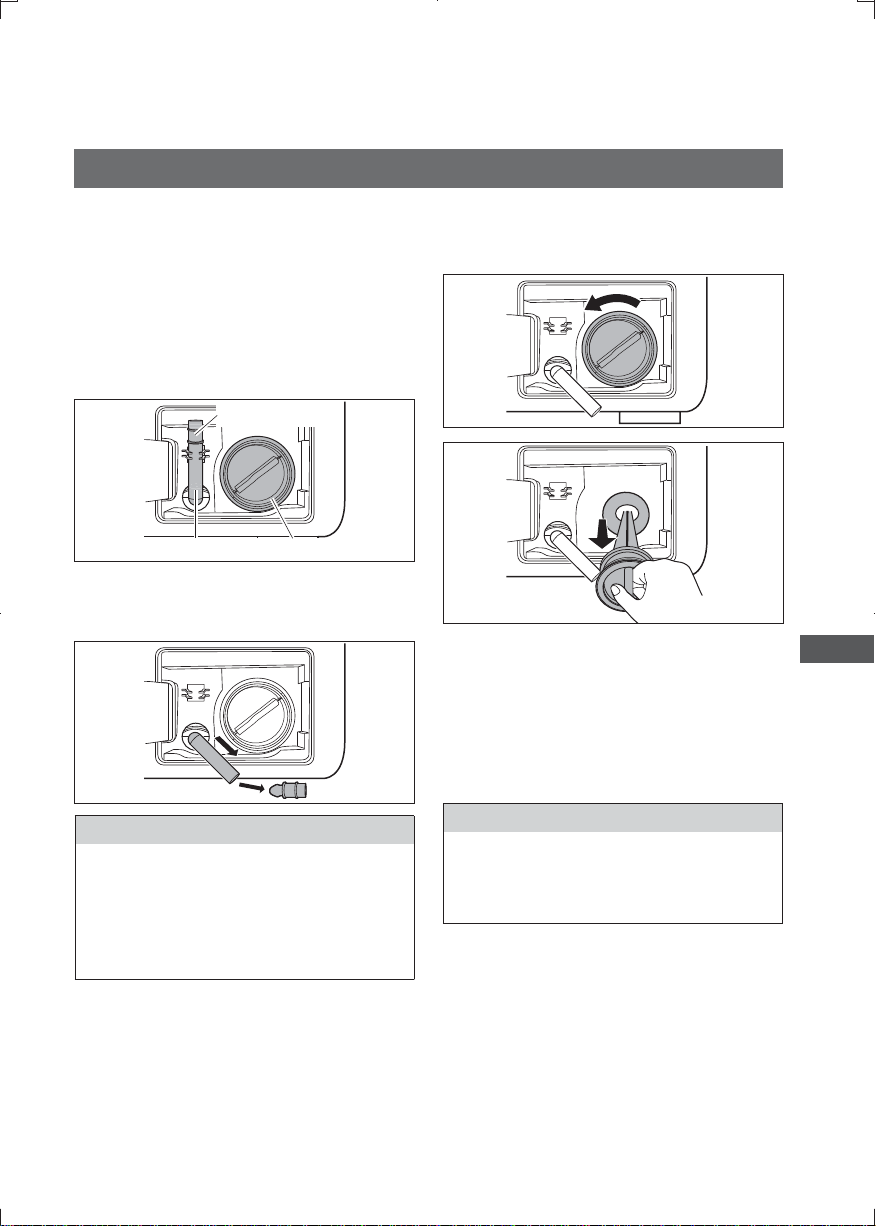
1 Pull out the detergent drawer.
2 Pull laterally by both thumbs with
proper force as shown by the small
DUURZVLQWKH¿JXUHDQGSXVK
the softener cover upwards by
the thumbs to remove it from the
detergent drawer.
3 Wash the detergent drawer with
water.
4 Replace the softener cover and
detergent drawer.
NA-120VX6_EN(New Zealand).indd 28 2017-9-29 14:46:19
29
Maintenance
'UDLQ¿OWHU
5HPRYHOLQWIURPWKHGUDLQ¿OWHURQFH
a month. A build-up of lint can hamper
drainage.
1 Switch off and unplug the
appliance.
2 2SHQWKHGUDLQ¿OWHUFRYHURQWKH
front, and place a container to
receive discharged water.
Hose stopper
Pump hose 'UDLQ¿OWHU
3 Pull out the pump hose, remove the
hose stopper to drain water into the
container.
CAUTION
'RQRWUHPRYHWKHGUDLQ¿OWHULI
there is water inside the drum, such
as during operation. If you do, a
large volume of water (possibly
scalding water) will pour out.
4 No water being left, turn the drain
¿OWHUDQWLFORFNZLVHWRORRVHQDQG
pull it out.
5 Remove any lint and debris.
65HSODFHWKHGUDLQ¿OWHU
7 Replace the hose stopper and
SXPSKRVHDQGFORVHWKHGUDLQ¿OWHU
cover.
CAUTION
%HVXUHWRWXUQWKHGUDLQ¿OWHU
clockwise until it is in place.
Otherwise, water leak may occur.
NA-120VX6_EN(New Zealand).indd 29 2017-9-29 14:46:20
30
Troubleshooting
Problem Cause and Measures
Appliance
Buttons do not
work
- Settings cannot be changed while an operation is
in progress. Only the spin speed and “Extra Rinse”
settings can be changed when the wash process is
paused.
- The Child Lock (
) may be activated. (P. 26)
Door does not
open
- The door is locked while an operation is in progress.
(P. 14)
- The Child Lock (
) may be activated. (P. 26)
- The temperature inside the drum may be very high.
- The water level may be too high.
To open the door immediately
(1) Switch the appliance off and then on again.
(2) Run the Spin operation (P. 24). After the water is
drained and the temperature falls, you can open the
door.
- If you switch off the appliance or there is a power cut
while the door is locked, it remains locked until the
power is turned on again.
Unusual odour
- 5XEEHUSDUWVPD\JLYHRIIDVPHOOZKHQ\RX¿UVWXVH
the appliance, but the smell will go away over time.
- Run the “Tub Clean” programme to clean the drum.
(P. 28)
Wash
No water going
into the appliance
- The tap may be turned off.
- The water supply may be disrupted.
- The water supply hose may be frozen. (P. 27)
- 7KHZDWHUVXSSO\¿OWHUPD\EHEORFNHG3
Water builds up
during a wash
- This is normal. Water is automatically supplied if the
water level falls.
Water drains out
during a wash
- If there is excess foam, water is drained out and fresh
water supplied to remove the foam. This is the foam
detection function.
- Even if water is directly supplied to the drum, it may
drain away without building up.
NA-120VX6_EN(New Zealand).indd 30 2017-9-29 14:46:20

31
Troubleshooting
Problem Cause and Measures
Rinse/Spin
Water is not
supplied to the
drum during the
rinse process
- Before rinsing, the appliance spins to drain out any
UHPDLQLQJZDWHU7KHQLW¿OOVXSZLWKIUHVKZDWHU
Rinsing begins
before the spin
SURFHVV¿QLVKHV
- If the appliance detects an unbalanced load, it
automatically starts rinsing to correct the imbalance.
- If excess foam remains after washing, the water is
GUDLQHGRXWDQGUH¿OOHGWRZDVKWKHIRDPDZD\7KLVLV
the foam detection function.
During the spin
process, the drum
stops and rotates
several times
- This is normal. When the appliance detects an
unbalanced load, it automatically tries to correct it.
- The laundry may be too light.
Try adding one or two bath towels.
Foam or water
remains on the
door or door seal
- Some foam or water may remain depending on the
state of the laundry or the amount of detergent used.
Wipe foam or water away before taking out the laundry.
Time
The displayed
remaining time
changes
- The display is only a guide and is corrected continually.
- The remaining time may increase if the rinse or spin
settings are changed or if the appliance detects an
unbalanced load and makes an adjustment accordingly.
Detergent and foam
There is not
enough/too much
foam
- The amount of foam varies depending on the
temperature, level and softness of the water.
The following can result in less foam
- Powdered detergent may have been put directly into
the drum.
It should be put into the detergent drawer. (P. 12)
- Too little detergent may have been used.
- Low foam detergent may be used.
- The laundry may be heavily soiled.
- The load may be large.
The following can result in more foam
- Too much detergent may have been used.
NA-120VX6_EN(New Zealand).indd 31 2017-9-29 14:46:20

32
Problem Cause and Measures
Detergent and foam
Fabric softener
RYHUÀRZV
- The amount of softener used may have been above the
“MAX” line in the detergent drawer. (P. 12)
- The detergent drawer may have been closed too
strongly and spilt some of the softener.
There is powdered
detergent left on
the laundry after
washing
- Powdered detergent may have been put directly into
the drum.
It should be put into the detergent drawer. (P. 12)
Noise
There is an
unusual noise or
vibration
- There may be a metal item in the drum.
- The anchor bolts may not have been removed.
( P. 36)
- The appliance may be installed on a slope or an
unstable surface.
- Wet clothes may be loaded at the start of washing.
Perform spin process or wring out the laundry
beforehand.
There is noise
when water drains
out
- This is normal. It is the noise of the drain pump
working.
There is a fan
rotation sound.
- This is normal. The fan cools electric parts.
Others
There is a power
cut during
operation
- Operation will resume from the point it had stopped
when the power is recovered. (Auto restart)
The circuit breaker
trips during
operation
- Figure out the cause and deal with it, then reset the
breaker.
Operation will resume from the point it had stopped
when the power is recovered. (Auto restart)
The water supply
is disrupted
- After the water supply is restored, the water may be
discoloured for a short while.
Disconnect the water supply hose, run the tap until
the water is no longer discoloured, and reconnect the
water supply hose. (P. 38)
The display is
unclear
- The appliance may be in a brightly lit or sunlit area.
Troubleshooting (continued)
NA-120VX6_EN(New Zealand).indd 32 2017-9-29 14:46:20

33
Troubleshooting
Unable to drain
What to do
Check the drain hose for any of following problems:
- It is blocked with debris.
- Hose tip is immersed in water.
- It rise higher than 1 m.
- Water in the pipe is frozen.
&OHDQWKHGUDLQ¿OWHULIEORFNHG3
After correcting the problem, open the door then close it, then
press “Start/Pause” to restart the machine. (However, the door
may not be opened due to water level; in this case, switch off the
power, and then re-switch on it and restart the operation.)
Door is open
What to do
Make sure that door is closed properly.
Close the door securely and press “Start/Pause”.
Unable to spin-dry
The product has been designed to detect unbalanced loads,
SDUWLFXODUO\VPDOOORDGVLQRUGHUWRHQVXUHTXLHWRSHUDWLRQDQG
achieve the best results.
This is not a malfunction. Perform any of the following solutions.
What to do
- Please try to untangle clumps of clothing.
- If you wash large items, e.g. blankets, please reduce the load.
- In case of very small load, add one or two bath towels.
- Please check that your product is on a stable surface.
- Please adjust the feet to ensure the machine is level.
After correcting the problem, open the door then close it, then
press “Start/Pause” to restart the machine.
Unable to supply
water
What to do
Check for any of following problems:
- Supply tap is closed.
- Water pipe or hose is frozen.
- Water supply has been disrupted.
- :DWHUVXSSO\¿OWHULVEORFNHG3
After correcting the problem, open the door then close it, then
press “Start/Pause” to restart the machine.
An error starting with “H” is displayed.
What to do
Turn off the tap just to be safe. Check the 2-digit number after
“H”, unplug the machine and contact a service agent of our
company.
Error Display
NA-120VX6_EN(New Zealand).indd 33 2017-9-29 14:46:21
34
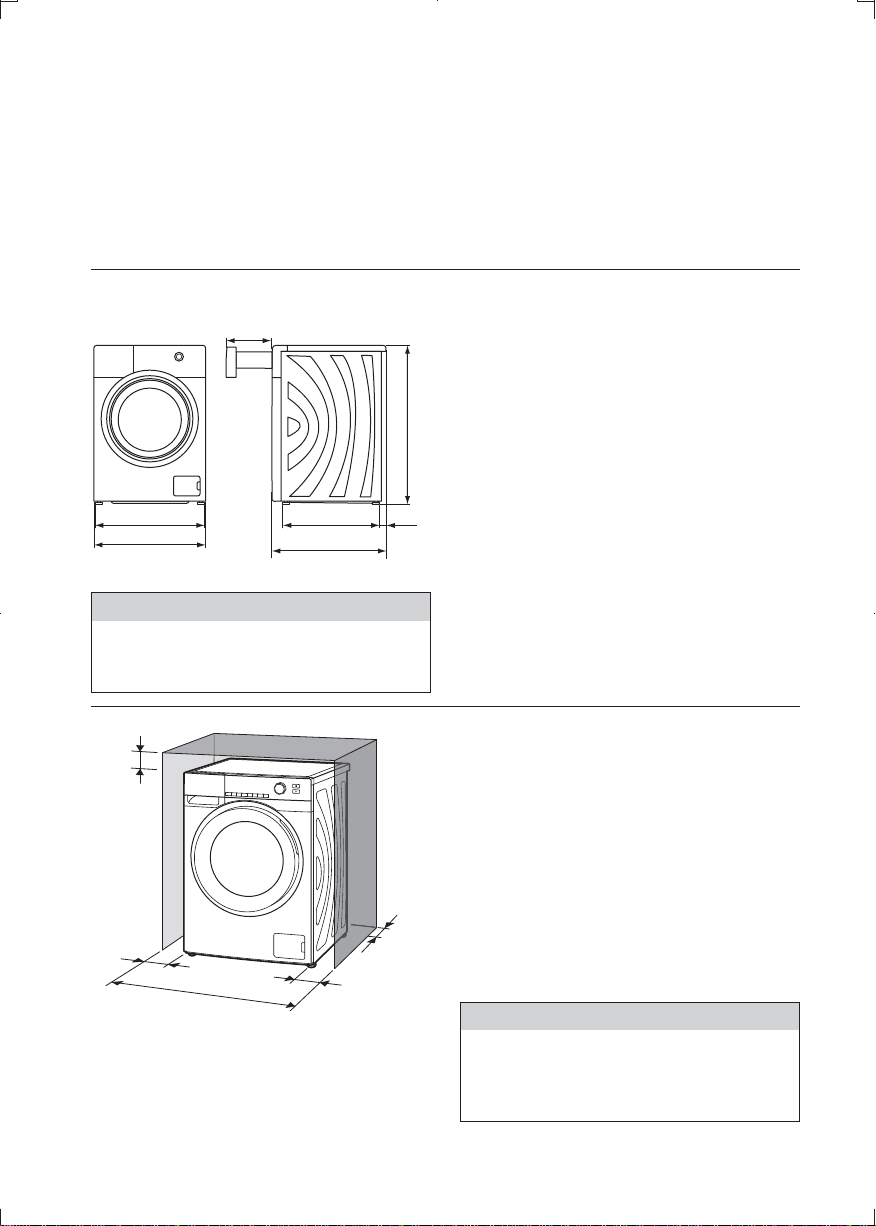
Choosing the Right Location
z Make sure to ask a service person for installation. Do not install by yourself.
z If the installation, test run and inspection of the washing machine are not
carried out following this installation method, Panasonic will not be liable for
any accident or damage caused.
Appliance dimensions
182
582
465
845
24
596
560
(mm)
CAUTION
Do not install where temperatures
may reach freezing.
(d)
(e)
(c)
(a)
(b)
Locations the appliance is not to
be installed
- In a damp place or where the
appliance may be exposed to rain,
etc. (As this could cause electric
VKRFNRU¿UH
- Locations that are uneven, or
unstable (As this could cause
vibration and noise)
- In direct sunlight (As this
could cause a malfunction or
deformation)
- Within, or on top of, unstable
surfaces, including but not limited
to benchtops, timber shelving, or
cabinets.
Set-in installation
- Install the appliance with easy
access to the power plug and
socket.
- Install the appliance where there is
enough space around it.
(a): 3 mm or more above
(b): 5 mm or more behind
(c): 2 mm or more on the left side
(d): 2 mm or more on the right side
(e): 64 cm or more
CAUTION
Do NOT let metallic portions of the
appliance come into contact with
metal sinks or other appliances.
NA-120VX6_EN(New Zealand).indd 34 2017-9-29 14:46:22
35
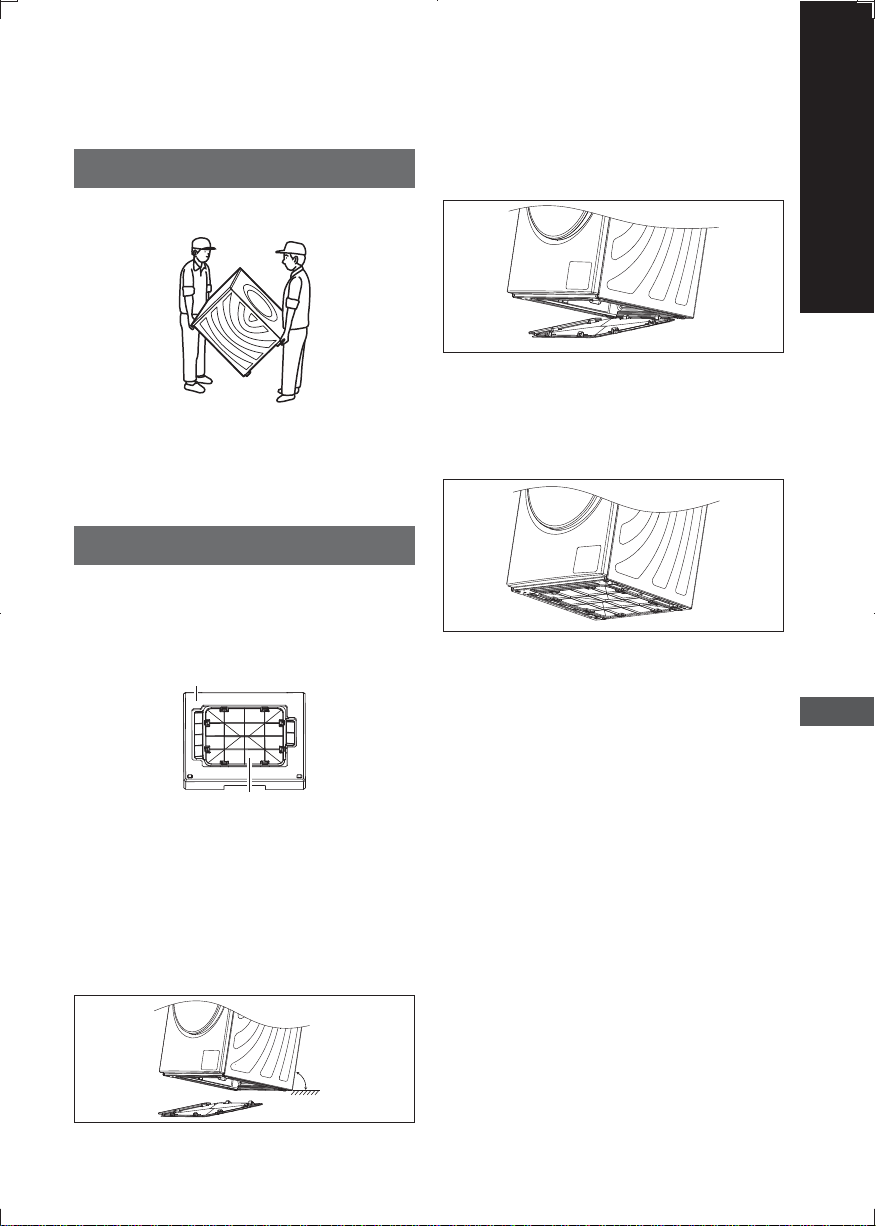
Installation
Service person only
Moving and Installing
Carrying the appliance
Don’t do it by yourself alone.
Tilt the appliance backwards, then
grip the bottom of the appliance while
anyone else holding the rear top.
Installation of bottom plate
Since the accessories for the bottom
plate are in the upper foam pad of the
package, do not the dispose of it.
Upper foam pad
Bottom plate
The bottom plate must be installed
with the FRONT mark facing
frontwards.
1 Tilt the body backwards by about
60° and keep it stable, then place
the bottom plate beneath the unit.
60°
2 Hang the rear claws of the bottom
plate to the base.
3 Snap the front claws into the base
until they click.
4 Snap the left and right claws into
the base securely until they click.
NA-120VX6_EN(New Zealand).indd 35 2017-9-29 14:46:25
36
Moving and Installing (continued)
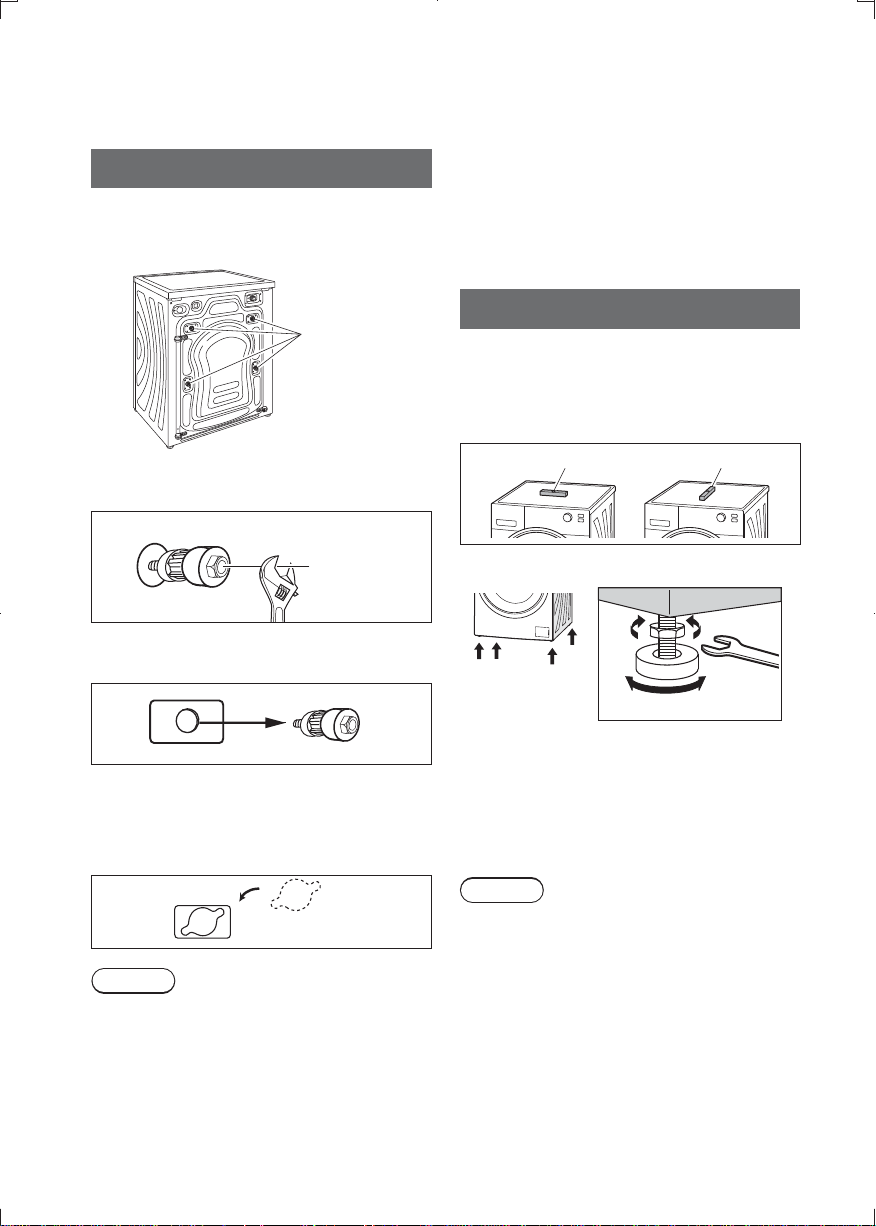
Removing the anchor bolts
The anchor bolts keep the interior of
the appliance in place, and protect it
from vibration during transportation.
Anchor
bolts
1 Loosen the 4 anchor bolts (4
pieces) using a spanner.
(Rear of appliance)
2 Turn the rubber part of each bolt
counterclockwise and pull it out.
3 Attach the cover cap to the hole. If
the caps are not attached, foreign
objects may enter the appliance
and cause a malfunction.
NOTE
zOperating the appliance with
anchor bolts still attached will cause
excessive vibration. They must be
removed before operation.
zStore the anchor bolts. They will
be needed when the appliance is
moved again in the future.
zWhen moving the appliance again,
the anchor bolts must be attached
to the appliance. Attach the anchor
bolts in the reverse order they were
removed.
Levelling the appliance
Prepare a thin spanner and spirit
level. (not supplied)
Use a spirit level to make sure the
appliance is level.
Spirit level
Spirit level
1
2
3
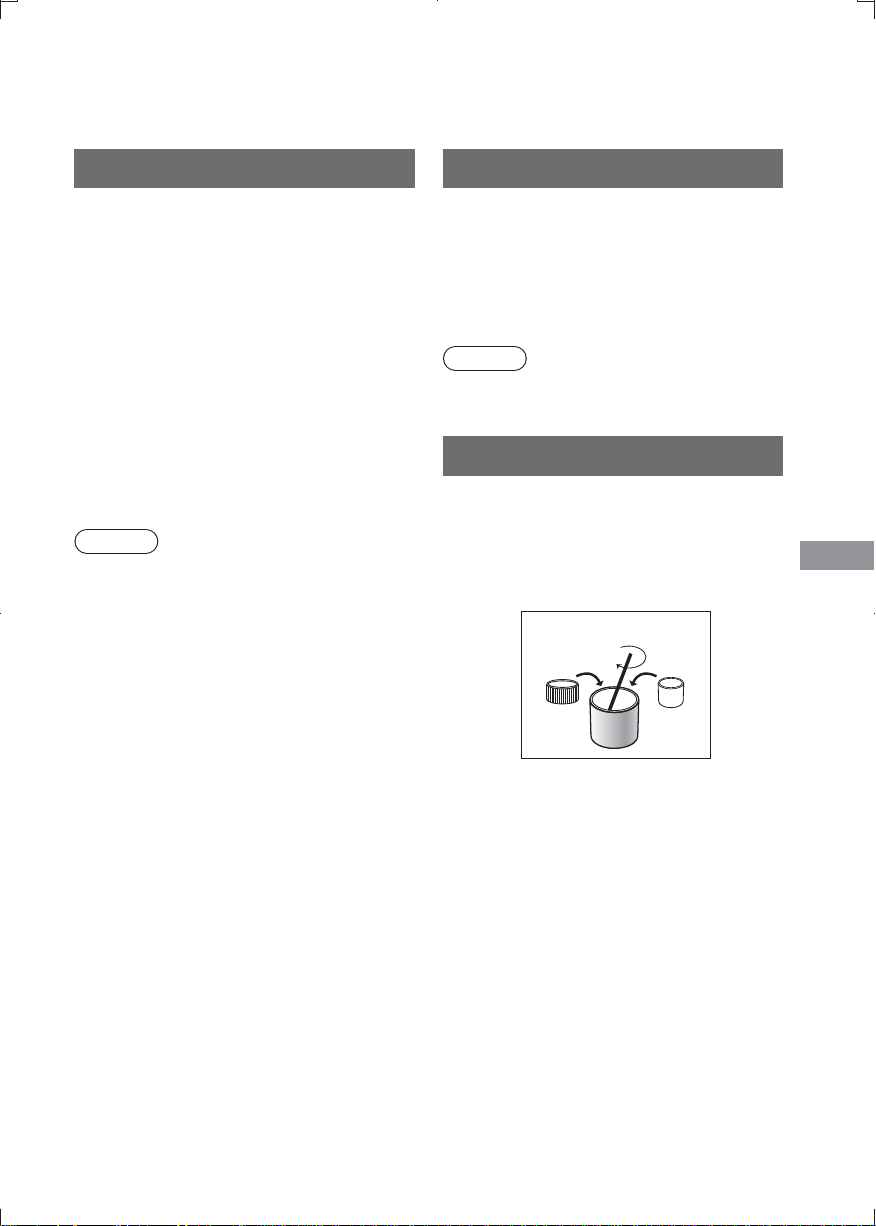
1 Loosen the lock nut with the
spanner.
2 Turn the adjustable foot to adjust
the height.
3 Tighten the lock nut.
NOTE
zMake sure that all lock nuts
are tightened securely and the
adjustable feet are still bolted to the
appliance.
If they are unbolted, the appliance
will shake and move around.
4 adjustable
feet
NA-120VX6_EN(New Zealand).indd 36 2017-9-29 14:46:27
37
Installation
Service person only
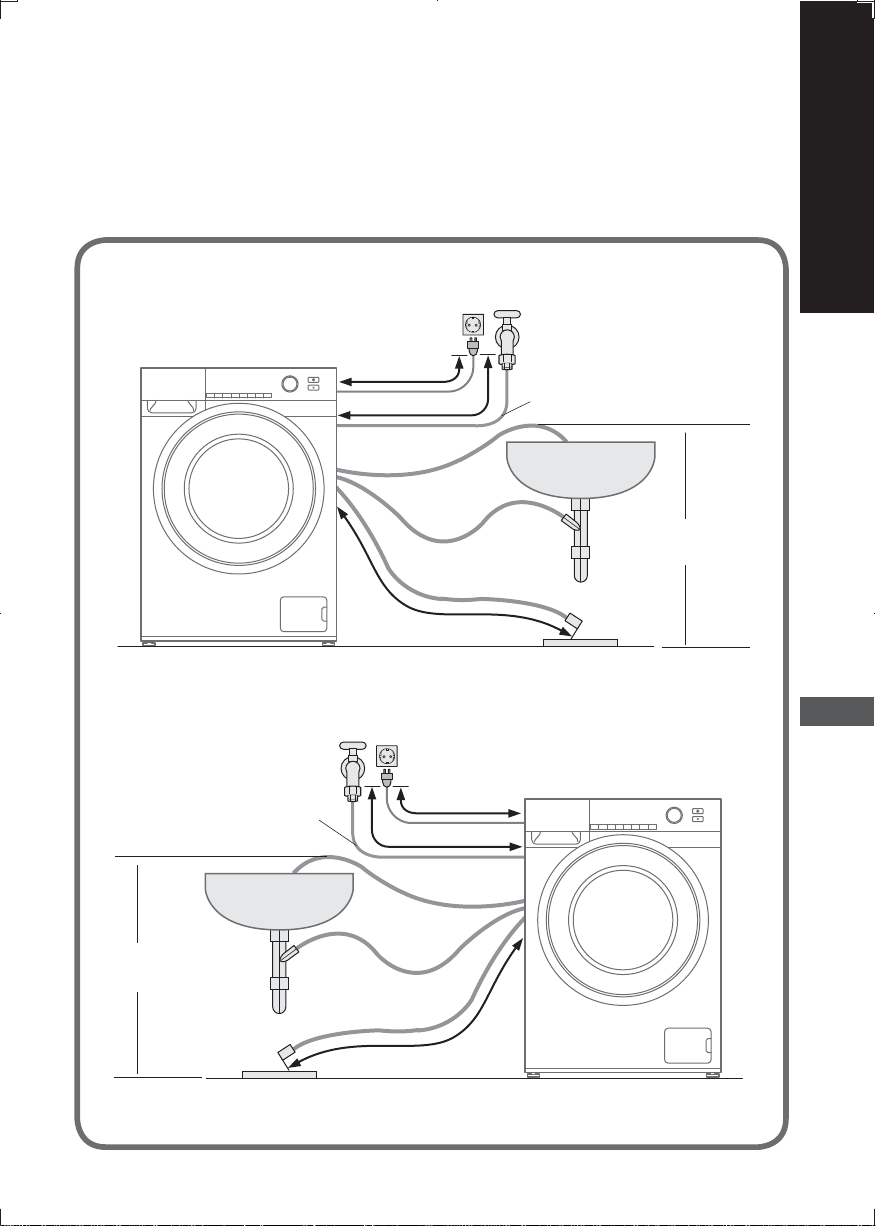
Connecting the Hoses
Connect the hoses properly to prevent water leaks.
Do not overtighten hoses as this may cause leaks.
Maximum connection distance of hoses and power cord
Left side connections
Right side connections
Sink
Water supply hose
Water supply hose
Drain hose
Drain hole
125 cm
40 cm
125 cm
S
T
Rise of drain hose
(max. 90 cm)
Drain hole
95 cm
75 cm
85 cm
Sink
S
T
Rise of drain hose
(max. 90 cm)
Drain hose
NA-120VX6_EN(New Zealand).indd 37 2017-9-29 14:46:28

38
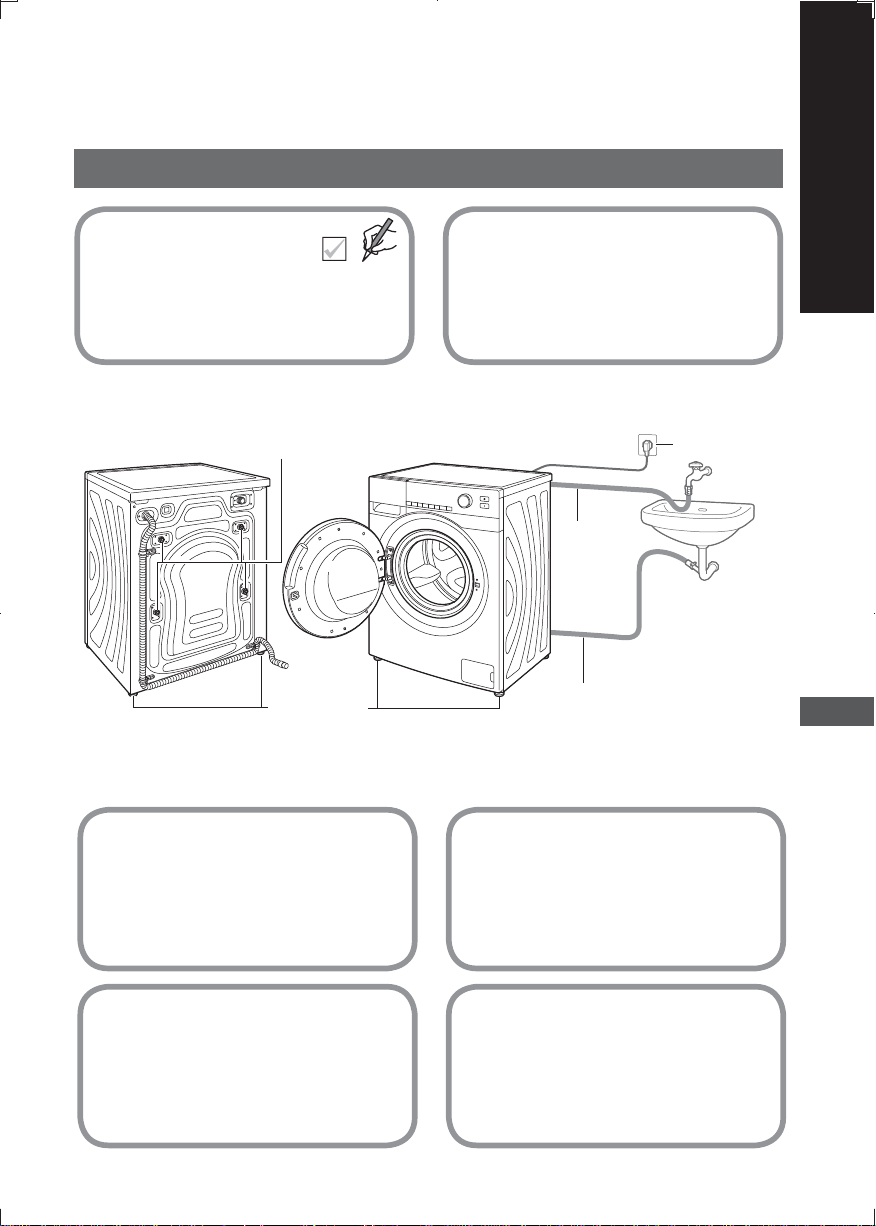
Water supply hose
0DLQVZDWHUSUHVVXUHDQGZDWHUÀRZ
zWater pressure: 0.03-1 MPa
If the water pressure exceeds this
YDOXH¿WDSUHVVXUHUHGXFLQJYDOYH
z:DWHUÀRZIURPWDS/PLQRU
more
Connecting the water supply hose
CAUTION
z'R127WZLVWVTXDVKPRGLI\RU
cut the hose.
z7LJKWHQWKHQXW¿UPO\
1 Attach one end of the hose to the
water inlet on the appliance and
tighten by hand.
Water inlet
Water supply
hose
(Rear of appliance)
2 Attach the other end of the hose to
the tap and tighten by hand.
min.
10 mm
3/4"
3 Turn on the tap slowly and make
sure there are no leaks.
Drain hose
Draining to a sink or wash basin
CAUTION
Secure the drain hose with an elbow
so that it does not come off by water
pressure during drainage.
Elbow
(supplied)
Draining to a stand pipe
Stand pipe
Draining to a drain hole
NOTE
zDo not twist, pull out or bend the
drain hose.
zDo not put the hose tip under water.
Connecting the Hoses (continued)
Water supply
hose
NA-120VX6_EN(New Zealand).indd 38 2017-9-29 14:46:29
39
Installation
Service person only
Checking after Installation
Appliance parts checklist
Anchor bolts
zHave you removed all 4 anchor
EROWVDQG¿WWHGFRYHUFDSV"
(P. 36)
Power plug
zIs the appliance plugged into
an AC 220-240 V household
VRFNHW"
Adjustable feet
zAre they stable and securely
WLJKWHQHG"3
z,VWKHDSSOLDQFHOHYHO"3
Water supply hose
zIs the water supply hose
SURSHUO\FRQQHFWHG",VLWIUHH
IURPOHDNV"3
Installation place
z,VWKHDSSOLDQFHRQDÀDWVWDEOH
VXUIDFH"
z'RHVLWUXQZLWKRXWYLEUDWLQJ"
(P. 36)
Drain hose
zIs the drain hose properly
FRQQHFWHG"'RHVLWGUDLQ
QRUPDOO\"3
Water supply
hose
Drain hose
Power plug
Anchor bolts (4)
Adjustable
feet (4)
NA-120VX6_EN(New Zealand).indd 39 2017-9-29 14:46:30
40
Checking after Installation (continued)
Test run
435
1
Turn on the tap.
2
Close the door without any
laundry in the drum.
3
Switch on the appliance.
4
Select the “Rapid 15”
programme.
5
Start operation.
Water leaks
zCheck the appliance and hose
joints for leaks. (P. 37)
Abnormal noise
zMake sure the appliance is level.
(P. 36)
Error display
Unable to drain (P. 33)
Unable to supply water
(P. 33)
zAfter resolving an error, open
and close the door and press
“Start/Pause” to resume the test.
NA-120VX6_EN(New Zealand).indd 40 2017-9-29 14:46:31
41
Installation/Others
Service person only
Power and Water Consumption
Programme
Temperature Water level
Load
Power
consumption
*
1
Water
consumption
*
1
Time*
1
Cotton
Cold High 10 kg 0.15 kWh 95 L 1:02
40 °C High 10 kg 1.0 kWh 95 L 1:17
60 °C High 10 kg 1.5 kWh 95 L 1:32
Cotton Eco 40 °C*
2
High 10 kg 1.02 kWh 85 L 5:03
Cold High 10 kg 0.4 kWh 94 L 2:23
40 °C High 10 kg 1.1 kWh 94 L 2:38
*1 The power, water consumption and time indicated in the table may vary
depending on variations in pressures, water hardness and temperatures,
URRPWHPSHUDWXUHVW\SHVDQGDPRXQWVRIODXQGU\YROWDJHÀXFWXDWLRQVDQG
functions to be used.
*2 Cotton Eco, 40deg, 1200 r/min is for normally cotton soiled load with AS/NZS
2040.1, AS/NZS 2040.2, AS/NZS 6400.
NA-120VX6_EN(New Zealand).indd 41 2017-9-29 14:46:32
42
6SHFL¿FDWLRQV
Model No. NA-120VX6 NA-120VG6
Rated voltage 220 - 240 V
Rated frequency 50 Hz
Maximum energy rated
power input
1670 - 1990 W
Heating energy rated
power input
1610 W (230 V)
Maximum spin speed 1200 r/min
Product dimensions 596 mm (W) × 560 mm (D) × 845 mm (H)
Product weight 66 kg
Maximum mass of dry
cloth
10 kg
Water consumption
Refer to “Power and Water Consumption”.
( P. 41)
Pressure of tap water 0.03 - 1 MPa
Check the power supply
The rated power of the
appliance is shown on the name
plate. Make sure it matches the
VSHFL¿FDWLRQVRI\RXUUHVLGHQFH
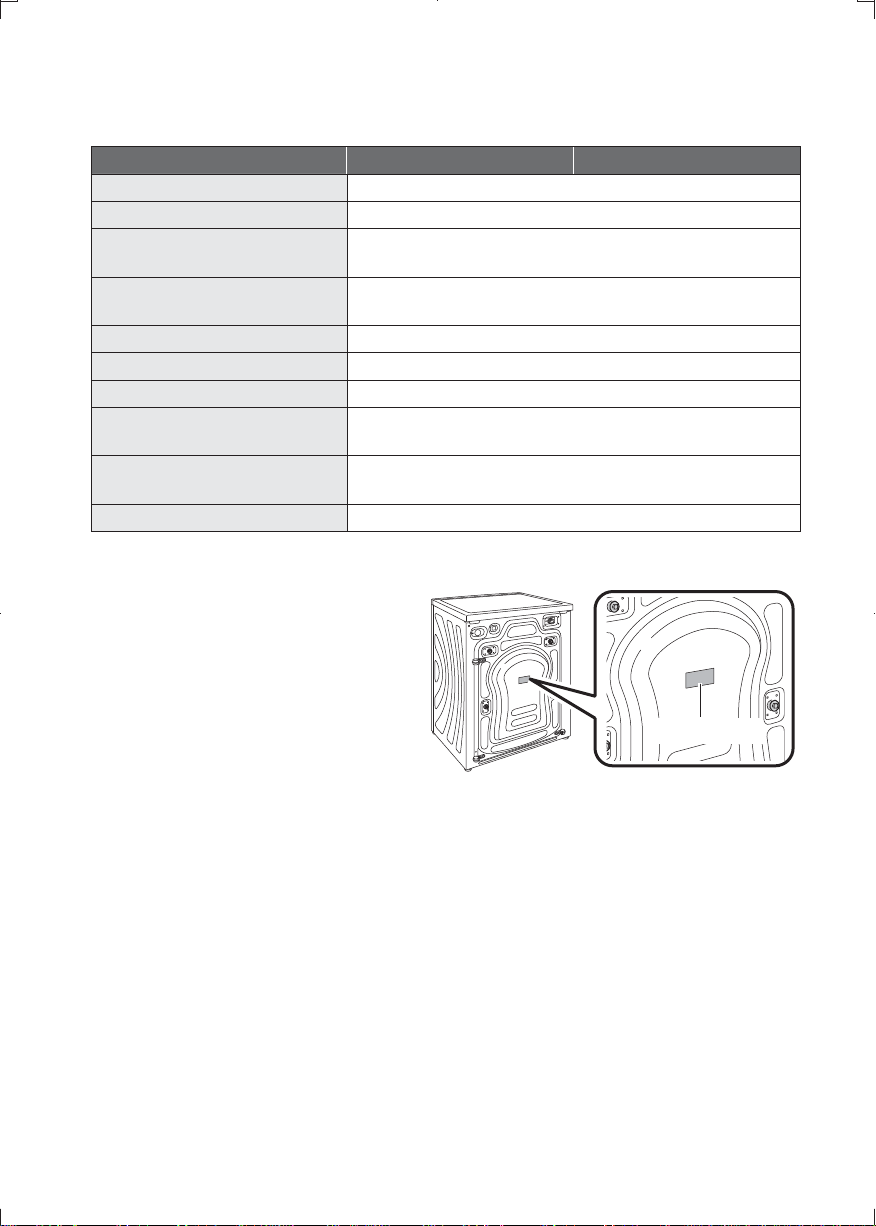
Name plate
NA-120VX6_EN(New Zealand).indd 42 2017-9-29 14:46:32

43
Others
NA-120VX6_EN(New Zealand).indd 43 2017-9-29 14:46:32

Printed in China
12-2017
S1217-0
http://www.panasonic.com
© Panasonic Corporation 2017
W9901-3MW00
NA-120VX6_EN(New Zealand).indd 44 2017-9-29 14:46:33