
Model No.
NA-140VS4
NA-148VS4
Operating Instructions
& Installation Instructions
Washing Machine
(Domestic use)
®
Thank you for purchasing this appliance.
- For optimum performance and safety, please read these instructions
carefully.
- Before connecting, operating or adjusting this appliance, please read the
instructions completely. Please keep this manual for future reference.
ReadBeforeUsing 2
SAFETYPRECAUTIONS 4
WashingInstructions 12
OptionalFunctions 22
Maintenance 24
Troubleshooting 27
InstallationInstructions 32
NA-140_148VS4_AUNZ_EN_20140213.indb 1 2014/02/13 13:35:32

2 - Read Before Using
Consider the Environment
Disposing of packaging
Thepackagingusedtoprotectthe
washingmachinefromdamageduring
transportationisallrecyclable.For
informationonrecycling,contactyourlocal
authority.
Disposing of Waste
Electrical & Electronic
Equipment
Information on disposal for users of
waste electrical & electronic equipment
(private households)
Thissymbolontheproductsand/or
accompanyingdocumentsmeansthat
usedelectricalandelectronicproducts
shouldnotbemixedwithgeneral
householdwaste.
Forpropertreatment,recoveryand
recycling,pleasetaketheseproductsto
designatedcollectionpoints,wherethey
willbeacceptedonafreeofchargebasis.
Alternatively,insomecountriesyoumaybe
abletoreturnyourproductstoyourlocal
retaileruponthepurchaseofanequivalent
newproduct.
Disposingofthisproductcorrectlywill
helptosavevaluableresourcesand
preventanypotentialnegativeeffectson
humanhealthandtheenvironmentwhich
couldotherwisearisefrominappropriate
wastehandling.Pleasecontactyourlocal
authorityforfurtherdetailsofyournearest
designateddisposablepoint.
Penaltiesmaybeapplicableforincorrect
disposalofthiswaste,inaccordancewith
nationallegislation.
Information on disposal in other
countries outside the European Union
ThissymbolisonlyvalidintheEuropean
Union.
Ifyouwishtodiscardthisproduct,please
contactyourlocalauthoritiesordealerand
askforthecorrectmethodofdisposal.
Eco-friendly Laundry
- Keeptotheloadlimitofeach
programme.
- Thewashingmachineautomatically
adjuststheoperatingtimeofeach
programmedependingontheload.
- Youonlyneedtouseapreliminarywash
ifyourlaundryisheavilysoiled.
- Usingthe60°CCottonprogramme
insteadofthe90°CCottononewillsave
energyandwillremoveordinarystains.
- Forlightlysoiledlaundry,usingtheCold
Washprogrammeinsteadofthe40°C
Quick50programmewillsavemore
energy.
Detergent amount
- Usethecorrectamountofdetergent
basedonthedetergentpackinstructions
andlocalwaterhardness.
- Adjusttheamountofdetergent
dependingonhowsoiledyourlaundryis.
When using a tumble dryer
Tosaveenergy,pleaseselectthecorrect
spinspeedaccordingtotheinstructionof
yourtumbledryer.
NA-140_148VS4_AUNZ_EN_20140213.indb 2 2014/02/13 13:35:32

Read Before Using - 3
Contents
3
Read Before Using
ConsidertheEnvironment. . . . . . . . 2
SAFETYPRECAUTIONS. . . . . . . . 4
CheckingYourWashingMachine
. . . 6
Yourwashingmachine . . . . . . . . . . . . .6
Accessories. . . . . . . . . . . . . . . . . . . . . .6
BeforeWashing . . . . . . . . . . . . . . . . 7
Checkingbeforeuse . . . . . . . . . . . . . . .7
Beforeinitialuse..................7
Preparingthelaundry. . . . . . . . . . . . . .7
UsingtheButtons . . . . . . . . . . . . . . 8
Unlockingthedoor . . . . . . . . . . . . . . . .9
AddingDetergentandOther
Chemicals. . . . . . . . . . . . . . . . . . . 10
Detergentcompartment . . . . . . . . . . .10
Softenercompartment. . . . . . . . . . . . .11
Prewashingcompartment . . . . . . . . . .11
Washing Instructions
Washing. . . . . . . . . . . . . . . . . . . . . 12
Settingwashing. . . . . . . . . . . . . . . . . .12
Requiredtime. . . . . . . . . . . . . . . . . . .13
Changingsettingswhilewashing. . . .13
Steamprogramme . . . . . . . . . . . . . . .14
SelectingtheProgramme. . . . . . . 16
DetailsofProgrammes. . . . . . . . . 18
TipsforWashing. . . . . . . . . . . . . . 20
WoolandDelicatesprogrammes. . . .20
Beddingprogramme..............21
OptionalFunctions. . . . . . . . . . . . . 22
Individualwashingfunctions . . . . . . . .22
Additionalfunctions. . . . . . . . . . . . . . .22
Presettimer. . . . . . . . . . . . . . . . . . . . .23
Childsafetylock. . . . . . . . . . . . . . . . .23
Settingthebuzzer . . . . . . . . . . . . . . . .23
Maintenance
Maintenance. . . . . . . . . . . . . . . . . 24
Cleaningtheoutsideofthe
appliance. . . . . . . . . . . . . . . . . . . . . . .24
Cleaningthedrum. . . . . . . . . . . . . . . .24
Cleaningthedetergentdrawer. . . . . .24
Cleaningthedoorsealandwindow
. . .25
Cleaningthedrainfilter . . . . . . . . . . . .25
Cleaningthewatersupplyfilter. . . . . .26
Preventingafrozenwatersupply
hose . . . . . . . . . . . . . . . . . . . . . . . . . .26
Troubleshooting
FaultChecklist. . . . . . . . . . . . . . . . 27
ErrorDisplay. . . . . . . . . . . . . . . . . 31
Installation Instructions
ChoosingtheRightLocation . . . . . 32
Carryingtheappliance . . . . . . . . . . . .32
Therightplacefortheappliance. . . . .32
Installingtheset-inappliance. . . . . . .33
MovingandInstalling. . . . . . . . . . . 34
Removingtheanchorbolts . . . . . . . . .34
Movingtheappliance . . . . . . . . . . . . .34
Levellingtheappliance............35
ConnectingHosesandPower
Supply......................36
Hosesandcablelengths. . . . . . . . . . .36
Watersupplyhose . . . . . . . . . . . . . . .36
Waterdrainhose. . . . . . . . . . . . . . . . .37
Connectingtothepowersupply. . . . .37
CheckingafterInstallation . . . . . . . 38
Installationchecklist . . . . . . . . . . . . . .38
Testrunafterinstallation . . . . . . . . . . .38
PowerandWaterConsumption. . . 39
Specifications . . . . . . . . . . . . . . . . 40
NA-140_148VS4_AUNZ_EN_20140213.indb 3 2014/02/13 13:35:32

4 - Read Before Using
SAFETY PRECAUTIONS
Readandfollowthesesafetyprecautions.
3 WARNING
This describes issues which could
cause death or serious injury.
General Use
- Thisapplianceisnotintendedforuse
bypersons(includingchildren)with
reducedphysical,sensoryormental
capabilities,orlackofexperienceand
knowledge,unlesstheyhavebeengiven
supervisionorinstructionconcerninguse
oftheappliancebyapersonresponsible
fortheirsafety.
- Childrenshouldbesupervisedtoensure
thattheydonotplaywiththeappliance.
- DoNOTplaceastandorachaircloseto
theappliance.
Childrenmayreachthecontrolpanelor
climbontoorintotheappliance.
- Turnoffthewatersupplytothe
applianceifitwillnotbeusedfora
prolongedperiod,suchasduringa
holiday.Thisisparticularlyimportant
ifthereisnodrainagearoundthe
appliance.
Ifthewatersupplyislefton,thewater
pressuremayincreaseandresultina
leak.
- DoNOTinstalltheapplianceinadamp
locationorinalocationexposedtothe
weather.
Thismayresultinproductmalfunctionor
deterioration,electricshockorfire.
- DoNOTspillwaterdirectlyontoanypart
oftheappliance.
Thismayresultinmalfunction,electric
shockorfire.
- Keepsourcesofignition,suchas
candlesorcigarettes,awayfromthe
appliance.
Theymaycauseafireordamagetothe
appliance.
- Keepflammablematerialsawayfrom
theappliance,forexample,gasoline,
thinner,alcohol,orclothingsoakedwith
thesematerials.
Theymaycauseanexplosionorafire.
Power source and cable
- Unplugthemainsleadwhencleaning
theappliance.
- Checkthemainsleadandmainsplug
fordamage.
Ifthemainsleadisdamaged,itmustbe
replacedbythemanufacturer,itsservice
agentorsimilarlyqualifiedpersonsto
avoidahazard.
- DoNOTuseamainsplugadaptoror
extensioncable.Thereisapossibilityof
overheatingwhichmaycauseafire.Use
anunusedhouseholdmainssocket,fully
ratedatAC220Vto240V.Ifyouare
notsure,contactaqualifiedelectrician.
- ENSUREthemainsplugisfullyinserted
intothehouseholdmainssocket.
Otherwise,alooseconnectionmay
overheatandcauseanelectricshockor
fire.
- DoNOTtouchthemainsleadormains
plugwithwethands.
Doingsomaycauseanelectricshock.
- DoNOTpullthemainsleadbutholdthe
mainsplugtounplugtheappliance.
Otherwise,themainsleadmaybe
damaged,whichmayleadtoanelectric
shockorfire.
NA-140_148VS4_AUNZ_EN_20140213.indb 4 2014/02/13 13:35:32

Read Before Using - 5
SAFETY PRECAUTIONS
To Prevent Injury
- Theapplianceshouldbeinstalledbythe
manufacturer’sdealerorserviceagent.
Iftheinstallation,testrunandinspection
arenotcarriedoutfollowingthe
installationmethodoutlinedinthese
instructions,themanufacturerwillnot
beliableforanyaccidentordamage
caused.
- DoNOTdismantle,repairormodifythe
appliance.
Theappliancemaymalfunction,which
mayresultinafireoraninjury.Ifrepairs
areneeded,contactyourlocalCustomer
ServiceCentre.
- DoNOTtouchthelaundryinsidethe
drumuntilithascompletelystopped,
asthereisapossibilityofinjury.Keep
childrenawayfromtherotatingdrum.
3 CAUTION
This describes issues which could cause
injury or damage your belongings.
General Use
- Priortouse,turnonthetapandcheck
thehoseandconnectionsforanyleaks.
Improperconnectioncouldcauseleaks.
- Usethenewhose-setssuppliedwiththe
applianceandoldhose-setsshouldnot
bereused.
- Thisapplianceisonlysuitablefortextiles
labelledwashingmachinewashable.
- DoNOTconnecttothehotwatersupply.
ThisapplianceworksONLYwithcold
water.
- DoNOTapplypesticide,hairsprayor
deodoranttotheappliance.
- DoNOTputanyelectricalequipment,for
example,TV,radioorbatterycharger,on
orneartheappliance.
- DoNOTputexcessivelaundryor
detergentintotheappliance.
Thismaycausedamagetotheappliance.
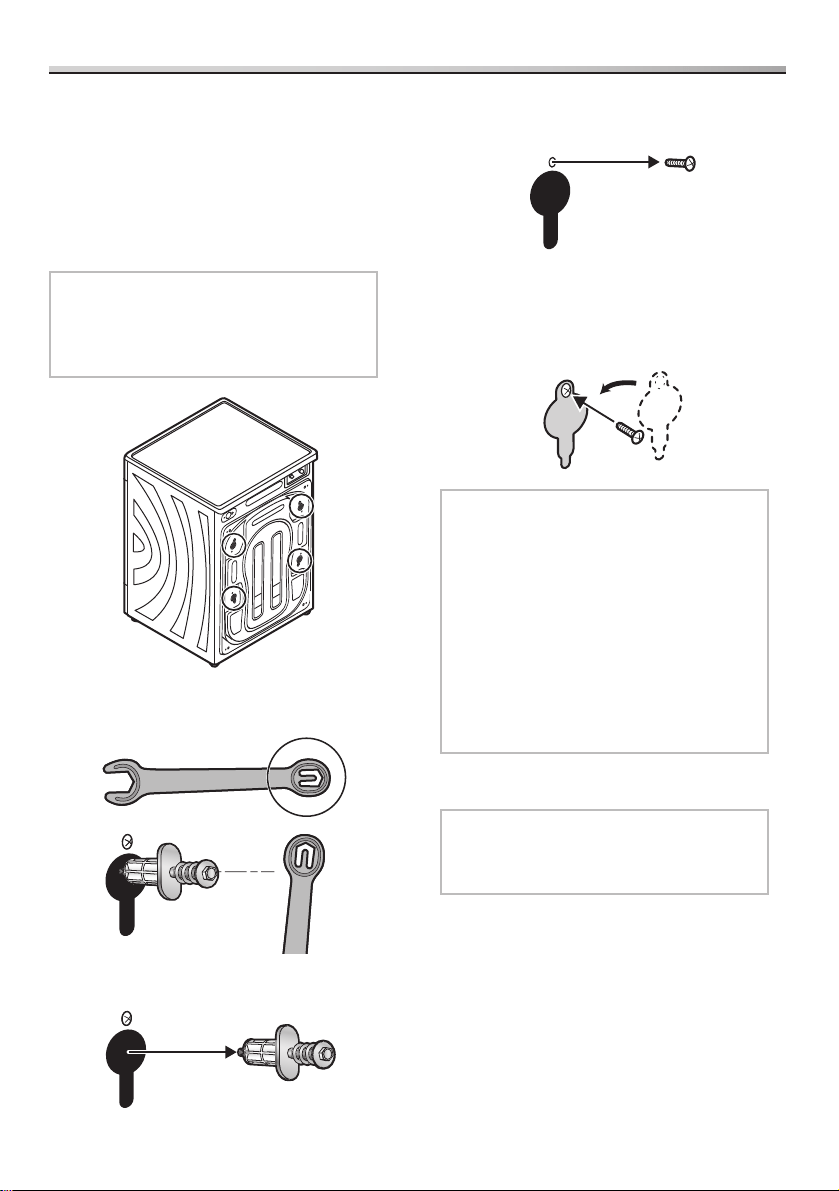
- REMOVEtheanchorboltsusingthe
suppliedspannerorasimilartoolbefore
installingtheappliance.Theanchorbolts
areusedtotransporttheappliance.
Iftheanchorboltsarenotremoved,the
appliancewillvibrateseverelyduringuse.
To Prevent Injury
- DoNOTclimbontotheappliance.
Thismaycauseinjuryordamagetothe
appliance.
- Keepfingersawayfromthedoorhinge
whenopeningandclosingthedoor.
- DoNOTslideyourhand(orunprotected
foot)underneaththeappliancewhenin
use.
- Checkallofthelaundryandremoveall
objectssuchasnails,pins,coins,clips,
metalwires,etc.
Theymaycausedamagetothelaundry
ortheappliance.
- DoNOTusetheappliancetowash
waterproofsheetsorclothing.There
isapossibilityofexcessivevibration
orfailureduringthespincycle,which
mayresultinaninjury,damagetothe
applianceorawaterleak.
- BECAREFULwhendraininghotwater
outofthedrum.
- BECAREFULnottogetlaundrycaught
inthedoorsealwhenitisclosed.This
mayresultinawaterleakordamageto
thelaundryduringthewashcycle.
NA-140_148VS4_AUNZ_EN_20140213.indb 5 2014/02/13 13:35:32

6 - Read Before Using
Checking Your Washing Machine
Your washing machine
Door
Water drain hose
Adjustable stands
(seepage35)
Drain filter cover
(seepage25)
Mains lead/
Mains plug
Door seal
Drum
(Washing/
Spin-drying tub)
Detergent drawer
(seepage10)
CAUTION
Do NOT bend the mains lead when the appliance is running.
Accessories
Makesurethatalltheaccessoriesare
suppliedwiththeappliance.
Elbow(seepage37)
Forfixingthewaterdrainhose
Spanner (seepages34-35)
EndAisforadjustingthestand.EndBis
fortheanchorbolts.
B
A
Cover cap (4) (seepages34-35)
Water supply hose (seepage36)
Eitheroneofthesehosesissuppliedwith
theappliance.
StandardHose
Hosewithwater
supplyvalve
NA-140_148VS4_AUNZ_EN_20140213.indb 6 2014/02/13 13:35:33
Read Before Using - 7
Before Washing
Checking before use
Fortheappliance’sinitialoperationor
afteraprolongedperiodofnon-operation,
performthefollowingprocedures:
1. Secure the water supply hose.
2. Turn on the tap.
3. Connect the power supply.
4. Make sure that the water drain hose
is positioned towards a drain.
Formoredetails,seepage37.
Before initial use
Thedefaultsettingisthe40°CCotton
programme.Beforeusingtheappliance
forthefirsttime,runtheprogramme
WITHOUTanydetergentorclothingto
rinseoutresidueormoisture.
NOTE
Theremayberesidualwaterinthe
applianceduetothefactoryinspection
priortoshipment.Thisisnota
malfunction.
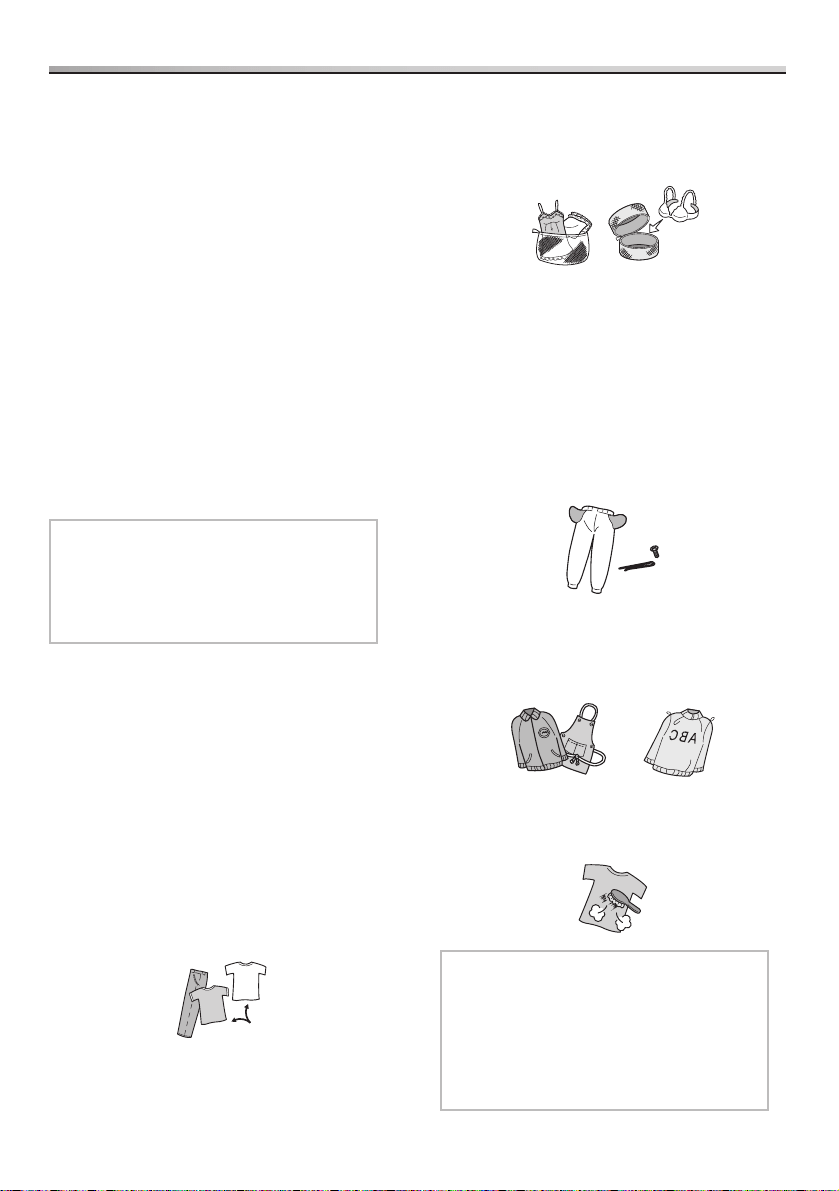
Preparing the laundry
Sorting the laundry
- Readclothingcarelabelstosortthe
laundryintodifferentloads.
- Sortthelaundrybycolour,typeoffabric
andhowsoileditis.Doingsowillhelp
youchoosethecorrectprogrammeand
temperatureforeachwash.
- Clothesthatarenotcolourfastshould
bewashedseparately.Washdenim
separately.
- Youshouldputbraswithmetalwires,
tights,laceclothingandsmallitemsinto
alaundrynettopreventthemorthe
appliancefrombeingdamaged.
Treating stains
Applystainremovertostainedportions.
Fordirtandsolidstains,washlightlyby
handfirst.
Checking clothing
- Checkthatthepocketsonclothing
donotcontainanyobjectsthatmay
damagetheclothesortheappliance.
- Tieupanyloosestringsontheclothing
andclosezippers.Turnclothingwith
raisedfabricsandzippersinsideout.
Otherwise,theclothesmaybedamaged.
- Removeanyhair,animalfur,sandand
othermaterialswithabrushbefore
washing.
NOTE
Donotwashclothesheavilystained
withlargequantitiesofvegetableoilor
cosmeticoil(aromaoil,etc.).Failure
toobservethismayresultinthedoor
sealswelling,causingthewaterto
overflowandleadingtomalfunctions.
NA-140_148VS4_AUNZ_EN_20140213.indb 7 2014/02/13 13:35:34

8 - Read Before Using
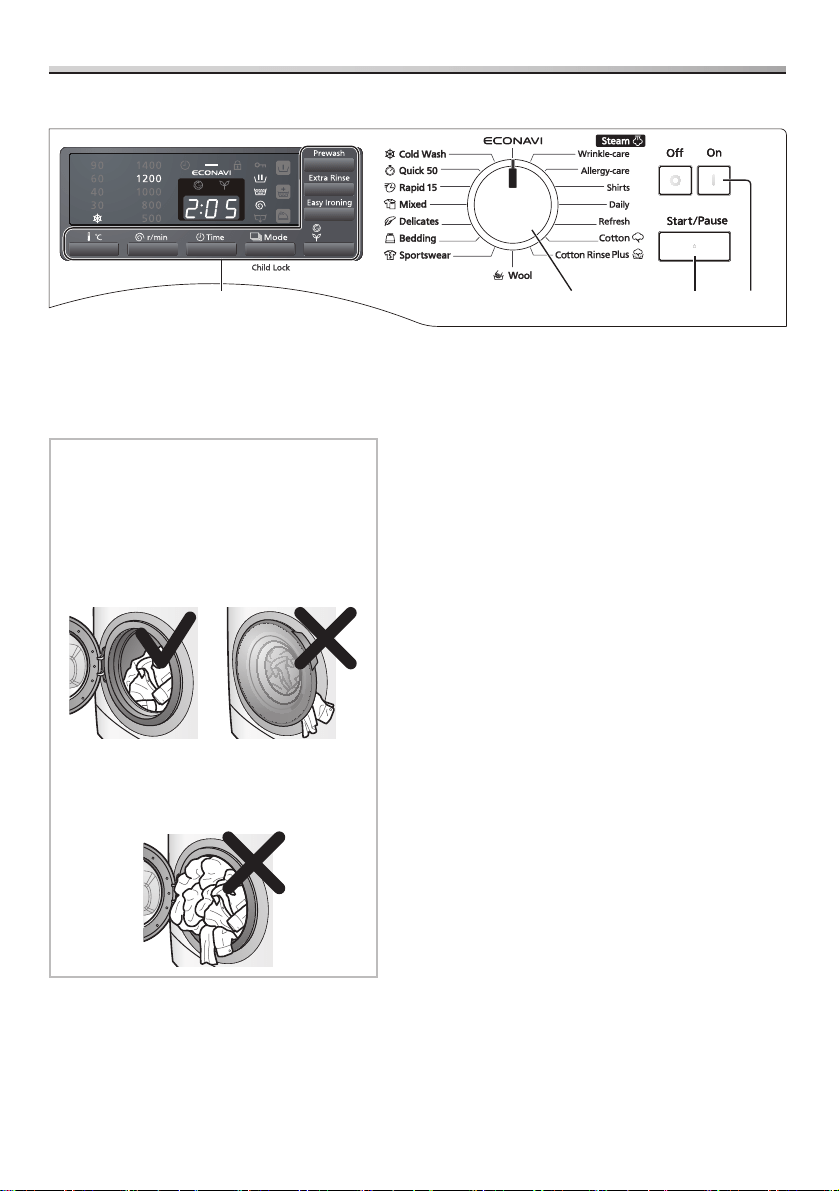
Using the Buttons
1. Power buttons
- IfyoudonotpresstheStartbutton
within10minutesaftertheappliance
hasbeenswitchedon,theappliance
automaticallyswitchesitselfoff.
- Thedisplaybelowappearsfor
3secondsaftertheappliancehas
beenswitchedoff.Youcannotturn
theapplianceonuntilthisdisplay
disappears.
2. Start/Pause button
Pressthisbuttontostartorpausethe
washprogramme.
3. Programme selection dial
Usethisdialtochoosethebest
programmeforthelaundry.
(Seepages16-17.)
4. Additional function buttons
Pressthesebuttonstoaddfunctions
totheprogrammetosuitthelaundry.
(Seepage22.)
5. Mode/Child Lock button
- Pressthisbuttontoselectthefunctionof
processes,forexample,theRinseand
SpinfunctionortheDrainonlyfunction.
(Seepage22.)
- Pressandholdthisbuttontosetthe
childsafetylock.Thedoorandthe
controlswillbelocked.(Seepage23.)
6. Time button
Pressthisbuttontopresetthetime
forwhentheprogrammefinishes.
(Seepage23.)
7. Spin speed button
Pressthisbuttontoseethespinspeed
(r/min)ortochoosethespinspeed
fortheprogrammeyouhaveselected.
(Seepage19.)
8. Temperature button
Pressthisbuttontochoosewater
temperaturesrangingfromcoldto90°C.
Youcanchoosehottertemperaturesfor
whites,cottons,orsoiledlaundry.
Speed
Eco
6
7
8
8
5
4
4
2
123
NA-140_148VS4_AUNZ_EN_20140213.indb 8 2014/02/13 13:35:34

Read Before Using - 9
Using the Buttons
Speed
Eco
91011
9. Process indicator
- Thisindicatorshowsthecurrentprocess
oftheprogramme.Theprocessconsists
ofwashN,rinseK,spinM,and
drainO.
- Thelightturnsoffwhentheprogramme
isfinished.
10. Remaining time indicator
- Thisindicatorshowstheapproximate
timeuntiltheprogrammefinishes.For
example,‘2:05’means2hoursand
5minutes.
- Thetimeiscalculatedfromtheweight
ofthelaundrymeasuredwhenwashing
starts.
11. ECONAVI lamp
(Seepage12.)
Unlocking the door
Thedoorautomaticallylockswhileinuse
andtheHsymbolisshowninlockedstate.
Aclickwillbeheardwhenthedoorlocksor
unlocks.
NOTE
- Iftheapplianceisswitchedoffwith
thedoorlocked,orifthereisapower
interruption,thedoorremainslocked
untiltheapplianceisturnedonagain.
- Thisisdifferentfromthechildsafety
lock.(Seepage23.)
Press the Start button to unlock the
door during operation.
Afterapproximately1minute,the
drumstopsspinningandthedoorwill
automaticallyunlock.
Ifthedoordoesnotopen,seepage27.
CAUTION
If you have to unlock the door mid-
programme, make sure that water
from the drum does not overflow
onto the floor.
Waterandsoapsudsmaycomeout
ofthedoorandthedooropening.You
mayneedatoweltosoakthemup.
NA-140_148VS4_AUNZ_EN_20140213.indb 9 2014/02/13 13:35:35
10 - Read Before Using
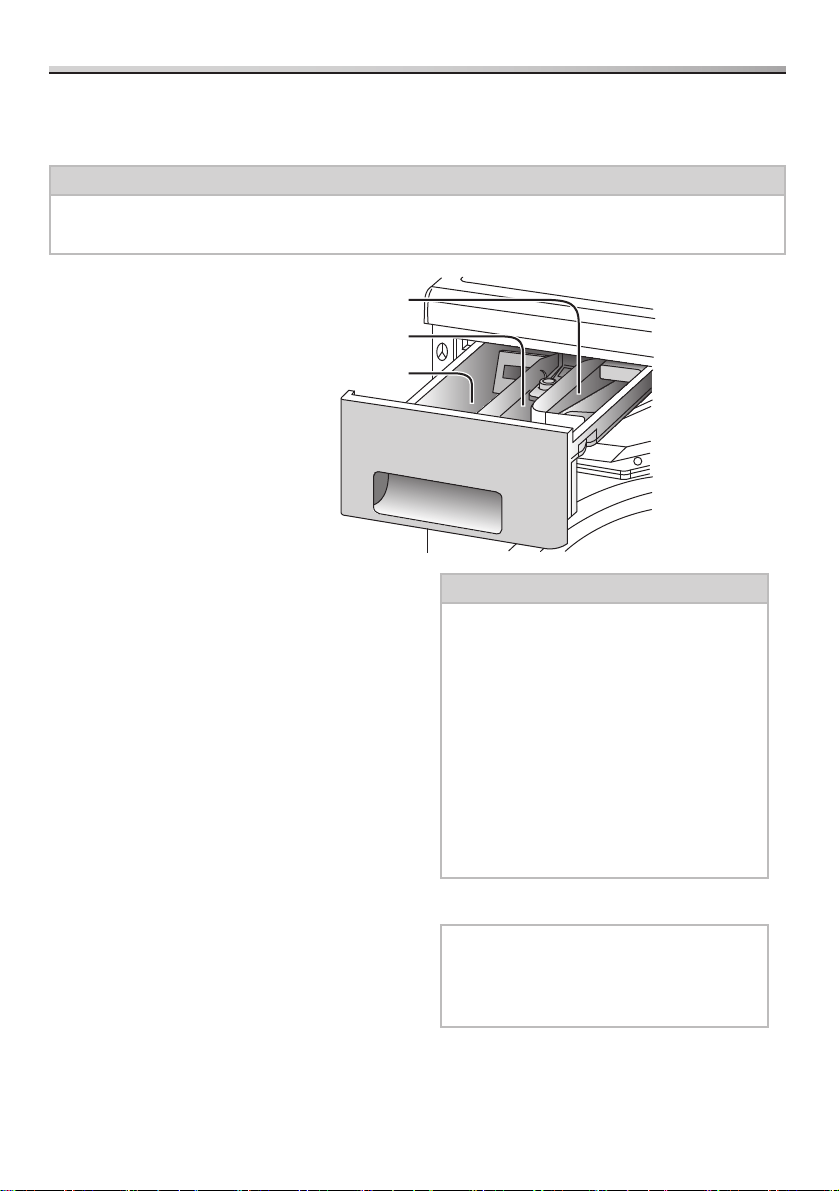
Adding Detergent and Other Chemicals
Detergent compartment
Thefollowingdetergentsandadditivesmay
beaddedtothiscompartment:
- Detergent
- Watersofteningagent
- Stainremover
- Tubcleaningdetergentorbleach
Ifyouusemultiplechemicalsinthis
compartmentforwashing,addtheminthe
followingorder:
1.Detergent
2.Watersofteningagent
3.Stainremover
Detergent
Useonlydetergentsthatarerecommended
forfully-automatedwashingmachines.
Pleaseuselowsudsdetergents.
CAUTION
If the instructions on the package
indicate that detergent should be
placed in the drum, do NOT put it
into the detergent drawer.
Thesedetergentsmaynotflowwell
andremaininthedetergentdrawer.
Donotoverfillwithdetergent.Failure
toobservethismayresultinthe
detergentblockingthewatersupply,
causingthewatertooverflowfrom
thefrontofthedetergentdrawerand
leadingtomalfunctions.
1. Liquid detergent
NOTE
DoNOTuseliquiddetergentwiththe
Prewashfunction.Itmayflowaway
duringtheprewash.
FortheWoolprogramme,usemildliquid
detergent.
Pull out the detergent drawer and add detergent or softener to the correct
compartment. Check the packages for the recommended amounts.
CAUTION
Do NOT use the appliance when the detergent drawer is removed.
Thismayresultinawaterleak.
Prewashing compartment
Softener compartment
Detergent compartment
NA-140_148VS4_AUNZ_EN_20140213.indb 10 2014/02/13 13:35:35

Read Before Using - 11
Adding Detergent and Other Chemicals
2. Powdered detergent
Detergentreachesthedrumonlywhen
waterflushesthroughthedetergent
drawer.Thus,ifyouhaveforgottentoadd
detergent,runtheDrainonlyfunctionusing
theModebutton.
Then,adddetergentandstartwashing
again.
Topreventpowdereddetergentfrom
remaininginthedrawer,performthe
following:
- Drytheinsideofthedrawerwithacloth.
- Makesurethatthedetergentisnot
lumpywhenyouadditbecausethismay
causeablockageovertime.
- Ifthedetergentremainsinthedetergent
compartment,putitintothedrum.
Amount of Detergent
Theamountofdetergentyoushoulduse
dependsonthefollowingfactors:
- Howsoiledthelaundryis
- Amountofthelaundry
- Waterhardness
Theamountoffoamvariesaccordingto
theamountandtypeofdetergent,how
soiledthelaundryis,andthehardnessand
temperatureofthewater.
Water softening agent
Ifyouliveinahardwaterarea(total
hardnessof1.3mmol/Lorhigher),we
recommendusingawatersofteningagent.
Formoredetailsonwaterhardness,
contactyourlocalwaterauthority.
Useofawatersofteningagentcanhelp
reducetheamountofdetergentrequired
foreachwashandhelppreventthe
formationoflimescaledeposits,whichmay
damagetheappliance.
Softener compartment
Fabric Softener
Topreventstatic,addsoftenerbeforeyou
startwashing.Itwillbeautomaticallyadded
inthefinalrinsecycle.
Ifthesofterremainsinthesoftener
compartment,dilutethesoftenerbefore
addingit.Adduptoonly130mltothe
compartmenttoavoidoverflowing.
Undiluted
softener
Water
Rinseouttheremainingsoftenerwith
asplashofwateroradampclothafter
washing.Ifitstickstothecompartment,
pulloutthedrawerandcleanitout.
(Seepage24.)
Prewashing compartment
Detergent for prewashing
Wheneveryouuseprogrammeswiththe
Prewashfunction,alwaysputdetergentfor
theprewashinthiscompartment.
NA-140_148VS4_AUNZ_EN_20140213.indb 11 2014/02/13 13:35:35
12 - Washing Instructions
Washing
Setting washing
1. Open the door and put the laundry
into the drum.
Fordetailsaboutpreparingandsorting
thelaundry,seepages7,16,and17.
NOTE
- Make sure to place the laundry
within the drum so that it does not
get caught in the door.
Failuretoobservethismayresultin
damagetothedoorseal,leadingto
malfunctions.
- Do NOT overload the drum.
Thismaycauseexcessivevibration
ordamagetotheappliance.
Speed
Eco
2634
4
2. Close the door and press the On
button.
3. Turn the programme selection dial
in either direction to select the
programme.
Theprogrammetimewillbedisplayed.
ECONAVI programme
Thisprogrammedetectsthelaundry
amountandtypes(cotton,chemicalfibre,
etc.)anddeterminesthebestsuitedwash
timeandwateramounttosaveenergyand
water.
Thewashtimeandwateramountcan
besavedmorewithsmalleramountof
laundry,largeramountofclothesthat
easilydry,suchaschemicalfibre,orwith
highertemperature.
- Lampindications
Blinking:Detecting
Lighting:InECONAVIoperation
OFF:NotinECONAVIoperation
4. Select optional functions.
- Processselection(seepage22.)
- Additionalfunctions(seepage22.)
- Temperature(seepage8.)
- Spinspeed(seepage8.)
Formoredetailsaboutavailable
functionsandsettingsforeach
programme,seepages18-19.
NA-140_148VS4_AUNZ_EN_20140213.indb 12 2014/02/13 13:35:36

Washing Instructions - 13
Washing
5. Add detergent to the detergent
drawer.
(Seepages10-11.)
6. Press the Start button.
Theappliancestartssupplyingwater.
Aftertheappliancehasstarted,the
laundryisweighed.Afterapproximately
5seconds,anewprogrammetime
willbedisplayed.Ifyouselectthe
Wool,Rapid15,Shirts,Sportswear,
Bedding,Wrinkle-care,DailyorRefresh
programmes,thelaundryisnot
weighed.
The buzzer will sound when the
programme has finished, and the door
will unlock immediately.
Removethelaundryandrearrangewhere
necessary.Donotleaveitinthedrumtoo
longaftertheprogrammeendstoprevent
colourtransfer.
CAUTION
After a high temperature wash, be
careful not to burn yourself when
handling the laundry or touching
the inside of the drum.
NOTE
- Ifthedetergentisnotcompletely
removedfromthelaundrybyusing
thebasicprogramme,usetheExtra
Rinsefunction.
- WiththeEcoandtheSpeedfunctions,
iftheloadisbig,thelaundrymay
sticktotheinsideofthedrum.Thisis
normal.
Required time
Requiredtimedependsontheprogramme
andtemperaturesetting.
- Actualtimemaydifferslightlyfromthe
displayedtime.
- Thedisplayedtimeincludesthetime
neededforthewatertofillupandto
drainout,thustheyvarydependingon
waterpressure,drainageandamountof
laundry.
- Ifyouchangethefunctionsetting
whilewashing,thedisplayedtimemay
change.
- Ifthelaundryinthedrumneedstobe
balanced,thetimewillbeextended.
Changing settings while
washing
Afterwashinghasstarted,theprogramme,
temperatureandpresettimecannotbe
changed.
- Tochangetheprogrammeortemperature
setting,turntheapplianceoffandthenon
again.
- Tochangetherinseorspinsettingwhile
washing,pressthePausebuttononce
theapplianceisfullofwater.
- YoucanchangetheSpinspeed,Extra
RinseandEasyIroningfunctionduring
thewashingprocess.
- Nosettingscanbechangedafterthe
washingprocesshasfinished.
NA-140_148VS4_AUNZ_EN_20140213.indb 13 2014/02/13 13:35:36

14 - Washing Instructions
Washing
Steam programme
CAUTION
BE CAREFUL
The metal ring may be hot after
using a Steam programme.
Metalring
NOTE
- WhentemporarilyhaltingaSteam
programme,iftheinsideofthedrum
ishot,thedoorwillnotopen.
- Ifyouwanttotakeitemsoutofthe
drumwhileitisstilloperating,turn
offthepoweronce,selecttheCotton
programmeandredotheDrain
operations.
Allergy-care programme
Theeffectsofhigh-temperaturewashing
andsteamoperationshelptoalleviatethe
effectsofallergiescausedbymitesand
pollen.
Available
- Foritemsthatneedtobegentletothe
skin,forexample,underwear,sheets,
towels,andbabyclothes–5kgorless
Shirts programme
TheSteameffectsduringthespin-drying
cyclethatfollowsthededicatedShirts
washingcyclehelptoreducewrinklesin
clothing.
Available
- Cottonandcottonblendshirtsand
blouses–2kgorless
Daily programme
TheSteameffectsduringthespin-drying
cyclethatfollowstheCottonwashingcycle
helptoreducewrinklesinclothing.
Available
- Dailywashingforcotton,linenand
cottonblenditems–2kgorless
NOTE
- Smallerloadsgiveabetterresult.
- Removeitemsassoonasthe
programmehasfinishedandthen
tumbledryusingtheSmoothingor
Gentlesmoothingprogramme,or
placeonahangertodry.
- Youcannotswitchbetweencycles
usingMode.
NA-140_148VS4_AUNZ_EN_20140213.indb 14 2014/02/13 13:35:36

Washing Instructions - 15
Washing
Wrinkle-care programme
UseofthededicatedSteamprogramme
willhelptoalleviatethewrinklingof
clothing.
Available
- Dryitemswhichareslightlycreased
Freshlywashedandspunitems–1.5kg
orless
Not available
- Delicateclothessuchaswoolandsilk
Refresh programme
UseofthededicatedSteamprogramme
willhelptolessenodoursinclothing.
- Thisprogrammewilllessencigarette
andotherwater-solubleodours.
Available
- Dryitemsonly–1.5kgorless
Not available
- Delicateclothessuchaswoolandsilk
NOTE
- TheWrinkle-careandRefresh
programmesonlystirlaundryusing
steam.Thewashindicatorblinks
duringtheprogrammeoperation.
- ThesearenotWashingprogrammes,
sotheydonotgetridofstains.
- Donotusedetergentsorfabric
softeners.
- Smallerloadsgiveabetterresult.
- IfyousetaSteamprogrammewith
drylaundry,attheendofthecycle
thelaundrywillfeelhumid.Theitems
mayneedtobedried.
- Removeitemsassoonasthe
programmehasfinishedanddry
themonhangers.
- IfyoucontinuouslyusetheWrinkle-
careorRefreshprogramme,the
temperatureinsidethedrumrises
highandthedoormaynotopensoon
aftertheoperationiscompleted.
NA-140_148VS4_AUNZ_EN_20140213.indb 15 2014/02/13 13:35:36

16 - Washing Instructions
Selecting the Programme
Programme Description
Max load
140VS4 148VS4
ECONAVI
Foritemswithmixedfabrics,forexample,
cotton,linenandsyntheticfibres.
(FordetailsaboutECONAVIprogramme,see
page12.)
10 kg 8 kg
s
Wrinkle-care
Reduceswrinklesindrycleangarmentsor
freshlywashedandspungarments,using
steam.
1.5 kg 1.5 kg
s
Allergy-care
Cycletoremoveallergenssuchasdustmites
andpollen,usingsteam.
5 kg 5 kg
s
Shirts
Washtotacklecollarandcuffgrimeonshirts/
blousestopreventcreasing,usingsteam.
2 kg 2 kg
s
Daily
Washforcasualwearwhichreducescreasing
ofgarments,usingsteam.
2 kg 2 kg
s
Refresh
Refreshcycletoremoveodoursfromdryclean
garments,usingsteam.
1.5 kg 1.5 kg
X
Cotton
Dailywashingforcotton,linenandcottonblend
items.(Forexamples,T-shirts,underwear,
towels,tablecloths.)
10 kg 8 kg
f
Cotton
Rinse Plus
Washingtakeslongeroverallbutrinsingis
morethoroughthantheCottonprogramme.
10 kg 8 kg
NA-140_148VS4_AUNZ_EN_20140213.indb 16 2014/02/13 13:35:37

Washing Instructions - 17
Selecting the Programme
Programme Description
Max load
140VS4 148VS4
i
Wool
Gentlewashingforhandwashonlywool,
machinewashablewool,andwoolblends.
2 kg 2 kg
l
Sportswear Forsyntheticsportswear. 3 kg 3 kg
V
Bedding
Forlargeitems,forexample,blankets,curtains,
andbedspreads.
3 kg 3 kg
Y
Delicates
Gentlewashingforsyntheticfibres,textiles,
satin,lace,etc.
5 kg 4 kg
c
Mixed
Foritemswithmixedfabrics,forexample,
cotton,linenandsyntheticfibres.
10 kg 8 kg
j
Rapid 15
Washesafewlightlysoileditemsin
15minutes.
2 kg 2 kg
e
Quick 50 Washeslightlysoileditemsin50minutes. 5 kg 4 kg
C
Cold Wash
Washeslaundrywithoutwarmingupwater.
Forcottonsandlinenblends.
10 kg 8 kg
NA-140_148VS4_AUNZ_EN_20140213.indb 17 2014/02/13 13:35:37

18 - Washing Instructions
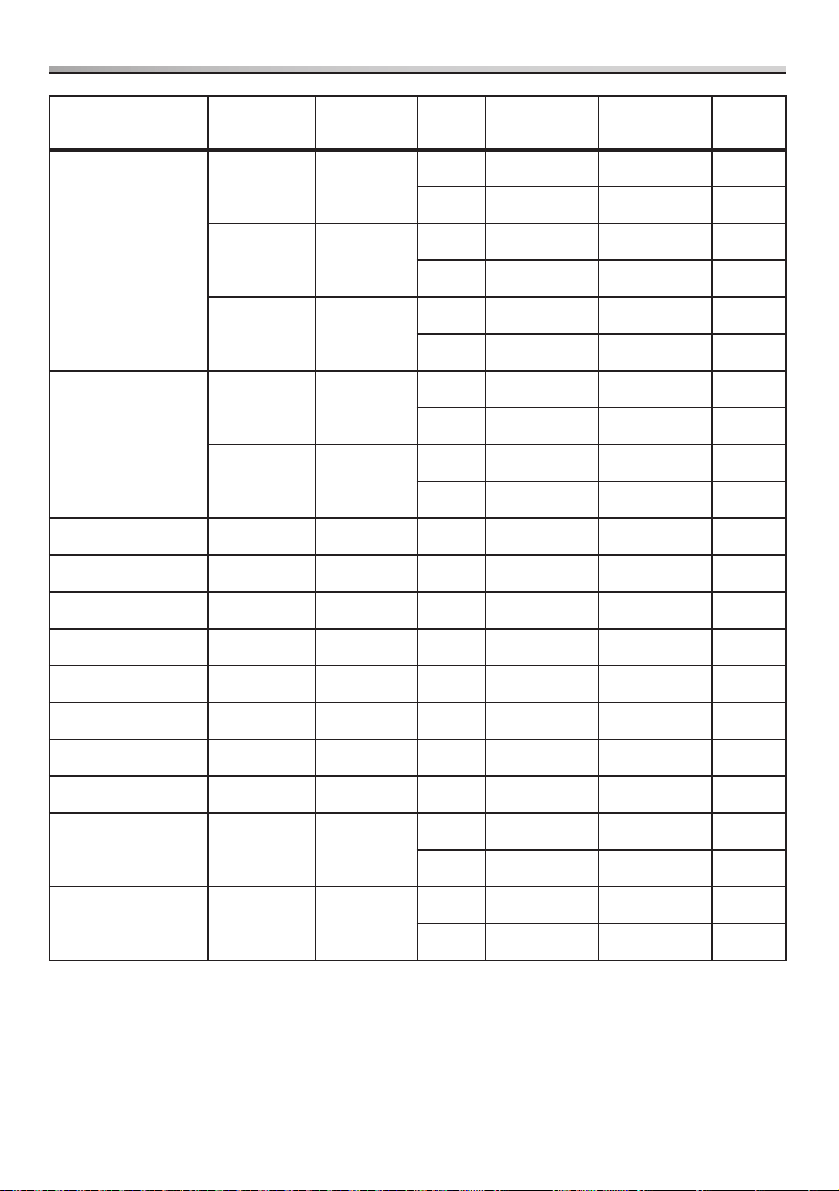
Details of Programmes
Programme
Auto setting
Manual setting Additional functions
Temperature
Number of
rinses
Spin speed
Approximate
time
Temperature Spin speed
Eco/
Speed
Extra
Rinse
Prewash
Easy
Ironing
140VS4 148VS4
ECONAVI Cold 2 1200 0:51-2:10 0:51-2:05 Cold-60°C 800-1400 ― ― ― ―
s
Wrinkle-care ― ― ― 0:35 0:35 ― ― ― ― ― ―
s
Allergy-care 60°C 3 1200 2:09-2:34 2:09-2:34 60°C 500-1200 ―
―
s
Shirts 40°C 2 500 1:34 1:34 Cold-60°C 500-800
―
s
Daily 40°C 2 1200 1:27 1:27 Cold-90°C 500-1200
―
s
Refresh ― ― ― 0:25 0:25 ― ― ― ― ― ―
X
Cotton 40°C 2 1200 1:15-2:15 1:15-2:10 Cold-90°C 500-1400
f
Cotton
Rinse Plus
40°C 2 1200 1:22–2:12 1:22–1:57 Cold-90°C 500-1400
i
Wool 30°C 3 500 0:40 0:40 Cold-40°C 500 ―
― ―
l
Sportswear 40°C 2 800 1:30 1:30 Cold-40°C 500-1200
V
Bedding 30°C 2 800 1:02 1:02 Cold-40°C 500-800 ―
―
Y
Delicates 40°C 2 800 0:55-1:00 0:55-1:00 Cold-40°C 500-800 ―
c
Mixed 40°C 2 1200 1:09-1:44 1:09-1:44 Cold-40°C 500-1400
j
Rapid 15 30°C 1 800 0:15 0:15 Cold-30°C 500-800 ― ― ― ―
e
Quick 50 40°C 2 1200 0:46-0:49 0:46-0:49 Cold-60°C 500-1400 ―
C
Cold Wash Cold 2 1200 1:37-2:42 1:37-2:27 Cold 500-1400 ―
NA-140_148VS4_AUNZ_EN_20140213.indb 18 2014/02/13 13:35:37

Washing Instructions - 19
Details of Programmes
Programme
Auto setting
Manual setting Additional functions
Temperature
Number of
rinses
Spin speed
Approximate
time
Temperature Spin speed
Eco/
Speed
Extra
Rinse
Prewash
Easy
Ironing
140VS4 148VS4
ECONAVI Cold 2 1200 0:51-2:10 0:51-2:05 Cold-60°C 800-1400 ― ― ― ―
s
Wrinkle-care ― ― ― 0:35 0:35 ― ― ― ― ― ―
s
Allergy-care 60°C 3 1200 2:09-2:34 2:09-2:34 60°C 500-1200 ―
―
s
Shirts 40°C 2 500 1:34 1:34 Cold-60°C 500-800
―
s
Daily 40°C 2 1200 1:27 1:27 Cold-90°C 500-1200
―
s
Refresh ― ― ― 0:25 0:25 ― ― ― ― ― ―
X
Cotton 40°C 2 1200 1:15-2:15 1:15-2:10 Cold-90°C 500-1400
f
Cotton
Rinse Plus
40°C 2 1200 1:22–2:12 1:22–1:57 Cold-90°C 500-1400
i
Wool 30°C 3 500 0:40 0:40 Cold-40°C 500 ―
― ―
l
Sportswear 40°C 2 800 1:30 1:30 Cold-40°C 500-1200
V
Bedding 30°C 2 800 1:02 1:02 Cold-40°C 500-800 ―
―
Y
Delicates 40°C 2 800 0:55-1:00 0:55-1:00 Cold-40°C 500-800 ―
c
Mixed 40°C 2 1200 1:09-1:44 1:09-1:44 Cold-40°C 500-1400
j
Rapid 15 30°C 1 800 0:15 0:15 Cold-30°C 500-800 ― ― ― ―
e
Quick 50 40°C 2 1200 0:46-0:49 0:46-0:49 Cold-60°C 500-1400 ―
C
Cold Wash Cold 2 1200 1:37-2:42 1:37-2:27 Cold 500-1400 ―
NA-140_148VS4_AUNZ_EN_20140213.indb 19 2014/02/13 13:35:37
20 - Washing Instructions
Tips for Washing
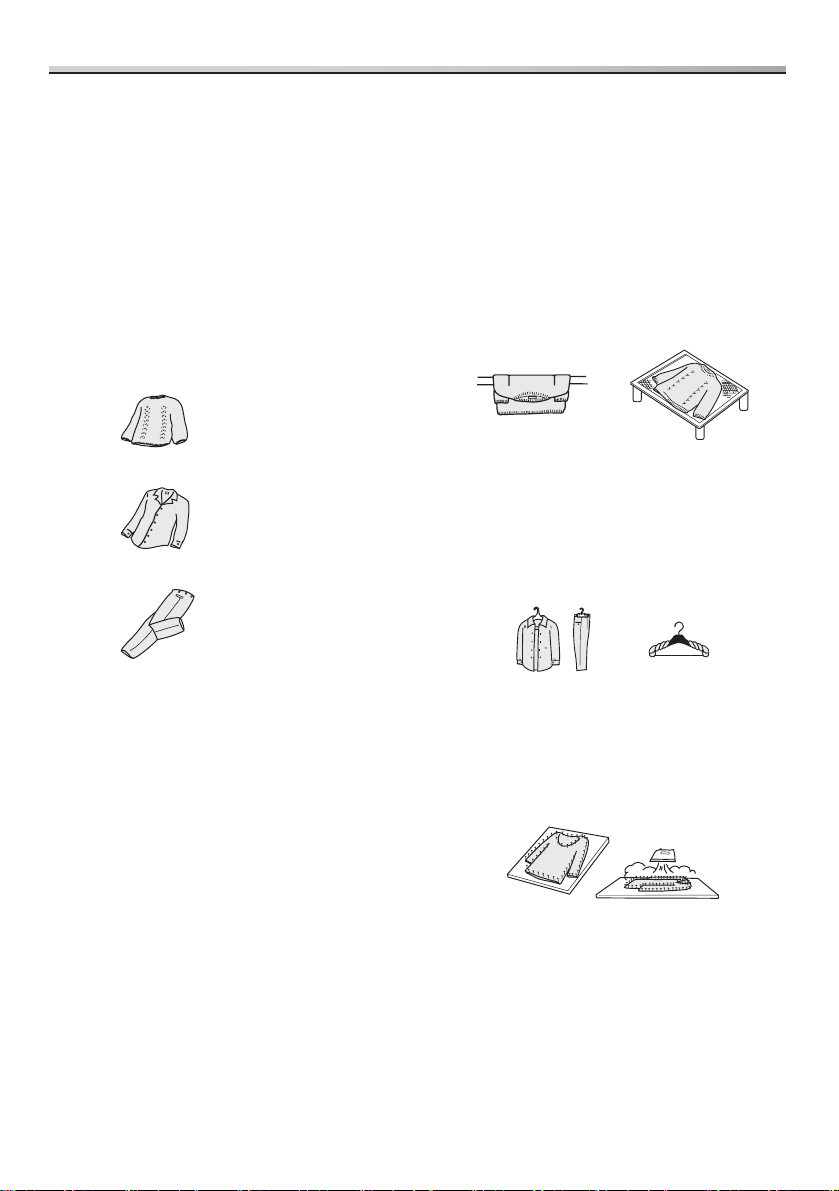
Wool and Delicates
programmes
Thedrumspinsgentlyinthese
programmes.
Laundry loads
- Woolprogramme:2kgorless
- Delicatesprogramme:
5kgorless(140VS4),
4kgorless(148VS4)
Approximate weights
- Woolsweater:400g
- Silkblouse:200g
- Trousers:400g
Putting laundry in the drum
Pileitemsoneontopofeachother.
Detergents
- Forwoolitems,useamildliquid
detergent.Otherdetergentsmay
damagetheclothes.
- WithWoolandDelicatesprogrammes,
youmayneedtousetheExtraRinse
functiontoremoveexcessdetergent
fromthelaundry.(Seepage22.)
Hanging the laundry
- Hangoutwhiteorlight-colouredwool
andnylonitemsawayfromdirectheator
sunlight.
- Afterwashing,layoutwoolandnylon
clothes,andreturnthemtotheirnormal
shapebeforehangingintheshade.This
willhelptoreducetheironingtime.
- Hangwoolitemswithcreasessmoothed
out,orspreadthemouttodry.
- Usehangersforshirts,blousesand
trousers.
Youmaywrapatowelaroundthe
hangertoapproximatetheclothing’s
shoulderwidthsothatitwillretainits
shapeasitdries.
If clothing shrinks in the wash
Spreadtheitemouttoitsoriginalsizeon
anironingboard.Usedresspinstohold
thesizeandshape.Then,useanironto
steamitandleaveittodry.
NA-140_148VS4_AUNZ_EN_20140213.indb 20 2014/02/13 13:35:37
Washing Instructions - 21
Tips for Washing
Bedding programme
- Makesurethatthelabelofeachitem
tobewashedshowseitherthewashor
hand-washsymbol(S,P).
- Washonlyoneblanketatatime.
Available
- 100%syntheticfibreblankets–upto3kg
- 100%syntheticfibrefutonsand100%
cottonblankets–upto1.5kg(single
bedsize)
- Sheets
- Bedspreads
- 100%syntheticfibreundersheets
Not available
- 100%woolblankets
- Long-piledblankets
- Electricblankets(includingcover)
Putting bedding into the drum
1. Fold down the blanket or bedspread
into a quarter of their original size.
2. Put the blanket or bedspread into the
drum.
Folditwhileputtingitintothedrum.
Bothendsoftheblanketshouldbeface
therearofthedrum.
CAUTION
Do NOT roll the blanket or bedspread
into balls, or haphazardly fold them.
Thismaycauseexcessivevibrationand
damagethelaundryortheappliance.
NOTE
Avoidusingblanketnets.Theyprevent
thelaundryfromspinningproperly.
NA-140_148VS4_AUNZ_EN_20140213.indb 21 2014/02/13 13:35:38
22 - Washing Instructions
Optional Functions
Individual washing functions
(Process selection)
Youcanselectasingleprocess,or
combineseveralprocessesbyselecting
individualwashingfunctions.
NOTE
Youcannotselectanymodefunctions
inAllergy-care,DailyandShirtsorthe
Rapid15programme.
Press the Mode button
to select a
function.
Function Description
Rinseonly
K
Rinsewashedlaundry
(Rinsewaterremains)
Spinonly
M
Spin-drywashedlaundry
Wash-Rinse
N K
Washandrinselaundry
(Rinsewaterremains)
Rinse-Spin
K M
Rinseandspin-dry
washedlaundry
Drainonly
O
Drainwaterfromthe
drum
- Wheneveryoustartwashing,the
processindicationflashestoshowwhich
functionisinprogress.
- Ifwaterremainsinthedrumwiththe
Rinseonly,SpinonlyorRinse-Spin
function,theoperationstartsfromthe
drainprocess.
Additional functions
Dependingontheprogramme,youcan
combinedifferentadditionalfunctions.
NOTE
Someadditionalfunctionscannot
beusedwithcertainprogrammes.
(Seepages18-19.)
Ifyouselectanunavailablefunction,
anerroralarmwillsound.
Press one or more of the function
buttons
you wish to combine.
Function
Description
Eco
F
Washingconsumesless
energyandwaterbuttakes
longer.
Speed
L
Thisfunctionrequiresless
timeforwashingandis
suitableforlightlysoiled
laundry.
Extra
Rinse
G
Rinseyourlaundrymore
thoroughlywithanextra
rinsingprocess.
Prewash
J
Prewashcycleforheavily
soiledlaundry
Easy
Ironing
E
- Makeironingeasierbyspin-
dryingyourlaundrymore
gently(at800r/minorless).
- Aftertheprogrammehas
finished,thelaundryis
rotatedintermittentlyforup
to30minutesoruntilthe
doorisopened.
- Reducingwrinkleshelpsto
unraveltangledlaundry.
YoucanactivateordeactivatetheExtra
RinseandEasyIroningfunctionsduringa
washingprocessbutnotaftertheprocess
hasfinished.
NA-140_148VS4_AUNZ_EN_20140213.indb 22 2014/02/13 13:35:38

Washing Instructions - 23
Optional Functions
Preset timer
Timefunctionisavailabletopresetthetime
fortheprogrammetofinish.
- YoucannotpresettheWoolprogramme.
- Thewashmayfinishbeforeorafter
presettimedependingonthekindof
laundry,thetemperatureandconditions
ofwatersupplyanddrainage.
NOTE
DoNOTusedetergentwhichdoesnot
dissolvethoroughlywiththepreset
functionbecausethedetergentmay
cakeupbeforethewashstartsand
doesnotflowout.
Setting a preset time
PressandholdtheTimebuttonuntilthe
desiredpresettimeisdisplayed.
Changing a preset time
1. Press the Off button and then press
the On button.
2. Choose the desired programme and
optional functions.
3. Set a preset time.
Cancelling a preset time
PresstheOffbutton.(Allsettingswillbe
cancelled.)
Checking a preset time
PresstheTimebutton.
Child safety lock
Thechildsafetylockpreventschildrenfrom
climbingintothedrumandgettingtrapped.
Thisfunctionkeepsthedoorclosedand
lockedevenwhentheapplianceisnotin
use.Italsodisablesthecontrolbuttons.
Activating/deactivating child safety lock
1. Switch on the appliance.
2. Press and hold the Mode button for at
least 5 seconds.
TheABsymbolslightuptoshowthat
thechildsafetylockisactivated.
3. To deactivate, hold down the Mode
button again for 5 seconds (please
ignore three beeps heard), and keep
Mode button pressed until it unlocks.
Setting the buzzer
Thebuzzerthatsoundswhena
programmefinishescanbeturnedoff.
1. Press the Start and On buttons at the
same time.
2. Release the On button and keep
pressing the Start button for
3 seconds. The buzzer setting will be
turned off after a beep is heard.
Ifyouwishtoresetthesetting,perform
thesamesteps1and2.Thebuzzer
settingwillbeturnedonaftertwobeeps
areheard.
NA-140_148VS4_AUNZ_EN_20140213.indb 23 2014/02/13 13:35:38
24 - Maintenance
Maintenance
Cleaning the detergent
drawer
Detergentresiduesoonbuildsupifthe
detergentdrawerisnotcleanedregularly.
Detergentbuildupmaydevelopmould.
1. Pull out the detergent drawer.
Softenercover
2. Remove the detergent drawer by
simultaneously lifting and pulling it.
3. Put your finger on the tab near the
front of the softener cover and pull
it up to remove it from the detergent
drawer.
4. Wash out the detergent residue with
water.
Useaclothtowipethewaterfromthe
appliance.
Cleaning the outside of the
appliance
Cleantheoutsideoftheappliancewitha
softclothandmilddetergent,forexample,
kitchendetergent,andsoapywater.
WARNING
- Do NOT splash water over the
appliance.
- Do NOT use cream cleansers,
thinners, or products containing
alcohol or paraffin oil.
Cleaning the drum
Ifyoukeepusingcoldwaterinthe
appliance,bacteriamaybuildupinside
thedrumandemitanodour.Youcan
avoidthisbyrunningthe90°CCotton
programmeonceamonth.(Whenusinga
scaleremover,followthemanufacturer’s
instructions.)
CAUTION
Viruses and bacteria are not killed
in water temperature of 40 °C.
Pathogens can spread via the
mingling of clothes and thus
transmit diseases.
Pathogensdieatthetemperatureofat
least60°C.
NOTE
DoNOTputlaundryorlaundry
detergentintotheapplianceduring
cleaning.
Ifyouusetubcleaningdetergentor
bleach,putitintothedetergentdrawer
beforestartingthewash.Theappropriate
amounttobeusedisapproximately30ml.
(Seepages10-11.)
NA-140_148VS4_AUNZ_EN_20140213.indb 24 2014/02/13 13:35:38
Maintenance - 25
Maintenance
5. Align the hole of the softener cover
with the click of the detergent drawer
to replace the softener cover in its
original position. Then, insert the
detergent drawer back to the main
unit.
Cleaning the door seal and
window
Aftereachwash,performthefollowing:
- Removeanyobjectsfromthedoorseal.
- Wipethewindowandsealtoremovelint
andstains.
Cleaning the drain filter
Werecommendcleaningthedrainfilter
onceamonth.Thefilterwillhavelint
buildup,whichmayinterruptdrainage
waterflow.
1. Switch off and unplug the appliance.
2. Open and remove the drain filter
cover. Then, place a container
underneath it to collect the drainage.
Cap
Pumphose
Drainfilter
3. Pull out the pump hose and remove
the cap to drain the water.
4. After all the water has drained away,
loosen the drain filter.
5. Carefully loosen the drain filter. More
water may drain out.
Thisisnormal.
6. Turn the drain filter anticlockwise to
unscrew it. Then, remove it.
7. Remove any lint and debris.
8. Replace the drain filter.
9. Replace the cap and pump hose to
the original position.
CAUTION
BE CAREFUL when draining hot
water.
NA-140_148VS4_AUNZ_EN_20140213.indb 25 2014/02/13 13:35:39
26 - Maintenance
Maintenance
Cleaning the water supply
filter
Cleanthefilterifwaterisnotsupplied
properly.
1. Turn off the tap.
2. Switch on the appliance.
3. Select the Cotton programme, and
then press the Start button.
4. After 1 minute, switch off the
appliance. Water has drained out of
the water supply hose.
5. Disconnect the water supply hose
from the appliance.
6. Clean the filter, which is on the rear
of the appliance.
Useasmallbrush,forexample,a
toothbrush.
7. If the unit is supplied with the hose
fitted with a water supply valve, turn
off the tap supplying water to the
appliance, disconnect the hose from
the tap and then clean the filter on
the hose in the same way.
8. Reconnect the water supply hose.
Tightentheplasticjointfirmly.
9. Turn on the tap and then check for
leaks.
Preventing a frozen water
supply hose
Iftheapplianceisdeliveredinfreezing
weatherconditions,aftersettingup,leave
itatroomtemperaturefor24hoursbefore
using.Thiswillensurethatthewatersupply
hosedoesnotbecomecloggedwithice.
Ifyourwatersupplyhosefreezes,perform
thefollowingprocedures:
1. Wrap warm towels around the joints
of the water supply hose.
Joints
Watersupplyhose
2. Add 2 to 3 litres of warm water to the
drum.
approximately
50°C
3. Start washing with the Drain only
function, using the Mode button.
(Seepage22.)
NA-140_148VS4_AUNZ_EN_20140213.indb 26 2014/02/13 13:35:39

Troubleshooting - 27
Fault Checklist
Problem Cause
Washing machine
Buttons do not work. - Theprogramme,temperatureandprocesssettingscannot
bechangedwhilewashingisinprogress(therinseand
spinsettingscanbechanged).
- Childsafetylockmaybeactivated.(Seepage23.)
Door does not open. - Doorlockmaybeactivated.(Seepage9.)
- Childsafetylockmaybeactivated.(Seepage23.)
- Thewatertemperatureorlevelmaybetoohigh.
Unusual odour - Rubberpartsmaygiveoffasmellwhenyoustartusing
theappliance,butthesmellwillgoawayovertime.
Youcanwashthedrumbyrunningthe90°Cprogramme.
(Seepage24.)
Wash
No water going into
the appliance.
- Thewatertapmaybeturnedoff.
- Thewatersupplyhosemaybefrozen.(Seepage26.)
- Thewatersupplymaybedisrupted.
- Thewatersupplyfiltermaybeclogged.(Seepage26.)
There is only a small
amount of water.
- Ifyouhavepausedthewashingandthenrestartit,the
appliancemaydrainoutsomewater.
DoNOTpourwaterinthroughthedoor.
Water builds up
during the wash
process.
- Thisisnormal;waterisautomaticallysuppliedifthe
amountofwaterhasdecreased.Forheavyloads,the
watermayfilluprepeatedly.
Water drains out
during the wash
process.
- Thisisnormal;thewaterfrequentlydrainsoutandbuilds
upinordertowashawayexcessfoam.Thisfeatureis
calledfoamdetection.
NA-140_148VS4_AUNZ_EN_20140213.indb 27 2014/02/13 13:35:39

28 - Troubleshooting
Fault Checklist
Problem Cause
Rinse/Spin
No water flows into
the appliance during
the rinse process.
- Beforerinsing,theappliancespinstodrainoutremaining
water.Thewaterwillfillupafterthat.
Rinsing begins
before the spin
process finishes.
- Theappliancemayhavedetectedanunbalancedload,
whichiscausedbythelaundryshiftingtoonesideof
thedrum,sorinsingstartedautomaticallytocorrectthe
imbalance.
- Afterwashing,excessfoammayremain,sothewateris
drainedoutandrefilledtowashitaway.Thisfeatureis
calledfoamdetection.
During spin-dry,
the drum stops and
rotates several times.
- Thisisnormal;theappliancehasdetectedanunbalanced
loadandistryingtocorrectit.
Foam and water
remain in the door or
door seal.
- Althoughsomefoamandwatermayremaindepending
uponthestateofthelaundryandtheamountofdetergent
used,rinseperformanceisunaffected.
The spin process
repeatedly starts and
stops.
- Thisisnormal;intermittentspinningofthetubhelpsthe
spinprocesstooperatequietly.
- Thelaundrymaybetoolight.Ifso,addoneortwobath
towels.
Time
The displayed
remaining time
changes.
- Theremainingtimeisestimatedandcorrectedcontinually.
Thus,thetimedisplayedmaychange.
- Theremainingtimeincreasesifextrarinsingandspinning
arerequiredtocorrectanunbalancedload,whichis
causedbythelaundryshiftingtoonesideofthedrum.
NA-140_148VS4_AUNZ_EN_20140213.indb 28 2014/02/13 13:35:39
Troubleshooting - 29
Fault Checklist
Problem Cause
Detergent and foam
There is no foam or
hardly any foam.
- Theamountoffoamvaries,dependingonthe
temperature,levelandsoftnessofthewater.
- Youmayhaveputpowdereddetergentdirectlyintothe
drum;youmustputitinthedetergentdrawer.
- Youmaynotbeusingenoughdetergent.
- Youmaybeusingareduced-foamtypeofdetergent.
- Heavilysoiledlaundryandlargerloadsoflaundrymay
reducetheamountoffoam.
There is a lot of foam. - Theamountoffoamvaries,dependingonthe
temperature,levelandsoftnessofthewater.
- Youmayhaveusedtoomuchdetergent.
- Thetypeofdetergentyouareusingmaycauseexcess
foam.
Fabric softener
overflows.
- ThesoftenermayhaveexceededtheMAXlevelofthe
detergentdrawer.(Seepage11.)
- Youmayhavespilttheliquidwhenclosingthedetergent
drawertoostrongly.
After the wash has
finished, powdered
detergent residue
remains.
- Youmayhaveputpowdereddetergentdirectlyintothe
drum;youmustputitinthedetergentdrawer.
Noise
There is an unusual
noise or vibration.
- Theremaybemetalitemsinthedrum.
- Theanchorboltsmaynothavebeenremoved.
(Seepage34.)
- Theappliancemaybeonaslopingorunstablesurface.
Ifnoneoftheaboveisthecause,contactyourlocal
CustomerServiceCentre.
There is noise when
the water drains out.
- Thisisnormal;itisnoisegeneratedbytheoperationof
thedrainpump.
The fan makes noise. - Thisisnormal;thefaniscoolingofftheelectricalparts.
NA-140_148VS4_AUNZ_EN_20140213.indb 29 2014/02/13 13:35:40

30 - Troubleshooting
Fault Checklist
Problem Cause
Others
The electricity supply
cuts out while the
appliance is on.
- Theappliancestopsandwillnotstartbyitselfwhenthe
powercomesbackon.Youhavetoselectaprogramme
andstartitagain.
A circuit breaker trips
and the electricity
supply is cut.
- Theappliancestopsandwillnotstartbyitselfwhenyou
resetthebreaker.Youhavetofindoutwhatcausedthe
breakertotripandsolveit.Then,resetthebreakertoturn
theelectricitysupplybackonandswitchontheappliance
again.
The water supply is
disrupted.
- Whenthewaterissuppliedagain,itmaybeimpureatfirst.
Youhavetodisconnectthewatersupplyhoseanddrain
awaytheimpurewaterthroughthetap.Makesurethatthe
watersupplyhosehasbeenreconnectedbeforeusingthe
appliance.
The display is not
clear.
- Theappliancemaybeinabrightlylitorsunlitarea.
NA-140_148VS4_AUNZ_EN_20140213.indb 30 2014/02/13 13:35:40
Troubleshooting - 31
Error Display
Unable to drain
What to do
Checkthedrainhoseforanyofthefollowingproblems.
- Itclogsup.
- Itstipisimmersedinwater.
- Itextendsfurtherthan3m.
- Thewaterisfrozen.
Cleanthedrainfilterifitclogsup.(Seepage25.)
Aftercorrectingtheproblem,openandclosethedoor,andthen
startthewashagain.
Door is open
What to do
Makesurethatthedoorisshutproperly.
Unable to spin-dry
Theappliancehasbeendesignedtodetectunbalancedloads,
particularlysmallloads,inordertoensurequietoperationand
achievethebestresults.
Thisisnotamalfunction.Performanyofthefollowingsolutions.
What to do
- Ifthelaundryistooheavy,untangleclumpsofclothing.
- Ifthelaundrysuchasablanketistooheavy,reducetheload.
- Ifthelaundryistoolight,addoneortwobathtowels.
- Iftheapplianceisonanunstableorunevensurface,change
thesettinglocation.
Aftercorrectingtheproblem,openandclosethedoor,andthen
startthewashagain.
Unable to supply
water
What to do
Checkforanyofthefollowingproblems.
- Thetapisclosed.
- Thewaterpipeorhoseisfrozen.
- Thewatersupplyhasbeendisrupted.
- Thewatersupplyfilterisclogged.(Seepage26.)
Aftercorrectingtheproblem,openandclosethedoor,andthen
startthewashagain.
Iftheredmarkappearsinthehosewithawatersupplyvalve,the
watersupplyhasstopped.
Youshouldreplacewithanewhose.
Hosewithwatersupplyvalve(AXW12C-7SR0)
AnerrordisplaystartingwithH.
What to do
PresstheOffbutton.Ifthedisplaystayson,orifitreappears
whenyoupresstheStartbutton,unplugtheapplianceand
contactyourlocalCustomerServiceCentre.
NA-140_148VS4_AUNZ_EN_20140213.indb 31 2014/02/13 13:35:40
32 - Installation Instructions
Choosing the Right Location
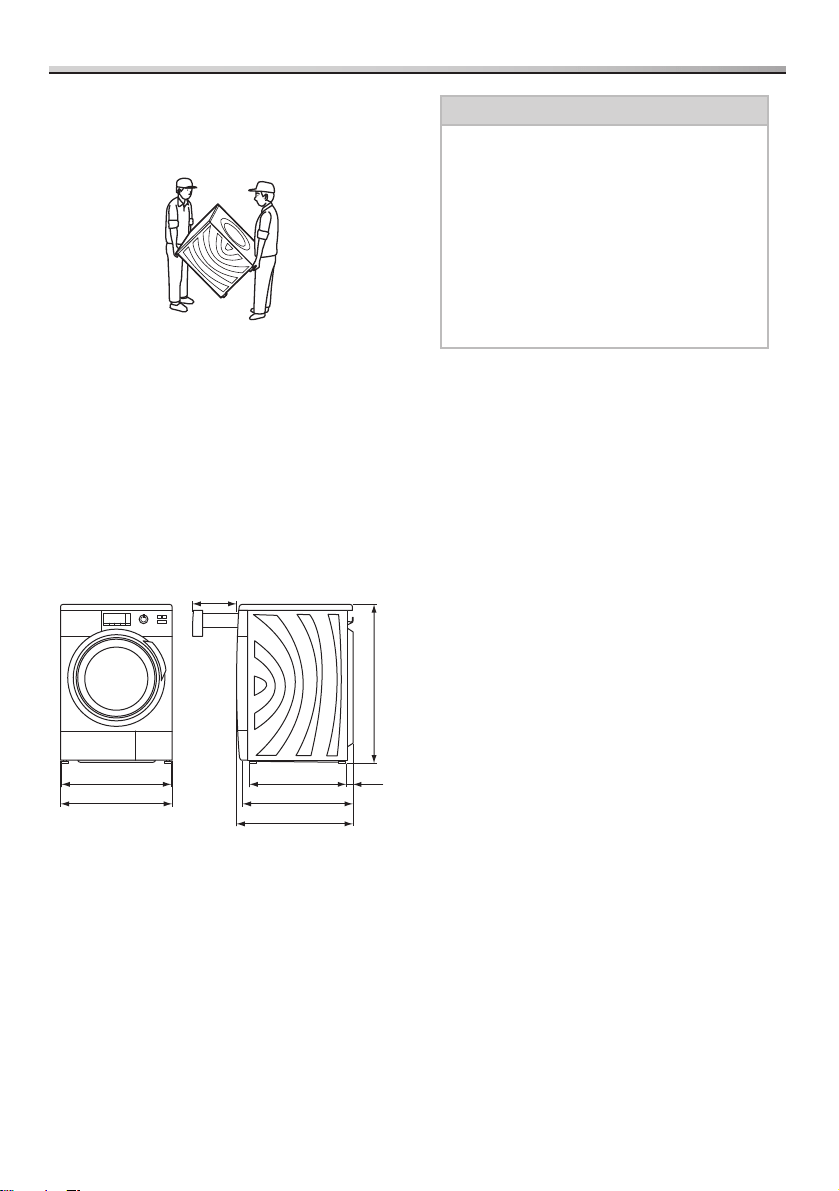
Carrying the appliance
The appliance must be carried by 2 or
more people.
Startbytiltingtheappliancebackwards.
Onepersonshouldstandbehindit,holding
therearofthetoppanel.Theotherperson
shouldgripthebottomstandsinthefront.
The right place for the
appliance
Makesurethatthereisenoughspacefor
theapplianceandthatopeningsonthe
basearenotobstructedbyacarpet.
582
596
240
516
594
625
38
845
Dimensionsinmillimetres
CAUTION
- Install the appliance on a flat,
stable surface to avoid excessive
vibration and noise.
- Do NOT install the appliance in
direct sunlight or in a place where
temperatures reach freezing.
- Do NOT let metallic portions of the
appliance come into contact with
metal sinks or other appliances.
Theinstallationshallbeinaccordancewith
therequirementsofAS/NZS3500.1.
NA-140_148VS4_AUNZ_EN_20140213.indb 32 2014/02/13 13:35:40
Installation Instructions - 33
Choosing the Right Location
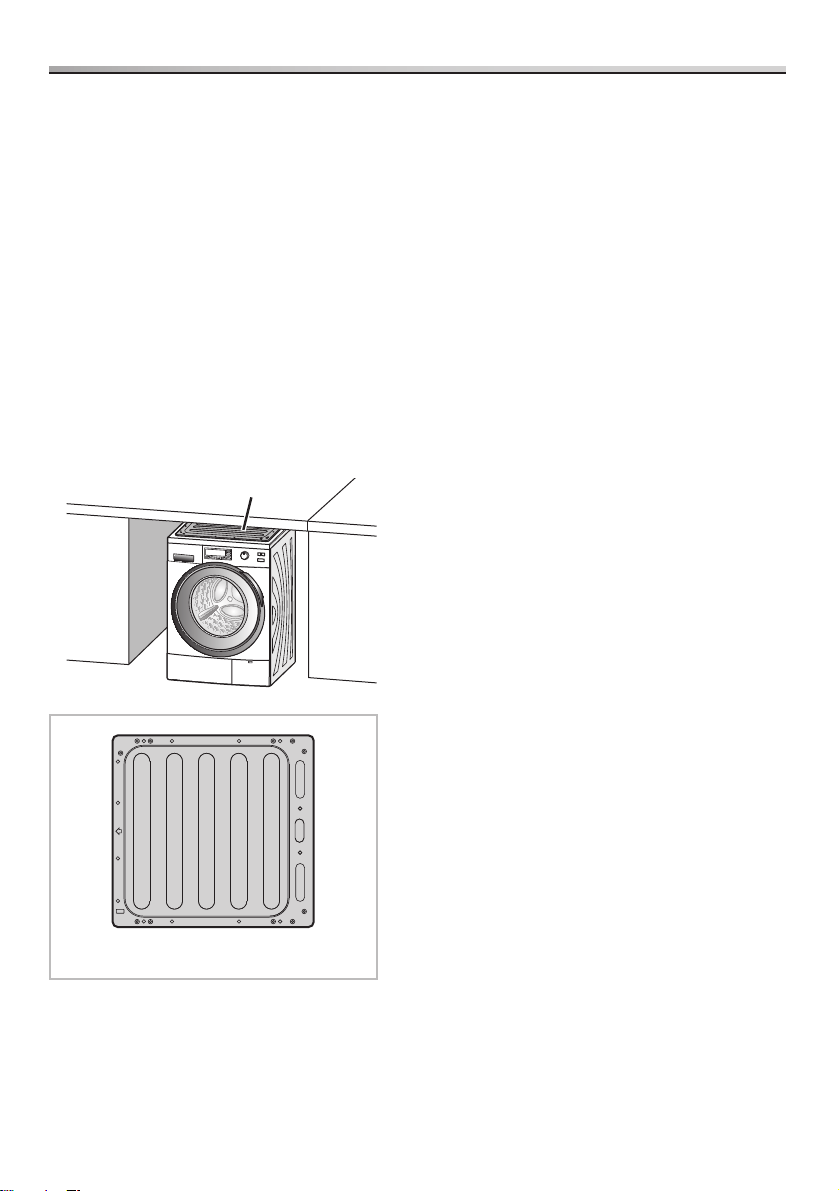
Installing the set-in
appliance
- Youneedaspaceofatleast60cm
wide.
Provideatleast2mmofclearance
onbothsidesandatleast3mmof
clearancebothonthetopandtheback
oftheappliance.
- Thecounterabovetheappliance
mustbefirmlyfixedtotheadjoining
cupboards.
- Haveatechnicianinstallametalcover
insteadofthestandardcoverpanel.
- Theplugmustbeaccessibleafter
installation.
Metalcover
Metalcover(AXW4595-7SR0)
NA-140_148VS4_AUNZ_EN_20140213.indb 33 2014/02/13 13:35:41
34 - Installation Instructions
Moving and Installing
Removing the anchor bolts
Fouranchorboltskeeptheinteriorofthe
applianceinplacewhiletheappliance
isbeingmoved.Removethembefore
installation,usingthespannersupplied
withtheappliance.Followtheinstructions
below.
NOTE
Theanchorboltsmustberemoved
beforetheapplianceisoperated.
Theymaycauseexcessivevibration.
1. Use the ‘B’ end of the spanner to
loosen the four bolts.
B
B
A
2. Pull the bolts out horizontally.
3. Remove the screws adjacent to the
bolt holes.
4. Attach each cover cap (included
with the accessories) over each bolt
hole, and then secure them with the
screws removed in step 3.
NOTE
- Makesurethatyoustoretheanchor
boltsbecausetheyareusedwhen
transportingtheappliance.Ifthe
applianceispassedontoanother
person,makesuretogivetheanchor
boltstothatperson.
- Makesuretheboltcapsare
attached.Failuretoobservethismay
resultinwaterenteringthewashing
machine,leadingtomalfunctions.
Moving the appliance
NOTE
Makesuretoinstalltheanchorboltsin
theappliance.
Before you move the appliance
- Shutthetapandruntheapplianceto
drainthewater.Drainremainingwater
fromthepumphose.(Seepage25.)
- Depressurizeandremovethewater
supplyhose.
- Disconnectthepowercable.
- Installtheanchorbolts.(Seepage35.)
NA-140_148VS4_AUNZ_EN_20140213.indb 34 2014/02/13 13:35:41

Installation Instructions - 35
Moving and Installing
Installing the anchor bolts
1. Unscrew and remove each cover cap.
2. Pull the bolt out until the tip is level
with the tip of the sleeve.
Haveanotherpersonholdthetopofthe
drum.
Samelevel
3. Insert each anchor bolt.
4. Tighten each bolt so that the spring
extends out to the length of 26 mm.
26mm
B
A
Levelling the appliance
Usingalevelenableseaseinadjustments.
Toadjustthestands,usethe‘A’endofthe
spanner.
B
A
Locknut
Stand
1. Loosen the lock nut on each stand by
turning it clockwise.
2. Adjust each stand by turning it
clockwise or anticlockwise.
3. Use a spirit level to make sure that
the appliance is properly levelled.
4. Tighten each lock nut by turning it
anticlockwise.
CAUTION
Make sure that all lock nuts are
tightened securely and the stands
are still securely bolted to the
appliance.
Iftheyareunbolted,theappliancewill
movearound.
NA-140_148VS4_AUNZ_EN_20140213.indb 35 2014/02/13 13:35:42
36 - Installation Instructions
Connecting Hoses and Power Supply
Water supply hose
CAUTION
- Do NOT connect the water supply
hose to a combination tap.
- Do NOT twist, squash, modify or
cut the hose.
- Optimummainswaterpressureis
0.03-1.0MPa.Ifthewaterpressure
exceedsthisvalue,installapressure
reducingvalve.
- Waterflowfromthetapshouldbemore
than5L/min.
Connecting the water supply hose
1. Attach one end of the hose to
the water inlet on the back of the
appliance and tighten the joint by
hand.
2. Attach the other end of the hose to
the tap and tighten it the same way.
min.10mm
min.10mm
3/4”
3/4”
Hosewithwater
supplyvalve
Standardhose
3. Open the tap slowly and make sure
that there are no leaks around the
joints.
Thejointsaresubjecttowaterpressure.
Followtheinstructionsinthissectiontopreventwaterleaks.Ifyouareunsure,askaservice
agenttoconnectthehoses.
Hoses and cable lengths
Leftsideconnections Rightsideconnections
~105cm ~135cm
~130cm ~90cm
~100cm ~140cm
0–max.100cm
NA-140_148VS4_AUNZ_EN_20140213.indb 36 2014/02/13 13:35:42
Installation Instructions - 37
Connecting Hoses and Power Supply
Leak-proof System
Theapplianceisinstalledwiththe
systemthatisdesignedtopreventwater
leaks.Thesystemincludesthefollowing
components.
1)Leaksensor
Thissensorwillceaseoperationof
theapplianceifitdetectsanyleaks.
Itislocatedonthebaseplateofthe
appliance.Ifaleakhasbeendetected,
anerrordisplaystartingwithH,for
example,H01,willappear.Inthatcase,
contactyourlocalCustomerService
Centre.
2)Overflowdetection
Ifwaterintheapplianceincreasesto
acertainlevel,thisfunctionstopsthe
watersupplyandactivatesthedrain
pump.
Water drain hose
Draining to a sink or wash-basin
Elbow
Draining to a drain hose
CAUTION
- Do NOT twist, pull out or bend the
drain hose.
- Secure the water drain hose so
that it will not come out of the
basin.
- Do NOT block the drain outlet of
the basin. Make sure that drainage
into the drain is sufficient.
- Do NOT let the tip of the water
drain hose dip into the drained
water.
Thiscancausewatertoflowback
intotheappliance.
Connecting to the power
supply
Nameplate
CAUTION
The name plate indicates the rated
power that the appliance needs.
Make sure that the power supply
specifications in your residence
match the information mentioned
here.
NA-140_148VS4_AUNZ_EN_20140213.indb 37 2014/02/13 13:35:43
38 - Installation Instructions
Checking after Installation
Test run after installation
Checkforwaterleakage,abnormalnoise,
andproperdrainage.
Performthefollowingprocedures
WITHOUTlaundryinthedrum.
1. Turn on the tap.
2. Close the door.
3. Press the On button. You have to select
“Quick 50” course and “Spin only” mode.
Then, press the Start button.
After the water is drained, start a test run.
4. While holding down the Speed/Eco
and Easy Ironing buttons, press the
On button.
5. When the display appears as below
(3 seconds), press the Speed/Eco button.
Theremainingtimeisdisplayedasshownbelow.
Thetestisrunforapproximately3minutes.
- Whenthewaterpressureislow,the
operationmaystopforseveralminutes
with“0:03”displayed.
Checkthefollowing:
- Isthereanyabnormalnoise?
Ifso,makesurethattheapplianceislevel.
- Isthereanywaterleakage?
Ifso,makesurethatthehosesare
properlyconnected.
Thefollowingerrorsmayoccur:
- Arethehosesproperlyconnected?
Isthedrainclogged?
- Haveyouproperlyconnectedthe
watersupplyhoseandturnedonthetap?
Aftertheappliancehasrecoveredfromanerror,
reopenandreclosethedoortoresumethetest.
Installation checklist
7
1
5 6 5 6
3
2
4
65
1)Anchorbolts
Haveyouremovedthemandattached
thecovercapsproperly?
2)Location
Istheapplianceonaflat,stable
surface?
Doesitrunwithoutvibrating?
3)Watersupplyhose
Isitfreefromleaks?
Isthewatersupplynormal?
4)Waterdrainhose
Isitfreefromleaks?
Doesitdrainnormally?
5)Adjustablestands
Aretheyboltedsecurelytothe
appliance?
6)Standcushions
Aretheystandingflat?
Iftheapplianceisnotlevel,theremay
beabnormalsoundswhenwateris
drainedout.
7)Powersupply
Isthehouseholddedicatedmainssocket
fullyratedatAC220Vto240V?
NA-140_148VS4_AUNZ_EN_20140213.indb 38 2014/02/13 13:35:44
Installation Instructions - 39
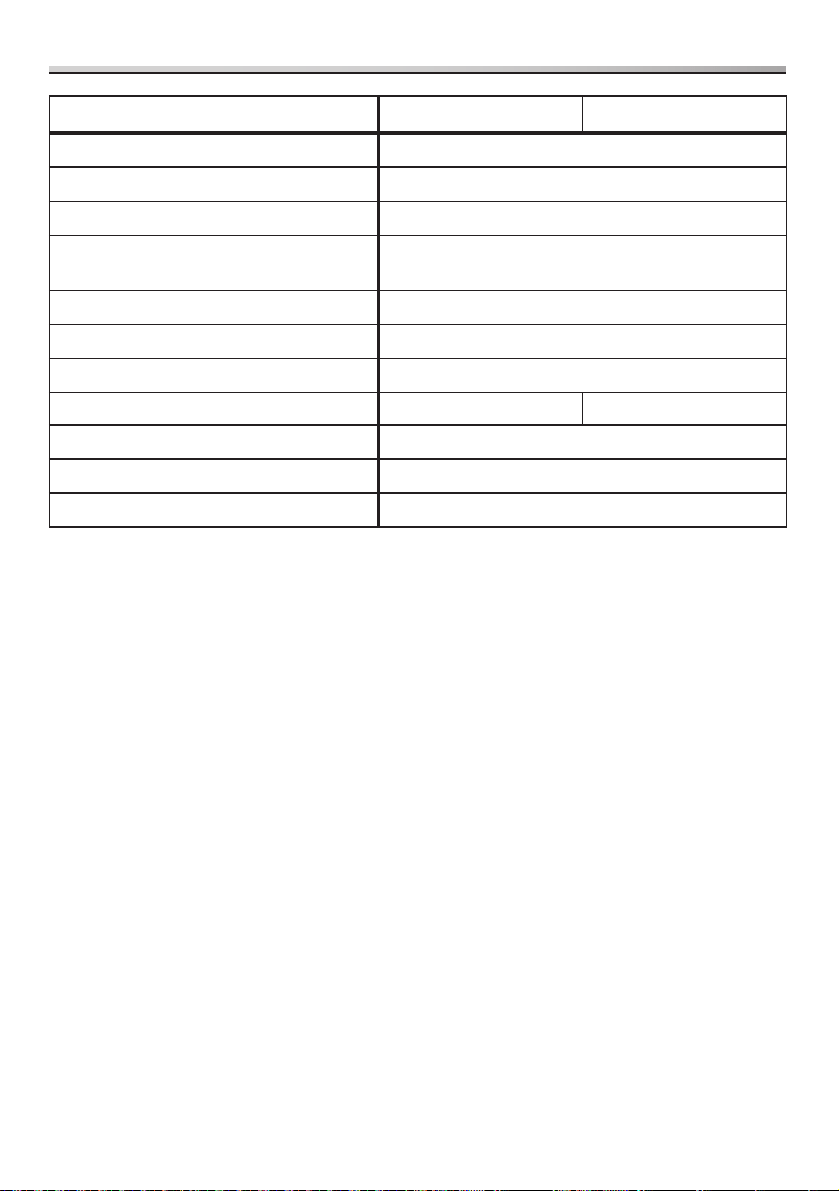
Power and Water Consumption
Programme
Temperature
Additional
function
Load
Power
consumption
2)
Water
consumption
2)
Time
2)
X
Cotton
40°C ―
10kg 1.07kWh 85L 2:15
8kg 0.90kWh 72L 2:10
60°C
1)
―
10kg 2.10kWh 85L 2:40
8kg 1.85kWh 72L 2:20
60°C
1)
Eco
10kg 0.85kWh 63L 3:45
8kg 0.65kWh 50L 3:45
f
Cotton
Rinse Plus
60°C ―
10kg 1.55kWh 87L 3:02
8kg 1.48kWh 74L 2:22
40°C Eco
3)
10kg 0.83kWh 80L 3:23
8kg 0.67kWh 68L 2:53
s
Wrinkle-care ― ― 1.5kg 0.21kWh ― 0:35
s
Allergy-care 60°C ― 5kg 1.94kWh 98L 2:34
s
Shirts 40°C ― 2kg 0.52kWh 31L 1:34
s
Daily 40°C ― 2kg 0.65kWh 40L 1:27
s
Refresh ― ― 1.5kg 0.20kWh ― 0:25
i
Wool 30°C ― 2kg 0.20kWh 50L 0:40
l
Sportswear 40°C ― 3kg 0.65kWh 45L 1:30
j
Rapid 15 30°C ― 2kg 0.15kWh 23L 0:15
e
Quick 50
40°C ―
5kg 0.48kWh 50L 0:49
4kg 0.45kWh 40L 0:49
C
Cold Wash
Cold ―
10kg 0.28kWh 87L 2:42
8kg 0.26kWh 74L 2:27
1)ResultscalculatedbasedontheusageoftheEcofunctionandthemaximumspinspeed
complywithIEC60456.
2)Thepower,waterconsumptionandtimeindicatedinthetablemayvarydependingon
variationsinpressures,waterhardnessandtemperatures,roomtemperatures,typesand
amountsoflaundry,voltagefluctuationsandfunctionstobeused.
3)CottonRinsePlus,40°C,Eco,1400r/minisfornormallycottonsoiledloadwith
AS/NZS2040.1,AS/NZS2040.2,AS/NZS6400.
NA-140_148VS4_AUNZ_EN_20140213.indb 39 2014/02/13 13:35:44
Specifications
40
Panasonic Corporation
http://panasonic.net
©PanasonicCorporation2014
PrintedinChina
March2014
H0314-0
NA-140VS4 NA-148VS4
Rated voltage 220-240V
Rated frequency 50Hz
Maximum energy rated power input 2000-2350W
Heating energy rated power input
Wash2000W(230V)
Steam1000W(230V)
Power consumption Off-mode/LeftOn-mode0.2W
Maximum spin speed 1400r/min
Product weight 74kg
Maximum mass of dry cloth 10kg 8kg
Product dimensions 596mm(W)×625mm(D)×845mm(H)
Water consumption Referto“PowerandWaterConsumption”.
Pressure of tap water 0.03-1MPa
NA-140_148VS4_AUNZ_EN_20140213.indb 40 2014/02/13 13:35:44