Loading ...
Loading ...
Loading ...
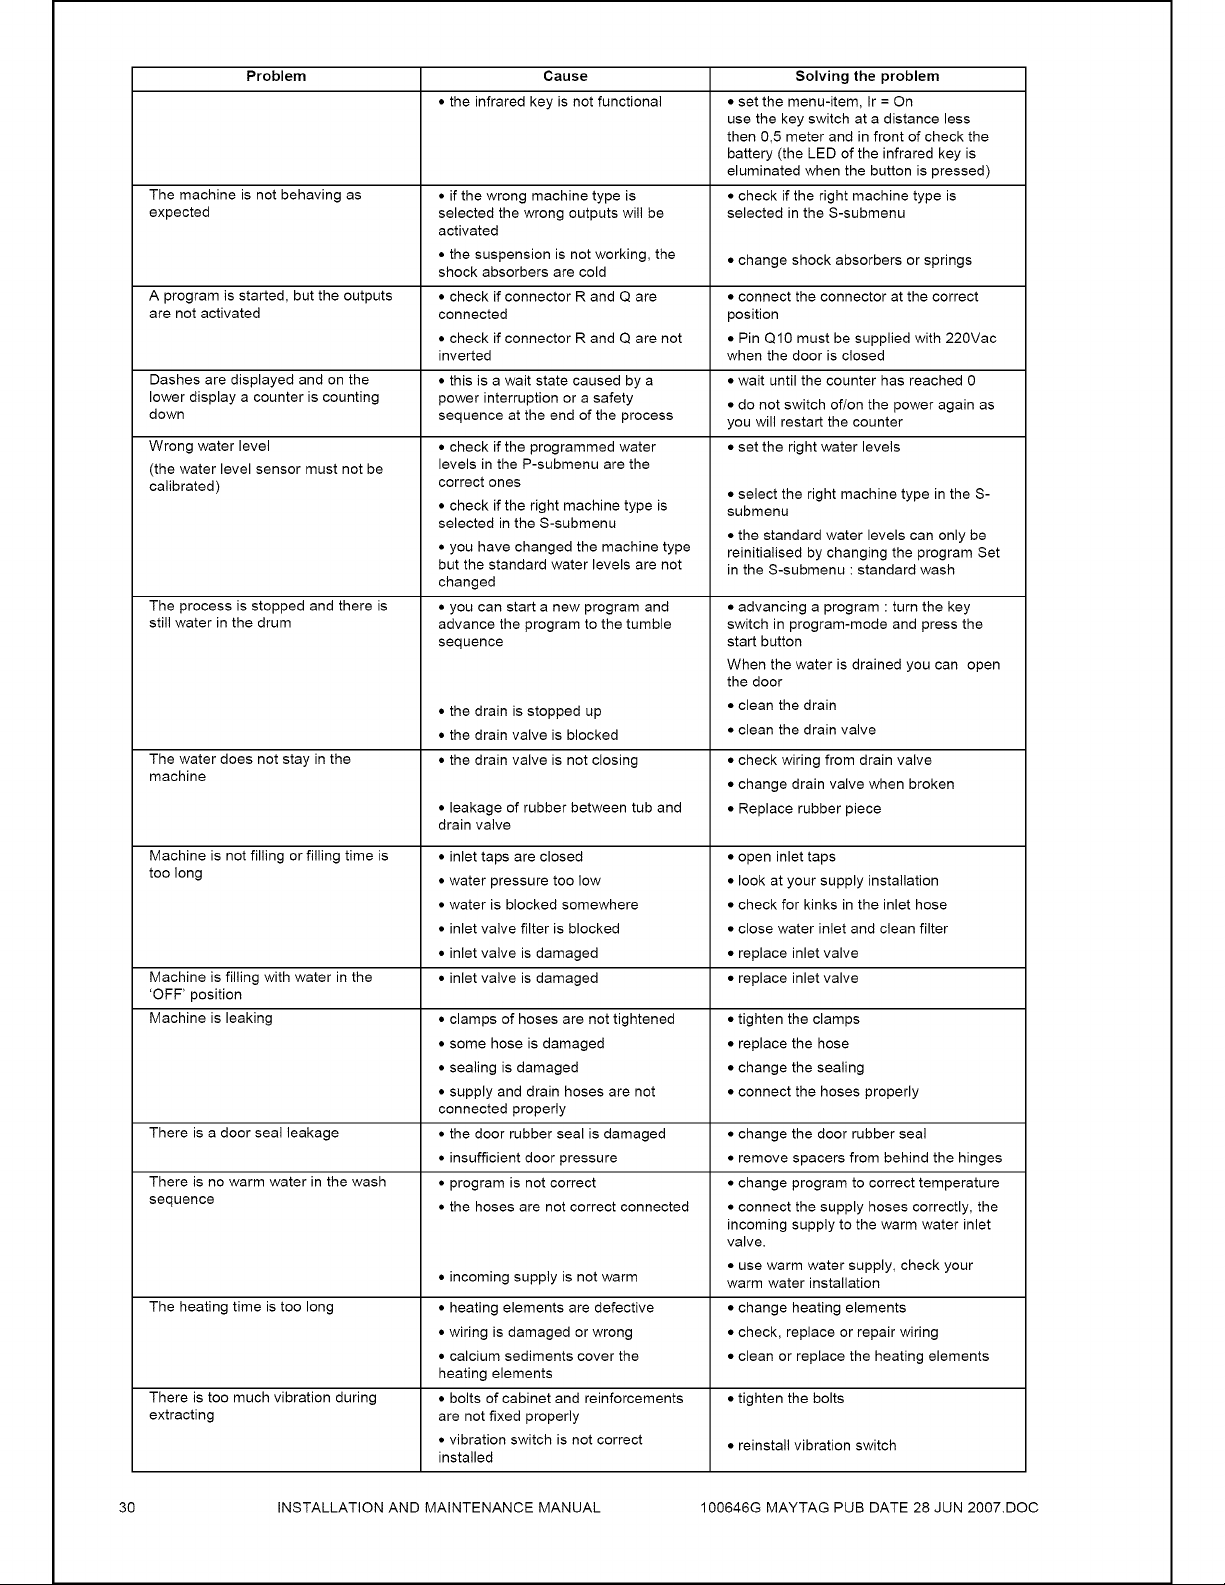
Problem
Cause
Solving
the
problem
«
the
infrared
key
is
not
functional
eset
the
menu-item,
Ir
=
On
use
the
key
switch
at
a
distance
less
then
0,5
meter
and
in
front
of
check
the
battery
(the
LED
of
the
infrared
key
is
eluminated
when
the
button
is
pressed)
The
machine
is
not
behaving
as
expected
if
the
wrong
machine
type
is
selected
the
wrong
outputs
will
be
activated
«
the
suspension
is
not
working,
the
shock
absorbers
are
cold
«
check
if
the
right
machine
type
is
selected
in
the
S-submenu
«
change
shock
absorbers
or
springs
A
program
is
started,
but the
outputs
are
not
activated
«
check
if
connector
R
and
Q
are
connected
«
check
if
connector
R
and
Q
are
not
inverted
«
connect
the
connector
at
the
correct
position
¢
Pin
Q10
must
be
supplied
with
220Vac
when
the
door
is
closed
Dashes
are
displayed
and
on
the
lower
display
a
counter
is
counting
down
«
this
is
a
wait
state
caused
by
a
power
interruption
or
a
safety
sequence
at
the
end
of
the
process
¢
wait
until
the
counter
has
reached
0
¢
do
not
switch
of/on
the
power
again
as
you
will
restart
the
counter
Wrong
water
level
(the
water
level
sensor
must
not
be
calibrated)
«
check
if
the
programmed
water
levels
in
the
P-submenu
are
the
correct
ones
«
check
if
the
right
machine
type
is
selected
in
the
S-submenu
*
you
have
changed
the
machine
type
but
the
standard
water
levels
are
not
changed
¢
set
the
right
water
levels
«
select
the
right
machine
type
in
the
S-
submenu
¢
the
standard
water
levels
can
only
be
reinitialised
by
changing
the
program
Set
in
the
S-submenu
:
standard
wash
The
process
is
stopped
and
there
is
still
water
in
the
drum
*
you
can
start
a
new program
and
advance
the
program
to
the
tumble
sequence
«
the
drain
is
stopped
up
«
the
drain
valve
is
blocked
¢
advancing
a
program
:
turn
the
key
switch
in
program-mode
and
press
the
start
button
When
the
water
is
drained
you can
open
the
door
e
clean
the
drain
e
clean
the
drain
valve
The
water
does
not
stay
in
the
machine
«
the
drain
valve
is
not
closing
«
leakage
of
rubber
between
tub
and
drain
valve
«
check
wiring
from
drain
valve
¢
change
drain
valve
when
broken
«
Replace
rubber
piece
Machine
is
not
filling
or
filling
time
is
too
long
«
inlet
taps
are
closed
«
water
pressure
too
low
¢
water
is
blocked
somewhere
e
inlet
valve
filter
is
blocked
e
inlet
valve
is
damaged
¢
open
inlet
taps
¢
look
at
your
supply
installation
¢
check
for
kinks
in
the
inlet
hose
¢
close
water
inlet
and
clean
filter
¢
replace
inlet
valve
Machine
is
filling
with
water
in
the
‘OFF’
position
e
inlet
valve
is
damaged
¢
replace
inlet
valve
Machine
is
leaking
«
clamps
of
hoses
are
not
tightened
«some
hose
is
damaged
«
sealing
is
damaged
«
supply
and
drain
hoses
are
not
connected
properly
¢
tighten
the
clamps
«
replace
the
hose
«
change
the
sealing
«
connect
the
hoses
properly
There
is
a
door
seal
leakage
«
the
door
rubber
seal
is
damaged
«
insufficient
door
pressure
«
change
the
coor
rubber
seal
*
remove
spacers
from
behind
the
hinges
There
is
no
warm
water
in
the
wash
sequence
*
program
is
not
correct
«
the
hoses
are
not
correct
connected
*
incoming
supply
is
not
warm
«
change
program
to
correct
temperature
«
connect
the
supply
hoses
correctly,
the
incoming
supply
to
the
warm
water
inlet
valve.
«use
warm
water
supply,
check
your
warm
water
installation
The
heating
time
is
too
long
«
heating
elements
are
defective
«
wiring
is
damaged
or
wrong
«
calcium
sediments
cover
the
heating
elements
«
change
heating
elements
e
check,
replace
or
repair
wiring
¢
clean
or
replace
the
heating
elements
There
is
too
much
vibration
during
extracting
¢
bolts
of
cabinet
and
reinforcements
are
not
fixed
properly
¢
vibration
switch
is
not
correct
installed
¢
tighten
the
bolts
¢
reinstall
vibration
switch
30
INSTALLATION
AND
MAINTENANCE
MANUAL
100646G
MAYTAG
PUB
DATE
28
JUN
2007.D0C
Loading ...
Loading ...
Loading ...