Imagine the possibilities
Thank you for purchasing this Samsung product
To receive more compRete service, pBease register your product at
wwwosamsu ngocom/register
'This Nanum Gothic Ecofont is provided by NAVER'

rdSoundConnect
TVSoundConnectletsyoulistentoaudiofromyourTVonyourSoundbarviaaBtuetoothconnectionandtets
youcontrolthesound,
NDMI
HDMttransmitsvideoandaudiosignalssimultaneously,andprovidesadearerpicture_
TheunitisatsoequippedwiththeARCfunctionwhichletsyoulistentosoundfromyourTVthroughthe
SoundbarviaanHDMtcable,ThisfunctionisontyavailableifyouconnecttheunittoanARCcompliantTV,
3DSOUND
The3DSOUNDfeatureaddsdepthandspaciousnesstoyourlisteningexperience,
WffeJessSubwoofer
Samsung'swirelessmoduledoesawaywithcablesrunningbetweenthemainunitandthesubwoofer_
Instead,thesubwooferconnectstoacompactwirelessmodulethatcommunicateswiththemainunit,
SpecialSoundEffects
YoucanselectdifferentSoundEffects-MUSIC/ VOICE/ SPORTS/ CINEMA / STANDARD(Original Sound)
depending on the type of content you want to enjoy,
Mu_ti-function Remote Control
You can use the supplied remote controt to controt various operations with the simple pressof a button,
USB Host Support
You can connect and play music rites from external USBstorage devicessuch asMP3 players,USBflash
memo,5,, etc, using the Soundbar's USBHOSTfunction,
Btuetooth Function
You can connect a Btuetooth device to the Soundbar and enjoy music with high quatity stereo sound, att
without wires!
DOLBY.
DIGITAL
Manufactured under licensefrom Dotby Laboratories, botby and the doubte-D symbol are trademarks of
Dolby Laboratories,
2.0Channel
For DTSpatents, see http:iipatents,dts,com, Manufactured under ticensefrom DTSLicensing Limited, DTS,
the Symbol, & DTSand the Symbol together are registered trademarks, and DTS2,0 Channel isa trademark of
DTS,tnc_@DTS,tnc, A1tRights Rese_,ed,
1,4,--iilr1|
The terms HDMt and HDMt HigMDefinition Multimedia interface, and the HDMt Logo are trademarks or
registered trademarks of HDMt Licensing LLCin the United Statesand other countries,
2
SAFELY HNFORH?Ai ON
SAFETY INFORMATION
SAFETY WARNIHGS
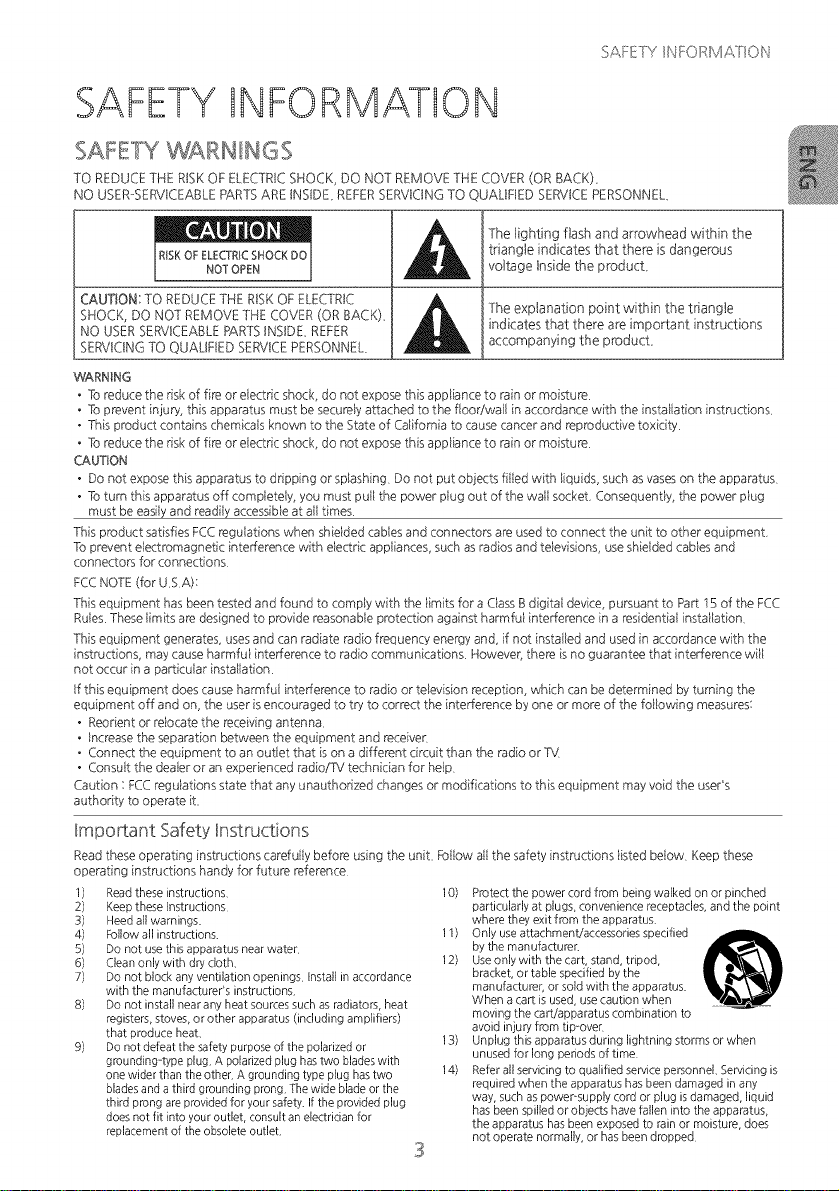
TO REDUCE THE RnSKOF ELECTRtCSHOCK, DO NOT REMOVE THE COVER (OR BACK),
NO USER-SERVICEABLEPARTSARE INSIDE, REFERSERVtONG TO QUALIFIED SERVICEPERSONNEL,
RISKOFELECTRICSHOCKDO
NOTOPEN
CAUTION: TO REDUCETHE RISKOF ELECTRIC
SHOCK, DO NOT REMOVE THE COVER (OR BACK),
NO USERSERVICEABLERARTSINSIDE, REFER
SERVICINGTO QUAUFIED SERVICEPERSONNEL,
The lighting flash and arrowhead within the
triangle indicates that there is dangerous
voltage Inside the product,
The explanation point within the triangle
indicates that there are important instructions
accompanying the product,
WARNING
• To reduce the risk of fire or eiectric shock, do not expose this appliance to rain or moisture
• To prevent injury, this apparatus must be secureiy attached to the floodwail in accordance with the instaiiation instructions
• This product contains chemicais known to the State of California to cause cancer and reproductive toxicity
• To reduce the risk of fire or eiectric shock, do not expose this appiiance to rain or moisture
CAUTION
• Do not expose this apparatus to dripping or splashing Do not put objects fiiled with liquids, such asvaseson the apparatus
• Toturn this apparatus off compietely, you must puil the power piug out of the wall socket. Consequentiy, the power piug
must be easiiyand read@accessibieat ail times
This product satisfies FCCregulations when shieided cablesand connectors are usedto connect the unit to other equipment.
To prevent electromagnetic interference with eiectric appiiances, such asradios and teievisions, useshieided cabies and
connectors for connections
FCCNOTE (for USA):
This equipment hasbeen tested and found to comply with the iimits for a Ciass8 digitai device, pursuant to Part 15 of the FCC
Ruies These iimits aredesigned to provide reasonable protection against harmfui interference in a residentiai instailation,
This equipment generates, usesand can radiate radio frequency energy and, if not instailed and used in accordance with the
instructions, may cause harmfui interference to radio communications Noweve_,there is no guarantee that interference wiil
not occur in a pa_ticuiar instalbtion
If this equipment does cause harmfui interference to radio or television reception, which can be determined by turning the
equipment off and on, the useris encouraged to try to correct the interference byone or more of the foilowing measures:
• Reorient or reiocate the receiving antenna,
• Increasethe separation between the equipment and receiver
• Connect the equipment to an outiet that is on a different circuit than the radio orTV
• Consult the dealer or an experienced radio/TV technician for help
Caution : FCCreguiations state that any unauthorized changes or modifications to this equipment may void the user's
authority to operate it,
Important Safety Instructions
Readthese operating instructions carefuily before using the unit, Foilow
operating instructions handy for future reference
1) Readthese instructions. 10)
2) Keepthese Instructions
3) Heedallwarnings.
4) Followallinstructions. 11)
5) Do not usethis apparatusnearwater
6) Cleanonlywith dry cloth. 12)
7) Do not blockany ventilationopenings Installin accordance
with the manufacturer's instructions.
8) Do not install nearany heat sourcessuchasradiators,heat
registers,stoves,or other apparatus(including amplifiers)
that produce heat. 13)
9) Do notdefeat the safetypurposeofthe polarizedor
groundingrtypeplug.A polarizedplug hastwo bladeswith
onewiderthan the other.A groundingtypeplug hastwo 14)
bladesanda third grounding prong.!"hewide bladeor the
third prongare providedforyour safety.Ifthe providedplug
doesnot fit into youroutlet, consultanelectricianfor
replacementof the obsoleteoutlet.
all the safety instructions iisted beiow Keep these
3
Protect the power cord from being walked on or pinched
particularly at plugs, convenience receptacles, and the point
where they exit from the apparatus.
Only use attachment!accessories specified
by the manufacturer
Use only with the cart, stand, tripod,
bracket, or table specified by the
manufacturer or sold with the apparatus.
When a cart is used, use caution when
moving the cart!apparatus combination to
avoid injury from tip over
Unplug this apparatus during lightning storms or when
unused for long periods of time
Refer all servicing to qualified service personnel. Servicing is
required when the apparatus has been damaged in any
way, such as power-supply cord or plug is damaged, liquid
has been spilled or objects have fallen into the apparatus,
the apparatus has been exposed to rain or moisture, does
not operate normally, or has been dropped
SAF/!IY INFORMATION
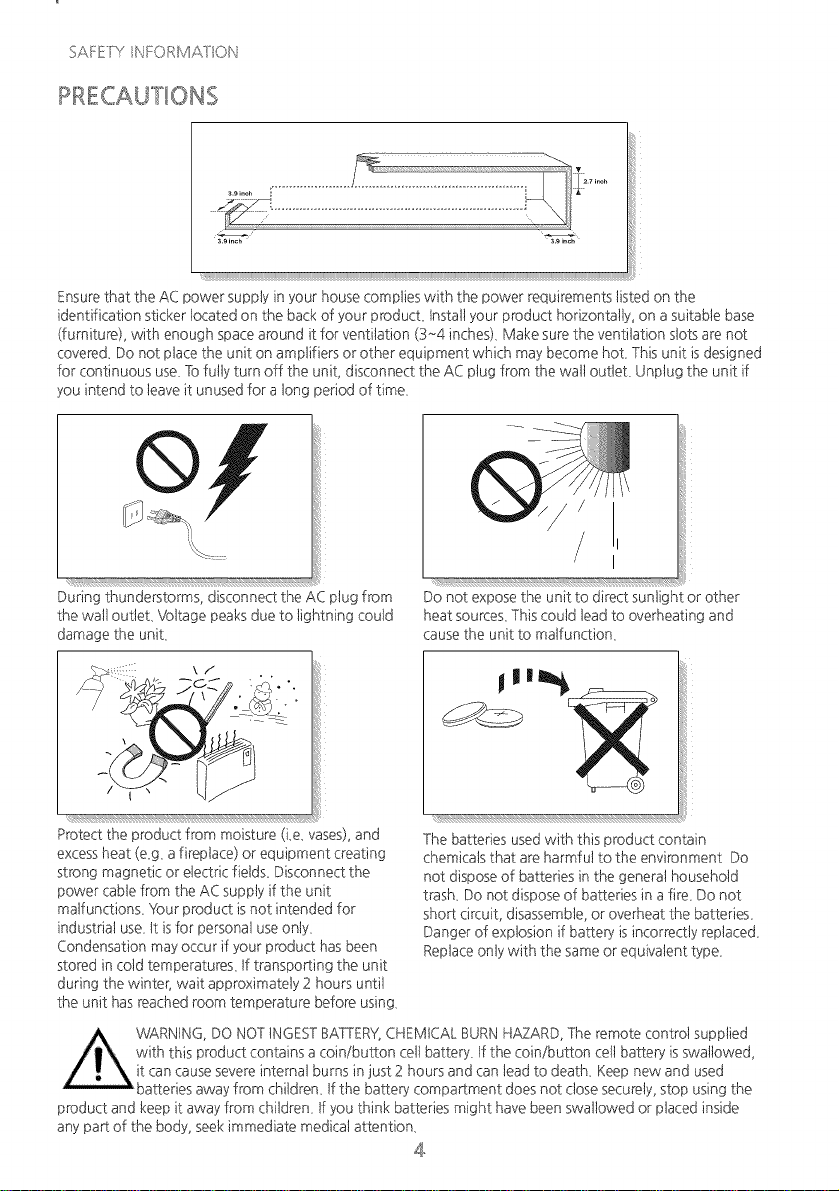
Ensurethat the AC power supply in your house complies with the power requirements listed on the
identification sticker located on the back of your product Install your product horizontally, on asuitable base
(furniture), with enough space around it for ventilation (3~4 inches), Make surethe ventilation slotsare not
covered_Do not place the unit on amplifiers or other equipment which may become hot, This unit is designed
for continuous use_Tofully turn off the unit, disconnect the AC plug from the watt outtet, Unplug the unit if
you intend to leave it unused for a tong period of time,
During thunderstorms, disconnect the AC plug from
the wattouttet, Voltage peaksdue to lightning could
damage the unit,
Protect the product from moisture (Le_vases),and
excessheat (e_g,afireplace) or equipment creating
strong magnetic or electdc field£ Disconnect the
power cable from the AC supply if the unit
matfunction£ 'four product is not intended for
industrial use, tt isfor personal use onty,
Condensation may occur if your product has been
stored in cold temperatures, tf transpoRing the unit
during the winter, wait approximately 2 hours until
the unit has reached room temperature before using,
Do not expose the unit to direct sunlight or other
heat sources,This could tead to overheating and
causethe unit to malfunction,
The batteries used with this product contain
chemicals that are harmful to the environment Do
not dispose of batteries in the genera1household
trash, Do not dispose of batteries in a fire, Do not
shoR circuit, disassemble,or overheat the batteries,
Danger of explosion if batters, is incorrectly replaced,
Replaceonty with the same or equivalent type,
product and keep it away from children, tf you think batteries might have been swallowed or placed inside
any par of the body, seek immediate medical attention,
4
CONTENTS
2 Licenses
3 SAFETY INFORMATION
3 Safety Warnings
4 Precautions
6 GETTING STARTED
6 Before reading the User's Manual
6 What's hduded
7 Top/Front Panel
8 Rear Panel
9 REMOTE CONTROL
9 Remote Control Buttons and Functions
11
ii
i2
i3
i4
i5
i6
hstalling the Wall Mount
Detaching the Wall Mount
Connecting the Wireless Subwoofer
Attaching the Toroidal Ferrite Core to
the Power Cord of the Subwoofer
Connecting an External Device using an
HDMB cable
Connecting an External Device using
Audio (analog) cable or Optical (digital)
cable
17
i7 hput mode
i7 ARC (HDMBOUT)
i8 Bluetooth
20 TV SoundConnect
2i USB
22 Software Update
23 TROUBLESHOOTING
24 APPENDIX
24 Specifications
GEf_NGS_&R_ED
GETTING STARTED
BEFORE READING THE USER'S MANUAL
Note the following terms before reading the usermanual,
icons used in this manual
Safety instructions and Troubleshooting
t ) Besure to familiarize yourself with the Safety Instructions before using this product. (Seepage 3)
2) tfa problem occurs, check Troubleshooting. (Seepage 23)
Copyright
@2014 Samsung Electronics Co.,Ltd.
AIt rights reserved; no part of this usePsmanuat may be reproduced or copied without the prior written
permission of Samsung Electronics Co.Ltd.
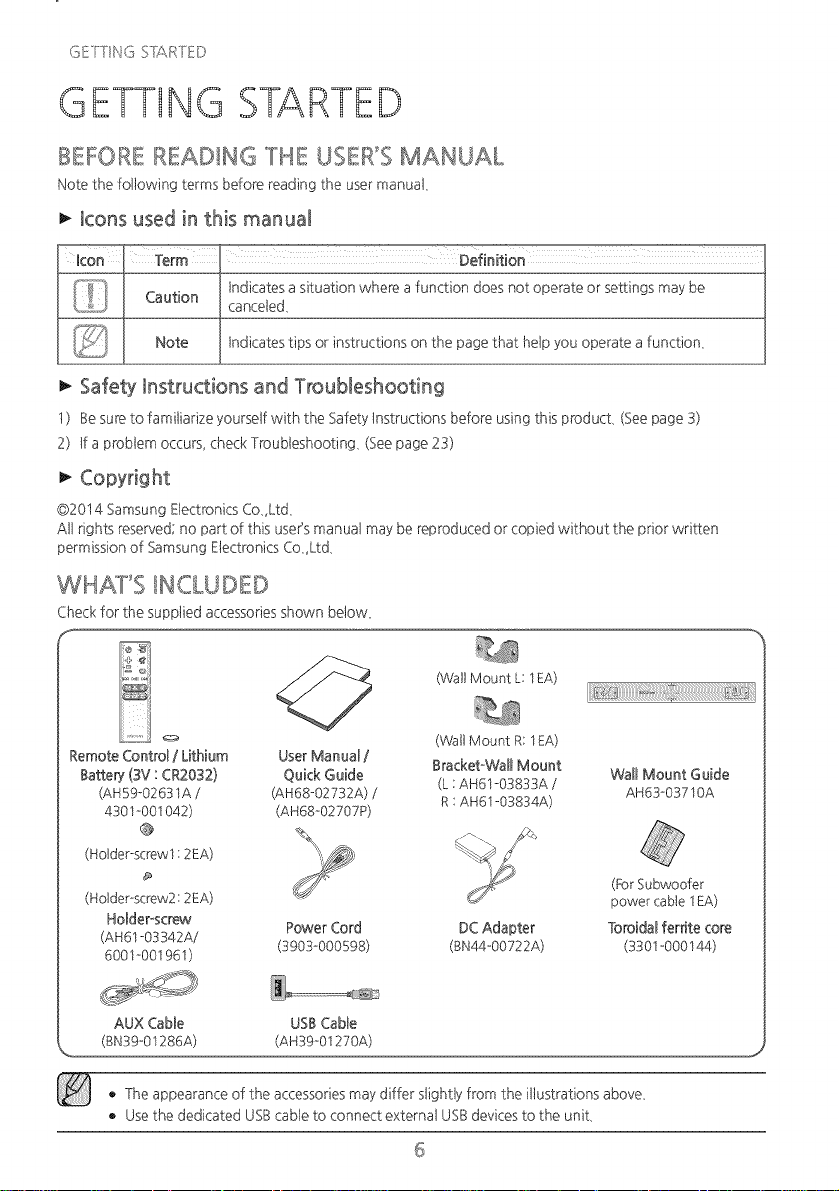
WHAT'S _NCLuDED
Check for the supplied accessoriesshown betow_
f
_ (WallMount L:1EA)
o (WallMount R:1EA)
Remote Control / Lithium UserManual / Bracket-Walt Mount
Batterj (3V : CR2032) Quick Guide (L:AH61-03833A /
Wall Mount Guide
(AH59-02631A / (AH68-02732A) /
R:AH61-03834A)
4301-001042) (AH68-02707P)
Holder-screw1: 2EA)
Holder-screw2:2EA)
Holder-screw
Power Cord DCAdapter
(AH61-03342A/ (3903-000598) (BN44-00722A)
6001-001961)
AH63-03710A
(ForSubwoofer
power cable 1EA)
Toroidat ferdte core
(3301-000144)
AUX Cable USB Cable
(BNS9-01286A) (AH39-01 Z20A)
• The appearance of the accessoriesmay differ slightty from the illustrations above,
• Usethe dedicated USBcable to connect externat USBdevicesto the unit,
6
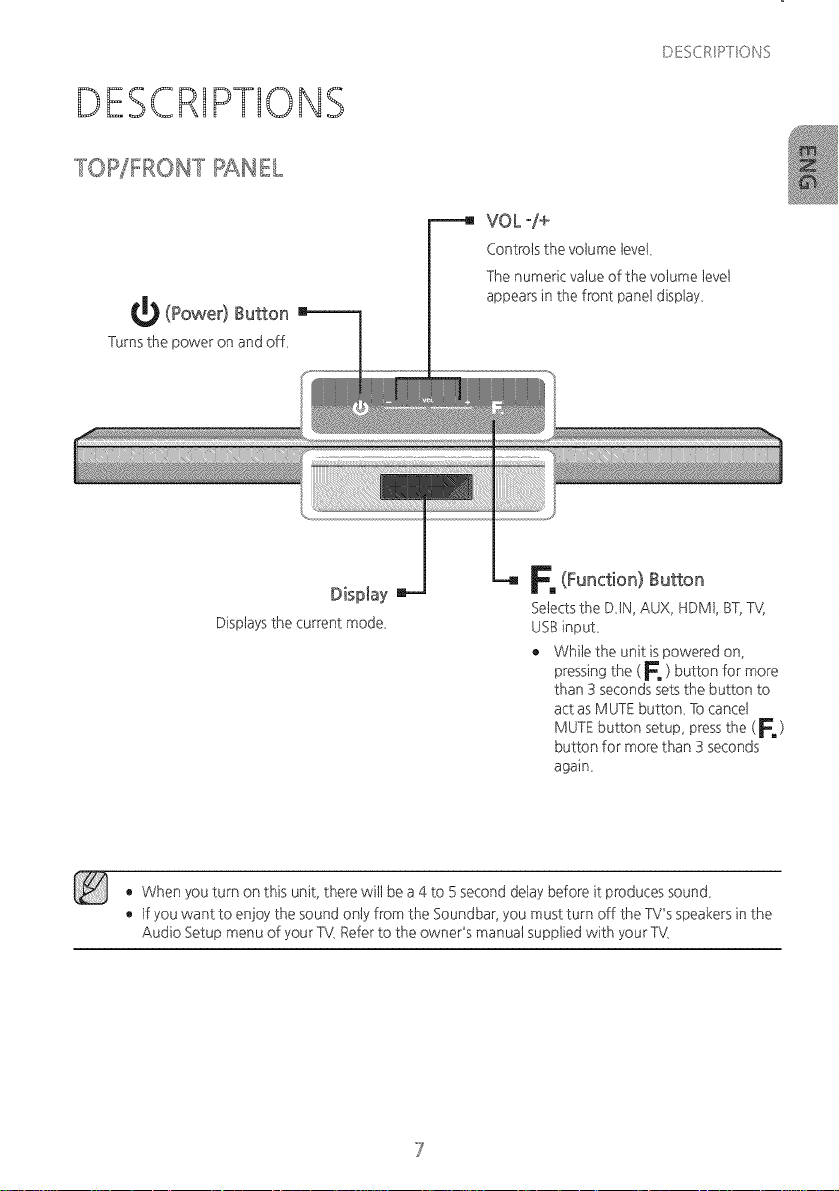
DESCRIPTIONS
E ONS
TOP/FRONT PANEL
_ (Power) Button
Turnsthe poweron andoff,
VOL -/+
Controts the votume 1eve1,
The numeric vatue of the votume tevel
appears in the front panel display,
Displaysthe current mode,
F, (Function) Button
Selectsthe DiN, AUX, HDMt, BT,TV,
USBinput,
• While the unit is powered on,
pressing the ( F, ) button for more
than 3 secondssets the button to
act as MUTE button, To cancel
MUTE button setup, pressthe (E )
button for more than 3 seconds
again,
• When you turn on this unit, there wit1be a 4 to 5 second delay before it produces sound,
• tf you want to enjoy the sound only from the Soundbar, you must turn off the TV'sspeakers in the
Audio Setup menu of your TV,Referto the owner's manuat supplied with your TV,
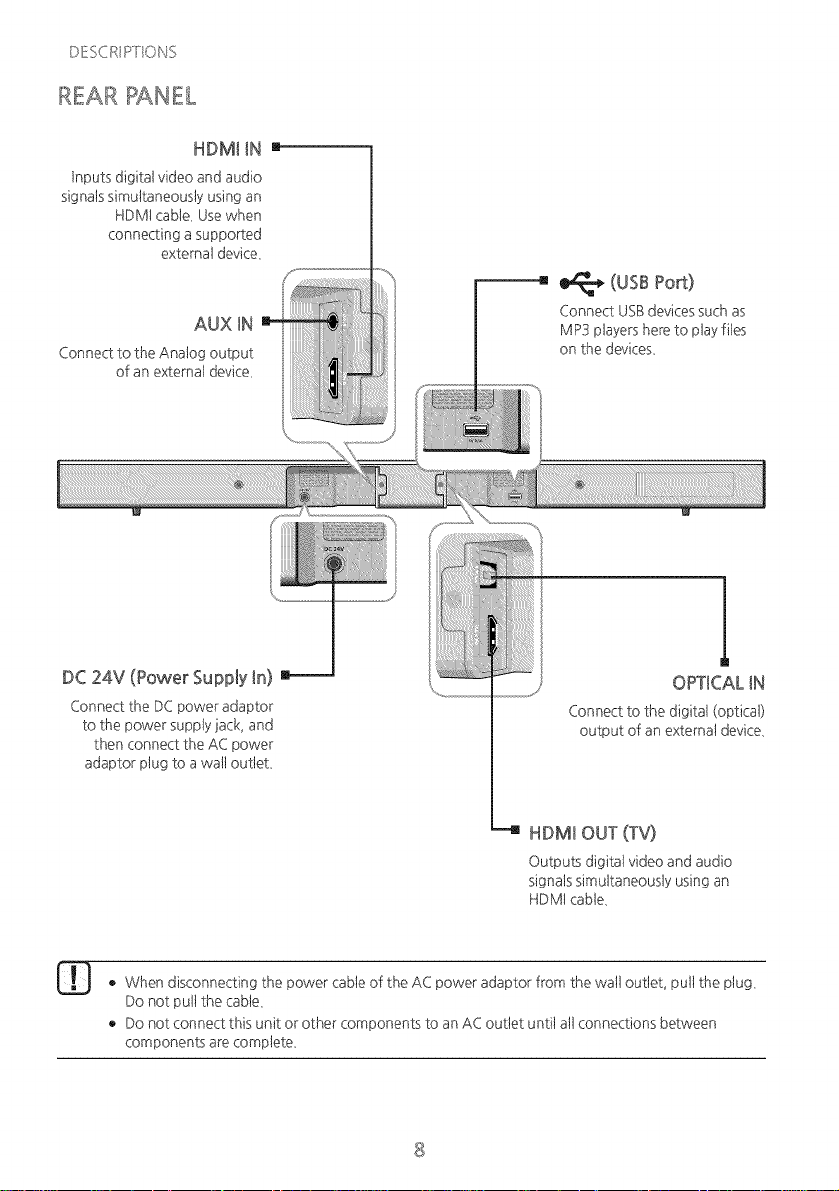
D/!SC:_IsTI(}NS
REAR PANEL
HDMI IN I
inputs digital video and audio
signats simultaneously usingan
HDMt cable, Usewhen
connecting asupported
externat device,
AUX iN
Connect to the Analog output
of an external device,
(usBPort)
Connect USBdevicessuch as
MP3 players here to playrites
on the devices,
DC 24V (Power Supply In)
Connect the DCpower adaptor
to the power supply jack, and
then connect the AC power
adaptor phJgto a watt outlet,
I|
OPTICAL IN
Connect to the digital (optic@
output of an external device,
--4 HDMI OUT (TV)
Outputs digitat video and audio
signats simultaneously using an
HDMt cable,
• When disconnecting the power cable of the AC power adaptor from the watt outtet, pult the plug,
Do not pult the cabte,
• Do not connect this unit or other components to an ACoutlet until at1connections between
components are complete,
8
H_ti!/\iOl _!CONTH_tOL
REMOTE CONTROL
REMOTE CON"TROt BUTTONS AND FUNCTIONS
SOURCE
Pressto select a source connected to the Soundbar,
MUTE
YOucan turn the votume down to 0 with the push of a button,
Pressagain to restore the sound to the previous votume tevet,
REPEAT
Pressto set the REPEATfunction during music playbackfrom a USB
device,
REPEATOFF: Cancels RepeatPlayback,
REPEATFILE: Repeatedly playa track,
REPEATALL : Repeatedly play atttracks,
REPEATRANDOM : Haystracks in random order,
(A track that has atready been played may be played again,)
SkipForward
tf there is more than one rite on the device you are playing, and you
pressthe _-I button, the next rite is selected,
AUDIO SYNC
tf the Soundbar isconnected to a digtat TV and the video appears out
of sync with the audio, pressthe AUDIO SYNC buttons to sync the
audio with the video, Usethe I_ _,_-)buttons to set the audio delay
between 0 ms and 300 m£ tn USBmode, TV mode, and BTmode, the
Audio Syncfunction may not work,
DBMMER/Anynet+
DBMMER: Pressthe DIMMER/Anynet+ button to control the
brightness of the display,
Anynet+ : Pressand hold the DIMMER/Anynet+ button for more than
3 secondsto turn the Anynet+ function on or ofL
(Auto Power Link : Default OFF,Anynet+ ON / Power Link Off or
Anynet+ OFF/ Power Link ON ), The Anynet+ function lets you control
the Soundbar with the remote from an Anynet+ compatible Samsung
TV The Soundbar must be connected to the %/via an HDM1cable,
* Auto Power Link
Synchronizesthe Soundbar to aconnected Optical source via the
Opticat jack so it turns on automatically when you turn on your TV
EQUAUZERWOOFER
Pressto select Treble or Bass,Then, use the 144 ),_,1button to adjust
the Trebleor Bassvolume from -3 to +3,
YOucan control the subwoofer volume, Pressthe 144),_4button to
increaseor decreasethe subwoofer volume, You can set it from
SW -6 to SW +6,
• Soundbar isa Samsung proprieta,3, name,
• Operate the TV using the TV's remote controt,
9
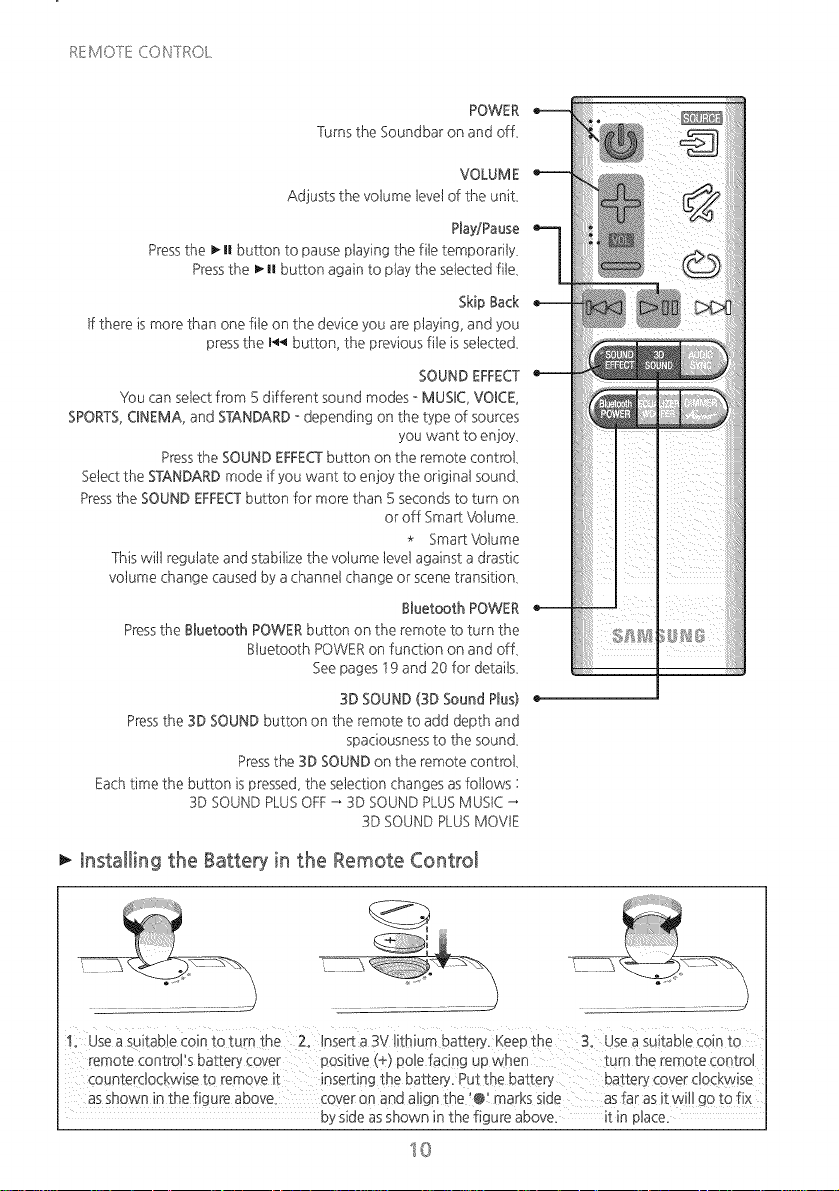
I_tE/\iO 1/! CQNTI_tOL
POWER
Turnsthe Soundbar on and off,
VOLUME
Adjusts the votume 1eve1of the unit,
Play/Pause
Pressthe _MIbutton to pause playing the fite temporarily,
Pressthe _MIbutton again to play the selected file,
Skip Back
tf there is more than one rite on the device you are playing, and you
pressthe 144button, the previous rite isselected,
SOUND EFFECT
You can select from 5 different sound modes - MUSIC,VOICE,
SPORTS,CBNEMA,and STANDARD- depending on the type of sources
you want to enjoy,
Pressthe SOUND EFFECTbutton on the remote controt,
Selectthe STANDARDmode if you want to enjoy the originat sound,
Pressthe SOUND EFFECTbutton for more than 5 seconds to turn on
or off Sma_ Votume,
* Sma_ Votume
This wit1regulate and stabilize the votume tevelagainst a drastic
votume change causedby a channel change or scenetransition,
Btuetooth POWER
Pressthe Btuetooth POWERbutton on the remote to turn the
Btuetooth POWERon function on and off,
See pages t 9 and 20 for details,
3D SOUND (3D Sound Plus)
Pressthe 3D SOUND button on the remote to add depth and
spaciousnessto the sound,
Pressthe 3D SOUND on the remote controt,
Eachtime the button is pressed,the selection changesas fottows :
3D SOUNDPLUSOFF_ 3D SOUND PLUSMUSIC
3D SOUND PLUSMOVIE
Installing the Batter), in the Remote Control
asshown in the %ure above. Coveron and align the '@! marks side as1:atas it Wittgo to fix
by side asshown in the figure above, it in ptace.
I0

CONNECTIONS
CQNN}!CT ONS
_NSTALUNG 'THE WALL MOUNT
You can usethe watt mount bracket to raount this unit on awatt,
Installation Precautions
• tnstatton ave_icat watt onty,
• For the installation, avoid a tocation with high temperature or
humidity, or a wattthat cannot sustain the weight of the set,
• Check the strength of the watL tfthe watt is not strong
enough to support the unit, reinforce the watt or instatt the
unit on a different watt that can support the unit's weight,
• Purchaseand use the fixing screws or anchors appropriate for
the kind of wan you have (plaster board, iron board, wood,
etc,), tf possible, fix the suppo¢ screws into watt studs,
• Purchasewan mounting screws according to the type and
thickness of the watt you wit1mount the Soundbar on,
Diameter : M5
Length: t 3/8 in (35 mm) or tonger recommended,
• Connect cables from the unit to extemat devicesbefore you
install it on the watt,
• Make sure the unit is turned off and unplugged before you
instatt it, Othe_vise, it may causean electric shock,
!. Placethe installation guide against the watt su,fface,
• The installation guide must be tevel,
• tnstattat least 2 inches (5 cm) below the %/, if the TV is
mounted on the watt,
2. Mark the tocation where the screws wit1go through on the
watt using a pen, and then remove the installation guide,
3. Fastenthe watt mounts and screws to the marked locations,
• The 1eftand right mounts are different shapes,
4. Securethe two hotder screwsto the screw holes on the back
of the Soundbar's main body, one on the 1eftand one on the
right,
5. Insert the USBcable into the back of the Soundbar before
installing iton the watt,
6. Set the hotder screwson the backof the Soundbar into the grooves of the watt mount_
For safe installation, make sureto push the hotder screwsattthe way to the bottom of the grooves,
11
CONNECTION!_
DE'TACk'qING 'TkqEWALL MOUNT
!. Puttthe Soundbar upwards asshown in the figure to separate
it from the watt mount,
• Do not hang onto the installed unit and avoid striking or dropping the unit,
• Securethe unit firmly to the wattso that it does not fattoff, tf the unit falls off, it may cause an
injuB, or damage the product,
• When the unit isinstalled on a wall, please make surethat children do not pult any of the
connecting cables, as it may causeit to fall,
• _r the optimal pe,fformance of a walt mount installation, install the speaker systemat least2 inches
(5 cm) below the %/,if the %/is mounted on the wail
• For your safety, if you do not mount the unit on the watt, install it on a secure, ftat su,ffacewhere it
is unlikely to fall,
12
CONN}!CT ONS
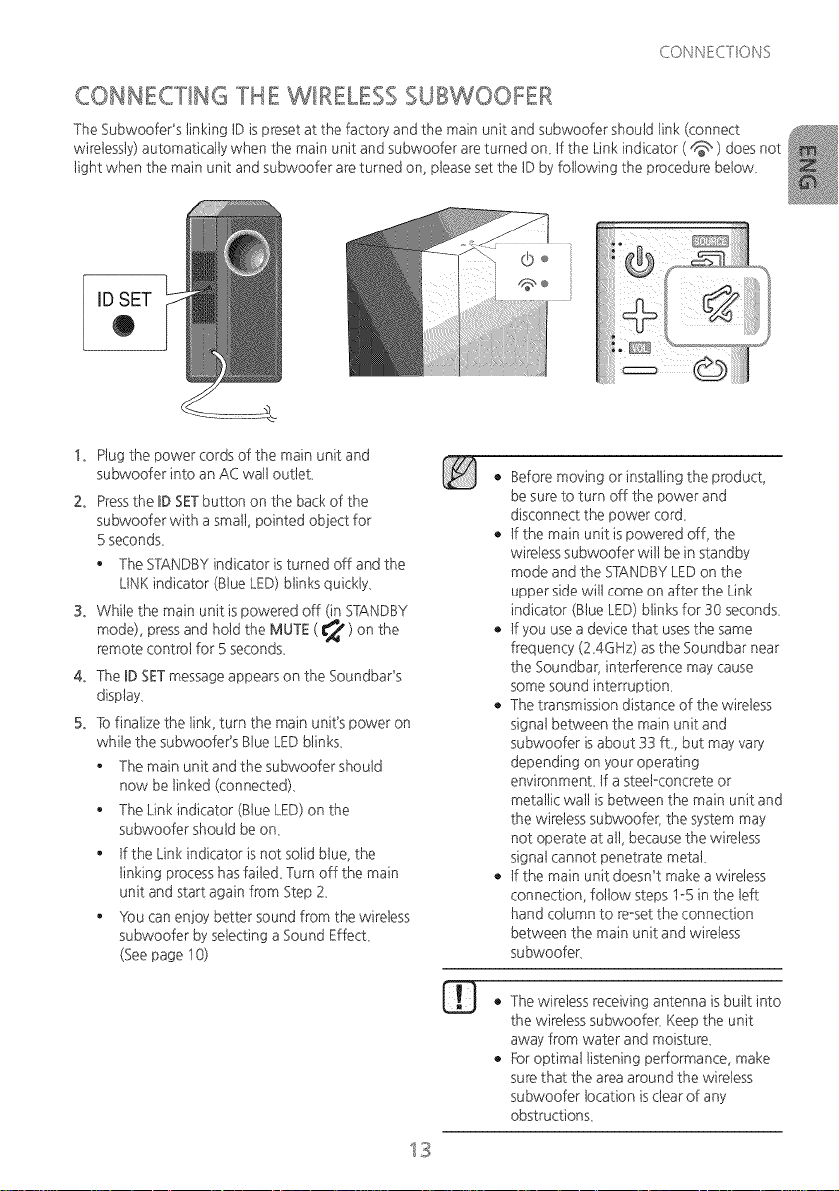
CONNECTING THE WIRELESS SUBWOOFER
The Subwoofer's 1inkingIDis presetat the facto_ and the main unit and subwoofer should 1ink(connect
wirelessly) automatically when the main unit and subwoofer are turned on_Ifthe Link indicator ( _ ) doesnot
tight when the main unit and subwoofer areturned on, pteaseset the IDby following the procedure betow_
IDSET
O
@
@@
!. Plug the power cords of the main unit and
subwoofer into an AC watt outtet.
2. Pressthe BDSETbutton on the backof the
subwoofer with a stoat1,pointed object for
5 seconds,
• The STANDBYindicator is turned off and the
LINKindicator (Blue LED)blinks quickly.
S. White the main unit ispowered off (in STANDBY
mode), pressand hotd the MUTE( _ ) on the
remote control for 5 seconds.
4. The BDSETmessage appears on the Soundbar's
display.
5. Tofinalize the link, turn the main unit's power on
white the subwoofer's Btue LEDblinks.
• The main unit and the subwoofer should
now be 1inked(connected).
• The Link indicator (Blue LED)on the
subwoofer should beon.
• tfthe Link indicator is not solid blue, the
1inkingprocesshas faited. Turn off the main
unit and start again from Step 2.
• YOucan enjoy better sound from the wireless
subwoofer by selecting aSound Effect.
(Seepage t 0)
13
• Before moving or installing the product,
be sure to turn off the power and
disconnect the power cord.
• tf the main unit is powered off, the
wireless subwoofer wit1 be in standby
mode and the STANDBYLED on the
upper sidewit1come on after the Link
indicator (Blue LED)blinks for 30 seconds.
• tf you use a devicethat usesthe same
frequency (2.4GHz) as the Soundbar near
the Soundbar, inte,fference may cause
some sound interruption.
• The transmission distance of the wireless
signat between the main unit and
subwoofer isabout 33 ft., but may van,
depending on your operating
environment, tf a ste@concrete or
metallic watt isbetween the main unit and
the wireless subwoofer, the system may
not operate at all, becausethe wireless
signatcannot penetrate metat.
• tf the main unit doesn't make awireless
connection, foltow steps I-5 in the left
hand cobmn to re-set the connection
between the main unit and wireless
subwoofer.
The wireless receiving antenna isbuitt into
the wireless subwoofer. Keep the unit
away from water and moisture.
Foroptimal listening pe,fformance, make
surethat the areaaround the wireless
subwoofer tocation is dear of any
obstructions.
_ _ s¸__ <'
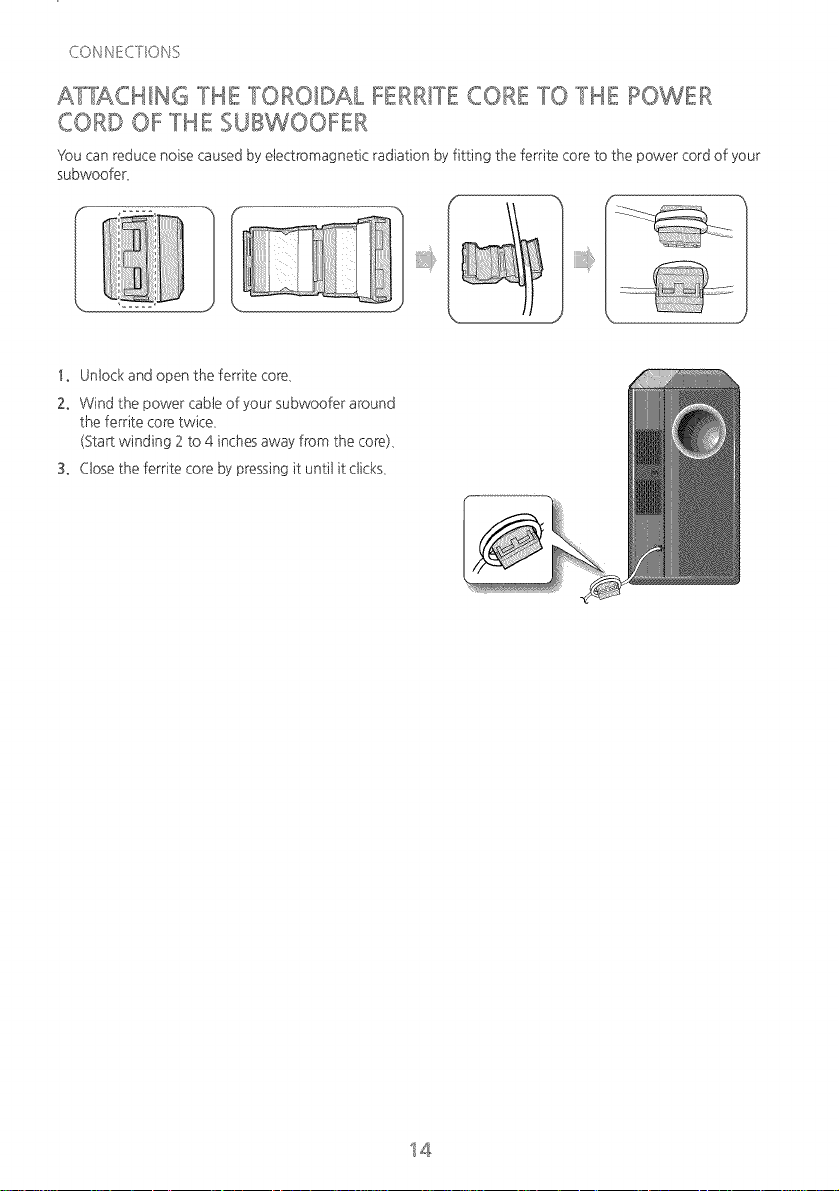
AT'YACHIHG TH E TOROIDAL FERRITE CORE "TOTH E ROWE R
[IORD OF 'THE SUBWOOFER
You can reduce noisecaused by elect@magnetic radiation by fitting the ferrite core to the power cord of ),our
subwoofer.
!. Unlock and open the ferrite core.
2. Wind the power cable of your subwoofer around
the ferrite core twice.
(Sta_ winding 2 to 4 inches away from the core).
3. Closethe ferrite core by pressing it until it clicks.
14
_s'_ _ _1 _ s¸_ _ C
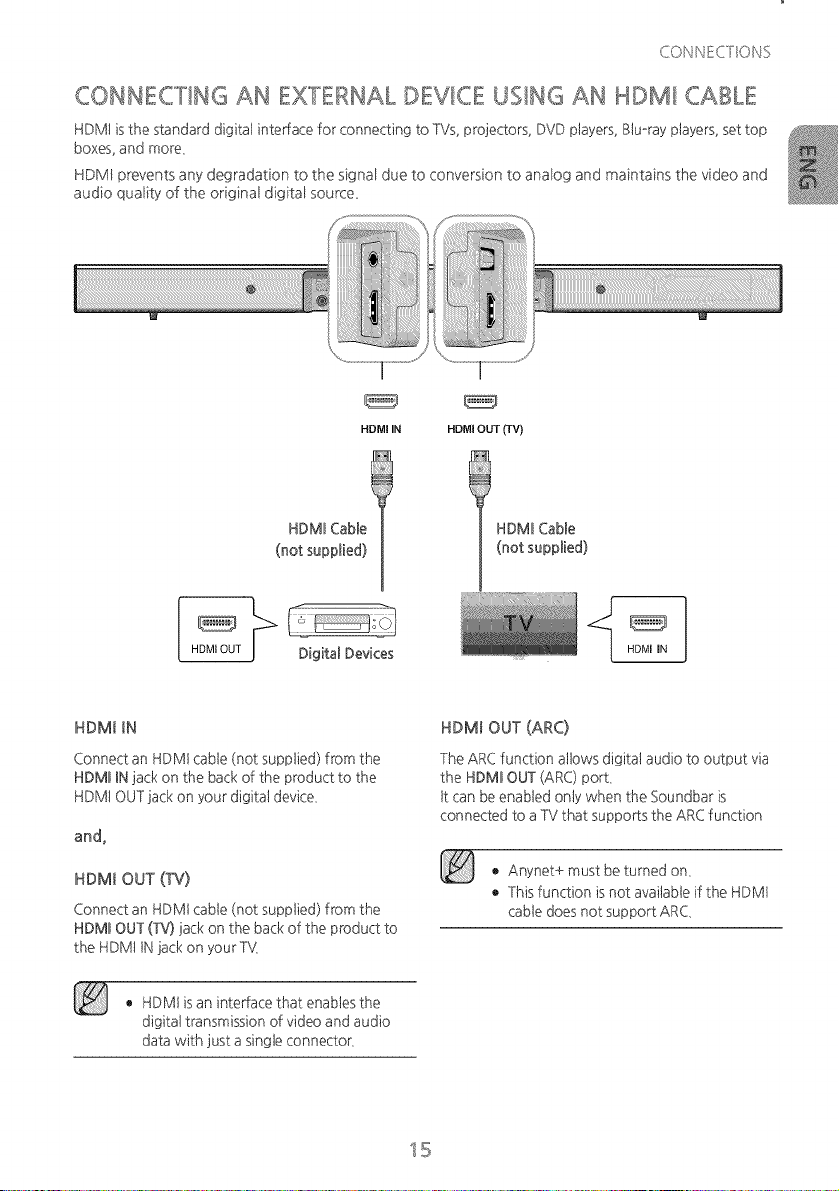
CONNECTING AN EXTERNAL DEVICE USING AN HDMI CABLE
HDMt is the standard digitat intedace for connecting to TVs, projectors, DVD players,Btu-ray players,set top
boxes,and more,
HDMI prevents any degradation to the signal due to conversion to analog and maintains the video and
audio quality of the original digital source
HDMI IN HDMI OUT (TV)
HDMI Cable
(not supplied)
Digital Devices
HDMI Cable
(not supplied)
HDM_ IN HDMI OUT (ARC)
Connect an HDMt cable (not supplied) from the
HDMI iN jack on the backof the product to the
HDMt OUTjack on your digitat device,
and,
HDM_ OUT (TV)
Connect an HDMt cable (not supplied) from the
HDMI OUT (TV)jack on the back of the product to
the HDMt tNjack on your Tk(
The ARCfunction allows digitat audio to output via
the HDMI OUT (ARC) port,
tt can beenabled only when the Soundbar is
connected to a TVthat suppo_s the ARCfunction
• Anynet+ must be turned on,
• This function isnot available if the HDMt
cable does not support ARC,
• HDMt is an interface that enablesthe
digitat transmission of video and audio
data with just asingle connector,
15
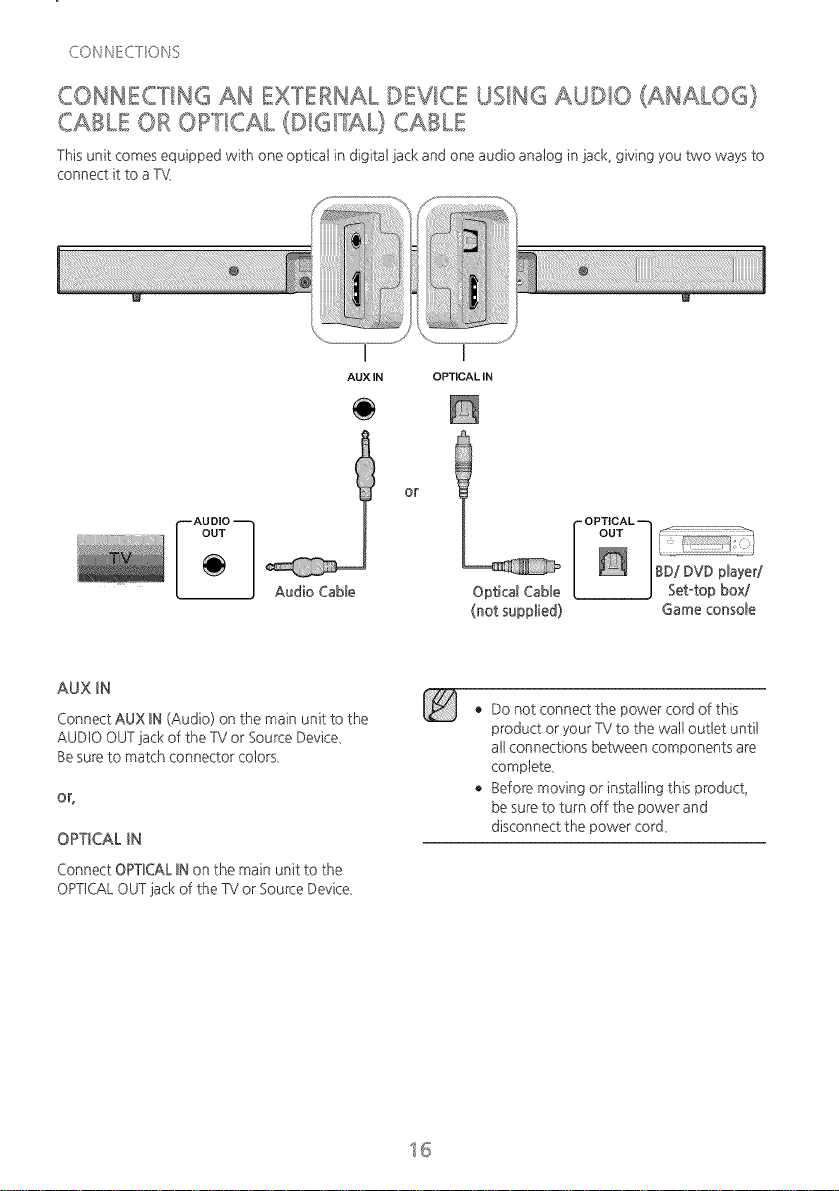
CONNECTING AN EXTERNAL DEVICE USING AUDIO (ANALOG)
_:__° (DIGFAL) CABLE
CABLE OR O, T,CAL
This unit corses equipped with one opticat indigital jack and one audio analog in jack, giving you two ways to
connect it to aTV
AUX IN
OPTICALIN
t -'AUDIO "--'/ I"" OPTICAL "--'t
I _ 1 / OUT _l '
t +
(not supp++ed) Game conso+e
AUXIN
Connect AUX BN(Audio) on the main unit to the
AUD10 OUTjack of the TV or Source Device,
Besure to match connector cotors,
Or+
OPTICAL IN
Connect OPTBCALBNon the main unit to the
OPTICALOUTjack of the TV or Source Device,
• Do not connect the power cord of this
product or your TVto the watt outlet until
attconnections between components are
complete,
• Before moving or installing this product,
besureto turn off the power and
disconnect the power cord,
15
FUNCTIONS
_NPUT MODE
Pressthe (Fm ) button on the main unit's top panel or the _ (SOURCE)button on the remote controt to
select the mode you want,
S
Optical Digital input DiN
AUX input AUX
HDMt input HDMB
BLUETOOTHmode ST
TV mode TV
USBmode USB
The unit turns off automatically in the following
situations,
• DJNiHDMtiBTiTViUSBiARC Mode
tfthere is no audio signat for 25 mimJtes,
• AUX Mode
tfthe AUX cable isdisconnected for
25 mimstes,
tfthere is no KEYinput for 8 hours when the
AUX cable is connected,
To turn the Auto Power Down function
ON or OFF,pressand hotd the _-Hbutton for
5 seconds,AUTO POWER DOWN ON / OFF
appears on the display,
ARC (HDMI OUT)
ARC (Audio Return Channel) transfers digitat audio signatto the HDMt OUT (ARC) po_,
HDMBCable
!° Connect the TV supporting ARCto the Soundbar with an HDMt cable,
2. Turn on the %/,and turn on the SoundbaCs Anynet+,
3. Pressthe ( F, ) button on the main unit's top panel or the _ (SOURCE)button on the remote controt to
select the DiN mode,
• tf the HDMt cable does not support ARCfeature, ARCmay not work property,
• To turn off the ARCfunction, turn Anynet+ off,
17
FUNC/ONS
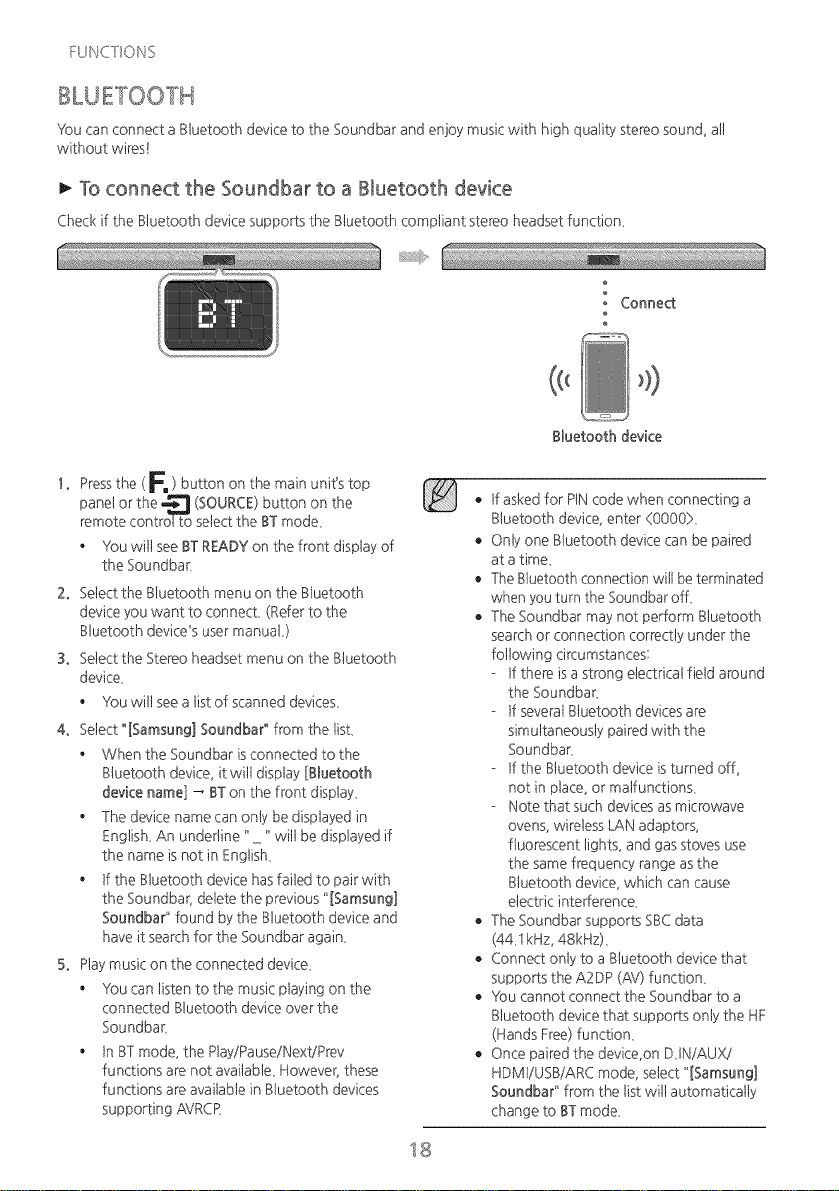
YOucan connect a Btuetooth device to the Soundbar and enjoy music with high quality stereo sound, all
without wires!
To connect the Soundbar to a Bluetooth device
Check if the Btuetooth device suppo_s the Btuetooth compliant stereo headset function_
ii
o Connect
Pressthe ( F. ) button on the main unit's top
panel or the .._ (SOURCE)button on the
remote control to select the BTmode,
• YOuwilt see BTREADYon the front displayof
the Soundbar,
2. Selectthe Bluetooth menu on the Bluetooth
device you want to connect, (Refer to the
Btuetooth device's user manual,)
3. Selectthe Stereo headset memJon the Btuetooth
device,
• YOuwit1seea tist of scanned devices,
4. Select "ISamsung] Soundba¢' from the tist,
• When the Soundbar is connected to the
Btuetooth device, it wit1display [Btuetooth
device name] _ BTon the front display,
• The device name can onty be displayed in
English, An underline "" wit1be displayed if
the name isnot in English,
• tf the Btuetooth device hasfaited to pair with
the Soundbar, delete the previous "[Samsung]
Soundbar" found by the Btuetooth device and
have it searchfor the Soundbar again,
5. Hay music on the connected device,
• YOucan listen to the music playing on the
connected Btuetooth device over the
Soundbar,
• tn BTmode, the PtayiPauseiNextiPrev
functions are not avaitabte_However, these
functions are available in Btuetooth devices
supporting AVRCR
Btuetooth device
• tfasked for PINcode when connecting a
Btuetooth device, enter <0000>,
• Ontyone Btuetooth device can bepaired
at a time_
• TheSluetooth connection will be terminated
when you turn the SoundbarofL
• The Soundbar may not perform Btuetooth
search or connection correctly under the
following circumstances:
tf there isa strong electrical field around
the Soundbar_
tf several Btuetooth devicesare
simultaneously paired with the
Soundbar,
tf the Btuetooth device is turned off,
not in place,or malfunctions,
Note that such devices as microwave
ovens,wireless LANadaptors,
fluorescent lights, and gas stoves use
the same frequency range as the
Btuetooth device, which can cause
electric interference,
• The Soundbar supports SBCdata
(44,1kHz, 48kHz),
• Connect only to a Btuetooth device that
suppo_s the A2DP (AV) function,
• You cannot connect the Soundbar to a
Bluetooth device that suppo_s onty the HF
(HandsFree)function,
• Oncepaired the device,on DJNiAUXi
HDMtiUSBiARC mode, select "[Samsung]
Soundbar" from the listwit1automatically
change to BTmode,
18
Bluetooth POWER on (Bluetooth POWER)
When the Btuetooth Power On function ison and the Soundbar isturned off, if a previously paired Btuetooth
device tries to pair with the Soundbar, the Soundbar turns on automatically,
!. tf the Soundbar isturned off, pressand hold ( F, ) button on the top panel for 5 seconds,
Or pressthe Btuetooth POWERon the remote white the Soundbar isturned on,
2. Btuetooth POWERon appears on the Soundbar's display,
• Available only if the Soundbar ististed among the Btuetooth device'spaired devices, (The Btuetooth
device and the Soundbar must have been previously paired at least once}
• Soundbar wit1appear in the Btuetooth device's searcheddevicestist onty when the Soundbar is
displaying [BTREADY],
• tnthe TV SoundConnect mode, the Soundbar cannot be paired to another Btuetooth device,
• tf the Soundbar isconnected to aTV through TV SoundConnect, and you turn the Soundbar off by
turning off the TV,the Btuetooth Power On function wit1not turn the Soundbar on,
To disconnect the Bluetooth device from the Soundbar
You can disconnect the Btuetooth device from the Soundbar, Forinstructions, seethe Btuetooth device's user
manual
• The Soundbar wit1be disconnected_
• When the Soundbar is disconnected from the Btuetooth device, the Soundbar wit1display
STI)BSCONNECTEDon the front display,
_- To disconnect the Soundbar from the Bluetooth device
Pressthe _ (SOURCE)button on the remote control or the (E ) button on the product's top panel to
switch from STto another mode or turn off the Soundbar,
• The connected Bluetooth device wit1wait a certain amount of time for a response from the Soundbar
before terminating the connection, (Disconnection time may differ, depending on the Btuetooth device)
• tn Btuetooth connection mode, the Btuetooth connection wit1be tost if the distance between the
Soundbar and the Btuetooth device exceeds t6,25 ft, (Sin),
• The Soundbar automatically turns off after 25 minutes in the Readystate,
More About Bluetooth
Btuetooth isa technology that enables Btuetooth-compliant devicesto interconnect easitywith each other
using ashort wireless connection,
• A Btuetooth device may causenoise or malfunction, depending on usage, when:
A pa_ of your body is in contact with the receiving/transmitting system of the Btuetooth device or the
Soundbar,
tt issubject to electrical variation from obstructions caused by a watt, corner, or office pa¢ition.
tt isexposed to electrical intederence from same frequency-band devicesincluding medicat equipment,
microwave ovens, and wireless LANs,
• Pair the Soundbar with the Btuetooth device white they are dose together,
• The further the distance between the Soundbar and Btuetooth device, the worse the quatity is,
tf the distance exceedsthe Btuetooth operational range, the connection islost,
• tn poor reception areas,the Btuetooth connection may not work property,
• The Btuetooth connection onty works when it is close to the unit, The connection wit1be automatically cut
off if the Btuetooth device isout of range, Evenwithin range, the sound quatity may be degraded by
obstaclessuch as watts or doors,
• Thiswireless device may causeelectdc intederence during itsoperation,
19
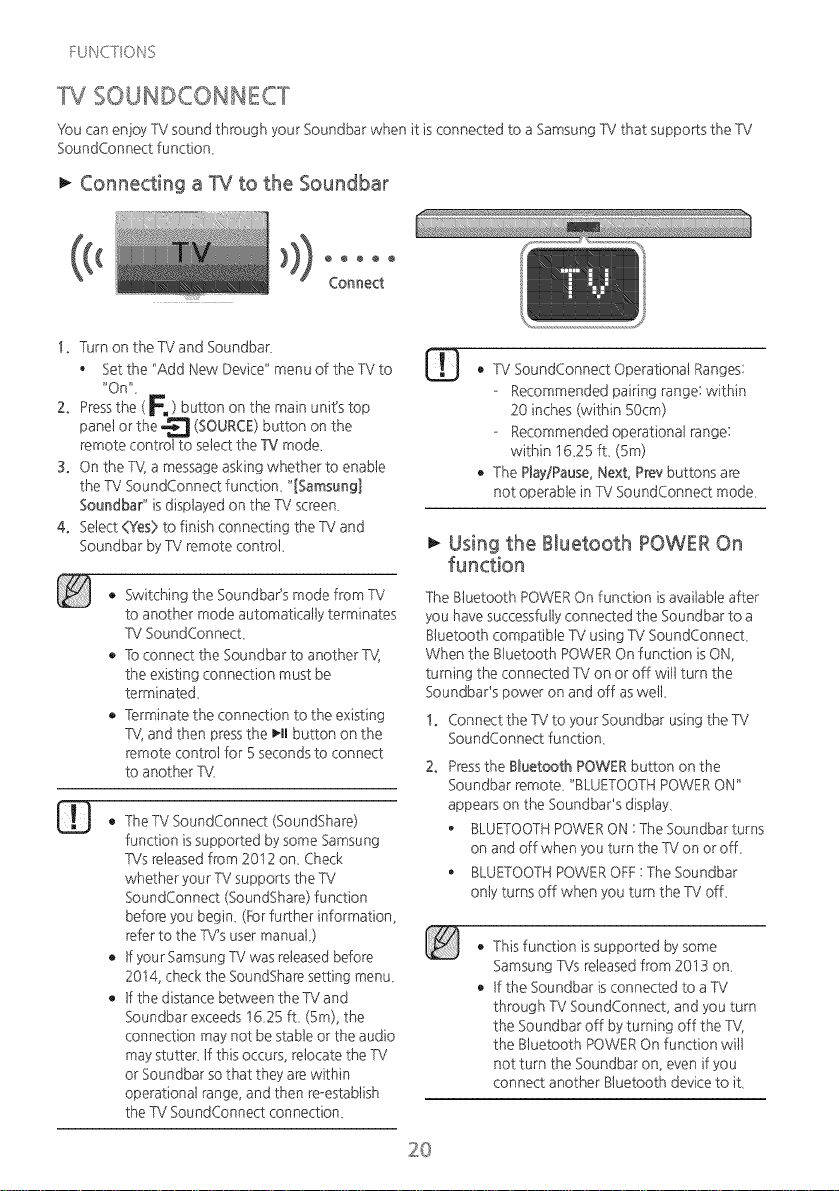
TV SOUNDCONNECT
You can enjoy TVsound through your Soundbar when it is connected to a Samsung TV that supports the TV
SoundConnect function,
Connecting a TV to the Soundbar
!. Turn on the TV and Soundbar,
• Set the "Add New Device" menu of the TV to
"On",
2. Pressthe (Fm ) button on the main unit's top
panel or the _ (SOURCE)button on the
remote controt to select the TV mode.
3. On the TV,a message asking whether to enable
the TV SoundConnect function, "[Samsung]
Soundbar" isdisplayed on the TVscreen,
4. Select<Yes>to finish connecting the TVand
Soundbar by TV remote controt,
• TV SoundConnect Operational Ranges:
Recommended pairing range: within
20 inches (within SOcm)
Recommended operational range:
within 1625 ft, (Sm)
• The Play/Pause,Next, Preybuttons are
not operable in TV SoundConnect mode,
Using the Bluetooth POWER On
• Switching the Soundbar's mode from TV
to another mode automatically terminates
TV SoundConnect,
• Toconnect the Soundbar to another TV,
the existing connection must be
terminated,
• Terminate the connection to the existing
TV,and then pressthe I_11button on the
remote control for Sseconds to connect
to another TV
e
o
TheTV SoundConnect (SoundShare)
function issupported by some Samsung
TVs releasedfrom 2012 on, Check
whether your TVsuppo_s the TV
SoundConnect (SoundShare) function
before you begin_ (_r fu_her information,
refer to the TV'susermanuaL)
tf your SamsungTVwas releasedbefore
2014, check the SoundSharesetting menu_
If the distance between the TVand
Soundbar exceeds 1625 ft, (Sm), the
connection may not be stableor the audio
may stutten If this occurs,relocate the TV
or Soundbar so that they are within
operational range, and then re-establish
the TV SoundConnect connection_
The Bluetooth POWEROn function isavailable after
you have successfullyconnected the Soundbar to a
Btuetooth compatible TV usingTV SoundConnect,
When the Btuetooth POWEROn function isON,
turning the connected TV on or off wit1turn the
Soundbar's power on and off as wee
!. Connect the TV to your Soundbar using the TV
SoundConnect function,
Pressthe Btuetooth POWERbutton on the
Soundbar remote, "BLUETOOTHPOWERON"
appears on the Soundbar's display,
• BLUETOOTHPOWERON :The Soundbar turns
on and off when you turn the TV on or ofL
• BLUETOOTHPOWEROFF:The Soundbar
onty turns off when you turn the TVoff,
• Thisfunctionissupportedbysome
Samsung TVs releasedfrom2013 on,
• tf the Soundbarisconnected to a TV
through TV SoundConnect, and you turn
the Soundbar off by turning off the TV,
the Bluetooth POWEROn function wit1
not turn the Soundbaron, even if you
connect another Btuetooth device to it,
2O
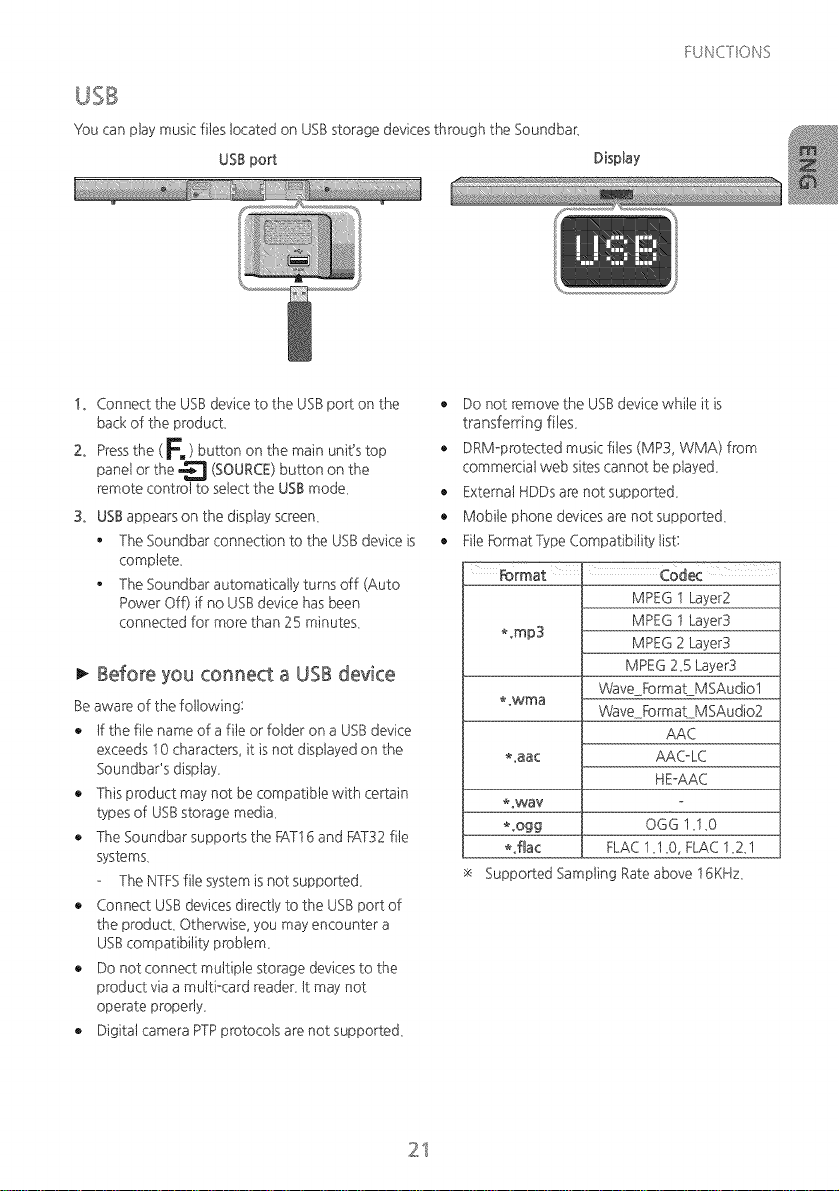
FUNCT ONS
You can playmusic fileslocated on USBstorage devicesthrough the Soundbar.
USB port Display
!. Connect the USBdevice to the USBpo_ on the •
back of the product,
2. Pressthe ( F. ) button on the main unit's top •
panel or the "_'__"i(SOURCE)button on the
remote control to select the USBmode, •
3. USBappears on the displayscreen, •
• The Soundbar connection to the USBdevice is •
complete,
• The Soundbar automatically turns off (Auto
Power Off) if no USBdevice has been
connected for more than 25 minutes,
_, Before you connect a USB device
Beaware of the following:
• tf the file name of a file or folder on a USBdevice
exceeds I 0 characters, it is not displayed on the
Soundbar'sdisplay,
• Thisproductmay notbe compatiblewithcertain
typesof USB storagemedia,
• The Soundbarsuppo_stheFATI6 and FAT32file
systems,
The NTFS filesystemisnotsupported,
• ConnectUSB devicesdirectlytotheUSB portof
theproduct,Otherwise,you may encountera
USB compatibilityproblem,
• Do notconnectmultiplestoragedevicestothe
productviaa multi-cardreader,Itmay not
operateproperly,
• DigitalcameraPTP protocolsarenotsupported,
Do not remove the USBdevice while it is
transferring files_
DRM-protected music files (MP3, WMA) from
commercial web sitescannot be played,
External HDDsare not supported,
Mobile phone devicesare not supported,
File FormatType Compatibility list:
Format C0dec
MPEGI Layer2
MPEGt Layer3
*omp3
MPEG2 Layer3
MPEG2_5Layer3
Wave FormaLM SAudio1
*owma
Wave FormaLMSAudio2
AAC
*oaac AAC%C
HE-AAC
*owav
**ogg OGG 1_I_0
*oflac FLAC1_I_0,FLAC12_1
SuppoSed Sampling Rateabove t 6KHz,
21
FUNCT ONS
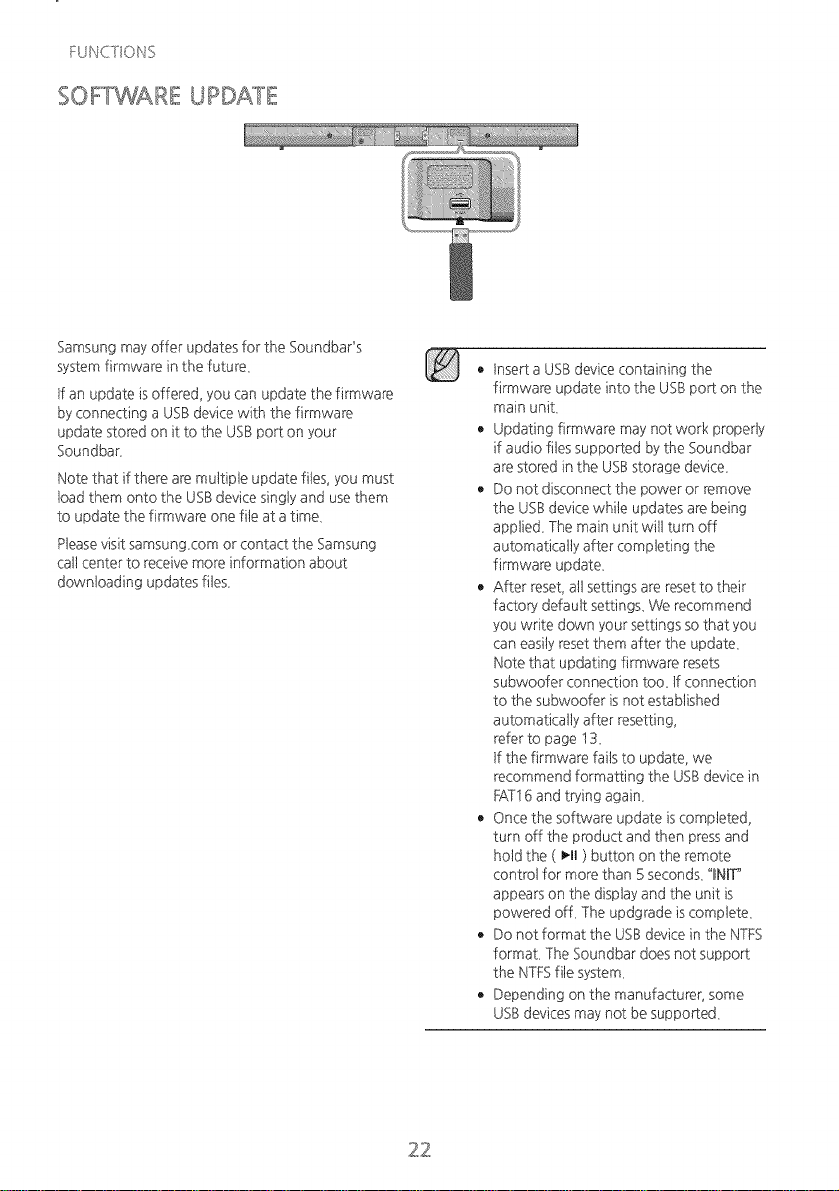
SOFTWARE UPDATE
Samsung may offer updates for the Soundbar's
system firmware in the future,
tf an update isoffered, you can update the firmware
by connecting a USBdevice with the firmware
update stored on it to the USBport on your
Soundbar,
Note that if there are multiple update rites, you must
toad them onto the USBdevice singly and use them
to update the firmware one rite at a time,
Pteasevisit samsung,com or contact the Samsung
cat1center to receive more information about
downloading updates rites,
• Insert a USBdevice containing the
firmware update into the USBport on the
main unit,
• Updating firmware may not work properly
if audio files supported by the Soundbar
are stored in the USBstorage device,
• Do not disconnect the power or remove
the USBdevice while updates are being
applied, The main unit will turn off
automatically after completing the
firmware update,
• After reset, attsettings are reset to their
facto6, default setting£ We recommend
you write down your settings so that you
can easityreset them after the update,
Note that updating firmware resets
subwoofer connection too_tf connection
to the subwoofer is not established
automatically after resetting,
refer to page 13.
tf the firmware faitsto update, we
recommend formatting the USBdevice in
FAT16and trying again,
• Once the software update iscompleted,
turn off the product and then pressand
hotd the ( _ll ) button on the remote
control for more than 5 seconds, "BNIT"
appears on the displayand the unit is
powered off, The updgrade iscomplete,
• Do not format the USBdevice in the NTFS
format, The Soundbar does not support
the NTFSfile system,
• Depending on the manufacturer, some
USBdevicesmay not be supported,
22
TROUBLESHOOTING
Before requesting sen,ice, pleasecheck the folowing.
• tsthere static electricity in the air? I "_ Disconnect the power plug and connect it again.
• tsthe Mute function on? ÷ Pressthe Mute button to cancel the function,
• tsthe volume set to minimum? ÷ Adjust the Volume.
• Are the batteries drained? ÷ Replacewith new batteries,
• tsthe distance between the remote controt and ÷ Move closerto the unit,
main unit too far?
• Does yourTV supportTV SoundConnect?
• tsyour TV firmware the tatest version?
• Does an error occur when connecting?
• Resetthe TV MODE and connect again,
÷ TV SoundConnect issupported by some
SamsungTVs releasedfrom 2012 on, Checkyour
TV to seeif it supports TV SoundConnect,
÷ Update your TV with the tatest firmware,
÷ Contact the Samsungcat1center,
÷ Pressand hold the _ Hbutton for 5seconds to
resetthe TV SoundConnect connection.
and SW+6),
23

Medetname IHW_H450
_Unit
Power Supply I Subwoofer (PS°WH450)
Standby Power Consumption
Power _ Unit
Consumption _Subwoofer (PS°WH450)
USB
Unit
Weight (PS°WH450)
Dimensions
(W x Hx D) _woofer (PS-WH450)
Operating Temperature Range
Operating Humidity Range
_ Unit
Rated Output
Power 1Subwoofer (pSoWH450)
AMPUFBER
SIN Ratio (Anatog hput)
Separation (1kHz)
DC24V
AC 120V~60Hz
0,45W
30W
20W
5Vi0_5A
4,63 lbs
11,27 lbs
37,7 x Z34 x 2_62 inches
7,06 x 1429 x 11,65 inches
+41 °Fto +95°F
10%to75%
80WiCH, 30HM, THD = 10%, lkHz
130WI 4 OHM, THD = 10%, 70Hz
65 dB
65 dB
SiN ratio, distortion, separation, and usable sensitivity are basedon measurements using AES (Audio
Engineering Society) guidelines,
* Nominat specification
Samsung Electronics Co,, Ltd reservesthe right to change the specifications without notice,
Weight and dimensions are approximate,
Open SounceLicenseNotice
Forfu_her information on Open Sourcesused in this product, pleasevisit the website:
http:iiopensource,samsung,com
To send inquiries and requests regarding open sources, contact Samsungvia Emait
(oss,request@samsung,com),
24

This SAMSUNGbrand product, as supplied and distributed by Samsung Electronics America, tnc. (SAMSUNG)
and delivered new, in the original carton to the originat consumer purchaser, iswarranted by SAMSUNG against
manufacturing defects in materials and workmanship for a limited warranty period of:
One (I} Year Parts and Labor*
(*90 DaysPartsand Labor for Commercial Use)
Thislimited warranty beginson the original date of purchase,and isvalidonly on products purchasedandused inthe
United State£ Toreceivewarranty service,the purchasermust contact SAMSUNGfor problem determination and
serviceprocedure£ Warrantyservicecan onlybe performed by aSAMSUNGauthorized servicecenter_Theoriginal
dated bill of salemust bepresented upon requestas proof of purchaseto SAMSUNGor SAMSUNG'sauthorized
servicecenter_Transportation of the product to and from the servicecenter isthe responsibility of the purchaser_
SAMSUNG wit1repair or replacethis product, at our option and at no charge asstipulated herein, with new or
reconditioned parts or products if found to be defective during the limited warranty period specified above_Alt
replaced parts and products become the property of SAMSUNGand must be returned to SAMSUNG_
Replacement partsand products assume the remaining original warranty, or ninety (90) days,whichever is tonger_
SAMSUNG's obligations with respectto software products distributed by SAMSUNG under the SAMSUNG brand
name are set forth in the applicable end user ticenseagreement. Non-SAMSUNG hardware and software
products, if provided, are on an "AStS"basis, Non-SAMSUNG mamJfacturers, supp%rs, publishers, and sen,ice
providers may provide their own warranties,
This limited warranty covers manufacturing defects in materials and workmanship encountered in normal, and
except to the extent otherwise expressly provided for in this statement, noncommercial use of this product, and
shall not apply to the following, including, but not limited to: damage which occurs in shipment; deliveB,and
installation; applications and usesfor which this product was not intended; altered product or serialnumbers;
cosmetic damage or exterior finish; accidents, abuse, neglect, fire, water, lightning or other actsof nature; useof
products, equipment, systems, utilities, services,parts, supplies, accessories,applications, installations, repairs,
external wiring or connectors not supplied and authorized by SAMSUNG, or which damage this product or result
in sen,ice problems; incorrect electrical tine voltage, fluctuations and surges; customer adjustments and failure to
follow operating instructions, cleaning, maintenance and environmental instructions that are covered and
prescribed in the instruction book; product removal or reinsta%tion; reception problems and distortion related to
noise, echo, inte_erence or other signat transmission and delivery problems, SAMSUNG does not warrant
uninterrupted or error-free operation of the product,
THEREARENO EXPRESSWARRANTIESOTHERTHANTHOSELISTEDANDDESCRIBEDABOVE,AND NOWARRANTIES
WHETHEREXPRESSORIMPLIED,INCLUDING,BUTNOTLIMITEDTO,ANY IMPLIEDWARRANTIESOF
MERCHANTABILffYORFITNESSFORA PARTICULARPURPOSE,SHALLAPPLYAFTERTHEEXPRESSWARRANTY
PERIODSSTATEDABOVE,AND NO OTHEREXPRESSWARRANTYORGUARANTYGIVENBYANY PERSON,FIRMOR
CORPORATIONWITHRESPECTTOTHISPRODUCTSHALLBEBINDINGONSAMSUNG_SAMSUNGSHALLNOTBE
LIABLEFORLOSSOFREVENUEORPROFITS,FAILURETO REALIZESAVINGSOR OTHERBENEFITS,ORANY OTHER
SPECIAL,INCIDENTALORCONSEQUENTIALDAMAGESCAUSEDBYTHEUSE,MISUSEORINABILITYTOUSETHIS
PRODUCT,REGARDLESSOFTHELEGALTHEORYONWHICHTHECLAIMISBASED,ANDEVENIFSAMSUNGHAS
BEENADVISEDOFTHEPOSSIBILITYOFSUCHDAMAGEE NORSHALLRECOVERYOFANY KINDAGAINSTSAMSUNG
BEGREATERINAMOUNTTHANTHEPURCHASEPRICEOFTHEPRODUCTSOLDBYSAMSUNGAND CAUSINGTHE
ALLEGEDDAMAGE WITHOUTLIMITINGTHEFOREGOING,PURCHASERASSUMESALL RISKAND LIABILITYFOR
LOSS,DAMAGEORINJURYTOPURCHASERAND PURCHASER'SPROPERTYANDTO OTHERSANDTHEIRPROPERTY
ARISINGOUTOFTHEUSE,MISUSEORINABILITYTOUSETHISPRODUCTSOLDBYSAMSUNGNOTCAUSEDDIRECTLY
BYTHENEGLIGENCEOFSAMSUNG_THISLIMITEDWARRANTYSHALLNOTEXTENDTOANYONEOTHERTHANTHE
ORIGINALPURCHASEROFTHISPRODUCT,ISNONTRANSFERABLEAND STATESYOUREXCLUSIVEREMEDY_
The benefits of this Limited YVarrantyextend onty to the originat purchaser of Samsung products from an
authorized Samsung reseller,THtSLtMtTEDWXRRANTYSHALLNOTAPPLYTO ANY SAMSUNG PRODUCTS
PURCHASEDFROMUNAUTHORIZEDRESELLERSOR RETAILERS,EXCEPTtNSTATESWHERESUCHRESTRICTION
MAY BE PROHIBITED,Fora tist of Samsungauthorized retailers, please go to: http:iiwww,samsung,comiusi
peaceofmindia uthorized reselters,htmt
Some states do not allow limitations on how long an implied warranty lasts, or the exclusion or 1imitationof
incidental or consequential damages, so the above limitations or exclusions may not apply to you, This warranty
gives you specific tegat rights, and you may atsohave other rights which vaB,from state to state,
Toobtain warranty hardware service, pleasecontact SAMSUNG customer care center,
AsanENERGYSTARPartner,Samsunghas
determinedthatthisproductorproduct
modelsmeetstheENERGYSTARguidelines
forenergyefficiency,
QUESTIONS OR COMMENTS?
AH68-02732A-01