Kitchen_kid ®
COMMERCIAL STYLE DUAL FUEL
CONVECTION RANGES WITH STEAM-ASSIST
For questions about features, operation/performance, parts, accessories or service, call: 1-800-422-1230
In Canada, for assistance, installation and service, call: 1-800-807-6777 or visit our website at www,kitchenaid,com or www, KitchenAid,ca
CUISINIERES A CONVECTION AVEC
INJECTION DE VAPEUR- STYLE COMMERCIAL
A BI-COMBUSTIBLE
Au Canada, pour assistance, installation ou service composez le 1-800-807-6777 ou visitez notre site web i www, KitchenAid,ca
Table of Contents/Table des matieres ............................................................................. 2
Models/Modeles KDRU707 KDRU763 KDRU767 KDRU783
W10271689A

TABLE OF CONTENTS
RANGE SAFETY ............................................................................. 4
The Anti-Tip Bracket .................................................................... 5
PARTS AND FEATURES ................................................................ 7
COOKTOP USE .............................................................................. 9
Cooktop Controls ......................................................................... 9
Cooktop Surface ........................................................................ 10
Sealed Surface Burners ............................................................. 10
Even-Heat TM Chrome Electric Griddle ....................................... 11
Cookware ................................................................................... 12
Home Canning ........................................................................... 12
ELECTRONIC OVEN CONTROLS ............................................... 13
Control Panel .............................................................................. 13
Glass-Touch Menu Driven Display ............................................ 13
Main Menus ................................................................................ 14
Menu Demonstration .................................................................. 15
Settings ...................................................................................... 16
Sound (Tones) ............................................................................ 16
Display Contrast ......................................................................... 16
Temp Format (Fahrenheit and Celsius) ...................................... 16
Calibration (Oven Temperature Control) .................................... 16
Water Filter/Filtration System ..................................................... 16
Learn Mode ................................................................................ 17
Sabbath Mode ............................................................................ 17
Languages .................................................................................. 19
Clock .......................................................................................... 19
Start ............................................................................................ 19
Tim er ........................................................................................... 19
Off ............................................................................................... 19
Control Lock ............................................................................... 19
OVEN USE ..................................................................................... 20
About Your Oven ........................................................................ 20
Aluminum Foil............................................................................. 20
Bakeware .................................................................................... 20
Positioning Racks and Bakeware .............................................. 20
SatinGlide TM Roll-Out Extension Rack ...................................... 21
Meat Thermometer ..................................................................... 21
Oven Vent ................................................................................... 22
Baking and Roasting .................................................................. 22
True-Broil TM Reflector Full and Center Broiling ......................... 22
Dual Fan True Convection Cooking ........................................... 23
Convection Bake ........................................................................ 24
Convection Roast ....................................................................... 25
Convection Broil ......................................................................... 25
EasyConvect TM Conversion ......................................................... 26
Proofing Bread ........................................................................... 26
STEAM-ASSISTED COOKING ..................................................... 27
Auto Steam ................................................................................. 27
Auto Steam Settings .................................................................. 27
Manual Steam ............................................................................ 29
Keep Warm ................................................................................. 29
Temperature Probe .................................................................... 30
Timed/Delay Cooking ................................................................. 31
COOKING CHARTS ...................................................................... 32
Bread Baking Chart .................................................................... 32
Casseroles Baking Chart ............................................................ 33
Desserts Baking Chart ............................................................... 33
Auto Steam Vegetable Cooking Chart ....................................... 34
Auto Steam Seafood Cooking Chart ......................................... 34
Manual Steam Cooking Chart .................................................... 34
Auto Steam Meats and Poultry Roasting Chart ........................ 35
RANGE CARE ............................................................................... 37
Self-Cleaning Cycle .................................................................... 37
Water Filter Cartridge Replacement .......................................... 38
General Cleaning ........................................................................ 38
Oven Lights ................................................................................ 39
Oven Door .................................................................................. 39
TROUBLESHOOTING .................................................................. 40
ASSISTANCE OR SERVICE ......................................................... 41
In the U.S.A ................................................................................ 41
Accessories ................................................................................ 42
In Canada ................................................................................... 42
WARRANTY .................................................................................. 43
2
TABLE DES MATIERES
SI_CURITI_ DE LA CUISINII=RE ................................................... 46
La bride antibasculement ........................................................... 47
PIECES ET CARACTleRISTIQUES .............................................. 50
UTIMSATION DE LA TABLE DE CUlSSON ................................ 52
Commandes de la table de cuisson .......................................... 52
Surface de la table de cuisson ................................................... 53
BrQleurs de surface scelles ........................................................ 53
Plaque & frire chromee electrique Even-Heat TM ........................ 54
Ustensiles de cuisson ................................................................ 55
Preparation de conserves & la maison ...................................... 55
COMMANDES I_LECTRONIQUES DU FOUR ............................ 56
Tableau de commande .............................................................. 57
€:cran tactile en verre & menus ................................................... 57
Menus principaux ....................................................................... 58
Demonstration de menu ............................................................ 58
Reglages ..................................................................................... 59
Sons (signaux sonores) .............................................................. 60
Contraste d'affichage ................................................................. 60
Format de temperature (Fahrenheit et Celsius) ......................... 60
Calibrage (commande de la temperature du four) .................... 60
Filtre a eau/systeme de filtration de I'eau .................................. 61
Mode d'apprentissage ............................................................... 61
Mode Sabbat .............................................................................. 61
Langues ...................................................................................... 64
Horloge ....................................................................................... 64
Start (mise en marche) ............................................................... 64
Minuterie ..................................................................................... 64
Off (arr_t) ..................................................................................... 65
Verrouillage de la commande .................................................... 65
UTIMSATION DU FOUR ............................................................... 65
Apropos du four ........................................................................ 65
Papier d'aluminium .................................................................... 65
Ustensiles de cuisson ................................................................ 66
Positionnement des grilles et des ustensiles de cuisson .......... 66
Grille coulissante deployante SatinGlide TM ............................... 67
Thermometre a viande ............................................................... 67
#vent du four .............................................................................. 67
Cuisson au four et r6tissage ...................................................... 68
Reflecteur True-Broil TM
Cuisson au gril & pleine puissance et centrale .......................... 68
Cuisson par convection veritable & double ventilateur .............. 69
Cuisson au four par convection ................................................. 70
R6tissage par convection .......................................................... 71
Cuisson au gril par convection .................................................. 71.
Conversion EasyConvect TM ......................................................... 72
Levee du pain ............................................................................. 72
CUIS_N AVEC INJECTION DE VAPEUR ................................. 73
Cuisson & la vapeur automatique .............................................. 73
Reglages de cuisson & la vapeur automatique .......................... 73
Cuisson & la vapeur manuelle .................................................... 75
Garder au chaud ......................................................................... 76
Sonde thermometrique .............................................................. 77
Cuisson minutee/diff6r6e ........................................................... 77
TABLEAUX DE CUISSON ............................................................ 79
Tableau de cuisson du pain ....................................................... 79
Tableau de cuisson des mets en sauce .................................... 80
Tableau de cuisson des desserts .............................................. 81
Tableau de cuisson & la vapeur automatique
des legumes .............................................................................. 81
Tableau de cuisson & la vapeur automatique des
fruits de mer .............................................................................. 82
Tableau de cuisson & la vapeur manuelle .................................. 82
Tableau de r6tissage des viandes et de la volaille
avec cuisson & la vapeur automatique ...................................... 83
ENTRETIEN DE LA CUISINII=RE ................................................. 85
Programme d'autonettoyage ..................................................... 85
Remplacement de la cartouche du filtre & eau .......................... 86
Nettoyage gen6ral ...................................................................... 86
Lampes du four .......................................................................... 88
Porte du four ............................................................................... 88
DlePAN NAG E................................................................................. 89
ASSISTANCE OU SERVICE ......................................................... 91
Accessoires ................................................................................ 92
GARANTIE ..................................................................................... 93
RANGE SAFETY
Your safety and the safety of others are very important.
We have provided many important safety messages in this manual and on your appliance. Always read and obey all safety
messages.
This is the safety alert symbol.
This symbol alerts you to potential hazards that can kill or hurt you and others.
All safety messages will follow the safety alert symbol and either the word "DANGER" or "WARNING."
These words mean:
You can be killed or seriously injured if you don't immediately
follow instructions.
You can be killed or seriously injured if you don't follow
instructions.
All safety messages will tell you what the potential hazard is, tell you how to reduce the chance of injury, and tell you what can
happen if the instructions are not followed.
WARNING: If the information in this manual is not followed exactly, a fire or explosion
may result causing property damage, personal injury or death,
- Do not store or use gasoline or other flammable vapors and liquids in the vicinity of this
or any other appliance.
- WHAT TO DO IF YOU SMELL GAS:
• Do not try to light any appliance.
• Do not touch any electrical switch.
• Do not use any phone in your building.
• Immediately call your gas supplier from a neighbor's phone. Follow the gas supplier's
instructions.
• If you cannot reach your gas supplier, call the fire department.
- Installation and service must be performed by a qualified installer, service agency or
the gas supplier,
WARNING: Gas leaks cannot always be detected by smell.
Gas suppliers recommend that you use a gas detector approved by UL or CSA.
For more information, contact your gas supplier.
If a gas leak is detected, follow the "What to do if you smell gas" instructions.
State of California Proposition 65 Warnings:
WARNING: This product contains a chemical known to the State of California to cause cancer.
WARNING: This product contains a chemical known to the State of California to cause birth defects or other reproductive harm.
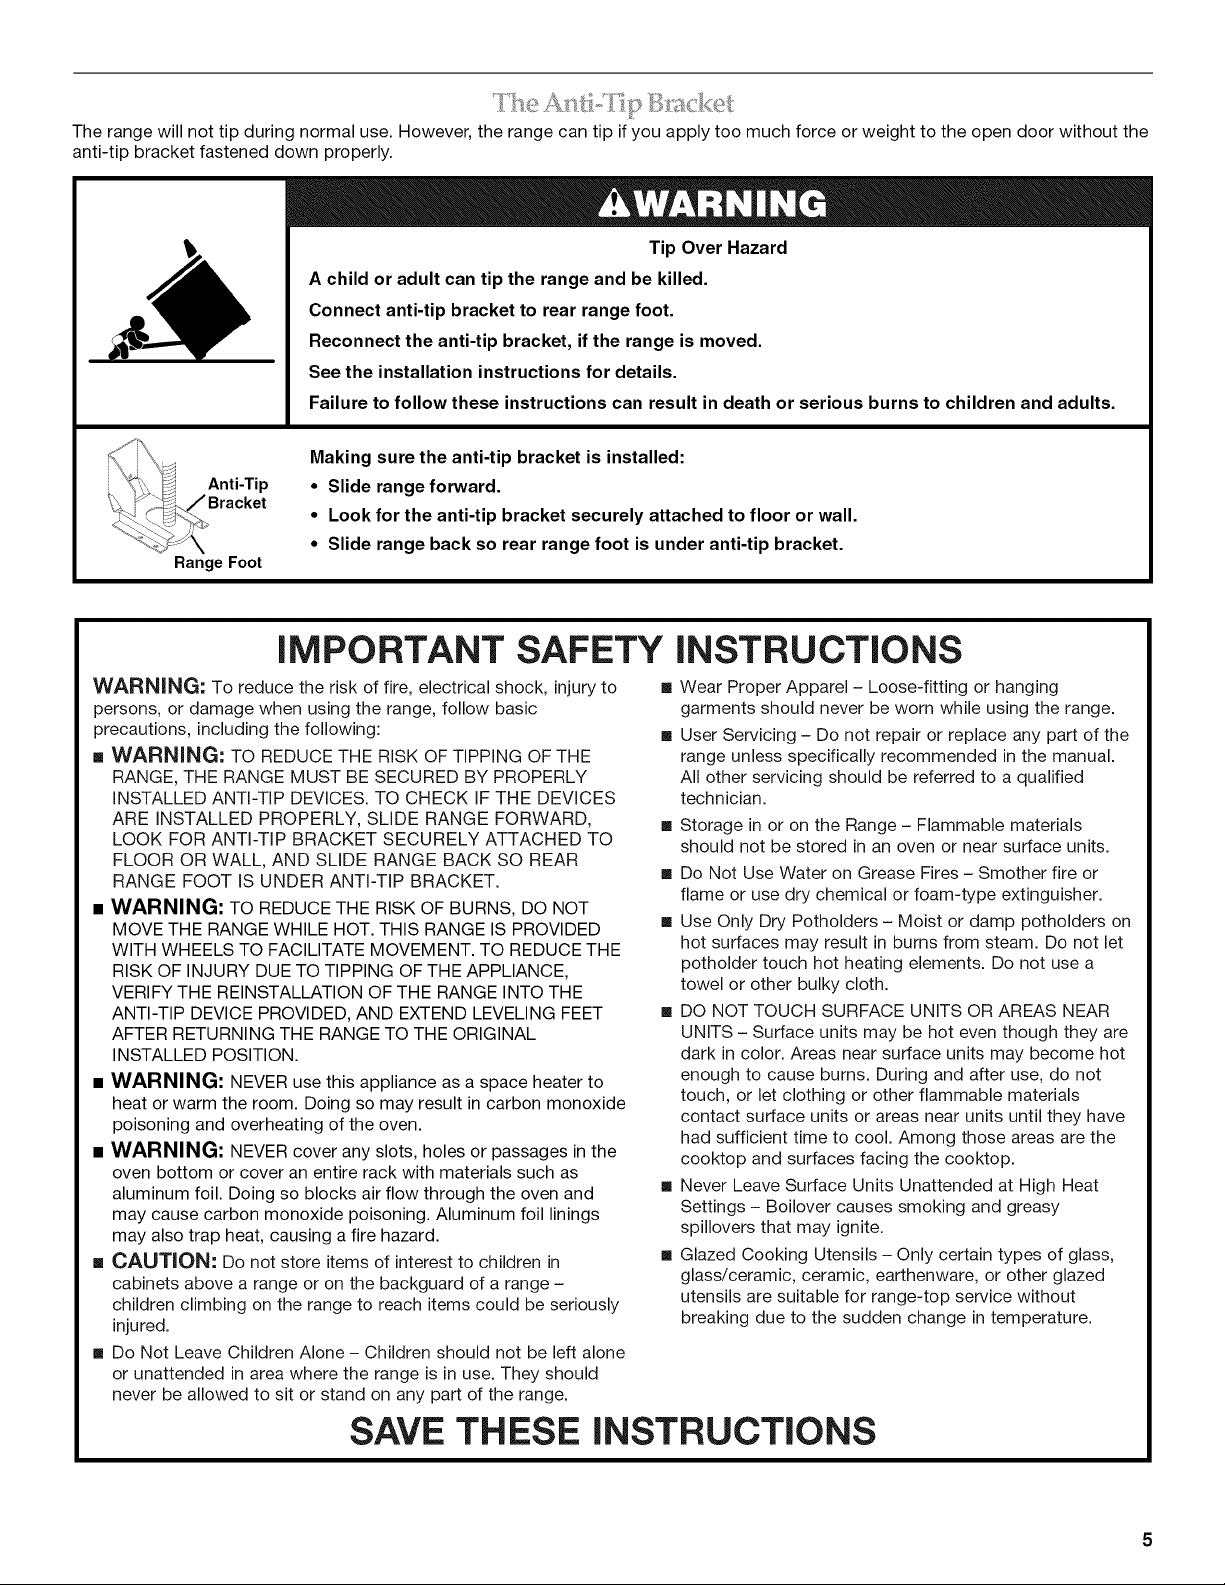
Therangewillnottipduringnormaluse.However,therangecantipifyouapplytoomuchforceorweighttotheopendoorwithoutthe
anti-tipbracketfasteneddownproperly.
Tip Over Hazard
A child or adult can tip the range and be killed.
Connect anti-tip bracket to rear range foot.
Reconnect the anti-tip bracket, if the range is moved.
See the installation instructions for details.
Failure to follow these instructions can result in death or serious burns to children and adults.
Anti-Tip
Range Foot
Making sure the anti-tip bracket is installed:
• Slide range forward.
• Look for the anti-tip bracket securely attached to floor or wall.
• Slide range back so rear range foot is under anti-tip bracket.
IMPORTANT SAFETY iNSTRUCTiONS
WARNING-" To reduce the risk of fire, electrical shock, injury to
persons, or damage when using the range, follow basic
precautions, including the following:
[] WARNING: TO REDUCE THE RISK OF TIPPING OF THE
RANGE, THE RANGE MUST BE SECURED BY PROPERLY
iNSTALLED ANTI-TIP DEVICES. TO CHECK IF THE DEVICES
ARE INSTALLED PROPERLY, SLIDE RANGE FORWARD,
LOOK FOR ANTI-TIP BRACKET SECURELY ATTACHED TO
FLOOR OR WALL, AND SLIDE RANGE BACK SO REAR
RANGE FOOT IS UNDER ANTI-TIP BRACKET.
[] WARNING: TO REDUCE THE RISK OF BURNS, DO NOT
MOVE THE RANGE WHILE HOT. THIS RANGE IS PROVIDED
WITH WHEELS TO FACILITATE MOVEMENT. TO REDUCE THE
RISK OF INJURY DUE TO TIPPING OF THE APPLIANCE,
VERIFY THE REINSTALLATION OF THE RANGE INTO THE
ANTI-TIP DEVICE PROVIDED, AND EXTEND LEVELING FEET
AFTER RETURNING THE RANGE TO THE ORIGINAL
INSTALLED POSITION.
[] WARNING: NEVER use this appliance as a space heater to
heat or warm the room. Doing so may result in carbon monoxide
poisoning and overheating of the oven.
[] WARNING: NEVER cover any slots, holes or passages in the
oven bottom or cover an entire rack with materials such as
aluminum foil. Doing so blocks air flow through the oven and
may cause carbon monoxide poisoning. Aluminum foil linings
may also trap heat, causing a fire hazard.
[] CAUTION, Do not store items of interest to children in
cabinets above a range or on the backguard of a range -
children climbing on the range to reach items could be seriously
injured.
[] Do Not Leave Children Alone - Children should not be left alone
or unattended in area where the range is in use. They should
never be allowed to sit or stand on any part of the range.
[] Wear Proper Apparel - Loose-fitting or hanging
garments should never be worn while using the range.
[] User Servicing - Do not repair or replace any part of the
range unless specifically recommended in the manual.
All other servicing should be referred to a qualified
technician.
[] Storage in or on the Range - Flammable materials
should not be stored in an oven or near surface units.
[] Do Not Use Water on Grease Fires - Smother fire or
flame or use dry chemical or foam-type extinguisher.
[] Use Only Dry Potholders - Moist or damp potholders on
hot surfaces may result in burns from steam. Do not let
potholder touch hot heating elements. Do not use a
towel or other bulky cloth.
[] DO NOT TOUCH SURFACE UNITS OR AREAS NEAR
UNITS - Surface units may be hot even though they are
dark in color. Areas near surface units may become hot
enough to cause burns. During and after use, do not
touch, or let clothing or other flammable materials
contact surface units or areas near units until they have
had sufficient time to cool. Among those areas are the
cooktop and surfaces facing the cooktop.
[] Never Leave Surface Units Unattended at High Heat
Settings - Boilover causes smoking and greasy
spillovers that may ignite.
[] Glazed Cooking Utensils - Only certain types of glass,
glass/ceramic, ceramic, earthenware, or other glazed
utensils are suitable for range-top service without
breaking due to the sudden change in temperature.
SAVE THESE INSTRUCTIONS
IMPORTANT SAFETY INSTRUCTIONS
• Utensil Handles Should Be Turned Inward and Not Extend Over
Adjacent Surface Units - To reduce the risk of burns, ignition of
flammable materials, and spillage due to unintentional contact
with the utensil, the handle of a utensil should be positioned so
that it is turned inward, and does not extend over adjacent
surface units.
• Clean Cooktop With Caution - If a wet sponge or cloth is used
to wipe spills on a hot cooking area, be careful to avoid steam
burn. Some cleaners can produce noxious fumes if applied to a
hot surface.
• Use Care When Opening Door - Let hot air or steam escape
before removing or replacing food.
• Do Not Heat Unopened Food Containers - Build-up of pressure
may cause container to burst and result in injury.
• Keep Oven Vent Ducts Unobstructed.
• Placement of Oven Racks - Always place oven racks in desired
location while oven is cool. If rack must be moved while oven is
hot, do not let potholder contact hot heating element in oven.
• DO NOT TOUCH HEATING ELEMENTS OR INTERIOR
SURFACES OF OVEN - Heating elements may be hot even
though they are dark in color. Interior surfaces of an oven
become hot enough to cause burns. During and after use, do
not touch, or let clothing or other flammable materials contact
heating elements or interior surfaces of oven until they have had
sufficient time to cool. Other surfaces of the appliance may
become hot enough to cause burns - among these surfaces are
oven vent openings and surfaces near these openings, oven
doors, and windows of oven doors.
• Proper Installation - The range, when installed, must be
electrically grounded in accordance with local codes or, in the
absence of local codes, with the National Electrical Code,
ANSI/NFPA 70. In Canada, the range must be electrically
grounded in accordance with Canadian Electrical Code. Be sure
the range is properly installed and grounded by a qualified
technician.
• Disconnect the electrical supply before servicing the
appliance.
• Injuries may result from the misuse of appliance doors
or drawers such as stepping, leaning, or sitting on the
doors or drawers.
• Maintenance - Keep range area clear and free from
combustible materials, gasoline, and other flammable
vapors and liquids.
• Top burner flame size should be adjusted so it does not
extend beyond the edge of the cooking utensil.
For self-cleaning ranges -
• Do Not Clean Door Gasket - The door gasket is
essential for a good seal. Care should be taken not to
rub, damage, or move the gasket.
• Do Not Use Oven Cleaners - No commercial oven
cleaner or oven liner protective coating of any kind
should be used in or around any part of the oven.
• Clean Only Parts Listed in Manual.
• Before Self-Cleaning the Oven - Remove broiler pan
and other utensils. Wipe off all excessive spillage before
initiating the cleaning cycle.
For units with ventilating hood -
• Clean Ventilating Hoods Frequently - Grease should not
be allowed to accumulate on hood or filter.
• When flambeing foods under the hood, turn the fan on.
SAVE THESE INSTRUCTIONS
6

PARTS AND FEATURES
This manual covers several different models. The range you have purchased may have some or all of the items listed. The locations and
appearances of the features shown here may not match those of your model.
NOTE: Burner ratings listed are for Natural gas.
Range
D
Oven Interior
0
N
A. Even-Heat TM chrome electric griddle (on
some models)
B. Heavy-duty single grate design
C. Island trim
D. Stainless steel panels
E. Roller feet
F. Leveling rods
G. T.H.E. TM 18 " (45,7cm) true convection
oven with steam assist [48" (121.9 cm)
range only]
H. Dual fan true convection oven with
steam assist
I. Removable lower panel
J. Balanced hinged doors
K. Large viewing window
L. Commercial style die cast metal control
knobs
M. Glass touch control with menu driven
display
N. Culinary ledge
O. Drip tray
Not shown:
Optional 9" (22.9 cm), 22" (55.9 cm) and
adjustable backguards
Optional griddle cover
Optional wok ring
Optional broil pan and roasting rack
Hefty slide-out racks with handle
SatinGfide TM roll-out extension rack with
handle
Optional stainless steel knobs
A
B C D
.................A
A. Halogen lights
B. Broil elements with True-Broil TM
reflector
C. Steam orifice
D. Oven cavity sensor
E. Convection fan(s)
F. CleanBake TM hidden element
F E
Control Panels
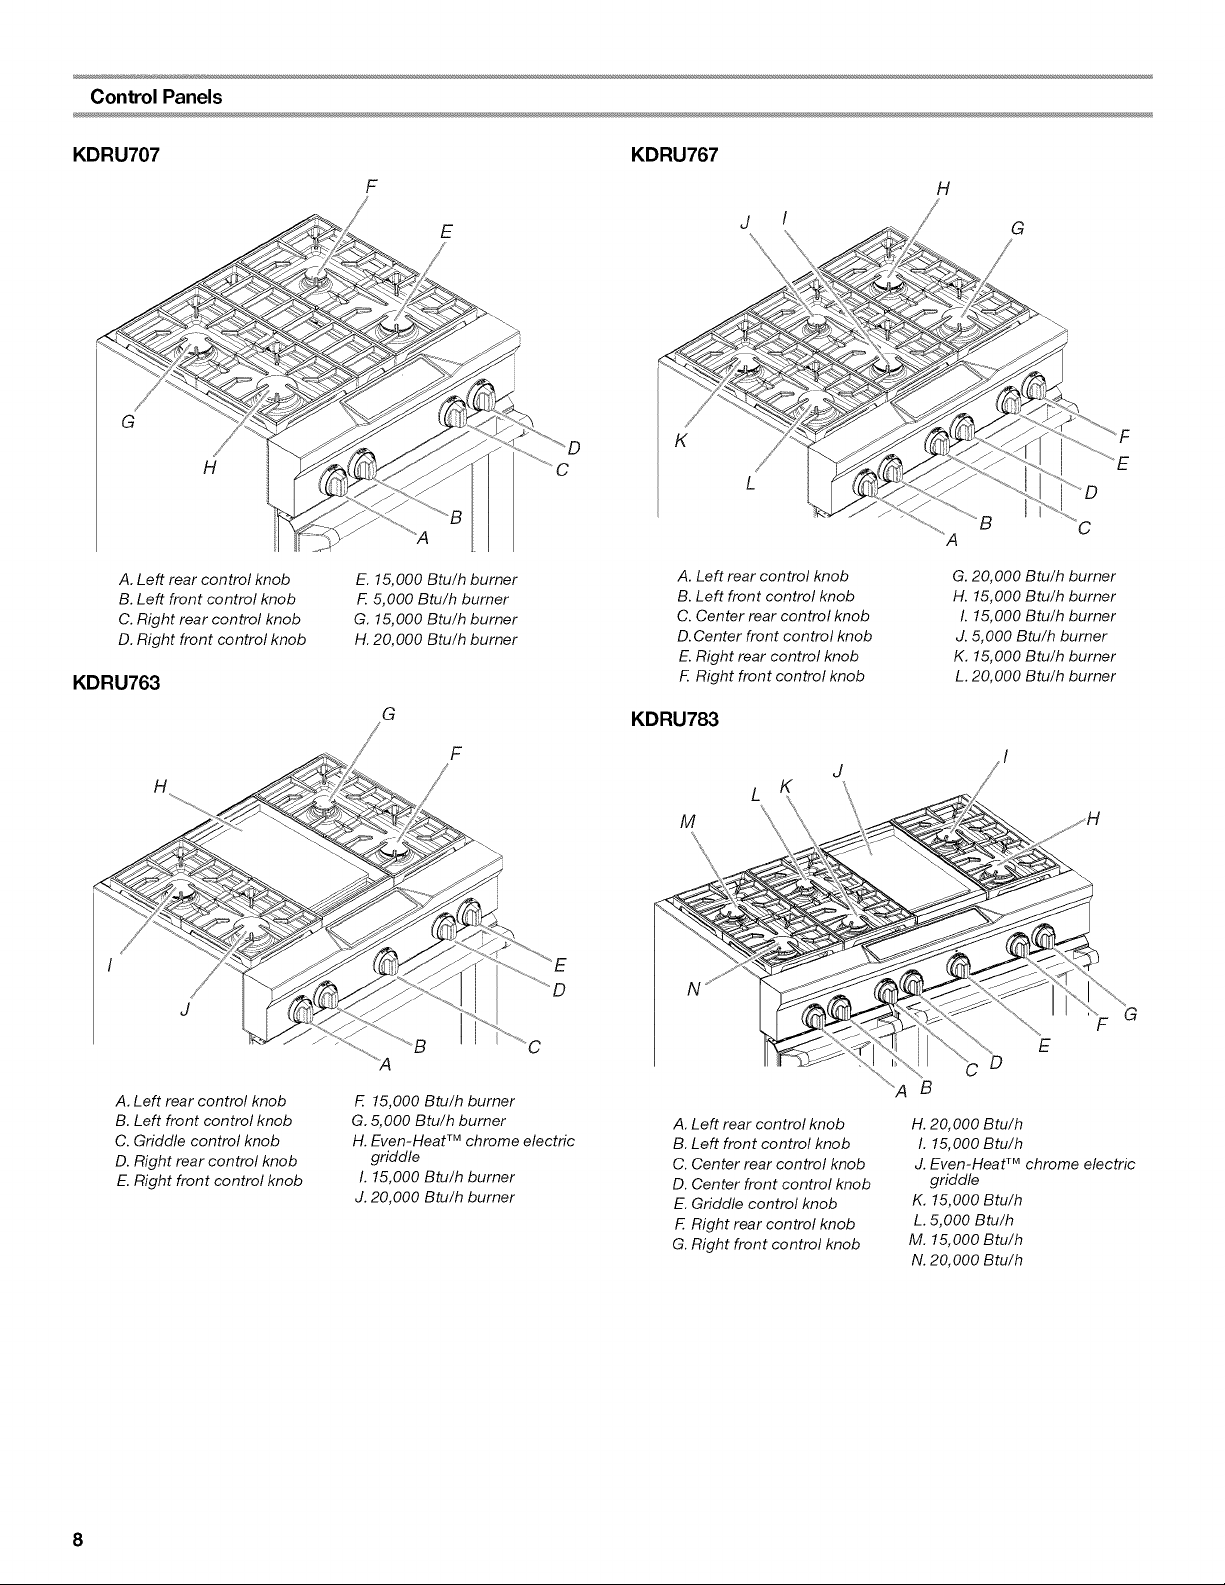
KDRU707 KDRU767
G
H
F H
E
K
j I
G
C
A. Left rear control knob
B. Left front control knob
C. Right rear control knob
D. Right front control knob
KDRU763
E. 15,000 Btu/h burner
F. 5,000 Btu/h burner
G. 15,000 Btu/h burner
H. 20,000 Btu/h burner
G
A. Left rear control knob
B. Left front control knob
C. Center rear control knob
D. Center front control knob
E. Right rear control knob
F. Right front control knob
KDRU783
G. 20,000 Btu/h burner
H. 15,000 Btu/h burner
I. 15,000 Btu/h burner
J. 5,000 Btu/h burner
K. 15,000 Btu/h burner
L. 20,000 Btu/h burner
H
I
J
A. Left rear control knob
B. Left front control knob
C. Griddle control knob
D. Right rear control knob
E. Right front control knob
F
C
F. 15,000 Btu/h burner
G. 5,000 Btu/h burner
H. Even-Heat TM chrome electric
griddle
I. 15,000 Btu/h burner
J. 20,000 Btu/h burner
J
L K
M
A. Left rear control knob
B. Left front control knob
C. Center rear control knob
D. Center front control knob
E. Griddle control knob
F. Right rear control knob
G. Right front control knob
F G
E
D
B
H. 20,000 Btu/h
I. 15,000 Btu/h
J. Even-Heat TM chrome electric
griddle
K. 15,000 Btu/h
L. 5,000 Btu/h
M. 15,000 Btu/h
N. 20,000 Btu/h
8
COOKTOP USE
( (
Fire Hazard
Do not let the burner flame extend beyond the edge of
the pan.
Turn off all controls when not cooking.
Failure to follow these instructions can result in death
or fire.
IMPORTANT: Your cooktop is factory-set for use with Natural
gas. If you wish to use LP gas, an LP Gas Conversion Kit is
included with your new range. See the instructions included in
the Installation Instructions for details on making this conversion.
Electric igniters automatically light the surface burners when
control knobs are turned to LITE.
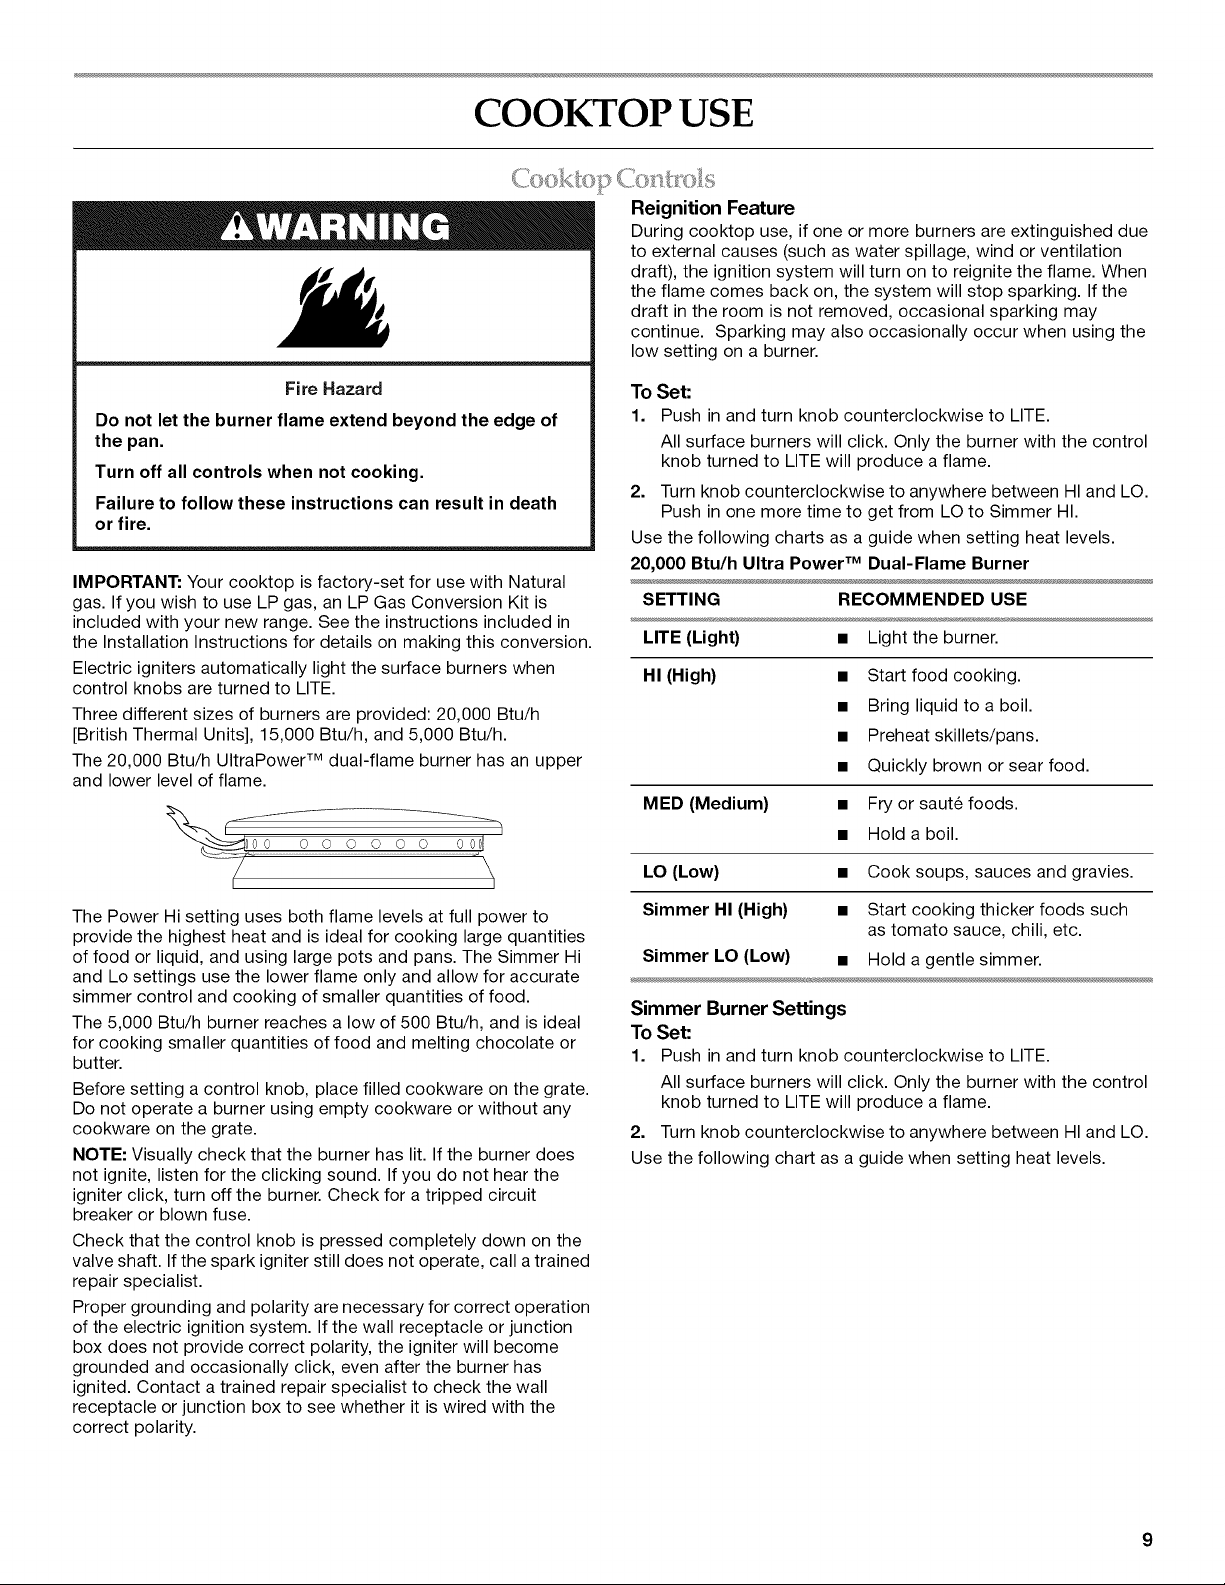
Three different sizes of burners are provided: 20,000 Btu/h
[British Thermal Units], 15,000 Btu/h, and 5,000 Btu/h.
The 20,000 Btu/h UltraPower TM dual-flame burner has an upper
and lower level of flame.
Reignition Feature
During cooktop use, if one or more burners are extinguished due
to external causes (such as water spillage, wind or ventilation
draft), the ignition system will turn on to reignite the flame. When
the flame comes back on, the system will stop sparking. If the
draft in the room is not removed, occasional sparking may
continue. Sparking may also occasionally occur when using the
low setting on a burner.
To Set:
1. Push in and turn knob counterclockwise to LITE.
All surface burners will click. Only the burner with the control
knob turned to LITE will produce a flame.
2. Turn knob counterclockwise to anywhere between HI and LO.
Push in one more time to get from LO to Simmer HI.
Use the following charts as a guide when setting heat levels.
20,000 Btu/h Ultra Power TM Dual-Flame Burner
SETTING RECOMMENDED USE
LITE (Light) • Light the burner.
HI (High) • Start food cooking.
• Bring liquid to a boil.
• Preheat skillets/pans.
• Quickly brown or sear food.
MED (Medium) • Fry or sau% foods.
• Hold a boil.
LO (Low) • Cook soups, sauces and gravies.
The Power Hi setting uses both flame levels at full power to
provide the highest heat and is ideal for cooking large quantities
of food or liquid, and using large pots and pans. The Simmer Hi
and Lo settings use the lower flame only and allow for accurate
simmer control and cooking of smaller quantities of food.
The 5,000 Btu/h burner reaches a low of 500 Btu/h, and is ideal
for cooking smaller quantities of food and melting chocolate or
butter.
Before setting a control knob, place filled cookware on the grate.
Do not operate a burner using empty cookware or without any
cookware on the grate.
NOTE: Visually check that the burner has lit. If the burner does
not ignite, listen for the clicking sound. If you do not hear the
igniter click, turn off the burner. Check for a tripped circuit
breaker or blown fuse.
Check that the control knob is pressed completely down on the
valve shaft. If the spark igniter still does not operate, call a trained
repair specialist.
Proper grounding and polarity are necessary for correct operation
of the electric ignition system. If the wall receptacle or junction
box does not provide correct polarity, the igniter will become
grounded and occasionally click, even after the burner has
ignited. Contact a trained repair specialist to check the wall
receptacle or junction box to see whether it is wired with the
correct polarity.
Simmer HI (High) • Start cooking thicker foods such
as tomato sauce, chili, etc.
Simmer LO (Low) • Hold a gentle simmer.
Simmer Burner Settings
To Set:
1. Push in and turn knob counterclockwise to LITE.
All surface burners will click. Only the burner with the control
knob turned to LITE will produce a flame.
2. Turn knob counterclockwise to anywhere between HI and LO.
Use the following chart as a guide when setting heat levels.
15,000 Btu/h Professional Burner
SETTING RECOMMENDED USE
LITE (Light) • Light the burner.
HI (High) • Start food cooking.
• Bring liquid to a boil.
• Preheat skillets/pans.
• Quickly brown or sear food.
MED (Medium) • Fry or saute foods.
• Hold a boil.
LO (Low) • Cook soups, sauces and gravies.
• Stew or steam foods.
5,000 Btu/h Simmer/Melt Burner
SETTING RECOMMENDED USE
LITE (Light) • Light the burner.
HI (High) • Cook soups, sauces and gravies.
• Stew or steam foods.
LO (Low) • Melt chocolate or butter.
REMEMBER: When range is in use or (on some models)
during the Self-Cleaning cycle, the entire cooktop area may
become hot.
Power Failure
In case of prolonged power failure, the surface burners can be lit
manually. Hold a lit match near a burner and turn knob
counterclockwise to HI. After burner lights, turn knob to setting.
<.,o{)I [©li> S '_ace
Wiping off the cooktop, grates and caps after each use will help
keep it free from stains.
Food spills containing acids, such as vinegar and tomato, should
be cleaned as soon as the entire appliance is cool. These spills
may affect the finish.
For more information, see the "Sealed Surface Burners" and
"General Cleaning" sections.
..................i%II lace lJIi Ir:__:e_],i
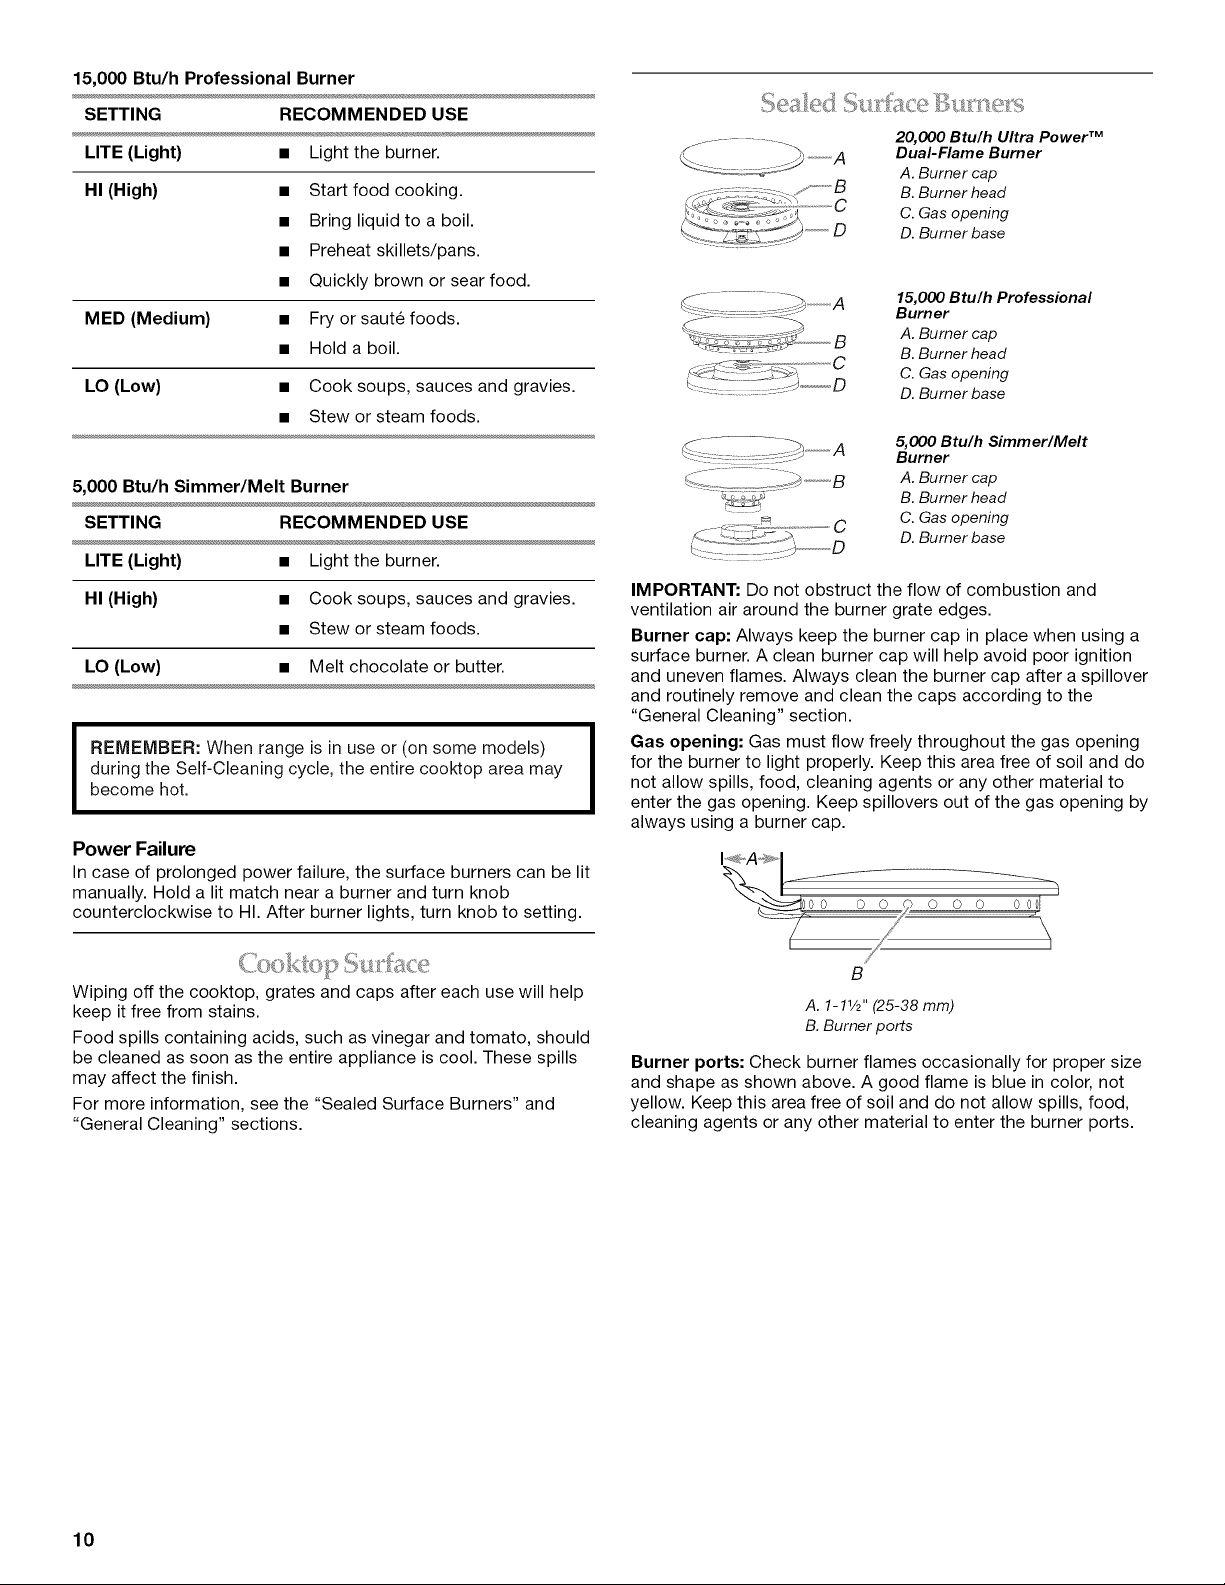
20,000 Btu/h Ultra Power TM
Dual-Flame Burner
A. Burner cap
B. Burner head
C C. Gas opening
)""""",D D. Burner base
15,000 Btu/h Professional
Burner
A. Burner cap
B. Burner head
C. Gas opening
D. Burner base
5,000 Btu/h Simmer/Melt
Burner
A. Burner cap
B. Burner head
C. Gas opening
D. Burner base
IMPORTANT: Do not obstruct the flow of combustion and
ventilation air around the burner grate edges.
Burner cap: Always keep the burner cap in place when using a
surface burner. A clean burner cap will help avoid poor ignition
and uneven flames. Always clean the burner cap after a spillover
and routinely remove and clean the caps according to the
"General Cleaning" section.
Gas opening: Gas must flow freely throughout the gas opening
for the burner to light properly. Keep this area free of soil and do
not allow spills, food, cleaning agents or any other material to
enter the gas opening. Keep spillovers out of the gas opening by
always using a burner cap.
B
A. 1-11/2'' (25-38 mm)
B. Burner ports
Burner ports: Check burner flames occasionally for proper size
and shape as shown above. A good flame is blue in color, not
yellow. Keep this area free of soil and do not allow spills, food,
cleaning agents or any other material to enter the burner ports.
10
To Clean:
IMPORTANT: Before cleaning, make sure all controls are off and
the oven and cooktop are cool. Do not use oven cleaners, bleach
or rust removers.
1. Remove the burner cap and burner head (15,000 and
5,000 Btu/h burners) from the burner base and clean
according to "General Cleaning" section.
2. Clean the gas opening with a damp cloth.
3. Clean clogged burner ports with a straight pin as shown. Do
not enlarge or distort the port. Do not use a wooden
toothpick. If the burner needs to be adjusted, contact a
trained repair specialist.
[
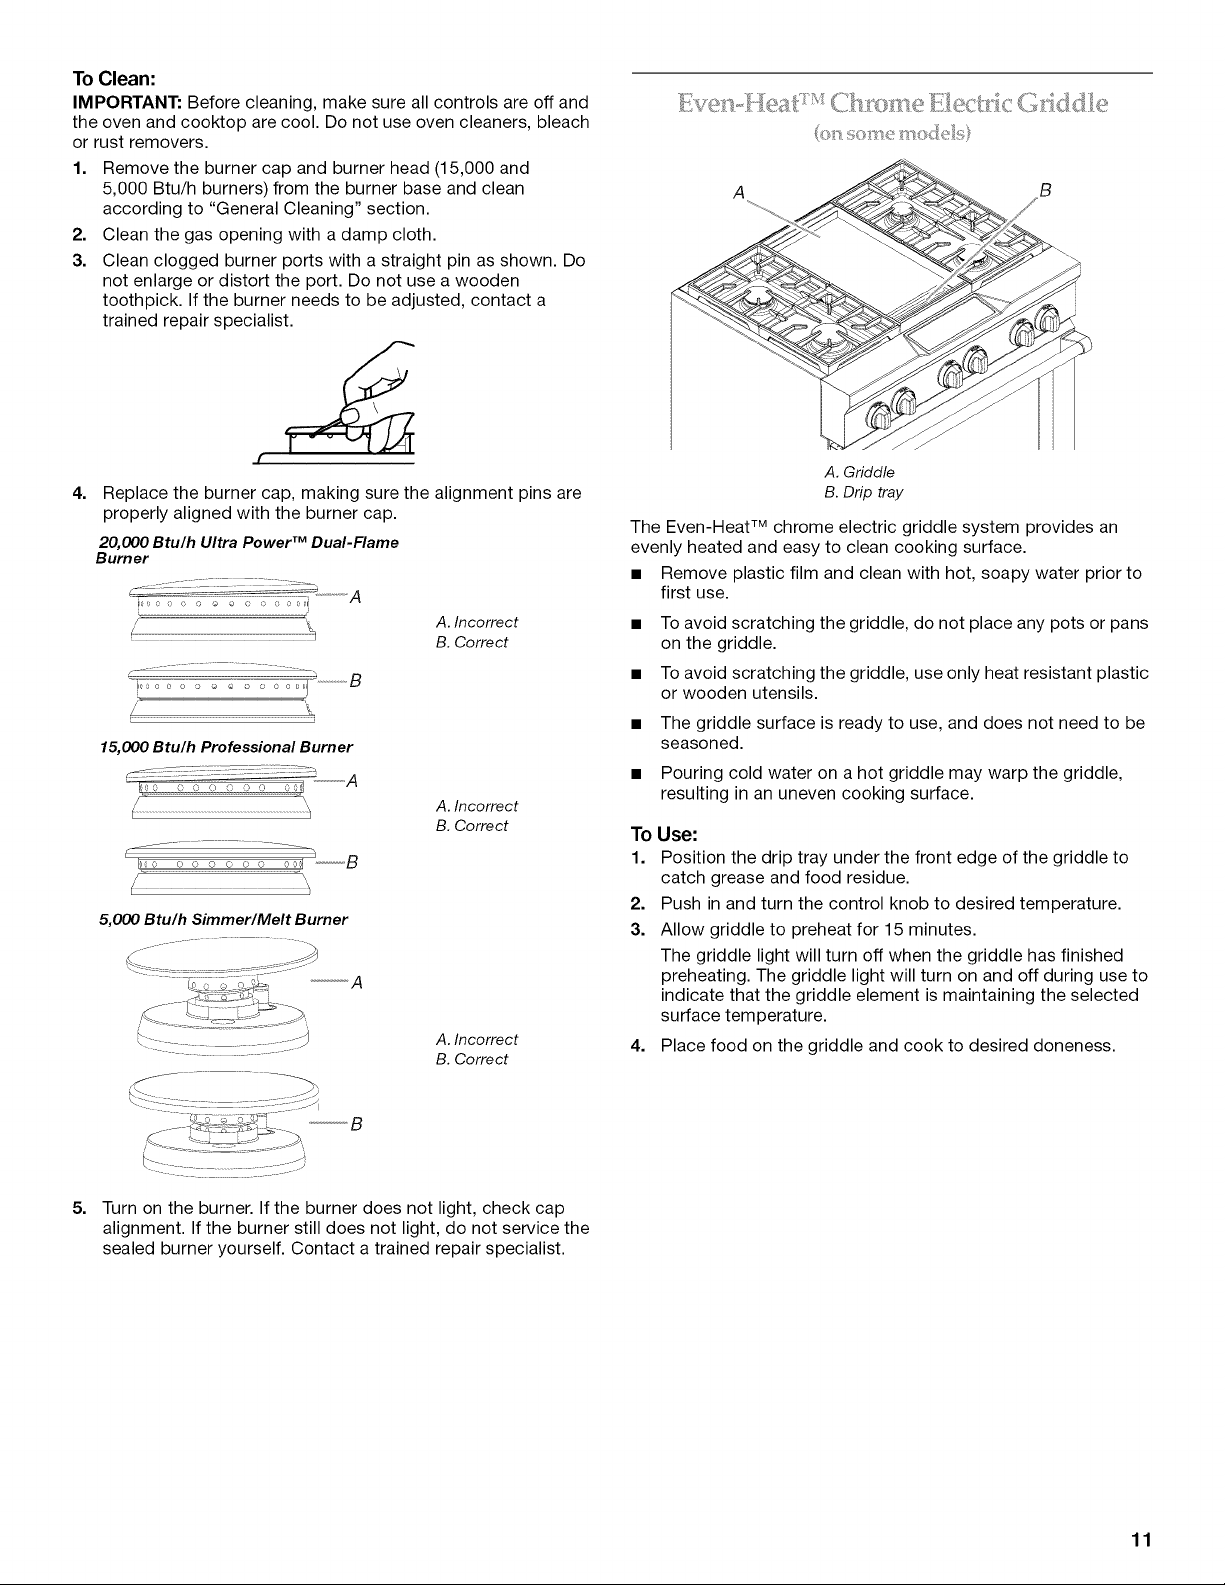
4.
Replace the burner cap, making sure the alignment pins are
properly aligned with the burner cap.
20,000 Btu/h Ultra Power TM Dual-Flame
Burner
i
A. Incorrect
B. Correct
15,000 Btu/h Professional Burner
l
A. Incorrect
B. Correct
5,000 Btu/h Simmer/Melt Burner
_A
A. Incorrect
B. Correct
A B
A. Griddle
B. Drip tray
The Even-Heat TM chrome electric griddle system provides an
evenly heated and easy to clean cooking surface.
• Remove plastic film and clean with hot, soapy water prior to
first use.
To avoid scratching the griddle, do not place any pots or pans
on the griddle.
To avoid scratching the griddle, use only heat resistant plastic
or wooden utensils.
The griddle surface is ready to use, and does not need to be
seasoned.
Pouring cold water on a hot griddle may warp the griddle,
resulting in an uneven cooking surface.
To Use:
1. Position the drip tray under the front edge of the griddle to
catch grease and food residue.
2. Push in and turn the control knob to desired temperature.
3. Allow griddle to preheat for 15 minutes.
The griddle light will turn off when the griddle has finished
preheating. The griddle light will turn on and off during use to
indicate that the griddle element is maintaining the selected
surface temperature.
4. Place food on the griddle and cook to desired doneness.
5. Turn on the burner. If the burner does not light, check cap
alignment. If the burner still does not light, do not service the
sealed burner yourself. Contact a trained repair specialist.
11
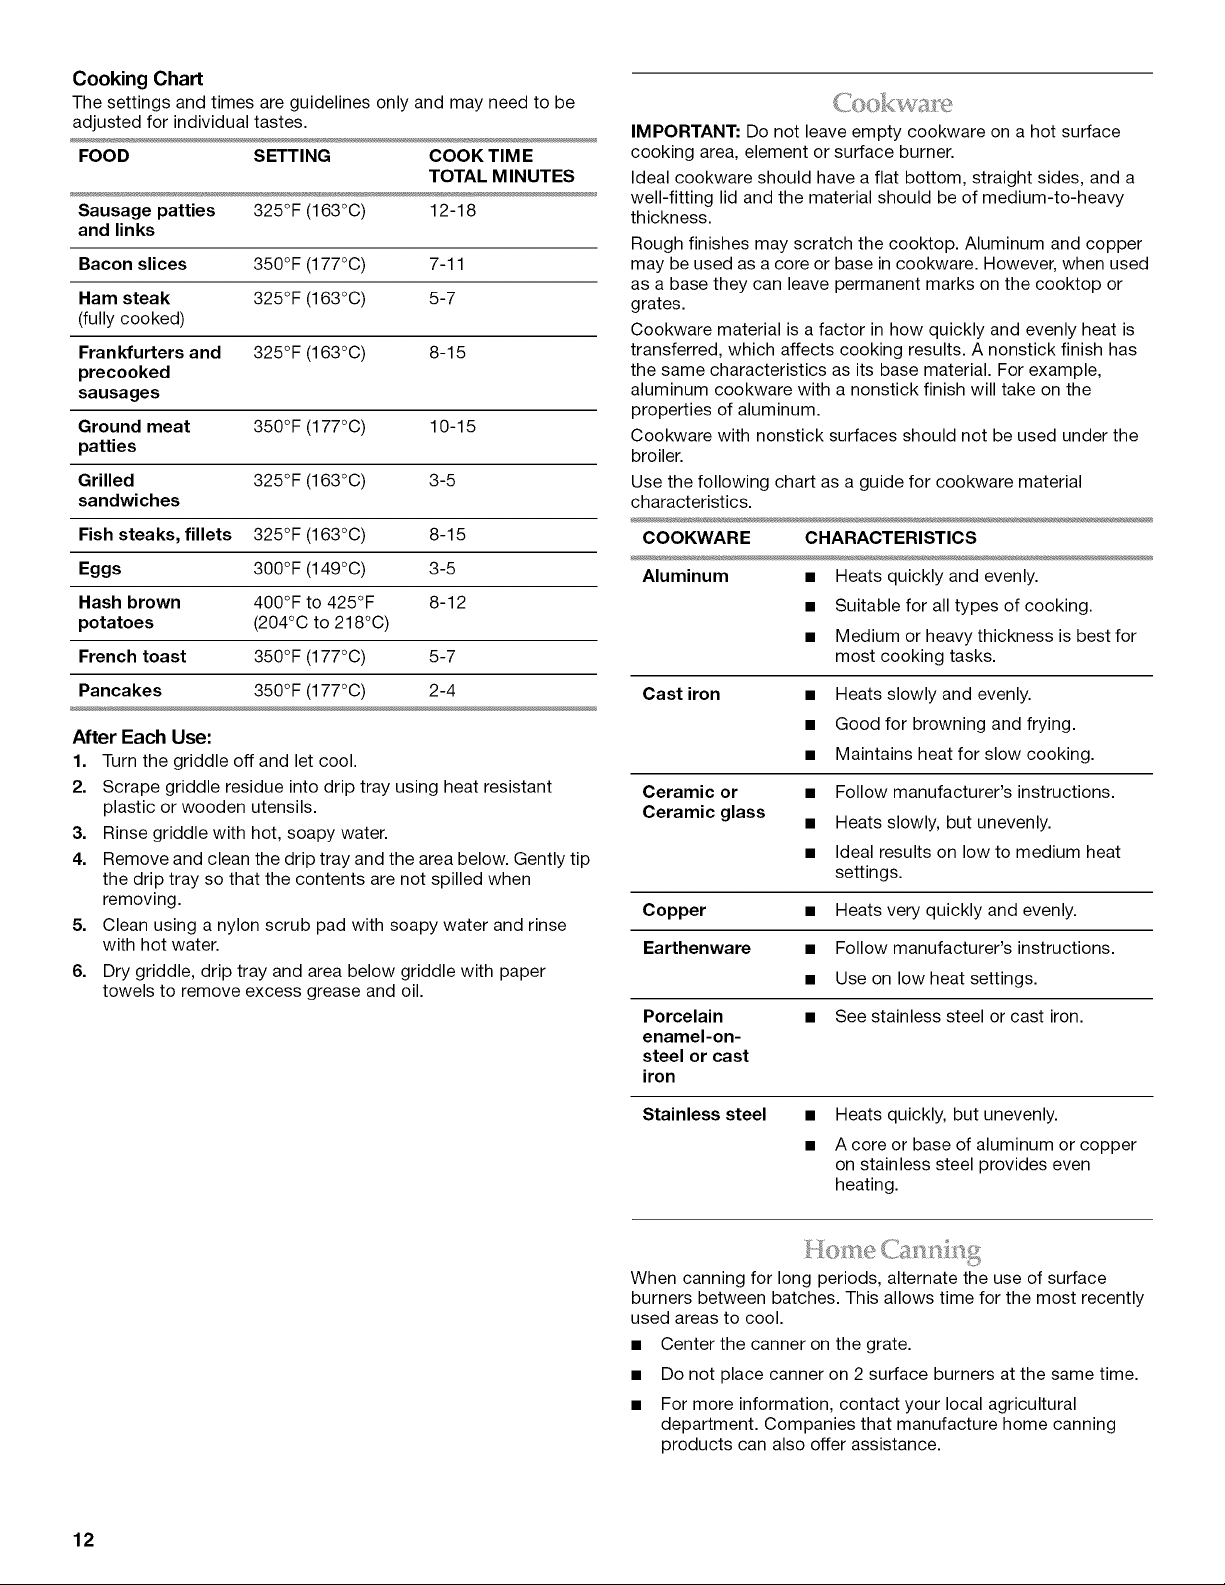
Cooking Chart
The settings and times are guidelines only and may need to be
adjusted for individual tastes.
FOOD SETTING COOK TIM E
TOTAL M INUTES
Sausage patties 325°F (163°C) 12-18
and links
Bacon slices 350°F (177°C) 7-11
Ham steak 325°F (163°C) 5-7
(fully cooked)
Frankfurters and 325°F (163°C) 8-15
precooked
sausages
Ground meat 350°F (177°C) 10-15
patties
Grilled 325°F (163°C) 3-5
sandwiches
Fish steaks, fillets 325°F (163°C) 8-15
Eggs 300°F (149°C) 3-5
Hash brown 400°F to 425°F 8-12
potatoes (204°C to 218°C)
French toast 350°F (177°C) 5-7
Pancakes 350°F (177°C) 2-4
After Each Use:
1. Turn the griddle off and let cool.
2. Scrape griddle residue into drip tray using heat resistant
plastic or wooden utensils.
3. Rinse griddle with hot, soapy water.
4. Remove and clean the drip tray and the area below. Gently tip
the drip tray so that the contents are not spilled when
removing.
5. Clean using a nylon scrub pad with soapy water and rinse
with hot water.
6. Dry griddle, drip tray and area below griddle with paper
towels to remove excess grease and oil.
IMPORTANT: Do not leave empty cookware on a hot surface
cooking area, element or surface burner.
Ideal cookware should have a flat bottom, straight sides, and a
well-fitting lid and the material should be of medium-to-heavy
thickness.
Rough finishes may scratch the cooktop. Aluminum and copper
may be used as a core or base in cookware. However, when used
as a base they can leave permanent marks on the cooktop or
grates.
Cookware material is a factor in how quickly and evenly heat is
transferred, which affects cooking results. A nonstick finish has
the same characteristics as its base material. For example,
aluminum cookware with a nonstick finish will take on the
properties of aluminum.
Cookware with nonstick surfaces should not be used under the
broiler.
Use the following chart as a guide for cookware material
characteristics.
COOKWARE CHARACTERISTICS
Aluminum • Heats quickly and evenly.
• Suitable for all types of cooking.
• Medium or heavy thickness is best for
most cooking tasks.
Cast iron
Ceramic or
Ceramic glass
• Heats slowly and evenly.
• Good for browning and frying.
• Maintains heat for slow cooking.
• Follow manufacturer's instructions.
• Heats slowly, but unevenly.
• Ideal results on low to medium heat
settings.
Copper • Heats very quickly and evenly.
Earthenware • Follow manufacturer's instructions.
• Use on low heat settings.
Porcelain • See stainless steel or cast iron.
enamel-on-
steel or cast
iron
Stainless steel • Heats quickly, but unevenly.
• A core or base of aluminum or copper
on stainless steel provides even
heating.
When canning for long periods, alternate the use of surface
burners between batches. This allows time for the most recently
used areas to cool.
• Center the canner on the grate.
• Do not place canner on 2 surface burners at the same time.
• For more information, contact your local agricultural
department. Companies that manufacture home canning
products can also offer assistance.
12
ELECTRONIC OVEN CONTROLS
This manual covers different models. The oven you have purchased may have some or all of the items listed. The locations and
appearances of the items shown here may not match those of your model.
The oven's controls are accessed through its control panel and interactive touch display.
NOTE: Due to the sensitivity of the control panel, we have provided special instructions for cleaning the panel as well as the touch
screen display. See "General Cleaning" section for cleaning instructions.
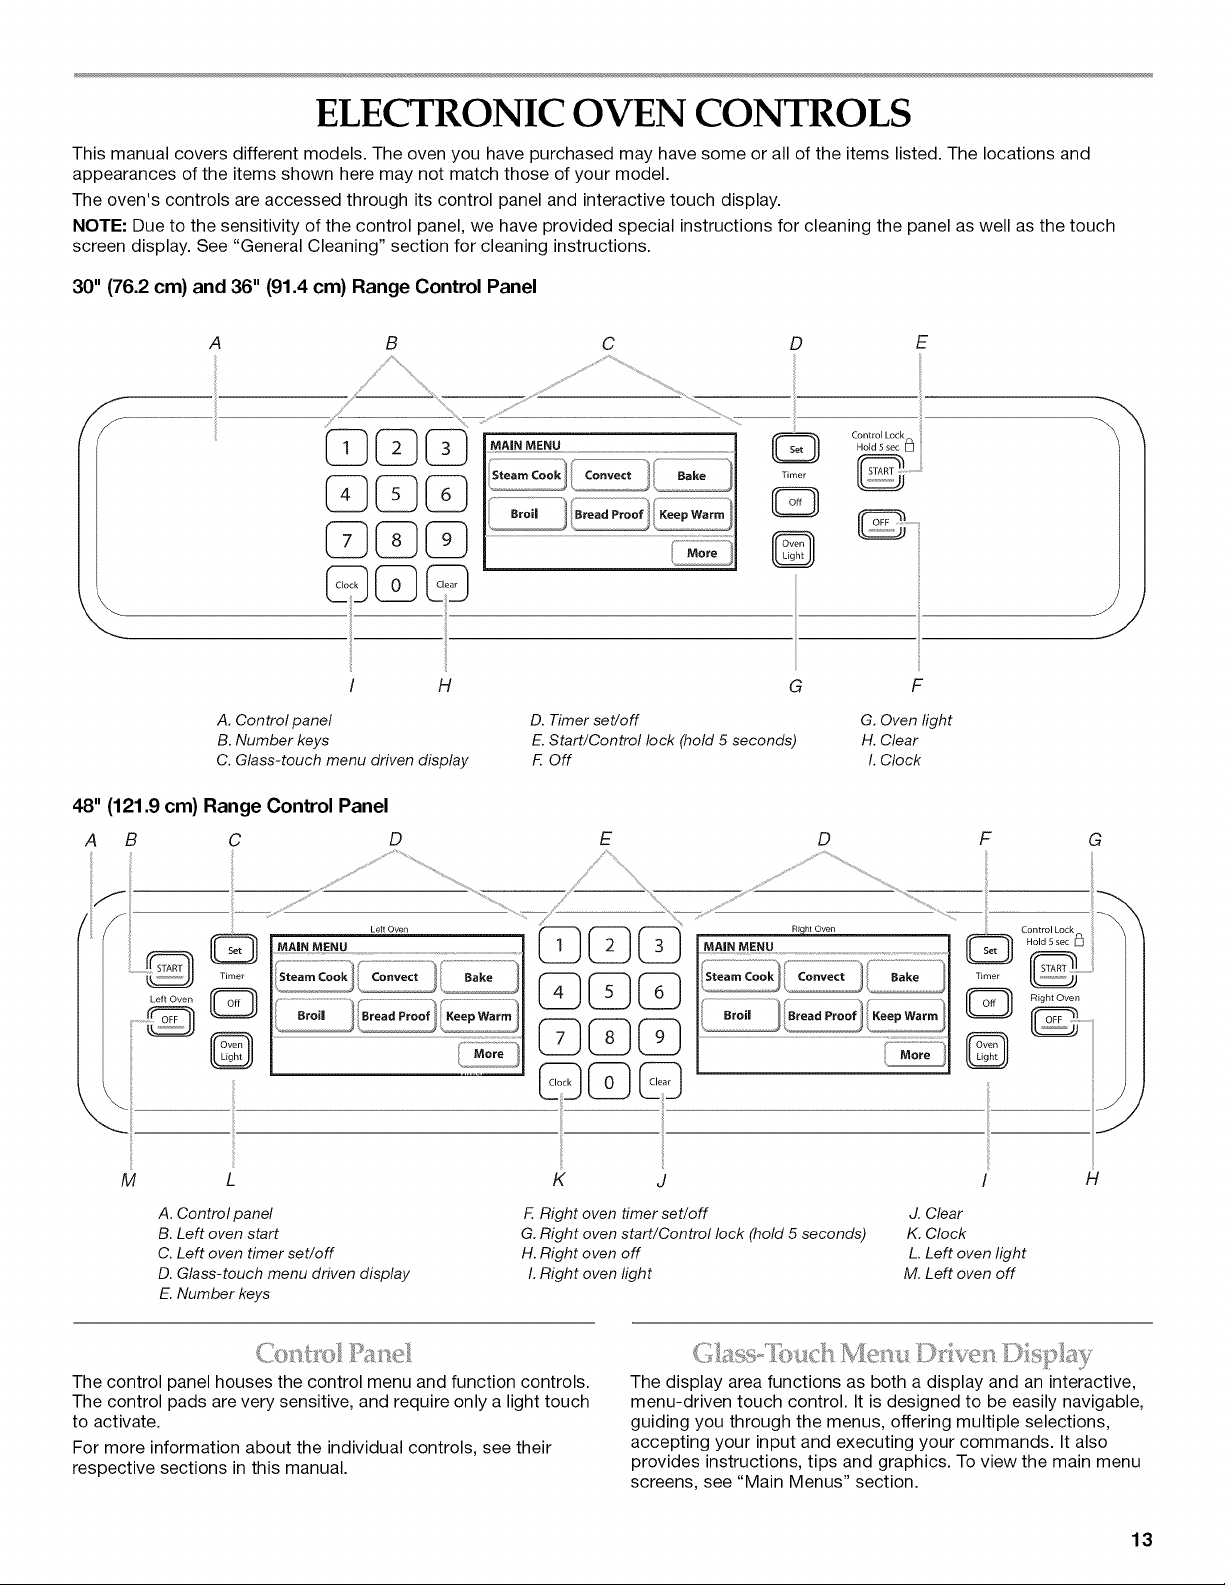
30" (76.2 cm) and 36" (91.4 cm) Range Control Panel
f
f
A C D E
B
%,
C C)C
!
i
/ H
. ........... ..............................................
Q
Timer
©
G
on.o,L=ki
Hold 5 sec [_]
F
A. Control panel
B. Number keys
C. Glass-touch menu driven display
D. Timer set/off
E. Start/Control lock (hold 5 seconds)
F. Off
G. Oven light
H. Clear
I. Clock
48" (121.9 cm) Range Control Panel
A B C
D E D F
ii
M
ii
K J
G
H
A. Control panel
B. Left oven start
C. Left oven timer set/off
D. Glass-touch menu driven display
E. Number keys
F. Right oven timer set/off
G. Right oven start/Control lock (hold 5 seconds)
H. Right oven off
I. Right oven light
d. Clear
K. Clock
L. Left oven light
M. Left oven off
J
J
The control panel houses the control menu and function controls.
The control pads are very sensitive, and require only a light touch
to activate.
For more information about the individual controls, see their
respective sections in this manual.
The display area functions as both a display and an interactive,
menu-driven touch control. It is designed to be easily navigable,
guiding you through the menus, offering multiple selections,
accepting your input and executing your commands. It also
provides instructions, tips and graphics. To view the main menu
screens, see "Main Menus" section.
13
Display
When power is first supplied to the appliance or, when power has
been interrupted for more than 10 seconds, the clock will be set
to 12:00 RM. To set the time, follow the instructions under
"Clock" section. To bypass setting the clock and begin using the
oven, touch Start, Off or Clear.
On 48" (121.9 cm) ranges, the left display shows the
18" (45.7 cm) oven and the right display shows the
30" (76.2 cm) oven.
When the oven(s) are in use (active mode), the display shows the
oven temperature, heat source(s) and timer, if set.
After approximately 2 minutes of inactivity, the display will go into
standby (sleep) mode. When the oven is in operation, the display
will remain active.
On 30" (76.2 cm) and 36" (91.4 cm) ranges, if the range is not in
use (sleep mode), the display shows the time of the day. To turn
the clock display on/off, see "Clock" section.
On 48" (121.9 cm) ranges, if the range is not in use (sleep mode)
the right display shows the time of day. To turn the clock display
on/off, see "Clock" section.
During programming, the display shows menus and the
appropriate selections for the respective cooking function.
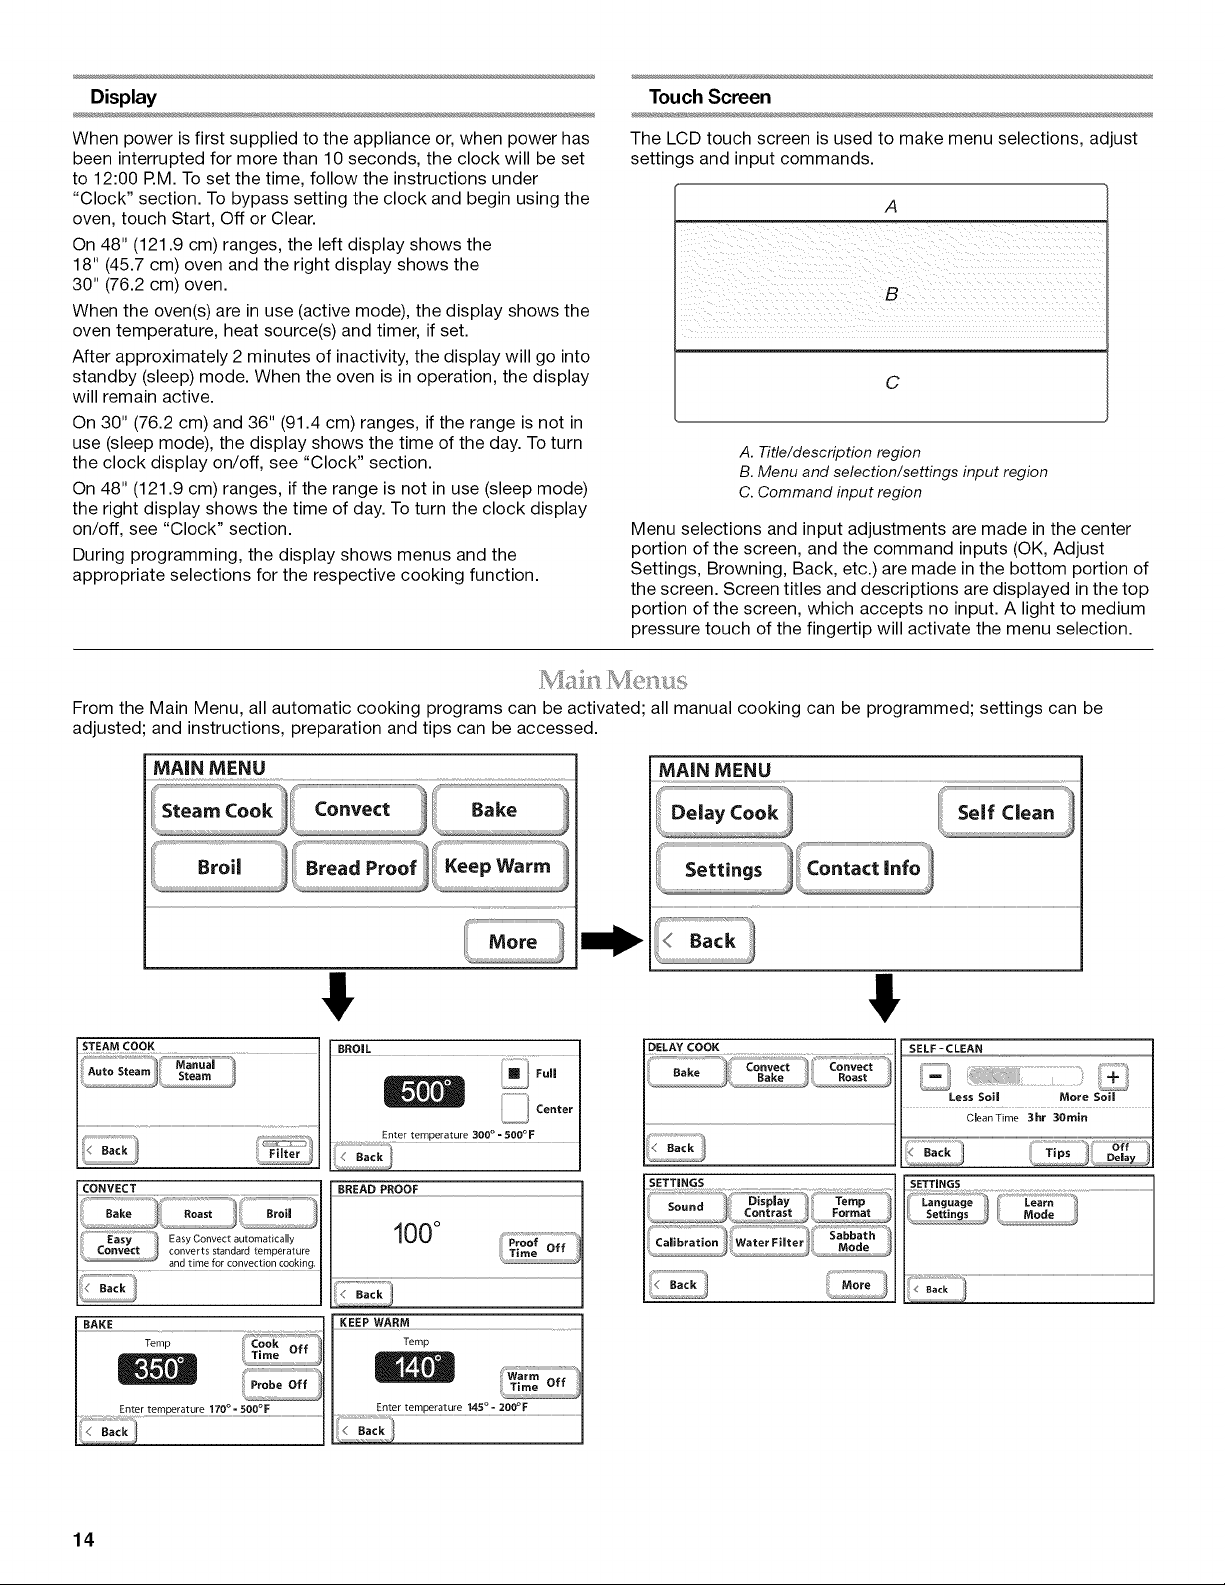
Touch Screen
The LCD touch screen is used to make menu selections, adjust
settings and input commands.
A
i i iiiiiiiiiiiiiiiiiiii
C
A. Title/description region
B. Menu and selection/settings input region
C. Command input region
Menu selections and input adjustments are made in the center
portion of the screen, and the command inputs (OK, Adjust
Settings, Browning, Back, etc.) are made in the bottom portion of
the screen. Screen titles and descriptions are displayed in the top
portion of the screen, which accepts no input. A light to medium
pressure touch of the fingertip will activate the menu selection.
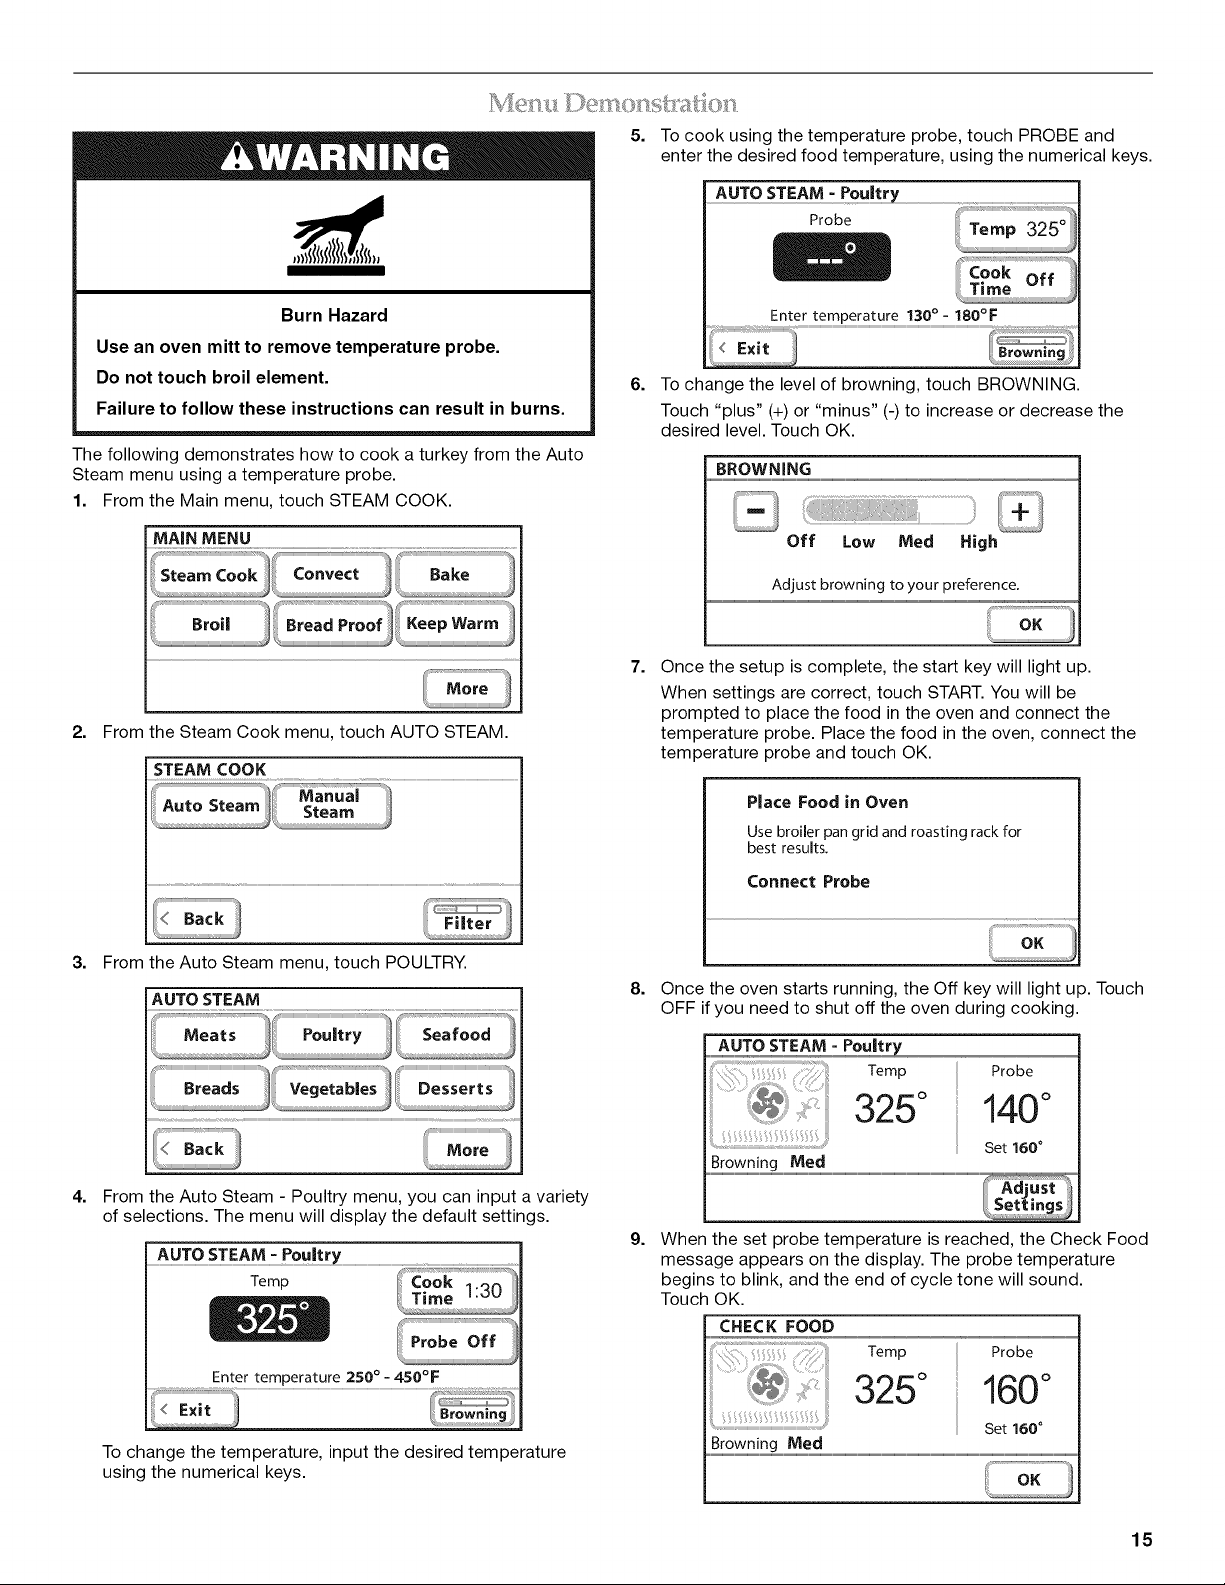
From the Main Menu, all automatic cooking programs can be activated; all manual cooking can be programmed; settings can be
adjusted; and instructions, preparation and tips can be accessed.
MAiN MENU
MAiN MENU
!;f_".........................................................................................................................................................................Delay Cook Serf clean
! !
DELAY COOK
CQNVECT ................................................................................................................................................BREAD PROOF
_Easy EasyC ..... t automatically
converts standard temperature
............. and time for convection cooking.
BAKE
Zemp
100°
KEEP WARM
Temp
Enter temperature 170 °= 500°F Enter temperature 145 °- 200°F
SELF-CLEAN
Less Soil More Soil
CleanTime 3hr 30rain
14
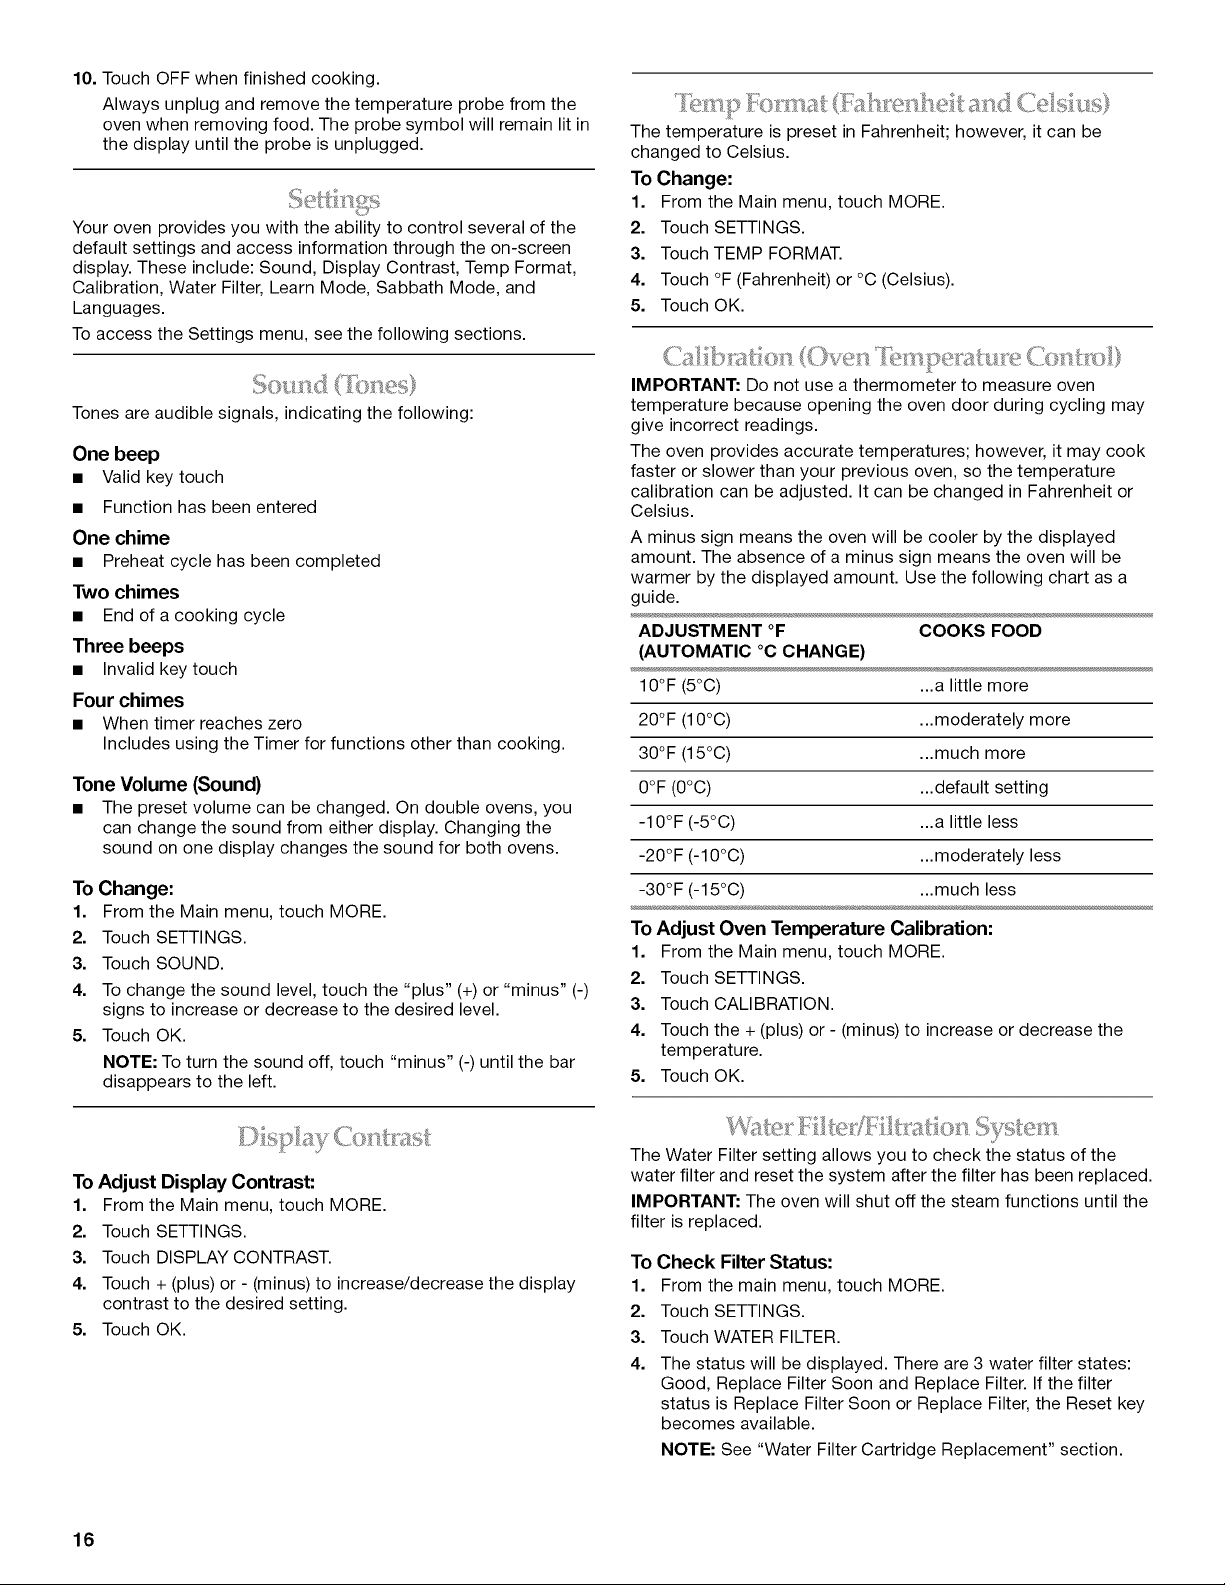
Burn Hazard
Use an oven mitt to remove temperature probe.
Do not touch broil element.
Failure to follow these instructions can result in burns.
The following demonstrates how to cook a turkey from the Auto
Steam menu using a temperature probe.
1. From the Main menu, touch STEAM COOK.
MAiN MENU
8roi, _}/__d_ P_;0of_! Keep Warm
2.
3. From the Auto Steam menu, touch POULTRY.
AUTO STEAM
4.
From the Auto Steam - Poultry menu, you can input a variety
of selections. The menu will display the default settings.
AUTOSTEAMPou!t[y
Temp
Entertemperature 250° - 450°F
/_Br°wning9
To change the temperature, input the desired temperature
using the numerical keys.
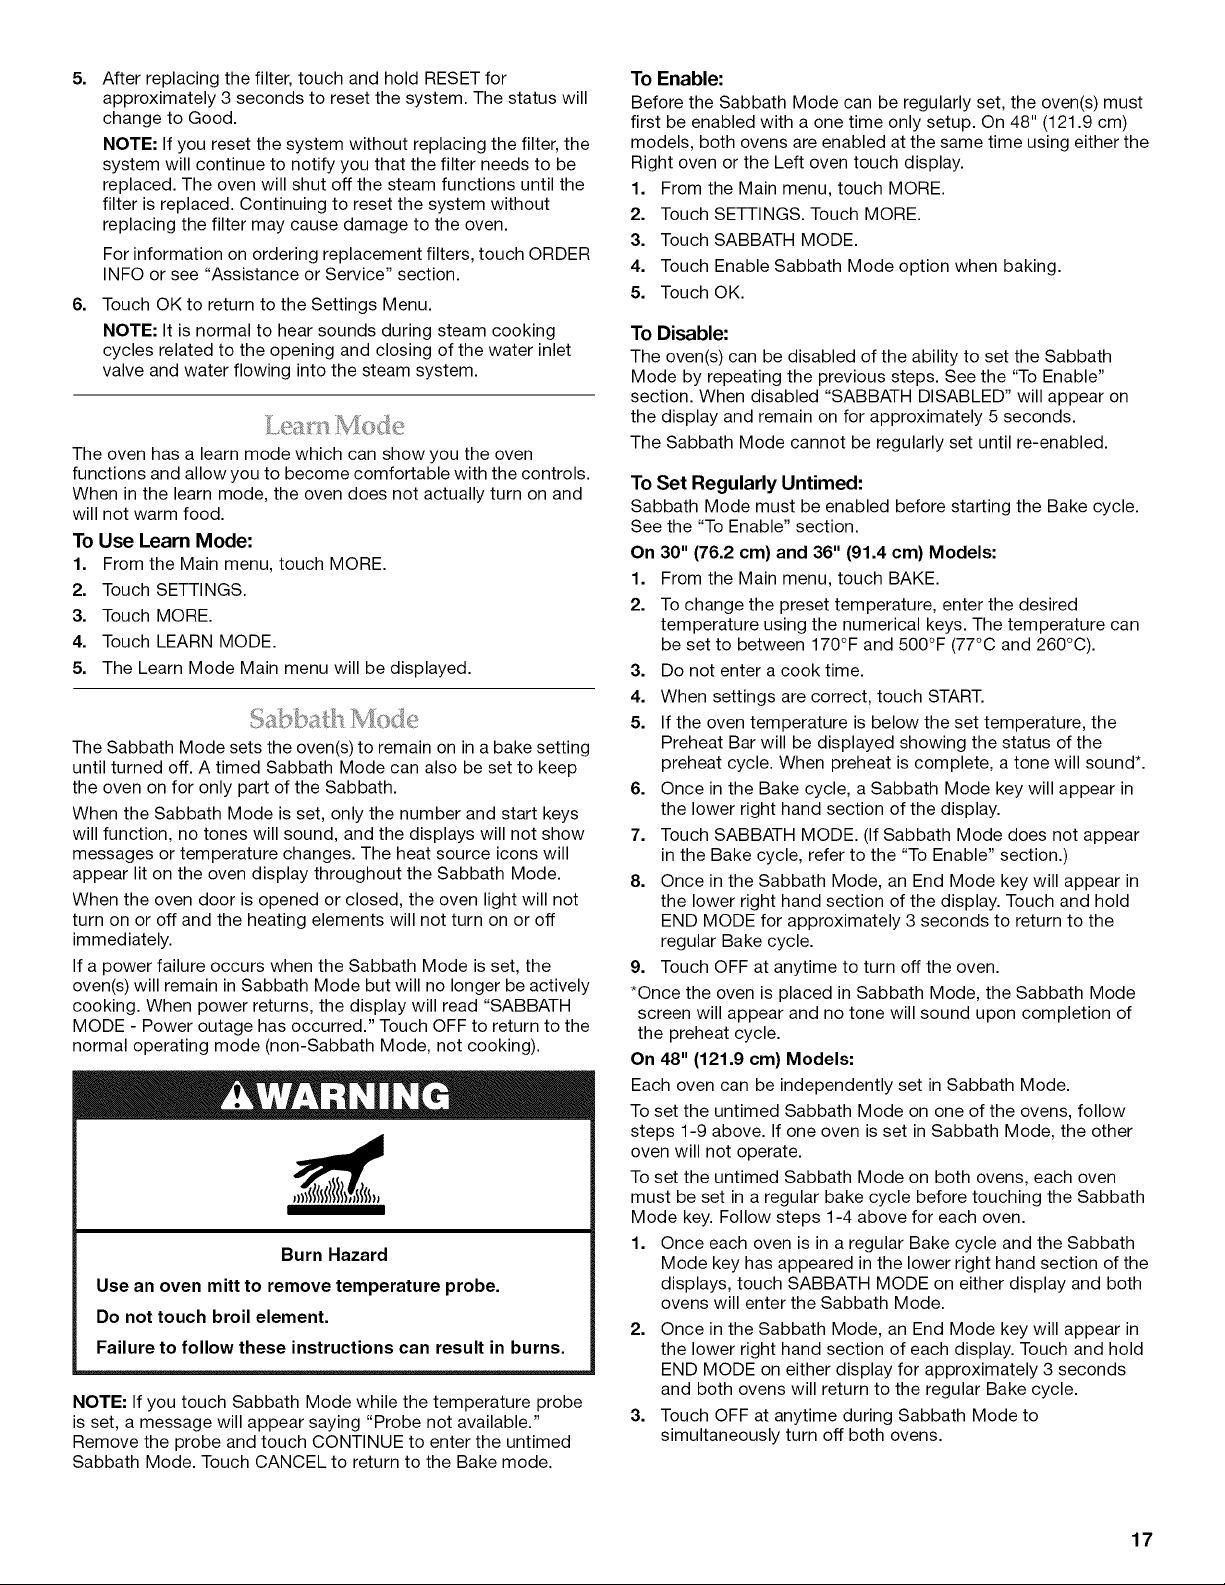
5.
6.
To cook using the temperature probe, touch PROBE and
enter the desired food temperature, using the numerical keys.
AUTO STEAM - Pou!try
Probe
Enter temperature 130 ° = 180°F
Ii Brownin
iil_
To change the level of browning, touch BROWNING.
Touch "plus" (+) or "minus" (-) to increase or decrease the
desired level. Touch OK.
BROWNING
Off Low Med High
Adjust browning to your preference.
7.
Once the setup is complete, the start key will light up.
When settings are correct, touch START. You will be
prompted to place the food in the oven and connect the
temperature probe. Place the food in the oven, connect the
temperature probe and touch OK.
Place Food in Oven
Use broiler pan grid and roasting rack for
best results.
Connect Probe
8.
Once the oven starts running, the Off key will light up. Touch
OFF if you need to shut off the oven during cooking.
AUTO STEAM = Poultr_
Temp
325 °
Browning Med
Probe
140°
Set 160 °
9.
When the set probe temperature is reached, the Check Food
message appears on the display. The probe temperature
begins to blink, and the end of cycle tone will sound.
Touch OK.
CHECK FOOD
Temp
325°
Probe
160°
Set 160 °
.....B:°w !ntMeal........................................................................................................................................................................................................................................................................
15
10. Touch OFF when finished cooking.
Always unplug and remove the temperature probe from the
oven when removing food. The probe symbol will remain lit in
the display until the probe is unplugged.
Your oven provides you with the ability to control several of the
default settings and access information through the on-screen
display. These include: Sound, Display Contrast, Temp Format,
Calibration, Water Filter, Learn Mode, Sabbath Mode, and
Languages.
To access the Settings menu, see the following sections.
Tones are audible signals, indicating the following:
One beep
• Valid key touch
• Function has been entered
One chime
• Preheat cycle has been completed
Two chimes
• End of a cooking cycle
Three beeps
• Invalid key touch
Four chimes
• When timer reaches zero
Includes using the Timer for functions other than cooking.
Tone Volume (Sound)
• The preset volume can be changed. On double ovens, you
can change the sound from either display. Changing the
sound on one display changes the sound for both ovens.
To Change:
1. From the Main menu, touch MORE.
2. Touch SETTINGS.
3. Touch SOUND.
4. To change the sound level, touch the "plus" (+) or "minus" (-)
signs to increase or decrease to the desired level.
5. Touch OK.
NOTE: To turn the sound off, touch "minus" (-) until the bar
disappears to the left.
The temperature is preset in Fahrenheit; however, it can be
changed to Celsius.
To Change:
1. From the Main menu, touch MORE.
2. Touch SETTINGS.
3. Touch TEMP FORMAT.
4. Touch °F (Fahrenheit) or °C (Celsius).
5. Touch OK.
IMPORTANT: Do not use a thermometer to measure oven
temperature because opening the oven door during cycling may
give incorrect readings.
The oven provides accurate temperatures; however, it may cook
faster or slower than your previous oven, so the temperature
calibration can be adjusted. It can be changed in Fahrenheit or
Celsius.
A minus sign means the oven will be cooler by the displayed
amount. The absence of a minus sign means the oven will be
warmer by the displayed amount. Use the following chart as a
guide.
ADJUSTMENT °F COOKS FOOD
(AUTOMATIC °C CHANGE)
10°F (5°C) ...a little more
20°F (10°C) ...moderately more
30°F (15°C) ...much more
0°F (0°C) ...default setting
-10°F (-5°C) ...a little less
-20°F (-10°C) ...moderately less
-30°F (-15°C) ...much less
ToAdjust Oven Temperature Calibration:
1. From the Main menu, touch MORE.
2. Touch SETTINGS.
3. Touch CALIBRATION.
4. Touch the + (plus) or - (minus) to increase or decrease the
temperature.
5. Touch OK.
ToAdjust Display Contrast:
1. From the Main menu, touch MORE.
2. Touch SETTINGS.
3. Touch DISPLAY CONTRAST.
4. Touch + (plus) or - (minus) to increase/decrease the display
contrast to the desired setting.
5. Touch OK.
The Water Filter setting allows you to check the status of the
water filter and reset the system after the filter has been replaced.
IMPORTANT: The oven will shut off the steam functions until the
filter is replaced.
To Check Filter Status:
1. From the main menu, touch MORE.
2. Touch SETTINGS.
3. Touch WATER FILTER.
4. The status will be displayed. There are 3 water filter states:
Good, Replace Filter Soon and Replace Filter. If the filter
status is Replace Filter Soon or Replace Filter, the Reset key
becomes available.
NOTE: See "Water Filter Cartridge Replacement" section.
16
5.
6.
After replacing the filter, touch and hold RESET for
approximately 3 seconds to reset the system. The status will
change to Good.
NOTE: If you reset the system without replacing the filter, the
system will continue to notify you that the filter needs to be
replaced. The oven will shut off the steam functions until the
filter is replaced. Continuing to reset the system without
replacing the filter may cause damage to the oven.
For information on ordering replacement filters, touch ORDER
INFO or see "Assistance or Service" section.
Touch OK to return to the Settings Menu.
NOTE: It is normal to hear sounds during steam cooking
cycles related to the opening and closing of the water inlet
valve and water flowing into the steam system.
The oven has a learn mode which can show you the oven
functions and allow you to become comfortable with the controls.
When in the learn mode, the oven does not actually turn on and
will not warm food.
To Use Learn Mode:
1. From the Main menu, touch MORE.
2. Touch SETTINGS.
3. Touch MORE.
4. Touch LEARN MODE.
5. The Learn Mode Main menu will be displayed.
The Sabbath Mode sets the oven(s) to remain on in a bake setting
until turned off. A timed Sabbath Mode can also be set to keep
the oven on for only part of the Sabbath.
When the Sabbath Mode is set, only the number and start keys
will function, no tones will sound, and the displays will not show
messages or temperature changes. The heat source icons will
appear lit on the oven display throughout the Sabbath Mode.
When the oven door is opened or closed, the oven light will not
turn on or off and the heating elements will not turn on or off
immediately.
If a power failure occurs when the Sabbath Mode is set, the
oven(s) will remain in Sabbath Mode but will no longer be actively
cooking. When power returns, the display will read "SABBATH
MODE - Power outage has occurred." Touch OFF to return to the
normal operating mode (non-Sabbath Mode, not cooking).
Burn Hazard
Use an oven mitt to remove temperature probe.
Do not touch broil element.
Failure to follow these instructions can result in burns.
NOTE: If you touch Sabbath Mode while the temperature probe
is set, a message will appear saying "Probe not available."
Remove the probe and touch CONTINUE to enter the untimed
Sabbath Mode. Touch CANCEL to return to the Bake mode.
To Enable:
Before the Sabbath Mode can be regularly set, the oven(s) must
first be enabled with a one time only setup. On 48" (121.9 cm)
models, both ovens are enabled at the same time using either the
Right oven or the Left oven touch display.
1. From the Main menu, touch MORE.
2. Touch SETTINGS. Touch MORE.
3. Touch SABBATH MODE.
4. Touch Enable Sabbath Mode option when baking.
5. Touch OK.
To Disable:
The oven(s) can be disabled of the ability to set the Sabbath
Mode by repeating the previous steps. See the "To Enable"
section. When disabled "SABBATH DISABLED" will appear on
the display and remain on for approximately 5 seconds.
The Sabbath Mode cannot be regularly set until re-enabled.
To Set Regularly Untimed:
Sabbath Mode must be enabled before starting the Bake cycle.
See the "To Enable" section.
On 30" (76.2 cm) and 36" (91.4 cm) Models:
1. From the Main menu, touch BAKE.
2. To change the preset temperature, enter the desired
temperature using the numerical keys. The temperature can
be set to between 170°F and 500°F (77°C and 260°C).
3. Do not enter a cook time.
4. When settings are correct, touch START.
5. If the oven temperature is below the set temperature, the
Preheat Bar will be displayed showing the status of the
preheat cycle. When preheat is complete, a tone will sound*.
6. Once in the Bake cycle, a Sabbath Mode key will appear in
the lower right hand section of the display.
7. Touch SABBATH MODE. (If Sabbath Mode does not appear
in the Bake cycle, refer to the "To Enable" section.)
8. Once in the Sabbath Mode, an End Mode key will appear in
the lower right hand section of the display. Touch and hold
END MODE for approximately 3 seconds to return to the
regular Bake cycle.
9. Touch OFF at anytime to turn off the oven.
*Once the oven is placed in Sabbath Mode, the Sabbath Mode
screen will appear and no tone will sound upon completion of
the preheat cycle.
On 48" (121.9 cm) Models:
Each oven can be independently set in Sabbath Mode.
To set the untimed Sabbath Mode on one of the ovens, follow
steps 1-9 above. If one oven is set in Sabbath Mode, the other
oven will not operate.
To set the untimed Sabbath Mode on both ovens, each oven
must be set in a regular bake cycle before touching the Sabbath
Mode key. Follow steps 1-4 above for each oven.
1. Once each oven is in a regular Bake cycle and the Sabbath
Mode key has appeared in the lower right hand section of the
displays, touch SABBATH MODE on either display and both
ovens will enter the Sabbath Mode.
2. Once in the Sabbath Mode, an End Mode key will appear in
the lower right hand section of each display. Touch and hold
END MODE on either display for approximately 3 seconds
and both ovens will return to the regular Bake cycle.
3. Touch OFF at anytime during Sabbath Mode to
simultaneously turn off both ovens.
17
To Regularly Set Timed:
=
Food Poisoning Hazard
Do not let food sit in oven more than one hour before
or after cooking.
Doing so can result in food poisoning or sickness.
Sabbath Mode must be enabled before starting the Bake cycle.
See the "To Enable" section.
On 30" (76.2 cm) and 36" (91.4 cm) Models:
1. From the Main menu, touch BAKE.
2. To change the preset temperature, enter the desired
temperature using the numerical keys. The temperature can
be set to between 170°F and 500°F (77°C and 260°C).
3. To enter a cook time, touch COOK TIME. Enter the desired
cook time using the numerical keys.
4. When settings are correct, touch START.
5. If the oven temperature is below the set temperature, the
Preheat Bar will be displayed showing the status of the
preheat cycle. When preheat is complete, a tone will sound*.
6. Once in the Bake cycle, a Sabbath Mode key will appear in
the lower right hand section of the display.
7. Touch SABBATH MODE. (If Sabbath Mode does not appear
in the Bake cycle, refer to the "To Enable" section.)
8. Once in the Sabbath Mode, an End Mode key will appear in
the lower right hand section of the display. Touch and hold
END MODE for approximately 3 seconds to return to the
regular Bake cycle.
9. Once Cook Time has reached 0:00, the Sabbath Mode
Complete message is displayed. The completed time
information is updated every minute, but no End of Cycle
tone will sound.
10. Touch OK to return to the Main Menu.
11. Touch OFF at anytime to turn off the oven.
*Once the oven is placed in Sabbath Mode, the Sabbath Mode
screen will appear and no tone will sound upon completion of
the preheat cycle.
On 48" (121.9 cm) Models:
Each oven can be independently set in Sabbath Mode.
To set a timed Sabbath Mode on one of the ovens, follow steps
1-11 above. If one oven is in Sabbath Mode, the other oven will
not operate.
To set a timed Sabbath Mode on both ovens, each oven must be
set in a regular timed bake cycle before touching the Sabbath
Mode key. Follow steps 1-4 above for each oven.
1. Once each oven is in a regular timed Bake cycle and the
Sabbath Mode key has appeared in the lower right hand
section of the displays, touch SABBATH MODE on either
display and both ovens will enter the Sabbath Mode.
2. Once in the Sabbath Mode, an End Mode key will appear in
the lower right hand section of each display. Touch and hold
END MODE on either display for approximately 3 seconds,
and both ovens will return to the regular Bake cycle.
3. Touch OFF at anytime during Sabbath Mode to
simultaneously turn off both ovens.
NOTE: On 48" (121.9 cm) models, one oven can be set in a timed
Sabbath Mode and one oven can be set in an untimed Sabbath
Mode, if both ovens are set prior to touching the Sabbath Mode
key.
To Set Delayed:
Sabbath Mode must be enabled before starting the Bake cycle.
See the "To Enable" section.
On 30" (76.2 cm) and 36" (91.4 cm) Models:
1. From the Main menu, touch MORE.
2. Touch DELAY COOK.
3. Touch BAKE.
4. To change the preset temperature, enter the desired
temperature using the numerical keys. The temperature can
be set to between 170°F and 500°F (77°C and 260°C).
5. Touch COOK TIME. Enter the desired cook time using the
numerical keys.
6. Touch DELAY TIME. Enter the amount of time you wish to
delay the start of cooking using the numerical keys.
7. When settings are correct, touch START.
8. Once the delay time is reached, if the oven temperature is
below the set temperature, the Preheat Bar will be displayed
showing the status of the preheat cycle. When preheat is
complete, a tone will sound*.
9. Once in the Delay Cook cycle, a Sabbath Mode key will
appear in the lower right hand section of the display.
10. Touch SABBATH MODE. (If Sabbath Mode does not appear
in the Bake cycle, refer to the "To Enable" section.)
11. Once in the Sabbath Mode, an End Mode key will appear in
the lower right hand section of the display. Touch and hold
END MODE for approximately 3 seconds to return to the
regular Bake cycle.
12. Once Cook Time has reached 0:00, the Sabbath Mode
Complete message is displayed. The completed time
information is updated every minute, but no End of Cycle
tone will sound.
13. Touch OK to return to the Main Menu.
14. Touch OFF at anytime to turn off the oven.
*Once the oven is placed in Sabbath Mode, the Sabbath Mode
screen will appear and no tone will sound upon completion of
the preheat cycle.
On 48" (121.9 cm) Models:
Each oven can be independently set in Sabbath Mode.
To set a delayed Sabbath Mode on one of the ovens, follow steps
1-14 above. If one oven is set in Sabbath Mode, the other oven
will not operate.
To set a delayed Sabbath Mode on both ovens, each oven must
be set in a regular delayed bake cycle before the Sabbath Mode
key is touched. Follow steps 1-7 above for each oven.
1. Once each oven is in a regular delayed Bake cycle and the
Sabbath Mode key has appeared in the lower right hand
section of the displays, touch SABBATH MODE on either
display and both ovens will enter the Sabbath Mode.
2. Once in the Sabbath Mode, an End Mode key will appear in
the lower right hand section of each display. Touch and hold
END MODE on either display for approximately 3 seconds,
and both ovens will return to the regular Bake cycle.
3. Touch OFF at anytime during Sabbath Mode to
simultaneously turn off both ovens.
On 48" (121.9 cm) models, one oven can be set in a delayed
Sabbath Mode and one oven can be set in a regular timed or
untimed Sabbath Mode provided both ovens are set prior to
touching the Sabbath Mode key.
NOTE: The Sabbath Mode screen will be displayed when the
oven is set in a delayed Sabbath Mode. The temperature change
keys referenced in the next section will not function before the
beginning of the Bake cycle. These become active once the Bake
cycle begins.
18
Temperature Change
The oven temperature can be changed when the oven(s) are in
the Sabbath Mode. No tones will sound, and the display will not
change. The heating elements will not turn on or off for a random
time, anywhere from 16 to 24 seconds. It may take up to
30 minutes for the oven to change temperature.
On 48" (121.9 cm) ranges, both oven cavities can be set for
independent temperatures.
If you wish to change the temperature on both ovens, wait at
least 1 minute from the time you change the temperature on the
first oven until you change the temperature on the second oven.
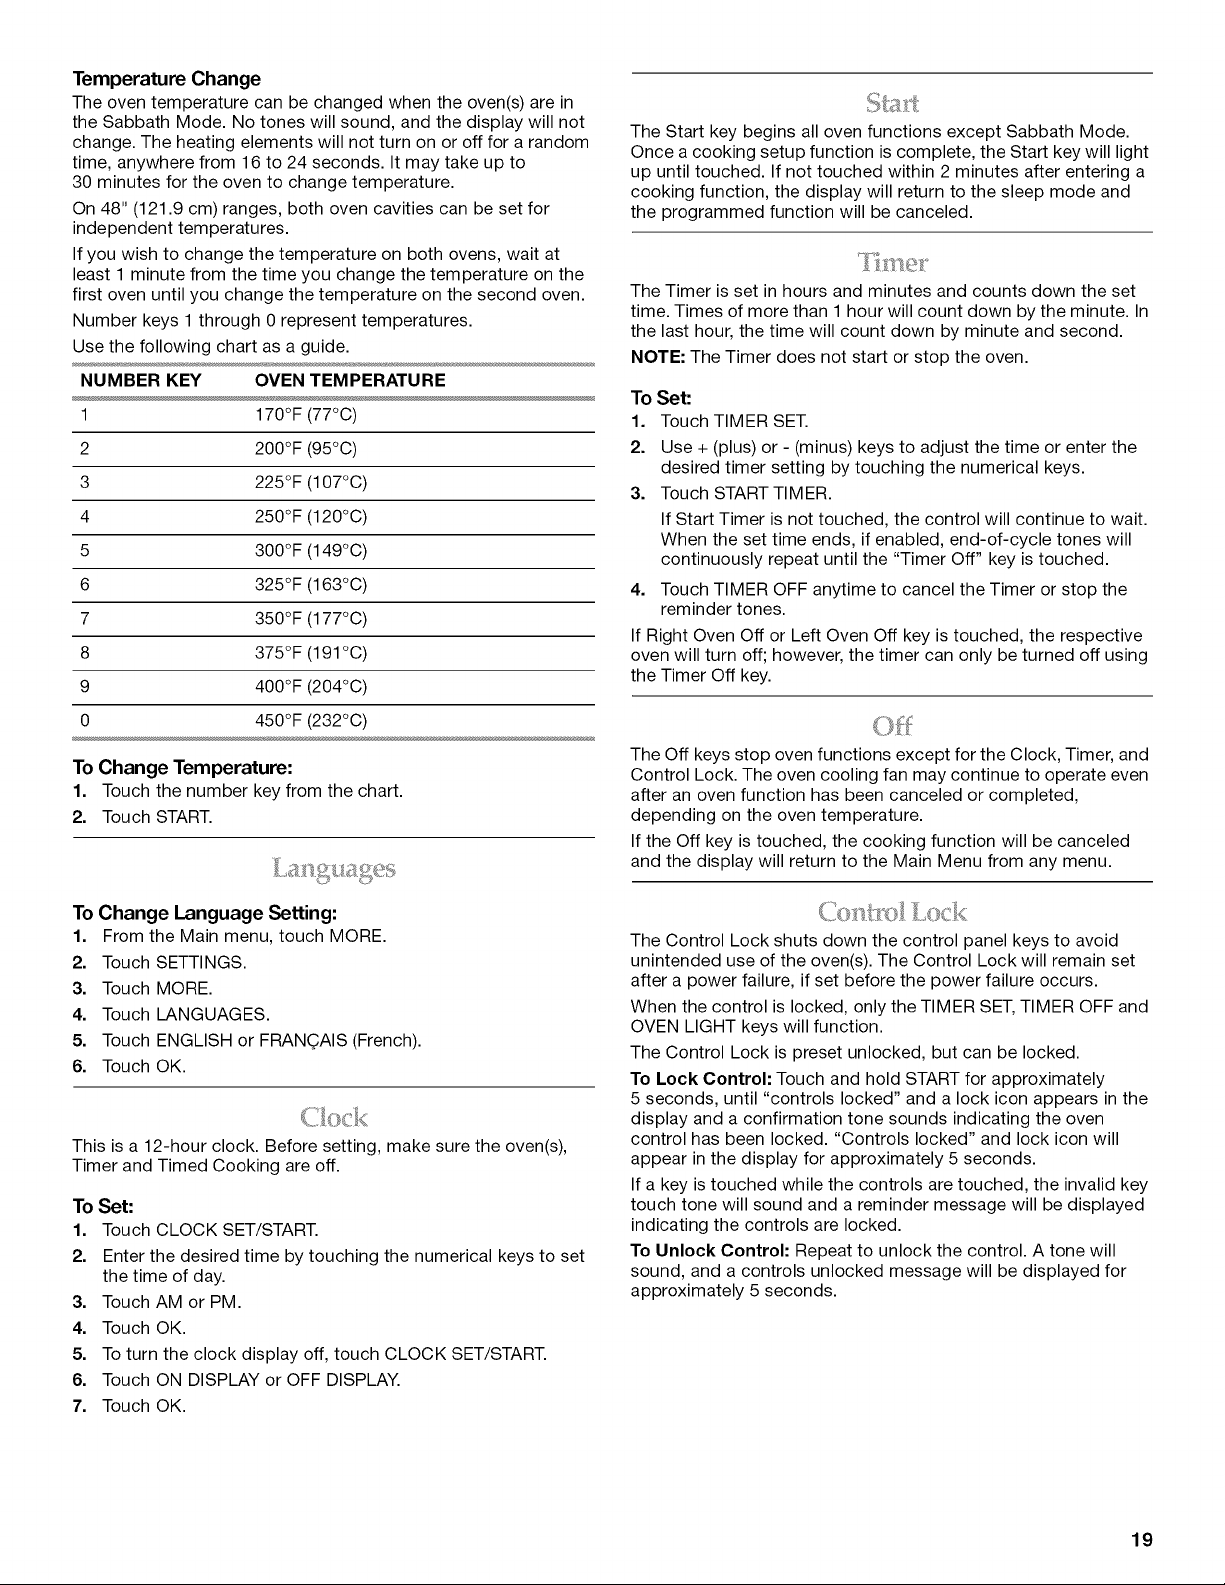
Number keys 1 through 0 represent temperatures.
Use the following chart as a guide.
NUMBER KEY OVEN TEMPERATURE
1 170°F (77°C)
2 200°F (95°C)
3 225°F (107°C)
4 250°F (120°C)
5 300°F (149°C)
6 325°F (163°C)
7 350°F (177°C)
8 375°F (191 °C)
9 400°F (204°C)
0 450°F (232°C)
To Change Temperature:
1. Touch the number key from the chart.
2. Touch START.
To Change Language Setting:
1. From the Main menu, touch MORE.
2. Touch SETTINGS.
3. Touch MORE.
4. Touch LANGUAGES.
5. Touch ENGLISH or FRAN(_AIS (French).
6. Touch OK.
This is a 12-hour clock. Before setting, make sure the oven(s),
Timer and Timed Cooking are off.
To Set:
1. Touch CLOCK SET/START.
2. Enter the desired time by touching the numerical keys to set
the time of day.
3. Touch AM or PM.
4. Touch OK.
5. To turn the clock display off, touch CLOCK SET/START.
6. Touch ON DISPLAY or OFF DISPLAY.
7. Touch OK.
The Start key begins all oven functions except Sabbath Mode.
Once a cooking setup function is complete, the Start key will light
up until touched. If not touched within 2 minutes after entering a
cooking function, the display will return to the sleep mode and
the programmed function will be canceled.
The Timer is set in hours and minutes and counts down the set
time. Times of more than 1 hour will count down by the minute. In
the last hour, the time will count down by minute and second.
NOTE: The Timer does not start or stop the oven.
To Set:
1. Touch TIMER SET.
2. Use + (plus) or - (minus) keys to adjust the time or enter the
desired timer setting by touching the numerical keys.
3. Touch START TIMER.
If Start Timer is not touched, the control will continue to wait.
When the set time ends, if enabled, end-of-cycle tones will
continuously repeat until the "Timer Off" key is touched.
4. Touch TIMER OFF anytime to cancel the Timer or stop the
reminder tones.
If Right Oven Off or Left Oven Off key is touched, the respective
oven will turn off; however, the timer can only be turned off using
the Timer Off key.
The Off keys stop oven functions except for the Clock, Timer, and
Control Lock. The oven cooling fan may continue to operate even
after an oven function has been canceled or completed,
depending on the oven temperature.
If the Off key is touched, the cooking function will be canceled
and the display will return to the Main Menu from any menu.
,,()el<
The Control Lock shuts down the control panel keys to avoid
unintended use of the oven(s). The Control Lock will remain set
after a power failure, if set before the power failure occurs.
When the control is locked, only the TIMER SET, TIMER OFF and
OVEN LIGHT keys will function.
The Control Lock is preset unlocked, but can be locked.
To Lock Control: Touch and hold START for approximately
5 seconds, until "controls locked" and a lock icon appears in the
display and a confirmation tone sounds indicating the oven
control has been locked. "Controls locked" and lock icon will
appear in the display for approximately 5 seconds.
If a key is touched while the controls are touched, the invalid key
touch tone will sound and a reminder message will be displayed
indicating the controls are locked.
To Unlock Control: Repeat to unlock the control. A tone will
sound, and a controls unlocked message will be displayed for
approximately 5 seconds.
19
OVEN
(}w!s
Odors and smoke are normal when the oven is used the first few
times, or when it is heavily soiled.
During oven use, the heating elements will not remain on, but will
cycle on and off throughout oven operation.
IMPORTANT: The health of some birds is extremely sensitive to
the fumes given off. Exposure to the fumes may result in death to
certain birds. Always move birds to another closed and well-
ventilated room.
The oven is equipped with a water filtration system. This system
is required for the use of the steam cooking functionality.
IMPORTANT: The oven will shut off the steam functions until the
filter is replaced.
The water filter needs to be changed occasionally. The life of the
filter will depend on factors such as the amount of steam cooking
done and the hardness of the water in your home. The oven has a
sensor to determine when the filter needs to be changed.
NOTE: It is normal to hear sounds during steam cooking cycles
related to the opening and closing of the water inlet valve and
water flowing into the steam system.
USE
BAKEWARE/ RECOMMENDATIONS
RESULTS
Stainless steel
• Light, golden
crusts
• Uneven browning
Stoneware/Baking
stone
• Crisp crusts
Ovenproof
glassware, ceramic
glass or ceramic
• Brown, crisp
crusts
• May need to increase baking time.
• Follow manufacturer's instructions.
• May need to reduce baking
temperatures slightly.
_,ac 15 a:sd _s
IMPORTANT: To avoid permanent damage to the porcelain
finish, do not place food or bakeware directly on the oven door or
bottom.
IMPORTANT: To avoid permanent damage to the oven bottom
finish, do not line the oven bottom with any type of foil or liner.
• For best cooking results, do not cover entire rack with foil
because air must be able to move freely.
• To catch spills, place foil on rack below dish. Make sure foil is
at least 1/2H(1.3 cm) larger than the dish and that it is turned
up at the edges.
The bakeware material affects cooking results. Follow
manufacturer's recommendations and use the bakeware size
recommended in the recipe. Use the following chart as a guide.
BAKEWARE/ RECOMMENDATIONS
RESULTS
Light colored • Use temperature and time
aluminum recommended in recipe.
• Light golden crusts
• Even browning
Dark aluminum and
other bakeware with
dark, dull and/or
nonstick finish
• Brown, crisp
crusts
• May need to reduce baking
temperatures slightly.
• Use suggested baking time.
• For pies, breads and casseroles,
use temperature recommended in
recipe.
• Place rack in center of oven.
Insulated cookie
sheets or baking
pans
• Little or no bottom
browning
• Place in the bottom third of oven.
• May need to increase baking time.
RACKS
• Position racks before turning on the oven.
• Do not position racks with bakeware on them.
• Make sure racks are level.
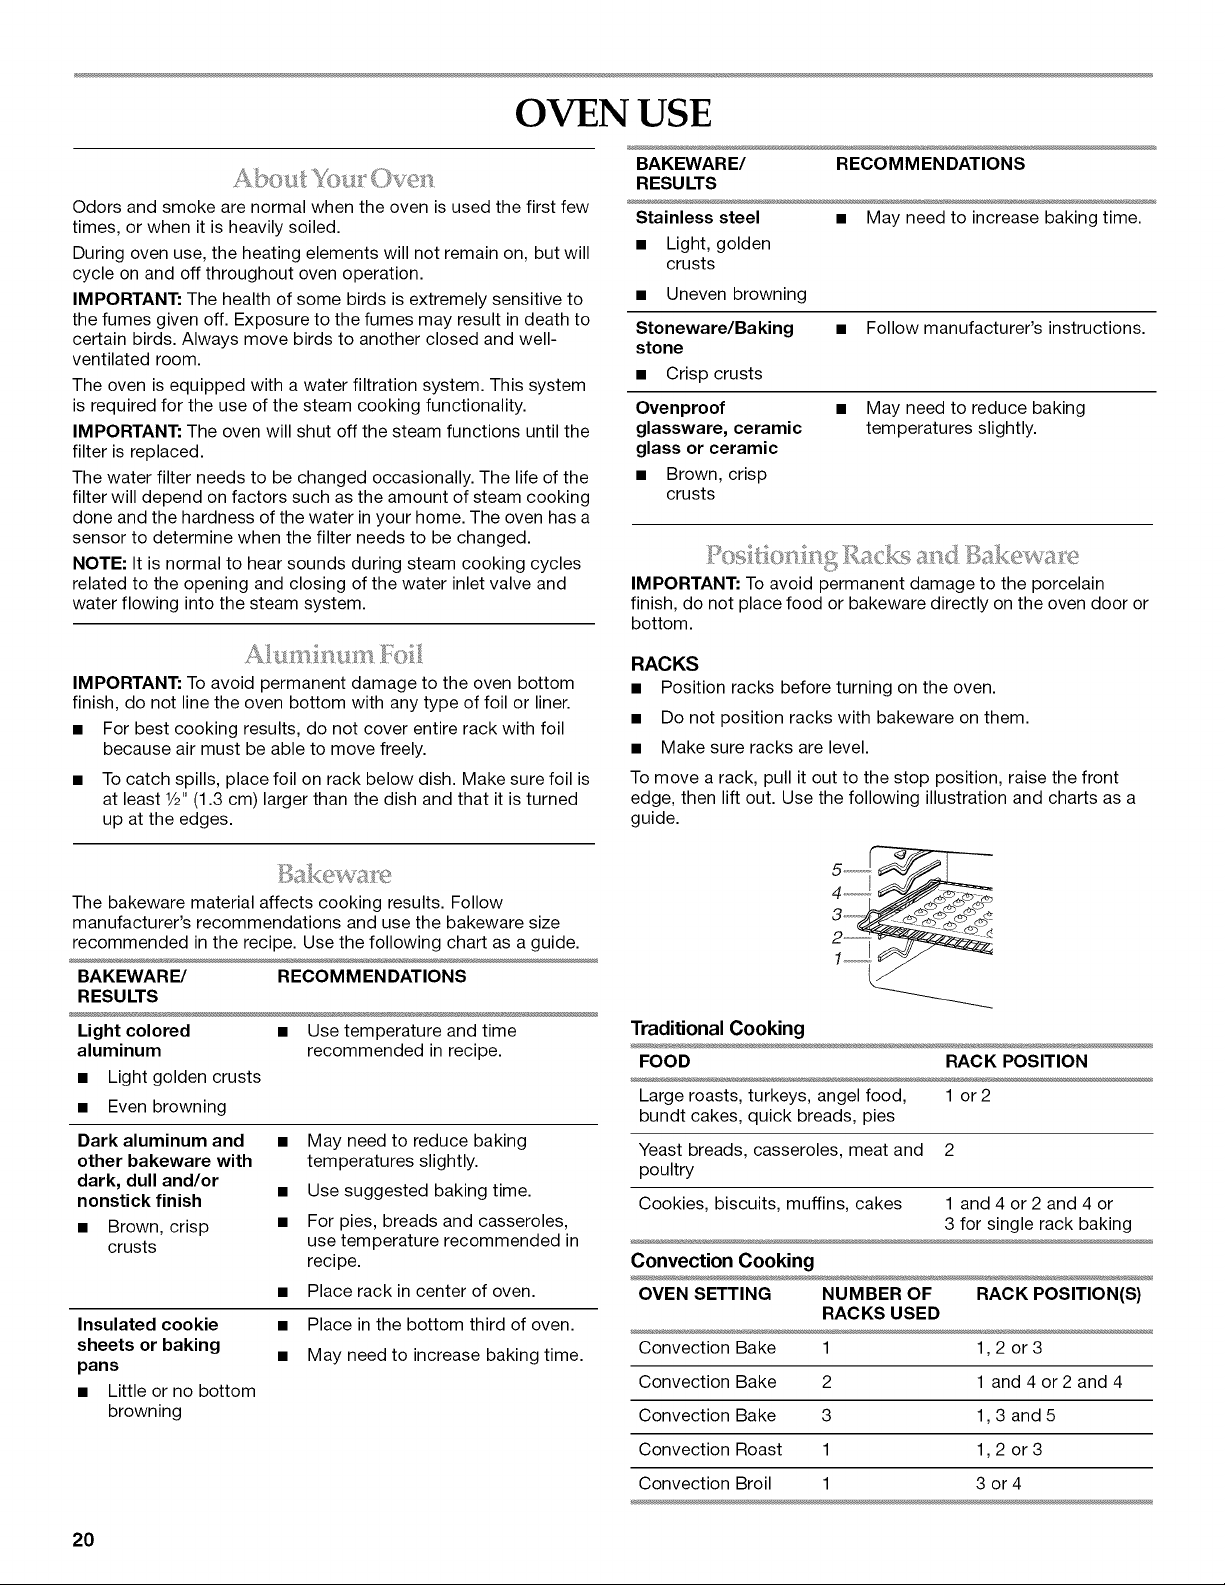
To move a rack, pull it out to the stop position, raise the front
edge, then lift out. Use the following illustration and charts as a
guide.
Traditional Cooking
FOOD RACK POSITION
Large roasts, turkeys, angel food, 1 or 2
bundt cakes, quick breads, pies
Yeast breads, casseroles, meat and 2
poultry
Cookies, biscuits, muffins, cakes 1 and 4 or 2 and 4 or
3 for single rack baking
Convection Cooking
OVEN SETTING NUMBER OF RACK POSITION(S)
RACKS USED
Convection Bake 1 1,2 or 3
Convection Bake 2 1 and 4 or 2 and 4
Convection Bake 3 1,3 and 5
Convection Roast 1 1,2 or 3
Convection Broil 1 3 or 4
20
BAKEWARE
To cook food evenly, hot air must be able to circulate. For
traditional cooking, allow 2" (5 cm) of space around bakeware
and oven walls. For convection cooking, allow 1" (2.5 cm) of
space around bakeware and oven walls. Use the following chart
as a guide.
NUMBER POSITION ON RACK
OF PAN(S)
1 Center of rack.
2 Side by side or slightly staggered.
3 or 4 Placement that gives best result. Make sure that
no bakeware piece is directly over another.
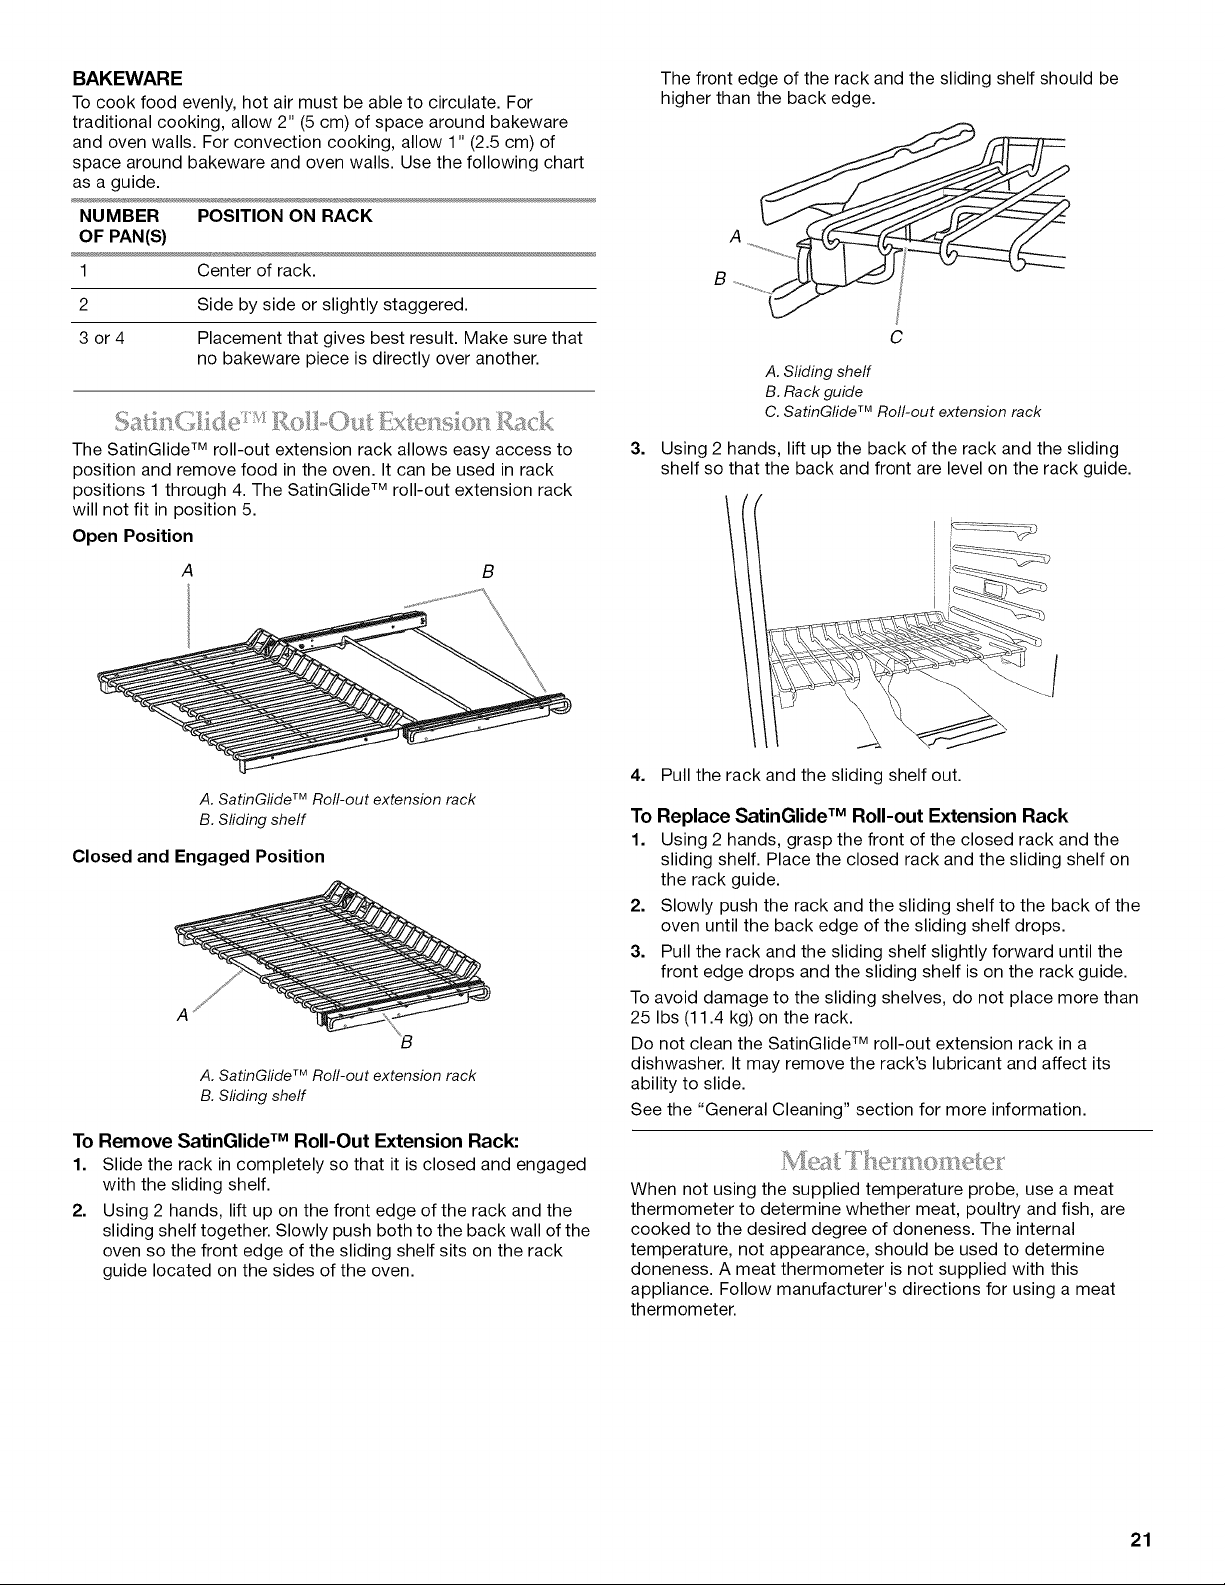
The SatinGlide TM roll-out extension rack allows easy access to
position and remove food in the oven. It can be used in rack
positions 1 through 4. The SatinGlide TM roll-out extension rack
will not fit in position 5.
Open Position
B
A. SatinGfide TM Roll-out extension rack
B. Sfiding shelf
Closed and Engaged Position
A. SatinG/ide TM Rofl-out extension rack
B. Sliding sheff
To Remove SatinGlide TM Roll-Out Extension Rack:
1. Slide the rack in completely so that it is closed and engaged
with the sliding shelf.
2. Using 2 hands, lift up on the front edge of the rack and the
sliding shelf together. Slowly push both to the back wall of the
oven so the front edge of the sliding shelf sits on the rack
guide located on the sides of the oven.
3.
The front edge of the rack and the sliding shelf should be
higher than the back edge.
C
A. Sliding shelf
B. Rack guide
C. SatinGfide TM Roll-out extension rack
Using 2 hands, lift up the back of the rack and the sliding
shelf so that the back and front are level on the rack guide.
4. Pull the rack and the sliding shelf out.
To Replace SatinGlide TM Roll-out Extension Rack
1. Using 2 hands, grasp the front of the closed rack and the
sliding shelf. Place the closed rack and the sliding shelf on
the rack guide.
2. Slowly push the rack and the sliding shelf to the back of the
oven until the back edge of the sliding shelf drops.
3. Pull the rack and the sliding shelf slightly forward until the
front edge drops and the sliding shelf is on the rack guide.
To avoid damage to the sliding shelves, do not place more than
25 Ibs (11.4 kg) on the rack.
Do not clean the SatinGlide TM roll-out extension rack in a
dishwasher. It may remove the rack's lubricant and affect its
ability to slide.
See the "General Cleaning" section for more information.
When not using the supplied temperature probe, use a meat
thermometer to determine whether meat, poultry and fish, are
cooked to the desired degree of doneness. The internal
temperature, not appearance, should be used to determine
doneness. A meat thermometer is not supplied with this
appliance. Follow manufacturer's directions for using a meat
thermometer.
21
i
i i \A
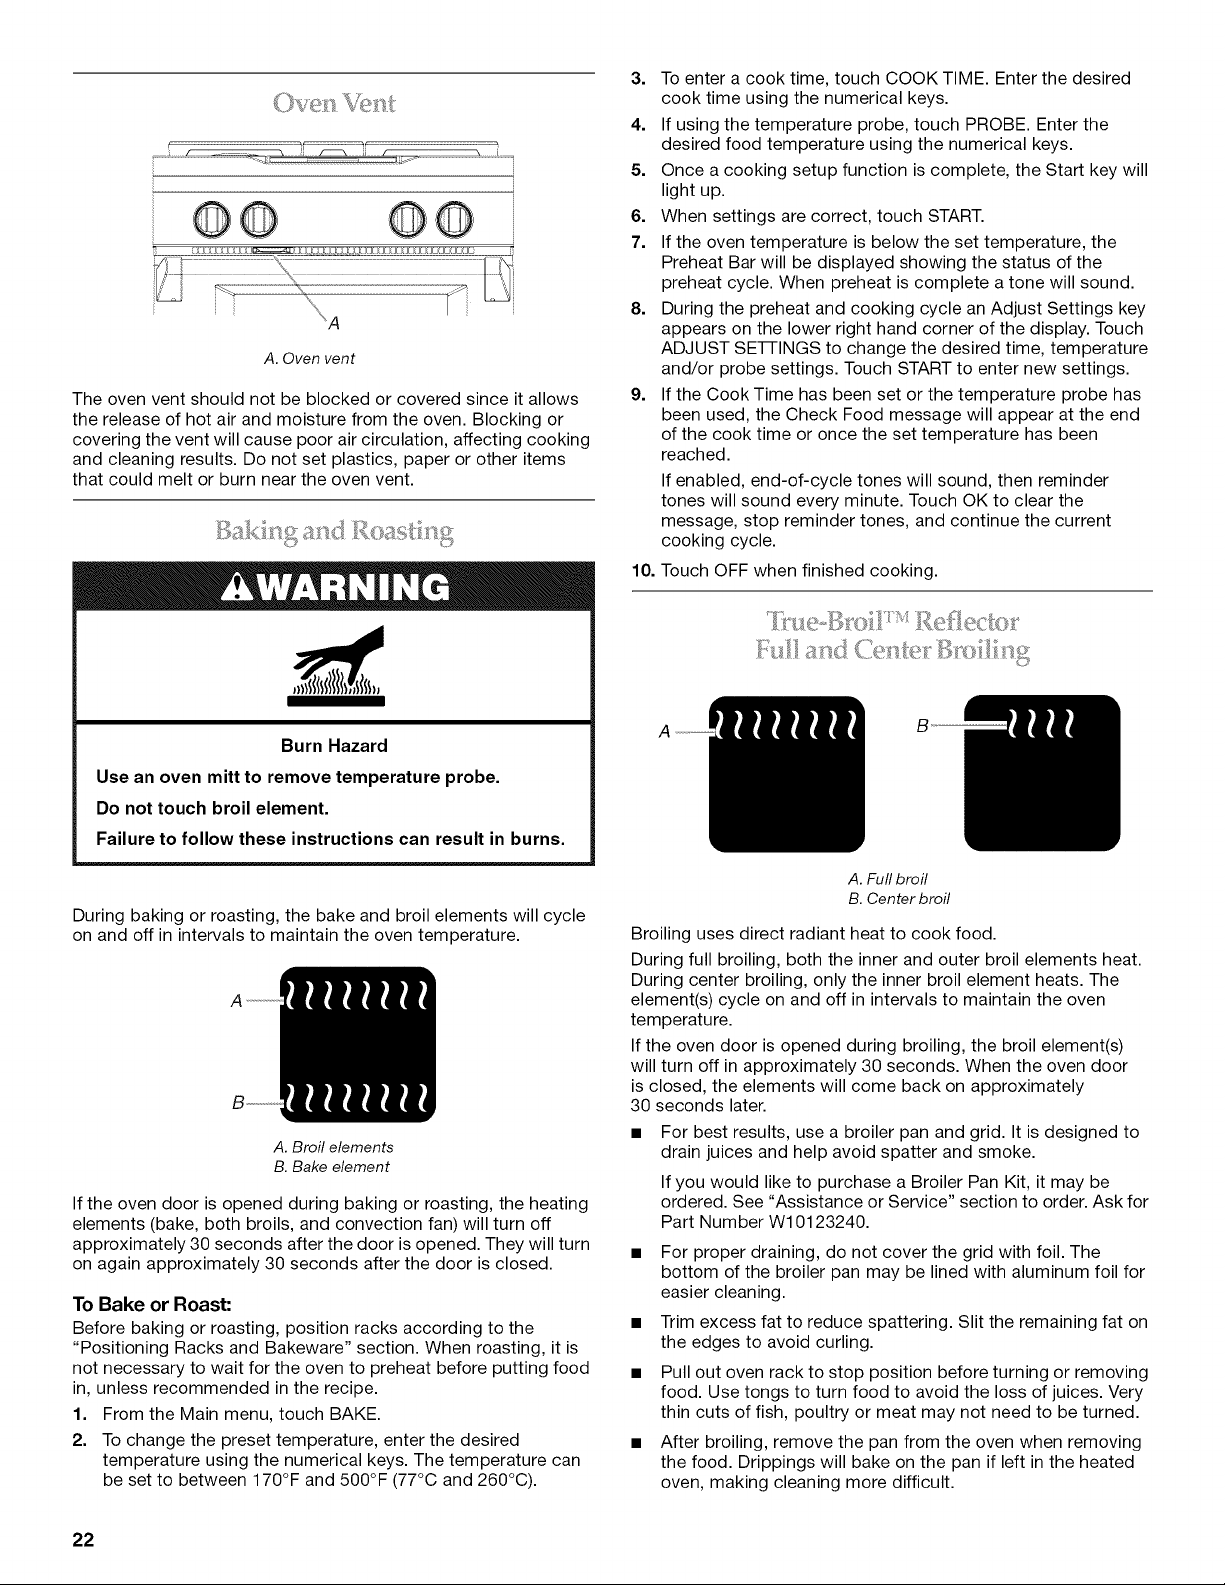
A. Oven vent
The oven vent should not be blocked or covered since it allows
the release of hot air and moisture from the oven. Blocking or
covering the vent will cause poor air circulation, affecting cooking
and cleaning results. Do not set plastics, paper or other items
that could melt or burn near the oven vent.
Burn Hazard
Use an oven mitt to remove temperature probe.
Do not touch broil element.
Failure to follow these instructions can result in burns.
During baking or roasting, the bake and broil elements will cycle
on and off in intervals to maintain the oven temperature.
A
A. Broil elements
B. Bake element
If the oven door is opened during baking or roasting, the heating
elements (bake, both broils, and convection fan) will turn off
approximately 30 seconds after the door is opened. They will turn
on again approximately 30 seconds after the door is closed.
To Bake or Roast:
Before baking or roasting, position racks according to the
"Positioning Racks and Bakeware" section. When roasting, it is
not necessary to wait for the oven to preheat before putting food
in, unless recommended in the recipe.
1. From the Main menu, touch BAKE.
2. To change the preset temperature, enter the desired
temperature using the numerical keys. The temperature can
be set to between 170°F and 500°F (77°C and 260°C).
3. To enter a cook time, touch COOK TIME. Enter the desired
cook time using the numerical keys.
4. If using the temperature probe, touch PROBE. Enter the
desired food temperature using the numerical keys.
5. Once a cooking setup function is complete, the Start key will
light up.
6. When settings are correct, touch START.
7. If the oven temperature is below the set temperature, the
Preheat Bar will be displayed showing the status of the
preheat cycle. When preheat is complete a tone will sound.
8. During the preheat and cooking cycle an Adjust Settings key
appears on the lower right hand corner of the display. Touch
ADJUST SE-I-I-INGS to change the desired time, temperature
and/or probe settings. Touch START to enter new settings.
9. If the Cook Time has been set or the temperature probe has
been used, the Check Food message will appear at the end
of the cook time or once the set temperature has been
reached.
If enabled, end-of-cycle tones will sound, then reminder
tones will sound every minute. Touch OK to clear the
message, stop reminder tones, and continue the current
cooking cycle.
10. Touch OFF when finished cooking.
A. Full broil
B. Center broil
Broiling uses direct radiant heat to cook food.
During full broiling, both the inner and outer broil elements heat.
During center broiling, only the inner broil element heats. The
element(s) cycle on and off in intervals to maintain the oven
temperature.
If the oven door is opened during broiling, the broil element(s)
will turn off in approximately 30 seconds. When the oven door
is closed, the elements will come back on approximately
30 seconds later.
• For best results, use a broiler pan and grid. It is designed to
drain juices and help avoid spatter and smoke.
If you would like to purchase a Broiler Pan Kit, it may be
ordered. See "Assistance or Service" section to order. Ask for
Part Number W10123240.
• For proper draining, do not cover the grid with foil. The
bottom of the broiler pan may be lined with aluminum foil for
easier cleaning.
• Trim excess fat to reduce spattering. Slit the remaining fat on
the edges to avoid curling.
• Pull out oven rack to stop position before turning or removing
food. Use tongs to turn food to avoid the loss of juices. Very
thin cuts of fish, poultry or meat may not need to be turned.
• After broiling, remove the pan from the oven when removing
the food. Drippings will bake on the pan if left in the heated
oven, making cleaning more difficult.
22
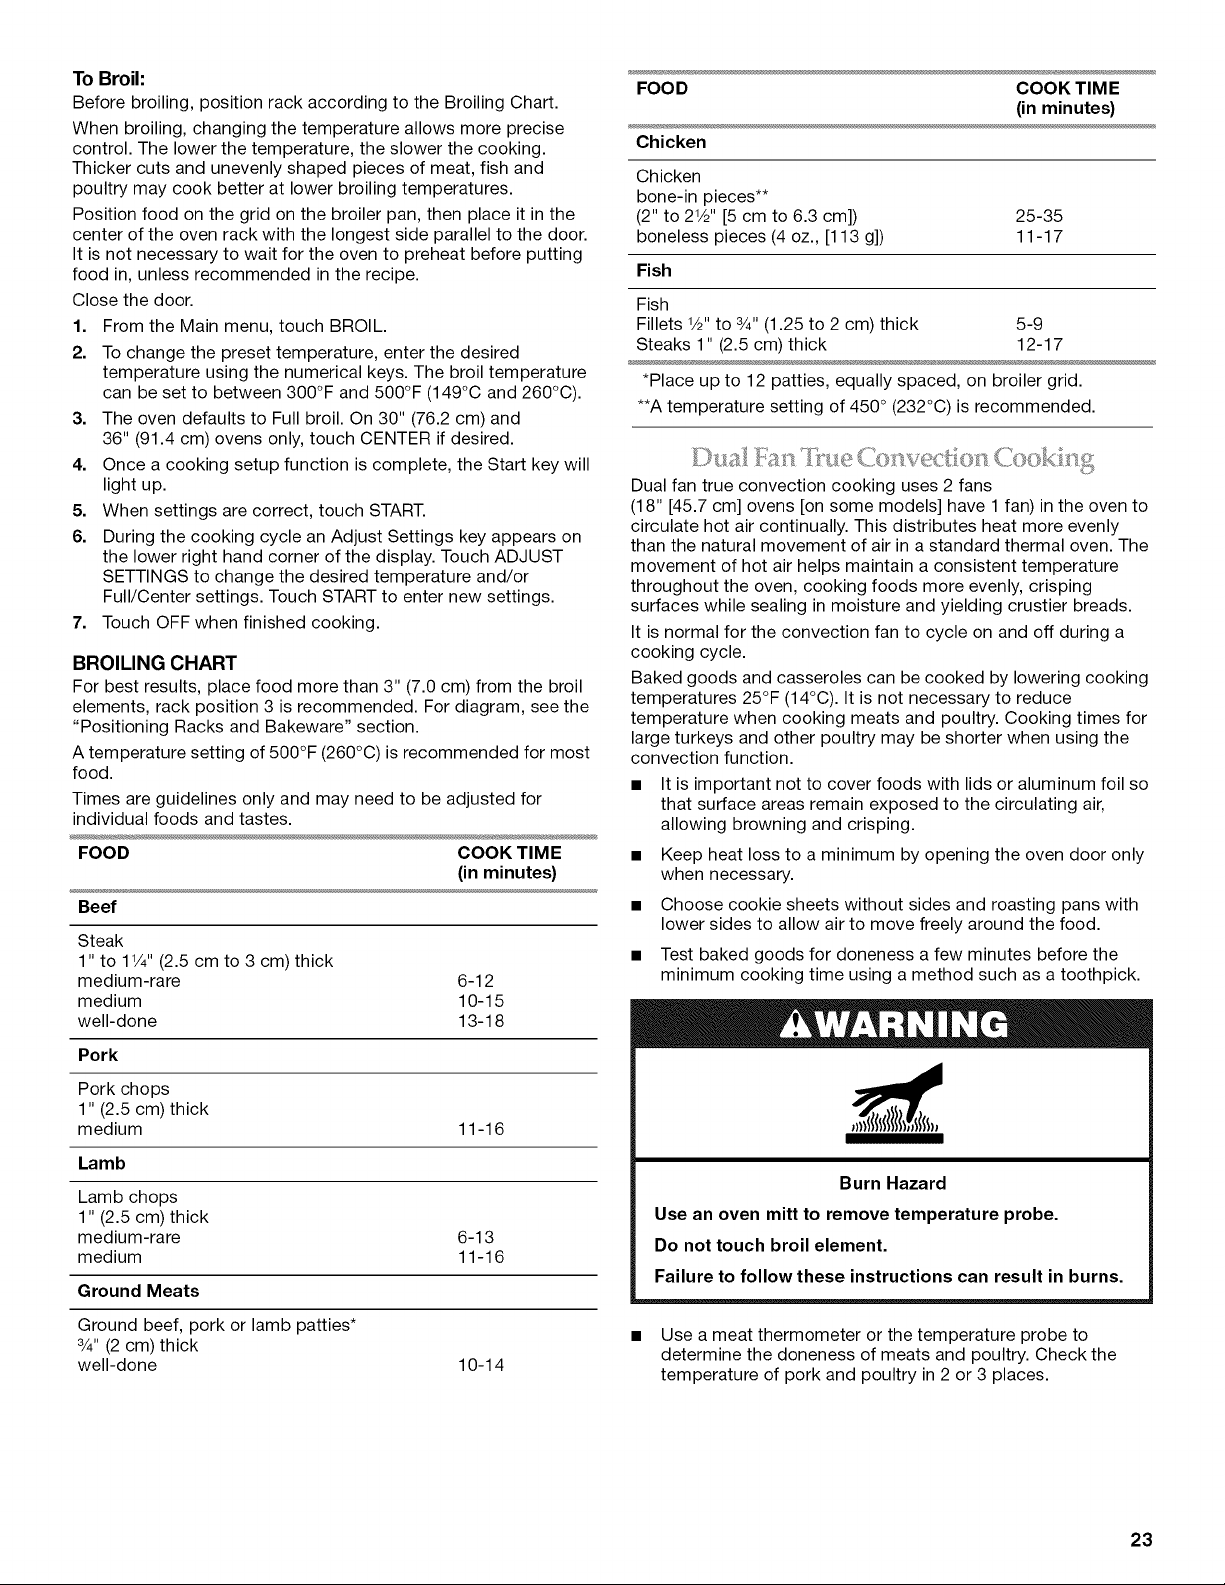
To Broil:
Before broiling, position rack according to the Broiling Chart.
When broiling, changing the temperature allows more precise
control. The lower the temperature, the slower the cooking.
Thicker cuts and unevenly shaped pieces of meat, fish and
poultry may cook better at lower broiling temperatures.
Position food on the grid on the broiler pan, then place it in the
center of the oven rack with the longest side parallel to the door.
It is not necessary to wait for the oven to preheat before putting
food in, unless recommended in the recipe.
Close the door.
1. From the Main menu, touch BROIL.
2. To change the preset temperature, enter the desired
temperature using the numerical keys. The broil temperature
can be set to between 300°F and 500°F (149°C and 260°C).
3. The oven defaults to Full broil. On 30" (76.2 cm) and
36" (91.4 cm) ovens only, touch CENTER if desired.
4. Once a cooking setup function is complete, the Start key will
light up.
5. When settings are correct, touch START.
6. During the cooking cycle an Adjust Settings key appears on
the lower right hand corner of the display. Touch ADJUST
SETTINGS to change the desired temperature and/or
Full/Center settings. Touch START to enter new settings.
7. Touch OFF when finished cooking.
BROILING CHART
For best results, place food more than 3" (7.0 cm) from the broil
elements, rack position 3 is recommended. For diagram, see the
"Positioning Racks and Bakeware" section.
A temperature setting of 500°F (260°C) is recommended for most
food.
Times are guidelines only and may need to be adjusted for
individual foods and tastes.
FOOD COOK TIME
(in minutes)
Beef
Steak
1" to 11/4"(2.5 cm to 3 cm) thick
medium-rare 6-12
medium 10-15
well-done 13-18
Pork
Pork chops
1" (2.5 cm) thick
medium 11-16
Lamb
Lamb chops
1" (2.5 cm) thick
medium-rare 6-13
medium 11-16
Ground Meats
Ground beef, pork or lamb patties*
3/4" (2 cm) thick
well-done 10-14
FOOD COOK TIME
(in minutes)
Chicken
Chicken
bone-in pieces**
(2" to 21/2'' [5 cm to 6.3 cm]) 25-35
boneless pieces (4 oz., [113 g]) 11-17
Fish
Fish
Fillets 1/2"to 3/4"(1.25 to 2 cm) thick 5-9
Steaks 1" (2.5 cm) thick 12-17
*Place up to 12 patties, equally spaced, on broiler grid.
**A temperature setting of 450 ° (232°C) is recommended.
Dual fan true convection cooking uses 2 fans
(18" [45.7 cm] ovens [on some models] have 1 fan) in the oven to
circulate hot air continually. This distributes heat more evenly
than the natural movement of air in a standard thermal oven. The
movement of hot air helps maintain a consistent temperature
throughout the oven, cooking foods more evenly, crisping
surfaces while sealing in moisture and yielding crustier breads.
It is normal for the convection fan to cycle on and off during a
cooking cycle.
Baked goods and casseroles can be cooked by lowering cooking
temperatures 25°F (14°C). It is not necessary to reduce
temperature when cooking meats and poultry. Cooking times for
large turkeys and other poultry may be shorter when using the
convection function.
• It is important not to cover foods with lids or aluminum foil so
that surface areas remain exposed to the circulating air,
allowing browning and crisping.
• Keep heat loss to a minimum by opening the oven door only
when necessary.
• Choose cookie sheets without sides and roasting pans with
lower sides to allow air to move freely around the food.
• Test baked goods for doneness a few minutes before the
minimum cooking time using a method such as a toothpick.
Burn Hazard
Use an oven mitt to remove temperature probe.
Do not touch broil element.
Failure to follow these instructions can result in burns.
• Use a meat thermometer or the temperature probe to
determine the doneness of meats and poultry. Check the
temperature of pork and poultry in 2 or 3 places.
23
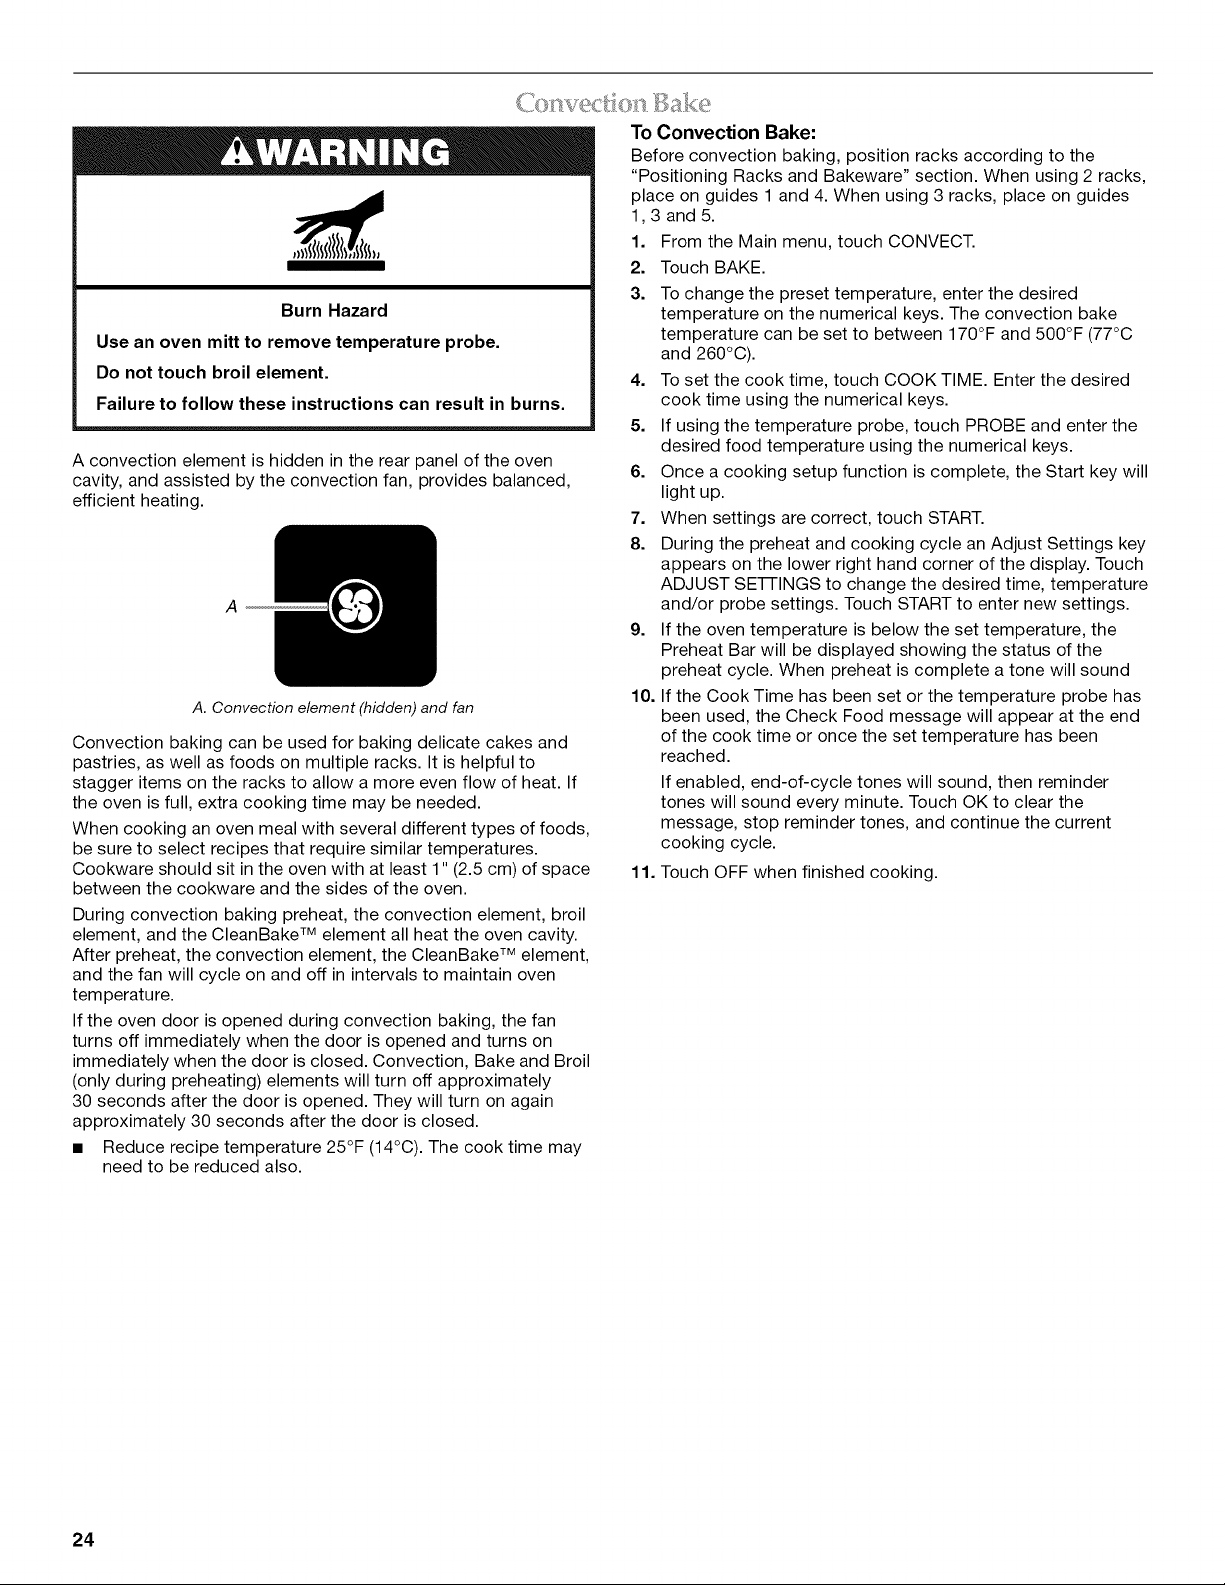
Burn Hazard
Use an oven mitt to remove temperature probe.
Do not touch broil element.
Failure to follow these instructions can result in burns.
A convection element is hidden in the rear panel of the oven
cavity, and assisted by the convection fan, provides balanced,
efficient heating.
A
A. Convection element (hidden) and fan
Convection baking can be used for baking delicate cakes and
pastries, as well as foods on multiple racks. It is helpful to
stagger items on the racks to allow a more even flow of heat. If
the oven is full, extra cooking time may be needed.
When cooking an oven meal with several different types of foods,
be sure to select recipes that require similar temperatures.
Cookware should sit in the oven with at least 1" (2.5 cm) of space
between the cookware and the sides of the oven.
During convection baking preheat, the convection element, broil
element, and the CleanBake TM element all heat the oven cavity.
After preheat, the convection element, the CleanBake TM element,
and the fan will cycle on and off in intervals to maintain oven
temperature.
If the oven door is opened during convection baking, the fan
turns off immediately when the door is opened and turns on
immediately when the door is closed. Convection, Bake and Broil
(only during preheating) elements will turn off approximately
30 seconds after the door is opened. They will turn on again
approximately 30 seconds after the door is closed.
• Reduce recipe temperature 25°F (14°C). The cook time may
need to be reduced also.
To Convection Bake:
Before convection baking, position racks according to the
"Positioning Racks and Bakeware" section. When using 2 racks,
place on guides 1 and 4. When using 3 racks, place on guides
1,3 and 5.
1. From the Main menu, touch CONVECT.
2. Touch BAKE.
3. To change the preset temperature, enter the desired
temperature on the numerical keys. The convection bake
temperature can be set to between 170°F and 500°F (77°C
and 260°C).
4. To set the cook time, touch COOKTIME. Enter the desired
cook time using the numerical keys.
5. If using the temperature probe, touch PROBE and enter the
desired food temperature using the numerical keys.
6. Once a cooking setup function is complete, the Start key will
light up.
7. When settings are correct, touch START.
8. During the preheat and cooking cycle an Adjust Settings key
appears on the lower right hand corner of the display. Touch
ADJUST SE-I-I-INGS to change the desired time, temperature
and/or probe settings. Touch START to enter new settings.
9. If the oven temperature is below the set temperature, the
Preheat Bar will be displayed showing the status of the
preheat cycle. When preheat is complete a tone will sound
10. If the Cook Time has been set or the temperature probe has
been used, the Check Food message will appear at the end
of the cook time or once the set temperature has been
reached.
If enabled, end-of-cycle tones will sound, then reminder
tones will sound every minute. Touch OK to clear the
message, stop reminder tones, and continue the current
cooking cycle.
11. Touch OFF when finished cooking.
24

Burn Hazard
Use an oven mitt to remove temperature probe.
Do not touch broil element.
Failure to follow these instructions can result in burns.
Convection roasting is used for roasting meats and poultry.
During convection roasting, the CleanBake TM and broil elements
will cycle on and off in intervals to maintain oven temperature,
while the fan constantly circulates the hot air.
6. Once a cooking setup function is complete, the Start key will
light up.
7. When settings are correct, touch START.
8. During the preheat and cooking cycle an Adjust Settings key
appears on the lower right hand corner of the display. Touch
ADJUST SE-i-i-INGS to change the desired time, temperature
and/or probe settings. Touch START to enter new settings.
9. If the oven temperature is below the set temperature, the
Preheat Bar will be displayed showing the status of the
preheat cycle. When preheat is complete a tone will sound.
10. If the Cook Time has been set or the temperature probe has
been used, the Check Food message will appear at the end
of the cook time or once the set temperature has been
reached.
If enabled, end-of-cycle tones will sound, then reminder
tones will sound every minute. Touch OK to clear the
message, stop reminder tones, and continue the current
cooking cycle.
11. Touch OFF when finished cooking.
A
B
C
A. Broil heat
B. Convection fan
C. Bake heat
If the oven door is opened during convection roasting, the fan
turns off immediately when the door is opened and turns on
immediately when the door is closed. Broil and bake elements
will turn off approximately 30 seconds after the door is opened.
They will turn on again approximately 30 seconds after the door
is closed.
• It is not necessary to reduce oven temperature when roasting
with convection. Roasting time may be shorter for poultry.
• For best results, use a broiler pan, grid and roasting rack,
designed to drain juices and help avoid spatter and smoke.
If you would like to purchase a Broiler Pan Kit, it may be
ordered. See "Assistance or Service" section to order. Ask for
Part Number W10123240.
To Convection Roast:
Before convection roasting, position racks according to the
"Positioning Racks and Bakeware" section. It is not necessary to
wait for the oven to preheat before putting food in, unless
recommended in the recipe.
Use a roasting rack on top of the broiler pan and grid. This holds
the food above the grid and allows air to circulate completely
around all surfaces.
1. From the Main menu, touch CONVECT.
2. Touch ROAST.
3. To change the preset temperature, enter the desired
temperature on the numerical keys. The convection roast
temperature can be set to between 170°F and 500°F (77°C
and 260°C).
4. To change the cook time, touch COOK TIME. Enter the
desired cook time using the numerical keys.
5. If using the temperature probe, touch PROBE and enter the
desired food temperature using the numerical keys.
A
B
A. Broil heat
B. Convection fan
During convection broiling, the broil elements will cycle on and off
in intervals to maintain oven temperature, while the fan constantly
circulates the hot air.
The temperature is preset at 325°F (163°C), but can be changed
to a different temperature. Cooking times will vary depending on
the rack position and temperature and may need to be adjusted.
If the oven door is opened during convection broiling, the fan
turns off immediately when door is opened and turns on again
immediately when door is closed. Broil elements will turn off
approximately 30 seconds after the door is opened. They will turn
on again approximately 30 seconds after the door is closed.
To Convection Broil:
Before convection broiling, see "Full and Center Broiling" section
for general broiling guidelines. Position rack.
Allow the oven to preheat for 5 minutes. Position food on the
unheated grid on the broiler pan, then place it in the center of the
oven rack with the longest side parallel to the door.
Close the door.
1. From the Main menu, touch CONVECT.
2. Touch BROIL.
3. To change the preset temperature, enter the desired
temperature on the numerical keys. The convection broil
temperature can be set between 300°F and 500°F (149°C and
260°C).
4. Once a cooking setup function is complete, the Start key will
light up.
5. When settings are correct, touch START.
6. Touch OFF when finished cooking.
25
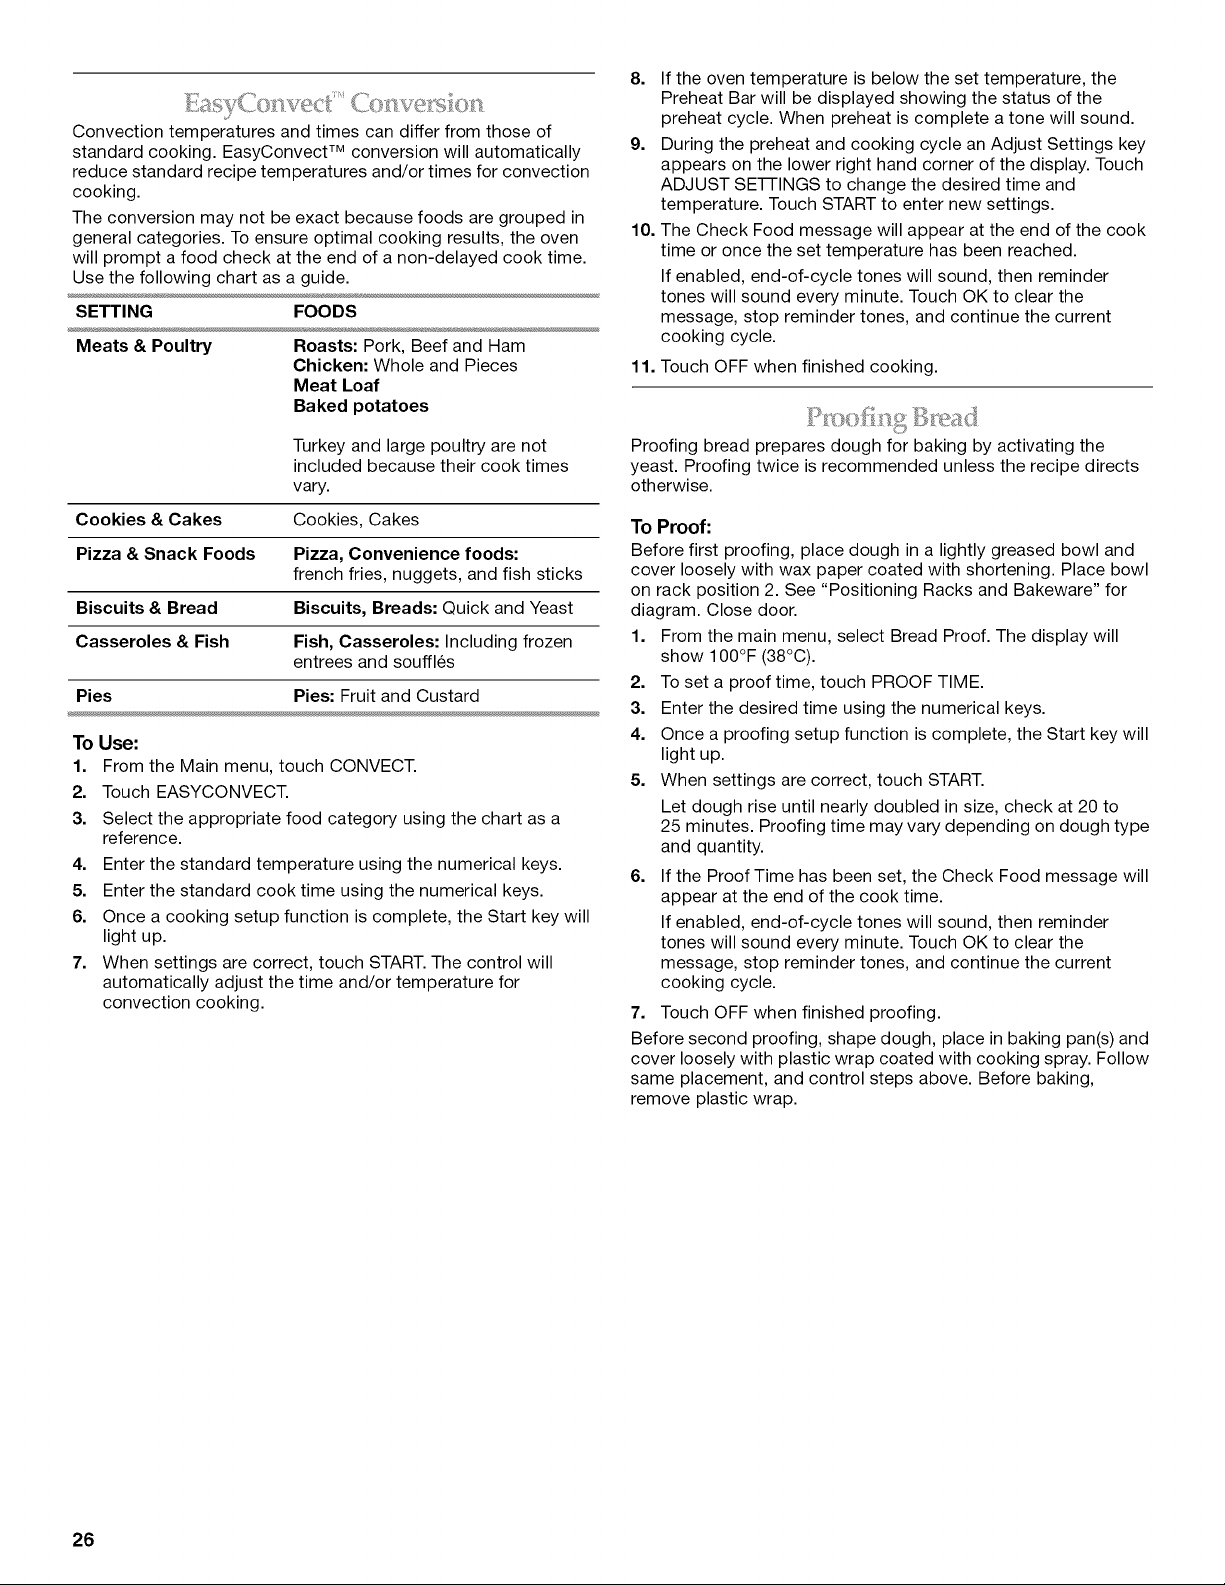
<
Convection temperatures and times can differ from those of
standard cooking. EasyConvect TM conversion will automatically
reduce standard recipe temperatures and/or times for convection
cooking.
The conversion may not be exact because foods are grouped in
general categories. To ensure optimal cooking results, the oven
will prompt a food check at the end of a non-delayed cook time.
Use the following chart as a guide.
SETTING FOODS
Meats & Poultry Roasts: Pork, Beef and Ham
Chicken: Whole and Pieces
Meat Loaf
Baked potatoes
Turkey and large poultry are not
included because their cook times
vary.
Cookies & Cakes Cookies, Cakes
Pizza & Snack Foods Pizza, Convenience foods:
french fries, nuggets, and fish sticks
Biscuits & Bread Biscuits, Breads: Quick and Yeast
Casseroles & Fish Fish, Casseroles: Including frozen
entrees and souffles
Pies Pies: Fruit and Custard
To Use:
1. From the Main menu, touch CONVECT,
2. Touch EASYCONVECT.
3. Select the appropriate food category using the chart as a
reference.
4. Enter the standard temperature using the numerical keys.
5. Enter the standard cook time using the numerical keys.
6. Once a cooking setup function is complete, the Start key will
light up.
7. When settings are correct, touch START. The control will
automatically adjust the time and/or temperature for
convection cooking.
8. If the oven temperature is below the set temperature, the
Preheat Bar will be displayed showing the status of the
preheat cycle. When preheat is complete a tone will sound.
9. During the preheat and cooking cycle an Adjust Settings key
appears on the lower right hand corner of the display. Touch
ADJUST SE-i-i-INGS to change the desired time and
temperature. Touch START to enter new settings.
10. The Check Food message will appear at the end of the cook
time or once the set temperature has been reached.
If enabled, end-of-cycle tones will sound, then reminder
tones will sound every minute. Touch OK to clear the
message, stop reminder tones, and continue the current
cooking cycle.
11. Touch OFF when finished cooking.
Ii:b'<!ad
Proofing bread prepares dough for baking by activating the
yeast. Proofing twice is recommended unless the recipe directs
otherwise.
To Proof:
Before first proofing, place dough in a lightly greased bowl and
cover loosely with wax paper coated with shortening. Place bowl
on rack position 2. See "Positioning Racks and Bakeware" for
diagram. Close door.
1. From the main menu, select Bread Proof. The display will
show 100°F (38°C).
2. To set a proof time, touch PROOF TIME.
3. Enter the desired time using the numerical keys.
4. Once a proofing setup function is complete, the Start key will
light up.
5. When settings are correct, touch START.
Let dough rise until nearly doubled in size, check at 20 to
25 minutes. Proofing time may vary depending on dough type
and quantity.
6. If the Proof Time has been set, the Check Food message will
appear at the end of the cook time.
If enabled, end-of-cycle tones will sound, then reminder
tones will sound every minute. Touch OK to clear the
message, stop reminder tones, and continue the current
cooking cycle.
7. Touch OFF when finished proofing.
Before second proofing, shape dough, place in baking pan(s) and
cover loosely with plastic wrap coated with cooking spray. Follow
same placement, and control steps above. Before baking,
remove plastic wrap.
26
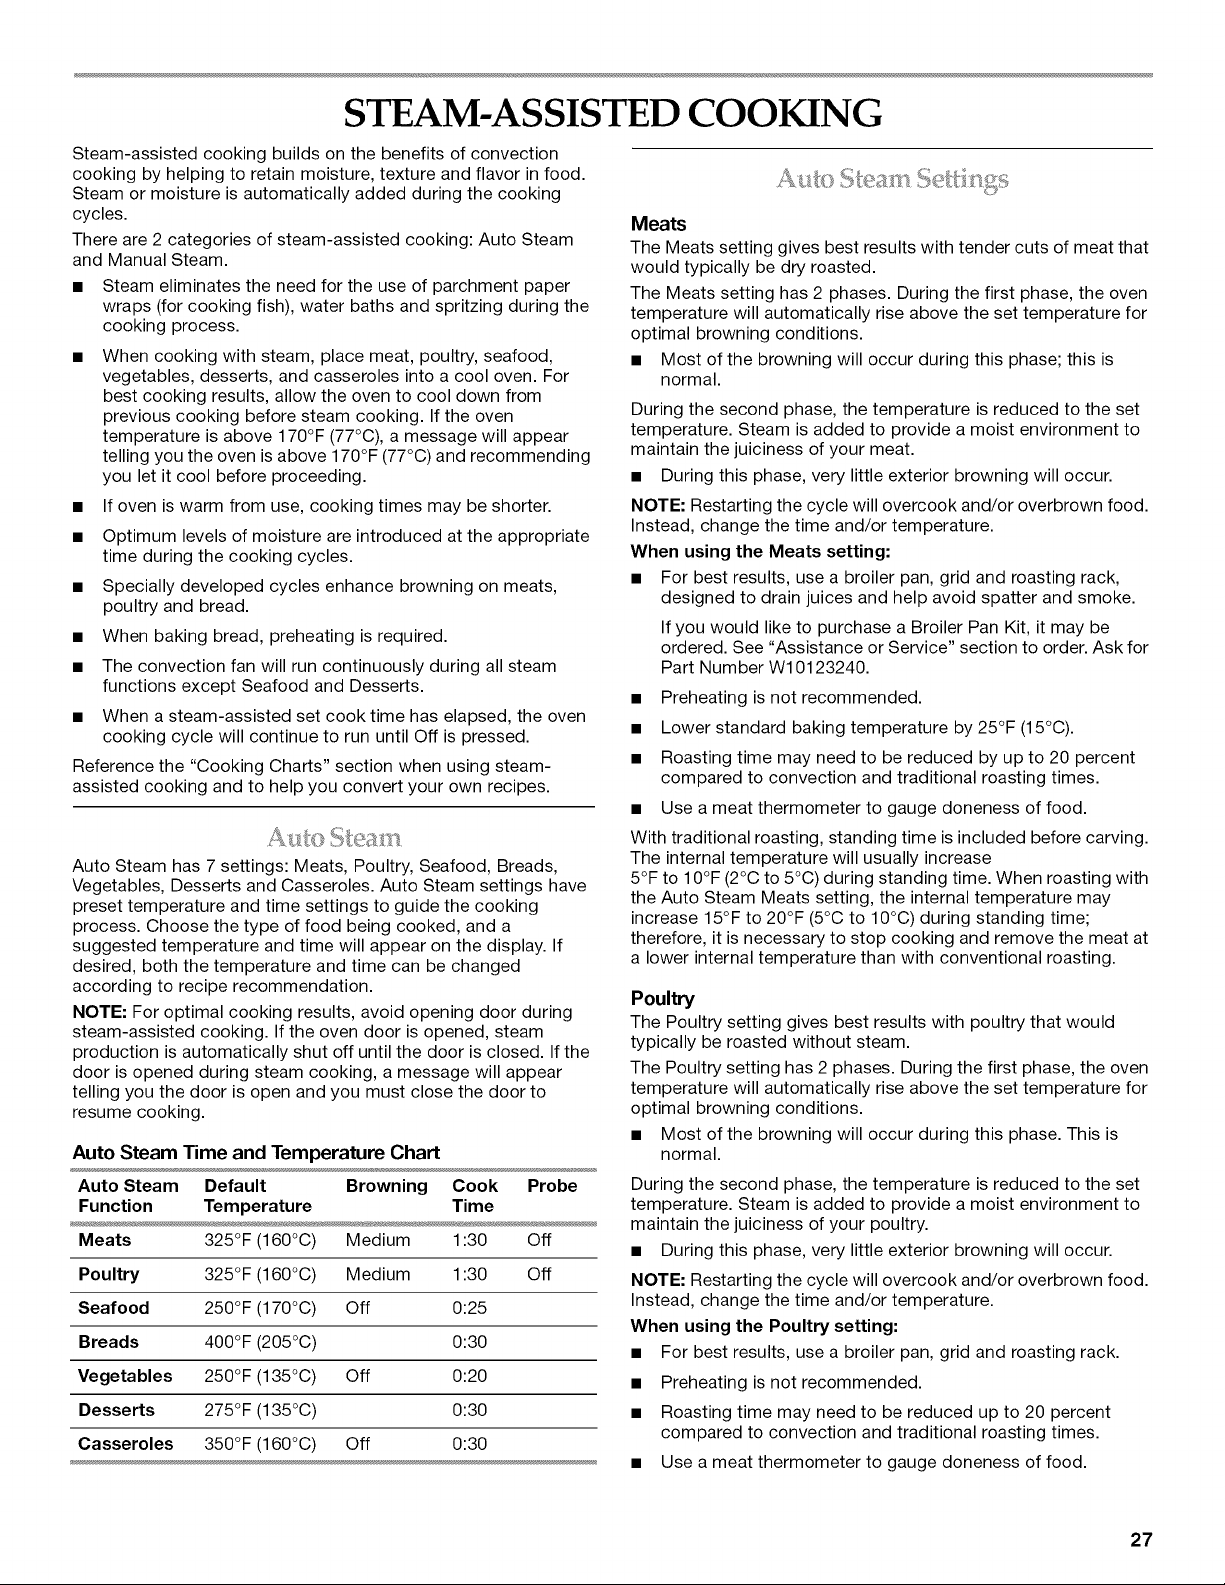
STEAM-ASSISTED COOKING
Steam-assisted cooking builds on the benefits of convection
cooking by helping to retain moisture, texture and flavor in food.
Steam or moisture is automatically added during the cooking
cycles.
There are 2 categories of steam-assisted cooking: Auto Steam
and Manual Steam.
• Steam eliminates the need for the use of parchment paper
wraps (for cooking fish), water baths and spritzing during the
cooking process.
• When cooking with steam, place meat, poultry, seafood,
vegetables, desserts, and casseroles into a cool oven. For
best cooking results, allow the oven to cool down from
previous cooking before steam cooking. If the oven
temperature is above 170°F (77°C), a message will appear
telling you the oven is above 170°F (77°C) and recommending
you let it cool before proceeding.
• If oven is warm from use, cooking times may be shorter.
• Optimum levels of moisture are introduced at the appropriate
time during the cooking cycles.
• Specially developed cycles enhance browning on meats,
poultry and bread.
• When baking bread, preheating is required.
• The convection fan will run continuously during all steam
functions except Seafood and Desserts.
• When a steam-assisted set cook time has elapsed, the oven
cooking cycle will continue to run until Off is pressed.
Reference the "Cooking Charts" section when using steam-
assisted cooking and to help you convert your own recipes.
Auto Steam has 7 settings: Meats, Poultry, Seafood, Breads,
Vegetables, Desserts and Casseroles. Auto Steam settings have
preset temperature and time settings to guide the cooking
process. Choose the type of food being cooked, and a
suggested temperature and time will appear on the display. If
desired, both the temperature and time can be changed
according to recipe recommendation.
NOTE: For optimal cooking results, avoid opening door during
steam-assisted cooking. If the oven door is opened, steam
production is automatically shut off until the door is closed. If the
door is opened during steam cooking, a message will appear
telling you the door is open and you must close the door to
resume cooking.
Auto Steam Time and Temperature Chart
Auto Steam Default Browning Cook Probe
Function Temperature Time
Meats 325°F (160°C) Medium 1:30 Off
Poultry 325°F (160°C) Medium 1:30 Off
Seafood 250°F (170°C) Off 0:25
Breads 400°F (205°C) 0:30
Vegetables 250°F (135°C) Off 0:20
Desserts 275°F (135°C) 0:30
Casseroles 350°F (160°C) Off 0:30
Meats
The Meats setting gives best results with tender cuts of meat that
would typically be dry roasted.
The Meats setting has 2 phases. During the first phase, the oven
temperature will automatically rise above the set temperature for
optimal browning conditions.
• Most of the browning will occur during this phase; this is
normal.
During the second phase, the temperature is reduced to the set
temperature. Steam is added to provide a moist environment to
maintain the juiciness of your meat.
• During this phase, very little exterior browning will occur.
NOTE: Restarting the cycle will overcook and/or overbrown food.
Instead, change the time and/or temperature.
When using the Meats setting:
• For best results, use a broiler pan, grid and roasting rack,
designed to drain juices and help avoid spatter and smoke.
If you would like to purchase a Broiler Pan Kit, it may be
ordered. See "Assistance or Service" section to order. Ask for
Part Number W10123240.
• Preheating is not recommended.
• Lower standard baking temperature by 25°F (15°C).
• Roasting time may need to be reduced by up to 20 percent
compared to convection and traditional roasting times.
• Use a meat thermometer to gauge doneness of food.
With traditional roasting, standing time is included before carving.
The internal temperature will usually increase
5°F to 10°F (2°C to 5°C) during standing time. When roasting with
the Auto Steam Meats setting, the internal temperature may
increase 15°F to 20°F (5°C to 10°C) during standing time;
therefore, it is necessary to stop cooking and remove the meat at
a lower internal temperature than with conventional roasting.
Poultry
The Poultry setting gives best results with poultry that would
typically be roasted without steam.
The Poultry setting has 2 phases. During the first phase, the oven
temperature will automatically rise above the set temperature for
optimal browning conditions.
• Most of the browning will occur during this phase. This is
normal.
During the second phase, the temperature is reduced to the set
temperature. Steam is added to provide a moist environment to
maintain the juiciness of your poultry.
• During this phase, very little exterior browning will occur.
NOTE: Restarting the cycle will overcook and/or overbrown food.
Instead, change the time and/or temperature.
When using the Poultry setting:
• For best results, use a broiler pan, grid and roasting rack.
• Preheating is not recommended.
• Roasting time may need to be reduced up to 20 percent
compared to convection and traditional roasting times.
• Use a meat thermometer to gauge doneness of food.
27
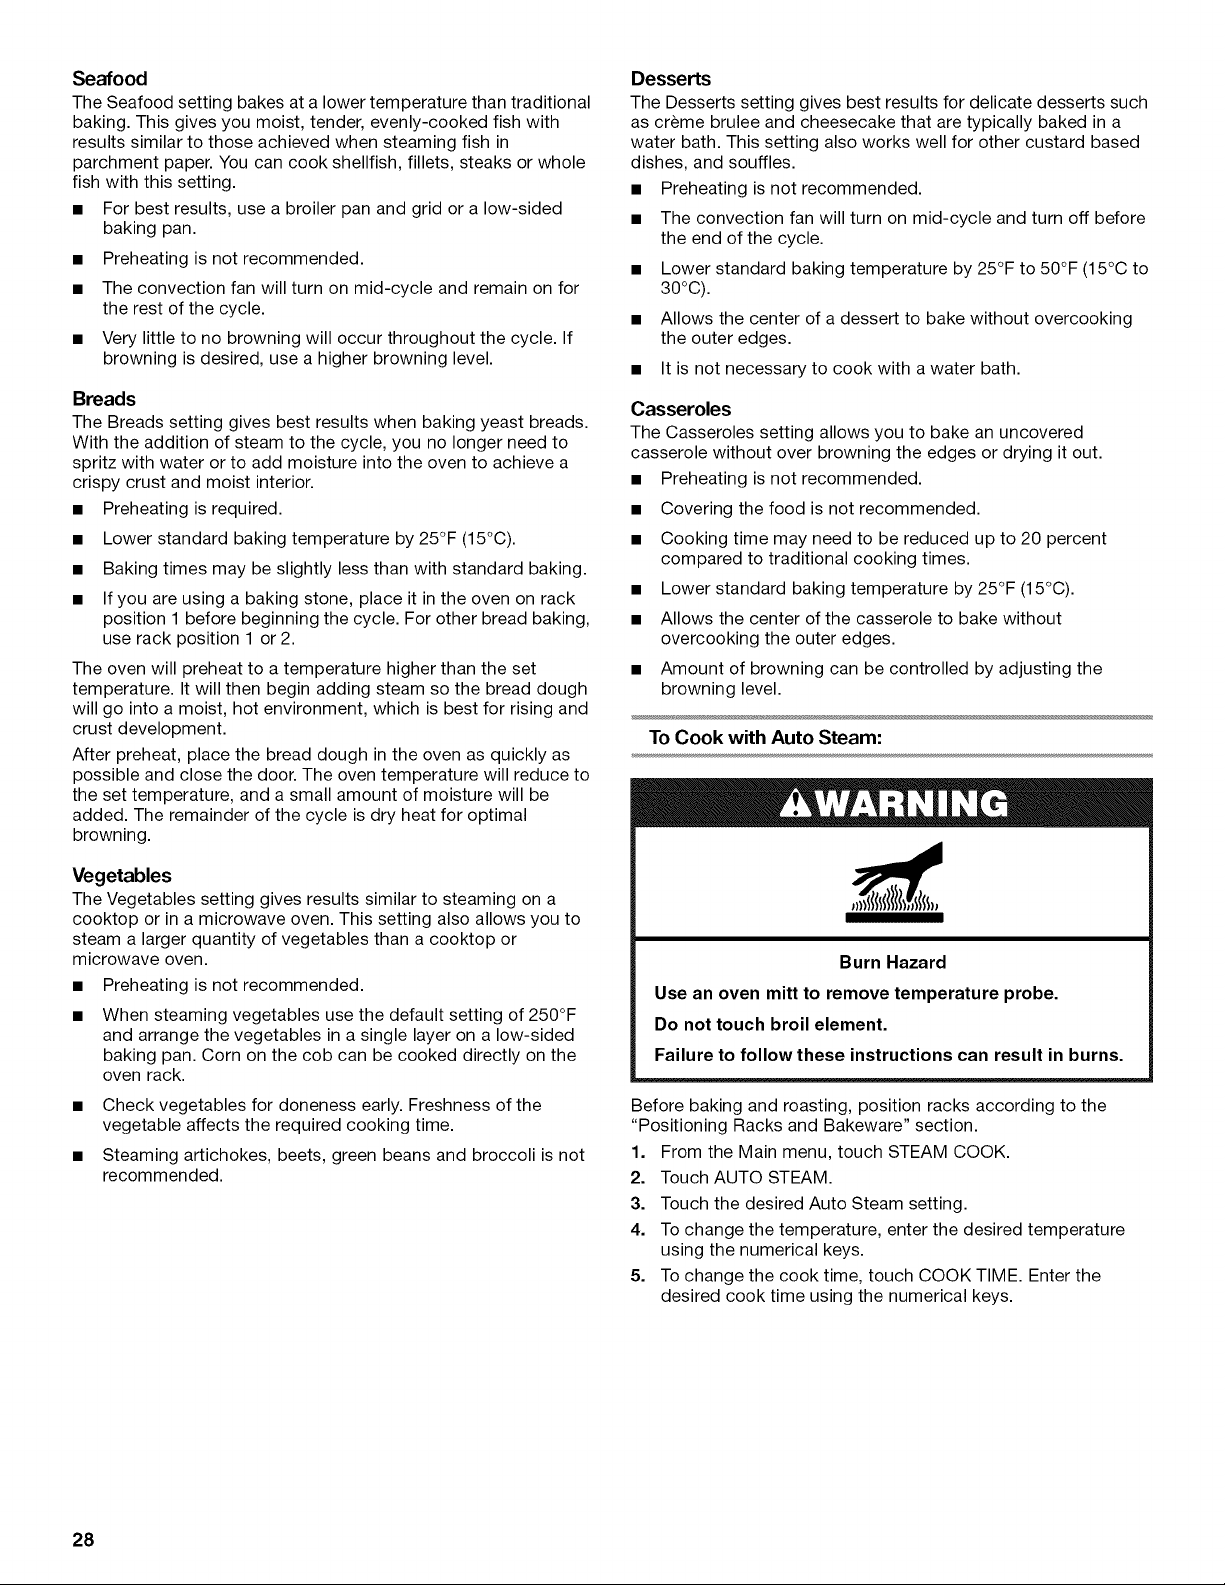
Seafood
The Seafood setting bakes at a lower temperature than traditional
baking. This gives you moist, tender, evenly-cooked fish with
results similar to those achieved when steaming fish in
parchment paper. You can cook shellfish, fillets, steaks or whole
fish with this setting.
• For best results, use a broiler pan and grid or a low-sided
baking pan.
• Preheating is not recommended.
• The convection fan will turn on mid-cycle and remain on for
the rest of the cycle.
• Very little to no browning will occur throughout the cycle. If
browning is desired, use a higher browning level.
Breads
The Breads setting gives best results when baking yeast breads.
With the addition of steam to the cycle, you no longer need to
spritz with water or to add moisture into the oven to achieve a
crispy crust and moist interior.
• Preheating is required.
• Lower standard baking temperature by 25°F (15°C).
• Baking times may be slightly less than with standard baking.
• If you are using a baking stone, place it in the oven on rack
position 1 before beginning the cycle. For other bread baking,
use rack position 1 or 2.
The oven will preheat to a temperature higher than the set
temperature. It will then begin adding steam so the bread dough
will go into a moist, hot environment, which is best for rising and
crust development.
After preheat, place the bread dough in the oven as quickly as
possible and close the door. The oven temperature will reduce to
the set temperature, and a small amount of moisture will be
added. The remainder of the cycle is dry heat for optimal
browning.
Vegetables
The Vegetables setting gives results similar to steaming on a
cooktop or in a microwave oven. This setting also allows you to
steam a larger quantity of vegetables than a cooktop or
microwave oven.
• Preheating is not recommended.
• When steaming vegetables use the default setting of 250°F
and arrange the vegetables in a single layer on a low-sided
baking pan. Corn on the cob can be cooked directly on the
oven rack.
• Check vegetables for doneness early. Freshness of the
vegetable affects the required cooking time.
• Steaming artichokes, beets, green beans and broccoli is not
recommended.
Desserts
The Desserts setting gives best results for delicate desserts such
as cr_me brulee and cheesecake that are typically baked in a
water bath. This setting also works well for other custard based
dishes, and souffles.
• Preheating is not recommended.
• The convection fan will turn on mid-cycle and turn off before
the end of the cycle.
• Lower standard baking temperature by 25°F to 50°F (15°C to
30°C).
• Allows the center of a dessert to bake without overcooking
the outer edges.
• It is not necessary to cook with a water bath.
Casseroles
The Casseroles setting allows you to bake an uncovered
casserole without over browning the edges or drying it out.
• Preheating is not recommended,
• Covering the food is not recommended,
• Cooking time may need to be reduced up to 20 percent
compared to traditional cooking times,
• Lower standard baking temperature by 25°F (15°C).
• Allows the center of the casserole to bake without
overcooking the outer edges.
• Amount of browning can be controlled by adjusting the
browning level.
To Cook with Auto Steam:
Burn Hazard
Use an oven mitt to remove temperature probe.
Do not touch broil element.
Failure to follow these instructions can result in burns.
Before baking and roasting, position racks according to the
"Positioning Racks and Bakeware" section.
1. From the Main menu, touch STEAM COOK.
2. Touch AUTO STEAM.
3. Touch the desired Auto Steam setting.
4. To change the temperature, enter the desired temperature
using the numerical keys.
5. To change the cook time, touch COOK TIME. Enter the
desired cook time using the numerical keys.
28
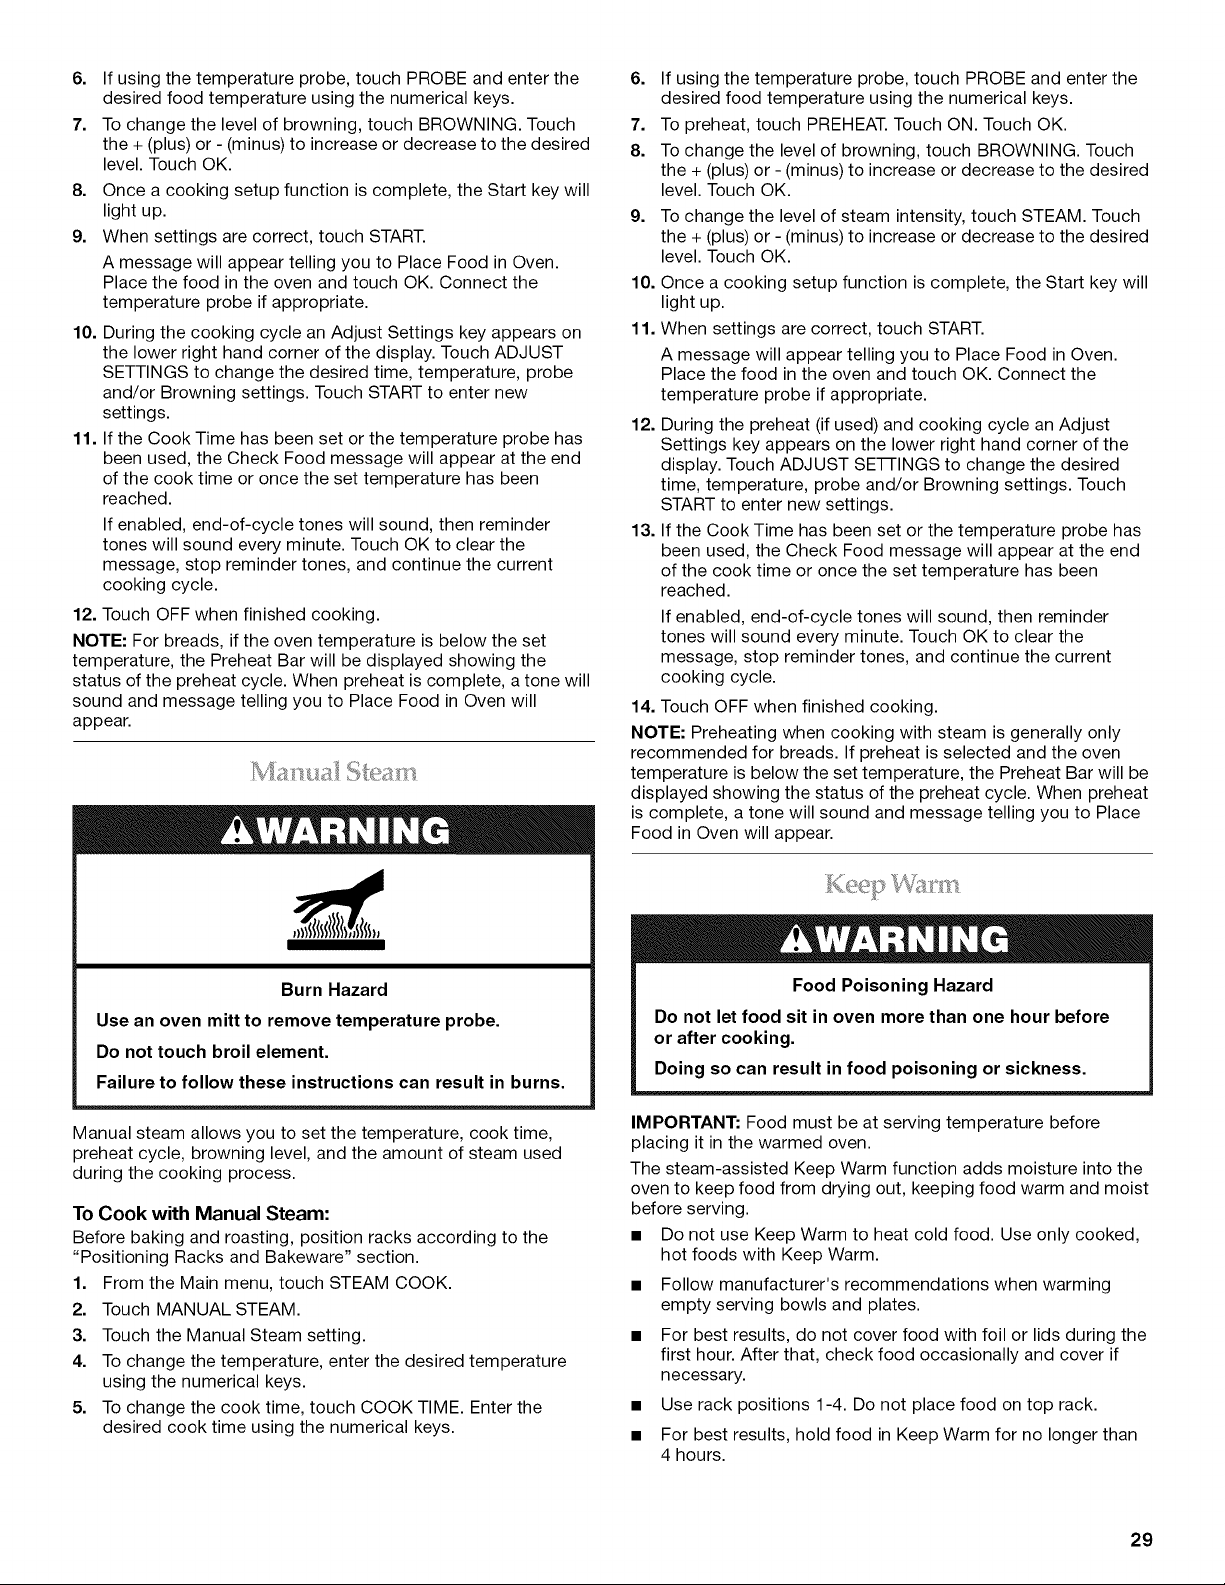
6. If using the temperature probe, touch PROBE and enter the
desired food temperature using the numerical keys.
7. To change the level of browning, touch BROWNING. Touch
the + (plus) or - (minus) to increase or decrease to the desired
level. Touch OK.
8. Once a cooking setup function is complete, the Start key will
light up.
9. When settings are correct, touch START.
A message will appear telling you to Place Food in Oven.
Place the food in the oven and touch OK. Connect the
temperature probe if appropriate.
10. During the cooking cycle an Adjust Settings key appears on
the lower right hand corner of the display. Touch ADJUST
SETTINGS to change the desired time, temperature, probe
and/or Browning settings. Touch START to enter new
settings.
11. If the Cook Time has been set or the temperature probe has
been used, the Check Food message will appear at the end
of the cook time or once the set temperature has been
reached.
If enabled, end-of-cycle tones will sound, then reminder
tones will sound every minute. Touch OK to clear the
message, stop reminder tones, and continue the current
cooking cycle.
12. Touch OFF when finished cooking.
NOTE: For breads, if the oven temperature is below the set
temperature, the Preheat Bar will be displayed showing the
status of the preheat cycle. When preheat is complete, a tone will
sound and message telling you to Place Food in Oven will
appear.
Burn Hazard
Use an oven mitt to remove temperature probe.
Do not touch broil element.
Failure to follow these instructions can result in burns.
Manual steam allows you to set the temperature, cook time,
preheat cycle, browning level, and the amount of steam used
during the cooking process.
To Cook with Manual Steam:
Before baking and roasting, position racks according to the
"Positioning Racks and Bakeware" section.
1. From the Main menu, touch STEAM COOK.
2. Touch MANUAL STEAM.
3. Touch the Manual Steam setting.
4. To change the temperature, enter the desired temperature
using the numerical keys.
5. To change the cook time, touch COOK TIME. Enter the
desired cook time using the numerical keys.
6. If using the temperature probe, touch PROBE and enter the
desired food temperature using the numerical keys.
7. To preheat, touch PREHEAT. Touch ON. Touch OK.
8. To change the level of browning, touch BROWNING. Touch
the + (plus) or - (minus) to increase or decrease to the desired
level. Touch OK.
9. To change the level of steam intensity, touch STEAM. Touch
the + (plus) or - (minus) to increase or decrease to the desired
level. Touch OK.
10. Once a cooking setup function is complete, the Start key will
light up.
11. When settings are correct, touch START.
A message will appear telling you to Place Food in Oven.
Place the food in the oven and touch OK. Connect the
temperature probe if appropriate.
12. During the preheat (if used) and cooking cycle an Adjust
Settings key appears on the lower right hand corner of the
display. Touch ADJUST SE-I-I-INGS to change the desired
time, temperature, probe and/or Browning settings. Touch
START to enter new settings.
13. If the Cook Time has been set or the temperature probe has
been used, the Check Food message will appear at the end
of the cook time or once the set temperature has been
reached.
If enabled, end-of-cycle tones will sound, then reminder
tones will sound every minute. Touch OK to clear the
message, stop reminder tones, and continue the current
cooking cycle.
14. Touch OFF when finished cooking.
NOTE: Preheating when cooking with steam is generally only
recommended for breads. If preheat is selected and the oven
temperature is below the set temperature, the Preheat Bar will be
displayed showing the status of the preheat cycle. When preheat
is complete, a tone will sound and message telling you to Place
Food in Oven will appear.
Food Poisoning Hazard
Do not let food sit in oven more than one hour before
or after cooking.
Doing so can result in food poisoning or sickness.
IMPORTANT: Food must be at serving temperature before
placing it in the warmed oven.
The steam-assisted Keep Warm function adds moisture into the
oven to keep food from drying out, keeping food warm and moist
before serving.
• Do not use Keep Warm to heat cold food. Use only cooked,
hot foods with Keep Warm.
• Follow manufacturer's recommendations when warming
empty serving bowls and plates.
• For best results, do not cover food with foil or lids during the
first hour. After that, check food occasionally and cover if
necessary.
• Use rack positions 1-4. Do not place food on top rack.
• For best results, hold food in Keep Warm for no longer than
4 hours.
29
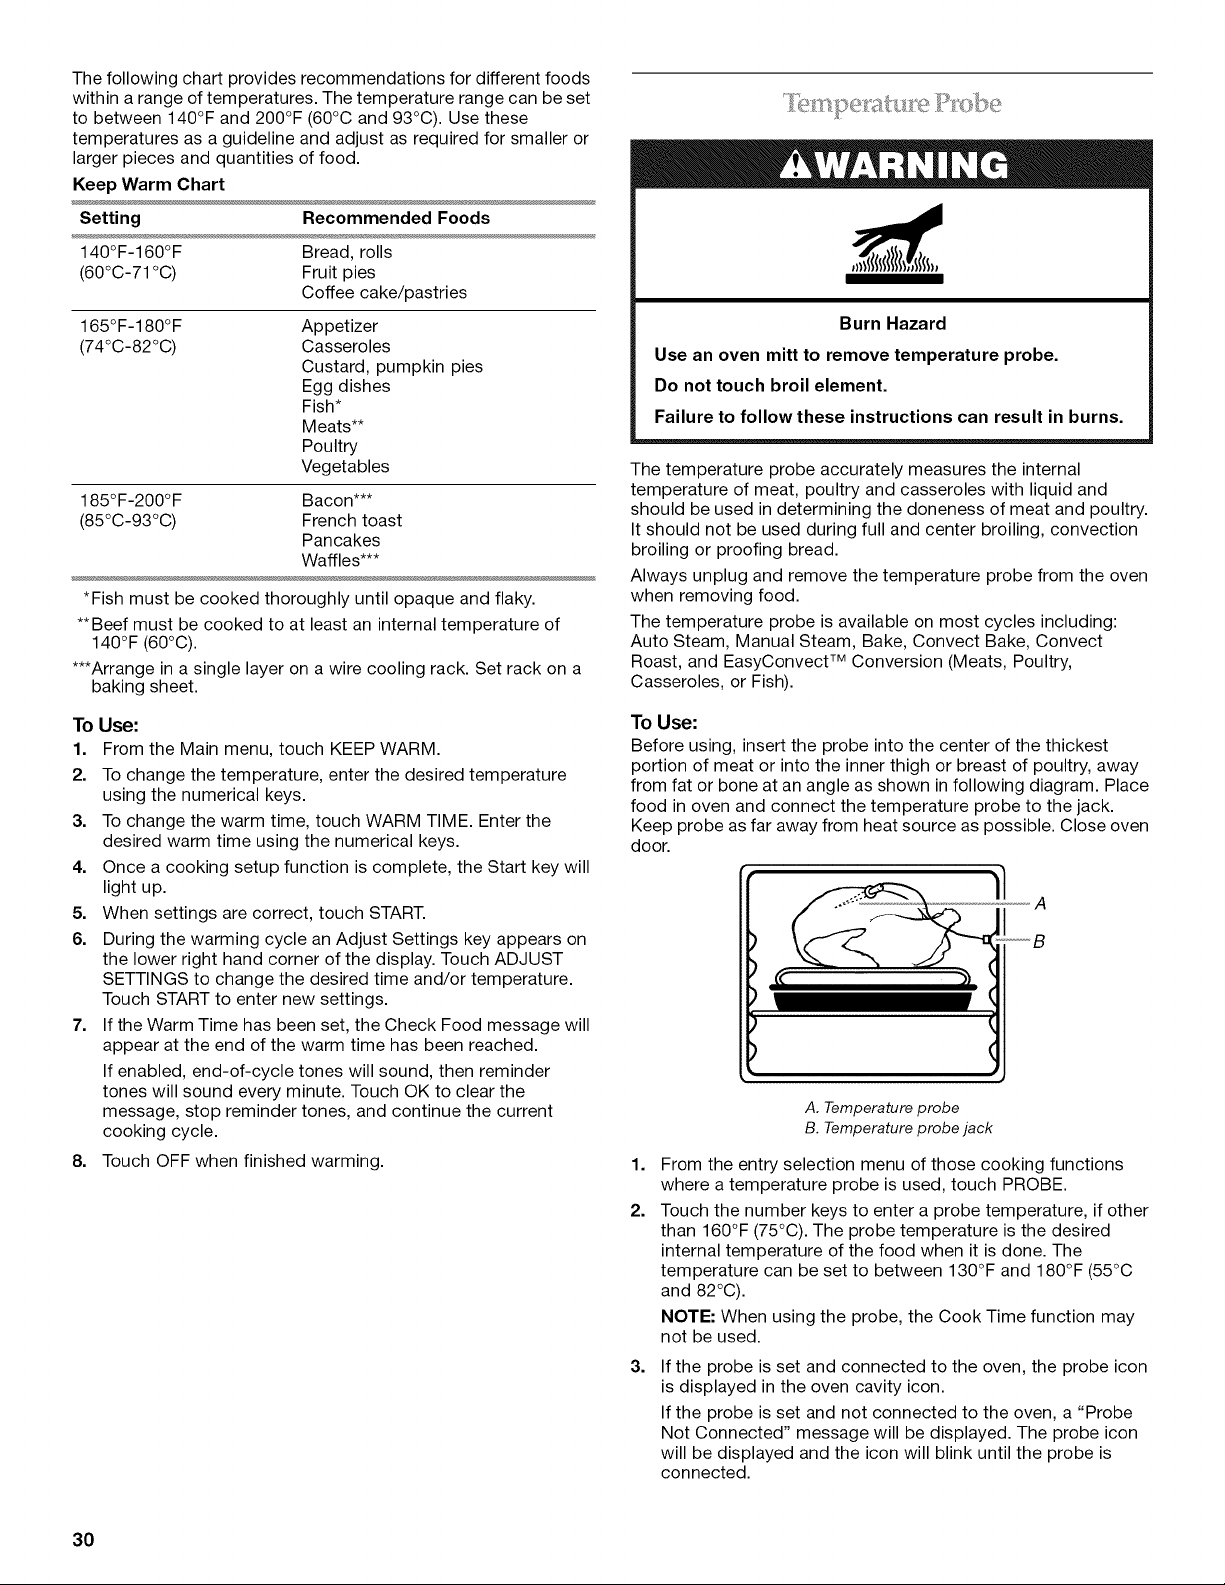
The following chart provides recommendations for different foods
within a range of temperatures. The temperature range can be set
to between 140°F and 200°F (60°C and 93°C). Use these
temperatures as a guideline and adjust as required for smaller or
larger pieces and quantities of food.
Keep Warm Chart
Setting Recommended Foods
140°F-160°F Bread, rolls
(60°C-71 °C) Fruit pies
Coffee cake/pastries
165°F-180°F
(74°C-82°C)
Appetizer
Casseroles
Custard, pumpkin pies
Egg dishes
Fish*
Meats**
Poultry
Vegetables
185°F-200°F Bacon***
(85°C-93°C) French toast
Pancakes
Waffles***
*Fish must be cooked thoroughly until opaque and flaky.
**Beef must be cooked to at least an internal temperature of
140°F (60°C).
***Arrange in a single layer on a wire cooling rack. Set rack on a
baking sheet.
To Use:
1. From the Main menu, touch KEEP WARM.
2. To change the temperature, enter the desired temperature
using the numerical keys.
3. To change the warm time, touch WARM TIME. Enter the
desired warm time using the numerical keys.
4. Once a cooking setup function is complete, the Start key will
light up.
5. When settings are correct, touch START.
6. During the warming cycle an Adjust Settings key appears on
the lower right hand corner of the display. Touch ADJUST
SETTINGS to change the desired time and/or temperature.
Touch START to enter new settings.
7. If the Warm Time has been set, the Check Food message will
appear at the end of the warm time has been reached.
If enabled, end-of-cycle tones will sound, then reminder
tones will sound every minute. Touch OK to clear the
message, stop reminder tones, and continue the current
cooking cycle.
8. Touch OFF when finished warming.
Burn Hazard
Use an oven mitt to remove temperature probe.
Do not touch broil element.
Failure to follow these instructions can result in burns.
The temperature probe accurately measures the internal
temperature of meat, poultry and casseroles with liquid and
should be used in determining the doneness of meat and poultry.
It should not be used during full and center broiling, convection
broiling or proofing bread.
Always unplug and remove the temperature probe from the oven
when removing food.
The temperature probe is available on most cycles including:
Auto Steam, Manual Steam, Bake, Convect Bake, Convect
Roast, and EasyConvect TM Conversion (Meats, Poultry,
Casseroles, or Fish).
To Use:
Before using, insert the probe into the center of the thickest
portion of meat or into the inner thigh or breast of poultry, away
from fat or bone at an angle as shown in following diagram. Place
food in oven and connect the temperature probe to the jack.
Keep probe as far away from heat source as possible. Close oven
door.
A
_B
1,
2.
3.
A. Temperature probe
B. Temperature probe jack
From the entry selection menu of those cooking functions
where a temperature probe is used, touch PROBE.
Touch the number keys to enter a probe temperature, if other
than 160°F (75°C). The probe temperature is the desired
internal temperature of the food when it is done. The
temperature can be set to between 130°F and 180°F (55°C
and 82°C).
NOTE: When using the probe, the Cook Time function may
not be used.
If the probe is set and connected to the oven, the probe icon
is displayed in the oven cavity icon.
If the probe is set and not connected to the oven, a "Probe
Not Connected" message will be displayed. The probe icon
will be displayed and the icon will blink until the probe is
connected.
30
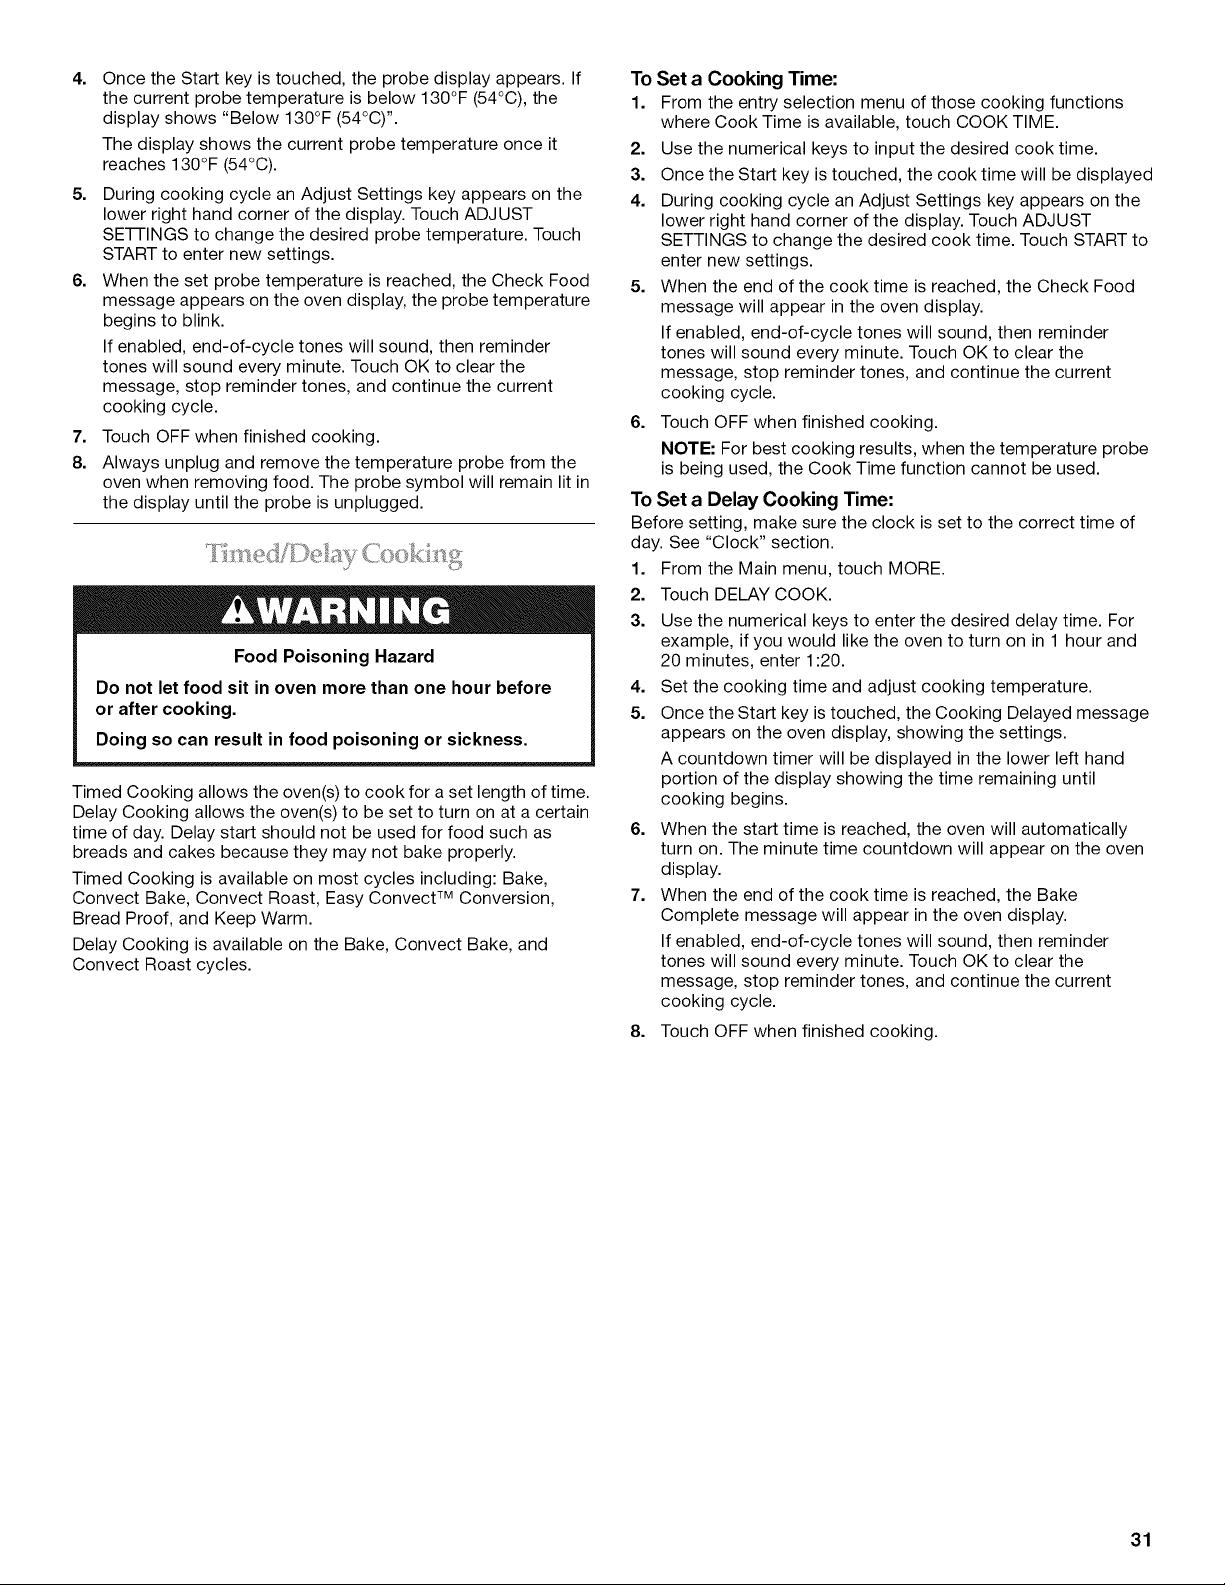
4. Once the Start key is touched, the probe display appears. If
the current probe temperature is below 130°F (54°C), the
display shows "Below 130°F (54°C) ''.
The display shows the current probe temperature once it
reaches 130°F (54°C).
5. During cooking cycle an Adjust Settings key appears on the
lower right hand corner of the display. Touch ADJUST
SE-I-I-INGS to change the desired probe temperature. Touch
START to enter new settings.
6. When the set probe temperature is reached, the Check Food
message appears on the oven display, the probe temperature
begins to blink.
If enabled, end-of-cycle tones will sound, then reminder
tones will sound every minute. Touch OK to clear the
message, stop reminder tones, and continue the current
cooking cycle.
7. Touch OFF when finished cooking.
8. Always unplug and remove the temperature probe from the
oven when removing food. The probe symbol will remain lit in
the display until the probe is unplugged.
Food Poisoning Hazard
Do not let food sit in oven more than one hour before
or after cooking.
Doing so can result in food poisoning or sickness.
Timed Cooking allows the oven(s) to cook for a set length of time.
Delay Cooking allows the oven(s) to be set to turn on at a certain
time of day. Delay start should not be used for food such as
breads and cakes because they may not bake properly.
Timed Cooking is available on most cycles including: Bake,
Convect Bake, Convect Roast, Easy Convect TM Conversion,
Bread Proof, and Keep Warm.
Delay Cooking is available on the Bake, Convect Bake, and
Convect Roast cycles.
To Set a Cooking Time:
1. From the entry selection menu of those cooking functions
where Cook Time is available, touch COOK TIME.
2. Use the numerical keys to input the desired cook time.
3. Once the Start key is touched, the cook time will be displayed
4. During cooking cycle an Adjust Settings key appears on the
lower right hand corner of the display. Touch ADJUST
SETTINGS to change the desired cook time. Touch START to
enter new settings.
5. When the end of the cook time is reached, the Check Food
message will appear in the oven display.
If enabled, end-of-cycle tones will sound, then reminder
tones will sound every minute. Touch OK to clear the
message, stop reminder tones, and continue the current
cooking cycle.
6. Touch OFF when finished cooking.
NOTE: For best cooking results, when the temperature probe
is being used, the Cook Time function cannot be used.
To Set a Delay Cooking Time:
Before setting, make sure the clock is set to the correct time of
day. See "Clock" section.
1. From the Main menu, touch MORE.
2. Touch DELAY COOK.
3. Use the numerical keys to enter the desired delay time. For
example, if you would like the oven to turn on in 1 hour and
20 minutes, enter 1:20.
4. Set the cooking time and adjust cooking temperature.
5. Once the Start key is touched, the Cooking Delayed message
appears on the oven display, showing the settings.
A countdown timer will be displayed in the lower left hand
portion of the display showing the time remaining until
cooking begins.
6. When the start time is reached, the oven will automatically
turn on. The minute time countdown will appear on the oven
display.
7. When the end of the cook time is reached, the Bake
Complete message will appear in the oven display.
If enabled, end-of-cycle tones will sound, then reminder
tones will sound every minute. Touch OK to clear the
message, stop reminder tones, and continue the current
cooking cycle.
8. Touch OFF when finished cooking.
31
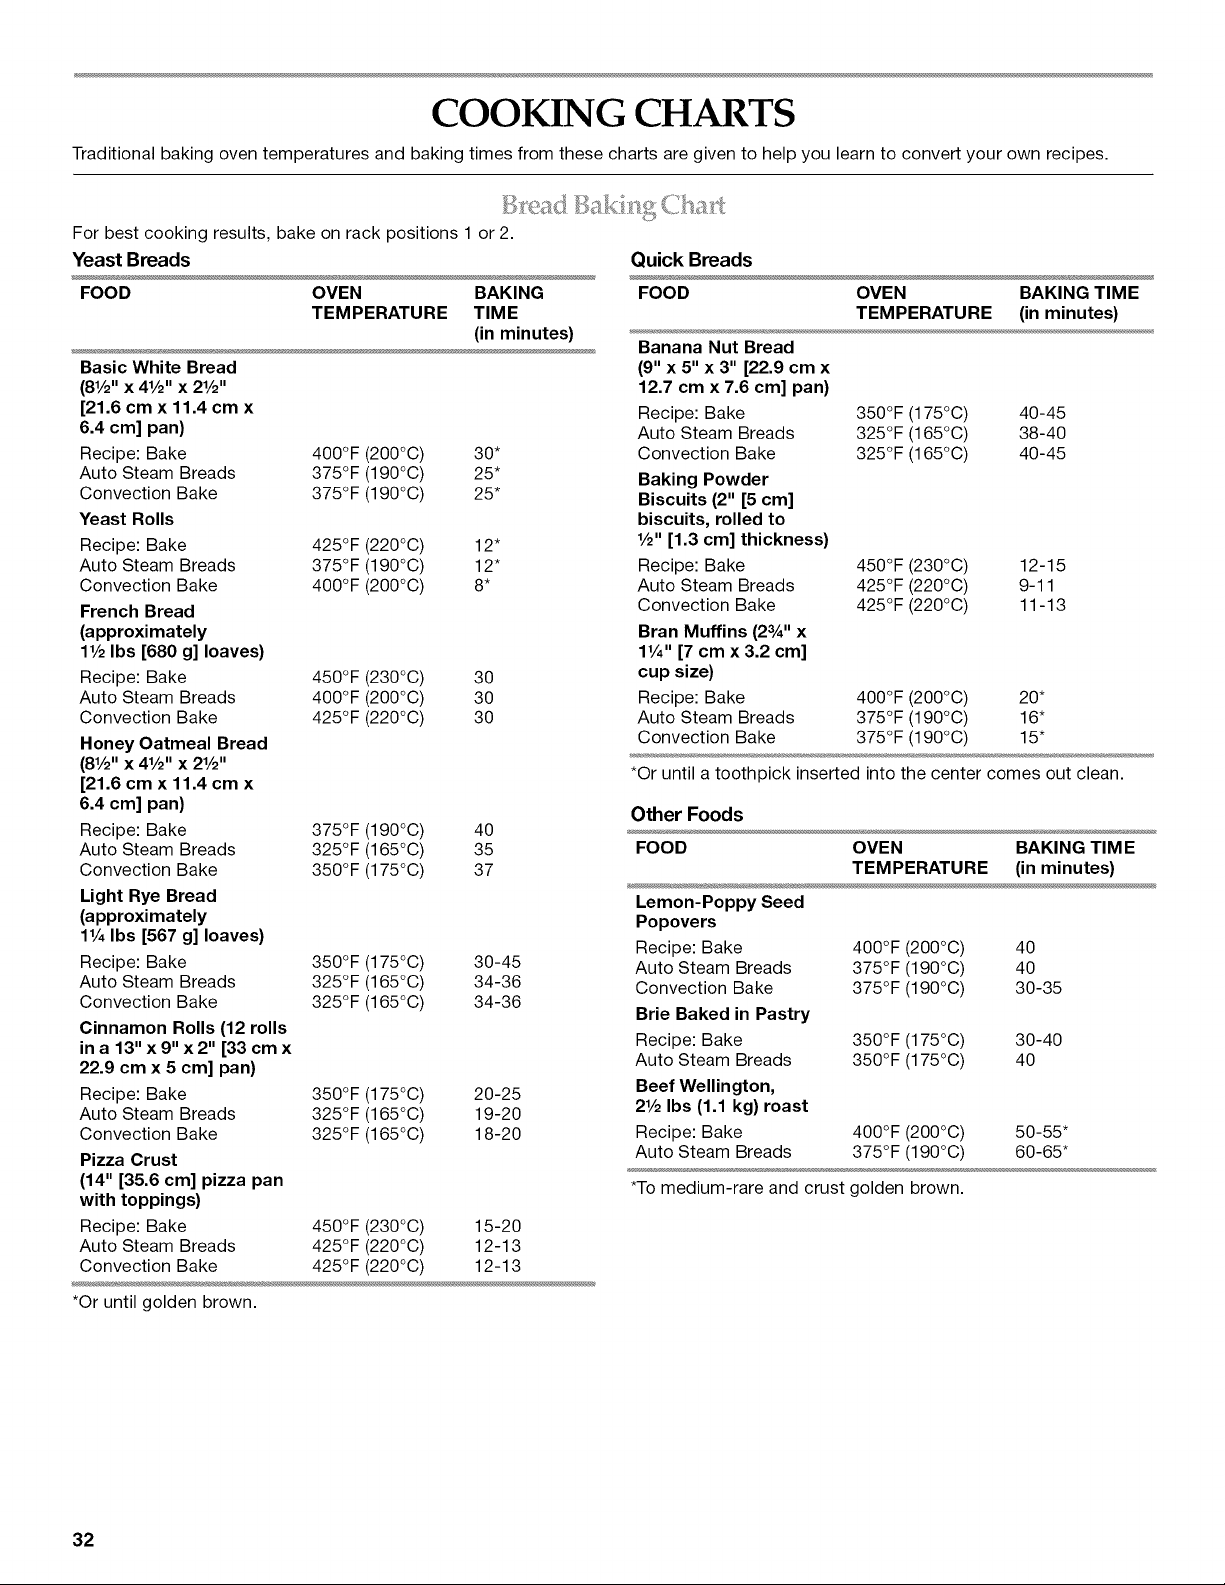
COOKING CHARTS
Traditional baking oven temperatures and baking times from these charts are given to help you learn to convert your own recipes.
7
For best cooking results, bake on rack positions 1 or 2.
Yeast Breads
FOOD OVEN BAKING
TEMPERATURE TIME
(in minutes)
Basic White Bread
(81/2'' x 41/2'' x 21/2''
[21.6 cm x 11.4 cm x
6.4 cm] pan)
Recipe: Bake 400°F (200°C) 30*
Auto Steam Breads 375°F (190°C) 25*
Convection Bake 375°F (190°C) 25*
Yeast Rolls
Recipe: Bake 425°F (220°C) 12"
Auto Steam Breads 375°F (190°C) 12"
Convection Bake 400°F (200°C) 8*
French Bread
(approximately
11/2Ibs [680 g] loaves)
Recipe: Bake 450°F (230°C) 30
Auto Steam Breads 400°F (200°C) 30
Convection Bake 425°F (220°C) 30
Honey Oatmeal Bread
(81/2'' x 41/2'' x 21/2''
[21.6 cm x 11.4 cm x
6.4 cm] pan)
Recipe: Bake 375°F (190°C) 40
Auto Steam Breads 325°F (165°C) 35
Convection Bake 350°F (175°C) 37
Light Rye Bread
(approximately
11/4Ibs [567 g] loaves)
Recipe: Bake 350°F (175°C) 30-45
Auto Steam Breads 325°F (165°C) 34-36
Convection Bake 325°F (165°C) 34-36
Cinnamon Rolls (12 rolls
in a 13" x 9" x 2" [33 cm x
22.9 cm x 5 cm] pan)
Recipe: Bake 350°F (175°C) 20-25
Auto Steam Breads 325°F (165°C) 19-20
Convection Bake 325°F (165°C) 18-20
Pizza Crust
(14" [35.6 cm] pizza pan
with toppings)
Recipe: Bake 450°F (230°C) 15-20
Auto Steam Breads 425°F (220°C) 12-13
Convection Bake 425°F (220°C) 12-13
*Or until golden brown.
Quick Breads
FOOD OVEN BAKING TIME
TEMPERATURE (in minutes)
Banana Nut Bread
(9" x 5" x 3" [22.9 cm x
12.7 cm x 7.6 cm] pan)
Recipe: Bake 350°F (175°C) 40-45
Auto Steam Breads 325°F (165°C) 38-40
Convection Bake 325°F (165°C) 40-45
Baking Powder
Biscuits (2" [5 cm]
biscuits, rolled to
1/2" [1.3 cm] thickness)
Recipe: Bake 450°F (230°C) 12-15
Auto Steam Breads 425°F (220°C) 9-11
Convection Bake 425°F (220°C) 11-13
Bran Muffins (2aA'' x
11/4'' [7 cm x 3.2 cm]
cup size)
Recipe: Bake 400°F (200°C) 20*
Auto Steam Breads 375°F (190°C) 16"
Convection Bake 375°F (190°C) 15"
*Or until a toothpick inserted into the center comes out clean.
Other Foods
FOOD OVEN BAKING TIME
TEMPERATURE (in minutes)
Lemon-Poppy Seed
Popovers
Recipe: Bake 400°F (200°C) 40
Auto Steam Breads 375°F (190°C) 40
Convection Bake 375°F (190°C) 30-35
Brie Baked in Pastry
Recipe: Bake 350°F (175°C) 30-40
Auto Steam Breads 350°F (175°C) 40
Beef Wellington,
21/2Ibs (1.1 kg) roast
Recipe: Bake 400°F (200°C) 50-55*
Auto Steam Breads 375°F (190°C) 60-65*
*To medium-rare and crust golden brown.
32
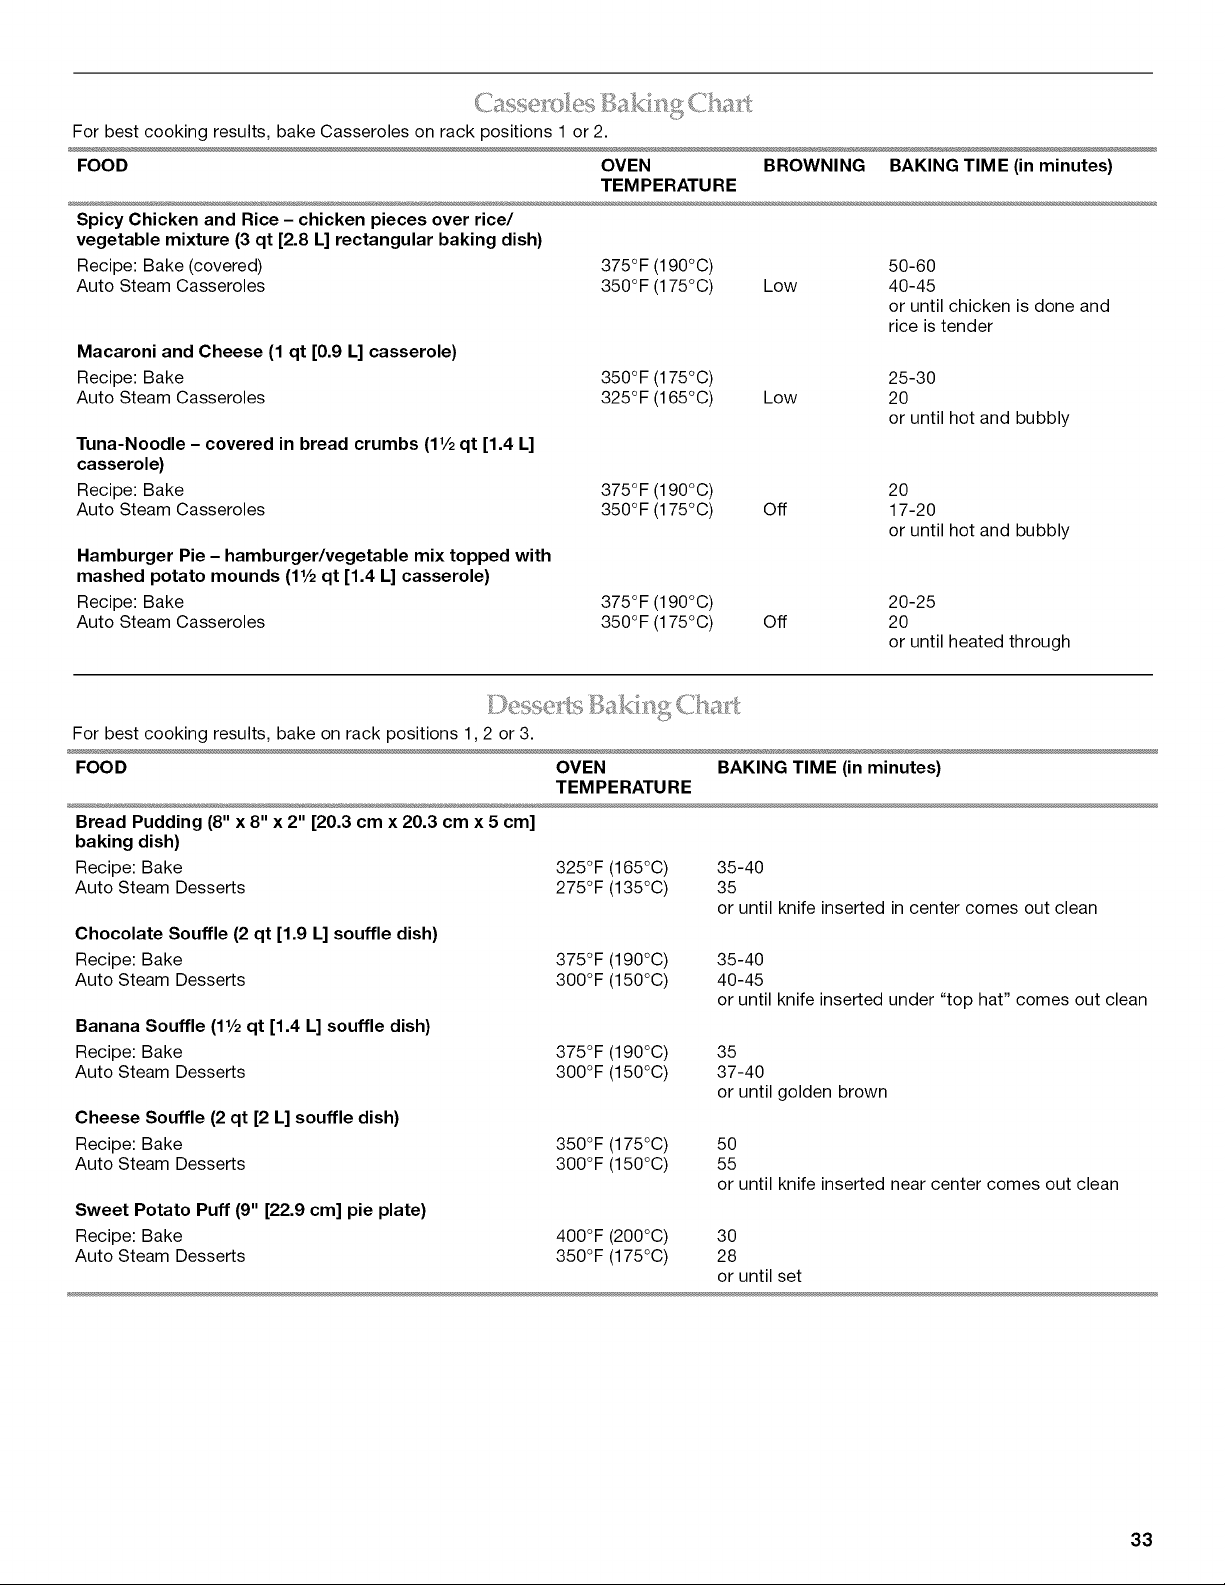
For best cooking results, bake Casseroles on rack positions 1 or 2.
FOOD OVEN BROWNING BAKING TIME (in minutes)
TEMPERATURE
Spicy Chicken and Rice - chicken pieces over rice/
vegetable mixture (3 qt [2.8 L] rectangular baking dish)
Recipe: Bake (covered)
Auto Steam Casseroles
Macaroni and Cheese (1 qt [0.9 L] casserole)
Recipe: Bake
Auto Steam Casseroles
Tuna-Noodle - covered in bread crumbs (1V2qt [1.4 L]
casserole)
Recipe: Bake
Auto Steam Casseroles
Hamburger Pie - hamburger/vegetable mix topped with
mashed potato mounds (1V2 qt [1.4 L] casserole)
Recipe: Bake
Auto Steam Casseroles
375°F (190°C) 50-60
350°F (175°C) Low 40-45
or until chicken is done and
rice is tender
350°F (175°C) 25-30
325°F (165°C) Low 20
or until hot and bubbly
375°F (190°C) 20
350°F (175°C) Off 17-20
or until hot and bubbly
375°F (190°C) 20-25
350°F (175°C) Off 20
or until heated through
• _............ _ _
For best cooking results, bake on rack positions 1,2 or 3.
FOOD OVEN BAKING TIME (in minutes)
TEMPERATURE
Bread Pudding (8" x 8" x 2" [20.3 cm x 20.3 cm x 5 cm]
baking dish)
Recipe: Bake
Auto Steam Desserts
Chocolate Souffle (2 qt [1.9 L] souffle dish)
Recipe: Bake
Auto Steam Desserts
Banana Souffle (1V2 qt [1.4 L] souffle dish)
Recipe: Bake
Auto Steam Desserts
Cheese Souffle (2 qt [2 L] souffle dish)
Recipe: Bake
Auto Steam Desserts
Sweet Potato Puff (9" [22.9 cm] pie plate)
Recipe: Bake
Auto Steam Desserts
325°F (165°C)
275°F (135°C)
35-40
35
or until knife inserted in center comes out clean
375°F (190°C)
300°F (150°C)
35-40
40-45
or until knife inserted under "top hat" comes out clean
375°F (190°C) 35
300°F (150°C) 37-40
or until golden brown
350°F (175°C)
300°F (150°C)
5O
55
or until knife inserted near center comes out clean
400°F (200°C) 30
350°F (175°C) 28
or until set
33
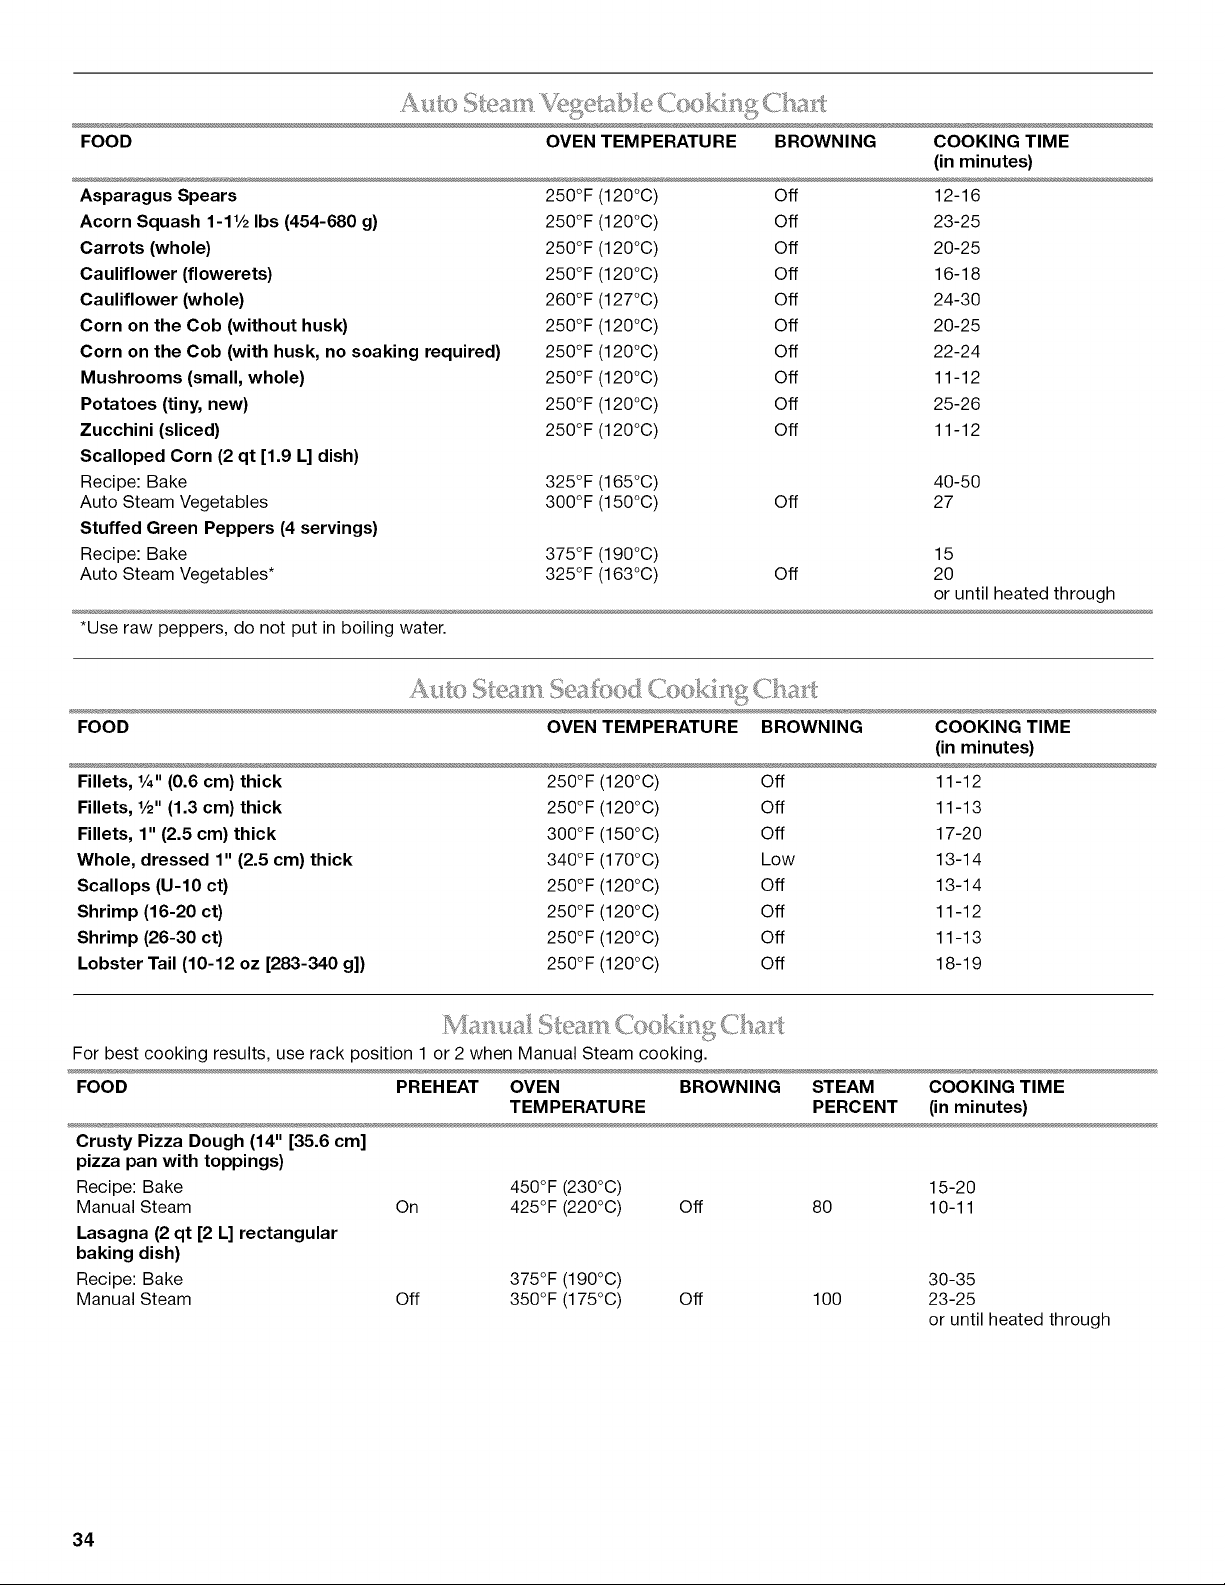
FOOD OVEN TEMPERATURE BROWNING COOKING TIME
Asparagus Spears
Acorn Squash 1-1V2 Ibs (454-680 g)
Carrots (whole)
Cauliflower (flowerets)
Cauliflower (whole)
Corn on the Cob (without husk)
Corn on the Cob (with husk, no soaking required)
Mushrooms (small, whole)
Potatoes (tiny, new)
Zucchini (sliced)
Scalloped Corn (2 qt [1.9 L] dish)
Recipe: Bake
Auto Steam Vegetables
Stuffed Green Peppers (4 servings)
Recipe: Bake
Auto Steam Vegetables*
*Use raw peppers, do not put in boiling water.
(in minutes)
250°F (120°C) Off 12-16
250°F (120°C) Off 23-25
250°F (120°C) Off 20-25
250°F (120°C) Off 16-18
260°F (127°C) Off 24-30
250°F (120°C) Off 20-25
250°F (120°C) Off 22-24
250°F (120°C) Off 11-12
250°F (120°C) Off 25-26
250°F (120°C) Off 11-12
325°F (165°C) 40-50
300°F (150°C) Off 27
375°F (190°C) 15
325°F (163°C) Off 20
or until heated through
FOOD OVEN TEMPERATURE BROWNING COOKING TIME
(in minutes)
Fillets, %" (0.6 cm) thick
Fillets, V2" (1.3 cm) thick
Fillets, 1" (2.5 cm) thick
Whole, dressed 1" (2.5 cm) thick
Scallops (U-10 ct)
Shrimp (16-20 ct)
Shrimp (26-30 ct)
Lobster Tail (10-12 oz [283-340 g])
250°F (120°C) Off 11-12
250°F (120°C) Off 11-13
300°F (150°C) Off 17-20
340°F (170°C) Low 13-14
250°F (120°C) Off 13-14
250°F (120°C) Off 11-12
250°F (120°C) Off 11-13
250°F (120°C) Off 18-19
For best cooking results, use rack position 1 or 2 when Manual Steam cooking.
FOOD PREHEAT OVEN BROWNING STEAM COOKING TIME
TEMPERATURE PERCENT (in minutes)
Crusty Pizza Dough (14" [35.6 cm]
pizza pan with toppings)
Recipe: Bake
Manual Steam On
Lasagna (2 qt [2 L] rectangular
baking dish)
Recipe: Bake
Manual Steam Off
450°F (230°C) 15-20
425°F (220°C) Off 80 10-11
375°F (190°C)
350°F (175°C) Off 100
30-35
23-25
or until heated through
34
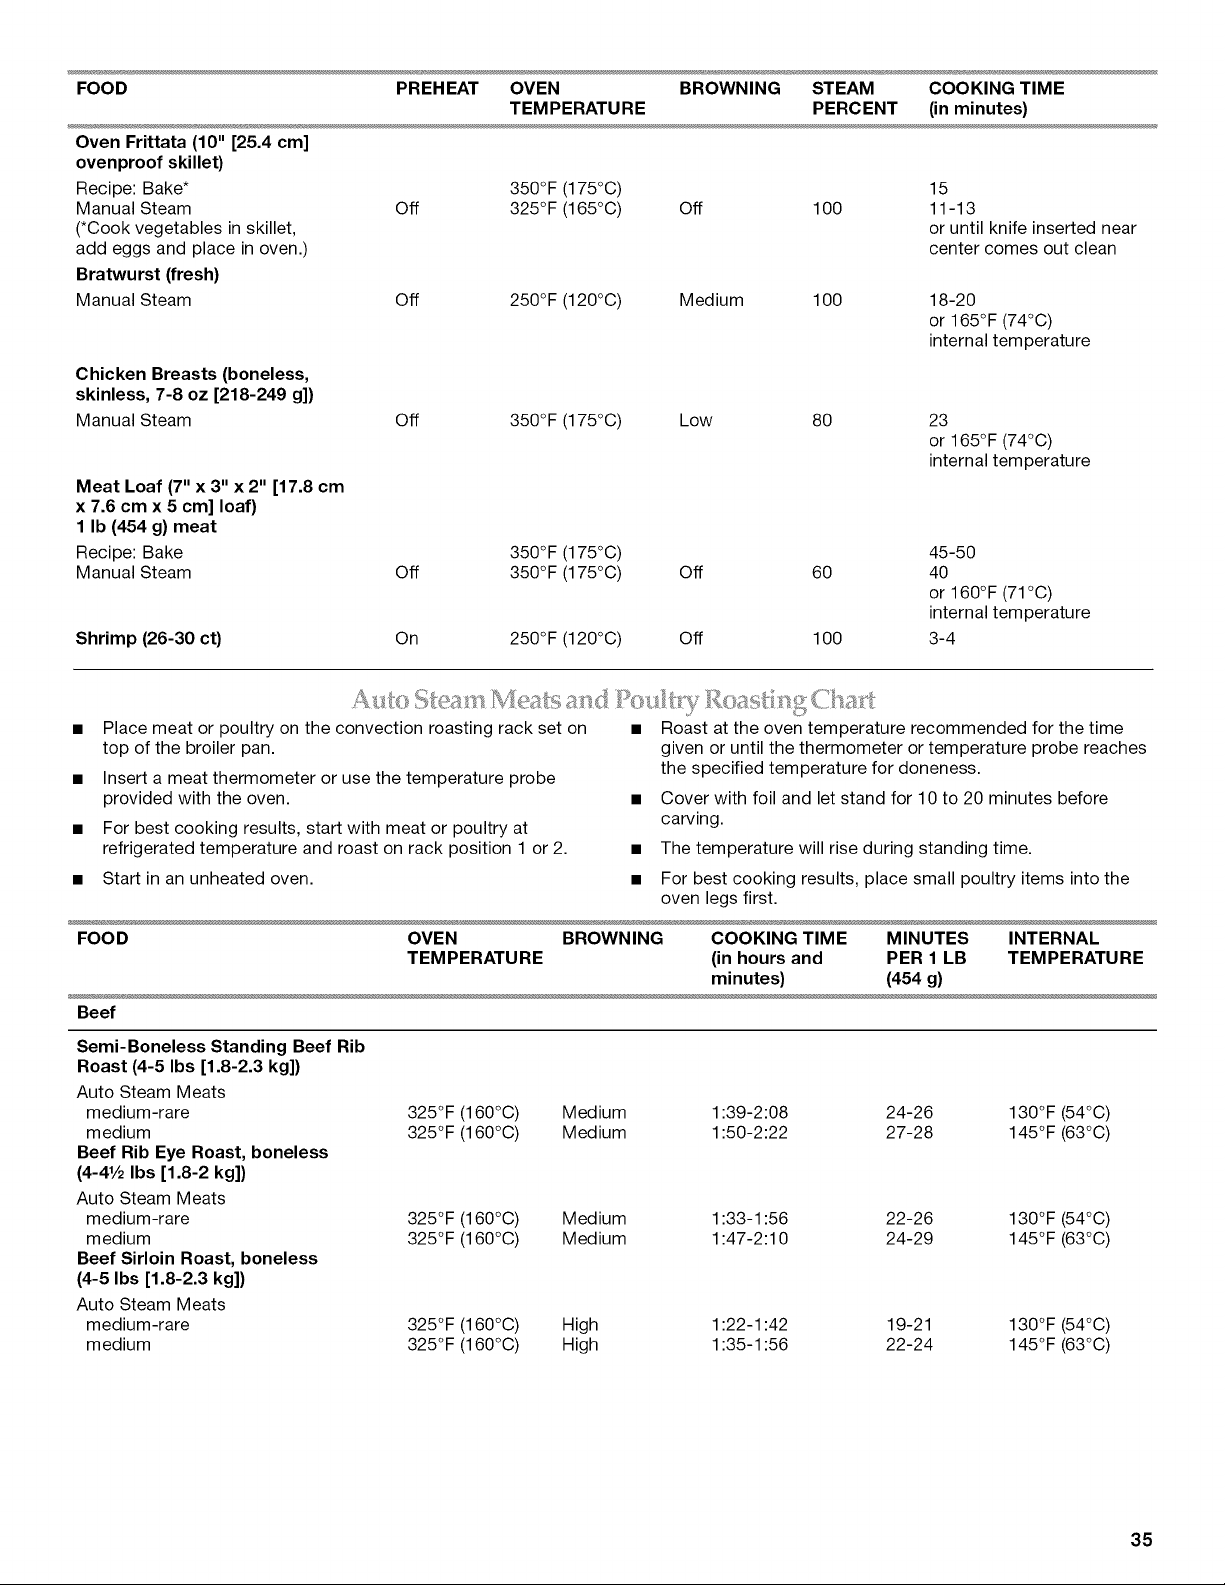
FOOD PREHEAT OVEN BROWNING STEAM COOKING TIME
TEMPERATURE PERCENT (in minutes)
Oven Frittata (10" [25.4 cm]
ovenproof skillet)
Recipe: Bake*
Manual Steam
(*Cook vegetables in skillet,
add eggs and place in oven.)
Bratwurst (fresh)
Manual Steam
350°F (175°C) 15
Off 325°F (165°C) Off 100 11-13
or until knife inserted near
center comes out clean
Off 250°F (120°C) Medium 100
18-20
or 165°F (74°C)
internal temperature
Chicken Breasts (boneless,
skinless, 7-8 oz [218-249 g])
Manual Steam
Meat Loaf (7" x 3" x 2" [17.8 cm
x 7.6 cm x 5 cm] loaf)
1 Ib (454 g) meat
Recipe: Bake
Manual Steam
Shrimp (26-30 ct)
Off 350°F (175°C) Low 80
350°F (175°C)
Off 350°F (175°C)
On 250°F (120°C)
23
or 165°F (74°C)
internal temperature
45-50
Off 60 40
or 160°F (71°C)
internal temperature
Off 100 3-4
• Place meat or poultry on the convection roasting rack set on
top of the broiler pan.
• Insert a meat thermometer or use the temperature probe
provided with the oven.
• For best cooking results, start with meat or poultry at
refrigerated temperature and roast on rack position 1 or 2.
• Start in an unheated oven.
• Roast at the oven temperature recommended for the time
given or until the thermometer or temperature probe reaches
the specified temperature for doneness.
• Cover with foil and let stand for 10 to 20 minutes before
carving.
• The temperature will rise during standing time.
• For best cooking results, place small poultry items into the
oven legs first.
FOOD OVEN BROWNING COOKING TIME MINUTES INTERNAL
TEMPERATURE (in hours and PER 1 LB TEMPERATURE
minutes) (454 g)
Beef
Semi-Boneless Standing Beef Rib
Roast (4-5 Ibs [1.8-2.3 kg])
Auto Steam Meats
medium-rare 325°F (160°C) Medium 1:39-2:08 24-26 130°F (54°C)
medium 325°F (160°C) Medium 1:50-2:22 27-28 145°F (63°C)
Beef Rib Eye Roast, boneless
(4-41/2 Ibs [1.8-2 kg])
Auto Steam Meats
medium-rare 325°F (160°C) Medium 1:33-1:56 22-26 130°F (54°C)
medium 325°F (160°C) Medium 1:47-2:10 24-29 145°F (63°C)
Beef Sirloin Roast, boneless
(4-5 Ibs [1.8-2.3 kg])
Auto Steam Meats
medium-rare 325°F (160°C) High 1:22-1:42 19-21 130°F (54°C)
medium 325°F (160°C) High 1:35-1:56 22-24 145°F (63°C)
35
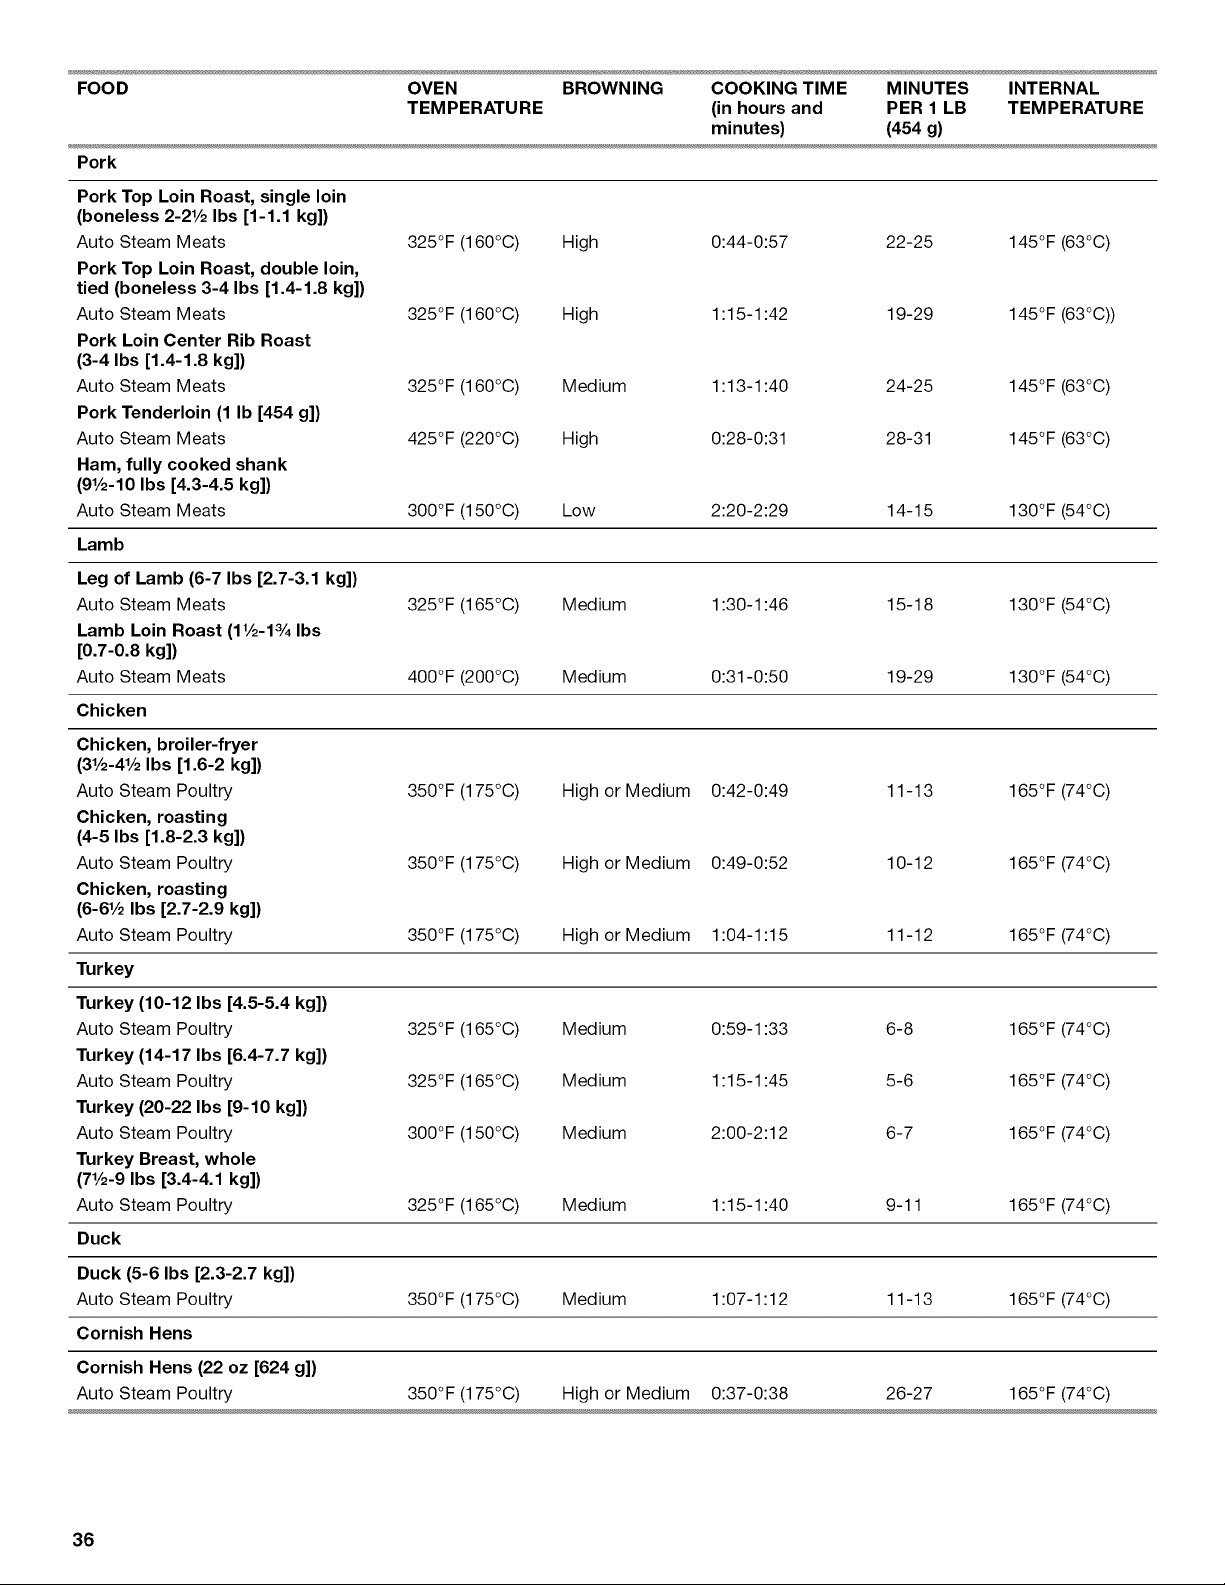
FOOD OVEN BROWNING COOKING TIME MINUTES INTERNAL
TEMPERATURE (in hours and PER 1 LB TEMPERATURE
minutes) (454 g)
Pork
Pork Top Loin Roast, single loin
(boneless 2-21/2 Ibs [1-1.1 kg])
Auto Steam Meats High 0:44-0:57 22-25
Pork Top Loin Roast, double loin,
tied (boneless 3-4 Ibs [1.4-1.8 kg])
Auto Steam Meats High 1:15-1:42 19-29
Pork Loin Center Rib Roast
(3-4 Ibs [1.4-1.8 kg])
Auto Steam Meats Medium 1:13-1:40 24-25
Pork Tenderloin (1 Ib [454 g])
Auto Steam Meats High 0:28-0:31 28-31
Ham, fully cooked shank
(91/2-10 Ibs [4.3-4.5 kg])
Auto Steam Meats 300°F (150°C) Low 2:20-2:29 14-15
Lamb
325°F (160°C) 145°F (63°C)
325°F (160°C) 145°F (63°C))
325°F (160°C) 145°F (63°C)
425°F (220°C) 145°F (63°C)
130°F (54°C)
Leg of Lamb (6-7 Ibs [2.7-3.1 kg])
Auto Steam Meats
Lamb Loin Roast (11/2-13/4Ibs
[0.7-0.8 kg])
Auto Steam Meats
Chicken
325°F (165°C) Medium 1:30-1:46 15-18 130°F (54°C)
400°F (200°C) Medium 0:31-0:50 19-29 130°F (54°C)
350°F (175°C) High or Medium 0:42-0:49 165°F (74°C)
350°F (175°C) High or Medium 0:49-0:52 165°F (74°C)
350°F (175°C) High or Medium 1:04-1:15 165°F (74°C)
325°F (165°C) Medium 0:59-1:33 165°F (74°C)
325°F (165°C) Medium 1:15-1:45 165°F (74°C)
300°F (150°C) Medium 2:00-2:12 165°F (74°C)
Chicken, broiler-fryer
(31/2-41/2Ibs [1.6-2 kg])
Auto Steam Poultry 11-13
Chicken, roasting
(4-5 Ibs [1.8-2.3 kg])
Auto Steam Poultry 10-12
Chicken, roasting
(6-61/2 Ibs [2.7-2.9 kg])
Auto Steam Poultry 11-12
Turkey
Turkey (10-12 Ibs [4.5-5.4 kg])
Auto Steam Poultry 6-8
Turkey (14-17 Ibs [6.4-7.7 kg])
Auto Steam Poultry 5-6
Turkey (20-22 Ibs [9-10 kg]}
Auto Steam Poultry 6-7
Turkey Breast, whole
(71/2-9 Ibs [3.4-4.1 kg])
Auto Steam Poultry 325°F (165°C) Medium 1:15-1:40 9-11 165°F (74°C)
Duck
Duck (5-6 Ibs [2.3-2.7 kg])
Auto Steam Poultry 350°F (175°C) Medium 1:07-1:12 11-13 165°F (74°C)
Cornish Hens
Cornish Hens (22 oz [624 g])
Auto Steam Poultry 350°F (175°C) High or Medium 0:37-0:38 26-27 165°F (74°C)
36
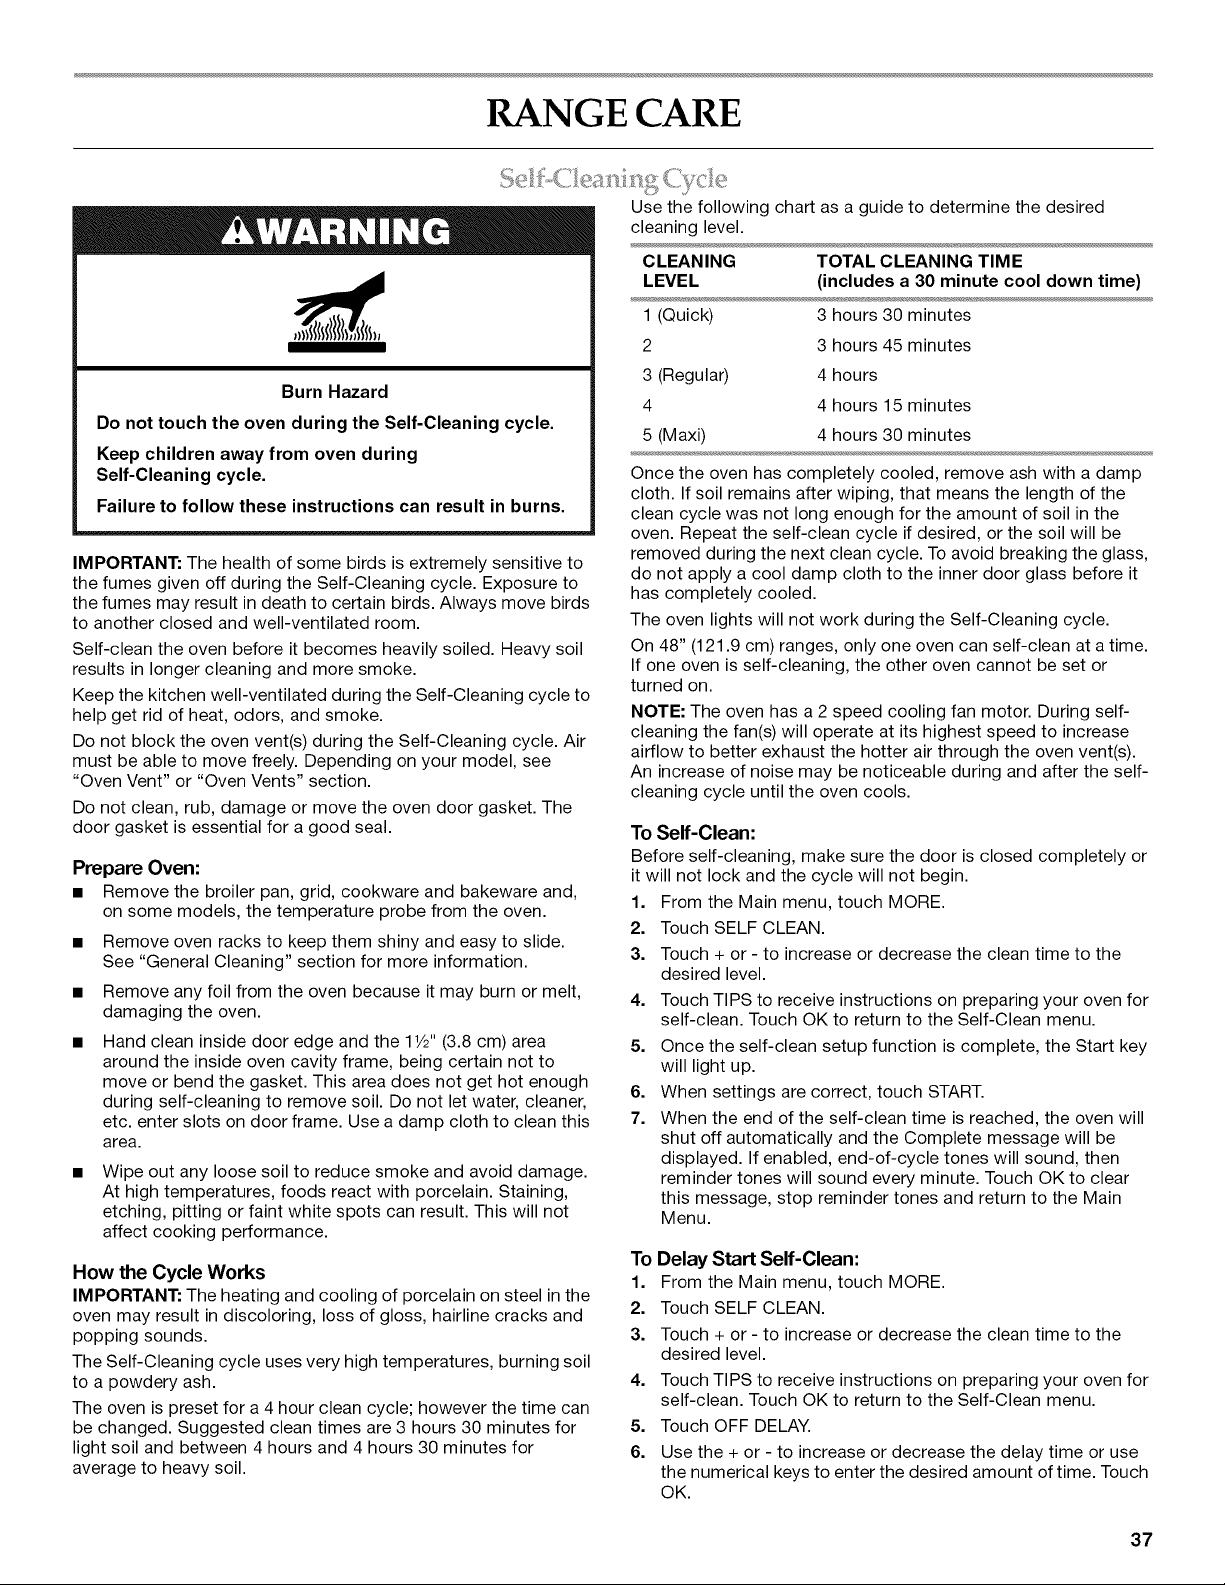
RANGE CARE
Burn Hazard
Do not touch the oven during the Self-Cleaning cycle.
Keep children away from oven during
Self-Cleaning cycle.
Failure to follow these instructions can result in burns.
IMPORTANT: The health of some birds is extremely sensitive to
the fumes given off during the Self-Cleaning cycle. Exposure to
the fumes may result in death to certain birds. Always move birds
to another closed and well-ventilated room.
Self-clean the oven before it becomes heavily soiled. Heavy soil
results in longer cleaning and more smoke.
Keep the kitchen well-ventilated during the Self-Cleaning cycle to
help get rid of heat, odors, and smoke.
Do not block the oven vent(s) during the Self-Cleaning cycle. Air
must be able to move freely. Depending on your model, see
"Oven Vent" or "Oven Vents" section.
Do not clean, rub, damage or move the oven door gasket. The
door gasket is essential for a good seal.
Prepare Oven:
• Remove the broiler pan, grid, cookware and bakeware and,
on some models, the temperature probe from the oven.
• Remove oven racks to keep them shiny and easy to slide.
See "General Cleaning" section for more information.
• Remove any foil from the oven because it may burn or melt,
damaging the oven.
• Hand clean inside door edge and the 11/2"(3.8 cm) area
around the inside oven cavity frame, being certain not to
move or bend the gasket. This area does not get hot enough
during self-cleaning to remove soil. Do not let water, cleaner,
etc. enter slots on door frame. Use a damp cloth to clean this
area.
Wipe out any loose soil to reduce smoke and avoid damage.
At high temperatures, foods react with porcelain. Staining,
etching, pitting or faint white spots can result. This will not
affect cooking performance.
How the Cycle Works
IMPORTANT: The heating and cooling of porcelain on steel in the
oven may result in discoloring, loss of gloss, hairline cracks and
popping sounds.
The Self-Cleaning cycle uses very high temperatures, burning soil
to a powdery ash.
The oven is preset for a 4 hour clean cycle; however the time can
be changed. Suggested clean times are 3 hours 30 minutes for
light soil and between 4 hours and 4 hours 30 minutes for
average to heavy soil.
Use the following chart as a guide to determine the desired
cleaning level.
CLEANING TOTAL CLEANING TIME
LEVEL (includes a 30 minute cool down time)
1 (Quick) 3 hours 30 minutes
2 3 hours 45 minutes
3 (Regular) 4 hours
4 4 hours 15 minutes
5 (Maxi) 4 hours 30 minutes
Once the oven has completely cooled, remove ash with a damp
cloth. If soil remains after wiping, that means the length of the
clean cycle was not long enough for the amount of soil in the
oven. Repeat the self-clean cycle if desired, or the soil will be
removed during the next clean cycle. To avoid breaking the glass,
do not apply a cool damp cloth to the inner door glass before it
has completely cooled.
The oven lights will not work during the Self-Cleaning cycle.
On 48" (121.9 cm) ranges, only one oven can self-clean at a time.
If one oven is self-cleaning, the other oven cannot be set or
turned on.
NOTE: The oven has a 2 speed cooling fan motor. During self-
cleaning the fan(s) will operate at its highest speed to increase
airflow to better exhaust the hotter air through the oven vent(s).
An increase of noise may be noticeable during and after the self-
cleaning cycle until the oven cools.
To Self-Clean:
Before self-cleaning, make sure the door is closed completely or
it will not lock and the cycle will not begin.
1. From the Main menu, touch MORE.
2. Touch SELF CLEAN.
3. Touch + or - to increase or decrease the clean time to the
desired level.
4. Touch TIPS to receive instructions on preparing your oven for
self-clean. Touch OK to return to the Self-Clean menu.
5. Once the self-clean setup function is complete, the Start key
will light up.
6. When settings are correct, touch START.
7. When the end of the self-clean time is reached, the oven will
shut off automatically and the Complete message will be
displayed. If enabled, end-of-cycle tones will sound, then
reminder tones will sound every minute. Touch OK to clear
this message, stop reminder tones and return to the Main
Menu.
To Delay Start Self-Clean:
1. From the Main menu, touch MORE.
2. Touch SELF CLEAN.
3. Touch + or - to increase or decrease the clean time to the
desired level.
4. Touch TIPS to receive instructions on preparing your oven for
self-clean. Touch OK to return to the Self-Clean menu.
5. Touch OFF DELAY.
6. Use the + or - to increase or decrease the delay time or use
the numerical keys to enter the desired amount of time. Touch
OK.
37
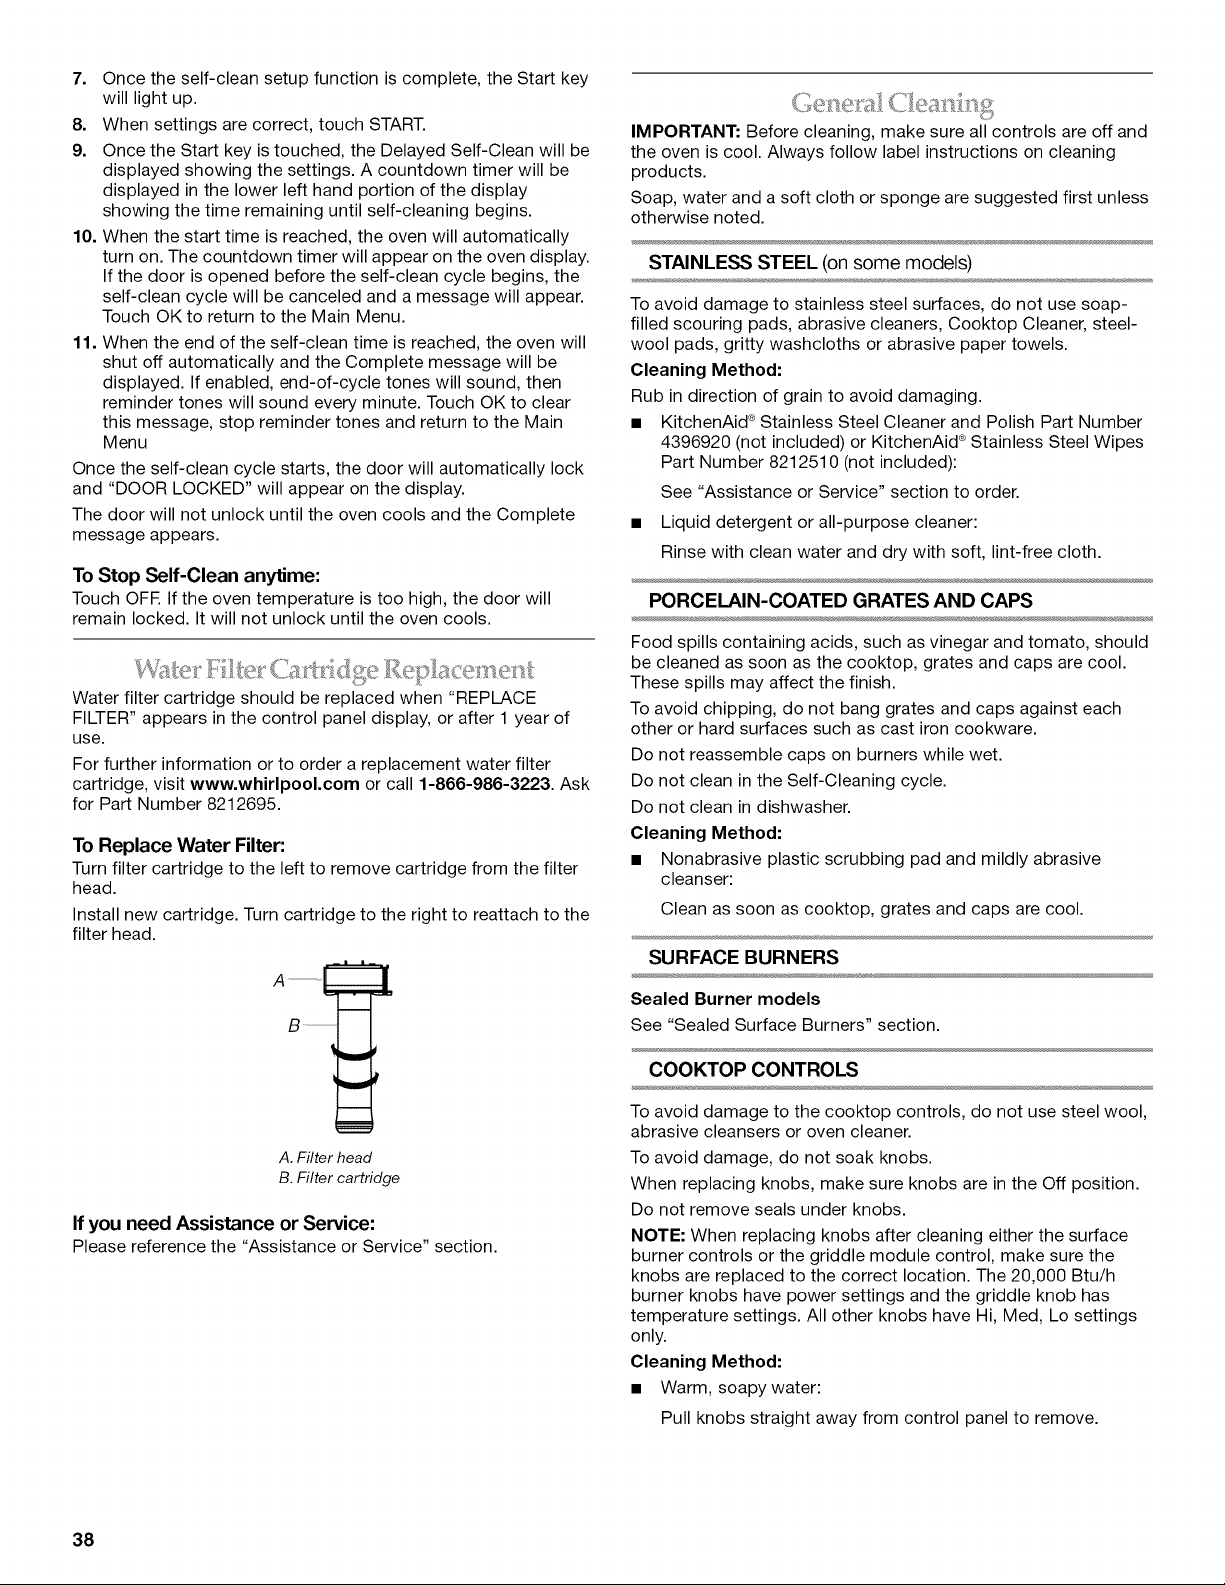
7. Once the self-clean setup function is complete, the Start key
will light up.
8. When settings are correct, touch START.
9. Once the Start key is touched, the Delayed Self-Clean will be
displayed showing the settings. A countdown timer will be
displayed in the lower left hand portion of the display
showing the time remaining until self-cleaning begins.
10. When the start time is reached, the oven will automatically
turn on. The countdown timer will appear on the oven display.
If the door is opened before the self-clean cycle begins, the
self-clean cycle will be canceled and a message will appear.
Touch OK to return to the Main Menu.
11. When the end of the self-clean time is reached, the oven will
shut off automatically and the Complete message will be
displayed. If enabled, end-of-cycle tones will sound, then
reminder tones will sound every minute. Touch OK to clear
this message, stop reminder tones and return to the Main
Menu
Once the self-clean cycle starts, the door will automatically lock
and "DOOR LOCKED" will appear on the display.
The door will not unlock until the oven cools and the Complete
message appears.
To Stop Self-Clean anytime:
Touch OFF. If the oven temperature is too high, the door will
remain locked. It will not unlock until the oven cools.
Water filter cartridge should be replaced when "REPLACE
FILTER" appears in the control panel display, or after 1 year of
use.
For further information or to order a replacement water filter
cartridge, visit www.whirlpool.com or call 1-866-986-3223. Ask
for Part Number 8212695.
To Replace Water Filter:
Turn filter cartridge to the left to remove cartridge from the filter
head.
Install new cartridge. Turn cartridge to the right to reattach to the
filter head.
A. Filter head
B. Filter cartridge
If you need Assistance or Service:
Please reference the "Assistance or Service" section.
IMPORTANT: Before cleaning, make sure all controls are off and
the oven is cool. Always follow label instructions on cleaning
products.
Soap, water and a soft cloth or sponge are suggested first unless
otherwise noted.
STAINLESS STEEL (on some models)
To avoid damage to stainless steel surfaces, do not use soap-
filled scouring pads, abrasive cleaners, Cooktop Cleaner, steel-
wool pads, gritty washcloths or abrasive paper towels.
Cleaning Method:
Rub in direction of grain to avoid damaging.
• KitchenAid ® Stainless Steel Cleaner and Polish Part Number
4396920 (not included) or KitchenAid ®Stainless Steel Wipes
Part Number 8212510 (not included):
See "Assistance or Service" section to order.
• Liquid detergent or all-purpose cleaner:
Rinse with clean water and dry with soft, lint-free cloth.
PORCELAIN-COATED GRATES AND CAPS
Food spills containing acids, such as vinegar and tomato, should
be cleaned as soon as the cooktop, grates and caps are cool.
These spills may affect the finish.
To avoid chipping, do not bang grates and caps against each
other or hard surfaces such as cast iron cookware.
Do not reassemble caps on burners while wet.
Do not clean in the Self-Cleaning cycle.
Do not clean in dishwasher.
Cleaning Method:
• Nonabrasive plastic scrubbing pad and mildly abrasive
cleanser:
Clean as soon as cooktop, grates and caps are cool.
SURFACE BURNERS
Sealed Burner models
See "Sealed Surface Burners" section.
COOKTOP CONTROLS
To avoid damage to the cooktop controls, do not use steel wool,
abrasive cleansers or oven cleaner.
To avoid damage, do not soak knobs.
When replacing knobs, make sure knobs are in the Off position.
Do not remove seals under knobs.
NOTE: When replacing knobs after cleaning either the surface
burner controls or the griddle module control, make sure the
knobs are replaced to the correct location. The 20,000 Btu/h
burner knobs have power settings and the griddle knob has
temperature settings. All other knobs have Hi, Med, Lo settings
only.
Cleaning Method:
• Warm, soapy water:
Pull knobs straight away from control panel to remove.
38

OVEN DOOR EXTERIOR
Cleaning Method:
• Glass cleaner and a soft cloth or sponge:
Apply glass cleaner to soft cloth or sponge, not directly on
panel.
• All-Purpose Appliance Cleaner Part Number 31682
(not included):
See "Assistance or Service" section to order.
OVEN DOOR INTERIOR
Cleaning Method:
• Self-Cleaning cycle:
For optimal door cleaning result, wipe away any deposits with
a damp sponge before running cycle.
CONTROL PANEL
Activate the Control Lock to avoid touch screen activation during
cleaning. See "Control Lock" section.
To avoid damage to the control panel, do not use abrasive
cleaners, steel-wool pads, gritty washcloths or abrasive paper
towels.
Cleaning Method:
• Glass cleaner and soft cloth or sponge:
Apply glass cleaner to soft cloth or sponge, not directly on
panel.
• All-Purpose Appliance Cleaner Part Number 31682
(not included):
See "Assistance or Service" section to order.
OVEN CAVITY
Do not use oven cleaners.
Food spills should be cleaned when oven cools. At high
temperatures, foods react with porcelain and staining, etching,
pitting or faint white spots can result.
Cleaning Method:
• Self-Cleaning cycle: See "Self-Cleaning Cycle" first.
OVEN RACKS
Cleaning Method:
• Self-Cleaning cycle:
See "Self-Cleaning Cycle" first. Remove racks or they will
discolor and become harder to slide. If this happens, a light
coating of vegetable oil applied to the rack guides will help
them slide.
• Steel-wool pad
GRIDDLE MODULE
Clean the griddle shortly after removing food and the griddle has
cooled down.
Cleaning Method:
• Hot, soapy water and/or nylon scrub pad
• After cleaning dry surface with a paper towel
Drip Tray and Area Under Tray
Allow cooktop to cool completely before cleaning.
Cleaning Method:
• Warm, soapy water or nonabrasive cleanser.
• Damp cloth or nonabrasive pad.
• Dry completely before placing drip tray in position.
The oven lights are 120-volt, 25-watt maximum halogen bulbs.
They will come on when the oven door is opened.
On 48" (121.9 cm) ranges, both the left and right oven lights
will come on when either door is opened. The oven lights will
not work during the Self-Cleaning cycle. When the oven door is
closed, touch OVEN LIGHT to turn light on or off.
To Replace:
Before replacing the bulb, make sure the oven is off and cool.
1. Disconnect power.
2. Remove glass light cover by grasping the front edge and
pulling away from oven.
3. Remove bulb from socket.
4. Replace bulb, using tissue or wearing cotton gloves to handle
bulb. To avoid damage or decreasing the life of the new bulb,
do not touch bulb with bare fingers.
5. Replace bulb cover by snapping back into wall.
6. Reconnect power.
Excessive Weight Hazard
Use two or more people to move and install oven
doors.
Failure to do so can result in back or other injury.
For normal range use, it is not suggested to remove the oven
door. However, if removal is necessary, make sure the oven is off
and cool. Then, follow these instructions. The oven door is heavy.
39
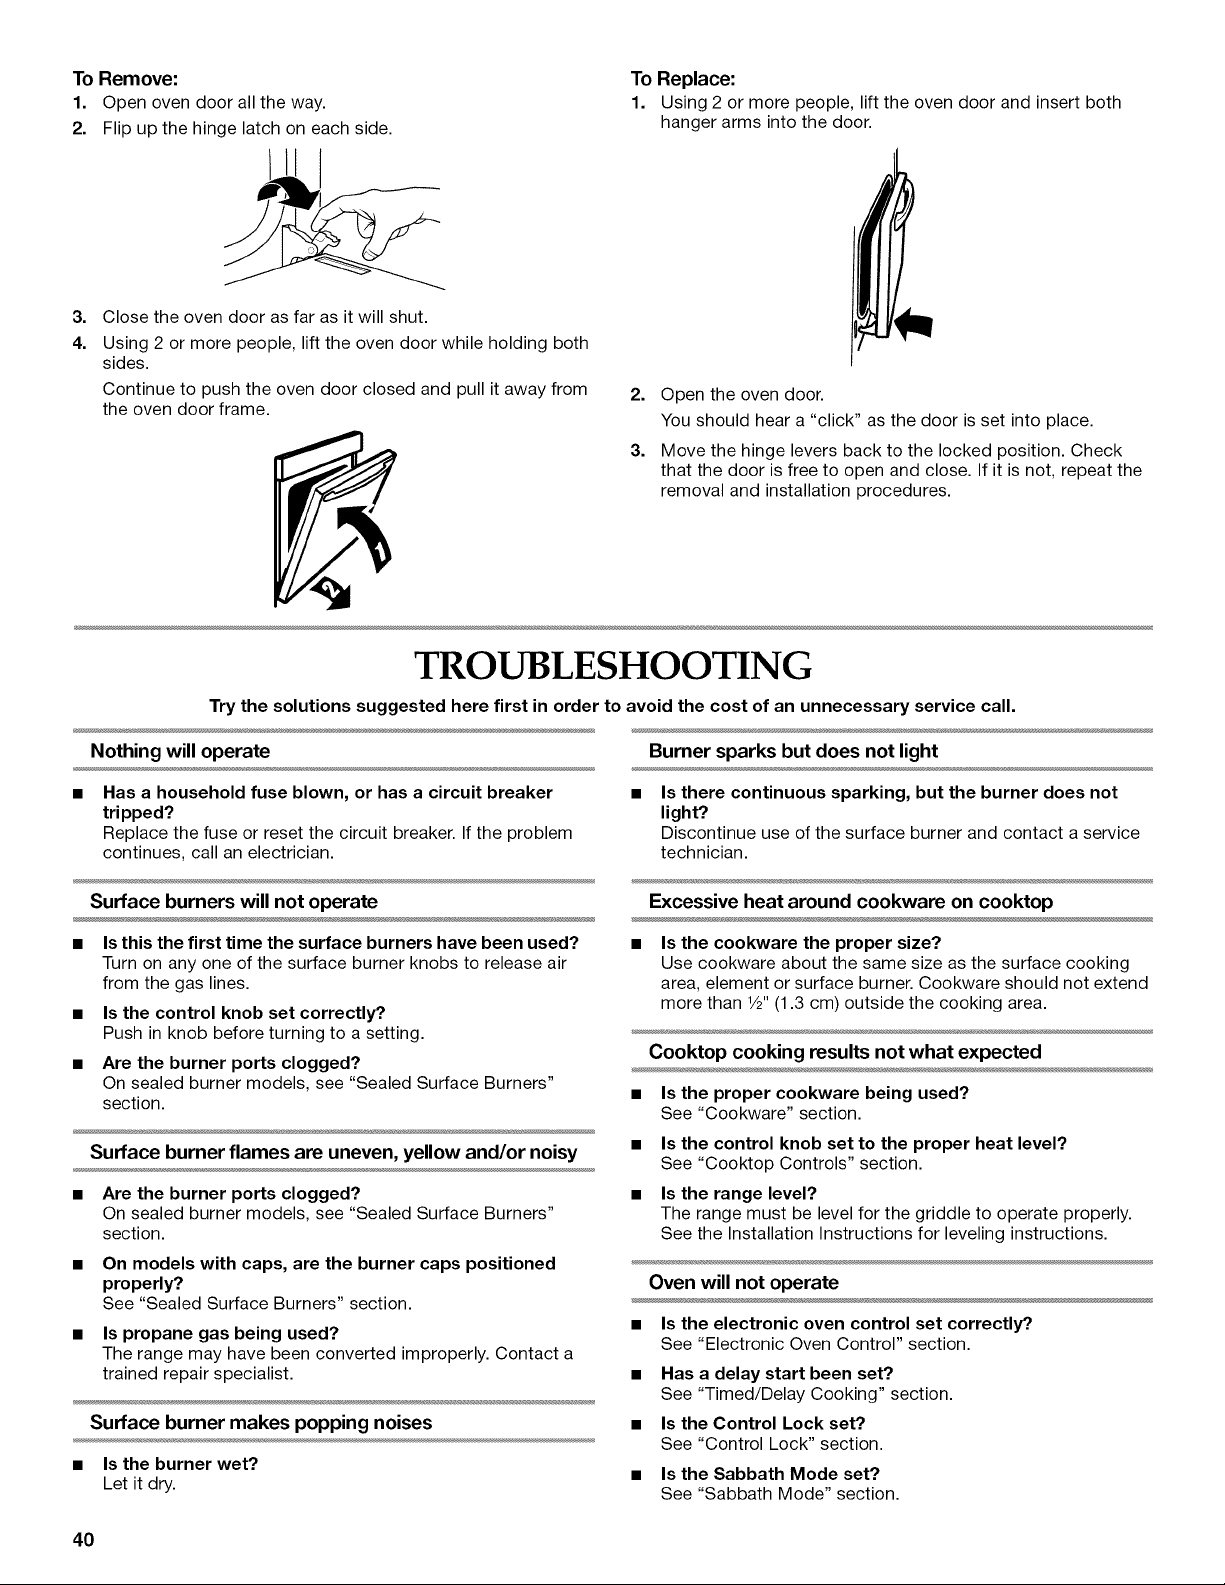
To Remove:
1. Open oven door all the way.
2. Flip up the hinge latch on each side.
To Replace:
1. Using 2 or more people, lift the oven door and insert both
hanger arms into the door.
3.
4.
Close the oven door as far as it will shut.
Using 2 or more people, lift the oven door while holding both
sides.
Continue to push the oven door closed and pull it away from
the oven door frame.
2. Open the oven door.
You should hear a "click" as the door is set into place.
3. Move the hinge levers back to the locked position. Check
that the door is free to open and close. If it is not, repeat the
removal and installation procedures.
TROUBLESHOOTING
Try the solutions suggested here first in order to avoid the cost of an unnecessaryservice call.
Nothing will operate Burner sparks but does not light
Has a household fuse blown, or has a circuit breaker
tripped?
Replace the fuse or reset the circuit breaker. If the problem
continues, call an electrician.
Is there continuous sparking, but the burner does not
light?
Discontinue use of the surface burner and contact a service
technician.
Surface burners will not operate
• Is this the first time the surface burners have been used?
Turn on any one of the surface burner knobs to release air
from the gas lines.
• Is the control knob set correctly?
Push in knob before turning to a setting.
• Are the burner ports clogged?
On sealed burner models, see "Sealed Surface Burners"
section.
Surface burner flames are uneven, yellow and/or noisy
Are the burner ports clogged?
On sealed burner models, see "Sealed Surface Burners"
section.
On models with caps, are the burner caps positioned
properly?
See "Sealed Surface Burners" section.
Is propane gas being used?
The range may have been converted improperly. Contact a
trained repair specialist.
Surface burner makes popping noises
• Is the burner wet?
Let it dry.
Excessive heat around cookware on cooktop
• Is the cookware the proper size?
Use cookware about the same size as the surface cooking
area, element or surface burner. Cookware should not extend
more than 1/2"(1.3 cm) outside the cooking area.
Cooktop cooking results not what expected
• Is the proper cookware being used?
See "Cookware" section.
• Is the control knob set to the proper heat level?
See "Cooktop Controls" section.
• Is the range level?
The range must be level for the griddle to operate properly.
See the Installation Instructions for leveling instructions.
Oven will not operate
• Is the electronic oven control set correctly?
See "Electronic Oven Control" section.
• Has a delay start been set?
See "Timed/Delay Cooking" section.
• Is the Control Lock set?
See "Control Lock" section.
• Is the Sabbath Mode set?
See "Sabbath Mode" section.
40
Oven temperature too high or too low
• Does the oven temperature calibration need adjustment?
See "Calibration (Oven Temperature Control)" section.
Display shows messages
Is the display showing a letter followed by a number?
Clear the display. See "Display(s)" section. If a letter followed
by a number reappears, call for service. See "Assistance or
Service" section.
Steam cycle will not operate
• Is the water supply connected to the oven?
See the Installation Instructions supplied with this oven.
• Does the filter need to be replaced?
The oven will shut off the steam functions until the filter is
replaced. See "Water Filter/Filtration System" section.
Self-Cleaning cycle will not operate
• Is the oven door open?
Close the oven door all the way.
• Has the function been entered?
See "Self-Cleaning Cycle" section.
• On some models, has a delay start Self-Clean cycle been
set?
See "Self-Cleaning Cycle" section.
• Has a delay start been set?
See "Timed/Delay Cooking" section.
• On 48" (121.9 cm) ranges, is one oven self-cleaning?
When one oven is self-cleaning, the other oven cannot be set
to self-clean.
Oven cooking results not what expected
Is the proper temperature set?
Double-check the recipe in a reliable cookbook.
Is the proper oven temperature calibration set?
See "Calibration (Oven Temperature Control)" section.
Was the oven preheated?
See "Baking and Roasting" section.
Is the proper bakeware being used?
See "Bakeware" section.
Are the racks positioned properly?
See "Positioning Racks and Bakeware" section.
Is there proper air circulation around bakeware?
See "Positioning Racks and Bakeware" section.
Is the batter evenly distributed in the pan?
Check that batter is level in the pan.
Is the proper length of time being used?
Adjust cooking time.
Has the oven door been opened while cooking?
Oven peeking releases oven heat and can result in longer
cooking times.
Are baked items too brown on the bottom?
Move rack to higher position in the oven.
Are pie crust edges browning early?
Use aluminum foil to cover the edge of the crust and/or
reduce baking temperature.
ASSISTANCE OR SERVICE
Before calling for assistance or service, please check
"Troubleshooting." It may save you the cost of a service call. If
you still need help, follow the instructions below.
When calling, please know the purchase date and the complete
model and serial number of your appliance. This information will
help us to better respond to your request.
If you need replacement parts
If you need to order replacement parts, we recommend that you
use only factory specified parts. These factory specified parts will
fit right and work right because they are made with the same
precision used to build every new KITCHENAID ® appliance.
To locate factory specified parts in your area, call us or your
nearest KitchenAid designated service center.
:ly 8se Z .S.A.
Call the KitchenAid Customer eXperience Center toll free:
1-800-422-1230.
Our consultants provide assistance with:
• Features and specifications on our full line of appliances.
• Installation information.
• Use and maintenance procedures.
• Accessory and repair parts sales.
• Specialized customer assistance (Spanish speaking, hearing
impaired, limited vision, etc.).
• Referrals to local dealers, repair parts distributors and service
companies. KitchenAid designated service technicians are
trained to fulfill the product warranty and provide after-
warranty service, anywhere in the United States.
To locate the KitchenAid designated service company in your
area, you can also look in your telephone directory Yellow
Pages.
For further assistance
If you need further assistance, you can write to KitchenAid with
any questions or concerns at:
KitchenAid Brand Home Appliances
Customer eXperience Center
553 Benson Road
Benton Harbor, MI 49022-2692
Please include a daytime phone number in your correspondence.
41
Accessories U.S.A.
To order accessories, call the KitchenAid Customer eXperience
Center toll free at 1-800-442-9991 and follow the menu prompts.
Or visit our website at www.kitchenaid.com and click on
"Shopping Options." Go to "Replacement Parts & Accessories"
and click on "applianceaccessories.com." Portable appliances,
bakeware, cookware, gadgets and textiles are also available.
KitchenAld ®Stainless Steel Cleaner and Polish
Order Part Number 4396920
KitchenAld ®Stainless Steel Wipes
Order Part Number 8212510
Cooktop Cleaner
Order Part Number 31464
Cooktop Protectant
Order Part Number 31463
Gas Grate/Drip Pan Cleaner
Order Part Number 31617
All-Purpose Appliance Cleaner
Order Part Number 31682
Griddle
Order Part Number W10190534
Grill and Griddle Cover
Order Part Number W10160195
Wok Ring
Order Part Number W10216179
KitchenAld ®Premium Broil Pan and Roasting Rack
Order Part Number W10123240
SatinGlide TM Roll-Out Extension Rack
30" (76.2 cm): Order Part Number W10208155
36" (91.4 cm): Order Part Number W10212435
High-Altitude Kit for Natual Gas
(for use in elevations higher than 6,500 ft [1981.2 m])
Order Part Number W10160841
High-Altitude Kit for LP Gas
(for use in elevations higher than 6,500 ft [1981.2 m])
Order Part Number W10237848
KitchenAld ®Replacement Water Filter
Order Part Number W10049700
Stainless Steel Knobs - 6 Burner/1 Grill/1 Griddle
Order Part Number W10231704
Stainless Steel Knobs - 4 Burner/1 Grill/1 Griddle
Order Part Number W10231703
Stainless Steel Knobs - 4 Burner
Order Part Number W10231702
1911A6'' (50.0 cm) to 39" (99.0 cm) Adjustable Backguard for
30" (76.2 cm) Ranges
Order Part Number 8285148
191_A6'' (50.0 cm) to 39" (99.0 cm) Adjustable Backguard for
36" (91.4 cm) Ranges
Order Part Number 8284756
19_A6'' (50.0 cm) to 39" (99.0 cm) Adjustable Backguard for
48" (121.9 cm) Ranges
Order Part Number 8284755
9" (22.9 cm) Backguard for 30" (76.2 cm) Ranges
Order Part Number W10115773
9" (22.9 cm) Backguard for 36" (91.4 cm) Ranges
Order Part Number W10115776
9" (22.9 cm) Backguard for 48" (121.9 cm) Ranges
Order Part Number W10115777
22" (55.9 cm) Backguard with Shelf for 30" (76.2 cm)
Ranges and Cooktops
Order Part Number W10225950
22" (55.9 cm) Backguard with Shelf for 36" (91.4 cm)
Ranges and Cooktops
Order Part Number W10225949
22" (55.9 cm) Backguard with Shelf for 48" (121.9 cm)
Ranges and Cooktops
Order Part Number W10225948
KitchenAld ®Architect_ II 30" (76.2 cm) Handle Kit
Order Part Number W10188342
KitchenAld ®Architect_ II 36" (91.4 cm) Handle Kit
Order Part Number W10188341
KitchenAld ®Architect_ II 48" (121.9 cm) Handle Kit
Order Part Number W1088343
Call the KitchenAid Canada Customer eXperience Centre toll
free: 1-800-807-6777.
Our consultants provide assistance with:
• Features and specifications on our full line of appliances.
• Use and maintenance procedures.
• Accessory and repair parts sales.
• Referrals to local dealers, repair parts distributors and service
companies. KitchenAid Canada designated service
technicians are trained to fulfill the product warranty and
provide after-warranty service, anywhere in Canada.
For further assistance
If you need further assistance, you can write to KitchenAid
Canada with any questions or concerns at:
Customer eXperience Centre
KitchenAid Canada
1901 Minnesota Court
Mississauga, Ontario L5N 3A7
Please include a daytime phone number in your correspondence.
42
KITCHENAID ®DUAL FUEL RANGE WARRANTY
LIM ITED WARRANTY
For one year from the date of purchase, when this major appliance is operated and maintained according to instructions attached to or
furnished with the product, KitchenAid brand of Whirlpool Corporation or Whirlpool Canada LP (hereafter "KitchenAid") will pay for
Factory Specified Parts and repair labor to correct defects in materials or workmanship. Service must be provided by a KitchenAid
designated service company. This limited warranty is valid only in the United States or Canada and applies only when the major
appliance is used in the country in which it was purchased. Outside the 50 United States and Canada, this limited warranty does not
apply. Proof of original purchase date is required to obtain service under this limited warranty.
SECOND THROUGH FIFTH YEAR LIMITED WARRANTY ON CERTAIN COMPONENT PARTS
In the second through fifth years from the date of purchase, when this appliance is operated and maintained according to instructions
attached to or furnished with the product, KitchenAid will pay for Factory Specified Parts for the following components if defective in
materials or workmanship:
• Electric element • Solid state touch control system parts
• Gas burners
SECOND THROUGH TENTH YEAR LIMITED WARRANTY ON STEAM-ASSIST OVEN CAVITY AND DOORS
In the second through tenth years from date of purchase, when this major appliance is operated and maintained according to
instructions attached to or furnished with the product, KitchenAid will pay for Factory Specified Parts for the porcelain oven cavity/inner
door if the part rusts through due to defects in materials or workmanship.
ITEMS EXCLUDED FROM WARRANTY
This limited warranty does not cover:
1. Service calls to correct the installation of your major appliance, to instruct you on how to use your major appliance, to replace or
repair house fuses, or to correct house wiring or plumbing.
2. Service calls to repair or replace appliance light bulbs, air filters or water filters. Consumable parts are excluded from warranty
coverage.
3. Repairs when your major appliance is used for other than normal, single-family household use or when it is used in a manner that is
contrary to published user or operator instructions and/or installation instructions.
4. Damage resulting from accident, alteration, misuse, abuse, fire, flood, acts of God, improper installation, installation not in
accordance with electrical or plumbing codes, or use of consumables or cleaning products not approved by KitchenAid.
5. Cosmetic damage, including scratches, dents, chips or other damage to the finish of your major appliance, unless such damage
results from defects in materials or workmanship and is reported to KitchenAid within 30 days from the date of purchase.
6. Costs associated with the removal from your home of your major appliance for repairs. This major appliance is designed to be
repaired in the home and only in-home service is covered by this warranty.
7. Repairs to parts or systems resulting from unauthorized modifications made to the appliance.
8. Expenses for travel and transportation for product service if your major appliance is located in a remote area where service by an
authorized KitchenAid servicer is not available.
9. The removal and reinstallation of your major appliance if it is installed in an inaccessible location or is not installed in accordance
with published installation instructions.
10. Major appliances with original model/serial numbers that have been removed, altered or cannot be easily determined. This warranty
is void if the factory applied serial number has been altered or removed from your major appliance.
The cost of repair or replacement under these excluded circumstances shall be borne by the customer.
DISCLAIMER OF IMPLIED WARRANTIES; LIMITATION OF REMEDIES
CUSTOMER'S SOLE AND EXCLUSIVE REMEDY UNDER THIS LIMITED WARRANTY SHALL BE PRODUCT REPAIR AS PROVIDED
HEREIN. IMPLIED WARRANTIES, INCLUDING WARRANTIES OF MERCHANTABILITY OR FITNESS FOR A PARTICULAR PURPOSE,
ARE LIMITED TO ONE YEAR OR THE SHORTEST PERIOD ALLOWED BY LAW. KITCHENAID SHALL NOT BE LIABLE FOR
INCIDENTAL OR CONSEQUENTIAL DAMAGES. SOME STATES AND PROVINCES DO NOT ALLOW THE EXCLUSION OR LIMITATION
OF INCIDENTAL OR CONSEQUENTIAL DAMAGES, OR LIMITATIONS ON THE DURATION OF IMPLIED WARRANTIES OF
MERCHANTABILITY OR FITNESS, SO THESE EXCLUSIONS OR LIMITATIONS MAY NOT APPLY TO YOU. THIS WARRANTY GIVES
YOU SPECIFIC LEGAL RIGHTS, AND YOU MAY ALSO HAVE OTHER RIGHTS WHICH VARY FROM STATE TO STATE OR PROVINCE
TO PROVINCE.
43
If outside the 50 United States and Canada, contact your authorized KitchenAid dealer to determine if another warranty applies.
If you need service, first see the "Troubleshooting" section of the Use & Care Guide. After checking "Troubleshooting," you may find
additional help by checking the "Assistance or Service" section or by calling KitchenAid. In the U.S.A., call 1-800-422-1230. In Canada,
call 1-800-807-6777. 9/07
Keep this book and your sales slip together for future
reference. You must provide proof of purchase or installation
date for in-warranty service.
Write down the following information about your major appliance
to better help you obtain assistance or service if you ever need it.
You will need to know your complete model number and serial
number. You can find this information on the model and serial
number label located on the product.
Dealer name
Address
Phone number
Model number
Serial number
Purchase date
44

45
p p ,_
SECURITE DE LA CUISINIERE
Votre securite et celle des autres est tres importante.
Nous donnons de nombreux messages de s_curit_ importants dans ce manuel et sur votre appareil m_nager. Assurez-vous de
toujours lire tous les messages de s_curit_ et de vous y conformer.
Voici le symbole d'alerte de s_curit&
Ce symbole d'alerte de s_curit_ vous signale les dangers potentiels de d_c_s et de blessures graves & vous
et & d'autres.
Tousles messages de s_curit_ suivront le symbole d'alerte de s_curit_ et le mot "DANGER" ou
"AVERTISSEMENT". Ces mots signifient •
Risque possible de d6cbs ou de blessure grave si vous ne
suivez pas imm6diatement les instructions.
Risque possible de d6cbs ou de blessure grave si vous
ne suivez pas les instructions.
Tousles messages de s_curit_ vous diront quel est le danger potentiel et vous disent comment r_duire le risque de blessure et
ce qui peut se produire en cas de non-respect des instructions.
AVERTISSEMENT • Si les renseignements dans ce manuel ne sont pas exactement
observes, un incendie ou une explosion peut survenir, causant des dommages au
produit, des blessures ou un deces.
- Ne pas entreposer ni utiliser de I'essence ou d'autres vapeurs ou liquides inflammables
proximite de cet appareil ou de tout autre appareil electromenager.
-QUE FAIRE DANS LE CAS D'UNE ODEUR DE GAZ :
• Ne pas tenter d'allumer un appareil.
• Ne pas toucher a un commutateur electrique.
• Ne pas utiliser le telephone se trouvant sur les lieux.
• Appeler immediatement le fournisseur de gaz a partir du telephone d'un voisin. Suivre
ses instructions.
• .&.defaut de joindre votre fournisseur de gaz, appeler les pompiers.
- L'installation et I'entretien doivent _tre effectues par un installateur qualifie, une agence
de service ou le fournisseur de gaz,
AVERTISSEMENT : L'odorat ne permet pas toujours la detection d'une fuite de gaz.
Les distributeurs de gaz recommandent I'emploi d'un detecteur de gaz (homologation UL ou CSA).
Pour d'autre information, contacter le fournisseur de gaz local.
En cas de detection d'une fuite de gaz, executer les instructions "Que faire dans le cas d'une odeur de gaz".
Avertissements de la proposition 65 de I'¢:tat de Californie "
AVERTISSEMENT " Ce produit contient un produit chimique connu par I'¢:tat de Californie pour 6tre & I'origine de cancers.
AVERTISSEMENT " Ce produit contient un produit chimique connu par I'¢:tat de Californie pour 6tre a I'origine de malformations
et autres d6ficiences de naissance.
46
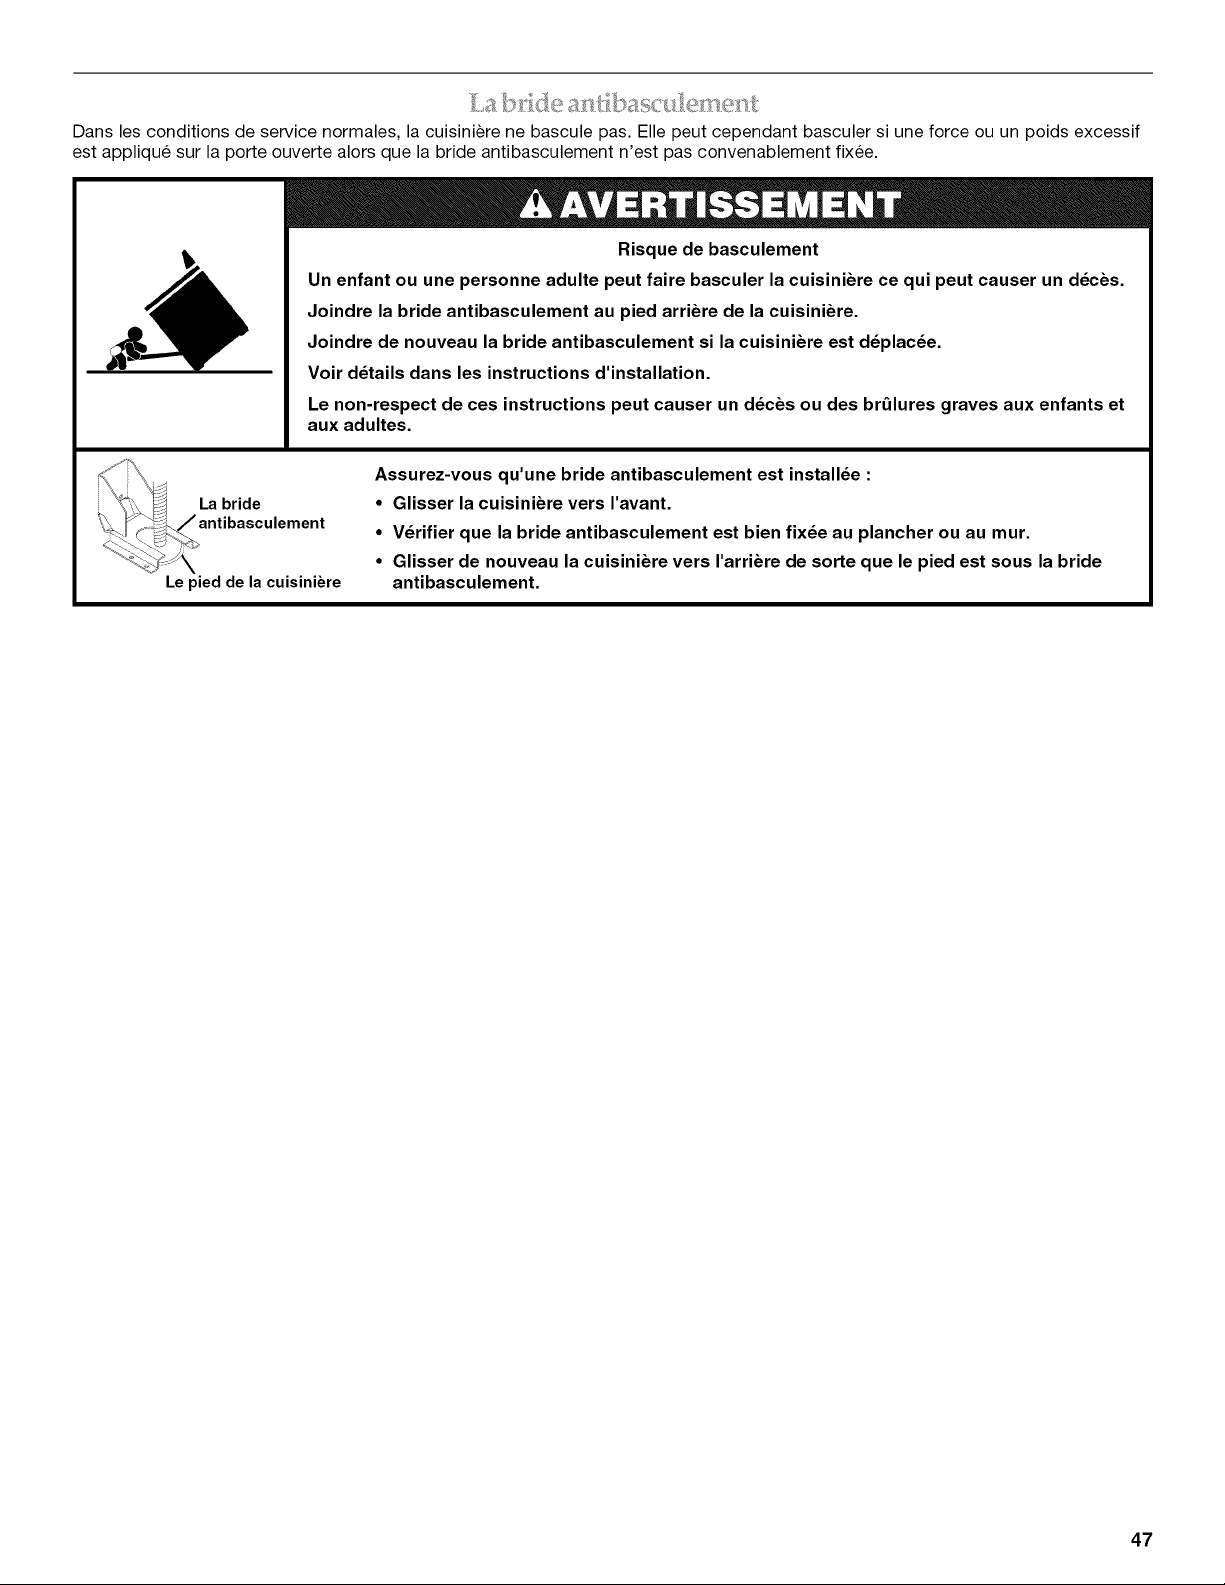
I _ I)/,e a?l-_basc I
Dans les conditions de service normales, la cuisiniire ne bascule pas. Elle peut cependant basculer si une force ou un poids excessif
est appliqu6 sur la porte ouverte alors que la bride antibasculement n'est pas convenablement fixee.
Risque de basculement
Un enfant ou une personne adulte peut faire basculer la cuisiniere ce qui peut causer un d_cbs.
Joindre la bride antibasculement au pied arriere de la cuisiniere.
Joindre de nouveau la bride antibasculement si la cuisiniere est d_plac_e.
Voir d_tails clans les instructions d'installation.
Le non-respect de ces instructions peut causer un d_cbs ou des brQlures graves aux enfants et
aux adultes.
La bride
Le pied de la cuisiniere
Assurez-vous qu'une bride antibasculement est install_e :
• Glisser la cuisiniere vers I'avant.
• V_rifier que la bride antibasculement est bien fix_e au plancher ou au mur.
• Glisser de nouveau la cuisiniere vers I'arriere de sorte que le pied est sous la bride
antibasculement.
47
IMPORTANTES INSTRUCTIONS DE SI CURITI
AVERTISSEMENT : Pour reduire le risque d'incendie, • Entretien par I'utilisateur - Ne pas reparer ni remplacer toute
de choc electrique, de blessures ou de dommages Iors de
I'utilisation de la cuisiniere, il convient d'observer certaines
precautions 61ementaires dont les suivantes :
• AVERTISSEMENT : POUR MINIMISER LE RISQUE
DE BASCULEMENT DE LA CUISINIERE, ELLE DOlT PTRE
BIEN IMMOBILIS¢:E PAR DES DISPOSITIFS
ANTIBASCULEMENT CORRECTEMENT INSTALL¢:S.
POUR VERIFIER SI LES DISPOSITIFS SONT
CORRECTEMENT INSTALLI2S, GLISSER LA
CUISINIERE VERS L'AVANT ET VI2RIFIER SI LA BRIDE
ANTIBASCULEMENT EST BIEN FIXCE AU PLANCHER
OU AU MUR, ET GLISSER LA CUISINIERE VERS
L'ARRIERE POUR QUE LE PIED ARRIERE DE LA
CUISINIERE SOIT SOUS LA BRIDE
ANTIBASCULEMENT.
• AVERTISSEMENT : POUR R¢:DUIRE LE RISQUE DE
BROLURE, NE PAS DI2PLACER LA CUISINIERE
LORSQU'ELLE EST CHAUDE. CE-I-I-E CUISINIERE
COMPORTE DES ROULETTES POUR EN FACILITER LE
DI2PLACEMENT. POUR R¢:DUIRE LE RISQUE DE
BLESSURE LI¢: AU BASCULEMENT DE L'APPAREIL,
V¢:RIFIER LA QUALIT¢: DE LA R¢:INSTALLATION DE LA
CUISINIERE DANS LE DISPOSITIF ANTI-BASCULEMENT
FOURNI ET DI2PLOYER LES PIEDS DE NIVELLEMENT
APR#S AVOIR RAMEN¢: LA CUISINIERE A SA POSITION
D'INSTALLATION INITIALE.
• AVERTISSEMENT : NE JAMAIS utiliser cet appareil
comme dispositif de chauffage de la piece. Le non-
respect de cette instruction peut entrainer une intoxication
au monoxyde de carbone et une surchauffe du four.
• AVERTISSEMENT : NE JAMAIS couvrir les fentes,
trous ou passages d'air au fond du four ou couvrir
entierement une grille avec des materiaux tels que du
papier d'aluminium. Le non-respect de cette instruction
emp_che la circulation de I'air dans le four et peut
entrainer une intoxication au monoxyde de carbone. Les
feuilles de papier d'aluminium peuvent egalement retenir
la chaleur et creer un risque d'incendie.
• MISE EN GARDE : Ne pas remiser dans des armoires
au-dessus de la cuisiniere ou sur le dosseret d'une
cuisiniere, des objets que des enfants pourraient vouloir
atteindre. Les enfants pourraient se brQler ou se blesser
en grimpant sur la cuisiniere.
• Ne pas laisser les enfants seuls - Les enfants ne doivent
pas _tre laisses seuls ou sans surveillance dans la piece
ou la cuisiniere est en service. Ne jamais laisser les
enfants s'asseoir ou se tenir sur une partie quelconque de
la cuisiniere.
• Porter des v_tements appropries - Des v_tements amples
ou detach6s ne doivent jamais _tre portes pendant
I'utilisation de la cuisiniere.
piece de la cuisiniere si ce n'est pas specifiquement
recommande dans le manuel. Toute autre operation
d'entretien ou de reparation doit _tre confiee & un
technicien qualifi&
• Remisage dans ou sur la cuisiniere - Des materiaux
inflammables ne doivent pas _tre remises dans un four ou
pres des el6ments de surface.
• Ne pas utiliser d'eau pour eteindre un feu de graisse -
€:touffer le feu ou les flammes ou utiliser un extincteur
produits chimiques secs, ou un extincteur a mousse.
• N'utiliser que des mitaines de four s_ches - Des mitaines de
four mouillees ou humides sur des surfaces chaudes
peuvent provoquer des brQlures provenant de la vapeur. Ne
pas laisser les mitaines de four toucher les el6ments
chauffants. Ne pas utiliser une serviette ou un tissu epais.
• NE PAS TOUCHER LES €:LI_MENTS DE SURFACE OU
L'ESPACE PRES DES €:LI_MENTS - Les el6ments de
surface peuvent _tre chauds m_me Iorsqu'ils ont une teinte
foncee. Les endroits pros des el6ments de surface peuvent
devenir assez chauds pour causer des brOlures. Pendant et
apres I'utilisation, ne pas toucher les el6ments chauffants et
ne pas laisser les v_tements ou autres materiaux
inflammables entrer en contact avec ces el6ments de
surface ou les endroits pros des el6ments, avant qu'ils aient
suffisamment refroidi. Ces endroits comprennent la table de
cuisson et les surfaces pros de la table de la cuisson.
• Ne jamais laisser les el6ments de la table de cuisson sans
surveillance alors qu'ils chauffent a la puissance maximale.
II pourrait en resulter une ebullition qui cause de la fumee et
des renversements de corps gras qui peuvent s'enflammer.
• Ustensiles de cuisson vitrifies - Seulement certains types
d'ustensiles de verre, vitroceramique, ceramique, fa'_'enceou
autres surfaces vitrifiees conviennent pour le service sur une
table de cuisson, sans bris attribuables aux changements
soudains de temperature.
• Les poignees des ustensiles doivent _tre tournees vers
I'interieur et non vers le dessus des elements adjacents -
Pour reduire le risque de brOlures, d'inflammation de
produits inflammables et de renversements dus
I'entrechoquement non intentionnel des ustensiles, la
poignee d'un ustensile doit _tre positionnee de sorte qu'elle
soit tournee vers I'interieur et non au-dessus des elements
de surface adjacents.
• Nettoyer la table de cuisson avec prudence - Si une eponge
ou un chiffon mouille est utilise pour essuyer les
renversements sur une surface de cuisson chaude, eviter
les brQlures causees par la vapeur chaude. Certains
nettoyants peuvent produire des emanations nocives
Iorsqu'ils sont utilises sur une surface chaude.
• Exercer une grande prudence Iors de I'ouverture de la porte
- Laisser I'air chaud ou la vapeur s'echapper avant
d'enlever ou de replacer un plat.
• Ne pas faire chauffer des contenants fermes -
L'accumulation de pression peut causer une explosion du
contenant et des blessures.
CONSERVEZ CES INSTRUCTIONS
48
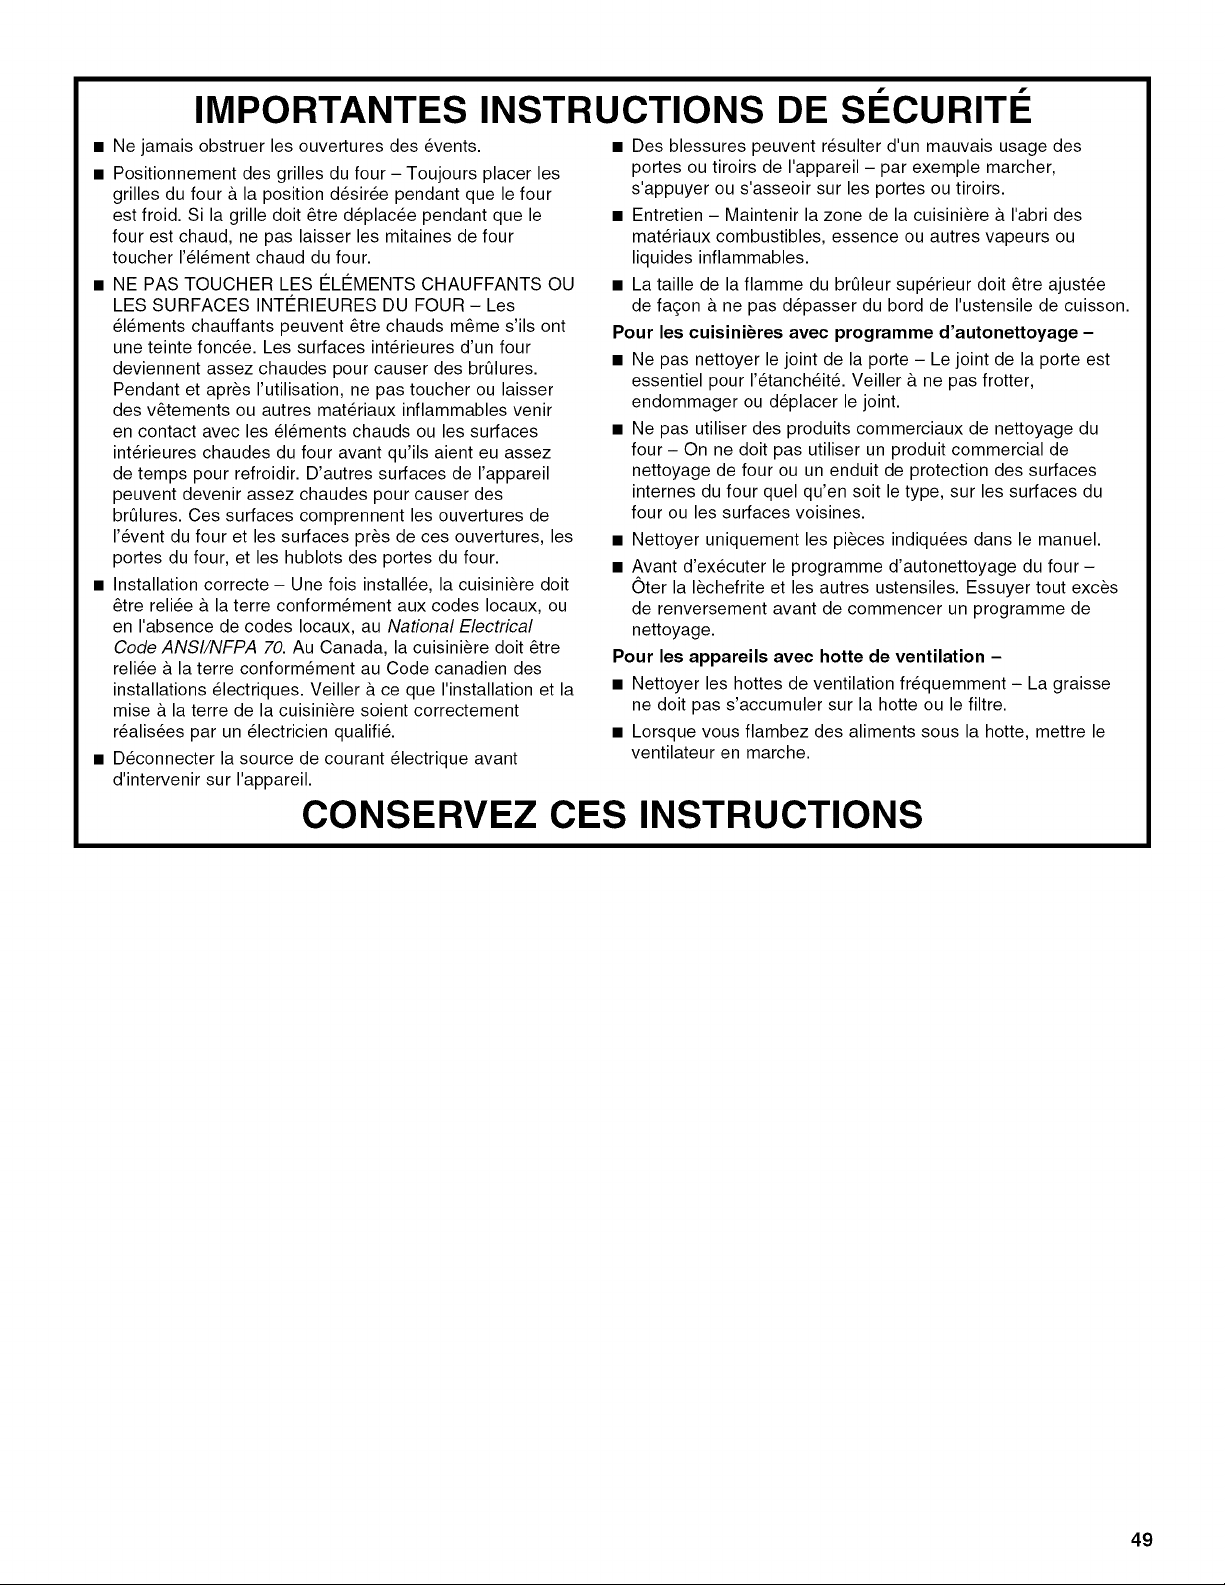
IMPORTANTES INSTRUCTIONS DE SECURITE
• Ne jamais obstruer les ouvertures des 6vents.
• Positionnement des grilles du four - Toujours placer les
grilles du four & la position d6sir6e pendant que le four
est froid. Si la grille doit 6tre d6plac6e pendant que le
four est chaud, ne pas laisser les mitaines de four
toucher 1'616mentchaud du four.
• NE PAS TOUCHER LES t_LI_MENTS CHAUFFANTS OU
LES SURFACES INTt_RIEURES DU FOUR - Les
616ments chauffants peuvent 6tre chauds m6me s'ils ont
une teinte fonc6e. Les surfaces int6rieures d'un four
deviennent assez chaudes pour causer des brQlures.
Pendant et apr_s I'utilisation, ne pas toucher ou laisser
des v6tements ou autres mat6riaux inflammables venir
en contact avec les 616ments chauds ou les surfaces
int6rieures chaudes du four avant qu'ils aient eu assez
de temps pour refroidir. D'autres surfaces de I'appareil
peuvent devenir assez chaudes pour causer des
brQlures. Ces surfaces comprennent les ouvertures de
1'6vent du four et les surfaces pros de ces ouvertures, les
portes du four, et les hublots des portes du four.
• Installation correcte - Une fois install6e, la cuisini_re doit
6tre reli6e & la terre conform6ment aux codes Iocaux, ou
en I'absence de codes Iocaux, au National Electrical
Code ANSI/NFPA 70. Au Canada, la cuisini_re doit 6tre
reli6e & la terre conform6ment au Code canadien des
installations 61ectriques. Veiller & ce que I'installation et la
mise & la terre de la cuisini_re soient correctement
r6alis6es par un 61ectricien qualifi6.
• D6connecter la source de courant 61ectrique avant
d'intervenir sur I'appareil.
• Des blessures peuvent r6sulter d'un mauvais usage des
portes ou tiroirs de I'appareil - par exemple marcher,
s'appuyer ou s'asseoir sur les portes ou tiroirs.
• Entretien - Maintenir la zone de la cuisini_re & I'abri des
mat6riaux combustibles, essence ou autres vapeurs ou
liquides inflammables.
• La taille de la flamme du brQleur sup6rieur doit 6tre ajust6e
de fa£on & ne pas d6passer du bord de I'ustensile de cuisson.
Pour les cuisini_res avec programme d'autonettoyage -
• Ne pas nettoyer le joint de la porte - Le joint de la porte est
essentiel pour 1'6tanch6it6. Veiller & ne pas frotter,
endommager ou d6placer le joint.
• Ne pas utiliser des produits commerciaux de nettoyage du
four - On ne doit pas utiliser un produit commercial de
nettoyage de four ou un enduit de protection des surfaces
internes du four quel qu'en soit le type, sur les surfaces du
four ou les surfaces voisines.
• Nettoyer uniquement les pi_ces indiqu6es dans le manuel.
• Avant d'ex6cuter le programme d'autonettoyage du four-
Oter la I_chefrite et les autres ustensiles. Essuyer tout exc_s
de renversement avant de commencer un programme de
nettoyage.
Pour les appareils avec hotte de ventilation -
• Nettoyer les hottes de ventilation fr6quemment - La graisse
ne doit pas s'accumuler sur la hotte ou le filtre.
• Lorsque vous flambez des aliments sous la hotte, mettre le
ventilateur en marche.
CONSERVEZ CES INSTRUCTIONS
49
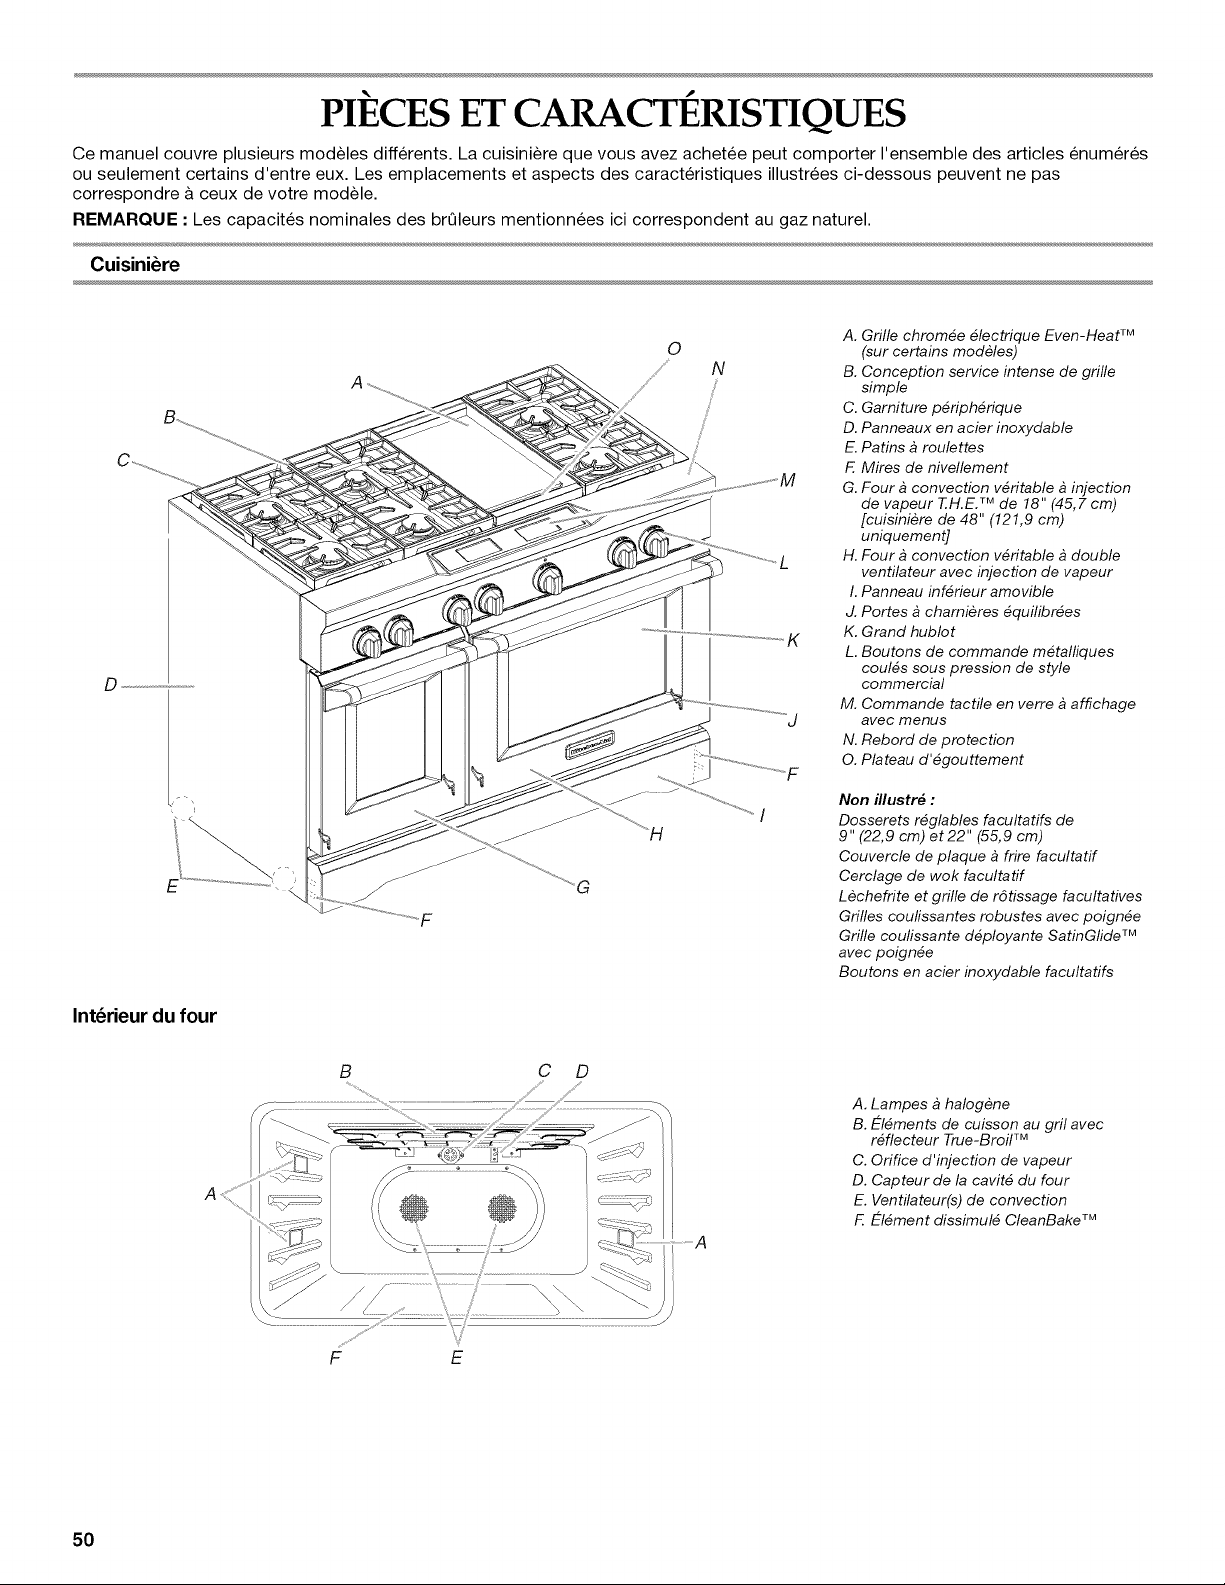
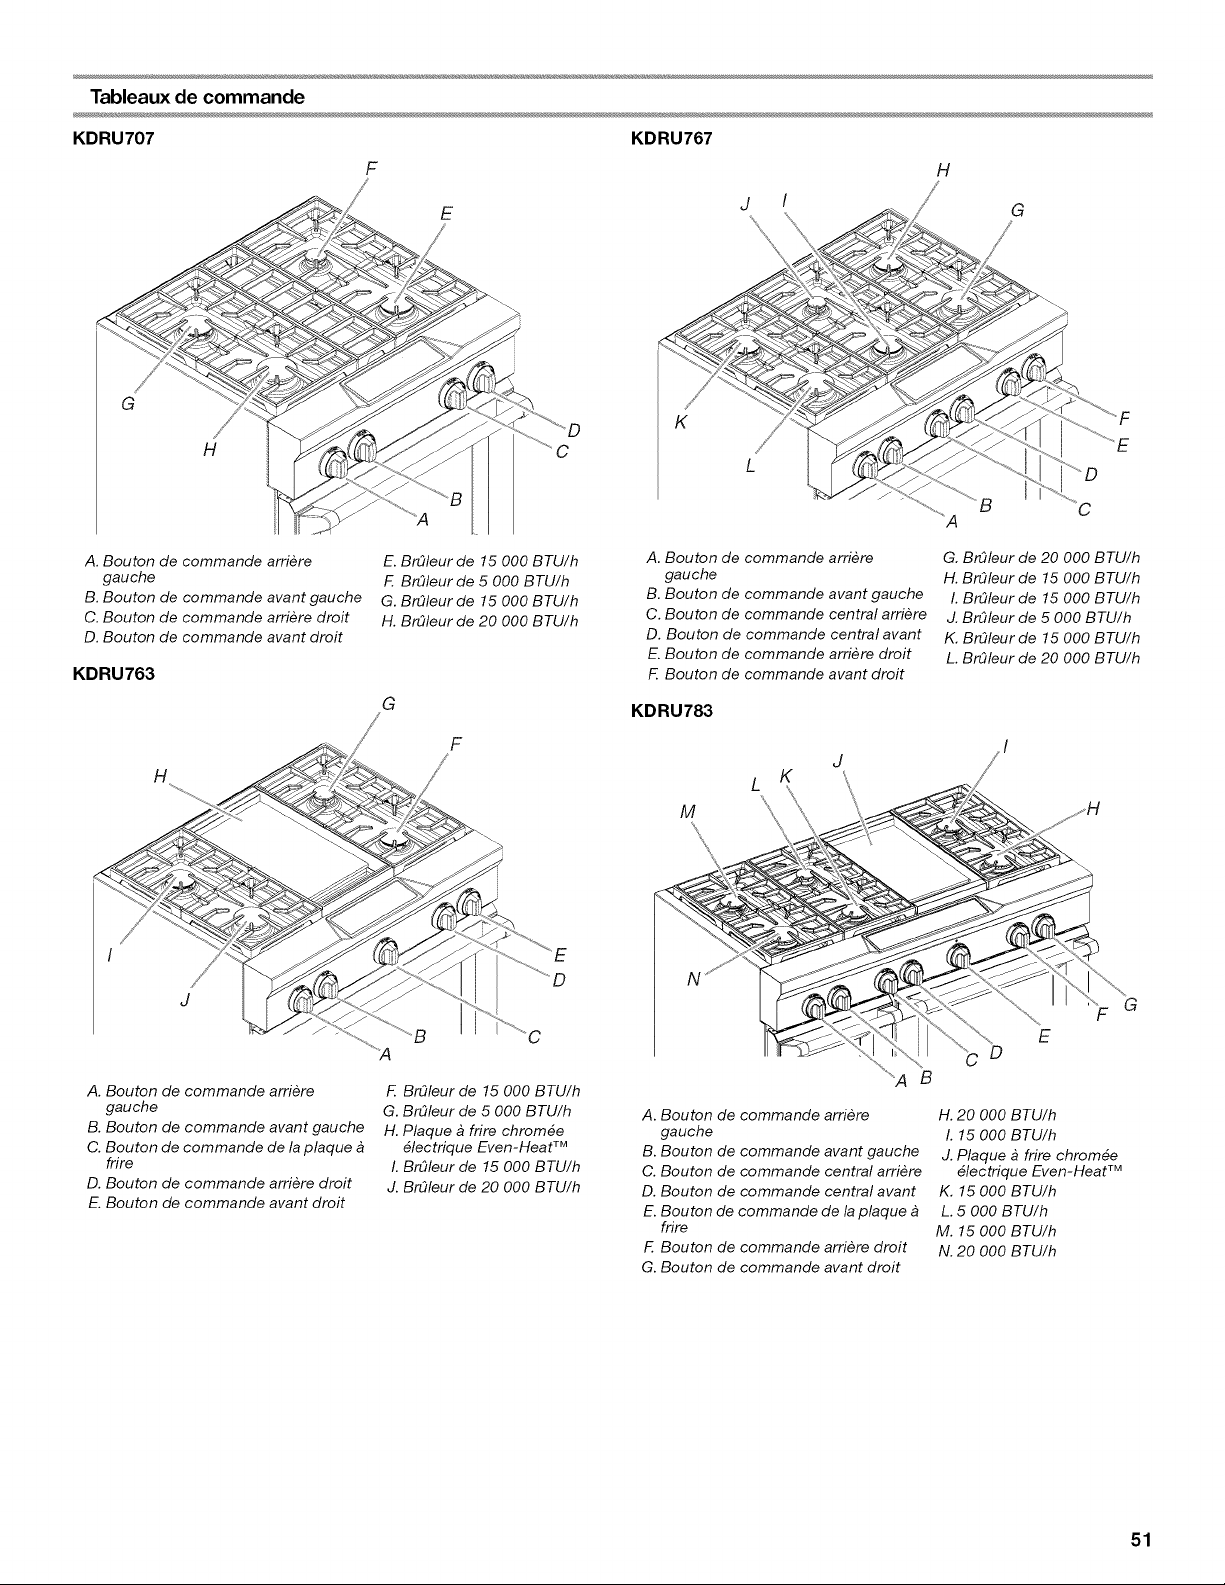
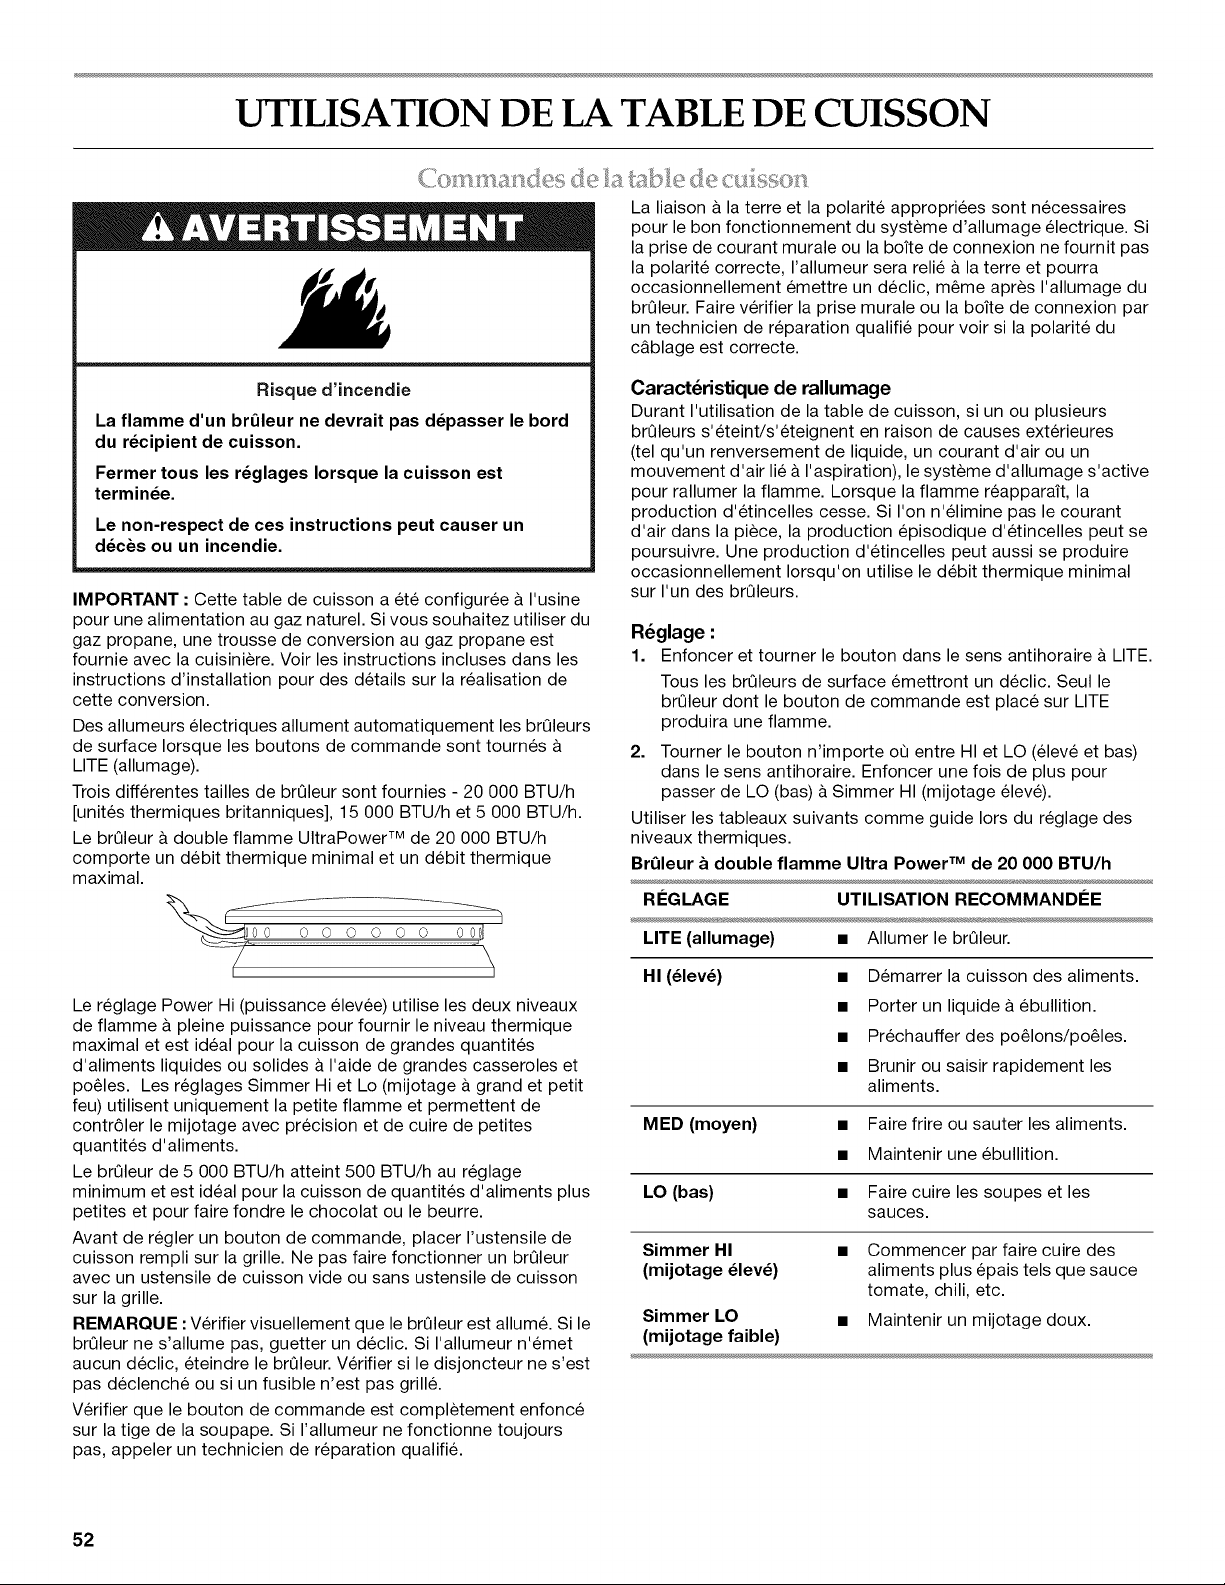
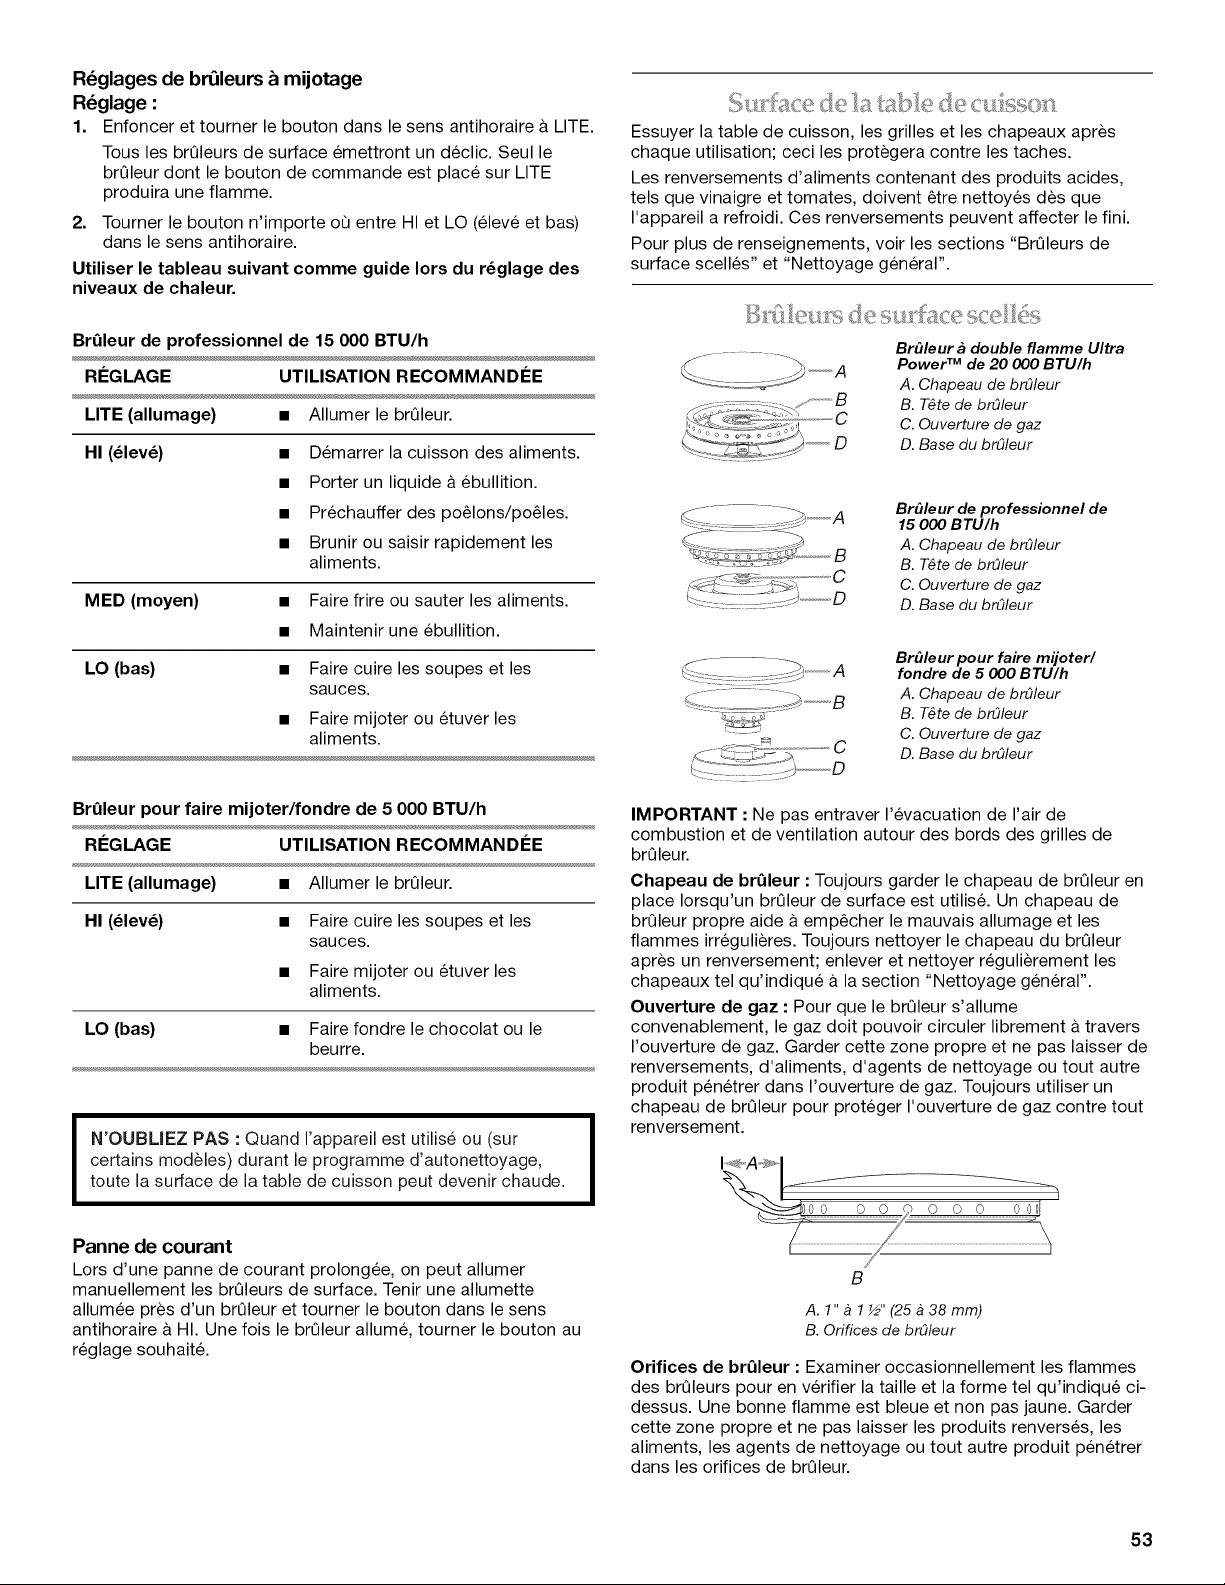
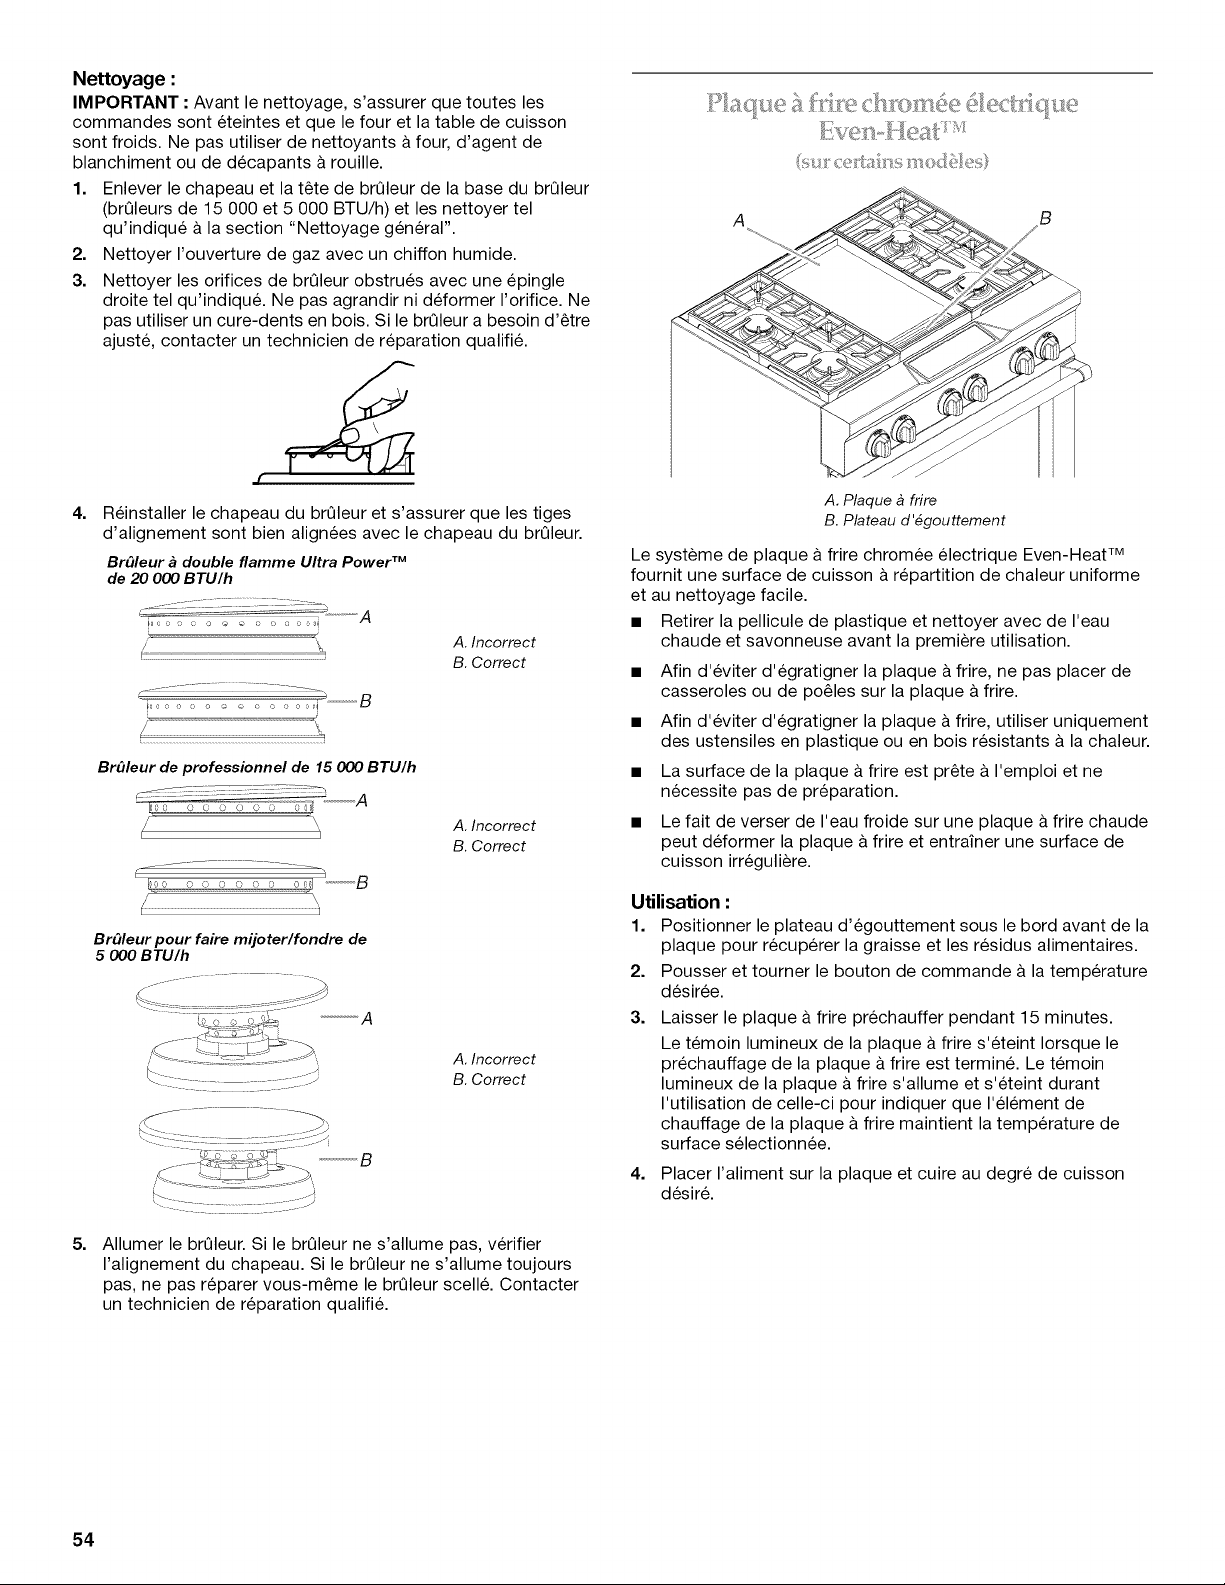

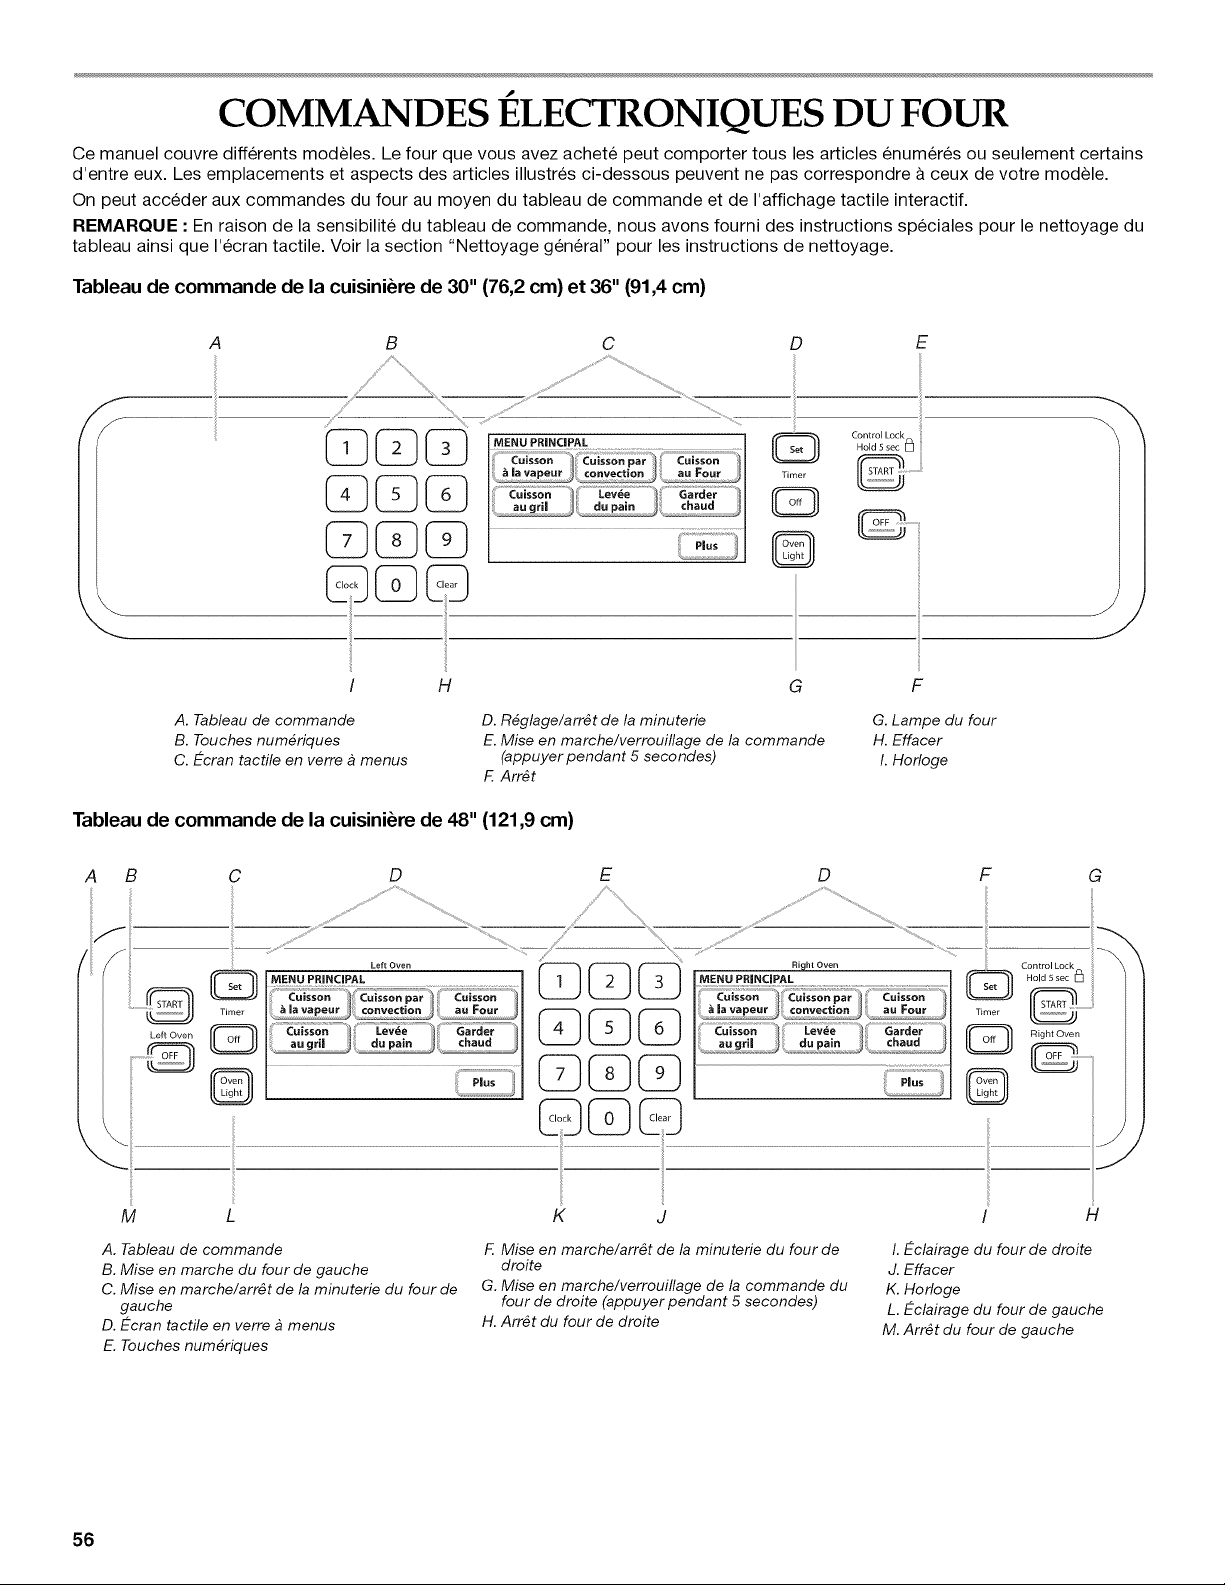
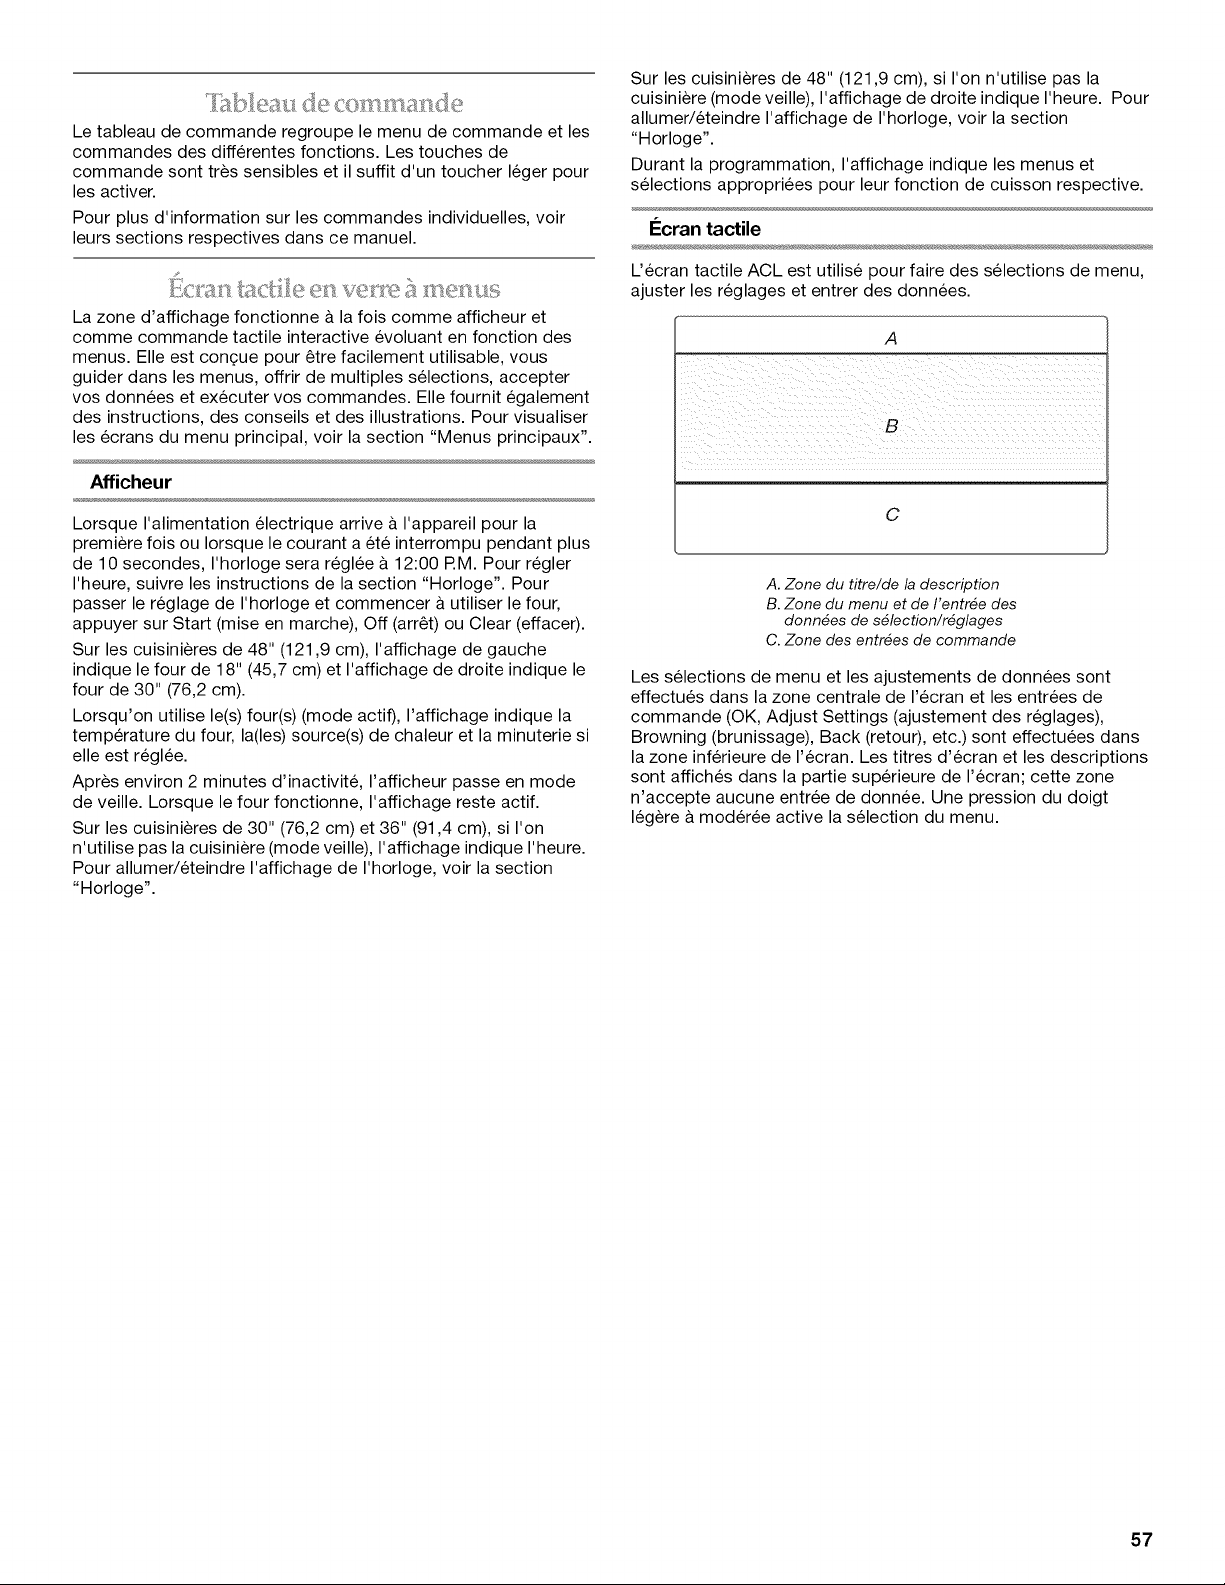
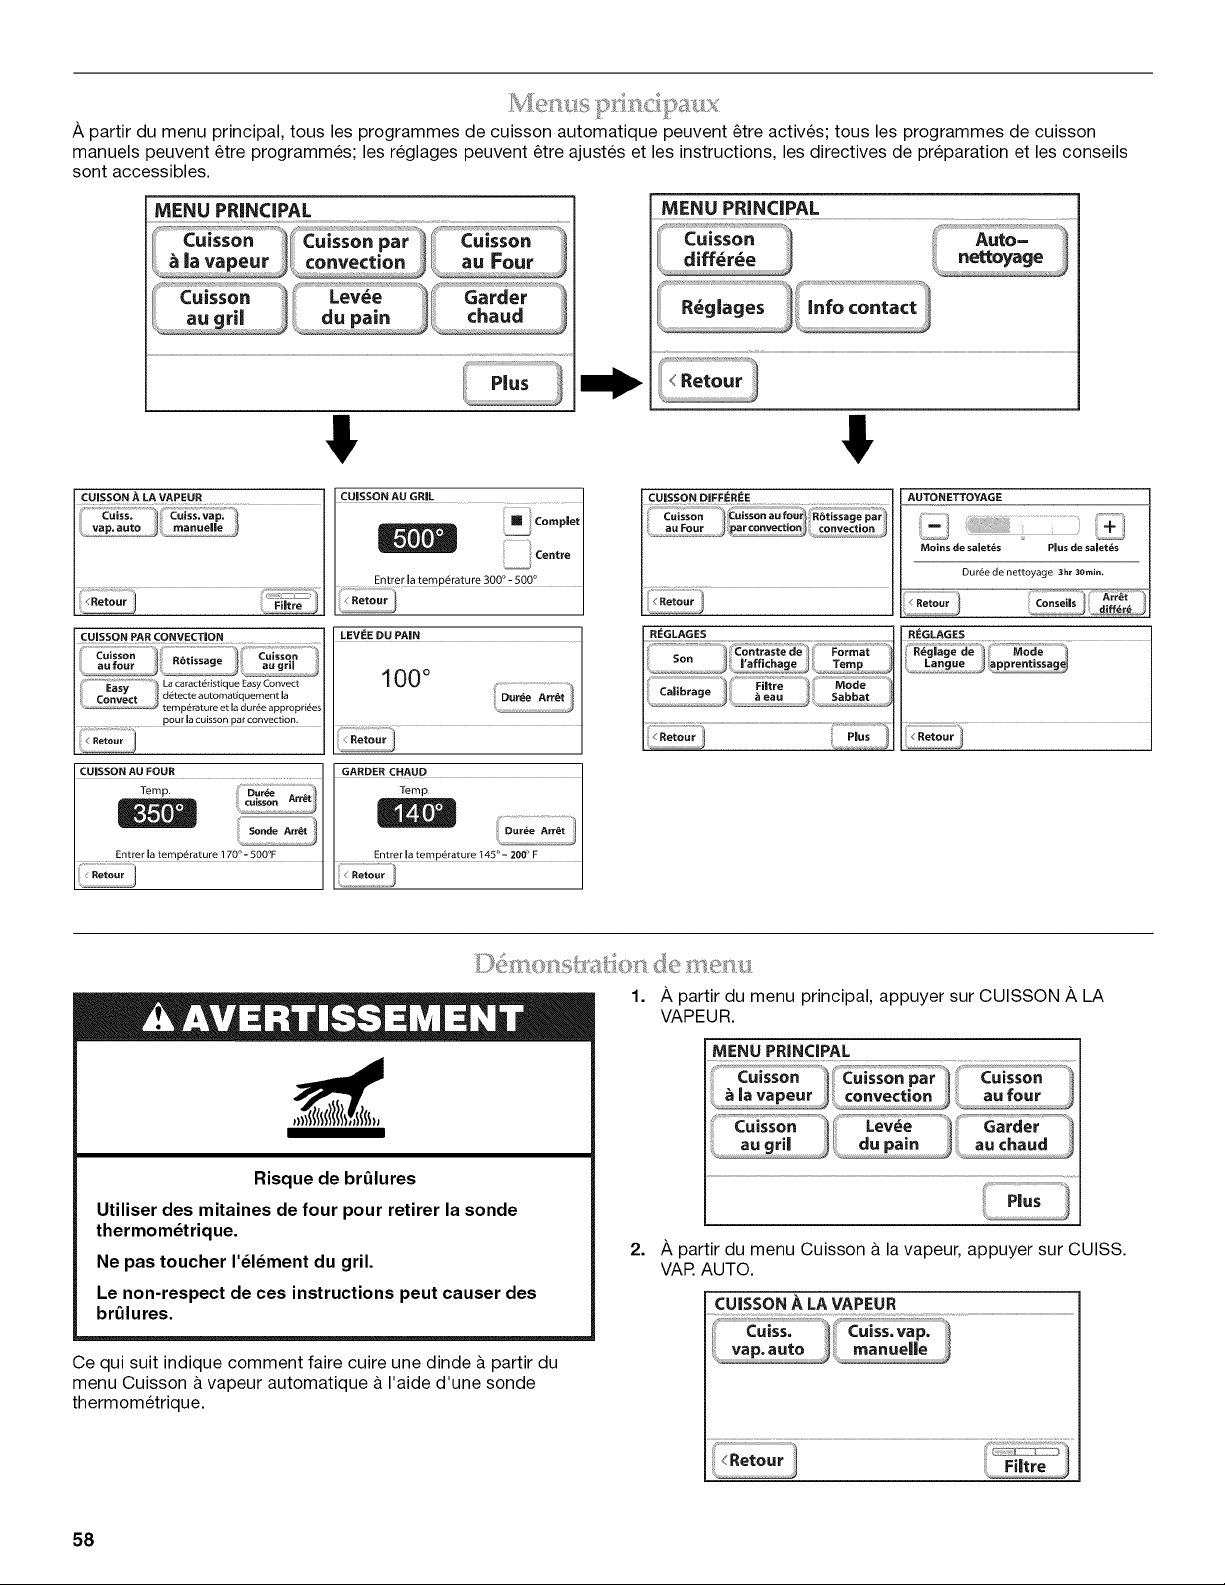
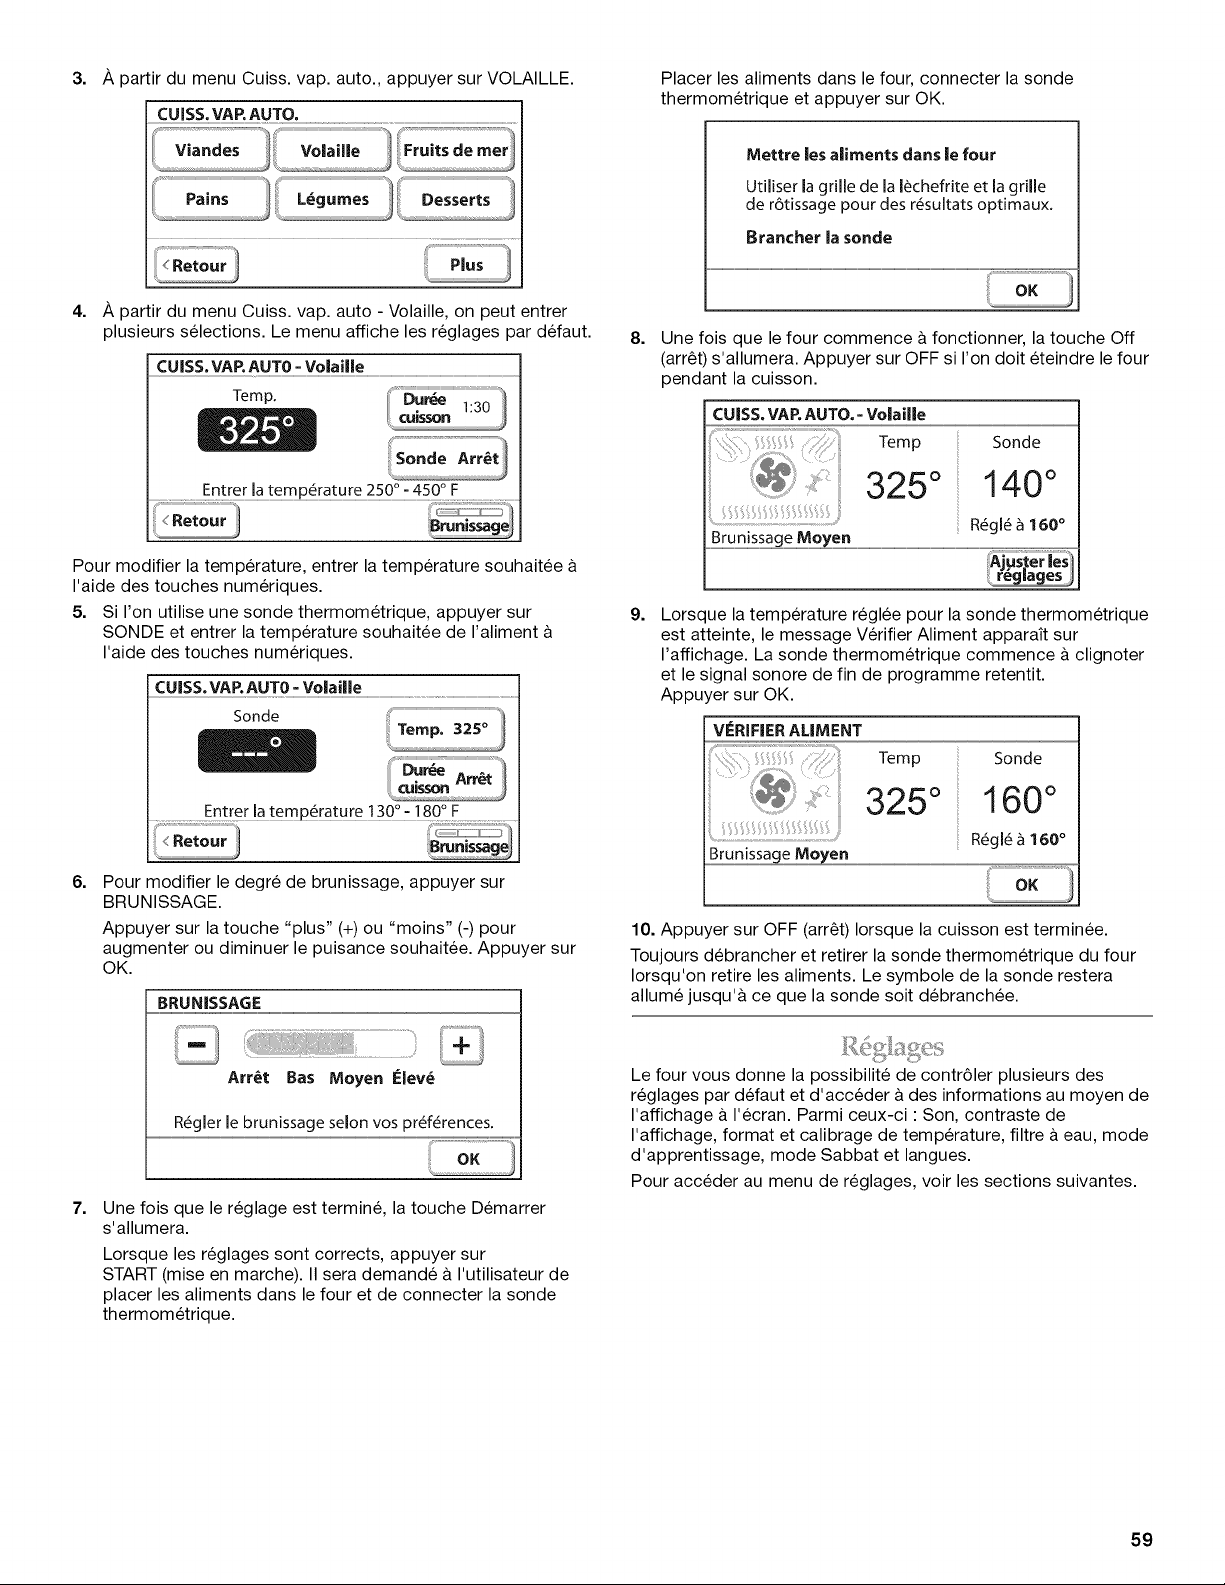
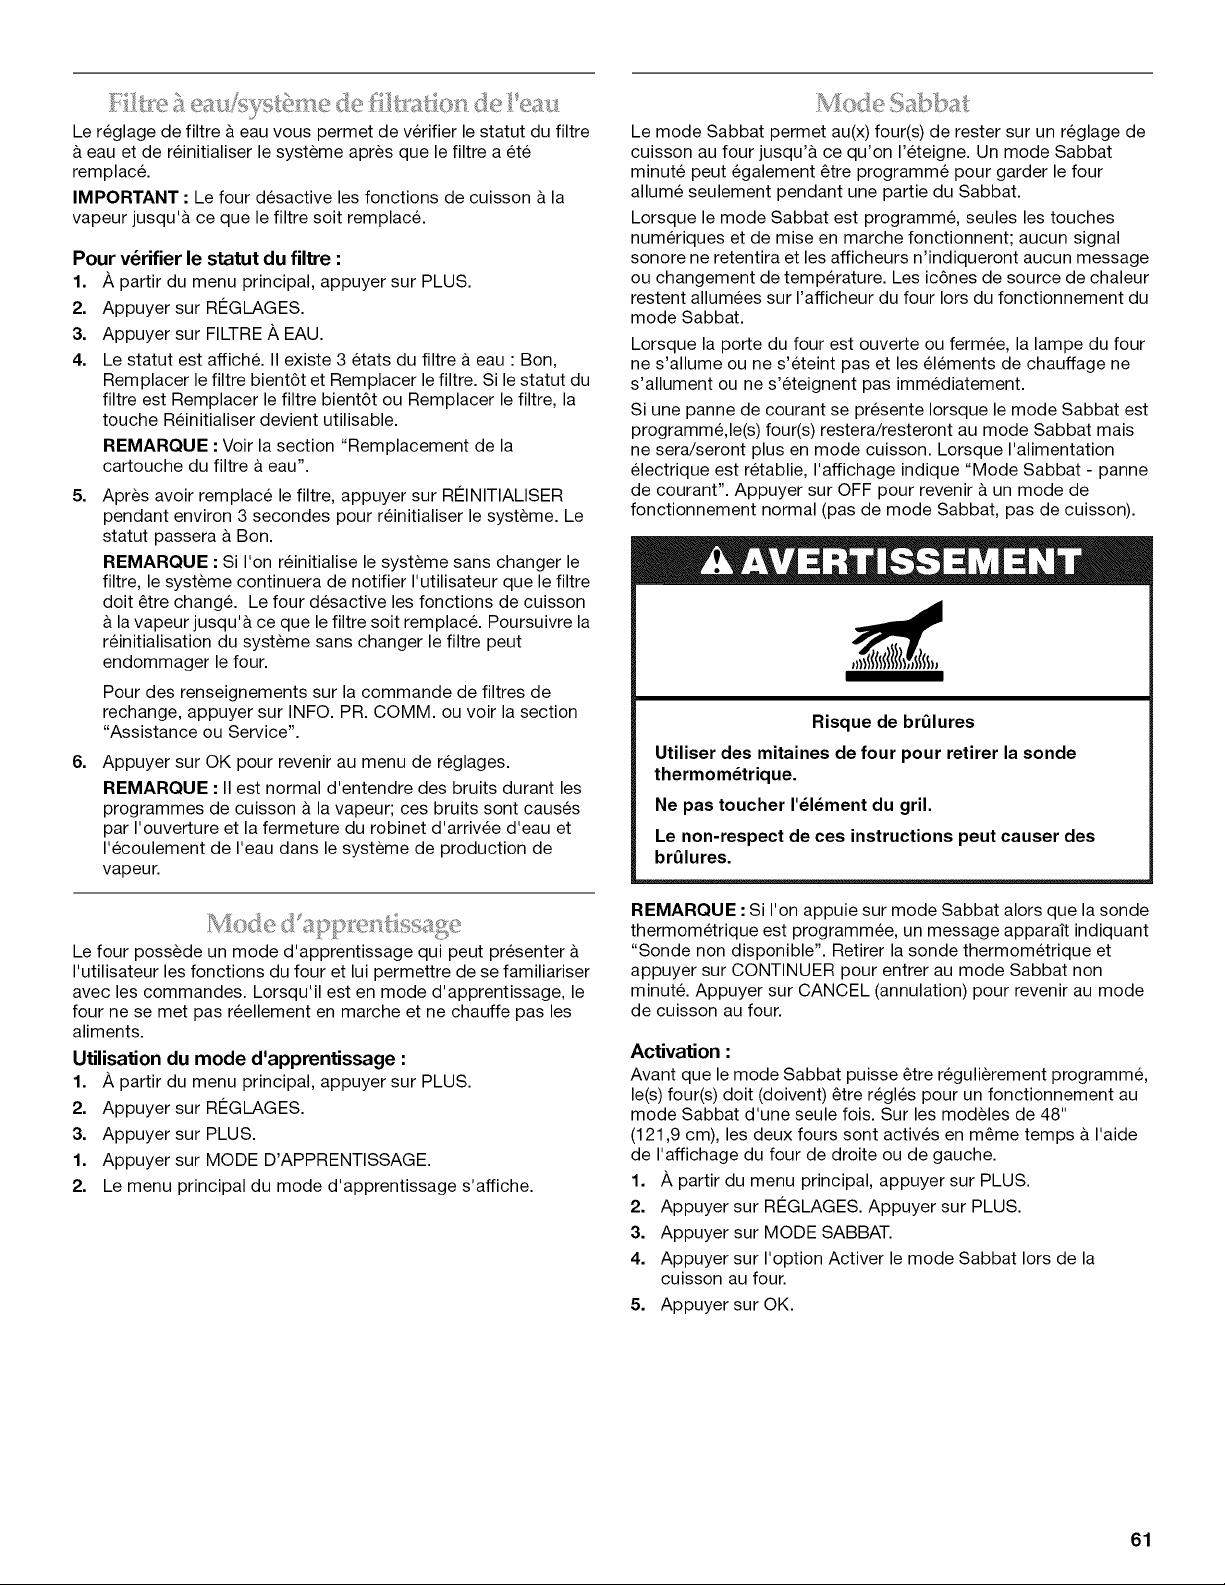
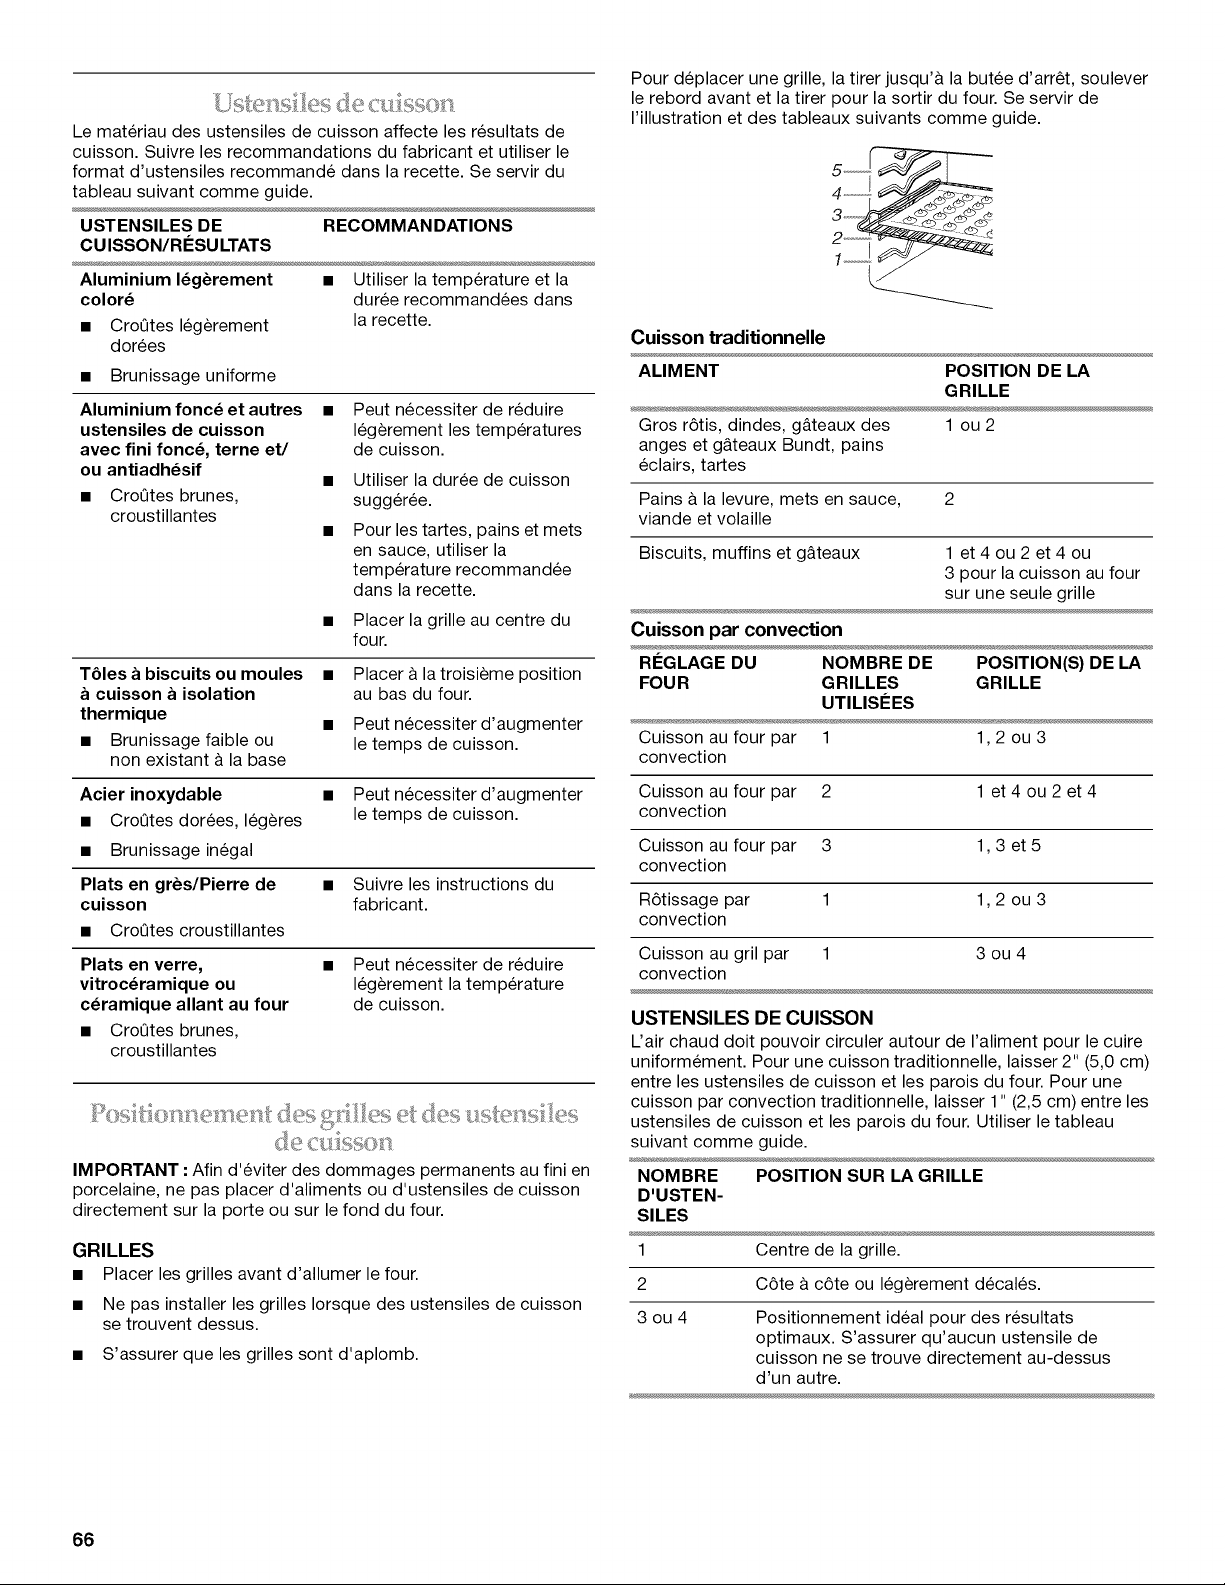
Le materiau des ustensiles de cuisson affecte les resultats de
cuisson. Suivre les recommandations du fabricant et utiliser le
format d'ustensiles recommande dans la recette. Se servir du
tableau suivant comme guide.
USTENSILES DE RECOMMANDATIONS
CU ISSON/RI_SU LTATS
Aluminium I_g_rement • Utiliser la temperature et la
color_ duree recommandees dans
• CroQtes legerement la recette.
dorees
• Brunissage uniforme
Aluminium fonc_et autres •
ustensiles de cuisson
avec fini fonc_, terne et/
ou antiadh_sif
• CroQtes brunes,
croustillantes
Peut necessiter de reduire
legerement les temperatures
de cuisson.
Utiliser la duree de cuisson
sugg6ree.
Pour les tartes, pains et mets
en sauce, utiliser la
temperature recommandee
dans la recette.
Placer la grille au centre du
four.
TSles a biscuits ou moules •
cuisson a isolation
thermique •
• Brunissage faible ou
non existant & la base
Placer a la troisieme position
au bas du four.
Peut necessiter d'augmenter
le temps de cuisson.
Acier inoxydable
• CroQtes dorees, legeres
• Brunissage inegal
Plats en gr_s/Pierre de
cuisson
• CroQtes croustillantes
• Peut necessiter d'augmenter
le temps de cuisson.
• Suivre les instructions du
fabricant.
Plats en verre,
vitroc_ramique ou
c_ramique allant au four
• CroQtes brunes,
croustillantes
• Peut necessiter de reduire
legerement la temperature
de cuisson.
I:OS}/l OIIQ}S(!!IICI(?!S;?S!IQ5 }_ el': 15[_15 _%
de cufsses
IMPORTANT • Afin d'eviter des dommages permanents au fini en
porcelaine, ne pas placer d'aliments ou d'ustensiles de cuisson
directement sur la porte ou sur le fond du four.
GRILLES
• Placer les grilles avant d'allumer le four.
• Ne pas installer les grilles Iorsque des ustensiles de cuisson
se trouvent dessus.
• S'assurer que les grilles sont d'aplomb.
Pour deplacer une grille, la tirer jusqu'a la butee d'arr_t, soulever
le rebord avant et la tirer pour la sortir du four. Se servir de
I'illustration et des tableaux suivants comme guide.
Cuisson traditionnelle
ALIMENT POSITION DE LA
GRILLE
Gros r6tis, dindes, g&teaux des 1 ou 2
anges et g&teaux Bundt, pains
eclairs, tartes
Pains a la levure, mets en sauce, 2
viande et volaille
Biscuits, muffins et g&teaux 1 et 4 ou 2 et 4 ou
3 pour la cuisson au four
sur une seule grille
Cuisson par convection
REGLAGE DU NOMBRE DE POSITION(S) DE LA
FOUR GRILLES GRILLE
UTILISI_ES
Cuisson au four par 1 1,2 ou 3
convection
Cuisson au four par 2 1 et 4 ou 2 et 4
convection
Cuisson au four par 3 1,3 et 5
convection
R6tissage par 1 1,2 ou 3
convection
Cuisson au gril par 1 3 ou 4
convection
USTENSILES DE CUISSON
L'air chaud doit pouvoir circuler autour de I'aliment pour le cuire
uniformement. Pour une cuisson traditionnelle, laisser 2" (5,0 cm)
entre les ustensiles de cuisson et les parois du four. Pour une
cuisson par convection traditionnelle, laisser 1" (2,5 cm) entre les
ustensiles de cuisson et les parois du four. Utiliser le tableau
suivant comme guide.
NOMBRE POSITION SUR LA GRILLE
D'USTEN-
SILES
1 Centre de la grille.
2 C6te a c6te ou legerement decales.
3ou4
Positionnement ideal pour des resultats
optimaux. S'assurer qu'aucun ustensile de
cuisson ne se trouve directement au-dessus
d'un autre.
66
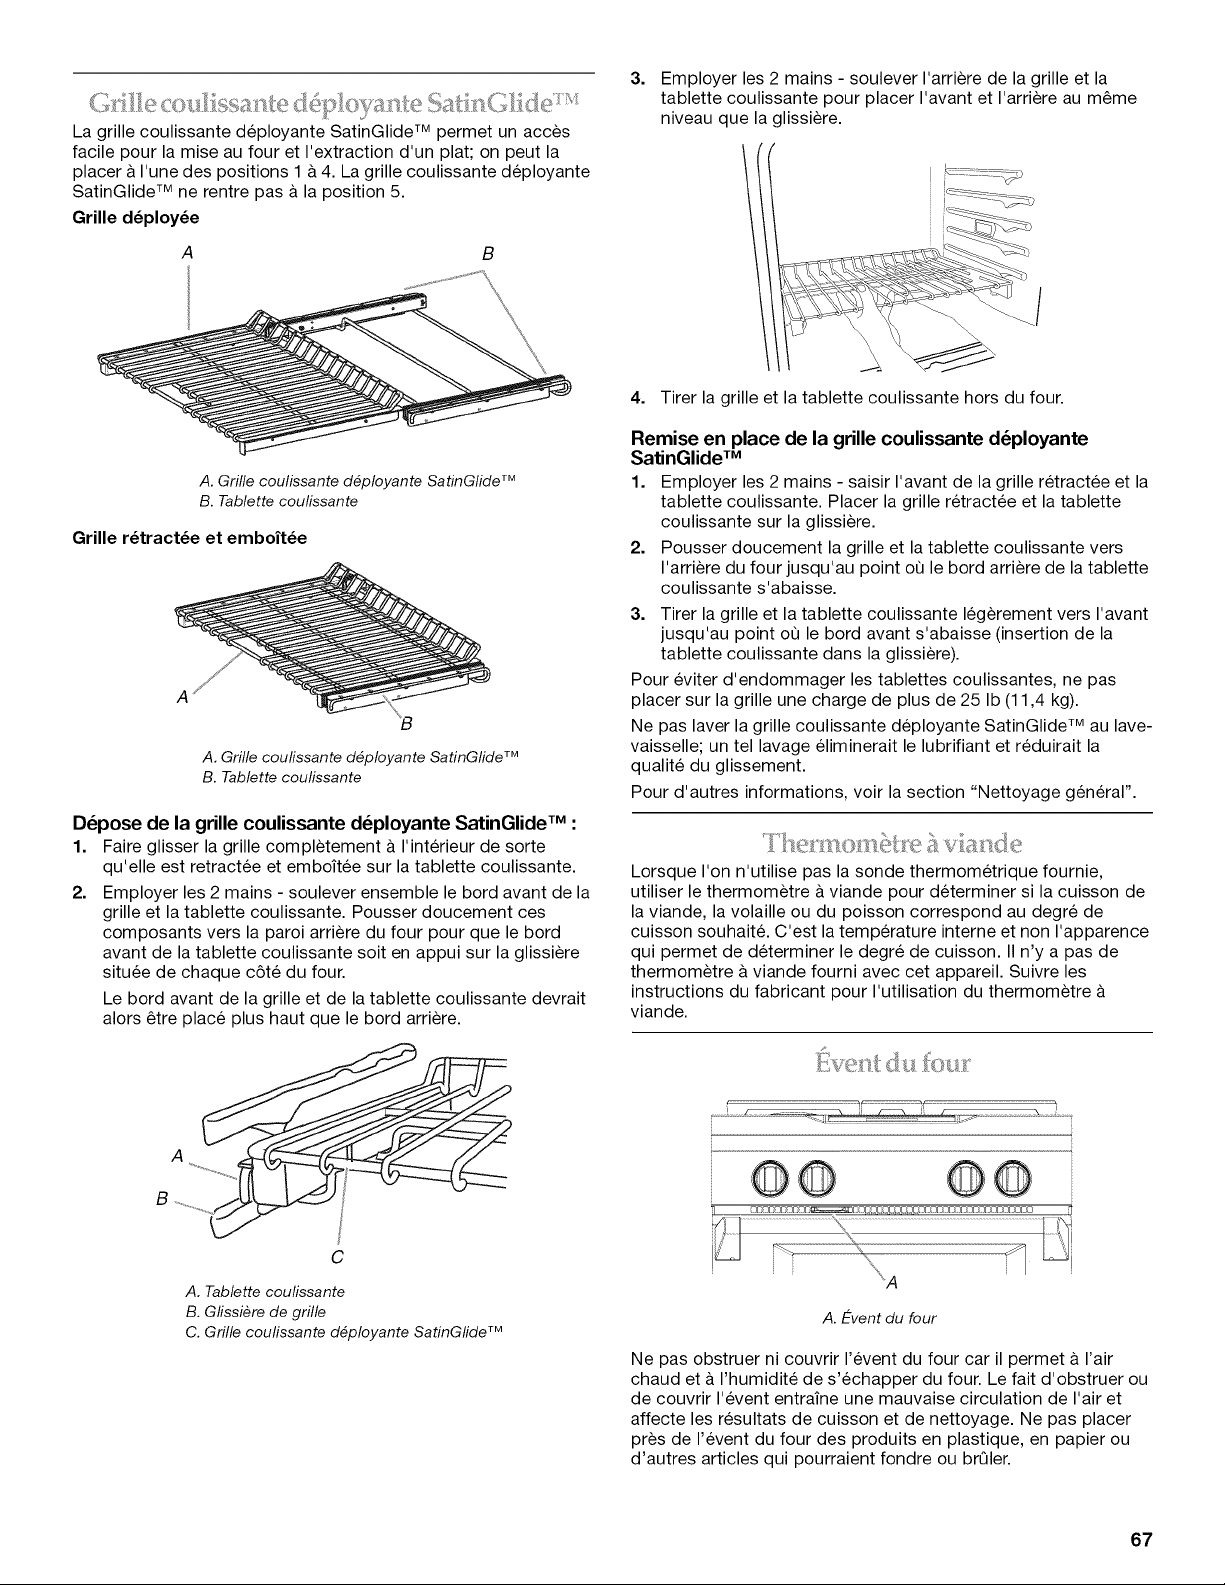
(.5 _._ @6_.__._$5_;_ __C _
La grille coulissante deployante SatinGlide TM permet un acces
facile pour la mise au four et I'extraction d'un plat; on peut la
placer & I'une des positions 1 & 4. La grille coulissante deployante
SatinGlide TM ne rentre pas a la position 5.
Grille d_ploy_e
B
A. Grille coulissante d_ployante SatinGlide TM
B. Tablette coulissante
Grille r_tract_e et emboft_e
A
A. Grille coufissante d_ployante SatinGlide TM
B. Tablette coulissante
D_pose de la grille coulissante d_ployante SatinGlide TM :
1. Faire glisser la grille completement a I'interieur de sorte
qu'elle est retractee et emboit6e sur la tablette coulissante.
2. Employer les 2 mains - soulever ensemble le bord avant de la
grille et la tablette coulissante. Pousser doucement ces
composants vers la paroi arriere du four pour que le bord
avant de la tablette coulissante soit en appui sur la glissiere
situ6e de chaque c6te du four.
Le bord avant de la grille et de la tablette coulissante devrait
alors _tre place plus haut que le bord arriere.
C
A. Tablette coulissante
B. Gfissiere de grille
C. Grille coufissante d_ployante SatinGlide TM
3.
Employer les 2 mains - soulever I'arriere de la grille et la
tablette coulissante pour placer I'avant et I'arriere au m_me
niveau que la glissiere.
4. Tirer la grille et la tablette coulissante hors du four.
Remise en place de la grille coulissante d_ployante
SatinGlide TM
1. Employer les 2 mains - saisir I'avant de la grille retract6e et la
tablette coulissante. Placer la grille retract6e et la tablette
coulissante sur la glissiere.
2. Pousser doucement la grille et la tablette coulissante vers
I'arriere du four jusqu'au point oQ le bord arriere de la tablette
coulissante s'abaisse.
3. Tirer la grille et la tablette coulissante legerement vers I'avant
jusqu'au point oQ le bord avant s'abaisse (insertion de la
tablette coulissante dans la glissiere).
Pour eviter d'endommager les tablettes coulissantes, ne pas
placer sur la grille une charge de plus de 25 Ib (11,4 kg).
Ne pas laver la grille coulissante deployante SatinGlide TM au lave-
vaisselle; un tel lavage eliminerait le lubrifiant et reduirait la
qualite du glissement.
Pour d'autres informations, voir la section "Nettoyage general".
Lorsque I'on n'utilise pas la sonde thermometrique fournie,
utiliser le thermom_tre & viande pour determiner si la cuisson de
la viande, la volaille ou du poisson correspond au degre de
cuisson souhait& C'est la temperature interne et non I'apparence
qui permet de determiner le degre de cuisson. II n'y a pas de
thermom_tre & viande fourni avec cet appareil. Suivre les
instructions du fabricant pour I'utilisation du thermometre
viande.
..... .......
A. E-vent du four
Ne pas obstruer ni couvrir I'event du four car il permet a I'air
chaud et & I'humidite de s'echapper du four. Le fait d'obstruer ou
de couvrir I'event entraine une mauvaise circulation de I'air et
affecte les resultats de cuisson et de nettoyage. Ne pas placer
pros de I'event du four des produits en plastique, en papier ou
d'autres articles qui pourraient fondre ou brQler.
67
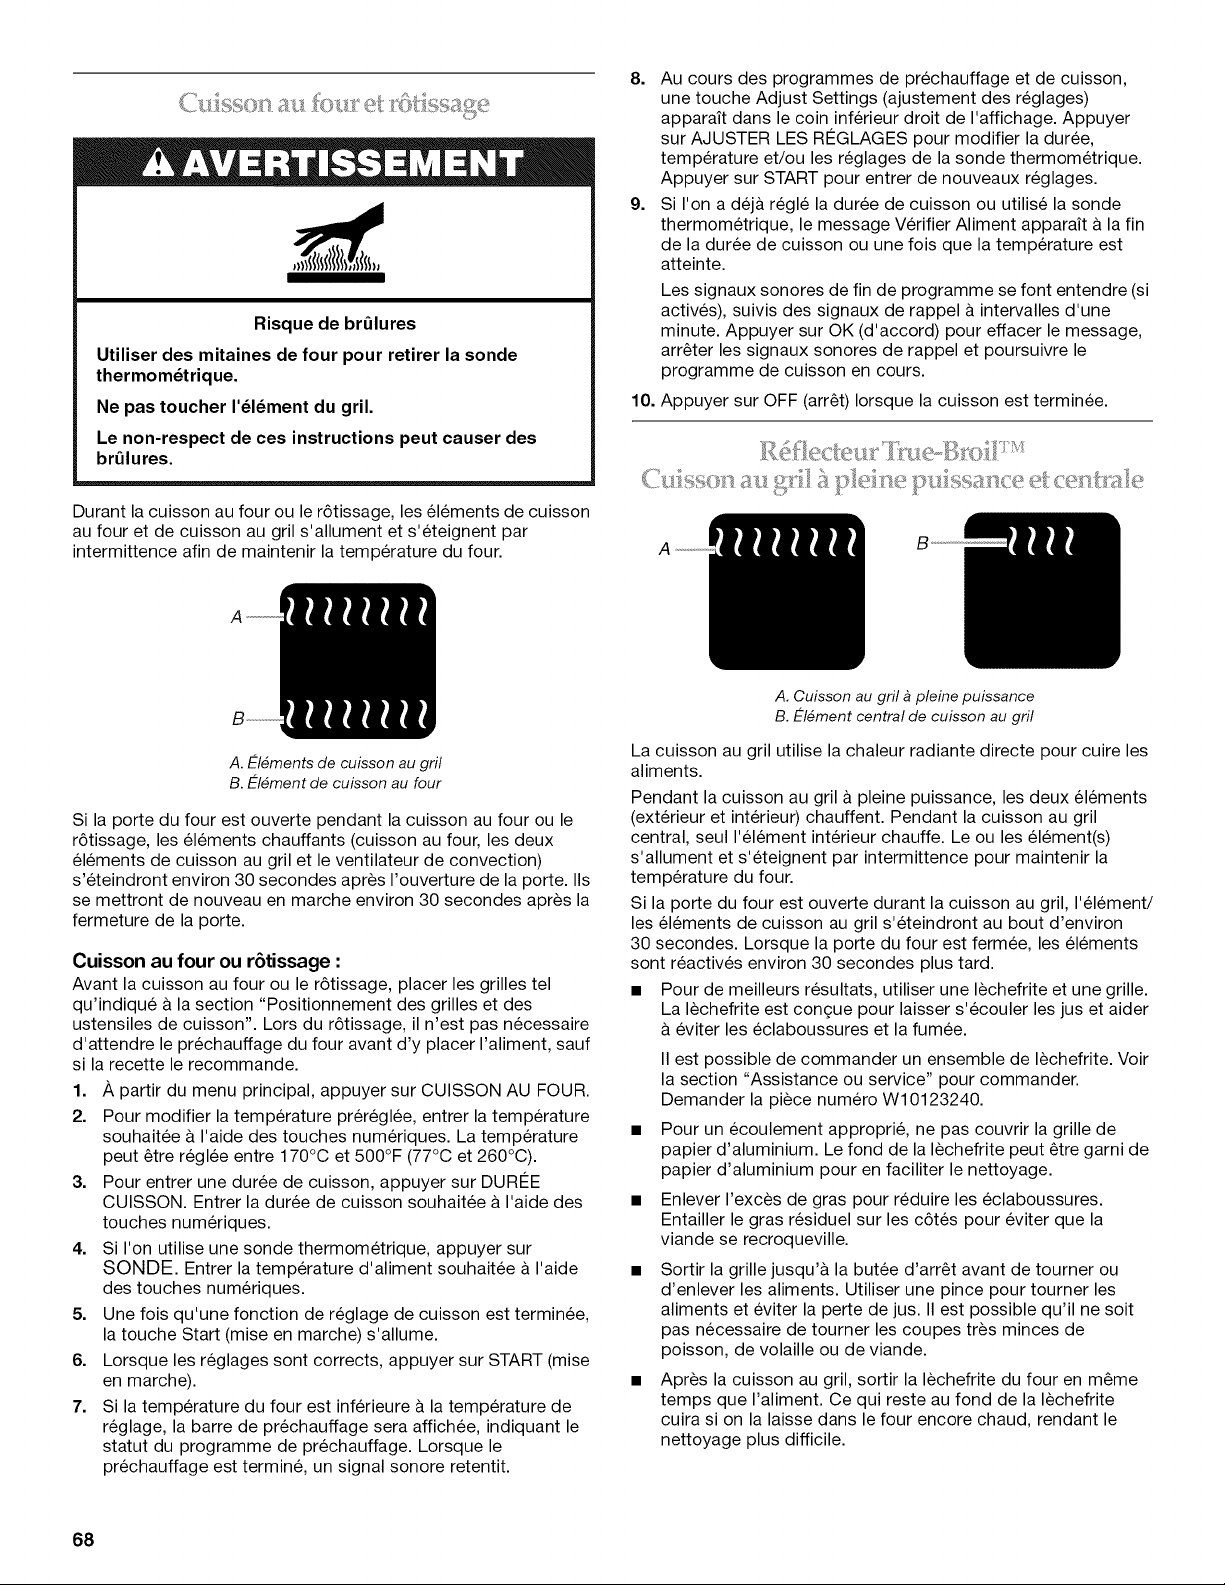
Risque de brQlures
Utiliser des mitaines de four pour retirer la sonde
thermom_trique.
Ne pas toucher I'_l_ment du gril.
Le non-respect de ces instructions peut causer des
brQlures.
Durant la cuisson au four ou le r6tissage, les el6ments de cuisson
au four et de cuisson au gril s'allument et s'eteignent par
intermittence afin de maintenir la temperature du four.
8. Au cours des programmes de prechauffage et de cuisson,
une touche Adjust Settings (ajustement des reglages)
apparait dans le coin inferieur droit de I'affichage. Appuyer
sur AJUSTER LES RI2GLAGES pour modifier la duree,
temperature et/ou les reglages de la sonde thermometrique.
Appuyer sur START pour entrer de nouveaux reglages.
9. Si I'on a dej& regl6 la duree de cuisson ou utilise la sonde
thermometrique, le message Verifier Aliment apparait a la fin
de la duree de cuisson ou une fois que la temperature est
atteinte.
Les signaux sonores de fin de programme se font entendre (si
actives), suivis des signaux de rappel a intervalles d'une
minute. Appuyer sur OK (d'accord) pour effacer le message,
arr_ter les signaux sonores de rappel et poursuivre le
programme de cuisson en cours.
10. Appuyer sur OFF (arr_t) Iorsque la cuisson est terminee.
A
A. E-I_ments de cuisson au gril
B. E-I_ment de cuisson au four
Si la porte du four est ouverte pendant la cuisson au four ou le
r6tissage, les el6ments chauffants (cuisson au four, les deux
el6ments de cuisson au gril et le ventilateur de convection)
s'eteindront environ 30 secondes apres I'ouverture de la porte. IIs
se mettront de nouveau en marche environ 30 secondes apres la
fermeture de la porte.
Cuisson au four ou r6tissage :
Avant la cuisson au four ou le r6tissage, placer les grilles tel
qu'indique & la section "Positionnement des grilles et des
ustensiles de cuisson". Lors du r6tissage, il n'est pas necessaire
d'attendre le prechauffage du four avant d'y placer I'aliment, sauf
si la recette le recommande.
1. A partir du menu principal, appuyer sur CUISSON AU FOUR.
2. Pour modifier la temperature prereglee, entrer la temperature
souhaitee & I'aide des touches numeriques. La temperature
peut _tre reglee entre 170°C et 500°F (77°C et 260°C).
3. Pour entrer une duree de cuisson, appuyer sur DUR#E
CUISSON. Entrer la duree de cuisson souhaitee & I'aide des
touches numeriques.
4. Si I'on utilise une sonde thermometrique, appuyer sur
SONDE. Entrer la temperature d'aliment souhaitee a I'aide
des touches numeriques.
5. Une fois qu'une fonction de reglage de cuisson est terminee,
la touche Start (mise en marche) s'allume.
6. Lorsque les reglages sont corrects, appuyer sur START (mise
en marche).
7. Si la temperature du four est inferieure & la temperature de
reglage, la barre de prechauffage sera affichee, indiquant le
statut du programme de prechauffage. Lorsque le
prechauffage est termine, un signal sonore retentit.
A. Cuisson au gril _ pleine puissance
B. E-I_ment central de cuisson au gril
La cuisson au gril utilise la chaleur radiante directe pour cuire les
aliments.
Pendant la cuisson au gril a pleine puissance, les deux elements
(exterieur et interieur) chauffent. Pendant la cuisson au gril
central, seul I'element interieur chauffe. Le ou les element(s)
s'allument et s'eteignent par intermittence pour maintenir la
temperature du four.
Si la porte du four est ouverte durant la cuisson au gril, I'element/
les elements de cuisson au gril s'eteindront au bout d'environ
30 secondes. Lorsque la porte du four est fermee, les elements
sont reactives environ 30 secondes plus tard.
• Pour de meilleurs resultats, utiliser une lechefrite et une grille.
La lechefrite est con(_ue pour laisser s'ecouler les jus et aider
eviter les eclaboussures et la fumee.
II est possible de commander un ensemble de lechefrite. Voir
la section "Assistance ou service" pour commander.
Demander la piece numero W10123240.
• Pour un ecoulement approprie, ne pas couvrir la grille de
papier d'aluminium. Le fond de la lechefrite peut _tre garni de
papier d'aluminium pour en faciliter le nettoyage.
• Enlever I'exces de gras pour reduire les eclaboussures.
Entailler le gras residuel sur les c6tes pour eviter que la
viande se recroqueville.
• Sortir la grille jusqu'& la butee d'arr_t avant de tourner ou
d'enlever les aliments. Utiliser une pince pour tourner les
aliments et eviter la perte de jus. II est possible qu'il ne soit
pas necessaire de tourner les coupes tres minces de
poisson, de volaille ou de viande.
• Apres la cuisson au gril, sortir la lechefrite du four en m_me
temps que I'aliment. Ce qui reste au fond de la lechefrite
cuira si on la laisse dans le four encore chaud, rendant le
nettoyage plus difficile.
68
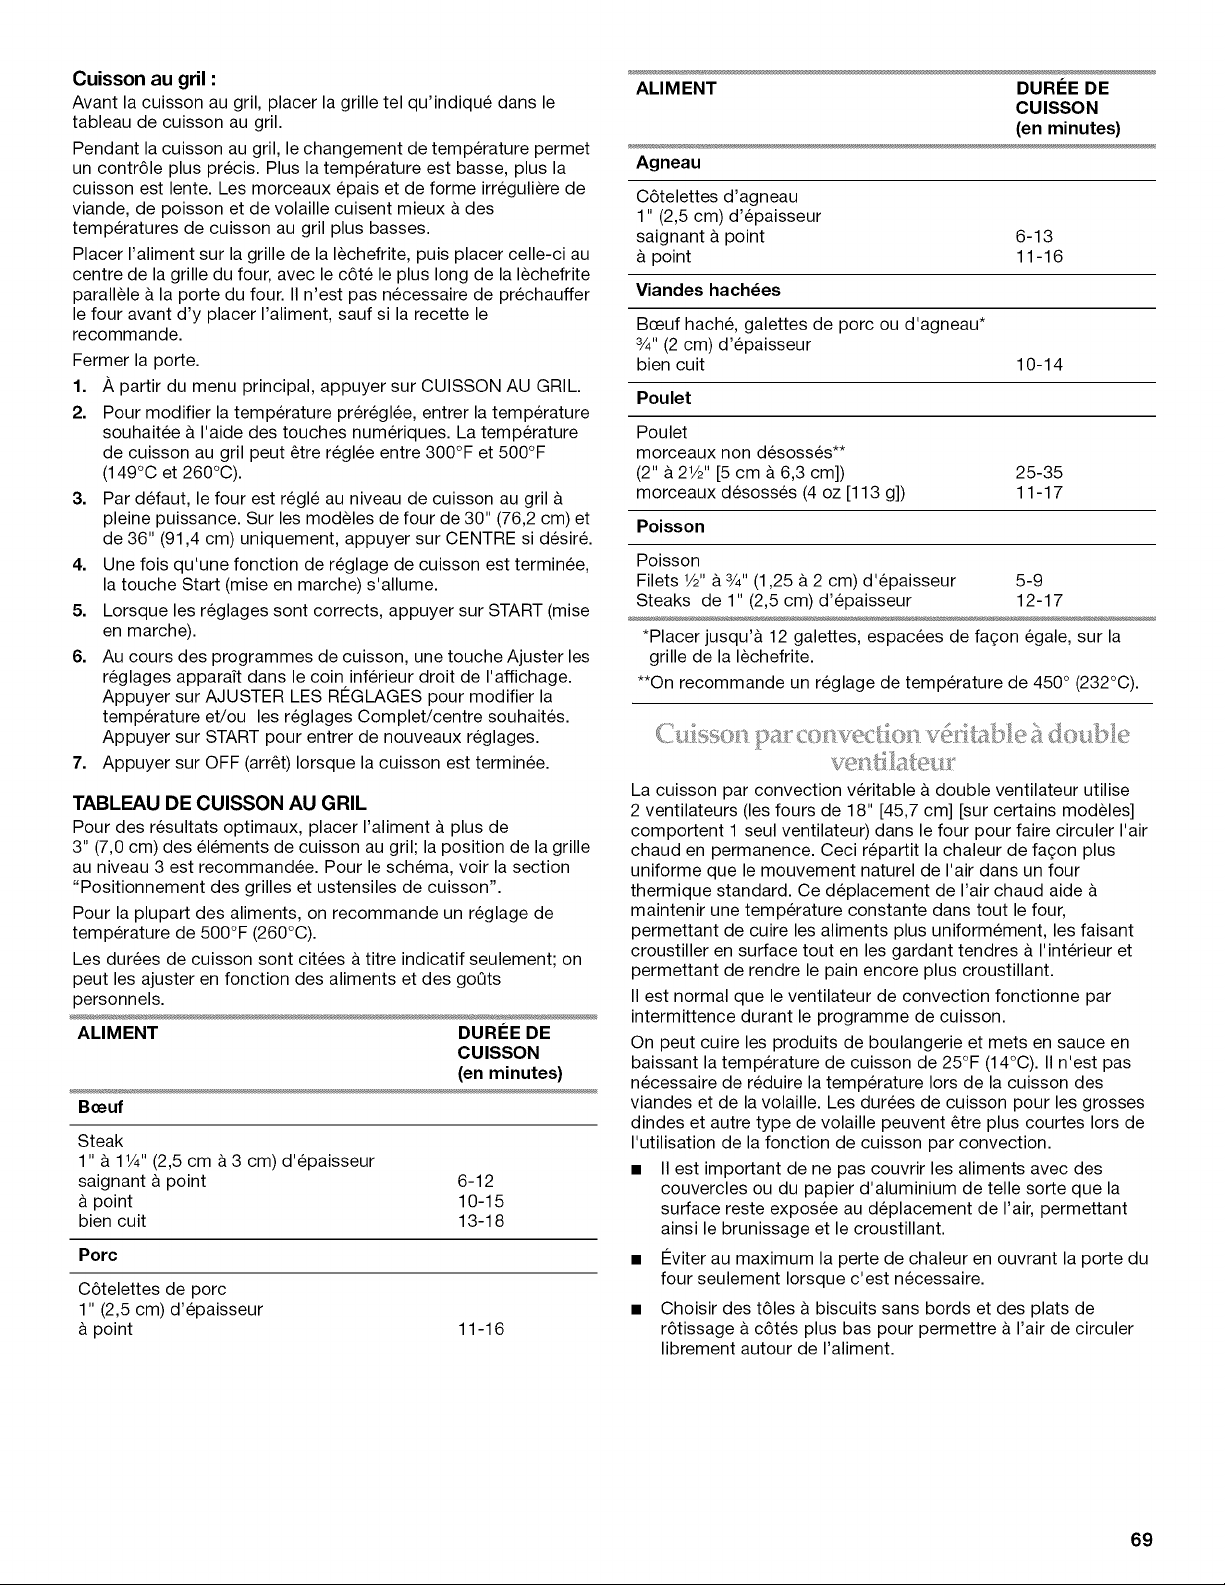
Cuisson au gril :
Avant la cuisson au gril, placer la grille tel qu'indiqu6 dans le
tableau de cuisson au gril.
Pendant la cuisson au gril, le changement de temperature permet
un contr61e plus precis. Plus la temperature est basse, plus la
cuisson est lente. Les morceaux epais et de forme irreguliere de
viande, de poisson et de volaille cuisent mieux a des
temperatures de cuisson au gril plus basses.
Placer I'aliment sur la grille de la lechefrite, puis placer celle-ci au
centre de la grille du four, avec le c6te le plus long de la lechefrite
parallele & la porte du four. II n'est pas necessaire de prechauffer
le four avant d'y placer I'aliment, sauf si la recette le
recommande.
Fermer la porte.
1. A partir du menu principal, appuyer sur CUISSON AU GRIL.
2. Pour modifier la temperature prer6gl6e, entrer la temperature
souhaitee & I'aide des touches numeriques. La temperature
de cuisson au gril peut etre reglee entre 300°F et 500°F
(149°C et 260°C).
3. Par defaut, le four est regle au niveau de cuisson au gril &
pleine puissance. Sur les modeles de four de 30" (76,2 cm) et
de 36" (91,4 cm) uniquement, appuyer sur CENTRE si desire.
4. Une fois qu'une fonction de reglage de cuisson est terminee,
la touche Start (mise en marche) s'allume.
5. Lorsque les reglages sont corrects, appuyer sur START (mise
en marche).
6. Au cours des programmes de cuisson, une touche Ajuster les
reglages apparait dans le coin inferieur droit de I'affichage.
Appuyer sur AJUSTER LES RI2GLAGES pour modifier la
temperature et/ou les reglages Complet/centre souhaites.
Appuyer sur START pour entrer de nouveaux reglages.
7. Appuyer sur OFF (arret) Iorsque la cuisson est terminee.
TABLEAU DE CUlSSON AU GRIL
Pour des resultats optimaux, placer I'aliment a plus de
3" (7,0 cm) des elements de cuisson au gril; la position de la grille
au niveau 3 est recommandee. Pour le schema, voir la section
"Positionnement des grilles et ustensiles de cuisson".
Pour la plupart des aliments, on recommande un reglage de
temperature de 500°F (260°C).
Les durees de cuisson sont citees a titre indicatif seulement; on
peut les ajuster en fonction des aliments et des goQts
personnels.
ALIMENT DUREE DE
CUlSSON
(en minutes)
Beeuf
Steak
1" & 1V4" (2,5 cm & 3 cm) d'epaisseur
saignant & point 6-12
& point 10-15
bien cuit 13-18
Porc
C6telettes de porc
1" (2,5 cm) d'epaisseur
& point
11-16
ALIMENT DUREE DE
CUlSSON
(en minutes)
Agneau
C6telettes d'agneau
1" (2,5 cm) d'epaisseur
saignant & point 6-13
& point 11-16
Viandes hach_es
Bceuf hache, galettes de porc ou d'agneau*
3/4"(2 cm) d'epaisseur
bien cuit 10-14
Poulet
Poulet
morceaux non desosses**
(2" & 21/2'' [5 cm & 6,3 cm]) 25-35
morceaux desosses (4 oz [113 g]) 11-17
Poisson
Poisson
Filets 1/2"& 3/4"(1,25 a 2 cm) d'epaisseur 5-9
Steaks de 1" (2,5 cm) d'epaisseur 12-17
*Placer jusqu'& 12 galettes, espacees de fa£_on egale, sur la
grille de la lechefrite.
**On recommande un reglage de temperature de 450 ° (232°C).
La cuisson par convection veritable a double ventilateur utilise
2 ventilateurs (les fours de 18" [45,7 cm] [sur certains modeles]
comportent 1 seul ventilateur) dans le four pour faire circuler I'air
chaud en permanence. Ceci repartit la chaleur de fa(_on plus
uniforme que le mouvement naturel de I'air dans un four
thermique standard. Ce deplacement de I'air chaud aide
maintenir une temperature constante dans tout le four,
permettant de cuire les aliments plus uniformement, les faisant
croustiller en surface tout en les gardant tendres & I'interieur et
permettant de rendre le pain encore plus croustillant.
II est normal que le ventilateur de convection fonctionne par
intermittence durant le programme de cuisson.
On peut cuire les produits de boulangerie et mets en sauce en
baissant la temperature de cuisson de 25°F (14°C). II n'est pas
necessaire de reduire la temperature Iors de la cuisson des
viandes et de la volaille. Les durees de cuisson pour les grosses
dindes et autre type de volaille peuvent etre plus courtes Iors de
I'utilisation de la fonction de cuisson par convection.
• II est important de ne pas couvrir les aliments avec des
couvercles ou du papier d'aluminium de telle sorte que la
surface reste exposee au deplacement de I'air, permettant
ainsi le brunissage et le croustillant.
• #viter au maximum la perte de chaleur en ouvrant la porte du
four seulement Iorsque c'est necessaire.
• Choisir des t61es & biscuits sans bords et des plats de
r6tissage a c6tes plus bas pour permettre a I'air de circuler
librement autour de I'aliment.
69
• Verifier la cuisson des produits de boulangerie quelques
minutes avant le temps de cuisson minimal, avec un cure-
dents par exemple.
Risque de brQlures
Utiliser des mitaines de four pour retirer la sonde
thermom_trique.
Ne pas toucher I'_l_ment du gril.
Le non-respect de ces instructions peut causer des
brQlures.
Utiliser un thermometre & viande ou la sonde de cuisson pour
determiner le degre de cuisson des viandes et de la volaille.
Verifier la temperature du porc et de la volaille a 2 ou 3
endroits.
Risque de brQlures
Utiliser des mitaines de four pour retirer la sonde
thermom_trique.
Ne pas toucher I'_l_ment du gril.
Le non-respect de ces instructions peut causer des
brQlures.
Uelement de convection est dissimule dans le panneau arriere de
la cavite du four et assiste par le ventilateur de convection pour
assurer un chauffage efficace et equilibre.
A
A. E-I_ment de convection (dissimul_) et ventilateur
La cuisson au four par convection peut _tre utilisee pour cuire
des g&teaux delicats et des p&tisseries ainsi que des aliments sur
plusieurs grilles. II est utile de decaler les articles sur les grilles
pour permettre une circulation plus uniforme de la chaleur. Si le
four est plein, il faudra peut-_tre allonger la duree de cuisson.
Lors de la cuisson au four d'un repas comportant plusieurs types
differents d'aliments, veiller a choisir des recettes necessitant
des temperatures semblables. Prevoir un espace d'au moins
1" (2,5 cm) entre I'ustensile de cuisson et les parois du four.
Lors du prechauffage pour la cuisson au four par convection, les
elements de convection, de cuisson au gril et I'element
CleanBake TM chauffent tous la cavite du four. Apres le
prechauffage, I'element de convection, I'element CleanBake TM et
le ventilateur fonctionneront par intermittence pour maintenir la
temperature du four.
Si la porte du four est ouverte pendant la cuisson par convection,
le ventilateur s'eteint immediatement Iorsque la porte est ouverte
et s'allume immediatement Iorsque la porte est fermee. Les
elements de convection, de cuisson au four et de cuisson au gril
(seulement pendant le prechauffage) s'eteignent environ
30 secondes apres I'ouverture de la porte. IIs se mettront de
nouveau en marche environ 30 secondes apres la fermeture de la
porte.
• Reduire la temperature de la recette de 25°F (14°C). II peut
aussi _tre necessaire de reduire la duree de cuisson.
Cuisson au four par convection :
Avant la cuisson au four par convection, placer les grilles tel
qu'indique & la section "Positionnement des grilles et des
ustensiles de cuisson". Si I'on utilise 2 grilles, les placer sur les
glissieres 1 et 4. Si I'on utilise 3 grilles, les placer sur les glissieres
1,3et5.
1. A partir du menu principal, appuyer sur CUISSON PAR
CONVECTION.
2. Appuyer sur CUISSON AU FOUR.
3. Pour modifier la temperature prereglee, entrer la temperature
souhaitee a I'aide des touches numeriques. La temperature
de cuisson au four par convection peut _tre reglee entre
170°C et 500°F (77°C et 260°C).
4. Pour entrer la duree de cuisson, appuyer sur DURg:E
CUISSON. Entrer la duree de cuisson souhaitee a I'aide des
touches numeriques.
5. Si I'on utilise une sonde thermometrique, appuyer sur
SONDE et entrer la temperature souhaitee de I'aliment
I'aide des touches numeriques.
6. Une fois qu'une fonction de reglage de cuisson est terminee,
la touche Start (mise en marche) s'allume.
7. Lorsque les reglages sont corrects, appuyer sur START (mise
en marche).
8. Au cours des programmes de prechauffage et de cuisson,
une touche Ajuster les reglages apparait dans le coin inferieur
droit de I'affichage. Appuyer sur AJUSTER LES Rg:GLAGES
pour modifier la duree, temperature et/ou les reglages de la
sonde thermometrique. Appuyer sur START pour entrer de
nouveaux reglages.
9. Si la temperature du four est inferieure a la temperature de
reglage, la barre de prechauffage sera affichee, indiquant le
statut du programme de prechauffage. Lorsque le
prechauffage est termine, un signal sonore retentit.
10. Si I'on a dej& regle la duree de cuisson ou utilise la sonde
thermometrique, le message Verifier Aliment apparait a la fin
de la duree de cuisson ou une fois que la temperature est
atteinte.
Les signaux sonores de fin de programme se font entendre (si
actives), suivis des signaux de rappel & intervalles d'une
minute. Appuyer sur OK (d'accord) pour effacer le message,
arr_ter les signaux sonores de rappel et poursuivre le
programme de cuisson en cours.
11. Appuyer sur OFF (arr_t) Iorsque la cuisson est terminee.
70
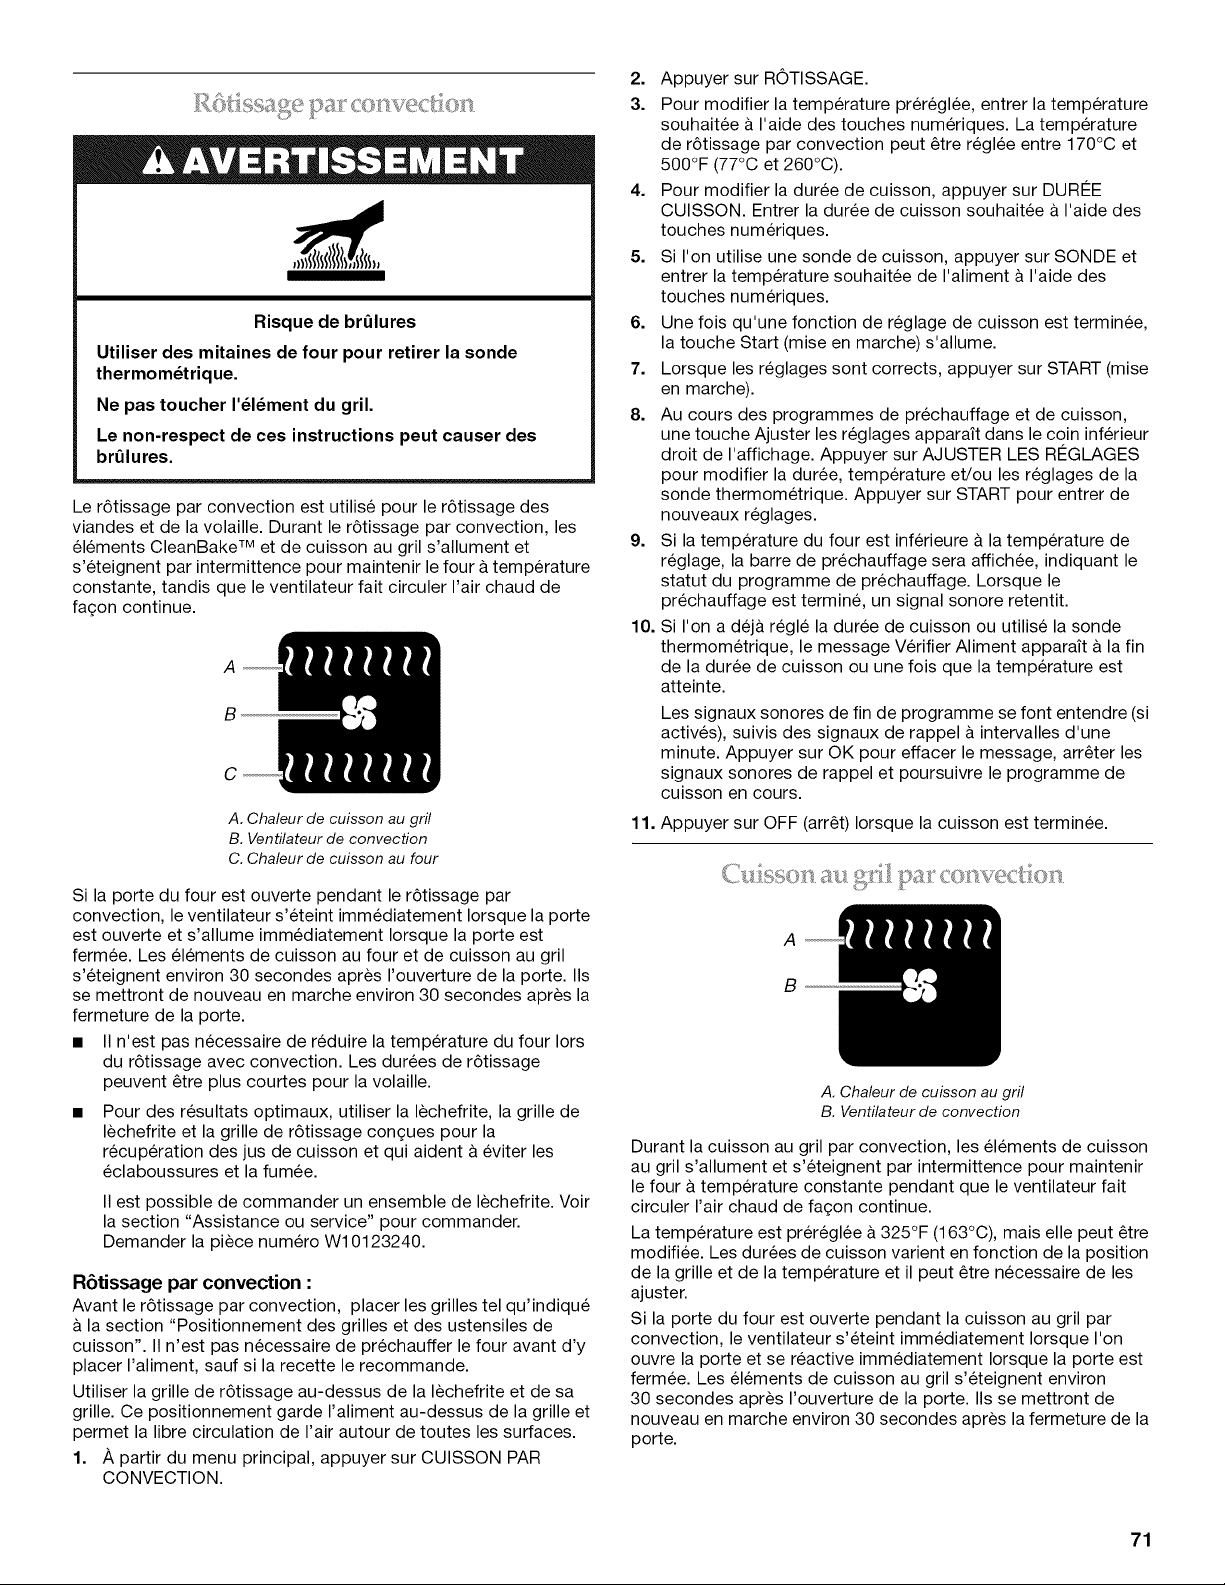
. pa co w ?d:io }.
Risque de brQlures
Utiliser des mitaines de four pour retirer la sonde
thermom_trique.
Ne pas toucher I'_l_ment du gril.
Le non-respect de ces instructions peut causer des
brQlures.
Le r6tissage par convection est utilise pour le r6tissage des
viandes et de la volaille. Durant le r6tissage par convection, les
elements CleanBake TM et de cuisson au gril s'allument et
s'eteignent par intermittence pour maintenir le four & temperature
constante, tandis que le ventilateur fait circuler I'air chaud de
fa£;on continue.
A
B
C
A. Chaleur de cuisson au gril
B. Ventilateur de convection
C. Chaleur de cuisson au four
Si la porte du four est ouverte pendant le r6tissage par
convection, le ventilateur s'eteint immediatement Iorsque la porte
est ouverte et s'allume immediatement Iorsque la porte est
fermee. Les elements de cuisson au four et de cuisson au gril
s'eteignent environ 30 secondes apres I'ouverture de la porte. IIs
se mettront de nouveau en marche environ 30 secondes apres la
fermeture de la porte.
• II n'est pas necessaire de red@re la temperature du four Iors
du r6tissage avec convection. Les durees de r6tissage
peuvent _tre plus courtes pour la volaille.
• Pour des resultats optimaux, utiliser la lechefrite, la grille de
lechefrite et la grille de r6tissage con(_ues pour la
recuperation des jus de cuisson et qui aident & eviter les
eclaboussures et la fumee.
II est possible de commander un ensemble de lechefrite. Voir
la section "Assistance ou service" pour commander.
Demander la piece numero W10123240.
Retissage par convection :
Avant le r6tissage par convection, placer les grilles tel qu'indiqu6
& la section "Positionnement des grilles et des ustensiles de
cuisson". II n'est pas necessaire de prechauffer le four avant d'y
placer I'aliment, sauf si la recette le recommande.
Utiliser la grille de r6tissage au-dessus de la lechefrite et de sa
grille. Ce positionnement garde I'aliment au-dessus de la grille et
permet la libre circulation de I'air autour de toutes les surfaces.
1. A partir du menu principal, appuyer sur CUISSON PAR
CONVECTION.
2. Appuyer sur ROTISSAGE.
3. Pour modifier la temperature prereglee, entrer la temperature
souhaitee & I'aide des touches numeriques. La temperature
de r6tissage par convection peut _tre reglee entre 170°C et
500°F (77°C et 260°C).
4. Pour modifier la duree de cuisson, appuyer sur DURI2E
CUISSON. Entrer la duree de cuisson souhaitee a I'aide des
touches numeriques.
5. Si I'on utilise une sonde de cuisson, appuyer sur SONDE et
entrer la temperature souhaitee de I'aliment & I'aide des
touches numeriques.
6. Une fois qu'une fonction de reglage de cuisson est terminee,
la touche Start (mise en marche) s'allume.
7. Lorsque les reglages sont corrects, appuyer sur START (mise
en marche).
8. Au cours des programmes de prechauffage et de cuisson,
une touche Ajuster les reglages apparaYt dans le coin inferieur
droit de I'affichage. Appuyer sur AJUSTER LES RI2GLAGES
pour modifier la duree, temperature et/ou les reglages de la
sonde thermometrique. Appuyer sur START pour entrer de
nouveaux reglages.
9. Si la temperature du four est inferieure a la temperature de
reglage, la barre de prechauffage sera affichee, indiquant le
statut du programme de prechauffage. Lorsque le
prechauffage est termine, un signal sonore retentit.
10. Si I'on a dej& regle la duree de cuisson ou utilise la sonde
thermometrique, le message Verifier Aliment apparaYt a la fin
de la duree de cuisson ou une fois que la temperature est
atteinte.
Les signaux sonores de fin de programme se font entendre (si
actives), suivis des signaux de rappel a intervalles d'une
minute. Appuyer sur OK pour effacer le message, arr_ter les
signaux sonores de rappel et poursuivre le programme de
cuisson en cours.
11. Appuyer sur OFF (arr_t) Iorsque la cuisson est terminee.
a-: _:,,iI l,i)a[
A
B
A. Chaleur de cuisson au gril
B. Ventilateur de convection
Durant la cuisson au gril par convection, les elements de cuisson
au gril s'allument et s'eteignent par intermittence pour maintenir
le four a temperature constante pendant que le ventilateur fait
circuler I'air chaud de fa(_on continue.
La temperature est prereglee a 325°F (163°C), mais elle peut _tre
modifiee. Les durees de cuisson varient en fonction de la position
de la grille et de la temperature et il peut _tre necessaire de les
ajuster.
Si la porte du four est ouverte pendant la cuisson au gril par
convection, le ventilateur s'eteint immediatement Iorsque I'on
ouvre la porte et se reactive immediatement Iorsque la porte est
fermee. Les elements de cuisson au gril s'eteignent environ
30 secondes apres I'ouverture de la porte. IIs se mettront de
nouveau en marche environ 30 secondes apres la fermeture de la
porte.
71
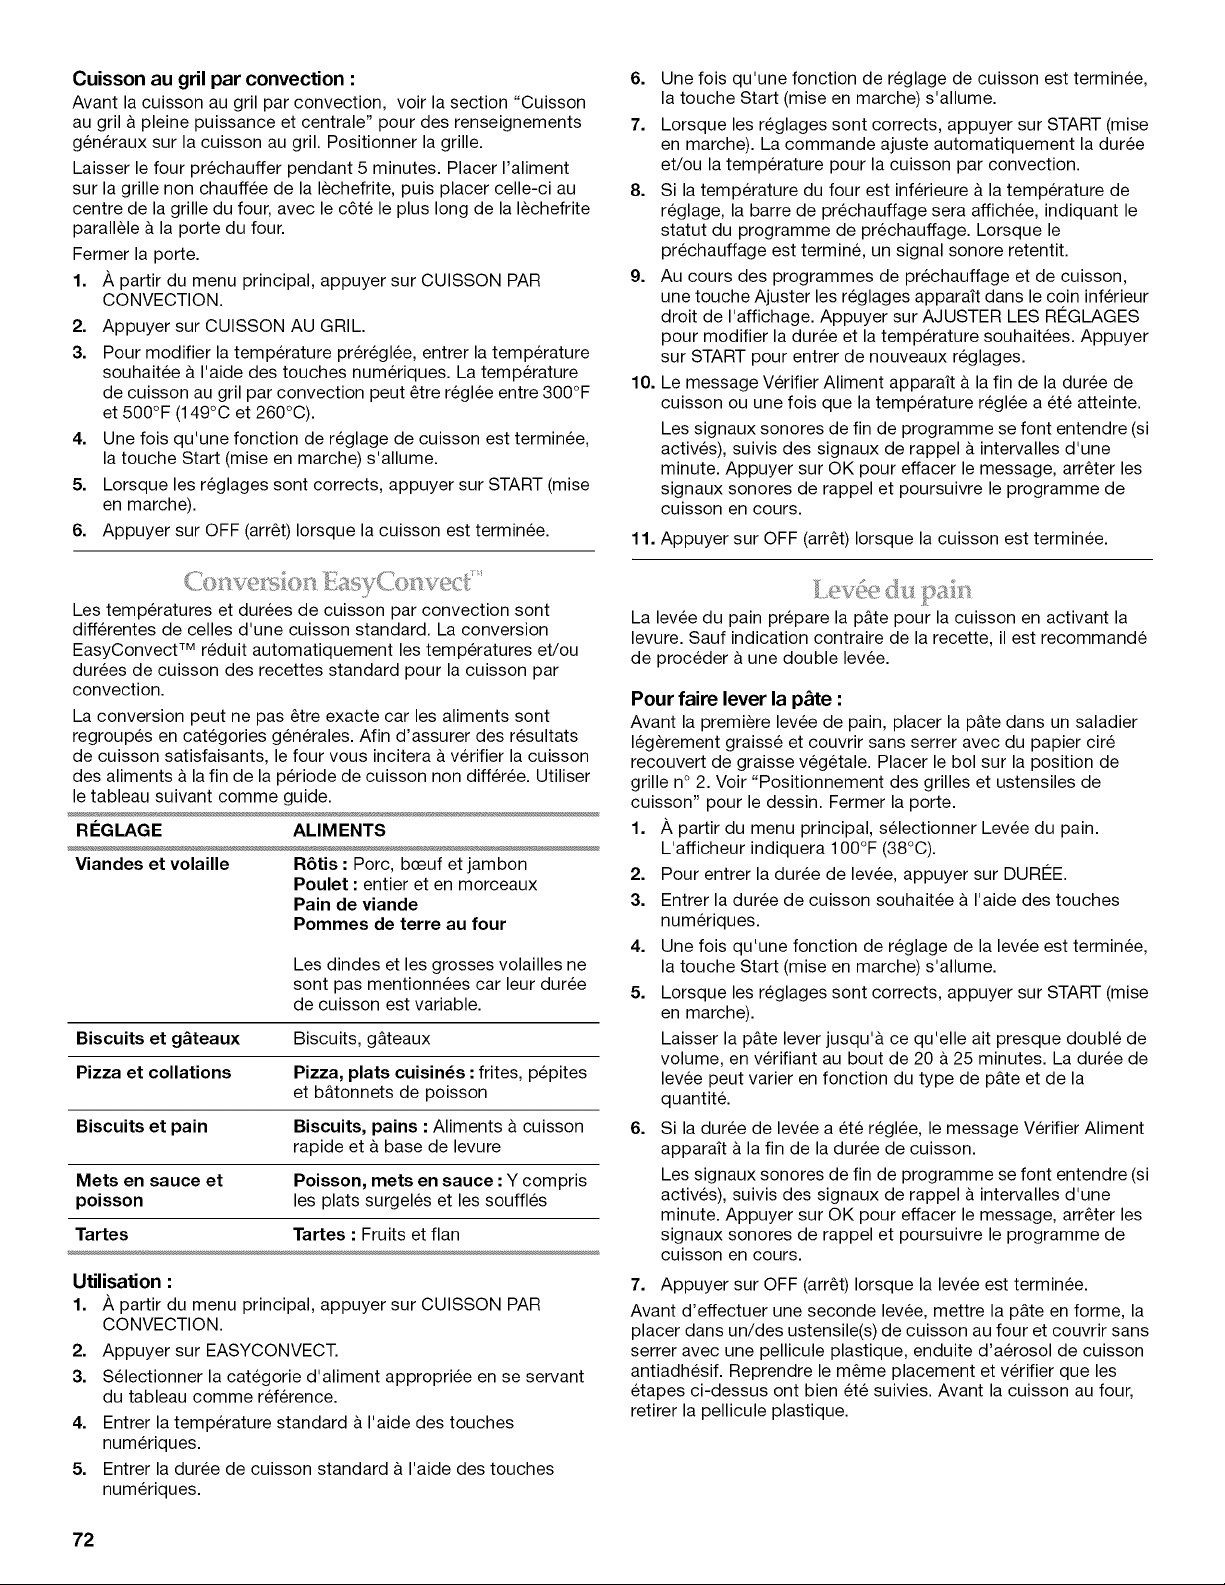
Cuisson au gril par convection :
Avant la cuisson au gril par convection, voir la section "Cuisson
au gril a pleine puissance et centrale" pour des renseignements
gen6raux sur la cuisson au gril. Positionner la grille.
Laisser le four prechauffer pendant 5 minutes. Placer I'aliment
sur la grille non chauffee de la lechefrite, puis placer celle-ci au
centre de la grille du four, avec le c6te le plus long de la lechefrite
parallele a la porte du four.
Fermer la porte.
1. A partir du menu principal, appuyer sur CUISSON PAR
CONVECTION.
2. Appuyer sur CUISSON AU GRIL.
3. Pour modifier la temperature pr6regl6e, entrer la temperature
souhaitee a I'aide des touches numeriques. La temperature
de cuisson au gril par convection peut 6tre regl6e entre 300°F
et 500°F (149°C et 260°C).
4. Une fois qu'une fonction de reglage de cuisson est terminee,
la touche Start (mise en marche) s'allume.
5. Lorsque les reglages sont corrects, appuyer sur START (mise
en marche).
6. Appuyer sur OFF (arr6t) Iorsque la cuisson est terminee.
Les temperatures et durees de cuisson par convection sont
differentes de celles d'une cuisson standard. La conversion
EasyConvect TM reduit automatiquement les temperatures et/ou
durees de cuisson des recettes standard pour la cuisson par
convection.
La conversion peut ne pas 6tre exacte car les aliments sont
regroupes en categories g6nerales. Afin d'assurer des resultats
de cuisson satisfaisants, le four vous incitera a verifier la cuisson
des aliments a la fin de la periode de cuisson non differ6e. Utiliser
le tableau suivant comme guide.
REGLAGE ALIMENTS
Poulet : entier et en morceaux
Pain de viande
Potatoes de terre au four
Les dindes et les grosses volailles ne
sont pas mentionnees car leur duree
de cuisson est variable.
Biscuits et g&teaux Biscuits, g&teaux
Pizza et collations Pizza, plats cuisin6s : frites, pepites
et b&tonnets de poisson
Biscuits et pain Biscuits, pains : Aliments & cuisson
rapide et & base de levure
Mets en sauce et Poisson, mets en sauce : Y compris
poisson les plats surgeles et les souffles
Tartes Tartes : Fruits et flan
Utilisation :
1. A partir du menu principal, appuyer sur CUISSON PAR
CONVECTION.
2. Appuyer sur EASYCONVECT.
3. Selectionner la categorie d'aliment appropriee en se servant
du tableau comme ref6rence.
4. Entrer la temperature standard & I'aide des touches
numeriques.
5. Entrer la duree de cuisson standard & I'aide des touches
numeriques.
6.
7.
8.
9.
10.
Une fois qu'une fonction de reglage de cuisson est terminee,
la touche Start (mise en marche) s'allume.
Lorsque les reglages sont corrects, appuyer sur START (mise
en marche). La commande ajuste automatiquement la duree
et/ou la temperature pour la cuisson par convection.
Si la temperature du four est inferieure & la temperature de
reglage, la barre de prechauffage sera affichee, indiquant le
statut du programme de prechauffage. Lorsque le
prechauffage est termine, un signal sonore retentit.
Au cours des programmes de prechauffage et de culsson,
une touche Ajuster les reglages apparait dans le coin inferieur
droit de I'affichage. Appuyer sur AJUSTER LES R¢:GLAGES
pour modifier la duree et la temperature souhaitees. Appuyer
sur START pour entrer de nouveaux reglages.
Le message Verifier Aliment appara_t & la fin de la duree de
cuisson ou une fois que la temperature r6glee a et6 atteinte.
Les signaux sonores de fin de programme se font entendre (si
actives), suivis des signaux de rappel & intervalles d'une
minute. Appuyer sur OK pour effacer le message, arr6ter les
signaux sonores de rappel et poursuivre le programme de
cuisson en cours.
11. Appuyer sur OFF (arr6t) Iorsque la cuisson est terminee.
La levee du pain prepare la p&te pour la cuisson en activant la
levure. Sauf indication contraire de la recette, il est recommande
de proceder & une double levee.
Pour faire lever la p&te :
Avant la premiere levee de pain, placer la p&te dans un saladier
16gerement graisse et couvrir sans serrer avec du papier cire
recouvert de graisse veg6tale. Placer le bol sur la position de
grille n° 2. Voir "Positionnement des grilles et ustensiles de
cuisson" pour le dessin. Fermer la porte.
1. /_,partir du menu principal, selectionner Levee du pain.
L'afficheur indiquera 100°F (38°C).
2. Pour entrer la duree de levee, appuyer sur DUR¢:E.
3. Entrer la duree de cuisson souhaitee & I'aide des touches
numeriques.
4. Une fois qu'une fonction de reglage de la levee est terminee,
la touche Start (mise en marche) s'allume.
5. Lorsque les reglages sont corrects, appuyer sur START (mise
en marche).
Laisser la p&te lever jusqu'& ce qu'elle ait presque double de
volume, en verifiant au bout de 20 & 25 minutes. La duree de
levee peut varier en fonction du type de p&te et de la
quantite.
6. Si la duree de levee a 6te regl6e, le message Verifier Aliment
apparait & la fin de la duree de cuisson.
Les signaux sonores de fin de programme se font entendre (si
actives), suivis des signaux de rappel & intervalles d'une
minute. Appuyer sur OK pour effacer le message, arr6ter les
signaux sonores de rappel et poursuivre le programme de
cuisson en cours.
7. Appuyer sur OFF (arr6t) Iorsque la levee est terminee.
Avant d'effectuer une seconde levee, mettre la p&te en forme, la
placer dans un/des ustensile(s) de cuisson au four et couvrir sans
serrer avec une pellicule plastique, enduite d'aerosol de cuisson
antiadhesif. Reprendre le m6me placement et verifier que les
etapes ci-dessus ont bien et6 suivies. Avant la cuisson au four,
retirer la pellicule plastique.
72
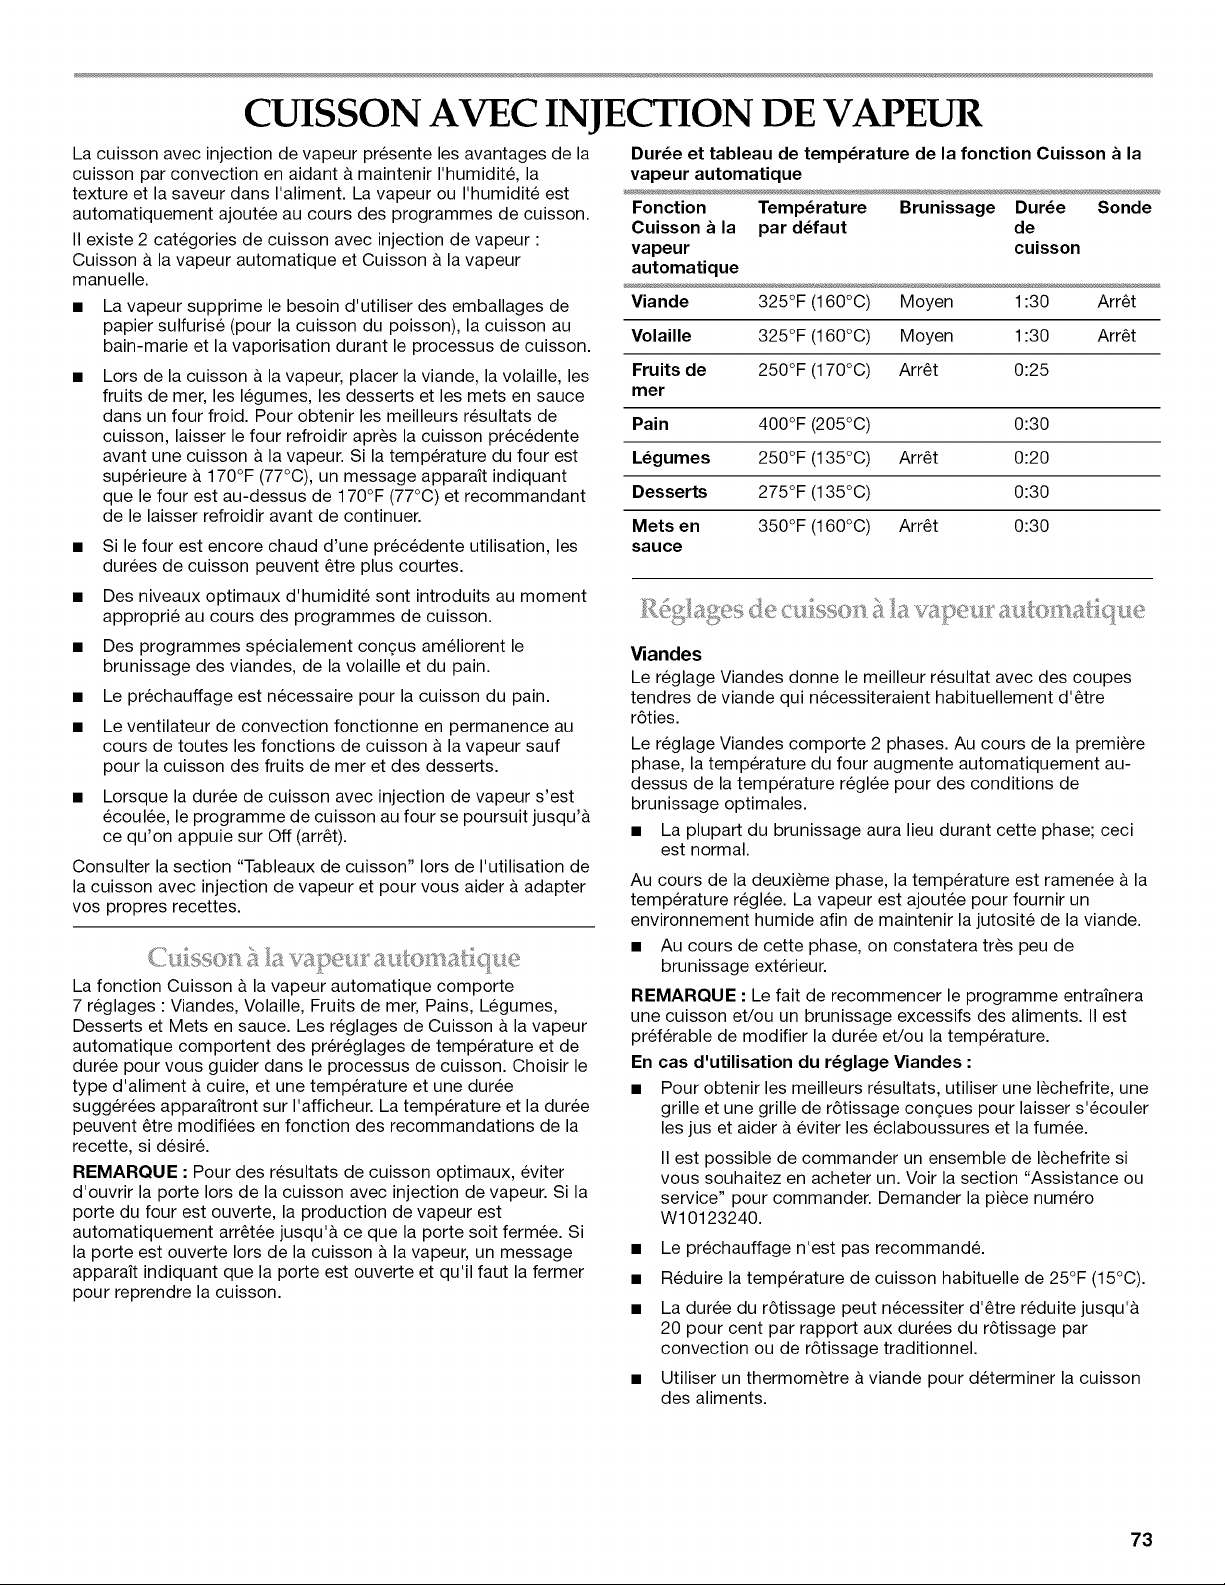
CUISSON AVEC INJECTION DE VAPEUR
La cuisson avec injection de vapeur presente les avantages de la
cuisson par convection en aidant a maintenir I'humidite, la
texture et la saveur dans I'aliment. La vapeur ou I'humidite est
automatiquement ajoutee au cours des programmes de cuisson.
II existe 2 categories de cuisson avec injection de vapeur :
Cuisson & la vapeur automatique et Cuisson & la vapeur
manuelle.
• La vapeur supprime le besoin d'utiliser des emballages de
papier sulfurise (pour la cuisson du poisson), la cuisson au
bain-marie et la vaporisation durant le processus de cuisson.
• Lors de la cuisson & la vapeur, placer la viande, la volaille, les
fruits de mer, les legumes, les desserts et les mets en sauce
dans un four froid. Pour obtenir les meilleurs resultats de
cuisson, laisser le four refroidir apres la cuisson precedente
avant une cuisson & la vapeur. Si la temperature du four est
superieure & 170°F (77°C), un message apparaYt indiquant
que le four est au-dessus de 170°F (77°C) et recommandant
de le laisser refroidir avant de continuer.
• Si le four est encore chaud d'une precedente utilisation, les
durees de cuisson peuvent etre plus courtes.
• Des niveaux optimaux d'humidite sont introduits au moment
approprie au cours des programmes de cuisson.
• Des programmes specialement con£_usameliorent le
brunissage des viandes, de la volaille et du pain.
• Le prechauffage est necessaire pour la cuisson du pain.
• Le ventilateur de convection fonctionne en permanence au
cours de toutes les fonctions de cuisson & la vapeur sauf
pour la cuisson des fruits de mer et des desserts.
• Lorsque la duree de cuisson avec injection de vapeur s'est
ecoulee, le programme de cuisson au four se poursuit jusqu'&
ce qu'on appuie sur Off (arret).
Consulter la section "Tableaux de cuisson" Iors de I'utilisation de
la cuisson avec injection de vapeur et pour vous aider a adapter
vos propres recettes.
La fonction Cuisson & la vapeur automatique comporte
7 reglages : Viandes, Volaille, Fruits de mer, Pains, Legumes,
Desserts et Mets en sauce. Les reglages de Cuisson & la vapeur
automatique comportent des prereglages de temperature et de
duree pour vous guider dans le processus de cuisson. Choisir le
type d'aliment & cuire, et une temperature et une duree
suggerees apparaYtront sur I'afficheur. La temperature et la duree
peuvent etre modifiees en fonction des recommandations de la
recette, si desire.
REMARQUE • Pour des resultats de cuisson optimaux, eviter
d'ouvrir la porte Iors de la cuisson avec injection de vapeur. Si la
porte du four est ouverte, la production de vapeur est
automatiquement arretee jusqu'& ce que la porte soit fermee. Si
la porte est ouverte Iors de la cuisson & la vapeur, un message
apparaYt indiquant que la porte est ouverte et qu'il faut la fermer
pour reprendre la cuisson.
Dur_e et tableau de temperature de la fonction Cuisson a la
vapeur automatique
Fonction Temperature Brunissage Dur_e Sonde
Cuisson a la par d_faut de
vapeur cuisson
automatique
Viande 325°F (160°C) Moyen 1:30 Arret
Volaille 325°F (160°C) Moyen 1:30 Arret
Fruits de 250°F (170°C) Arret 0:25
mer
Pain 400°F (205°C) 0:30
L_gumes 250°F (135°C) Arret 0:20
Desserts 275°F (135°C) 0:30
Mets en 350°F (160°C) Arret 0:30
sauce
Viandes
Le reglage Viandes donne le meilleur resultat avec des coupes
tendres de viande qui necessiteraient habituellement d'etre
r6ties.
Le reglage Viandes comporte 2 phases. Au cours de la premiere
phase, la temperature du four augmente automatiquement au-
dessus de la temperature reglee pour des conditions de
brunissage optimales.
• La plupart du brunissage aura lieu durant cette phase; ceci
est normal.
Au cours de la deuxieme phase, la temperature est ramenee a la
temperature reglee. La vapeur est ajoutee pour fournir un
environnement humide afin de maintenir la jutosite de la viande.
• Au cours de cette phase, on constatera tres peu de
brunissage exterieur.
REMARQUE • Le fait de recommencer le programme entraYnera
une cuisson et/ou un brunissage excessifs des aliments. II est
preferable de modifier la duree et/ou la temperature.
En cas d'utilisation du r_glage Viandes •
• Pour obtenir les meilleurs resultats, utiliser une lechefrite, une
grille et une grille de r6tissage con£;ues pour laisser s'ecouler
les jus et aider a eviter les eclaboussures et la fumee.
II est possible de commander un ensemble de lechefrite si
vous souhaitez en acheter un. Voir la section "Assistance ou
service" pour commander. Demander la piece numero
W10123240.
• Le prechauffage n'est pas recommand&
• Reduire la temperature de cuisson habituelle de 25°F (15°C).
• La duree du r6tissage peut necessiter d'etre reduite jusqu'&
20 pour cent par rapport aux durees du r6tissage par
convection ou de r6tissage traditionnel.
• Utiliser un thermometre & viande pour determiner la cuisson
des aliments.
73
Avec le r6tissage traditionnel, le temps de repos est inclus avant
le decoupage de la viande. La temperature interne augmente en
general de 5°F a 10°F (2°C a 5°C) au cours du temps de repos.
En cas de r6tissage avec le reglage Viandes - cuisson & la vapeur
automatique, la temperature interne peut augmenter de 15°F
20°F (5°C a 10°C) au cours du temps de repos; par consequent, il
est necessaire d'arr_ter la cuisson et de retirer la viande a une
temperature interne inferieure a celle applicable au r6tissage
conventionnel.
Volaille
Le reglage Volaille donne les meilleurs resultats avec la volaille
qui serait r6tie habituellement sans vapeur.
Le reglage Volaille comporte 2 phases. Au cours de la premiere
phase, la temperature du four augmente automatiquement au-
dessus de la temperature regl6e pour des conditions de
brunissage optimales.
• La plupart du brunissage aura lieu durant cette phase. Ceci
est normal.
Au cours de la deuxieme phase, la temperature est ramenee a la
temperature reglee. La vapeur est ajoutee pour fournir un
environnement humide afin de maintenir la jutosite de la volaille.
• Au cours de cette phase, on constatera tres peu de
brunissage exterieur.
REMARQUE • Le fait de recommencer le programme entrainera
une cuisson et/ou un brunissage excessifs des aliments. II est
preferable de modifier la duree et/ou la temperature.
En cas d'utilisation du r_glage Volaille :
• Utiliser une lechefrite, une grille et une grille de r6tissage pour
des resultats optimaux.
• Le prechauffage n'est pas recommande.
• La duree du r6tissage peut necessiter d'etre reduite jusqu'_
20 pour cent par rapport aux durees du r6tissage par
convection ou de r6tissage traditionnel.
• Utiliser un thermometre a viande pour determiner la cuisson
des aliments.
Fruits de mer
Le reglage Fruits de mer cuit a une temperature inferieure _ celle
utilisee pour la cuisson au four traditionnelle. Ceci permet
d'obtenir un poisson humide, tendre, cuit uniformement avec des
resultats similaires a ceux obtenus avec la cuisson du poisson
la vapeur dans du papier sulfurise. Vous pouvez faire cuire des
fruits de mer, des filets, des darnes ou le poisson entier avec ce
reglage.
• Utiliser une lechefrite, une grille ou un plat de cuisson aux
bords peu eleves pour des resultats optimaux.
• Le prechauffage n'est pas recommande.
• Le ventilateur de convection s'allume a mi-programme et
reste allume jusqu'& la fin du programme.
• Au cours du programme, il n'y aura peu ou pas de
brunissage. Si un brunissage est desire, utiliser un niveau de
brunissage plus eleve.
Pains
Le reglage Pains donne les meilleurs resultats Iors de cuisson au
four de pain & la levure. Grace a I'ajout de vapeur, il n'est plus
necessaire de vaporiser ou d'ajouter de I'eau dans le four pour
obtenir une croQte croustillante et un interieur humide.
• Le prechauffage est necessaire.
• Reduire la temperature de cuisson habituelle de 25°F (15°C).
Les durees de cuisson au four peuvent _tre legerement
inferieures a celles de la cuisson standard.
En cas d'utilisation d'une pierre de cuisson, placer celle-ci
dans le four sur la grille en position 1 avant le debut du
programme. Pour la cuisson au four d'autres pains, utiliser la
position de grille 1 ou 2.
Le four prechauffe a une temperature superieure a la temperature
reglee. II ajoute ensuite de la vapeur afin que la pate a pain leve
dans un environnement humide, chaud, c'est-a-dire des
conditions ideales pour la levee de la pate et la consistance
croustillante.
Apres le prechauffage, placer la pate a pain dans le four aussit6t
que possible et fermer la porte. La temperature du four est
ramenee a la temperature reglee et une petite quantite d'humidite
est ajoutee. Le reste du programme se fait avec une chaleur
seche pour un brunissage optimal.
L_gumes
Le reglage Legumes donne des resultats similaires a la cuisson a
la vapeur sur une table de cuisson ou au micro-ondes. Ce
reglage permet de cuire a la vapeur une plus grande quantite de
legumes que sur une table de cuisson ou un micro-ondes.
• Le prechauffage n'est pas recommande.
• Lors de la cuisson a la vapeur de legumes, utiliser le reglage
par defaut de 250°F et placer les legumes sur une seule
couche dans un plat de cuisson a bords peu eleves. Les epis
de ma'l's peuvent _tre cuits directement sur la grille du four.
• Verifier la cuisson des legumes assez t6t. La fraicheur des
legumes affecte la duree de cuisson requise.
• La cuisson a la vapeur des artichauts, betteraves, haricots
verts et brocolis n'est pas recommandee.
Desserts
Le reglage Desserts donne les meilleurs resultats pour les
desserts delicats tels que la creme brQlee et le gateau au
fromage, desserts habituellement prepares au bain-marie. Ce
reglage fonctionne bien aussi avec les plats a base de creme et
les souffles.
• Le prechauffage n'est pas recommande.
• Le ventilateur de convection s'allume a mi-programme et
s'eteint avant la fin du programme.
• Reduire la temperature de cuisson habituelle de 25°F a 50°F
(15°C a 30°C).
• Permet au centre du dessert de cuire sans cuire
excessivement les bords.
II n'est pas necessaire de faire cuire au bain-marie.
Mets en sauce
Le reglage Mets en sauce permet de faire cuire un mets en sauce
non couvert sans trop faire brunir les bords ou le rendre sec.
• Le prechauffage n'est pas recommande.
• II n'est pas recommande de couvrir les aliments.
• La duree de cuisson peut necessiter d'etre reduite jusqu'a
20 pour cent par rapport aux durees de cuisson
traditionnelles.
• Reduire la temperature de cuisson habituelle de 25°F (15°C).
• Permet au centre du mets en sauce de cuire sans cuire
excessivement les bords.
Le degre de brunissage peut _tre contr61e en ajustant le
niveau de brunissage.
74
Cuissonavec le r_glage Cuisson & la vapeur
automatique :
Risque de brQlures
Utiliser des mitaines de four pour retirer la sonde
thermom_trique.
Ne pas toucher I'_l_ment du gril.
Le non-respect de ces instructions peut causer des
brQlures.
Avant la cuisson au four et le r6tissage, placer les grilles tel
qu'indiqu6 & la section "Positionnement des grilles et des
ustensiles de cuisson".
1. Dans le menu principal, appuyer sur CUISSON A LA
VAPEUR.
2. Appuyer sur CUISS. VAR AUTO.
3. Appuyer sur le reglage Cuiss. vap. auto. desir6.
4. Pour changer la temperature, entrer la temperature desir6e
I'aide des touches numeriques.
5. Pour changer une duree de cuisson, appuyer sur DURI2E
CUISSON. Entrer la duree de cuisson desir6e en utilisant les
touches numeriques.
6. Pour utiliser la sonde thermometrique, appuyer sur SONDE et
entrer la temperature des aliments desir6e a I'aide des
touches numeriques.
7. Pour changer le niveau de brunissage, appuyer sur
BRUNISSAGE. Appuyer sur + (plus) ou - (moins) pour
augmenter ou diminuer le niveau desir6. Appuyer sur OK.
8. Une fois qu'une fonction de reglage de cuisson est terminee,
la touche Start (demarrer) s'allume.
9. Lorsque les reglages sont corrects, appuyer sur START
(demarrer).
Un message apparait indiquant de mettre les aliments au
four. Placer les aliments dans le four et appuyer sur OK. Relier
la sonde thermometrique si besoin.
10. Pendant le programme de cuisson, une touche d'ajustement
des reglages apparait dans le coin inferieur droit de
I'affichage. Appuyer sur AJUSTER RI2GLAGES pour changer
les reglages de duree, de temperature, de sonde et/ou de
brunissage d6sires. Appuyer sur START (demarrer) pour
entrer de nouveaux reglages.
11. Si la duree de cuisson a et6 regl6e ou la sonde
thermometrique utilisee, le message Verifier aliment
apparaitra a la fin de la duree de cuisson ou une fois que la
temperature regl6e aura et6 atteinte.
Les signaux sonores de fin de programme seront emis (si
actives), suivis des signaux de rappel a intervalles d'une
minute. Appuyer sur OK pour effacer le message, arreter les
signaux de rappel et continuer le programme de cuisson en
cours.
12. Appuyer sur OFF (arret) Iorsque la cuisson est terminee.
REMARQUE : Pour les pains, si la temperature du four est
inferieure a la temperature reglee, la barre de prechauffage
s'affichera pour indiquer le statut du programme de
prechauffage. Lorsque le prechauffage est termine, un signal est
emis et un message indique de mettre les aliments au four.
C_i_'_ _ t_ V_?_T_J_ _
Risque de br_lures
Utiliser des mitaines de four pour retirer la sonde
thermom_trique.
Ne pas toucher I'_l_ment du gril.
Le non-respect de ces instructions peut causer des
brQlures.
La cuisson & la vapeur manuelle permet de regler la temperature,
la duree de cuisson, le programme de prechauffage, le degre de
brunissage et la quantite de vapeur utilisee Iors du processus de
cuisson.
Cuisson avec le r_glage Cuisson & la vapeur manuelle :
Avant la cuisson au four et le r6tissage, placer les grilles tel
qu'indique a la section "Positionnement des grilles et des
ustensiles de cuisson".
1. Dans le menu principal, appuyer sur CUISSON A LA
VAPEUR.
2. Appuyer sur CUISS. VAR MANUELLE.
3. Appuyer sur le reglage de cuisson & la vapeur manuelle.
4. Pour changer la temperature, entrer la temperature desiree
I'aide des touches numeriques.
5. Pour changer une duree de cuisson, appuyer sur DURI2E
CUISSON. Entrer la duree de cuisson desiree en utilisant les
touches numeriques.
6. Pour utiliser la sonde thermometrique, appuyer sur SONDE et
entrer la temperature des aliments desiree a I'aide des
touches numeriques.
7. Pour prechauffer, appuyer sur PR¢:CHAUFFAGE. Appuyer sur
MARCHE. Appuyer sur OK.
8. Pour changer le niveau de brunissage, appuyer sur
BRUNISSAGE. Appuyer sur + (plus) ou - (moins) pour
augmenter ou diminuer le niveau desire. Appuyer sur OK.
9. Pour changer le niveau d'intensite de la vapeur, appuyer sur
VAPEUR. Appuyer sur + (plus) ou - (moins) pour augmenter
ou diminuer le niveau desire. Appuyer sur OK.
10. Une fois qu'une fonction de reglage de cuisson est terminee,
la touche Start (demarrer) s'allume.
11. Lorsque les reglages sont corrects, appuyer sur START
(demarrer).
Un message apparait indiquant de mettre les aliments au
four. Placer les aliments dans le four et appuyer sur OK. Relier
la sonde thermometrique si besoin.
75
12. Pendant le programme de prechauffage (s'il est utilise) et de
cuisson, une touche d'ajustement des reglages apparait dans
le coin inferieur droit de I'affichage. Appuyer sur AJUSTER
RI2GLAGES pour changer les reglages de duree, de
temperature, de sonde et/ou de brunissage desir6s. Appuyer
sur START (demarrer) pour entrer de nouveaux reglages.
13. Si la duree de cuisson a 6te regl6e ou la sonde de
temperature utilisee, le message Verifier aliment apparaitra &
la fin de la duree de cuisson ou une fois que la temperature
regl6e aura et6 atteinte.
Les signaux sonores de fin de programme seront emis (si
actives), suivis des signaux de rappel a intervalles d'une
minute. Appuyer sur OK pour effacer le message, arreter les
signaux de rappel et continuer le programme de cuisson en
cours.
14. Appuyer sur OFF (arret) Iorsque la cuisson est terminee.
REMAROUE • Le prechauffage Iors de la cuisson & la vapeur est
generalement recommande uniquement pour les pains. Si le
prechauffage est selectionne et que la temperature du four est
inferieure & la temperature reglee, la barre de prechauffage
s'affichera pour indiquer le statut du programme de
prechauffage. Lorsque le prechauffage est termine, un signal est
emis et un message indique de mettre les aliments au four.
Risque d'empoisonnement alimentaire
Ne pas laisser des aliments dans un four plus d'une
heure avant ou apres la cuisson.
Le non-respect de cette instruction peut causer un
empoisonnement alimentaire ou une maladie.
IMPORTANT • Les aliments doivent etre & la temperature de
service avant d'etre places dans le four chaud.
La fonction Garder au chaud avec injection de vapeur ajoute de
I'humidite dans le four afin d'empecher I'assechement des
aliments et de les conserver chauds et humides avant le service.
• Ne pas utiliser la fonction Garder au chaud pour chauffer des
aliments froids. Utiliser seulement des aliments cuits et
chauds avec la fonction Garder au chaud.
Suivre les recommandations du fabricant pour le rechauffage
des bols et plats de service vides.
Pour des resultats optimaux, ne pas couvrir les aliments avec
du papier d'aluminium ou des couvercles pendant la premiere
heure. Ensuite, verifier les aliments de temps en temps et
couvrir si necessaire.
• Utiliser les positions de grille 1 a 4. Ne pas placer d'aliments
sur la grille superieure.
• Pour des resultats optimaux, ne pas utiliser la fonction Garder
au chaud pendant plus de 4 heures.
Le tableau suivant fournit des recommandations pour differents
aliments avec une gamme de temperatures. La temperature peut
etre reglee entre 140°F et 200°F (60°C et 93°C). Utiliser les
temperatures comme guide et ajuster au besoin pour les
morceaux plus petits ou plus gros et en fonction des quantites
d'aliments.
Tableau pour la fonction Garder au chaud
R_glage Aliments recommand_s
140°F-160°F Pain, petits pains
(60°C-71°C) Tartes aux fruits
Brioches/p&tisseries
165°F-180°F Hors d'ceuvre
(74°C-82°C) Mets en sauce
Creme p&tissiere, tartes & la
citrouille
Plats & base d'ceufs
Poisson*
Viandes**
Volaille
Legumes
185°F-200°F Bacon***
(85°C-93°C) Pain dore
Crepes
Gaufres***
*Le poisson doit etre cuit completement jusqu'& ce qu'il soit
opaque et floconneux.
**Le bceuf doit etre cult de fa£;on & ce que la temperature interne
atteigne au moins 140°F (60°C).
***Disposer en une simple couche sur une grille de
refroidissement en metal. Placer la grille sur une plaque &
p&tisserie.
Utilisation :
1. Dans le menu principal, appuyer sur GARDER CHAUD.
2. Pour changer la temperature, entrer la temperature desiree &
I'aide des touches numeriques.
3. Pour changer une duree de maintien au chaud, appuyer sur
DURI2E. Entrer la duree de maintien au chaud desiree en
utilisant les touches numeriques.
4. Une fois qu'une fonction de reglage de cuisson est terminee,
la touche Start (demarrer) s'allume.
5. Lorsque les reglages sont corrects, appuyer sur START
(demarrer).
6. Pendant le programme de maintien au chaud, une touche
d'ajustement des reglages apparait dans le coin inferieur droit
de I'affichage. Appuyer sur AJUSTER RI2GLAGES pour
changer les reglages de duree et/ou de temperature. Appuyer
sur START (demarrer) pour entrer de nouveaux reglages.
7. Si la duree de maintien au chaud a ete reglee, le message
Verifier aliment apparaitra & la fin de la duree de maintien au
chaud.
Les signaux sonores de fin de programme seront emis (si
actives), suivis des signaux de rappel a intervalles d'une
minute. Appuyer sur OK pour effacer le message, arreter les
signaux de rappel et continuer le programme de cuisson en
cours.
8.
Appuyer sur OFF (arret) Iorsque le maintien au chaud est
termin&
76
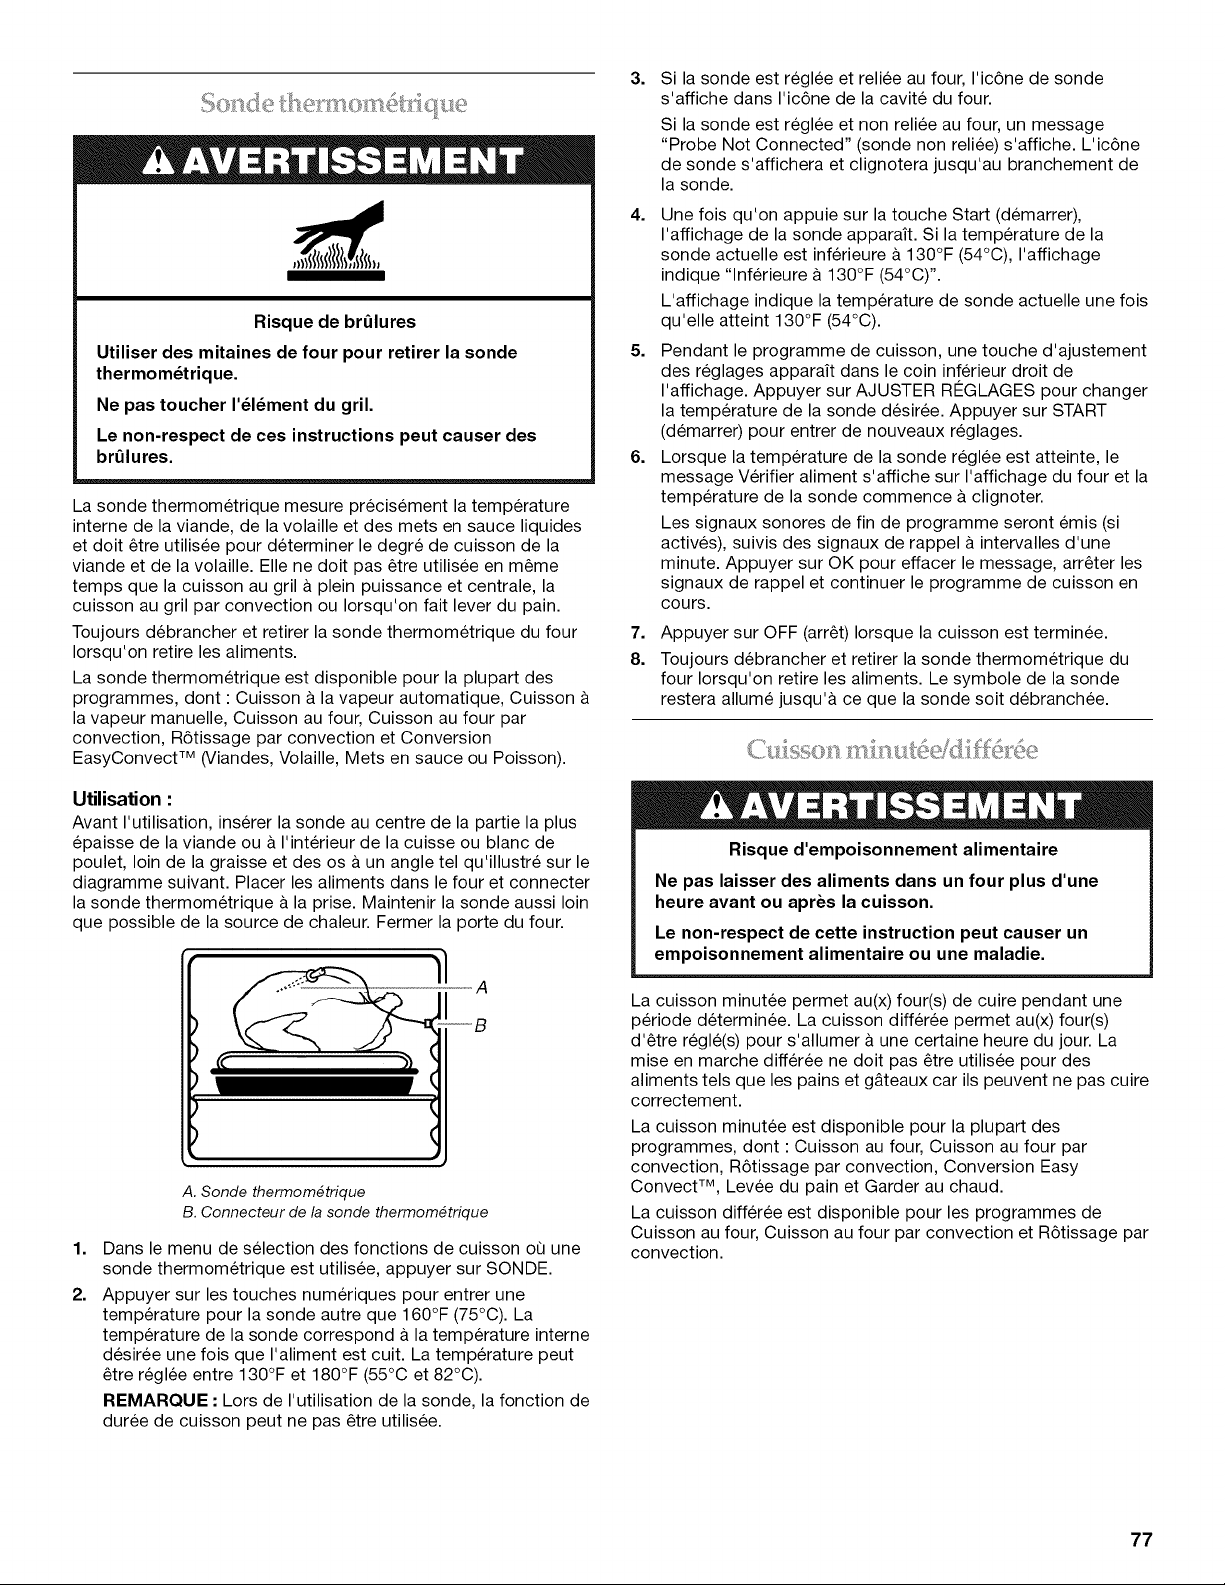
Risque de brQlures
Utiliser des mitaines de four pour retirer la sonde
thermom_trique.
Ne pas toucher I'_l_ment du gril.
Le non-respect de ces instructions peut causer des
brQlures.
La sonde thermometrique mesure precis6ment la temperature
interne de la viande, de la volaille et des mets en sauce liquides
et doit etre utilisee pour determiner le degre de cuisson de la
viande et de la volaille. Elle ne doit pas etre utilisee en meme
temps que la cuisson au gril & plein puissance et centrale, la
cuisson au gril par convection ou Iorsqu'on fait lever du pain.
Toujours debrancher et retirer la sonde thermometrique du four
Iorsqu'on retire les aliments.
La sonde thermometrique est disponible pour la plupart des
programmes, dont : Cuisson a la vapeur automatique, Cuisson
la vapeur manuelle, Cuisson au four, Cuisson au four par
convection, R6tissage par convection et Conversion
EasyConvect TM (Viandes, Volaille, Mets en sauce ou Poisson).
Utilisation :
Avant I'utilisation, inserer la sonde au centre de la partie la plus
epaisse de la viande ou a I'interieur de la cuisse ou blanc de
poulet, loin de la graisse et des os a un angle tel qu'illustre sur le
diagramme suivant. Placer les aliments dans le four et connecter
la sonde thermometrique a la prise. Maintenir la sonde aussi loin
que possible de la source de chaleur. Fermer la porte du four.
---B
1.
2.
A. Sonde thermom_trique
B. Connecteur de la sonde thermom_trique
Dans le menu de selection des fonctions de cuisson oQ une
sonde thermometrique est utilisee, appuyer sur SONDE.
Appuyer sur les touches numeriques pour entrer une
temperature pour la sonde autre que 160°F (75°C). La
temperature de la sonde correspond a la temperature interne
desiree une fois que I'aliment est cuit. La temperature peut
etre reglee entre 130°F et 180°F (55°C et 82°C).
REMARQUE • Lors de I'utilisation de la sonde, la fonction de
duree de cuisson peut ne pas etre utilisee.
3.
Si la sonde est reglee et reliee au four, I'ic6ne de sonde
s'affiche dans I'ic6ne de la cavite du four.
Si la sonde est reglee et non reliee au four, un message
"Probe Not Connected" (sonde non reliee) s'affiche. L'ic6ne
de sonde s'affichera et clignotera jusqu'au branchement de
la sonde.
4. Une fois qu'on appuie sur la touche Start (demarrer),
I'affichage de la sonde apparaff. Si la temperature de la
sonde actuelle est inferieure & 130°F (54°C), I'affichage
indique "lnferieure & 130°F (54°C) ''.
L'affichage indique la temperature de sonde actuelle une fois
qu'elle atteint 130°F (54°C).
5. Pendant le programme de cuisson, une touche d'ajustement
des reglages apparait dans le coin inferieur droit de
I'affichage. Appuyer sur AJUSTER R¢:GLAGES pour changer
la temperature de la sonde desiree. Appuyer sur START
(demarrer) pour entrer de nouveaux reglages.
6. Lorsque la temperature de la sonde reglee est atteinte, le
message Verifier aliment s'affiche sur I'affichage du four et la
temperature de la sonde commence & clignoter.
Les signaux sonores de fin de programme seront emis (si
actives), suivis des signaux de rappel a intervalles d'une
minute. Appuyer sur OK pour effacer le message, arreter les
signaux de rappel et continuer le programme de cuisson en
cours.
7.
8.
Appuyer sur OFF (arret) Iorsque la cuisson est terminee.
Toujours debrancher et retirer la sonde thermometrique du
four Iorsqu'on retire les aliments. Le symbole de la sonde
restera allume jusqu'& ce que la sonde soit debranchee.
Risque d'empoisonnement alimentaire
Ne pas laisser des aliments dans un four plus d'une
heure avant ou apres la cuisson.
Le non-respect de cette instruction peut causer un
empoisonnement alimentaire ou une maladie.
La cuisson minutee permet au(x) four(s) de cuire pendant une
periode determinee. La cuisson differee permet au(x) four(s)
d'etre regle(s) pour s'allumer & une certaine heure du jour. La
mise en marche differee ne doit pas etre utilisee pour des
aliments tels que les pains et g&teaux car ils peuvent ne pas cuire
correctement.
La cuisson minutee est disponible pour la plupart des
programmes, dont : Cuisson au four, Cuisson au four par
convection, R6tissage par convection, Conversion Easy
Convect TM, Levee du pain et Garder au chaud.
La cuisson differee est disponible pour les programmes de
Cuisson au four, Cuisson au four par convection et R6tissage par
convection.
77
R_glage d'une dur_e de cuisson :
1. Dans le menu de selection de ces fonctions de cuisson pour
lesquelles la duree de cuisson est disponible, appuyer sur
DURI2E CUISSON.
2. Utiliser les touches numeriques pour entrer la duree de
cuisson desir6e.
3. Une fois que I'on appuie sur la touche Start (demarrer), la
duree de cuisson s'affiche.
4. Pendant le programme de cuisson, une touche d'ajustement
des reglages apparait dans le coin inferieur droit de
I'affichage. Appuyer sur AJUSTER RI2GLAGES pour changer
la duree de cuisson d6siree. Appuyer sur START (demarrer)
pour entrer de nouveaux reglages.
5. Lorsque la fin de la duree de cuisson est atteinte, le message
Verifier aliment apparait sur I'affichage du four.
Les signaux sonores de fin de programme seront emis (si
actives), suivis des signaux de rappel a intervalles d'une
minute. Appuyer sur OK pour effacer le message, arr_ter les
signaux de rappel et continuer le programme de cuisson en
cours.
6=
Appuyer sur OFF (arr_t) Iorsque la cuisson est terminee.
REMARQUE • Pour obtenir les meilleurs resultats de cuisson,
si la sonde thermometrique est utilisee, la fonction Duree de
cuisson ne doit pas _tre utilisee.
R_glage d'une dur6e de cuisson diff_r_e :
Avant le reglage, s'assurer que I'horloge est regl6e a I'heure
exacte. Voir la section "Horloge".
1. Dans le menu principal, appuyer sur PLUS.
2. Appuyer sur CUISSON DIFFI2RI2E.
3. Utiliser les touches numeriques pour entrer la duree differ6e
desir6e. Par exemple, si vous souhaitez que le four s'allume
dans 1 h 20, entrer 1:20.
4. Regler la duree et la temperature de cuisson.
5. Une fois que la touche Start (demarrer) est enfoncee, le
message Cuisson differ6e apparait sur I'affichage du four,
indiquant les reglages.
Un decompte s'affichera dans la partie inferieure gauche de
I'affichage et indiquera le temps restant avant le debut de la
cuisson.
6=
7=
Lorsque I'heure de mise en marche est atteinte, le four
s'allume automatiquement. Le compte a rebours en minutes
apparaitra sur I'affichage du four.
Lorsque la fin de la duree de cuisson est atteinte, le message
Cuisson au four terminee apparait sur I'affichage du four.
Les signaux sonores de fin de programme seront emis (si
actives), suivis des signaux de rappel a intervalles d'une
minute. Appuyer sur OK pour effacer le message, arr_ter les
signaux de rappel et continuer le programme de cuisson en
cours.
8. Appuyer sur OFF (arr_t) Iorsque la cuisson est terminee.
78
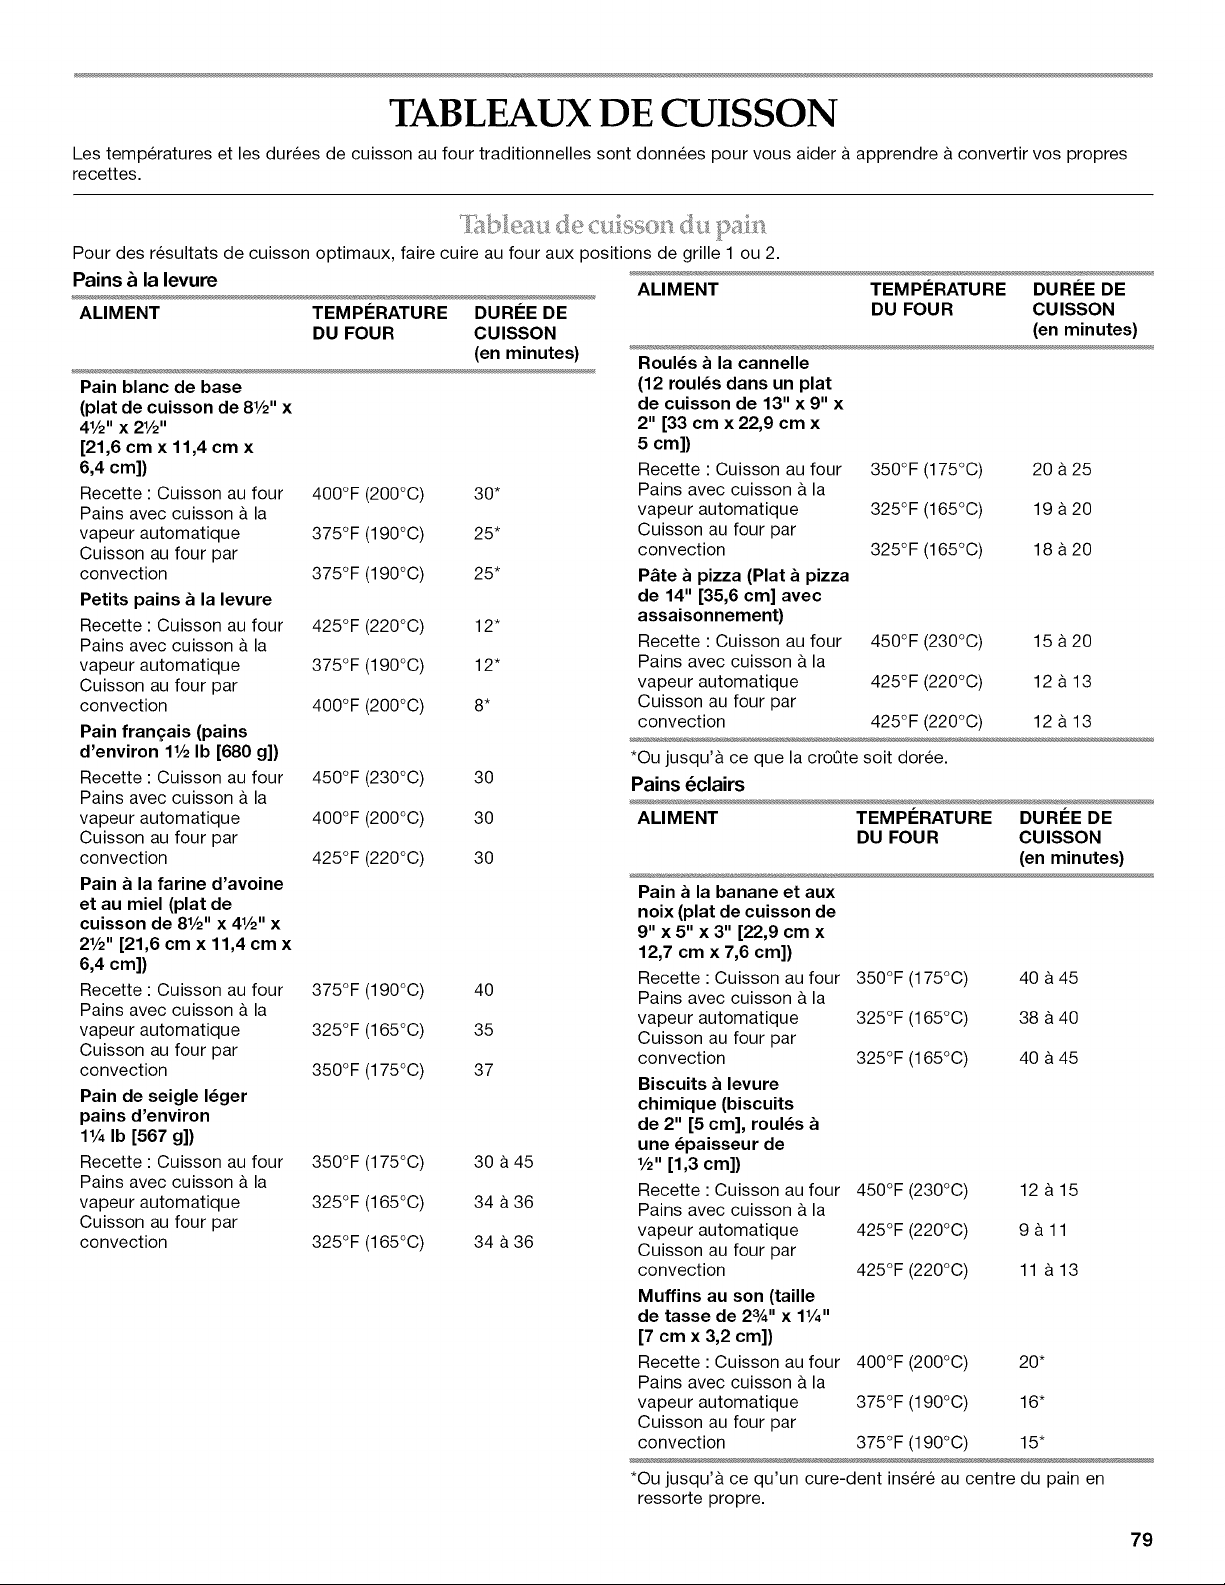
TABLEAUX DE CUISSON
Les temperatures et les durees de cuisson au four traditionnelles sont donnees pour vous aider a apprendre a convertir vos propres
recettes.
Pour des resultats de cuisson optimaux, faire cuire au four aux positions de grille 1 ou 2.
Pains _ la levure
ALIMENT TEMPI_RATURE DURI_E DE
DU FOUR CUlSSON
(en minutes)
Pain blanc de base
(plat de cuisson de 8V2" x
4V2" x 2V2"
[21,6 cm x 11,4 cm x
6,4 cm])
Recette : Cuisson au four 400°F (200°C) 30*
Pains avec cuisson a la
vapeur automatique 375°F (190°C) 25*
Cuisson au four par
convection 375°F (190°C) 25*
Petits pains a la levure
Recette : Cuisson au four 425°F (220°C) 12"
Pains avec cuisson a la
vapeur automatique 375°F (190°C) 12"
Cuisson au four par
convection 400°F (200°C) 8*
Pain fran_ais (pains
d'environ 1V2Ib [680 g])
Recette : Cuisson au four 450°F (230°C) 30
Pains avec cuisson & la
vapeur automatique 400°F (200°C) 30
Cuisson au four par
convection 425°F (220°C) 30
Pain a la farine d'avoine
et au miel (plat de
cuisson de 8V2" x 41/2"x
2V2" [21,6 cm x 11,4 cm x
6,4 cm])
Recette : Cuisson au four 375°F (190°C) 40
Pains avec cuisson a la
vapeur automatique 325°F (165°C) 35
Cuisson au four par
convection 350°F (175°C) 37
Pain de seigle I_ger
pains d'environ
1V4Ib [567 g])
Recette : Cuisson au four 350°F (175°C) 30 a 45
Pains avec cuisson a la
vapeur automatique 325°F (165°C) 34 a 36
Cuisson au four par
convection 325°F (165°C) 34 a 36
ALIMENT
RouI_s a la cannelle
(12 roul_s dans un plat
de cuisson de 13" x 9" x
2" [33 cm x 22,9 cm x
5 cm])
Recette : Cuisson au four
Pains avec cuisson a la
vapeur automatique
Cuisson au four par
convection
P_te a pizza (Plat a pizza
de 14" [35,6 cm] avec
assaisonnement)
Recette : Cuisson au four
Pains avec cuisson a la
vapeur automatique
Cuisson au four par
convection
TEMPI_RATURE DURI_E DE
DU FOUR CUlSSON
(en minutes)
350°F (175°C) 20 a 25
325°F (165°C) 19 a 20
325°F (165°C) 18 a 20
450°F (230°C) 15 a 20
425°F (220°C) 12 a 13
425°F (220°C) 12 a 13
*Ou jusqu'& ce que la croQte soit doree.
Pains 6clairs
ALIMENT TEMPERATURE DUREE DE
DU FOUR CUISSON
(en minutes)
Pain a la banane et aux
noix (plat de cuisson de
9" x 5" x 3" [22,9 cm x
12,7 cm x 7,6 cm])
Recette : Cuisson au four 350°F (175°C) 40 a 45
Pains avec cuisson a la
vapeur automatique 325°F (165°C) 38 &40
Cuisson au four par
convection 325°F (165°C) 40 a 45
Biscuits a levure
chimique (biscuits
de 2" [5 cm], roul_s
une _paisseur de
V2" [1,3 cm])
Recette : Cuisson au four 450°F (230°C) 12 & 15
Pains avec cuisson a la
vapeur automatique 425°F (220°C) 9 a 11
Cuisson au four par
convection 425°F (220°C) 11 a 13
Muffins au son (taille
de tasse de 23A'' x 1V4"
[7 cm x 3,2 cm])
Recette : Cuisson au four 400°F (200°C) 20*
Pains avec cuisson a la
vapeur automatique 375°F (190°C) 16"
Cuisson au four par
convection 375°F (190°C) 15"
*Ou jusqu'a ce qu'un cure-dent insere au centre du pain en
ressorte propre.
79
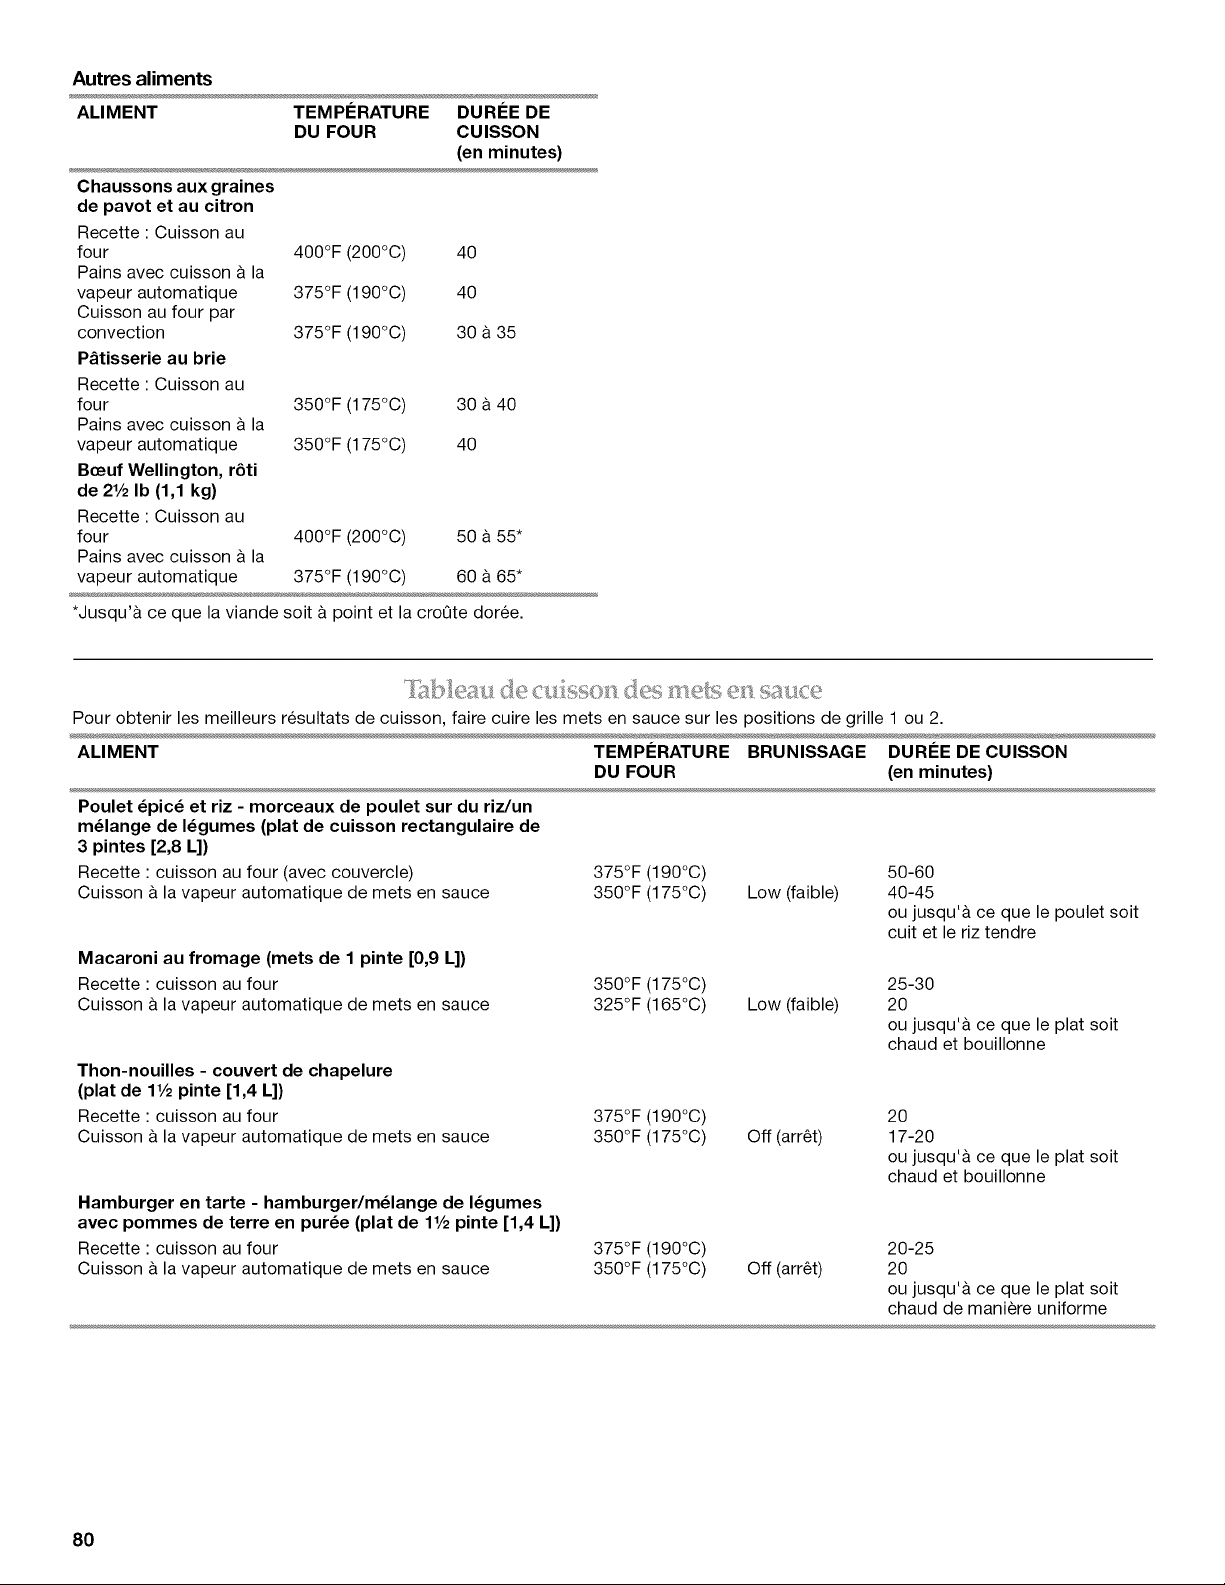
Autres aliments
ALIMENT TEMPERATURE DUREE DE
DU FOUR CUlSSON
(en minutes)
Chaussons aux graines
de pavot et au citron
Recette : Cuisson au
four 400°F (200°C) 40
Pains avec cuisson & la
vapeur automatique 375°F (190°C) 40
Cuisson au four par
convection 375°F (190°C) 30 & 35
P&tisserie au brie
Recette : Cuisson au
four 350°F (175°C) 30 a 40
Pains avec cuisson & la
vapeur automatique 350°F (175°C) 40
Beeuf Wellington, r6ti
de 21/2Ib (1,1 kg)
Recette : Cuisson au
four 400°F (200°C) 50 a 55*
Pains avec cuisson & la
vapeur automatique 375°F (190°C) 60 & 65*
*Jusqu'& ce que la viande soit & point et la croQte doree.
(,es ii]ets el sal:Ice
I['A_le _,:ide (] l:ll_),}sol]
Pour obtenir les meilleurs resultats de cuisson, faire cuire les mets en sauce sur les positions de grille 1 ou 2.
ALIMENT TEMPERATURE BRUNISSAGE DUREE DE CUISSON
DU FOUR (en minutes)
Poulet _pic_ et riz - morceaux de poulet sur du riz/un
m_lange de I_gumes (plat de cuisson rectangulaire de
3 pintes [2,8 L])
Recette : cuisson au four (avec couvercle)
Cuisson & la vapeur automatique de mets en sauce
Macaroni au fromage (mets de 1 pinte [0,9 L])
Recette : cuisson au four
Cuisson & la vapeur automatique de mets en sauce
Thon-nouilles - couvert de chapelure
(plat de 11/2pinte [1,4 L])
Recette : cuisson au four
Cuisson & la vapeur automatique de mets en sauce
Hamburger en tarte - hamburger/m_lange de I_gumes
avec pommes de terre en pur_e (plat de 11/2pinte [1,4 L])
Recette : cuisson au four
Cuisson & la vapeur automatique de mets en sauce
375°F (190°C)
350°F (175°C) Low (faible)
350°F (175°C)
325°F (165°C) Low (faible)
375°F (190°C)
350°F (175°0) Off (arr_t)
375°F (190°C)
350°F (175°0) Off (arr_t)
50-60
40-45
ou jusqu'& ce que le poulet soit
cuit et le riz tendre
25-30
2O
ou jusqu'& ce que le plat soit
chaud et bouillonne
2O
17-20
ou jusqu'& ce que le plat soit
chaud et bouillonne
20-25
2O
ou jusqu'& ce que le plat soit
chaud de maniere uniforme
8O
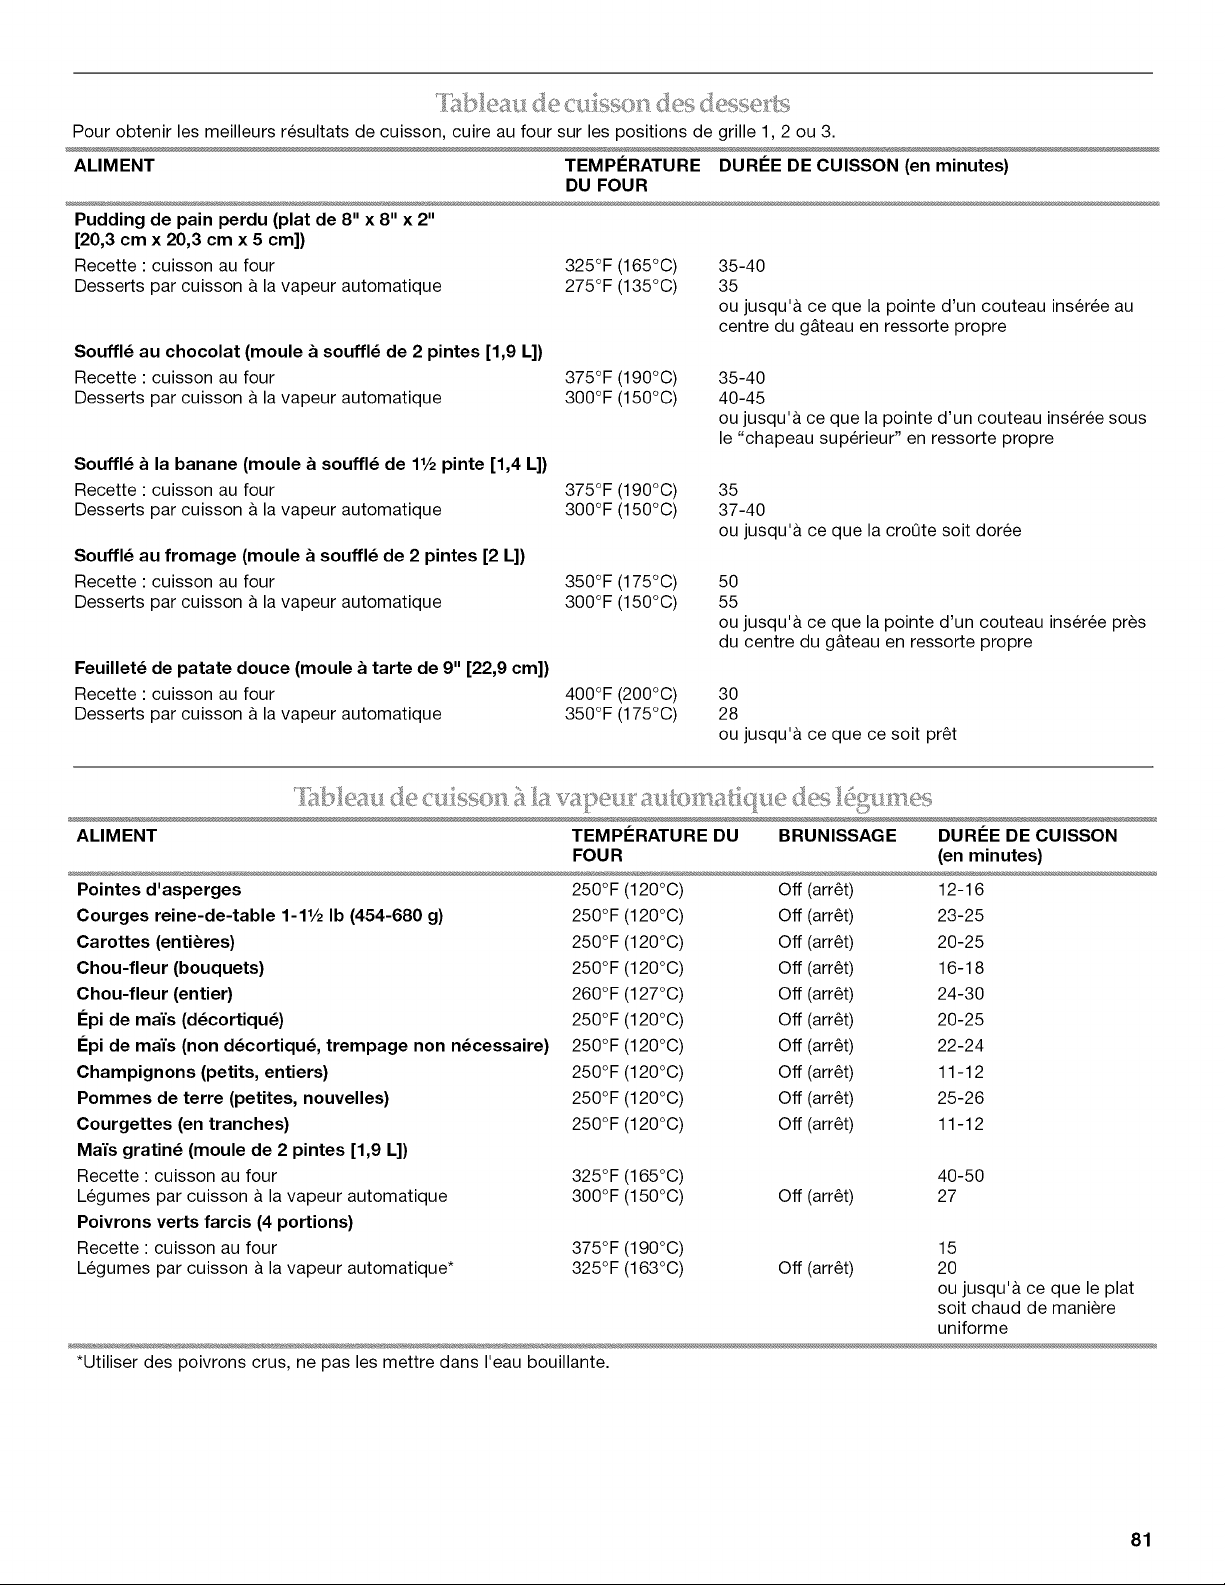
_"_ _% ,_ 2 _ _ ,! % _,_ _-_ _ -_._ l,¸ _
Pour obtenir les meilleurs resultats de cuisson, cuire au four sur les positions de grille 1,2 ou 3.
ALIMENT TEMPERATURE DUREE DE CUISSON (en minutes)
DU FOUR
Pudding de pain perdu (plat de 8" x 8" x 2"
[20,3 cm x 20,3 cm x 5 cm])
Recette : cuisson au four
Desserts par cuisson & la vapeur automatique
Souffl_ au chocolat (moule a souffl_ de 2 pintes [1,9 L])
Recette : cuisson au four
Desserts par cuisson & la vapeur automatique
Souffl_ a la banane (moule a souffl_ de 1V2 pinte [1,4 L])
Recette : cuisson au four
Desserts par cuisson & la vapeur automatique
Souffl_ au fromage (moule a souffl_ de 2 pintes [2 L])
Recette : cuisson au four
Desserts par cuisson & la vapeur automatique
Feuillet_ de patate douce (moule a tarte de 9" [22,9 cm])
Recette : cuisson au four
Desserts par cuisson & la vapeur automatique
325°F (165°C)
275°F (135°C)
375°F (190°C)
300°F (150°C)
375°F (190°C)
300°F (150°C)
350°F (175°C)
300°F (150°C)
35-40
35
ou jusqu'a ce que la pointe d'un couteau inser6e au
centre du g&teau en ressorte propre
35-40
40-45
ou jusqu'a ce que la pointe d'un couteau inser6e sous
le "chapeau superieur" en ressorte propre
35
37-40
ou jusqu'& ce que la croQte soit doree
5O
55
ou jusqu'a ce que la pointe d'un couteau inser6e pros
du centre du g&teau en ressorte propre
400°F (200°C) 30
350°F (175°C) 28
ou jusqu'& ce que ce soit pr_t
s
........ £................................. .... (_e5 _s
ALIMENT TEMPERATURE DU BRUNISSAGE DUREE DE CUlSSON
Pointes d'asperges
Courges reine-de-table 1-1V2 Ib (454-680 g)
Carottes (enti_res)
Chou-fleur (bouquets)
Chou-fleur (entier)
I_pi de mai"s (d_cortiqu_)
I_pi de mai"s (non d_cortiqu_, trempage non n_cessaire)
FOUR (en minutes)
250°F (120°C) Off (arr_t) 12-16
250°F (120°C) Off (arr_t) 23-25
250°F (120°C) Off (arr_t) 20-25
250°F (120°C) Off (arr_t) 16-18
260°F (127°C) Off (arr_t) 24-30
250°F (120°C) Off (arr_t) 20-25
250°F (120°C) Off (arr_t) 22-24
250°F (120°0) Off (arr_t) 11-12
250°F (120°C) Off (arr_t) 25-26
250°F (120°0) Off (arr_t) 11-12
Champignons (petits, entiers)
Pommes de terre (petites, nouvelles)
Courgettes (en tranches)
Mai"s gratin_ (moule de 2 pintes [1,9 L])
Recette : cuisson au four
Legumes par cuisson & la vapeur automatique
Poivrons verts farcis (4 portions)
Recette : cuisson au four
Legumes par cuisson & la vapeur automatique*
325°F (165°C) 40-50
300°F (150°C) Off (arr_t) 27
375°F (190°C) 15
325°F (163°C) Off (arr_t) 20
ou jusqu'a ce que le plat
soit chaud de maniere
uniforme
*Utiliser des poivrons crus, ne pas les mettre dans I'eau bouillante.
81
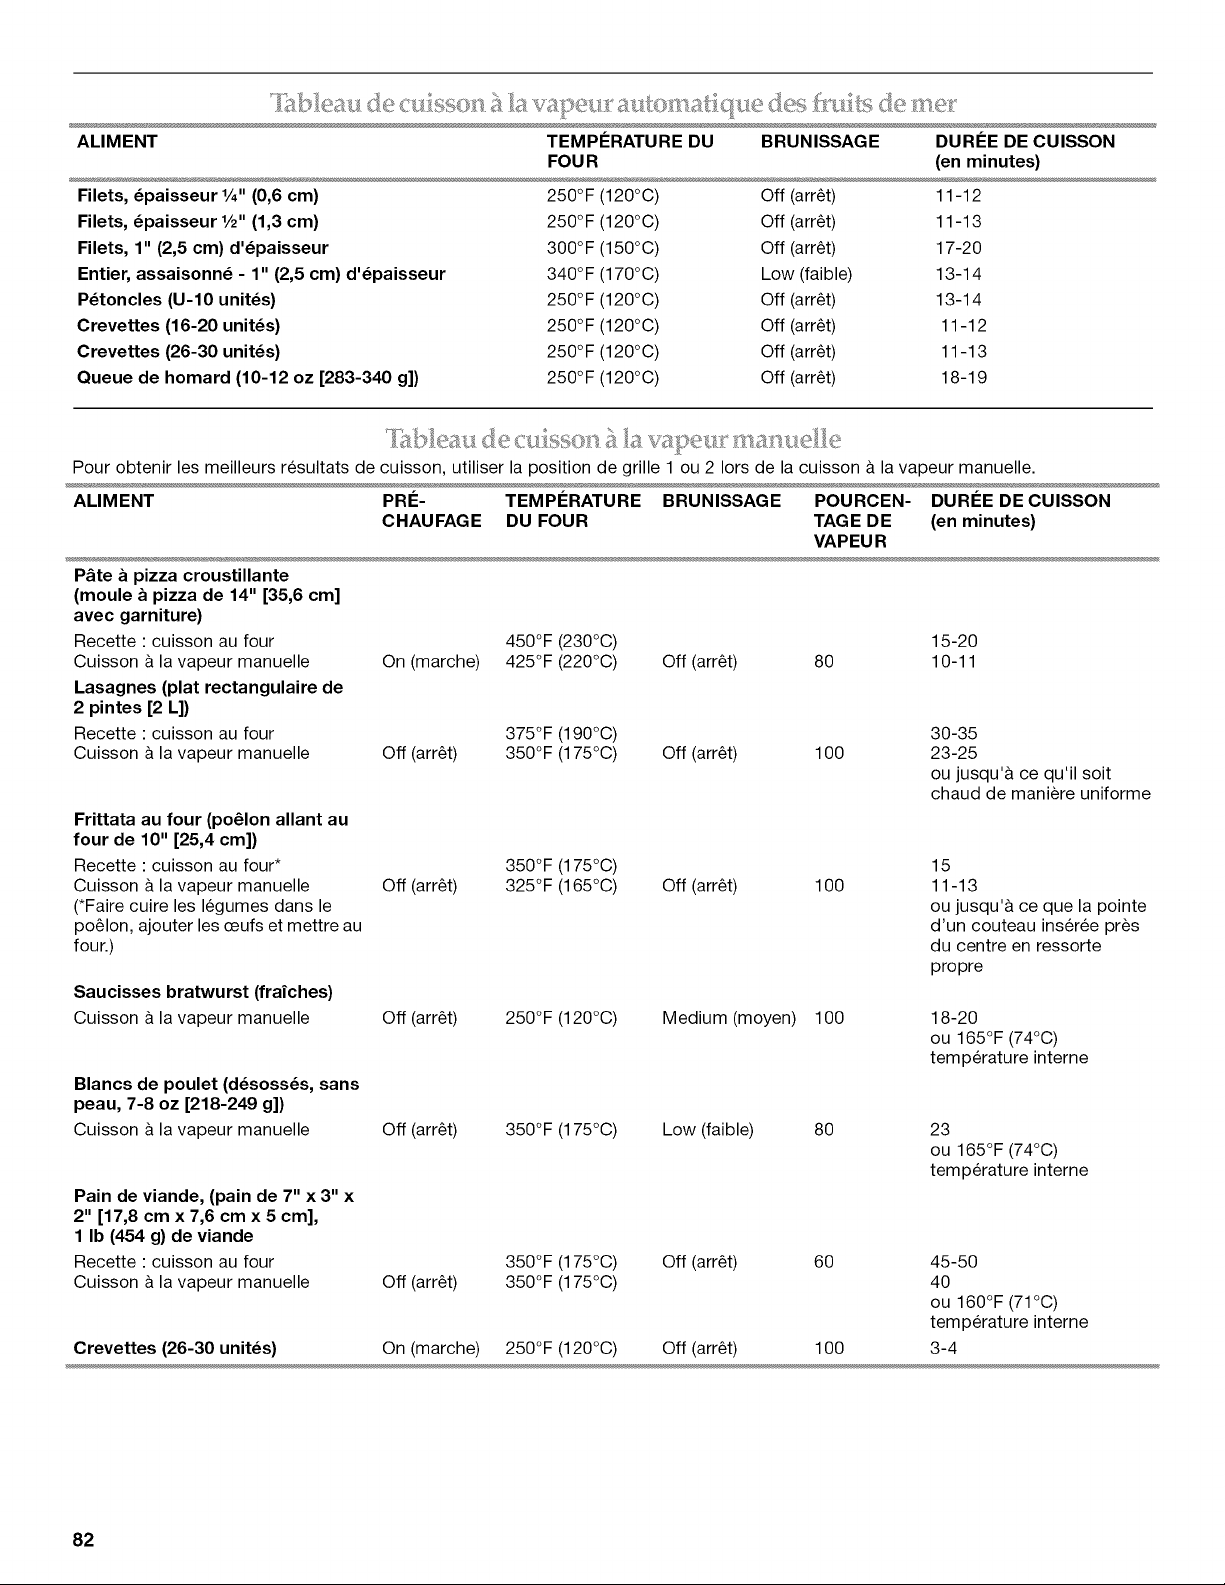
N_,_r_ea_, de i!_a _a ? _ _,_a@ }}__al_iq des _}_, ls de __.<:_
ALIMENT TEMPERATURE DU BRUNISSAGE DUREE DE CUISSON
Filets, _paisseur %" (0,6 cm)
Filets, _paisseur 1/2" (1,3 cm)
Filets, 1" (2,5 cm) d'_paisseur
Entier, assaisonn_ - 1" (2,5 cm) d'_paisseur
P_toncles (U-IO unit_s)
Crevettes (16-20 unit_s)
Crevettes (26-30 unit_s)
Queue de homard (10-12 oz [283-340 g])
FOUR (en minutes)
250°F (120°C) Off (arret) 11-12
250°F (120°C) Off (arret) 11-13
300°F (150°C) Off (arret) 17-20
340°F (170°C) Low (faible) 13-14
250°F (120°C) Off (arret) 13-14
250°F (120°C) Off (arret) 11-12
250°F (120°C) Off (arret) 11-13
250°F (120°C) Off (arret) 18-19
Pour obtenir les meilleurs resultats de cuisson, utiliser la position de grille 1 ou 2 Iors de la cuisson & la vapeur manuelle.
ALIMENT PRE- TEMPERATURE BRUNISSAGE POURCEN- DUREE DE CUlSSON
CHAUFAGE DU FOUR TAGE DE (en minutes)
VAPEUR
P&te a pizza croustillante
(moule & pizza de 14" [35,6 cm]
avec garniture)
450°F (230°C) 15-20
On (marche) 425°F (220°C) Off (arret) 80 10-11
Recette : cuisson au four
Cuisson & la vapeur manuelle
Lasagnes (plat rectangulaire de
2 pintes [2 L])
Recette : cuisson au four
Cuisson & la vapeur manuelle
Frittata au four (po61on allant au
four de 10" [25,4 cm])
Recette : cuisson au four*
Cuisson & la vapeur manuelle
(*Faire cuire les legumes dans le
poelon, ajouter les ceufs et mettre au
four.)
Saucisses bratwurst (frafches)
Cuisson & la vapeur manuelle
Blancs de poulet (d_soss_s, sans
peau, 7-8 oz [218-249 g])
Cuisson & la vapeur manuelle
Pain de viande, (pain de 7" x 3" x
2" [17,8 cm x 7,6 cm x 5 cm],
1 Ib (454 g) de viande
Recette : cuisson au four
Cuisson & la vapeur manuelle
375°F (190°C) 30-35
Off (arret) 350°F (175°C) Off (arret) 100 23-25
ou jusqu'& ce qu'il soit
chaud de maniere uniforme
350°F (175°C)
Off (arret) 325°F (165°C) Off (arret) 100
15
11-13
ou jusqu'& ce que la pointe
d'un couteau inseree pros
du centre en ressorte
propre
Off (arret) 250°F (120°C) Medium (moyen) 100
18-20
ou 165°F (74°C)
temperature interne
Off (arret) 350°F (175°C) Low (faible) 80
23
ou 165°F (74°C)
temperature interne
350°F (175°C) Off (arret) 60 45-50
Off (arret) 350°F (175°C) 40
ou 160°F (71°C)
temperature interne
Crevettes (26-30 unit_s) On (marche) 250°F (120°C) Off (arret) 100 3-4
82
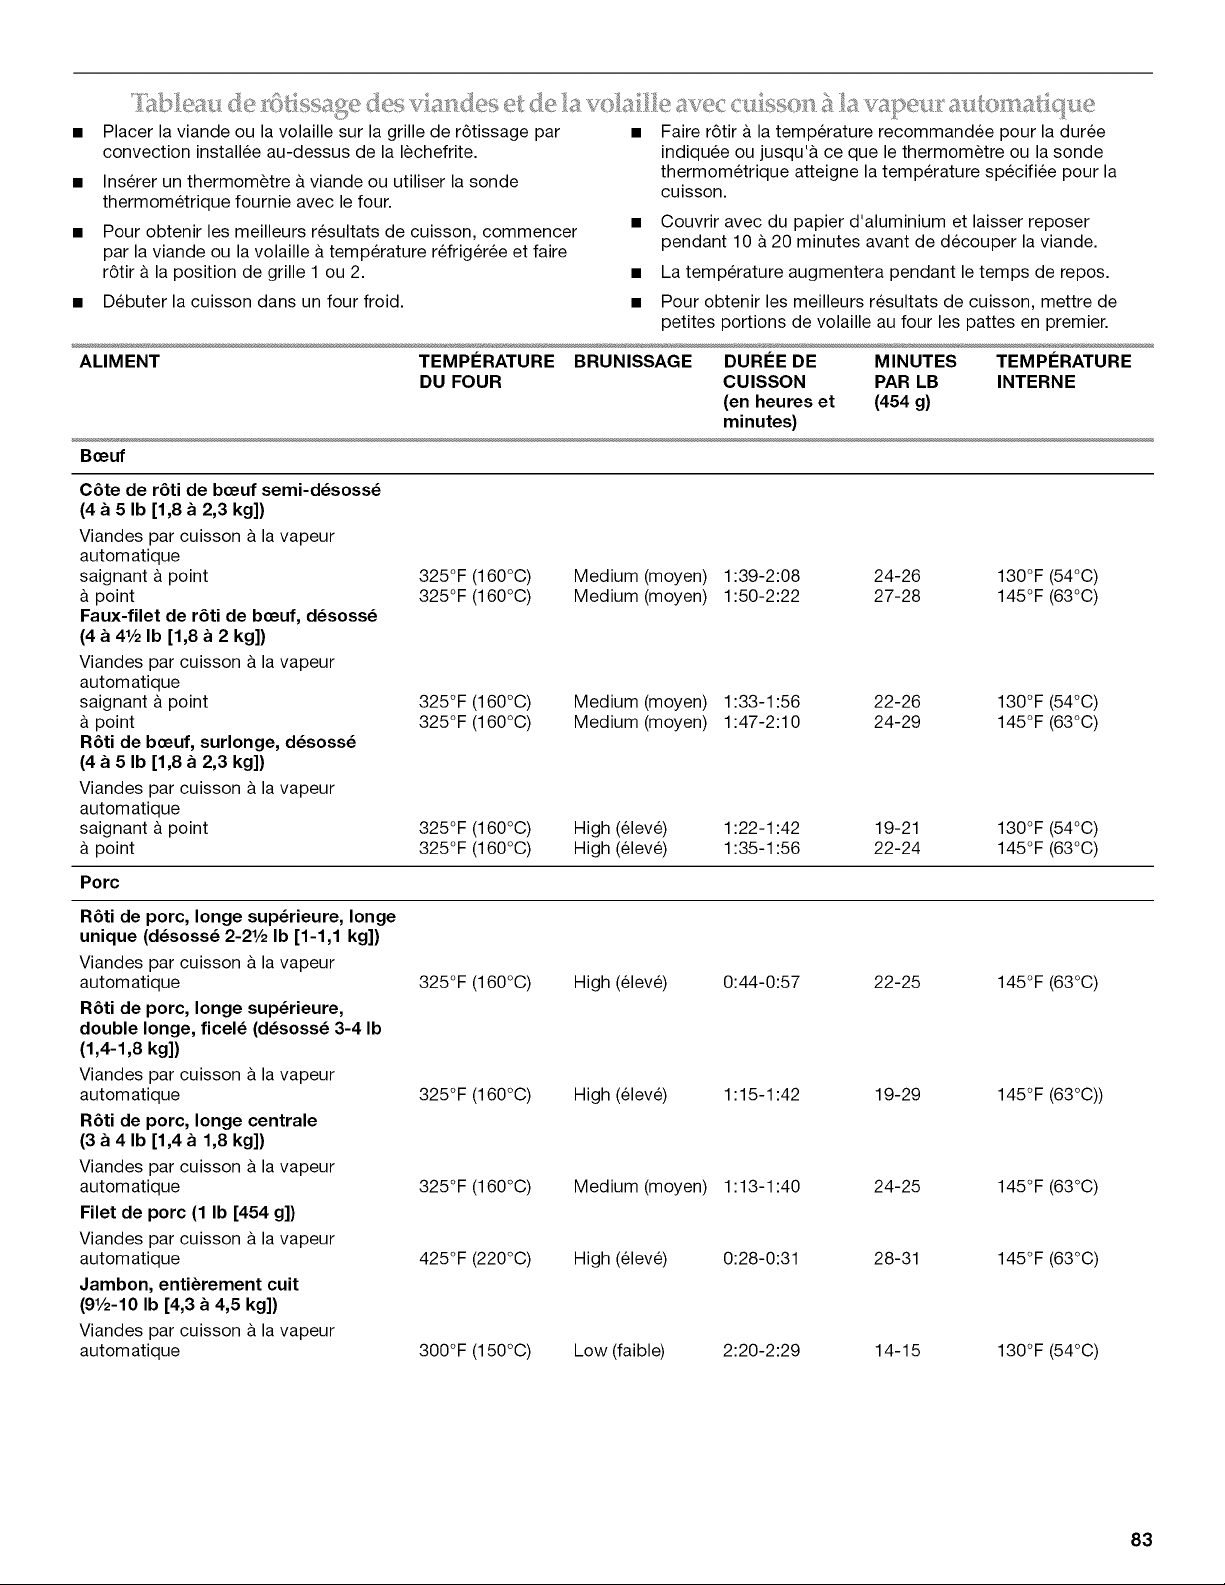
Placer la viande ou la volaille sur la grille de r6tissage par
convection installee au-dessus de la lechefrite.
Inserer un thermometre a viande ou utiliser la sonde
thermometrique fournie avec le four.
Pour obtenir les meilleurs resultats de cuisson, commencer
par la viande ou la volaille a temperature refrig6r6e et faire
r6tir a la position de grille 1 ou 2.
Debuter la cuisson dans un four froid.
Faire r6tir a la temperature recommandee pour la duree
indiquee ou jusqu'& ce que le thermom_tre ou la sonde
thermometrique atteigne la temperature specifi6e pour la
cuisson.
• Couvrir avec du papier d'aluminium et laisser reposer
pendant 10 a 20 minutes avant de decouper la viande.
• La temperature augmentera pendant le temps de repos.
• Pour obtenir les meilleurs resultats de cuisson, mettre de
petites portions de volaille au four les pattes en premier.
ALIMENT TEMPI_RATURE BRUNISSAGE DURI_E DE MINUTES TEMPI_RATURE
DU FOUR CUISSON PAR LB INTERNE
(en heures et (454 g)
minutes)
B_euf
C6te de r_ti de b_euf semi-d_soss_
(4 a 5 Ib [1,8 a 2,3 kg])
Viandes par cuisson _ la vapeur
autom atique
saignant & point 325°F (160°C) Medium (moyen) 1:39-2:08 24-26
point 325°F (160°C) Medium (moyen) 1:50-2:22 27-28
Faux-filet de r_ti de b_euf, d_soss_
(4 a 41/2Ib [1,8 a 2 kg])
Viandes par cuisson _ la vapeur
autom atique
saignant & point 325°F (160°C) Medium (moyen) 1:33-1:56 22-26
point 325°F (160°C) Medium (moyen) 1:47-2:10 24-29
R_ti de b_euf, surlonge, d_soss_
(4 a 5 Ib [1,8 a 2,3 kg])
Viandes par cuisson _ la vapeur
autom atique
saignant & point 325°F (160°C) High (eleve) 1:22-1:42 19-21
point 325°F (160°C) High (eleve) 1:35-1:56 22-24
Porc
130°F (54°C)
145°F (63°C)
130°F (54°C)
145°F (63°C)
130°F (54°C)
145°F (63°C)
R6ti de porc, Ionge sup_rieure, Ionge
unique (d_soss_ 2-21/2 Ib [1-1,1 kg])
Viandes par cuisson _ la vapeur
autom atique
R_ti de porc, Ionge sup_rieure,
double Ionge, ficel_ (d_soss_ 3-4 Ib
(1,4-1,8 kg])
Viandes par cuisson _ la vapeur
autom atique
R_ti de porc, Ionge centrale
(3 a 4 Ib [1,4 a 1,8 kg])
Viandes par cuisson _ la vapeur
autom atique
Filet de porc (1 Ib [454 g]}
Viandes par cuisson & la vapeur
autom atique
Jambon, enti_rement cuit
(91/2-10 Ib [4,3 a 4,5 kg])
Viandes par cuisson _ la vapeur
autom atique
325°F (160°C) High (eleve) 0:44-0:57 22-25
325°F (160°C) High (eleve) 1:15-1:42 19-29
325°F (160°C) Medium (moyen) 1:13-1:40 24-25
425°F (220°C) High (eleve) 0:28-0:31 28-31
300°F (150°C) Low (faible) 2:20-2:29 14-15
145 °F (63°C)
145°F (63°C))
145 °F (63°C)
145°F (63°C)
130°F (54°C)
83
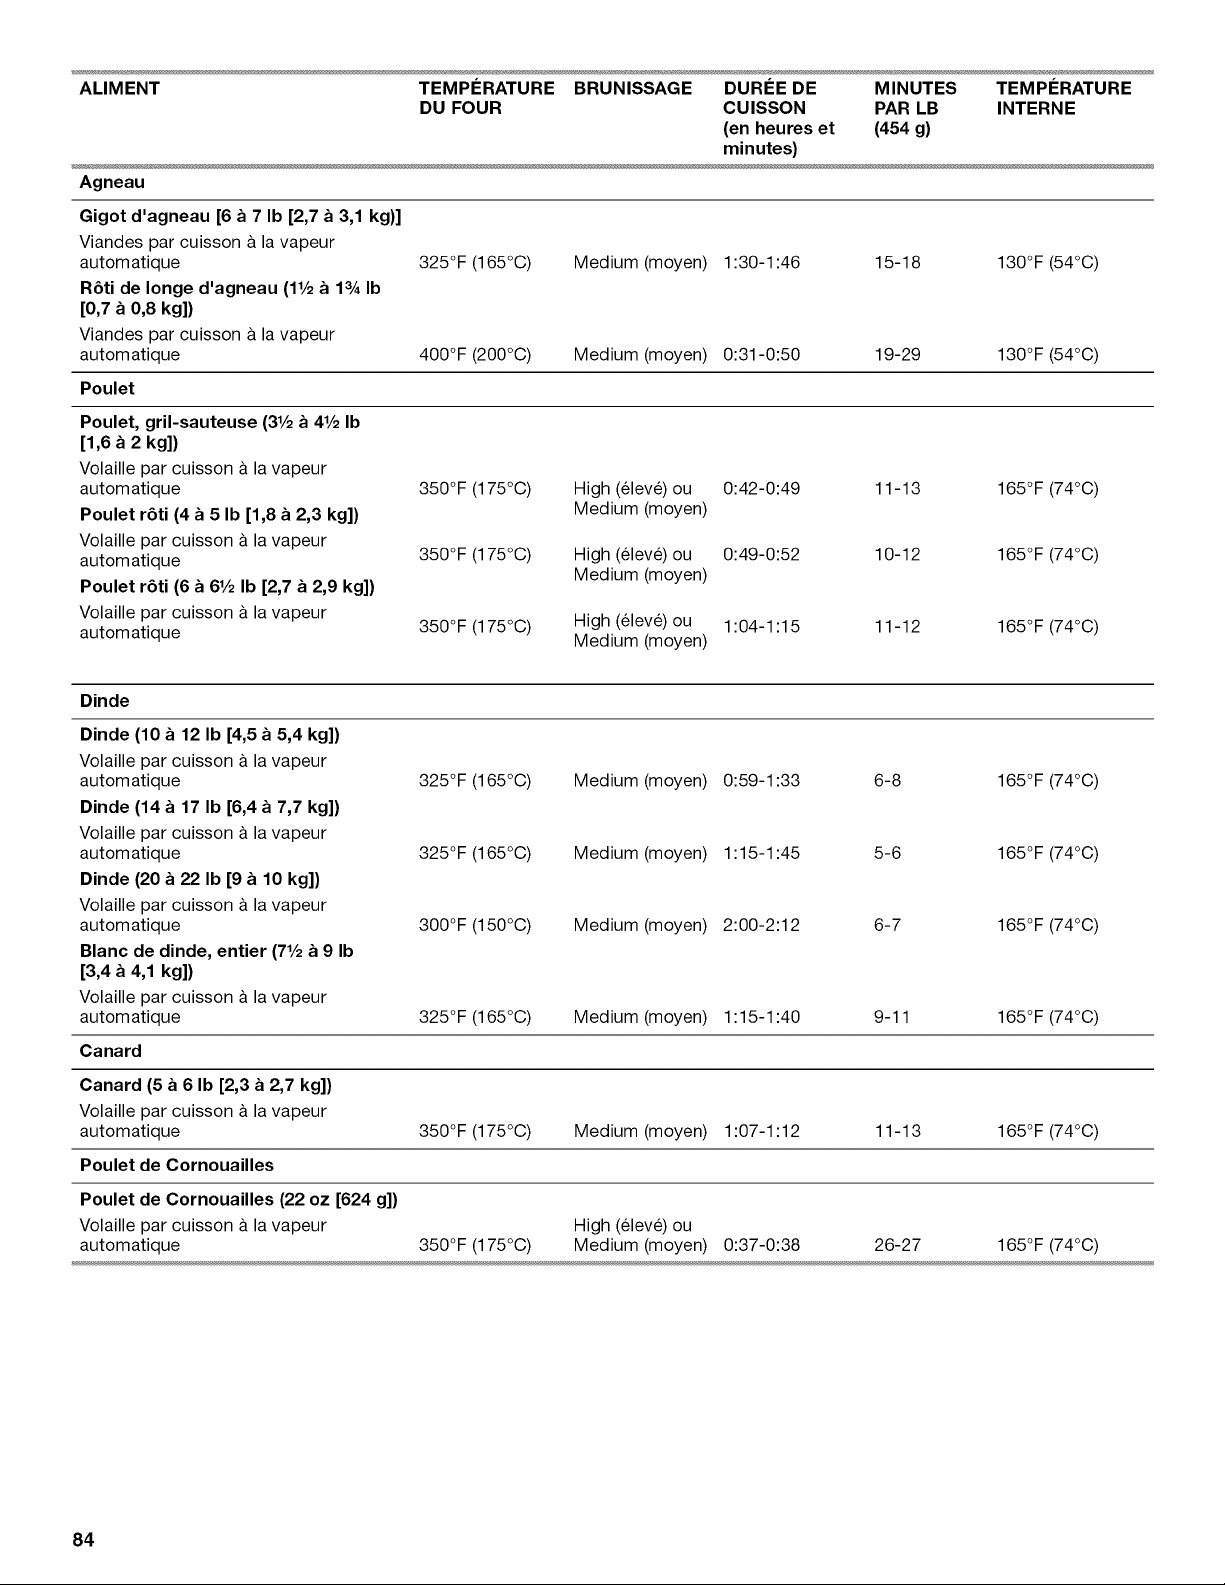
ALIMENT TEMPERATURE BRUNISSAGE DUREE DE MINUTES TEMPERATURE
DU FOUR CUISSON PAR LB INTERNE
(en heures et (454 g)
minutes)
Agneau
Gigot d'agneau [6 a 7 Ib [2,7 a 3,1 kg)]
Viandes par cuisson & la vapeur
autom atique
R6ti de Ionge d'agneau (11/2a 13A Ib
[0,7 a 0,8 kg])
Viandes par cuisson & la vapeur
autom atique
325°F (165°C) Medium (moyen) 1:30-1:46 15-18 130°F (54°C)
400°F (200°C) Medium (moyen) 0:31-0:50 19-29 130°F (54°C)
Poulet
Poulet, gril-sauteuse (31/2a 41/2Ib
[1,6 a 2 kg])
Volaille par cuisson & la vapeur
automatique
Poulet r6ti (4 a 5 Ib [1,8 a 2,3 kg])
Volaille par cuisson & la vapeur
automatique
Poulet r6ti (6 a 61/2Ib [2,7 a 2,9 kg])
Volaille par cuisson & la vapeur
automatique
350°F (175°C) High (elev6) ou 0:42-0:49 11-13 165°F (74°C)
Medium (moyen)
350°F (175°C) High (elev6) ou 0:49-0:52 10-12 165°F (74°C)
Medium (moyen)
350OF (175oc) High (elev6) ou 1:04-1:15 11-12 165°F (74°C)
Medium (moyen)
Dinde
Dinde (10 a 12 Ib [4,5 a 5,4 kg])
Volaille par cuisson & la vapeur
automatique 6-8
Dinde (14 a 17 Ib [6,4 a 7,7 kg])
Volaille par cuisson & la vapeur
automatique 5-6
Dinde (20 a 22 Ib [9 a 10 kg])
Volaille par cuisson & la vapeur
automatique 6-7
Blanc de dinde, entier (71/2a 9 Ib
[3,4 a 4,1 kg])
Volaille par cuisson & la vapeur
automatique 325°F (165°C) Medium (moyen) 1:15-1:40 9-11 165°F (74°C)
Canard
Canard (5 a 6 Ib [2,3 a 2,7 kg])
Volaille par cuisson & la vapeur
automatique 350°F (175°C) Medium (moyen) 1:07-1:12 11-13 165°F (74°C)
Poulet de Cornouailles
Poulet de Cornouailles (22 oz [624 g])
Volaille par cuisson & la vapeur High (61eve) ou
automatique 350°F (175°C) Medium (moyen) 0:37-0:38 26-27 165°F (74°C)
325°F (165°C) Medium (moyen) 0:59-1:33 165°F (74°C)
325°F (165°C) Medium (moyen) 1:15-1:45 165°F (74°C)
300°F (150°C) Medium (moyen) 2:00-2:12 165°F (74°C)
84
ENTRETIEN DE LA CUISINIERE
Risque de br01ures
Ne pas toucher le four au cours du programme
d'autonettoyage.
Garder les enfants loin du four au cours du programme
d'autonettoyage.
Le non-respect de ces instructions peut causer des
br01ures.
Comment fonctionne le programme
IMPORTANT : Le chauffage et le refroidissement de la poroelaine
sur I'acier dans le four peuvent causer une decoloration, une
perte de la brillanoe du fini, des fissures minuscules et emettre
des craquements.
Le programme d'autonettoyage utilise des temperatures tres
elevees, brQlant les saletes pour les reduire en cendre.
Le four est preregle pour un programme d'autonettoyage de
4 h, mais la duree peut etre modifiee. Les durees de nettoyages
suggerees sont de 3 h 30 pour des saletes legeres et entre 4 h et
4 h 30 pour des saletes moyennes a abondantes.
Utiliser le tableau ci-dessous comme guide pour determiner le
niveau de nettoyage desire.
NIVEAU DE DURI_E DE NETTOYAGE TOTALE
NETTOYAGE (inclut 30 minutes de temps de
refroidissement)
1 (rapide) 3 heures 30 minutes
IMPORTANT : La sante de certains oiseaux est tres sensible aux
emanations qui surviennent durant le programme
d'autonettoyage. L'exposition aux emanations peut entrainer la
mort de certains oiseaux. Toujours deplacer les oiseaux dans une
autre piece fermee et bien aeree.
Proceder a I'autonettoyage du four avant qu'il ne devienne tres
sale. Les saletes intenses necessitent un nettoyage plus long et
degagent plus de fumee.
Veiller ace que la cuisine soit bien aeree pendant le programme
d'autonettoyage afin d'aider a eliminer la chaleur, les odeurs et la
fumee.
Ne pas obstruer le ou les events du four durant le programme
d'autonettoyage. L'air doit pouvoir circuler librement. Selon votre
modele, voir la section "12vent du four" ou "12vents du four".
Ne pas nettoyer, frotter, endommager ou deplacer le joint
d'etancheite de la porte du four. Le joint de la porte est essentiel
pour une bonne etancheite.
Preparation du four :
• Sortir du four la lechefrite, la grille, les ustensiles de cuisson
au four et, sur certains modeles, la sonde thermometrique.
Sortir les grilles du four pour les garder brillantes et pour
qu'elles glissent facilement. Voir la section "Nettoyage
general" pour plus de renseignements.
• Enlever tout papier d'aluminium du four ; celui-ci risquerait de
brQler ou de fondre et d'endommager le four.
3 heures 45 minutes
3 (regulier) 4 heures
4 4 heures 15 minutes
5 (maximum) 4 heures 30 minutes
Lorsque le four a completement refroidi, retirer la cendre avec un
chiffon humide. S'il reste des saletes apres I'essuyage, cela
signifie que le programme de nettoyage n'a pas fonctionne
suffisamment Iongtemps pour pouvoir eliminer toutes les saletes
du four. Repeter le programme d'autonettoyage si desire; on
peut aussi attendre le prochain programme de nettoyage pour
eliminer ces saletes. Pour eviter de casser le verre, ne pas
appliquer de chiffon froid humide sur le hublot de la porte interne
avant qu'il n'ait completement refroidi.
Les lampes du four ne fonctionnent pas durant le programme
d'autonettoyage.
Sur les cuisinieres de 48" (121,9 cm), seul un four peut proceder
I'autonettoyage a la fois. Si un four effectue un programme
d'autonettoyage, I'autre four ne peut etre ni regle ni allume.
REMARQUE : Le four possede un ventilateur de refroidissement
2 vitesses. Pendant I'autonettoyage, le(s) ventilateur(s)
fonctionnera(ont) a la vitesse la plus elevee pour augmenter le
flux d'air et faciliter I'evacuation de I'air chaud a travers le(s)
events du four. Une augmentation du bruit peut etre constatee
pendant et apres le programme d'autonettoyage jusqu'au
refroidissement du four.
Nettoyer manuellement le bord interieur de la porte et une
zone de 11/2"(3,8 cm) sur le pourtour du cadre de la cavite du
four, en prenant soin de ne pas deplacer ni plier le joint
d'etancheite. Cette section ne devient pas assez chaude au
cours du programme d'autonettoyage pour pouvoir eliminer
la salete. Ne pas laisser de I'eau, un nettoyant, etc. penetrer
dans les fentes du cadre de la porte. Nettoyer cette zone
avec un chiffon humide.
Essuyer toute salete decollee afin de reduire la fumee et
d'eviter les dommages. A des temperatures elevees, les
aliments reagissent avec la porcelaine. Cette reaction peut
causer des taches, des attaques, des piqQres ou de legeres
taches blanches. Ceci n'affectera pas la performance de
cuisson.
Autonettoyage :
Avant I'autonettoyage, s'assurer que la porte est completement
fermee sinon elle ne se verrouillera pas et le programme ne
commencera pas.
1. Dans le menu principal, appuyer sur PLUS.
2. Appuyer sur AUTONE-i-i-OYAGE.
3. Appuyer sur + ou - pour augmenter ou diminuer la duree de
nettoyage au niveau desire.
4. Appuyer sur CONSEILS pour recevoir des instructions sur la
preparation de votre four pour le programme
d'autonettoyage. Appuyer sur OK pour retourner au menu
d'autonettoyage.
85
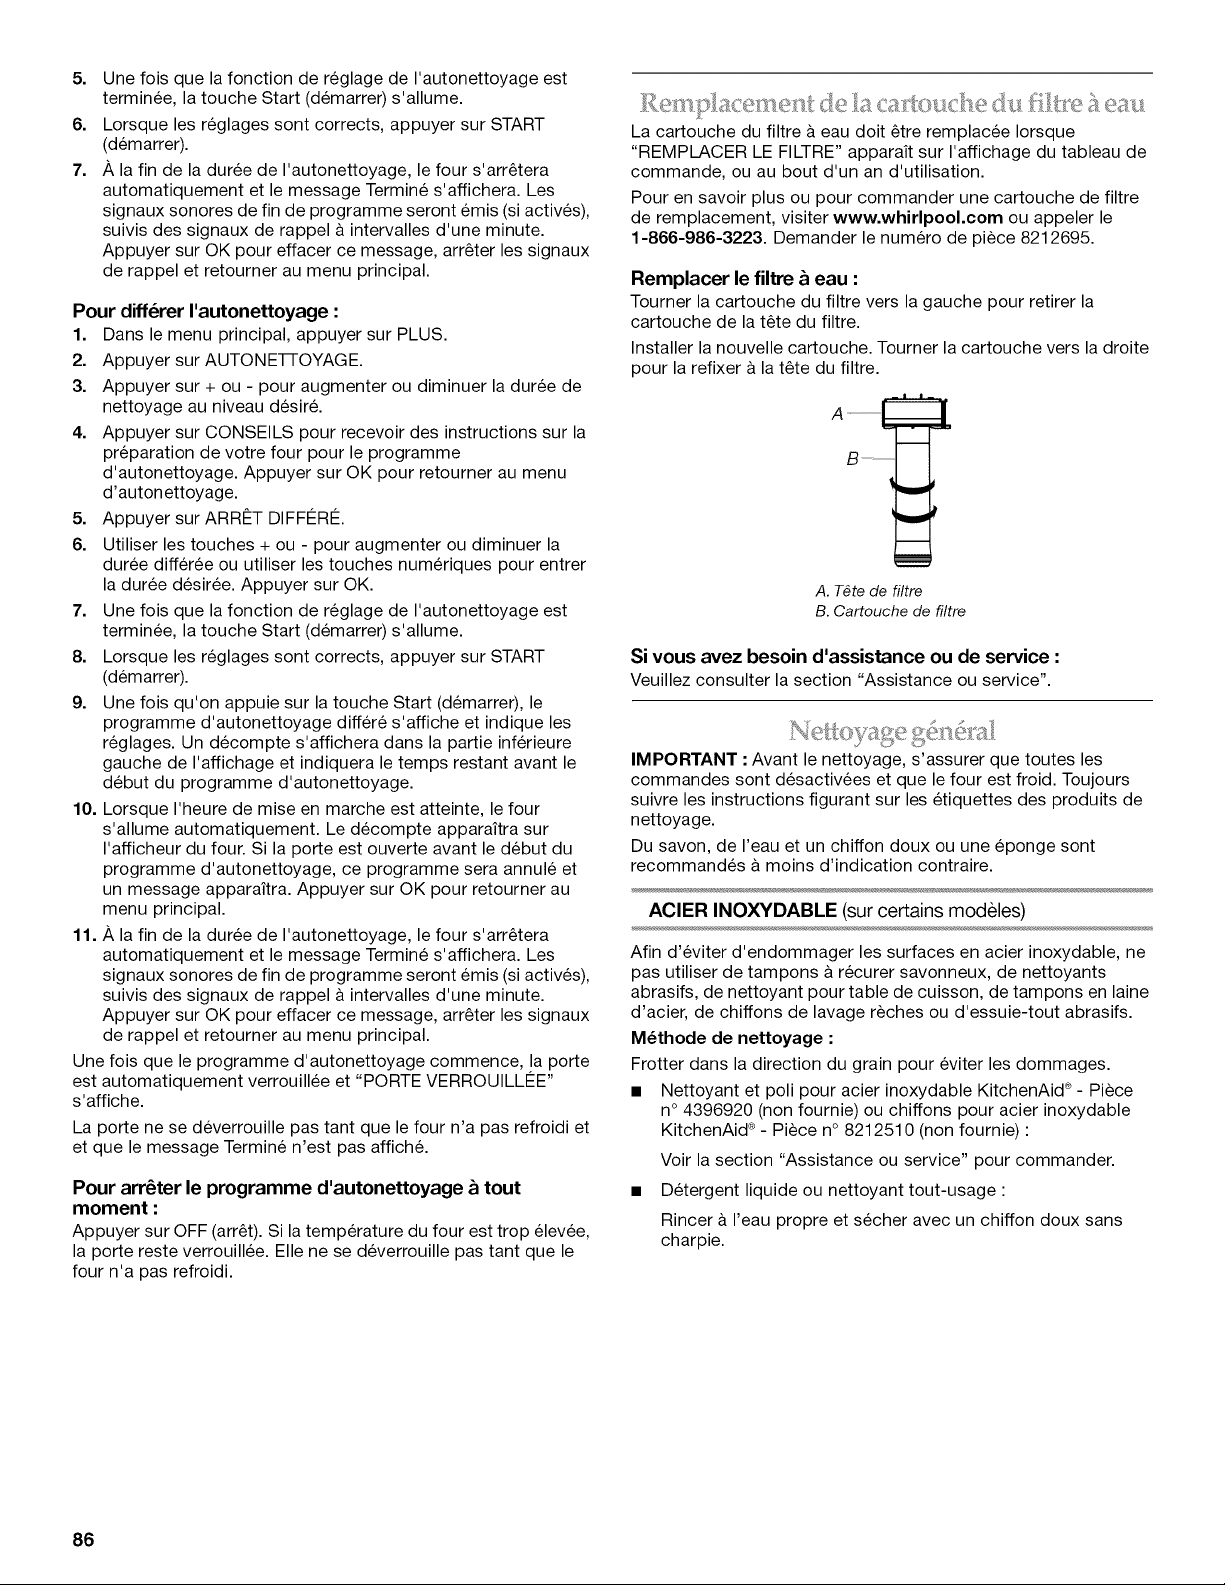
5. Une fois que la fonction de reglage de I'autonettoyage est
terminee, la touche Start (demarrer) s'allume.
6. Lorsque les reglages sont corrects, appuyer sur START
(demarrer).
7. A la fin de la duree de I'autonettoyage, le four s'arretera
automatiquement et le message Termine s'affichera. Les
signaux sonores de fin de programme seront emis (si actives),
suivis des signaux de rappel a intervalles d'une minute.
Appuyer sur OK pour effacer ce message, arreter les signaux
de rappel et retourner au menu principal.
Pour diff6rer I'autonettoyage :
1. Dans le menu principal, appuyer sur PLUS.
2. Appuyer sur AUTONE-I-I-OYAGE.
3. Appuyer sur + ou - pour augmenter ou diminuer la duree de
nettoyage au niveau desire.
4. Appuyer sur CONSEILS pour recevoir des instructions sur la
preparation de votre four pour le programme
d'autonettoyage. Appuyer sur OK pour retourner au menu
d'autonettoyage.
5. Appuyer sur ARRESTDIFFI2RI2.
6. Utiliser les touches + ou - pour augmenter ou diminuer la
duree differee ou utiliser les touches numeriques pour entrer
la duree desiree. Appuyer sur OK.
7. Une fois que la fonction de reglage de I'autonettoyage est
terminee, la touche Start (demarrer) s'allume.
8. Lorsque les reglages sont corrects, appuyer sur START
(demarrer).
9. Une fois qu'on appuie sur la touche Start (demarrer), le
programme d'autonettoyage differe s'affiche et indique les
reglages. Un decompte s'affichera dans la partie inferieure
gauche de I'affichage et indiquera le temps restant avant le
debut du programme d'autonettoyage.
10. Lorsque I'heure de mise en marche est atteinte, le four
s'allume automatiquement. Le decompte apparaitra sur
I'afficheur du four. Si la porte est ouverte avant le debut du
programme d'autonettoyage, ce programme sera annule et
un message apparaitra. Appuyer sur OK pour retourner au
menu principal.
11. A la fin de la duree de I'autonettoyage, le four s'arretera
automatiquement et le message Termine s'affichera. Les
signaux sonores de fin de programme seront emis (si actives),
suivis des signaux de rappel a intervalles d'une minute.
Appuyer sur OK pour effacer ce message, arreter les signaux
de rappel et retourner au menu principal.
Une fois que le programme d'autonettoyage commence, la porte
est automatiquement verrouillee et "PORTE VERROUILLI2E ''
s'affiche.
La porte ne se deverrouille pas tant que le four n'a pas refroidi et
et que le message Termine n'est pas affich&
Pour arr6ter le programme d'autonettoyage & tout
moment :
Appuyer sur OFF (arret). Si la temperature du four est trop elevee,
la porte reste verrouillee. Elle ne se deverrouille pas tant que le
four n'a pas refroidi.
La cartouche du filtre a eau doil etre remplacee Iorsque
"REMPLAOER LE FILTRE" appara_t sur I'affichage du tableau de
commande, ou au bout d'un an d'utilisation.
Pour en savoir plus ou pour commander une cartouche de filtre
de remplacement, visiter www.whirlpool.com ou appeler le
1-866-986-3223. Demander le numero de piece 8212695.
Remplacer le filtre & eau :
Tourner la cartouche du filtre vers la gauche pour retirer la
cartouche de la tete du filtre.
Installer la nouvelle cartouche. Tourner la cartouche vers la droite
pour la refixer a la tete du filtre.
A. T_te de filtre
B. Cartouche de filtre
Si vous avez besoin d'assistance ou de service :
Veuillez consulter la section "Assistance ou service".
IMPORTANT : Avant le nettoyage, s'assurer que toutes les
commandes sont desactivees et que le four est froid. Toujours
suivre les instructions figurant sur les etiquettes des produits de
nettoyage.
Du savon, de I'eau et un chiffon doux ou une eponge sont
recommandes & moins d'indication contraire.
ACIER INOXYDABLE (sur certains modeles)
Afin d'eviter d'endommager les surfaces en acier inoxydable, ne
pas utiliser de tampons a recurer savonneux, de nettoyants
abrasifs, de nettoyant pour table de cuisson, de tampons en laine
d'acier, de chiffons de lavage r_ches ou d'essuie-tout abrasifs.
M_thode de nettoyage :
Frotter dans la direction du grain pour eviter les dommages.
• Nettoyant et poli pour acier inoxydable KitchenAid ®- Piece
n° 4396920 (non fournie) ou chiffons pour acier inoxydable
KitchenAid ®- Piece n° 8212510 (non fournie) :
Voir la section "Assistance ou service" pour commander.
• Detergent liquide ou nettoyant tout-usage :
Rincer & I'eau propre et secher avec un chiffon doux sans
charpie.
86
GRILLES ET CHAPEAUX I_MAILLI_S
Les renversements d'aliments contenant des produits acides,
tels que vinaigre et tomates, doivent _tre nettoyes des que la
table de cuisson, les grilles et les chapeaux ont refroidi. Ces
renversements peuvent affecter le fini.
Pour eviter I'ecaillement, ne pas entrechoquer les grilles et les
chapeaux ni les frapper contre des surfaces dures telles que les
ustensiles en fonte.
Ne pas reinstaller les chapeaux sur les brQleurs Iorsqu'ils sont
mouilles.
Ne pas les nettoyer au moyen du programme d'autonettoyage.
Ne pas nettoyer au lave-vaisselle.
M_thode de nettoyage :
• Ustensile de recurage en nylon non abrasif et nettoyant
legerement abrasif •
Nettoyer des que la table de cuisson, les grilles et les
chapeaux ont refroidi.
BRULEURS DE SURFACE
ModUles a brQleurs scell_s
Voir la section "BrQleurs de surface scelles".
COMMANDES DE LA TABLE DE CUlSSON
INTI_RIEUR DE LA PORTE DU FOUR
M_thode de nettoyage :
• Programme d'autonettoyage •
Pour un nettoyage optimal de la porte, essuyer tout dep6t
avec une eponge humide avant de lancer le programme.
TABLEAU DE COMMANDE
Activer la fonction de verrouillage de la commande pour eviter
d'activer I'ecran tactile au cours du nettoyage. Voir la section
"Verrouillage de la commande".
Afin d'eviter d'endommager le tableau de commande, ne pas
utiliser de nettoyants abrasifs, de tampons en laine d'acier, de
chiffons de lavage reches ou d'essuie-tout abrasifs.
M_thode de nettoyage :
• Nettoyant a vitre et chiffon doux ou eponge •
Appliquer le nettoyant a vitre sur un chiffon doux ou une
eponge, et non pas directement sur le tableau.
• Nettoyant tout-usage pour appareils menagers - Piece
n° 31682B (non fourni) •
Voir la section "Assistance ou service" pour commander.
r
CAVITE DU FOUR
Afin d'eviter d'endommager les commandes de la table de
cuisson, ne pas utiliser de laine d'acier, de nettoyants abrasifs ou
de nettoyant pour four.
Afin d'eviter tout dommage, ne pas immerger les boutons de
commande.
Lors de la reinstallation des boutons, s'assurer que chaque
bouton est & la position Off (arr_t).
Ne pas retirer les joints sous les boutons.
REMARQUE • Lors de la reinstallation des boutons apres le
nettoyage des commandes des brQleurs de surface ou de la
commande du module de la plaque a frire, verifier que les
boutons sont reinstalles a leur emplacement correct. Les
boutons de brQleur de 20 000 BTU/h possedent des reglages de
puissance et le bouton de la plaque a frire des reglages de
temperature. Tousles autres boutons possedent uniquement des
reglages Hi (eleve), Med (moyen), Lo (bas).
M_thode de nettoyage :
• Eau tiede savonneuse :
Tirer les boutons directement hors du tableau de commande
pour les enlever.
EXTI_RIEUR DE LA PORTE DU FOUR
M_thode de nettoyage :
• Nettoyant a vitre et chiffon doux ou eponge :
Appliquer le nettoyant a vitre sur un chiffon doux ou une
eponge, et non pas directement sur le tableau.
• Nettoyant tout-usage pour appareils menagers- Piece
n° 31682B (non fourni) :
Voir la section "Assistance ou service" pour commander.
Ne pas utiliser de nettoyants a four.
Les renversements alimentaires doivent _tre nettoyes Iorsque le
four a refroidi./_, des temperatures elevees, les aliments
reagissent avec la porcelaine et cette reaction peut entrainer la
formation de taches, d'un film de silice, de piqQres ou de legeres
taches blanches.
M_thode de nettoyage :
• Programme d'autonettoyage : Voir d'abord "Programme
d'autonettoyage".
GRILLES DU FOUR
Methode de nettoyage :
• Programme d'autonettoyage :
Voir d'abord "Programme d'autonettoyage". Sortir les grilles
sinon elles se decoloreront et glisseront plus difficilement. Le
cas echeant, une legere couche d'huile vegetale appliquee
sur les glissieres facilitera le glissement des grilles.
• Tampon en laine d'acier
MODULE DE LA PLAQUE .A FRIRE
Ne pas attendre trop Iongtemps apres le retrait des aliments et le
refroidissement de la plaque pour la nettoyer.
Methode de nettoyage :
• Eau chaude savonneuse et/ou tampon & recurer en nylon
• Apres le nettoyage, secher la surface avec un essuie-tout.
Plateau d'_gouttement et zone situ_e sous le plateau
Laisser la table de cuisson refroidir completement avant le
nettoyage.
M_thode de nettoyage :
• Eau tiede savonneuse ou nettoyant non abrasif.
• Chiffon humide ou tampon non abrasif.
• Secher completement avant de placer le plateau
d'egouttement en position.
87
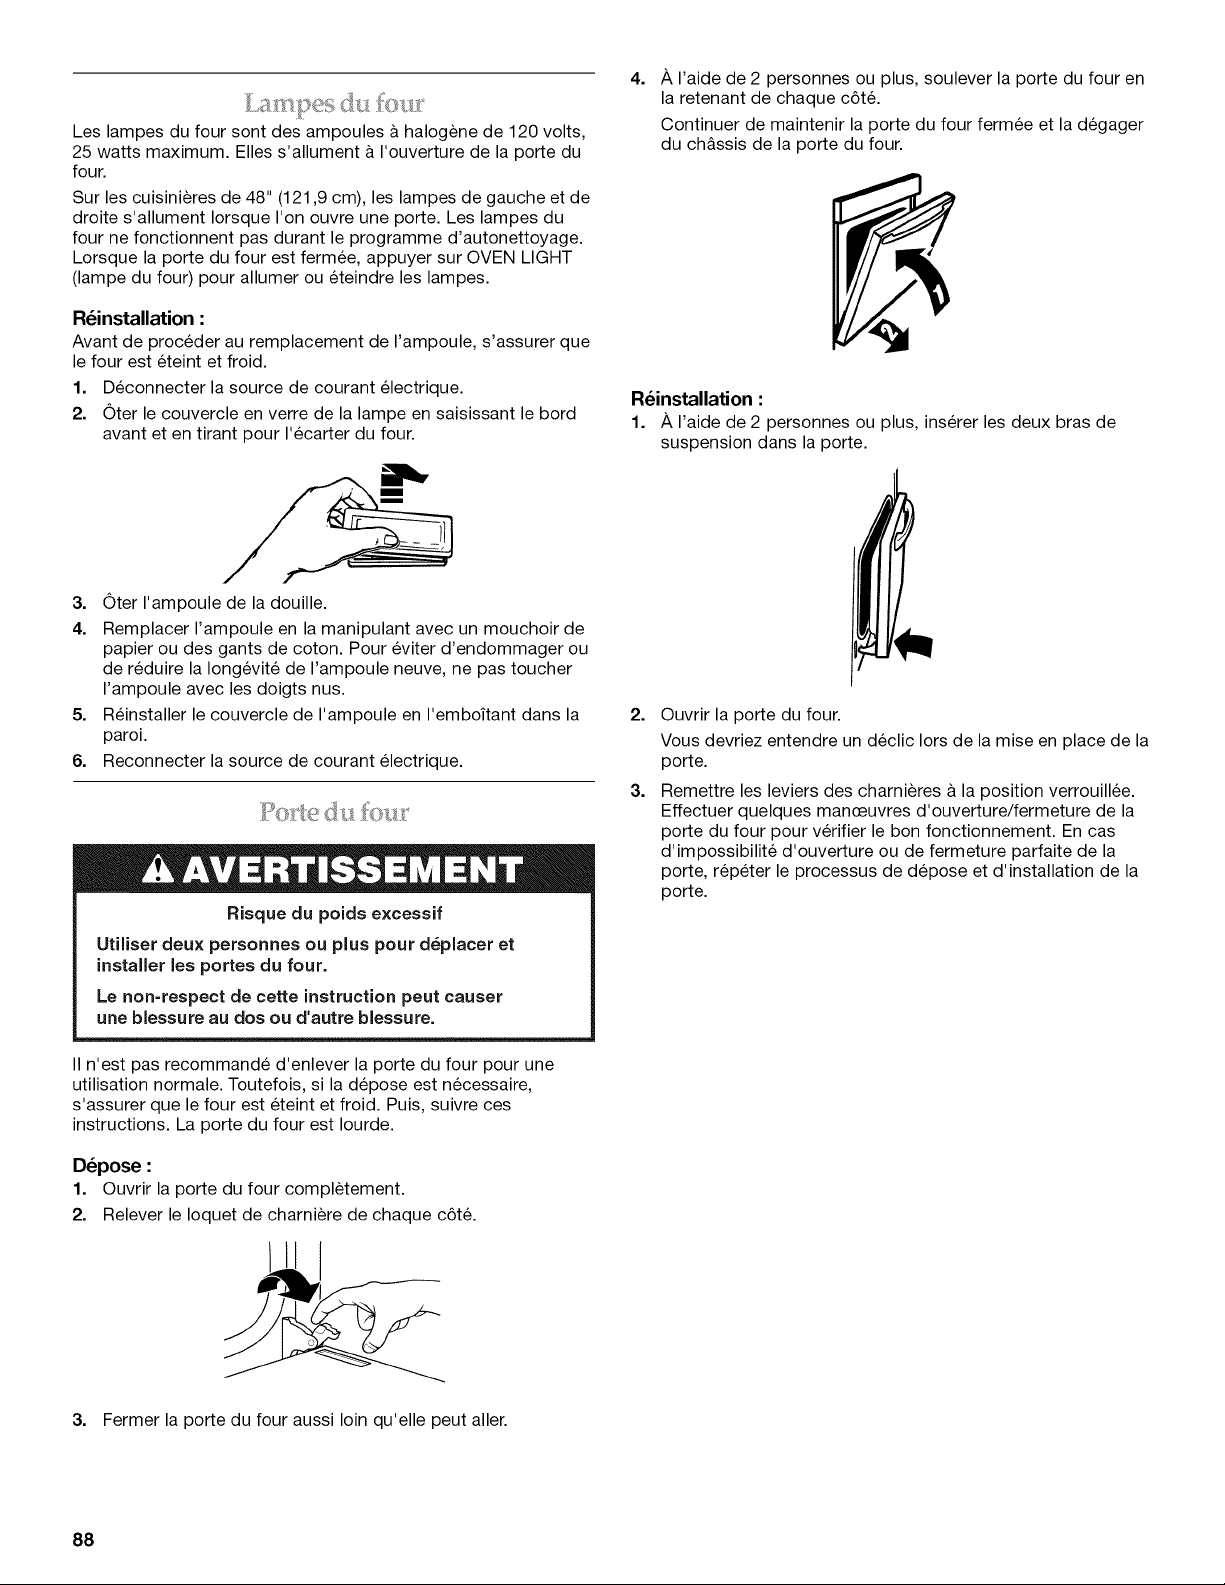
Les lampes du four sont des ampoules & halogene de 120 volts,
25 watts maximum. Elles s'allument & I'ouverture de la porte du
four.
Sur les cuisinieres de 48" (121,9 cm), les lampes de gauche et de
droite s'allument Iorsque I'on ouvre une porte. Les lampes du
four ne fonctionnent pas durant le programme d'autonettoyage.
Lorsque la porte du four est fermee, appuyer sur OVEN LIGHT
(lampe du four) pour allumer ou eteindre les lampes.
R_installation :
Avant de proceder au remplacement de I'ampoule, s'assurer que
le four est eteint et froid.
1. Deconnecter la source de courant electrique.
2. Oter le couvercle en verre de la lampe en saisissant le bord
avant et en tirant pour I'ecarter du four.
4=
A I'aide de 2 personnes ou plus, soulever la porte du four en
la retenant de chaque c6t&
Continuer de maintenir la porte du four fermee et la degager
du chassis de la porte du four.
R_installation :
1. A I'aide de 2 personnes ou plus, inserer les deux bras de
suspension dans la porte.
3. Oter I'ampoule de la douille.
4. Remplacer I'ampoule en la manipulant avec un mouchoir de
papier ou des gants de coton. Pour eviter d'endommager ou
de reduire la Iongevit6 de I'ampoule neuve, ne pas toucher
I'ampoule avec les doigts nus.
5. Reinstaller le couvercle de I'ampoule en I'emboitant dans la
paroi.
6. Reconnecter la source de courant electrique.
Risque du poids excessif
Utiliser deux personnes ou plus pour d_placer et
installer les portes du four.
Le non=respect de cette instruction peut causer
une blessure au dos ou d'autre blessure.
II n'est pas recommande d'enlever la porte du four pour une
utilisation normale. Toutefois, si la depose est necessaire,
s'assurer que le four est eteint et froid. Puis, suivre ces
instructions. La porte du four est Iourde.
D_pose :
1. Ouvrir la porte du four completement.
2. Relever le Ioquet de charniere de chaque c6t&
2=
3=
Ouvrir la porte du four.
Vous devriez entendre un declic Iors de la mise en place de la
porte.
Remettre les leviers des charnieres a la position verrouillee.
Effectuer quelques manceuvres d'ouverture/fermeture de la
porte du four pour verifier le bon fonctionnement. En cas
d'impossibilite d'ouverture ou de fermeture parfaite de la
porte, rep6ter le processus de depose et d'installation de la
porte.
3. Fermer la porte du four aussi loin qu'elle peut aller.
88
p
DEPANNAGE
Essayer les solutions sugg_r_es ici d'abord afin d'_viter le coQt d'une visite de service non n_cessaire.
Rien ne fonctionne
Un fusible du domicile est-il grill_ ou le disjoncteur s'est-il
d_clench_?
Remplacer le fusible ou reenclencher le disjoncteur. Si le
probleme persiste, appeler un electricien.
Les br_leurs de surface ne fonctionnent pas
• Est-ce la premiere fois que les brQleurs de surface sont
utilis_s? Allumer n'importe quel brQleur de surface pour
liberer I'air des canalisations de gaz.
• Le bouton de commande est-il r_gl_ correctement?
Pousser sur le bouton avant de le tourner a un reglage.
• Les orifices des brQleurs sont-ils obstru_s?
Sur les modeles a brQleurs scelles, voir la section "BrQleurs
de surface scelles".
Les flammes des br61eurs de surface ne sont pas
uniformes, sont de teinte jaune et/ou bruyantes
Les orifices des brQleurs sont-ils obstru_s?
Sur les modeles & brQleurs scelles, voir la section "BrQleurs
de surface scelles".
Sur les modules a chapeau, les chapeaux des brQleurs
sont-ils bien install6s?
Voir la section "BrQleurs de surface scelles".
Utilise-t-on du gaz propane?
La cuisiniere a peut-_tre et6 mal convertie. Contacter un
technicien de reparation qualifi&
Le br_leur de surface _met des bruits d'_clatement
• Le brQleur est-il mouill_?
Le laisser secher.
Le br_leur _met des _tincelles, mais ne s'allume pas.
Les r_sultats de cuisson sur la table de cuisson ne sont
pas les r_sultats pr_vus
• Utilise-t-on un ustensile de cuissonappropri_?
Voir la section "Ustensiles de cuisson".
• Le bouton de commande est-il r_gl6 au niveau appropri_
de chaleur?
Voir la section "Commandes de table de cuisson".
La cuisini_re est-elle d'aplomb?
La cuisiniere doit _tre d'aplomb pour que la plaque & frire
puisse fonctionner correctement. Voir les Instructions
d'installation pour des instructions de nivellement.
Le four ne fonctionne pas
La commande _lectronique du four est-elle bien r_gl_e?
Voir la section "Commande electronique du four".
Une mise en marche diff_r_e a-t-elle _t_ r_gl_e?
Voir la section "Cuisson minutee/diff6r6e".
Le verrouillage de la commande a-t-il _t_ r_gl_?
Voir la section "Verrouillage de la commande".
Le mode Sabbat a-t-il _t_ programme?
Voir la section "Mode Sabbat".
La temperature du four est trop 6levee ou trop basse
Le calibrage de la temperature du four a-t-il besoin d'6tre
ajustS?
Voir la section "Calibrage (commande de la temperature du
four)".
Des messages s'affichent
• L affichage indique-t-il une lettre suivie dun chiffre?
Effacer I'affichage. Voir la section "Affichage(s)". Si une lettre
suivie d'un chiffre reapparait, faire un appel de service. Voir la
section "Assistance ou service".
Y a-t-il une production continue d'_tincelles sans que le
brQleur ne s'allume?
Discontinuer I'utilisation du brQleur de surface et contacter un
technicien de service.
Chaleur excessive autour des ustensiles de cuisson sur
la table de cuisson
• L'ustensile de cuisson est-il de dimension appropri_e?
Utiliser un ustensile de cuisson & peu pres de la m_me
dimension que la surface de cuisson. L'ustensile de cuisson
ne doit pas depasser de plus de 1/2"(1,3 cm) a I'exterieur de la
zone de cuisson.
Le programme de cuisson _ la vapeur ne fonctionne pas
• L'alimentation en eau est-elle raccord_e au four?
Voir les Instructions d'installation fournies avec ce four.
Le filtre doit-il 6tre change?
Le four desactive les fonctions de cuisson & la vapeur
jusqu'& ce que le filtre soit remplac& Voir la section "Filtre &
eau/systeme de filtration de I'eau".
89
Le programme d'autonettoyage ne fonctionne pas
• La porte du four est-elle ouverte?
Fermer la porte du four completement.
• Une fonction a-t-elle _t_ entree?
Voir la section "Programme d'autonettoyage".
• Sur certains modules, un programme d'autonettoyage
mise en marche diff_r_e a-t-il _t_ r_gl_?
Voir la section "Programme d'autonettoyage".
• Une mise en marche diff_r_e a-t-elle _t_ r_gl_e?
Voir la section "Cuisson minutee/diff6r6e".
Sur les cuisinibres de 48" (121,9 cm), I'un des fours est-il
en cours d'autonettoyage?
Lorsqu'un four effectue un programme d'autonettoyage,
I'autre four ne peut pas _tre regl6 pour un programme
d'autonettoyage.
Les r_sultats de cuisson au four ne sont pas les r_sultats
pr_vus
La temperature correcte est-elle r_gl_e?
Contre-verifier la recette dans un livre de recettes fiable.
Le calibrage de la temperature du four est-il r_gl_
correctement?
Voir la section "Calibrage (commande de la temperature du
four)".
• Le four a-t-il _t_ pr_chauff_?
Voir la section "Cuisson au four et r6tissage".
• Utilise-t-on un ustensile de cuisson au four appropri_?
Voir la section "Ustensiles de cuisson au four".
Les grilles sont-elles install_es correctement?
Voir la section "Positionnement des grilles et ustensiles de
cuisson".
Existe-t-il une circulation d'air appropri_e autour des
ustensiles de cuisson?
Voir la section "Positionnement des grilles et ustensiles de
cuisson".
• La p&te est-elle distribute uniform_ment dans le plat?
Verifier que la pate est repartie uniformement dans le plat.
• Utilise-t-on une dur_e de cuisson appropri_e?
Ajuster la duree de cuisson.
• La porte a-t-elle _t_ ouverte pendant la cuisson?
L'ouverture de la porte pour verifier la cuisson laisse la
chaleur du four s'echapper et peut necessiter des durees de
cuisson plus Iongues.
• Les articles cuits au four sont-ils trop bruns a la base?
Deplacer la grille a une position plus elev6e dans le four.
• Les bords des croQtes de tarte ont-ils bruni trop t6t?
Utiliser du papier d'aluminium pour couvrir le bord de la
croQte et/ou reduire la temperature de cuisson du four.
90
ASSISTANCE OU SERVICE
Avant de faire un appel pour assistance ou service, veuillez
verifier la section "Depannage". Cette verification peut vous faire
economiser le coQt d'une visite de service. Si vous avez encore
besoin d'aide, suivez les instructions ci-dessous.
Lors d'un appel, veuillez connaYtre la date d'achat, le numero de
modele et le numero de serie au complet de I'appareil. Ces
renseignements nous aideront & mieux repondre a votre
demande.
Si vous avez besoin de pieces de rechange
Si vous avez besoin de commander des pieces de rechange,
nous vous recommandons d'employer uniquement des pieces
specifiees par I'usine. Les pieces specifiees par I'usine
conviendront et fonctionneront bien parce qu'elles sont
fabriquees avec la m_me precision que celle utilisee dans la
fabrication de chaque nouvel appareil KITCHENAID ®.
Pour Iocaliser des pieces specifiees par I'usine dans votre region,
nous appeler ou contacter le centre de service designe
KitchenAid le plus proche.
Veuillez appeler sans frais le Centre pour I'eXperience de la
clientele de KitchenAid Canada au : 1-800-807-6777.
Nos consultants vous renseigneront sur les sujets suivants :
• Caracteristiques et specifications sur toute notre gamme
d'appareils electromenagers.
• Consignes d'utilisation et d'entretien.
• Vente d'accessoires et de pieces de rechange.
• References aux marchands Iocaux, aux distributeurs de
pieces de rechange et aux compagnies de service. Les
techniciens de service designes par KitchenAid Canada sont
formes pour remplir la garantie des produits et fournir un
service apres la garantie, partout au Canada.
Pour plus d'assistance
Si vous avez besoin de plus d'assistance, vous pouvez
soumettre par ecrit toute question ou preoccupation &
KitchenAid Canada & I'adresse suivante :
Centre pour I'eXperience de la clientele
KitchenAid Canada
1901 Minnesota Court
Mississauga, Ontario L5N 3A7
Veuillez inclure dans votre correspondance un numero de
telephone oQ I'on peut vous joindre dans la journee.
91

Nettoyant et poli pour acier inoxydable KitchenAid ®
Commander la )iece numero 4396920
Chiffons pour acier ino_ rdable KitchenAid®
Commander la )iece numero 8212510
Nettoyant pour table de cuisson
Commander la )iece numero 31464B
Protecteur de table de cuisson
Commander la )iece numero 31463B
Nettoyant pour grille et plateau d'_gouttement
Commander la )iece numero 31617B
Nettoyant tout-usage pour appareils m_nagers
Commander la )iece numero 31682B
Plaque & frire
Commander la )iece numero W10190534
Capot du gril et couverclede la plaque & frire
Commander la )iece numero W10160195
Cerclage de wok
Commander la )iece numero W10216179
L_chefrite et grille de retissage de qualit_ sup_rieure
KitchenAid ®
Commander la piece numero W10123240
Grille deployante coulissante SatinGlide TM
30" (76,2 cm) : Commander la piece numero W10208155
36" (91,4 cm) : Commander la piece numero W10212435
Ensemble en altitude _lev_e pour gaz naturel
(pour un usage a une altitude superieure a 6 500 pi [1981,2 m])
Commander la piece numero W10160841
Ensemble en altitude _lev_e pour propane
(pour un usage a une altitude superieure a 6 500 pi [1981,2 m])
Commander la piece numero W10237848
Filtre _ eau de rechange KitchenAid ®
Commander la piece numero W10049700
Boutons en acier inoxydable - bn31eur6 / gril 1 / plaque
frire 1
Commander la piece numero W10231704
Boutons en acier inoxydable - br_leur 4 / gril 1/ plaque
frire 1
Commander la piece numero W10231703
Boutons en acier inoxydable - br_leur 4
Commander la piece numero W10231702
Dosseret r_glable de 19 lY16"(50,0 cm) &39" (99,0 cm) pour
cuisini_res de 30" (76,2 cm)
Commander la piece numero 8285148
Dosseret r_glable de 19 lY_6"(50,0 cm) &39" (99,0 cm) pour
cuisini_res de 36" (91,4 cm)
Commander la piece numero 8284756
Dosseret r_glable de 19 _Y_6"(50,0 cm) &39" (99,0 cm) pour
cuisini_res de 48" (121,9 cm)
Commander la piece numero 8284755
Dosseret de 9" (22,9 cm) pour cuisini_res de 30" (76,2 cm)
Commander la piece numero W10115773
Dosseret de 9" (22,9 cm) pour cuisini_res de 36" (91,4 cm)
Commander la piece numero W10115776
Dosseret de 9" (22,9 cm) pour cuisini_res de 48" (121,9 cm)
Commander la piece numero W10115777
Dosseret de 22" (55,9 cm) avec tablette pour cuisini_res et
tables de cuisson de 30" (76,2 cm)
Commander la piece numero W10225950
Dosseret de 22" (55,9 cm) avec tablette pour cuisini_res et
tables de cuisson de 36" (91,4 cm)
Commander la piece numero W10225949
Dosseret de 22" (55,9 cm) avec tablette pour cuisini_res et
tables de cuisson de 48" (121,9 cm)
Commander la piece numero W10225948
Ensemble de poign_e Architect _ II KitchenAid ® de
30" (76,2 cm)
Commander la piece numero W10188342
Ensemble de poign_e Architect _ II KitchenAid ®de
36" (91,4 cm)
Commander la piece numero W10188341
Ensemble de poign_e Architect _ II KitchenAid ® de
48" (121,9 cm)
Commander la piece numero W1088343
92
GARANTIE DE LA CUISINIERE A BI-COMBUSTIBLE
KITCHENAID ®
GARANTIE LIMITI_E
Pendant un an & compter de la date d'achat, Iorsque ce gros appareil menager est utilise et entretenu conformement aux instructions
jointes & ou fournies avec le produit, la marque KitchenAid de Whirlpool Corporation ou Whirlpool Canada LP (ci-apres designees
"KitchenAid") paiera pour les pieces specifiees par I'usine et la main-d'ceuvre pour corriger les vices de materiaux ou de fabrication. Le
service doit etre fourni par une compagnie de service designee par KitchenAid. Cette garantie limitee est valide unjquement aux
€:tats-Unis ou au Canada et s'applique exclusivement Iorsque I'appareil est utilise dans le pays oQ il a ete achet& A I'exterieur du
Canada et des 50 €:tats des Etats-Unis, cette garantie limitee ne s'applique pas. Une preuve de la date d'achat original est exigee pour
obtenir un service dans le cadre de la presente garantie limitee.
GARANTIE LIMITI_E DE LA DEUXIEME A LA CINQUIEME ANNI_E INCLUSIVEMENT SUR CERTAINS COMPOSANTS
De la deuxieme a la cinquieme annee inclusivement a compter de la date d'achat, Iorsque cet appareil menager est utilise et entretenu
conformement aux instructions jointes & ou fournies avec le produit, KitchenAid ou KitchenAid Canada paiera pour les pieces
specifiees par I'usine pour les composants suivants, en cas de vices de materiaux ou de fabrication :
• €:lements electriques • Pieces du systeme de commande a semi-conducteurs
• BrQleurs & gaz
GARANTIE LIMITI_E DE LA DEUXIEME A LA DIXIEME ANNI_E INCLUSIVEMENT SUR LA CAVITI_ ET
LES PORTES DU FOUR A INJECTION DE VAPEUR
De la deuxieme a la dixieme annee inclusivement a compter de la date d'achat, Iorsque ce gros appareil est utilise et entretenu
conformement aux instructions jointes a ou fournies avec le produit, KitchenAid paiera pour les pieces specifiees par I'usine pour la
cavite du four en porcelaine et la porte interieure si la piece rouille de part en part du fait de vices de materiaux ou de fabrication.
ARTICLES EXCLUS DE LA GARANTIE
La pr_sente garantie limit_e ne couvre pas :
1. Les visites de service pour rectifier I'installation du gros appareil menager, montrer a I'utilisateur comment utiliser I'appareil,
remplacer ou reparer des fusibles ou rectifier le c&blage ou la plomberie du domicile.
2. Les visites de service pour reparer ou remplacer les ampoules electriques de I'appareil, les filtres & air ou les filtres & eau. Les pieces
consomptibles ne sont pas couvertes par la garantie.
3. Les reparations Iorsque le gros appareil menager est utilise & des fins autres que I'usage unifamilial normal ou Iorsque les
instructions d'installation et/ou les instructions de I'operateur ou de I'utilisateur fournies ne sont pas respectees.
4. Les dommages imputables & : accident, modification, usage impropre ou abusif, incendie, inondation, actes de Dieu, installation
fautive ou installation non conforme aux codes d'electricite ou de plomberie, ou I'utilisation de pieces consomptibles ou de produits
nettoyants non approuves par KitchenAid.
5. Les defauts apparents, notamment les eraflures, les bosses, fissures ou tout autre dommage au fini du gros appareil menager, &
moins que ces dommages soient dus & des vices de materiaux ou de fabrication et soient signales & KitchenAid dans les 30 jours
suivant la date d'achat.
6. Les coQts associes au transport du gros appareil menager du domicile pour reparation. Ce gros appareil menager est congu pour
etre repare & domicile et seul le service & domicile est couvert par la presente garantie.
7. Les reparations aux pieces ou systemes resultant d'une modification non autorisee faite & I'appareil.
8. Les frais de transport pour le service d'un produit si votre gros appareil est situe dans une region eloignee oQ un service d'entretien
KitchenAid autorise n'est pas disponible.
9. La depose et la reinstallation de votre gros appareil si celui-ci est installe dans un endroit inaccessible ou n'est pas installe
conformement aux instructions d'installation fournies.
10. Les gros appareils menagers dont les numeros de serie et de modele originaux ont ete enleves, modifies ou qui ne peuvent pas etre
facilement identifies. La presente garantie est nulle si le numero de serie d'usine a ete modifie ou enleve du gros appareil menager.
Le coQt d'une reparation ou des pieces de rechange dans le cadre de ces circonstances exclues est & la charge du client.
CLAUSE D'EXONI:!:RATION DE RESPONSABILITI:!: AU TITRE DES GARANTIES IMPLICITES; LIMITATION DES RECOURS
LE SEUL ET EXCLUSIF RECOURS DU CLIENT DANS LE CADRE DE LA PR¢:SENTE GARANTIE LIMIT¢:E CONSISTE EN LA
R¢:PARATION PR¢:VUE CI-DESSUS. LES GARANTIES IMPLICITES, Y COMPRIS LES GARANTIES APPLICABLES DE QUALIT¢:
MARCHANDE ET D'APTITUDE A UN USAGE PARTICULIER, SONT LIMIT¢:ES A UN AN OU A LA PLUS COURTE P¢:RIODE AUTORIS¢:E
PAR LA LOI. KITCHENAID N'ASSUME AUCUNE RESPONSABILIT¢: POUR LES DOMMAGES FORTUITS OU INDIRECTS. CERTAINES
JURIDICTIONS NE PERMETTENT PAS L'EXCLUSION OU LA LIMITATION DES DOMMAGES FORTUITS OU INDIRECTS, OU LES
LIMITATIONS DE LA DUR¢:E DES GARANTIES IMPLICITES DE QUALIT¢: MARCHANDE OU D'APTITUDE A UN USAGE PARTICULIER,
DE SORTE QUE CES EXCLUSIONS OU LIMITATIONS PEUVENT NE PAS S'APPLIQUER DANS VOTRE CAS. CETTE GARANTIE VOUS
CONF#RE DES DROITS JURIDIQUES SP¢:CIFIQUES ET VOUS POUVEZ €:GALEMENT JOUIR D'AUTRES DROITS QUI PEUVENT
VARIER D'UNE JURIDICTION A UNE AUTRE.
93
Si vous residez a I'exterieur du Canada et des 50 12tatsdes 12tats-Unis, contactez votre marchand KitchenAid autorise pour determiner
si une autre garantie s'applique.
Si vous avez besoin de service, voir d'abord la section "Depannage" du Guide d'utilisation et d'entretien. Apr_s avoir v6rifie la section
"Depannage", de I'aide supplementaire peut _tre trouvee en verifiant la section "Assistance ou service" ou en appelant KitchenAid. Aux
E.-U., composer le 1-800-422-1230. Au Canada, composer le 1-800-807-6777. 1/o8
Conservez ce manuel et votre re£u de vente ensemble pour
r_f_rence ult_rieure. Pour le service sous garantie, vous
devez presenter un document prouvant la date d'achat ou
d'installation.
Inscrivez les renseignements suivants au sujet de votre gros
appareil menager pour mieux vous aider a obtenir assistance ou
service en cas de besoin. Vous devrez connaitre le numero de
modele et le numero de serie au complet. Vous trouverez ces
renseignements sur la plaque signaletique situ6e sur le produit.
Nom du marchand
Adresse
Numero de t_lephone
Numero de module
Numero de serie
Date d'achat
94

95

W10271689A 5/o9
© 2009. All rights reserved. ® Registered Trademark/TM Trademark of KitchenAid, U.S.A., KitchenAid Canada licensee in Canada Printed in U.S.A.
Tous droits reserves. ® Marque deposee/TM Marque de commerce de KitchenAid, U.S.A., Emploi sous licence par KitchenAid Canada au Canada Imprime aux E.-U.
