Owner 's Guide for Schumacher PC-1500
Table of Contents
FEATURES
• ON/OFF rocker switch
• LED indicator Green indicates Power ON Red indicates Overload/Interruption in power
• 12 Volt power cord
• 120V standard AC outlets (2)
• USB port(s) – 5V, 2.0A Model PC-1000 includes one port Model PC-1500 features two ports
• High-speed cooling fan(s)
To keep the converter cool, the fan speeds up as the load increases. The fan does not run when the converter is turned off. Model PC-1000 uses one fan Model PC-1500 uses two fans
• Positive Battery Cable Terminal (Red)
• Negative Battery Cable Terminal (Black)
• Ground Terminal and ground wire
Grounds converter, to protect against electrical shock.
• Thermal Protection
When the thermal resistor exceeds 80° C (176° F), the converter shuts down until it cools off, and then automatically restarts.
• Surge Protection
When the power input from the vehicle’s battery exceeds 16 volts, the converter shuts down. Once the voltage drops down to less than 14 volts, it automatically restarts.
• Low-Battery Protection
When the power input from the vehicle’s battery drops to below 10.5 volts, the alarm will sound, the red LED will light, and the converter will shut down.
BEFORE USING YOUR CONVERTER
that draws a higher wattage than the converter can provide, as this may cause damage to the converter and product. When you turn on a device or a tool that runs on a motor, the device goes through two stages:
1. Start Up – Requiring an initial surge of power (commonly known as the “starting” or “peak” load).
2. Continuous Operation – Power consumption drops (commonly known as the “continuous load”).
The wattage (WATTS) or amperes (AMPS) can normally be found stamped or printed on most devices and equipment, or in the user’s manual. Otherwise, contact the manufacturer to find out whether the device you want to use is compatible with a modified sine wave. To calculate the wattage: Wattage = AMPS x 120 (AC Voltage). To calculate the starting load: Starting Load = 2 x wattage. In general, the startup load of the device or power tool determines whether your converter has the capability to power it. To calculate the continuous load: Continuous Load = AMPS x 120 (AC Voltage).
IMPORTANT: Always run a test to establish whether the converter will operate a particular piece of equipment or device. In the event of a power overload, the converter is designed to automatically shut down. This safety feature prevents damaging the converter while testing devices and equipment within the wattage range of the converter. If a device does not operate properly when first connected to the converter, turn the converter ON/OFF switch ON, OFF, and ON again in quick succession. If this procedure is not successful, it is likely that the converter does not have the required capacity to operate the device in question.
IMPORTANT: This converter uses a modified sine waveform (diagram A) which is not quite the same as power company electricity (diagram B). For the following devices, we strongly recommend that you use caution and check the device’s manual to make sure it is compatible with modified sine waveform.
1. Switch mode power supplies
2. Linear power supplies
3. Class 2 transformers
4. Line filter capacitors
5. Shaded pole motors
6. Fan motors
7. Microwave ovens
8. Fluorescent and high intensity lamps (with a ballast)
9. Transformer less battery chargers Using the converter with any of these devices may cause the device to run warmer or overheat.

IMPORTANT: If you are using the power converter to operate a battery charger, monitor the temperature of the battery charger for about 10 minutes. If the battery charger becomes abnormally warm, disconnect it from the converter immediately.
FASTENING THE CONVERTER TO A FLAT SURFACE
For your convenience, the converter may be fastened horizontally to a flat surface. The area where the converter is to be fastened must be dry, well-ventilated and away from any combustible material or fumes.
1. Turn off and disconnect the converter.
2. Place the back of the converter with the mounting bracket against a flat, secure surface.
3. Attach the converter, using corrosionresistant screws.
CONNECTING CONVERTER CABLES
The converter and power source must be in the OFF mode.
IMPORTANT: Make sure to connect your converter only to a 12 volt power supply. To avoid electrical shock, it is necessary to ground the converter as well as the device powering it. The converter should be grounded, using a 16 AWG copper wire (included).
NOTE: Do not turn on the converter or the power source until the converter and the power source are grounded.
TO GROUND THE CONVERTER
1. Turn off and disconnect the converter.
2. Locate the chassis ground screw on the back of the converter.
3. Remove the outer hex nut and loosen the second hex nut.
4. Attach the grounding wire’s ring connector to the ground terminal of the converter.
5. Tighten the hex nut securely. Then, replace the other hex nut and tighten it securely.
6. Attach the other end of the wire to a properly grounded location:
Vehicle: Connect to the chassis, unpainted frame part, or engine block of the vehicle.
Fixed location: Connect to a ground rod or other appropriately rated ground.
CONNECTING CONVERTER CABLES TO THE CONVERTER PC-1000:
1. Locate the Positive and Negative plastic terminals on the right side of the converter and remove the terminal caps completely.
2. Install the POSITIVE (RED) cable ring lug onto the POSITIVE (RED) terminal screw. Install the NEGATIVE (BLACK) cable ring lug onto the NEGATIVE (BLACK) terminal screw. Tighten each terminal so that the cable cannot come loose.
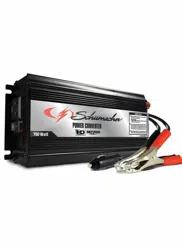
PC-1500 (see illustration below):
1. Locate the Positive and Negative terminals on the left side of the converter.
2. From the POSITIVE (RED) and the NEGATIVE (BLACK) terminals, remove the hex nut, split lock and flat washer.
3. Place the POSITIVE (RED) ring connector onto the POSITIVE (RED) converter terminal. Place the NEGATIVE (BLACK) ring connector onto the NEGATIVE (BLACK) converter terminal.
4. Place a flat washer and split lock on top of each ring connector. Put a hex nut over these and tighten.

CONNECTING THE CONVERTER CABLE TO A 12V BATTERY OR 12V POWER SOURCE:
1. Keep hands, hair, clothing and jewelry clear of battery terminals.
2. Wear eye protection and protective clothing.
3. For a negative-grounded vehicle (do not use with positive ground electrical systems), connect the POSITIVE (RED) ring terminal from the converter to the POSITIVE (POS, P, +) ungrounded post of the battery. Connect the NEGATIVE (BLACK) ring terminal to the vehicle chassis or engine block away from the battery. Do not connect the terminal to the carburetor, fuel lines or sheet-metal body parts. Connect to a heavy gauge metal part of the frame or engine block.
4. To disconnect the converter, remove first the negative terminal and then the positive terminal.
IMPORTANT: Failure to make the correct connections will result in blown fuses and permanent damage to the converter.
BATTERY BANK INSTRUCTIONS
BATTERY BANK ASSEMBLY
WARNING: Read these safety instructions before assembling the battery bank.
• Connect batteries ONLY in parallel (negative terminals together to one cable; positive terminals together to the other cable), as shown in the Battery Bank Example.
• Do not connect 12V batteries in a series with the negative of one battery connected to the positive of the next.
DANGER: CONNECTING INCORRECTLY MAY RESULT IN VOLTAGE HIGH ENOUGH TO CAUSE ELECTROCUTION.
• While assembling the battery bank, wear splash-resistant ANSI-approved safety goggles and electrically insulated gloves.
• Connect ONLY similar batteries together in a battery bank. Do not connect old to new, flooded to gel cells, or batteries with different capacities.
• Use extension cables with the specified gauge (or thicker).
PC-1000 6' or less: 6 AWG; 6-10': 4 AWG
PC-1500 6' or less: 4 AWG; 6-10': 2 AWG
WARNING: RISK OF EXPLOSIVE GASES.
• Assemble the battery bank in a clean, well-ventilated location, away from ignition sources and flammable materials.
• To reduce risk of battery explosion, follow these instructions and those published by the battery manufacturer and manufacturer of any equipment you intend to use in vicinity of a battery. Review cautionary markings on these products.
CONNECTING THE BATTERIES IN PARALLEL
1. First, connect all of the positive terminals to each other.
2. Next, connect all of the negative terminals to each other.
3. Connect the negative and positive output cables to opposite ends of the bank. Do not allow the output cables to touch one another.
4. Test the voltages at the output cables, to make sure that the battery bank is correctly wired.
5. If the voltage is higher than 13 volts, part of the battery bank is probably connected in series (a negative • 7 • terminal of one battery attached to a positive terminal of another) instead of in parallel.
6. Carefully examine the diagram and correct the wiring before attaching to the converter.
7. Make sure the converter’s switch is set to OFF (O).
8. Connect the output cables from the battery bank to the converter.
†Bank Capacity = (single battery capacity) x (# of batteries) 400 Ah capacity is for (2) 200 Ah batteries.
*200 Ah batteries shown for illustration purposes.
Example: 12V/400 Ah† BATTERY BANK

OPERATING INSTRUCTIONS
1. Connect the converter (see Connecting Converter Cables section.
2. Switch the converter’s ON/OFF switch to the ON (I) position.
3. The GREEN LED indicator will light, indicating the converter is receiving power.
4. Switch the converter’s ON/OFF switch to the OFF (O) position. (The GREEN LED may flash briefly and/or the internal speaker may make a brief “beep”. This is normal.)
5. Make sure the device to be operated is turned OFF.
6. Plug the device into the converter’s AC outlet.
7. Switch the converter’s ON/OFF switch to the ON (I) position.
8. Turn the device on.
9. To disconnect, reverse the above procedure.
NOTE: If more than one device is to be powered, start one device at a time, to avoid a power surge and overloading the converter. The surge load of each device should not exceed the converter’s Continuous Operation wattage rate.
IMPORTANT: Using the converter with some rechargeable devices may damage the converter and/or device. If you are using the converter to operate a rechargeable device, monitor the temperature of the converter for about 10 minutes. If the converter becomes abnormally hot, disconnect it from the device immediately; do not use the device with the converter.
USING THE CONVERTER TO OPERATE A TV OR AUDIO DEVICE
The converter is shielded and filtered to minimize signal interference. Despite this, some interference may occur with your television picture, especially with weak signals. Below are some suggestions to improve reception.
1. Try altering the position of the converter, antenna cables, and television power cord. Add an extension cord from the converter to the TV, to isolate its power cord and antenna cables from the 12 volt power source.
2. Try coiling the television power cord and the input cables running from the 12 volt power source to the converter.
3. Affix one or several “Ferrite Data Line Filters” to the television power cord. Ferrite Data Line Filters can be purchased at most electronic supply stores.
4. Try grounding the converter with a 16 AWG (minimum) wire, using as short of an extension length as possible.
NOTE: You may hear a “buzzing” sound being emitted from inexpensive sound systems when operated with the converter. This is due to ineffective filters in the sound system’s power supply.
Unfortunately, this problem can only be resolved by purchasing a sound system with a higher quality power supply or higher quality filter.
USING THE USB PORT(S)
The USB port provides up to 2A at 5V DC. Model PC-1000 includes one port. Model PC-1500 includes two ports.
1. Plug the device into the USB port.
2. Turn the USB device on.
3. Reverse these steps when finished using the USB port.
WARNING: The converter draws power, even when the switch is OFF. To avoid battery drain, disconnect the converter when not in use.
POWER SOURCE
Your average automobile battery at full charge will provide an ample power supply to the converter when the engine is on. Keep the car running at all times when using the converter. The actual length of time the converter will function depends on the age and condition of the battery and the power demand being placed by the device being operated with the converter.
When possible, recharge your batteries when they are not more than 50% discharged. This gives the batteries a much longer life cycle than recharging when they are more deeply discharged. The power converter has a battery low voltage shutdown at 10V±0.5V DC. With moderate to heavy loads, this will protect against over-discharging the battery. If the converter is running only light loads it is advisable to recharge before the converter low voltage shutdown point is reached.
IMPORTANT: The converter draws low amperage from the battery with the main ON/OFF switch turned on and no load connected. To prevent battery discharge, turn the converter off when you are not using it.
LED INDICATOR AND SHUTDOWN PROTECTION
The Green LED lights automatically when then converter is plugged into a 12 volt DC power source and is turned on. The Red LED lights, the alarm sounds and the converter automatically turns itself off under the following conditions:
1. When the power input from the vehicle’s battery drops to approximately 10.5 volts, the low voltage alarm will sound. When the voltage goes down below 10 VDC, the converter shuts off. Recharge or replace the battery.
2. When the power input from the vehicle’s battery exceeds 16 volts, high voltage overload protection occurs.
3. The continuous load demand from the equipment or device being operated exceeds the continuous load rating of the converter. Use a higher capacity converter or lower rated device.
4. The thermal resistor exceeds 80° C (176° F.) Allow the converter to cool. Do not block the cooling slots or air flow over and through the converter. Reduce the load on the converter to the continuous rated output.
RESET: To reset after shutdown occurs, switch the converter’s ON/OFF switch to the OFF (O) position. Check the source of the problem and correct. Switch the converter’s ON/OFF switch to the ON (I) position.
IF THE CONVERTER’S FUSE BLOWS
Your power converter is fitted with fuses, which should not have to be replaced under normal operating conditions. A blown fuse is usually caused by reverse polarity or a short circuit within the device or equipment being operated. If a fuse does blow, take the converter to a qualified technician for repair.
MAINTENANCE AND STORAGE INSTRUCTIONS
- Before each use, ensure that all of the converter’s components are in place and in good working condition.
- After use and before performing maintenance, unplug and disconnect the converter.
- Use a clean, dry cloth to wipe external surfaces of the converter’s case.
- Servicing does not require opening the unit, as there are no user-serviceable parts. All servicing should be performed by qualified service personnel.
- Store inside, in a cool, dry place, out of the reach of children.
- Recycle or properly dispose of internal electrical components.
TROUBLESHOOTING