
NOTE: In case of shutdown caused by
improper operation, you can pull out
the battery or press the "Reset" button
to restart the camera.
Thank you for purchasing our products.
Please fill in the following information
and keep this form properly.
Basic Instructions for Video/Photo Mode
1. Power ON/OFF
Press and hold the ① power button to turn on
the camera; the blue indicator light will be on
when you turn on the power. Press and hold ①
again to turn off the camera, and the blue
indicator goes out.
2. Mode settings
Short press the "Up," "Down," "Left," or "Right"
buttons to select the corresponding mode.
3. Video mode
Select the video mode on the interface, short
press "OK" to start recording. The recording
indicator flashes, indicating that the camera is
in the recording process.
4. Photo mode
Short press the "Video/Photo" button to take a
photo. The indicator light flashes once,
indicating that the picture is taken.
5. Game mode
Select the game mode on the interface, short
press the "OK" button to confirm. Press the
"Left" or "Right" button to select different
games, short press "OK" to start the selected
game, and short press the "Back" button to exit
the game.
6.Music mode
Insert the memory card into the camera and
turn it on, then pull out the memory card,
Battery Instructions
1. Please refer to the diagram for battery level
indication.
2. There are three ways to charge the battery.
The blue indicator will light up during the
charging process.
①: Power adapter
②: PC's USB port
③: Car charger
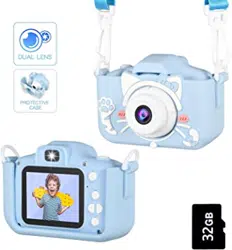
Kids Digital Camera Instruction Manual
(For Reference Only)
01
02
03
04
05
06
07
Microphone
SD Card Slot
USB Interface
Lens
Key Function Description:
1. Power Button
Press and hold ① to switch on/off the camera.
2. Video/Photo
Press ② in the main interface to enter the
photo taking interface, and press ② again in
the photo taking interface to take a photo.
3. Back
Press ③ to return to the previous interface.
4. OK
Press ④ to confirm the selected options.
5. Left
In the menu options, pressing ⑤ is to select the
function from the left.
6. Up
In the menu options, pressing ⑥ is to select the
function upward; in the photo mode, press ⑥
to switch different filters, and long press to
adjust focal length (Max. support 8.0 X).
7. Right
In the menu options, pressing ⑦ is to select the
function from the right; in the photo mode,
press ⑦ to switch between front and rear
camera.
8. Down
In the menu options, pressing ⑧ is to select the
function downward; in the photo mode, press
⑧ to switch different filters, and long press to
adjust focal length.
9. Display
2.0-inch color display
10. USB
The USB interface is used to connect either the
PC for data transmission or external power
supply to charge the battery or power up the
camera.
11. SD Card Slot
Insert the SD card
12. Lens
Viewfinder
13. Microphone
The built-in camera mic records sound for
video or audio files.
10
10
11
11
12
12
13
13
EN
Specifications
Customer Information
Name
Tel No.
Purchase Date
Purchase Address
Contact Address
Image Sensor GC0308
2.0-inch color display
Fixed lens, 100 degrees angle
Mini SD card (32GB Max)
JPG
Russian, English, Chinese (Simplified/
Traditional), Korean, Japanese, etc.
JPEG
1080P: 1440x1080 720P: 1280x720
VGA:640x480
OFF, ON
OFF, ON
OFF, 1 min, 3 mins, 5 mins, 10 mins
20M、12M、8M、5M、3M
Normal, background 1
Delete single or all photos
Cancel, start
DC-5V
Windows ME/2000/2003/
XP/Vista/Win7; Mac OS; Linux
50HZ、60HZ
Cancel, start
D600-0164-3703
Greedy Snake, Tetris, Push Box
Display
Lens
Storage Media
Photo Format
Languages
Video Format
Video Resolutions
Time Marker
Motion Detection
Loop Recording
Photo Resolutions
Photo Frame
Delete
Formatting Operation
Charging Voltage
Support Systems
Optical Frequency
Reset
Version
Games
Remarks
Warranty Card
import the downloaded songs (MP3 format)
into the MP3 file in the memory card on the
computer, then install the card into the
machine, open the music software and play
Too.
5
7
4
6
8
1
9
9
2
1
6
2
3
4
5
7
8
Back
Down
Left
OK
Right
Video/Photo
Up
Power Button
Display
3
Description of product structure