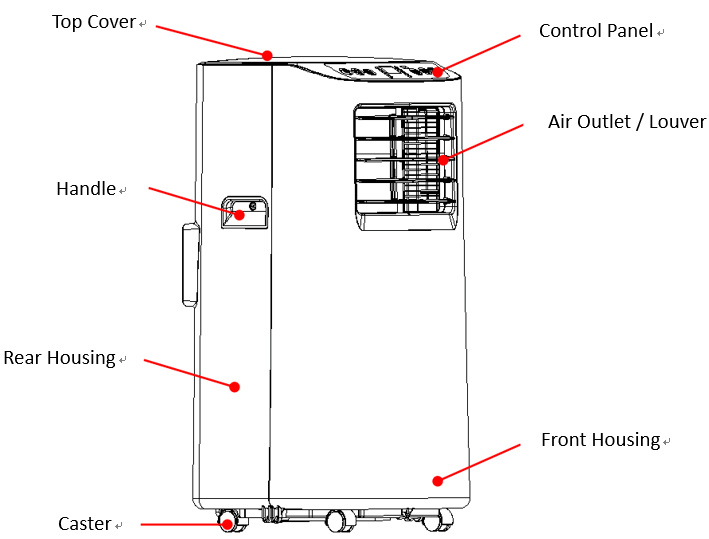
This unit can easily be moved from one room to another.
While moving the unit please note that it must always be kept upright and then placed on an even surface.
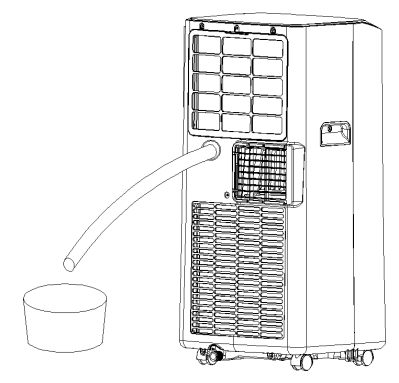
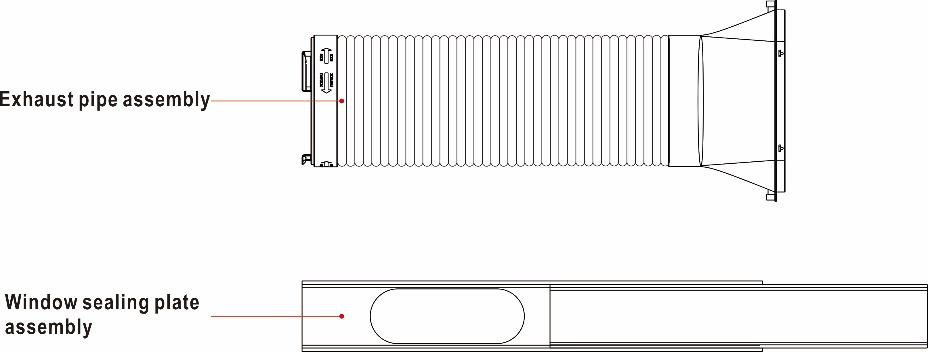
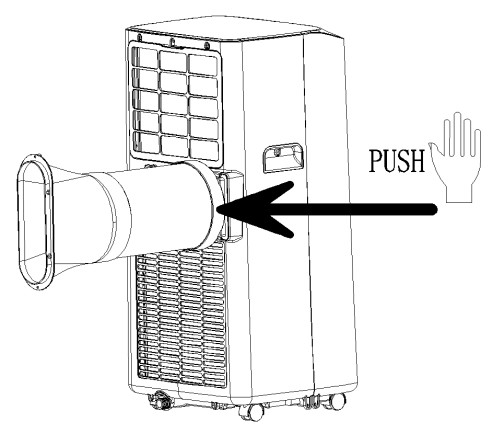
1. Attach the fishtail connector to the end of the hose, by extending the end of the hose and twisting the fishtail until firmly attached (At least 3 full rotations)
2. Attach the exhaust hose to the air conditioner body, by pushing into position on the hot air outlet vent.
3. Make sure the unit is upright and there are no obstructions to the air inlets and outlet grills.
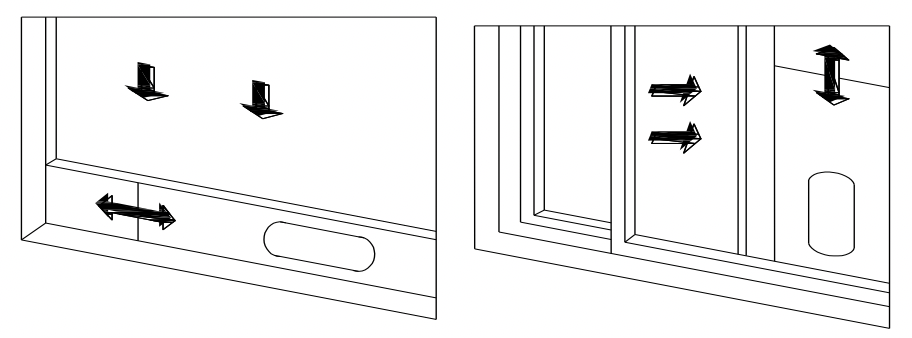
INSTALLATIONOFWINDOWKIT.
The window kit (slide bar and fishtail) can be used with sliding windows and doors. For other types of window, the fishtail should be used on its own.
1. Partially open the window and then fix the window kit to the window.
2. Fix the end of the fishtail to the air-outlet window kit.
NOTES:
• The window kit is only designed to be installed with sliding or sash windows or doors. The window kit is not designed or to be used with any other style of windows.
• The fish tail adaptor can be used without the slide bar with most windows / doors.
• When using the air conditioner ensure that the opening left around the fishtail is as small as possible to ensure efficient cooling.
• The best form of installation is through a wall duct. By properly venting you expel hot air from your room while efficiently cooling it.
• Your air conditioner should be used without the vent pipe in dehumidifier mode. When using dehumidifier mode ensure that an external water tank is used, monitored and regularly emptied before overflowing. Permanent plumbing can be also be installed for dehumidifier mode or an external uplift water pump can be set up for unattended use.
IMPORTANTSAFEGUARDS
The length of the soft hose extends from 28 cm to 150 cm. If hose is extended above this length the unit may malfunction and this can invalidate the warranty. The outlet vent must be well ventilated and not obstructed as this will cause the unit to overheat. Avoid bending the air hose more than 30 degrees.
FEATURESANDOPERATIONFEATURES
FEATURES
• Self-evaporative system - External water tank not needed when vented correctly in cooling mode.
• Modern design and simple operation
• Bright LED screen - Indicates temperature and current mode
• On/Off timer function - Allows you to choose when the unit operates
• Castors and handles for portability
• Compressor protection technology for extended life span
OPERATION
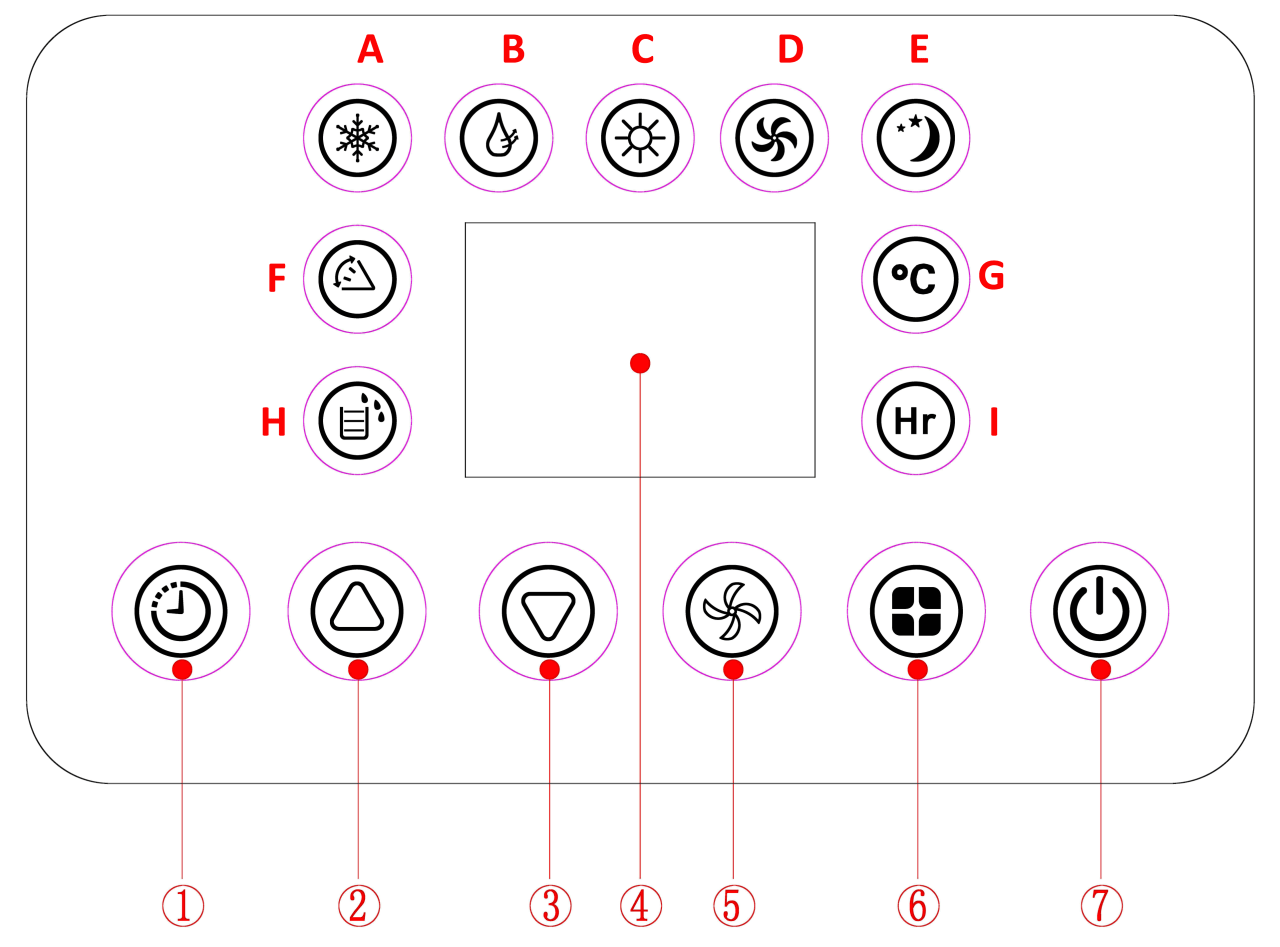
SelectionButtonsandDisplay
1. Timer
2. Up (temperature/ timer)
3. Down (temperature/ timer)
4. Control Panel Screen
5. Fan Speed
6. Mode Selection
7. Power On/ Off
Indicator LEDs
A. Cooling Mode
B. Dehumidifier Mode
C. Heating Mode (certain models only)
D. Fan mode
E. Sleep mode
F. Fan swing (certain models only)
G. Celsius temperature
H. Tank Full indicator light
I. Timer indicator
Press the UP and DOWN buttons at the same time to change the temperature displayed between Celsius and Fahrenheit (certain models only).
POWERON/OFF(7)
Press the POWER button to turn the unit On or Off
When turned on the unit will be set to cooling mode with a desired temperature of 22oC. · Press the POWER button again and the unit will turn off.
MODEBUTTON(6)
Press this button to change between Cooling, Fan, Sleep or Dehumidifying Modes.
COOLINGMODE
Cold air is expelled through the front of the unit and hot air is expelled through the vent hose.
When the machine is turned on, it will enter cooling mode with a desired temperature of 22ºC and low fan speed.
If the unit is not in cooling mode, press the MODE button to select cooling mode, the cooling mode indictor will be illuminated.
Press the UP and DOWN buttons to adjust the desired temperature (Between 16ºC and 31ºC)
Press the FAN button to change between the fan speeds (low or high)
FANMODE
No heating or cooling, air is recirculated.
Press the “MODE” button to select the fan mode, the fan mode indicator (D) will illuminate.
DEHUMIDIFYMODE
The unit should be set up without a vent hose, moisture is extracted from the air that passes through the unit. Continuous drainage should be set up for the moisture collected (Drainage pipe not included)
Press “MODE” to select dehumidify mode, the dehumidifying mode indicator will illuminate
When using dehumidify mode the sleep function cannot be used and the fan speed is low.
TIMER
Timer functions cannot be combined or repeated.
POWERONTIMER
With the appliance is turned off, press the “TIMER” button to setup the power-on time. Press the UP and DOWN buttons to adjust the duration of the timer (from 1 to 24 hours). The timer indicator will turn on. The unit will start after selected number of hours.
POWEROFFTIMER
With the appliance running with the desired settings, press the “TIMER” button to setup the power-off timer. Press the UP and DOWN buttons to adjust the duration of the timer (from 1 to 24 hours). The timer indicator will illuminate. The unit will stop after selected number of hours.
SLEEPMODE
While the sleep mode is activated in cooling mode, after one hour the desired temperature will be increased by 1ºC, after another hour the desired temperature will increase by another 1ºC and remain at that level. This means the unit will spend less time with the compressor running, and so run quieter.
Press the MODE button until the sleep mode indicator is illuminated, the fan speed is set to low.
Sleep mode cannot be used in dehumidifying and fan mode.
If the internal tank becomes full, the machine will turn off and sleep mode will be cancelled.
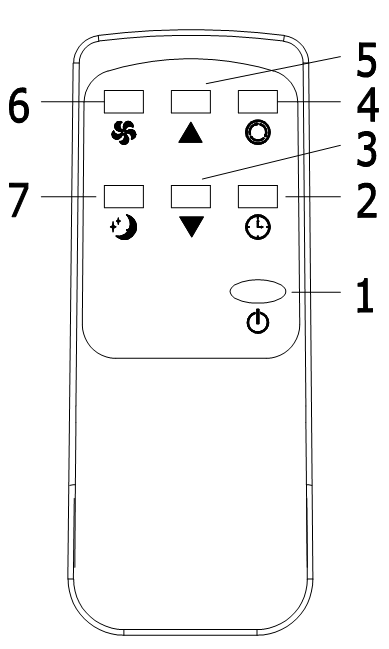
REMOTECONTROL
The air conditioner can be controlled with the remote control. Two AAA-batteries are required to use the remote control.
Note: the air flow direction cannot be adjusted with the remote control.
1. POWER: Press the POWER button to turn the machine on or off.
2. TIMER: Press the TIMER button to set the timer.
3. DOWN: Press the DOWN button to decrease the desired temperature or timer duration
4. MODE: Press the MODE button to switch between cooling, fan and dehumidifier modes.
5. UP: Press the UP button to increase the desired temperature or timer duration
6. FAN: Press the FAN button to change between high and low fan speeds.
7. SLEEPMODE: Press the SLEEP button to turn on sleep mode
MULTIPROTECTIVEFUNCTIONS
OVERFLOWPROTECTIONFUNCTION
When the water in the internal water tank exceeds the warning level, the machine will automatically sound an alarm, and the Tank full indicator will illuminate. At this point, the internal water tank will need emptying. After the water is emptied, the machine will automatically return to the original state. If vented correctly and the humidity level is normal, the self evaporative function will vastly reduce the frequency the tank will need emptying.
The machine has automatic defrosting function: during defrosting, heating symbol on the display screen will flash.
PROTECTIONFUNCTIONOFTHECOMPRESSOR
To increase the service life of the compressor, it has a 3-minute delay start protection function
EMPTYINGTHEWATERCONTAINER
MANUALDRAINAGE:
When the internal water tank is full the unit will stop working.
Shut off the unit and unplug. Try not to move the model abruptly as this may cause the water in the internal tank to spill out.
Place a tray under the water plug or place the unit in a drainage area.
Unscrew the drain plug cap and remove the rubber stopper - water will drain from the internal tank.
Put the rubber stopper back and screw the drain plug cap back into place.
CONTINUOUSDRAINAGE:
Unscrew the drain plug cap and remove the rubber stopper. Connect a water pipe (Not supplied) to the water outlet. You can plumb this pipe into your current plumbing system, lead it outside and use gravity fall or use a water pump.
Note: This model has a self-evaporative function, which reduces the need to empty the water tank. If the unit is vented correctly most of the water is reused to cool the condenser coils and any excess is evaporated. Please do not use continuous drainage if you intend to use the self -evaporating facility.
Clean the surface of the machine with a wet soft cloth. Do not use chemicals, such as benzene, alcohol, gasoline, etc; otherwise, as this may cause damage to the surface and or the internal workings of the machine
AIRFILTERCLEANING
If the filter screen is clogged with dust, the effectiveness of the air conditioner is reduced. The filter screen should be cleaned once every two weeks or as often as necessarily in your environment.
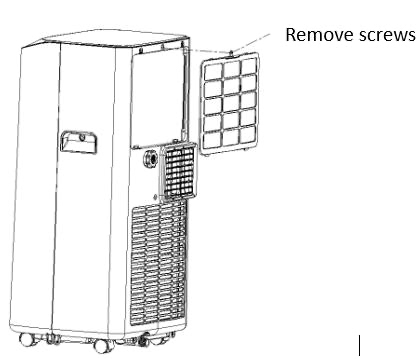
CLEANTHEUPPERFILTERSCREENFRAME
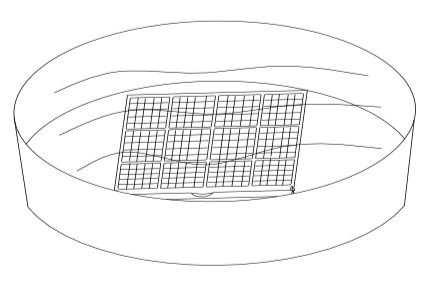
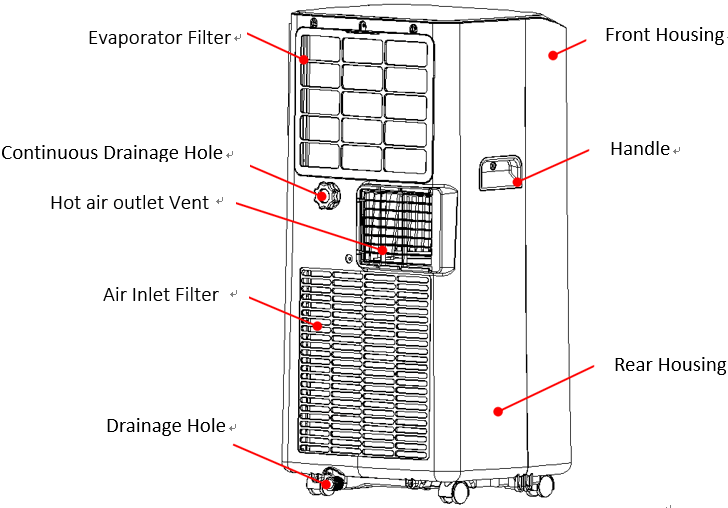
Grip the edge of the evaporator filter screen frame with both hands. Pull out to remove the filter screen from its frame. If present, unscrew the screws fixing the filter before removing it (as shown in the above figure).
Put the evaporator filter screen into warm water with neutral detergent (about 40 ℃ /104℉) and dry it in the shade after rinsing clean.
CLEANTHELOWERFILTERSCREENFRAME
Hold the handle of the air inlet filter screen frame, and pull it outward gently to remove it.
Put the filter screen into warm water with neutral detergent (about 40 ℃ / 104 ℉) and dry it in the shade after rinsing clean.
ENDOFSEASONMAINTENANCE
1. Remove the rubber stopper and drain plug cap from the drainage hole and empty the internal tank. You can also drain the water by leaning the unit.
2. Then switch the unit to low fan mode.
3. Keep the unit in this mode for half day - until the conduit is dried. Doing this helps to keep the inside of the unit dry and prevents mould from developing
4. Turn off the unit and pull out the plug.
5. Replace the rubber stopper and drain plug cap
6. Coil the wire and bind it together, then put it into the accessories space.
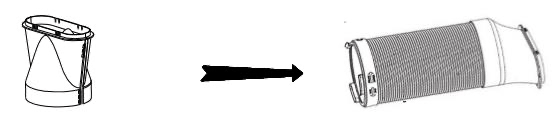
7. Separate the air-exhaust pipe and store it safely.
8. Cover the unit and keep it in a dry place.
9. Take the batteries out of the remote control and store or dispose of them safely
Keep all accessories with the unit ready for next season.
TROUBLESHOOTING
Do not repair or disassemble the air conditioning. Unqualified repair will invalidate the warranty and may lead to failure, causing injuries and property damage. Only use it as directed in this user manual and only perform operations advised here.
Problems
Reasons
Solutions
The air conditioning does not work.
There is no electricity.
Turn it on after connecting it to a socket with electricity.
The tank full indicator is illuminated.
Discharge the water inside.
The ambient temperature is too low or too high
Only use to use the machine within temperature range of 7-35 ℃ (44-95℉).
In cooling mode, the room temperature is lower than the set temperature; in heating mode, the room temperature is higher than the set temperature.
Change the set temperature.
In dehumidification mode, the ambient temperature is low.
The machine is placed in a room with an ambient temperature of greater than 17 ℃ . (62 ℉).
The cooling or heating effect is not good
There is direct sunlight.
Use curtains to reduce heat from the sun
Doors or windows are open; there are a lot of people; or in cooling mode, there are other sources of heat (e.g. fridges)
Close doors and windows; increase air conditioning power
The filter screen is dirty.
The filter screen is dirty.
The air inlet or outlet is blocked.
Clear obstructions; make sure venting is correct as described in this user manual and hose is not bent
Loud Noise
The air conditioning is not placed on a flat surface.
Put the air conditioning on a flat and hard place (to reduce noise).
Compressor does not work.
Overheat protection starts.
Wait for 3 minutes until the temperature is lowered, and then restart the machine.
The remote control does not work.
The distance between the machine and the remote control is too far.
Let the remote control get close to the air conditioning, and make sure that the remote control directly faces to the direction of the remote-control receiver.
The remote control is not aligned with the direction of the remote control receiver.
Batteries are dead.
Replace batteries.
Displays 'E1'.
The pipe temperature sensor is abnormal.
Clean filters and restart. Refer to service centre if issue still persist.
Displays 'E2'
The room temperature sensor is abnormal.
Clean filters and restart. Refer to service centre if issue still persist.
If problems not listed in the table occur or recommended solutions do not work, please contact the service centre.
#1 Is it possible to remove the black panel that's on the air outlet on the front? The air is only coming out on one side
Not ever tried , the air is designed to come out the front
#2 If the unit is running and there is a power cut, will it continue where it left off automatically when power is restored? Or would it need restarting manually?
Not would need re starting manually, we had a short power cut last week and it went off, we had to re set the timer


 and DOWN
 buttons to adjust the desired temperature (Between 16ºC and 31ºC)
 : Press the POWER button to turn the machine on or off.
 : Press the TIMER button to set the timer.
 : Press the DOWN button to decrease the desired temperature or timer duration
 : Press the MODE button to switch between cooling, fan and dehumidifier modes.
 : Press the UP button to increase the desired temperature or timer duration
 : Press the FAN button to change between high and low fan speeds.
 : Press the SLEEP button to turn on sleep mode