PRO.FORM
Model No. 831.299261
Serial No.
Find theserialnumberin thelocation
shownbelow.Wnte theserialnumber
inthe spaceabovefor reference.
Number
Decal
EOu I PM E:NT
HELPLINE. I
1-800-735-5879
SEARS, ROEBUCK AND CO.
HOFFMAN ESTATES, IL 60179
_CAUTION
Read all precautions and Irmt_c-
tlons In this manual before using
this equipment. ,Savethis manual
for future reference_
USER'S MANUAL
PatentPending
www.proform.com
new products, prizes,
fitness tips, and much more!
PRO.FORM
TABLE OF CONTENTS
IMPORTANT PRECAUTIONS ................................................................. 3
BEFORE YOU BEGIN ....................................................................... 5
ASSEMBLY ............................................................................... 6
OPERATION AND ADJUSTMENT ............................................................. 8
HOW TO FOLD AND MOVE THE TREADMILL .................................................. 19
TROUBLE-SHOOTING ..................................................................... 20
CONDITIONING GUIDELINES ............................................................... 22
PART LIST ............................................................................... 23
ORDERING REPLACEMENT PARTS .................................................. Back Cover
FULL 90-DAY WARRANTY ........................................................... Back Cover
Note: An EXPLODED DRAWING is attached inthe center ofthis manual.
2

IMPORTANT PRECAUTIONS
A WAR NING: To.din .. d.kof .mo, ok d=*hock,or",i.rvtoWon.,rood
following Important precautions and Inlormeeion before opereeing the treadmill.
1. It ISthe responeeblllty of the owner to ensure
that all users of this treadmill are adequately
Informed of ell wamlngsind precautions.
2. Use the treadmill ordy su described.
3. Place the tieadmlll on a level surface, with at
least eight feet of clearance behind it- Do not
place the tl_admlll on any surface that blocks
air ope_ng_ To prateat the floor or earpat
from damage, place a mat under the treadmill.
4. Keep the treadmill Indoors_ away from tools-
ture and dust. Do not put the treadmill In a
garage or covered patio, or near water.
5. Do not opem_ the treadmill where aerosol
products am used or wbem oxygen Is being
admlnlatered.
6. Keep ctdMren under the age of 12 and pets
away from the treadrnl at all times.
7. The treadmill should not be used by persons
weighing morethan _ pounds.
8. Nevor eilow more than one person on the
b-eadmlll at a Ume.
9. Wear appropriate exorcise cfothln9 when
usln!i the treadmill. Do nat wear loose cloth-
Ing thee could become caught in the treadmlll,
Athletic support clothes are recommended for
both men and women. Always wear athletic
shoes. Never use the treadmill with bare feet,
wearing only stockings, or in sandals.
10. Wben connecting the powor cord (sea page ll),
plug the power cord Into u surge suppressor
(nothlclud#) andplugthesurgesuppressor
Into a g_ounded circuit capable of CexTylng15
or more amps. No other appliance should be
on the same circuit. Do not mean extension
cord.
patlon ot 4SOioulea. Tile surge lUl:,l_
must be electriceily rated for 120 volts AC sud
lS ampo.'ro purcheea e surge suppr.sur ,see
your local PROFORM dealer or call 1-800-366-
7278 ond ordar part number I46148.
12. Keep the power cord and the surge suppre_
sor away from heated surfaces.
13. Never move the weiMng belt while the power
ISturned off. Do not opereee the tmedmM if
the powercord or plug Is _,orlt the
.edmlli is notworkingWopody,(See
BEFORE YOU BEGIN on page 5 It the tread-
mill IS not worldng Wopedy. ) :
14. Never start _ treednilll whill_ you am stand-
Ing on the walldng belt. Always hold the
handrails whlin ueing the treadmill.
1.%The Irlllmill Ill llpill of high speeds.
AdJuatthe spead In small i_ tojvold
sudden lumps In speed.
16.The pulse sensor Is not a medical device.
Vurinue factors, including theucer's move-
may affect the!ccuracy of heart reee
reedings. The puisesensor Irleeende_ only
as an exorcise aid in deblminlng heart rate
trends In gemmd.
17. Never leave the treadmill unattended while it
Is running. Always removethe key, unplug
-the I:_ cold and-m_ the i)n#o/f sidich to
the off pealtlon I the tnmdmill Is not in
use_(See the drawing on pmgeS for the Ioca.
tion of the or_'offswitch.)
III. Do not atthmpt to raise, lower, or move tbe
t_ldmlll ueelit Is propety assembled. (See
ASSEMBLY on page 6, and HOW TO FOLD
AND MOVE THE TREADMILL on page 19.) You
mueebe shle to eafeiy lift 48 pounds (20 kg) In
order to ralea, lower, or moveihe tre#ndil.
11. Use only a eingle-outlet surge suppressor that
Is UL 1449 Ileeld n a translerd voltage surge
suppressor (TVSS). The surge suppressor
must have u UL suppressed voltage ragng of
400 volts or less and a minimum surge dissl-
19. Do not change the incline of le fill by
placing objects under thetmadmig.
20. When folding or n-,ovlngthe treadmill, make
sum that the storage latch Is folly closed.
3
21. When using I-FILcom CD's and vldans, on
electronic "chirping" sound will alert you
when the speed al_Vor Incline of the treadmill
Is about to change. Always listen for the
"chirp" and be prepared for speed and/or In-
cline changes. In some Instances, the speed
and/or Incline may change before the per-
sonal trelnor describes the change.
22. When using I-FILcom CD's and videos, you
can manually override the speed and In¢llne
settings at any time by pressing the speed
and Incline buttons, However, when the next
"chirp" Is heard, the speed sn¢VorIncline will
changeto the next setffitgs of the CD or video
program.
24. Inspect and tighten all parts of the treads-rill
regularly.
25. Never Insert or drop any object Into any
opening.
=6. DANGER: Always unplug the power
cord Immedistely after use, before cleaning
the l_idmlll, and before pedfo4_ing the mairr
tenence and adjustment procedures de-
scribed In b'dsmmmal, Never removethe
motor hood unless Instructed to do so by an
authorized service represemative. Servicing
other than the procedures In this manual
should be performed by an authodzed servlco
representativeon;y.
23. Always remove FRLcom CD's and videos 27. This traedmnl Is Intended for In-home use
from your CD pisyer or VCR when you are nof only. Do not use this treedmlll In any conmmr-
using them. cisl, rental, or Instltullomd setting.
WARNING: bo.,n ngthisoranyexerciseprogram,consultyourpbysiclan. This
is especisl]y Important for persons over the age of 35 or persons with preexisting health problems.
Read all Instructions _ using. SEARS assumes no responslblWy for personal Injury or property
damage sustained by or through the use of this product.
SAVE THESEINSTRUCTIONS
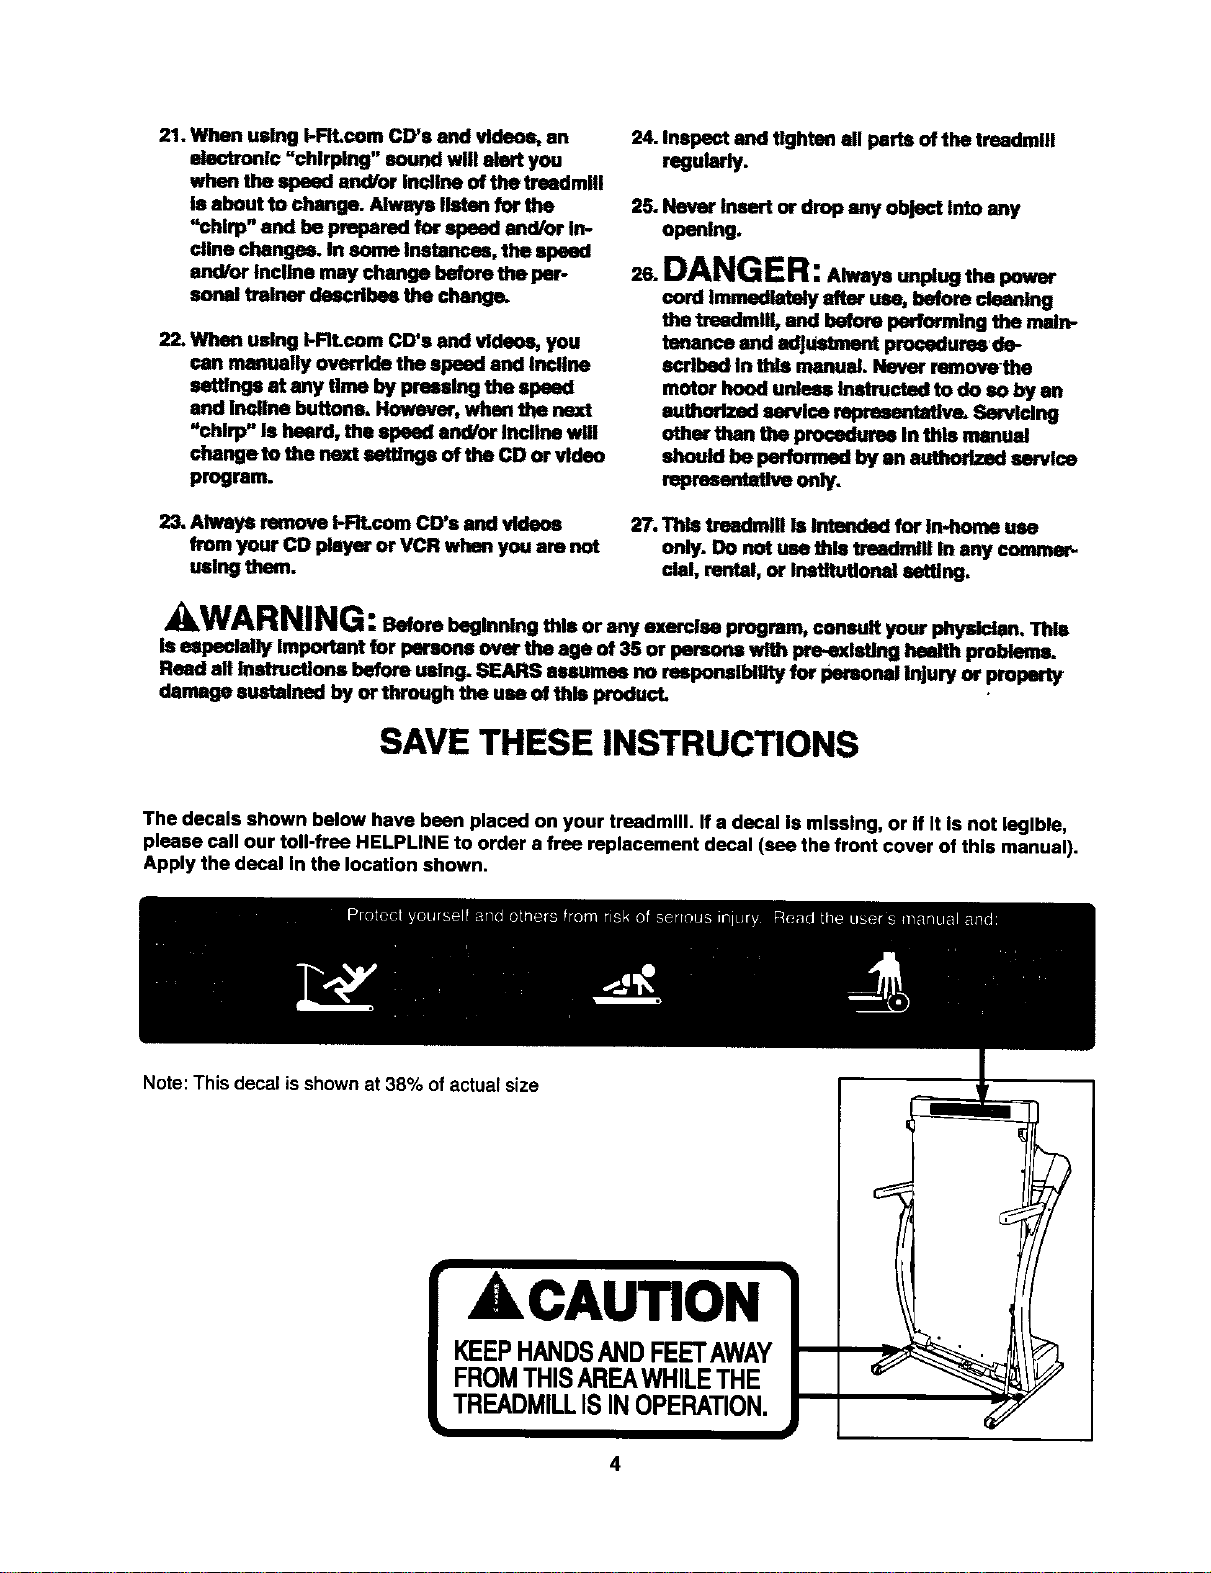
The decals shown below have bean placed on your treadmill. If a decal Is missing, or if It is not legible,
please call our toll-frea HELPUNE to order a free replacement decal (see the front cover of this manual).
Apply the decal In the location shown.
Note: This decal isshown at 38% ofactual size
ACAUTION
KEEPHANDSANDFEETAWAY
4
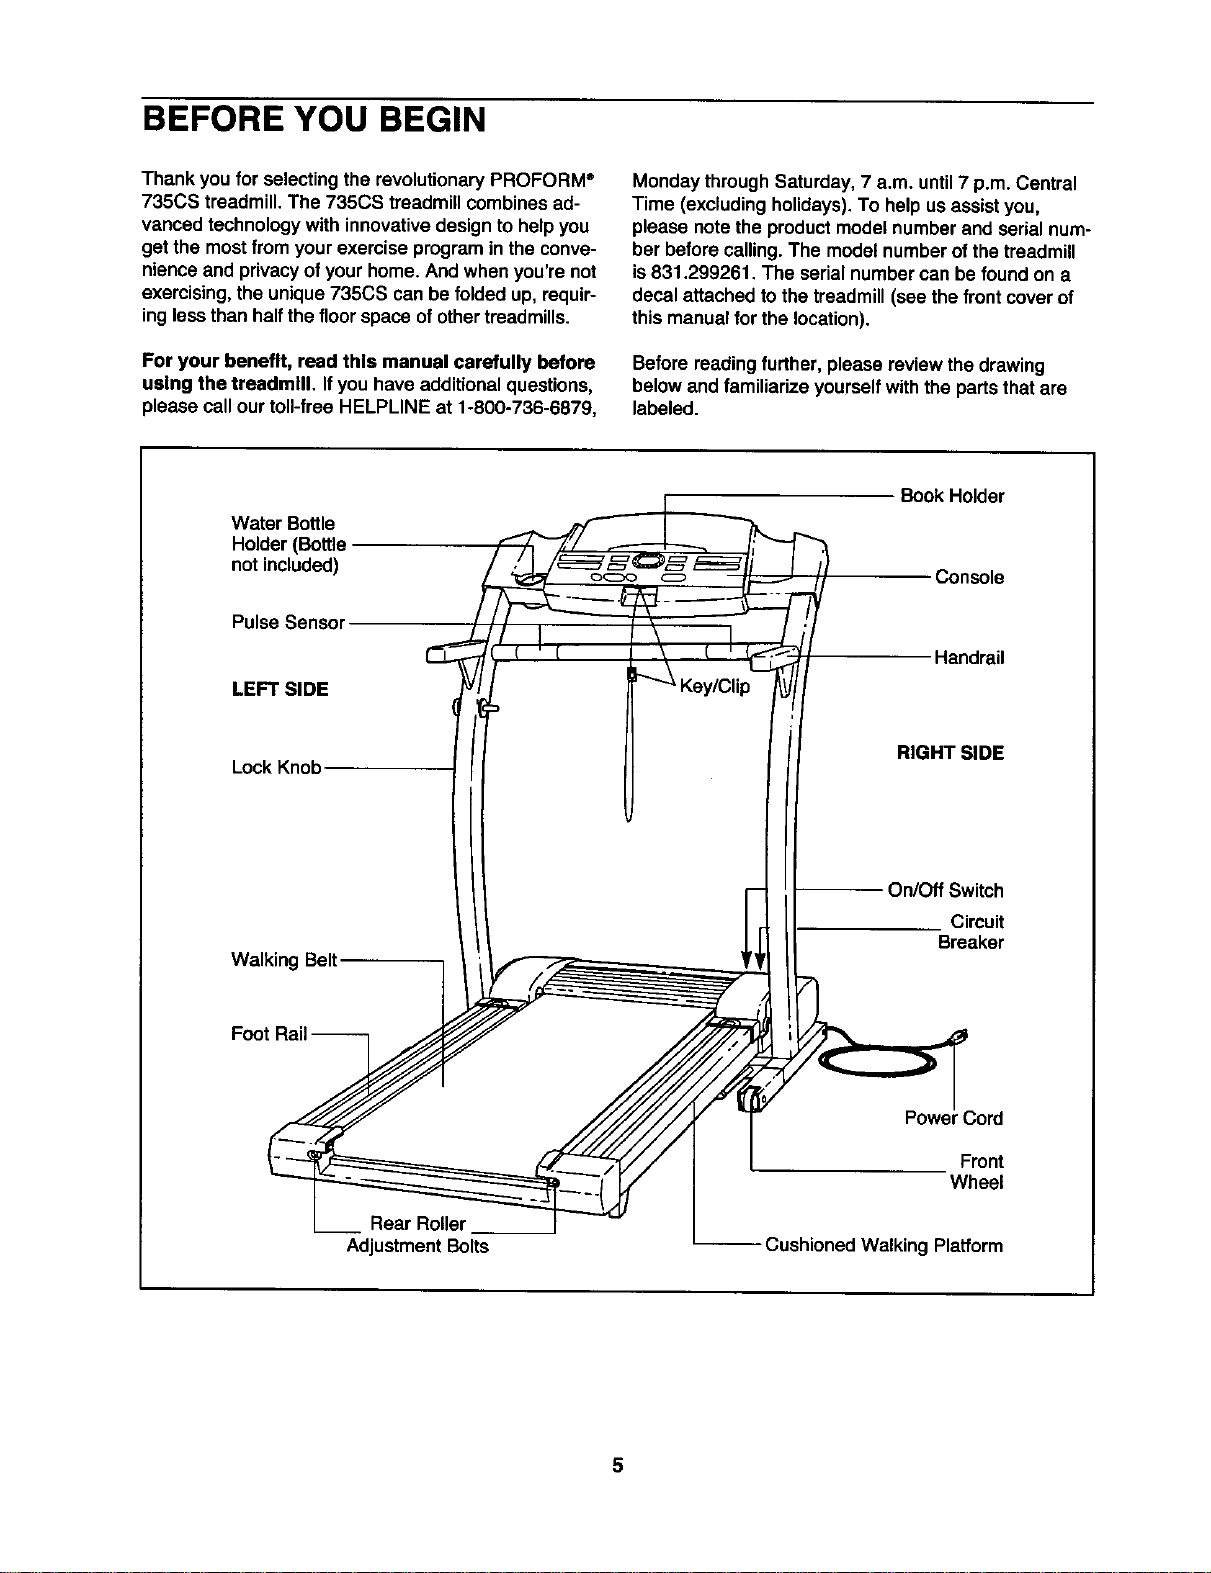
BEFORE YOU BEGIN
Thank you for selectingthe revolutionaryPROFORM®
735CS treadmill.The 735CS treadmillcombinesad-
vanced technologywith innovativedesign to helpyou
get the mostfrom yourexercise programin the conve-
nienceand privacyof yourhome. And when you're not
exercising,the unique735CS can be folded up, requir-
inglessthan halfthe floorspace ofothertreadmills.
For your benefit, read this manual carefully before
using the treadmill, Ifyou have additionalquestions,
please call ourtoll-free HELPLINE at 1-800-736-6879,
Monday throughSaturday, 7 a.m. until7 p.m. Central
Time (excludingholidays).To helpus assistyou,
please notethe productmodel numberand serial num-
ber beforecalling.The modelnumberof thetreadmill
is831.299261. The serial numbercan be foundon a
decal attached tothe treadmill(see the front cover of
this manualfor the location).
Before readingfurther,please review the drawing
belowand familiarize yourselfwiththe partsthatare
labeled.
Water Bottle
Holder(Bottle
not included)
Pulse Sensor
LEFT SIDE
LockKnob
Walking Belt
Book Holder
Console
Handrail
RIGHT SIDE
On/Off Switch
Circuit
Breaker
Rear Roller
AdjustmentBolts
.3ord
Front
Wheel
-- Cushioned Walking Platform
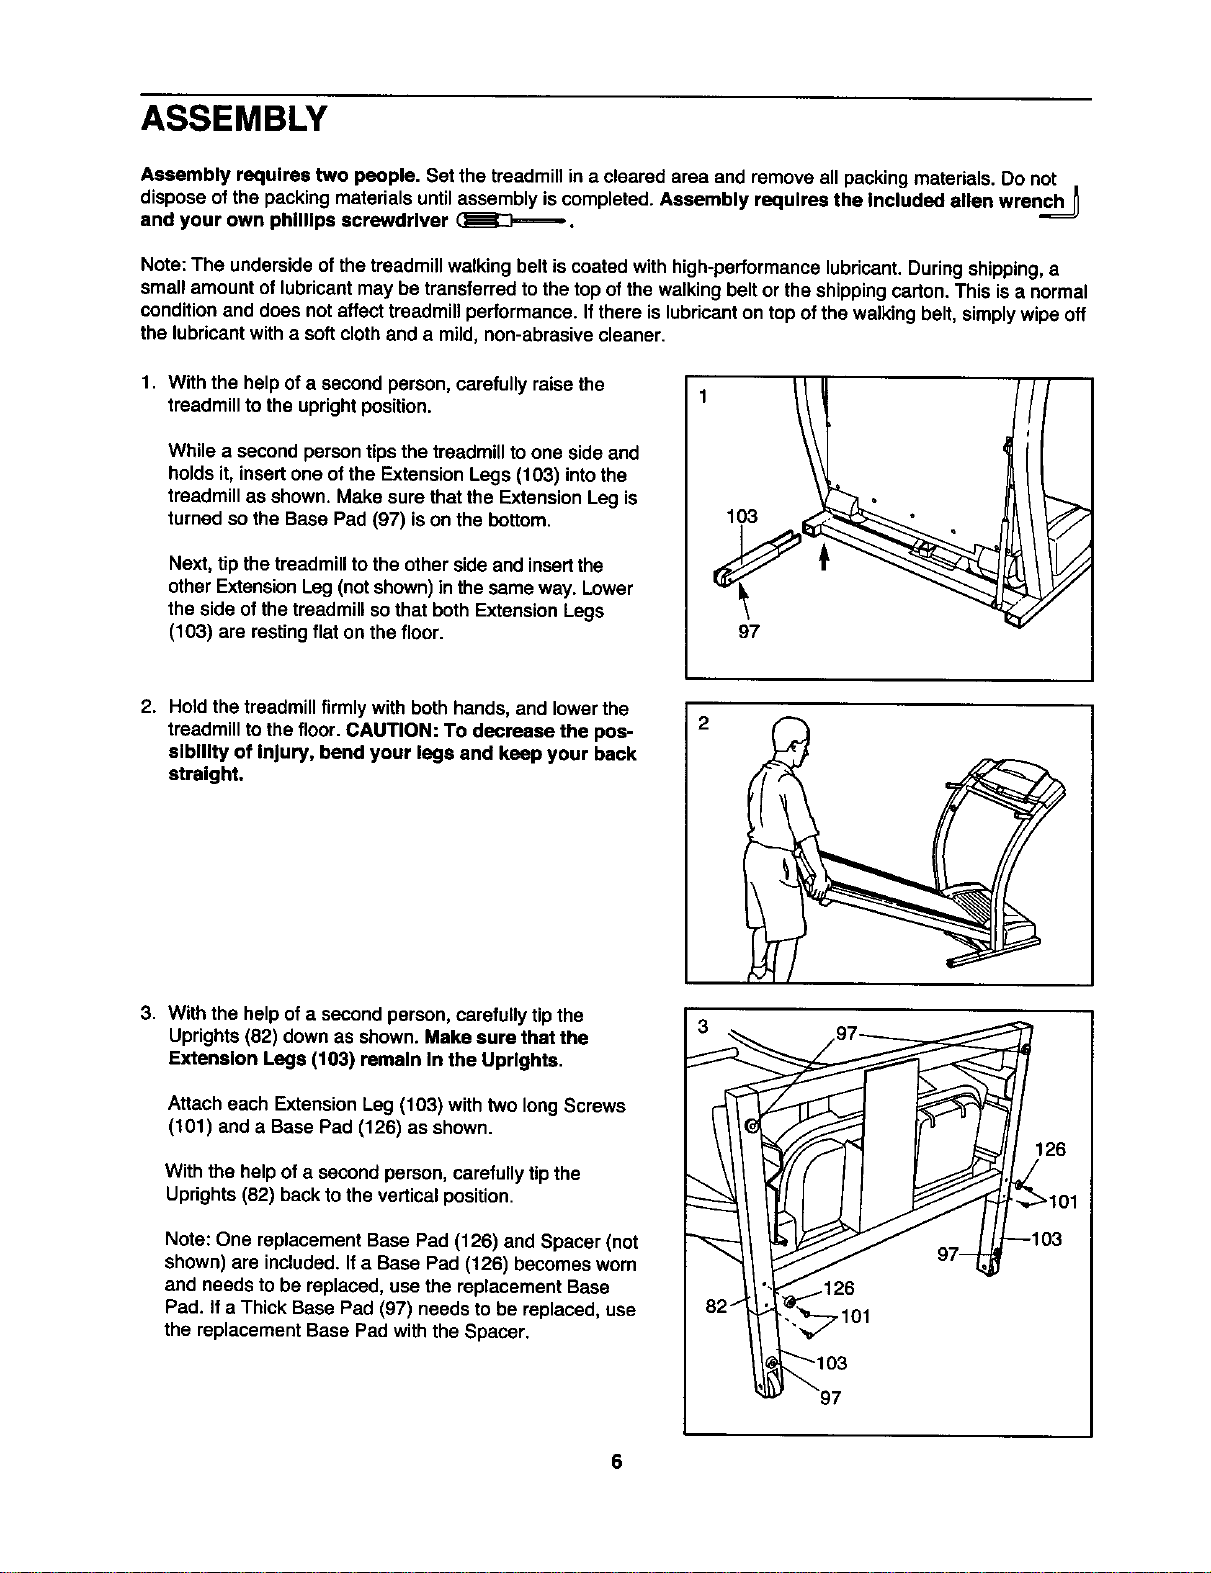
ASSEMBLY
Assembly requires two people. Set the treadmillin a cleared area and remove all packingmaterials. Do not
disposeof the packingmaterialsuntilassembly iscompleted.Assembly requires the Included allen wrench _
and your own phillips screwdriver (_.
Note: The undersideofthe treadmill walking belt is coated with high-performancelubricant.Duringshipping,a
small amountof lubricantmay be transferredto thetop of the walkingbeltor theshippingcarton. Thisis a normal
conditionand does notaffect treadmillperformance. If there is lubricanton topof the walkingbelt,simplywipe off
the lubricantwith a softclothand a mild, non-abrasivecleaner.
1. With the helpofa second person,carefully raise the
treadmillto the uprightposition.
While a secondperson tips the treadmillto one sideand
holdsit, insertone of the ExtensionLegs (103) intothe
treadmillas shown. Make sure that the Extension Leg is
turned so the Base Pad (97) ison the bottom.
Next, tip the treadmillto the otherside and insertthe
otherExtensionLeg(notshown)inthe sameway. Lower
the side ofthe treadmillsothat both ExtensionLegs
(103) are restingflat on the floor.
{*
1O3
97
2. Hold the treadmillfirmly with both hands, and lower the
treadmillto the floor. CAUTION: To decrease the pos-
sibility of Injury, bend your legs and keep your back
streight.
3. With the helpofa secondperson,carefullytip the
Uprights(82) down as shown. Make sure that the
Extension Legs (103) remain In the Uprights.
Attach each ExtensionLeg (103) with two longScrews
(101) and a Base Pad (126) as shown.
With the helpof a secondperson,carefullytipthe
Uprights(82) backtothe verticalposition.
Note: One replacement Base Pad (126) and Spacer (not
shown)are included.Ifa Base Pad (126) becomesworn
and needs to be replaced,use the replacement Base
Pad. Ifa Thick Base Pad (97) needs to be replaced,use
the replacement Base Pad with the Spacer.
7101
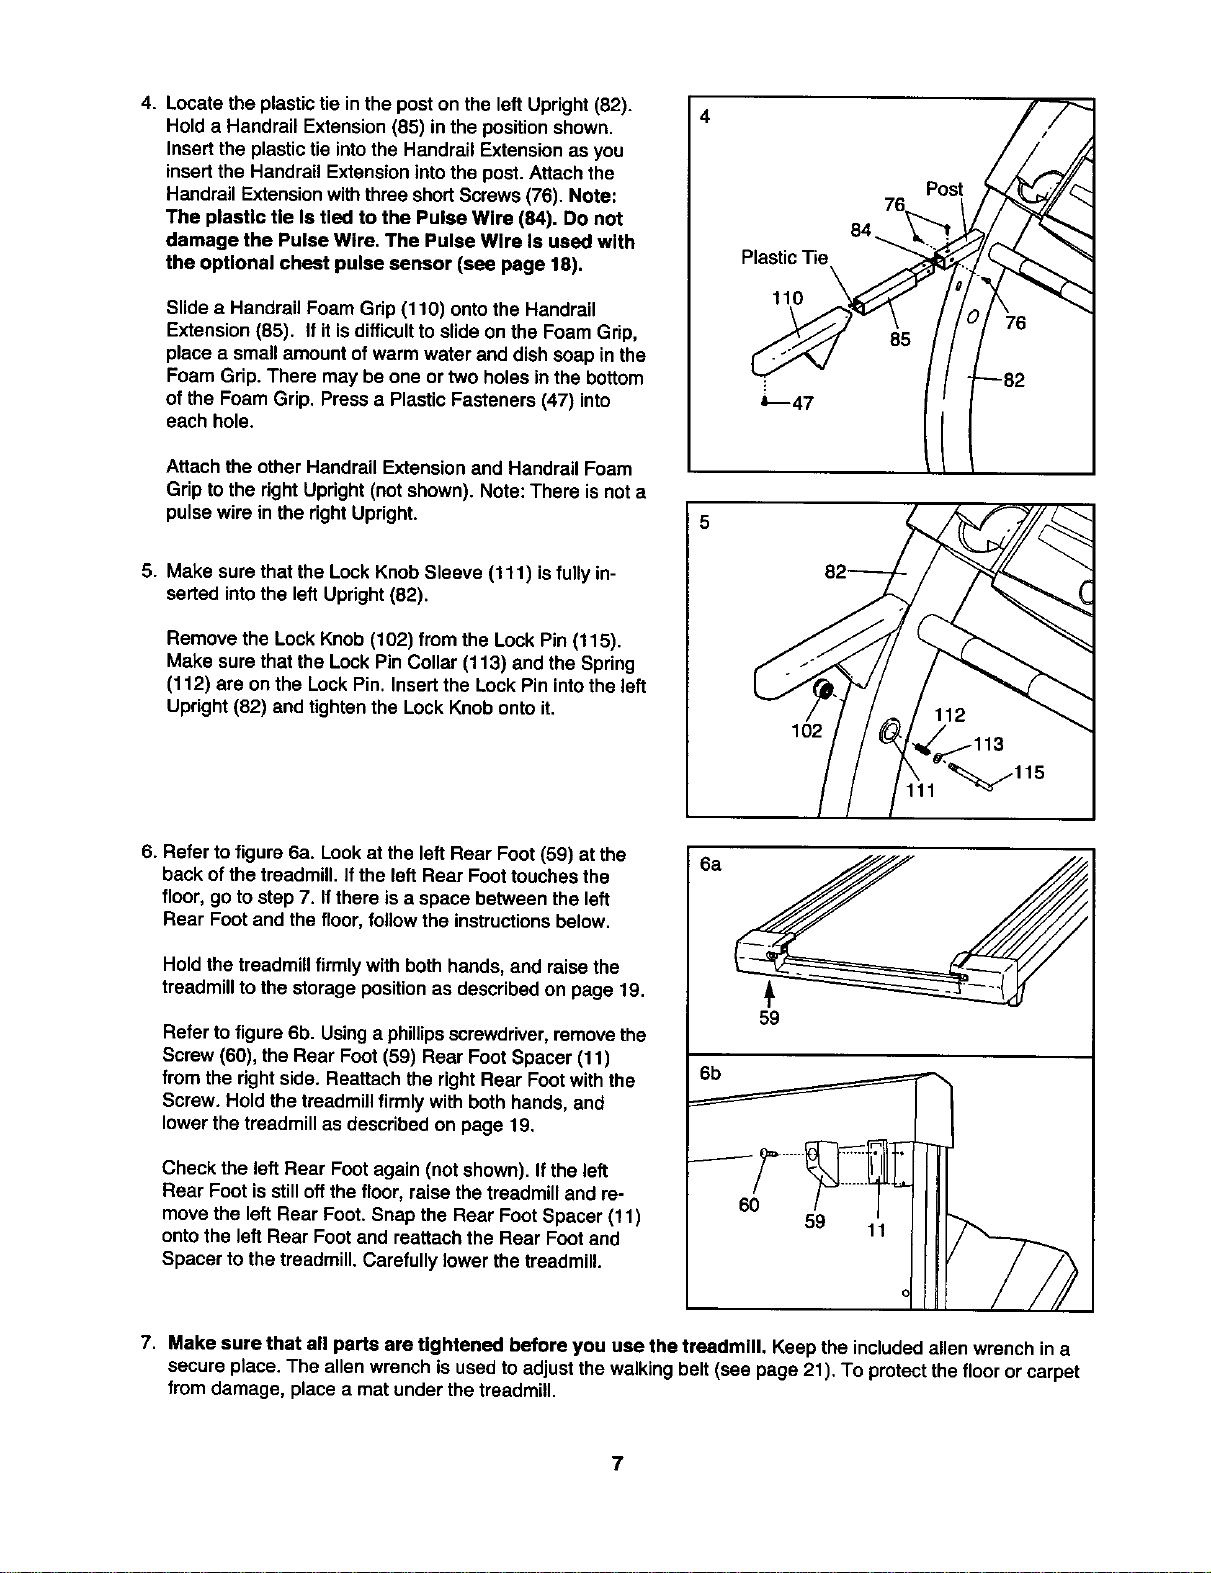
4. Locate the plastictie in the poston the leftUpright (82).
Hold a Handrail Extension (85) in the position shown.
Insert the plastic tie into the Handrail Extension as you
insert the Handrail Extension into the post. Attach the
Handrail Extension with three short Screws (76). Note:
The plastlc tie Is tled to the Pulse Wlre (84). Do not
damage the Pulse Wire. The Pulse Wlre Is used with
the optional chest pulse sensor (see page 18).
Slidea Handrail Foam Grip(110) ontothe Handrail
Extension(85). If it is difficult to slide on the Foam Grip,
place a small amount of warm water and dish soap in the
Foam Grip. There may be one or two holes inthe bottom
of the Foam Grip. Press a Plastic Fasteners (47) into
each hole.
Attach the other Handrail Extension and Handrail Foam
Grip to the right Upright (not shown), Note: There is not a
pulse wire in the right Upright.
5. Make surethat the Lock Knob Sleeve (111) isfully in-
serted into the left Upright (82).
Remove the Lock Knob (102) from the Lock Pin (115).
Make surethat the Lock Pin Collar (113) and the Spring
(112) are on the Lock Pin. Insert the Lock Pin into the left
Upright (82) and tighten the Lock Knob onto it,
4
Plastic Tie
110
I O2
76
84
\
Post
85
6. Refer to figure 6a. Lookat the left Rear Foot (59) at the
back ofthe treadmill. Ifthe left Rear Foottouchesthe
floor, go tostep 7. Ifthere isa space between the left
Rear Footand the floor,follow the instructionsbelow.
Hold the treadmillfirmly with both hands, and raise the
treadmillto the storagepositionas describedon page 19.
Refer to figure 6b. Usinga phillips screwdriver,removethe
Screw(60), theRear Foot(59) Rear FootSpacer (t 1)
from the right side. Reattach the rightRear Footwith the
Screw. Hold thetreadmillfirmly with bothhands, and
lowerthe treadmillas describedon page 19.
Check the left Rear Foot again (not shown). If the left
Rear Foot is still off the floor, raise the treadmill and re-
move the left Rear Foot. Snap the Rear Foot Spacer (11)
onto the left Rear Foot and reattach the Rear Foot and
Spacer to the treadmill. Carefully lower the treadmill.
8a
59
6b
60
59
7. Make sure that all parts are tightened before you use the tresdmlll. Keep the includedallen wrenchin a
secure place.The allenwrench isused to adjustthewalking belt (see page 21). To protectthefloor or carpet
from damage, place a mat under the treadmill.
7
OPERATION AND ADJUSTMENT
THE PERFORMANT LUBETM WALKING BELT
Your treadmill features a walkingbelt coated with
PERFORMANT LUBETM, a high-performancelubricant.
IMPORTANT: Never apply silicone spray or other
substances to the walking belt or the walking plat-
form. Such substances will deteriorate the walking
belt and cause excessive wear.
HOW TO PLUG IN THE POWER CORD
kDANGER:
of the equipment_lrounding =_xlluotor'een
ref_ultInan In_ risk i_ eleob_ _-'k,
Check with a qualified eteofdclan or service-
man if you are In doubt u to whetlter the
product Is propedy grounded. Do not modify
the plug provided with the product--If It will
nof fit the outlet, have a proper outlet
installed by a qualified _¢lan.
Yourtreadmill, likeany othertype ofsophisticated
electronicequipment,can be seriouslydamaged by
suddenvoltage changes inyour home's power.
Voltage surges, sp_kes,and no_seinterferencecan
resultfrom weather conditionsor from otherappliances
being turnedon or off. To decrease the possibility of
your treadmill being damaged, always use a surge
suppressor with your treadmill (see drawing 1 at
the right).
To purchase a surge suppressor, see your local
PROFORM deeler or call toll-free 1-800-366-7278
and order part number 146148. Use onlya single-
outletsurgesuppressorthatis UL 1449 listedas a
transientvoltagesurge suppressor(TVSS). The surge
suppressormusthave a UL suppressedvoltage rating
of400 voltsor lessand a minimumsurgediss_pahonof
450 joules.The surgesuppressormustbe electrically
rated for 120 voltsAC and 15 amps
This product must be grounded. If itshouldmalfunc-
tionor break down, groundingprovidesa path of least
resistancefor electriccurrentto reducethe riskof elec-
tric shock,This productis equippedwitha cord having
an equipment-grounding conductorand a grounding
plug Plug the power cord Into a surge suppressor,
and plug the surge suppressor Into an appropriate
outlet that Is properly installed and grounded In
accordance with all local codes and ordlnanees.
Important: The treadmill Is not competlble with
GFCI-equlpped outlets.
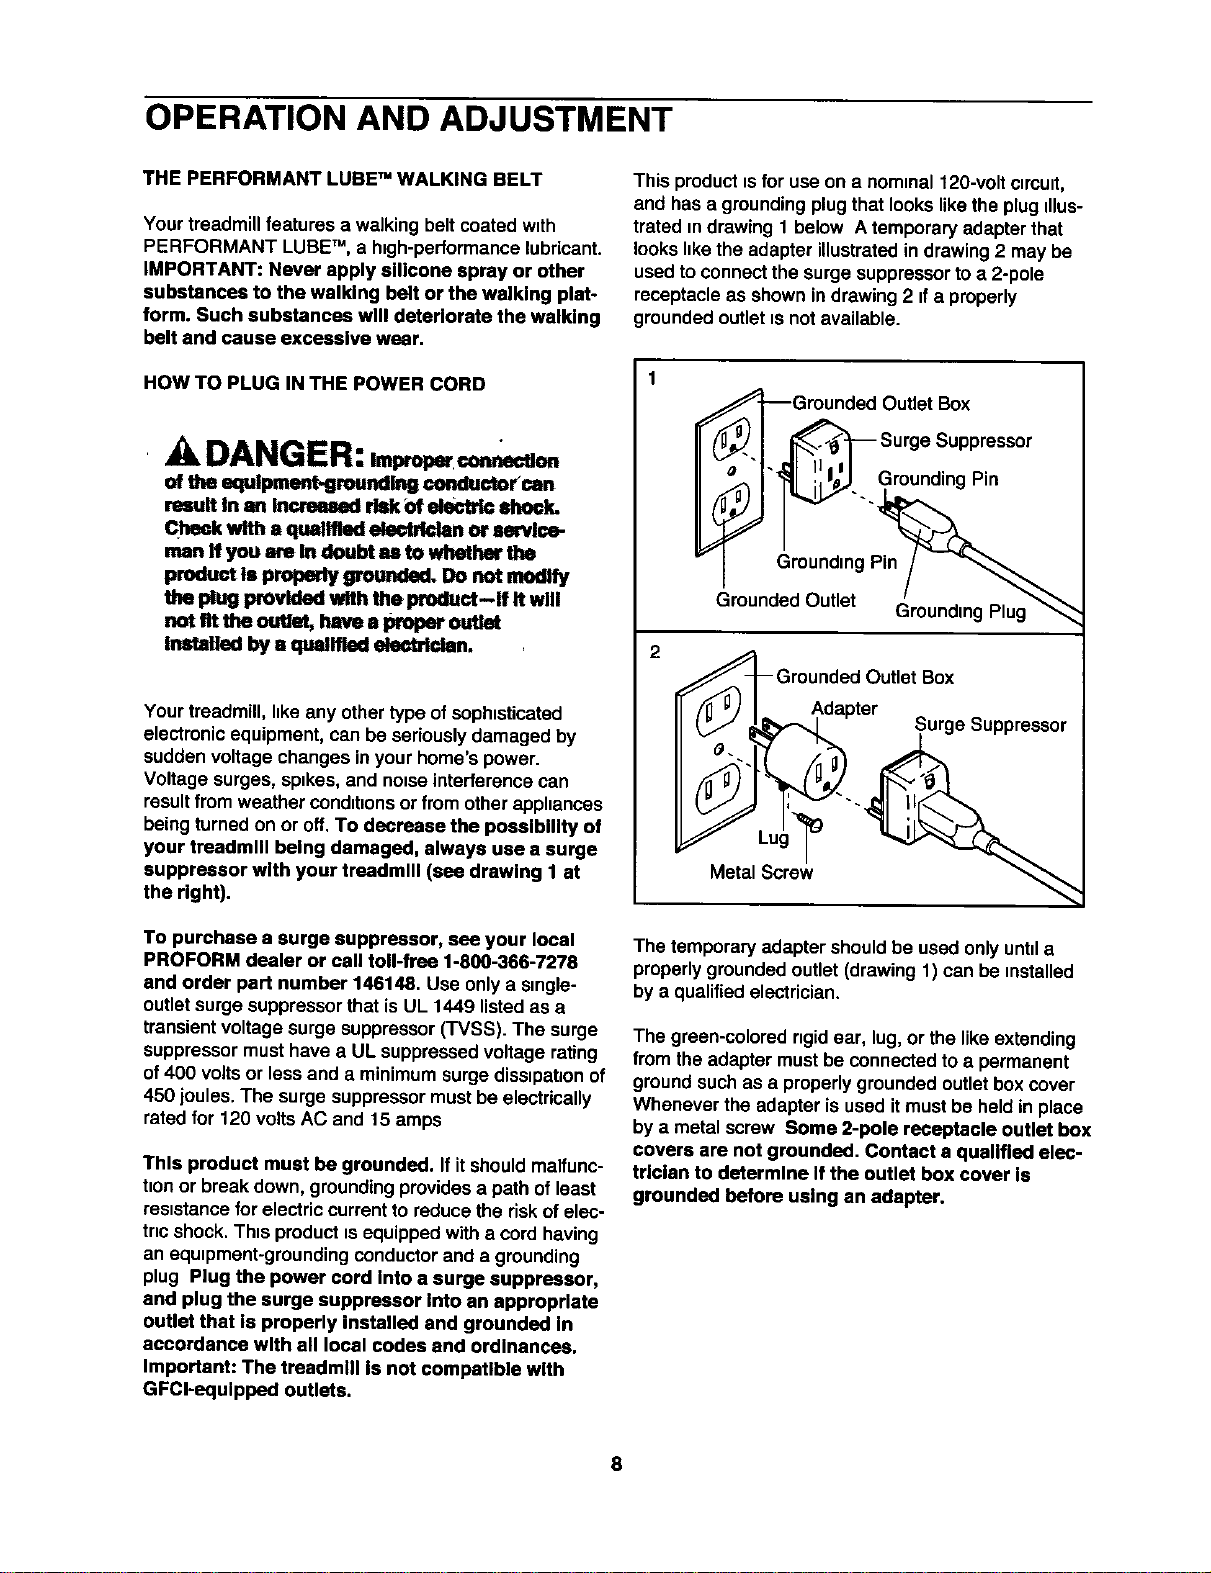
This product is for useon a nominal120-voltclmuit,
and hasa groundingplugthat lookslikethe plugillus-
trated mdrawing 1 below A temporaryadapter that
looks hkethe adapter illustrated in drawing 2 may be
used to connectthe surge suppressorto a 2-pole
receptacle as shownin drawing 2 ifa properly
grounded outlet _snot available.
2
GroundedOutlel (_roundingPlug"'_
_l_Gr°u:d(._' I_Ld_eOrUtlet:uiie Suppressor
Metal Screw
The temporaryadapter shouldbe used onlyuntila
properly groundedoutlet(drawing1) can be installed
bya qualifiedelectrician.
The graan-cotored ngid ear, tug,or the likeextending
from the adapter must be connected to a permanent
ground such as a properly grounded outlet box cover
Whenever the adapter is used it must be held in place
by a metalscrew Some 2-pole receptacle outlet box
covers are not grounded, Contact a qualified elec-
trician to determine Ifthe outlet box cover Is
grounded before using an adapter.
8
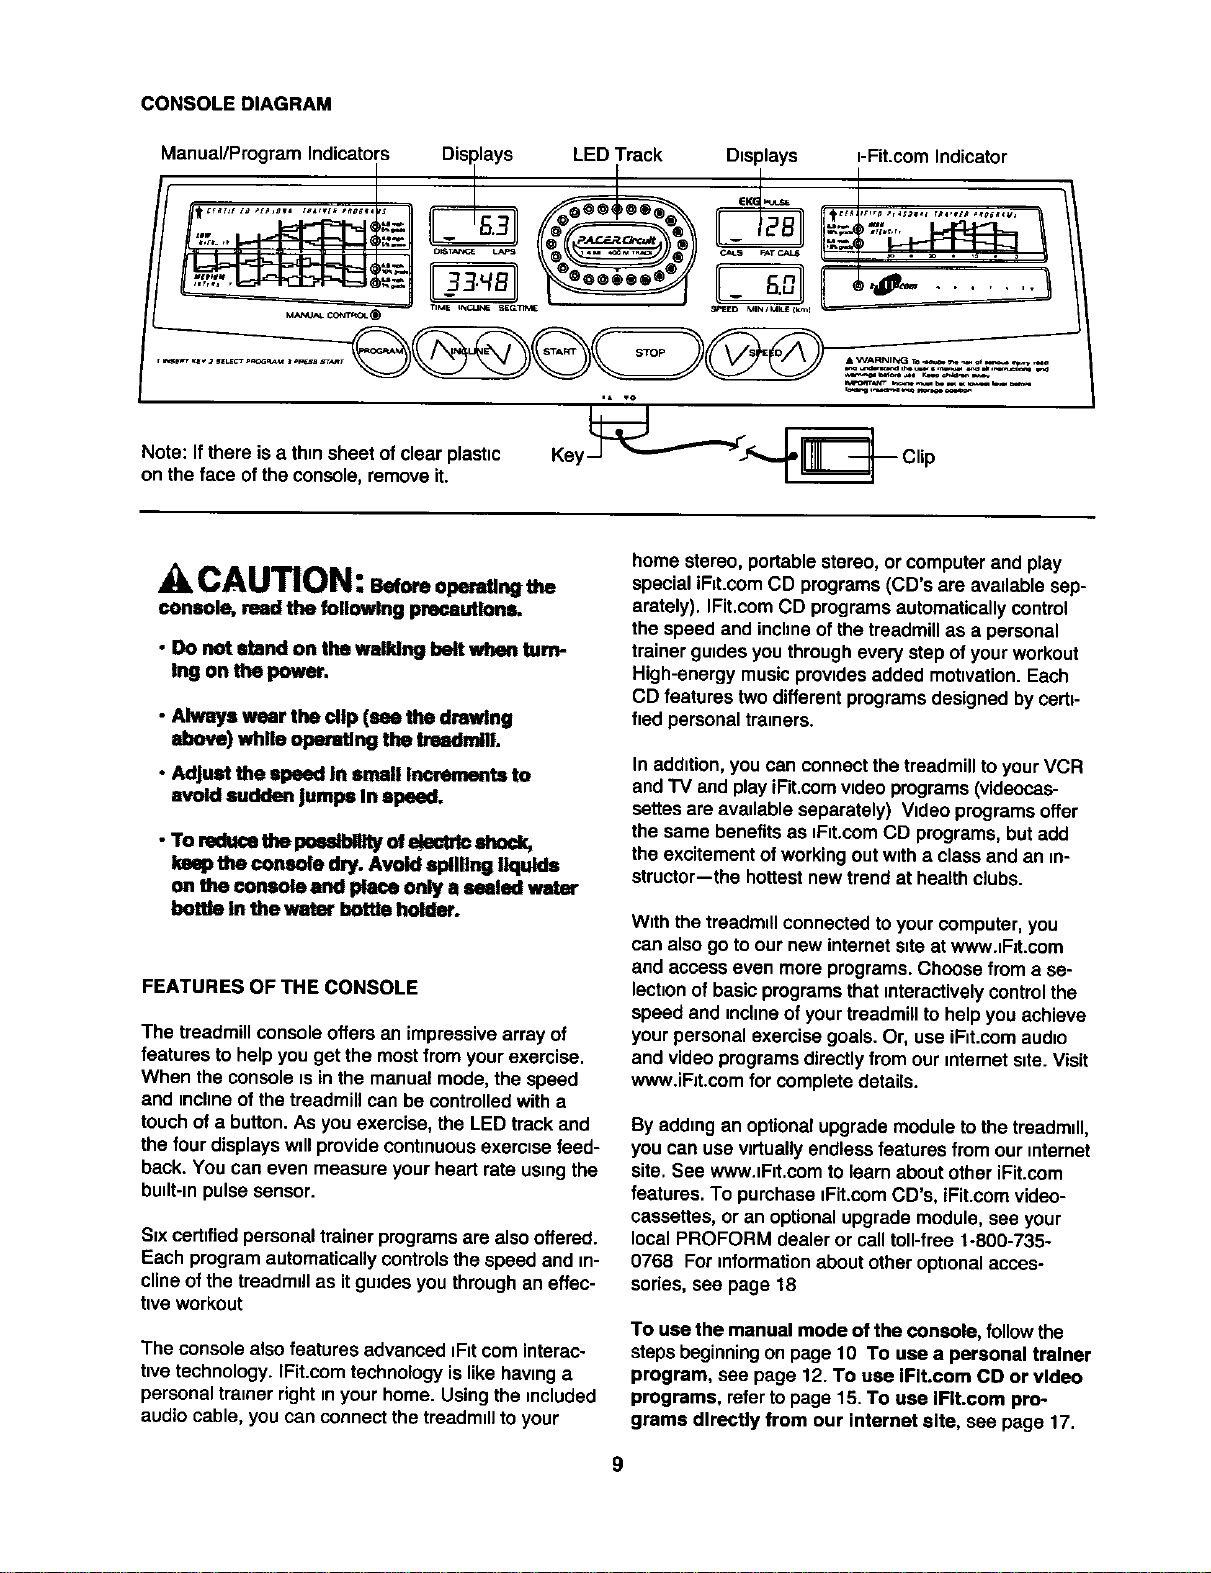
CONSOLE DIAGRAM
Manual/Program Indicators Disrlays LED Track Displays i-Fit.com Indicator
d q_ L_J | _ J II- _'_U N v
____(_MANU_' CONI_OL_ TIME hXC:LINE SECLIIN_ SPEED rV_NIMUlk_I _
,* VO
s eoto, .o r0,a t,c0.,0
on thefaceoftheconsole,remove it.
CAUTION:
console, mad the following precautions.
• Do not stand on the walking belt when turn-
Ing on the power.
• Always wear the dip (see the drawing
above) while opendlng the treadmilL
• Adjust the speed In =11all Increments to
avoid ==udder=jumps In speed,
- To red_e the pmma_#_ ofe_ctrlc shock,
lamp the console dry. Avoid spilling liquids
on "dteconsole and place only a staled water
bottle In the warm-bottle holder.
FEATURES OF THE CONSOLE
The treadmillconsoleoffers an impressive array of
features to helpyou get the mostfrom yourexercise.
When the consoleis inthe manualmode,the speed
and incline of thetreadmillcan be controlledwitha
touchof a button.As you exercise,the LED track and
the four displayswdlprovide continuousexercise feed-
back. You can even measure yourheart rate usingthe
budt-mpulsesensor.
Svxcertifiedpersonaltrainer programsare alsooffered.
Each programautomaticallycontrolsthe speed and in-
clineofthe treadmillas itgradesyou throughaneffec-
tiveworkout
The consolealso features advanced _F_tcorninterac-
hvetechnology.IFit.comtechnologyislike havinga
personaltrainer rightin your home. Usingthe included
audio cable, you can connectthe treadmdlto your
home stereo, portablestereo, or computer and play
specialiRt.com CD programs(CD's are avadablesep-
arately). IFit.comCD programsautomaticallycontrol
the speed and inchneof the treadmillas a personal
trainer guidesyou througheverystep ofyour workout
High-energymusicprovidesadded motivation.Each
CD features twodifferentprogramsdesignedby certi-
fied personaltremers.
In addition,you can connectthe treadmilltoyourVCR
andTV and play iFit.comvideoprograms(videocas-
settesareavailable separately) Video programsoffer
the same benefitsas _F_t.comCD programs,but add
the excitementof workingout witha classand an in-
structor-the hottestnew trendat healthclubs.
With thetreadmdlconnectedtoyour computer,you
can also go to ournew internets_teat wwwJF=t.com
and access even more programs.Choose from a se-
lect=onof basicprogramsthat mteractivelycontrolthe
speed and incline of yourtreadmillto helpyou achieve
yourpersonalexercise goals. Or, useiF_t.comaudio
and videoprogramsdirectlyfrom our mternetsite.Visit
www.iFJt.comfor completedetails.
By addingan optionalupgrademoduleto the treadmdl,
you can use wrtually endlessfeatures from ourmternet
site. See wwwJF_t.comto learnabout otheriFit.com
features. To purchase iFit.comCD's, iFit.comvideo-
cassettes,or an optionalupgrademodule, see your
local PROFORM dealer or calltoll-free 1-800-735-
0768 Forinformation about otheroptionalacces-
sories,see page 18
To use the manual mode of the console, followthe
stepsbeginningon page 10 To use a personal trainer
program, see page 12. To use IFIt.com CD or video
programs, refertopage 15. To use IFIt.com pro-
grams directly from our internet site, see page 17.
STEP-BY-STEPCONSOLEOPERATION
Makesurethat the on/off
switch near the power
cord is in the on
position. Next, make sure
that the key is removed
from the console and the
I
Position
power cordis properly plugged in (see HOW TO PLUG
IN THE POWER CORD on page 8).
When you are ready to begin exercising,stepontothe
foot rails of the treadmill. Find the clip attached to the
key (see the drawing on page 9), and slide the clip
onto the waistband of your clothing.
To use the manual mode ofthe console, followthe
stepsbelow. To use a personal trainer program, see
page 12. To use IFIt.com CD or video programs,
refertopage 15. To use IFIt.com programs directly
from our Internet site, see page 17.
Note: The consolecan display speed and distance in
either miles or kilometers (see SPEED/MIN-MILE DIS-
PLAY on page 11). For simplicity, all instructions in this
manual refer to miles.
exercise, changethe speed of thewalking belt as
desired by pressing the SPEED buttons.
To stopthe walkingbelt, pressthe STOP button.
The TIME/INCLINE/SEG TIME displaywillbegin
toflash. To restartthewalkingbelt,pressthe
START buttonor the SPEED ,_ button.
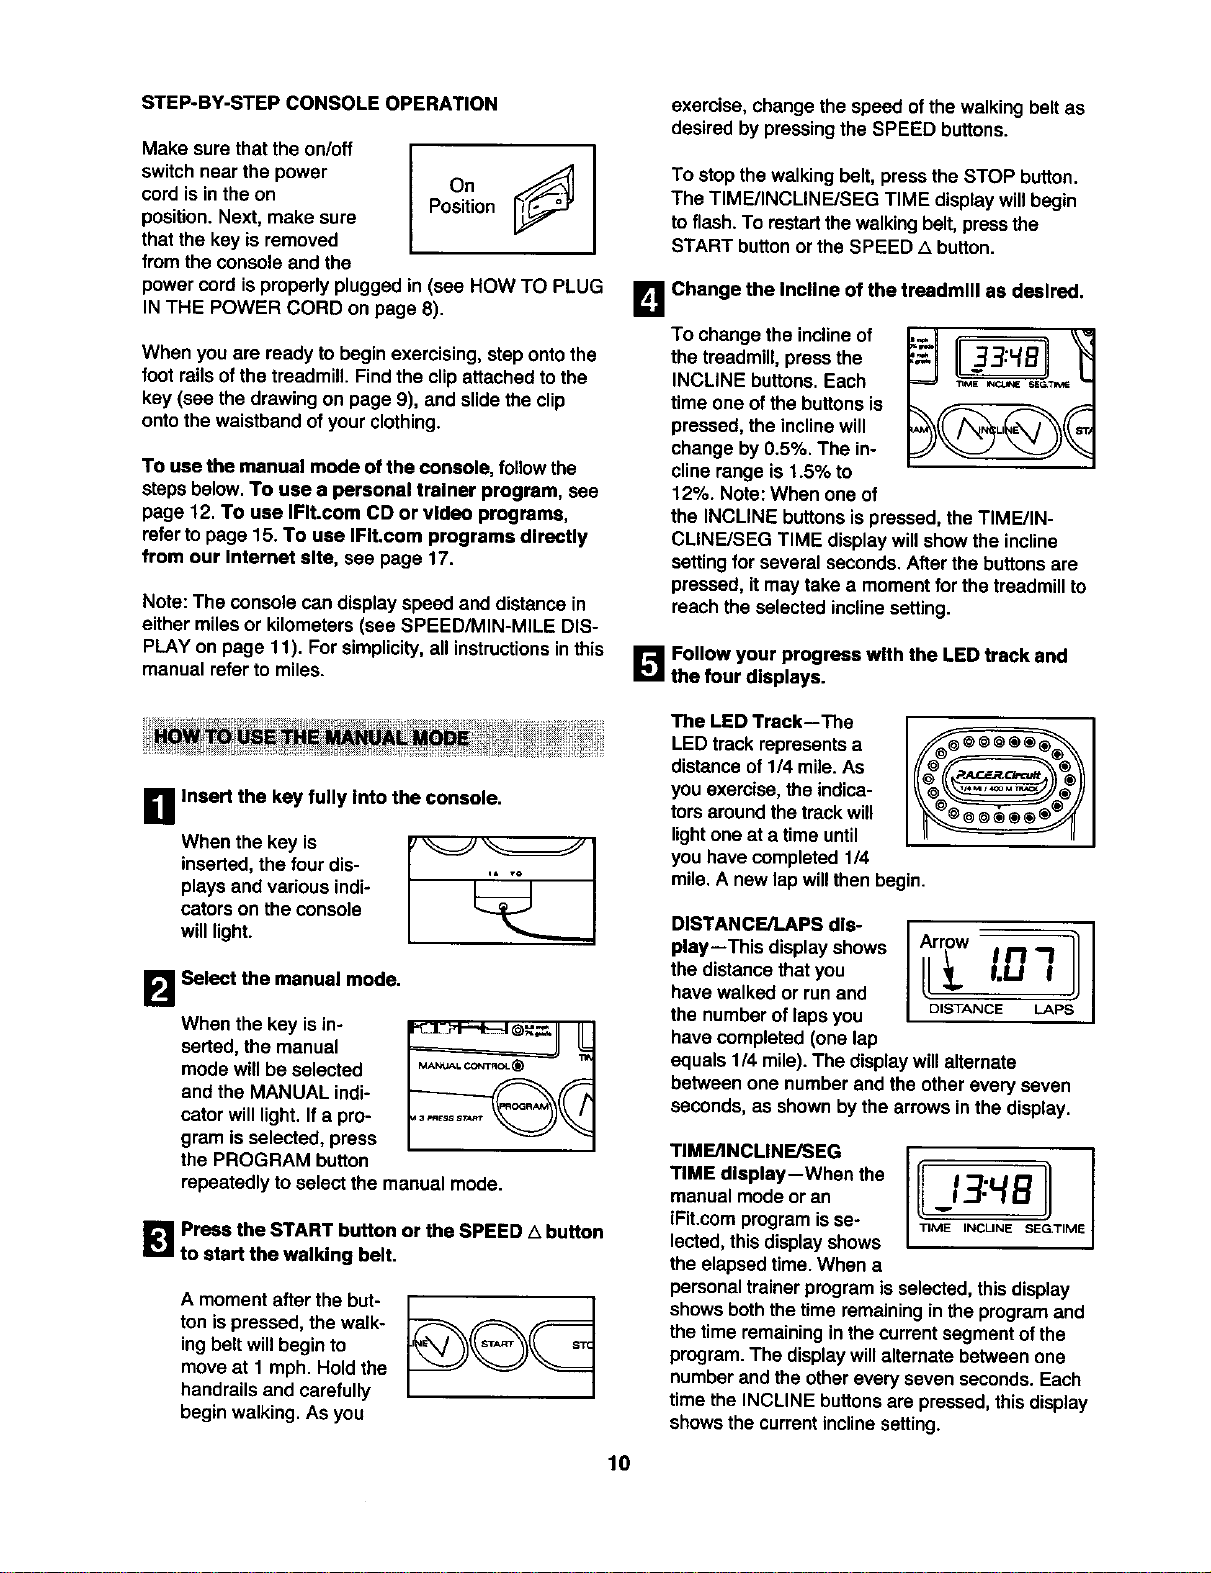
L_ Change the Incline of the treadmill as desired.
To changethe inclineof
the
treadmill,press the II33:4BII
INCLINE buttons. Each _,,,
time one of the buttons is
pressed, the incline will
change by 0.5%. The in-
cline range is 1.5% to
12%. Note: When one of
the INCLINE buttons is pressed, the TIME/IN-
CLINFJSEG TIME display will show the incline
settingfor several seconds. After the buttons are
pressed, it may take a moment for the treadmill to
reach the selected incline setting.
B Follow your progress with the LED track and
the four displays.
B Insert the key fully Into the console.
When the key is
inserted,the fourdis-
plays and various indi-
catorson theconsole
willlight.
B Select the manual mode.
When the key isin-
serted, the manual
mode willbe selected
and the MANUAL indi-
cator willlight.Ifa pro-
gram is selected,press
the PROGRAM button
MAM_L CONT_C__
repeatedly toselect the manual mode.
_|1 Press the START button or the SPEED A button
to start the walking belt.
A moment afterthe but-
ton ispressed, the walk-
ingbelt willbeginto
moveat 1 mph. Hold the
handrailsand carefully
beginwalking.As you
The LED Track--The
LED trackrepresents a
distanceof 1/4 mile.As
you exercise,the indica-
torsaround thetrackwill
lightone at a timeuntil
you havecompleted 1/4
mile. A new lap willthen begin.
DISTANCE/LAPS dis-
play--This displayshows
the distancethat you
have walked or runand
the numberof lapsyou
have completed (one lap
DISTANCE LAPS
equals114mile). The display willalternate
between one numberand the otherevery seven
seconds,as shownbythe arrows in thedisplay.
TIME/INCLINE/SEG
TIME display--When the
manualmode or an
iFit.comprogramisse-
lected,thisdisplayshows
the elapsedtime. When a
personal trainer programisselected,this display
showsboththetime remaininginthe program and
the timeremaininginthe currentsegment ofthe
program.The displaywillalternate betweenone
numberand theothereveryseven seconds.Each
timethe INCLINE buttonsare pressed,thisdisplay
showsthe currentinclinesetting.
lO
CALS/FAT CALS/
PULSE display--This
displayshows the ap-
proximate numbersof
calories and fat calories
you have burned(see
eEKG PULSE
_ 1221
CALS FAT CALS
FAT BURNING on page 22). Every seven sec-
onds, the display willchange from one numberto
the other, as shownby thearrows inthe display.
This displaywillalso show yourheart rate when
the pulsesensorisused (see step6 on thispage).
SPEED/MIN-MILE
dlsptay--This display
showsthe speed of the
walking belt and your
currentpace (pace is
measured in minutesper
mile). Everyseven seconds, the displaywill
changefrom one numberto the other, as shown
bythe arrowsin the display.
Note: The SPEED/MIN-MILE display canshow
speed in either miles per hour or kilometersper
hour.To determine whichunitof measurementis
selected, holddownthe STOP buttonwhile insert-
ingthe key intothe console.An "E," for english
miles,or an _M,"for met-
ric kilometers,willappear
inthe display.Pressthe
SPEED A buttonto
changethe unitof mea-
surement.When the de-
siredunitof measure-
II MIN / MILE (km)]
opoooE !
ment isselected,remove and then reinsertthe
key. Note: Forsimplicity,all instructionsin this
manual referto miles.
Note:To reset thedisplays, pressthe STOP but-
ton,removethe key,and then reinsertthe key.
r_ Measure your pulse, If desired.
Stand on the
foot rails and Sensors
place your
handson the
metal contacts
on the pulsebar.
Yourpalms
mustbe resting
on the upper
contacts, and _EKG PULSE
your fingers must
be touchingthe _ 122
lowercon_cts--
avoid moving CALORIES FAT CALORIES
your hands.
When yourpulse
isdetected, the heart-shapedindicatorin the
CALS/FAT CALS/PULSE displaywillflash
stesdlly and a series ofdashes (-- --) willap-
pear. After a few seconds,your heart ratewillbe
shown. For the most accurate heart rate read-
Ing, continue to hold the contacts for about 15
seconds.
B When you are finished exercising, remove the
key.
Stepontothe footrails,
pressthe STOP button,
and remove thekey from
the console. Keep the
key ina secure place.
Note: If the displays
and various Indicators on the console remain
lit after the key is removed, the console is In
the "demo" mode. Refer to page 18 and turn off
the demo mode.
When you are finishedusingthe treadmill, move
the on/offswitchnearthe powercordtothe off
position.
11
i1
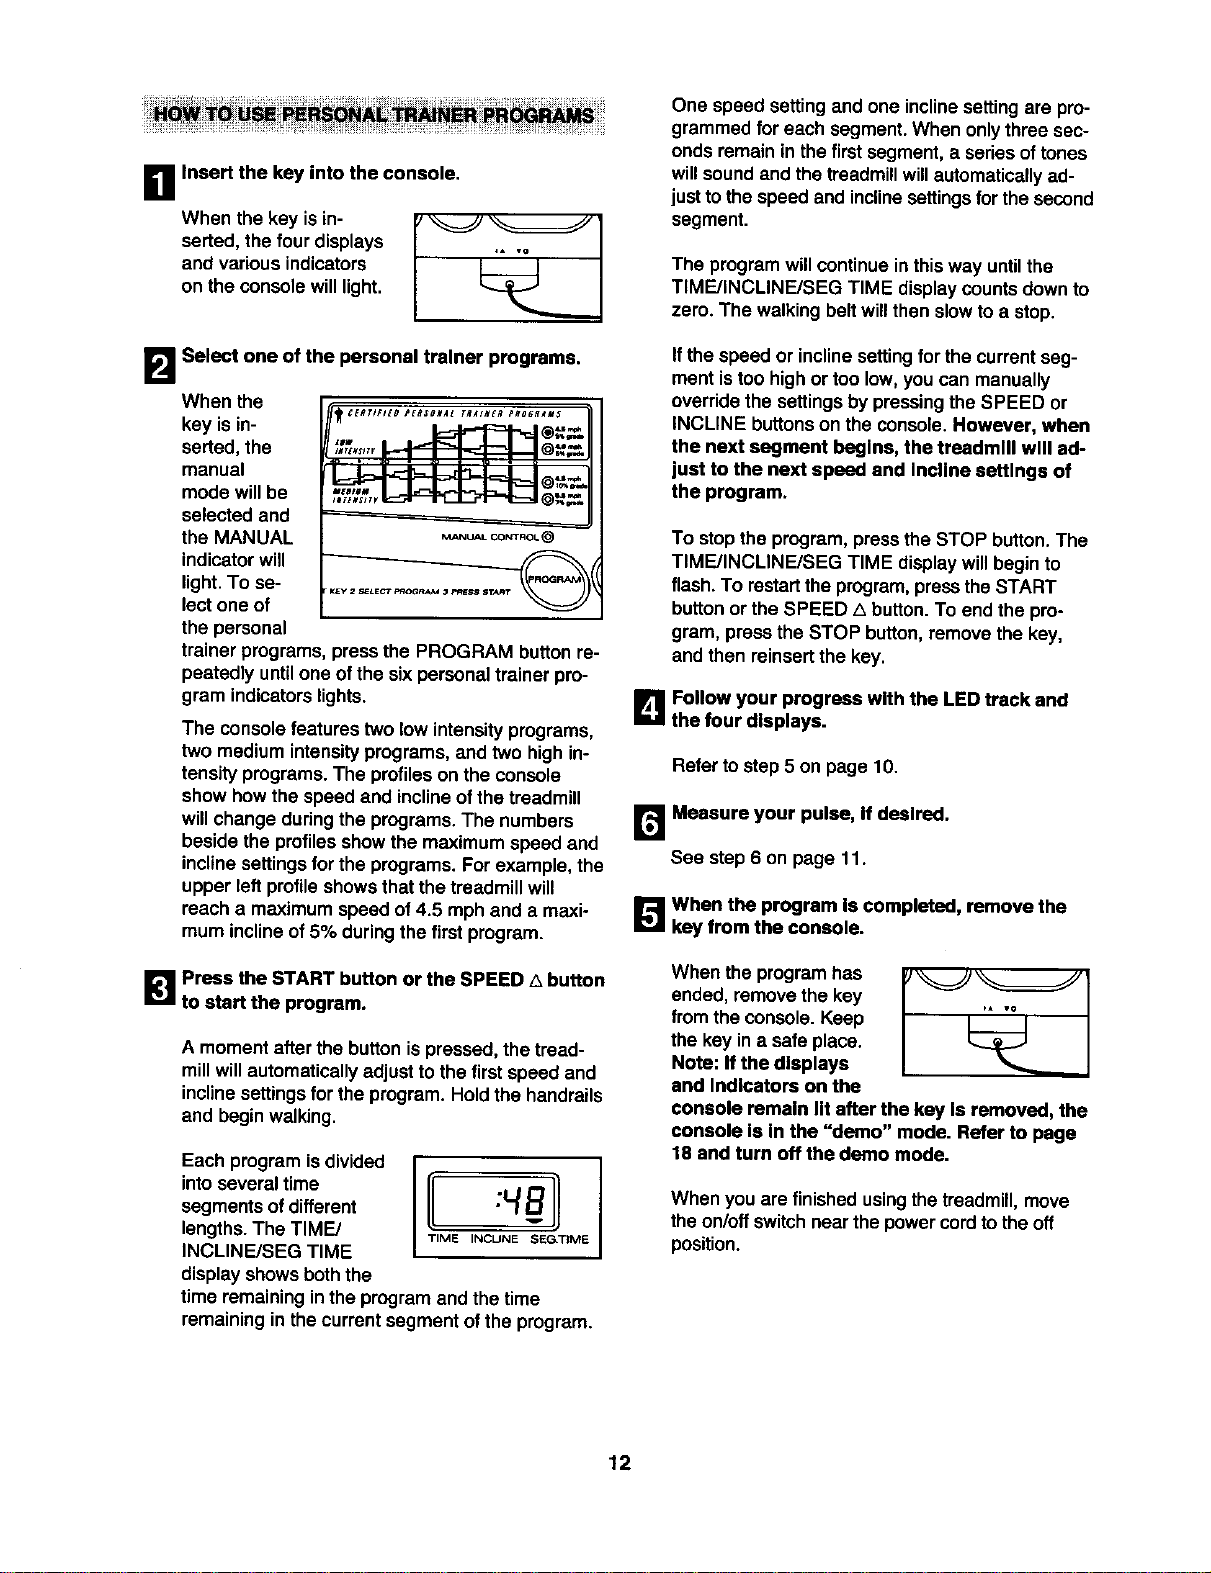
Insert the key into the console.
When the key isin-
serted, the four displays
and various indicators
on the consolewill light.
B Select one of the personal trainer programs.
When the
key isin-
serted,the
manual
mode willbe
selected and
the MANUAL
indicator will
light. To se-
lect one of
the personal
trainer programs,press the PROGRAM button re-
peatedly until one of the sixpersonal trainer pro-
gram indicators lights.
The console features twolow intensityprograms,
two mediumintensityprograms,and two high in-
tensityprograms.The profileson the console
show how thespeed and inclineofthe treadmill
willchange duringthe programs.The numbers
beside the profilesshowthe maximum speed and
inclinesettingsforthe programs.For example, the
upper left profile showsthatthe treadmill will
reach a maximum speed of 4.5 mph and a maxi-
mum incline of 5% during the first program.
1_1 Press the START button or the SPEED A button
to start the program.
A moment afterthe button ispressed, the tread-
millwillautomaticallyadjust to the firstspeed and
inclinesettingsfor the program. Holdthe handrails
and beginwalking.
Each programisdivided
into several time
segmentsofdifferent
lengths.The TIME/
INCLINE/SEG TIME
displayshowsboththe
time remainingin the programand the time
remaining inthe currentsegment of the program.
One speed settingand one inclinesettingare pro-
grammed for each segment.When onlythree sec-
ondsremain in the firstsegment,a seriesof tones
willsoundand the treadmillwillautomaticallyad-
justto thespeed and inclinesettingsfor the second
segment.
The programwillcontinuein this way untilthe
TIME/INCLINE/SEG TIME display counts down to
zero. The walking beltwillthen slowto a stop.
Ifthe speed or inclinesettingfor the currentseg-
mentistoo high or too low,you can manually
overridethe settingsbypressingthe SPEED or
INCLINE buttonson the console.However, when
the next segment begins, the treadmill will ad-
just to the next speed and Incline settings of
the program.
To stopthe program, press the STOP button. The
TIME/INCLINE/SEG TIME displaywillbegin to
flash. To restartthe program,presstheSTART
buttonor the SPEED LI button.To end the pro-
gram, prosethe STOP button,remove the key,
and then reinsertthe key.
L_ Follow your progress with the LED track and
the four displays.
Refer to step 5 on page 10.
r_ Measure your pulse, If desl_-=d.
See step6 on page 11.
_'J_ When the program Is completed, remove the
key from the console.
When the program has
ended, removethe key
fromthe console. Keep
the key in a safe place.
Note: If the displays
and Indicators on the
console remain lit after the key Is removed, the
console Is In the "demo" mode. Refer to page
18 and turn off the demo mode.
When you are finished usingthe treadmill,move
the on/offswitchnearthe powercordto the off
position.
12
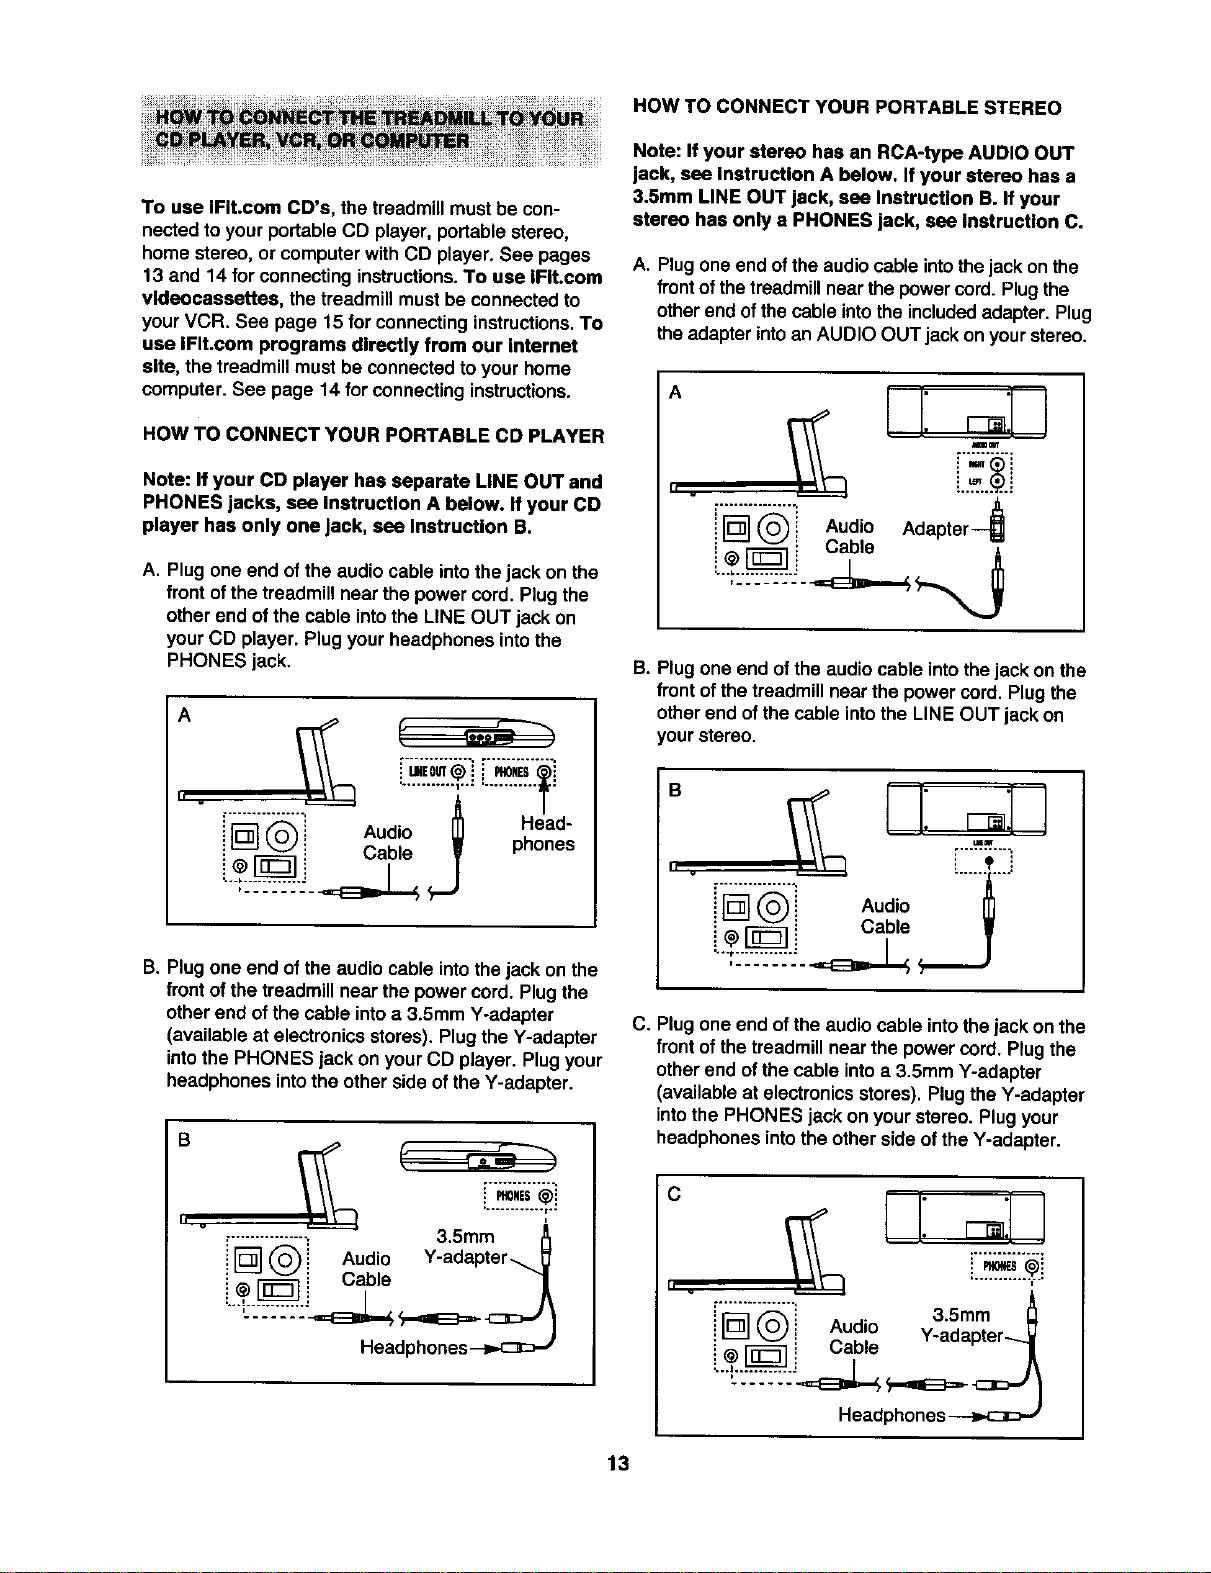
HOW TO CONNECT YOUR PORTABLE STEREO
To use IFit.com CD's, the treadmillmustbe con-
nectedto your portableCD player, portablestereo,
home stereo, or computerwith CD player. See pages
13 and 14 for connectinginstructions.To use IFit.com
vldeocassettes, the treadmillmustbe connectedto
your VCR. See page 15 for connectinginstructions.To
use IFIt.com programs directly from our internet
site, the treadmillmustbe connectedto your home
computer. See page 14 for connectinginstructions.
HOW TO CONNECT YOUR PORTABLE CD PLAYER
Note: If your CD player has separate LINE OUT and
PHONES jacks, see InstrucUon A below. If your CD
player has only one jack, see Instructlon B.
A. Plug one end of the audio cable intothe jack on the
front ofthe treadmillnear the powercord. Plug the
otherend ofthe cable intothe LINE OUT jack on
yourCD player. Plugyourheadphones intothe
PHONES jack,
A
II .
1
/
Audo Head-
i L_J_ i Cable W pnones
J
B. Plugone end of the audio cable intothejack on the
front of the treadmillnear the powercord. Plugthe
otherend of the cable intoa 3.5mm Y-adapter
(available at electronicsstores),Plugthe Y-adapter
intothe PHONES jackon yourCD player. Plugyour
headphones intothe other side ofthe Y-adapter.
" v
r.............. 3.5mm_0NES
i _ ('_i Audio Y-adapter_
i _r-_ i Cable '1
Headphones
Note: If your stereo has an RCA-type AUDIO OUT
jack, see Instruction A below. If your stereo has a
3.5mm LINE OUT jack, see Instruction B. If your
stereo has only a PHONES jack, see Instruction C.
A. Plugone end ofthe audiocable intothe jack onthe
front ofthetreadmillnear the powercord.Plugthe
otherend ofthecable intotheincludedadapter. Plug
theadapter intoan AUDIO OUT jackon yourstereo.
A
" v
i'F_]"_'" Audio Adaptar--_
C ,a
B. Plugone end ofthe audio cable intothe jack on the
front of thetreadmillnear the powercord. Plugthe
otherend of the cable intothe LINE OUT jack on
yourstereo.
" ......
C. Plug one end ofthe audio cable into thejack on the
frontof thetreadmillnear the power cord. Plugthe
other end ofthe cable intoa 3.5mm Y-adapter
(availableat electronicsstores). Plugthe Y-adapter
intothe PHONES jack on yourstereo. Plugyour
headphonesintothe other side ofthe Y-adapter.
c
II u
A
[................! 3.5mm
:[] Q: _ _. -adapter-.._i ! Audio y
! @_ i L;aole /
L..l............i =EDL__ __=E_ _=._
Headphones---i=.c_)J
13
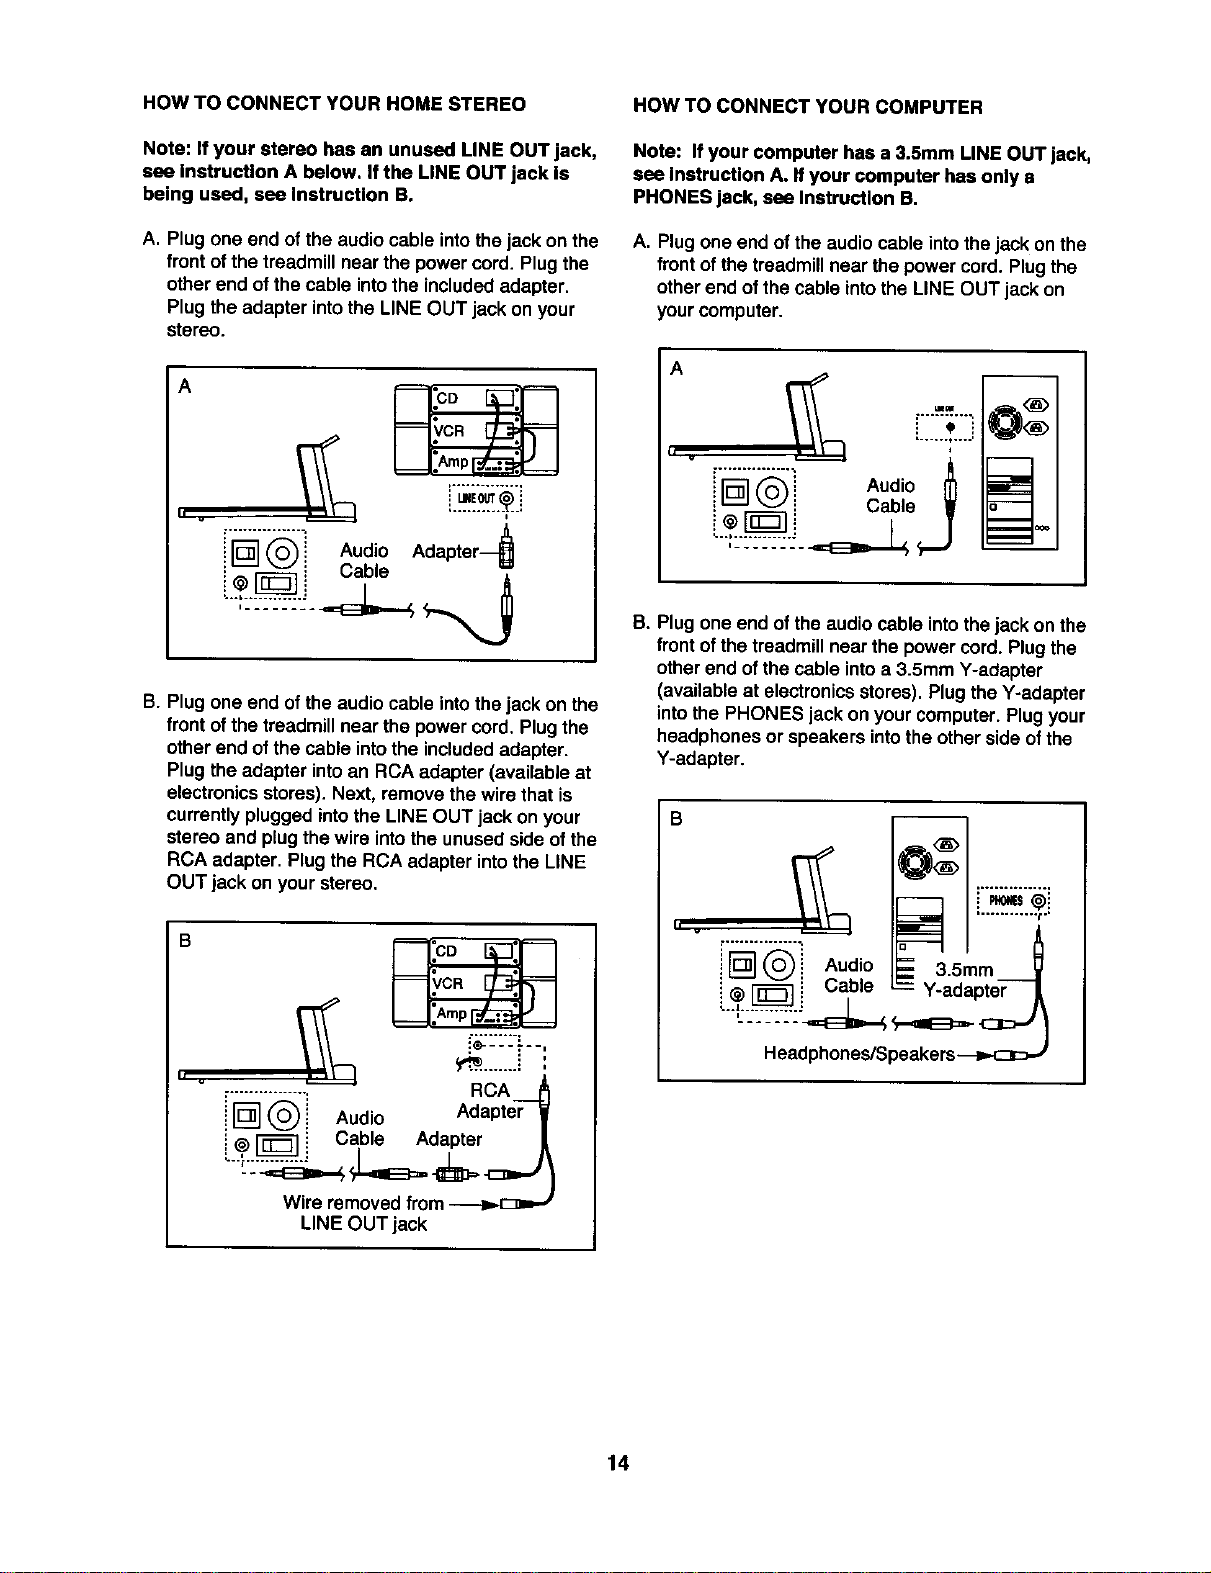
ROW TO CONNECT YOUR HOME STEREO
Note: If your stereo has an unused LINE OUT jack,
see Instruction A below. Ifthe LINE OUT jack Is
being used, see Instruction B.
A. Plug one end of the audio cable intothe jack on the
front of the treadmill near the power cord. Plug the
other end of the cable into the included adapter.
Plug the adapter into the LINE OUT jack on your
stereo.
A
h
B. Plug one end of the audio cable intothe jack on the
front of the treadmill near the power cord. Plug the
other end of the cable into the included adapter.
Plug the adapter into an RCA adapter (available at
electronics stores). Next, remove the wire that is
currentlyplugged into the LINE OUT jack on your
stereo and plug the wire into the unused side of the
RCA adapter. Plug the RCA adapter into the LINE
OUT jack on your stereo.
B
.__--_--.---_.,
,................ RCA .._
i l_ _ Audio Adapter 1
! ,-__ Cable Adapter
Wire removed from --_.E_--
LINE OUT jack
HOW TO CONNECT YOUR COMPUTER
Note: If your computer has a 3.5mm LINE OUT jack,
see Instruction A. Ifyour computer has only a
PHONES jack, see Instruction B.
A. Plug one end of the audio cable into the jack on the
front of the treadmill near the power cord. Plug the
other end of the cable Into the LINE OUT jack on
your computer.
A
•.._...t .o..,
Ir ............... • Itl
("_ Audio nl
_ i Cable •
I.,I
B. Plugone end of the audio cable intothe jack on the
front of the treadmill near the power cord. Plug the
other end of the cable into a 3.5mm Y-adapter
(available at electronics stores). Plug the Y-adapter
into the PHONES jack on your computer. Plug your
headphones or speakers into the other side of the
Y-adapter.
B
i i Audio =" 35ram
_[_1-_ i Cable _" Y-adapter-_
14
HOW TO CONNECT YOUR VCR
Note: If your VCR has an unused AUDIO OUT jack,
sea Instruction A below. If the AUDIO OUT jack Is
belng used, sea Instruction B. If you have a TV
wlth a bullt-ln VCR, sea Instruction B. If your VCR
Is connected to your home stereo, sea HOW TO
CONNECT YOUR HOME STEREO on page 14.
A. Plugone end of the audio cable intothe jack on the
front of the treadmillnear the powercord. Plugthe
other end of the cable intothe includedadapter.
Plugthe adapter intothe AUDIO OUT jackon your
VCR.
A
II v
MI0 al_
i'F:'_]°'_'i Audio Adapter---_
i @ [-_1 i Cable
B. Plugone end of the audio cable intothejack on the
front of the treadmillnear the powercord. Plugthe
otherend ofthe cable intothe includedadapter.
Plugthe adapter intoan RCA adapter (available at
electronicsstores).Next, remove the wire that is
currentlyplugged intothe AUDIO OUT jack on your
VCR and plug thewire intothe unused side ofthe
RCA adapter. Plugthe RCA adapter intothe AUDIO
OUT jack on yourVCR.
B
II v
i'_"_"! RCA Adapter--
i L_ (_i Audio
! _ [_']i Cable Adapter
Wire removedfrom_
AUDIO OUT jack
To use iFit.comCD's orvideocassettes,the treadmill
mustbe connectedtoyourportableCD player, portable
stereo,home stereo, computerwithCD player, or
VCR. See HOW TO CONNECT THE TREADMILL TO
YOUR CD PLAYER, VCR, OR COMPUTER on page
13. Note: To purchase IFIt.com CD's or IFIt.com
vldeacaasettes, sea your local PROFORM dealer or
call toll-frea 1-800-735-0768.
Make surethatthe on/off
switchnear the powercord
isin the on position.In
addition,make sure thatthe
powercordis properly
pluggedin (see HOW TO
IOn
Position
PLUG IN THE POWER CORD on page 8).
When you are readyto beginexercising,step ontothe
foot railsofthe treadmill. Findthe clipattachedto the
key (see the drawingon page 9), and slidethe clip
ontothe waistbandof yourclothing.Followthe steps
belowto usean iFit.comCD orvideo. Note: The In-
structions Included In the CD case describe how to
use the CD with a variety of PROFORM treadmills.
Some Instructions may not apply to this treadmill.
When the key is
inserted,thefourdisplays
and various indicators
on the consolewilllight.
B Insert the key fully into the console.
B Press the PROGRAM button.
When the key isin-
serted,the manual
mode willbe selected.
To use an iFit.comCD
or videoprogram, press
the PROGRAM button.
The iFit.comindicator
willlight.
K I
!_1 Insert the IFIt.com CD or vldeocassette.
If you are usingan iFit.comCD, insertthe CD into
yourCD player. Ifyou are usingan iFit.comvideo-
cassette, insertthe videocassetteintoyourVCR.
15
D Press the PLAY button on your CD player or
VCR.
A momentafter the buttonis pressed,your per-
sonal trainer willbegin guidingyou throughyour
workout.Simplyfollowyourpersonaltrainer's
instructions.Note: Ifthe TIME/INCLINE/SEG
TIME display Isflashing, press the Startbuttonor
the Speed Z_buttonon the console.The treadmill
willnot respondto a CD or video programwhen
theTIME/INCLtNE/SEG TIME disptayis flashing.
Duringthe CD or videoprogram,an electronic
"chirping" soundwillalertyou whenthe speed
and/orinclineofthetreadmillisabouttochange.
CAUTION: Always listen for the "chirp" and be
prepared for speed end/or Incline changes. In
some instances, the speed and/or incline may
change before the personal trainer deacrlbea
the change.
If the speed or inclinesettingsare too highor too
low,you can manuallyoverridethe settingsat any
time bypressingthe SPEED or INCLINE buttons
on the consols. However, when the next "chirp"
Is heard, the speed and/or Incline will change
to the next settings of the CD or video program.
To stop the program at any time, press the
START/STOP buttonon the console.The
TIME/MIN-MILE display willbeginto flash. To
restartthe program, press the START/STOP but-
ton again. After a moment, thewalking belt will
begin to moveat 1 mph.When the next "chirp"
Is heard, the speed and Incline will change to
the next settings of the CD or video program.
The programcan also be stopped by pressingthe
STOP buttonon yourCD playeror VCR.
When theCD or videoprogramiscompleted,the
walkingbeltwillstopand theTIME/MIN-MILE dis-
play willbegin toflash. Note:To useanother CD
or videoprogram,press the START/STOP button
or remove the key and go to step 1 on page 15.
Note: If the speed or incline of the treadmill
does not change when a "chirp" is heard:
• make sure that the IFIt.com Indicator Is lit and
that the TIME/INCLINE/SEG TIME display Is
not flashing. If the TIME/tNCLINE/SEG TIME
display Is flashing, press the Start button or
the Speed A button on the console
• adjust the volume of your CD player or VCR. If
the volume Is too high or too low, the console
may not detect the program signals
• make sure that the audio cable Is properly
connected, that It Is fully plugged In, and that
It Is not wrapped around a power cord
• If you are using your portable CD player and
the CD skips, set the CD player on the floor or
another flat surface Instead of on the console.
l_'J_Follow your progress with the LED track and
the four displays.
See step5 on page 10.
rt,,,_Measure your pulse, If dealred.
See step6 on page 11
B When the IFIt.com CO or video program Is
finished, remove the key.
Step ontothefootrails
and removethekey from
the console.Keep the
key Ina secure place.
Note: If the displays
and various Indicators
on the console remain nt after the key Is re-
moved, the console Is In the "demo" mode.
Refer to page 18 and turn off the demo mode.
CAUTION: Always remove IFIt.com CD's and
vldeocassettes from your CD player or VCR
when you are finished using them.
When you are finished usingthe treadmill,move
theon/off switchnear thepower cordtothe off
position.
16

Our new internetsiteat www.iFit.comallows you to
access a large selectionof programsthat interactively
controlyourtreadmillto helpyou achieve your specific
exercise goals. In addition,you can play iFit.comaudio
and video programsdirectlyfrom the internet.By
addingan optionalupgrade module tothe console,you
can use virtuallyendlessfeatures on ourintemetsite.
Explorewww.iFit.comfor details.To purchasean up-
grade module,call toll*free1-800-735-0768.
To use programsfrom our internetsite, the treadmill
mustbe connectedtoyour home computer. See HOW
TO CONNECT YOUR COMPUTER on page 14. In ad-
dition,you musthave at least a 56K modem and an
accountwith an internetservice provider. A listof addi-
tional systemand software requirementswillbe found
on our internet site.
Next, make sure thatthe
on/off switchnear the
power cordis in theon po-
sition. In addition, make
sure that the powercord is
properlypluggedin (see
OnJ
Position
HOW TO PLUG IN THE POWER CORD on page 8).
Followthe steps below to use a program from our
internetsite.
B Insert the key fully into the console.
When the key is
inserted,the four dis-
plays and various indi-
cators on the console
will light.
B Press the PROGRAM button.
When the key is in-
serted, the manual
mode willbe selected.
To use a program from
our internat site, press
the PROGRAM button.
The iFit.com indicator
will light.
]Go to your computer and start an Internet
connection.
B Start your web browser, If necessary, and go to
our Internet site at www.IFit.com.
_'JJ Follow the desired links on our Internet site to
select a program.
Read and follow the on-lineinstructionsfor usinga
program.
r,_ Follow the on-line Instructions to start the
program.
When you startthe program,an on-screen count-
down willbegin.
B Return to the treadmill and stand on the foot
rails. Find the clip attached to the key and slide
the key onto the waistband of your clothing.
When theon-screencountdown ends,the program
willbegin and thewalkingbeltwillbegin to move.
Holdthe handrails,stepontothewalkingbelt,and
beginwalking.
Duringthe program, an elec_onic"chirping" sound
willalertyou when the speed and/or inclineof the
treadmill is about to change. CAUTION: Always
listen for the "chirp" and be prepared for speed
and/or Incline changes.
If the speed or inclinesettingsare too highor too
low,you can manually overridethe settingsat any
time by pressingthe SPEED or INCLINE buttons
on the console. However, when the next "chirp"
Is heard, the speed and/or Incline will change
to the next settings of the program.
To stopthe programat any time, press the STOP
buttonon the console.The TIME/INCLINE/SEG
TIME displaywillbegin toflash. To restart the pro-
gram, press the START button.After a moment,
the walkingbelt willbeginto moveat 1.0 mph.
When the next "chirp" Is heard, the speed and
Incline will change to the next settings of the
program.
When the programiscompleted,thewalkingbelt
willstopand theTIME/INCLINFJSEG TIME display
willbeginto flash. Note:To use another program,
press the STOP buttonand go to step5 above.
Note: Ifthe speed or Incline ofthe treadmill
does not change when a "chirp" is heard, make
sure that the IFIt.com Indicator Is lit and that
the TIME/INCLINFJSEG TIME display Is not
flashing. In addition, make sure that the audio
cable is properly connected, that It Is fully
plugged In, and that It Is not wrapped around a
power cord.
17
B FollowyourprogresswiththeLEDtrackand
thefourdisplays.
Seestep5onpage10.
!_1 Messureyourpulse,Ifdesired.
Seestep6onpage11.
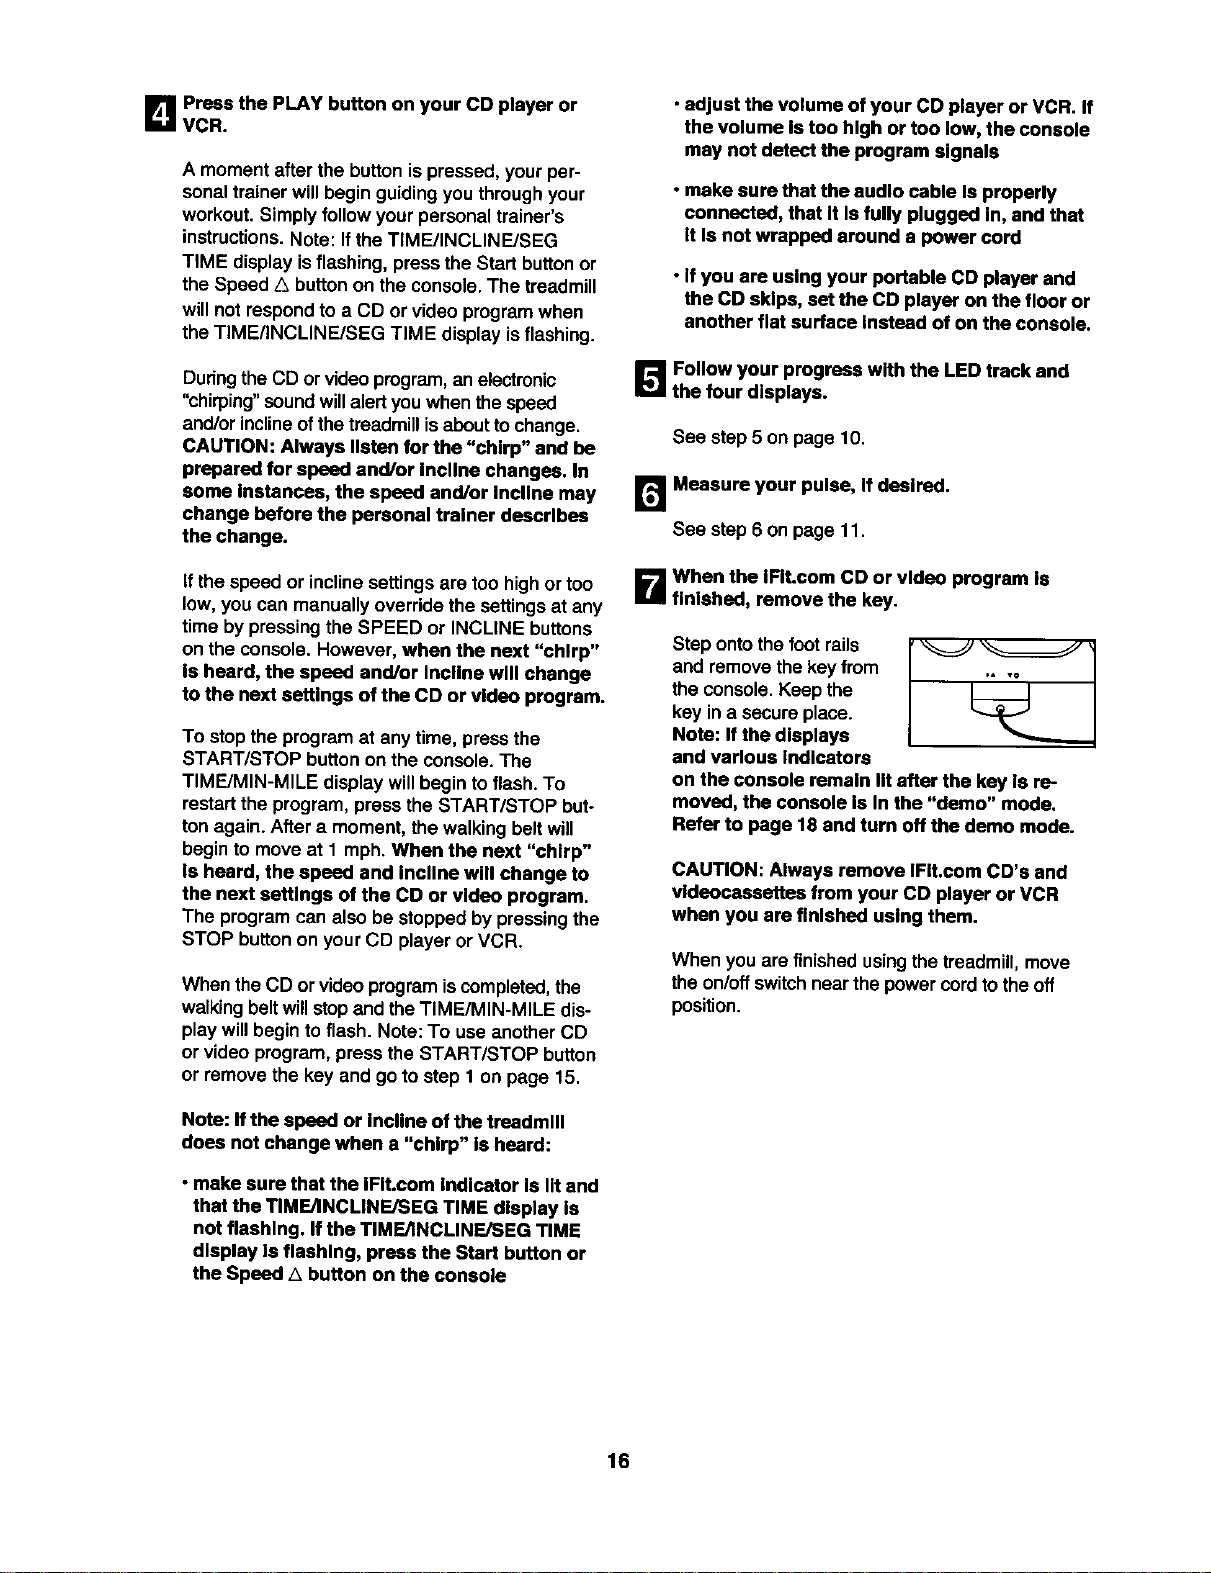
_I_ When the program Is flnlshed, remove the
key.
Step ontothefoot railsand removethe key from
the console.Keepthe key in a secure place. Note:
If the displays and various Indlcatora on the
console remain lit after the key Is removed, the
console Is In the "demo" mode. Refer to the In-
structions st the right and turn off the demo
mode.
When you are finishedusingthe treadmill,move
theon/off switchnear the powercordto the off
position.
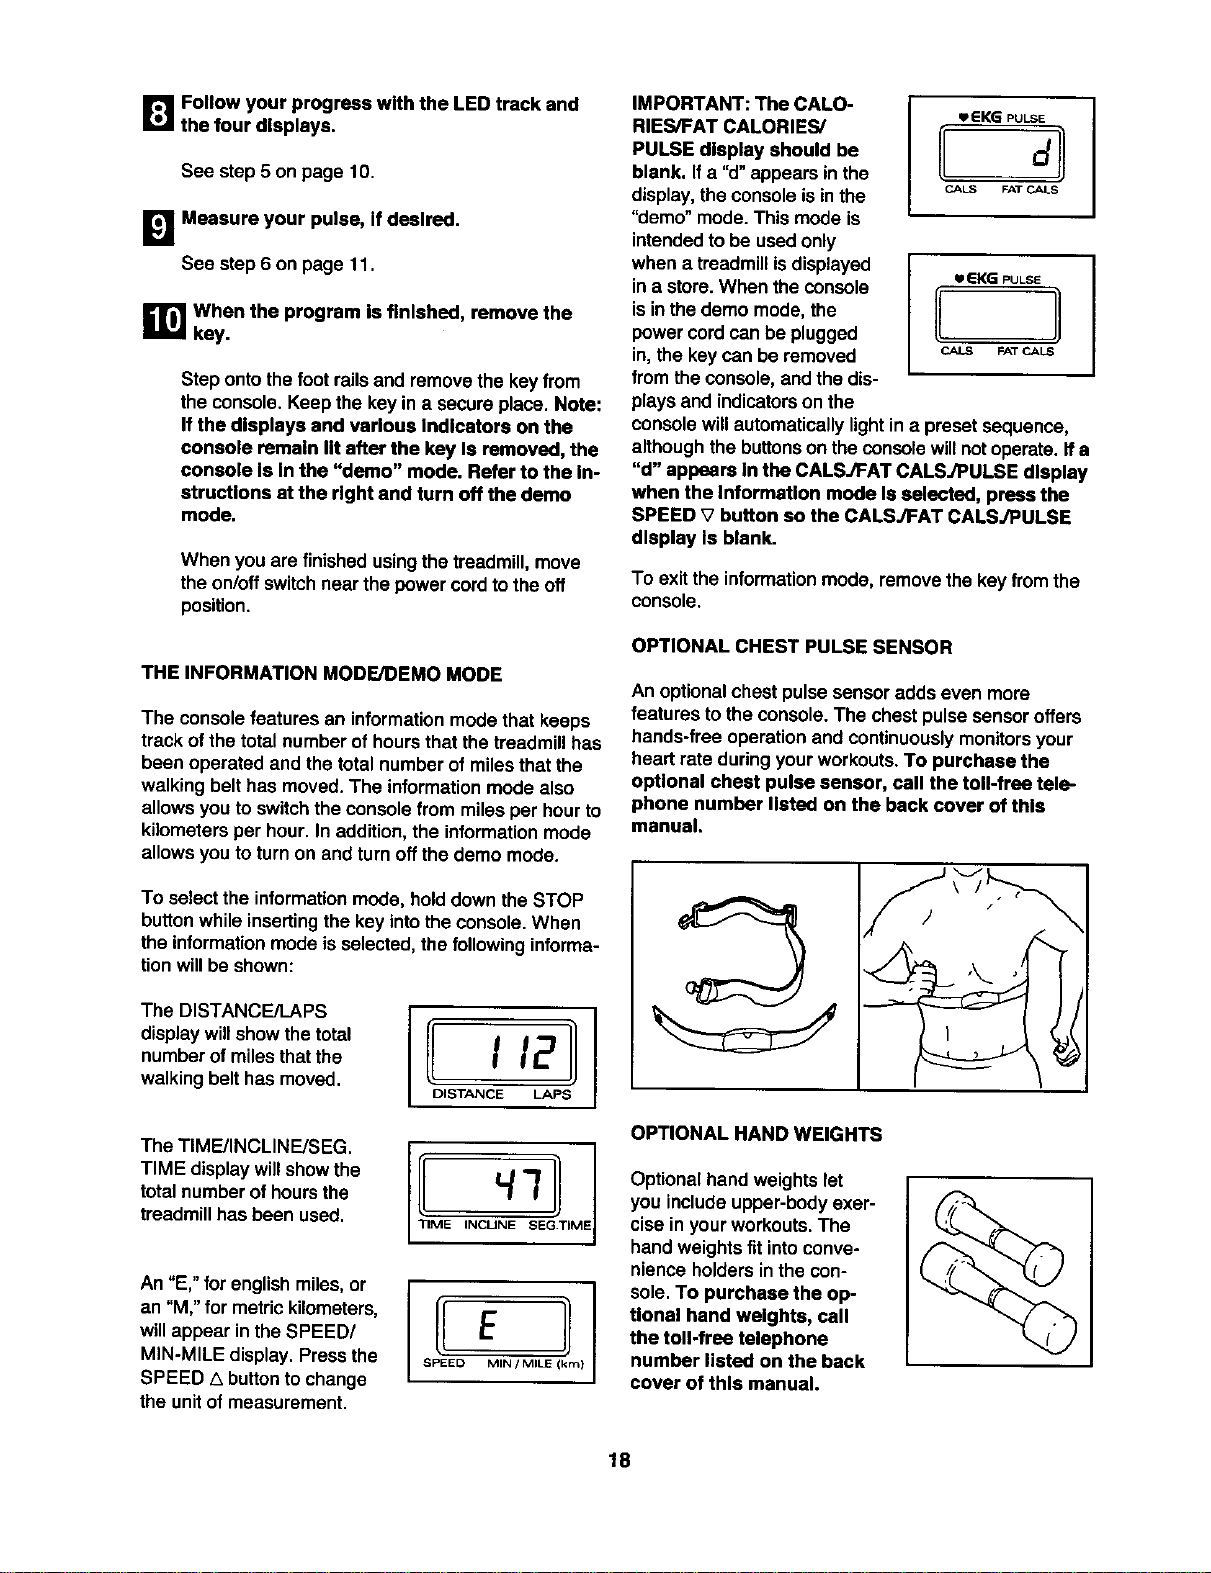
THE INFORMATION MODE/DEMO MODE
The consolefeatures an informationmodethat keeps
trackof the total numberof hoursthat thetreadmillhas
been operated and thetotal number of milesthatthe
walking belt has moved.The informationmode also
allowsyou to switchthe console from milesper hourto
kilometersper hour.In addition,the informationmode
allowsyou to turnon and turnoffthe demo mode.
To selectthe informationmode, holddownthe STOP
buttonwhileinsertingthe key intotheconsole.When
the informationmode isselected,the following informa-
tionwillbe shown:
The DISTANCE/LAPS
display will show the total
number of miles that the
walking belt has moved.
I I12
DISTANCE LAPS
The TIMFJINCLINE/SEG.
TIME display willshow the
total number of hours the
treadmill has been used.
An "E," for englishmiles,or
an "M,"for metrickilometers,
willappear in theSPEED/
MIN-MILE display.Pressthe
SPEED 1_buttontochange
the unitof measurement.
I S!!D EMIN/MILIE(km)
IMPORTANT: The CALO-
RIES/FAT CALORIES/
PULSE display should be
blank. If a "d" appearsin the
display,the consoleis inthe
"demo" mode.This mode is
intendedto be usedonly
when a treadmillisdisplayed
ina store.When the console
isinthe demo mode, the
power cordcan be plugged
in,the keycan be removed
fromthe console,andthe dis-
plays and indicatorson the
lip e K_ pULSE
CA_ FAT C_LS
UEKG PULSE
CALS FAT CALS
consolewillautomaticallylightin a preset sequence,
althoughthe buttonson theconsole willnotoperate.If a
"d" appears In the CALSJFAT CALSJPULSE display
when the Information mode Is selected, press the
SPEED V button so the CALS./FAT CALSJPULSE
display Is blank.
To exit the informationmode, removethe key fromthe
consols.
OPTIONAL CHEST PULSE SENSOR
An optionalchestpulse sensoradds even more
features tothe console.The chest pulse sensoroffers
hands-free operationand continuouslymonitorsyour
heart rate duringyourworkouts.To purchase the
opUonal chest pulse sensor, call the toll-free tele-
phone number listed on the back cover of this
manual.
OPTIONAL HAND WEIGHTS
Optionalhandweightslet
you includeupper-body exer-
cisein your workouts. The
hand weights fit into conve-
nience holders in the con-
sole.To purchase the op-
tional hand weights, call
the toll-free telephone
number listed on the back
cover of this manual.
18
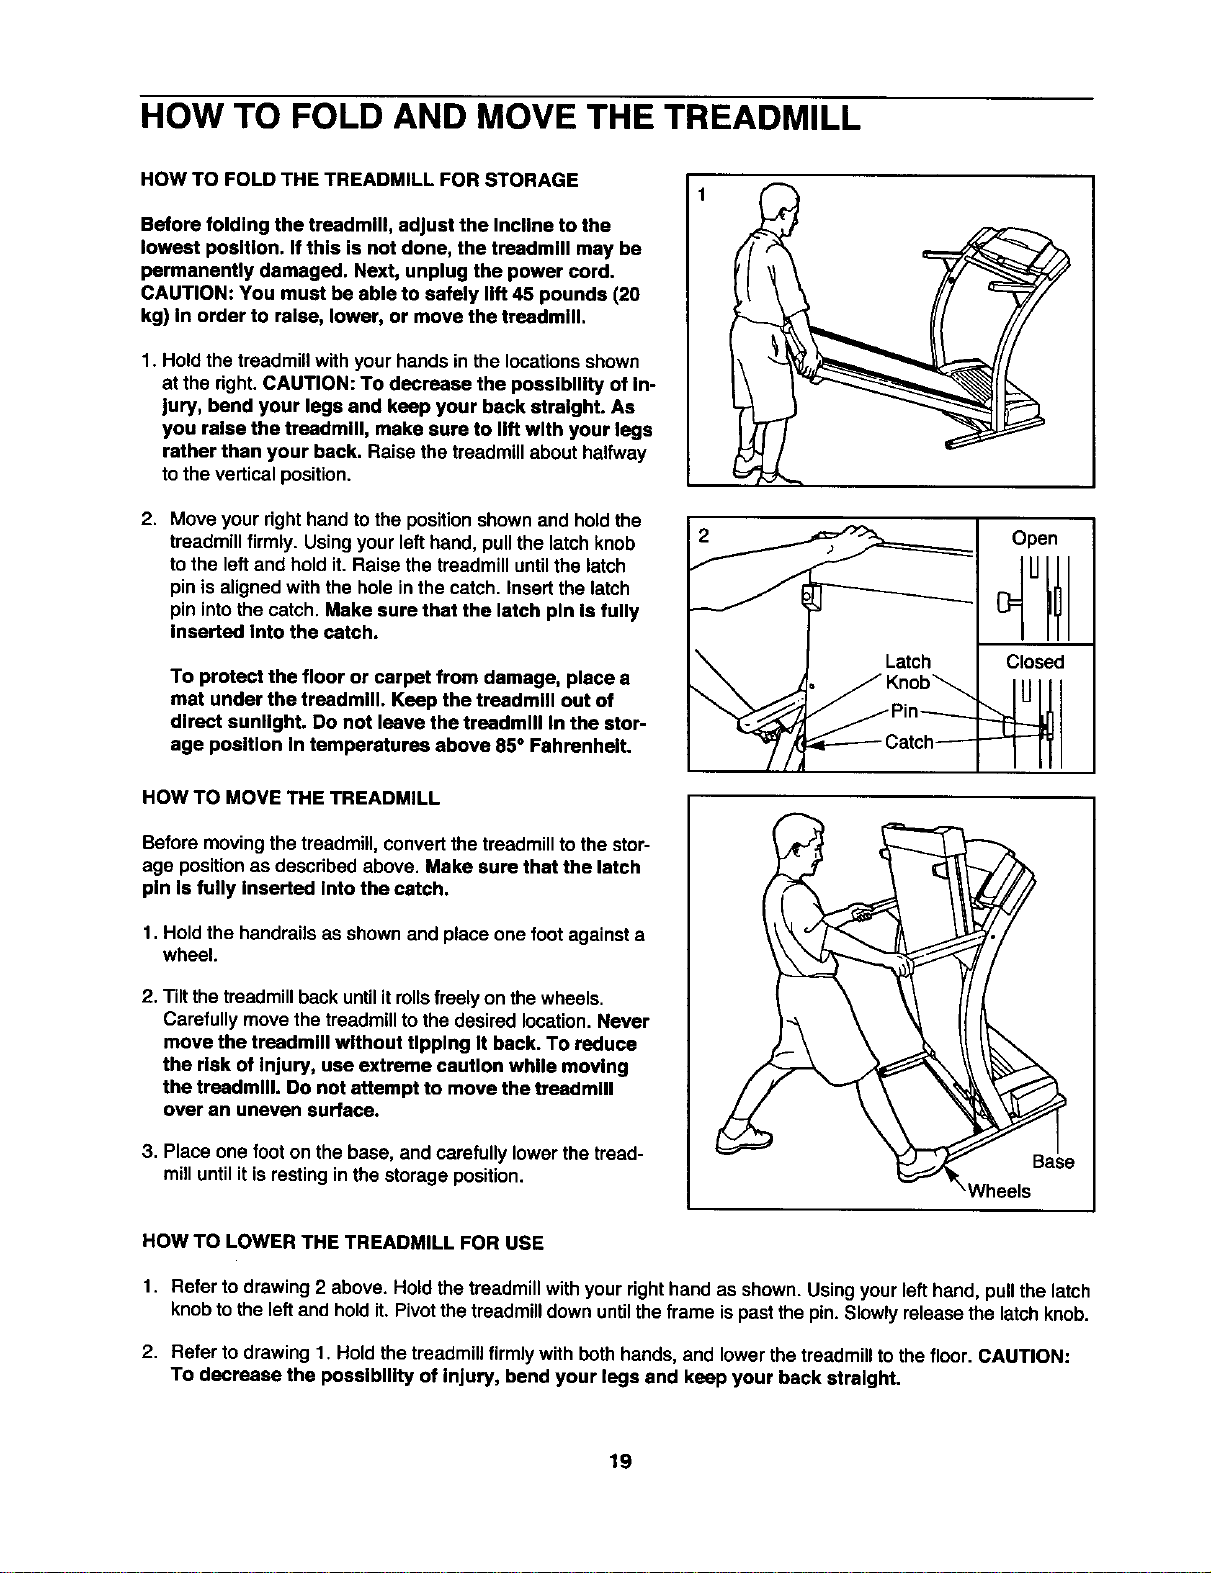
HOW TO FOLD AND MOVE THE TREADMILL
HOW TO FOLD THE TREADMILL FOR STORAGE
Before folding the treadmill, adjust the Incline to the
lowest position. If this is not done, the treadmill may be
permanently damaged. Next, unplug the power cord.
CAUTION: You must be able to safely lift 45 pounds (20
kg) In order to raise, lower, or move the treadmill.
1. Holdthe treadmillwith your hands in the locationsshown
at the right.CAUTION: To decrease the possibility of In-
jury, bend your legs and keep your back straight. As
you relse the treadmill, make sure to lift with your legs
rather than your back. Raise the treadmillabout halfway
tothe verticalposition.
2. Move your righthandto the positionshownand holdthe
treadmillfirmly. Usingyourlefthand, pullthe latch knob
to the leftand holdit. Raise the treadmilluntilthe latch
pinis alignedwith the hole inthe catch. Insertthe latch
pinintothe catch. Make sure that the latch pin Is fully
Inserted Into the catch.
To protect the floor or carpet from damage, place a
mat under the treadmill. Keep the treadmill out of
direct sunlight. Do not leave the treadmill In the stor-
age position In temperatures above 85° Fahrenheit.
Open
Closed
HOW TO MOVE THE TREADMILL
Beforemovingthe treadmill,convertthe treadmillto the stor-
age positionas describedabove. Make sure that the latch
pin Is fully Inserted Into the catch.
1. Hold the handrailsas shownand place one foot againsta
wheel.
2. Tiltthetreadmillback until it rollsfreelyon the wheels.
Carefullymovethe treadmillto the desired location.Never
move the treadmill without tipping It back. To reduce
the risk of Injury, use extreme caution while moving
the treadmill. Do not attempt to move the treadmill
over an uneven surface.
3. Place one foot on the base, and carefully lowerthe tread-
milluntilit isrestingin the storageposition.
!
HOW TO LOWER THE TREADMILL FOR USE
1. Refer to drawing2 above. Hold the treadmillwith yourrighthand as shown. Usingyour lefthand, pullthe latch
knobtothe leftand holdit. Pivotthe treadmilldownuntilthe frame ispastthe pin.Slowlyreleasethe latchknob.
2. Refer to drawing 1. Hold the treadmillfirmly with bothhands, and lowerthe treadmilltothe floor. CAUTION:
To decrease the possibility of Injury, bend your legs and keep your back straight.
19
TROUBLE-SHOOTING
Most tresdmlll problems can be solved by following the simple steps below. Find the symptom that
applies, and follow the steps listed. If further assistance Is needed, call our toll-free HELPLINE at
1-800-736-6879, Monday through Saturday, 7 a.m. until 7 p.m. Central Time (excluding holidays).
PROBLEM: The power does not turn on
SOLUTION:
a. Make sure thatthe powercord ispluggedintoa surgesuppressor,and that the surgesuppressor
isplugged intoa properlygroundedoutlet(see page 7). Use onlya single-outletsurgesuppressor
that isUL 1449 listedas a transientvoltage surgesuppressor(TVSS). The surge suppressor
musthave a UL suppressedvoltage ratingof400 voltsor lessand a minimumsurgedissipation
of450 joules. The surgesuppressormustbe electricallyrated for 120 voltsAC and 15 amps.
Important:The treadmillisnot compatiblewith GFCl-equipped outlets.
b. After the powercordhas been plugged in, make surethatthe key is fully insertedintothe con-
sole. See step1 on page 10.
c. Check the circuitbreaker located on the treadmill
near the power cord. Ifthe switchprotrudesas
shown,the circuitbreaker hastripped.To resetthe
circuitbreaker, wait for five minutesand then press
the switchback in.
d. Check the on/offswitchlocatedon the treadmill
near the powercord. The switchmustbe in theon
position.
c
Tripped L_ Reset
Tripped Reset
d
On9
Position
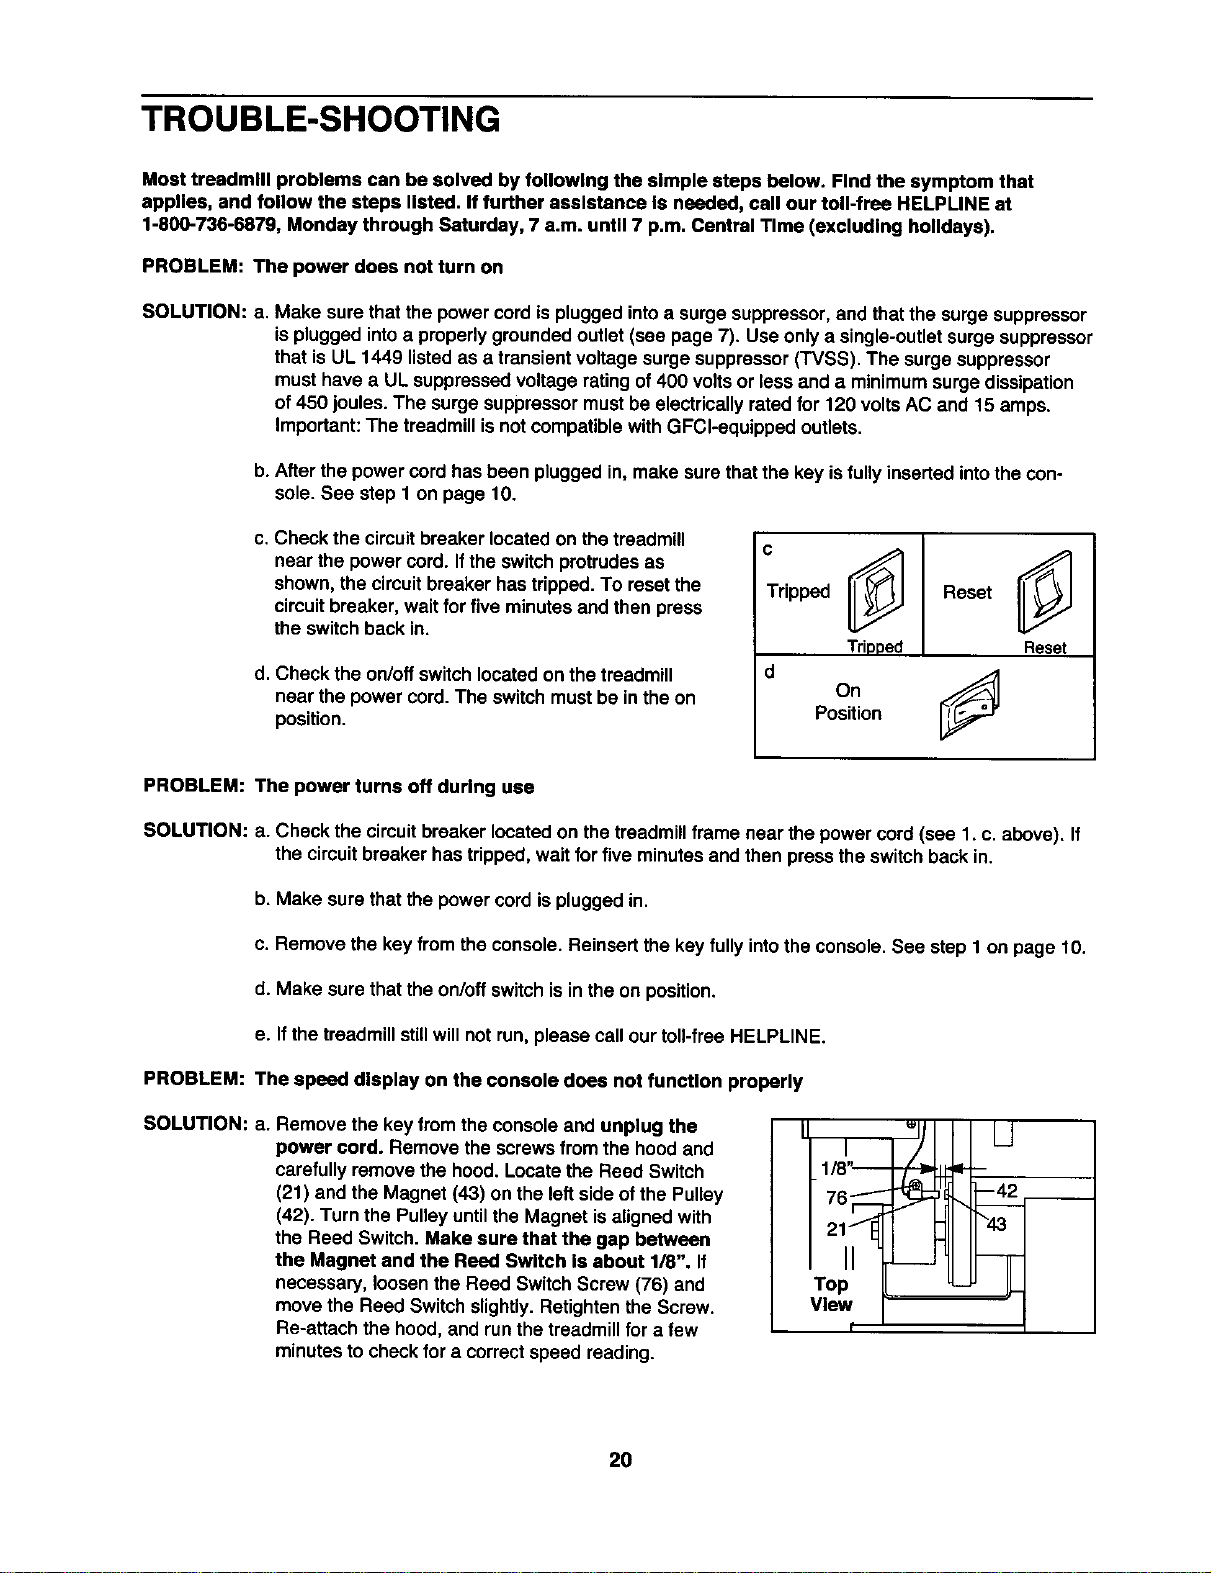
PROBLEM:
SOLUTION:
PROBLEM:
SOLUTION:
The power turns off during use
a. Check the circuitbreaker locatedon the treadmillframe near the power cord(see 1. c. above). If
the circuitbreaker hastripped,wait for five minutesand then press theswitch backin.
b. Make sure that the powercordisplugged in.
c. Remove the key from theconsole. Reinsertthe key fully intothe console.See step 1 on page 10.
d. Make sure that theon/off switchis inthe on position.
e. If the treadmillstillwillnot run, please call ourtoll-free HELPLINE.
The speed display on the console does not funcUon properly
a. Remove the key from the consoleand unplug the
power cord. Remove the screwsfrom the hood and
carefully removethe hood.Locatethe Reed Switch
(21) and the Magnet (43) on the leftside ofthe Pulley
(42). Turn the Pulleyuntilthe Magnet isalignedwith
the Reed Switch.Make sure that the gap between
the Magnet and the Reed Switch Is about 1/8". If
necessary, loosenthe Reed SwitchScrew (76) and
move the Reed Switch slightly.Retightenthe Screw.
Re-attach the hood,and runthetreadmillfor a few
minutesto checkfor a correctspeed reading.
I
_1/8I'---
2tll
Top
View
t
20
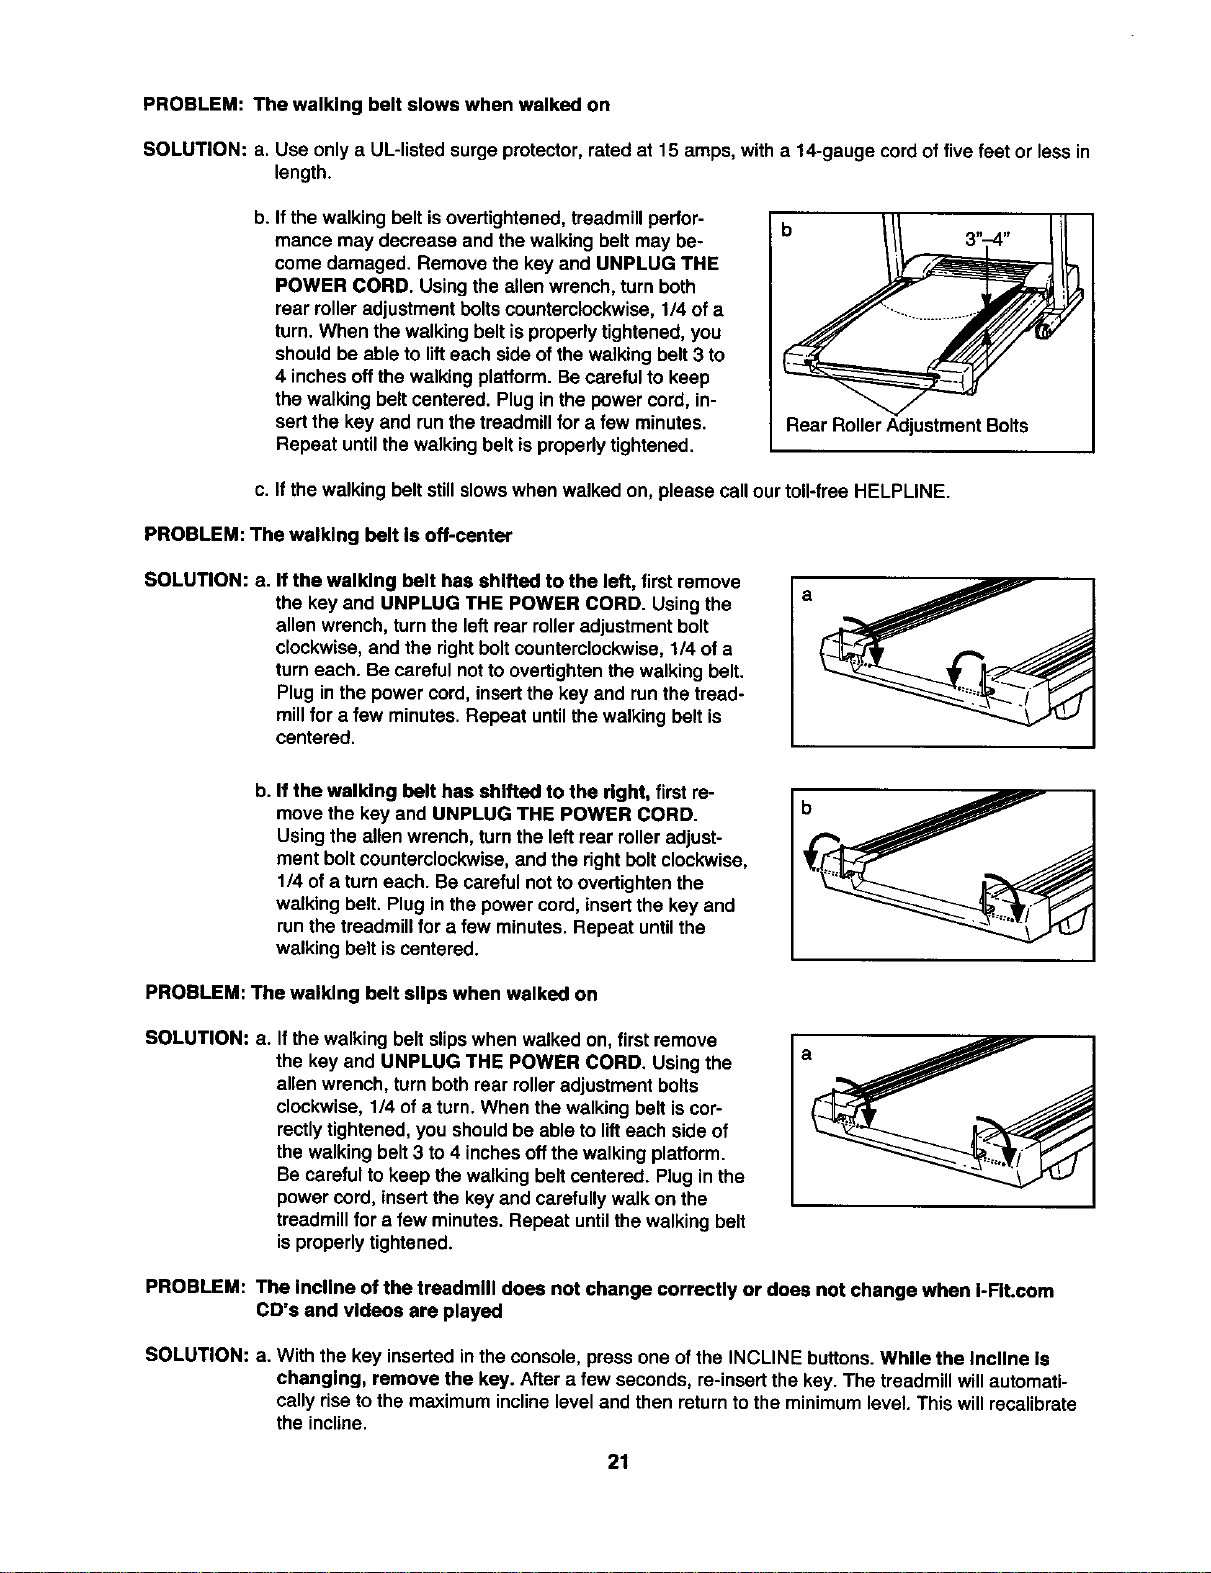
PROBLEM: The walking belt slows when walked on
SOLUTION: a. Use only a UL-listedsurgeprotector,rated at 15 amps, witha 14-gaugecordof fivefeet or less in
length.
b. If thewalking belt is overtightened,treadmillperfor-
mance may decrease end the walking belt may be-
come damaged. Remove the key and UNPLUG THE
POWER CORD. Using the allen wrench, turn both
rear roller adjustment bolts counterclockwise, 1/4 of a
turn. When the walking belt is properly tightened, you
should be able to lift each side of the walking belt 3 to
4 inches off the walking platform. Be careful to keep
the walking belt centered. Plug in the power cord, in-
sert the key and runthe treadmill for a few minutes.
Repeat until the walking belt is properly tightened.
Rear RollerAdjustmentBolts
c. If thewalking belt stillslowswhen walked on, please call our toll-free HELPLINE.
PROBLEM: The walking belt Is off-center
SOLUTION: a. If the walking belt has shifted to the left, firstremove
the key and UNPLUG THE POWER CORD. Usingthe
allen wrench, turnthe leftrear rolleradjustmentbolt
clockwise,and the rightboltcounterclockwise,1/4 of a
turneach. Be carefulnotto overtightenthe walking belt.
Plug inthe power cord,insertthe key and runthe tread-
millfor a few minutes.Repeat untilthe walkingbelt is
centered.
b. If the walking belt has shifted to the right, firstre-
movethe key and UNPLUG THE POWER CORD.
Usingthe allenwrench, turnthe leftrear rolleradjust-
ment boltcounterclockwise,and the rightbolt clockwise,
1/4 ofa turneach. Be carefulnot toovertightenthe
walking belt. Plug inthe powercord, insertthe key and
runthe treadmillfor a few minutes.Repeat untilthe
walking belt is centered.
PROBLEM: The walklng belt sllps when walked on
SOLUTION: a. If the walkingbelt slipswhen walked on,firstremove
the key and UNPLUG THE POWER CORD. Usingthe
allenwrench, turn bothrear rolleradjustment bolts
clockwise,1/4 of a turn. When the walking belt iscor-
rectly tightened, you should be able to lift each side of
the walking belt 3 to 4 inches off the walking platform.
Be careful to keep the walking belt centered. Plug in the
power cord, insertthe key and carefully walk on the
treadmill for a few minutes. Repeat until the walking belt
is properly tightened.
PROBLEM: The incline of the treadmill does not change correctly or does not change when I-FIt.com
CD's and videos are played
SOLUTION: a. Withthe key inserted inthe console,press one ofthe INCLINE buttons.While the Incline Is
changing, remove the key. After a few seconds, re-insertthe key. The treadmillwillautomati-
cally riseto the maximum inclinelevel and then returntothe minimumlevel.This willrecalibrate
the incline.
21
CONDITIONING GUIDELINES
_WARNING: beginning this
or any exerckm program, consult your physl-
clan. This Is upectally Important for IndMdu-
als over the age of 35 or Individuals with pre-
existing health problems.
The pulso sensor is not a medical device.
Various factors, Including your movement,
may affe_ the accuracy of heart rate reeding_
The mor Is Intmtded only ex an mmmlse aid
In defarmlning hemt rate trends In general
The following guidelineswillhelp youto plan yourex-
ercise program. Remember--these are generalguide-
linesonly. Formore detailed exercise information,ob-
tain a reputablebookor consult yourphysician
EXERCISE INTENSITY
Whether yourgoal isto burnfat orto strengthenyour
cardiovascularsystem,the key to achievingthe
desired resultsisto exercise withthe proper intensity.
The properintensitylevel can be found by usingyour
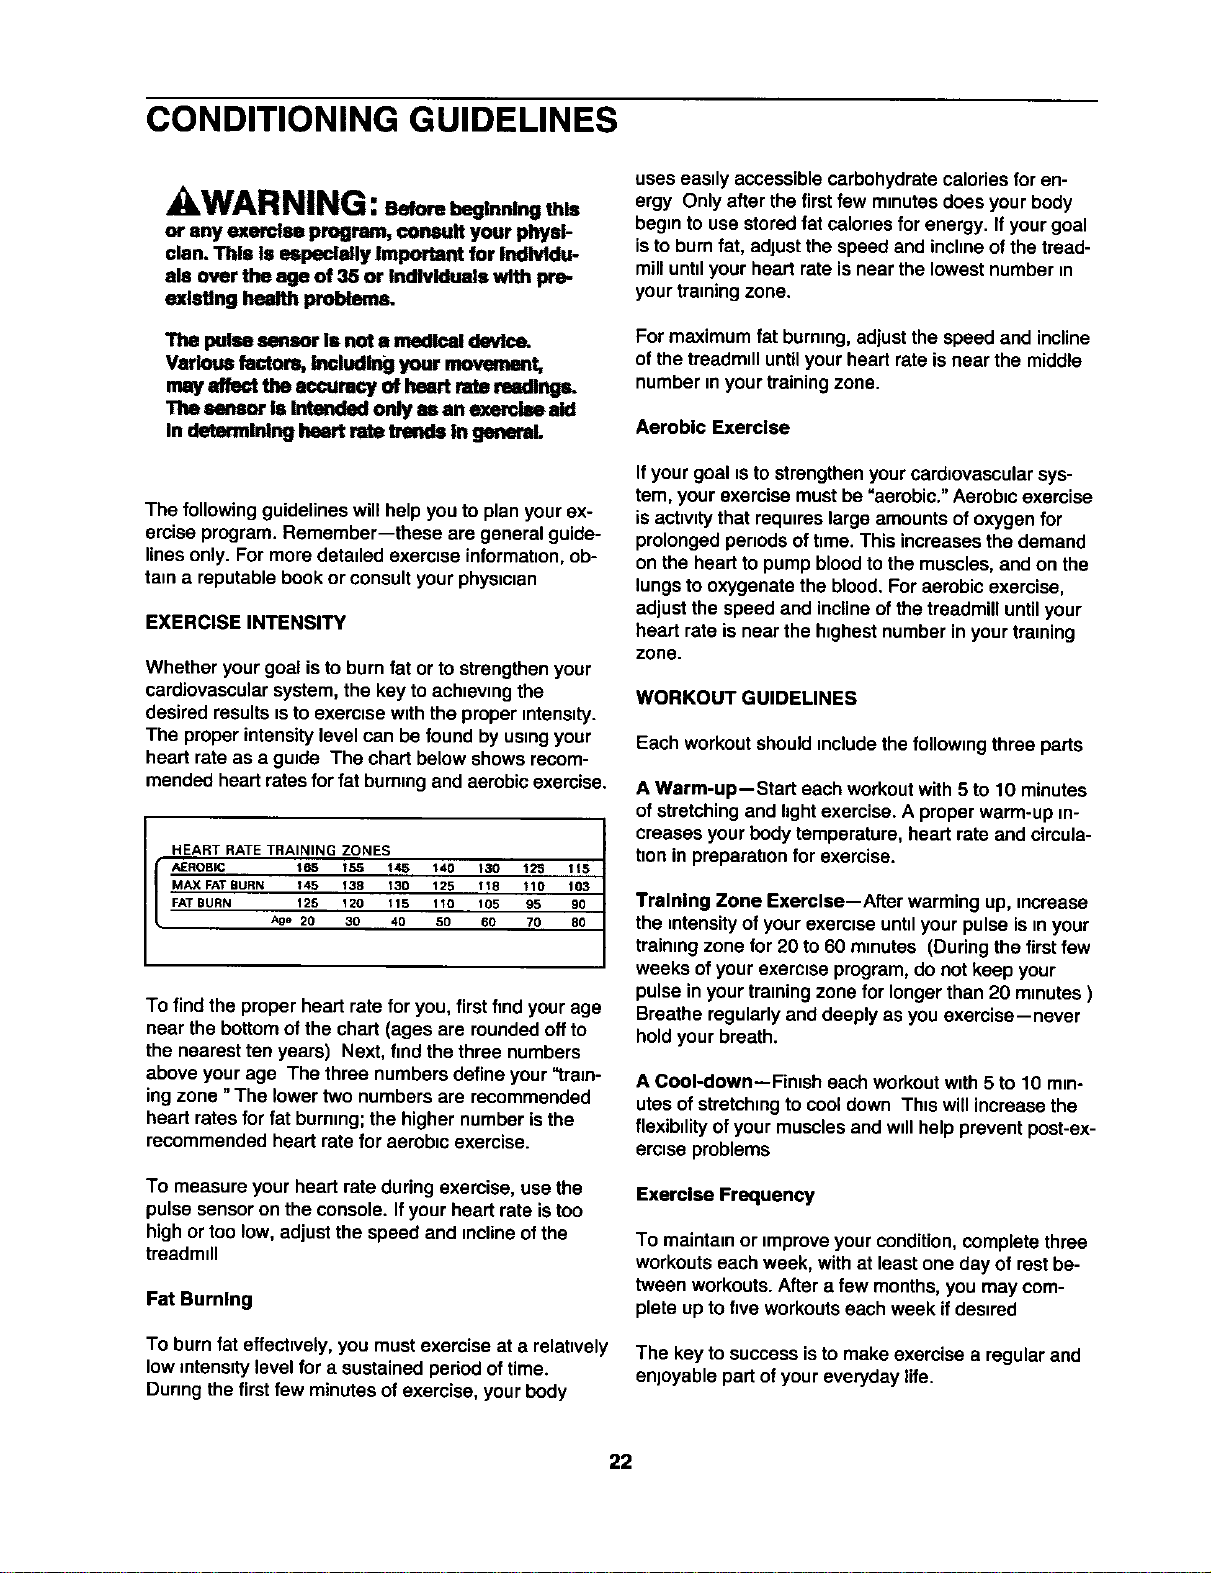
heart rate as a guide The chart belowshows recom-
mendedheartratesforfat burningand aerobicexercise.
HEART RATE TRAINING ZONES
AEROBIC 165 1_5 t/_5 140 130 12_ 115
MAX FAT BURN 145 138 130 125 118 110 103
FAT BURN 125 120 115 110 105 95 90
Age 20 30 40 50 60 70 80
To findthe properheart rate for you,firstfmdyour age
near the bottomof the chart (ages are roundedoffto
the nearestten years) Next, findthethree numbers
above yourage The three numbersdefineyour "tram-
ingzone "The lowertwo numbersare recommended
heart ratesfor fat burning;the higher numberisthe
recommendedheart rate for aerobic exercise.
To measure yourheart rate duringexercise, usethe
pulsesensoron the console. Ifyourheart rate istoo
highor too low, adjustthe speed and inclineofthe
treadmill
Fat Burning
To burn fat effectively,you mustexercise at a relatively
low intensitylevel for a sustainedperiodoftime.
Duringthe firstfew minutesof exercise,yourbody
uses easily accessiblecarbohydratecaloriesfor en-
ergy Only afterthe firstfew minutesdoes yourbody
begin to usestoredfat caloriesfor energy. Ifyourgoal
isto burnfat, adjustthe speed and inclineofthe tread-
milluntilyourheart rate is nearthe lowestnumber in
yourtrainingzone.
For maximum fat burning,adjustthe speed and incline
ofthe treadmilluntilyourheart rate isnear the middle
number in yourtrainingzone.
Aerobic Exerclse
Ifyourgoal isto strengthenyourcardiovascularsys-
tem, your exercisemustbe "aerobic." Aerobicexercise
is activitythat requireslargeamountsofoxygenfor
prolongedperiodsoftime. This increasesthe demand
on the heartto pumpbloodtothe muscles,and on the
lungsto oxygenatethe blood. Foraerobic exercise,
adjustthe speed and inclineofthe treadmilluntilyour
heart rate isnear the highest numberin yourtraining
zone.
WORKOUT GUIDELINES
Each workoutshouldincludethe following three parts
A Warm-up--Start each workoutwith5 to 10 minutes
of stretchingand hghtexercise.A properwarm-up in-
creases yourbodytemperature,heart rate and circula-
tionin preparationfor exercise.
Training Zone Exercise--After warming up, increase
the intensityof yourexercise untilyourpulseis inyour
trainingzone for 20 to 60 minutes (Duringthe firstfew
weeks ofyour exerciseprogram,do not keep your
pulse in yourtrainingzone for longerthan 20 minutes)
Breatheregularlyand deeply as you exercise--never
holdyourbreath.
A Cool-down--Finish each workoutwith 5 to 10 min-
utesofstretchingto cooldown Thiswill increasethe
flexibility ofyour musclesand willhelppreventpost-ex-
ercise problems
Exercise Frequency
To maintainor improveyour condition,complete three
workoutseach week, with at least one day of restbe-
tween workouts.After a few months,you may com-
plete upto five workoutseach week ifdesired
The key to successisto make exercise a regularand
enjoyable partof youreveryday life.
22
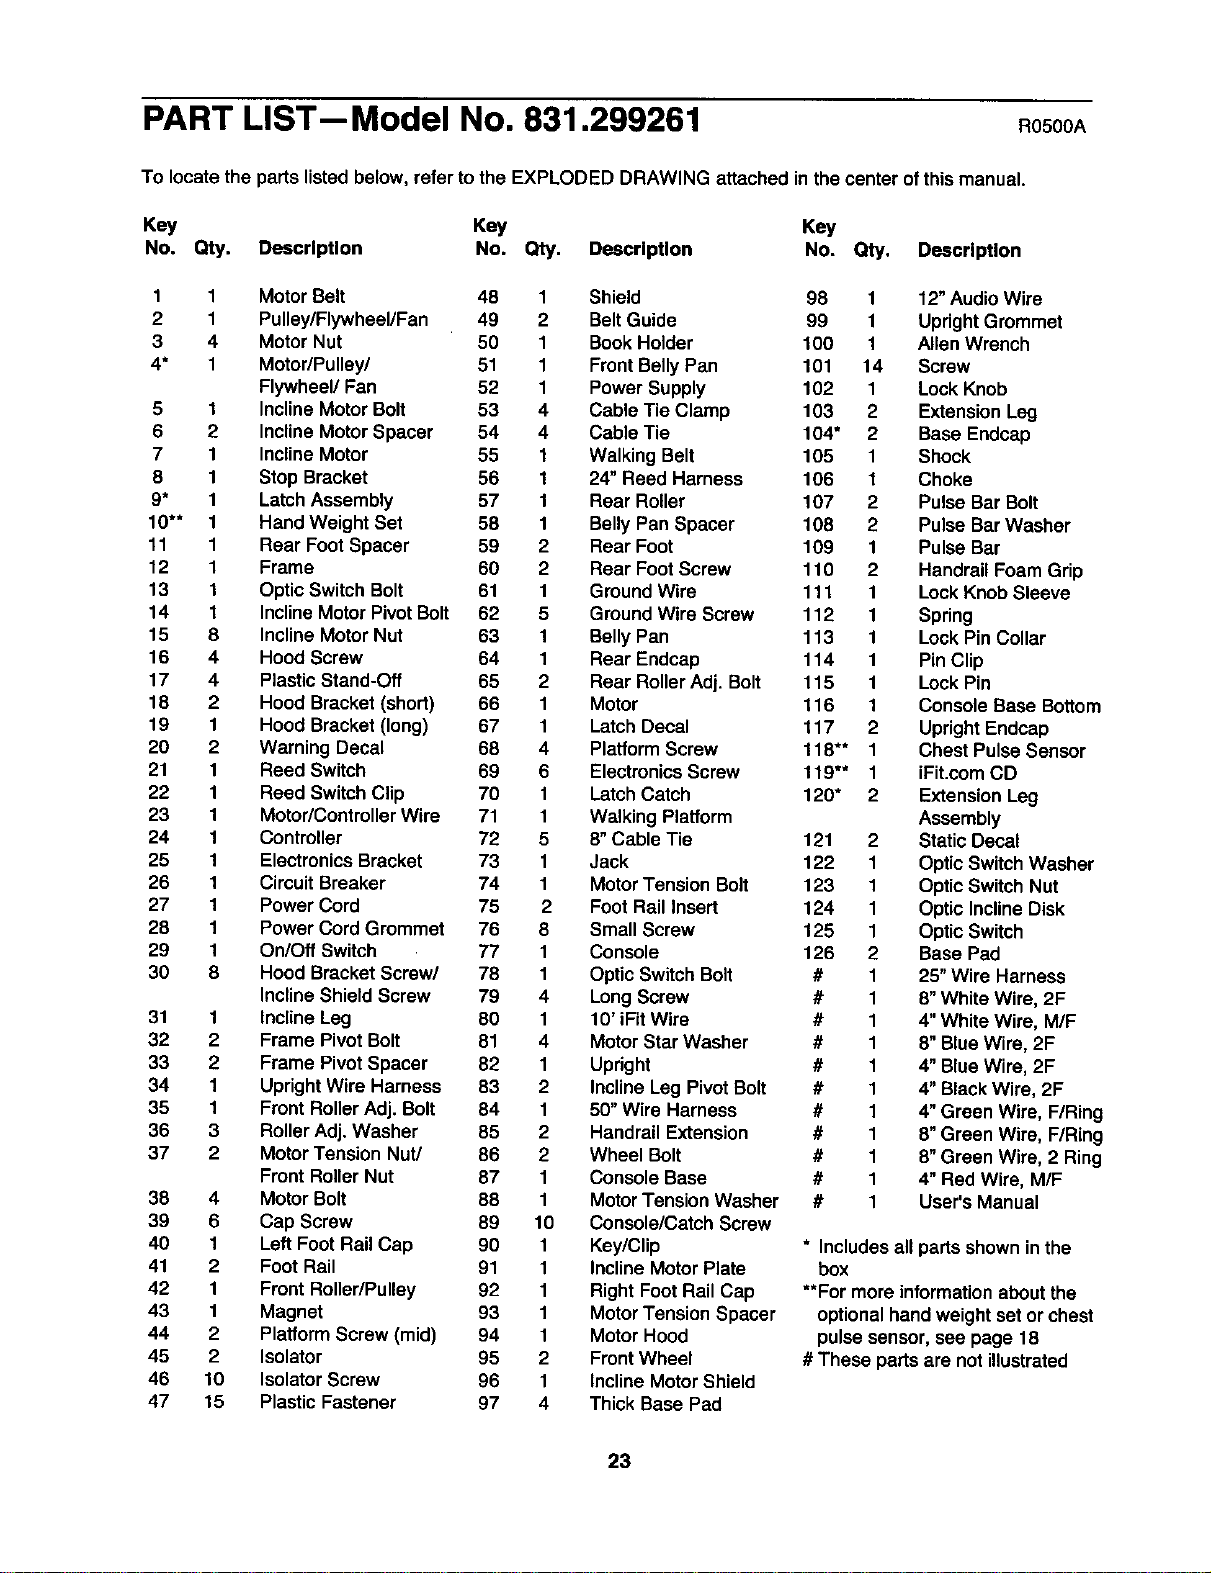
PART LIST--Model No. 831.299261 R050oA
To locate the parts listedbelow, referto the EXPLODED DRAWING attached inthe center ofthis manuel.
Key Key Key
No. Qty, Description No. Qty. Description No. Qty. Description
1
2
3
4*
5
6
7
8
9*
10"*
11
12
13
14
15
16
17
18
19
20
21
22
23
24
25
26
27
28
29
30
31
32
33
34
35
36
37
38
39
40
41
42
43
44
45
46
47
1
1
4
1
1
2
1
1
1
1
1
1
1
1
8
4
4
2
1
2
1
1
1
1
1
1
1
1
1
8
1
2
2
1
1
3
2
4
6
1
2
1
1
2
2
10
15
Motor Belt
Pulley/Flywheel/Fan
Motor Nut
Motor/Pulley/
Flywheel/Fan
InclineMotor Bolt
InclineMotor Spacer
InclineMotor
Stop Bracket
Latch Assembly
Hand Weight Set
Rear FootSpacer
Frame
Optic Switch Bolt
InclineMotorPivotBolt
InclineMotorNut
Hood Screw
PlasticStand-Off
Hood Bracket (shod)
Hood Bracket (long)
Warning Decal
Reed Switch
Reed SwitchClip
Motor/ControllerWire
Controller
ElectronicsBracket
CircuitBreaker
Power Cord
Power Cord Grommet
On/Off Switch
Hood Bracket Screw/
InclineShield Screw
InclineLeg
Frame PivotBolt
Frame PivotSpacer
UprightWire Harness
Front RollerAdj. Bolt
RollerAdj. Washer
MotorTension Nut/
Front RollerNut
MotorBolt
Cap Screw
LeftFoot Rail Cap
FootRail
Front Roller/Pulley
Magnet
PlatformScrew (mid)
Isolator
IsolatorScrew
PlasticFastener
48 1 Shield 98 1 12"Audio Wire
49 2 Belt Guide 99 1 UprightGrommet
50 1 BookHolder 100 1 Allen Wrench
51 1 Front BellyPan 101 14 Screw
52 1 Power Supply 102 1 LockKnob
53 4 Cable Tie Clamp 103 2 ExtensionLeg
54 4 Cable Tie 104" 2 Base Endcap
55 1 WalkingBelt 105 1 Shock
56 1 24" Reed Harness 106 1 Choke
57 1 Rear Roller 107 2 Pulse Bar Bolt
58 1 Belly PanSpacer 108 2 Pulse Bar Washer
59 2 Rear Foot 109 1 Pulse Bar
60 2 Rear FootScrew 110 2 Handrail Foam Grip
61 1 GroundWire 111 1 LockKnob Sleeve
62 5 GroundWire Screw 112 1 Spring
63 1 Belly Pan 113 1 Lock PinCollar
64 1 Rear Endcap 114 1 Pin Clip
65 2 Rear RollerAdj. Bolt 115 1 Lock Pin
66 1 Motor 116 1 Console Base Bottom
67 1 Latch Decal 117 2 Upright Endcap
68 4 Platform Screw 118"* 1 Chest Pulse Sensor
69 6 Electronics Screw 119"* 1 iFit.com CD
70 1 LatchCatch 120" 2 Extension Leg
71 1 Walking Platform Assembly
72 5 8" Cable Tie 121 2 StaticDecal
73 1 Jack 122 1 OpticSwitch Washer
74 1 MotorTension Bolt 123 1 OpticSwitch Nut
75 2 FootRail Insert 124 1 Optic InclineDisk
76 8 Small Screw 125 1 Optic Switch
77 1 Console 126 2 Base Pad
78 1 Optic Switch Bolt # 1 25" Wire Harness
79 4 LongScrew # 1 8"WhiteWire, 2F
80 1 10' iFit Wire # 1 4"WhiteWire, M/F
81 4 MotorStar Washer # 1 8"BlueWire, 2F
82 1 Upright # 1 4" BlueWire, 2F
83 2 InclineLeg PivotBolt # 1 4"BlackWire, 2F
84 1 50" Wire Harness # 1 4"Green Wire, FIRing
85 2 Handrail Extension # 1 8" Green Wire, FIRing
86 2 Wheel Bolt # 1 8"Green Wire, 2 Ring
87 1 Console Base # 1 4" Red Wire, M/F
88 1 MotorTension Washer # 1 User's Manual
89 10 Console/Catch Screw
90 1 Key/Clip * Includesall partsshownin the
91 1 InclineMotorPlate box
92 1 Right FootRail Cap **For more informationaboutthe
93 1 MotorTensionSpacer optionalhandweightset orchest
94 1 MotorHood pulsesensor, see page 18
95 2 Front Wheel # These parts are notillustrated
96 1 InclineMotorShield
97 4 Thick Base Pad
23
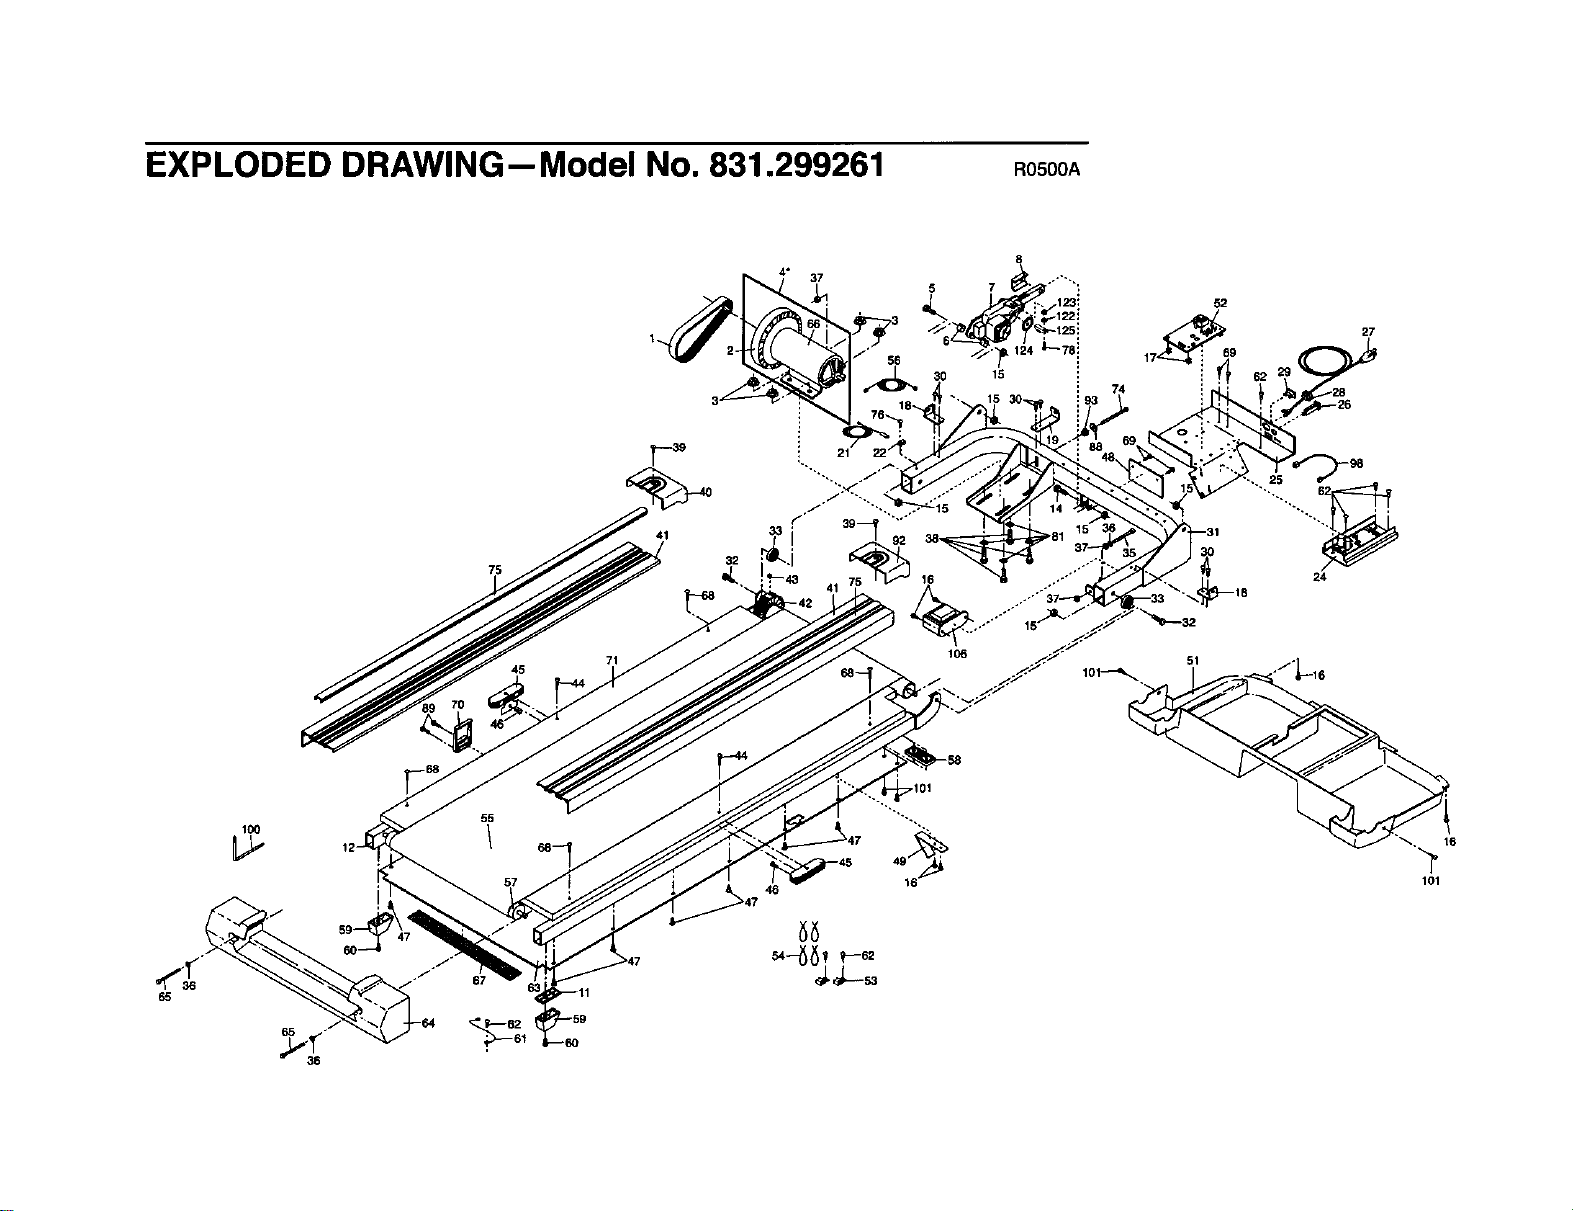
EXPLODED DRAWING--Model No. 831.299261 R0S00A
37
52
27
75
45
41
71
21
106
25
24
65
100
36
65
36
55
57
16
101
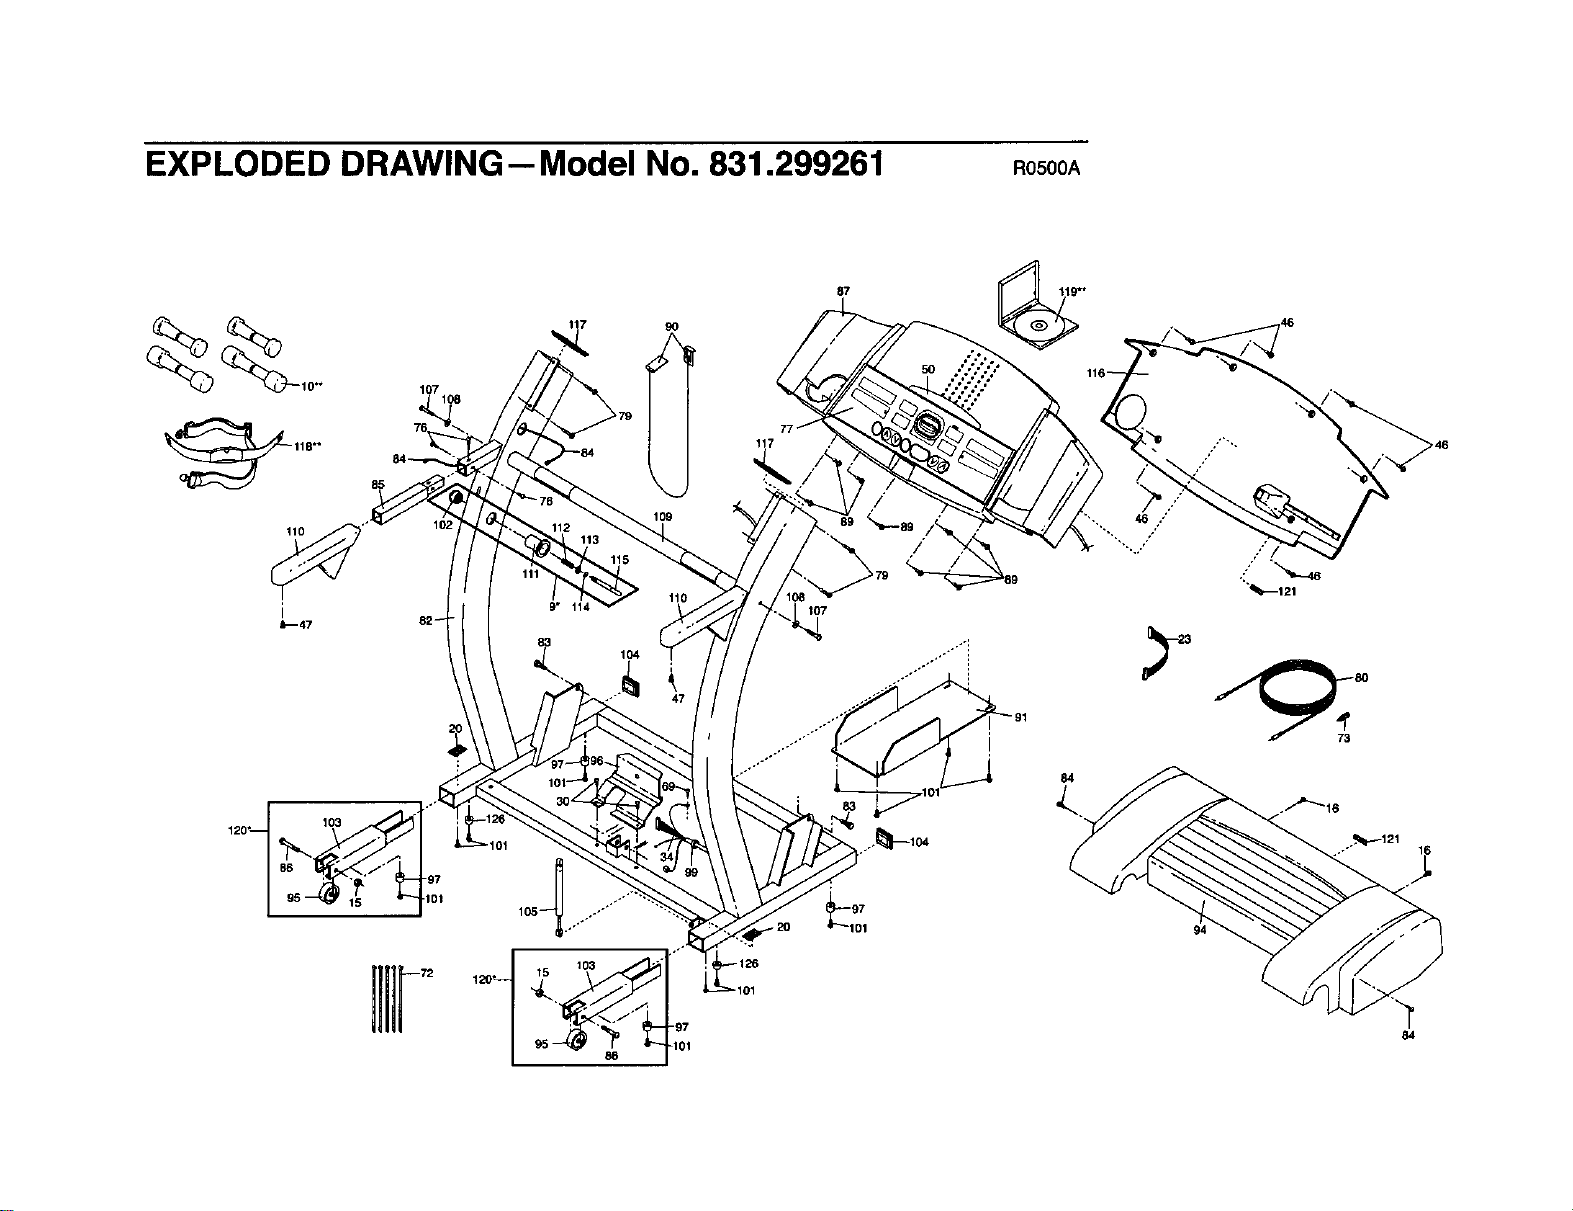
EXPLODED DRAWING--Model No. 831.299261 Ros00A
110
i
_47 82_
120"[ 103 101
9O
109
110
9" 114
83
104
117
107
87
84
/
94
_121
84

SEARS
Model No. 831.299261
QUESTIONS?
If you find that:
• you need help assembling or
operating the PROFORM
735CS treadmill
• a part is missing
• or you need to schedule repair
service
call our toll-free HELPLINE
1-800-736-6879
Monday-Saturday, 7 am-7 pm
Central Time (excluding holidays)
REPLACEMENT
PARTS
If parts become worn and need
to be replaced, call the following
toll-free number
1-800-FON-PART
(1-800-366-7278)
The modelnumber and serial number of your PROFORM ®735CS
treadmill are listed on a decal attached to the frame. See the front
cover of this manual to find the location of the decal.
All replacement parts are availablefor immediatepurchaseor
specialorder when you visityournearest SEARS Service Center.
To requestservice orto order partsby telephone, callthe toll-free
numbers listedat the left.
When requesting help or service,or orderingpads, please be
prepared toprovidethefollowinginformation:
• The NAME OF THE PRODUCT (PROFORM ®735CS treadmill)
• The MODEL NUMBER OF THE PRODUCT (831.299261)
• The KEY NUMBER AND DESCRIPTION OF THE PART (seethe
EXPLODED DRAWING inthe center ofthis manual and the
PART LIST on page 23).
FULL 90 DAY WARRANTY
For 90 days from the date of purchase, iffailure occursdue to defect in materialor workmanshipin this
SEARS TREADMILL EXERCISER, contactthe nearest SEARS Service Centerthroughoutthe United
States and SEARS willrepairor replacethe TREADMILL EXERCISER, free of charge.
Thiswarrantydoes notapplywhen the TREADMILL EXERCISER isused commercially orfor rentalpur-
poses.
Thiswarrantygives you specificlegalrights, and you may also have other rightswhichvaryfrom state
tostate.
SEARS, ROEBUCK AND CO., DEPT. 817WA, HOFFMAN ESTATES, IL 60179
Part No. 164794 R0500A Printed in USA © 2000 Seam, Roebuck and Co.