Loading ...
Loading ...
Loading ...
5
INSERT THE HEATER ASSEMBLY IN THE WALL CAN
Wire connections
STEP 4
Install grill
STEP 5
Attach grill with screws provided. Turn electrical power back on at the main disconnect panel.
Wait 10 to 15 seconds for heater to power up before pushing any buttons. After a few seconds, if the
heater has been properly installed, the display will flash and show room temperature. The default
temperature setting in HEAT mode is 70
˚
F (21.1
˚
C).
Proceed to OPERATING INSTRUCTIONS.
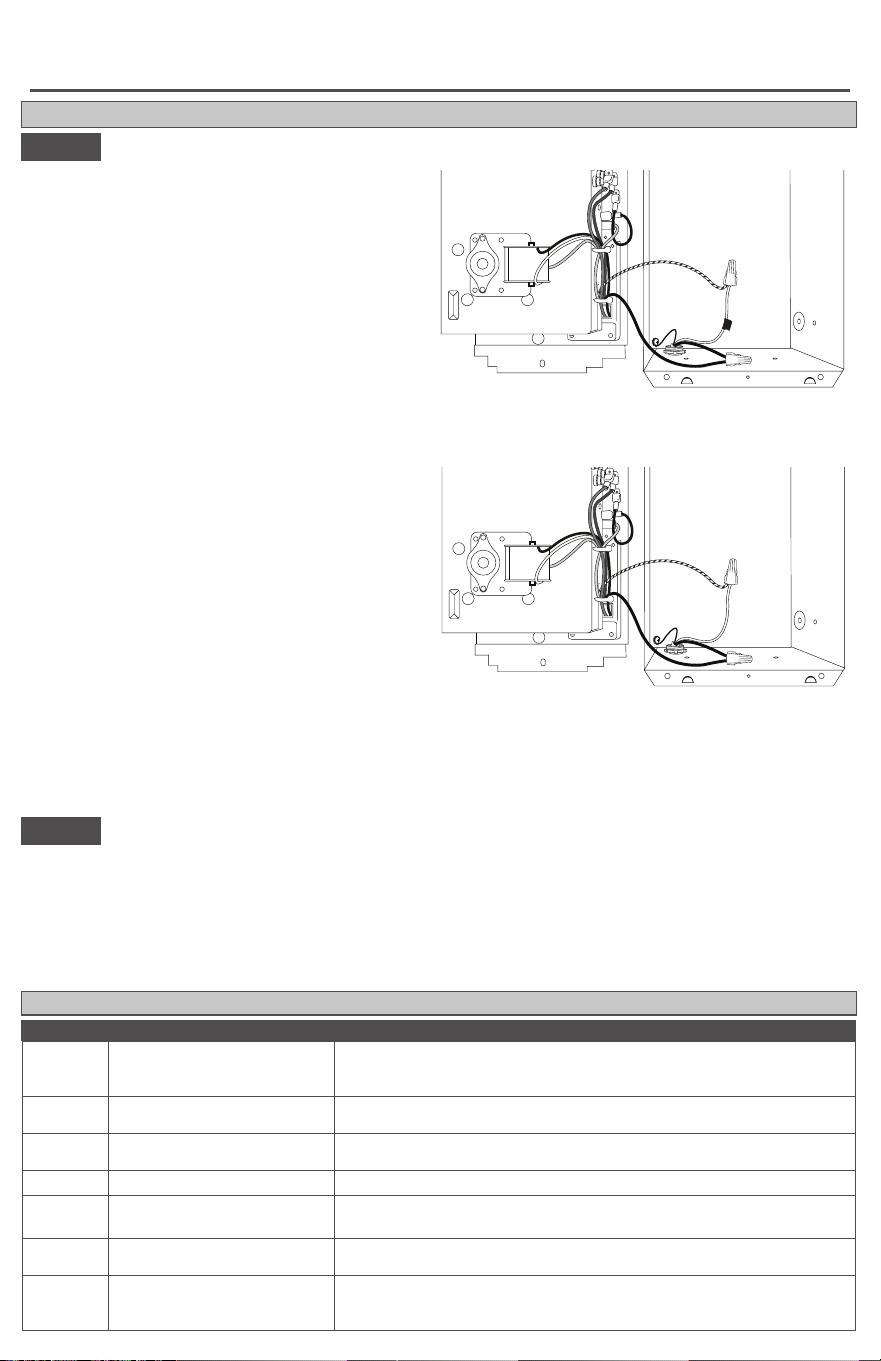
1. Your heater has two connection wires on the
side. Your supply wire has two connection wires
and a supply ground wire.
A. Connect supply ground wire to grounding
screw in wall can (See Figures 3 and 4).
B. Connect one supply wire to one heater
wire with a wire connector (not included).
For 240 or 208 volts, it doesn’t matter
which heater wire. Both supply wires
(black and white) are hot. Wrap supply
(white) wire with black tape to identify it as
hot (Figure 3).
For 120 volts, connect the neutral (white)
supply wire to the black and white striped
heater wire (Figure 4).
C. Connect the remaining supply wire to the
remaining heater wire with a wire connector
(not included) (See Figures 3 and 4).
2. Insert the bottom edge of the heater assem-
bly into the D-shaped tabs at the bottom of the
wall can.
3. Push all wires back into the bottom of the
wall can. Make sure connections are tight and
none of the wires are caught between the motor
and the wall can, or pinched between the side
of the heater and the wall can.
Figure 3
240 Volt
4. Attach the heater assembly at top of the wall can with screw provided. Align digital display with grill
cutout before tightening.
wall can
DISPLAY PROBLEM SOLUTION
No
Display
No power, internal control
faulty
Check that power is being supplied to heater. If operating on
generator power, confirm generator setting; if display still doesn’t
turn on, control is faulty. Replace heater assembly.
F1
Grill is interfering with
display buttons
Turn power o at main disconnect panel, realign grill. Turn power
back on at main disconnect panel.
F4
1. Line voltage is too low
2. Loose wire connections
1. Clears automatically when line voltage returns to normal.
2. Check wire connections.
F6
Line voltage is too high Clears automatically when line voltage returns to normal.
F8
Internal control fault
Disconnect power, reconnect power. If F8 code returns, control is
faulty. Replace heater assembly.
FF
Temperature
is
below
0˚F
(-17.8˚C), too low to display
Clears automatically when temperature is 0˚F (-17.8˚C) or above.
FA
Line voltage is too low
Double check voltage supply matches heater voltage rating. A
CE168T can only be connected to 208 volts, and a CE162T can
only be connected to 240 volts.
FAULT CODES
Figure 4
120 Volt
A
B
C
A
B
C
wall can
INSTALLATION INSTRUCTIONS
Loading ...
Loading ...
Loading ...