Loading ...
Loading ...
Loading ...
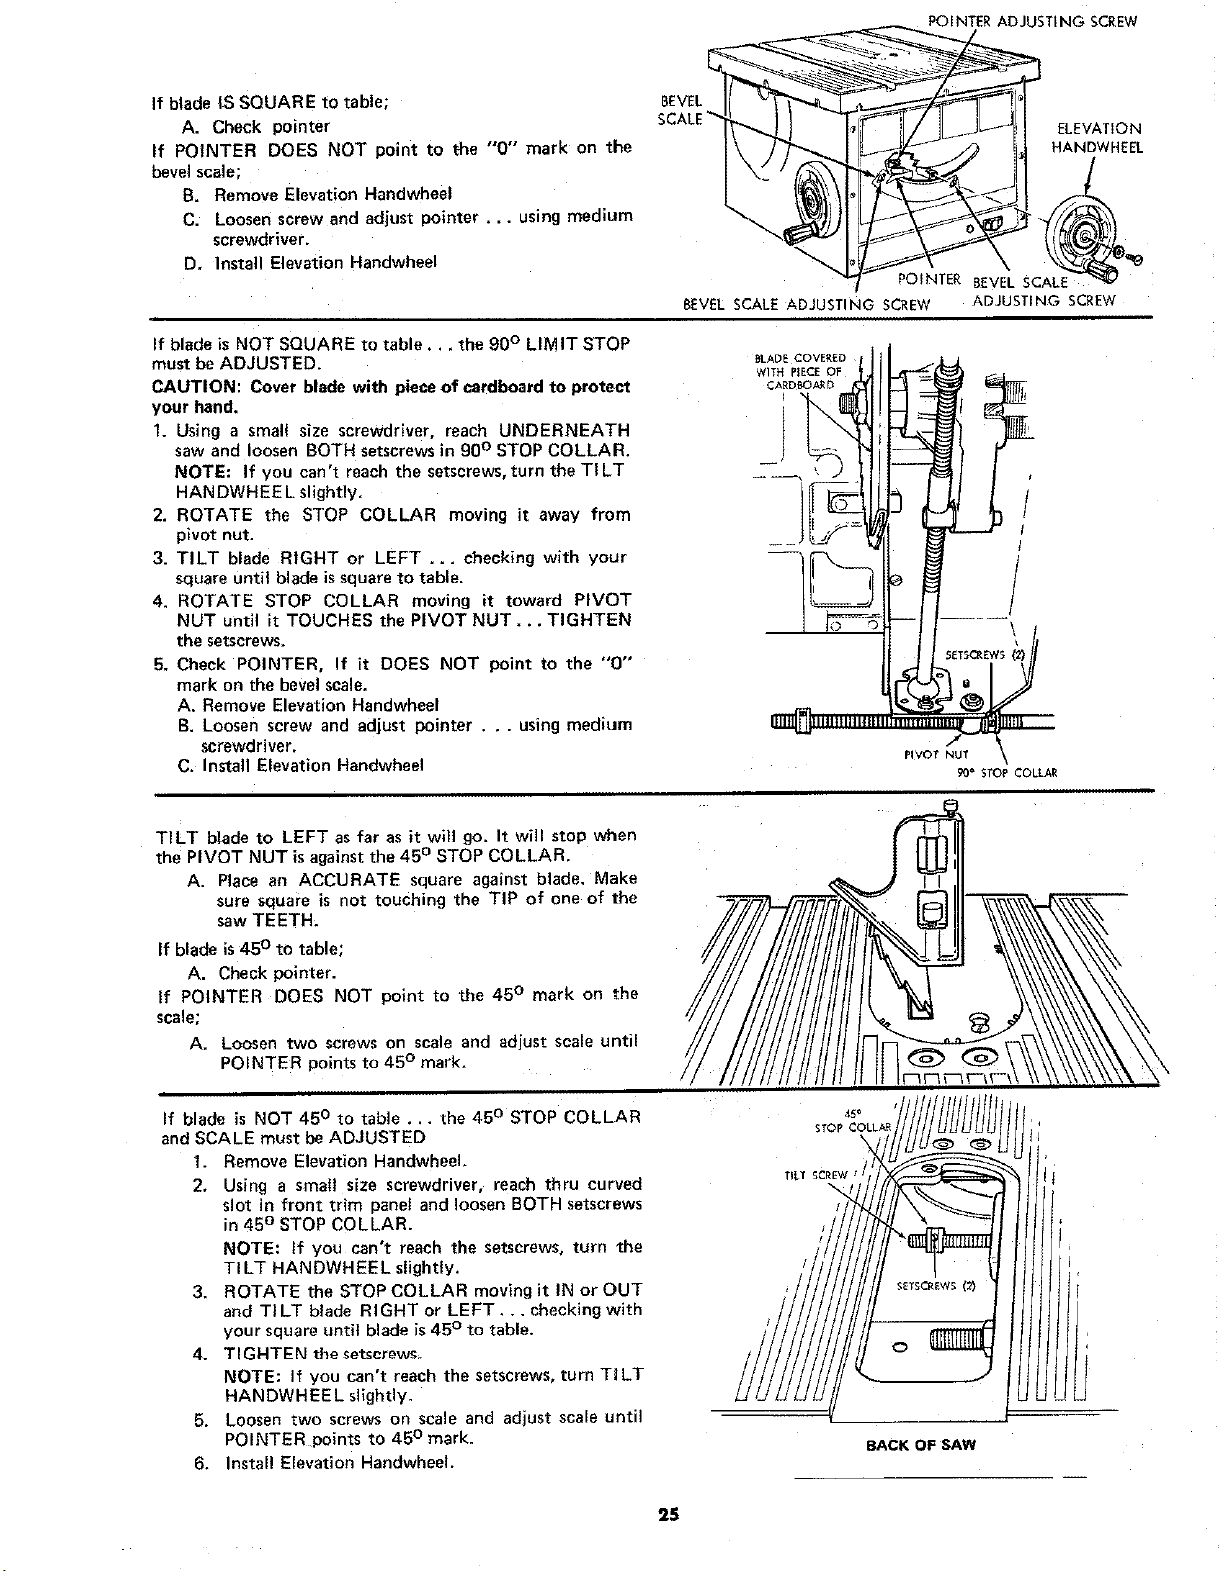
IfbladeISSQUARE to table;
A. Check pointer
If POINTER DOES NOT point to the "0" mark on the
bevel scale;
B. Remove Elevation Handwheel
C. Loosen screw and adjust pointer.., using medium
screwdriver.
D, Install Elevation Handwheel
BEVEL SCALE ADJUSTING SCREW
If blade is NOT SQUARE to table.,, the 90° LIMIT STOP
must be ADJUSTED.
CAUTION: Cover blade with piece of cardboard to protect
your hand.
1. Using a small size screwdriver, reach UNDERNEATH
saw and loosen BOTH setscrewsin 90° STOP COLLAR.
NOTE: If you can't reach the setscrews, turn the TILT
HANDWHEEL slightly.
2. ROTATE the STOP COLLAR moving it away from
pivot nut.
3. TILT blade RIGHT or LEFT ... checking with your
square until blade issquare to table.
4. ROTATE STOP COLLAR moving it toward PIVOT
NUT until it TOUCHES the PIVOT NUT... TIGHTEN
the setscrews,
5. Check POINTER, If it DOES NOT point to the "0'"
mark on the bevel scale.
A. Remove Elevation Handwheel
B, Loosen screw and adjust pointer . . . using medium
screwdriver.
C. Install Elevation Handwbeel
POINTERADJUSTING SCREW
ELEVATION
HANDWHEEL
POINTER BEVEL SCALE
ADJUSTING SCREW
PiVOt NUT
90= STOP COLLAR
TILT blade to LEFT as far as it will go. It will stop when
the PIVOT NUT isagainst the 45 ° STOP COLLAR.
A. Place an ACCURATE square against blade. Make
sure square is not touching the TiP of one of the
saw TEETH;
If blade is45° to table;
A. Check pointer.
If POINTER DOES NOT point to the 45 ° mark on the
scale;
A. Loosen two screws on scale and adjust scale until
POINTER points to 45 ° mark.
If blade is NOT 45 ° to table ... the 45 ° STOP COLLAR
end SCALE must be ADJUSTED
t. Remove Elevation Handwheel.
2, Using a small size screwdriver, reach thru curved
slot in front trim panel and loosen BOTH setscrews
in 45 ° STOP COLLAR.
NOTE: If you can't reach the setscrews, turn _he
TILT HAN DWH EEL slightly.
3. ROTATE the STOP COLLAR moving it IN or OUT
and TILT blade RIGHT or LEFT... checking with
your square until blade is 45° to table.
4_ TIGHTEN thesetscrgws_
NOTE: If you can't reach the setscrews, turn TILT
HANDWHEEL slightly.
5. Loosen two screws on scale and adjust scale until
POINTER points to 45 ° mark.
6. Install Elevation Handwheel.
BACK OF SAW
25
Loading ...
Loading ...
Loading ...