WARNING! TO PREVENT SERIOUS INJURY FROM ACCIDENTAL OPERATION: Turn the Rotation Switch of the tool to its “OFF” position and unplug the tool from its electrical outlet before assembling or making any adjustments to the tool.
Note: For additional information regarding the parts listed in the following pages, refer to the Assembly Diagram near the end of this manual.
Operating Instructions
Tool Set Up
Before each use, inspect Drain Cleaner and correct any problems.
Once the Drain Cleaner is assembled, check the device and cutters for any signs of wear and damage. If necessary, replace worn or damaged parts prior to using the drain cleaning machine. Dull or damaged cutting tools can lead to binding, cable breakage, and slow the drain cleaning.
Verify Drain Cleaner is unplugged and inspect the power cord, Ground Fault Circuit Interrupter (GFCI) and plug for damage. If the plug has been modified, is missing the grounding prong or if the cord is damaged, to avoid electrical shock, do not use the machine until the cord has been replaced by a qualified electrician.
Clean any oil, grease or dirt from all equipment handles and controls. This helps prevent the machine or control from slipping during use.
Verify Foot Switch is attached to Drain Cleaner.
Verify Drain Cleaner is properly assembled. Inspect the machine for broken, worn, missing, misaligned or binding parts or any other condition which may prevent safe and normal operation.
Make sure that switches and handles move smoothly between positions and lock in place, and that the bumpers at the bottom of the handle are present and firmly attached.
Rotate the drum and make sure that it turns freely without binding.
Check that all warning labels are present, firmly attached and readable.
Make sure Belt Guard is securely fastened to the Drain Cleaner.
Check the cable for any wear and damage. If any section of the cable is worn or flattened, replace cable before use.
Verify cable does not have multiple or excessive kinks (greater than 15°). Kinks weaken the cable and can cause cable failure. Replace any cables that have multiple or excessively large kinks.
Look for spaces between the cable coils. Kinking, stretching (pulling cable by hand) or running the cable in reverse can deform the cable. Cables with spaces between the coils should be replaced.
Check for signs of excessive corrosion. Corrosion weakens the cable, making it brittle. This can be caused by storing the cable wet or using the cable with corrosive chemicals (often found in chemical clog removers). Excessively corroded cable should be replaced.
Before use, fully retract the cable with no more than 2" of cable outside of the machine. This will the keep the cable from "whipping” when the machine is turned on.
Set the Rotation Switch to the OFF position.
With dry hands, plug cord into properly grounded outlet and move the Rotation Switch into the Forward position.
Move Feed Lever to exactly between F and R settings, otherwise cable will start moving in or out during this test.
Press the Foot Switch and note the direction of rotation of the drum. If the Foot Switch does not control the Drain Cleaner’s operation, do not use the machine until the Foot Switch has been repaired.
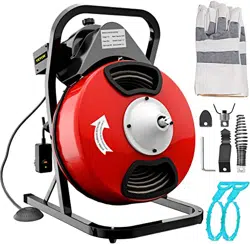
The drum should rotate clockwise when seen from the front of the drum. It will match the drum direction shown on the warning label and the arrow on the drum. If the rotation is not correct, do not use the machine until it has been repaired.
After inspection, set the Rotation Switch to OFF, dry off your hands, and unplug the Drain Cleaner.
Once you’ve verified that the Drain Cleaner is in good working order, inspect the work area where you will be using the machine.
Work Area Set-Up
Verify that work area has adequate lighting for the job.
Make sure work area is free of flammable liquids, vapors or dust that may ignite. Sparks can be generated during Drain Cleaner operation. Do not work in area until these sources of ignition have been identified and corrected.
Choose a firm, stable location for the machine and operator that will remain relatively dry. Do not use the machine while standing in water. If needed, remove the water from the work area.
Verify the electrical outlet is properly grounded. A three-prong or GFCI outlet may not be properly grounded. If in doubt, have outlet inspected by a licensed electrician.
Make sure there is a clear, unobstructed path from the Drain Cleaner to the electrical outlet.
Inspect the drain to be cleaned. If possible, determine the best access point(sj to the drain, the size(s) and length(s) of the drain, distance to tanks or mainlines, the nature of the blockage, presence of drain cleaning chemicals or other chemicals, etc.
If there are chemicals present in the drain, read and adhere to the specific safety measures required to work around those chemicals. Contact the chemical manufacturer for required safety instructions and information.
If necessary, remove fixture (toilet, sink, etc.) to allow access to the drain. Do not feed the cable through a fixture. This could damage the Drain Cleaner and the fixture.
Determine the correct drain cleaning cable size for the drain cleaning job. See Cable/Pipe Size chart below.
Cable Size
Pipe Size
Typical Applications
1/2" (included)
2" to 4"
Roof stacks and small floor drains (no roots)
3/8"
1-1/2"to 3"
Roof stacks, laundry lines and small drains (no roots)
If needed, place protective covers over the work area floor. Cleaning the clogged drain can be a messy operation.
Make sure that the Drain Cleaner handle is locked into the upright position for transport. If the Drain Cleaner needs to be lifted, use proper lifting techniques or seek assistance if needed. Use caution when moving equipment up and down stairs. Wear appropriate footwear to help prevent slipping on floor.
Set the Drain Cleaner so that the drum opening is within 2 feet of the drain access. The greater the distance from the drain access, the higher the risk of the cable twisting or kinking.
If the machine cannot be placed with the drum opening within 2' of the drain access, use appropriate-sized pipes and fittings to extend the drain access back to within 2' of the drum opening. Improper cable support can allow the cable to kink and twist and can damage the cable or injure the operator.
If needed, set up barriers to keep bystanders away from the Drain Cleaner and work area during operation.
Select proper cutting tool. (See Cutting Tool Accessories on page 9).
Install the tool to the end of the cable. Slide the base of the Cutter Tool into the slot at the end of the cable. Fasten together using a, screwdriver.
Position the Foot Switch for easy accessibility. You must be able to hold and control the cable, control the Foot Switch, and reach the Rotation Switch.
Confirm that the Rotation Switch is in the OFF position.
Run the cord along the clear path. With dry hands, plug the Drain Cleaner into a properly grounded outlet. Keep all connections dry and off the ground.
If the power cord is not long enough, use an extension cord that is in good condition and has a three prong plug similar to the one supplied on the Drain Cleaner. Keep the connection off the ground to prevent it from accidentally getting wet.
Also verify that the extension cord is rated for outdoor use and contains a W or W-A in the cord designation (i.e. SOW).
Verify the extension cord has sufficient wire size (16 AWG for 50' or less, 14 AWG for 50’ - 100' long). Undersized wires can overheat, melting the insulation or causing a fire or other damage.
When using an extension cord, the GFCI on the Drain Cleaner does not protect the extension cord. If the outlet is not GFCI protected, use a plug-in type GFCI between the outlet and the extension cord. This will reduce the risk of shock if there is a fault in the extension cord.
Manual Feed Operation
Position the Drain Cleaner two feet from the drain.
Position the Drain Cleaner so that you can operate Foot Switch while having one hand on cable at all times. This will keep cable from hazardously “whipping" when activating the Drain Cleaner. Also, make sure Rotation Switch on top of Drain Cleaner is within reach. WARNING! Only one person should feed cable and operate Foot Switch. Do not operate Drain Cleaner with one person controlling cable and another person controlling Foot Switch. This can cause cable to kink, twist, or break, which can also lead to serious personal injury.
Make sure Rotation Switch is in Forward position.
With the Drain Cleaner off, pull the cable out of drum and feed into the drain. Gradually work the cable as far into the drain as it will go.
Step on the Foot Switch and continue feeding cable into the drain.
As you feed cable, you may feel and see cable slow down and/or start to wind or load up (a “twisting” or “squirming” motion). This may indicate a change in drain line (such as a drain trap, elbow, etc.), a build up in the drain (mud or grease), or the actual blockage. Continue to slowly feed the cable until the cable reaches the blockage. WARNING! Do not allow cable to build up outside drain. This can cause cable to twist, kink or break. When working with larger sewers or septic tanks, minimize the amount of cable fed to prevent kinking and knotting of cable.
If the cable becomes lodged in a narrow part of the drain or in a drain trap, allow the cable to try and work itself past the obstruction. If cable still won’t pass obstruction, release pressure from the Foot Switch and use sharp downward thrusts to try and pass obstruction. Once cable is past, press the Foot Switch and continue feeding.
Working Through a Blockage
If cutting tool becomes lodged in a blockage and Drain Cleaner is still operating, cable will start to wind up or twist. If so, release pressure from Foot Switch and Drain Cleaner motor will stop. WARNING! Do not let cable build up outside drain.
The cable and drum will turn backwards until the tension in the cable is released. WARNING! Do not remove gloved hand from cable until all the tension is released.
Put Power Feed Lever in “reverse" position to pull cable back and free cutting tool from blockage.
If motor can’t pull cable out, release pressure from Foot Switch and allow cable to stop spinning. Once cable has stopped spinning, grab cable with both gloved hands and pull cable free.
Once tool is free of blockage and is turning again, slowly feed rotating cutting tool back into blockage. Do not force tool through blockage. Allow cutting tip to break up and work through blockage. CAUTION: While working through the blockage, tool and cable can get clogged with debris from blockage, preventing further cleaning. The cable and tool will then need to be retrieved from drain and debris removed.
Retrieving Drain Cleaner Cable
Once drain is clear, turn on faucet or use a hose to flush debris out. NOTE: If water flow slows or stops, resume using the drain cleaner to locate and clear blockage further down the drain.
To retrieve cable, set Power Feed Lever in reverse (up) position but make sure Rotation Switch is still in Forward position. WARNING! Do not retrieve cable with Rotation Switch set in Reverse position.
Keep one hand on cable. The cable can get caught while being retrieved.
Continue retrieving cable until you can pull cable by hand. Release foot from Foot Switch. WARNING! Do not pull cable from drain while cable is still rotating. The cable can whip around, causing serious injury.
Place Rotation Switch in OFF position, dry your hands, unplug machine.
Release Tension Knob tension and pull remaining cable from drain by hand and feed into Drain Cleaner. If needed, change cutting tool and continue cleaning.
Power Feed Operation
1. Position the Drain Cleaner two feet from the drain.
2. Release all tension from the Tension Knob, then grab the cable with both gloved hands and push the cable into the drain until at least one foot of cable is in the drain. Retighten Tension Knob.
3. After making sure the Rotation Switch is in the "Forward" position, Tension Knob has been retightened, and the Power Feed Lever is in the down (forward) position, press the Foot Switch to start feeding the cable further into the drain. Make sure you can operate the Foot Switch while having at least one hand on the cable at all times. Also make sure the Rotation Switch on top of the Drain Cleaner and Power Feed Lever are within reach. WARNING! Only one person should operate the cable feed and the Foot Switch. Do not operate the Drain Cleaner with one person controlling the cable and another person controlling the Foot Switch. This can cause the cable to kink, twist, and break, which can also lead to serious personal injury.
4. If the cable becomes lodged (for example: in a narrow part of the drain, in a drain trap, etc.), put the Power Feed Lever in the "neutral” position and allow the cable to try and work itself past the obstruction. If cable still won’t pass obstruction, release pressure from the Foot Switch and use sharp downward thrusts to try and pass obstruction. Once cable is past, put the Power Feed Lever in the down (forward) position, press the Foot Switch, and continue feeding.
Maintenance and Servicing
Cleaning Drain Cleaner Cables
Thoroughly flush Drain Cleaner cables with clean water after every use. Doing so will help prevent the build-up of sediment and any drain cleaning chemicals still in the cable.
Once cables have been flushed, carefully tip the Drain Cleaner forward to empty out any remaining debris.
Once the cable is clean and dry, pull the cable from the drum.
Lubricate with oily rag as you feed cable back into drum. WARNING! Do not attempt to remove a rotating cable.
Cleaning/Lubricating Housing
The Drain Cleaner should be cleaned as needed with hot, soapy water and/or disinfectants. WARNING! Risk of shock! Do not allow water to get into the motor or any other electrical components.
Dry Drain Cleaner before storing or using again.
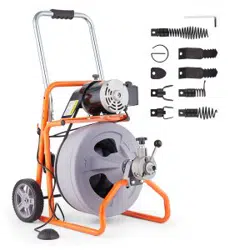
For Model 68284 (Power Feed Drain Cleaner), hose out the power-feed assembly with clean water.
Once dry, thoroughly lubricate with a lightweight machine oil.
If Drain Cleaner drum is removed or changed, grease bearings with good general purpose grease.
Removing and Installing Belt
Loosen Belt Guard Knob and slide Belt Guard off from top of Drain Cleaner motor
Use screwdriver to slide belt off back of Drain Cleaner drum.
Slide new belt into belt pulley above drum.
Slide new belt onto rear of drum until securely in place.
Slide Belt Guard pack into place above Drain Cleaner drum. Tighten Belt Guard Knob to lock Belt Guard back into place.
WARNING! Do not operate the Drain Cleaner without the Belt Guard in place.
Installing Replacement Cable
Remove old cable by pulling cable completely out. Separate cable from drum-connecting cable.
Connect new cable to drum-connecting cable and feed cable back into drum.
General Cleaning, Maintenance, and Lubrication
BEFORE EACH USE, inspect the general condition of the tool. Check for:
loose hardware,
misalignment or binding of moving parts,
cracked or broken parts,
damaged electrical wiring, and
any other condition that may affect its safe operation.
AFTER USE, wipe external surfaces of the tool with clean cloth.
WARNING! If the supply cord of this power tool is damaged, it must be replaced only by a qualified service technician.
Troubleshooting
Problem
Probable Cause(s)
Solution(s)
Motor shuts off during use
The motor may have been shut off by its internal thermal protection switch, or auto reset breaker.
GFCI breaker tripped.
Turn motor off. Allow motor to cool off completely before restarting and stay clear of cable when turning motor back on.
Make sure all electrical components are dry and all insulation is in good repair. Press reset button. If GFCI trips again, have machine serviced by qualified electrician before further use.
Cable kinks, twists, or breaks.
Too much force on the cable.
Too much slack between. Drain Cleaner and drainpipe inlet.
Cable used is wrong size for drain pipe.
Cable exposed to acid.
Cable worn out.
Do not force cable. Let cutter do the work.
Move Drain Cleaner to within two feet of drainpipe inlet.
Change cable size.
Clean and oil cable regularly.
Replace cable.
Cable tangles in drum.
Too much force on the cable.
Motor running in reverse.
Distributor tube frozen.
Do not force cable. Let cutter tool do the work.
Retract Cable with the Motor Direction Switch in the Forward position.
Technician should lubricate distributor tube bearings.
Power Cord GFCI trips when unit is plugged in or when Foot Pedal is pressed.
Motor Direction Switch defective.
Frayed Power Cord.
Short circuit in Motor.
Excess moisture touching Power Cord or Drain Cleaner.
Faulty GFCI unit.
Repair or replace Motor Direction Switch.
Repair or replace the Power Cord.
Have Motor repaired by a qualified technician; Replace Motor.
Dry cord and unit.
Electrician must Replace Power Cord with GFCI.
Motor does not operate or the Foot Pedal sticks.
Pneumatic Foot Pedal may have a leak.
Check for leaks in air line leading from Foot Pedal. Check for tears and holes in Foot Pedal. Replace if need
The “Forward/ Reverse" Switch does not work.
The centrifugal switch requires the motor to come to a complete stop before it will allow the direction of the motor to be changed.
Move the “Forward/Reverse" Switch to the “Off position and allow the motor to stop before changing from “Forward” to “Reverse” or vice versa.
#1 Do the cutter attachments go into the slot or out?
The cutter is to be fixed in the slot of the spring joint.
#2 When I feed the snake into the drain and then try to turn the machine on...it moves a bit and then trips the GFCI even without footswitch. Any ideas?
You need to put the spring outside the machine flat on the ground, put the switch knob at the "CCW" position, then turn on the power supply, step on the air bag with your foot, and then release it immediately, then step on it and release it. Repeat for 6 to 7 times, and the pipe can be unwound.
#3 When do you use the CW switch setting and when do you use the CCW setting?
When you attach the "corkscrew" connection & feed it down your piping...you will go in the direction that utilizes the connection to catch/tangle whatever is in your piping. There are other connections that can be used in either the motors CW/CCW - the option of both directions is if there is some sort of snaring of the connector (gets caught on something - though I don't even know if its possible to ensnare on something down there). Both directions gives more ability to unclog things. Just beware, you must wear gloves when feeding the cable down the piping...in if your gloves get caught by the cabling it will twist your hand off!