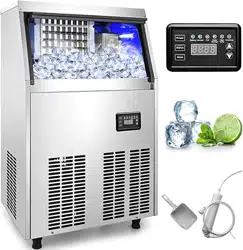
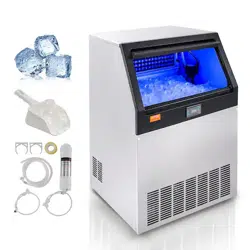
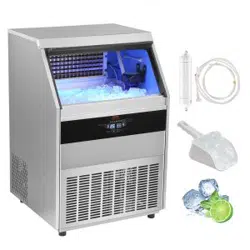
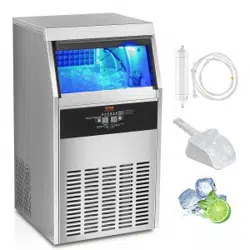
Commercial Kitchen FACTOBY - Water flow system ice machine.
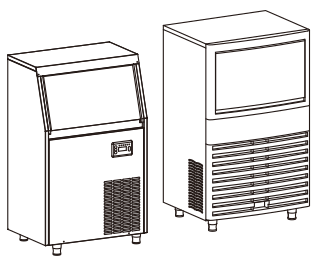
The exterior of the machine will be continuously adjusted for production optimization.
The exterior used in this manual is for reference only.
Receiving And Checking
Thank you for selecting our company's automatic ice machine. In order to protect your legitimate rights and interests, please pay attention to the following things when receiving and checking the machine:
- The outer packing of the machine is intact.
- Machine's model is consistent with your purchased.
- The appearance of the machine is in good condition.
- The attaced part sare complete.
- The internal components of the machine are in good condition.
In the process of transportation, due to improper stacking or handling, the lubricating Oi1 in the compressor will flow into the refrigeration pipeline. resulting in a serious lack of oil for the compressor. Once the electricity is switched on, the compressor will be burned in a short time. Therefore, we strongly suggests that after the customer receive our machine, place the machine in the right position for a day, so that the lubricating oil can flow back to the compressor, then install and use the machine.
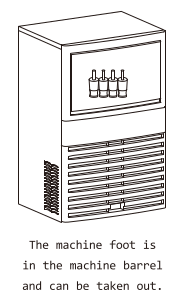
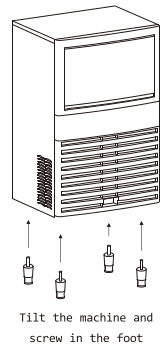
1. Screw the feet of the ice machine to the baseplate.
2. Each foot must be screwed up and tightened so as not to bend.
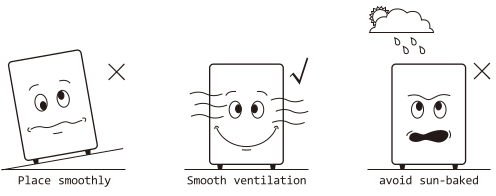
3. Put the ice machine in a sturdy and flat position.
4. Adjust the height of the foot to make the ice machine level.
5. The ice machine is not suitable to be used in the outdoors. The normal using ambient temperature is between 10-38 degree centigrade, and the water temperature is between 5-30 degree centigrade.
6. High temperature will seriously reduce the amount of ice output. We suggest that the client put the ice machine in a room with cold air. It is strictly forbidden to put together with high temperature equipment (such as refrigerators, ovens)
7. Ice machine should not be installed in environments without sewers and drainage.
8. Air-cooled ice machine relies on air circulation for heat dissipation. Therefore, more than 15 cm of space should be reserved around to facilitate heat dissipation.
Electrical safety
- It is strictly forbidden to plug in and out when hands are wet. The power supply must be unplugged before maintenance and cleaning.
- It is necessary to ensure that sockets are equipped with grounding wires and are grounded safely.
- Electrical control system has more than 36V voltage, do not open and touch at will in use.
- The poner connection should be marked according to nameplate, the specified power supply should be used, and the specifications of the wires used in the connection circuit should be determined to meet the requirements.
- The power plug should be unplugged or cut off when the ice machine stops using.
- If the soft wire of the power supply is damaged, it must be replaced by the manufacturer or other maintenance department or similar professional staff in order to avoid danger.
Installation of Water Supply
- The ice machine must use direct drinking water at room tenperature.
- Water supply pressure must be controlled between @.1 and 0.63 MPa.
- The ice machine is drained by gravity. Therefore, it is necessary to ensure that the drainage pipe has sufficient slope and drop.
- Randon donated water filters are only used for machine testing.
- The filter is disposable. Change regularly according to local water quality.
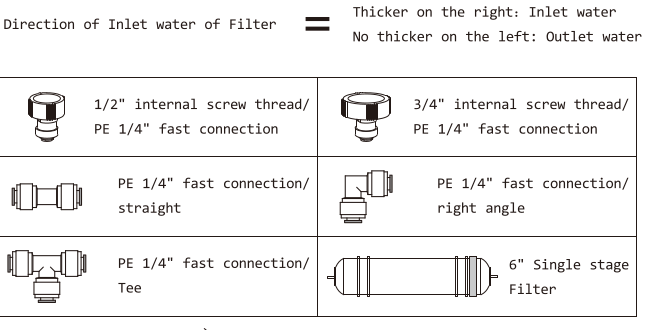
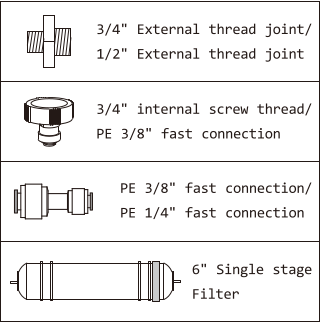
- Connections on filters need to be disassembled with appropriate tools.
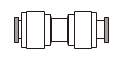
The clamp is stretch and locked. and the intubation cannot be pulled out.
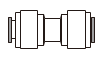
The clanp is pressed and unlocked. and the intubation can be pulled out.
All-in-one Machine Installation Diagram
This diagram is used for water connection of air-cooled machines.

- Tap Water: 1/2" extrernal thread joint
- Ice water inlet:
- White 3/4" external thread nylon joint . Ice machine Drainag 1" Black bellows
- If users have direct drinking water source, they can connect the ice machine without using this filter.
Direction of Inlet water of Filte = Thicker on the right: Inlet water. No thicker on the left: Outlet water.
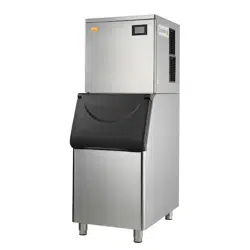
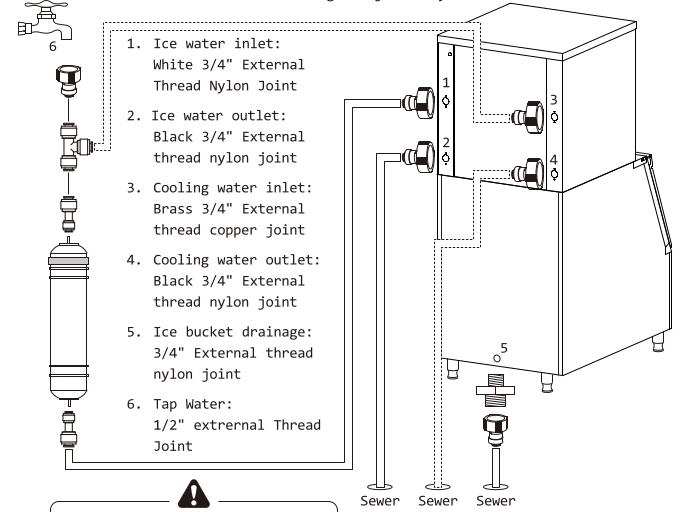
Split Machine Installation Diagram
This diagram is used for water connection of water-cooled machines. It is more accurate to distinguish joints by color and material.
- Ice water inlet: White 3/4" External Thread Nylon Joint
- Ice water outlet: Black 3/4" External thread nylon joint
- Cooling water inlet: Brass 3/4" External thread copper joint
- Cooling water outlet: Black 3/4" External thread nylon joint
- Ice bucket drainage: 3/4" External thread nylon joint
- Tap Water: 1/2" extrernal Thread Joint
Three drains cannot be joined together and must be independently inserted into the sewer.

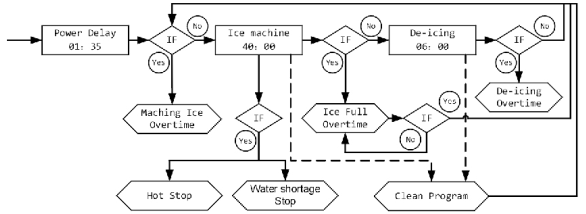
Ice Machine Steps
The working steps of the ice machine are divided into three parts :
1. The automatic cleaning of the ice machine (once, 2 minutes )
When each ice machine starts, the automatic 2 minutes cleaning program is automatically carried out to clean the floating objects in the evaporator and the tank. In 2 minutes the tank uninterrupted water, pump run. The user can hear the noise of the pump work flow from the top of the evaporator down into the tank, and then overflow from the tank, from the drain outlet of the ice storage bucket.
2. Ice (loop's work, the longest 40 minutes )
After the completion of automatic cleaning, the pump will delay 45 seconds to start, When making ice, the water pump works continuously from above the evaporator to the tank, and the water will slowly become cold until it freezes. Ice thickness is measured by the ice thickness detector during the ice making process. When the thickness of the test is reached, the program will turn to the de-icing step. If the gap of the ice thickness detector is too large, it will be forced into the de-icing program after more than 40 minutes of ice making time.
3. De-icing ( cycle work, up to 4 minutes )
In the de-icing procedure, ice will be heated, ice and evaporator will be the connection will be melted, when the ice to weight and can not be attached to the evaporator, it will fall off, complete a de-icing process.
When the ice falls, the water plate will be turned over, and then the water retaining plate will be reset due to the dead weight, and then the machine starts to make ice again. When the ice storagebin is too much ice, the ice block can not be reset, and the control chip is judged to be full of ice and temporarily shut down until the water retaining plate is reset.
SK/SM Control Panel Operating Manual
Power:
1. When the machine is in working state, press this key to stop the program and shut down automatically.
2. When the machine is not working, press this key to start it immediately.
Status: When the machine is in working state, press this key to jump to execute the deicing subroutine. There are two situations:
1. When appropriate ice is available, this key can stop the ice making process and turn to the deicing process.
2. When there is no ice or too thin, this key will be transferred to the deicing process, which will automatically jump to the ice making process after 6 minutes of deicing time.
Wash:
1. Short press once to control the blue light's turn on/off
2. Press 3 seconds long to execute the cleaning subroutine. After 4 minutes, jump the ice making subroutine automatically.
Think: 1. Press once, the screen number is +1, ice making time is +1 minutes.
Thin: 1. Press once, the screen number is -1, ice making time is -1 minutes.
Adjusting ice thickness can only be observed after de-icing. Ice-making time under normal conditions is mostly within 15-30 minutes. No more than 3 minutes at a time to adjust ice thickness.
SA Control Panel Operating Manual
General description:
This is a fully automatic ice making machine, all programs of the SA control panel have been set up in the factory.
Usually, the user just need to do some simple operation. Please place the machine in the appropriate location and connect to power supplies.
IF you machine has red switch on the machine's back or left side, Please turn on it. Then the SA control panel will light up, the machine will run automatically, the user need no any other operation.
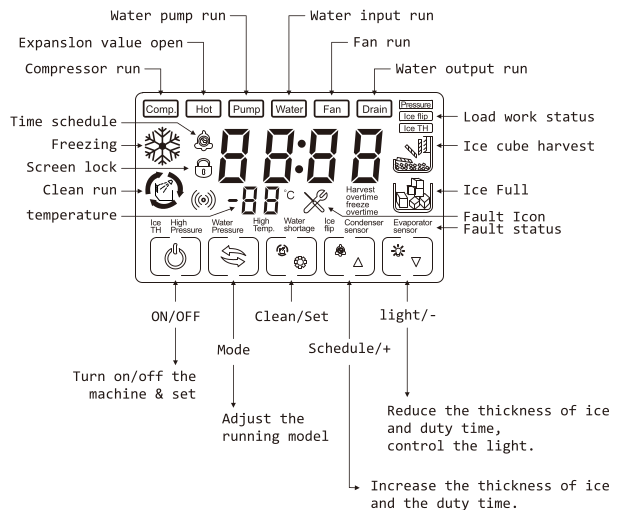
I. Button instruction
ON/OFF Button 
1. Press it to turn off ice machine in the status of power ON
2. turn on ice machine in the status of power OFF
3. schedule time in the status of time schedule setting
4. turn off the machine in the status of time schedule.
Clean/Set Button 
1. Press the button in the status of power OFF , releasing the button when it flashes, machine works on manual clean.
2. Press the button in the status of manual clean, machine go to drain step and then enter into rinsing process after drain finished. Press the button in the status of rinsing, machine will go to drain and then go to next procedure.
3. Press the button goes to manual clean, in the status of ice freezing. ice harvest and ice full.
Schedule/+ Button 
1. Press it to enter time schedule setting when power OFF.
2. In the status of time schedule setting, press the button to increase 1 minutes, long pressing to increase time continuously.
3. In the status of setting, press the button to increase one of the parameter, long pressing to increase continuously.
Light/- Button 
1. In the status of setting, press the button to reduce one of the parameter, long continuously.
2. In the status of time schedule setting, press the button to reduce 1 minutes, continuously.
3. In the status of non set , press the button to turn on/off the blue Light.
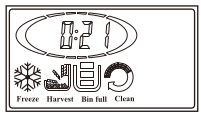
II.SA control panel status instructions (Drawing instruction)
1. Switch on: LCD control panel lights up.
2. Switch on time-delay:
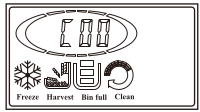
Water inlet: Display time C00, icons of Clean, Freezing, Ice cube harvest and Ice full of storage light up.
Switch on clean: Display time is cleaning time, Clean icon lights up.
Pressure balance: Icons of Clean, Freezing, Ice cube harvest and Ice full of storage light up. If condenser sensor had fault, Fault icon lights up. Condenser sensor icon lights up, temperature displays EE.
3. Manual clean: Clean icon flashes. Displays time is cleaning time. (It will not display icon, if the programhas no cleaning function. .
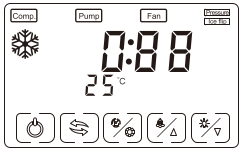
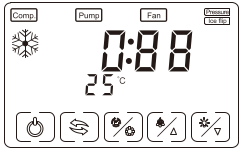
4. Ice freezing: Rreezing, Comp. and regarding icons light up. Display time is ice freezing time. After entering the countdown program. it displays remaining time for ice making. In the status of delayed shutting down, Freezing icon flashes. If condenser sensor had fault, Fault icon light on, Condenser sensor icon lights up, temperature displays EE.
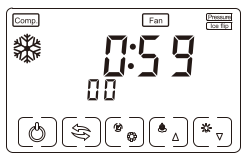
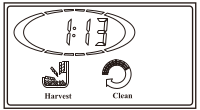
5. Ice harvest: Ice cube harvest icon light up. Display time is ice cube harvest time. In the status of delayed shutting down , Ice cube harvest icon flashes.
If condenser sensor had fault, Fault icon lights up, Condenser sensor icon Lights up, temperature displays EE.
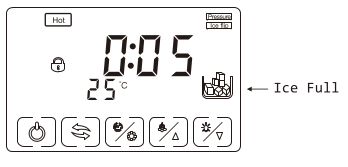
6. Ice full: Ice full of storage icon lights up. Display time is ice full time, All the load works will be turned off.
Ice full of storage icon works with water plate. When the water plate close, Ice full of storage icon lights up, Ice full of storage icon goes out when water plate opens. No button pressed for 6@ seconds, screen locked, screen lock icon lights up. Press any key to unlock.
Ice full is released (compressor is on delayed status), Ice full of storage icon flashes, turn on delay. If condenser sensor had fault, Fault icon light on, Condenser sensor icon lights up, temperature displays EE.
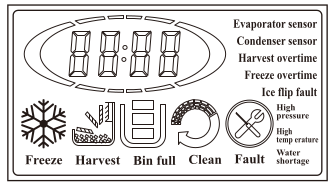
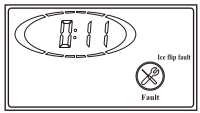
7. Fault: Fault icon lights up, corresponding fault status icons light on. All the load works will turn off.
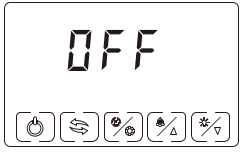
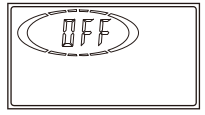
8. Switch off: Displays OFF.
9. Schedule time setting: Time schedule icon lights up. Display time is the schedule time to turn on the machine.
10. Schedule status: All icons of Clean, Freezing, Ice cube harvest, Ice full of storage light up. Time schedule icon flashes. Displaying scheduled time counts down.
11. Condenser fault, Fault icon lights up, Condenser sensor icon lights up. and the machine working.
12. Water plate or ice full switch faults, Ice flip lights up, Fault icon flashes.
13. Overtime ice making fault, if it happens 1@ times consecutively, Freeze overtime icon lights Fault icon flashes.
14. Overtime ice harvest fault, if it happens 3 times consecutively, Harvest overtime icon lights Fault icon flashes.
15. High temperature fault, (condensation temperature is over 65 degree Celsius).
High Temp. icon lights up and Fault icon flashes.
16. Water shortage fault, after 4 minutes water inputting continuously, water is still not full, Water shortage icon lights up and Fault icon flashes.
17. High pressure fault, HP switch open (the function is invalid without HP switch), High pressure icon lights up and Fault icon flashes.
III. Several frequently-used procedures setting for your reference
Please operate as the following steps when you need.
A. How to set the program when the ice storage is full?
When the ice storage is full, the control panel will display “full ice” pattern as the following picture.
- Use ice shovel to clean the ices which cover on the water plate.
- Press the discretional one of the five buttons to unlocked.
- Press On/Off button to turn off the machine, the control panel will appear “OFF”.
- Press On/Off button to turn on the machine, then press 3 times Model button to back to making ice model.
B. How to adjust the thickness of the ice?
1. When the is on making ice model. Press the discretional one of the five buttons to unlocked.
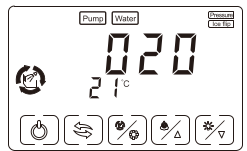
2. Press Schedule/+ button, the position which displays temperature will flash “0” .

3. Press Schedule/+ button and Light/- button to adjust. Press Schedule/+ button for one time. the position which displays temperature will appear "01" as the following picture. It means the ice making time will be increased 1 min. the ice will become thick.

4. Press Light/- button for one time, the position which displays temperature will appear "-1" as the following picture. It means the ice making time will be reduced 1 min, the ice will become thin. After setting, you need no other operation, the machine will resume making ice automatically.
C. How to clean the machine?
1. Press the discretional one of the five buttons to unlocked.
2. Press On/Off button, the control panel will appear OFF’ as the following picture.
3. Press Clean/Set button, the control panel will display clean pattern, Usually, 2 minutes to clean the machine is enough.
4. Press Model button 3 times to back to making ice model.
Adjusting ice thickness can only be observed after de-icing. Ice-making time under normal conditions is mostly within 15-30 minutes. No more than 3 minutes at a time to adjust ice thickness.
DZ Control Panel Operating Manual
Power-on delay water intake Situation Display.
Power-on Delay: After water intake finish, displays Standby time.
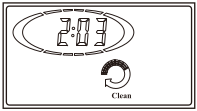
Clean display
When ice harvest, press clean button display: Clean light flashes, enter into cleaning.
Fault: light flashes. correspoinding fault item lights ON.
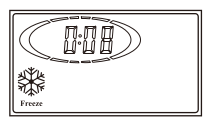
Freeze: displays ice freezing time, after freeze finisn, began to harvest, it will displays 30s countdown. Harvest: display ice harvest time.
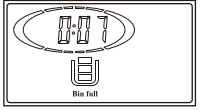
Bin Full: light ON when ice bin full. Light flashes after ice were taken out.
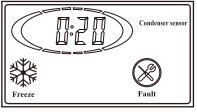
Condenser sensor and falut light ON.
Standby display: no operations within 2mins. the back-light becomes dark, will recover bright against any operations.
Adjusting ice thickness can only be observed after de-icing. Ice-making time under normal conditions is mostly within 15-30 minutes. No more than 3 minutes at a time to adjust ice thickness.
Routine Cautions
- When transportation and mobile location, the ice machine tilt shall not exceed 45 degrees.
- Ice machine, please use independent water source, and check regularly to prevent water pressure is too low, fluctuations or filter clogging.
- Do not store any sundries in the ice storage bin, or freeze any food in the ice storage bin and keep the ice shovel clean.
- Switch the ice storage bin plastic door, should be light open and light closed, don't beat box door, after taking the ice, please turn off the sliding door of the ice storage bin.
- Ice machine should be far away from the heat source. It is strictly prohibited to use in high temperature or low temperature environment. It is necessary to avoid direct sunlight in order to avoid affecting the heat dissipation of the machine.
- It is forbidden to wash the surface of ice machine directly with water. otherwise it may lead to short circuit, leakage and other faults.
- After the ice machine is used for a period of time, if it is stopped for a long time, it should be electrified every two months for four to six hours.
Falut self-diagnosis
- Pump--can directly observe whether there is water flowing from the evaporator up, if there is no pump failure
- Refrigeration--after 10 minutes of ice making, the water in the sink will be significantly cooler, and you can feel the water temperature directly by touching the evaporator or running water
- Influent--one by one in the automatic cleaning process can be observed in the tank overflow pipe constantly flowing into the ice storage bin. In the process of ice making, you can put your hand into the water tank to feel the amount of water, the normal situation accounts for more than half of the tank.
Maintenance
- In order to improve the reliability and service life of the ice machine, and to avoid the increase of the energy consumption of the ice output, the maintenance should be carried out according to the requirements of this manual. often clean the environment around the ice machine to keep clean, do not plug the case of ventilation shutters.
- The shell can be cleaned with a neutral cleaning agent, and then wipe clean with a rag which is made of soft material. Commercial stainless steel cleanser and polishing agent can be used when necessary.
- Filter element should be checked regularly. Most of the ordinary filter element is replaced in half a year, and the senior core should be replaced on time according to the description.
- Water pipes can be washed directly when the water tank and the ice storage bin are cleaned. Do not let water pressure is too large, do not directly flush the water pump and the above part of the ice, to prevent the leaching circuit part.
- Air-cooled ice machine condenser maintenance : three months to clean an air- cooled condenser. A vacuum cleaner with a soft brush or a brush is arranged in the direction of the fin to avoid the damage of the fin to affect the refrigerating efficiency.
- Maintenance of the wintering : in addition to turning off the water source and power supply, the water tank of the ice machine is also needed to becleaned, residual water in the inlet and drain pipes needs to be cleared away.
Warning:
- Any maintenance of the ice machine is not within the manufacture's warranty.
- The wind condenser fin edge is sharp, please be careful when cleaning.
- Before cleaning and maintenance work. be Sure to turn off the water and power. pull out the plug.
- The filter cartridge should be replaced periodically.
P70 Water Tank clean
If there is impurity scale in the water tank, the ice machine will deposit scale inside after a period of time, which will affect the color, quality and taste of ice. If not handled in time, the machine will not work properly.
P70 water tank has which was applied by our company for a new appearance patent to facilitate customers to clean scale by themselves. as shown in the figure:
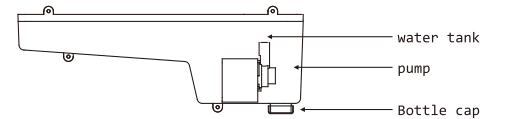
The bottle cap at the bottom of the tank can be screwed off to drain water from some scales in the tank.
Then a large amount of water is used to wash the scales deposited in the flume and discharge them from the drainage outlet.
The cleaning process is completed by tightening the installation of bho beeen pan fined.
The bottle cap at the bottom of the tank can be screwed off to drain water from some scales in the tank.
Then a large amount of water is used to wash the scales deposited in the flume and discharge them from the drainage outlet.
The cleaning process is completed by tightening the installation of the bottle cap first.
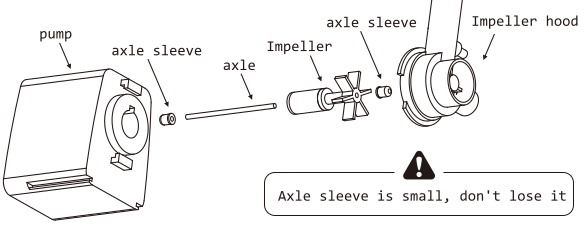
Submersible Pump Clean
The serious scale in the tank will jam the impeller of the pump and cause the water inside the machine to be unable to circulate. At this time, it is necessary to power off and take out the water pump to dismantle and clean.
Some machine models use submersible pumps, as shown in the figure. after decomposing the pump, use toothbrush to remove scale, and then return to normal. rm
Drainage Pump Application
The drainage pipe is short or the sewer is too high. Drainage pump can be carried out according to this figure.Drainage pump is fully automatic gap work. when the waste water accumulates to a certain height, automatically start the pump drainage.
The drainage pump connects the pipe of the sewer, which needs the user to solve by himself.
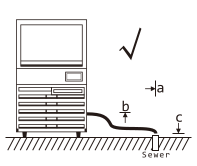
Best case
Distance of sewer < length of drain pipe
Height of sewer < drainage height
No need to use drainage pump
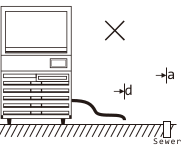
Distance of sewer > length of drain pipe need to use drainage pump
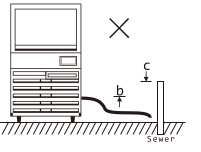
Height of sewer > drainage height need to use drainage pump
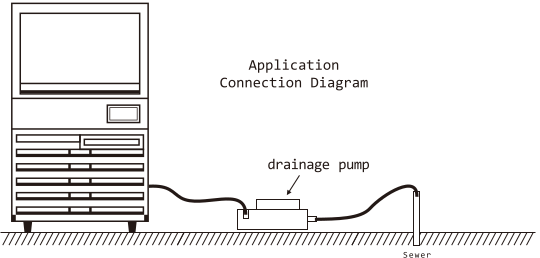
Application Connection Diagram
Fault Detection - Troubleshooting
Ice machine does not start
Cause:
- Poor contact of socket.
- Ice storage bin is full of ice.
- The cover of evaporator does not reset.
Solution:
- Replace the socket.
- Remove the ice, the machine will run automatically.
- Adjust the cover to make it reset free.
Ice machine shuts down after operation
Cause:
- The water supply has not been opened or not connected firmly.
- Tce machine didn't be placed horizontally.
- High-voltage temperature control switch action.
Solution:
- Recheck the water supply.
- Adjust the feet to be horizontal.
- Open the front panel, clean the condenser.
Lack of ice production
Cause:
- Didn't clean more than two months.
- The water temperature is too high (Usually it happens in summer).
- The environment temperature is too high.
- The environment space is small or closed
- The water inlet valve fails and Keeps. open (the water tank is overflowing).
Solution:
- Open the front panel, clean the condenser.
- Clean up the surrounding sundries and use electric fan to makes the temperature cool down and the air circulating.
- Clean up the surrounding sundries to make’ air circulating.
- Replace the water inlet valve.
The transparency of ice cube is poor or the shape of the ice is incomplete.
Cause:
- Imporper adjustment of ice thickness detector.
- The water quality is poor.
- Water tank and evaporator is dirty.
- Water inlet valve filter screen is dirty.
- Large amount of running water above evaporator.
- The drain valve fails and keeps close (split ice maker).
Solution:
- Reset the ice thickness detector
- Install the filter, replace the filter element
- Clean the ice machine and replace the filter element.
- Clean the water inlet valve filter screen. regulate water flow.
- Replace the drain valve. ighten silicon tube of water pump.
The ice cube can not drop from the evaporator.
Cause:
- The ice is too thick.
- The ice detector is dirty and loose.
Solution:
- Adjust the ice thickness.
- Clear the probe and check the connection.
Excessive noises
Cause:
- The ice machine placed instability. foot hangs in the air.
- The shell of the ice machine touch other objects.
Solution:
- Place the ice machine smoothly.
- Avoid touching other objects.
The shell of the ice maker has condensed water
Cause:
- The door of ice storage bin is not completely closed.
- Working in a high temperature and humid environment.
Solution:
- Completely shut down the ice storage tank.
- Normal phenomenon.
Error Codes
E01: Ice Full Switch error
- Possible causes:
- De-icing plate is missing or misplaced
- The polarity of the magnetic induction element is reversed
- Possible solutions:
- Replace ice removal plate or full ice sensor
- Contact manufacturer for help
E02: Ice making timeout error
- Possible causes:
- Ambient (air) temperature is too hot
- Cooling effect on condensing system is poor
- Cooling fan isn’t spinning fast enough
- Refrigeration system is leaking
- Possible solutions:
- Decrease air temperature, for example place a unit in a place of better ventilation or turn on air conditioning
- Contact manufacturer for help
E03: deicing timeout error
- Possible causes:
- Ice cube setting is too thin
- Not enough water in water tank
- Ambient (air) temperature is too col
- De-icing solenoid valve failure
- Possible solutions:
- Change ice cube thickness
- Check water inlet system and if water tank if flooded
- Block ventilation inlet area proportionally with membrane materials
- Contact with manufacturer for help
E04: High temperature shutdown error
- Possible causes:
- Ambient (air) temperature is too hot
- Condensing system is not providing enough cooling effect
- Cooling fan is damaged and doesn’t work properly
- Possible solutions:
- Decrease air temperature, for example place a unit in a place of better ventilation or turn on air conditioning
- Contact manufacturer for help
E05: Water shortage shutdown error
- Possible causes:
- Water supply pressure is not enough
- Possible solutions:
- Check water supply pressure
- Check if water filter is blocked
- Check if bottle cap at the bottom of water tank is properly tightened and sealed
- Contact manufacturer for help
E06: High pressure shutdown error
- Possible causes:
- Condenser temperature is too high
- Refrigeration system is blocked
- Main control board failure
- Possible solutions:
- Decrease air temperature, for example place a unit in a place of better ventilation or turn on air conditioning
- Check condensation heat dissipation system
- Contact manufacturer for help
E07: Condensation probe error
- Possible solutions:
- Contact manufacturer for help
E08: Condensation probe error
- Possible solutions:
- Contact manufacturer for help
E09: Evaporation probe error
- Possible solutions:
- Contact manufacturer for help
E10: Evaporation probe error
- Possible solutions:
- Contact manufacturer for help
E11
- Possible causes:
- Ring temperature is too hot
- Condensing system isn’t dissipating heat enough
- Refrigeration system is leaking
- De-icing hot valve failure
- Possible solutions:
- Contact manufacturer for help