Operator's Manual
®
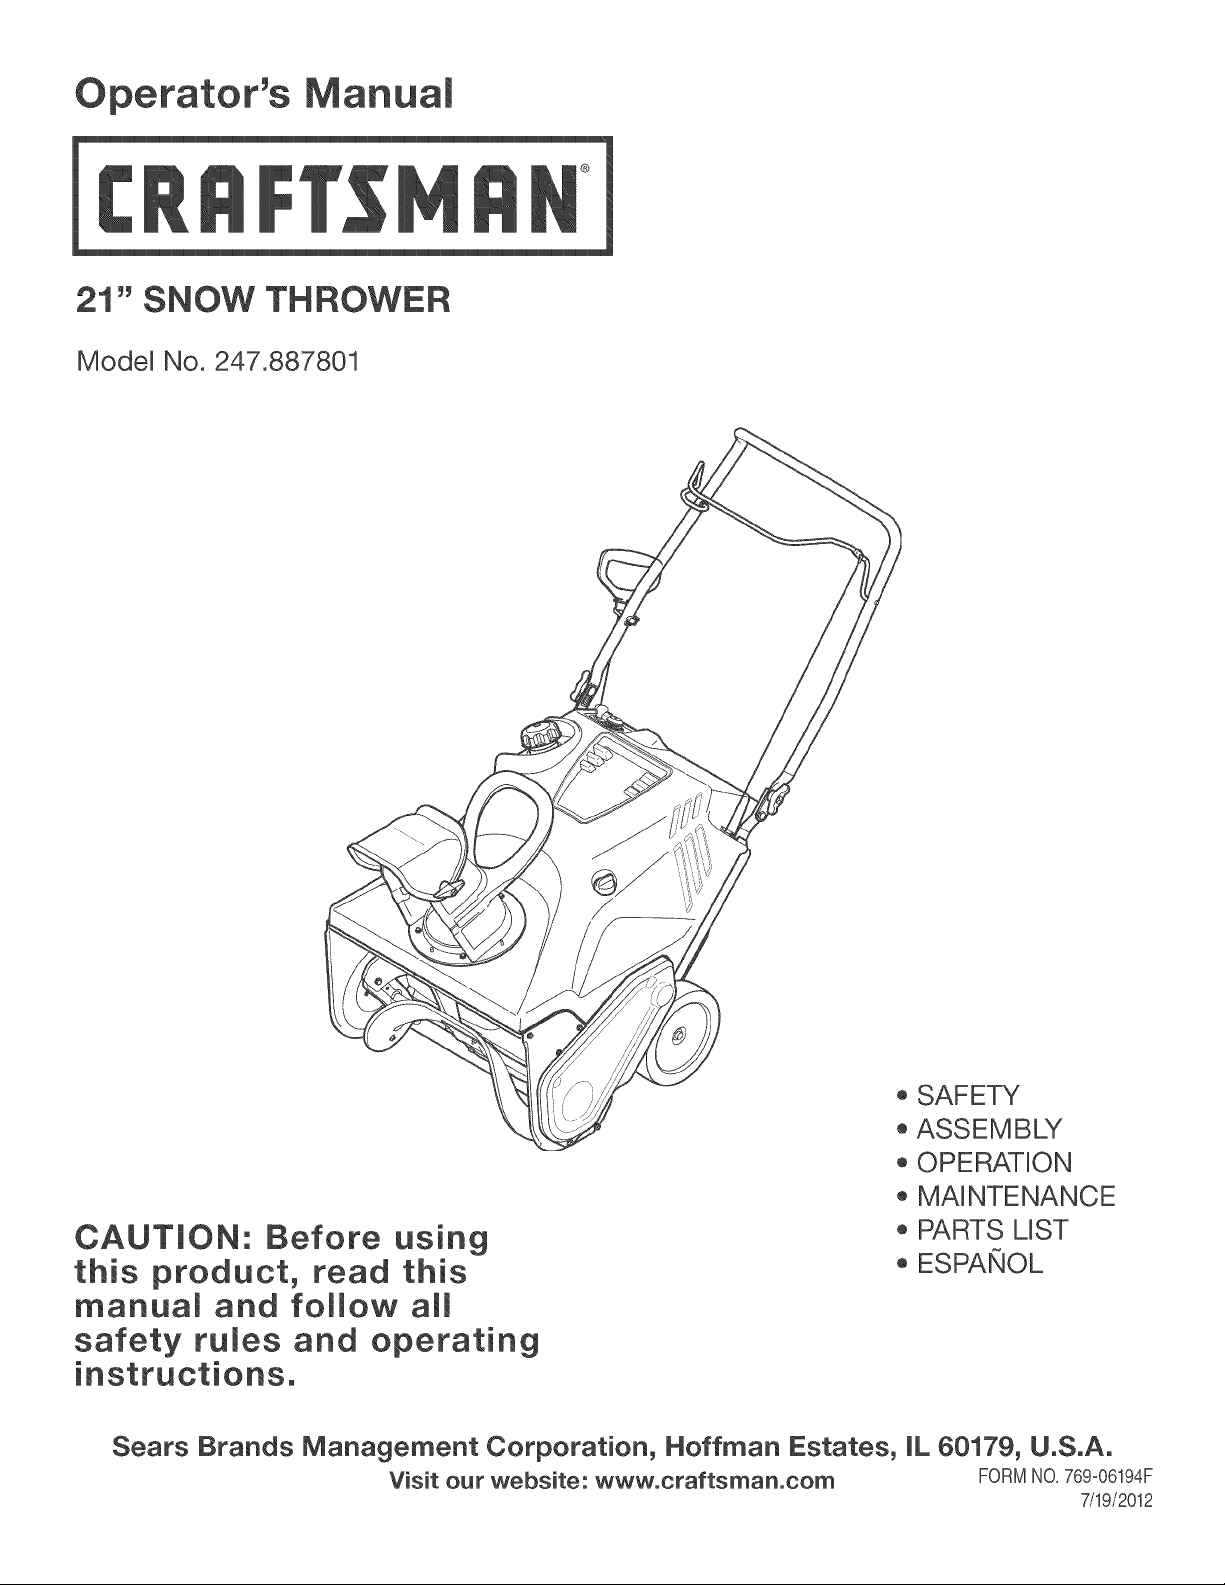
21" SNOW THROWER
Model No. 247.887801
CAUTION: using
this product, read this
manua_ and fo_mow am_
safety fumes and operating
instructions.
®SAFETY
®ASSEMBLY
®OPERATION
® MAINTENANCE
® PARTS LIST
® ESPAtIOL
Sears Brands Management Corporation, Hoffman Estates, IL 60179, U.S.A.
Visit our website: www.craftsman.com FORMNO.769=06194F
7/19/2012

WarrantyStatement..................................Page2
SafeOperationPractices..........................Pages3-6
Assembly..................................................Pages7-9
Operation..................................................Pages10-12
ServiceandMaintenance.........................Pages13-17
Off-SeasonStorage..................................Page18
TroubleShooting.......................................Page19
PartsList...................................................Pages20-31
Labels.......................................................Page32
RepairProtectionAgreement...................Page36
Espa_ol.....................................................Page37
ServiceNumbers......................................BackCover
CRAFTSMANTWOYEARFULL WARRANTY
FORTWOYEARSfromthedateofpurchase,thisproductiswarrantedagainstanydefectsinmateriaHorworkmanship.DefectiveproductwiHH
receivefreerepairorfreerepHacementifrepairisunavaiHabHe.
Thiswarrantyisvoidifthisproductiseverusedwile providingcommerciaHservicesorifrentedtoanotherperson.
Forwarrantycoveragedetailstoobtainrepairorreplacement,visitthewebsite:www.craftsman.com
Thiswarranty covers ONLYdefects in material and workmanship. Warranty coverage does NOTinclude:
, ExpendabHeitemsthatcan wearoutfrom normaHusewithin thewarrantyperiod,incHudingbut not Himitedto augers,augerpaddHes,drift
cutters,skid shoes,shavepilate,shearpins,sparkpHug,air cHeaner,beHts,and oiHfiHter.
, Standardmaintenanceservicing,oiHchanges,or tune-ups.
, Tire repHacementor repaircausedby puncturesfromoutsideobjects,suchas naiHs,thorns,stumps,or gHass.
, Tireor wheeHrepHacementor repairresuHtingfrom normaHwear,accident,orimproperoperationor maintenance.
, Repairsnecessarybecauseof operatorabuse,incHudingbutnot Himitedto damagecausedby over-speedingthe engine,or fromimpacting
objectsthat bendthe frame,augershaft,etc.
, Repairsnecessarybecauseof operatornegHigence,incHudingbut not Himitedto,eHectricaHand mechanicaHdamagecausedby improper
storage,faiHureto usethe propergradeandamountof engineoiH,or faiHureto maintainthe equipmentaccordingto the instructionscontained
inthe operator'smanual
, Engine(fueHsystem)cHeaningor repairscausedbyfueHdeterminedto becontaminatedor oxidized(stab). HngeneraH,fueHshouHdbe used
within30 daysof itspurchasedate.
, NormaHdeteriorationandwearof the exteriorfinishes,or productHabeHrepHacement.
Thiswarrantygivesyou specificHegaHrights,andyou mayaHsohaveotherrightswhichvaryfrom stateto state.
Sears Brands Management Corporation, Hoffman Estates, (}0179
EngineOilType:
EngineOilCapacity:
FuelCapacity:
SparkHug:
SparkHug Gap:
SAE 5%30
20 ounces
2 Quarts
F6RTC
.020"-.030"
Model Number.................................................................
Serial Number .................................................................
Dateof Purchase.............................................................
Recordthe modelnumber,serialnumber
anddateof purchaseabove
@Sears Brands,LLC
2
Thissymbolpointsout importantsafetyinstructionswhich,if not
followed,couldendangerthepersonalsafetyand/orpropertyof
yourselfand others. Readand followall instructionsin thismanual
beforeattemptingto operatethis machine.Failureto complywith
theseinstructionsmayresultin personalinjury.Whenyou seethis
symbol,HEEDiTS WARNING!
CAUFORNIA PROPOSmON 65
EngineExhaust,someof itsconstituents,andcertainvehicle
componentscontainoremitchemicalsknownto Stateof California
to causecancerandbirthdefectsorotherreproductiveharm.
Thismachinewasbuiltto beoperatedaccordingto the safeopera-
tion practicesinthis manual As withanytypeof powerequipment,
carelessnessor erroron the partof the operatorcan resultin serious
injury.Thismachineis capableof amputatingfingers,hands,toes
andfeetand throwingdebris.Failureto observethe followingsafety
instructionscouldresultin seriousinjuryor death.
Your Responsibility--Restrict the use of thispowermachineto
personswho read,understandand followthewarningsand instruc-
tionsin this manualand on the machine.
SAVE THESE NSTRUCT ONS!
, Read,understand,andfollowall instructionson the machineand
in themanual(s)beforeattemptingto assembleand operate.
Failureto do socan resultinseriousinjuryto the operatorand/
orbystanders.Keepthismanualin a safeplaceforfuture and
regularreferenceandfor orderingreplacementparts.Toorder
replacementparts call,1-800-4MY-HOME.
Befamiliarwithall controlsandtheir properoperation.Knowhow
to stopthe machineanddisengagethemquickly.
Neverallowchildrenunder 14yearsof age to operatethis
machine.Children14and over shouldreadandunderstandthe
instructionsand safeoperationpracticesin thismanualand on
the machineandbe trainedand supervisedby anadulL
Neverallowadultsto operatethis machinewithoutproper
instruction.
Thrownobjectscan causeseriouspersonalinjury. Planyour
snow4hrowingpatternto avoiddischargeof materialtoward
roads,bystandersandthe like.
Keepbystanders,pets andchildrenat bast 75feet fromthe
machinewhile it is in operation.Stopmachineif anyoneenters
the area.
Exercisecautionto avoidslippingor falling,especiallywhen
operatingin reverse.
Thoroughlyinspecttheareawherethe equipmentis to be used.
Removeall doormats,newspapers,sleds,boards,wires andother
foreignobjects,whichcouldbe trippedoverorthrownby the auger/
impeller.
Alwayswear safetyglassesor eyeshieldsduringoperationand
while performingan adjustmentor repairto protectyoureyes.
Thrownobjectswhich ricochetcancauseseriousinjuryto the
eyes.
, Donot operatewithoutwearingadequatewinteroutergarments.
Donot wearjew@y, long scarvesorotherlooseclothing,which
could becomeentangledin movingparts.Wearfootwearwhich
will improvefootingonslipperysurfaces.
, Usea groundedthree-wireextensioncordand receptaclefor all
machineswith electricstartengines.
, Disengageall controlleversbeforestartingthe engine.
, Neverattemptto makeanyadjustmentswhileengineis running,
exceptwherespecificallyrecommendedinthe operator'smanual
, Letengineandmachineadjustto outdoortemperaturebefore
startingto clearsnow.
SafeHandlingofGasoline
Toavoidpersonalinjuryorpropertydamageuseextremecarein
handlinggasoline.Gasolineisextremelyflammableandthevaporsare
explosive.Seriouspersonalinjurycanoccurwhengasolineisspilled
onyourselforyourclotheswhichcanignite.Washyourskinand
changeclothesimmediately_
, Useonlyanapprovedgasolinecontainer.
, Extinguishallcigarettes,cigars,pipesandothersourcesof
ignition.
, Neverfuelmachineindoors.
, Neverremovegascaporaddfuelwhiletheengineishotor
, Allowenginetocoolatbasttwominutesbeforerefueling.
, NeveroverfillfueltanLFilltanktonomorethanYainchbelow
bottomoffillernecktoprovidespaceforfuelexpansion.
, Replacegasolinecapandtightensecurely.
, ifgasolineisspilled,wipeitofftheengineandequipmenLMove
machinetoanotherarea.Wait5minutesbeforestartingthe
engine.
, Neverstorethemachineorfuelcontainerinsidewherethereisan
openflame,sparkorpilotlight(e.g.furnace,waterheater,space
heater,clothesdryeretc.).
, Allowmachinetocoolatbast5minutesbeforestori%
, Neverfillcontainersinsideavehicleoronatruckortrailerbed
withaplasticliner.Alwaysplacecontainersonthegroundaway
fromyourvehiclebeforefilling.
, ifpossible,removegas-poweredequipmentfromthetruckor
trailerandrefuelitontheground,ifthisisnotpossible,thenrefuel
suchequipmentonatrailerwithaportablecontainer,ratherthan
fromagasolinedispensernozzle.
, Keepthenozzleincontactwiththerimofthefueltankor
containeropeningatalltimesuntilfuelingiscomplete.Donotuse
anozzlelock-opendevice.
, Donotputhandsorfeetnearrotatingparts,intheauger/impeller
housingorchuteassembly.Contactwiththerotatingpartscan
amputatehandsandfeel
, Theauger/impellercontrolleverisasafetydevice.Neverbypass
itsoperation.Doingsomakesthemachineunsafeandmaycause
personalinjury.
, Thecontrolleversmustoperateeasilyinbothdirectionsand
automaticallyreturntothedisengagedpositionwhenreleased.
, Neveroperatewithamissingordamagedchuteassembly.Keep
allsafetydevicesinplaceandworki%
, Neverrunanengineindoorsorinapoorlyventilatedarea.Engine
exhaustcontainscarbonmonoxide,anodorlessanddeadlygas.
, Donotoperatemachinewhileundertheinfluenceofalcoholor
drugs.
, Mufflerandenginebecomehotandcancauseaburn.Donot
toucLKeepchildrenaway.
, Exerciseextremecautionwhenoperatingonorcrossinggravel
surfaces.Stayalertforhiddenhazardsortraffic.
, Exercisecautionwhenchangingdirectionandwhileoperatingon
slopes.
, Planyoursnow-throwingpatterntoavoiddischargetowards
windows,walls,carsetc.Thus,avoidingpossibleproperty
damageorpersonalinjurycausedbyaricocheL
, Preventpossiblepropertydamageorpersonalinjuryfrom
objectricochetbyplanningyoursnowthrowingpatterntoavoid
dischargetowardswindows,walls,cars,etc.
, Donotoverloadmachinecapacitybyattemptingtoclearsnowat
toofastofarate.
, Neveroperatethismachinewithoutgoodvisibilityorlight.Always
besureofyourfootingandkeepafirmholdonthehandles.Walk,
neverrun.
, Disengagepowertotheauger/impellerwhentransportingornot
inuse.
, Neveroperatemachineathightransportspeedsonslippery
surfaces.Lookdownandbehindandusecarewhenbackingup.
, ifthemachineshouldstarttovibrateabnormally,stoptheengine,
disconnectthesparkplugwireandgrounditagainsttheengine.
inspectthoroughlyfordamage.Repairanydamagebefore
startingandoperati%
, Disengageallcontrolleversandstopenginebeforeyouleave
theoperatingposition(behindthehandles).Waituntiltheauger/
impellercomestoacompletestopbeforeuncloggingthechute
assembly,makinganyadjustments,orinspections.
, Neverputyourhandinthedischargeorcollectoropenings.Do
notunclogchuteassemblywhileengineisrunning.Shutoff
engineandremainbehindhandlesuntilallmovingpartshave
stoppedbeforeuncloggi%
, Useonlyattachmentsandaccessoriesapprovedbythemanufac_
turer(e.g.wheelweights,tirechains,cabsetc.).
, Whenstartingengine,pullcordslowlyuntilresistanceisfelt,then
pullrapidly.Rapidretractionofstartercord(kickback)willpull
handandarmtowardenginefasterthanyoucanletgo.Broken
bones,fractures,bruisesorsprainscouldresulL
, CallI_8004MY_HOMEforthelocationofthenearestSearsParts
&RepairServiceCenter.
CLEARUNG A CLOGGED DUSCHAF{GE CHUTE
Handcontactwith the rotatingimpellerinsidethe dischargechute
is the mostcommoncauseof injuryassociatedwith snowthrowers.
Neveruse yourhand to cleanout thedischargechute.
Toclear thechute:
1. SHUTTHE ENGINEOFF!
2. Wait 10secondsto be surethe impellerbladeshavestopped
rotating_
3_ Alwaysusea clean-outtool, not yourhands.
4
MAUNTENANCE & STORAGE
, Nevertamperwith safetydevices_Checktheirproperoperation
regularly.Referto the maintenanceandadjustmentsectionsof
thismanual.
, Beforecleaning,repairing,or inspectingmachinedisengageall
controlleversandstopthe engine.Wait untilthe auger/impeller
cometo a completestop.Disconnectthe sparkplug wireand
groundagainsttheengineto preventunintendedstarting.
, Checkboltsand screwsfor propertightnessat frequentintervals
to keepthe machinein safeworkingcondition.Also, visually
inspectmachinefor anydamage.
, Do notchangetheenginegovernorsettingor over-speedthe
engine.Thegovernorcontrolsthe maximumsafeoperatingspeed
of the engine.
, Snowthrowershaveplatesand skidshoesare subjectto wear
anddamage.Foryoursafetyprotection,frequentlycheckall
componentsand replacewithoriginalequipmentmanufacturer's
(OEM)parts onlyas listed inthe Partspagesof this Operator's
Manual.Useof partswhichdo not meetthe originalequipment
specificationsmayleadto improperperformanceand compro-
misesafety!
, Checkcontrolleversperiodicallyto verifythey engageanddisen-
gageproperlyandadjust,if necessary.Referto the adjustment
sectionin thisoperator'smanualfor instructions.
, Maintainor replacesafetyand instructionlabels,as necessary.
, Observeproperdisposallawsand regulationsfor gas,oil,etc. to
protectthe environment.
, Priorto storing,run machinea few minutestoclear snowfrom
machineand preventfreezeup of auger/impeller.
, Neverstorethe machineorfuel containerinsidewherethereis an
openflame,sparkorpilot lightsuch as a waterheater,furnace,
clothesdryer etc.
, Alwaysreferto the operator'smanualfor properinstructionson
off-seasonstorage.
, Checkfuelline,tank, cap,andfittingsfrequentlyfor cracksor
leaks.Replaceif necessary.
, Do notcrank enginewithsparkplug removed.
, Accordingto the ConsumerProductsSafetyCommission(CPSC)
andthe U.S.EnvironmentalProtectionAgency(EPA),this product
hasan AverageUsefulLifeof seven(7)years,or 60 hoursof
operation.At the end of theAverageUsefulLifehavethe machine
inspectedannuallybyan authorizedservicedealer to ensurethat
allmechanicalandsafetysystemsareworkingproperlyand not
wornexcessively.Failureto do so can resultin accidents,injuries
ordeath.
DO NOT MODUFY ENGUNE
Toavoidseriousinjuryor death,do not modifyengineinany way.
Tamperingwiththe governorsettingcanlead to a runawayengineand
causeit to operateat unsafespeeds.Nevertamperwithfactorysetting
of enginegovernor.
NOTUOE REGARDUNG EMUSSUONS
Engineswhich arecertifiedtocomplywithCaliforniaand federal
EPAemissionregulationsfor SORE(SmallOff RoadEquipment)are
certifiedto operateon regularunleadedgasoline,and mayinclude
the followingemissioncontrolsystems:EngineModification(EM),
OxidizingCatalyst(CO), SecondaryAirInjection(SAI)and ThreeWay
Catalyst(TWO)if so equipped.
SPARK ARRESTOR
Thismachineis equippedwithaninternalcombustionengineand
shouldnotbe usedonor nearany unimprovedforest-covered,
brush-coveredor grass-coveredlandunlessthe engine'sexhaust
systemis equippedwitha sparkarrestormeetingapplicablelocalor
statelaws (if any)
Ifa sparkarrestoris used, it shouldbe maintainedin effectiveworking
orderby theoperator.Inthe State of Californiathe aboveis required
bylaw (Section4442 of the CaliforniaPublicResourcesCode).Other
statesmayhavesimilarlaws. Federallawsapplyonfederallands.
A sparkarrestorfor the muffleris availablethroughyournearestSears
PartsandRepairServiceCenter.
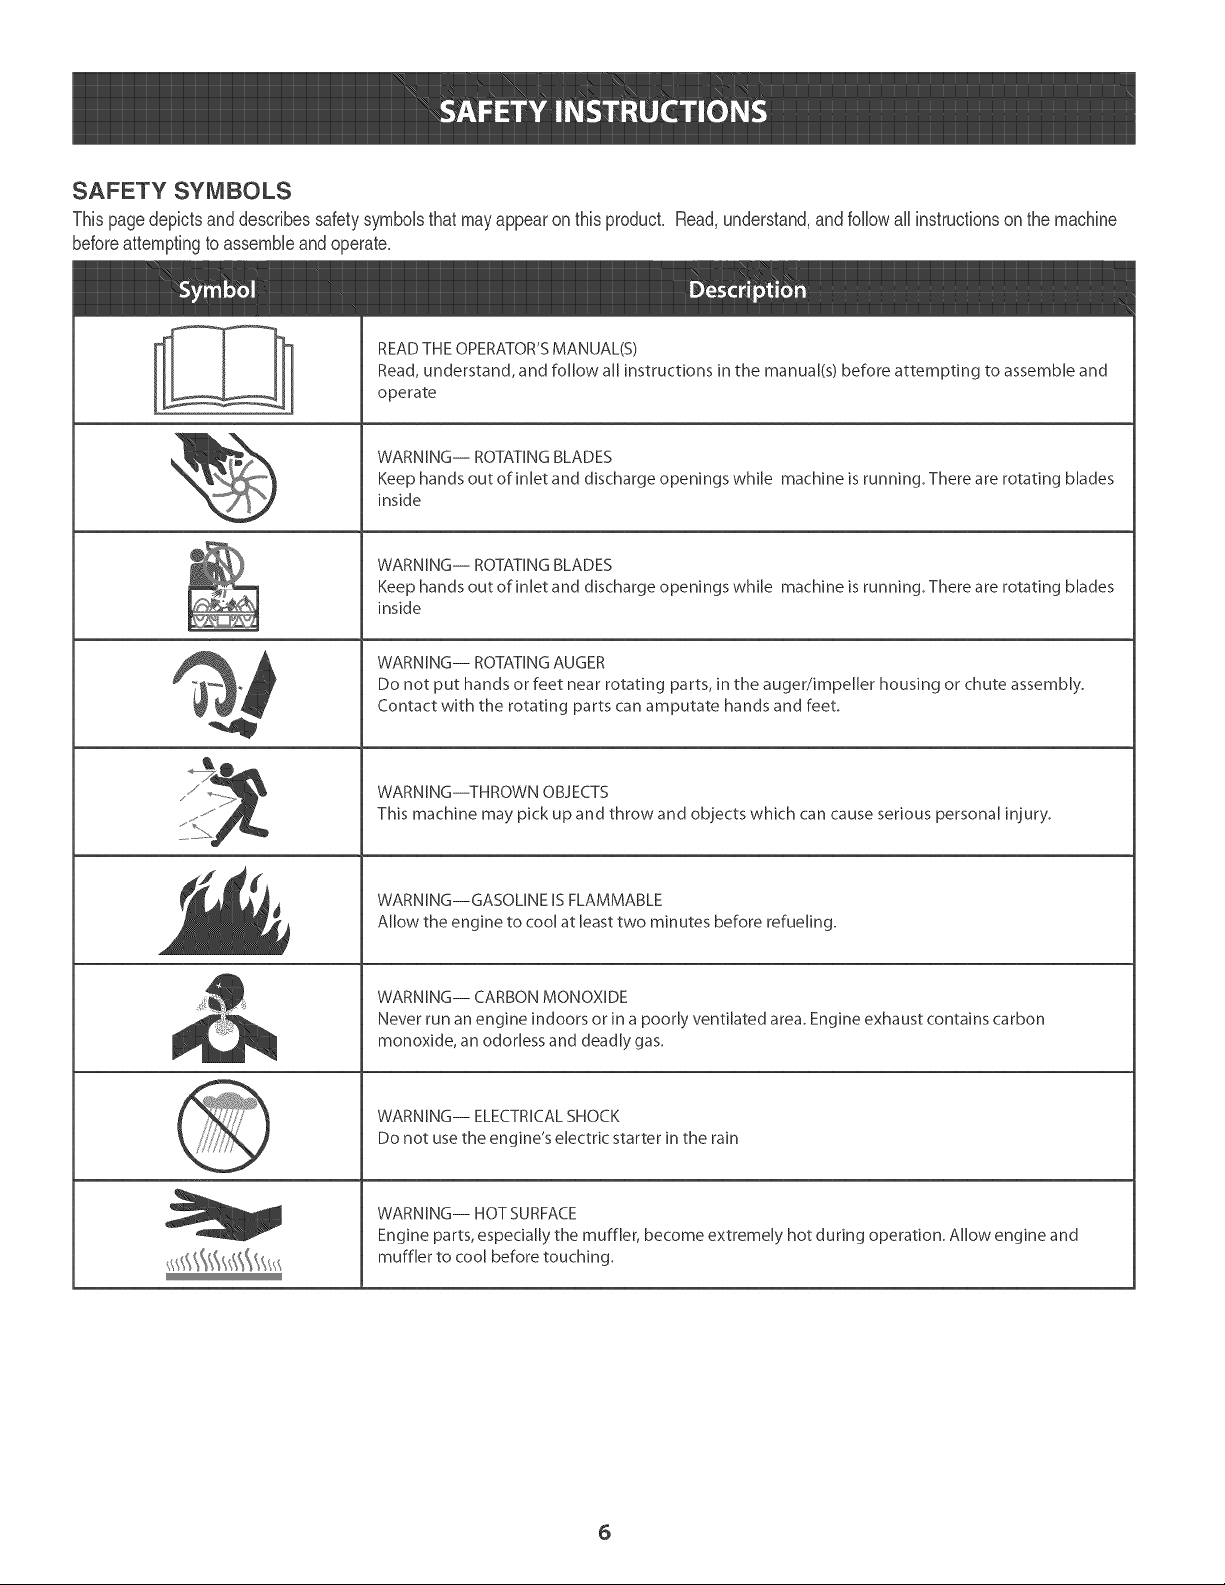
SAFETY SYMBOLS
Thispagedepictsanddescribessafetysymbolsthatmayappearon thisproduct. Read,understand,andfoflowaftinstructionson the machine
beforeattemptingto assembleandoperate.
°
i
\
READ THE OPERATOR'S MANUAL(S)
Read, understand, and follow all instructions in the manual(s) before attempting to assemble and
operate
WARNING-- ROTATING BLADES
Keep hands out of inlet and discharge openings while machine is running, There are rotating blades
inside
WARNING-- ROTATING BLADES
Keep hands out of inlet and discharge openings while machine is running. There are rotating blades
inside
WARNING-- ROTATING AUGER
Do not put hands or feet near rotating parts, in the auger/impeller housing or chute assembly.
Contact with the rotating parts can amputate hands and feet.
WARNING--THROWN OBJECTS
This machine may pick up and throw and objects which can cause serious personal injury.
WARNING--GASOLINE ISFLAMMABLE
Allow the engine to cool at least two minutes before refueling.
WARNING-- CARBON MONOXIDE
Never run an engine indoors or in a poorly ventilated area. Engine exhaust contains carbon
monoxide, an odorless and deadly gas.
WARNING-- ELECTRICALSHOCK
Do not use the engine's electric starter in the rain
WARNING-- HOT SURFACE
Engine parts, espedaJ[y the muffler, become extremely hot during operation. Allow engine and
muffler to cool before touching.
5
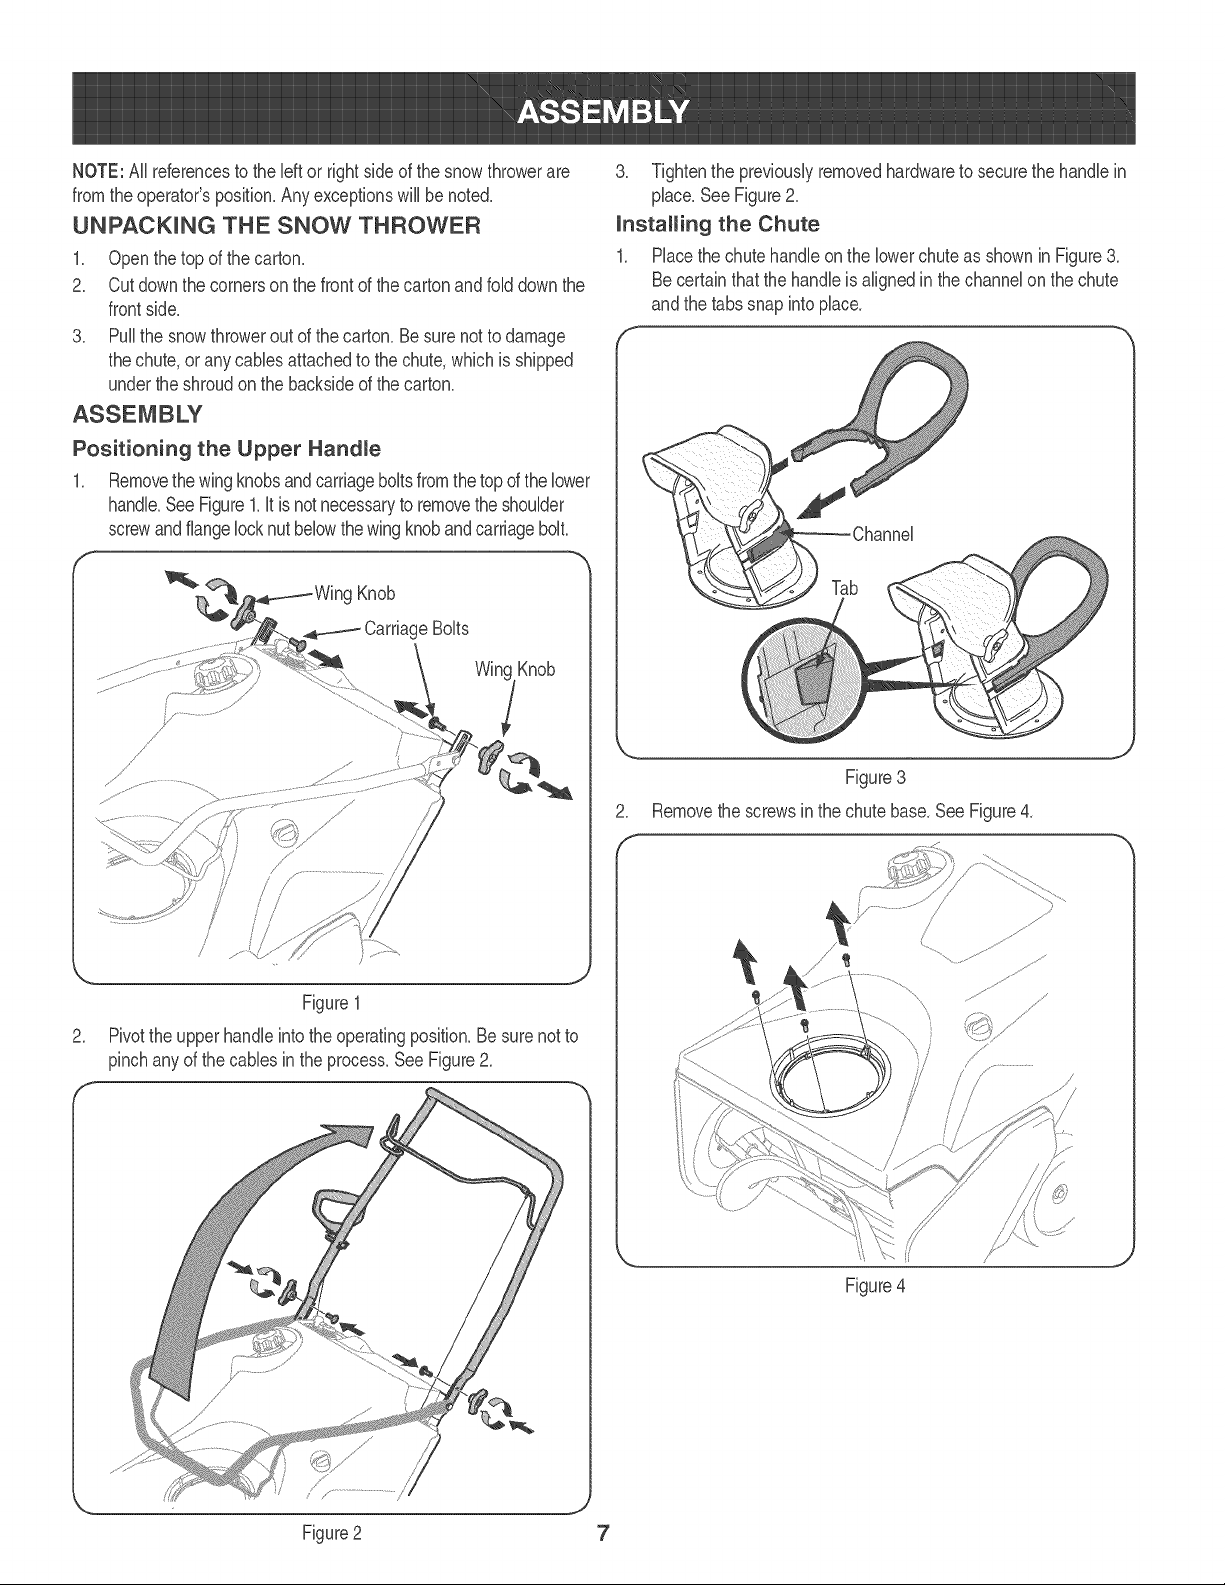
NOTE:All referencesto the leftor rightside of the snowthrowerare
fromthe operator'sposition.Anyexceptionswill be noted.
UNPACKUNG THE SNOW THROWER
1. Openthe top of the carton.
2. Cut downthe cornerson the front of thecarton andbid down the
frontside.
3. PuiIthe snowthroweroutof the carton.Be sure notto damage
thechute,or anycanes attachedto the chute,which is shipped
underthe shroudon the backsideof the carton.
Positioning the Upper Handme
1. Removethewingknobsandcarriageboltsfromthe topof thelower
handle.SeeFigure1.it is notnecessaryto removethe shoulder
screwand flangelocknut belowthewingknobandcarriagebolt,
g Knob
CarriageBolts
Win(
/
.
Figure1
Pivotthe upperhandleintothe operatingposition.Besure notto
pinchanyof thecanes inthe process.See Figure2_
3_ Tightenthe previouslyremovedhardwareto securethe handlein
place.SeeFigure2_
installing the Chute
1. Placethe chutehandle onthe lowerchuteas shownin Figure&
Becertainthatthe handleis alignedin the channelon the chute
andthe tabs snap intoplace.
.
Tab
Figure3
Removethe screwsinthe chute base.SeeFigure4.
//
Figure4
Figure2 7
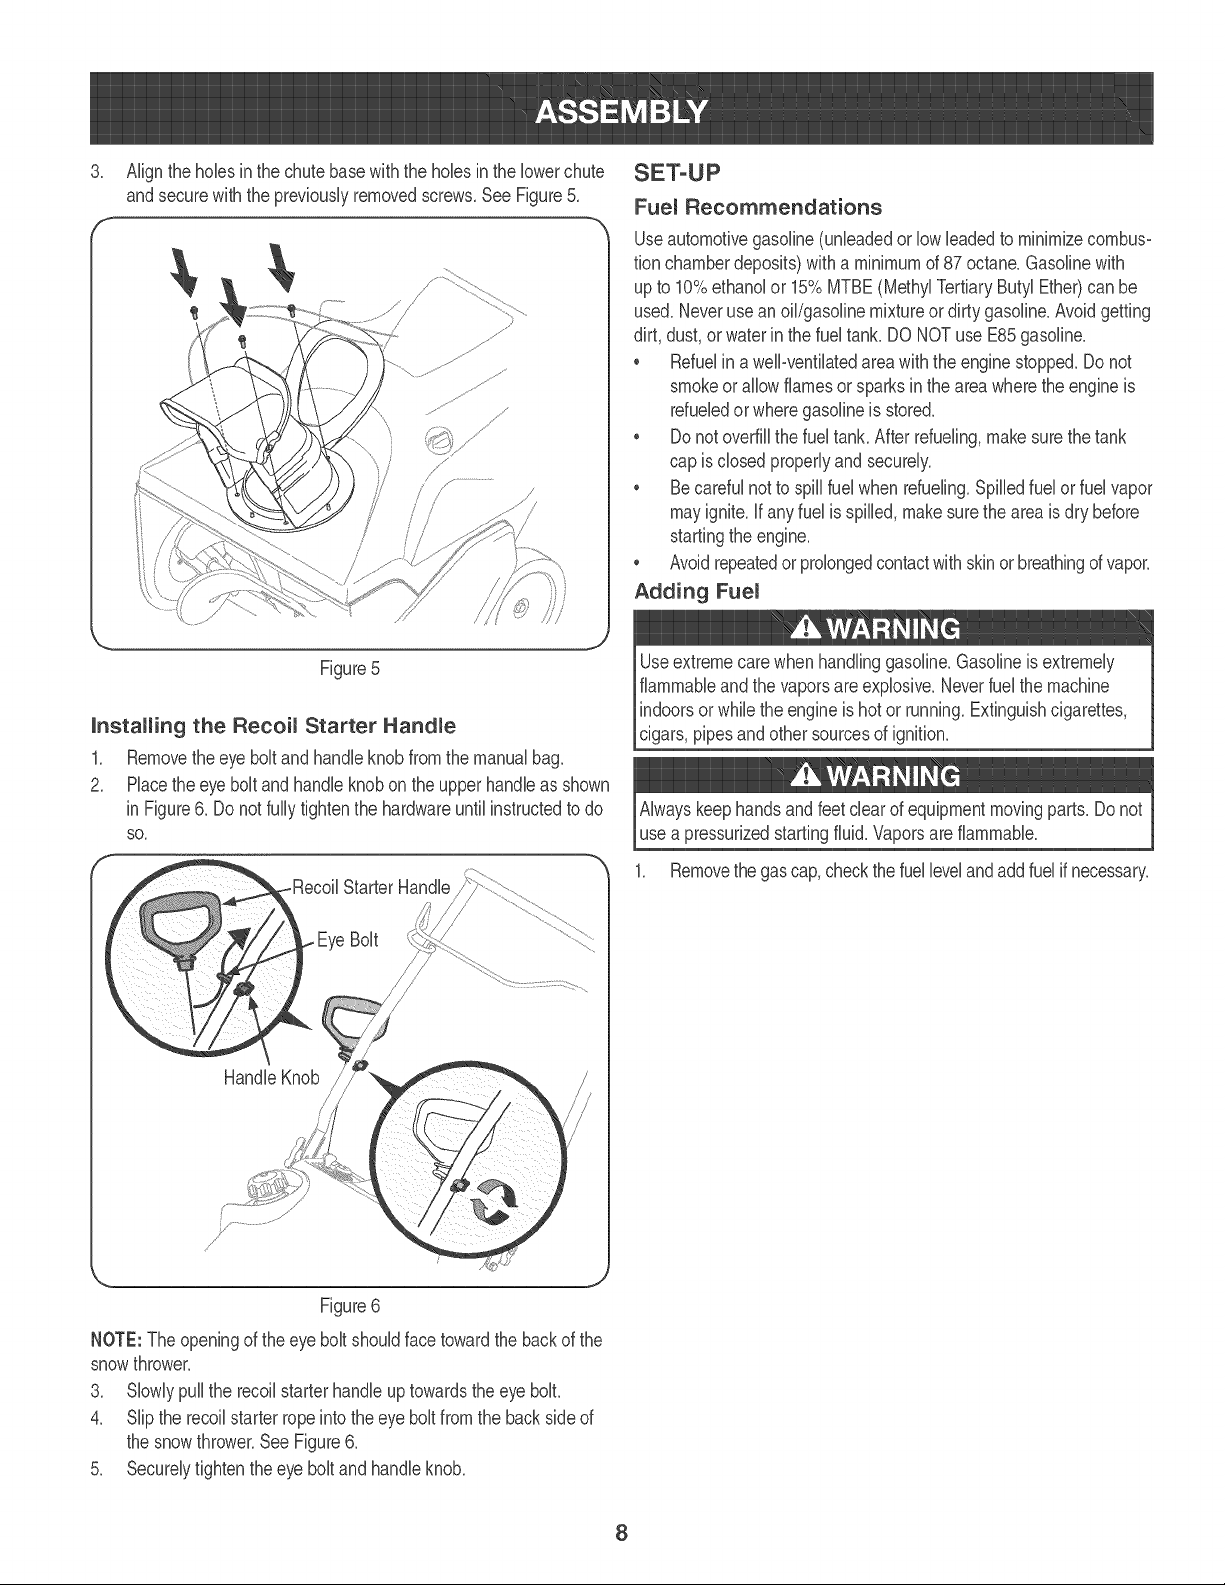
Aligntheholesinthechutebasewiththeholesinthelowerchute
andsecurewiththepreviouslyremovedscrews.SeeFigure5.
-'S
Installing the Recoil Starter Handle
1. Removetheeye boltandhandleknobfromthe manualbag.
2. Placetheeye boltand handleknobonthe upper handleas shown
in Figure6. Donot fullytightenthe hardwareuntil instructedto do
SO,
Fuel Recommendations
Useautomotivegasoline(unleadedor lowleadedto minimizecombus-
tion chamberdeposits)with a minimumof 87 octane.Gasolinewith
upto 10%ethanolor 15%MTBE(MethylTertiaryButyl Ether)can be
used.Neverusean oil/gasolinemixtureordirty gasoline.Avoidgetting
dirt. dust.orwaterin the fuel tank.DO NOTuse E85 gasoline.
, Refuelin a well-ventilatedarea withthe enginestopped.Do not
smokeor allowflamesor sparksin the areawherethe engineis
refueledor wheregasolineis stored.
, Donot overfillthe fueltank. Afterrefueling,makesurethe tank
cap is closed properlyandsecurely.
, Becarefulnotto spillfuel whenrefueling.Spilledfuelor fuel vapor
mayignite.Ifanyfuel is spilled, makesurethe areais dry before
startingthe engine.
, Avoidrepeatedor prolongedcontactwithskinorbreathingofvapor.
Adding Fuel
Alwayskeephandsandfeetclearof equipmentmovingparts. Donot
use a pressurizedstartingfluid.Vaporsare flammable.
1_ Removethe gascap,checkthefuelleveland addfuelif necessary.
Figure6
NOTE:The openingof theeye bit shouldface towardthe backof the
snowthrower.
3. Slowlypull the recoilstarterhandleuptowardsthe eye bolt.
4. Slip the recoilstarterropeintothe eyebolt fromthe back sideof
the snowthrower.SeeFigure6.
5. Securelytightenthe eye boltand handleknob.
8
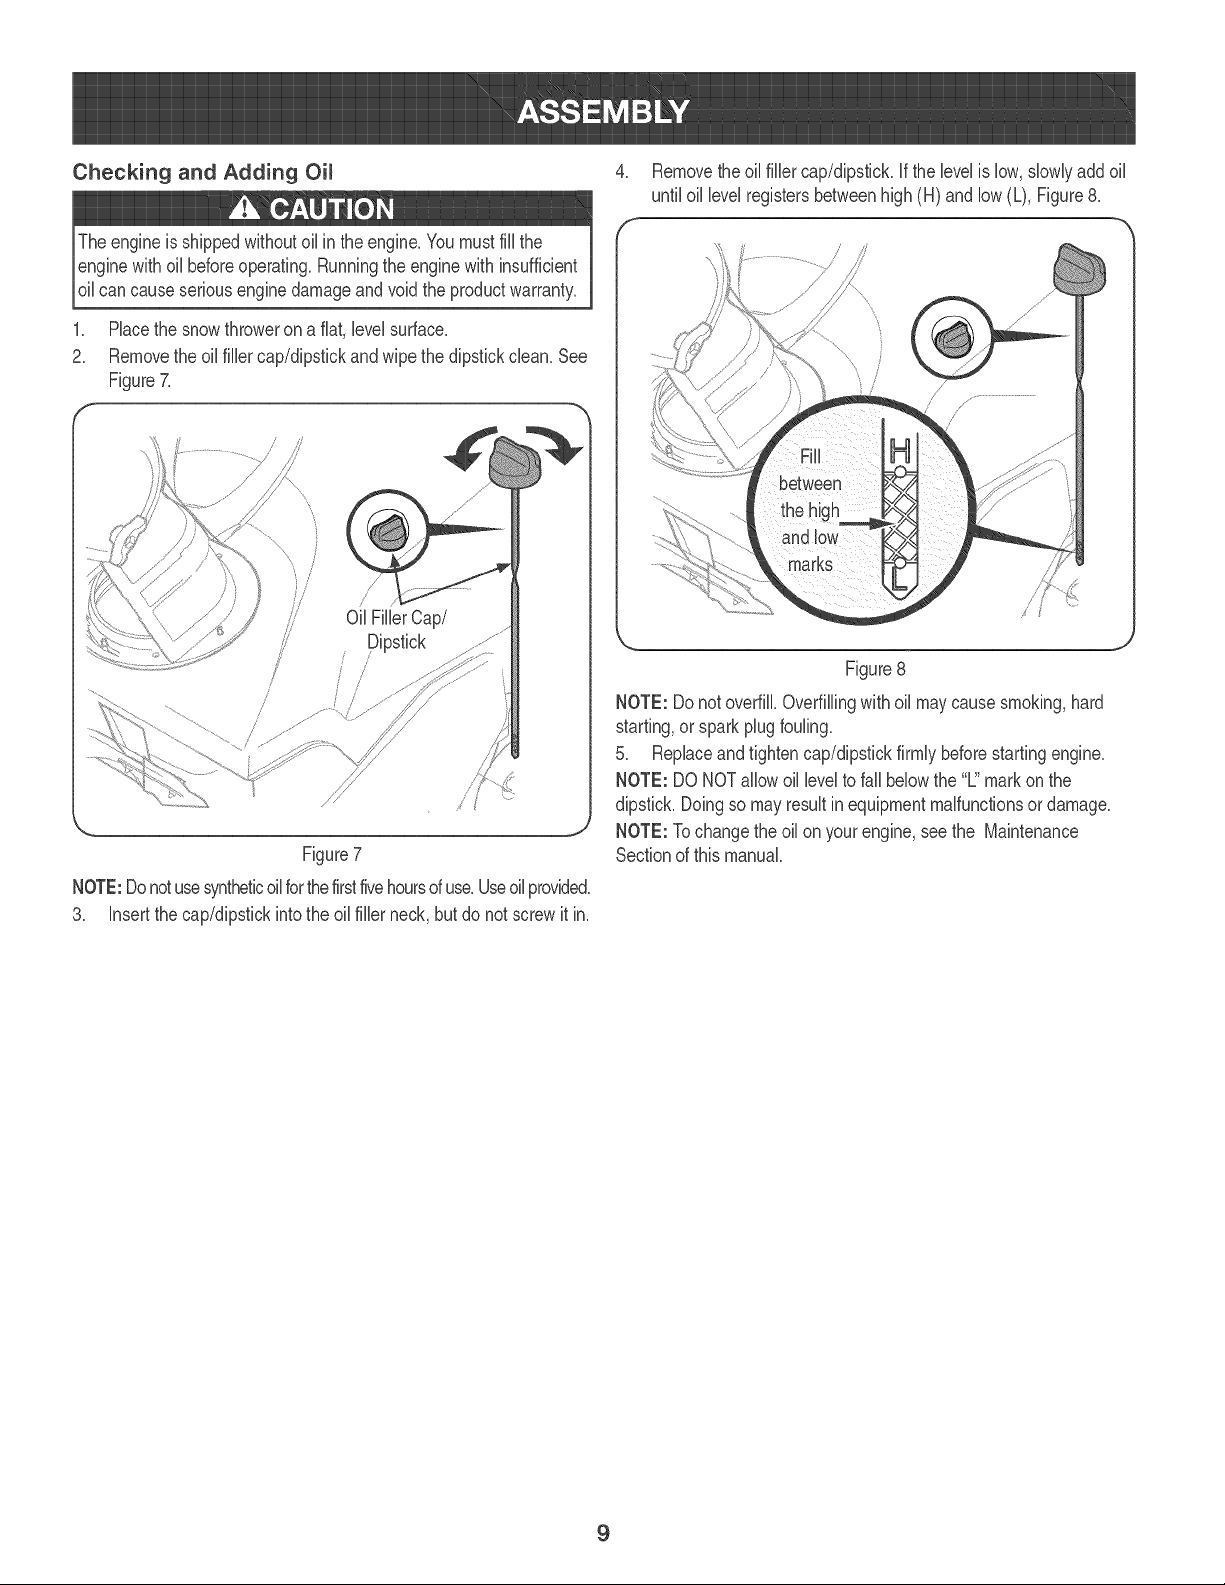
Checking and Adding Oil
Theengine is shippedwithoutoil in theengine.Youmustfinthe
enginewithoNbeforeoperafing.Runningthe enginewithinsufficient
oNcan causeseriousenginedamageand void the productwarranty.
,
2_
Placethe snowthroweron a flat,level surface.
Removethe oil fillercap/dipstickandwipethe dipstickclean.See
Figure7.
,.. j
Figure7
NOTE:Donotusesyntheticoilforthefirstfivehoursofuse.Useoilprovide&
3. Insertthe cap/dipstickintothe oilfiller neck,butdo not screwit in.
,
f
Removethe oilfiller cap/dipstick,If thelevelis low,slowlyaddoil
until oil levelregistersbetweenhigh(H) and low (L), Figure8,
Figure8
NOTE: Do notoverfill,Overfillingwith oilmaycausesmoking,hard
starting,or sparkplugfouling,
5, Replaceand tightencap/dipstickfirmlybeforestartingengine,
NOTE: DO NOTallowoil levelto fall belowthe "L"markon the
dipstick,Doingso mayresultinequipmentmalfunctionsor damage,
NOTE: Tochangethe oil onyourengine,seethe Maintenance
Sectionof this manual,
9
AugerControl
Recoil
Button
Electric
Outlet
Gas Ca
Control
ChuteAssembl'
ShavePlate
Aug
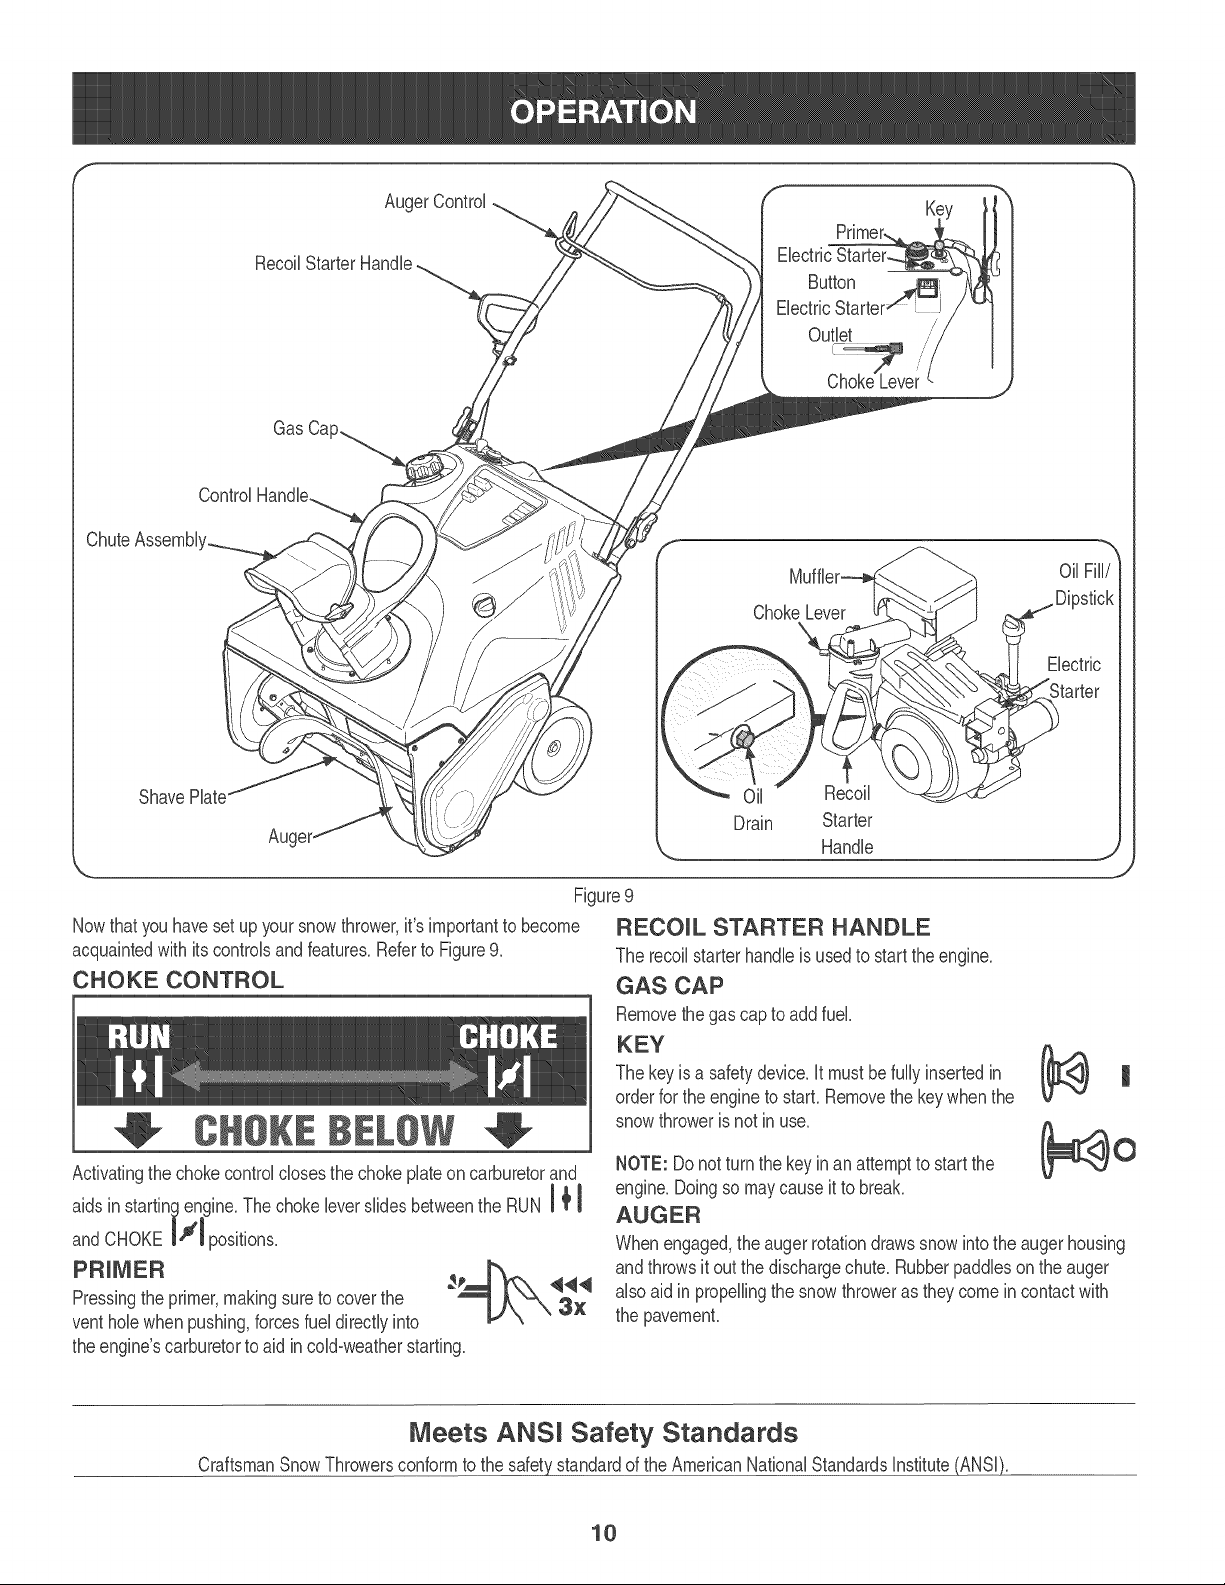
Nowthat youhaveset up yoursnowthrower,it's importantto become
acquaintedwith itscontrolsand features.Referto Figure9.
CHOKE CONTROL
CHOK£ B£ W
Activatingthe chokecontrolclosesthe chokeplateon carburetorand
aidsinstartin_engine.ThechokeleverslidesbetweentheRUNI÷l
andCHOKEIll position&
Handle
Figure9
RECOUL STARTER HANDLE
The recoilstarterhandleis usedto startthe engine.
GAS CAP
Removethe gascap to addfuek
KEY
The keyis a safetydevice,it mustbe fullyinsertedin
orderfor theengineto starL Removethe keywhenthe
snowthroweris not inuse.
Pressingthe primer,makingsureto coverthe
venthob when pushing,forcesfueldirectlyinto
theengine'scarburetorto aid incold-weatherstarting.
NOTE: Do notturn the key inanattemptto startthe O
engine.Doingso maycauseit to break.
AUGER
Whenengaged,the augerrotationdrawssnow intothe augerhousing
andthrowsit out the dischargechute.Rubberpaddieson the auger
also aidin propellingthe snowthroweras theycomein contactwith
the pavemenL
Meets ANSi Safety Standards
CraftsmanSnowThrowersconformto the safetystandardof the AmericanNationalStandardsinstitute(ANSi).
10
AUGER CONTROL
Locatedon the upperhandHe,the auger controHhandHeis usedto
engageanddisengagedriveto the auger.Squeezethe controHhandHe
againstthe upperhandHeto engagethe auger;reHeaseit to disengage.
CHUTE ASSEMBLY
Rotatethe dischargechuteto the Heftor rightusingthe controHhandHe.
Thepitch of the dischargechute controHsthe angHeat whichthe snow
is thrown.Loosenthewing knobonthe side of the dischargechute
beforepivotingthe dischargechute upwardordownward.Refighten
the knoboncethe desiredpositionhasbeenachieved.
SHAVE PLATE
Theshavepilatemaintainscontactwiththe pavementas the snow
throweris propeHHed,aHHowingsnowchosetothe pavement'ssurfaceto
bedischarged.
ELECTRUC STARTER OUTLET
Requiresthe useof a three-prongoutdoorextensioncordanda 120V
powersource/waHHoutlet.
ELEOTRUC STARTER BUTTON
Pressingthe eHectricstarterbuttonengagesthe engine'seHectric
starterwhenpHuggedintoa 120Vpowersource.
OIL FILL/DIPSTICK
EngineoiHHeveHcan becheckedand oiHaddedthroughtheoiHfiHL
OUL BRAUN
EngineoiHcan be drainedthroughthe oiHdrain.
Engineexhaustexitsthe enginevia the muffler.
BEFORE STARTUNG THE ENGUNE
machineandin this manuaHbefore
STARTUNG THE ENGUNE
3ressurizedstartinc arefHammabHe.
Toavoidcarbonmonoxidepoisoning,makesurethe engineis
outdoorsina weHH-ventiHatedarea.
1. Makecertainboththe augercontroHis in thedisengaged
(reHeased)position.
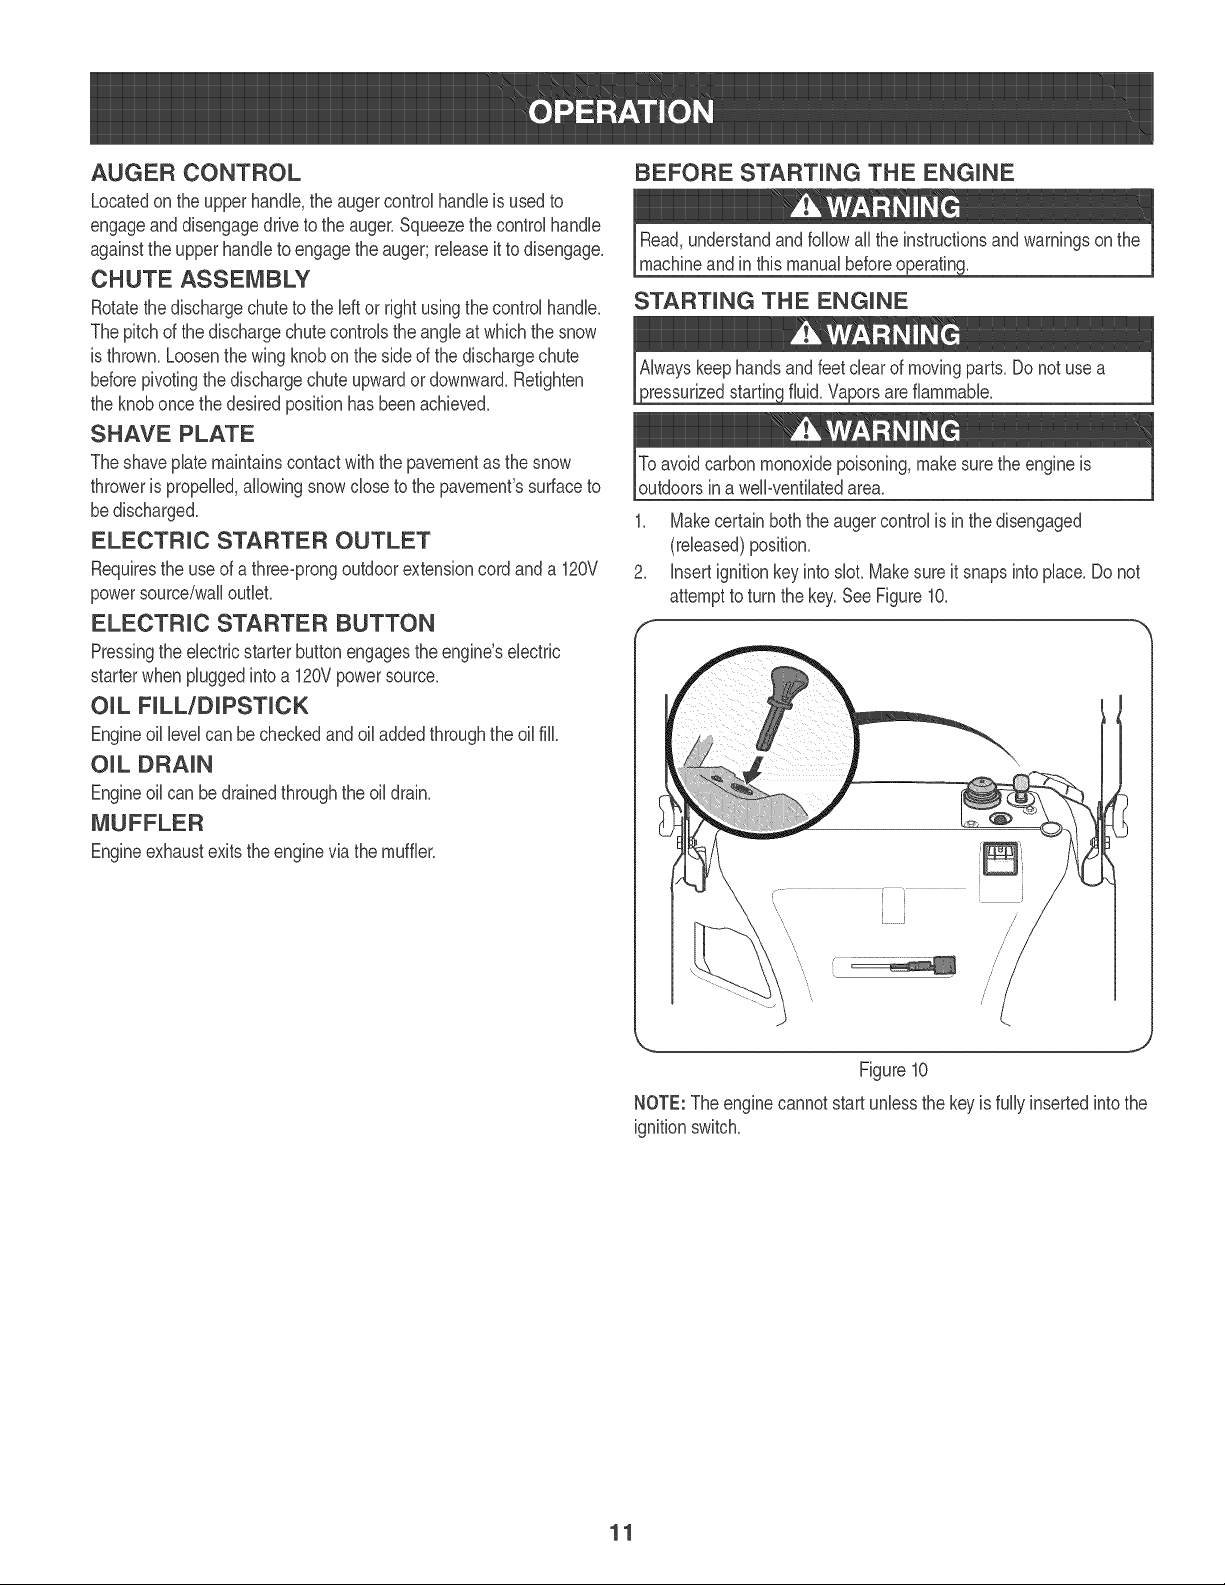
2. Hnsertignitionkey into shot.Makesureit snapsinto pHace.Do not
attemptto turn the key.See Figure10.
/
/
\
Figure10
NOTE:TheenginecannotstartunHessthe key is fuHHyinsertedintothe
ignitionswitch.
11
Electric Starter
Determinethat yourhome'swiringis a three-wiregroundedsystem.
Aska Hbensedebctrbian if youarenot certain.
if you havea groundedthree-prongreceptacb,proceedas foHHows:
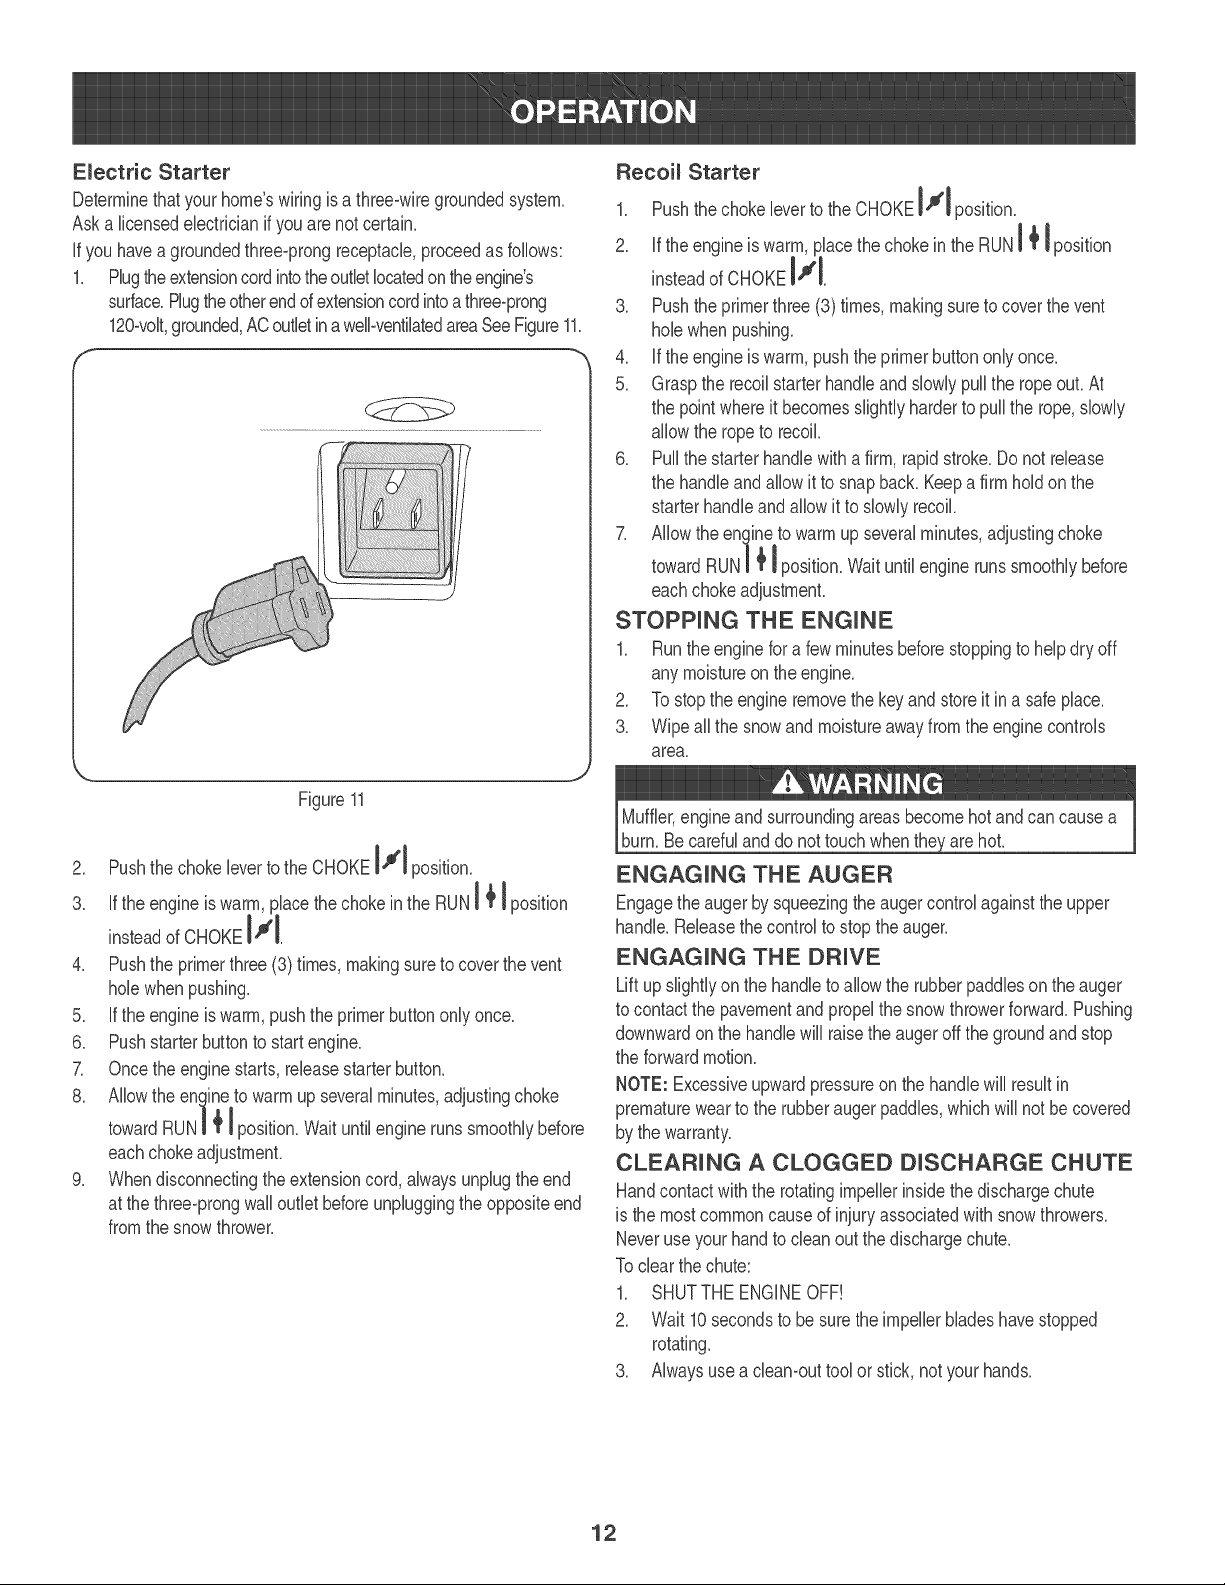
1. Rug theextensioncordintotheoutbtHocatedontheengine's
surface.Rugtheotherend ofextensioncordintoa three-prong
120-voHt,grounded,ACoutbt inaweBventiHatedareaSee Figure11.
Figure11
2. Pushthe chokeleverto the CHOKEill position.
3. if the engineis warm,placethe choke inthe RUN1_ I position
insteadof CHOKEIfl_
4. Pushthe primerthree (3) times,makingsureto coverthe vent
hob whenpushing.
5. if the engineis warm,pushtheprimerbuttononly once.
6. Pushstarterbuttonto start engine.
7. Oncethe enginestarts,releasestarterbutton.
8.
.
eachchokeadjustment.
Whendisconnectingtheextensioncord, alwaysunplugthe end
at the three-prongwalloutlet beforeunpluggingthe oppositeend
fromthe snowthrower.
Recoim Starter
1. Pushthe chokeleverto the CHOKEIll position.
It A
2. if the engineis warm,placethe chokein the RUN! I position
l--I
insteadofCHOKEill.
3. Pushthe primerthree(3) times,makingsureto coverthe vent
hob when pushing.
4. if the engineis warm,pushthe primerbuttononlyonce.
5. Graspthe recoilstarterhandleandslowlypullthe rope out.At
the pointwhereit becomesslightlyharderto pull the rope,slowly
allowthe rope to recoil.
6. Pullthe starterhandlewitha firm,rapidstroke.Do not release
the handleandallowit to snapback. Keepa firmhold on the
starterhandleand allowit to slowlyrecoil.
7. Allowthe engineto warm upseveralminutes,adjustingchoke
]l
÷
t
towardRUN_ _position.Wait untilengine runssmoothlybefore
eachchoke adjustment.
STOPPUNG THE ENGUNE
1. Runtheengine fora fewminutesbeforestoppingto helpdry off
any moistureonthe engine.
2. To stopthe engineremovethe keyand storeit ina safeplace.
3. Wipeall the snowand moistureawayfromthe enginecontrols
area.
Muffler,engineandsurroundingareasbecomehotandcan causea
burn. Becarefulanddo not touchwhentheyarehoL
ENGAGUNG THE AUGER
Engagethe augerby squeezingtheaugercontrolagainstthe upper
handle.Releasethe controlto stopthe auger.
ENGAGUNG THE DRUVE
Liftupslightlyonthe handleto allowthe rubber paddiesonthe auger
to contactthe pavementand propelthe snowthrowerforwar&Pushing
downwardonthe handlewill raisethe augeroff the groundandstop
the forwardmotion.
NOTE: Excessiveupwardpressureonthe handlewill resultin
prematurewearto the rubberaugerpaddies,which willnot becovered
by the warranty.
CLEARUNG A CLOGGED DUSCHARGE CHUTE
Handcontactwith the rotatingimpellerinsidethe dischargechute
is the mostcommoncauseof injuryassociatedwith snowthrowers.
Neveruse yourhand to cleanout thedischargechute.
Toclear thechute:
1. SHUTTHE ENGINEOFF!
Z Wait 10secondsto be surethe impellerbladeshavestopped
rotating.
3. Alwaysusea cleamouttool or stick,not yourhands.
12
MAUNTENANCESCHEDULE
Followthe maintenanceschedub given below.This chartdescribes
serviceguidelinesonly. Usethe ServiceLog coBmnto keeptrackof
compbted maintenancetasks.To locate the nearest Sears Service
Centeror to schedule service, simply contact Sears at
1-800-4-MY-HOME®.
'I 11I[d_l _.._t_=
Eachuse 1. 1. Check
2. 2. Cban
1st5 hours 1. 1. Change.
Every5hours 1. 1. Check.
2. 2. Cban.
25 hours 1. 2. Check.
Everyseason/50hours 1. 1. Change
Everyseason/100hours 1. 1. Cban, replace,re-gap
Everyseason/Before 1. 1. Lubricate
storage 2. 2. Lubricate
3. 3. Lubricate
q_JTi
EngineoilbveI.
Snowthrowerand exhaust
area.
Engineoil.
Engineoil.
Exhaustarea.
Sparkplug.
Engineoil
Sparkplug
Pivotpoints
Controlhandle
ENGINE MAINTENANCE
usedoil.
Oim Recommendations
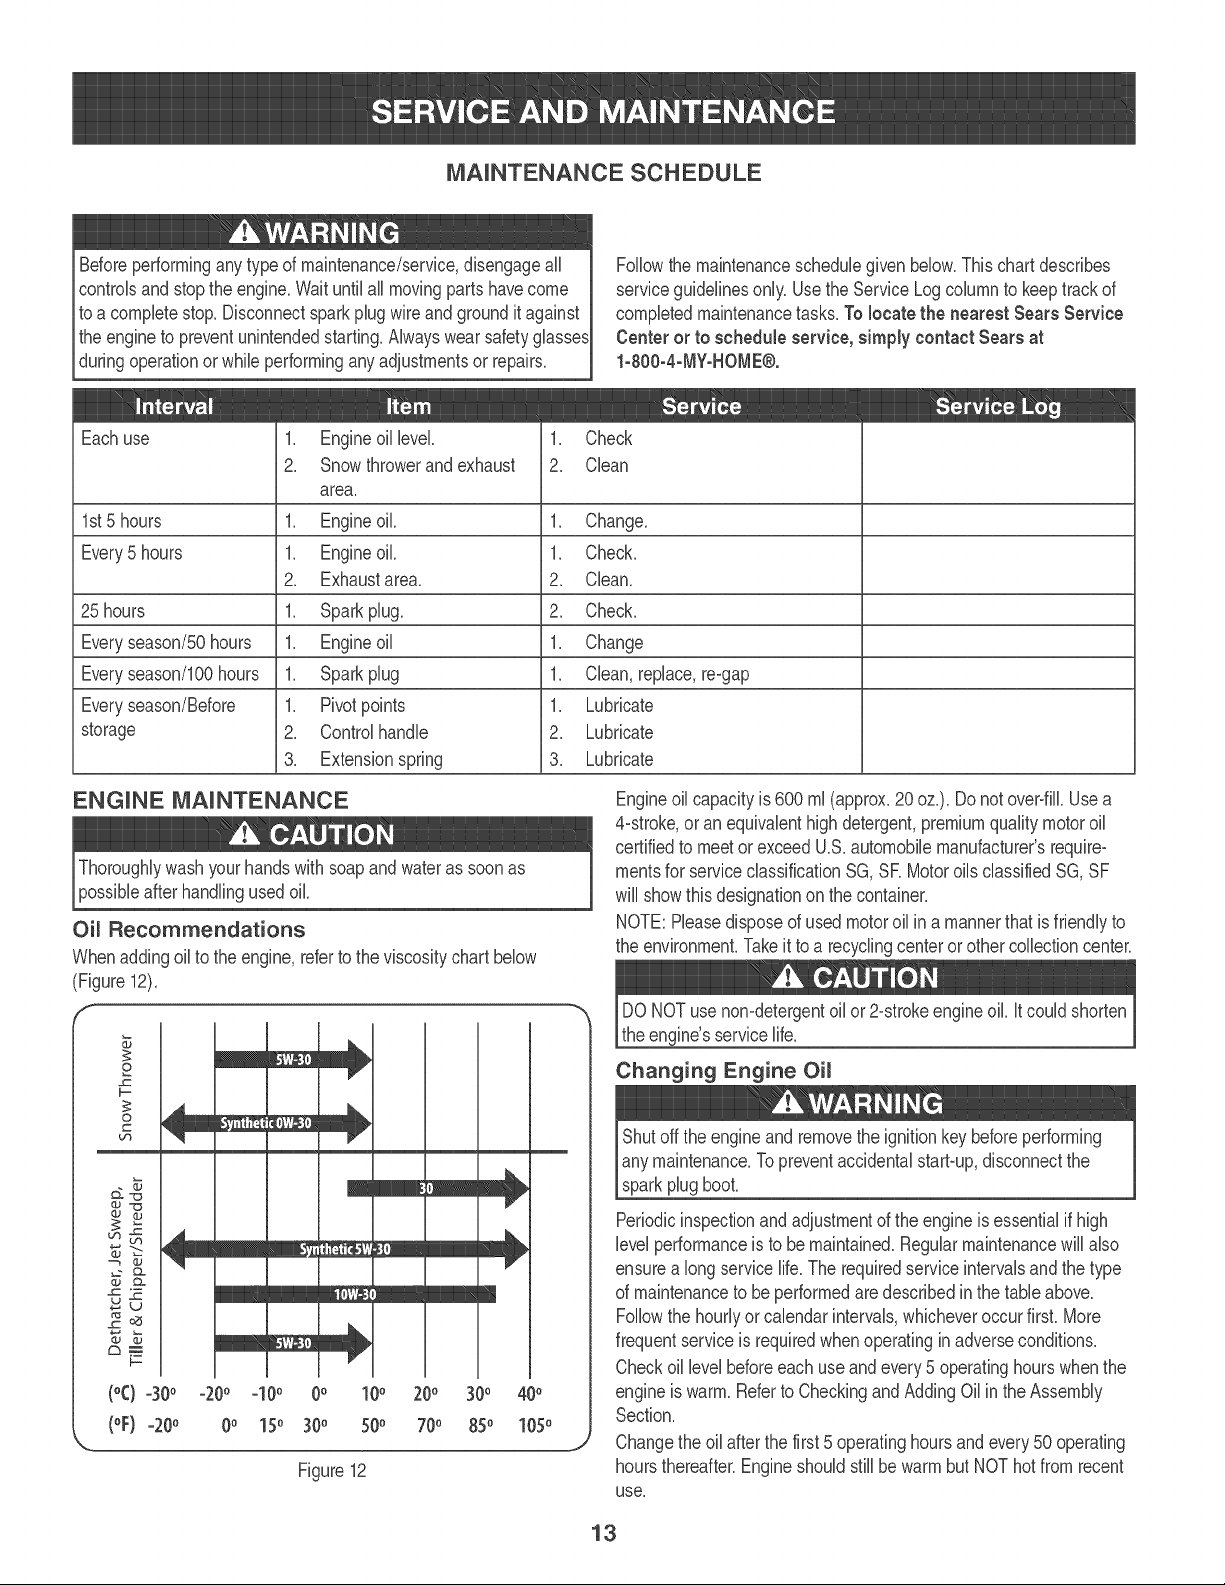
Whenaddingoil to the engine,referto theviscositychartbelow
(Figure12).
2
b-
O
r_
o ©
b-
(°() -300 -200 -10° 0° 10° 200 300 400
(oF)-200 0o 15o 300 500 700 850 1050
Figure 12
Engineoil capacityis 600 ml (approx.20oz.). Do notovePfill.Use a
4-stroke,oran equivalenthighdetergent,premiumqualitymotoroil
certifiedto meetor exceedU.S.automobilemanufacturer'srequire-
mentsfor serviceclassificationSG, SR Motoroils classifiedSG, SF
will showthis designationon the container.
NOTE:Pleasedisposeof used motoroil in a mannerthatis friendlyto
the environment.Takeit to a recyclingcenteror othercollectioncenter.
DONOT usenon-detergentoil or2-strokeengineoil. it couldshorten
the engine'sservicelife.
Changing Engine Oim
Shutoff the engineand removethe ignitionkeybeforeperforming
any maintenance.Topreventaccidentalstart-up,disconnectthe
sparkplugboot.
Periodicinspectionandadjustmentof the engineis essentialif high
level performanceis to bemaintaine&Regularmaintenancewill also
ensurea longservicelife.The requiredserviceintervalsand the type
of maintenanceto be performedaredescribedin the tableabove.
Followthe hourlyor calendarintervals,whicheveroccurfirsLMore
frequentserviceis requiredwhenoperatingin adverseconditions.
Checkoil levelbeforeeachuse andevery5 operatinghourswhenthe
engineis warm.Referto CheckingandAddingOilin theAssembly
Section.
Changethe oil afterthe first5 operatinghoursandevery50 operating
hoursthereafter.Engineshouldstillbewarm butNOT hotfrom recent
use.
13
.
2_
f
Drainfuelfromthe tank by runningtheengine untilthe fueltank is
empty.Besurethe fuel fill capis secure.
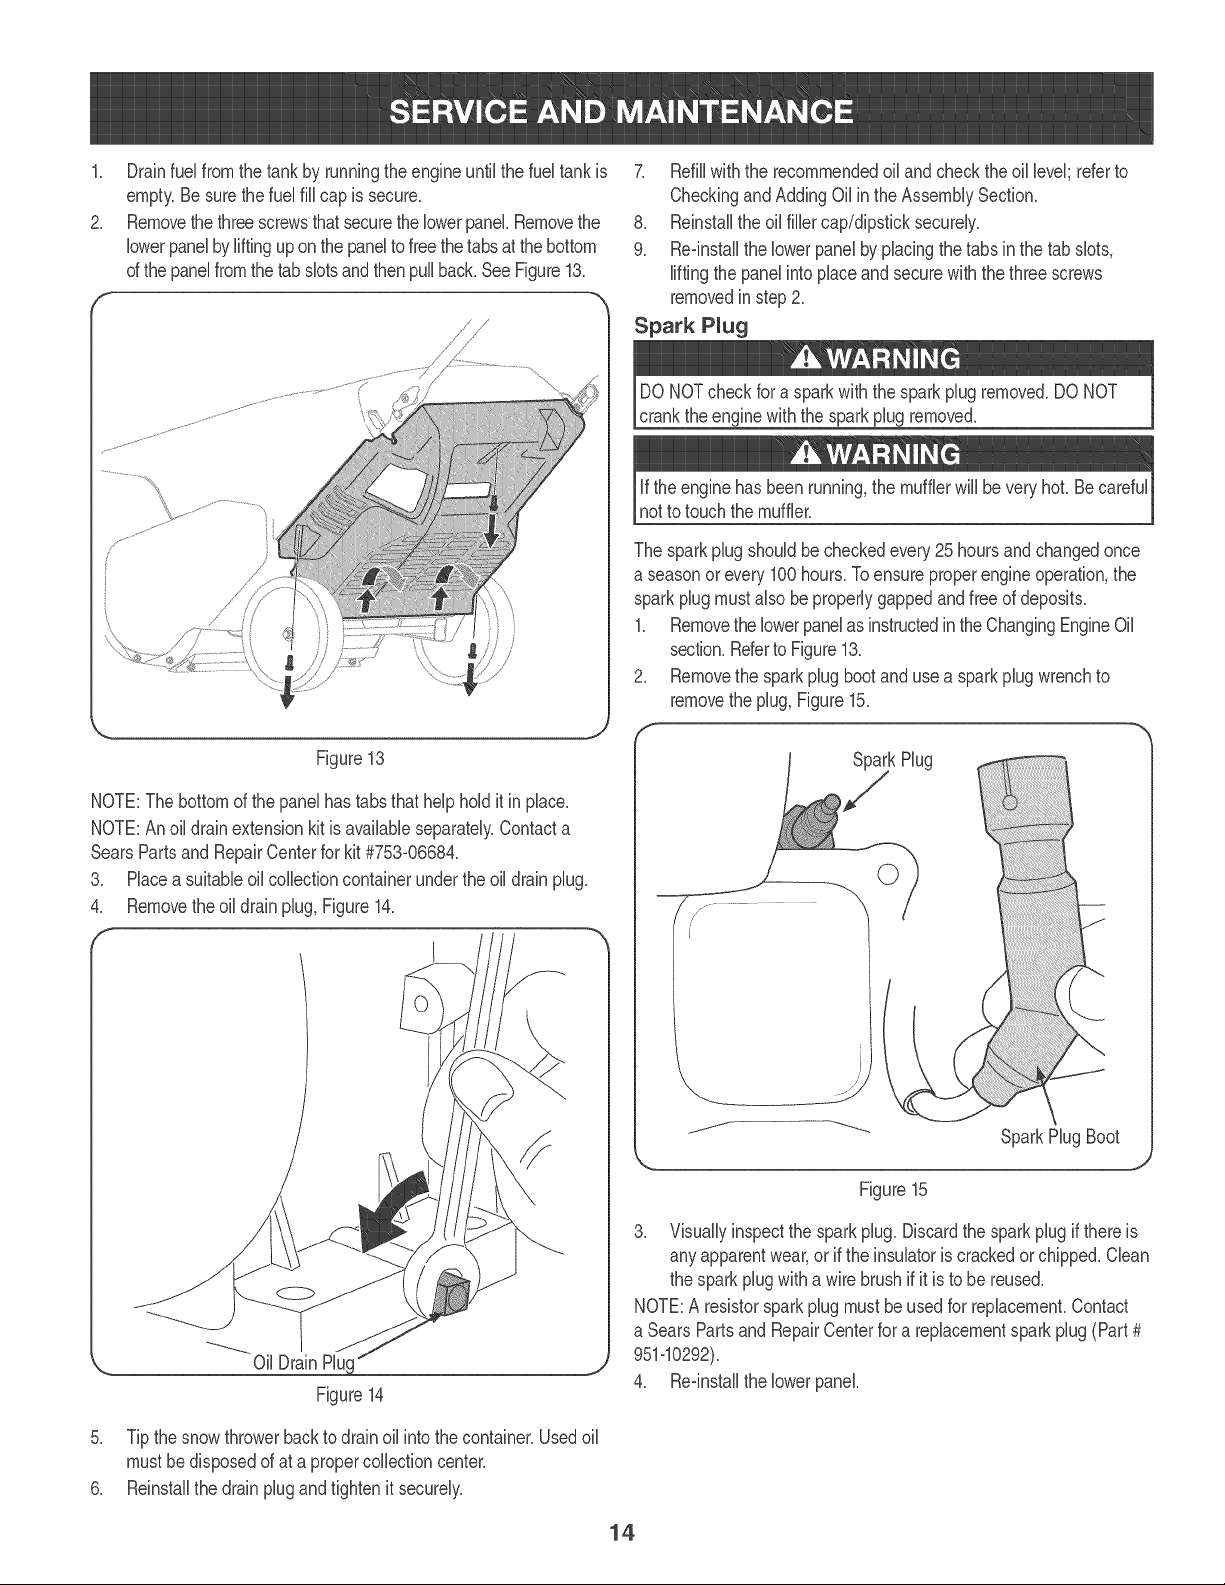
Removethethreescrewsthat securethelowerpanekRemovethe
lowerpanelby liftinguponthe panelto freethetabsatthe bottom
of thepanelfromthetab slotsandthenpullback.See Figure13.
Figure13
NOTE:The bottomof thepanel hastabs thathelphold it in place.
NOTE:An oil drainextensionkit is availableseparately.Contacta
SearsPartsand RepairCenterfor kit#753@6684.
3. Placea suitableoil collectioncontainerunderthe oiUdrain pUug.
4. Removetheoil drainplug,Figure14.
l
•., Oil DrainPlug _,
Figure14
5. Tip thesnow throwerbackto drainoil intothe container.Usedoil
mustbe disposedof at a propercollectioncenter.
6. Reinstallthe drain plugandtightenit securely.
Z Refillwith the recommendedoil and checktheoil level;referto
Checkingand AddingOil inthe AssemblySection.
8. Reinstallthe oil fillercap/dipsticksecurely.
9. Re-installthe lowerpanelbyplacingthetabs inthe tab slots,
liftingthe panelintoplaceand securewiththe threescrews
removedinstep2.
Spark Plug
DONOTcheck fora sparkwiththe sparkplug removed.DONOT
cranktheenginewiththe sparkplug removed.
if the enginehas been running,the mufflerwill beveryhoL Becareful
not to touch themuffler.
The sparkplugshouldbecheckedevery 25hoursandchangedonce
a seasonor every 100hours.Toensureproperengineoperation,the
sparkplugmustalso beproperlygappedandfreeof deposits.
1. Removethe lowerpanelas instructedin theChangingEngineOil
section.Referto Figure13.
2. Removethe sparkplugbootand usea sparkplugwrenchto
removethe plug,Figure15.
SparkPlug
,/
©
SparkHug Boot
Figure15
3. Visuallyinspectthe sparkplug. Discardthe sparkplugif thereis
any apparentwear,or if the insulatoris crackedorchipped.Clean
the sparkplugwitha wire brushif it is to be reused.
NOTE:A resistorsparkplugmust be usedfor replacemenLContact
a Sears Partsand RepairCenterfor a replacementsparkplug(Part#
951q0292)_
4_ Re-installthelowerpanek
14
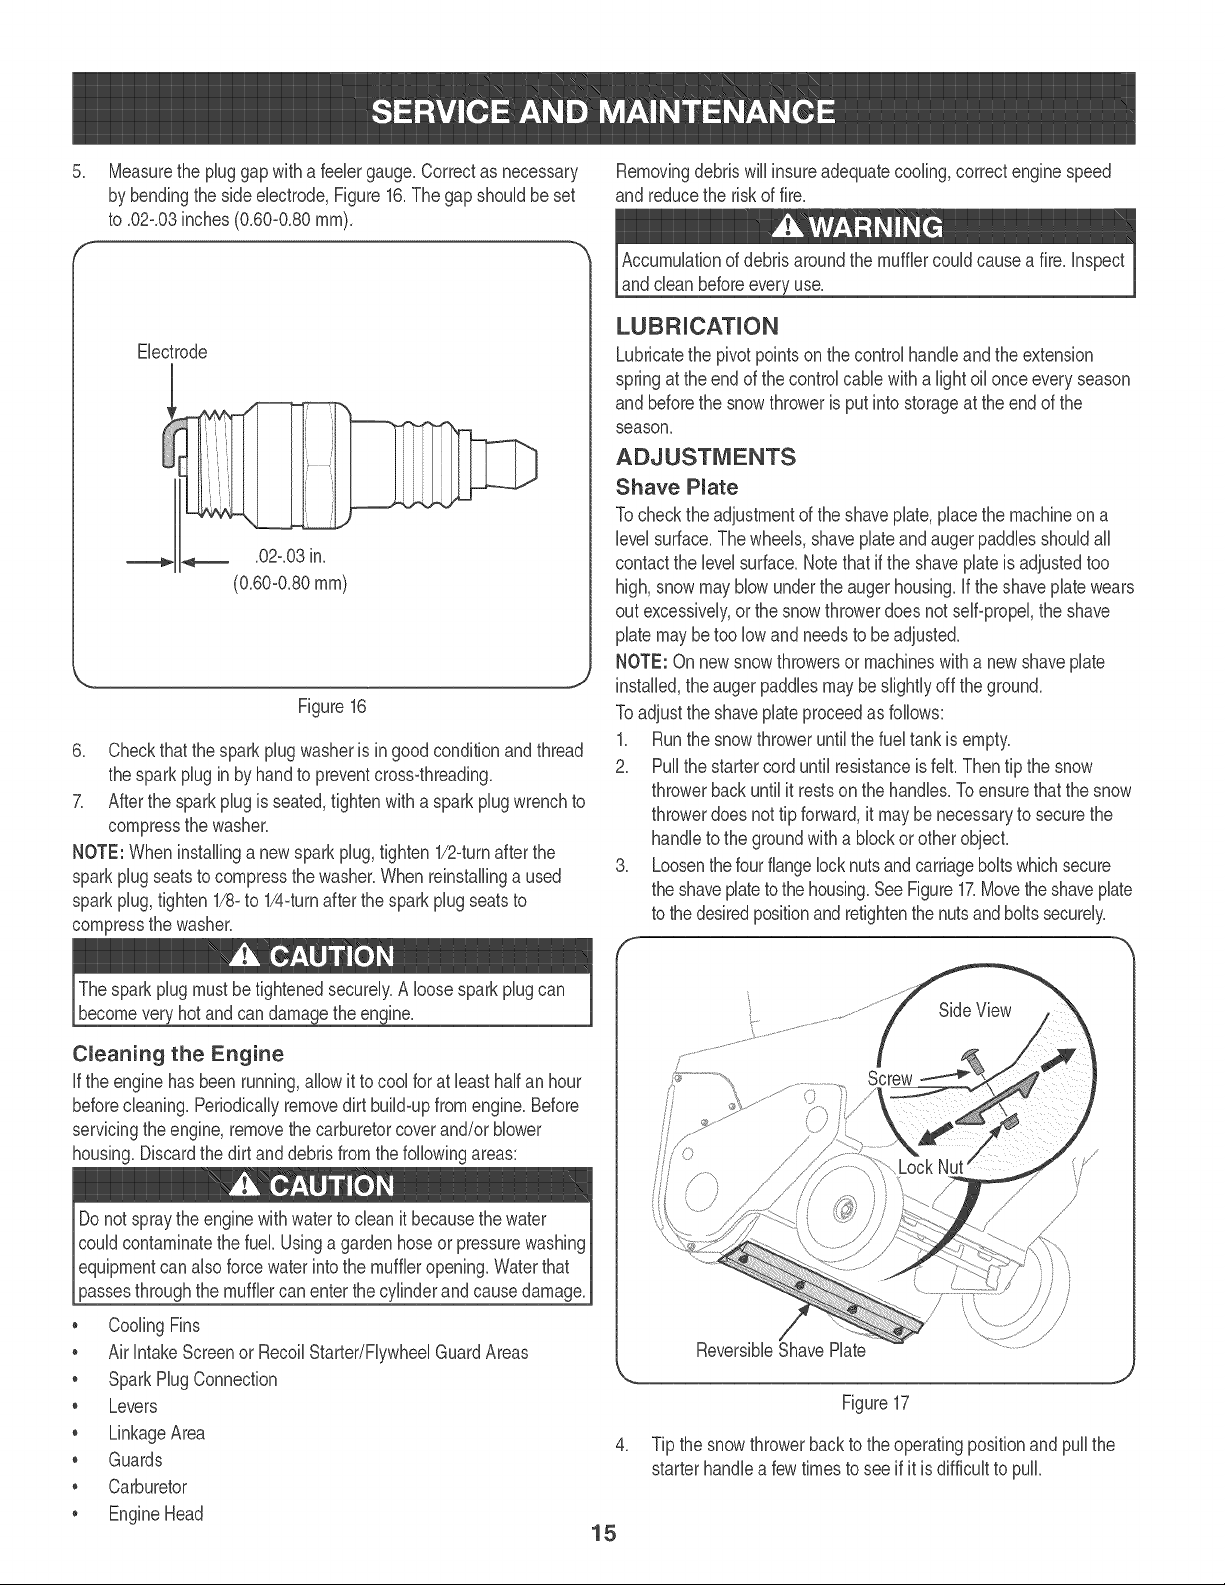
5_ Measurethe pluggapwitha feelergauge.Correctas necessary
by bendingthe side electrode,Figure16_The gap shouldbe set
to .02-.03inches(0.60-0.80ram).
Electrode
Figure16
6. Checkthat thespark plugwasheris in goodconditionandthread
the sparkplugin by handto preventcross-threadi%
7_ Afterthe sparkplugis seated,tightenwith a sparkplugwrenchto
compressthe washer.
NOTE:Wheninstallinga newsparkplug,tighten1/2-turnafterthe
sparkplugseatsto compressthe washer.Whenreinstallinga used
sparkplug,tighten1/8-to 1/4-turnafterthe sparkplug seatsto
compressthe washer.
Thespark plugmustbetightenedsecurely.A loosespark plugcan
becomeveryhotandcan damagethe engine.
Cmeaning the Engine
if the engine hasbeen running,allowit to cool for at bast halfan hour
beforecleaning.Periodicallyremovedirt build-upfromengine.Before
servicingthe engine,removethecarburetorcover and/orblower
housing.Discardthe dirtand debrisfrom the followingareas:
, CoolingFins
, Air intakeScreenor RecoilStarter/FlywheelGuardAreas
, SparkHug Connection
, Levers
, LinkageArea
, Guards
, Carburetor
, EngineHead
Removingdebriswillinsureadequatecooling,correctenginespeed
and reducethe risk of fire.
Accumulationof debrisaroundthe mufflercouldcausea fire.inspect
andclean beforeeveryuse.
Lubricatethe pivotpointson thecontrolhandleandthe extension
springat the endof the controlcablewith a light oil onceevery season
and beforethe snowthroweris put intostorageat the endof the
season.
Shave Pmate
Tocheckthe adjustmentof the shaveplate,placethe machineon a
level surface.Thewheels,shaveplateand augerpaddiesshouldall
contactthe levelsurface.Notethat if the shaveplateis adjustedtoo
high, snowmayblowunderthe auger housing,if the shaveplatewears
out excessively,or the snowthrowerdoesnot seBpropel,the shave
plate maybetoo low andneedsto beadjusted.
NOTE: Onnewsnowthrowersor machineswith a newshaveplate
installed,the augerpaddiesmaybeslightlyoff the ground.
Toadjust the shaveplateproceedas follows:
1. Runthe snowthroweruntilthe fueltank is empty.
2. Pullthe startercorduntil resistanceis felt.Then tip the snow
throwerbackuntilit restson the handles.To ensurethatthe snow
throwerdoesnot tip forward,it maybe necessaryto securethe
handleto the groundwith a blockor other object.
3. Loosenthefourflangelocknutsandcarriagebolts whichsecure
the shaveplatetothe housing.SeeFigure17.Movethe shaveplate
to the desired)ositionandretightenthe nutsandboltssecurely.
V
/
/
/
ReversibleShavePlate
Figure17
4. Tip the snowthrowerbackto theoperatingpositionandpullthe
starterhandlea fewtimesto see if it is difficultto pull.
15
5. If the starteris difficult to pull, removethe sparkplugandpull the
handleseveraltimesto ensurethat any oil trappedinthe engine
headis removed.
Oilmaycomeout of the spark plugholewhen it is removedand the
starterhandleis pulled.
6. bspect the sparkplug. Ifit is wet,cleanoff anyoil before
re-installing.
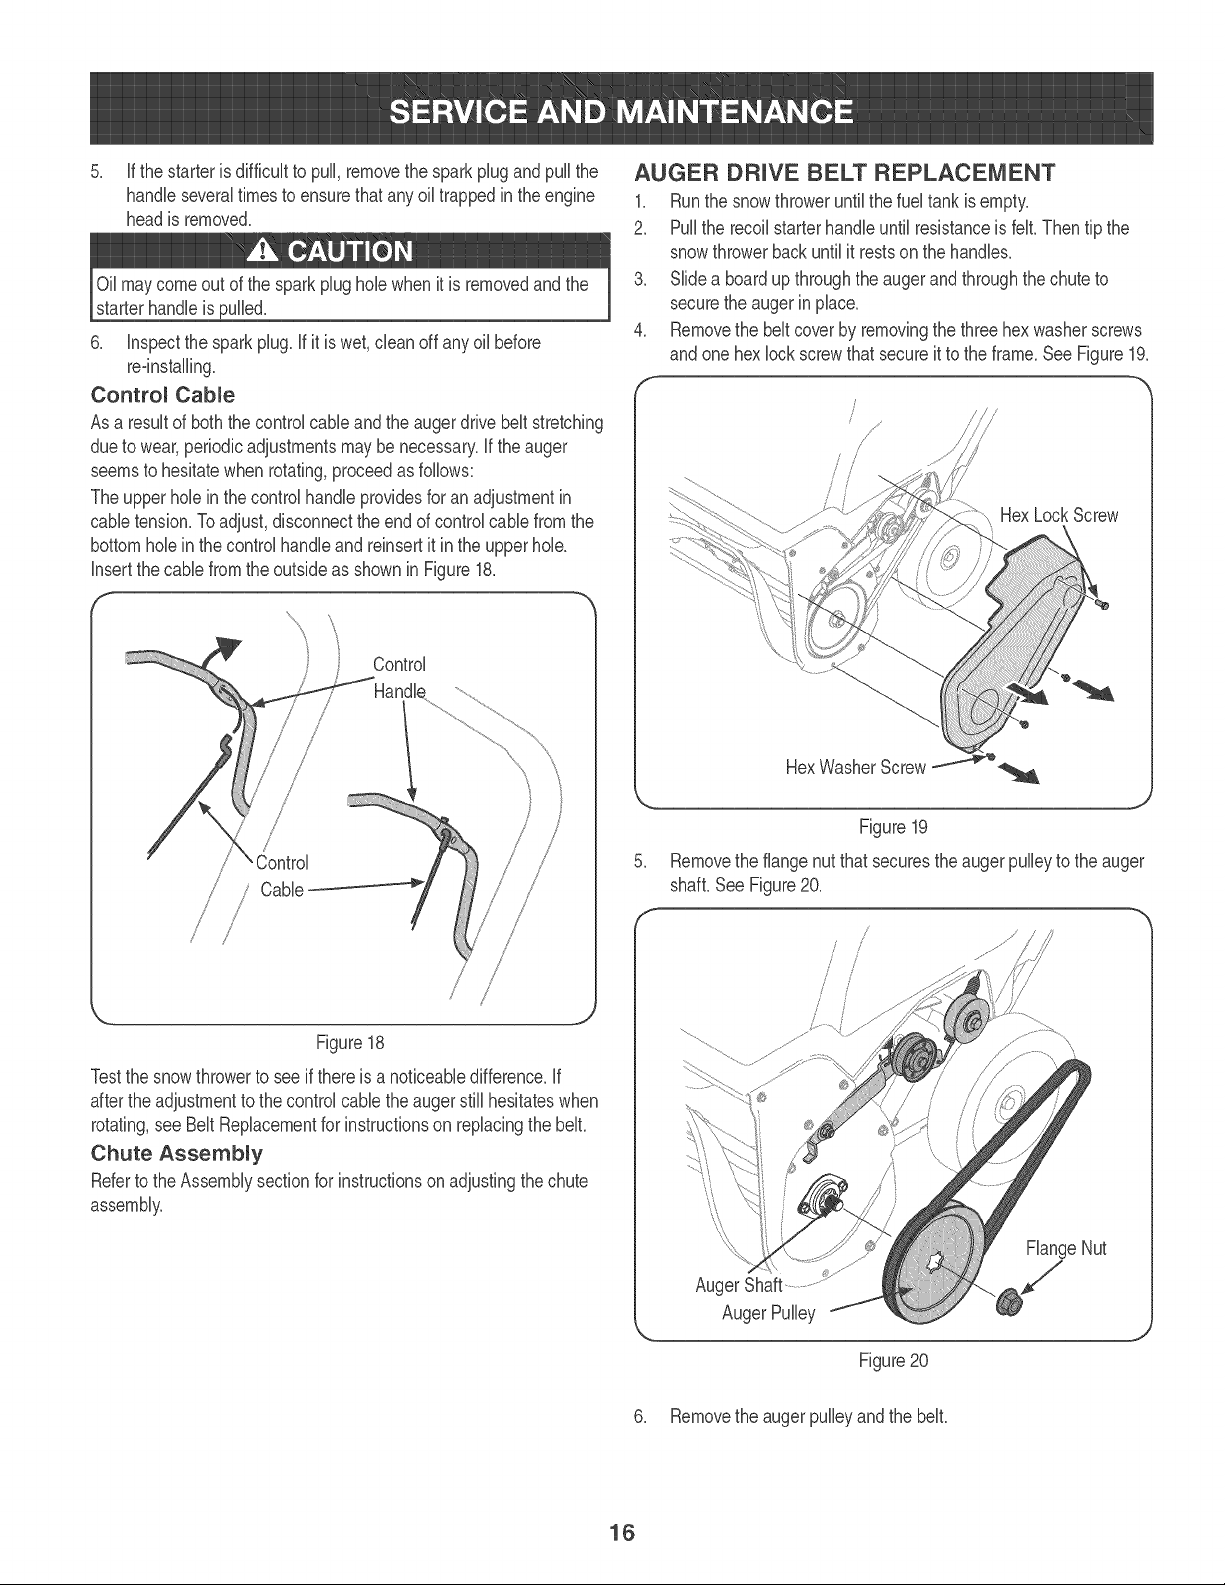
Control Cable
As a resultof both thecontrolcableandthe auger drivebelt stretching
dueto wear,periodicadjustmentsmaybenecessary.If the auger
seemsto hesitatewhenrotating,proceedas follows:
Theupper holeinthe controlhandle providesfor an adjustmentin
cabletension.Toadjust,disconnectthe end of controlcablefrom the
bottomholein the controlhandleand reinsertit in the upper hole.
Insertthe cablefromtheoutsideas shown in Figure18.
f
Control
/
/
/
/
/
Cable
J
Figure18
Testthe snowthrowerto seeif there is a noticeabledifference,if
aftertheadjustmentto the controlcablethe augerstill hesitateswhen
rotating,see BeltReplacementfor instructionson replacingthebell
Chute Assembly
Referto the Assemblysectionfor instructionsonadjustingthechute
assembly.
AUGER DRIVE BELT REPLACEMENT
1. Runthe snowthroweruntilthe fueltank is empty.
2. Pullthe recoilstarterhandleuntil resistanceis fell Thentip the
snowthrowerbackuntil it restson thehandles.
3. Slidea boardup throughthe augerandthroughthe chuteto
securethe augerinplace.
4. Removethe beltcover by removingthe threehexwasherscrews
andone hexlockscrewthatsecureit to the frame.See Figure19.
I
/
,/,/
/
/
/ /
/ /
/ /
HexLockScrew
.
Removethe flangenutthat securestheaugerpulleyto the auger
shaft.SeeFigure20.
/
/ /
/
/ J
..................::::::::::::::::::::::::
FlangeNut
AugerPulley
Figure20
6. Removethe augerpulleyand the bell
16
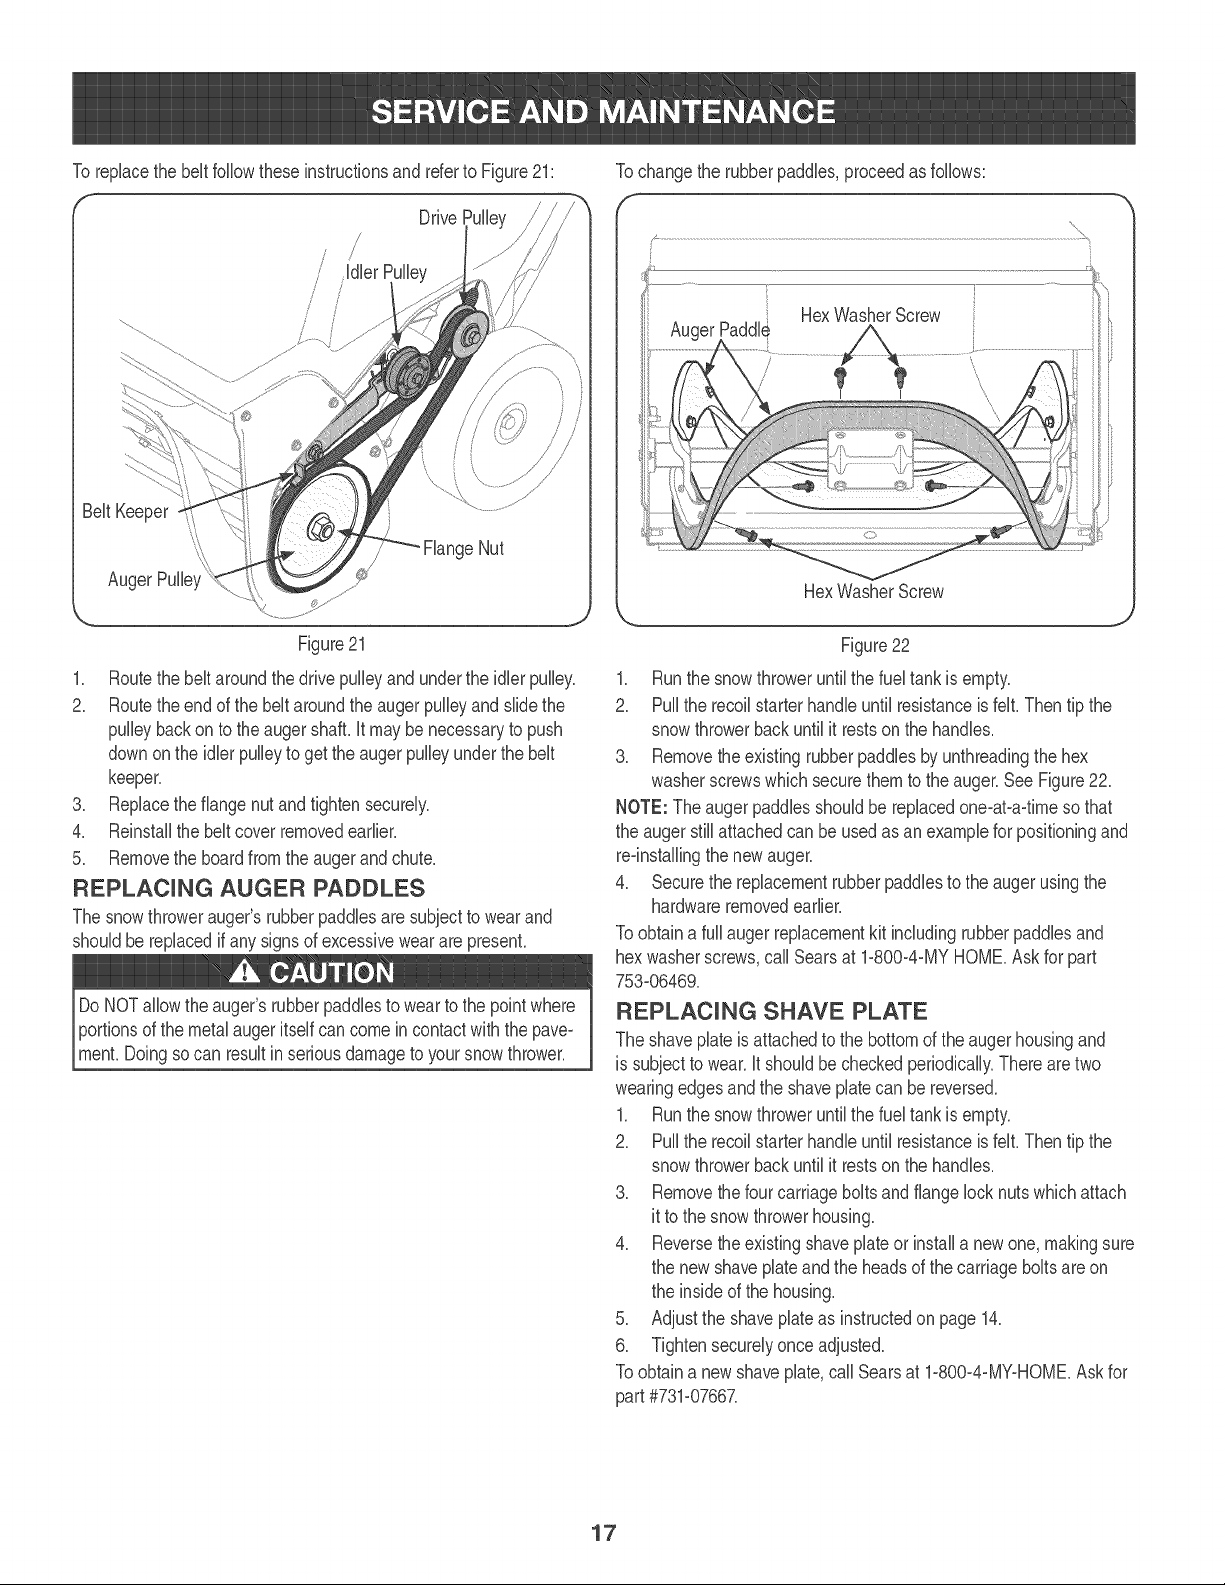
To replacethe belt followtheseinstructionsandreferto Figure21: Tochangethe rubberpaddies,proceedasfollows:
Drive
/
J
/
/
/
Figure21
1. Routethe beltaroundthe drivepulleyand underthe idlerpulley.
2. Routethe end of the beltaroundthe auger pulleyand slidethe
pulleybackon to the augershafL it maybe necessaryto push
downon the idlerpulleyto get theaugerpulleyunderthe belt
keeper.
3. Replacethe flangenut and tightensecurely.
4. Reinstallthe beltcoverremovedearlier.
5. Removethe boardfromthe augerandchute.
REPLACING AUGER PADDLES
The snowthrowerauger'srubberpaddiesare subjectto wearand
shouldbe replacedif any signsof excessiveweararepresent.
Do NOTallowthe auger'srubberpaddiesto wearto the pointwhere
HexWasherScrew
Paddle_
HexWasherScrew
Figure22
1. Runthe snowthroweruntilthe fueltank is empty.
2. Pullthe recoilstarterhandleuntil resistanceis felt.Then tip the
snowthrowerbackuntil it restson the handles.
3. Removethe existingrubberpaddiesby unthreadingthe hex
washerscrewswhichsecurethem to the auger.See Figure22.
NOTE: Theauger paddiesshouldbe replacedone-at-a-timesothat
the augerstillattachedcan beusedas anexamplefor positioningand
re-installingthe newauger.
4. Securethe replacementrubberpaddiesto the augerusingthe
hardwareremovedearlier.
Toobtaina full auger replacementkit includingrubberpaddiesand
hex washerscrews,callSearsat 1-800-4-MYHOME.Ask for part
753°06469.
REPLACING SHAVE PLATE
The shaveplateis attachedto the bottomof the augerhousingand
is subjectto wear.it shouldbecheckedperiodically.Therearetwo
wearingedgesandthe shaveplatecan be reversed.
1. Runthe snowthroweruntilthe fueltank is empty.
2. Pullthe recoilstarterhandleuntil resistanceis felt.Then tip the
snowthrowerbackuntil it restson the handles.
3. Removethe fourcarriagebolts andflangelocknutswhich attach
it to the snowthrowerhousing.
4. Reversethe existingshaveplateor installa newone, makingsure
the new shaveplateand the headsof the carriageboltsareon
the insideof the housing.
5. Adjustthe shaveplateas instructedon page14.
6. Tightensecurelyonceadjusted.
Toobtaina new shaveplate,call Searsat 1-800-4-MY-HOME.Ask for
part #731-07667.
17
if the snowthrowerwillnot be usedfor30 daysor longer,or if it is the end of the snowseasonwhenthe lastpossibilityof snowis gone,the
equipmentneedsto be storedproperly.Followstorageinstructionsbelowto ensuretop performancefrom the snowthrowerfor manymoreyears.
PREPARUNG THE ENGUNE
Enginesstoredover30daysneed to be drainedof fuel to prevent
deteriorationandgumfromforminginthe fuel systemor onessential
carburetorparts,if thegasolinein yourenginedeterioratesduring
storage,youmayneedto havethe carburetor,andotherfuel system
components,servicedor replaced.
1_ Removeall fuel fromthe tank by runningtheengineuntilit stops.
2_ Changethe engineoik
3_ Removethe sparkplug andpourapproximately1 oz.(30 ml)of
cleanengineoil intothe cylinder.Pullthe recoilstarterseveral
timesto distributethe oil,and reinstallthe sparkplug.
4_ Cleantheexteriorof the engineby discardingdirt anddebrisfrom
thefollowingareas:
PREPARUNG SNOW THROWER
if the snowthrowerwill not beusedfor 30 daysor longer,followthe
instructionsbelow.
1_ Storethe equipmentin aclean,dry area.
2_ Wipedownthe snowthrowerwitha ragand removeanydirt or
debris.
3_ if storingthe snowthrowerin anunventilatedarea,rustproofthe
metalpartsof the machinewitha lightoil or siliconecoating.
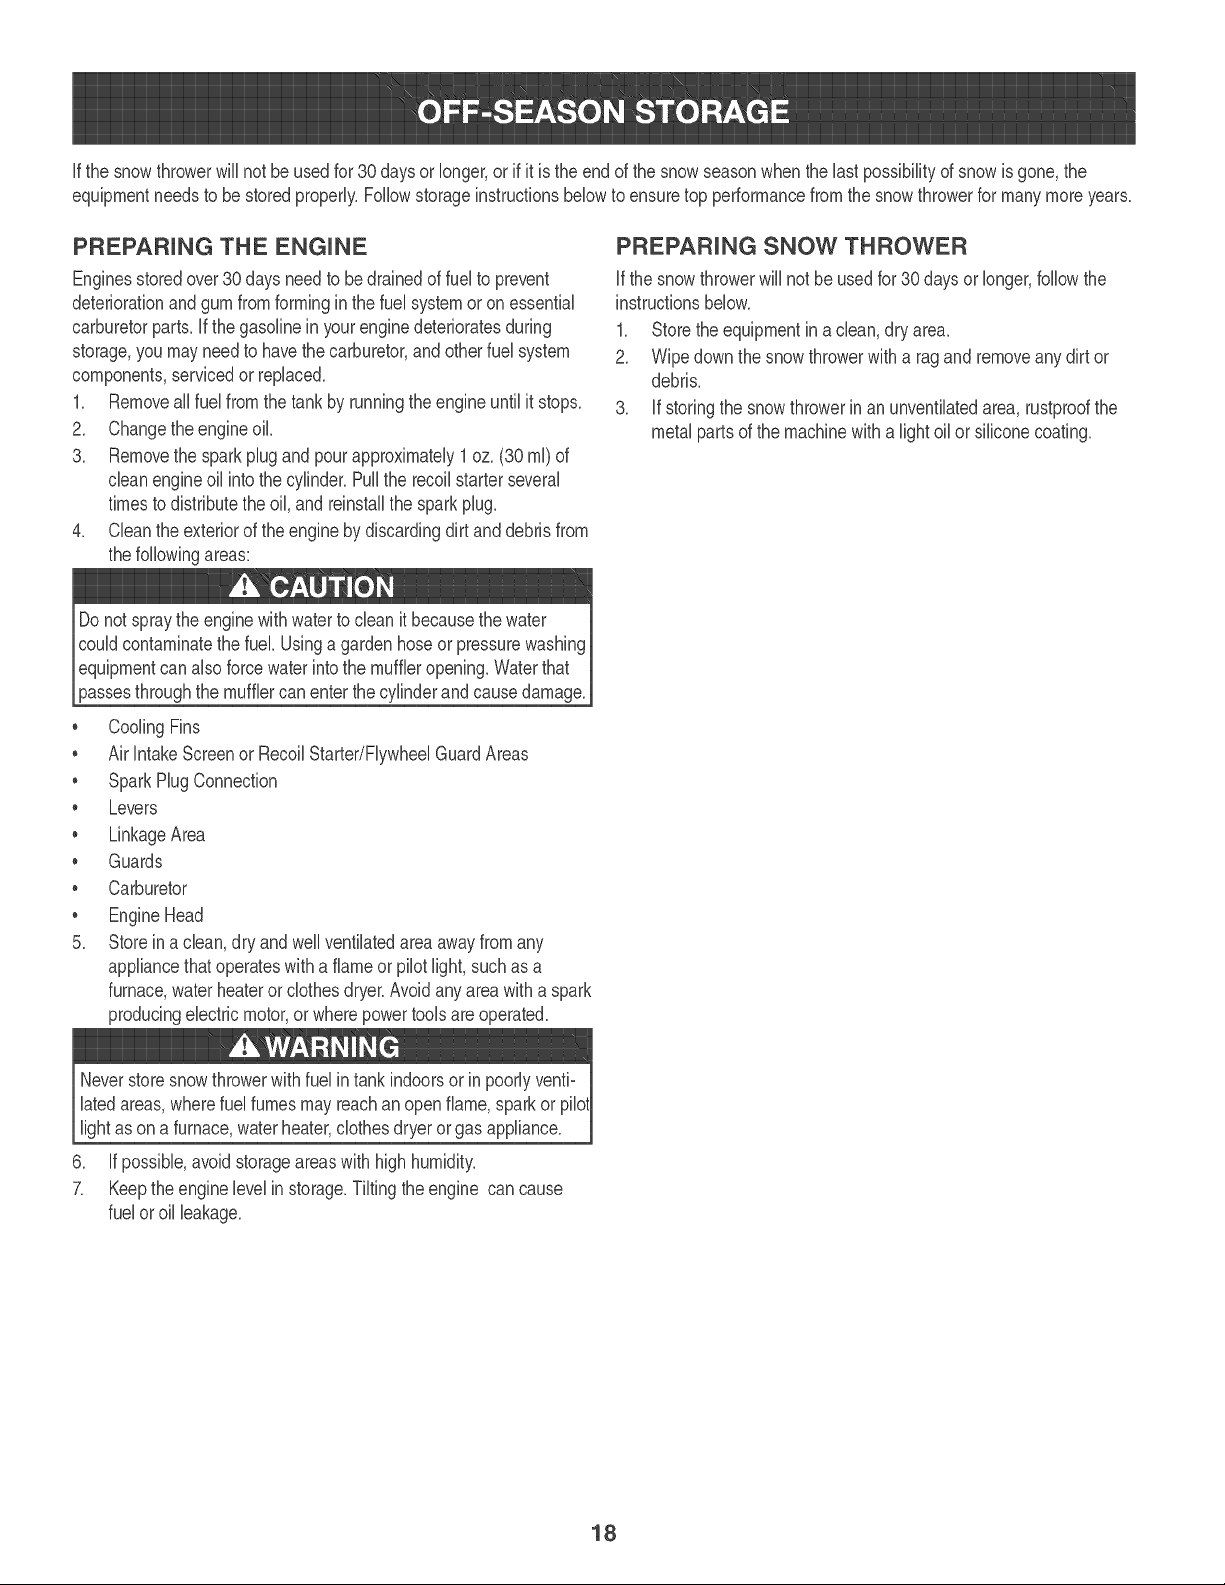
, CoolingFins
, Air intakeScreenor RecoilStarter/FlywheelGuardAreas
, SparkHug Connection
, Levers
, LinkageArea
, Guards
, Carburetor
, EngineHead
5. Storeina clean,dry and wellventilatedareaawayfromany
appliancethat operateswitha flameor pilot light,suchas a
furnace,waterheateror clothesdryer.Avoidany areawitha spark
producingelectricmotor,or wherepowertools areoperated.
latedareas,wherefuel fumesmayreachan openflame,
lightas on a furnace,water heater,clothesdryer orgas appliance.
6. if possible,avoidstorageareaswith highhumidity.
7_ Keepthe enginelevelin storage.Tiltingthe engine can cause
fuelor oil leakage.
18
or
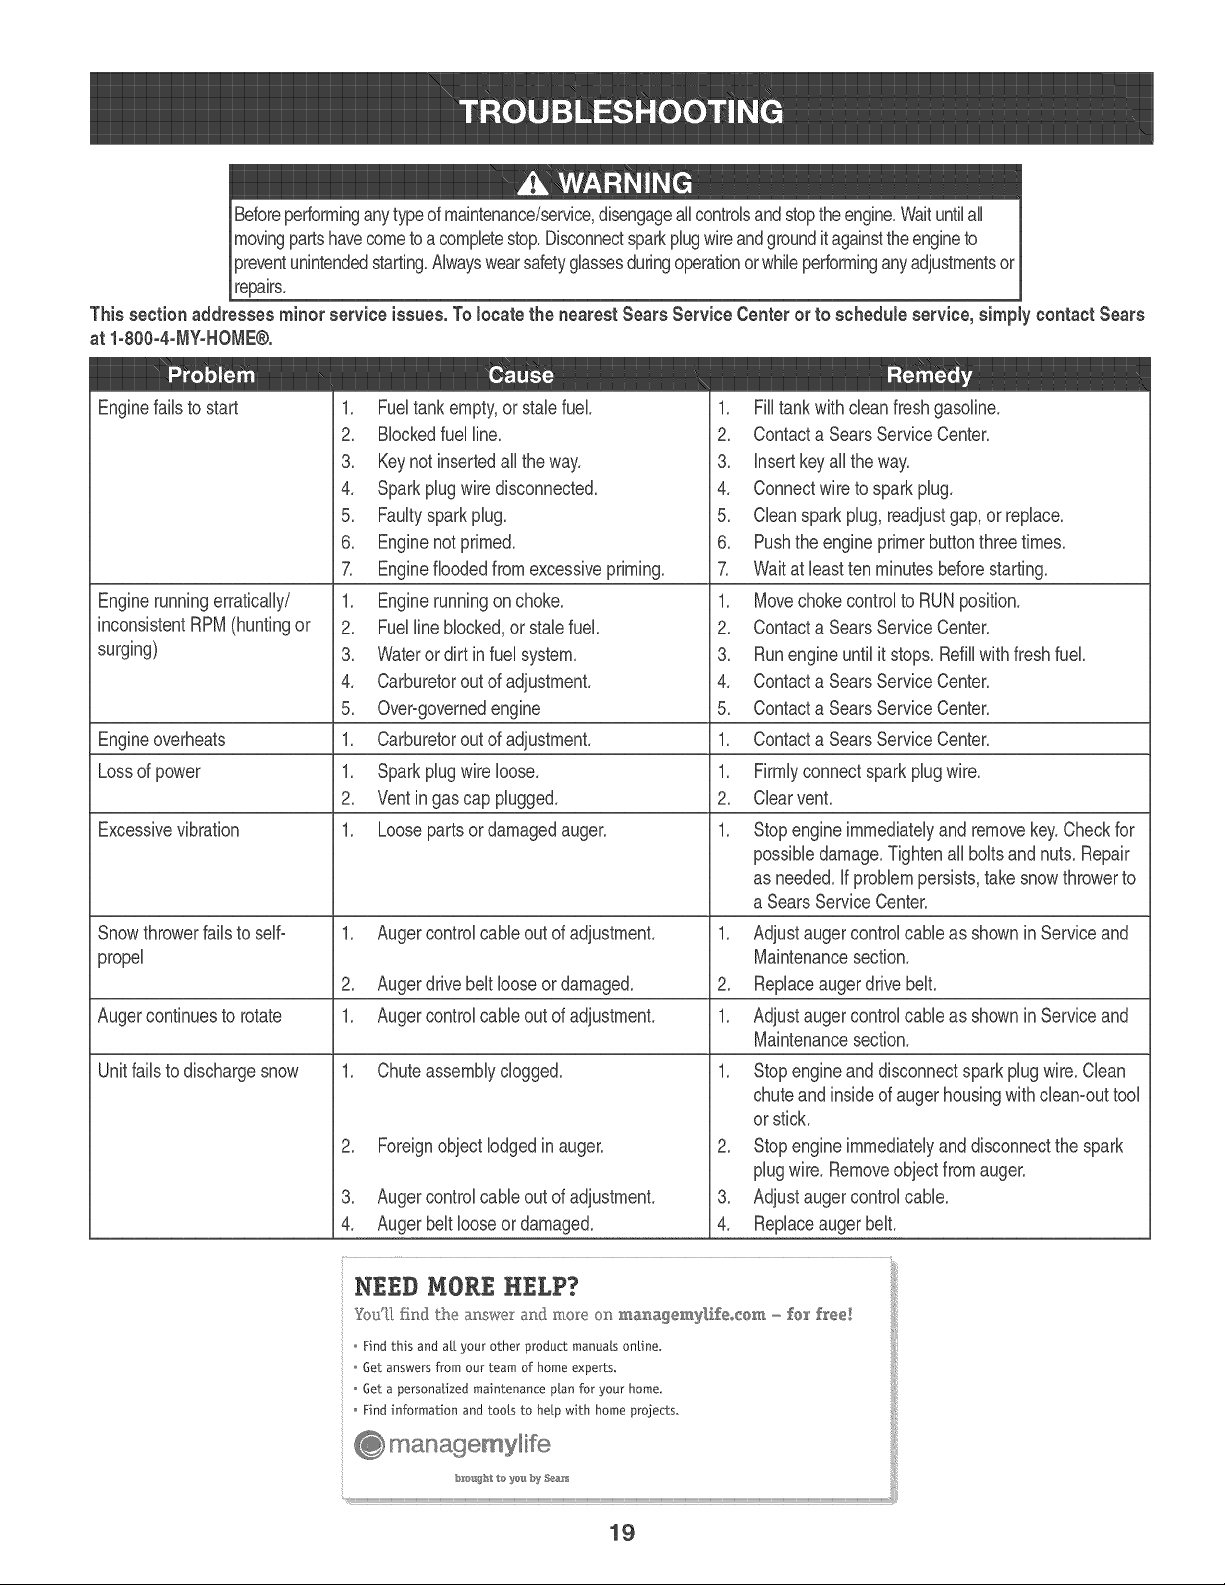
This sectbn addresses miner service issues. Tolocate the nearest Sears Service Centeror to sehedub service, simply contact Sears
at 1-800-4-MYoHOME®.
.......__Z_t'_;j:_il
Enginerunningerratically/
inconsistentRPM(huntingor
surging)
1. Fueltank empty,or stab fuel.
2. BIockedfuel line.
3. Keynot insertedall the way.
4. Sparkplugwiredisconnected.
5. Faultysparkplug.
6. Enginenot primed.
7. Enginefloodedfrom excessivepriming.
1. Enginerunningon choke.
2. Fuelline blocked,or stab fuel.
3. Wateror dirt infuel system.
4. Carburetoroutof adjustment.
5. Overogovernedengine
1. Carburetoroutof adjustment.
1. Sparkplug wireloose.
2. Ventin gascap plugged.
1. Looseparts ordamagedauger.
Engineoverheats
Lossof power
Excessivevibration
Snowthrowerfails to selfo 1. Augercontrolcableoutof adjustment. 1.
propel
2. Augerdrive beltlooseor damaged. 2.
Augercontinuesto rotate 1. Augercontrolcableoutof adjustment. 1.
Unitfailsto dischargesnow 1. Chuteassemblyclogged. 1.
2. Foreignobjectlodgedin auger.
3. Augercontrol cableoutof adjustment.
4. Auger beltlooseordamaged.
........_[_.[_
1. Filltank withcleanfreshgasoline.
2. Contacta SearsServiceCenter.
3. insertkeyalltheway.
4. Connectwireto sparkplug.
5. Cleansparkplug,readjustgap,or replace.
6. Pushthe engineprimerbuttonthreetimes.
7. Wait at bast ten minutesbeforestarting.
1. Movechoke controlto RUNposition.
2. Contacta SearsServiceCenter.
3. Runengineuntilit stops.Refillwithfreshfuel.
4. Contacta SearsServiceCenter.
5. Contacta SearsServiceCenter.
1. Contacta SearsServiceCenter.
1. Firmlyconnectspark plugwire.
2. Clearvent.
1. Stopengine immediatelyandremovekey.Checkfor
possibledamage.Tightenall boltsand nuts.Repair
as needed,if problempersists,take snowthrowerto
a SearsServiceCenter.
Adjustaugercontrolcableas shownin Serviceand
Maintenancesection.
Replaceaugerdrivebelt.
Adjustaugercontrolcableas shownin Serviceand
Maintenancesection.
Stopengineand disconnectsparkplugwire.Clean
chuteand insideof augerhousingwithclean-outtool
or stick.
2. Stopengineimmediatelyand disconnectthe spark
plugwire.Removeobjectfromauger.
3. Adjustauger controlcable.
4. Replaceaugerbelt.
Find this and atLyour other product rnanua{s onl__ne.
6et answers from our team of home experts,
6et a personalized maintenance p{an for your home.
Find information and too{s to he!.pwith home projects.
_ managemylife
19
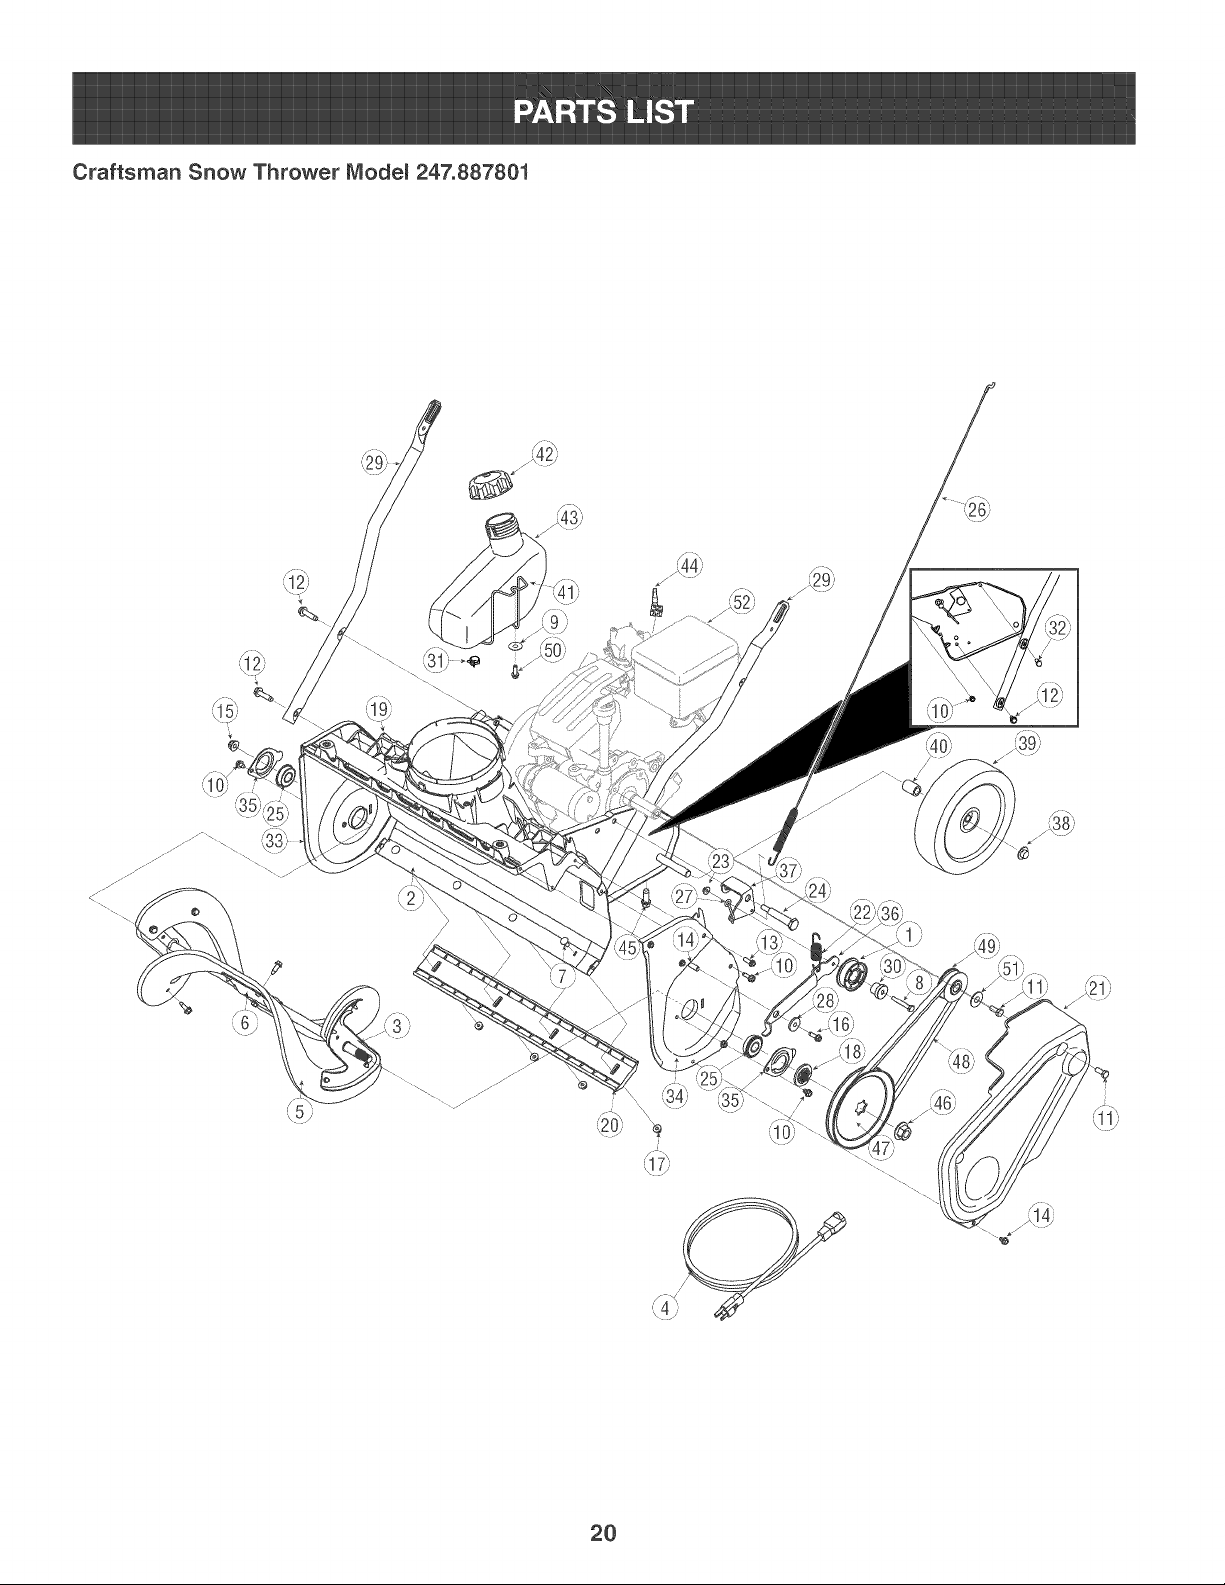
Craftsman Snow Thrower Modem 247.887801
\
2O
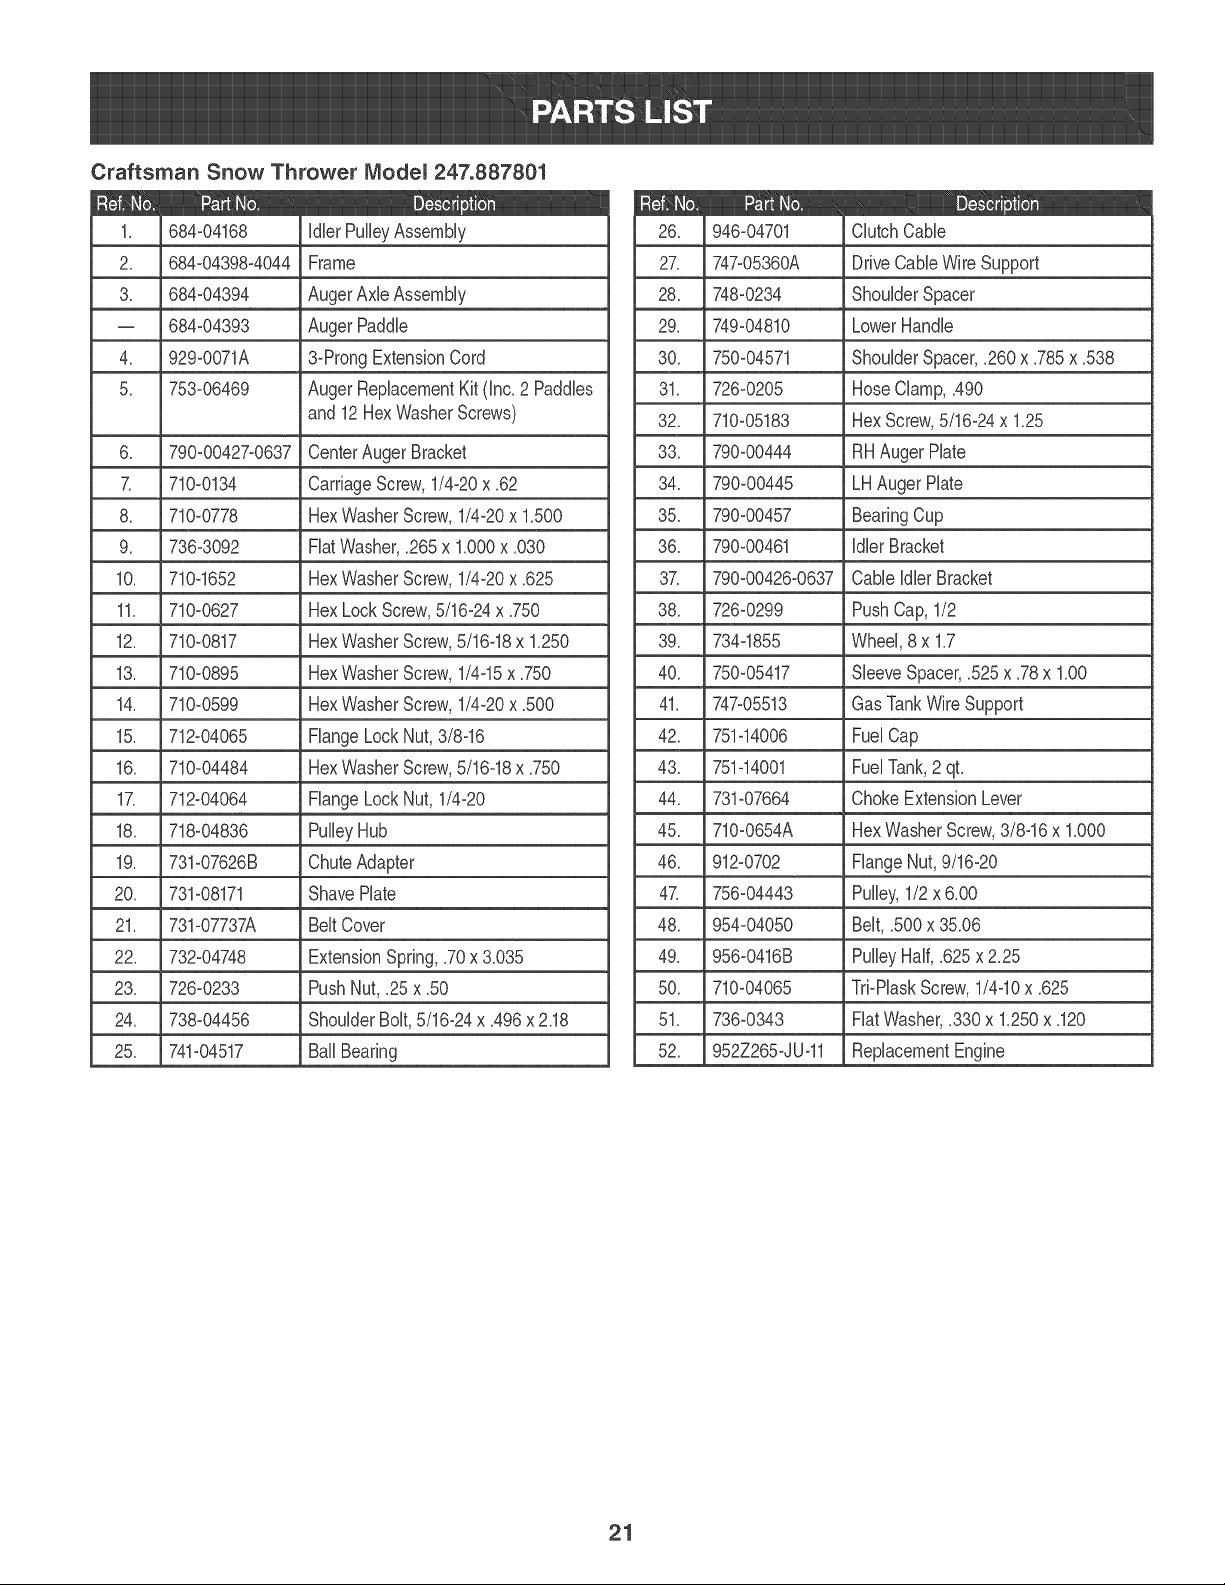
Craftsman Snow Thrower Modem 247.887801
1. 684-04168
2. 684-04398-4044
3. 684-04394
-- 684-04393
4. 929-0071A
5. 753_06469
6. 790-00427_0637
Z 710-0134
8. 710-0778
9. 736-3092
10. 710-1652
11. 710-0627
12. 710-0817
13. 710-0895
14. 710-0599
15. 712_04065
16. 710-04484
1Z 712o04064
18. 718-04836
19. 731_07626B
20. 731_08171
21. 731_07737A
22. 732_04748
23. 726_0233
24. 738-04456
25. 741_04517
IdlerPulleyAssembly
Frame
AugerAxleAssembly
AugerPaddle
3_ProngExtensionCord
AugerReplacementKit (Inc.2 Paddies
and12Hex WasherScrews)
CenterAugerBracket
CarriageScrew,1/4-20x .62
HexWasherScrew,1/4_20x 1.500
FlatWasher,.265x 1.000x .030
HexWasherScrew,1/4_20x .625
HexLockScrew,5/16_24x .750
HexWasherScrew,5/16_18x 1.250
HexWasherScrew,1/4_15x .750
HexWasherScrew,1/4_20x .500
FlangeLockNut,3/8-16
HexWasherScrew,5/16_18x .750
Range LockNut, 1/4_20
PulleyHub
ChuteAdapter
ShavePlate
BeltCover
ExtensionSpring,.70x 3.035
PushNut,.25 x .50
ShoulderBolt,5/16_24x .496x 2.18
BallBearing
26. 946_04701 ClutchCable
27. 747_05360A DriveCableWire Support
28. 748-0234 ShoulderSpacer
29. 749_04810 LowerHandle
30. 750_04571 ShoulderSpacer,.260x .785x .538
31. 726_0205 HoseClamp,.490
32. 710_05183 HexScrew,5/16_24x 1.25
33. 790_00444 RHAugerHate
34. 790_00445 LHAugerHate
35. 790_00457 BearingCup
36. 790_00461 IdlerBracket
37. 790_00426_0637Cable IdlerBracket
38. 726_0299 PushCap, 1/2
39. 734_1855 Wheel,8 x 1.7
40. 750_05417 SleeveSpacer,.525x .78x 1.00
41. 747_05513 Gas TankWire Support
42. 751_14006 FuelCap
43. 751_14001 FuelTank,2 qt.
44. 731°07664 ChokeExtensionLever
45. 710_0654A HexWasherScrew,3/8-16x 1.000
46. 912_0702 FlangeNut,9/16_20
47. 756_04443 Pulley,1/2 x 6.00
48. 954_04050 Belt,.500x 35.06
49. 956_0416B PulleyHalf,.625x 2.25
50. 710_04065 Tri_PlaskScrew,1/4-10x .625
51. 736_0343 FlatWasher,.330x 1.250x .120
52. 952Z265_JU_11 ReplacementEngine
21
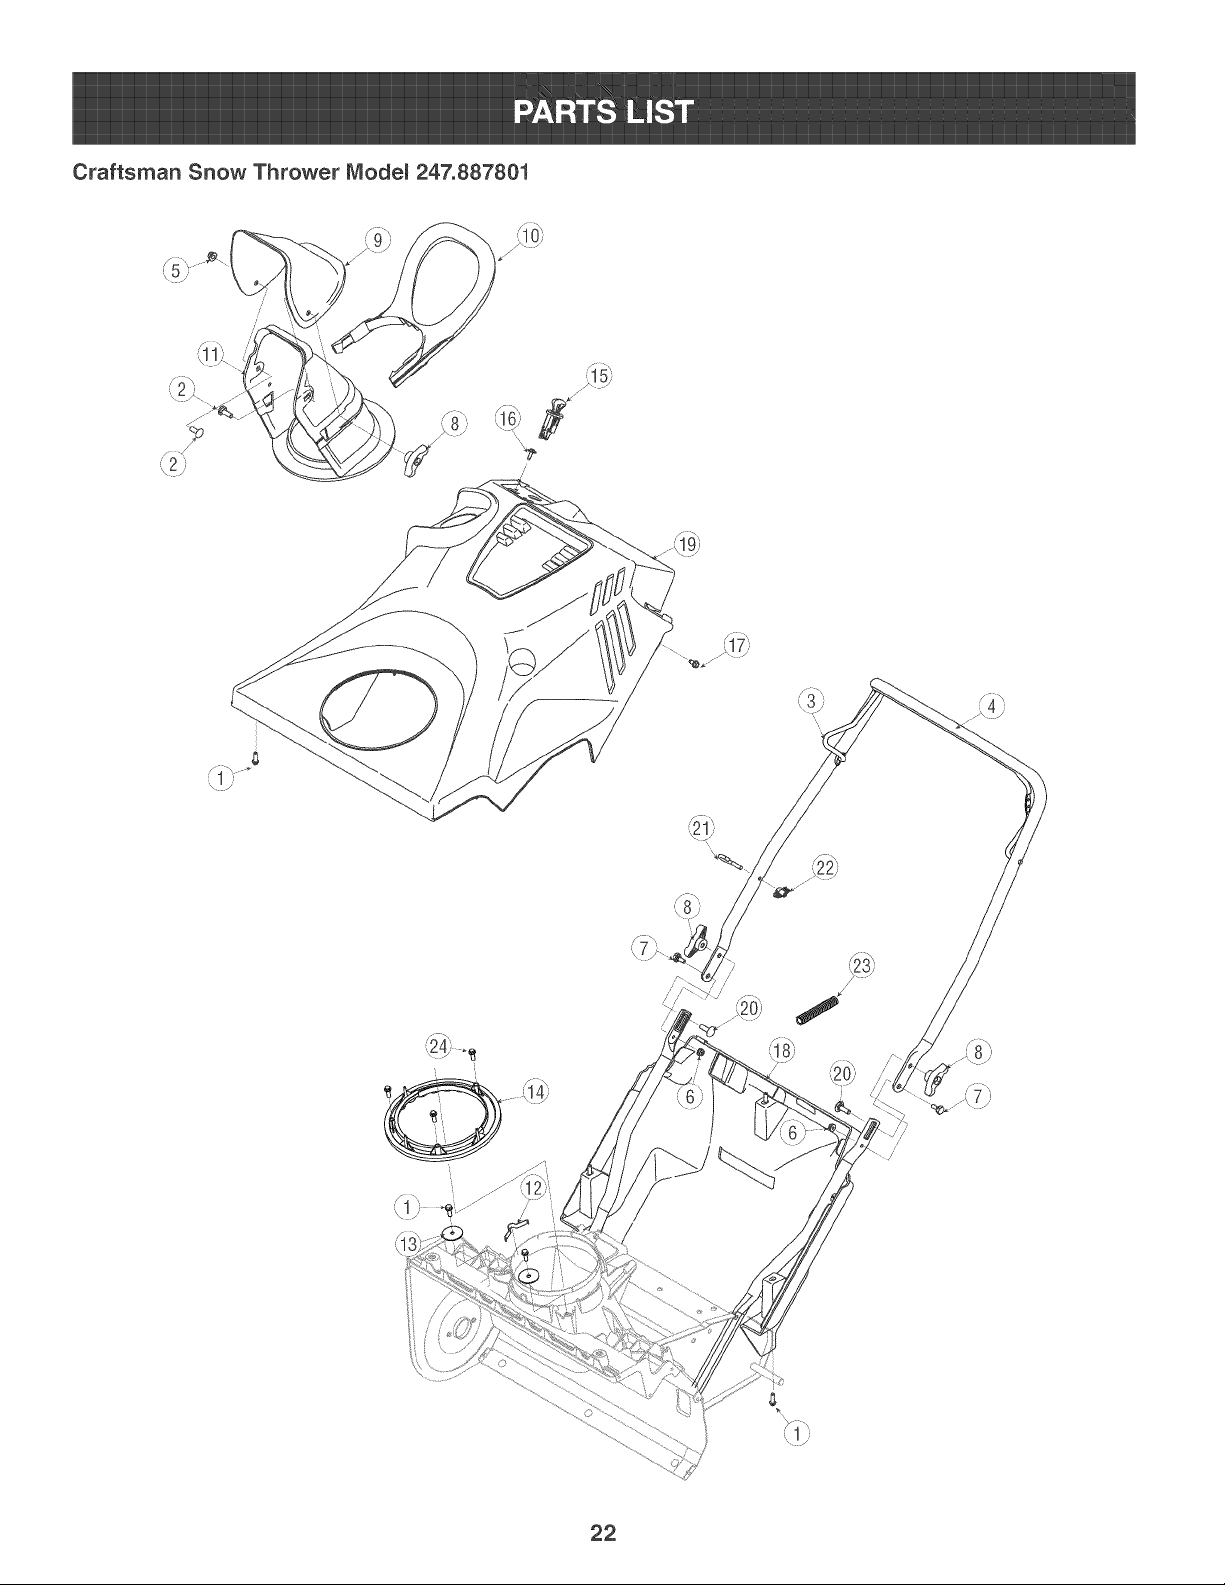
Craftsman Snow Thrower Modem 247.887801
/
/ !
22
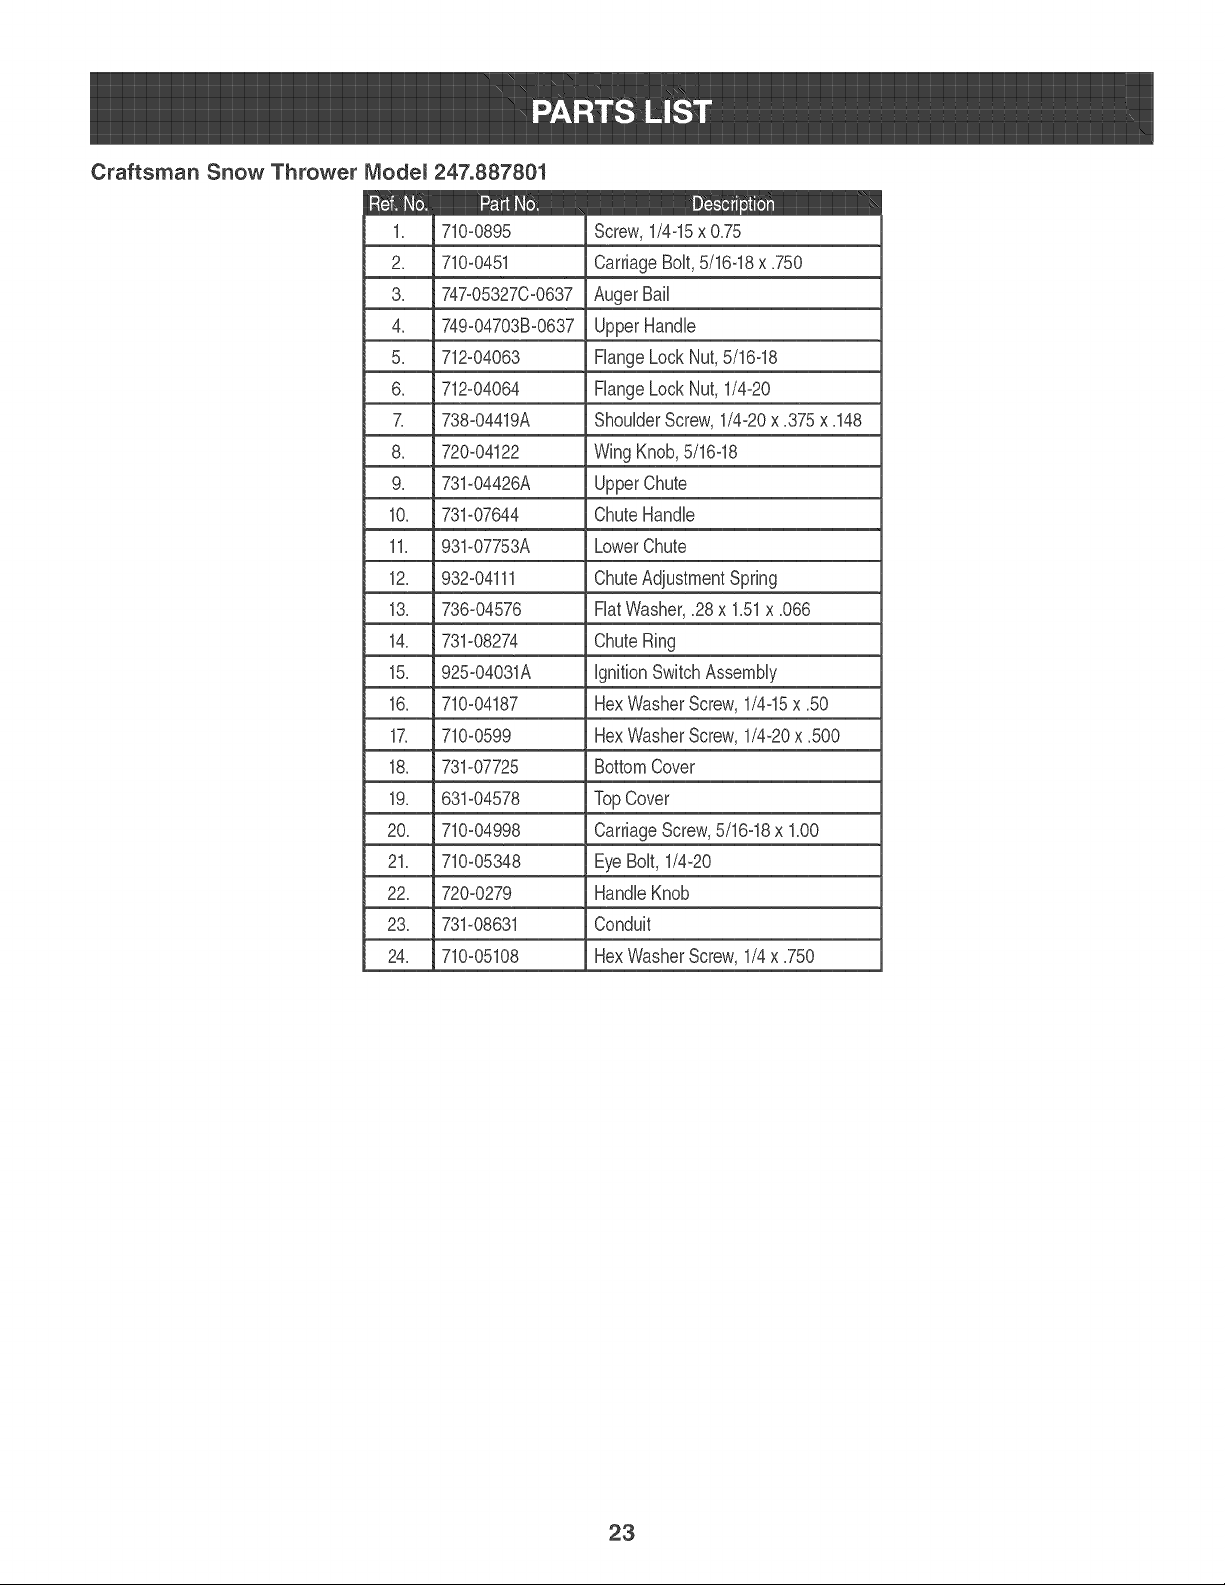
Craftsman Snow Thrower Modem 247.887801
1. 710_0895
2. 710_0451
3. 747_05327C_0637
4. 749_04703B_0637
5. 712_04063
6. 712_04064
738-04419A
8. 720_04122
9. 731_04426A
10. 731o07644
11. 931_07753A
12. 932_04111
13. 736_04576
14. 731_08274
15. 925_04031A
16. 710_04187
17. 710_0599
18. 731_07725
19. 631_04578
20. 710_04998
21. 710_05348
22. 720_0279
23. 731_08631
24. 710_05108
Screw,1/4_15x 0.75
CarriageBolt,5/16_18x .750
AugerBail
UpperHandle
HangeLock Nut,5/16_18
FlangeLock Nut, 1/4-20
ShoulderScrew,1/4_20x .375x .148
Wing Knob,5/16_18
UpperChute
ChuteHandle
LowerChute
ChuteAdjustmentSpring
FlatWasher,28 x 1.51x .066
ChuteRing
IgnitionSwitchAssembly
HexWasherScrew,1/4_15x .50
HexWasherScrew,1/4_20x .500
BottomCover
TopCover
CarriageScrew,5/16_18x 1.00
EyeBolt, 1/4_20
HandleKnob
Conduit
HexWasherScrew,1/4x .750
23
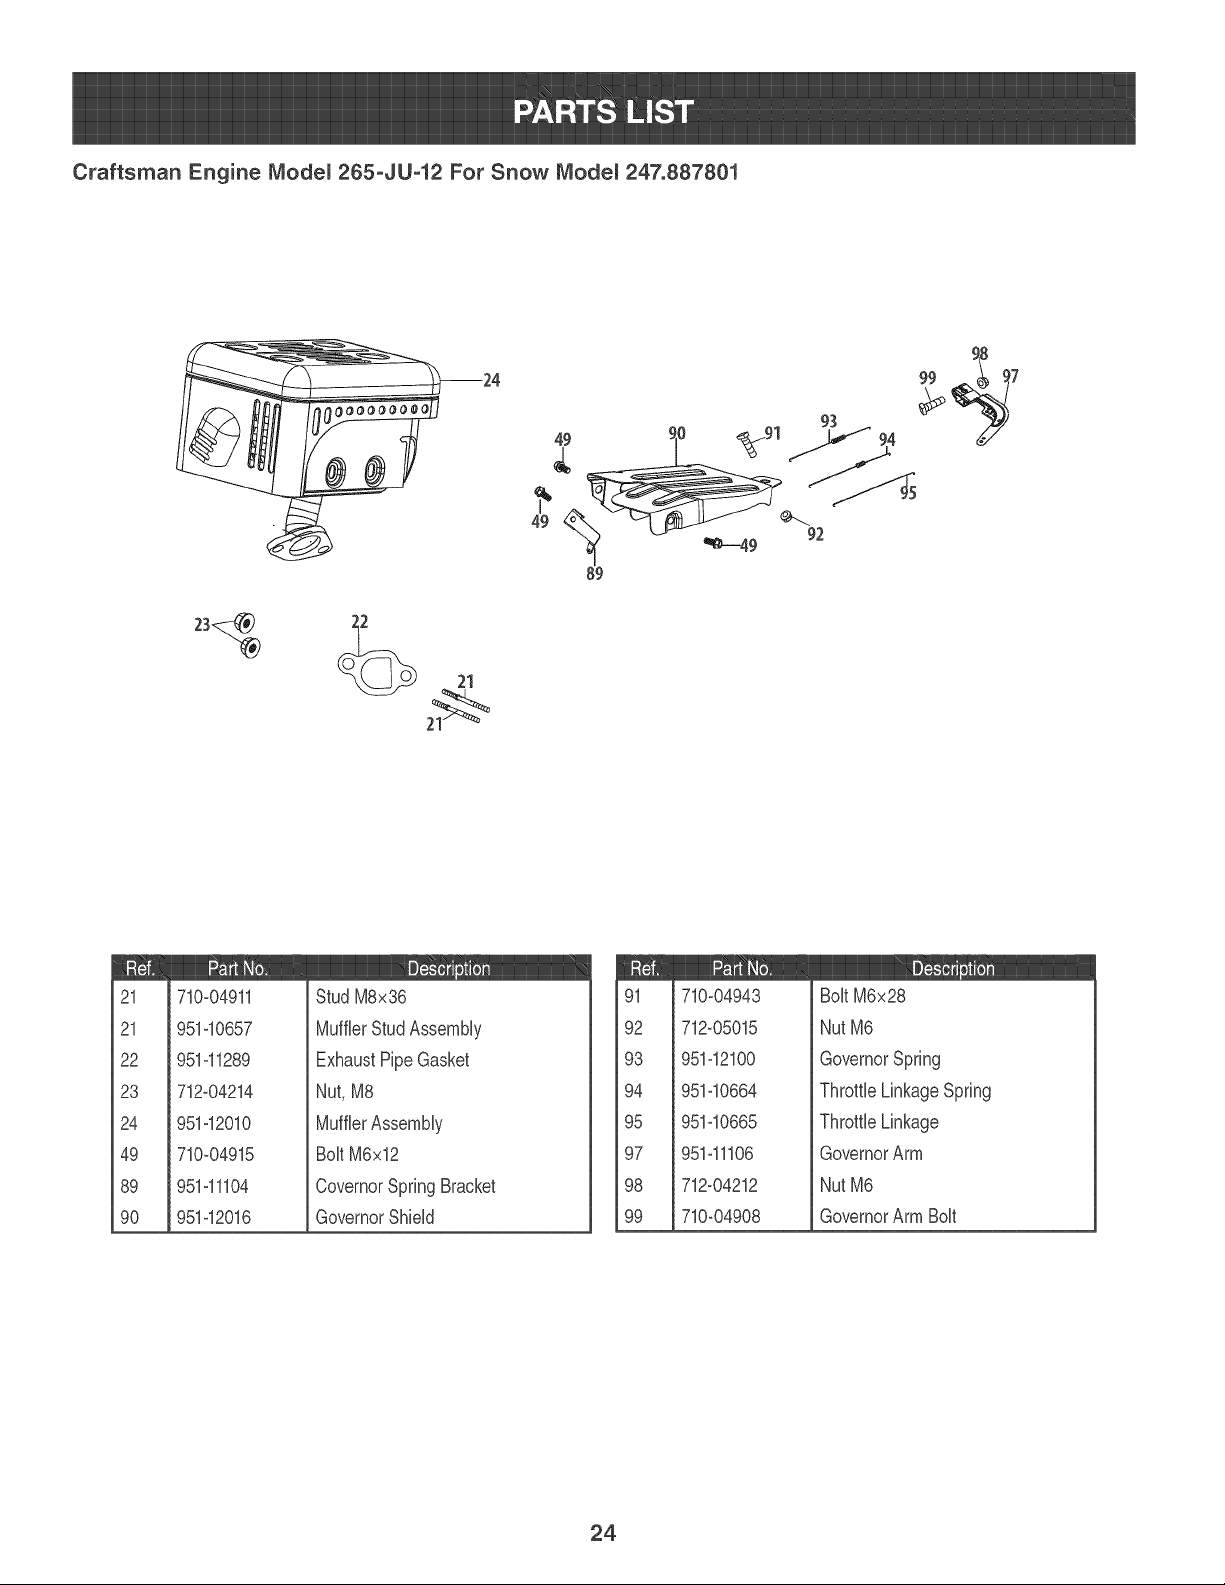
Craftsman Engine Modem 265oJU-12 For Snow Modem 247.887801
99 ,
93
21
21
22
23
24
49
89
90
710_04911
951_10657
951o11289
712_04214
951o12010
710_04915
951_11104
951_12016
Stud M8x36
MufflerStudAssembly
ExhaustPipeGasket
Nut,M8
MufflerAssembly
BoRM6x12
CovemorSpring Bracket
GovernorShMd
91 710o04943
92 712_05015
93 951_12100
94 951_10664
95 951_10665
97 951_11106
98 712o04212
99 710_04908
BoRM6x28
NutM6
GovernorSpring
ThrottleLinkageSpring
ThrottleLinkage
GovernorArm
NutM6
GovernorArm BoR
24
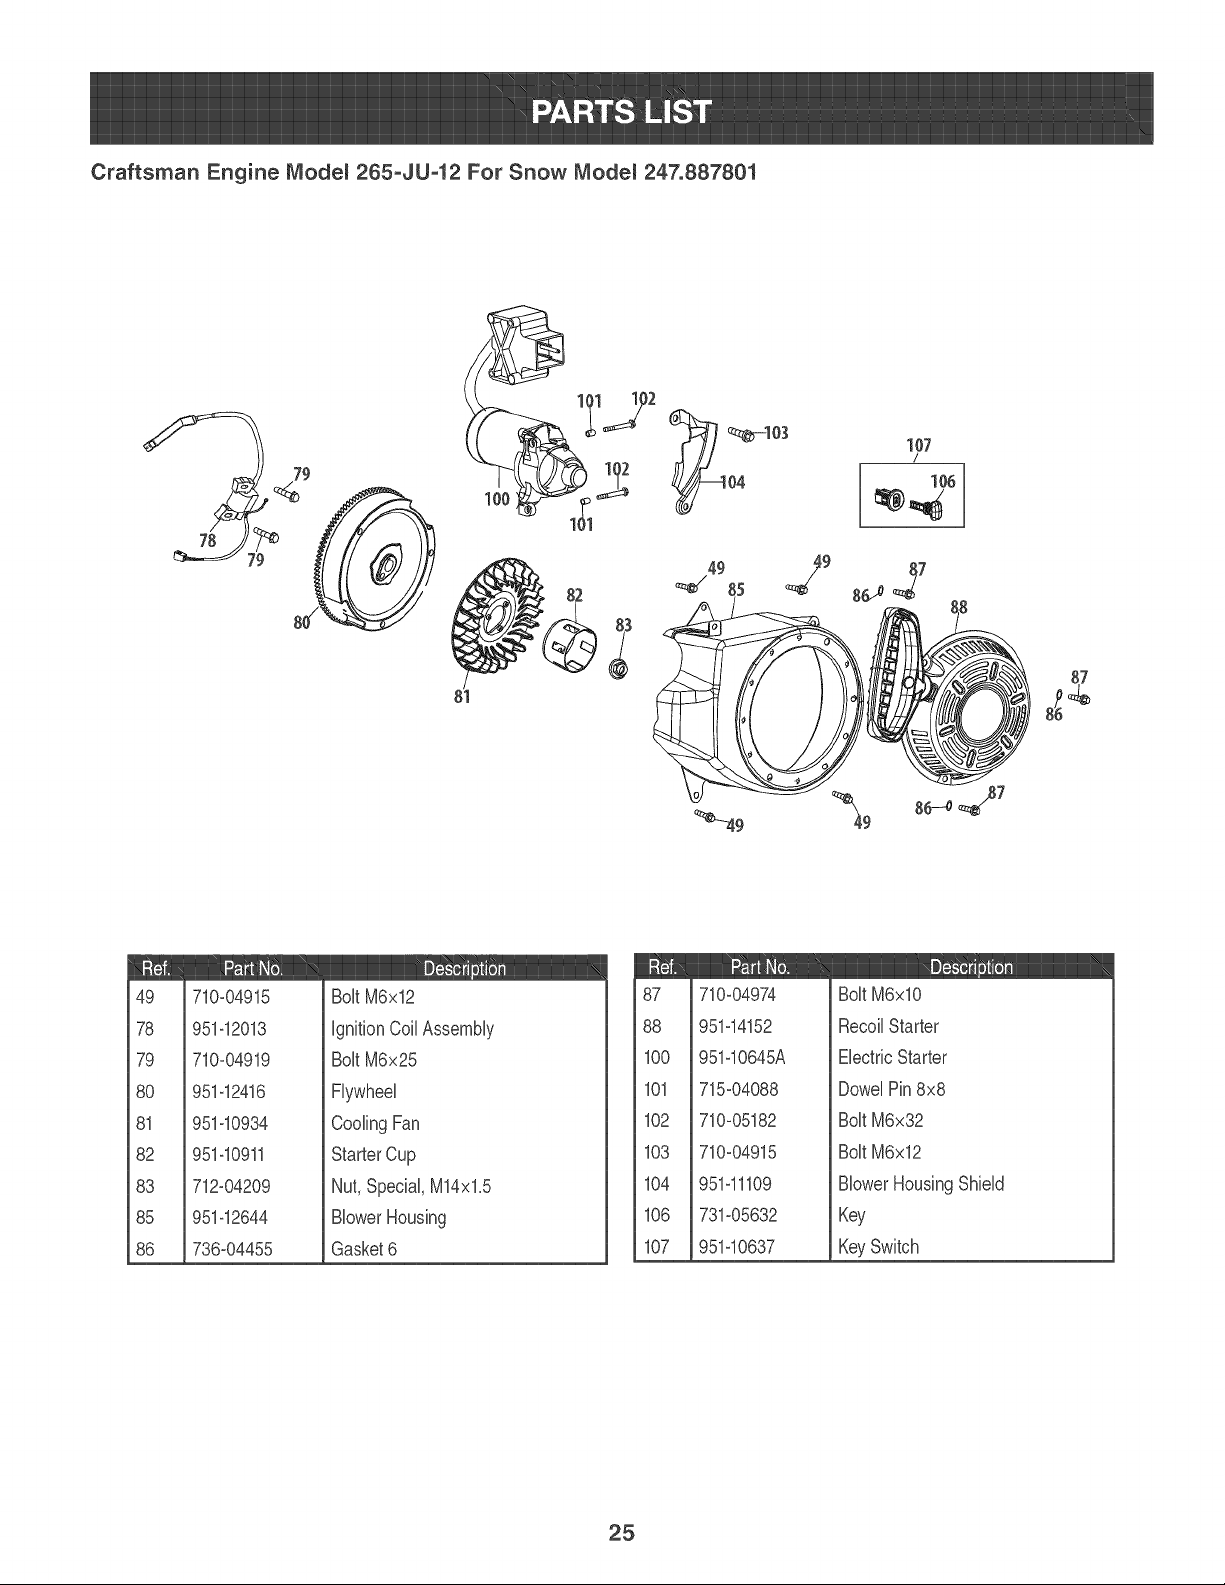
Craftsman Engine Modem 265-JU-12 For Snow Modem 247.887801
2
107
/
108
87
49 710-04915
78 951-12013
79 710-04919
80 951-12416
81 951-10934
82 951-10911
83 712-04209
85 951-12644
86 736-04455
BoltM6x12
IgnitionCol Assembly
BoltM6x25
Flywheel
CoolingFan
StarterCup
Nut,Special,M14x1.5
BlowerHousing
Gasket6
87
88
IO0
101
102
103
104
106
107
710-04974
951-14152
951-10645A
715-04088
710-05182
710-04915
951-11109
731-05632
951-10637
BoltM6xlO
RecoilStarter
ElectricStarter
DowelPin8x8
BoltM6x32
BoltM6x12
BlowerHousingShield
Key
KeySwitch
25
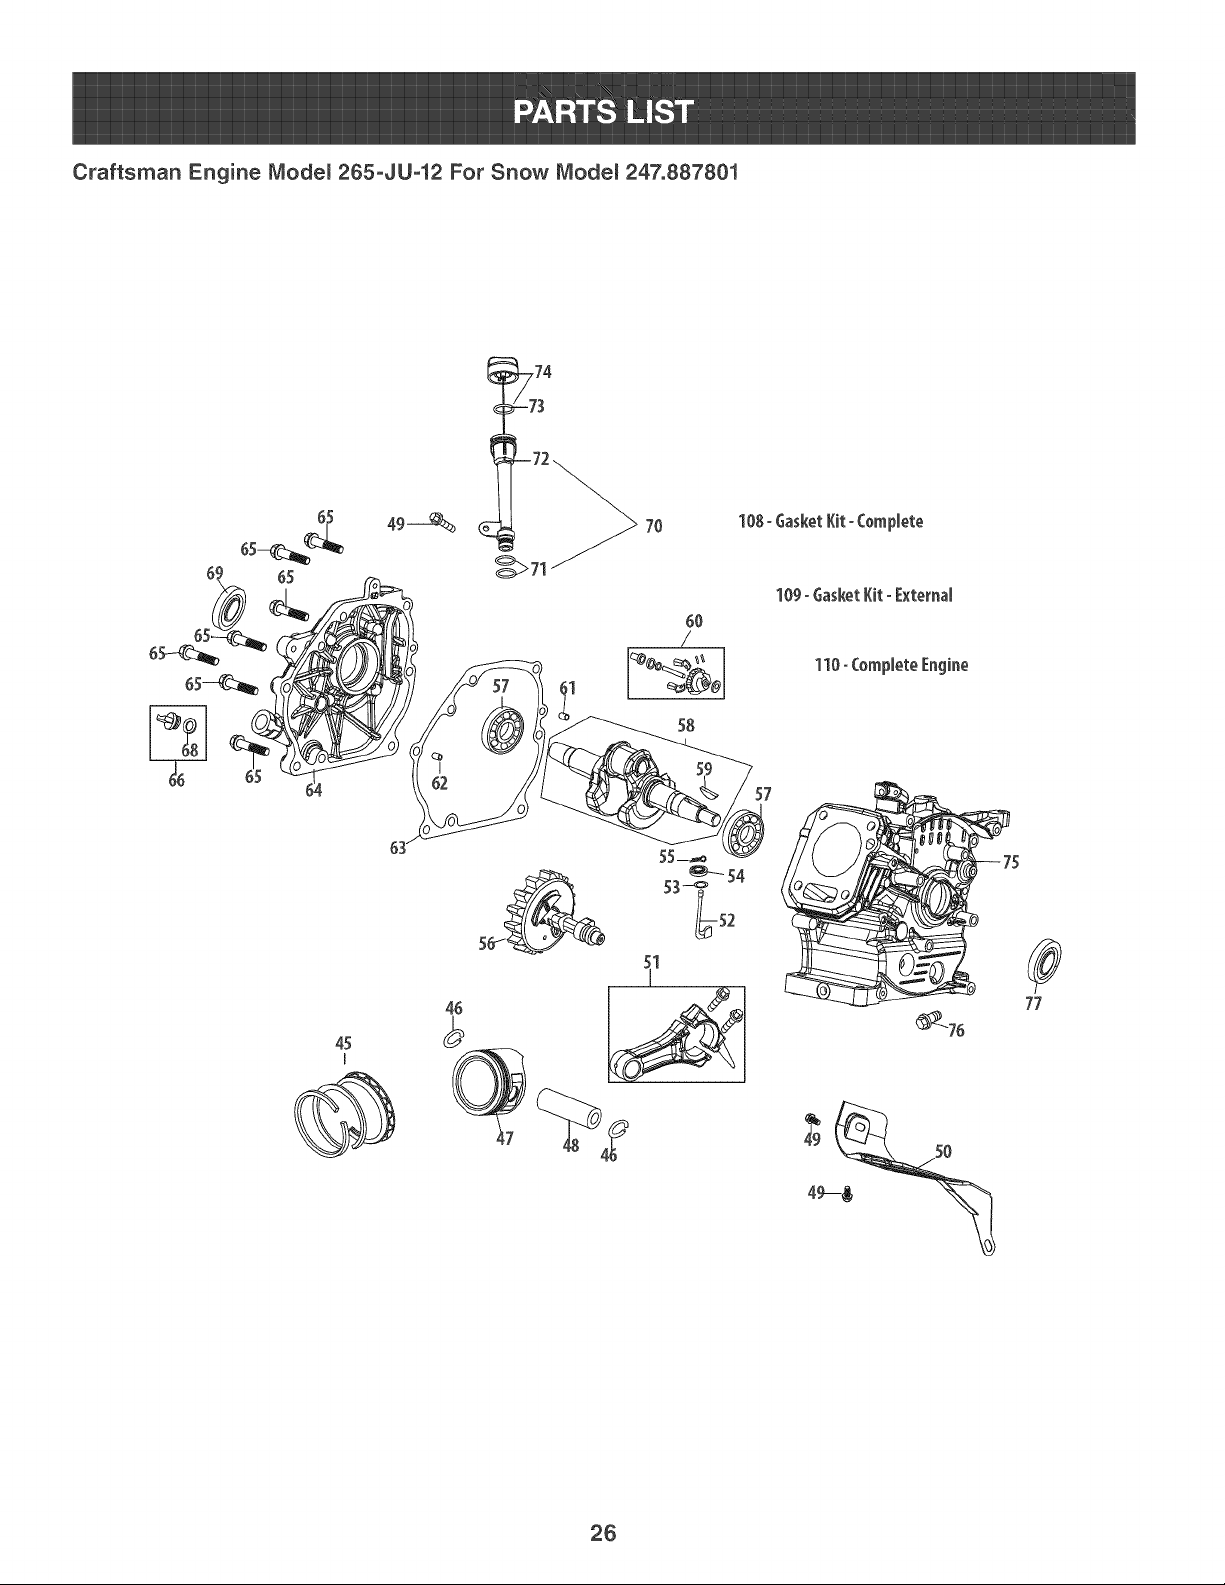
Craftsman Engine Modem 265oJU-12 For Snow Modem 247.887801
,74
45
58
1
77
26
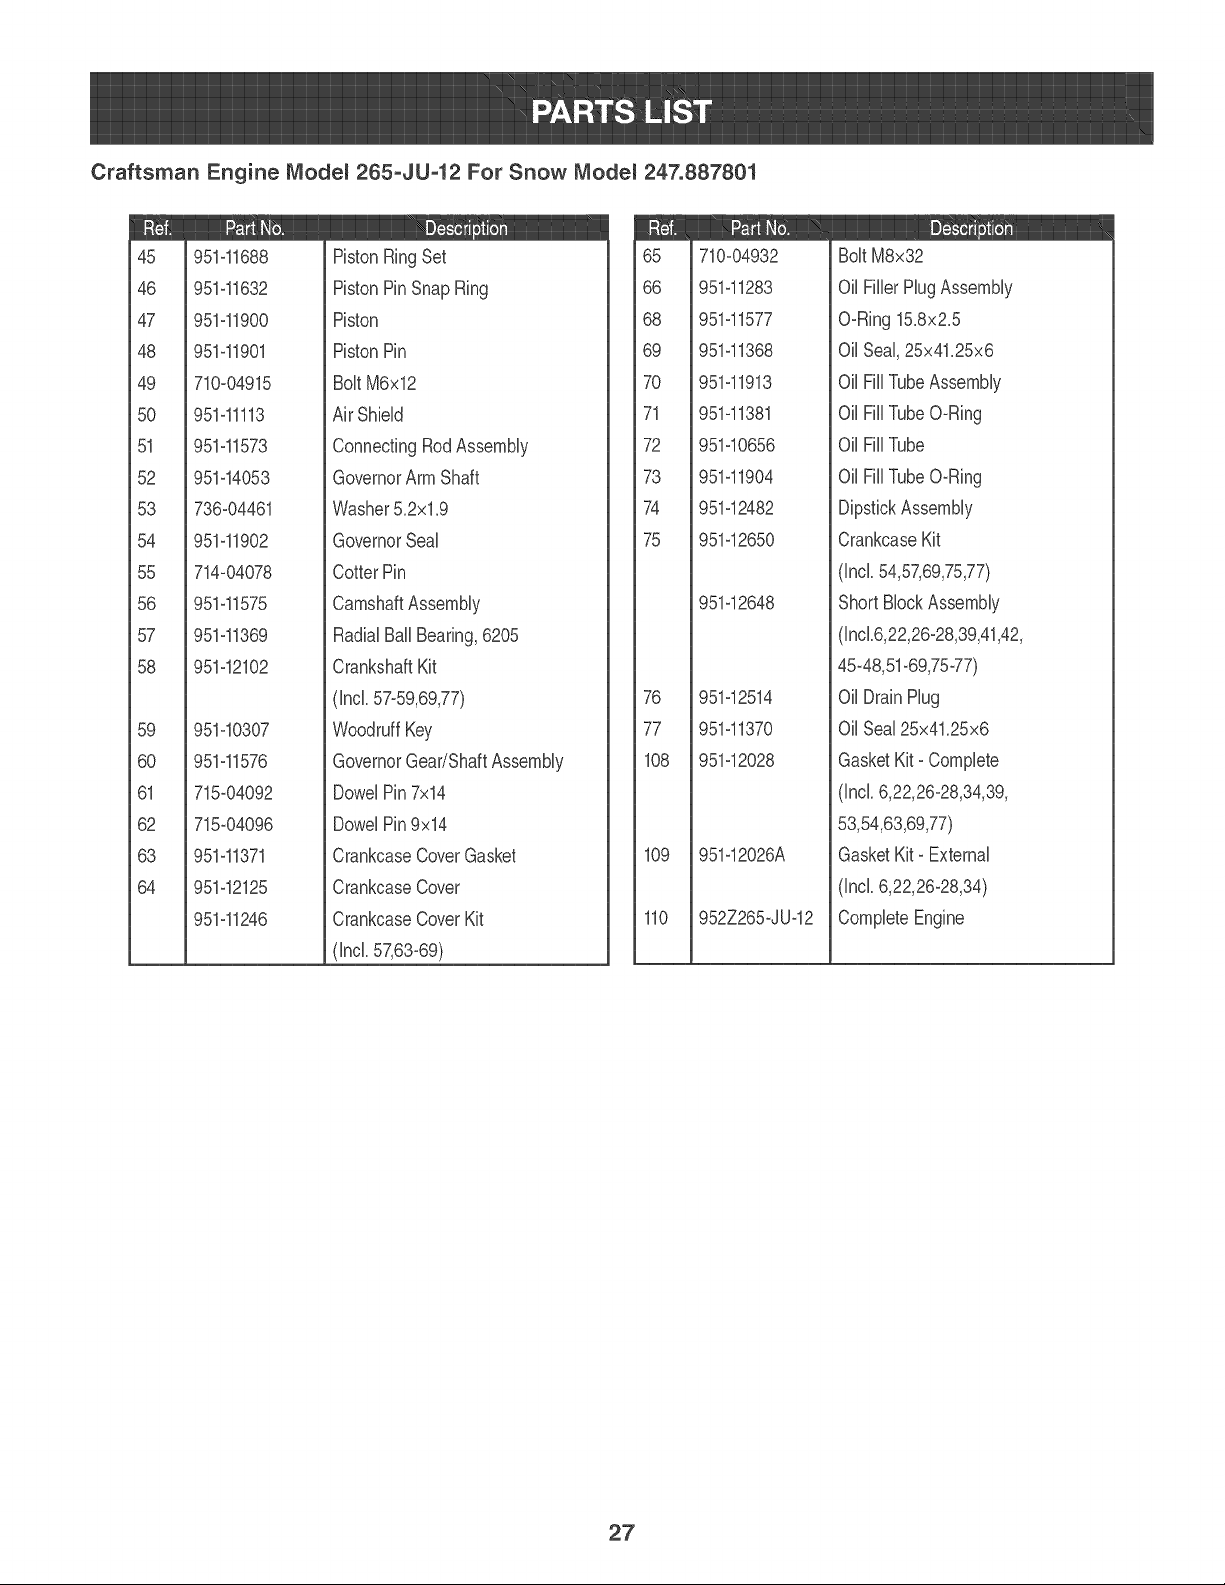
Craftsman Engine Modem 265-JU-12 For Snow Modem 247.887801
45 951-11688
46 951-11632
47 951-11900
48 951-11901
49 710-04915
50 951-11113
51 951-11573
52 951-14053
53 736-04461
54 951-11902
55 714-04078
56 951-11575
57 951-11369
58 951-12102
59 951-10307
60 951-11576
61 715-04092
62 715-04096
63 951-11371
64 951-12125
951-11246
PistonRingSet
PistonPinSnapRing
Piston
PistonPin
Bolt M6x12
AirShield
ConnectingRodAssembly
GovernorArm Shaft
Washer5.2xl .9
GovernorSeal
CotterPin
CamshaftAssembly
RadialBall Bearing,6205
CrankshaftKit
(Incl.57-59,69,77)
WoodruffKey
GovernorGear/ShaftAssembly
DowelPin7x14
DowelPin9x14
CrankcaseCoverGasket
CrankcaseCover
CrankcaseCoverKit
(Incl.57,63-69)
65 710-04932
66 951-11283
68 951-11577
69 951-11368
70 951-11913
71 951-11381
72 951-10656
73 951-11904
74 951-12482
75 951-12650
951-12648
76 951-12514
77 951-11370
108 951-12028
109 951-12026A
110 952Z265-JU-12
BoltM8x32
0il FillerPlugAssembly
O-Ring15.8x2.5
0il Seal,25x41.25x6
0il Fill TubeAssembly
0il Fill TubeO-Ring
0il Fill Tube
0il Fill TubeO-Ring
DipstickAssembly
CrankcaseKit
(Incl.54,57,69,75,77)
ShortBlockAssembly
(Inc1.6,22,26-28,39,41,42,
45-48,51-69,75-77)
0il DrainPlug
0il Seal 25x41.25x6
GasketKit- Complete
(Incl.6,22,26-28,34,39,
53,54,63,69,77)
GasketKit- External
(Incl.6,22,26-28,34)
CompleteEngine
27
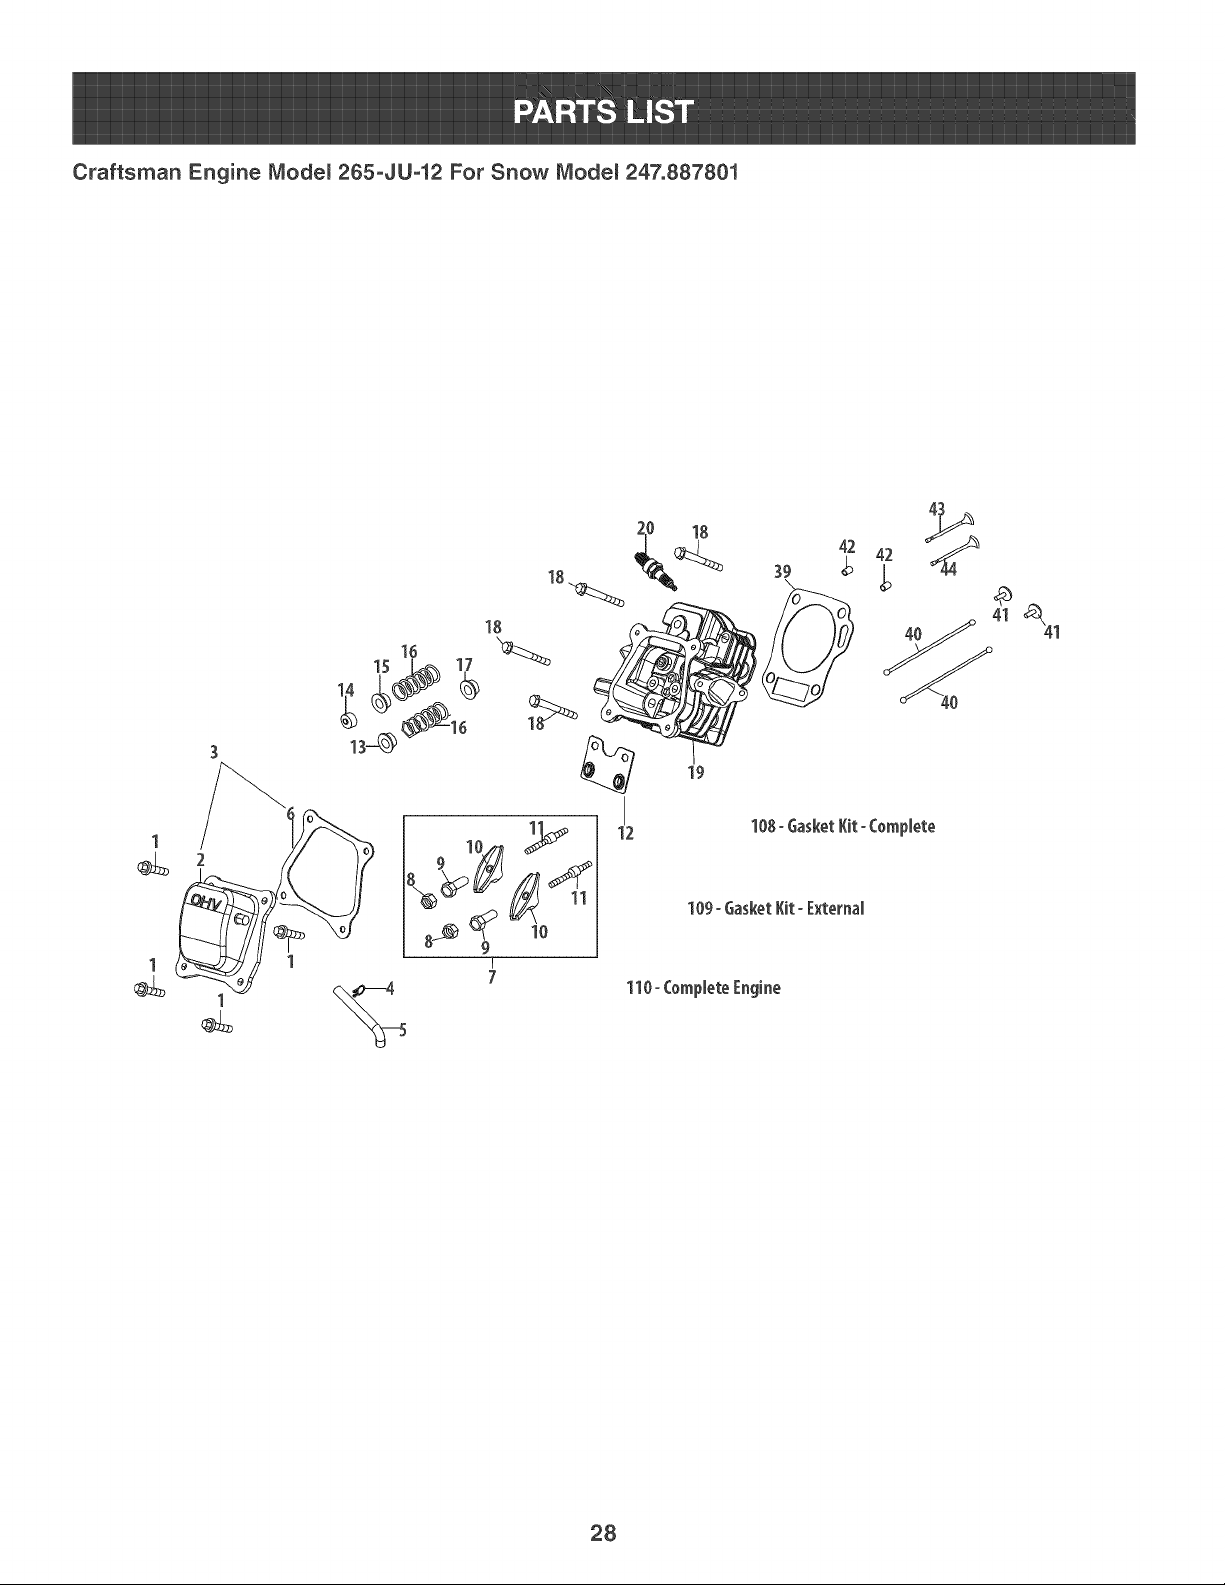
Craftsman Engine Modem265oJU-12 For Snow Modem 247.887801
1 1
4O
28
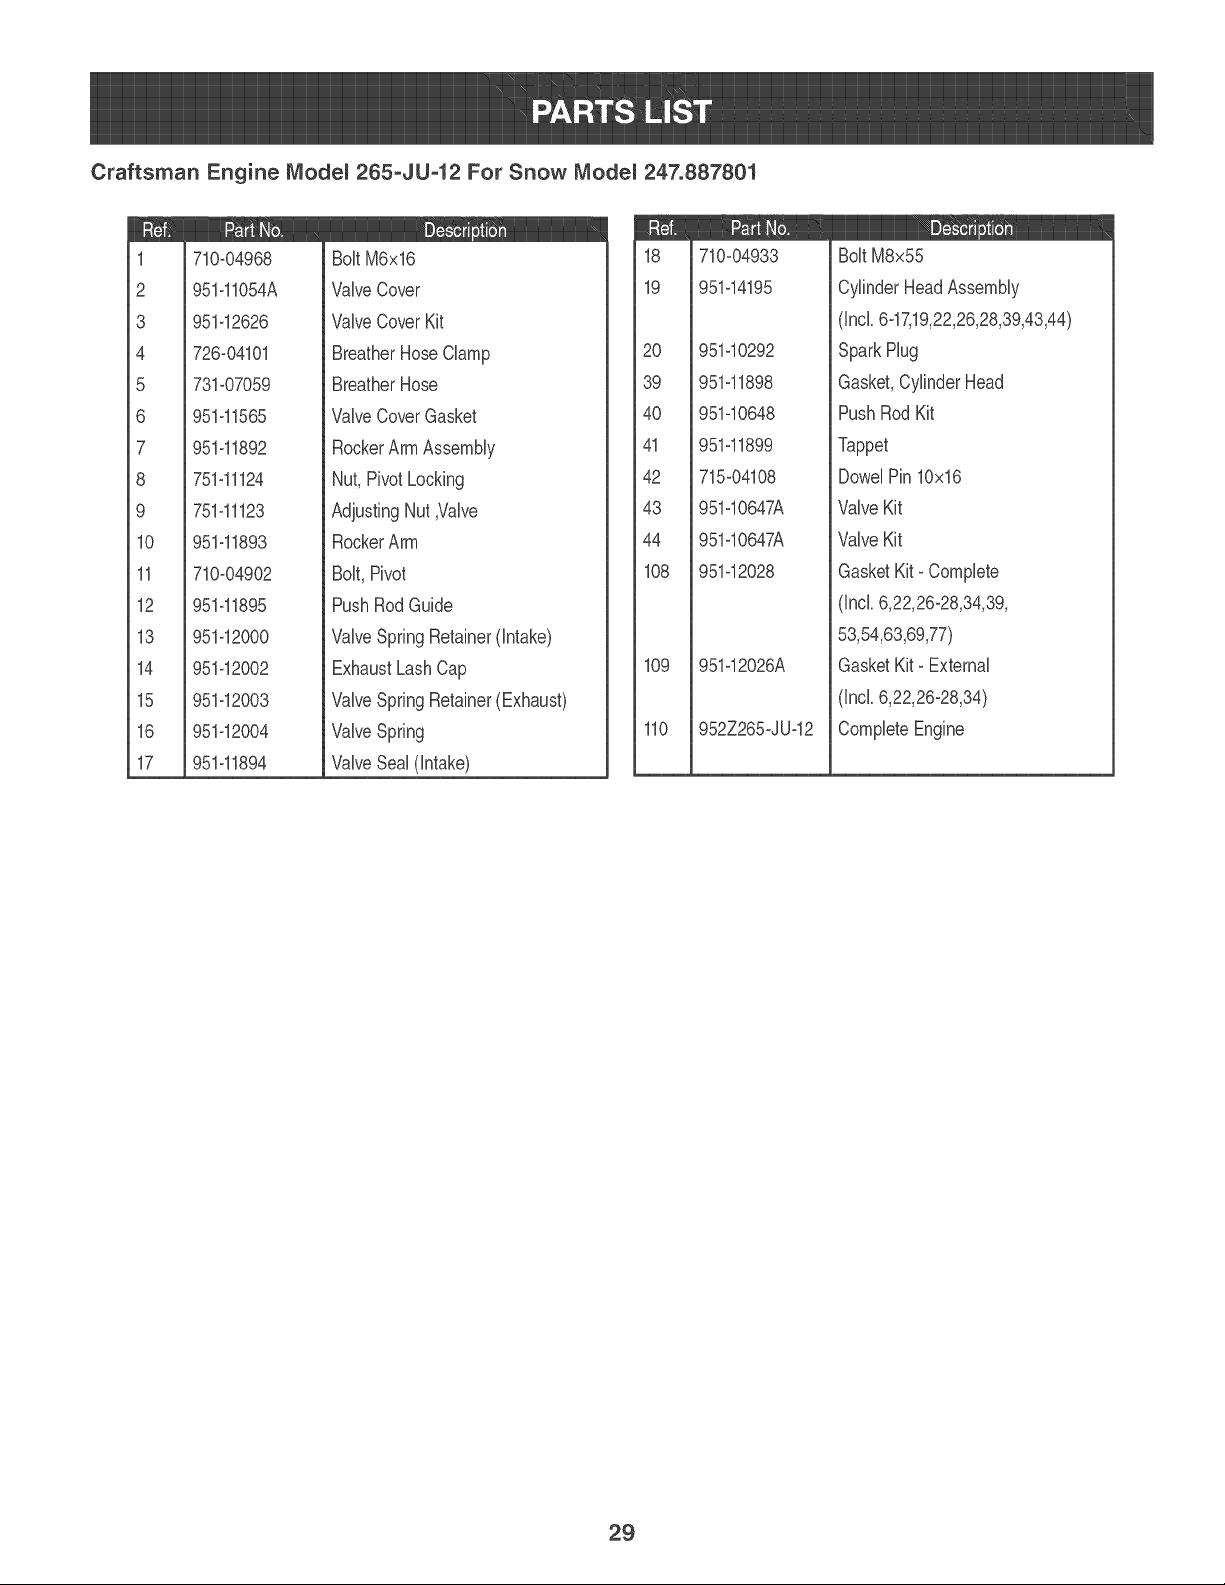
Craftsman Engine Modem 265-JU-12 For Snow Modem 247.887801
1 710-04968
2 951-11054A
3 951-12626
4 726-04101
5 731-07059
6 951-11565
7 951-11892
8 751-11124
9 751-11123
10 951-11893
11 710-04902
12 951-11895
13 951-12000
14 951-12002
15 951-12003
16 951-12004
17 951-11894
BoltM6x16
ValveCover
ValveCoverKit
BreatherHoseClamp
BreatherHose
ValveCoverGasket
RockerArmAssembly
Nut,Pivot Locking
AdjustingNut,Valve
RockerArm
Bolt,Pivot
PushRodGuide
ValveSpringRetainer(intake)
ExhaustLashCap
ValveSpringRetainer(Exhaust)
ValveSpring
ValveSeal (intake)
18 710-04933
19 951-14195
20 951-10292
39 951-11898
40 951-10648
41 951-11899
42 715-04108
43 951-10647A
44 951-10647A
108 951-12028
109 951-12026A
110 952Z265-JU-12
BoltM8x55
CylinderHeadAssembly
(Incl.6-17,19,22,26,28,39,43,44)
SparkHug
Gasket,CylinderHead
PushRodKit
Tappet
DowelPin10x16
ValveKit
ValveKit
GasketKit- Complete
(Ind. 6,22,26-28,34,39,
53,54,63,69,77)
GasketKit- External
(ind. 6,22,26-28,34)
CompleteEngine
29
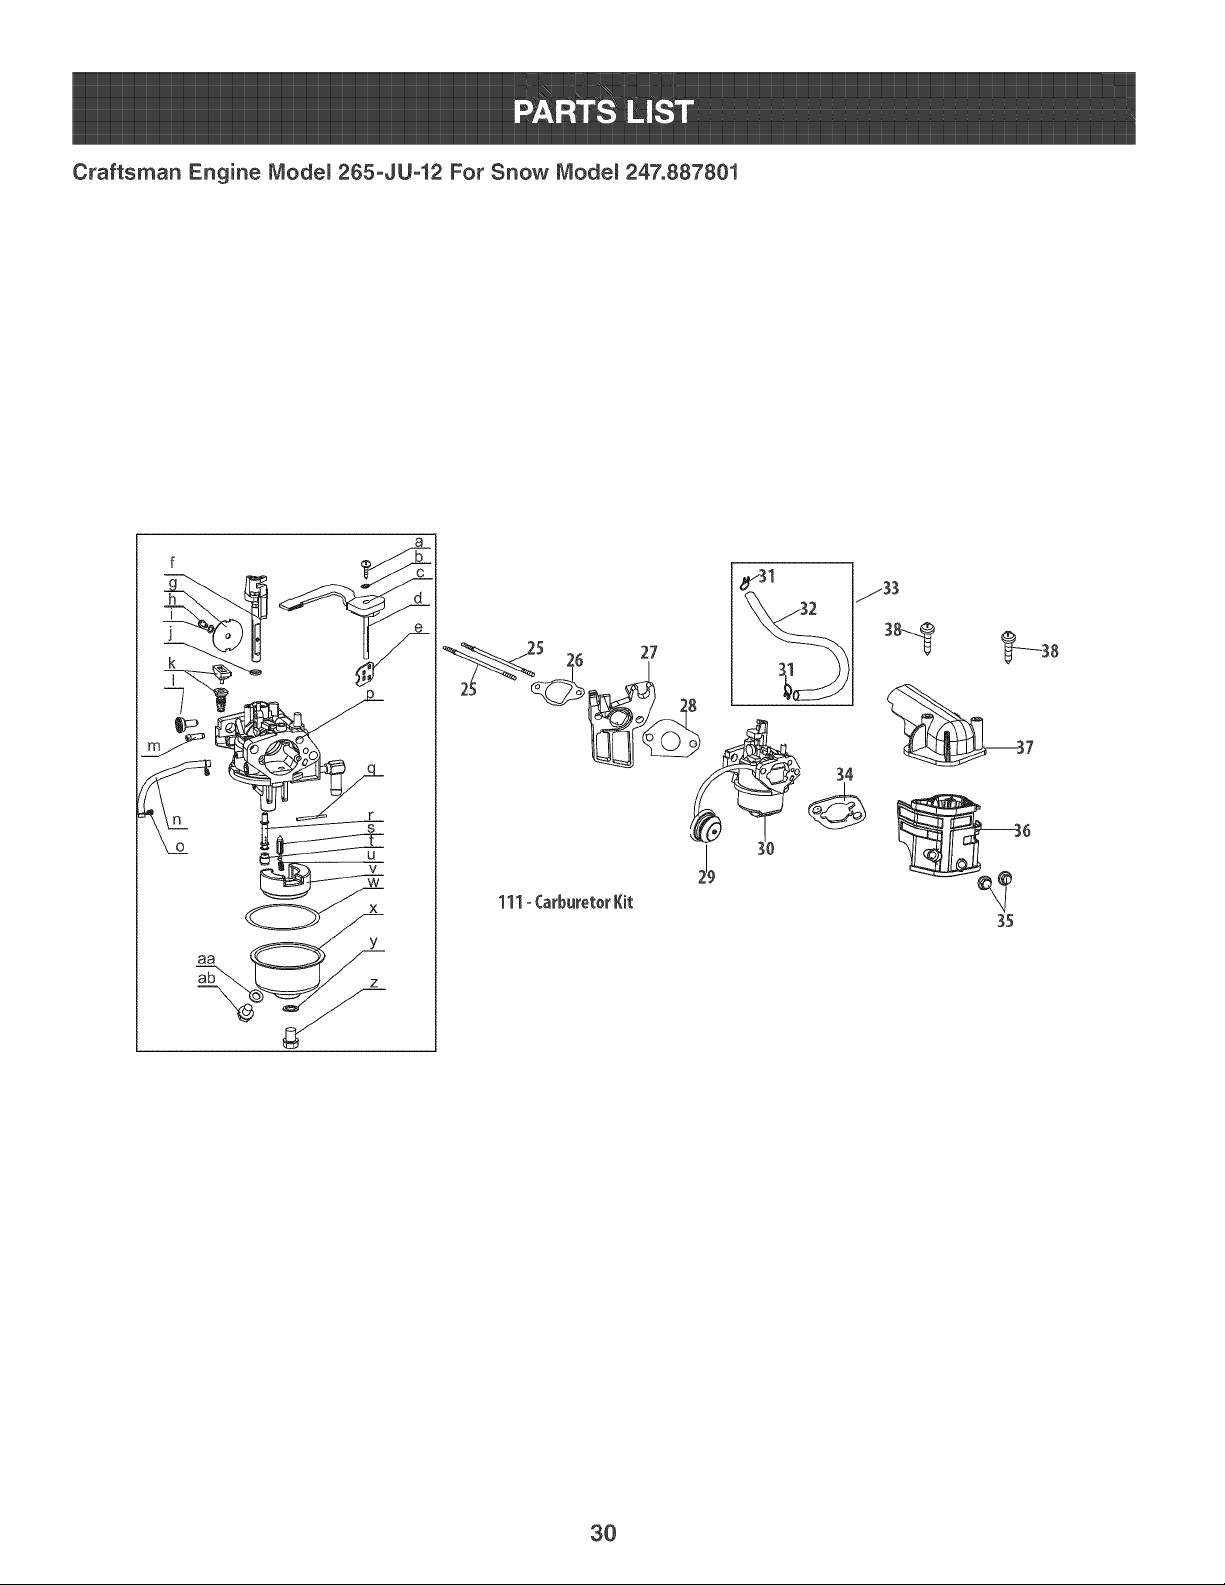
Craftsman Engine Modem 265oJU-12 For Snow Modem 247.887801
Z7
3O
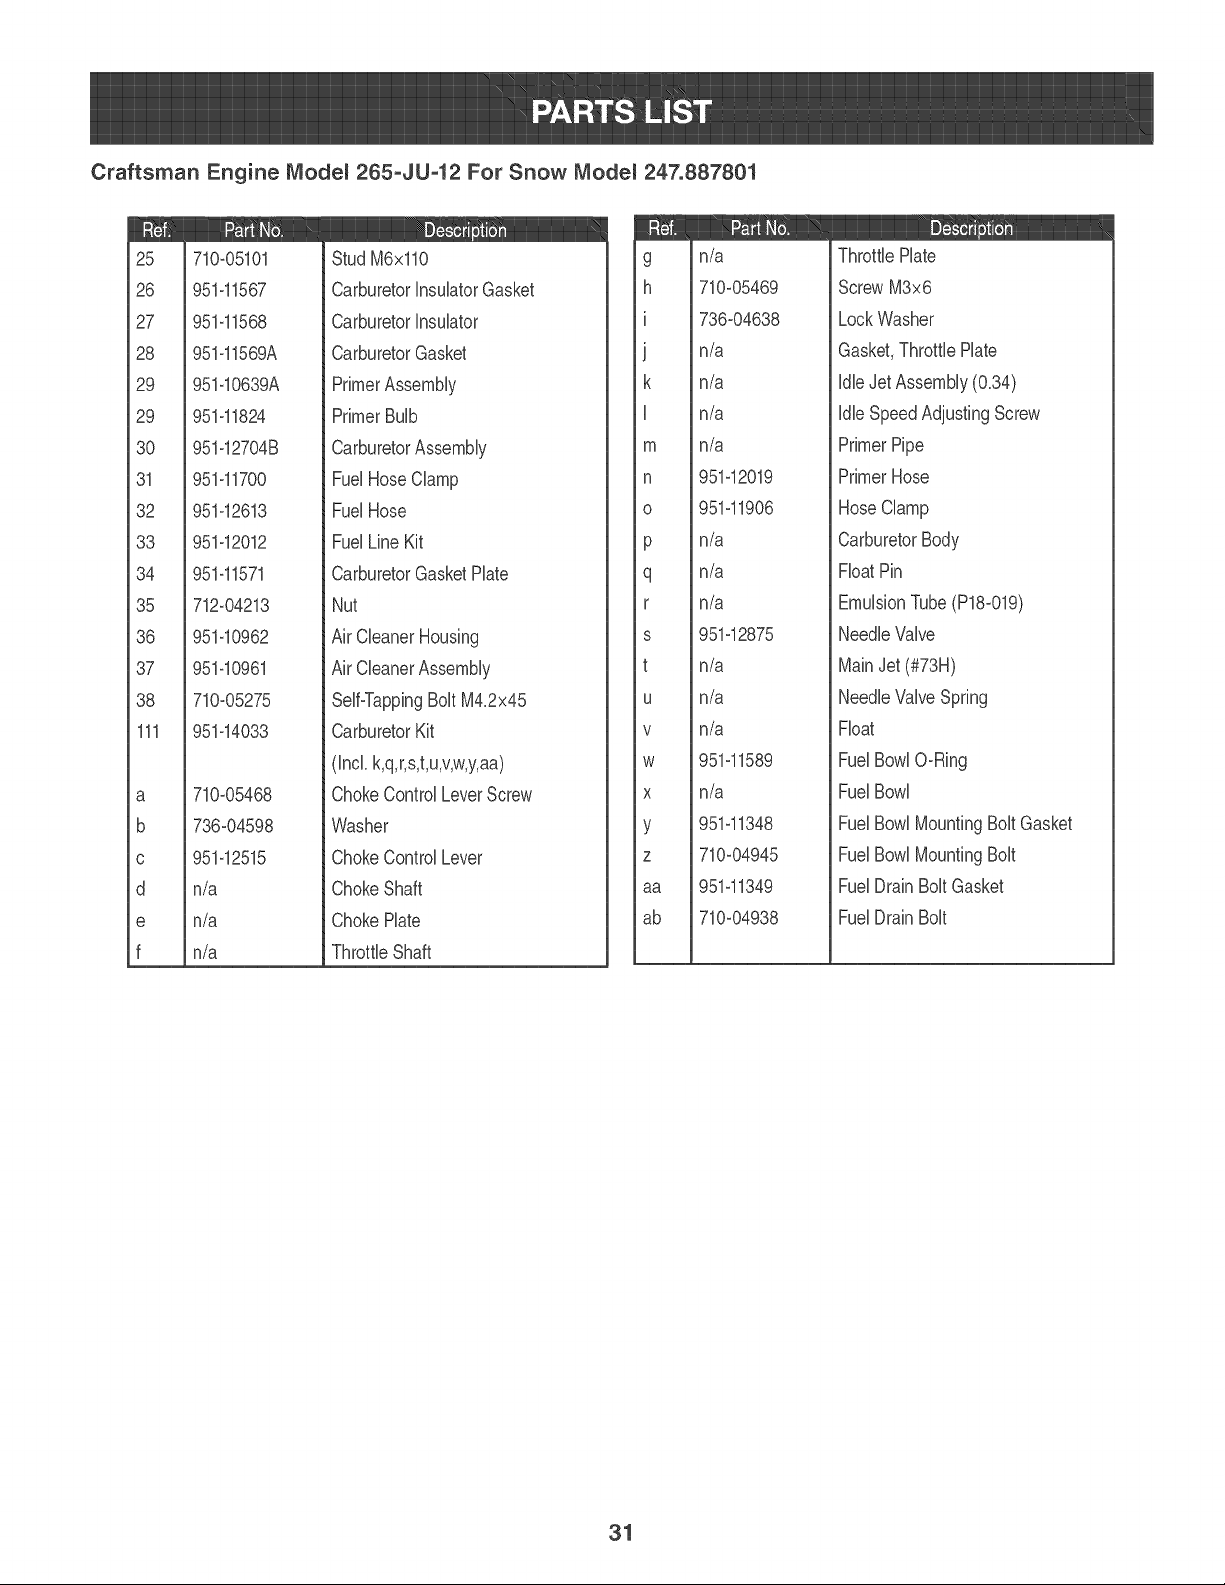
Craftsman Engine Modem 265oJU-12 For Snow Modem 247.887801
25 710-05101
26 951-11567
27 951-11568
28 951-11569A
29 951-10639A
29 951-11824
30 951-12704B
31 951-11700
32 951-12613
33 951-12012
34 951-11571
35 712-04213
36 951-10962
37 951-10961
38 710-05275
111 951-14033
a
b
C
d
e
f
710o05468
736-04598
951-12515
n/a
n/a
n/a
StudM6x110
CarburetorInsulatorGasket
CarburetorInsulator
CarburetorGasket
PrimerAssembly
PrimerBulb
CarburetorAssembly
FuelHoseClamp
FuelHose
FuelLine Kit
CarburetorGasketHate
Nut
Air CleanerHousing
Air CleanerAssembly
Self-TappingBoltM42x45
CarburetorKit
(Inckk,q,r,s,t,u,v,w,y,aa)
ChokeControlLeverScrew
Washer
ChokeControlLever
ChokeShaft
ChokePlate
ThrottleShaft
g n/a
h 710-05469
i 736-04638
j n/a
k n/a
I n/a
m n/a
n 951-12019
o 951-11906
p n/a
q n/a
r n/a
s 951-12875
t n/a
u n/a
v n/a
w 951-11589
x n/a
y 951-11348
z 710-04945
aa 951-11349
ab 710-04938
ThrottlePlate
ScrewM3x6
LockWasher
Gasket,ThrottlePlate
IdleJet Assembly(0.34)
IdleSpeedAdjustingScrew
PrimerPipe
PrimerHose
HoseClamp
CarburetorBody
FloatPin
EmulsionTube(P18-019)
NeedleValve
MainJet (#73H)
NeedleValveSpring
Float
FuelBowlO-Ring
FuelBowl
FuelBowlMountingBolt Gasket
FuelBowlMountingBolt
FuelDrainBoltGasket
FuelDrainBolt
31

Craftsman Snow Thrower ModeJ 247.887801
777S34027
777D18032
777S32236
777S33118 777U22139
DON_"
gSE E85 ORFgEE
CONTAININGM_E
THAN10% EmANOL
777S33731
777D16367
777X43688
32

33

MTD CONSUMER GROUP (NC (MTD), the California Air Resources Board (CARB)
and the United States Environment Protection Agency (U. S. EPA)
Emission Contro( System Warranty Statement
(Owner's Defect Warranty Rights and Ob(igations)
EMBSIONCONTROLSYSTEMCOVERAGEIS APPLICABLETOCERTIFIEDENGINESPURCHASEDINCALIFORNIAIN 2005ANDTHERE-
AFTER,WHICHARE USEDINCALIFORNIA,ANDTO CERTIFIEDMODELYEAR2005ANDLATERENGINESWHICHARE PURCHASEDAND
USEDELSEWHEREIN THEUNITEDSTATES.
Californiaandelsewherein the UnitedStatesEmissionControlDefectsWarrantyCoverage
The CaliforniaAir ResourcesBoard(CARB),U.S. EPAandMTDarepleasedto explaintheemissionscontrol systemwarrantyon your modelyear
2006andlatersmalloff-roadengine,in California,new smalloff-roadenginesmustbe designed,builtand equippedto meettheStatesanti-smog
standards.Elsewhereinthe UnitedStates,newnon-road,spark-ignitionenginescertifiedfor model2005and later,mustmeetsimilarstandardsset
forthby the U.S. EPA.MTDmustwarrantythe emissioncontrolsystemonyourenginefor the periodof time listedbelow,providedtherehasbeen
noabuse,neglector impropermaintenanceof your smalloff-roadengine.
Youremissioncontrolsystemmay includepartssuch as the carburetor,fuel-injectionsystem,the ignitionsystem,and catalyticconverter,fueltanks,
fuel lines,fuel caps,valves,canisters,filters,vaporhoses,clamps,connectors,andotherassociatedemission-relatedcomponents.
Wherea warrantableconditionexists,MTDwill repairyoursmalloff-roadengineat no cost to yourincludingdiagnosis,partsand labor.
MANUFACTURER'S WARRANTY COVERAGE:
Thisemissionscontrolsystemis warrantedfor twoyears,if anyemission-relatedpart onyourengineis defective,the part will berepairedor
replacedby MTD.
OWNER'S WARRANTY RESPONS(BIUT(ES:
As the smalloff=roadengineowner,youare responsibleforthe performanceof the requiredmaintenancelisted inyour Owner'sManual MTD
recommendsthatyou retainall yourreceiptscoveringmaintenanceson yoursmalloff=roadengine,but MTDcan not denywarrantysolelyfor the
lackof receiptsor foryour failureto ensurethe performanceto all scheduledmaintenance.
As the smalloff=roadengineowner,youshouldhoweverbe awarethat MTDmaydenyyour warrantycoverageif yoursmalloff=roadengineorpart
hasfaileddue toabuse,neglect,impropermaintenanceor unapprovedmodifications.
Youare responsiblefor presentingyour smalloff=roadengineto an AuthorizedMTDServiceDealeras soonas a problemexists.Thewarranted
repairsshouldbe completedin a reasonableamountof time,notto exceed30 days.
if you haveanyquestionsregardingyourwarrantyrightsand responsibilities,you shouldcontacta MTDService Representativeat 1-800-800-7310
andaddressis MTDCONSUMERGROURRO.Box361131,ClevelandOH,44136-0019_
DEFECTS WARRANTY REQU(REMENTS FOR 1995 AND LATER SMALL OFF-ROAD ENG(NES:
Thissectionappliesto 1995and later smalloff=roadengines.The warrantyperiodbeginson the datethe engineor equipmentis deliveredto an
ultimatepurchaser.
(a) GeneralEmissionsWarrantyCoverag£
MTDmustwarrantto the ultimatepurchaserand eachsubsequentpurchaserthatthe engineis:
(1)Designed,built,andequippedsoas to conformwithallapplicableregulationsadoptedby the AirResourcesBoardpursuantto itsauthorityin
Chapters1 and2,Part5, Division26of the Healthand SafetyCode; and
(2) Freefromdefectsin materialsand workmanshipthatcausethe failureof a warrantedpart to beidenticalin all materialrespectsto the partas
describedin theenginemanufacturer'sapplicationfor certificationfora periodof two years.
{b)The warrantyon emissions-relatedpartswill be interpretedas follows:
(1)Anywarrantedpart thatis not scheduledfor replacementas requiredmaintenancein the writteninstructionsrequiredby Subsection(c)
mustbe warrantedfor the warrantyperioddefinedinSubsection(a)(2). if any suchpartfailsduringthe periodof warrantycoverage,it mustbe
repairedor replacedby MTDaccordingto Subsection(4) below.Anysuch part repairedor replacedunder thewarrantymustbewarrantedfor
the remainingwarrantyperiod.
(2)Any warrantedpartthat is scheduledonlyfor regularinspectionin the writteninstructionsrequiredby Subsection(c) must bewarrantedfor
thewarrantyperioddefinedin Subsection(a)(2).A statementin suchwritteninstructionsto the effectof "repairor replaceas necessary"will
not reducethe periodof warrantycoverage.Anysuchpart repairedor replacedunderwarrantymustbe warrantedforthe remainingwarranty
period.
(3) Anywarrantedpartthat whichis scheduledfor replacementas requiredmaintenancein the writteninstructionsrequiredby Subsection(c)
mustbe warrantedfor the periodof time priorto the first scheduledreplacementpointforthat part.if the part fails priorto thefirst scheduled
replacement,the part mustbe repairedor replacedby MTDaccordingto Subsection(4) below.Any suchpart repairedor replacedunder
warrantymustbewarrantedfor the remainderof the periodpriorto the first scheduledreplacementpointfor the part
(4) Repairor replacementof any warrantedpartunderthewarrantyprovisionsof this articlemustbe performedat no chargeto the ownerat a
warrantystation.
(5) Notwithstandingthe provisionsof Subsection(4)above,warrantyservicesor repairsmustbe providedat all MTDdistributioncentersthat
arefranchisedto servicethe subjectengines.
(6)Theownermustnotbechargedfordiagnosticlaborthatleadstothedeterminationthatawarrantedpartisinfactdefective,providedthat
suchdiagnosticworkisperformedatawarrantystation.
(7)Theenginemanufacturerisliablefordamagestootherenginecomponentsproximatelycausedbyafailureunderwarrantyofanywarranted
part.
(8)Throughouttheengine'swarrantyperioddefinedinSubsection(a)(2),MTDwillmaintainasupplyofwarrantedpartssufficienttomeetthe
expecteddemandforsuchparts.
(9)Anyreplacementpartmaybeusedintheperformanceofanywarrantymaintenanceorrepairsandmustbeprovidedwithoutchargetothe
owner.SuchusewillnotreducethewarrantyobligationsofMTD.
(10)Add-onormodifiedpartsthatarenotexemptedbytheAirResourcesBoardmaynotbeused.Theuseofanynon-exemptedadd-onor
modifiedpartsshallbegroundsfordisallowingawarrantyclaimmadeinaccordancewiththisarticle.Theenginemanufacturershallnotbe
liableunderthisarticletowarrantfailuresofwarrantedpartscausedbytheuseofnon-exemptedadd-onormodifiedpart.
MTDwill includea co_yof the followingemissionwarrantyLpartslist witheach newen_q those portionsof the list apglicableto the
(1)FuelMeteringSystem
, Coldstart enrichmentsystem(soft choke)
•Carburetorandinternalparts
, Fuel Pump
, FuelTank
(2)Air inductionSystem
, Aircleaner
, intakemanifold
(3) ignitionSystem
, Sparkplug(s)
, MagnetoignitionSystem
(4)ExhaustSystem
, Catalyticconverter
, SAI (Reedvalve)
(5) MiscellaneousitemsUsedin AboveSystem
, Vacuum,temperature, position,time sensitivevalvesand switches
, Connectorsandassemblies
(6) Evaporativecontrol
, Fuel Hosecertifiedfor ARBevaporativeemissionof 2006.
, Fuel HoseClamps
, Tetheredfuel cap
, Carboncanister
, Vaporlines
GDOCdO0174Rev,B
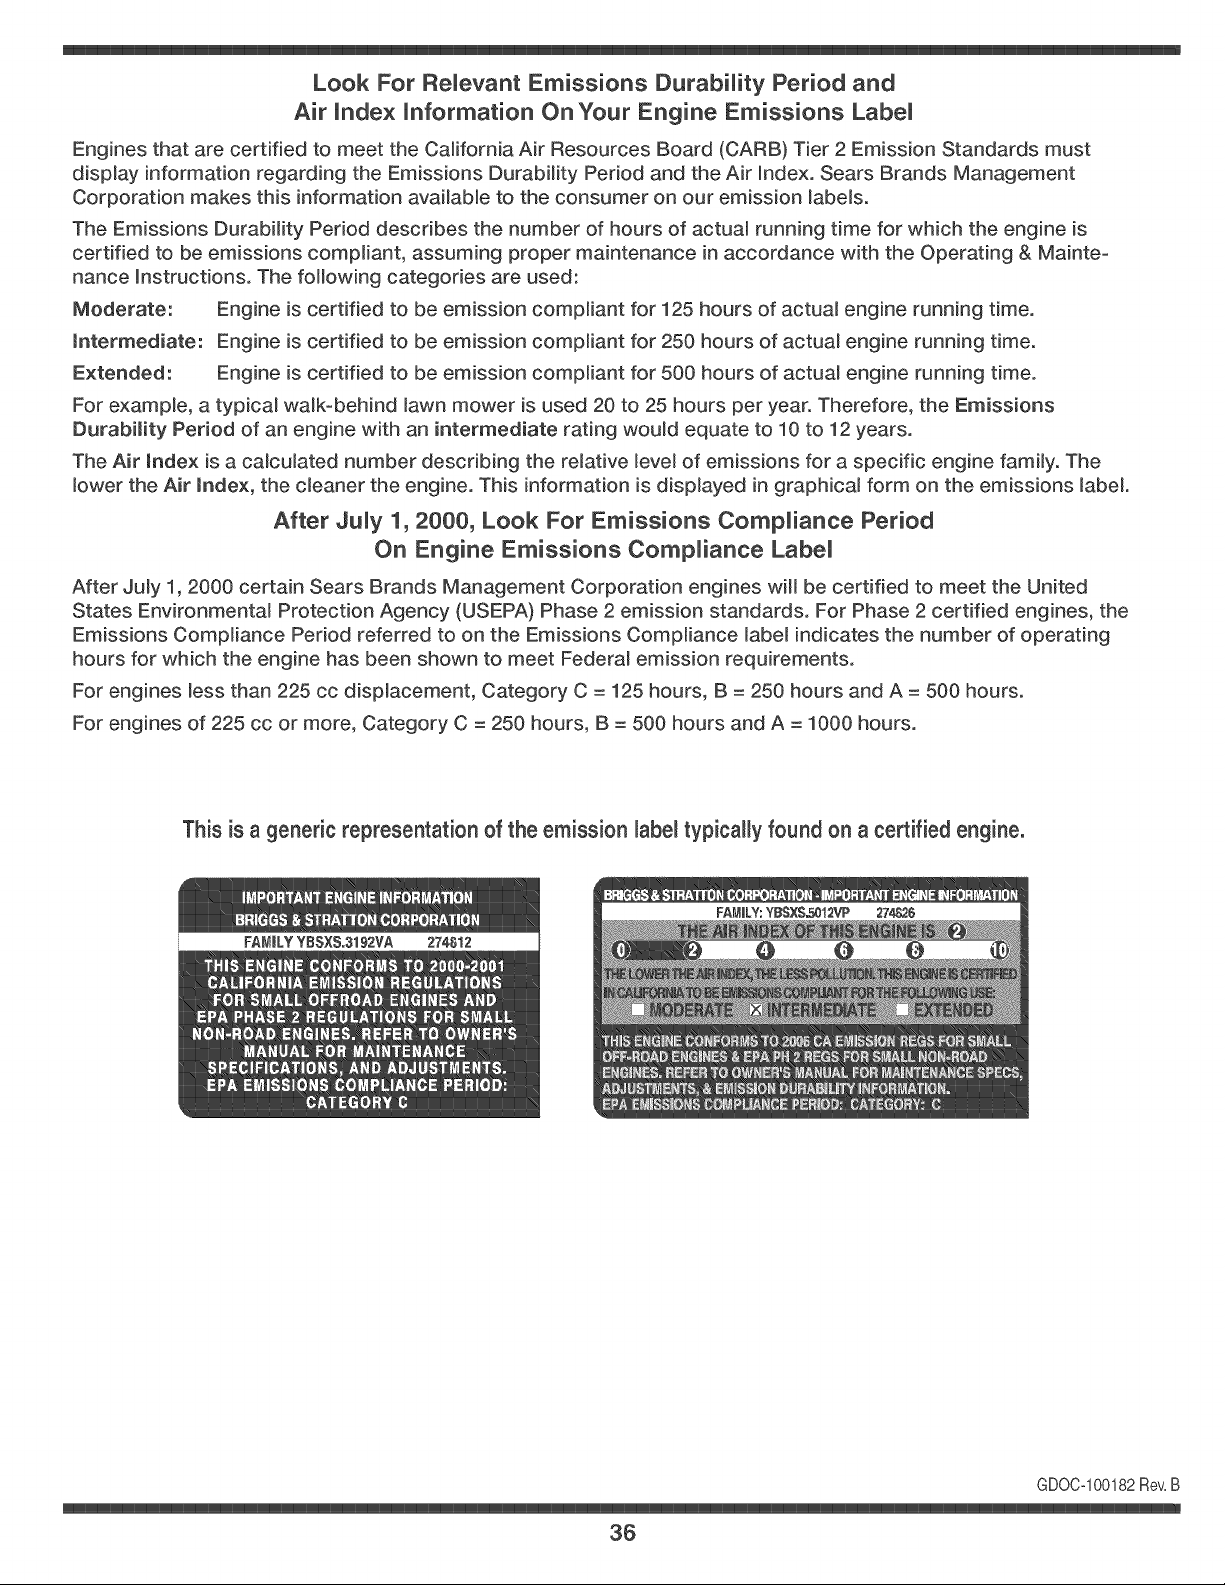
Look For ReUevant Emissions DurabiUity Period and
Air Unde× Unformation On Your Engine Emissions LabeU
Engines that are certified to meet the California Air Resources Board (CARB) Tier 2 Emission Standards must
display information regarding the Emissions Durability Period and the Air index. Sears Brands Management
Corporation makes this information available to the consumer on our emission labels.
The Emissions Durability Period describes the number of hours of actua_ running time for which the engine is
certified to be emissions compliant, assuming proper maintenance in accordance with the Operating & Mainte-
nance instructions. The following categories are used:
Moderate: Engine is certified to be emission compliant for 125 hours of actual engine running time.
mntermediate: Engine is certified to be emission compliant for 250 hours of actual engine running time.
Extended: Engine is certified to be emission compliant for 500 hours of actual engine running time.
For example, a typical walk-behind lawn mower is used 20 to 25 hours per year. Therefore, the Emissions
Durability Period of an engine with an intermediate rating would equate to 10 to 12 years.
The Air mndex is a calculated number describing the relative level of emissions for a specific engine family. The
lower the Air mndex, the cleaner the engine. This information is displayed in graphical form on the emissions label.
After July 1,2000, Look For Emissions Compliance Period
On Engine Emissions CompUiance LabeU
After July 1, 2000 certain Sears Brands Management Corporation engines wiii be certified to meet the United
States Environmental Protection Agency (USEPA) Phase 2 emission standards. For Phase 2 certified engines, the
Emissions Compliance Period referred to on the Emissions Compliance label indicates the number of operating
hours for which the engine has been shown to meet Federal emission requirements.
For engines less than 225 cc displacement, Category C = 125 hours, B = 250 hours and A = 500 hours.
For engines of 225 cc or more, Category C = 250 hours, B = 500 hours and A = 1000 hours.
This is a generic representation of the emission labe_typically found on a certified engine.
GDOC-100182Rev.B
36

Congratulations on making a smart purchase. Your new Craftsman® product is designed and
manufactured for years of dependable operation. But like all products, it may require repair
from time to time. That's when having a Repair Protection Agreement can save you money and
aggravation.
Here's what the Repair Protection Agreement* incUudes:
[_ Expert service by our 10,000 professional repair specialists
[_ UnUimited service and no charge for parts and labor on all covered repairs
[_ Product repUacement up to $1500 if your covered product can't be fixed
[_ Discount of 25% from regular price of service and related installed parts not covered by the
agreement; also, 25% off regular price of preventive maintenance check
[_ Fast heUp by phone - we call it Rapid Resolution - phone support from a Sears representative.
Think of us as a "talking owner's manual."
Once you purchase the Repair Protection Agreement, a simple phone cal! is al! that it takes for you
to schedule service. You can call anytime day or night, or schedule a service appointment online.
The Repair Protection Agreement is a risk-free purchase. If you cancel for any reason during the
product warranty period, we will provide a full refund. Or, a prorated refund anytime after the
product warranty period expires. Purchase your Repair Protection Agreement today!
Some Uimitations and exclusions appUy. For prices and additionaU information in the U.S.A.
call 1-800-827-6855.
*Coverage in Canada varies on some items. For full detaiUs call Sears Canada at 1-800-361-
6885.
Sears installation Service
For Sears professiona/insta//ation of home appliances, garage door openers, water heaters, and
other major home items, in the U.S.A. or Canada call 1-800-4-MY-HOME®.
37
DeclaraciOn de garantia ............ Pagina 38
Medidas de segundad ............. Paginas 39-42
Montaje ......................... Paginas 43-45
Funcionamiento .................. Paginas 46m48
Servicio y Mantenimiento ........... Paginas 49-53
AImacenamiento fuera de temporada . Pagina 54
SoluciOn de problemas ............. Pagina 55
Acuerdo de protecciOn
para reparaciones ................. Pagina 59
NOmeros de servicio ............... Contratapa
GARANTJA COMPLETA CRAFTSMAN POR DOS ANOS
PORDOSANOSa parfir dela fechade lacompra,esteproductoesta garantizadopordefectosen los materialesy la manodeobra.
Los productosdefectuososseranreparadossin costoo reemphzadossin costosi la reparad6nnoesta disponiNe.
La presentegarantiase anula si se ufilizaesteproductoalguna vezparaprestarservicioscomercialeso si se Ioalquilaa otra persona.
Paraobtener informaci6nsobre el alcancede la garantiay solicitar la reparaci6n o el reemplazo,visite el sitio Web:www.craftsman.com
Esta garantia cubre 0NiCAMENTElosdefectos en tos materiales yen la mano de obra. Estagarantia NOcubre:
, Elementosno renovaNesquepuedendesgastarsepor eluso normal,duranteel plazode la garantia,induyendoentreotros,las barrenas,
las paletasdelas barrenas,los cortadoresde desplazamiento,laszapatasantideslizantes,la placade raspado,lospasadoresdecuchilla,
la buj[a,elfiltro de aire,las correasy el filtrodeaceite.
, Serviciosde mantenimientoestandar,cambiosde aceiteo afinaci6n.
, Cambiode neum_.ticoso reparacionesporpinchadurascon objetosexternoscomedavos, espinas,toconeso vidrios.
, Reemplazoo reparaci6nde neumb.ticoso ruedascome resultadodel desgastenormal,unaccidente,o funcionamiento
o mantenimientoincorrectos.
, Reparacionesrequeridascome resultadodel use inadecuadoperpartedeloperador,induyendoentreotros el da_oocasionadoper objetos
queimpactanla mb.quinay quetuercenel bastidor,el ejede la barrena,etc, o debidoa queel motorrueaceleradoen exceso.
, Reparacionesnecesariasdebidoa negligenciadeloperador,induyendoentre otros,da_osmecanicoy el6ctricoocasionadopor
unalmacenamientono apropiado,fallaporel use deaceitede gradey/o cantidadnoapropiadoso falla pernodar mantenimiento
alequipode acuerdocon las instruccionescontenidasen el manualdel operador.
, Limpiezao reparacionesdel motor(sistemade combustible)debidasa combustiblequese determinaesta contaminadou oxidado(viejo).
Engeneral,el combustibledebeutilizarseen unperiodono mayorde 30dias a partirde su adquisici6n.
, El deterioroy desgastenormalde losacabadosexteriores,o reemplazode laetiquetadel producto.
Estagarantiale otorgaderechoslegalesespecificos,pero ustedpodriagozarde otrosderechosen raz6nde su lugarde residencia.
Sears Brands Management Corporation, Hoffman Estates, 60179
Tipode aceitedelmotor:
Capacidadde aceitedel motor:
Capacidadde combustible:
Bujias:
Separaci6nde hs bujias:
SAE5W-30
20onzas
2 Cuartosdegal6n
F6RTC
0.020".0.030"
NQmerode modelo ...............................
NQmerode serie .................................
Fechade compra ................................
Registrearribael nOmerodel modelo,el nOmero
deserie y la fechade cor@ra
© Sears Brands,LLC
38
La presenciade estesimboloindica que setrata de instruccionesde
seguridadimportantesquedebe respetarpara evitarponeren riesgosu
seguridadpersonaly/o materialy la de losdemos.Leay cumplatodas las
instruccionesde estemanual antesde intentaroperar estam_.quina.Si no
respetaestas instruccionespuedeprovocarlesionespersonales.Cuando
vea estesimbolo, iTENGAEN CUENTALA ADVERTENCIA!
Estam_quinaest,.dise_adapara serutilizadarespetandolasnormas
de seguridadcontenidasen este manual.AI igual quecon cualquiertipo
de equipomotorizado,un descuidoo error por partedel operadorpuede
producir lesionesgraves.Esta m_quinaes capaz de amputardedos,
manos y piesy de arroiarresiduos.Deno respetarlas instruccionesde
seguridadsiguientesse puedenproducir lesionesgraveso la muerte.
PROPOSUCU6N 65 DE CALUFORNUA
Elescapedel motorde esteproducto,algunosde suscomponentesy
algunoscomponentesdel vehiculocontieneno liberansustanciasquimicas
que el estadode Californiaconsideraque puedenproducirc_ncer,
defectosde nacimientou otros problemasreproductivos.
Su Responsabilidad -- Estam_quinamotorizadas61opuedenusadalas
personasque lean,comprendany respetenlas advertenciase instruc-
cionesque apareceneneste manualyen la m_quina.
iGUARDE ESTAS INSTRUCCIONES!
• Lea,entienday cumplatodas las instruccionesincluidasen lamb.quina
yen el(los) manual(es)antesde intentarrealizarel montaiede la unidad
y utilizarla.Si no Iohace, se puedenprovocarlesionespersonalesal
operadoro a los transeOntes.Guardeeste manualen un lugarseguro
para consultasfuturasy peri6dicas,as[ como parasolicitar repuestos.
Antecualquierduda, Ilameal 1-800-4MY-HOME.
• Familiaricesecon todos loscontrolesy conel uso adecuadode
los mismos.Sepa c6modetenerla m_quinay desengancharlos
controlesrapidamente,
• No permitanuncaque losniSosmenoresde 14 a_iosutilicenesta
mb,quina. Los ni_osde 14 a_osen adelantedebenleer y entenderlas
instruccionesde operaci6ny normasde seguridadcontenidasen este
manualyen la m_quinay debenset entrenadosy supervisadospot
un adulto.
• Nunca permitaquelos adultosoperenesta m_quinasin recibir antesla
instrucci6napropiada.
• Los objetosarrojadospor lamb.quinapuedencausarlesionesgraves.
Planifiqueel patr6nen el queva a ir arro]andonievepara evitar que
la descargade materialse realicehacialos caminos,
losobservadores,etc.
• Mantengaa los observadores,mascotasy ni_os pot Iomenos a 75 pies
de la m_quinasiempreque est@funcionando.Detengala m_quinasi
aiguiense acerca.
• Seaprecavidopara evitarpatinarseo caerse especiaimentecuando
operala m_quinaen marchaatras.
Inspeccioneminuciosamentee! &readondeutilizar&el equipo.Saquetodos
losfelpudos,peri6dicos,trineos,tablas,cablesy otrosobietosextra_oscon
losque podriatropezaro que podrianset arroiadospot la barrena/impulsor.
• Paraprotegerselos oiosutilice siempreanteoioso antiparrasde
seguridadmientrasopera lam&quinao mientrasla aiustao repara.Los
obietosarroiadosquerebotan puedencausar lesionesocularesgraves.
• Nooperela m_.quinasin lavestimentaadecuadaparaestaral aire libre
en invierno.No utilicealhaias,bufandaslargas uotras prendassueltas
que podrianenredarseen laspartesm6viles.Utiliceun calzadoespecial
parasuperficiesresbaladizas.
• Useun prolongadory un tomacorrientede tres cables conconexi6na
tierra paratodas las m&quinascon motoresde encendidoelectrico.
• Desengranetodas laspalancasde controlantes de arrancarel motor.
• Nuncaintenterealizaraiustesmientrasel motorest& en marchaexcepto
en loscasos espedficamenterecomendadosen el manualdel operador.
• Deiequeel motory lamb,quinase adaptena la temperaturaexterior
antesde comenzara sacar lanieve.
39
Manejo segure de la gasolina
Para evitarlesionespersonaleso daSosmaterialessea sumamentecuida-
dosoal manipularla gasolina.La gasolina essumamenteinflamabley sus
vaporespuedencausar explosiones.Si se derramagasolinaencima o sobre
la ropa se puedelesionargravementeya quese puedeencender. L_vesela
piely c_mbiesede ropa de inmediato.
• Utilices61olos recipientesparagasolinaautorizados.
• Apaguetodos los cigarrillos,cigarros,pipas yotras fuentes
de combusti6n.
• Nunca carguecombustibleen lam6.quinaen un espaciocerrado.
• Nunca saquela tapa del combustibleni agreguecombustiblemientrasel
motorest_ calienteo en marcha.
• Deieque el motorse enfrie por Io menosdos minutosantesde volvera
cargarcombustible.
• Nunca Ileneen excesoeldep6sitode combustible.Lleneeltanque a no
m&sde Y2pulgadapotdebajode la basedel cuello de Ilenadodejando
espaciopara la dilataci6ndel combustible.
• Vuelvaa colocar la tapadel combustibley aiOstelabien.
• Limpieel combustibleque se hayaderramadosobre el motory el
equipo.Trasladela m_quinaa otra zona. Espere5 minutosantesde
encenderel motor.
• Nunca almacenela m_quinao el recipientede combustibleen un
espaciocerradodondehayafuego,chispas o luz piloto (pot eiemplo,
homos,calentadoresde agua, calefactores,secadoresde ropa,etc.).
• Deieque la m_quinase enfrie potIo menos5 minutosantes
de guardada.
• Nunca llene losrecipientesen el interiorde un vehiculoo carni6no
caja de remolquecon recubrimientopl_.sfico.Coloquesiemprelos
recipientesen el pisoy lejos delveh[culoantes de Ilenados.
• Si es posible,retireel equipo a gasolinadel cami6n o remolquey Ilenelo
en el suelo.Siesto no es posible,Ileneel equipoen un remolquecon un
recipienteport_til,en vezde hacedocon unaboquilladispensadora
de gasolina.
• Mantengala boquillade Ilenadoen contactocon el hordedel dep6sito
de combustibleo con la aberturadel recipienteen todo momento,hasta
terminarlacarga.No ufiliceun disposifivode boquillade apertura/cierre.
FUNOUONAMUENTO
• No pongalasmanoso los piescerca de las piezasgiratorias,en la
caia de la barrena/impulsor o en el montajedel canalde descarga.El
contactocon laspiezasgiratoriaspuederesultaren la amputaci6nde
manoso pies.
• La palanca de controldela barrena/impulsor es un dispositivode
seguridad.Nunca evitesu funcionamiento.Dehacerlolaoperaci6nde la
m_quinaes desgosay puedeocasionarlesiones.
• Las palancasde control debenfuncionarbienen ambasdirecciones
y regresarautom_ticamentea la posici6nde desengranecuandose
lassuelta.
• Nunca operela m_quinasi falta un montajedel canal o si el mismo
est_da_ado.Mantengatodos losdisposifivosde seguridaden su lugar
yen funcionamiento.
• Nunca enciendael motoren espacioscerradoso en unazona con poca
venfilaci6n.Elescapedel motorconfiene mon6xidode carbono,un gas
inodoroy letal.
• No utilicela m_quinabaiola infiuenciadel alcoholo lasdrogas.
• El silenciadory el motorse calientany puedencausarquemaduras.
No lostoque.Mantengaa los niffosaleiados.
• Seasumamenteprecavidocuandoopere la m_.quinasobre una
superficiecongrava o cuandola cruce.Mantengasealerta pot si se
presentanpeligros ocultoso tr_nsito.
• Tengacuidadocuandocambiede direcci6no cuandooperela m_quina
en pendientes.
• Planifiqueel patr6nen e!que va a ir arroiandonievepara evitarque
la descargade materialse produzcahacialas ventanas,las paredes,
los autom6viles,etc. y evitaras[ posiblesda_osmaterialeso lesiones
producidaspot los rebotes.
• Nunca didia la descargahacialos ni_os,losobservadoreso las
mascotasnideie quenadie se paredelantede lam_quina.
• No sobrecarguela capacidadde la m_quinatratandode sacarla nieve
muy r_pidamente.
• Nunca opereesta m_quinasin buenavisibilidado iluminaci6n.Siempre
debe estar segurode que est_ bienafirmadoy sujetandofirmementelas
manijas.Camine,nunca corra.
• Corte la cordentea la barrena/impulsorcuandotransportela m_quina
o cuandola mismano esta enuso.
• Nunca opere lam_quinaa alta velocidadde desplazamientosobre
superficiesresbaladizas.Mire haciaabajo y haciaatr_s y tenga cuidado
cuandovaya marchaatr_s.
• Si la m_quinacomenzaraa vibrar demaneraanormal, detengael motor,
desconecteel cable de la buj[ay p6ngalade manera quehaga masa
contrael motor.[nspeccionela m_quinaminuciosamenteparaver si
est,. da_ada.Reparetodos los da_os antesde encendery operar
la m_quina.
• Desengranetodas las palancasde controly detengael motorantes de
deiar la posici6nde operaci6n(detr6.sde las maniias), Esperea que la
barrena/impulsorse detenga porcompletoantesde destaparel montaie
del canal o realizarajustese inspecciones.
• Nunca pongalas manosen lasaberturasde descargao de recolecci6n.
No destapeel montaiedel canal mientrasel motorest,.en funciona_
miento.Antesde destaparlo,apagueel motory permanezcadetr_s
de las barrasde control hastaquetodas las partesm6vilesse
hayan detenido.
• Use s61ounionesy accesodosaprobadospor elfabdcante(poreiemplo,
pesas para lasruedas,cadenasparalosneum_ticos,cabinas,etc.).
• Paraencenderel motor,iale de la cuerdalentamentehastaque sienta
resistencia,hego iale r6.pidamente.El replieguer_pidode [acuerda
de arranque(tensi6nde retroceso)[eialar_ [a mano y el brazohacia el
motor m_s rapidode Io que ustedpuede soltar.PuedeIlegara causar
huesos rotos,fracturas,hematomasy esguinces.
• Llame al I_800-4MY_HOMEpara la ubicaci6nm_scercanade Sears
Parts& ServiceCenter de reparaci6n.
DESPEJE DE UN CANAL DE DESCARGA
OBSTRUUDO
Elcontactode las manoscon el impulsorrotatorioqueest&dentro del canal
de descargaes lacausa mAscom_nde lesionesasociadascon lasm&quinas
quitanieve.Nuncausesu mano para [impiarel canal de descarga.
Paradespeiarel canal:
1. iAPAGUEELMOTOR!
2. Espere10segundosparaestarsegurode quelas cuchillasdel motor
han deiadode rotar.
3. Utilice siempreunaherramientade [impieza,no use [as manos.
4O
MANTENUMUENTOY ALMACENAMUENTO
• Nunca alterelosdispositivosdeseguridad.Controleperi6dicamenteque
funcionencorrectamente.Remitasealas seccionesde mantenimientoy
aiustede estemanual.
• Antesde realizarla limpieza,repararo revisarla m&quina,
desengranetodas las palancasde control y detengael motor.Esperea
que la barrena/impulsorse detenga porcompleto.Desconecteel cable
de la buiia y p6ngalohaciendomasacontra el motorparaevitar quese
enciendaaccidentalmente.
• Controlefrecuentementeque todoslos pernosy tornillosesten bien
aiustadosparacomprobarque lam_quinase encuentraen condiciones
segurasde funcionamiento.Adem&s,hagauna inspecci6nvisual de la
m&quinaparaverificar si est&daSada.
• No cambie raconfiguraci6ndel reguladorder motorniacererede-
masiadoel mismo. El reguladordel motorcontrolalavelocidadm&xima
de funcionamientosegurodel motor.
• Quitanievesafeitarplacasy patinesest&nsuietosa desgastey daSos.
Parasu protecci6nde seguridad,verifiquefrecuentementetodos los
componentesy con(OEM)del fabdcantedel equipo originals61o
apareceen las p&ginasde piezasde este manualdel operador.El uso
de piezasque no cumplencon lasespecificacionesdel equipo original
puedeconducira la malae]ecuci6ny la seguddadde compromiso!
• Reviselaspalancasde control peri6dicamenteparaverificarque
engraneny desengranenadecuadamentey aj0stelossi es necesario.
Consultelasecci6n de ajustesen este manualdel operador para
obtenerinstrucciones.
• Mantengao reemplacelasetiquetasde seguridady de instrucciones
seg0nsea necesario.
• Observelareglamentaci6ny lasnormasrespectoa la eliminaci6n
correctade gasolina, aceite,etc. paraprotegerel medicambiente.
• Antesde almacenarlam&quinaenciendalaunosminutospara sacar la
nievequehayaquedadoen la mismay paraevitar as[ quese congele
la barrena/impulsor.
• Nunca almacenela m&quinao el recipientede combustibleen un
espaciocerradodonde hayafuego,chispaso luz pilotocomo por
e]emplo,calentadoresde agua,hornos,secadoresde ropa,etc.
• Consultesiempreel manualdel operadorpara obtenerinstrucciones
adecuadasparaelalmacenamientofuera de temporada.
• Verifiquefrecuentementela I[neade combustible,el dep6sito,el tap6n,
y losaccesodosbuscandorajaduraso perdidas.Reemplacede
sernecesario.
• No d6 arranqueal motorsi no esta la bu][ade encendido.
• SegOnlaComisi6nde Seguridadde Productospara el Consumidorde
los EstadosUnidos(CPSC)y la Agenciade Protecci6nAmbienta!de los
EstadosUnidos (EPA),este productotiene unavida Otilmedia de siete
(7) a_oso 60 horas de funcionamiento.AIfinalizar la vida Ofilmedia
haga inspeccionaranualmenteestaunidadpot undistribuidorde
servicioautorizadoparacerciorarsede que todoslos sistemas
mec&nicosy de seguridadfuncionancorrectamentey notienen
excesivodesgaste.Si no Io hace,puedenproducirseaccidentes,
lesioneso la muerte.
NO MODUFUQUE EL MOTOR
Paraevitarlesionesgraveso la muerte, nomodifiqueel motorde ninguna
manera.Si altera laconfiguraci6ndel regulador,el motorse puededesbocar
y funcionara velocidadesque no son seguras.Nunca cambiela configuraci6n
de f&bricadel reguladordel motor.
AWSO REFERUDO A EMUSUONES
Losmotoresque est&ncertificadosy cumplencon las regulacionesde
emisionesfederalesEPAy de Californiapara SORE (EquipospequeSostodo
terreno) est_.ncerfificadosparafuncionar congasolinasin plomocomOny
puedenincluirlos siguientessistemasde controlde emisiones:Modificaci6n
de motor(EM), catalizadoroxidante(CO),inyecci6nde airesecundada(SAI)
y catalizadorde tresv[as (TWC)si estin instalados.
AMORTUGUADOR DE CHUSPAS
iiiii_, A'
Esta m_.quinaesti equipadacon un motorde combusti6ninternoy no
debe serutilizadaen o cerca de un terrenoagrestecubiertopor bosque,
malezaso hierbaexceptoqueel sistemade escape del motoreste
equipadocon un amortiguadordechispasquecumpla con las leyes
localeso estatalescorrespondientes(encaso de exisfir).
Si se utilizaun amortiguadordechispas el operadorIo debe manteneren
condicionesde uso adecuadas.Enel Estadode California las medidas
anteriormentemencionadasson exigidaspor ley (Articulo4442del C6digo
de RecursosP0blicosdeCalifornia).Es posibleque existanleyessimilares
en otrosestados.Las leyesfederalesse aplicanen territoriosfederales.
Podr6.obtenerunamortiguadorde chispasparael silenciadoren el centro
de serviciode piezas y reparacionesSears m&scercano.
41
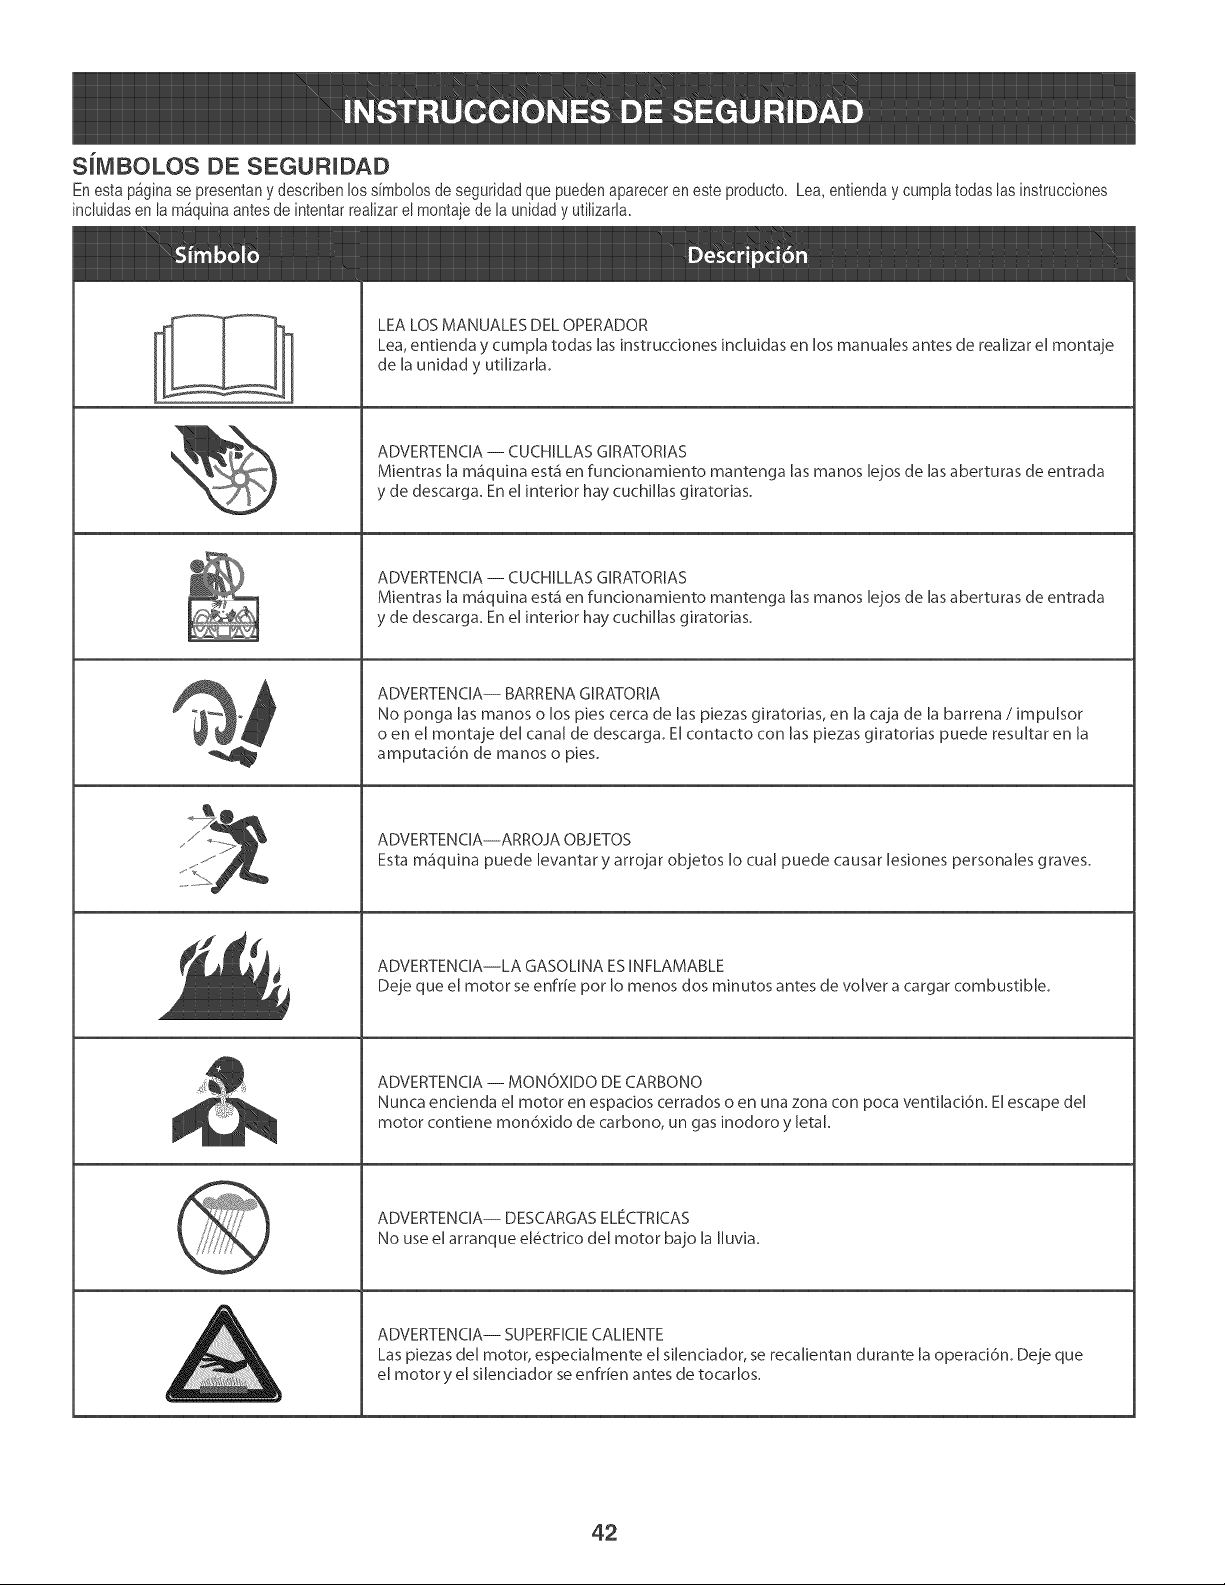
SiMBOLOS DE SEGURUDAD
En esta p&gina se presentan y describen los simbolos de seguridad que pueden aparecer en este producto. Lea, enfienda y cumpla todas las instrucciones
incluidas en la m_quina antes de intentar realizar el montaie de la unidad y utilizarla.
°
i
i
i
i
\
-_-\7
LEA LOS MANUALES DEL OPERADOR
Lea, entienda y cumpla todas [as [nstrucdones [ncluJdas en los manuales antes de realJzar el montaje
de [a unidad y uti[Jzar[a.
ADVERTENCIA -- CUCHILLAS GIRATORIAS
Mlentras [a m_iquina est.1 en fundonamlento mantenga [as manos [ejos de [as aberturas de entrada
y de descarga. En el interior hay cuchillas giratorias.
ADVERTENCIA -- CUCHILLAS GIRATORIAS
Mientras [a m_iquina est.1 en fundonamiento mantenga [as manos [ejos de [as aberturas de entrada
y de descarga. En el interior hay cuchillas giratorias.
ADVERTENCIA-- BARRENAGIRATORIA
No ponga [as manos o los pies cerca de [as piezas giratorias, en [a caja de [a barrena / [mpulsor
o en el montaje de[ canal de descarga, El contacto con [as piezas giratorJas puede resultar en [a
amputad6n de manos o pies,
ADVERTENC[A--ARROJA OBJETOS
Esta m_iquina puede [evantar y arrojar objetos 1o cual puede causar [esiones personales graves.
ADVERTENC[A--LA GASOLJNA ES [NFLAMABLE
Deje que e[ motor se enfrie por [o menos dos minutos antes de vo[ver a cargar combustible.
ADVERTENC[A-- MONOXIDO DE CARBONO
Nunca encienda e[ motor en espacios cerrados o en una zona con poca ventilad6n, E[escape de[
motor contiene mon6xido de carbono, un gas inodoro y [eta[,
ADVERTENCIA-- DESCARGAS ELECTRICAS
No use el arranque el@ctrJco de[ motor bajo [a [[uvJa,
ADVERTENCIA-- SUPERFICIE CALIENTE
Las piezas de[ motor, especialmente el silenciador, se recalientan durante [a operad6n, Deje que
el motor y el si[endador se enfr[en antes de tocarlos.
42
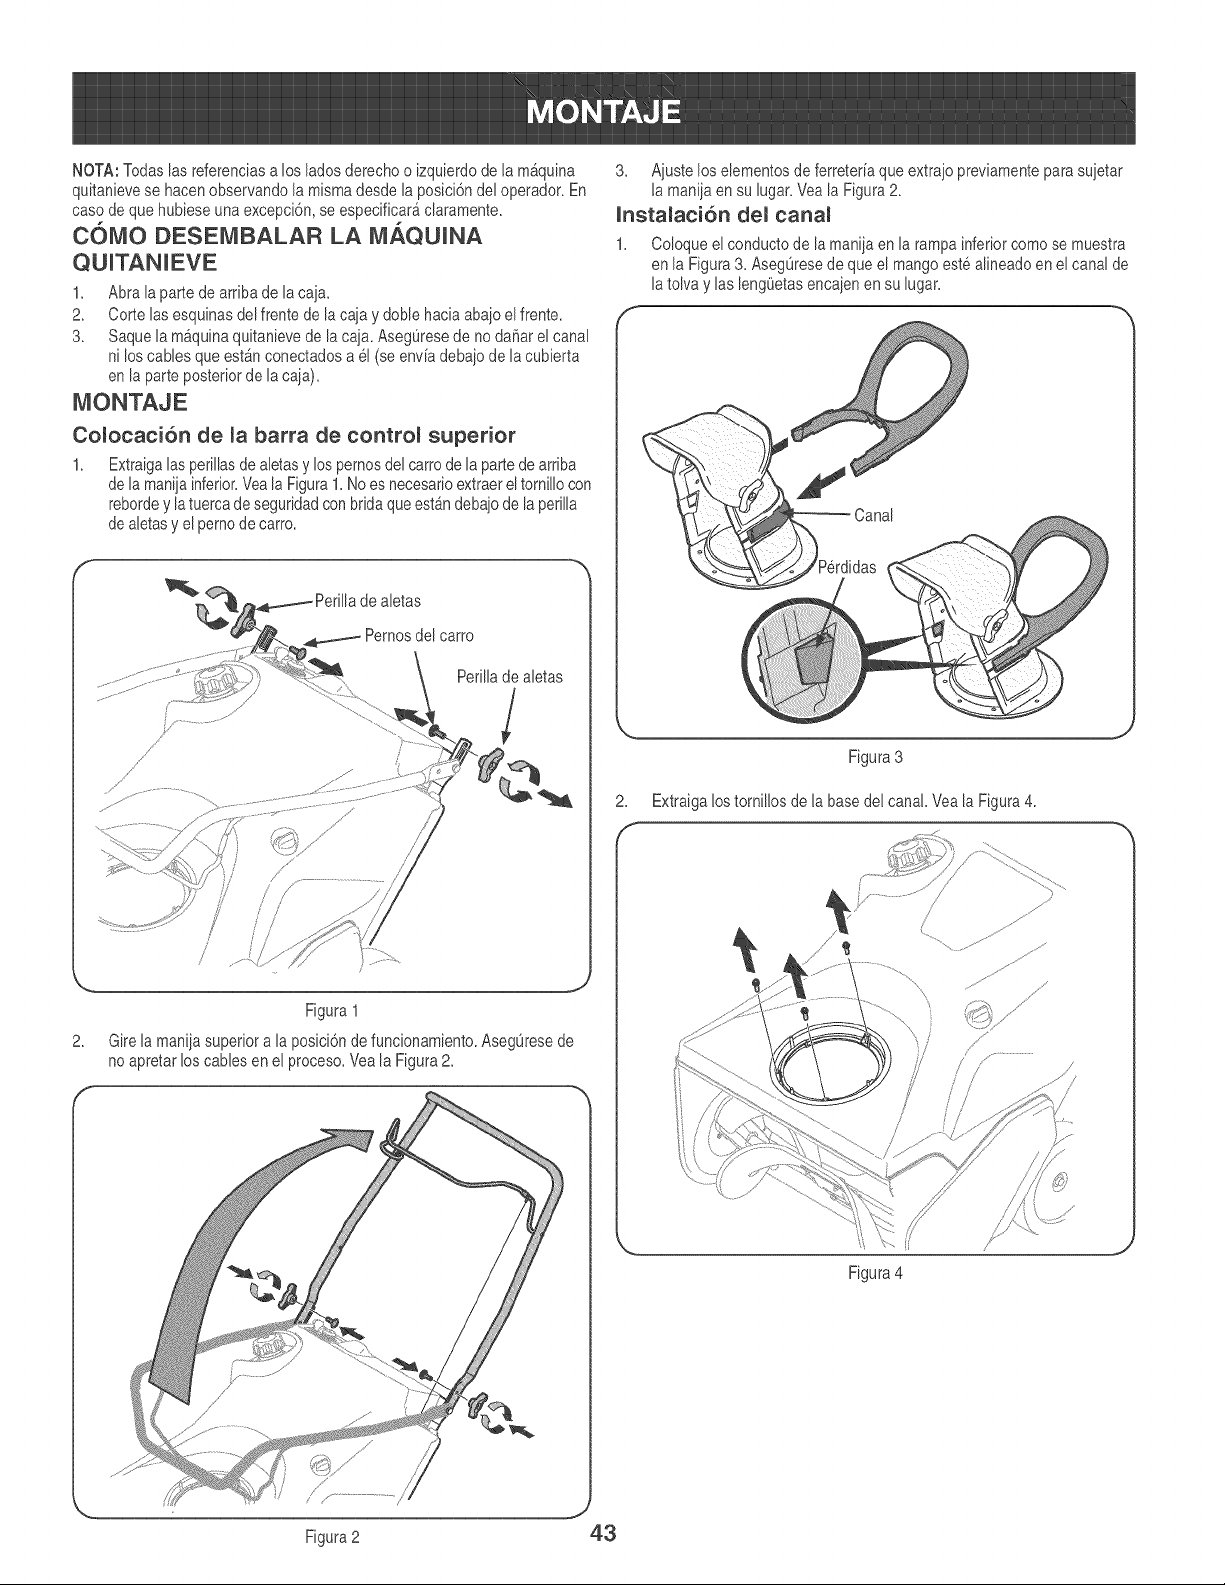
NOTA:Todaslas referenciasa losladosderechoo izquierdode lamAquina
quitanievese hacenobservandola mismadesdela posici6ndel operador.En
caso de que hubieseunaexcepci6n,se especificaraclaramente.
C0MO DESEMBALAR LA MAQUUNA
1. Abra la partede arribade la caia.
2. Corte lasesquinasdel frentede lacaia y doble haciaabaioelfrente.
3. Saquelam_.quinaquitanievede lacaia. AsegOresede no da_arel canal
ni loscables que est&nconectadosa el (se env[adebajodela cubierta
en la parteposteriorde la caja).
Comocaci6n de mabarra de controm superior
1. Extraigalasperillasdealetasy los pemosdel carrode lapartede arriba
de la maniiainferior.Veala Rgura 1.No es necesadoextractel tomillocon
rebordey latuercade seguddadcon bridaqueestb.ndebaiode la perilla
de aletasy el pemode carro.
aletas
Pemosdel carro
2.
/
/
/
/
Figura 1
Girela maniiasuperiora laposici6nde funcionamiento.AsegOresede
no apretarlos cablesen el proceso.Vea la Figura2.
3. Aiustelos elementosde ferreteriaqueextraio previamenteparasuietar
la maniiaen su lugar.Veala Figura2.
lnstamaci6n dem canam
1. Coloqueel conductode lamaniiaen la rampainferiorcomose muestra
en la Figura3. AsegOresede que el mangoest_alineadoen el canalde
la tolva y las leng(_etasencaienen su lugar.
Figura3
2. Extraigalostorni!!osde la basede! cana!.Yeala Figura4.
Figura4
Figura2 43
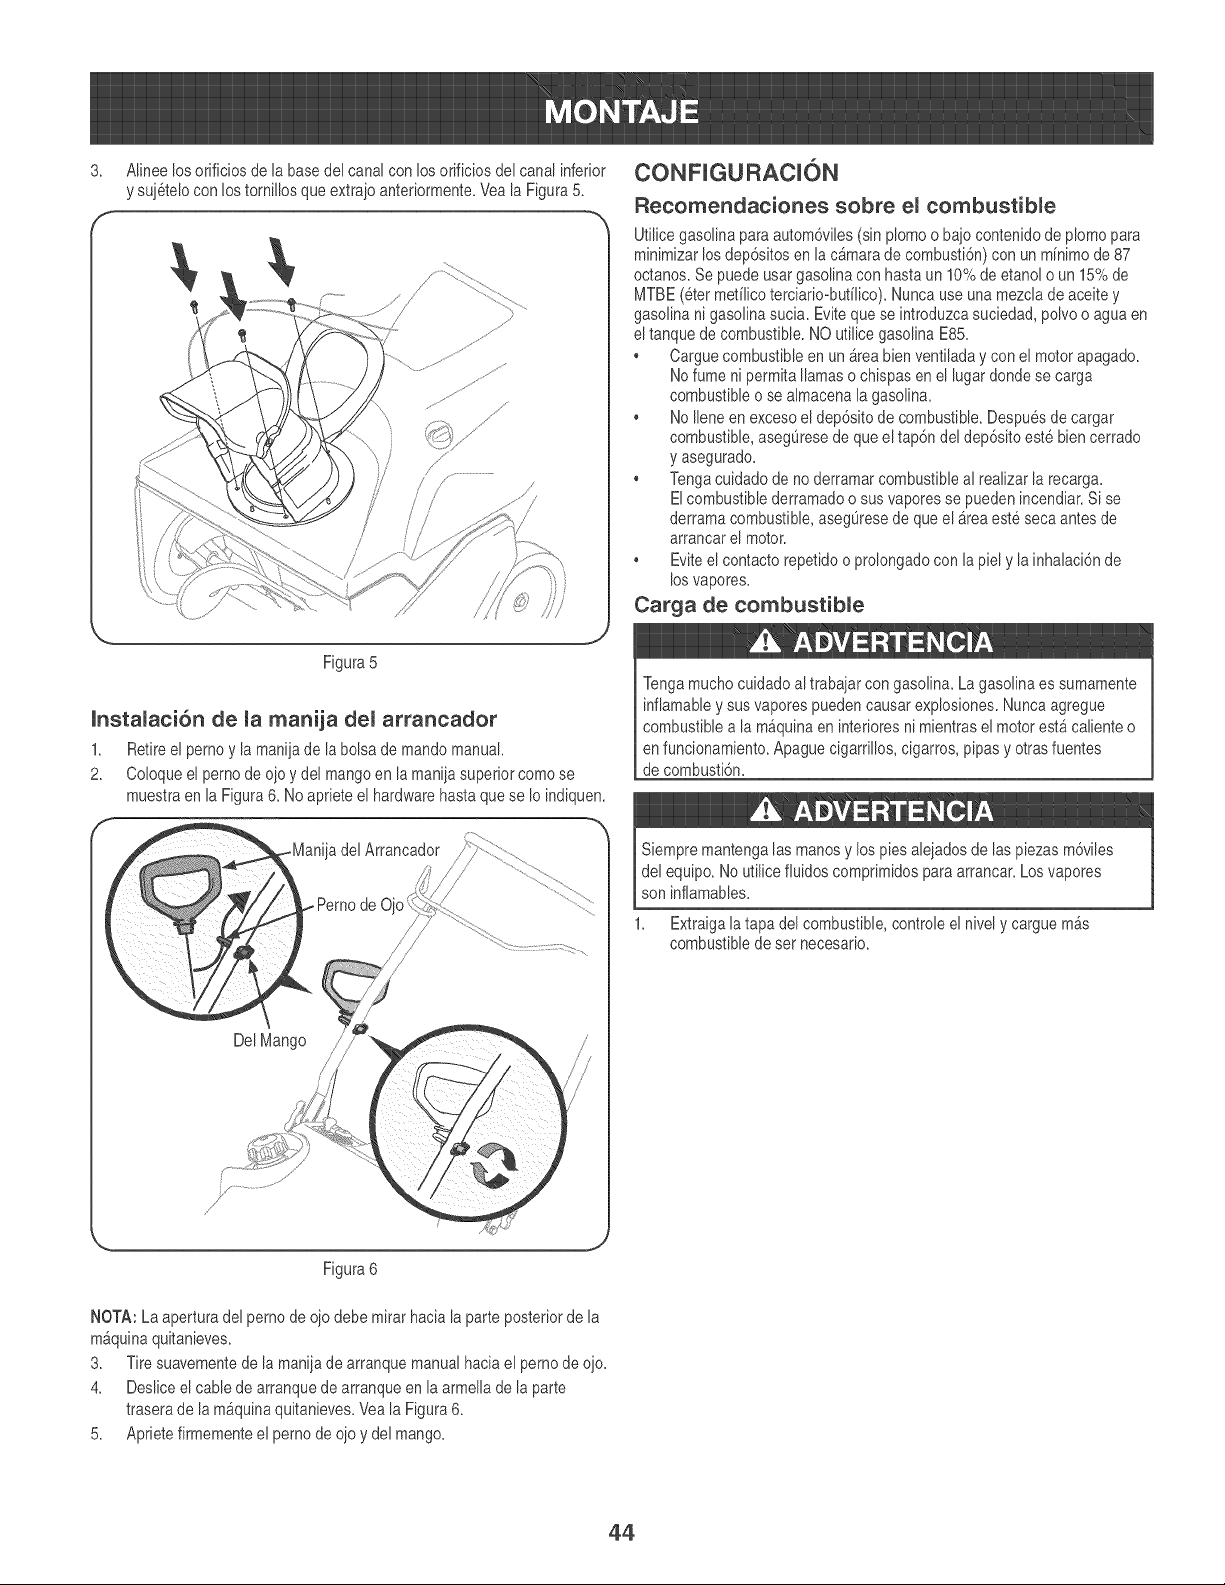
3. A[ineelosorificios de la basedeJcanalconlosorificiosdel canal inferior
y sui_telocon lostornillosque extraioanteriormente.Yeala Figura5.
/
/
J
Figura5
lnstaJaci6n de Ja manila deJ arrancador
1. Retireel pernoy la maniiade la bolsa demandomanual.
2. Coloqueel pernode olo y del mangoen lamaniiasuperiorcomo se
muestraen la Figura6. Noaprieteel hardwarehasta quese Io indiquen.
Del Mango
Recomendaciones sobre eJ combustible
Utilicegasolinapara autom6viles(sin plomo o ba]ocontenidode plomo para
minimizarlosdep6sitosen lac4marade combusti6n)con un minimode 87
octanos.Se puedeusargasolinacon hastaun 10%de etano[o un 15%de
MTBE(eter metiJicoterciario-butilico).Nuncause una mezciadeaceitey
gasolina nigasoJinasucia. Evitequese introduzcasuciedad,poivoo agua en
el tanquede combustible.NOutilicegasolina E85.
• Carguecombustibleen un _reabienventiJaday con el motorapagado.
Nofume nipermita llamaso chispasen el lugar dondese carga
combustibleo se a[macenala gasolina.
• Noliene en excesoel dep6sitode combustible.Despuesde cargar
combustible,asegOresede queel tap6ndel dep6sitoest@biencerrado
y asegurado.
• Tengacuidadode no derramarcombustibleaJrealizarlarecarga.
Elcombustiblederramadoo susvaporesse puedenincendiar.Si se
derramacombustible,asegOresede queel area estesecaantes de
arrancareJmotor.
• Eviteel contactorepefidoo prolongadocon lapiel y la inhalaci6nde
losvapores.
Carga de combustible
Tengamuchocuidadoal trabajarcongasolina. La gasolinaes sumamente
infiamabJey susvaporespuedencausar expJosiones.Nuncaagregue
combustiblea la m4quinaen interioresni mientraseJmotorest_caJienteo
en funcionamiento.Apaguecigarrillos,cigarros,pipas y otrasfuentes
de combusti6n.
Siempremantengalasmanos y los pies aJe]adosde laspiezas m6viles
del equipo.No utilicefiuidoscomprimidospara arrancar.Losvapores
son infiamables.
1. Extraigala tapa del combustible,controleel nively carguem_s
combustiblede ser necesario.
Figura6
NOTA: La aperturadel pernode ojo debe mirarhacia la parteposteriorde la
m_quinaquitanieves.
3. Tire suavementede la maniiade arranquemanualhacia el pernode o]o.
4. Desliceel cablede arranquede arranqueen la armellade la parte
traserade la m_quinaquitanieves.Veala Rgura 6.
5. Aprietefirmementeel pernode o]oy del mango.
44
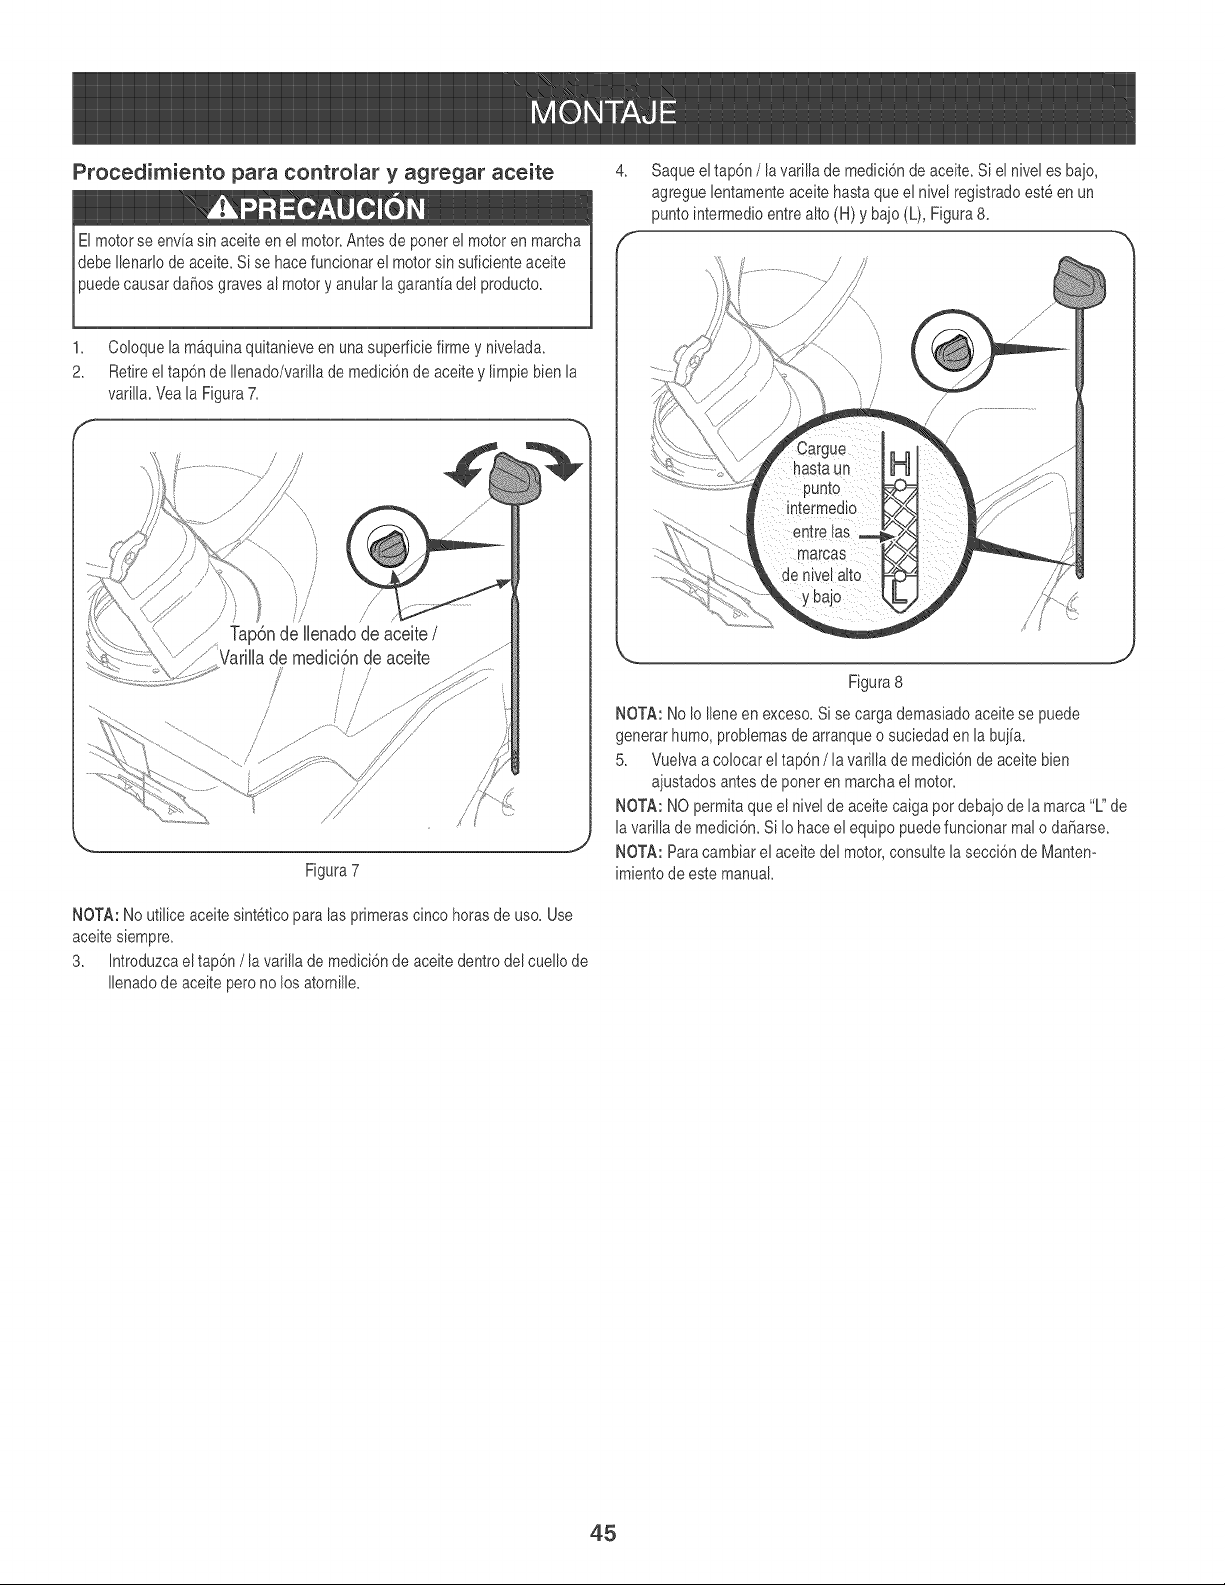
Procedimiento para contromar y agregar aceite
El motorse enviasin aceiteen el motor.Antesde ponerel motoren marcha
debe Ilenarlodeaceite.Si se hacefuncionarel motorsinsuficienteaceite
Duedecausar daSosgraves a motory anuar a garant a de producto.
1. Coloquela m_quinaquitanieveen unasuperficiefirme y nivelada.
2. Retireeltap6n de Ilenado/varillade medici6ndeaceitey rimpiebienla
varilla.Vea la Figura7.
Figura7
NOTA:No utiliceaceitesinteticoparalas primerascinco horasde uso.Use
aceitesiempre.
3. htroduzca eltap6n / la varillade medici6nde aceitedentro del cuellode
Ilenadodeaceite pero no losatornille.
Saqueel tap6n/ lavarilrade medici6nde aceite.Si el niveres baio,
agreguelentamenteaceitehastaque el nivelregistradoest_enun
puntointermedioentre alto(H) y bajo(L), Figura8.
.,,., j
Figura8
NOTA: No Io Ileneen exceso.Si se carga demasiadoaceitese puede
generarhumo,problemasdearranqueo suciedaden la buiia.
5. Vuelvaa colocarel tap6n / la varilla de medici6nde aceitebien
aiustadosantesde poneren marchael motor.
NOTA: NO permitaque el nivelde aceitecaiga pordebaiodela marca"L"de
la varilla de medici6n.Si Io haceel equipo puedefuncionarrealo da_arse.
NOTA: Paracambiarel aceitedel motor,consultela secci6ndeManten-
imientode estemanual.
45
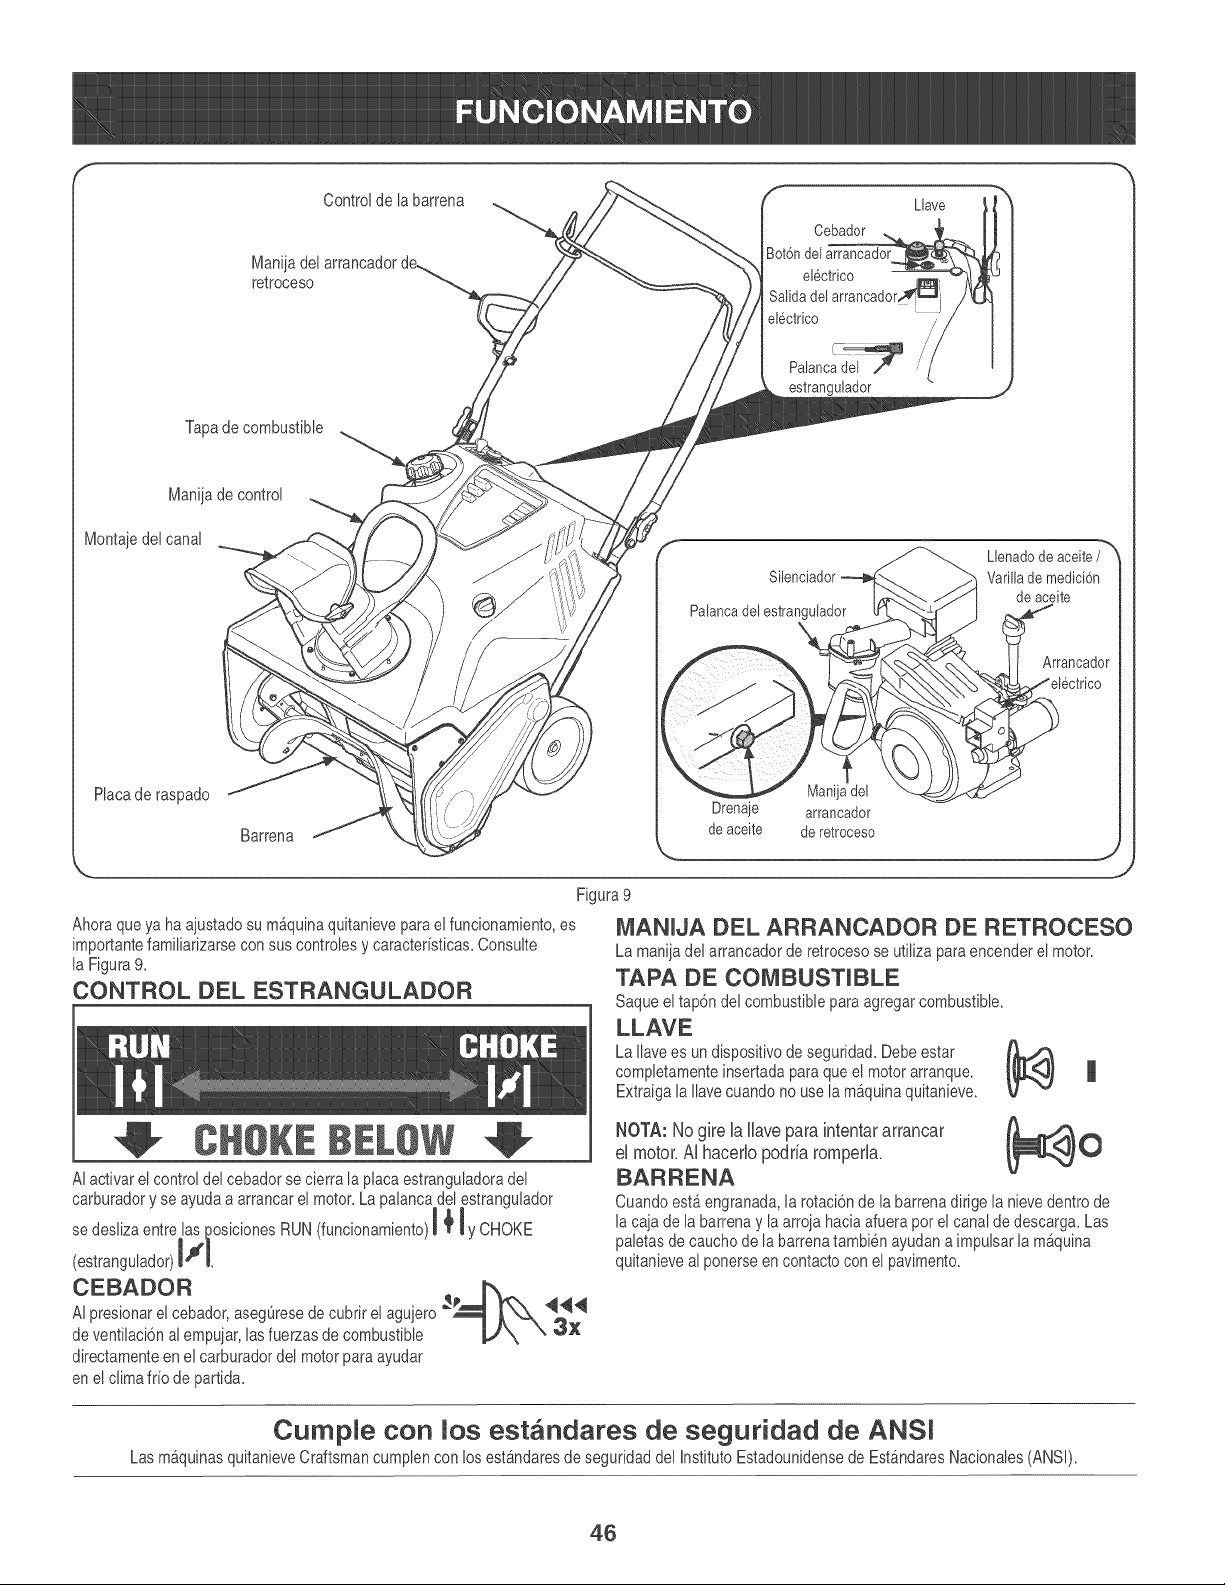
Maniiadee
retroceso
Tapade combustible
Controlde la barrena
B_ot6ndC:_dor Llave
electrico
Salidadel arrancadol
electrico
Palancai'_ ,."
estrangulador
Maniiade control
Montaiedel canal
Placade raspado
Llenadode aceite/
Varillade medici6n
de aceite
Barrena
Figura 9
Ahoraqueya ha aiustadosu m_quinaquitanieveparael funcionamiento,es
importantefamiliarizarsecon sus controlesy caracterisficas.Consulte
la Figura9.
CONTROL DEL ESTRANGULADOR
MANUA DEL ARRANCADOR DE RETROCESO
La maniiadel arrancadorde retrocesose utiliza paraencenderel motor.
TAPA DE COMBUSTUBLE
Saqueel tap6ndel combustiblepara agregarcombustible.
La Ilavees un dispositivode seguridad.Debeestar
completamenteinsertadapara queel motorarranque.
Extraigala Ilavecuandono use lam_quinaquitanieve.
CHOKE BE W
AIacfivar elcontrol del cebadorse cierra la placa estranguladoradel
carburadory se ayudaa arrancarel motor.La palancadel estrangulador
AI presionarel cebador,aseg_resedecubrirel aguiero _"_ r, -,, _"_
3x
de ventilaci6nalempuiar,lasfuerzasde combustible _,,/_\
directamenteen el carburadordel motorpara ayudar
en e! cl[mafrio de partida.
NOTA: Nogire lallaveparaintentararrancar
el motor.AI hacerlopodria romperla.
O
Cuandoest,.engranada,la rotaci6nde la barrenadirige la nieve dentrode
la caia de labarrenay la arroiahacia afuerapor el canalde descarga.Las
paletas de cauchode la barrenatambienayudana impulsarla m_quina
quitanieveal ponerseen contactoconel pavimento.
Cumple con los estandares de seguridad de ANSi
Las m&quinasquitanieveCraftsmancumplencon losest&ndaresde seguridaddel InstitutoEstadounidensede EstandaresNacionales(ANSI).
46
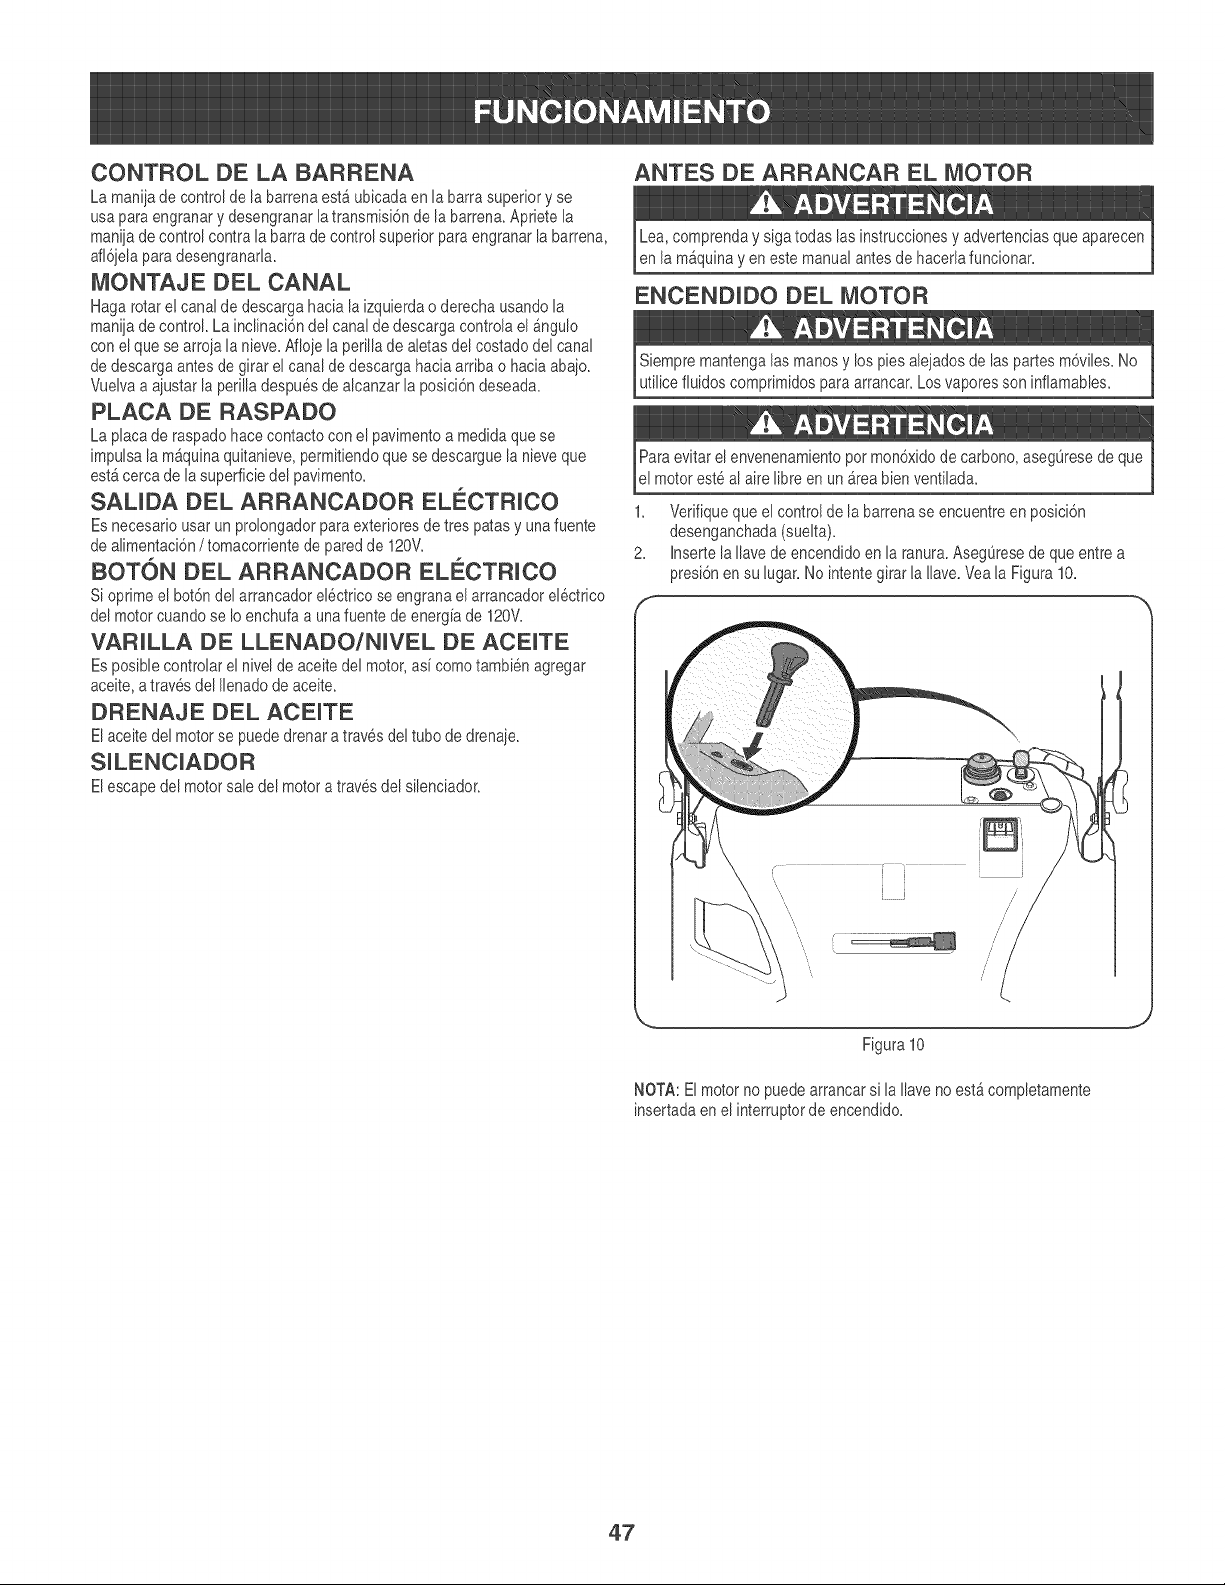
CONTROL DE LA BARRENA
La maniiade controlde la barrenaesta ubicadaen labarra superiory se
usa paraengranary desengranarlatransmisi6nde la barrena.Apriete la
maniiade control contrala barrade controlsuperior paraengranarla barrena,
afl6ielapara desengranada.
MONTAJE DEL CANAL
Hagarotare! canaldedescarga hacia laizquierdao derechausandola
maniiade control.La inclinaci6ndel canal dedescargacontrolael _ngulo
con el quese arroja lanieve.Afioje la perillade aletasdel costado del canal
de descargaantesde girar el canal de descargahaciaardbao haciaabajo.
Vuelvaa aiustarla perilladespuesde alcanzarla posid6n deseada.
PLACA DE RASPADO
La placade raspadohacecontactocon el pavimentoa medidaquese
impuJsaJam4quinaquitanieve,permifiendoquese descargueJanieveque
est_cercade JasuperficiedeJpavimento.
SAUDA DEL ARRANCADOR ELECTRUCO
Es necesariousar un prolongadorparaexterioresde trespatas y unafuente
de aJimentaci6n/tomacorriente de paredde 120V.
BOT6N DEL ARRANCADOR ELECTRUCO
Si oprimeel bot6ndel arrancadorelectricose engranael arrancadorelectrico
del motorcuandose Ioenchufaa unafuentedeenergiade 120V.
VARULLA DE LLENADO/NUVEL DE ACEUTE
Es posiblecontrolar el nivelde aceitedel motor,asi comotambienagregar
aceite,a travesdel Ilenadode aceite.
DRENAJE DEL ACEUTE
Elaceitedel motorse puededrenara travesdel tubo de drenaie.
Elescape deJmotorsale deJmotora travesdeJsiJenciador.
ANTES DE ARRANCAR EL MOTOR
Lea, comprenday siga todas las instruccionesy advertenciasqueaparecen
en la m&quinayen este manualantesde hacerlafuncionar.
ENCENDUDO DEL MOTOR
Siempremantengalasmanosy los pies aleiadosde las partesm6viles.No
utilicefiuidos comprimidospara arrancar.Los vaporesson infiamaNes.
Paraevitar el envenenamientopor mon6xidode carbono,aseg0resede que
el motorest_al airelibreen un area bienvenfilada.
1. Verifiquequeel contro!de la barrenase encuentreen posici6n
desenganchada(suelta).
2. InsertelaIlavede encendidoen la ranura.Aseg0resedeque entrea
presi6nensu lugar. No intentegirarla Ilave.Veala Figura10.
/
/
\
Figura10
NOTA:El motorno puedearrancarsi la Ilaveno est&completamente
insertadaen el interruptorde encendido.
47
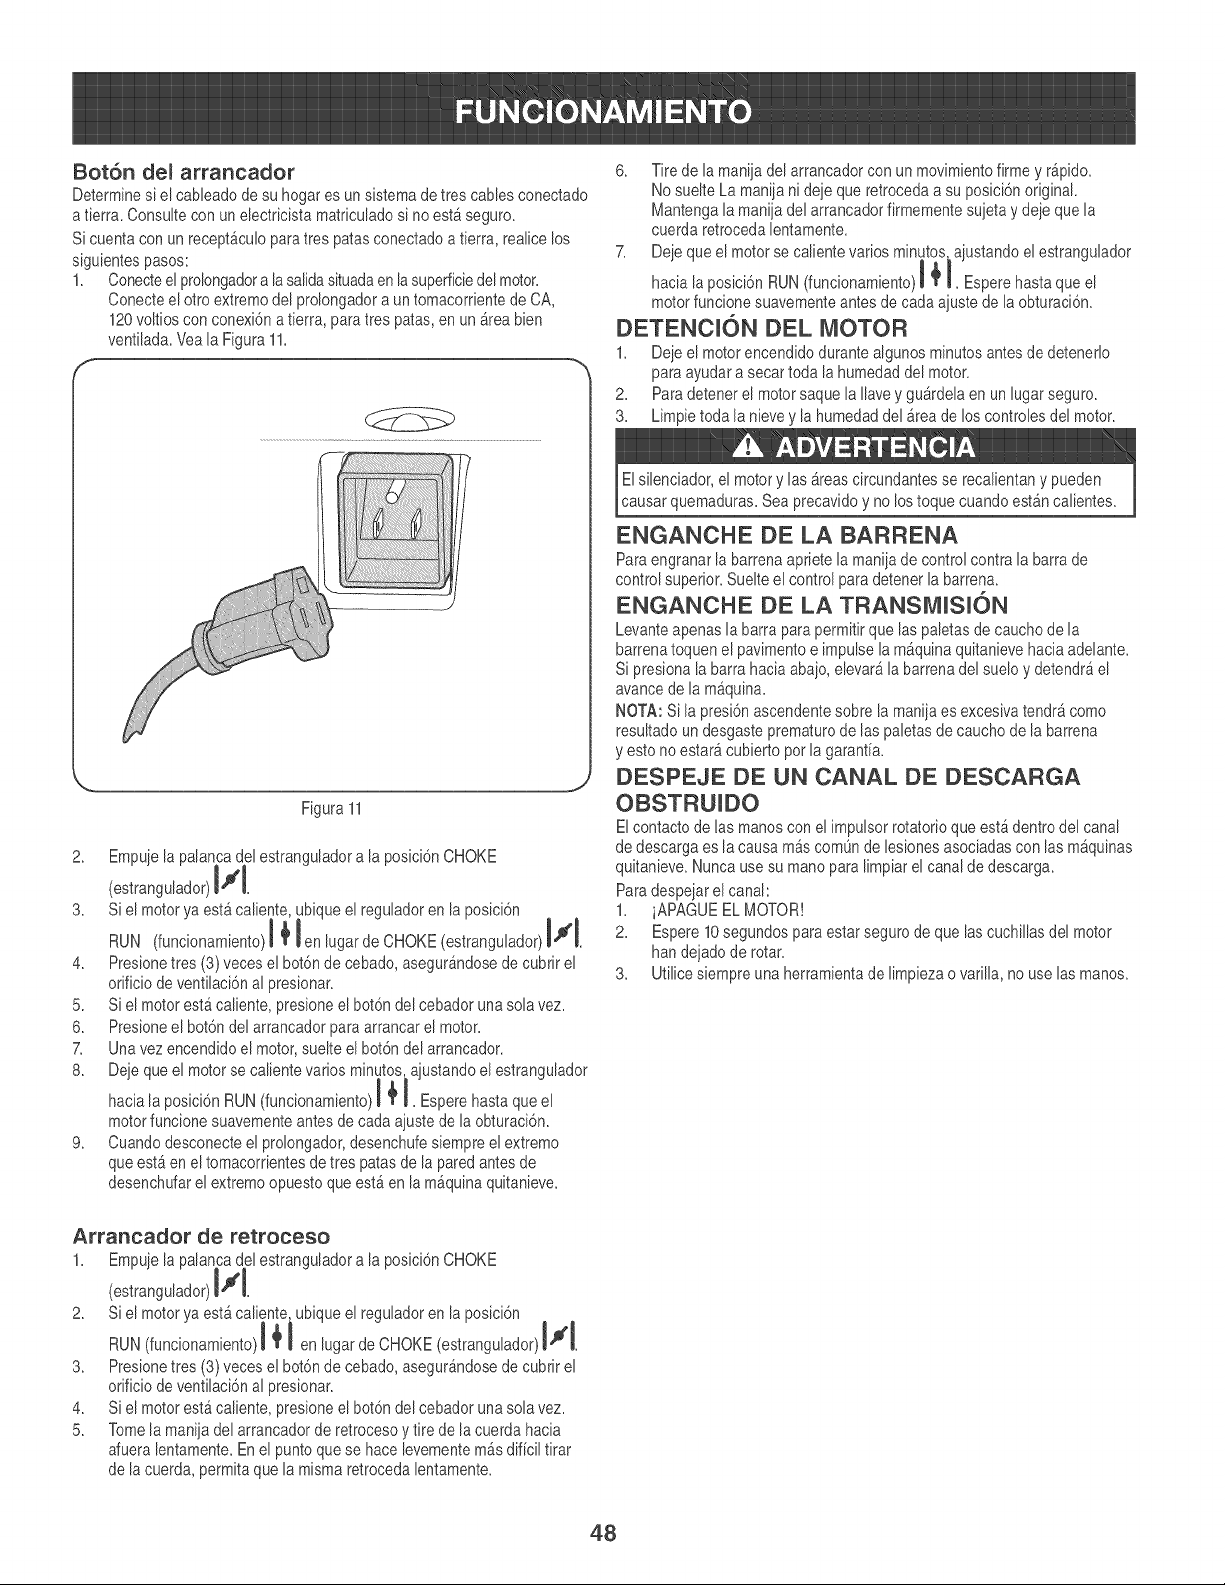
Bot6n demarrancador
Determinesi el cableadode su hogares un sistemade tres canes conectado
a tierra.Consultecon un electricistamatriculadosi no est&seguro.
Sicuenta con un recept&culoparatres patasconectadoa tierra, realicelos
siguientespasos:
1, Conecteel prolongadora lasalidasituadaen lasuperficiedelmotor,
Conecteel otroextremodel prolongadora un tomacorrientede CA,
120voltioscon conexi6nafierra, para tres paras,en un _reabien
ventilada,Veala Figura11,
Figura 11
2. Empuiela palancadel estranguladora la posici6nCHOKE
<estrangutador>I"I.
3, Si el motorya est_caliente, ubiqueel reguladoren la posici6n
< uncionamiento>1÷len,u ardeCHOKE<estran u,ador>I'I.
4. Presionetres (3) veces el botdn de cebado,asegur_ndosede cubrirel
orificiode ventilaci6nal presionar,
5. Si el motoresta caliente,presioneel bot6n del cebador unasolavez,
6, Presioneel bot6n del arrancadorparaarrancarel motor,
7, Unavez encendidoel motor,suelte elbot6n del arrancador.
8, Deieque el motorse calientevarios minytos_aiustandoel estrangulador
l
hacialaposici6nRUN<_uncionamiento>I I. Esperehastaqueel
motorfuncionesuavementeantesde cadaaiustede la obturaci6n,
9, Cuandodesconecteel prolongador,desenchufesiempreel extremo
queest_en eltomacorrientesde tres patasde la paredantesde
desenchufarel extremoopuestoqueest_ en la m_quinaquitanieve,
6. Tire de la maniiadel arrancadorcon un movimientofirmey r_pido,
No suelteLa maniianideie queretrocedaa su posici6noriginal.
Mantengala maniiadel arrancadorfirmementesuietay deie quela
cuerda retrocedalentamente.
7, Deie queel motorse calientevariosminutos_aiustandoel estrangulador
m
+
hacialaposici6nRUN<_uncionamiento>1 i,Esperehastaqueel
motorfuncionesuavementeantes de cadaaiustede la obturaci6n,
DETENCK)N DEL MOTOR
1. Deie el motorencendidodurante algunosminutosantes de detenerlo
para ayudara secartoda lahumedaddel motor.
2, Paradetenerel motorsaque la Ilaveygu_rdela en un lugarseguro,
3, Limpietoda la nievey la humedaddel _readelos controlesdel motor,
Elsilenciador,el motory las _reas circundantesse recalientany pueden
causar quemaduras,Sea precavidoy no los toquecuandoestan calientes,
ENGANCHE DE LA BARRENA
Paraengranarla barrenaaprietela maniiade controlcontrala barrade
control superior.Suelteel controlpara detenerla barren&
ENGANCHE DE LA TRANSMUSU6N
Levanteapenasla barra para permifirque laspaletasde cauchode la
barrenatoquenel pavimentoe impulsela m_quinaquitanievehacia adelante,
Si presionala barrahacia abaio, elevarala barrenadel suelo ydetendr_el
avancede la mAquina,
NOTA: Si la presi6nascendentesobre la maniiaes excesivatendr_ como
resultado un desgasteprematurode laspaletasde cauchode labarrena
y estono estar_cubierto pot la garanfia,
DESPEJE DE UN CANAL DE DESCARGA
OBSTRUUDO
Elcontactode las manoscon el impulsorrotatorioqueest&dentro del canal
de descargaes lacausa mAscomL_nde lesionesasociadascon lasm&quinas
quitanieve,Nuncausesu mano para limpiarel canaldedescarga,
Paradespeiarel canal:
1, iAPAGUEELMOTOR!
2, Espere10segundosparaestarsegurode quelas cuchillasdel motor
han deiadode rotar,
3. Ufilice siempreunaherramientade limpiezao varilla,no use lasmanos,
Arrancador de retroceso
1. Empujela palancadel estranguladora la posici6nCHOKE
(estrangutadortFl
2. Si el motorya est_caliente, ubiqueel reguladoren la posicidn
RoN< unc onam ento>I eolunardeCHOKE<estran ulador>Pq
3, Presione tres (3}veces el botdn de cebado, asegurfindose de cubrir el
orificiode ventilacidnal presionar,
4, Si el motorest,. caliente,presioneel bot6n del cebador unasolavez.
5, Tomela maniiadel arrancadorde retrocesoy tire dela cuerdahacia
afueralentamente.Enel punto quese hace levementem_.sdificil tirar
de la cuerda,permitaque la mismaretrocedalentamente,
48
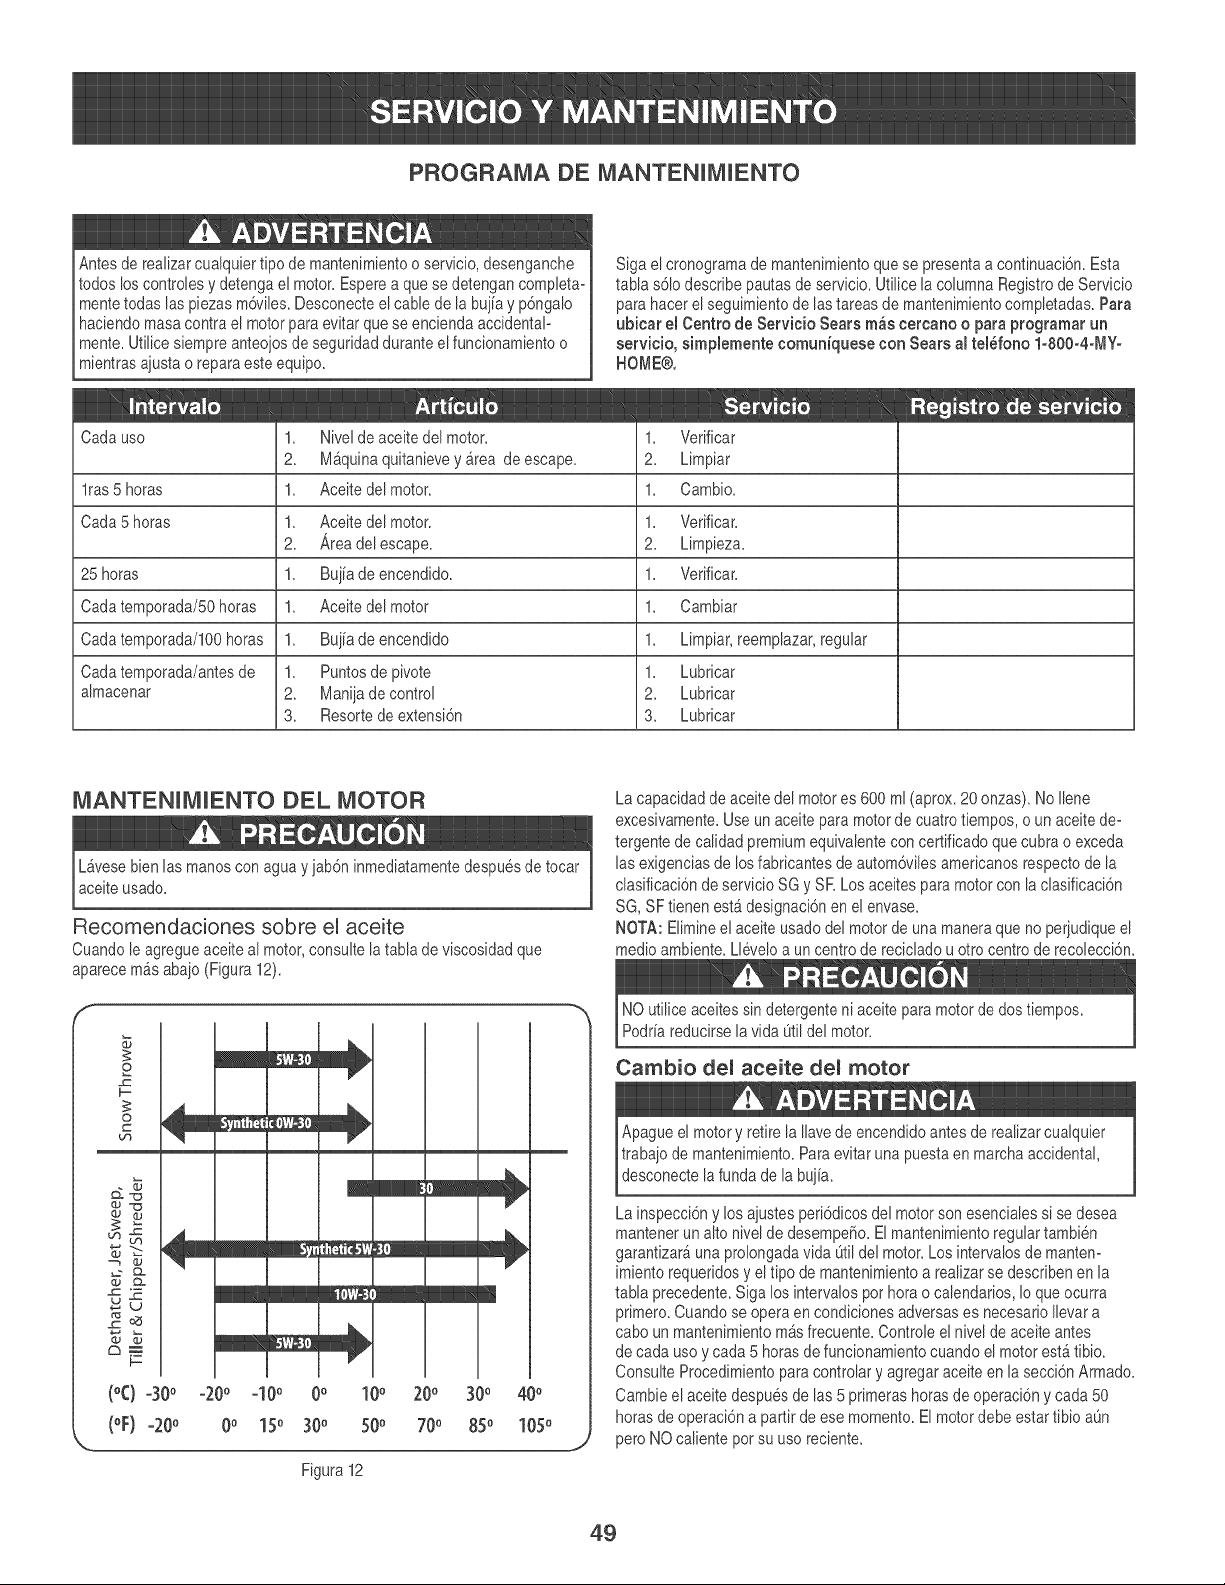
PROGRAMA DE MANTENUMUENTO
Antesde realizarcualquiertipo de mantenimientoo servicio,desenganche
todos loscontrolesy detengael motor.Esperea que sedetengancompleta-
mentetodas las piezas m6viles.Desconecteel cable dela buiia y p6ngalo
haciendomasacontrael motorpara evitarque seenciendaaccidental-
Imente.Utilicesiempreanteoiosde seguridadduranteel funcionamientoo
_mientrasaiustao reparaesteequipo.
Siga elcronogramade mantenimientoquese presentaa continuaci6n.Esta
tabla s61odescribepautas de servicio.Utilice la columnaRegistrode Servicio
para hacerel seguimientode lastareasde mantenimientocompletadas.Para
ubicar el Centro de Servicio Sears m_s eereano o para programar un
servicio, simplemente eomuniquese con Sears al tel_fono 1-800-4-MY-
HOME®,
Cadauso Verificar
Limpiar
Cambio.
1.
2.
1.
1.
2.
1.
1.
1.
1.
2.
3.
Nivelde aceitedel motor.
Maquinaquitanievey area de escape.
Aceitedel motor.
Aceitedel motor.
Area del escape.
Buiia de encendido.
Aceitedel motor
Bui[ade encendido
Puntosde pivote
Manijade control
Resortede extensi6n
1.
2.
1.
1.
2.
1.
1.
1.
1.
2.
3.
lras 5 horas
Cada5 horas Verificar.
Limpieza.
25 horas Verificar.
Cadatemporada/50horas Cambiar
Cadatemporada/100horas Limpiar,reemplazar,regular
Cadatemporada/antesde Lubricar
almacenar Lubdcar
Lubricar
MANTENIMIENTO DEL MOTOR
L_vesebien las manoscon agua y iab6ninmediatamentedespuesdetocar
aceiteusado.
Recomendaciones sobre el aceite
Cuandole agregueaceiteal motor,consultela tablade viscosidadque
aparecem_sabaio (Figura12).
2
F=
O
r_
o ©
0'3 _
_2®
£3m__
F-
(°C) -300 -200 -10 ° 0 ° 10 ° 200 300 400
(oF)-200 0 o 15o 300 500 700 850 1050
Figura 12
La capacidadde aceitedel motores 600ml (aprox. 20 onzas).No Ilene
excesivamente.Use un aceitepara motorde cuatrofiempos,o un aceitede-
tergentede calidadpremiumequivalentecon certificadoque cubra o exceda
las exigenciasde losfabdcantesde autom6vilesamedcanosrespectode la
clasificaci6ndeservicioSG y SR Los aceitespara motorcon la clasificaci6n
SG, SFfienen esta designaci6nen el envase.
NOTA: Elimineel aceite usadodel motorde unamaneraque no periudiqueel
medio ambiente.Lleveloa un centrode recicladou otro centrode recolecci6n.
NO utiliceaceitessindetergenteni aceitepara motorde dos fiempos.
Podriareducirsela vida Otildel motor.
Cambio del aceite dem motor
Apagueel motory retirela Ilavede encendidoantes de realizarcualquier
trabaiode mantenimiento.Paraevitar unapuesta en marchaaccidental,
desconectela funda de la buiia.
La inspecci6ny !os aiustesperi6dicosdel motorson esencialessi sedesea
mantenerun alto nivelde desempeSo.Elmantenimientoregulartambien
garantizarauna prolongadavida titil del motor.Los intervalosdemanten-
imiento requeridosy eltipo de mantenimientoa realizarse describenen la
tabla precedente.Siga los intervalosporhorao calendarios,Io queocurra
primero.Cuandose operaen condicionesadversases necesarioIlevara
cabo un mantenimientom&sfrecuente.Controleel nivelde aceite antes
de cadauso y cada5 horasde funcionamientocuandoel motorest&tibio.
ConsulteProcedimientoparacontrolary agregaraceiteen la secci6nArmado.
Cambieel aceitedespuesdelas 5 primerashoras de operaci6ny cada50
horas deoperaci6na parfirdeese momento.El motordebeestar tibio a0n
pero NOcaliente porsu uso reciente.
49
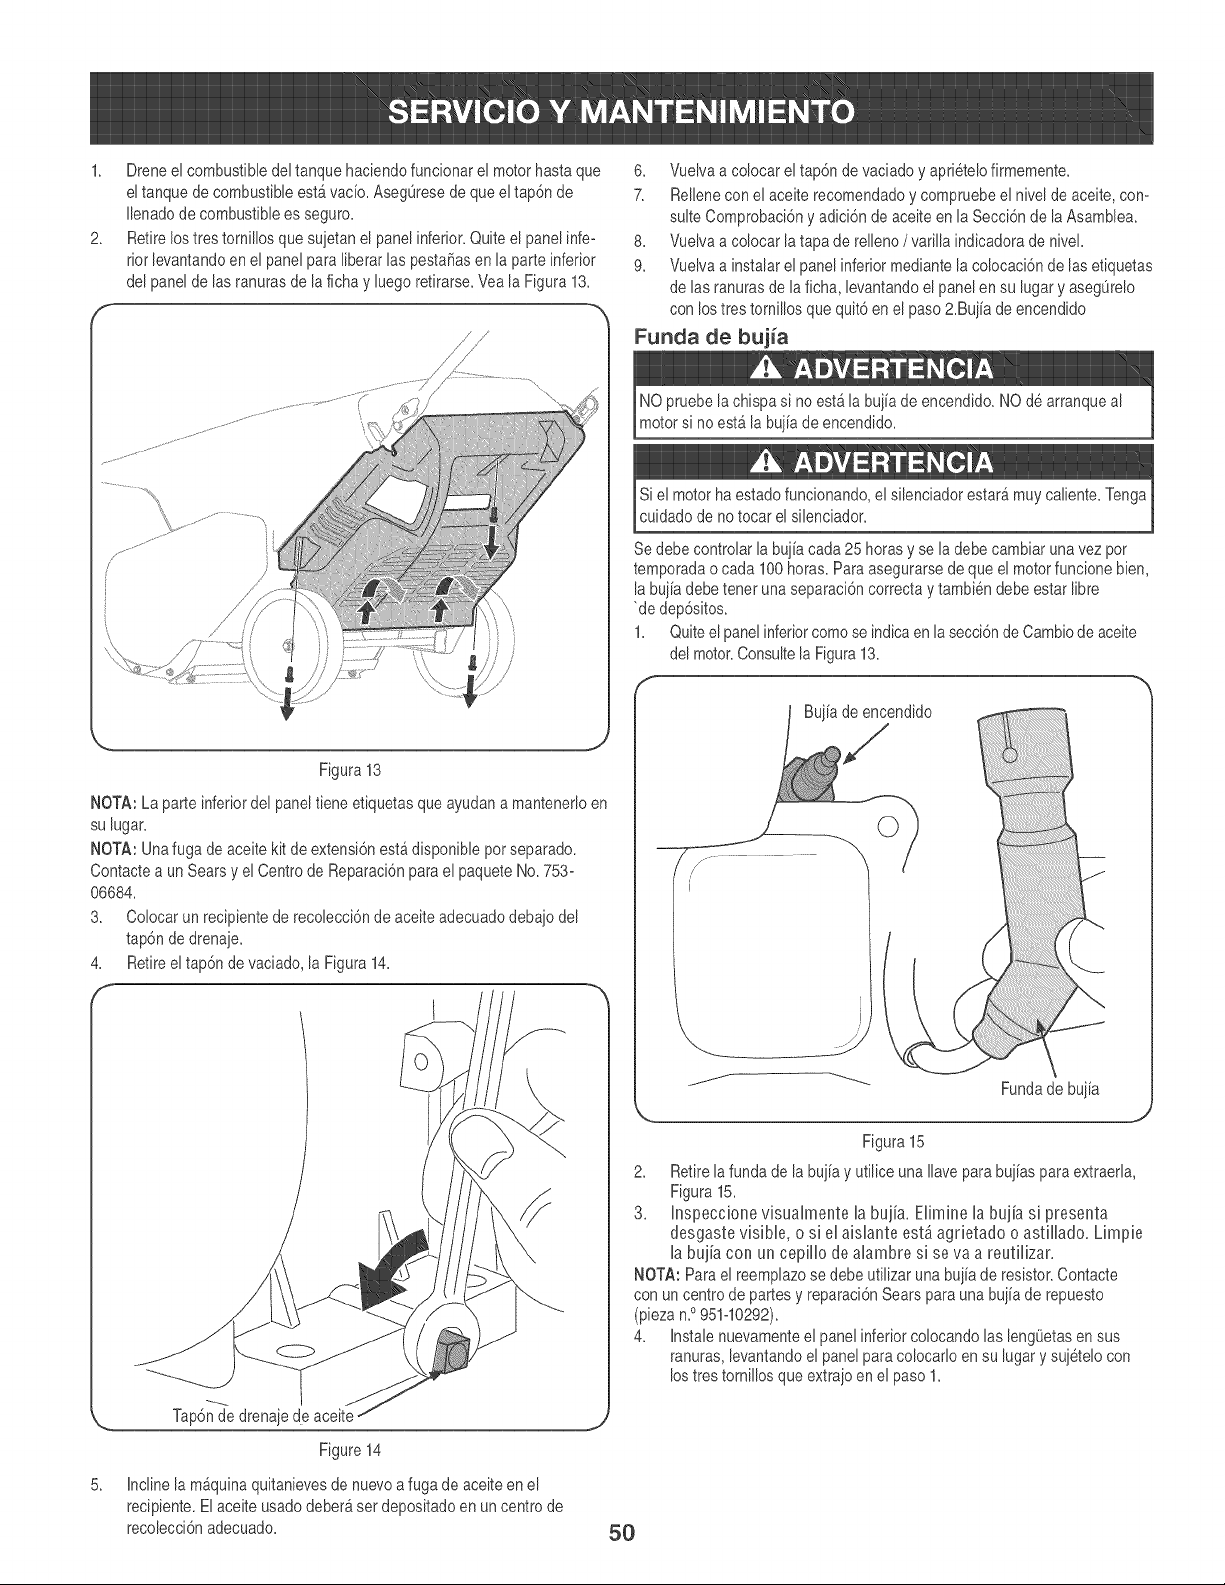
1,
2,
f
Dreneel combustibledel tanque haciendofuncionarel motorhasta que
eltanque de combustibleestavac[o.Aseg0resede que el tap6nde
Ilenadodecombustiblees seguro.
Retirelostres tornillosquesuietan el panelinferior.Quiteel panelinfe-
rior levantandoen el panel )araliberarlas pesta_asen la parte inferior
del panelde lasranurasde la ficha y luegorefirarse.Veala Figura13.
Figura 13
[`,IOTA:La parteinferiordel paneltiene efiquetasque ayudana mantenerloen
su lugar.
NOTA: Unafuga de aceitekit deextensi6nest_disponiblepot separado.
Contactea un Sears y el Centrode Reparaci6npara el paqueteNo.753-
06684.
3. Colocarun recipientede recolecci6nde aceiteadecuadodeba]odel
tap6ndedrenaie.
4. Retireeltap6n de vaciado la Figura14.
f l
5,
Tap6nde drenaiede aceite
Figure 14
Inclinela m_quinaquitanievesde nuevoa fugade aceiteen el
recipiente.Elaceiteusado deber_set depositadoen uncentrode
recolecci6nadecuado.
6. Vuelvaa colocarel tap6n de vaciadoy apri6telofirmemente.
7. Rellenecon el aceiterecomendadoy compruebeel nivel de aceite,con-
suite Comprobaci6ny adici6nde aceiteen la Secci6nde la Asamblea.
8. Vuelvaa colocar latapa de relleno / varilla indicadorade nivel.
9. Vuelvaa instalarel panel inferiormediantelaco!ocaci6nde lasefiquetas
de lasranurasde la ficha,levantandoel panelen su lugary aseg0relo
con lostrestornillosque quit6en el paso2.Bui[ade encendido
Funda de bujia
NO pruebela chispa si no est_la buiia de encendido.NOdearranqueal
motorsi no esta la bui[ade encendido.
Si el motorha estadofuncionando,el silenciadorestaramuycaliente.Tenga
cuidadodenotocar el silenciador.
Se debe controlar la buiiacada 25 horas y se ladebe cambiarunavez por
temporadao cada 100horas.Paraasegurarsede que el motorfuncionebien,
[abui[adebe tenet una separaci6ncorrecta ytambiendebe estar [ibre
'de dep6sitos.
1. Quiteel panelinferiorcomose indicaen [a secci6nde Cambiode aceite
de[motor.Consulte[a Figura13.
Bui[ade encendido
©
Fundade bu][a
J
Figura15
2. Retire[a funda de [abui[ay utilice una[lavepara bui[asparaextraeda,
Figura15.
3. Inspeccione visualmente la buj[a. Elimine la bujh si presenta
desgaste visible, o si el aislante est_ agrietado o astillado. Limpie
la bujh con un cepillo de alambre si se va a reutilizar.
['IOTA:Para el reemplazose debe utilizar una bui[ade resistor.Contacte
con uncentrode partesy reparaci6nSears parauna bui[ade repuesto
(piezan.°951-10292).
4. Instalenuevamenteel panel inferiorco[ocando[as [eng0etasen sus
ranuras,levantandoel panelpara colocarloensu lugar y suietelocon
lostrestornillosque extraioen el paso1.
5O
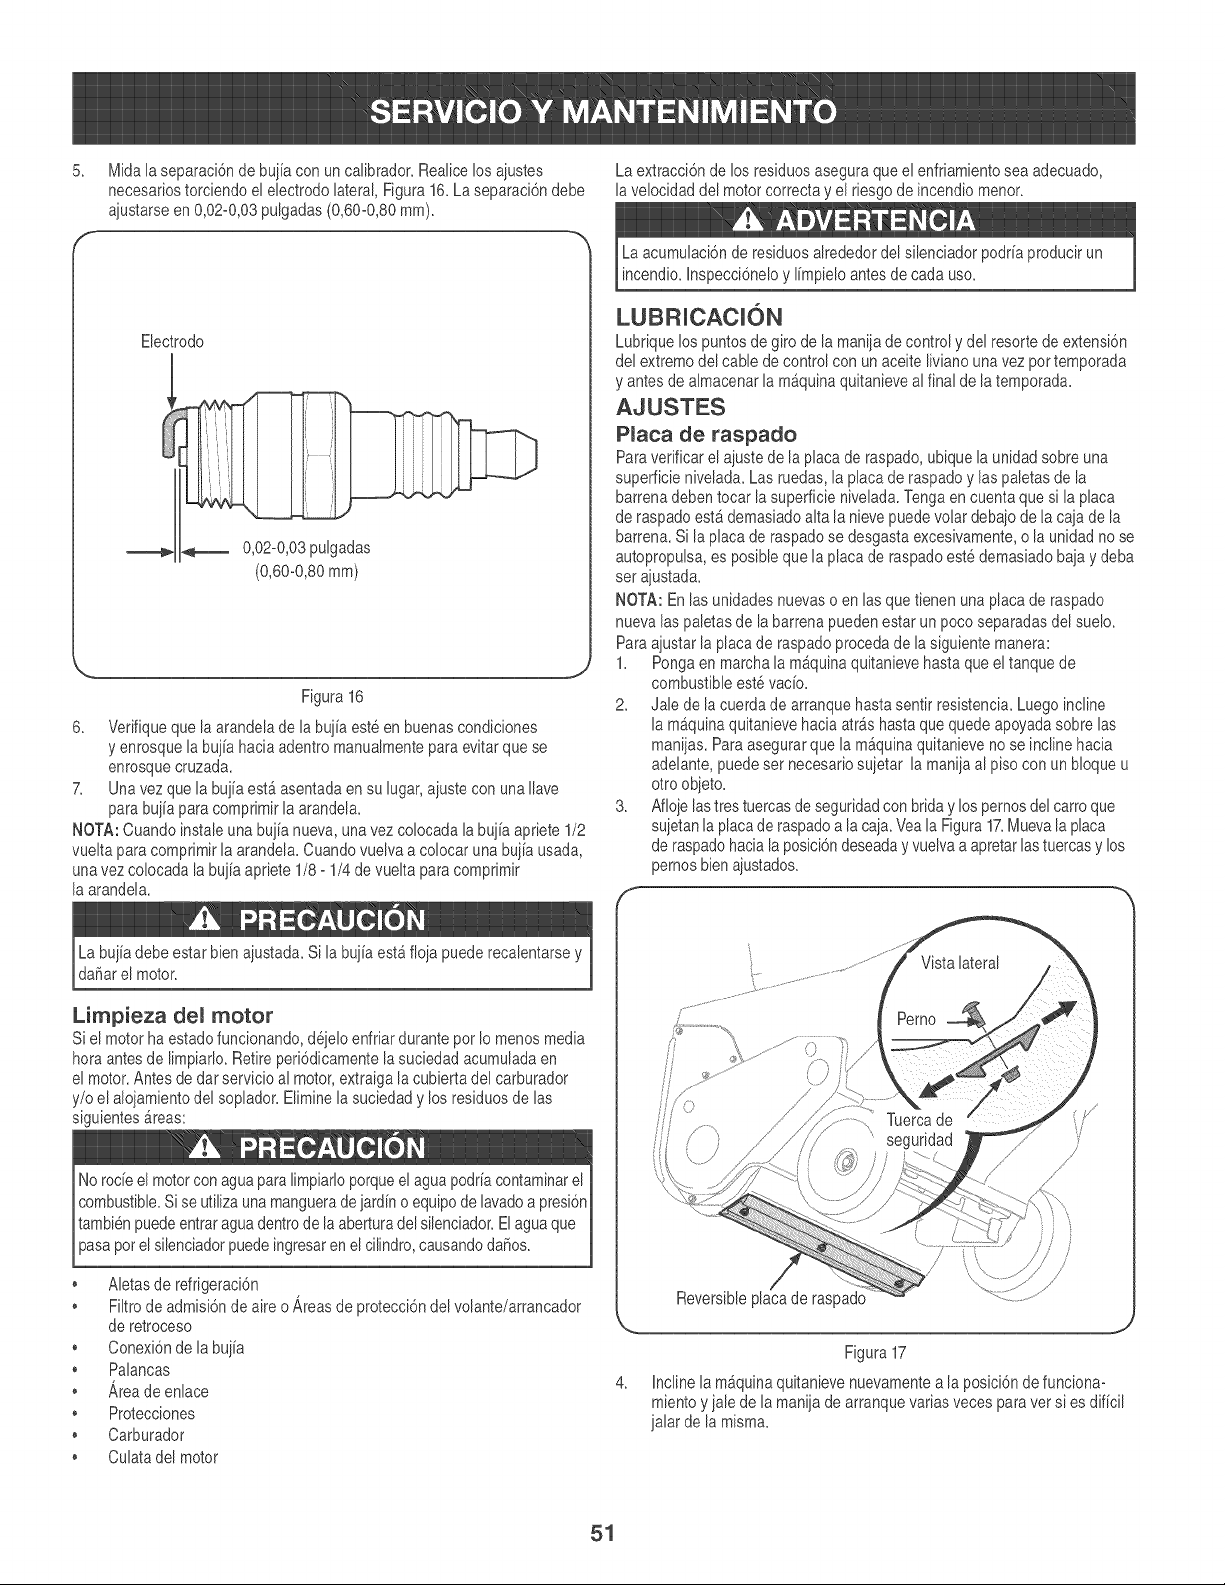
5. La extracci6nde losresiduosaseguraqueel enfriamientosea adecuado,
la velocidaddel motorcorrectay el riesgo de incendiomenor.
Midala separaci6nde bui[acon un calibrador.Realicelosaiustes
necesariostorciendoel electrodo lateral,Figura 16.La separaci6ndebe
aiustarseen 0,02-0,03pulgadas(0,60-0,80ram).
Electrodo
_ 0,02-0,03pulgadas
(0,60-0,80ram}
Figura 16
6. Vedfiqueque Jaarandelade labuj[aeste en buenascondiciones
y enrosquela bui[ahaciaadentromanualmenteparaevitarquese
enrosquecruzada.
7. Unavez que [a bui[aest_ asentadaen su [ugar,ajustecon una[lave
para buiiaparacomprimirla arandela.
[tOTA: Cuando instaleunabui[anueva, unavezcolocadala buiia apriete1/2
vueltapara compdmirla arandela.Cuandovuelva a colocar una buiia usada,
unavez co[ocadala bui[aapriete1/8- 1/4 devuelta paracomprimir
la arandela.
La acumulaci6nde residuosalrededordel silenciadorpodriaproducirun
incendio,nnspecci6neloy [impie[oantesde cada uso.
Lubriquelos puntosde giro de la maniiade control y del resortede extensi6n
del extremodel cable decontrol con un aceite[ivianounavez pottemporada
y antesde almacenar[a m_quinaquitanievea[ final de [atemporada.
AJUSTES
PJaca de raspado
Paraverificare[ aiustede la placade raspado,ubique la unidadsobre una
superficienivelada.Las ruedas,la placade raspadoy laspaJetasde [a
barrenadebentocar la superficienivelada.Tengaen cuenta quesi la pJaca
de raspadoestademasiadoalta [a nieve puedevo[ar debaiode [a caiade la
barrena.Si la placa de raspadose desgastaexcesivamente,o la unidad no se
autopropulsa,es posiblequela placa de raspadoestedemasiadobaiay deba
ser aiustada.
[tOTA: En [as unidadesnuevaso en [asquefienen unaplaca de raspado
nueva laspaletasde la barrenapuedenestar un pocoseparadasdel suelo.
Paraaiustar la placade raspadoprocedade lasiguientemanera:
1. Pongaen marchala m_quinaquitanievehastaque el tanquede
combustibleest6vacio.
2. JaJede lacuerdade arranquehastasentir resistencia.Luegoincline
[a m_quinaquitanievehacia atr_s hastaque quedeapoyadasobre [as
maniias. Paraasegurarque [a m_quinaquitanieveno se incline hacia
adelante,puedeset necesadosujetar la manijaal pisocon un bloque u
otro objeto.
3. Afioie lastres tuercasde seguridadcon briday los pemosdel carroque
sujetanla placade raspadoa lacaja.Veala Figura17.Muevala placa
de raspadohacialaposici6ndeseaday vuelvaa apretarlastuercasy los
pemos bienajustados.
f
La bui[adebe estar bienaiustada.Si[a bui[aesta fioia puederecalentarsey
daffarel motor.
Limpieza deJ motor
Siel motorha estadofuncionando,deieloenfriar durantepor Io menos media
hora antesde limpiarlo.Retireperi6dicamentela suciedadacumuladaen
el motor.Antes de dar servicioal motor,extraigala cubiertadel carburador
y/o el aloiamientodel soplador.Eliminela suciedady losresiduos delas
siguientesareas:
Norode el motorcon aguapara limpiarloporqueelagua podriacontaminarel
combustible.Si se utilizaunamanguerade iardino equipode lavadoa presi6n
tambienpuedeentraraguadentrode la aberturade[siJenciador.El aguaque
Pasapote s encador puede ngresaren e c ndro,causandodaffos.
• Aletasderefrigeraci6n
• Filtrode admisi6nde aire o ,_reasdeprotecci6ndel volante/arrancador
de retroceso
• Conexi6nde la buiia
• Palancas
• ,_reade enlace
• Protecciones
• Carburador
• Culatadel motor
k..
/
Reversiblepiaca de raspado
Figura17
InclineJam_quinaquitanievenuevamentea Japosici6nde funciona-
miento yiaJede [a maniiade arranquevariasveces paravet si es dif[ci[
ialar de la misma.
51
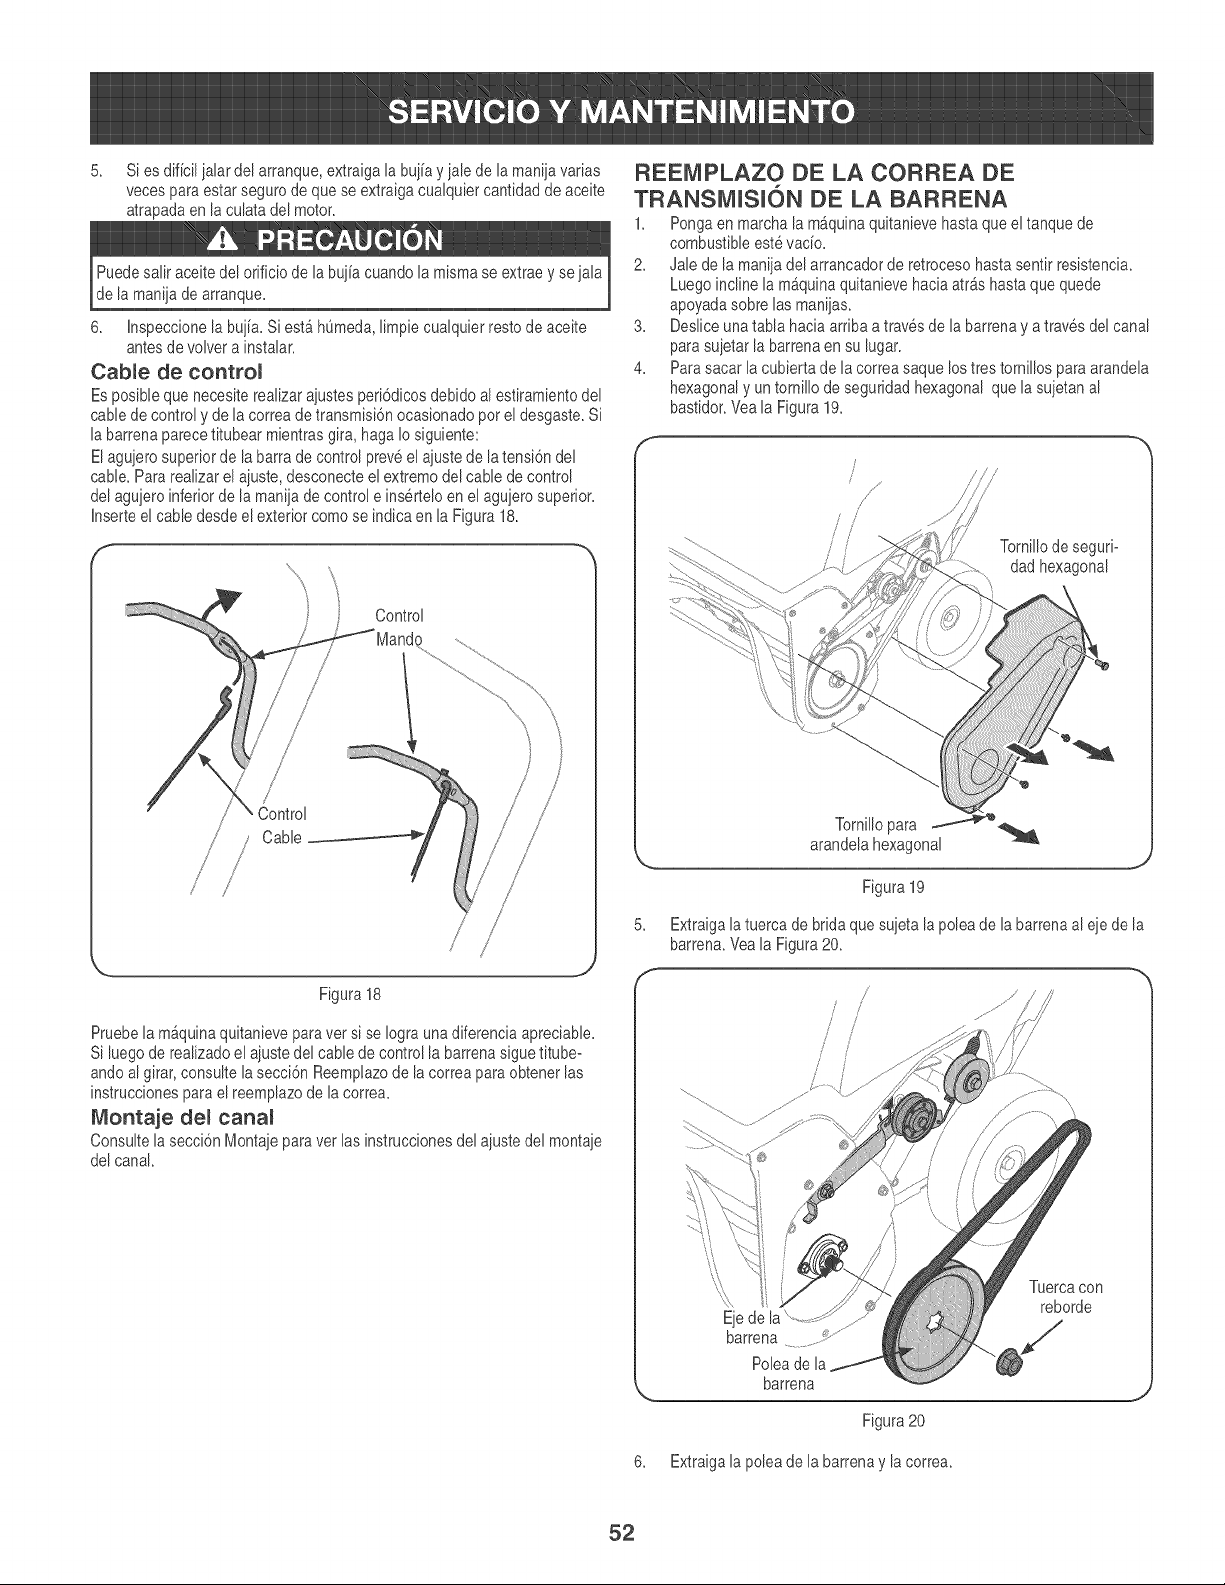
5. Si esdificil ialar del arranque,extraigala bui[ay iale de la maniiavarias
vecespara estar segurode que se extraigacualquiercantidaddeaceite
atrapadaen la culatadel motor.
Puedesalir aceitedel orificio de la bui[acuandolamismase extraey seiala
de la maniiade arranque.
6. Inspeccionela bui[a.Siesta hOmeda,limpiecualquierrestode aceite
antesde volvera instalar.
Cabme de controm
Es posibleque necesiterealizaraiustesperi6dicosdebido alestiramientodel
cablede control y dela correade transmisi6nocasionadopot eldesgaste.Si
la barrenaparecetitubear mientrasgira, haga Io siguiente:
Elaguierosuperiorde la barrade control prev_el aiustede la tensi6ndel
cable.Para realizarel ajuste,desconecteelextremo del cable de control
del agujeroinferiorde la manilade controle inserteloenel aguierosuperior.
Inserteel cabledesdeel exteriorcomo se indicaen la Figura18.
Control
/
Control
Cable
i
/
/
/
/
/
Figura 18
Pruebela m_quinaquitanieveparavet si se Iograunadiferenciaapreciable.
Si luegode realizadoel aiustedel cablede control la barrenasigue titube-
ando algirar,consultela secci6nReemplazode la correapara obtenerlas
instruccionespara el reemplazode la correa.
Montaje del canal
Consultelasecci6n Montajeparavet las instruccionesdel ajustedel montaje
del canal.
REEMPLAZO DE LA CORREA DE
TRANSMUSK_N DE LA BARRENA
1. Pongaen marcha lamb.quinaquitanievehastaque eltanque de
combustibleestevado.
2. Jale de la maniiadel arrancadorde retrocesohastasentir resistencia.
Luegoincline la m_quinaquitanievehaciaatr_s hastaque quede
apoyadasobrelasmaniias.
3. Desliceunatabla haciaarribaa travesde la barrenay a traves del canal
parasuietarla barrenaen su lugar.
4. Parasacarla cubiertade lacorrea saque lostrestornillos paraarandela
hexagonaly untornillode seguridadhexagonal que lasuietan al
bastidor.Veala Figura19.
I
/
/,f
/
J/
/ /
/ / Tornillodeseguri-
dad hexagonal
Tornillopara __
arandelahexagonal
.. J
Figura19
5,
Extraigala tuerca de bridaque sujetala poleade labarrenaal eje de la
barrena.Veala Figura20.
Tueroa con
':' reborde
Eiede la
barrena ..................................... j
Poleade la
barrena
Figura20
6. Extraigala poleade la barrenay la correa.
52
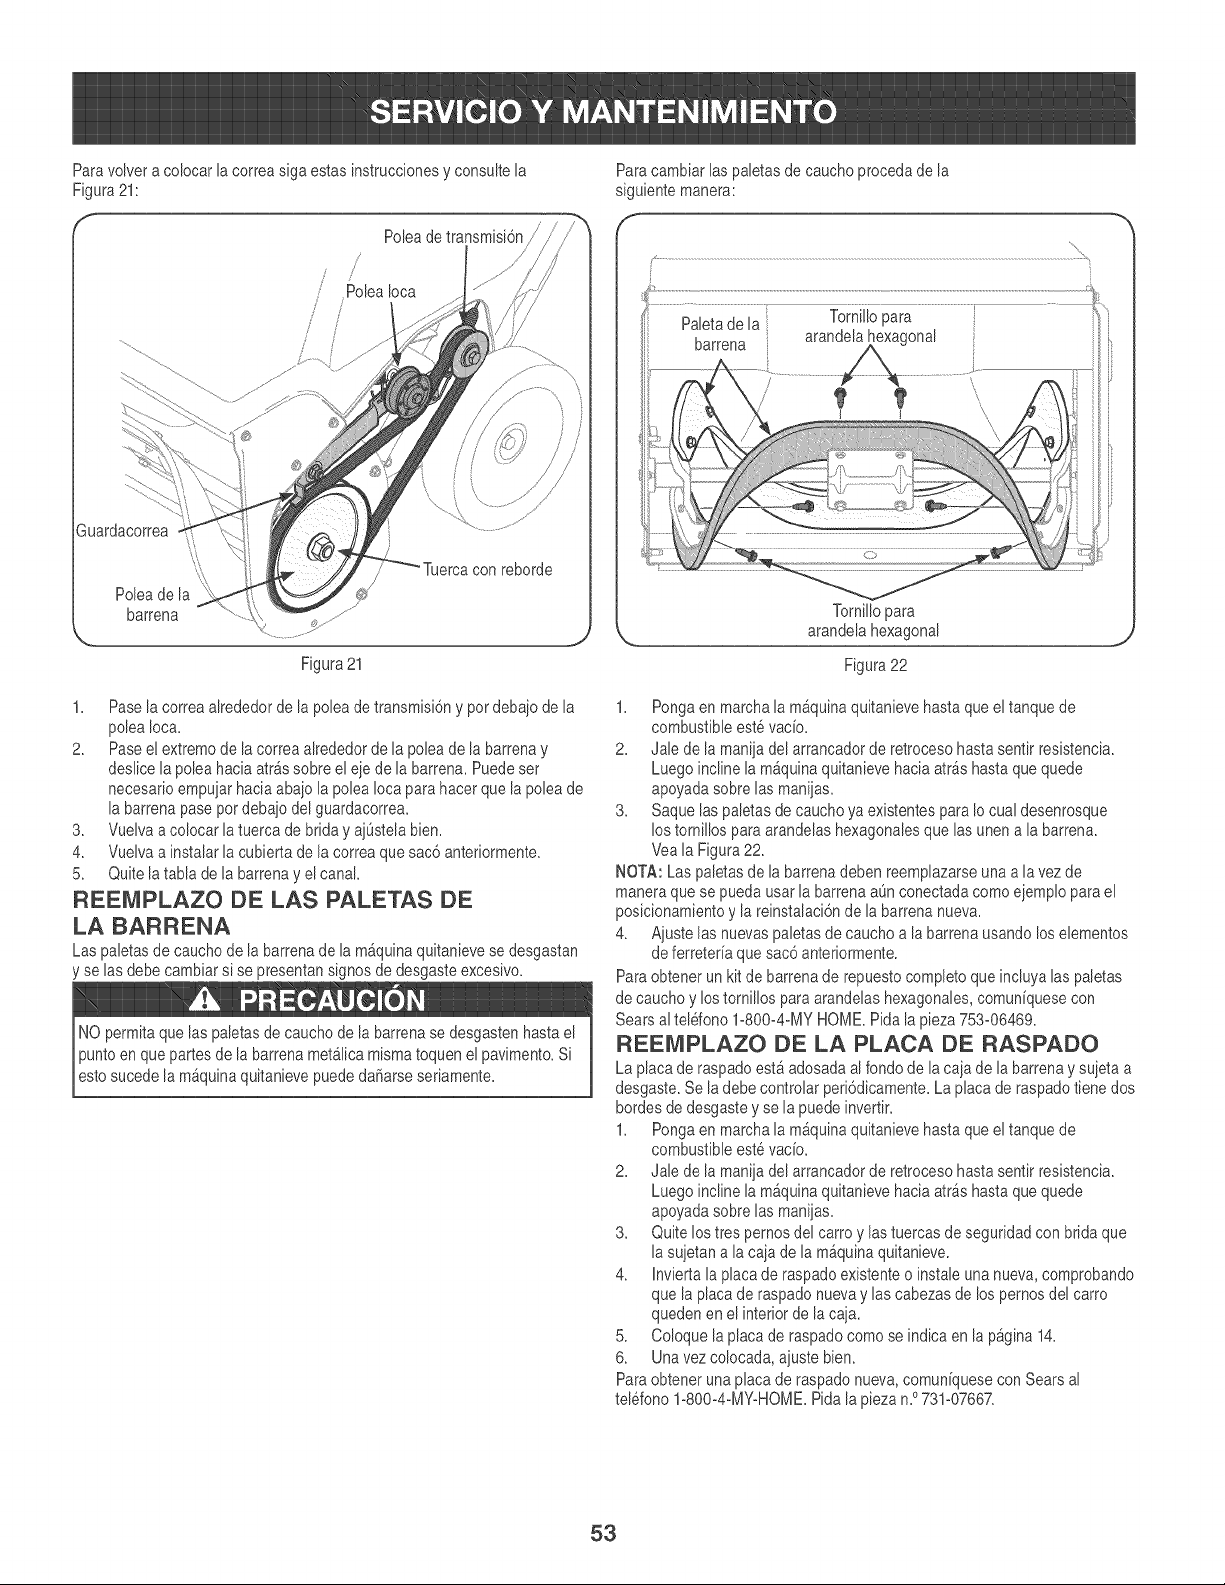
Paravolvera colocar la correasiga estasinstruccionesy consultela Paracambiarlas paletasde cauchoprocedade la
Figura21: siguientemanera:
Poleade transmisiOn
/
/
_olea Ioca
/ /
J /
/
Tomillopara
Figura21
1, Pasela correaalrededorde la poleade transmisi6ny por debajode la
poleaIoca.
2, Pasee! extremode la correaalrededorde la poleade la barrenay
deslice lapolea haciaarrassobre el e]ede labarrena. Puedeser
necesarioempu]arhacia aba]ola poleaIocapara hacer que la poleade
la barrenapasepot deba]odel guardacorrea.
3, Vuelvaa colocar la tuercadebdda y a]0stelabien.
4, Vuelvaa instalarla cubiertade la correaque sac6 anteriormente,
5, Quitelatabla de la barrenay el canal,
REEMPLAZO DE LAS PALETAS DE
LA BARRENA
Las paletasde cauchode la barrenade la m&quinaquitanievese desgastan
y se lasdebe cambiarsi se presentansignos de desgasteexcesivo.
NO permitaque las paletasde cauchode la barrenase desgastenhastael
puntoenquepartesde la barrenamet_.licamismatoquen el pavimento,Si
estosucedela m_quinaquitanievepuededa_arseseriamente,
Figura22
1. Pongaen marchala m_quinaquitanievebasraque el tanquede
combustibleest_vado,
2, Jaie de la maniiadel arrancadorde retrocesohastasentir resistencia,
Luegoincline la m_quinaquitanievehaciaatr_s basraque quede
apoyadasobrelas manijas,
3, Saquelas paletasde cauchoya existentespara Io cual desenrosque
los tornillospara arandelashexagonalesque las unena la barrena,
Veala Figura22,
NOTA: Las paletasde la barrenadeben reemplazarseunaa lavez de
maneraquese puedausar la barrenaaOnconectadacomoejemploparael
posicionamientoy la reinstalaci6nde la barrenanueva,
4, Ajustelas nuevaspaletasde caucho a la barrenausandolos elementos
de ferreteriaquesac6 anteriormente.
Paraobtenerunkitde barrenade repuestocompletoqueincluya laspaletas
de cauchoy lostornillos paraarandelashexagonales,comuniquesecon
Sears altelefono 1-800-4-MYHOME,Pidala pieza 753-06469.
REE[_PLAZO DE LA PLACA DE RASPADO
La placade raspadoest,, adosadaal fondo de lacaia de labarrenay suietaa
desgaste.Se la debecontrolarperi6dicamente.La placade raspadofiene dos
bordesde desgastey se la puedeinvertir.
1. Pongaen marchala mb.quinaquitanievebasraque el tanquede
combustibleestevado.
2. Jale de la maniladel arrancadorde retrocesohastasenfir resistencia.
Luegoincline la m_.quinaquitanievehaciaatr&sbasraque quede
apoyadasobrelas manijas.
3. Quitelos tres pernosdel carro y lastuercasde seguridadcon bridaque
la su]etana lacaia de la m_quinaquitanieve.
4. Inviertala placaderaspado existenteo instale unanueva,comprobando
que la placade raspado nuevay las cabezasde los pemos del carro
quedenen el interiorde la ca]a.
5. Coloque laplacade raspadocomose indica en lap&gina14.
6. Unavez colocada,a]ustebien.
Paraobtenerunaplaca deraspadonueva,comuniquesecon Sears al
telefono1-800-4-MY-HOME.Pida la piezan.°731-07667.
53
Si no se vaa utilizar [a m_quinaquitanievedurante30 dias o m6.s,o si es elfinal de la temporadade nievey ya no existeposibilidadde que nieve,es necesario
a[macenarel equipode maneraadecuada.Siga lasinstruccionesde almacenambnto quese indicana continuaci6nparagaranfizarel rendimientom_ximode
la m_quinaquitanievedurante muchosafros m_s.
PREPARACU6N DEL MOTOR
Los motoresquese almacenandurantem_s de 30 d[asdebenser drenados
de combustibleparaevitar quese deterioreny seforme goma en ersistema
de combustibleo en las piezasprincipalesdel carburador.Si lagasolinaen
su motorse deterioraduranteel armacenamiento,puederesultarnecesario
repararo reemplazarel carburadory otros componentesdel sistema
de combustible.
1. Eliminetodo el combustibledel tanque haciendofuncionar el motor
hastaque se detenga.
2. Cambieel aceitedel motor.
3. Extraigala bui[ade encendidoy vierta en el cilindroaproximadamente
1 onza(30 ml) deaceite para motorlimpio. Tire varbs vecesdel
arrancadorde retrocesopara distribuirel aceitey reinstab la bui[a.
4. Limpieel exteriordel motoreliminandolasuciedady los residuosde las
siguienteszonas:
N
No rocie el motor con agua para limpiarloporque el agua podria contaminar
el combustible, Si se utiliza una manguera de iardin o equipo de lavado a
presidn tambi@ puede entrar agua dentro de la abertura del silenciador,
Elaguaque pasapor el silenciadorpuedeingresaren el cilindro,
causandodafos.
PREPARACKSN DE LA M._QUUNA
QUUTANUEVE
Si no se va a usar lamb,quinaquitanievedurante30 d[aso m_s,siga las
siguientesinstruccionesinciuidasa continuaci6n.
1. AImaceneel equipoen un _readespeiadayseca.
2. Limpie la m&quinaquitanievecon un trapo y quitela suciedad
o losresiduos.
3. Si aimacenala m_quinaquitanieveen un Bgar realvenfilado,cubralas
pbzas meta[icasdela rn_quinacon unacapa delgadade aceite
o silicona comoantioxidante.
, Abtas de refrigeraci6n
, FiHtrode admisi6n de aire o Areas de protecci6n de[ voHante/
arrancador de retroceso
• Conexi6n de la bujia
, Palancas
, Area de enlace
, Protecciones
, Carburador
, Culata del motor
5. AImaceneel motoren un sector limpio,secoy bienventilado,leiosde
cualquierartefactoquefuncionecon una llamao luzpilotocomo hornos,
calentadoresde agua o secadoresde ropa. Evitecualquiersector
con un motorel@trico queproduzcachispaso don@ se utilicen
herramientasel@tricas.
Nunca almacene la m_quina quitanieve con combustible en el tanque en
un espacio cerrado o en areas con poca ventilaci6n, donde los gases del
combustible puedan alcanzar el fuego, chispas o una luz piloto como la que
tienen algunos hornos, calentadores de agua, secadores de ropa o algOn
otro dispositivo a gas,
6, Si es posible, evite sectores de almacenamiento con mucha humedad,
7, Mantenga el motor nivelado cuando !o almacene, La inclinaci6n del
motor puede resultar en fugas de combustible o aceite,
54
Antesde realizarcualquiertipo de mantenimientoo servicio,desenganchetodosloscontrolesy detengael motor,Esperea
quesedetengancompletamentetodaslaspiezasm6viles,Desconecteelcablede labuiiay p6ngalohaciendomasacontra
l elmotorparaevitarqueseenciendaaccidentalmente,Utilicesiempreanteoiosde seguridadduranteelfuncionamientoo
mientrasaiustao reparaesteequipo,
En esta secci6n se analizan problemas menores de servieio, Para ubiear el Centre de Servieio Sears m_s cercano o para programar un servieio,
simplemente eomuniquese con Sears al tel_fono 1-800-4-MY-HOME®.
El motor no arranca
Elmotorfuncionade
maneraerr_fica/RPM
desiguales(oscilaci6n
o sobretensi6n)
t, El tanque de combustible estb_vado o el combustible se
ha echado a perder,
2, La Ifnea del combustible est8 bloqueada,
3, No se introduio completamente la Ilave,
4, Se ha desconectado el cable de la bujia,
5, La buiia no funciona correctamente,
6, El motor no estb,cebado,
7, El motor est_ ahogado ya que ha side cebado demasiado,
2,
3,
4,
5,
t,
t,
2,
t,
El motor estg.funcionando en la posici6n "choke"
(estrangulador),
La linea del combustible est_ tapada o el combustible es
viejo.
Hay agua o suciedad en el sistema de combustible,
Es necesario regular el carburador,
Exceso de regulaci6n del motor
Es necesado regular el carburador,
El cable de la buiia estb,fiojo,
La ventilaci6n de la tapa del combustible est_ obstruida,
Hay piezas que est_n flojas o la barrena est_ dahada,
t, Llene el dep6sito con gasolina limpia y nueva,
2, Comuniquese con el centre de servicio Sears,
3, Introduzca completamente la Ilave,
4, Conecte el cable a la buiia,
5, Limpie la buiia, ajuste la distancia disruptiva o cambie la bujia,
6, Optima el bot6n del cebador del motor cinco veces,
7, Aguarde al menos diez minutes antes de encender el motor,
1, Mueva la palanca del estrangulador a la posici6n
RUN (marcha),
2, Comuniquese con el centre de servicio Sears,
3, Haga marchar el motor hasta que se detenga, Vuelva a Ilenar
el dep6sito con combustible nuevo,
Comuniquese con el centre de servicio Sears,
Comuniquese con el centre de servicio Sears,
4,
5,
El motor recalienta t, Comuniquese con el centre de servicio Sears,
Perdida de potencia t, Conecte firmemente el cable de la bujia,
2, Destape la ventilaci6n,
Vibraci6n excesiva t, Pare el motor inmediatamente y retire la Ilave, Controle si la
maquina estA dahada, Ajuste todos los pernos y las tuercas,
Realice las reparaciones necesarias, Si el problema persiste,
Ileve la m_quina quitanieve al centre de servicio Sears,
La m_.quina quitanieve no t, El cable del control de la barrena necesita un ajuste, t, Ajuste el cable de control de la barrena tal y come se muestra
se autopropulsa en la secci6n de Servicio y Mantenimiento,
2, La correa de transmisi6n de la barrena estA floja 2, Reemplace la correa de transmisi6n de la barrena,
o dahada,
La barrena confinOa t, El cable del control de la barrena necesita un ajuste, t, Ajuste el cable de control de la barrena tal y come se muestra
rotando en la secci6n de Servicio y Mantenimiento,
1, El conjunto del canal estb_tapado, 1,
2, Hay un obieto extraho en la barrena,
3, El cable del control de la barrena necesita un ajuste,
4, La correa de la barrena estA floja o dahada,
La unidadnodescarga
la nieve
Detenga el motor y desconecte el cable de la buiia, Limpie el
canal y el interior de la caja de la barrena con la herramienta
de limpieza o una varilla,
2, Detenga el motor de inmediato y desconecte el cable de la
buj[a, Retire el objeto de la barrena,
3, Ajuste el cable del control de la barrena,
4, Reemplace la correa de la barrena,
&I EGESITA AYUDA?
_steylosrnanualesdetodossusotrosproductos_osencontrarfienlinea.
Suspreguntasser_nrespondidaspernuestroequipodeespedalistas,
0btengaunp_andemantenimientopersonalizadoparasubegat.
Encuentreinformaci6nyherramientasqueIoayudar_nconlosproyectosdom6stJcos,
!!!!!!!!!!!!!!!!!!!!!!!!!!!!!!!!!!!!!!!!!!!!!!!!!!!
55
MTD CONSUMER GROUP, INC. (MTD), el Bordo de Recursos de Aire de California (CARB)
y la Agencia de Protecci6n Medioambiental de Estados Unidos (U. S. EPA}
Declaraci6n de Garant_a del Sistema de Control de Ernisiones
(Derechos y obligaciones del propietario seg_n la garant(a contra defectos}
LACOBERTURADESISTEMADECONTROLDEEMISIONES APLICABLEA MOTORESCERTIFICADOSCOMPRADOSENCALiFORNiA
EN2005 Y A PARTIRDE ENTONCES,QUESON USADOSEN CALiFORNiA,Y HASTAANO2005DE MODELOCERTIFICADOY MOTORES
POSTERIORESQUESON COMPRADOSY USADOSENOTRAPARTEEN LOSESTADOSUNIDOS.
Californiayen otraparteen la Coberturade Garantiade DefectosdeControlde Emisi6nde los EstadosUnidos
El Bordode Recursosde Airede California(CARB),la U.S. EPAy MTDsecomplacenenexplicarla garantiadel sistemade controldeemisiones
de su motorparaequipotodo terreno,modelo,a_o 2005y versionesposteriores.En California,los nuevosmotorespeque_ospara equipotodo
terrenose debendiseSar,fabricary equiparparacumplirconestandaresde antinieblat6xicade estados.Enotraparteen los EstadosUnidos,
el nuevonocamino,motoresdeignici6ndechispacertificadosparaelmodelo2005y mb.star@,debeencontrareljuegode estandaressimilar
adelantepor los EstadosUnidos.EPA.MTDdebegarantizarel sistemadecontrolde emisionesde su motorpor elperiodode tiempoindicadomb.s
abajo,siemprey cuandono hayaexistidousoincorrecto,negligencianimantenimientoinadecuadode su motorpequeSoparaequipotodoterreno.
El sistemade controlde emisionespuedeincluirpiezascomo,porejemplo,el carburador,sistemadeinyecci6nde combustible,el sistemade
encendido,el catalizador,losdep6sitosde combustible,abastecede combustiblelineas,gorrasde combustible,vb@ulas,latas,filtros,mangueras
devapor,abrazaderas,conectoresy otroscomponentesrelacionadosconlas emisiones.
Dondeexistaunacondici6ncubiertaporla garantia,MTDrepararb,su motor pequeSoparaequipotodoterrenosincostoalgunoincluyendoel
diagn6stico,laspiezasy la manode obra.
COBERTURA DE LA GARANTiA DEL FABRICANTE:
Estesistemade controldeemisionesse garantizapor el t@rminodedos aSos.Si algunapiezade su motorrelacionadacon lasemisioneses
defectuosa,MTD repararb,o sustituirb,dichapieza.
RESPONSABILIDADES DEL PROPIETARIO SEGUN LA GARANTIA:
Comopropietariode un motorpeque_ode equipotodoterreno,ustedes responsablede realizarel mantenimientonecesarioquefigura enel
manualdel propietario.MTDle recomiendaqueconservetodos los recibosque cubrenlos serviciosde mantenimientodel motorpequeSopara
equipotodoterreno,noobstanteIo cual MTDno podrb,denegarel cumplimientodela garantiaOnicamentepot la faltade reciboso pot su imposibi=
lidadde asegurarquese realizarb.ntodos los serviciosde mantenimientoprogramado.
Comopropietariodel motorpequeSoparaequipotodo terreno,sinembargo,ustedtambi_ndebesaberque MTDpuededenegarlacoberturade la
garantiasi su motorpequeSoparaequipotodoterrenoo unapiezadel mismofallandebidoa usoincorrecto,negligencia,mantenimientoindebido
oa modificacionesno aprobadas.
Ustedes responsablede presentarlacortadoradec6spedal centrode distribuci6no de mantenimientode MTDCONSUMERGROURiNC. tan
prontocomo aparecierael problema.Lasreparacionescubiertaspot la garantiasedebenllevaracabo en un lapsorazonableque noexcedade
30dias.Si desearealizaralgunaconsultacon respectoa la coberturade lagarantia,debeponerseen contactocon su distribuidorlocalde MTD.
Paracomunicarseconla LineadeAsistenciaal Clientede Distribuidoresde MTD,llameal nOmero(877)282=8684.
REQUERIMIENTOS DE GARANTJA SOBRE DEFECTOS PARA MOTORES PEQUENOS DE EQUIPO TODO TERRENO
DE 1995YVERSIONES POSTERIORES:
Estasecci6nse aplicaa motorespequeSosde equipotodo terrenode 1995y versionesposteriores.Elperiododegarantiacomienzaa partirde la
fechaen queel motoro elequipo seentreganal compradorfinal.
La_Coberturade lagarantiacontraemisionesgenerales
MTDgarantizaal compradorfinaly a cada compradorsubsiguienteque el motor:
(1)hasido diseSado,construidoy equipadode maneraque cumplacontodas las regulacionesvigentesadoptadaspot el Departamentodelos
RecursosdeAire en virtuda suautoridadconferidaen los capitulos1 y 2, Parte5, Divisi6n26 del C6digode Saludy Seguridad;y
(2)esta librede defectosen los materialesyen la manode obraquecausenla falla deunapiezabajo garantiaque seaid6nticaentodoslos
aspectosmaterialesa lapiezacomoaparecedescriptaen laaplicaci6ndel fabricantedel motorparacertificaci6npot unperiododedos aSos.
_qarantia sobre piezasrelacionadasconemisionesse interpretarb,de la siquientemanera:
(1)Cualquierpiezacubierta pot garantiaquenoest_ programadapara su reemplazosegOnel mantenimientorequeridoen las instrucciones
escritasdela Subsecci6n(c) debeestargarantizadapot un periodode garantiadefinidoen la Subsecci6n(a)(2). Sila piezafalladurante
el periododecoberturade la garantia,lamismaseth.reparadao reemplazadapot MTD de acuerdocon laSubsecci6n(4)a continuaci6n.
Cualquierpiezareparadao reemplazadasegOnlagarantiasegarantizarb,pot el restodelperiodode garantia.
(2) Cualquierpiezacubiertapot garantiaqueest_programadasolopara inspecci6nregularen las instruccionesescritasde la Subsecci6n
(c) debeestargarantizadapot un periododegarantiadefinidoenla Subsecci6n(a) (2). Unadeclaraci6nen dichasinstruccionespot escrito
alefectode "reparaci6no reemplazosegOnseanecesario"no reducirb,elperiodode coberturade la garantia.Cualquierpiezareparadao
reemplazadasegOnla garantiase garantizarb,pot el restodel periodode garantia.
(3) Cualquierpiezagaranfizadaqueest_programadaparareempbzosegOnelmantenimientorequefidodeconformidadconlasinstruc-
cionesescritasdelaSubsecci6n(c)segarantizaporelperiododefiempoanterioralaprimerafechadereemplazoprogramadaparaesa
pieza.Silapiezafallaantesdelprimerreemplazoprogramado,lamismaserb.reparadaoreemplazadaporMTDdeacuerdoconlaSubsecd6n
(4)aconfinuaci6n.Cualquierpiezareparadaoreemplazadabajogarantiasegarantizaraporelrestodelperiodoanterioralprimerreemplazo
programadopuntualparaesapieza.
(4)Lareparad6noelreemplazodecualquierpiezagarantizadadeconformidadconlasdisposidonesdelagarantiaqueaquiseesfipulase
deberealizarenuncentrodegarantiasincostoalgunoparaelpropietario.
(5)SinperjuidodebsdisposMonesdelaSubsecd6n(4)anterior,losservidosoreparadonescubiertosporlagarantiadebensersumin-
istradosportodosloscentrosdedistfibuci6ndeMTDquetenganlafranquidapararealizarreparadonesymantenimientoalosmotoresen
cuesfi6n.
(6)ElpropietafionodebeafrontarningOncargoparatrabajosdediagn6sficoqueIlevenalaconclusi6ndequeunapiezabajogarantiapresenta
efecfivamentedefectos,siempreycuandodichodiagn6sticoseaIlevadoacaboenuncentrecubiertoporlagarantia.
(7)Elfabricantedelmotoresresponsableporda_oscausadosaotroscomponentesdemotoresdefivadosdelafallabajogarantiadecualquier
piezagarantizada.
(8)DurantetodoelperiododegarantiadelmotordefinidoenlaSubsecci6n(a)(2),MTDmantendrb,unsuministrodepiezascubiertaspor
garantiasuficienteparasatisfacerlademandaesperadaparatalespiezas.
(9)Cualquierpiezadereemplazosepodrb,usarparaelcumplimientodelmantenimientooreparacionesbajogarantia,ysesuministrarb,sin
cargoalpropietario.Dichousenoreducirb,lasobligacionesdegarantiadeMTD.
(10)Nosepodranusarpiezasadicionalesnimodificadasquenoest_nexentasdeacuerdoconelDepartamentodelosRecursosdelAire(Air
ResourcesBoard).Elusedepiezasadicionalesomodificadasnoexentasserb.causasuficienteparaanubrunreclamobajogarantiarealizado
deacuerdoconestearticulo.Elfabricantedelmotornotendraresponsabilidad,enconformidadconestearticulo,degarantizarfallasdepiezas
garantizadasquefuerencausadasporelusedeunapiezanoexentaadicionalomodificada.
_) MTDincluirb,una copiade lasiguientelistade piezasbajoqarantiacontra emisionescon cadanuevomotor,utilizandolas partesde la lista
_licables al motor.
(1)Sistemademedici6ndecombustible
, Sistemade mejoraparainicioenfrio (cebadosuave)
, Carburadory componentesinternes
, Bombade combustible
, Dep6sitode combustible
(2) Sistemadeinducci6ndeaire
, Filtrode aire
, Colectorde entrada
(3) Sistemadeencendido
oBujia(s)
, Sistemade encendidoper magneto
(4)Sistemadeescape
, Catalizador
, SAI (valvulade Ca_a)
(5) Componentesvaries utilizadosen el sistemaanterior
, Wlvulas e interruptoresde vacio,temperatura,posici6nsensiblesal tiempo
, Conectoresy montajes
(6)Controlde Evaporative
, Manguerade CombustiblecertificadaparaARB evaporativeemisi6nde 2006.
, Abrazaderasde Manguerade Combustible
, Gorrade combustibleatada
, Latade carb6n
, Lmeasdevapor
GDOC-100174Rev,B
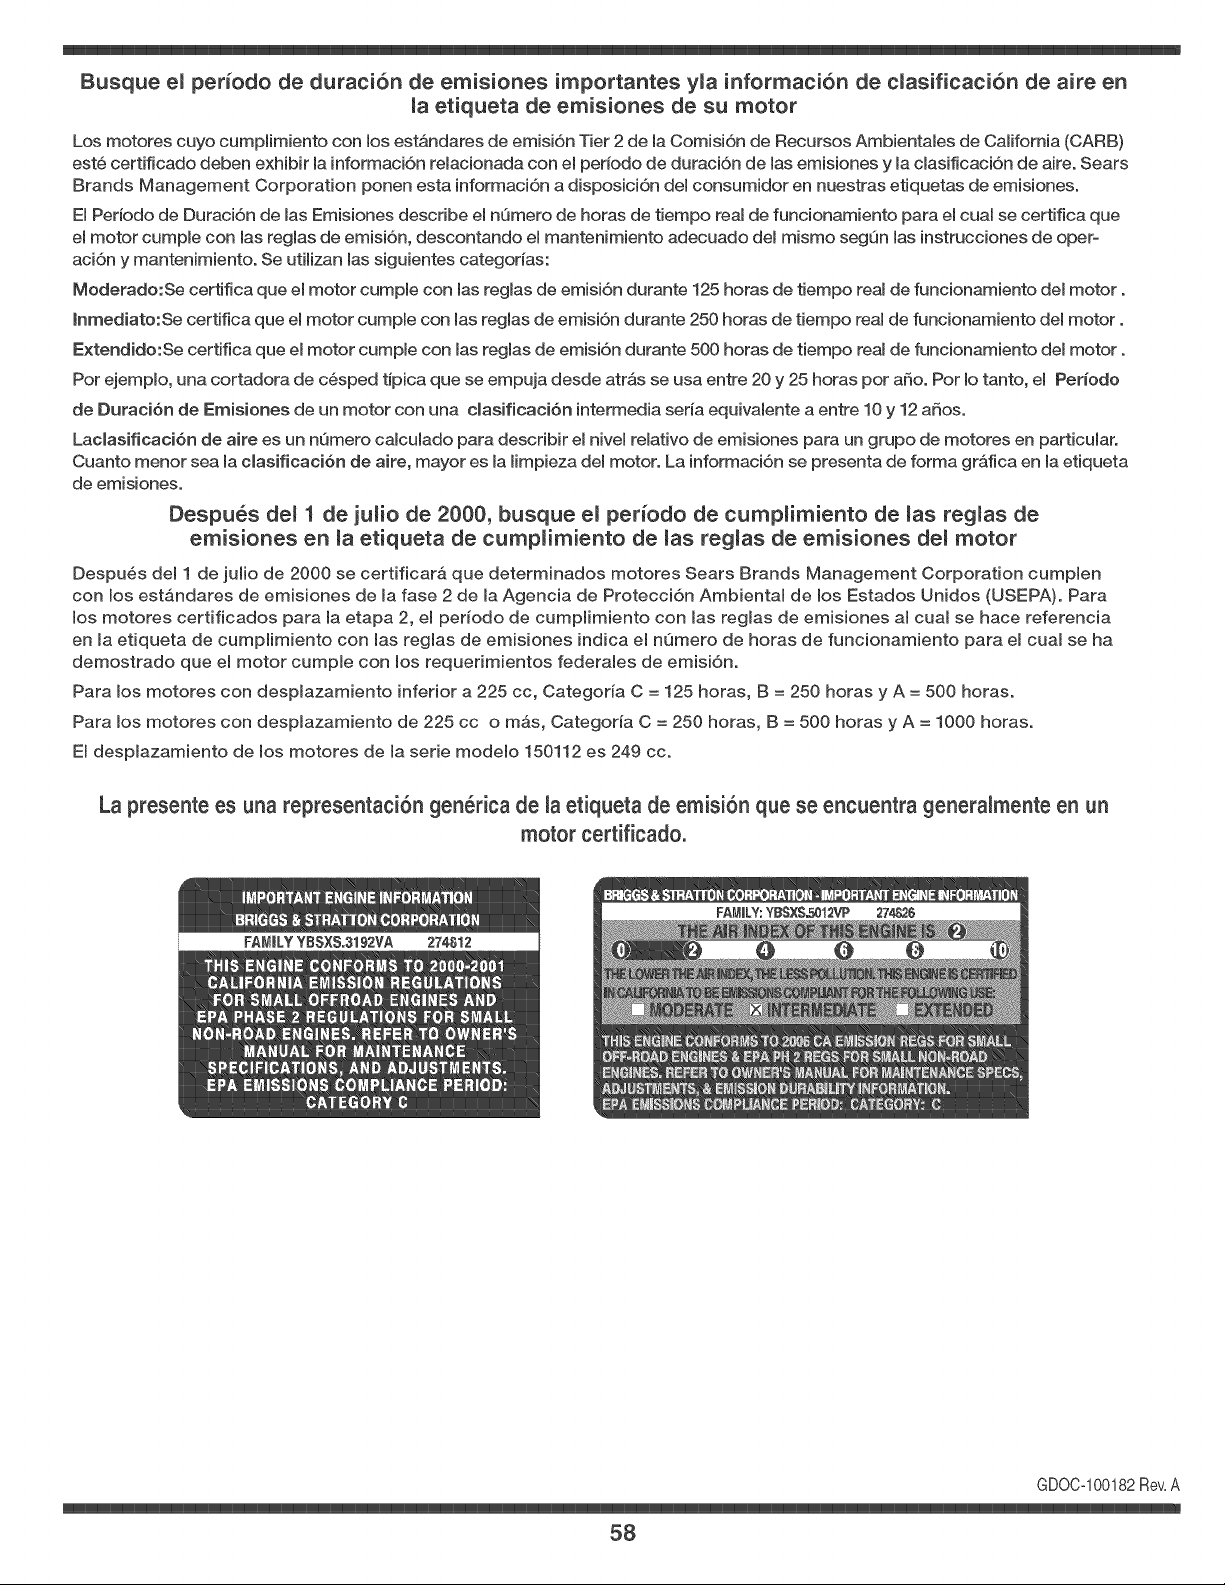
Busque e( per(odo de duraci6n de emisiones importantes y(a informaci6n de c(asificaci6n de aire en
meetiqueta de emisiones de su motor
Los motores cuyo cumpiimiento con los est&ndares de emisi6n Tier 2 de la Comisi6n de Recursos Ambientales de California (CARB)
est6 certificado deben exhibir la informaci6n reiacionada con el per(odo de duraci6n de las emisiones y la ciasificaci6n de aire. Sears
Brands Management Corporation ponen esta informaci6n a disposici6n del consumidor en nuestras etiquetas de emisiones.
El Per(odo de Duraci6n de las Emisiones describe el nQmero de horas de tiempo real de funcionamiento para el cual se certifica que
el motor cumpie con las regias de emisi6n, descontando el mantenimiento adecuado del mismo segQn las instrucciones de opero
aci6n y mantenimiento. Se utiiizan las siguientes categodas:
Moderado:Se certifica que el motor cumpie con las regias de emisi6n durante 125 horas de tiempo real de funcionamiento del motor.
mnmediato:Se certifica que el motor cumpie con las regias de emisi6n durante 250 horas de tiempo real de funcionamiento del motor.
Extendido:Se certifica que el motor cumpie con las regias de emisi6n durante 500 horas de tiempo real de funcionamiento del motor.
Por ejemplo, una cortadora de c6sped t(pica que se empuja desde atr&s se usa entre 20 y 25 horas por a_o. Por Io tanto, el Per_odo
de Duraci6n de E-'misiones de un motor con una ciasificaci6n intermedia seda equivaiente a entre 10 y 12 a_os.
Laciasificaci6n de aire es un nQmero caicuiado para describir el nivel reiativo de emisiones para un grupo de motores en particular.
Cuanto menor sea la ciasificaci6n de aire, mayor es la limpieza del motor. La informaci6n se presenta de forma grafica en la etiqueta
de emisiones.
Oespu_s del 1 de juiio de 2000, busque el pedodo de cumpiimiento de las regias de
emisiones en la etiqueta de cumpiimiento de las regias de emisiones del motor
Despu_s del 1 de juiio de 2000 se certificara que determinados motores Sears Brands Management Corporation cumpien
con los estandares de emisiones de la fase 2 de (a Agencia de Protecci6n Ambiental de los Estados Unidos (USEPA). Para
los motores certificados para la etapa 2, el pedodo de cumpiimiento con (as regias de emisiones al cua( se hace referencia
en la etiqueta de cumpiimiento con las regias de emisiones indica el nQmero de horas de funcionamiento para el cual se ha
demostrado que el motor cumpie con los requerimientos federaies de emisi6n.
Para los motores con despiazamiento inferior a 225 cc, Categoda C = 125 horas, B = 250 horas y A = 500 horas.
Para los motores con despiazamiento de 225 cc o m_s, Categoda C = 250 horas, B = 500 horas y A = 1000 horas.
El despiazamiento de los motores de la serie modelo 150112 es 249 cc.
La presente es una representaci6n gen_rica de la etiqueta de emisi6n que se encuentra generaimente en un
motor certificado.
GDOC-100182Rev.A
58

Fdicitaciones pot haber realizado una adquMci4n intdigente. El producto Craftsman® que ha
adquirido esta disenado y fabdcado para bdndar muchos anos de funcionamiento confiabb. Pero
como todos los productos a veces puede requedr de reparaciones. Es en ese momento cuando el
disponer de un Acuerdo de protecci6n para reparaciones le puede ahorrar dinero y probbmas.
A con%uaci6n se detaHanbs puntos incbidos en eUAcuerdo:
Servicio experto prestadopot nuestros 10,000 especblbtas en reparaciones profesionabs
Servicio ilimitado sin cargo para bs piezasy la mano de obra en todas bs reparacionescubiertas
Reemplazo del producto hasta 1500 d6bres si no es posibb reparar el producto cubierto
Descuento de 25% del precio normal del servicio y de bs piezas rebcionadas con el mismo que no esten cubiertas
pot el acuerdo; ademAs,25% del precio normal de laverificaci6n de mantenimientopreventivo
Ayuda rApida pot tel_fono - Io Ibmamos Resobci6n RApida- el apoyo tebf6nico de un Chamusca al representante.
Piense en nosotros como el manual "de un duefio habbdor."
Una vez adquirido el Acuerdo, puede programar el servicio con tan s61orealizar una Ilamadatebf6nica. Puede Ilamaren
cualquier momentodel dia o de la noche o programar un servicio en linea.
ElAcuerdo de Protecci6nde Reparaci6nes una compra sin riesgo. Si usted anula pot alguna raz6n duranteel periodo de
garantia de producto, proporcionaremos un reembolso Ibno. O, un reembolso prorrateado en cualquier momentodespues
del periodo de garantia de producto expira, iAdquiera hoy su acuerdode protecci6n para reparaciones!
Se aplican determinadas limitaciones y exclusiones. Para obtener informaci6n adicional y precios en los Estados
Unidos Hameal 1-800-827-6(}55.
El *Coverage en Canada vada en algunos articulos. Para detaHes Henos la Hamada Chamusca Canada en 1-800-
361-6665.
Servicio de instalaci6n de Sears
Si desea solicitar la instabci6n profesionalde Sears de aparatos domesticos, dispositivos para abrir portones, cabntado-
res de agua y otros articulos domesticos importantes, en los Estados Unidos o Canada Ibme al 1-800-4-MY-HOME®.
59

Your Home
For troubleshooting, product manuals and expert advice:
managernylife
www.managemylife.com
For repair - in your home - of all major brand appliances,
lawn and garden equipment, or heating and cooling systems,
no matter who made it, no matter who sold it!
For the replacement parts, accessories and
owner's manuals that you need to do-it-yourself.
For Sears professional installation of home appliances
and items like garage door openers and water heaters.
1-800-4-MY-HOME ® (1-800-469-4663)
Call anytime, day or night (U.S.A. and Canada)
www.sears.com www.sears.ca
Our Home
For repair of carry-in items like vacuums, lawn equipment,
and electronics, call anytime for the location of your nearest
Sears Parts & Repair Service Center
1-800-488-1222 (U.S.A.) 1-800-469-4663 (Canada)
www.sears.com www.sears.ca
To purchase a protection agreement on a product serviced by Sears:
1-800-827-6655 (U.S.A.) 1-800-361-6665 (Canada)
Para pedir servicio de reparaci6n
a domicilio, y para ordenar piezas:
1-888-SU-HOGAR ®
(1-888-784-6427)
www.sears.com
Au Canada pour service en frangais:
1-800-LE-FOYER Mc
(1-800-533-6937)
www.sears.ca
® Registered Trademark / TMTrademark of KCD IP, LLC in the United States, or Sears Brands, LLC in other countries
® Marca Registrada ! TMMarca de Fabrica de KCD IP, LLC en Estados Unidos, o Sears Brands, LLC in otros paises
MCMarque de commerce ! MDMarque deposee de Sears Brands, LLC