Loading ...
Loading ...
Loading ...
4 www.dimplex.com
Level 1 - Flame effect only, twice activates Level 2 -
Flame effect and Purire™, three times activates Level
3 - Flame effect, Purire™ and heat.
C. On Button
Pressing this button at any time will shut the unit off.
D, E & F LED Indicators
Depicts which of the three (3) levels the replace is
currently operating at: Level 1 - , Level 2 - or Level
3 - .
Optional Remote Control Operation
The BFRC-KIT is supplied with a radio frequency remote
control. This remote control has a range of approximately
50 feet (15.25 m), it does not have to be pointed at the
replace and can pass through most obstacles (including
walls). It is supplied with one of hundreds of independent
frequencies to prevent interference with other units.
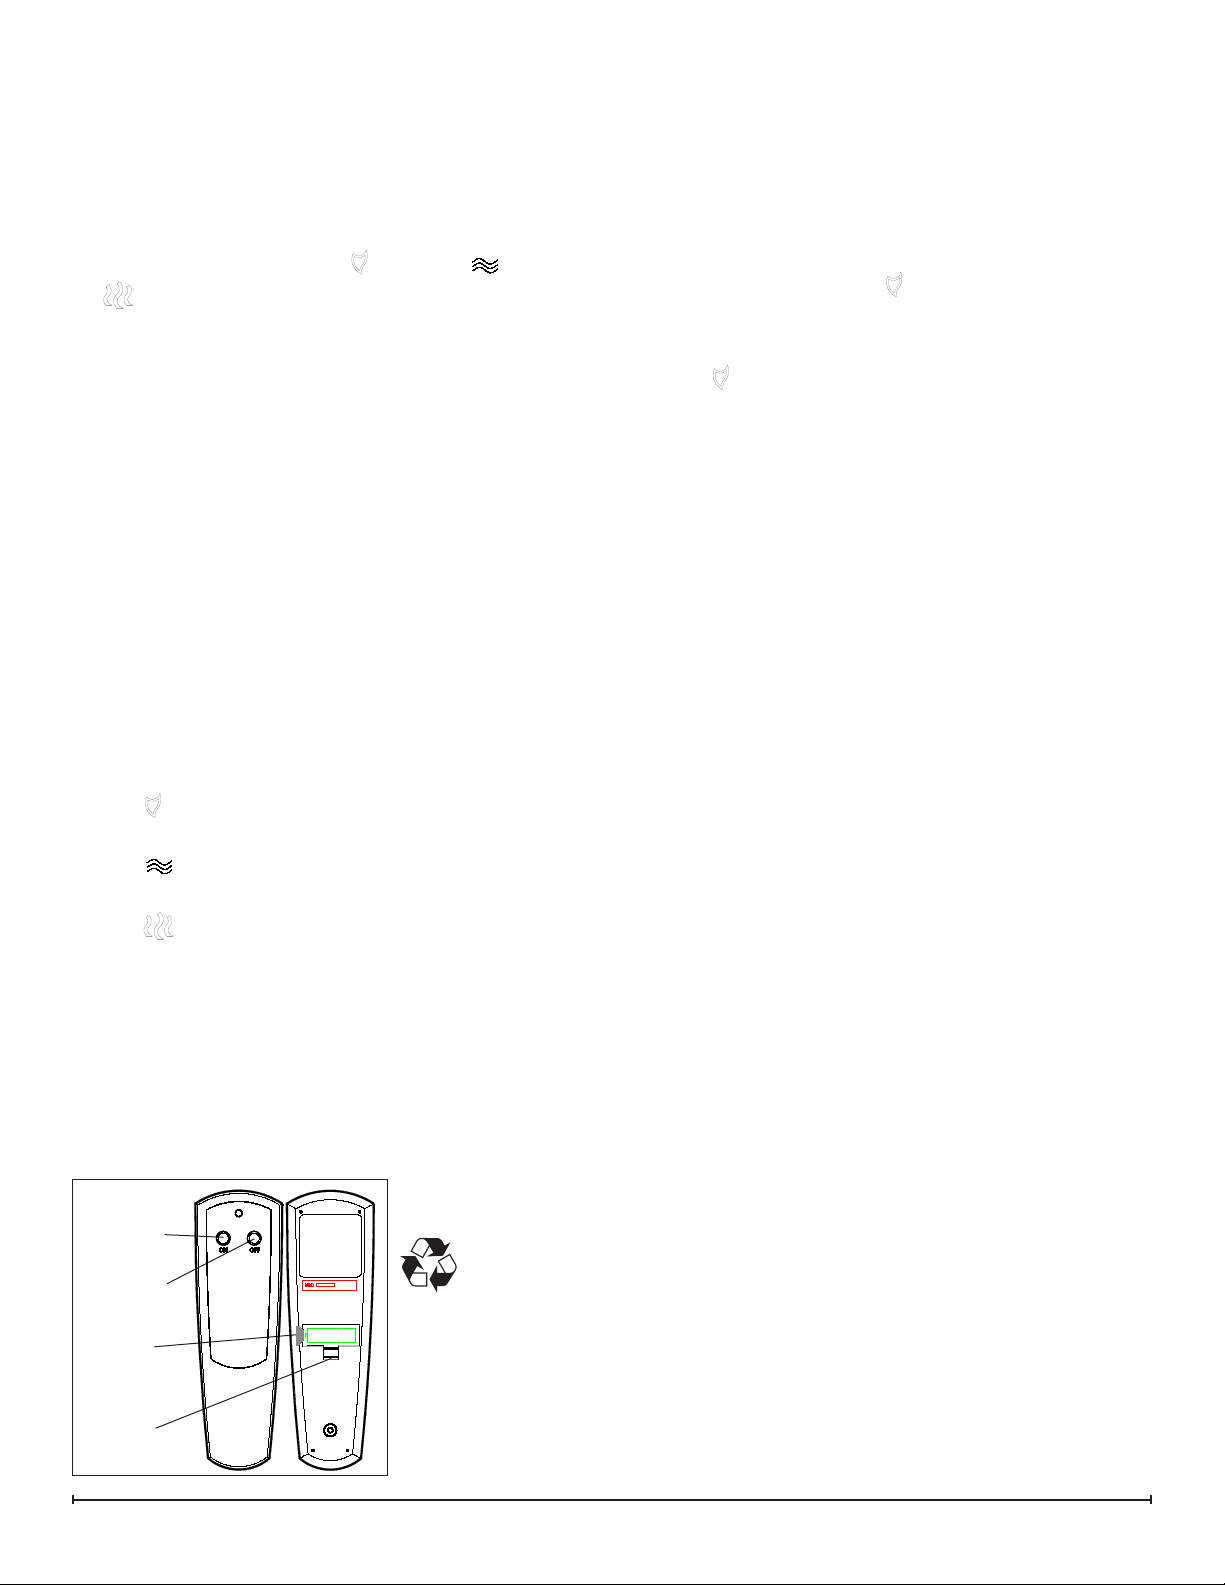
!
NOTE: Before attempting any operation with the
remote, pull the plastic insulator strip out from between
the remote casing and battery cover (Figure 3).
The remote control operates the replace levels
sequentially. The level is increased every time the ON
button on the remote control is pressed. The replace can
be turned off at any point by pressing the OFF button on the
remote control.
!
NOTE: The Mode Selector Switch on the original
manual controls needs to be set to “=” to have full
functionality of the replace. (Figure 2)
Level 1 :The ame effect is turned on and the rst red
indicator light is activated.
Level 2 : The ame effect remains on, the Purire is
activated. (Heater remains off)
Level 3 : The ame effect remains on, the Purire is
activated and the heater turns on.
Remote Control Initialization/Reprogramming
If the remote control or receiver has been replaced or the
remote does not seem to be operating the replace, follow
these steps to initialize/reprogram the remote control and
receiver:
1. Ensure that power is supplied through main service
panel.
2. Access the manual controls, (remove the glass doors
if applicable) pull the right hand steel curtain to the
outside of the unit.
3. Locate manual controls.
4. Move the 3-position switch to “Remote”, on newer
models only.
5. Activate the main power switch, the red Level 1
Indicator Light may ash . (Figure 2-D)
6. Press and hold the On button on the manual controls
(Figure 2-C) for ve (5) seconds. The Level 1 Indicator
Light (Figure 2-D) will then ash for 10 seconds.
7. Within the 10 seconds press the ON button located on
the hand held remote control (Figure 3) or any button
on the wall mounted controller. This will synchronize
the remote control and receiver.
Battery Replacement
To replace the battery:
1. Slide battery cover open on the remote control
(Figure 3).
2. Install one (1) 12-Volt (A23) battery in the battery
holder.
3. Close the battery cover.
Optional Wall Mounted Remote Operation
!
NOTE: For button/display references see Figure 4.
1. Room Temperature - Displays current ambient
temperature in the room.
2. Set Temperature - Displays and controls the heater
to the temperature at which the thermostat is currently set
to. Press 8 to lower the thermostat and press 9 to raise
the thermostat. Pressing both 8 and 9 together will toggle
between Celsius and Fahrenheit.
3. Flame Effect Icon - The ame icon will icker if and
when the Flame Effect is turned on. Press 11 to turn the
Flame Effect on, and press 10 to turn the Flame Effect off.
4. Purire™ Icon - The display arrows for the Purire™
will cycle when turned on. Press 13 to turn the Purire™
function on, and press 12 to turn Purire™ off.
5. Heat Off Indicator - This function manually overrides
the thermostat control and prevents the replace’s heater
from coming on.
To do this, press 8 to decrease Set Temperature to any
temperature below 0
o
C or 32
o
F. To reactivate heat from
“HEAT OFF” setting, press 9 to increase the thermostat
Set Temperature. The Set Temperature will be displayed
starting at 21
o
C (70
o
F), replacing the “HEAT OFF” icon.
6. Function Lock Indicator - Enabling this function will
lock out the Wall Switch Remote Control so as to prevent
the current settings from being changed. To Enable, press
8, 9, and 10 sequentially. To disengage, press 8, 9 and
10 sequentially again. The Indicator icon will be displayed
when enabled.
7. RF Code Function and Change Procedure - In
Off Button
On
Button
Battery
Cover
Plastic
Strip
Battery must
be recycled or
disposed of
properly. Check with
your Local Authority or
Retailer for recycling
advice in your area.
Figure 3
Loading ...
Loading ...
Loading ...