Operating Instructions
Washer
PW 6107
PW 6137
PW 6167
PW 6207
To prevent accidents
and machine damage
read these instructions
before
installation or use.
M.-Nr. 09 118 330
en, fr - US, CA

2

IMPORTANT SAFETY INSTRUCTIONS ..........................................................4
Guide to the machine ........................................................................7
Guide to the washer .........................................................................8
Operating panel .............................................................................8
Use ......................................................................................10
Turn on the washer ..........................................................................10
Sort and load the laundry .....................................................................10
Maximum dry laundry weights for standard programs .................................................10
Add detergent..............................................................................11
Select a program ...........................................................................12
Select wash options (if desired) ................................................................12
Adjust the program (if desired).................................................................13
End of program.............................................................................14
Chip card use .............................................................................15
Card operation .............................................................................15
Additional features .........................................................................16
Language selection .........................................................................16
Delay Start ................................................................................16
Program stop ..............................................................................17
Canceling a program ........................................................................17
Skipping program cycles .....................................................................18
Optional Module ...........................................................................19
Liquid dispensing system.....................................................................19
Peak load cut off ............................................................................21
Communication module ......................................................................21
Operating data .............................................................................21
Load module...............................................................................23
Frequently asked questions .................................................................24
Power failure - Emergency door release .........................................................24
Fault messages.............................................................................26
Cleaning and Care .........................................................................28
Help to protect the environment ..............................................................32
Installation Instructions .....................................................................33
Removing the shipping struts ..................................................................34
On-site connections .........................................................................35
Water connections ..........................................................................35
Plumbing..................................................................................35
Detergent connection at the mixing compartment of the liquid dispensing system ........................36
Electrical connection ........................................................................37
Technical Data.............................................................................39
Contents
3

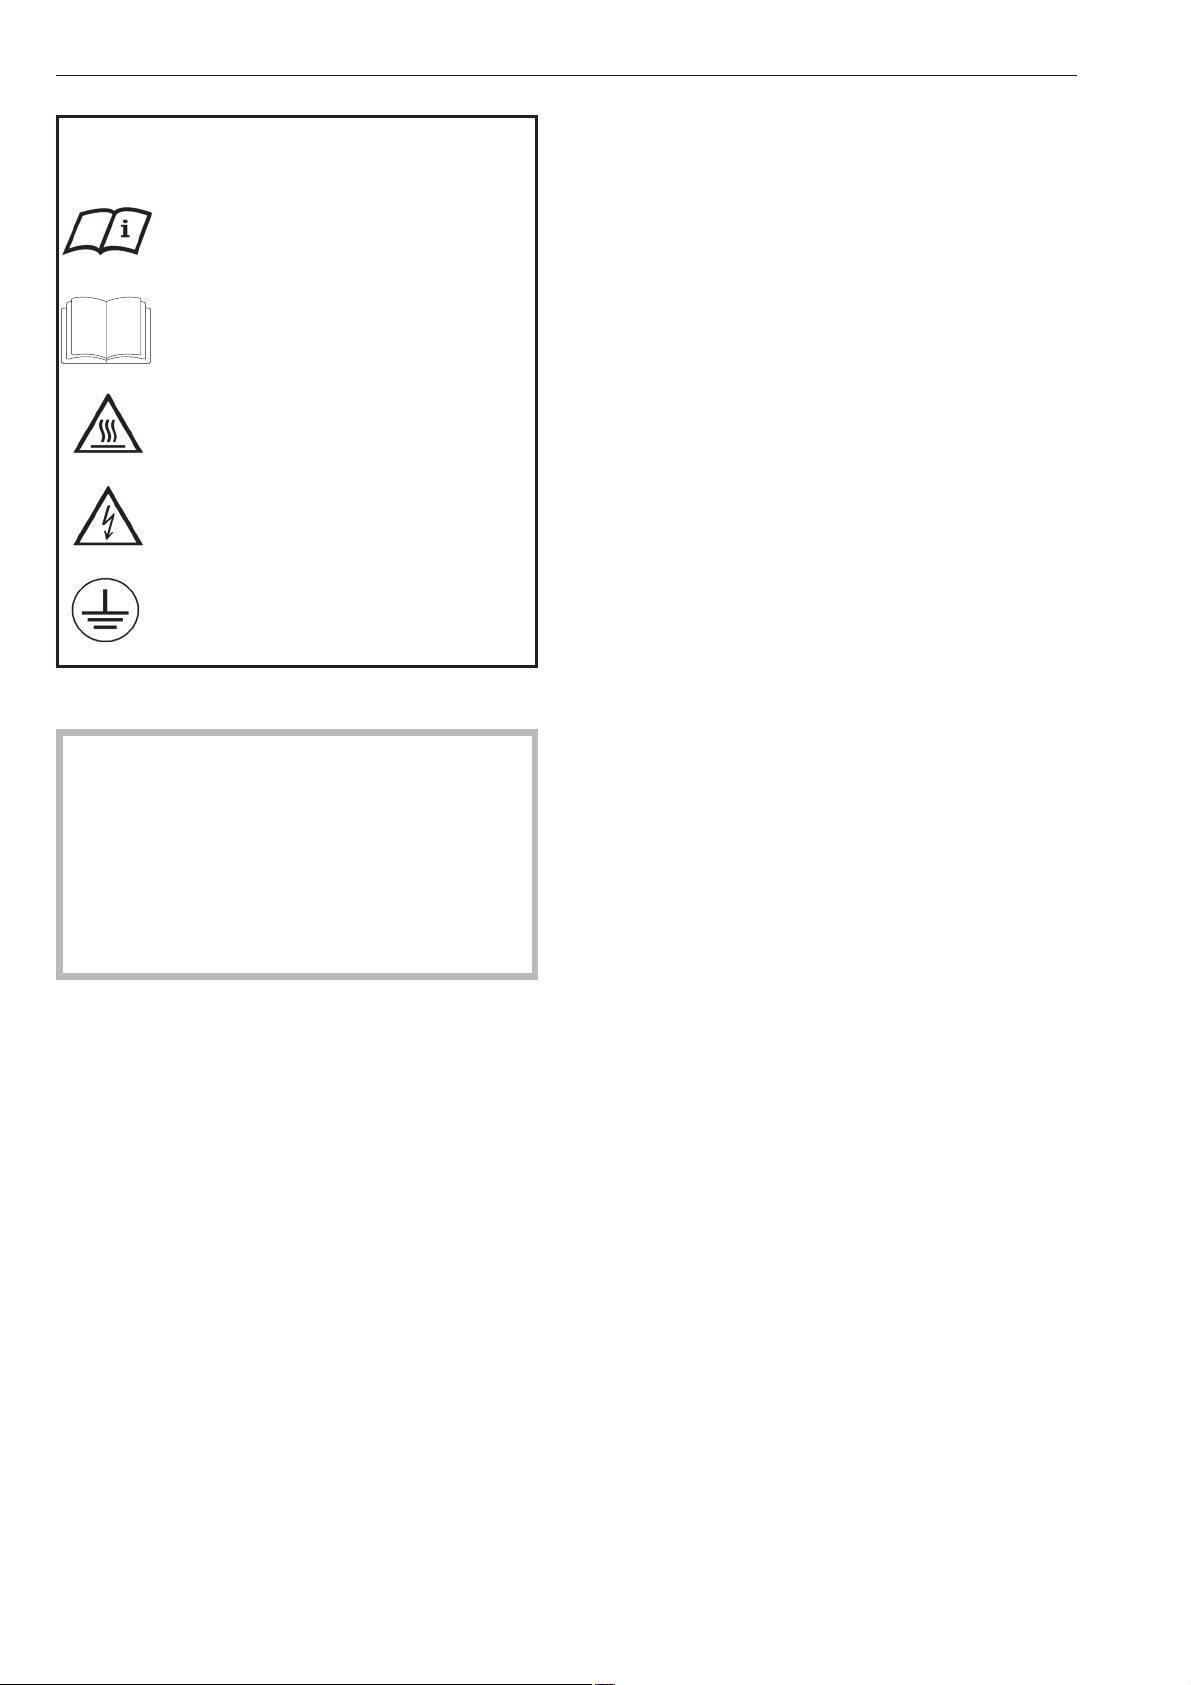
Explanation of safety instructions and
warnings on the washer
Read the operating instructions.
Read all the instructions, e.g. the
installation instructions.
Caution, hot surfaces.
Caution, voltage up to 1000 V
Grounding
,
READ AND SAVE THESE INSTRUCTIONS
Keep these operating instructions in a safe place
and pass them on to any future user.
Read all instructions before installation or use of the
washer to prevent injury and machine damage.
Installation, repair and maintenance work should be
performed by a Miele authorized service technician.
Work by unqualified persons could be dangerous.
This appliance complies with current safety
requirements. Improper use of the appliance can
lead to personal injury and material damage.
All personnel working with this machine must be
fully trained in all aspects of its use and safety.
Correct usage of the washer
~
Only use the washing machine to wash items which are
specified by the manufacturer to be machine washable on
the fabric care label. Any other applications may be
dangerous.
~
Persons who lack physical, sensory or mental abilities,
or experience with the appliance should not use it without
supervision or instruction by a responsible person.
~
This washer-extractor is only intended for laundry which
has not come in contact with flammable substances.
~
Dry cleaning solvents must not be used in this machine.
Such solvents could cause a fire or explosion.
~
Do not wash articles that have been previously cleaned,
washed, soaked or spotted with gasoline, dry-cleaning
solvents, organic oils or other flammable substances.
These articles give off vapors that could ignite or explode.
Do not add these items to the wash load.
~
CAUTION: Fire hazard!
Do not store or use gasoline, gasoline-based substances
or any easily flammable materials near the machine. Do not
use the top of the washer as a storage area.
~
Do not store any chemicals (liquid detergents, wash
aids) on the top of the washer. The chemicals could
damage the surface. Spilled chemicals must be
immediately washed off with a wet sponge.
~
Under certain conditions, hydrogen gas may be
produced in a hot water system that has not been used for
2 weeks or more. HYDROGEN GAS IS EXPLOSIVE. If the
hot water system has not been used for such a period, turn
on all hot water faucets and let the water flow from each for
several minutes before using the washing machine. This
will release any built-up hydrogen gas. Do not smoke or
use an open flame during this time, the gas is flammable.
~
Check the wash results when the laundry was soiled
with biological oils or grease. If the laundry is not
sufficiently cleaned, a spontaneous combustion might
occur when the laundry is dried in a dryer.
Use special detergents or wash programs.
~
If the washer is operated in a publicly accessible area,
the operator must ensure the safe use of the appliance.
~
Ensure that any one operating this machine is familiar
with these important safety instructions.
IMPORTANT SAFETY INSTRUCTIONS
4

Electrical Safety
~
Be certain this appliance is properly installed and
grounded by an authorized technician. For electrical safety
this machine must be grounded. It is imperative that this
basic safety requirement be tested by a qualified
electrician. Consult a qualified electrician if in doubt.
~
Repairs to electrical or steam appliances should only be
carried out by a Miele authorized technician in accordance
with local and national safety regulations. Unauthorized
repairs could cause injury or machine damage.
~
Do not repair of replace any part of the appliance or
attempt any servicing unless specifically recommended in
these operating instructions. Contact Miele’s Technical
Service Department for assistance.
~
Do not damage, remove, or bypass any of the safety
features and controls of the washer.
~
Do not operate the appliance if the control panel, wires
or cables are damaged.
~
Do not operate the washer when housing parts have
been removed and the moving or electrical parts are
exposed and accessible.
~
The washer is only completely isolated from the
electrical supply when the circuit breaker has been tripped
or the power main shut off.
~
Do not use force to open the washer drum door. The
door handle is equipped with an extra safety mechanism to
guarantee that the door remains locked.
~
Faulty components must only be replaced with genuine
Miele spare parts to guarantee the safe operation of this
machine.
Use
~
Do not let children play in, on or near the washer. Do not
let them play with the controls or operate the unit. Close
supervision of children is necessary when the appliance is
used near children.
~
Always close the door after loading or unloading the
washer, to prevent:
–
children from climbing into the washer, or hiding small
items in the washer.
–
small animals from climbing into the washer.
~
The drum door glass will be hot when washing at very
high temperatures. Do not touch the glass.
~
Do not reach into the appliance if the drum is moving.
~
Take care not to pinch or cut your fingers on the hinges
of the drum door or lint flap. Use the handles.
~
The area necessary to open the drum door completely
must not be obstructed by doors or other structures.
~
Do not drink washer water! Harmful residues could be
present.
~
Always follow the instructions of the chemical
manufacturer when using cleaning agents and special
application chemicals. Only use such chemicals for the
purpose and in the situation specified by the manufacturer.
This will prevent the danger of adverse chemical reactions
and material damage.
If in doubt, check with the manufacturer to be sure that the
product is suitable for use in this machine.
~
Dyes, dye removers and descaling agents may only be
used in this machine if the manufacturer states they are
suitable for use in a washing machine. Always observe the
manufacturer’s instructions carefully.
~
Fabric softeners may be used with this machine. Follow
the manufacturers instructions.
~
Do not use high pressure cleaners to hose down the
washer.
~
Check the hoses regularly for leaks to prevent water
damage.
~
Do not tamper with
the controls.
IMPORTANT SAFETY INSTRUCTIONS
5

Additional information
~
Disinfecting and cleaning agents often contain chlorides
(salts) which can cause steel surfaces to rust. To protect
the machine from rust damage, only use chloride free
disinfecting and cleaning agents for washing/disinfecting
and for cleaning the machine. If you are not sure about an
agent contact Miele’s Professional Department. If you
accidentally spill an agent containing chloride on the
machine it should be rinsed off with water and dried with a
soft cloth.
~
The manufacturer of the washer does not take
responsibility for the effect of the chemical on the laundry
or the machine when a chemical cleaning agent is
recommended on technical application grounds.
~
Keep the area around the machine clean and free of
debris.
~
Before the appliance is removed for service or
discarded, remove the door.
~
The interior of the machine should be cleaned
periodically by a qualified service agent.
Using accessories
~
Only use genuine Miele accessories. If other parts are
used, guarantee, performance and product liability claims
may become void.
Chlorine damage to components
How to handle chlorine bleach and perchloroethylene
(PCE)
~
Heavy use of chlorine products increases the risk of
damage to appliance components.
Depending on the chlorine concentration, the exposure
time, and the temperature, the use of liquid and powdered
chlorine-based bleaches can erode the stainless steel
protective layer and lead to corrosion of the appliance
components. Therefore, it is recommended that these
products not be used. Instead you can use oxygen-based
bleaches.
If you still need to use chlorine-based bleaches in special
cases, you will need to perform a neutralizing step each
time. Failure to do so can result in permanent and
irreversible damage to the washing machine and the
laundered items.
Chlorine neutralization
Chlorine neutralization must be done immediately following
the use of a chlorine-based bleach. For best results, use
hydrogen peroxide or an oxygen-based laundry soap or
bleach, without draining the tub.
If thiosulfate is used (especially with hard water), lime
deposits can form, leading to residue on the laundered
items or a build-up in the washing machine. The preferable
alternative is to use hydrogen peroxide, because it helps
promote the neutralization of chlorine.
The exact amounts to be used, and at what temperature(s),
should be selected based on the recommendations of the
neutralizer manufacturer, then checked for efficacy. The
laundry will need to be tested to ensure that no active
chlorine remains behind after neutralization.
SAVE THESE
INSTRUCTIONS
IMPORTANT SAFETY INSTRUCTIONS
6
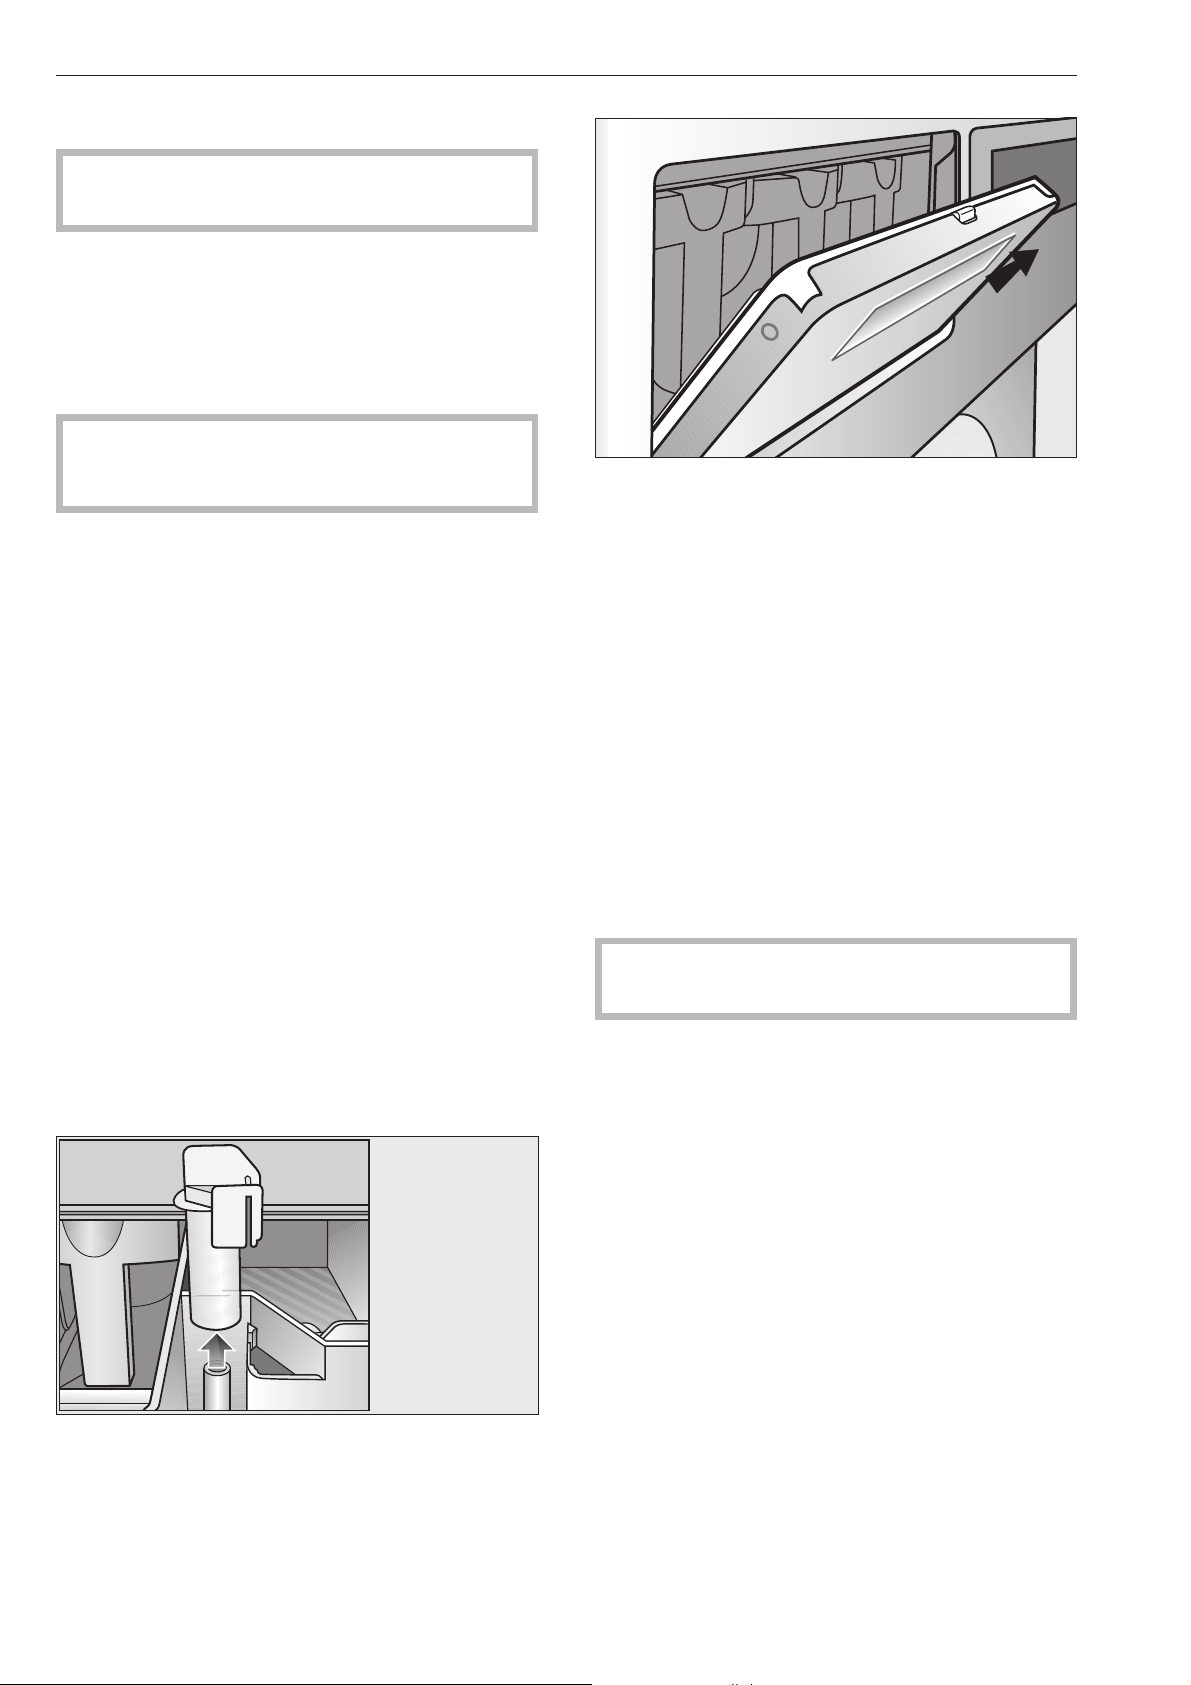
a Emergency Stop button
Pressing the red button turns the machine off.
b Control panel
c Detergent compartments
Pull the handle to open the flap.
d Drum door
Pull the door handle to open the drum door.
Do not use force.
e Door handle
The door handle is equipped with an extra safety
mechanism to guarantee that the door remains
locked (see "Frequently asked questions").
f Four height adjustable feet
g Electrical connection
h Water connection
i Water recovery connections
j Communication module
k Drain pipe
l Connections for liquid dispensing
m Vapor vent
See "Installation"
Guide to the machine
7
c
d
e
b
a
f
i
m
h
l
j
g
k
Operating panel
a Display*
1 Hot Wash 194 °F
2 Cottons 140 °F
3 Cottons Intensive 140 °F
i FC A
After turning the machine on, the display briefly
shows a welcome screen and switches to the
program list. The last started program is highlighted.
b Control keys
The control keys have different functions depending
on the machine status. The functions are shown in the
display above each button.
If programmed to "Button allocation direct", the first 6
programs from the program list can be selected
directly with the control keys 1 to 6.
c "START" button
The circle illumination flashes if a selected program
can be started. To start a program press the "START"
button. Once a program has started the START
button can be pressed to show the original display.
* Contents in the display will vary with
program offering.
d Optical interface PC
The optical interface on the machine’s control panel
provides the connection point for data transfer
between the machine’s controls and a PC.
e Jog shuttle
Turn the jog shuttle to display selections and input
fields.
Press the jog shuttle to confirm display selections or
changes.
f Card reader
For card operation. Washing programs can be
uploaded and downloaded on the program card. The
programs on the card can be used to operate the
washer.
g I On button
Turns the machine on.
h 0 Off button
Turns the machine off.
i Emergency Stop button
Only use in case of an emergency.
^ Press the red button to turn the machine off. After
clearing the danger, turn the button clockwise to
unlock it.
^ Press "START" to continue the interrupted program.
Guide to the washer
8
a b c d e f g h i
Control keys
^
Press once to activate the function, press again to
deactivate the function.
i Manual operation
(Used by Miele Service Technicians)
See the Programming Manual.
FC Functions
Press this key to temporarily select another language
and/or access the Supervisor level.
A Back to the previous display
+ i Block plus
The respective program block, e.g. prewash, will be
added to the program.
m Starch Stop
Press this button to stop the program and allow
starch to be added to the laundry.
k Spin Stop
Press this button if a final spin is not required after the
final rinse.
m Delay start
Press this key to select a start time in the display.
K Information
To show program information
f Stop/Finish
Press to stop a selected program or to end an
already stopped program.
q Drain
ü Skip
Cycles of a program in progress can be skipped or
repeated.
e/- Following or previous line
S Save
See the Programming Manual.
$ Program locked
If a program is locked it cannot be stopped or ended
with the 0 "Off" button after 1 minute.
) Program unlocked
ß Dispensing
ä Dispensing not available
\ Operating data
->l<- Reset to 0 (zero)
To reset the load sensor to "00.0" when the drum is
empty and the display shows a load size.
D Data transfer
Operator Card
No programs are saved on this card. To transfer the
data from the control to the card and vice versa see
the Programming Manual.
30 programs containing 6 blocks each can be saved
on the card.
The rear side of the card can be labeled.
Guide to the washer
9
The machine must be commissioned by a Miele
service technician or a dealer authorized by the
manufacturer before it is used for the first time.
Turn on the washer
^
Open the on-site water faucets (and the supply
faucets for steam, if relevant).
^
Turn on the electrical supply at the mains (on site).
^
Press l "On" to turn the washer on.
Miele
PROFESSIONAL
PW 6xx7
Welcome
The welcome screen shows.
1 Hot Wash 194 °F
2 Cottons 140 °F
3 Cottons Intensive 140 °F
i äFC A
Then the program list is shown. The last started
program is highlighted.
Sort and load the laundry
^
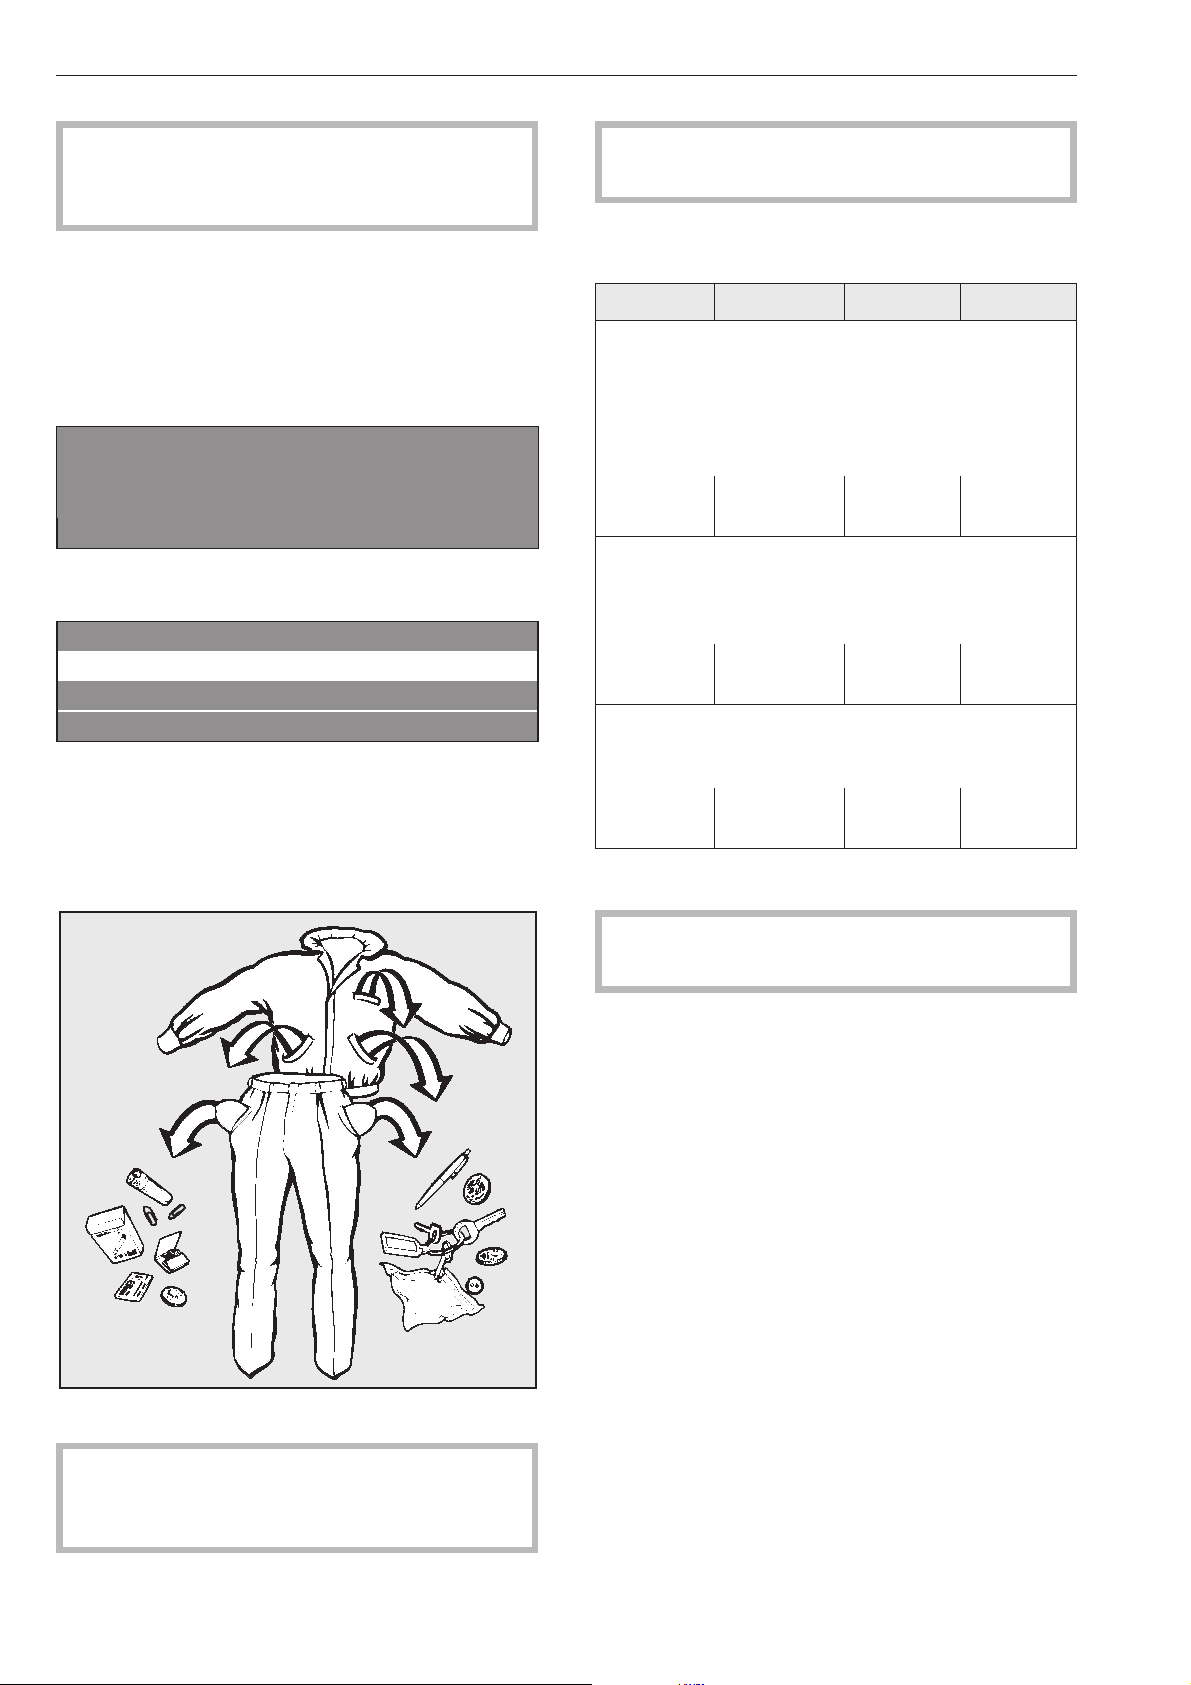
Empty all pockets.
Foreign objects left in pockets (e.g. nails, coins,
paper clips, etc.) can cause damage to clothes
and the machine.
^
Sort the laundry.
Only wash fabrics according to their wash care
label.
Maximum dry laundry weights for standard
programs
PW 6107 PW 6137 PW 6167 PW 6207
1 Hot Wash
2 Cottons
3 Cottons Intensive
4 Cottons
5 Cottons Intensive
6 Cottons Eco short
max. 22 lbs
(10 kg)
max. 29 lbs
(13 kg)
max. 35 lbs
(16 kg)
max. 44 lbs
(20 kg)
7 Permanent Press
8 Permanent Press Intensive
9 Permanent Press
10 Permanent Press Intensive
max. 11 lbs
(5 kg)
max. 14 lbs
(6.6 kg)
max. 17 lbs
(8 kg)
max. 22 lbs
(10 kg)
11 Delicates
12 Woolens
13 Handwash Woolens
max. 9 lbs
(4 kg)
max.11.5 lbs
(5.2 kg
max. 14 lbs
(6.4 kg)
max. 17 lbs
(8 kg)
^ Load the laundry loosely into the drum.
To prevent fabric damage, check that laundry will
not be caught in the closed door.
^
Close the drum door with the handle.
Do not swing the door shut.
Use
10

Add detergent
^
Open the detergent compartment flap,
pull out the respective containers and add
detergent.
j = Detergent for the main wash
i = Detergent for a Pre-Wash
(
1
/
4
of the total recommended amount
of detergent)
p = Front compartment
Fabric softener or liquid starch
p = Rear compartment
Liquid additives e.g. bleach
^
Do not exceed the maximum fill level (see arrow),
the excess will flow directly into the drum.
^
Close the detergent compartment.
Bleach
Only bleach items with the x symbol on the fabric
care label.
Liquid bleach can only be used in a program
designed for bleach.
Liquid bleach must only be filled in a programmed
detergent compartment. It will be automatically
added to the second rinse.
A third rinse is necessary when using bleach (see
the Programming Manual).
,
With increased use of chlorine the possibility of
machine damage rises.
Fabric dye
Fabric dye and color aids must be suitable for use in
a washer. Always follow the instructions of the
manufacturer.
Use
11
Detergent
Only use the correct amount of high efficiency low
sudsing detergent. Too much detergent will cause
over sudsing.
Dosage
Follow the instructions on the detergent packaging to
ensure the correct usage and dosage amount for
your water hardness.
Adjust the amount of detergent if the load is smaller
and more or less soiled than normal.
Water hardness
Water
hardness
levels
Water
quality
Hardness
level in mmol/l
German
hardness
°d
I soft 0 - 1.3 0 - 7
II moderate 1.3 - 2.5 7 - 14
III hard 2.5 - 3.8 14 - 21
IV very hard over 3.8 over 21
If you do not know the water hardness in your area
contact your local water authority.
Select a program
^ Select a program by turning the jog shuttle (e.g.
Program 1 Hot Wash), see "Program guide".
The following will appear in the display:
18 Extra Drain
1 Hot Wash 194 °F
2 Cottons 140 °F
i äFC A
^
Confirm the selected program by pressing the
inner button of the jog shuttle.
The display shows:
1 Hot Wash 22.0 /22.0 lb
194 °F Main wash
Rinse 1200 rpm
+im k m A
Select wash options (if desired)
^
Press one of the wash option buttons.
To deselect the option, press it again.
+ i Block Plus
A pre-wash can be selected for heavily soiled laundry
in certain program. If a pre-wash is an option the
"+i" field is highlighted. If a pre-wash is not
available, the "+i" will not be shown.
m Starch Stop
Starch can be selected with all standard program
(excluding Extra Spin and Extra Drain). The m field
is highlighted in the display.
k Spin Stop
Spin Stop can be selected with all standard program
(excluding Extra Spin). The k field is highlighted in
the display.
If no additional changes need to be made to the
program:
^ Press "START" and the program will begin.
Use
12
Adjust the program (if desired)
Laundry weight
The laundry weight can be manually selected.
1 Hot Wash 22.0 22.0 lb
104 °F Pre-wash
194 °F Main wash e
+im k m A
^
Turn the jog shuttle to "Laundry weight" and press
to confirm the selection.
The weight shown on the right side indicates the max.
weight.
^
Turn the jog shuttle to the desired laundry weight
and press to confirm the selection.
Temperature in 1° increments from 15 °C to max.
95 °C .
^
Turn the jog shuttle to "Temperature" (104 °F for
Pre-wash) and press to confirm the selection.
1 Hot Wash 22.0 / 22.0 lb
104 °F Pre-wash
194 °F Main wash e
+im k m A
^ Turn the jog shuttle to the desired temperature and
press it to confirm the selection.
Spin speed
The spin speed can be adjusted from 0 - 300 then in
25 rpm increments.
^
Turn the jog shuttle to "Spin speed" and press to
confirm the selection.
1 Hot Wash 22.0 / 22.0 lb
194 °F Main wash
Rinse 1100 rpm
+im k m A
^
To change the spin speed turn the jog shuttle,
press to confirm the selection.
Max. spin speeds
PW 6107 PW 6137 PW 6167 PW 6207
1200 rpm 1100 rpm 1150 rpm 1100 rpm
^
Press "START" and the program will begin.
After starting the program the program sequence
appears in the display.
1 Hot Wash
104 °F Pre-wash 68 °F
Main wash Finish at 12:35
+im k mKf
The second line of the display here shows Pre-wash
and the current temperature.
1 Hot Wash
194 °F Main wash 140 °F
Rinse 1 Cold Finish at 12:35
+im k mKf
Once the Pre-wash ends, Main wash will appear in
the second row of the main program block. The
current temperature will appear next to it and the first
rinse cycle will appear below.
The Program End indicator will appear in the display
along with the program end time.
1 Hot Wash
194 °F Main wash 140 °F
Rinse 1 Cold Finish at 12:35
+im k m K f
By pressing the K "Information" button, further
information regarding the wash cycle can be shown,
for example:
1 Hot Wash
Delay start 7.10.2010
Start time: 9:47 e
A
Time after start: 0h 23 min
Time left: 0h 11min
Program end 12: 35 Clock e
Time left: 0h 11min
Repetition: No
Area 3: Rinse e
Use
13

Block 2: Rinse 2
Step: Wash time 1
Actual water level: 22 in e
Required water level 60 in
Actual temperature 95 °F
Rqurd. temp.: 140 °F e
1 Hot Wash
rpm: 40 rpm
Rhythm 12 / 3 -
A
^
Press A "Back" to return to the program.
End of program
At the end of the program, once the drum is
stationary and no water is in the machine the display
shows (for example):
1 Hot Wash
Program end
Door can be opened.
m FC A
At the same time a tone will sound for a short time to
signal the program end.
^ Pull the door handle to open the drum door.
Important: If the door cannot be opened, press
against the door handle then pull again.
Do not use force!
^
Remove the laundry.
If the program was stopped with water in the machine
or while spinning, the following is displayed:
1 Hot Wash
Program end - Water in the drum
qmFC A
or
1 Hot Wash
Program end - Drum rotates
m FC A
,
The drum door is locked.
Do not use force!
^
Press the q "Drain" button or select the Drain Extra
program and press "START".
^
At the end of the program open the door.
Leave the drum door open to air dry the interior.
^
Turn the machine off with the 0 "Off" button.
^
Shut off the power supply (on-site).
Use
14
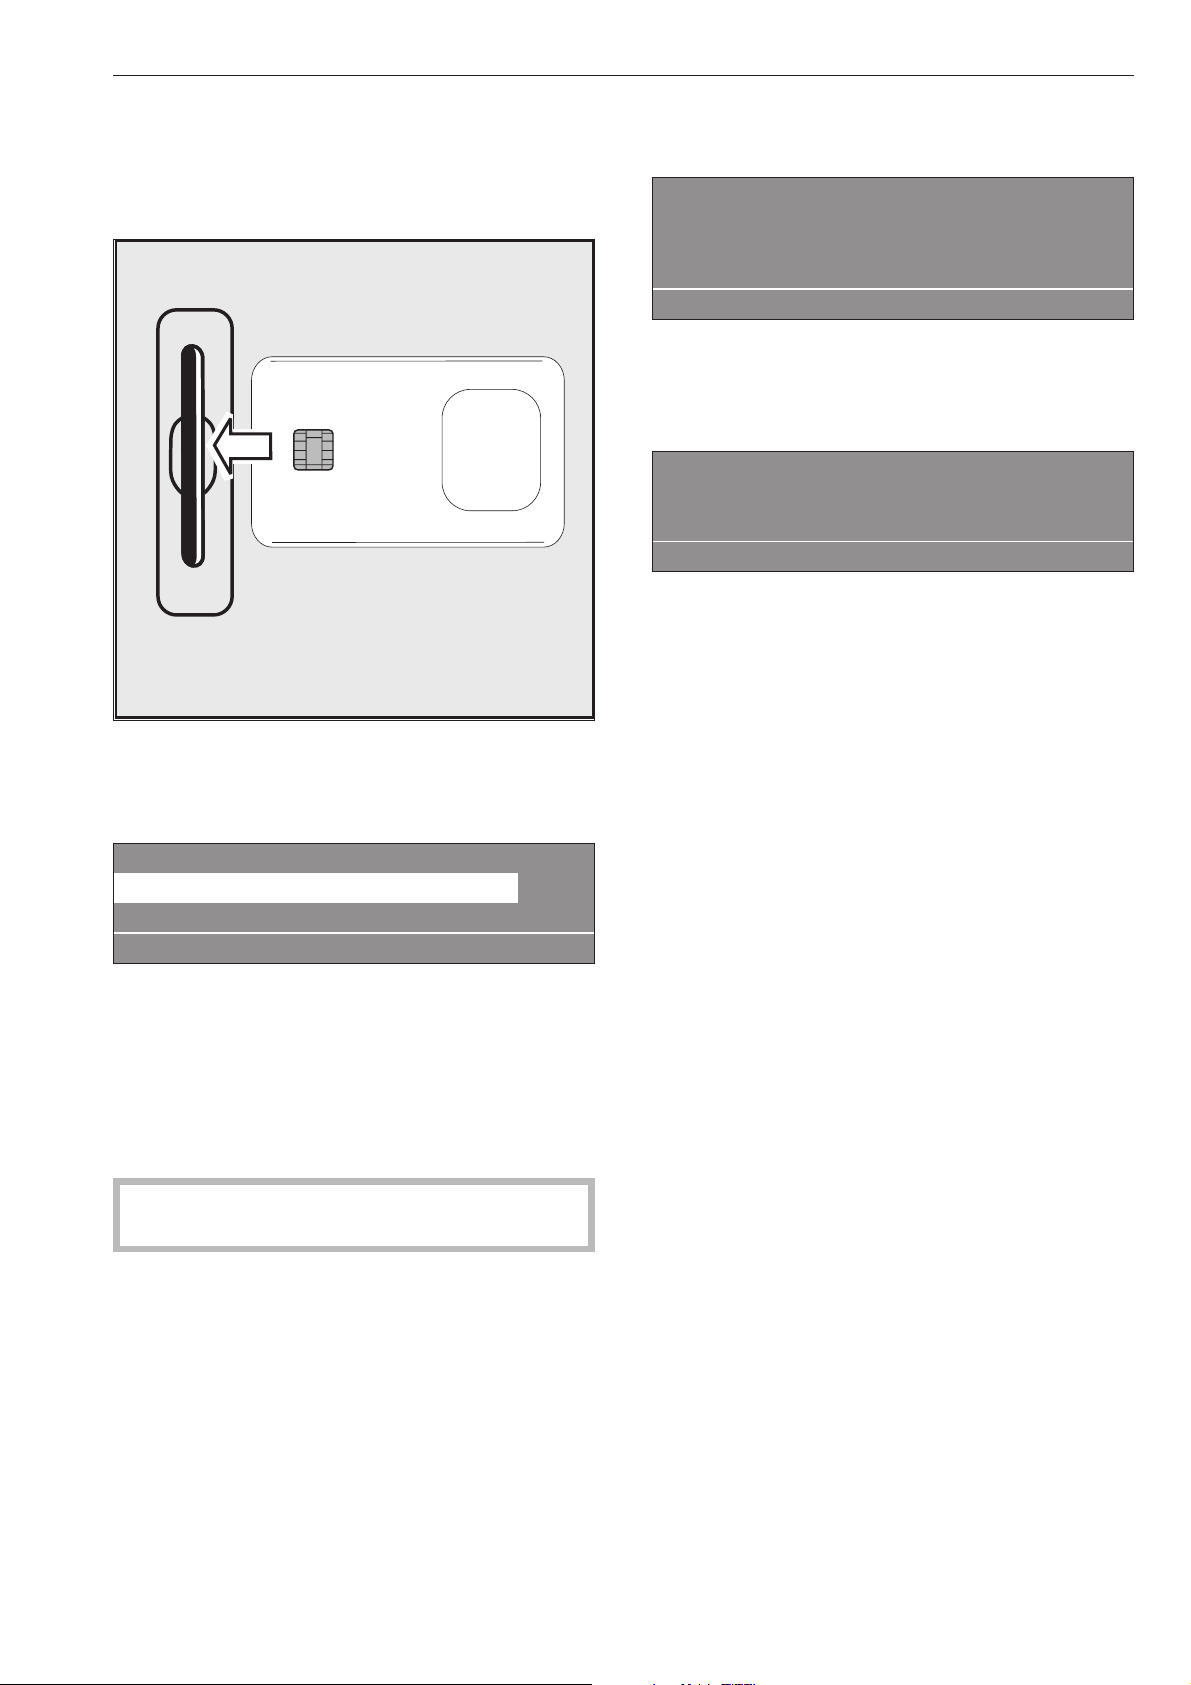
Chip cards are programmed to a machine type.
Empty cards can be used with any machine.
^
Press l "On" to turn the washer on.
The Welcome screen shows.
^ Insert the card, arrow first, into the card reader.
The display shows the list of programs on the card,
example:
Card operation
17 Fire department clothing 113 °F
18 Wrinkle-free 140 °F
i ßFC A
^
Turn the jog shuttle to select a program. Press the
jog shuttle to confirm the selection.
^
Press the "START" button to begin the program.
^
Remove the card from the card reader.
Once the program is finished it will be deleted from
the machines memory.
,
Do not insert any items other than the card into
the card reader.
If the card was inserted the wrong way, the display
shows:
§
Card fault
Reinsert card correctly in card reader.
i ü f
^
Reinsert the card properly into the card reader.
If the card is not suitable for this type of machine, the
display shows:
Card operation
Programs on the card are only
suitable for machine type PW 6167
A
^
Insert a card suitable for this machine type.
Card operation
For laundry loads which need special wash
procedures, a single special program is written on a
card which is then used to run the program.
This function blocks all machine programs. The
washer runs only the program saved on the card.
The function "Load" can be activated in the supervisor
level. The machine will only accept cards in this
function.
Chip card use
15

Language selection
The language can be selected with the F flag
symbol. The language is set back to its original
setting 5 minutes after the program ends or when the
door is opened.
1 Hot Wash 194 °F
2 Cottons 140 °F
3 Cottons Intensive 140 °F
i FC A
Press the function button FC. The display shows:
Settings Back A
Main menu Language
Supervisor level
FC A
^
Turn then press the jog shuttle to select
"Language".
Settings Dansk
Language Deutsch
English
FC A
^ Turn the jog shuttle to select the desired language
and press to confirm the selection.
Delay Start
Use the m "Delay start" button to program the washer
to start automatically at a later time.
Setting the delay start
In the program selected, the display will show (for
example):
1 Hot Wash 22.0 / 35.0 lb
194 °F Main wash
Rinse 1000 rpm
+im k m A
^
Press m "Delay Start".
The following will appear in the display:
1 Hot Wash 10.0/16.0 lb
Start time: 16 : 10 Start date: 4.2.2010
After setting the delay start press Start.
A
The display shows the current time of day and date.
The entry field is highlighted for hours.
^
Press, then turn the jog shuttle to select the hour.
Press it to confirm the selection.
^
Repeat with the minutes, day, month and year.
^
Press the "START" button to start the program at the
selected start time.
The following appears in the display:
1 Hot Wash 22.0 / 35.0 lb
194 °F Main wash
16:15 -4.2.2010 Start: 6:00 -4.3.2010
+im k m A
The display shows the current time of day, date and
the start time.
^
If the door is opened before the delay start time
has elapsed, press the "START" button again.
Canceling the Delay Start
^
Press m "Delay Start" again or the
A "Back" button to cancel the delay start
function.
With Pre-wash
For heavily soiled laundry a pre-wash can be
selected for Standard programs 1 to 10 by pressing
the+i "Block plus" button
Pressing the button again will deselect the function.
When the +i "Block plus" button is pressed the
display shows the following:
1 Hot Wash 31.0 / 35.0 lb
104 °F Pre-wash
Main wash e
+i mk m A
The "+i" field is highlighted.
Additional features
16

Starch
In the detergent container
Starch can be selected for all standard programs
(except Extra Spin und Extra Drain) before starting
the program by pressing m "Starch Stop".
The field m is highlighted in the display.
By pressing the button again the function can be
deselected.
1 Hot Wash
m
Program stop - Starch stop
Door can be opened.
i ü f
"Starch Stop" flashes in the display.
^
Add starch, prepared according to the
manufacturer’s instructions, into compartment p.
The wash time is automatically extended by 4
minutes.
The program will continue by pressing "START".
In the drum
^ Once the program stops in "Starch Stop", open the
drum door and add starch to the laundry load
prepared according to the manufacturer’s
instructions.
^ Close the drum door.
The display shows:
1 Hot Wash
m
Program stop - Starch stop
Door can be opened.
i ü f
^
Press the "START" button to continue the program.
Without spin
Without spin can be selected for all standard
programs (except "Extra spin") Before starting the
program press k "Without spin".
"k" is highlighted in the display.
Pressing the button again will deselect the function.
1 Hot Wash
k
Program stop - W/o spin
i ü f
"Without spin" flashes in the display when the spin
cycle is reached.
^
Press the f "End" button.
^
The program ends without spinning.
^
To continue the program with spinning, press the
"START" button.
Program stop
^
To stop the program, press f "End".
The program stops.
1 Hot Wash
Program stop
i ü f
^
To continue the program press "START".
Canceling a program
^
To cancel a program, press the f "End" button
twice.
If the program was canceled with water in the
machine or during spinning, the display shows:
1 Hot Wash
Program stop - Water in the drum
i ü f
or:
1 Hot Wash
Program stop - Rotating drum
i ü f
^
Press the q "Water drain" button or select the
program Extra Spin, and press the "START" button.
Additional features
17

Canceling a locked program
Locked programs cannot be stopped or canceled.
1 Hot Wash
194 °F Main wash
LOCKED Finish at 12:35
)e
The display shows that the program is locked if the f
"End" button is pressed.
^
To unlock the program press the ) "Unlock"
button.
^
Enter the password, by turning the jog shuttle to the
desired character in the alpha numeric list and then
pressing the jog shuttle to confirm each selection.
After entering the password the display shows:
Unlock program?
S A
Press the S "Save" button to confirm. The normal
display shows and the program can be canceled.
1 Hot Wash
194 °F Main wash 140 °F
Rinse 1 Finish at 12:35
mKf
Skipping program cycles
Cycles of a program in progress can be skipped or
repeated.
^
Press the f "End" button to stop the program.
1 Hot Wash
Program stop
i ü f
^
Press the ü "Skip/Repeat" button. The display
shows the current area, block or step.
See also "Program structure" in the Programming
Manual.
Skip/Repeat -> Hot Wash
Area 2: Main wash e
S A
Area 2: Main wash
Block 1: Main wash
Step: Wash time 2 -
S A
^ Turn the jog shuttle to "Area" and press it to confirm
the selection.
Area: Select either 1 Pre-wash, 2 Main wash or 3
Rinse and confirm by pressing the jog shuttle.
^ Turn the jog shuttle to "Block" and press it to
confirm the selection.
Block: Select either Pre-wash 1-10, Main wash 1-10
or Rinse 1-10 and confirm by pressing the jog
shuttle.
^
Turn the jog shuttle to "Block" and press it to
confirm the selection. Select the desired program
step and confirm.
^
To start the new program step press S "Save" and
"START".
To go back without skipping a program cycle
^
Press the A "Back" button to go back to the
program stop.
Additional features
18
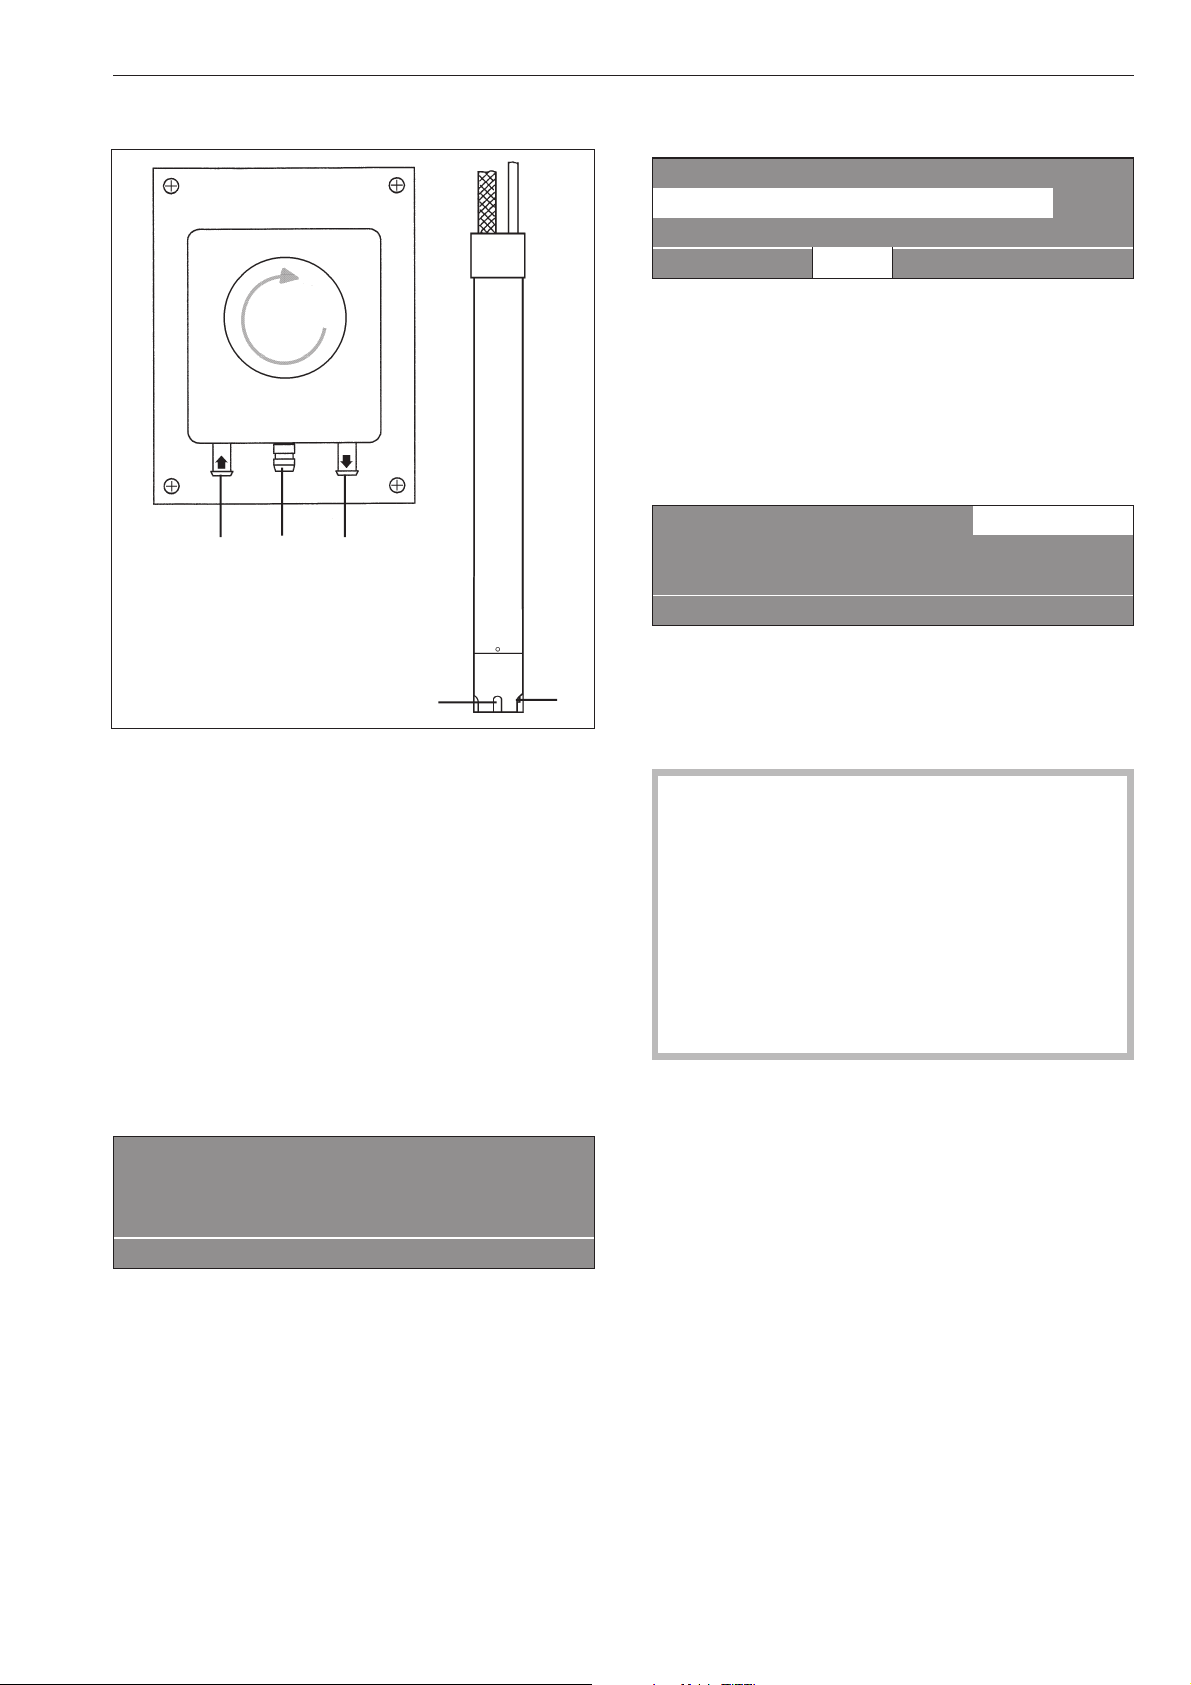
Liquid dispensing system
(Dispensing systems vary)
Priming the dispensing pumps
a Hose connection socket (in)
b Hose connection socket (out)
c Leakage outlet
d Suction inlet opening
e Level indicator
When the dispenser container is empty the pump and
the machine will shut off.
The display will indicate that the detergent dispenser
is empty.
ö
Dispensing system fault
Fill dispensing container 1
Press Start.
if
^
Refill the dispensing containers.
^
Press "START" to continue the program.
Deselecting the dispensing
1 Hot Wash 194 °F
2 Cottons 140 °F
3 Cottons Intensive 140 °F
i ä FC A
^
The liquid dispensing can be manually deselected
ä before a program start.
he liquid dispensing can be manually deselected
before a program start.
The dispensing pump is turned off.
The display shows:
1 Hot Wash 22.0/22.0 kg ä
194 °F Main wash
Rinse 1000 rpm
+im k m A
Dispensing amount
,
Always follow the instructions of the chemical
manufacturer when using cleaning agents and
special application chemicals.
Only use such chemicals for the purpose and in
the situation specified by the manufacturer to
prevent the danger of adverse chemical reactions
and material damage.
If in doubt, check with the manufacturer that the
product is suitable for use in this machine.
Liquid detergent should stand at room temperature
before being used to ensure proper dispensing.
Optional Module
19
e
a
c
b
d

Priming the dispensing pumps
Use the calibration to get liquid detergent to the
pumphead. Once calibration is complete run an
empty program to get detergent to the machine
before actually washing a load of laundry in the
machine.
Dispensing calibration
The dispensing calibration is used to calculate the
flow rate of each dispensing pump.
For direct access to the dispensing calibration when
the machine is turned off:
^
Press and hold the 2
nd
control key from the left.
^
Turn the machine on and release the control key.
Dispensing calibration ~ Main menu
Dispensing pump 1
Dispensing pump 2 e
A
Dispensing pump 1 to 13
After selecting a dispensing pump the display shows:
Dispensing calibration ~ Dispensing pump 1
V: 100ml t: 0s P: No
0/1 S A
The dispensing amount can be adjusted in 1ml
increments from 0 to 999 ml.
^
Press the 0/1 control key, the dispensing hose fills.
Press the 0/1 button again to stop.
^
Point the hose of the dispensing pump to be
determined, in a measuring cup. Hold the cup high
enough so the liquid has to be pumped rather than
flowing out.
,
Avoid skin and eye contact, wear protective
clothing.
^
Press A to get back to the main menu.
Dispensing calibration ~ Main menu
Dispensing pump 1
Dispensing pump 2 e
A
^
Select the dispensing pump.
Dispensing calibration ~ Dispensing pump 1
V: 100ml t: 0s P: No
0/1 S A
^
The dispensing can be manually stopped by
pressing the 0/1 button or it will stop automatically
after 60 seconds.
^
Measure the pumped amount in the measuring
cup.
Dispensing calibration ~ Dispensing pump 1
V: 100ml t: 30s P: 200.0 ml/min
0/1 S A
^
Enter the measured amount in the "V:" field. The
flow rate P: in milliliter per minute is calculated by
the control.
^
Press S "Save" to allocate the measured values to
the dispensing pump.
^ Reconnect the hose.
Maintenance of the dispensing system
Rinse the dispensing system with hot water every 2
weeks, or before shutting down the dispenser pumps
for any length of time, to prevent the system from
clogging.
^ Rinse out the suction pipes with water.
^
Place the suction pipes in a container with warm
water, 104 - 122°F (40 - 50°C).
^
Select each pump by using the dispensing
calibration.
^
Turn on each pump until the dispensing system is
rinsed.
^
Check the connection points, hoses and washers
for leaks.
Optional Module
20

Peak load cut off
When activating the peak load cut off the heat is
turned off and the program is stopped. The display
shows:
1 Hot Wash
Program stop - Peak load function
Program will continue.
if
When the peak load function ends the program will
continue automatically.
Communication module
The communication module makes it possible to
connect the machine to a PC (Personal Computer).
The outlet for the module is on the back of the
machine.
This requires a special Editor Program which is
available from the Miele Professional Department.
Operating data
By pressing the \ "Operating data" button the
operating data module can be used to read or delete
operating data either before the start of a program, or
after it has finished.
1 Hot Wash 194 °F
2 Cottons 140 °F
3 Cottons Intensive 140 °F
i \ FC A
After pressing the \ button the following will
appear.
Operating data module
Total data
Program data e
\ A
Selection choice:
–
Total data
In this option all program data is collated and
summarized.
–
Program data
Program data contains all the data called up during a
program.
–
Delete data
–
Module (Total data including program data)
–
Total data (only delete total data)
–
Program data (only delete program data)
Pressing the button again deselects the \
"Operating data" option..
If there is no more memory available in the operating
data module a message will appear after pressing
the "START" button to say that the operating data will
be overwritten.
If you press the A "Back button or do not press the
"START" button within 30 seconds the display will
revert to the way it was before starting the program.
Total data
Operating data module
Total data
Program data e
\ A
After selecting Total data the following (example) will
appear in the display:
Operating data module ~ Total data
Total time power on: 20,987 h
Operating hours: 123456 h e
\ A
Other options:
Total time power on: 200,987 h
Operating hours: 123,456 h
Duration heating active: 73,456 h
Duration drive motor active: 93,456 h
Program starts: 23,456
Program stops: 567
Program cancellations: 67
Water volume: 1,234,567 l
Amount of laundry: 1,234,567 kg
Liquid agent: 2,345 l
Energy: 12,345,678 kWh
Optional Module
21

Program
Operating data module
Program data -
Delete data e
\ A
After selecting Program data the following (example)
will appear in the display:
Operating data module ~ Program data
1 Hot Wash 194 °F -
2 Cottons 140 °F e
\ A
Select the program you want from the list and press
the rotary dial to call up a list of all program starts
including date and start time for that program (Hot
Wash 90°C in the example).
Program data ~ 1 Hot Wash
Date: 05.21.2010 Start time: 11:30 -
Date: 05.21.2010 Start time: 12:30 e
\ A
Select the required program start from the list for
program 1 Hot Wash and confirm your choice by
pressing the rotary dial.
Program data ~ 1 Hot Wash
Date: 05.21.2010
Name: Miller e
\ A
Other options:
Town: Lehrte
Serial number: 12345678
Machine type: PW 6107
Amount of laundry: 29 lbs
+ Button: activated
Starch stop button: activated
Without spin button: not activated
Program start: 11:30
Program end: 12:05
Total operating time:0h35min
Electrical energy: 12.5 kWh
Gas energy: 0 kWh
Stem energy: 0 kWh
Total volume of water: 140 l
Max. water temperature: 203 °F
Max. drain temperature: 113 °F
Program change 2
(after making your selection and
pressing the jog shuttle only the last 3 stops and starts will
be displayed.)
Program fault: none (only the last 3 faults are saved)
Area 1: Pre-wash (after making your selection and
pressing the jog shuttle you can display the area or the
block.)
Block 1: Pre-wash
Holding time: 6 min
Water volume: 20 l
Dispensing phase 1: Amount ml (after making your
selection and pressing the jog shuttle 5 dispensing
are displayed.)
Max. Temperature: 54 °F
Holding time: 6 min
Dispensing phase 2: no
Delete data
Operating data module
Program data
Delete data e
\ A
After selecting Delete data the following message will
appear in the display:
Operating data module ~ Delete data
Module: 02.21.2010
Total data: 07.12.2010 e
\ A
The module menu option can be used to delete the
total data and program data from the operating data
memory.
The total data option can only be used to delete the
total data from the operating data. The program data
option can only be used to delete program data from
the operating data.
After making your selection and pressing the rotary
dial you will be prompted to enter your password.
Password:
ABCDEFGHIJKLMNOPQRSTUVWXYZ
0123456789
KSA
After keying in your password or inserting your
supervisor level key card in the reader the following
security prompt will appear in the display:
Delete operating data?
S A
After pressing the S button the data will be deleted.
Optional Module
22

Load module
If the machine is equipped with a load module, the
load weight will be displayed, in 0.5 lb increments,
while loading the laundry. The maximum laundry
weight is displayed next to the selected program.
^
Reset with the I "zero setting" if the weight display
does not show "00.0" when the drum is empty.
1 Hot Wash 00.0 / 35.0 lb
140 °F Main wash
Rinse e
+im k m ->I<- A
If there was still laundry in the drum when the weight
display was reset, the display shows:
1 Hot Wash - -.-/ 35.0 lb
140 °F Main wash
Rinse e
+im k m ->I<- A
^
Reset again with the I button.
If the machine is overloaded (wet laundry) the
machine calculates after the programs start with the
nominal value. This value is saved in the operating
data module.
At the end of a program, with the drum stationary, the
residual moisture of the laundry is displayed.
1 Hot Wash
Program end Residual moisture 60 %
Door can be opened.
m FC A
Optional Module
23
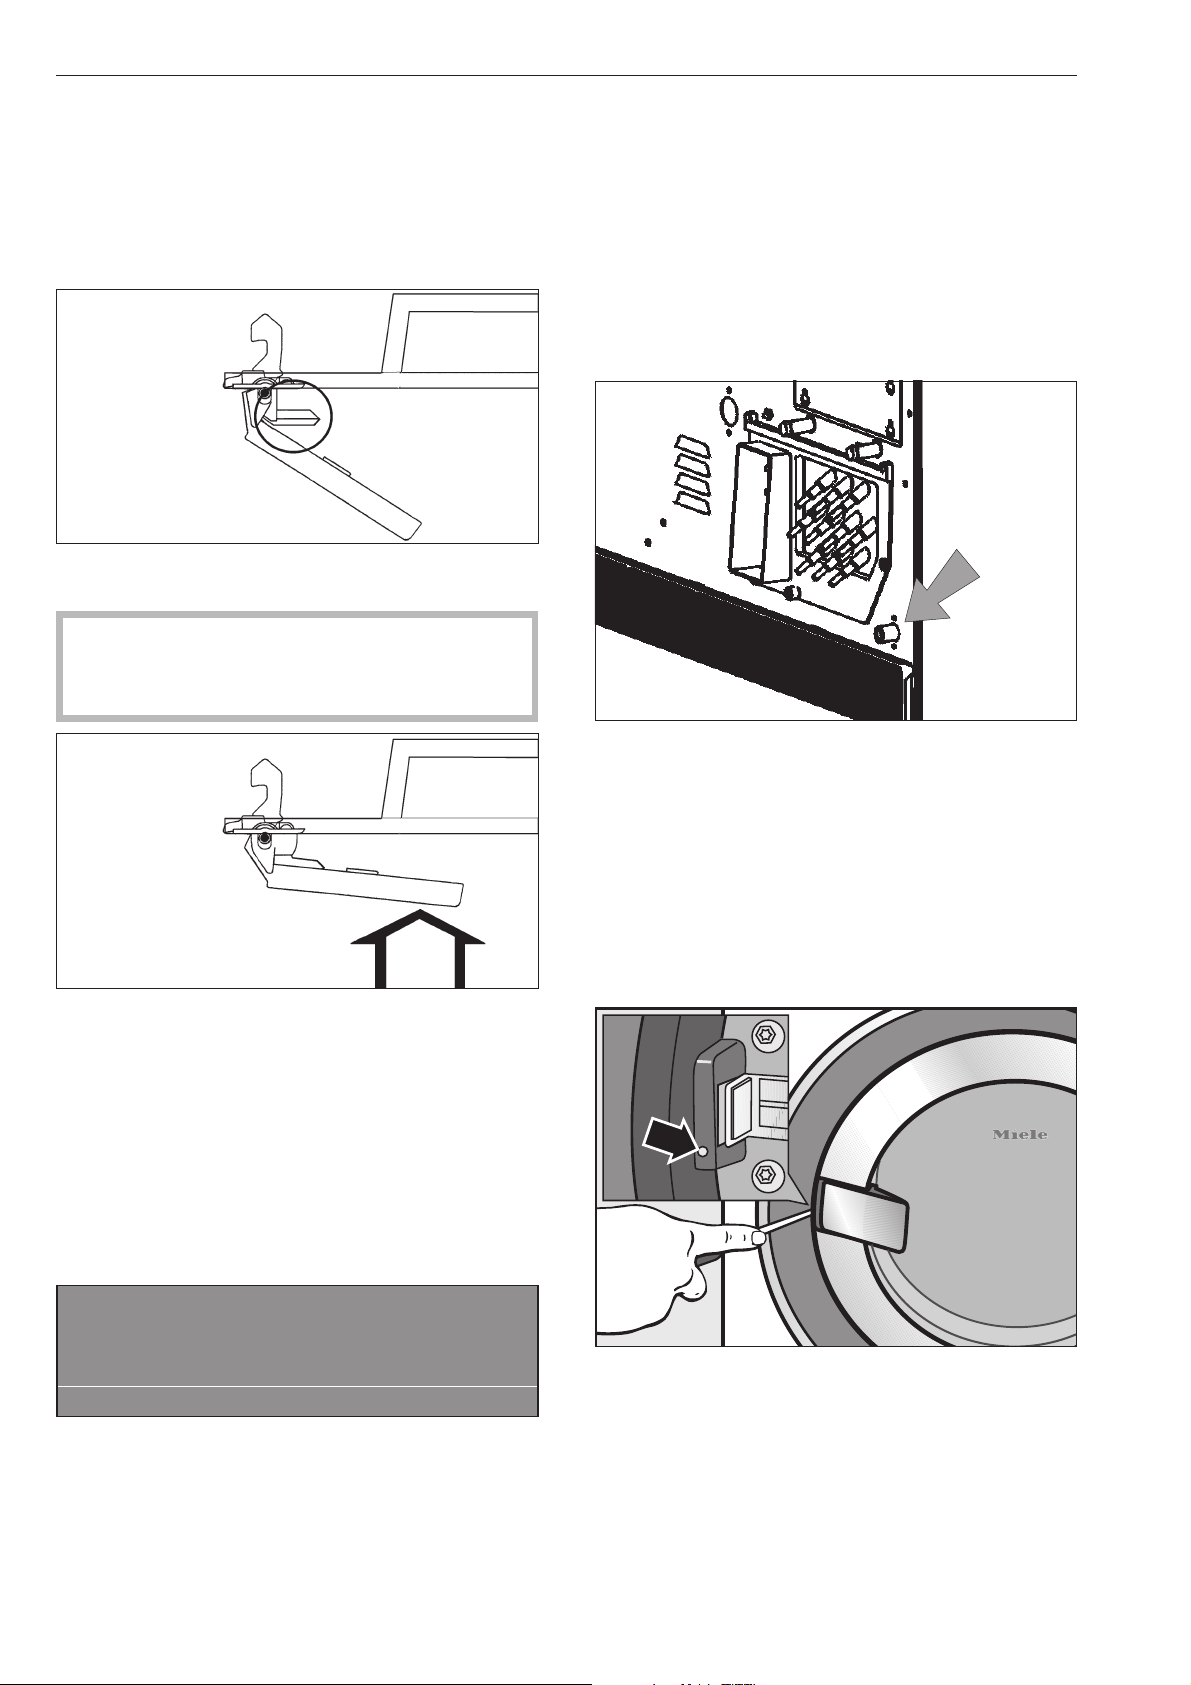
The drum door cannot be opened
^
Press against the door handle, turn the machine on
then off and pull on the door handle once more.
The safety mechanism of the door handle
is disengaged
The door handle has lost its function. The door cannot
be opened or closed.
The safety mechanism is designed to protect the
handle from damage, i.e. if too much force is
being used in an attempt to open the door.
^
Firmly press against the door handle until you hear
the safety mechanism click.
The door can now be opened or closed provided
there is no water in the machine.
Power failure - Emergency door release
During a short power failure
The program remains in the last position. When
power is restored the following message appears in
the display:
y
Power failure
Program stop.
Press Start.
i ü f
^
Press "START" to continue the program.
Extended power failure
^
Turn the machine off.
^
Turn the electrical supply off at the main power
supply.
^
Close the valves (on-site).
The machine must be drained and the drum door
opened manually to unload the machine.
Draining the wash water
^ Place a container under the manual drain at the
rear of the machine.
^ Open the drain by loosening the venting screw. Do
not take it completely out.
^ A small amount of water will drain from the
machine.
^ Tighten the venting screw again and test for leaks
by opening the water supply.
Open the door manually
^
Insert and hold a small screwdriver in the opening
next to the door lock.
^
Press against the door handle, then pull it towards
you to open the door.
Do not use force!
^
Remove the laundry.
Frequently asked questions
24

Reasons for over sudsing
Detergent type
^
Only use detergent formulated for use in
commercial washers. Detergents for domestic
machines are not suitable.
Too much detergent
^ Follow the detergent manufacturer’s instructions
and adjust the amount to the local water hardness.
Over sudsing detergent
^ Use a low sudsing detergent or contact Miele’s
detergent application specialists.
Very soft water
^ In areas with soft water, use less detergent.
Soiling level of laundry
^ For lightly soiled laundry use less detergent.
Residue, e.g. undissolved detergent on laundry
^ Run a prewash without detergent and without
selecting a temperature.
^ Laundry which has been pre-treated in detergent
before washing must be thoroughly rinsed before
running a wash program.
Small loads
^ Reduce the amount of detergent accordingly.
Drum speed too high during a wash
(Profitronic-controls)
^ Reduce the drum speed and wash rhythm.
Large articles of laundry stretching
during the spin cycle
Large articles of laundry (e.g. table cloths) can
stretch during the spin cycle. This can generally be
prevented by reprogramming the machine.
Please contact the Miele Service Department.
Frequently asked questions
25

Fault messages
,
Repairs to electrical or steam appliances
should only be carried out by a Miele authorized
technician in accordance with local and national
safety regulations. Unauthorized repairs could
cause injury or machine damage.
Faults that occur before or after the start of a program
flash in the display.
If the display remains off, the washer has no power.
^
Check the plug, main switch and fuses on-site.
y
Power failure
Program stop.
Press Start.
f
^ Press "START".
This fault message can also indicate that the overload
cut-out of the drive motors has over heated.
^ Allow the motor to cool.
M
Water intake fault
Contact Technical Service
if restart w/o success.
if
^
Check the water supply and press "START".
a
Door lock fault.
Contact Technical Service
if restart w/o success.
if
^
Press the door handle so that it closes with a click,
press "START".
§
Heating system fault
Program stop. Press Start.
Program runs with cold water..
if
^
Press "START" to continue the program without
heating.
If the program has a "Thermostop" the program will
time out.
^
Contact Miele Technical Service.
^
Some programs may be canceled if this messages
shows.
Contact Technical Service.
m
Drive motor fault
Program stop. Press Start.
Motor temperature too high.
if
^ Allow the motor to cool.
§
Imbalance fault
Contact Technical Service
if restart w/o success.
i A
Large imbalance, the imbalance switch has
activated.
^
Turn the machine off and on again
^
Press "START".
q
Drain valve fault
Contact Technical Service
if restart w/o success.
if
^
Check and clean the drain system and press
"START".
A defective drain valve should only be replaced by
an authorized service technician.
Frequently asked questions
26
ö
Dispensing system fault
Fill dispensing container 1
Press Start.
if
^
Change/fill the dispensing container.
§
Card fault
Reinsert card correctly in card reader.
A
^
Insert the card properly into the card reader.
^
In the event of a fault which you cannot correct
yourself, please contact Technical Service.
^
When contacting Technical Service please quote
the model, serial number (SN) and part number
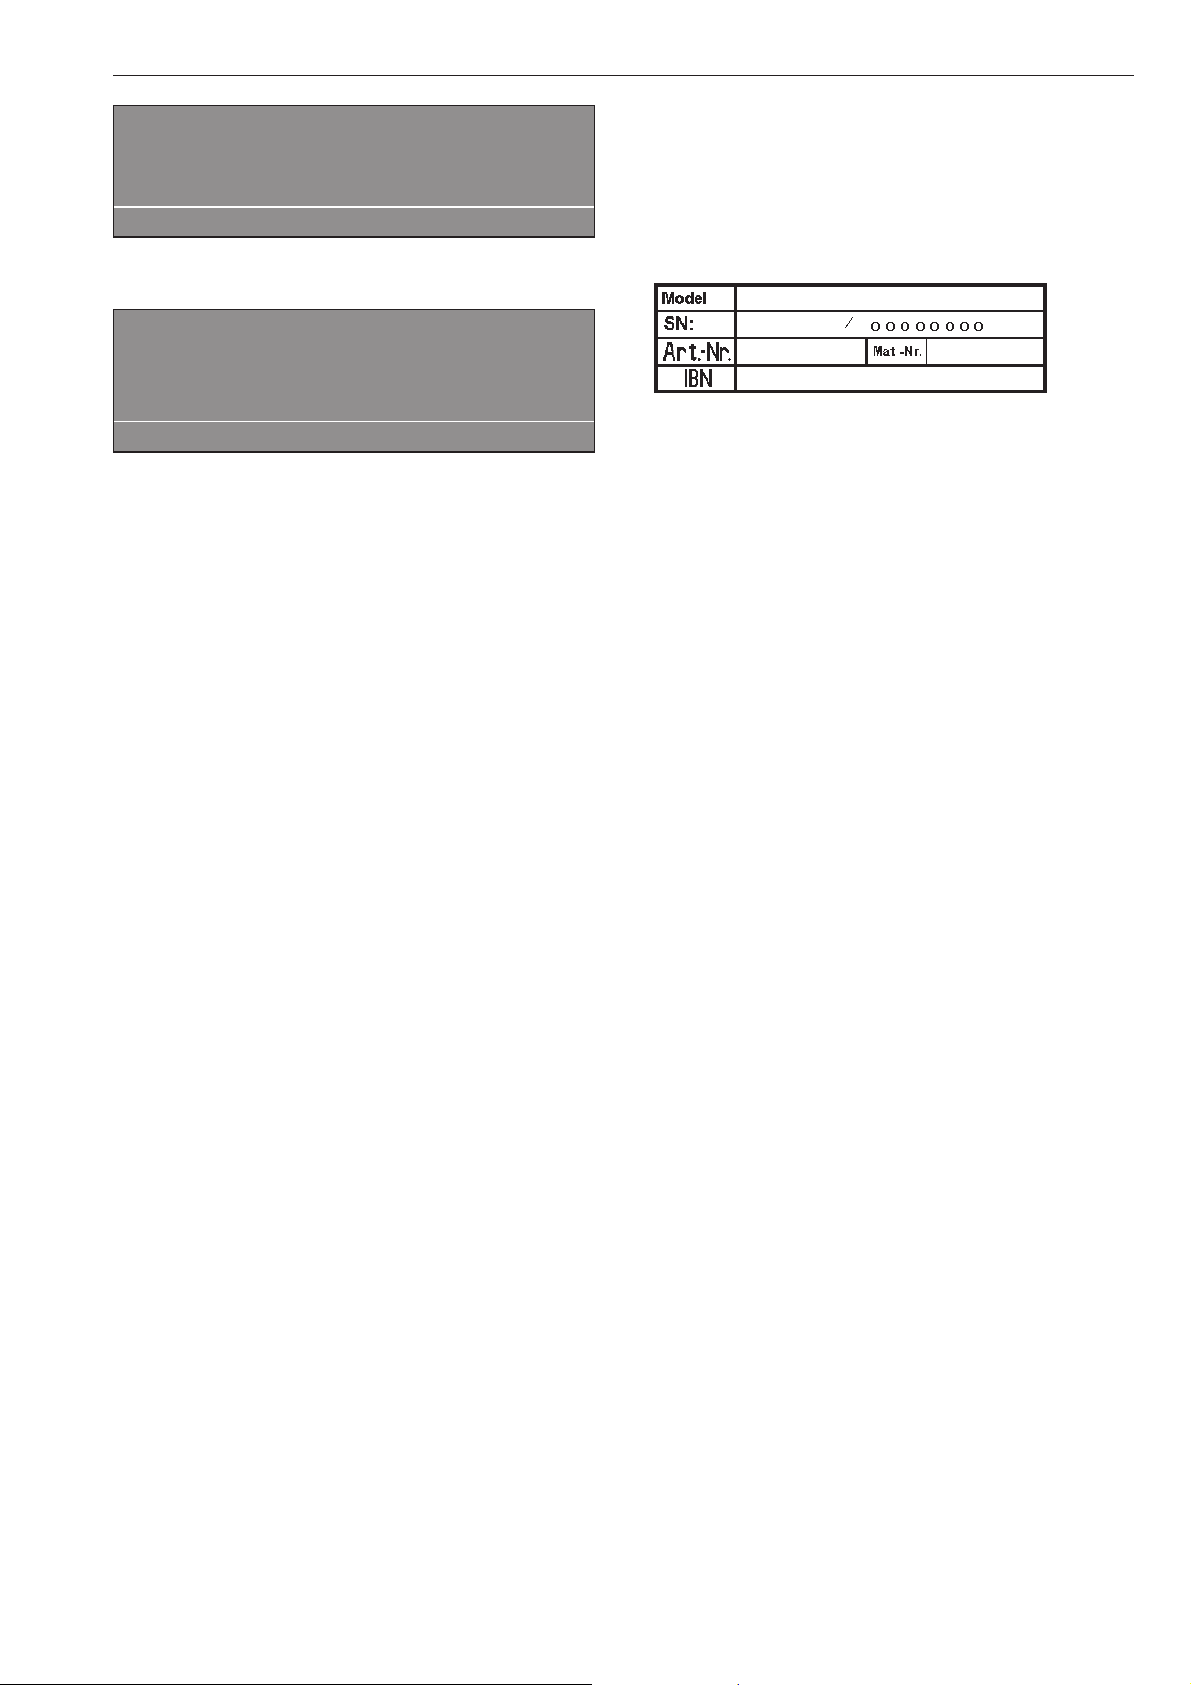
(M.-Nr.) of the machine.
They can be found on the data plate located at the
top of the door opening (when drum door is open) or
on the back of the machine at the top.
^
When contacting Technical Service report the fault
in the display.
Only use original Miele spare parts when performing
maintenance or repairs on this machine. When
ordering please quote the model, serial number (SN)
and part number (M.-Nr.) of the machine.
Frequently asked questions
27
After each use
Never use high pressure cleaners to hose down
the machine.
The machine should be cleaned immediately after
use.
^ After use do not shut the drum door, allow the
interior to air dry.
Cleaning the exterior
,
Never use abrasive cleaners, scouring pads,
steel wool or caustic cleaners on the machine.
They will damage the surface.
All surfaces can be cleaned with a solution of warm
water and liquid dish soap applied with a soft
sponge.
Door gasket
^ Clean any residues on the door gasket with a damp
cloth.
Stainless steel
Stainless steel surfaces can be cleaned using a
non-abrasive stainless steel cleaner.
To help prevent resoiling, a conditioner for stainless
steel can also be used.
^ Apply sparingly with even pressure.
Clean the detergent dispenser, dispenser
compartments and siphons
The detergent dispenser, dispenser compartments
and siphons must be cleaned after each use with
warm water to thoroughly remove any residues of
detergents or other agents. If the machine is not
going to be used for a while the detergent dispenser
should be left open to air the compartment.
The siphon in the dispenser compartment for fabric
conditioner should also be cleaned.
Remove the siphon and clean with hot water. Then
put it back in place.
To clean the drip channels and siphon in the
detergent dispenser, open the flap 45°. The siphon
can be cleaned with a bottle brush if necessary..
The grille over the cooling fan at the back of the
machine should be checked for soiling from time to
time and cleaned if necessary.
Rust
The drum itself and the wash water drum are made of
stainless steel. Water with a high iron content or items
like paper clips or iron buttons which are in the
laundry, can lead to rust in the drums.
^ To help prevent rust, a conditioner for stainless
steel can be used.
^ Check the door gasket for iron residue and clean
with stainless steel conditioner.
^ Clean regularly.
Leave the drum door open after use for the interior
to air dry.
Cleaning and Care
28
^
Regularly check and clean the filters in the water
intake faucets, 1, and the water intake hoses, 2.
Cleaning and Care
29
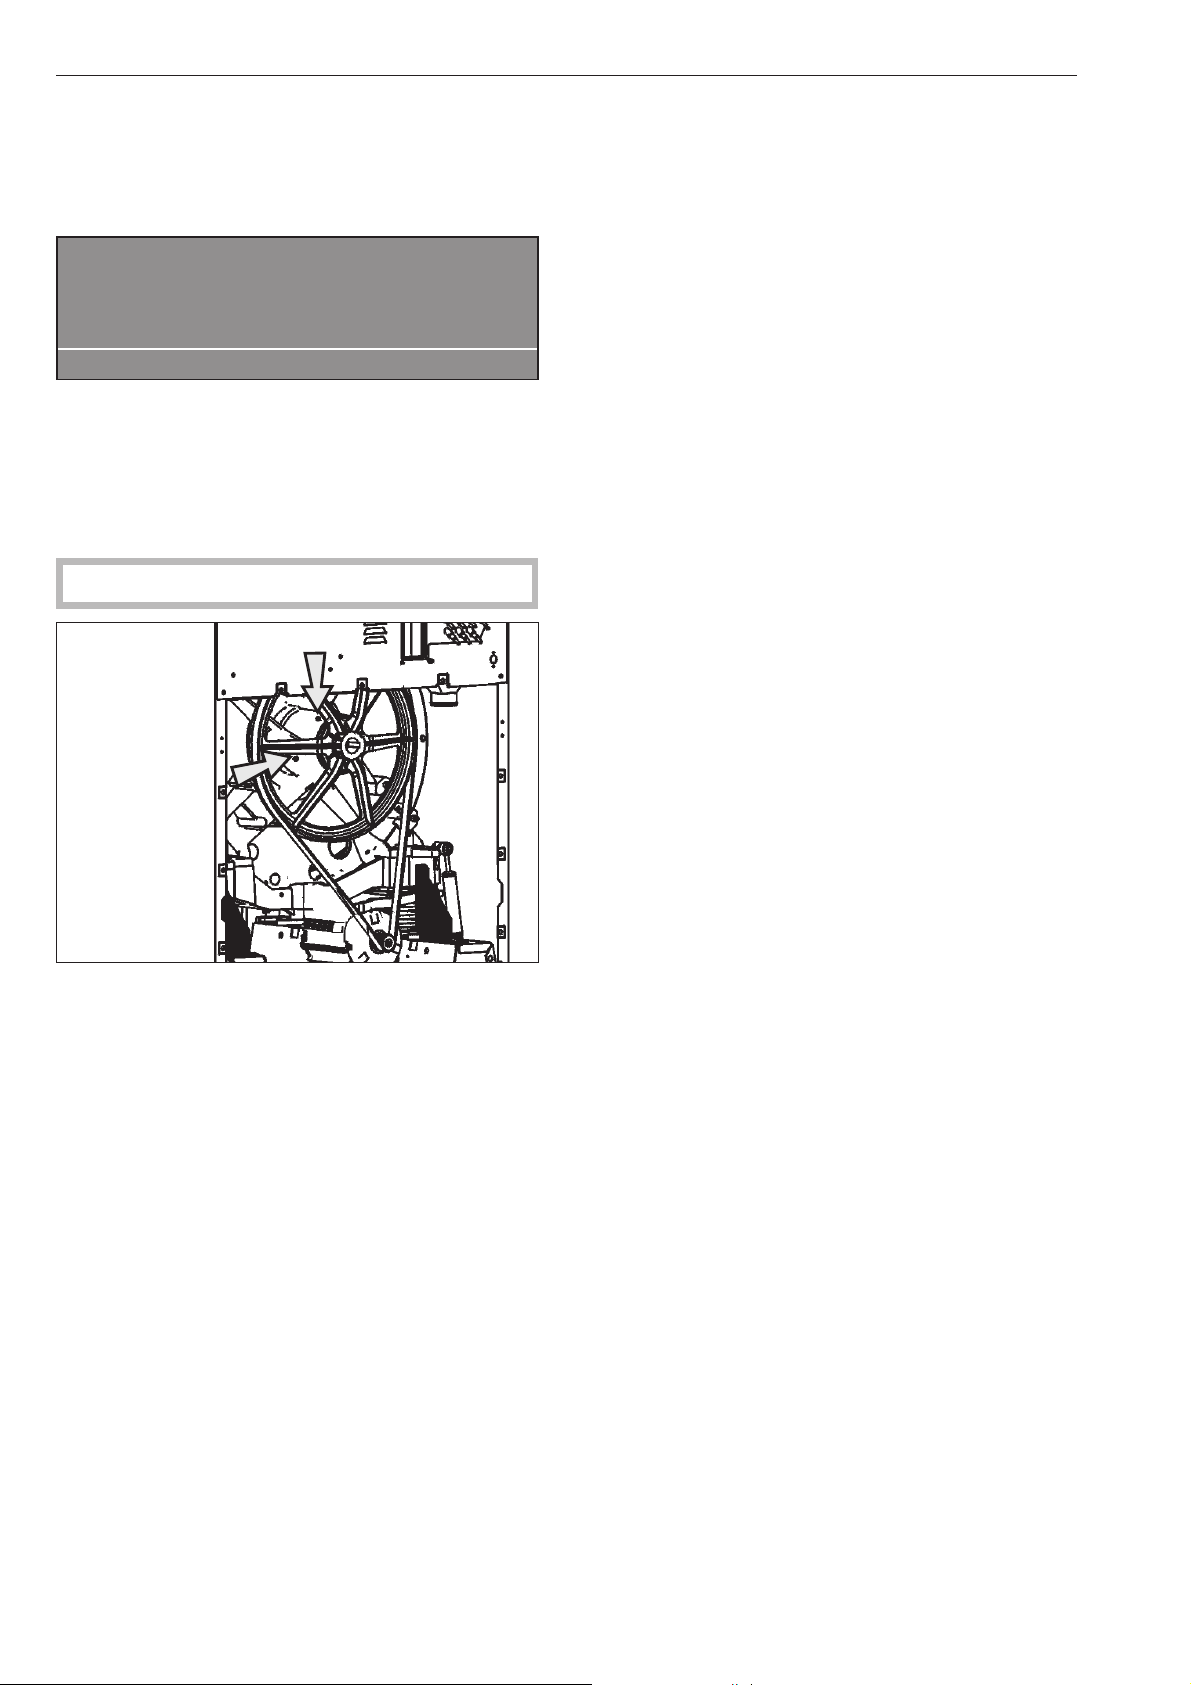
Drum bearing lubrication
(PW 6167 and PW 6207 only)
If the machine needs to be serviced the following
message shows:
§
Drum bearing lubrication
Contact Technical Service.
A
^
Press A "back" to delete the message.
The message will show each time the machine is
turned on, until a Service Technician has serviced the
machine.
,
Unplug the machine.
^
After about 1000 operating hours, lubricate the
drum journal bearings with the lubricating nipple
using Arcanol L 100 grease.
Maintenance during downtime
When the machine is not in use for an extended time
(4 weeks or more), the drum bearings must be
lubricated (before the downtime).
^
Lubricate the drum bearings according to the
warning message and turn the drum by hand a few
times.
^
Repeat every month to prevent bearing damage.
Cleaning and Care
30
Installation Instructions

Disposal of the packing materials
The packing materials protect the appliance during
shipping. They have been designed to be
biodegradable and recyclable.
To prevent suffocation, ensure that any plastic
wrappings, bags, etc. are disposed of safely and
kept out of the reach of children.
Disposal of an old appliance
Old appliances may contain materials that can be
recycled. Please contact your local recycling center
about the possibility of recycling these materials.
Ensure that the appliance presents no danger to
children while being stored for disposal. Before
discarding an old appliance, unplug it from the outlet,
cut off its power cord and remove any doors to
prevent hazards.
Help to protect the environment
32
The washer must only be installed by a Miele
authorized service technician.
,
This washer-extractor is only intended for
laundry which has not come in contact with
flammable substances.
Before installation or service disconnect the power
supply to the work area.
Do not install or store this machine in a room
where temperatures below freezing may occur or
where the machine may be exposed to the
weather.
Do not install the washer on carpeting. Carpeting
will block the washers air vents.
,
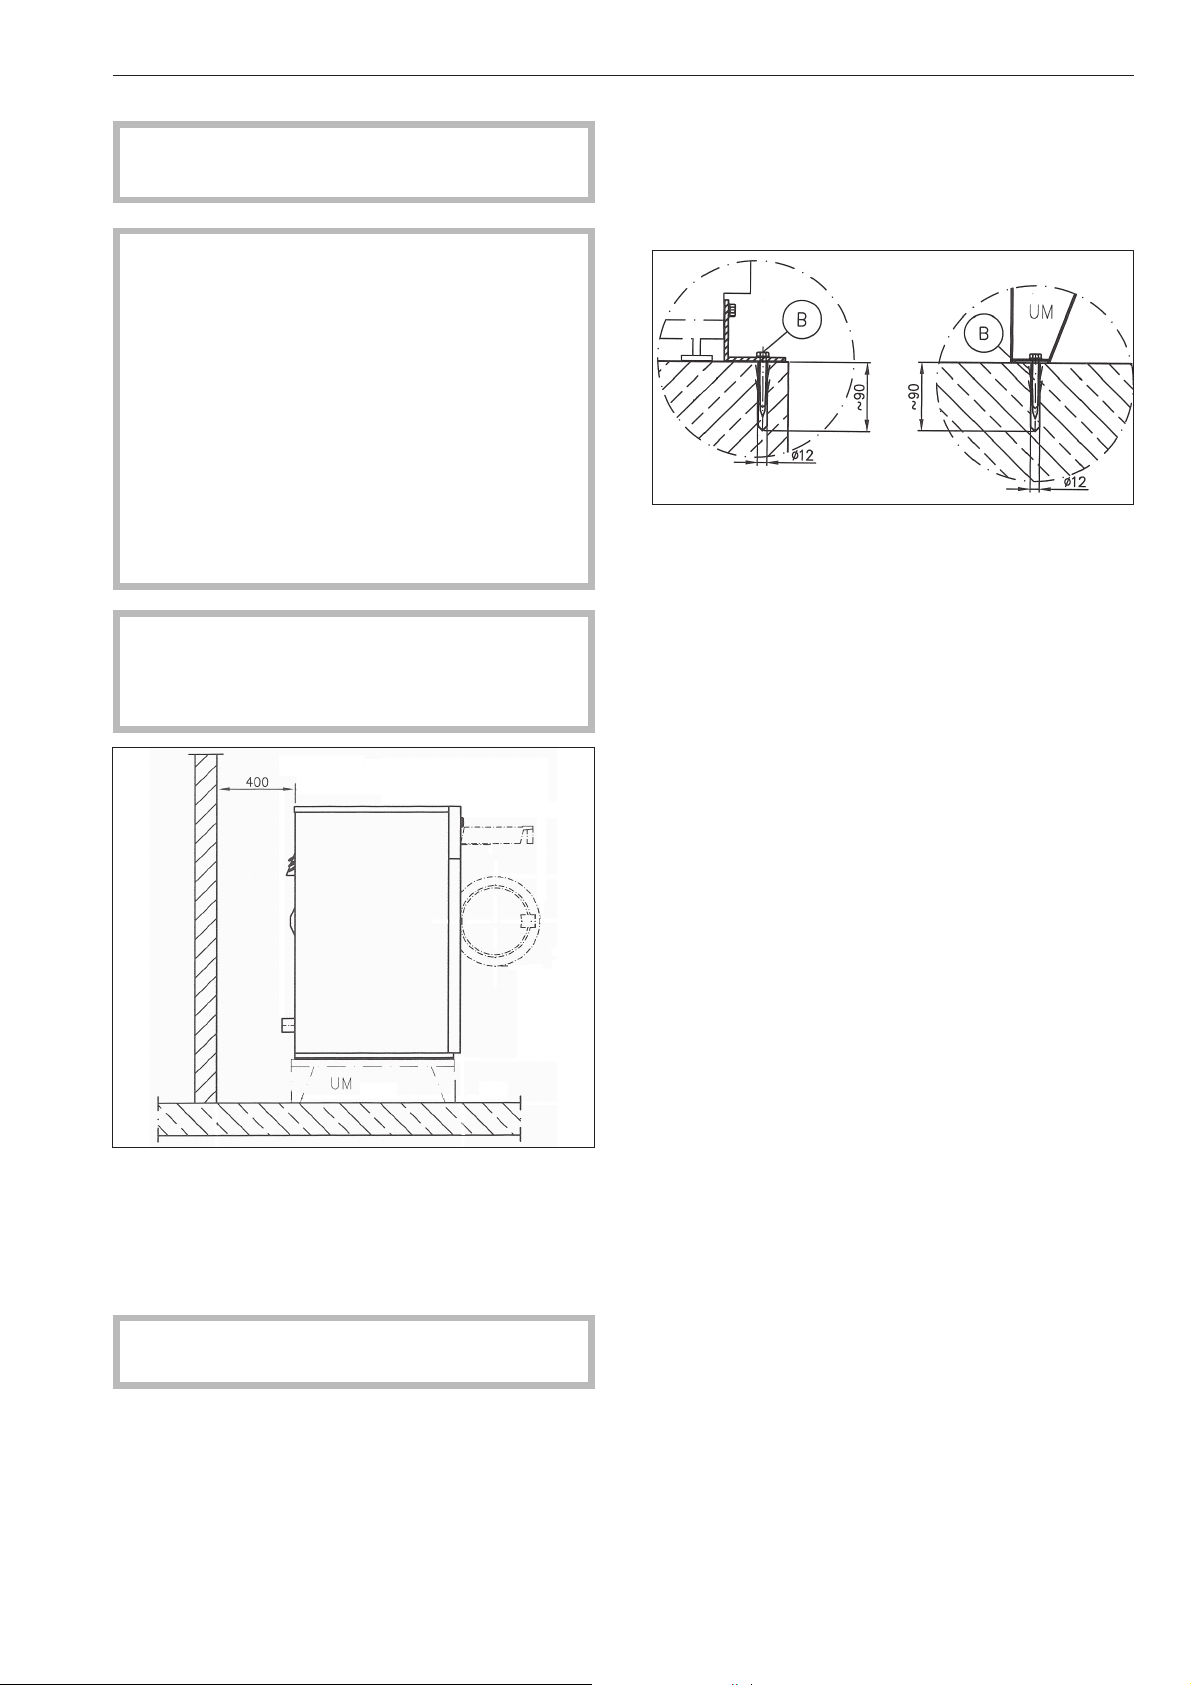
The minimum dimensions and distance
required from the wall, as shown in the installation
diagram, must be observed to allow service to be
performed and the data plate to be viewed.
Minimum distance from the wall is approx.15 3/4"
(400 mm) to allow for maintenance work.
The washer must be leveled for proper operation. The
machine does not need to be installed on a base,
however, any unevenness in the floor must be
compensated for.
,
Only move the machine if all panels are in
place.
Plinth
A concrete or reinforced floor is the most suitable
surface for the washer. These types of floors are less
prone to vibration during the spin cycle.
The base must be secured to the floor.
Concrete base / floor Miele plinth
Installation Instructions
33
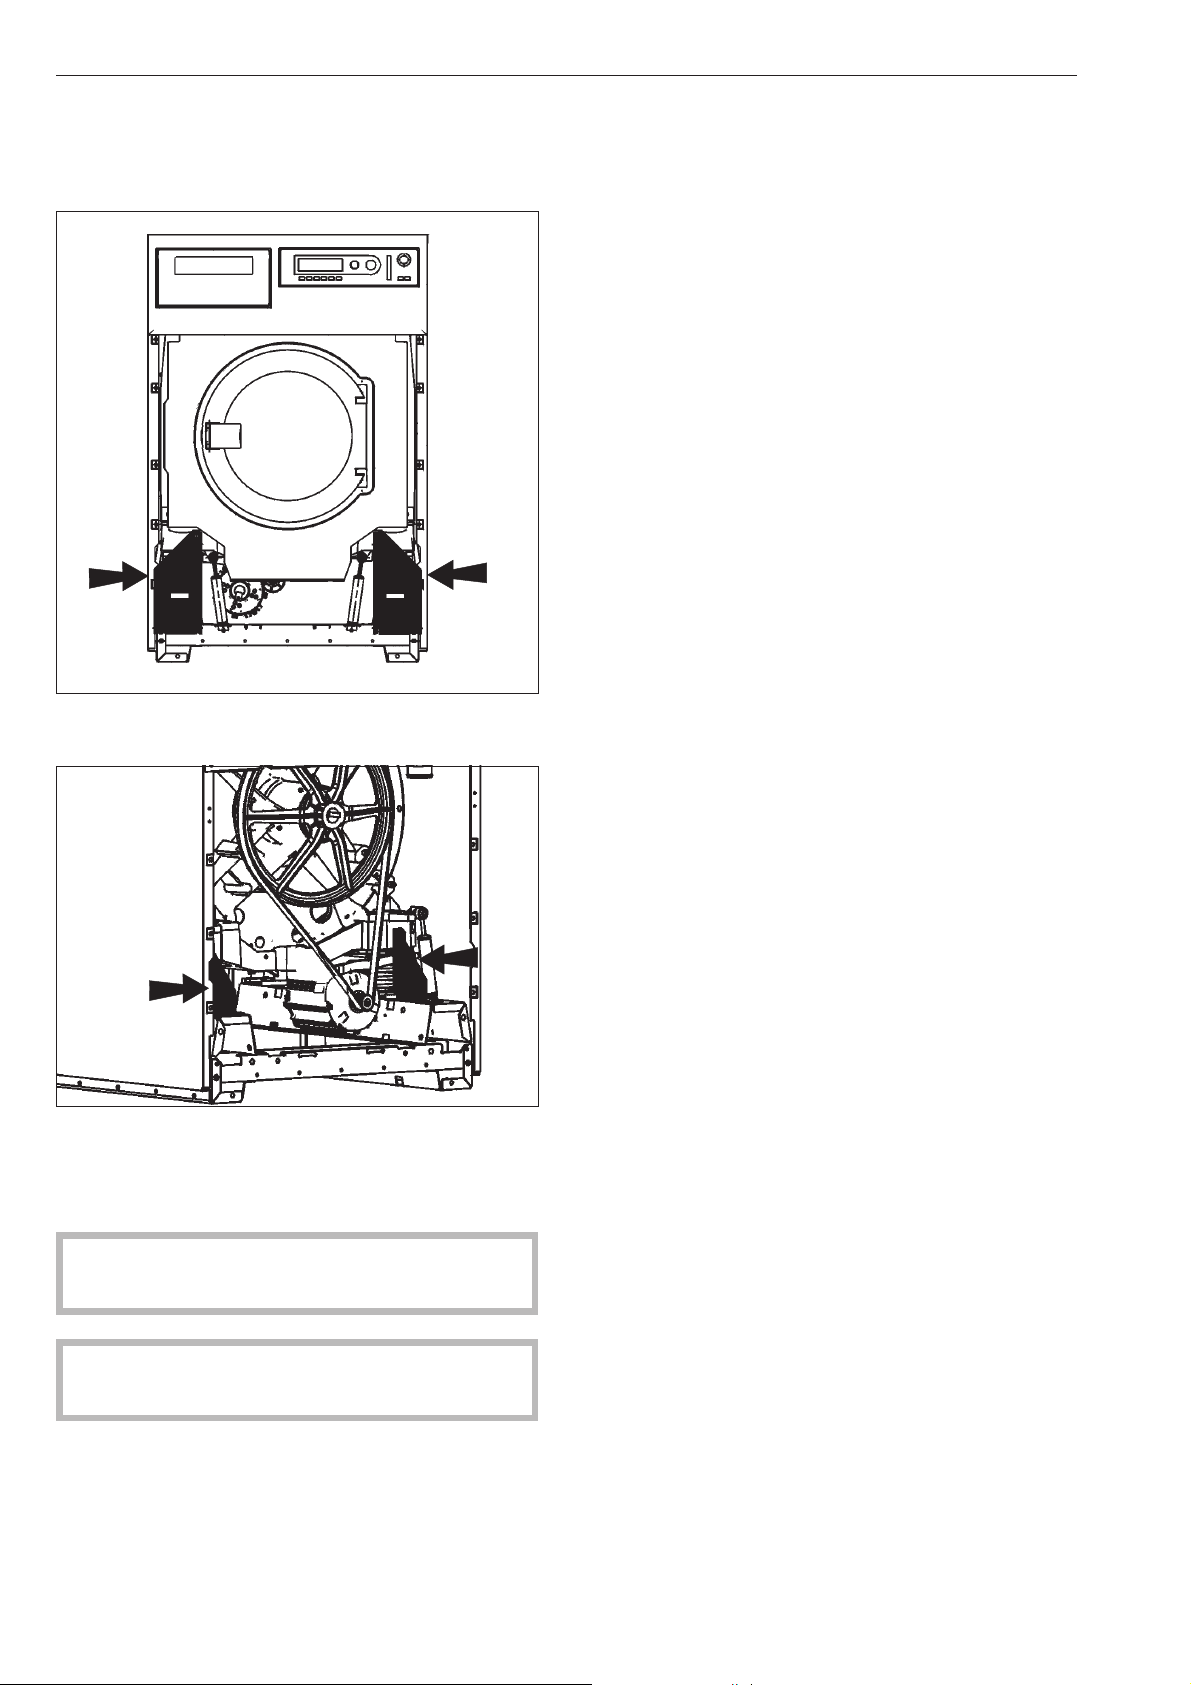
Removing the shipping struts
Four shipping struts, two at the front and two at the
rear, are each fixed with 3 hex screws.
^ Remove the shipping struts at the installation location
before using the washer.
^
Take off the front and back panel of the machine by
removing the screws at the bottom edge of the
front service panel and the screws in the rear panel
and remove.
Save the shipping struts for future use. They must be
refitted if the machine is moved.
Do not move the machine without all of the outer
panels in place.
Installation Instructions
34

On-site connections
WW Hot water
KW Cold water
KWH Hot Cold Hard water
EL Electrical connection
AG Gas (gas heated models)
G Gas supply (gas heated models)
AV Drainage
D Steam port (steam heated models)
K Condensation vent (steam heated models)
Water connections
Cold water Warm water Cold water
Hard water Liquid dispensing Hard water
Plumbing
The machine should be connected to two water
supply faucets, which conform with local and national
regulations. Installation must be carried out by an
authorized service technician.
To ensure the machine is correctly connected please
follow the installation plan and the installation
instructions supplied with the machine.
Connecting the water intake / water drain
hoses
A water pressure flow rate of at least 14.5 psi, maximum
145 psi is required.
The inlet pressure hoses supplied with the machine
must be used for connection to the water supply.
If replacing an inlet hose only use a hose tested to at
least 1015 psi pressure, and for a water temperature
of at least 194°F (90 °C). This also applies to all
fittings. Miele original parts fulfill these requirements.
The hot water intake must not exceed a temperature
of 158°F (70°C).
Installation Instructions
35
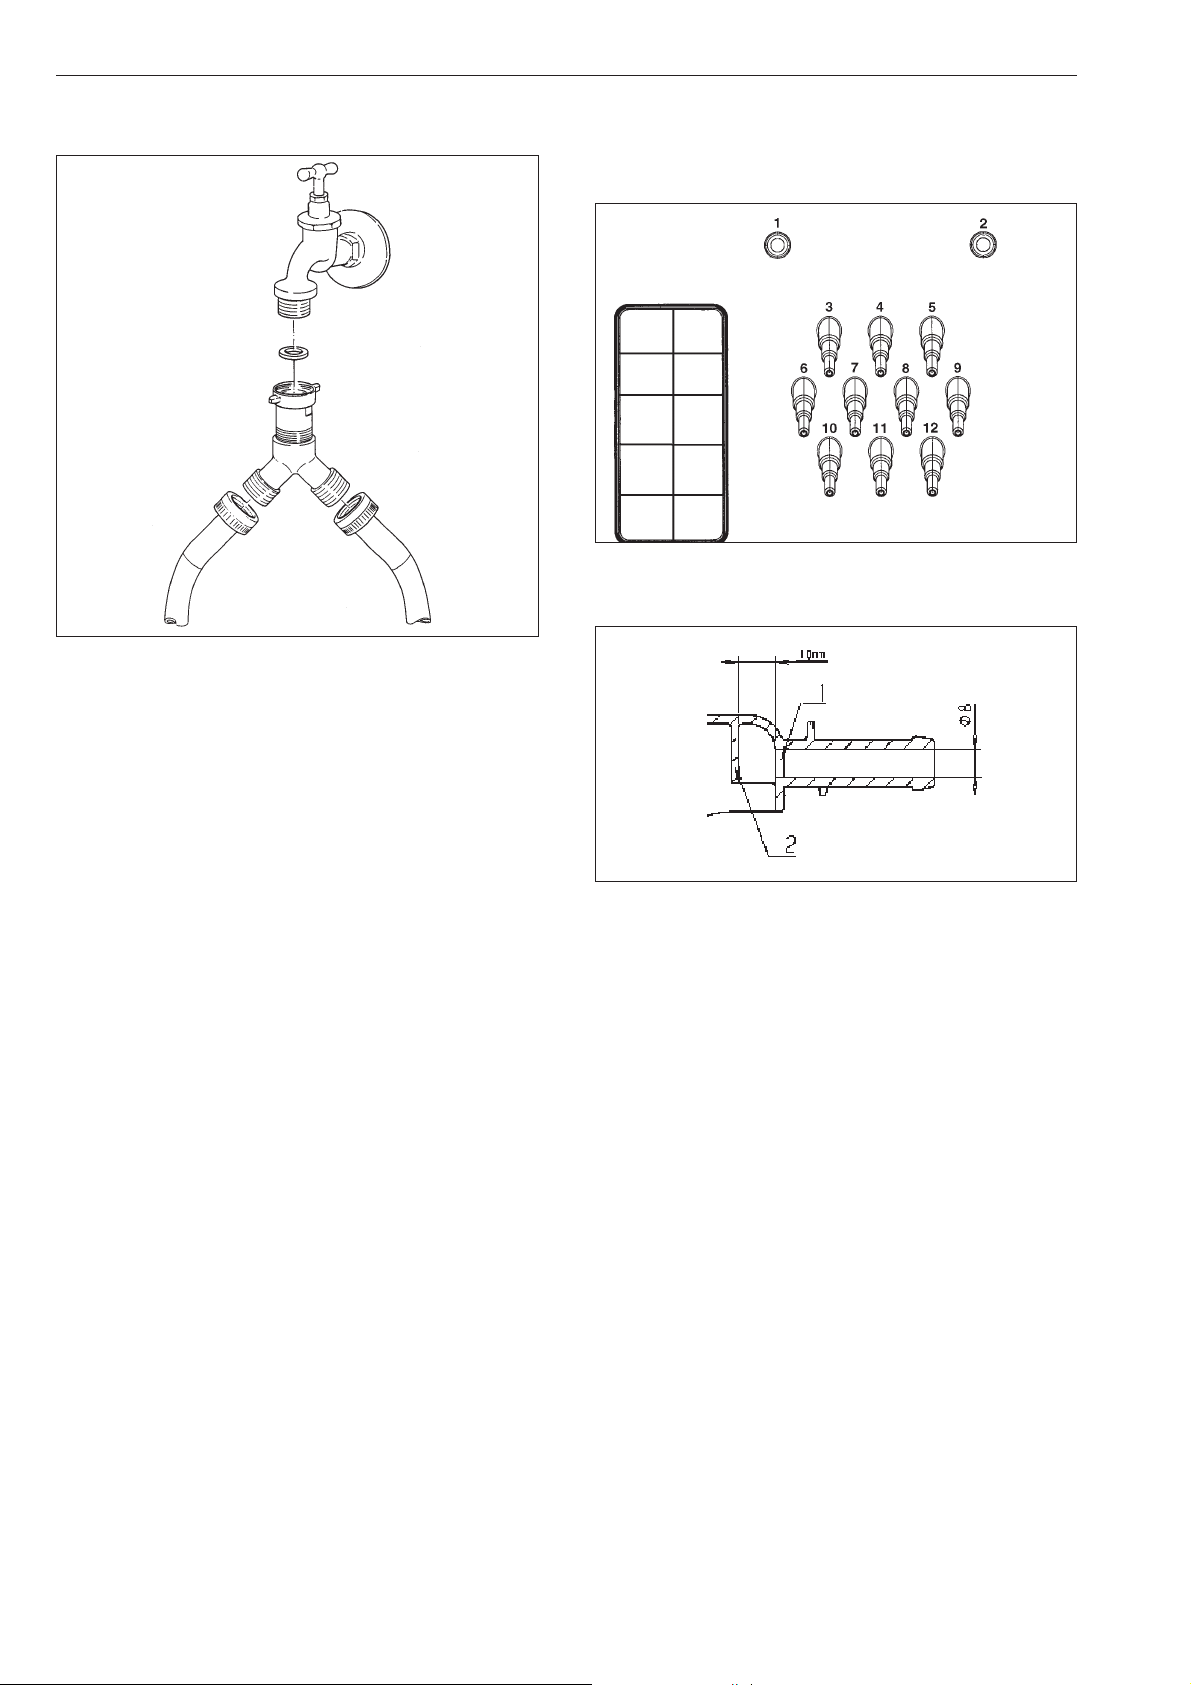
Cold water connection only
Use the included Y-piece.
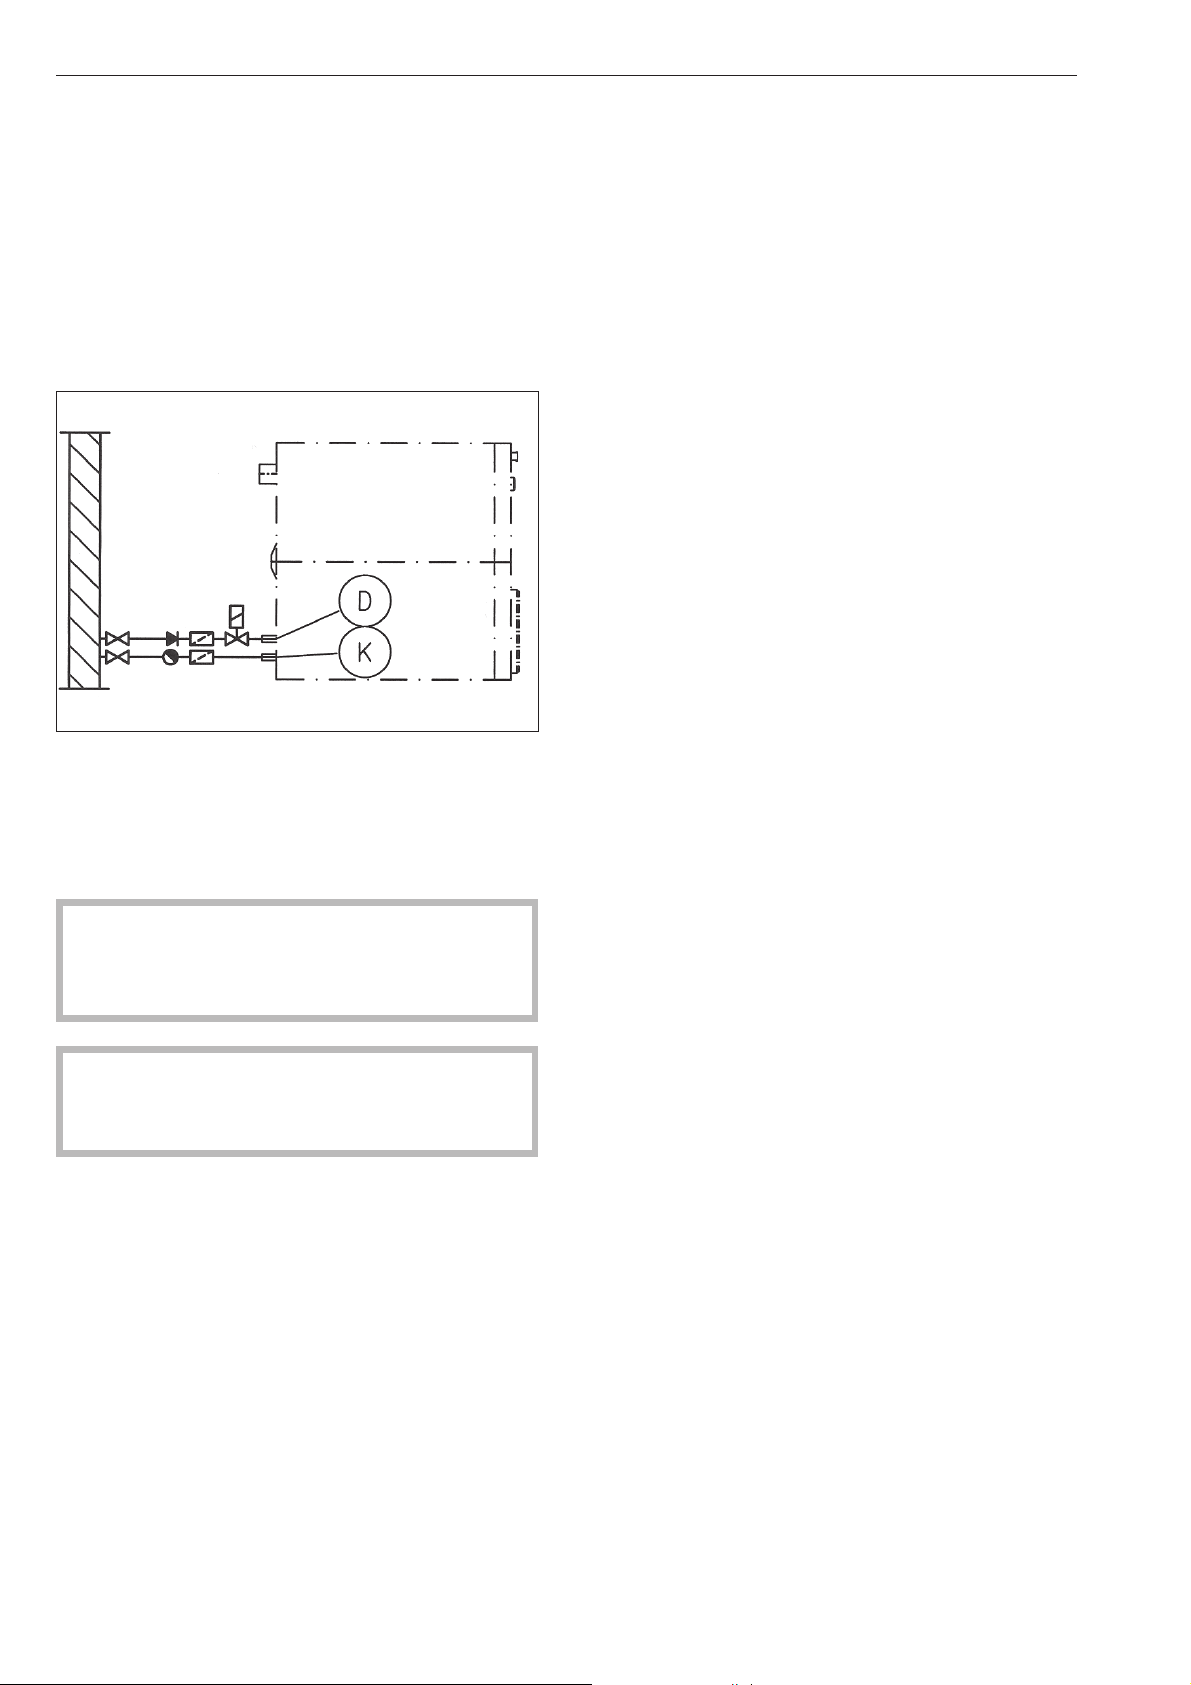
Detergent connection at the mixing
compartment of the liquid dispensing
system
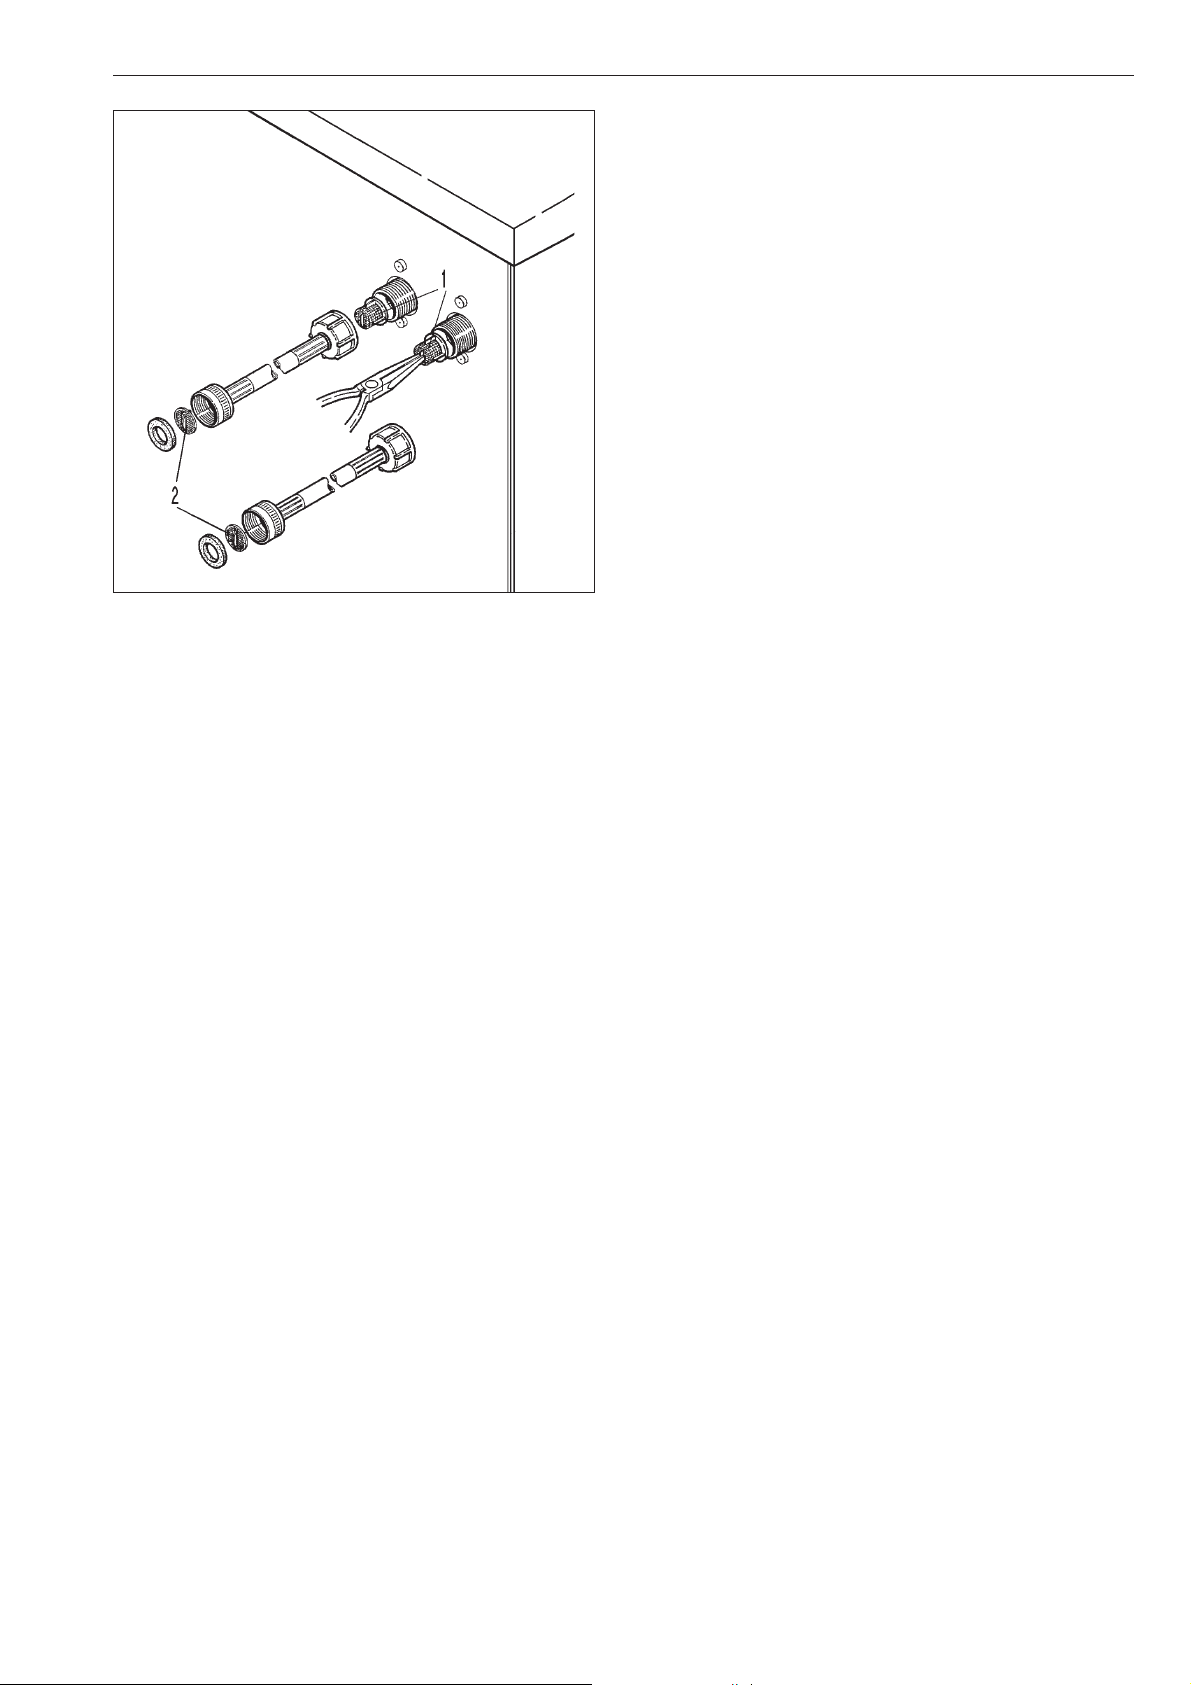
Connections 1 and 2 are for paste dispensing. These
connection sockets are closed and must be drilled
open using an 8 mm drill.
Note: Drill only through the first (1) wall, there is an
impact surface (2) 3/8" (10 mm) behind it.
Drilled connections that are no longer in use must be
closed up again.
Connections 3 and 12 are for liquid dispensing.
These connection sockets are closed and must be
cut off to fit the hose diameter using a small saw.
If the opened sockets are no longer in use they must
be closed up
Installation Instructions
36
1"
3/4"
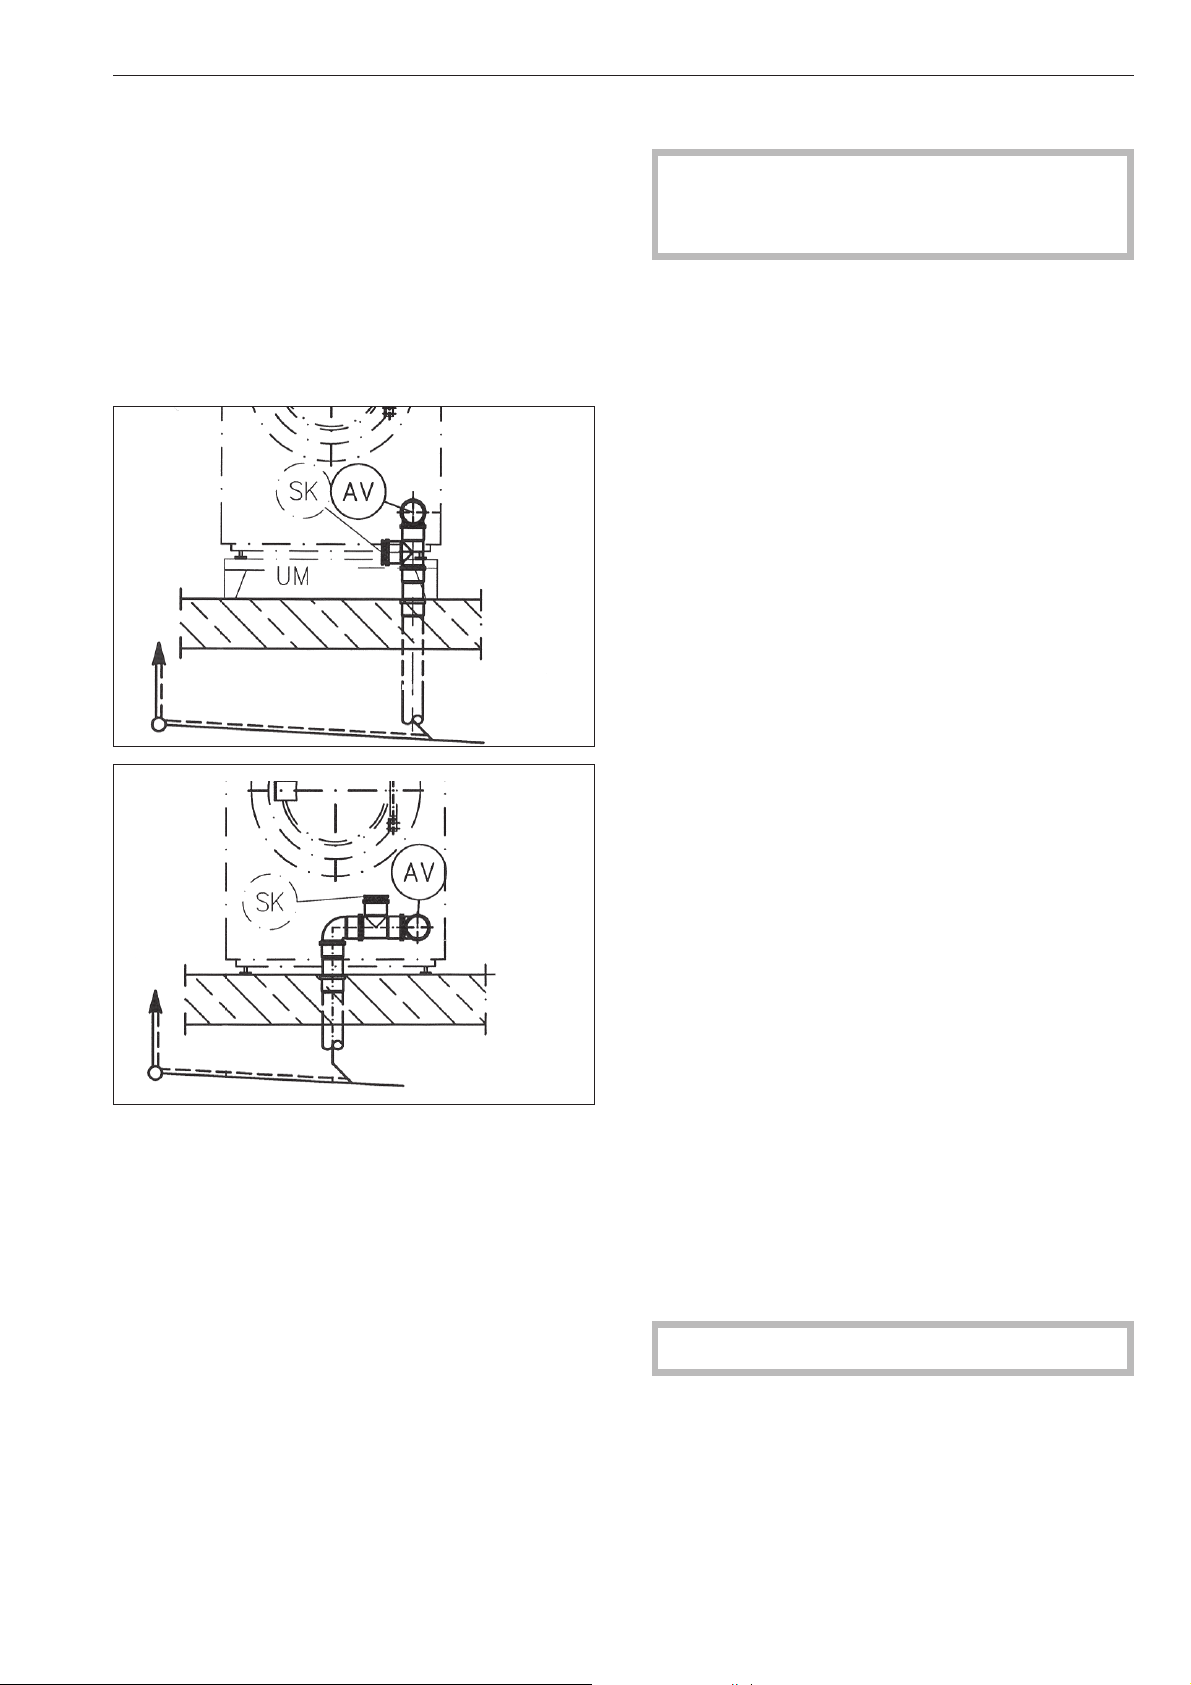
Water outlet
Water outlet AV is DN 70 on the machine, the fitting to
the machine is DN 70. Short-term thoughput 200
l/min.
Foam compensator SK
In the event of over sudsing, foam may escape
through the vapor vent. To drain the foam, a drain
with siphon can be fitted using off-the-shelf piping
materials.
Installation examples
Electrical connection
All electrical work must be performed by a
qualified service technician in accordance with
applicable codes and standards.
The connecting terminal is located behind the cover.
The machine must only be connected to the voltage
and frequency shown on the data plate.
The machine is equipped with a multi-tap
transformer.
Steam heated washers are factory set to 3 phase,
208 V, 60 Hz
They can be converted to 3 phase, 240 V, 60 Hz by a
Miele Service Technician.
Electrically heated washers are factory set to 3
phase, 230 V, 50/60 Hz
They can be converted to 3 phase, 208 V, 60 Hz by a
Miele Service Technician.
If the appliance is hard wired, a multiple-pole
separator must be installed. An appropriate separator
is a switch with a contact opening of at least 3 mm.
This includes circuit breakers, fuses and switches.
The plug connection or the separator must be always
be accessible.
Connection should be made in accordance with the
wiring diagram and the installation diagram to a
suitable isolator, with an on-off switch which is easily
accessible for servicing. These diagrams are
important for the correct electrical functioning of the
machine.
Potential equalization
A potential equalization must be provided if the leak
current is >10 mA.
The electric heating is factory-set to
9 kW PW 6107
15 kW PW 6137, PW 6167
18 kW PW 6207.
To activate the heating the water level in the drum
must be 2" (50 mm) high.
A motor overload protection is located in the motor
winding.
See the enclosed wiring and installation diagrams.
Installation Instructions
37
Connecting the dispensing pumps
The connecting terminal for 4 time controlled
dispensing pumps is located behind the cover next to
the electrical connection. See the supplied wiring
diagram.
Steam connection
The steam connection must only be connected by a
certified installer. For more information see the
enclosed installation plan and the installation manual.
Steam solenoid valve, dirt filter and steam shutoff
valve must be installed on site.
The steam valve and the condensate trap are
available from your Miele dealer or from Miele.
,
Do not attempt to repair a gas-heated dryer
yourself! Repairs must be carried out by a
qualified technician. Contact Miele Technical
Service or an authorized dealer.
Once the appliance has been set up and
connected, replace all the housing parts that were
removed.
Installation Instructions
38

PW 6107 PW 6137 PW 6167 PW 6207
Height 49 3/16" (1250 mm) 49 3/16" (1250 mm) 55 1/8" (1400 mm) 55 1/8" (1400 mm)
Width 31 5/8" (804 mm) 31 5/8" (804 mm) 36 3/8" (924 mm) 36 3/8" (924 mm)
Depth 36 7/16" (925 mm) 39 9/16" (1005 mm) 39 5/8" (1007 mm) 44 7/8" (1140 mm)
Depth with door open 52 3/4" (1340 mm) 55 7/8" (1420 mm) 56" (1422 mm) 61 1/4" (1555 mm)
Weight 714 lbs (324 kg) 754 lbs (342 kg) 1000 lbs (454 kg) 1090 lbs (495 kg)
Drum volume 26.4 gal (100 l) 34.3 gal (130 l) 42.3 gal (160l) 52.8 gal (200 l)
Max. load size
(dry laundry)
22 lbs (10 kg) 28.7 lbs (13 kg) 35.3 lbs (16 kg) 44.1 lbs (20 kg)
Voltage see data plate
Fuse rating see data plate
Connected load see data plate
Test certificates
awarded
see data plate
Max. load bearing
in operation
8750 lbs (3970 kg) 9490 lbs (4304 kg) 12100 lbs (5469 kg) 13400 lbs (6076 kg)
Emission sound
pressure level
<80db(A)
Technical Data
39
All
rights reserved/1016
M.-Nr. 09 118 330 / 03
Operating instructions
Washer-Extractor
PW 6107
PW 6137
PW 6167
PW 6207
To avoid the risk of accidents or damage to the machine it is
essential to read these instructions before installing,
commissioning and using it for the first time.
M.-Nr. 09 118 330
en-CA

2

Warning and Safety instructions...............................................................4
Caring for the environment ...................................................................7
Description of the machine ...................................................................8
Control elements.............................................................................9
How to wash correctly ......................................................................11
Sort the laundry.............................................................................11
Maximum loads for the standard programs .........................................................11
Add detergent..............................................................................12
Detergent dispensing ........................................................................13
Select a program ...........................................................................13
Open the door at the end of the program.........................................................15
Card operation ............................................................................16
Card access operation .......................................................................16
Additional options .........................................................................17
Language selection .........................................................................17
Start date and time ..........................................................................17
Program stop ..............................................................................18
Program cancellation ........................................................................18
Changing the program order ..................................................................19
Optional modules ..........................................................................20
Liquid dispensers ...........................................................................20
Peak load cut-out ...........................................................................22
Communication module ......................................................................22
Operating data .............................................................................22
Weighing system ...........................................................................24
Problem solving guide ......................................................................25
The door will not open .......................................................................25
Power cut during a wash program - Emergency door release.........................................25
Error messages.............................................................................27
After sales service ..........................................................................28
Cleaning and care ..........................................................................29
Installation and connection ..................................................................32
Transit fittings ..............................................................................33
On-site connections .........................................................................34
Plumbing connections on the machine ..........................................................34
Liquid agent dispensing mixing box connections ..................................................35
Electrical connection ........................................................................36
Connecting the dispenser pumps ..............................................................37
Steam connection ...........................................................................37
Technical data .............................................................................38
Contents
3
Explanation of the Warning and Safety
symbols on the machine
It is essential to read these operating
instructions.
Please refer to specific instructions, e.g.
Installation instructions
Caution, hot surfaces.
Caution, voltage up to 1000 volts.
Earthing
To avoid the risk of accidents and damage to the
machine read the operating instructions carefully
before using it for the first time. They contain
important information about the installation, safety,
use and maintenance of the machine. Keep these
operating instructions in a safe place and ensure
that new users are familiar with the content. Pass
them on to any future owner of the machine.
Correct application
~
This machine is not designed for washing items
which have been treated with dangerous or
flammable substances.
~
Only use the machine to wash items which are
specified by the manufacturer to be
machine-washable on the wash-care label.
Any other applications may be dangerous. The
manufacturer is not liable for damage resulting from
improper use or operation.
~
Chemical dry cleaning agents must not be used in
this machine. Most dry cleaning agents, e.g. benzine,
pose a fire and explosion hazard.
~
Petrol, paraffin, or any easily flammable liquid
must not be stored or used near the machine. Do not
use the machine lid as a storage shelf.
Fire and explosion hazard.
~
Do not store any chemicals on the machine lid
(liquid detergent, fabric conditioners etc). They could
discolour the lid and also damage the surface finish.
If any chemicals should come in contact with the
surface, wipe them away immediately with clean
water. Then dry with a soft cloth.
~
When used in a commercial environment ensure
that all operators are trained to use the machine
correctly.
If the machine is used in a publically accessible
room, please ensure that operators are able to use it
safely.
~
This machine is not intended for outdoor use.
Technical and electrical safety
~
The electrical safety of this machine can only be
guaranteed if connected to a correctly installed
earthing system on site. It is most important that this
basic safety requirement is present and tested
regularly, and where there is any doubt, the on-site
electrical wiring should be inspected by a qualified
electrician. The manufacturer cannot be held liable
for the consequences of an inadequate earthing
system (e.g. electric shock).
~
Do not damage, remove or bypass the safety
features, fixtures and control elements of this
machine.
~
Do not use a machine with damaged controls or
cables. These must be repaired before it is used
again.
~
Any removable outer panels must be back in
place, and all moving or electrical parts shielded
before the machine is switched on.
~
Connection should be made via a suitable isolator
which complies with local and national safety
regulations and which is easily accessible for
disconnecting the machine from the electricity
supply. Provision must be made on site to switch off
all poles.
~
The machine is only completely isolated from the
electricity supply either when it is switched off at the
isolator switch or the mains fuse has been withdrawn.
~
Repairs to electrical or steam operated machines
may only be carried out by a suitably qualified person
in accordance with national and local safety
regulations.
Repairs and other work by unqualified persons could
be dangerous.
The manufacturer cannot be held liable for
unauthorised work.
~
Do not force the drum door open. The door handle
is fitted with an safety device to ensure that the door
lock functions correctly.
~
Faulty components must only be replaced by
genuine Miele original spare parts. Only when these
parts are fitted can the safety standards of the
machine be guaranteed.
Warning and Safety instructions
4

~
The best materials are used in the manufacture of
this machine, and every care is taken to check all
parts. However, with time, deterioration of parts can
occur, especially with such components as hoses,
giving rise to leaks. Check the inlet hoses regularly
for signs of wear and tear. Change in good time to
avoid the risk of leaks and subsequent damage.
~
Local regulations regarding regular inspection and
maintenance of this machine must be observed. A
log book should be kept with the machine.
Using the washer-extractor
~
This machine is not intended for use by people
reduced physical, sensory or mental capabilities, or
lack of experience and knowledge, unless they are
supervised whilst using it or have been shown how to
use it correctly by a person responsible for their
safety.
~
This machine is not a toy! To avoid the risk of
injury never allow children to play on or near the
machine, or to operate it themselves.
~
Remember that the porthole glass will be hot when
washing at very high temperatures. Do not let
children touch it.
~
Always close the door after use. This way you will
avoid the danger of:
– children climbing onto or into the washer-extractor
or hiding things in it.
– pets or other small animals climbing into it.
~
Always make sure that the drum is stationary
before reaching into the machine to remove laundry.
Reaching into a moving drum is extremely
dangerous.
~
Take care in the area of the hinges of the drum
door. Danger of injury.
~
The drum door must be able to be opened to its
fullest extent. This area must not be restricted by
doors or structural features.
~
The water used for washing is a suds solution and
is not drinking water.
The suds solution must be drained away via an
appropriate drainage system.
~
The washer-extractor may only be operated
without supervision if there is a floor drain (gully) in
the immediate vacinity.
~
If the washer-extractor is switched off and the
drum door is closed, you need to switch the machine
on before you can open the door.
If water comes out of the suds container when the
door is opened, close the door and switch the
washer-extractor on. Drain the water away before you
try and open the door.
~
It is the operator's responsiblity to ensure that the
standard of disinfection in thermal as well as chemo
thermal procedures is maintained (in accordance
with national health and safety regulations) by
carrying out suitable validation tests. These
procedures should be checked on a regular basis,
either thermo-electrically using loggers, or
bacteriologically with bio indicators. The operator
must pay particular attention to maintaining the
correct parameters in the procedure, including
temperature and with chemo thermal programs, the
chemical concentration used. Disinfection programs
must not be interrupted, as this can have a limiting
effect on the disinfection result.
~
It is particularly important to observe
manufacturer's instructions when using a combination
of cleaning agents and special application products.
Only use the product for the application described by
the manufacturer, to avoid any material damage or
the occurrence of strong chemical reactions.
Confirm with the detergent manufacturer that their
product can be used in combination with another
type of product.
~
Only use dyes, colour run and dye removers
specified as being suitable for use in washing
machines. Always observe the manufacturer's
instructions carefully.
~
Laundry that was soiled with biological oils or fat
should be washed using a suitable detergent and /or
wash program. It must also be inspected after
washing. If oils or fat are not sufficiently removed they
could cause the laundry to self ignite during the
drying process. This type of soiling should be
removed using specialist detergents and/or
programs.
~
Do not use a pressure washer or hose to clean the
machine.
Warning and Safety instructions
5

Further notes
~
Cleaning and disinfecting agents often contain
chlorine-based substances. Do not let such agents
dry out on stainless steel surfaces, as the chlorine
can have a corrosive effect. Use chlorine-free agents
for washing and disinfecting and also for cleaning
stainless steel surfaces to protect them from
corrosion.
If in doubt, confirm with the manufacturer that their
product is suitable. If any agent containing chlorine
comes into contact with the stainless steel surfaces,
wipe it away immediately with clean water. Then dry
with a soft cloth.
~
The manufacturer cannot be held liable for the
effect of a chemical cleaning agent on laundry or the
machine, even when the use of such agents is
recommended.
Please note that changes to the product which have
not been made known by the manufacturer can affect
the quality of the wash result.
Using accessories
~
Accessory parts may only be fitted when
expressly approved by Miele. Using spare parts or
accessories from other manufacturers will invalidate
the guarantee, and Miele cannot accept liability.
Chlorine and component damage
Notes on using chlorine bleach and
perchlorethylene
~
Frequent use of chlorine increases the risk of
component damage.
The use of agents containing chlorine, such as
sodium hypochlorite and chlorine bleach in powder
form, can damage the protective upper surface of
stainless steel and cause corrosion to components.
Factors affecting this are chlorine concentration
levels, contact time and temperature. It is therefore
advisable to avoid the use of such agents. Oxygen
based bleaching agents should be used instead.
If, however, chlorine based bleaching agents have to
be used for particular types of soiling, then
anti-chlorine measures must also be carried out. If
this is not done irreparable damage can occur to
components in the machine and to laundry.
Anti-chlorine treatment
Anti-chlorine treatment has to be carried out
immediately after chlorine bleach has been used. The
use of hydrogen peroxide or an oxygen based
cleaning or bleaching agent is recommended and the
laundry should not be drained in between.
With thiosulfate, especially when used with hard
water, gypsum can form, which can lead to
incrustations on laundry or deposits in the machine.
The use of hydrogen peroxide is preferable as it aids
the chorline neutralising process.
The exact quantity of additives and the treatment
temperatures required must be set and tested on site
in accordance with the dosage recommendations of
the detergent and additive manufacturers. The
laundry must also be tested to check whether it
contains any active chlorine residues.
Disposing of your old machine
~
Before disposing of an old machine, first make the
door lock unusable. This way you will prevent
children from accidentally locking themselves in and
endangering their lives.
All personnel working with this machine must be
fully trained in all aspects of its use and safety.
Keep these instructions in a safe and accessible
place.
Warning and Safety instructions
6
Disposing of the packing material
The packaging is designed to protect the machine
during transportation. The materials used are
environmentally friendly for disposal.
Rather than just throwing these materials away,
please ensure that they are recycled.
,
Packaging materials such as plastic film and
bags must be kept out of the reach of babies and
children. Danger of suffocation.
Disposing of your old machine
Electrical and electronic machines often contain
materials which, if handled or disposed of incorrectly
could be potentially hazardous to human health and
to the environment. They are, however, essential for
the correct functioning of your machine. Please do
not dispose of your old it with your general waste.
Please dispose of it at your local community waste
collection/recycling centre.
Please contact your local waste collection centre or
scrap merchant about recycling schemes.
Please store it out of the reach of children whilst
awaiting disposal.
Tips on saving energy
To save energy and water, try to load the maximum
for the program selected. Underloading is
uneconomical. Overloading gives a poorer quality of
wash result and may cause unnecessary creasing.
Make sure that your laundry is thoroughly spun
before drying. This saves time and energy.
Carrying out the final rinse with hot water helps to
reduce the residual moisture level, and the residual
heat in the laundry will help keep processing time
down in the dryer, thus saving energy.
Follow detergent manufacturer's advice regarding the
right amount of detergent to use.
This will depend on the size of the load, the water
hardness level and the amount of soiling in the
laundry.
Chose the correct program (with pre-wash or
intensive options selected) and the correct
temperature.
Caring for the environment
7

a Emergency stop switch
Press the red button to switch the machine off.
b Control panel
c Detergent dispenser drawer
Pull the handle to open the compartment.
d Drum door
Pull the door handle to open the drum door. Do not
use force to open it.
e Door handle
The door handle is fitted with a safety device to
ensure that the door lock functions correctly (see
"Problem solving guide").
f 4 adjustable screw feet
g Electrical connection
h Water inlet connections
i Water recycling connections
j Communication slot
k Water drainage
l Liquid agent dispensing connections
m Vapour extraction
See "Installation and connection"
Description of the machine
8
c
d
e
b
a
f
i
m
h
l
j
g
k

Control elements
a Display
1 Cottons 90 °C
2 Cottons universal 60 °C
3 Cottons intensive 60 °C
i FC A
After switching on the "Welcome" display will appear
for a short time followed by the program list. The most
recently used program is highlighted.
b Function buttons
The six buttons underneath the display are the
function buttons. These buttons have specific
functions depending on the status of the machine.
These functions will be listed in the display above the
buttons and will be highlighted once selected.
If the machine is reprogrammed to "Direct button
allocation" the first 6 programs listed in the display
can be selected directly via these buttons.
c START button
The lightring will flash when a selected program can
be started. Pressing the Start button will start the
program. After a program has started, pressing this
button will show the display as it was before the start
of the program.
d PC / Optical interface
This interface is used for transferring data to the
control unit from a PC and vice versa.
e Rotary selector
Turning the selector brings up options and menus in
the display.
Pressing the selector confirms your selection.
f Chip card reader
When a chip card is inserted, the programs on the
chip card can be used.
Insert the card in the direction of the arrow (on the
card).
g I Mains on switch
Switches the machine on.
h 0 Mains off switch
Switches the machine off.
i Emergency stop switch
Only for use in an emergency.
Press the red button to switch the machine off. After
the problem has been resolved, turn the red dial
clockwise to release it. Then press the Start button to
continue the interrupted program.
Description of the machine
9
a b c d e f g h i
Function buttons
Pressing the button activates the function and
pressing the button again deactivates it.
f Stop/End
The function button on the right-hand side is used to
stop a program after it has started.
Pressing it again finishes the program.
+i Block plus
The relevant program block (e.g. Pre-wash) is added
to the program.
m Starch stop
Press this button if you wish to laundry to be
starched.
k Without spin
Press this button if you do not want the laundry to be
spun after being rinsed.
FC Settings
Press this button to switch to another language
temporarily.
m Start time
Press this button before the start of a program to
display the message that a start time can be
selected.
K Information
Press this button to call up program information in the
display.
q Water drainage
i Manual control
See the programming instruction booklet.
ü Change order
The order of the program in progress can be
changed or program blocks can be repeated.
A Back
Takes you back to the previous display.
e/- Indicates more information on the
next / previous line
S Save
See the programming instruction booklet.
$ Programme locked
Once a locked program has been started, the End
button can only be used to stop and cancel it during
the first minute.
) Programme unlocked
ß Dispensing
ä Dispensing switched off
\ Operating data
> I < 0- Setting (calibration)
If the display does not show 00.0 when the drum is
empty press this button to reset it.
Data transfer
Chip card operation
A chip card is available to order as an optional extra.
It is supplied without any programs.
See the programming instruction booklet for
information on transferring data from the control unit
to the chip card and vice versa.
The chip card can store a maximum of 30 programs,
each with 6 blocks. The back of the chip card can be
labelled.
Description of the machine
10

The machine must be commissioned by a Miele
service technician before it is used for the first
time.
^
Open the on-site faucets for water and steam,
depending on the type of heating.
^
Switch on the on-site mains switch.
^
Press the "On" I switch to switch the machine on.
M
PROFESSIONAL
PW 6xx7
Welcome
A "Welcome" message will appear in the display.
1 Cottons 90 °C
2 Cottons universal 60 °C
3 Cottons intensive 60 °C
i äFC A
This is followed by the program list (with the most
recently used program highlighted).
Turn the selector dial to highlight the program you
want. The program can be then started by simply
pressing the START button.
Sort the laundry
^
Empty any pockets.
Foreign objects (e.g. nails, coins, paper clips, etc.)
can cause damage to garments and components
in the machine.
Maximum loads for the standard programs
(Dry weight of laundry)
PW 6107 PW 6137 PW 6167 PW 6207
1 Cottons 90°C
2 Cottons universal 60°C
3 Cottons intensive 60°C
4 Cottons universal 30°C
5 Cottons intensive 30°C
6 Cottons Eco short
max. 10 kg max. 13 kg max. 16 kg max. 20 kg
7 Minimum iron 60°C
8 Minimum iron intensive 60°C
9 Minimum iron 30°C
10 Minimum iron intensive 30°C
max. 5 kg max. 6.6 kg max. 8 kg max. 10 kg
11 Delicates
12 Woollens 30°C
13 Handwashable woollens 30°C
max. 4 kg max. 5.2 kg max. 6.4 kg max. 8 kg
The maximum load for other programs is given in the
relevant program overview.
^ Load the laundry
^ Close the drum door with the door handle. Do not
slam it shut.
Make sure that no garments are caught between
the drum door and the drum opening.
How to wash correctly
11
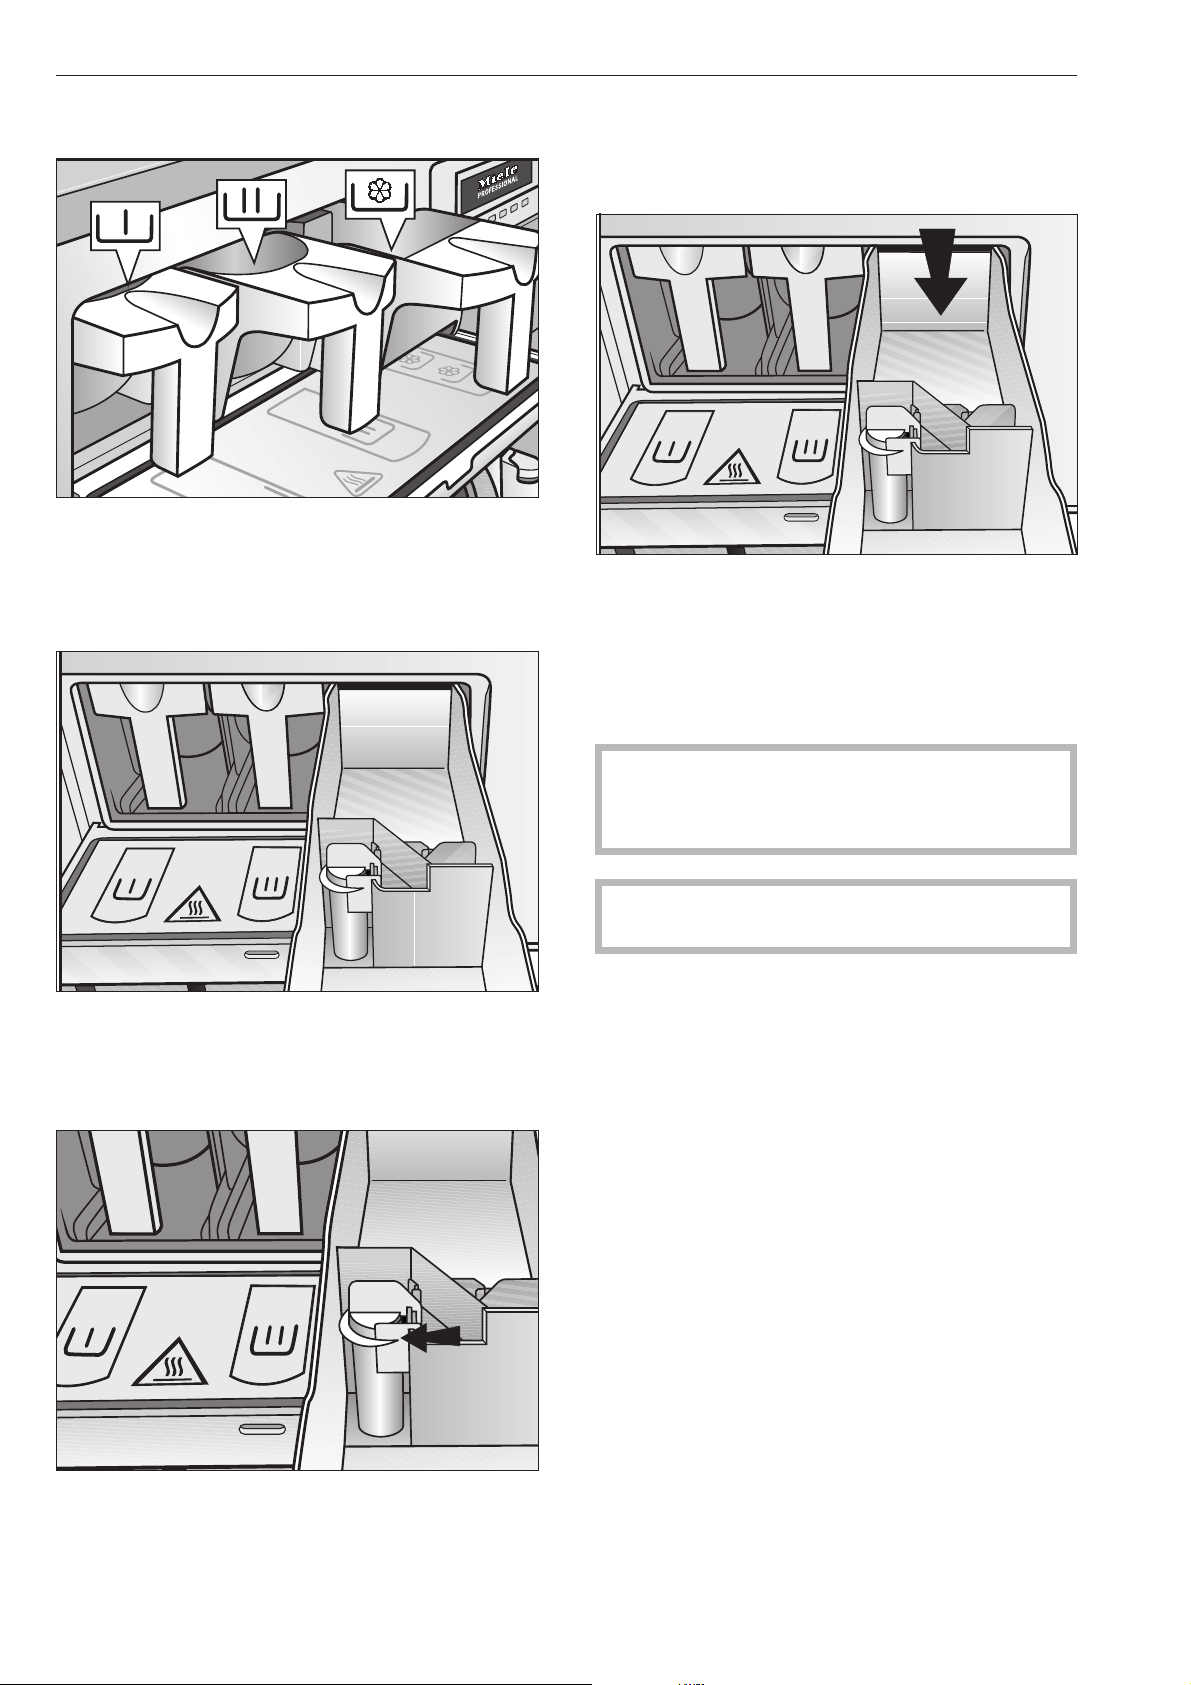
Add detergent
^
With the standard programs, place detergent for
the main wash in compartment j and if wished,
detergent for the Pre-wash in compartment i.
Place fabric conditioner in the front section of
compartment p
^
Place other liquid washing additives, e.g. liquid
starch, in the rear section of the compartment p
(only if the machine has been programmed for this
function).
^
Do not exceed the level marker in compartment
p. Otherwise the agent will run through the siphon
into the suds container.
Bleaching agents
Only use bleaching agents on textiles with the x
symbol on the wash care label.
Liquid bleaching agents may only be placed in the
compartment designated for them. This is to ensure
that the agent is added automatically at the second
rinse. Liquid bleaching agents should only be used
with coloureds if the textile manufacturer's wash care
label states that the textile is colour fast and suitable
for bleaching.
A 3rd rinse cycle must be programmed in if bleach
is to be used (see Profitronic programming
manual).
,
Frequent use of chlorine increases the risk of
component damage.
Only use dyes, colour run, dye removers and
descaling agents which are specified as being
suitable for use in washing machines. Always
observe the manufacturer's instructions carefully.
How to wash correctly
12
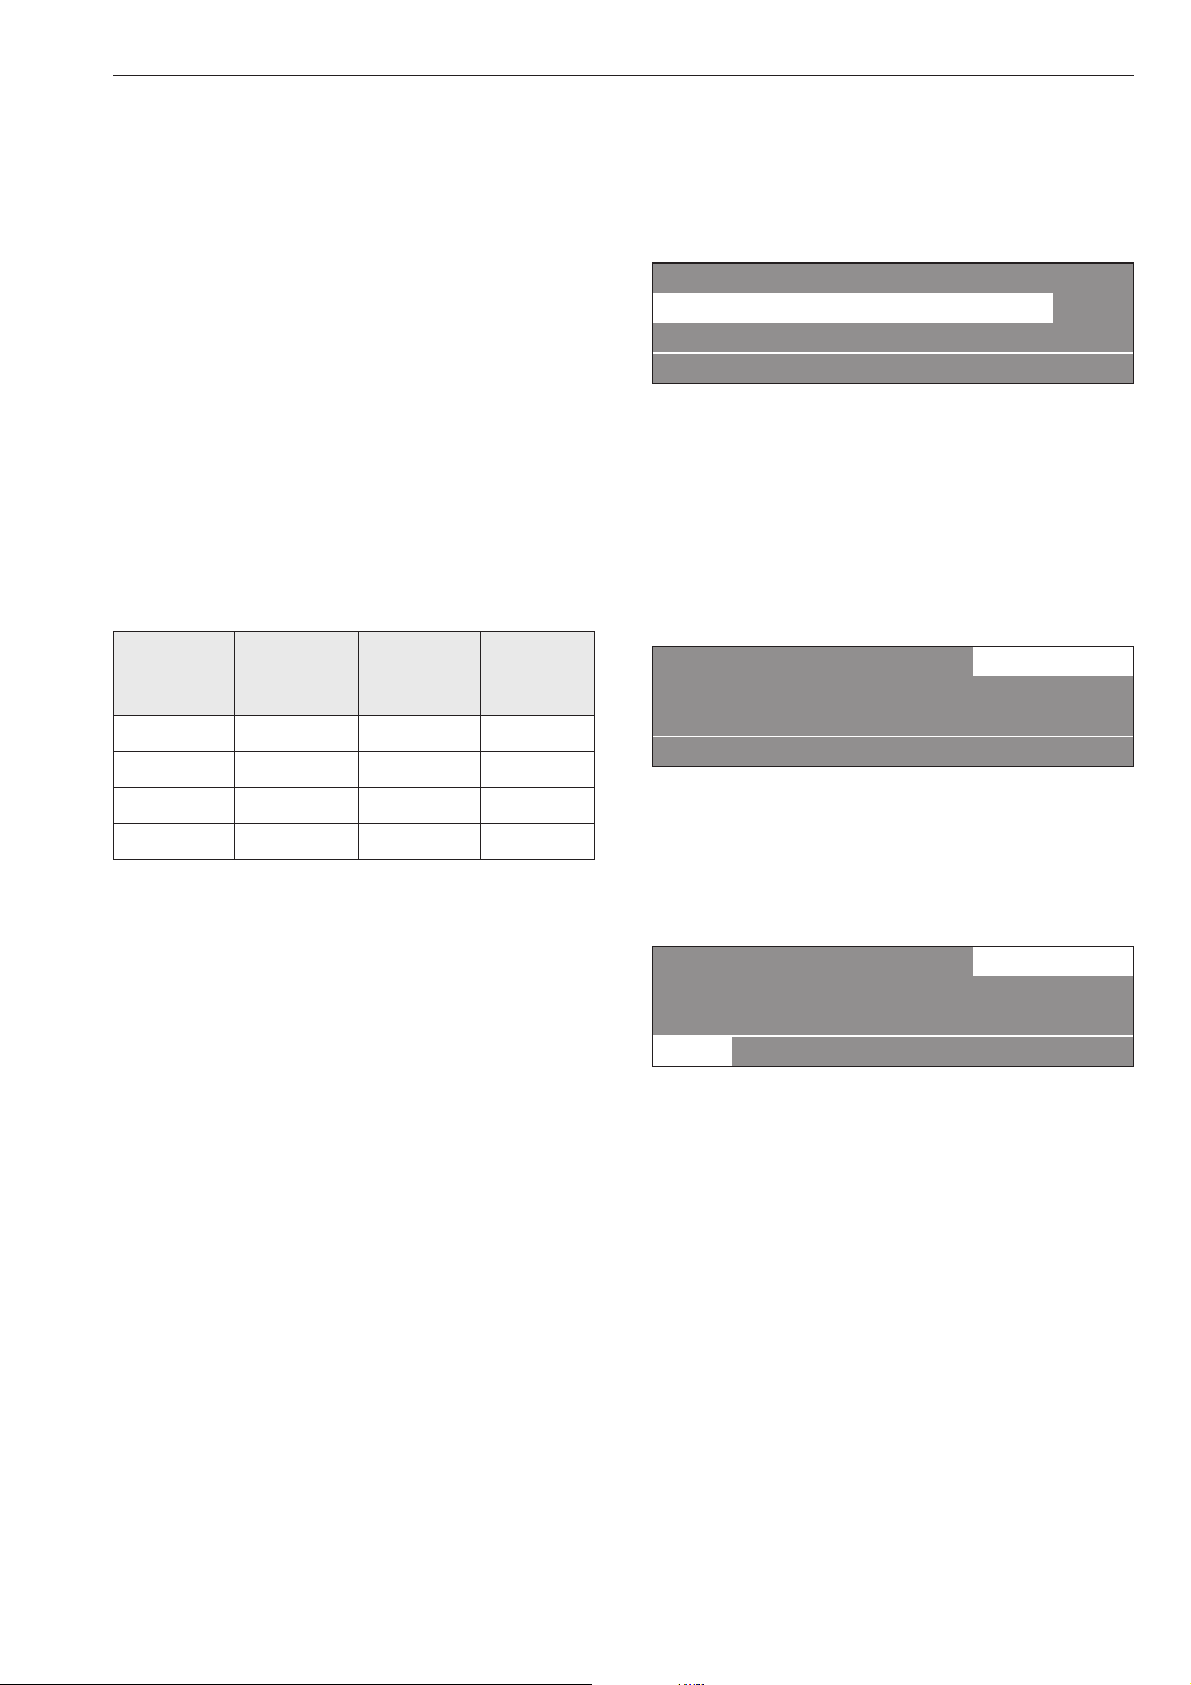
Detergent dispensing
It is important to avoid adding too much detergent as
this causes excessive foam.
–
Do not use detergents which create a lot of foam.
–
Follow the detergent manufacturer's instructions for
use.
The right amount to dispense will depend on the
following:
–
The amount of laundry
–
The water hardness level
–
The soiling level of the laundry
The amount to dispense
Take the water hardness into account and follow the
detergent manufacturer's instructions on the
packaging.
Water hardness levels
Hardness
range
Water
properties
Hardness
level in
mmol/l
Hardness
in
gr/gal
I soft 0 - 1.3 0 - 7
II medium 1.3 - 2.5 7 - 14
III hard 2.5 - 3.8 14 - 21
IV very hard above 3.8 above 21
Check with your local water supplier if you do not
know the hardness level in your area.
Select a program
^
Turn the rotary dial to select a program (e.g.
Program 1 Cottons).
For this example, the following will appear in the
display:
16 Separate drain
1 Cottons 90 °C
2 Cottons universal 60 °C
i äFC A
Select the Pre-wash, Starch stop or Without spin
additional option
^
Confirm the selection of the program by pressing
the rotary selector.
For this example, the following will appear in the
display:
1 Cottons 10.0 / 10.0 kg
90 °C Main wash
Rinses 1100 rpm
+im k m A
^ If wished you can now select the Pre-wash
program block, by pressing the +i function
button.
When the +i function button is pressed, the
following will appear in the display:
1 Cottons 10.0 / 10.0 kg
40 °C Pre-wash
90 °C Main wash 1100 rpm
+i mk m A
"+i" is highlighted.
Press the function button again to deselect the
function.
Press the m Starch stop button if the laundry is to be
starched.
Press the k Without spin button if you do not want
the laundry to be spun after being rinsed.
If you do not wish to make any further alterations to
the program:
^
Press the START button. The program will start.
How to wash correctly
13

If you wish to make alterations before the start of
the program, e.g. to the load size, temperature or
spin speed:
Load weight
You can enter the weight of the load manually before
the start of the program.
1 Cottons 10.0 10.0 kg
40 °C Pre-wash
90 °C Main wash e
+im k m A
^
Turn the rotary dial until "Load" is highlighted. Press
the dial to confirm your selection. Turn the dial to
alter the weight and confirm your selection by
pressing it.
Temperature in 1 °C increments from cold, 15 to
max. 95 °C .
^
Turn the rotary dial to select the "Temperature" field
(40°C for pre-wash) and press it to confirm your
selection.
1 Cottons 10.0 / 10.0 kg
40 °C Pre-wash
90 °C Main wash e
+im k m A
^ Turn the rotary dial to alter the temperature value
and then press it to confirm your selection.
Spin speed in 25 rpm increments from 0, 300 to
maximum spin speed.
^
Turn the rotary dial to select the "Spin speed" field
(1100 rpm for the final spin) and press it to confirm
your selection.
1 Cottons 10.0 / 10.0 kg
90 °C Main wash
Rinses 1100 rpm
+im k m A
^
Turn the rotary dial to alter the spin speed and then
press it to confirm your selection.
Maximum spin speeds
PW 6107 PW 6137 PW 6167 PW 6207
1200 rpm 1100 rpm 1150 rpm 1100 rpm
^
Press the START button. The program will start.
Once a program has started the program sequence
will appear in the display.
1 Cottons
40 °C Pre-wash 20 °C
Main wash Ready at 12:35
+im k mKf
In the 2nd line of the display, pre-wash in this
example, the actual suds temperature will also be
shown.
1 Cottons
90 °C Main wash 60 °C
Rinse 1 Cold Ready at 12:35
+im k mKf
Once the pre-wash program block has finished the
program block for the main wash will appear in the
2nd line of the display together with the actual suds
temperature. Under that the following program block
will be listed. Rinse 1 in this example.
The time that the program will finish is shown on the
right hand side of the display.
1 Cottons
90 °C Main wash 60 °C
Rinse 1 Cold Ready at 12:35
+im k m K f
Pressing the K "Information" button will call up further
information about the program e.g.:
1 Cottons
Start date and time: 10.7.2010
Start time: 9:47 e
A
Time after start: 0h 23 min
Time left: 0h 11min
Time after start: 0h 23 min e
Time left: 0h 11min
Repeat: No
Area 3: rinse e
How to wash correctly
14

Block 2: Rinse 2
Block step: Wash time 1
Actual level: 22 mm e
Rqrd. level: 60 mm
Actual temperature: 35 °C
Rqrd. temperature: 60 °C e
1 Cottons
Spin speed: 40 rpm
Rhythm: 12 / 3 -
A
^
Press the A "Back" button to return to the
program sequence display.
Open the door at the end of the program
The following message will appear in the display at
the end of the program as long as there is no water in
the machine and the drum is stationary:
1 Cottons
Programme finished
The door can be opened.
m FC A
At the same time an acoustic buzzer will sound for 5
seconds to let you know that the program has
finished.
^
Pull the door handle to open the drum door.
Important: If the door will not open press against it
and then pull on the handle again. Do not use force
to open it.
^
Unload the drum.
If the program was interrupted with water in the drum,
or if the program was stopped, for example, during
the spin the following message will appear in the
display:
1 Cottons
Programme finished. Water in the drum.
qmFC A
or
1 Cottons
Programme finished. Drum still rotating.
m FC A
,
The machine door is locked. Never use force
to try and open the door.
^
Press the q "Water drainage" function button or
select the Separate spin program and press the
START button.
Open the door at the end of the program.
If no more laundry is to be processed:
^
Switch the machine off by pressing the "Off" 0
button and then switch off at the on-site mains
switch.
^
Close all faucets for water and steam as
applicable.
How to wash correctly
15
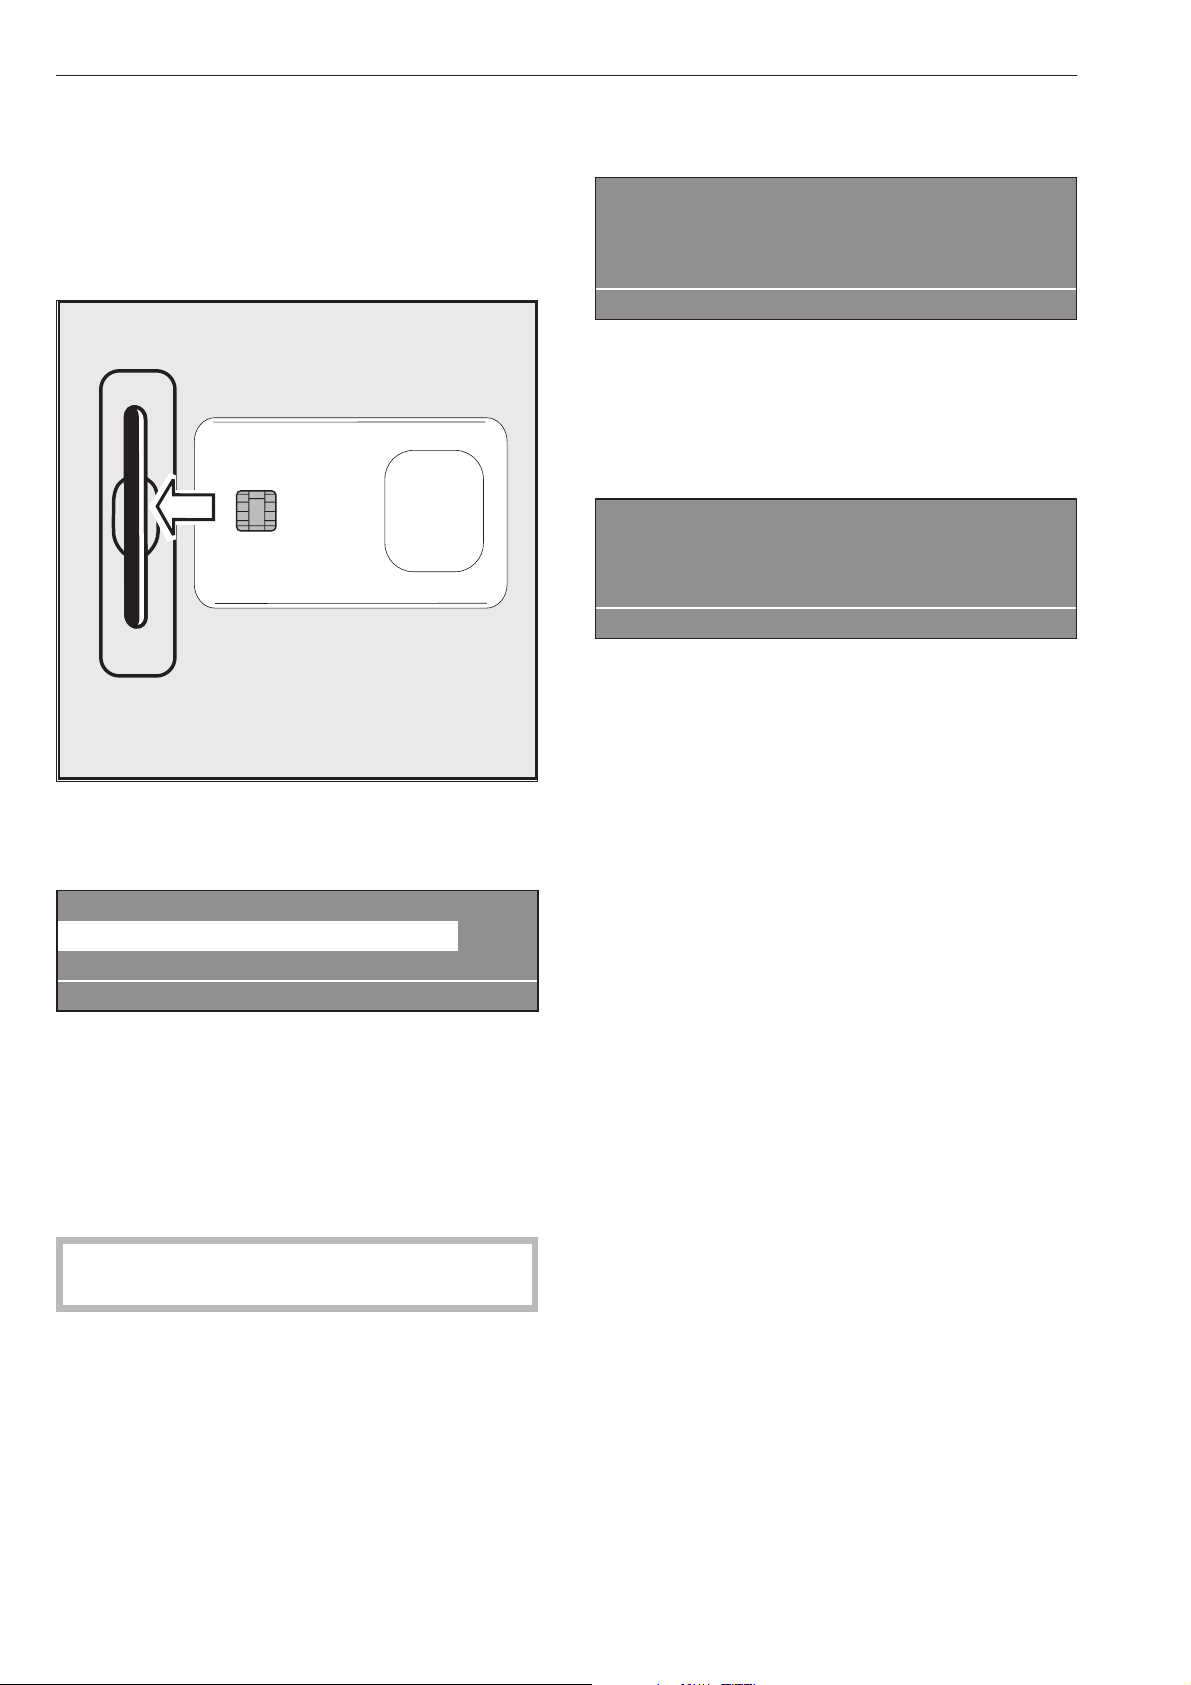
Cards on which a program has been saved can only
be used on the machine type for which they have
been written. Unwritten cards can be used
universally.
^
Press the "On" I button to switch the machine on.
The Welcome screen will appear.
^ Insert the card in the reader.
The programs listed on the card will appear in the
display.
Card operation
17 Masks 45 °C
18 Minimum iron 60 °C
i ßFC A
^
Use the rotary dial to highlight the program you
want to use. Press the rotary dial to select the
program you have highlighted.
^
Press the START button. The program will start.
After pressing the START button you can remove the
card from the reader. The program is deleted from
the machine's memory once it has finished.
,
Never insert any other type of card or object
into the card reader!
If the card is inserted the wrong way round the
following message will appear in the display:
§
Card fault
Card incorrectly inserted in card reader.
A
^
Insert the card the right way round in the card
reader.
If the card is not the right one for the machine it is
being used in the following message will appear in
the display:
Card contents
Programmes on the card are
only suitable for machine type PW 6161.
A
^
Insert the correct card for the machine in the card
reader.
Card access operation
programs requiring special procedures are written on
to a card which is then used to run the program.
"Card access" has to be activated via the supervisor
level in the machine.
The machine will then only run programs by using a
card (on which one program has been saved).
programs in the machine's control unit cannot then
be accessed.
Card operation
16

Language selection
The language shown in the display can be changed
briefly before starting a program if you wish. To do so
use the button underneath the flag symbol.
The language will revert back to the default setting 5
minutes after the end of a program with the door
open.
1 Cottons 90 °C
2 Cottons universal 60 °C
3 Cottons intensive 60 °C
i FC A
If you press the FC button the following will appear
in the display:
Settings Back <-
Main menu Language
Supervisor level
FC A
^
Press the rotary dial to confirm your selection of the
"Language" menu.
Settings deutsch
Language F english (GB)
español
FC A
^ Turn the rotary dial to highlight the language you
want and then press the dial to confirm your
selection.
Start date and time
If you want a program to start at a later time use the
m button for "Start date and time".
To set a date and time
After selecting your program, e.g. Cottons in the
example here, the following will appear in the display:
1 Cottons 10.0 / 16.0 kg
90 °C Main wash
Rinses 1000 rpm
+im k m A
^
Press the m "Start date and time" button.
The following (example) will appear in the display:
1 Cottons 10.0 /16.0 kg
Start time: 16 : 10 Start date: 2.4.2010
After selection press the start button
A
The actual time and date will then appear. The input
field for hours will be highlighted.
^
Press the rotary dial to change the hour.
Turn the rotary dial to alter the hour and then press
it to confirm your selection.
^
Then turn the rotary dial to select the "Minutes" field
and press it to confirm your selection.
Turn the dial to alter the minutes and then press it
to confirm your selection.
^
Then turn the rotary dial to select the "Start date"
field and press it to confirm your selection.
Turn the dial to alter the date and then press it to
confirm your selection.
^
Do the same for the month and the year.
After setting the required start date and time:
^
Press the START button and the program selected
will commence at the time specified.
The display will now contain the following information:
1 Cottons 10.0 / 16.0 kg
90 °C Main wash
16:15 -2.4.2010 Start 6:00 -3.4.2010
+im k m A
The current time and date as well as the start time will
be displayed.
^ If the door is opened again you will have to press
the START button again.
To cancel the start time and date function
Press the m "Start date and time" button again or
press the A"Back", and any changes will be
rejected.
With pre-wash
For heavily soiled laundry the standard programs 1 to
10, can have a pre-wash added. To do so press the
"Block+" button i.
Pressing the button again deselects the option.
When the "Blockplus" + i button is pressed, the
following will appear in the display:
1 Cottons 14.0 / 16.0 kg
40 °C Pre-wash
Main wash e
+i mk m A
The "+i" field will be highlighted in the display.
Additional options
17

Starch
Starching via the dispenser drawer
Starch can be selected with all the standard
programs (except for Separate spin and Separate
drain) before starting a program by selecting the m
"Starch stop" option.
The m field will be highlighted in the display.
Pressing the button again deselects the option.
1 Cottons
m
Prog. stopped. Starch stop pressed.
The door can be opened.
i ü f
Once the "Starch stop" program stage is reached the
words "Starch stop" will start flashing in the display.
Make up the starch solution following the
manufacturer's instructions on the packaging and
then add it to the rear section of compartment p.If
necessary dilute the starch with water. The wash time
is automatically increased by 4 minutes.
Press the START button to continue the program.
Dispensing directly into the drum
Make the starch up following the manufacturer's
instructions on the packaging. Once the "Starch stop"
program stage has been reached open the door and
add the starch. Close the drum door
The following message will appear in the display
again:
1 Cottons
m
Prog. stopped. Starch stop pressed.
The door can be opened.
i ü f
Press the START button and the program selected
will commence
Without spin
"Without spin" can be selected with all the standard
programs (except for Separate spin) before starting a
program by selecting the k "Without spin" option.
The k field will be highlighted in the display.
Pressing the button again deselects the option.
1 Cottons
k
Prog. stopped. Without spin pressed.
i ü f
Once the "Without spin" program stage is reached the
words "Without spin" will start flashing in the display.
To finish the program without spinning and with water
left in the drum press the f button.
To continue with a spin press the START button.
Program stop
To halt the program press the f button.
The program remains stationary.
1 Cottons
Programme stop
i ü f
To continue the program press the START button.
Program cancellation
Press the f button twice in succession to cancel a
program.
If there is still water in the machine or if it was
cancelled during spinning the following (example) will
appear in the display:
1 Cottons
Programme finished. Water in the drum.
i ü f
or:
1 Cottons
Programme stopped. Drum rotating.
i ü f
To open the door press the q "Water drainage"
button or select the Separate spin program and press
the START button.
Additional options
18

Program cancelled with a locked program
It is not possible to stop or cancel a program if the
program is locked.
1 Cottons
90 °C Main wash
Locked Ready at 12:35
)f
The display will show that the machine is locked if
you try to cancel the program with the f button.
To cancel the program you will first have to select the
) "Unlocked" function and then enter a password to
unlock the program.
After entering the password the following will show in
the display:
Unlock programme?
S A
Press the S "Save" button to return to the normal
display and the program can now be cancelled.
1 Cottons
90 °C Main wash 60 °C
Rinse 1 Ready at 12:35
mKf
Changing the program order
The program structure of programs that are in
progress can be adjusted or program blocks can be
repeated.
^
Press the f button and the program will stop.
1 Cottons
Programme stop
i ü f
^
After pressing the ü "Reorganise" button the
current area, block or step will appear in the
display.
See also "Program structure" in the Programming
Manual.
Reorganise -> Cottons
Area 2: Main wash e
S A
Area: 2 Main wash
Block 1: Main wash
Step: Wash time 2 -
S A
^ Turn the rotary dial to alter the area and then press
it to confirm your selection. Area: Select 1
Pre-wash, 2 Main wash or 3 Rinses and confirm
your selection.
^
Turn the rotary dial to alter the block and then
press it to confirm your selection. Block: Select
Pre-wash 1-10, Main wash 1-10 or Rinses 1-10 and
confirm your selection.
^
Turn the rotary dial to alter the step and then press
it to confirm your selection. Select the required
program step and confirm your selection.
^
Press the S "Save" button and then press START to
reorganise the program structure or press the A
"Back" button to override the program stop and not
change the program order.
Additional options
19
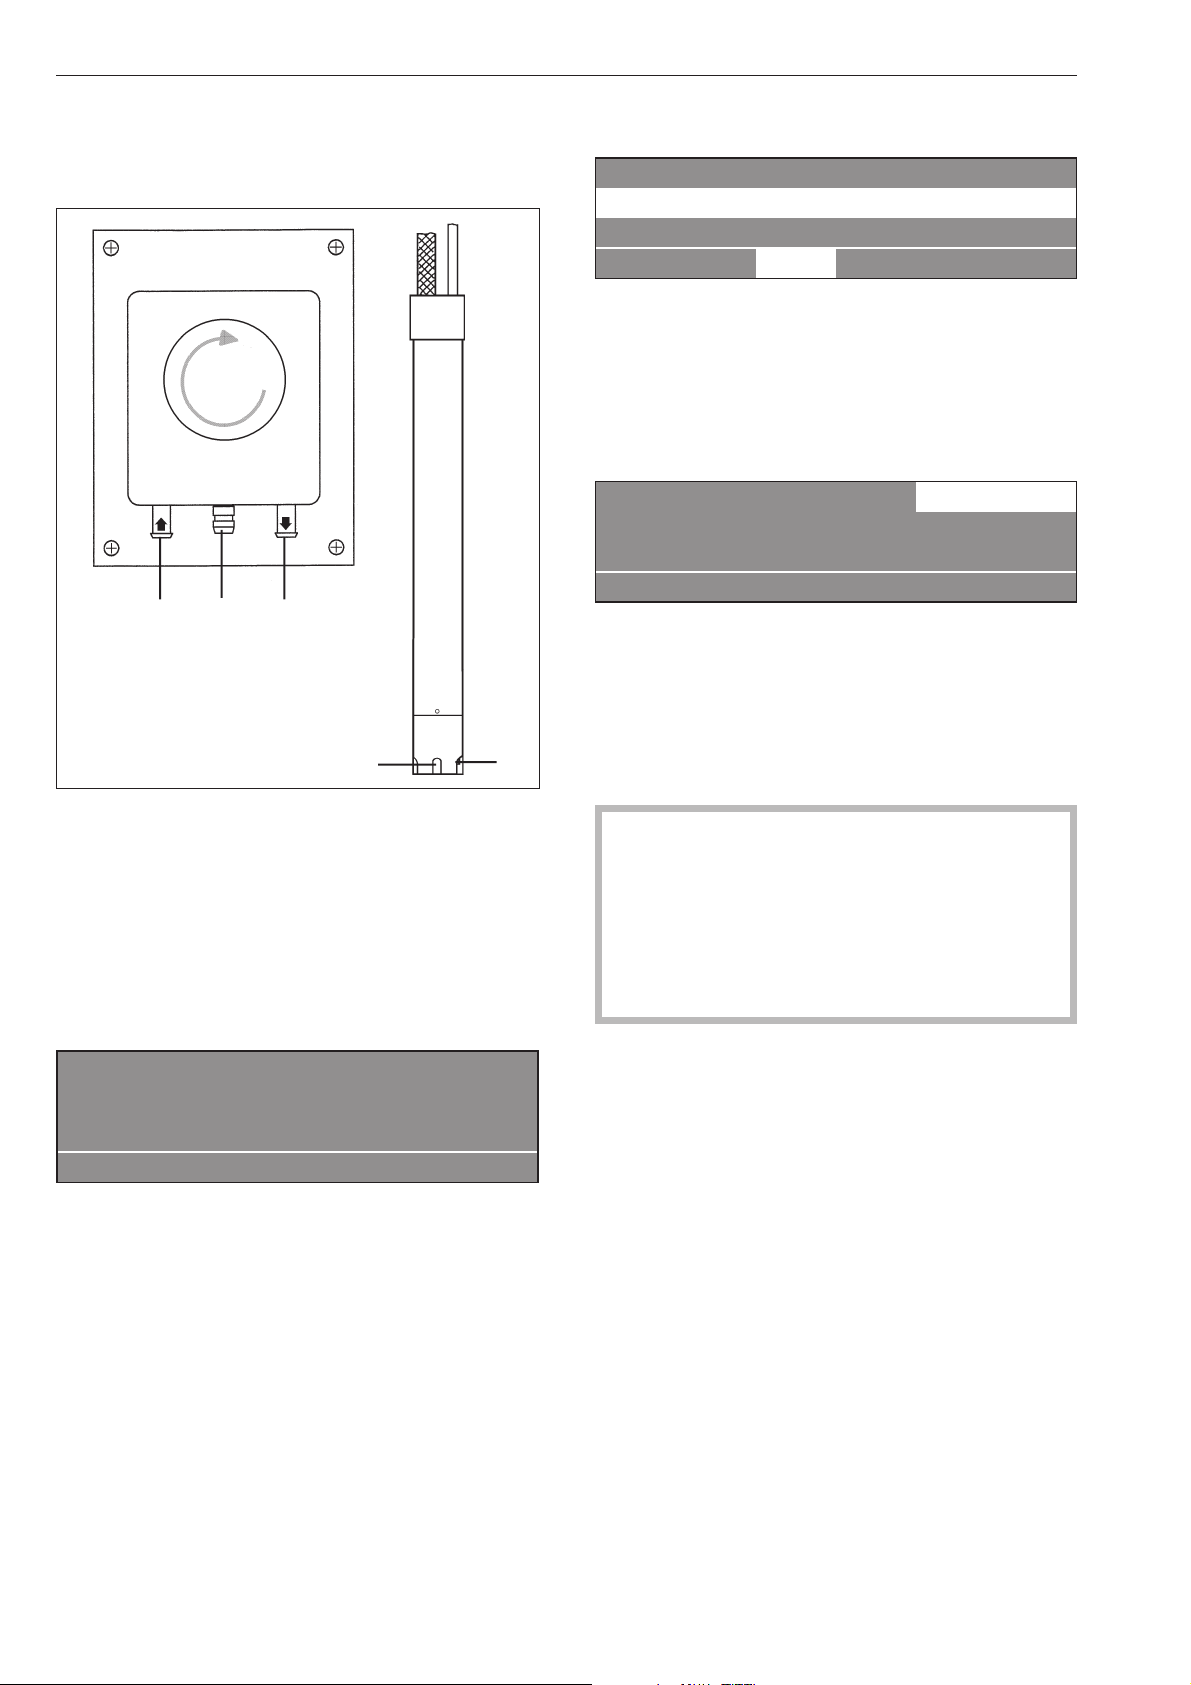
Liquid dispensers
Dispenser pump Suction pipe
a Hose connection socket (suction side)
b Hose connection socket (pressure side)
c Leakage outlet (in case of damaged hose)
d Suction inlet
e Level checker for empty indicator. The pump and
the machine will switch off automatically if a liquid
agent container is empty.
ö
Dispensing system fault
Fill dispenser 1
Press the start button
if
The machine will warn you that the liquid dispensing
agent level is insufficient.
The program can be restarted after refilling the liquid
agent container by pressing the START button.
To deselect the liquid dispensing system
1 Cottons 90 °C
2 Cottons universal 60 °C
3 Cottons intensive 60 °C
i ä FC A
You can switch off the liquid dispensing system
manually before starting a program by setting the ä
"Dispensing" system to off.
Once the program has started dispensing will not
take place via the dispenser pumps and the following
will appear in the display:
1 Cottons 10.0/10.0 kg ä
90 °C Main wash
Rinses 1000 rpm
+im k m A
Dispensing amount
Please follow the manufacturer's instructions on the
packaging for dispensing requirements.
,This is particularly important when using a
combination of cleaning agents and special
application products. Only use the product for the
application described by the manufacturer, to
avoid any material damage or the occurrence of
strong chemical reactions. Confirm with the
detergent manufacturer that their product can be
used in combination with another type of product.
Liquid agents should be allowed to settle to room
temperature before use to ensure that their viscosity
level is correct and thus ensure the correct amount is
dispensed.
Optional modules
20
e
a
c
b
d
Commissioning the dispensing pumps
Before the liquid dispensing pumps can be used the
liquid agent must be drawn up into the system and
the amount to be dispensed set.
Dispenser calibration
The dispensers need to be calibrated to ensure the
dispenser pumps supply the correct amount of liquid
agent.
To calibrate the dispensers with the machine
switched off:
^
Press and hold the rotary dial in.
^
Then switch the machine on with the "On" switch.
Dispenser calibration ~ Main menu
Dispenser pump 1
Dispenser pump 2 e
A
Selection choice: Dispenser pumps 1 to 13
After selecting a dispenser pump the following
message will appear in the display:
Dispenser calibration ~ Dispenser pump 1
V: 100ml t: 0s P: no
0/1 S A
The amount to dispense can be set between 0 and
9999 ml in 1 ml increments.
^
Press the 0/1 multi-function button and the
dispenser hose will start to fill. Press the 0/1 button
again to stop filling the hose.
^
Direct the hose of the dispenser pump being
calibrated into a suitable measuring flask.
,
Avoid contact with the skin and eyes, and
wear suitable protective clothing.
^
Press the A "Back" button to return to the main
menu.
Dispenser calibration ~ Main menu
Dispenser pump 1
Dispenser pump 2 e
A
^
Select dispenser pump.
Dispenser calibration ~ Dispenser pump 1
V: 100ml t: 0s P: no
0/1 S A
^
Press multi-function button 0/1.
To stop the pump press the 0/1 button again, or it
will switch off automatically after a period of 60
seconds.
^
Measure the amount collected in the measuring
flask.
Dispenser calibration ~ Dispenser pump 1
V: 100ml t: 30s P: 200.0 ml/min
0/1 S A
^ Enter this value in field "V:". Flow rate P in ml/min
will be calculated electronically.
^ Press the S "Save" button to save the values
measured in memory.
^ Reconnect the hose.
Cleaning and maintaining the dispensing system
The dispensing system should be flushed through
with clean warm water every two weeks and before
any longer down-times to prevent the risk of
blockages and corrosion.
^
The suction pipes should be cleaned through with
water.
^
Place the suction pipes in a container of hot water
(40 - 50°C).
^
Then use the dispenser calibration system to
operate each pump until the dispensing system is
thoroughly flushed through.
^
After reconnecting all parts check all connections,
hoses, dispensers and seals for leakages.
Optional modules
21

Peak load cut-out
If the peak-load cut out function is activated the
heating will switch itself off and any program running
will be stopped. The following message will appear in
the display:
1 Cottons
Prog. stopped. Peak load cut-out.
Programme will continue
if
Once the peak load has finished the program will
continue automatically as before.
Communication module
This machine can be linked to a PC via a
communication module.
The shaft for the communication module is located at
the rear of the machine for use by Miele Service.
Operating data
By pressing the \ "Operating data" button the
operating data module can be used to read or delete
operating data either before the start of a program, or
after it has finished.
1 Cottons 90 °C
2 Cottons universal 60 °C
3 Cottons intensive 60 °C
i \ FC A
After pressing the \ button the following will appear
in the display:
Operating data module
Total data
Programme data e
\ A
Selection choice:
–
Total data
In this option all program data is collated and
summarized.
–
Program data
program data contains all the data called up during a
program.
–
Delete data
- Module (Total data including program data)
- Total data (only delete total data)
- program data (only delete program data)
Pressing the button again deselects the \
"Operating data" option.
If there is no more memory available in the operating
data module a message will appear after pressing
the START button to say that the operating data will
be overwritten.
If you press the A "Back" button or do not press the
START button within 30 seconds the display will
revert to the way it was before starting the program.
Total data
Operating data module
Total data
Programme data e
\ A
After selecting Total data the following (example) will
appear in the display:
Operating data module ~ Total data
Total time power on: 200,987 h
Operating hours: 123456 h e
\ A
Other options:
Total time power on: 200,987 h
Operating hours: 123,456 h
Duration heating active: 123,456 h
Duration drive motor active: 93,456 h
Programme starts: 23,456
Programme stops: 567
Programme cancellations: 67
Water volume: 1,234,567 l
Amount of laundry: 1,234,567 kg
Liquid agent: 2,345 l
Energy: 12,345,678 kWh
Optional modules
22

Program data
Operating data module -
Programme data
Delete data e
\ A
After selecting program data the following (example)
will appear in the display:
Operating data module~ Programme data
1 Cottons 90 °C
2 Cottons universal 60 °C e
\ A
Select the program you want from the list and press
the rotary dial to call up a list of all program starts
including date and start time for that program.
Programme data ~ 1 Cottons
Date: 21.05.2010 Start time: 11:30
Date: 21.05.2010 Start time: 12:30 e
\ A
Select the required program start from the list for
program 1 Cottons and confirm your choice by
pressing the rotary dial.
Programme data ~ 1 Cottons
Date: 21.05.2010
Name: Smith e
\ A
Other options:
Town: Abingdon
Serial number: 12345678
Machine type: PW 6107
Amount of laundry: 13 kg
+ Button: Activated
Starch stop button: Activated
Without spin button: Not activated
Programme start: 11:30
Programme finished: 12:05
Total operating time:0h35min
Electrical energy: 12.5 kWh
Gas energy: 0 kWh
Steam energy: 0 kWh
Total volume of water: 140 l
Max. water temperature: 95 °C
Max. drain temperature: 45 °C
Programme change: 2
(after making your selection and
pressing the rotary dial only the last 3 stops and starts will
be displayed.)
Programme fault: None (only the last 3 faults are saved.)
Area 1: Pre-wash (after making your selection and
pressing the rotary dial you can display the area or the
block.)
Operating time: 6 min
Water volume: 20 l
Dispensing phase 1: Amount ml
(after making your
selection and pressing the rotary dial 6 dispensings are
displayed.)
Max. temperature: 12 °C
Holding time: 6 min
Dispensing phase 2: No
Delete data
Operating data module
Programme data
Delete data e
\ A
After selecting Delete data the following message will
appear in the display:
Operating data module~ Delete data
Module: 21.02.2010
Total data: 12.07.2010 e
\ A
The module menu option can be used to delete the
total data and program data from the operating data
memory.
The total data option can only be used to delete the
total data from the operating data.
The program data option can only be used to delete
program data from the operating data.
After making your selection and pressing the rotary
dial you will be prompted to enter your password.
Password:____
ABCDEFGHIJKLMNOPQRSTUVWXYZ
0123456789
KSA
After keying in your password or inserting your
supervisor level key card in the reader the following
security prompt will appear in the display:
Delete operating data?
S A
After pressing the S button the data will be deleted!
Optional modules
23

Weighing system
If the machine has been equipped with a weighing
system module the weight of the laundry in the
machine will be displayed in 0.2 kg increments. The
maximum load for the program selected will show
next to the actual weight in the drum.
If when the drum is empty the load display is not
showing "00,0", you will need to press the ->I<-"to
reset it
1 Cottons 00,0/ 16.0 kg
60 °C Main wash
Rinses e
+im k m ->I<- A
If after calibrating the sensor to 0 there was still
laundry in the drum the following will appear in the
display:
1 Cottons - -,- / 16.0 kg
60 °C Main wash
Rinses e
+im k m ->I<- A
Press the ->I<-button again to set it to 0.
If there is too much laundry in the drum, e.g. because
it is wet, a nominal load will be calculated after
starting the program and this value will also be saved
by the operating data module.
At the end of the program when the drum has
stopped rotating the display will show the residual
moisture content of the laundry.
1 Cottons
Programme finished Residual moisture 60 %
The door can be opened
m FC A
Optional modules
24
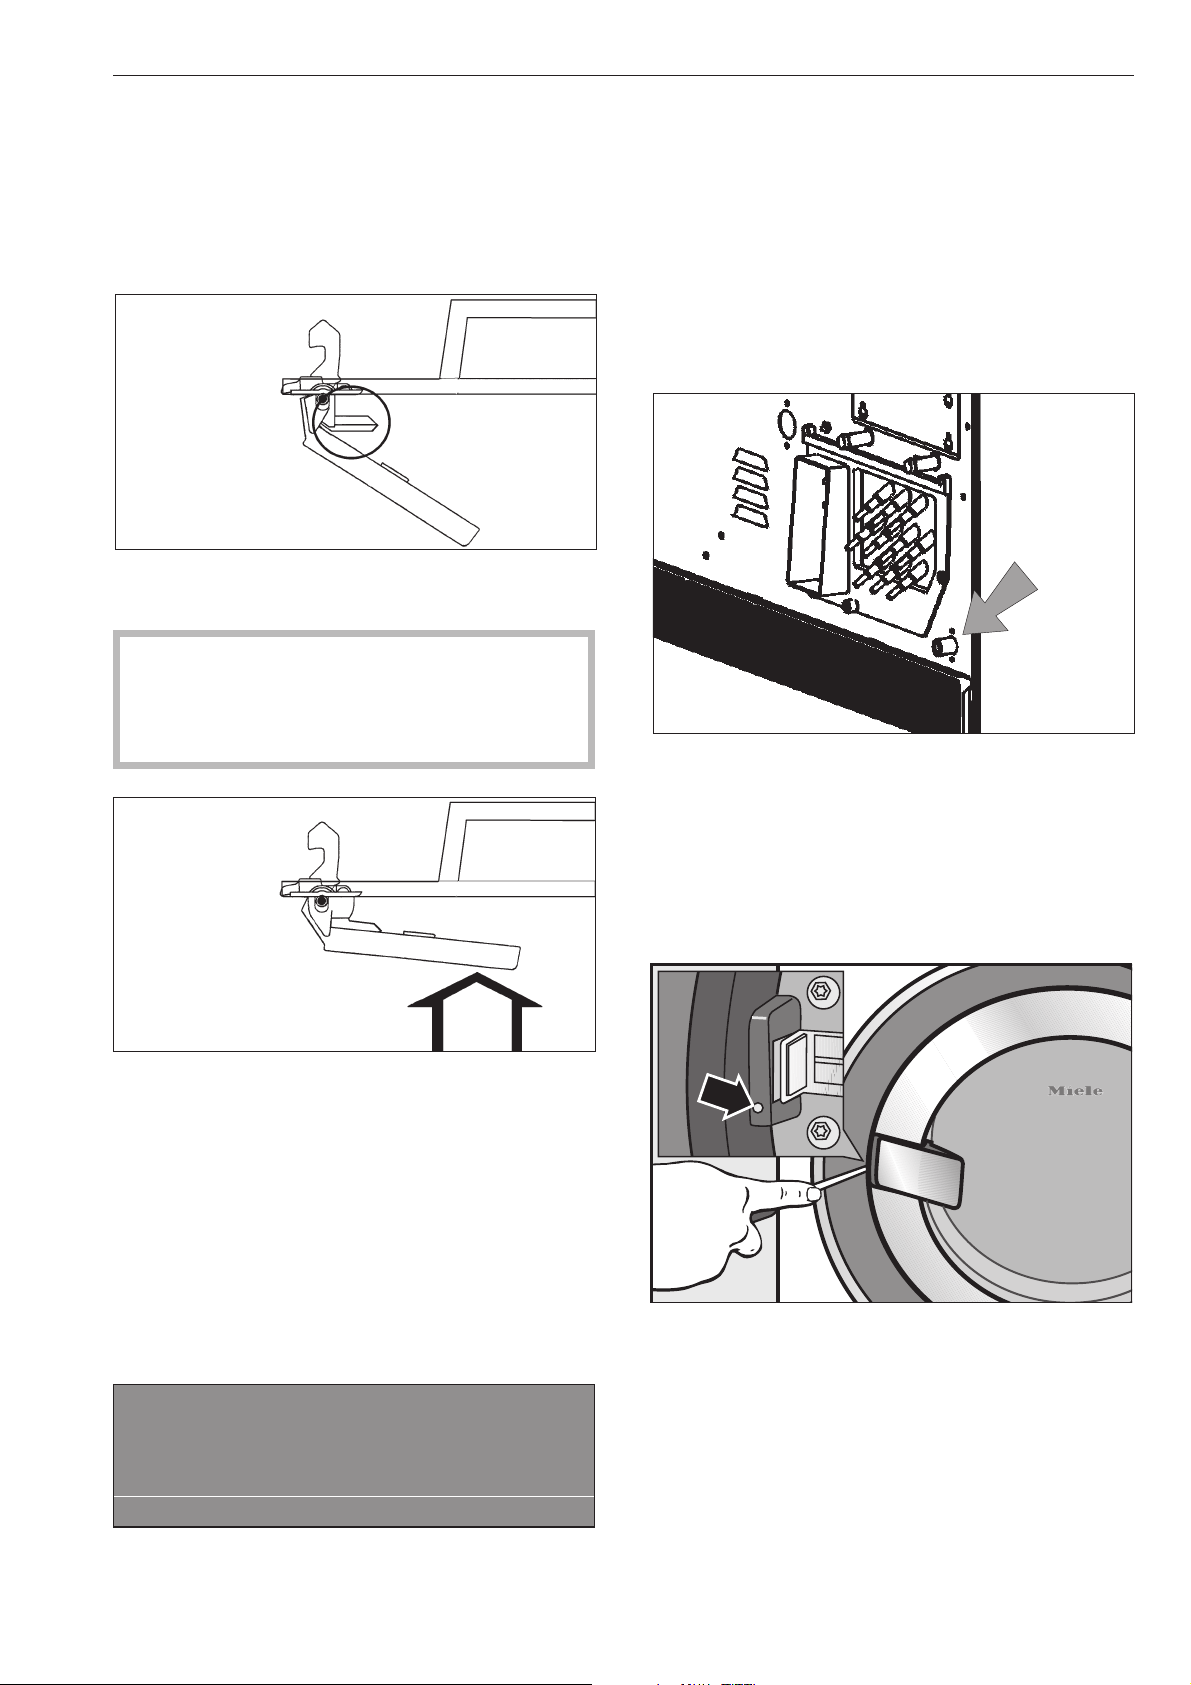
The door will not open
^
Press against the door handle and at the same time
switch the machine off and then on again. Then try
to open the door again.
If you still cannot open the door:
The door handle safety mechanism has disingaged
itself. The door handle cannot be opened or closed.
The safety mechanism is designed to protect the
handle and the lock from damage, for instance, if
too much force is being used in an attempt to
open the door.
^
Press firmly against the door handle until you
clearly hear the safety mechanism engage.
You will now be able to open and close the door
again (as long as there is no water in the machine).
Power cut during a wash program -
Emergency door release
With a short power cut:
The program remains in the last position, and when
power is restored the following message appears in
the display:
y
Power cut
Programme stop
Press the start button.
i ü f
^
Press the START button and the program selected
will continue.
With an extended power cut:
^
Switch the machine off.
^
Switch off the mains supply at the on-site mains
switch.
^
Close all faucets for water and steam as
applicable.
To remove the laundry the drain valve will need to be
opened manually and the drum door unlocked
manually.
^ Open the drain valve by partially opening the
venting screw (spanner size 17 mm) at the rear of
the machine. Do not unscrew it completely. Drain
off the suds. Take care as some water will seep out
of the screw opening (approx. 100 mm). This
should be collected in a suitable container.
^ Tighten up the venting screw again and check that
there is no leak.
^
Insert a screwdriver (head approx. 4 mm) into the
opening beside the door lock so that the head
engages with the notch of the door release
mechanism. Turning the screwdriver slightly
anti-clockwise will unlock the door.
Never use force to open the door!
^
Remove the laundry
Problem solving guide
25
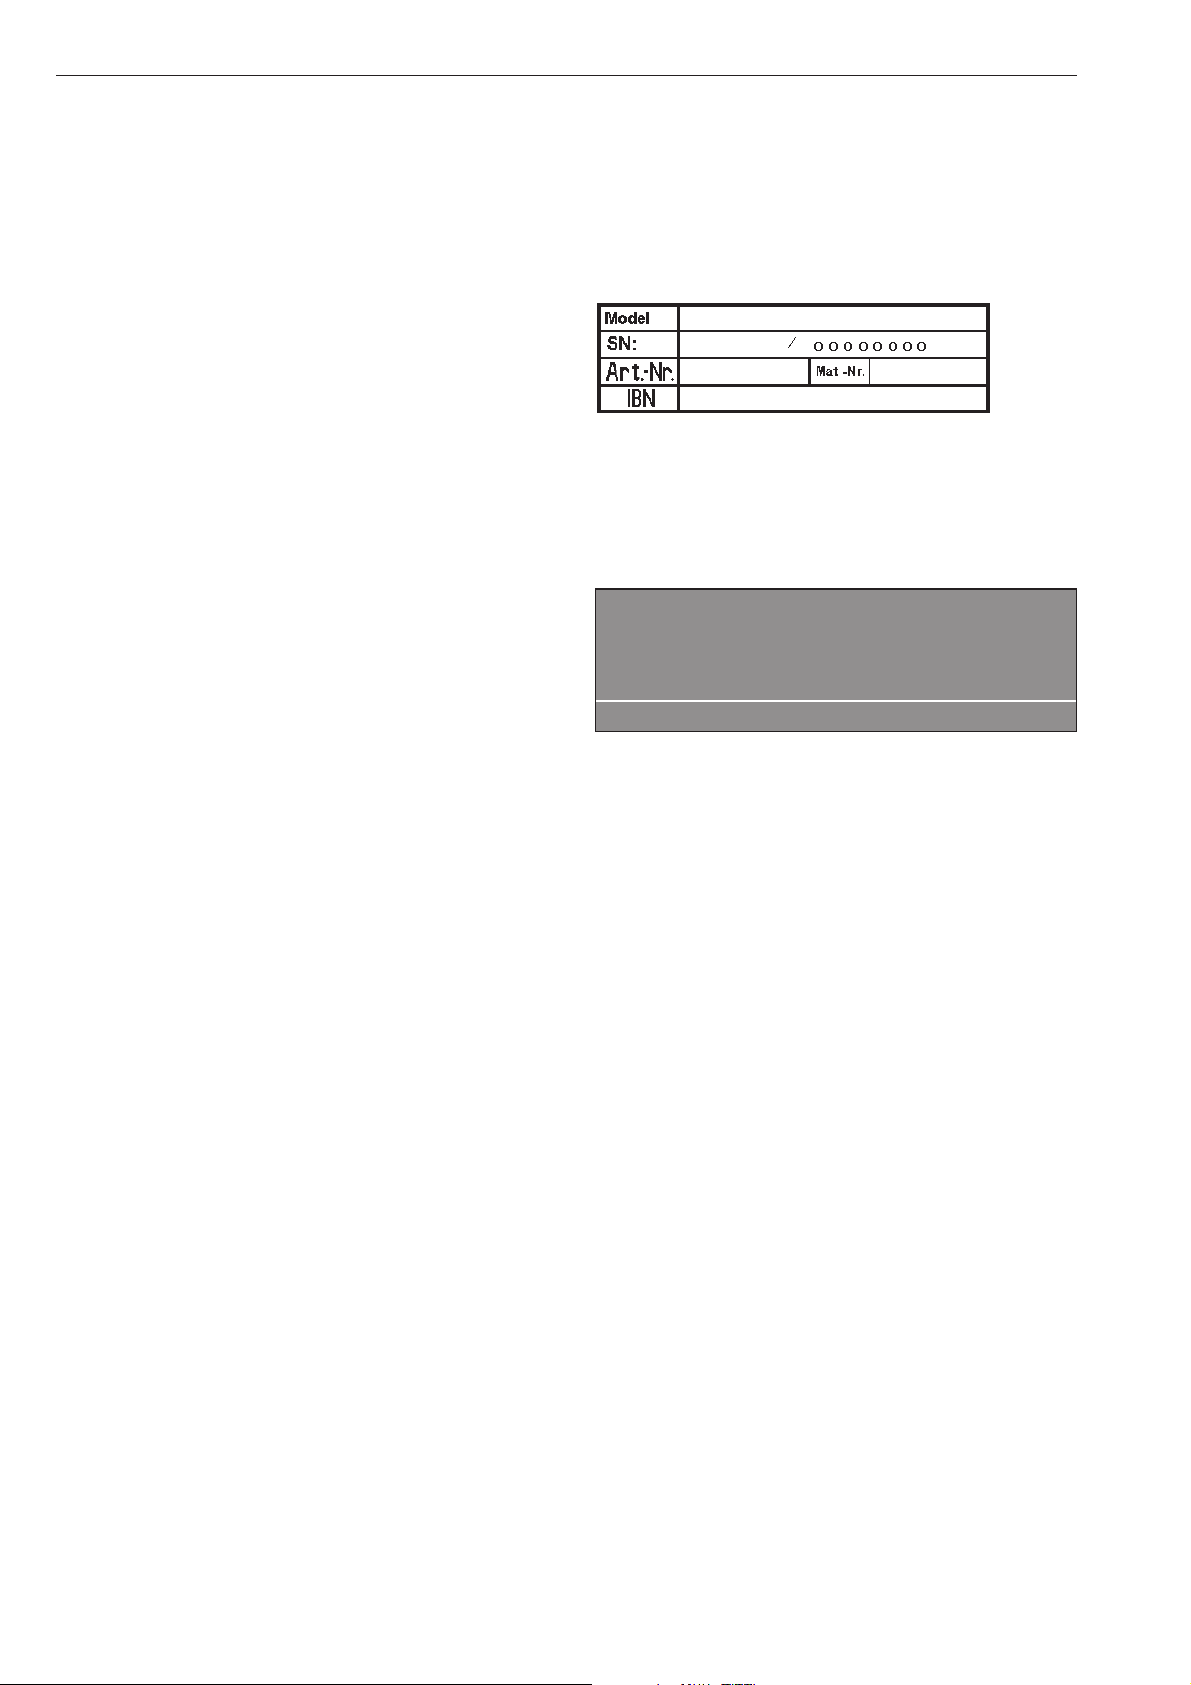
Possible reasons for increased levels of
foaming
–
Detergent type
^
Only use detergents formulated for commercial
washer-extractors. Domestic laundry detergents
are not suitable.
–
Using too much detergent
^
Follow the manufacturer's dosage
recommendations on the packaging and take local
water hardness levels into account.
–
Heavy foaming detergent
^
Use a low foaming detergent or contact your
detergent supplier for advice.
–
Very soft water
^
In areas with very soft water (hardness level 1)
dispense less detergent as specified by the
detergent manufacturer.
–
Soiling level of the laundry
^
For lightly soiled laundry dispense less detergent in
accordance with the detergent manufacturer's
instructions.
– Residues e.g. detergent on the laundry
^ Run a pre-wash without detergent and without
selecting a temperature.
Laundry which has been soaked before washing
must be thoroughly rinsed before running a wash
program.
– Small loads
^ Reduce the amount of detergent dispensed
according to the size of the load.
–
Drum speed too high during the wash
(Profitronic controls)
^
Reduce the drum speed and the wash rhythm.
Large articles of laundry stretching
during the spin cycle
Large articles of laundry (e.g. table cloths) can
stretch during the spin cycle. This can generally be
prevented by reprogramming the machine.
Please contact the Miele Service Department.
Service interval
If after switching the machine on the following
message appears in the display the machine will
need to be serviced by the Miele Service
Department.
§
Service interval 1
Call the Service Department
A
The display will go out after 5 minutes.
Problem solving guide
26

Error messages
,
Repairs to electrical or steam operated
machines may only be carried out by a suitably
qualified person in accordance with national and
local safety regulations.
A message will appear in the display if there is a
problem either before starting a program or once it
has started:
The display remains dark.
There is no power to the machine.
^
Check the mains switch and the on-site fuses.
y
Power cut
Programme stop
Press the start button.
f
^ Once power has been restored press the START
button.
This error message can also indicate that the winding
on the motor has overheated.
^ Allow the motor to cool down.
M
Water inlet fault
Call the Service Department
if restart does not work.
if
^
Check the faucet and then press the START button.
a
Door lock fault
Call the Service Department
if restart does not work.
if
^
Push firmly on the door handle until you hear the
lock engaging. Confirm by pressing START.
§
Heating system fault
Programme stopped. Press start.
program will continue without heat.
if
^
To continue the program with heating press the
START button. If a disinfection program was
running the program will be cancelled if this
message appears.
Call the Service Department.
m
Drive motor fault
Programme stopped. Press the start button.
Motor overheating.
if
^
Allow the motor to cool down.
§
Imbalance fault
Call the Service Department
if restart does not work.
i A
The imbalance is too great and the imbalance switch
has been activated.
^ Switch the machine off and on again. Then press
the START button.
§
Drain valve fault
Call the Service Department
if restart does not work.
if
^
Check the on-site drainage system and then press
the START button.
A defective drain valve must be repaired by a Miele
Service technician only.
ö
Dispensing system fault
Fill dispenser 1
Press the start button
if
Replace the empty container with a full one.
Problem solving guide
27

§
Card fault
Card incorrectly inserted in card reader.
if
^
Insert the card the right way round in the card
reader.
After sales service
In the event of any faults please contact the Miele
Service Department.
When contacting the Service Department, please
quote the Model, Serial number (SN) and Material
number (M.Nr) of your machine. These are shown on
the data plate.
This is visible above the door aperture or at the back
of the machine.
Please let the Service Department know any error
message that has appeared in the display.
Should you require spare parts ensure that you only
use original Miele Spare Parts (and remember to let
the Spare Parts Department know the model, serial
number and material number of your machine).
Problem solving guide
28
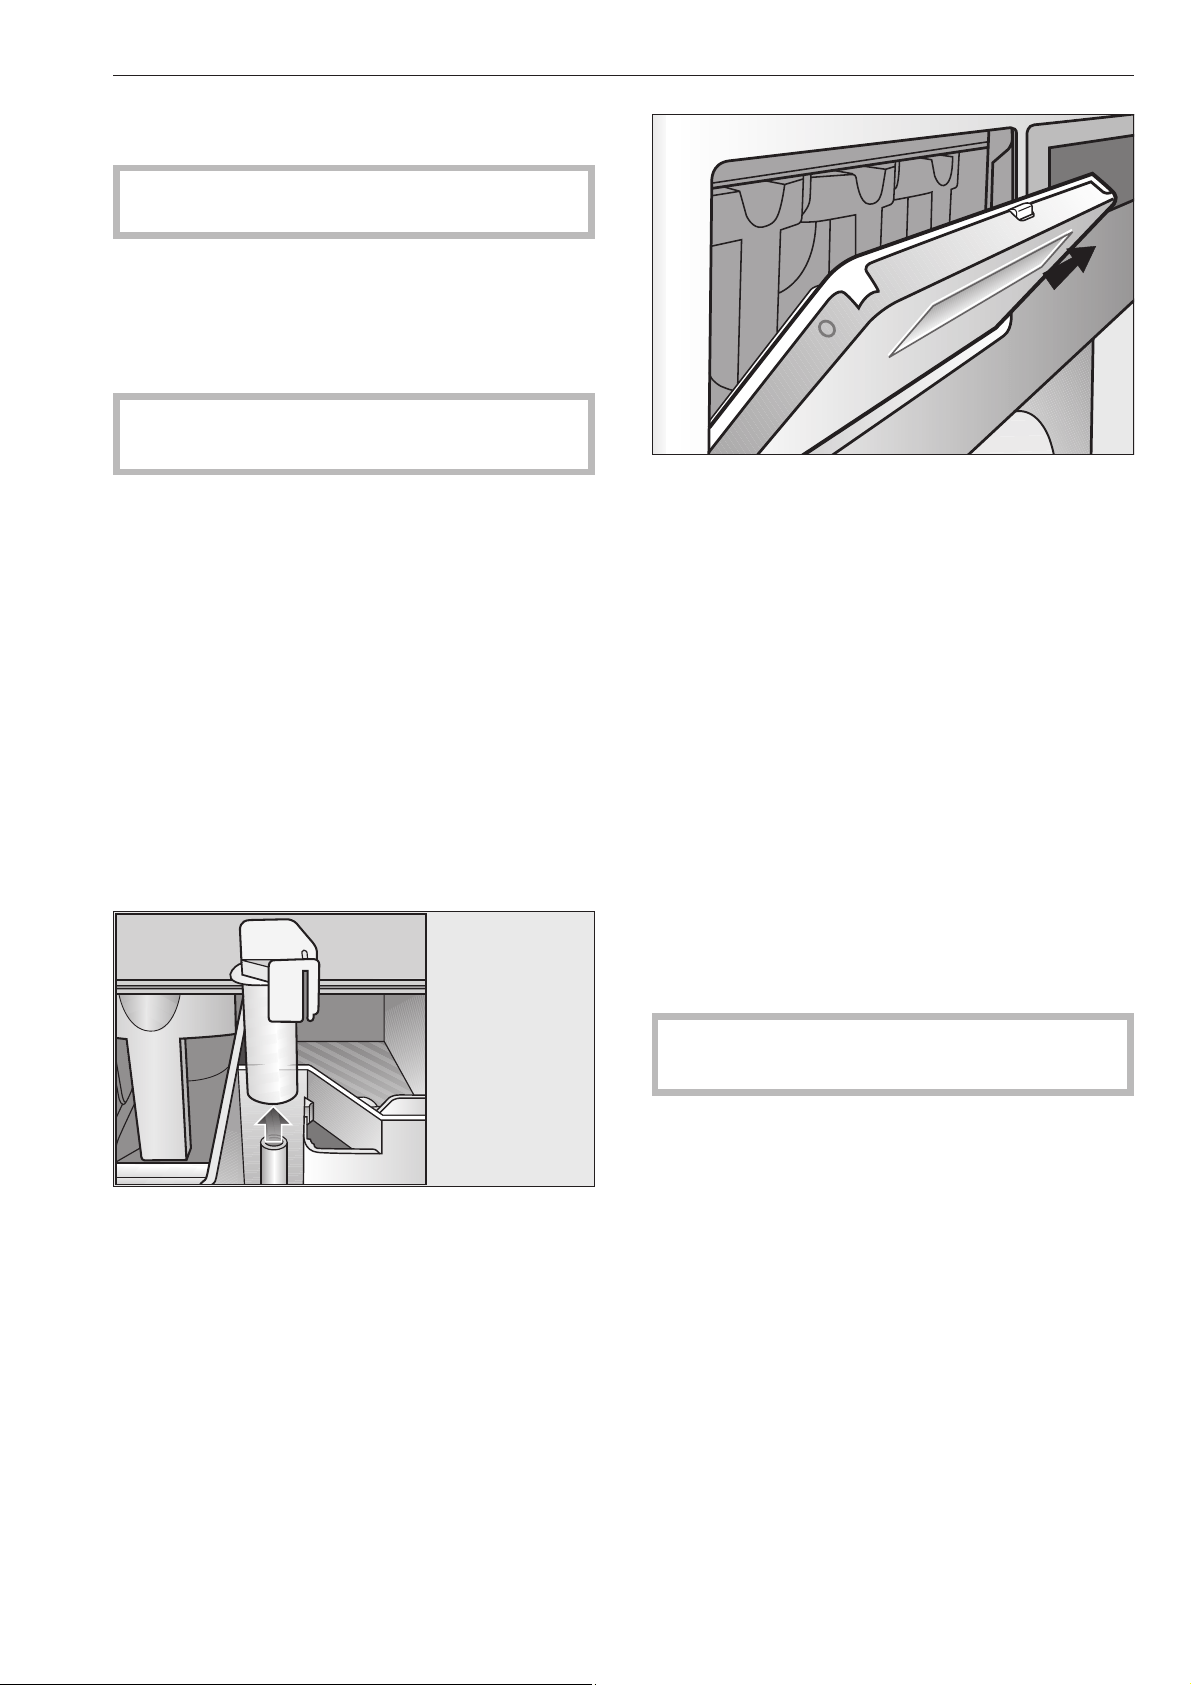
The machine should be cleaned and checked over
immediately after use where possible.
,
Do not use a pressure washer or hose to clean
the machine.
The housing, control panel and any plastic
components should be cleaned using a suitable mild
cleaning agent, applied with a soft damp cloth. Rub
dry with a soft cloth after cleaning.
Do not use abrasive cleaning agents as they will
damage the surface material.
Parts of the housing made from stainless steel can be
cleaned using a suitable proprietary stainless steel
cleaning agent.
Any deposits on the door seals should be wiped off
using a damp cloth.
Clean the detergent dispenser, dispenser
compartments and siphons
The detergent dispenser, dispenser compartments
and siphons must be cleaned after each use with
warm water to thoroughly remove any residues of
detergents or other agents. If the machine is not
going to be used for a while the detergent dispenser
should be left open to air the compartment. The
siphon in the dispenser compartment for fabric
conditioner should also be cleaned.
Remove the siphon and clean with hot water. Then
put it back in place.
Pull the detergent dispenser flap out to a 45° angle to
allow cleaning of the drip channel and the siphons. If
a siphon is blocked a bottle brush can be used.
The grille over the cooling fan at the back of the
machine should be checked for soiling from time to
time and cleaned if necessary.
Superficial rust
The drum and suds container are manufactured from
rust free stainless steel.
Water with a very high iron content, or foreign objects
such as paper clips, metal buttons etc. which get into
the drum with the laundry can cause superficial
rusting in the drum and suds container.
To prevent this happening the drum and suds
container should be checked and cleaned regularly
and if rusting does occur it should be removed using
a proprietary cleaning agent for stainless steel.
The door seals should be checked for foreign objects
regularly and cleaned as described above.
Leave the door ajar after cleaning to allow the
machine to dry.
Cleaning and care
29
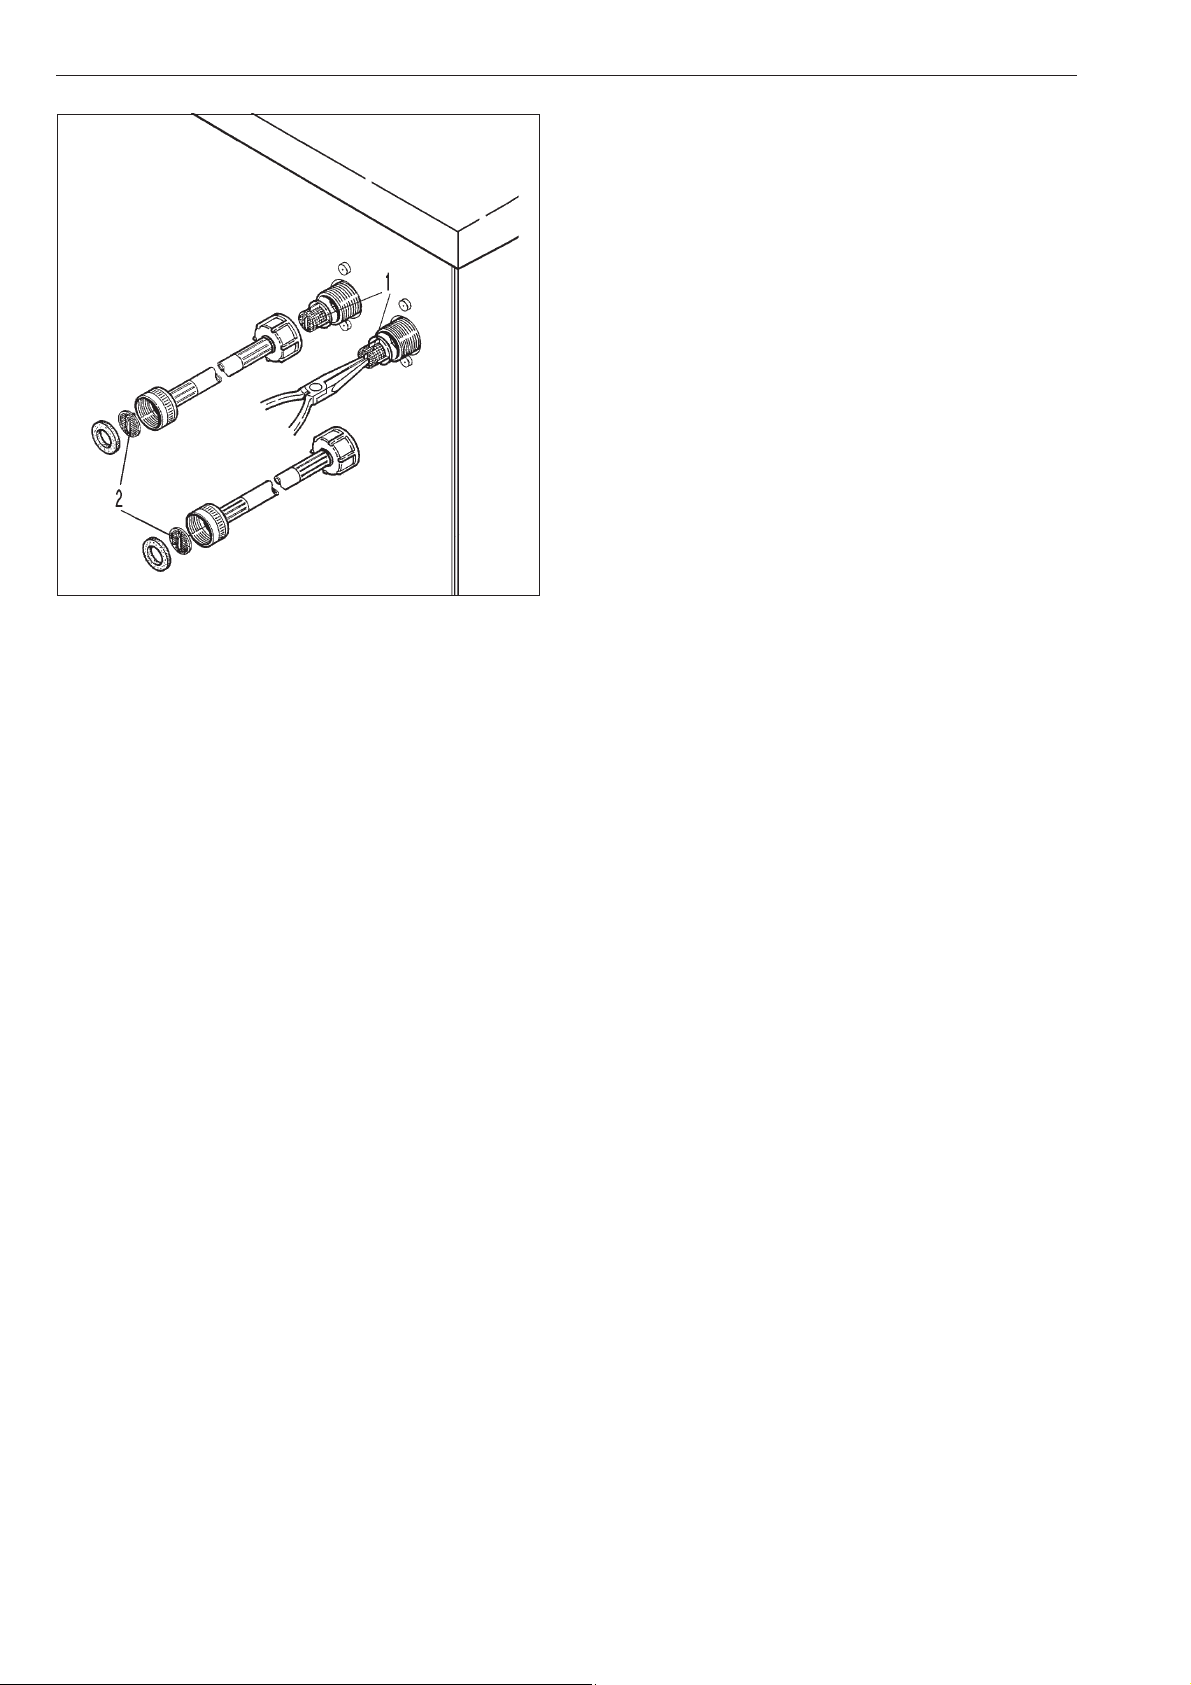
The filters in the water inlet valve (1) and in the inlet
hoses (2) should be checked from time to time for
soiling and cleaned if necessary.
When the machine is not in use
If the machine is not going to be used for a longer
period of time (4 weeks or more) the drum should be
rotated several times after the last use. The drum
should then be rotated every 4 weeks to prevent
damage to the bearings.
Cleaning and care
30
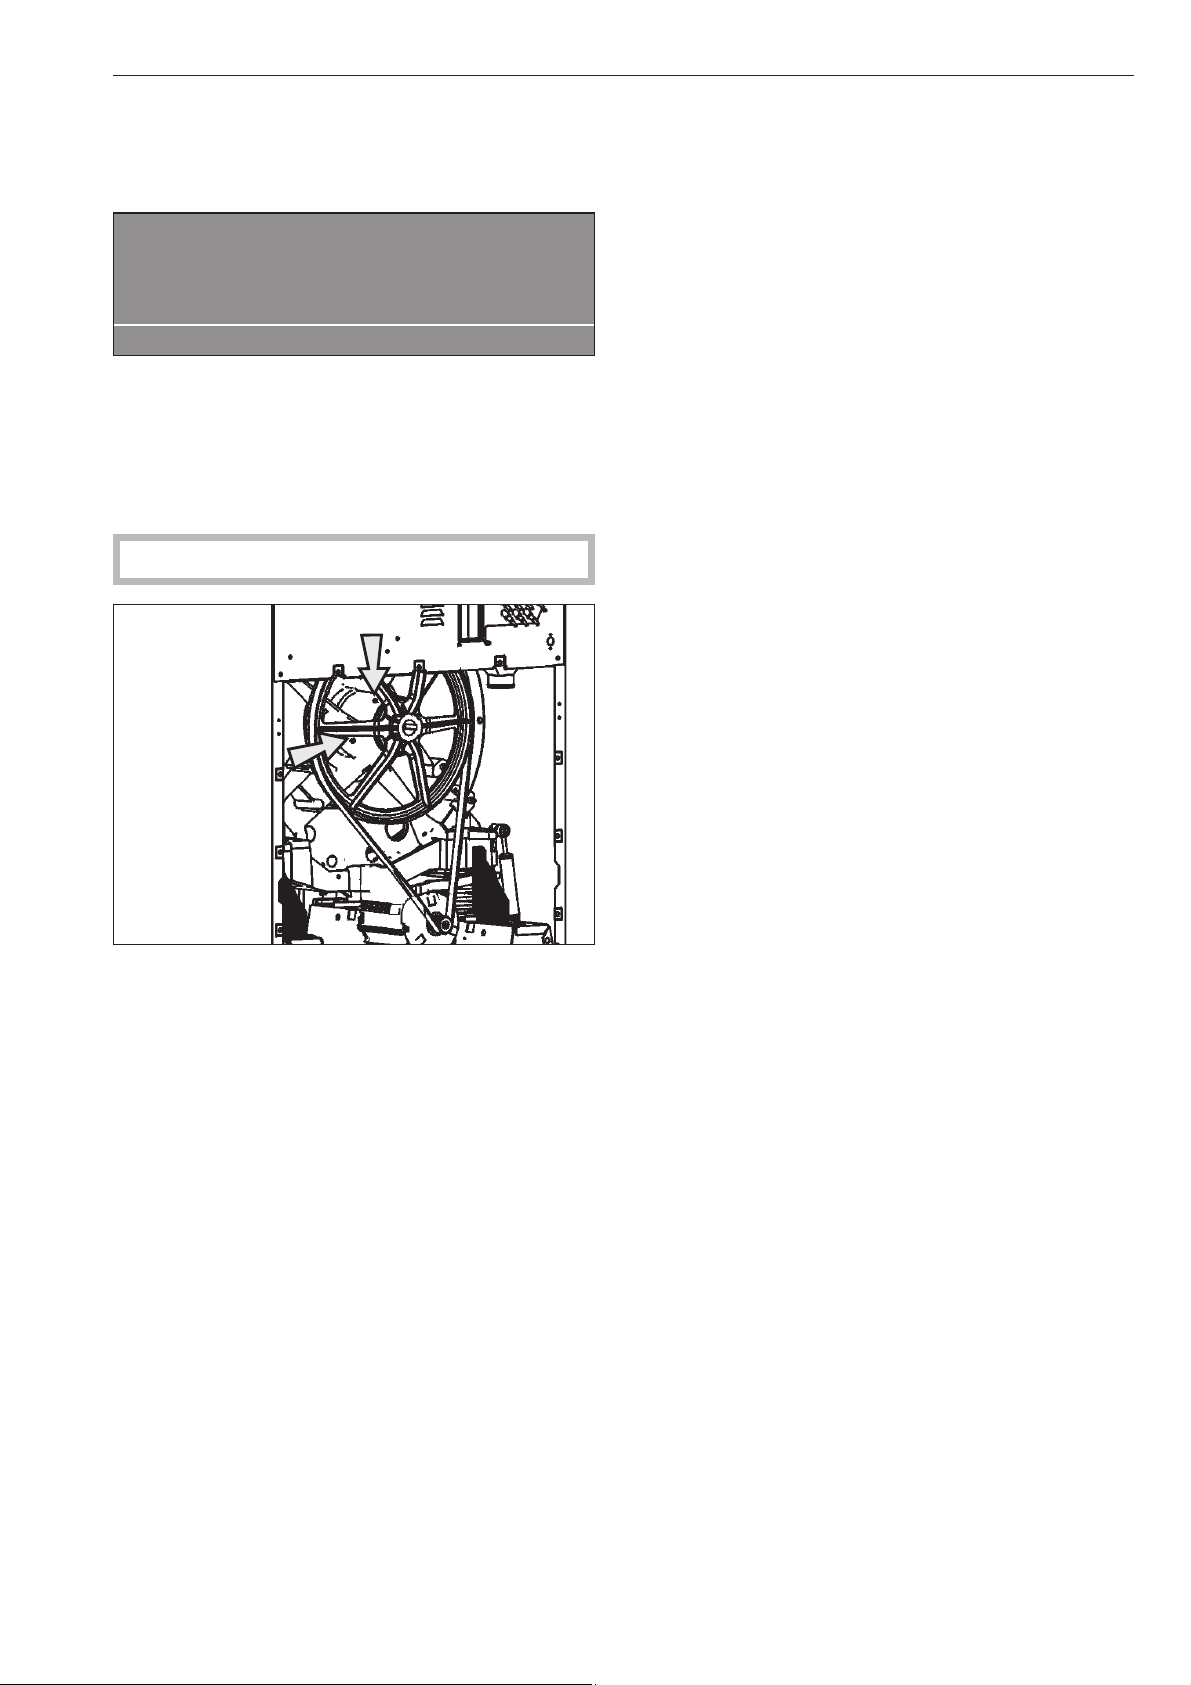
Drum bearings (PW 6167, PW 6207)
Once the service interval has been reached the
following message will appear in the display:
§
Lubricate drum bearings
Call the Service Department.
A
Press the A"Back" button to get rid of the message
in the display. This message will appear in the
display each time you switch the machine on until the
service work has been carried out by the Miele
service technician.
,
Disconnect the machine from the mains.
The grease nipples on the drum bearings need to be
lubricated after approx. 1000 operating hours with
Arcanol L 100.
When the machine is not in use
If the machine is not going to be used for a longer
period of time (4 weeks or more) the drum bearings
should be lubricated (PW 6167, PW 6207) as
described above and the drum rotated a few turns.
The drum should then be rotated again every 4
weeks to prevent damage to the bearings.
Cleaning and care
31
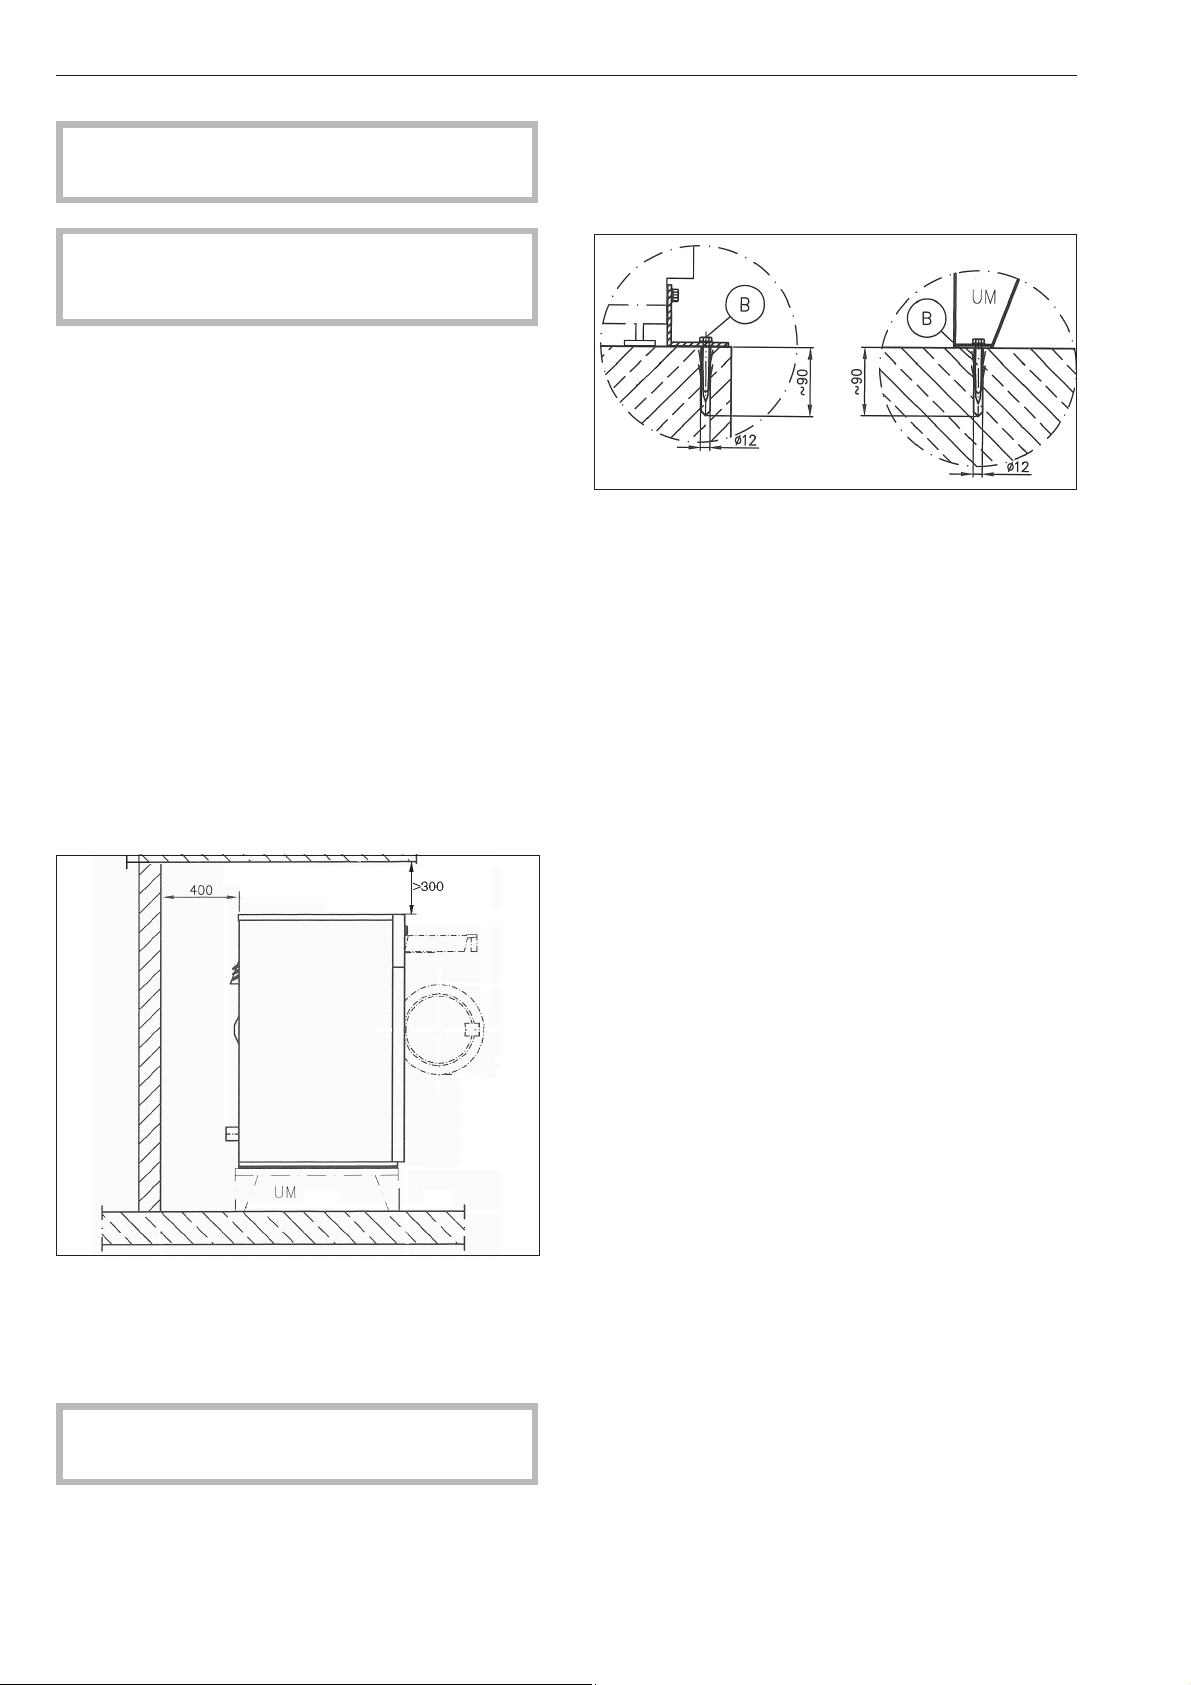
This machine must be installed by an authorised
technician only.
,
This machine is not designed for washing
items which have been treated with dangerous or
flammable substances.
To avoid the risk of frost damage do not install this
machine in a room where there is a risk of frost
occurring.
Use a pallet lifter to move the machine around the
room.
Transport packaging must be carefully removed
using suitable tools.
Use a suitable lifting mechanism to lift the machine off
the transport pallet.
Do not install the machine on carpeted flooring as the
carpet pile can hinder the free flow of air into the
ventilation gaps at the bottom of the machine.
To ensure suitable access for future maintenance and
service work, please ensure that the minimum
distances between the machine and the wall
specified on the installation diagram are strictly
observed.
Minimum distance to wall for maintenance and
service work: approx. 400 mm
The washer-extractor must be perfectly level to
ensure that it functions correctly.
The screw feet can be adjusted to align it.
The machine must not be moved without all the
outer panels in place.
Installation on a base
The washer-extractor can be installed on a base or a
raised concrete base.
The base must be secured to the floor.
Concrete base / Floor Miele base
Installation and connection
32

Transit fittings
The transit fittings, 2 at the front and 2 at the back are
each secured in position with 3 hex screws. These
have to be removed on-site before the machine can
be commissioned.
To do so the front panel and the rear panel of the
machine have to be removed. Unscrew the screws
from the bottom edge of the front panel and then take
the front panel off.
Unscrew the screws from the back panel and then
take the back panel off.
Store the transit fittings in a safe place for future
use. They will need to be refitted should the
machine ever require be moved to another
location.
Installation and connection
33
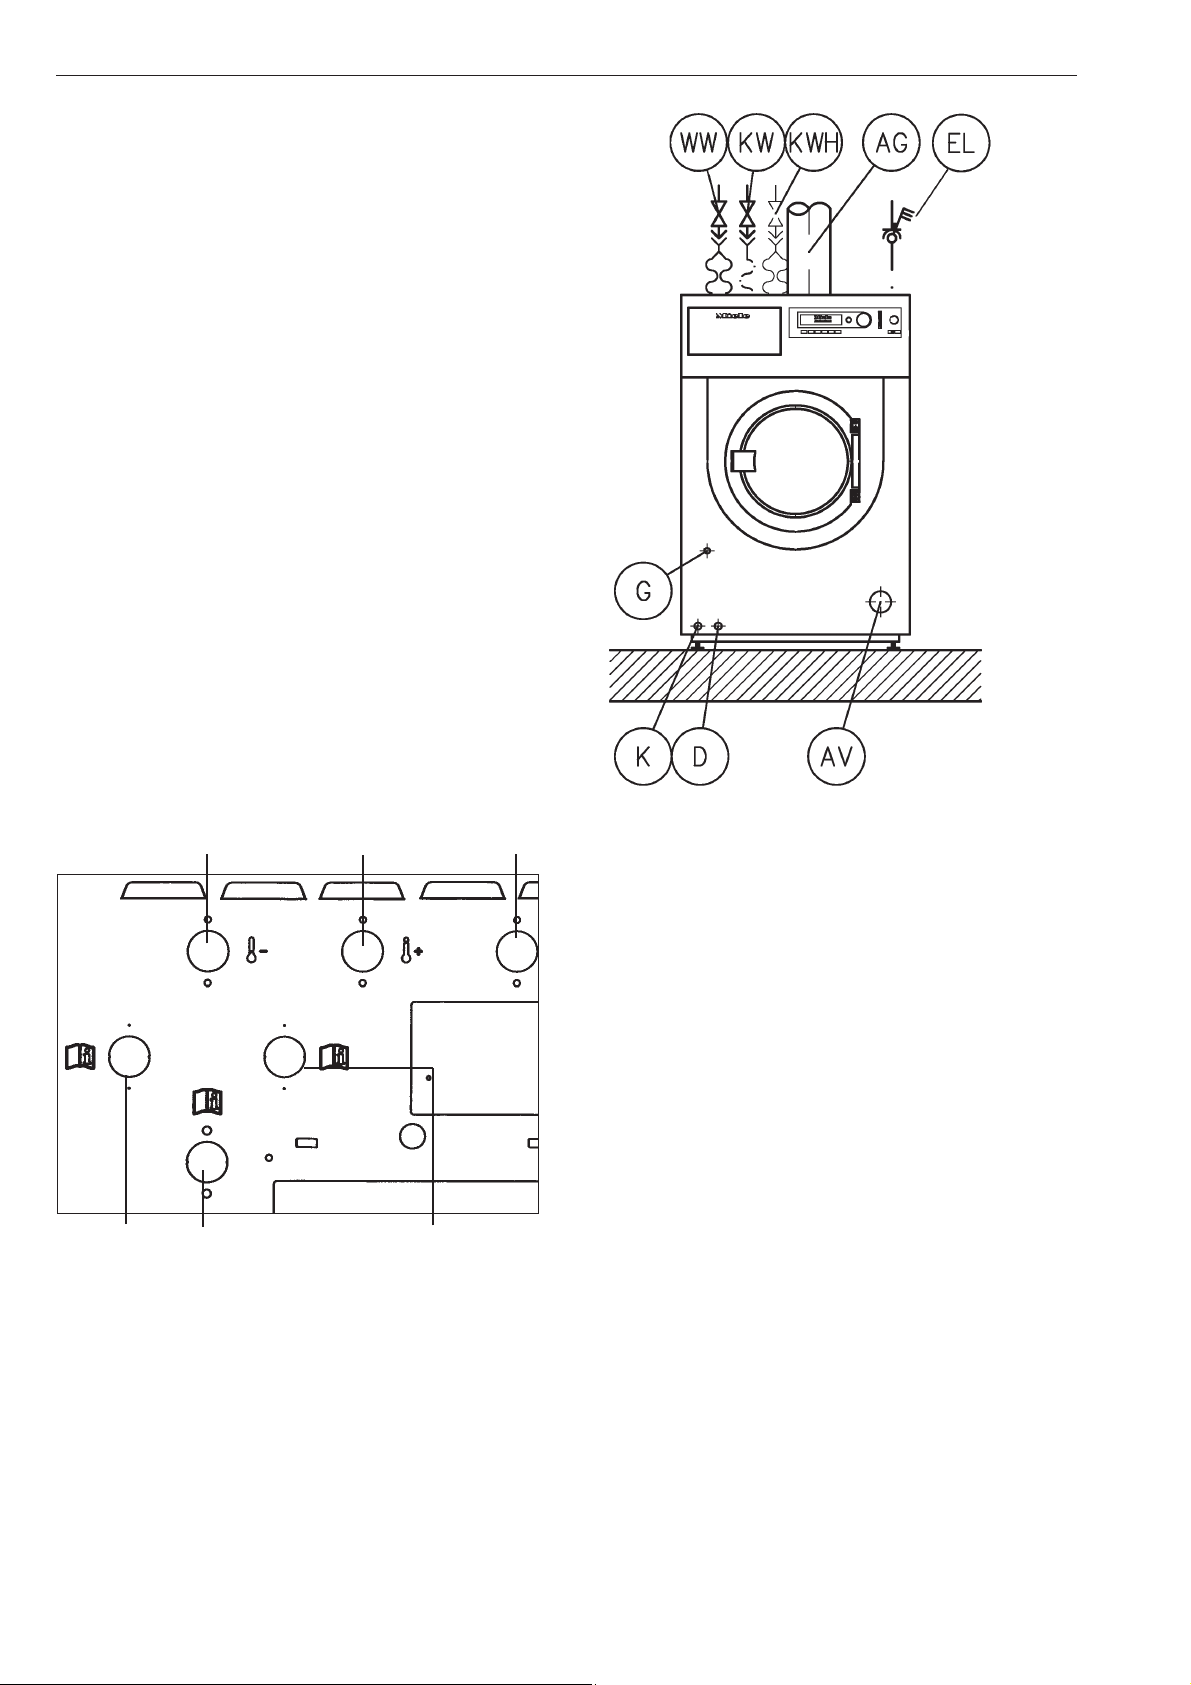
On-site connections
WW Hot water
KW Cold water
KWHHot and cold hard water
EL Electrical connection
AG Exhaust gas (gas heated machines only)
G Gas connection (gas heated machines only)
AV Drain
D Steam connection (steam heated machines)
K Condensate drain (steam heated machines)
Plumbing connections on the machine
Cold water Hot water Cold water
Hard water Liquid dispensers Hard water
Plumbing
Connection must be made to the water supply via a
faucet which conforms to local and national
regulations. This work must be carried out by an
authorised person in strict accordance with local and
national regulations.
Water inlet / drainage
To ensure trouble free operation of the machine, the
flow pressure must be at least 100 kPa (14.5 psi) and
not exceed 1000 kPa (145 psi).
The inlet pressure tested hoses supplied with the
machine must be used for connection to the water
supply.
If replacing an inlet hose only use a hose tested to at
least 7000 kPa (1,015 psi) pressure, and for a water
temperature of at least 90 °C.
This also applies to all fittings. Genuine Miele original
parts fulfil these requirements.
Water taken into the machine must not exceed a
temperature of 70°C.
Installation and connection
34
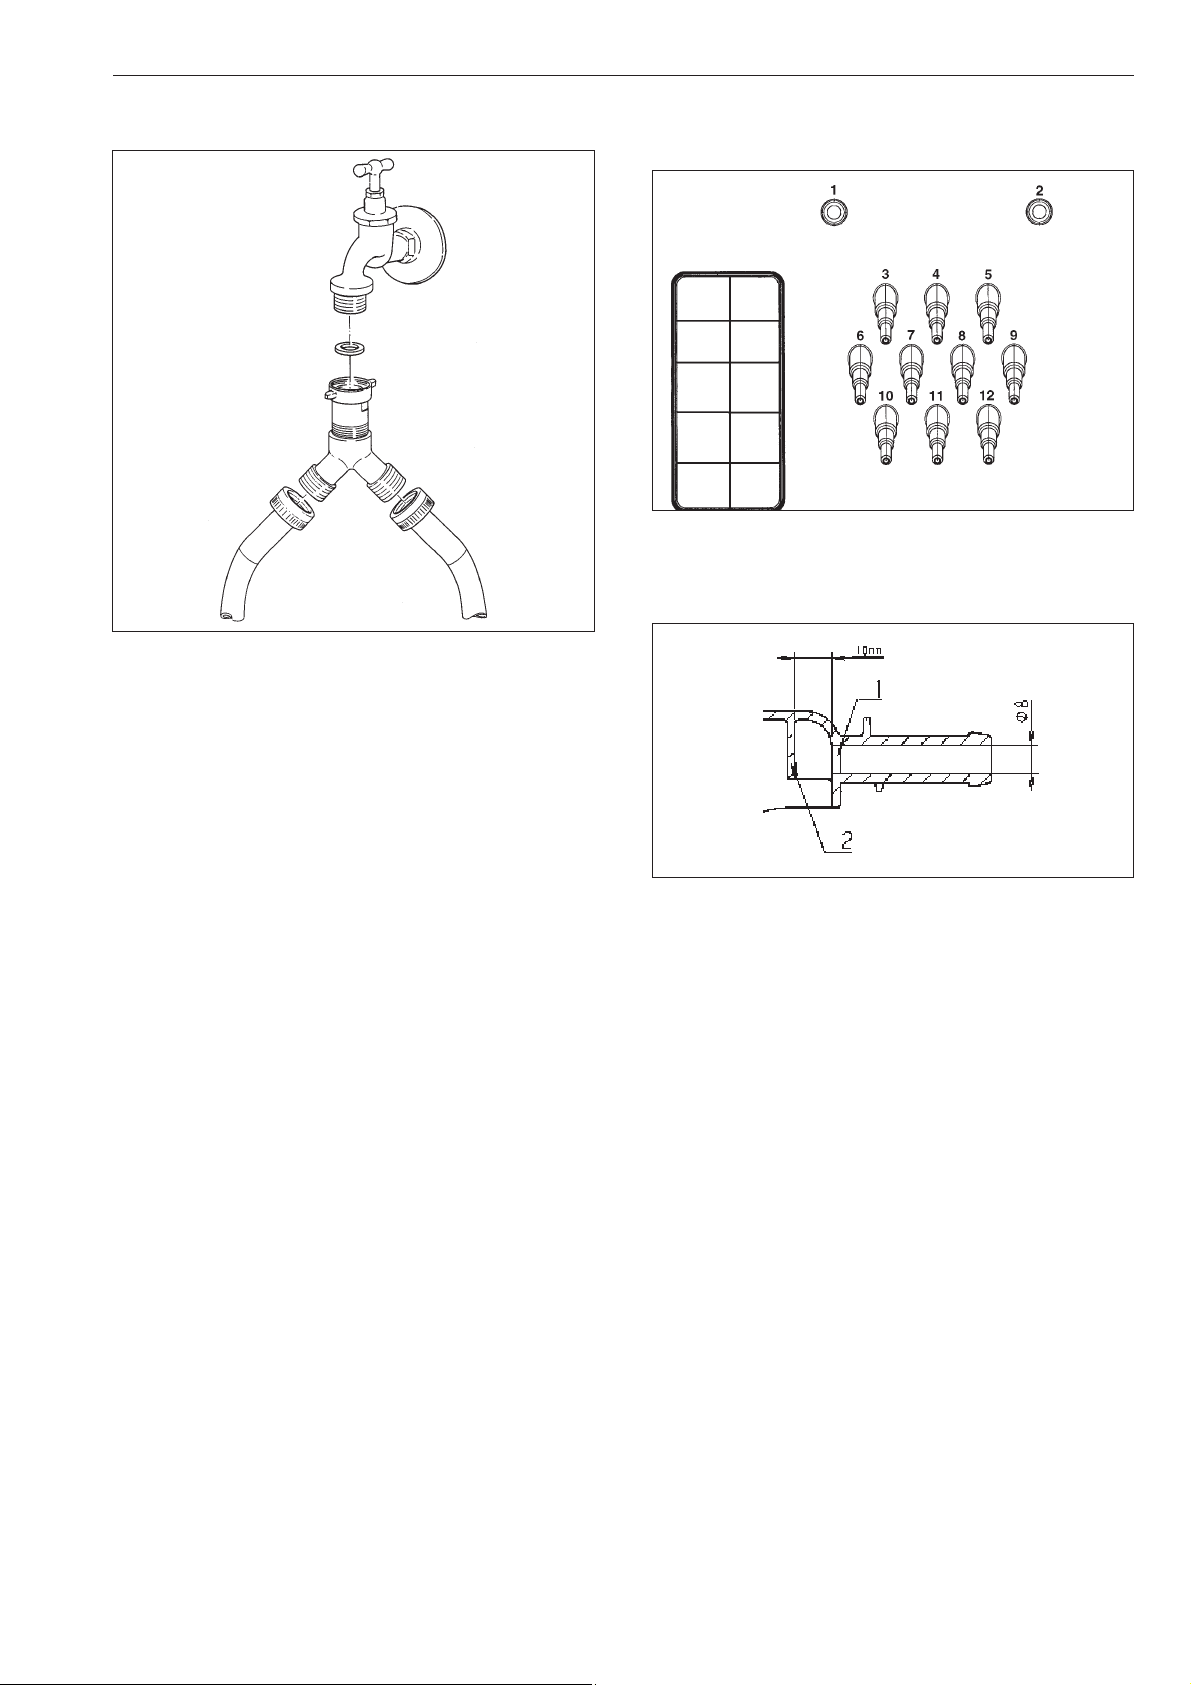
Cold water supply
A Y-piece connnector is supplied with the machine.
Liquid agent dispensing mixing box
connections
Connections 1 and 2 are for viscous agents only.
These connections are sealed and have to be drilled
open with an 8 mm drill bit.
Be carefull to only drill through the first wall (1). There
is a second one located 10 mm behind it (2) to
deflect the agent and this must not be drilled into.
Any connections that have been drilled open must be
resealed if they are subsequently not required.
Connections 3 to 12 are for liquid agents only. These
connections are also sealed and have to be trimmed
to the correct diameter for the hoses being used with
a suitable small saw.
Any connections that have been opened must be
resealed if they are subsequently not required.
Installation and connection
35
1"
3/4"
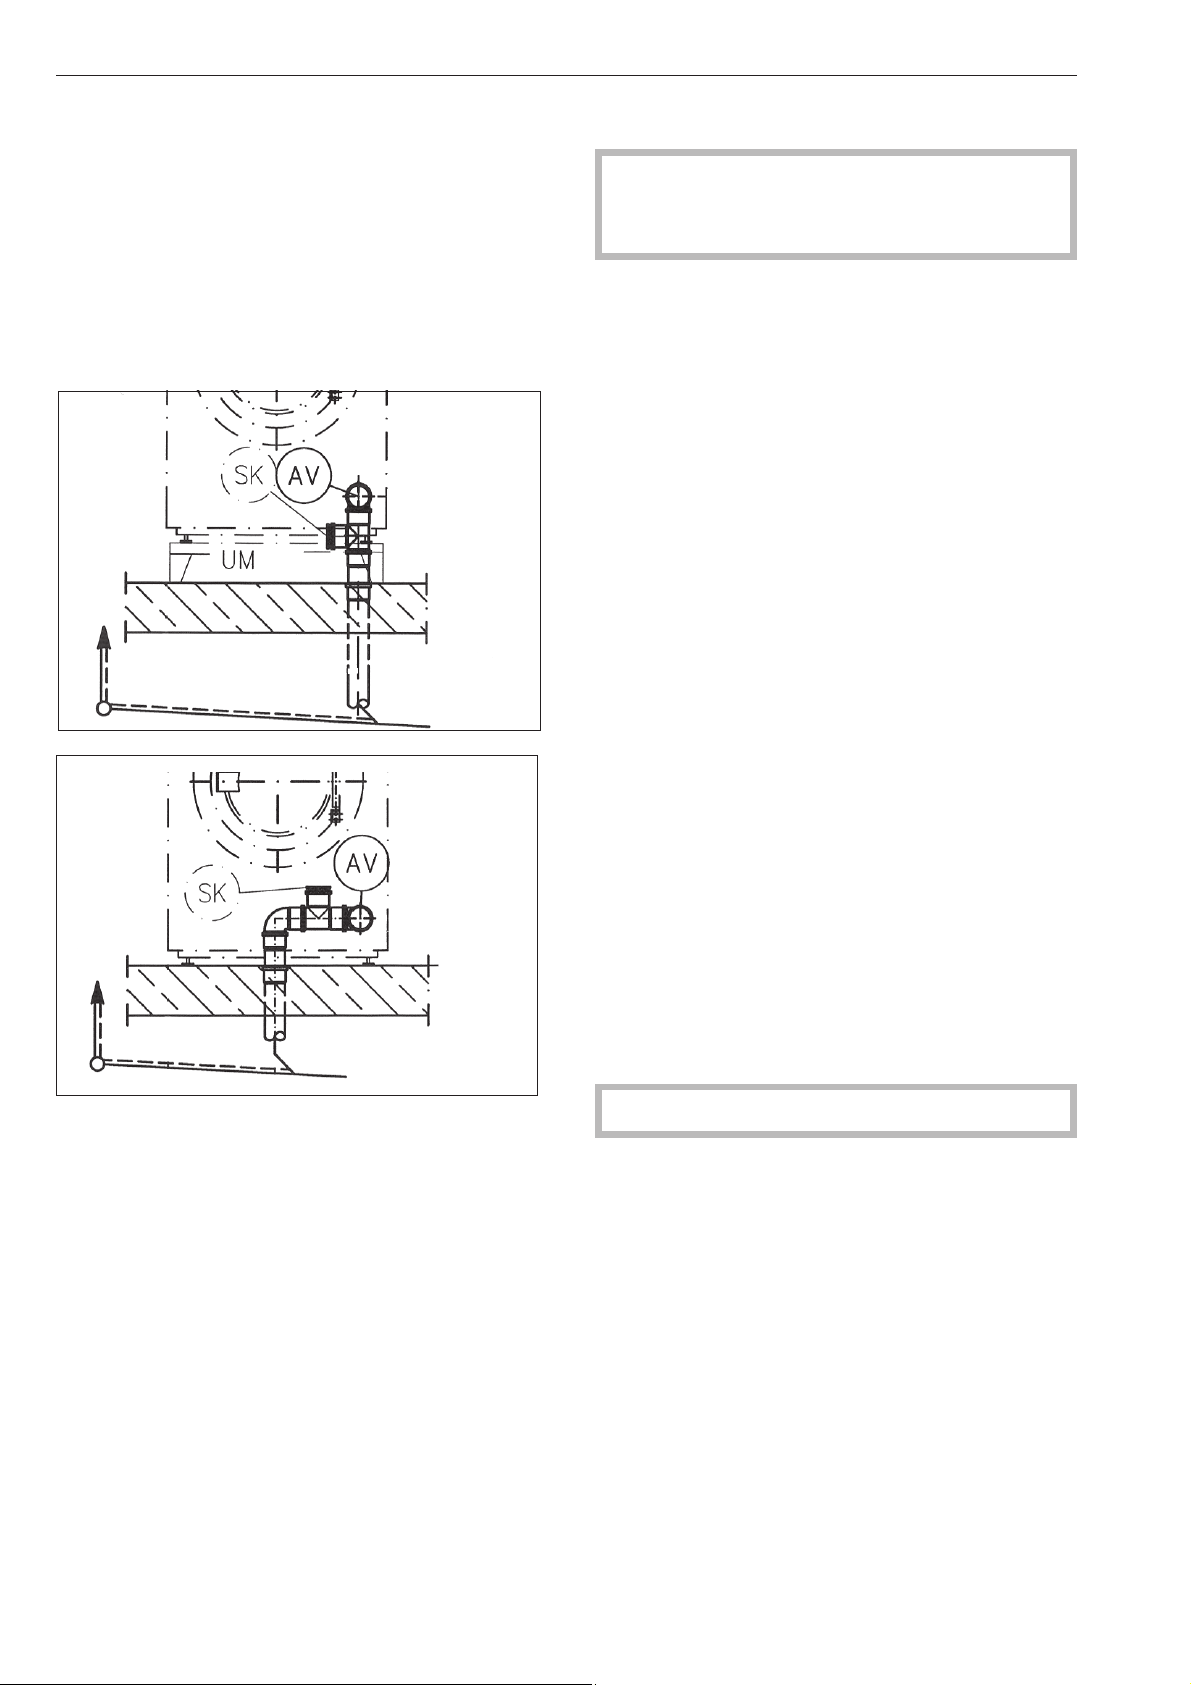
Water drainage
Dump valve drainage (AV) DN 70 on the machine
side, DN 70 socket on-site. Transient flow rate 200
l/min.
Foam compensator (SK)
Increased foaming can lead to foam being
discharged from the vapour vent. A drain with siphon
(commercial off-the-shelf pipe material) can be
retro-fitted to dispose of the foam.
Installation examples
Electrical connection
The electrical connection must only be carried out
by a suitably qualified electrician in accordance
with local and national safety regulations.
The connection terminal is located behind the cover.
The machine must only be connected to the voltage
and frequency shown on the data plate.
The machine is equipped with a multi-tap
transformer.
If the applicance is hard wired, a multi-pole separator
must be installed. An appropriate separator is a
switch with a contact opening of at least 1/8" (3 mm).
This includes circuit breakers, fuses and switches.
The plug connection or the separator must always be
accessible.
Connection should be made in accordance with the
wiring diagram and installation diagram to a suitable
isolator, with an on-off switch which is easily
accessible for servicing. The wiring and installation
diagrams are important for the correct electrical
functioning of the machine.
If the machine is disconnected from the electricity
supply ensure adequate measures are taken to
ensure that it cannot be reconnected to the electricity
supply until all work has been carried out.
Potential equalization
Potential equalization must be provided if the leak
current exceeds 10mA.
To activate the heating the water level in the drum
must be 2" (50cm) high.
A motor overload protection is located in the motor
winding.
See the enclosed wiring and installation diagrams.
Installation and connection
36
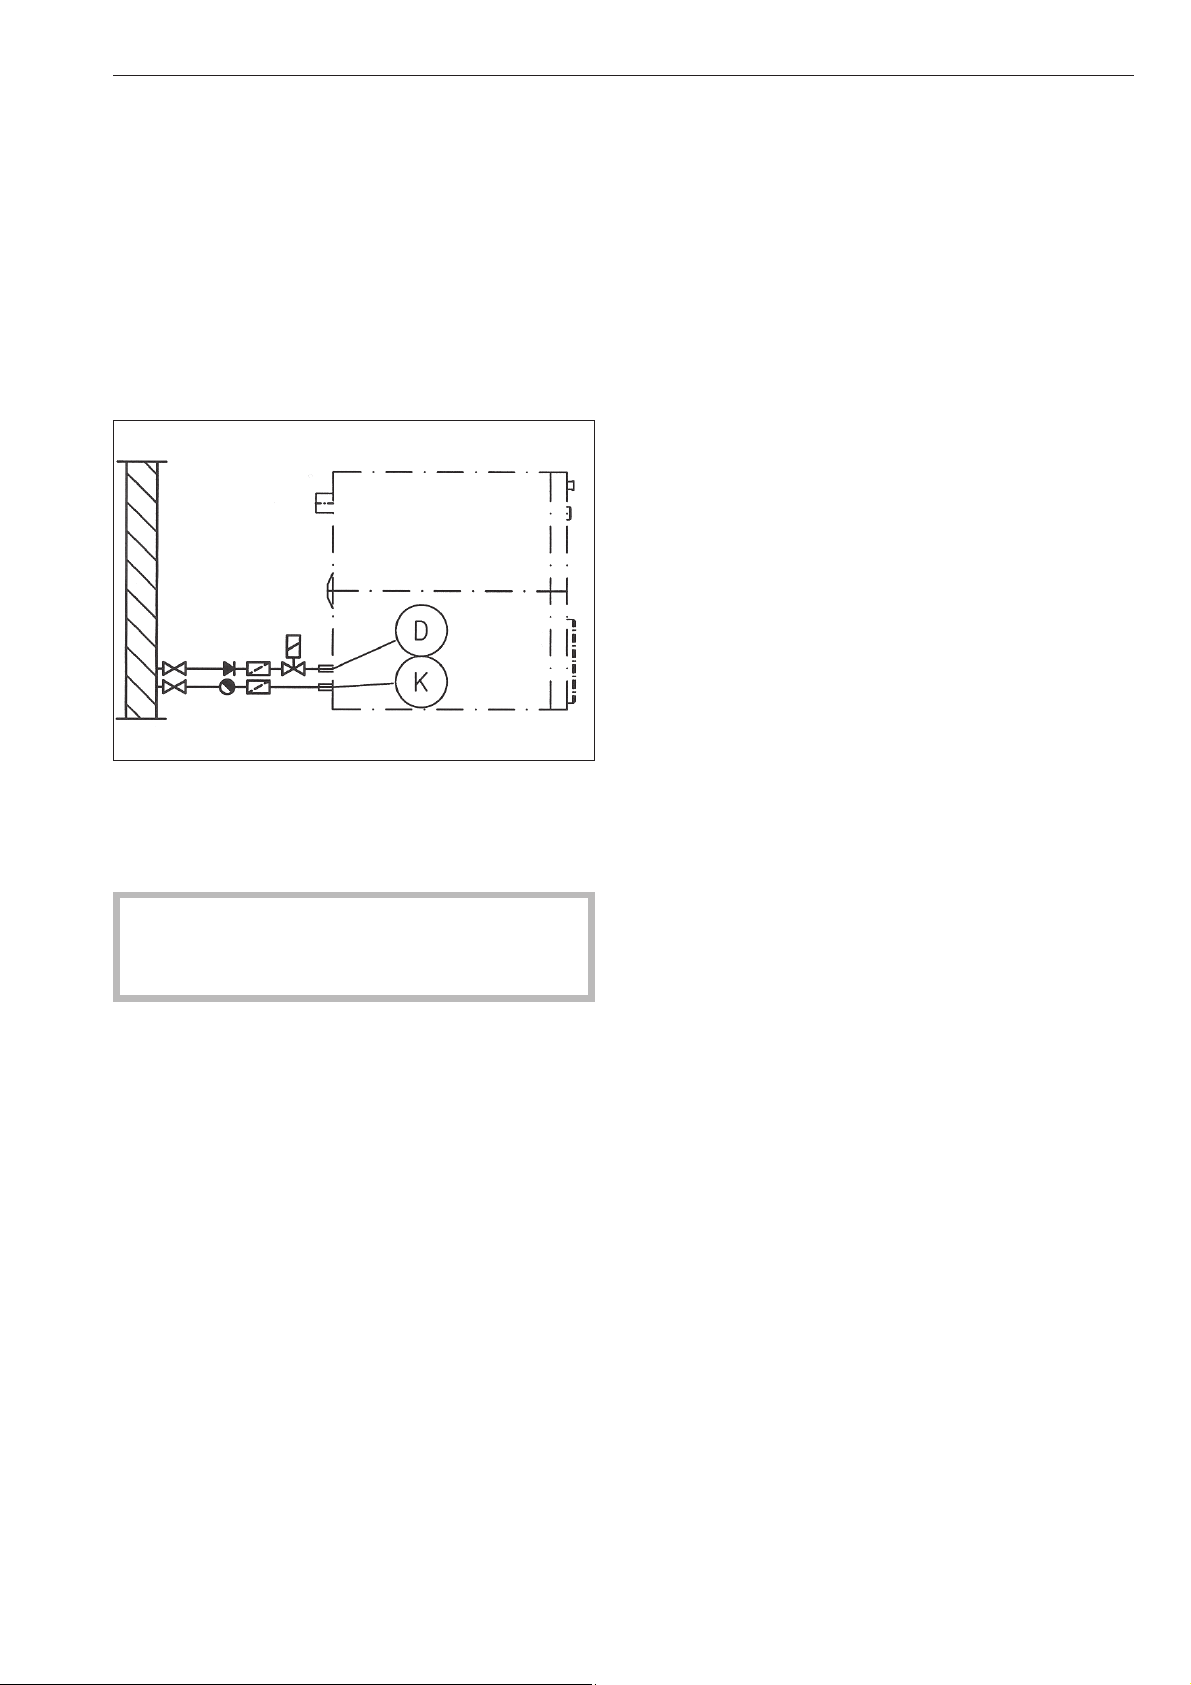
Connecting the dispenser pumps
Connection points for 4 time controlled dispenser
pumps which can be operated without the
multi-function module are located behind the cover
next to the electrical connection point. See the wiring
diagram supplied.
Steam connection
Steam connection must only be carried out by an
authorised installer. See the installation instructions
supplied.
A steam solenoid valve, dirt trap and steam stop
valve should be installed on-site.
A steam valve and condensate trap are available to
order from the Miele Spare Parts Department.
After setting up and connecting the machine
successfully ensure that all removable outer
panels are correctly fitted back into position.
Installation and connection
37

PW 6107 EL,S PW 6137 EL,S PW 6167 EL,S PW 6207 EL,S
Height in mm 1250 1250 1400 1400
Width in mm 804 804 924 924
Depth in mm 925/1235 1005/1345 1007/1425 1140/1535
Depth with door open in
mm
1340/1632 1420/1742 1422/1822 1555/1932
Weight in kg 320/395 341/407 475/548 508/589
Drum volume in l 100 130 160 200
Max. capacity in kg/lb
(dry laundry)
10 (22) 13 (29) 16 (35) 20 (44)
Voltage See data plate
Rated load See data plate
Fuse rating See data plate
Test certificates
awarded
See data plate
Max. load bearing
in operation in N
3931/4667 4290/4942 5675/6333 6203/6978
Product safety standard IEC 335-1, IEC 335-2-11
Emission sound
pressure level in
dB (A), EN ISO 11204
Sound power level in
dB (A), EN ISO 9614-2
<80
* EL = Electric heating
S = Steam heating
Technical data
38

39

Alteration
rights reserved/1016
M.-Nr.
09118330 / 03
,PSRUWHU
0LHOH/LPLWHG
3URIHVVLRQDO'LYLVLRQ
&OUR6ALLEY$RIVE
6AUGHAN/.,+6
0HONE
&AX
WWWMIELEPROFESSIONALCA
PROFESSIONAL MIELECA
0LHOH3URIHVVLRQDO7HFKQLFDO6HUYLFH
0HONE
&AX
SERVICEPROFESSIONAL MIELECA
*HUPDQ\
0DQXIDFWXUHU
-IELE#IE+'
#ARL-IELE3TRAE
'àTERSLOH
&DQDGD

Mode d'emploi
Lave-linge
PW 6107
PW 6137
PW 6167
PW 6207
Lisez impérativement ce mode d'emploi avant
d'installer et de mettre en service cet appareil.
Vous vous protégerez ainsi et éviterez de détériorer votre appareil.
M.-Nr. 09 118 330
fr-CA

2

Prescriptions de sécurité et mises en garde .....................................................4
Votre contribution à la protection de l'environnement .............................................7
Description ................................................................................8
Description de la machine ....................................................................9
Fonction des éléments du panneau de commandes .................................................9
Lavage ...................................................................................11
Mise en marche ............................................................................11
Préparation du linge .........................................................................11
Capacités des programmes standard .............................................................11
Adjonction de détergents .....................................................................12
Dosage de détergent ........................................................................13
Sélectionner le programme ...................................................................13
Fin du programme ..........................................................................15
Lavage avec la carte ........................................................................16
Mode charge de linge .......................................................................16
Fonctions additionnelles ....................................................................17
Sélection de la langue .......................................................................17
Départ différé ..............................................................................17
Arrêt de programme .........................................................................18
Annulation de programme ....................................................................19
Changer l'ordre.............................................................................19
Modules en option .........................................................................20
Dosage de produits liquides ..................................................................20
Circuit de délestage .........................................................................22
Module de communication ....................................................................22
Données exploitation ........................................................................22
Charge ...................................................................................24
Recherche des anomalies ...................................................................25
Le porte de chargement ne s'ouvre pas. .........................................................25
Panne de courant pendant le lavage, déverrouillage d'urgence de la porte. .............................25
Messages d'erreurs .........................................................................27
Nettoyage et entretien ......................................................................29
Installation et raccordement .................................................................31
Sécurités de transport .......................................................................32
Raccordements à prévoir par l'exploitant.........................................................33
Raccordements à l'eau sur la machine ..........................................................33
Raccordement de dosage sur le boîtier mélangeur du dosage liquide..................................34
Branchement électrique ......................................................................35
Raccorder les pompes doseuses...............................................................36
Raccordement de vapeur.....................................................................36
Caractéristiques techniques .................................................................37
Table des matières
3
Explication des consignes de sécurité et
d'avertissement sur la machine
Veuillez lire le mode d'emploi.
Veuillez lire les instructions comme la no
-
tice d'installation.
Attention, surfaces chaudes.
Attention, tension jusqu'à 1000 V.
Mise à la terre
Veuillez lire le mode d'emploi avant de faire fonc-
tionner votre lave-linge. Vous vous protégerez ain-
si et éviterez de détériorer votre lave-linge.
Conservez soigneusement ce mode d'emploi.
Le montage, réparation et entretien ne devraient
être effectuées que par un technicien apprové par
Miele.
Cette machine a été conçu en confirmité avec les
exigences de sécurité actuelles. Une machine mal
réparée peut presenter un risque importante pour
l'utilisateur et l'matériau.
Le personnel opérateur doit recevoir des forma
-
tions et être tennau courant des instructions.
Utilisation conforme du lave-linge
~
Ce lave-linge est destiné au traitement du linge ne
contenant pas de substances dangereuses ou in
-
flammables.
~
Ne lavez dans ce lave-linge que les textiles décla
-
rés lavables en machine par le fabricant sur l'éti
-
quette d'entretien ou qui peuvent être traités au net
-
toyage à l'eau.
~
N'utilisez pas ce lave-linge pour effectuer un net
-
toyage à sec ! La plupart des produits de nettoyage,
essence par ex., entraînent des risques d’in
-
cendie/d’explosion.
~
Ne pas stocker ni utiliser d'essence, de pétrole ou
autre produit inflammable à proximité du lave-linge.
Ne pas poser d'objets sur le couvercle du lave-linge.
Risque d'incendie et d'explosion !
~
Ne pas entreposer des produits chimiques sur le
couvercle du lave-linge (lessive liquide, adjuvants).
Ils peuvent décolorer ou abîmer la laque. Essuyer im
-
médiatement les produits chimiques répandus par in
-
davertance avec un tissu imbibé d'eau.
~
Si le lave-linge est installé dans le domaine profes
-
sionnel, seul le personnel formé ou le personnel spé
-
cialisé peut utiliser la machine.
Si le lave-linge est installé dans un endroit public,
l'exploitant doit garantir l'utilisation sans danger du
lave-linge.
~
Ce lave-linge ne convient pas à une utilisation en
extérieur.
Sécurité électrique et technique
~
La sécurité électrique de ce lave-linge n'est ga
-
rantie que s'il est raccordé à un système de mise à la
terre homologué. Il est très important que cette condi
-
tion de sécurité élémentaire soit remplie. En cas de
doute, faites vérifier l'installation par un professionnel.
Le fabricant ne peut être tenu pour responsable de dé
-
gâts causés par une mise à la terre manquante ou dé
-
fectueuse à l'installation.
~
Ne pas abîmer, enlever ou désactiver les systè
-
mes de sécurité et les éléments de commande de ce
lave-linge.
~
Un lave-linge présentant des dommages au ni-
veau des éléments de commande ou de l'isolation
des câbles ne doit pas être utilisé avant d'avoir été
réparé.
~
Le lave-linge ne peut être utilisé que lorsque tou-
tes les pièces d'habillage externes sont montées et
qu'il n'y a pas de risque de contact avec des pièces
conductrices, en mouvement ou chauffées.
~
Pour le raccordement fixe, un selectionneur doit
être présent près de l'appareil.
~
Le lave-linge n'est débranché du secteur que
lorsque l'interrupteur principal ou le fusible (à prévoir
par l'utilisateur) est arrêté.
~
Les réparations sur les lave-linge à chauffage
électrique ou vapeur doivent exclusivement être ef
-
fectuées par un technicien apprové par Miele. Con
-
tactez Service Miele. Les réparations incorrectes
peuvent entraîner de graves dangers pour l’utilisa
-
teur.
~
Ne jamais forcer pour ouvrir la porte du lave-linge.
Afin de garantir la sécurité de fonctionnement du ver
-
rou de porte, la poignée est dotée d'une sécurité
anti-forcement.
~
Remplacez les pièces défectueuses uniquement
par des pièces détachées d'origine Miele, que nous
garantissons répondre totalement aux exigences de
sécurité que nous imposons à nos machines.
Prescriptions de sécurité et mises en garde
4

~
L'utilisation des meilleurs matériaux et tout le soin
apporté à la fabrication ne protègent pas les tuyaux
d'arrivée des dommages liés au vieillissement. Fissu
-
res, coudes, hernies et autres anomalies peuvent
provoquer des fuites d'eau. Contrôler régulièrement
les tuyaux d'arrivée d'eau afin de les remplacer à
temps et d'éviter des dégâts liés à l'eau.
~
Ne jouez pas avec les commandes.
~
Dans certaines circonstances un système d'eau
chaude qui n'a pas dervi durant deux semaines ou
davantage peut produire de l'hydrogène.
L'HYDROGÈNE EST UN GAZ EXPOLIF. Si le système
d'eau chaude n'a pas servi durant une telle période,
ouvrez tous les robinets d'eau chaude et laissez l'eau
couler plusieurs minutes avant d'utiliser la machine.
Cette manoevre permettra de libèrer l'hydrogène qui
aura pu s'y accumuler. Comme le gaz est une subs
-
tance inflammable, abstenez-vous de fumer et n'utili
-
sez pas de flamme nue pendant ce processus.
Utilisation du lave-linge
~
Les personnes qui ne sont pas en mesure d'utili
-
ser ce lave-linge en toute sécurité en raison de défi
-
ciences physiques, sensorielles ou mentales ou de
leur manque d'expérience ou de connaissances ne
doivent pas l'utiliser sans la surveillance ou les ins
-
tructions d'une personne responsable.
~
Ne jamais permettre aux enfants de jouer sur ou à
proximité du lave-linge ou même d'utiliser eux-même
le lave-linge.
~
En cas de lavage à haute température, le hublot
est brûlant. Empêchez les enfants de toucher le hu
-
blot du lave-linge pendant le lavage.
~
Fermez la porte après chaque lavage. Vous évite
-
rez ainsi :
–
que les enfants grimpent dans le lave-linge ou y
cachent des objets.
–
de petits animaux s'introduisent dans le lave-linge.
~
S'assurer que le tambour est à l'arrêt avant de dé
-
charger le linge. Ne jamais mettre les mains dans un
tambour qui tourne encore, risque de blessure.
~
Il existe un risque de se coincer ou de se couper
les doigts au niveau des charnières de la porte de
chargement.
~
Le rayon d'ouverture complète de la porte ne doit
pas être bloqué par une porte ou tout autre obstacle.
~
L'eau utilisée pour le lavage contient de la lessive
et est non potable !
Evacuez le bain lessiviel dans le système de vidange
prévu à cet effet.
~
Le lave-linge ne peut fonctionner sans surveil
-
lance que si une vidange au sol est installée à proxi
-
mité.
~
Lorsque le lave-linge est hors tension et la porte
de chargement fermée, il faut d'abord mettre le
lave-linge en marche puis ouvrir la porte de charge
-
ment.
Si l'eau s'échappe de la cuve lorsque la porte est ou
-
verte : fermer la porte et enclencher le lave-linge.
~
L'exploitant est tenu de garantir les conditions de
désinfection nécessaires aux procédés thermiques et
chimico-thermiques par des contrôles dans l'utilisation
quotidienne. Il convient de contrôler la procédure régu
-
lièrement à l'aide d'indicateurs chimiques et de réaliser
des tests bactériologiques à l'aide de bio-indicateurs.
L'exploitant est tenu de garantir les conditions de désin
-
fection nécessaires au respect des paramètres de pro
-
cédé, de température et de concentration dans le cas
des programmes chimico-thermiques. Les programmes
de désinfection ne doivent pas être interrompus, sinon
le résultat de la désinfection pourrait être imparfait.
Prescriptions de sécurité et mises en garde
5

~
En cas d'utilisation d'adjuvants et de produits spé
-
ciaux, suivre les conseils d'utilisation du fabricant.
N'utiliser ces produits que dans le cadre prévu par le
fabricant pour éviter les détériorations de matériaux
et les réactions chimiques violentes (gaz explosif...).
Demander confirmation au fabricant du détergent
que ce produit peut être utilisé en lave-linge.
~
Les teintures et décolorants ainsi que le produit
détartrant doivent convenir à l'utilisation en lave-linge.
Veuillez suivre les instructions d'utilisation du fabri
-
cant.
~
Vérifiez le résultat de lavage du linge souillé d'hui
-
les ou de graisses biologiques. Le linge insuffisam
-
ment lavé peut s'enflammer au séchage en machine.
Pour ce type de linge, utilisez des détergents ou des
programmes spéciaux.
~
Ne pas utiliser de nettoyeur sous pression ni de jet
pour nettoyer le lave-linge.
Autres conseils
~
Les produits de désinfection et de nettoyage
contiennent souvent du chlore. Si de tels produits sè
-
chent sur des surfaces en acier inoxydable, le chlore
peut attaquer l'acier inoxydable et provoquer la for-
mation de rouille. Pour protéger votre appareil contre
la corrosion, utilisez des produits non chlorés pour le
lavage/la désinfection ainsi que pour le nettoyage
des surfaces en acier inox.
Demander confirmation au fabricant du détergent
que ce produit peut être utilisé en lave-linge. Si un
produit contenant du chlore est accidentellement ré-
pandu sur la surface en inox, rincer immédiatement
avec de l’eau puis sécher avec un tissu.
~
La recommandation de certains produits lessiviels
chimiques n'engage pas la responsabillité du fabri
-
cant du lave-linge quant aux impacts de ces produits
sur le linge et le lave-linge.
Veuillez noter que des modifications de produit non
signalées par le fabricant de ces produits peuvent al
-
térer les résultats de lavage.
~
Garder la zone autour de la machine propre et
exempte de debris.
~
Avant de retirer l'appareil pour le faire reparer ou
le mettre au rebut, enlevez la porte.
~
L'interieur de la machine doit être nettoyé réguliè
-
rement.
Utilisation d'accessoires
~
Les accessoires ne doivent être montés que s'ils
sont agréés expressément par Miele. Le montage
d'autres pièces exclut le bénéfice de la garantie.
Dommages liés à l'utilisation de chlore
Conseils relatifs au traitement du linge avec des
produits de blanchiment au chlore et du perchlo
-
réthylène
~
Plus le chlore est utilisé dans ce lave-linge, plus
les risques de dommages augmentent.
L'utilisation de produits contenant du chlore, par
exemple de l'hypochlorite de sodium, de l'eau de ja
-
vel, des produits de blanchiment en poudre peut en
fonction de leur concentration en chlore détruire la
couche protectrice de l'acier inoxydable et provoquer
la corrosion des éléments. Pour cette raison, il faut
éviter d'utiliser ce type de produits et utiliser tant que
possible des produits de blanchiment à base d'oxy
-
gène.
Si cependant il fallait impérativement utiliser des pro
-
duits de blanchiment contenant du chlore pour un
certain type de taches, il faut impérativement effec
-
tuer un traitement antichlore ensuite. Sinon les élé
-
ments du lave-linge et le linge pourraient être abîmés
irrémédiablement.
Traitement antichlore
Le traitement antichlore doit être effectué juste après
le lavage avec chlore. Le mieux est d’utiliser du pe-
roxyde d’hydrogène ou une lessive ou un produit de
blanchiment à base d’oxygène, sans vidanger le bain
lessiviel.
Avec le thiosulfate, en particulier si l'eau est dure, il
peut se former une sorte de plâtre qui s’incruste sur
le linge ou laisse des dépôts dans le lave-linge. Le
traitement au peroxyde d'hydrogène participant au
processus de neutralisation du chlore, il vaut mieux
utiliser cette méthode.
La quantité de produits à utiliser ainsi que les tempé
-
ratures doivent être déterminés et vérifiés sur place,
en fonction des recommandations du dosage des fa
-
bricants de lessive et de produit additif. Il faut égale
-
ment vérifier qu'il n'y a pas de reste de chlore actif
dans le linge.
Elimination de l'ancien appareil
~
En cas de mise au rebut de l'ancienne machine à
laver, détruire la serrure. Vous éviterez que des en
-
fants ne s'y enferment en jouant et ne soient en dan
-
ger de mort.
Si d'autres personnes sont formées à la manipula
-
tion du lave-linge, il est impératif de mettre à leur
disposition les prescriptions de sécurité ou de leur
expliquer.
Conservez ce mode d'emploi.
Prescriptions de sécurité et mises en garde
6
Enlèvement de l'emballage
L'emballage protège votre machine des avaries de
transport. Les matériaux utilisés sont choisis en fonc
-
tion de critères écologiques de façon à en faciliter le
recyclage.
Le recyclage de l'emballage économise les matières
premières et réduit le volume des déchets à éliminer.
En principe, votre revendeur reprend l'emballage.
,
Tenez les matériaux d'emballage tels que films
et sacs en plastique hors de portée des enfants.
Risque de suffocation.
Enlèvement de l'ancien appareil
Les appareils électriques et électroniques contien
-
nent souvent encore des matériaux recyclables. Ils
contiennent également des matériaux nocifs, néces
-
saires au bon fonctionnement et à la sécurité de l'ap
-
pareil. Ces matériaux peuvent être dangereux pour
les hommes et l'environnement s'ils restent dans la
collecte de déchets ou s'ils sont mal manipulés. Ne
jetez par conséquent en aucun cas votre appareil
avec les déchets.
Veuillez faire en sorte que votre ancien appareil soit
évacué conformément aux réglements locaux sur les
déchets.
Renseignez-vous auprès de votre revendeur.
Gardez l'ancien appareil hors de portée des enfants
jusqu'à son enlèvement, pour éviter tout accident.
Conseils pour l'économie d'énergie
Utilisez tant que possible la capacité de charge maxi
-
male du programme de lavage. La consommation
d'énergie rapportée à la quantité de linge sera ainsi
optimisée. Il n'est pas rentable de trop peu charger la
machine. En revanche, une surcharge altère le résul
-
tat de lavage.
Essorez le linge en lave-linge avec la vitesse d'esso
-
rage maximale. Vous économiserez ainsi du temps et
de l'électricité au séchage.
Si le linge est rincé à l'eau chaude lors du dernier rin
-
çage en machine, l'humidité résiduelle réduite et la
chaleur résiduelle du linge permettent un temps de
traitement plus court au sèche-linge ou dans la re
-
passeuse et donc une économie d'énergie.
Veuillez donc tenir compte des indications du fabri
-
cant de lessive lors du dosage de détergent.
Le dosage dépend de la quantité de linge, de la du
-
reté d'eau et du degré de salissure du linge. Bien
choisir le programme (penser aussi au Prélavage, à
la fonction Intensif) et la température.
Votre contribution à la protection de l'environnement
7
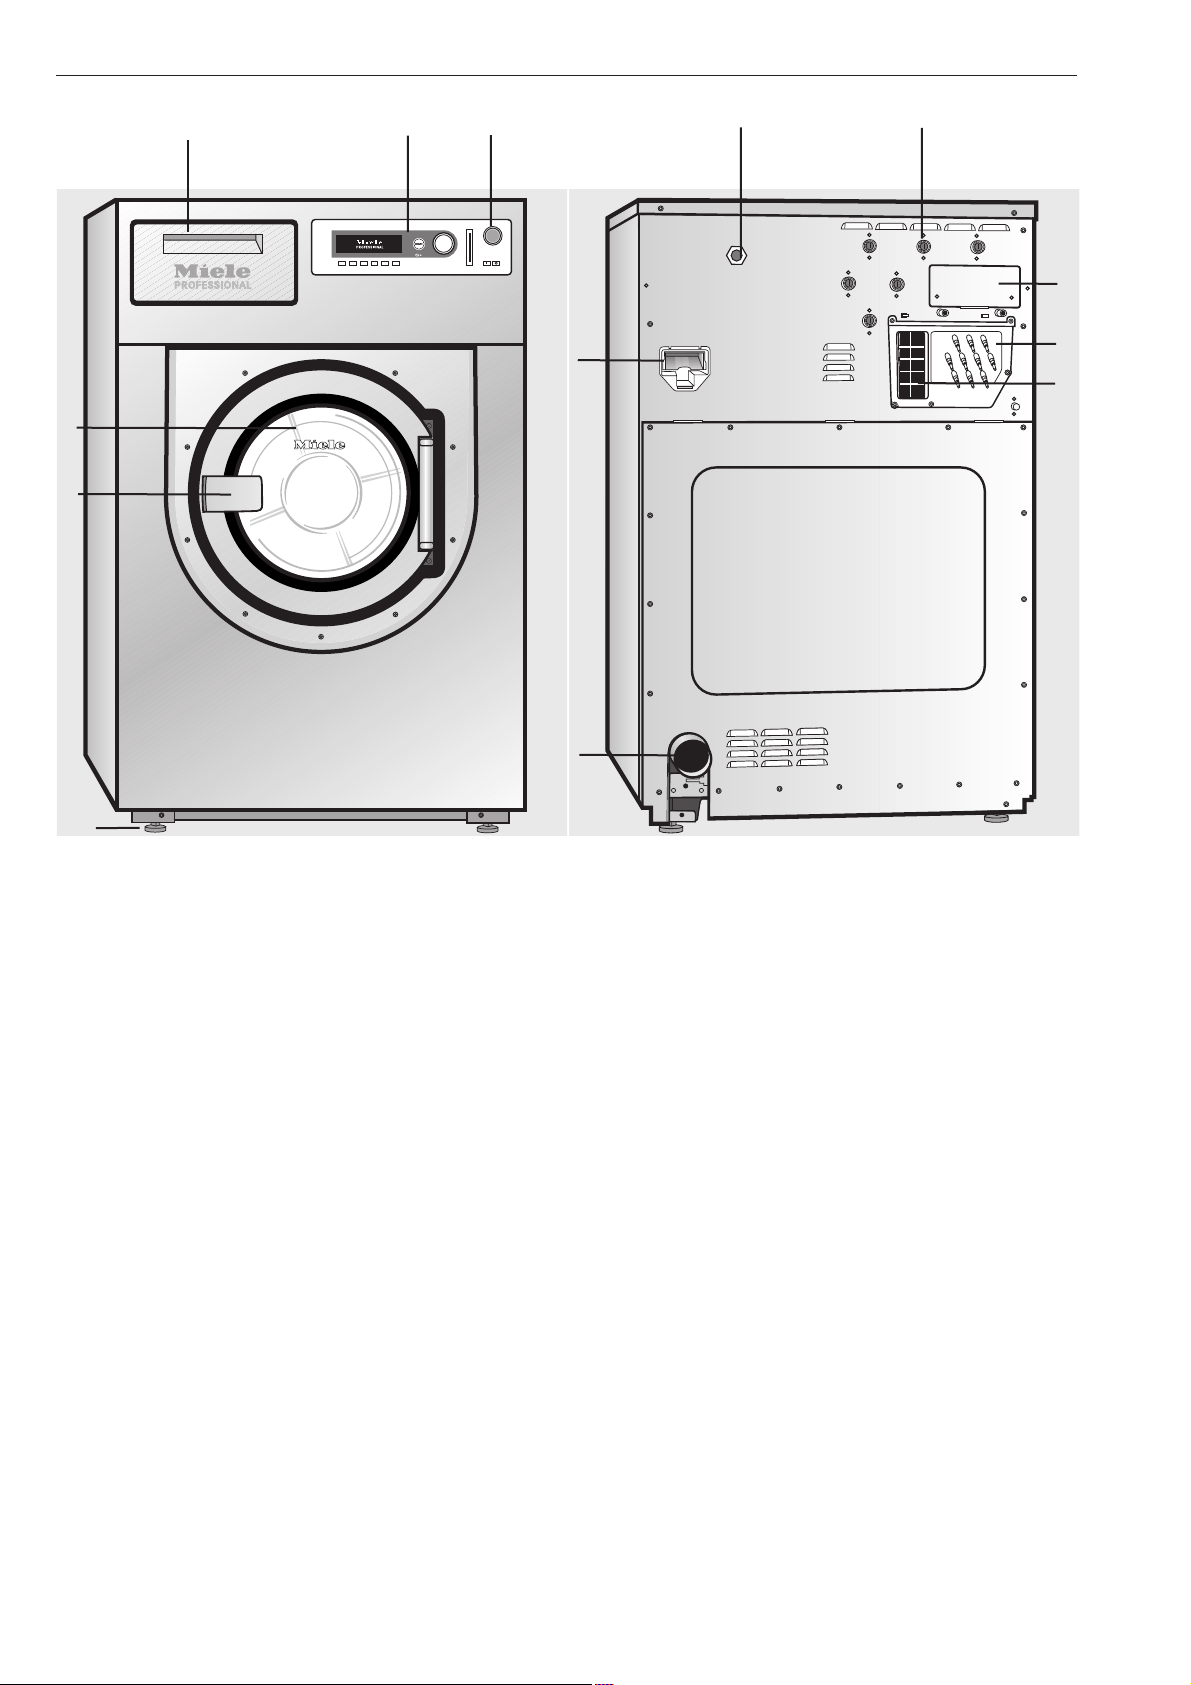
a Interrupteur d'arrêt d'urgence
Pour arrêter la machine, presser le bouton rouge.
b Panneau de commandes
c Boîte à produits
Pour ouvrir la boîte, tirer sur la poignée.
d Porte
Pour ouvrir la porte, tirer sur la poignée. Ne jamais
forcer pour ouvrir la porte !
e Poignée
Afin de garantir la sécurité de fonctionnement du ver
-
rou de porte, la poignée est dotée d'une sécurité
anti-forcement (voir Dépannage).
f 4 pieds à vis réglables
g Branchement électrique
h Raccordements en eau
i Raccordements pour recyclage de l'eau
j Boîtier de communication
k Vidange
l Raccordements de dosage liquide
m Evacuation des buées
Voir chapitre "Installation et raccordement".
Description
8
c
d
e
b
a
f
i
m
h
l
j
g
k
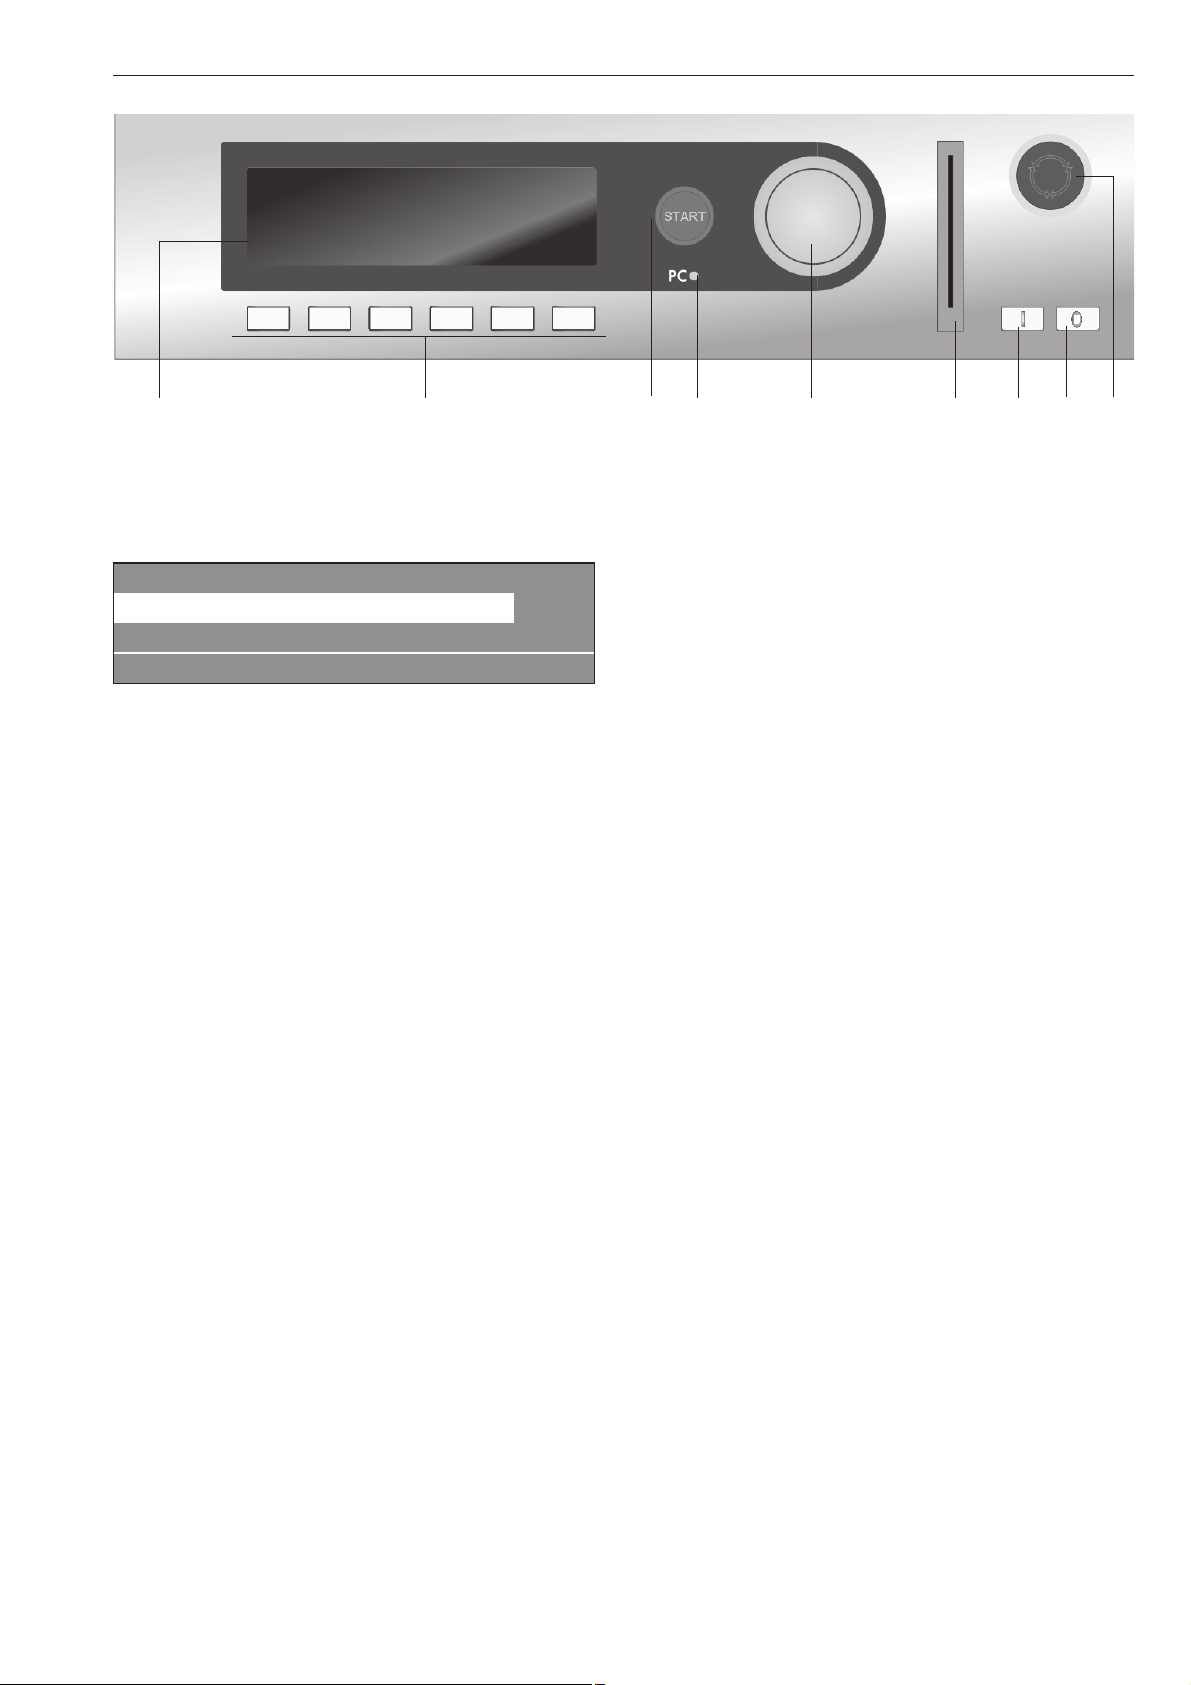
Fonction des éléments du panneau de
commandes
a Afficheur
1 Blanc 90 °C
2 Couleurs 60 °C
3 Couleurs intensif 60 °C
i FC A
Une fois la machine enclenchée, un message de
bienvenue apparaît brièvement, puis la liste des pro-
grammes. Le programme utilisé en dernier est repré-
senté en surbrillance.
b Touches de fonction
Les six touches situées sous l'écran sont des touches
de fonction. Suivant le mode dans lequel se trouve la
machine, certaines fonctions sont affectées à ces
touches.
Elle sont affichées au-dessus des touches et sont re-
présentées en surbrillance après actionnement de la
touche correspondante.
En cas de changement de programmation sous
"Affectation des touches - direct", les 6 premiers pro
-
grammes de la liste des programmes peuvent être
sélectionnés directement par les touches1à6.
c Touche Départ
L'anneau lumineux clignote lorsqu'un programme sé
-
lectionné peut être lancé. Pour démarrer le program
-
me, appuyer sur cette touche. Une fois le programme
démarré, cette touche permet de réafficher l'écran
précédant le démarrage du programme.
d Diode PC
La diode permet de transférer des données de la
commande vers un PC et inversement.
Le raccordement s'effectue par l'interface optique sur
le panneau de commandes.
e Bouton tourne-valide
L'extérieur du bouton se tourne et permet de sélec
-
tionner les champs de l'écran et les champs de
saisie.
L'intérieur du bouton sert à valider la sélection ou la
saisie.
f Lecteur de carte à puce
Permet d'insérer une carte et d'exécuter les program
-
mes qui sont enregistrés dessus.
Insérer la carte dans le sens de la flèche.
g Interrupteur Marche
Pour mettre la machine sous tension
h Interrupteur Arrêt
Pour mettre la machine hors tension
i Bouton d'arrêt d'urgence
Utilisation en cas de danger uniquement.
Pour arrêter la machine, presser le bouton rouge.
Une fois le danger écarté, déverrouiller le bouton en
le tournant vers la droite.
Afin de pouvoir poursuivre le programme, presser la
touche "Départ".
Description de la machine
9
a b c d e f g h i
Touches de fonction
Pour activer une fonction, appuyer sur la touche cor
-
respondante. Pour la désactiver, rappuyer une fois.
f Interruption/Arrêt
Après le lancement du programme, la touche de
droite sert de touche d'arrêt du programme.
Lorsque cette touche est actionnée, le programme
sélectionné est interrompu ou si le programme était
interrompu, il est arrêté.
+i Bloc plus
Le bloc de programme correspondant est ajouté au
programme (par. ex. prélavage).
m Arrêt amidonnage
Si le linge doit être amidonné, presser cette touche.
k Arrêt sans essorage
Si l'essorage ne doit pas être effectué après le rin
-
çage, actionner la touche.
FC Réglages
L'actionnement de la touche permet de basculer sur
une autre langue provisoirement.
m Départ différé
Si cette touche est actionnée avant le démarrage du
programme, il existe la possibilité de modifier l'heure
de départ.
K Information
Pour afficher les informations sur le programme.
q Vidange
i Commande manuelle
Voir notice de programmation
ü Modifier ordre
Le déroulement du programme en cours peut être
modifié ou certains blocs de programme répétés.
A Retour
Retour à la page précédente.
e/- Signale qu'une ligne suit / précède
S Enregistrer
Voir notice de programmation
$ Programme verrouillé
Si un programme verrouillé a été lancé, il ne peut
plus être interrompu ou arrêté après 1 minute de dé
-
roulement.
) Programme déverrouillé
ß Dosage
ä Désactivation dosage
\ Données exploitation
Réglage ->I<-0 (tarage)
Si l'affichage de charge n'est pas sur "00,0" alors que
le tambour est vide, appuyer sur la touche.
Transfert données
La carte exploitant
Cette carte ne comporte pas de programme pour le
moment.
Pour en savoir davantage sur le transfert de données
de la commande vers la carte et inversement, voir la
notice de montage.
La carte peut accueillir un maximum de 30 program
-
mes répartis en six blocs.
Il est possible d'écrire une référence au dos de la
carte.
Description de la machine
10
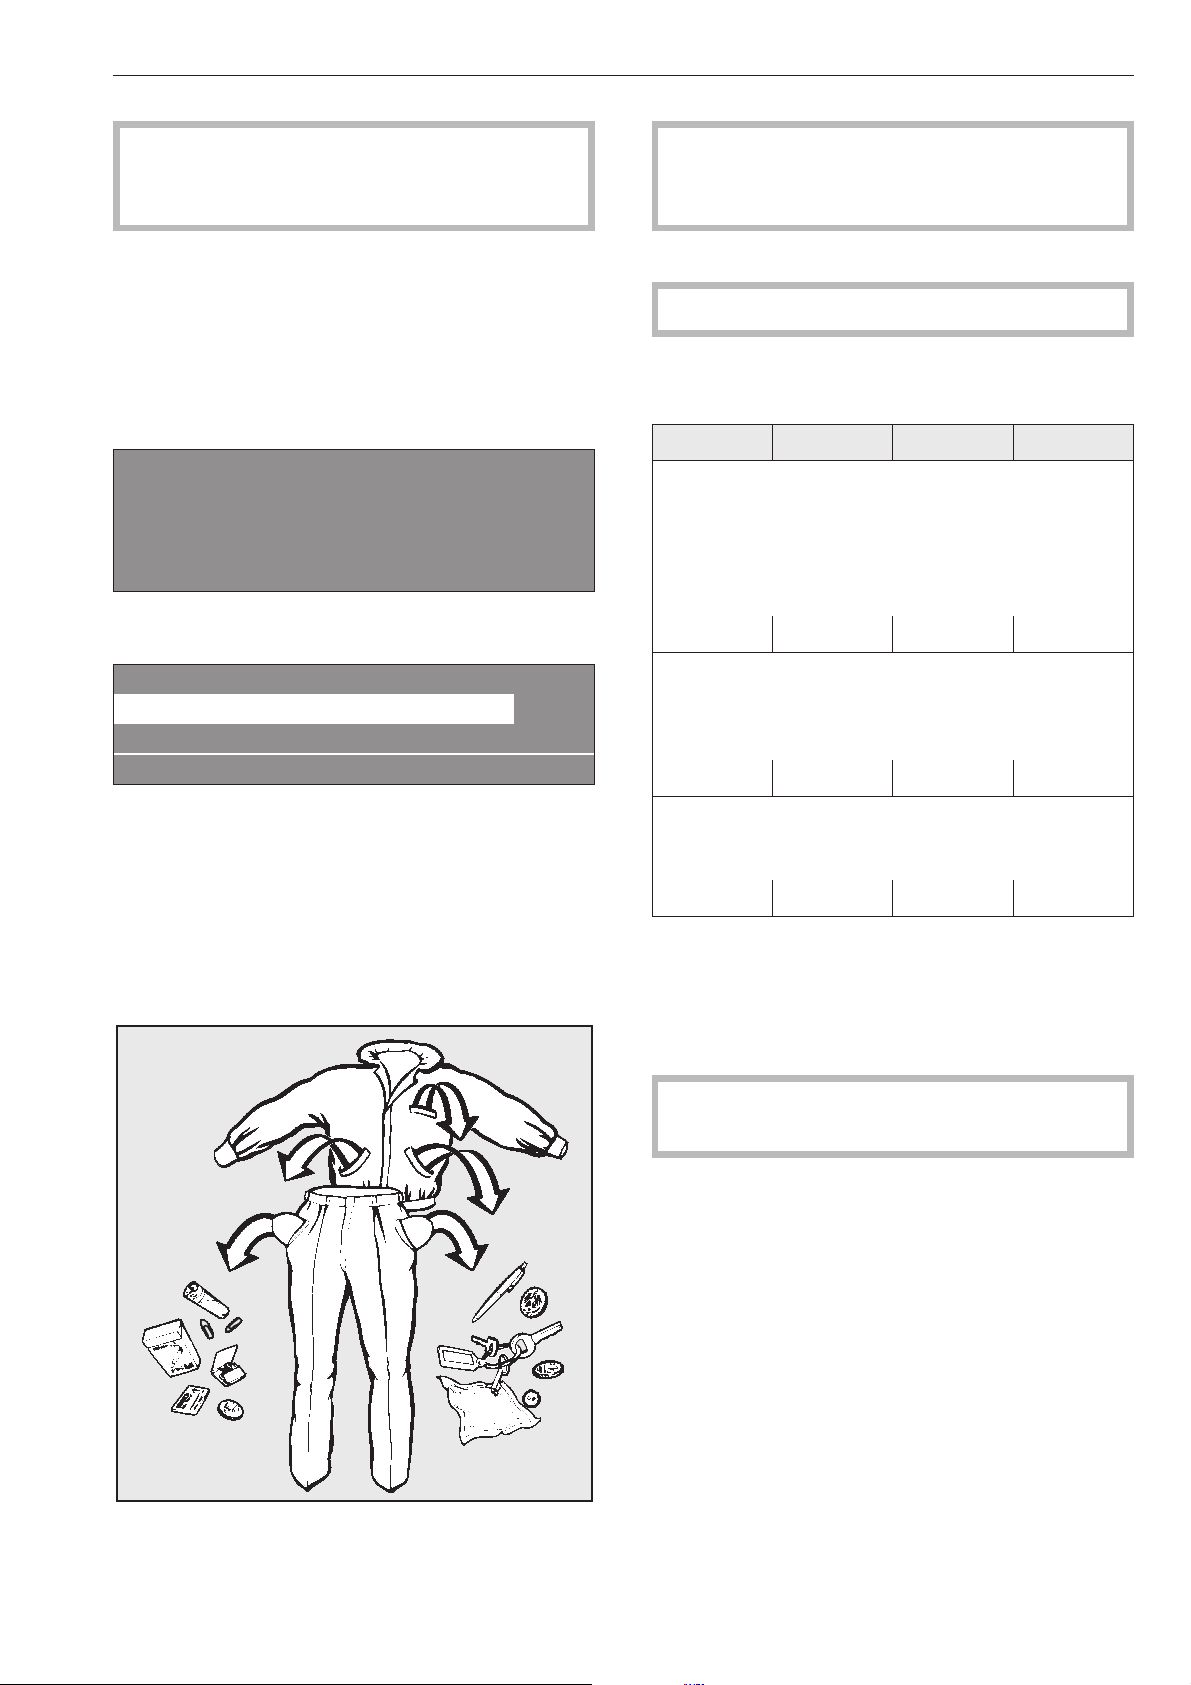
La première installation de la machine à laver ne
doit être effectuée que par le Service Miele ou un
revendeur agréé par Miele.
Mise en marche
^
Ouvrir les vannes d'eau et le cas échéant de va
-
peur de l'installation domestique.
^
Enclencher l'interrupteur principal (côté installa
-
tion).
^
Enclencher la machine avec la touche I "Marche".
M
PROFESSIONNEL
PW 6xx7
Bienvenue
Le message de bienvenue est affiché.
1 Blanc 90 °C
2 Couleurs 60 °C
3 Couleurs intensif 60 °C
i äFC A
puis la liste des programmes (le programme lancé en
dernier est représenté en surbrillance).
Un programme peut être sélectionné en tournant le
bouton tourne-valide puis lancé immédiatement avec
la touche "Départ".
Préparation du linge
^
Vider les poches.
Les corps étrangers (pièces de monnaie, vis,
clous, trombones, etc.,) peuvent endommager le
linge et certaines pièces de l'appareil.
^
Trier le linge
Suivez des informations sur l'etiquette d'entretien.
Capacités des programmes standard
(Linge sec)
PW 6107 PW 6137 PW 6167 PW 6207
1 Blanc 90°C
2 Couleurs 60°C
3 Couleurs 60°C intensif
4 Couleurs 30°C
5 Couleurs 30°C intensif
6 Couleurs Eco court
max. 10 kg max. 13 kg max. 16 kg max. 20 kg
7 Non repassable 60°C
8 Non repassable 60°C intensif
9 Non repassable 30°C
10 Non repassable 30°C intensif
max. 5 kg max. 6,6 kg max. 8 kg max. 10 kg
11 Fin
12 Laine 30°C
13 Laine lavable main 30°C
max. 4 kg max. 5,2 kg max. 6,4 kg max. 8 kg
Les capacités des autres programmes sont indi-
quées dans l'aperçu correspondant.
^
Charger le linge.
^
Fermer la porte avec la poignée, ne pas la claquer.
Vérifier qu'aucune pièce de linge n'est coincée
entre la porte et l'orifice de chargement.
Lavage
11
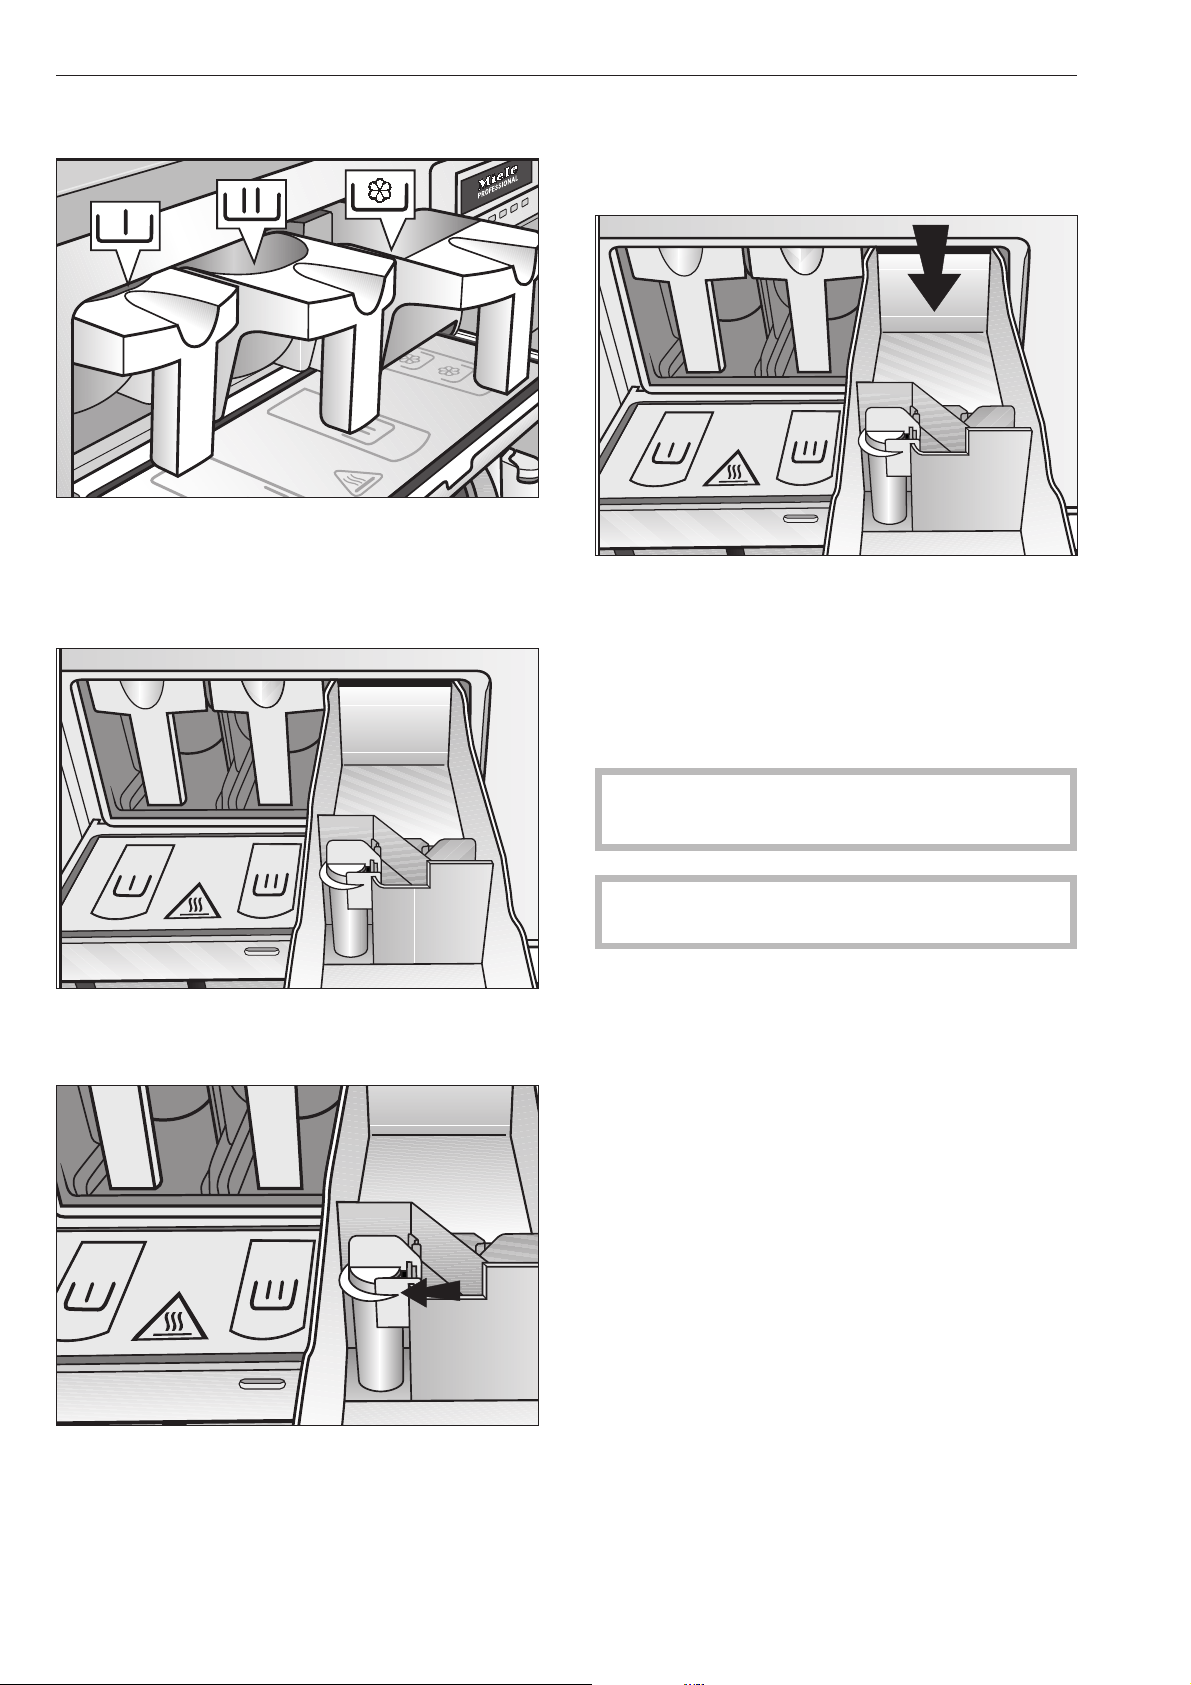
Adjonction de détergents
^
Programmes standard : verser la lessive pour le la
-
vage dans le compartiment j et éventuellement
la lessive de prélavage dans le compartiment i,
ainsi que l'assouplissant dans le compartiment
avant p.
^
Verser les autres adjuvants liquides dans le com
-
partiment arrière p si l'option correspondante est
programmée.
^
Les compartiments p ne doivent pas être remplis
au-delà du repère sans quoi le produit est tout de
suite aspiré par le siphon d'aspiration vers la cuve.
Eau de javel
Ne blanchissez que les textiles marqués d'un sym
-
bole d'entretien x.
L'adjonction d'eau de javel doit être programmée
dans le compartiment réservé à cet effet. Il est ainsi
certain que le produit sera entraîné au bon moment,
pendant le deuxième rinçage. L'adjonction d'eau de
Javel avec des couleurs est sans risque uniquement
si le fabricant indique que les textiles couleurs sont
garantis grand teint sur l'étiquette d'entretien et s'il
autorise expressément le blanchiment.
Un troisième rinçage doit être programmée pour le
blanchiment (voir notice de montage Profitronic).
,
Plus le chlore est utilisé, plus les composants
risquent d'être abîmés.
Les teintures et décolorants ainsi que les détar
-
trants doivent convenir à l'utilisation en machine à la
-
ver. Veuillez suivre les instructions d'utilisation du fa
-
bricant.
Lavage
12
Dosage de détergent
Il faut éviter le surdosage, qui provoque une forma
-
tion de mousse excessive.
–
Ne pas utiliser de détergent très moussant.
–
Tenir compte des indications du fabricant de les
-
sive.
Le dosage dépend :
–
de la quantité de linge
–
de la dureté de l'eau
–
du degré de salissure du linge
Quantité de dosage
Tenir compte de la dureté d'eau et des recommanda
-
tions du lessivier.
Duretés d'eau
Zone de
dureté
Propriété
de l'eau
Dureté
totale en
mmol/l
Dureté
allemande °d
I douce 0 - 1,3 0 - 7
II moyenne 1,3 - 2,5 7 - 14
III dure 2,5 - 3,8 14 - 21
IV très dure plus de 3,8 plus de 21
Interrogez la Compagnie Distributrice d'eau si vous
ne connaissez pas la zone de dureté de l'eau cou-
rante à votre lieu d'habitation.
Sélectionner le programme
^
Sélectionner un programme en tournant le bouton
tourne-valide ( par ex. programme 1 Blanc).
L'écran suivant apparaît :
16 Vidange supplémentaire
1 Blanc 90 °C
2 Couleurs 60 °C
i äFC A
Sélectionner les fonctions supplémentaires Préla
-
vage, Amidonnage ou Arrêt essorage.
^
Valider le programme choisi en pressant le bouton
à l'intérieur du bouton tourne-valide.
L'écran suivant apparaît :
1 Blanc 10,0 / 10,0 kg
90 °C Lavage
Rinçage 1100 tr/min
+im k m A
^
Sélectionner également le bloc de programme Pré
-
lavage si nécessaire en actionnant la touche de
fonction +i "Bloc plus".
Lorsque la touche de fonction +i "Bloc plus" est ac
-
tionnée, l'écran suivant apparaît :
1 Blanc 10,0 / 10,0 kg
40 °C Prélavage
90 °C Lavage 1100 tr/min
+i mk m A
Le champ "+i" est sélectionné.
Pour désactiver la fonction, rappuyer sur la touche.
Si le ligne doit être amidonné, presser la touche m
Arrêt amidonnage.
Si l'essorage ne doit pas être effectué après le rin-
çage, actionner la touche k Arrêt essorage.
Si aucune autre modification ne doit être effectuée :
^
Presser la touche "Départ",
le programme de lavage se déroule.
Lavage
13

Si des modifications doivent être effectuées avant
le démarrage du programme comme par exemple
le poids, la température ou la vitesse d'essorage :
Poids
Avant le démarrage du programme, la quantité de
linge peut être saisie manuellement.
1 Blanc 10,0 10,0 kg
40 °C Prélavage
90 °C Lavage e
+im k m A
^
Se déplacer sur le champ de saisie "Poids" en tour
-
nant le bouton tourne-valide, valider en pressant le
bouton. Tourner le bouton tourne-valide pour sélec
-
tionner le poids, puis le presser pour valider.
Température
Elle peut être réglée par pas de 1 °C de froid, 15 jus
-
qu'à maxi 95 °C .
^
Sélectionner le champ "Température" en tournant le
bouton tourne-valide (40 °C pour le prélavage) et
valider en appuyant.
1 Blanc 10,0 / 10,0 kg
40 °C Prélavage
90 °C Lavage e
+im k m A
^ Tourner le bouton tourne-valide pour sélectionner
la température désirée, puis le presser pour vali-
der.
Vitesse d'essorage
Modification par pas de 25 tr/min de 300 à maximum.
^
Sélectionner le champ "Vitesse de rotation" en tour
-
nant le bouton tourne-valide (1100 tr/min pour l'es
-
sorage final) et valider en appuyant.
1 Blanc 10,0 / 10,0 kg
90 °C Lavage
Rinçage 1100 tr/min
+im k m A
^
Tourner le bouton tourne-valide pour sélectionner
"Vitesse de rotation", puis le presser pour valider.
Vitesses d'essorage maximales
PW 6107 PW 6137 PW 6167 PW 6207
1200 tr/min 1100 tr/min 1150 tr/min 1100 tr/min
^
Presser la touche "Départ",
le programme de lavage se déroule.
Le déroulement du programme est affiché après le
démarrage du programme.
1 Blanc
40 °C Prélavage 20 °C
Lavage Fin à 12:35
+im k mKf
La température du bain lessiviel apparaît également
dans la deuxième ligne de l'affichage, ici le préla
-
vage.
1 Blanc
90 °C Lavage 60 °C
Rinçage 1 froid Fin à 12:35
+im k mKf
Lorsque le bloc de programme Prélavage est termi
-
né, le bloc de programme lavage est affiché à la
deuxième ligne avec la température actuelle du bain
lessiviel. Le bloc de programme suivant est indiqué
en-dessous, ici Rinçage 1.
L'heure de fin de programme est affichée en bas à
droite.
1 Blanc
90 °C Lavage 60 °C
Rinçage 1 froid Fin à 12:35
+im k m K f
Appuyer sur la touche K "Information" pour afficher
d'autres informations sur le programme, comme par
ex. :
1 Blanc
Départ différé : 10.7.2010
Heure départ : 9:47 e
A
Temps après départ : 0h 23 min
Temps restant : 0h 11min
Temps après départ : 0h 23 min e
Temps restant : 0h 11min
Répétition : non
Domaine 3 : Rinçage e
Lavage
14

Bloc 2 : Rinçage 2
Pas de bloc : Temps lavage 1
Niveau réel : 22 mm e
Niveau consigne : 60 mm
Température réelle : 35 °C
Température de consigne : 60 °C e
1 Blanc
Vitesse rotation : 40 tr/min
Rythme : 12 / 3 -
A
^
Pour retourner au déroulement du programme ac
-
tionner la touche A "Retour"
Fin du programme
A la fin du programme, lorsque le tambour est arrêté
et qu'il n'y a plus d'eau dans la machine, le message
suivant apparaît :
1 Blanc
Fin de programme
La porte peut être ouverte.
m FC A
Simultanément un signal sonore est déclenché pen-
dant 5 secondes pour signaler la fin du programme.
^ Pour ouvrir la porte, tirer sur la poignée.
Remarque : si la porte ne s'ouvre pas, la presser et
tenter de nouveau de tirer sur la poignée. Ne jamais
forcer pour ouvrir la porte ! -
^
Enlever la charge de linge.
Si le programme est arrêté alors qu'il reste
de l'eau dans la machine ou pendant
l'essorage, le message suivant est affiché :
1 Blanc
Fin du programme avec eau dans machine
qmFC A
ou
1 Blanc
Fin du programme avec rotation tambour
m FC A
,
La porte est verrouillée. N'essayez pas de for
-
cer pour ouvrir la porte.
^
Presser la touche de fonction q "Vidange" ou sé
-
lectionner le programme Essorage supplémentaire
et actionner la touche "Départ".
Ouvrir la porte après la fin du programme.
Si aucun autre programme de lavage n'est prévu :
^ Arrêter la machine avec la touche 0 "Arrêt.
Arrêter l'interrupteur principal (côté installation).
^ Fermer les vannes d'eau ou de vapeur côté instal-
lation.
Lavage
15
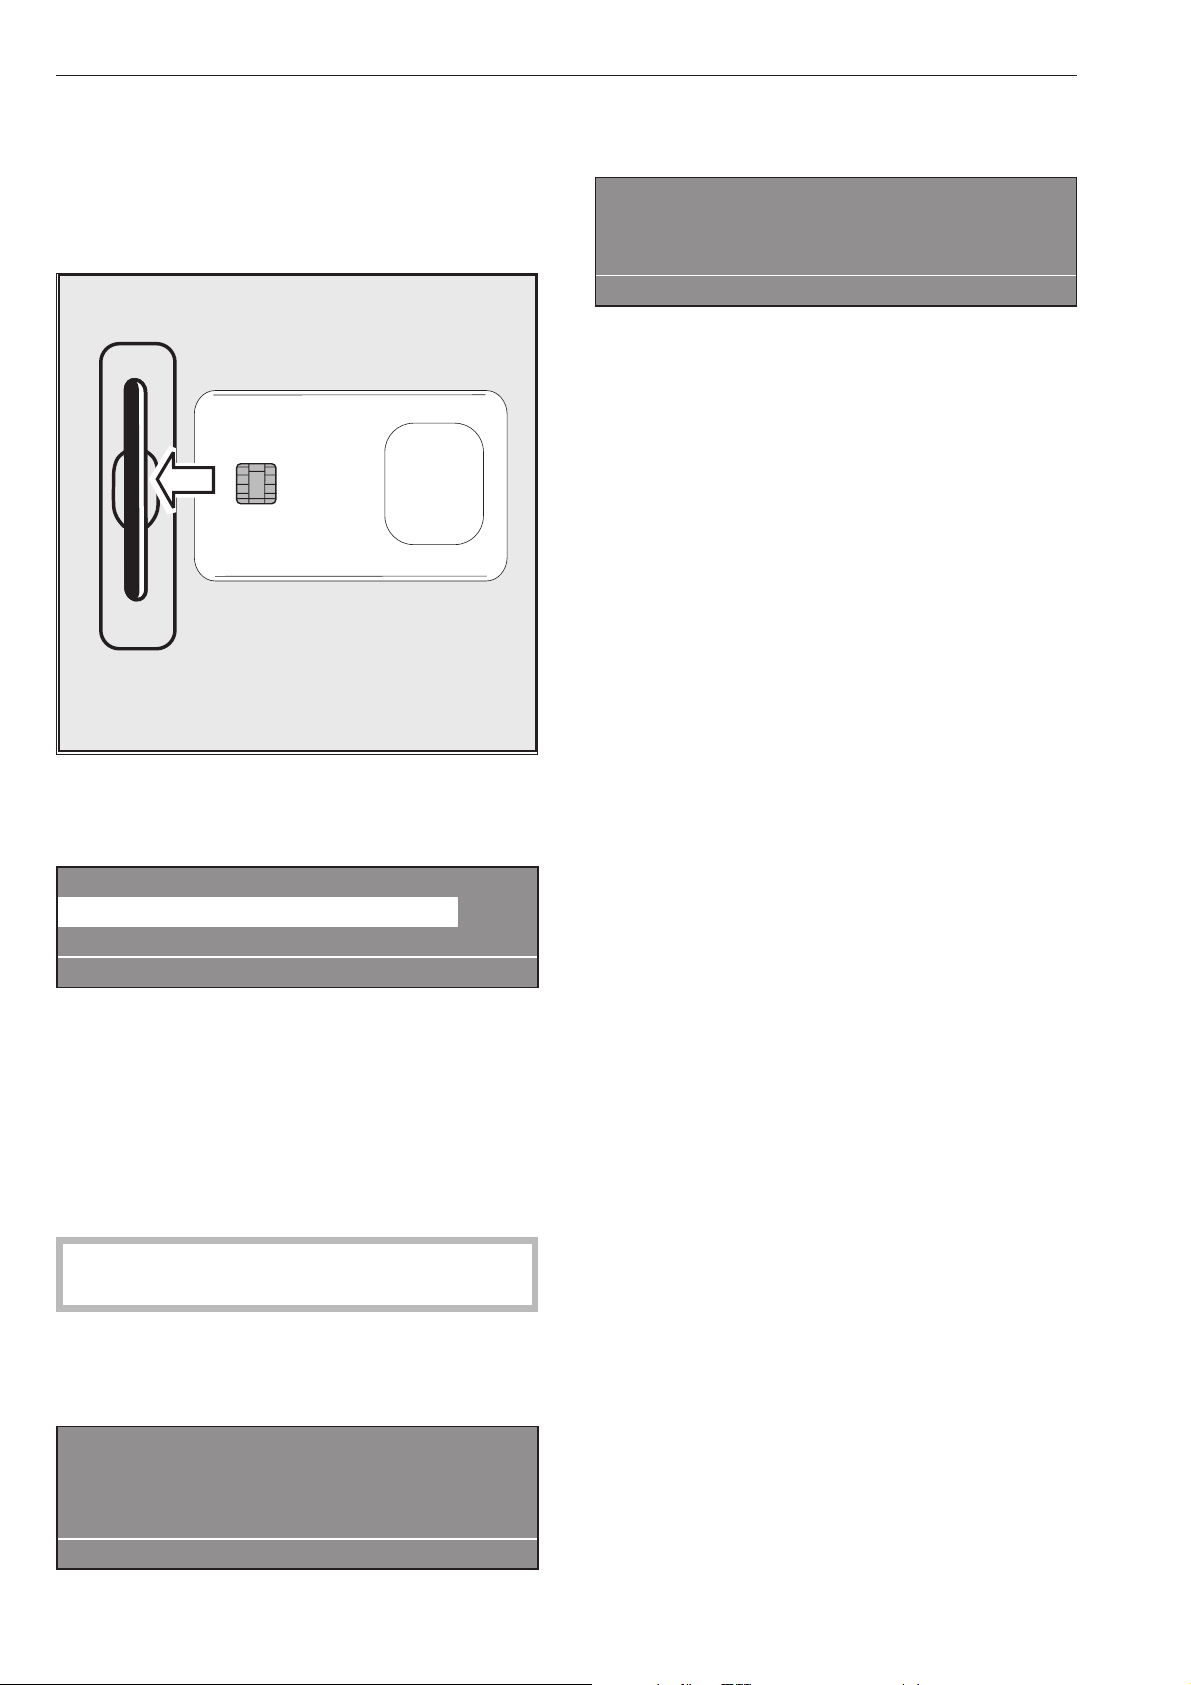
Les cartes sur lesquelles un programme est chargé
conviennent à un seul type de machine. Les cartes
vierges peuvent être utilisées sur toutes.
^
Enclencher la machine avec la touche I "Marche".
Le message de bienvenue apparaît.
^ Insérer la carte.
Les programmes enregistrés sur la carte sont affi-
chés.
Fonctionnement avec carte
17 Masques 45 °C
18 Non repassable 60 °C
i ßFC A
^
Pour mettre un programme en surbrillance, tourner
le bouton tourne-valide. Presser le bouton
tourne-valide pour sélectionner le programme.
^
Presser la touche "Départ", le programme se dé
-
roule.
Après actionnement de la touche "Départ" la carte
peut être retirée du lecteur. A la fin du programme,
celui-ci est effacé.
,
N'insérez pas d'autre objet que la carte dans
la fente.
Si la carte est introduite à l'envers, le message sui
-
vant apparaît :
§
Défaut carte
Carte mal insérée dans lecteur.
A
^
Introduire la carte correctement dans le lecteur.
Si la carte ne convient pas à ce type de machine, le
message suivant apparaît :
Contenu carte
Les programmes présents sur la carte
conviennent uniquement au type PW 6161
A
^
Insérer la carte appropriée à la machine.
Mode charge de linge
Une charge de linge qui nécessite un procédé spé
-
cial est accompagnée d'une carte sur laquelle un
programme est enregistré.
En mode exploitant, cette fonction peut être activée
sous l'option "Charge de linge".
La carte n'accepte alors que les cartes pour charges
de linge (avec un programme). L'accès aux pro
-
grammes de la mémoire Profitronic n'est plus effec
-
tué.
Lavage avec la carte
16

Sélection de la langue
La langue peut être modifiée provisoirement avant le
démarrage du programme avec le symbole du dra
-
peau.
Cette modification de la langue est annulée 5 minutes
après la fin du programme si la porte est ouverte.
1 Blanc 90 °C
2 Couleurs 60 °C
3 Couleurs intensif
i FC A
Si la touche de fonction FC est pressée, le contenu
suivant apparaît :
Réglages retour <-
Menu principal Langue
Mode exploitant
FC A
^
Valider "Langue" en pressant le bouton '"tourne-va
-
lide"
Réglages español
Langue F français
italiano
FC A
^ Sélectionner la langue souhaitée en tournant le
bouton tourne-valide et valider en pressant l'inté-
rieur du bouton.
Départ différé
Si le programme doit être utilisé ultérieurement, il est
possible de différer le départ avec la touche de fonc
-
tion m "Départ différé ".
Régler le départ différé
L'affichage suivant apparaît après la sélection du
programme :
1 Blanc 10,0 / 16,0 kg
90 °C Lavage
Rinçage 1000 tr/min
+im k m A
^
Actionner la touche de fonction m "Départ différé"
L'écran suivant apparaît :
1 Blanc 10,0/16,0 kg
Heure départ: 16 : 10 Date départ: 2.4.2010
Actionnez la touche Départ après la sélection.
A
L'heure et la date affichées sont toujours actuelles. Le
champ de saisie des heures est en surbrillance.
^
Plus le chlore est utilisé, plus les composants ris
-
quent d'être abîmés.
^
Presser le bouton pour mettre les minutes en sur
-
brillance. Tourner ensuite pour régler les minutes,
puis valider en appuyant sur le bouton tourne-va
-
lide.
^
Tourner le bouton pour mettre en surbrillance et va
-
lider le champ de saisie de la date de départ.
Modifier le jour en tournant puis valider en pres
-
sant.
^
Modifier également le mois et l'année le cas
échéant.
Après réglage du départ différé
^
Activer Touche "Départ", le programme choisi est
lancé.
L'affichage suivant apparaît :
1 Blanc 10,0 / 16,0 kg
90 °C Lavage
16:15 -2.4.2010 Départ : 6:00 -3.4.2010
+im k m A
L'affichage indique l'heure actuelle, la date et le dé-
part différé.
^ Si la porte de chargement est ouverte, la touche
"Départ" doit être actionnée de nouveau.
Annulation du départ différé
Si la touche m "Départ différé" est actionnée de nou-
veau ou la touche A"Retour", les modifications ne
sont pas prises en compte.
Avec prélavage
Pour le linge très sale, il est possible d'ajouter un pré
-
lavage avant le départ du programme dans les pro
-
grammes standard 1 à 10 en pressant la touche +i
"Bloc plus".
La fonction peut être désactivée en réactionnant la
touche.
Lorsque la touche +i "Bloc plus" est actionnée, l'af
-
fichage suivant apparaît :
1 Blanc 14,0 / 24,0 kg
40 °C Prélavage
Lavage e
+i mk m A
Le champ "+i" dans l'affichage est représenté en
surbrillance.
Fonctions additionnelles
17

Amidonnage
Adjonction de produit d'amidonnage par le compar
-
timent
L'amidonnage peut être effectué dans tous les pro
-
grammes standard (sauf Essorage supplémentaire et
Vidange supplémentaire) avant le démarrage du pro
-
gramme en actionnant la touche m "Amidonnage".
La touche m est représentée en surbrillance sur l'af
-
fichage.
La fonction peut être désactivée en réactionnant la
touche.
1 Blanc
m
Arrêt programme par touche amidonnage
La porte peut être ouverte.
i ü f
Lorsque le pas de programme "Amidonnage" est at
-
teint, "Arrêt amidonnage" clignote à l'affichage.
Verser l'amidon préparé suivant les indications du fa
-
bricant dans le compartiment avant p. Allonger
éventuellement l'amidon avec de l'eau. Le temps de
lavage est prolongé automatiquement de 4 minutes.
Le programme est poursuivi après l'actionnement de
la touche "Départ"
Adjonction de produit d'amidonnage dans le tam-
bour
Lorsque le pas de programme "Arrêt amidonnage"
est atteint, ouvrir la porte de chargement et ajouter
l'amidon préparé conformément aux indications du
fabricant. Fermer la porte.
Le message suivant est affiché de nouveau :
1 Blanc
m
Arrêt programme par touche amidonnage
La porte peut être ouverte.
i ü f
Actionner la touche "Départ", le programme est pour
-
suivi.
Sans essorage
Sans essorage peut être sélectionné dans tous les
programmes standard (sauf Essorage supplémen
-
taire) avant le démarrage du programme en action
-
nant la touche k "Sans essorage"
La touche k est représentée en surbrillance sur l'affi
-
chage.
La fonction peut être désactivée en réactionnant la
touche.
1 Blanc
k
Arrêt progr. par touche sans essorage
i ü f
Lorsque le pas de programme "Arrêt essorage" est
atteint "Arrêt essorage" clignote à l'affichage.
Le programme est terminé sans essorage et avec de
l'eau dans la machine si la touche f "Interrup
-
tion/Arrêt" est actionnée.
Si le programme doit être poursuivi avec l'essorage,
actionner la touche "Départ"
Arrêt de programme
Pour arrêter le programme, presser la touche f
"Interruption/Arrêt".
Le programme s'arrête.
1 Blanc
Arrêt de programme
i ü f
Pour poursuivre le programme, actionner la touche
"Départ".
Fonctions additionnelles
18

Annulation de programme
Si le programme doit être annulé, presser deux fois
de suite la touche f "Interruption/Arrêt".
Si le programme a été arrêté alors que la machine
contenait encore de l'eau ou pendant l'essorage, les
messages suivants peuvent être affichés :
1 Blanc
Arrêt programme, eau reste dans machine
i ü f
ou :
1 Blanc
Arrêt programme avec rotation tambour
i ü f
Pour pouvoir ouvrir la porte, presser la touche de
fonction q "Vidange" ou sélectionner le programme
Vidange supplémentaire et presser la touche "Dé
-
part".
Annulation des programmmes verrouillés
Dans le cas des programmes verrouillés, l'arrêt et
l'annulation d'un programme est impossible.
1 Blanc
90 °C Lavage
Verrouillé. Fin à 12:35
)f
L'affichage indique que le programme est verrouillé
lorsque la touche f "Interruption/Arrêt" est actionnée
pour tenter d'annuler le programme.
Pour déverrouiller le programme, presser la touche
de fonction ) "Déverrouillage" et entrer le mot de
passe.
Après la saisie du mot de passe, l'affichage indique :
Déverrouiller programme ?
S A
Après l'actionnement de la touche S "Enregistrer" l'af
-
fichage normal réapparaît et le programme peut être
annulé.
1 Blanc
90 °C Lavage 60 °C
Rinçage 1 Fin à 12:35
mKf
Changer l'ordre
Le déroulement du programme en cours peut être
modifié ou certains blocs de programme répétés.
^
Actionner la touche f "Interruption/Arrêt", pour in
-
terrompre le programme.
1 Blanc
Arrêt de programme
i ü f
^
Actionner la touche ü "modifier ordre". Le do
-
maine, bloc ou pas actuel est affiché.
Voir également la notice de programmation "Struc
-
ture des programmes".
Changer ordre -> Blanc
Domaine 2: Lavage e
S A
Domaine 2 : lavage
Bloc 1 : lavage
Pas : temps lavage 2 -
S A
^ Tourner le bouton tourne-valide pour sélectionner
le domaine, puis le presser pour valider. Domaine :
sélectionner 1 prélavage, 2 lavage ou 3 rinçage et
valider.
^
Tourner le bouton tourne-valide pour sélectionner
le bloc, puis le presser pour valider. Bloc : sélec
-
tionner prélavage 1-10, lavage 1-10 ou rinçage
1-10 et valider.
^
Tourner le bouton tourne-valide pour sélectionner
le pas, puis le presser pour valider. Sélectionner le
pas de programme puis valider.
^
Presser la touche S "Enregistrer" puis "Départ", le
changement d'ordre est effectué ou actionner la
touche A "Retour" pour retourner à l'arrêt de pro
-
gramme et ne pas effectuer le changement
d'ordre.
Fonctions additionnelles
19

Dosage de produits liquides
Pompe doseuse Canne d'aspiration
a Raccord (côté aspiration)
b Raccord (côté pression)
c Vidange (en cas de rupture de tuyau)
d Ouverture d'aspiration
e Sonde de niveau pour la jauge de bidon. Si le bi
-
don est vide, la pompe et la machine s'arrêtent au
-
tomatiquement.
ö
Défaut circuit dosage
Remplir le bidon 1
Presser la touche Départ
if
Le lave-linge signale qu'il faut ajouter du produit.
Une fois le bidon rempli, le programme peut être
poursuivi en actionnant la touche "Départ".
Désactivation du dosage
1 Blanc 90 °C
2 Couleurs 60 °C
3 Couleurs intensif 60 °C
i ä FC A
Avant le démarrage du programme, il est possible de
désactiver le dosage liquide avec la touche de fon
-
tion ä "Dosage désactivé"
Après le démarrage du programme, l'adjonction de
lessive n'est pas effectuée par les pompes doseuses
et l'affichage suivant apparaît :
1 Blanc 14,0/24,0 kg ä
90 °C Lavage
Rinçage 1000 tr/min
+im k m A
Volumes de dosage
Les indications du fabricant de détergents doivent
être suivies.
,En cas d'utilisation d'adjuvants et de produits
spéciaux, suivre les conseils d'utilisation du fabri-
cant. N'utiliser ces produits que dans le cadre pré-
vu par le fabricant pour éviter les détériorations de
matériaux et les réactions chimiques violentes
(gaz explosif...). Demander confirmation au fabri-
cant du détergent que ce produit peut être utilisé
en machine à laver.
Les produits liquides doivent être mis à la tempéra
-
ture ambiante normale avant d'être utilisés afin que la
viscosité et le dosage soient optimaux.
20
Modules en option
e
a
c
b
d

Mise en service des pompes doseuses
Avant la mise en service des pompes doseuses, la
lessive liquide doit être aspirée et la quantité de do
-
sage réglée.
Calibrage du dosage
Le calibrage du dosage est utilisé pour déterminer le
refoulement des pompes doseuses.
Pour accéder directement au calibrage de dosage
machine éteinte :
^
Maintenir la touche multifonction 2 enfoncée.
^
Puis enclencher la machine avec l'interrupteur
Marche.
Calibrage dosage~ menu principal
Pompe doseuse 1
Pompe doseuse 2 e
A
Possibilités de sélection : pompes doseuses1à13
Après la sélection d'une pompe doseuse, l'affichage
suivant apparaît :
Calibrage dosage ~ Pompe doseuse 1
V: 100ml t: 0s P: non
0/1 S A
La quantité de dosage est réglable de 0 à 9999 ml
par pas de 1 ml.
^
Presser la touche Multifonctions 0/1, le tuyau de
dosage se remplit. Arrêter avec la touche 0/1.
^
Maintenir le tuyau de la pompe à calibrer verticale
-
ment dans un gobelet gradué.
,
Eviter tout contact avec la peau ou les yeux,
porter des vêtements de protection.
^
Retourner avec la touche retour A au menu prin
-
cipal.
Calibrage dosage~ menu principal
Pompe doseuse 1
Pompe doseuse 2 e
A
^
Sélectionner la pompe de dosage
Calibrage dosage ~ Pompe doseuse 1
V: 100ml t: 0s P: non
0/1 S A
^
Presser la touche multifonctions 0/1.
Pour arrêter la pompe presser la touche 0/1 sinon
elle s'arrête automatiquement après 60 secondes.
^
Mesurer la quantité versée dans le gobelet gradué.
Calibrage dosage ~ Pompe doseuse 1
V: 100ml t: 30s P: 200,0ml/min
0/1 S A
^
Saisir la valeur dans le champ "V". Le débit dosage
P en ml/min est calculé par la commande.
^
Pour que la valeur mesurée soit attribuée à la
pompe presser la touche de fonction S "Enregis
-
trer".
^ Remettre le tuyau en place.
Nettoyage et entretien du système de dosage
Toutes les 2 semaines et avant tout arrêt prolongé
des pompes doseuses, le système de dosage doit
être rincé à l'eau chaude afin d'éviter toute obstruc-
tion ou corrosion dans le système de dosage.
^ A cet effet, nettoyer les buses d'aspiration avec de
l'eau.
^
Disposer les buses d'aspiration dans un récipient
avec de l'eau chaude (40 - 50°C).
^
Commander chaque pompe par le calibrage de
dosage jusqu'à ce que le système de dosage soit
rincé.
^
Contrôler que les raccords, flexibles, raccords de do
-
sage et les joints sont étanches.
Modules en option
21

Circuit de délestage
Lorsque la fonction circuit de délestage est sélec
-
tionnée, le chauffage est coupé et un arrêt de pro
-
gramme est effectué. Le message suivant s'affiche :
1 Blanc
Arrêt programme par délestage.
Le programme reprend automatiquement.
if
Après la fin de la fonction de délestage, le program
-
me est poursuivi automatiquement.
Module de communication
Le module de communication permet le raccorde
-
ment d'un ordinateur à la machine.
Le logement du boîtier de communication se trouve à
l'arrière du lave-linge.
Un programme d'edition des données est disponible
auprés de Miele Professional.
Données exploitation
Avec le module données exploitation, les données
d'exploitation peuvent être consultées ou effacées
avec la touche \ "données d'exploitation" avant le
démarrage du programme ou après la fin du pro-
gramme.
1 Blanc 90 °C
2 Couleurs 60 °C
3 Couleurs intensif 60 °C
i \ FC A
Après actionnement de la touche \ l'affichage sui
-
vant apparaît :
Module données d'exploitation
Ensemble de données
Données de programme e
\ A
Possibilité de sélection :
–
Ensemble de données
Dans cette rubrique, les données de tous les pro
-
grammes sont réunies et totalisées.
–
Données de programme
Les données de programme sont des données enre
-
gistrées pendant le déroulement d'un programme.
–
Supprimer les données
- Module (ensemble des données et données de pro
-
gramme)
- Ensemble de données (effacer uniquement l'en
-
semble de données)
- Données de programme (effacer les données de
programme uniquement)
La fonction peut être désactivée en réactionnant la
touche \ "Données d'exploitation".
Si la capacité de mémoire dans le module données
d'exploitation est épuisée, un message signale que
les données d'exploitation vont être écrasées après
l'actionnement de la touche "Départ".
Si la touche A "retour" est pressée ou que la touche
"Départ" n'est pas actionnée dans les 30 secondes, le
programme n'est pas démarré et l'affichage précé
-
dent réapparaît.
Ensemble de données
Module données d'exploitation
Ensemble de données
Données de programme e
\ A
Après la sélection de l'ensemble des données, l'affi-
chage suivant apparaît (exemple) :
Module données d'exploitation ~ ensemble données
Temps d'enclenchement total : 200.987 h
Heures de fonctionnement : 123456 h e
\ A
Autres possibilités de sélection :
Temps d'enclenchement total : 200.987 h
Heures fonctionnement : 123.456 h
Temps de chauffage : 73 456 h
Tps activ. mot. entraînmt : 93.456 h
Départs de programme : 23.456
Arrêts programme : 567
Annulations de programme : 67
Quantité d’eau : 1.234.567 l
Charge de linge : 1.234.567 kg
Produit à doser : 2 345 l
Energie: 12 345 678 kWh
Modules en option
22

Données de programme
Module données d'exploitation -
Données de programme
Supprimer les données e
\ A
Après la sélection des données programme, l'affi
-
chage suivant apparaît (exemple) :
Module données d'exploitation ~ données de programme
1 Blanc 90 °C
2 Couleurs 60 °C e
\ A
Choisir le programme correspondant dans la liste des
programmes et presser le bouton tourne-valide ; la
liste de tous les démarrages de programme avec la
date et l'heure de départ est affichée, en commen
-
çant par le programme 1 Blanc.
Données de programme ~ 1 Blanc
Date : 21.05.2010 Heure départ : 11:30
Date : 21.05.2010 Heure départ : 12:30 e
\ A
Choisir dans la liste de tous les démarrages de pro-
gramme du programme 1 Blanc le départ de pro-
gramme qui vous intéresse et valider en pressant le
bouton tourne-valide.
Données de programme ~ 1 Blanc
Date : 21.05.2010
Nom : Dupont e
\ A
Autres possibilités de sélection :
Localité : Blanc-Mesnil
Numéro de fabrication : 12345678
Type de machine : PW 6107
Quantité de linge : 13 kg
Touche+: activé
Touche amidonnage : activé
Touche arrêt cuve pleine
(sans essorage) : non enfoncé
Départ programme : 11:30
Arrêt du programme : 12:05
Temps fonctionnement:0h35min
Consommation électrique : 12,5 kWh
Consommation gaz:0kWh
Consommation vapeur:0kWh
Quantité d'eau totale : 140 l
Tempér. arrivée air maxi : 95 °C
Tempé. eau vidange maxi : 45 °C
Modification du programme : 2
(pour afficher 3 arrêts et
3 départs seulement, sélectionner et valider avec le bouton
tourne-valide)
Défaut programme : aucun (seuls les trois derniers dé
-
fauts sont enregistrés.)
Domaine 1: Prélavage (après la sélection et la validation
avec le bouton rotatif, le bloc ou le domaine peuvent être
sélectionnés.)
Temps de fonctionnement:6min
Quantité d'eau : 20 l
Phase dosage 1: Quantité en ml
(après sélection et vali
-
dation avec le bouton tourne-valide, les 6 dosages sont affi
-
chés.)
Température maxi : 12 °C
Temps de maintien:6min
Phase dosage 2: non
Supprimer les données
Module données d'exploitation
Données de programme
Supprimer données e
\ A
Après sélection de Supprimer données, l'affichage
suivant apparaît :
Module données d'exploitation ~ Supprimer données
Module : 21.02.2010
Ensemble de données : 12.07.2010 e
\ A
L'option module permet d'effacer l'"ensemble des
données" et les "données de programme" des don-
nées d'exploitation.
L'option Ensemble de données permet uniquement
de supprimer les données globales des données
d'exploitation.
L'option données de programme permet de suppri
-
mer les données de programme des données d'ex
-
ploitation. Après la sélection d'une option et la valida
-
tion en pressant le bouton tourne-valide, le système
prie d'entrer le mot de passe.
Mot de passe:____
ABCDEFGHIJKLMNOPQRSTUVWXYZ
0123456789
KSA
Après saisie du mot de passe ou insertion de la carte
pour le niveau utilisateur l'option est accessible. Une
question de sécurité supplémentaire est posée.
Réellement supprimer données fonctionnement ?
S A
Après la validation avec la touche S "Enregistre
-
ment", les données sont supprimées.
Modules en option
23

Charge
Si la machine est dotée d'un module de charge, le
poids de remplissage du linge pendant le charge
-
ment du linge est affiché par pas de 0,2 kg. Le poids
de remplissage maximal du programme sélectionné
est affiché à côté.
Si l'affichage de charge n'indique pas "00,0" lorsque
le tambour est, ceci est effectué avec la touche
->I<-"mettre à zéro".
1 Blanc 00,0 / 16,0 kg
60 °C Lavage
Rinçage e
+im k m ->I<- A
Si du linge oublié est enlevé du tambour après le ta
-
rage, le contenu d'affichage suivant apparaît :
1 Blanc - -,- / 16,0 kg
60 °C Lavage
Rinçage e
+im k m ->I<- A
Remettre à zéro avec la touche ->I<-.
En cas de surcharge (le linge est trempé), le calcul
est toujours effectué en fonction de la charge nomi-
nale et cette valeur est enregistrée également dans le
module de données de fonctionnement.
A la fin du programme, lorsque le tambour s'immobi-
lise, l'humidité résiduelle apparaît à l'affichage.
1 Blanc
Fin de programme Humidité résiduelle 60 %
La porte peut être ouverte.
m FC A
Modules en option
24
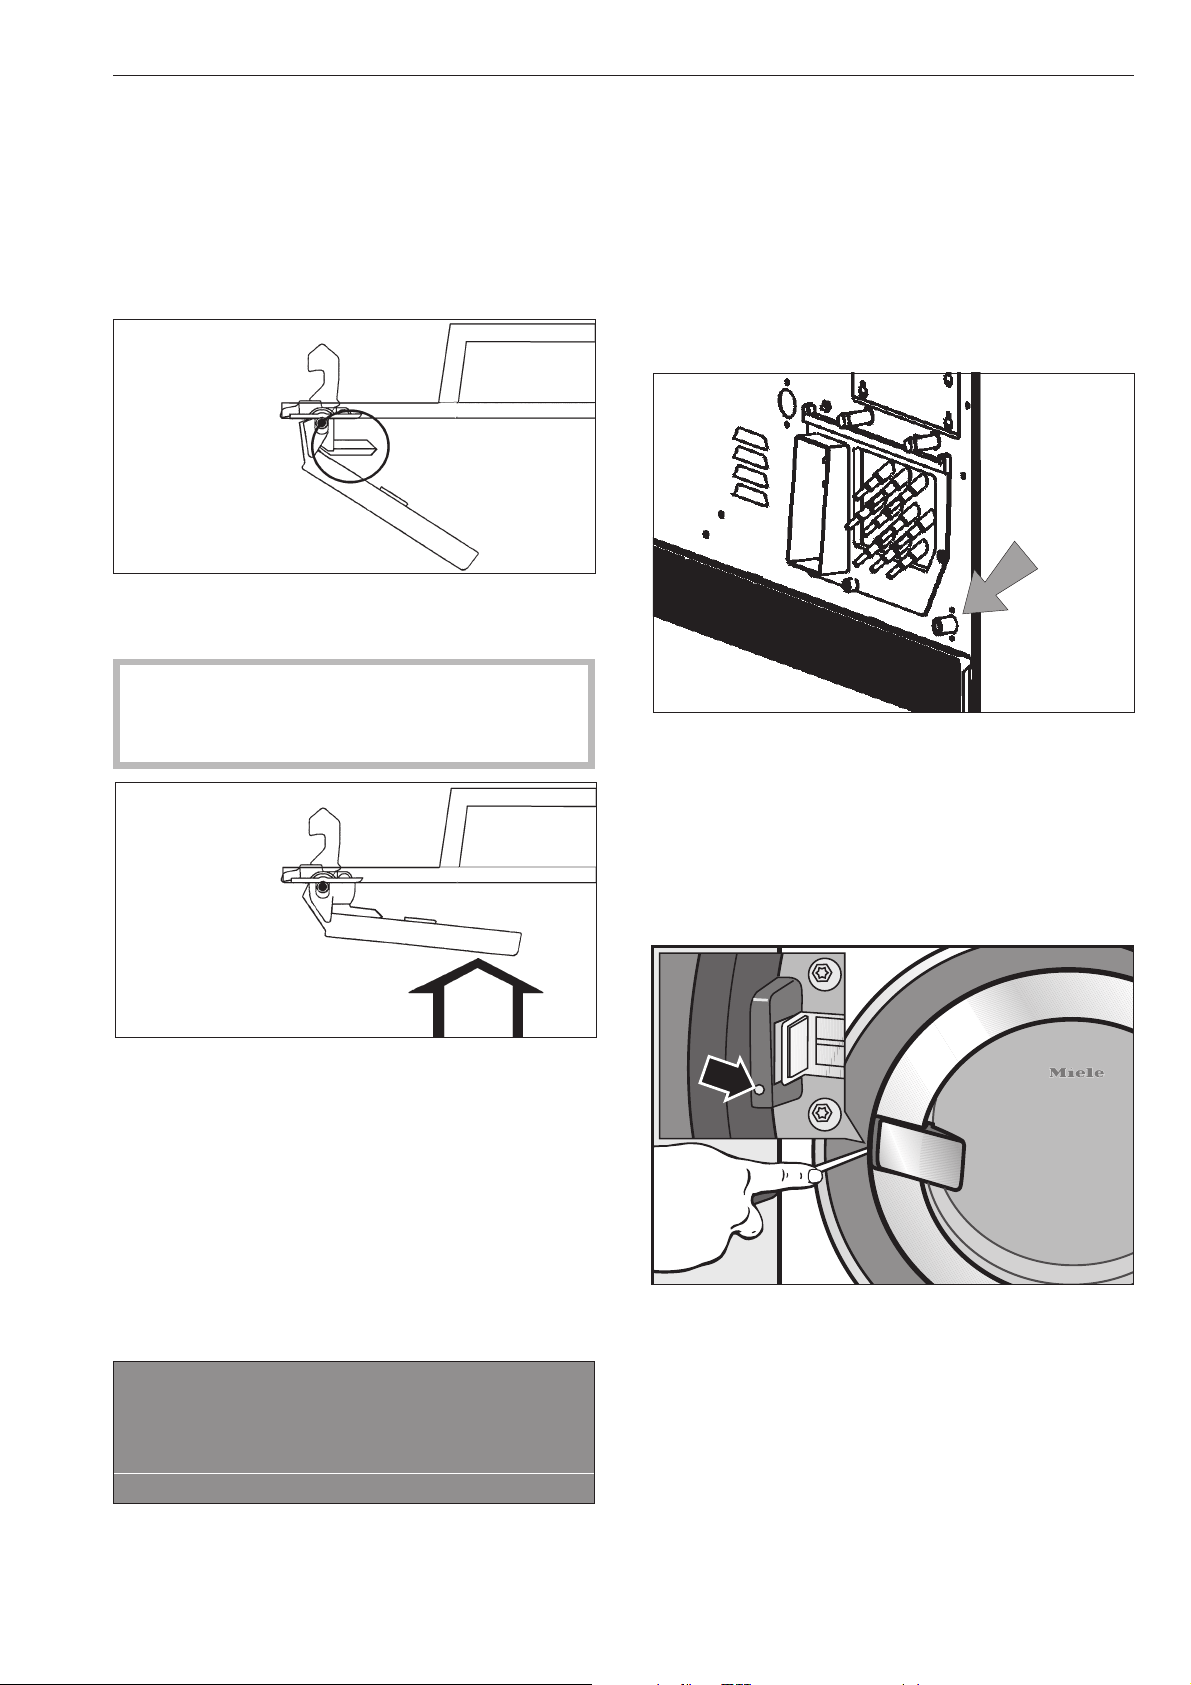
Le porte de chargement ne s'ouvre pas.
^
Presser la poignée de porte, arrêter et réenclen
-
cher la machine et tirer de nouveau la poignée de
porte.
La sécurité de la poignée de porte est dé
-
clenchée.
La poignée de porte ne fonctionne plus, la porte ne
peut plus être ouverte ni fermée.
Le déclenchement du fusible permet d'éviter
d'abîmer la poignée de porte et la serrure si la
porte est ouverte en forçant.
^
Presser fortement contre la poignée jusqu'à ce que
la sécurité s'enclenche audiblement.
La porte de chargement peut de nouveau être ou
-
verte ou fermée (Si n'y a pas d'eau dans la machine).
Panne de courant pendant le lavage,
déverrouillage d'urgence de la porte.
En cas de panne de courant brève :
Le programme reste sur la dernière position adoptée
et le message suivant apparaît lorsque le courant est
rétabli :
y
Coupure tension
Arrêt programme
Presser la touche Départ
i ü f
^
Actionner la touche "Départ" pour poursuivre le pro
-
gramme.
En cas de panne de courant prolongée :
^
Mettre la machine hors tension
^
Arrêter l'interrupteur principal (côté installation).
^
Fermer les vannes d'eau ou de vapeur côté instal
-
lation.
Pour retirer le linge, ouvrir le clapet de vidange ma
-
nuellement et déverrouiller la porte de chargement
manuellement.
^ Ouvrir le clapet de vidange en desserrant la vis de
prise d'air (ouverture de clé 17) à l'arrière de la ma-
chine mais ne pas la sortir complètement. Vidanger
le bain lessiviel. Un peu d'eau s'écoule de l'ouver-
ture de vis, (environ 100 ccm) disposer un récipient
adapté pour la recueillir.
^ Revisser ensuite la vis de prise d'air et vérifier son
étanchéité (ouvrir la vanne d'eau).
^
Insérer un tournevis (de 4 mm environ) dans l'ou
-
verture à côté de la serrure de porte et l'enfoncer
dans le creux du verrouillage. Déverrouiller la porte
en tournant légèrement dans le sens contraire des
aiguilles d'une montre.
Ne jamais forcer !
^
Décharger le linge.
Recherche des anomalies
25

Causes possibles de la formation exces
-
sive de mousse
–
Type de détergent
^
Utilisez des détergents convenant aux machines
professionnelles. Les lessives ménagères ne sont
pas appropriées.
–
Surdosage du détergent
^
Veuillez respecter les indications de dosage du fa
-
bricant de lessive et dosez en fonction de la dureté
d'eau locale.
–
Détergent très moussant
^
Utilisez un détergent qui mousse moins ou deman
-
dez le conseil d'un spécialiste des détergents à
Miele.
–
Eau très douce
^
Pour l'eau en zone de dureté 1, mettre moins de
détergent conformément aux indications du fabri
-
cant de lessive.
–
Degré de salissure du linge
^
Si le linge est peu sale, mettre moins de produit,
conformément aux indications du fabricant de les-
sive.
– Restes dans le linge tels que des produits net-
toyants
^ Effectuer un prélavage à froid, sans lessive.
Bien rincer le linge prétraité à l'assouplissant.
– Faible charge
^ Réduire la quantié de produit en proportion.
–
Vitesse de rotation du tambour au lavage trop
élevée (commande Profitronic)
^
Réduire la vitesse et le rythme de lavage.
Les grandes pièces de linge sont étirées
pendant l'essorage
Il peut arriver que des grandes pièces de linge (par
exemple des nappes) soient étirées à l'essorage.
Ceci peut être évité en modifiant la programmation.
S'adresser au Service Miele.
Affichage intervalle Service, prévention
Si un des messages qui suivent s'affiche à la mise en
marche de l'appareil, le Service Miele doit venir effec
-
tuer une maintenance ou le contrôle annuel de pré
-
vention.
§
Intervalle sav 1
Appeler le SAV.
A
§
Contrôle prévention
Appeler le SAV.
A
L'affichage s'éteint après cinq secondes.
Recherche des anomalies
26

Messages d'erreurs
,
Les réparations sur les machines électriques,
gaz ou vapeur doivent exclusivement être effec
-
tuées par des techniciens agréés Miele. Les répa
-
rations incorrectes peuvent entraîner de graves
dangers pour l'utilisateur.
Si des anomalies se produisent avant ou après le dé
-
marrage du programme, elles sont affichées.
L'affichage reste sombre.
La machine n'est pas alimentée.
^
Contrôler le connecteur, l'interrupteur principal et
les fusibles (côté installation).
y
Coupure tension
Arrêt programme
Presser la touche Départ
f
^ Lorsque le courant est rétabli, presser la touche
"Départ"
Ce message d'anomalie peut également signifier que
le klixon du moteur d'entraînement s'est déclenché.
^
Laisser refroidir le moteur.
M
Défaut arrivée eau
Appeler le service après-vente
si le redémarrage échoue.
if
^
Contrôler le robinet d'eau et presser la touche "Dé
-
part".
a
Défaut serrure porte
Appeler le service après-vente
si le redémarrage échoue.
if
^
Appuyez avec force sur la poignée jusqu'à ce que
la serrure s'enclenche avec un déclic. Presser la
touche "Départ".
§
Défaut chauffage
Arrêt programme. Presser touche Départ.
Déroulemt prog uniquemt sans chauffage.
if
^
Si la touche "Départ" est actionnée, le programme
est poursuivi sans chauffage. Dans le cas des pro
-
grammes de désinfection, le programme est inter
-
rompu avec ce message de défaut.
Appeler le Service Miele.
m
Défaut entrainement
Arrêt programme. Presser touche départ.
Température moteur trop élevée.
if
^
Laisser refroidir le moteur.
§
Défaut balourd
Appeler le service après-vente
si le redémarrage échoue.
i A
Le balourd est trop important, le commutateur antiba-
lourd s'est déclenché.
^ Arrêter puis réenclencher la machine et actionner
la touche "Départ".
Recherche des anomalies
27
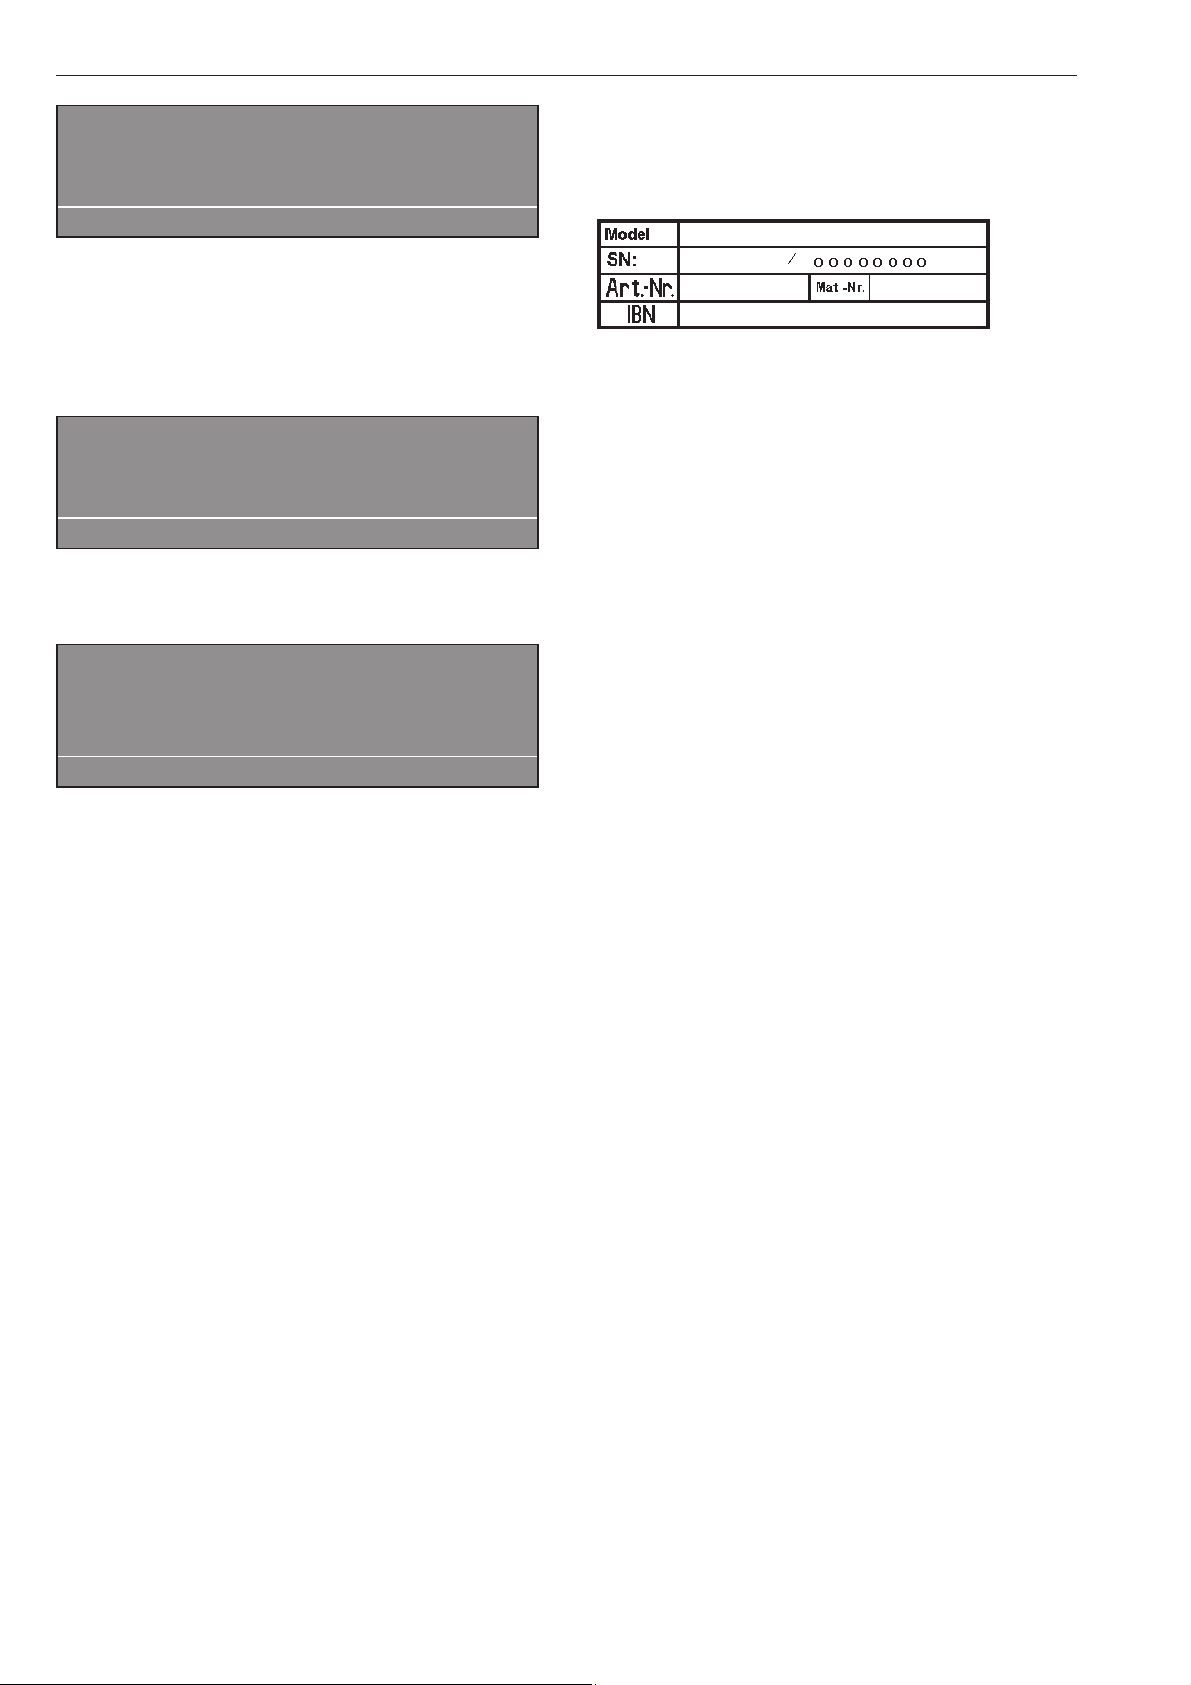
q
Défaut clapet vidange
Appeler le service après-vente
si le redémarrage échoue.
if
^
Contrôler le système d'évacuation côté installation
et presser la touche "Départ".
Un clapet de vidange défectueux ne peut être réparé
que par le Service Miele.
ö
Défaut circuit dosage
Remplir le réservoir dosage 1
Presser la touche départ.
if
Remplacer le bidon.
§
Défaut carte
Carte mal insérée dans lecteur.
A
^ Introduire la carte correctement dans le lecteur.
En cas de panne, veuillez contacter le Service Miele.
Indiquer le modèle, le numéro de série (SN) et le nu
-
méro de matériel (M.-Nr.).
Ces indications figurent sur la plaque signalétique.
Elle est collée porte ouverte, au-dessus du hublot, ou
en haut derrière la machine.
Indiquer également le message d'erreur à l'affichage
de la machine.
En cas de remplacement, utiliser exclusivement
les pièces de rechange originales Miele (dans ce
cas également, veuillez préparer le modèle, le numé
-
ro de série (SN) et le numéro de matériel (M.-Nr.)).
Recherche des anomalies
28
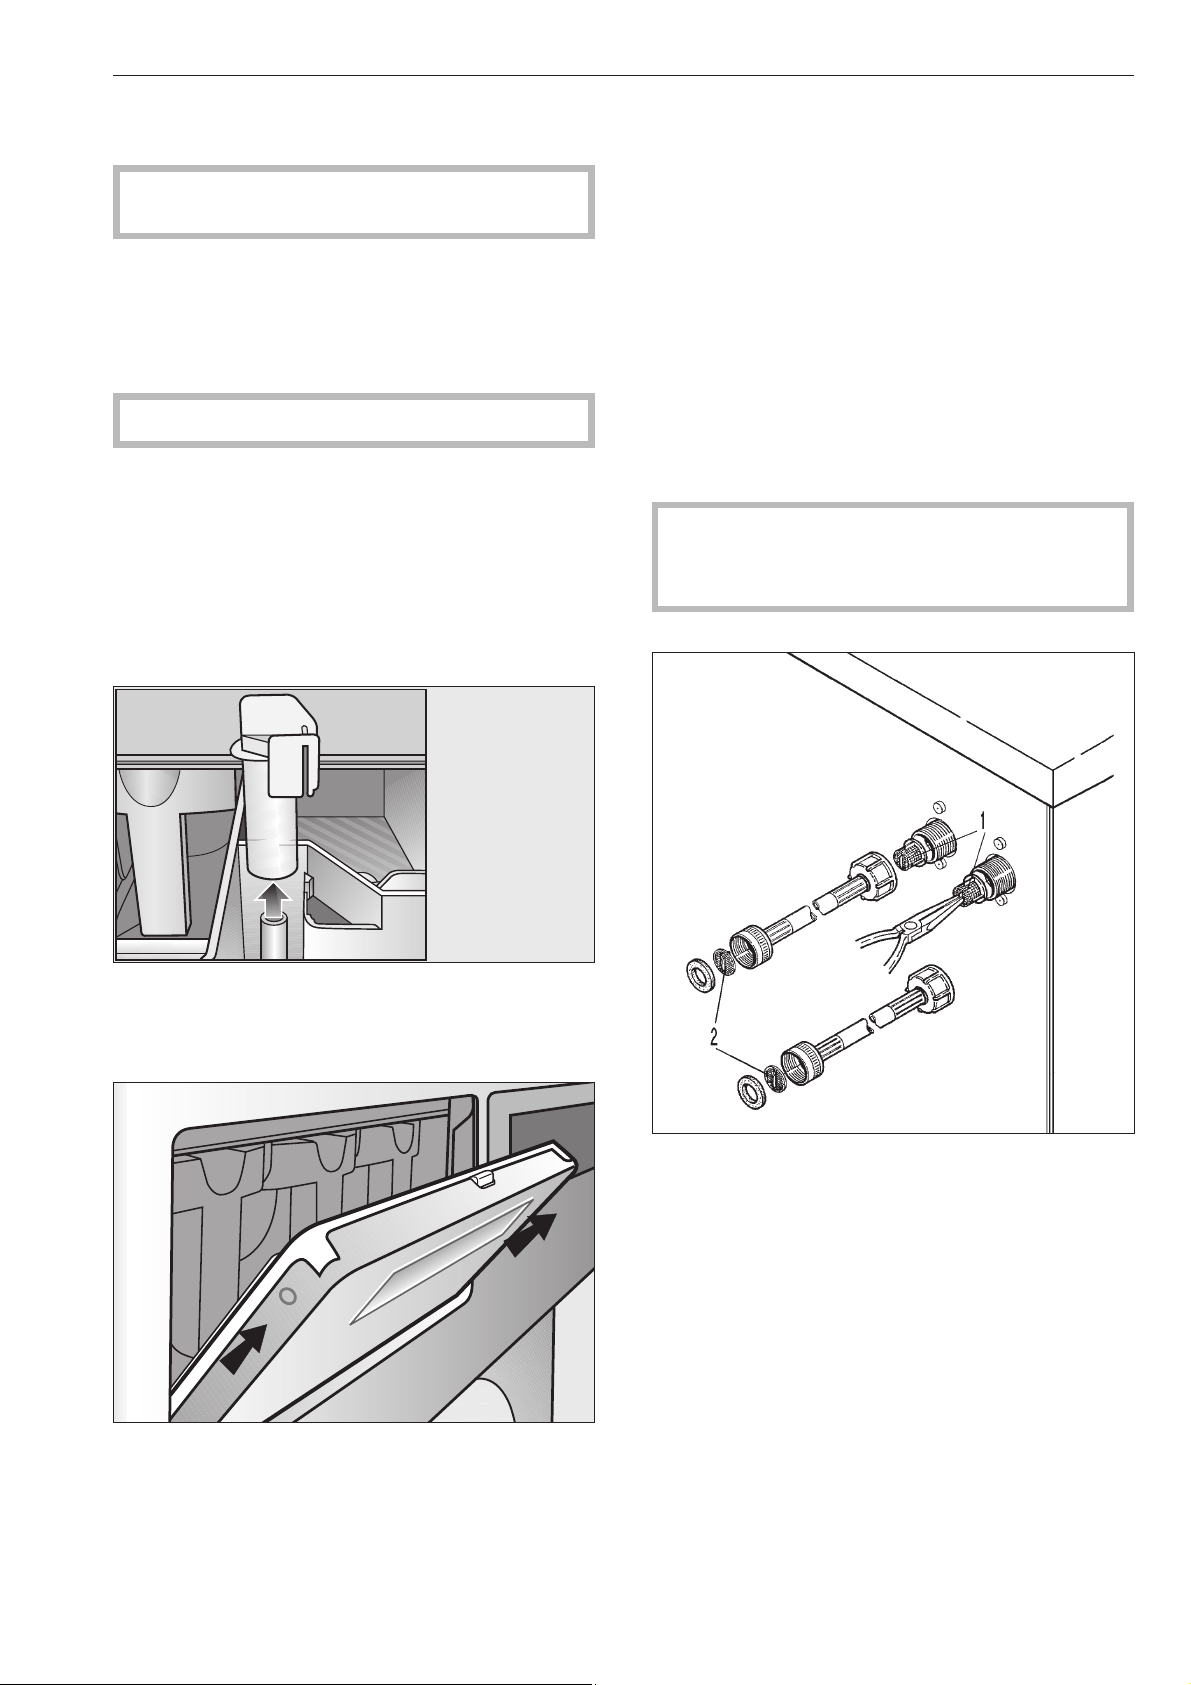
Effectuer le nettoyage et l'entretien après l'utilisa
-
tion du lave-linge.
,
Ne pas utiliser de nettoyeur sous pression ni
de jet pour nettoyer le lave-linge.
Nettoyer la carrosserie, le panneau de commandes
et les pièces en plastique avec un produit nettoyant
doux ou un tissu lisse humide, puis sécher.
Pour nettoyer les pièces de la carrosserie en inox, il
faut utiliser un nettoyant inox du commerce.
Les produits abrasifs rayent les surfaces.
Nettoyage de la boîte à produits, des comparti
-
ments et du tube d'aspiration
Après utilisation, nettoyer la boîte à produits et les
compartiments à l'eau chaude des résidus de lessive
et des incrustations. Nettoyer le tube d'aspiration des
compartiments pour adjuvants.
Retirer le tube d'aspiration, le nettoyer à l'eau chaude
puis le replacer.
Pour nettoyer la rainure d'égouttage sur la boîte à
produits, retirer la trappe de la boîte à produits en
l'inclinant à 45°. En cas d'obstruction du siphon, ce
-
lui-ci peut être nettoyé avec un goupillon.
Il faut vérifier régulièrement si la grille d'aération de
la cuve au dos de la machine est sale et la nettoyer le
cas échéant.
Formation de corrosion
Le tambour et la cuve sont en acier inoxydable.
De l'eau contenant du fer ou des corps étrangers en
fer (par exemple trombones, boutons ou copeaux de
fer) amenés avec le linge peuvent provoquer une cor
-
rosion hétérogène dans le tambour ou dans la cuve.
Dans ce cas nettoyer immédiatement le tambour ou
la cuve avec un produit d'entretien inox et régulière
-
ment ensuite.
Vérfiier que les joints de porte ne présentent pas de
débris de fer et les nettoyer soigneusement avec les
produits cités.
Ces opérations doivent être effectuées régulèrement
à titre préventif.
Afin que le lave-linge puisse sécher après utilisa
-
tion, la porte de chargement ne doit pas être
fermée mais juste poussée.
Contrôler régulièrement les filtres dans les robinets
d'arrivée d'eau (1) et les flexibles d'arrivée (2) et les
nettoyer le cas échéant.
Nettoyage et entretien
29
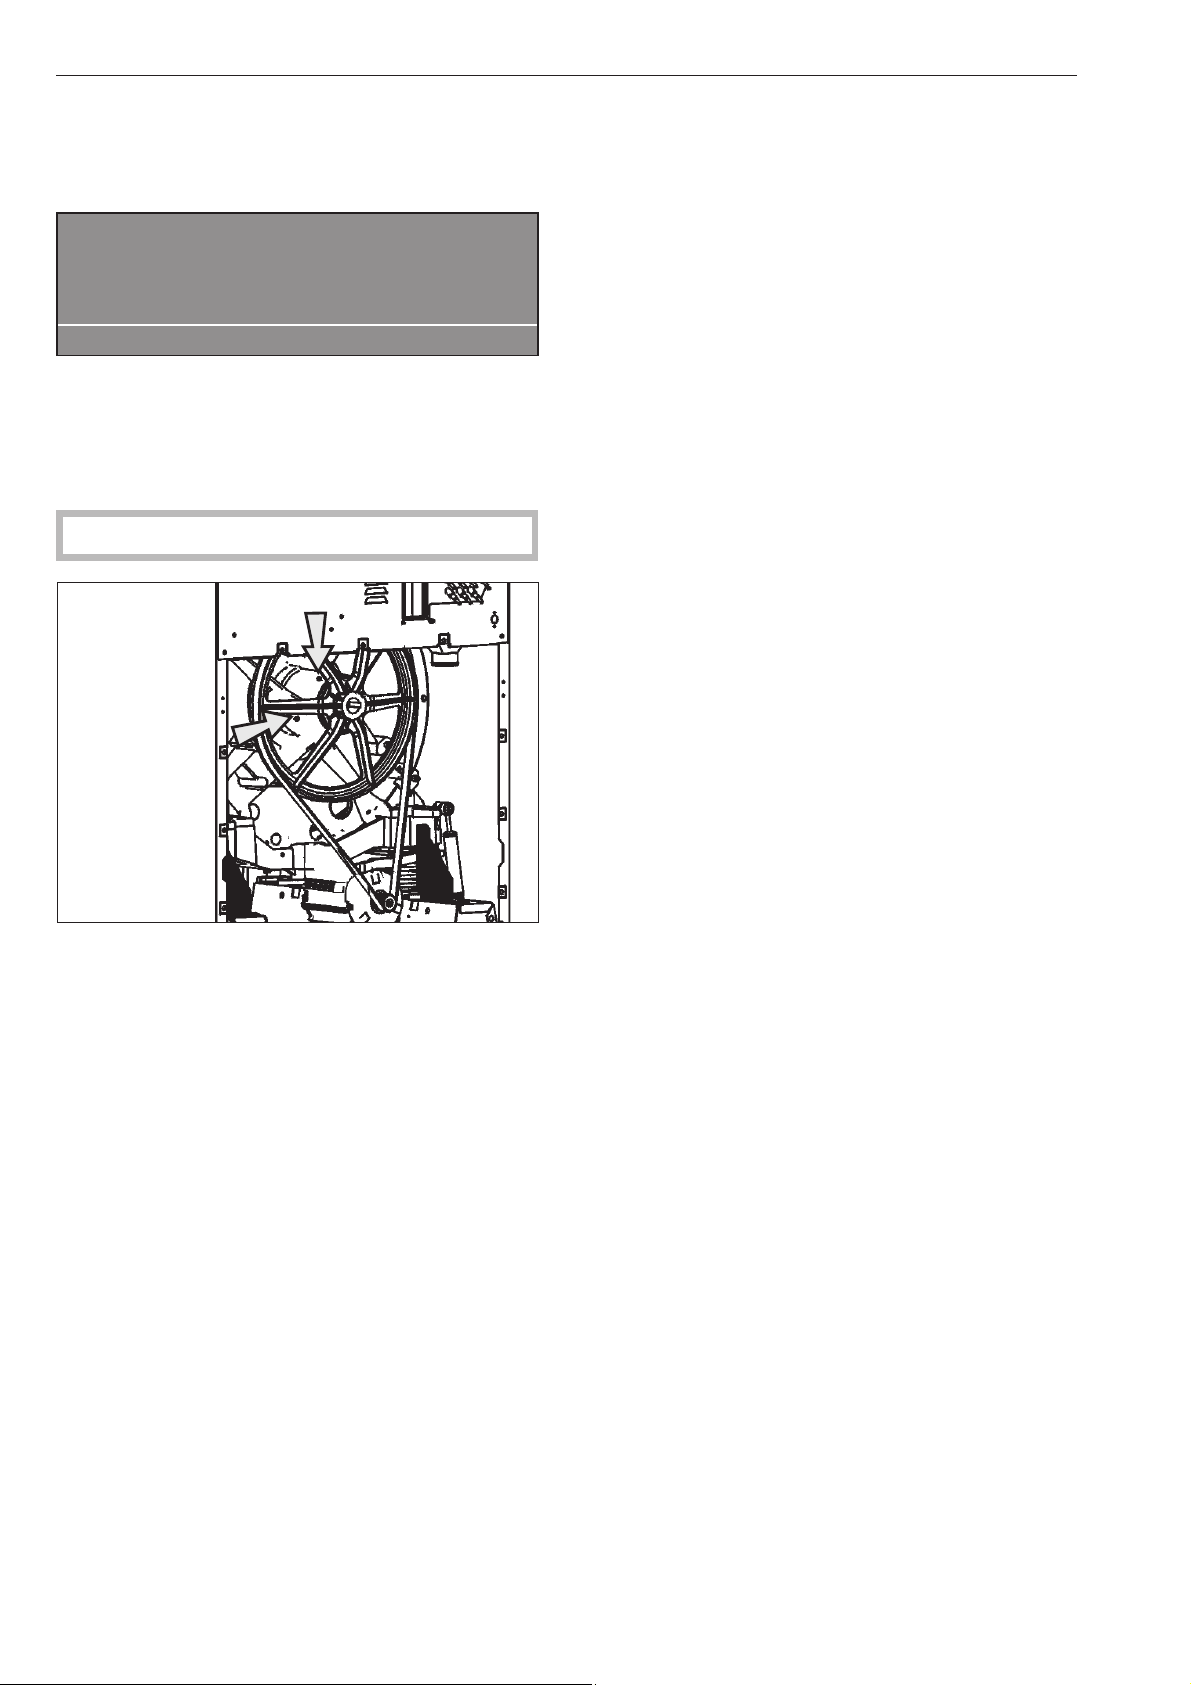
Graissage du palier de tambour PW 6167, PW 6207
Lorsque l'intervalle Service Miele est atteint, le mes
-
sage suivant apparaît :
§
Graisser palier tambour
Appeler le SAV.
A
Ce message peut être supprimé avec la touche
A"Retour". Il apparaît après la mise en marche de la
machine tant que le Miele technicien n'a pas fait cette
opération.
,
Mettre la machine hors tension.
Le palier de tambour doit être graissé environ toutes
les 1000 heures de fonctionnement par le graisseur
avec de la graisse Arcanol L 100.
Périodes d'immobilisation
Si la machine ne fonctionne pas pendant une période
longue (à partir de 4 semaines) graisser le palier de
tambour et faire décrire quelques tours au tambour
avant l'immobilisation. Faire tourner le tambour toutes
les 4 semaines pour éviter que les paliers soient abî
-
més.
Nettoyage et entretien
30
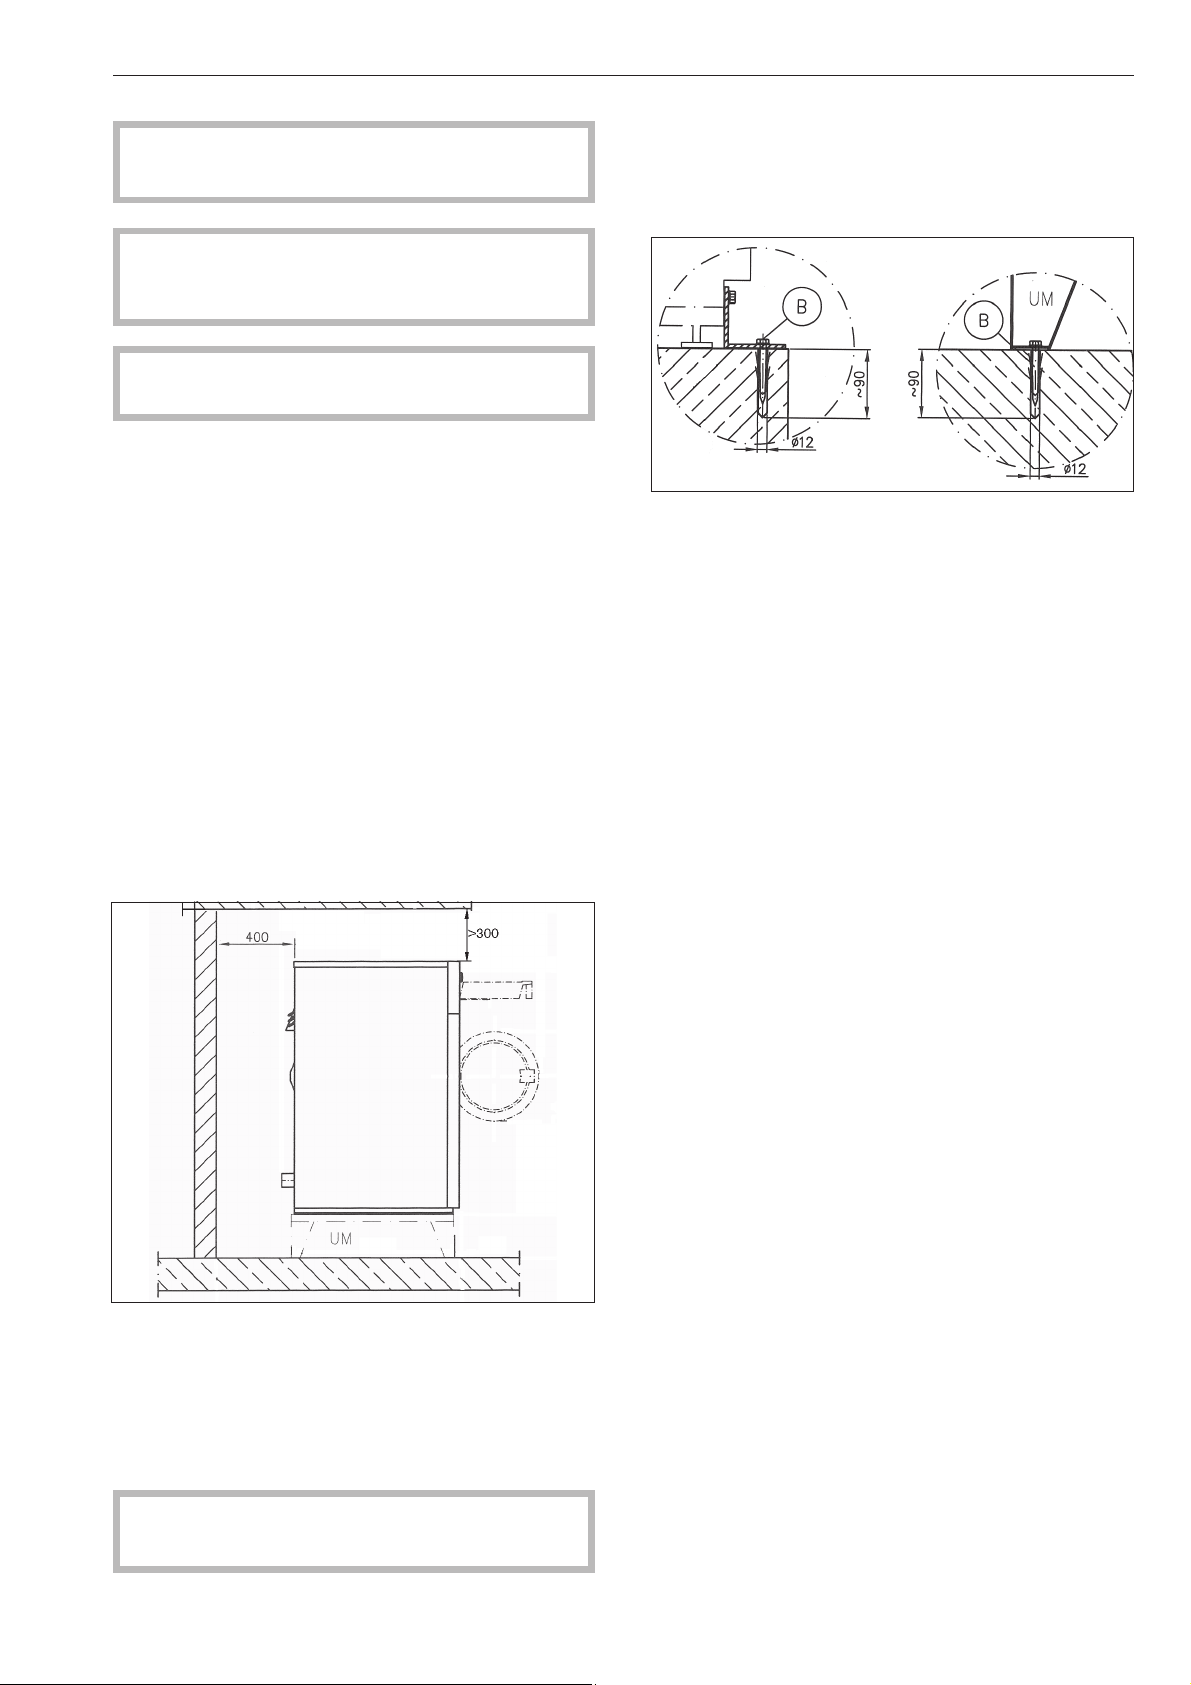
Ce lave-linge ne doit être installé que par le ser
-
vice Miele ou un revendeur autorisé.
,
Ce lave-linge est destiné au traitement du
linge ne contenant pas de substances dangereu
-
ses ou inflammables.
,
Mettre la machine hors tension avant l'installa
-
tion.
Pour éviter les dégâts liés au gel, le lave-linge ne doit
pas être installé dans des pièces exposés au gel.
Avant d'installer ou de service débrancher l'alimenta
-
tion.
Déplacez le lave-linge dans la pièce avec un chariot.
Retirer l'emballage de transport avec prudence, avec
des outils appropriés.
Soulever le lave-linge de la palette de transport avec
un mécanisme de levage.
Ne pas installer le lave-linge sur une moquette car
celle-ci risque de bloquer les ouvertures de ventila-
tion en bas de la carrosserie
Afin de faciliter les interventions du service
après-vente, respecter les cotes minimales et la dis-
tance par rapport au mur avec accès indiquées.
Distance par rapport au mur 400 mm pour les travaux
de maintenance.
Pour un bon fonctionnement, le lave-linge doit être
installé parfaitement d'aplomb.
Régler l'aplomb du sèche-linge en ajustant les pieds
vissables.
Ne déplacer le lave-linge que lorsque toutes les
pièces d'habillage sont montées.
Montage sur socle
En cas de montage sur socle, le lave-linge doit être
fixé au socle normal ou béton.
Le socle doit être fixé au sol.
Socle en béton/ plancher Socle Miele
Installation et raccordement
31

Sécurités de transport
Les sécurités de transport, 2 devant et 2 derrière sont
fixées par 3 vis à six pans creux et ne doivent être
enlevées que sur le lieu d'installation avant la mise en
service de la machine.
A cet effet la façade et la paroi arrière doivent être
déposées. Dévisser les vis sur l'arête inférieure de la
façade et enlever celle-ci.
Dévisser les vis de la paroi arrière et enlever la paroi
arrière.
Conservez les sécurités de transport. Elles doivent
être montées pour tout transport de la machine.
Ne déplacer pas le lave-linge sans que tous les
panneaux extérieur soient en place.
Installation et raccordement
32
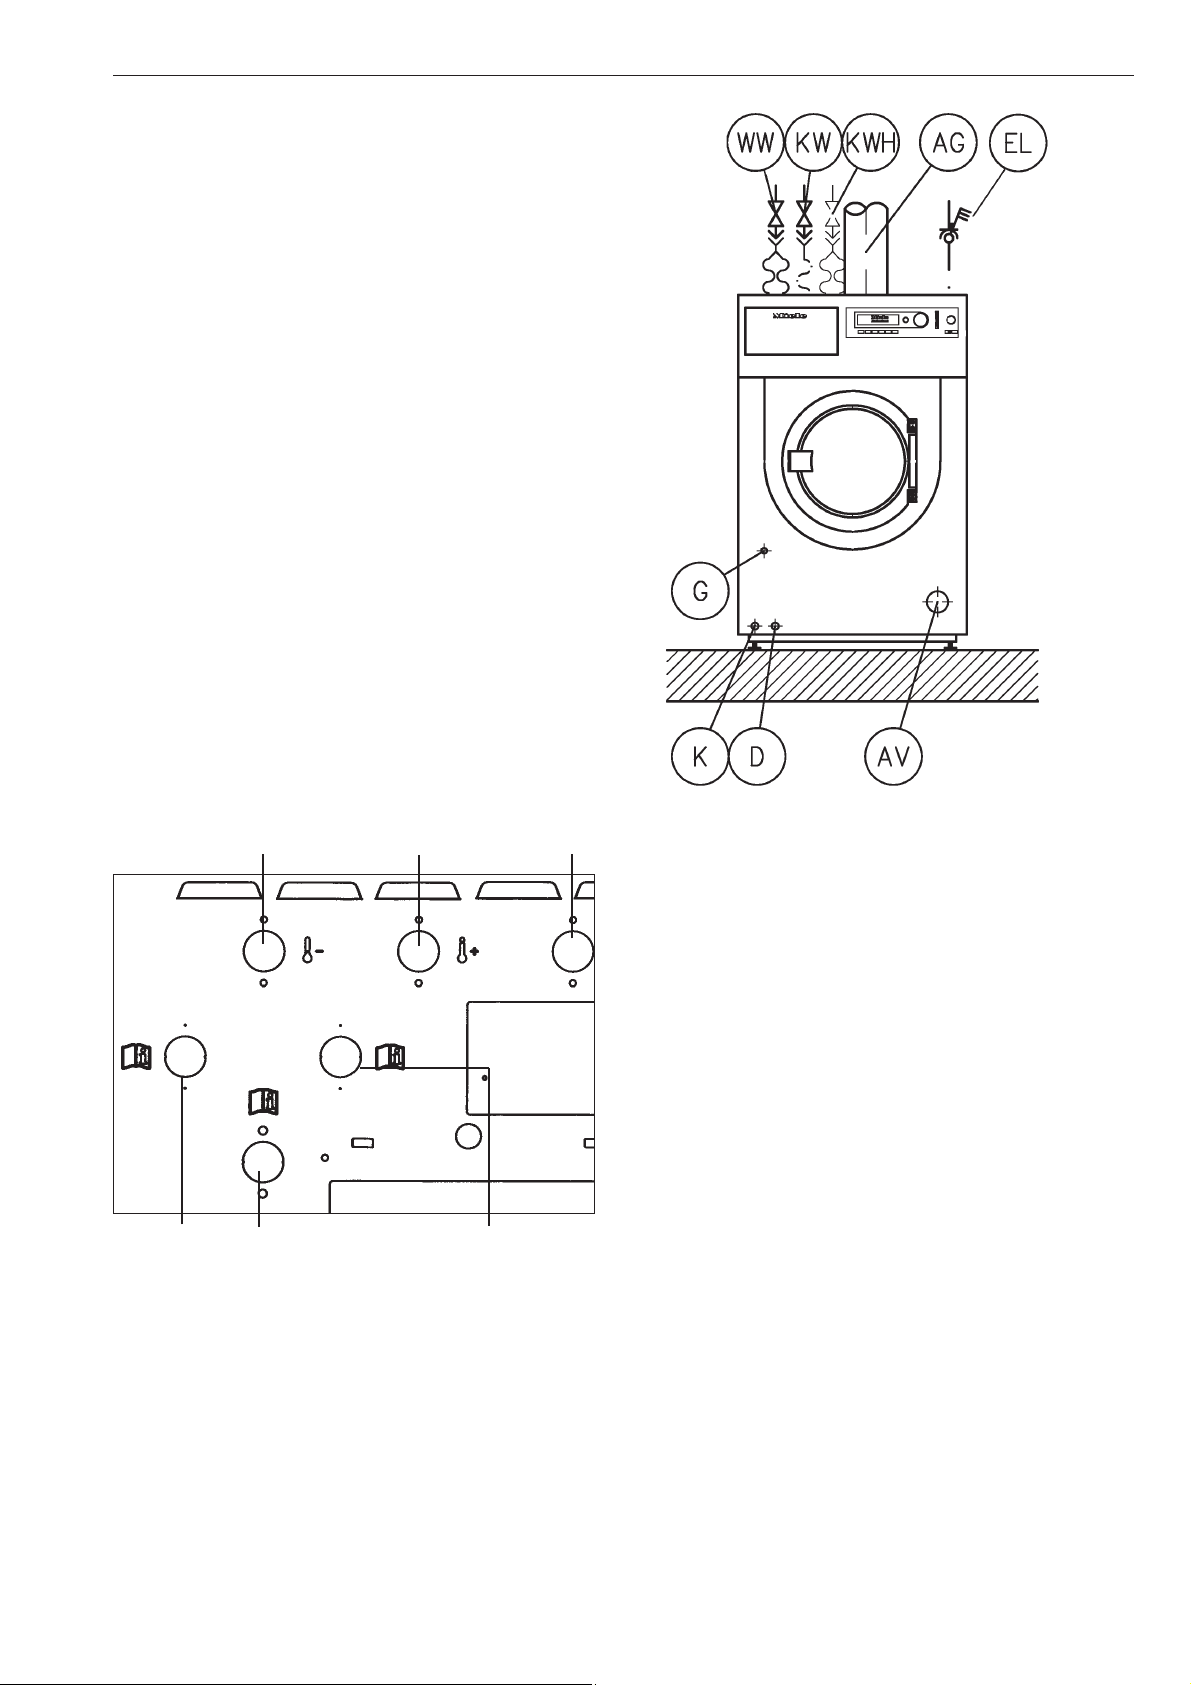
Raccordements à prévoir par l'exploitant
WW eau chaude
KW eau froide
KWH eau dure froide chaude
EL branchement électrique
AG gaz brûlés (machines à chauffage gaz)
G raccordement au gaz (machines à chauffage gaz)
AV Vidange
D Raccordement vapeur (machines à chauffage
vapeur)
K Vidange eau condensée (machines à chauffage
vapeur)
Raccordements à l'eau sur la machine
Eau froide Eau chaude Eau froide
Eau dure Dosage liquide Eau dure
Raccordement à l'eau
Le raccordement à la conduite d’alimentation doit
s’effectuer par un robinet Le montage doit être exé
-
cuté exclusivement par un installateur agréé en res
-
pectant les prescriptions spécifiques en vigueur sui
-
vant les pays. La machine doit être connecteé à
deux robinets d'alimentation d'eau qui conforment
avec aux codes locaux.
–
Suiver le plan d'installation et les instructions d'ins
-
tallation fourni avec la machine.
Raccordement de l’arrivée d’eau/la vidan
-
ge
La pression d’eau doit se situer entre 1 bar et 10 bars
(14.5 -145 psi) pour garantir un déroulement de pro
-
gramme satisfaisant.
Utiliser les tuyaux d’arrivée d'eau fournis.
N'utilisez que des qualités de flexibles supportant
une pression d'au moins 70 bars (1015 psi) et une
température d’au moins 90 °C en cas d'échange.
Cela vaut également pour les robinetteries qui y sont
reliées. Les pièces d'origine Miele répondent à ces
exigences.
L'arrivée d'eau chaude ne doit pas dépasser une
température de 70 °C.
Installation et raccordement
33
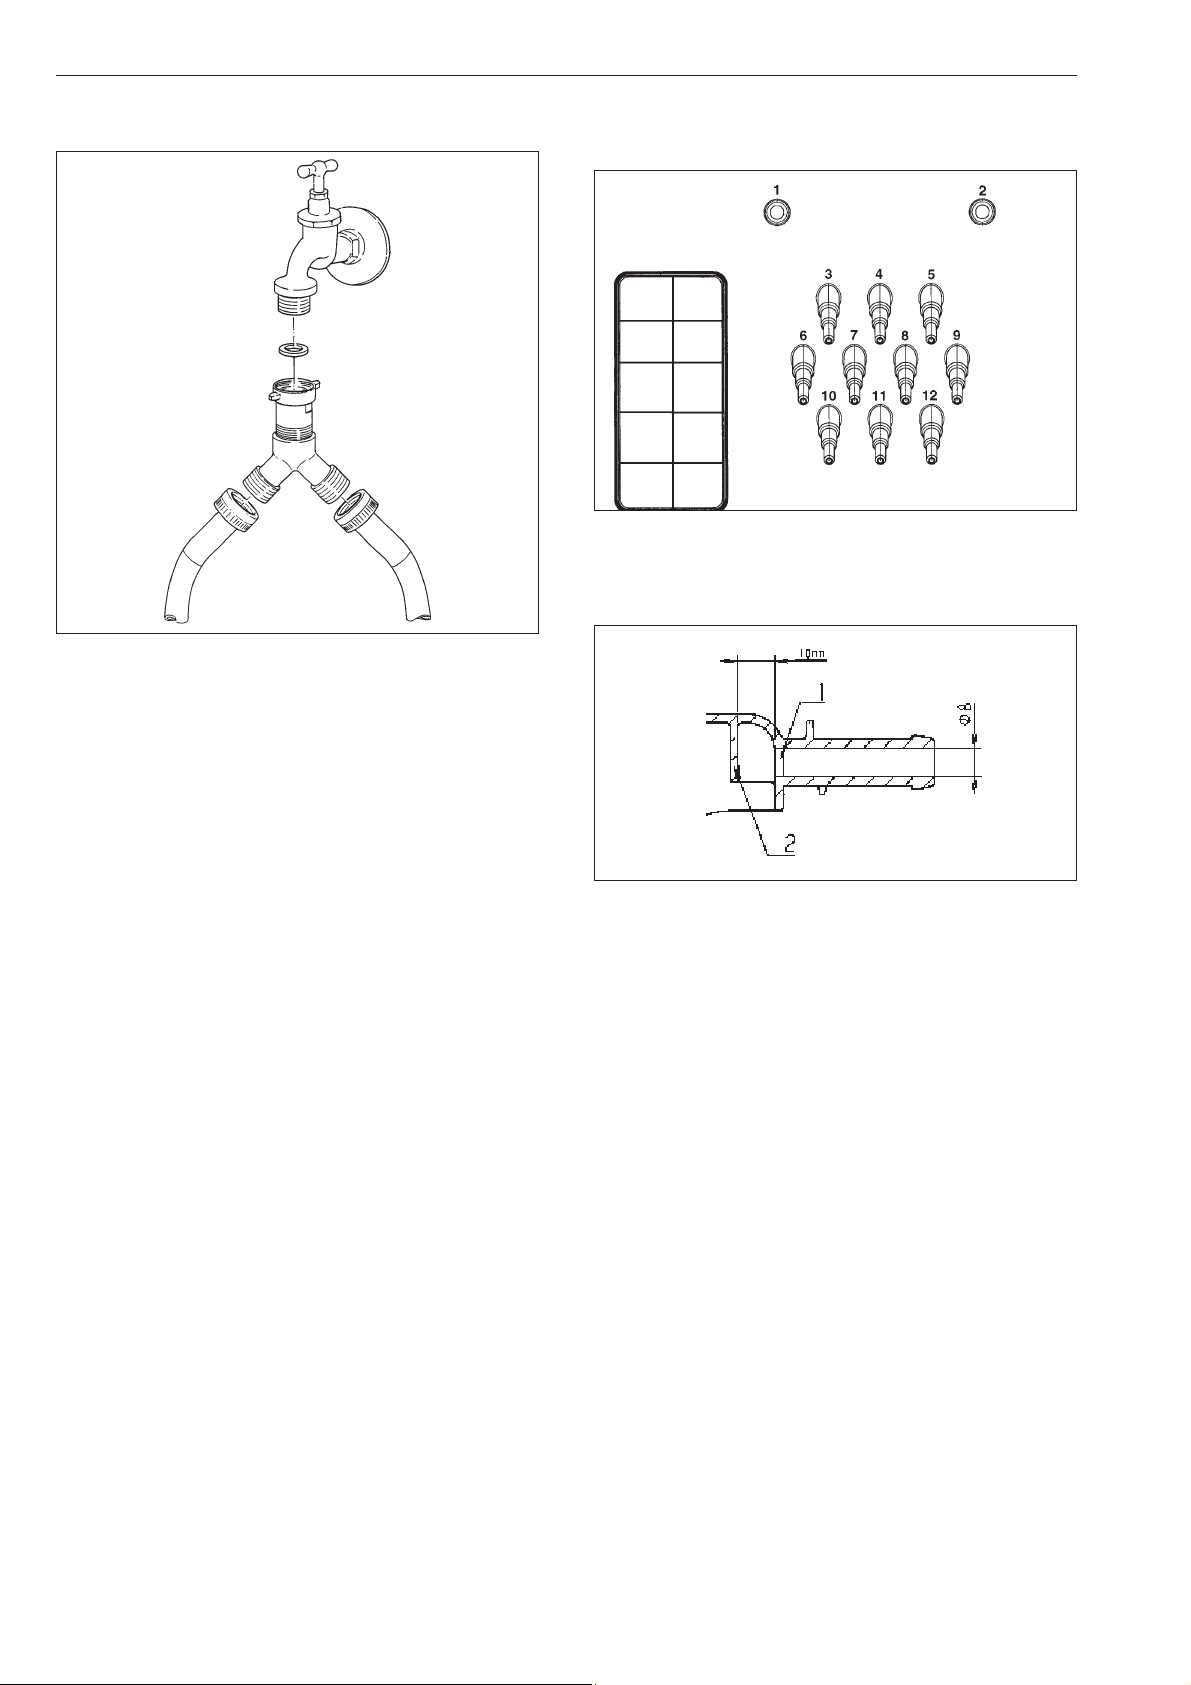
Raccordement à l'eau froide uniquement
La pièce en Y est fournie.
Raccordement de dosage sur le boîtier
mélangeur du dosage liquide
Les raccordements 1 et 2 sont destinés au dosage
de produits visqueux. Ces raccordements sont fer
-
més et doivent être percés avec un foret de 8 mm.
Il faut faire attention à ne percer que la première cloi-
son (1), car une cloison d'impact (2) se trouve envi-
ron 10 mm derrière.
Si les raccordements percés ne sont plus utilisés, ils
doivent être obturés.
Les raccordements 3 à 12 sont destinés au dosage
de produits liquides. Ces raccordements tubulaires
sont fermés et doivent être ouverts avec une petite
scie au diamètre correspondant au tuyau qui sera
raccordé dessus.
Si les raccordements coupés ne sont plus utilisés, ils
doivent être obturés.
Installation et raccordement
34
1"
3/4"
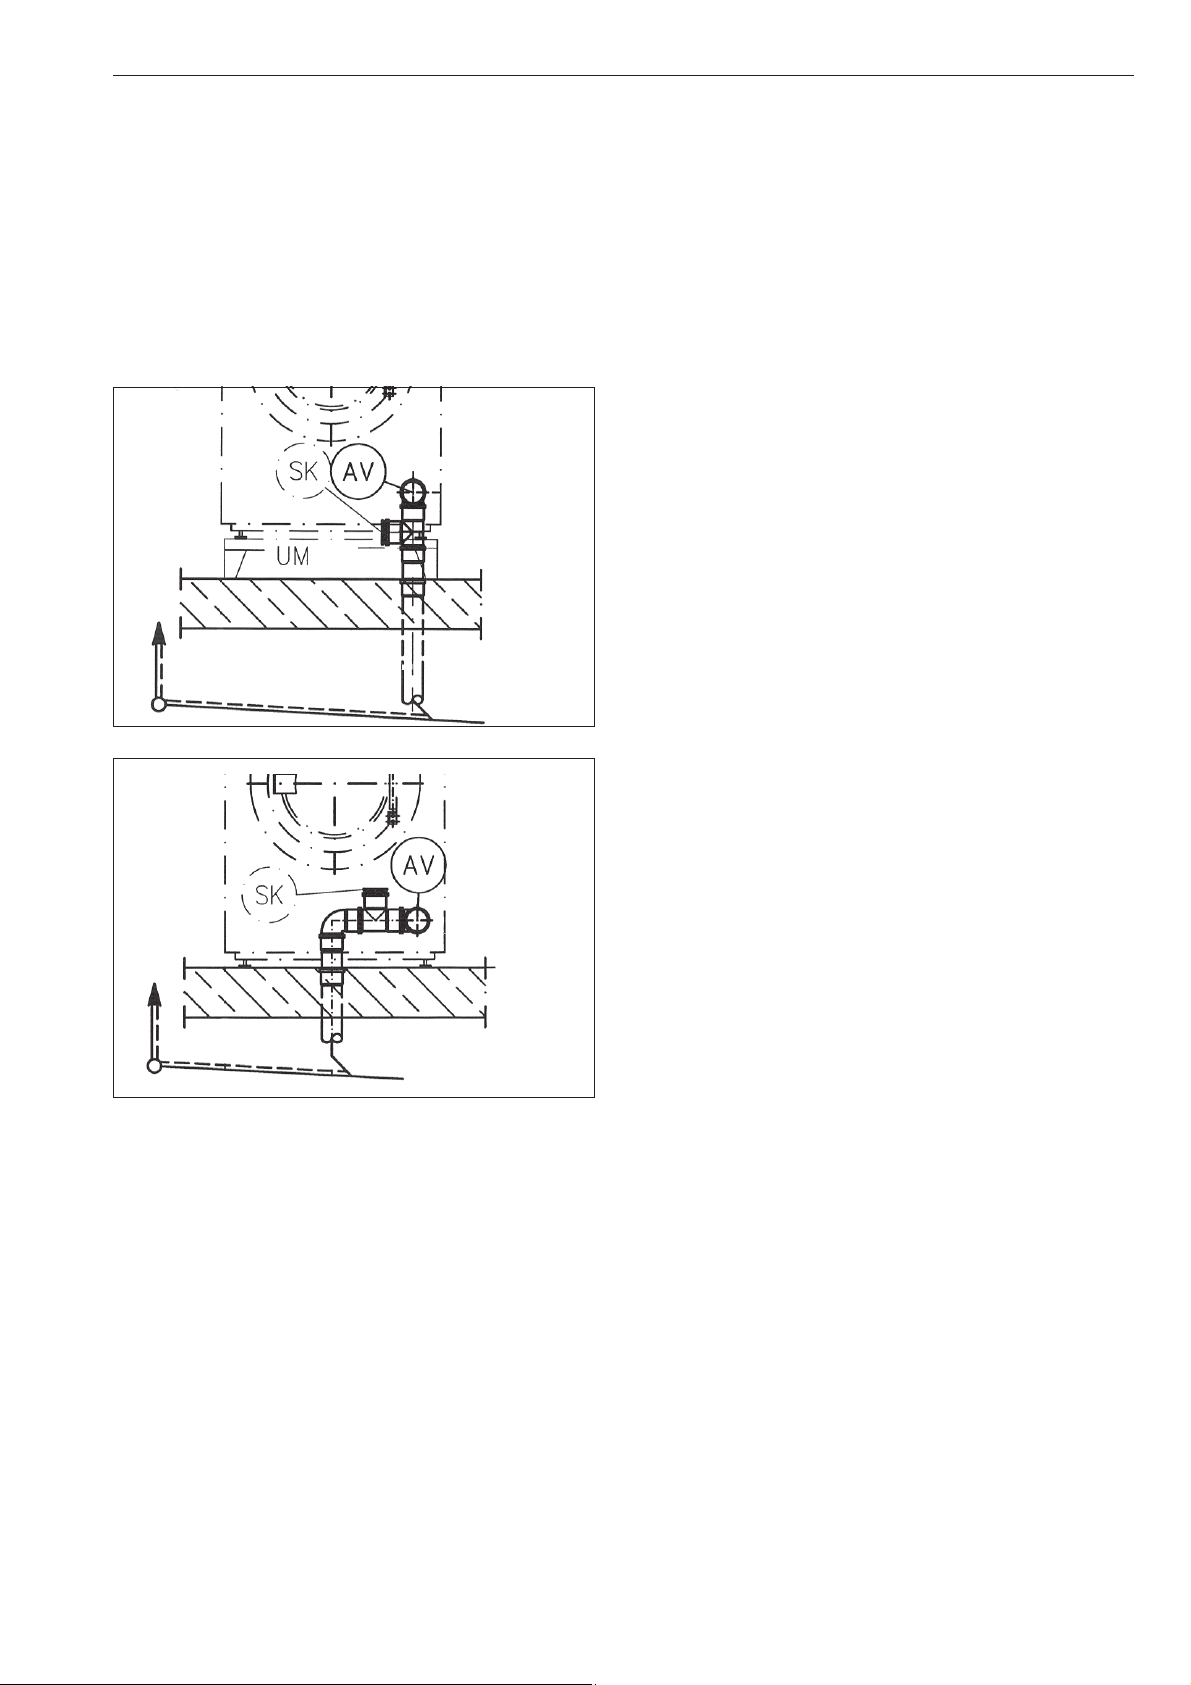
Vidange
Vidange AV côté machine DN 70, côté installation
manchon DN 70. Débit temporaire 200 l/min.
Dérivateur de mousse SK
En cas de formation de mousse excessive, de la
mousse peut sortir par l'évacuation des buées. Pour
évacuer la mousse, une vidange avec siphon peut
être fabriquée avec des tuyaux du commerce et
ajoutée.
Exemples d'installation
Branchement électrique
Le branchement doit être effectué uniquement par un
électricien agréé et être conforme aux normes en vi
-
gueur imposées et aux prescriptions spécifiques à
chaque pays.
Ouvrir le couvercle de la machine. La borne de rac
-
cordement se trouve sur le support organes électri
-
ques.
La machine ne doit être raccordé à la tension et la
fréquence indiquées sur la plaque signalétique.
La machine est équipée d'un transformateur multi-
tap.
Machines à laver vapeur (réglage d'usine) :
3N, 208V, 60 Hz commutable par un technicien Miele
en 3N, 240V, 60Hz
Machines à laver elèctrique (réglage d'usine) :
3N, 230V, 50/60Hz
commutable par un technicien Miele en 3N, 208V,
60Hz
Pour le raccordement fixe, une déconnexion tous pô
-
les doit être présente côté installation. Ce dispositif
peut être constitué d'un interrupteur à ouverture de
contact de min. 3 mm. Il peut s'agir d'un disjoncteur
automatique, de fusibles ou de contacteurs.
La prise ou le dispositif de sectionnement doivent
toujours être accessibles.
Si le lave-linge est débranché, le dispositif de sec-
tionnement doit être verrouillable ou le point de sec-
tionnement doit pouvoir être surveillé.
Veuillez respecter le schéma électrique fourni !
Liaison équipotentielle
Effectuer une liaison équipotentielle en cas courant
de fuite >10 mA.
Le chauffage électrique est réglé sur
9 kW PW 6107
15 kW PW 6137, PW 6167
18 kW PW 6207
Le niveau de bain lessiviel minimal pour l'activation
du chauffage est de 50 mm à la colonne d'eau.
Le moteur est protégé contre les surcharges par un
klixon.
Installation et raccordement
35
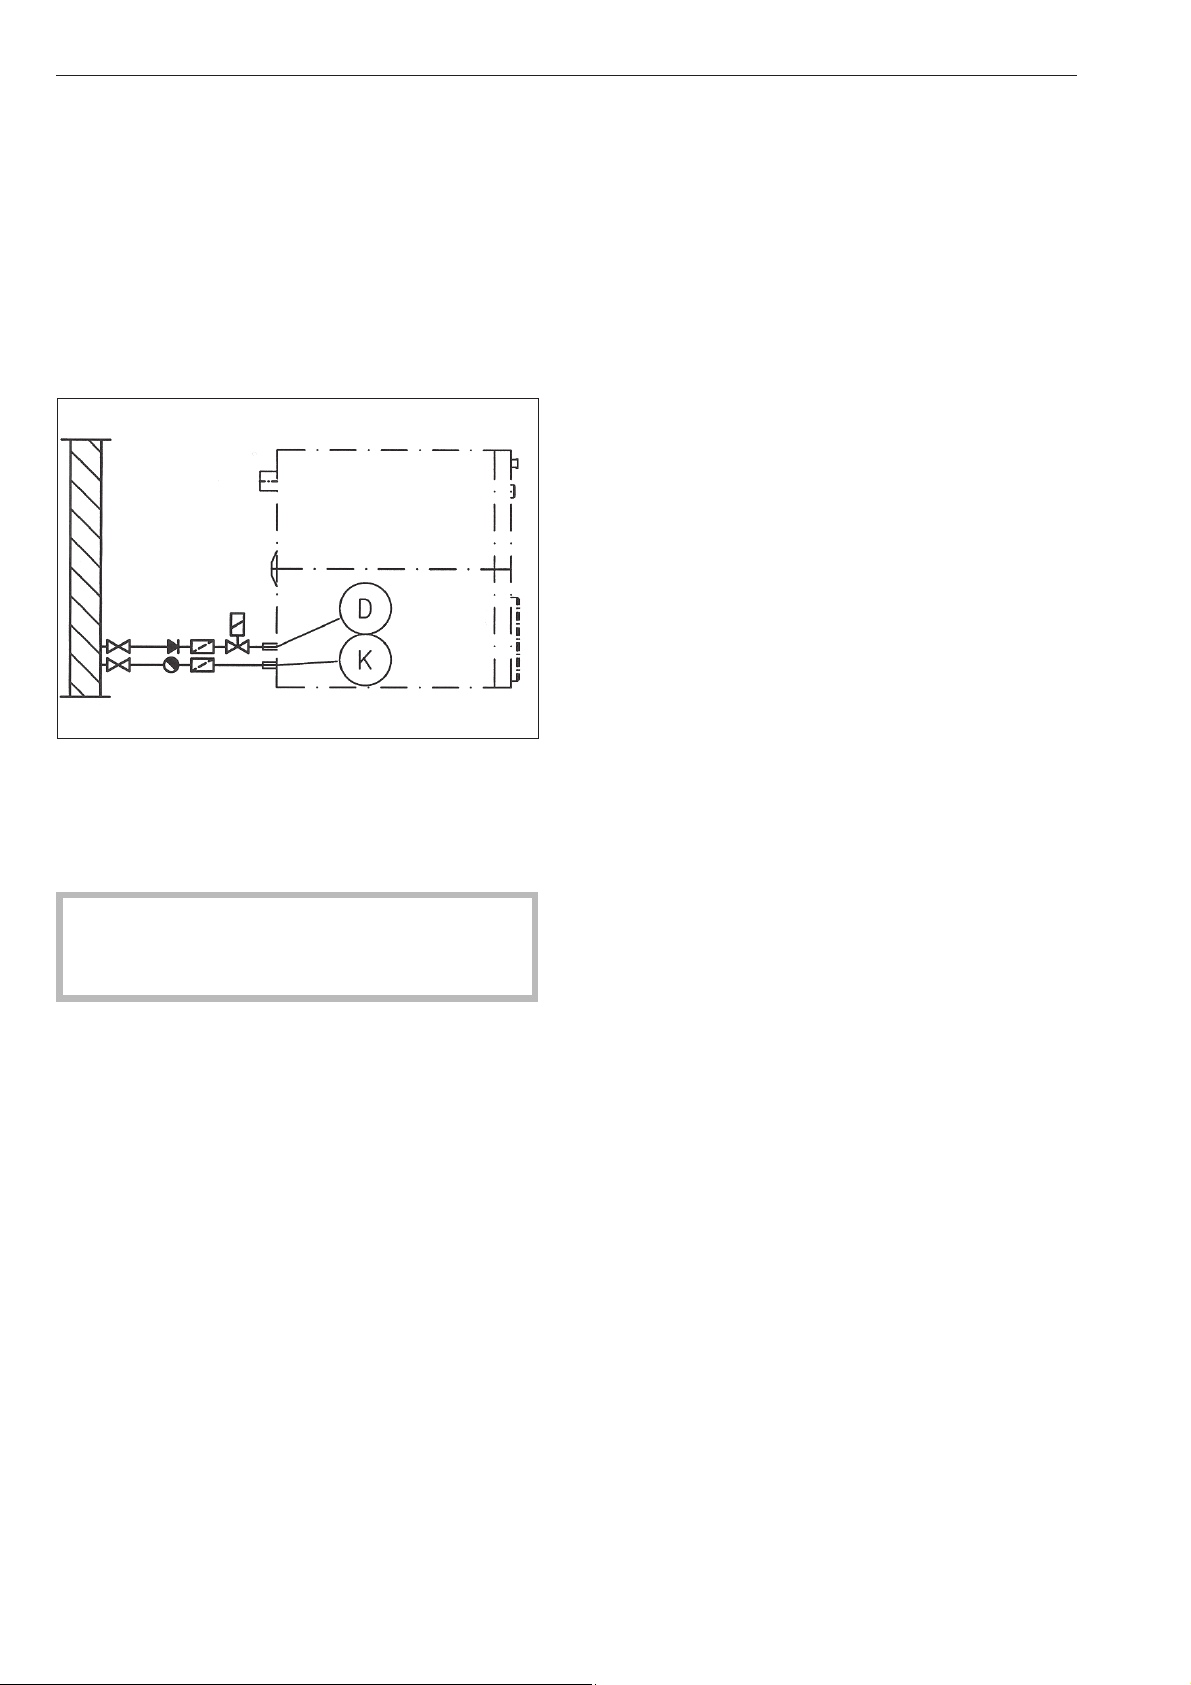
Raccorder les pompes doseuses
Les bornes de raccordement des 4 pompes doseu
-
ses qui peuvent fonctionner sans module multifonc
-
tions se trouvent derrière la tôle, à côté du raccorde
-
ment électrique. Voir le plan d'installation fourni.
Raccordement de vapeur
Seul un installateur habilité peut effectuer l'installation
du raccordement de vapeur. Voir la notice d'installa
-
tion fournie.
Electrovanne vapeur, filtre vapeur et robinet de va-
peur sont à prévoir par l’exploitant.
La vanne de vapeur et le purgeur eau condensée
sont disponibles chez les revendeurs spécialisés ou
au Miele.
Une fois la machine montée et raccordée, il faut
impérativement reposer toutes les pièces d'habil-
lage externes.
Installation et raccordement
36

PW 6107 EL,D PW 6137 EL,D PW 6167 EL,D PW 6207 EL,D
Hauteur en mm 1250 1250 1400 1400
Largeur en mm 804 804 924 924
Profondeur en mm 925 1005 1007 1140
Profondeur porte ouverte
en mm
1340 1420 1422 1555
Poids en kg 324 342 454 495
Contenu du tambour en l 100 130 160 200
Capacité maxi en kg
(linge sec)
10 13 16 20
Tension Voir plaque signalétique
Puissance de raccorde
-
ment
Voir plaque signalétique
Fusible Voir plaque signalétique
Labels de conformité Voir plaque signalétique
Charge au sol max. en
fonctionnement en N
3970 4304 5469 6076
Niveau de pression
acoustique en dB (A)
<80
Caractéristiques techniques
37

38

39

Sous réserve
de modifications/1016
,PSRUWHU
0LHOH/LPLWHG
3URIHVVLRQDO'LYLVLRQ
&OUR6ALLEY$RIVE
6AUGHAN/.,+6
0HONE
&AX
WWWMIELEPROFESSIONALCA
PROFESSIONAL MIELECA
0LHOH3URIHVVLRQDO7HFKQLFDO6HUYLFH
0HONE
&AX
SERVICEPROFESSIONAL MIELECA
*HUPDQ\
0DQXIDFWXUHU
-IELE#IE+'
#ARL-IELE3TRAE
'àTERSLOH
&DQDGD
M.-Nr. 09 118 330 / 03
