A4 M ult i- Funct ion Print er
AM30 Series User’s Manual
Regulat or y m ode l:
AM3 0 XX, AM3 0 XXA, AM3 0 XXAF, AM 3 0 XXAFP
Avision I nc.

i
i
Trade m ark s
Microsoft is a U.S. regist ered tradem ark of Microsoft Corporation.
Windows, Windows Vista, Windows 7, Windows 8, and Windows 10 are eit her registered
tradem arks or tradem arks of Microsoft Corporat ion in t he United St at es and/ or ot her count ries.
Energy Star
®
is a registered tradem ark of the U.S. governm ent .
I BM, I BM PC are registered t radem arks of I nt ernat ional Business Machines Corp.
Ot her brands and product nam es herein are t radem arks or registered t radem arks of t heir
respect ive holders.
Copyright
All right s reserved. No part of this publicat ion m ay be reproduced, t ransm itt ed, transcribed,
st ored in a ret rieval system , or t ranslated into any language or com put er language, in any
form or by any m eans, electronic, m echanical, m agnet ic, optical, chem ical, m anual, or
ot herwise, wit hout t he prior writt en perm ission of Avision I nc.
Mat erial scanned by t his product m ay be prot ected by governm ent al laws and ot her
regulations, such as copyright laws, t he cust om er is solely responsible for com plying with all
such laws and regulat ions.
W a rra nt y
The inform ation cont ained in this docum ent is subj ect t o change wit hout not ice.
Avision m akes no warrant y of any kind with regard to t his m at erial, including, but not
lim it ed t o, the im plied warrant ies of fit ness for a part icular purpose.
Avision shall not be liable for errors cont ained herein or for incident al or consequent ial
dam ages in connect ion wit h the furnishing, perform ance, or use of this m aterial.

iii
Safet y I nform a tion
When using t his equipm ent , t he following safety precaut ions should always be followed.
Safe t y During Operat ion
I n t his m anual, t he following im port ant sym bols are used:
W ARN I N G:
I ndicat es potent ially hazardous situat ions, which if inst ructions are not follow ed, could result
in deat h or serious inj ury.
CAUTI ON :
I ndicat es a pot ent ially hazardous sit uat ion which, if instructions are not followed, m ay result
in m inor or m oderat e inj ury or dam age t o propert y.
I m port a nt:
I ndicat es operat ional requirem ent s and rest rictions. Please read and follow t hese
instruct ions t o ensure a proper operat ion and t o avoid dam age t o the m achine.
N ot e :
I ndicat es furt her explanat ion or clarificat ion. Reading this is highly recom m ended.
W ARN I N G:
To avoid hazardous electric shock or fire, do not rem ove any covers or screws other than
t hose specified in t his m anual.
CAUTI ON :
To reduce t he risk of fire, use only no.26AWG or larger telecom m unication line cord.
Disconnect the power plug by pulling the plug, not the cable.

i
v
Precaut ions
Do not install t he equipm ent near heating or air conditioning unit s.
Do not install t he equipm ent in a hum id or dusty place.
Place t he equipm ent in a separat e area with good vent ilat ion.
I t is recom m ended t o m ake good use of recycled paper for copying.
Do not dispose of t he t oner cartridge. Put the used t oner cart ridge int o t he bundled
plastic bag, and then return it t o a dealer or service representat ive. The lat t er recycles
or deals with t he collected toner cart ridges in accordance w ith t he relevant regulations.
The equipm ent is equipped wit h both the power- saving and standby m odes. The
equipm ent can not achieve zero energy consum pt ion state unt il it is not connected t o
any ext ernal power supply.
Ret ain t he box and packing m at erials for shipping purposes.
N ot ice
I m port a nt
Do not m ake copies of any it em for which copying is prohibit ed by law .
Copying t he following it em s are norm ally prohibit ed by t he local law:
Bank bills, revenue st am ps, bonds, stock cert ificat es, bank draft s, checks.
Copyright s and Tradem ark s
Ethernet is a registered t radem ark of Xerox Corporat ion.
Microsoft, Windows, Windows NT, Windows XP, and Windows Vista are registered tradem arks
of Microsoft Corporation in t he Unit ed Stat es and/ or ot her count ries.
Ot her product nam es used herein are for ident ificat ion purposes only and m ay be t radem arks
of t heir respective com panies. We disclaim any and all right s to t hose m arks.
W a r r a nt y
The inform at ion cont ained in t his docum ent ( s) is subj ect t o change w ithout notice.
The m anufact urer m akes no warrant y of any kind wit h regard t o this m at erial, including, but
not lim it ed t o, t he im plied warrant ies of fitness for a part icular purpose.
The m anufact urer shall not be liable for errors contained herein or for incident al or
consequent ial dam ages in connect ion wit h the furnishing, perform ance, or use of this
m at erial.

v
Safe t y I nst ruct ion
This print er is a page print er which is operat ed by m eans of a LSU ( Laser Scanning Unit )
printhead. There is no possibility of danger from t he LSU print head, provided t he print er is
operated according t o t he inst ructions in t his m anual. Since radiation em itt ed by t he LSU
print head is com pletely confined within protective housings and ext ernal covers, the LSU
beam s cannot escape from t he m achine during any phase of user operat ion.
Do not place a coffee cup, vase, or ot her liquid-filled cont ainer on t he m achine. Spillage
can dam age the m achine’s elect rical part s and insulat ion.
Take care not t o drop paper clips, st aples, or any other m et al obj ects into t he m achine.
When clearing paper j am s, refer t o t he instructions in t his m anual.
Before disconnect ing t he plug, turn the m achine off. Make sure your hands are dry.
Hold t he plug it self, not it s cord, when disconnecting it from t he recept acle.
Never att em pt t o open any fixed cover.
Do not at t em pt t o alter t he m achine or its part s.
Under norm al condit ions t he sm all quant it ies of ozone gas produced by t he m achine are
harm less. However, if t he m achine is used for an ext ended period or wit hin a sm all room ,
you should m ake sure t hat t he area is adequately vent ilated. Also vent ilat e t he room if
you not ice t he m achine sm ells after a period of frequent or extended use.
Do not m odify t his product , as a fire, electrical shock, or breakdown could result . I f t he
product em ploys a LSU print head, t he LSU beam source could cause blindness.
Do not at t em pt t o rem ove the covers and panels which have been fixed to t he product.
Som e products have a high- volt age part or a LSU beam source inside t hat could cause
an elect rical shock or blindness.
I f t his product becom es inordinat ely hot or em its sm oke, or unusual odor or noise,
im m ediat ely turn OFF t he power sw itch, unplug the power cord from t he power outlet ,
and t hen call your aut horized service represent at ive. I f you keep on using it as is, a fire
or electrical shock could result .
I f t his product has been dropped or it s cover dam aged, im m ediately t urn OFF t he power
swit ch, unplug t he power cord from t he power out let , and then call your aut horized
service representat ive. I f you keep on using it as is, a fire or elect rical shock could
result .
The inside of t his product has areas subj ect t o high t em perat ure, which m ay cause
burns. When checking the inside of the unit for m alfunct ions such as paper m is- feed, do
not touch the locat ions ( around t he fusing unit, et c.) which are indicated by a 「Caution!
Hot Surface」caut ion label.
Do not store the m achine’s consum ables in any of t hese locations:
Where t he t em perat ure or hum idity m ay be excessively high.
Where flam m able it em s or liquids are stored.
I n direct sunlight .
I n
dust y conditions.

v
i
Federal Com m unica t ions Com m ission ( FCC) com plia nce infor m a tion
st a tem ent
Part 1 5
This equipm ent has been t est ed and found t o com ply wit h t he lim it s for a Class B digit al
device, pursuant t o Part 15 of t he FCC Rules. These lim it s are designed t o provide
reasonable protection against harm ful interference in a residential inst allat ion. This
equipm ent generates, uses and can radiat e radio frequency energy and, if not inst alled and
used in accordance with t he inst ructions, m ay cause harm ful interference t o radio
com m unications.
However, t here is no guarant ee t hat int erference w ill not occur in a part icular installat ion. I f
this equipm ent does cause harm ful int erference t o radio or television reception, w hich can be
determ ined by t urning the equipm ent off and on, t he user is encouraged to t ry t o correct t he
int erference by one of the following m easures:
Reorient or relocat e t he receiving antenna.
I ncrease the separat ion between the equipm ent and receiver.
Connect t he equipm ent int o an outlet on a circuit different from t hat t o which t he
receiver is connected.
Consult t he dealer or an experienced radio/ TV t echnician for help.
This device com plies wit h Part 15 of t he FCC Rules. Operat ion is subject t o t he following t wo
condit ions: ( 1) This device m ay not cause harm ful int erference, and ( 2) t his device m ust
accept any int erference received, including int erference that m ay cause undesired operat ion.
European Union Regula tor y N ot ice
Products bearing the CE m arking com ply wit h t he following EU Directives:
Low Volt age Direct ive 2014/ 35/ EC
EMC Direct ive 2014/ 30/ EC
Restrict ion of t he use of cert ain hazardous substances ( RoHS) Directive 2011/ 65/ EU
RED ( Radio Equipm ent Direct ive) ( 2014/ 53/ EC)
This product satisfies the Class B lim its of EN55022, EN55024, safety requirem ents of EN
60950 and ROHS requirem ent s of EN50581.
* This m achine is cert ified as Class 1 Laser/ LED product.

vii
FCC Caut ion:
Any changes or m odifications not expressly approved by t he party responsible for com pliance
could void the user’s aut horit y t o operat e t his equipm ent .
This device is int ended only for OEM int egrat ors under t he follow ing condit ions:
1) The ant enna m ust be installed such t hat 20 cm is m aint ained between t he ant enna and
users.
2) The t ransm itt er m odule m ay not be co- locat ed wit h any ot her transm itter or ant enna.
I MPORTAN T N OTI CE:
FCC Radiat ion Exposure St at em ent :
This equipm ent com plies wit h FCC radiat ion exposure lim it s set fort h for an uncont rolled
environm ent . This equipm ent should be installed and operat ed with m inim um dist ance 20cm
between the radiat or & your body. To m aint ain com pliance wit h FCC RF exposure com pliance
requirem ent s, please avoid direct contact to the transm it t ing ant enna during t ransm itt ing.
I C N ot ice:
Operation is subj ect t o the following t wo condit ions:
1) This device m ay not cause interference and
2) This device m ust accept any int erference, including int erference t hat m ay cause undesired
operation of t he device.
I MPORTAN T N OTE:
I C Radiat ion Exposure St at em ent :
This equipm ent com plies wit h I C radiation exposure lim its set fort h for an uncontrolled
environm ent. End users m ust follow t he specific operat ing inst ructions for sat isfy ing RF
exposure com pliance. This equipm ent should be inst alled and operat ed with m inim um
distance 20cm bet ween t he radiator & your body.
This transmit t er m ust not be co-locat ed or operat ing in conj unction wit h any other antenna
or transm it ter.
Règlem e n t d’ I ndust ry Ca nada
Les condit ions de fonct ionnem ent sont suj et t es à deux conditions:
( 1) Ce périphérique ne doit pas causer d’int erférence et.
( 2) Ce périphérique doit accept er tout e int erférence, y com pris les interférences pouvant
pert urber le bon fonctionnem ent de ce périphérique.
Disposal of W ast e Equipm e nt by Users in Privat e Union
This sym bol on t he product or on it s packaging indicates that t he product can not be
disposed of with your other household wast e. I nstead it should be sent to appropriate
facilit ies for recovery and recycling in an effort t o protect hum an healt h and the environm ent .
Fore m ore inform ation about where you can drop off your waste equipm ent for recycling,
please cont act your local city office, your household waste disposal service or t he shop where
you purchased t he product .

vii
i
Product Sa fet y Guide
Please clearly read all these inst ructions, and follow all instructions and w arnings before
installing and using the device.
The following indicat ions are used in t his docum ent t o obviat e any chance of accident or
dam age t o you and/ or the device.
W ARN I N G I ndicates potent ially hazardous situat ions, which if inst ructions are
not follow ed, could result in death or serious inj ury.
CAUTI ON I ndicat es a potent ially hazardous sit uation which, if inst ructions are
not followed, m ay result in m inor or m oderat e inj ury or dam age t o
propert y.
W ARN I N G
Use only the USB cable t hat cam e wit h your device and avoid abrasions, cut s, fraying,
crim ping, and kinking. Using any other USB cable could cause fire, elect rical shock, or
inj ury.
Place t he device close enough t o the com puter so that the interface cable can easily
reach between t he device and the com put er.
Do not place or st ore t he device:
Out doors
Near excessive dirt or dust, water, or heat sources
I n locations subject to shocks, vibrat ions, high tem perat ure or hum idit y, direct
sunlight , st rong light sources, or rapid changes in t em perature or hum idit y
Do not use t he device with wet hands.
Never disassem ble, m odify, or at t em pt t o repair t he device or device option by yourself,
except as specifically ex plained in t he device's docum ent at ion. This could cause fire,
electrical shock, or inj ury.
Unplug the device and the USB cable, and refer servicing t o qualified serv ice personnel
under the following condit ions:
Liquid has entered the device.
Obj ect has entered t he device.
The device has been dropped, or the case has been dam aged.
The device does not operat e norm ally ( i.e. appearance of sm oke, st range sm ell,
odd noise, et c.) , or exhibit s a distinct change in perform ance.
Unplug t he device and the USB cable before cleaning.
ix
CAUTI ON:
Do not locat e t he device on racket y or aslope t ables. Do not locat e t he device on
unstable surface. The device m ay fall dow n and this m ay result in inj ury.
Do not place heavy obj ects on the unit . I t m ay cause unbalance and the device m ay fall
down. This m ay result in injury.
Store t he AC Power cord/ USB cable bundled out of the reach of children t o avoid the risk
of inj ury.
Keep plastic bags bundled out of t he reach of children t o avoid t he danger of
suffocat ion.
I f you are not going t o use t he device for a long period, unplug the USB cable from t he
electrical outlet.
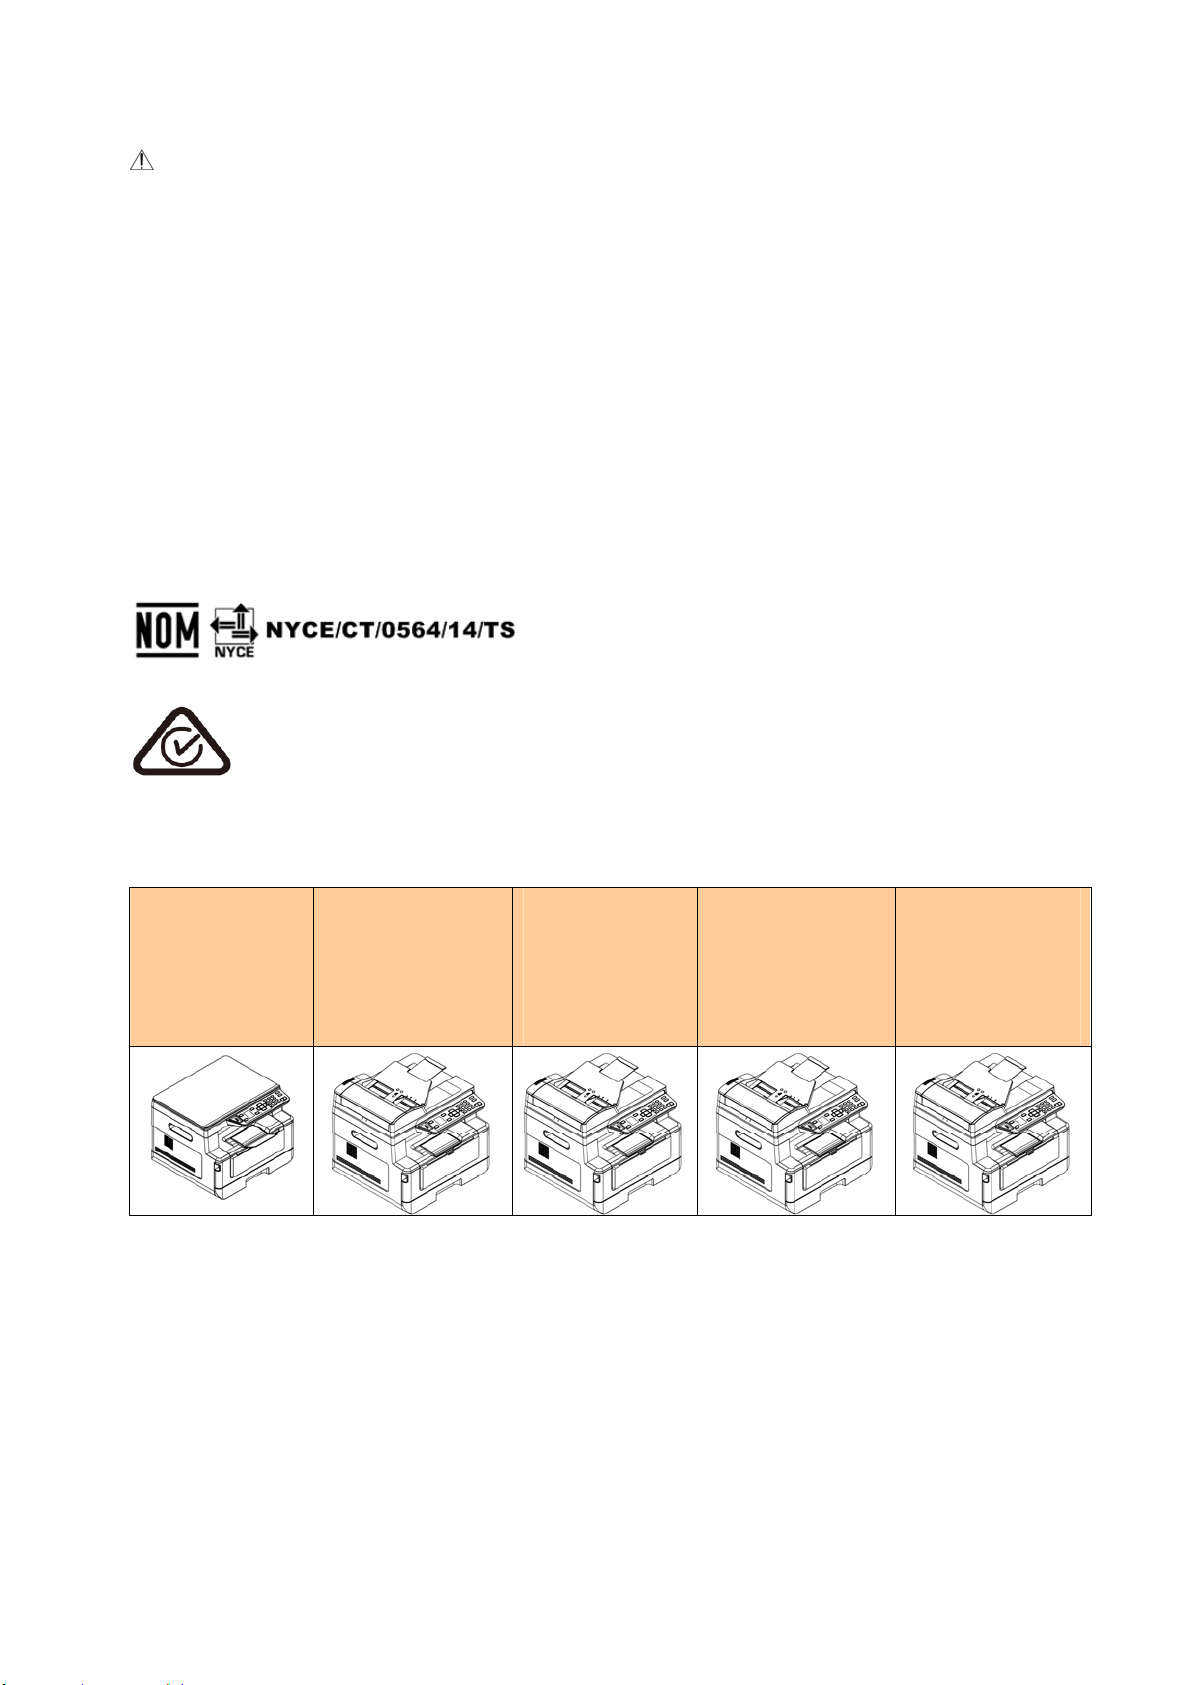
The docum e nt is int ende d t o be use d for the follow ing m odels:
AM 3 0 XX ( A
Fla tbed
MFP)
AM 3 0 XXA ( A
MFP w ith an
auto docum ent
fe eder)
AM 3 0 XXAP
( A MFP w it h
a docum e nt
fe eder, and
a pa ge
device )
AM 3 0 XXAF( A
MFP w ith an
auto docum ent
fe eder, and a
fax m odule)
AM 3 0 XXAFP
( A MFP w it h a
docum en t
fe eder, a fa x
m odule, and a
pa ge device )
1
1 . Overview
I ntroduction
Congrat ulations on your purchase of Avision’s MFP. This MFP is Avision’s m ost
innovat ive product which integrat es scan, copy, print , em ail, and fax functions into
one unit . The product supports docum ent size up t o legal size.
I n addit ion, through the net work port at t he back of t he m achine, the product is
able t o work as a net work print er. Through the color LCD screen and t he
easy- t o- use cont rol panel, m aking copy is easy j ust as you norm ally do on a
regular copier.
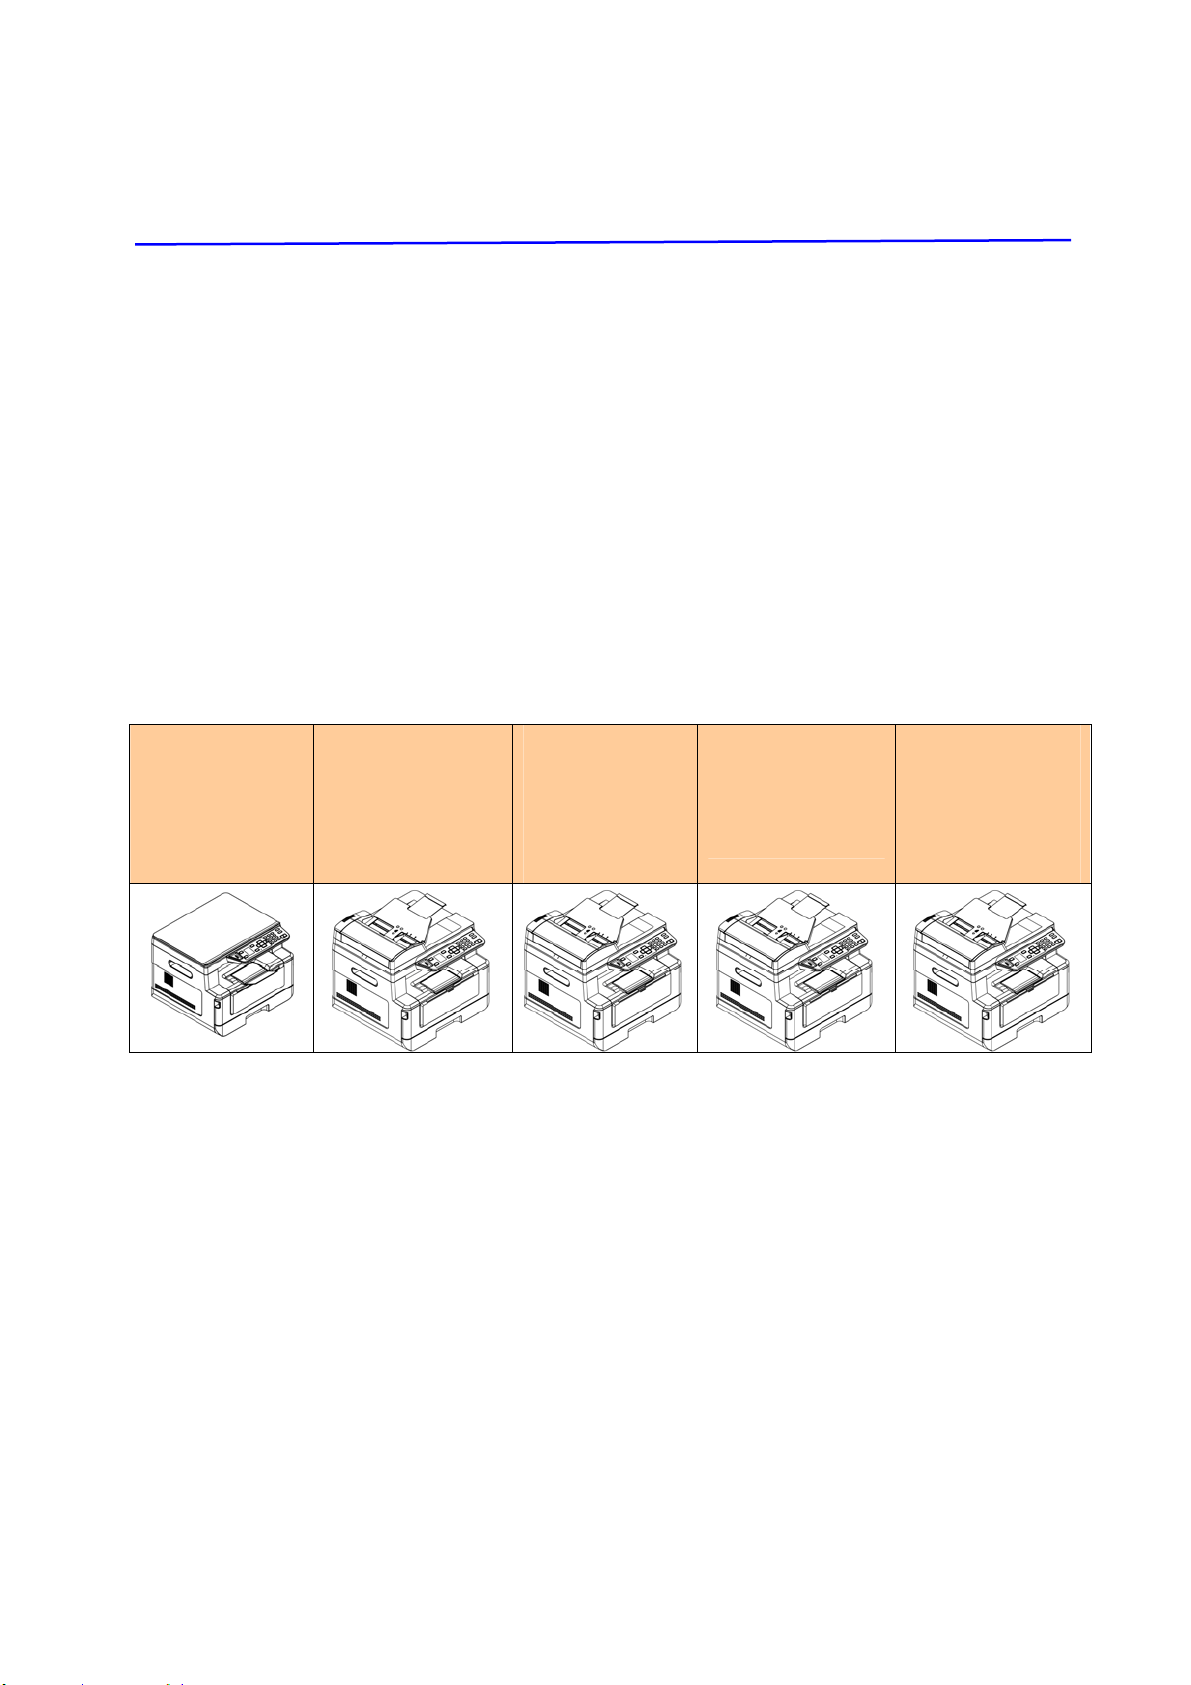
“ The product ” refers to the following MFP m odels. The following t able shows t he
differences bet ween each m odel:
AM 3 0 XX ( A
Fla tbed
MFP)
AM 3 0 XXA ( A
MFP w ith an
auto docum ent
fe eder)
AM 3 0 XXAP
( A MFP w it h
a docum e nt
fe eder, and
a pa ge
device )
AM 3 0 XXAF( A
MFP w ith an
auto docum ent
fe eder, and a
fax m odule)
AM 3 0 XXAFP
( A MFP w it h a
docum en t
fe eder, a fa x
m odule, and a
pa ge device )
Aut o D ocum ent Fe e der: Auto Docum ent Feeder allows 1- Sided scanning
and copying for m ult i- page docum ent .
Fax m odule : With the opt ional fax m odule and a t elephone line, t he product
allows you t o use it as a fax m achine to send docum ent s t o your recipients.
W i- Fi : Wit h an ext ernal Wi- Fi USB dongle connect ed to t he USB port , the
product allows you t o connect your com puter through wireless connect ion.
Plus, if you have installed a MB App on your m obile devices, t he product
allows you t o scan and receive t he scanned im age from a m obile device.
Feat ures
Va rious Advanced Copy Fea t ures
The product is designed with various advanced copy feat ures which include I D
card copy, paper saver to copy m ult i-page docum ent ont o a single sheet, et c.

2
Print ing:
When the product is connected to a com put er t hrough the USB int erface or a
net w ork port, it is able to perform 2- Sided print ing t hrough a com puter on t he
network.
Scan- t o- e - m ail, USB, FTP or CI FS
The product offers an unprecedent ed docum ent delivery t echnology, t ransm itt ing
paper docum ent s elect ronically over the int ernet t o various destinat ions including
e- m ail addresses, t he MFP’s m em ory, an USB flash drive ( support s part it ion t ype
FAT16/ FAT32) , ft p servers, or som eone else’s com put er on the net work. The new
way to dist ribut e docum ents is faster, m ore cost effect ive, and safer t han any
tradit ional m et hods such as m ail, or courier.
Faxing ( for AM 3 0 XXF only) :
Wit h a built- in fax board and an addit ional t elephone line, the product is able t o
transm it your scanned docum ent to a fax m achine j ust like regular fax m achine.
Scanning:
When the product is connected to a com put er and the scanner driver is installed
ont o a connect ed com puter through t he USB port , it can be used as a full scanner
to capture phot os or docum ent s into your com puter.
Rem ot e Device Ma nagem e n t t hrou gh Em be dde d W eb Pa ge
The product provides an em bedded web page t o let t he syst em adm inist rator
rem otely m onitor t he product by m anaging an address book, checking t he
supplies stat us of t oner cart ridge.
3
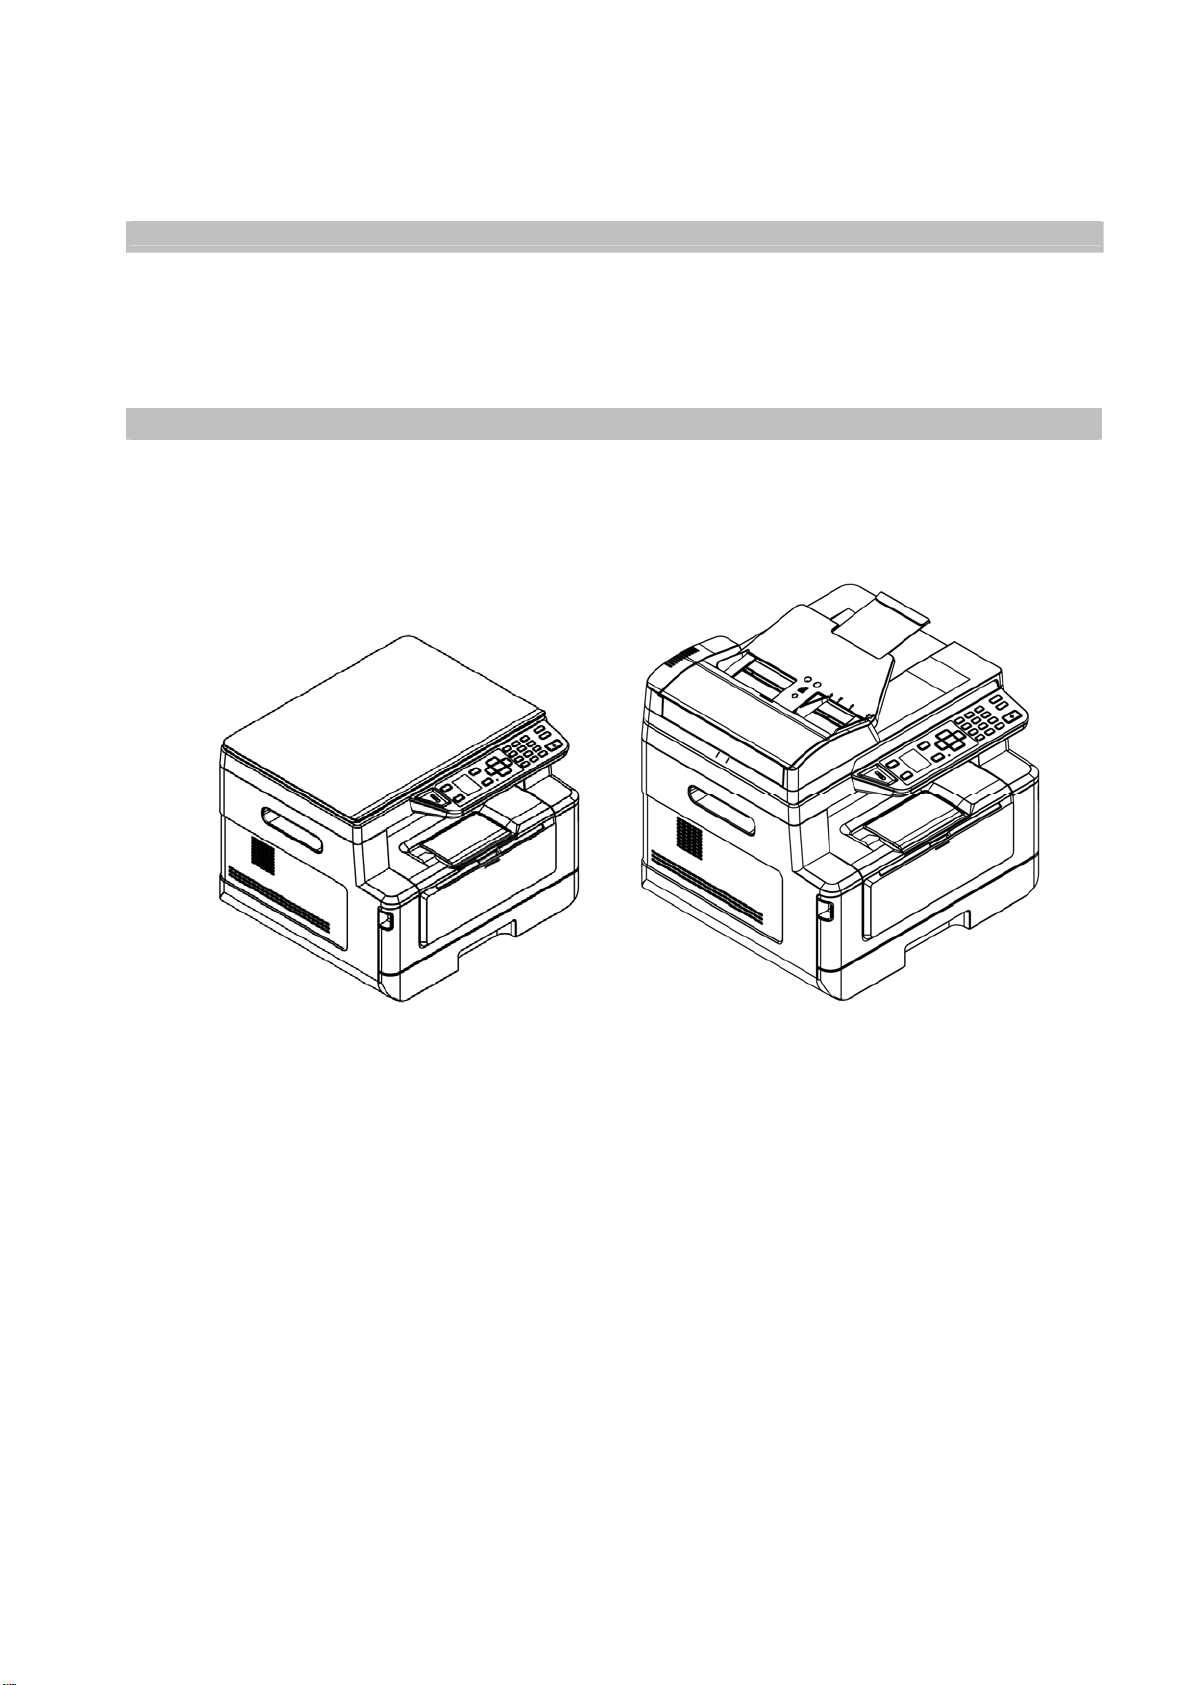
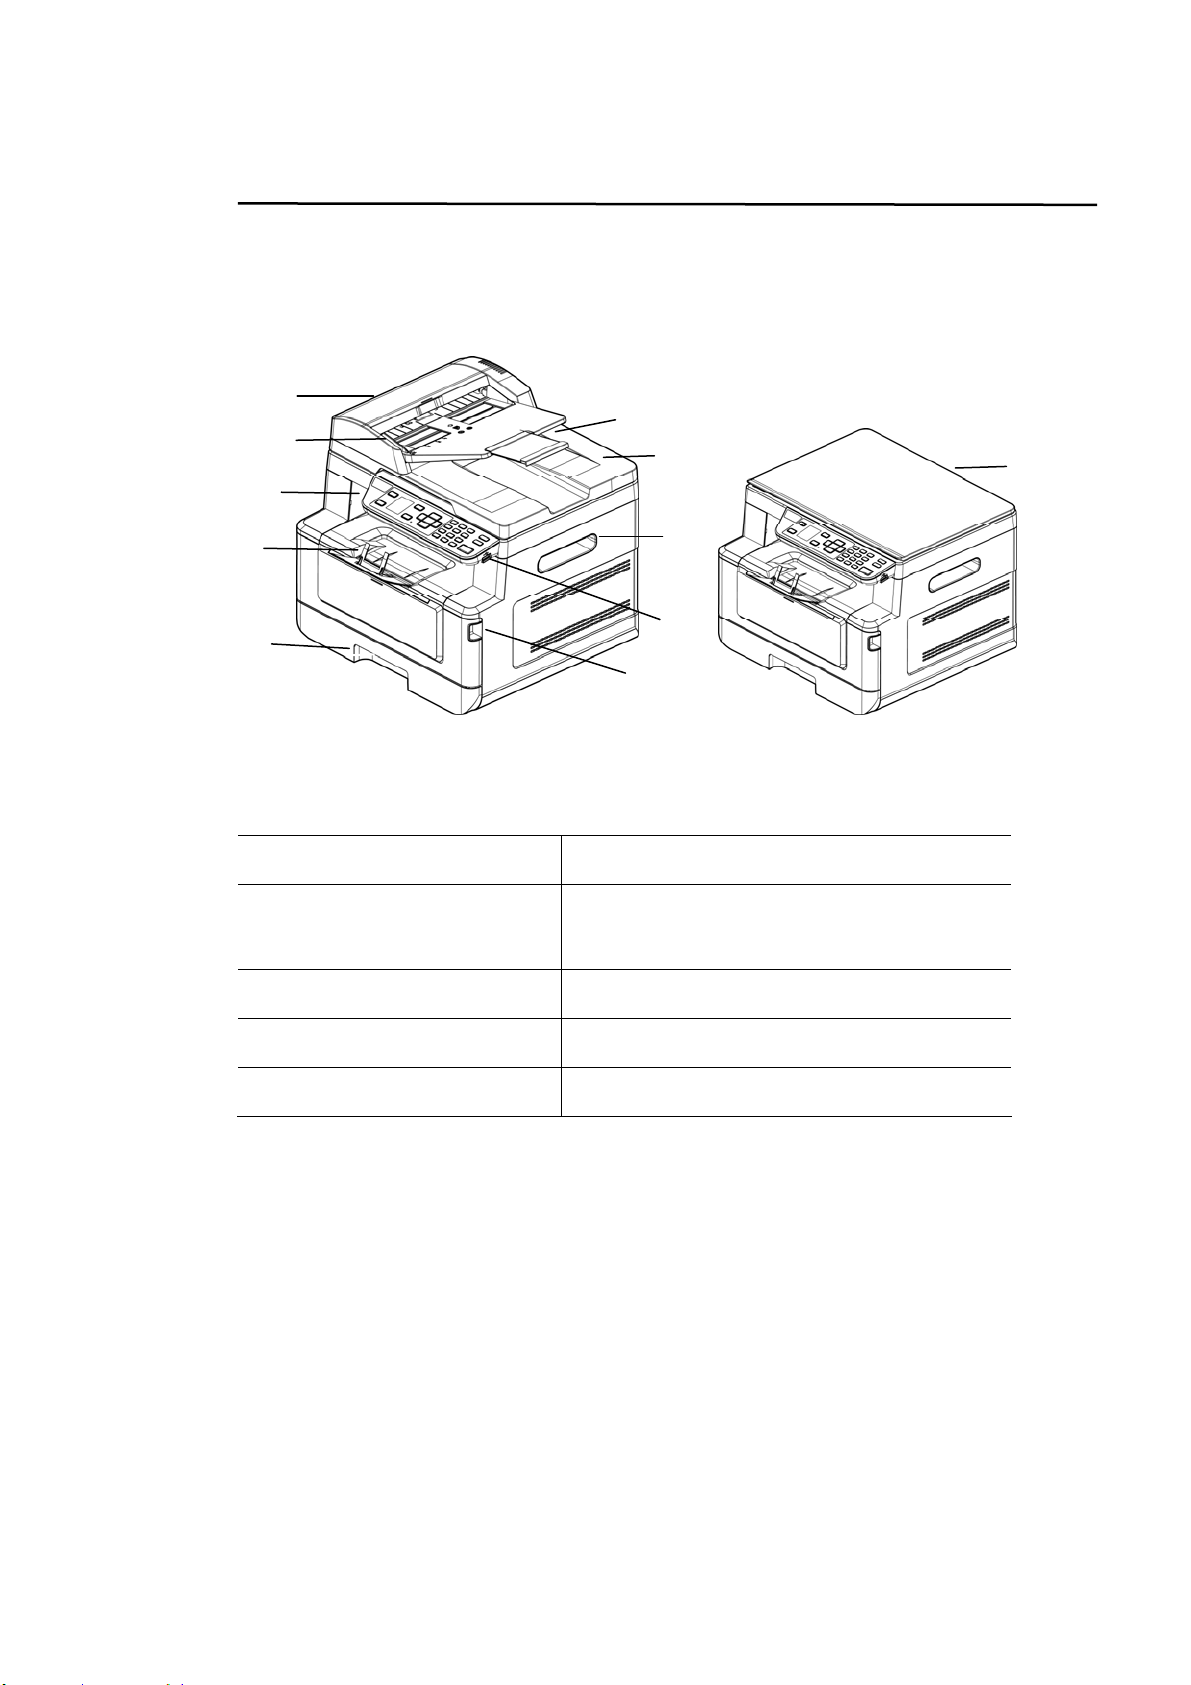
The Ex t erna l Vie w
The Front View
A M FP w it h a n Aut o D ocum e nt Feeder A Fla t be d MFP
1. Auto Docum ent Feeder
6. Handle of t he Front Cover
2. Paper Guide 7. USB Port ( USB Flash Drive,
FAT16/ FAT32)
3. Control Panel 8. Handle of t he Side Cover
4. Paper St opper 9. Docum ent Cover
5. Main Paper Tray 10. Ext ension
5
1 0
7
3
4
1
2
8
9
6
1 0
4
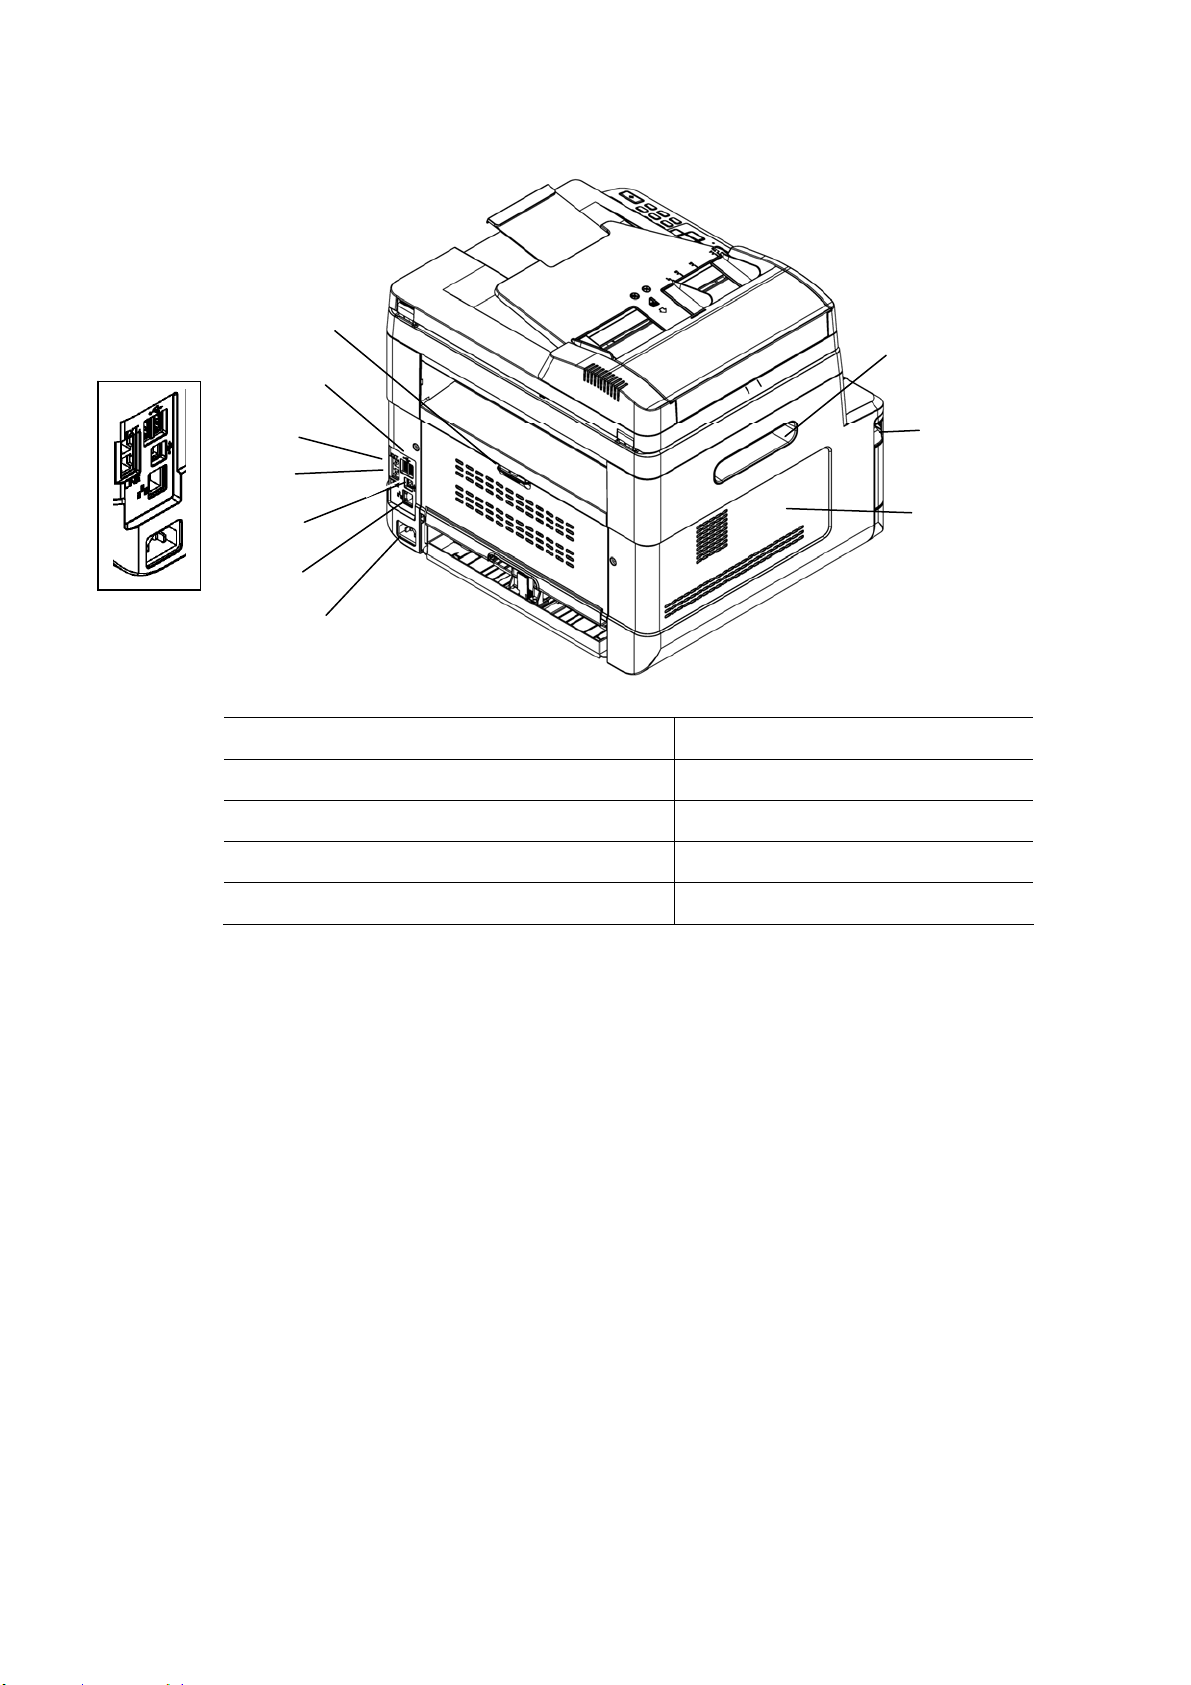
The Rear Vie w
1. Handle of t he Rear Cover 6. Network Port
2. USB Port ( Type A, to USB flash Disk )
7. Power Receptacle
3. Ext ( Telephone Set ) 8. Handle of t he Side Cover
4. Line ( Telephone Line) 9. Handle of t he Front Cover
5. USB Port ( Type B, to PC) 10. Side Cover
8
2
1
4
5
6
9
1 0
3
7
5
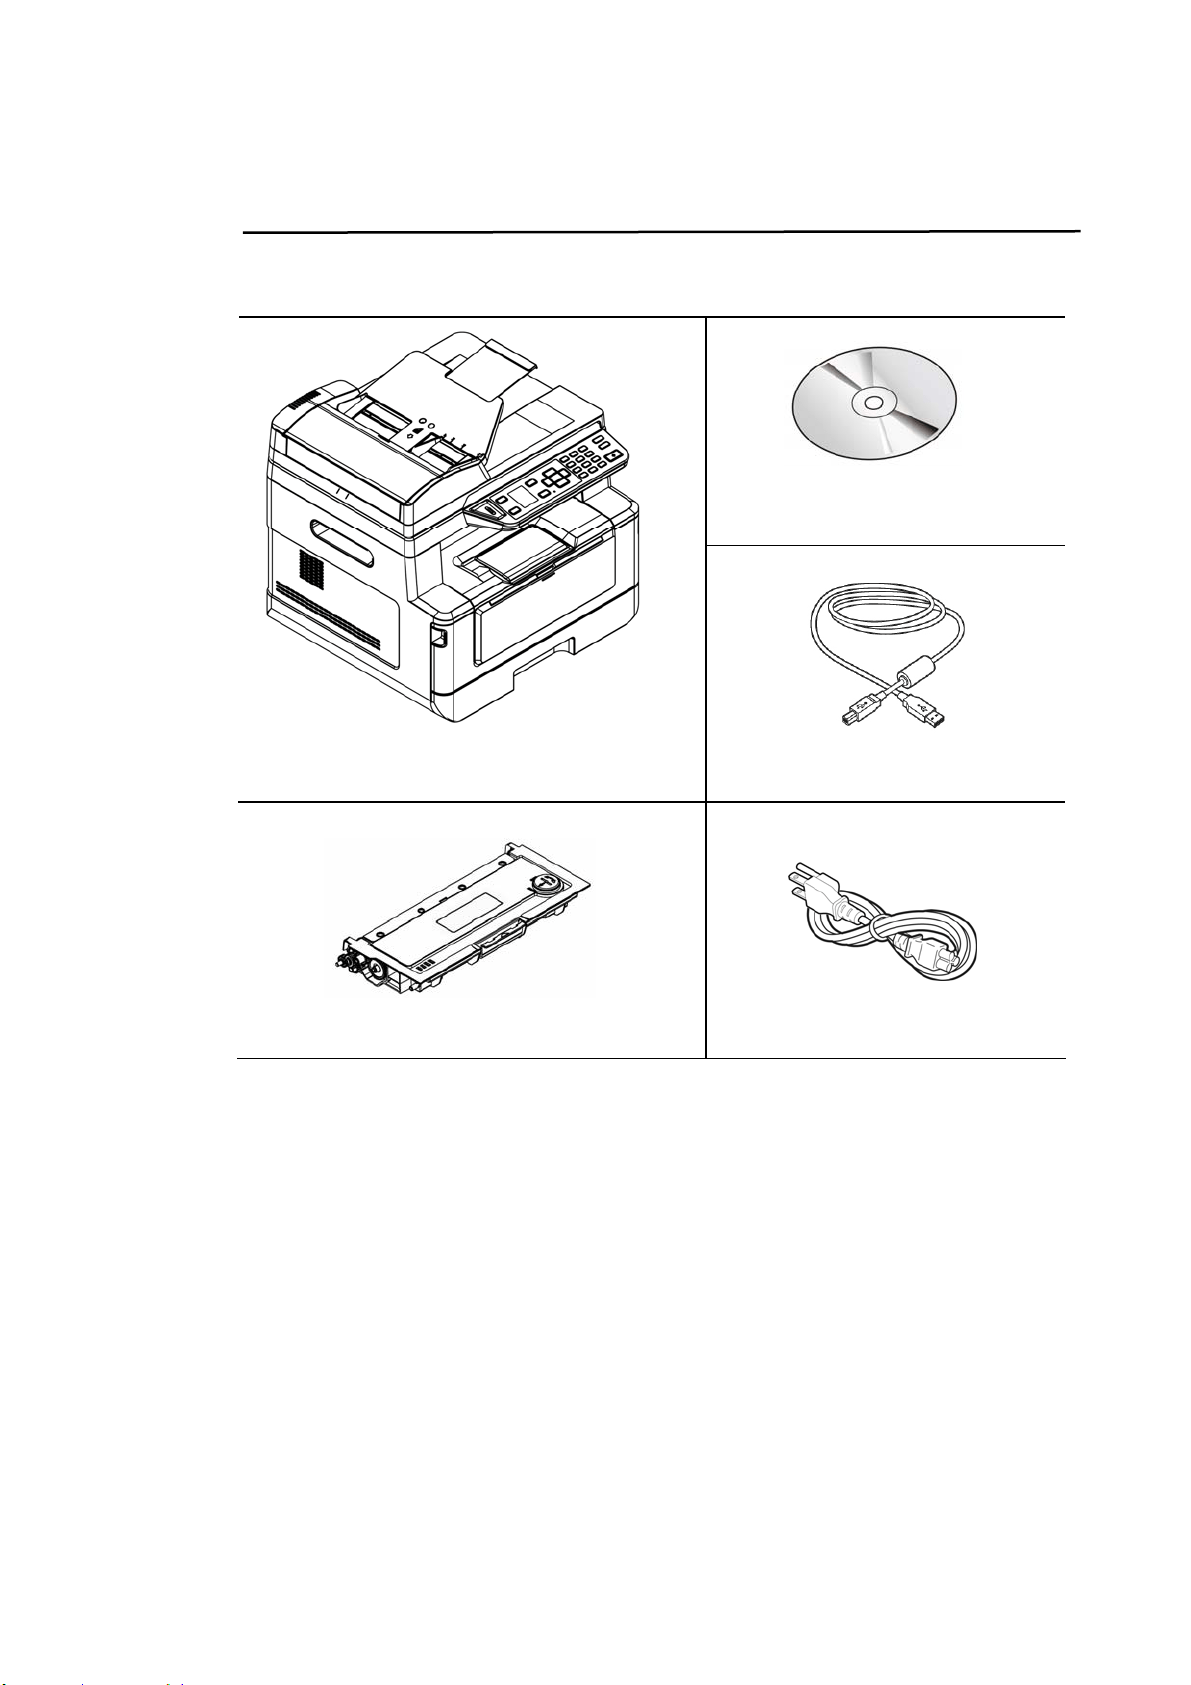
Pa ckage Cont e nt s
CD-ROM ( I ncluding Driver, and
User’s Manual)
Main Unit
USB Cable
Toner Cart ridge
Power Cord
6
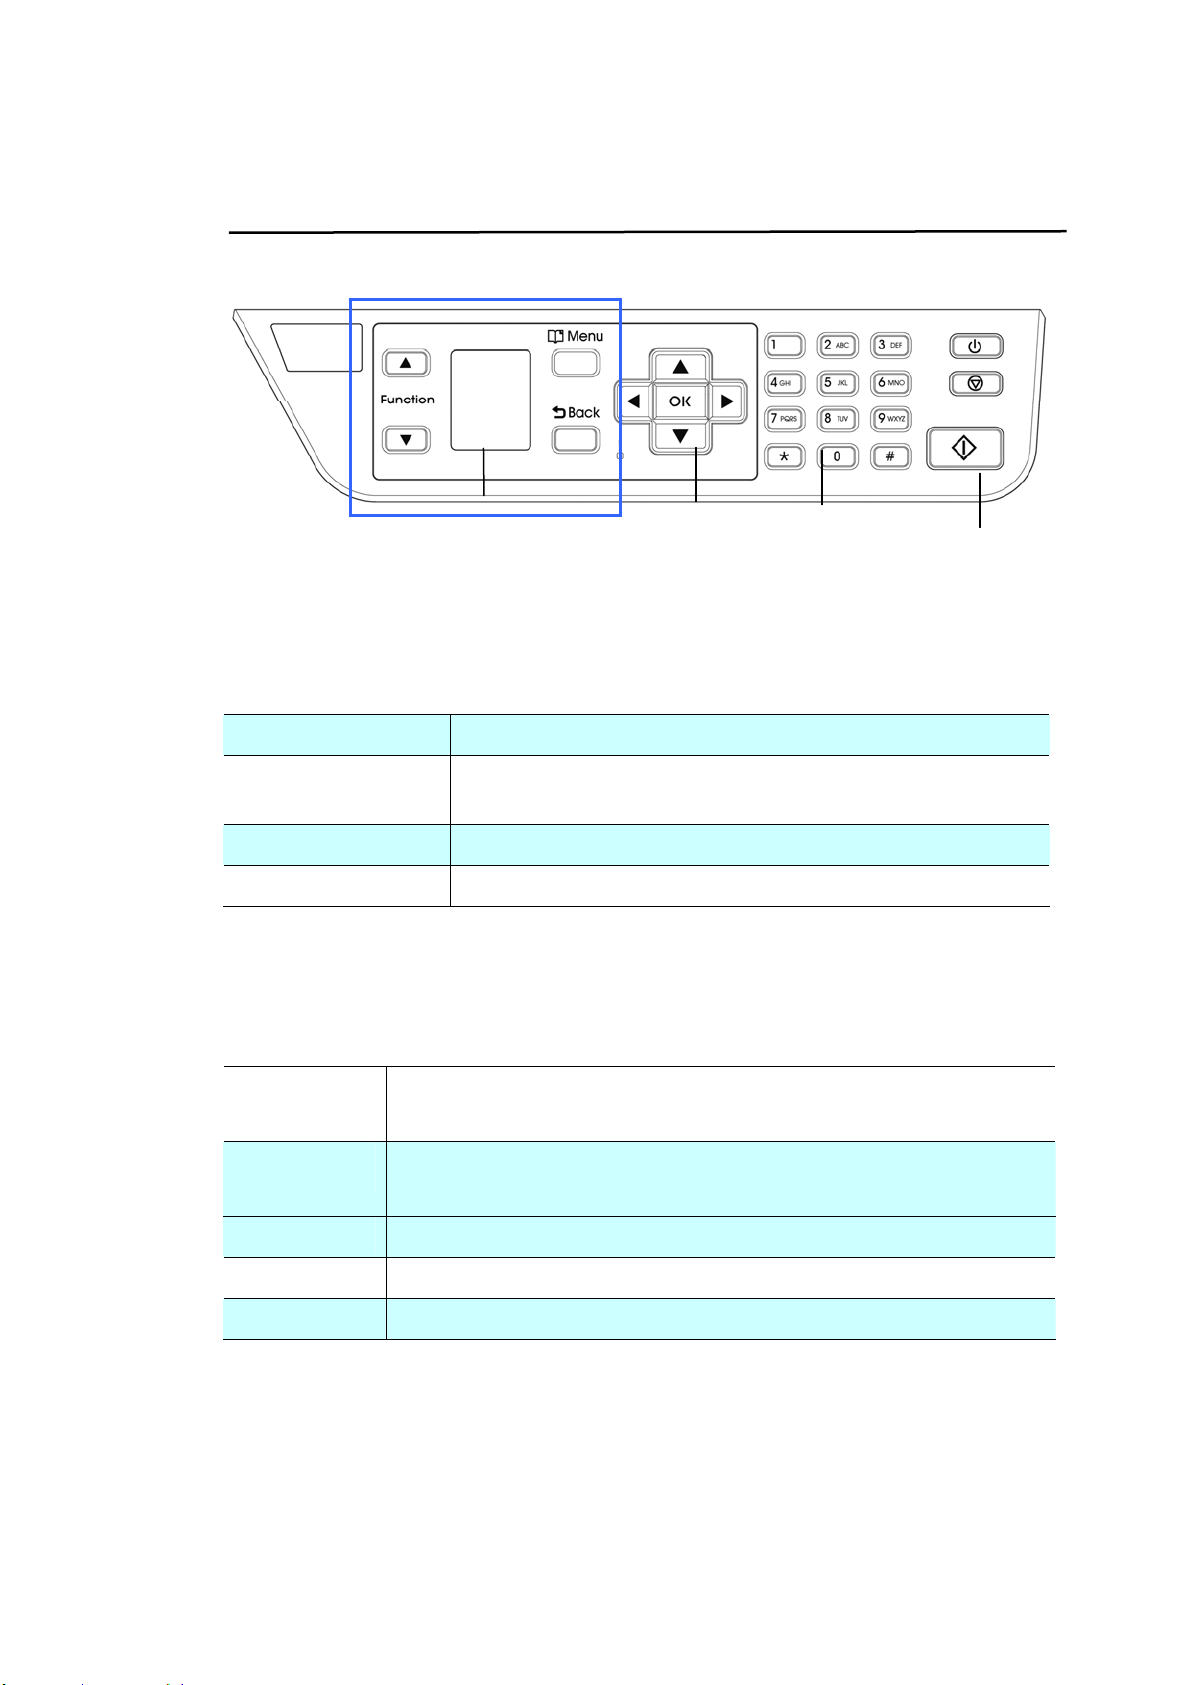
Cont rol Pa nel
Part A:
Funct ion / Used t o choose a working m ode.
LCD screen Used t o display inform ation and provide access t o t he
product’s functions.
Menu Used t o ent er t he Menu m ode.
Back
Used t o go back t o t he previous level.
Part B: Function Keys
◄
Used t o scroll backwards through m enu selection.
Used t o delet e t ext while ent ering a t ext .
►
Used t o scroll forwards t hrough m enu selection.
Used t o add a space from t he right while entering a text .
OK
Used t o confirm a select ion in Menu m ode.
/ Used t o display or select an opt ion.
LED Light Used t o indicat e t he m achine’s st atus.
Part C: N um eric/ Cha ra ct er Keypa d
Used t o ent er copy quant ity, fax num ber.
Part A
Part B
Part D
Part C
7
Part D: Start Butt on & Ot her But tons
Used t o choose the Start but t on to perform t he copy, scan, fax, e- m ail, or filing
funct ion.
Pow e r: Press to t urn on t he m achine.
St op/ Cancel: Press to pause a current j ob.
St a rt : Press t o st art a copy, scan-t o, fax, or ot her j ob.
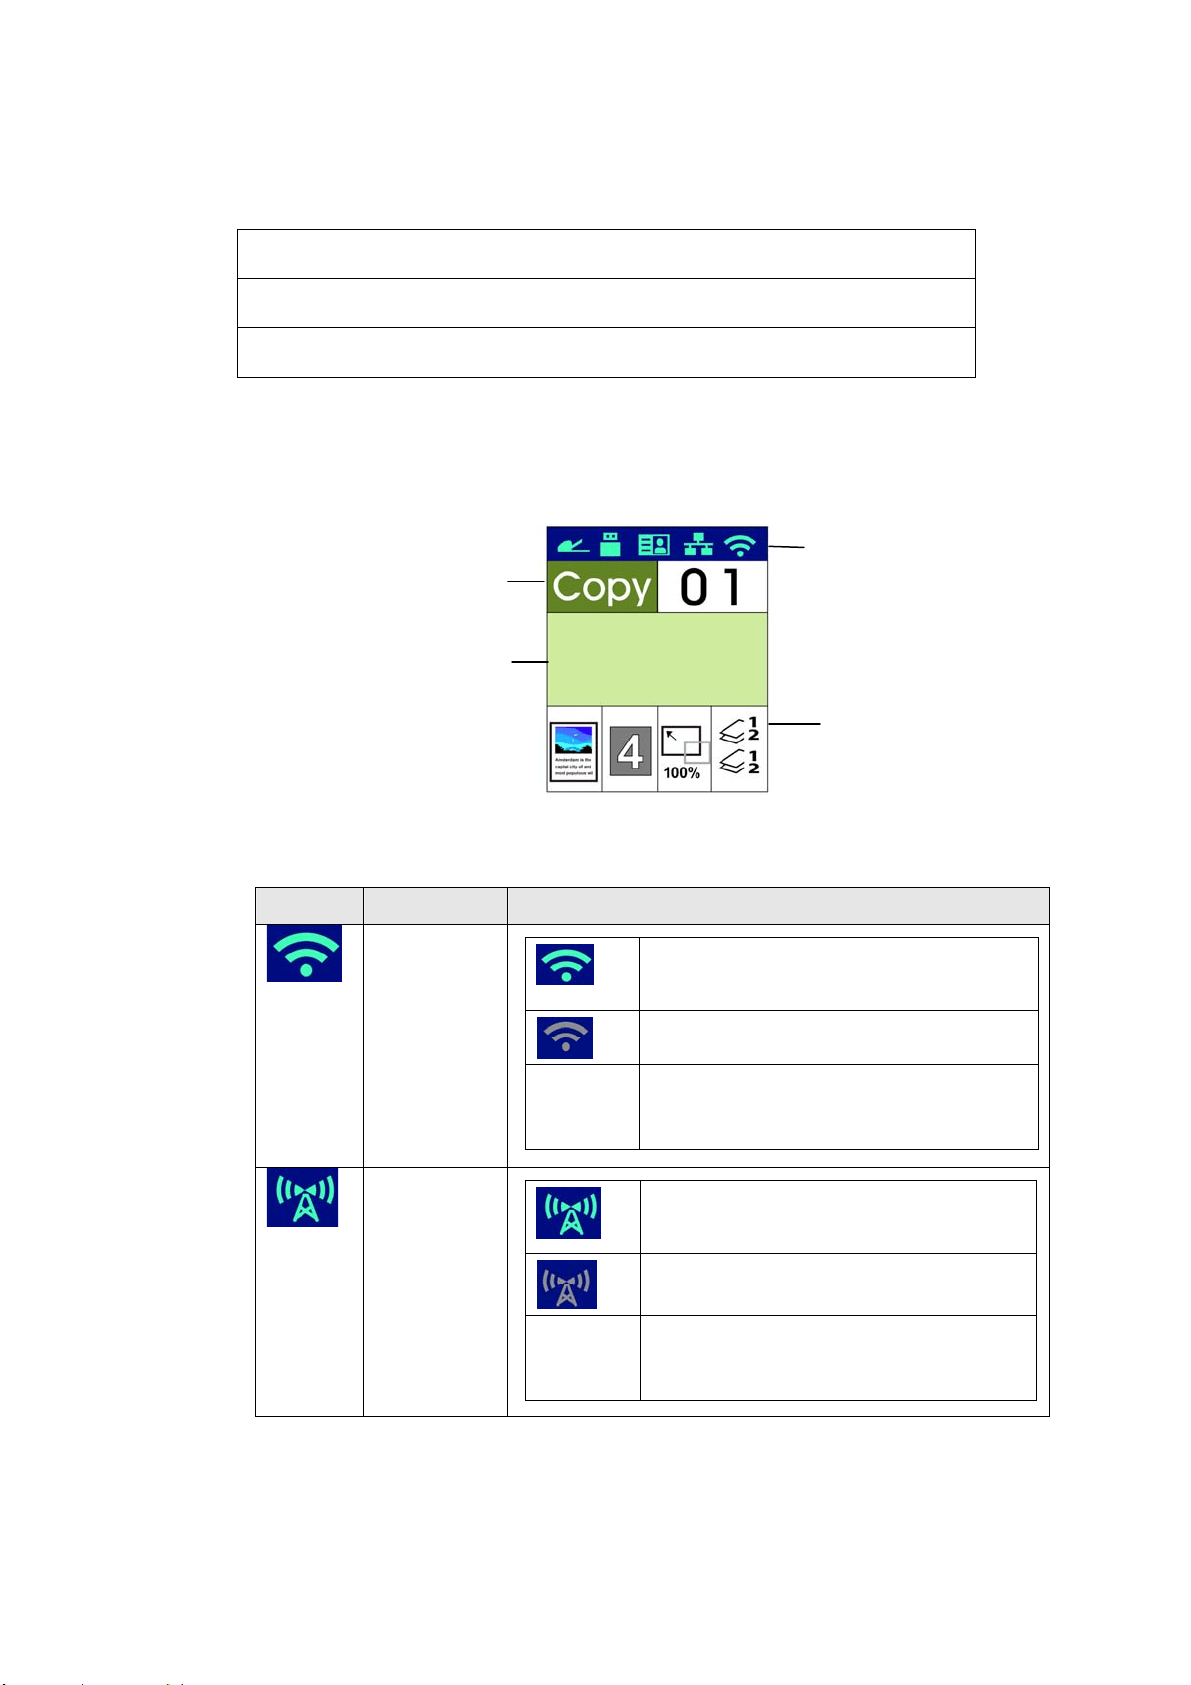
LCD Screen a nd St at us Bar
Stat us Bar
I con N a m e LED Light Color/ St a tus I ndica t ion
Wi- Fi Mode
A green icon indicat es connection
successful
A gray icon indicat es obt aining I P
No
Display
No Wi- Fi USB dongle
Wi- Fi AP
Mode
A green icon indicat es connection
successful
A gray icon indicat es obt aining I P
No
Display
No Wi- Fi USB dongle
St at us Bar
Set tings
Funct ion
Nam e
St at us
I ndicat ion
Ready
8
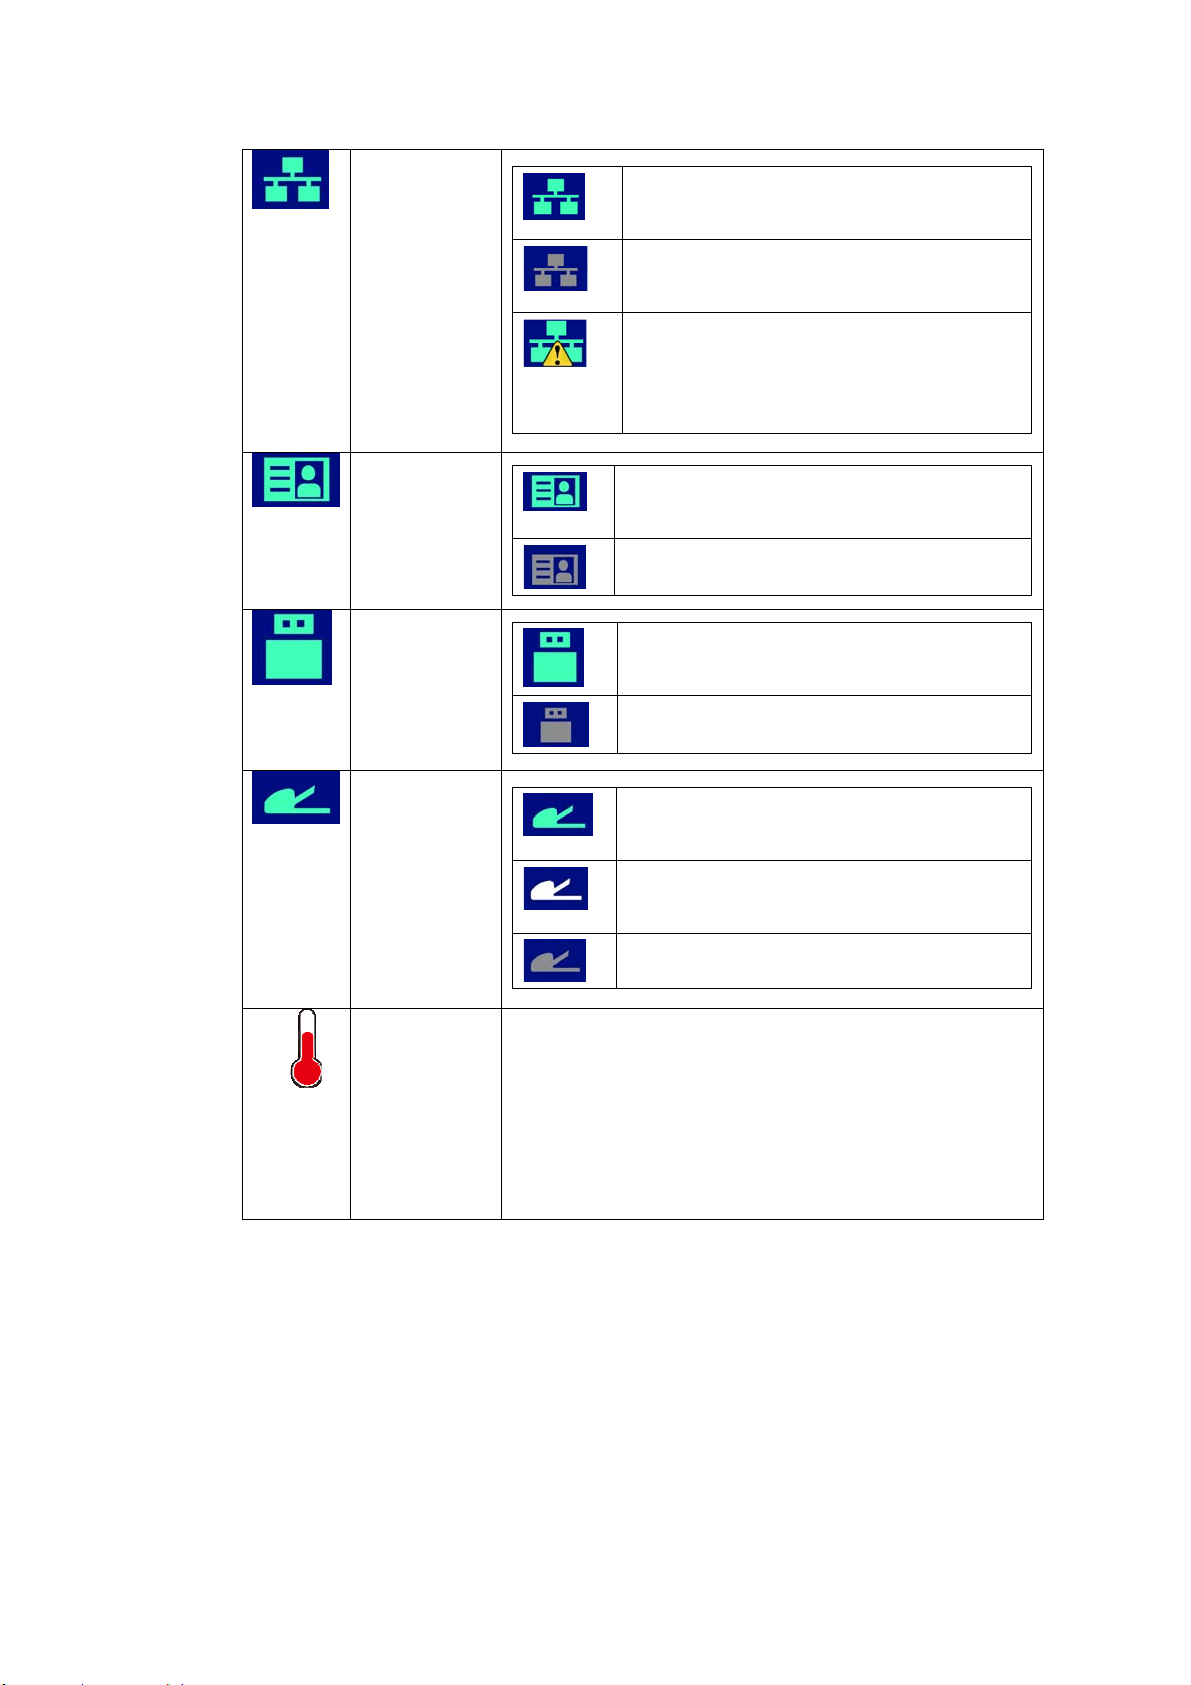
Ethernet
Mode
A green icon indicat es connection
successful
A gray icon indicates no connect ion of
the wired network cable.
An Auto I P address has been given to
the device since DHCP server is not
working. Yet network connection is
only lim it ed t o Local Area Net work
( LAN) .
CSA6 Mode
A green icon indicat es connection
successful
A gray icon indicates no connect ion.
USB Mode
A green icon indicat es connection
successful
A gray icon indicates no connect ion.
Aut o
Docum ent
Feeder
Mode
A green icon indicat es t here is paper
in t he Aut o Docum ent Feeder.
A white icon indicates no paper in Aut o
Docum ent Feeder.
A gray icon indicates no connect ion.
High
Tem perature
Tem perature inside t he print er is t oo high. Each
rear- side pr int ing will be stopped for 6 seconds and
then cont inued print ing.
Aft er t he m achine has been idled for 30 m inut es
and the t em perat ure has dropped t o norm al
degrees, t he [ High Tem perat ure] icon will t hen
disappear.
9
2 . I nst alling Your Machine
Preca ut ions
Do not inst all t he equipm ent near heating or air conditioning unit s.
Do not inst all t he equipm ent in a hum id or dusty place.
Place t he equipm ent in a separat e area with good vent ilat ion.
The equipm ent is equipped wit h bot h t he power- saving and st andby m odes.
The equipm ent can not achieve zero energy consum pt ion st at e unt il it is not
connect ed to any external power supply.
Be sure t o use t he correct AC power supply.
Ret ain the box and packing m aterials for shipping purposes.
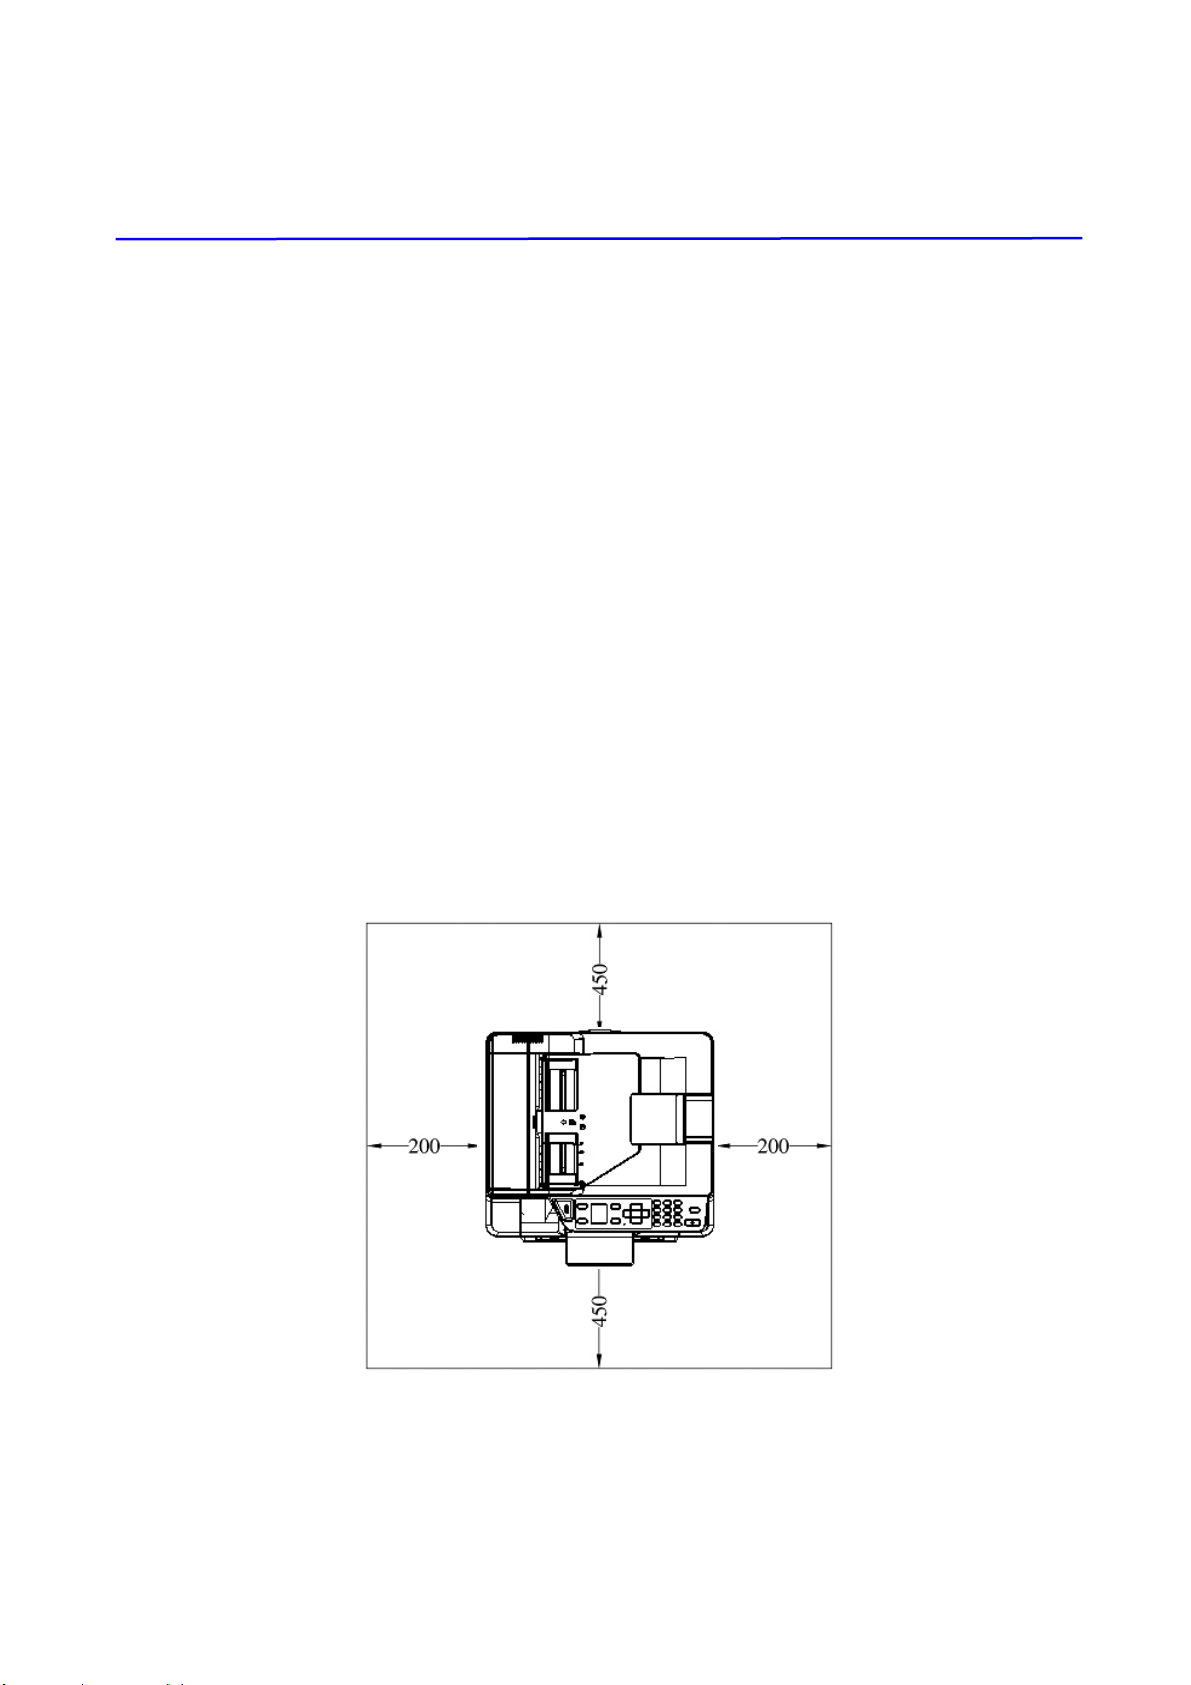
Operational Space
Please reserve t he following operat ion space.
Machine dim ension: 402 x 380 x 308 m m ( WxDxH) ( AM30XX)
Machine dim ension: 402 x 380 x 367 m m ( WxDxH) ( AM30XXA, AM30XXAP,
AM30XXAFP)
Measuring unit: mm
10
Rem oving t he Tapes of t he Toner Cart ridge
I m port a nt!
When you unpack t he m achine, a toner cart ridge has been
packed separat ely besides the m achine. Please rem ove t he
package cushion and t apes on t he t oner cart ridg before using
it .
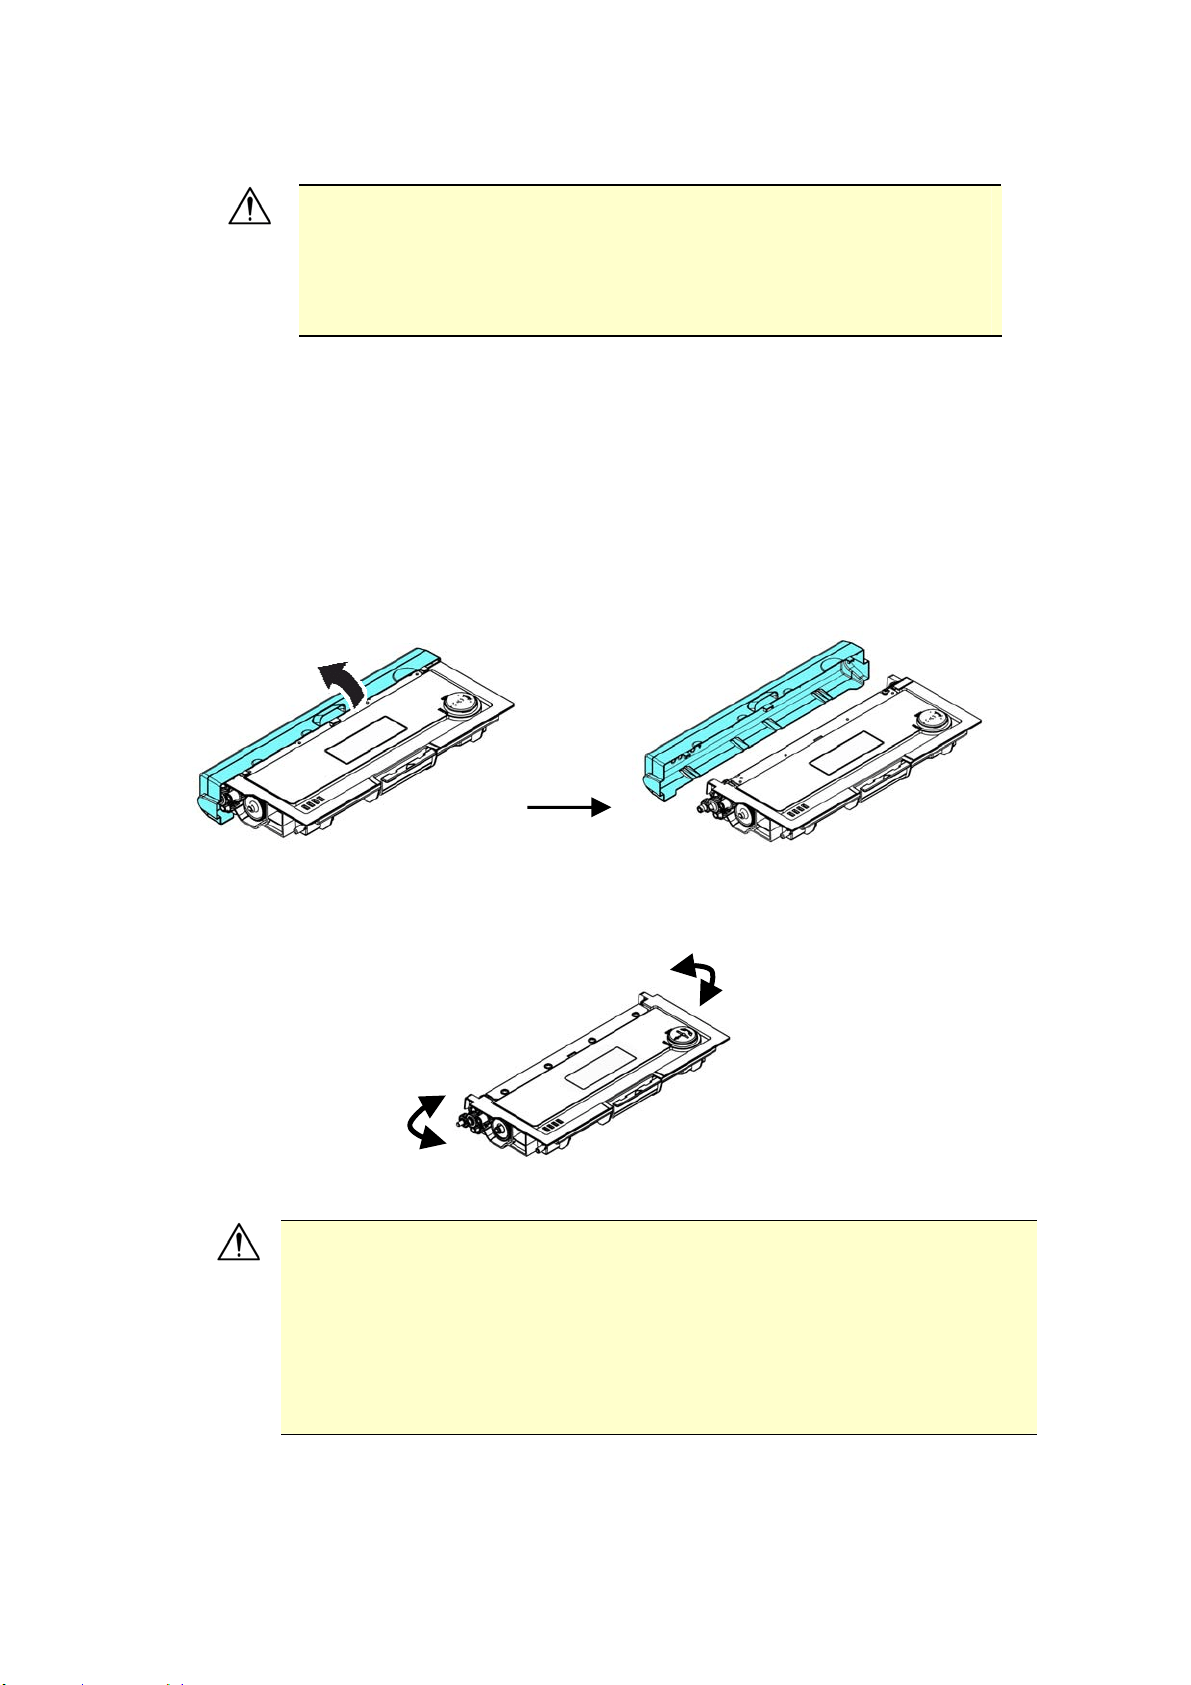
I nstalling t he Toner Cart ridge
Please follow these st eps t o install t he t oner cart ridge:
1 . Unpack t he new t oner cart ridgeg.
2 . Rem ove t he prot ective cover.
3 . Tilt t he t oner cart ridge up and down and t hen right and left 10 t im es to distribut e
the t oner evenly inside t he t oner cart ridge.
W a r nin g!
Be careful not to inhale t oner.
I f t oner gets on your clot hing or ot her fabric, wipe off the toner wit h
a dry clot h. Wash the it em s in cold wat er and air dry.
To avoid print quality problem s, DO NOT touch the t oner rollers.
To prevent the t oner cartridge from dam age, do not expose it
m ore t han several m inutes.
11
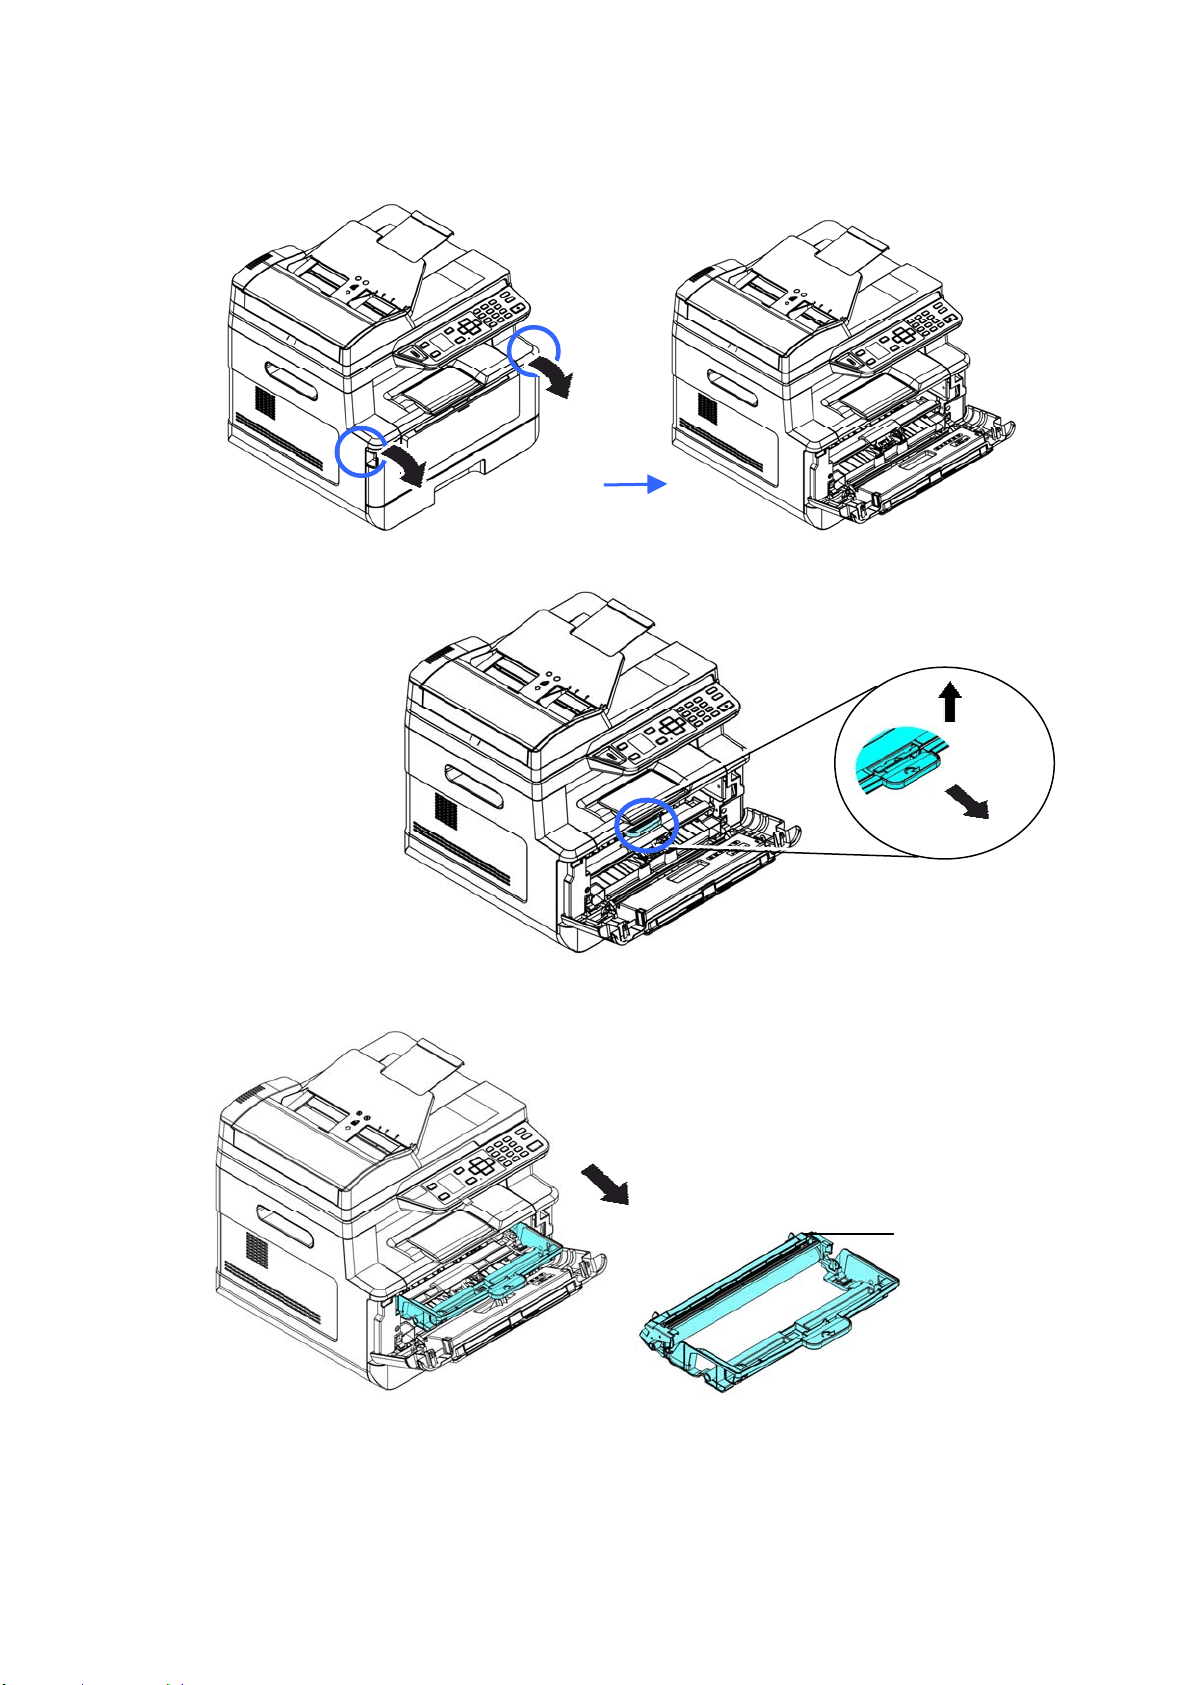
4 . Open t he front cover by pulling t he handles on both sides as shown.
3 . Hold t he handle of the drum unit and pull it out as shown.
Drum Unit
12
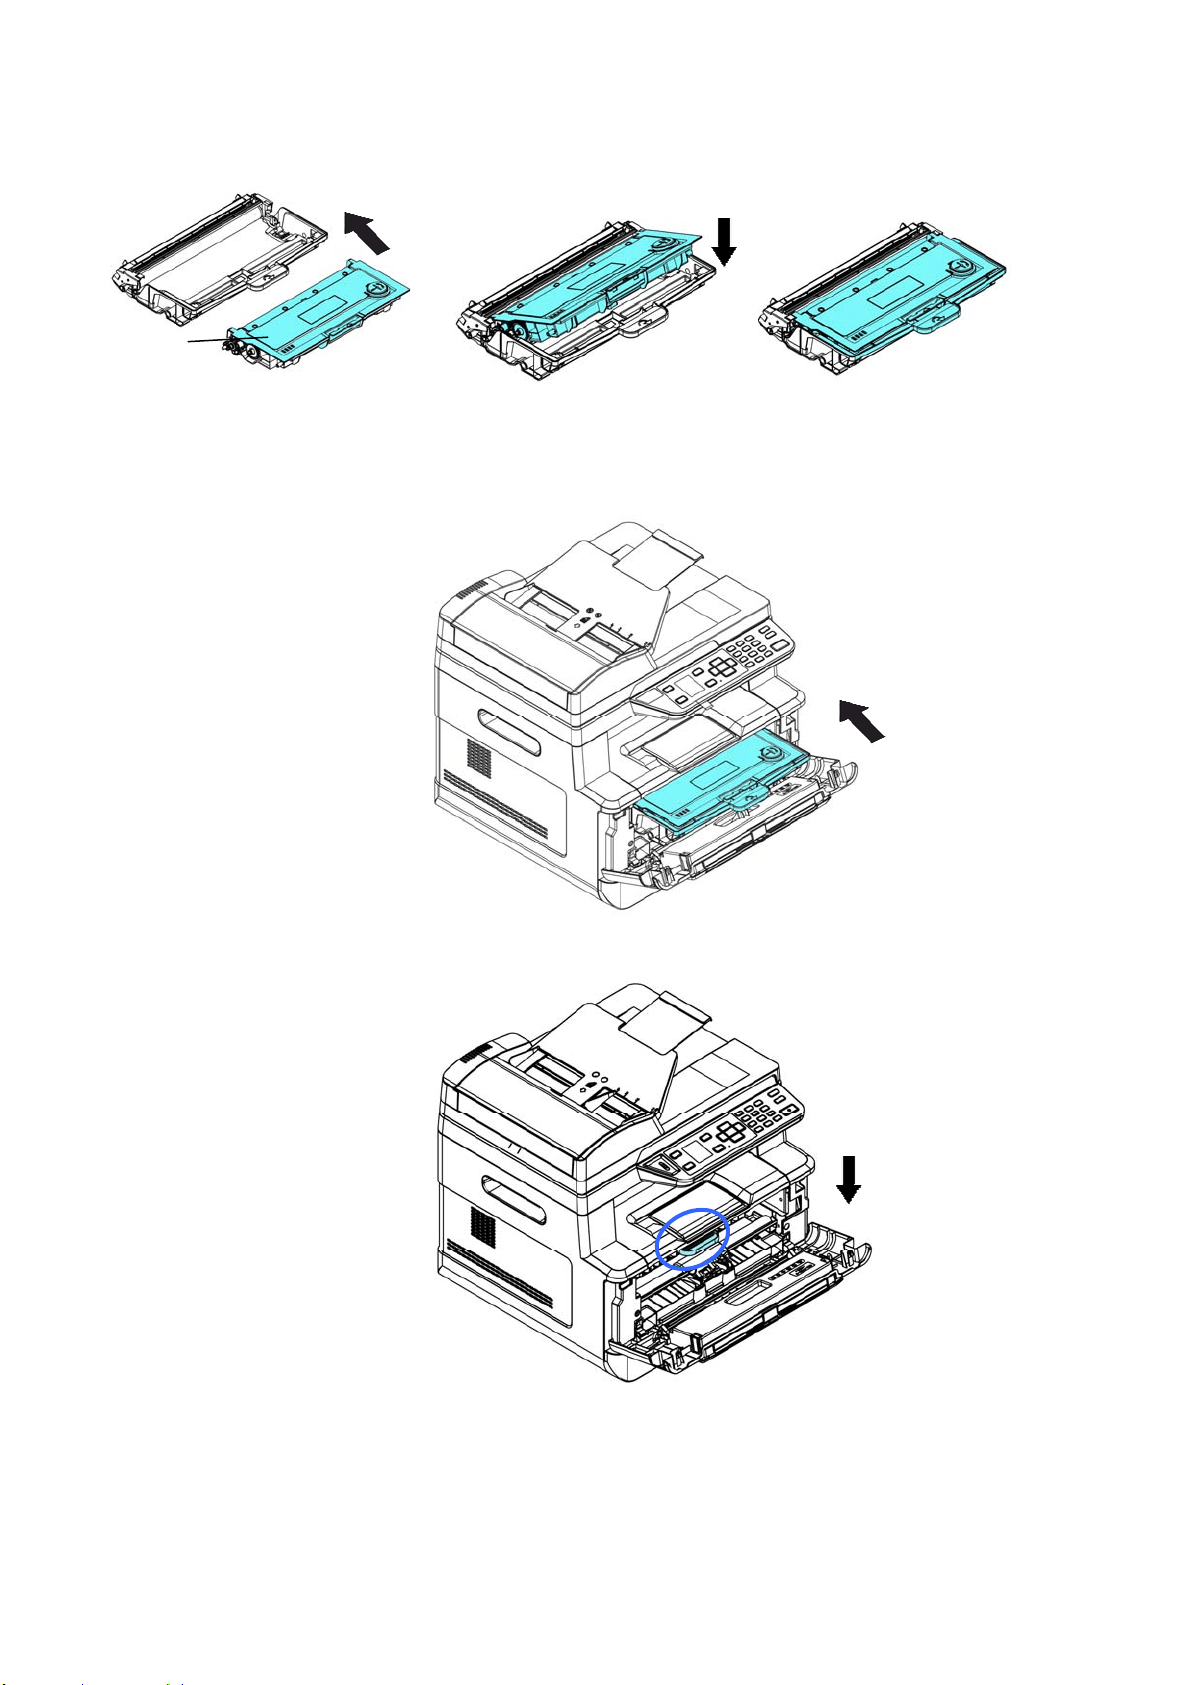
4 . I nst all t he t oner cart ridge t o the drum unit .
5 . Hold t he handle of t he drum unit and t oner cartridge assem bly and insert t he
assem bly t o its original place.
6 . Press down t he t oner cart ridge t o fix it int o place.
7 . Close t he front cover.
Toner
Cart ridge
13
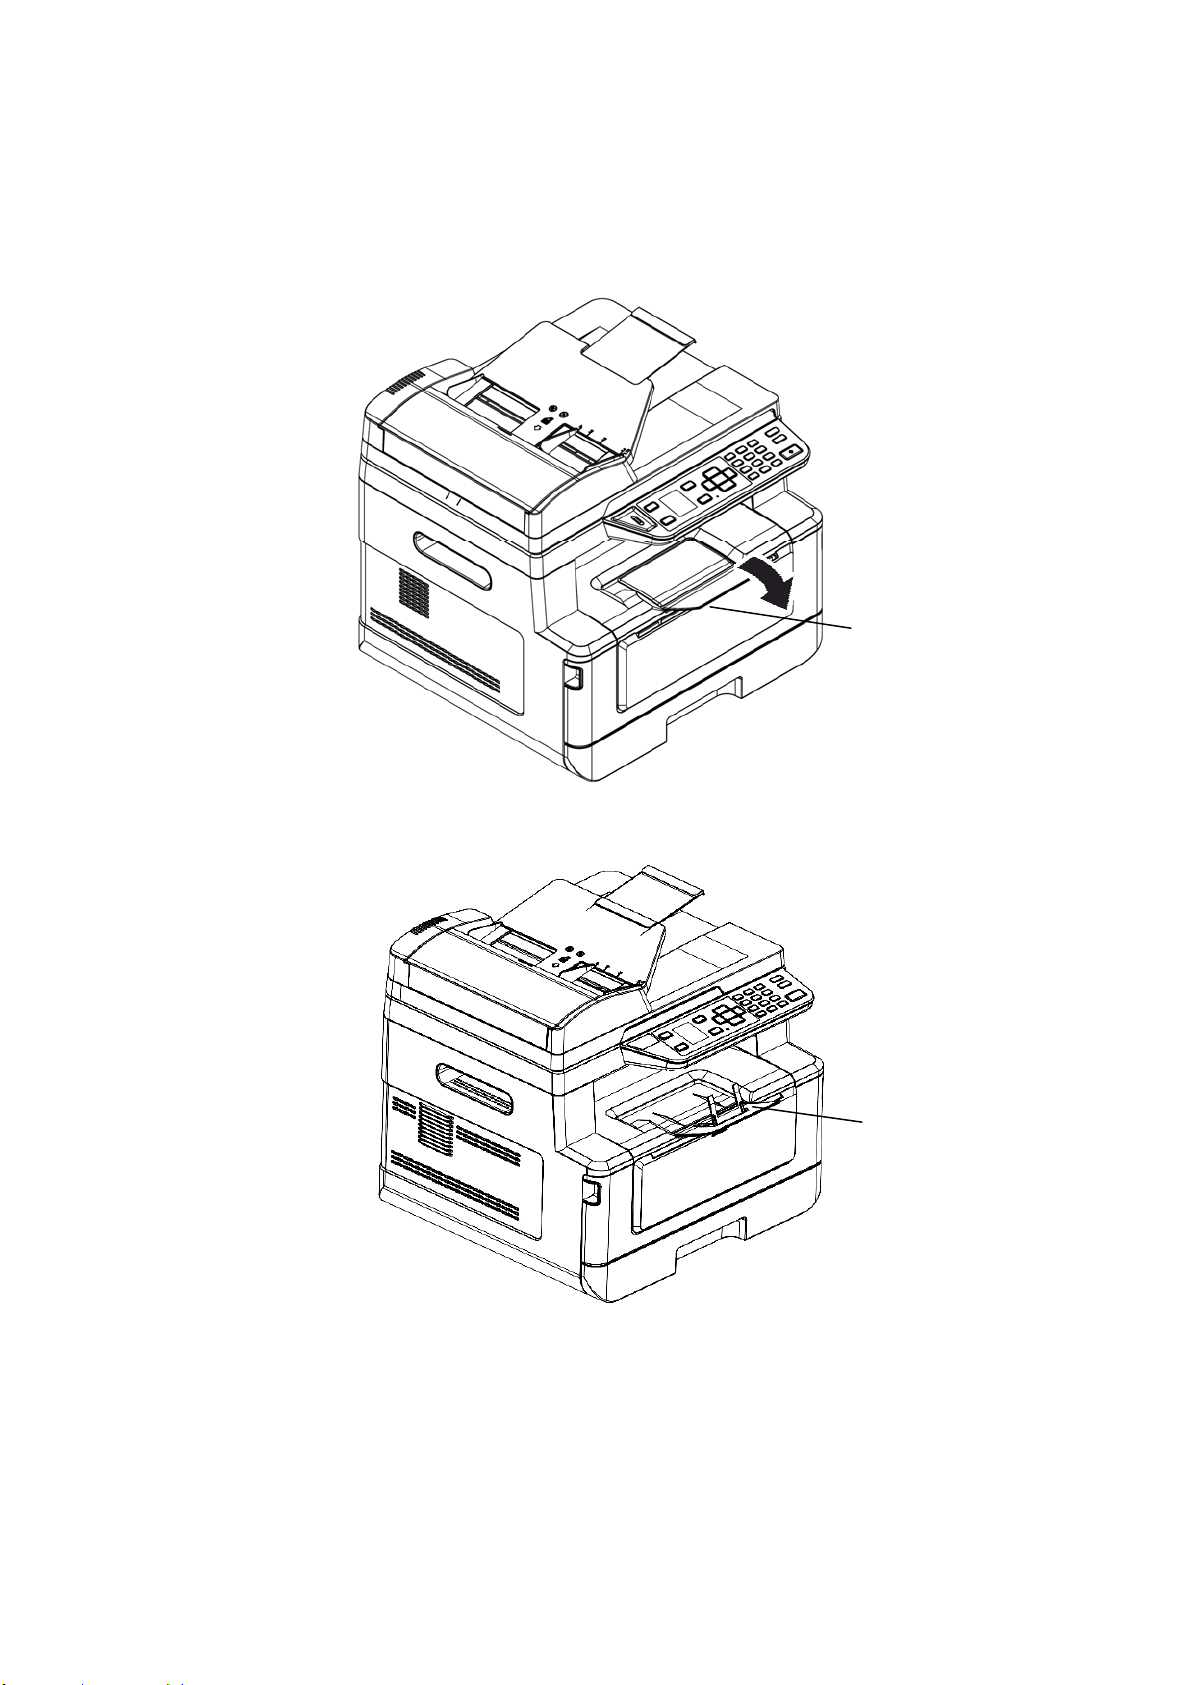
I nstall t he Out put Bin
Lift t he out put bin up t o t he stuck position.
Out put Bin
Paper Stopper
14
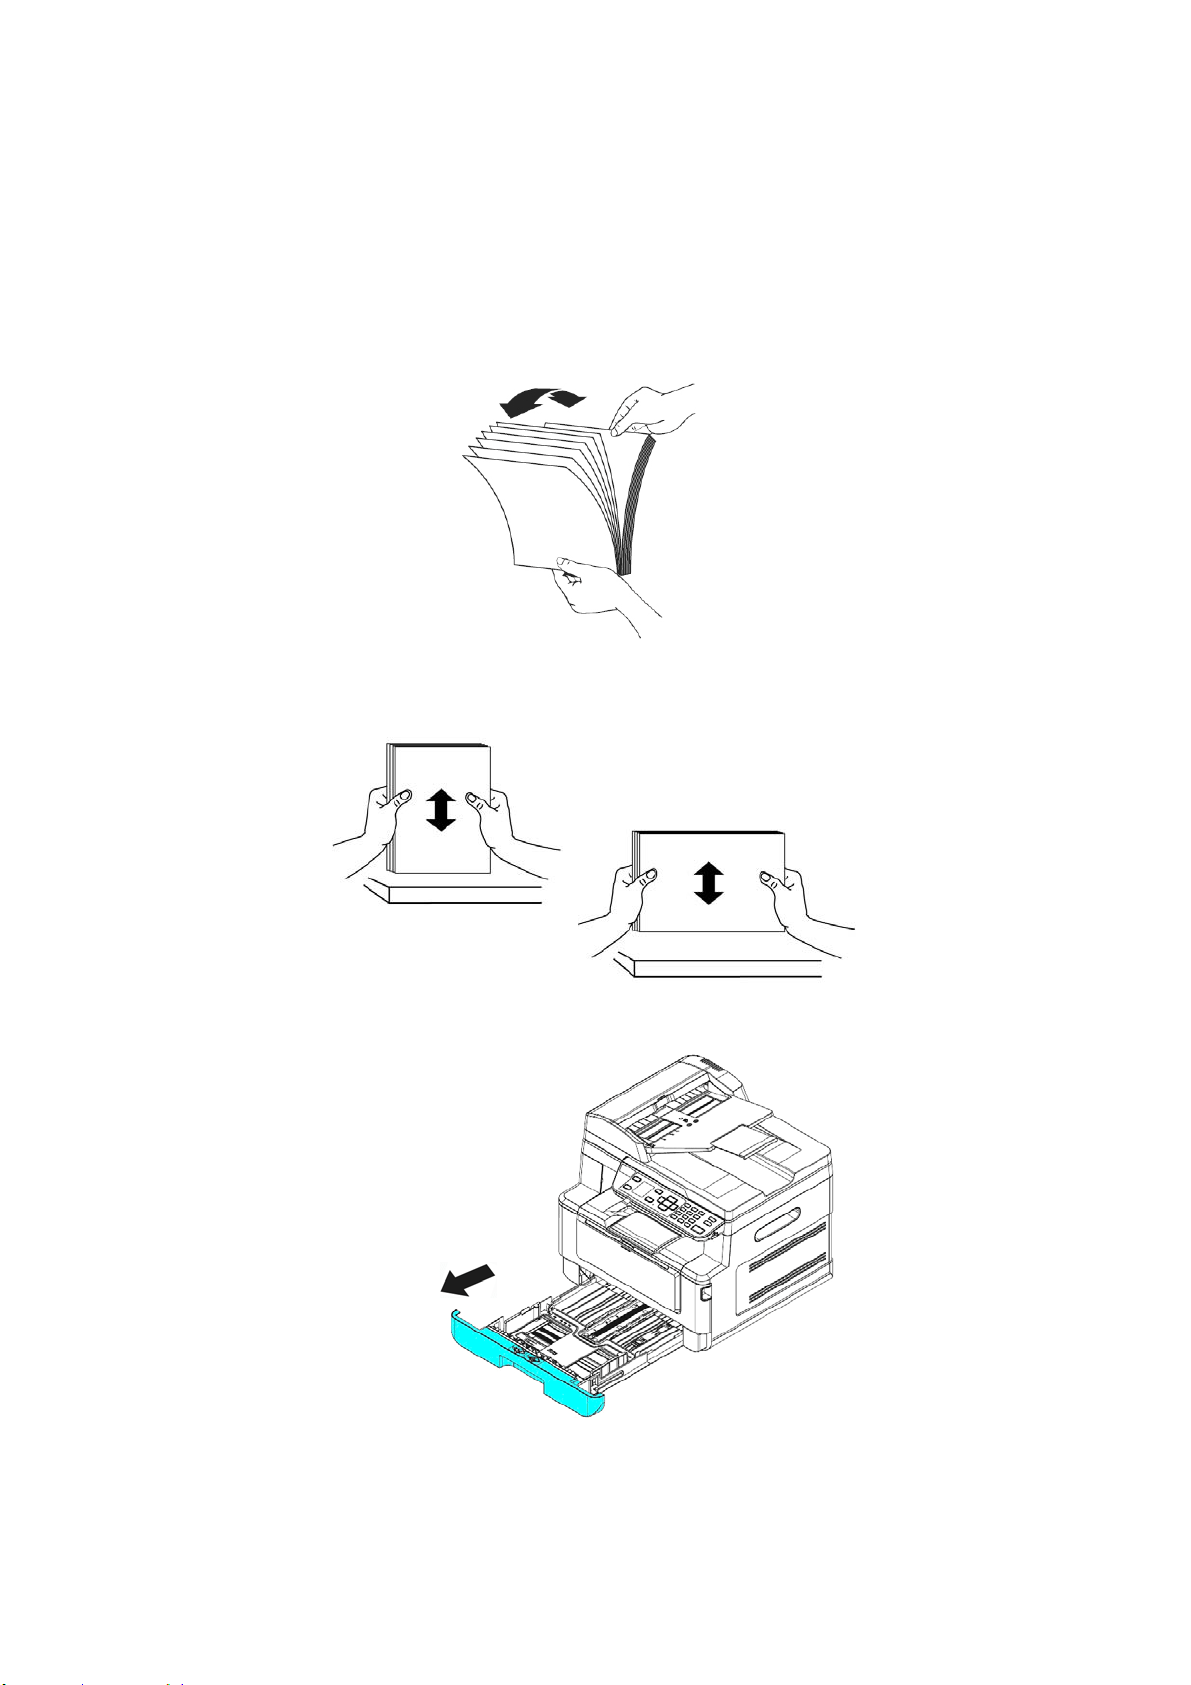
Loading The M ain I nput Tra y
To insert paper t o the m ain input t ray,
1 . Fan your paper first t o ensure t hat the pages do not stick t ogether.
2 . Align the edges of the docum ents by t apping the bot t om of t he stack against the
table t op. Rotat e the stack 90 degrees and repeat .
3 . Pull the m ain t ray out gent ly.
1
5
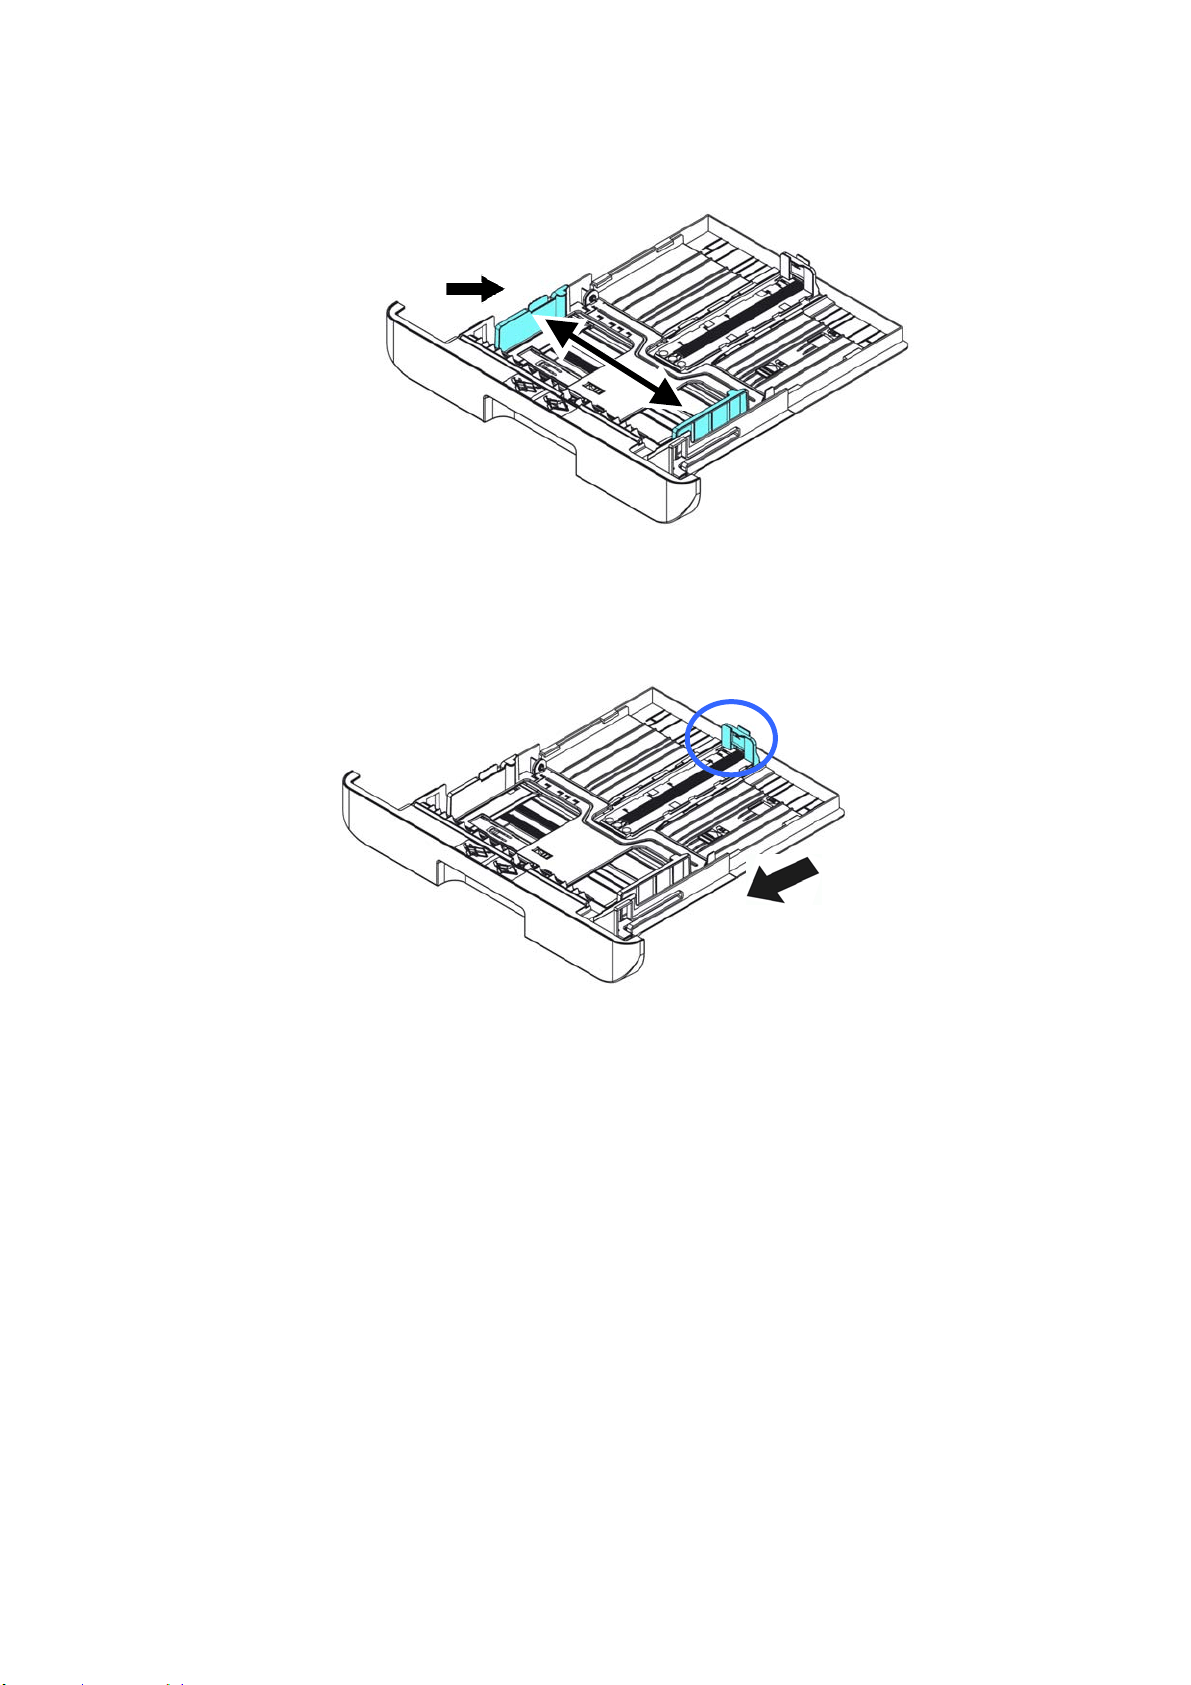
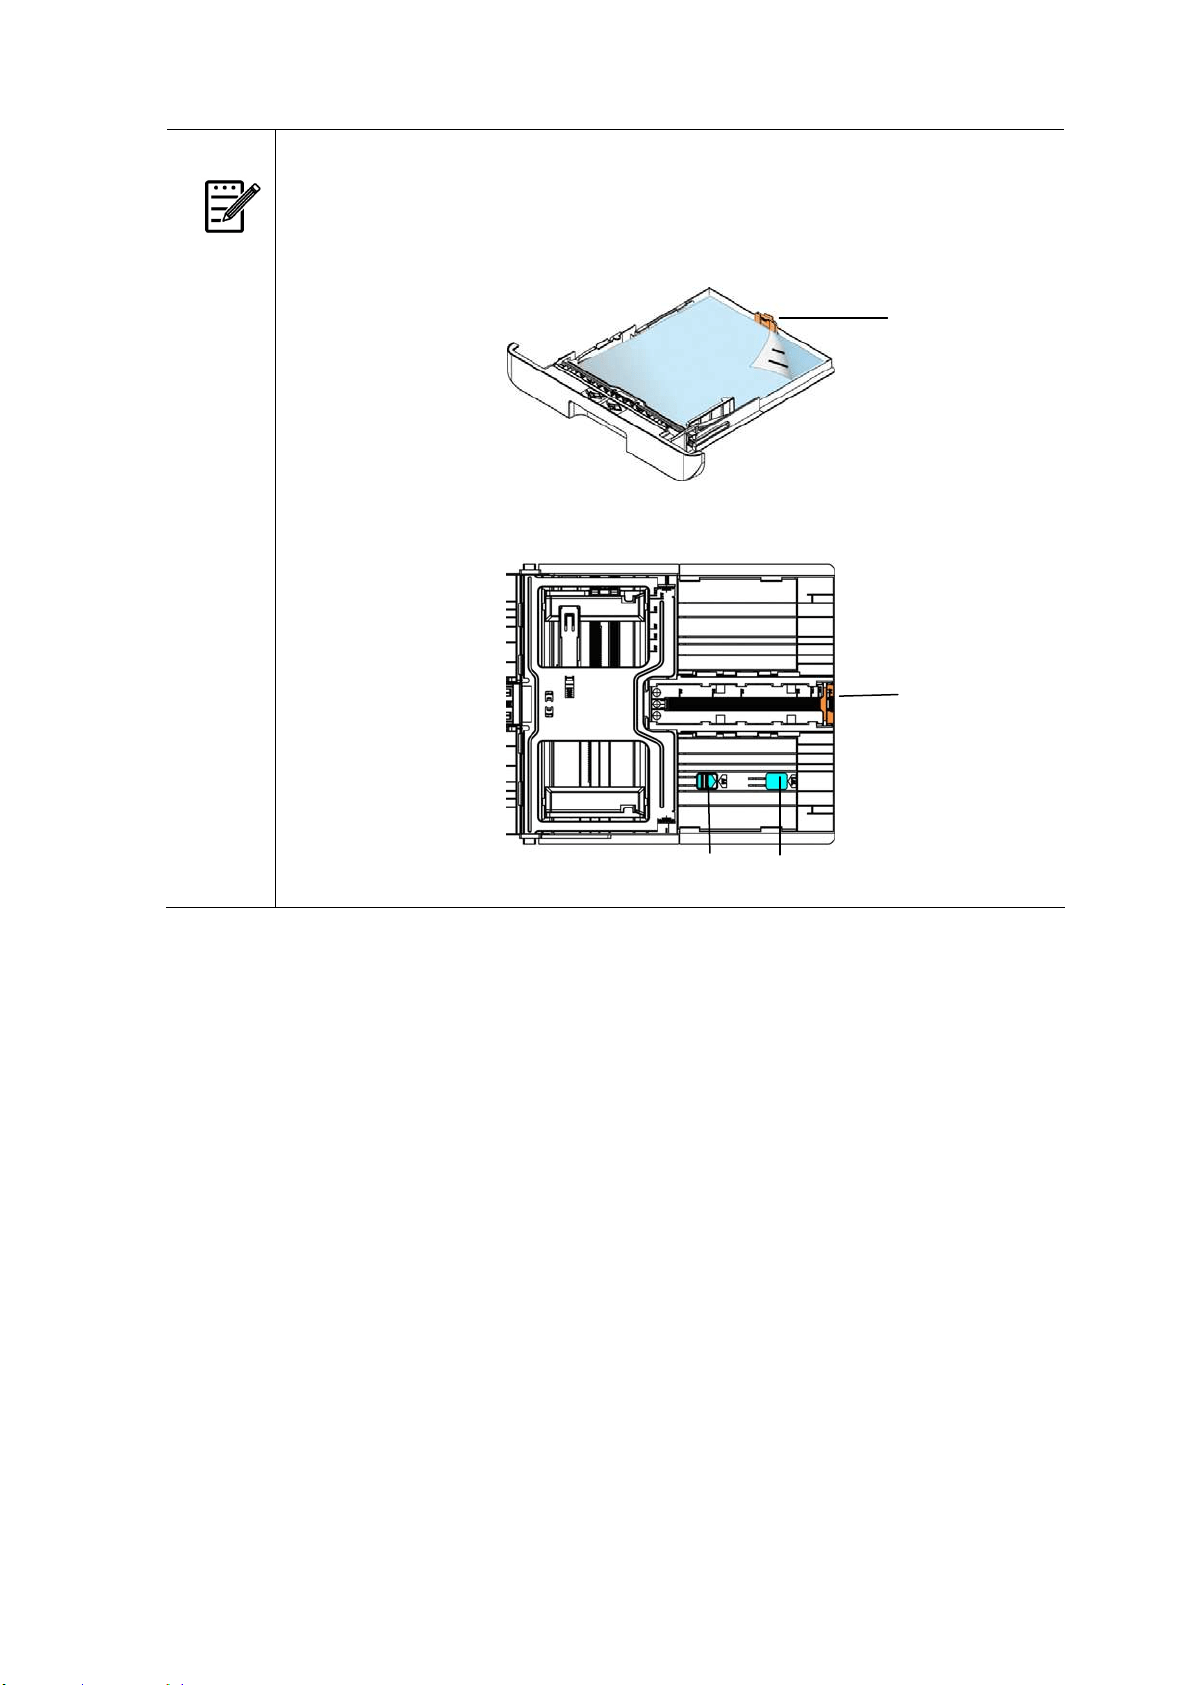
4 . Press the width guide t ab ( ) , and then m ove t he widt h guide () t o the correct
position for t he paper size being loaded.
5 . Unlock t he lengt h guide, squeeze t he lengt h guide tab inward () as show n, and
slide the guide
(
) t o t he correct position for the paper size being loaded.
6 . I f you w ish t o load paper larger t han A4, press t he first lengt h slider ( ) and then
m ove it to the right (
) t o t he desired lengt h you w ish.
16
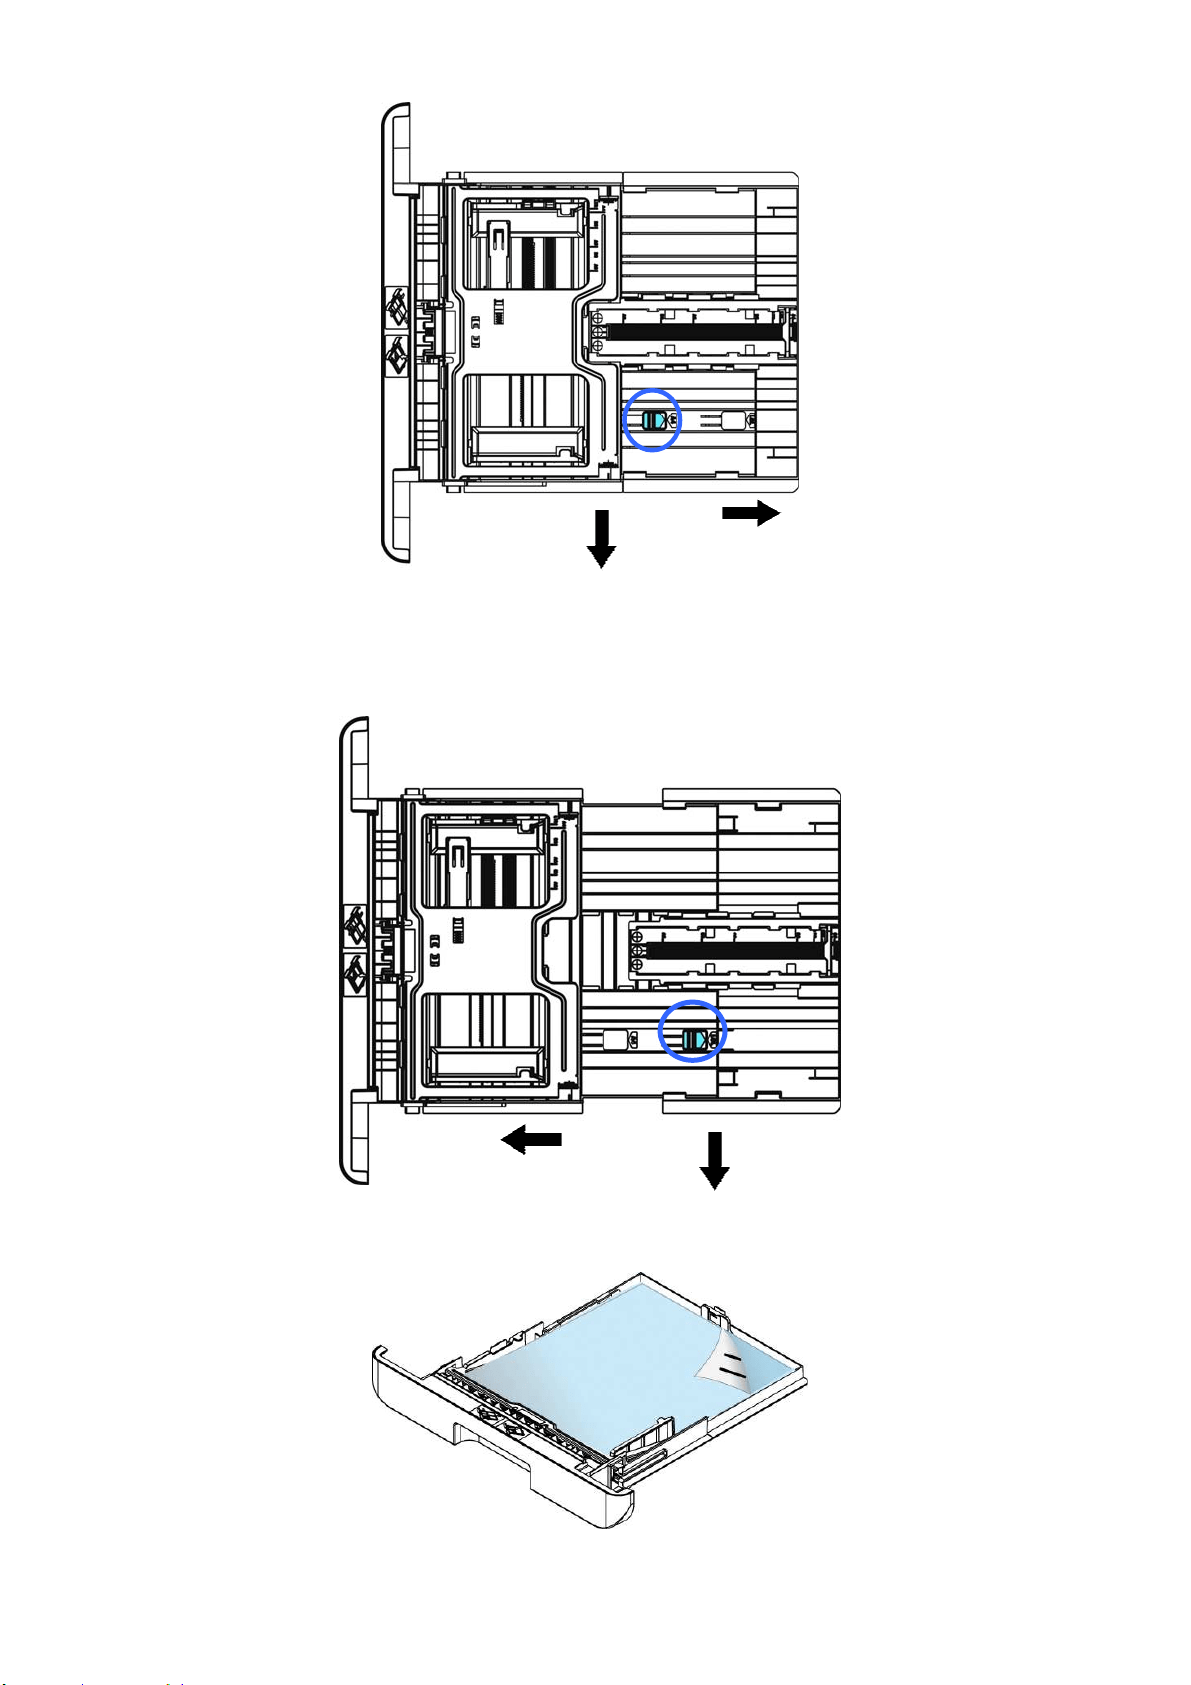
To set t he length slider back to A4, press the 2
nd
lengt h slider (
) and t hen
m ove it to the left (
) .
7 . Load t he paper st ack wit h the Pr inting Side FACE D OW N as illust rat ed.
8 . I nsert the t ray.
1
7
N ot e :
To avoid t he chance of m iss- fed, m ake sure t he length guide t ab and
lengt h slider are installed in t heir proper posit ions.
Make sure t he end of your paper slightly t ouch t he lengt h guide as
indicated in below.
Make sure t he lengt h slider is installed in t he specified locat ion in eit her
position A or B as shown in below.
Length
Guide Tab
Lengt h
Guide Ta b
Posit ion A Posit ion B

18
Paper size s a nd w e ights used for M a in I nput Tray
Paper capacit y
250 pages(70g/ m ² plain paper)
Pape r size A4 ( 210 x 297 m m )
A6 ( 105 x 148 m m )
A5 ( 148 x 210 m m )
B6 ( 125 x 176 m m )
B5 ( 176 x 250 m m )
Lett er ( 216 x 279 m m )
Legal ( 216 x 356 m m )
Custom Size: 76.2 x 127 m m ~ 216 x 356 m m
( 3 x 5 in. ~ 8.5 x 14 in.)
Pape r w e ight 16 ~ 28 lbs (60 ~ 105 g/ m ² )
* Duplex print ing is available only for paper in A4, B5, or let t er size.
N ot e :
To ensure t he best quality print ing and copying, please use t he paper or
m edia which we have recom m ended.
Make sure t o fan your paper before loading it t o t he paper t ray.
I f t here are instructions about the print ing side on t he package of your
paper, please follow t he instruct ions t o load your paper properly wit h
the correct printing side t o t he paper t ray.
I f t he print ing quality is not satisfactory or paper j am s are easily t o
occur, t urn over the paper stack so that t he t op page is now on bott om
and then reload it t o t he paper t ray.
Pack and seal the rem aining paper with t he original packaging and st ore
the paper in a dark and dry locat ion away from the sunshine. Paper
which collect s m uch m oist ure is easy t o cause j am during print ing.
19
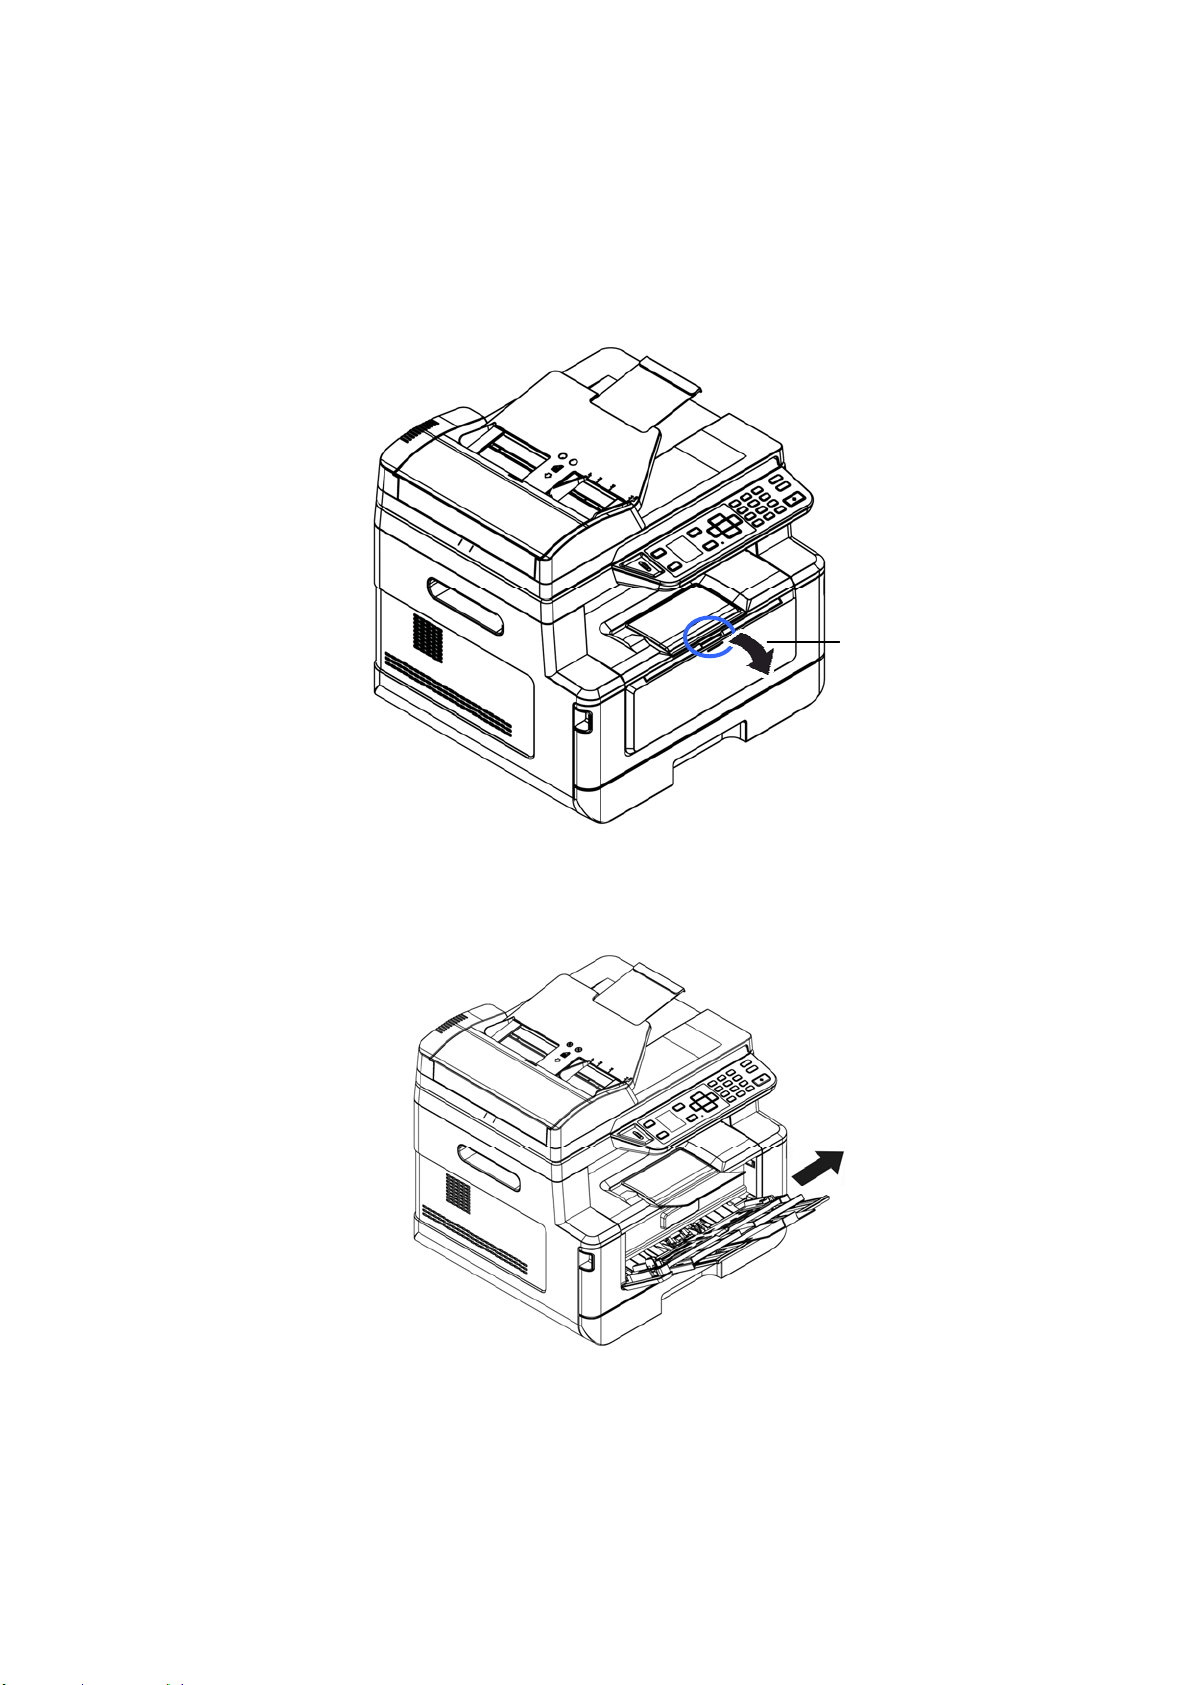
Loading t he M anua l Tra y
When you need t o print different size paper, you can use t he m anual tray.
1 . Open t he m anual t ray by grasping t he handle and pull it down.
2 . Pull out t he m anual tray ext ension t o m eet your paper size.
Manual Tray
20
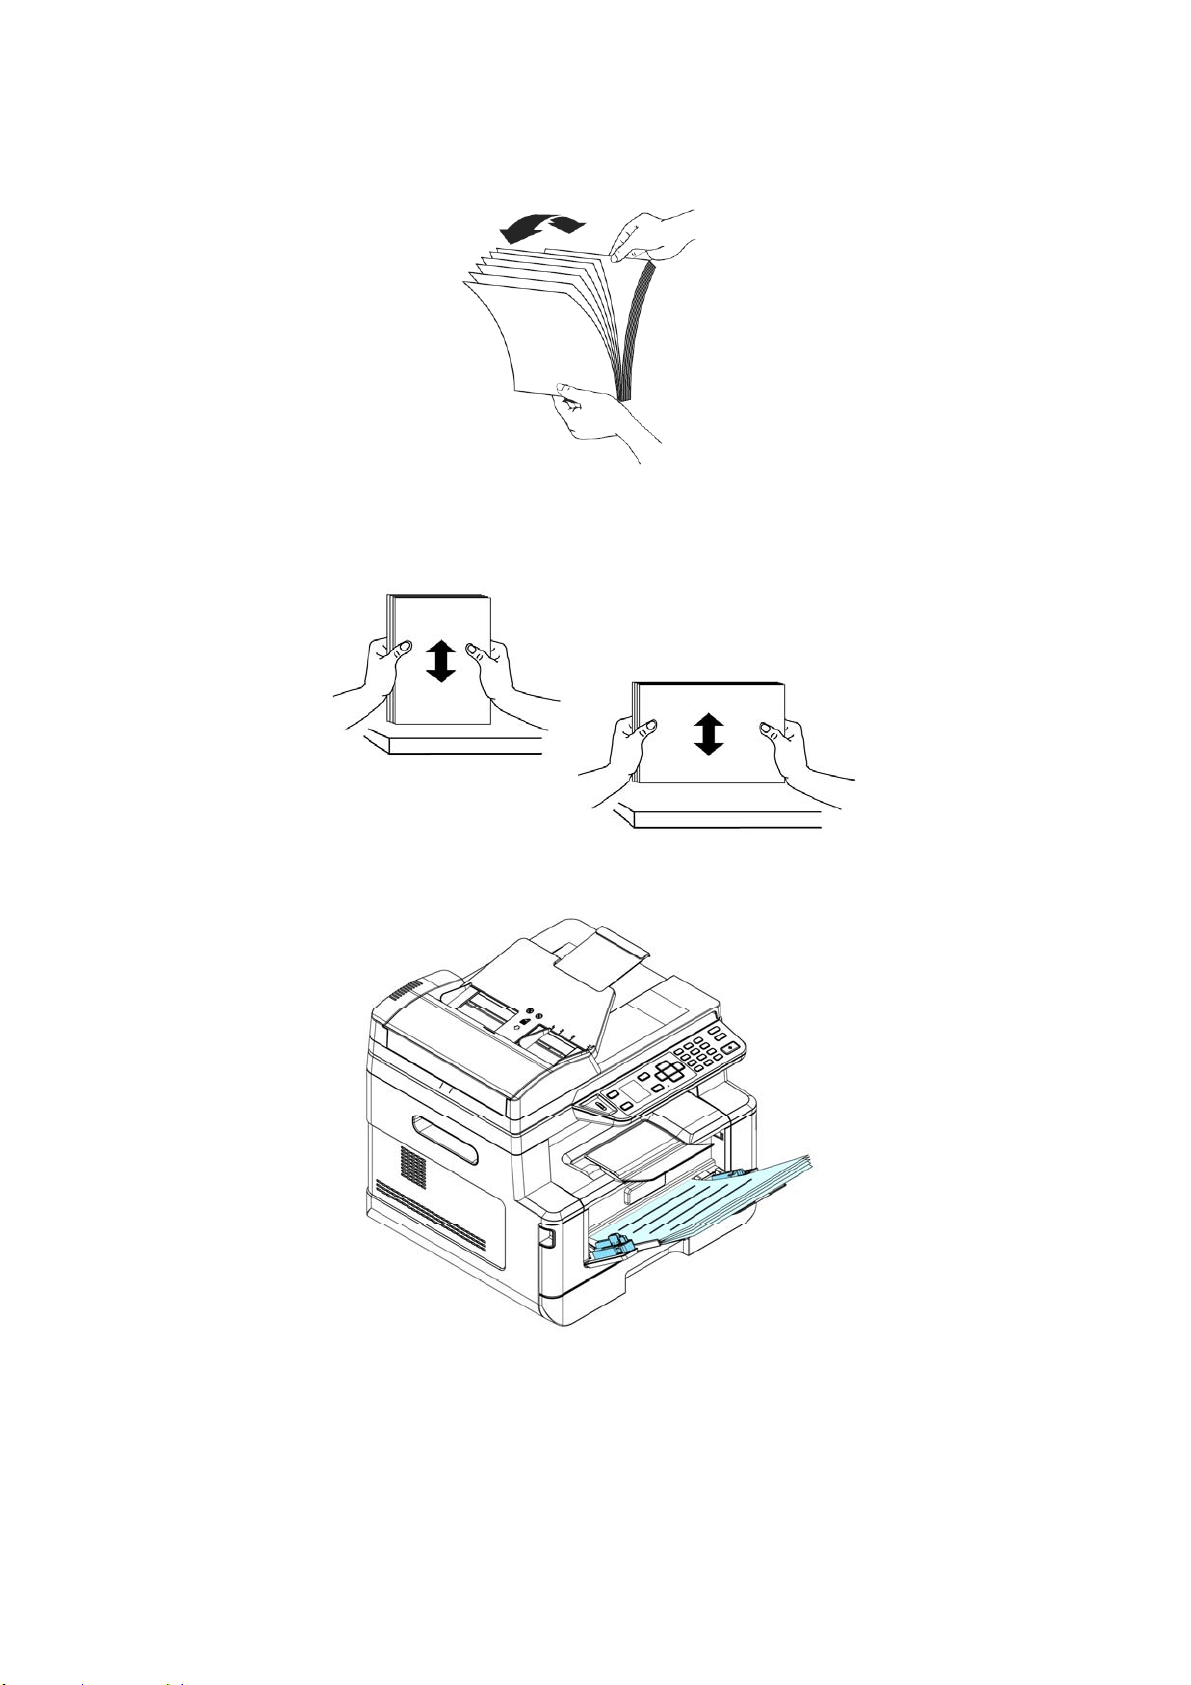
3 . Fan your paper first t o ensure t hat the pages do not st ick t oget her.
4 . Align t he edges of the docum ent s by t apping t he bot t om of t he st ack against the
table t op. Rotat e the stack 90 degrees and repeat .
5 . Load the paper stack with t he Print ing Side FACE UP as illust rat ed.
21
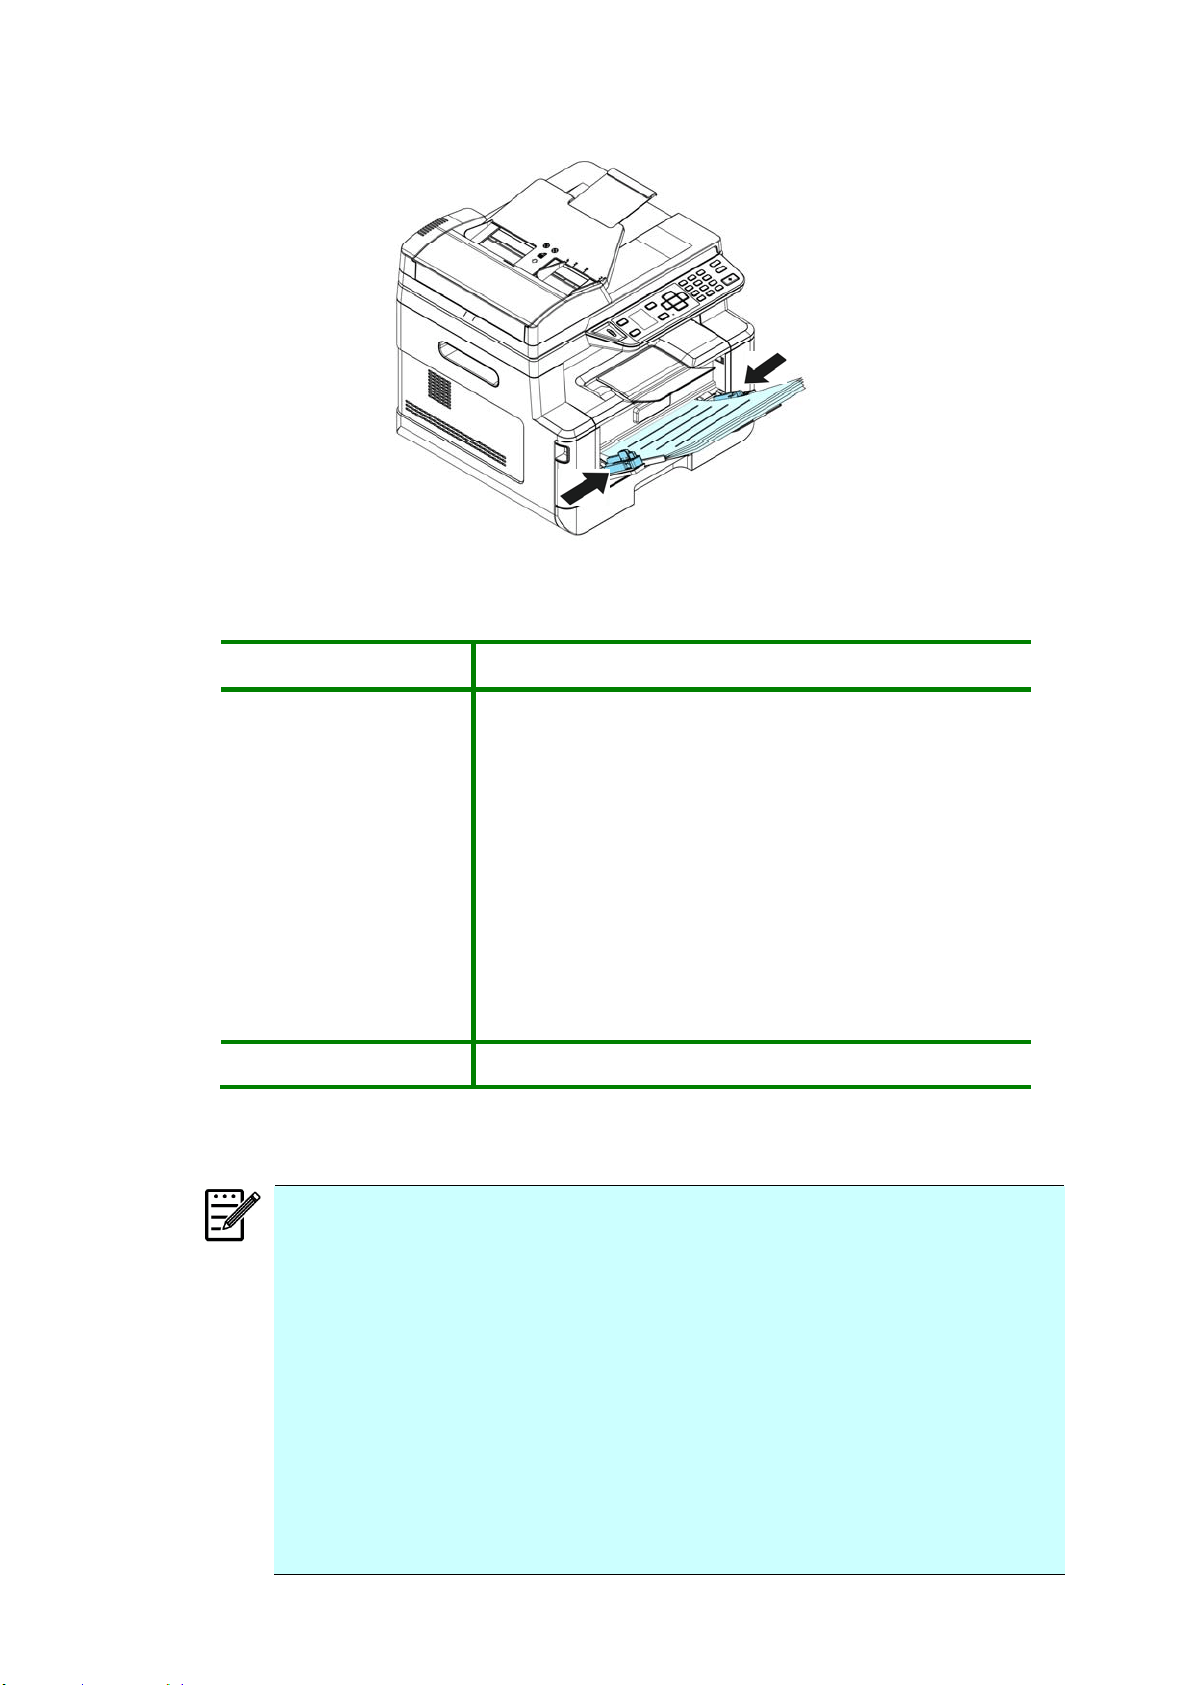
6 . Slide t he paper guides so that t hey slight ly t ouch the paper st ack.
Paper size s a nd w e ight s used for Manual Tra y
Paper capacit y
10 pages(70g/ m ² plain paper)
Pape r size
A4 ( 210 x 297 m m )
A6 ( 105 x 148 m m )
A5 ( 148 x 210 m m )
B6 ( 125 x 176m m )
B5 ( 176 x 250 m m )
Lett er ( 216 x 279 m m )
Legal ( 216 x 356 m m )
Custom Size: 76.2 x 127 m m ~ 216 x 356 m m
( 3 x 5 in. ~ 8.5 x 14 in.)
Pape r w e ight 60 ~ 163 g/ m ² ( 16 ~ 43 lbs)
* Duplex print ing is available only for paper in A4, B5, or let t er size.
N ot e :
To ensure t he best quality print ing and copying, please use t he paper or
m edia which we have recom m ended.
Make sure t o fan your paper before loading it t o t he paper t ray.
I f t here are instructions about the print ing side on t he package of your
paper, please follow t he instruct ions t o load your paper properly wit h
the correct printing side t o t he paper t ray.
I f t he print ing quality is not satisfactory or paper j am s are easily t o
occur, t urn over the paper stack so that t he t op page is now on bott om
and then reload it t o t he paper t ray.
Pack and seal the rem aining paper with t he original packaging and st ore
the paper in a dark and dry locat ion away from the sunshine. Paper
which collect s m uch m oist ure is easy t o cause j am during print ing.
22
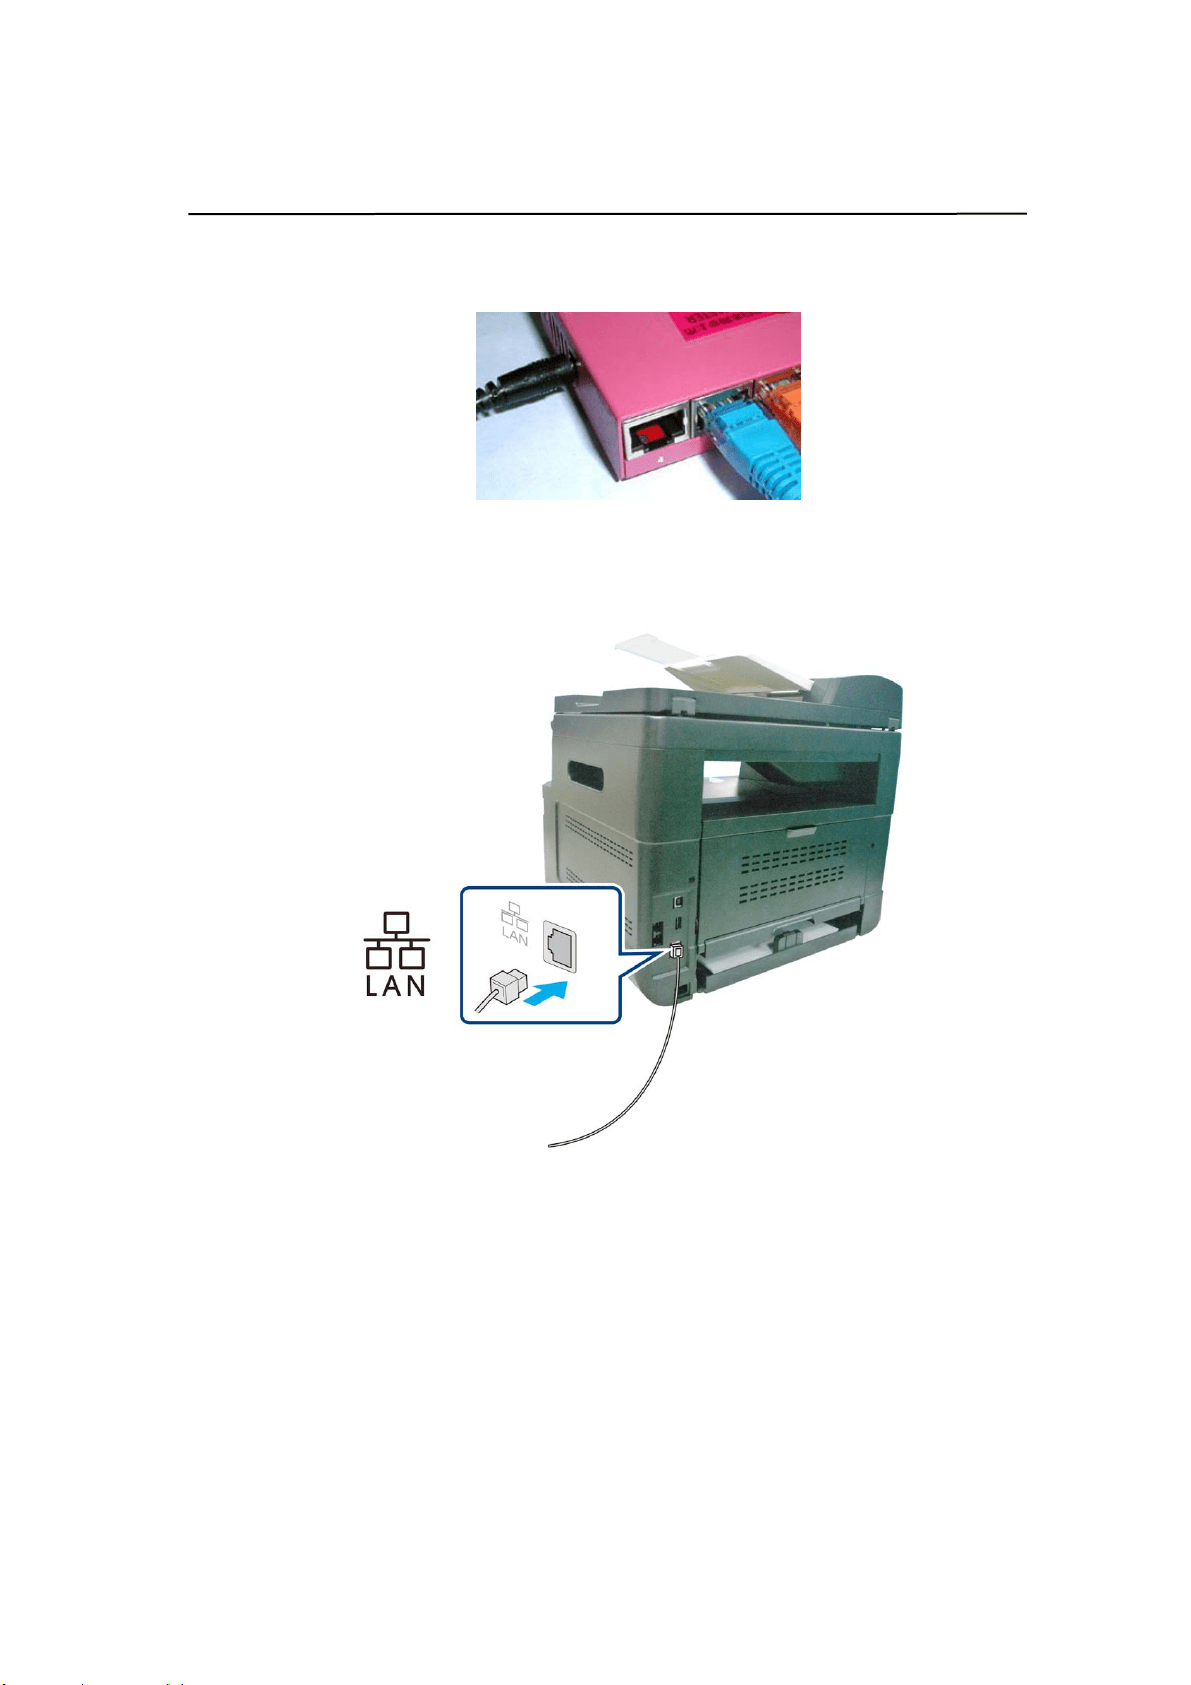
Connect ing t o a W ire d N etw ork
1 . Connect one end of your net work cable to an available port of your Et hernet Hub.
2 . Connect t he other end to t he LAN port at the back of t he product as shown.

23
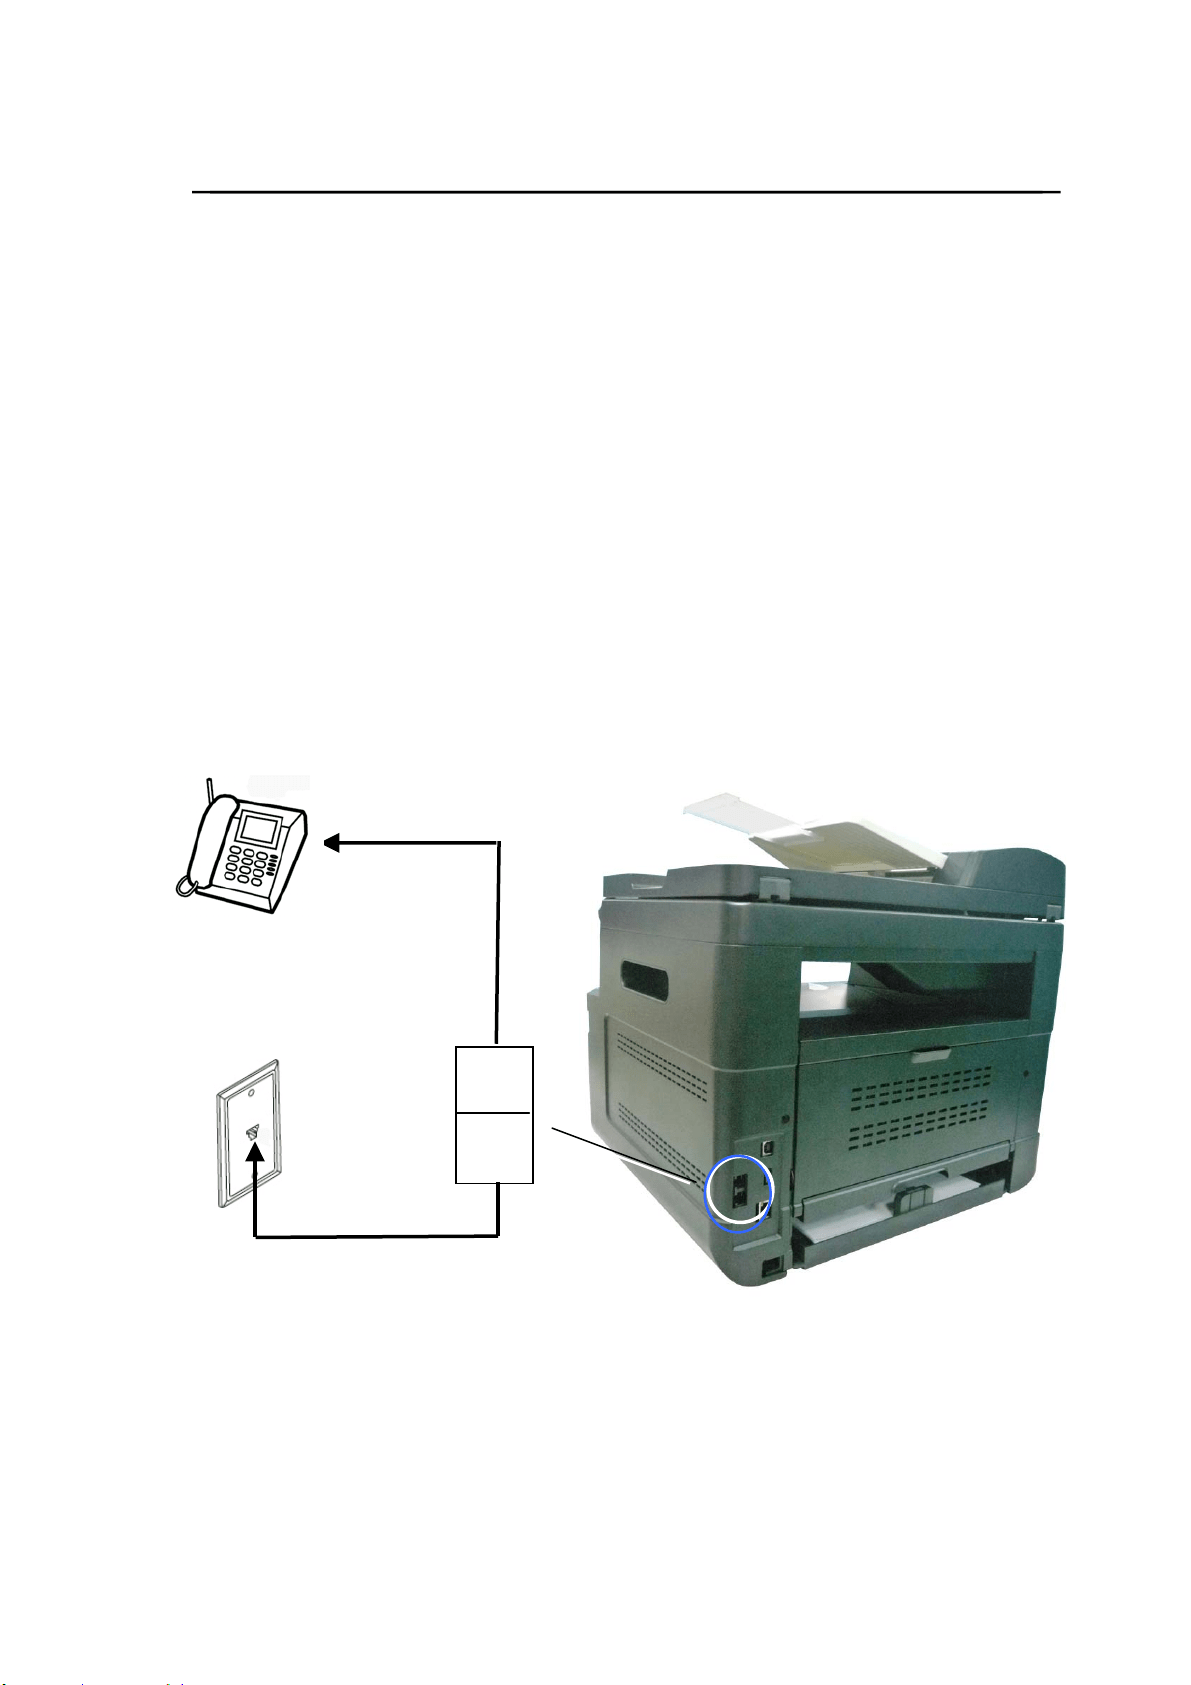
Connect ing dir ectly to a Telephone W all Jack
Connect t he m achine t o a telephone line t o send fax ( available for AM30XXF only) .
1 . Make sure you have a t elephone cord and a telephone wall j ack.
2 . Connect one end of the telephone cord into t he 「LI N E」port of the m achine.
3 . Connect t he other end of the t elephone cord into an act ive t elephone wall j ack.
EXT
LINE
24
Connect ing t o a Telephone
Connect a telephone t o t he m achine t o use t he fax line as a norm al telephone line if
an opt ional fax m odem is included in the m achine.
1 . Make sure you have t he follow ing:
A t elephone
Two t elephone cords
A t elephone wall j ack
2 . Connect one t elephone cord to t he 「LI NE」port of t he m achine, and then plug it
int o an active telephone wall j ack.
3 . Connect t he other t elephone cord to a t elephone, and t hen plug it int o t he 「EXT」
port of t he m achine.
EXT
LINE
2
5
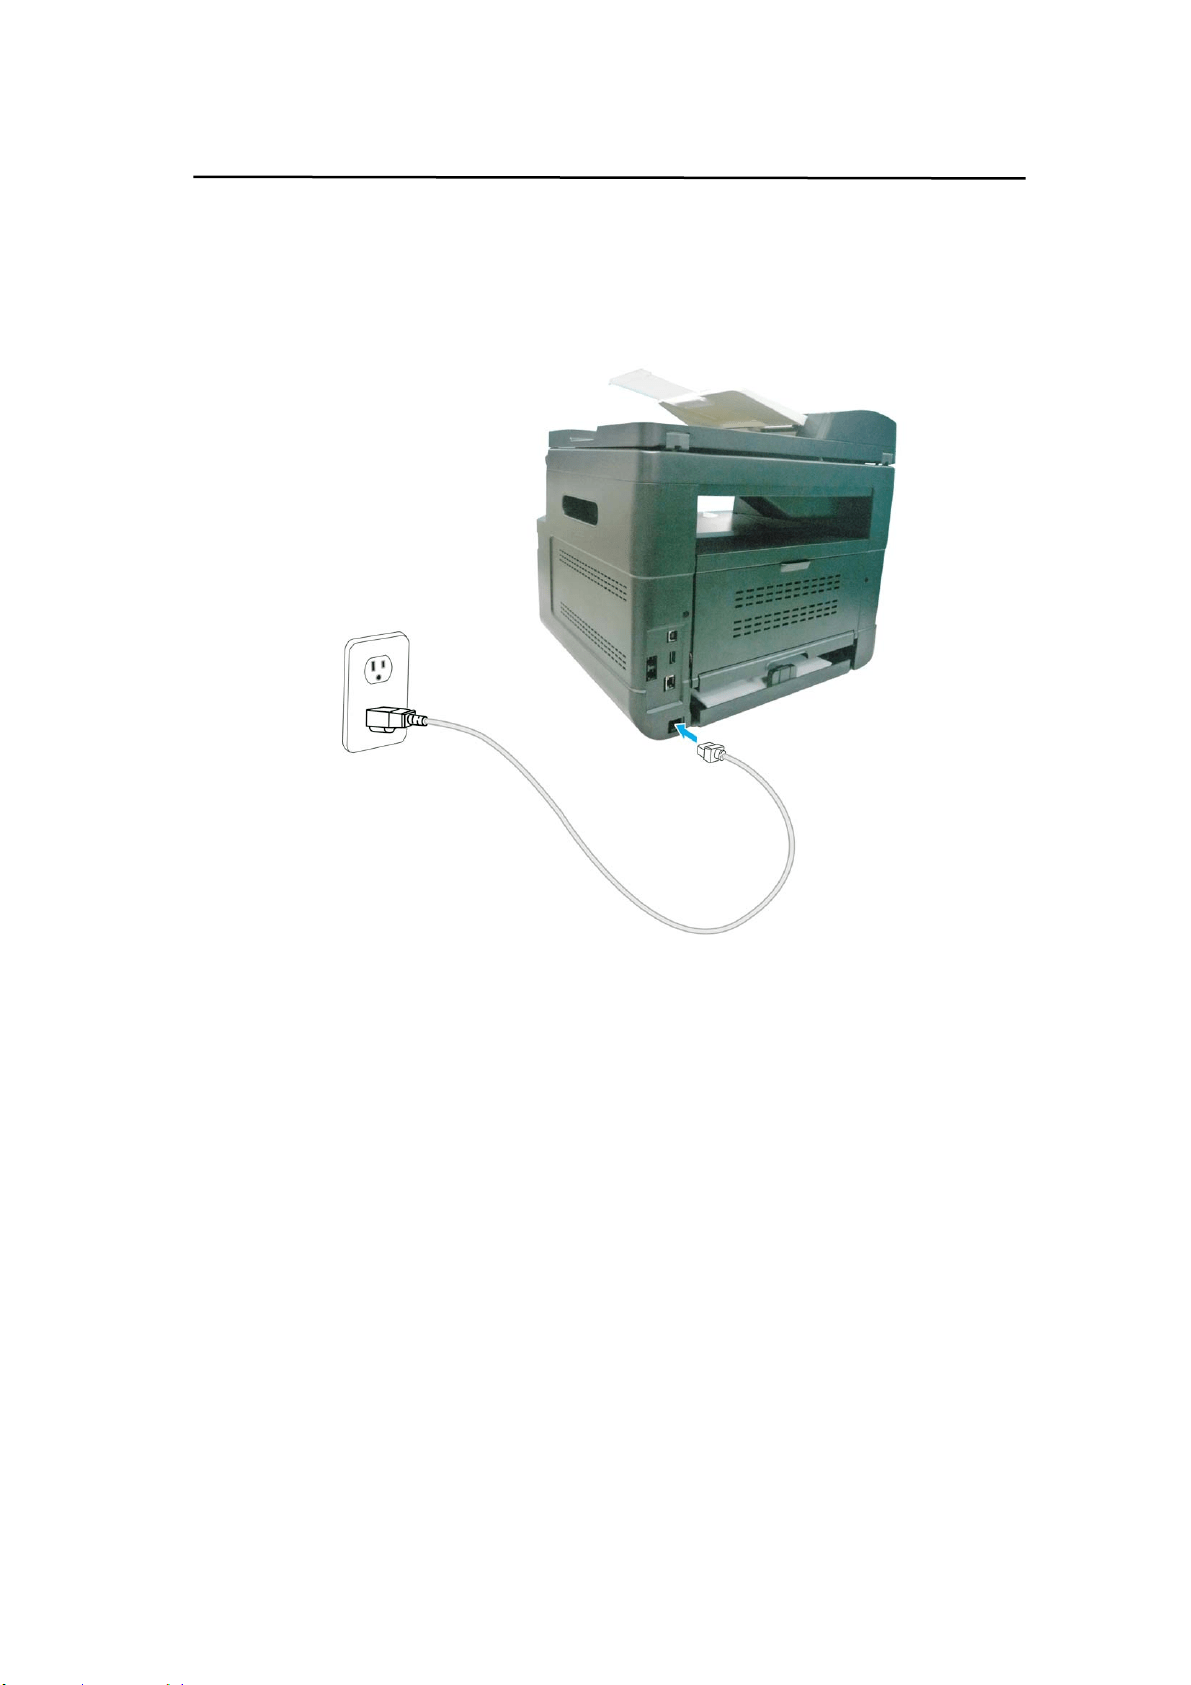
Connect ing t o Pow er
1 . Connect t he sm all end of t he power cable t o t he power j ack of your product.
2 . Connect the ot her end to an appropriate power out let .
26
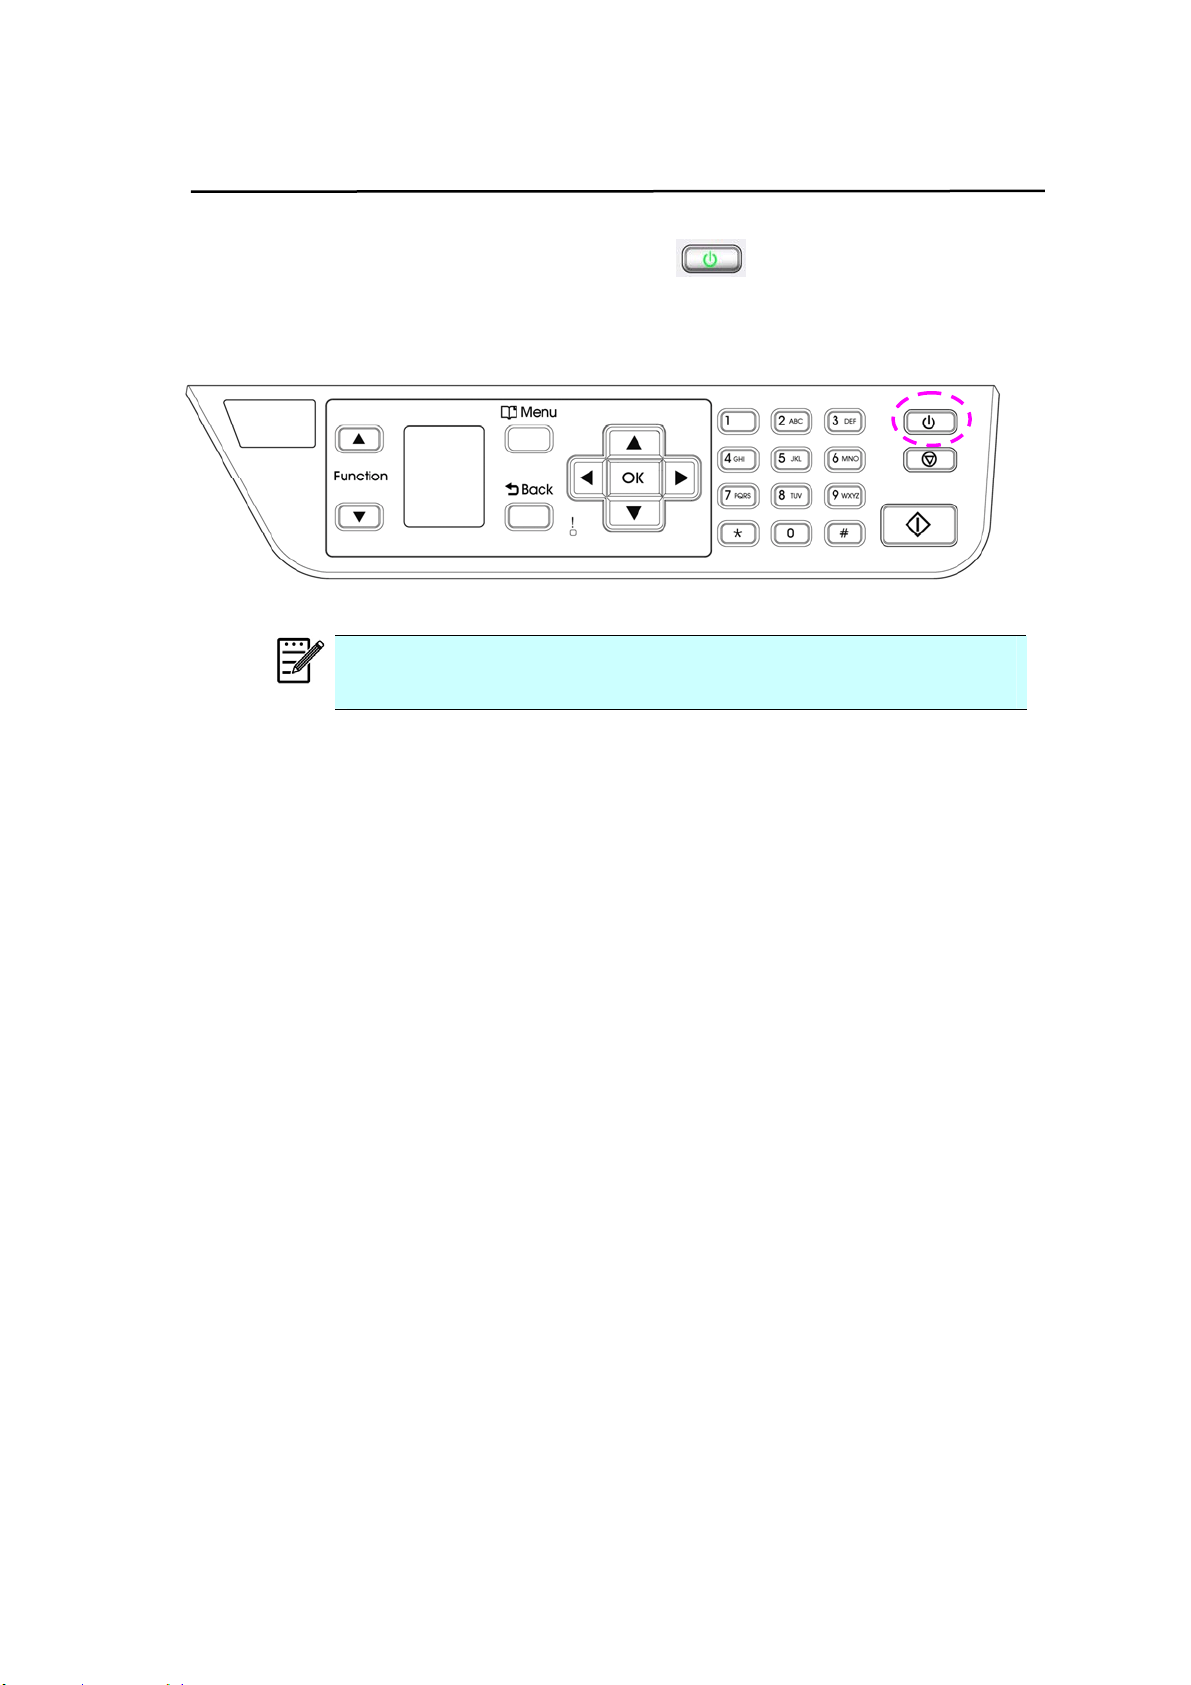
Turning On The Machine
To t urn on the product , press t he Power butt on
on the control panel, t he LED
light will t urn solidly on. To turn off the product, hold and press t he Power but t on for
t hree seconds, t he LED light will be off.
N ot e :
When the product is not in use, be sure t o turn off the product
to get a zero power consum pt ion st at e.

2
7
Specifing Your Count r y
When t he product is t urned on for t he first tim e, t he following enquiring w ill be
displayed. Please specify your count ry t o use the opt ional fax function properly.
Country
USA
Germ any
Taiw a n
China
Singapore
Ma laysia
Tha ila nd
Use t he arrow key t o select your count ry and then press [ OK] to com plete. Choice:
USA, Germ any, Taiwan, China, Singapore, Malaysia, Thailand, I ndonesia, Korea,
and South Africa.
28
Checking t he Pr oduct’s Default I P Address
I f t he product has been connect ed to a network t hrough a Ethernet cable, aft er
turning on, an I P address will be aut om at ically given by default t hrough t he DHCP
server. Follow t hese st eps t o check t he product ’s I P address:
To check the product’s I P address,
1 . Turn on the product by pressing t he Power butt on.
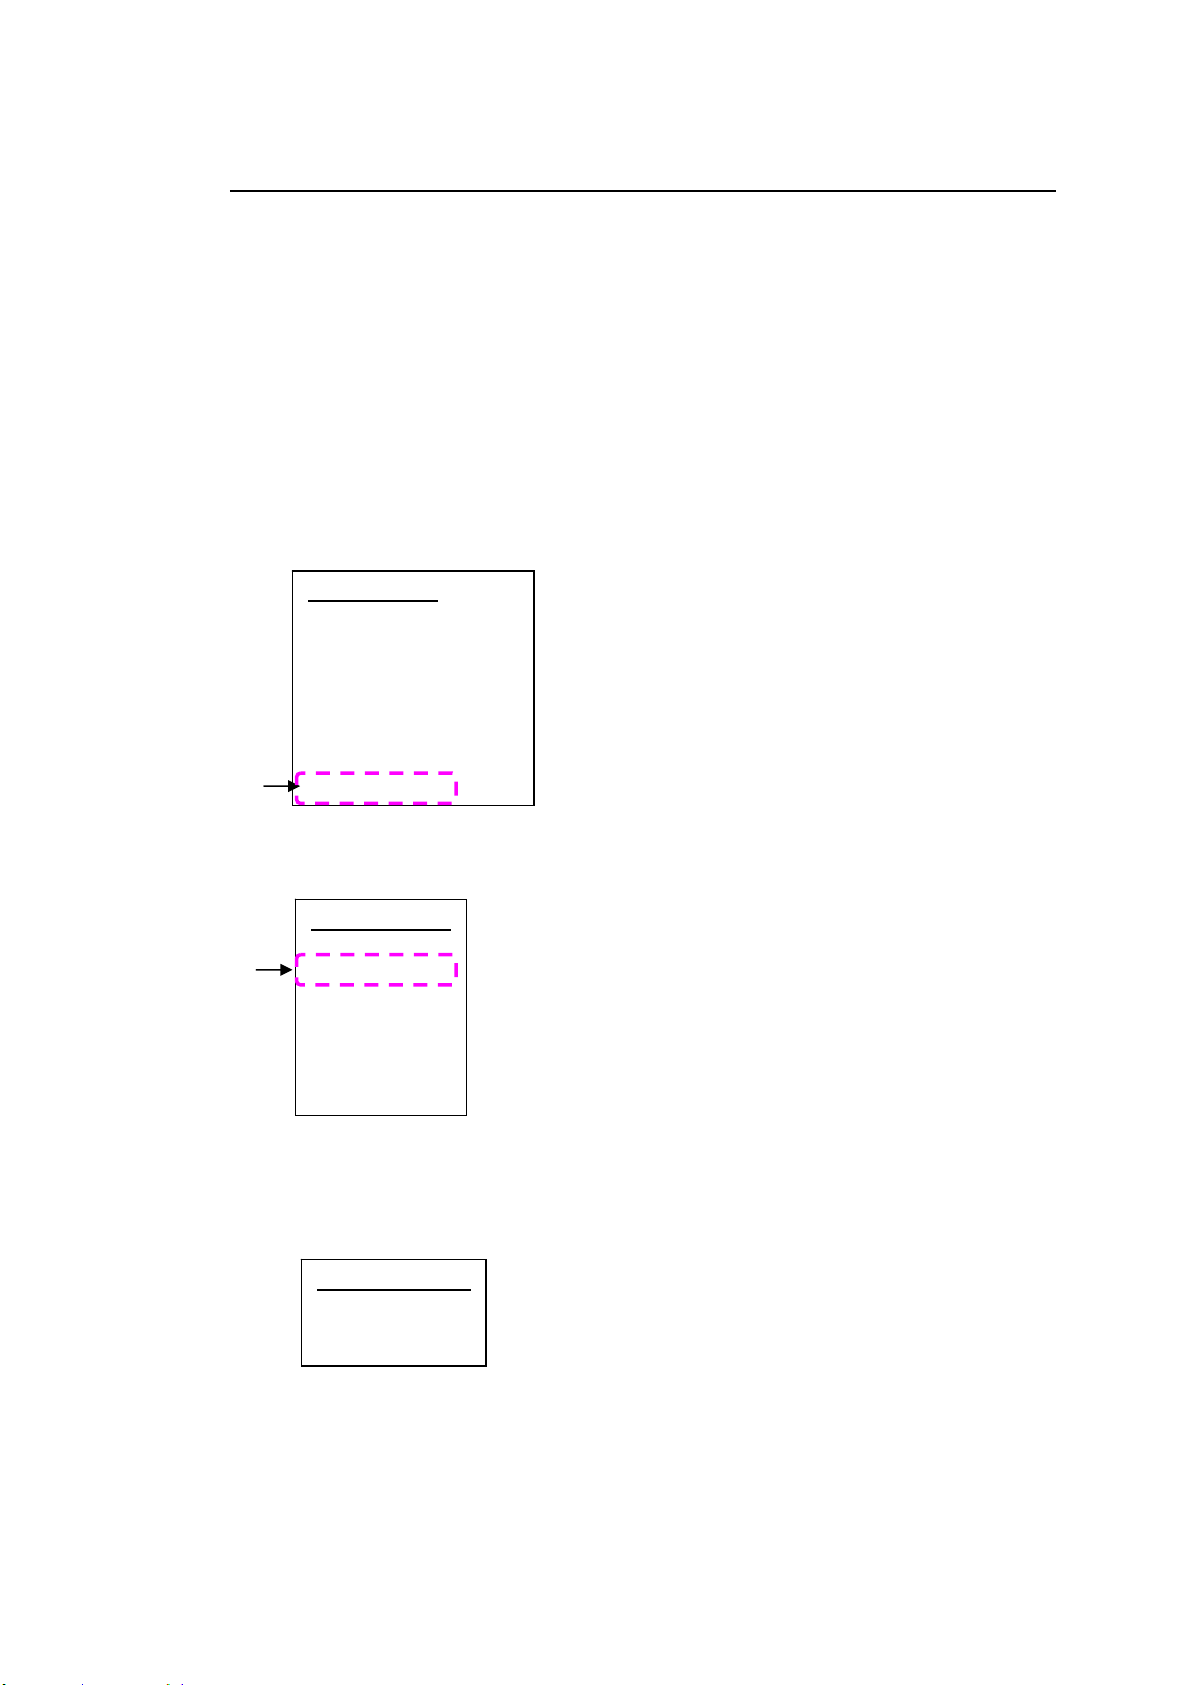
2 . Press t he [ M e nu] butt on on t he cont rol panel. The following screen w ill be
prom pt ed.
3 . Scroll dow n t o [ I nform ation] via t he Dow n Arr ow Key ▼ and t hen press
the [ OK] but t on. The following screen will be prom pt ed.
4 . Choose [ I P Addr e ss] via t he Dow n Ar r ow Key ▼ and t hen press t he [ OK]
butt on. The I P address from t he DHCP server w ill be prom pt ed. For
exam ple, 10.1.23.81.
Menu
N e t w or k
Syst em
Copy
I D Ca r d Copy
Fax
Scan
Report
I nform at ion
I nform a t ion
Host Nam e
I P Addr e ss
SSI D
LAN M AC
W i- Fi MAC
FW Ve rsion
Ma chine SN
I P Address
1 0 .1 .2 3 .8 1
29
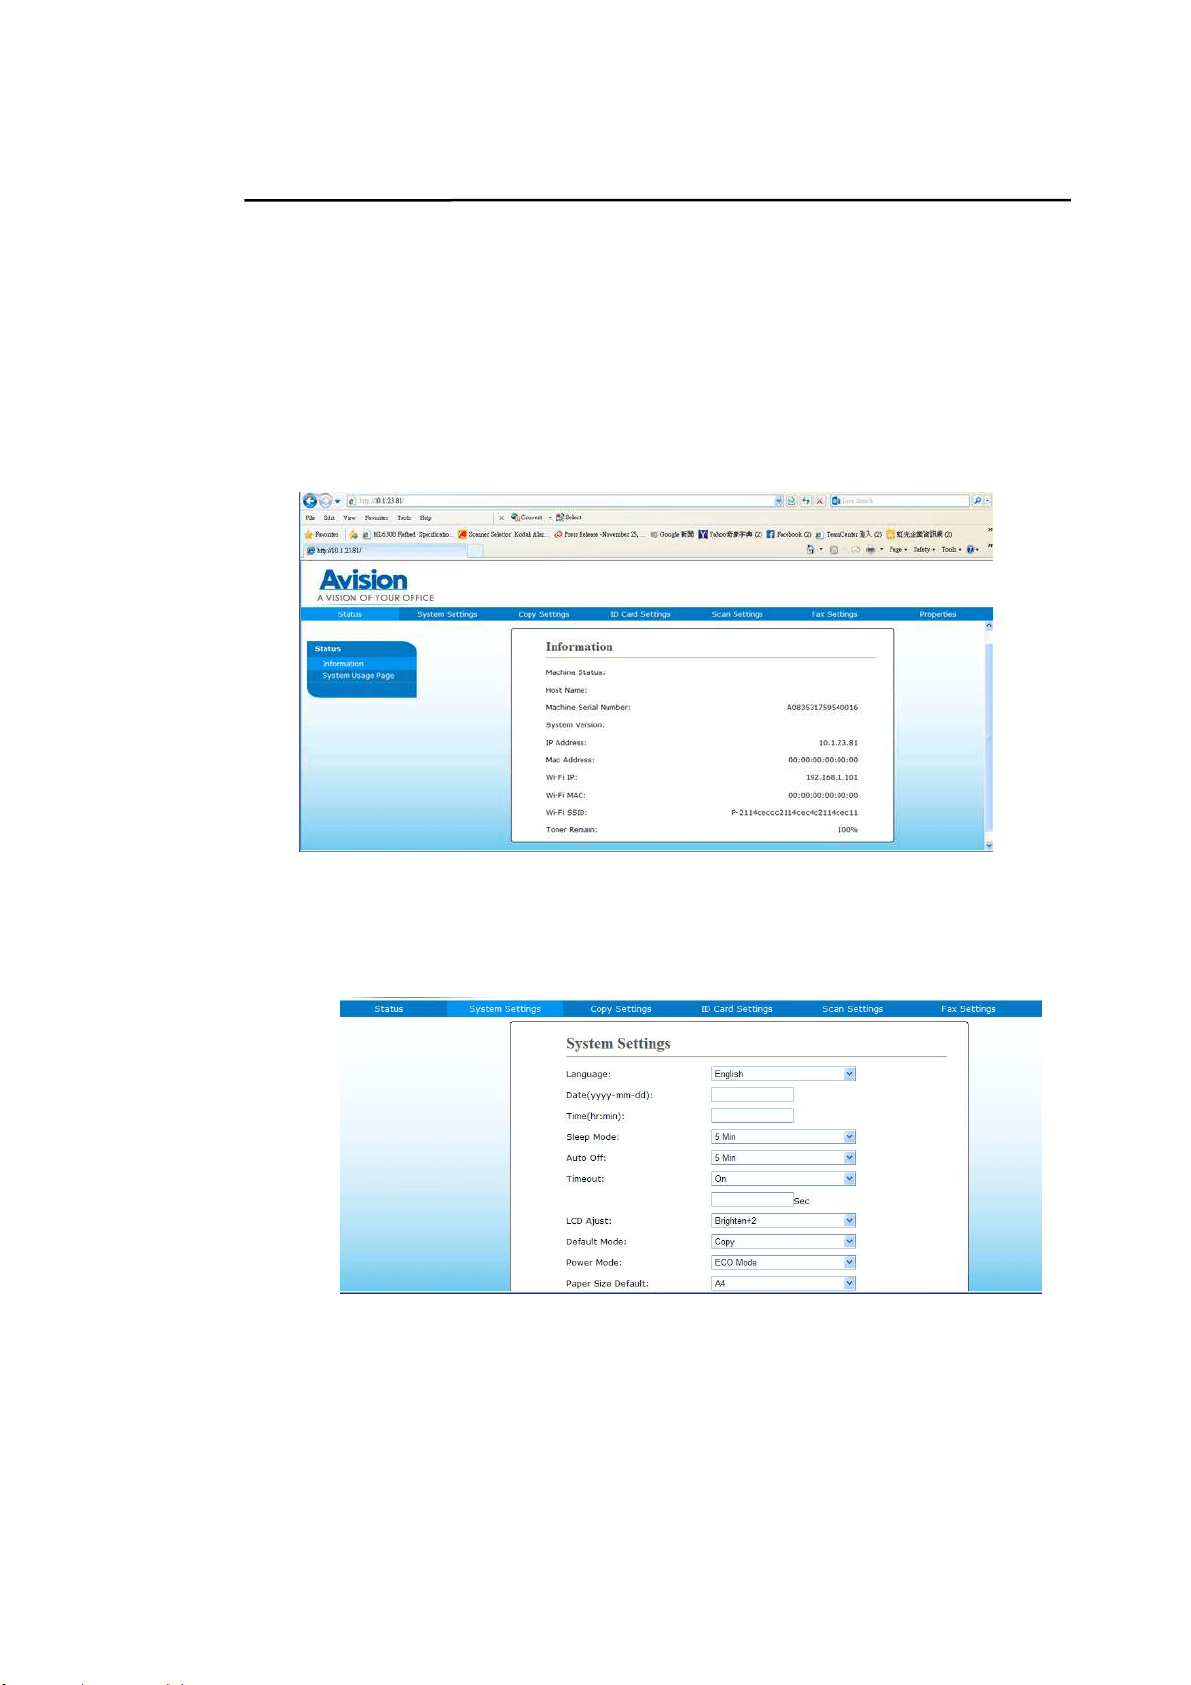
Specifying the Product’s Dat e a nd Tim e
To se t t he pr oduct’s date a nd tim e,
1. Refer t o the preceding section, Che ck in g t he Product ’s Default I P Address,
to get the product ’s I P address from t he DHCP server.
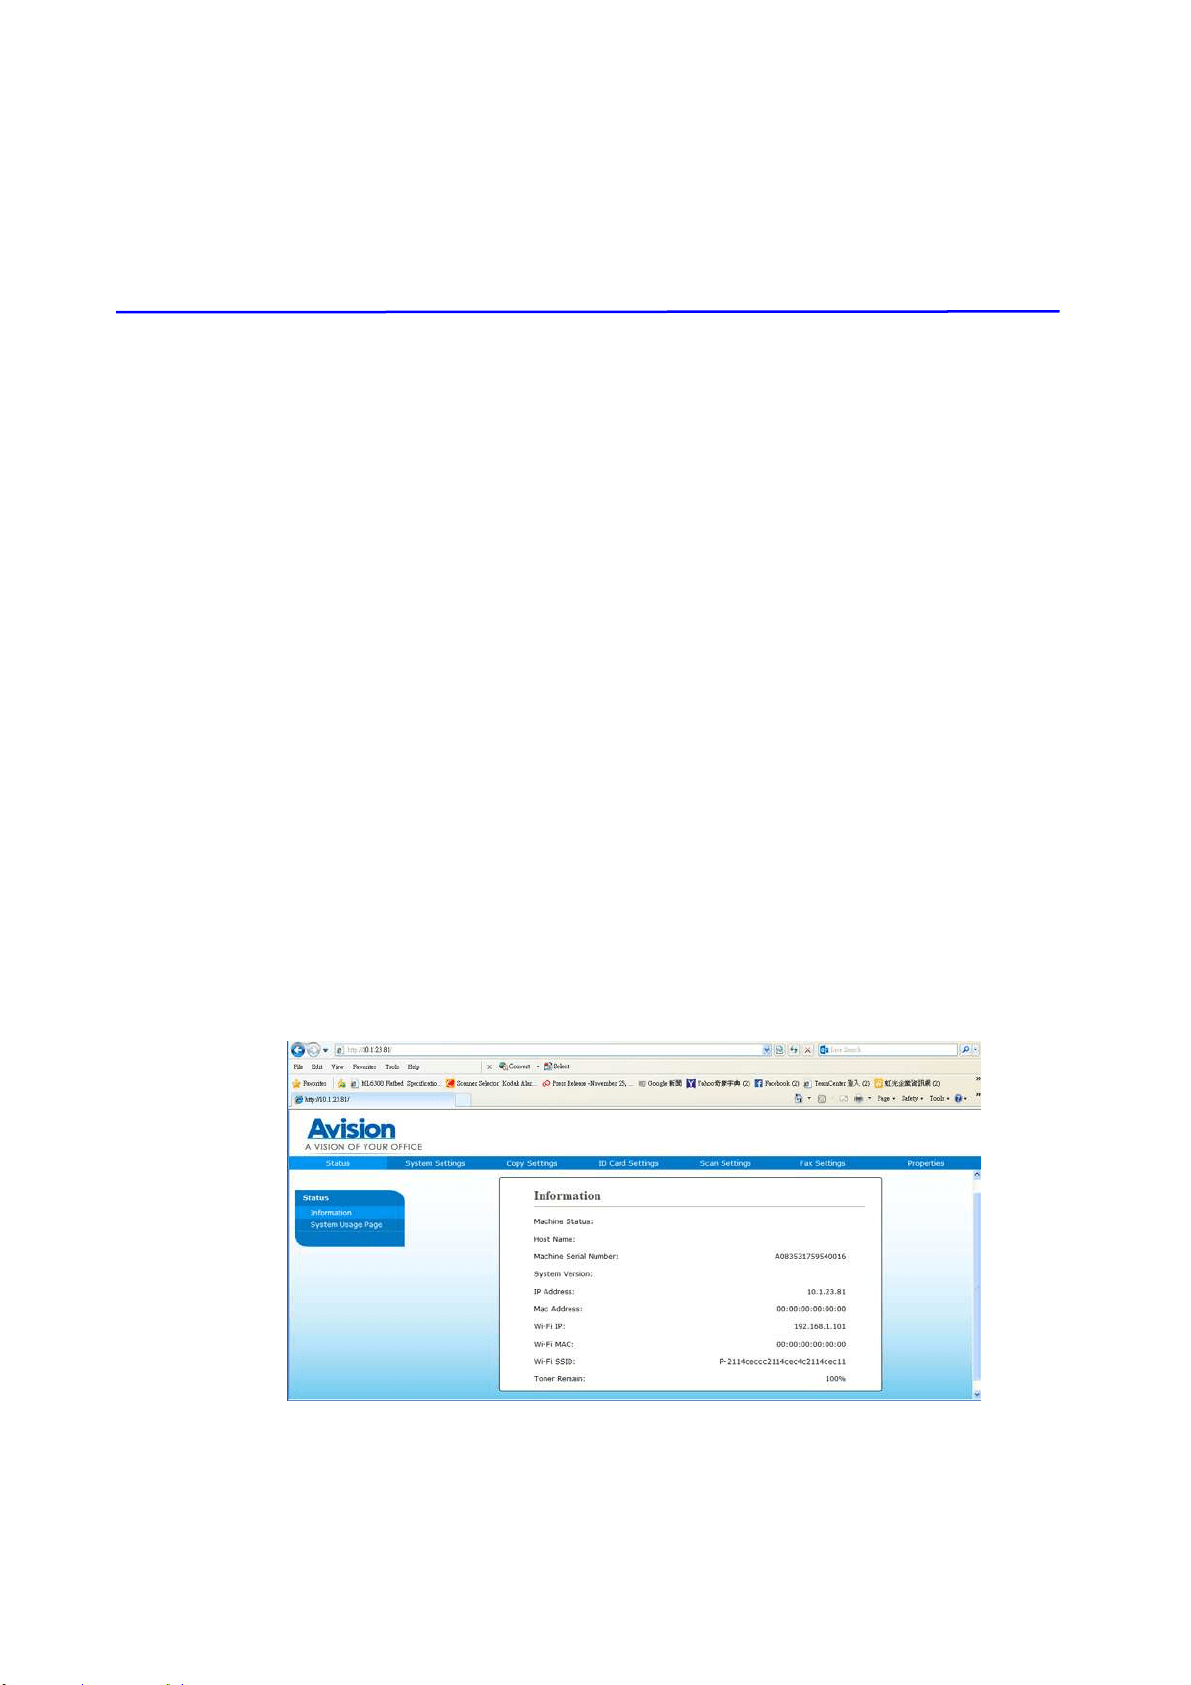
2. Open your browser.
3. Type the product ’s I P address on the URL field of your browser. For exam ple,
10.1.20.25. The following em bedded web page will be displayed.
4. Select [ System Set t ings] and ent er current dat e and tim e on the [ Da t e] and
[ Tim e ] page. For exam ple, ent er [ 2 0 1 5 - 1 1 - 2 1 ] (yyyy- m m - dd,
year- m onth- dat e) as current dat e. Ent er [ 0 8 :2 5 ] ( hr: m in, hour: m inute) as
current t im e.
4. Click [ Updat e] to save t he setting and exit t he page.
Ready
30
I nstalling t he Scanner / Print er ( W indow s)
System Requirem ent
Windows XP, Windows Server 2003, Windows Vist a, Windows 7, Windows 8, Windows
10
For USB I nt erface Use r s
Please follow these st eps t o inst all the scanner, print er, and fax drivers if this
m achine is connect ed to your com puter via a USB cable.
I m port a nt!
DO NOT connect t he USB cable before installing t he scanner,
printer, and fax drivers.
1 . I nsert the supplied CD int o your CD- ROM drive. The installat ion m enu w ill be
displayed.
2 . To inst all t he scanner / prin t er drivers:
Click
「I nst all Scanne r Drive r a n d Pr int e r D rive r 」and follow t he on- screen
instructions t o com plete t he inst allat ion of t he program .
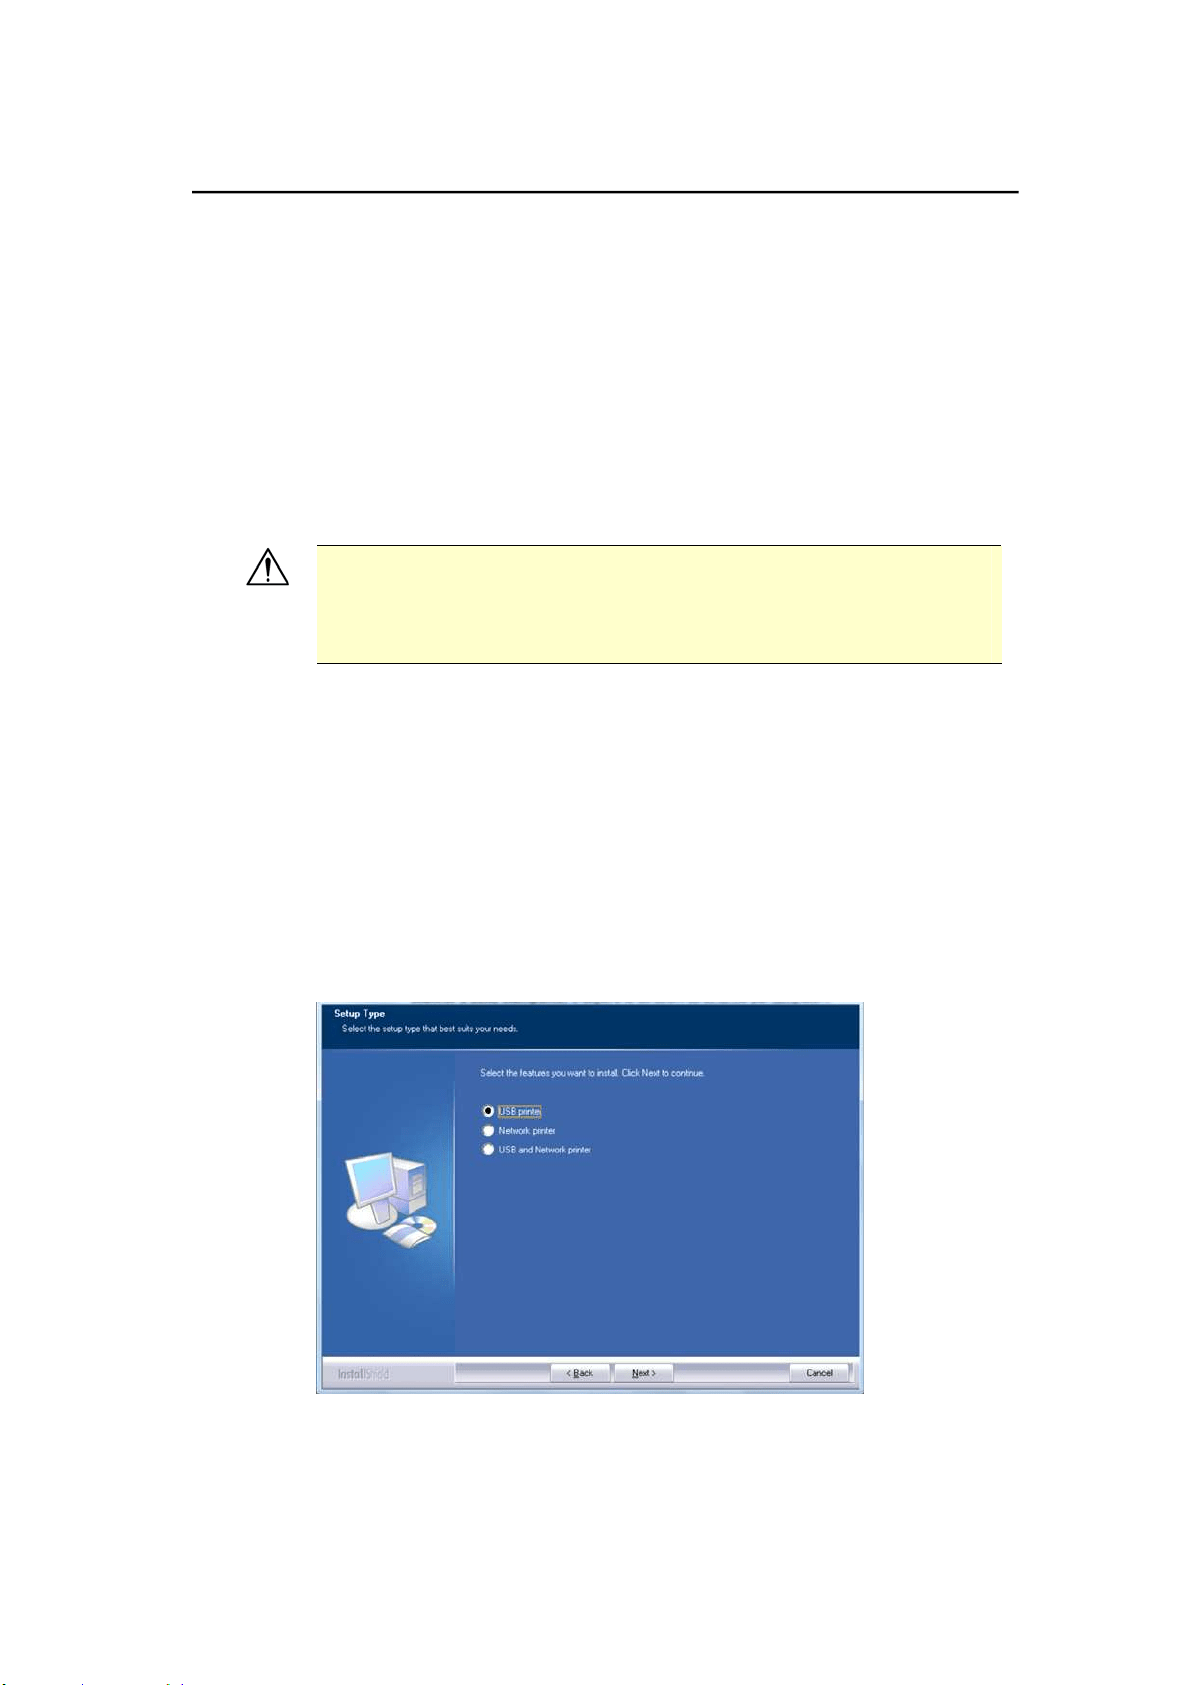
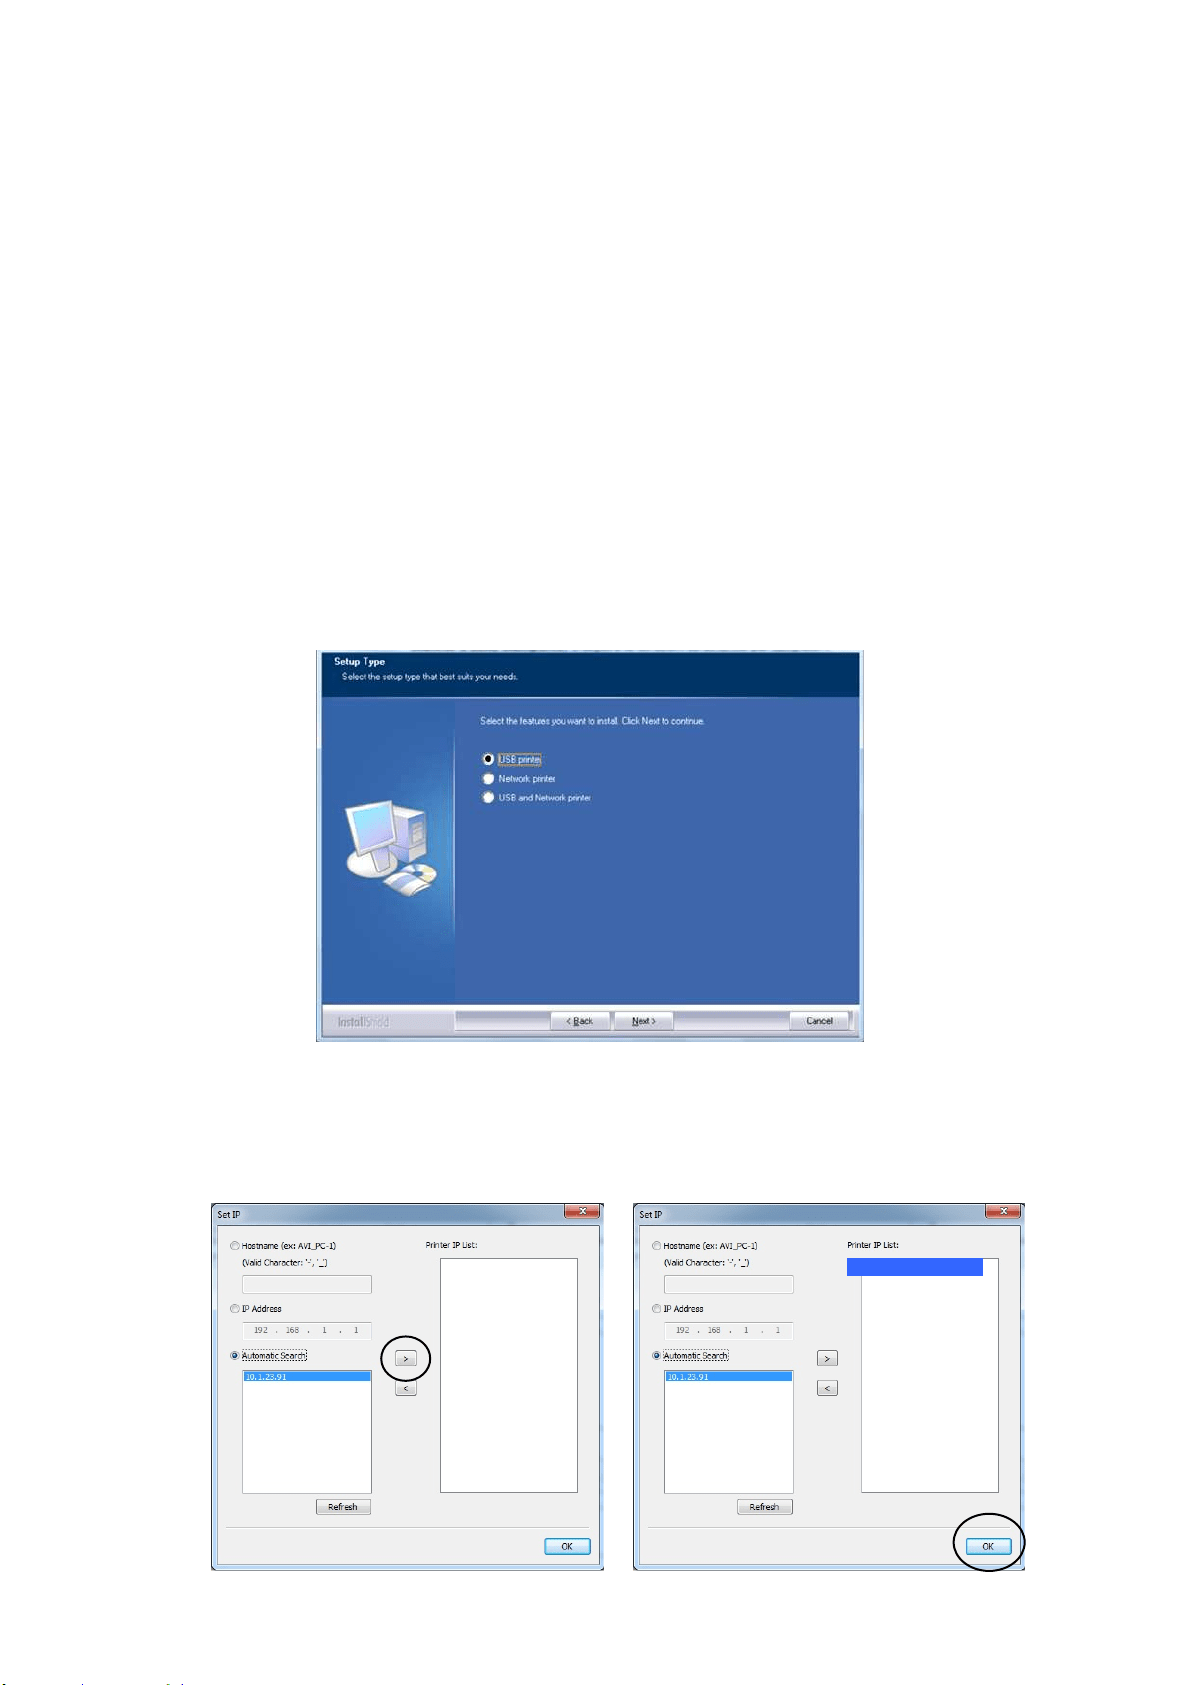
3 . When the [ Se t up Type] dialog box appears, select [ USB pr int er] and t hen click
[ N ext ] .
4 . During inst allat ion, t he [ USB Conne ct ion] dialog box will be prom pted t o instruct
you to t urn on t he MFP and then connect t he MFP to your com puter wit h a USB
cable.
a. Connect one end of t he USB cable to your com put er.
31
b. Connect the ot her end to t he USB port of your product.
5 . When 「Found N ew H ar dw are」screen appears, click N e xt and follow t he
on- screen instruct ion to com plet e t he installat ion.
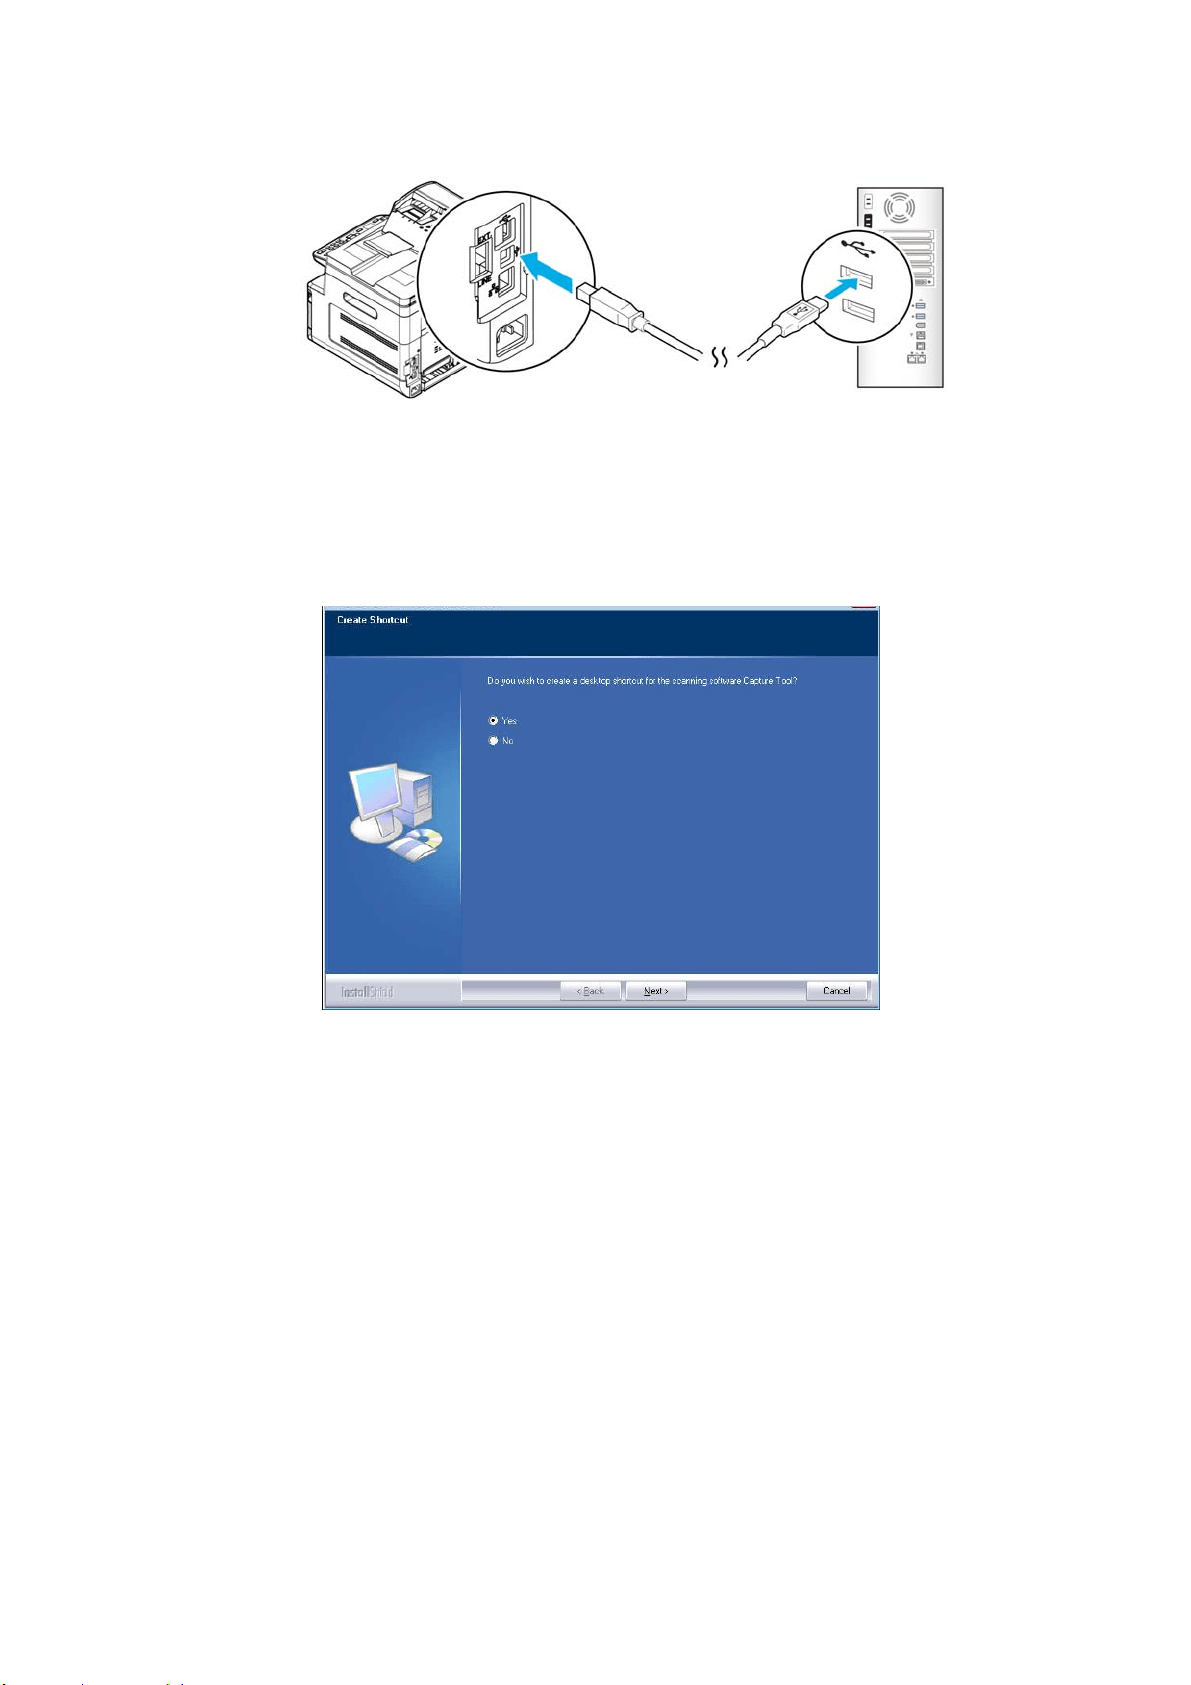
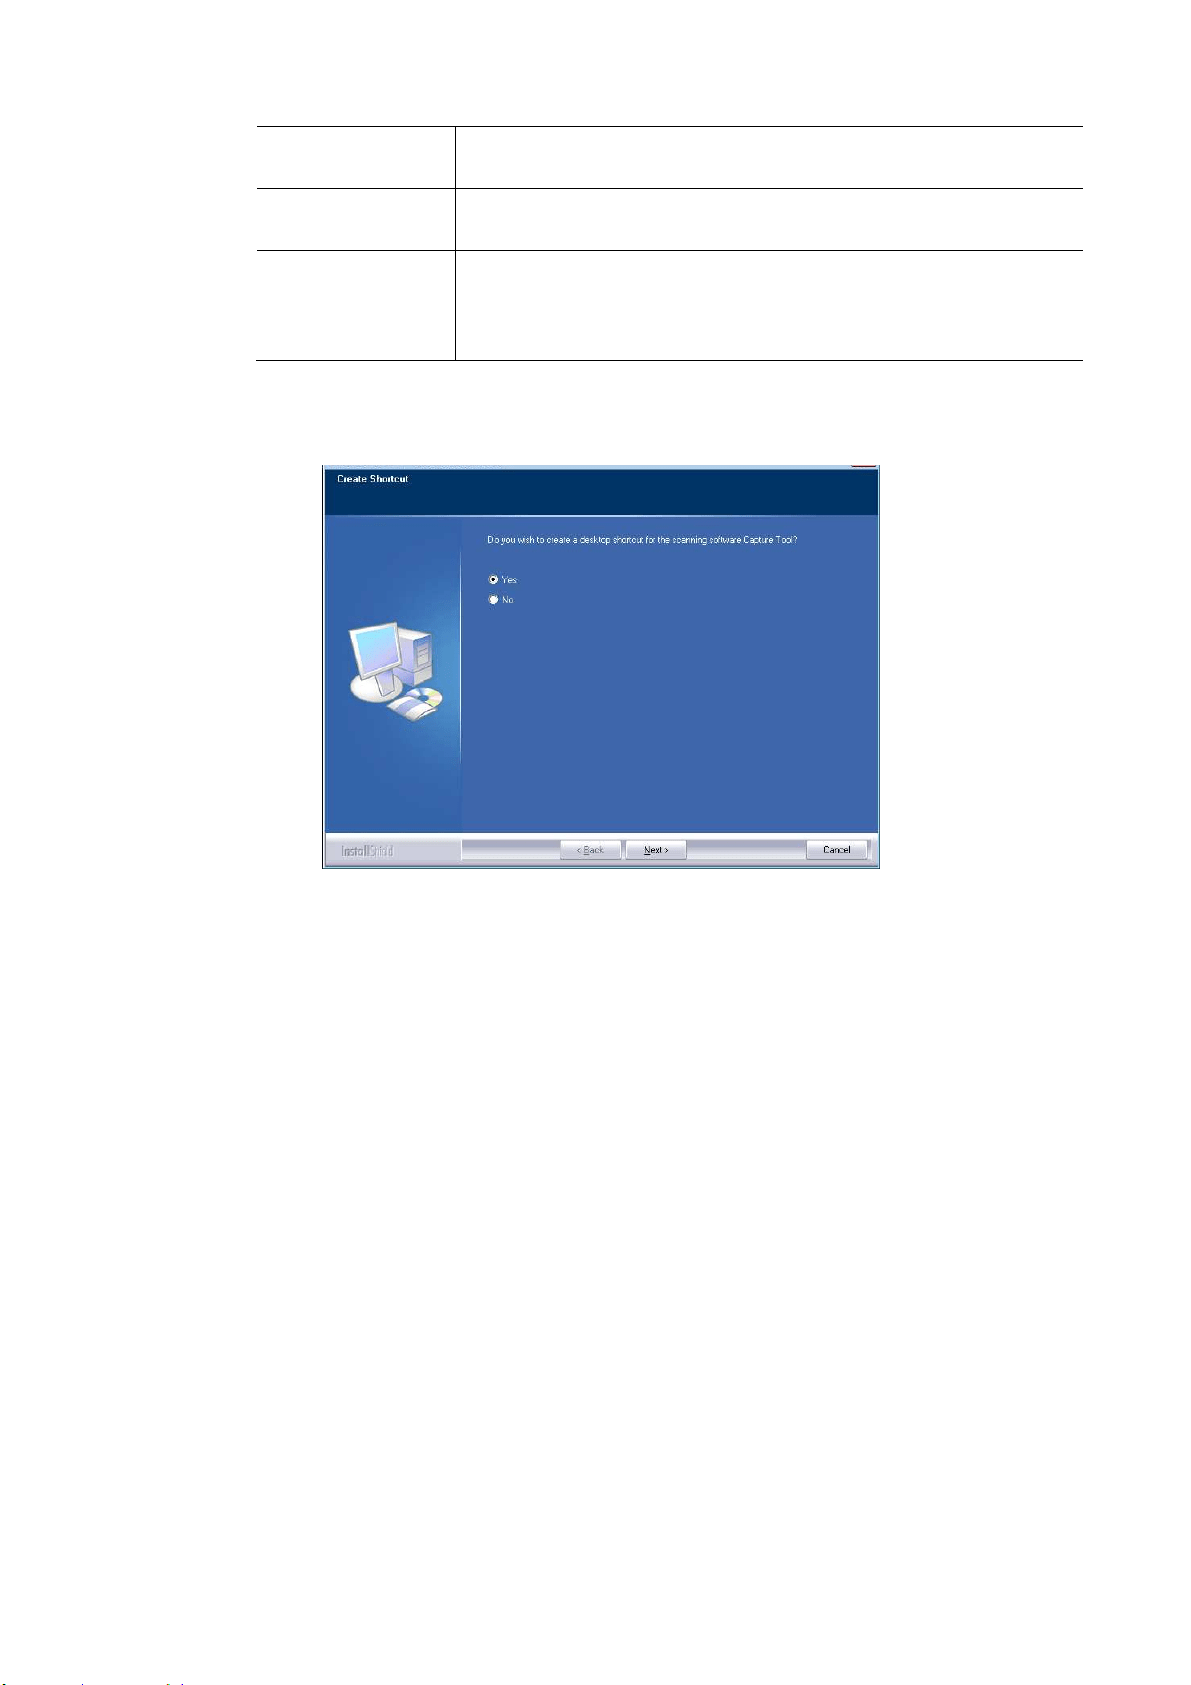
6 . When the following dialog box appears, click [ Ye s] if you w ish t o creat e a deskt op
short cut for the scanning software Capture Tool.
7 . When t he Finish dialog box appears, click Finish to com plet e.
I f you have successfully inst alled the print er’s driver, you will find a print er,
「AM30XX Print er」, has been added in t he 「Print ers and Faxes」opt ion from t he
Cont rol Panel.
32
For N et w ork I nt erfa ce Use r s
Please follow these st eps t o inst all the scanner, print er, and fax drivers if this
m achine is connect ed to your com puter via a network.
1 . I nsert the supplied CD int o your CD- ROM drive. The installat ion m enu w il be
displayed.
2 . To inst all t he scanner driver and print er driver:
Click
「I nst all Scanner Drive r a nd Pr in t er Drive r」and follow the on- screen
instructions t o com plete t he inst allat ion of t he program .
3 . When t he Set up Type dialog box appears, check [ N et w ork pr in t e r ] and
click [ N e x t ] t o cont inue. I f you need to connect the product t o a wireless
network, check [ USB a n d Ne t w ork pr int e r] since t he Network Setup Tool is
included in t he USB driver and only available when the product is connecting
to your com put er t hrough the USB cable.
4 . When t he following Set I P dialog box appears, choose one of the following
options and click [ > ] to add to t he printer list. When t he desired opt ion
set t ing is com plet ed, click [ OK] . ( Follow t he preceding section – Checking
the Product ’s Default I P Address to obt ain t he product’s default I P address.
10.1.23.91
33
Host Na m e Enter the product ’s host nam e t o be connect ed in t he blank
box of t he Host Nam e opt ion.
I P Addr e ss Ent er the product’s I P address t o be connected in t he blank
box of t he I P Address option.
Aut o Se a rch Searches t he product’s print ers autom atically, and all t he
product’s host nam es found in t he net work will be displayed
in t he box of the Aut om atic Search. Use your m ouse t o
choose your desired host nam e t o be connected.
5 . When the following dialog box appears, click [ Ye s] if you wish to creat e a
desktop short cut for t he scanning software Capture Tool.
6 . When t he Finish dialog box appears, choose 「Finish」t o com plet e.
I f you have successfully inst alled the print er’s driver, you will find a print er,
「AM30XX Net Work」, has been added in t he 「Print ers and Faxes」opt ion from
the Control Panel.
34
Cha nging t he Product ’s I P Address in a W ired N et w ork
To change the product ’s I P address, you need t o install the N e t w or k Set up Tool.
The N et w or k Setup Tool is included in t he USB print er driver. Aft er t he inst allat ion
of t he USB print er driver is com pleted, t he N et w ork Setup Tool is aut om at ically
installed ont o your com put er. Follow t hese st eps to updat e t he I P address t o t he
product in a wired net work.
You m ay also choose your network connect ion t ype via the web page. (See m ore
details in t he subsequent sect ion Cust om ize t he System ’s Set t ings via the Em bedded
Web Page in Chapter 5.)
1 . Make sure t he product is connect ed t o your com put er via a USB cable.
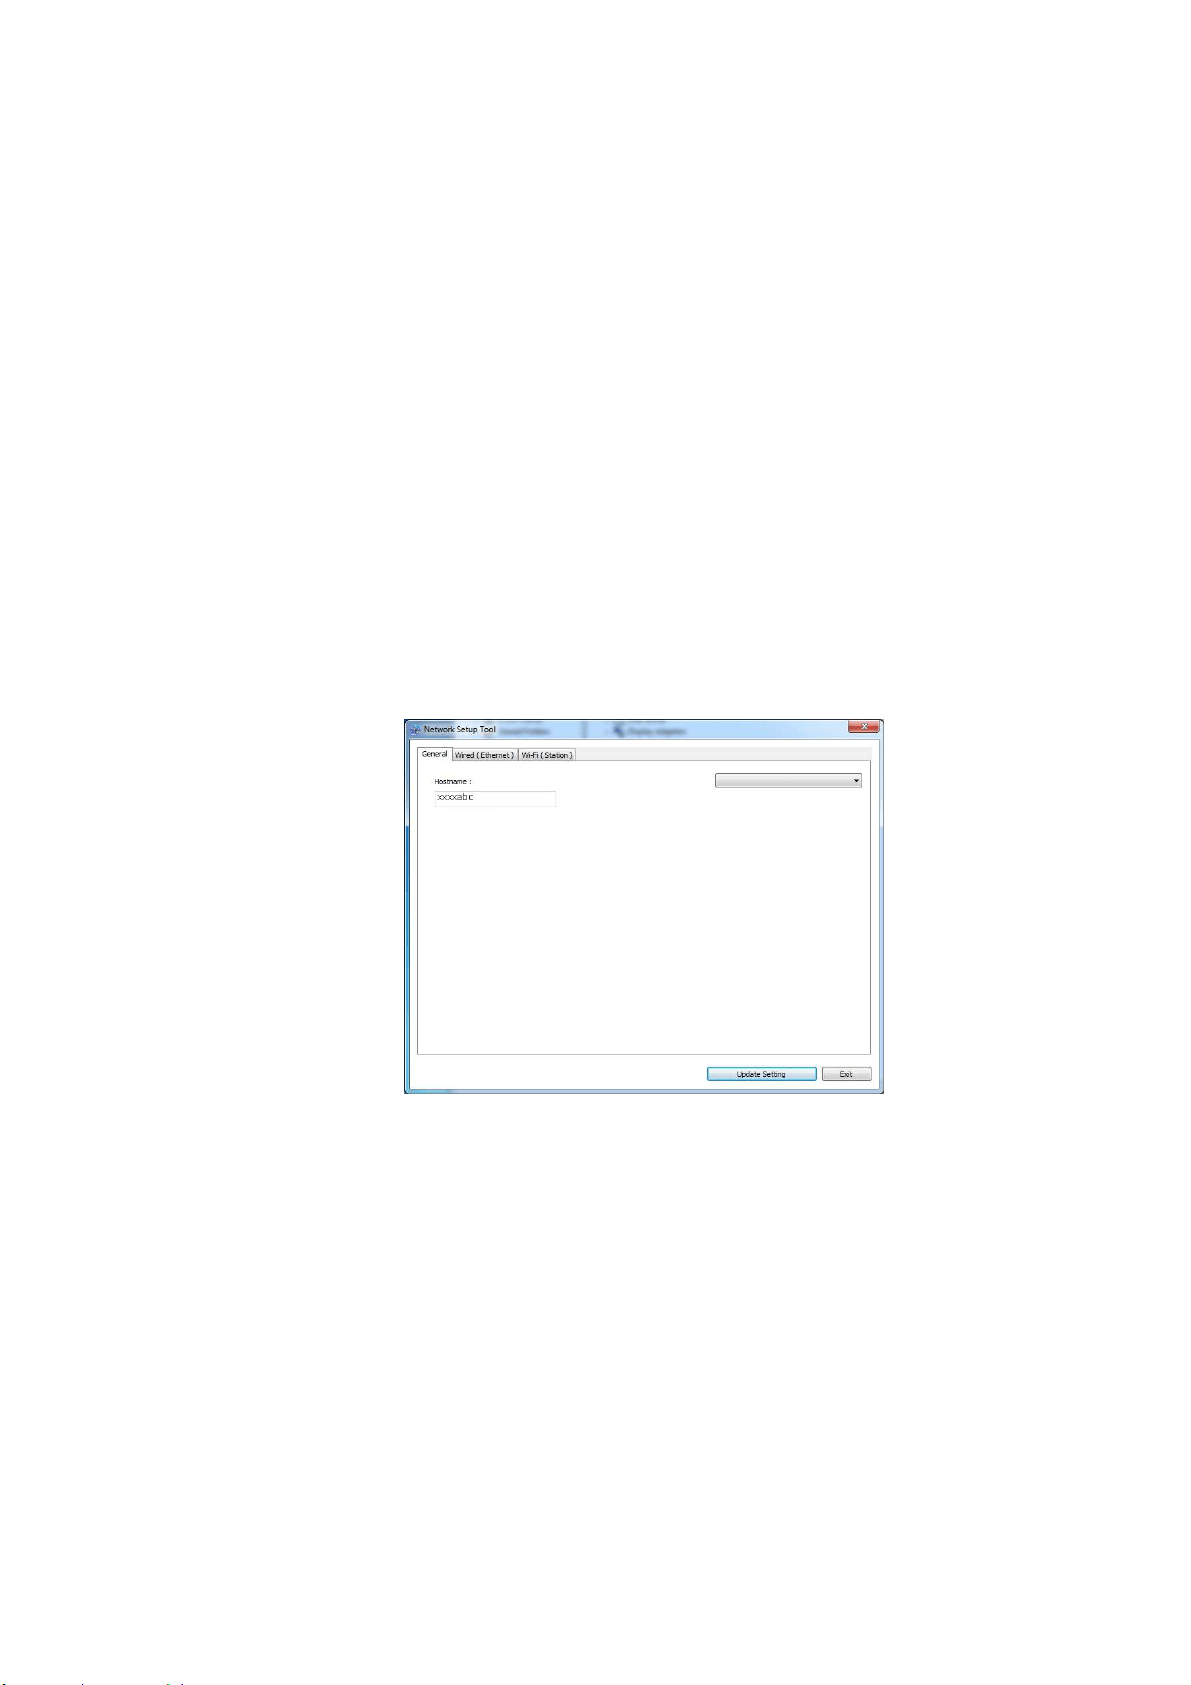
2 . St art N et w or k Set up Tool by choosing the St a rt butt on and t hen select All
Progra m s> AM 3 0 XX MFP> N et w ork Setup Tool in succession. The following
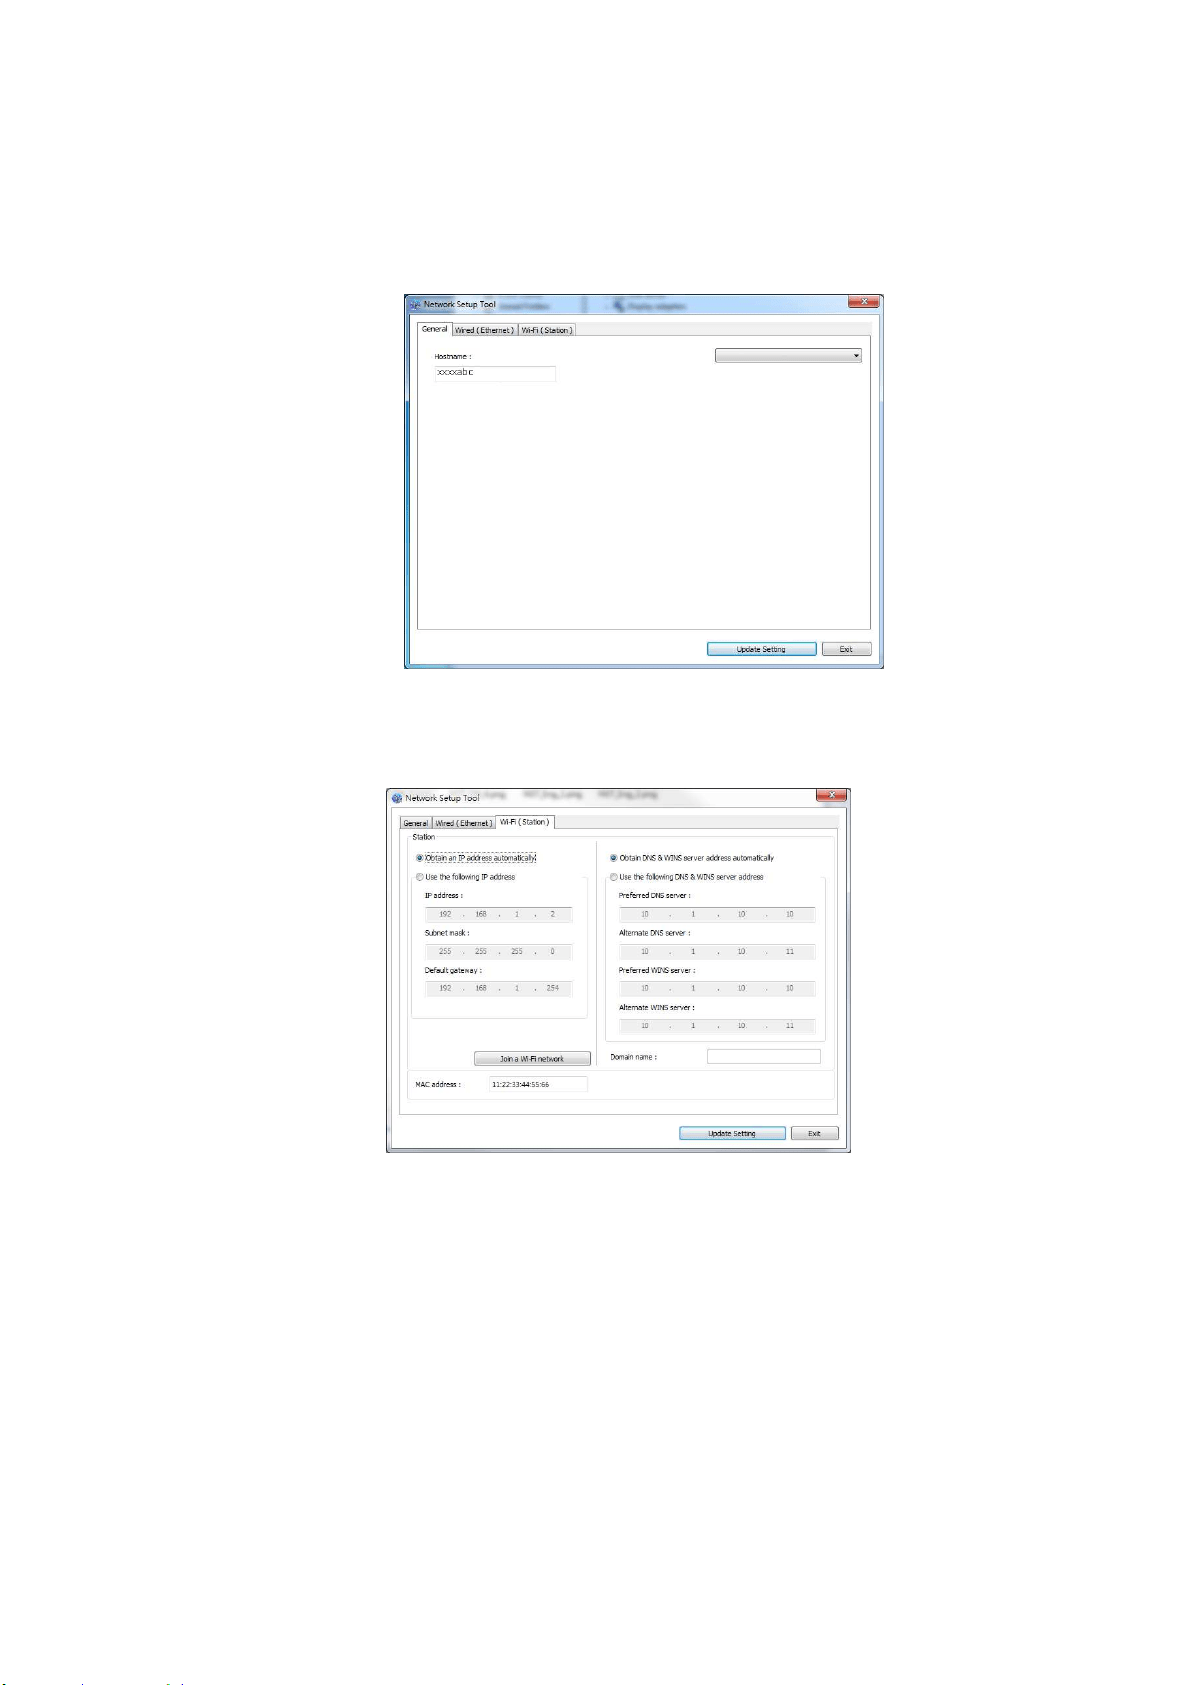
Network Setup Tool screen will be prom pted.
3 . On the [ Genera l] page, check [ W ir e d ( Et hernet ) ] Network.
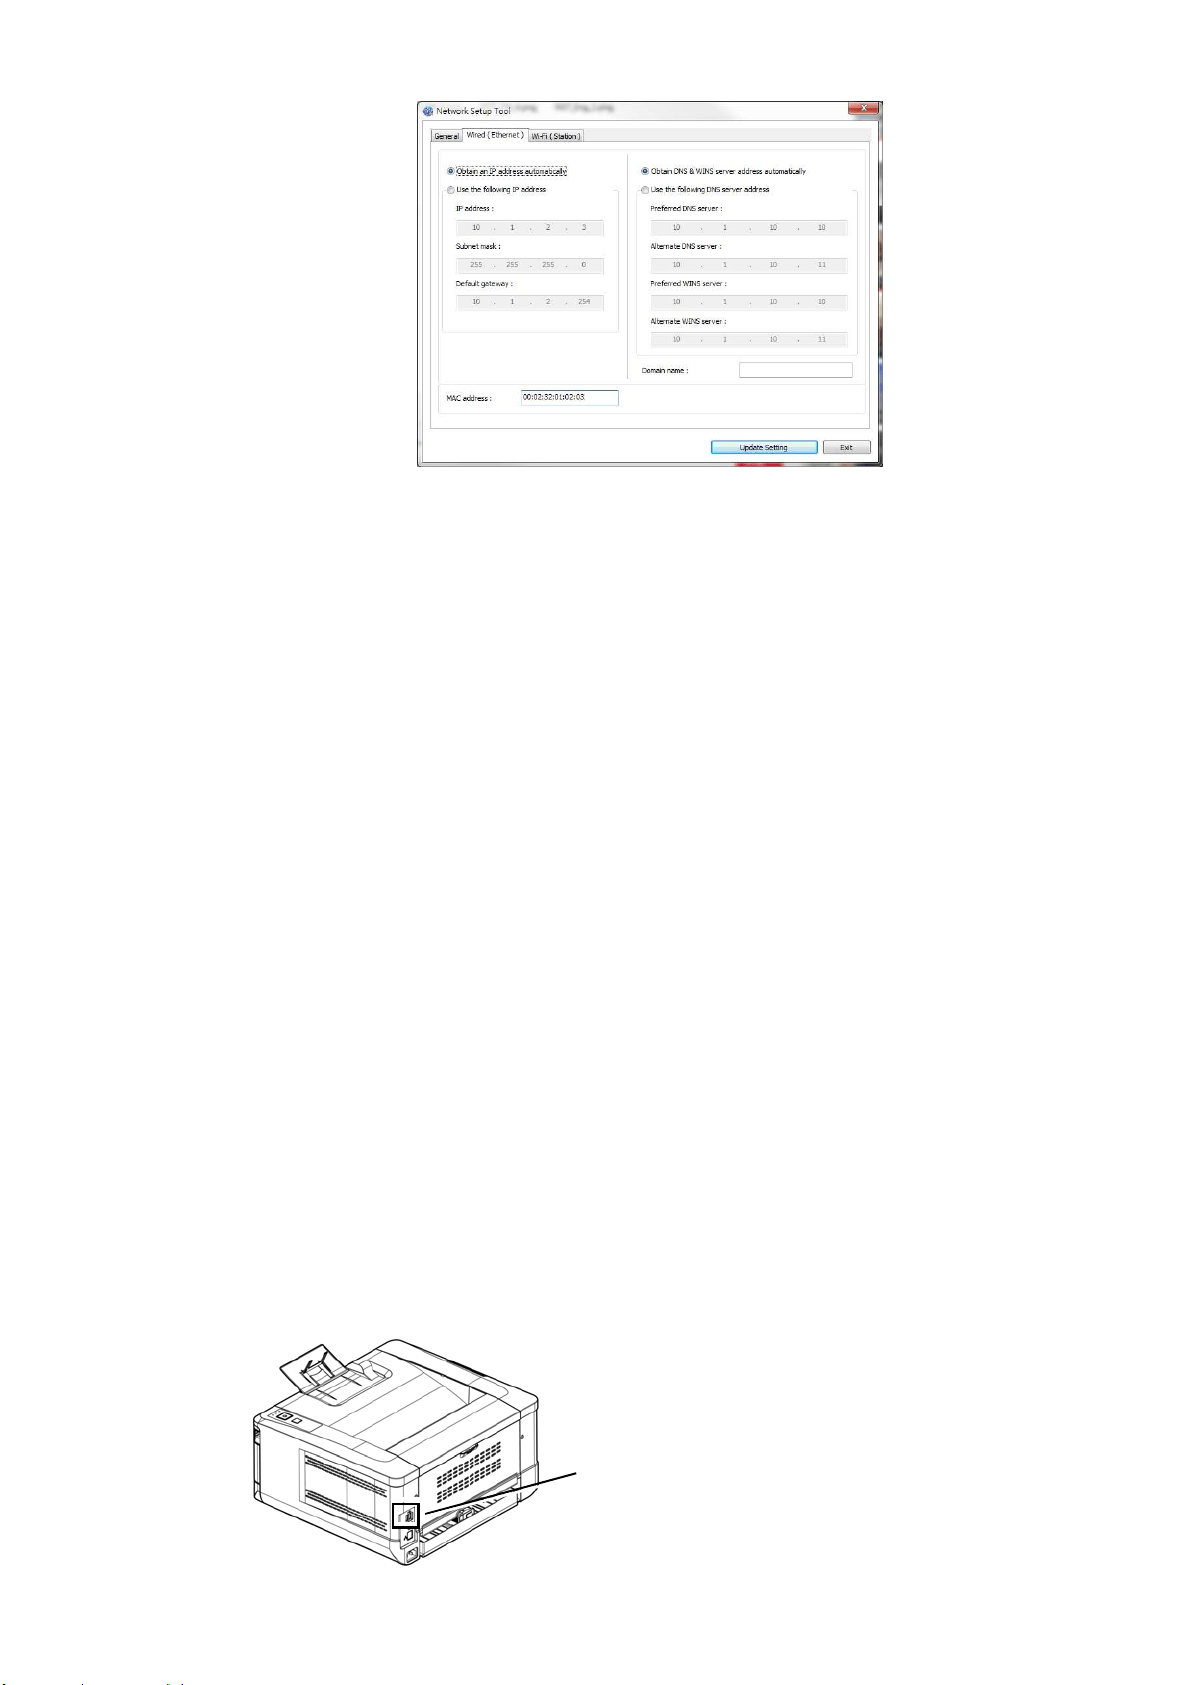
4 . Click t he [ W ired ( Et he r n e t) ] t ab to prom pt t he Wired (Et hernet ) page.
AM30 Series Printer
3
5
5 . Check [ Obt a in a n I P address a utom at ically] t o obt ain t he I P address directly
from t he DHCP server or you m ay enter your stat ic I P on t he [ I P Addre ss] ,
[ Subnet Ma sk] , and [ Gat ew a y] field respect iv ely.
6 . I f you have assigned a specific I P, enter your dom ain nam e server and WI NS
server as well and t hen click [ Upda t e Set t ing] to updat e t he I P inform ation t o
the product .
7 . I f updat e is successfully, an [ Upda t e Device Successfully] m essage w ill be
displayed and the Network Set up Tool will be autom atically closed.
Set ting t he Pr oduct’s I P Address in a W ire less N e t w ork
To set an I P address to t he product, you need t o install t he Ne t w ork Se t up Tool.
The N et w or k Setup Tool is included in t he USB print er driver. Aft er t he inst allat ion
of t he USB print er driver is com pleted, t he N et w ork Setup Tool is aut om at ically
installed ont o your com put er. Follow t hese st eps to set and update t he I P address t o
t he product in a wireless net work:
You m ay also choose your network connect ion t ype via the web page. (See m ore
details in t he subsequent sect ion Cust om ize System ’s Set t ings via t he Em bedded
Web Page in Chapter 5.)
To w irelessly connect the product to a network, you need to install a Wi- Fi dongle t o
the product at the back of t he USB port.
USB
port
36
1 . Make sure t he product is connect ed t o your com put er via a USB cable.
2 . St art t he Ne t w ork Se t up Tool by choosing the St art butt on and then select
All Progr a m s> AM3 0 XX MFP> N et w ork Set up Tool in succession. The
following Net work Setup Tool screen will be prom pted.
3 . On t he [ Gene ra l] page, check [ W i- Fi ( Sta t ion) ] .
4 . Click t he [ W i- Fi ( Sta t ion) ] t ab t o prom pt the [ W i- Fi ( St at ion) ] page.
5 . Check [ Obt a in a n I P address a utom at ically] t o obt ain t he I P address
directly from t he DHCP server or you m ay ent er your stat ic I P on t he [ I P
Address] , [ Subnet Mask ] , and [ Gat ew a y ] field respectiv ely.
6 . Click [ Join a W i- Fi ne tw or k ] and the current ly connected wireless net works
will be displayed. Select t he wireless network you want t o connect and t hen
enter t he securit y key if required.
AM30 Series Printer

3
7
7 . Click [ Connect ] to start connect ing t he SSI D ( wireless net work nam e) and
then updat e t he I P inform at ion to t he product.
8 . I f update is successfully, an [ Updat e Device Succe ssfully ] m essage will be
displayed and the Network Set up Tool will be autom atically closed.
Uninst alling t he Scanne r D rive r a nd Pr int er D r iver
1 . From the 「St art 」m enu, select 「All Pr ogra m s」, 「the AM3 0 Se r ies MFP」,
and then 「Uninst all D r iver」.
Or from t he 「St a r t 」m enu, select 「Cont rol Pa n e l」, 「Add or Rem ove
Progra m s」, 「the AM 3 0 Series M FP」, and then 「Rem ove」.
2 . Follow t he inst ruct ions on t he screen t o com plete rem oving the scanner driver
and the print er driver.
Uninst a lling t he Fax D r iver
1 . From the 「St art 」m enu, select 「All Program s」, 「t he AM 3 0 Se r ie s fa x」,
and then 「Uninst all D r iver」.
Or from t he 「St a r t 」m enu, select 「Cont rol Pa n e l」, 「Add or Rem ove
Progra m s」, 「the AM 3 0 Series」, and t hen 「Rem ove」.
2 . Follow the inst ructions on the screen t o com plet e rem oving the fax driver.

38
I nst alling t he Optional Print er Driver ( M ac
OS)
System Requirem ent
Opera t ing Syst em :
Mac OS X 10.11 or lat er
Com put e r:
Recom m ended: I nt el
®
Core
TM
Duo Processor 2.4 GHz or higher
Minim um : I nt el
®
Core
TM
Duo Processor 1.83 GHz
PowerPC G5 1.6 GHz
Mem ory:
Recom m ended: 1 GB or m ore
Minim um : 512 MB
Turning on t he Pr int er
Press t he Pow e r but t on on the front panel, t he Pow er LED will flash. When it is
finished and ready t o scan, t he LED indicator will stop flashing and becom e steadily
on. To turn off t he scanner, press t he Pow er but t on for about 3 seconds, the
Power LED will be off.
I nst alling t he Pr int er D r iver
N OTE: The screens in this section are basically from Mac OS 10.11. The screens on
your Macint osh will vary depending on your operat ing system .
Follow t he procedure t o inst all Avision’s AM30 Series print er driver for Macint osh
com puter from t he CD-ROM supplied wit h t he print er.
1 . Turn your com puter on, and log in wit h an account t hat has adm in right s.
2 . I nsert t he Software CD- ROM int o the CD-ROM drive. The print er program -
Avision AM30…pkg will be displayed.
39
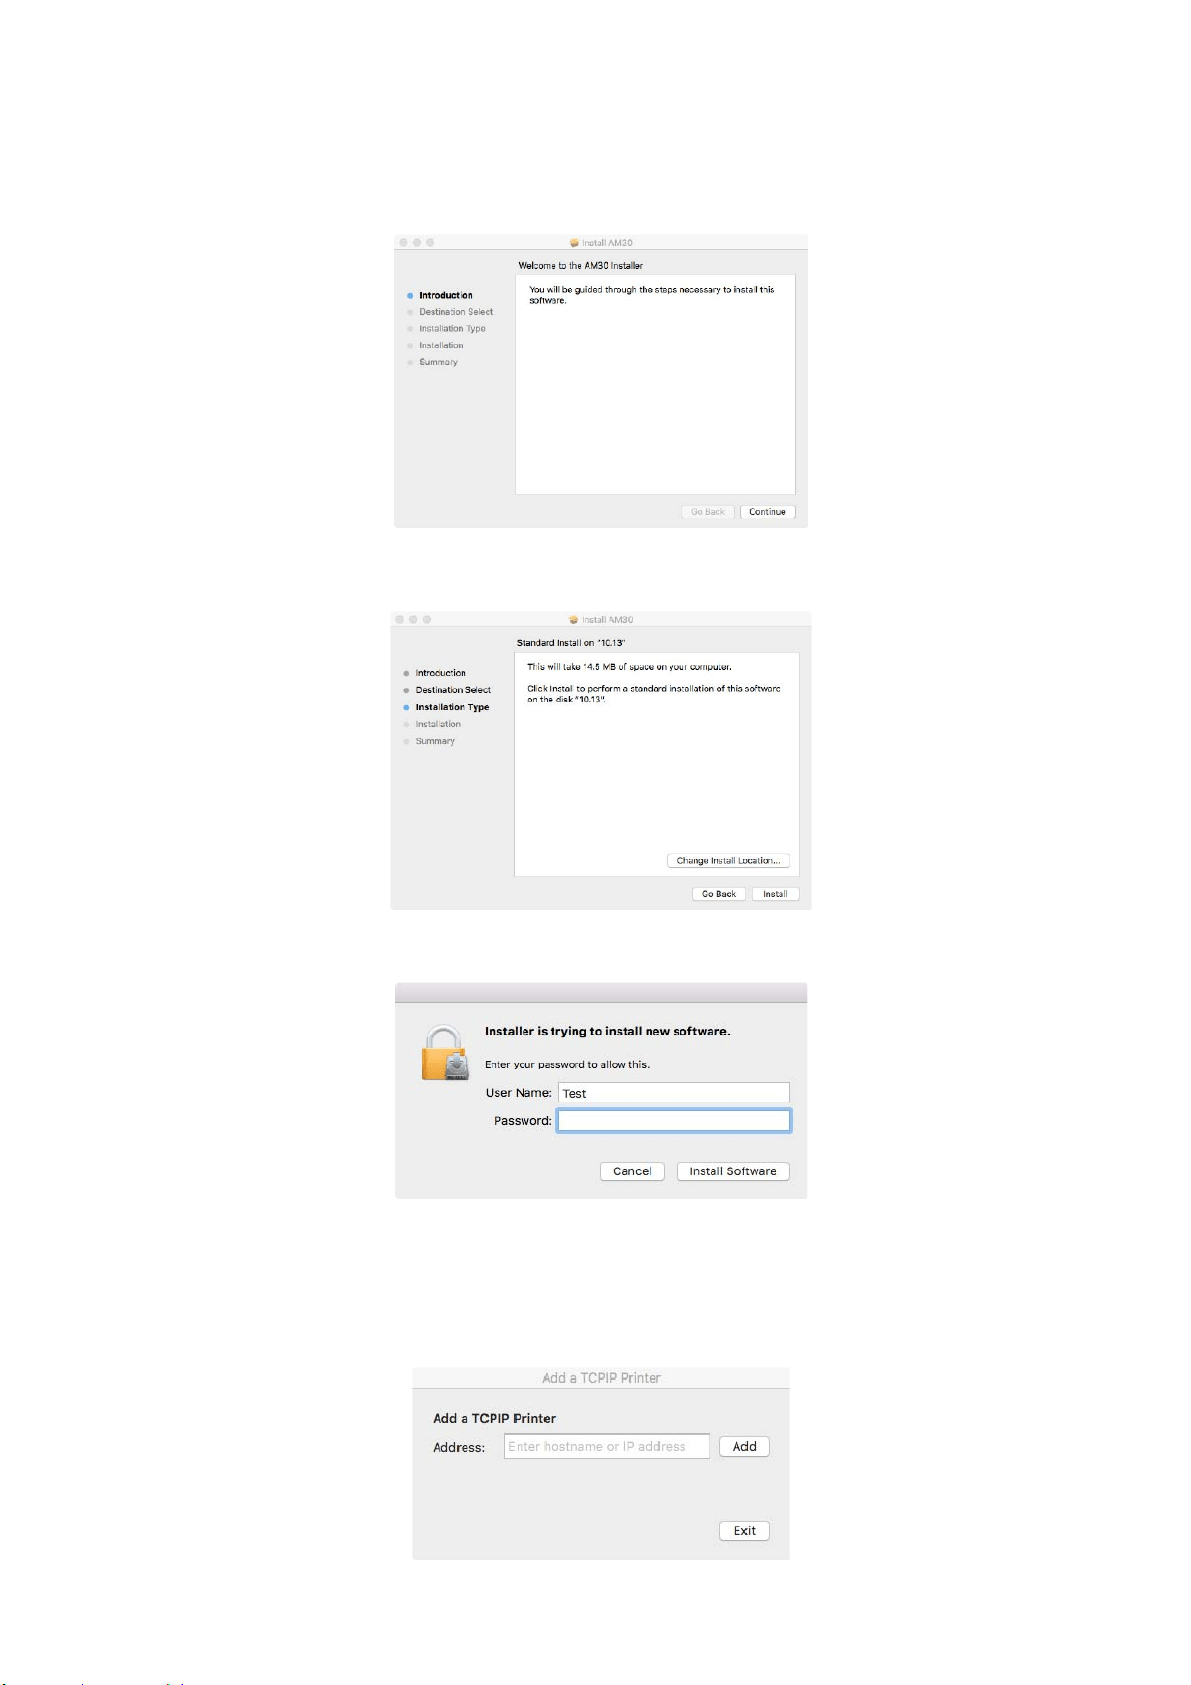
3 . Double- click t he [ Avision AM 3 0 …] icon.
4 . Click t he [ Cont inu e ] but t on on t he Welcom e window.
5 . I f you wish t o change t he default installat ion disk, click [ Cha n ge I nst all
Loca t ion…] or click t he [ I nsta ll] butt on to continue inst alling the program .
6 . Log in wit h a password t hat has adm in right s and click t he [ I nst a ll Softw are ]
butt on.
7 . The com put er begins inst alling t he soft ware.
8 . When the following screen is prom pted, ent er the I P address of t he printer and
click [ Add] .
* I f you wish t o connect t he print er to your com put er wit h a USB
cable, skip t he I P address and click [ Exit ] t o continue.
40
9 . When [ Add Print e r AM3 0 _ N e t Successful] m essage is displayed, click [ Exit]
to cont inue. ( I f wish to add m ore AM30 printer, ent er t he I P address again and
t hen click [ Add] t o continue.)
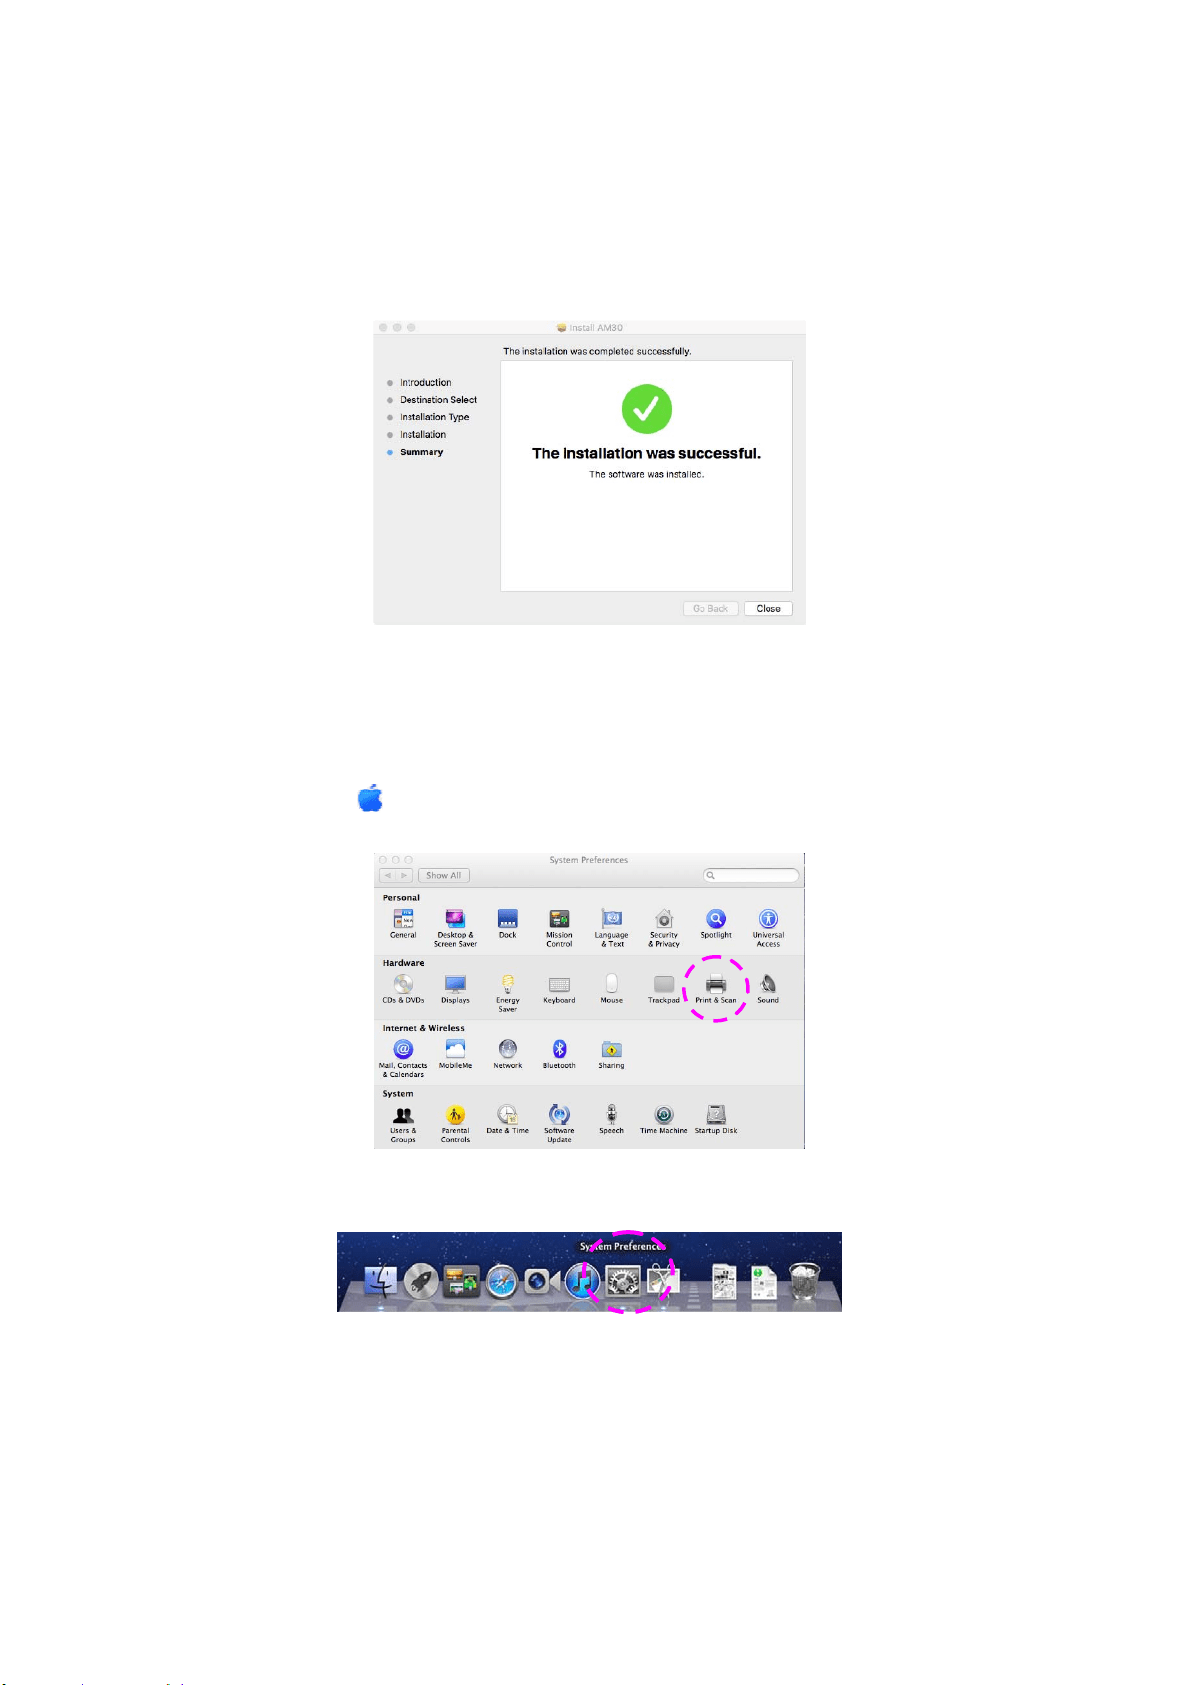
1 0 . When t he [ The inst a llat ion w as successful] screen appears, click t he [ Close ]
butt on to close t he installation.
1 1 . Rem ove t he Set up CD- ROM from the CD- ROM drive. * I f you I f you wish to
connect t he printer to your com puter with a USB cable, connect the print er wit h
the USB cable now. I f you already connect did, unplug and replug t he USB
connect or again.
1 2 . Select the
Apple icon in t he top- left corner, t hen click [ Syst em Pre ferences]
and then [ Print & Scan] .
Or click [ Syst em Pre ferences] icon on your dock, and t hen [ Pr int & Scan] .
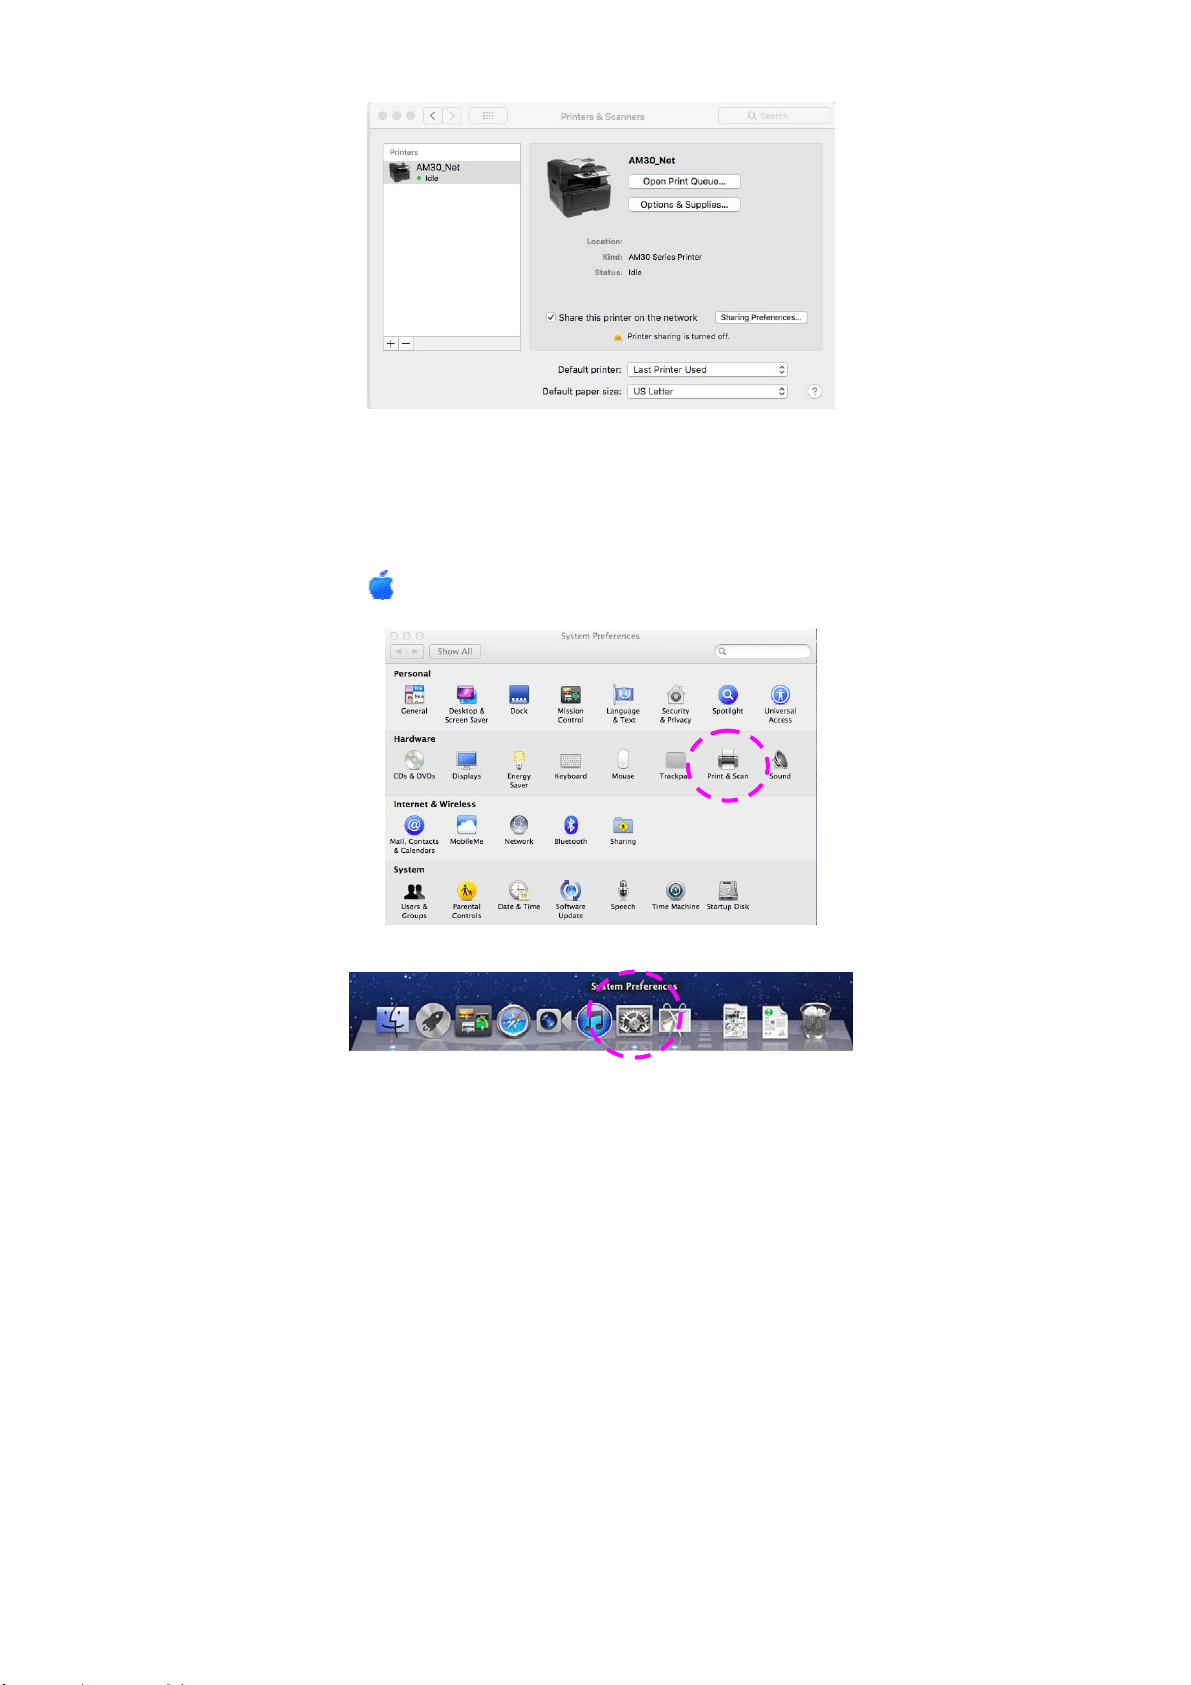
1 3 . You can find an AM30 printer has been added in your print er list.
41
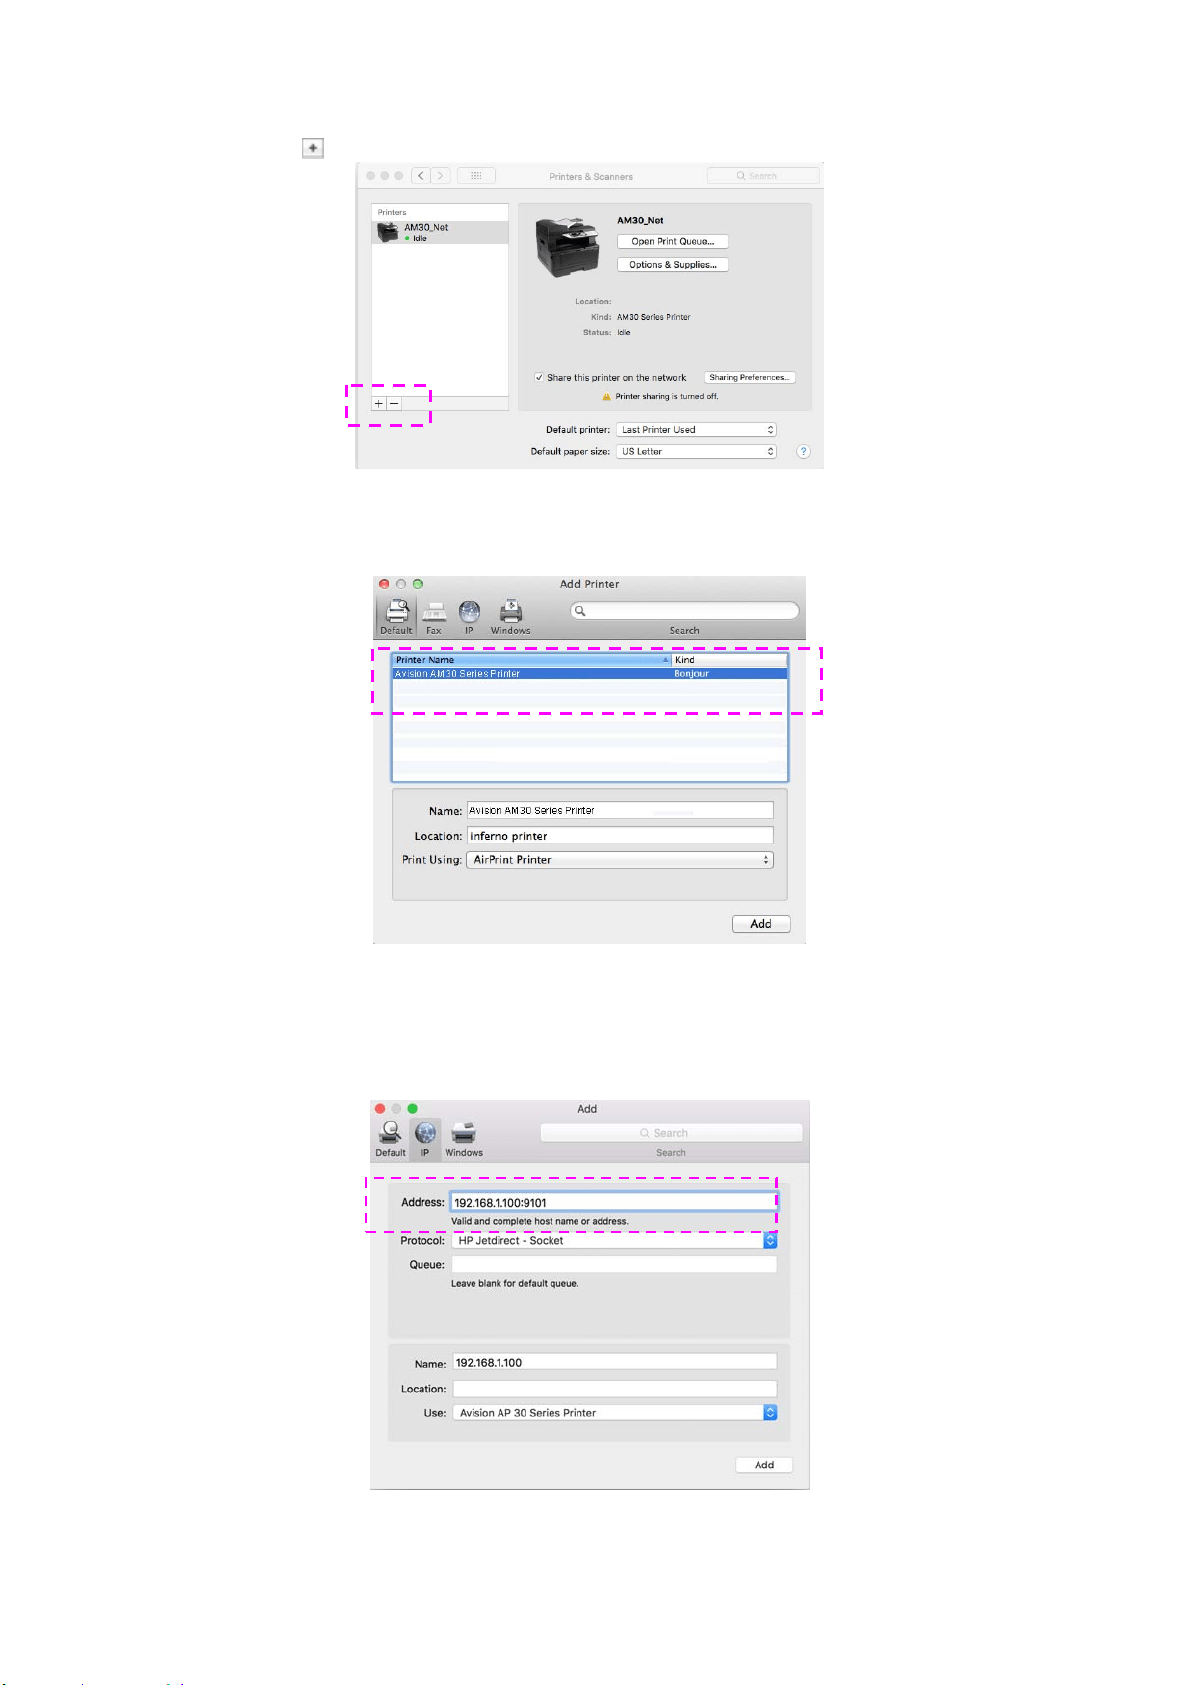
Adding a ne w Print er
You m ay also add a new print er by following these st eps:
1 . Select t he
Apple icon in t he top- left corner, t hen click [ Syst em Pre ferences]
and then [ Print & Scan] .
Or click [ Syst em Pre ferences] icon on your dock, and t hen [ Pr int & Scan] .
42
2 . Click
and t hen [ Add Other Print er or Sca nner] to add t he print er.
3 . A dialog appears list ing print ers on your local net work. I t m ay t ake a m inut e or
two for your print er to appear. Select your print er when it appears in t he list .
I f your print er st ill doesn’t appear in t he list , try adding t he print er by it s I P
address. While ent ering the I P address by clicking t he I P icon, be sure t o include
the address wit h [ : 9101] , for exam ple, 192.168.1.100: 9101.
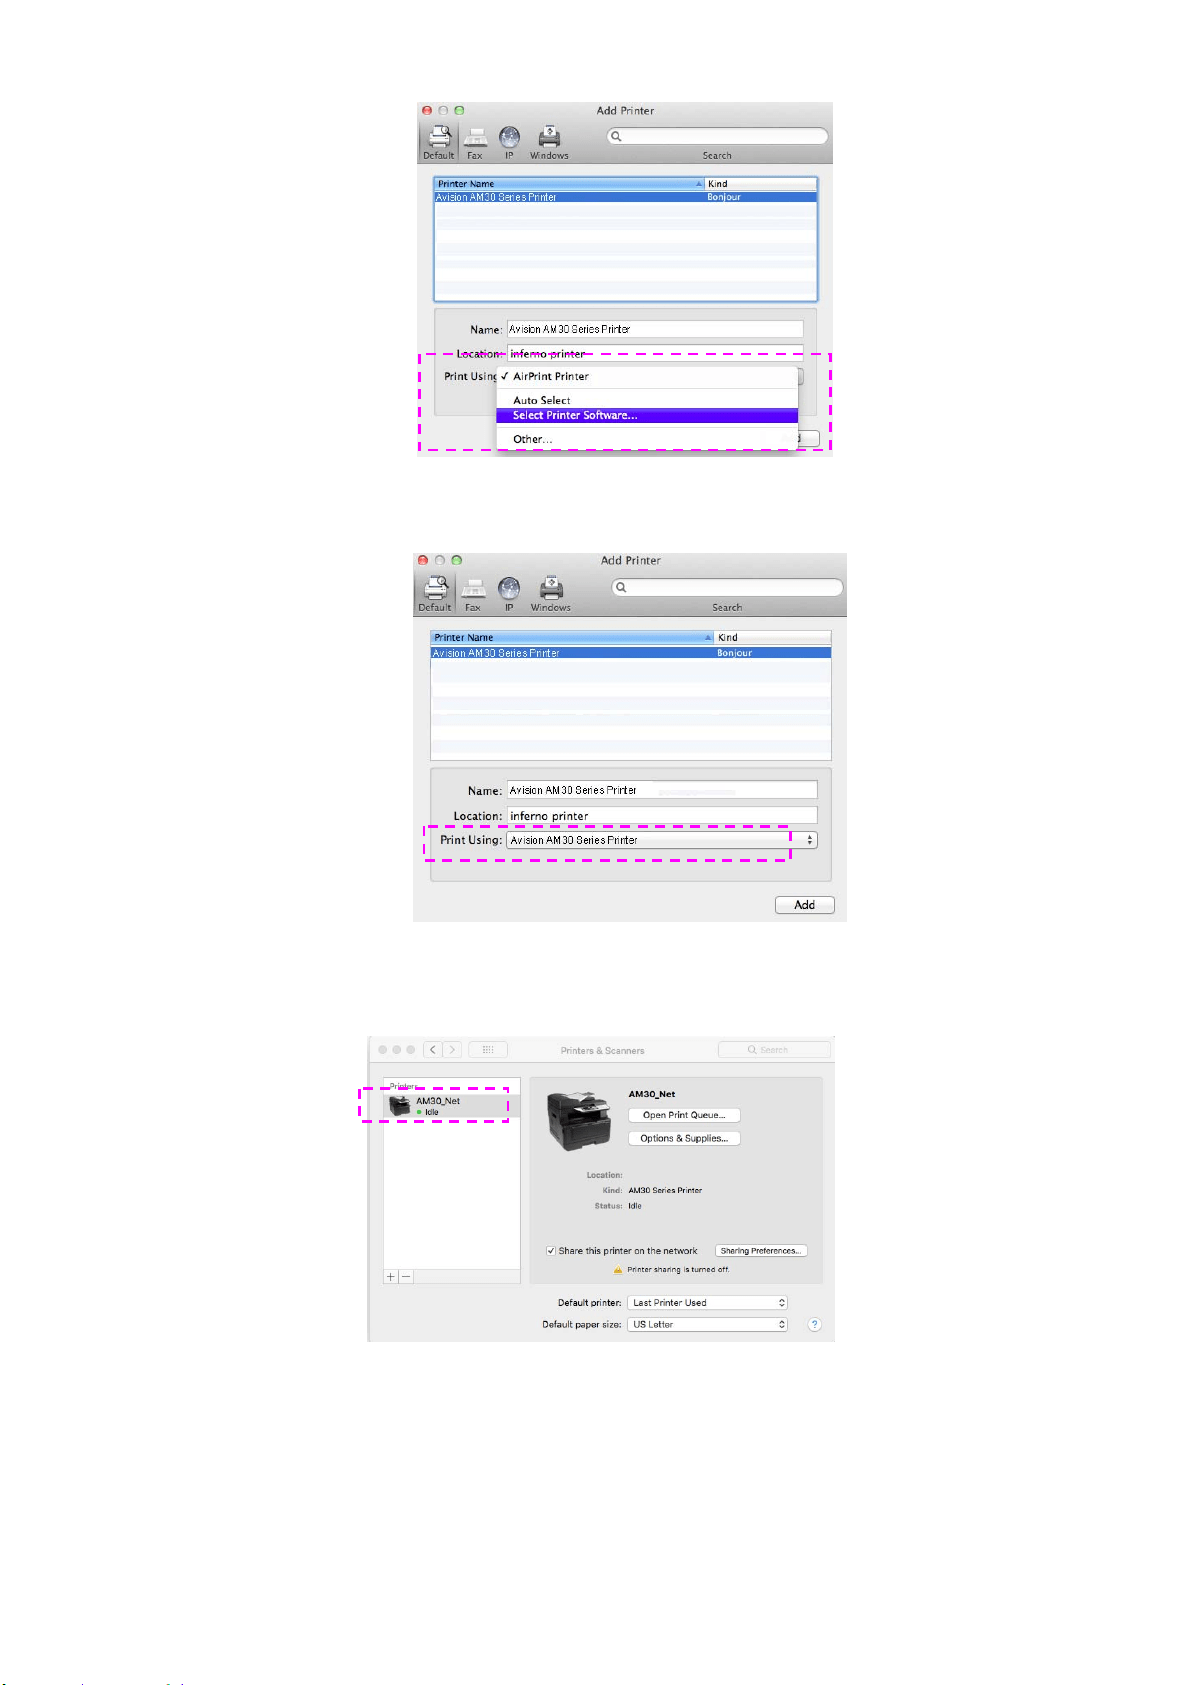
4 . Locate the print er driver by clicking t he arrow butt on of the [ Print Using]
option and then select [ Sele ct Print er Soft w are ] .
43
5 . A dialog appears listing current print er drivers installed on your com put er. Select
your print er and click [ OK] . Your [ Print Using] option will display t he print er you
have select ed.
6 . Click t he [ Add] butt on t o add the print er. Now your printer will be in t he list on
t he upper- left corner as shown in below.
7 . Close t he [ Print & Scan] window.
44
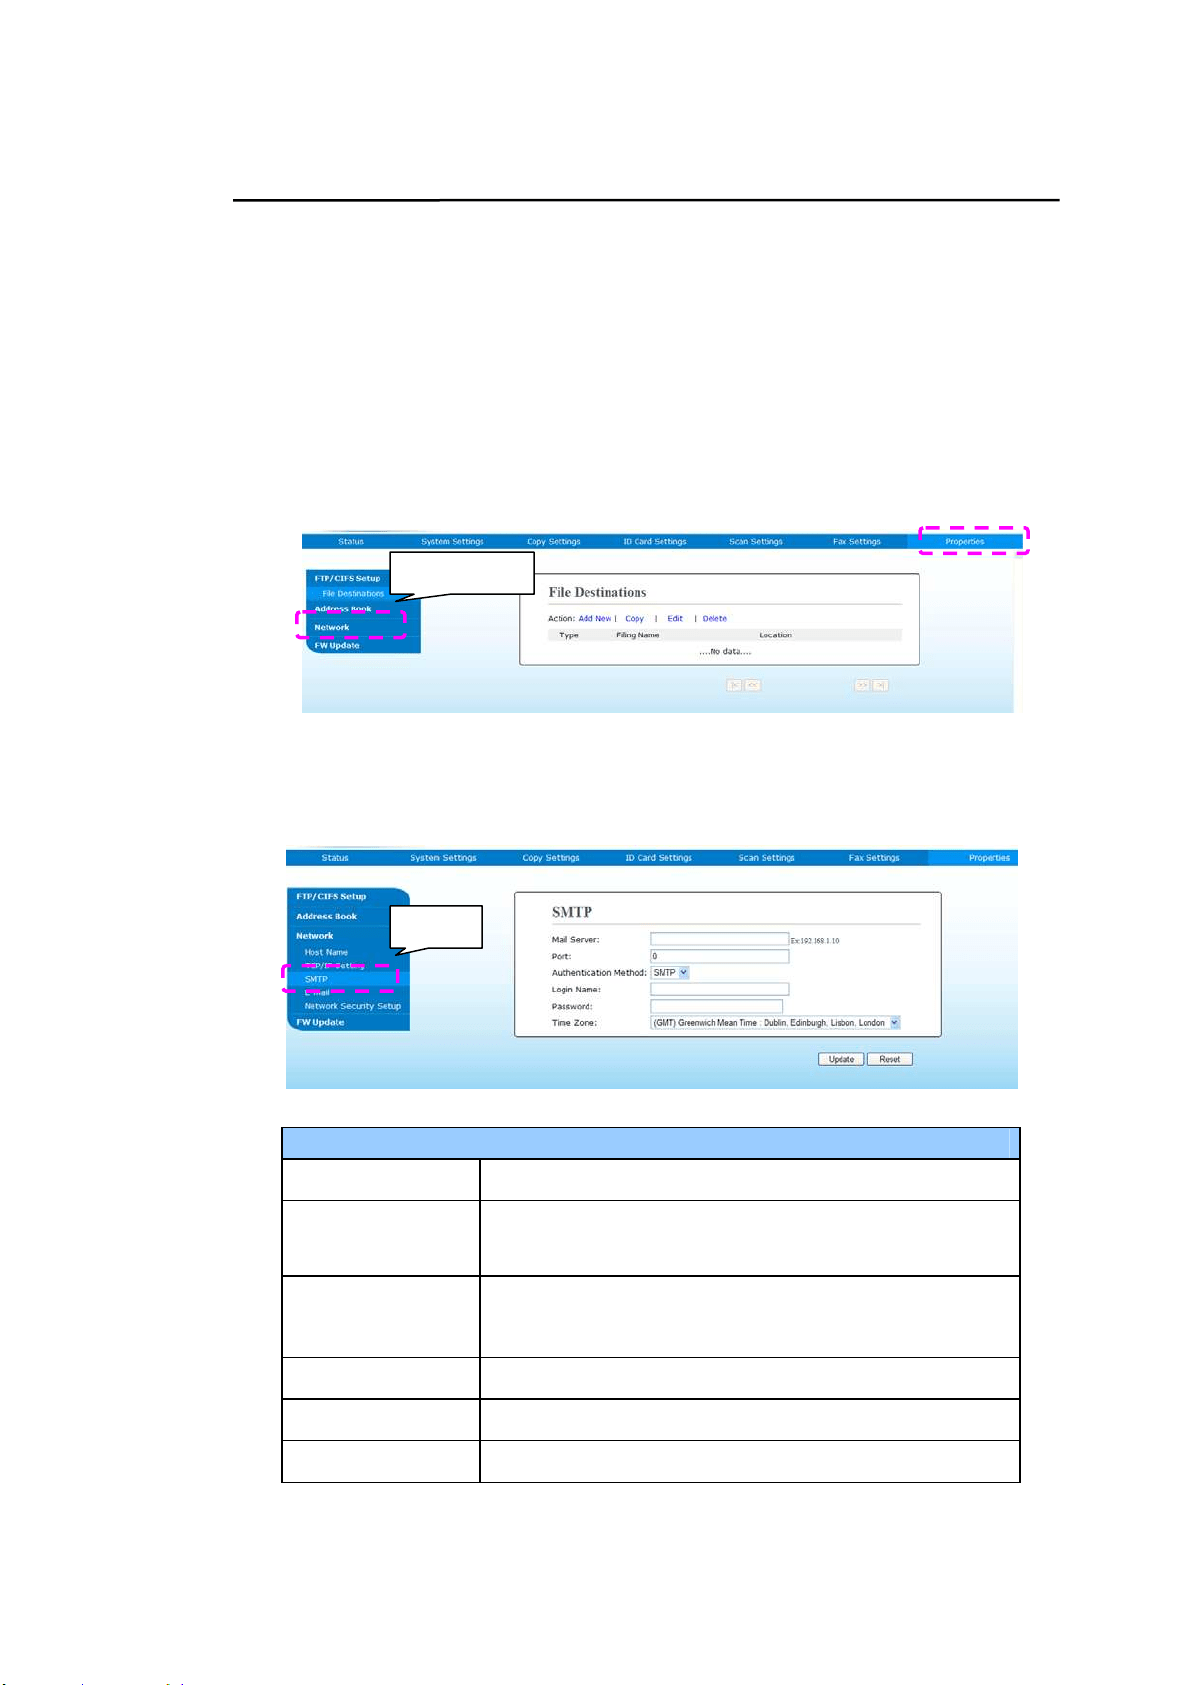
Specifying t he Product’s SMTP Ser ver
To use the scan- to- em ail feat ure, you m ust specify the product ’s SMTP server.
To specify t h e SM TP ser ve r ,
1. Refer to t he preceding section, Spe cifying t he Product ’s Da t e and Tim e ,
to launch the product ’s em bedded web page.
2. On t he product’s web page, choose [ Pr ope r t ies] and t hen choose
[ N et w or k] on t he left side as shown in the following:
3. Choose [ SM TP] from t he Network opt ion. The following SMTP page will be
displayed. Ent er your I P address for t he SMTP server and t he aut hent icat ion
inform ation if required.
E- m ail Serve r Sett ing
Ma il Serv e r Enter the I P address of your SMTP server.
SMTP Por t # Enter t he port num ber of the SMTP server.
* 25
Aut henticat ion
Met hod
Enter the em ail aut hentication m et hod.
Choice: * N one, SMTP, POP3
Login N am e Enter the login nam e for SMTP aut hent icat ion.
Passw ord Enter the password for SMTP authent ication.
Tim e Zone Enter the t im e zone of your location.
SMTP
N e t w or k

4
5
N ot e :
Please check t he SMTP server inform at ion wit h your Network
Adm inistrator.
4. Click [ Upda t e ] t o save t he sett ing and exit the page.
N ot e :
1. The login nam e is case- sensit ive and is up t o 32 digit s or
characters.
2. The password is case-sensit ive and is up t o 16 characters.
46
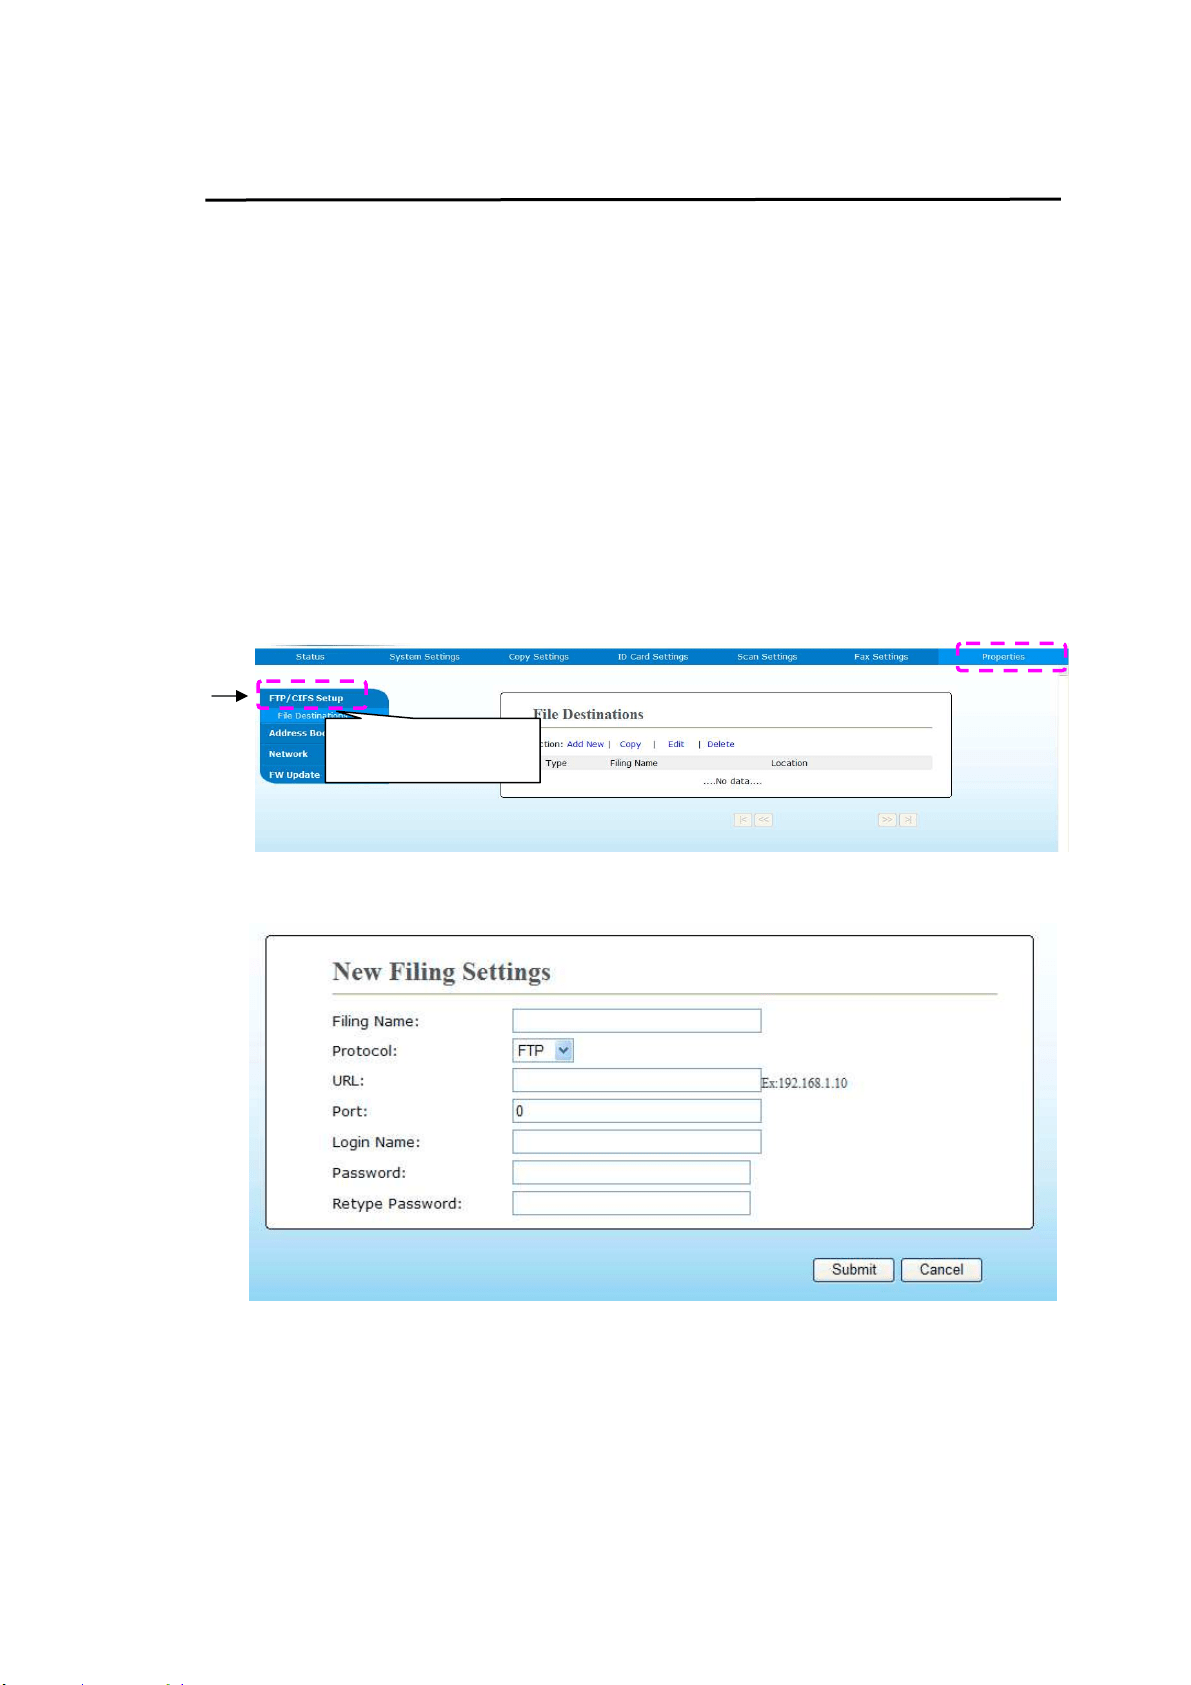
Cre ating a File Dest ina tion on the N etw ork
The product allows you to scan and save t he scanned im age t o a specified dest inat ion
including FTP and CI FS server on t he network, or a USB flash drive.
Before sending the im age files t o FTP or CI FS server on the net w ork, you need to
first set up the FTP or CI FS dest inat ion through t he em bedded web page. Please
follow these st eps t o creat e a FTP or CI FS dest inat ion.
To se t FTP or CI FS as your filing dest inat ion,
1. Refer t o the
preceding sect ion, Spe cify ing t he Pr oduct ’s Dat e a nd Tim e , t o
launch the product ’s em bedded w eb page.
2. On the product ’s web page, choose [ Pr ope r t ies] and t hen choose [ FTP/ CI FS
Set up] on the left side. The following [ File Dest ina t ion] page will be displayed.
3. Choose [ Add N ew ] t o prom pt t he [ N ew Filing Set t in gs] page.
4. Refer t o the following table t o enter proper settings.
FTP/ CI FS Se t up

4
7
I tem
Descript ion
Filing N a m e
( N am e of
De st ina t ion)
Ent er t he nam e of t he destinat ion. ( The nam e will be
displayed in t he dest inat ion list .)
Protocol
Choose t ype of prot ocol. Choice: CI FS, FTP
URL ( Addr e ss)
Enter t he dom ain nam e or I P address for t he server. For
exam ple, dom ainnam e.com \ foldernam e or
10.1.23.145\ foldernam e.
Port N um ber
Enter t he port num ber of the server here if your port
num ber is different wit h the default sett ing. Default :
FTP :2 1 , CI FS:1 3 9
Login N am e Enter the aut horized login nam e t o t he server.
Passw ord Enter your password t o t he server.
Re t ype Passw or d Reent er your password.
5. After com pleting ent ering t he settings, click「Subm it」t o finish. The new filing
dest ination will be displayed in t he dest ination list . This m eans you have
successfully creat ed a new CI FS or FTP filing destination.
48
Cre ating Your Address Book
The product allows you t o scan and save t he scanned im age t o your recipients via
e- m ail or fax. Yet before sending t he im age files to e- m ail or fax, you need to first
set up address book through the em bedded web page. Please follow t hese steps t o
creat e your address book.
To crea t e your a ddress book,
1. Refer t o t he
preceding sect ion, Spe cify ing t he Pr oduct ’s Dat e a nd Tim e , t o
launch the product ’s em bedded w eb page.
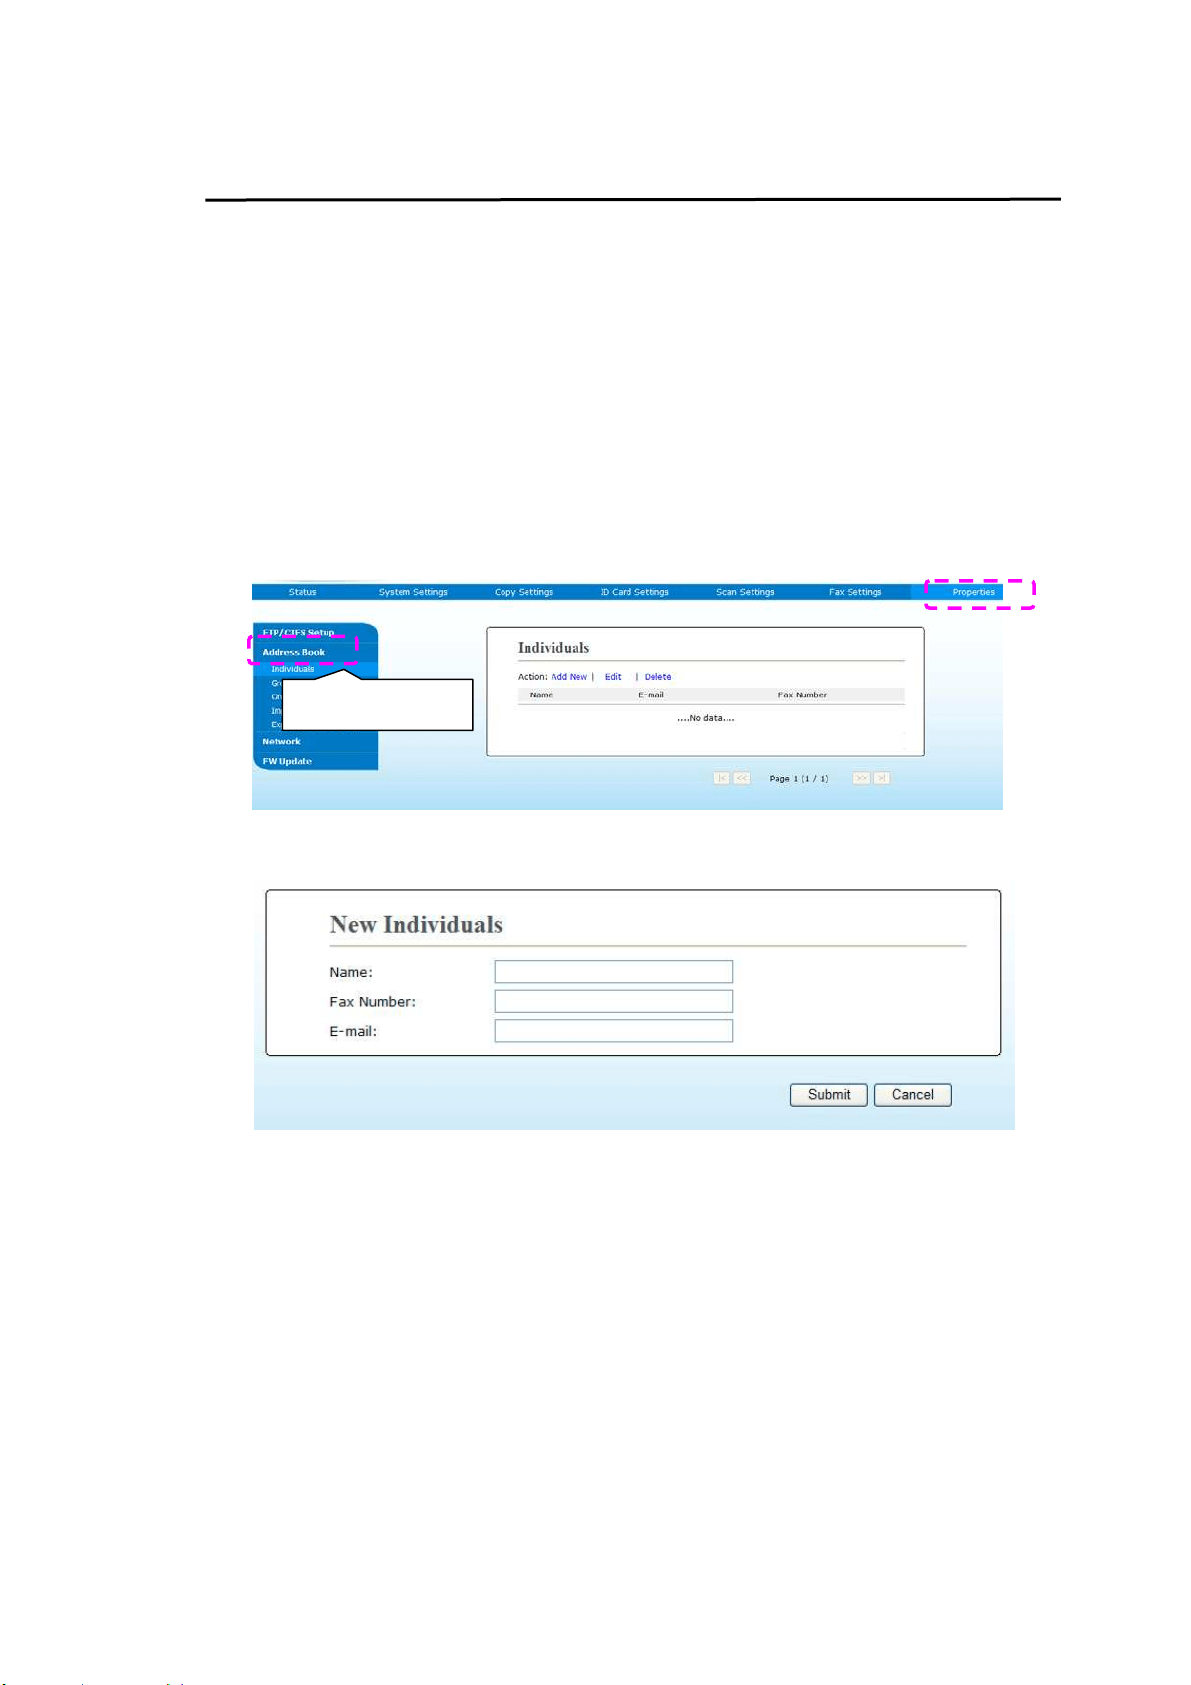
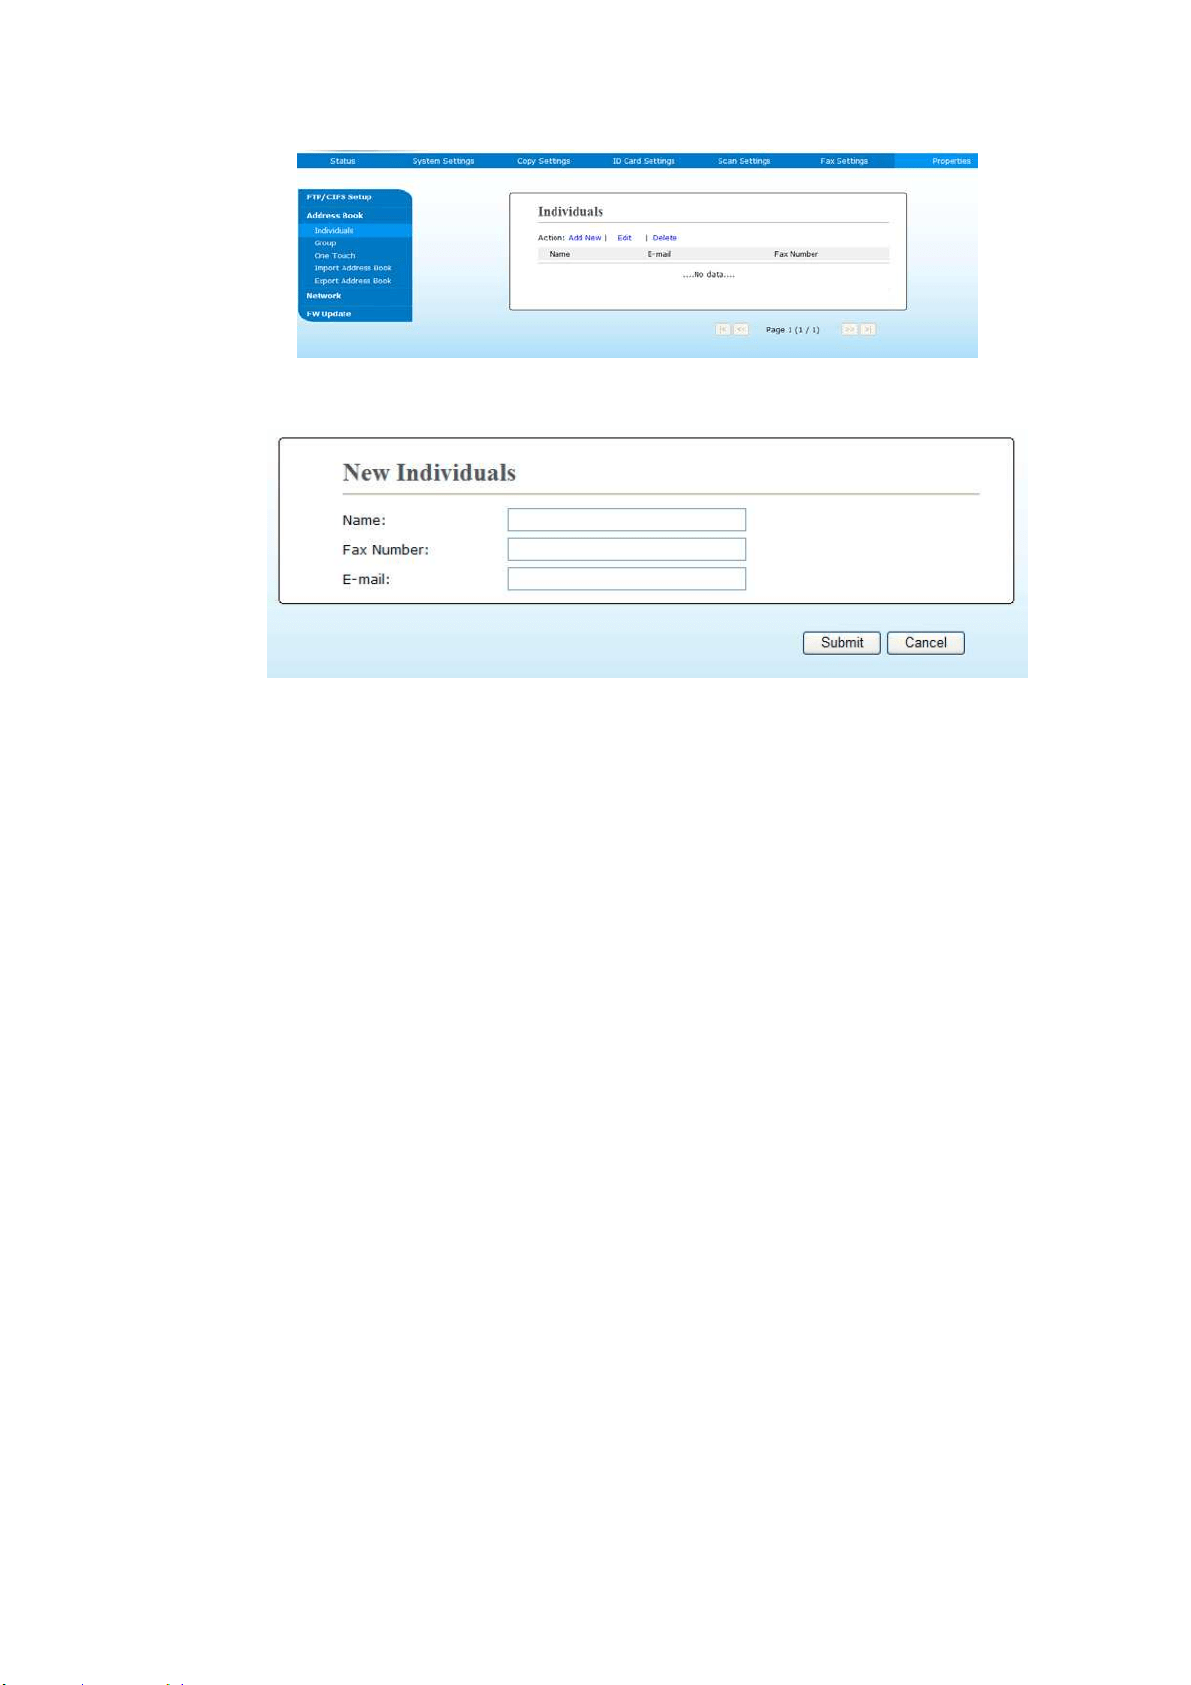
2. On t he product ’s w eb page, choose [ Pr ope r t ies] and t hen choose [ Address
Book] on t he left side. The following page will be displayed.
3. Choose [ Add Ne w ] to prom pt the following page.
4. Ent er t he nam e, fax num ber, and e- m ail address for an individual recipient .
5. After com pleting ent ering t he settings, click「Subm it 」to finish. The new recipient
will be displayed in t he e- m ail list. This m eans you have successfully creat ed an
address book.
Address Book

49
3 . Operat ion
Loading Paper
The product can scan and send docum ent( s) eit her in the ADF ( Aut om atic
Docum ent Feeder) or on t he glass. I f you need t o send m ult iple pages,
please load your papers in the ADF. The ADF can hold up t o 35 pages (70
g/ m
2
, 20 lbs) at one t im e. I f you need t o send pages from books,
newspaper clippings, or paper with wrinkles or curls, please place your
paper on the glass.
N ot ice on Using t he ADF
Before using t he ADF, please m ake sure t hat your paper m eet s the
following specifications:
Docum ent ( s) can range in size from 76.2 x 127 m m ( 3 x 5 in.) to 216 x
356 m m ( 8.5 x 14 in.) .
Docum ent ( s) should be square or rectangular and in good condit ion
( not fragile or worn) .
Docum ent ( s) should be free of curl, wrinkle, t ears, wet ink, or punch
holes.
Docum ent ( s) should be free of staples, paper clips, paper sticky not es.
Keep the glass clean wit hout docum ent placed on it.
N ot e :
To t ransm it irregular t ypes of docum ent( s) , place t he
docum ent ( s) on t he glass or m ake a copy first and then
transm it the copy inst ead.

5
0
Loading Your Docum ent in t he ADF Paper Tr a y
Fanning Your Docum ent
N ot e :
To avoid occasional m ult i- feeds or paper j am s, please fan your
docum ent s and align t he top edges before feeding them into t he
scanner.
1. Hold bot h ends of the docum ent s and fan t hem a few tim es.
2. Rotat e the docum ent s by 90 degrees and fan t hem in the sam e
m anner.
3. Align t he edges of t he docum ent s in a step-like pat tern ( see pict ure
below) .
St ep-like
Scanning
Direction
51
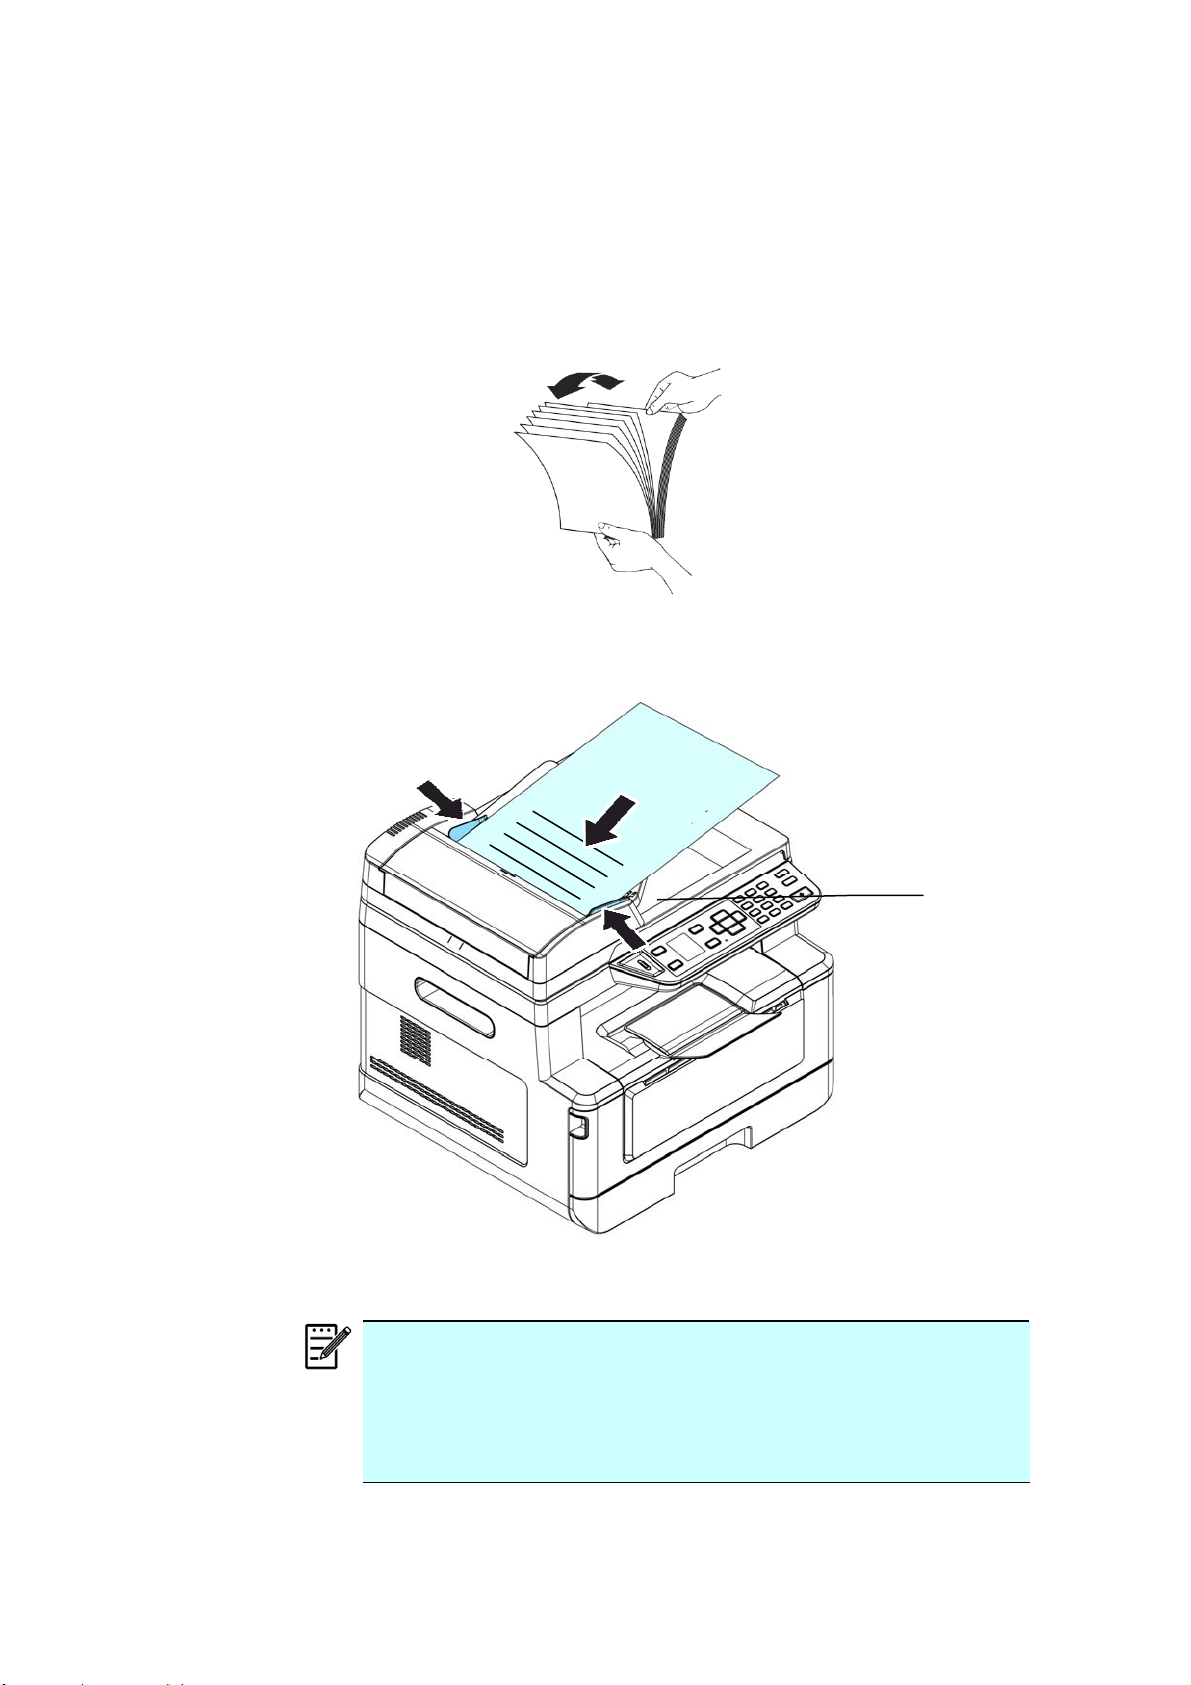
Placing Docum ent( s) in t he ADF
1 . Make sure your docum ent is free of st aples, paper clips and is not
torn out.
2 . I f y ou have m ultiple pages, fan your docum ent ( s) t o avoid occasional
paper j am .
3 . Place your docum ent( s) wit h t he text FACE UP in the ADF and m ake
sure t hat t he t op of each page feeds in first .
4 . Adj ust the Paper Guides to cent er t he docum ent( s) in t he ADF.
N ot e :
I f t here is no paper in the ADF input t ray, t he product
considers the scan source is flatbed glass. I f t here is paper
in t he ADF input t ray, t he product considers the scan source
is ADF input t ray.
Paper
Guide
52
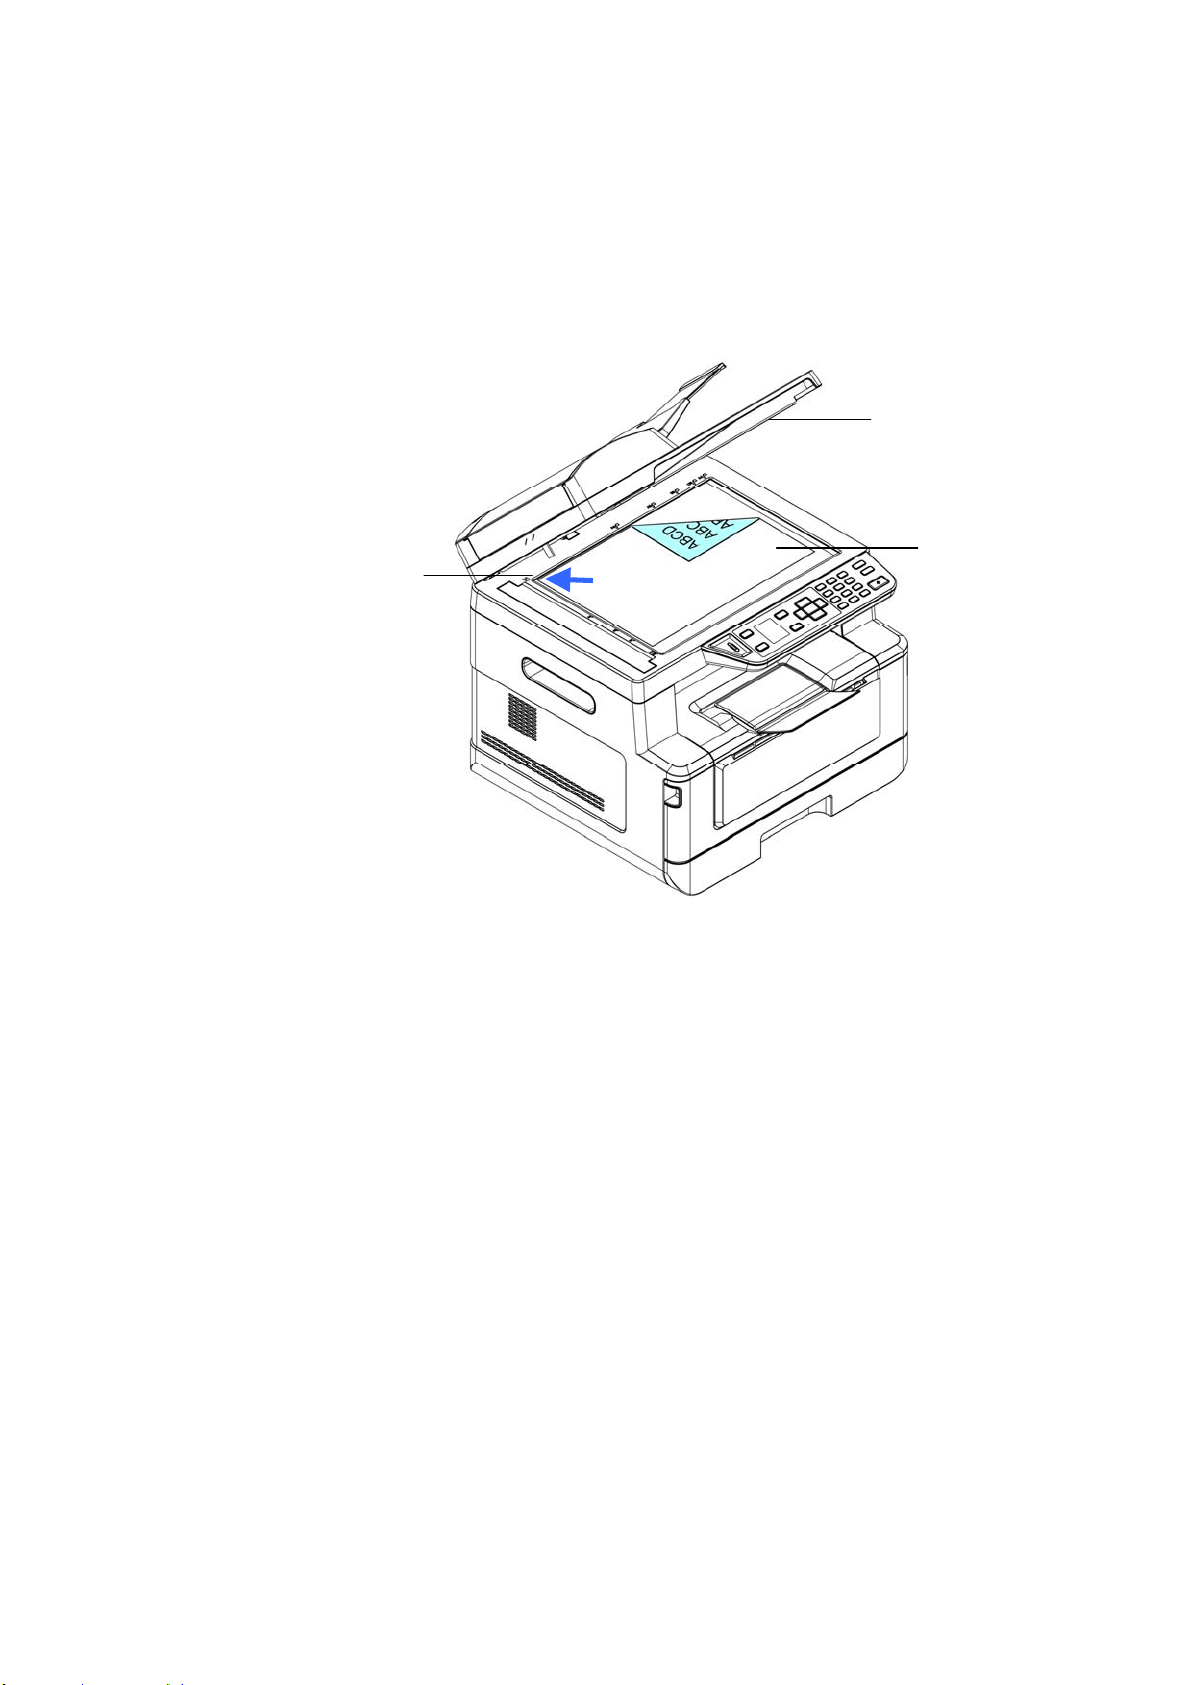
Placing Docum ent( s) on t he Glass
1 .
Open t he docum ent ( s) cover to reveal t he glass.
2 . Place your docum ent with t he text FACE DOW N on the glass and align
the docum ent in the upper- left corner.
3 . Close the docum ent cover.
Upper- Left
Corner
Docum ent
Cover
Face Down

53
Paper Orie nt at ion
Place your A4 or LTR paper vertically on t he glass wit h t he t ext facing down
and align it wit h the A4 or LTR m arks.
Glass

54
Copy
1 . Place your m ulti- page docum ent Fa ce Up, Top Fir st in the aut o
docum ent feeder or place your single-page docum ent Face Dow n on
the docum ent glass.
2 . Press the Function / key unt il the following「Copy 」m ode is shown
in t he LCD display. ( Copy m ode is t he default operat ional m ode.)
3 . Confirm or change Copy opt ions as desired such as Original, Densit y,
Paper Supply, and Sort .
Press or t o select the sett ing.
Press or to select the opt ion.
Copy
Mode
Choose your original t ype.
Choice:
( Te x t ) / ( Phot o) / ( Mixed)
Densit y
Lighten or darken your im age. Choice: 1~ 7 (default : 4 )
Scaling
Resize your docum ent .
Choice:
( 1 0 0 % ) , , ( 25% ~ 400% ) ,
1 0 0 % : Resize your docum ent according t o your original.
Full Pa ge: Resize your docum ent t o fit your out put paper
size.
Custom Zoom : Resize your docum ent bet ween 25%
and 400% in one percent increm ent .
N - up: Com bine 2 or 4 pages of docum ent s t o be printed
on a single side of a sheet.
Copy M ode
Density
Sca ling
Colla t ed
Ready

5
5
Collat ed
Collat ed: Place your copies in 「Sort」order ( e.g.
page 1,2,3 / 1,2,3 / 1,2,3) .
Uncolla te d: Place your copies in 「Stack」order
( e.g. 1,1,1/ 2,2,2/ 3,3,3).
* The default set t ings is displayed in it alic bold st yle.
4 . Ent er your copy count wit h the num eric keypad. The copy count will
be displayed.
5 . Press t he [ St art ] but t on ( ) on t he cont rol panel t o start copying
your docum ent s.

56
I D Ca r d Copy
The I D Card Copy funct ion allows you t o copy both t he front and rear side
of your I D card easily and correctly in a second.
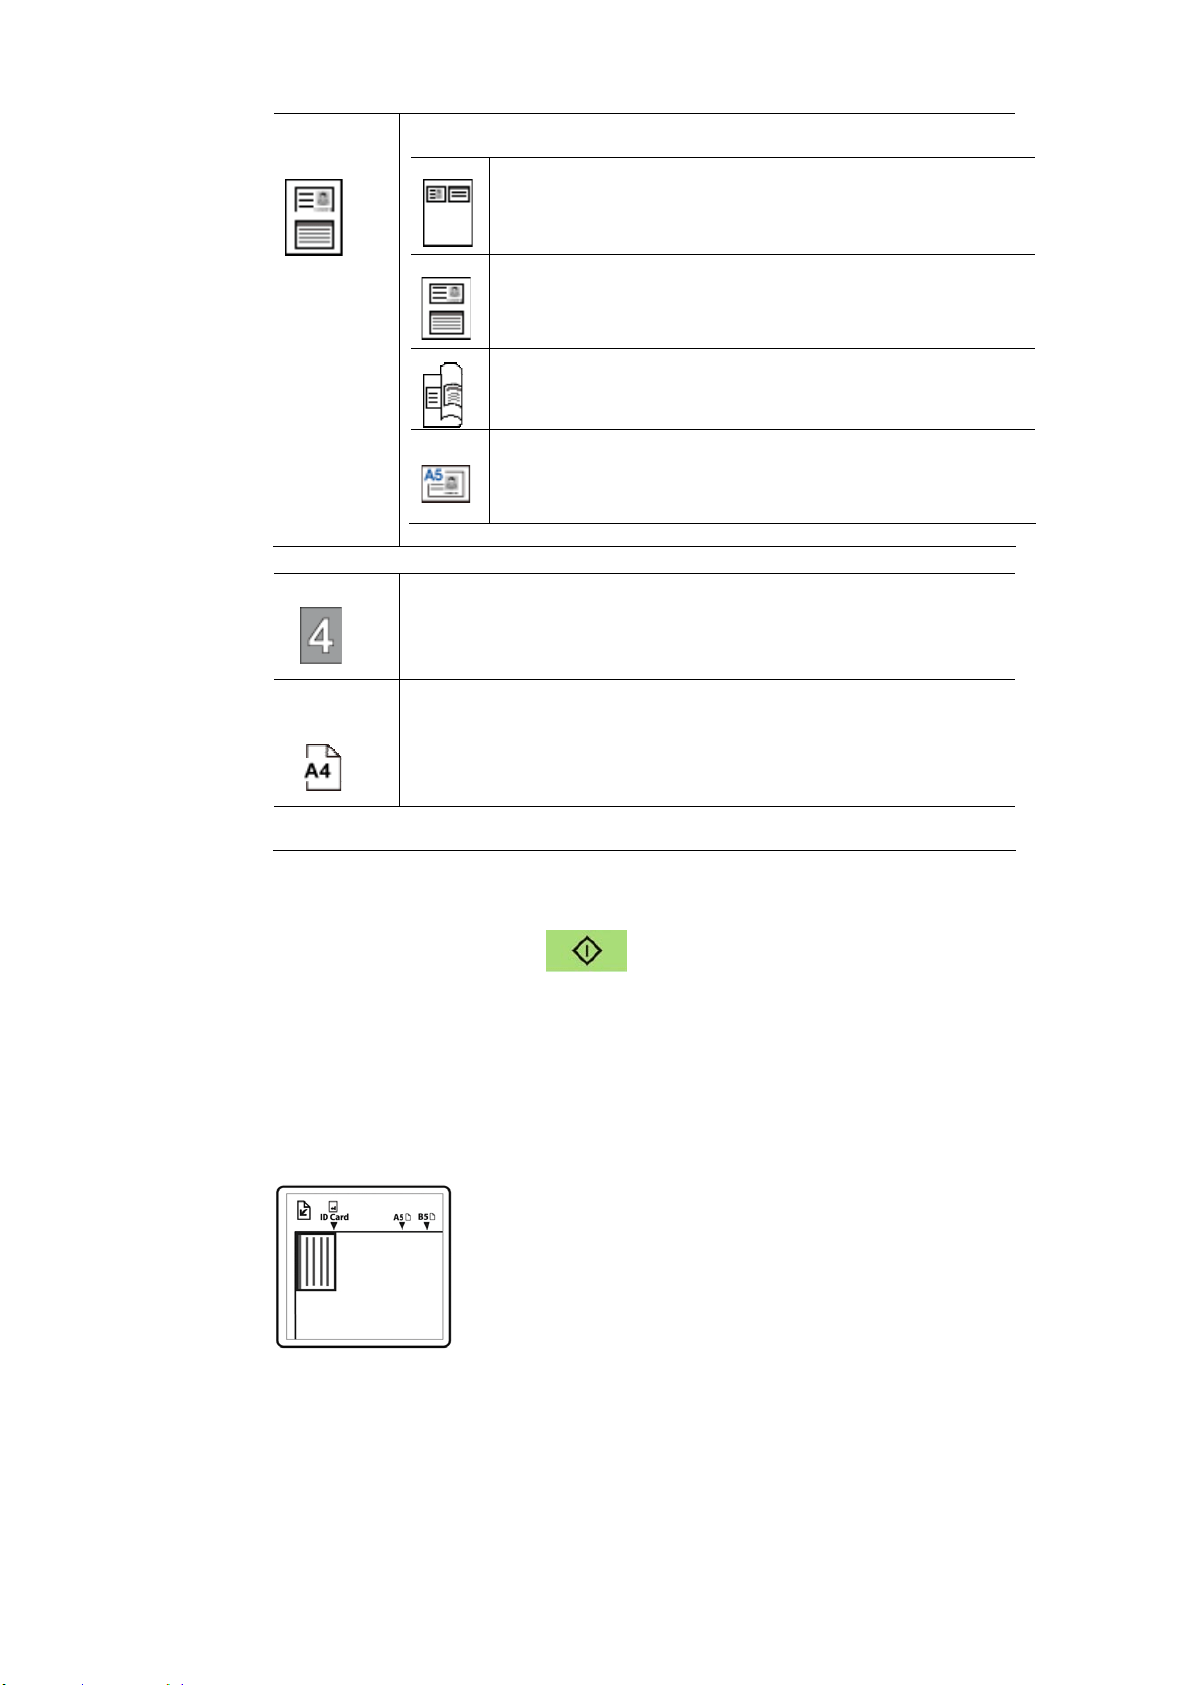
The Operat ion St eps:
1 . Place one side of your I D card FACE DOW N , align it t o t he 「I D Card」
m ark as indicat ed below:
2 .
Press Funct ion
/ button until t he 「I D Ca r d Copy」is displayed on
the screen.
3 .
Confirm or change opt ions as desired such as Mode, Density, Paper
Supply, or Paper Size.
Press or t o select the sett ing.
Press or to select the opt ion.
Copy Mode
Density
Paper Size
Ready
5
7
Mode
Choice: * Left / Righ t , Up/ Dow n, Duple x , Big Card
Left / Right – Copy t he left and right side of
your I D card on one side of a sheet.
Up/ Dow n – Copy t he front and rear side of
your I D card on t he upper and bott om half of
one side of a sheet .
Duplex – Copy the front and rear side of your
I D card on the front and rear side of a sheet .
Multi- ca r d - Copy t he front and rear side of
your m ultiple cards or bigger card on one side of
a sheet .
Densit y
Lighten or darken your im age. Choice: 1~ 7 (default : 4 )
Pape r
Size
Select your paper size.
Choice: A4, Lett er.
* De fault set t ings in ita lic bold style .
4 .
Enter your copy count. The copy count will be displayed.
5 .
Press t he [ St a rt ] but t on (
) on the control panel t o start
copying your cards.
6 .
Aft er t he first side scanning is finished, t he「Nex t :Press 1 /
Fin ish:Pr e ss 2 」dialog box will be prom pt ed.
7 .
Open the docum ent cover and place the ot her side of your card, align
to t he「I D Ca rd」m ark as illust rat ed.
8 . As illust rat ed by choosing 「I D Card Copy ( Up/ Dow n) 」, tap「1 」on
the operat ional panel t o cont inue scanning t he ot her side of your card
or tap [ 2 ] t o leave the screen. The result is illustrat ed in below:

58
I m port a nt!
The I D Card copy feat ure does not support loading your
cards from t he aut o docum ent feeder.
59
Scan t o E- m a il
The scan function allows you t o first scan your docum ent s and t hen send
the scanned im age t o a specified e- m ail address. To send your scanned
im ages to an e- m ail address, you need t o first set t he e- m ail sett ings
including t he address book through t he product’s em bedded web page.
The ope ra t ing st eps:
1 . Place your m ulti- page docum ent Fa ce Up, Top Fir st in the aut o
docum ent feeder or place your single-page docum ent Face Dow n on
the docum ent glass.
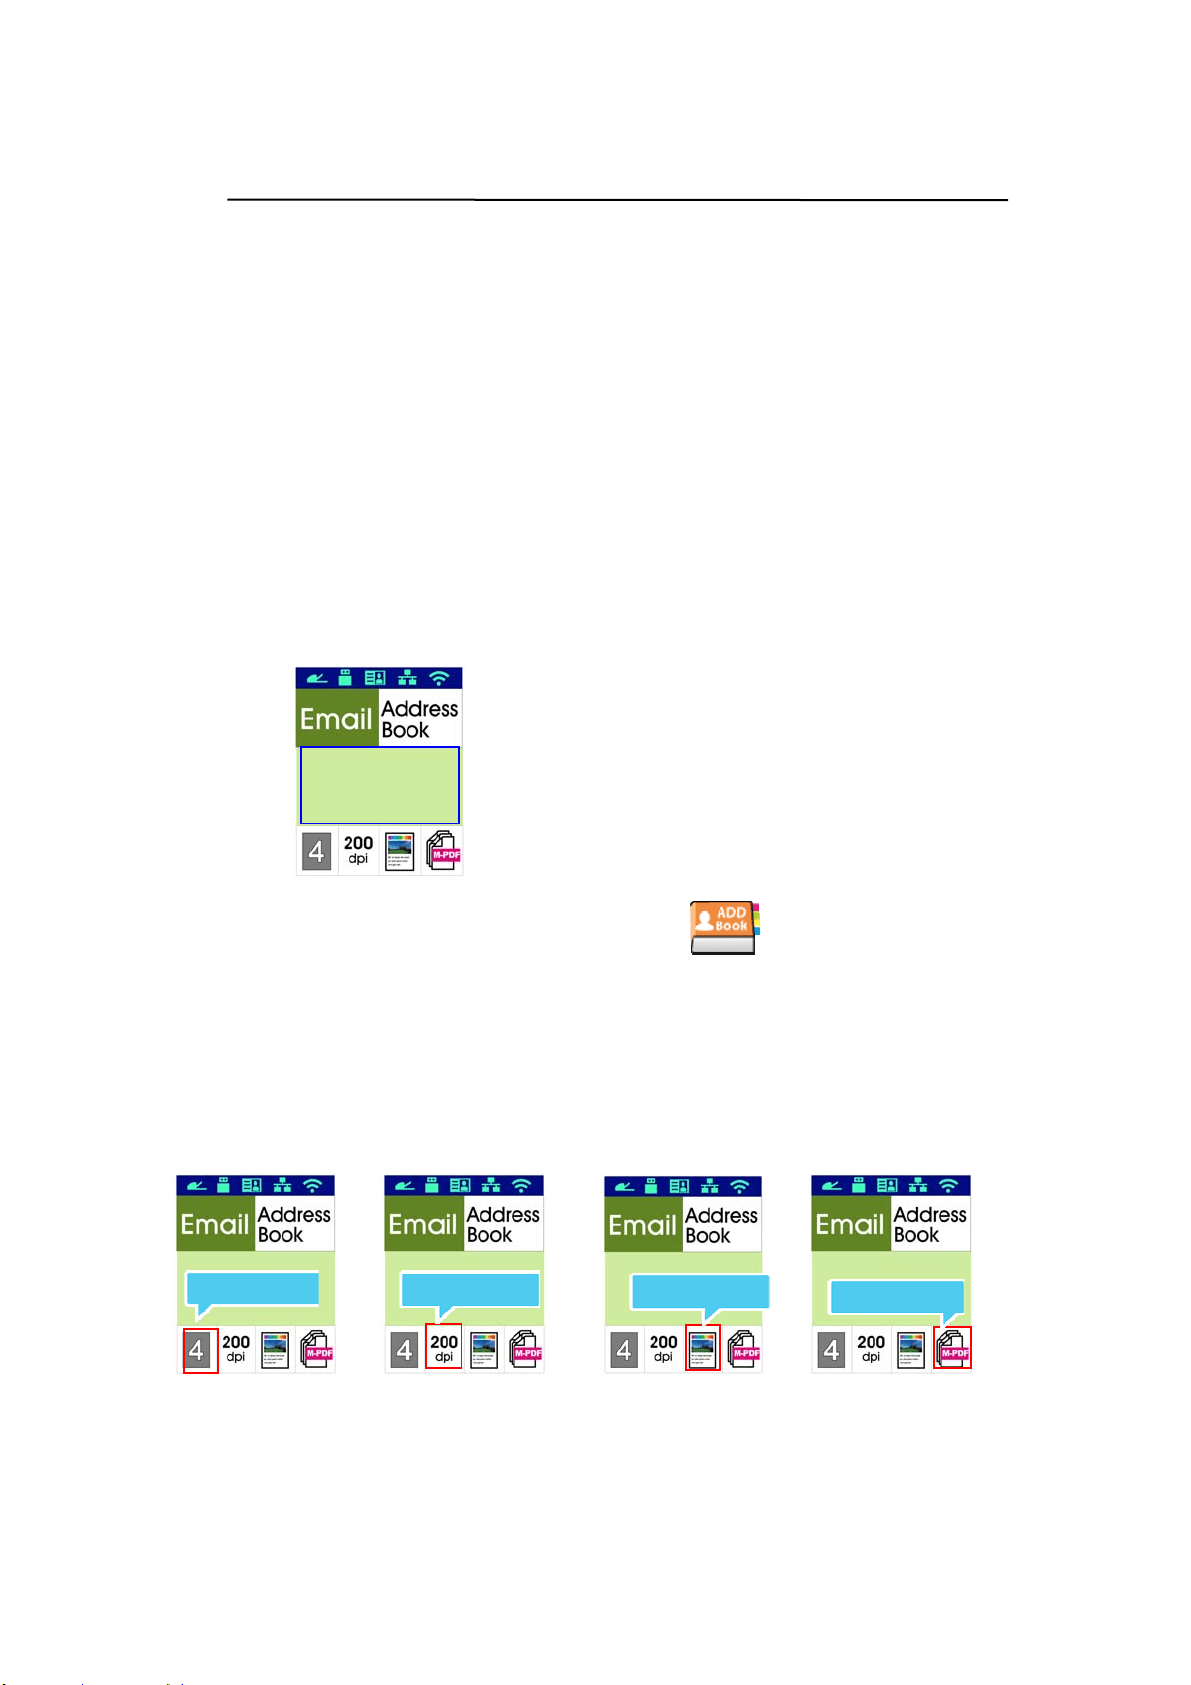
2 .
Press Funct ion
/ key unt il t he following「Em ail」m ode is shown in
the LCD display.
3 .
Press t o highlight t he Address Book and then press [ OK] .
4 . Select your recipient from t he Address Book and then press [ OK] . (See
Chapt er 4 for m ore det ails on how to creat e your address book)
5 . Confirm or change options as desired such as Density, Resolut ion,
Color Mode, or File Form at .
Press or t o select the sett ing.
Press or to select the opt ion.
Desnity
Resolution
Scan Mode
File Format
Ready
6
0
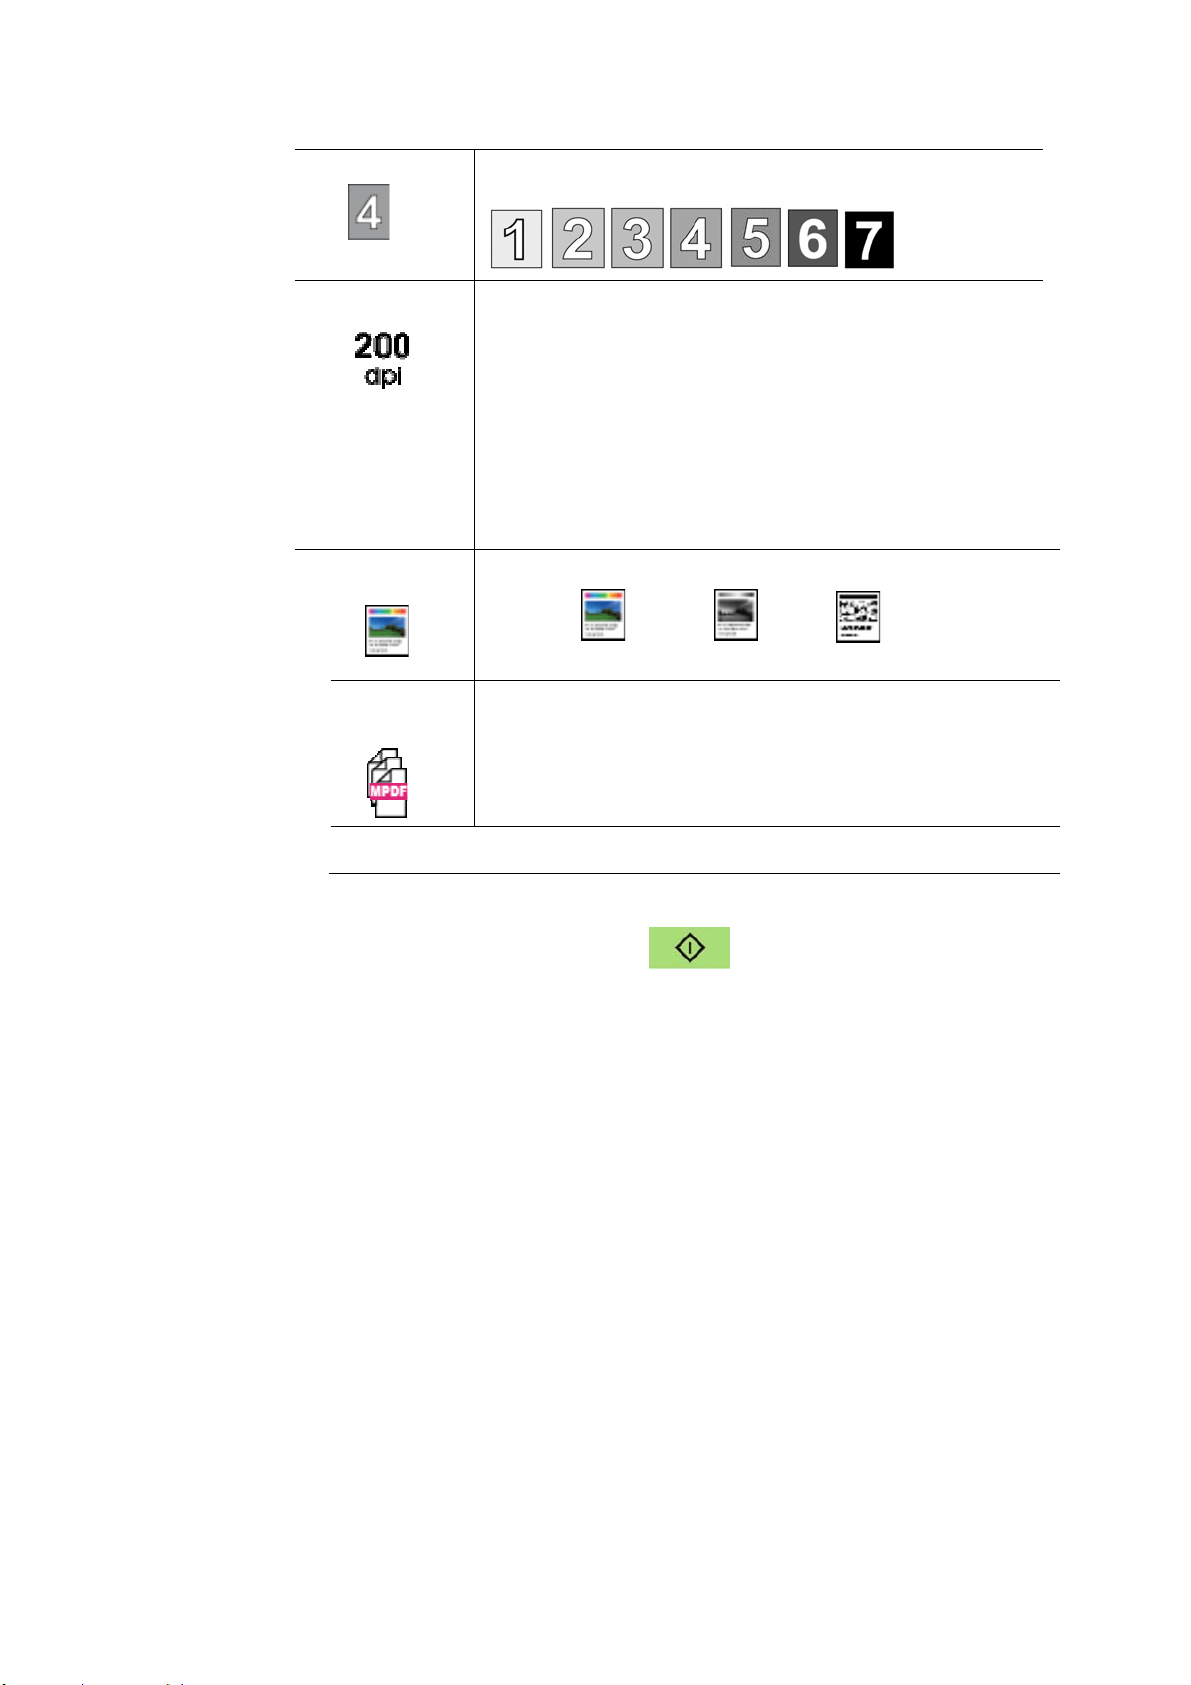
Densit y
Lighten or darken your im age. Choice: 1~ 7 (default :
4 )
Re solut ion
Choose t he resolution of t he scanned im age. The
higher the value, the m ore details can be reviewed
yet m ore disk space will be required.
Choice: 150/ 2 0 0 / 300/ 600 dpi
150 dpi: Suit s to be viewed on t he screen.
200 dpi: Suit s for m ost business docum ent .
300 dpi/ 600 dpi: High qualit y im age helps
increase OCR ( opt ical character recognit ion)
accuracy.
Color
Mode
Choose your desired color m ode.
Choice:
Color 、 Gray、 Black and
Whit e
File
Form at
Choose your desired file form at for the scanned
im age.
Choice: M PD F ( Mult i- Pa ge PD F) 、PDF ( Single-Page
PDF) 、JPEG、TI FF、BMP ( for black and w hit e only) 。
* De fault set t ings in ita lic bold style .
6 . Press t he [ Star t ] but t on ( ) on t he cont rol panel t o start
scanning your docum ent s.
61
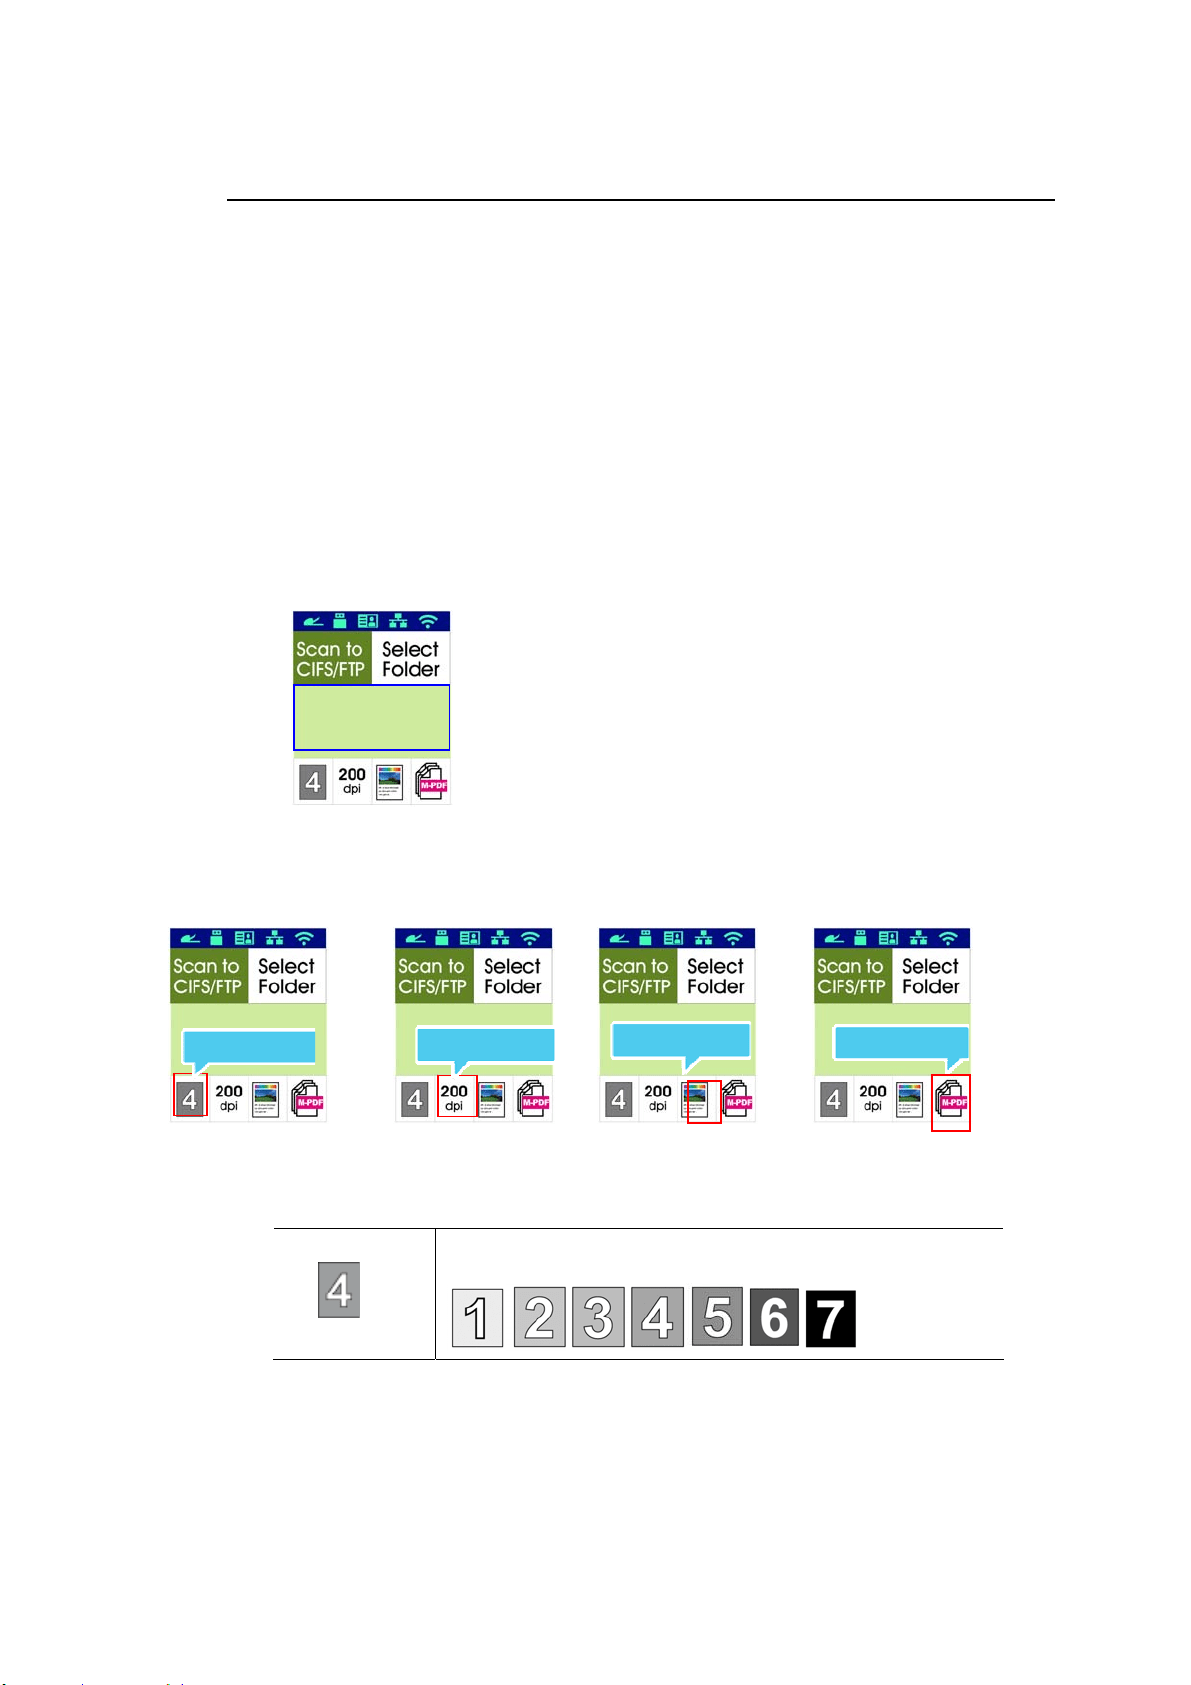
Scan t o CI FS/ FTP
The scan function allows you t o first scan your docum ent s and t hen send
the scanned im age t o a server in the net work such as CI FS or FTP servers.
To save your scanned im ages t o t he network, you need to first set t he CI FS
or FTP settings through t he product ’s em bedded web page.
The ope ra t ing st eps:
1 . Place your m ulti- page docum ent Face Up, Top First in t he aut o
docum ent feeder or place your single-page docum ent Face Dow n on
the docum ent glass.
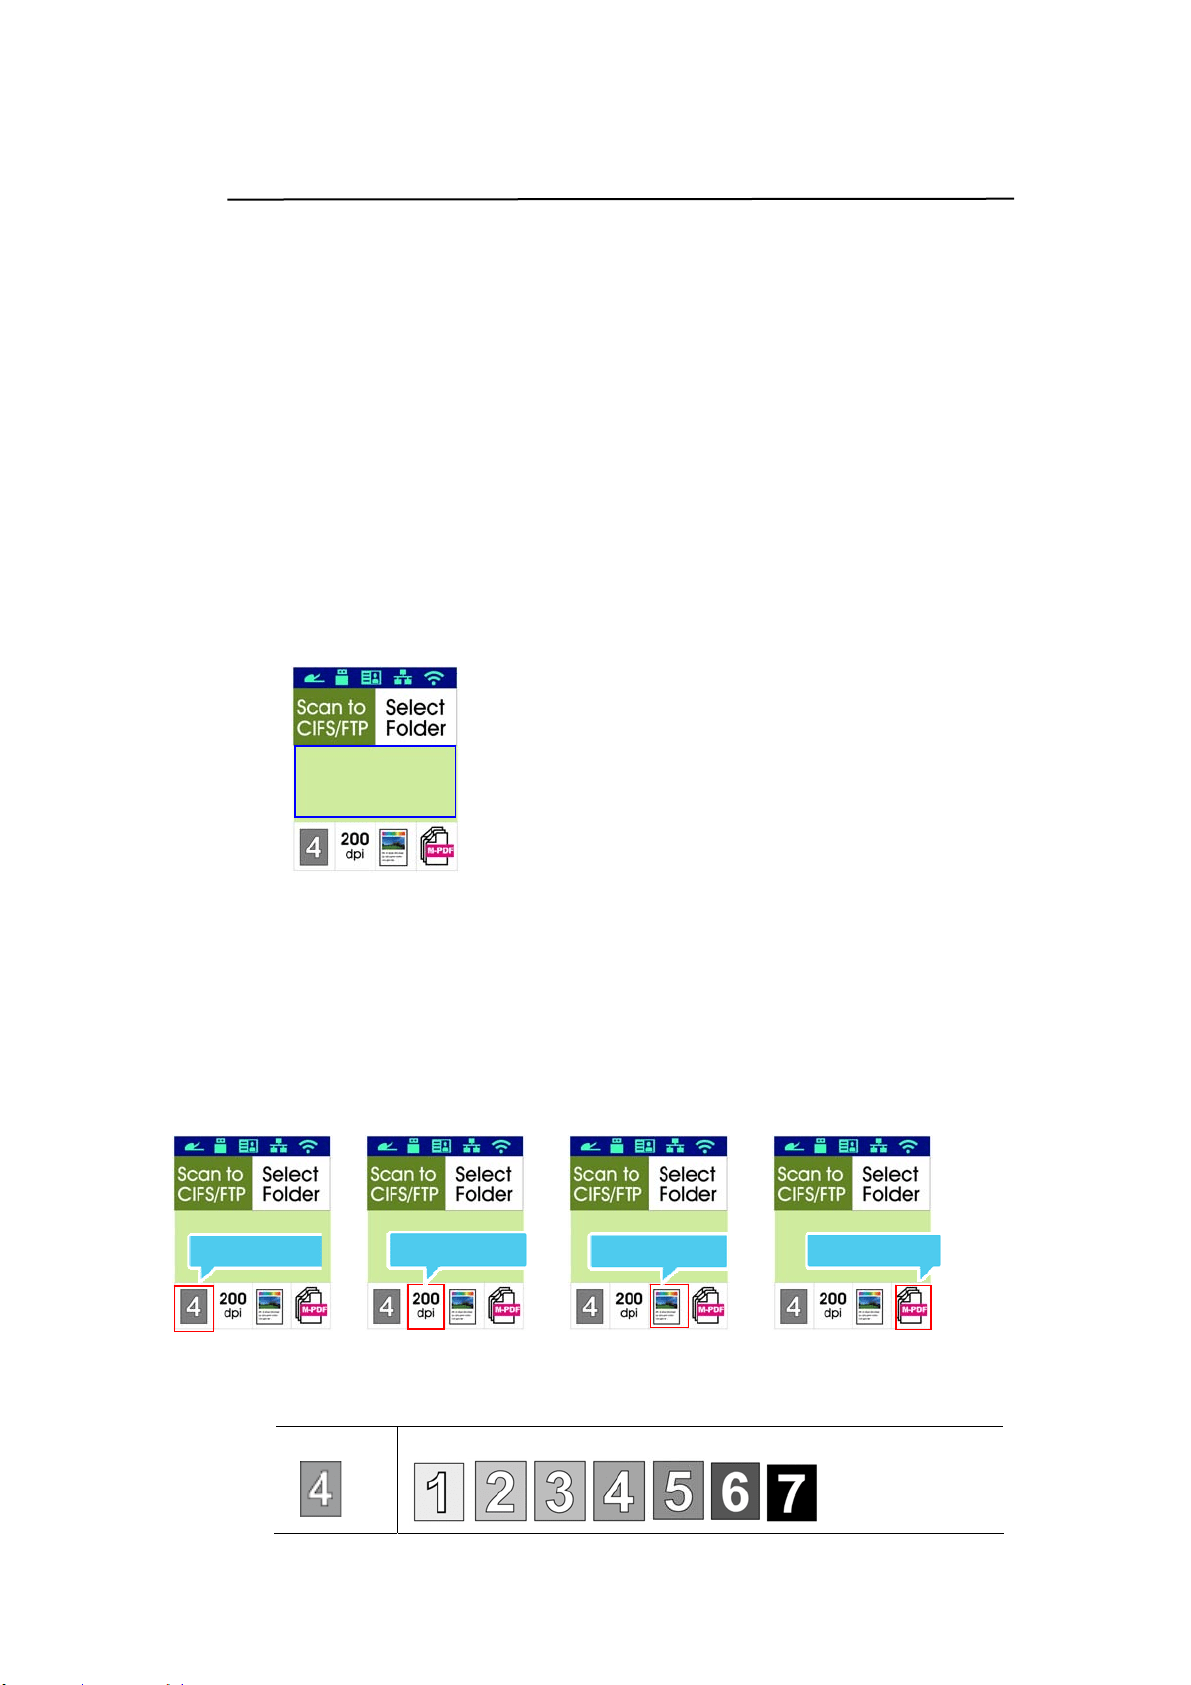
2 .
Press Funct ion
/ key unt il t he follow ing「Scan t o CI FS/ FTP」
m ode is shown in t he LCD display.
3 .
Press t o highlight the file destinat ion and t hen press [ OK] .
4 . Select your filing destination and t hen press [ OK] . ( See Chapt er 4 for
m ore details on how to creat e your file dest inat ions.)
5 . Confirm or change opt ions as desired such as Density, Resolut ion,
Paper Supply, or Paper Size.
Press or t o select the sett ing.
Press or to select the opt ion.
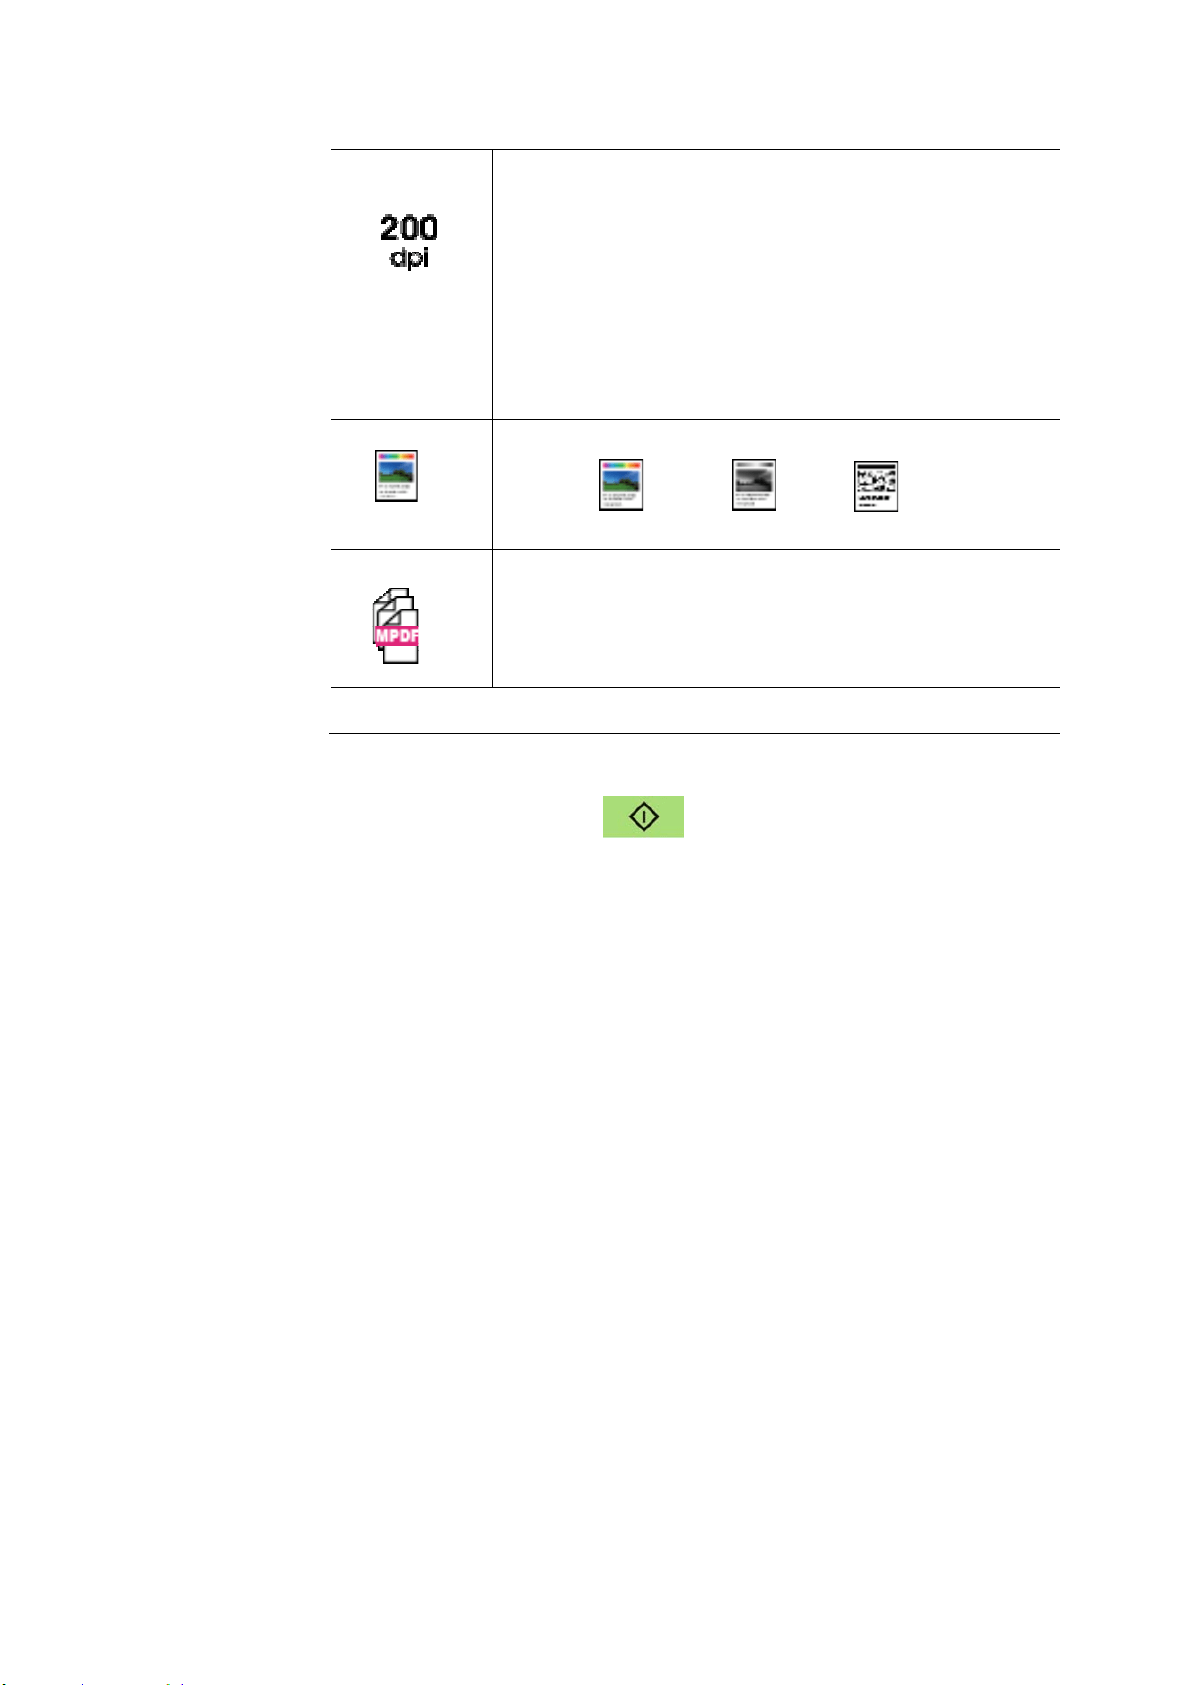
Densit y
Lighten or darken your im age. Choice: 1~ 7 (default : 4 )
Density
Resolution
Scan Mode
File Format
Ready
62
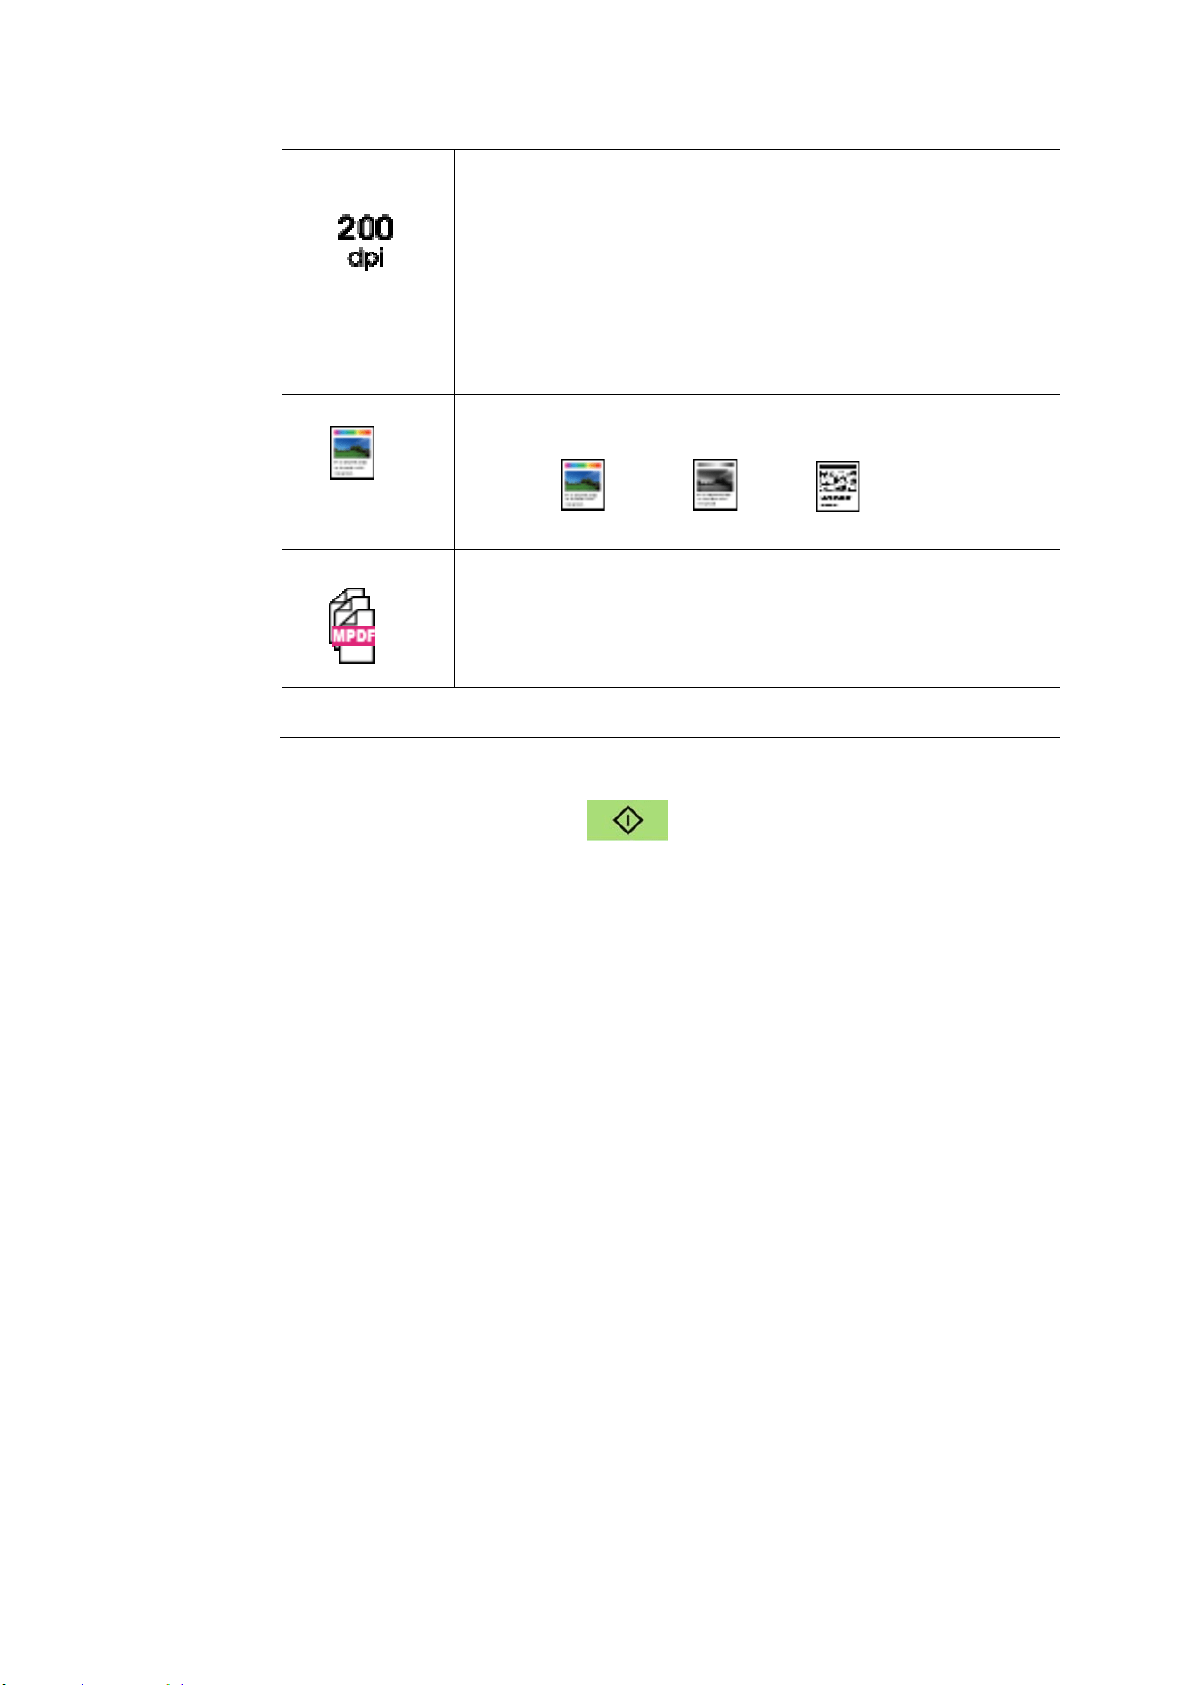
Re solut ion
Choose t he resolution of t he scanned im age. The
higher the value, the m ore details can be reviewed yet
m ore disk space will be required.
Choice: 150/ * 2 0 0 / 300/ 600 dpi
150 dpi: Suit s to be viewed on t he screen.
200 dpi: Suit s for m ost business docum ent .
300 dpi/ 600 dpi: High qualit y im age helps increase
OCR ( opt ical charact er recognition) accuracy.
Color M ode
Choose your desired color m ode for your scanned
im age.
Choice:
Color 、 Gray、 Black and
Whit e
File Form at
Choose your desired file form at for the scanned
im age.
Choice: M PD F ( Mult i- Pa ge PD F) 、PDF ( Single-Page
PDF) 、JPG、BMP、TI FF。
* De fault set t ings in ita lic bold style .
6 . Press t he [ St a r t] but t on ( ) on t he cont rol panel to start
scanning your docum ents.
63
Scan t o USB
The scan function allows you t o first scan your docum ent s and t hen send
the scanned im age t o a USB flash drive insert ed t o the product.
The ope ra t ing st eps:
1 . Place your m ulti- page docum ent Fa ce Up, Top Fir st in the aut o
docum ent feeder or place your single-page docum ent Face Dow n on
the docum ent glass.
2 .
Press Funct ion
/ key unt il t he follow ing「Scan t o USB」m ode is
shown in the LCD display.
3 .
Confirm or change options as desired such as Density, Resolut ion, Paper
Supply, or Paper Size.
Press or t o select the sett ing.
Press or to select the opt ion.
Densit y
Lighten or darken your im age. Choice: 1~ 7 (default :
4 )
Desnit
y
Resolution
Scan Mode
File Format
Ready
64
Re solut ion
Choose t he resolution of t he scanned im age. The
higher the value, the m ore details can be reviewed
yet m ore disk space will be required.
Choice: 150/ * 2 0 0 / 300/ 600 dpi
150 dpi: Suit s to be viewed on t he screen.
200 dpi: Suit s for m ost business docum ent .
300 dpi/ 600 dpi: High qualit y im age helps
increase OCR ( opt ical character recognit ion)
accuracy.
Color M ode
Choose your desired color m ode.
Choice:
Color 、 Gray、 Black and
Whit e
File Form at
Choose your desired file form at for the scanned
im age.
Choice: M PD F ( Mult i- Pa ge PD F) 、PDF
( Single- Page PDF) 、JPG、BMP、TI FF。
* De fault set t ings in ita lic bold style .
4 . Press t he [ St a rt] but ton ( ) on t he control panel t o start
scanning your docum ents.
6
5
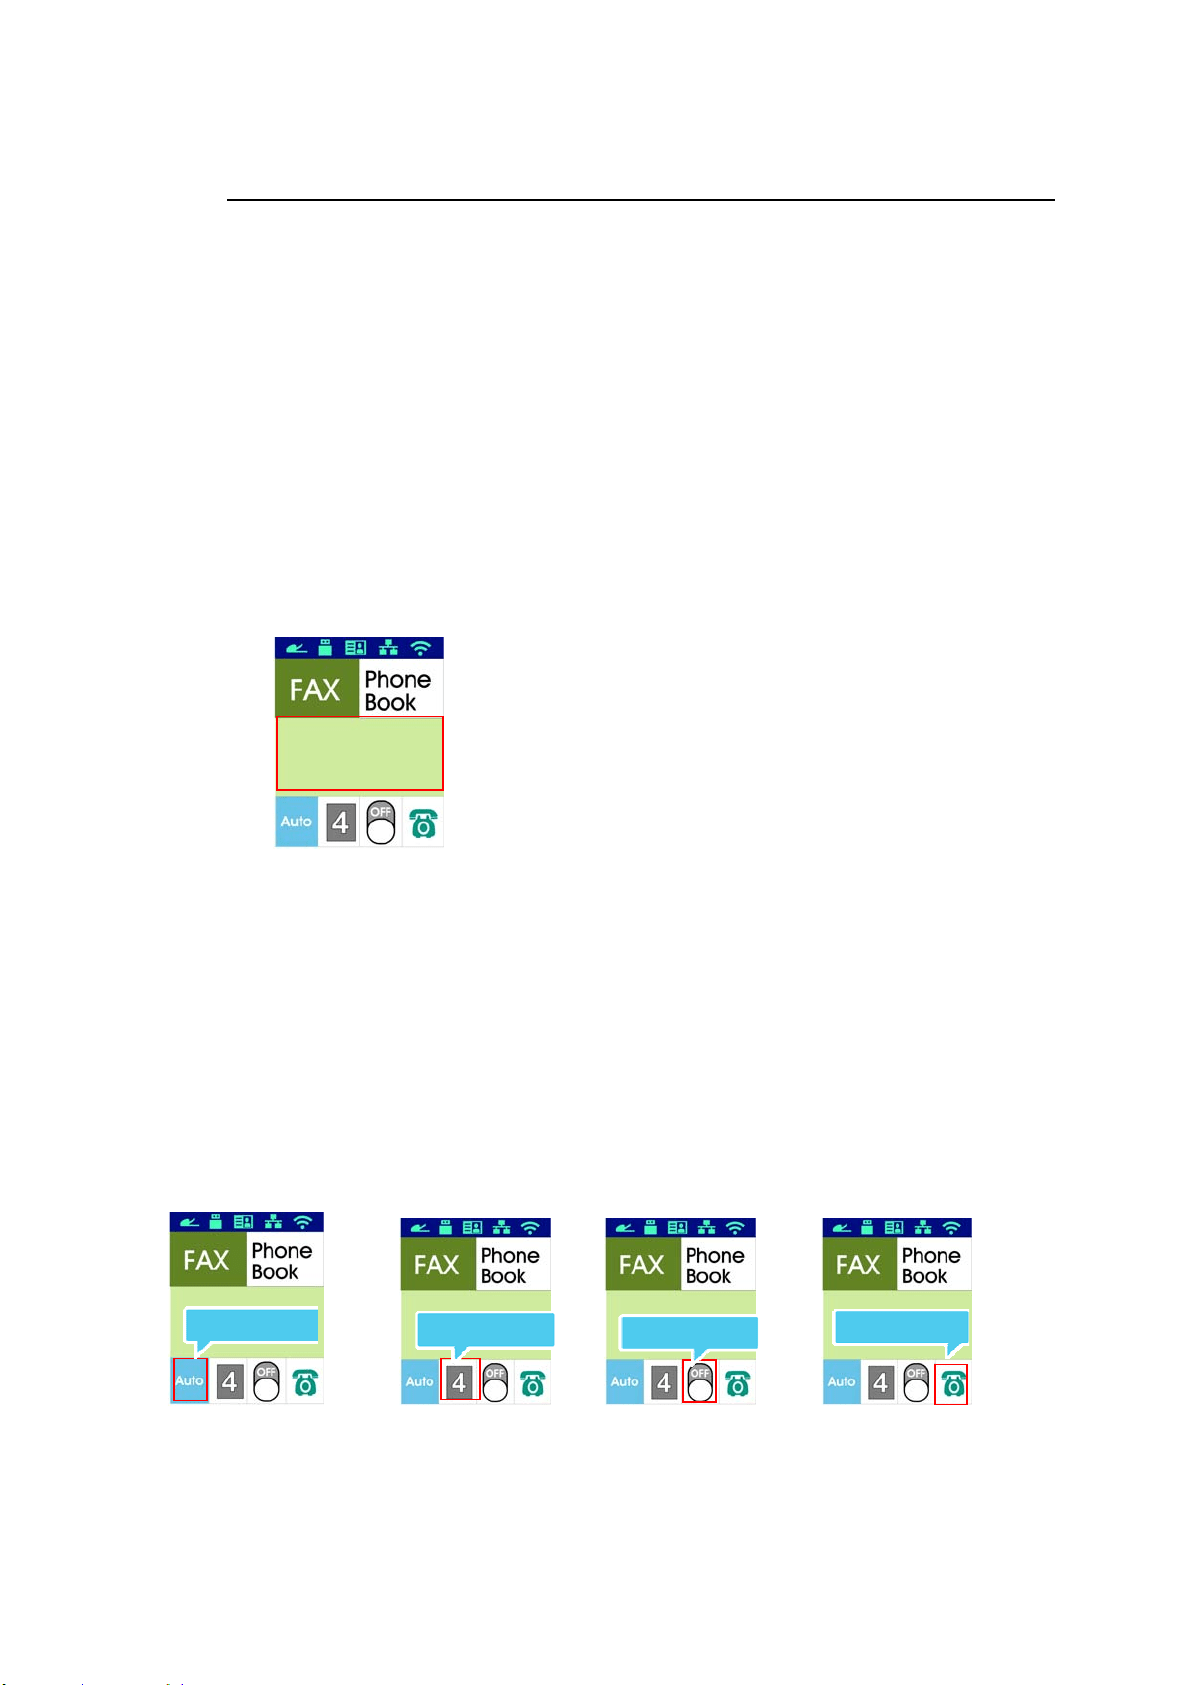
Fa x
The funct ion which is available for t he m odel of AM30XX allow s you t o scan
your docum ent s and t hen send t he scanned im age t o your recipient by fax.
Before using t he fax funct ion, be sure you have connected a telephone line
to t he m achine.
The ope ra t ing st eps:
1 . Place your m ulti- page docum ent Fa ce Up, Top First in t he auto
docum ent feeder or place your single-page docum ent Face Dow n on t he
docum ent glass.
2 . Press Function / key until t he following「Fax 」m ode is show n in t he
LCD display.
3 . Press to highlight the Phone Book and t hen press [ OK] . Select t he
fax num ber from t he list . ( See Chapter 4 for m ore details on how to
creat e your phone book.)
Or sim ply enter t he recipient ’s fax num ber by the num eric keypad.
* Note: To m anually ent er t he recipient ’s fax num ber, only one num ber is
allowed. I f you wish to send your docum ent t o m ultiple recipient s, you
will have choose t hem from t he Phone Book.
4 . Confirm or change Fax opt ions as desired such as Quality, Densit y,
Show Speed, or Transm ission Mode.
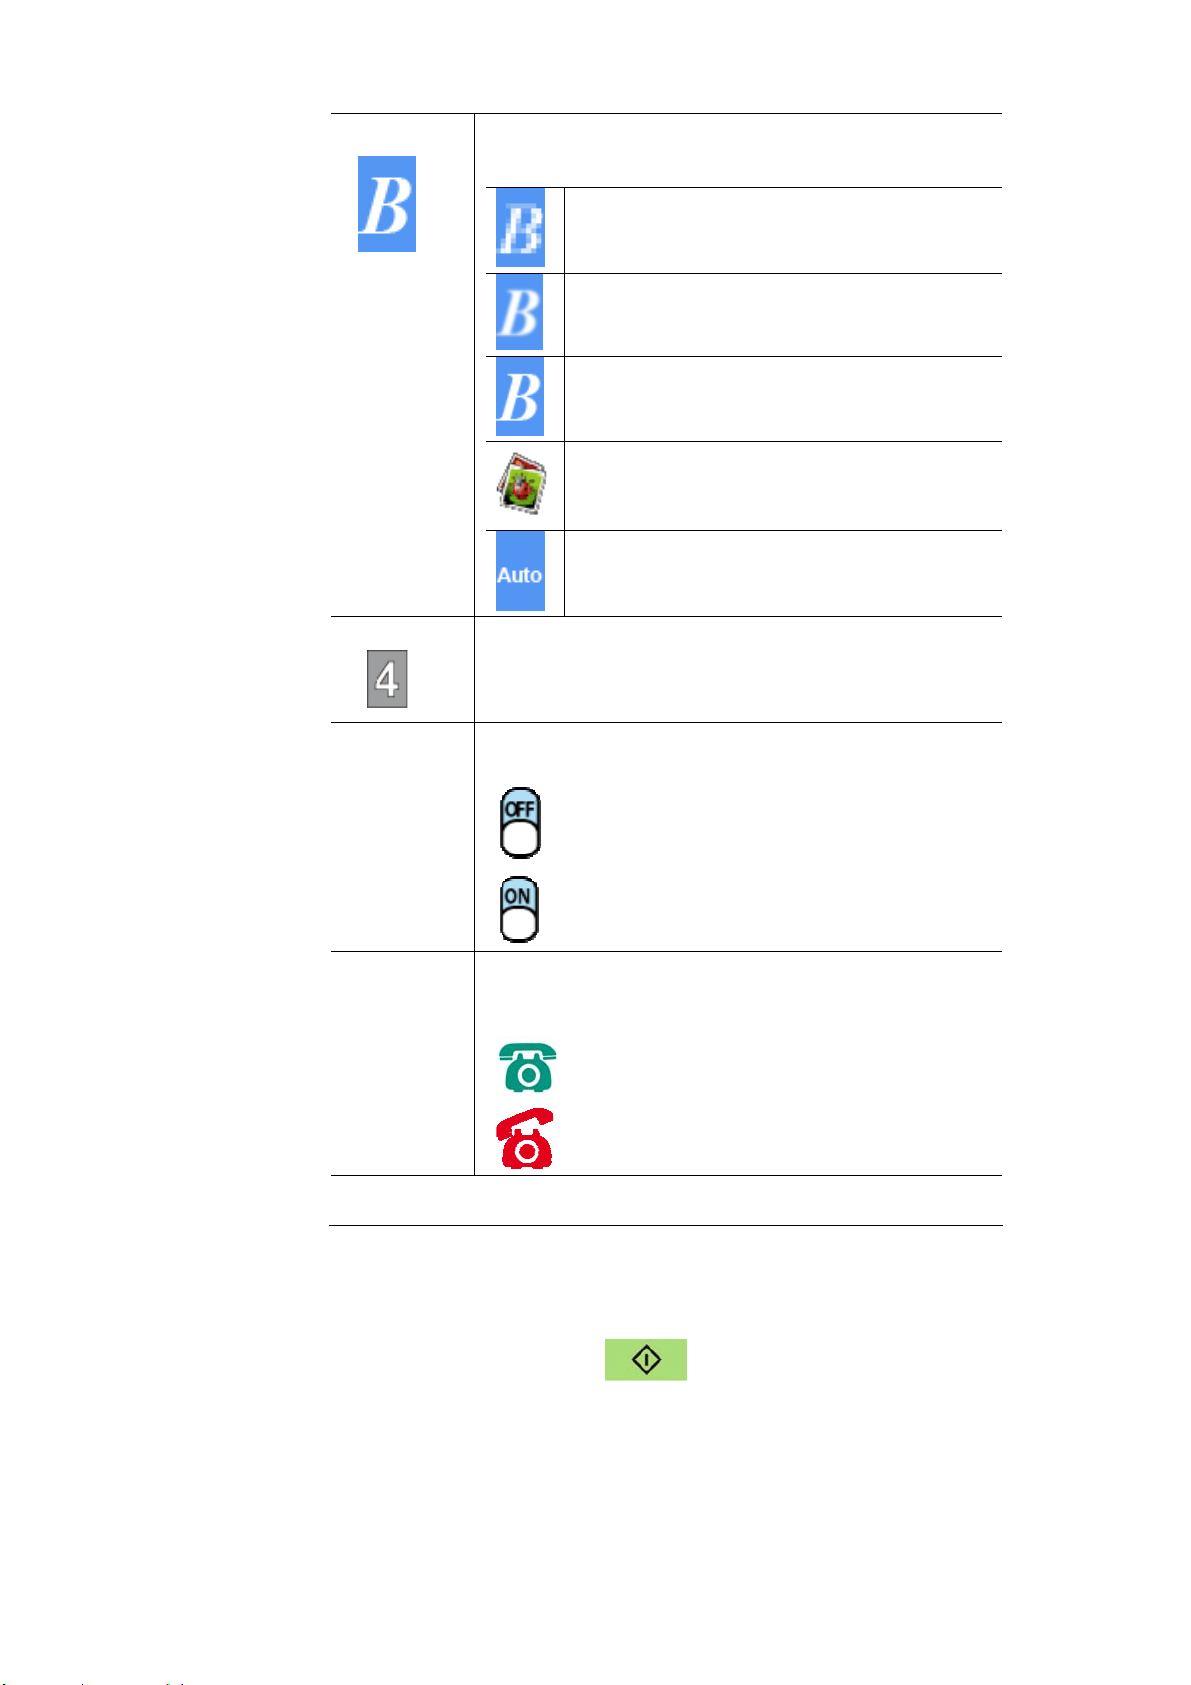
Quality
Density
Delay Send
Hook
Ready
66
Qua lit y
Choice: * Standa r d, Fine, Super Fine, Phot o,
Aut o
St andard
Fine
Super Fine
Phot o
Aut o
Densit y
Lighten or darken your im age. Choice: 1~ 7
( default : 4 )
Trans-
m ission
Mode
Choose if you wish to send t he fax later.
Choice: Off/ On
Off ( no de la y send)
Delay Send
Hook
Choose if you wish to use the hook feat ure –
t o use t he [ m anual send] or [ m anual receive]
feature.
On
Off
* Default set t ings in it alic bold st yle.
*
The defa u lt set t ings is displayed in ita lic bold style .
5 . Press t he [ St ar t ] butt on ( ) on the control panel t o start
scanning and faxing your docum ent s.
6
7
Manua lly Receiving or Se nding a Fa x
The ope ra t ing st eps:
1 . Make sure t he device is connected t o a working t elephone line.
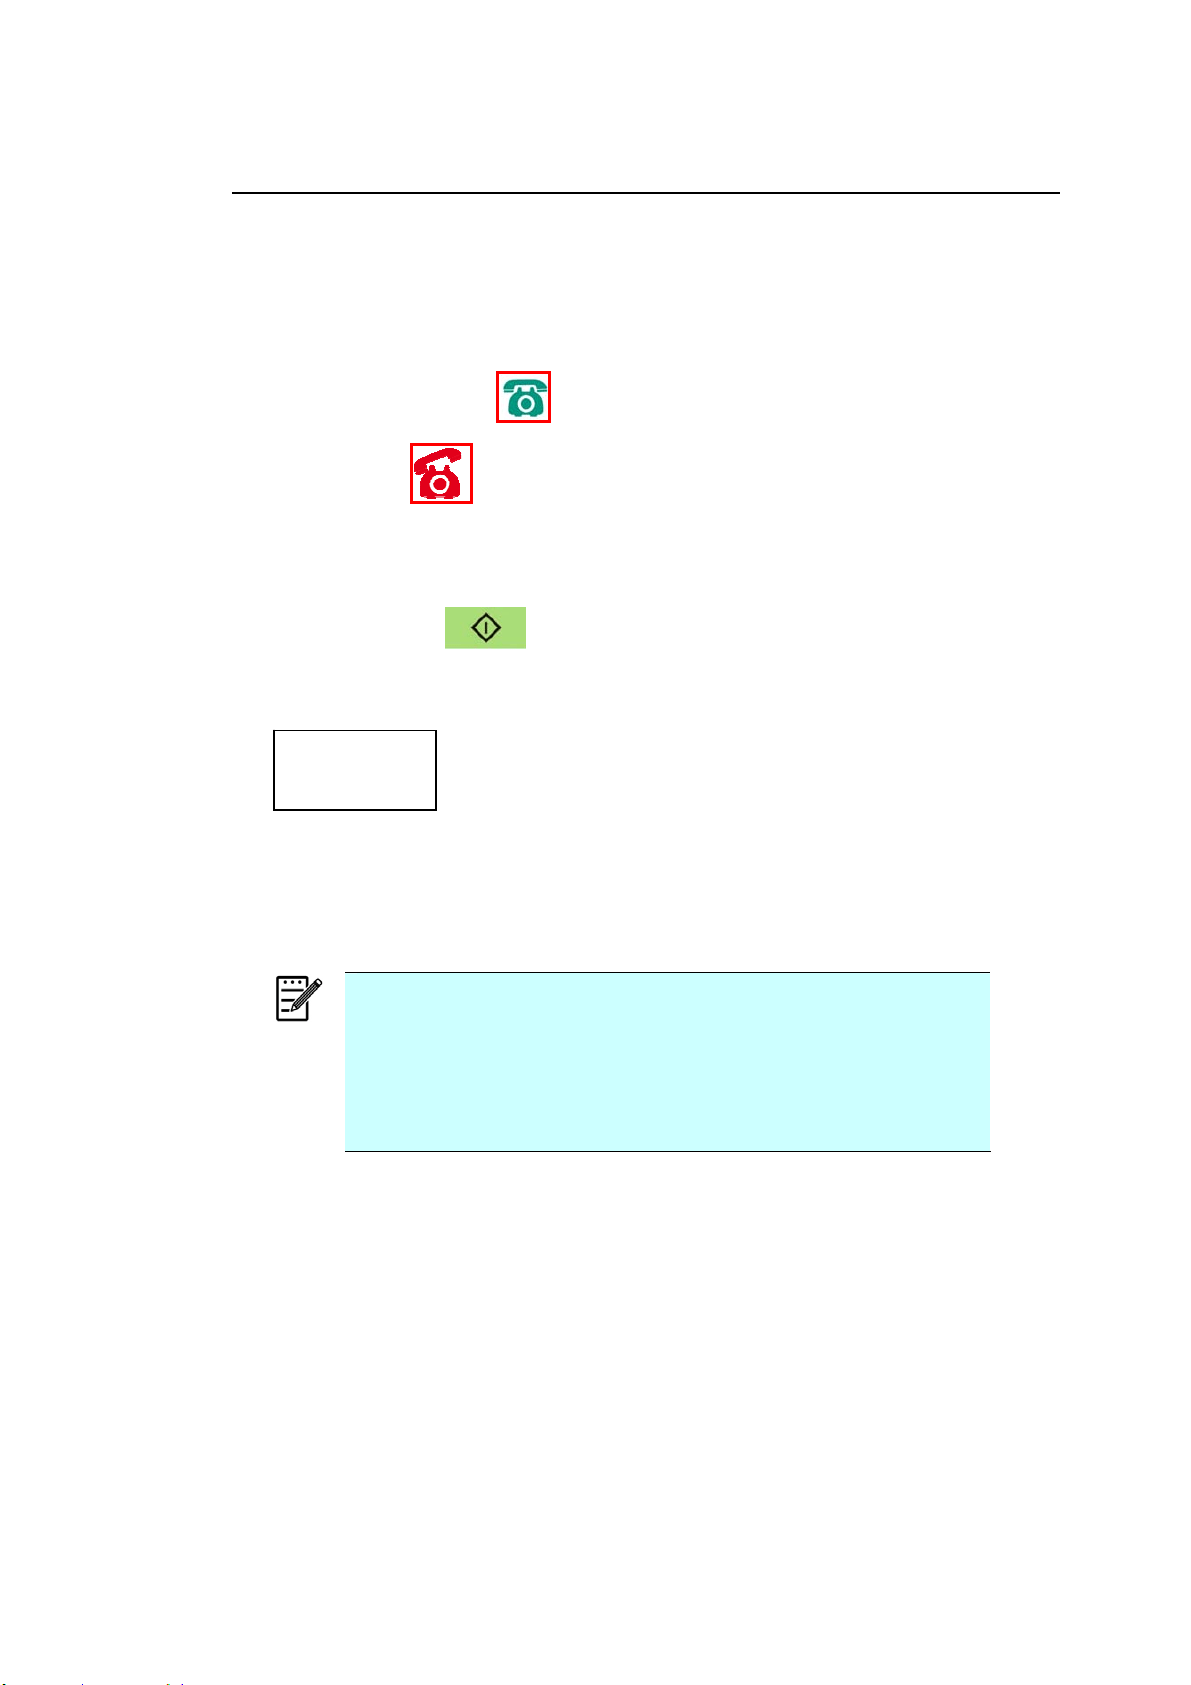
2 . Press repeat ly until ( hook on icon) is highlighted.
3 . Press unt il ( hook off icon) appears.
4 . Ent er the fax num ber via t he num eric keypad.
5 . When the line is connected and you hear a high- pit ched tone, press the
「Sta r t」butt on
。
6 . LCD displays the following screen.
7 . To send fax: press 1, t o receive fax: press 2.
8 . When the t ransm ission is OK, the LCD screen ret urns t o t he ready
st at us.
N ot e :
A telephone line has t o be inst alled t o use t his
funct ion.
The Ma nual opt ion from Rx Mode m ust be
select ed t o receive a fax m anually. Tap
[ Me nu] and select Fax> RX Mode> * Manual.
Send: 1
Receive: 2

68
Spea k a nd t hen Send a Fax
I m port a nt!
I t m ay be possible t hat faxes will reach unint ended recipient s due t o t he
m isdialing or incorrect registrat ion of fax/ t elephone num bers. When you
send im port ant docum ents, it is recom m ended t hat you send them after
speaking on the t elephone.
The opera t ing ste ps t o spe a k and t he n send a fa x
:
1 . Make sure t he device is connected t o a working telephone set and that
your receipient’s fax m achne is connected with a t elephone set .
2 .
Pick up the handset and then dial t he receipient’s telephone num ber.
3 . When t he conversation is over, press t he 「Start 」but t on .
4 .
LCD displays t he following screen.
5 . To send fax: press 1, to receive fax: press 2.
6 . The receipient choose [ Re ceive] and then hang down the handset.
7 . Hang down your handset .
8 . When t he transm ission is OK, the LCD screen ret urns t o the ready
st at us.
Send: 1
Receive: 2
69
Using t he Opt ional Scan M odule ( CSA6 ) for I D
Cards
Sim ply loading your I D card to the scan m odule ( CSA6) , the print can be
st arted and in a second t he front side and rear side of your I D card are
printed in one side of a sheet .
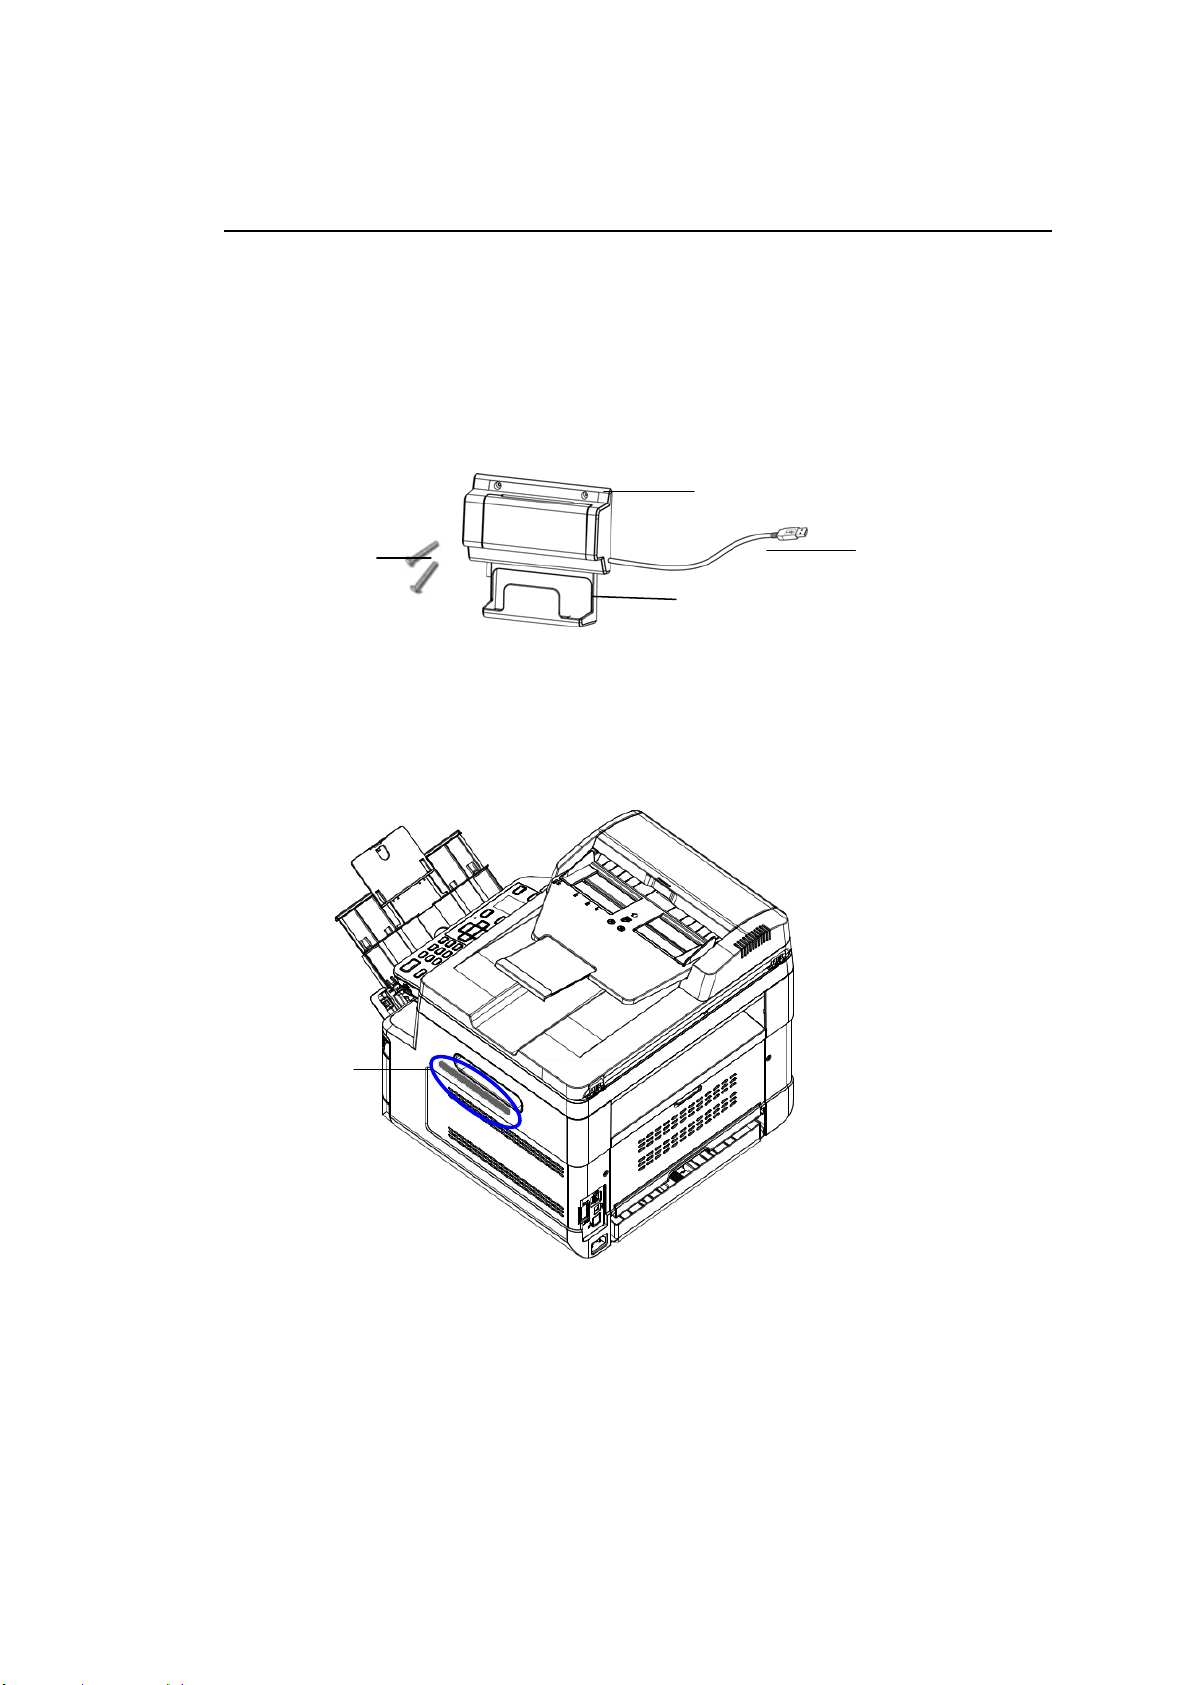
Kn ow ing th e Scan M odu le :
Rem oving t h e Myla r :
Locate t he m ylar for t he reserved holes on the side cover and rem ove it
with a box cut t er.
Out put Tray
Card Feeder
USB Cable
Fixing
Screws x 2
Mylar
7
0
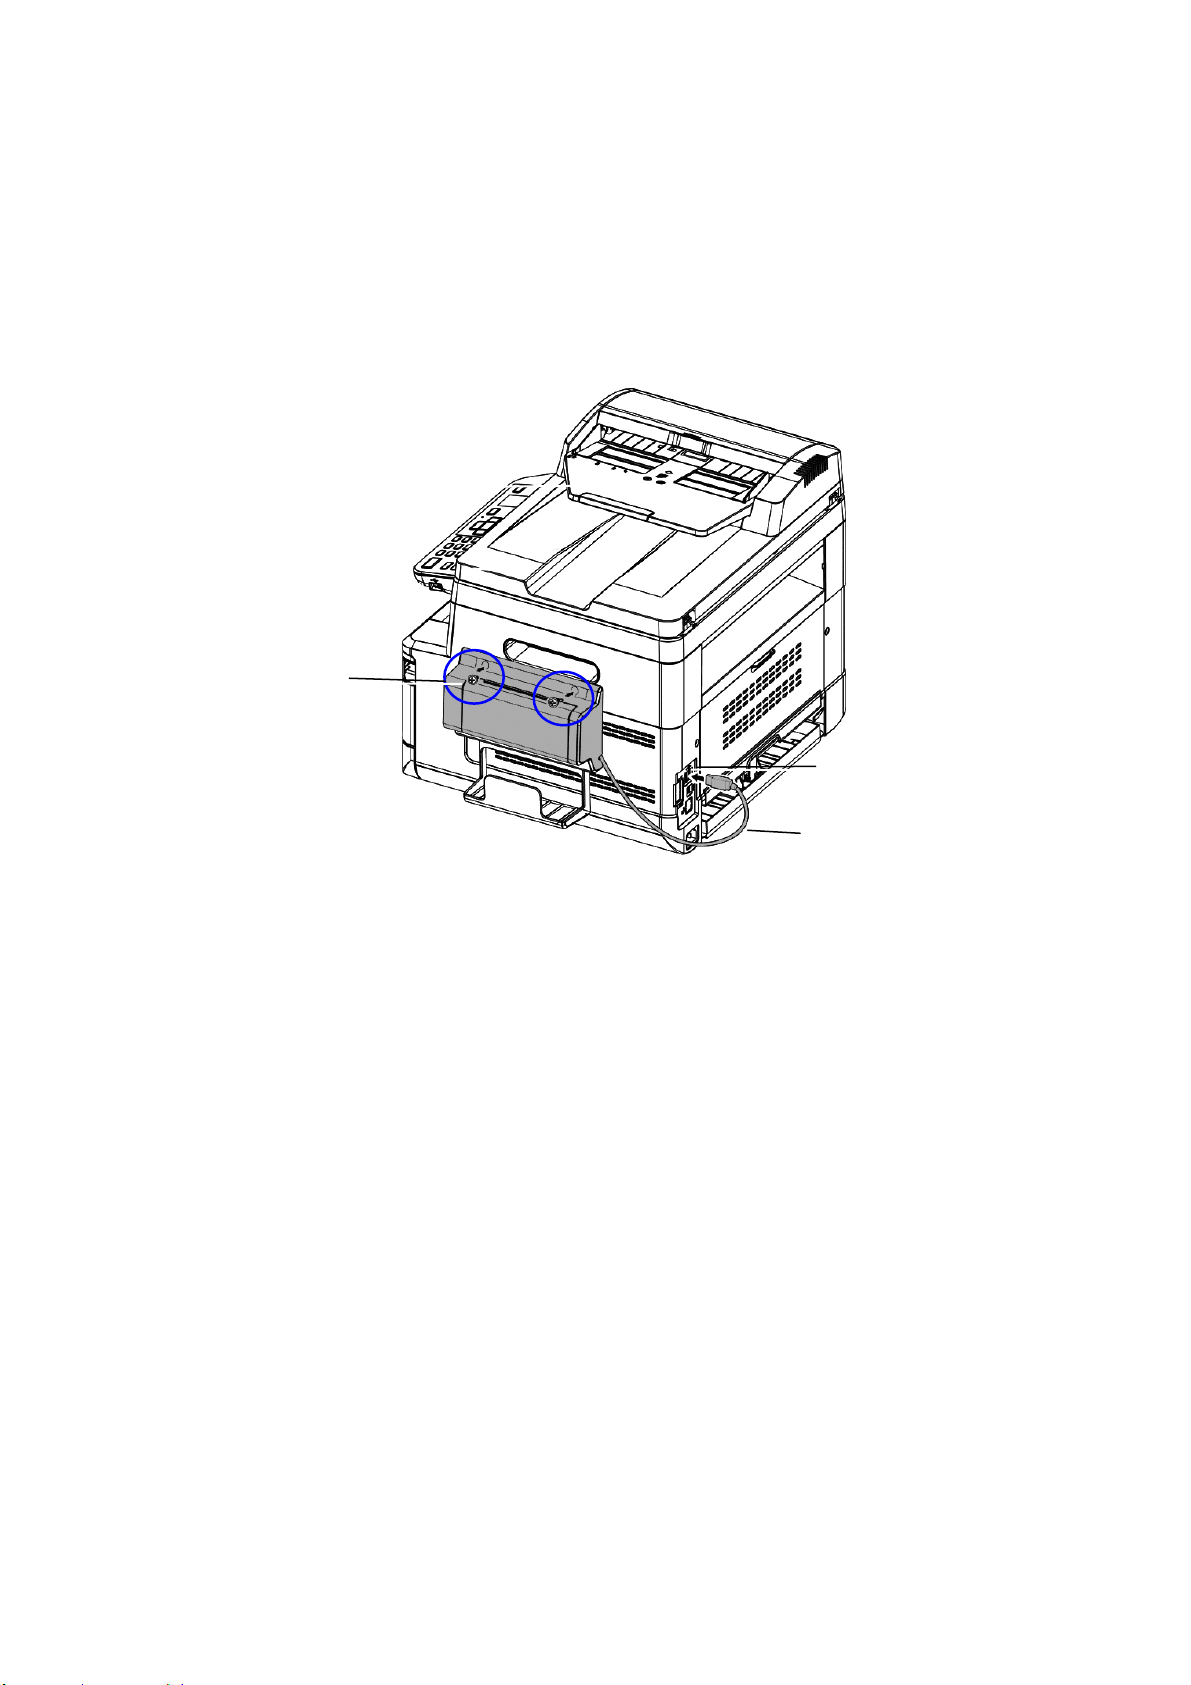
I nst a lling t he Scan Modu le:
1. Note t wo reserved holes on the side wall beneat h the operat ional panel
and fast en the scanning m odule wit h two fixing screws as shown.
2. Connect t he USB cable to t he USB port on rear side.
3. Turn off and t hen t urn on the product t o ensure t he m achine can
identify t he scan m odule.
USB Port
Fixing
Screws
USB Cable
71
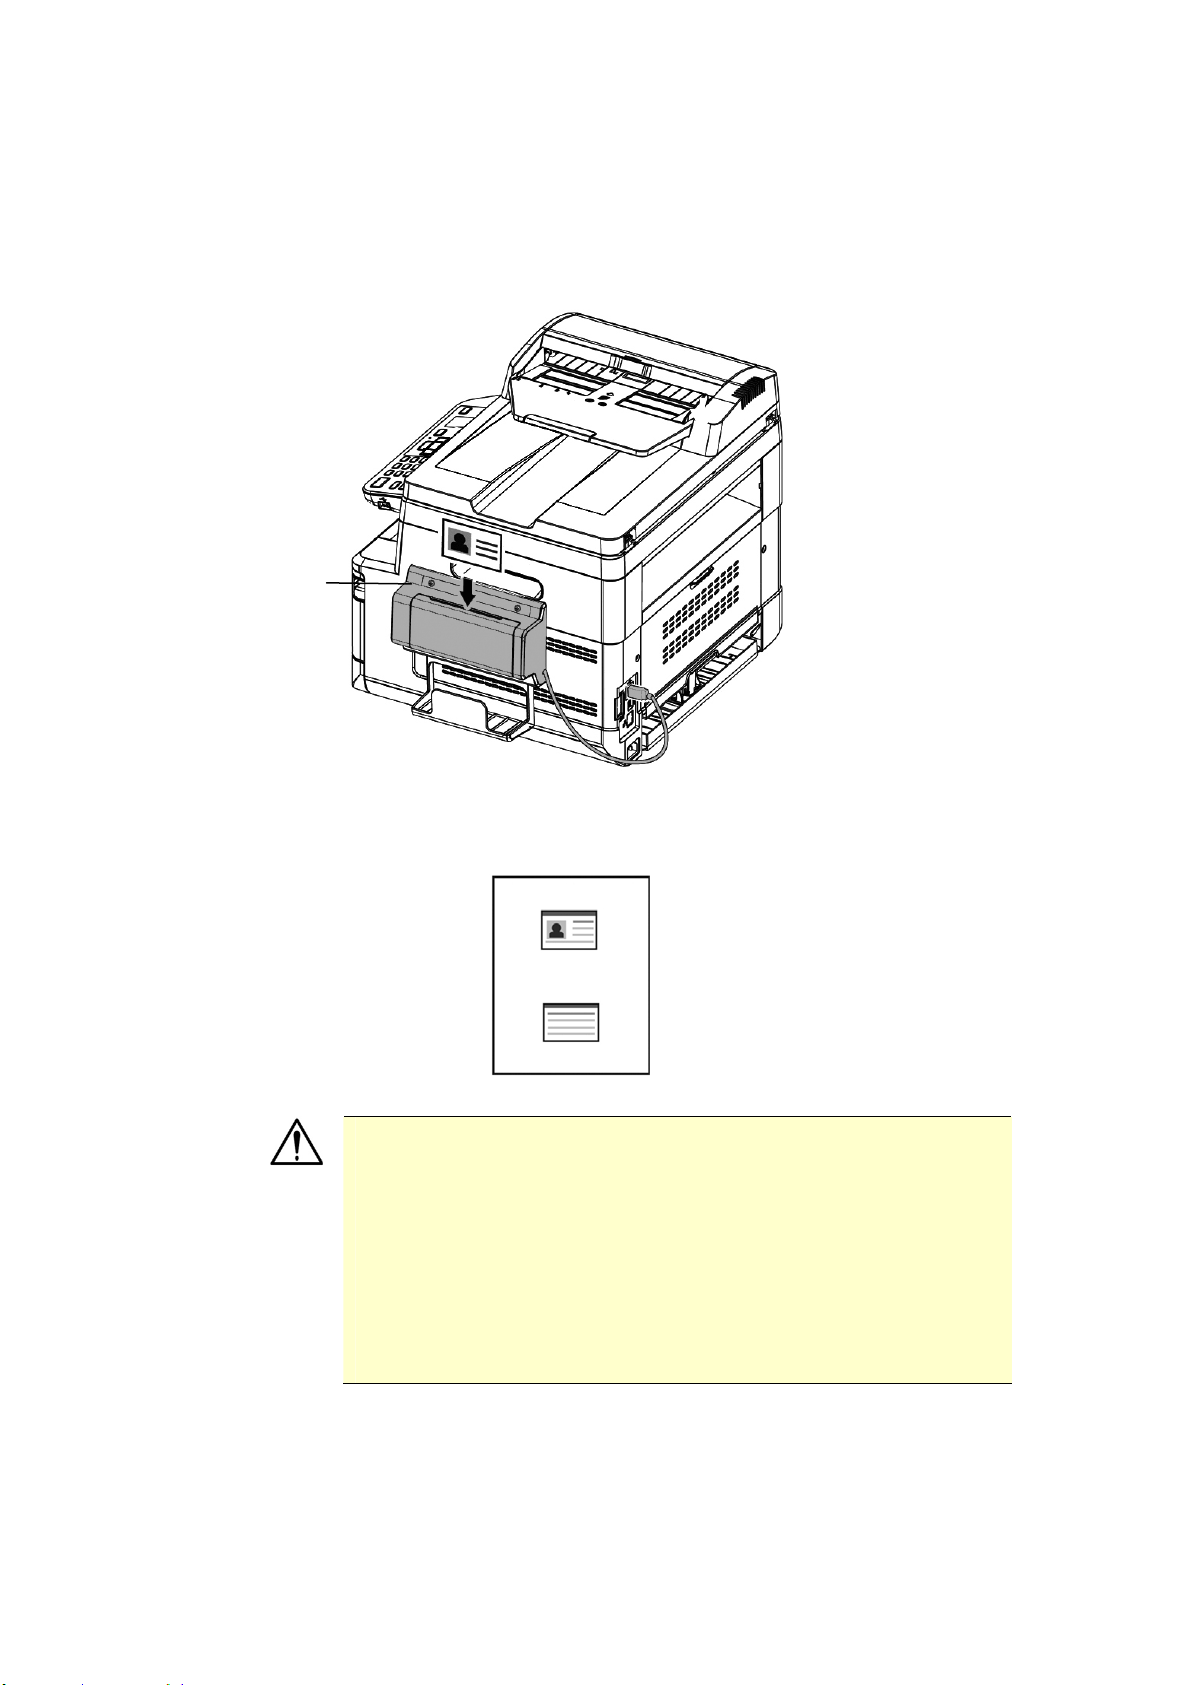
Ma k ing I D Car d Copy:
1. I nsert your card FACE OUTW ARD t o t he card feeder and m ake sure
t he bott om of card feeding first as illust rat ed.
2. I n a second, t he front side and the rear side of your I D card w ill be
copied in one side of a sheet.
N ot e :
Only one card can be insert ed at one t im e. The scan m odule
does not allow t o be fed m ore t han one card at a t im e.
Please not e the I D card copy set t ings can also be applied to
CSA6 sett ings. I f desired, you can change your CSA6
set t ings by changing your I D card copy set t ings on t he
product’s web page or on t he control panel as described in
the subsequent sect ion, I D Ca rd Copy Set t ings on page
74.
Card
Feeder
72
4 . Set t ing up and M anaging
Dest inat ions
This section provides procedure for t he adm inistrator t o set up and m anage your
dest inations including e- m ail addresses or net work folders t o dist ribute t he scanned
docum ent on the net work.
Setting up Your Address Book
This section provides procedure for t he adm inistrator on how t o set up Address
Book which includes e- m ail address and fax num ber.
Adding a N e w Mem ber
To add a new m em ber,
1. Obtain the product’s I P address by pressing t he [ M e n u] key on the control
panel and t hen choose [ I nform a t ion] > [ I P Address] . The product ’s I P
address will be displayed.
2. Open your browser.
3. Type t he product’s I P address on the URL field of your browser. For exam ple,
10.1.20.25. The following em bedded web page will be displayed
4. On t he product ’s w eb page, choose [ Pr ope r t ies] and t hen choose [ Address
Book] on the left side. The following [ Address Book] page will be displayed.
Ready
73
5. Choose [ Add N ew ] t o prom pt t he following page.
6. Ent er t he nam e, fax num ber, and e- m ail address for an individual recipient .
7. After com pleting ent ering t he settings, click「Subm it」t o finish. The new
recipient will be displayed in t he e- m ail list . This m eans you have successfully
creat ed an address book.
Modifying a Current M em ber
To m odify a current m em ber,
1. Repeat Step 1 to St ep 4 from t he previous sect ion, Adding a New Mem ber.
The [ Addr e ss Book ] page appears.
2. Choose t he m em ber you want t o m odify from t he list and then choose
[ Modify] to prom pt the [ M odify Mem be r] page.
3. Modify your m em ber inform ation. Click [ Subm it ] t o save t he sett ing or
[ Cancel] to leave t he page without saving any set t ing.
Delet ing a Current M em ber
To m odify a current m em ber,
1. Repeat Step 1 to St ep 4 from t he previous sect ion, Adding a New Mem ber.
The [ Addr e ss Book ] page appears.
2. Choose t he address you want to delet e from t he list and then choose
[ Delet e ] to erase the address. A Confirm ation dialog box appears t o
confirm your delet ion. Click [ OK] to confirm or [ Ca ncel] to exit .

74
Adding a N e w Group
To send m ultiple recipients sim ult aneously at one tim e, you can creat e groups t o
speed up the process. Up to 5 m em bers can be included in one group and a tot al
of 10 groups can be creat ed.
Follow t hese st eps to creat e a new group,
1 . Repeat Step 1 to St ep 4 from t he previous sect ion, Adding a New Mem ber.
The [ Addr e ss Book ] page appears.
2 . Click [ Group] and then choose [ N e w ] t o prom pt t he [ Add a New Group]
page.
3 . Enter your group nam e.
4 . Choose t he address from t he right side and click t o add a m em ber to the
group.
5 . Click [ Subm it ] t o save t he set t ing or [ Cancel] t o leave the page wit hout
saving any setting.
Modifying a Current Gr oup
To m odify a current e- m ail group,
1 . Repeat Step 1 to St ep 4 from t he previous sect ion, Adding a New Mem ber.
The [ Addr e ss Book ] page appears.
2 . Click [ Group] and choose t he group you want to m odify from t he list and
then choose [ Modify] to prom pt t he [ M odify Gr oup] page.
3 . Modify your group inform at ion. Choose t he group m em ber you wish t o add
and then click t o add t he new m em ber or click to delet e an old m em ber
from t he group.
4 . Click [ Subm it ] t o save t he set t ing or [ Cancel] t o leave the page wit hout
saving any setting.

7
5
Delet ing a Current Gr oup
To delet e a current e- m ail group,
1 . Repeat Step 1 t o St ep 4 from t he previous sect ion, Adding a New Mem ber.
The [ Addr e ss Book ] page appears.
2 . Click [ Group] and choose t he group you want t o delet e from t he list and then
choose [ Dele t e ] t o erase the group. A Confirm at ion dialog box appears to
confirm your delet ion. Click [ OK] to confirm or [ Ca ncel] to exit .
Adding Your One Touch Key
To speed up t he process to send your docum ent, t he product provides one t ouch
key for your frequently used recipient s. The one t ouch key can be either a
m em ber or a group which cont ains m ult iple m em bers t o allow y ou ret rive all
num bers by sim ply t apping t he key. Up to 10 one t ouch keys can be set.
Follow t hese st eps to creat e a new group,
1 . Repeat St ep 1 to Step 4 from t he previous section, Adding a New Mem ber.
The [ Addr e ss Book ] page appears.
2 . Click [ One Touch ] and t hen choose [ N e w ] t o prom pt t he [ Add a N ew
One Tou ch] page.
3 . Enter your one- t ouch num ber.
4 . Choose t he m em ber or group from t he right side and click t o add a
m em ber or group to t he one- touch key.
5 . Click [ Su bm it] t o save t he sett ing or [ Ca ncel] t o leave t he page wit hout
saving any setting.
Modifying a Current One Touch Key
To m odify a current e- m ail group,
1 . Repeat St ep 1 to Step 4 from t he previous section, Adding a New Mem ber.
The [ Addr e ss Book ] page appears.
2 . Click [ One Touch ] and choose t he one- t ouch num ber you want t o m odify
from t he list and then choose [ Modify] t o prom pt t he [ Modify One
Touch] page.
3 . Modify your group inform at ion. Choose the group m em ber you w ish t o
add and t hen click to add t he new m em ber or click to delet e an old
m em ber from t he group.
4 . Click [ Su bm it] t o save t he sett ing or [ Ca ncel] t o leave t he page wit hout
saving any setting.

76
Delet ing a Current One Touch Key
To delet e a current e- m ail group,
1 . Repeat Step 1 t o St ep 4 from t he previous sect ion, Adding a New Mem ber.
The [ Addr e ss Book ] page appears.
2 . Click [ One Touch] and choose the num ber you want to delet e from t he list
and then choose [ De le t e] t o erase t he one-t ouch key. A Confirm ation dialog
box appears t o confirm your delet ion. Click [ OK] t o confirm or [ Ca ncel] to
exit.
I m port ing Ext e r nal Address Book
The product allows you to im port ext ernal address book from ot her devices in
a .csv form at t o save your tim e in t yping all t he addresses. Before im port ing
ext ernal address book t o this product, be sure an address book file in .csv form at
has been creat ed in advance.
To im port current address book,
1 . Repeat Step 1 to St ep 4 from t he previous sect ion, Adding a New Mem ber.
The [ Addr e ss Book ] page appears.
2 . Click [ I m por t Addr ess Book] t o prom pt the [ I m por t Address Book]
page.
3 . Click [ Br ow se ] t o search t he address book file on your com put er.
4 . Click [ I m por t ] t o st art im port ing t he address book file. I n a second, t he
im port ed address book will be added in the product.

7
7
Ex port ing Current Address Book
The product allows you t o export current address book of t his device t o anot her
device in a .csv file form at.
To export current address book,
1 . Repeat Step 1 to St ep 4 from t he previous sect ion, Adding a New Mem ber.
The [ Addr e ss Book ] page appears.
2 . Click [ Export Address Book] t o prom pt t he [ Export Addre ss Book ] page.
3 . Click [ Ex port ] and then [ Br ow se] t o specify the location of your address
book.
4 . Click [ Apply] and the current address book will be stored in a .csv file.

78
Setting up Your File Dest inat ions
The sect ion provides procedure on how to set up your file dest inat ions t o send your
scanned docum ent to a specified network folder.
Adding a N e w File Dest ina t ion
To creat e a new file destination, follow these st eps:
1 . On t he product’s web page, choose [ Pr ope r t ies] and t hen choose
[ FTP/ CI FS Se t up] on the left side. The following [ N ew File Dest inat ion]
page w ill be displayed.
Ent er t he follow ing inform ation respect ively:
I t e m Descript ion
De st ina t ion
N a m e
Ent er t he nam e of your dest inat ion. The nam e will
be shown in the LCD screen.
Protocol Enter t he t ype of prot ocol of your destinat ion server.
Choice: FTP, FTPS, CI FS
URL Enter t he I P address and t he shared folder nam e of
your FTP server.
Port # Enter t he port num ber of the destinat ion server.
* 21 ( FTP) , 139 ( CI FS)
Login N am e Ent er t he user nam e of t he dest inat ion server.
Passw ord Enter t he password of dest inat ion server.
Re t ype
Passw ord
Choose your desired scan opt ion profile.
2 . Click [ Subm it ] t o save t he set t ing or [ Cancel] t o leave the page wit hout
saving any setting.
Modifying a Curr ent File Dest inat ion
To m odify a current file destination,
1 . Repeat Step 1 to St ep 2 from t he previous sect ion, Adding a New File
Dest ination. The [ Ne w File D e stinat ion] page appears.
2 . Choose t he dest inat ion you want t o m odify from t he list and t hen choose
[ Modify] to prom pt t he [ M odify File Dest inat ion] page.
3 . Modify your destinat ion inform at ion.
4 . Click [ Subm it ] t o save t he set t ing or [ Cancel] t o leave the page wit hout
saving any setting.

79
Delet ing a Current File Dest inat ion
To delet e a current file dest inat ion,
1 . Repeat Step 1 to St ep 2 from t he previous sect ion, Adding a New File
Dest ination. The [ Ne w File De st ina t ion] page appears.
2 . Choose t he dest inat ion you want t o delete from t he list and t hen choose
[ Delet e ] to erase the dest ination. A Confirm at ion dialog box appears t o
confirm your delet ion. Click [ OK] to confirm or [ Ca ncel] to exit .

8
0
5 . Cust om izing the Product ’s
Set t ings
This chapter is specifically t arget ed t o t he persons who are responsible for t he
adm inist ration of t he product. I t is recom m ended that the adm inist rat or read this
chapt er before inst alling t he m achine.
The product’s set t ings can be custom ized via t he cont rol panel or t he product ’s
em bedded web page. How t o cust om ize t he product’s set t ings via t hese t wo
m et hods will be described in the following sect ions.
N ot e :
When installing t he product for t he first t im e, it is recom m ended t hat
the Adm inist rator retain the default system sett ings. The sett ings can
be custom ized at a later dat e once you are fam iliar wit h t he operat ion
and funct ionality.
Cust om izing Syst e m ’s Se t t ings via t he Cont rol Pane l
To change the default set t ings on the cont rol panel, press t he “ m enu” but t on on
t he control panel. The m enu inform at ion will be displayed. To navigat e t he m enu
it em s, t he En t er , Up, Dow n, and Ba ck butt ons are provided on t he cont rol panel.
You can adjust set t ings ( e.g. set t he paper size for Tray 1) or view inform ation
( e.g. I P address, firm ware version) .
Typical st eps in using t he m enus are as follows:
1 . Press t he Men u butt on to access t he m enu item s.
2 . Press t he Up or Dow n butt on repeat edly unt il the desired m enu is
highlight ed in t he displayed list .
3 . Press t he [ OK] but t on to select this m enu.
4 . Press t he Up or Dow n butt on repeat edly unt il t he desired it em is
highlight ed.
5 . Press t he [ OK] but t on t o select t his it em .
6 . Press t he Back butt on to go back t o t he previous screen.
7 . Press t he Cance l butt on t o leave t he m enu item .
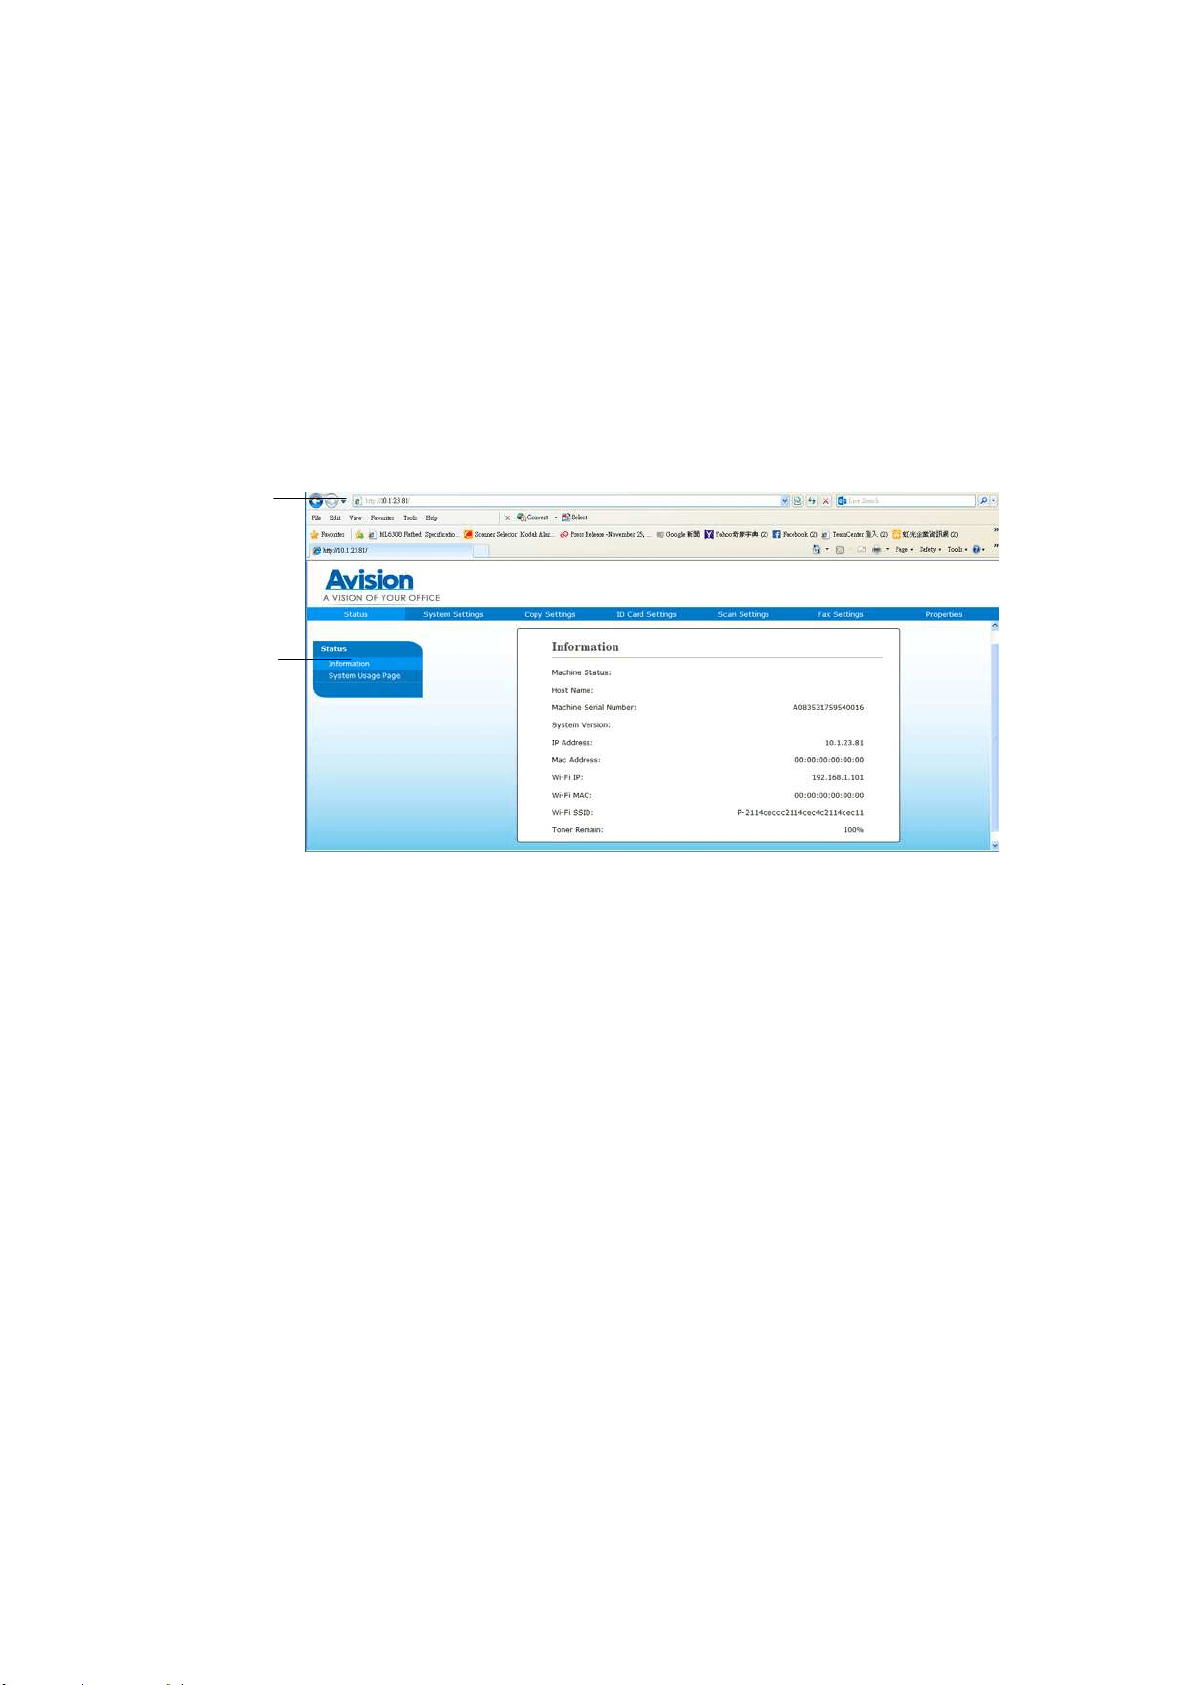
81
Cust om ize Syst em ’s Set t ings via the Em be dde d W eb Page
Note: Any update of t he web page requires adm inistrator’s login.
You m ay choose your net work connect ion type t hrough t he webpage.
1 . Obt ain t he product’s I P address by pressing t he [ Menu] key and select
[ I nform at ion ] > [ I P Addr e ss] . The I P address will be displayed.
2 . Open your browser and t ype t he product ’s I P address on t he URL address ,
for exam ple, ht t p: / / 10.1.20.80 and press Ent er. I n a second, the em bedded
web page will be displayed
.
3 . Ent er your desired setting on your select ed it em s.
Ready

82
Set ting I t em s t o be Cust om ized
St at us ( Ava ila ble only on t he w e bpage)
Displays t he stat us and basic inform ation of t he product .
I tem Descript ion
I nform at ion Display t he following basic inform at ion of t he product .
Machine Status
Displays t he m achine stat us.
Host Nam e Displays t he host nam e.
Machine SN
Displays t he m achine’s series num ber.
System Version
Displays t he firm ware version.
Hom epage
Version
Displays the version of t he em bedded web page.
Fax Pat ch Code
Version
Displays t he version of the installed fax pat ch code.
Fax pt t Version
Displays the fax pt t version.
I P Address
Displays t he I P address.
Mac Address
Displays t he Mac address.
Wi- Fi I P
Displays t he Wi- Fi I P address.
Wi- Fi Mac
Displays t he Wi- Fi Mac address.
Wi- Fi SSI D
Displays the Wi- Fi SSI D nam e.
Toner Rem ain
Displays the t oner rem ain of the t oner cartridge.
Report Select s t o print each report .
Config. Choose t o print t he sett ing inform at ion of the product.
Network Choose t o print t he net work inform at ion of t he product.
Menu Map Choose t o print all the m enu item s on t he LCD screen.
Usage Choose t o print t he usage report including t he num ber of
copies, toner usage inform at ion, EP usage inform at ion,
and fuser usage inform at ion.
Add. Book Choose t o prints t he address inform at ion of the product .
Fax Log Choose t o prints t he fax log of t he product .
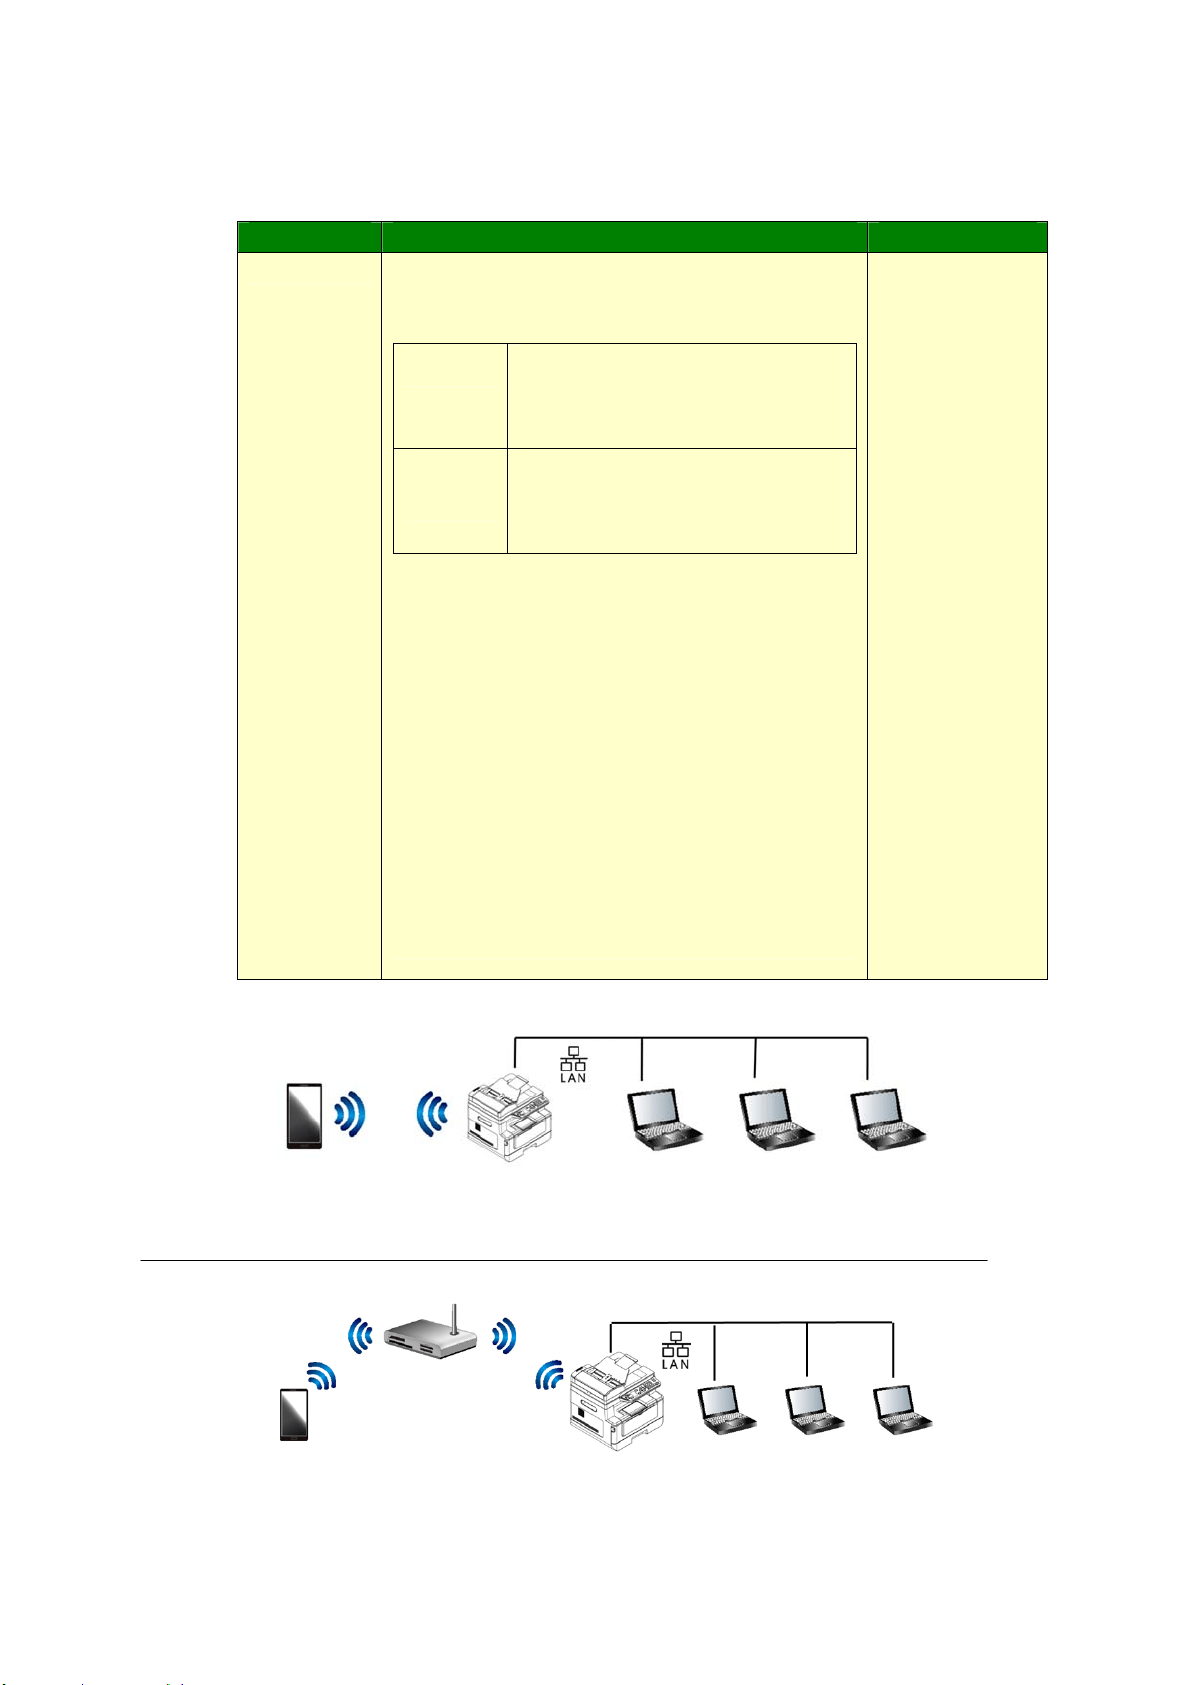
83
N e t w ork ( Availa ble only on t he LCD Screen)
* Factory Default
I tem Descript ion Choice
N e t w or k
W i- Fi: Choose to turn on or off Wi-Fi
connect ion. Choice: W i- Fi/ W i- Fi W PS
Butt on/ Direct Link
On
Turn on Wi- Fi and enter Wi- Fi
St at ion Mode. Please go t o t he
product’s web page to select a
wireless network ( SSI D) .
Direct
Link
Turn on Wi- Fi and go to Wi- Fi
AP ( Access Point m ode. The
product is now an Wi- Fi AP
it self.
W i- Fi W PS But t on: You m ay connect t he
device to a WPS com patible wireless access
point by selecting [ W i- Fi W PS butt on] . To
enable t he WPS connect ion of your access
point , please refer t o the user’s guide of your
access point .
N e t w or k Filt e r: Specify if you w ish t o
enable or disable t he Net work filt er
configuration. Once enabled, your can specify
the filter m ode t o allow som e I Ps t o access
the device or deny som e I Ps from accesing
the device via the product ’s em bedded web
page. Choice: Enable/ * Disable
Wi- Fi/
Wi- Fi WPS
But t on/
Network Filt er
Wi‐Fi(APmode)andLANmodecanbeusedatthesametime
Wi‐Fi(Stationmode)andLANmodecan
notbeusedatthesametime
Mobile Device AM30XX PC PC PC
Mobile Device AM30XX PC PC PC

84
W i- Fi Conne ct ion:
W ired LAN : I f t he device is connected to a wired LAN via an ethernet cable,
the Wi- Fi connection will aut om atically set t o t o AP m ode. A wired LAN and a
wireless network can be working at the sam e t im e.
W irele ss N et w ork : I f SSI D has been connect ed successfully, t he wired LAN
will not be working. I f the device fails to connect t o a wireless network ( SSI D) ,
the device will aut om at ically ent er Wi- Fi AP m ode (t he device itself is an AP) .
System Se t tings ( Availa ble on t he LCD Scr e e n a nd w ebpa ge)
* Factory Default
I tem Descript ion Opt ion
Lan guage The language displayed on
the LCD screen
* English / 繁體中文/ 简体中文
/ Deut sch
Da t e / Tim e Set s up t he current date
and tim e on the product.
The t im e form at is 24- hour
system .
Sleep Mode Choose how long t o ent er
the energy saving m ode
aft er your last action.
5Min/ * 15Min/ 30Min/ 1Hr/ 2Hr/ 4Hr
Aut o Off Choose how long t o shut
down the product
aut om at ically after your last
action.
* Off/ 5Min/ 15Min/ 30Min/ 1Hr/ 2Hr/
4Hr
Sche dule
Re st ar t
Enable or disable [ Schedule
Restart ] .
I f select on, ent er num ber
of day t o restart t he device
aut om at ically.
* On/ Off
Tim eout When t he m achine has not
been operat ed for a cert ain
period of tim e, t he system
will aut om at ically reset all
set t ings back to t he preset
values.
System Tim eout Value : 0
~ 300 seconds. Each
select able interval range is
15 seconds.
* On ( 60 secs) / Off
Defa ult Mode Set t he default operat ing
m ode on the LCD screen.
* Copy, I D Card Copy, Scan t o
USB, Scan t o CI FS/ FTP, Scan to
E- m ail, Fax
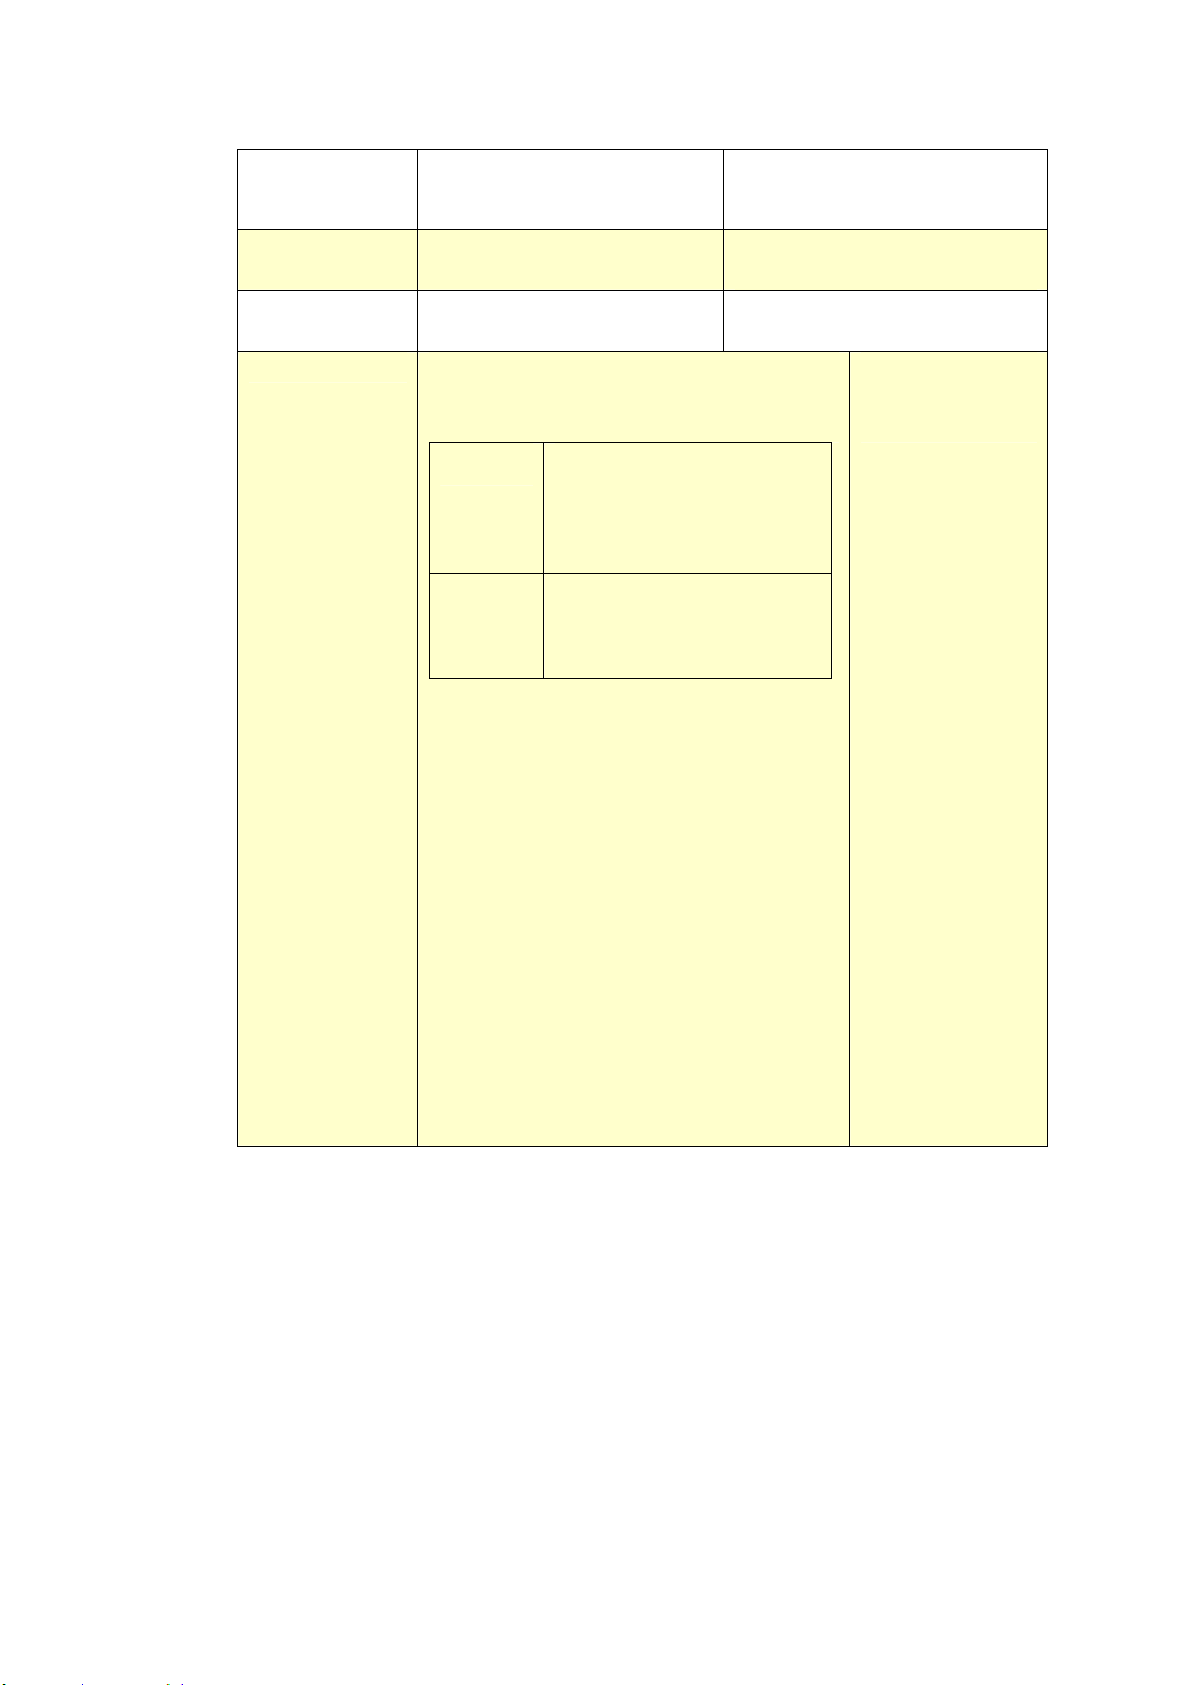
8
5
Paper Size
Defa ult
Choose default paper size.
* A4/ LTR/ LGL
Media Type
Choose default m edia type.
Thin/ * Plain/ Thick/ Envelope/ L
aser/ Bond/ Post card
Duplex Print
Choose t o enable/ disable
duplex print .
ON/ * Off
N e t w or k
W i- Fi: Choose to t urn on Wi- Fi
connect ion. Choice: W i- Fi/ W i- Fi W PS
Butt on/ Direct Link
On
Turn on Wi- Fi and ent er
Wi- Fi St at ion Mode.
Please go t o t he product’s
web page to select a
wireless network ( SSI D) .
Direct
Link
Turn on Wi- Fi and go t o
Wi- Fi AP ( Access Point
m ode. The product is now
an Wi-Fi AP it self.
W i- Fi W PS But t on: You m ay connect
the device t o a WPS com pat ible wireless
access point by selecting [ W i- Fi W PS
but t on] . To enable t he WPS connection
of your access point , please refer to t he
user’s guide of your access point .
N e t w or k Filt e r: Specify if you w ish t o
enable or disable t he Net work filt er
configurat ion. Once enabled, your can
specify t he filt er m ode t o allow som e I Ps
to access the device or deny som e I Ps
from accesing the device via the
product’s em bedded web page. Choice:
Enable/ * Disable
Wi- Fi/ Wi- Fi WPS
Mode / Direct
Link

86
Ma na gem e nt
Factory D e f. Reset all sett ings t o fact ory
default values.
Copy
Calibrat ion
( for LCD scre en
only)
Perform copy calibrat ion.
I m m ediate/ 1 ~ 30 days
Scanner
Calibrat ion
( for w ebpage
only)
Perform scanner calibrat ion.
I m m ediate/ 1 ~ 30 days
Re se t Count
Choose t o reset count for
roller or pad aft er
replacem ent . Click
[ im m ediate] t o reset count.
ADF Pad/ ADF Roller/ Tray 1
Pad/ Manual Tray Pad
V- Mag
Adj ust m ne t
Choose t o adj ust t he
vert ical m agnificat ion
rat e of t he print er.
- 0.4% / - 0.2% / * 0%
+ 0.2% / + 0.4 %
Passw ord Sett ings
N e w Passw ord
Enter a password to enable
m odifying t he web page.
Password should be 8~ 32
characters or digit s in
lengt h.
Re t ype
Passw ord
Ret ype new password.
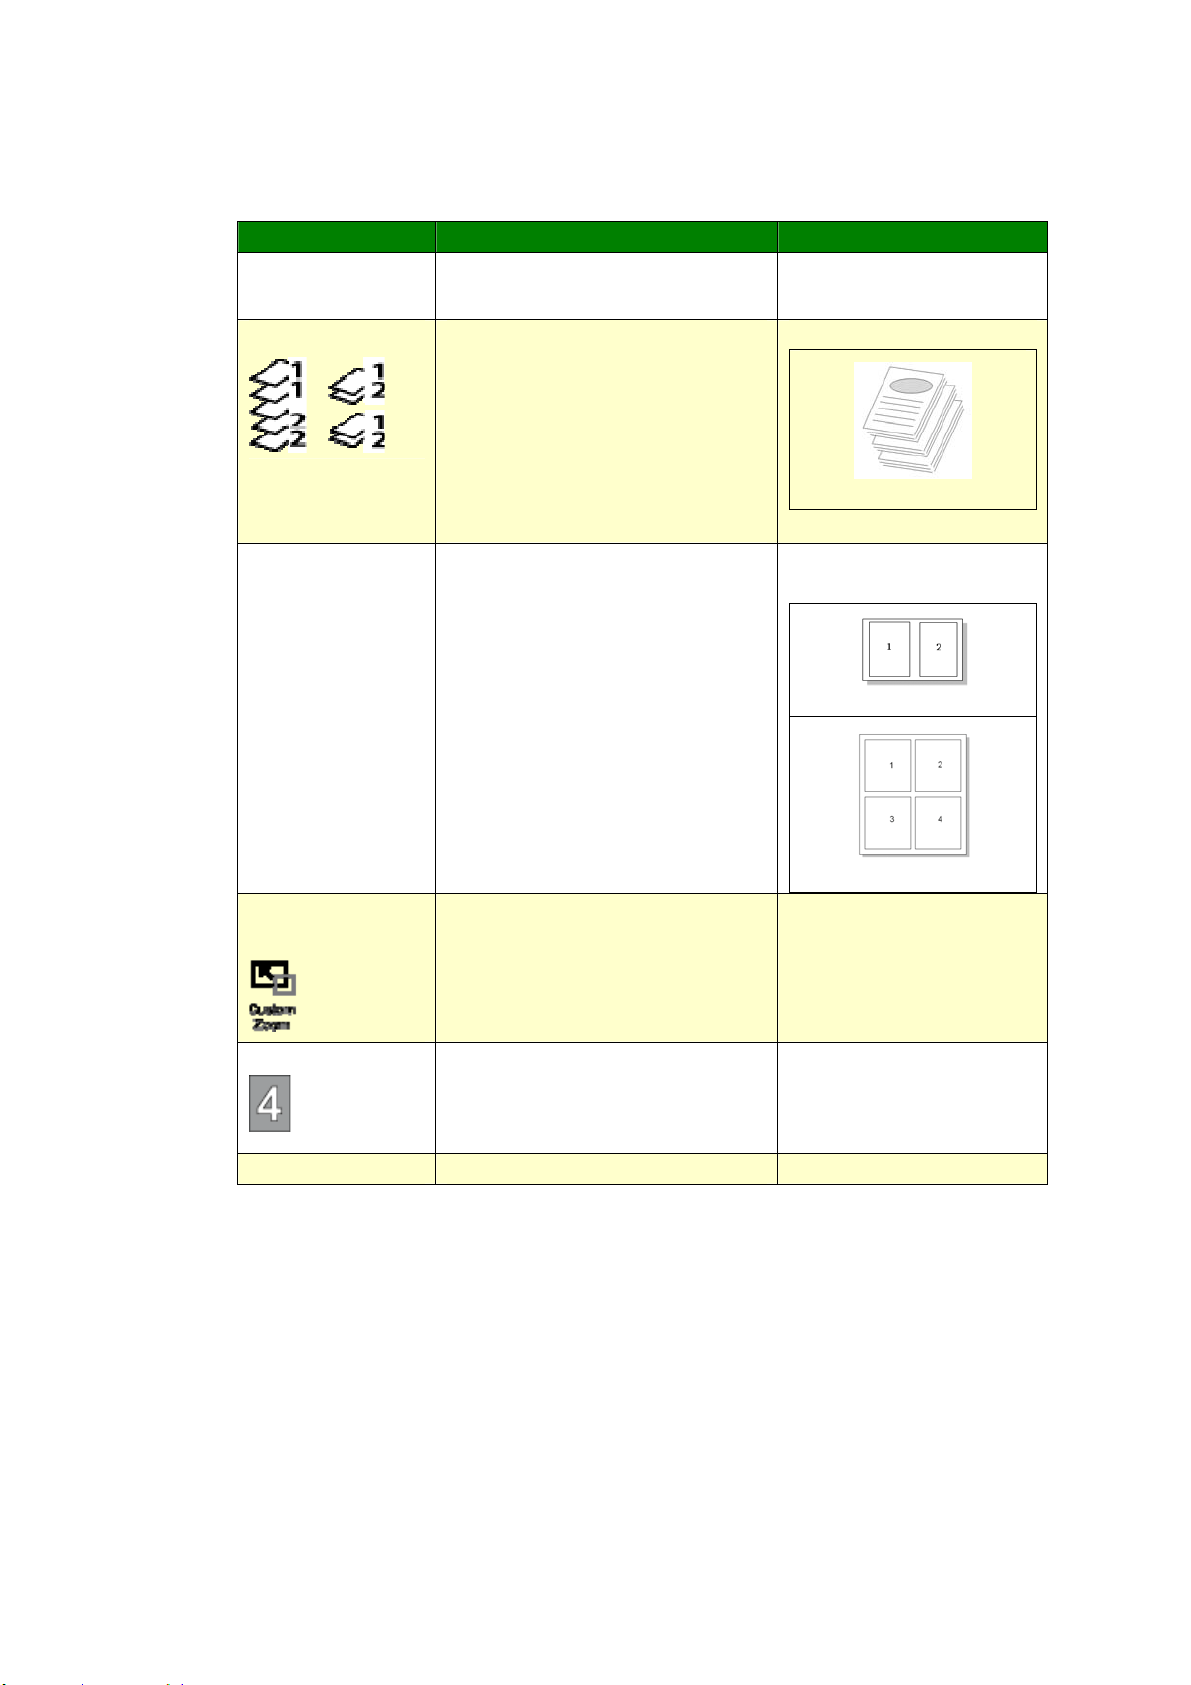
8
7
Copy Se t t ings ( Availa ble on t he LCD Scre e n a nd w ebpa ge)
* Factory Default
I tem Descript ion Opt ion
Copy Mode
Select your copy m ode t o
enhance your t ext or pictures.
* Text/ Phot o/ Mixed
Collat e
Select ing On sort s docum ent s
by t he order, ( 1,2,3 / 1,2,3 /
1,2,3) .
Select ing Off st acks docum ent s
by t he order,
( 1,1,1/ 2,2,2/ 3,3,3) .
On/ * Off
Collat ed
N - up
Select ing 2 t o 1 print s 2
original im ages reduced t o fit
ont o one sheet of paper.
Select ing 4 t o 1 print s 4
original im ages reduced t o fit
ont o one sheet of paper.
* 2 to 1/ 4 to 1
2 t o 1
4 t o 1
Custom Zoom
Defa ult
Custom Size ( 2 5 % ~
4 0 0 % ) : Resize your
docum ent s from 25% t o 400% .
25% ~ 400%
Densit y
Light en or darken an im age.
1/ 2/ 3/ * 4/ 5/ 6/ 7
Tone r Save
Enable or disable Toner Save.
On/ * Off
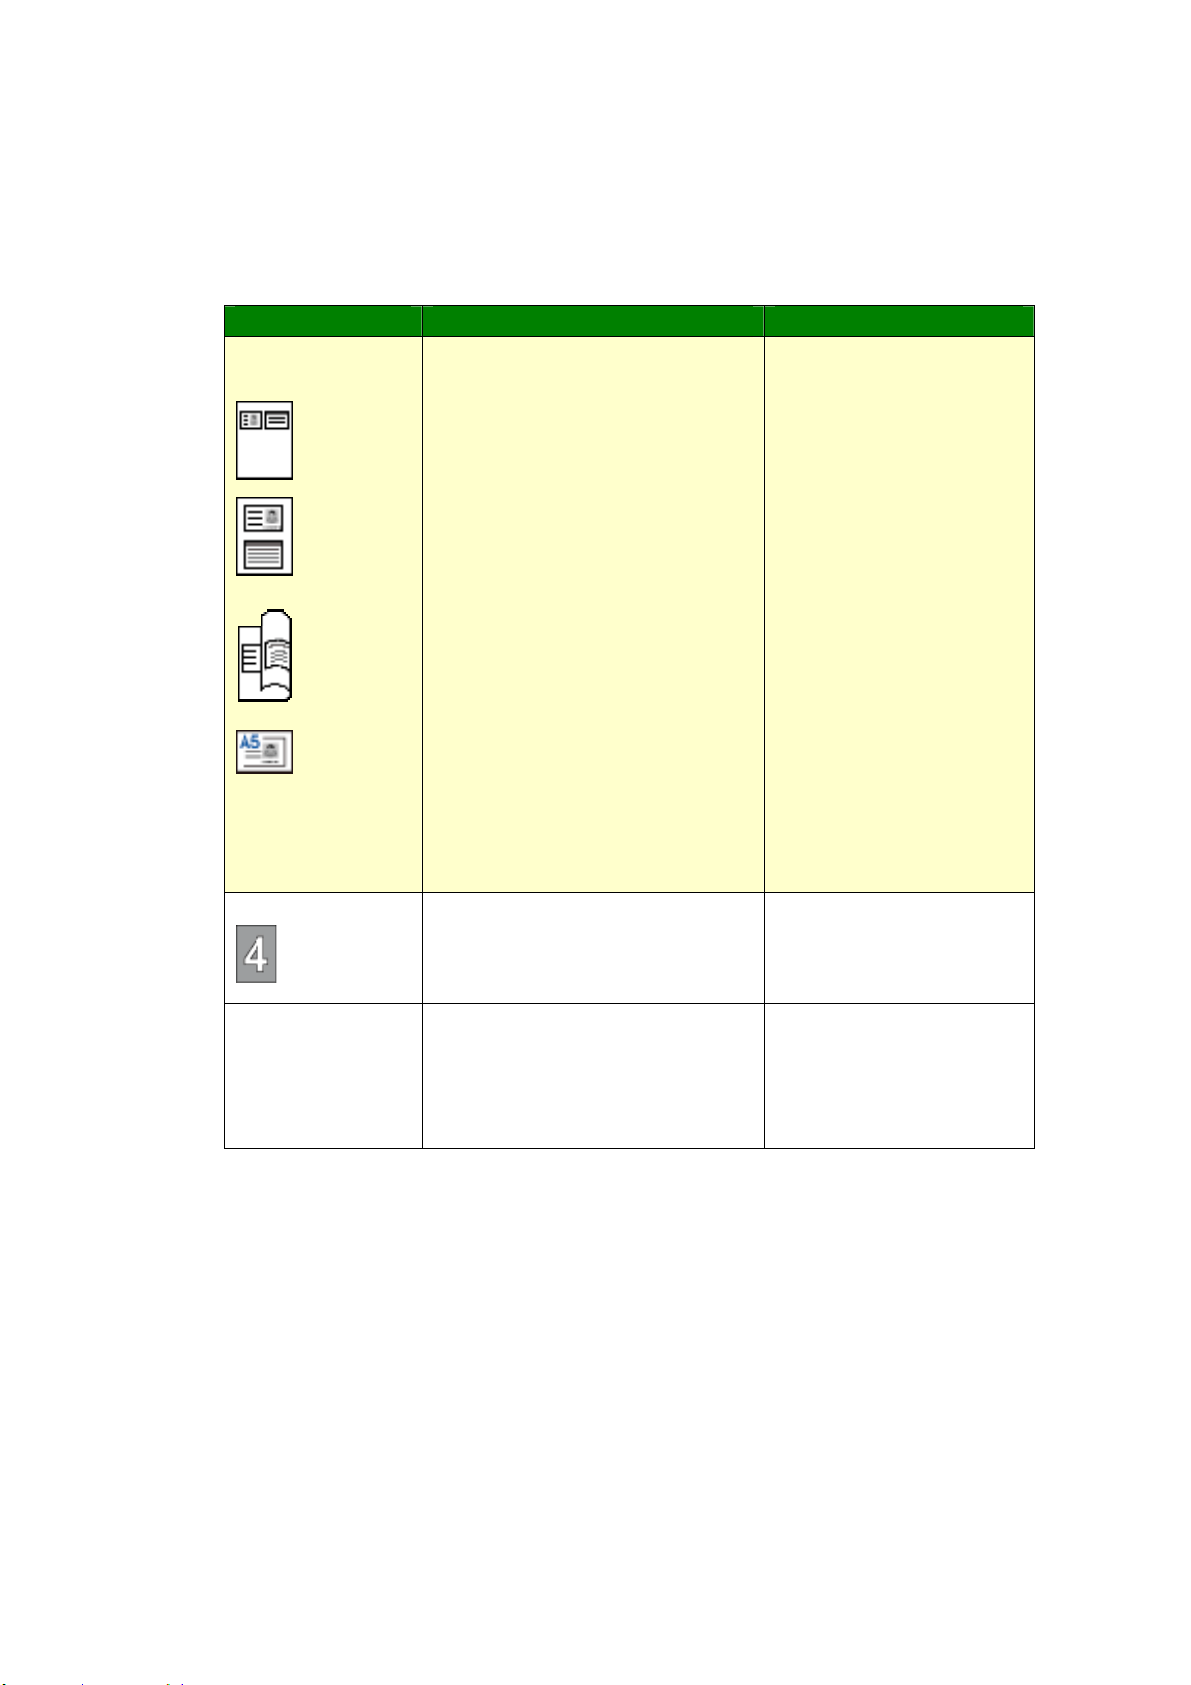
88
I D Ca r d Copy Se t t ings ( Ava ila ble on t he LCD Scr e e n a nd
w ebpage)
* Factory Default
* This is also the fact ory default sett ings if you have installed an opt ional scan
m odule for I D card (CSA6). I f desired, change your CSA6 set t ing here.
I tem Descript ion Opt ion
Mode
Select an I D Card Copy m ode.
Up/ Dow n – Copy t he front
and rear side of your I D card
on t he upper half and bot tom
half on one side of a sheet.
Right / Left –Copy the front
and rear side of your I D card
on t he right half and left half
on one side of a sheet.
Front/ Rear - Copy t he front
and rear side of your I D card
on t he front and rear side of a
sheet .
Multi- ca r d – Copy the front
and rear side of I D card in A5
size or m ult iple cards on one
side of a sheet .
Up/ Down
/ * Right / Left
/ Front/ Rear
/ Mult i- card
Densit y
Light en or darken an im age.
1/ 2/ 3/ * 4/ 5/ 6/ 7
Ve rt ical
Posit ion
Adj ust m ent
Slighly adj ust t he vert ical
position of t he scanned im age
of t he I D card.
Up/ Down( * 0~ 177m m ) ,
Left/ Right( * 0~ 355m m ),
Front/ Rear( * 0~ 177m m )

89
Scan Se t tings ( Ava ila ble on t he LCD Scre e n a nd w e bpa ge)
* Factory Default Sett ing
I tem Descript ion Opt ion
Scan M ode
Choose your Color Mode t o
enhance your t ext or pictures.
B&W/ Grayscale/ * Color
Densit y
Light en or darken an im age.
1/ 2/ 3/ * 4/ 5/ 6/ 7
Re solut ion Choose t he resolution of t he
scanned im age. The higher
the value, the m ore det ails
can be reviewed yet m ore
disk space will be required.
Choice: 150/ * 2 0 0 / 300/ 600
dpi
150 dpi: Suit s to be viewed
on t he screen.
200 dpi: Suit s for m ost
business docum ent .
300 dpi/ 600 dpi: High qualit y
im age helps increase OCR
( opt ical charact er recognit ion)
accuracy.
150/ * 200/ 300/ 600 dpi
File N a m e
Choose your default file nam e.
File Form at
Select a file form at for the
scanned im age.
* MPDF ( Mult i- page
PDF ) 、PDF ( Single- page
PDF) 、JPEG、TI FF
Er r Repor t
Enable to print a transm ission
report or print a report only
when errors.
Off/ On/ * On Error

9
0
Fax Set tings ( Availa ble for LCD Scr e e n and w ebpa ge )
( To access t he set t ing, you need to inst all a fax m odule and a t elephone line
first .)
* Factory Default
I tem Descript ion Opt ion
Qua lit y Select a docum ent qualit y. * Standard/ Fine/ Super
Fine/ Phot o/ Aut o
Densit y
Light en or darken an im age.
1/ 2/ 3/ * 4/ 5/ 6/ 7
Header Set s header inform ation for
out going faxes.
* Off/ On
Foote r
Set s ON if you wish to show
footer inform ation for all
out going faxes.
* Off/ On
Tone / Pulse Set s the product to t one- or
pulse-dialing m ode.
* Tone / 10 PPS/ 20 PPS
20 PPS applies only for China.
Tone and 10 PPS apply for any
countries except China.
Volum e
Set s ON if you wish to t urn
on t he speaker during fax
com m unication.
Off/ High/ * Medium / Low
Redia l
Set s t he num ber of redial
at t em pt s and redial int erval
set t ing if the num ber dialed
is busy.
Redial Count ( 0/ 1/ * 2)
I nt erval (1m in/ * 2m in/ 3m in)
DialTone Det
Set s ON t o allow t his product
to wait for and detect dial
tone before proceeding wit h
dialing.
Off/ * On
Conn e ct Tim e
Set s your connection t im e
aft er dialing and before
receiving signal.
30/ * 60/ 70/ 80/ 90 ( Seconds)
Tx Le ve l
Set s t he level of
transm ission signal.
0 ~ - 15 dBm
( * -13 dBm )
ECM
Choose ON if you wish to
enable t he Error Correct ion
Mode t o correct errors in
transm ission due to bad
lines.
* Off/ On
St a rt ing Ra t e
Set s t he level of start ing
rat e.
* Super G3/ G3/ Forced
I nfo Displa y
Show speed inform at ion
during t ransm ission.
Off/ * On
Codec
Specify or Disable Fax Codec
m odes (MR、MMR) .
* MMR/ MR/ MH

91
TX Report
Choose if you wish to print
the fax t ransm ission report
or print t he error report only.
Off/ On/ * Error
Protocol Log
Print t he prot ocol
inform ation.
* Off/ On/ Error
Coun t ry
Specify a count ry nam e for
fax.
USA/ Germ any/ Taiwan/ China/
Singapore/ Malaysia/ Thailand/
I ndonesia/ Korea/ South Africa
Forw a rd Tx
Set s ON if you wish to
forward all incom ing faxes or
em ails t o another fax
num ber or em ail address.
* Off/ Fax Num ber/ E-m ail
Fax Num ber: Num ber/ * Local
Print( On/ off)
E- m ail: From / Subject/ E-m ail
Re duce / Split
Choose t o scale the ent ire
content s of your receiving
fax t o fit int o the paper of
the print er.
Choose t o split t he ent ire
content s of your receiving
fax int o several pages.
Reduce / * Split
N o. of Rings t o
receive
Lets you set t he num ber of
tim es t he phone ring before
receiving the fax.
Note: The product ’s speaker
does not produce such a ring
tone. I t is possible for a user
to hear t he ring t one via an
ext ernal phone connected to
the product .
1 ~ 10
Default Value: 3
RX Mode
Select “ Fax” t o receive an
incom ing fax aut om atically.
Select “ Manual” t o receive an
incom ing fax m anually.
On how t o receive/ send
faxes m anually, refer t o the
sect ion, Receiving or
Sending a Fax Manually.
* Fax/ Manual
Dela y Send
Specify t he length of t im e for
delay send.
Hour/ Minut e
Over sea s
Mode
Choose your desired
overseas m ode.
Off/ I gnore 1
st
DI S/ DI S-DCS
I nt erval (500, 800 m s)/ I gnore
1
st
DI S + DI S-DCS I nt erval
( 500, 800 m s)

92
FTP/ CI FS Se t up ( Availa ble on t he w e b pa ge)
To send your scanned docum ent to a specified net w ork folder, you need t o set up
your file destination. To creat e or m odify your file destination, please refer to the
preceding section, Set t ing up Your File Destinat ion, on page 64.
Address Book ( Availa ble on t he w eb page)
To send your scanned docum ent to an e- m ail address or group, you need t o setup
your address book. To creat e or m odify your address book, please refer t o the
preceding section, Set t ing up Your Address Book, on page 58.
N e t w ork ( Availa ble on t he w eb page)
Displays t he net work inform ation of t he product .
* Fact ory Default
I tem Descript ion Opt ion
Host Nam e
Host Nam e Dipslay t he host nam e for t he product.
Et hernet Set t ings
DHCP: Enables DHCP * Off/ On
I P Address: Set up an I P
address.
I nput t he I P address of t he product .
Subnet Mask I nput the subnet m ask num ber.
Gateway I nput t he gateway for your I P.
Aut o- Obt ain WI NS/ DNS * Off/ On
Prim ary DNS Server Set s up t he prim ary DNS server address for the
product.
Secondary DNS Server Set s up t he secondary DNS server address for the
product.
Prim ary WI NS Server Set s up t he prim ary WI NS server address for t he
product.
Secondary WI NS Server Set s up t he secondary WI NS server address for t he
product.
Dom ain Nam e Set s up a dom ain nam e for t he product.
W i- Fi Set t ings
Search AP Click [ Sea rch AP] and t he current ly connected
wireless net w orks will be displayed. Select t he
wireless network you want t o connect and then
enter t he securit y key if required.
I P Settings Obtain t he I P address directly from t he DHCP server
or you m ay enter your stat ic I P on t he [ I P
Address] , [ Subnet Mask ] , and [ Gat ew a y ] field
respect ively.

93
SMTP
Mail Server Ent er t he I P address of your SMTP server.
SMTP Port # Enter t he port num ber of the SMTP server.
* 25
Aut hent icat ion Met hod Enter the em ail aut hentication m et hod.
Choice: * None, SMTP, POP3
Login Nam e Enter the login nam e for SMTP aut hent icat ion.
Password Enter the password for SMTP authent ication.
Tim e Zone Enter the t im e zone of your location.
E- Mail
From Specify sender’s e- m ail address. This is a m ust it em
to send im ages to e- m ail address.
Subj ect
Type t he default subject.
Signature Specify t he signature file of t he sender if necessary.
Reply to
Specify the e- m ail address you wish t o reply to. I f this
it em is left blank, t he [ From ] address will be used as
the [ Reply t o] address.
Message
Type t he default ’s e- m ail m essage.
N e t w or k Secur ity Sett ings
Security Configuration
Filter
Specify if you w ish t o enable or
disable the filt er configuration.
* Disable/ Enable
Filter Mode
Specify your filt er m ode t o
allow som e I Ps to access t he
device or deny som e I Ps from
accessing t he device’s
em bedded web page.
Allow/ Deny
I P Address Filt er
Configurat ion
I P Addr e ss Filt e r
Configurat ion- Four t ypes of
St art I P and End I P can be
specified.
Ma c Addre ss Filt er
Configurat ion- Up t o 10 Mac
address can be specified.
I P Address Filt er
Configurat ion/
Mac Address Filter
Configurat ion
A
+
M ana ger Set t ings
A
+
M ana ger Set t ings
Enter t he I P address of a specified server t o send
the system log file to for quick t roubleshoot ing.
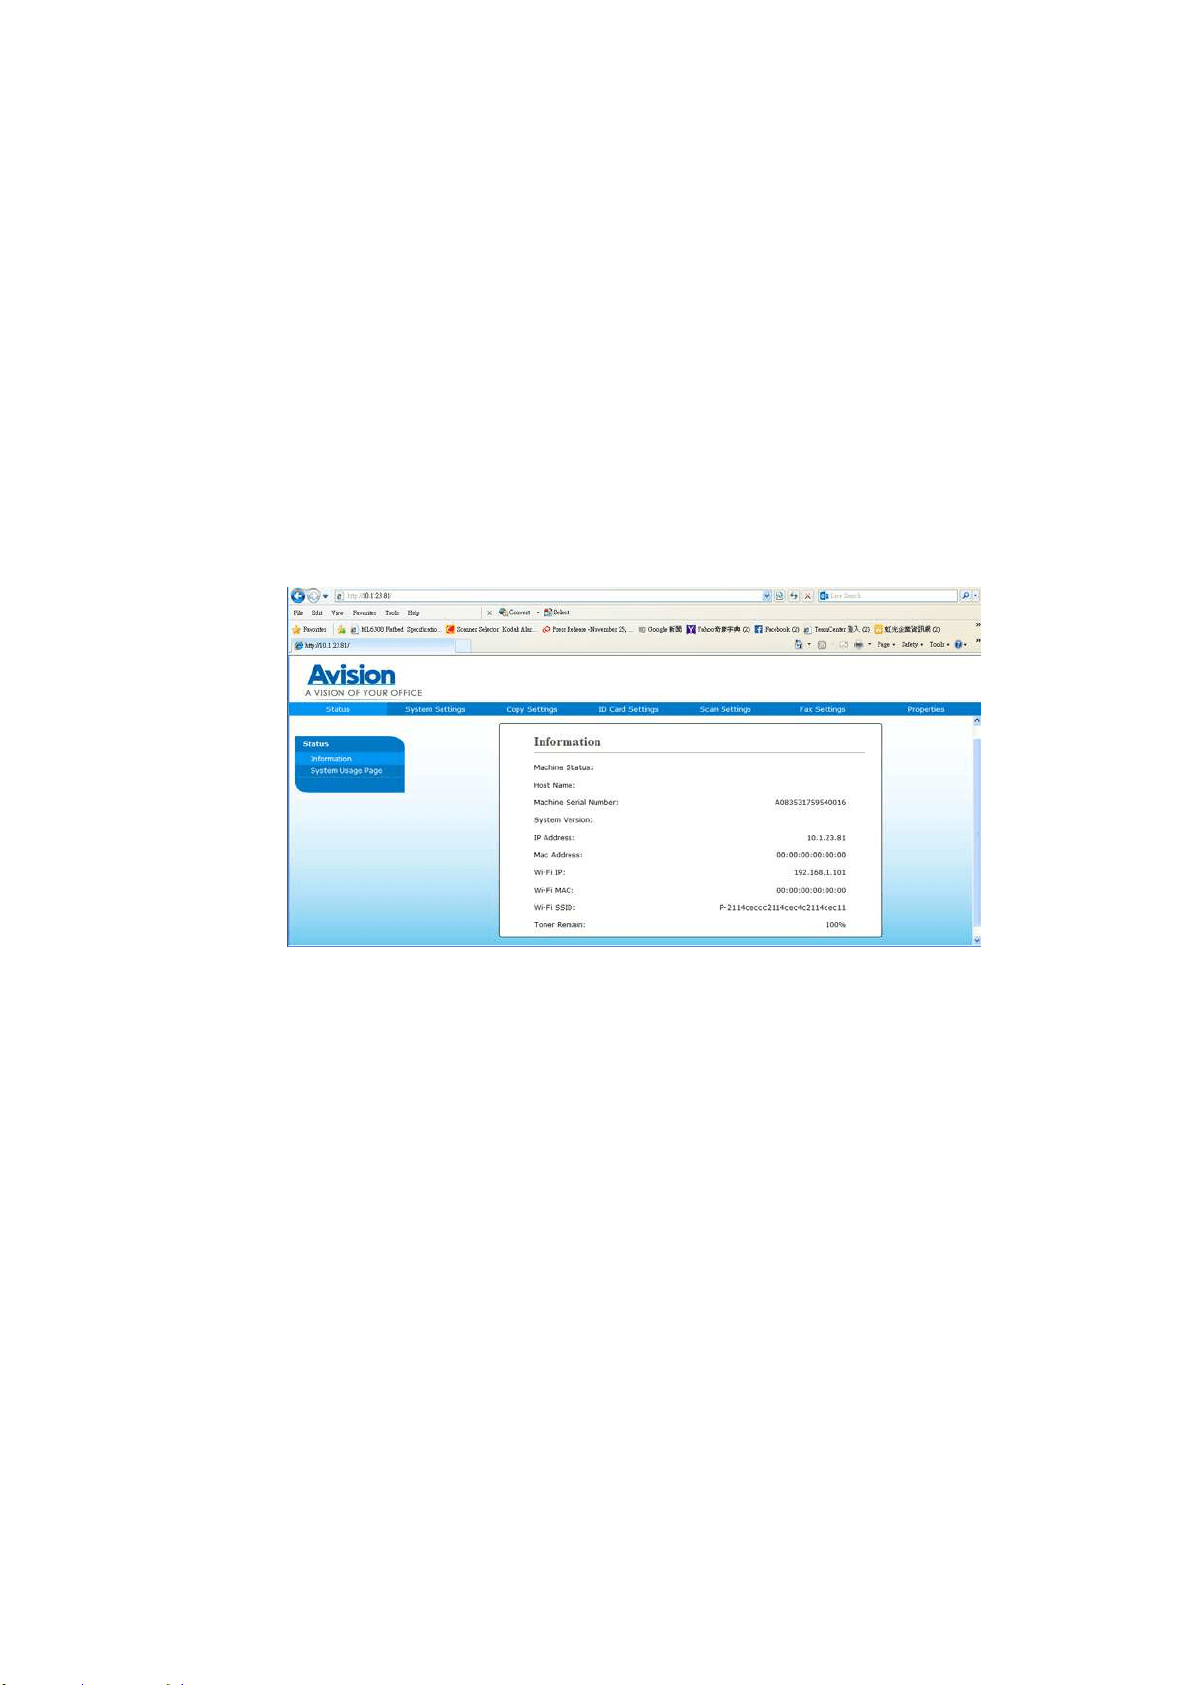
94
Updat ing The Product ’s Firm w ar e
Before updat ing the product ’s firm ware, you need to first download t he latest
firm ware from our w eb site at www.avision.com onto your com puter.
To update t he product’s firm ware, follow t hese steps:
1 . Refer t o t he preceding sect ion, Know ing t he Pr oduct ’s Defa ult I P
Address, t o get t he product ’s I P address from t he DHCP server.
2 . Open your browser.
3 . Type the product ’s I P address on t he URL field of your browser. For exam ple,
10.1.20.25. The following em bedded web page will be displayed
4 . On t he product’s web page, choose [ Proper t ies] and t hen choose [ FW
Updat e] on t he left side. The [ FW Upda t e] page will be displayed.
5 . Choose [ Brow se ] to find t he firm ware file on your com put er.
6 . Choose [ Upda t e ] t o begin updating t he firm ware to t he product.
Ready
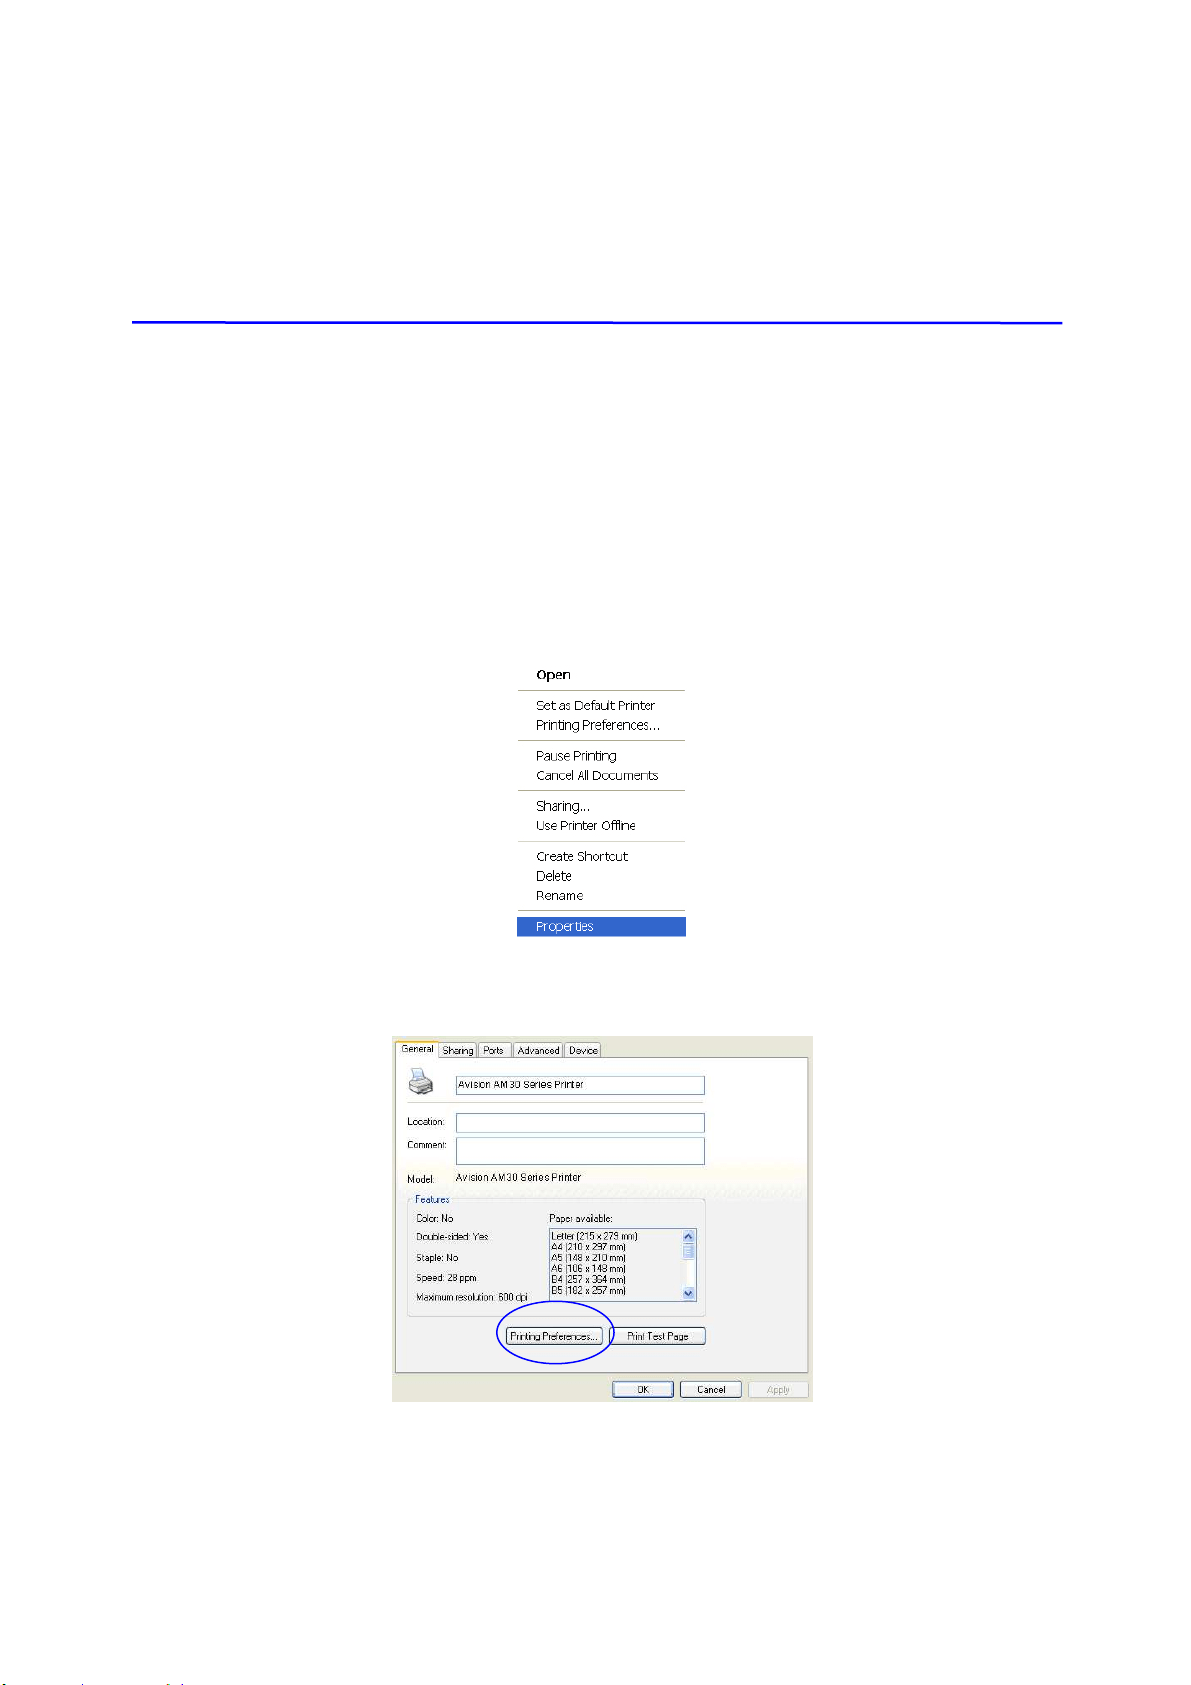
9
5
6 . Configuring the Print er
Driver
Displaying t he Print er Driver Propert ies
Dialog Box ( W indow s)
To display the Print er Driver Proper t ies dialog box,
1 . Click St ar t on t he syst em t ray and choose Print ers and Fax e s.
2 . Right - click the product ’s printer nam e and choose Prope r t ies.
3 . The product ’s Print er Properties dialog box appears.
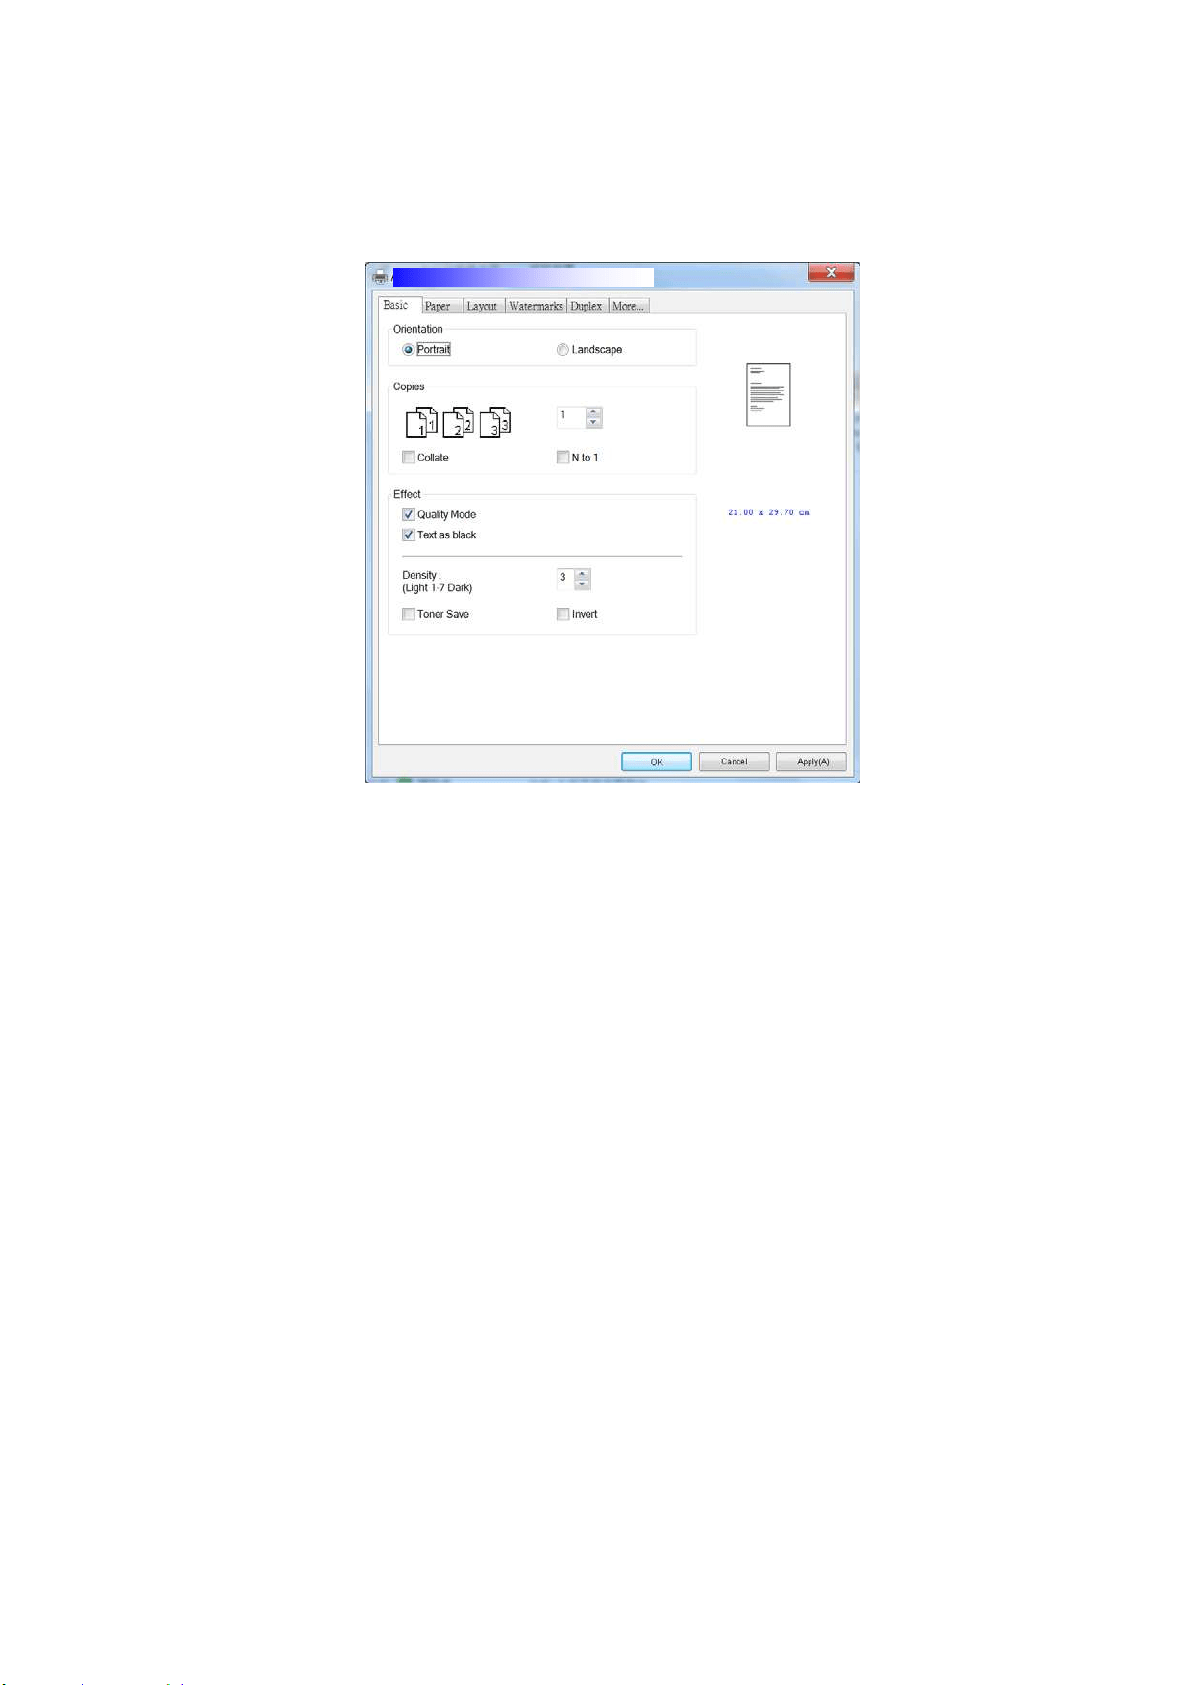
96
4 . Click Printing Prefe r e n ces t o prom pt t he following Print ing Preferences
dialog box.
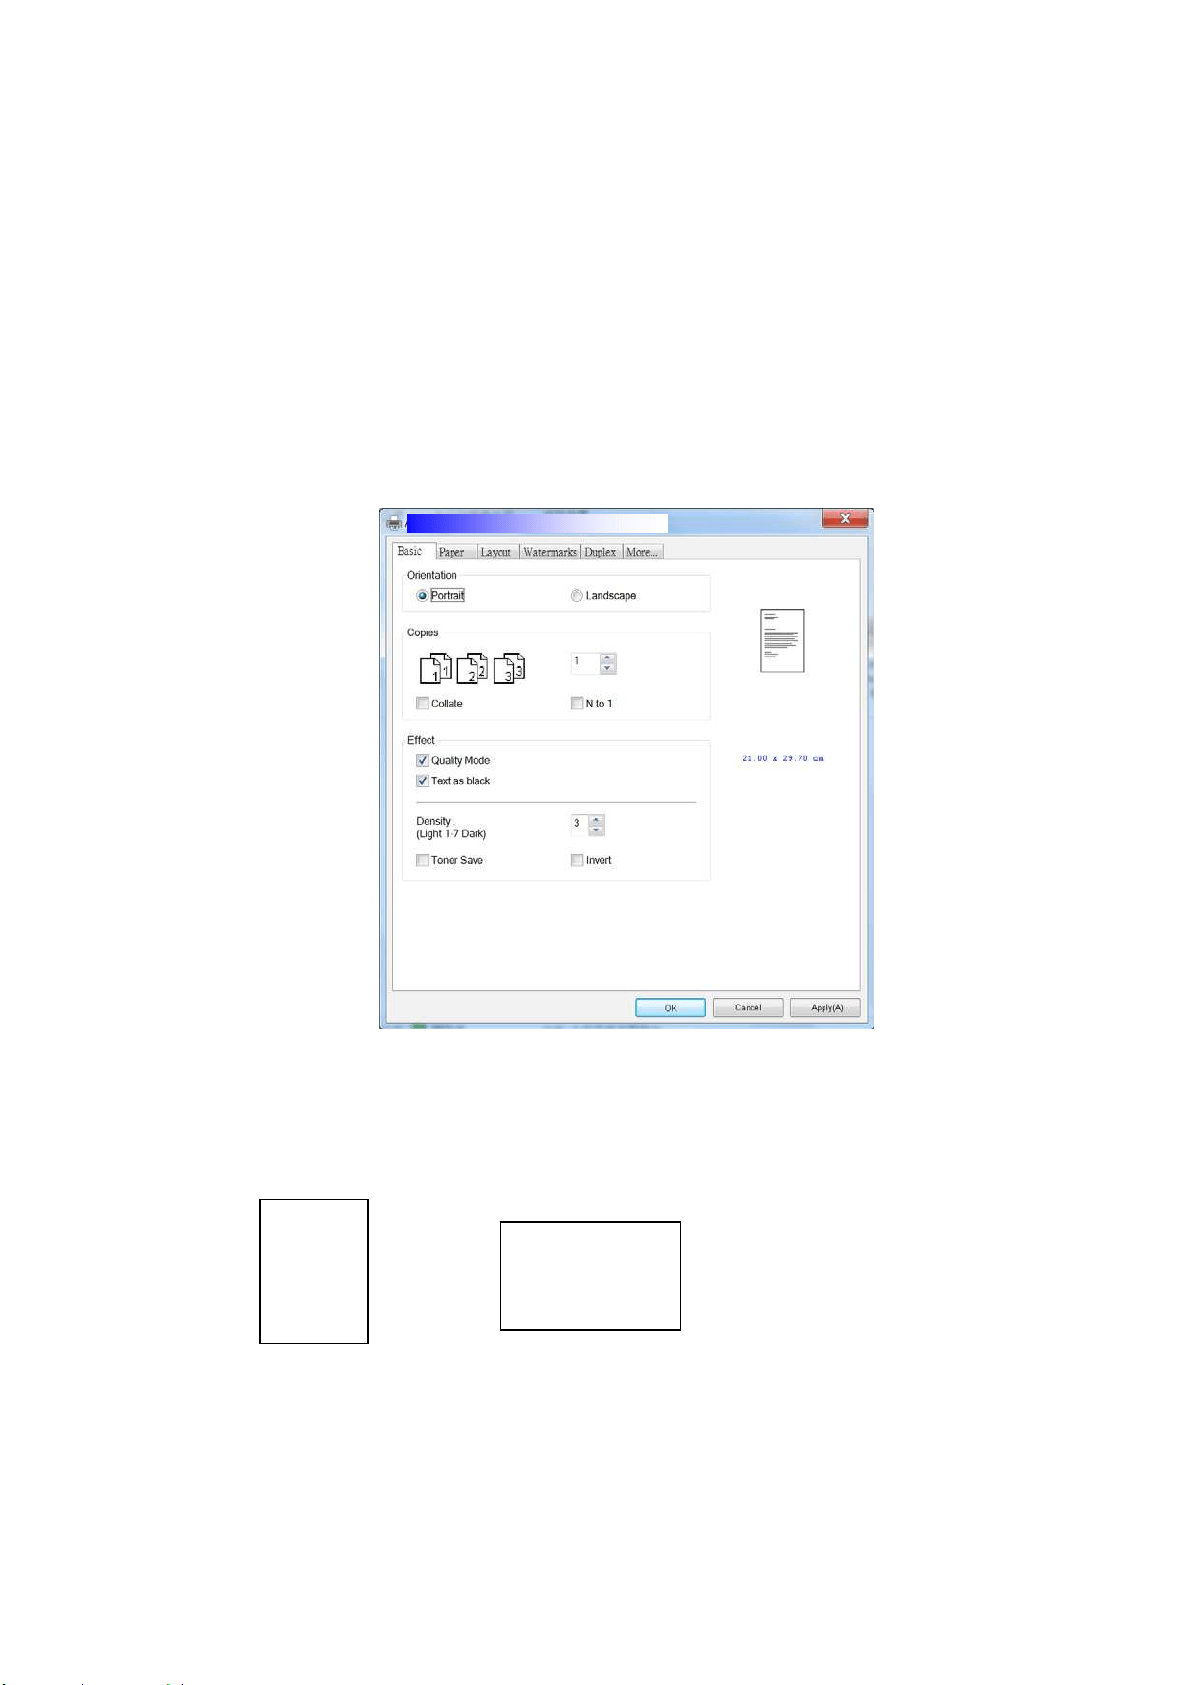
9
7
Configuring Print er Driver Set t ings
The Printing Preferences dialog box consist s of t he Basic tab, t he Paper tab, t he
Layout t ab, t he Wat erm ark t ab, the Duplex tab, and t he More t ab. The cont ent s
of each t ab will be explained in t he following sections.
The Ba sic Tab
The Basic tab cont ains sett ings for Orient at ion, Copies, Effect , Densit y, Toner Save,
and I nvert .
Orient a tion
Choose your orient at ion. Choice: Por t r a it, Landscape
Portr a it
Landscape
ABC
ABC
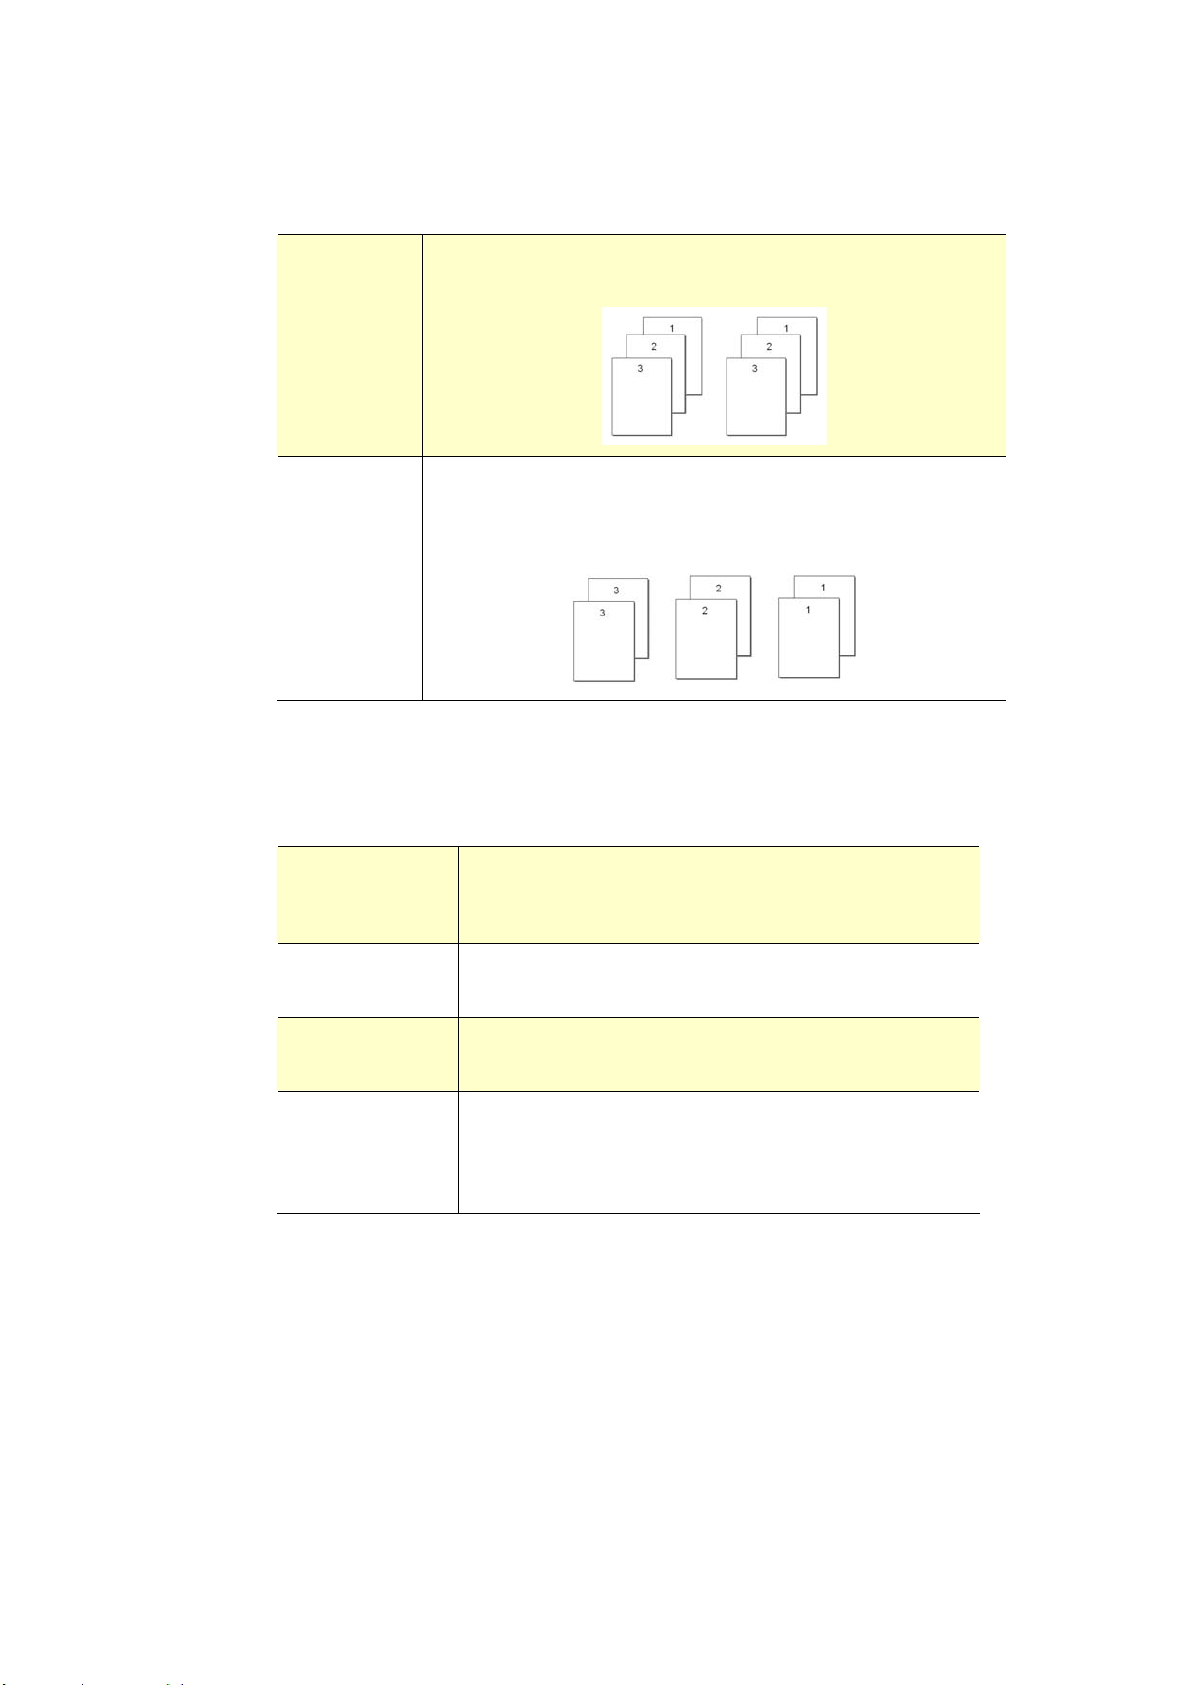
98
Copie s
Choose t he num ber of copies t o be printed. You can enter up to 999.
Collat ed: Click t o print your docum ent in t he page order such as
1/ 2/ 3, 1/ 2/ 3, 1/ 2/ 3.
N t o 1 : Click t o reverse t he print ing order of your docum ent .
As a result , t he last page of your docum ent will be
printed first and vice versa.
Effect
Qua lit y M ode : I f t he pict ure in your docum ent does not print
clearly, click Qualit y M ode t o im prove its
quality.
Densit y: Click t o light en or darken your docum ent .
Densit y level ( 1~ 7) . Default: 3
Tone r Save : Allows you t o print your docum ent using t he
toner saving m ode.
I nvert : I nvert m akes each im age pixel invert ed to its
com plem ent ary color. For exam ple: t he original
black t ext on white background becom es white
text on black background.
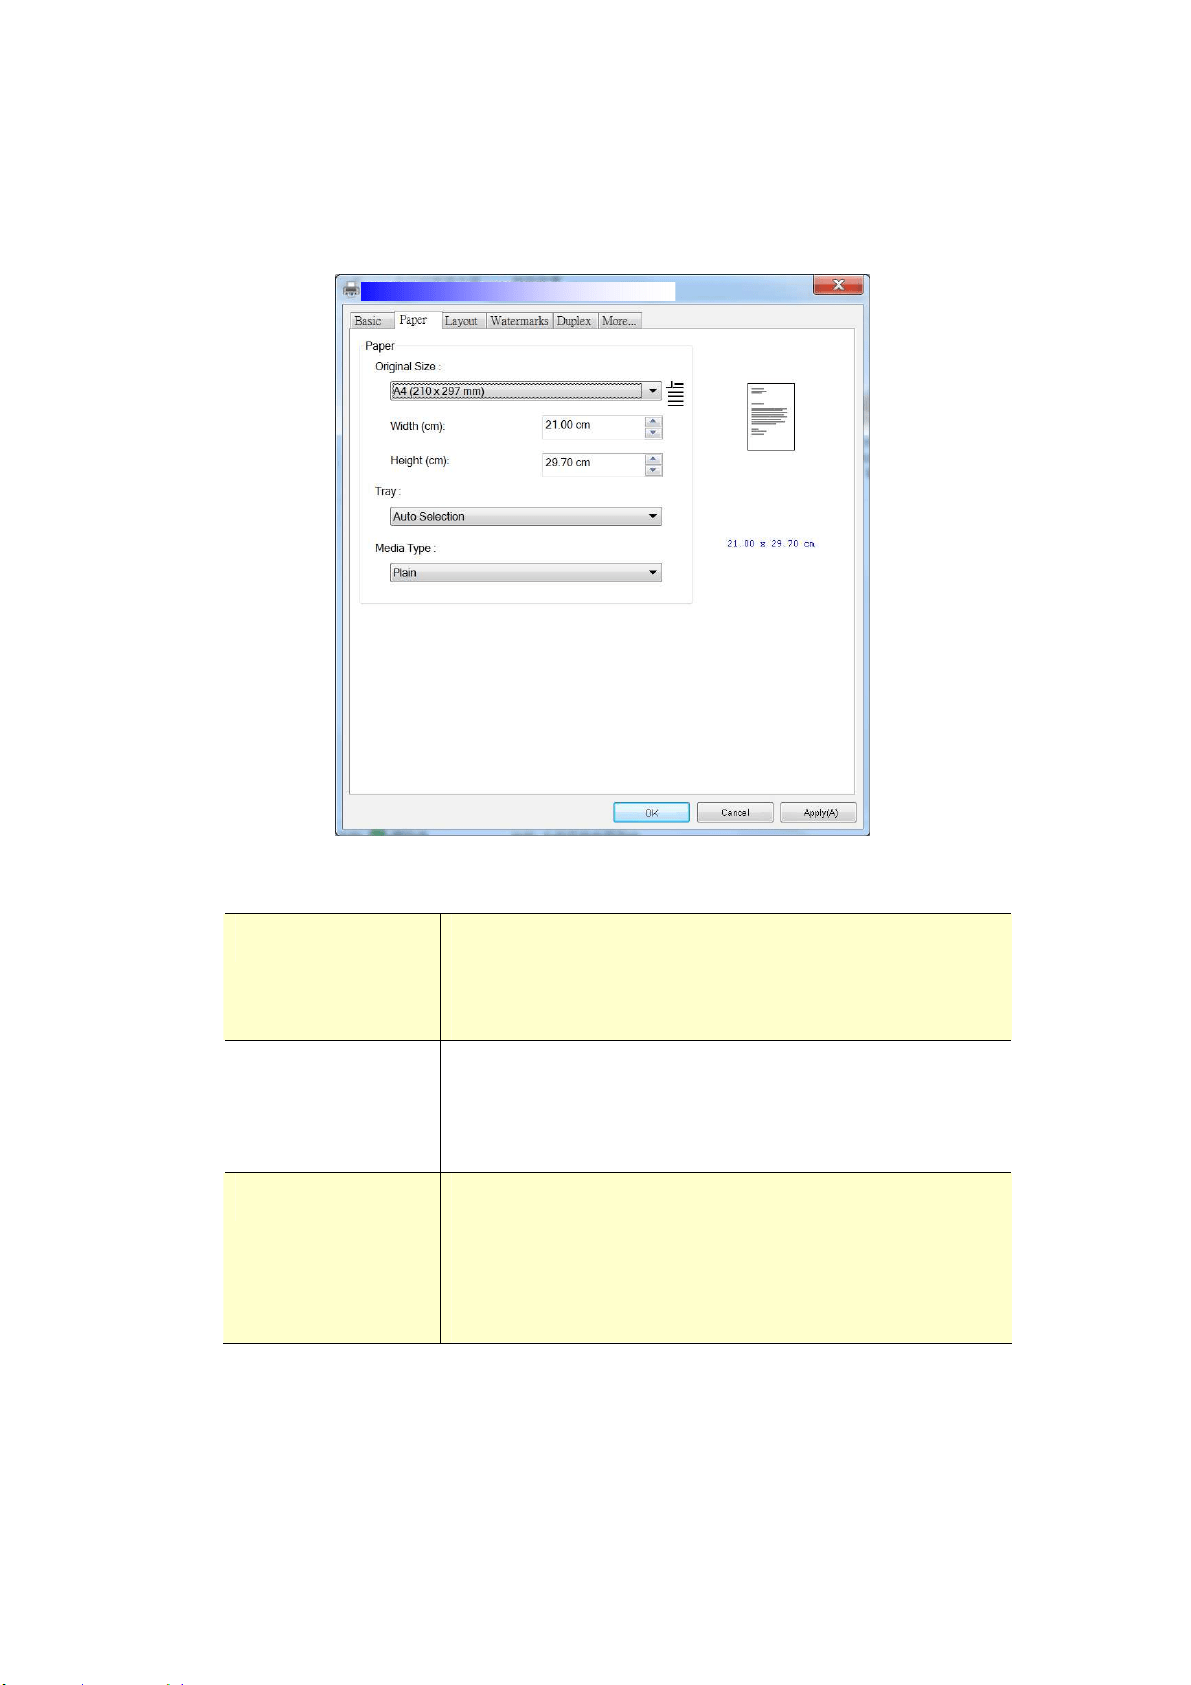
99
The Paper Tab
The Paper t ab cont ains sett ings for Original Size, Tray, and Media Type.
Paper
Origina l Size : Choose t he size of paper loaded in the designated
tray.
Choice: A4 , A5 , A6 , B5 , B6 , Lega l, Let t er, Use r
Define
Tray: Choose the t ray from which your paper should be fed.
Choice: Aut o, Manual Tr a y, Main Tray
Aut o m eans aut om atically select the paper t ray which
is available ( priorit y: 1: m anual t ray; 2: m ain tray) .
Media Type: Choose t he type of m edia t o be used for print ing.
Choice: Pla in Pa pe r , Thin Pa pe r, Thick Pa pe r ,
Lase r Pa per, * Postcard, * Bond, * Envelope
* : Only availa ble in t he m anual t ra y for one - side
print ing
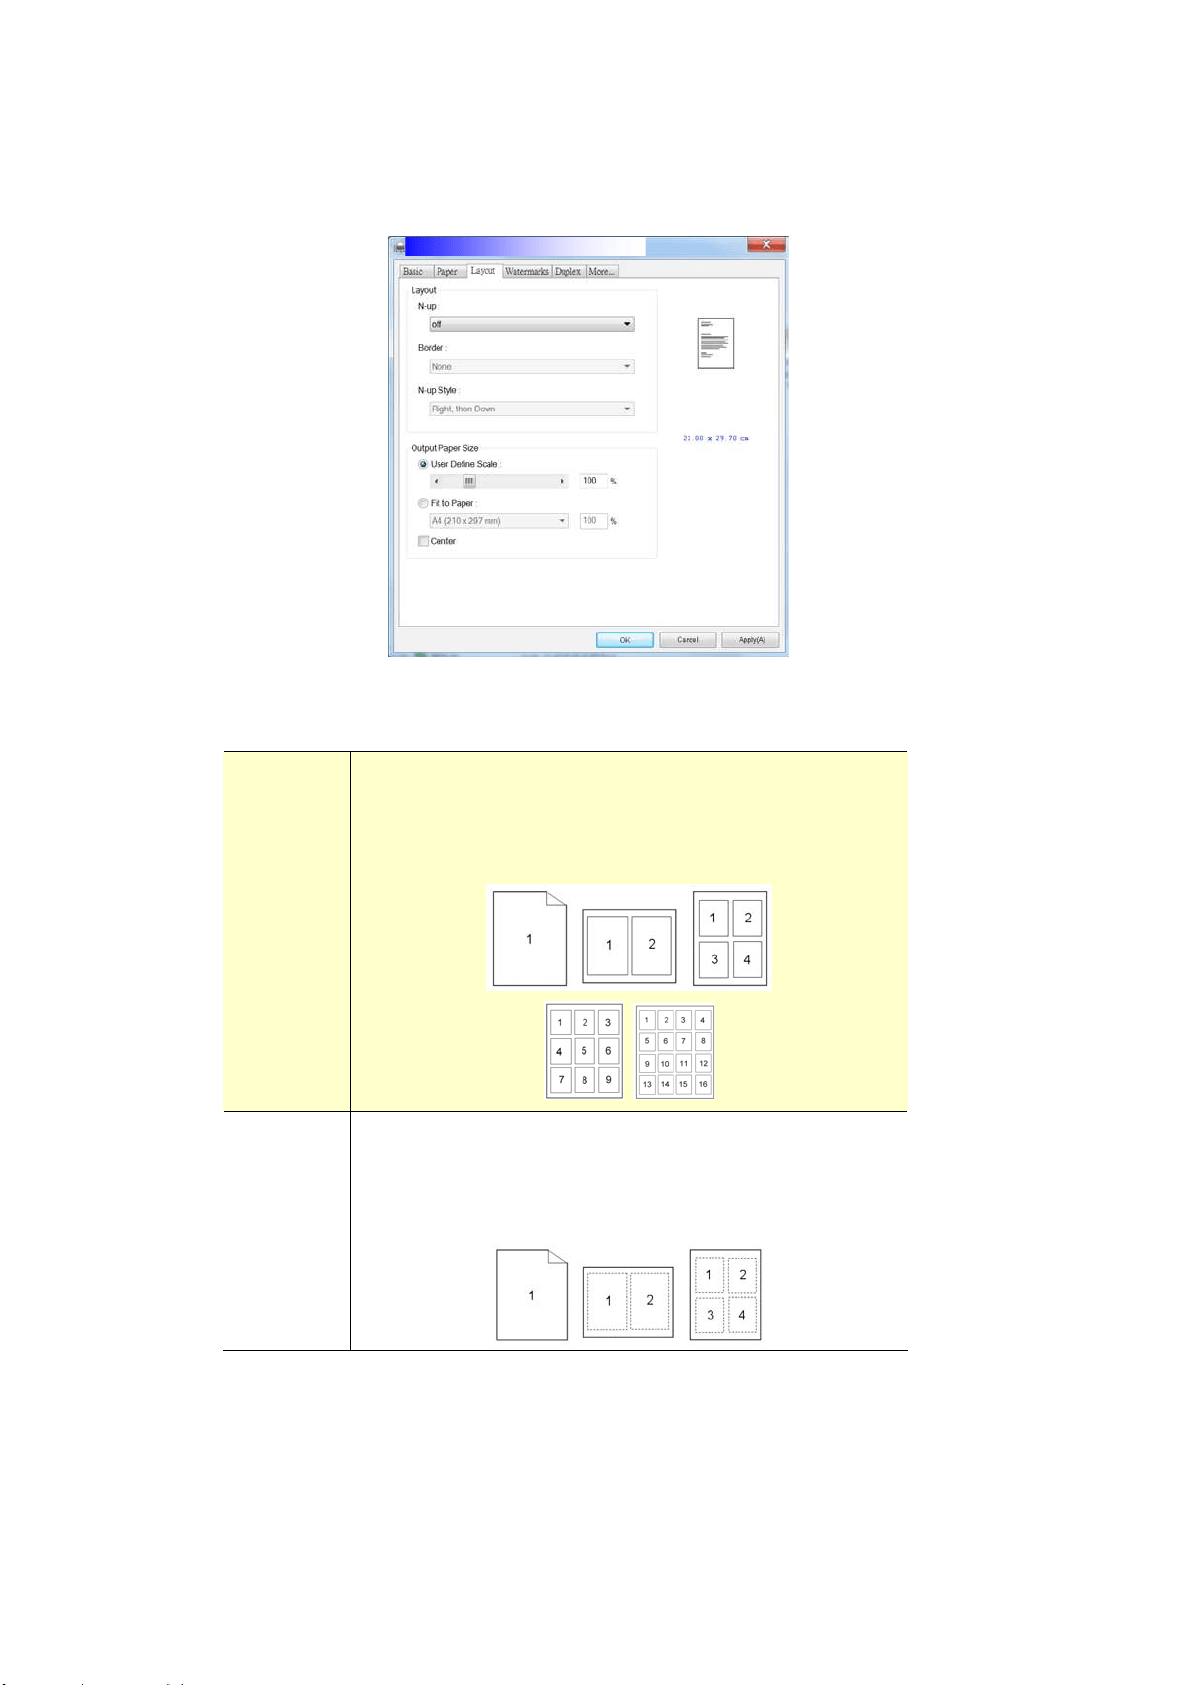
10
0
The Layout Ta b
The Layout t ab cont ains set tings for N-up, and Out put Paper Size.
N - up
N - up: Choose num ber of pages t o be printed on a single
sheet of paper.
Choice: Off, 2 up( 2 - in- 1 ) , 4 - up( 4 - in- 1 ) ,
9 - up( 9 - in- 1 ) , 1 6 - up( 1 6 - in- 1 )
Borde r : Choose if you wish t o add border around each page
when print ing m ore t han one page on a single sheet
of paper.
Choice: N one, Border Line , D ashed Line
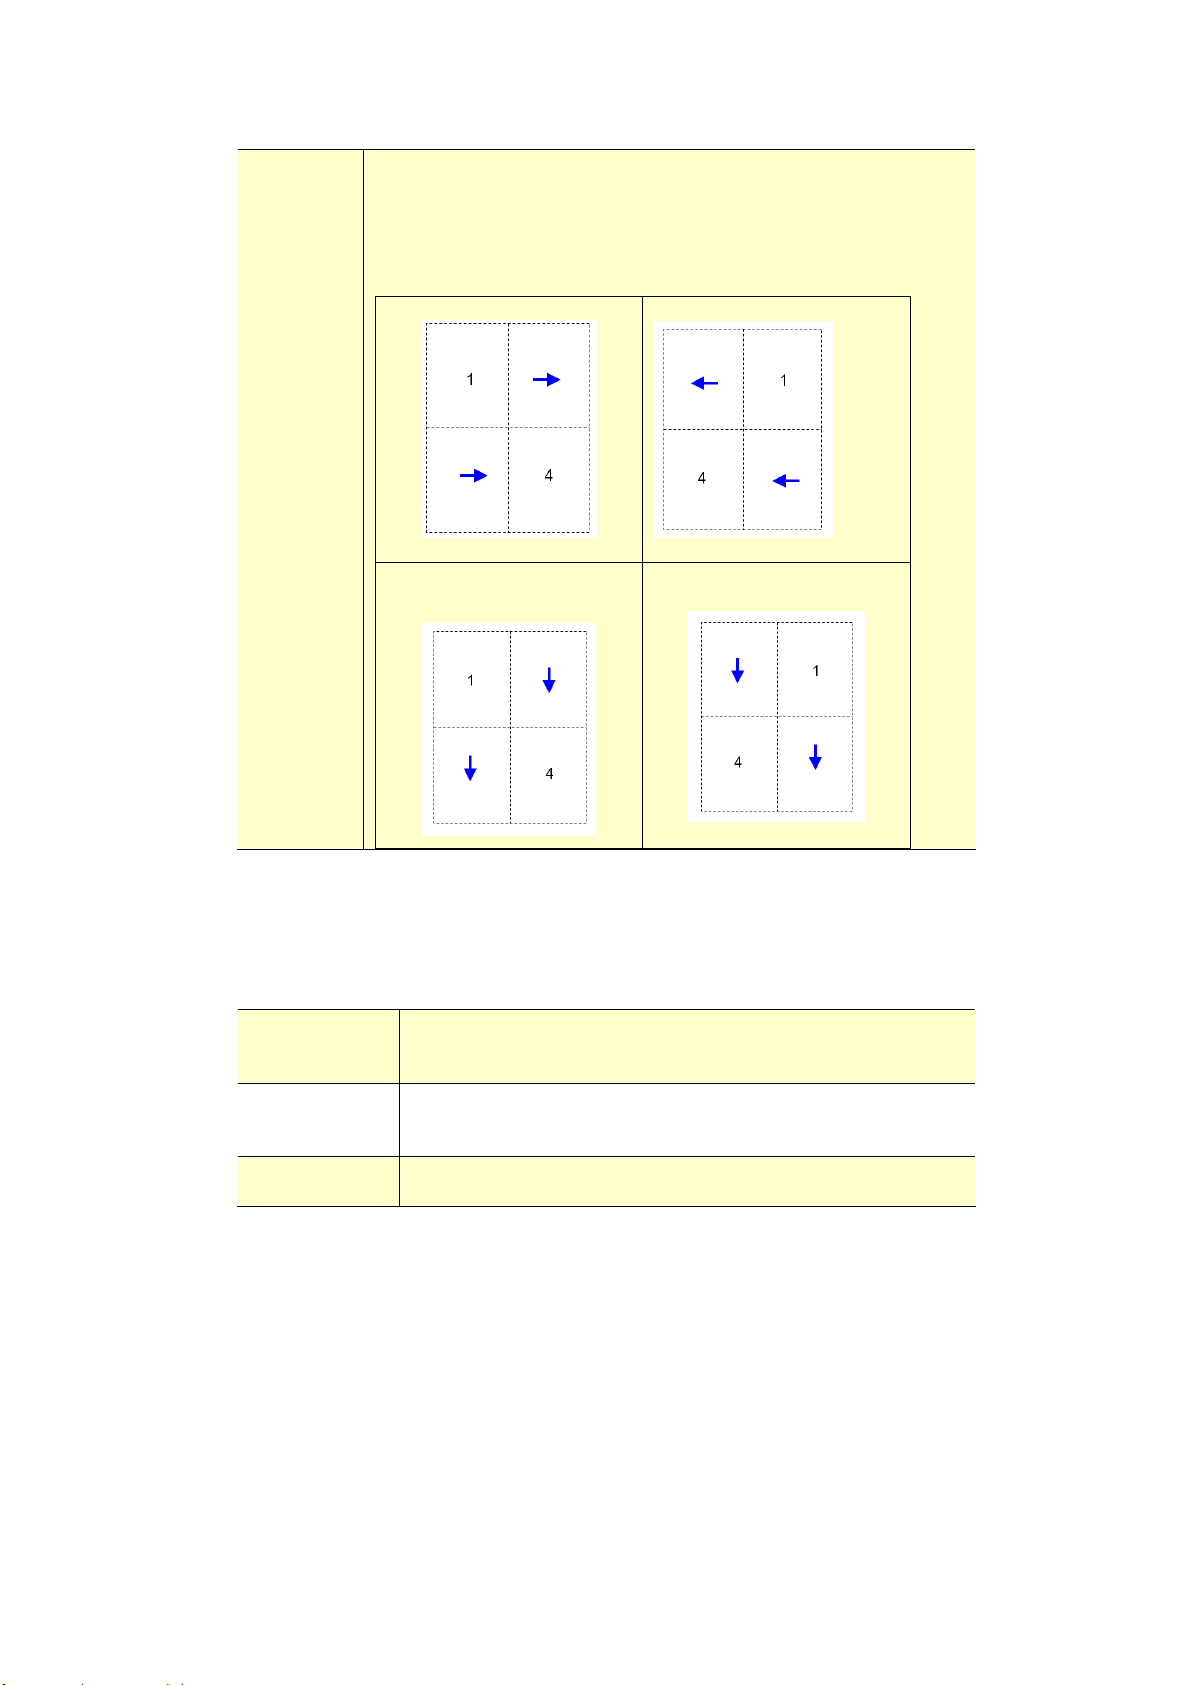
101
N - up
St yle:
Choose the style you want when print ing m ult i- page
docum ent on a single sheet.
Choice: Right , t hen Dow n/ Dow n, t hen Right / Le ft ,
t he n Dow n/ Dow n, t he n Left
Right , t hen Down
Down, t hen Left
Down, t hen Right
Left, t hen Down
Out put Paper Size
User Define
Scale
You can reduce or enlarge your printed im age using
the Slider Bar. Sca ling rat e: 2 5 % ~ 4 0 0 %
Fit t o Paper Out put t he full page of t he selected original including
the four m argins.
Cent e r Print your im age in t he cent er of t he out put paper.
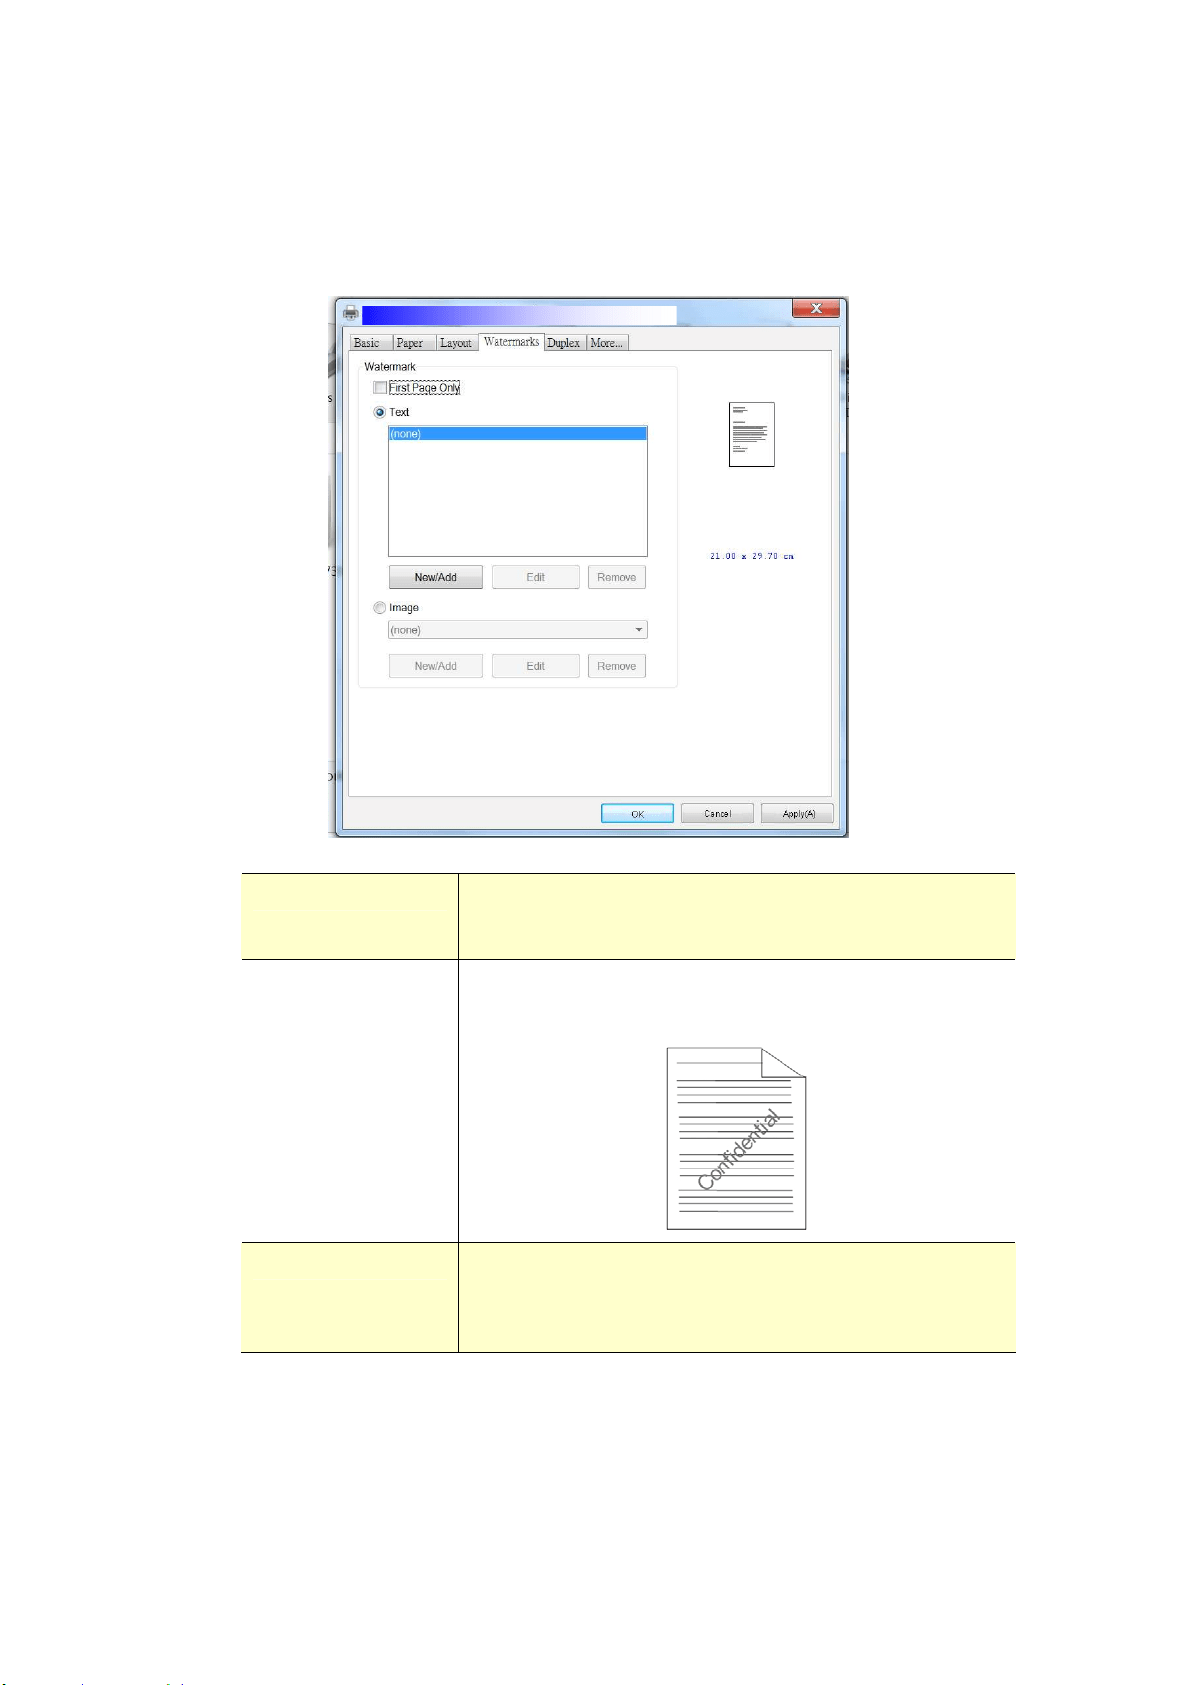
10
2
The W a term ark Tab
The Wat erm ark tab allows you t o add som e t ext or im age ( such as
CONFI DENTI AL, I MPORTANT, DRAFT, etc) for your docum ent .
Fir st Pa ge only Check t o print waterm ark only on t he first page.
Clear t he check box will print wat erm ark on all
pages.
Text Choose and click N ew / Add t o add new wat erm ark
text. Click t he Edit butt on to change or t he
Rem ove but ton t o delet e.
I m age Choose and click New/ Add t o add waterm ark im age.
Click t he Edit butt on to change or t he Rem ove
but t on t o delet e. You can choose your im age in file
form at such as BMP, TI FF, or JPEG.
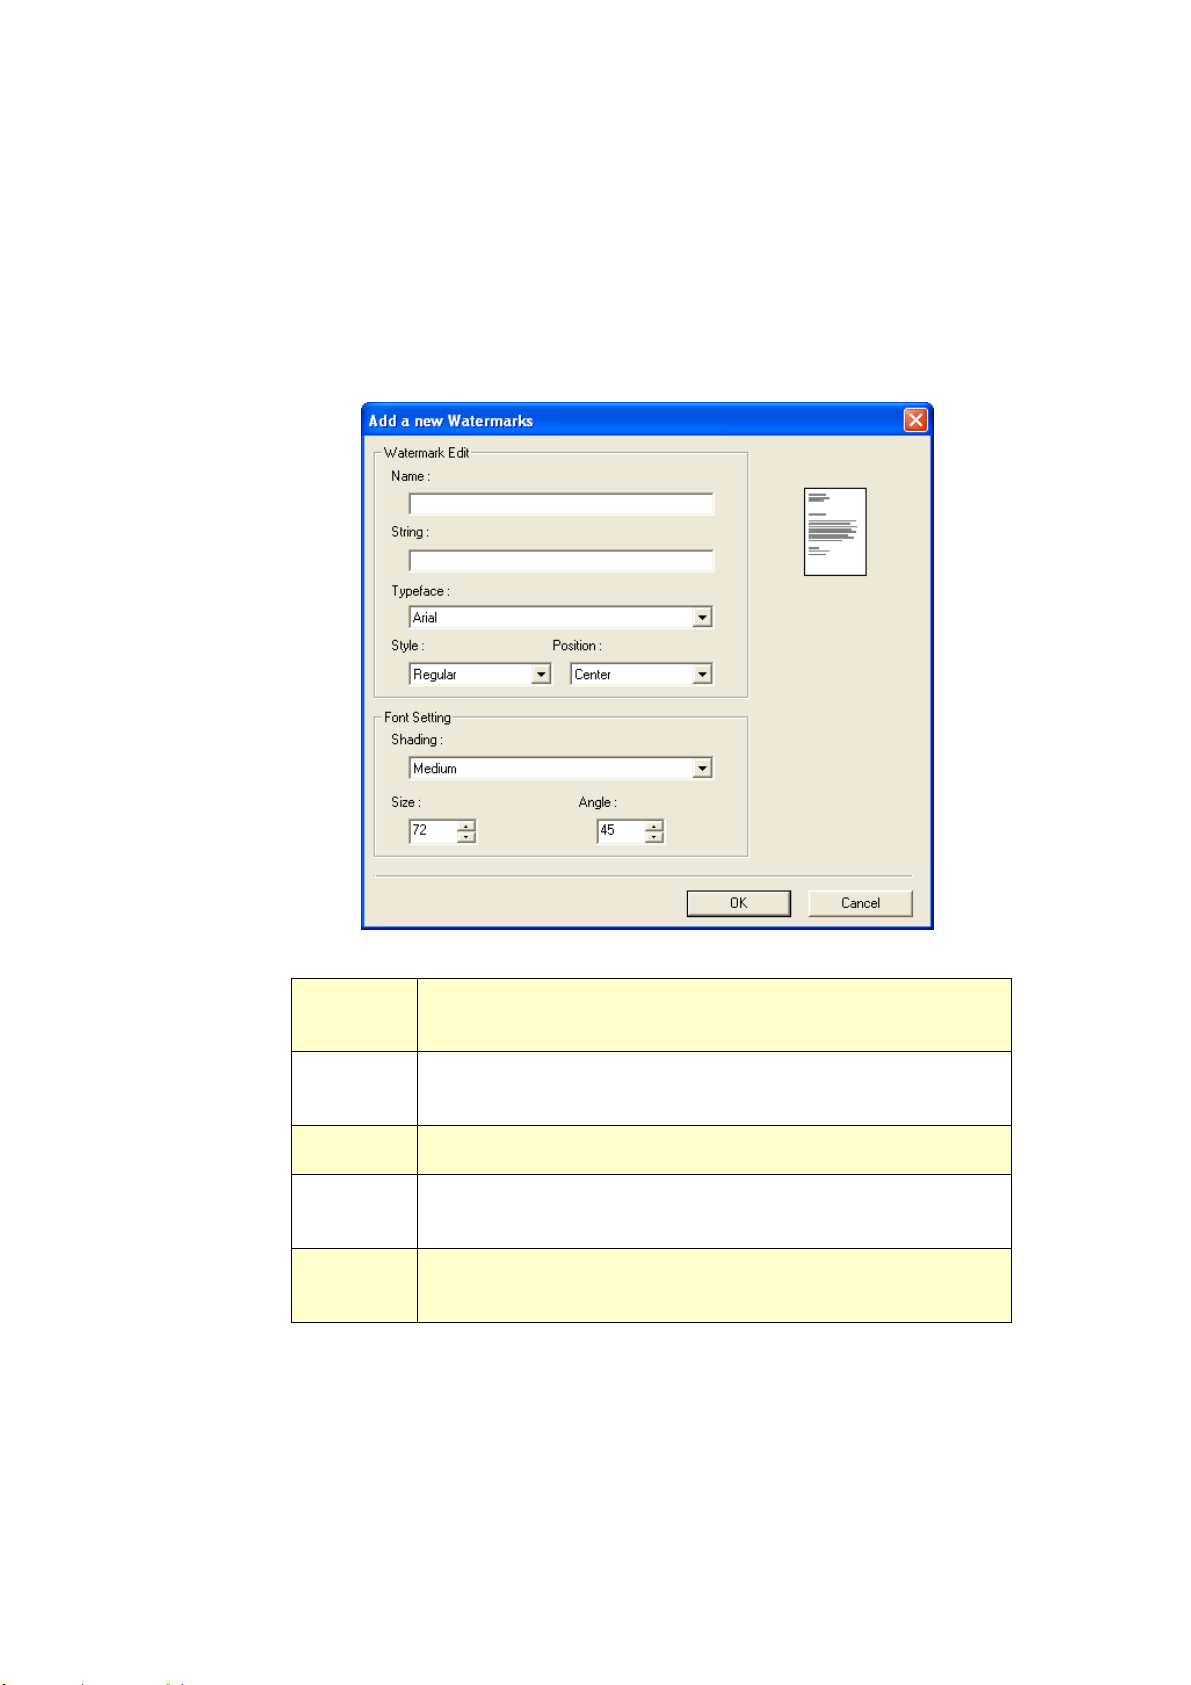
103
Adding a ne w w a t e rm ark t ex t
To add a
new wat erm ark text,
1 . Choose Text and t hen click t he Add/ New butt on. The following Wat erm ark
dialog box appears.
N a m e Nam e your waterm ark t ext . This nam e w ill be shown in
the Wat erm ark t ext list.
St r ing Ent er your wat erm ark text, such as confident ial,
im port ant, and so on.
Typefa ce Choose your font t ype for your wat erm ark text.
St yle Choose the st yle of your wat erm ark text. Choice:
Re gula r, Bold, I ta lic, Bold I talic.
Posit ion Choose the position of your waterm ark t ext . Choice:
Cent e r , Tile.

104
Angle Specify the angle of the waterm ark t ext from 0° t o 360°
Size Specify t he size of your wat erm ark t ext from 1 to 288.
Sha ding Specify a relative density for the wat erm ark text.
Choice: Ligh t est , Light , M e dium , D ark , Dark e st.
2 . Click t he OK button to save t he set tings. I f the new wat erm ark text is
creat ed successfully, t he w at erm ark nam e will be shown in t he Text list .
Edit ing a cu r rent w a t er m a r k tex t
To edit a current wat er
m ark t ext,
1 . Choose the waterm ark nam e t hat you wish to edit from the Text list .
2 . Click t he Edit but t on. The Wat erm ark Edit dialog box appears.
3 . Change your set t ings for t he selected waterm ark t ext and choose OK to
com plet e.
Re m oving a cur rent w at erm ark te x t
To rem ove a current
waterm ark t ext ,
1 . Choose the waterm ark nam e that you wish to rem ove from t he Text list.
2 . Click t he Re m ove but t on. The w at erm ark t ext w ill be rem oved.
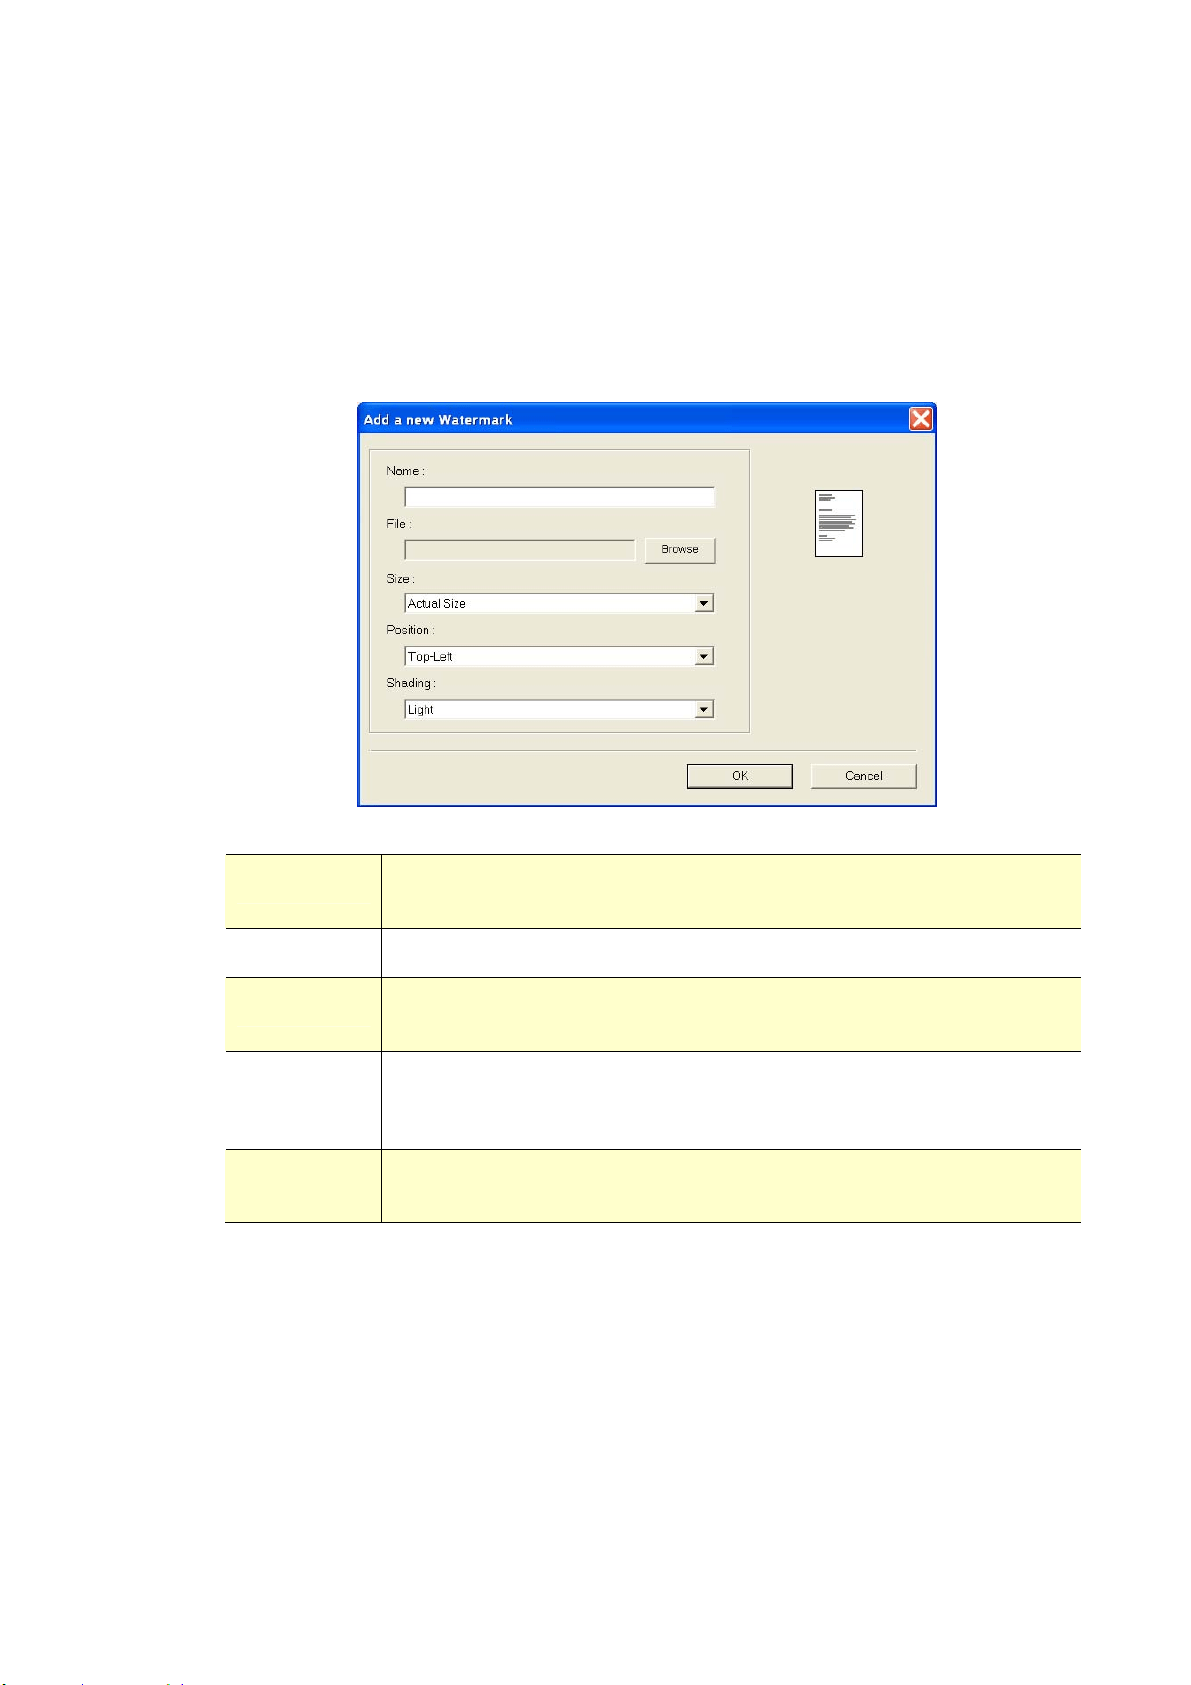
10
5
Adding a ne w w a t e rm ark im age
To add a
new wat erm ark im age,
1 . Choose I m age and then click the Add/ N e w but t on. The following
Wat erm ark dialog box appears.
N a m e Nam e your wat erm ark im age. This nam e w ill be shown in the
Wat erm ark im age list.
File Click t he Brow se butt on to locate your wat erm ark im age.
Size Spe cify the size of your w a t e rm ark im age . Choice: Actura l
Size , Fit to Pa ge , Tile.
Posit ion Choose the posit ion of your waterm ark im age. Choice: Top- Left,
Top- Ce nter, Top- Right , Ce nter , Cent er- Left , Cent er- Right ,
Bot t om - Cen t er , Bott om - Right , Bot t om - Left.
Sha ding Specify a relative density for the wat erm ark text. Choice :
Ligh t est , Ligh t , M e dium , D a rk, D a rke st .
2 . Click t he OK button to save t he set tings. I f t he new waterm ark im age is
creat ed successfully, t he w at erm ark nam e will be shown in t he I m age list.

10
6
Edit ing a cu r rent w a t er m a r k im a ge
To edit a current wat erm ark im age,
1 . Choose t he waterm ark nam e t hat you wish t o edit from t he I m age list .
2 . Click t he Edit but ton. The Wat erm ark Edit dialog box appears.
3 . Change your set t ings for t he selected wat erm ark im age and choose OK t o
com plet e.
Re m oving a cur rent w at erm ark I m age
To rem ove a current
waterm ark im age,
1 . Choose t he waterm ark nam e t hat you wish t o rem ove from t he I m age list .
2 . Click t he Rem ove but t on. The wat erm ark im age will be rem oved.
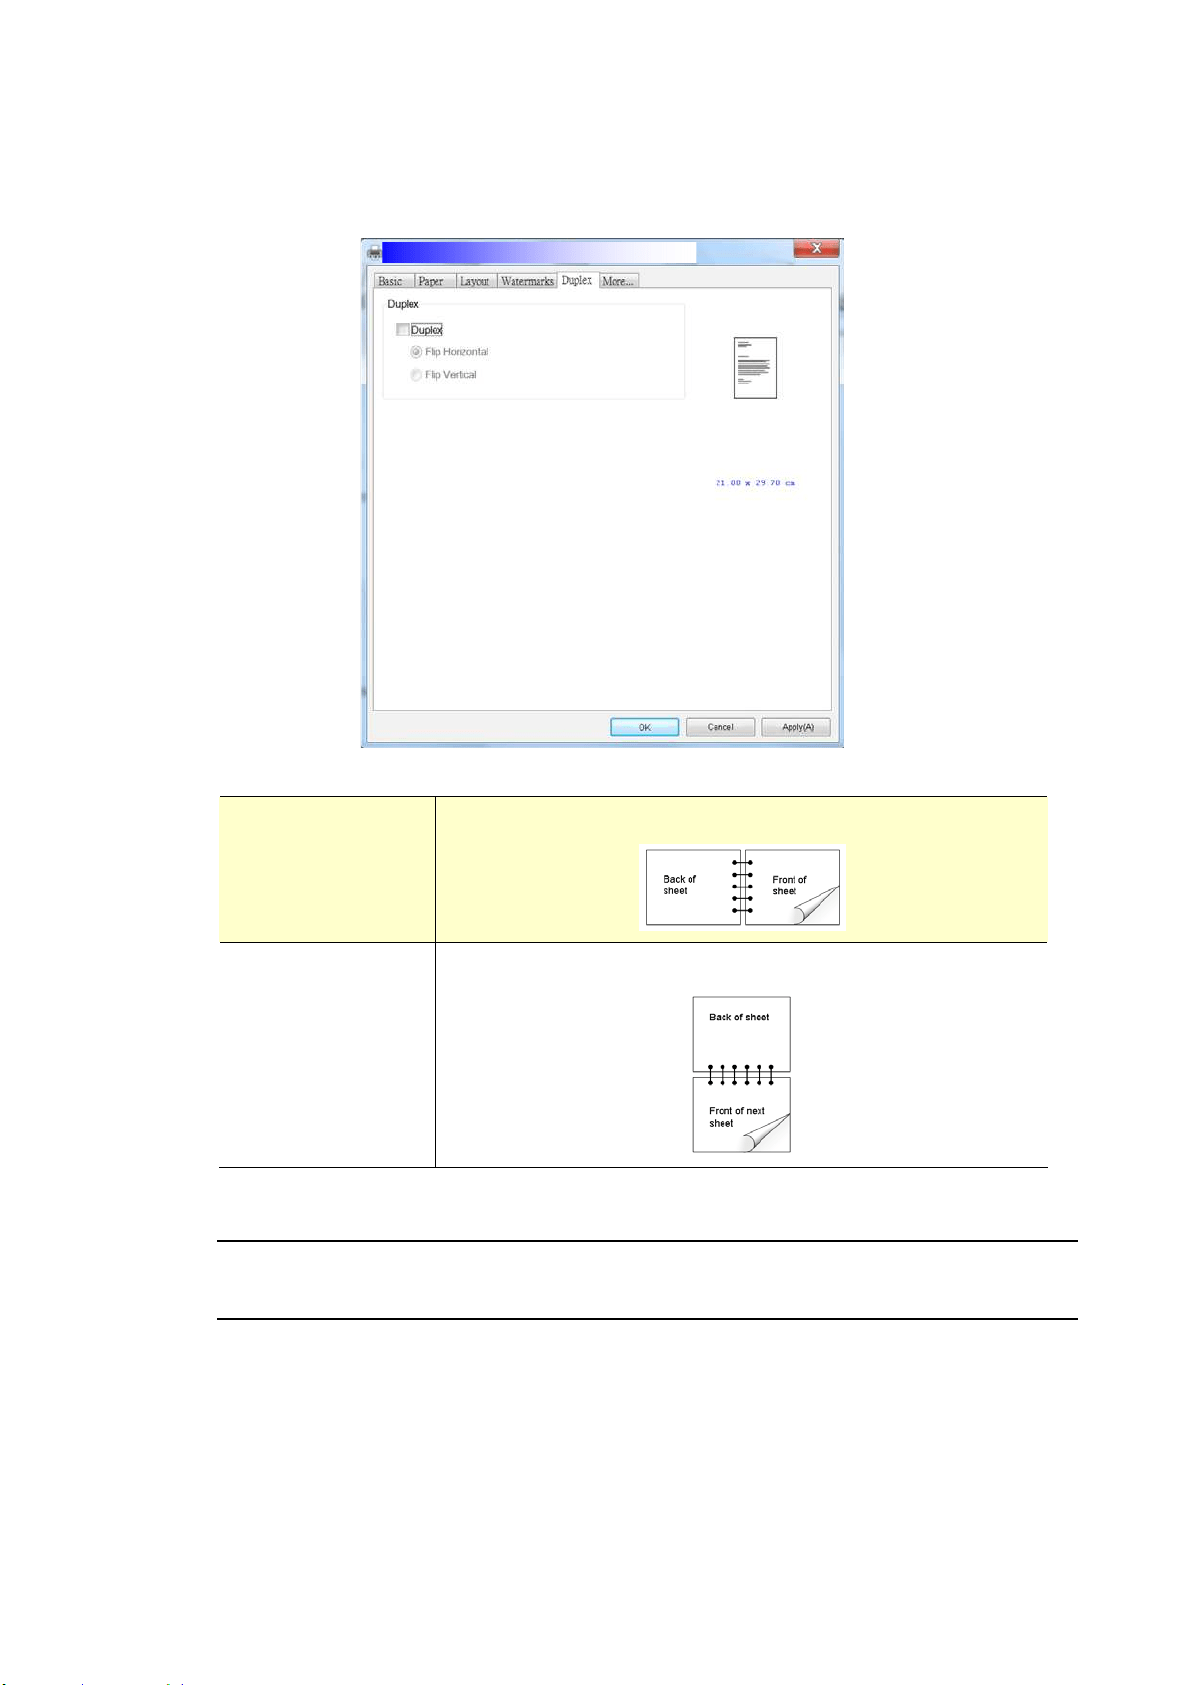
10
7
The Duplex Tab
The Duplex tab allows you to print your docum ent on two sides of t he paper.
Flip H orizont al Check t o flip the duplex docum ent on the left edge.
Flip Ver t ical Check t o flip t he duplex docum ent on the bot t om edge.
N ot e : The duplex feat ure support s only paper size of A4, B5, or let t er in the
paperweight of 60 ~ 105 g/ m
2
.
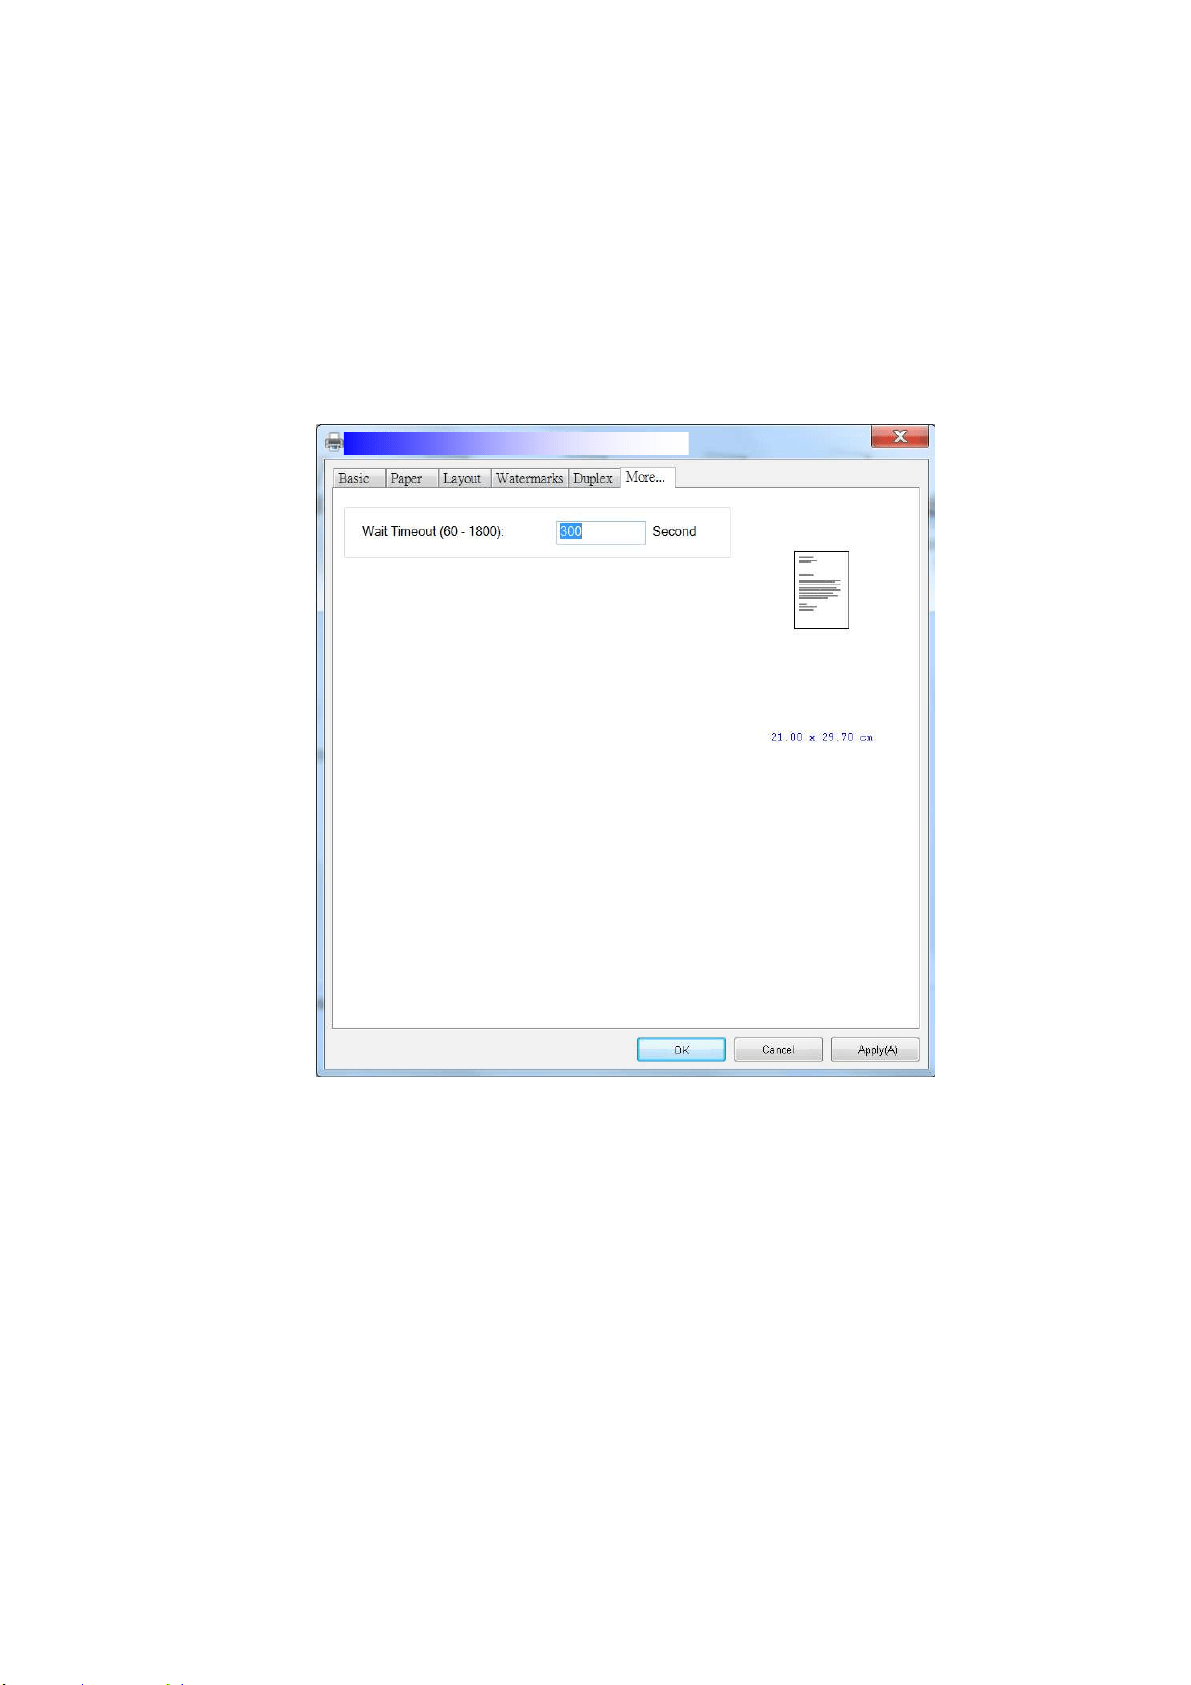
108
The More Ta b
On t he More t ab, a W a it Tim eout option is provided t o set t he am ount of t im e
the MFP waits for dat a t o com e from com put er during a job. I f t he data stream
pauses for longer than t he specified num ber of seconds, t he j ob is cancelled.
Perm itt ed tim eout values: 60~ 1800 seconds, default t im eout values: 300
seconds
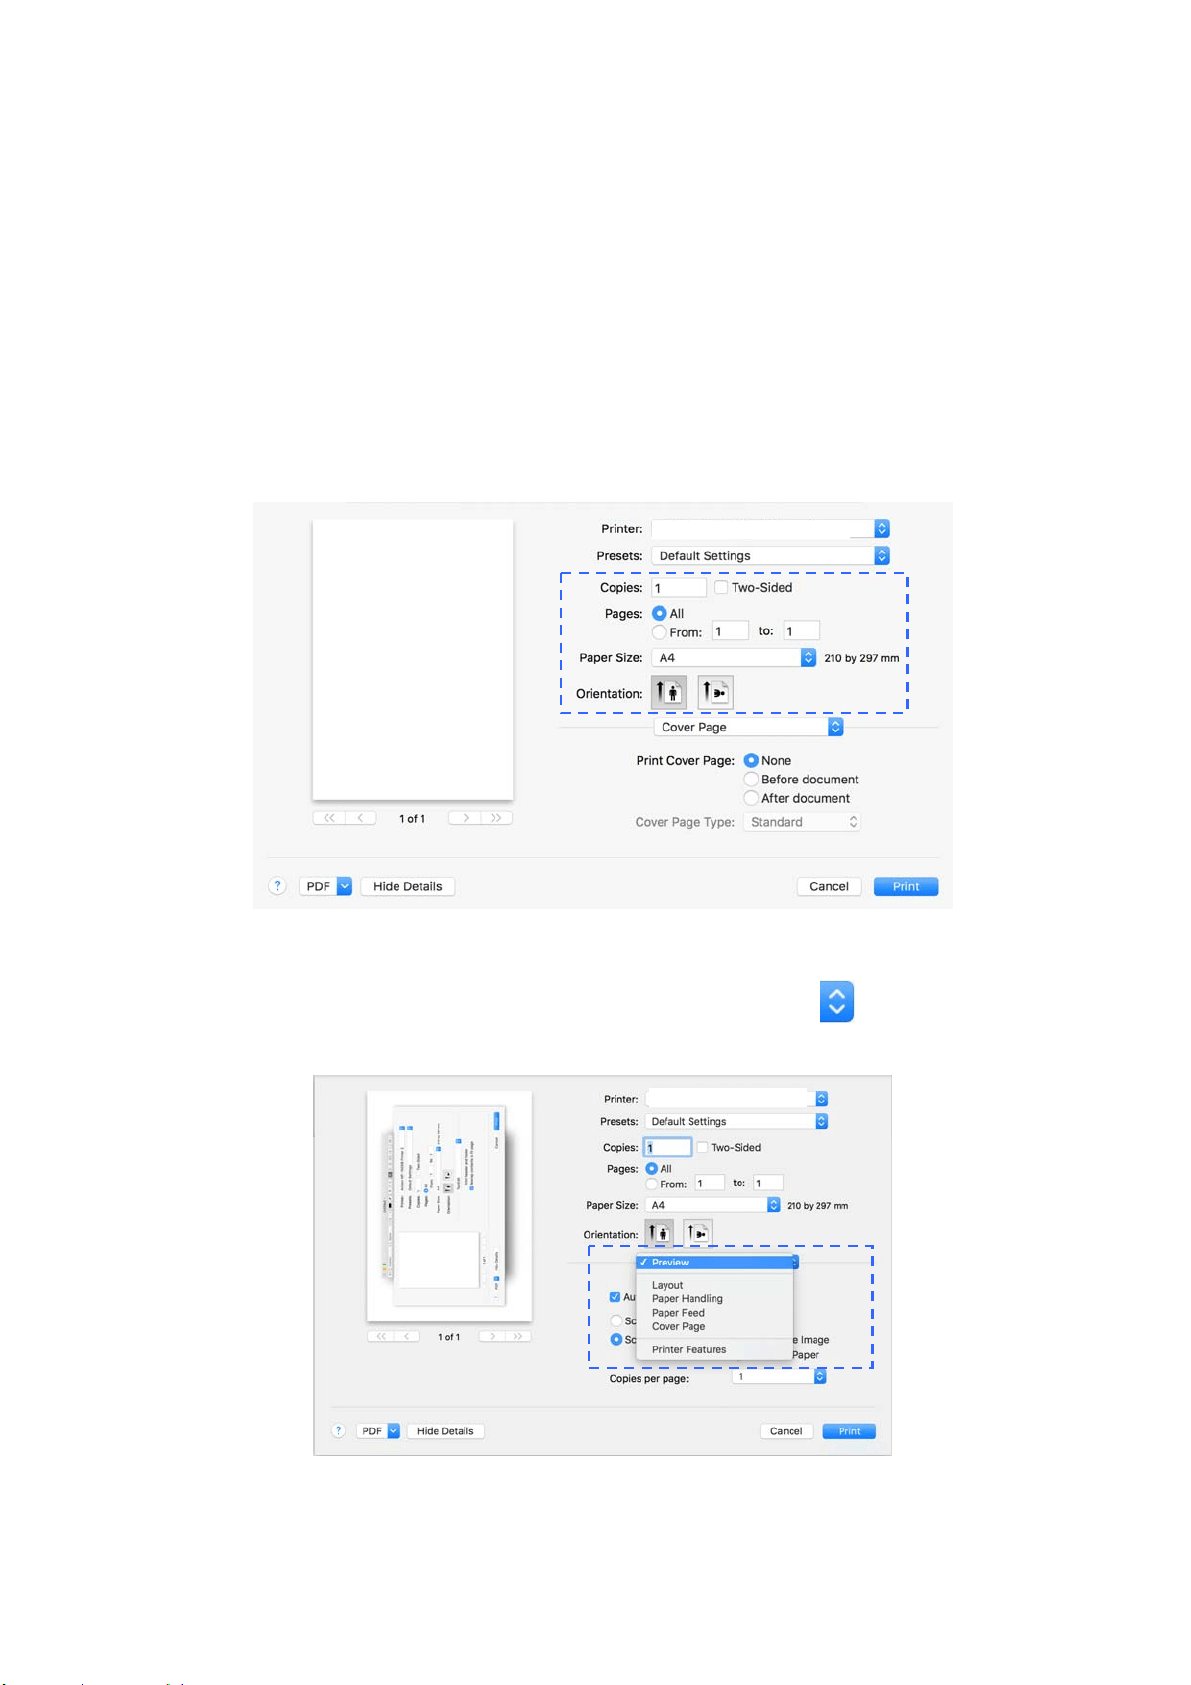
109
Acce ssing t he Fe a t ures of t he Pr int er Driver ( M a c OS)
The Avision AM30 Series Printer provides t he following print er feat ures. You can
change t he following printer settings when you print from your com puter.
Choosing Pa ge Set up Opt ions
Open your docum ent and then click File, t hen Pa ge. Make sure XXXX Printer
( where XXXX is your m odel nam e) is chosen in the Pr int er pop- up m enu. You can
change t he sett ings for Copie s, Tw o- Sided, Pape r Size, and Orienta t ion.
Choosing Pr int ing Opt ions
For m ore page setup options, click the disclosure arrow (
) on the printer
options.
AM30 Series Printer
AM30 Series Printer
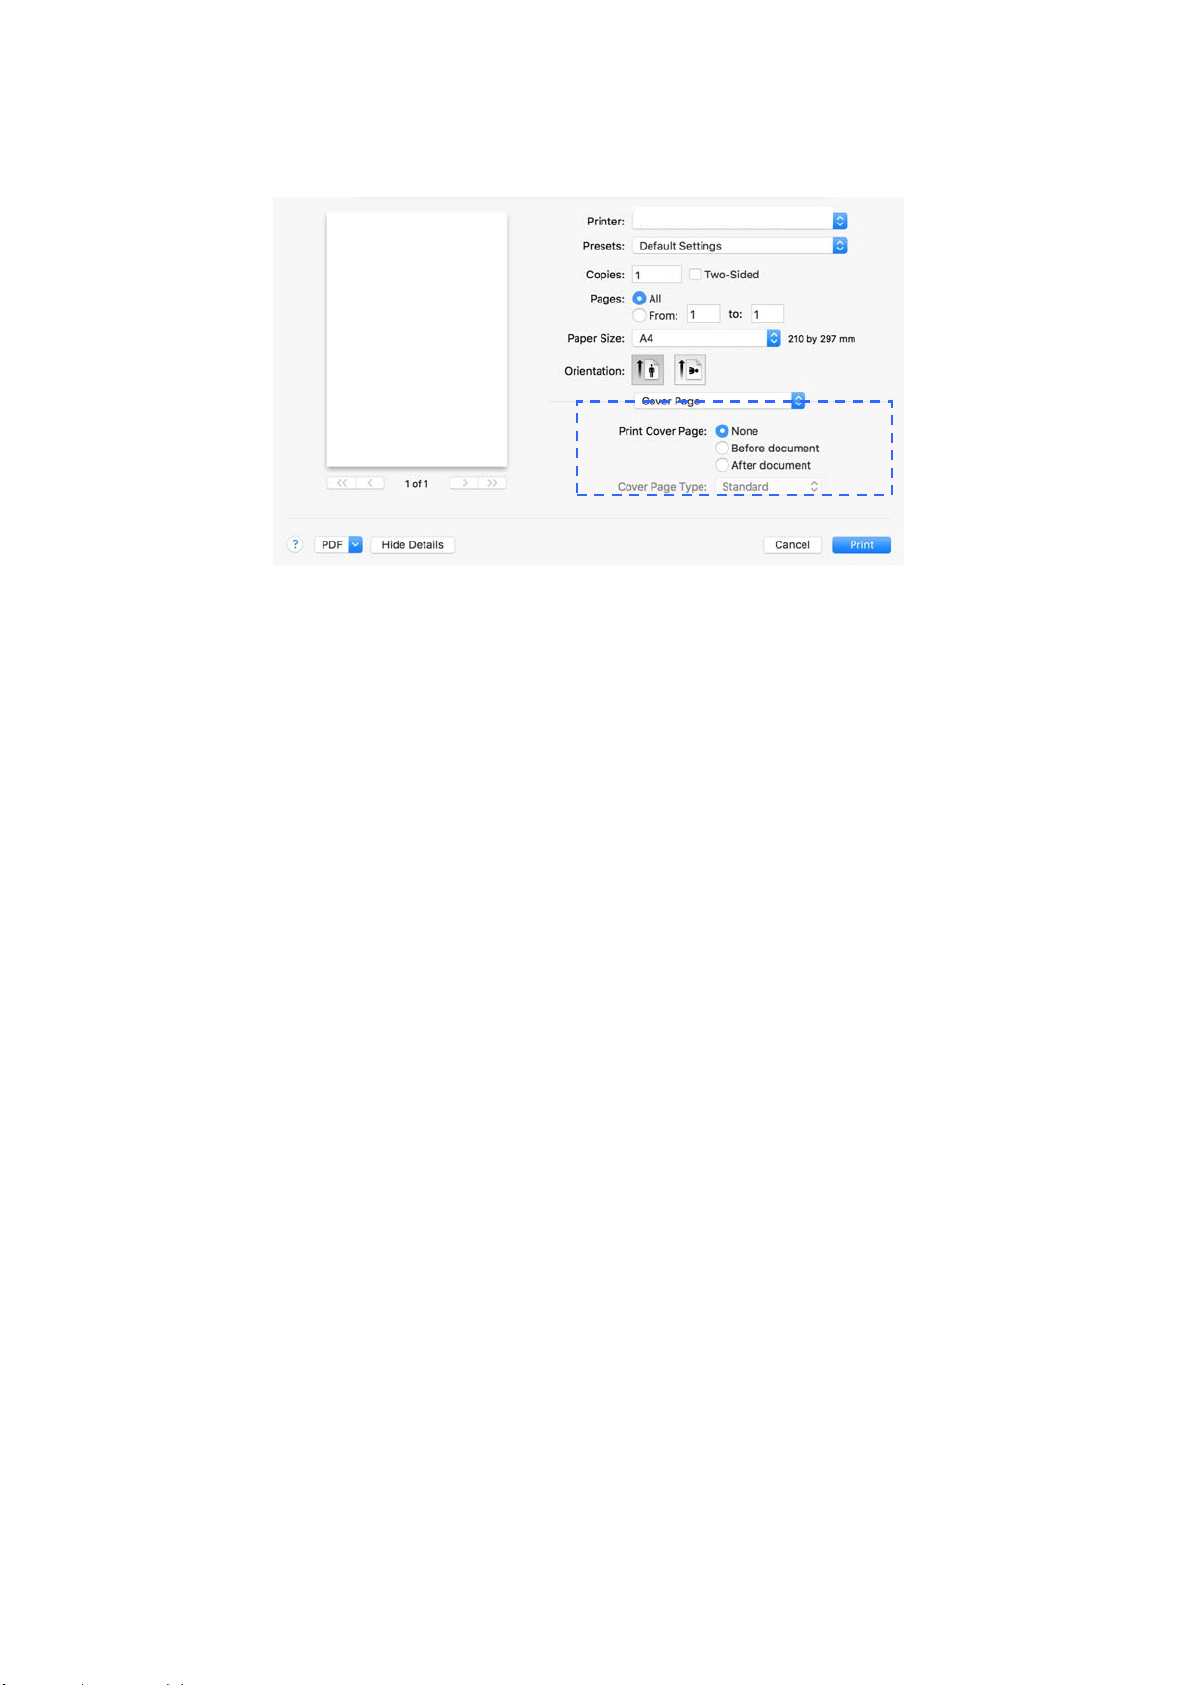
11
0
Cove r Pa ge
You can m ake the following cover page sett ings:
Pr int Cover pa ge :
I f you want t o add a cover page t o your docum ent, use
this funct ion.
Choice : N on e , Be for e Docum e nt , Aft e r docum e n t
AM30 Series Printer

111
Layout
Pa ges per She e t :
Choose num ber of pages t o be printed on a single sheet
of paper. Choice: 1 , 2 ,4 , 6 , 9 , 1 6
La you t
Direction:
When you specify t he pages per sheet , you can also
specify t he direct ion of t he layout.
Bor de r :
I f you want t o add a border, use t his funct ion.
Choice: N one, Single hairline , Single Thin Line,
Double Hairline, D ouble Th in Line
Tw o- Sided:
Choice: Off, Long- Edge binding, Short - Edge
binding
When using Tw o- Sided print ing, you can select
whet her to bind copies on the long-edge or short - edge.
Lon g- Edge binding will pr int t he pages so t hat you flip
them like you would do on a book. Shor t - Edge
binding prints t hem so that your flip t hem like you
would do on a calenda r .
Long- Edge binding
( Port r ait )
Long- Edge binding
( Landscape)
AM30 Series Printer
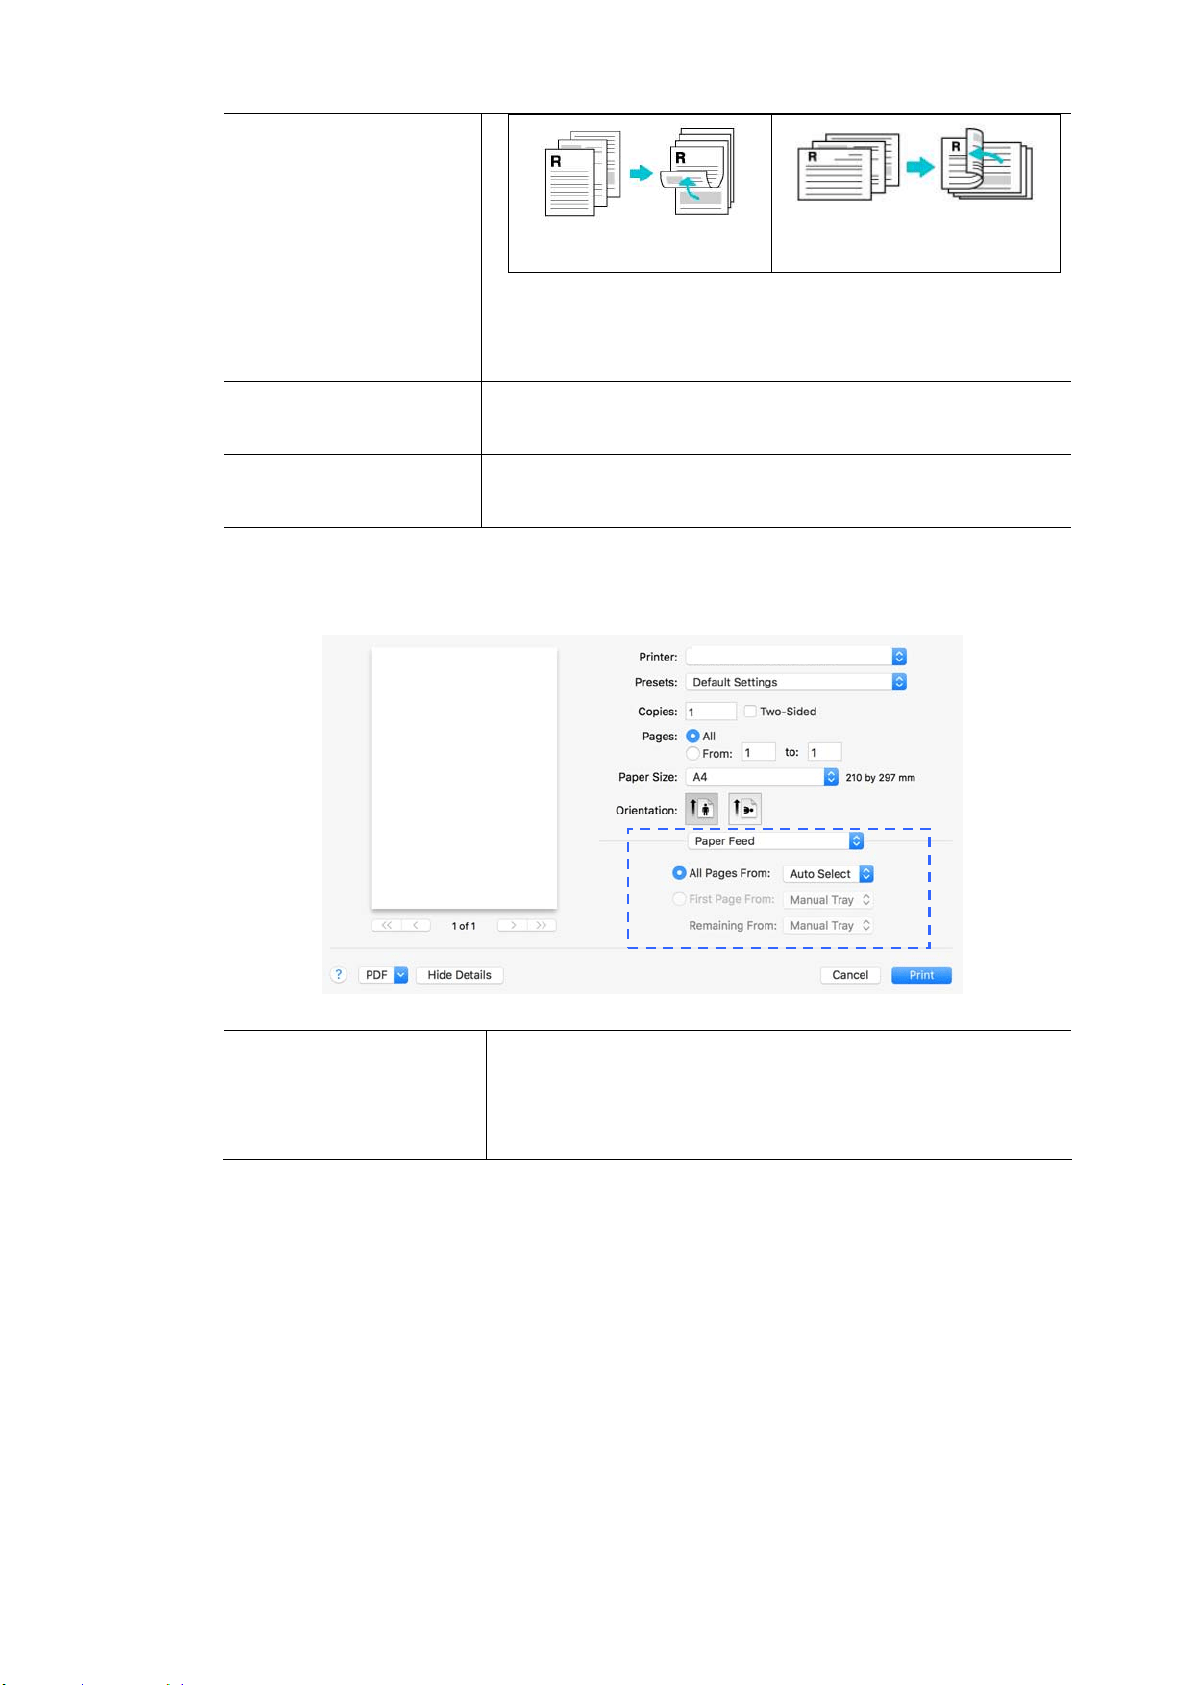
11
2
Short- Edge binding
( Port r ait )
Short- Edge binding
( Landscape)
N ot e : The duplex feature supports only page sizes of
A4, B5, and let t er wit h paper weight bet ween 60g/ m
2
and 105g/ m
2
.
Reverse Page
Orient a t ion:
Check Reverse Page Orienta t ion to reverse the dat a
from up t o down.
Flip Hor izonta lly:
Check t o print the pages so that you flip them like you
would do on a book .
Pape r Fe ed
All pa ges Fr om :
Choose t he tray from which your paper should be fed.
Choice: Aut o, Manual Tr a y, Main Tray
Aut o m eans aut om atically select the paper t ray which
m at ches t he paper size of your docum ent .
AM30 Series Printer
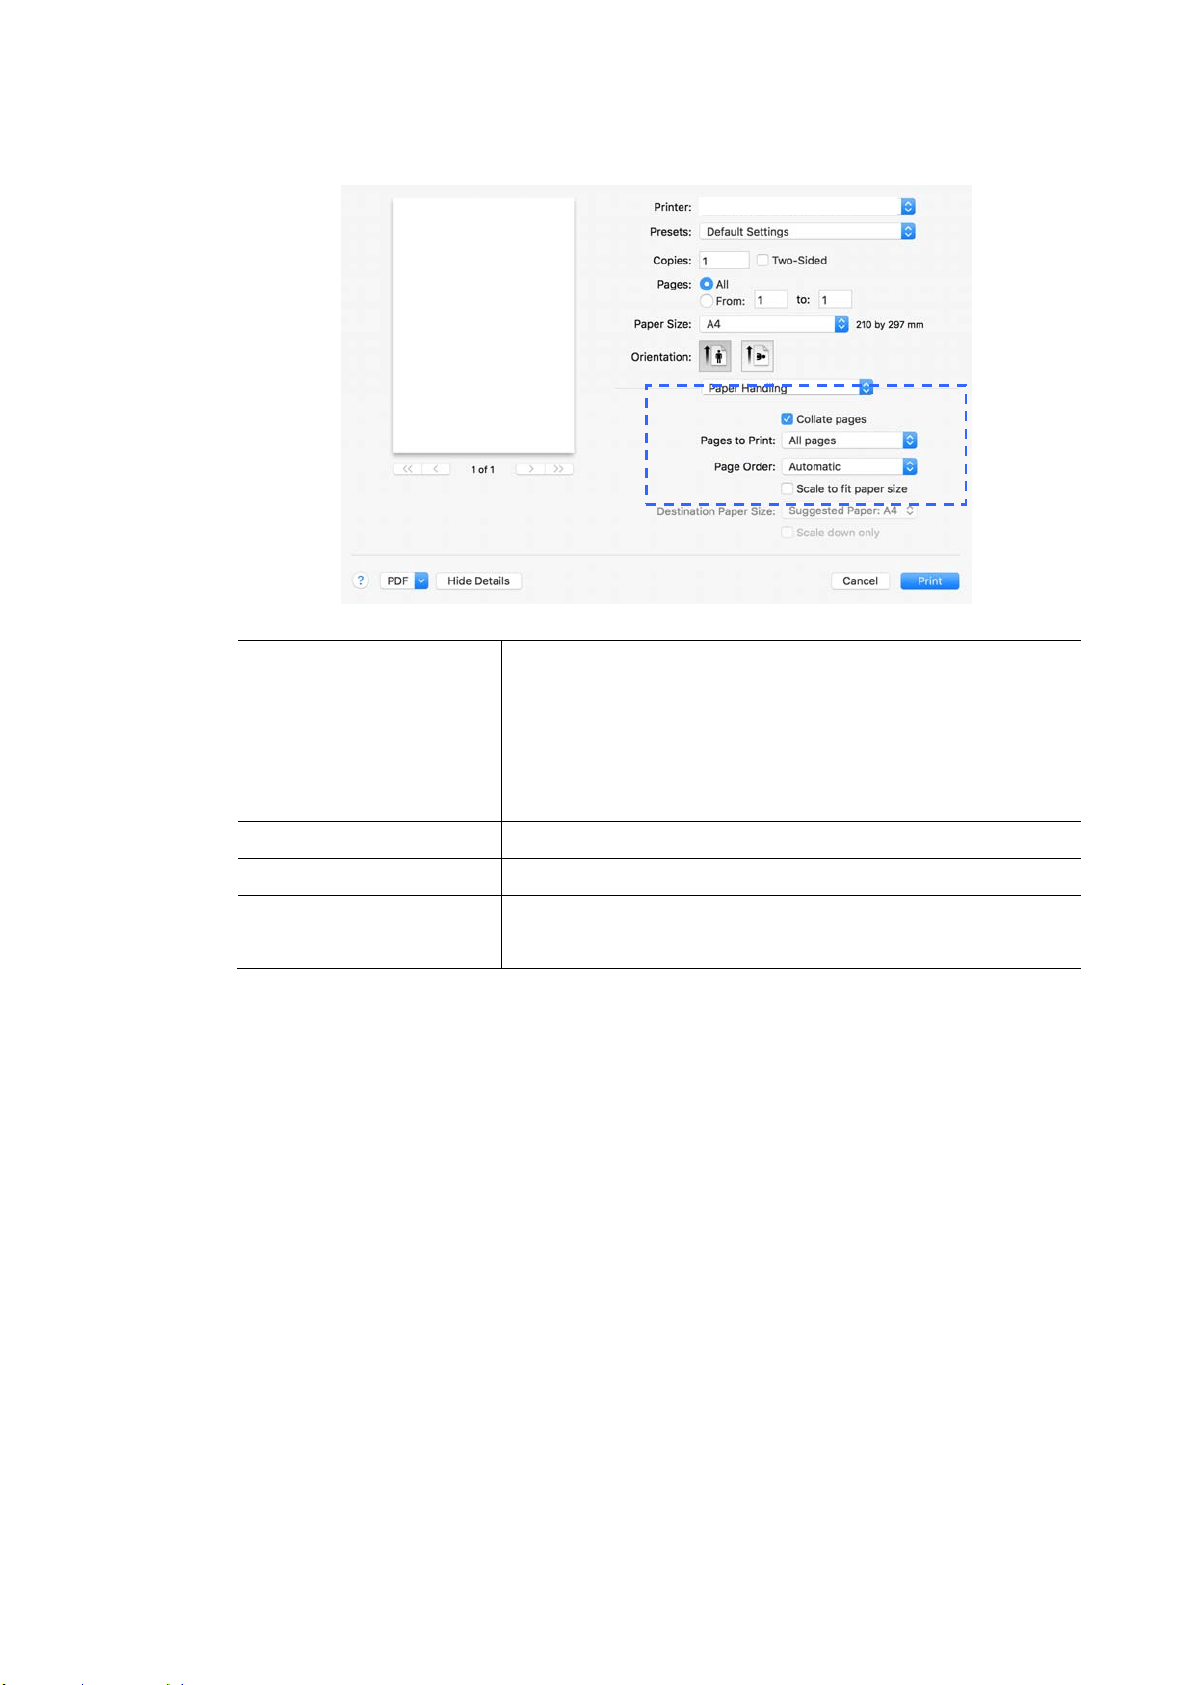
113
Paper Ha ndling
Collat e page s:
Your print er can sort m ultiple copy j obs. For exam ple,
if you print t w o copies of a t hree- page docum ent and
you choose not t o collat e t hem , t he pages print in this
order: 1, 1, 2, 2, 3, 3. I f you choose t o collat e, the
pages print in t his order: 1, 2, 3, 1, 2, 3.
Pa ges to Print :
Select how m any pages you wish t o print.
Pa ge Order:
Choice: Aut om at ic, Nor m a l, Reverse
Sca le to fit pa per
size:
Out put t he full page of t he select ed original including
the four m argins.
AM30 Series Printer
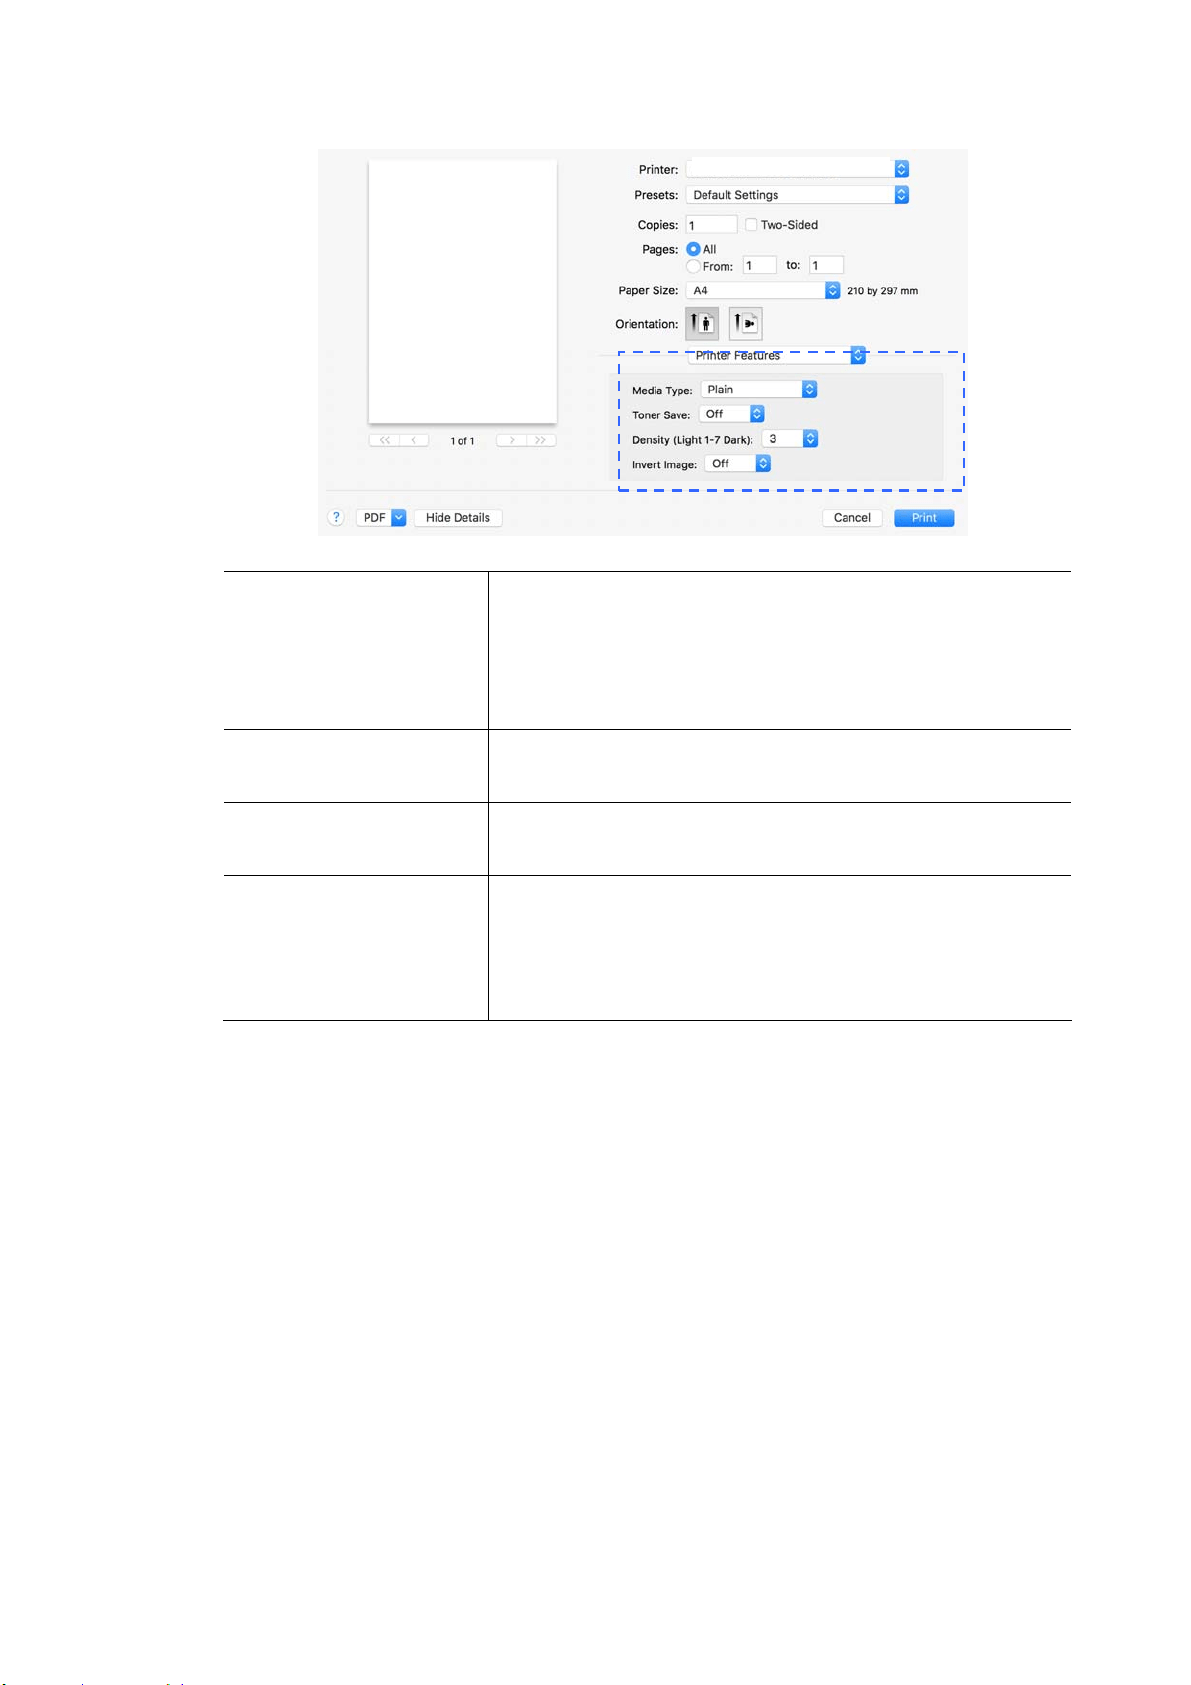
114
Print er Fea t ures
Media Type:
Choose t he type of m edia t o be used for print ing.
Choice: Pla in Pa pe r , Thin Pa pe r, Thick Pa pe r ,
Lase r Pa per, * CardSt ock, * Bond, * Envelope
* : Only availa ble in t he m anual t ra y for one - side
print ing
Tone r Sa ve :
Allows you t o print your docum ent using the toner
saving m ode.
De nsit y Leve l
( Light 1 ~ 7 Da r k)
Click t o light en or darken your docum ent . Choice:
1 ~ 7 . ( Default: 3 )
I nvert I m age s:
I nvert m akes each im age pixel invert ed to it s
com plem ent ary color. For exam ple: t he original black
text on white background becom es w hite t ext on black
background. Choice : * off/ On
AM30 Series Printer
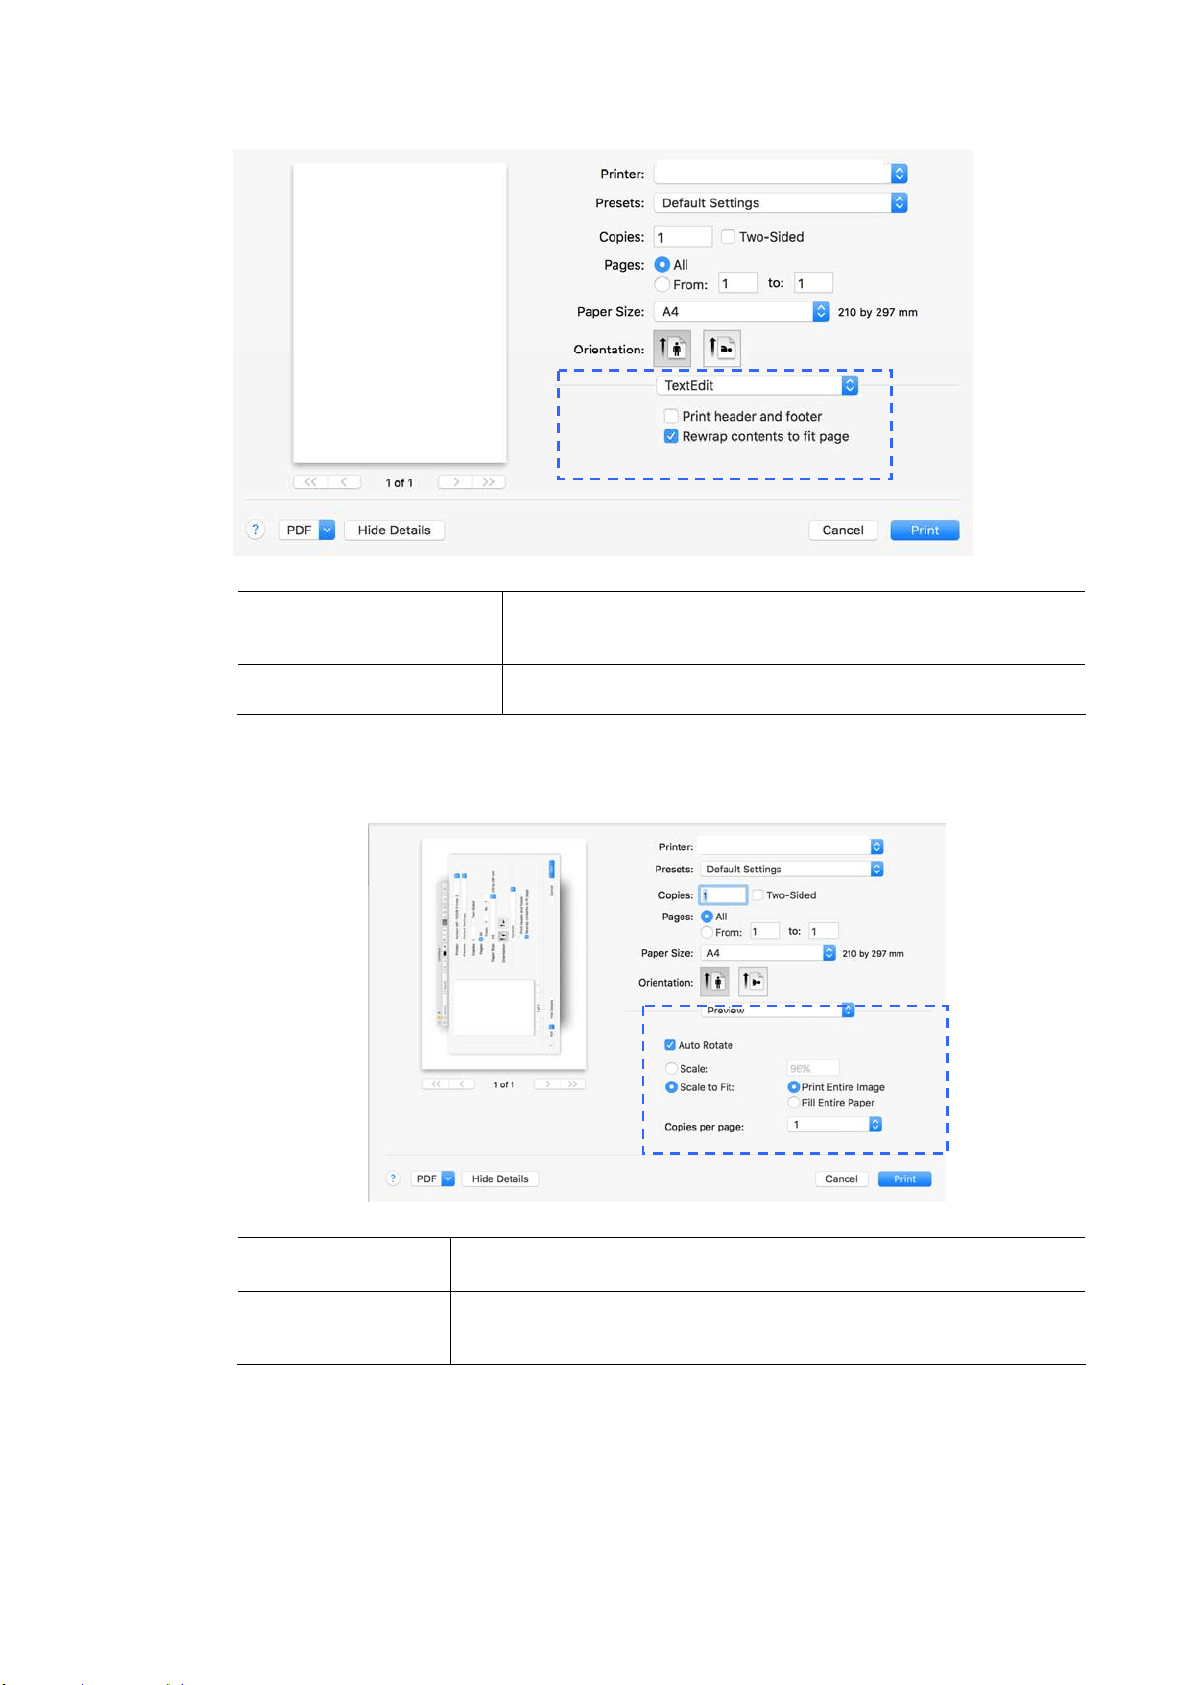
11
5
Text Edit
Pr int H ea der and
Foote r :
I f you wish t o print header and foot er, use this
funct ion.
Rew a r p cont ent s
t o fit pa ge:
Adj ust cont ent s to fit your page.
Preview
Aut o Rot at e :
Check t o aut om atically rotat e your im age t o fit your paper.
Sca le :
Enlarge or reduce your im age.
Choice: Print Ent ire I m age, Fill Ent ire Paper
AM30 Series Printer
AM30 Series Printer

11
6
7 . Print ing Docum ent s from a
Mobile Device
By connect ing an ext ernal USB dongle ( Wi- Fi m odule) t o the product and
installing t he Mopria™ app on your Android m obile device, the product can be
convert ed int o a wireless device and your m obile device is able to print em ails
and docum ents by sim ply tapping Print from t he m enu,.
Making Preparat ion
To connect the product t o a wireless LAN, prepare t he followings:
An environm ent in w hich a w ireless LAN is availa ble
When connect ing the scanner t o a wireless LAN, you m ay need inform at ion for a
wireless access point such as an SSI D ( net work nam e) and a securit y key
( password). For det ails, contact your Network Adm inistrator or refer t o t he
m anual for the wireless access point.
At t ent ion!
Do not place obst acles t hat block radio waves ( e.g. walls or m et al plates) or
devices t hat cause radio wave int erference (e.g. cordless phones) wit hin 100
m m of the product , or near your wireless access point .
Mpria Pr int Service
The Mopria Print Service (app) can be downloaded from t he Google Play St ore t o
enable print funct ionalit y on any Android phone or tablet ( Android version 4.4 or
lat er) . Once installed, sim ply connect your device t o t he sam e net work as t he
print er and your m obile print can be com pleted.

11
7
Connect ing a USB dongle
I nsert the supplied USB dongle ( Wi- Fi Module) to t he USB flash port at t he back
of t he product, and t hen t urn on the product.
Connect ing t o a W ireless N et w ork via
t he N et w ork Set up Tool
Befor e You Begin!
Make sure t he com put er has been connected t o t he product via the USB cable.
Make sure t he power adapter has been connect ed and the product has been
turned on.
The N et w or k Setup Tool is an application t o configure t he sett ings required for
connect ing t he product via wireless LAN. The N e t w or k Set u p Tool can be used
to configure the following wireless or wired sett ings:
Connect ing t he product to a wireless access point
Connect ing t he product t o a wired network
Set ting t he I P address for t he scanner
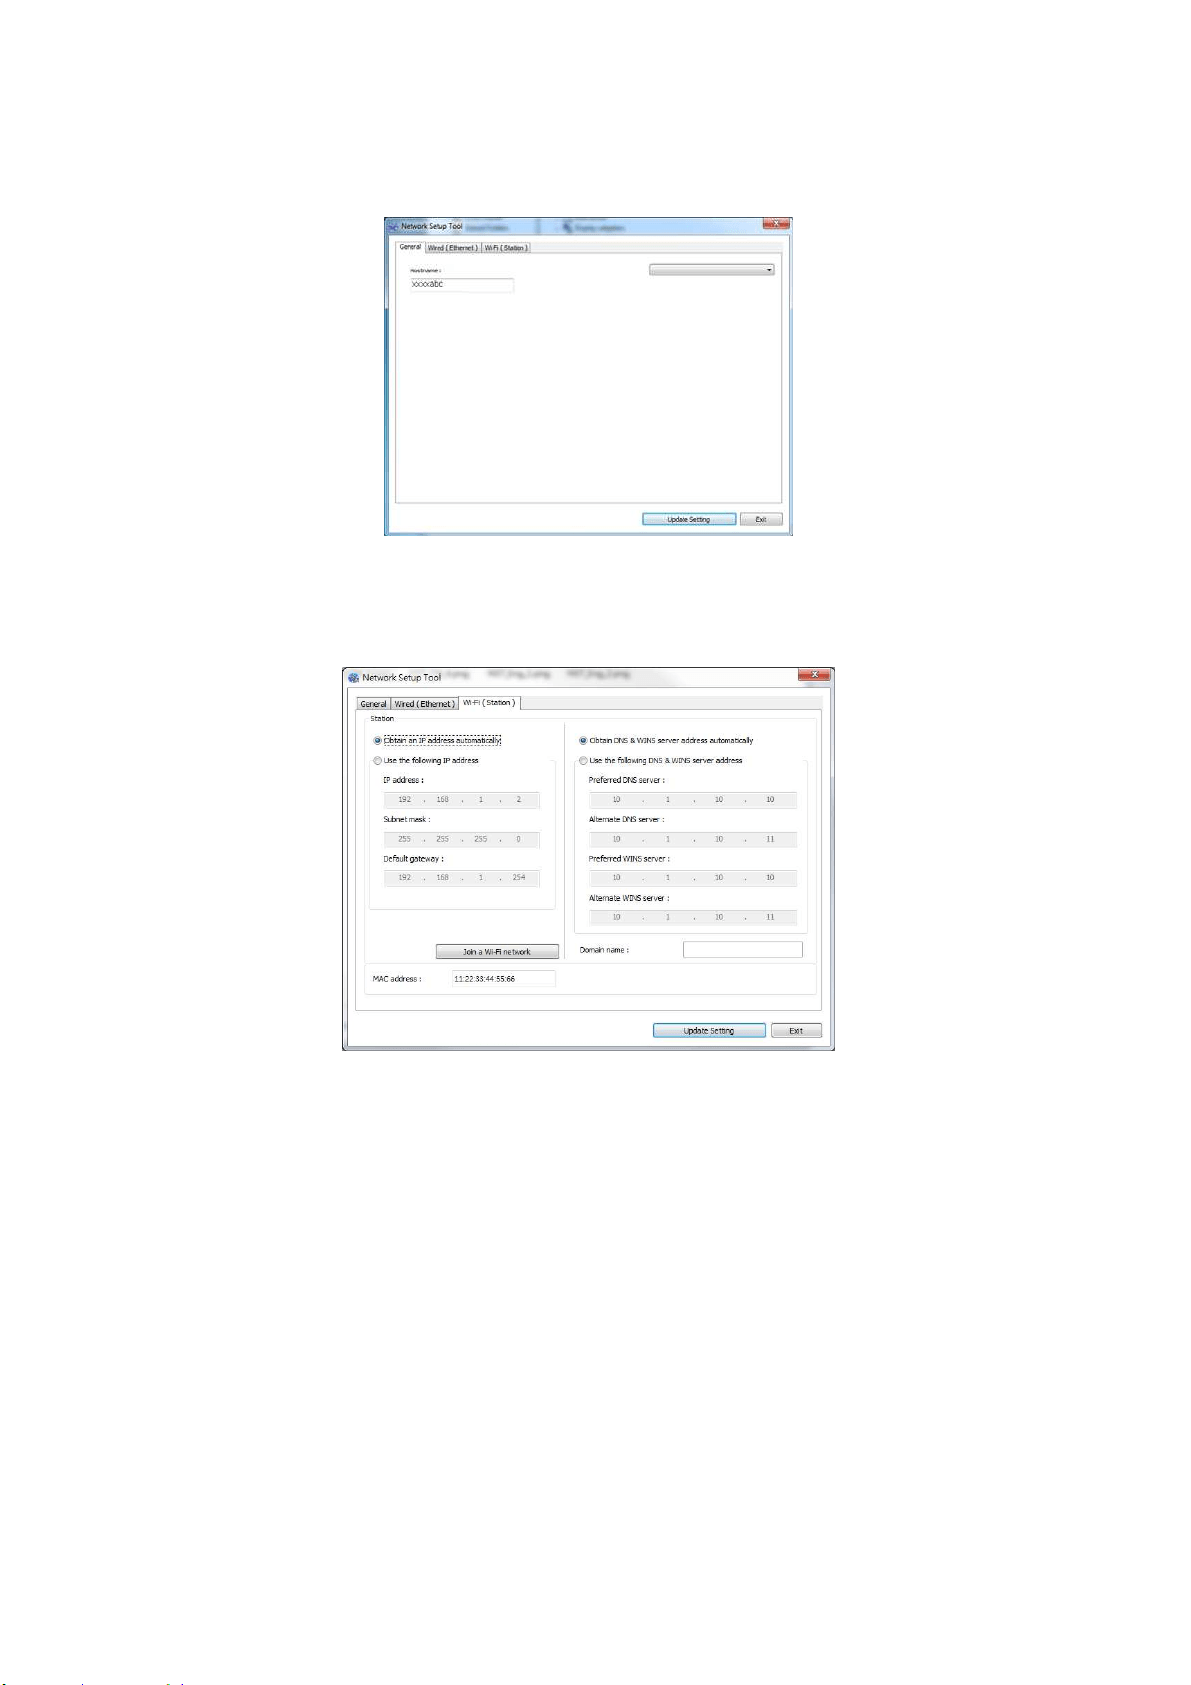
118
1 . Launch t he program by clicking t he St art > All Program s> Avision AM 3 0
Series M FP> N et w ork Set up Tool. The m ain window appears.
2 . On t he [ Gene ra l] page, check [ W i- Fi ( Sta t ion) ] .
3 . Click t he [ W i- Fi ( Sta t ion) ] t ab t o prom pt the [ W i- Fi ( St at ion) ] page.
4 . Check [ DH CP] to obt ain t he I P address directly from t he DHCP server or you
m ay ent er your stat ic I P on the [ I P Address] , [ Subne t Mask ] , and
[ Gat ew a y] field respect ively.
5 . Click [ Connect t o SSI D] and t he current ly connected wireless net works w ill
be displayed. Select t he wireless net work you want t o connect and then ent er
the securit y key if required.
AM30 Series Printer

119
6 . Click [ Connect ] to start connect ing t he SSI D ( wireless net work nam e) and
then updat e t he I P inform at ion to t he product.
7 . I f update is successfully, an [ Updat e Device Succe ssfully ] m essage will be
displayed and the Network Set up Tool will be autom atically closed.
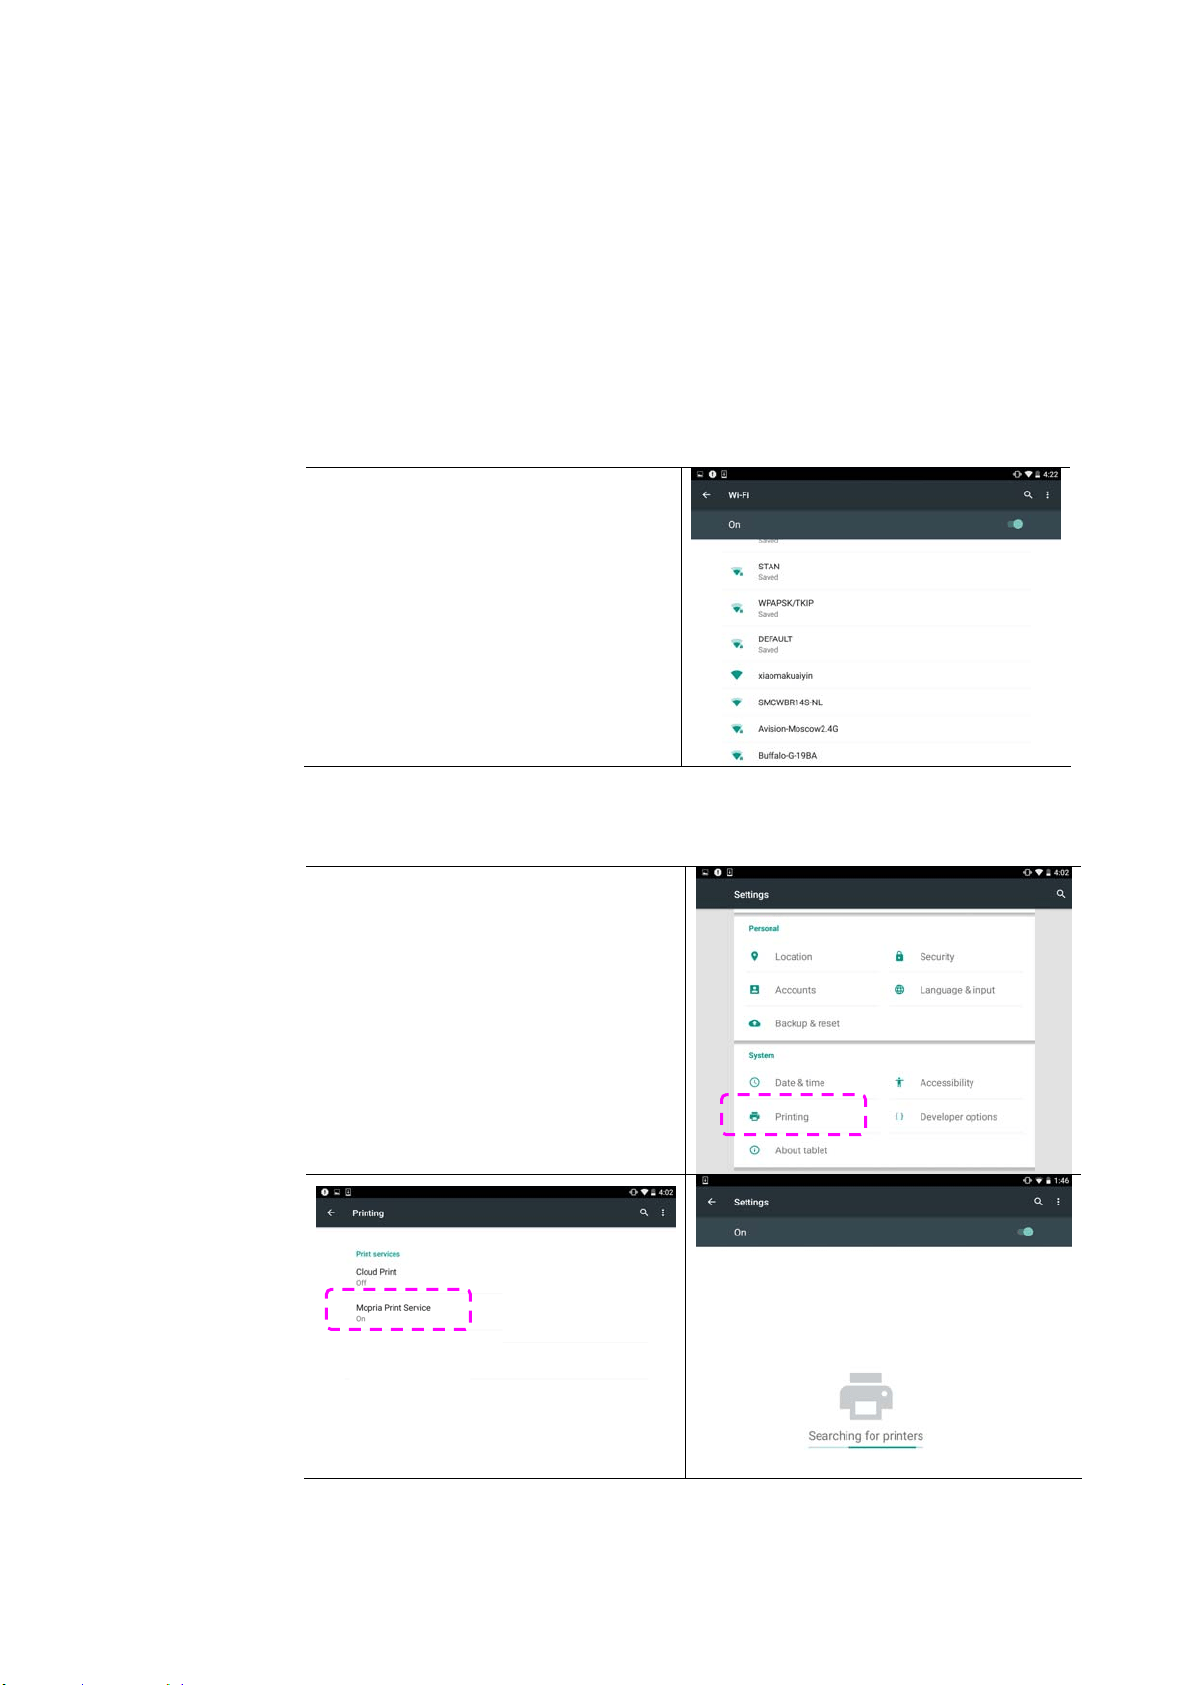
12
0
Printing Your File from a Android Mobile
Device
Make sure t hat the Mopria Print Service ( Print App) has been installed on your
Android m obile device. The Mopria Print App can be purchased for free from
an applicat ion store such as Google Play.
1 . Select sam e w ir e less net w ork as your pr int e r .
On your m obile device, t ap
Set t ings> W i- Fi and choose the
sam e net work nam e ( SSI D) of
your print er.
2 . Tur n M opr ia Print Service on. The device will search available printers.
On your m obile device, t ap
Set t ings> Pr int ing> Mopria Print
Service t o turn Mopria Print
Service on. The Device will search
for all available print er s.
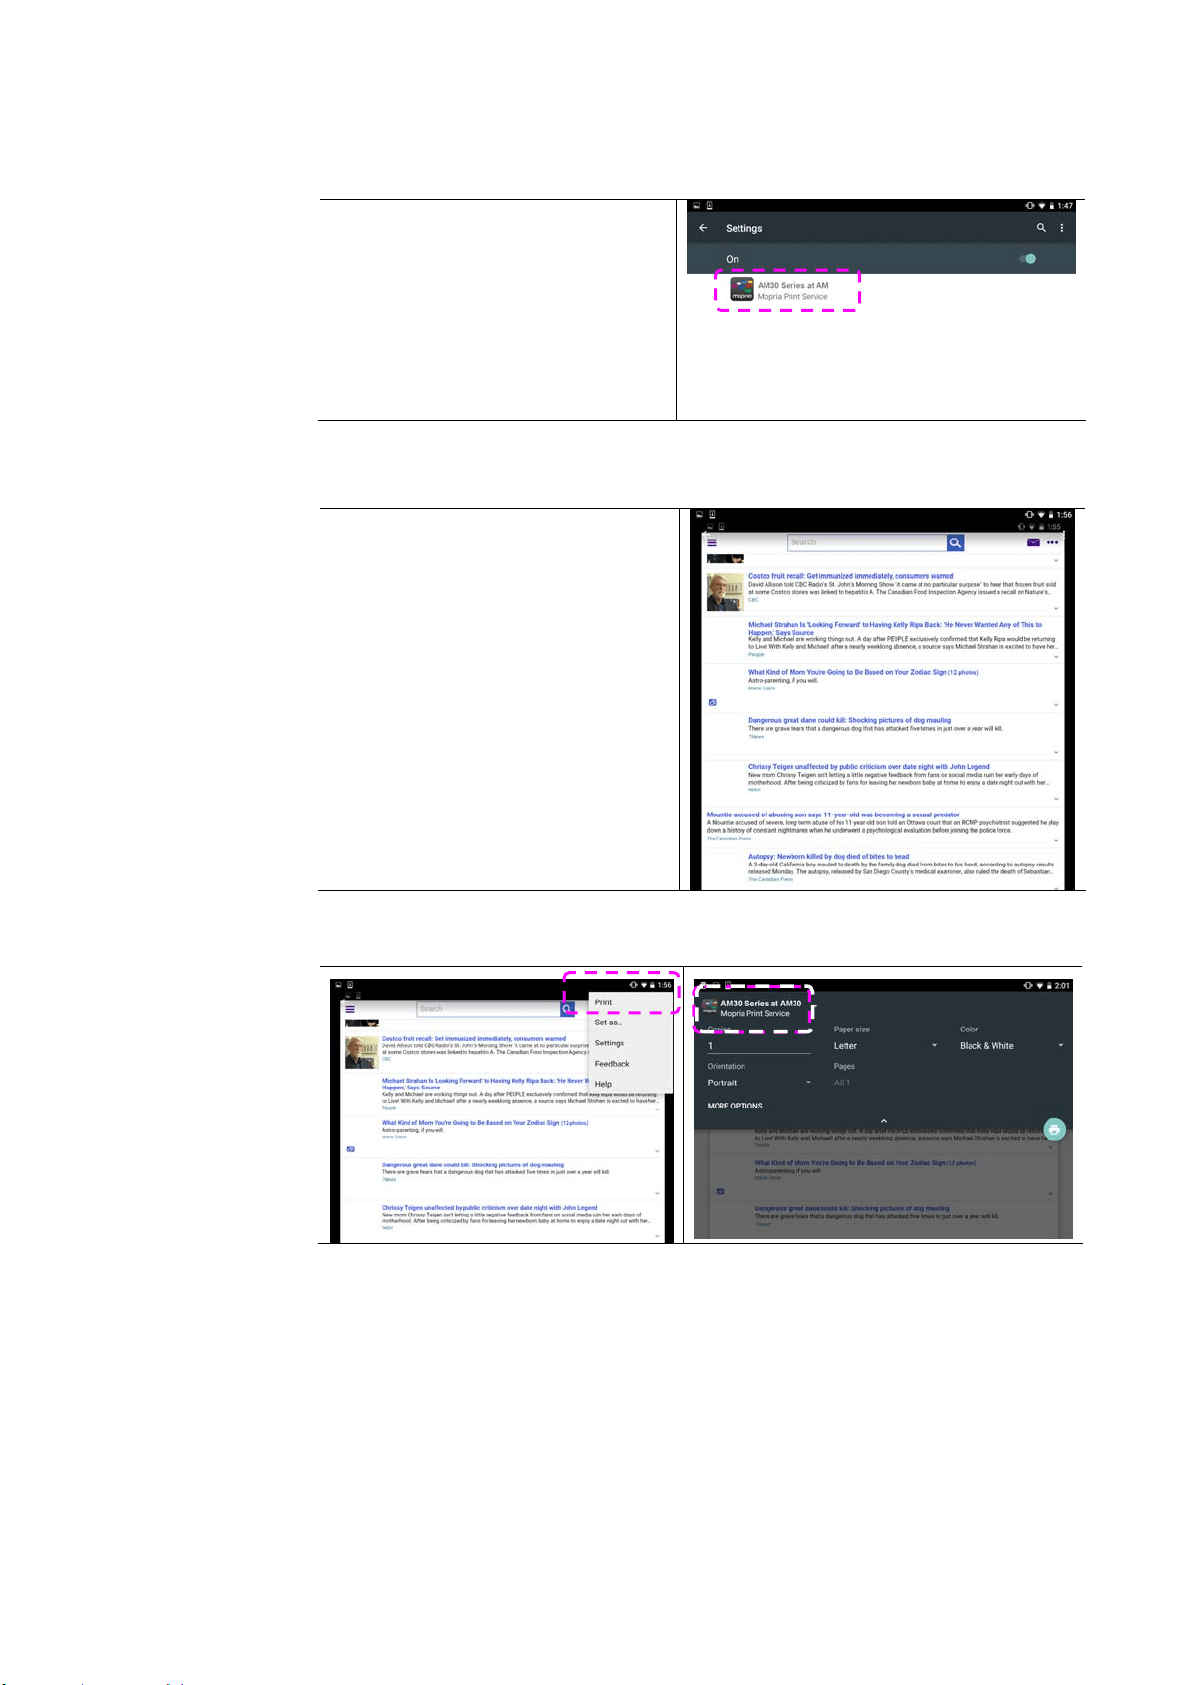
121
3 . Select your printer.
Select [ AM 3 0 Ser ies at AM3 0 ]
from t he print er list.
4 . Open t he file which you want t o print .
Open t he file you want t o print .
5 . Choose [ Pr in t ] from t he m enu and select your printer.
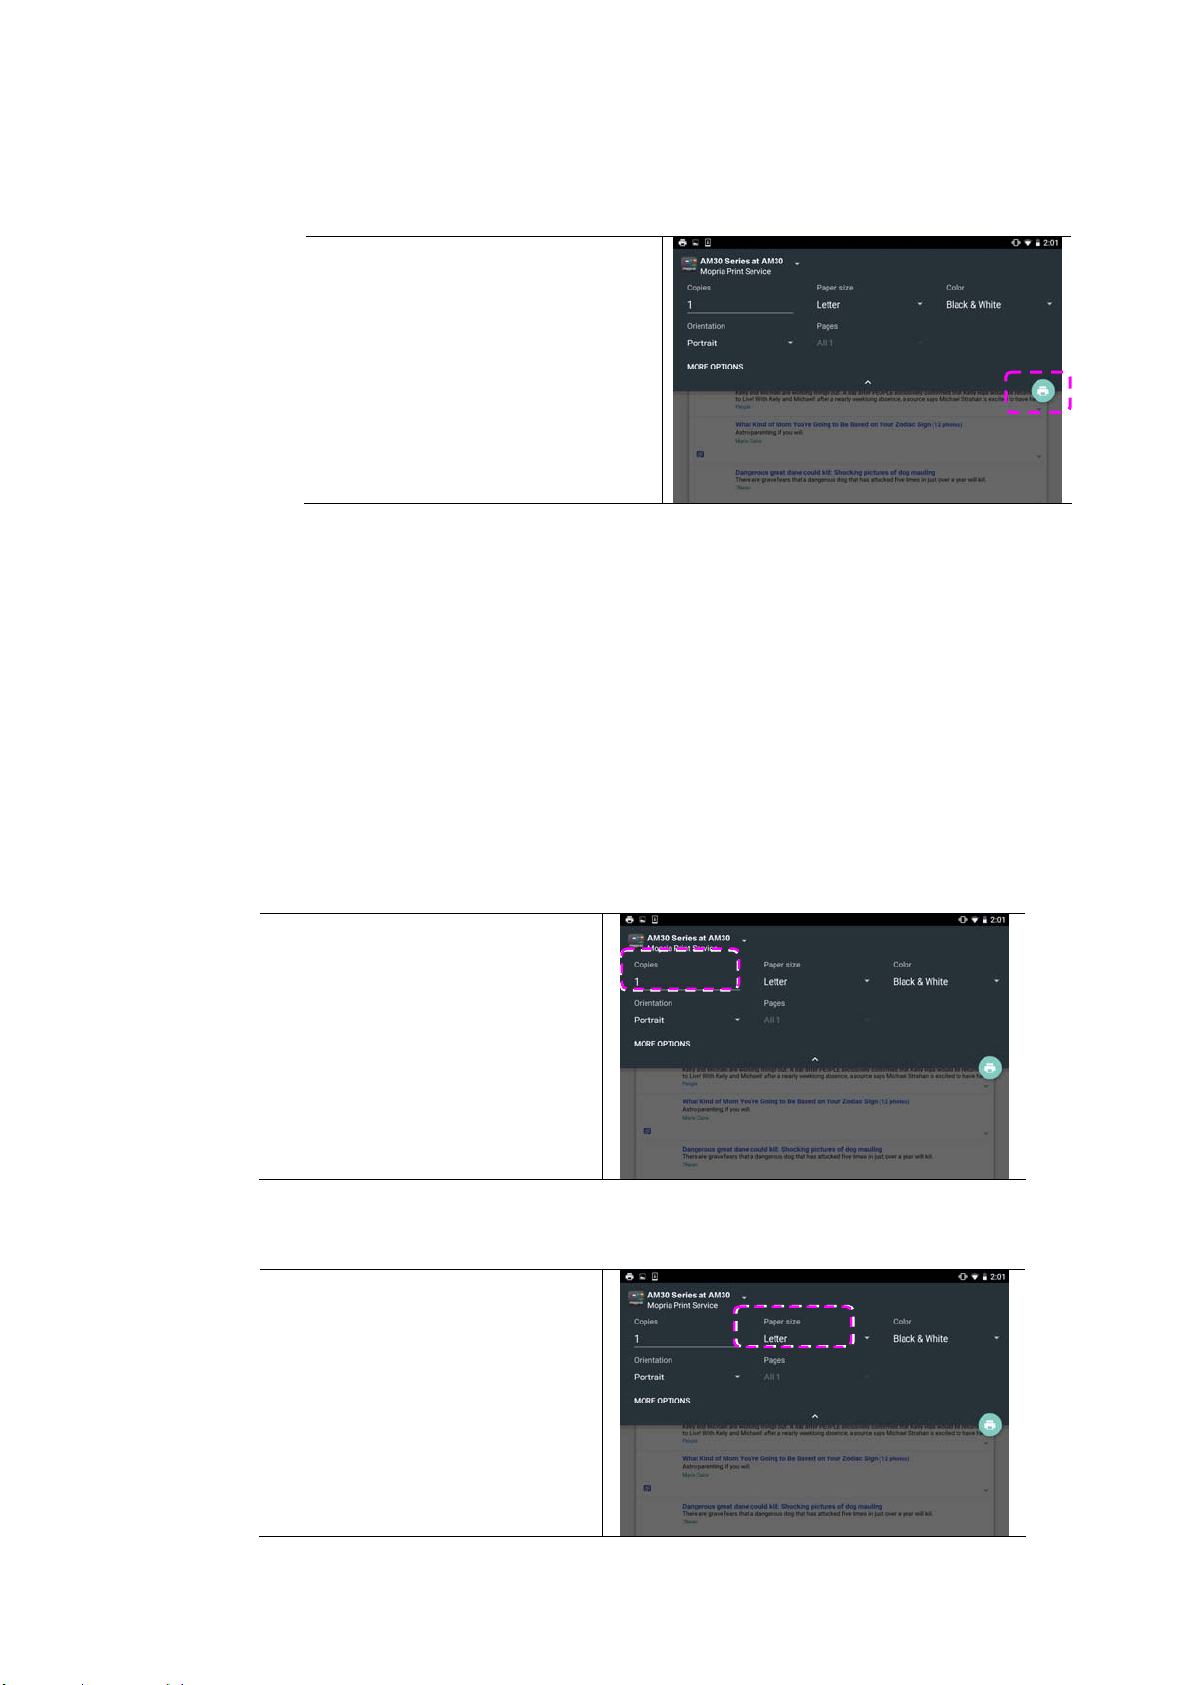
12
2
6 . Choose print set t ings and print.
I f you do not need t o change
print opt ions, t ap Print t o
send t he print j ob.
I f you need t o change print
options, continue t o t he next
section.
Change t he Print Set t ings
Mopria Print Service allows you to print w eb pages, docum ent s, em ails, phot os,
and content from apps t hat support Android print ing. Print settings m ay vary
depending on the app and print er select ed. The follow ing print opt ions m ay
display:
N um ber of Print e d Copies
Tape [ Copies] t o enter your
desired copy count if you w ant
to print m ore t han one copy.
Cha nging t he Pa pe r Size
I n t he print set t ings m enu, t ap
[ Pape r size] , then select the
pa per size opt ion from t he
m enu: Lett er, and A4 m ay be
options offered depending upon
the app or printer.
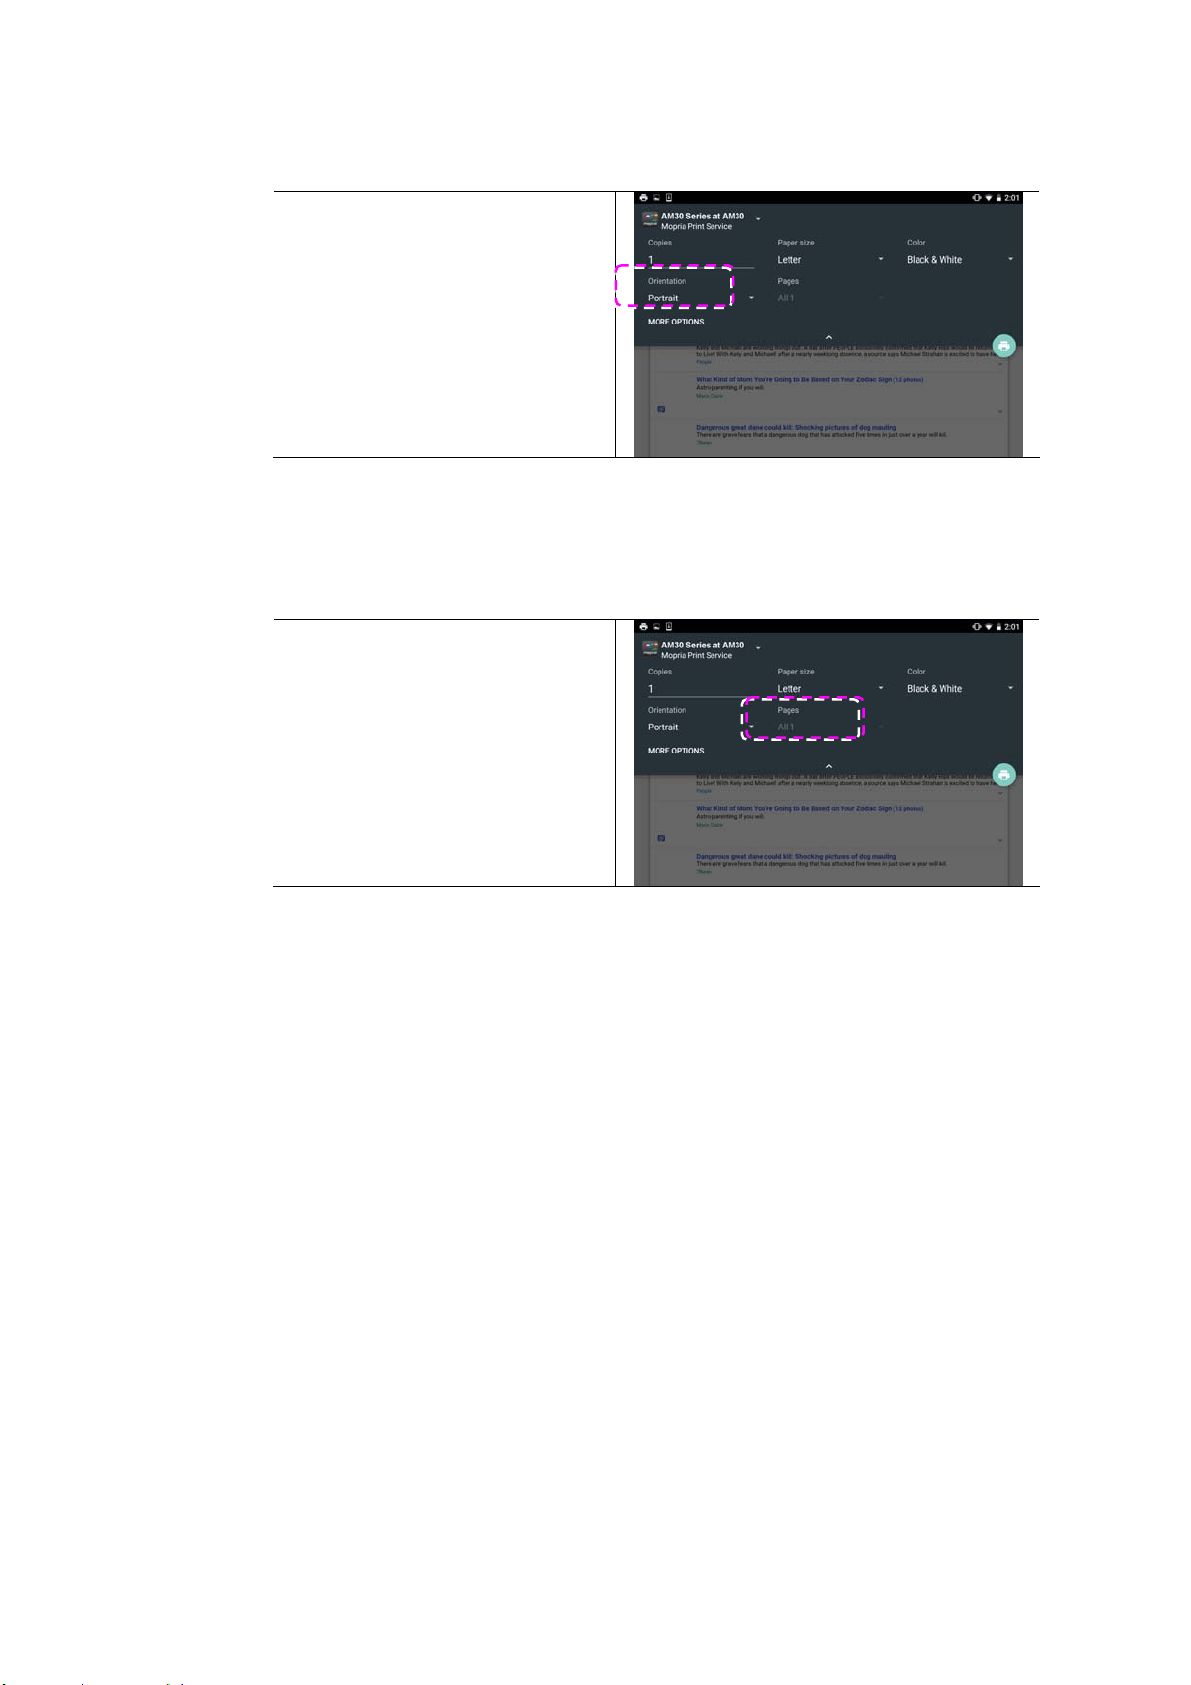
123
Cha nging t he Or ie nt at ion
I n t he print set t ings m enu, t ap
[ Orien t a t ion] , t hen select the
option you prefer. Port rait or
landscape m ay be opt ions
offered depending upon t he
app or print er.
Defining t he Pa ge Range
I n t he print set t ings m enu, t o
print m ult iple pages, t ap
[ Page s] , and then select t he
page range t hat you want t o
print. NOTE: Pa ge s will only
display wit h cert ain applicat ions
and file t ypes, such as PDFs.
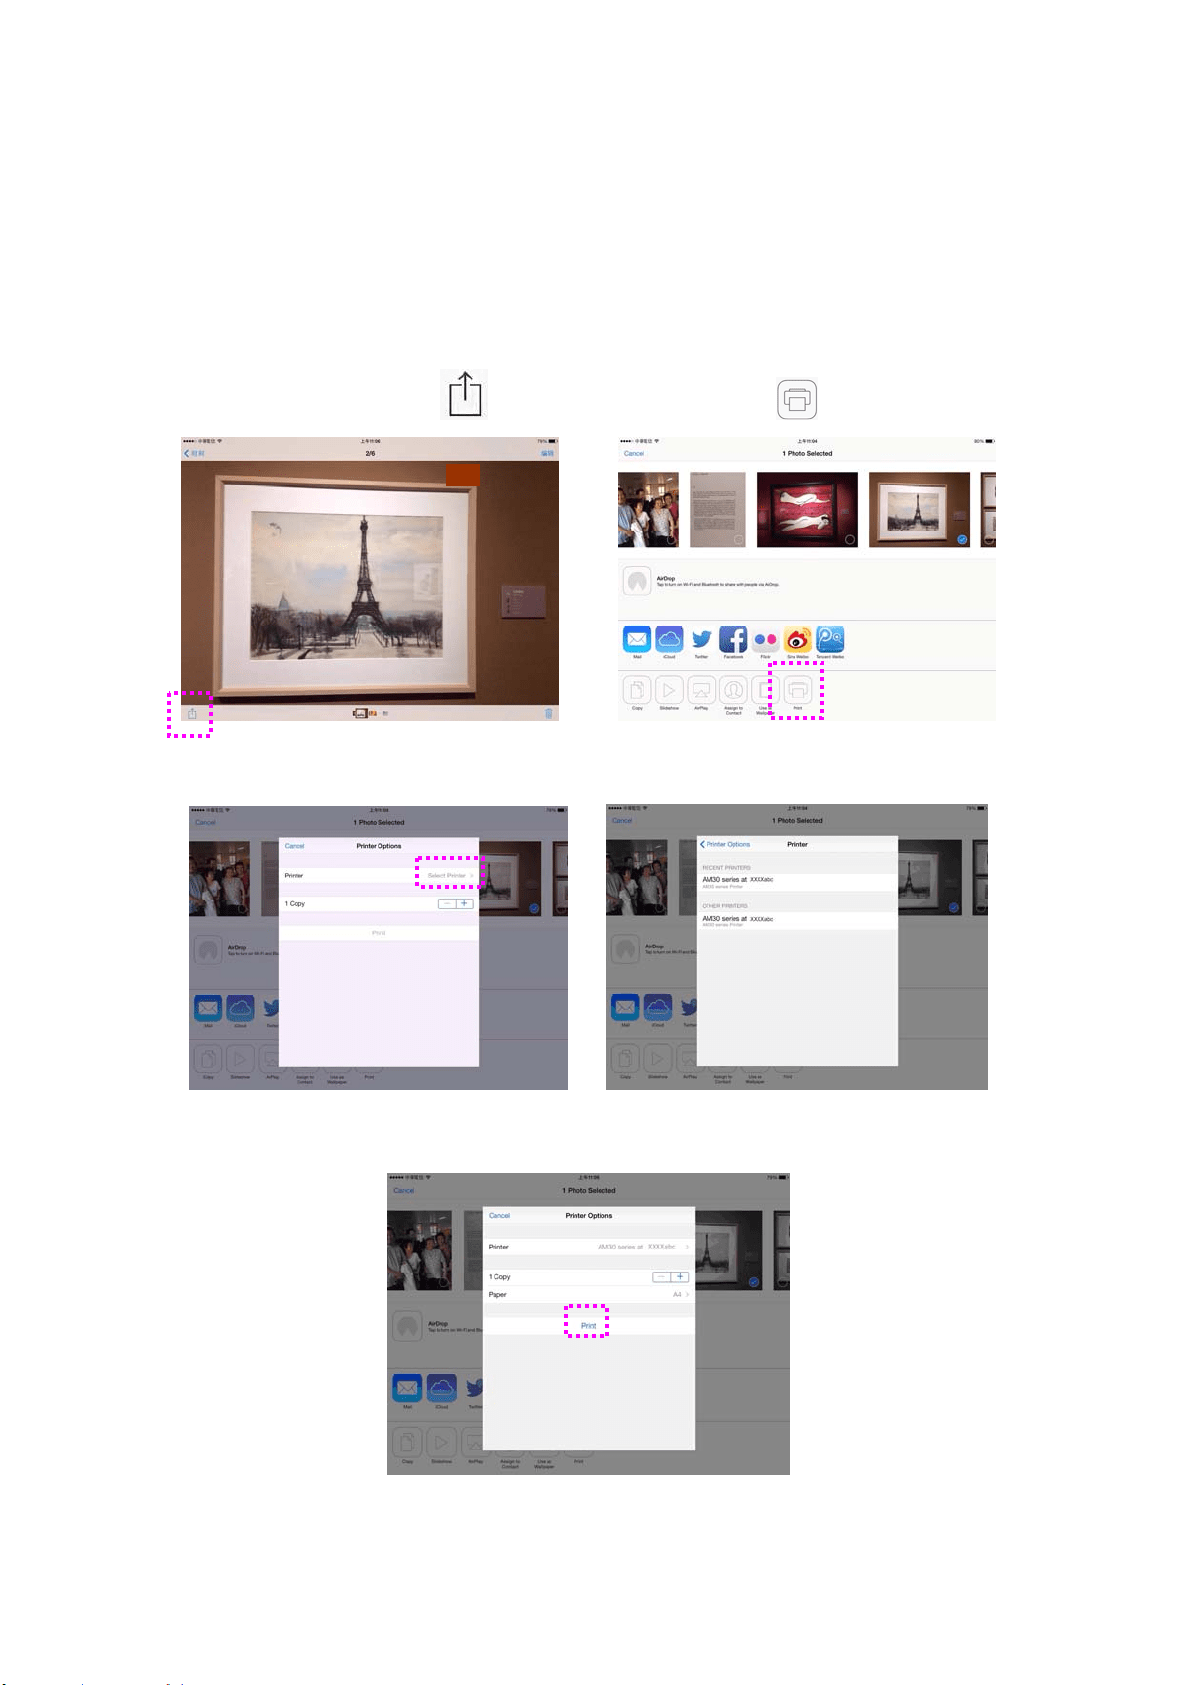
124
Printing Your File from a iOS Mobile
Device
1. Turn on your m obile devices such as iPhone or iPad.
2. Tap 「Se t t in gs」 and t hen open Wi- Fi. Select t he net work sam e wit h
your print er.
3. Open t he picture or t he docum ent that you want t o print. Tape t he
Share icon (
) and t hen t he print icon ( ) 。
4. Tap [ Select Print er] and choose your desired print er.
5. Tap [ Print ] t o start print ing.

12
5
8 . Using the Product as a
Scanner
Aft er inst alling the scanner driver and connect ing t he USB cable t o your
com puter, t he product can be used as a fine scanner. You can use various
scanning features t o m odify your scanned im age.
Syst em Requirem ents
CPU: I nt el
®
Core™ 2 Duo or higher
Mem ory: 32 bit : 1 GB
64 bit : 2 GB
Optical Drive: DVD- ROM Drive
USB Port: USB port 2.0 ( com pat ible wit h USB 1.1)
Com patible
Operating
System :
Microsoft Windows XP( SP3) , Windows Vist a
( 32- bit / 64- bit ) , Windows 7 ( 32-bit / 64- bit) ,
Windows 8.x ( 32- bit / 64-bit ) , Windows 10
( 32- bit / 64- bit )
St arting a Scan From Capt ure Tool Applicat ion
Capt ure Tool is a useful t est program . With t his tool, you can perform sim ple
scans and view t he captured im ages. I n addit ion, it helps you com plet e your
scan at a rated speed.
The following procedure describes how t o verify your scanner inst allat ion. I f t he
installat ion is not correct, please review t he preceding sect ion to check if t he cable
connect ion and scanner driver have been successfully inst alled.
Before you begin, be sure the scanner is on.
1. Select St art> Program s> Avision xxx Scanner> Avision Capt ure Tool. The Select
Scanner Model dialog box will be displayed.
2. Select your driver t ype and scanner m odel and click OK. The follow ing Avision
Capt ure Tool dialog box will be displayed.
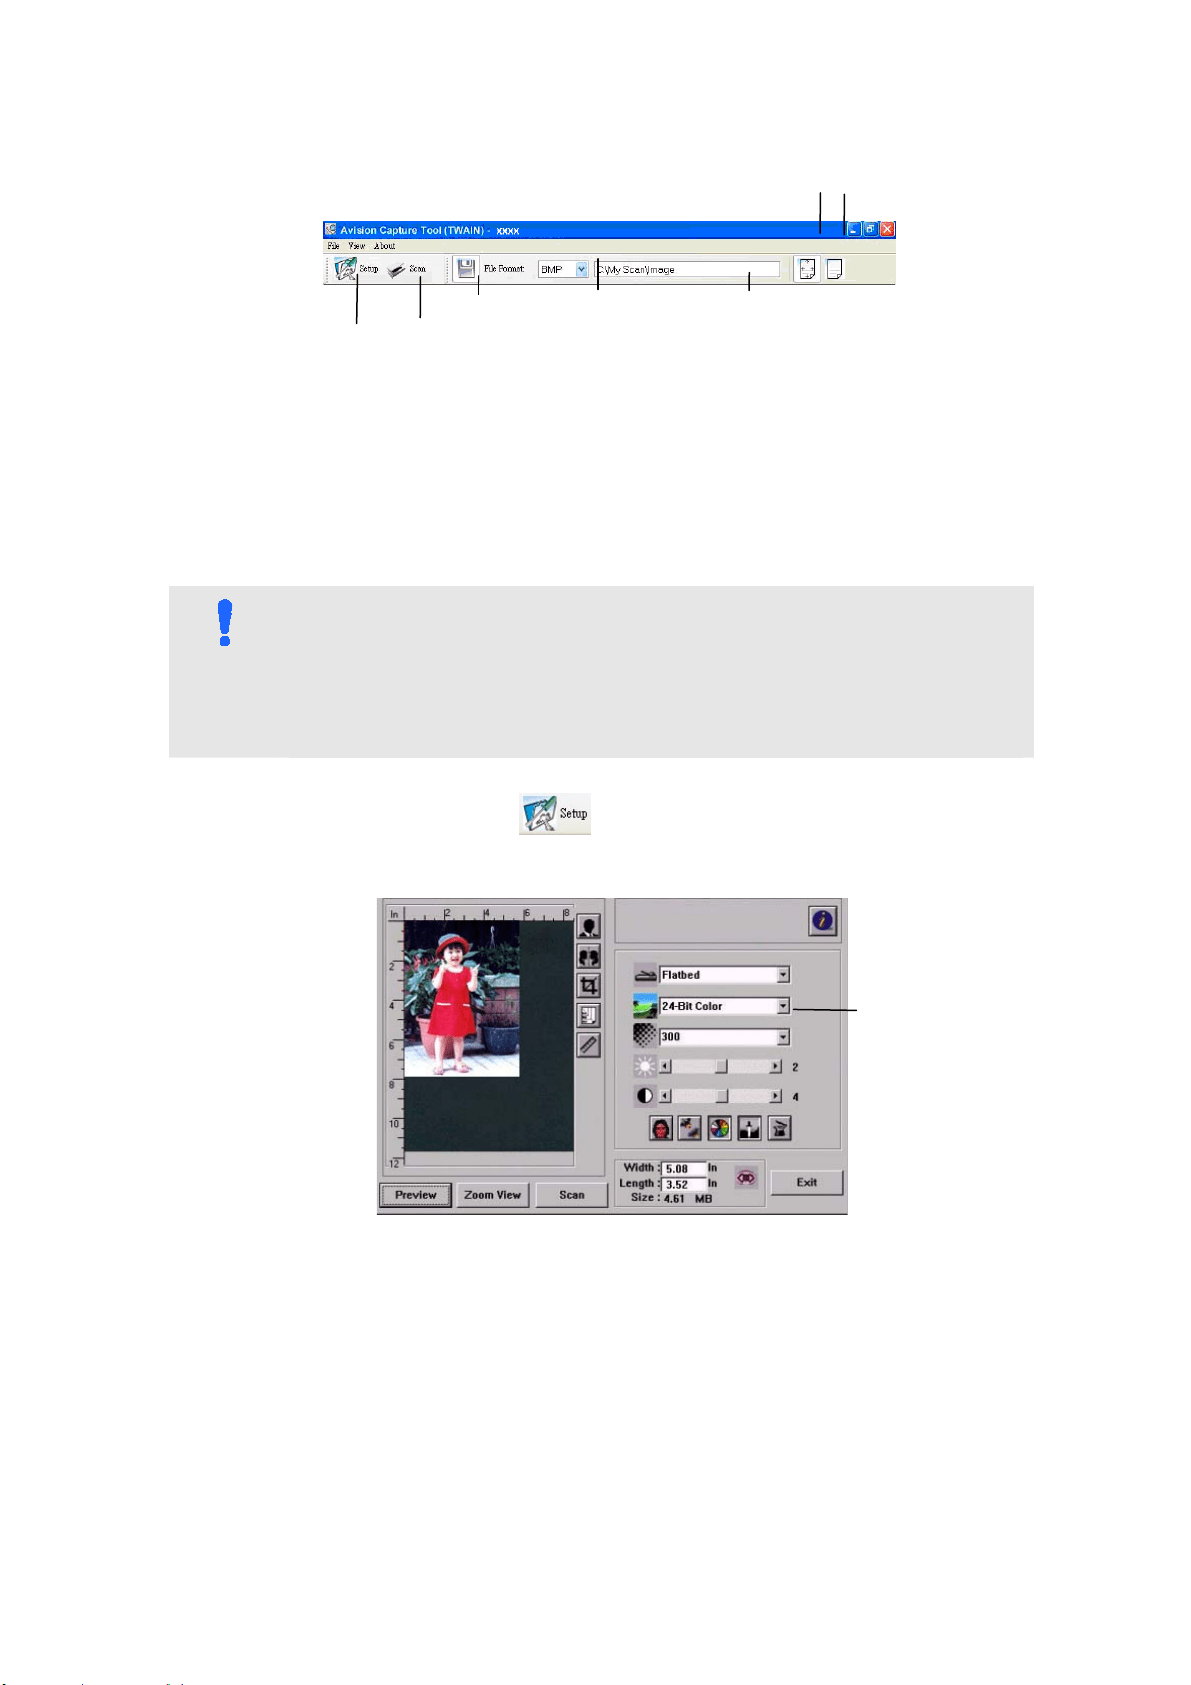
12
6
3. Choose your desired file form at from the File Form at drop down list box.
( Default is JPEG, ot her choice includes TI FF, MTI FF, PDF, MPDF, GI F, and
BMP.) The support ed file form at s vary depending on your scanner m odel.
4. Type your desired folder nam e and file nam e in t he File Pat h box. ( Default is
C: \ Docum ent s and Set t ings\ User Nam e\ My Docum ent s\ My Scan\ I m age.)
N OTE:
I f you do not wish t o save t he scanned im age, deselect t he Save but t on
since default is Save Enable. I n this case, the t hum bnail view w ill be
disabled. And t herefore, after viewing all t he scanned im ages, only t he
last one will rem ain on the screen.
5. Click t he Setup but t on (
) or choose Set up from t he File m enu to
prom pt the Scanner Propert ies dialog box.
6. From t he I m age Selection Box, choose your desired im age type for your
scanned im age. ( Default is Front B&W) I f you have a duplex scanner,
choose Front and Rear t o scan both sides of your docum ent.
7. Click OK t o quit t he Scanner Propert ies dialog box. ( To learn m ore det ails
about t he Scanner Propert ies dialog box, please see t he subsequent chapter,
Using the Scanner Propert ies Dialog Box.)
8. Place your docum ent face down on the docum ent glass or face up in the auto
docum ent feeder.
I m age
Select ion
Box
Set up
Actual
Size
Fit
Page
Scan
File Form at Save
File Pat h
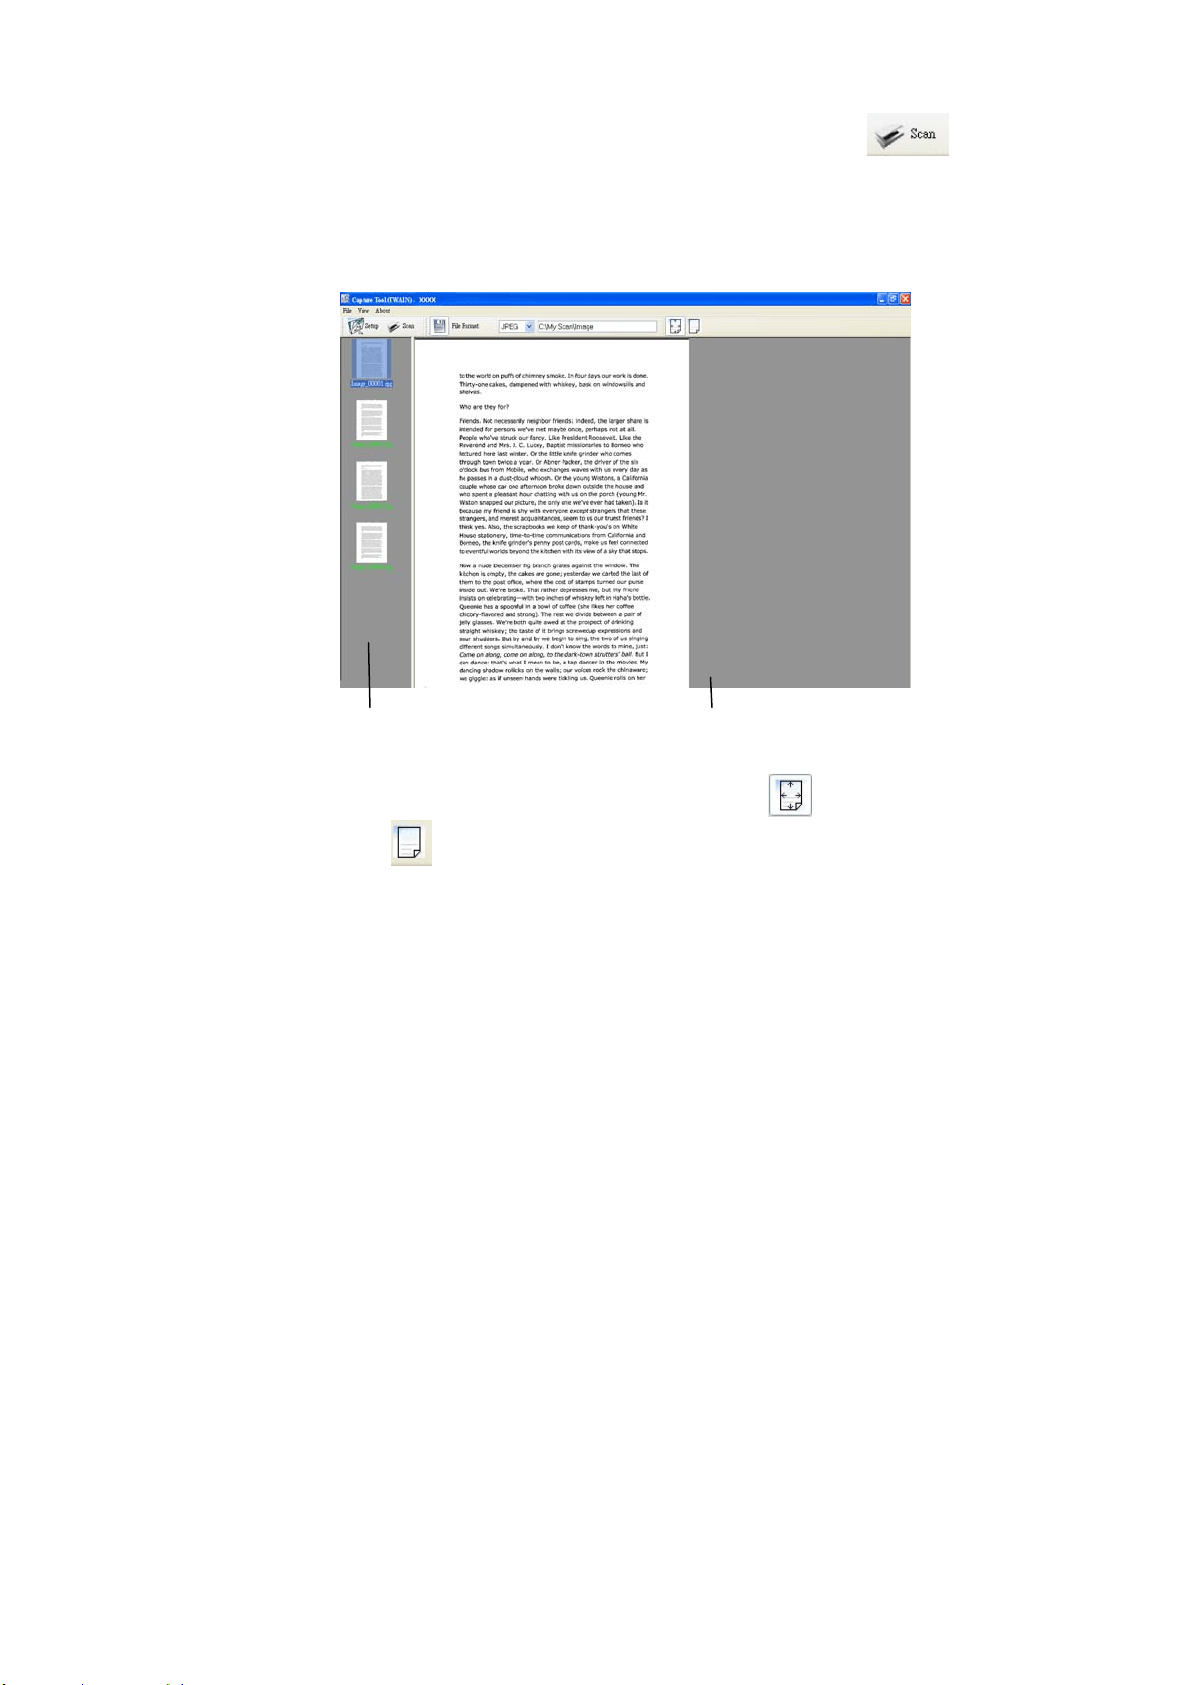
12
7
9. I n t he Scan Validat ion dialog box, click the Scan but t on ( ) or choose
Scan from t he File m enu.
10. The docum ent will be scanned and displayed in the Scan Validation screen.
Aft er the scanned im ages have been displayed, your scanner installat ion
verificat ion is com pleted.
11. You can view t he scanned im age in Fit Page (
) or Act ual Size ( 100% )
butt on (
) from t he Viewing toolbars at t he right side.
12. Click t he Close box or Quit from t he File m enu t o exit the Scan Validat ion
Tool.
St arting a Scan From Ot her I m age Editing Applicat ion
1. St art your im age edit ing application.
2. Pull down t he File m enu and choose Sele ct Source.
I f t he Sele ct Source com m and is not available on the File m enu, see your
application’s user’s guide t o det erm ine how t he TWAI N link is used. A
dialog box wit h a list of scanning sources appears.
3. Select t he m odel nam e of your product .
You need t o select t he source only once, unless you want to choose
anot her scanner.
4. Place the docum ent FACE DOW N on the flatbed glass.
Display View
Thum bnail View
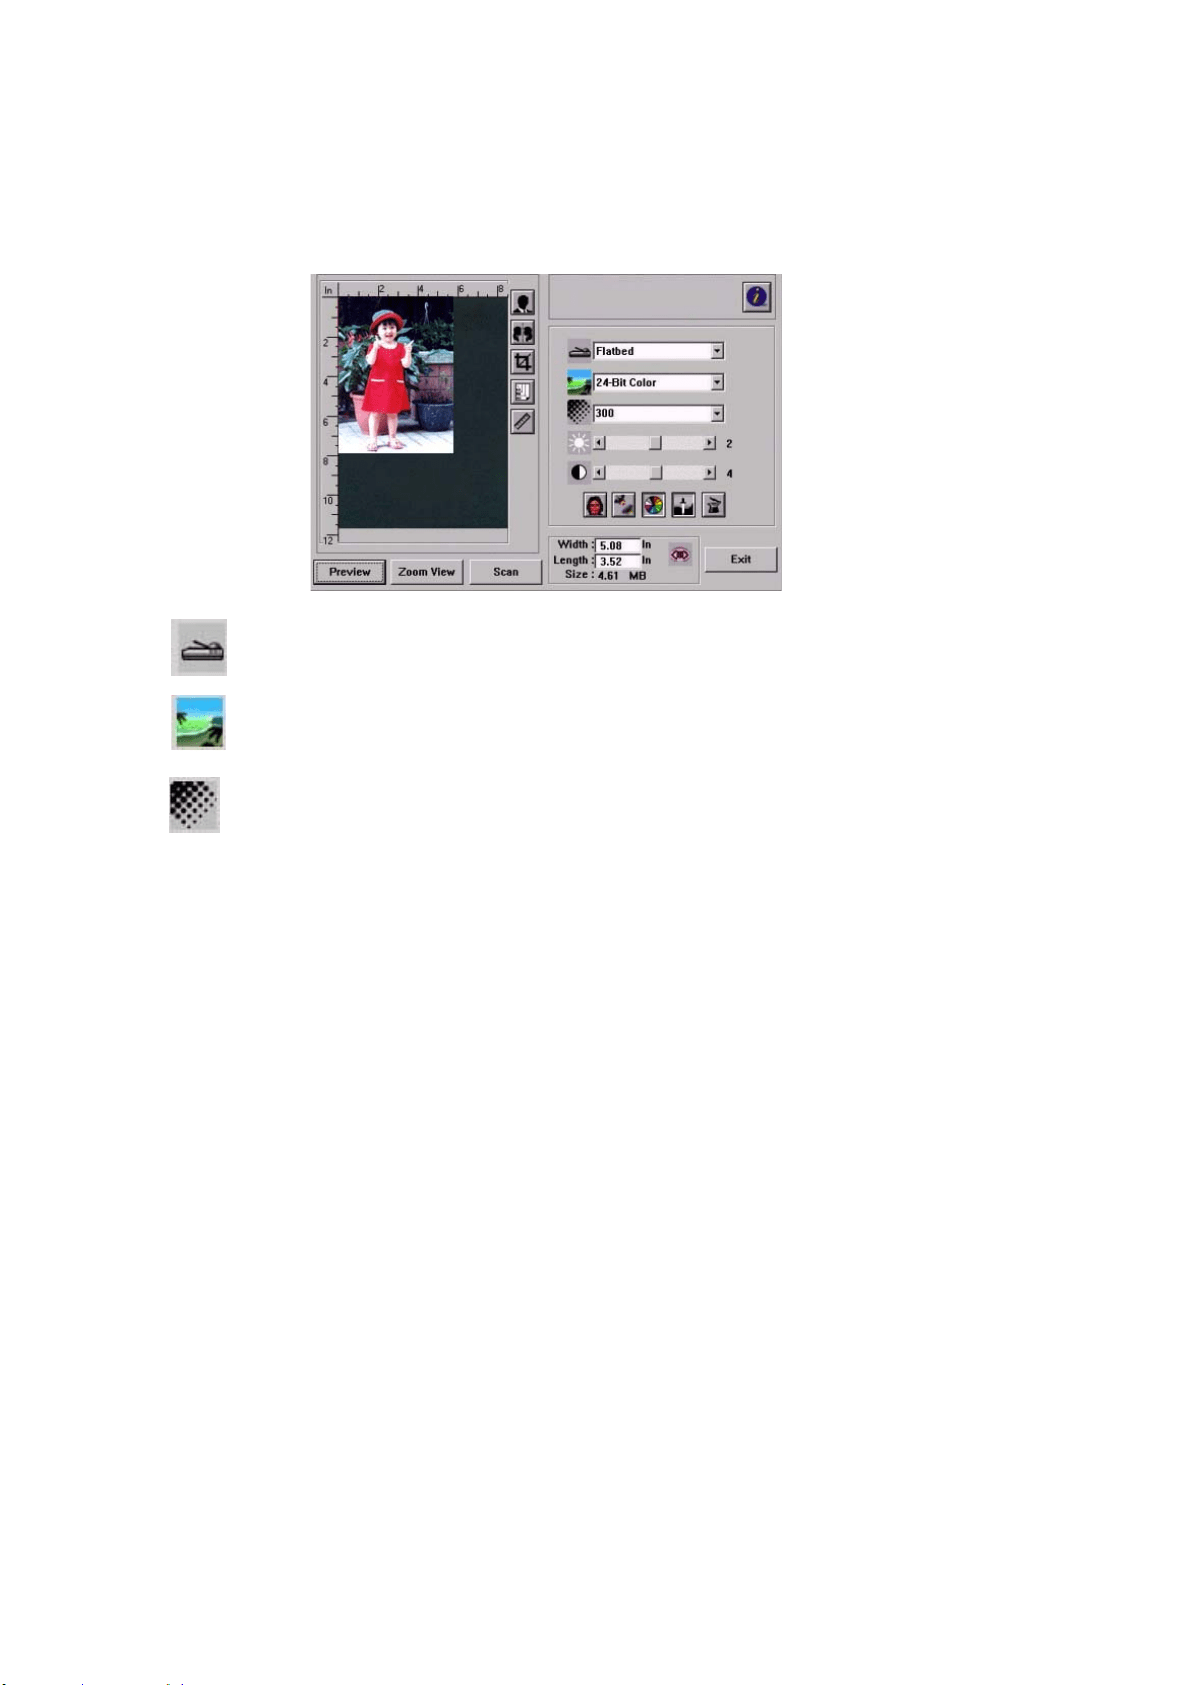
128
5. Pull down t he File m enu and choose Acquire.
A dialog box containing scanning feat ures appears.
6. Select t he scanning m ethod you want t o use on the Scan Met hod
drop- down m enu.
7. Select t he m ode you want t o use for your scans on the I m a ge Type
drop- down m enu.
8. Select a scanning resolution on t he Resolution drop- down m enu.
9. Select t he sett ing for t he scanning feat ures ( e.g. Sharpen, Descreen, et c.)
that you want t o use.
10. Click on Previe w or Sca n to preview or scan you docum ent s.
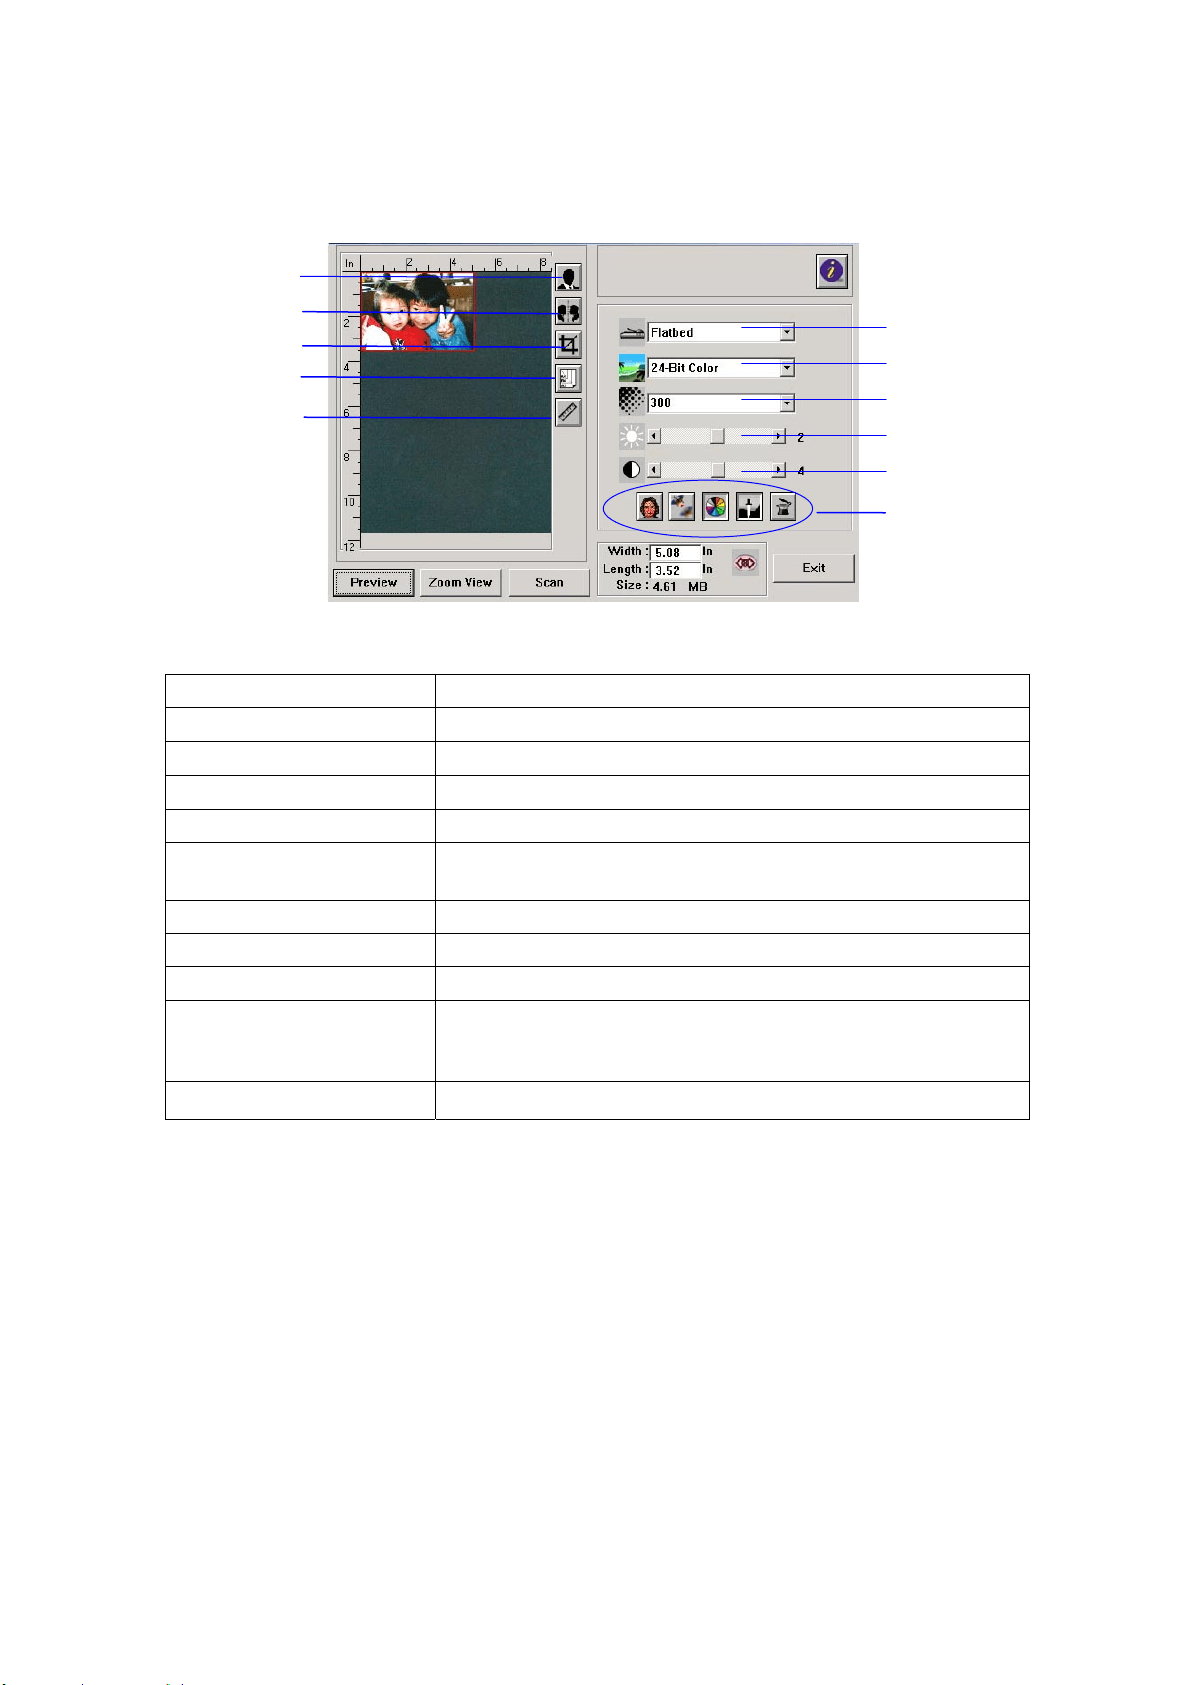
129
A Glance of t he User I nterface
1 . Sca n Met hod Choice: Flat bed, Sim plex/ Multi- Page, Duplex/ Multi- Page
2 . I m age Type Choice: Black & Whit e, 8- Bit Gray, 24- Bit Color
3 . Resolut ion
Choice: 50, 72, 100, 144, 150, 200, 300, 600 ( dpi) .
4 . Br igh t ness: Adj ust the bright ness level from –100 t o + 100.
5 . Cont rast Adj ust t he cont rast level from –100 t o + 100.
6 . Furt her Tools Descreen, Sharpen, Color Adj ustm ent, Aut o Level,
Advanced Set t ings ( From left t o right ) .
7 . I nve rt Reverse t he color of your scanned im age.
8 . M ir ror Fun ct ion Flap your im age.
9 . Pr e view Aut o Ar e a Resize your scanned area.
1 0 . Pape r Size Select your paper size from Card 4” x2.5” , Phot o 5” x3.5” ,
Phot o 3.5” x5” , Phot o 4” x6” , Phot o 6” x4” , A5, B5, A4,
Lett er, Legal, scanner m axim um .
1 1 . Me a sur in g Unit
Choice: cm, inch, and pixel.
1
2
3
4
5
6
7
8
9
10
11

13
0
Using Basic Feat ures
Choosing Scan Met hod
Choice:
Fla tbed: Select t his sett ing if you need t o scan a single page from t he flat bed.
* Sim plex / M ult i- Page, Duplex/ M ult i- Pa ge—use this sett ing if you are using the
aut om at ic docum ent feeder ( ADF) to scan docum ents at a tim e.
Sele ct ing Proper I m age Type
Bla ck & W hit e
Choose B&W if your original cont ains only B&W t ext ,
pencil or ink sket ch.
8 - bit Gray
8- bit Gray im ages contain act ual shades of gray.
2 4 - bit Color
Choose 24- bit Color if you wish t o scan a color im age.
Bla ck & W hit e Gray 2 4 - bit Color
Det er m in ing Proper Resolut ion
A proper resolut ion reproduces a clear im age wit h good details. The resolution is
m easured by dot s per inch ( dpi) .
Adj ust ing Bright ne ss And Cont r a st
1. Brightness
Adj usts t he light ness or darkness of an im age. The higher t he value, t he bright er
the im age.
2 . Cont r ast
Adj usts t he range between t he darkest and the lightest shades in t he im age. The
higher the cont rast, t he bigger t he different grayscale.
Enla rging Preview e d I m age
Enlarge your previewed im age t o t he m ax. of the preview window.

131
N ot e t his fun ct ion only enlarging your pr e view im a ge. This does not
enlarge you r r e a l im age.
I nve rt ing And Se lect ing Your I m a ge
The invert com m and reverses t he brightness and the color in t he im age. For color
im ages, each pixel w ill be changed int o it s com plem ent ar y color at t he com m and of
I nvert .
Mir ror Function
Reverse the right and left side of your im age.
Aut o Se lect I m age
Aut om atically set t he whole im age as your scan area. (Or you m ay resize the area
by dragging t he cursor diagonally.)
Enhancing You r I m age
1 . Descre
en
Elim inat es the
m oir e pat t erns* com m only found in printed m at t er.
2 . Sharpe n
Sharpen t he scanned im age.
Before Descreen Aft er Descreen
Before Sharpen
Aft er Sharpen
* M oire pa t t ern: An undesirable pat tern in a color print ing result ing from incorrect
screen angle of overprinting halftone.
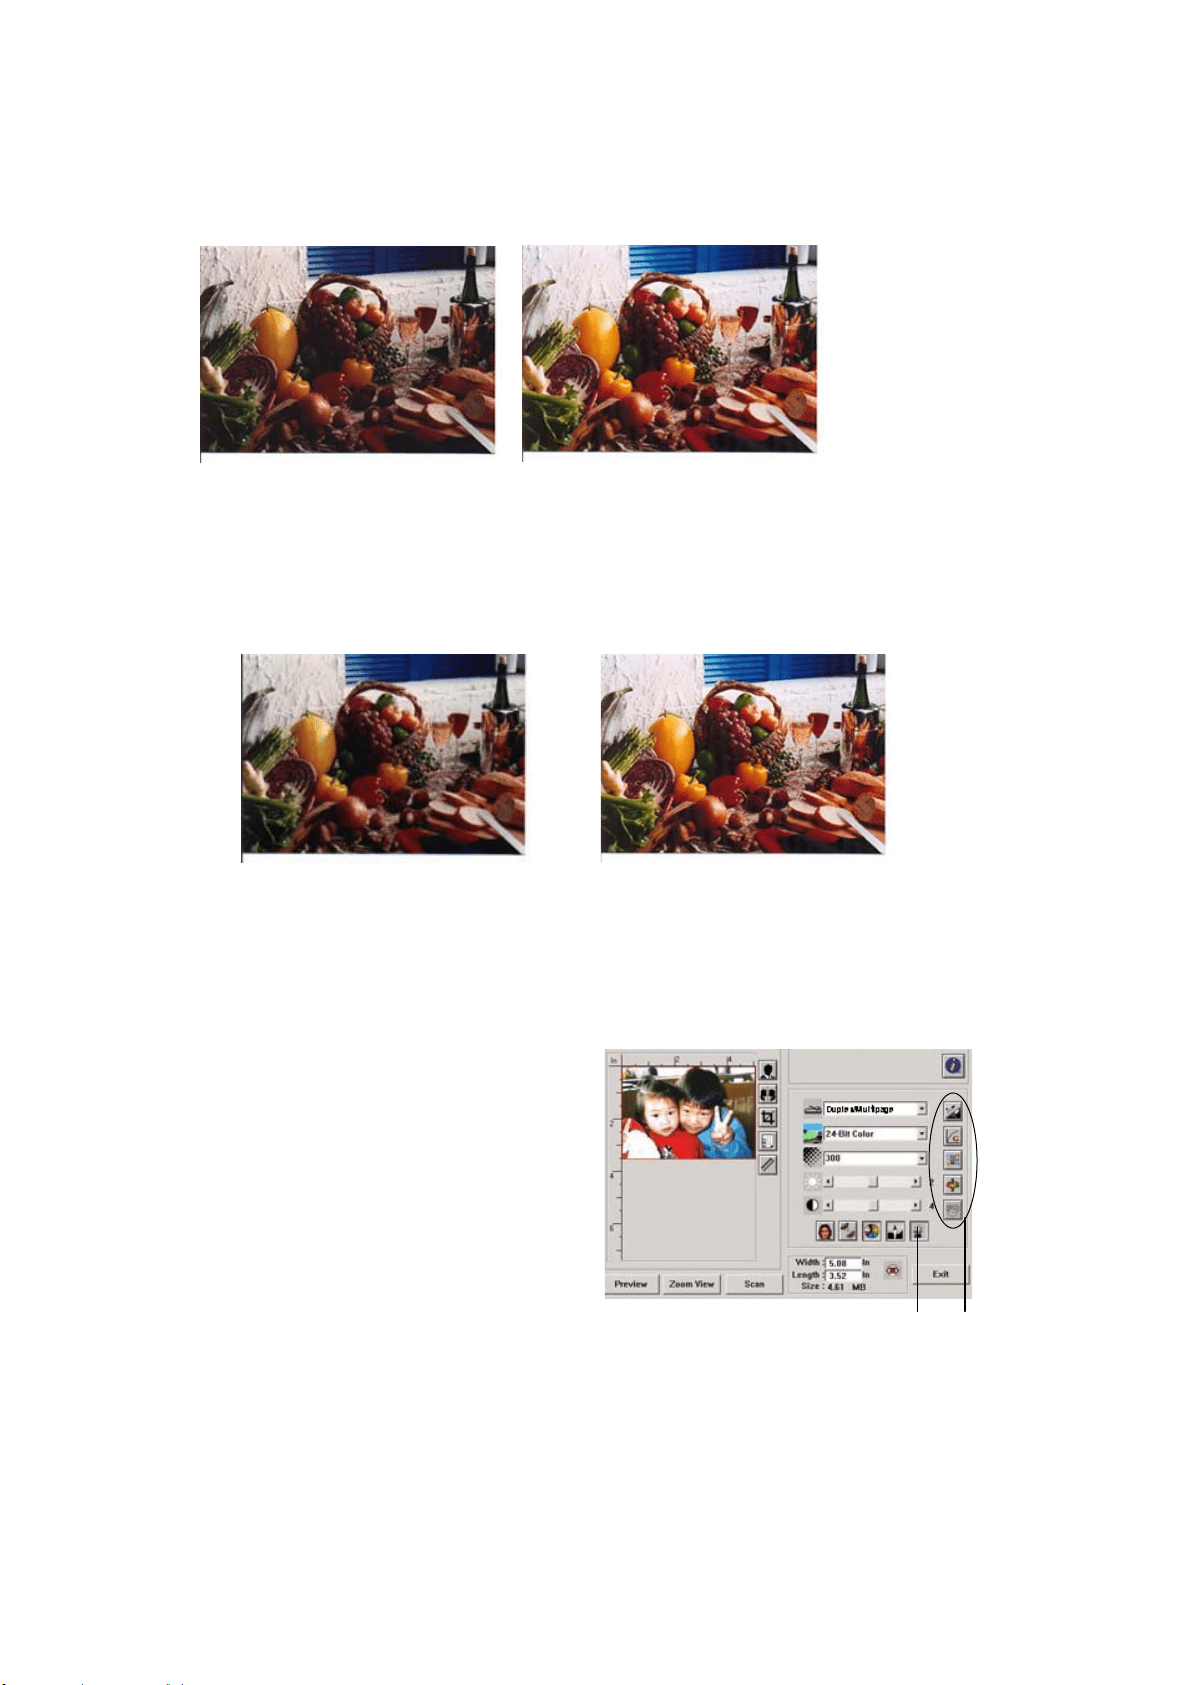
13
2
Color Adj ust m ent
Adj usts t he color qualit y of t he im age so that it com es close t o the original. This
funct ion uses default param eters to adj ust the im age.
Norm al
Aft er Color Matching
Au t o Level
Aut om atically adj ust s t he highlight and shadow areas of the scanned im age to
optim ize your im age.
Norm al
Aft er Auto Level
Using Advance d Fea t ures
The Sw it ch but t on
1 . Click the butt on t o pop up t he advanced
set t ings bar at t he right side. The
advanced set t ings include
Highlight/ Shadow,
Hue/ Sat uration/ Light ness, Curve, Color
Balance, Color Drop-out .
2 . The Advanced Settings bar
1
2

133
Adj ust in g Highlight/ Shadow Le ve ls
Highlight refers t he light est point in a scanned im age while shadow
refers t he darkest point. Using Highlight and Shadow t ool t oget her
allows you t o extend t he range of color and reveal m ore det ails in a
gray or color im age.
1 . Sha dow : The darkest point of an im age.
2 . Ga m m a: The m idt ones of t he im age.
3 . H ighlight : The light est point of an im age.
4 . Point e r : Move t he point er t o change t he value.
W hen t he va lue of ga m m a changes, the im a ge cha nges accordingly.
Gam m a Value: 1.0
Gam m a Value: 1.4
Gam m a Value: 2.0
1
2
3
4
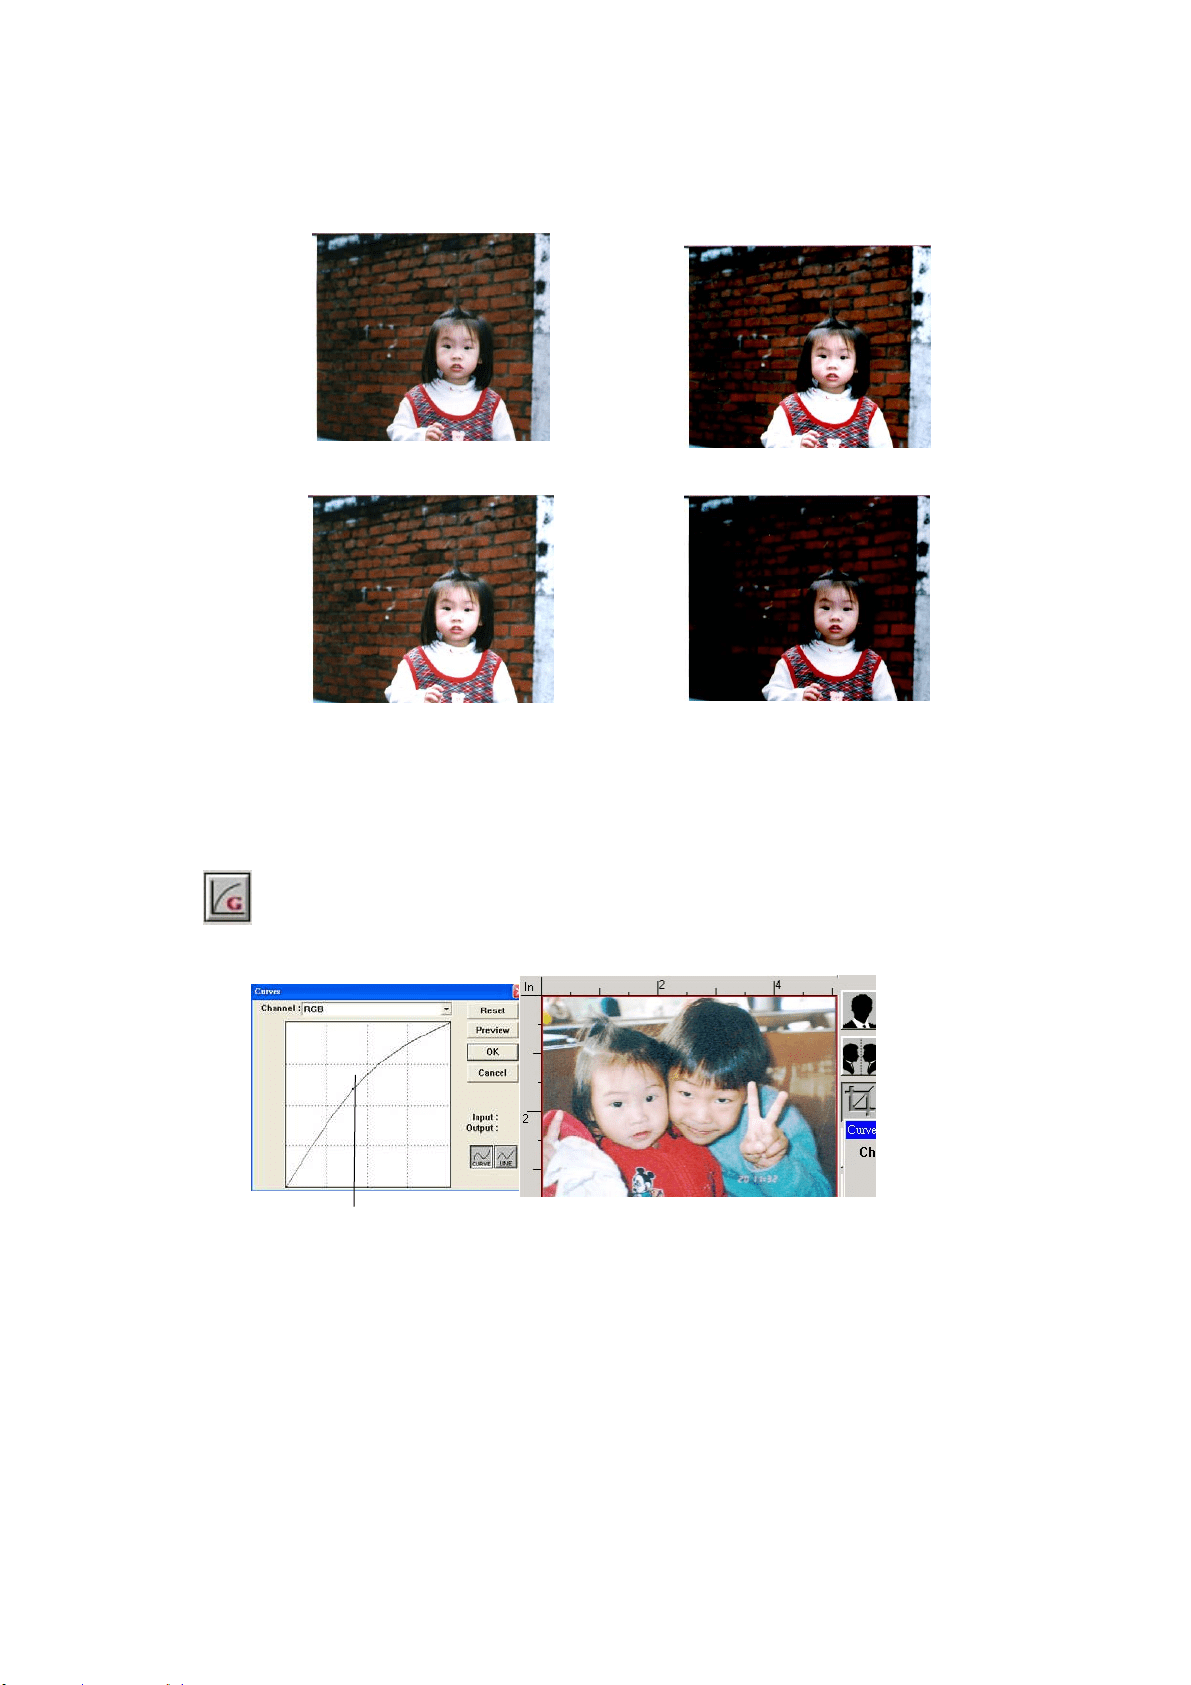
134
W hen t he va lue of highlight and shadow cha nge, t he im a ge cha nge s
accordingly.
Highlight : 255/ Shadow: 0( Norm al)
Highlight : 210/ Shadow: 10
Highlight : 200/ Shadow : 0
Highlight : 255/ Shadow : 50
Adj ust in g t he Bright ness Cu rve
Adj usts t he m idt ones of the im age without dram atically alt ering t hen
light est and the darkest areas.
When the curve is m oved up or down, the
im age t urns bright er or darker.
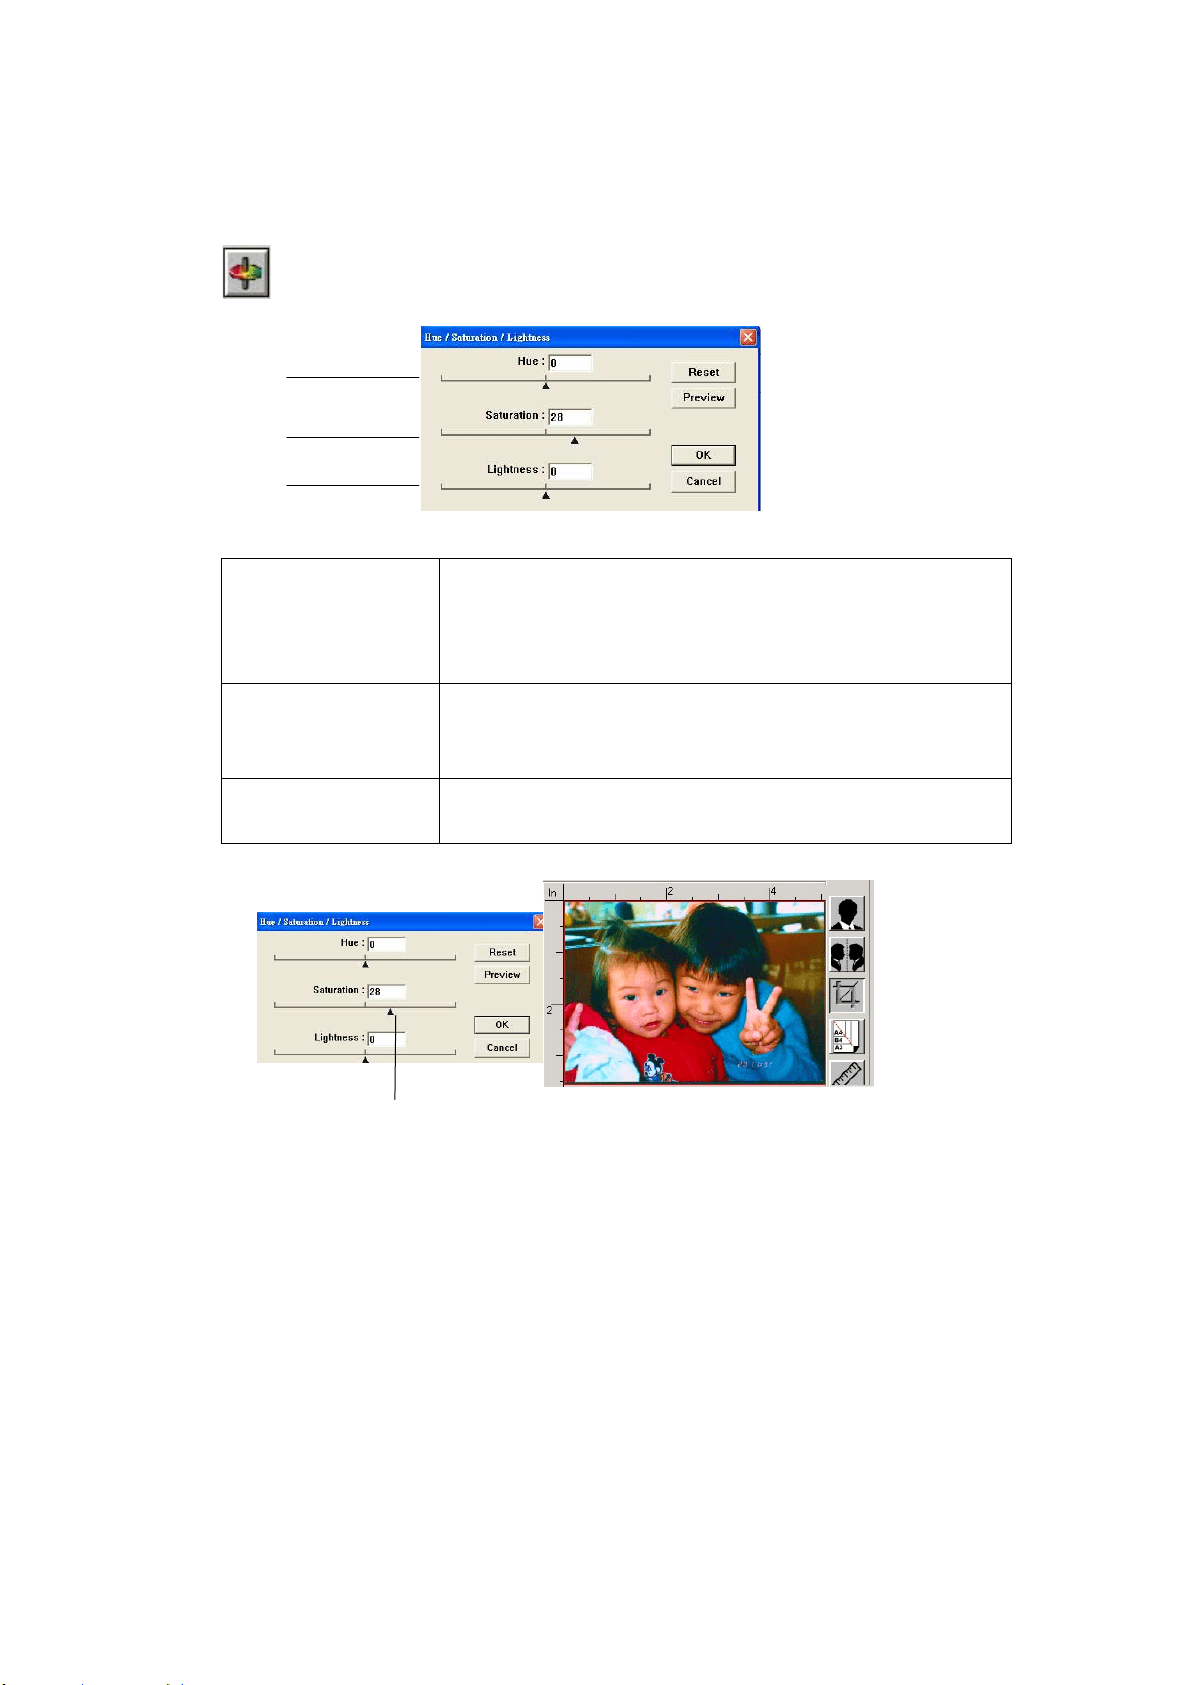
13
5
Changing Color Hue/ Sa t ura t ion/ Light ne ss
I m prove your im age by changing t he level of
hue/ saturation/ lightness.
( 1 ) . H ue Adj ust the hue by m oving t he triangle t o the right or
left . ( Not e t he level of int ensit y for t he color will be
changed sim ultaneously when t he hue adj ust m ent is
m ade) .
( 2 ) . Sa t ura t ion Move t he triangle t o the right t o increase t he saturation
level or t o t he left t o decrease the level. The level of
saturation decides if t he color is pale or rich.
( 3 ) . Light n e ss I ncrease t he light ness by m oving t he triangle t o the
right or t o the left t o decrease t he lightness.
(1)
(2)
(3)
Move t he Saturat ion point er t o t he right , t he
color t urns rich.
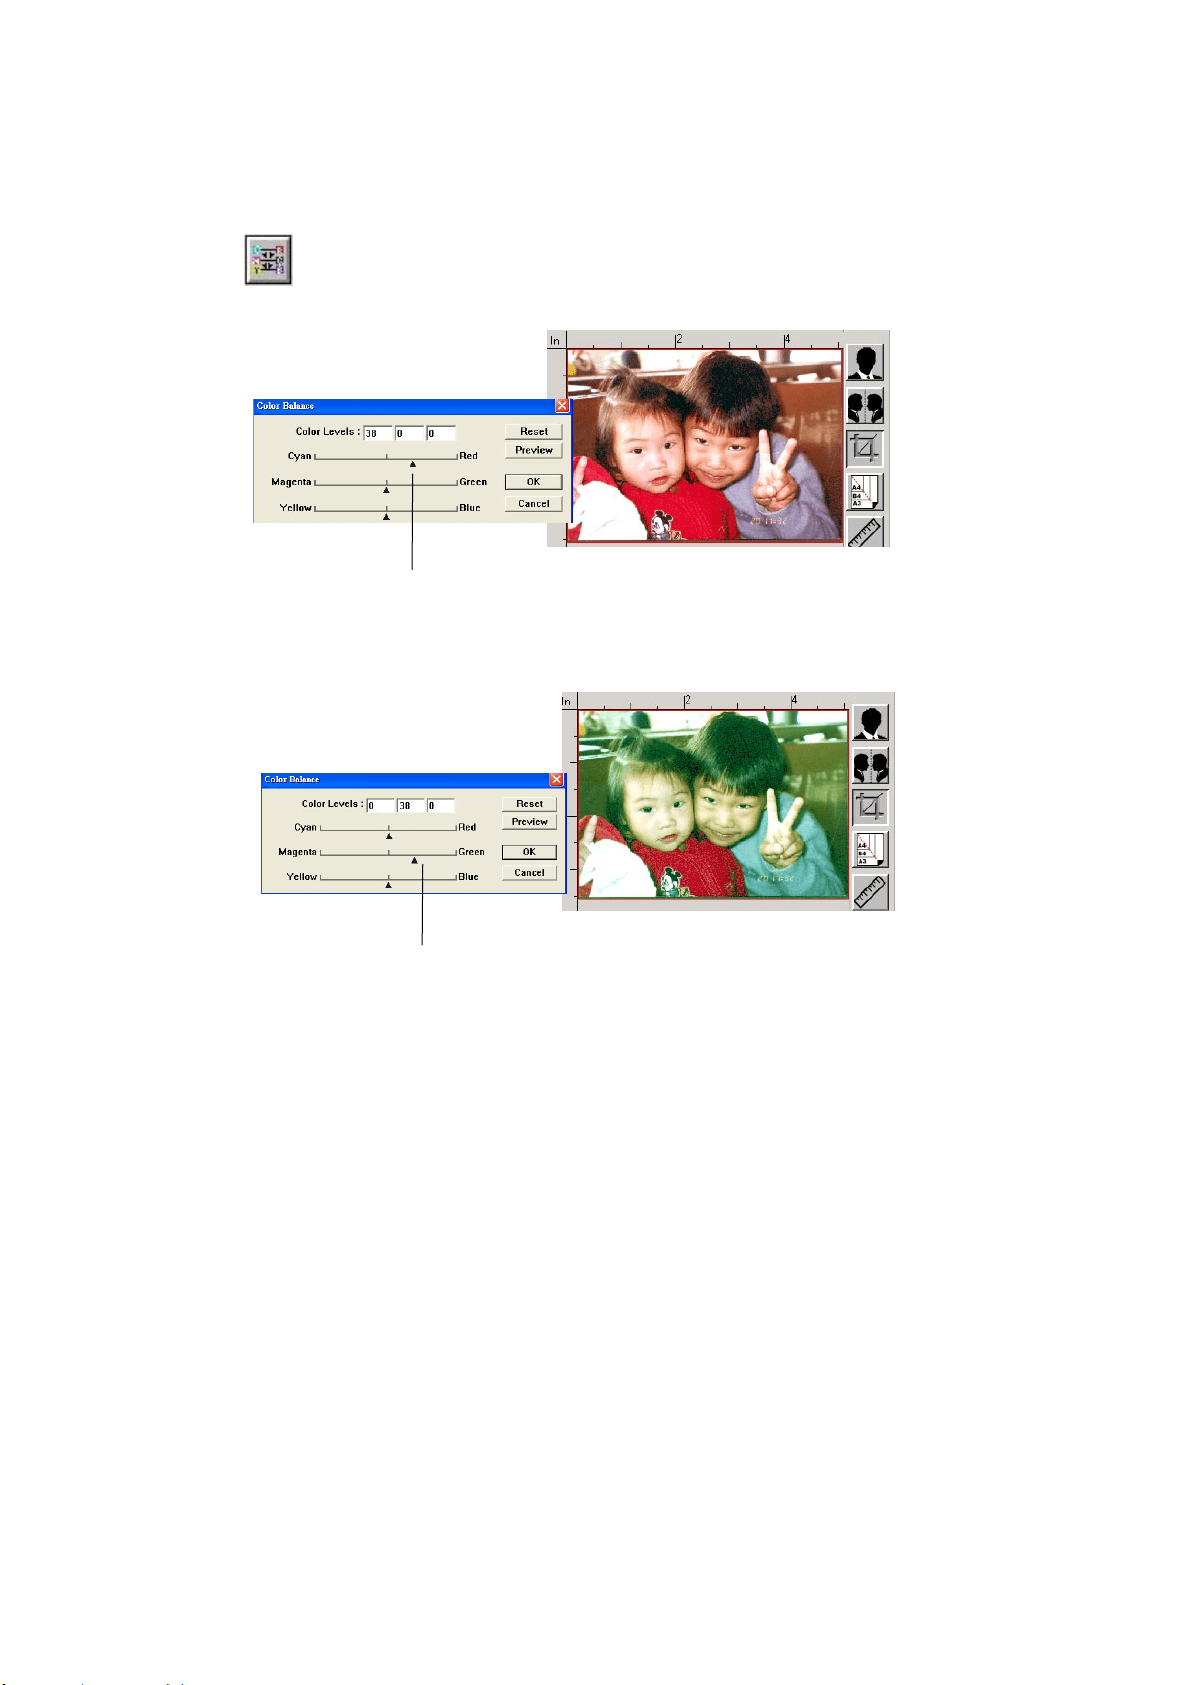
13
6
Using Color Ba la nce
The Color Balance allows you to obt ain an opt im al im age qualit y.
Move t he pointer toward Red, t he im age t urns int o a reddish hue.
Move t he point er t oward Green, t he im age t urns into a greenish hue.
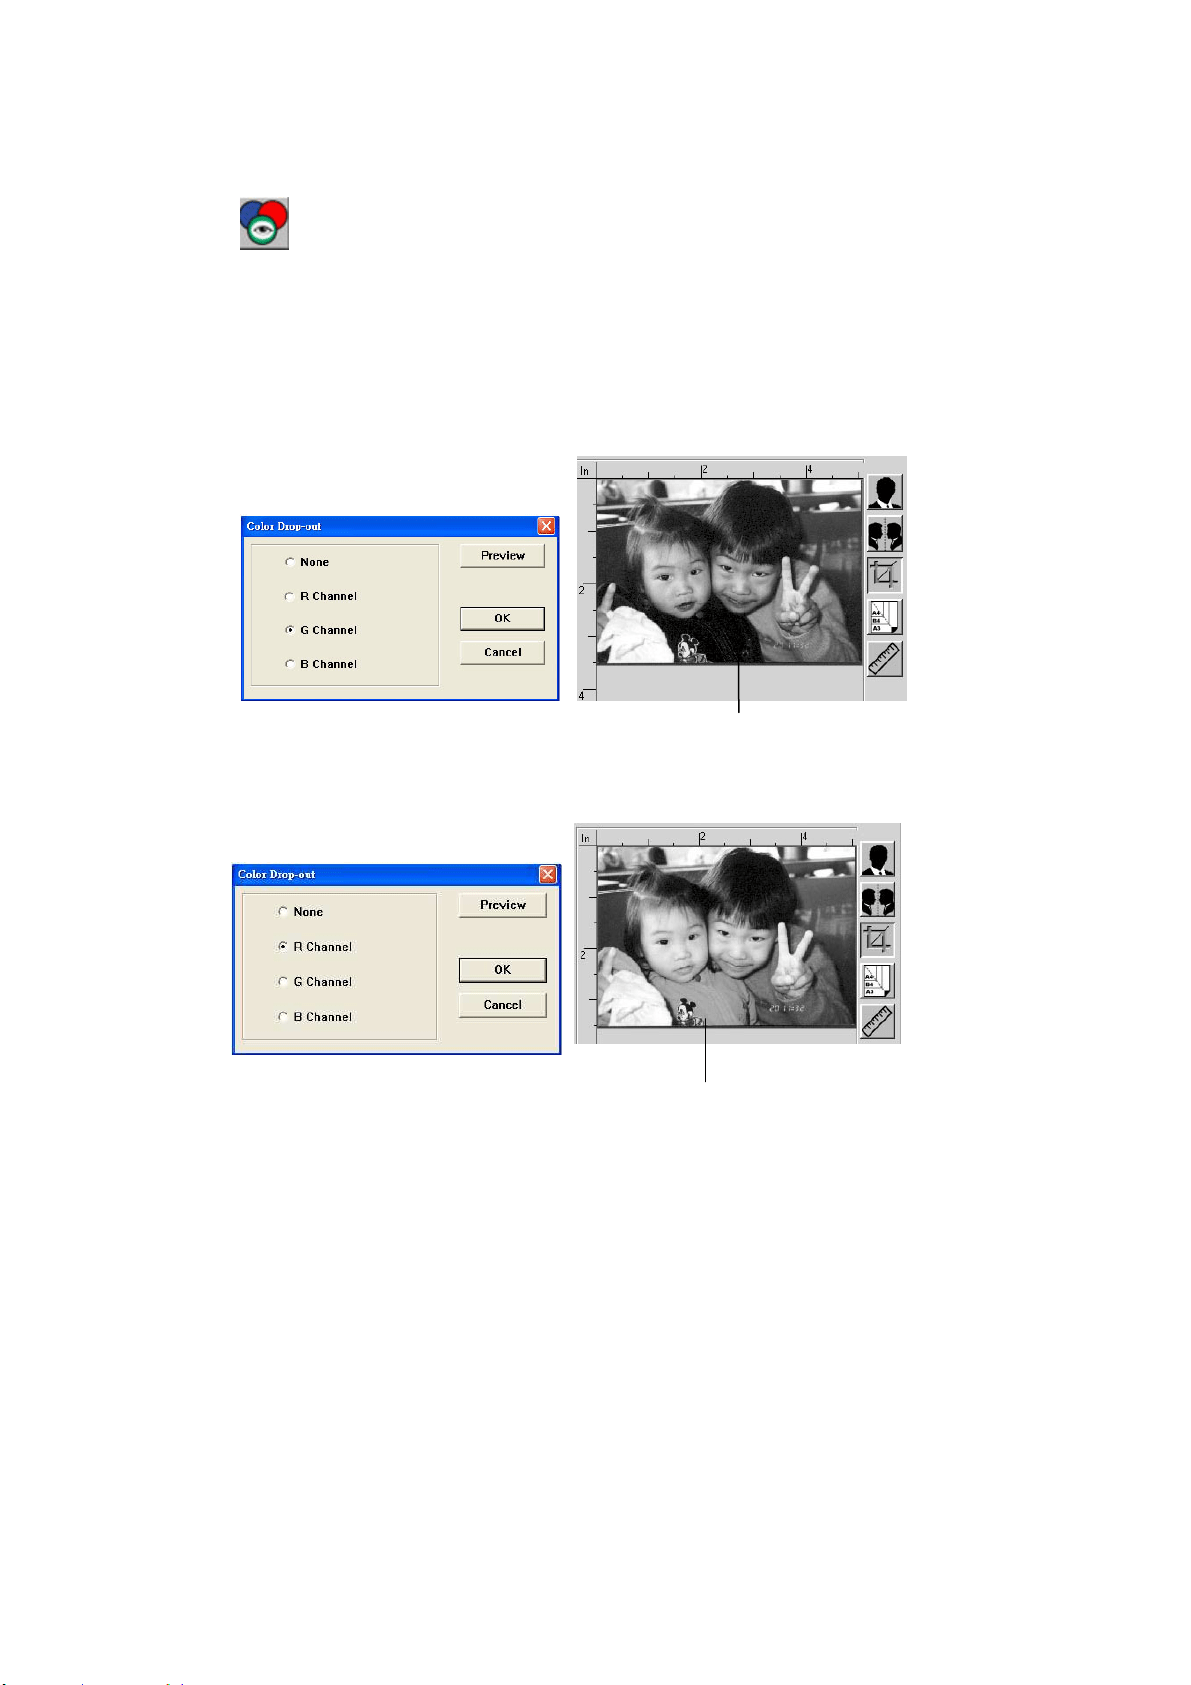
13
7
Color D rop- out
Click t he but t on and a dialog box in below will be displayed. This
dialog allows you to rem ove one of the R ( Red) , G ( Green) , or B
( Blue) color channel. This function is part icularly useful when you
need to convert text using OCR software.
Note t hat this funct ion support s only black & whit e and gray im age.
Therefore, be sure t o choose any black & white or gray im age t ype
while applying t his funct ion.
The effect on im age aft er rem oving the G channel
The effect on im age aft er rem oving the R channel.
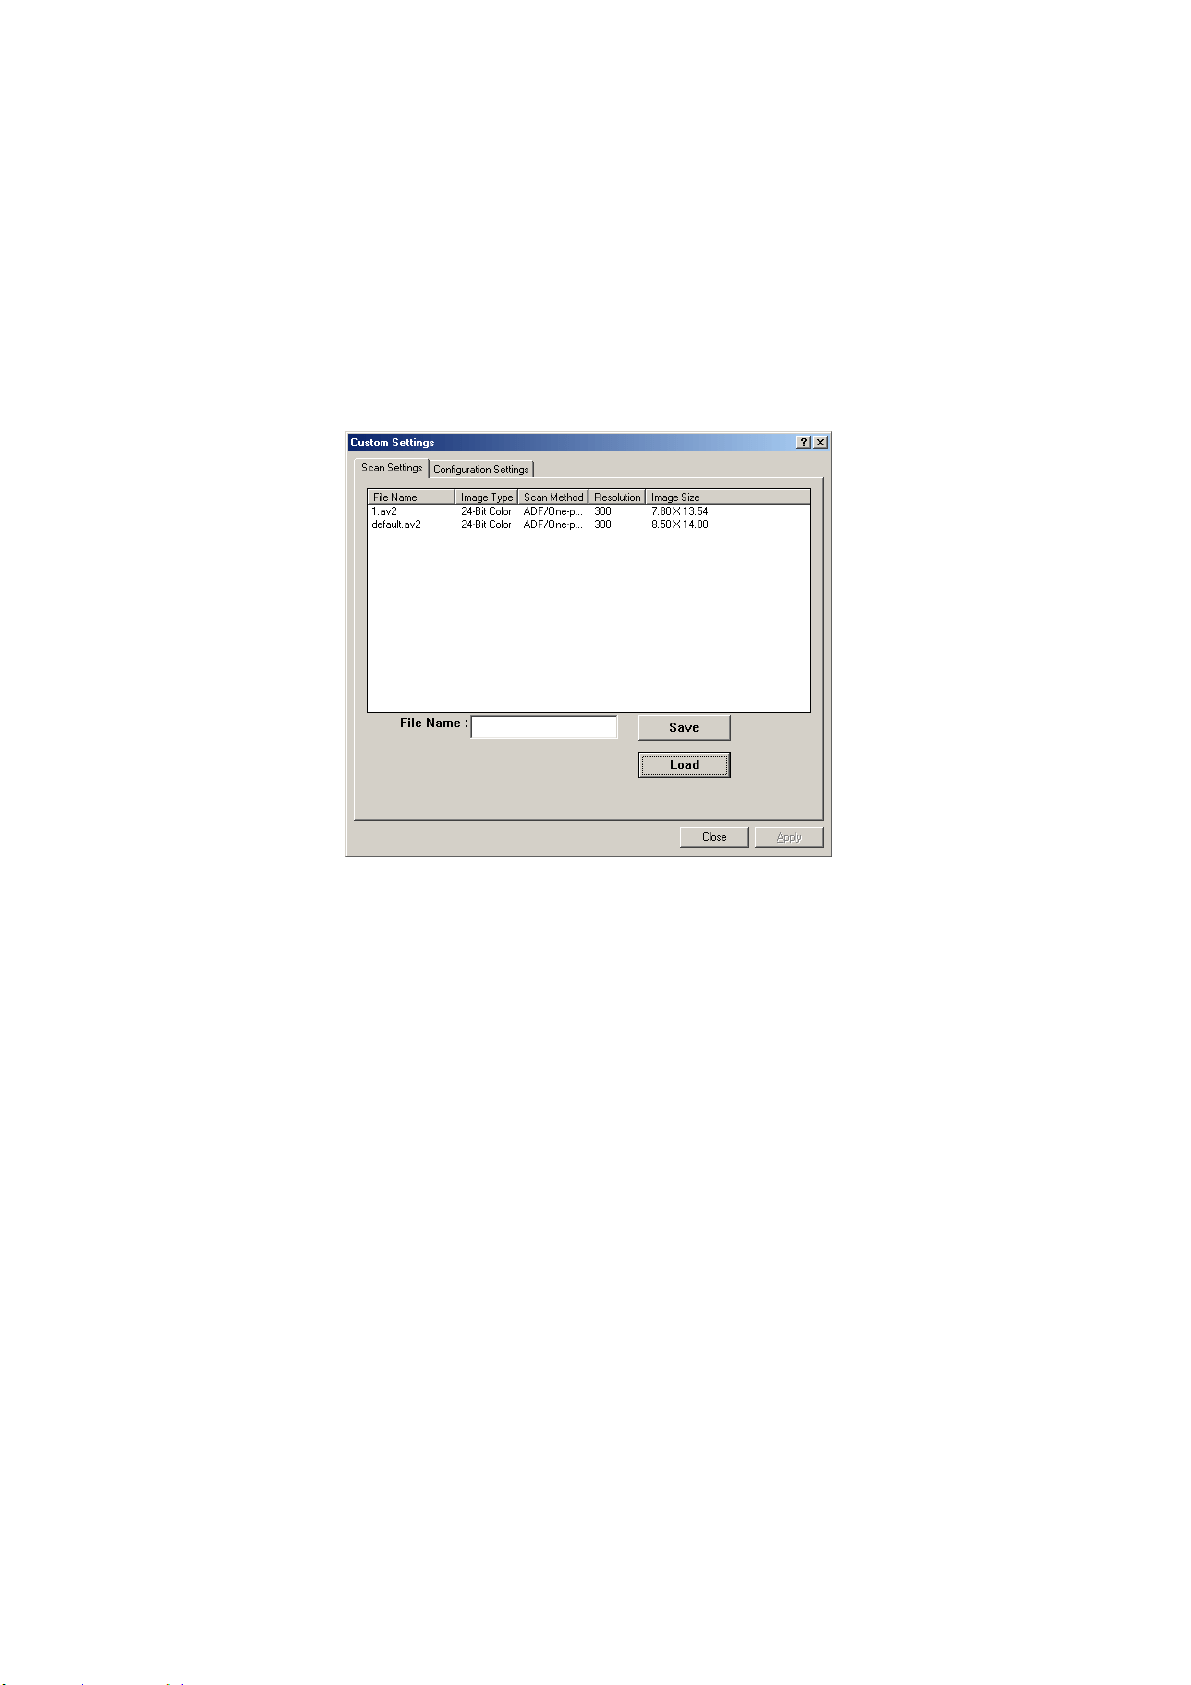
138
Custom Set t ings
C
lick the Cust om Set t in gs but t on to access a dialog box where you can save your
scan settings and configurat ion set t ings. There are t wo t abs: Scan Set tings and
Configurat ion Settings.
Scan Sett ings
The Scan Set t ings t ab allows you to save your scanning feat ure sett ings in a file,
load an exist ing file, or delet e an existing file.
Saving a sca n set t ings file
Type a nam e for your set t ings in t he File N a m e text box and click the Save
but t on. Your sett ings w ill be saved and t he file nam e w ill appear in t he list box.
Using a scan set t ings file
You can use an existing settings file. Right - click t he file nam e for t he set t ings
you w ant t o use and click the Load butt on. The sett ings in t he file will
aut om at ically be specified in the scanning features dialog box.
Delet ing a scan se t t ings file
Right - clicks a file nam e and press t he D elet e but t on t he com put er keyboard t o
delete t he file. Not e you cannot delete the default scan set t ings file default .av2.
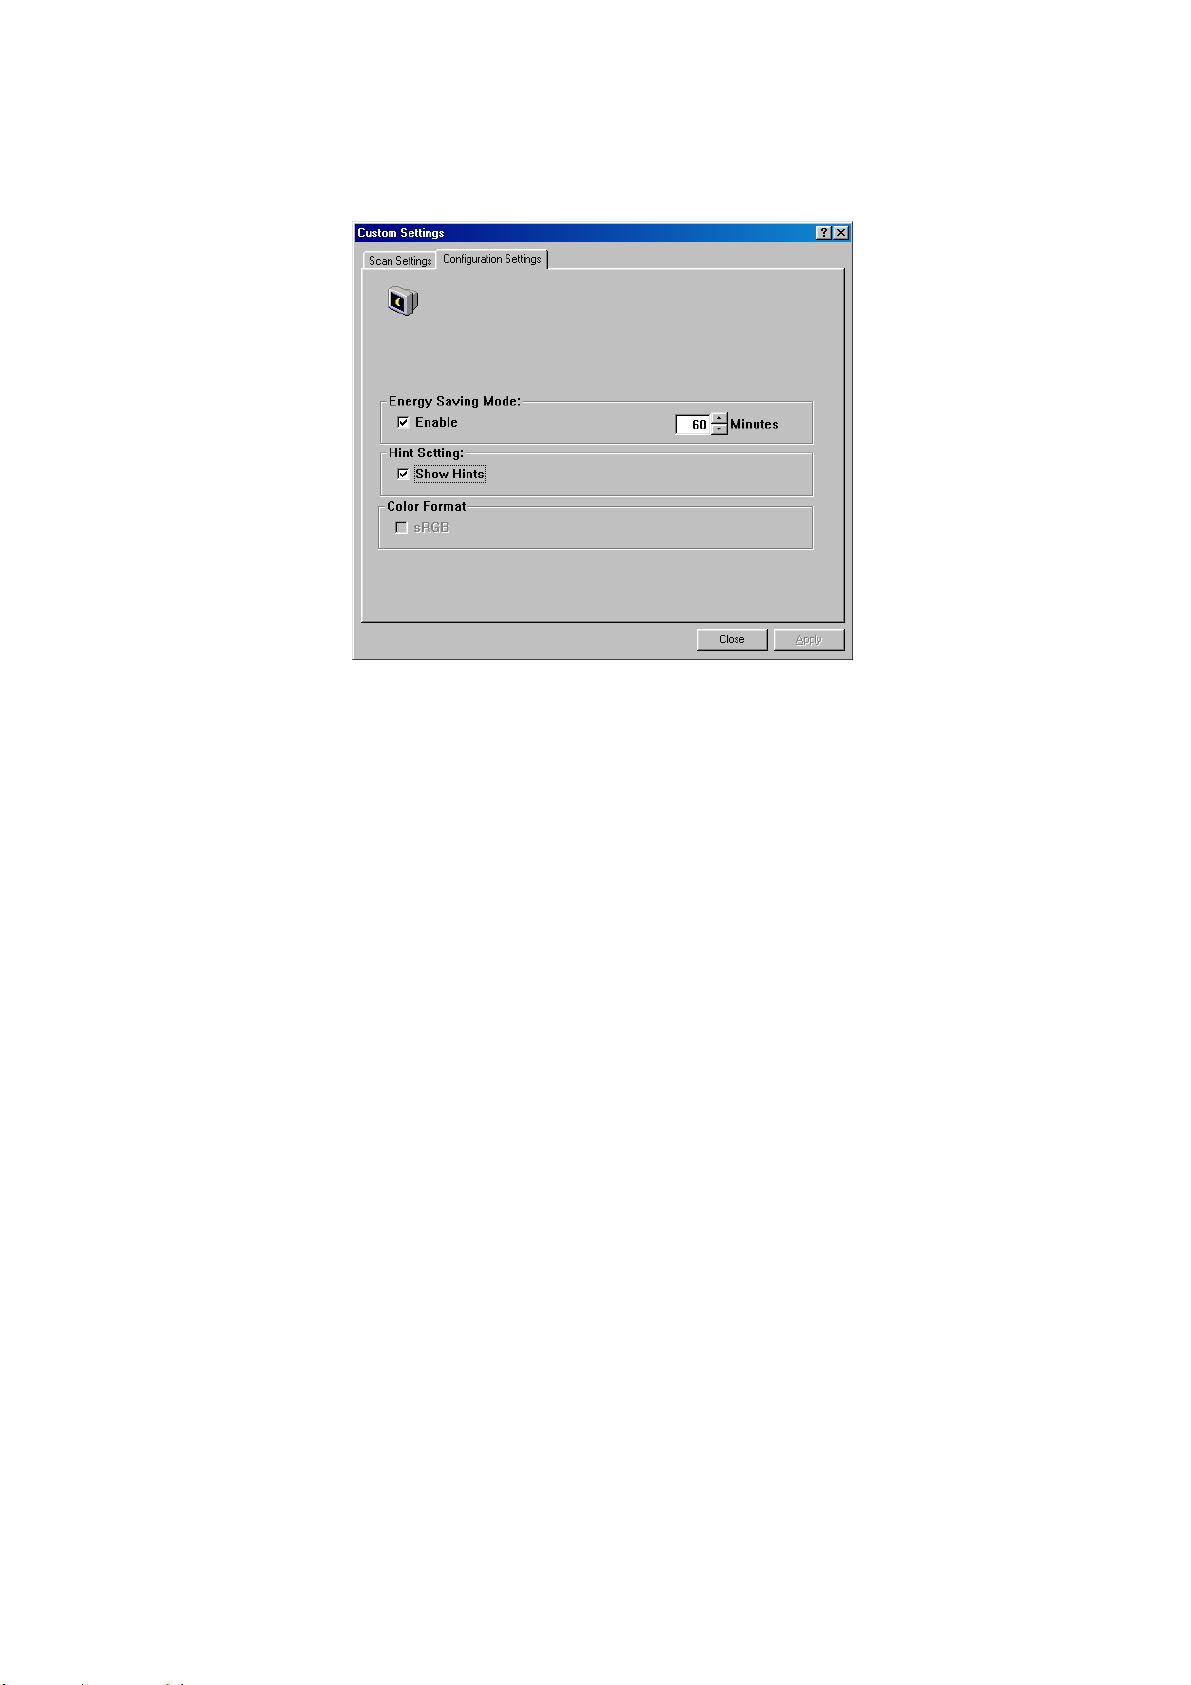
139
Configura t ion Se t t ings
The Configurat ion Se t t ings tab allows you t o cust om ize configurat ion set t ings.
Energy Sa ving Mode—checks the Ena ble box t o enable energy savings. You can
specify a t im e delay in t he Minut es box. Click the Apply butt on t o save the
changes. The default set ting is 15 m inutes.
Hint Set t ing—check t he Show H int s box if you wish to show a pop- up m enu
when your cursor is placed on an item .
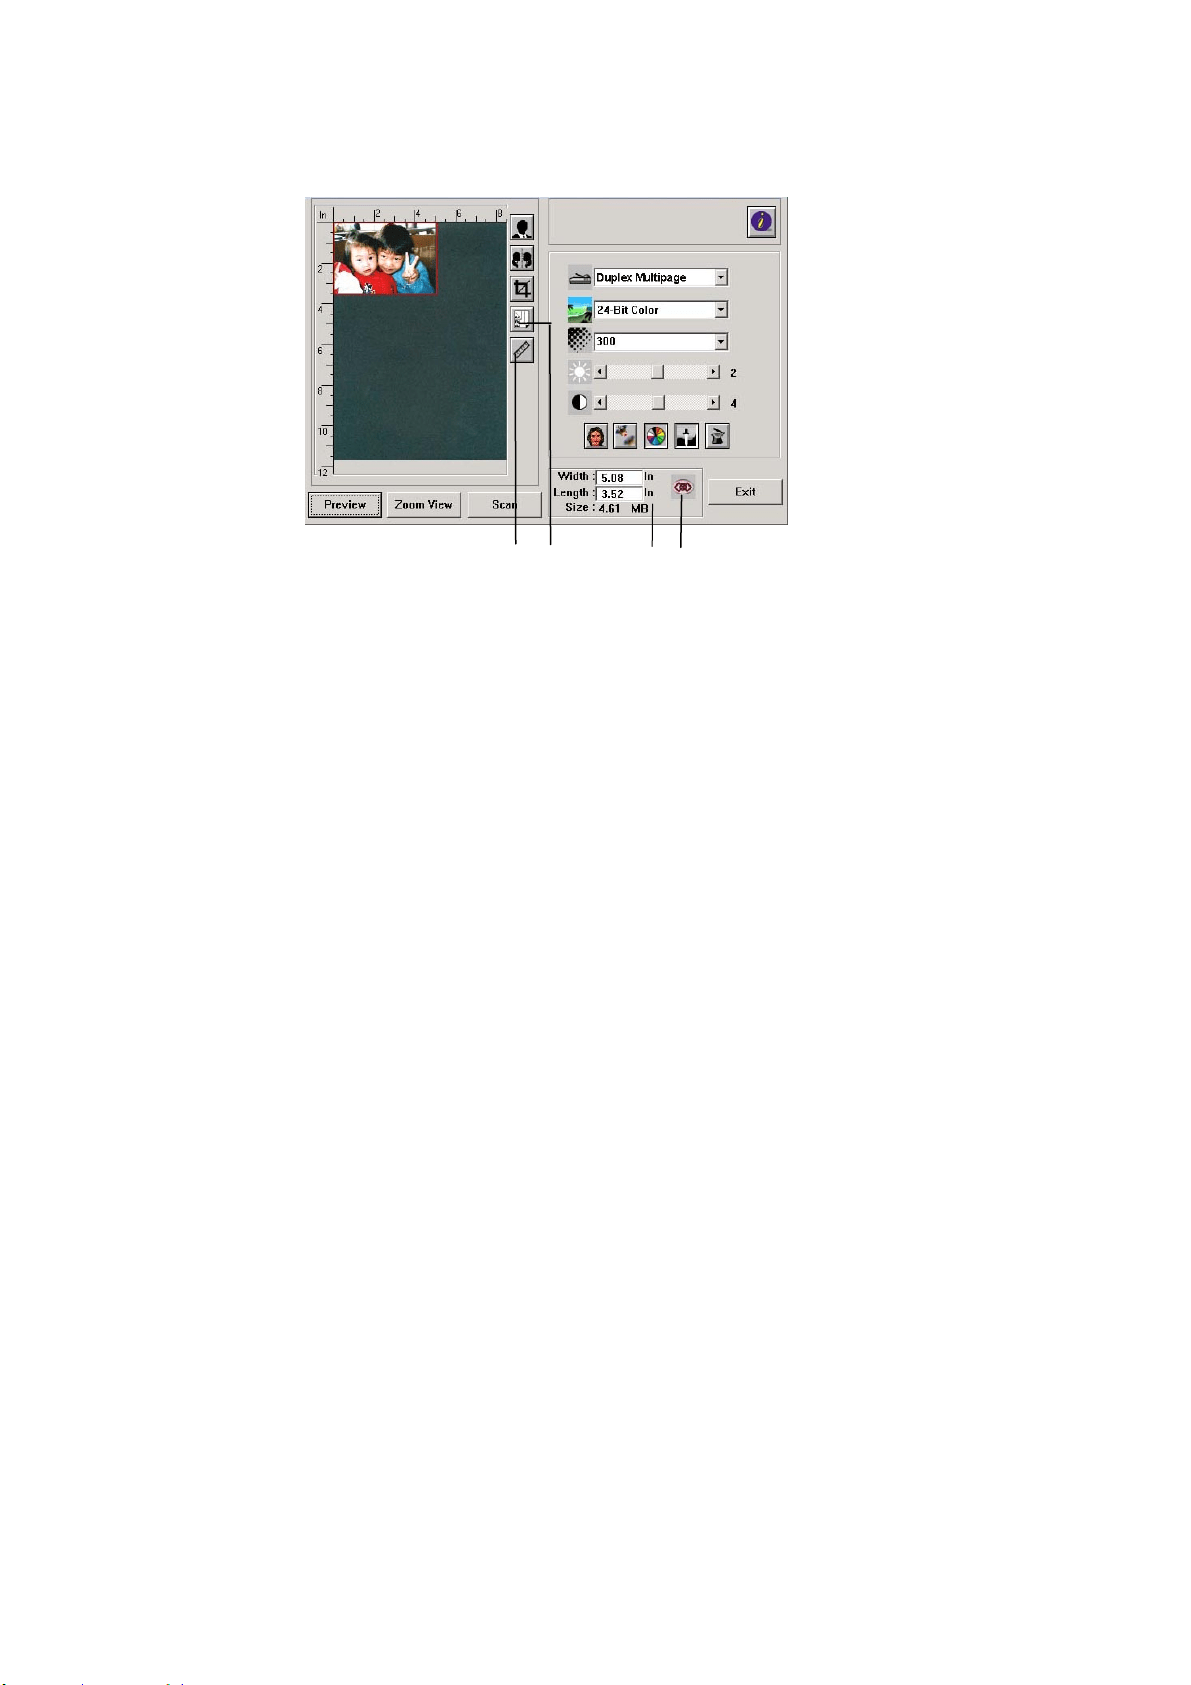
140
Using Other Tools
1 . Me a sur ing Unit A rem inder of t he m easuring system in use. By
clicking t he but t on, you can change the m easuring
unit .
Choice: I n ch, cm , Pix el.
2 . Pape r Size Provide frequently used scan sizes.
Choice: Card 4 x2 .5 in., Phot o 5 x 3 in., Phot o
6 x4 in., B5 , A5 , A4 , Le t t e r , and Scann e r
Ma x im um .
3 . I m age Size Display im age size for t he scanned area.
4 . Lock I m age Fix your out put widt h and height.
1 2
3 4
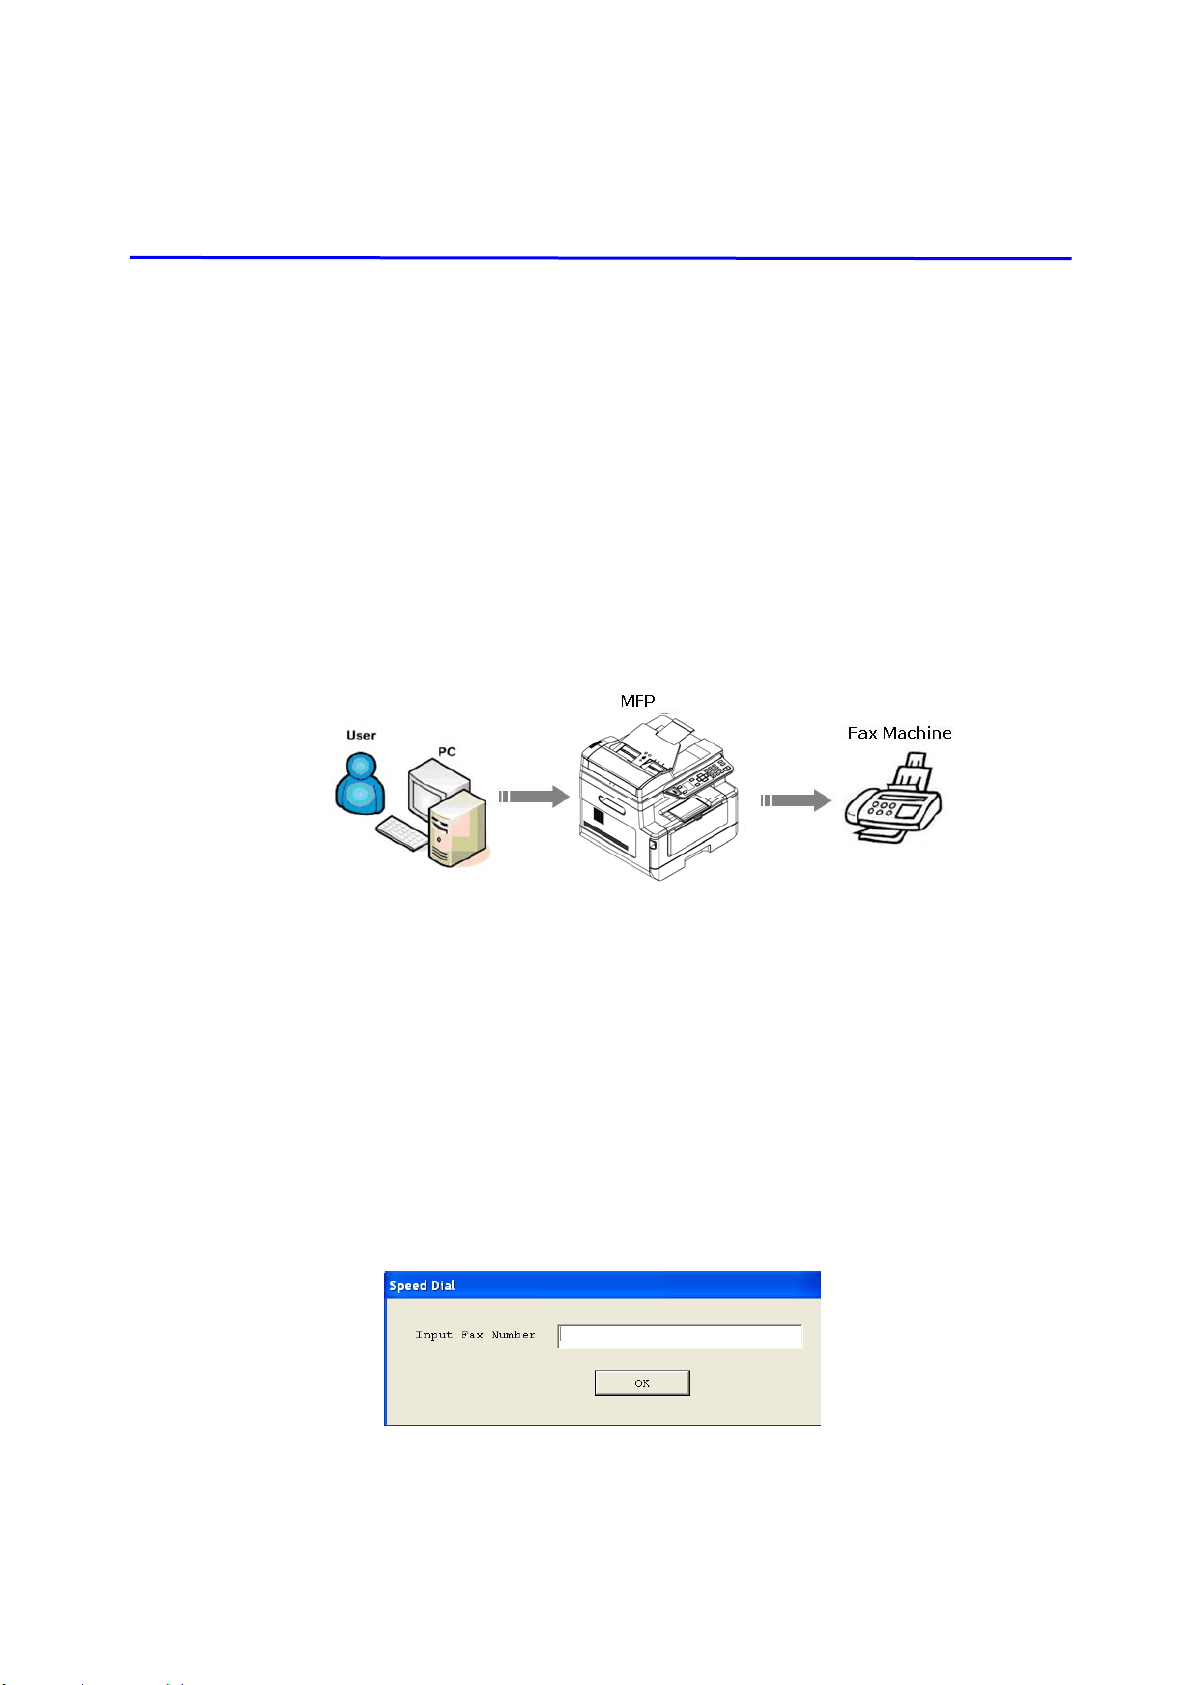
141
9 . Using PC- Fax
Wit h the PC- Fax feat ure, when your com put er is connect ed to t he product which
includes an optional fax m odem and a t elephone line and has been set up
according t o the preceding section I nst a lling a t e le phone line, you are able t o
send files t o ot her fax m achines t hrough your com put er. Sim ply open your file,
select 「Avision AM30XX Fax」as your print er, and ent er t he recipient ’s fax num ber
through the AM30XX fax propert ies dialog box. The fax j ob is done! Yet before
using the PC- Fax funct ion, m ake sure t hat you have successfully installed the
product’s print er driver on your com puter.
Sending Faxes t hrough Your Com put er
1 . Open your file.
2 . Choose Pr int from the File m enu.
3 . Select AM 3 0 XX to be your print er.
4 . Press Pr int .
5 . Ent er your fax num ber when a fax num ber dialog is prom pted and press OK
to start sending.
Sending
Sending
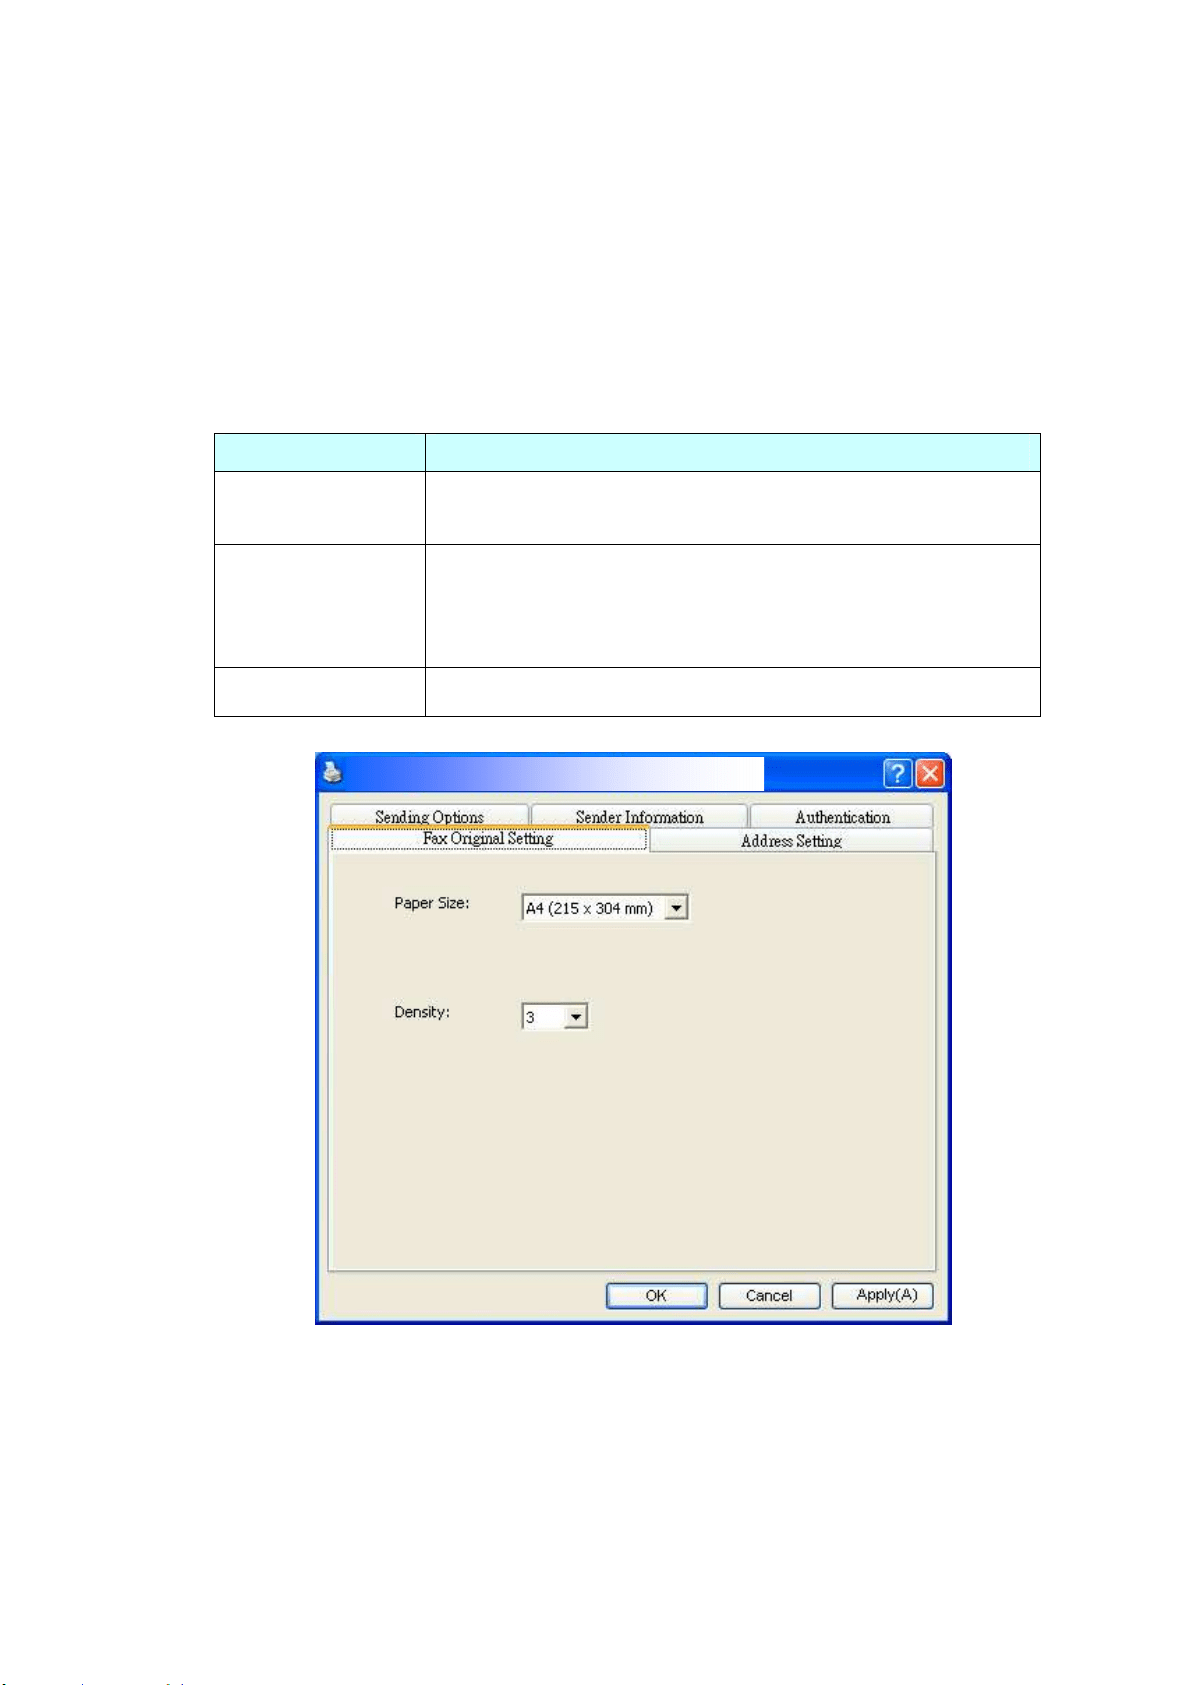
14
2
Accessing t he PC- Fax Propert ies
This PC- Fax Propert ies dialog box consist s of several t abbed window which allows
you to cust om ize your fax settings and create your phone book.
The Gene r a l Set t ing Tab
The General Setting t ab allows you t o choose your out put paper size, your desired
fax resolut ion, and your desired density level.
I tem Descript ion
Paper Size Choose your out put paper size.
Choice: * A4 , B4 , and A3 .
Densit y Darken or light en your original if necessary.
Choice: 1 , 2 , 3 , * 4 , 5 , 6 , 7
1 indicat es the weakest level while 7 represents the
st rongest level.
* Default set t ing
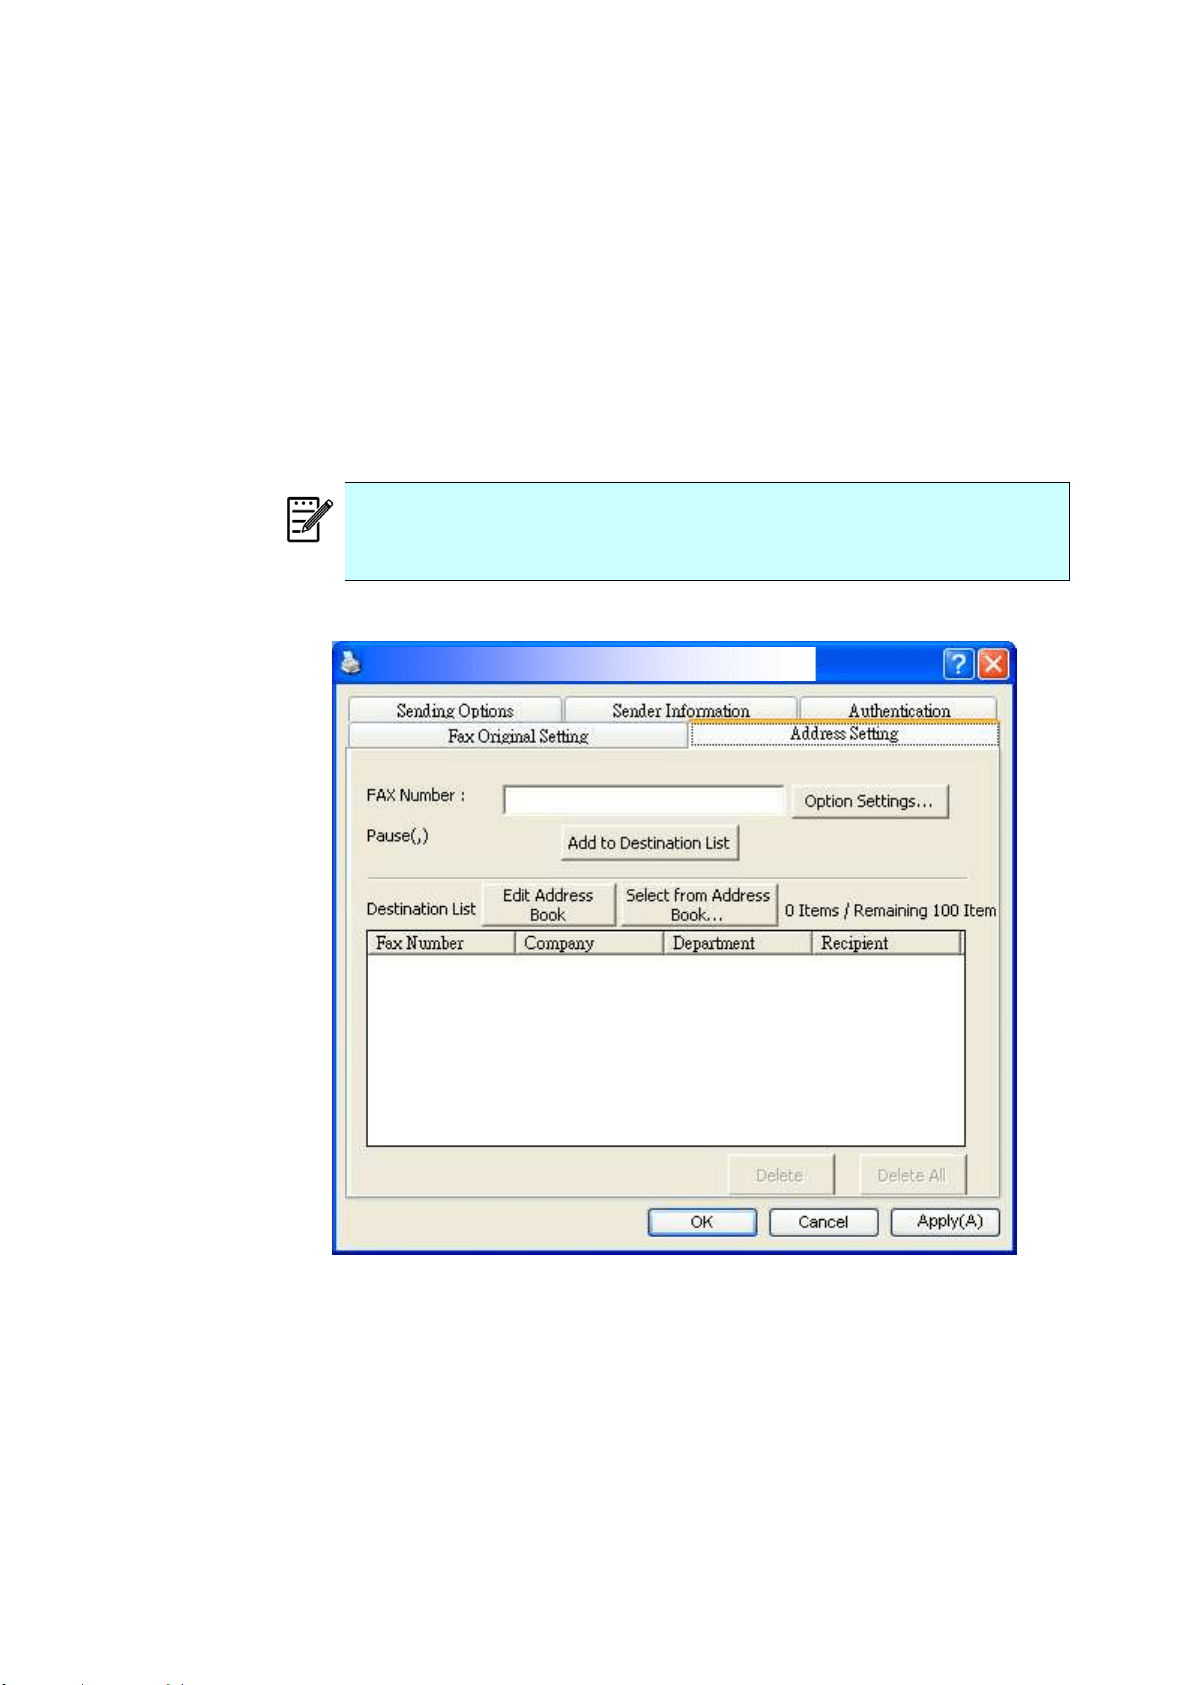
143
The Addre ss Set ting Ta b
The Address Set t ing t ab allows you t o ent er your fax num ber or select your
desired fax num bers from current address book of your Windows system .
Fax num be r : Ent er your recipient ’s fax num ber. You m ay click t he Opt ion
Set t ings but t on to enter m ore inform at ion including com pany, depart m ent,
and nam e of your recipient . The inform ation will be show n in t he Destinat ion
List.
Add t o Dest ina t ion List : Click t o add t o your fax dest ination list. Up to 100
fax num bers can be ent ered and broadcasted.
N ot e :
The Destinat ion List can not be saved and used as your phone book.
The fax num bers are only tem porarily saved for one fax
transm ission.
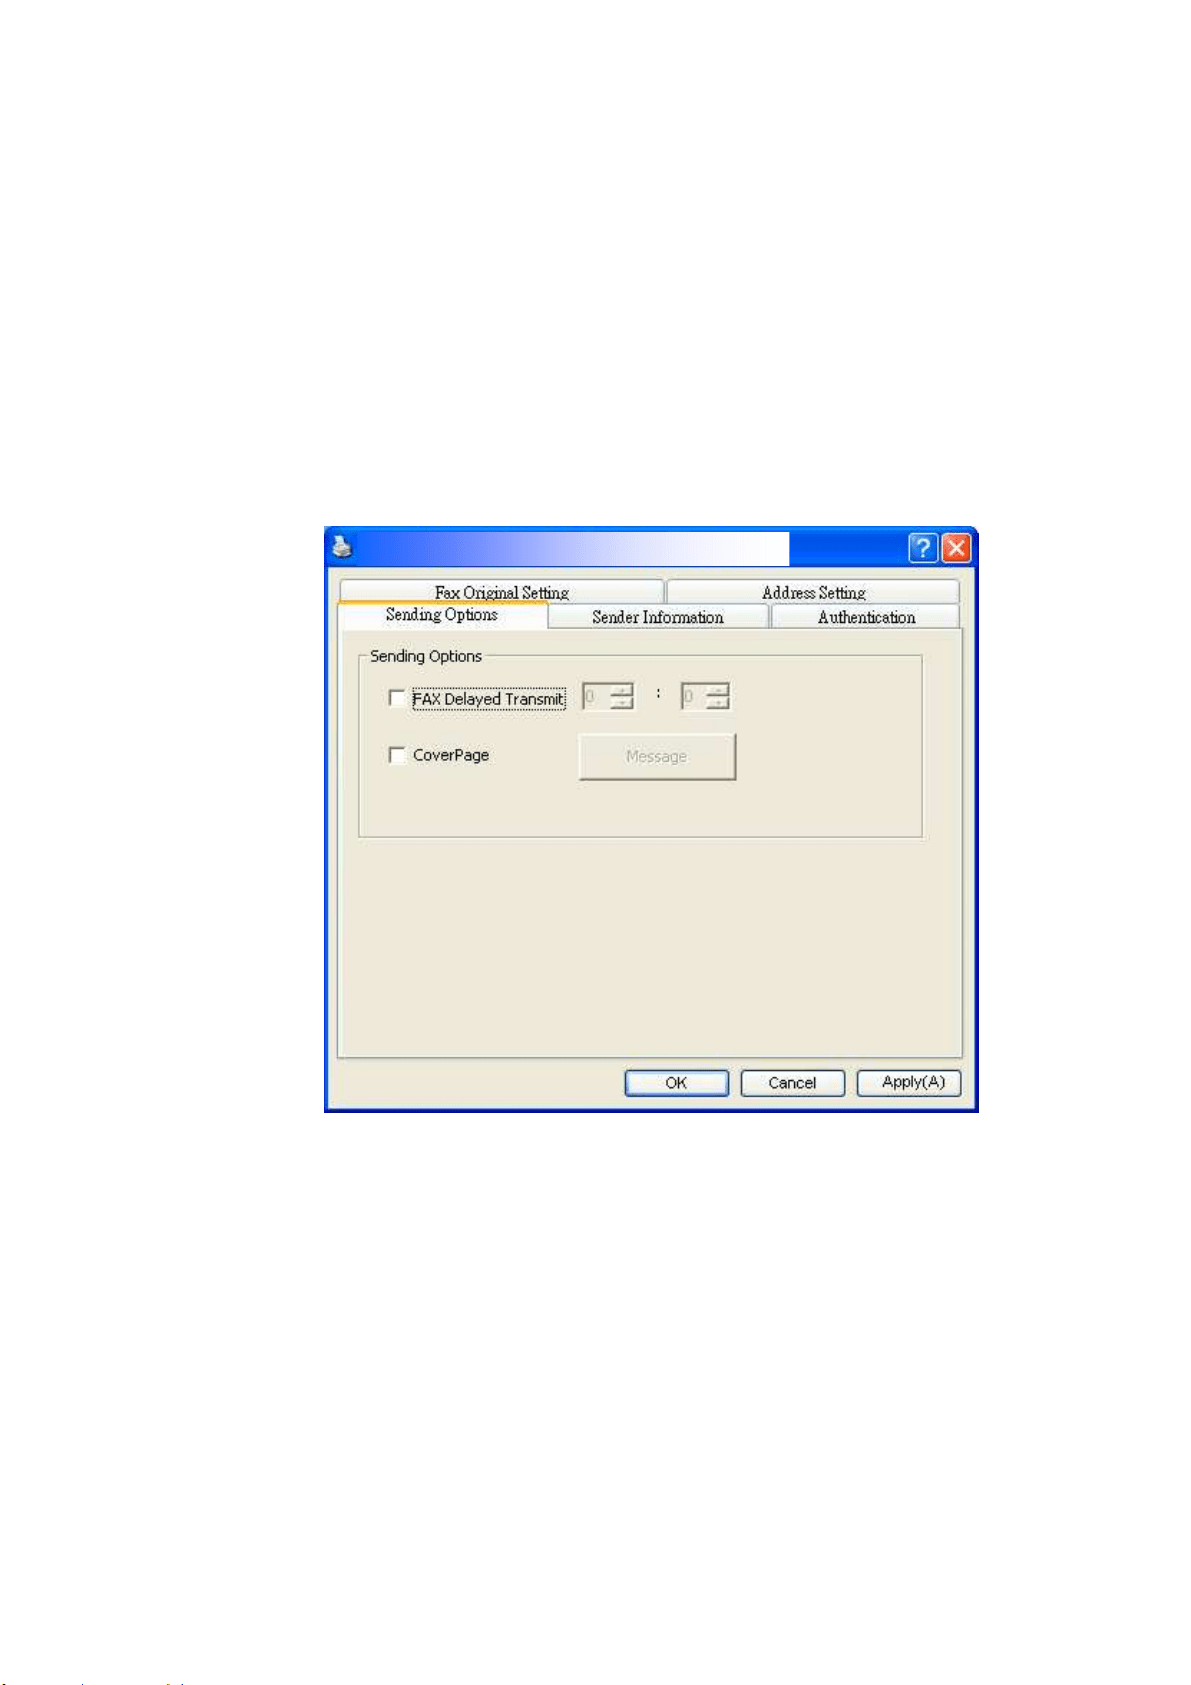
144
The Sending Opt ions Tab
The Sending Options t ab allows you t o set m ore opt ions such as delay fax, or
fax m essage.
FAX D ela y Tr a nsm it : Ent er your desired t im e in 24- hour form at t o send the
delayed fax.
Cove r Pa ge: Choose Cove r Pa ge and then click t he Message box. A Message
dialog box appears t o let you ent er your m essage. The cover page which
includes the sender inform at ion and your m essage will be sent and print ed as
a separat e sheet.
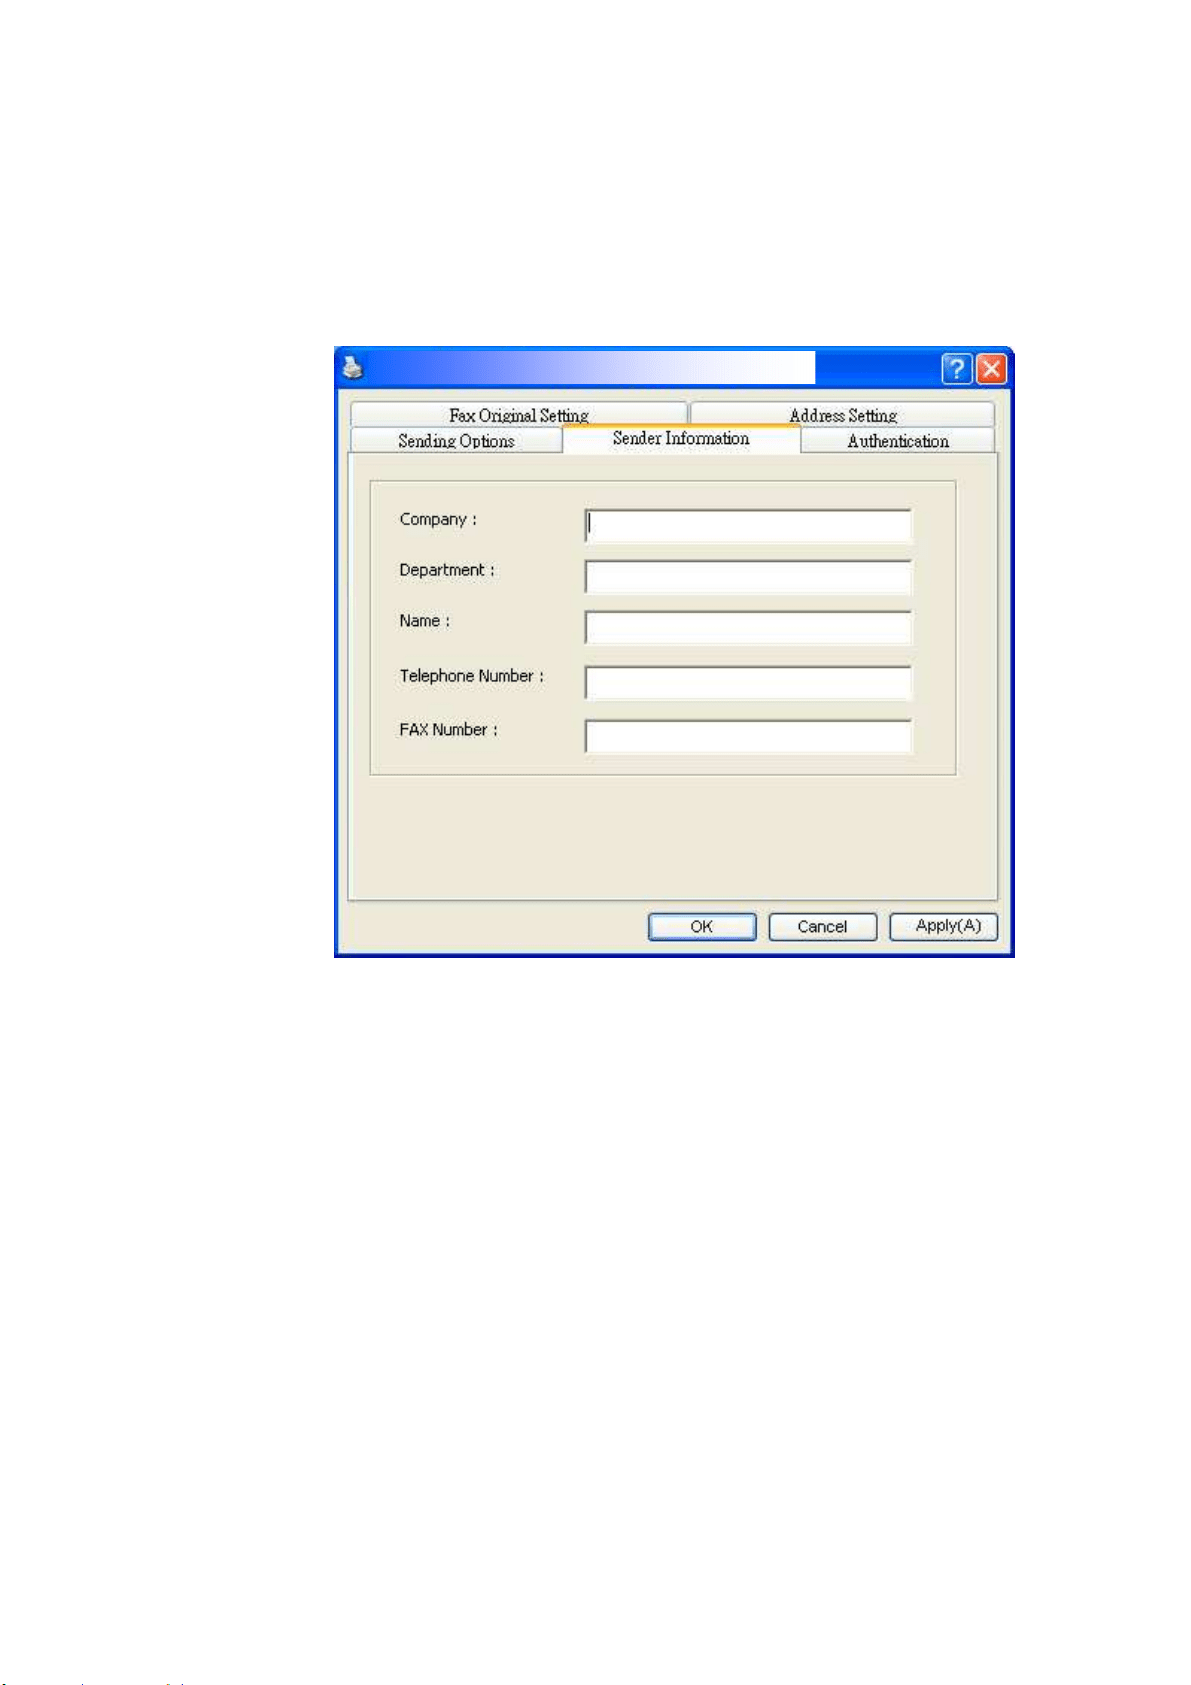
14
5
The Sender I nform at ion Ta b
The Sender I nform at ion t ab allow s you to enter the sender’s inform at ion which
will be included as cover page. The sender’s inform at ion includes com pany
nam e, depart m ent nam e, recipient’s nam e, t elephone num ber and fax
num ber.
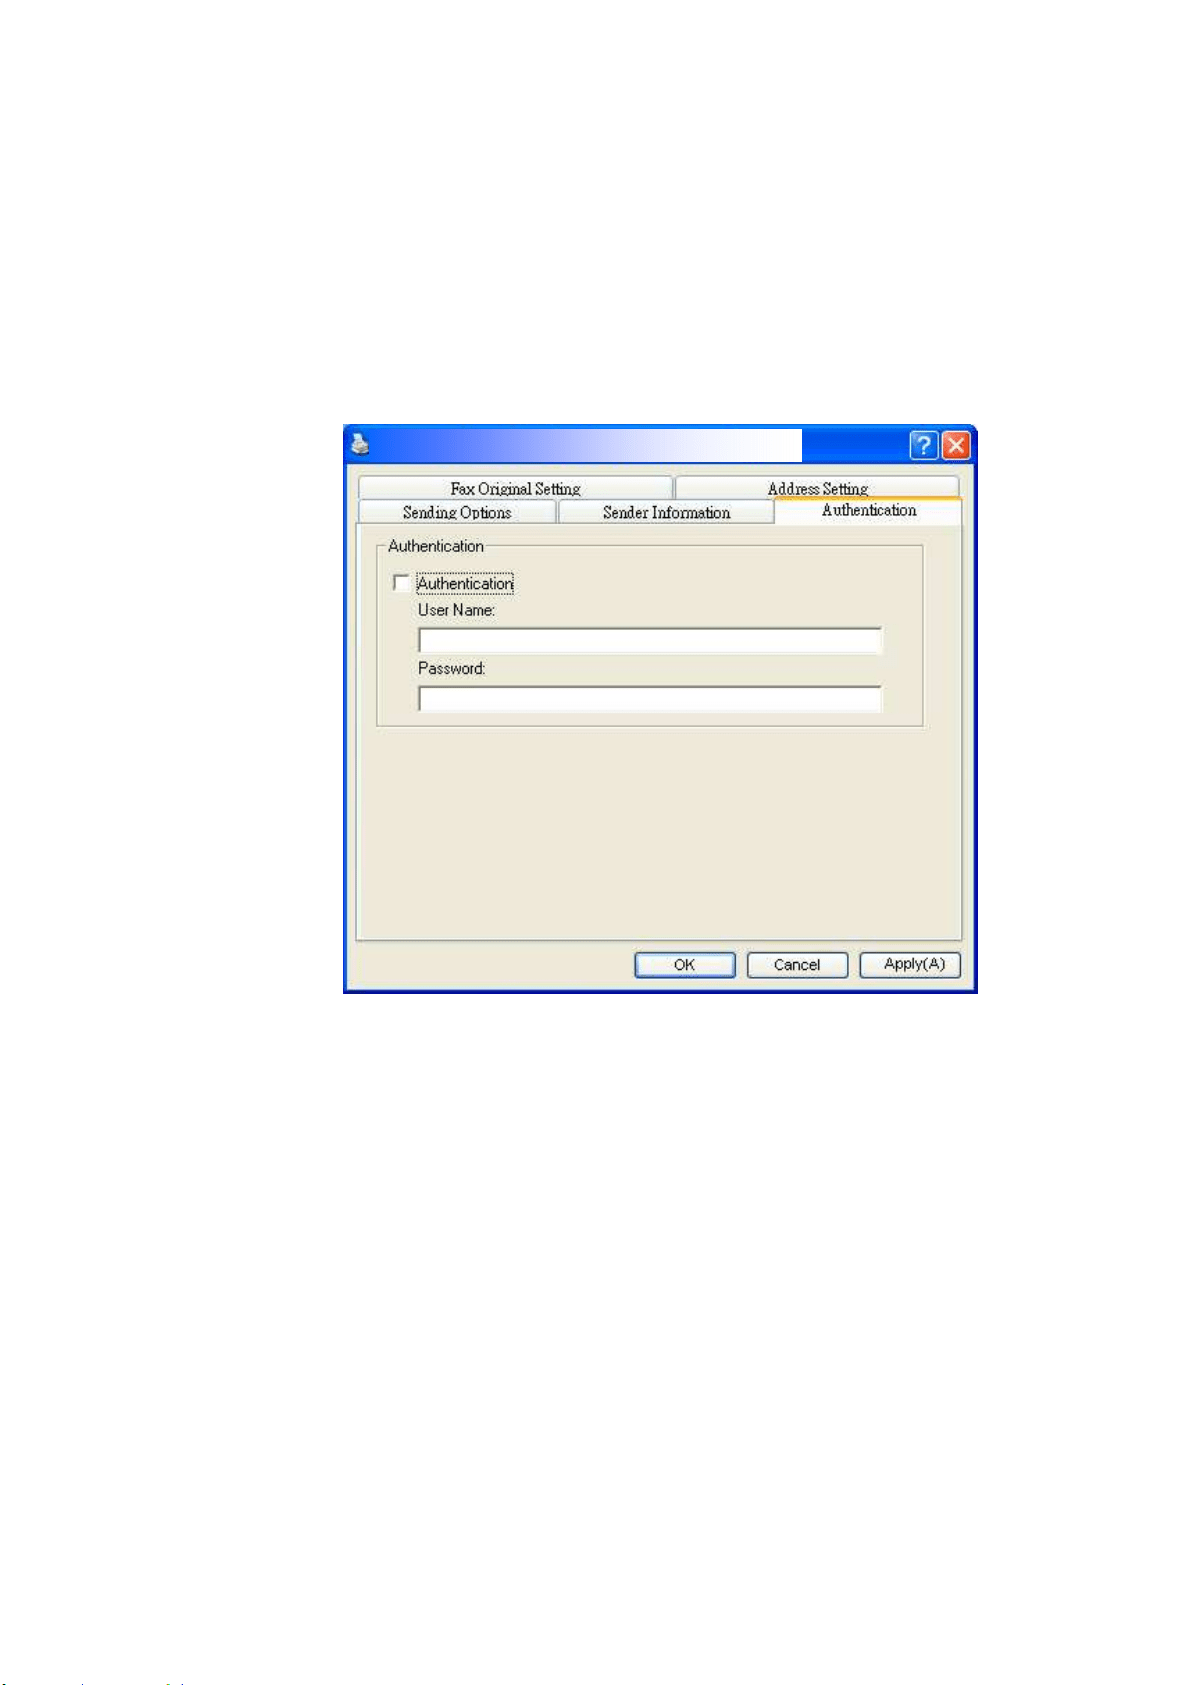
14
6
The Aut hent icat ion Ta b
The product allows the adm inist rat or t o setup t he privilege t o use t he fax
function t hrough the em bedded web page. I f so, an aut hent icat ion is required
in t he product’s fax propert ies dialog box t o prevent unaut horized access of t he
fax function.
Click t he 「Aut he nticat ion」tab, and t hen enter t he account nam e and password
the adm inistrat or has set t hrough the em bedded web page.
User nam e lim it at ion:
Allowable lengt h: 1~ 28 charact ers or sym bols: ;Allowable sym bols: 「.」, 「- 」.
「_」, 「@」, 「;」, 「 」.
Passw ord lim it at ion:
Allowable lengt h: 1~ 28 charact ers or sym bols: , no lim itat ion on sym bols.
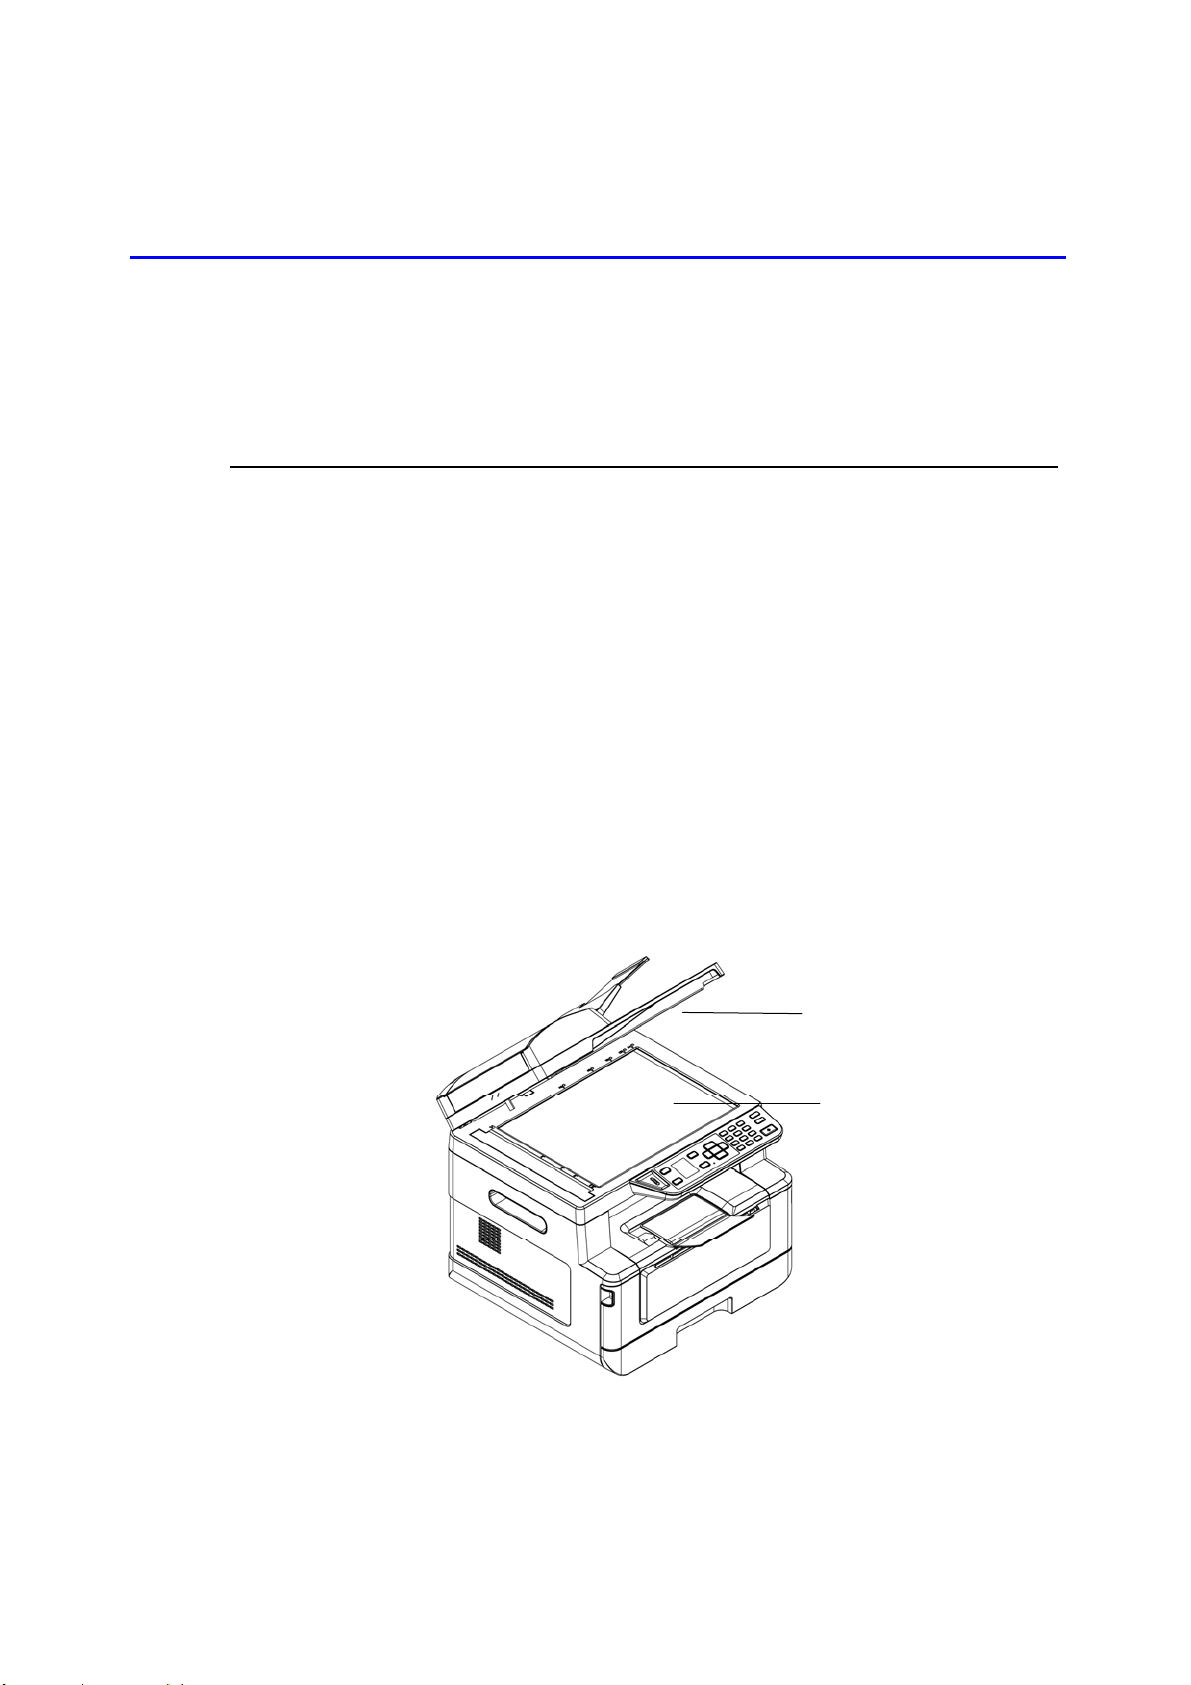
14
7
1 0 . Maint aining t he Product
Cleaning The Glass
The product is designed to be alm ost m aintenance- free. However, it still needs t o
be cleaned occasionally t o ensure opt im um im age qualit y and perform ance.
To clean t he glass,
1 . Open the docum ent cover as shown below.
2 . Dip a soft clean clot h w ith isopropyl alcohol ( 95% ) .
3 . Gently wipe the flatbed glass and t he whit e sheet beneath t he docum ent
cover to rem ove t he dust or any t oner particles.
4 . Close the docum ent cover. Your m achine is now ready to use.
1. Docum ent Cover
2. Flatbed Glass
1
2
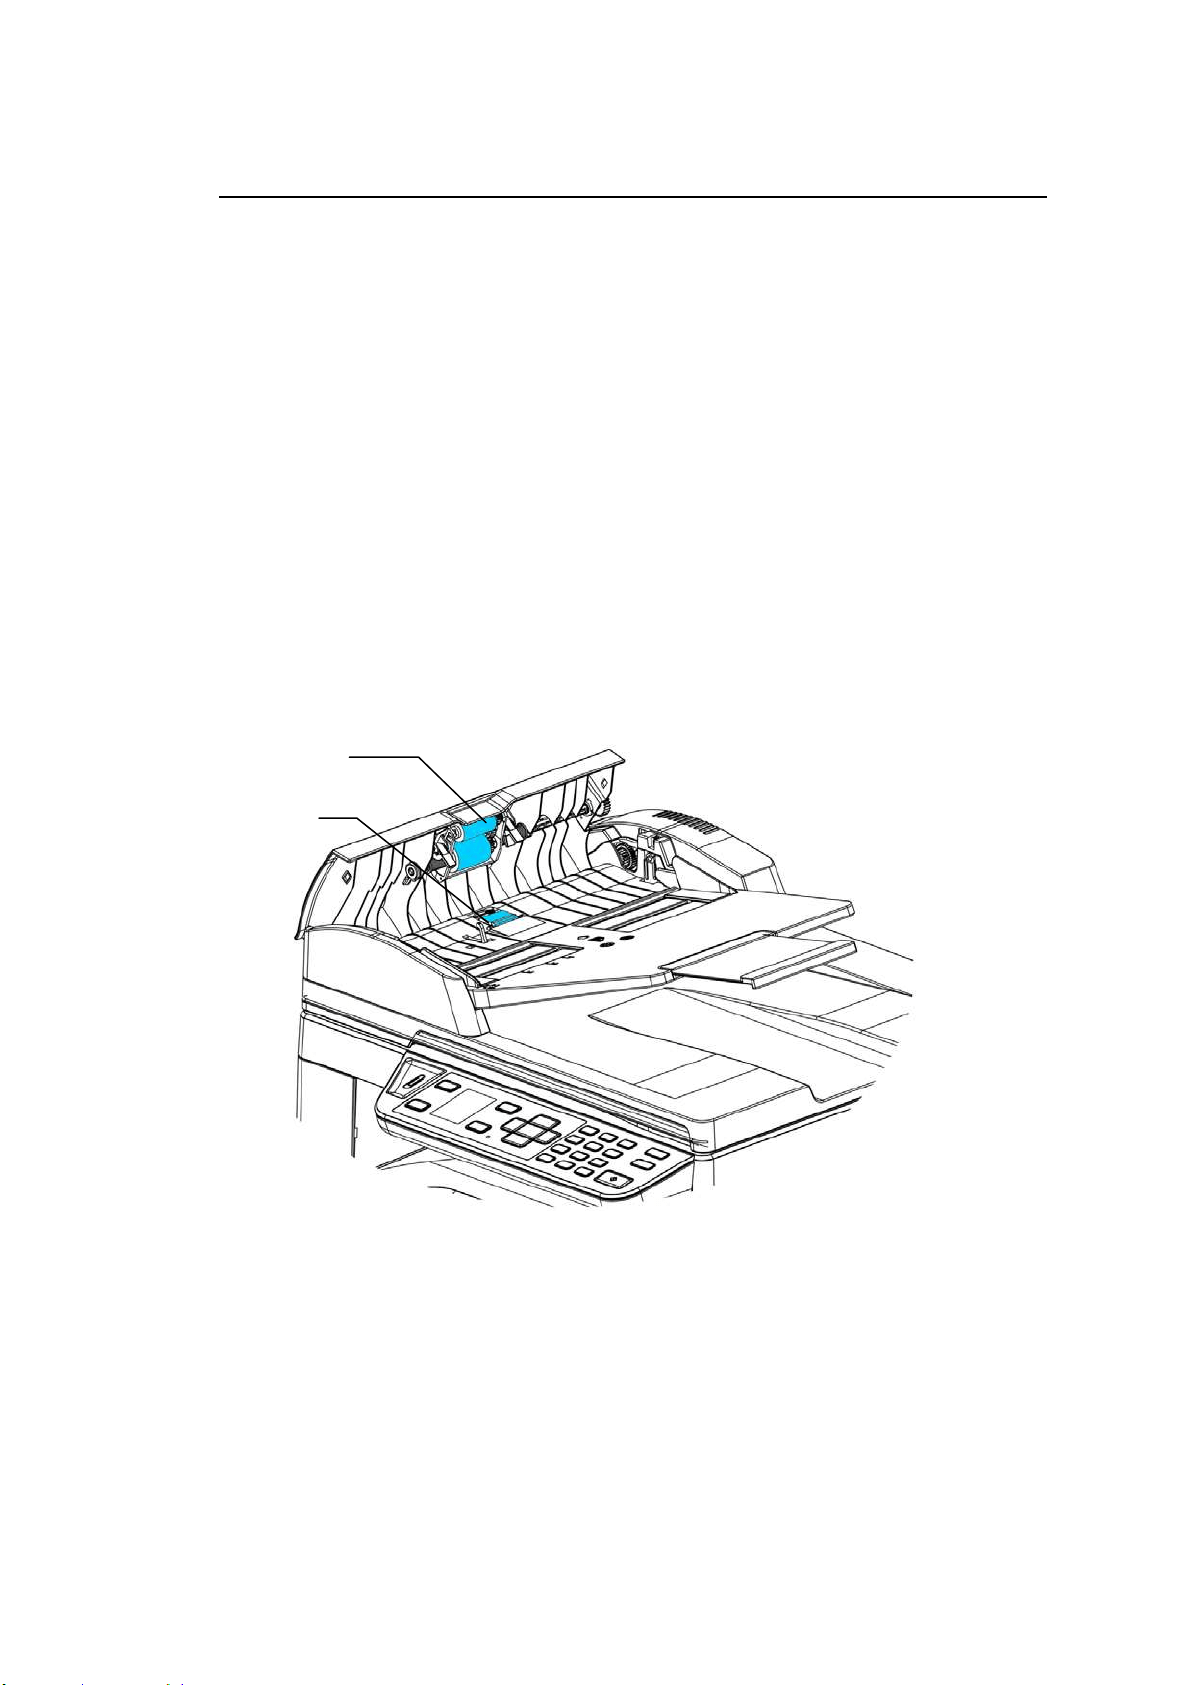
148
Cleaning the ADF
From tim e t o t im e t he pad assem bly and feeding rollers m ay becom e
cont am inat ed with ink, toner part icles or paper dust . I n t his case t he product m ay
not feed docum ent s sm oot hly. I f t his occurs please follow t he cleaning procedures
to ret urn your m achine to it s original stat e.
1 . Moisten a clean lint less clot h wit h isopropyl alcohol ( 95% ) .
2 . Gent ly open t he ADF front cover. Wipe t he feeding rollers from side t o side.
Rot at e t he rollers forward wit h your finger and repeat t he above cleaning
procedures until t he rollers are clean. Be careful not to snag or dam age t he
pick springs.
3 . Wipe t he rubber part of t he ADF snap- in pad.
4 . Close t he ADF unit . Your m achine is now ready t o use.
ADF Pad
ADF Roller
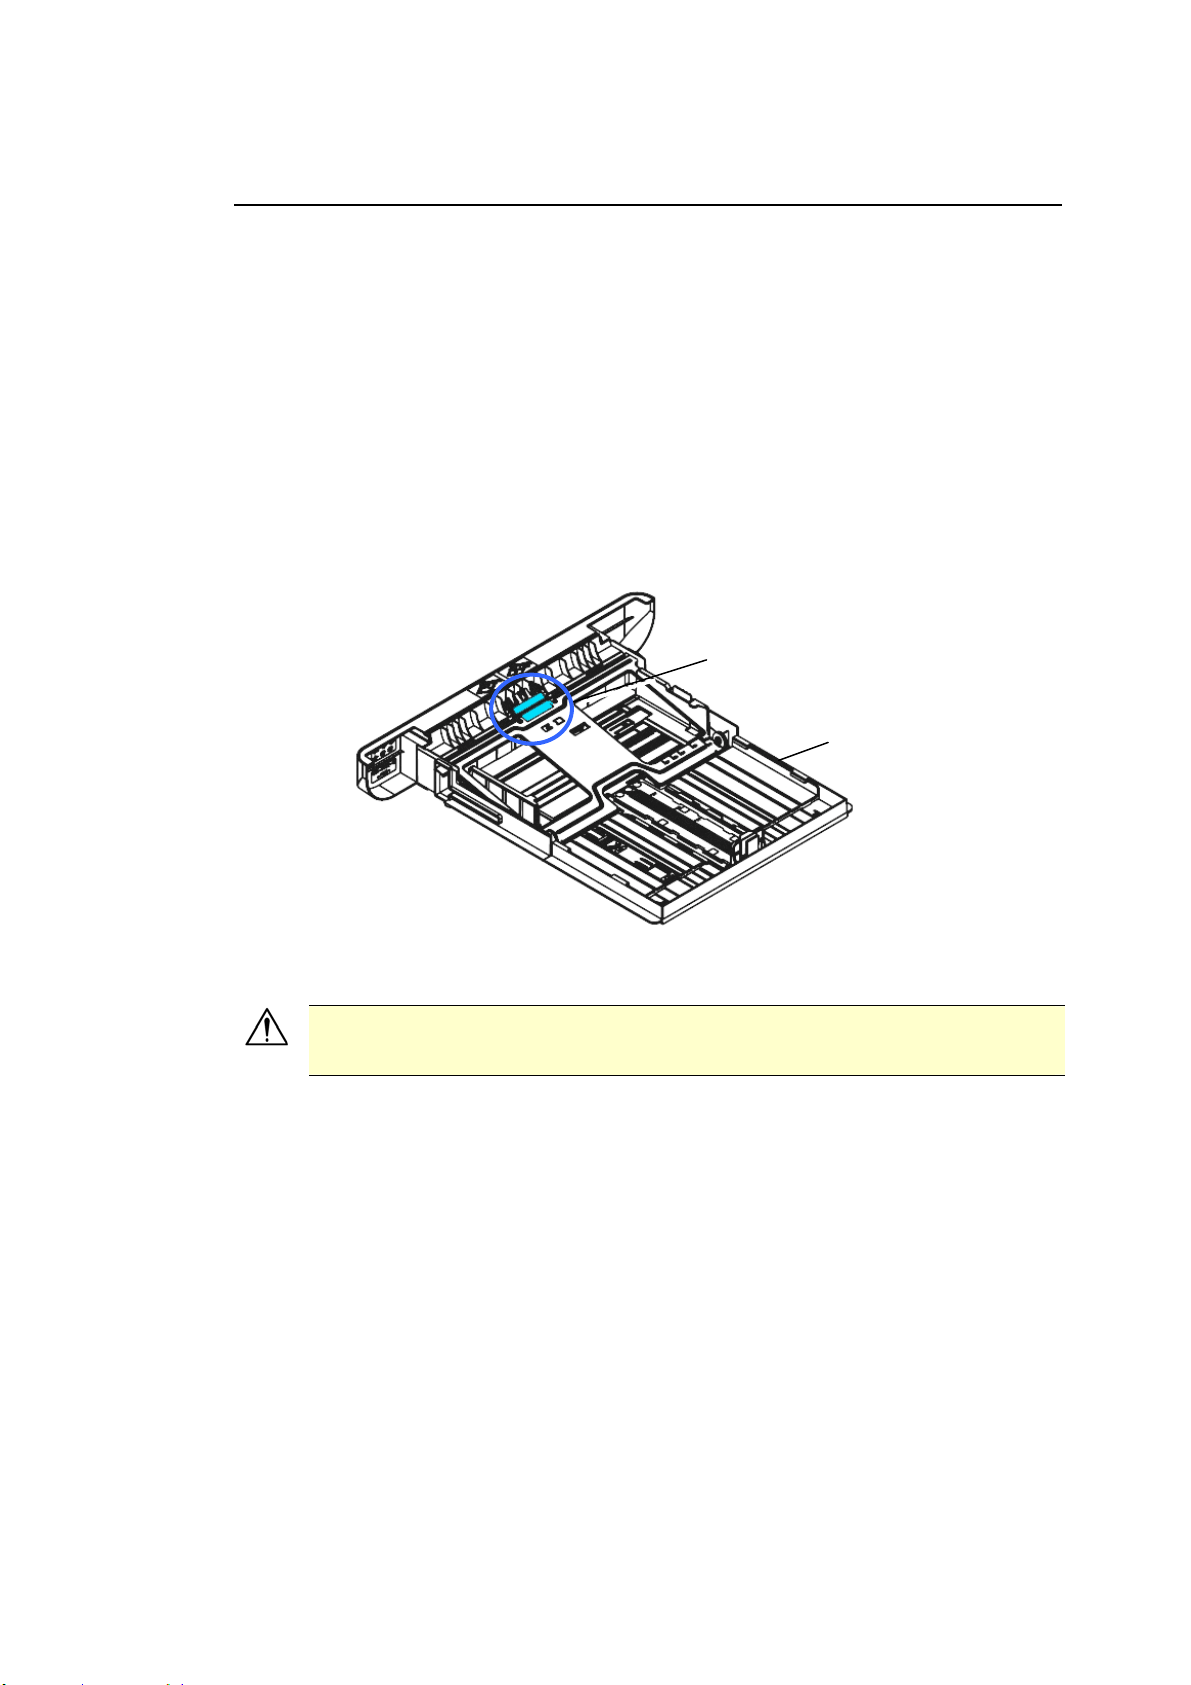
149
Cleaning the Pad in t he Casset te
I f t he Pad in t he Cassett e is sm eared wit h paper powder or dirt or every 30K
copies, paper m ay not feed sm oothly or noise occurs during paper feeding. Follow
the procedure below t o clean t he Pad in the Casset t e.
You need t o prepare: cott on swab
1 . Rem ove all paper in the cassett e.
2 . Moisten a cot t on sw ab wit h isopropyl alcohol ( 95% ) .
3 . Clean the rubber part of t he pad.
I m port a nt:
Aft er cleaning the sm eared Pad, dry it com plet ely.
Casset t e
Pad
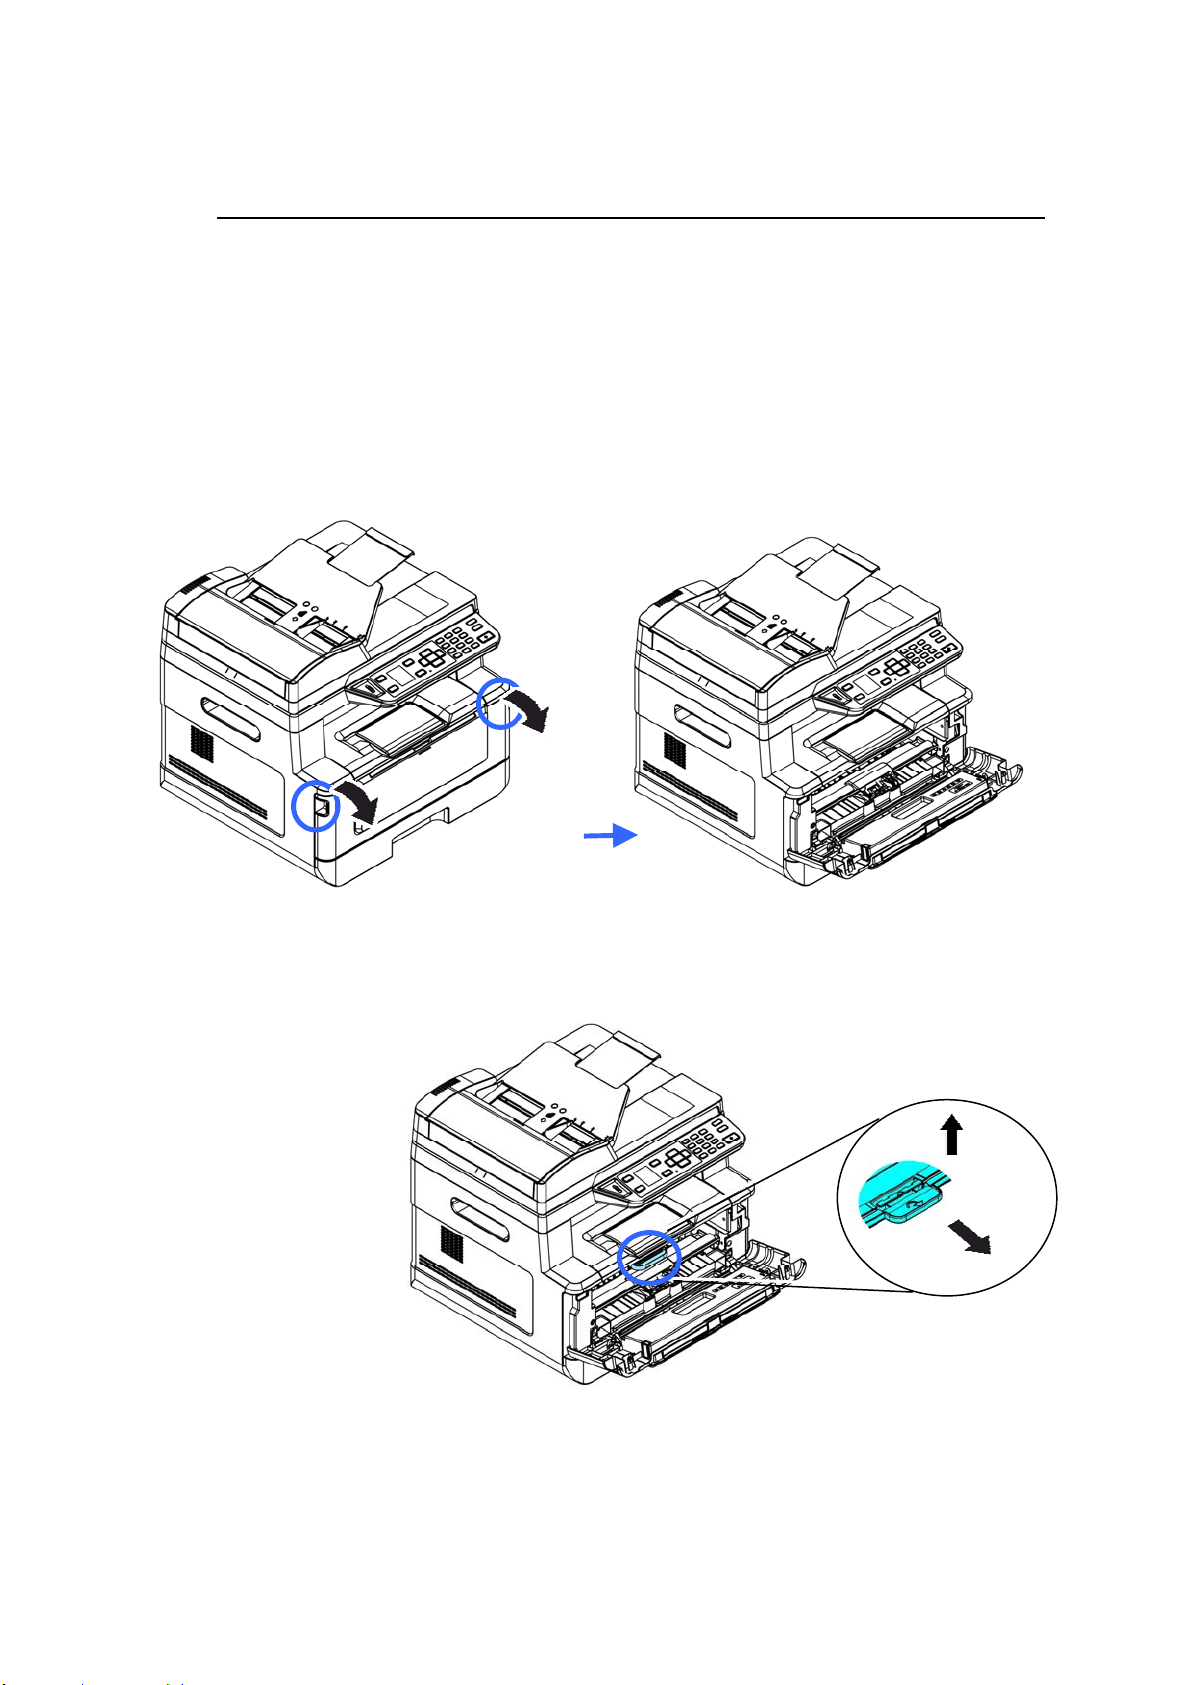
15
0
Cleaning the Drum Unit
I f t he drum unit is sm eared with paper powder or dirt , the print out m ay appear
defect ive im age of regular int erval. Follow t he procedure below t o clean t he drum
unit .
1 . Turn off t he power and rem ove t he power cord from t he power out let .
2 . Open the front cover by pulling t he handles on bot h sides as shown.
3 . Lift t he handle of the drum unit and toner cart ridge assem bly and gent ly
rem ove t he assem bly.
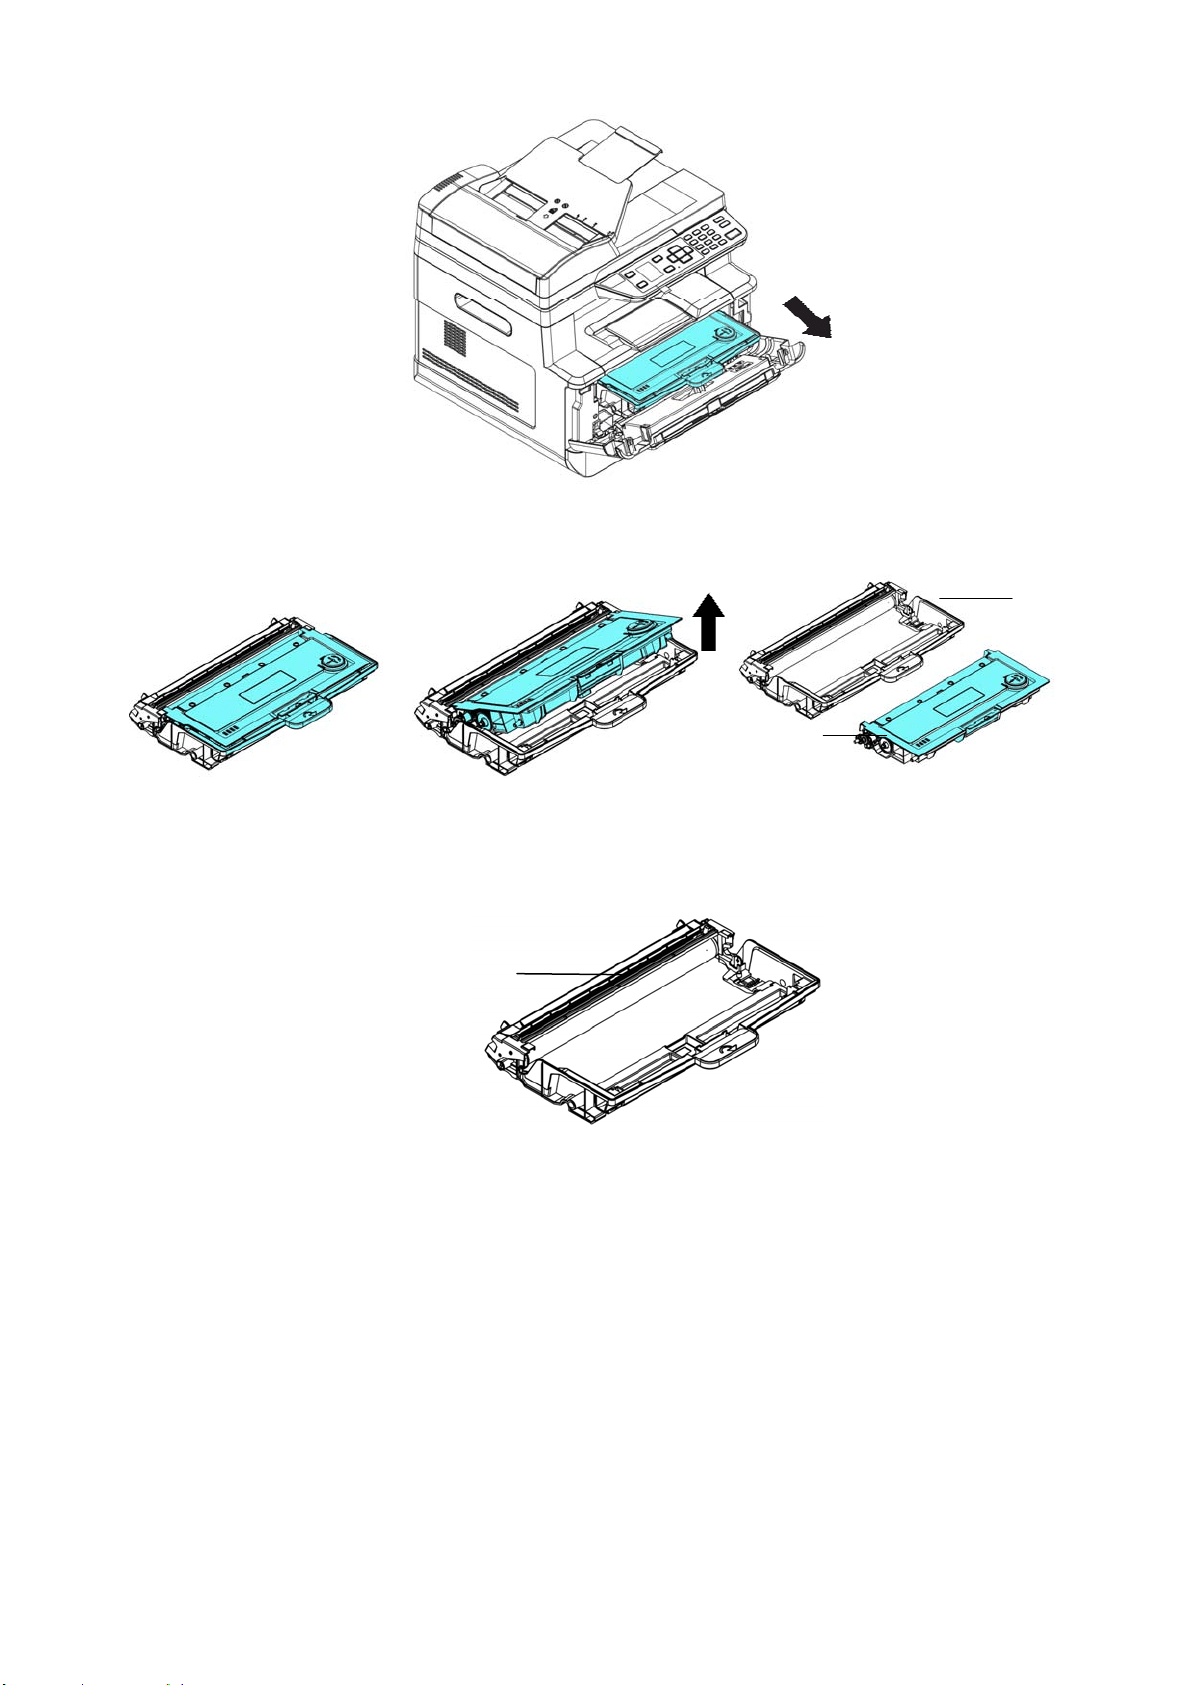
151
4 . Rem ove t he toner cart ridge from t he drum unit as shown.
5 . Clean the drum unit with a clean and soft cloth.
Drum
Unit
Toner
Cart ridge
Clean this area.
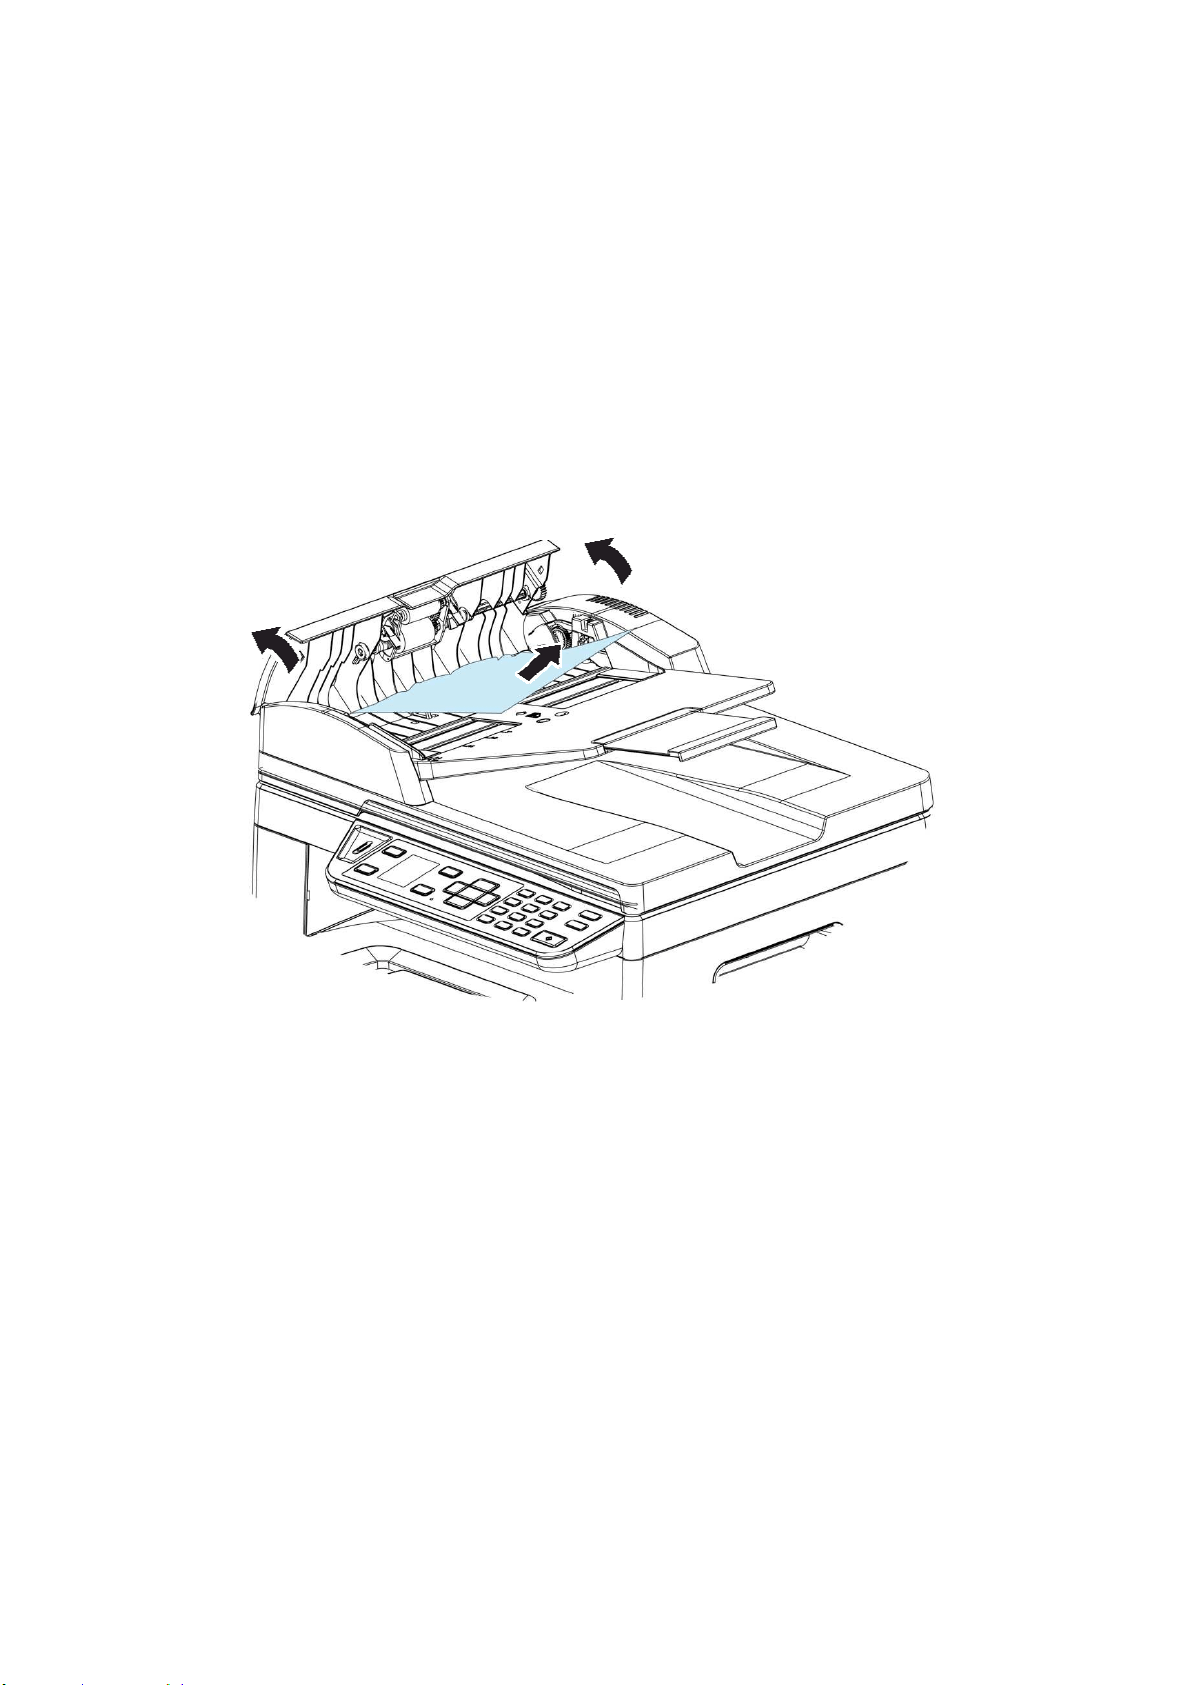
15
2
Clearing the ADF Paper Jam
I n t he event of a paper j am in the ADF, follow the procedures below t o rem ove t he
paper:
1 . Gent ly open t he ADF front cover to t he left .
2 . Carefully pull t he paper out of t he ADF unit .
3 . Close t he ADF front cover. Your product is now ready t o use.
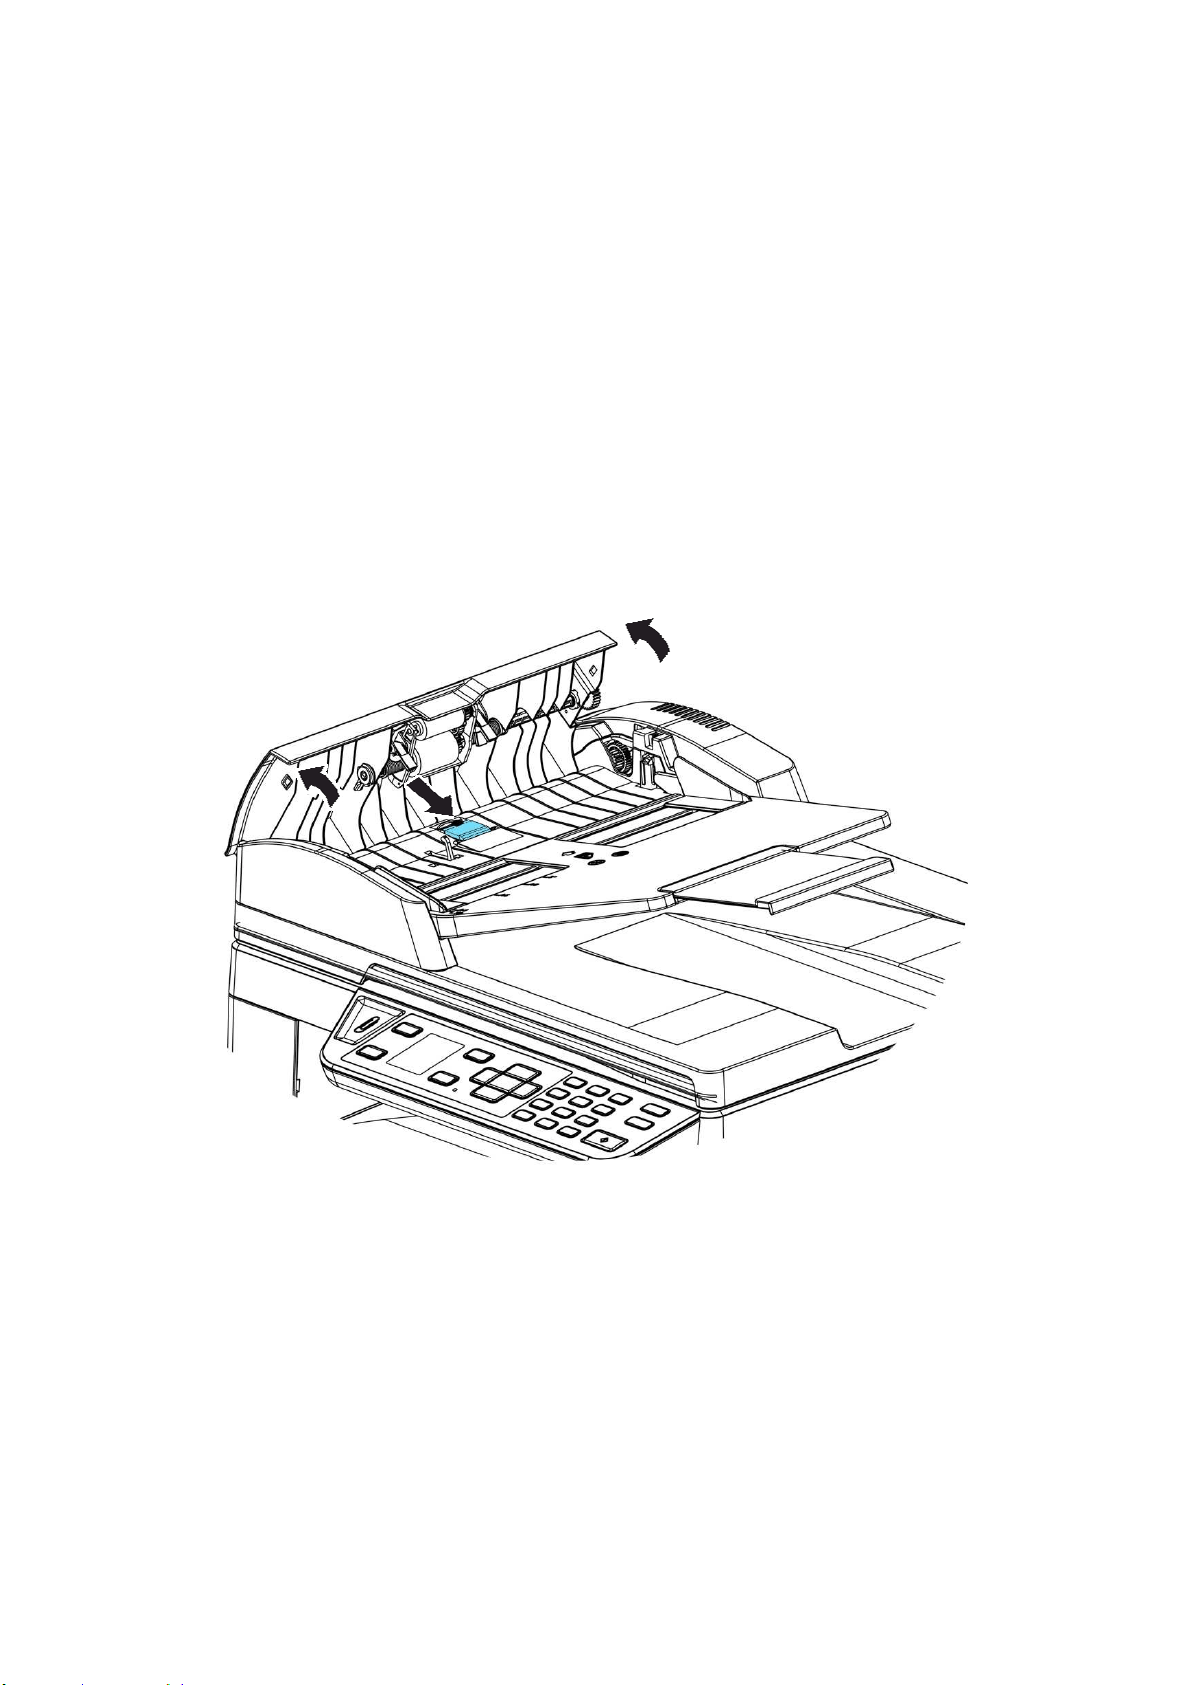
153
Replacing t he Snap- in Pad Module
Aft er scanning about 20,000 sheets t hrough t he ADF, t he pad m ay be worn out
and you m ay experience problem s w ith docum ent feeding. I n this case, it is highly
recom m ended t o replace t he pad m odule with a new one. For ordering t he pad
m odule, please consult your nearest dealer and follow t he procedure below t o
replace it.
Disassem bling Pr ocedu r e
1 . Gent ly open t he ADF front cover.
1 . Rem ove the ADF snap- in pad m odule by pressing t he lock upward.
Assem bling Pr ocedure
1 . Gently open the ADF front cover t o t he left .
2 . Rem ove t he ADF pad m odule from t he box.
3 . Place it int o the holes unt il it snaps int o place.
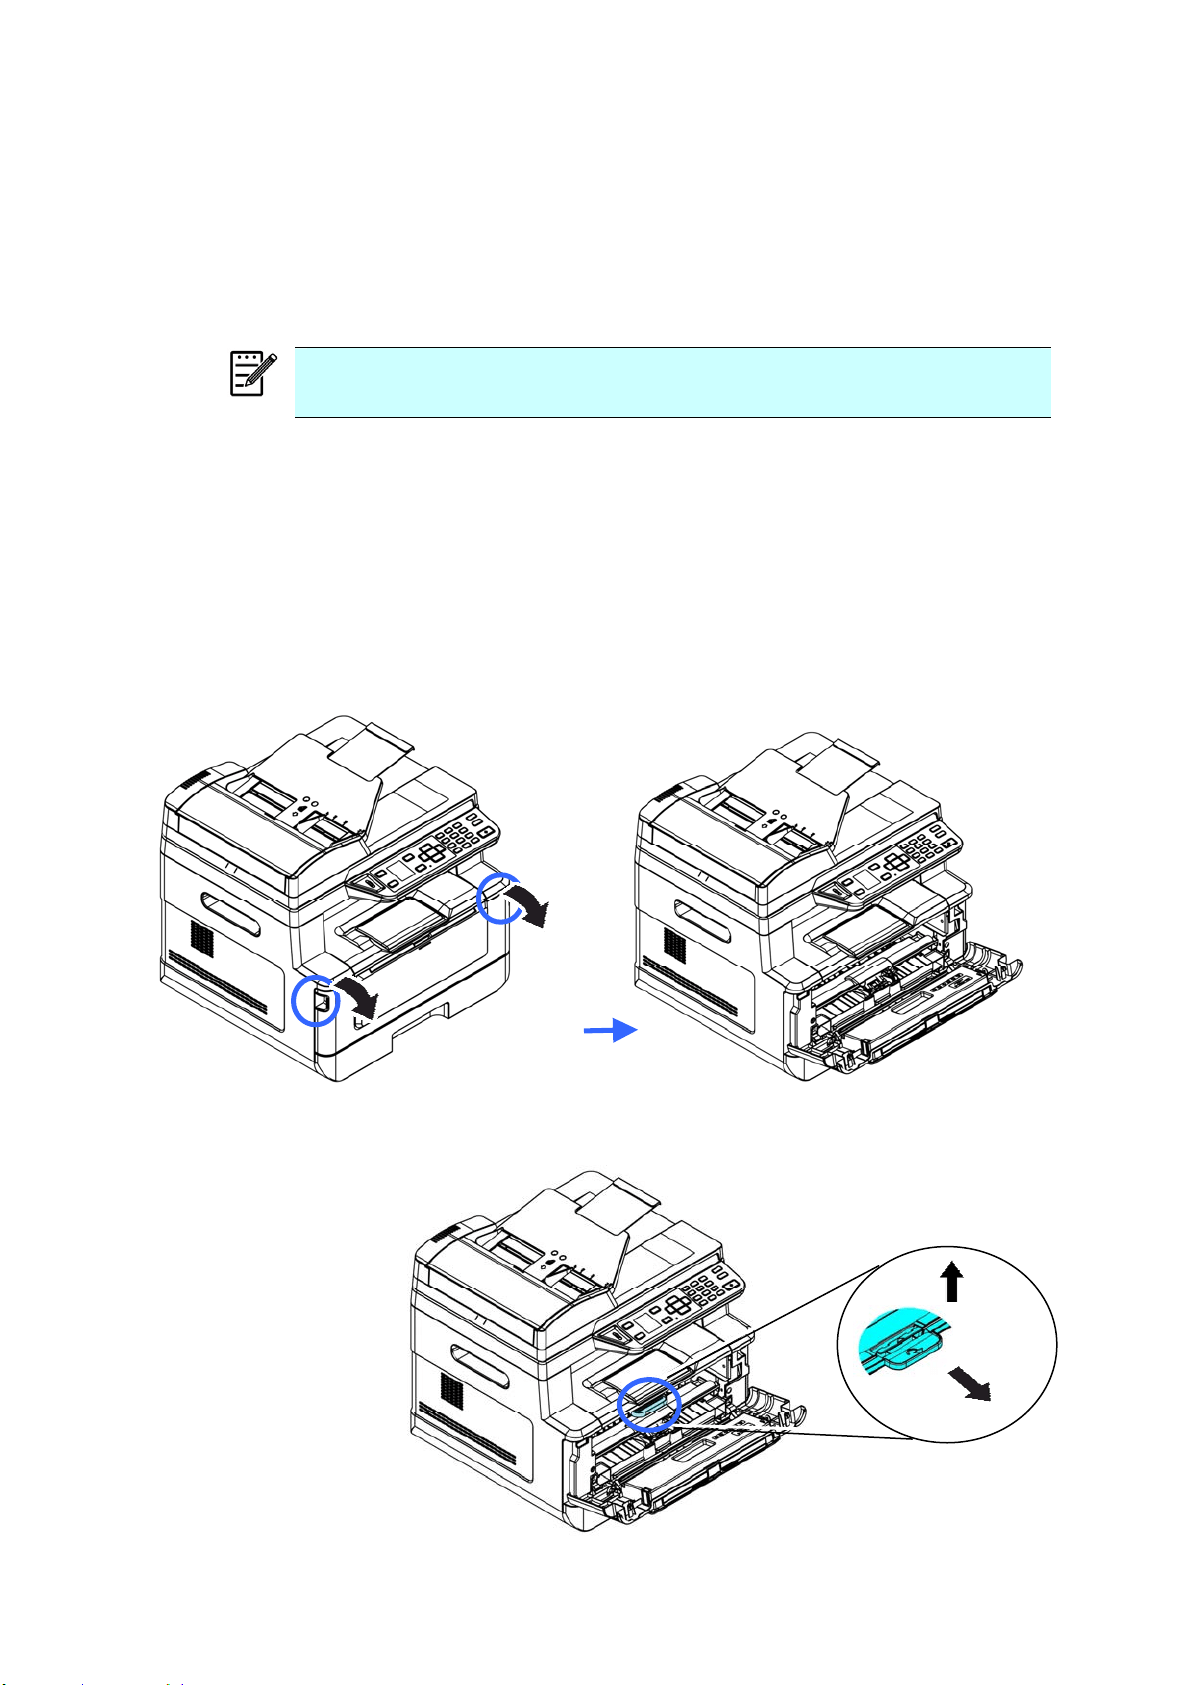
154
Replacing The Toner Cart ridge
The t oner cart ridge that com es with t he product needs t o be replaced after print ing
approxim ately 3,000 pages. When t he toner cart ridge is running low, you will be
prom pt ed with a [ Tone r Low ] m essage. Buy a new t oner cart ridge and have it
ready before you receive [ Replace Toner] m essage.
N ot e :
The drum unit and t he t oner cart ridge are two separat e part s.
Follow t hese st eps to replace the t oner cart ridge:
Rem oving t he Toner Ca r t ridge
3 . Turn off t he power and rem ove t he power cord from t he power out let .
4 . Open the front cover by pulling t he handles on bot h sides as shown.
2 . Lift t he handle of the drum unit and toner cart ridge assem bly and gent ly
rem ove t he assem bly.
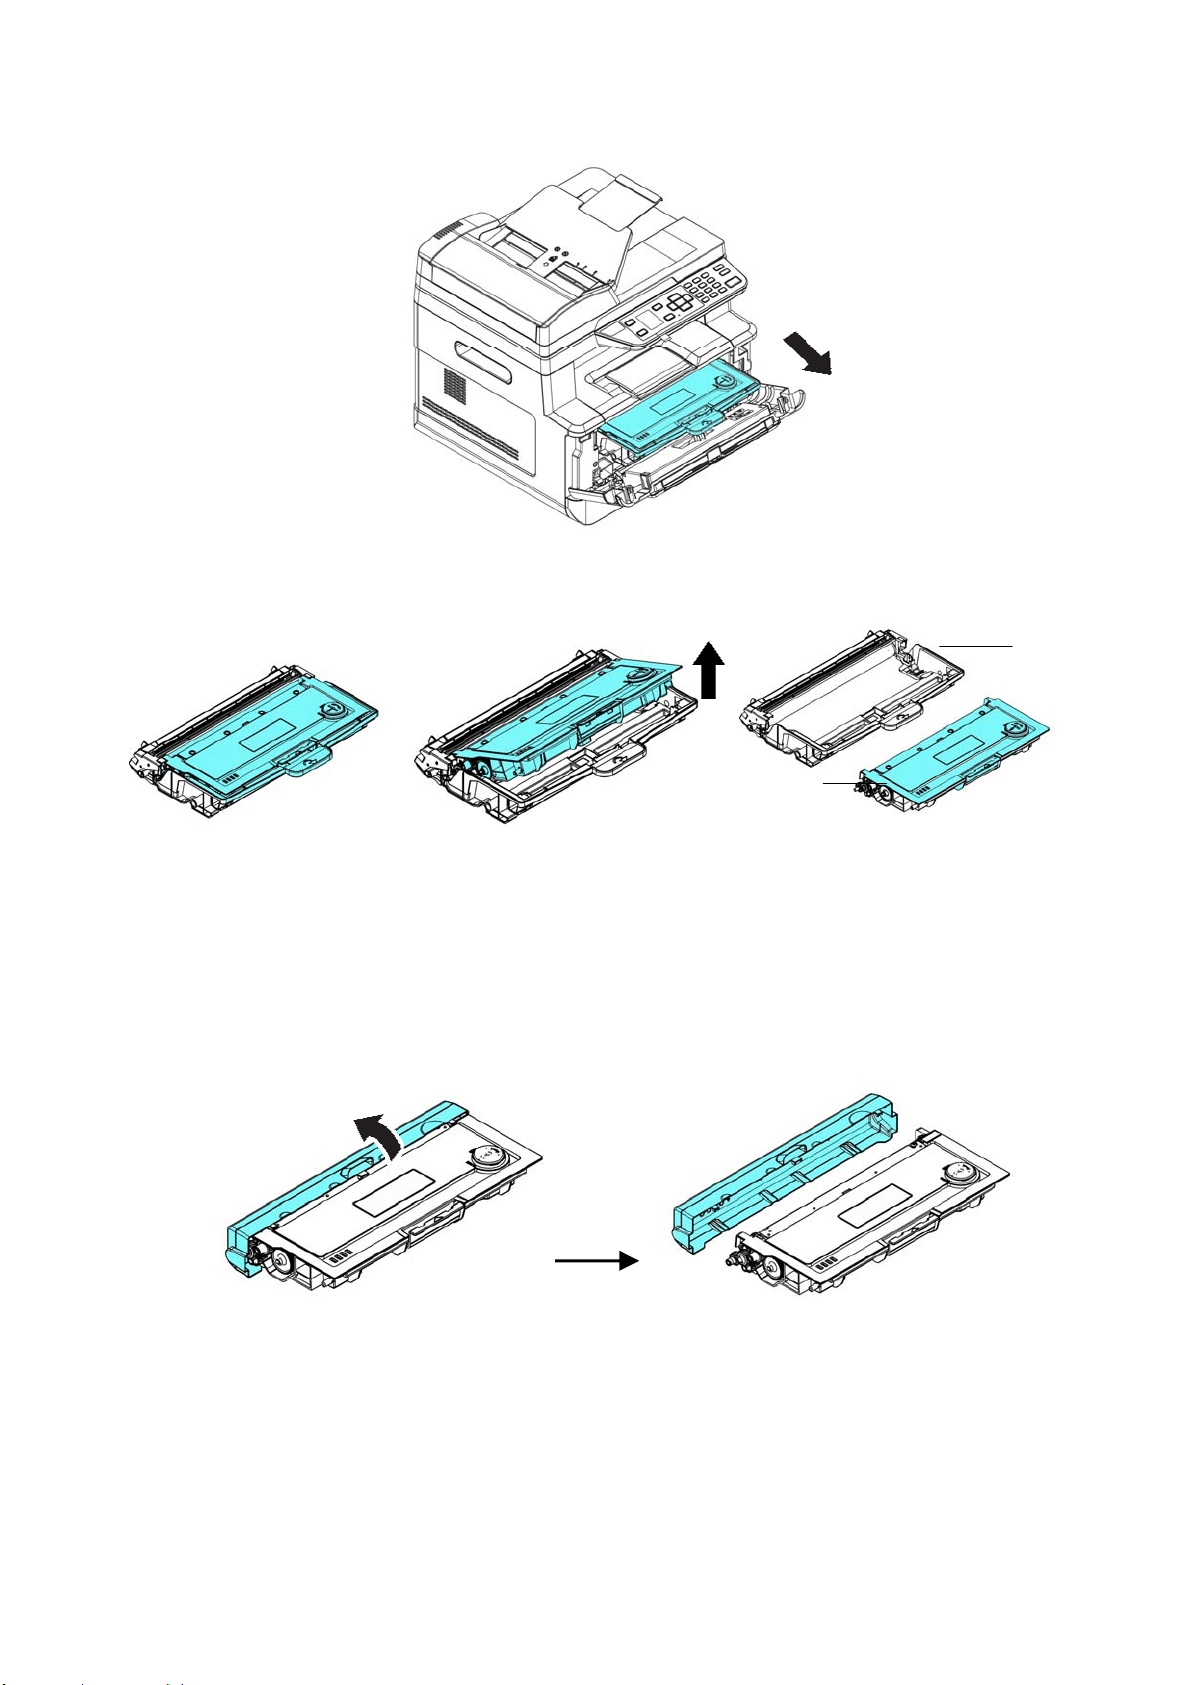
15
5
3 . Rem ove t he toner cart ridge from t he drum unit as shown.
I nst alling t he Toner Ca r t ridge
1 . Unpack t he new toner cart ridge.
2 . Rem ove the prot ective cover.
3 . Tilt t he t oner cartridge up and down and t hen right and left 10 t im es t o
dist ribute t he toner evenly inside the t oner cart ridge.
Drum
Unit
Toner
Cart ridge
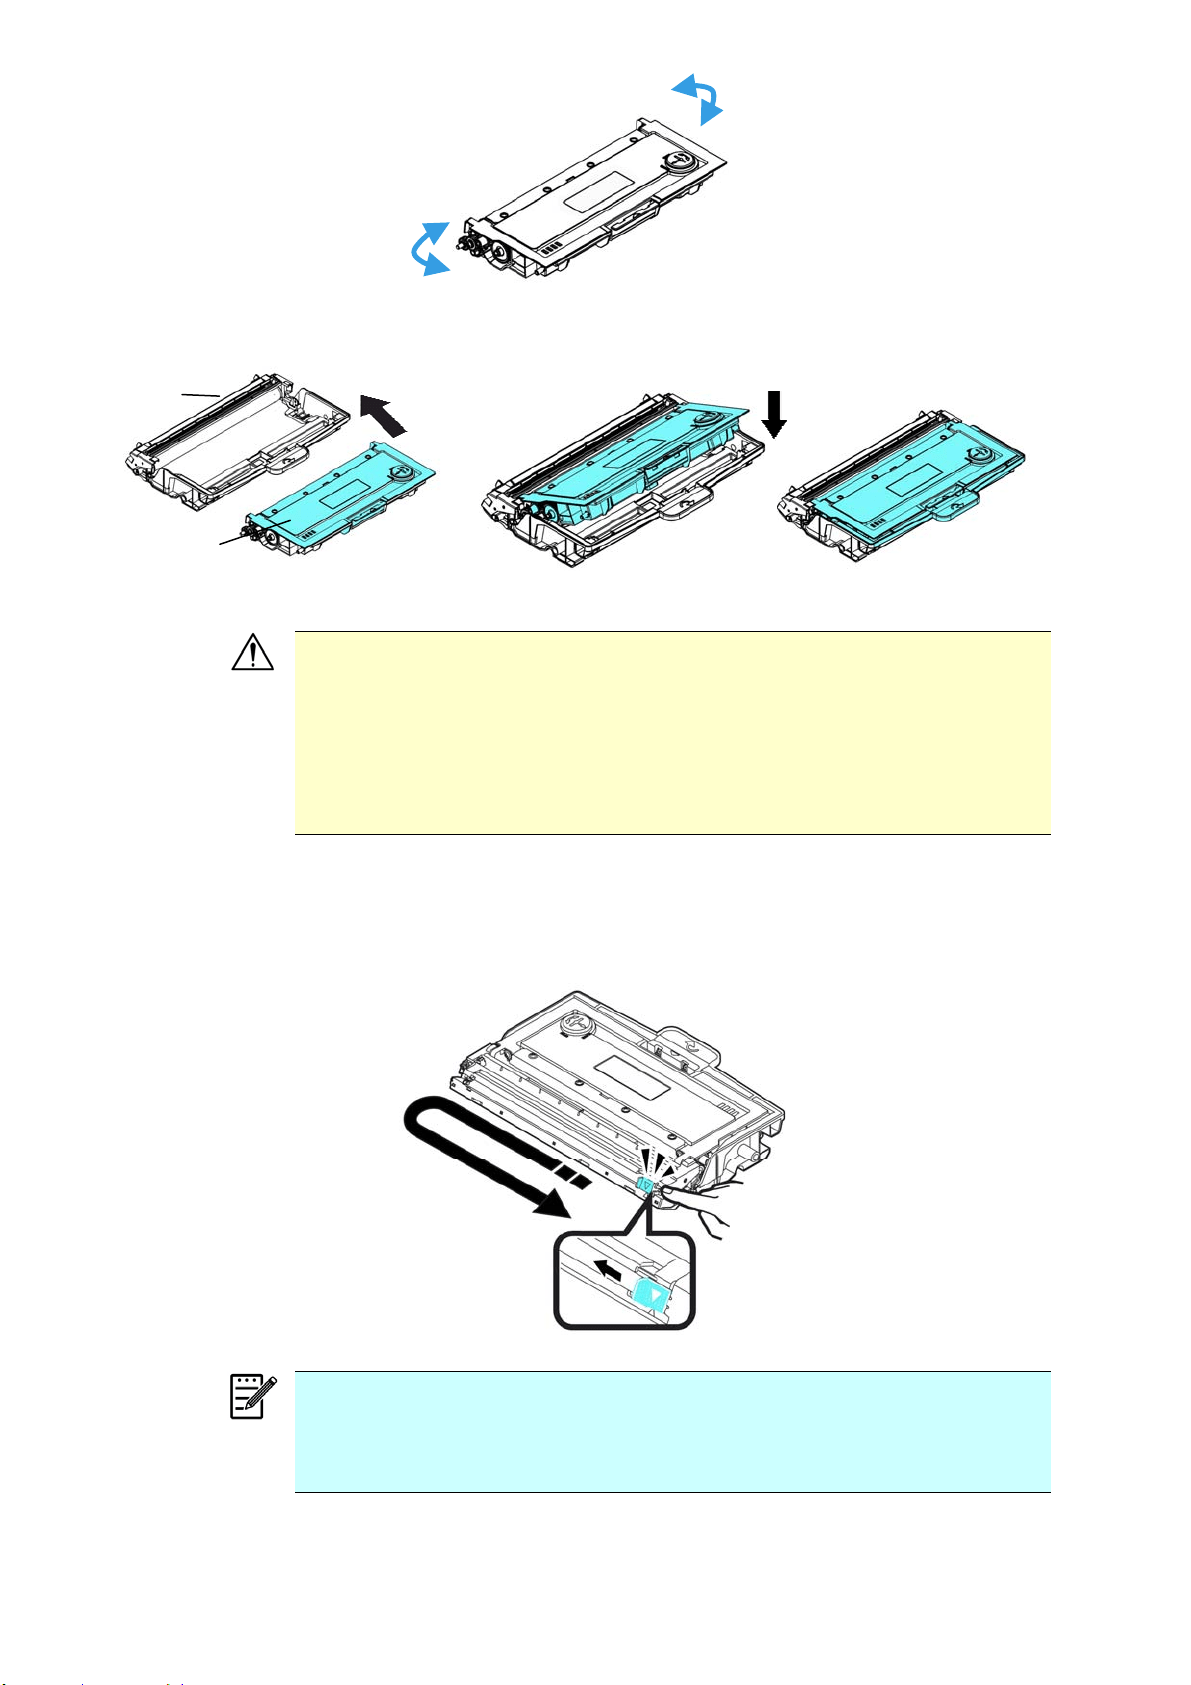
15
6
4 . I nst all t he toner cart ridge t o t he drum unit .
W a r nin g!
Be careful not to inhale t oner.
I f t oner gets on your clot hing or ot her fabric, wipe off the toner wit h
a dry clot h. Wash the it em s in cold wat er and air dry.
To avoid print quality problem s, DO NOT touch the t oner rollers.
To prevent t he toner cart ridge from dam age, do not expose it
m ore t han several m inutes.
5 . Clean t he corona wire inside t he drum unit by gent ly sliding t he tab from
left t o right and right t o left for several t im es. (Aft er the t oner cart ridge
has been used for a period of tim e, som e am ount s of toner m ay rem ain
on t he corona wire.)
N ot e :
Be sure t o return the t ab to t he Hom e position (▲) . The arrow on t he
tab m ust be aligned wit h t he arrow on t he drum unit . I f it is not ,
printed pages m ay have a vert ical stripe.
Drum
Unit
Toner
Cart ridge
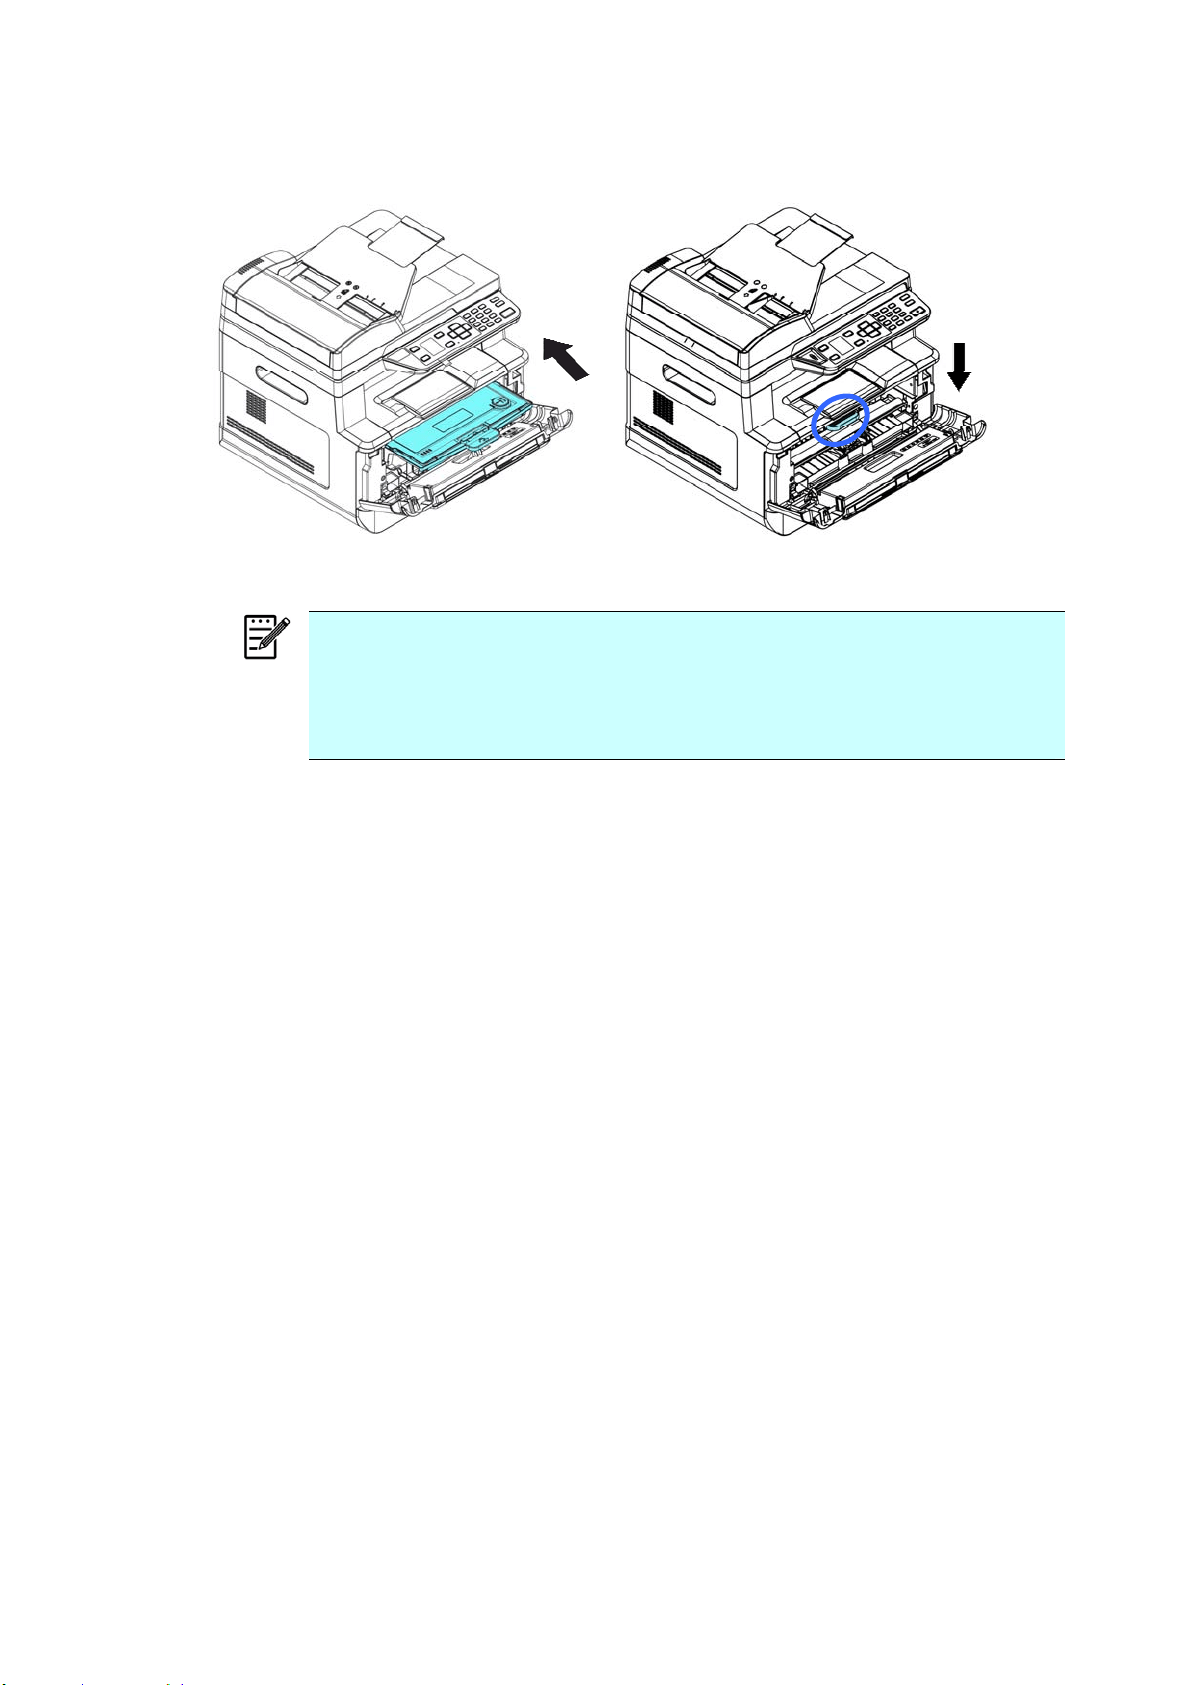
15
7
6 . Hold t he handle of t he toner cart ridge assem bly and insert t he t oner
cart ridge assem bly t o its original place. Press t he handle t o fix it firm ly in
place.
N ot e :
Do not dispose of t he t oner cart ridge. Put t he used t oner cart ridge int o
the bundled plastic bag, and then return it t o a dealer or service
representat ive. The latt er recycles or deals with t he collect ed t oner
cart ridges in accordance wit h t he relevant regulat ions.
7 .
Close t he front cover.
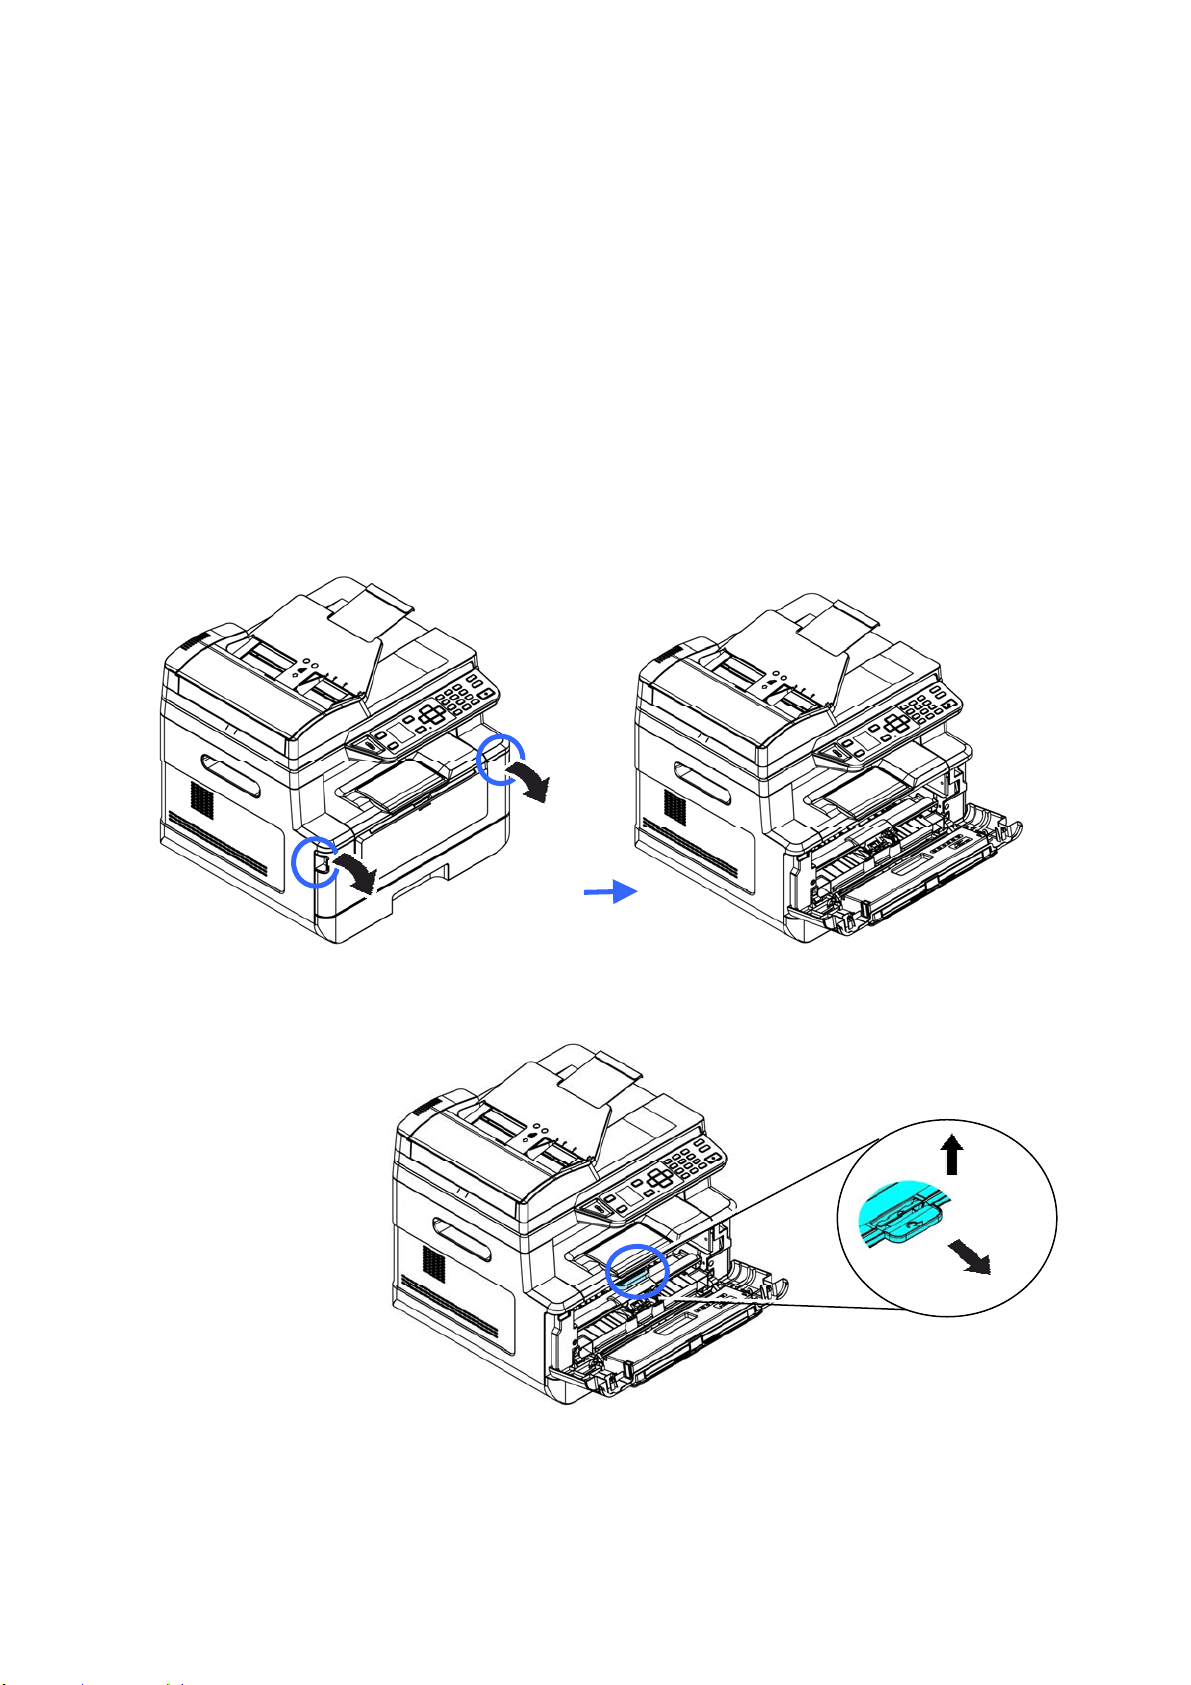
158
Replacing The Drum Unit
The drum unit t hat com es wit h the product needs t o be replaced aft er printing
approxim ately 12,000 pages. When t he drum unit is running low, you will be
prom pt ed with a [ Drum Low ] m essage. Buy a new toner cart ridge and have it
ready before you receive [ Replace Dr um ] m essage.
Follow t hese st eps to replace the t oner cart ridge:
Rem oving t he Drum Unit a nd t he Toner Cart ridge Assem bly
1 . Turn off t he power and rem ove t he power cable from t he power out let .
2 . Open t he front cover by pulling t he handles on both sides as shown.
3 . Lift t he handle of the t oner cart ridge and gently rem ove t he t oner cart ridge.
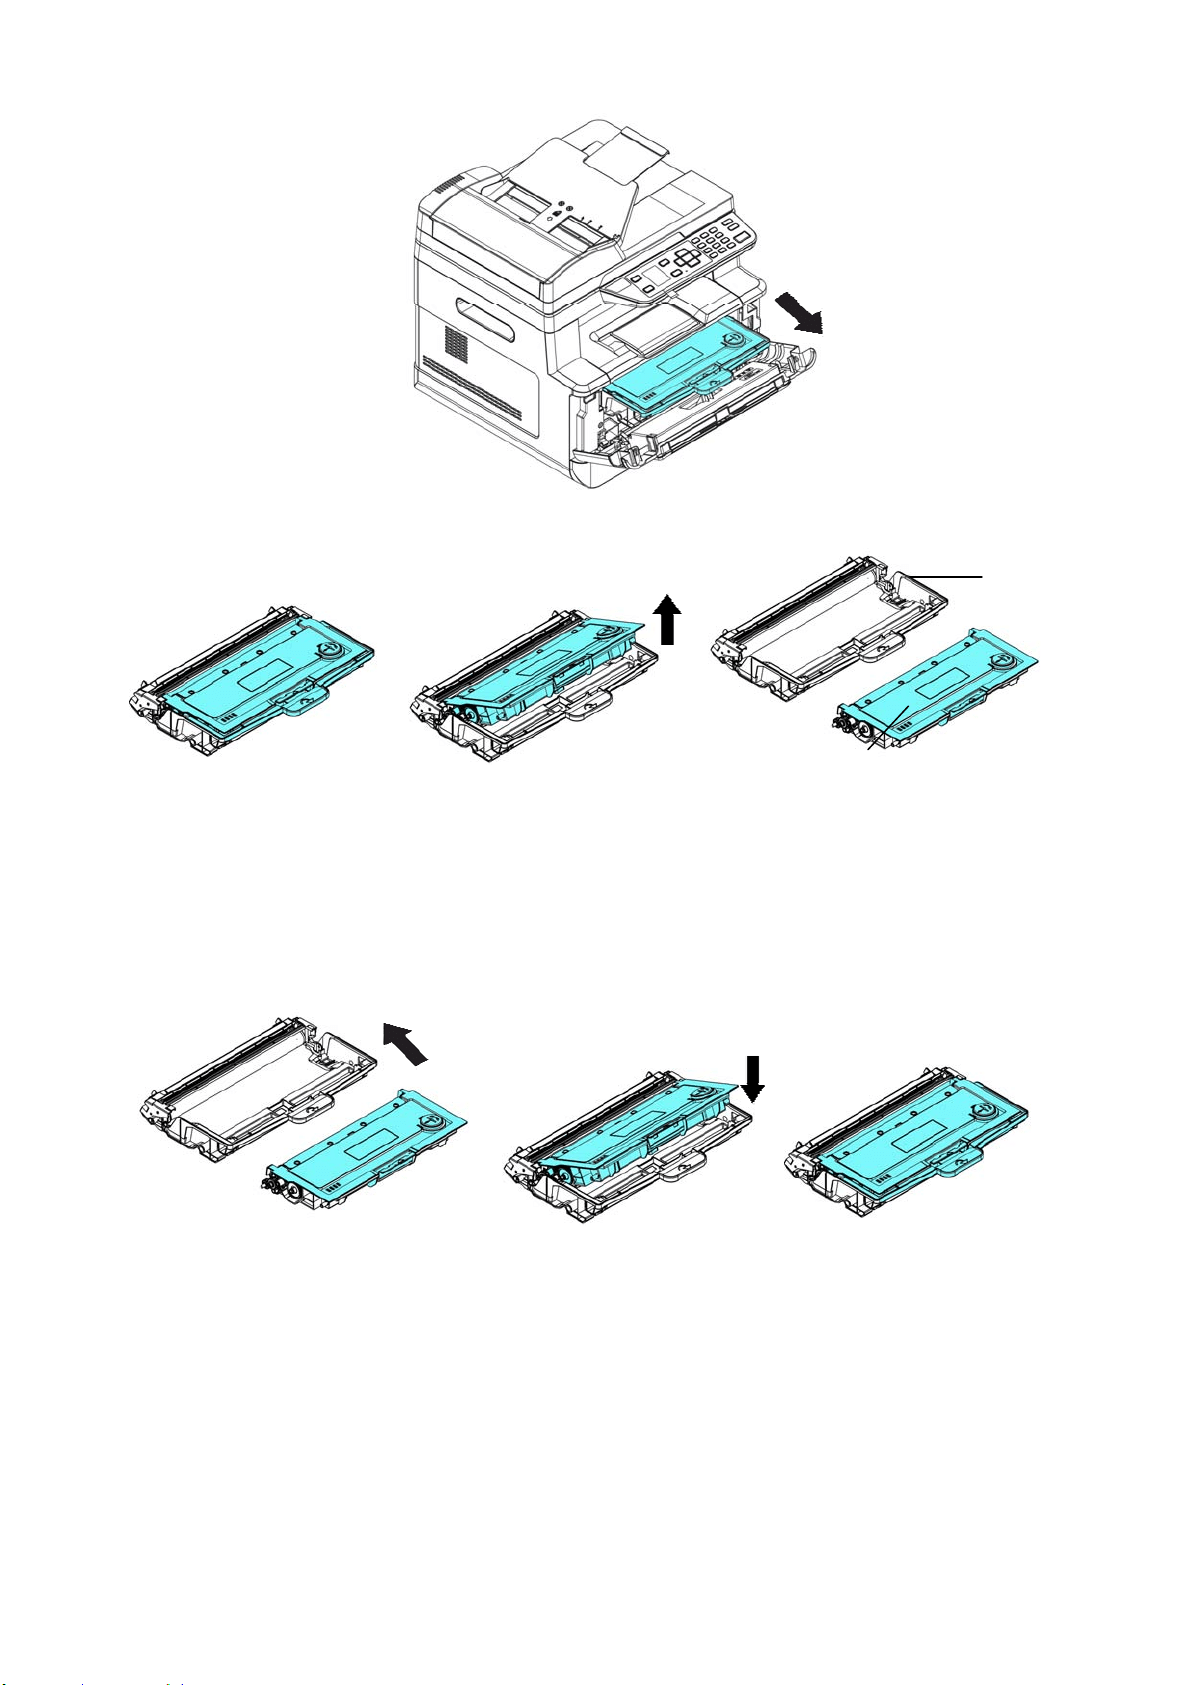
159
4 . Rem ove t he toner cart ridge from t he drum unit as shown.
I nst alling t he Drum Unit
1 . I nst all the toner cart ridge t o the new drum unit.
2 .
Hold t he handle of t he t oner cart ridge and insert t he t oner cart ridge to its
original place. Press t he handle t o fix it firm ly in place.
Drum
Unit
Toner
Cart ridge
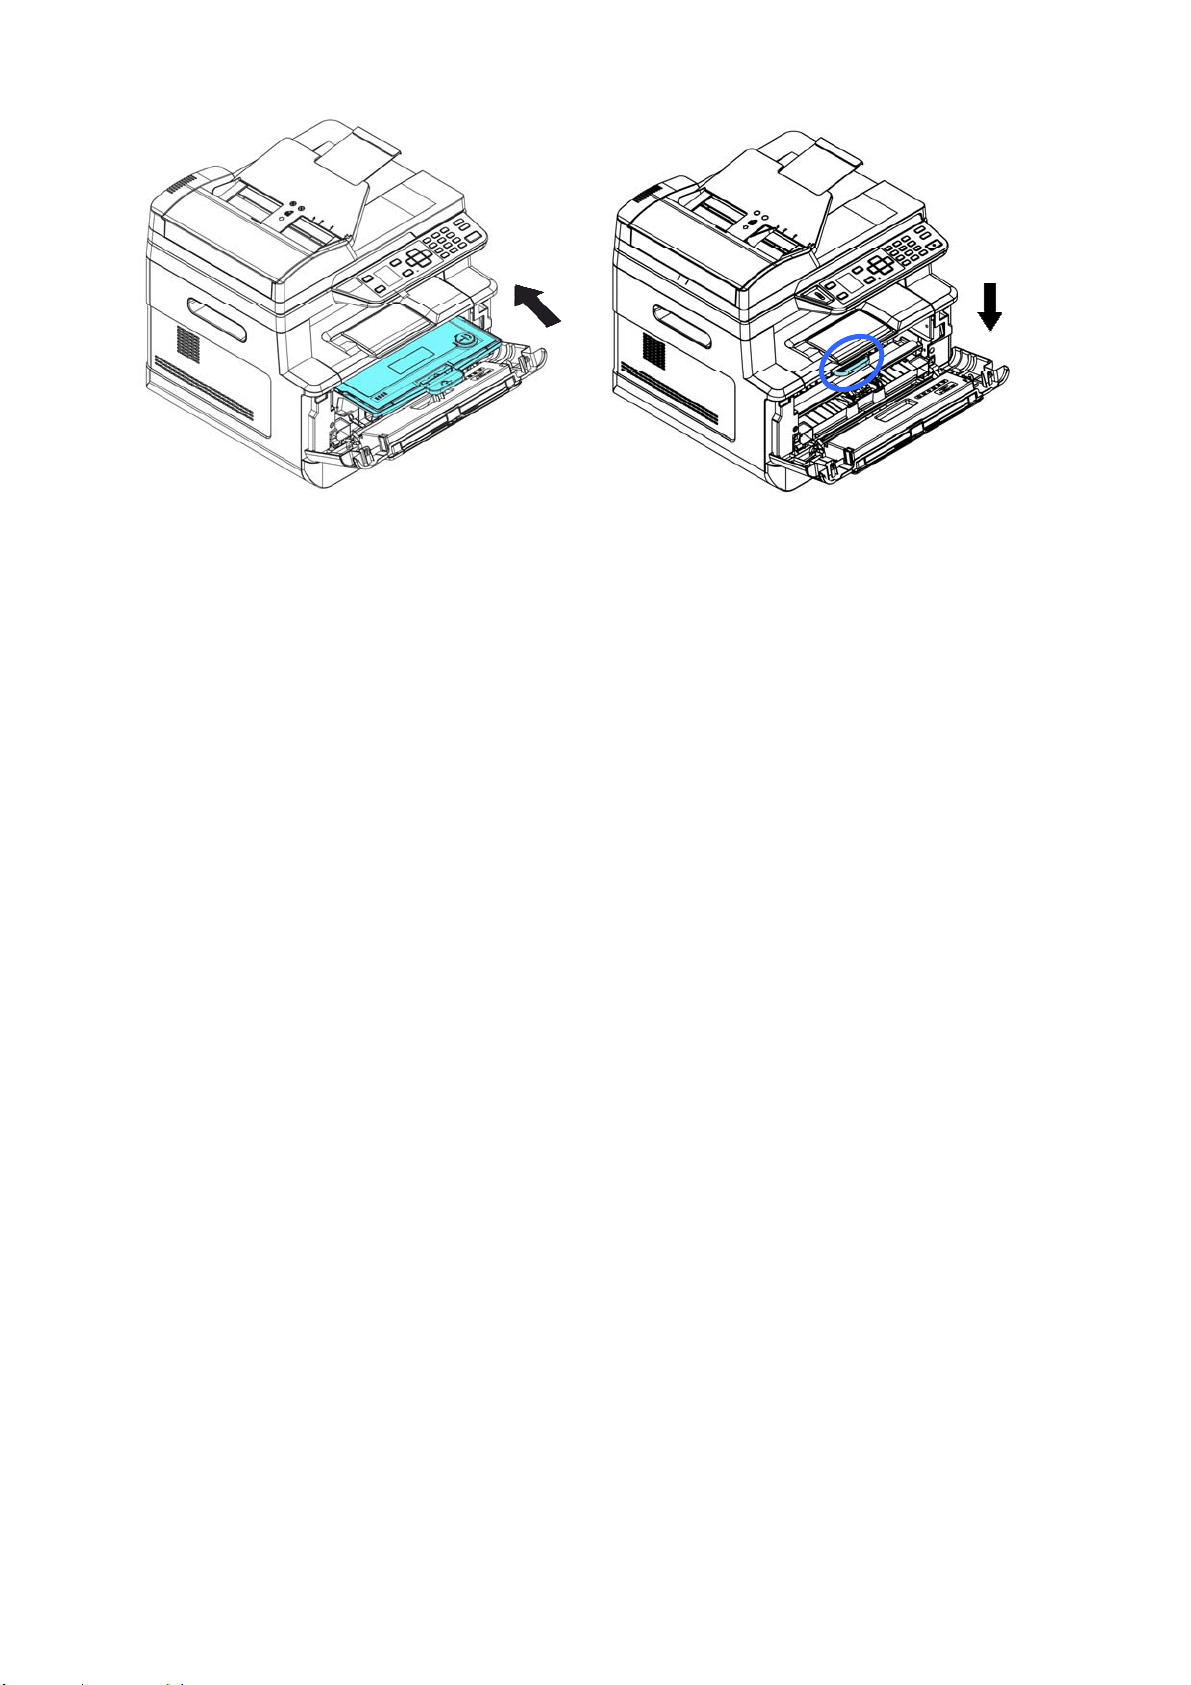
16
0
3 .
Close t he front cover.
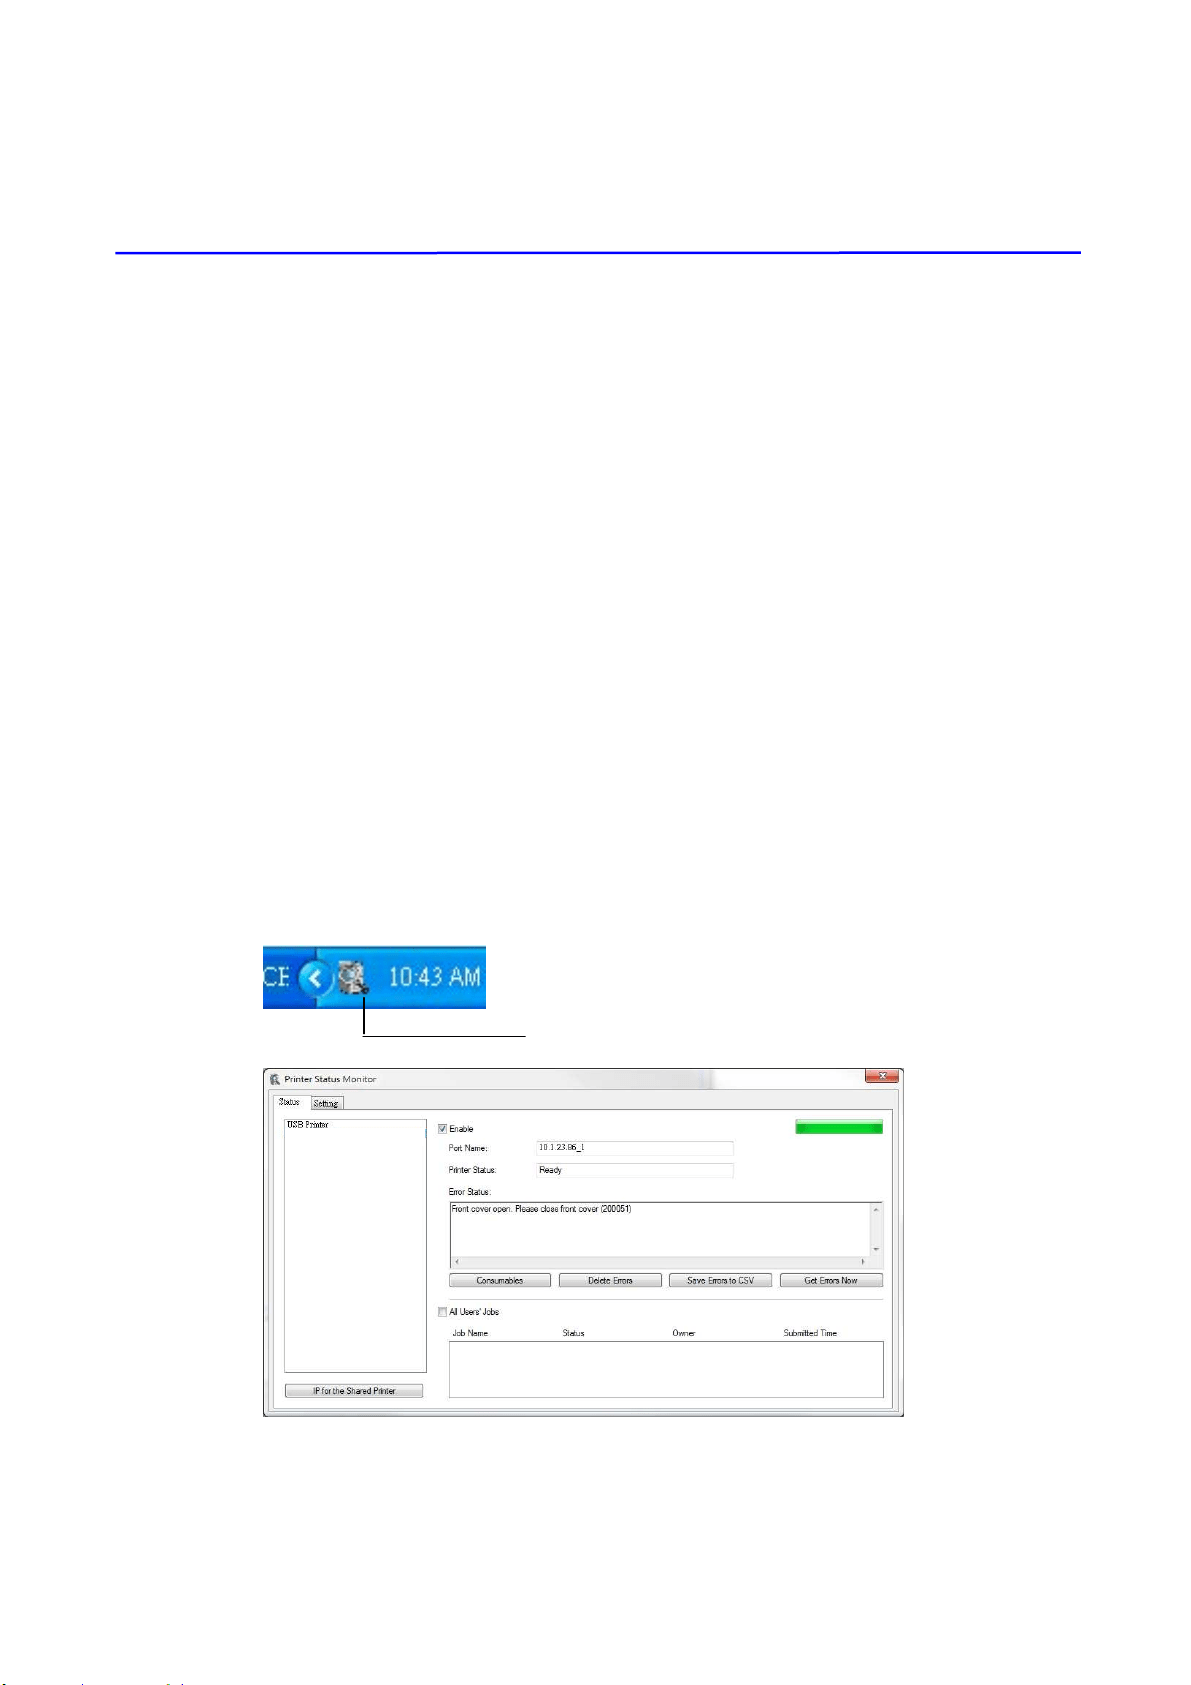
161
1 1 . Troubleshooting
Monit oring Your Printer Using Print er
St a t us Monit or
Printer St atus Monit or allows you t o m onit or your printer’s stat us, get
inform ation on consum able parts, and alert s you when printer errors occur.
Print er Stat us Monit or is available when the print er is connected direct ly t o a
host com puter via t he USB port or a net work port .
Print er Stat us Monit or is inst alled when you inst all t he print er driver as
described in t he preceding sect ion.
Acce ssing Pr int er Stat us M onit or
Double- click t he Prin t e r St at us M onitor icon on t he syst em t ray. The
following print er st atus window appears.
Print er St at us W indow
Print er St at us M onitor icon
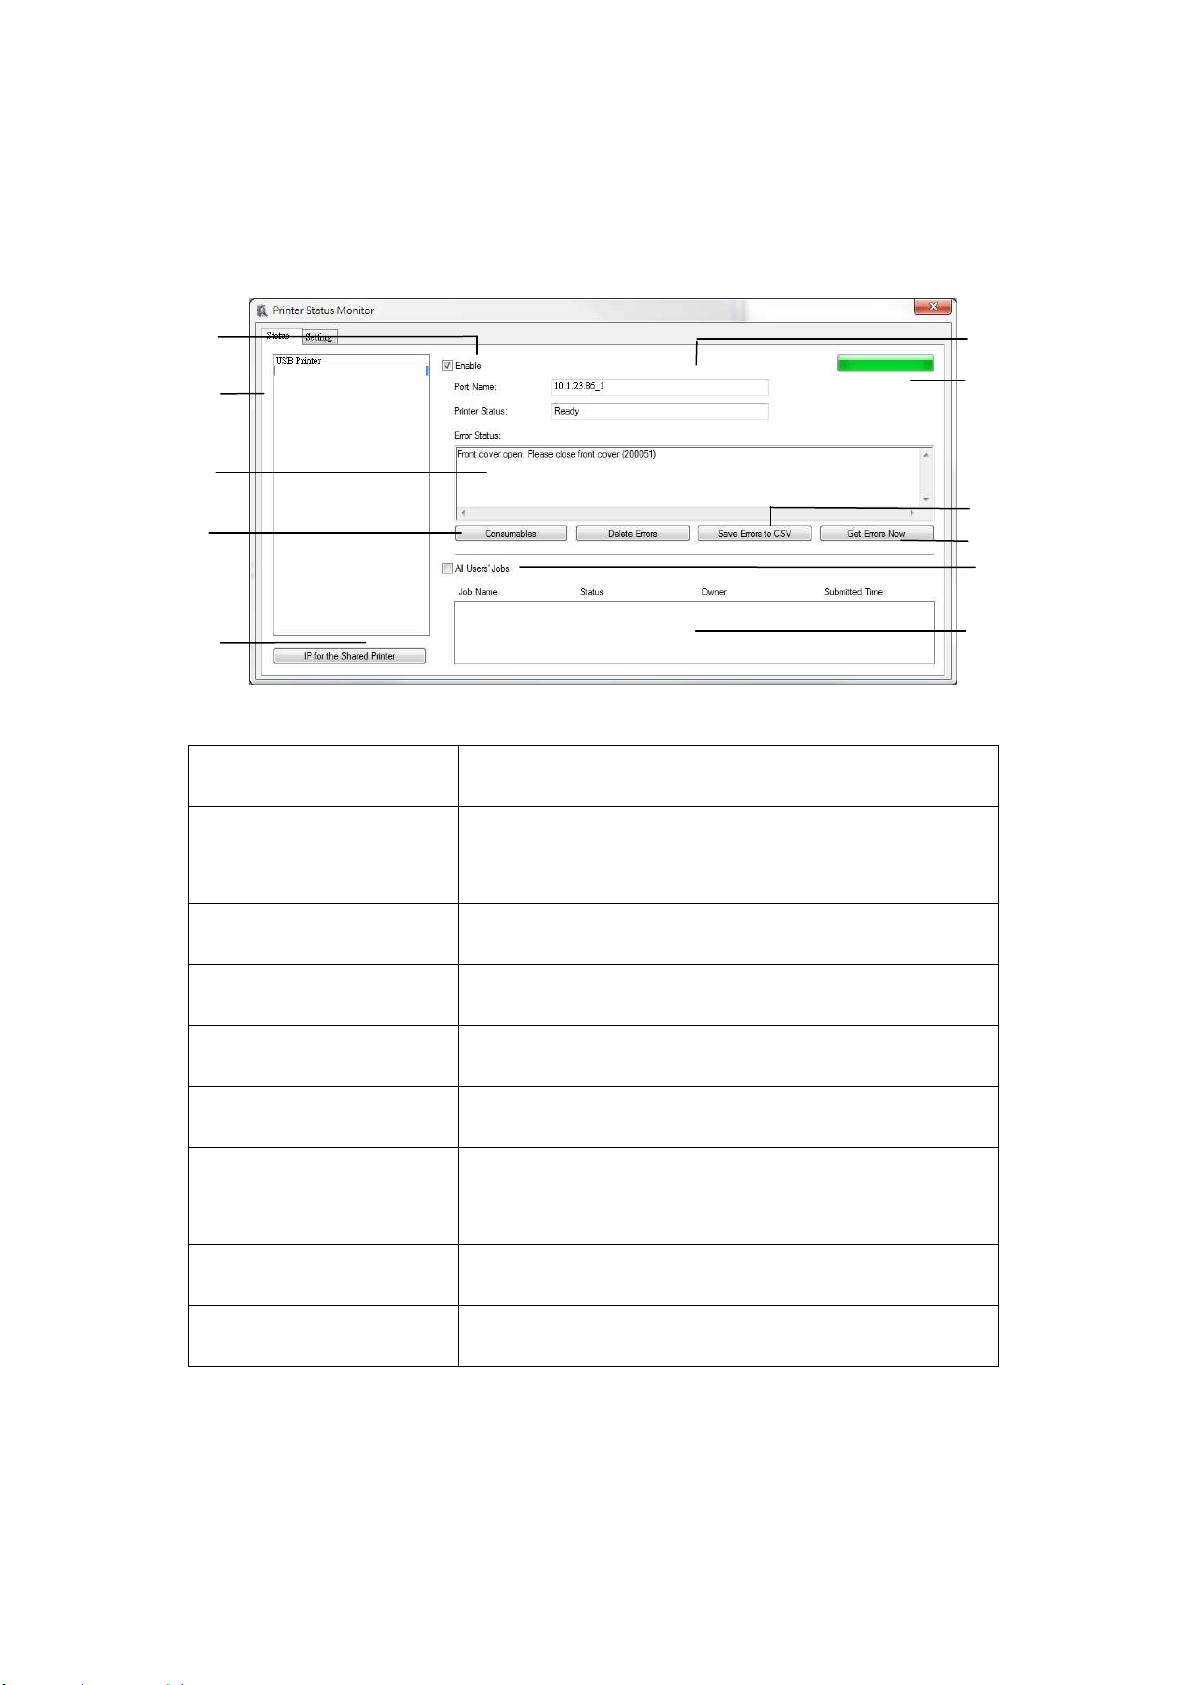
162
Get t ing Pr int er St a t us D e t ails
You can m onit or printer st at us and get inform ation on consum able products
using the Printer St at us Monitor dialog box.
a Por t N am e Port nam e for t he specified print er.
b Pr ogress Bar The progress bar t o access t he lat est data of t he
specified print er.
c Delet e Err or s Delet e all t he error m essages.
d Sa ve Err or s t o CSV Save error m essage t o a CSV file.
e All Use r s’ Jobs Check t he box to show All users’ jobs.
f Job Box Show all t he jobs in queue.
g Enable Check t he box t o enable accessing t he stat us of a
specified print er.
h Print e r Displays connect ed printers.
i Text Box Displays the current stat us of the printer.
a
b
c
d
e
f
g
h
i
j
k

163
j Consum ables Click t o show t he inform at ion of t he paper t ray and
the consum ables parts such as Drum , Toner
Cart ridge.
The Consum ables w indow
k I P for a
Sha red Pr inte r
Click here to enter the I P for a shared printer to
get t he print er stat us.
Drum Usage
Remain
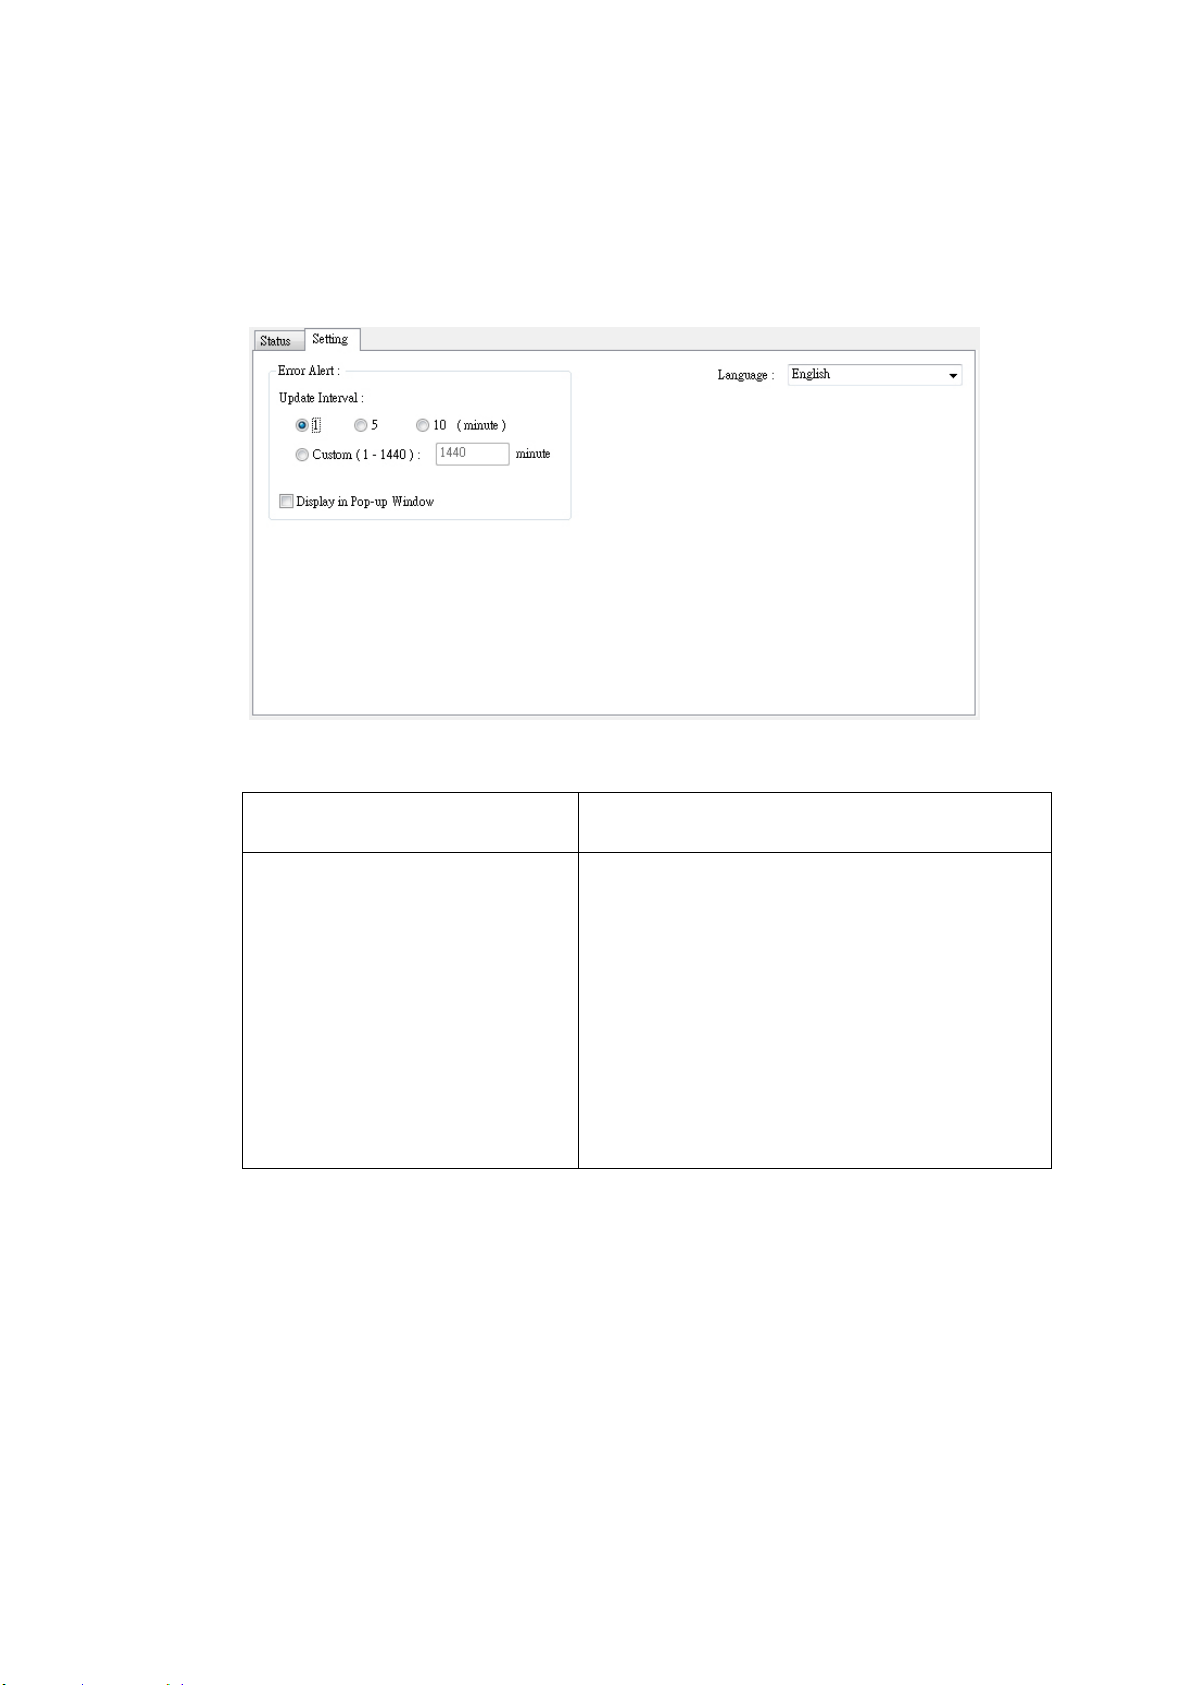
164
Set ting Monit oring Pr e fe rences
To m ake specific m onit oring set tings, click t he Sett ing t ab on t he Print er Stat us
Monitor window.
Language
Displays the language of t he window.
St at us Alert
Update Tim e
Display in Pop- up Window
Define t he int erval t o refresh t he print er
error stat us.
Choice: 1, 5, 10 (m inut e) , Custom ( 1 ~
1400 m inut e)
Check the [ Pop- up Window] box t o
aut om at ically show t he error stat us in a
pop-up window on t he system t ray.

16
5
Clearing A W a rning or Error M essage
I f a problem occurs during operat ion, a warning or error m essage and QR code
will display on t he LCD panel. I n addit ion, the Error LED will be flashing or
solidly lit to indicat e a warning or an error stat us. To solve t he problem , please
follow t he on- screen inst ruction and the following table for m ore det ailed
inform ation or use your m obile phone t o scan and view the t roubleshoot ing
video.
W a r n ing Message
Message D e script ion or Solut ion
Aut o Tem p.
Adj ust
( 2 0 0 0 0 4 )
Aut o Tem perature Adj ustm ent . Please wait .
The t em perat ure inside t he printer is t oo high. To avoid
dam aging t he toner, t he print j ob is suspended for a few
m inut es. Aft er t he t em perat ure ret urns t o t he norm al
degrees, t he warning m essage w ill t hen disappear and
t he print j ob will cont inue.
Tone r low
( 2 0 0 0 3 2 ) .
Toner t hat rem ains is lower t han 10% . The m achine
can st ill perform print ing or copying funct ion yet wit h
poor quality.
Dr um unit n e ar
end ( 2 0 0 0 4 3 ) .
Drum unit that rem ains is lower t han 10% .
Call t he service personnel t o order and replace the EP.
Tone r e m pty
( 2 0 0 0 3 1 )
Toner has run out .
Replace a new t oner cart ridge.
N o Drum unit
( 2 0 0 0 4 1 )
Please inst all Drum unit and rest art MFP.
Drum unit life
ends ( 2 0 0 0 4 2 )
Dr u m unit life has been exhausted.
Call t he service personnel t o order and replace the EP
m odule.

166
Er r or M essage
Er r or M essage a nd Codes
Possible Causes or Solution
Syst em error
Service code: 100111
Restart MFP. I f t his error persists, call service
personnel for help.
Scan m odule error ( 000113)
Restart MFP or call service.
An unexpected error from scanner part s
occurs.
Restart MFP or call service to replace scanner
part s t hat fail.
Printer m odule error.
Please restart MFP or call service
( 205000, 205001) .
An unexpected error from print er part s
occurs.
Restart MFP or call service personnel t o
replace print er parts that fail.
Printer m odule error.
Please clean corona wire and
restart MFP or call service
( 205101) .
An unexpected error from print er part s
occurs.
Please clean corona wire and restart MFP or
call service personnel t o replace printer part s
t hat fail.
Fax m odule error ( 300000) .
Restart MFP or call service
The fax board is not installed or dam aged.
Restart MFP or call service t o replace t he fax
board.
Mot or error ( 000001) .
Press # butt on to erase or call
service.
When MFP is boot ed, t he scanner and printer
engine I nit ializat ion fail.
Restart MFP.
Scanner lam p error (002007) .
Please close flat bed cover and
Press # butt on to erase or call
service.
The CI S lam p is dam aged or not lit.
Call service personnel to replace t he CI S unit .
Fan fails ( 200090) .
Call service personnel to replace the fan.
Front cover opens ( 200051) .
Please close front cover.
Rear cover opens (200054) .
Please close rear cover.
Cont inue feed error ( 200000) .
Please open front cover t o clear t he paper
and load paper to proper t ray.
Fuser error ( 201600, 201604~ 5,
201613, 201615~ 201618,
201621~ 201623)
Please restart MFP. I f t he error persist s, call
service personnel for help.

16
7
Please open rear cover ( 200002) .
The rear cover has t o be opened when bond,
card, or t ransparency is selected as m edia
type.
Please load paper in m anual t ray
( 200080) .
Paper em pt y in the m anual t ray.
Please check t ray 1 and press OK
( 200003) .
Pick up error. Paper em pty, paper j am , or
pickup failed in t ray 1.
Please load paper t o t ray1
( 200081)
Tray 1 paper em pt y.
I P conflict ( 500000) .
Please check net work set t ings.
Check your net work sett ing.
Net cable unplugs ( 500001) .
Plug in Cable.
Connect network cable.
DHCP no response ( 500002) .
Please check net work set t ings.
Check network sett ings.
USB flash disk not found.
I nsert USB flash drive t o the USB flash port.
USB flash disk connect ion fails.
Job abort .
Check t he connect ion of USB flash drive.
MFP not ready.
Try again lat er.
MFP is busy wit h current j ob. Wait unt il
current j ob is com plet ed.
Buffer full Job abort .
Mem ory is not enough t o process the
scanned im ages.
Buffer full
Print scanned im ages:1
Cancel job:2
Mem ory is not enough t o process the
scanned im ages. Press [ 1] t o print t he first
few im ages which have not exceeded t he
m em ory lim it or press [ 2] t o cancel job.
Resetting default sett ings fails.
Please t ry again lat er.
Resetting default sett ings.
Scanner Calibrat ion fails.
Please t ry again lat er.
Please t ry again by pressing t he Menu but t on
and then choosing
System > Managem ent> Calibration.
Reset count fail.
Please t ry again lat er.
Please t ry again by pressing t he Menu but t on
and then choosing
System > Managem ent> Reset count.
Set ting fails.
Please t ry again lat er.
Set ting t he Menu opt ion fails. Check your
set t ing.
Full page not support N in 1
The Full page feat ure does not support N in 1
( 2 in 1 or 4 in 1) .

168
Cust om zoom not support N in 1
The Custom Zoom feature does not support
N in 1 (2 in 1 or 4 in 1).
Pape r Jam
ADF paper j am ( 002013) .
1. Open ADF cover and clear paper.
2. Close ADF cover.
Paper j am ( 200301) . Please check m anual t ray.
Paper j am ( 200302) . Please open front cover and t ray 1 to clear j am paper.
Paper j am ( 200324) . Please open front cover and t ray 1 to clear j am paper.
Paper j am ( 200325) . Please open front cover and pull drum unit out to clear j am
paper.
Paper j am ( 200326) . Please open front cover and pull drum unit out to clear j am
paper.
Paper j am ( 200327) . Please open front cover and pull drum unit out to clear j am
paper.
Paper j am ( 200328) . Please open front cover and pull drum unit out to clear j am
paper.
Paper j am ( 200329) . Please open front cover and pull drum unit out to clear j am
paper.
Paper j am ( 200330) . Please open front cover and rear cover to clear j am paper.
Paper j am ( 200331) . Please open front cover and rear cover to clear j am paper.
Paper j am ( 200332) . Please open front cover and rear cover to clear j am paper.
Paper j am ( 200333) . Please open front cover and rear cover to clear j am paper.
Paper j am ( 200334) . Please check t he duplex t ray and open front cover and rear
cover t o clear t he j am paper.
Paper j am ( 200335) . Please check t he duplex t ray and open front cover and rear
cover t o clear t he j am paper.
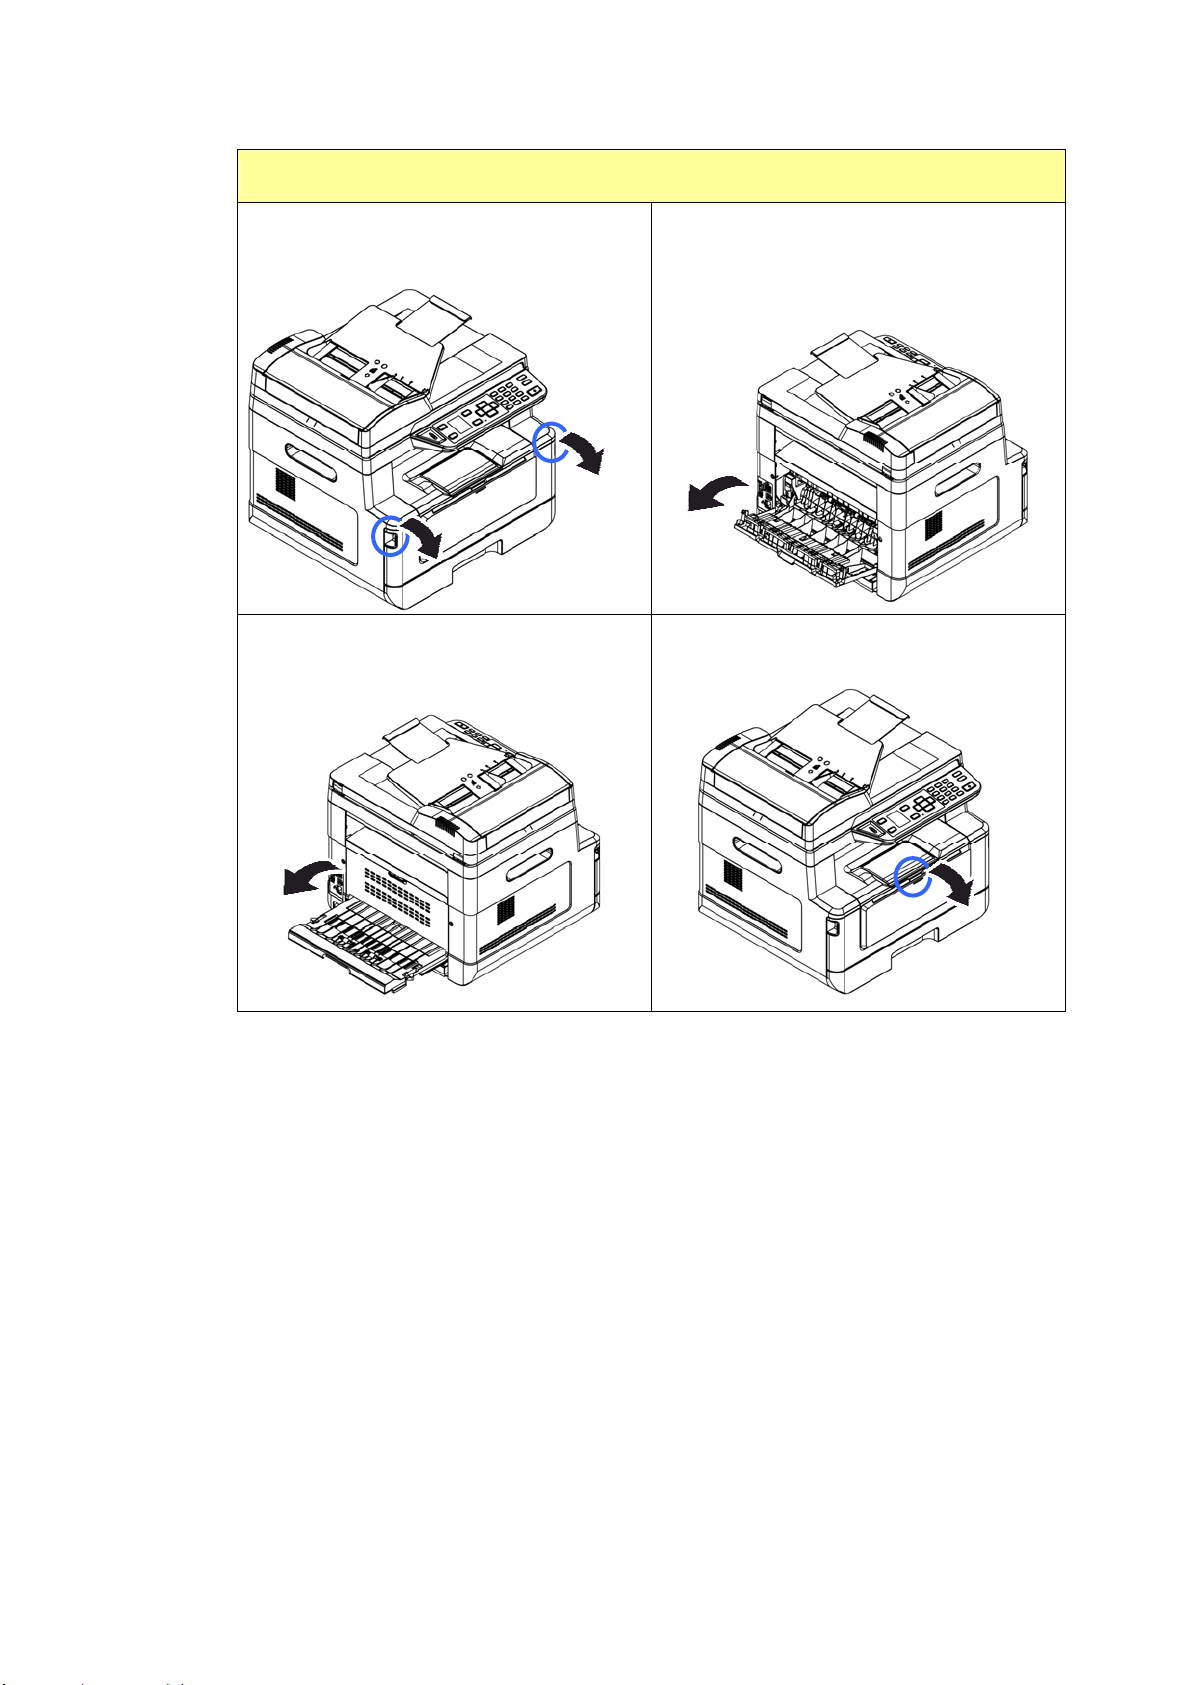
169
Loca t ions of t he Jam m ed Pa per
Front Cove r : Open the front cover by
pulling t he handles of t he front cover
on
bot h sides as illust rat ed.
Rea r Cover: Open t he rear cover by
pulling the handle of t he rear cover as
shown.
Duplex tray: Pull the duplex t ray
beneath t he rear cover out of t he m ain
unit .
Manual tray: Open t he m anual t ray by
grasping the handle and pull it down.
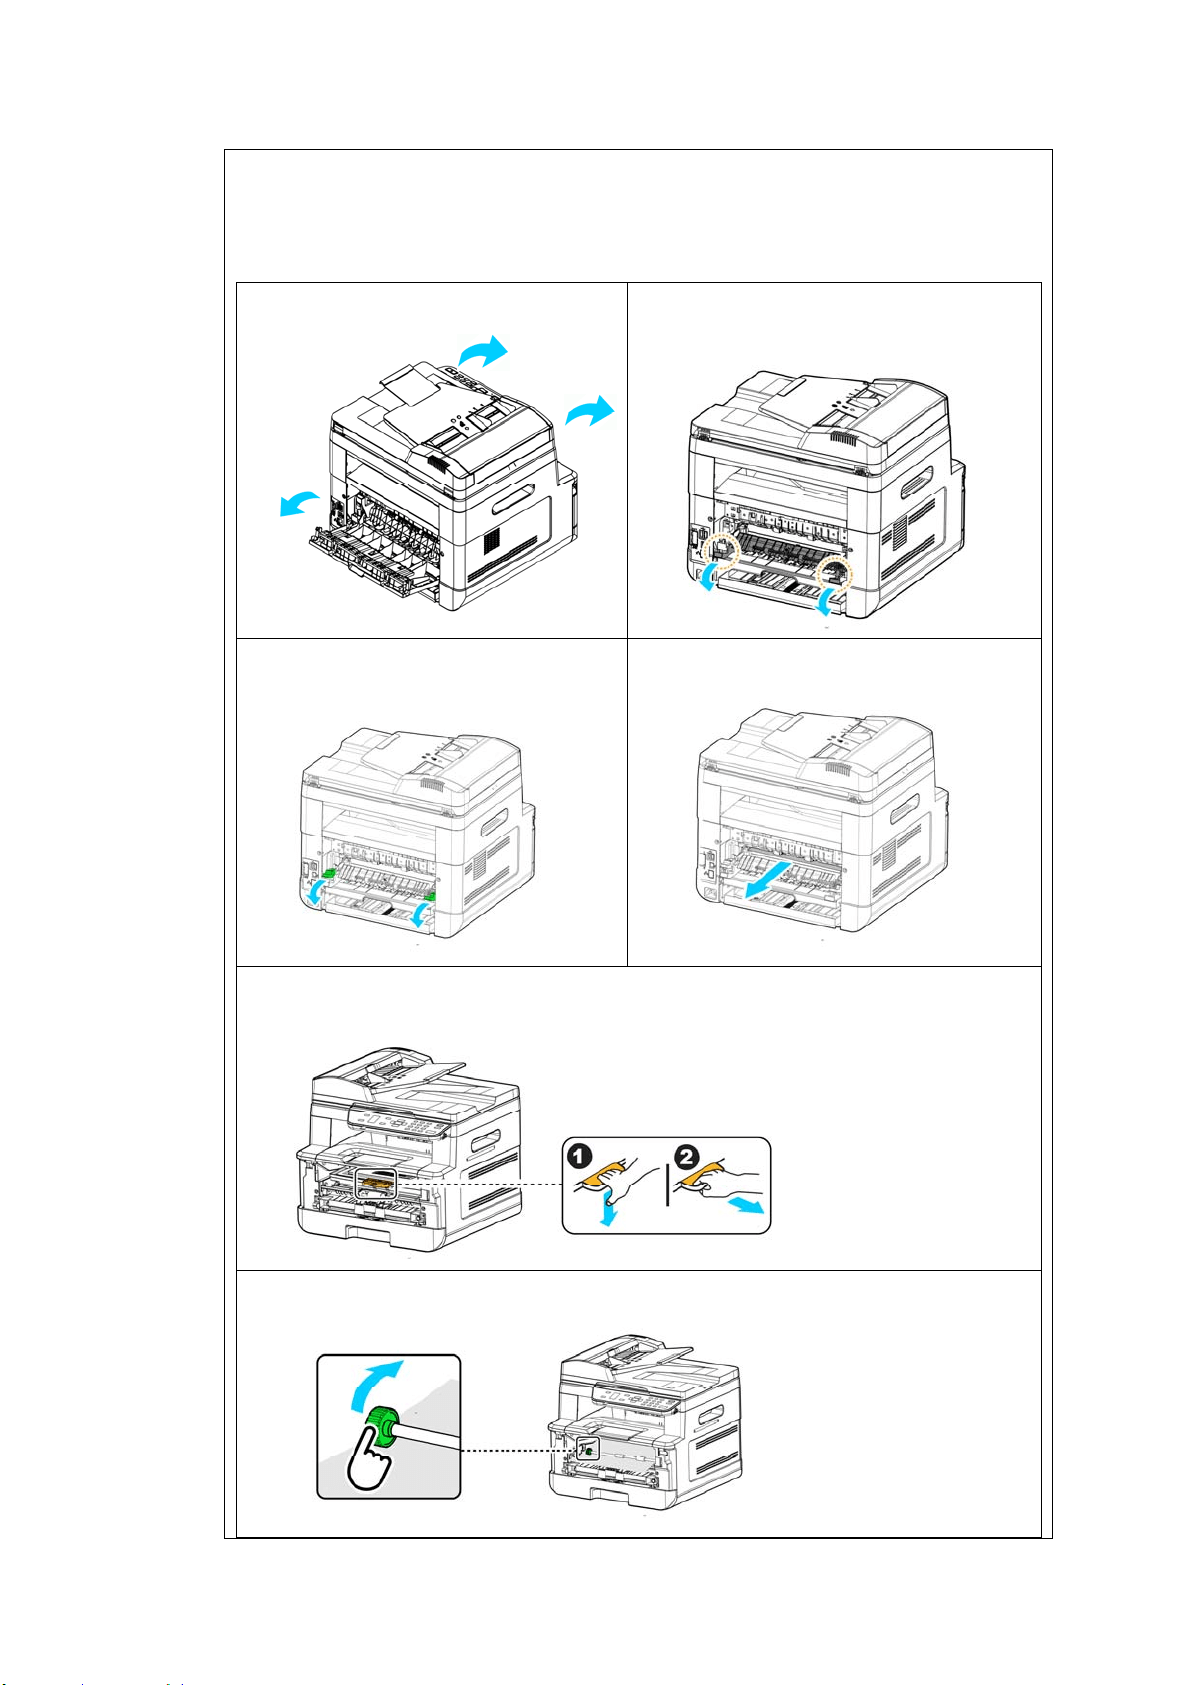
17
0
Fuser :
The area around the fuser is hot . To avoid a burn inj ury, be careful not t o touch
the fuser unt il it cools down and follow t hese steps to rem ove t he j am m ed
paper:
1 . Open t he Front Cove r and the
Rea r Cover.
2 . Pull down the Fuser Pat h as
indicated.
3 . Pull down t he Release Arm on
both sides.
4 . Slowly rem ove t he j am m ed paper.
5 . I f there is difficulty t o pull off t he j am m ed paper, rem ove t he print er
cart ridge fir st.
6 . Rot ate t he Release Wheel t o slowly pull out t he j am m ed paper.

171
Sending to FTP/ CI FS Er rors
I nvalid login nam e or
password.
Please check your login nam e or password on t he
product’s web page.
Connect ion failed.
Unable t o connect to
server.
Connection fails during scan t o FTP/ CI FS.
Check net work environm ent or t ray again later.
JPEG not support
Black&Whit e
JPEG file form at does not support black and whit e
im age m ode.
Fax Er r or s
Exceed m ax num ber. Fax recipients exceed m ax. allowable num ber ( 5) .
No fax num bers added.
Please add fax num ber.
No fax num ber has been ent ered.
Fax com m unication error
Fax t ransm ission or receiving fails.
Please t ry again lat er.
Line is in use.
Please hang up t he phone before leaving t he fax function.
E- Mail Err or s
Exceed allow able lim it . E-m ail recipient s exceed allowable num ber ( 5) .
No recipient s added.
Please add recipient s
before pressing start.
Enter your recipient.
No from address added.
Please add address in the [ From ] field, before
pressing start.
File nam e is exist ed.
Job abort .
File nam e for the scanned im age exist ed.
Change your file nam e.
JPEG not support
Black&Whit e
JPEG file form at does not support black and whit e
im age m ode.
No entries found.
Please m odify your search ent ry.
Unknown error.
Restart MFP. I f t his error persists, call service
personnel for help.

17
2
Er r or M essage a nd Codes
Possible Causes or Solution
Syst em error
Error ( Num ber) .
Restart MFP. I f t his error persists, call service personnel for
help.
300100 Print er API _NVRAM_RW_TEST_FAI L
300101 Printer API _NVRAM_WRI TE_FAI L
300102 Printer API _NVRAM_READ_FAI L
300200 Printer Flash Error
300201 Printer FLASH_BLOCK_ERASE_FAI LED
300202 Printer FLASH_CHI P_ERASE_FAI LED
300203 Print er FLASH_PROGRAM_FAI LED
201610
Printer LPH Error,LPH cable connection fails.
201650 Printer runt im e error.
201651 Firm ware error.
201701
Printer MB NVRAM:reading error
201702
Printer MB NVRAM:writing error
201703
Printer MB NVRAM:reading error while com paring
201704
Printer MB NVRAM:com paring error
201711
Print er Drum Unit NVRAM:reading error
201712
Print er Drum Unit NVRAM:writing error
201713
Print er Drum Unit NVRAM:reading error
201714
Print er Drum Unit NVRAM:com paring error
201721
Printer Toner NVRAM:reading error
201722
Printer Toner NVRAM:writing error
201723
Printer Toner NVRAM:reading error while com paring
201724 Printer Toner NVRAM:com paring error
201730 Printer uses wrong NVRAM Address.
302651 Network_I NI T_FAI L , net work init ialization fails.
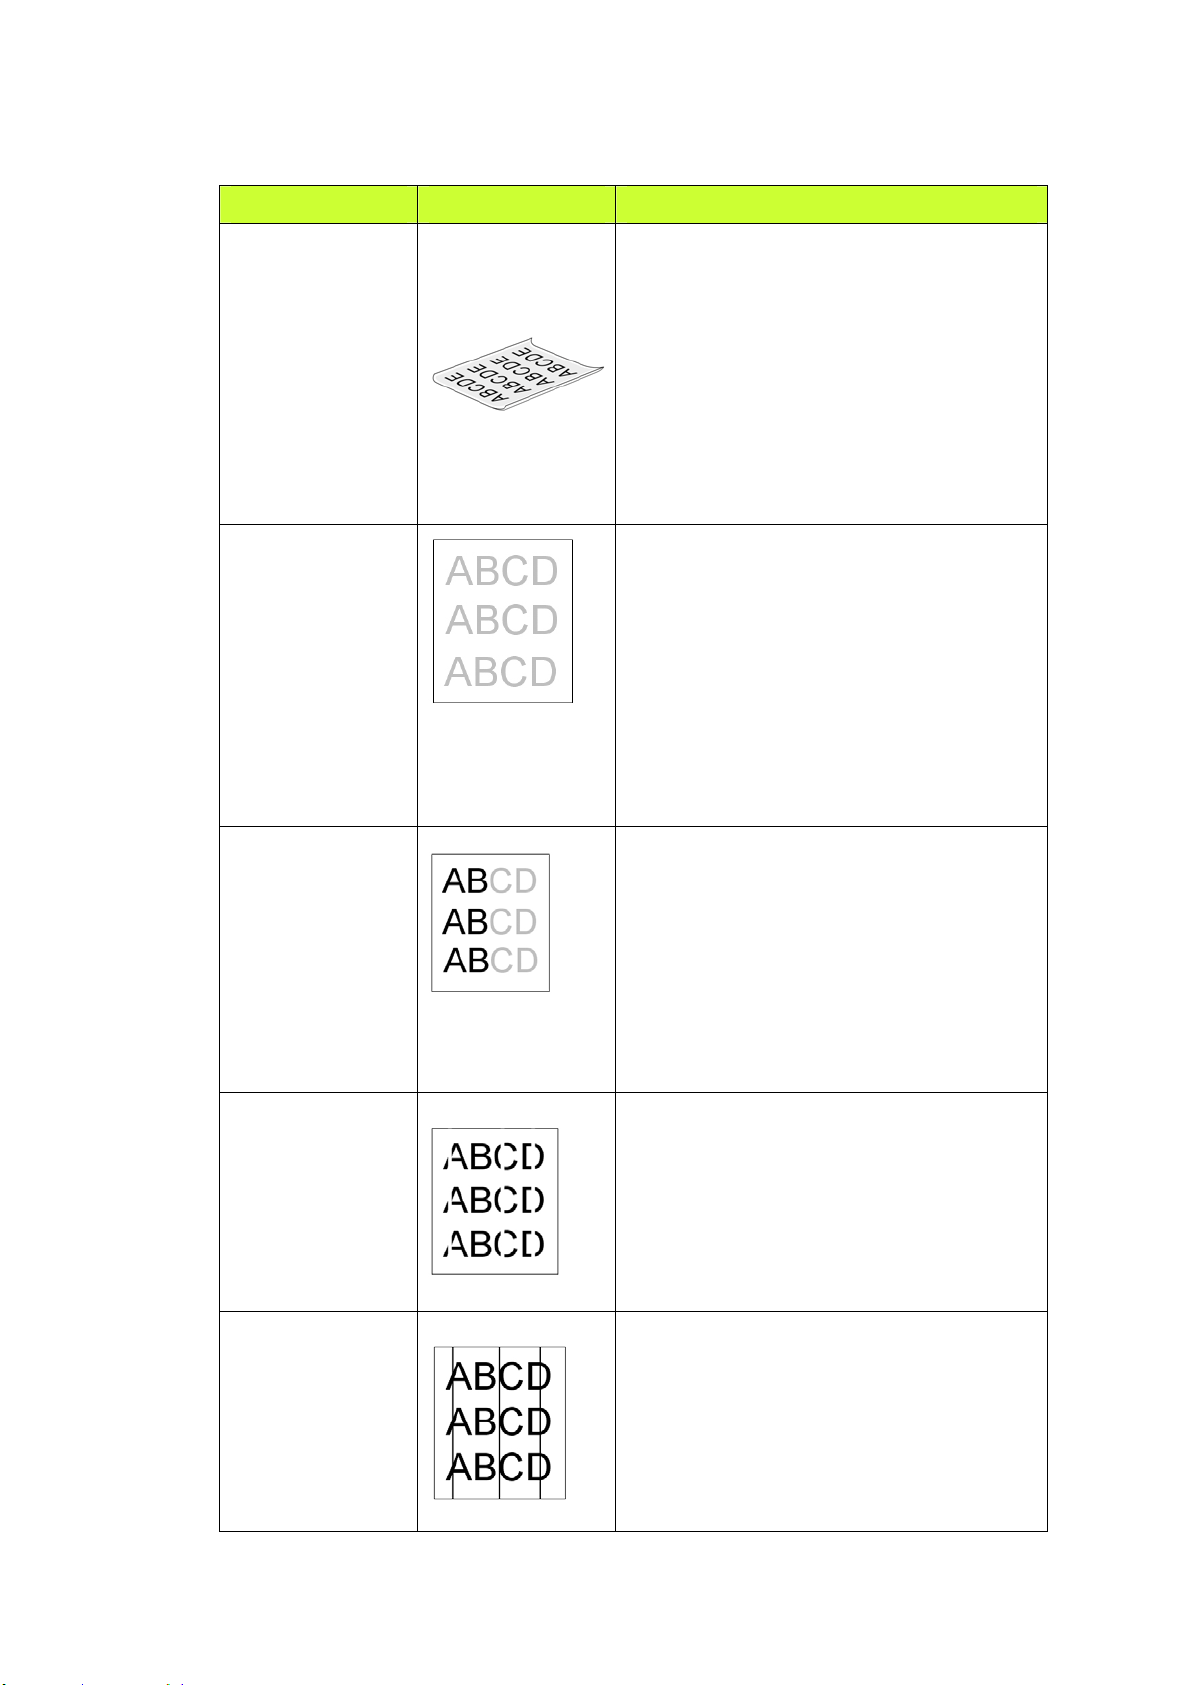
173
I m age Proble m Troubleshoot ing
Problem I m age Ex am ple
Solut ion
Paper curls
1. Use paper of standard weight : I f
you are using thin paper, t ry to use
paper of st andard weight ( 80
g/ m
2
) .
2. Use paper with less m oisture: Load
the paper t o t he paper t ray
im m ediately aft er rem oving t hem
from t he packaging. Seal the
rem aining paper wit h t he original
packaging to keep from t he
m oist ure absorpt ion.
Ligh t
print( e nt ire
pa ge)
1. Make sure t hat t he toner cart ridge
is fully inst alled.
2. Make sure t hat t he Toner Save
set t ing is t urned off in t he printer
driver.
3. Try using a different t ype of paper.
4. The toner cart ridge m ight be
alm ost em pt y. Replace t he t oner
cart ridge.
Ligh t
pr int ( pa rt ia l
pa ge)
1. Make sure t hat t he toner cart ridge
is fully inst alled.
2. The t oner level m ight be low.
Replace the t oner cartridge.
3. The paper m ight not m eet the
print er’s specificat ions ( for
exam ple, t he paper is t oo m oist or
too rough).
Ve rt ical w h it e
lines
Call t he service personnel for help.
Ve rt ical bla ck
lines
Please clean t he EP charger ( corona
wire) according t o the procedure
described in this m anual on page 154.
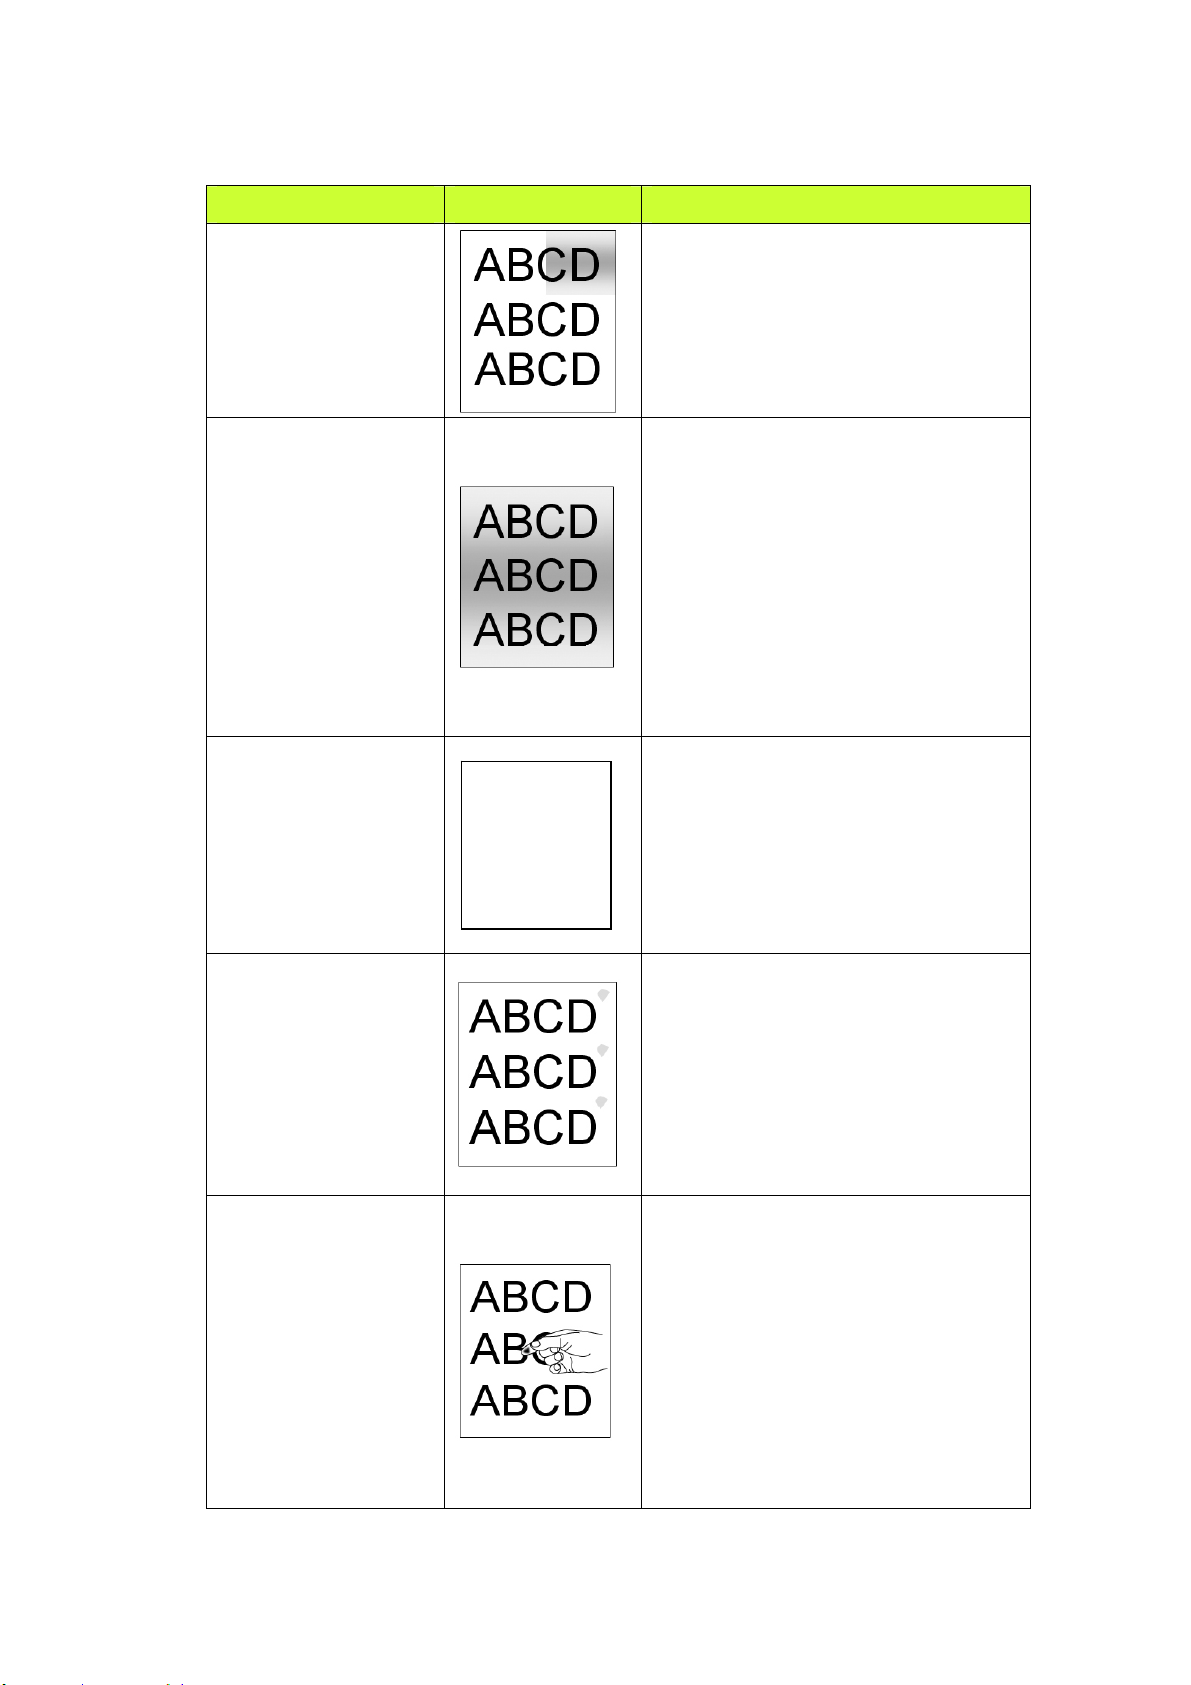
174
I m age Proble m Troubleshoot ing
Problem I m age Ex am ple
Solut ion
Dirty
ba ckground( pa rt ial
pa ge)
Check if t oner is not leaked from
the t oner cart ridge. I f so, replace
the t oner cart ridge.
Dirty
ba ckground( ent ir e
pa ge)
1. The paper m ight not m eet t he
print er’s specificat ions ( for
exam ple, t he paper is t oo thin).
2. Check if there is enough t oner
in t he toner cart ridge. I f not,
please replace t he t oner
cart ridge.
3. Call t he service personnel for
help.
Print blank pa ge
Check if there is enough toner in
the t oner cart ridge. I f not , please
replace t he toner cart ridge.
I f t his error happens again, call
service for help.
Defect ive im a ge of
re gula r in t e rva l
1. Clean the drum unit with a soft
and clean clot h ( See p. 149) .
2. I f t his error hapeens again, call
service for help.
2.
Loose t one r
1. I f you have observed a rougher
texture on one side of your
paper, try printing on the
sm oot her side.
2. The paper m ight not m eet t he
print er’s specificat ions ( for
exam ple, t he paper surface is
not sm oot h or paper t oo thick) .
3. Media t ype incorrect. Please
choose proper m edia t ype for
your paper.

17
5
Black line on edge
The im age is slight ly skew. Make
sure t he edge of your docum ent is
properly aligned and slight ly t ouch
the paper guides in t he aut o
docum ent feeder.
Technica l Support
I f your problem still exists aft er trying t he above solut ion, please cont act our
technical support .
Headquart e r
Avision I nc.
No. 20, Creation Road I , Science-Based I ndustrial Park,
Hsinchu 300, Taiwan, ROC
TEL: + 886 ( 3) 578- 2388
FAX: + 886 ( 3) 577- 7017
E- MAI L: serv ice@avision.com .t w
Web Sit e: ht t p: / / www.avision.com .t w
US and Cana da Ar e a
Avision Labs, I nc.
6815 Mowry Ave., Newark CA 94560, USA
TEL: + 1 ( 510) 739- 2369
FAX: + 1 ( 510) 739- 6060
E- MAI L: support @avision- labs.com
Web Sit e: ht t p: / / www.avision.com
China Area
Sha nghai Te chnica l Support Cent e r
7A, No.1010, Kaixuan Road, Shanghai 200052 P.R.C.
TEL :+ 86- 21- 62816680
FAX :+ 86- 21-62818856
E-MAI L :sales@avision.net.cn
Web Sit e: ht t p: / / www.avision.com .cn
Europe Area
Avision Europe Gm bH
Bischofstr. 101 D-47809 Krefeld Germ any
TEL: + 49- 2151- 56981- 40
FAX: + 49- 2151-56981- 42
E- MAI L: info@avision- europe.com
Web Sit e: ht t p: / / www.avision.de
Espaço Br a sil
Avision Bra sil Ltda .
Avenida Jabaquara, 2958 – Cj. 75 – Mirandópolis –
CEP: 04046- 500 – São Paulo, Brasil
TEL: + 55- 11- 2925- 5025
E-MAI L: suport e@avision.com .br
Web Sit e: ht t p: / / www.avision.com .br

17
6
1 2 . Specificat ions
All specifications are subj ect t o change wit hout notice. For detailed
specificat ions, please refer t o our w eb sit e at ht t p: / / www.avision.com
Gene ra l
Re gula t ory M ode l
N u m ber
AM30xyzzz(x= 0~ 9,A~ Z;
y= 1 or 2;
zzz= A/ D/ blank, P/ blank, F/ blank)
Type MFP
Funct ions Copier- Printer-Scanner- E-m ail- Fax
CPU 300MHz ARM9MP ( build in SOC)
Flash m em ory 16M
RAM 128M DDR2 SDRAM ( AM30XX/ AM30XXA)
256M DDR2 SDRAM ( AM30XXF/ AM30XXAP)
Dim ension ( WxDxH)
AM30XX
AM30XXA/ AM30XXAP/
AM30XXF
404 x 380 x 308 m m
( 15,8 x 14,9 x 12 in.)
404 x 380 x 367 m m
( 15,8 x 14,9 x 14,4 in.)
Weight
AM30XX
AM30XXA/ AM30XXP/
AM30XXF
12 kg ( 26.4 lb.)
13 kg ( 28.6 lb.)
Max paper capacity 250 (m ain t ray) ( 70 g/ m
2
)
10 ( m anual tray) ( 70 g/ m
2
)
35 ( Aut o Docum ent Feeder) ( 70 g/ m
2
)
Warm up t im e < 25 seconds
LCM 1.7 in. TFT
Connect ivit y Hi- speed USB 2.0 ( Device/ Host ) ( Com patible
with USB 3.0)
10/ 100 Base- Tx Et hernet
RJ- 11 (For AM30XXF)
Wi- Fi: 802.11 b/ g/ n (Opt ional)

17
7
Tem perature
10° C ~ 32 ° C
Opearating
Environm ent
Hum idt y
15% ~ 80% RH
Tem perature
- 40° C ~ 65° C
St oring
Environm ent
Hum idt y
10% ~ 90% RH
Current consum pt ion
100~ 127Vac, 50/ 60Hz,12A
Or 220~ 240Vac, 50/ 60Hz, 6.5A
Toner cart ridge lifet im e 3,000 prints
Drum unit lifetim e
12,000 prints
Product Lifet im e
60,000 prints
Copy Fun ct ions
Copy size
Legal, Let t er, A4, A5, B4( I SO) , B5(I SO)
Max scanning size Legal ( 216 x 356 m m ( 8.5 x 14 in.) ( ADF)
Copy resolution 600 x 600dpi
Copy speed 20 cpm ( A4, N t o N)
30 cpm ( A4, 1 t o N)
Copy count up to 99, Aut o Reset t o 1
Zoom 25 ~ 400%
First copy out put tim e
( FCOT)
< 14 seconds
N-up copy 2 in1 / 4 in 1 / I D card
Copy m ode Text / Photo/ Mixed
Print Funct ion
Printing m et hod Mono Laser
Printing speed 30 ppm ( A4) , 32 ppm (Let t er)
Max print size 216 x 356 m m ( 8 x 14 in.)
Min print size 76.2 x 127 m m ( 3 x 5 in.)
Resolut ion 600 x 600dpi
PDLs/ Emulat ions GDI
First print out tim e < 11 seconds
Edge erase 4.3 m m ( t op, bot t om , left , right)

178
Scaling 25 ~ 400%
Duplex print Yes
Network print Yes
Scan Function
Scanner type Flat bed/ ADF/ CI S type, Color/ BW
Max scanning size Legal (216 x 356 m m ( 8.5 x 14 in.) ( ADF)
Optical resolut ion 1200 x 1200 dpi
Scanning bit dept h
Color - 24bit ( out put ) / 48bit ( input)
Gray - 8bit( out put ) / 16bit ( input)
B/ W - 1bit
File form at Color/ Gray - JPEG, MPDF, PDF, TI FF
B/ W - PDF, MPDF, TI FF
Scan t o Dest inat ions Scan to E-m ail, Scan to FTP/ CI FS, Scan to USB
flash drive ( part ition t ype FAT16/ FAT32)
Fax Function ( opt iona l)
Qualit y ( Resolut ion) Up t o 200 x 400 dpi
Fax speed 33.6 Kbps
Telephone system PSTN ( Public Swit ch Telephone Net work)
PBX ( Private Branch eXchange)
Maxim um scan area 216 m m X 356 m m ( 8.5 x 14 in.)
Com patibilit y I TU Super G3( ECM)
One- touch key 10 ( Each one is used as one- t ouch or group dial)
Group num ber Up to 10 groups ( Up t o 5 m em bers in each group)
Broadcast quant it y Up t o 5 fax m em bers
Receiving in Mem ory
Maxim um approx. 2,000 pages*
* Based on I TU-T ( I TU Telecom m unicat ion
St andardizat ion Sect or) Standard Chart No. 1,
JBI G standard m ode.
Operation system s
( PC-Fax)
Windows XP, Windows 7, Windows 8, Windows 10
I nt erface USB, Network
Tone/ Pulse * Tone, 10 PPS, 20 PPS
No. of Rings * 1, 2, 3, 4, 5, 6, 7, 8, 9, 10
Header/ Footer OFF, * ON
Bright ness Light, * Norm al, Dark
SPKR Volum e OFF, * ON
Tx Report * OFF, ON, Error
Redial Count * 0, 1, 2

179
Redial I nt er val * 1 m in, 2 m in, 3 m in
Reduct ion Rx * OFF, ON
Phone Book One Touch, Speed Dial, Group Dial, Block Fax
Special Fax SFAX Hotkey, Mem . Manage.
SFAX Hot kley: Delay Tx, Broadcast , Polling Rx,
Secure Tx, Secure Rx, Color Fax
Mem . Manage.: Tx Job List, Rx Job List, Job Clear
W i- Fi Specifications:
Model: GWF- 7A05
St andard I EEE 802.11 b/ g/ n st andards com pliant
Wireless LAN 1T1R Mode
Frequency Range
2.412 ~ 2.483GHz ( subject to local
regulations)
802.11n: 20MHz/ 40MHz
Num ber of Select able
Channels
802.11b/ g: 13 channels
Dat a Rat e
802.11n: up t o 150Mbps
802.11b: DSSS 11Mbps
802.11g: OFDM 54Mbps
Transm it Power( EI RP)
802.11b: 18dBm + / -1dB
802.11g: 15dBm + / - 1dB
802.11n: 14dBm + / -1dB
Security
64/ 128- Bit WEP Key, WPA( TKI P with
I EEE802.1x) , WPA2(AES with 802.1x) ,
AES