www.lgservice,com
LG
Window-TypeAir Conditioner
MODELS: LWHD1800R , L WHD1450ER
after
para el futuro
,o
FOR "{OUR RECORDS
Write the mode_ and sedai numbers here:
Model #
_ria! #
You can fir_d the humors on a _abel on the side of the
product,
Dealer's Name
Date Purchased
[] Stap# your receipt to this pa_ in t_ _ent you need it
to prove date of purchase or for warra_ly issues,
READ THIS MANUAL
Inside you will find many helpful hints on how to use and
maintain your air conditioner pro_rly: Just a little preventive
care on your part can save you a great dea_ of time and
mor_y over the life of your air cond_ioner,
You'll flr_J many answers to common problems in the chin1
d troubleshooting tips, I_ you _ev#w ou_ chart of
Troubleshooting Tips first, you may not aeed _o call f(_
serv_e at aE
PRECAUTION
, Contact an Authorized Service Center for repair or
maintenance of this unit. Call 1-800-243-0000 to
locate the neare_ ASC.
,This air conditioner is not intended for use by young
children or tnvafids without supervision_
,Young children should be su_tvised to ensure that
they do not play with the air conditioner.
,ff the power cord requires replacement have an
Authorized Servicer install an exact rep|acement part.
, |nstallation work must he performed in accordance
with the Nations| E_ectric Code by qualified and
authorized personnet on|y:
2 Room Air Conditioner
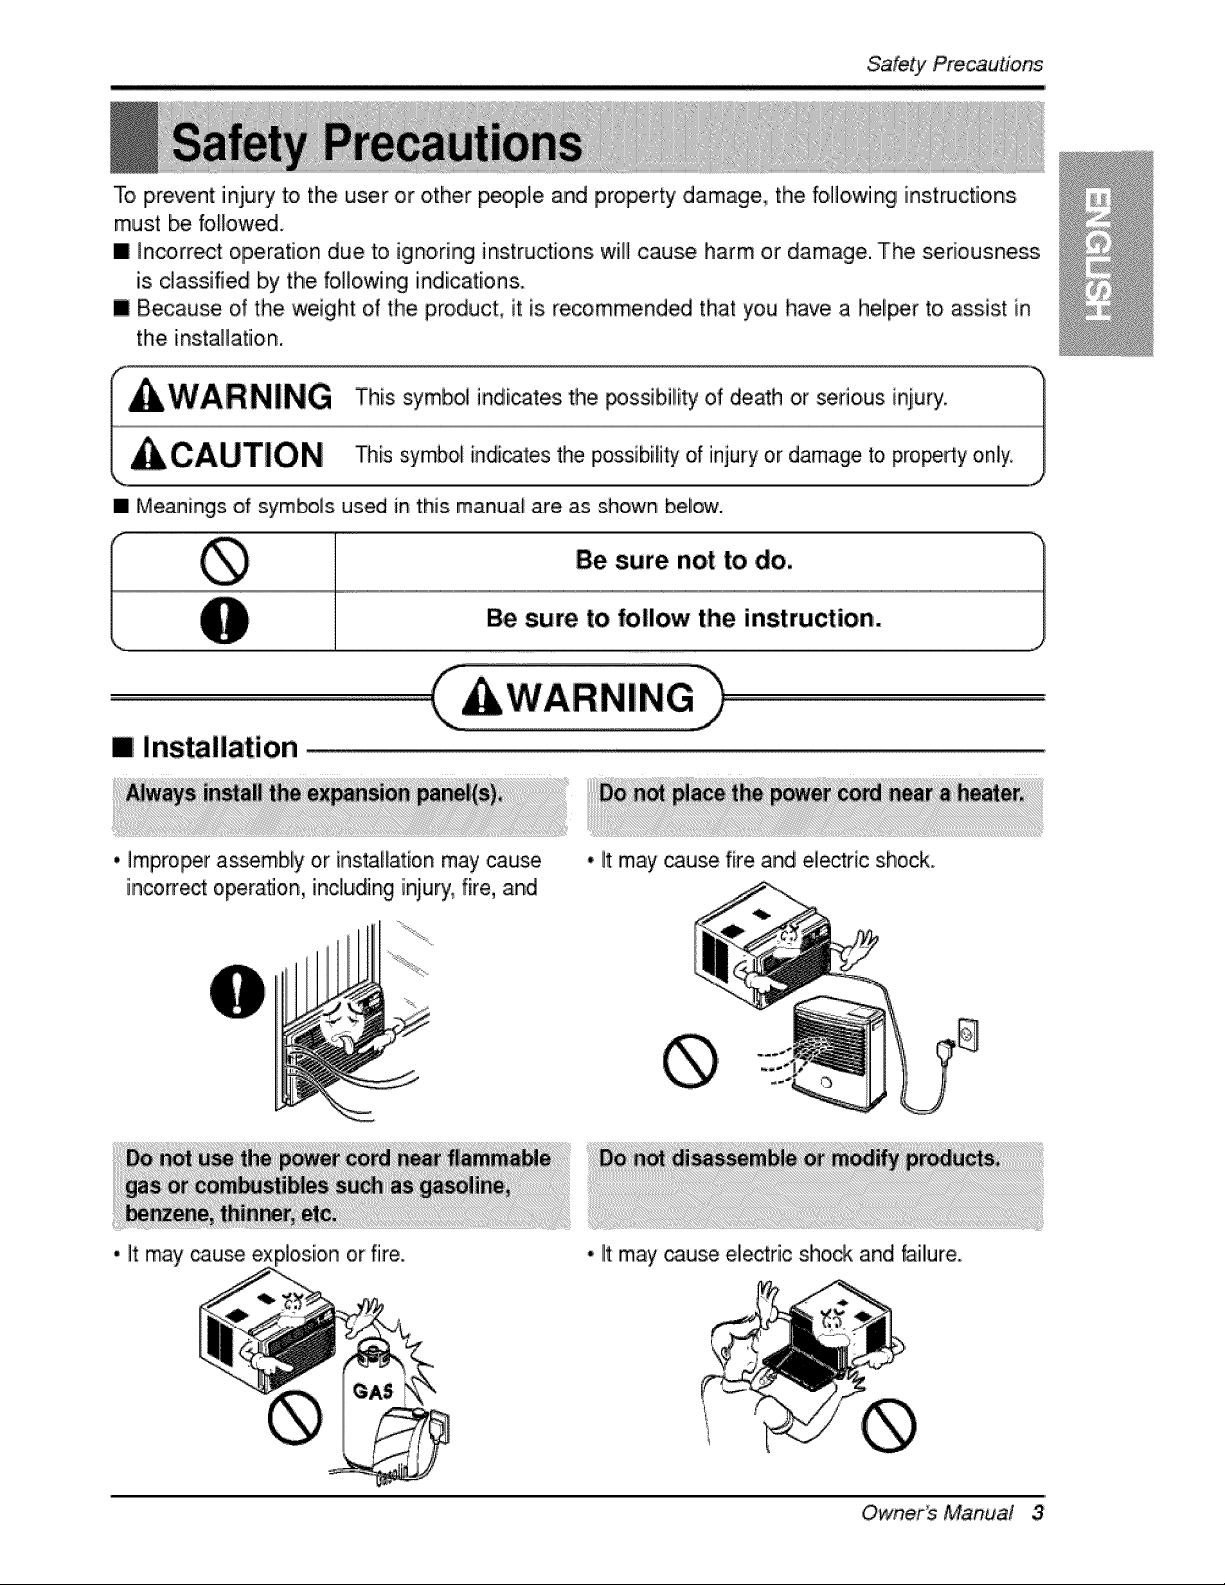
To prevent injury to the user or other _ople and property damage, the following instructions
must be foIFowed.
[] _n_rrect operation due to ignoring instructions wfl] cause harm or damage. The seriousness
is classified b,y the foi]]o,wing indications.
[] B_ause of the weight of the product, it is recommend_ that you have a hel_r to assist in
the instaHatiion.
• Meanings of sym_]s used in this manual are as shown bel_.
Be sure not to do.
Be sure to follow the instruction.
mi installation
* Improperassembly or [nstalfat[onmay cause
inco_ect operation, includinginjury,fire, and
• It may _use fire and electdc shock
• It may cause ex or fiire. • lit may _use electric slhock and failure.
Owner_ Manual 3
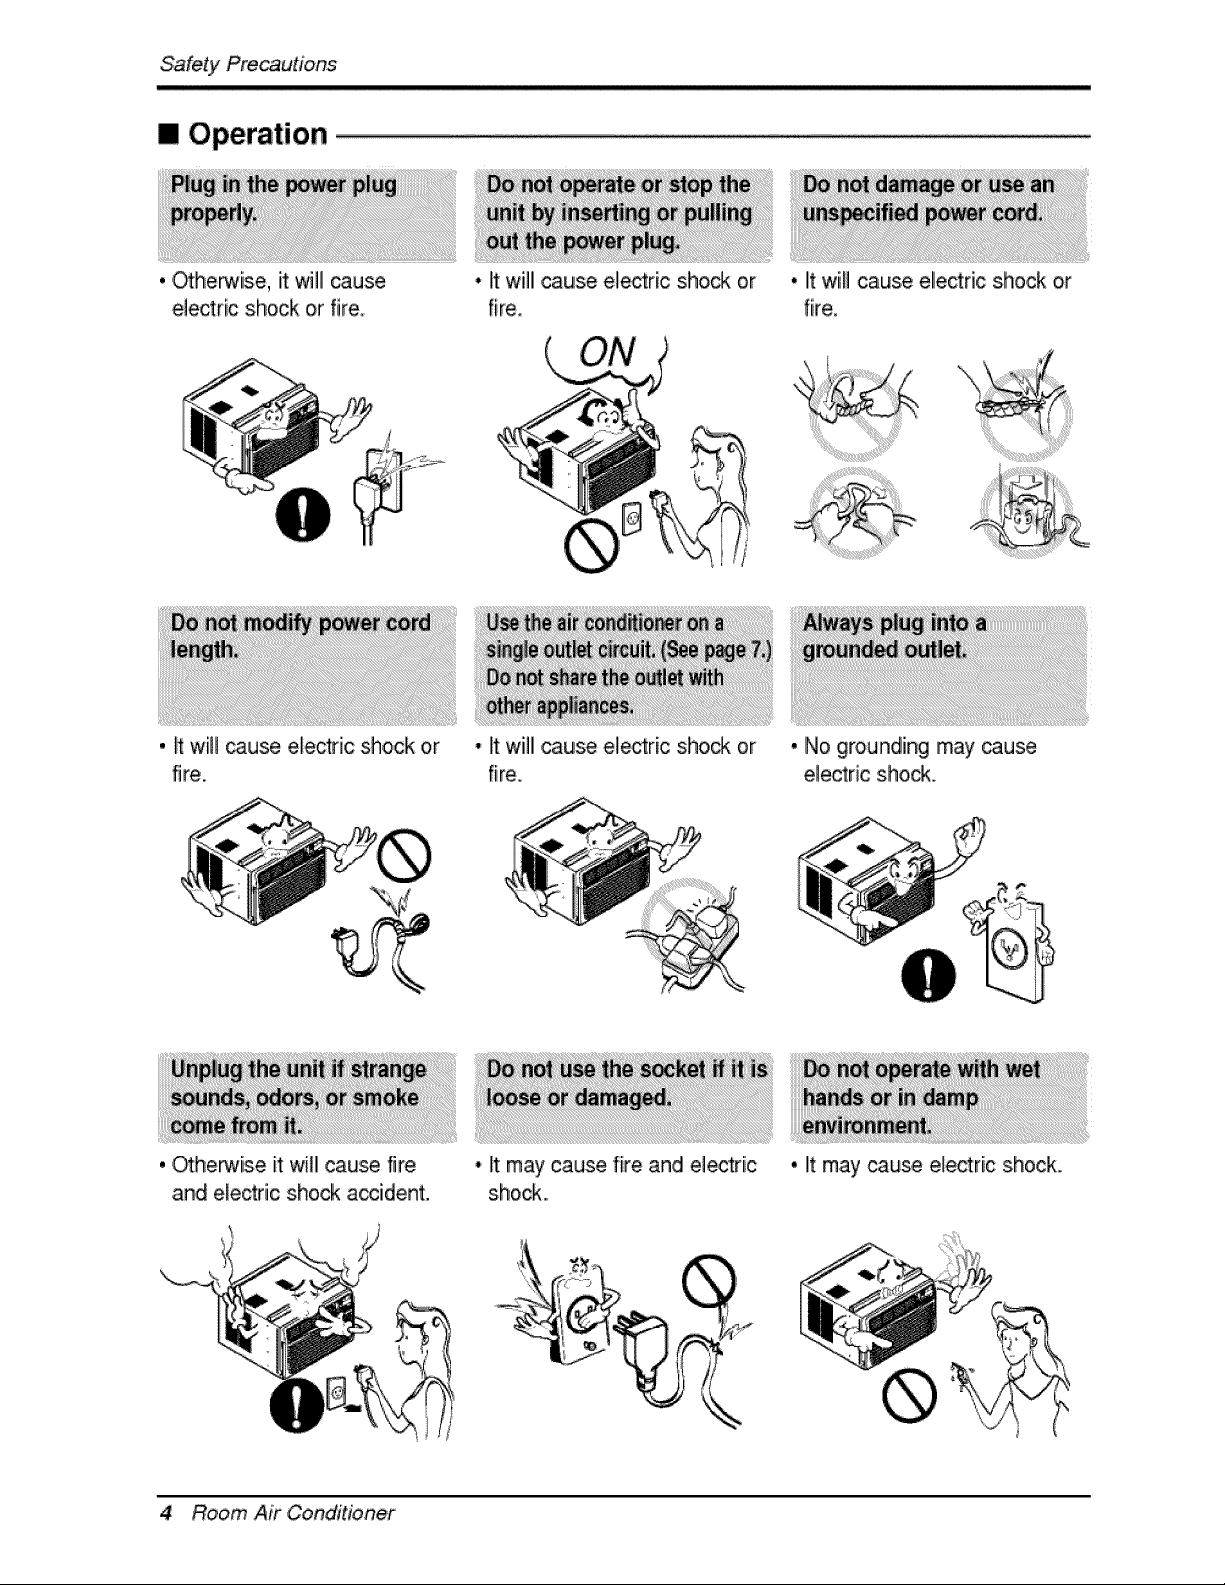
[] Operation
. ._he_ise, it will cause
electric shock or fire
, _ will _use electric shock or
fire.
, _herwise it will cause fire
and electric shock accident.
• It willl cause e_ectric shock or
fire.
• It will cause ele_ric sho_ or
fire.
• It may cause fire and electri.c
shock...
• litwiill cause ellectric shock or
fire.
• No grounding may _use
ele_ric sho_.
4 Room Air Conditioner
• It may cause electric shock.
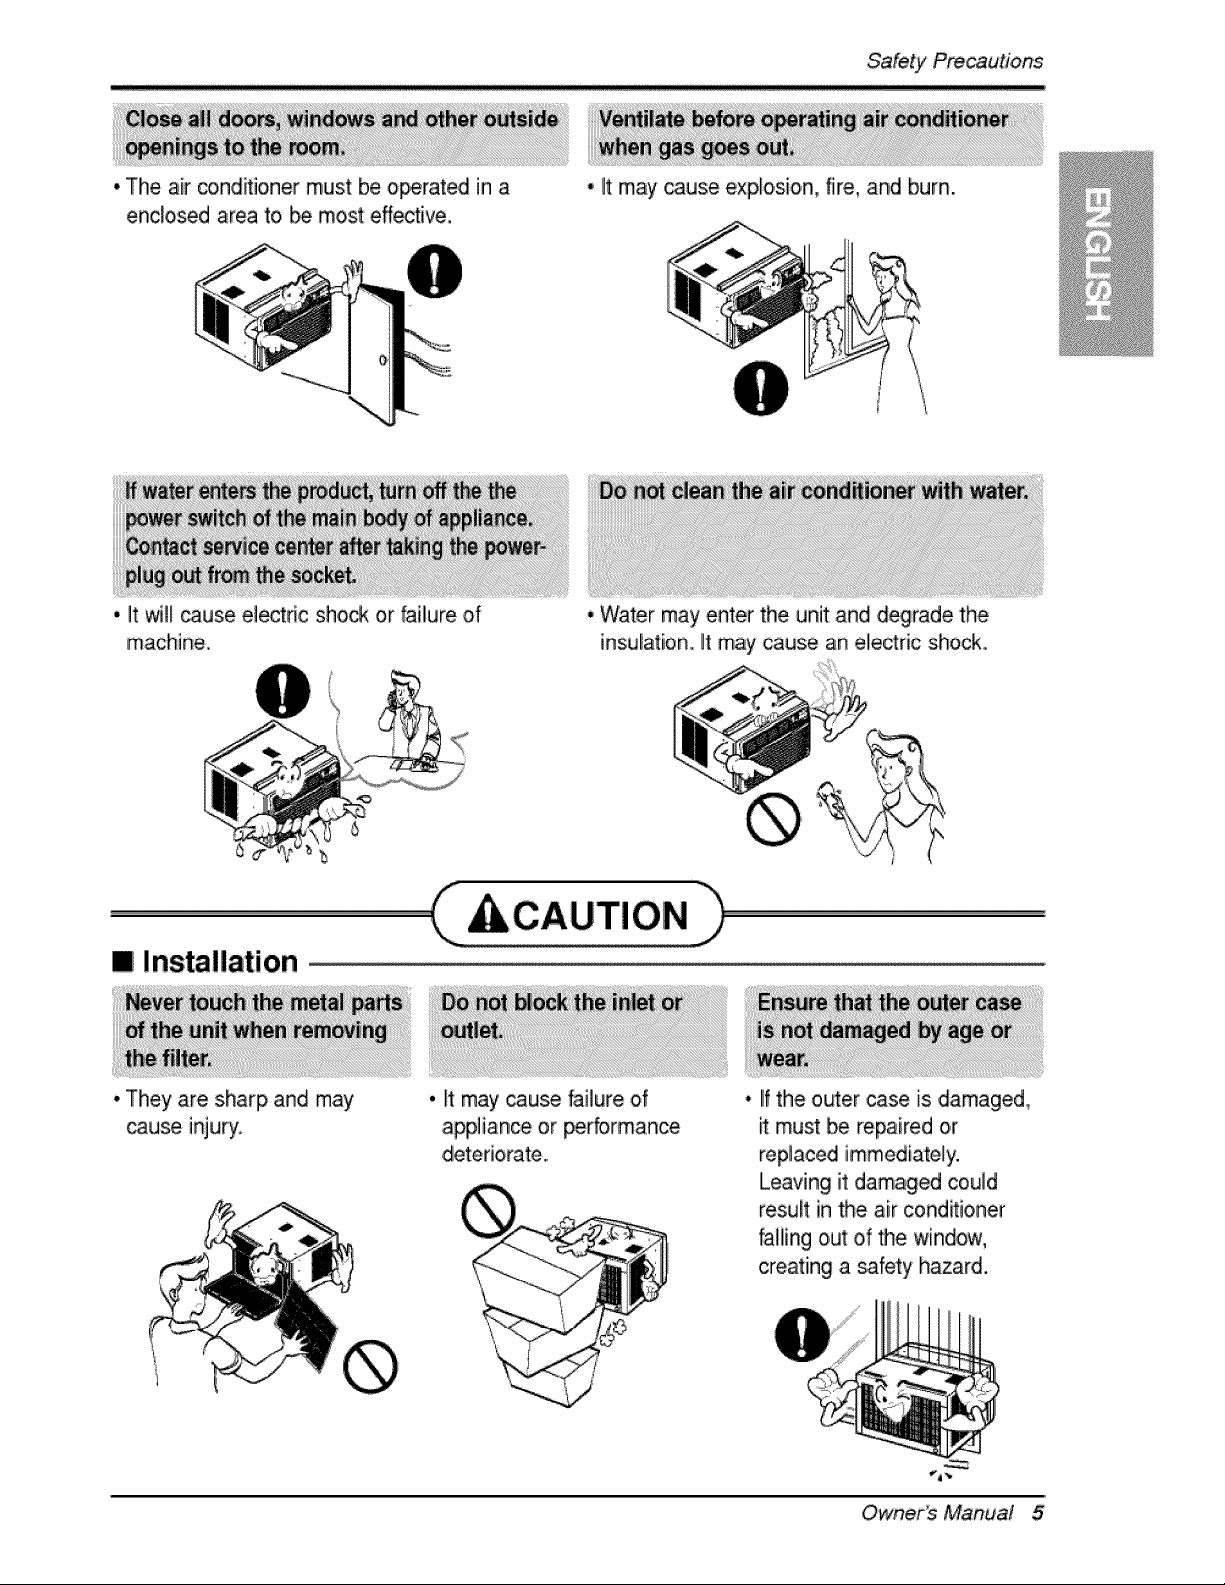
* The air co,nd_ioner must be operated in a
enclosed area to _ most effective,
* It may cause explosion, fire, and burn.
'i _t _I cause ele_ric sho_ or faillure of
machine..
[] Installation
* They are sharp and may
cause inju_.
* Water may enter the unit and degrade the
insulation. It may cause an electric shock..
C c,uT,o.h
, It may cause failure of
appliance or performance
• IIfthe outer case is damaged,
must be repaired or
replaced immediately.
Leaving it damaged could
result in the air cond_ioner
falling out of the window,
creating a safety hazard.
Owner_ Manual 5
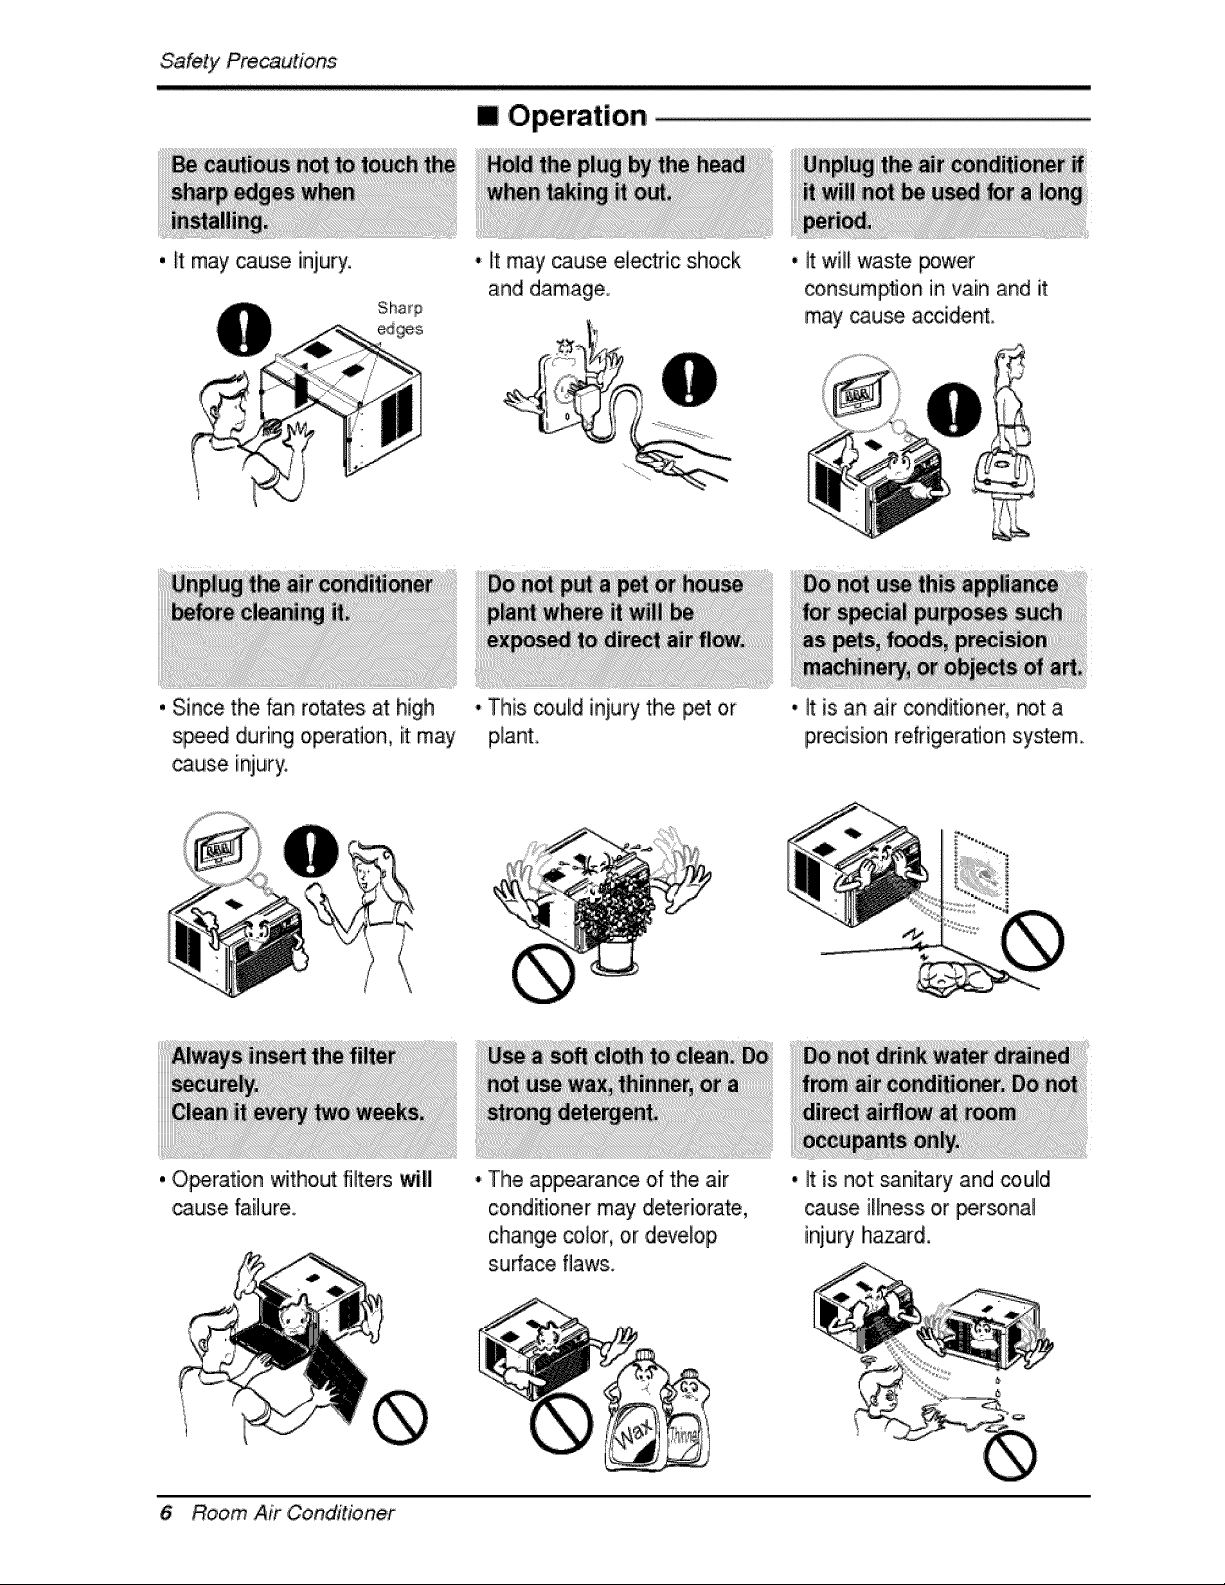
= Operation
. It may cause injury. • It may cause electric shock
and damage.
., it will waste power
consumption in vain and it
may cause accident.
, Since the fan rotates at high
sp.e_ during operation, it: may
cause injury.
, Operation without filters will
cause failure..
• This _.uld iniury the _t or
plant.
• It is an air _nditioner, not a
precision refrigeration system
• Tlhe ap_arance of the air
c:ond_i,oner may deteriorate,
change color, or develop
s.ufface flaws.
., It is not sanitary and coulld
cause illness or _r_nal
injury hazard.
6 Room Air Conditioner
Before, Operation
1. Plug in the power cord properly.
i ¸?
2. Use a dedicated circuit. Ovedoadiing the line could create a fire, Ihazard.
3. Do not use an extension cord. See page 11 for more details.
4. Do not start/stop operation by plugging/unplugging the power cord.
5. If the power co_d is damaged and requires replacement, Ihave an Authorized
Servicer install an exact replacement part.
ii _i_(i_i!_!_!_!_!__ I
i. Being exposed to direct aidlow for an extended p,eriodl of time could Ibe
hazardous to your health. Do not expose occupants, pets, or plants to direct
airflow for extended periods of tiime.
2. Due to the possibility of oxygen deficiency, ventilate the room when used
together with stoves or other heating devices,
3 Do not use this air conditioner for non-specified sp,ecia! purposes (e.g_
preserving precision devices, food, pets, plants, and art objects). Such usage
co,uid damage the items.
4 The air conditioner is a consumer comfort appliance, not a precision climate
control system.
1. Do not touch the metal parts of the unit when removing the filter. Injuries can
occur when handling sharp metal edges.
2. Do not use water to clean inside the air conditioner. Exposure to water can
destroy the insulation, leading to, p,ossible electric shock.
3. When cleaning the unit, first make sure that the power and breaker are turned
off. The fan rotates at a very high speed during operation. There iis a
possibility of injury if the unit's power is accidentally triggered on while
cleaning inner parts o,f the unit.
For repair .and maintenance, contact an Authorized Service Center. See the
warranty page for details or cal! (800) 243-0000. Have your model number and
serial number available. They should be written on page 2 of this manual.
Owner_ Manual 7
/ntrodu'c#on
This symbol alerts you to the risk of electric shock.
This symbol alerts you to hazards that could cause harm to the
air conditioner.
This symbol indicates s_cial notes.
WARNING: This appliance should be install_ in accordance with the
National El_tric C_e.
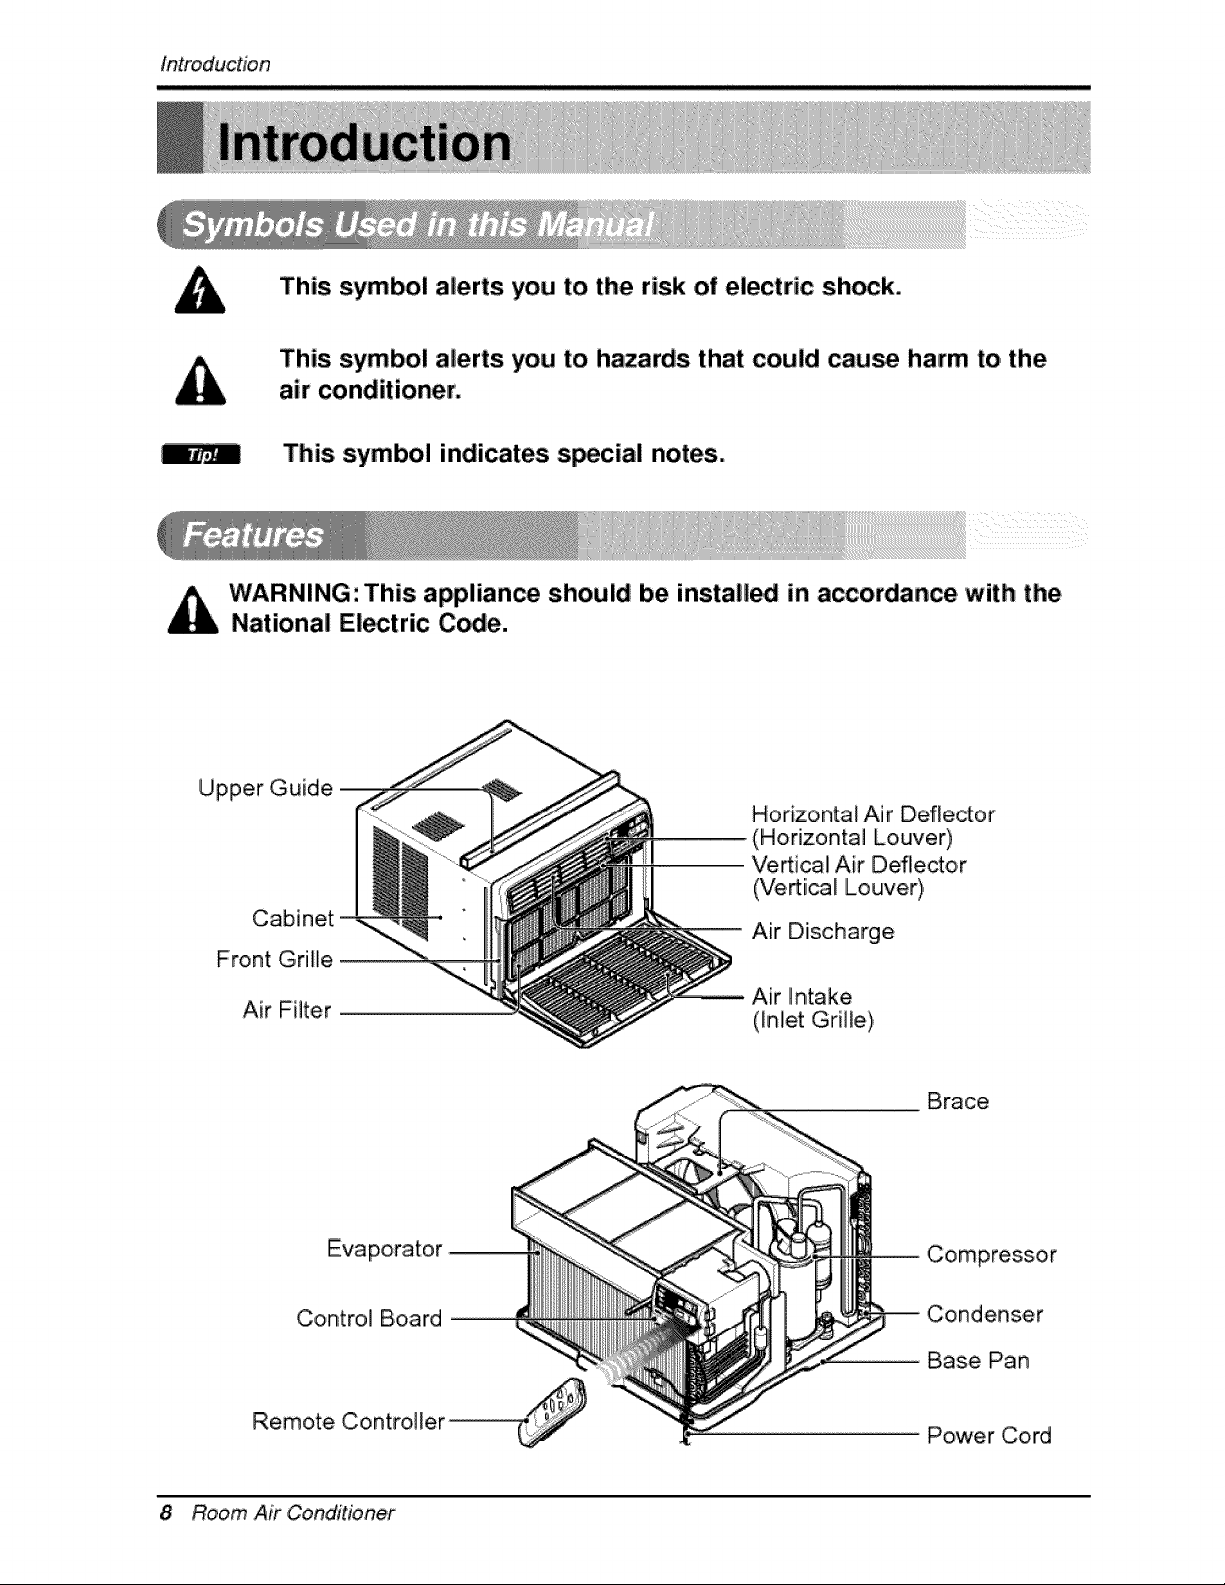
Upper Guide
Cabinet
Front Grille
Air Filter
Horizontal Air Deflector
(Horizontal Louver)
Ve_ica! Air Deflector
(Vertical Louver),
Air Diischarge
Brace
Evaporator
Control Board
Remote Controi][er ...............................................
Compressor
Condenser
Base Pan
Power Cord
8 Room Air Conditioner
E/ect'rica/Safety,
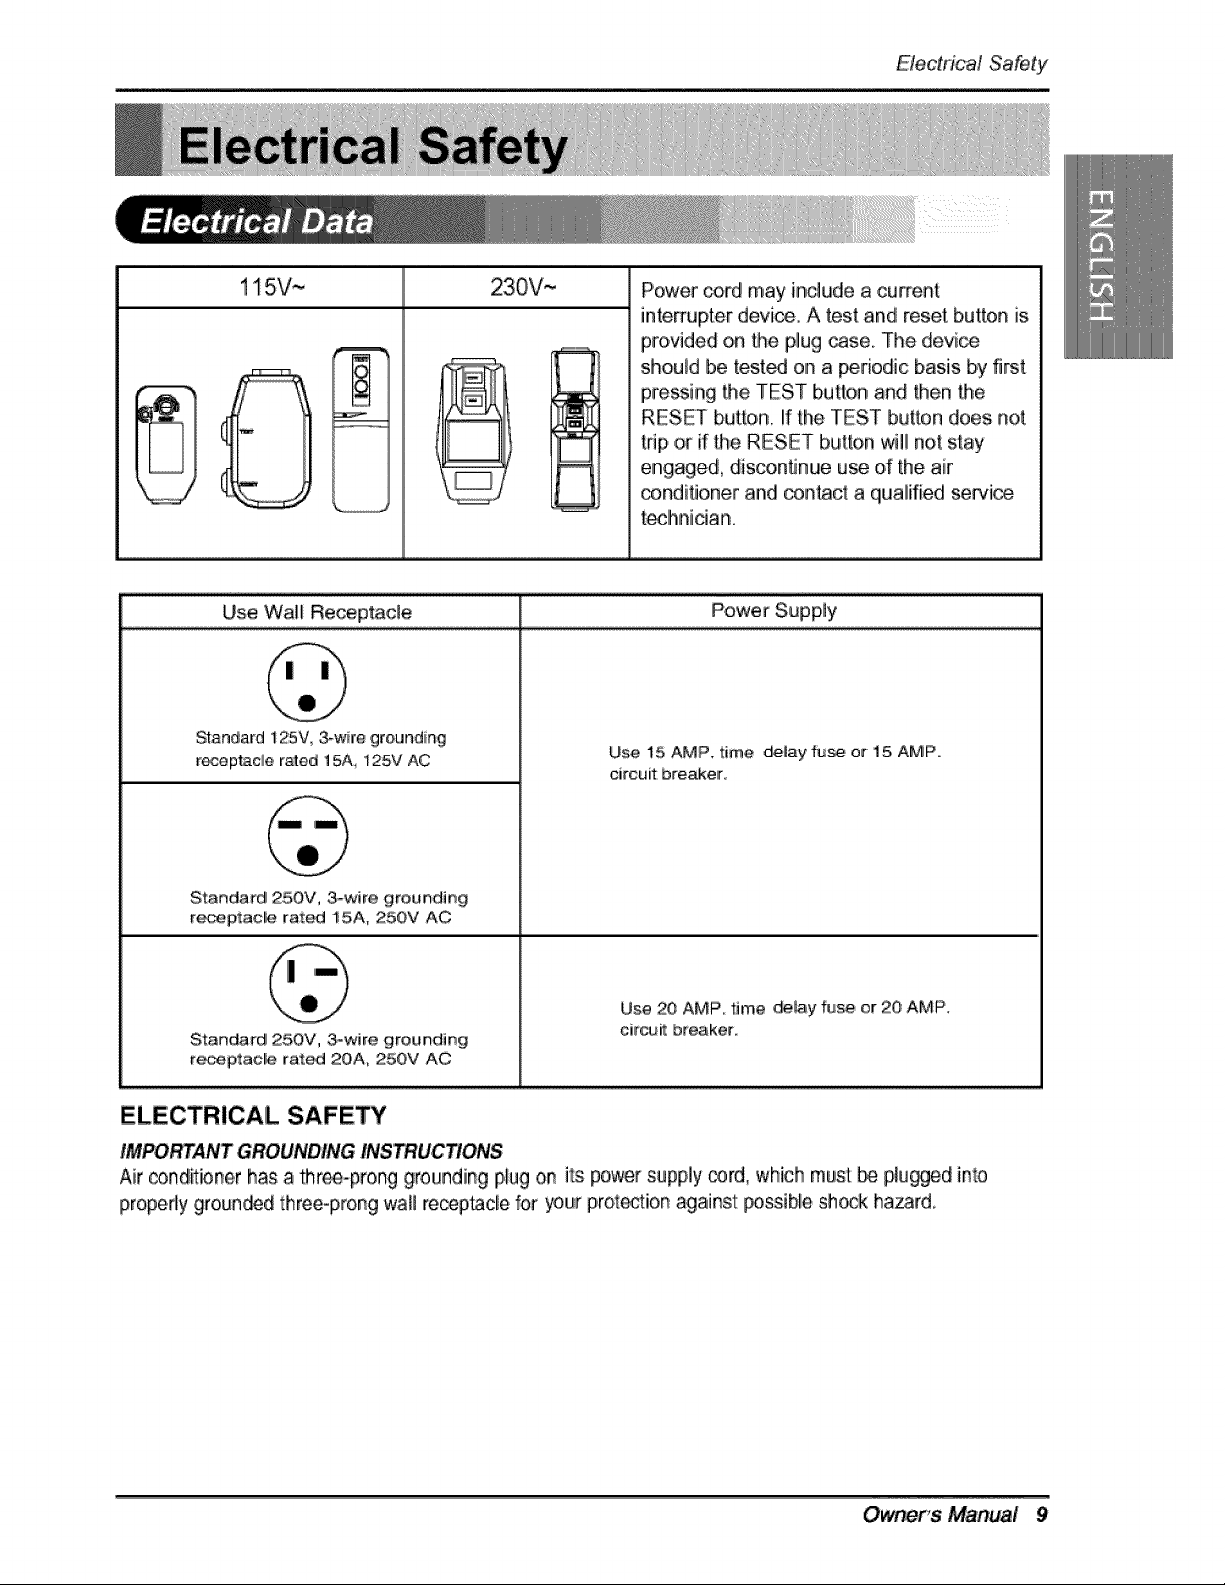
115V~ 230V,~
Use Wall Re_ptac_e Power Supp,ly
Power coKJ may include a current
interrupter device. A test and reset button is
provided on the plug _se. The device
should be t_.ted on a _riodic basis b,y first.
pressing the TEST button and then Me
RESET button, if the TEST button does not
trip ,oirif the RESET button will not stay
engaged, disco,nfinue use d' the air
conditioner and _n_ct a qiualified servia
teclhnician.
Standard 125V ,3-wire grounding
re_eptacie rated t 5A_ i25V AC
St:anda_d 250V, 3-wire groundir_g
receptacle rat_ 15A, 25OV AC
Standard 250V, _wire groundi#g
recep,tac_e rat_ 20A, 250V AC
Use 15 AMP, time d_lay fu_, or 15, AMP,
ciircuilt breaker
Use 20 AMP, tJm,e _,_ay fuse or 20 AMP,
citer breaker
ELECTRICAL SAFETY
IMPO_ANT GROUNDING INSTRUC_ONS
Air _ndlitioner has a three-prong grounding p,_ugon its power supply _rd0 which must _ plumed into
properly gro,un_d three-prong wall receptacle for your proration against: t:_ssible shock ha_rd,
Owner's' Manual 9
WARNING: This appliance must be properly grounded.
The power cord of this appliance is equipped with a three-prong grounding plug.
To miinimize the risk of electric shock, use the plug with a standard three-slot
grounding wall power ,outlet. If the power ,outlet does not include a grounding slot,
have a qualified eiectrician replace the outlet before you use the room air
conditio, ner_
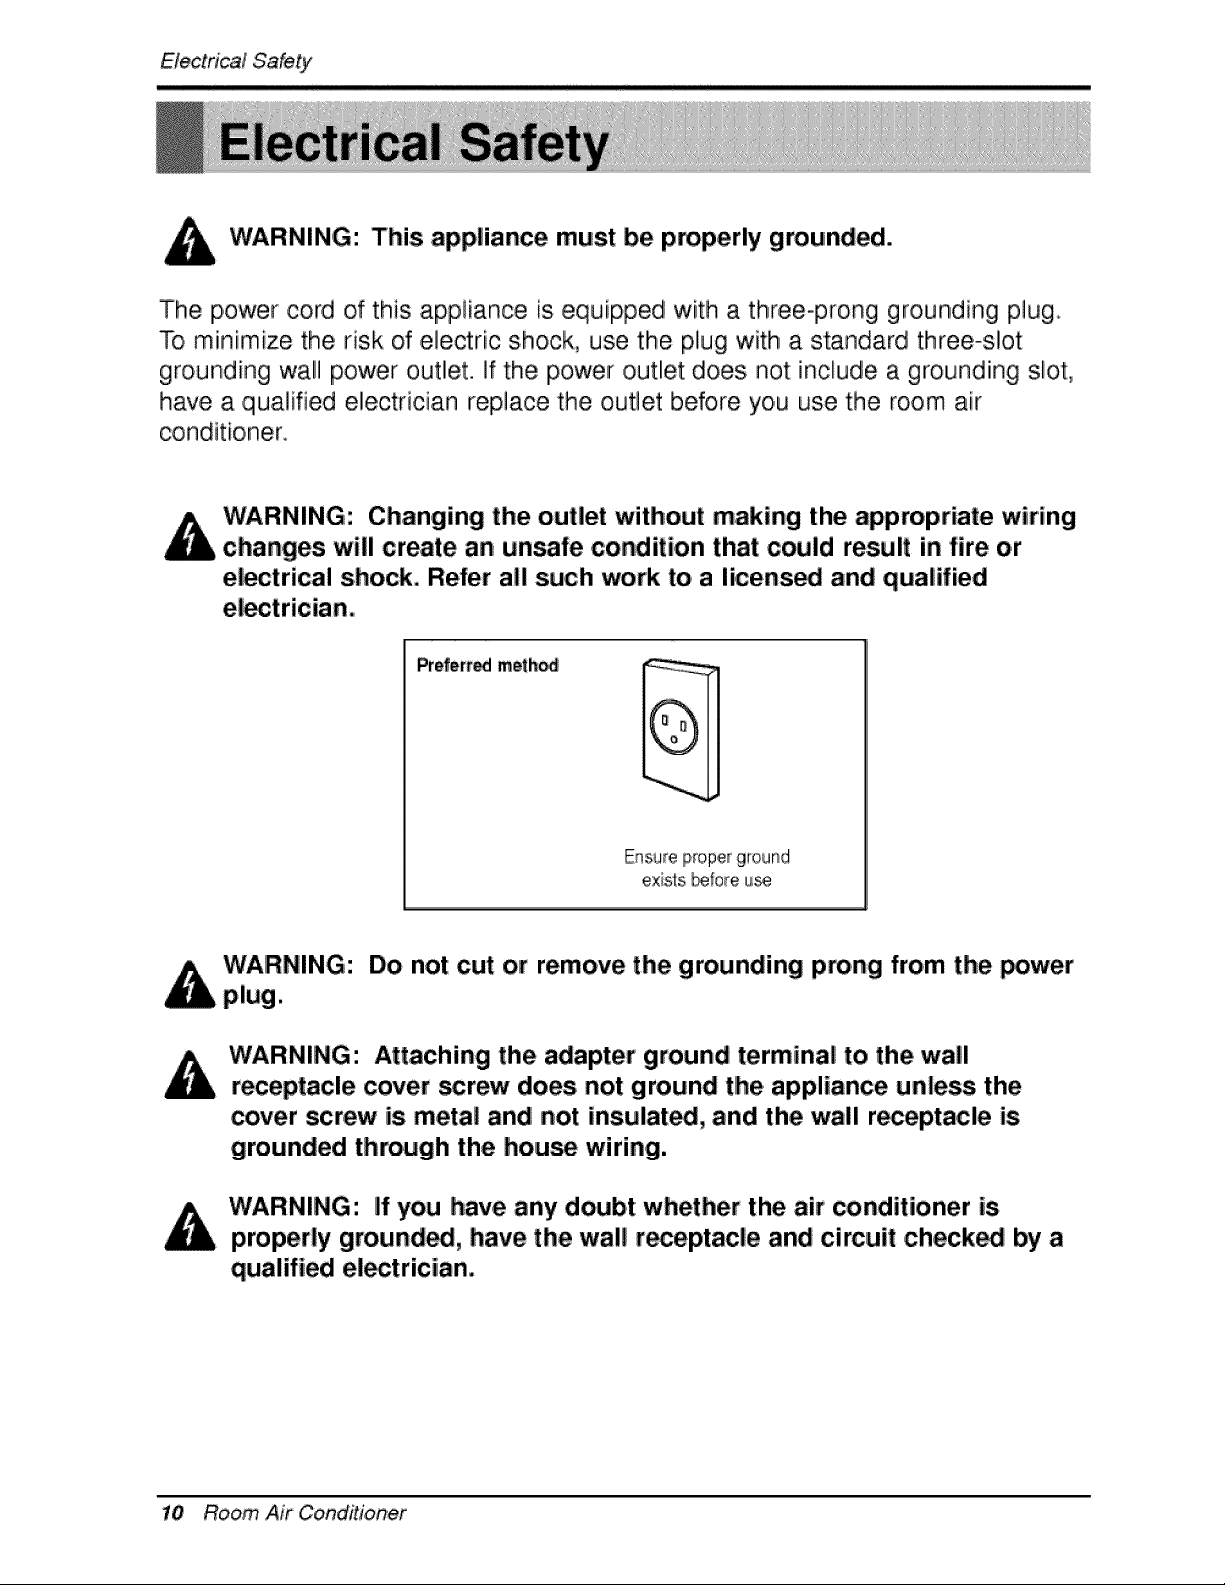
Changing the outlet without making the appropriate wiring
changes will create an unsafe condition that could result in fire o.r
el_trical shock, Refer all such work to a li.cens_ and qualified
Prefert_ meth_
exists _:ore u_
Do not cut or remove the grounding prong from the _wer
WARNING: Attaching the adapter ground terminal to the wall
receptacle cover _rew does not ground tlhe appliance unless the
cover screw is metal and not insulate, and the wall receptacle is
grounded through the house wiring.
WARNING: If you have any doubt whether the air conditioner is
properly ground_, have the wall r_eptacle and circuit checked by a
qualified el_trician.
10 Room Air Conditioner
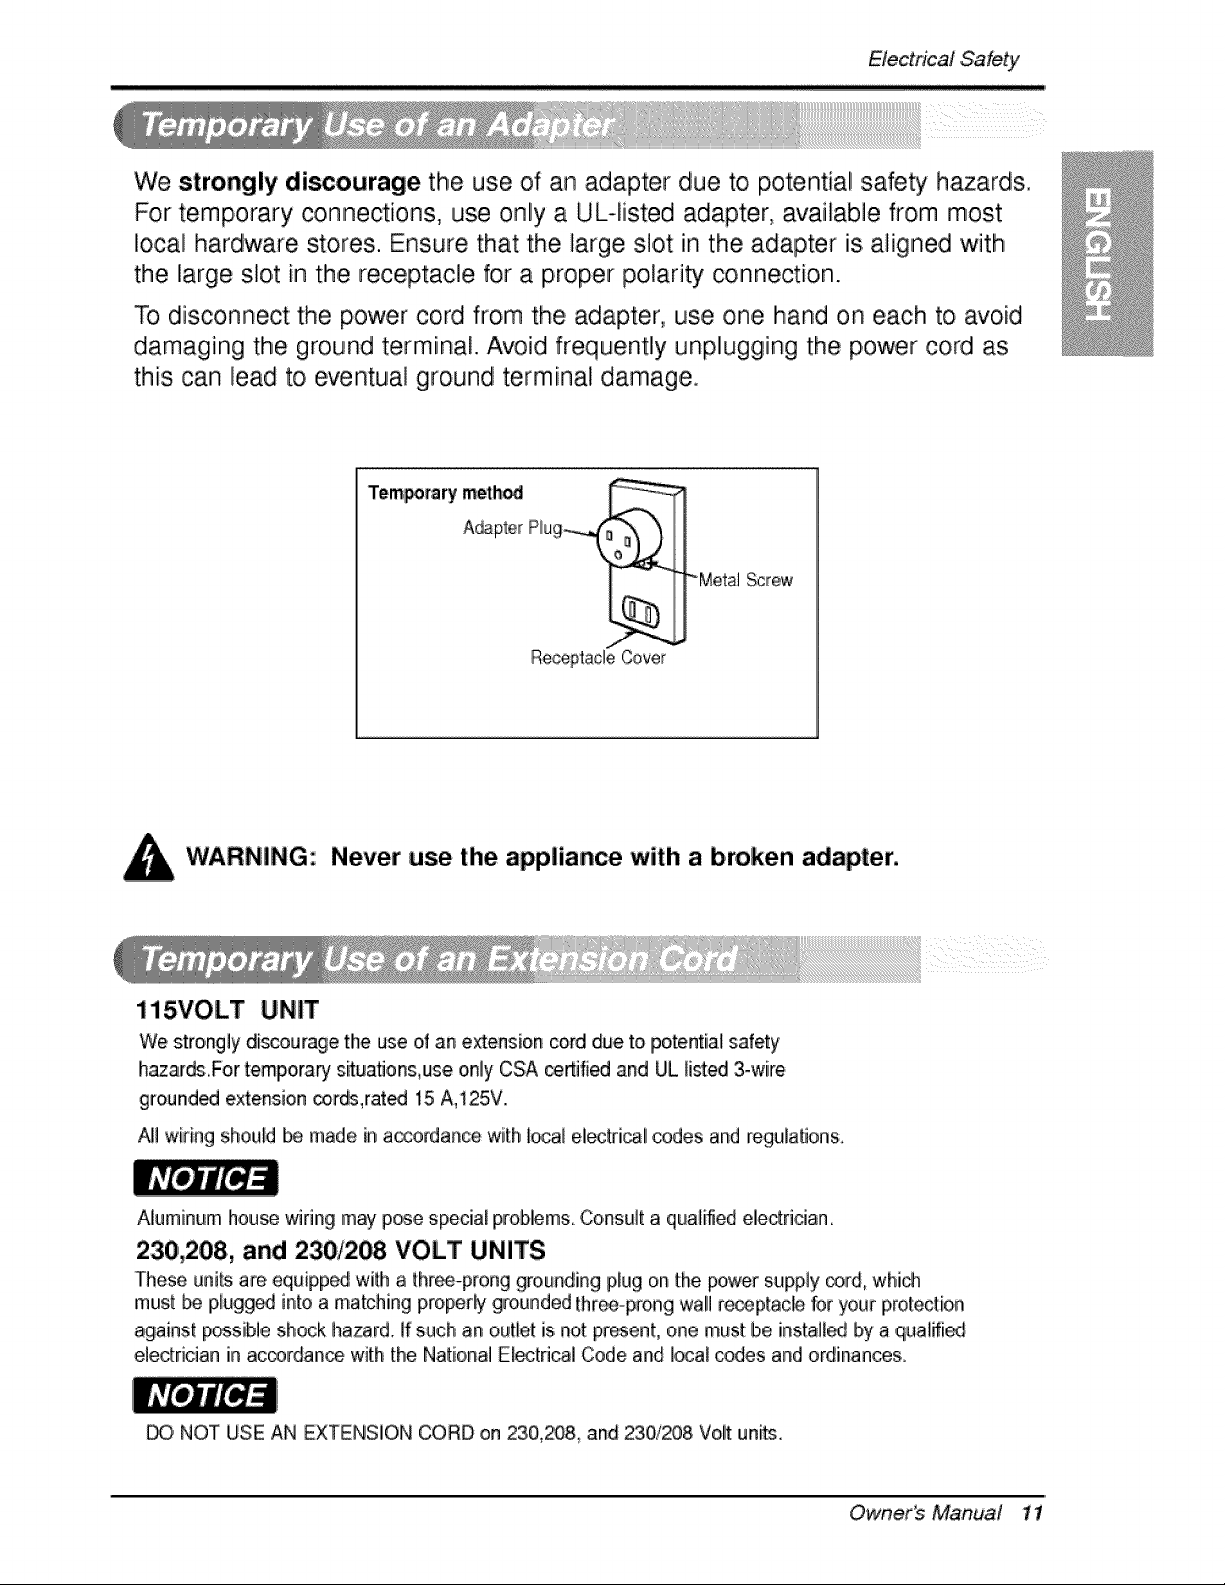
We strongly discourage the use of an adapter due to potential :safety h_ards..
For temporary connections, use only a UL-fisted adapter, available from most
local hardware stores. Ensure that the, large slot in the adapter is aligned with
the large slot in the receptacle for a proper polarity connection.
To disconnect the power cord from the adapter, use one hand on each to avoid
damaging the ground terminal. Avoid frequently unplugging the p,ower cord as
this can lead to eventual ground terminal damage.
Tempomry meth_ ,_,(_ __..i, .i
A_p_e_ Rug
ReceptacleCover
"_Me,talScrew
Never use the ,appliance with a broken adapter,
115VOLT
We strongly di_urage tlhe use of an extension cord due to potential safety
h_ards For temporary situatmns,use o,nl'yCSA certified and UL limed 3-wire
ground_ extension cords,rat_ 15 A,125V.
AIi!wiring should be made in a_ordance with i_l electrical codes and regulations.
Aluminum house _ring may p_e special prob#ms Consul[ a quailed eledridan
230,208, and 230/2_ VOLT UNITS
These units a_ equipped willh a thr_-pmng grounding plug on the power supply core which
mus_be p,lugg_ into a matching properly grounded [hr.-prong wall re_ptacle _r your p,ro_ection
against p_s[b],e shock hazard. ]f such an outie!_is not present, one must be install_ by a ,qualffi_
e_edrician in ac_rdan_ with the 1'4ationaJEl_[ric:aJ Code and ]oca_codes and ordinances.
NOT USE AN EXTENSIION CORD on 23,0,,208_and 230,/_8 Volt units.
Owner_ Manud 11
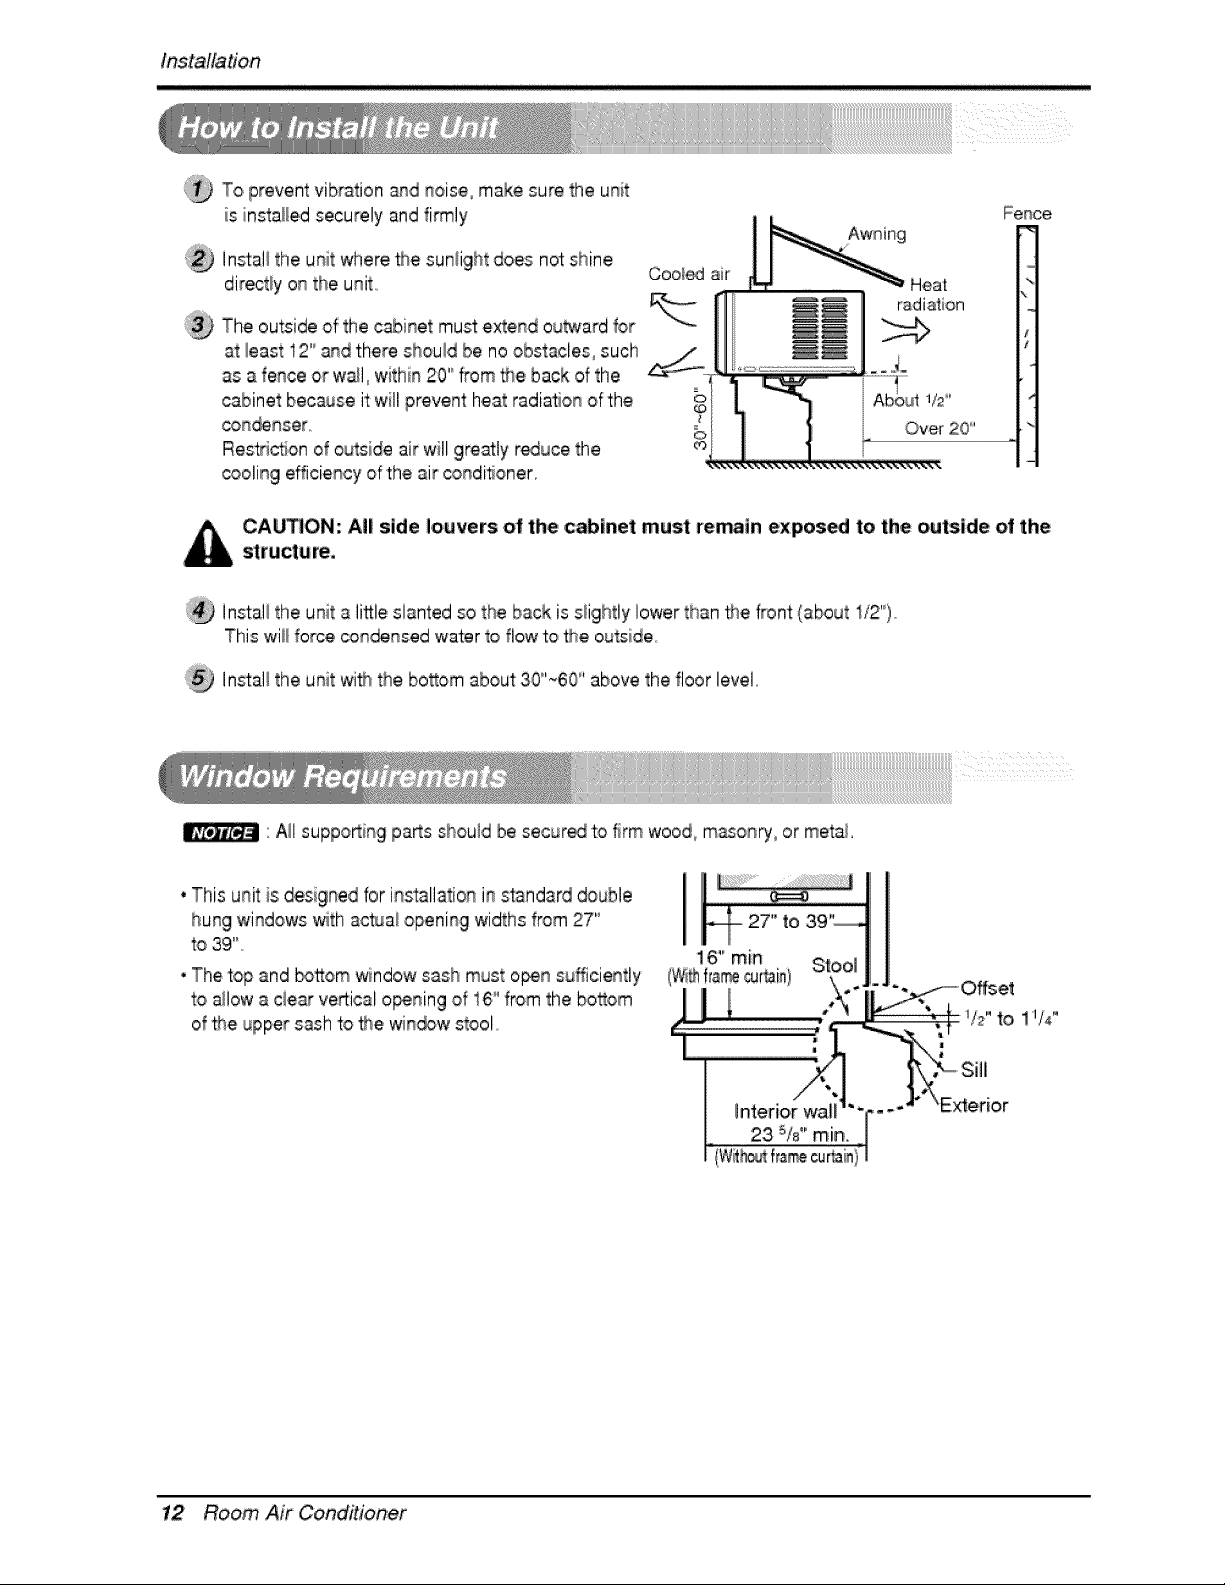
T'oprevent vibration and noise° make sure the unit
is installed securely and fi_ly
Install the unit where,_e sunlight does not shine
directly on tihe unit,,
Cooi_ air
The outside of the cabinet must extend outward for
at least 12'°and there shouid be no obstacles, such
as a fence or wall, within 20'_from the back of the
cabinet becsJse i'twill prevent heat radial,on of the i
con_nser G
Restriction of outside air will gre_ty r_uce the _
cooling efficiency of the air _ndiloner,
Fence,
Heat
radia_iorl
CAUTION: All side Jiouvers o| 'the cabinet must retrain expos_ to the outside of the
structure,
':_ In_al_ the unit a li_le slanted so the back it s_ightlylower than the, front (about 1/2'_)o
This will force co#_,nsed water to flow to _e outsiide
Ins4al_the unit with the bosom about 30"_60 '' above the floor level,
"All supp,o_ingparts should be secur_ t:o firm wood, m,asonry, or metal,
* This unit is; designe,dfor ins:tallationi_ standard double
hung windows with ao_a! opening widths from 2:7"
to 39'"
•The top and _tt:om window sash must o_n sufficiently
to allow a ,ciear veRical o_ning of 16°'from the bosom
of _e upper sash to _e win_w stool.
12 Room Air Coinditionef
installa#on
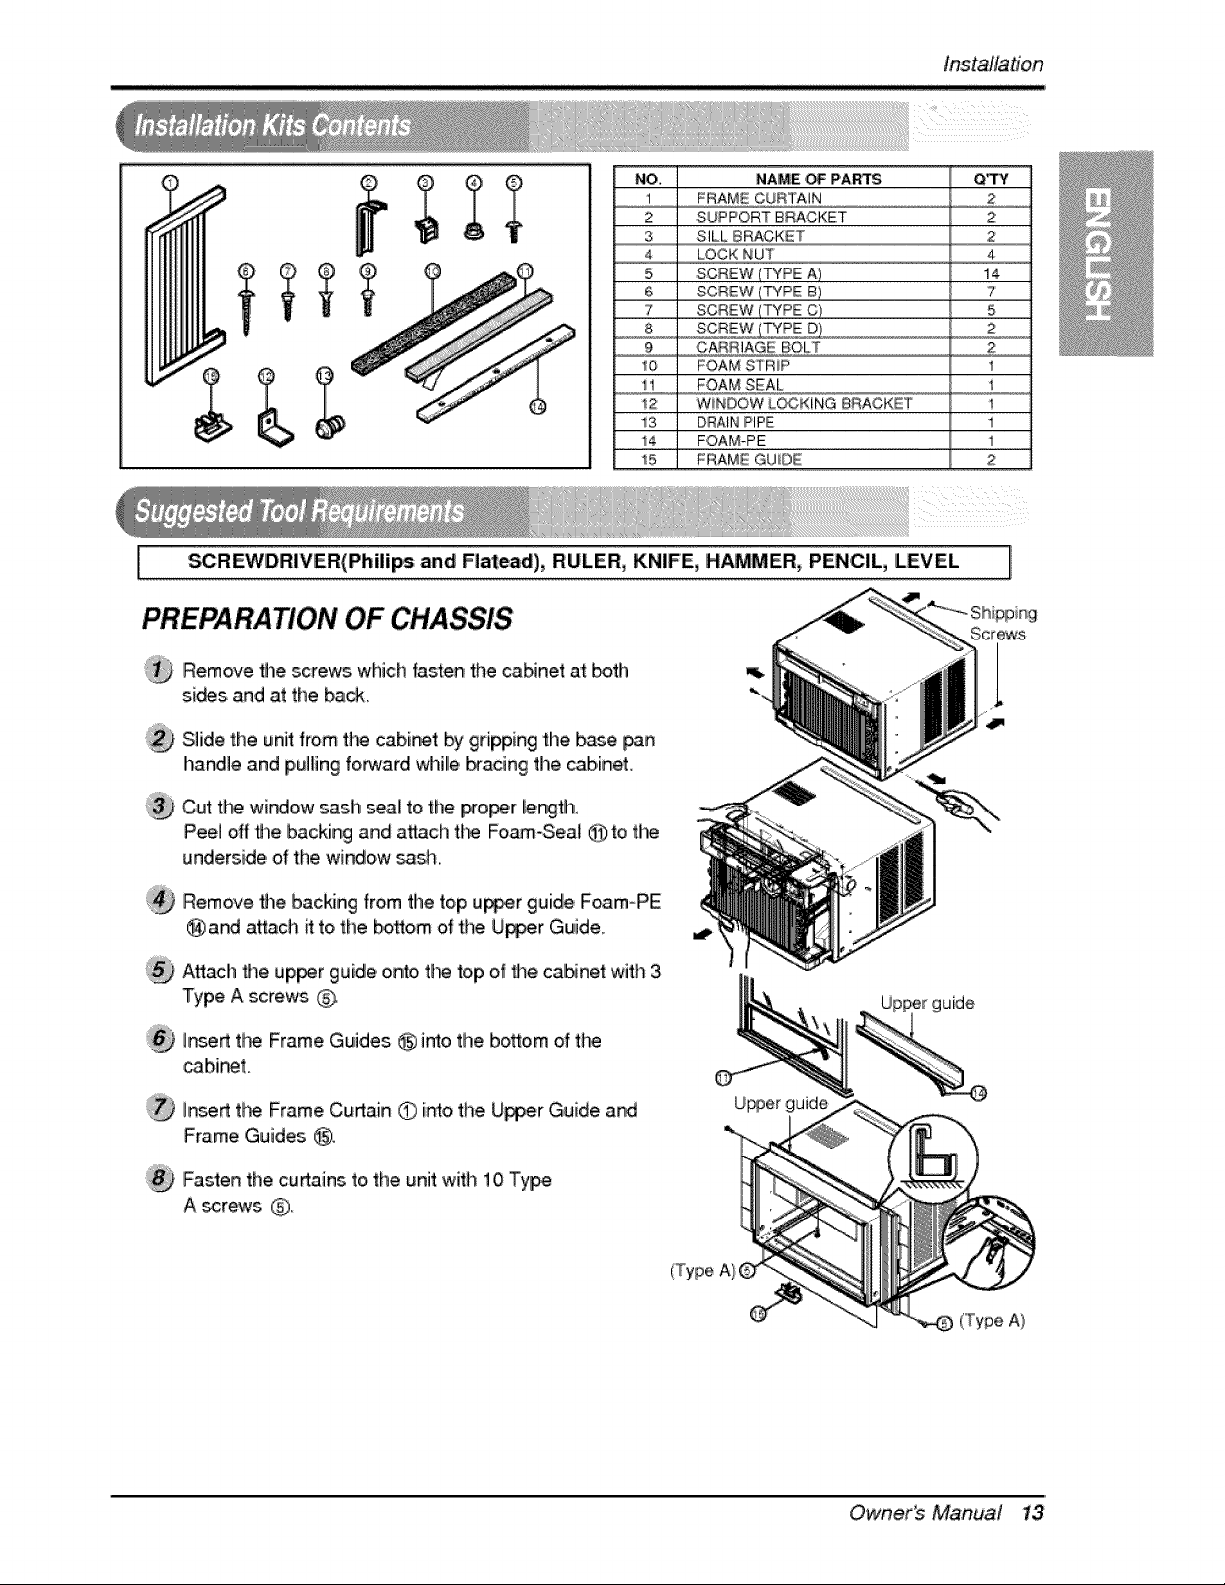
NO, NAME '_ PARTS Q_
1 FRAME CURTAIN 2
2 SUPPORT BRACKET 2
3 SILL BRACKET :2
4 LOCK NUT 4
5 SCREW (TYPE A) 14
6 SCREW (TYPE B / 7
7 SCREW (TYPE C_ 5
8 sc#_,2,_Z,LT_A,#! 2
9 CARRIAGE BOLT 2
10 FOAM STRIP I
1 FOAMSEAl....
12 WINDOW L_KiNG BRACKET 1
13 DRAIN PIPE 1
i4 FOAM-IPE i
!5 FRAME GUIDE 2
I _REWDR|VER(Phi]i_ and Flatead), RULER, KN|FE, HAMMER, PENCIL, LEVEL
PREPA RATION OF ,CHASSIS
®
@
®
@
Remove tildescrews which fasten the caNnet a't _th
s,[_s and at the _ck.
S]iide the unit from tL_ cab[_t by gripping the base _n
handle and p,u]lingforward _lille _acing the cabinet,
Cut t_ widow _ash _ea[ to the _o_r length.
Peel off fl_e backing and a_ch fl"_ Foam-Seal @ to the
underside of the window _s,h.
Remove fl_e backing from the top u_r guide, F_m-P'E
@ a,nd a_ach it to the bottom of the Upper Guide,
Attach _e up_r guide o,n_, tl_ top of fl_e cabinet with 3
Type A screws G
hsed fl_ Frame Guides _ imo the botlom of tire
,cabinet.
I_,ed tt_ Frame Curtain O intothe U_er Guide and
Frame Guides @.
Fasten the curtains to, the unit with 10 Type
A _re_vs @
U_er guide
uide
('Type A}
Owner_ Manua,? 13
installation
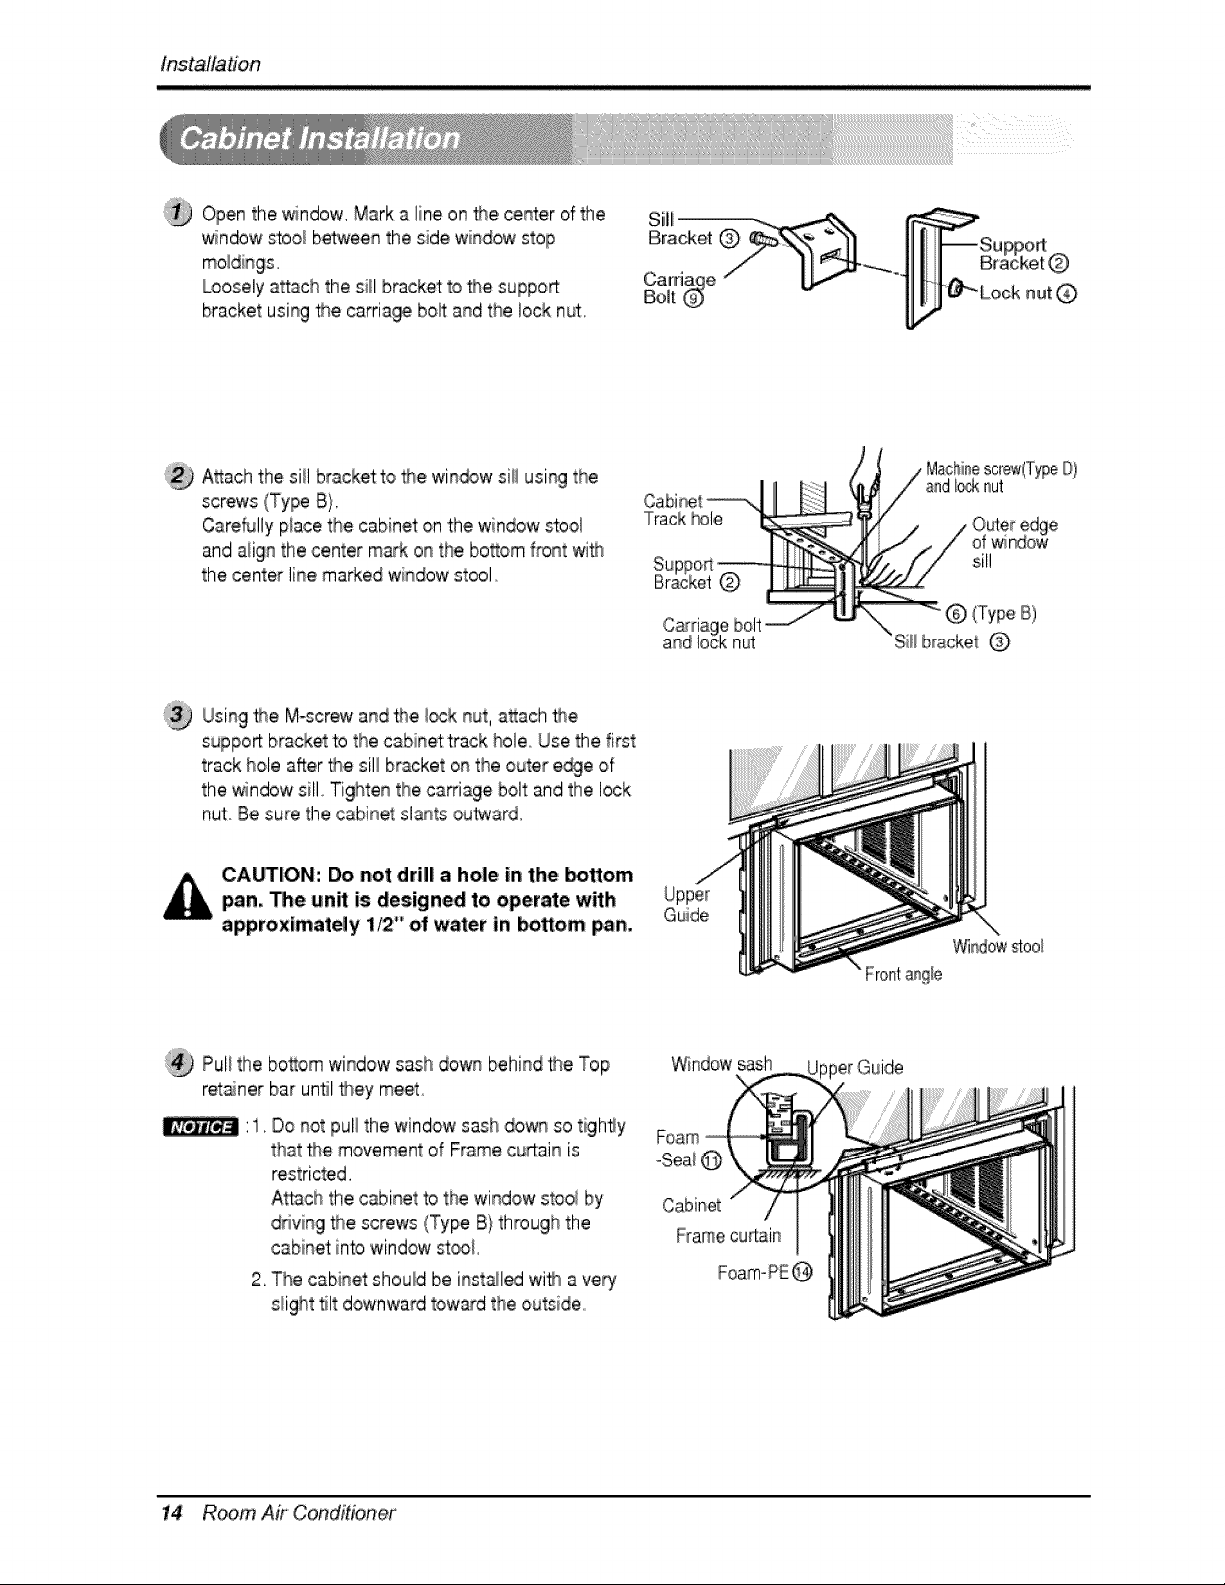
Open the window. Mark a line on _e center of the
'_ndow s'too_b@een the side window stop
Loosely a_a,chthe si_lbracket to _e support
bracket using _e carria_ bo_ and the lock nut.
Attach the si{I bracket to 2_ewin_w si_iusing the
screws (Type B}.
CareMly p!ace the cabinet on the window _ool
and align the center m_k on the bottom front wi_
the center line marked window stool,
Cabi_t _-,
Track _le
©
Machinescrew(T_eO)
I_k nut
sill
(Type iB)
Siii b_ack,el
Usin9 _e M-screw and the I_k nut, attach #_e
support bracket to the cabinet track hole Use the first
track hole after the sill bracket on the outer e_e of
the window sill Tighten tlhecarriage bolt and the lock
nut Be "_ure the cabinet _lants outward,
CA_ION: Do not drill a hole in the bottom
pan, '_e un_ is designed to operate with
approximately 1,_ _'oil water in _om pan,
Guide
;:_ Pull the bottom window sash down behind the Top
ret_ner bar until they meet.
Do not pull the windowsash down so tighly
that _e movement of Frame curtain is
restricted.
Attach the cabinet to the window stoo_by
driving _e screws (Type B)through the
cabinet inb window stool
2. The cabinet should be inst_led wif_ a very
s_ighttilt downward tow:_d the outside
Windows_h
Foam
-Sea_@
Cabinet
Framecu_lain
pperGuide
14 Room Air Conditioner
tnstalta#on
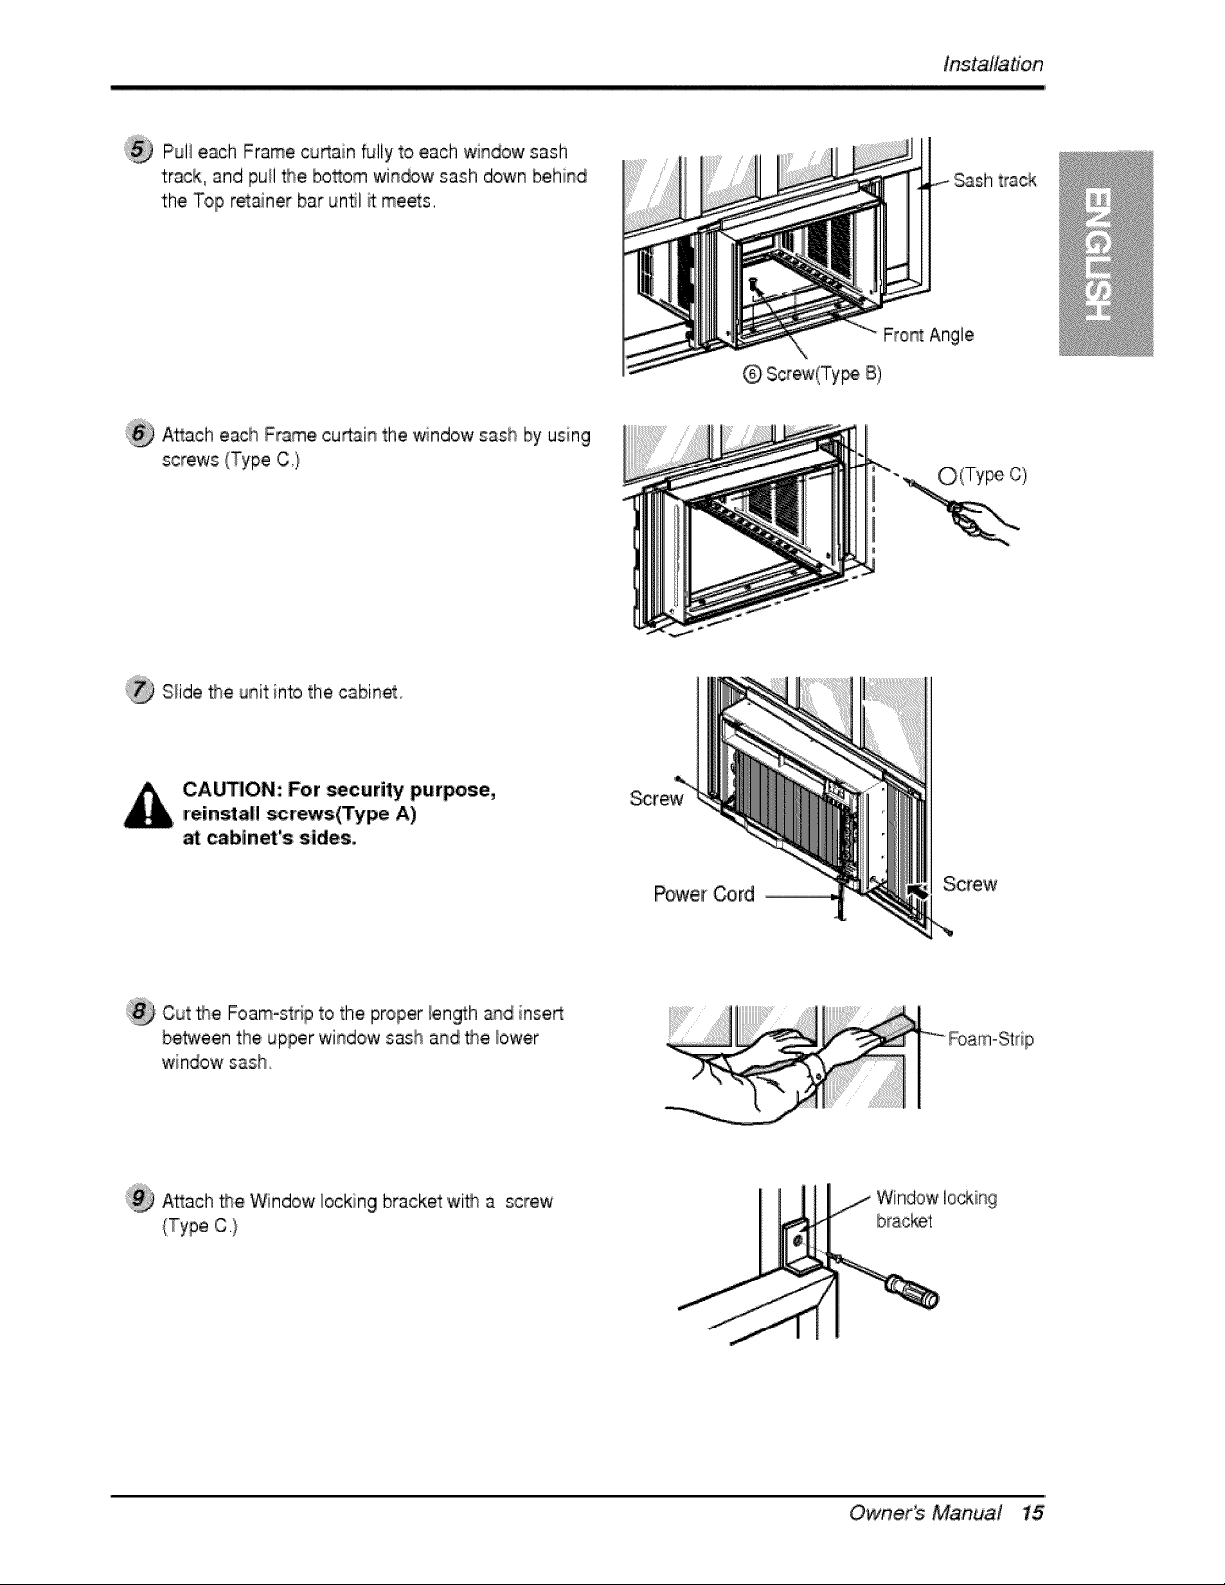
Pul! each Frame cu_ain fully to each window sash
track, and puil the bosom win_w sash down behind
the Top retainer bar untl R meets,
Sash track
ii_ A_ach each Frame curtain the window sash by using
screws (Type C,}
@ Screw(Ty_ B)
O(Ty c)
}@ Slide flse unit into the cabinet
CA_ION: For _curity purpose,
=reinsta!l scr_:s(Type A)
,_binet's sides,
Screw
Cut _e Foam-strip to the proper len_h and inse_
be_een thie upper window sash and _e bwer
windowsash.
Attach _e _ndow locking bracket'with a screw
(Type C.}
Owner_ Manual 15
in,stallation
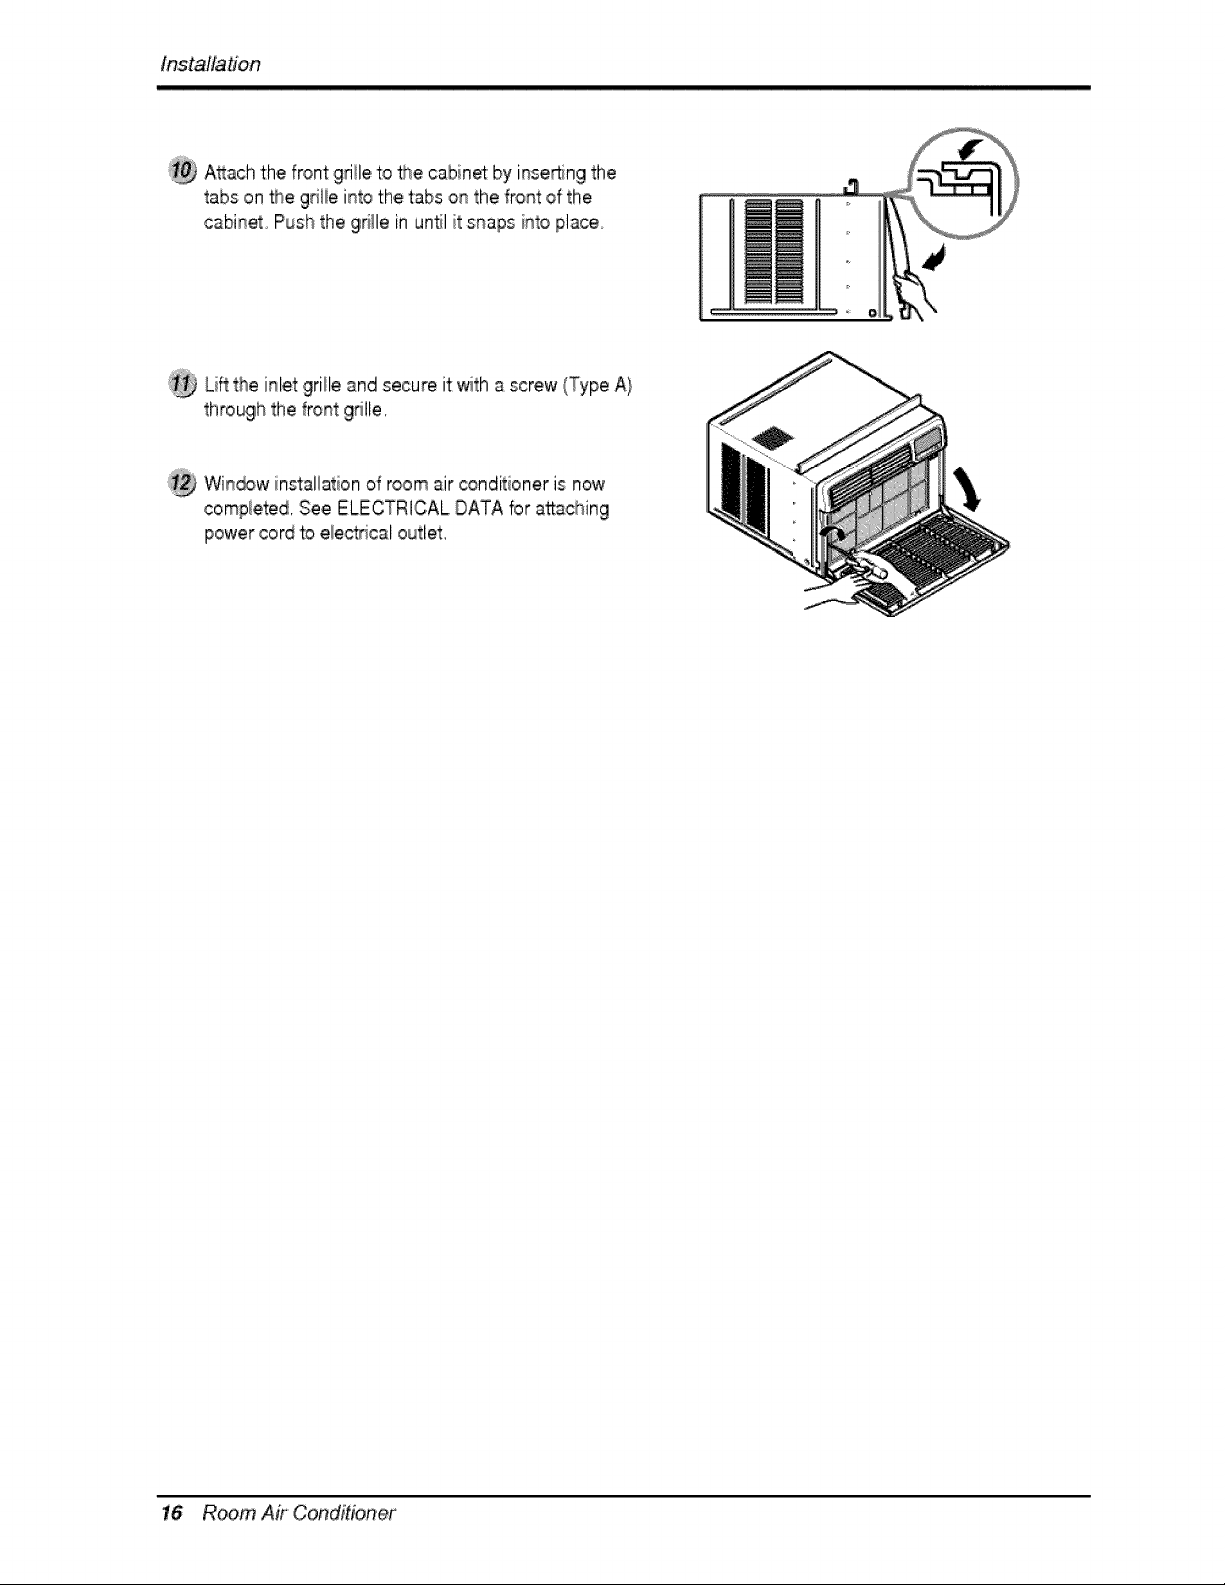
A_ach the front gd!le to the cabinm by i!nse!_:ingthe
tabs on the grilie into the tabs on the front ,of the
cabinet Push the gr'i_lein unN it snaps into place
Lift the inlet grille and secure it with a screw (Type A}
through the front grille,
Win_w in_allatiion of room air _nditioner is now
compie'ted, See ELECTRICAL DATA for attaching
power cord to electrical outlet,
16 Room Air Conditioner
Operating Instruc#ons
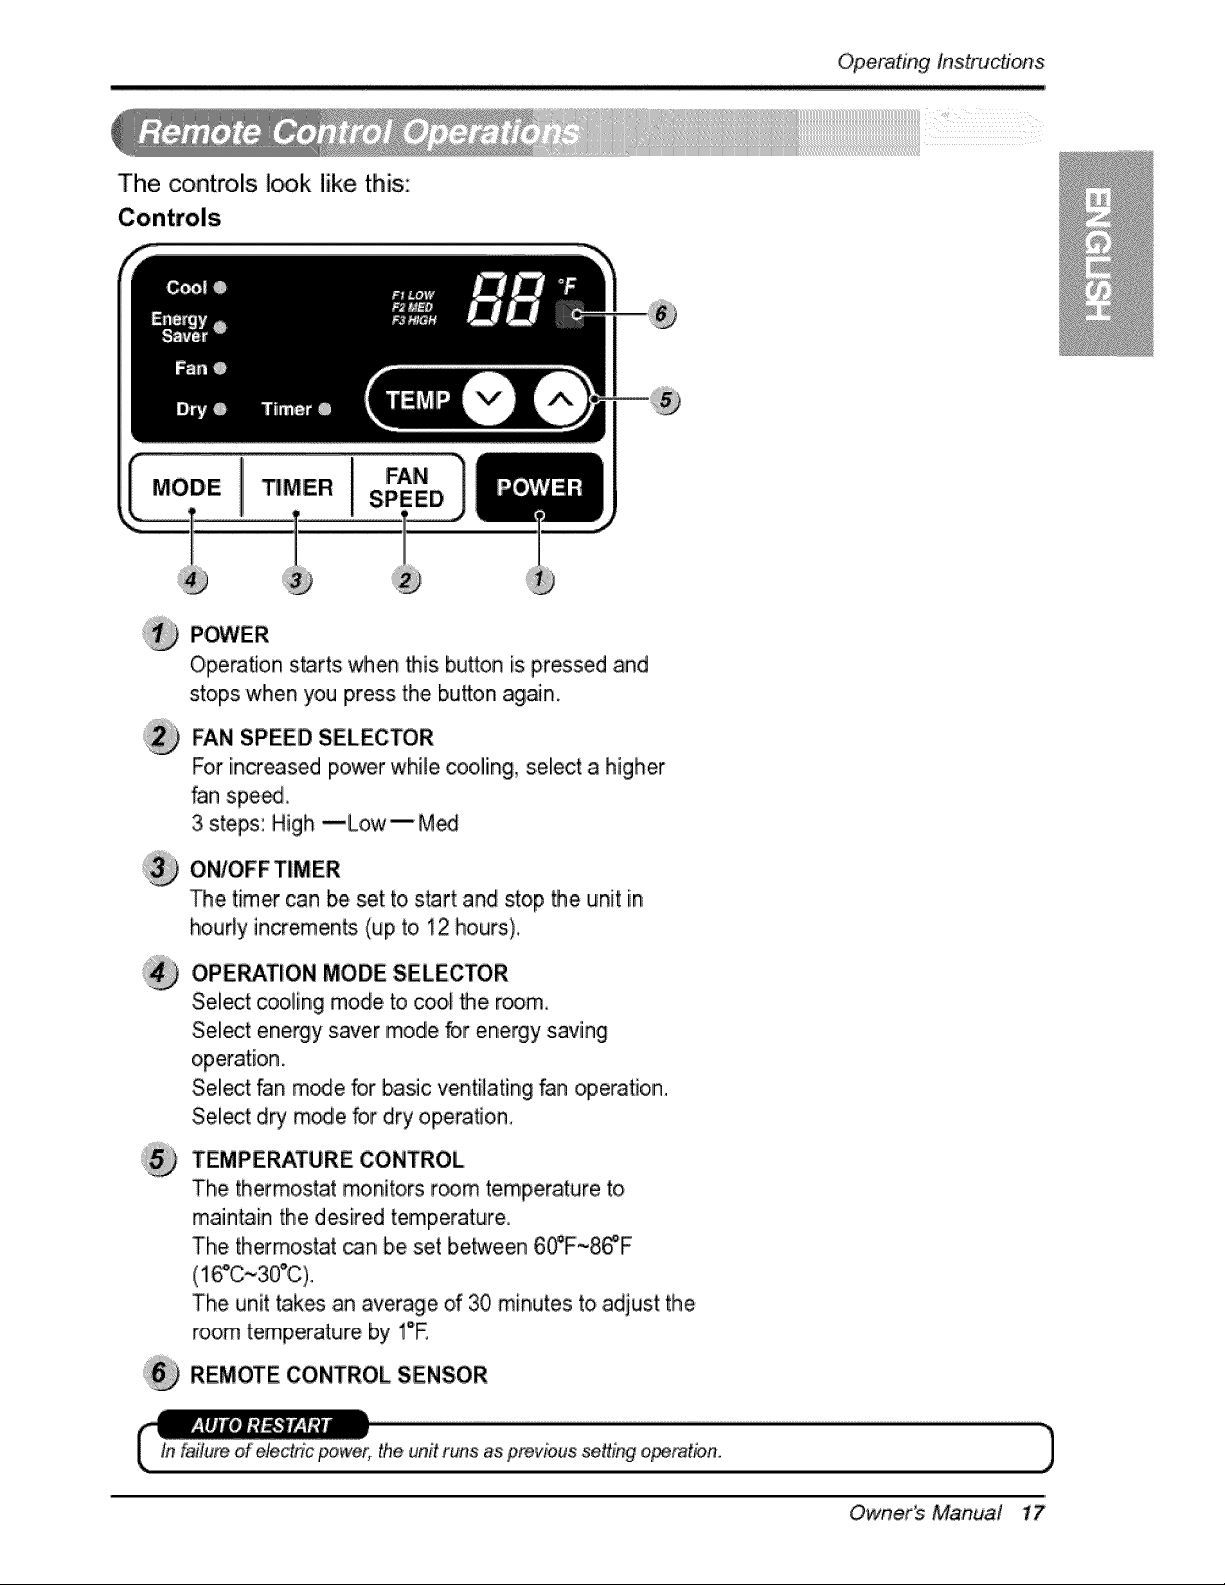
The controls I_k like this:
I
P_,/ER
Operation starts when this button is pressed and
stops when you press the bu_on again.
FAN SPEED SELECTOR
For increased power while cooliing, s,ellecta higher
fan spe_
3 steps: High --Low-- M_
ON/OFFTIMER
The timer can be set to,start and stop the unit iin
hourly increments (up to. 12 hours).
OPERATION MODE SELECTOR
Select cooling mode to cool the room,
Sellect energy saver mode _,r energy saving
operation.
SeUect fan m_e for _sic ventilating fan operation.
Select d_ mode for dry opera,on.
TEMPERATURE CONTROL
The thermostat monitors r_m temperature to
maintain the desired temperature.
The thermostat _n, be set between 6_F~8_F
The unit takes an average of 30 minutes to adjust the
room temperature by !°E
REMOTE CONTROL SENSOR
tn latium of'electric _wer, the unfl runs as prevbus se_Lngo_mtion,
_.,
,J
Owner_ Manual 17
Operating instruc#o_,s
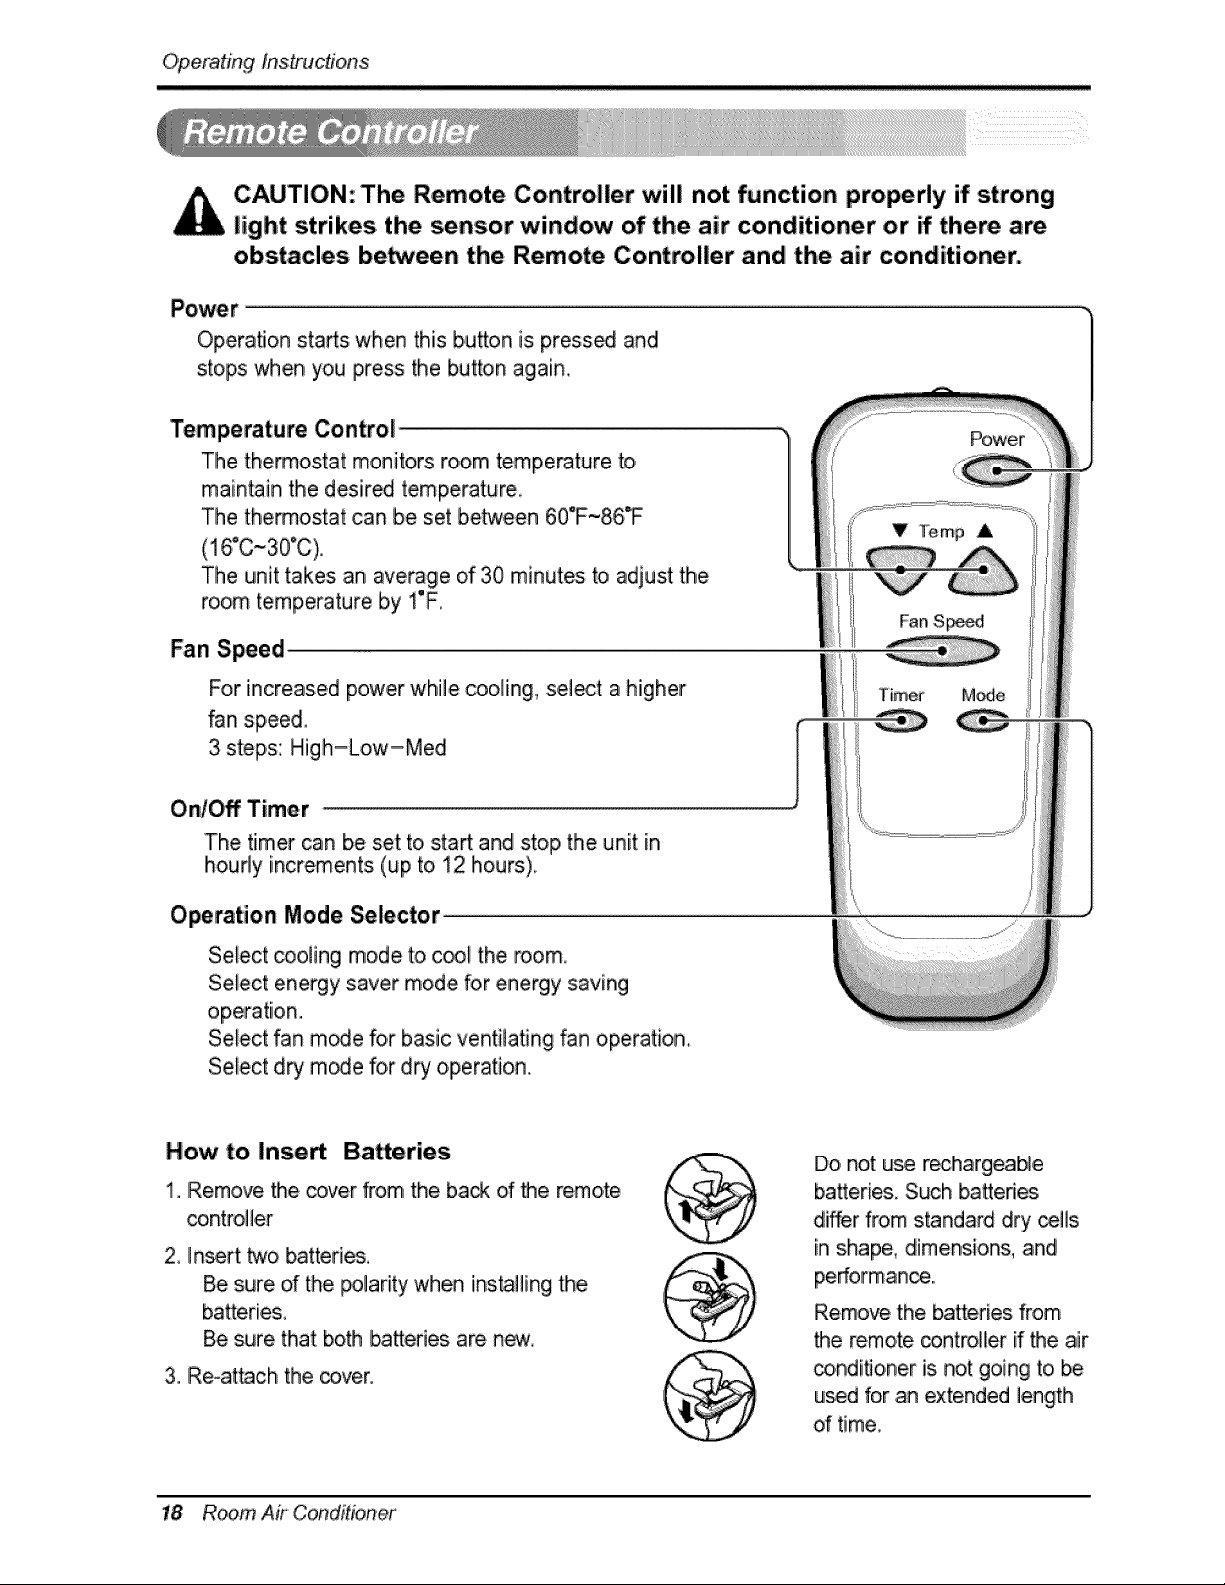
CAUTION: The Remote Controller will not function properly if strong
light strikes the sensor window of the air conditioner or _ there are,
obs_cles be_een the Remote Controller and the air conditioner.
Operation stads when this b,u_on is press_ and
stops when you press the button again,
'Temperature Control
The thermostat monitors ro,om temperature to,
maintain the desired temperature
The thermostat can be set between 60°F~86T
,(16°C~30°C),
The unit takes an average of 30 minutes to adjust the
room temperature by I°F.
Fan Speed
For increased power while coo_ing,,sel_t a higher
_n speed,
3 steps: High-Low-Meal
Ont_ Timer
J
The timer can be set to sta_ and stop the unit in
houdy increments (up to, !2 hours),
V Temp A
Fan S_
Timer
Operation Mode Selector
Select _oiing mode to c_E the room
Select energy saver mode for energy saving
operation.
Select fan m_e for basic ventiiating fan operation,
SeFect d_ m_e for dry operation..
_wer
M_e
How t:o Inse_
1. Remove the cover from the ba_ d the remote
controller
2, Inert two _tteries,
Be sure of the polarity when ins_lling the
Be sure, that both b,a_eries are new.
3. Re-attach the cover.
Do, not u_ reclhargeab_e
ba_eries. Such _efi_
differ from standard dry cells
in shape, dimensions, and
performance...
Remove the batteries from
the remote _ntro!_er if the air
conditioner Usnot going to be
used for an extended length
d time_
18 Room Air Conditioner
Operating Instructions
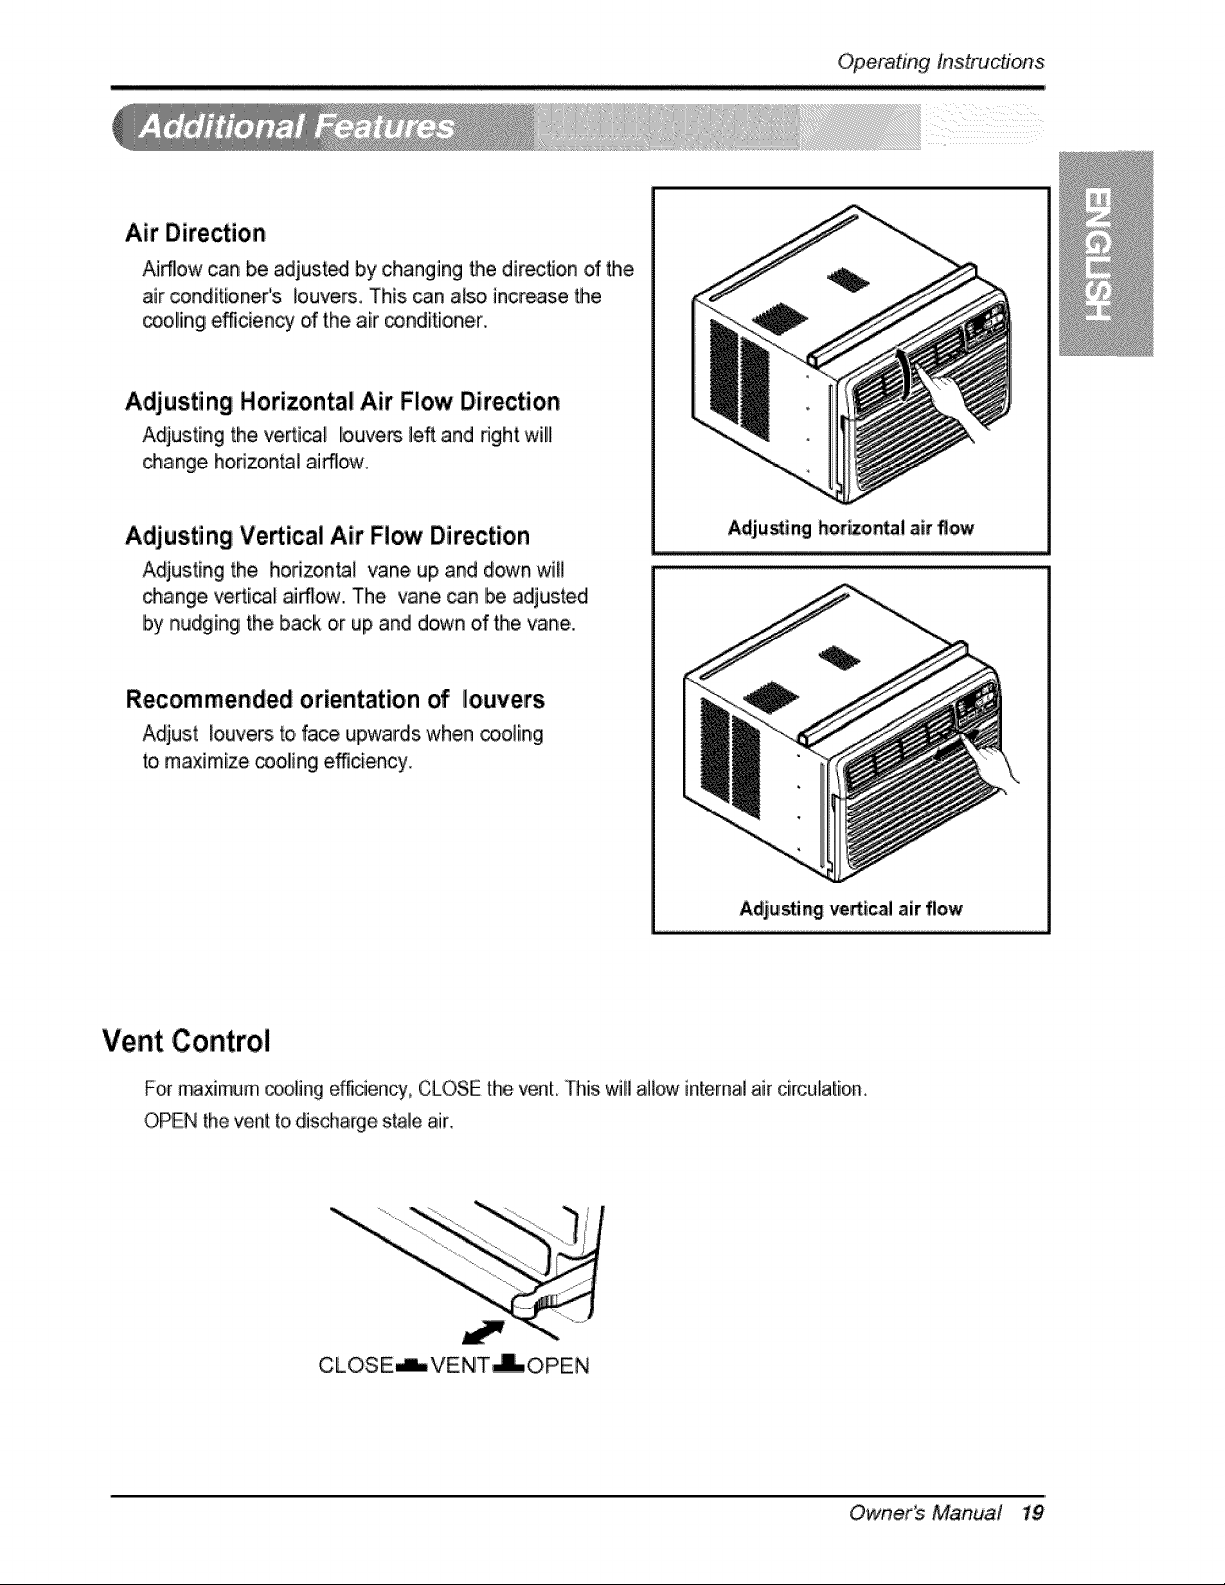
,Air Direction
Airflow can be adjust_ by changing the direction of the
air ,conditioner's louvers. This can also increase the
_oling efficiency of the air _nditioiner.
Adjusting Horizontal Air Flow Direction
Adjusting the venial louvers lea and nght will
_ange horizontal ai_o,w.
Adjusting Vertical Air Flow Direction
Adjusting the horizon_t vane up and down wil!
_ange venial airflow, The vane can Ibe adjusted
by nudging the back oir up and down of the vane.
Recommendedorientation of louvers
Adjust louvers to,face upwards when cooling
to maximize _olingi efficiency.
Adjuring bonzo_al air flow
Adjesting vertical air flow
Vent Control
For maximum _oling e_ciency, CLOSE the venL rh_swill all_ internal air circulatio,m
OPEN the vent [o discharge stale air,
CLOSE_VEN!T-i-OPEN
Owner_ Manual 19
Operatinginstructions
ii i i i i i
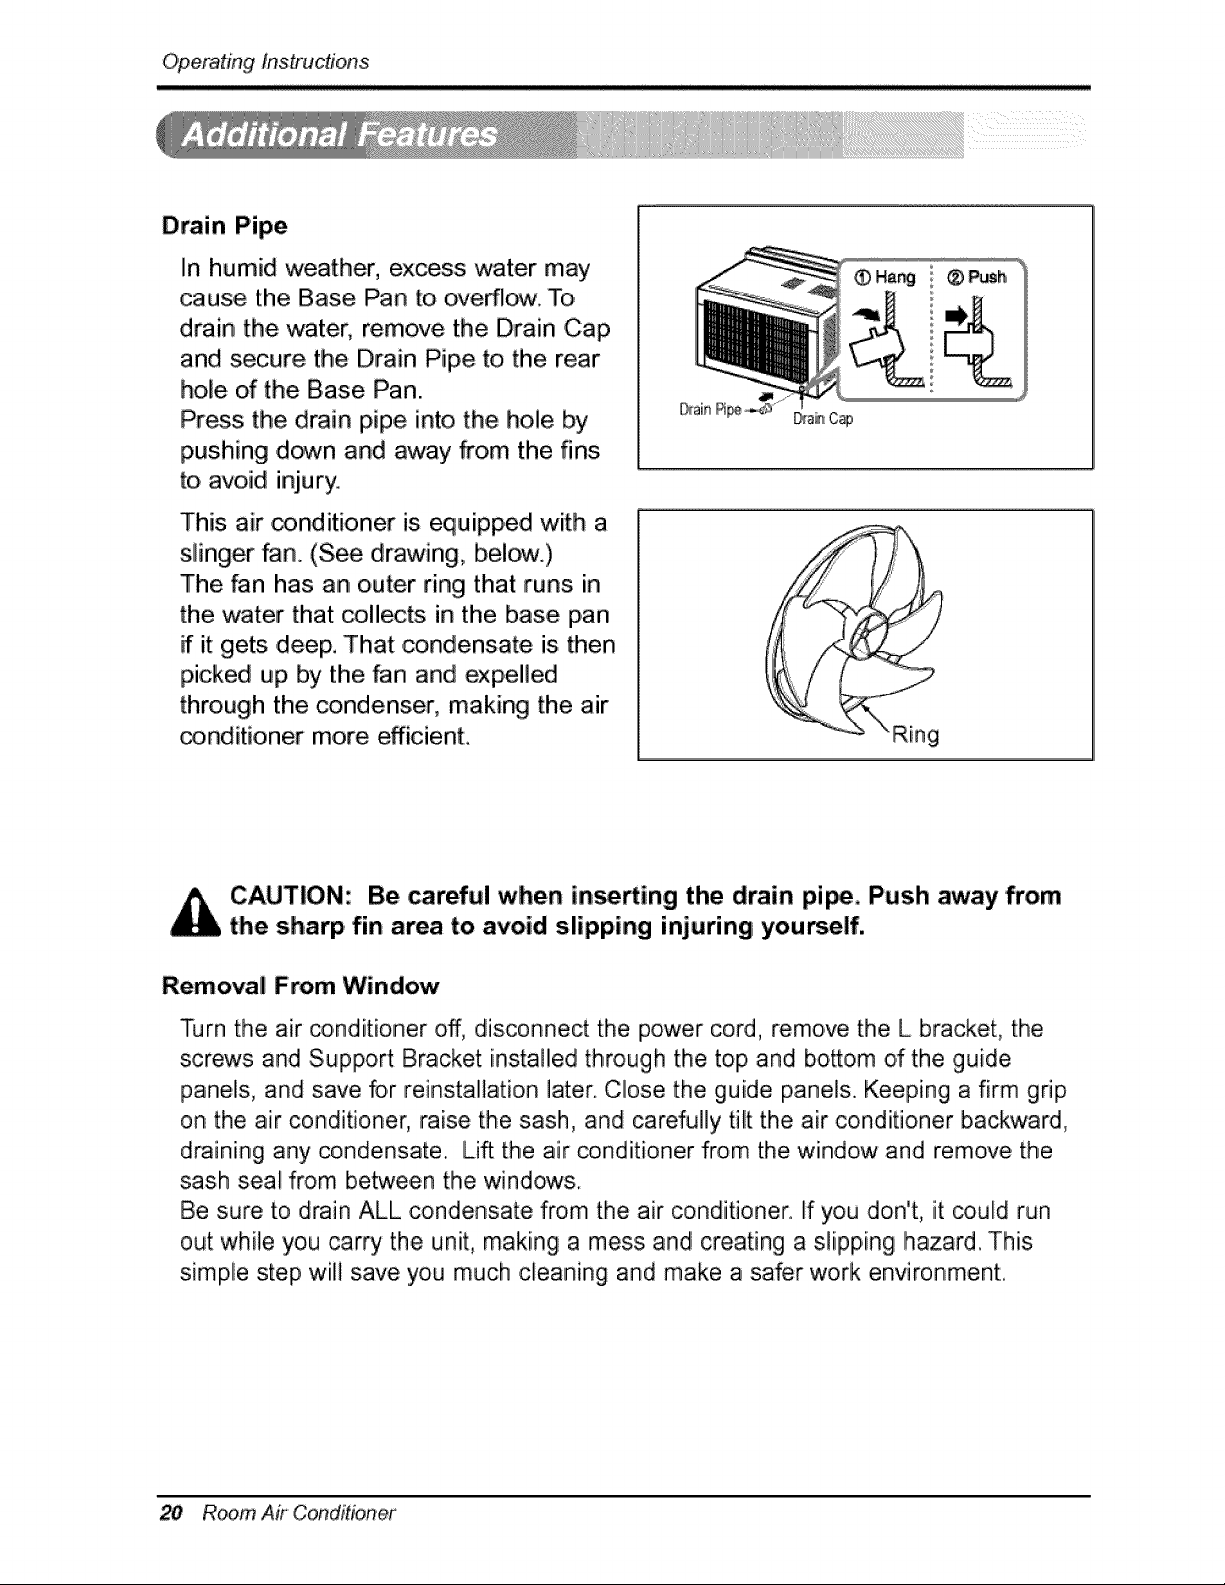
Drain Pipe
In humid weather, excess water may
cause the Base Pan to overlie. To,
drain the water, remove the Drain Cap
and secure the Drain Pipe to the rear
hole of the Base Pan.
Press the drain pipe into the hole by
pushing down and away from the fins.
to avoid injury.
This air conditioner is equipped with a
slinger fan.. (See, drawing,, below.)
The fan has an outer ring that runs in
the water that collects in the base pan
if it gets ,deep, That ,condensate is then
picked up by the _n and expelled
through the _ndenser, making the air
_nditioner more efficient,
• Hang ® Push
Ring
CAUTION,: Be _reful when in, fling the drain pi_, Push away from
the sharp fin area to avoid slipping injuring you6elf.
Removal From Window
Turn the air _nditioner off, disconnect the power cord, remove the L bracket, the
screws and Support Bracket installed through the top and bottom d the guide
panels, and save for reinstal]ation later. Close the guide panels.. Keeping a firm grip
on the air conditioner, raise the sash, and carefully tilt the air conditioner backward,
draining any condensate. Lift the air _nditioner from the window and remove the
sash seat from between the windows.
Be sure to drain ALL condensate from the air conditioner. Ifyou don't, it could run
out while you carry the unit, making a mess and creating a slipping Ihazard_ This
s[mp, le step wiiH save you much cleaning and make a safer work environment:.
20 Room Air Conditioner
Maintenance and Service
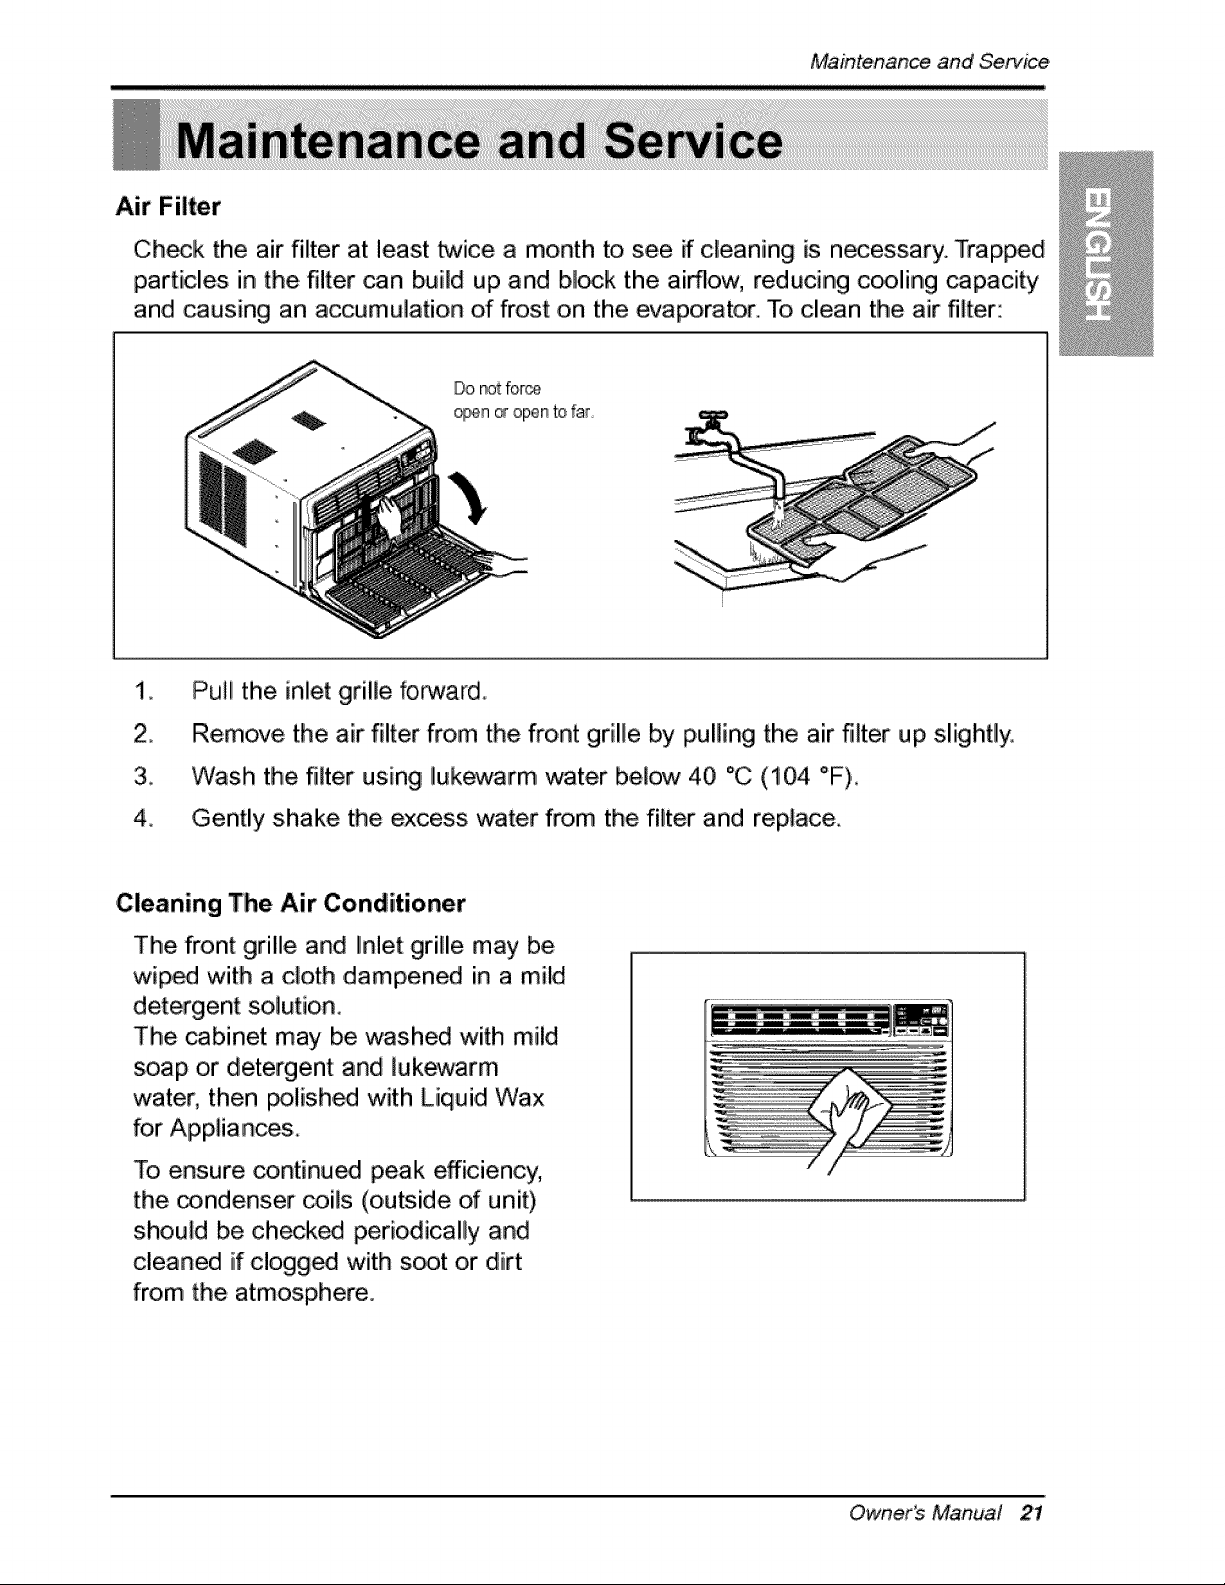
Air Filter
Ch_k the air filter at least twice a month to see if cleaning is necessary., Trapped
particles in the filter can build up and blink the airflow; reducing c_ling capacity
and causing an accumulation of frost on the evaporator. To clean the air filter:
Do not force
_n _ open tofar
2.
3.
4_
PuIIi the inlet grille forward.
Remove the air filter from the front grille by pulling the air filter up slightly,
W,iash the filter using Iukewarm water below 40 °C (104 °F),.
Gently shake the ,excess water from the filter and replace
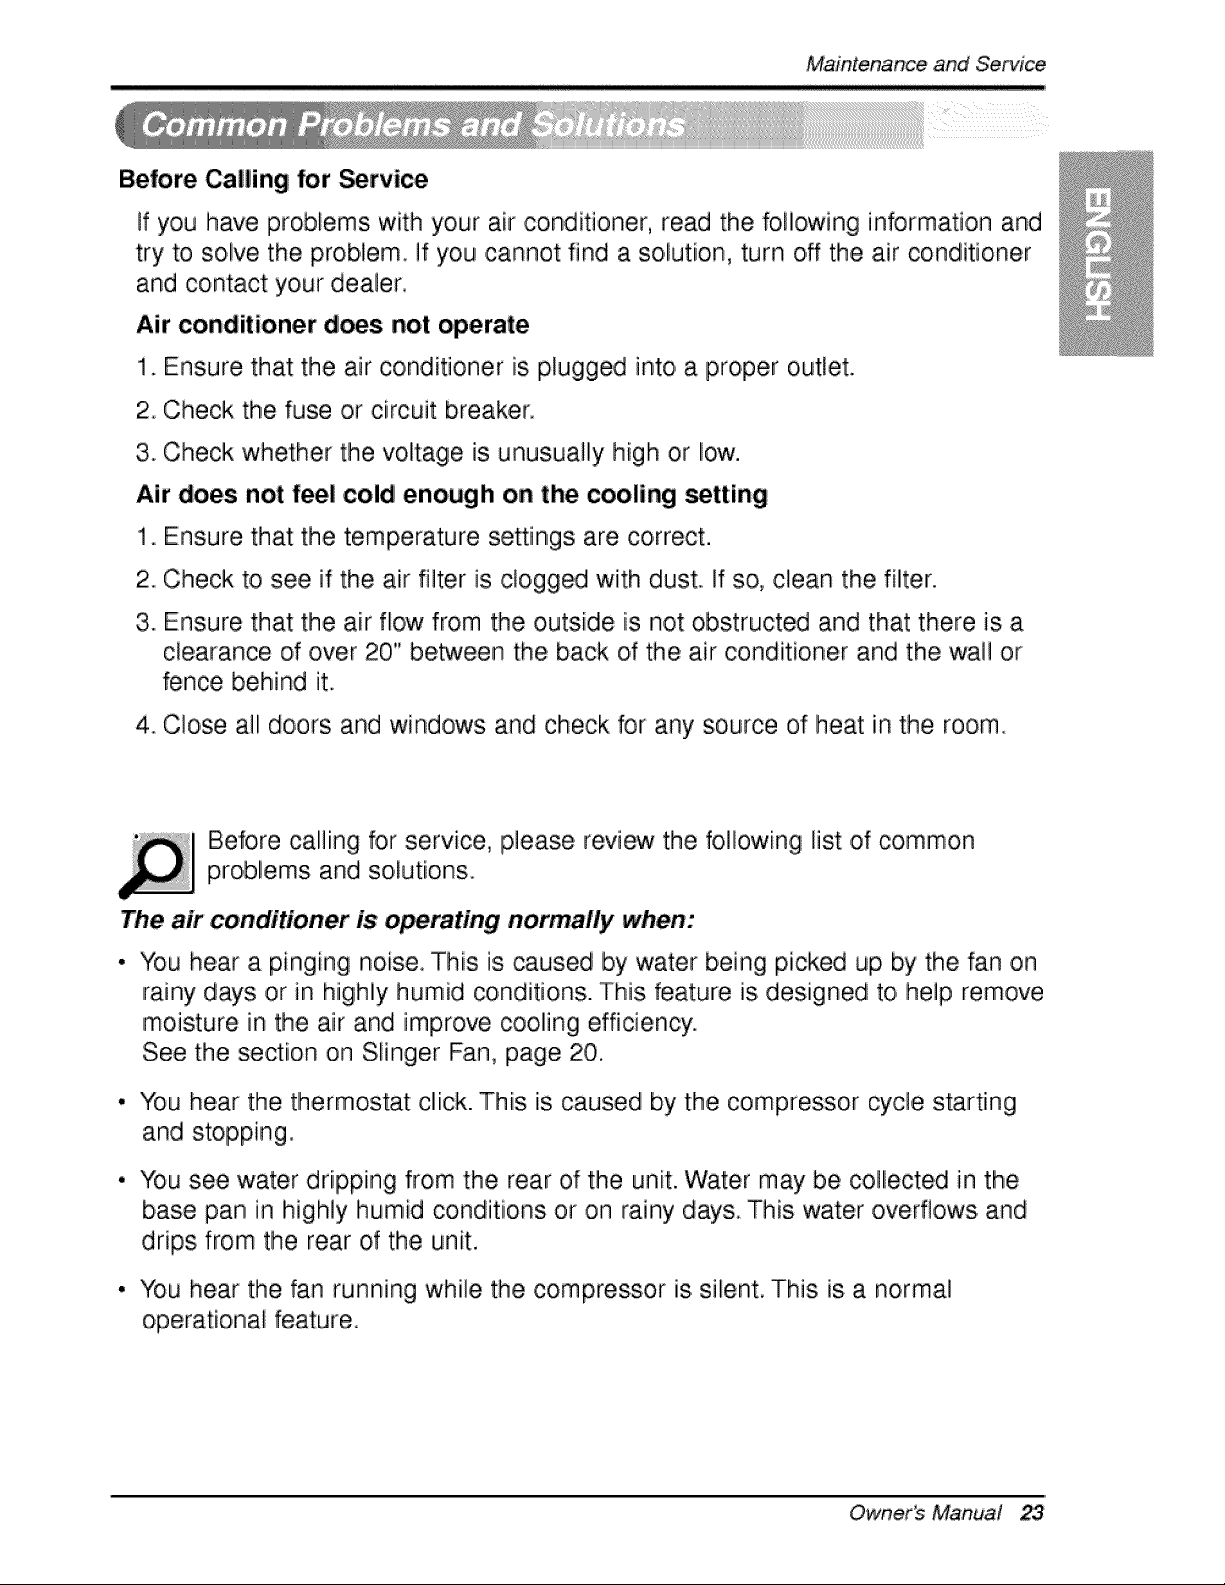
Cleaning The Air Conditioner
The front grillle and Ilnlet grille may be
wiped with a cloth ,dampened in a mild
detergent solution.
The _binet may be washed with mild
soap or detergent and lukewarm
water, then _lished with Liquid Wax
for Appliances.
To ensure continued peak efficiency,
the condenser coils (outside of unit)
should be checked periodically and
cleaned if clogged with s_t or dirt
from the atmosphere.
Owner_ Manual 21

MaintenanceandService
How to Remove the Front Grille
1. Pull the inlet grille for.Nard
2. Remove the screw securing the
Front Grille.
3. Push the grille up from the _om and
pull the top of the grille away from the
case as the top tabs lift out of their
slots.
22 Room Air Conditioner
M,iaJntenanceandService
Before Calling for Service
if you have problems with your air conditioner, read the following
information and
try to solve the problem° if yo,u ,cannot find a solution, turn off the air conditioner
and contact your dealer.
Air conditioner does not operate
1. Ensure that the air conditioner is plugged into, a proper outlet.
2.,Check the fuse or circuit breaker.
3,. Check whether the volt:age is unusually high or low.
Air does not fee! co!d enough on the cooling _tting
1. Ensure that the temperature settings are correct.
2. Check to see if the air filter is clogged with dust. If so, clean the filter.
3. Ensure that the air flow from the outside iis not obsitructed and that there is a
clearance of over 20" between the back of the air conditioner and the wail or
fence behind it.
4 Close all doors and windows and check for any source of heat in the room.
Before callliing for service, please review the following list ,of common
problems and solutions.
The air conditioner is o_rating normally when:
• You hear a pinging noise. This is caused by water being picked up by the fan on
rainy days or in highly humid conditions. This feature is designed to, help remove
moisture in the air and iimprove cooling efficiency.
See the section on Stinger Fan, page 20.
, You hear tlhe tlhermostat click. This iis caused by tlhe compressor cycle starting
and stopping.
° You see water dripping from the rear ,of the unit. Water may be collected in the
base pan in highly humid conditions or on rainy days. This water overflows and
drips from the rear of the unit.
• You hear the fan running while the compressor is silent. This is a normai
operational feature,
Owner_ Manual 23
MaintenanceandService
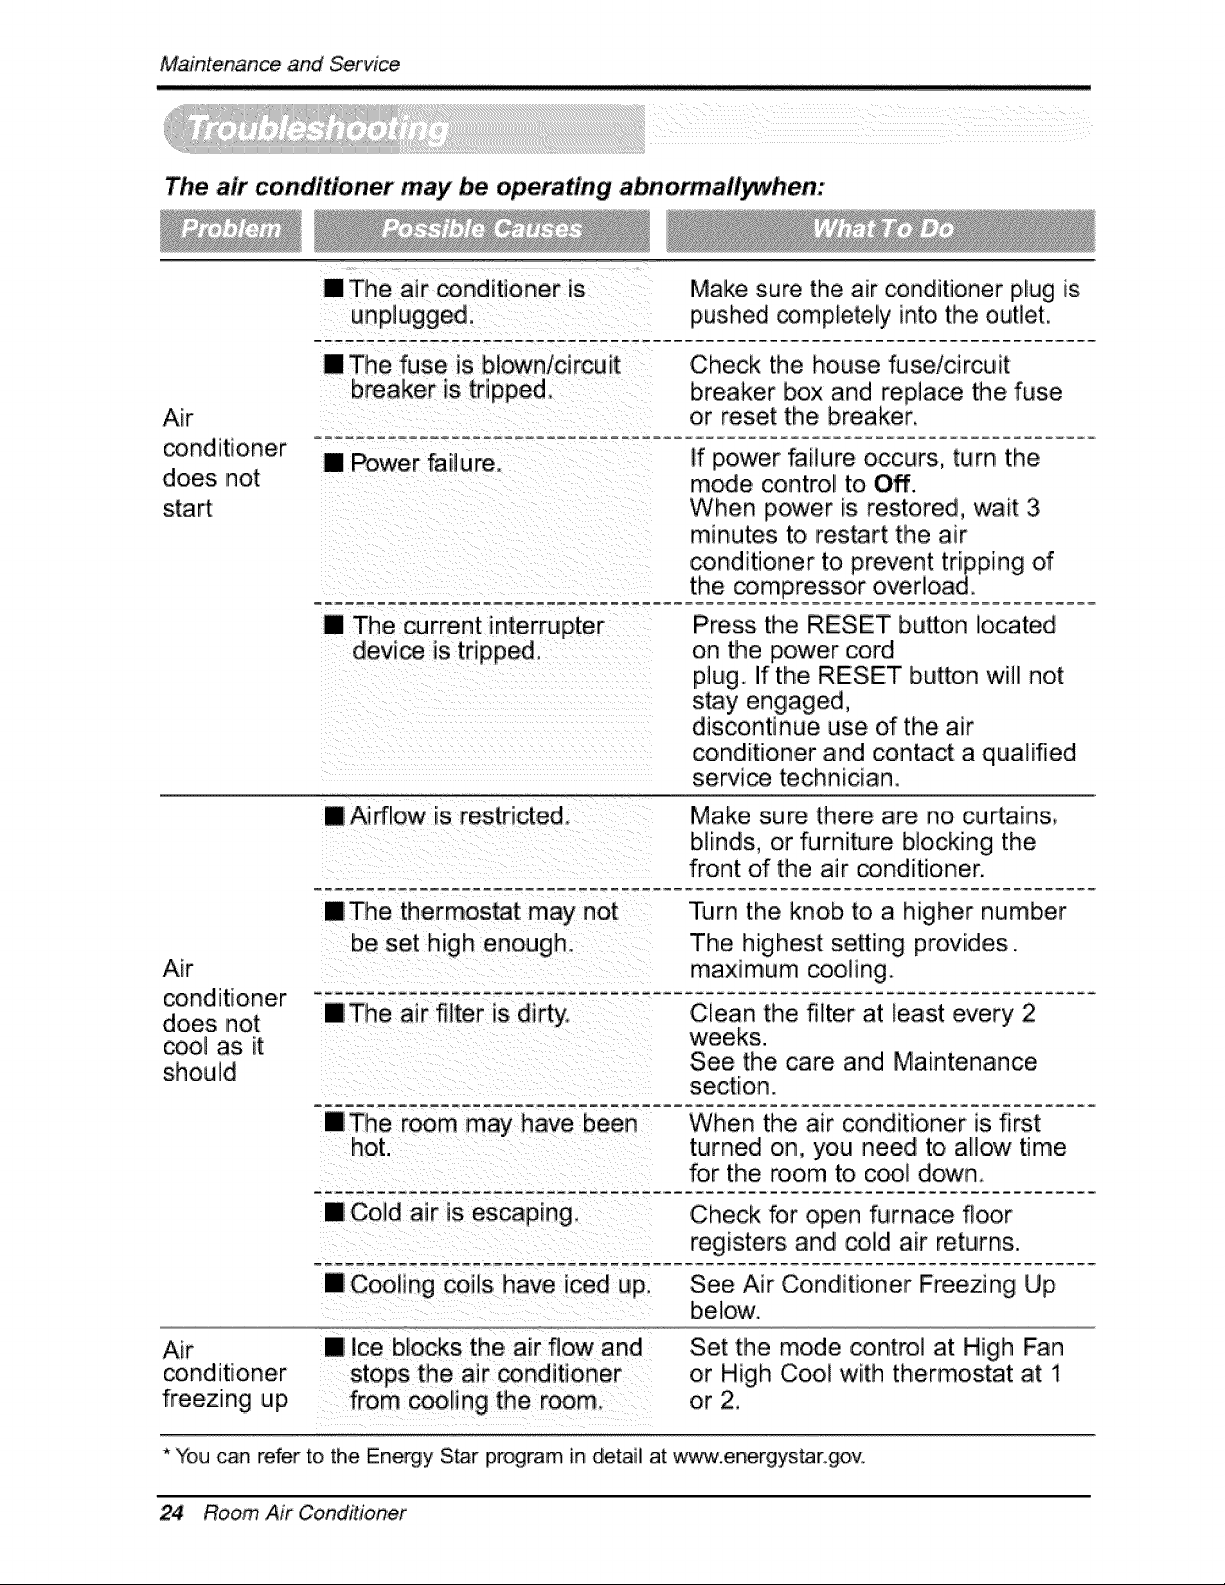
The air conditioner may _ operating abnormallywhien:
[] The air conditioner is
[] The fuse is blown/circuit
breaker is tripped.
Air
conditioner
does not
start
Make sure the air conditioner plug is
pushed completely into the outlet,
Check the house fuse!circuit
breaker box and replace the fuse
or reset the breaker,
If power failure occurs, turn the
mode control to Off.
When power is restored, wait 3
minutes to restart the air
conditioner to prevent tripping of
the compressor overload.
[] Airflow is restricted,
Press the RESET button located
on the power cord
plug. If the RESET button will not
stay engaged,
discontinue use of the air
conditioner and contact a qualified
service technician,
Air
conditioner ................................
does not
oool as it
should
Make sure there are no curtains,
b]inds, or furniture b,locking the
front of the air conditioner.
Turn the knob to a higher number
The highest setting provides.
maximum cooling,
Clean the filter at _east every 2
weeks.
See the care and Maintenance
section.
Air
conditioner
freezing up
hot.
[] Cold air is escaping,
When the a_r conditioner is first
turned on, you need to allow time
for the room to cool down.
Check for open furnace floor
registers and cold air returns.
nc_ling coils have iced up, See Air Conditioner Freezing Up
[] ice blocks the air flow and
stops the air conditioner
from cooling the room,,
below.
Set the mode contro at High Fan
or High Coo_ with thermostat at 1
or 2,
* You can refer to the Energy Star program in detail at w'ww.energystar gov.
24 Room Air CoinditJoRer
Memo
Owner's Manual 25
Memo
26 RoomAir Conditioner
Precauciones de Seguridad ......... 28
Antes de _ner en marcha .............32
Introducci6n ...................................
Simbolos Utilizados en
Este Manual................................ 33
Cara_risticas ............................ 33
Seguridad El_rica ...................... 34
U_ Transitotio de _n
A_ptador ..................................... 36
Use Temporal de un
Cable A]argador .......................... 36
Instalaci6n .........................................37
Corno instalalauni_dl.................37
Requis,it_ _ 4aVentana ..............37
Insta_c_6nde]gabJnete................39
Ins_cciones de
Funcionam iento ...............................42
In.racoons de Contro_
Remote ....................................... 42
Control Rernoto ............................43
Adiciona]es e Caracteri_cas .......44
La Direcci6n de] Ai_'e ................ 44
Centro_de ven_laci[n ............... 44
T_ de Desagi_e ..................... 45
Rernever_ode la Ventana ........ 45
Mantenimiento y Servicio ..............46
Fibre de Aire ......................... 48
Limpieza del Aire
Acondicionado .......................... 46
Come Remover ],aPariHa
Fro_] ........................................47
Probiemas y So]uciones
Habitua]es .................................... 48
Rese]uciSn de proNemas .............49
PARA SUS ARCHIVOS
Escdba aqui e] modelo y nt)mero de serie:
Mode|o n _ :
Puede e_ontrar los nBmeros en la etiqueta de la pa_e
lateral del producto
Nombre de[ distribuider':
Fecha do compra:
m Adjunte su _eci_ a esta pagina con ]a gr_adora _ra
el memento que b necesite para pmbar la _echa de su
adquisici6n o r_ra _a validacbn de la garant_a,
LEA ESTE MANUAL
En s._ interbr encon_rar_ touches, c¢_)sei_ Qtiles _e
ulilizaci6n y manlenimienlo de su acondicionadof de aire,
Unos p_ cu[dados per su parle le [pueden ahorrar
touche tiempo y dine_o du_ante la vida de su
acondicionador de aire.
En la tab]a de consejos para la soluci6n r&pida de,
pr_lemas enco_t_ar,_ m_has re_)u_tas a I_ pr_lemas
m_s habituales, Si revisa pdmero nuest_a Tabla de
Coa_les para la solu,ci6n rapida de pr<Aflemas, _al '_,.z r_
necesile Hamar nunca a] servicio tecni¢&
PRECAUC!ON
• Cor_t_¢te_ e# C_tro de SeRtc_ Aatot[z_o, _am re_'ar o
regularel m_nten_m_r4o de est_ _n_d, Ll_ _ 1.800-24_0_
para _bi_r el CSA m_s cetcano,,
• _1_ acondic_onado_o _ apto _t_ set usado _t n_5os
_e_o_ o d_c_c_t_o¢ sin la su_tvision ad,ecuada.
• Los niSos_e_ d_ =er s_p-_vis_los p=ra _eg_rat _ue
no iu_j_en con el ai_ a_ondic_nade,
• $i hay que cambiarel c_e de aliment_n, _o_ic_ea un_nico
de setvtcio_e _nstale_n re,cambioe_cto,
• Eltt_baje de ]a tt_st_]_c[6_debe set t_itz_do de _erdo a)
C_[go El_trtco N_na( _ic_m_te pot e_personalcaltfic_o y
)J
Manual del Propietario 27
Precauciones de .Seguridad
Para prevenir tanto Eesiones al usuar[o u otras personas como daSos matefia]es, es preciso
seguir estas instrucciones.
[] La incorrecta operacion del aparato como _nsecuencia de ignorar ]as [nstrucciones
provocara daSos o ]esiones.
[] A cause det peso pesado de] p,roducto, se recomienda que usted tenga a un ayudante a
participa en [a [nstataci6n,
m El significado de los s_mboUos utJlizados en este, manual se indica a continuaci6n.
Asegur,e_ de no hacerlo.
As_urese de seguir las instrucciones.
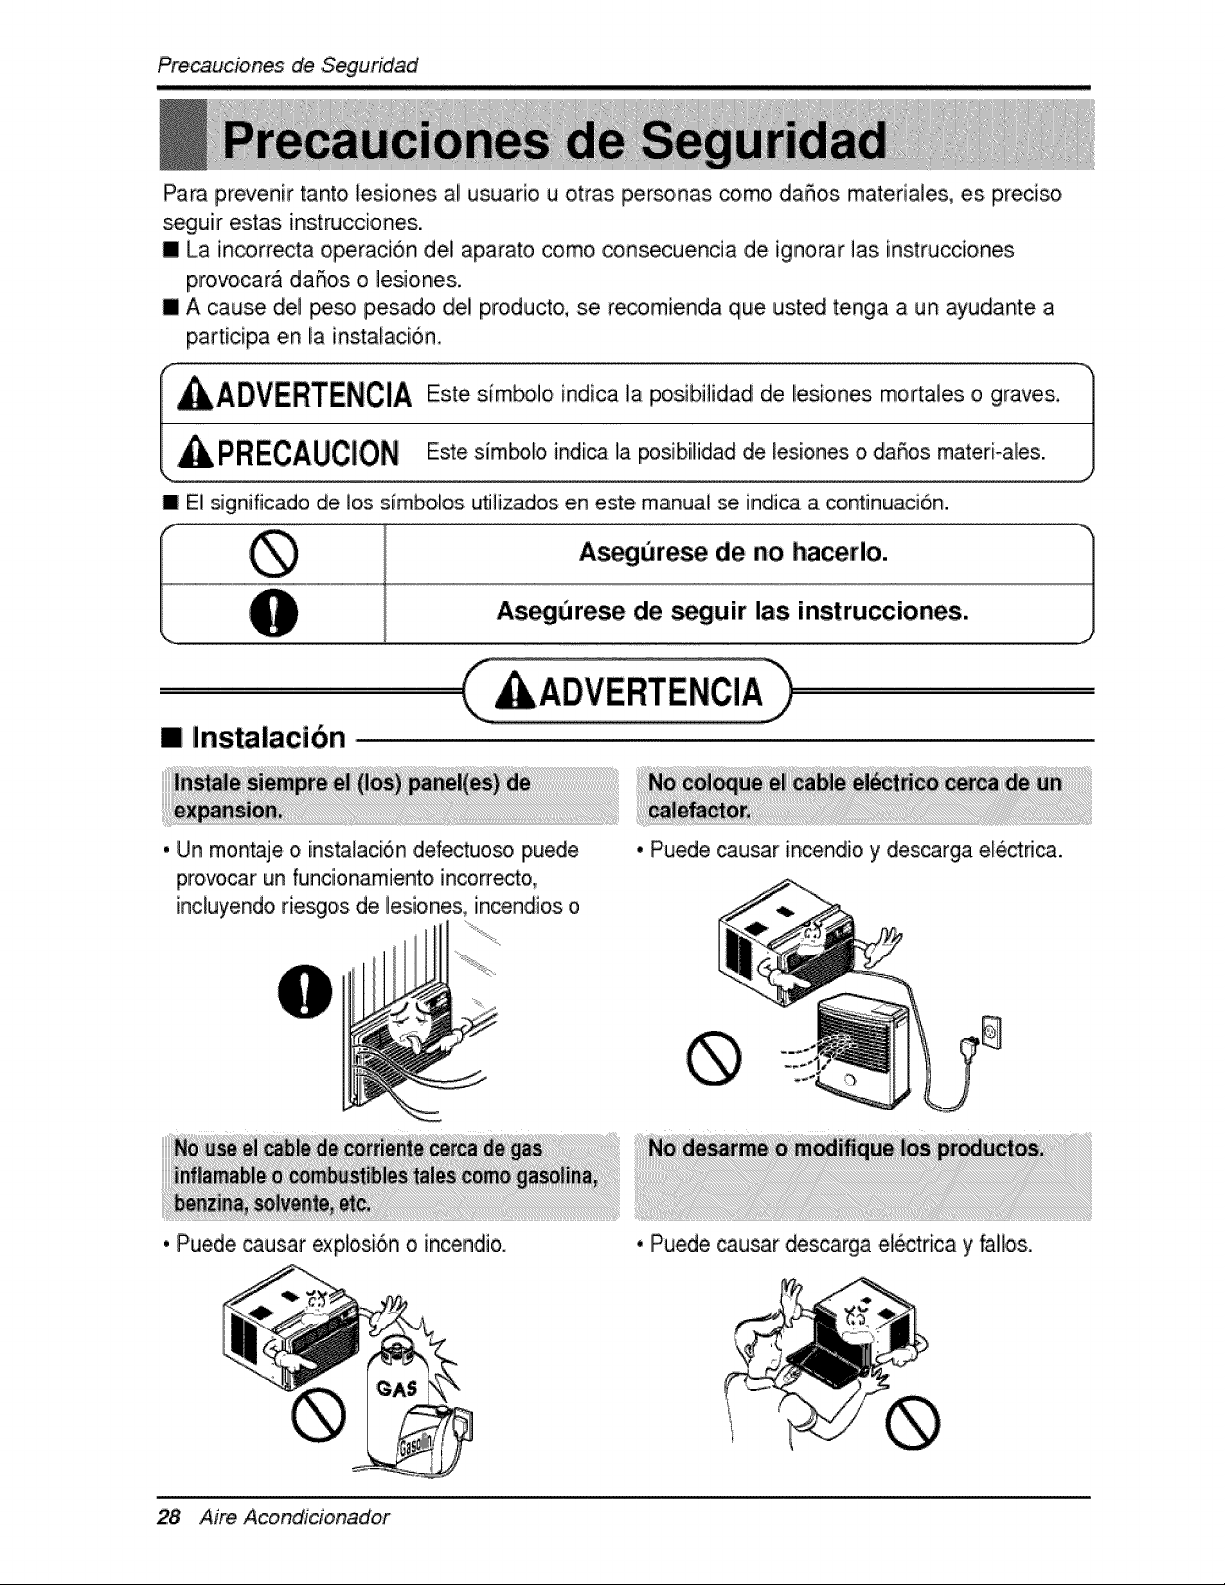
[] Instalaci6n
. Un mon_je o insta_aci6n defectuoso puede
pmvocar un funcionami.ento incorre_o,
[ncluyendo fiesgos de lesiones, incendios o
• Puede causar incendio y descarga ele_dca.
. Puede caus,ar explosi6n o incendio.
28 Aire A,condicionador
, Puede _usar descarga electrica y faHos.

Precauciones de Seguridad
[] Funcionamiento
, De oI_'o modo, causara . Causara descarga electdca o • Causar& de_arga el_rica o
descarga el6ctrica o incendio.., in,cendio, incendio.
• Cau_ra descarga electrica o
. En ca_ que no, puede
. CausarA ,descarga electdca o • Si no hay conexi6n a ma_,
se puede pro,ducir una
descarga electrica.
causar incendio, y accidente
de corto cimuito,.,
, Puede _usar incendio y
ia_idente e!_tri_,
• Pu_e causar descarga
Manual del Propietario
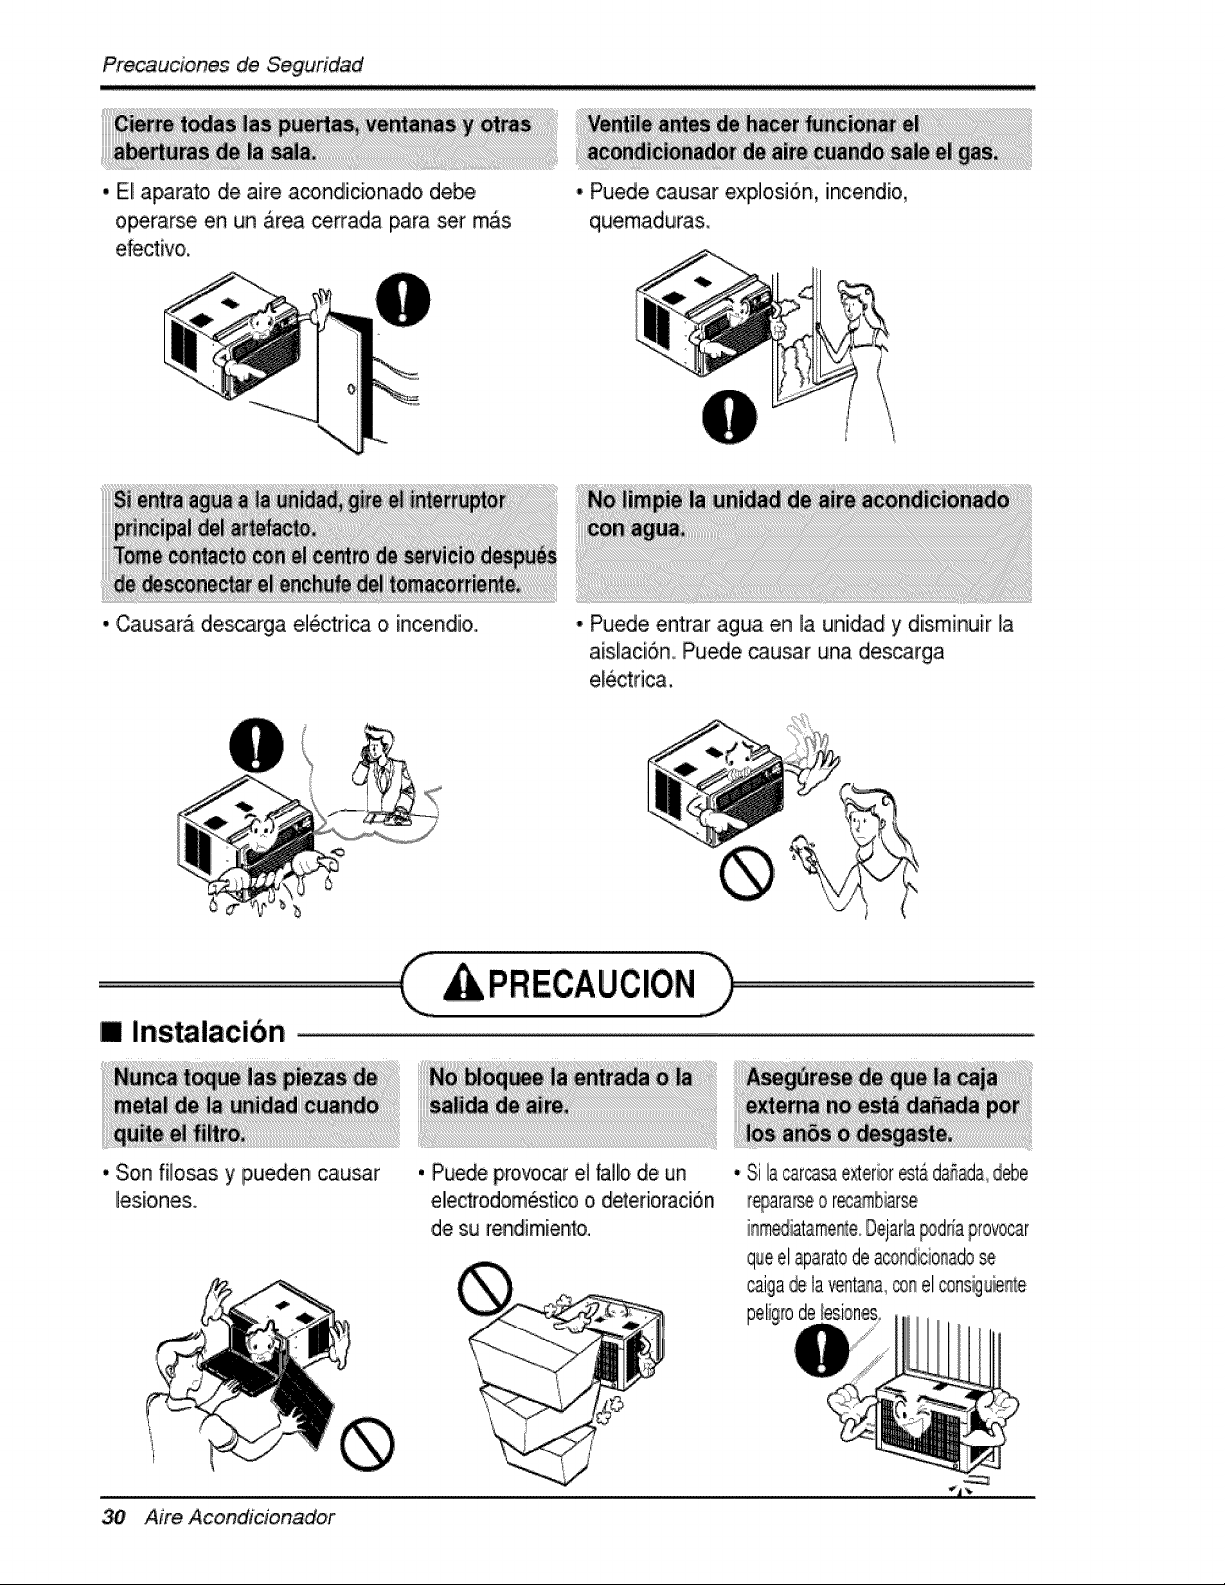
Precauciones de Seguddad
,. El a_rat,o, de aire acondlic:ionado debe
operarse en un _rea ce_ada para set mas
efectivo.
,. Causara descarga electrica o incendio,..
• Puede cau!_r explosi6n, incendio,
quemadura&
• Puede entrar agua en _a uniidad y diisminuir la
ais.laci6n, Puede causar una. descarga
ele_dca,
[] Instaiacibn
., Son filosas y p,ueden causar
lesio,n.es.
PRECAUCION
. Puede prorvoicarel tallode un
ellec_°odomesticoo.deterioracion
.desu rendimiento.
Aire Acondicionador
[] Funcionamiento
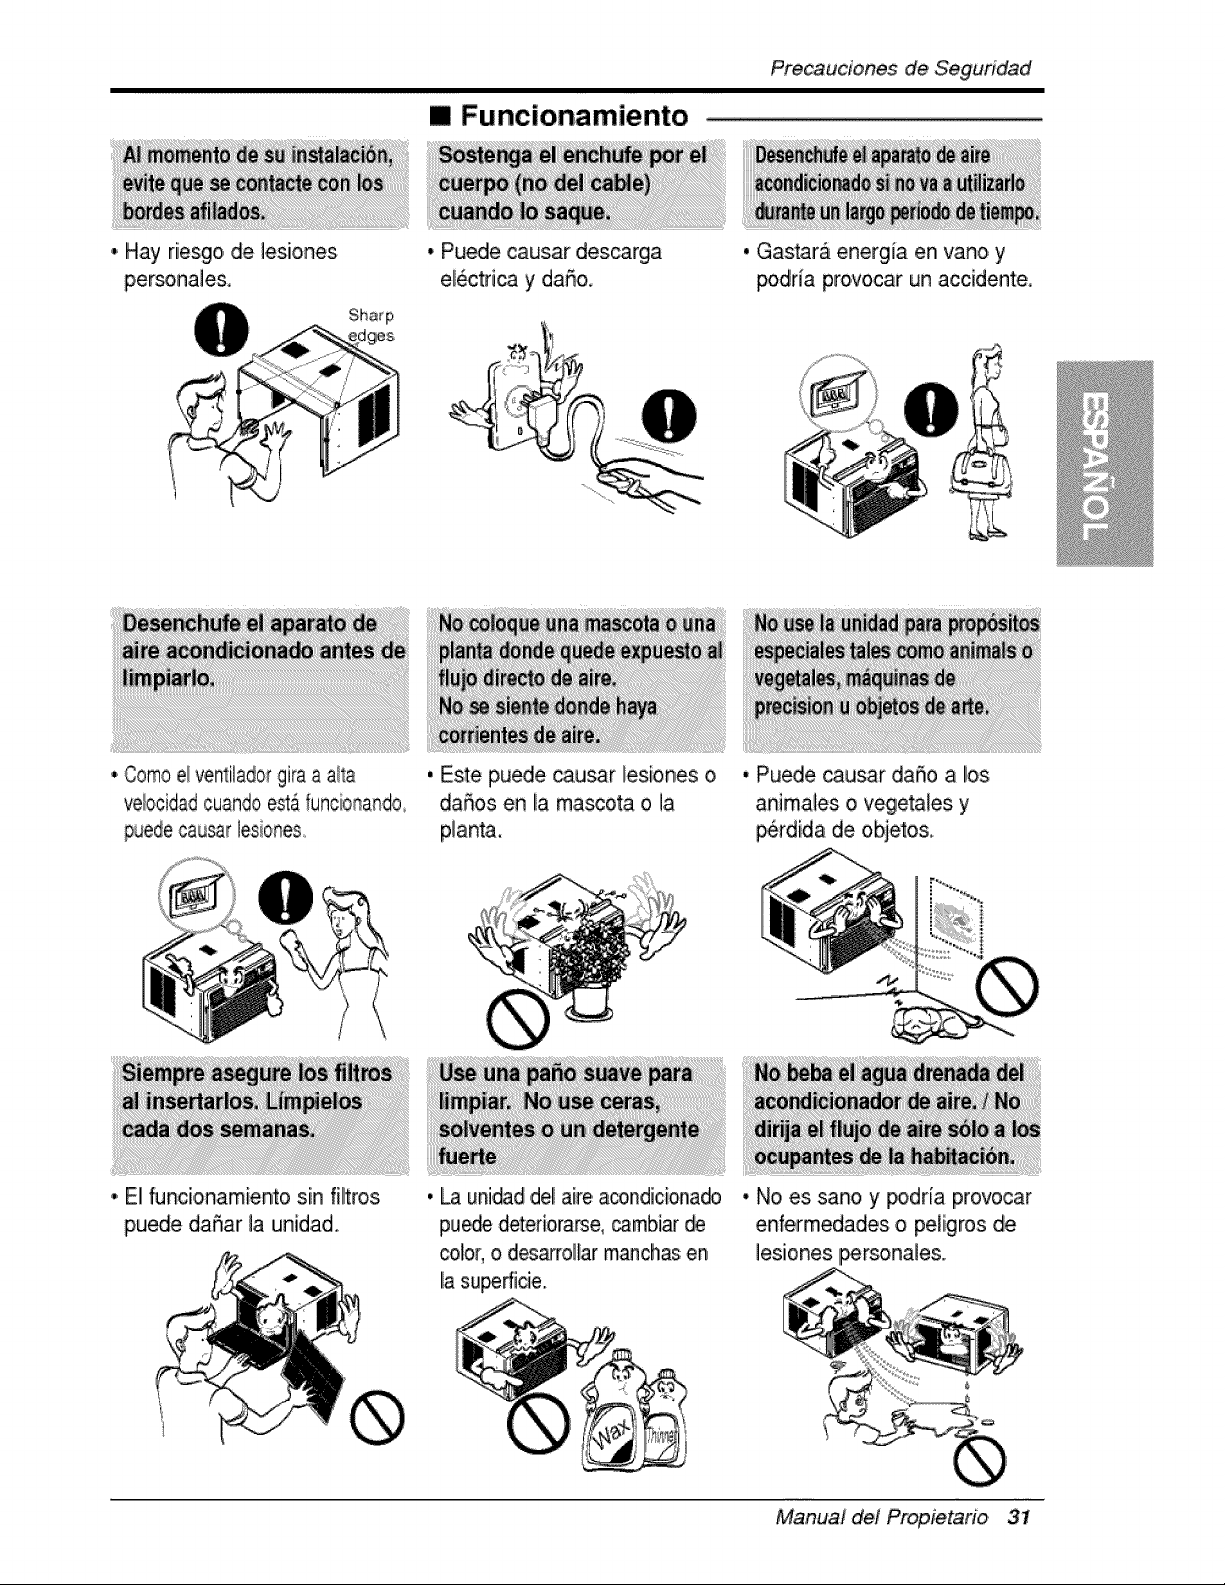
Precauciones de Seguridad
I'i Hay riesgo, de ]esiiones
persoRa]e&
• Puedle causar des_rga
el_tfica y daSo.
• Gastara energia en vano y
podria provocar un acc[dente.
• Como ei ventilador gira a aila
vebcidad cuando estAfuncionando
puede causar lesiones..
• El Nnc[,onamiento sin filtros
puede daSar la uR[diad,
, Este pu_e ca,usar lesiones o
daffos en la miasoota o ]a
planta,
, Pu_e causar da5o a los
anima]es o vegetales y
_rdida de objetos,
, _ unidad,dellaire acondiciona_
pu_e deteriorarse,_mbiar @
color, o d_a_ollar maJ_ch_;en
Ilasup,erficie.
• No es sano y _dda provocar
enfermedades o pel[gros de
]esiones IF_rsona]es.
,Mair?ua]del Propietario 31
Preca'ucJonesde Seguridad
!, Coloque e! enchufe co,rrectamente,
2, Use un On[co circuito para este aparato, Recargar el circuito, podria provocar
un r[esgo de incendios.
3. No utilice un aiargadior. Consulte la pagina 34 para mas detalles.
4. No, arranque/detenga ell funcionamiento enchufando/desenchufando el cable
de corriente el6ctr[ca.
5. Si el alargador esta da5ado y ha de ser recambiado, solicite a un tecnico,
autorizado que [nstale un recamlbio exacto.
1. Estar exp,uesto, al fiujo directo de aire por un perio, do ]argo de tiempo puede
constituir un riesgo para su salud. No exponga alas personas, mascotas o
plantas al flujo directo por periodos largos de tiempo.
2. Debido a la posibilidad de falta de ox[geno,, ventile la habitaci6n cuando se
use, a! mismo tiempo que estufas u otros dispositivos de calefaccion.
3, No, use este aco,ndicionador de aire par a propositos determinados no
espec[ficados (pot ej,: preservar dispositivo, s de precision, alimentos,
cacho, rros, plantas y objetos ,de arte). Tales usos puede daS_arlos elementos.
4. El aparato de aire acondici,onado es un aparato diseSado para ell confo,rt del
consumidor. No es un sistema ac]imatizador.
1, No, toque las partes de metal de la unidad cuando quite el f[Itro. Puede
lastimarse cuando manipule bordes fH,osiosde metal.
2. No use agua para IliimlPiaradentro del acondiioiionadlor. La exposici6n al agua
p,uede destruir la ais],aci6n y esto a su vez provocar una descarga e]ectrica,
3, Cuando, I[mpie la unidad, as egOrese que la corfiente y eli [nterruptor esten
desco, nec_dos El vent[iador gila a muy alta velocidad cu,ando esta
funcionando. Ex[ste la posibilidad de les[onarse si la energia se conecta
accidentaimente cuando, este limpiando Iias piezas internas de la unidad,
Para reparaciones y mantenlm[ento, pongase en contacto con un centro de
servicio au_orizado. Co,nsulte la p,Ag[na de garantia 0 ]lame all nOmero (800) 243°
0000. Tenga su nOmeor d emodelo y nOmero de serie a mano. Los encontrara
en Ila pAgiina 25 de este manual.
32 Aire Acondicionador
P're_ucionesde Seguddad
Este simbolo |o advierte de un peligro de accidente por corriente
Este simbolo Io adliverte ,de un peligro que pueda cau_r un daSo
del ventliador.
Este sim_lo sigtnifica condiccioneis especiaies,
iADVERTENClA : Este a_rato de_ria instalarse ,de acue_,o con las
normas de! Cbdigo Electrico National,
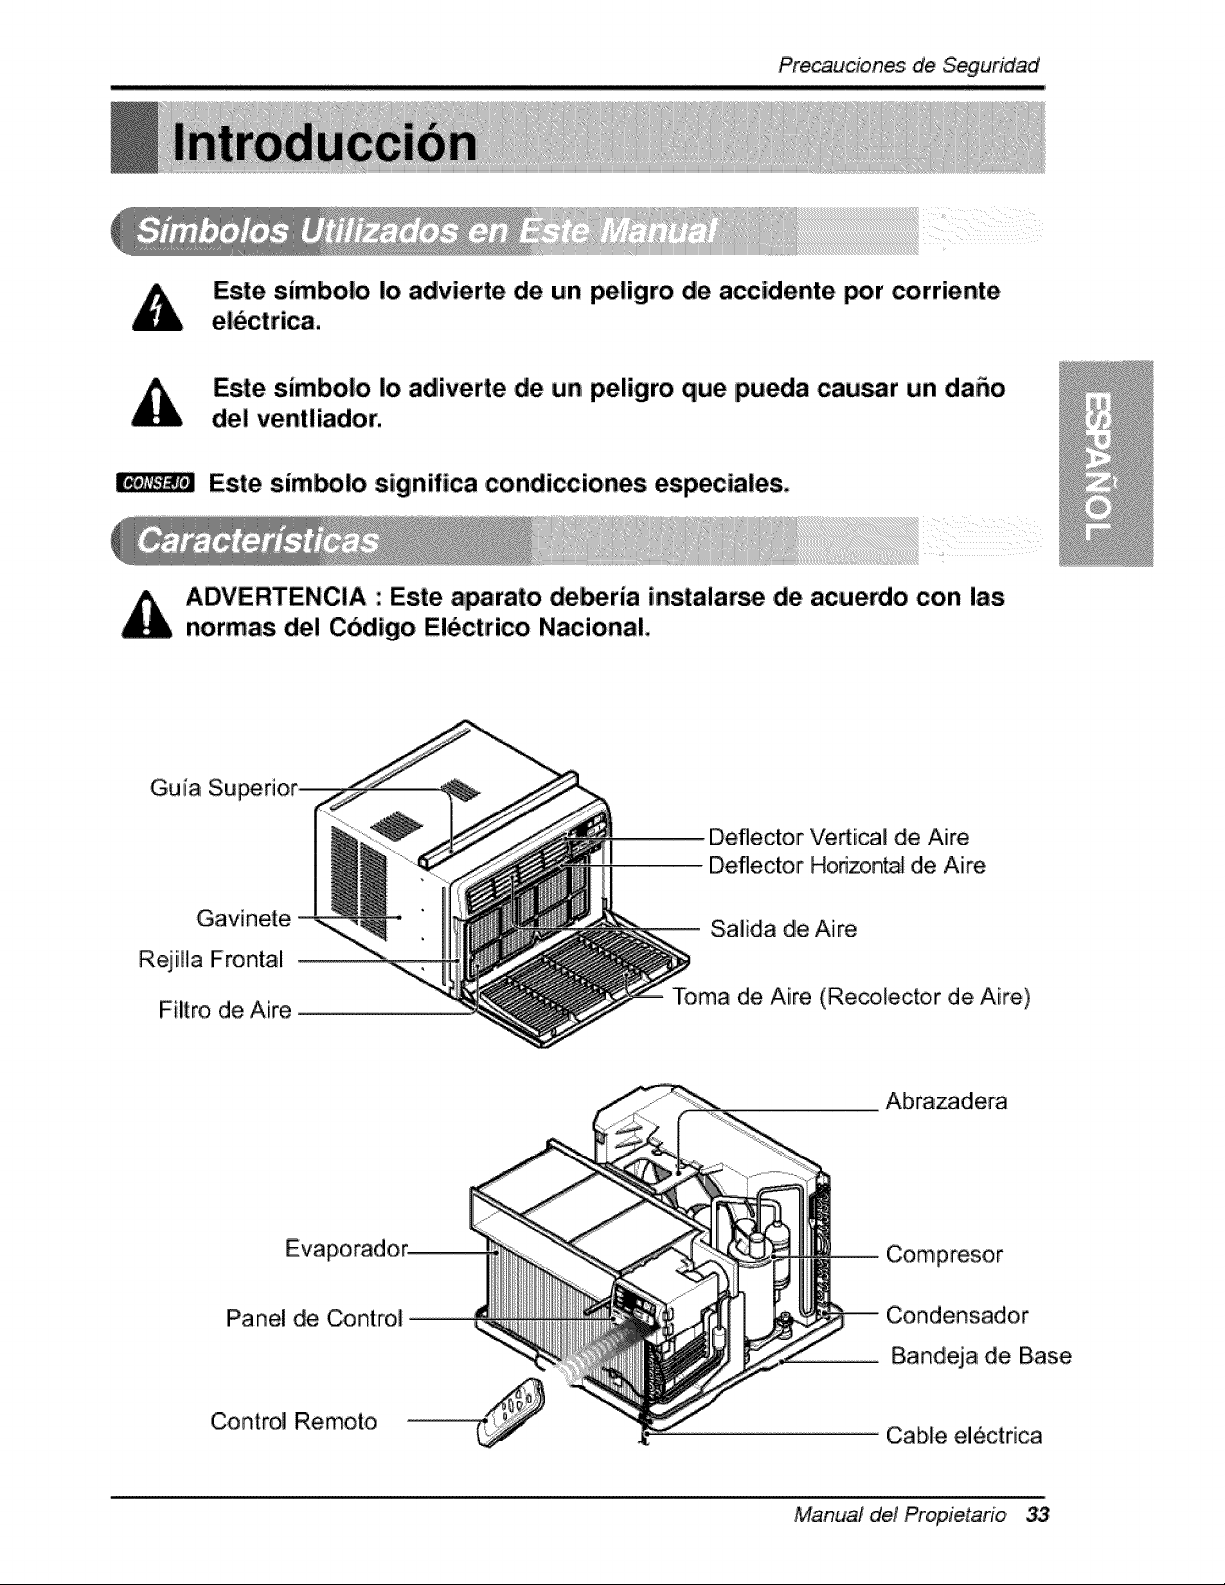
Gu i[a Su
Gavinete,
R,ejiHa Frontal
Filtro de Aire
Deflector Vedical de Aire
Deflector Honzontal de Aire
Salida de Aire
Toma de Aire (Recotector de Aire)
Eva
Panel de Control
Control Remoto
Abra,zadera
Compresor
Condensador
Bandeja de Base
Cable el_ctrica
Manual del P_opietario
Pre_ucionesde Siegudd_'d
_ T
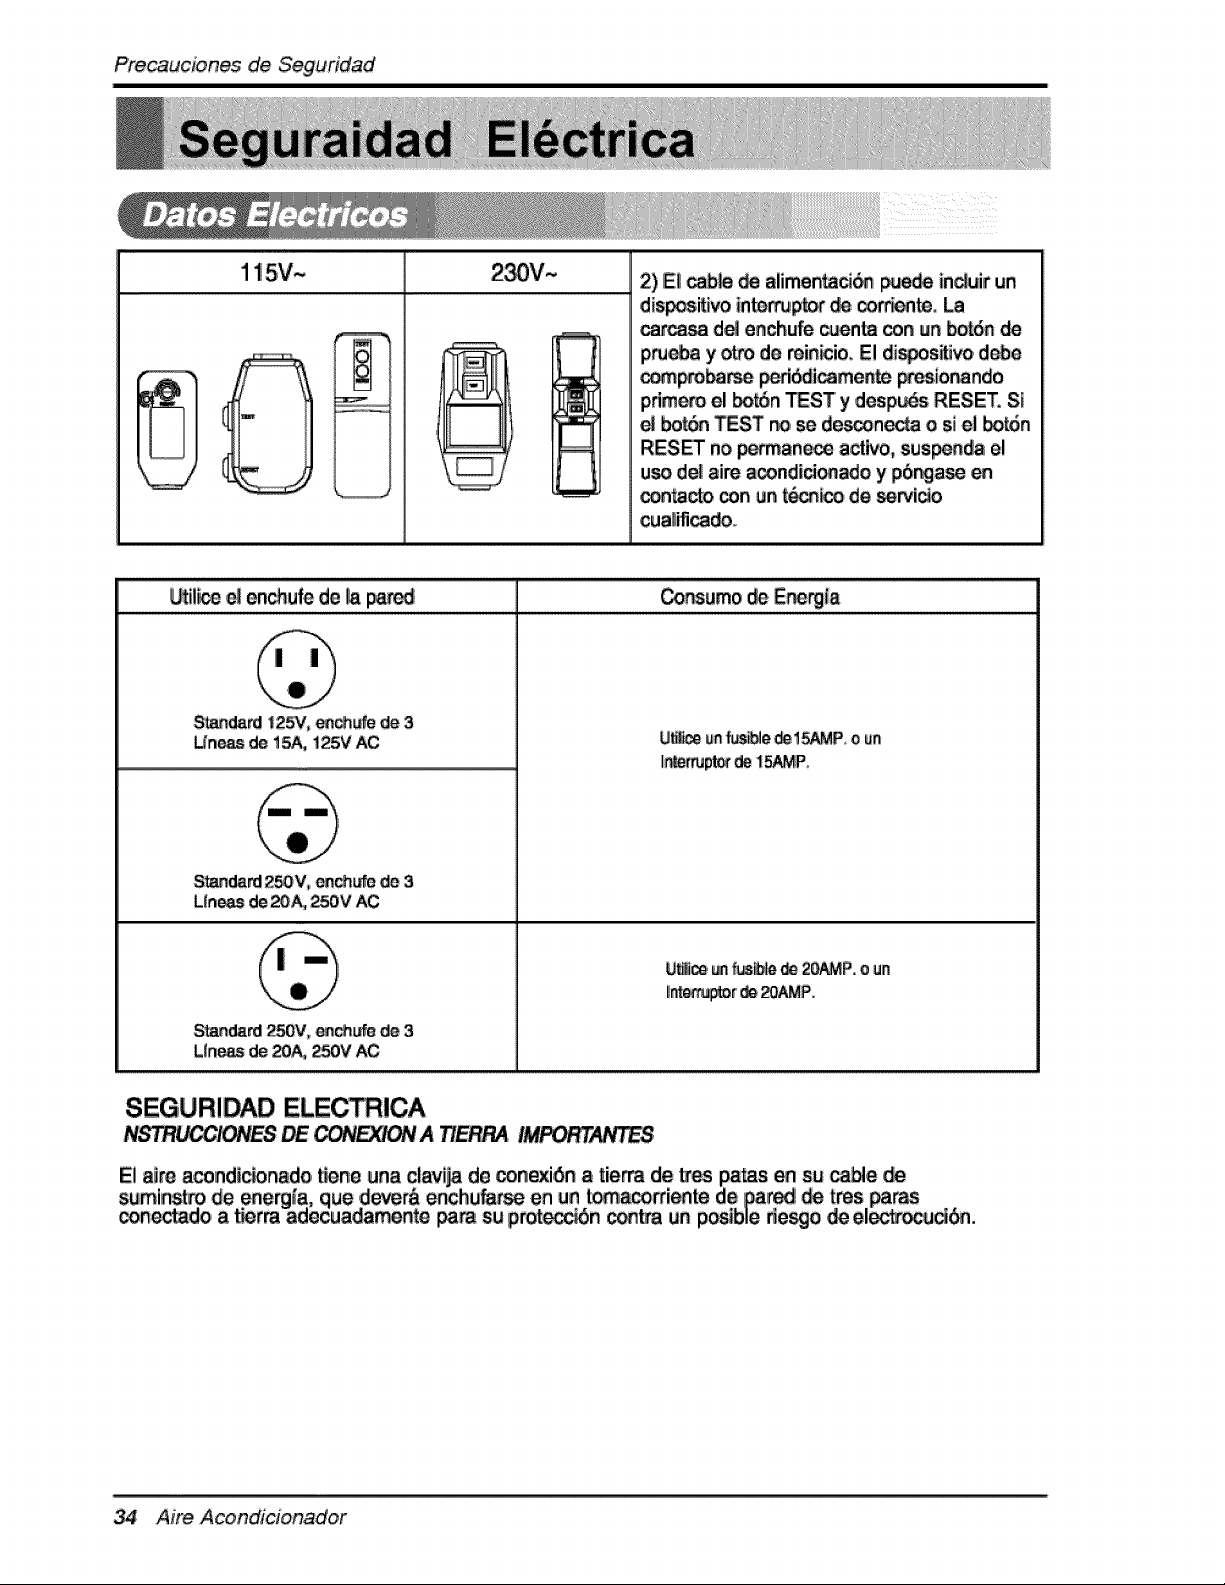
115V~ 2) IEIl_b_ _ alimen_ _e_ induir un
-¢
J !_ttt_
dis_ivo in_p_ _ _rd_n_
_ d_ enlchufe_n_ _n un bot6n de
p,_a y _i de min_ioo El dis_s_, d_e
__ _i_mente W_ionando
p.rimero el botSn TEST' y despu_s RESET. S_
bo_ TEST no se de_'.,onoctao si el botd,n
RES_ no _manece activo, sus_nda el
u_ d_ aim a_ndici_ado y p6ng_e
_tacto _n ur_t_ de _i_
cua_ifi_do.
_ili_ e! enchufe de _apa_d _r_urno _, E_rg{a
S_dard !2_', _ufe de 3
Un_de 1_ 125V_
Standard250% _chufe d_ 3
L_n_ de_& 250V AC
S_'_dard 250V, ea_ d_ 3
LIne_ de 20A,._0V AC
_fl_._r' _ L_AMP'.
SEGURIDAD ELECt!CA
A T/E_ !_T_FE8
34 Aire Acondicionador
Pre,caucionesde ,Segundad
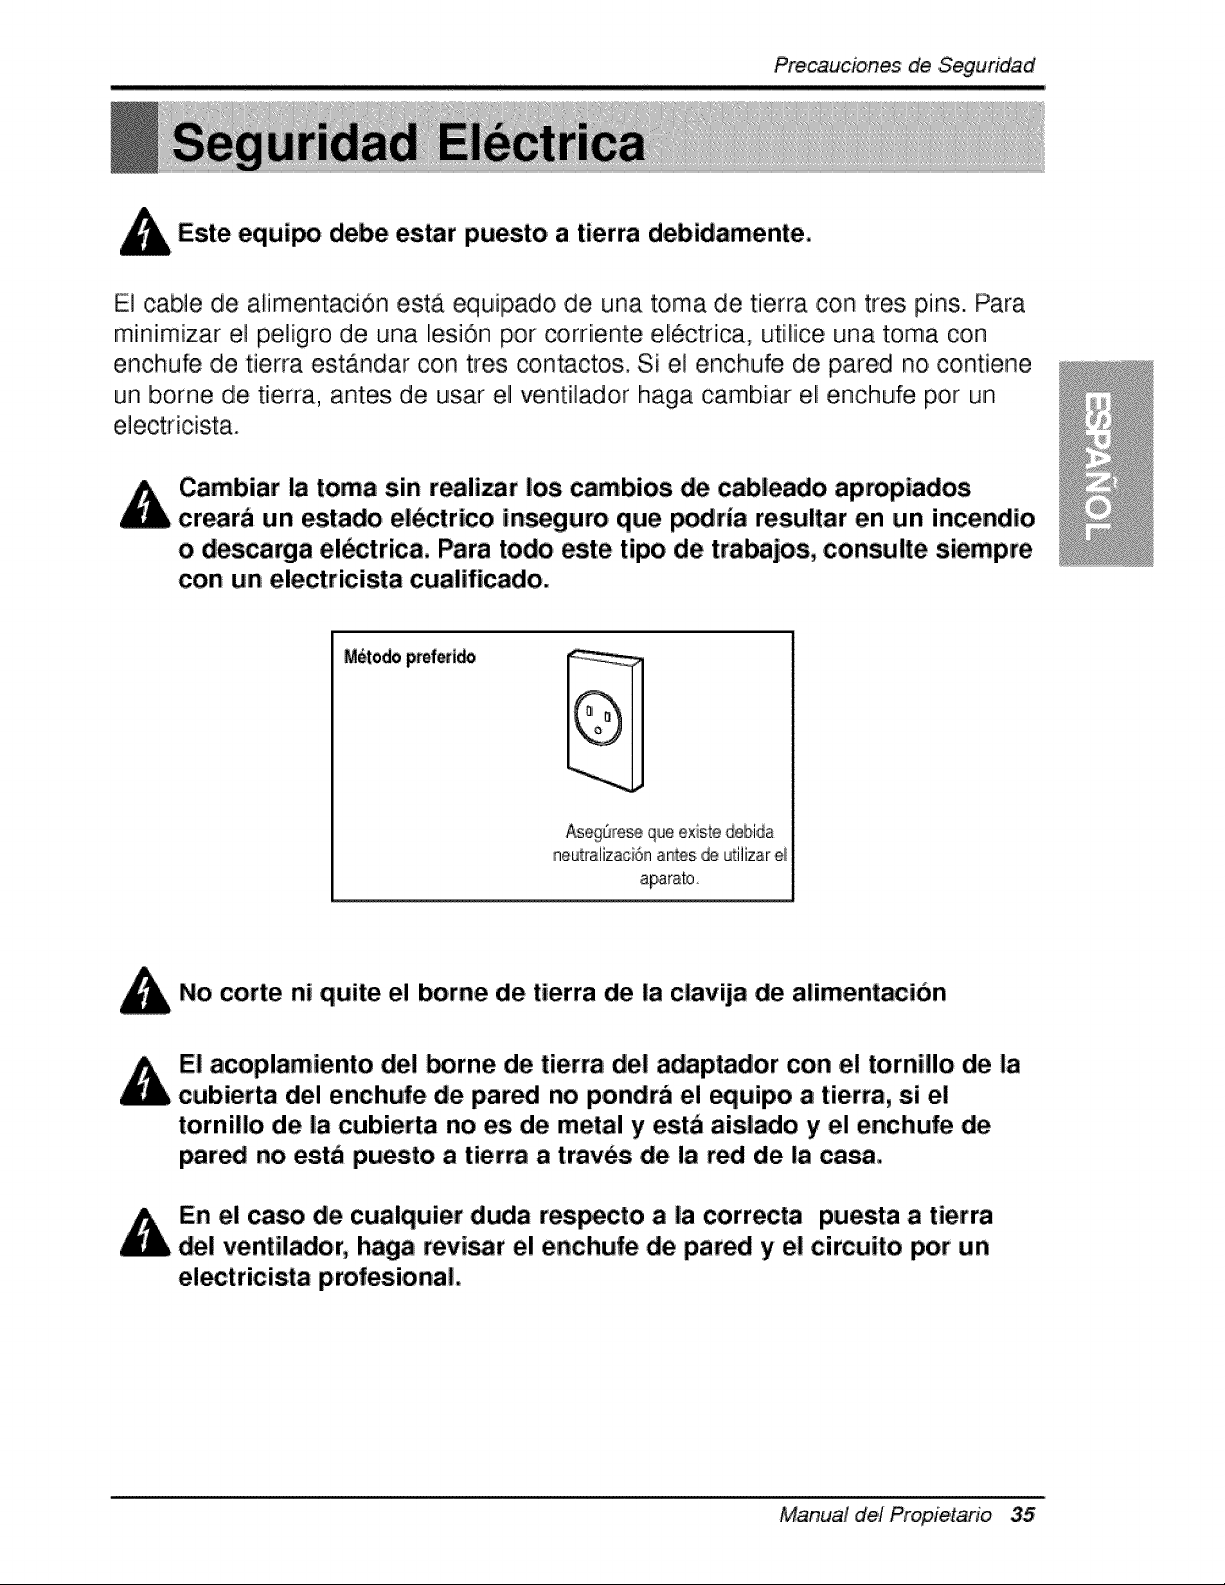
Este equipo debe es,tar puesto a tierra debidamente,
El cable de alimenta,ci6n esta equipado de una toma de tierra ,con tres pins. Para
miiniimizar el peligro de una I!esi6n pot corriiente eliectrica, utiliice una t,oma con
enchufe de tierra estandar con tres contactos. Si el enchufe de pared no, contiene
un borne de tierra, antes ,de usar el ventilador haga cambiar eli enchufe pot un
Cambiar la toma sin realizar los cambios de cableado apmpiados.
crearb un estado el_ctrico insegum que p_ria resultar en un incendio
o descarga el_strica. Para todo est:e tipo de tmbajos, consulte siempre
con un electricista cualificado,
Aseg_re_ que e×iste debida
neutraiizaci6n antes ,_ L_iiizar_
aparato,
No corte ni quite el borne de tierra de la clavija de alimentac|on
E! acoplamiento de! _rne de tierra de! adaptador con el tornil!o de la
cubierta del enchufe de pared no p,ondra el equipo a tierm, si el
tornillo de la cubierta no es de metal y est_ aislado y el enchufe de
par_ no est_ puesto a tierra a t:rav_s de la red de |a casai,
En el caso de cualquier duda respecto a |a correcta puesta a tierra
de! ventilador, haga revi_r e! enchufe de pared y el cimuito por un
ei_tricista iprofesi.onal,
Manual del Propietario 35
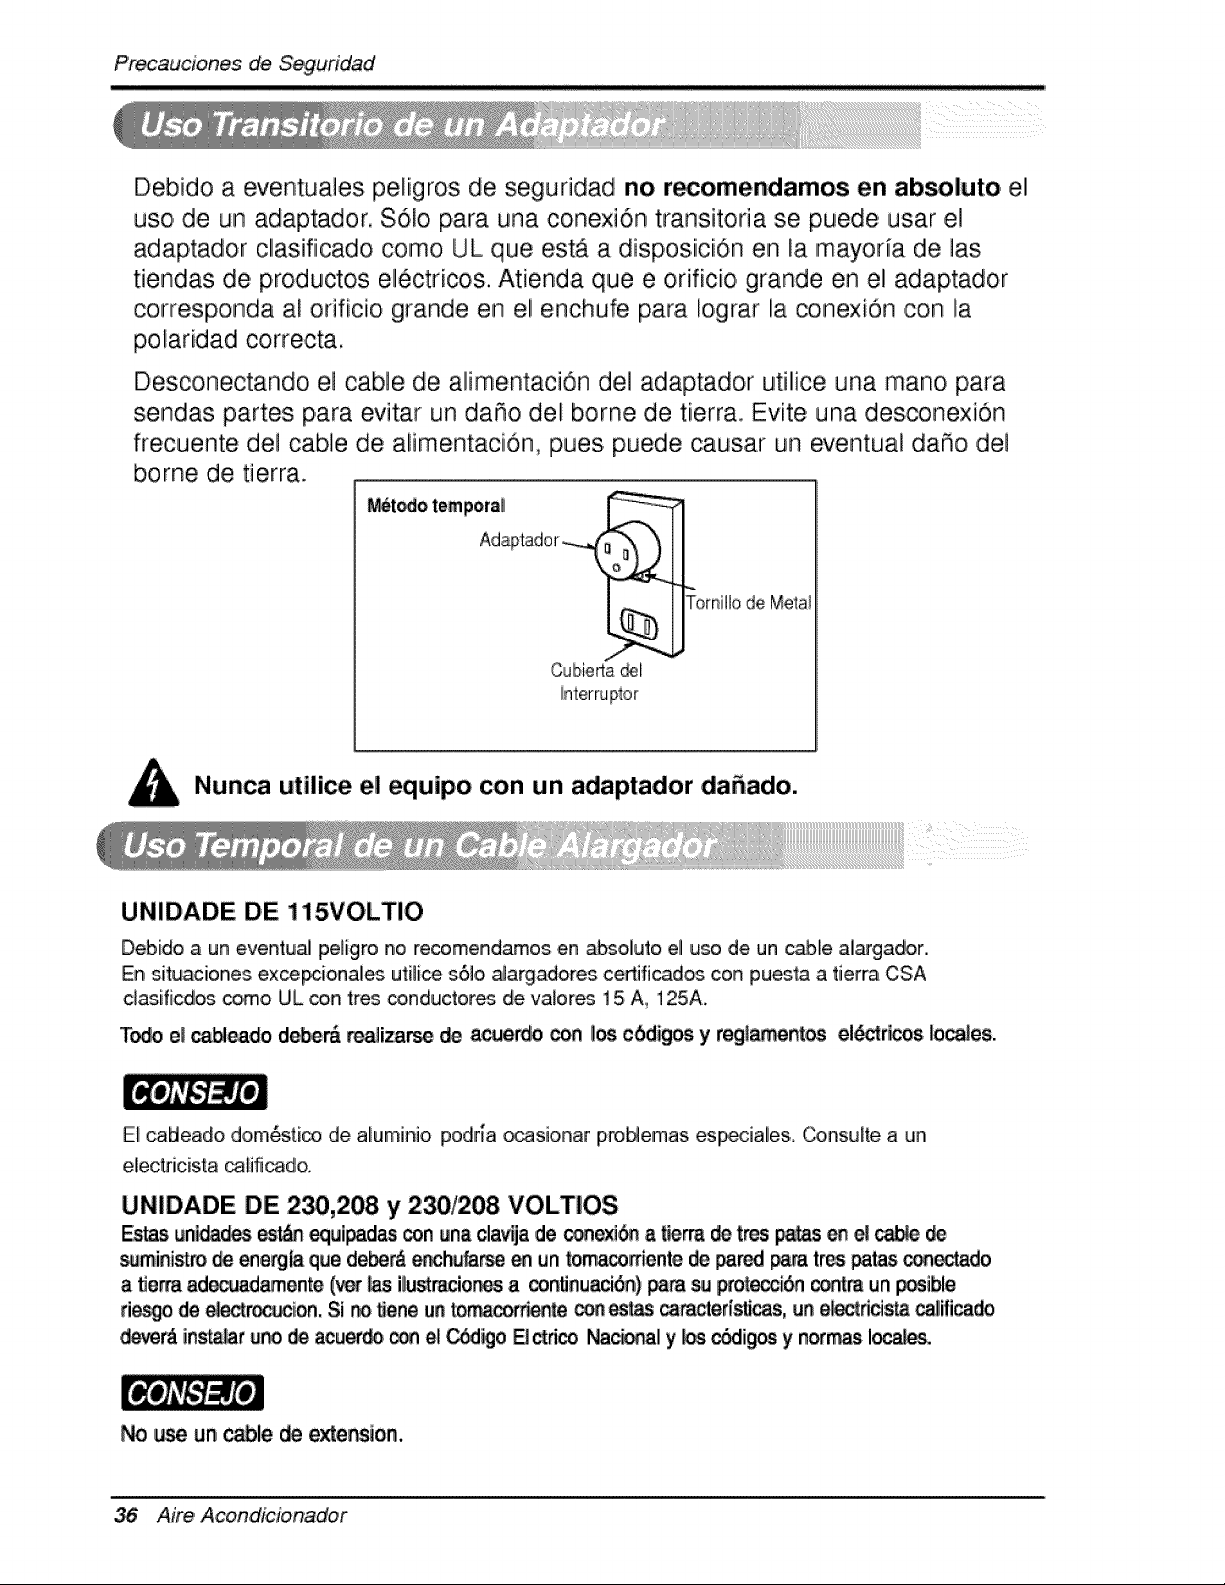
Debido a eventua]es peligros de seguridad no r_omendamos en ab_luto el
uso, de un adaptador. $61o, para una conexi6n transitoria se p.uede usar el
adiaptador cllasifiicadio como UL que est,_ a disposiiiciiOn en la mayoda de ]as
tiendlas de, productos ellectricos. Atie,nda que e orificio grande en el adaptador
corresponda a! orificio grande en el enchufe para Io,grar la conexi6n ,con la
p.olaridad correcta,
Descon,ectando el cable de alimentaci6n de] adaptador utilice una mano para
sendas partes p,ara evitar un da_o de! borne de tierra. Evite una desconexion
frecuente del cable de alimentacidn, pues puede causar un ecentua! da_o del
borne de tierra.
M_6t_o tempora_ :_
Adi@tad° r _"_1_ I_
Cubiert_.._E_J_omillo de Meta!
Nuaca utilice el equipo con un adaptador da_ado.
UNIDADE DE 115VOLTIO
Debido a un eventua_ Ipe_igrono recomendamos e.rl _soliuto ell uso de. un cabfe alargador..
En situaciones exce_ionales ut[_ice s6]o alargadores certi'ficad_ con pu_ta a tierra CSA
c_as[ficdios _mo UL _rt tres conductor_ de valores 15iA., 125A.
T_ el _leado d_m r_]i_ de a_e_o _ _ cbdigos y regl_entos eldd:ri_os, Io_les.
El calbleado dome,rico de aluminio podna _sionar proMemas esp_iales. _,nsuite a un
eliect{r[cista _ifi_do.
UNIDADE DE :2_,208, y 230/208 VOLTIOS
Estasun_ _t_s equi_ _n unaclavtjade_exi6n a _, _ trespa_._ene!_
_Jmini_ro_ energia quedebe_enchu_ _ un_maco#iente_ pared _ trespatas conec'tado
a fle_ ad_ad_ente (vet _s i_u_r_cionesa _n_nua#i6n) _ su p_otecc[6n_tm un _ible
rico de_r_ion, Si no_eneunto.corSe _'_es_ _racter[_cas, ane_desta _ificado
dle_erAins'_a_r_ _ acuer_ _ el_o B _rico Na_al y _ _ig_ y nofrr_ Io_.
No _ un cable _ exte_ion.
Aire, Acondicionador
instalacion
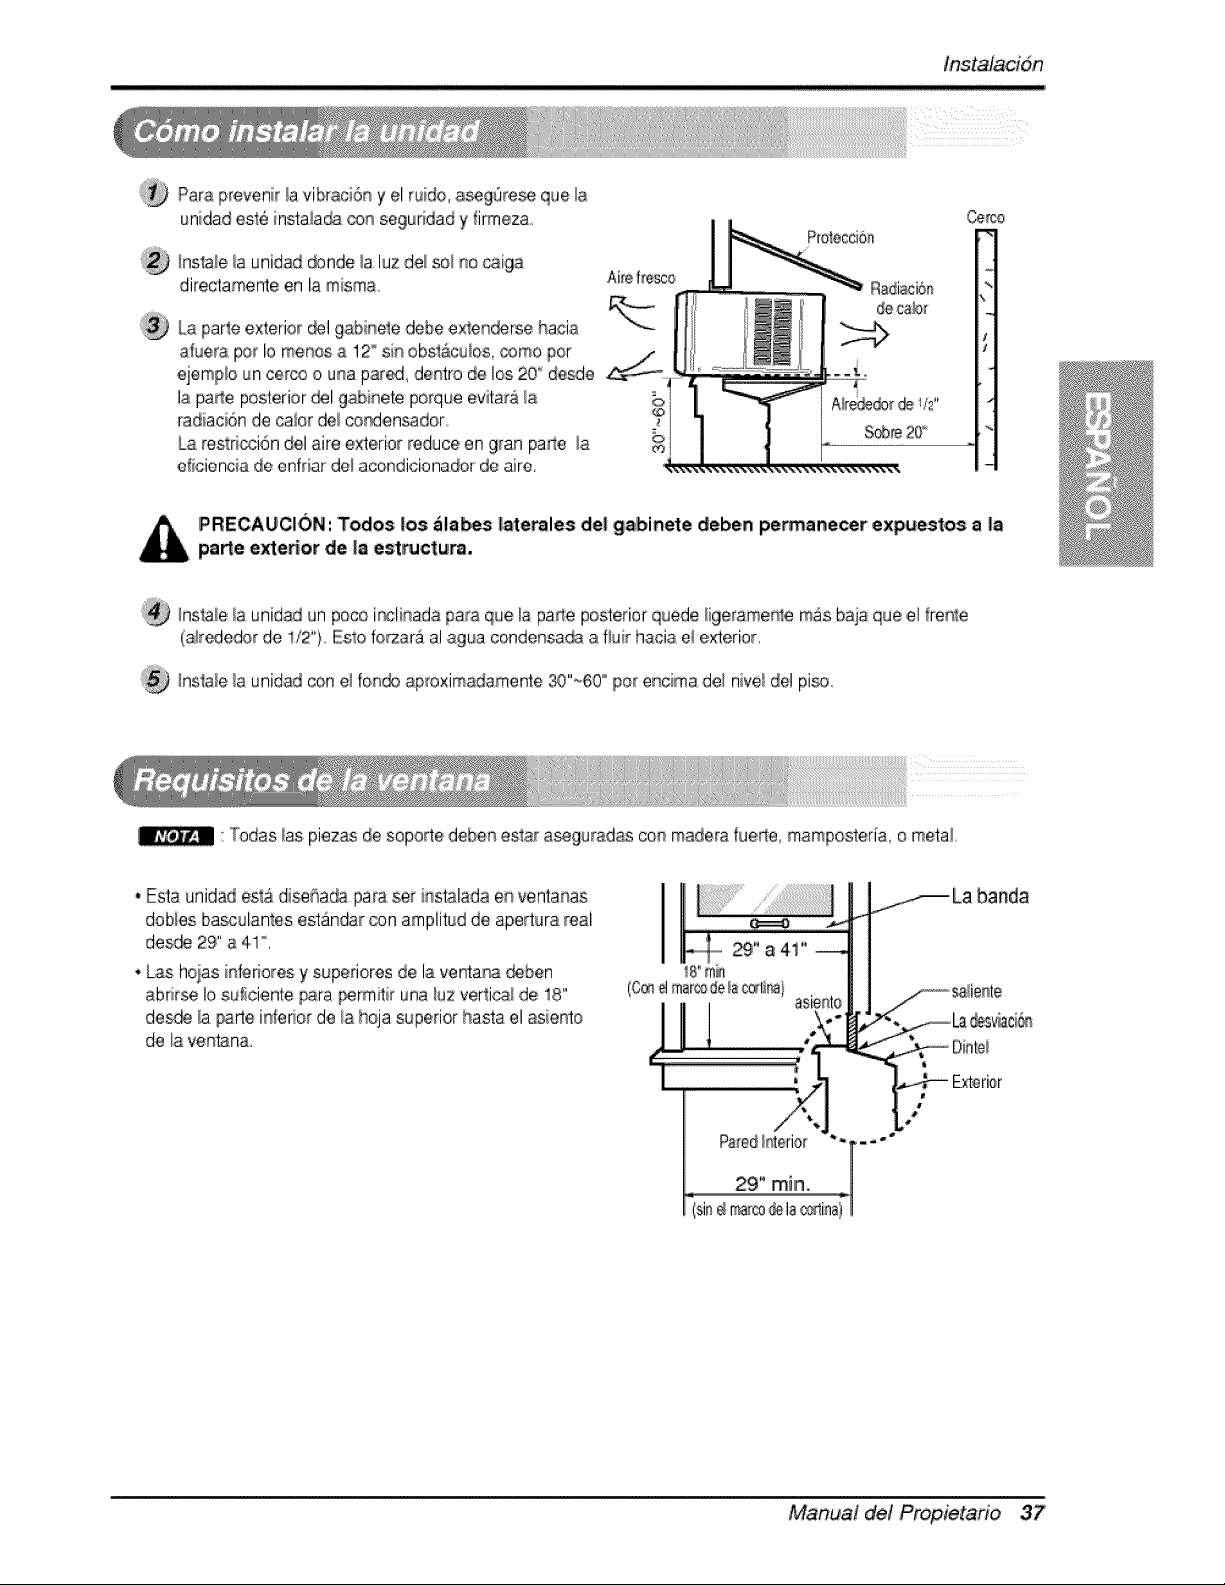
Para£revenir!a vibraci6_y el rude, a_g6res_ que la
unlidad .esle instala_ con seguridad y firrneza
IProteccioa
(_ _nsla_ela L;nidaddonde _aluz de/so_ no _t_iga
directamente en la m;sma, Aireffc_co Radiaci6n
decab_
_5
;?_ La parle exterior _! gabir_ele debe ex_e_rse hacia
atuera per Io menos a 12° sin obsl:acubs, come per
i-
.ej.emp_oun cero3 o una piared_dentro de los 20 "'desde
la pa_e posterior ®1 gabinete porque evitara _a
radiaci6n de calor del condensador_
La r.estdcci6n del aire e_erio_ reduce en gran parle la
etieiencia de enfriar de_acondicionador de aire.
P'RECAUCION: Todos los ala_s |aterales det gabinete deben pe_anecer expuestos a |a
parle e_eHor de |a est_ctu_.
InsIale _auni,dad un pete ir_li_ada para que I,aparte posterior quede _geramer_te mas baja que el ffer_:e
(a_r¢_edor de , "t2 _..Esto fo_ar_ al agua cendensa_ .afiuir h.aoia e! exterior.
/nsla_e la _nidad con el foir'_doaproximadamente 30"~60 "' per ,er_cimadel rlive/del piso
: Todas bs piezas de soporte deben est_ iaseguradias con madera fuede rnampesteria, e metal
• Esta unidad esta di._ha_ par.a_r i[_stal.adae_ ventanas
,dobies iba_:ulantes estandar con arnplitud de apertura real
de_e 29" a 41 °.
* Las hoias infedores y super|ores de la venta_ ,deben
abrirse I,osu!ici,ente _ra _rmitir una/uz vert:i_! de !8"
de_e ia _.rte in_eder de _ahoja superior hasta el _iento
de la yen:tan&
I
Manual de! Propietafio 37
tns,talacidn
NOMBRED,E_ PARTE _nt_
MAROO DE LACORTINA 2
.__3....... _S__]_CAg!S_=_;#.E_ZE............. _&__,,
3
4
5
6
7
8
9
10
12
13
_4
15
r_IEr,_ULADELALFE/ZAR 2
TUERCA 4
TORNIL[,O (flPO A) !4
TORNILLO 7
TORNILLO!'TIPOC_ 5
T_NILLO ,t_IPOD1 2
PER[_ 2
BURLFE DE ESPUNA I
BURLF£ _ ESPUi'_A-PE 1
ABR_DERADE F_ ALAV_q'_ I
CA_O DE OREN#JE I
I
G UIA DtiiL MARCO 2
i z z
[
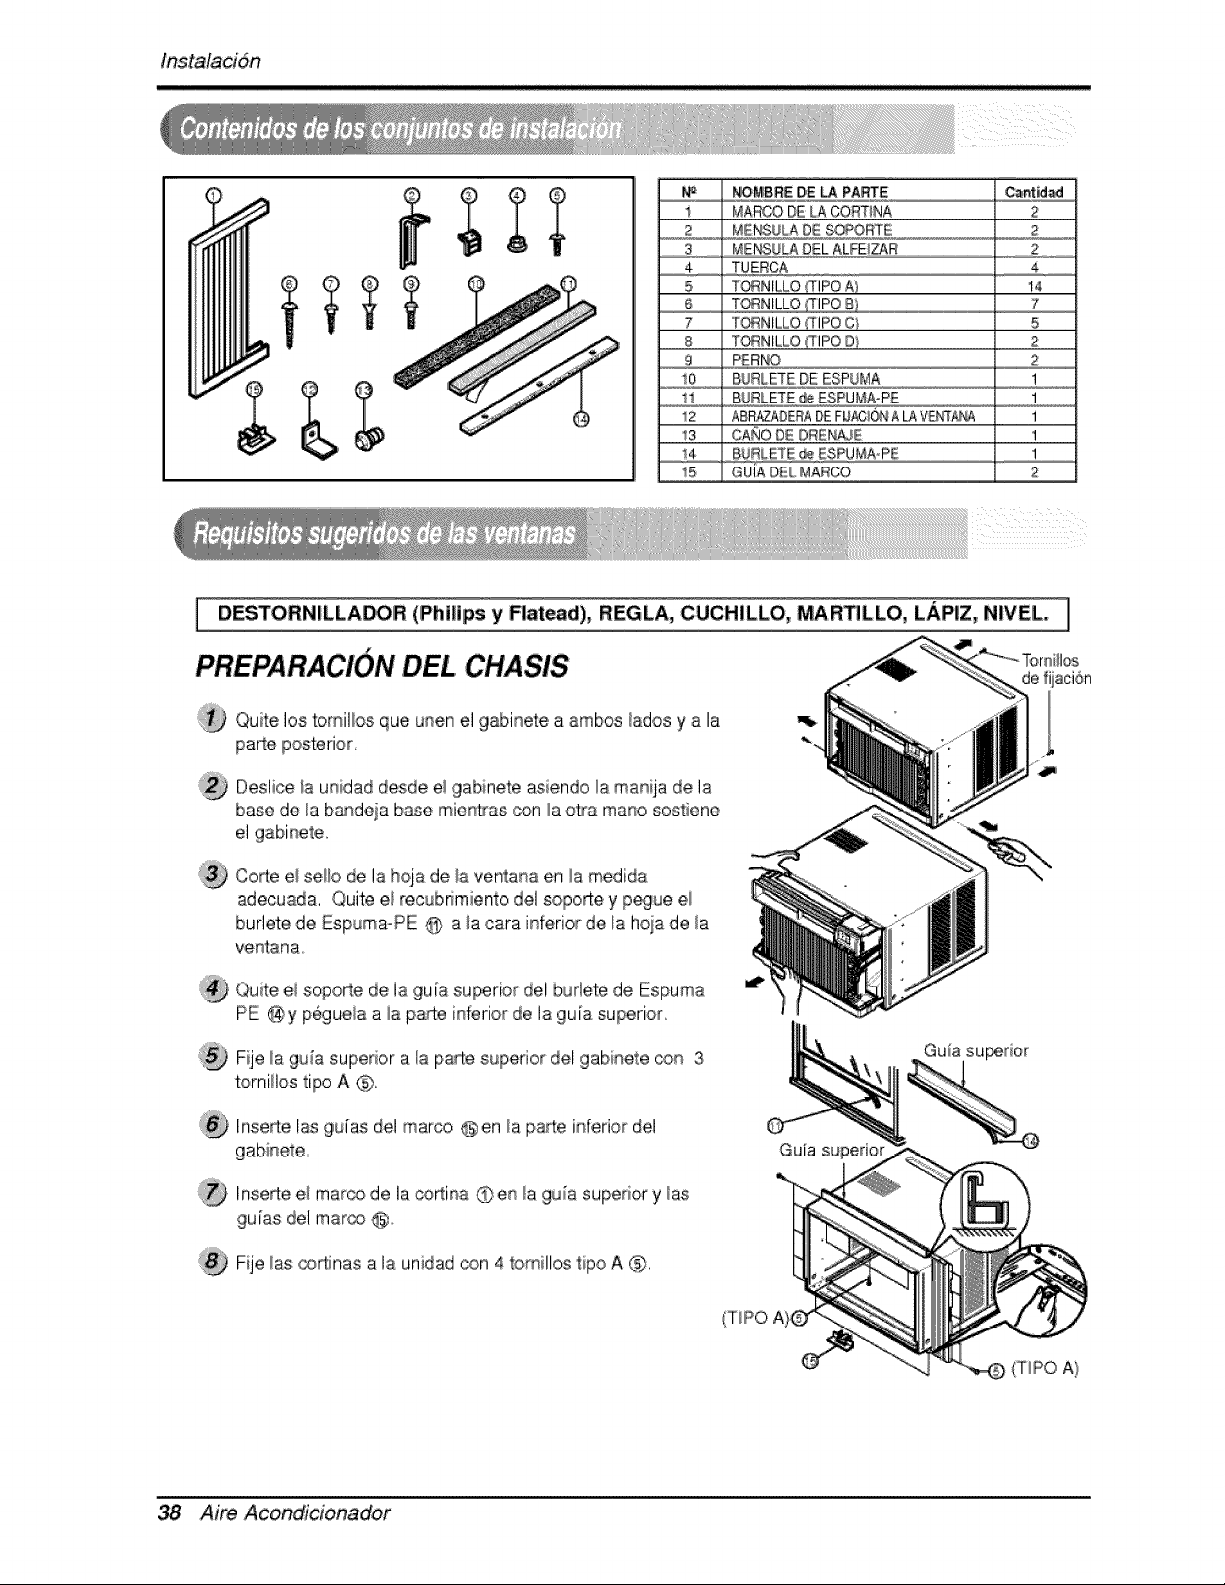
PREPARACI6N DEL CHASIS
DESTORNILLADOR (Philips y Rat_di), REGLA, CUCH|LLO, MA_ILLO, LAPiZ, NIVEL ]
Qute los tomil/os que unen el 9abinete a ambos/ados y a la
parte posterior,
Deslice/a unidad desde e! 9abinete asiendo la manija de la
bane do la bandeja base mien_as con la o_-a mano sostiene
el gabinet,e.
Co_e el sel/o de la [hqa de la ventana en la medida
a,deouada, Quite el re,cubffmiento del sopo_e y p_ue el
burlete de Espuma-PE @ a la cara inferior de, la hoia de la
v,entana.
Quite el sopo_e de ia ,gu[a superior del burlete de Espuma
PE @y p6guela a ia pare inferior de la gu[a superior,
Fije la guia superior a I!apaIe superior del gabinete con 3
torni/os tipo A @,
liqse_ei las gu[as del marco @ en la parte inferior del
D Inserte e/mar_, de la coRina @en/a gu_a superior y/as
gu[as del mar@ @,,
Fije las co_inas a la unidad con 4 tomillos ripe A C_).
Aim Acondi'cionador
lnstalacidn
MENSULADEL
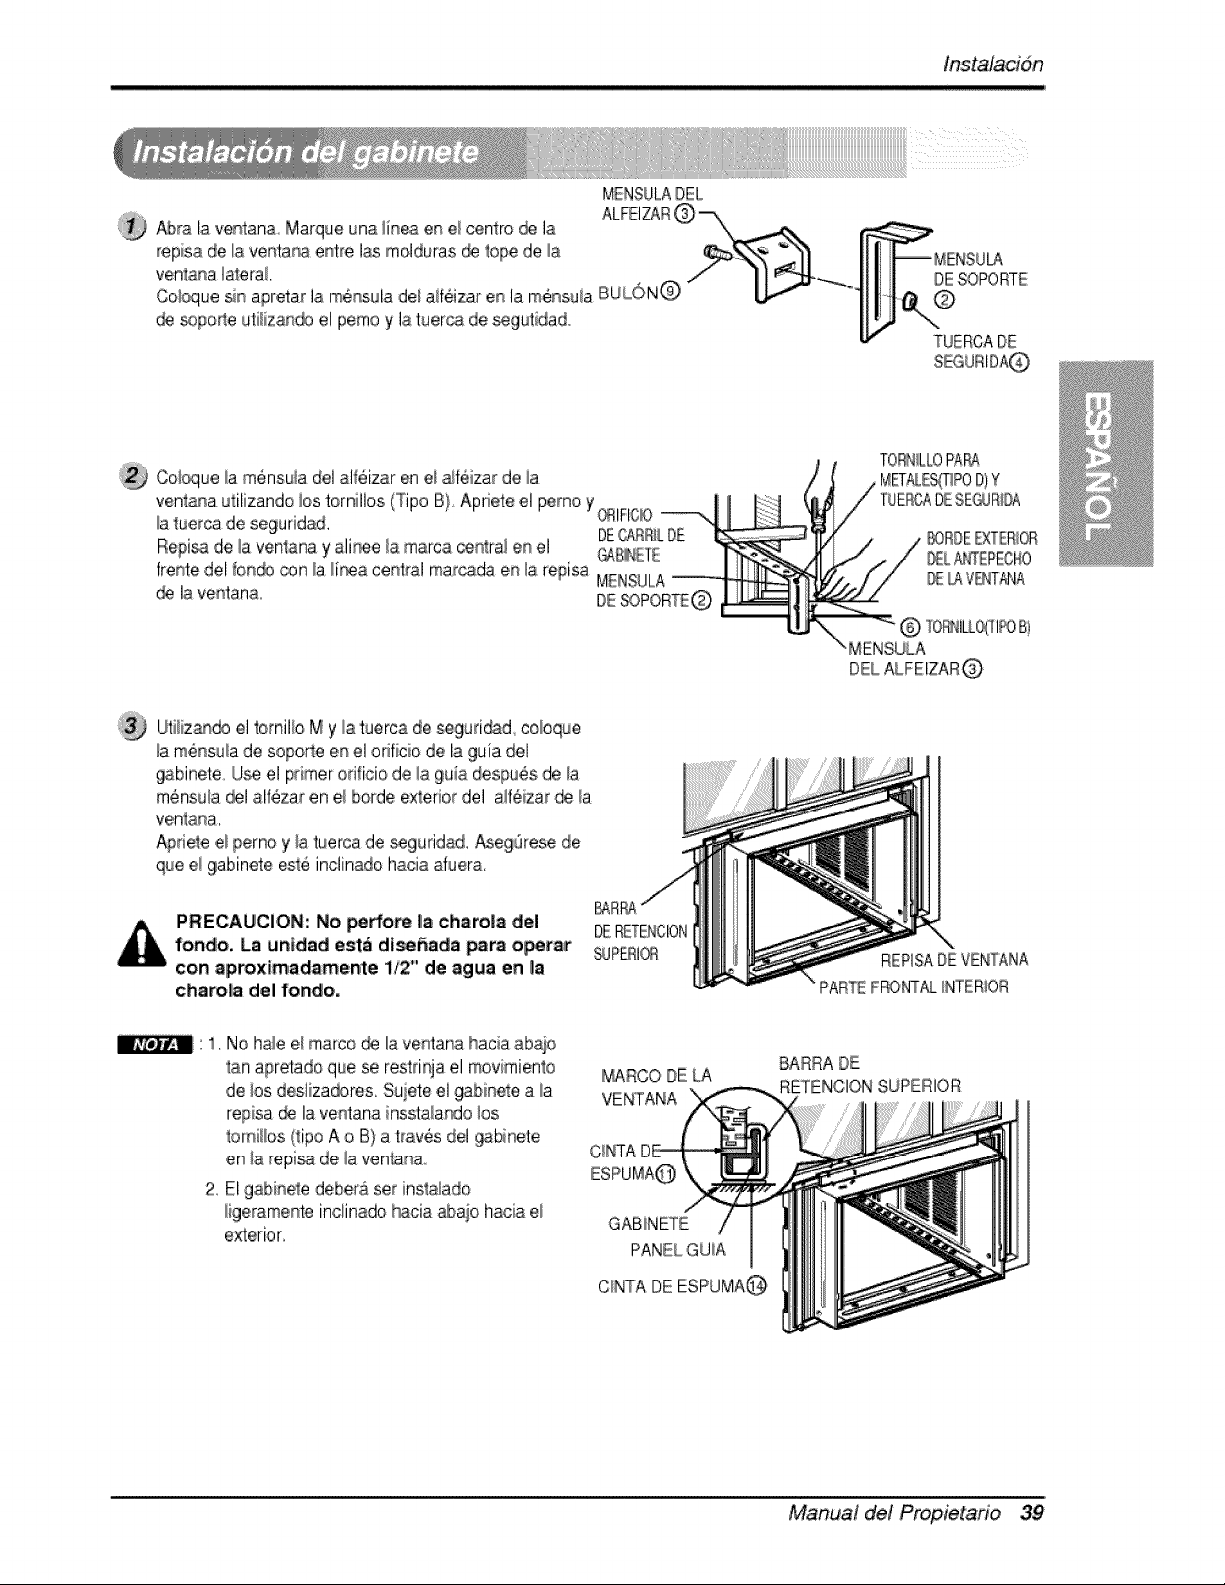
_ra la ventana Marque una iinea en e_ centre @ la
repisa de la v,entana entre las molduras @ lope de la
venlana lateral
Cebque sin apretar I.am#nsula d@ aifeizar en la m_ssu!a BUi......,ON@
@ _po_e uti{iz.an@ ,elpemo y la tueroa de _gutidad.
DESOPORTE
TUERCADE
Coi_ue _amensuia del al_6izar en ei _f6izar de ia
venlana utilizando ios ternillos (Tipo B} Apnete el pemo Y(_IFIC© ----',
Ilaberca de seguridad. DECARRiLD£
Repi_ de la venlana y ali_e/a marca ce#tral en el O_B_aEE
frente del bn_J con _a_inea central mar@da en la repisa MEN.SULA
@ la ventana.
TORNLLOPAP_
_RDE _XTER_OR
D£L,A_EPEOHO
LAVBdT/_J/A
Utiliz_, el tomilb M y la tuerca de _guri@d, cobque
_am6nsu_a de soperte en el onficie de la guia ,del
9abinele. U_ el primer ori!ioio d,e !a 9uia despues de !a
m@nsu_a_1 al_ezar en el borde exterior del a_fezar de _a
venla_a.
Apriele ,e_perno y _atuerca de _guridad. Aseg@ese de
que e_9abinete este inclinado hacia duera,
MENSULA
DEL ALFEIZAR@
PRECAUCION: No pe#o_ Ilacharo|8 de,I
fondo, La untdad ,est_ die,aria _ra o_rar
con ap,roximadamente i/2" de agua en _a
chsrolia del fondo,
DERETENCION
_PERI_
REPISADE VENTANA
PARTEFF©_,_ INTER_OR
' 1. No hab el marco _ la ventarla hacia abaio
tan apretado que se restdqa el movimienl:o
de ios desliza_res. Suiete el gabinete a _a
regisa d_ la ventana inssta/ar_o los
_omi!!os (ripe A o B) a tray,s del _bineie
en la r,epi_ de _aven_anao
2. E! gabbele debe_& set insla}ado
ligerameste inclinado _ciia abaio hacia el
exterior,
MARCO DE [A
VENTANA
GABiNETE
PANELGU_A
C_NTADE ESPUMA@
BARRA DE
RETENCION SUPERIOR
Manual del Propietano 39
tnstalacibn
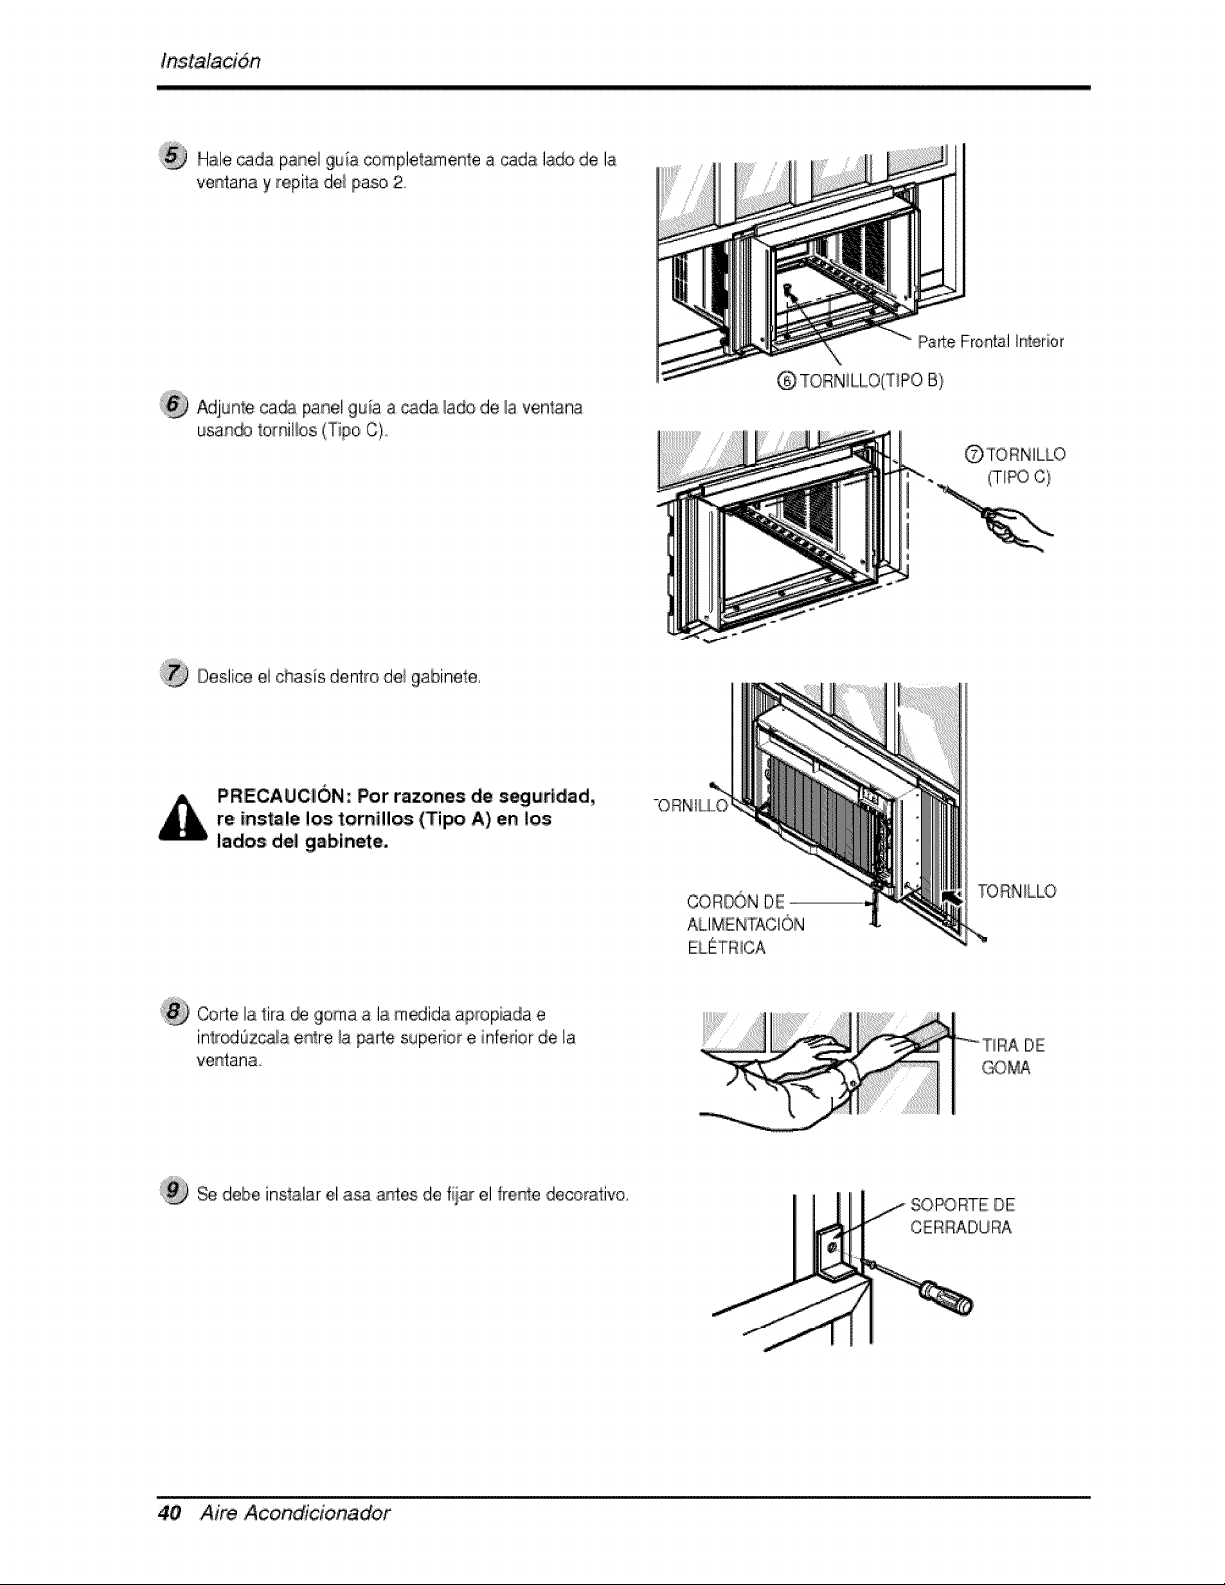
Hale cada pane_9uia completamenIea cada lade d,ela
ventanay repiia del paso 2,
Adjunteca_ panel guia a _d,a _adod,e_aventana
usan_ tomil_os(Tipo C)
Parte Frontal Interior
Q TOIRNILLO(T_POB}
(TIPO C}
Oesli@ ei chasis dentro dei gabinete,
PRECAUC_i0N; Por razones de segutldad,
re insole los tornillos (Tipo A),en los
lados del gsbinete,
-OR:NIU0
TORN_LLO
Cofle la 1ira _ goma a la m_ida apropiada e
inlr_Ozcala e_re _a _e superior e infedor de la
ventana
deibe inslalar el a_ antes de fiiar el ffe_stedecorativo.
fJ
SO_RTE: DE
CERRADURA
40 Aim Acondicionador
lnstalacidn
®
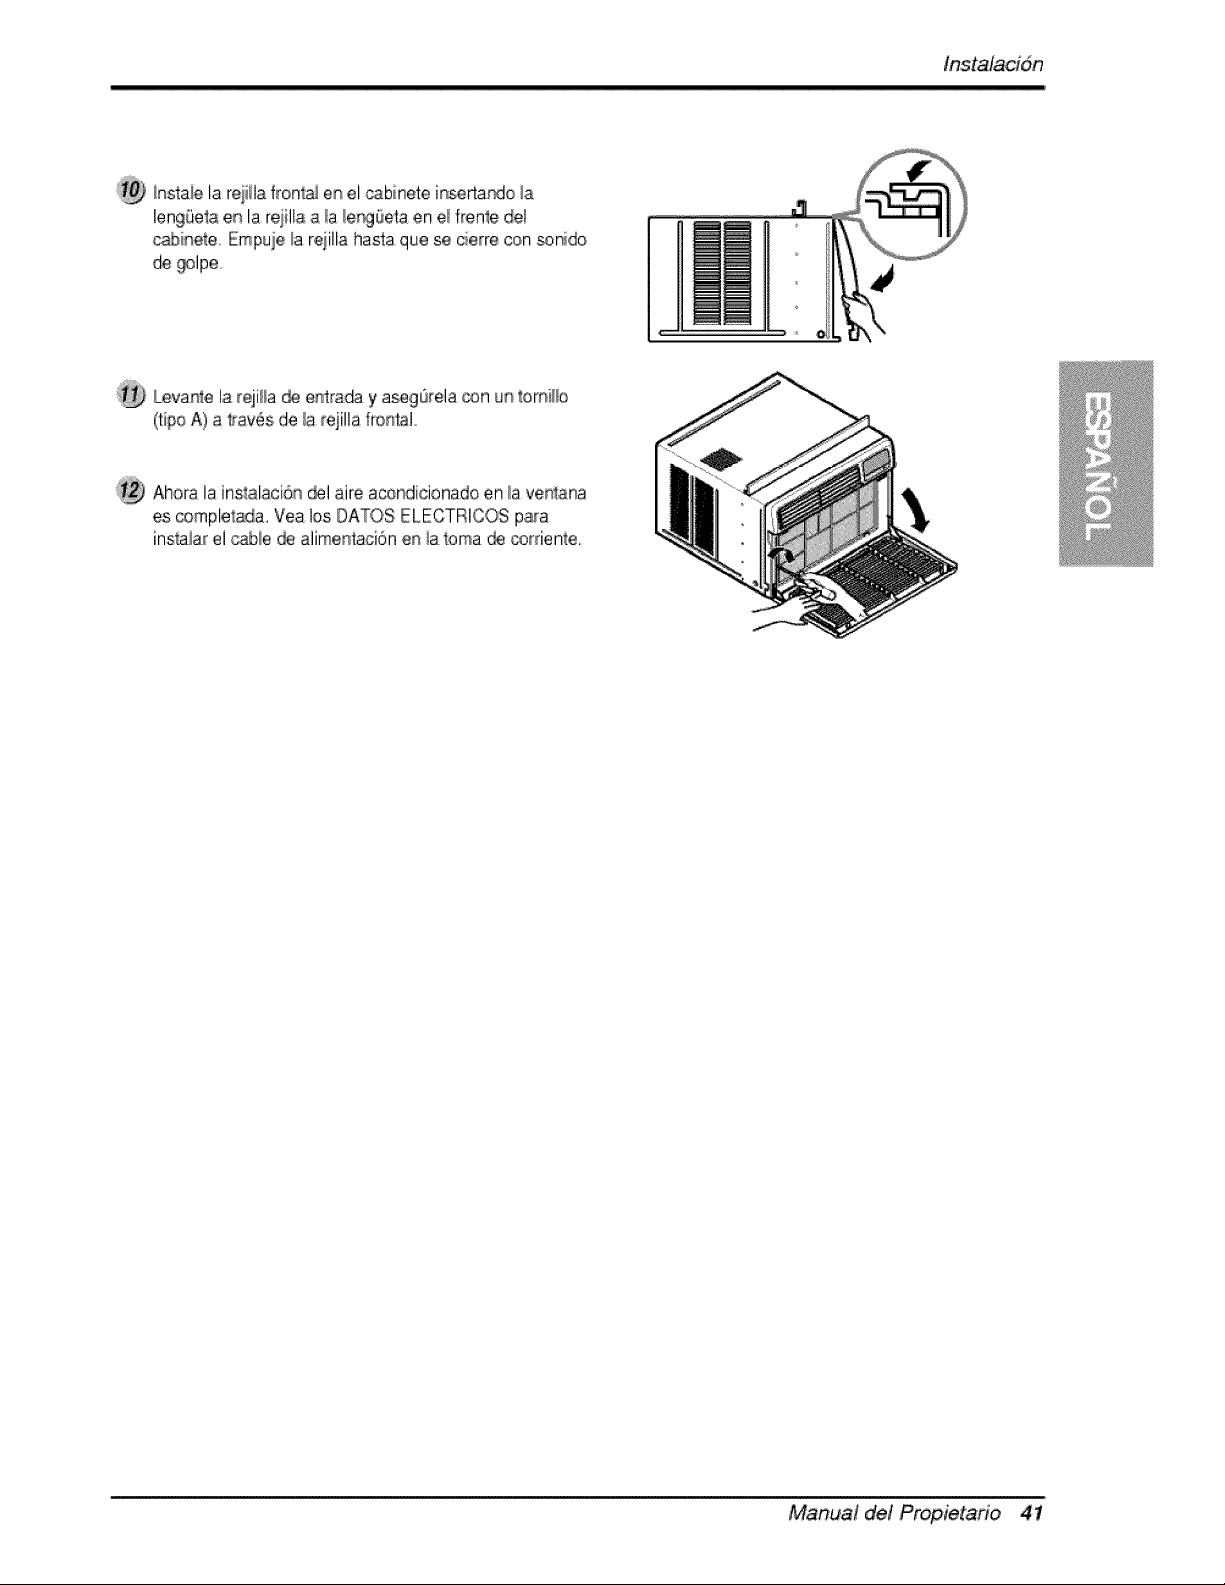
hstaie la rejilla front,_ en el _binete in_rtardo la
leng_Setaeis la reiilla a !a/er_Oeta en e/frenle del
_binel:e, Empuie _areiilla hasta que se cierre con sonido
de _lpe,
iLeva_,ela _-qiHa_ entrada y aseg0rela_n unt:omiLHo
(ti#o A) a lrav_s de/a rejillaffor_talo
Ahora la instalaci6n _1 aire acondi[cionado en _aven4ana
es complelada, Vea los DAT,OS ELECTRICOS p,ara
inslaiar el _bie _ aiimentaci6n en ia toma _ _rriente.
Manual del Propietafio 41
instrucciones de funcion,amiento
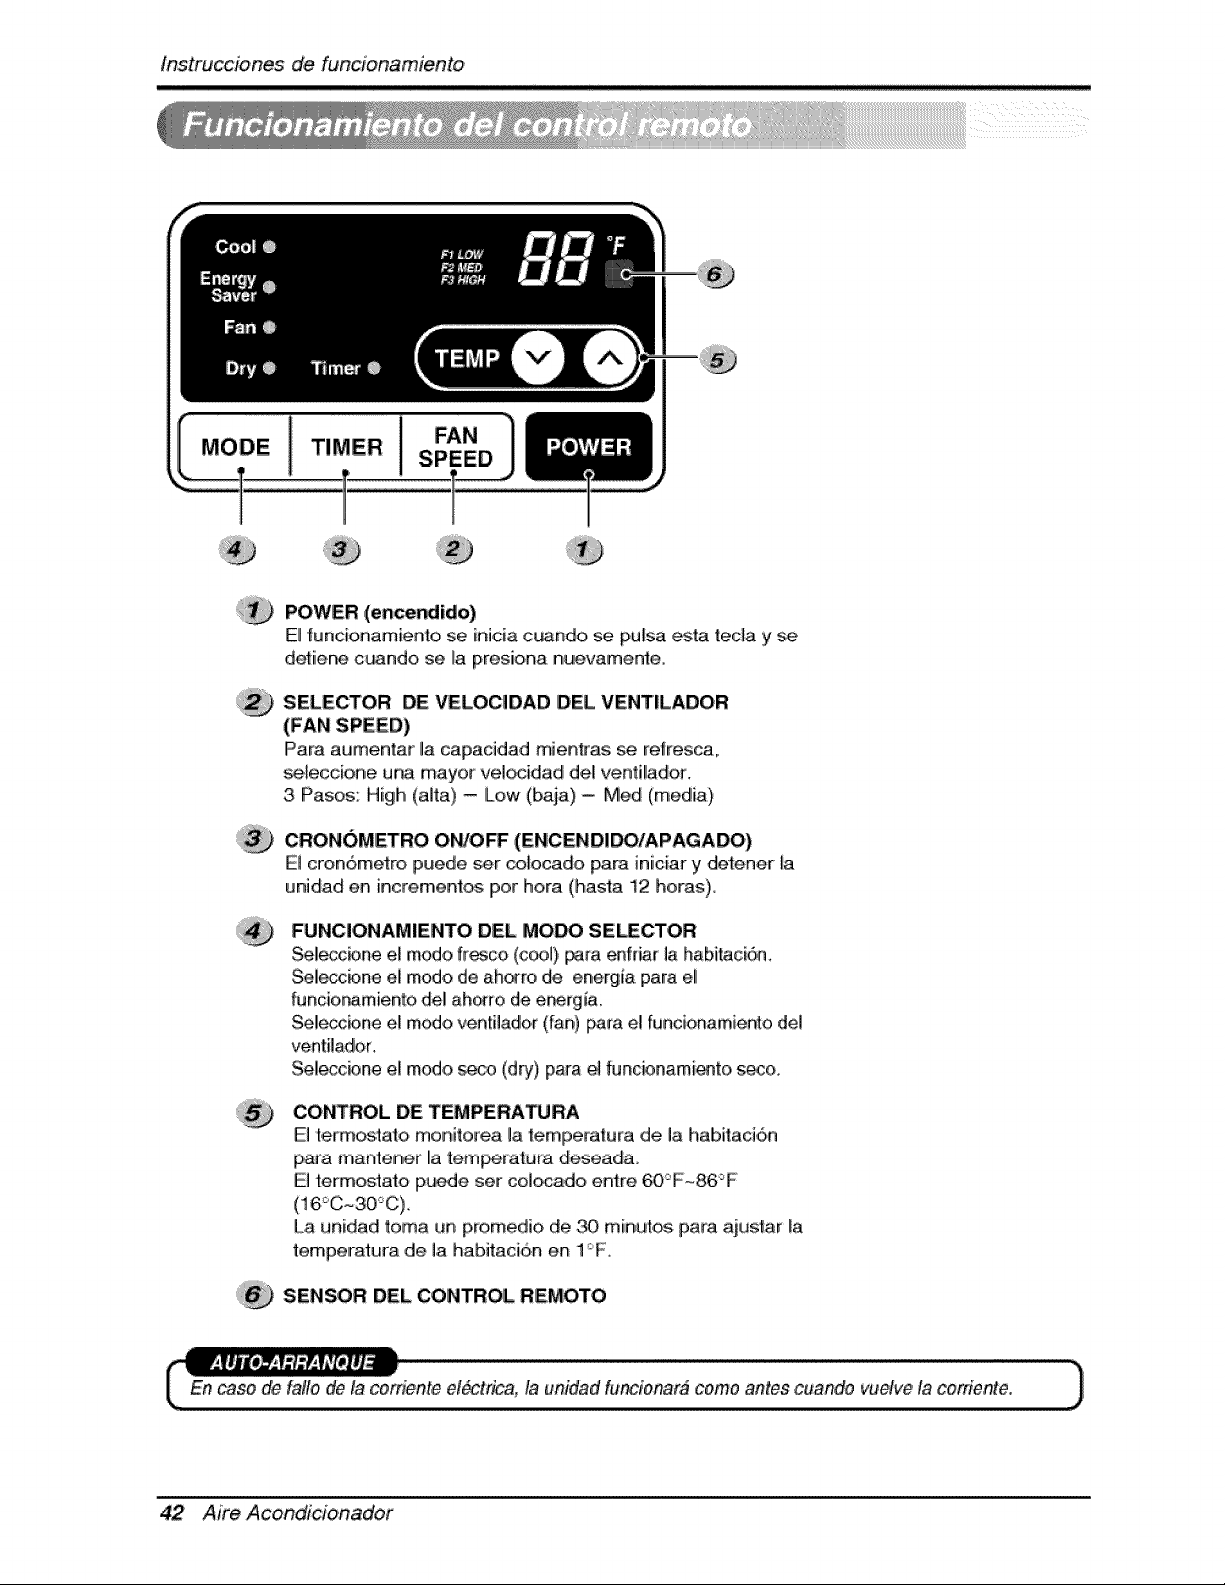
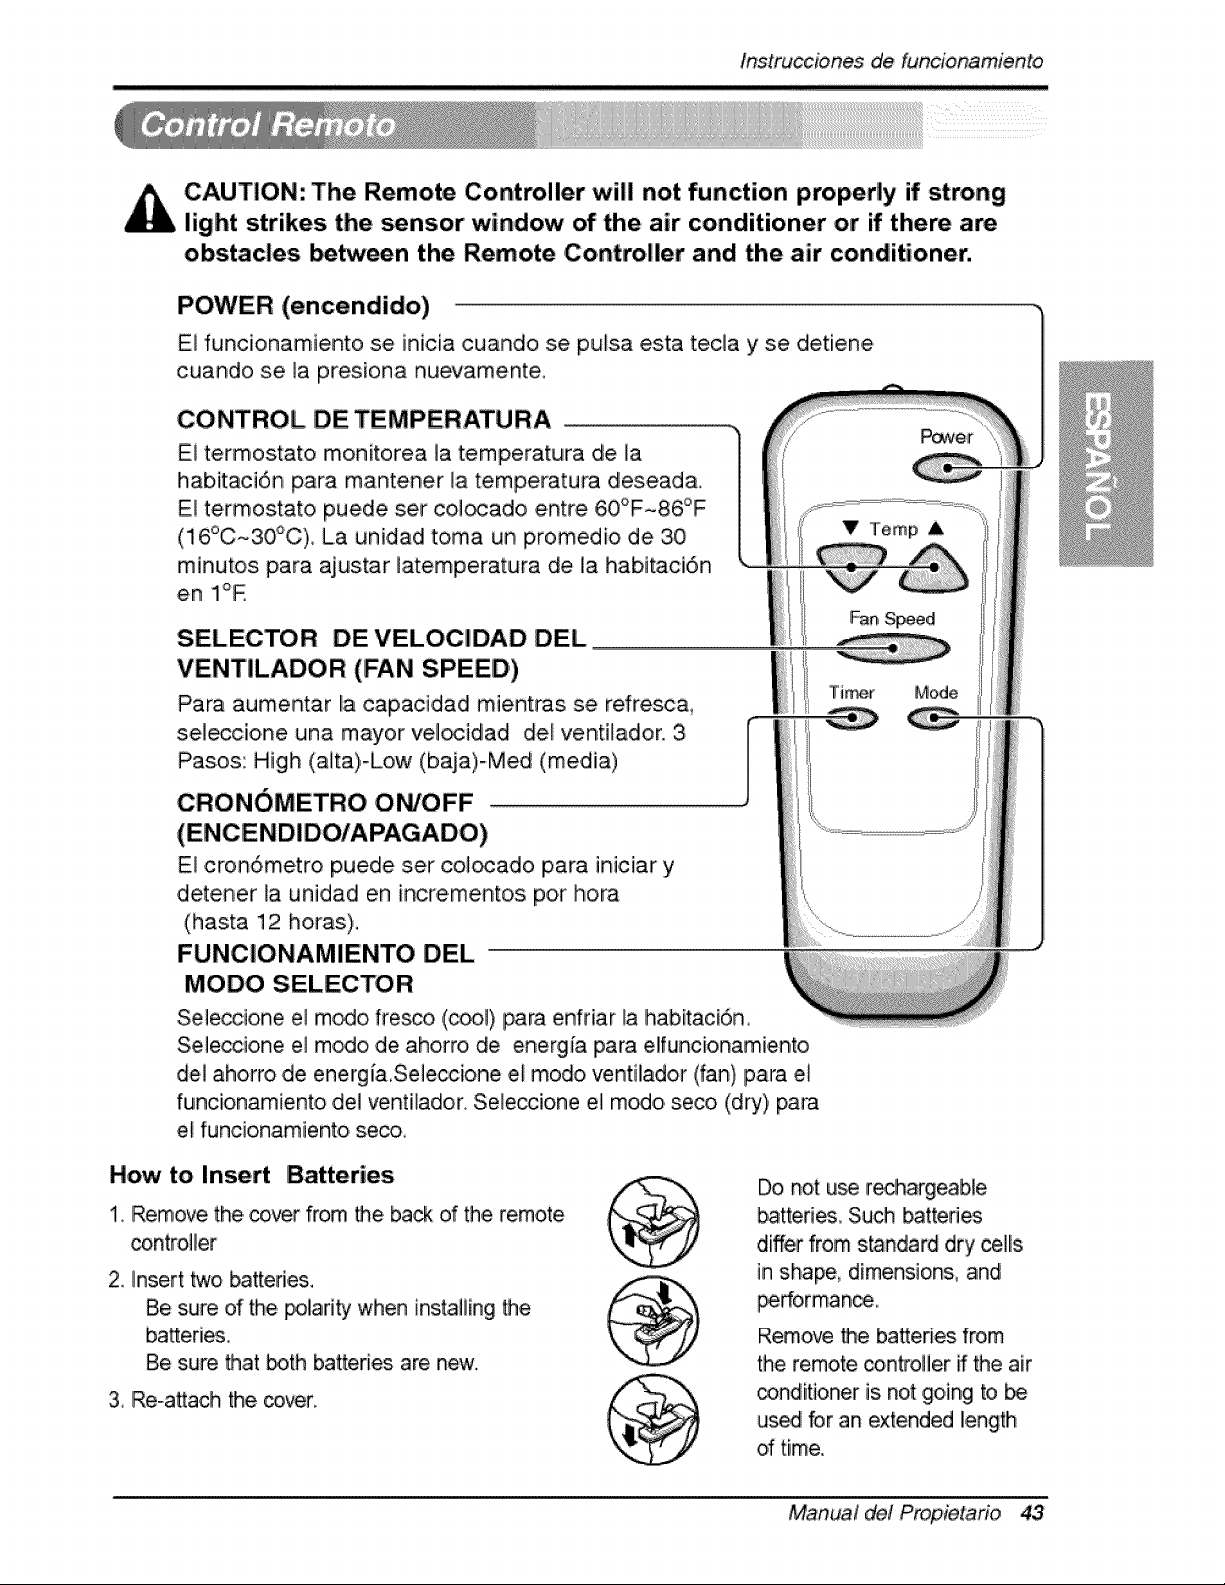
POWER (encer_ido)
El funcionamiento se inicia c_ndo, se pu[sa ,_ta teda y se
detiiene c_ndo se La presiena nu!evamente,
SELECTOR DE VELOCIDAD DEL VENT|LADOR
(FAN SPEED)
IPara at,Jmentar la capacidad mienkas se reffesca,
se,_eccione una mayor vel_idadl deU ventil!ador.
3 Pasos: High (alta) - [Low (baja) -Med (media)
,CRON()METRO OWO_ (ENCENDIDO/APAGADO)
El cron6metro puede ser _ocado para iniciar y det:ener [a
unidad en increment_ Ipor hera (hasta 12 hera:s),
FUNCIONAMIIENTO DEL MOW SE_CTOR
Sel!_cbne e! mode #_co (c_!) _,_a enfdar la habi_ci6a.
Seleccbne el mode d,e ah_ro de energia para eli
funcio, r_miento del! ahorro de er_rg_a.
Sel!eccbne el mode ven'_il,ado,r(fan) [_ra el funcionamiento del
ventilador,
Se!_cbne el mode seco (dry), pa[a _ fiJncbnami_to, s_o,
CONTROL DE TEMPE, RA_RA
El _:ermos_ato monitore,a la te,mlPeratura de, la habitacion
paJa mante_n,er Ila {em_atura deseada
El term_tato p_e set col_do entre 60_F~86°F
La unidad toma un prom ,,d_,ode _ miinut;,_ para ait,,tstar [a
temperatura de la habitaci6n en 1F
SENSOR DEL CONTROL REMOTO
En case _ fa#e de la cosden_eel_trica, la unidad fu'_ionar# come antes cuiaftde vuelve la coniente.
42 Aire Acondlcioinadof
lnstrucciones de, funcion,am,iento
CAUTION: The Remote Controller will not function properly if strong
light strikes the _nsor window of the air conditioner or if there are
obstacles _tween the Remote Co,ntro|ler and the air conditioner.
POWER (encendido)
El funcionamiento se inicia cuando se pulsa esta teda y se detiene
cuando se ]a presiona nuevamente.
CONTROL DE TEMPERATU RA
El termostato monitorea la temperatura de la
habitaci6n para mantener _a temperatura desead&
Eli te,rmostato puede set col_ado entre 60°F-86°F
(16°C~30_C) La unidad toma un promedio de 30
minutos para ajustar latemperatura de la habitaci6n
en Ii°R
SELECTOR DEVELOCIDAD DEL
VENTILADOR (FAN SPEED')
Para aumentar la capaci,dad mientras se refresc&
sel_cione una mayor vel_idad del ventilador, 3,
Pasos: High (aita)-Low (baja)-Med (media)
CRONOMETRO ON/OFF ..............................................................................................................................................................................
E! cron6metro puede set co]_ado para iniciar y
d,etener la unidad en inc#e, mentos por hora
(hasta 12 horas),
FUNClONAMIENTO DEL
MODO SELECTOR
Seleccione el rn_o fresco, ,(_l) para enfdar la habitaci6n
Seleccione el modo de aho, rro, de energia para elfuncionamiento
del iahorro de energ ia,Seleccione el modo ventilador (fan)Ipara el
funcionamiento del ventllador. Seleccione el modo seco (dry) para
el funcionamiento, se_,
How to Insert Batteries
1, Remove the _ver from the back d the remote
controller
2, insert two batteries.
Be sure of the polarity when instaliing _e
batteries,
Be sure that both batteries are new.
3, Re-attach the _ver:
Do not u_ rechargeable
batteri_, Su_ _tteri_
differ from s_ndard dry ,cells
in shape, dimensions, and
_rforman_,,
Remove the bakeries from
the remote controller ff the air
_nditioner is not going to be
us_ for an extended Ilength
of time,.
Manual del Propietario 43
tns,truc_iones _ funcionamien, to
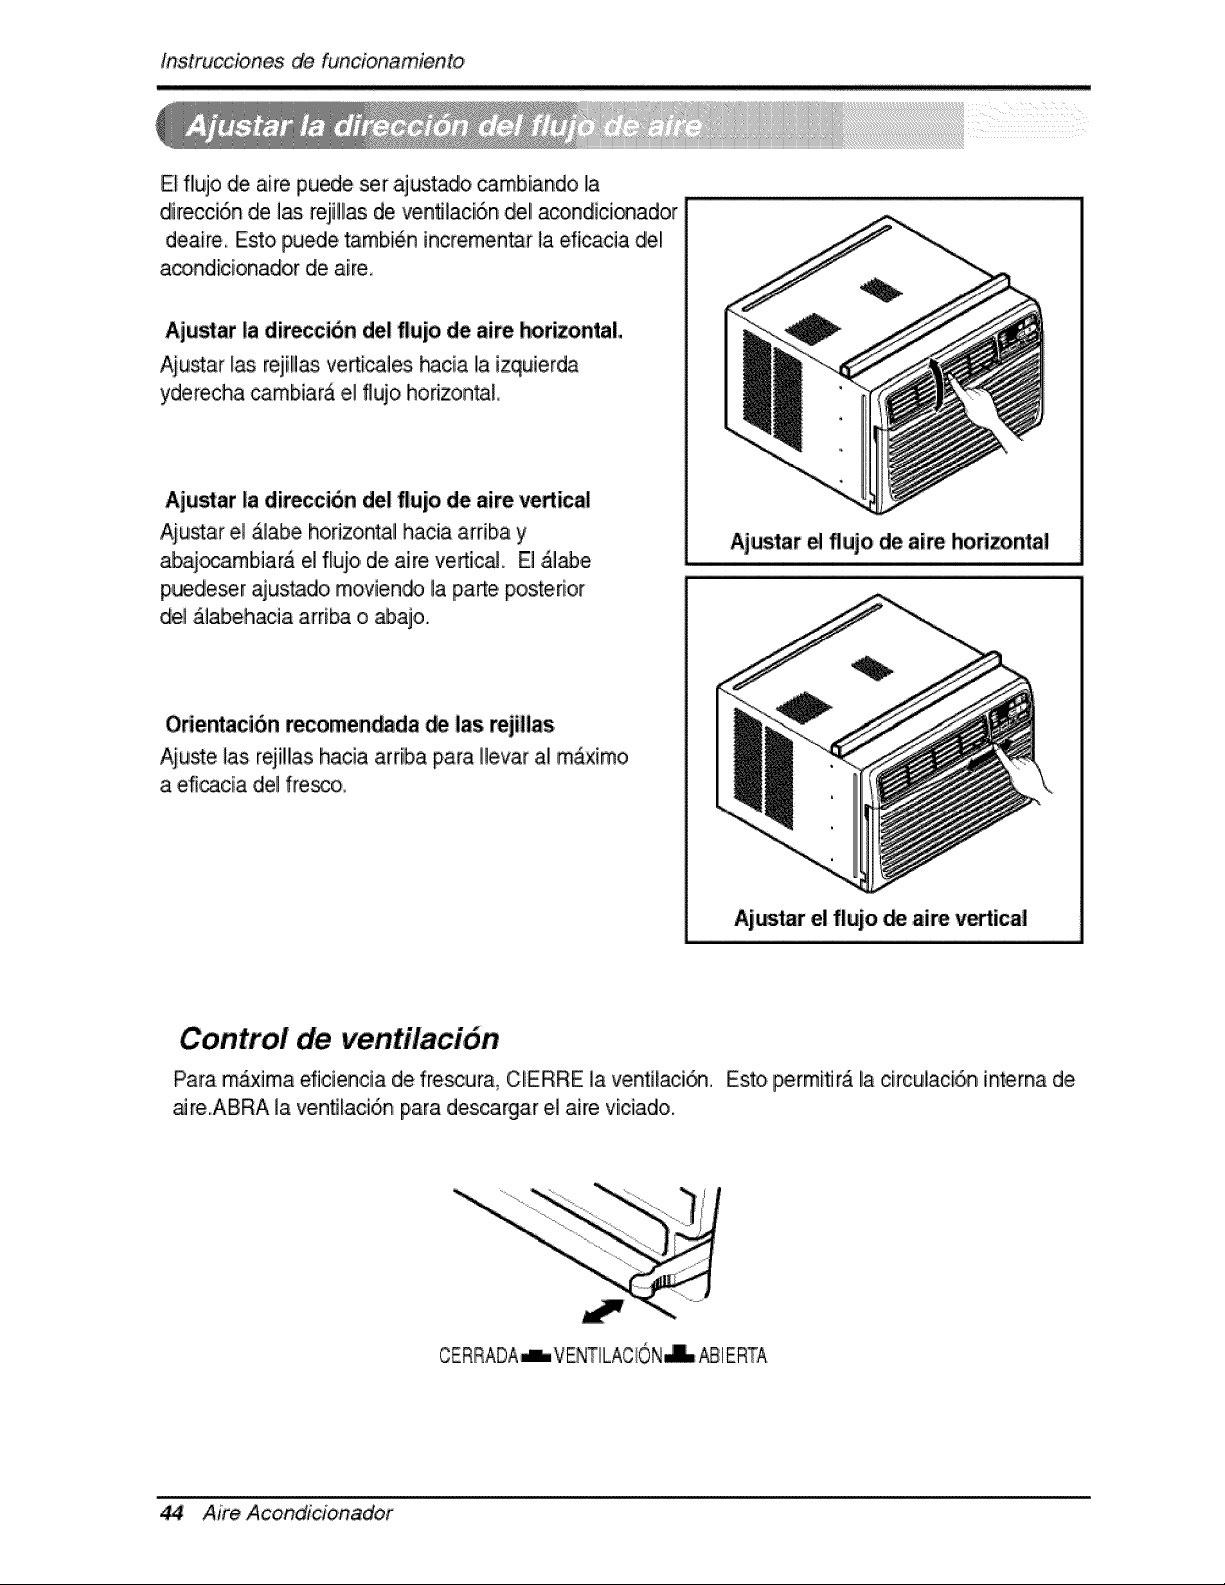
E_flujo de aire puede set ajustadlo _mbiando la
direcci6n de 1_ reji!las de venfllaci6n de! acondici_ador
deaire, Esto puede tambi6n incremen_r la ,dicacia del
a_ndicionador de aire,
Aju_at la diteccion del flujo de aire horizontal
Aiu_ar las rejill_ verticales hacia la izquierda
yderecha cambiara el flujo horizon_L
Aju_at la direccion del flujo de aire vertical
Aiustar el &labe horizontal hacia arriba y Ajustar e flujo de aire Ihorizontal
abai_arnbiar& el flujo, de aire vertic_. El &l_e
p,uedeser ajus_do rnoviendo la parte posterior
del _labehacia arri_ o _ajo.
Odentacion _comen_da _ las rejillas
Aiuste ]as rejillas hacia arriba para Hevar al m_x[mo
a eficacia del fre_o,
Ajar el flujo _ aire v_tical
Control de ventilaci6n
Para m_xima eficien,cia de frescura_ CERRE la ventilaci_ Esto permiflr_ la circulaci6,n int,erna d,e
aJre.ABRA la venfllaci6n piara descargar e,i aire viciado.
CERRADA-L VENTILACION_ _1 ERTA
44 Aire Acond_cionador
O_rating Instructions
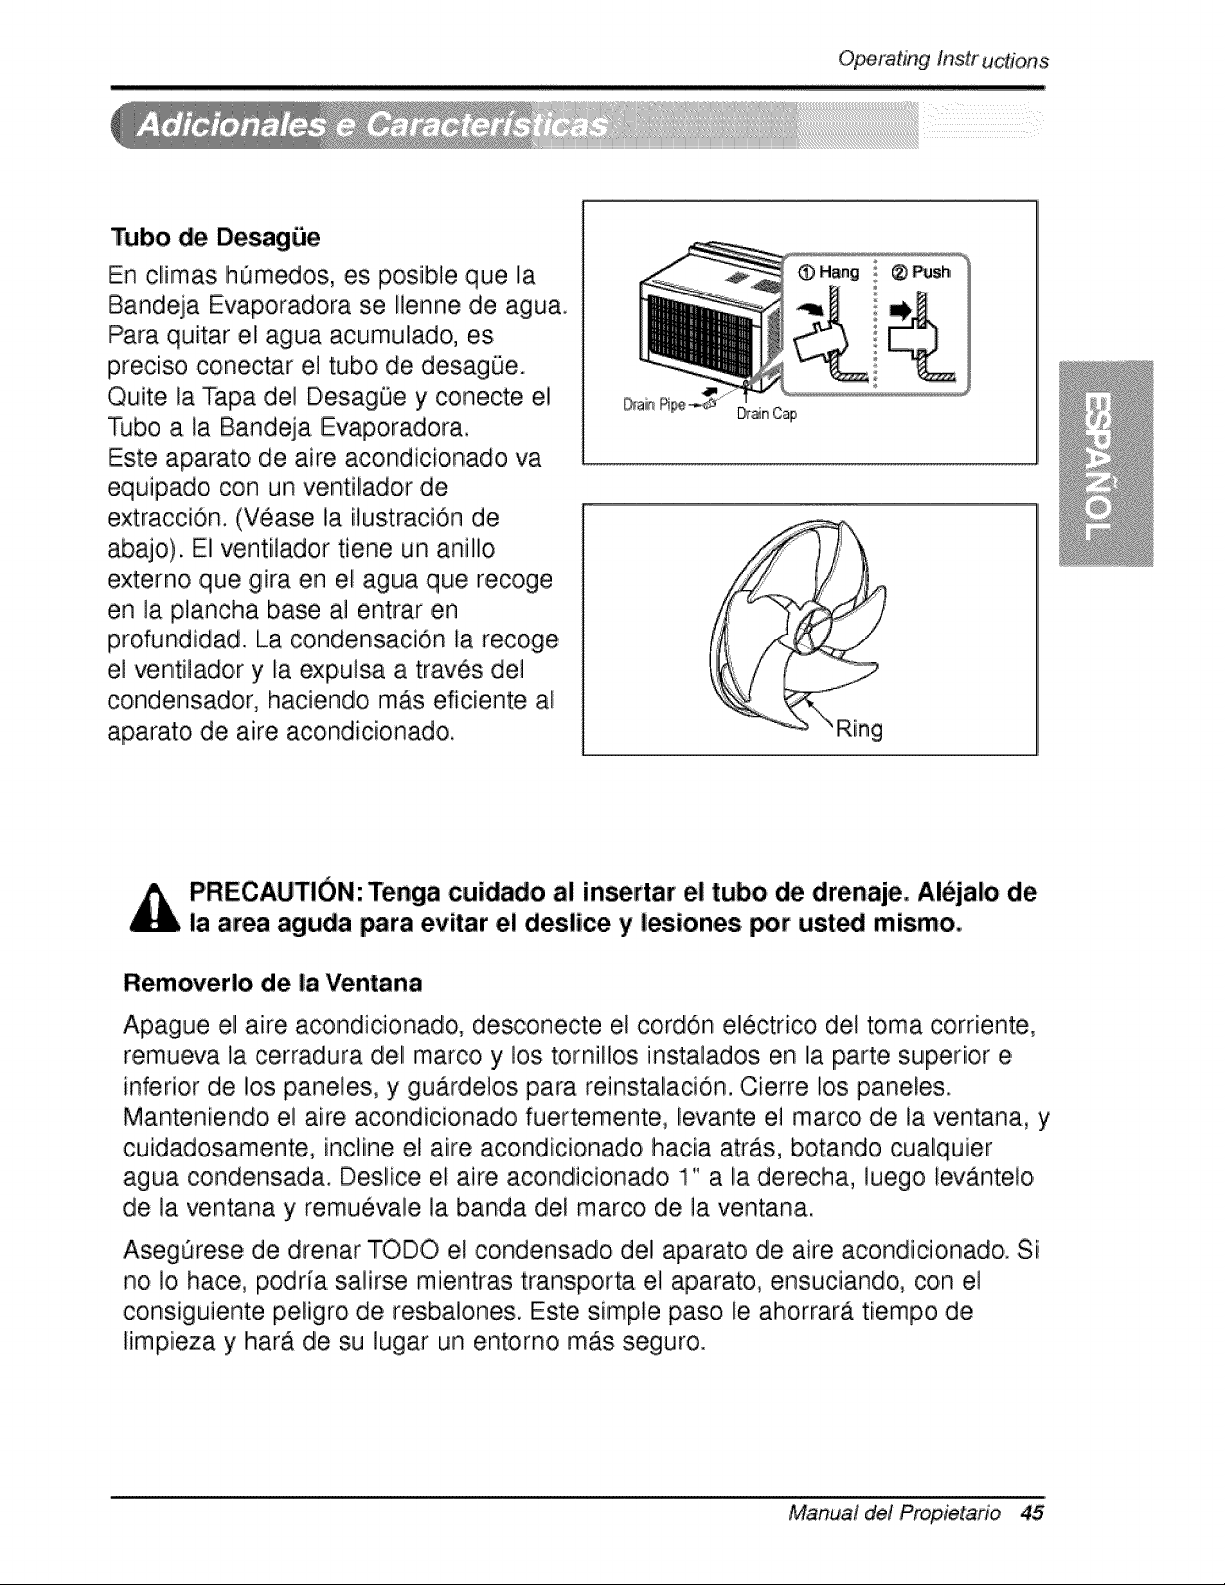
Tube de Desag_e
En climas h0medos, es po,sible que la
Bandeja Evaporadora se Ilenne de .agua.
Para quitar eli agua acumulado, es
preciiso conectar el tubo de des.ag0e.
Quite la Tapa del D,esagOe y conecte el
Tubo a la Bandeja Evaporadora.
Este aparato de aire acondicionado va
equipado, con un ventilador de
extraccion. (Vease la ilustraciOn de
abajo). El ventilador tiene un anillo
externo que gira en el agua que recoge
en la #ancha base al entrar en
profundidad. La condensacion la recoge
el ventiladoir y la expulsa a tra,4s de1
condensadlor, haciendo mAs eficiente al
aparato de aire acondicionado,
Dr_n Cap
PRECAUTION: Tenga cuidado al insertar el tubo de drenaje, iAl_jalo de
la area aguda para evitar e! deslice y lesiones _r ust_ mismo,
Removerlo de la Ventana
Apague el aire acondicionado, desconecte el cordon electrico del toma corriente,
remueva la cerradura del marco y los tornillos instala,dos en la parte superior e
inferior de los paneles, y gu.ardelos para reinstalacion. Cierre ios paneles.
Manteniendoi el aire aco,ndicionado fuertemente, levante el marco de la ventana, y
cuidadosamente, incline el aire acondicionado hacia atras, botando cualquier
agua condensada. Deslice el aire acondicionado 1" a la derecha, luego levanteio
de la ventana y remuevale la banda del marco de la ventan.a.
AsegOrese de drenar TODO el condensado ,del aparato de aire acondicio, nado. Si
no !o hace, podria salirse mientras transp.orta e! aparato, ensuciando, con ,e!
cons iguiente p,eligro de resbalones. Este simple paso le ahorrara tiempo de
limpieza y harA de su lugar un entorno mAs seguro.
Manual de! Propietario 45
Mante_imiento y servJcio
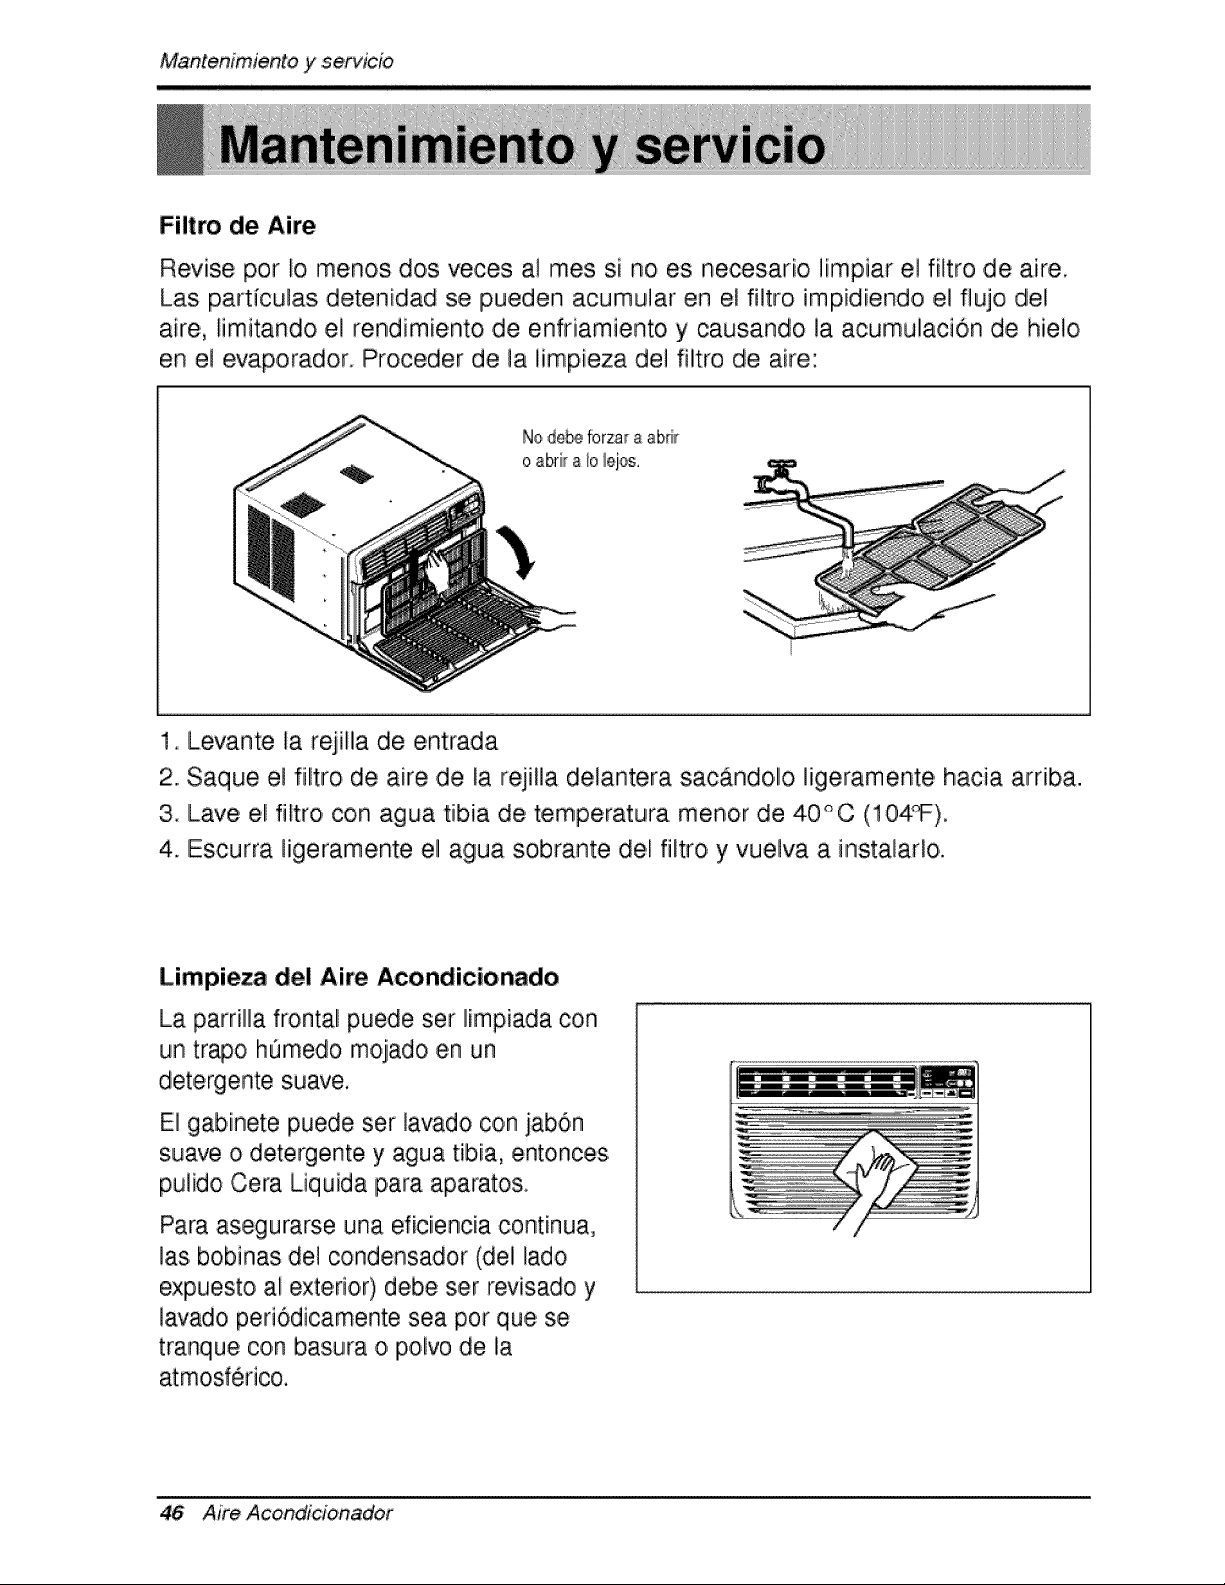
Filtro de Aire
Revise por io menos dos veces ,a]rues si no es necesar[o ][mpiar e] fi]tro de aire.
Las particulas detenidiad se pueden acumu]ar en el filtro impidiendo e] flujo diel
aire, limitandio e] rendimiento de enfriamiento y causando ]a acumulaci6n de hielo
en el evaporador. Proceder de la limpieza de] filltro de aire:
Node_ forzara abdlr
oabri[ aIo iejos.
1, Levante [a r_ilila de entrada
2. Saque e] filitro de aire de la rejiHa dlelantera sacAndollo ]igeramente hacia ardba.
3 ILave el filtro con agua tibia de temperatura menor de 40°0 (104_).
4. Escurra ligeramente el agua sobrante deI filtro y vuelva a instalado.
Limpieza del Aire Aco,ndicionado
La parrill]a frontal puede ser limpiada con
un trio hOmedo mojado en un
det,ergente suave.
E] gabinete puede ser lavado con jab6n
suave o detergente y agua tibia, entoncesi
pu]ido Cera Liquida para aparatos,
Para asegurarse una eficiencia continua,
las bobinas del condensador (del lado
expuesto ai exterior) debe ser revisado y
lavado periodicamente sea pot que se
tranque con basu_vao polvo de la
atmosferico.
46 Aim Acond_cionador

,Mantenimie, n,itoy servicio
C:omo Remover la P'arilla Frontal
1 Tire de la rejilla de entrada hacia
delante agarrando ambas lengQetas
y tire del filtro del aire hasta sacado.
2_ Saqiue el tornillo que asegura la
Parrilla [Frontal,
3. Suelte el lado izqiuierdo pdmero.
Despues cuidadosamente ha!e
desde la parte de arnba y empuje
hacia la derecha. Las lengQetas
est_n aseguradas.
Manual de! Propietano 47
Mantenimientoy servJcie
Antes de Llamar el Servicio de Asistencia T_cnica
S[ tiene problemas con su ventilador, lea las informaciones siiguientes y trate de
resolver el problem& S[ no puede encontrar Iia so]uci6n, desconecte el ventillador
y dirijase a su suministrador.
El ventilador no funciona
1. Compruebe que eli ventillador est6 conectado en un enchufe correcto.
2. Revise el fusible.
3. Compruebe que la tension no sea demasiado a]ta o baja.
AI ajustarse el enfriamiento, el aire no parece frio |o suficiente
1. Revise si los ajustes de la temperatura son correctos
2. Revise si el fi]tro de aire no estA atascado de polvo. En el caso de que si,
camb[e eli filltro.
3. Compruebe que afuera no haya un obstAcu]o del flujo de aire y si entre la
parte trasera ,del ventillador y la pared o Ila barrera haya espacio Ilibre de po,r ]o
menos I metro (20").
4. Cierre todas ]as puertas y ventanas y compruebe que n,o haya una fuente de
ca]or e,n la hab[taci6n.
Antes de ]lamar al servicio, tenga a bien revisar la siguiente ]ista de
problemas y sus soluciones.
E/acondicionador de, aire esta ando norrnalmente cuando:
• Escucha un sonido metalico, Lo causa el agua que recoge el condensador en
dias Huvioso,s o en condicio, nes de mucha humedad. Esta caracteristica esta
diseSada para ayudar a ,quitar la humedad en el aire y mejorar la capacidad de
enfriamiiento,.
Consulte la secciOn del Venti]ador de extracci,On en la p_gina 43.
, Oye un clic en el termostato. Lo causa e,]ciclo del compresor que co,mienza y se
- Ve gotear agua de [la parte posterior de la unidad. E] agiua puede ser recogida
en Iia bandeja de base en condiciones de mucha humedad o dias de Iiluvia. Esta
agua desborda y gotea desde Ila parte posterior de la un[dad.
• Oye funcio, nar el ventilador mientras el comp, resor estA si]encioso. Esto es una
caracteristica operativa normal.
Aim Acond_cionador
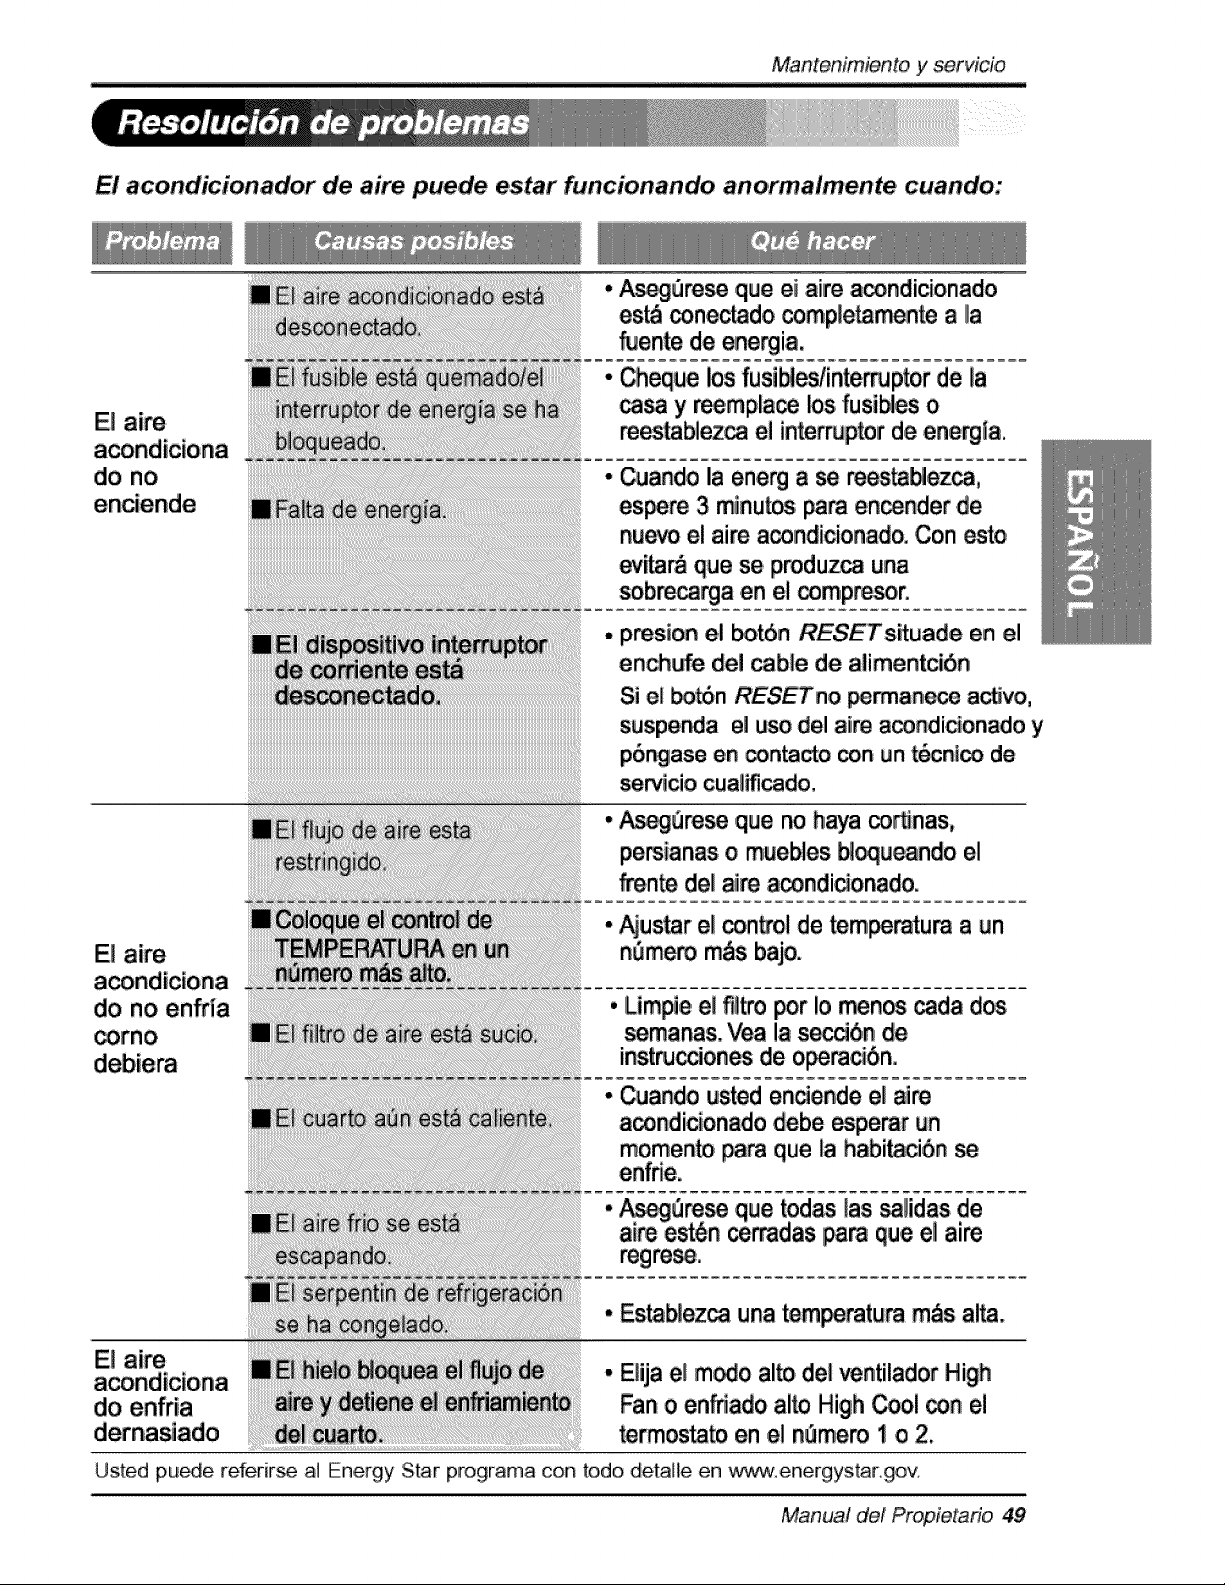
Mantenimiento, y servido
El acondicionador de aire puede estar funcion,ando anoirma/mente cuando:
El aire
do no
A_re_ qu=eei aiire a_ndicionado
es_ _,nec_do completa_nte a Ila
_ente de energia,
Cheque los fusibles/in_mJptor de la
_ y reempla_ los fusi_es o
m_.tablez_ el interruptor de ene_ia.
Cuando la energ a se reesta_ezca,
es_re 3 minu_ pare en_nder .de
nu_ el aire a_ndicionado. Con e_o
ever& que se produ.z_ una
sobre_a .en el _mpresor.
presion el _t_n RESETsituade en el
ench_e del cable de alimentcibn
Si el _n RESETno _an_ a_vo,
suspe_ia el uso del aire a_ndi_onado y
p6,_ase e,n _n_cto _n #n t_cnl_ de
servicio cuaiificado.
E! aire
do no enfrla
_rno
E! aire
do ,enffia
#_ure_ ,que no haya coronas,
pemianas o muebles _l_ndo el
f-_n_ dellaiire a_ndicionado.
_u_r el _n_ol de _mperatum a _n
n_mero m&sbajo.
• Limpi,ee! fl_tropor !o menos _da dos
semanas. Yea !a s_6n de
inst_c_on_ de o_m_bni.
• Cuando usted endende el aire
a_ndiciortado debe esperar un
momento _ra que la habi_ciSn se
• Estab!ez_ una tem_ratura robs alta.
* Elija el m_o alto,del ventilador High
Fan o enfriado ai_ High _ol _n el
termostato en el _mem 1 o 2.
Us,ted pu_e referir_ al Energy Star programa con to,do detaHe en www.energystargov
Manual de! Propietafio, 49
Nota
50 Aire Acondicionador
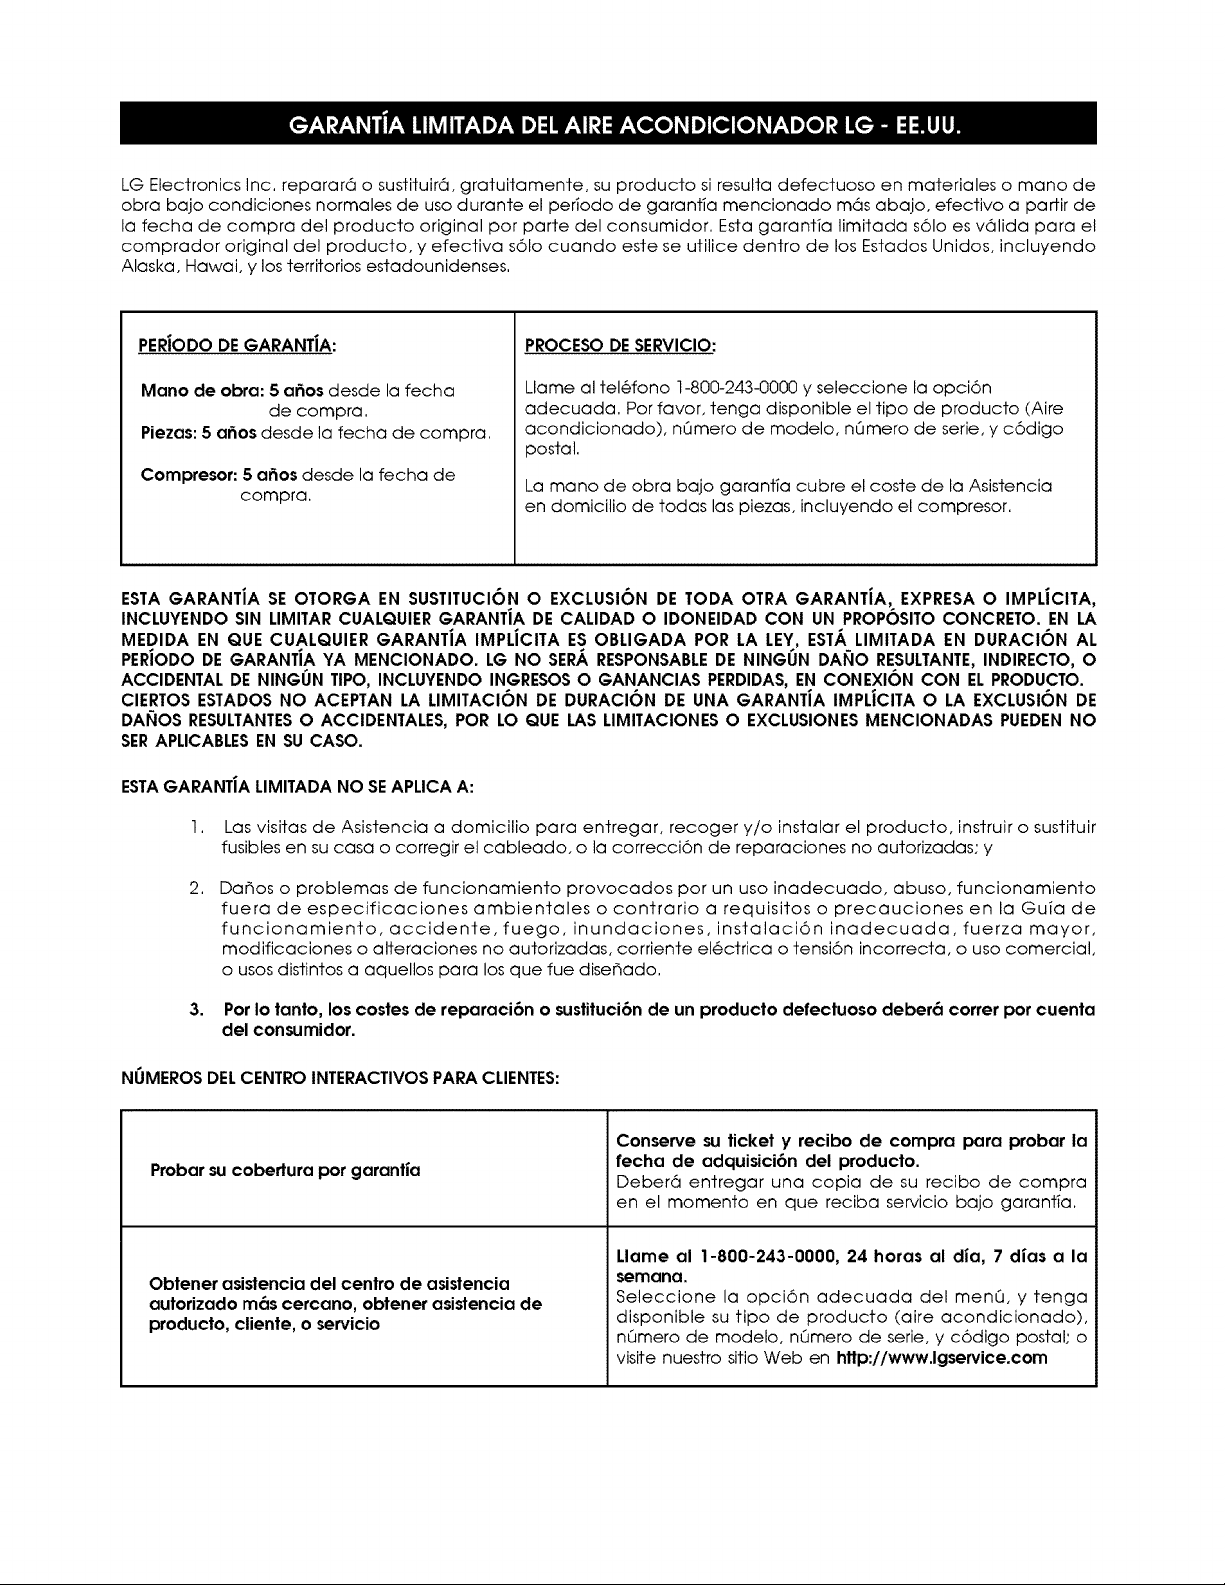
LG Electronics Inc, reparar6 o sustituir6, gratuitamente, su producto si resulta defectuoso en materiales o mano de
obra bajo condiciones normales de uso durante el per_odo de garantia mencionado m6s abajo, efectivo a partir de
la fecha de compra del producto original por parte del consumidor. Esta garanfia limitada s61o es v61ida para el
comprador original del producto, y efectiva s61o cuando este se utilice dentro de los Estados Unidos, incluyendo
Alaska, Hawai, y los territorios estadounidenses.
PERJODODEGARANT|A:
Mano de obra: 5 a6os desde la fecha
de compra.
Piezas: 5 a6os desde la fecha de compra.
Compresor: 5 a_os desde la fecha de
compra.
PROCESO DE SERVICIO:
Llame al tel6fono 1-800-243-0000 y seleccione la opci6n
adecuada. Por favor, tenga disponible el tipo de producto (Aire
acondicionado), nQmero de modelo, nQmero de serie, y c6digo
postal.
La mano de obra bajo garant_a cubre el coste de la Asistencia
en domicilio de todas las piezas, incluyendo el compresor.
ESTA GARANTiA SE OTORGA EN SUSTITUCI6N O EXCLUSION DE TODA OTRA GARANTIA, EXPRESA O IMPLJCITA,
INCLUYENDO SIN LIMITAR CUALQUIER GARANTiA DE CALIDAD O IDONEIDAD CON UN PROPOSITO CONCRETO. EN LA
MEDIDA EN QUE CUALQUIER GARANTiA IMPLiCITA ES OBLIGADA POR LA LEY, ESTA LIMITADA EN DURACION AL
PERJODO DE GARANTiA YA MENCIONADO. LG NO SER,_.RESPONSABLEDE NINGUN DANO RESULTANTE,INDIRECTO, O
ACCIDENTAL DE NINGUN TIPO, INCLUYENDO INGRESOSO GANANCIAS PERDIDAS,EN CONEXION CON EL PRODUCTO.
CIERTOS ESTADOS NO ACEPTAN LA LIMITACION DE DURACION DE UNA GARANTIA IMPLJCITA O LA EXCLUSION DE
DANOS RESULTANTESO ACCIDENTALES, POR LO QUE LAS LIMITACIONES O EXCLUSIONES MENCIONADAS PUEDEN NO
SERAPLICABLESEN SU CASO.
ESTAGARANT|A LIMITADA NO SEAPLICA A:
I.
2.
3,
Las visitas de Asistencia a domicilio para entregar, recoger y/o instalar el producto, instruir o sustituir
fusibles en su casa o corregir el cableado, o la correcci6n de reparaciones no autorizadas; y
Da_os o problemas de funcionamiento provocados por un uso inadecuado, abuso, funcionamiento
fuera de especificaciones ambientales o contrario a requisitos o precauciones en la Guia de
funcionamiento, accidente,fuego, inundaciones, instalaci6n inadecuada,fuerza mayor,
modificaciones o alteraciones no autorizadas, corriente el6ctrica o tensi6n incorrecta, o uso comercial,
o usos distintos a aquellos para los que fue dise_ado.
Por Io tanto, los costes de reparaci6n o sustituci6n de un producto defectuoso deber6 correr por cuenta
del consumidor.
NLIMEROSDEL CENTRO INTERACTIVOS PARA CLIENTES:
Probar su cobertura por garantJa
Obtener asistencia del centro de asistencia
autorizado m6s cercano, obtener asistencia de
producto, cliente, o servicio
Conserve su ticket y recibo de compra para probar la
fecha de adquisici6n del producto.
Deber6 entregar una copia de su recibo de compra
en el momento en que reciba servicio bajo garant;a,
Llame al 1-800-243-0000, 24 horas al dJa, 7 dJas a la
semana,
Seleccione la opci6n adecuada del menQ, y tenga
disponible su tipo de producto (aire acondicionado),
nQmero de modelo, nQmero de serie, y c6digo postal; o
visite nuestro sitio Web en http://www.lgservice.com
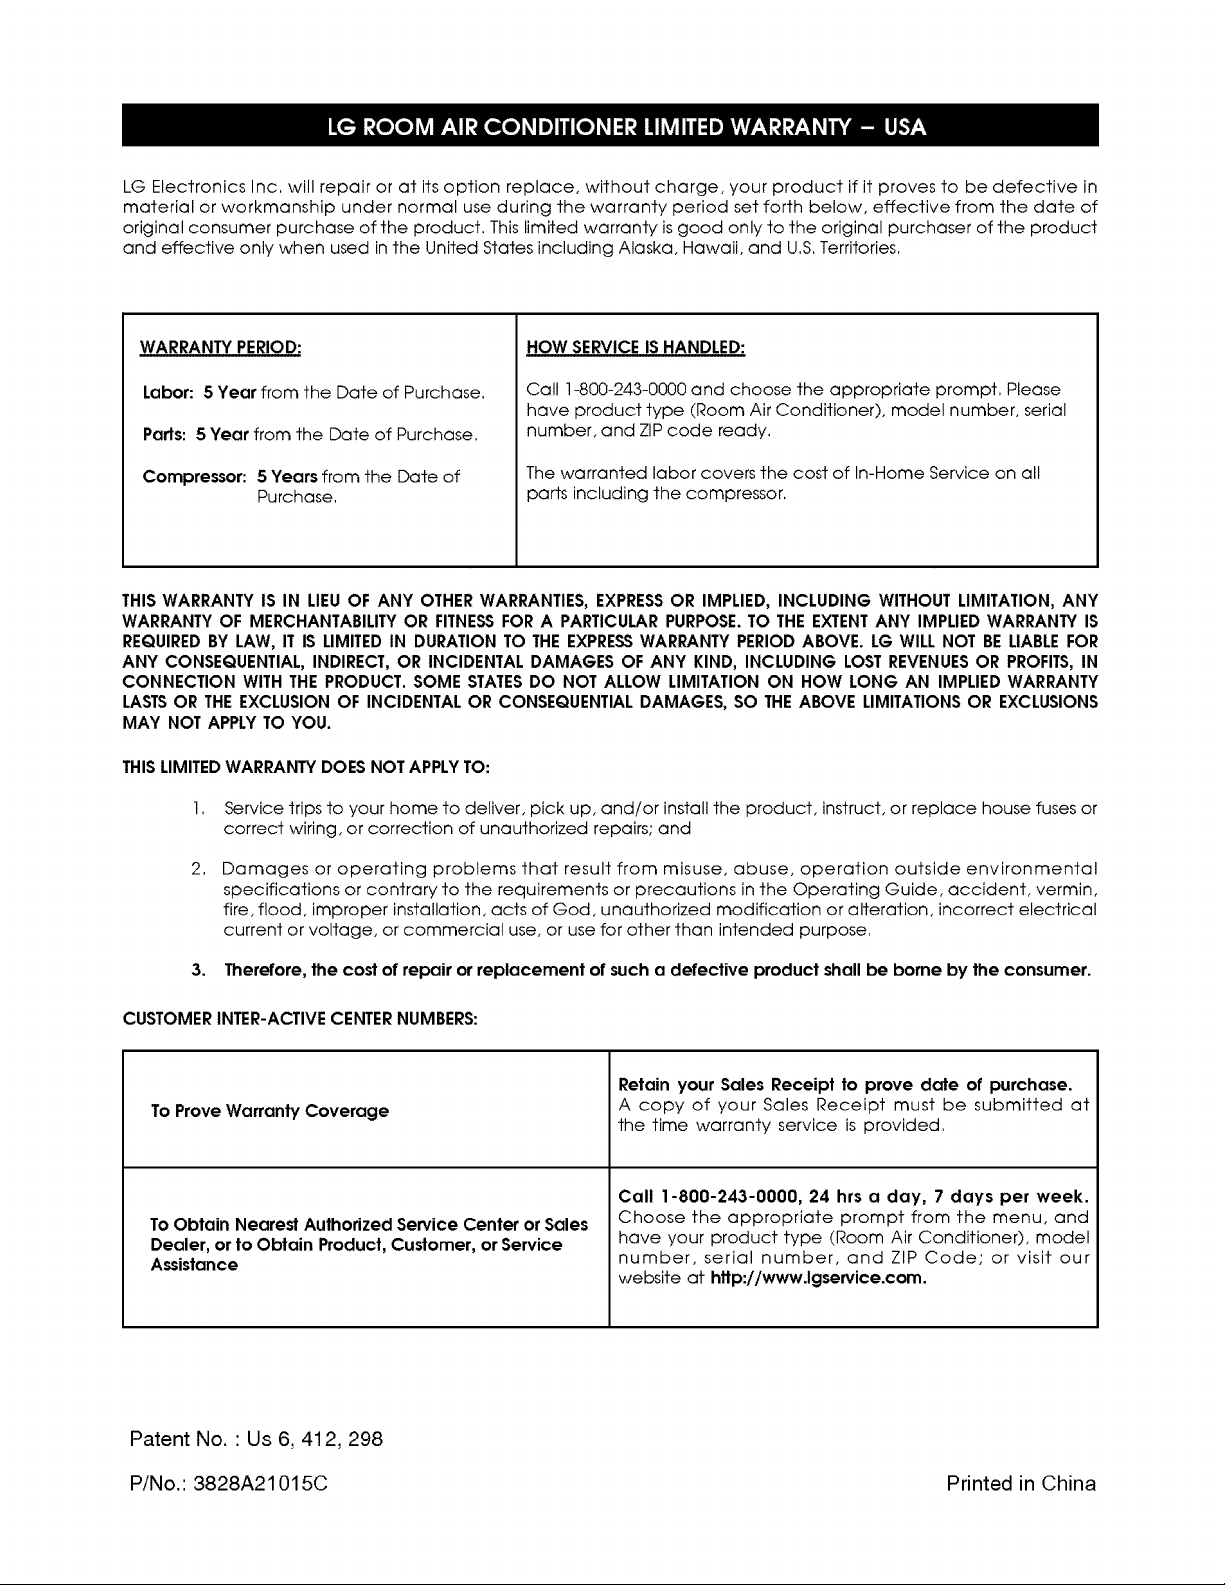
LG Electronics Inc. will repair or at its option replace, without charge, your product if it proves to be defective in
material or workmanship under normal use during the warranty period set forth below, effective from the date of
original consumer purchase of the product. This limited warranty is good only to the original purchaser of the product
and effective only when used in the United States including Alaska, Hawaii, and U.S,Territories,
WARRANTY PERIOD:
Labor: 5 Year from the Date of Purchase.
Parts: 5 Year from the Date of Purchase,
Compressor: 5 Years from the Date of
Purchase.
HOW SERVICE IS HANDLED:
Call 1-800-243-0000 and choose the appropriate prompt, Please
have product type (Room Air Conditioner), model number, serial
number, and ZIP code ready,
The warranted labor covers the cost of In-Home Service on all
parts including the compressor.
THIS WARRANTY IS IN LIEUOF ANY OTHER WARRANTIES, EXPRESSOR IMPLIED, INCLUDING WITHOUT LIMITATION, ANY
WARRANTY OF MERCHANTABILITYOR FITNESSFOR A PARTICULARPURPOSE.TO THE EXTENTANY IMPLIED WARRANTY IS
REQUIREDBY LAW, IT IS LIMITED IN DURATION TO THE EXPRESSWARRANTY PERIOD ABOVE. LG WILL NOT BE LIABLEFOR
ANY CONSEQUENTIAL, INDIRECT, OR INCIDENTAL DAMAGES OF ANY KIND, INCLUDING LOST REVENUESOR PROFITS,IN
CONNECTION WITH THE PRODUCT. SOME STATESDO NOT ALLOW LIMITATION ON HOW LONG AN IMPLIED WARRANTY
LASTSOR THE EXCLUSION OF INCIDENTAL OR CONSEQUENTIALDAMAGES, SO THE ABOVE LIMITATIONS OR EXCLUSIONS
MAY NOT APPLY TO YOU.
THISLIMITEDWARRANTY DOES NOT APPLYTO:
2,
Service trips to your home to deliver, pick up, and/or install the product, instruct, or replace house fuses or
correct wiring, or correction of unauthorized repairs; and
Damages or operating problems that result from misuse, abuse, operation outside environmental
specifications or contrary to the requirements or precautions in the Operating Guide, accident, vermin,
fire, flood, improper installation, acts of God, unauthorized modification or alteration, incorrect electrical
current or voltage, or commercial use, or use for other than intended purpose,
3. Therefore, the cost of repair or replacement of such a defective product shall be borne by the consumer.
CUSTOMER INTER-ACTIVE CENTERNUMBERS:
To Prove Warranty Coverage
To Obtain Nearest Authorized Service Center or Sales
Dealer, or to Obtain Product, Customer, or Service
Assistance
Retain your Sales Receipt to prove date of purchase.
A copy of your Sales Receipt must be submitted at
the time warranty service is provided.
Call 1-800-243-0000, 24 hrs a day, 7 days per week.
Choose the appropriate prompt from the menu, and
have your product type (Room Air Conditioner), model
number, serial number, and ZIP Code; or visit our
website at http://www.lgservice.com.
Patent No. ' Us 6, 412, 298
P/N o.: 3828A21015C Printed in China

