
Contact 8AIMI$UNG WORLDWIDE
If you have any questions or comments relating to Samsung products, please contact the SAMSUNG customer care center.
Comuniquese con SAMSUNG WORLDWIDE
Si desea formular alguna pregunta o comentario en relaci6n con los productos de Samsung, comuniquese con el centro de
atenci6n al cliente de SAMSUNG
Samsung Electronics Canada Inc., Customer
Service 55 Standish Court Mississauga,
Ontario L5R 4B2 Canada
CANADA 1-800-SAMSUNG(726-7864) www.samsung.com/ca
Samsung Electronique Canada Inc., Service
la Clientele 55 Standish Court Mississauga,
Ontario L5R 4B2 Canada
Samsung Electronics America, Inc.
U.S.A 1-800-SAMSUNG(726-7864) www.samsung.com/us 105 Challenger Road
Ridgefield Park, NJ 07660-0511
imagine the possibilities
Thank you for purchasing this Samsung product.
To receive more complete service, please
register your product at
www.samsung.com/register
Model Serial No.
BN68-02151A-00

important Warranty information Regarding Television Format Viewing
See the warranty card for more information on warranty terms.
Wide screen format LCD Displays (16:9, the aspect ratio of the screen width to height) are primarily designed to view wide screen
format full-motion video. The images displayed on them should primarily be in the wide screen 16:9 ratio format, or expanded to
fill the screen if your model offers this feature and the images are constantly moving. Displaying stationary graphics and images
on screen, such as the dark sidebars on nonexpanded standard format television video and programming, should be limited to no
more than 5% of the total television viewing per week.
Additionally, viewing other stationary images and text such as stock market reports, video game displays, station Iogos, web sites
or computer graphics and patterns, should be limited as described above for all televisions. Displaying stationary images that
exceed the above guidelines can cause uneven aging of LCD Displays that leave subtle, but permanent burned-in ghost images in
the LCD picture. To avoid this, vary the programming and images, and primarily display full screen moving images, not stationary
patterns or dark bars.
On LCD models that offer picture sizing features, use these controls to view different formats as a full screen picture.
Be careful in the selection and duration of television formats used for viewing. Uneven LCD aging as a result of format selection
and use, as well as burned-in images, are not covered by your Samsung limited warranty.
U.S.A Only
The product unit accompanying this user manual is licensed under certain intellectual property rights of certain third parties.
In particular, this product is licensed under the following US patents: 5,991,715, 5,740,317, 4,972,484, 5,214,678, 5,323,396,
5,539,829, 5,606,618, 5,530,655, 5,777,992, 6,289,308, 5,610,985, 5,481,643, 5,544,247, 5,960,037, 6,023,490, 5,878,080,
and under US Published PatentApplication No. 2001-44713-A1.
This license is limited to private non-commercial use by end-user consumers for licensed contents. No rights are granted for
commercial use. The license does not cover any product unit other than this product unit and the license does not extend to
any unlicensed product unit or process conforming to ISO/IEC 11172-3 or ISO/IEC 13818-3 used or sold in combination with
this product unit. The license only covers the use of this product unit to encode and/or decode audio files conforming to the
ISO/IEC 11172-3 or ISO/IEC 13818-3. No rights are granted under this license for product features or functions that do not
conform to the ISO/IEC 11172-3 or ISO/IEC 13818-3.
• Other countries
The product unit accompanying this user manual is licensed under certain intellectual property rights of certain third parties.
This license is limited to private non-commercial use by end-user consumers for licensed contents. No rights are granted for
commercial use. The license does not cover any product unit other than this product unit and the license does not extend to
any unlicensed product unit or process conforming to ISO/IEC 11172-3 or ISO/IEC 13818-3 used or sold in combination with
this product unit. The license only covers the use of this product unit to encode and/or decode audio files conforming to the
ISO/IEC 11172-3or ISO/IEC 13818-3. No rights are granted under this license for product features or functions that do not
conform to the ISO/IEC 11172-3 or ISO/IEC 13818-3.
• SAMSUNG ELECTRONICS NORTH AMERICAN LIMITED WARRANTY STATEMENT
Subject to the requirements, conditions, exclusions and limitations of the original Limited Warranty supplied with Samsung
Electronics (SAMSUNG) products, and the requirements, conditions, exclusions and limitations contained herein, SAMSUNG
will additionally provide Warranty Repair Service in the United States on SAMSUNG products purchased in Canada, and
in Canada on SAMSUNG products purchased in the United States, for the warranty period originally specified, and to the
Original Purchaser only.
The above described warranty repairs must be performed by a SAMSUNG Authorized Service Center. Along with this
Statement, the Original Limited Warranty Statement and a dated Bill of Sale as Proof of Purchase must be presented to the
Service Center. Transportation to and from the Service Center is the responsibility of the purchaser.
Conditions covered are limited only to manufacturing defects in material or workmanship, and only those encountered in
normal use of the product.
Excluded, but not limited to, are any originally specified provisions for, in-home or on-site services, minimum or maximum
repair times, exchanges or replacements, accessories, options, upgrades, or consumables.
For the location of a SAMSUNG Authorized Service Center, please call toll-free:
in the United States : 1-800-8AMSUNG (t-800-72G7864)
in Canada : 1-800-SAMSUNG
Precautions When Displaying a Still image
A still image may cause permanent damage to the TV screen
• Do not display a still image on the LCD panel for more than 2 hours as it can cause screen image retention. This image
retention is also known as "screen burn". To avoid such image retention, reduce the degree of brightness and contrast of the
screen when displaying a still image.
• Watching the LCD TV in 4:3 format for a long period of time may leave traces of borders displayed on the left,
right and center of the screen caused by the difference of light emission on the screen.
Playing a DVD or a game console may cause a similar effect to the screen.
Damages caused by the above effect are not covered by the Warranty.
• Displaying still images from Video games and PC for longer than a certain period of time may produce partial a_r-images.
To prevent this effect, reduce the 'brightness' and 'contrast' when displaying still images.
© 2009 Samsung Electronics Co., Ltd. All rights reserved.

CONTENTS
- List of Features.....................................................................2 ,, Configuring the Picture Menu.............................................17
•=Accessories............................................................. 2 "=Using Your TV asa Computer (PC) Display.......................19
•=Viewing[ne Control Panel...................................... 3 "=Setting up the TV with your PC ....................................... 20
,, Viewingthe ConnectionPanel............................. 4
"=Remote Control ................................................. 5
"=Installing Batteriesin the RemoteControl.............. 5
"=Configuring the Sound Menu..............................................21
"=ConnectingCable TV ............................................. 6 "=Configuring the Setup Menu...............................................22
"=ConnecItnga DVDI Blu-rayplayerI CableBoxI
Satellitereceiver(Set-TopBox)via HDMI......................... 7
"=Connectinga DVD 1Biu-ray player I Cable Box t
Satellite rece ver (Set-TopBox)via DVl ................. 8 "=Configuring the input Menu................................................26
"=Connectinga DVD / Biu-ray player / Cable Box /
Satellite receiver (Set-TopBox)via Component cables 8
"=Connectinga VCR ................................................... 9
"=Connectinga DigitalAudio System........................ 9
"=Connectingan Amplifier l DVD HomeTheater...... 10
= Connectinga Camcorder........................................ 11
"=Connecunga PC ................................ 12
"=Configuringthe Support 1.4enu............................................26
•=Troubleshooting ..................................................28
•=WallMount Kit Specifications (VESA) ................................29
"=Using the Anti-Theft Kensington Lock ................................30
"=Securingthe TV to the Wall ................................................30
"=Specifications.....................................................
"=Viewing_nemenus .............................................................13
"=Plug& Play Feature............................................................14
= Configuringthe Channel Menu............................... 15
"=Managing Channels................................................. 15
License
$R$(0_ TruSurround HD, SRS and (o) Symbol are trademarks of SRS Labs, Inc.
TruSurround HD technology is incorporated under license from SRS Labs, Inc.
o i G i T A L
r_ DOLBY Manufactured under license from Dolby Laboratories. Dolby and the double-D symbol are trademarks
DIGITAL ] of Dolby Laboratories.
C)
Symbol
Note One-TouchButton TOOLButton

Figures and illustrations in this User Manual are provided for reference only and may differ from actual product appearance.
Product design and specifications may be changed without notice in order to enhance product performance.
List of Features
• Adjustable picture settings that can be stored in the TV's memory.
• Automatic timer to turn the TV on and off.
• Aspecial sleep timer.
• Excellent Digital Interface & Networking :
• With a built-in HD digital tuner, non-subscription HD broadcasts can be viewed with no Cable Box/Satellite receiver (Set-Top
Box) needed.
• HDMI/DVl connection of your PC to this TV.
• Excellent Picture Quality
• SRS TruSurround HD provides a virtual surround system.
Accessories
Remote Control Power Cord Cleaning Cloth
(BN59-00857A) (3903-000144) (BNe3-01798B)
(LNI9B650: BN59-00885A) &
Batteries (AAA x 2)
Owner's Instructions
Warranty Card /
Safety Guide Manual
Stand Base(BN96-11163A) Stand Body(BN96-10168B
Please make sure the following items are included with your LCD TV. If any items are missing, contact your dealer.
The items color and shape may vary depending on the model.

Viewing the Control Panel
The product color and shape may vary depending on the model.
The front panel buttons can be activated by touching it with your finger.
SItMSUNG
O d) (POWER): Press to turn the TV on and off.
POWER INDICATOR: Blinks and turns offwhen the power is on and lights up in stand-by mode.
O V CH A: Press to change channels. In the on-screen menu, use the V CH A buttons as you would use the T and A
buttons on the remote control.
O --VOL+: Press to increase or decrease the volume. In the on-screen menu, use the --VOL+ buttons as you would use the
_,iand 1_buttons on the remote control.
O MENU: Press to see an on-screen menu of your TV's features.
O SOURCE C#: Toggles between all the available input sources. In the on-screen menu, use this button as you use the
ENTER[E_ button on the remote control.
O REMOTE CONTROL SENSOR: Aim the remote control towards this spot on the TV.
O SPEAKERS
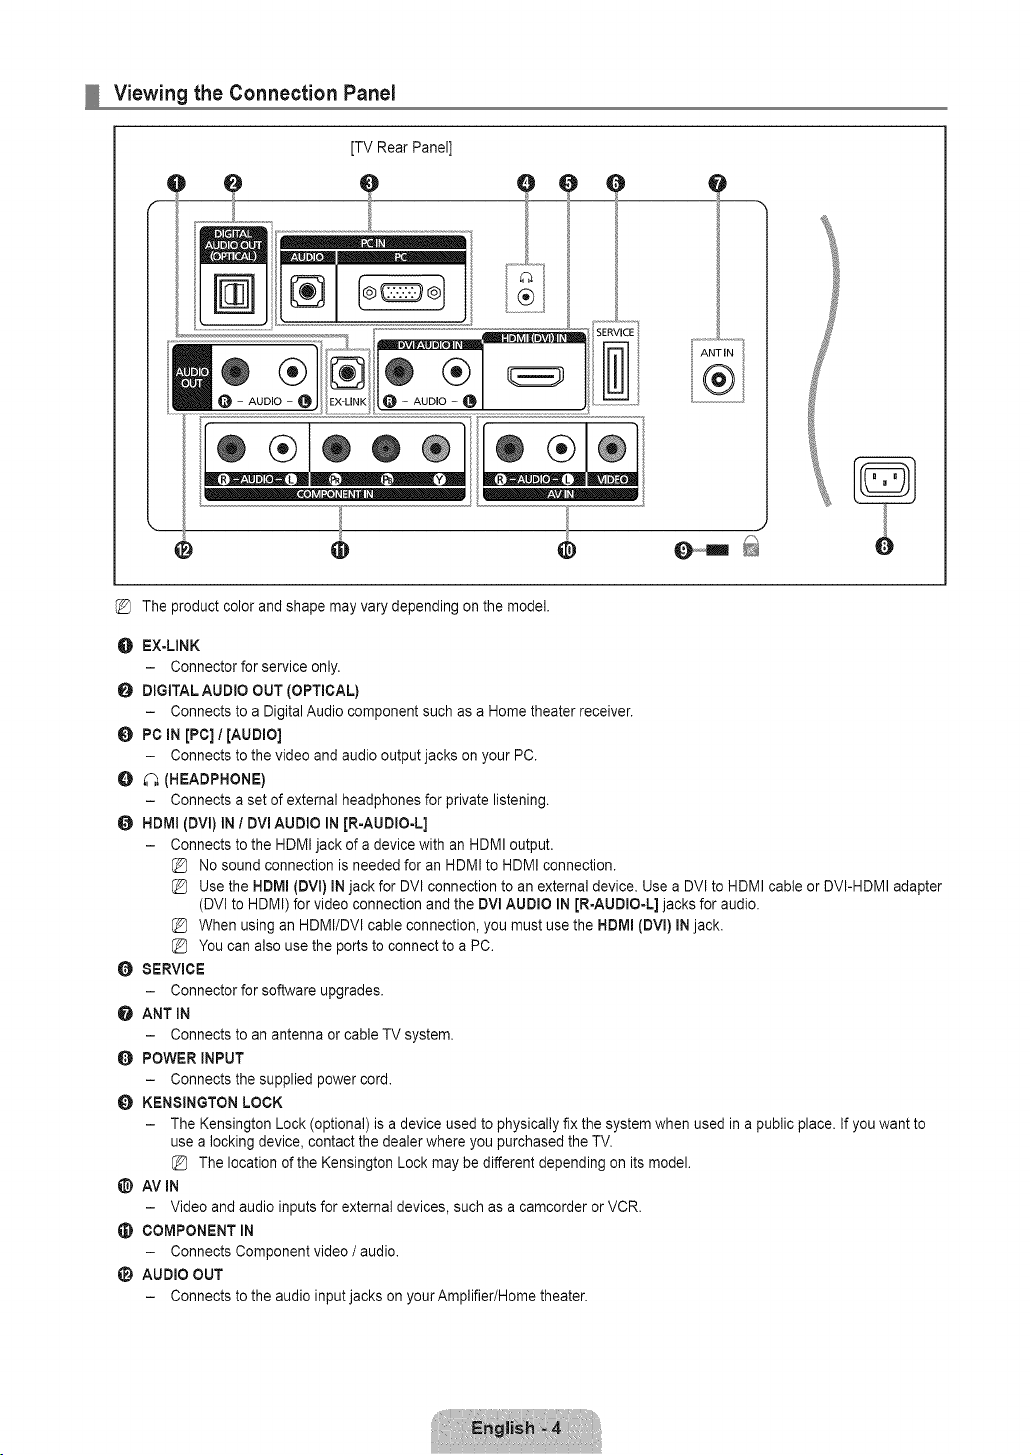
Viewing the Connection Panel
[TV Rear Panel]
O
®@@
ANT IN
@
The product color and shape may vary depending on the model.
O EX-LINK
- Connector for service only.
O DIGITAL AUDIO OUT (OPTICAL)
- Connects to a Digital Audio component such as a Home theater receiver.
O PC iN [PC] / [aUDiO]
- Connects to the video and audio output jacks on your PC.
O _ (HEADPHONE)
- Connects a set of external headphones for private listening.
O HDml (DVl) In / DVI AUDIO In [R-AUDIO-L]
- Connects to the HDMI jack of a device with an HDMI output.
No sound connection is needed for an HDMI to HDMI connection.
Use the HDMI (DVl) IN jack for DVl connection to an external device. Use a DVl to HDMI cable or DVI-HDMI adapter
(DVl to HDMI) for video connection and the DVl AUDIO IN [R-AUDIO-L] jacks for audio.
When using an HDMI/DVl cable connection, you must use the HDMI (DVl) IN jack.
You can also use the ports to connect to a PC.
O SERVICE
- Connector for software upgrades.
@ ANT IN
- Connects to an antenna or cable TV system.
0 POWER INPUT
- Connects the supplied power cord.
O KENSINGTON LOCK
- The Kensington Lock(optional) is a device used to physically fix the systemwhen used in a public place. If you want to
use a locking device, contact the dealer where you purchased the TV.
{_ The locationof the Kensington Lockmay be different depending on its model.
AVIN
- Video and audio inputs for external devices, such as a camcorder or VCR.
COMPONENT IN
- Connects Component video / audio.
li_ AUDIO OUT
- Connects to the audio input jacks on yourAmplifier/Home theater.
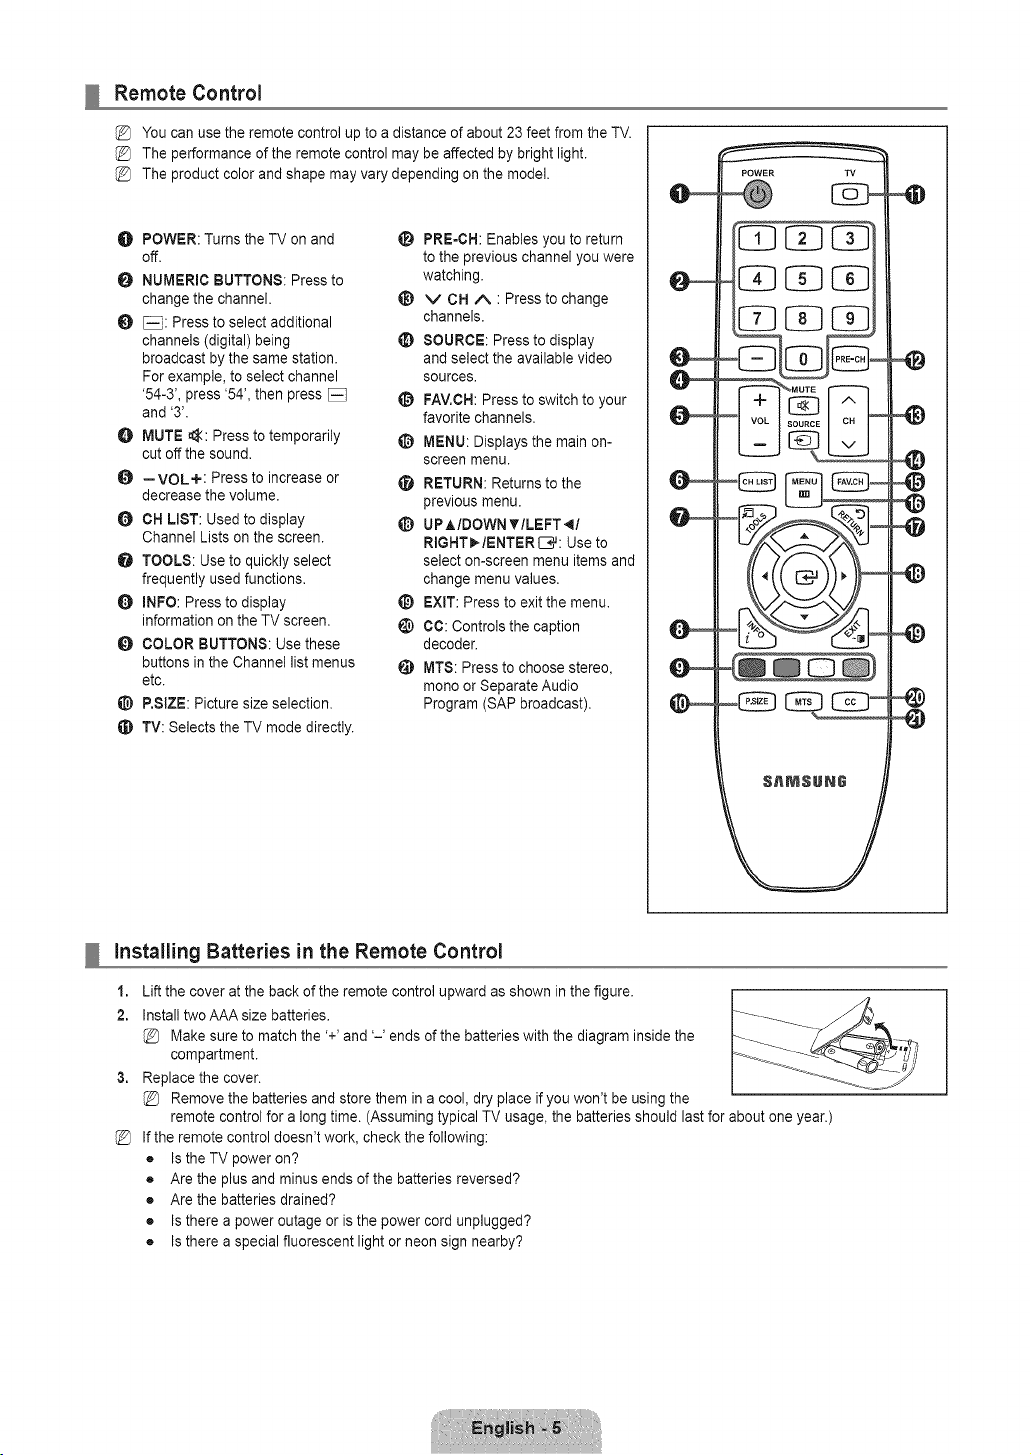
Remote Control
You can use the remote control up to a distance of about 23 feet from the TV.
The performance of the remote control may be affected by bright light.
The product color and shape may vary depending on the model.
O POWER: Turns the TV on and
off.
NUMERIC BUTTONS: Press to
change the channel.
_: Press to select additional
channels (digital) being
broadcast by the same station.
For example, to select channel
'54-3', press '54', then press
and '3'.
O MUTE _: Press to temporarily
cut off the sound.
O --VOL+: Press to increase or
decrease the volume.
CH LIST: Used to display
Channel Lists on the screen.
O TOOLS: Use to quickly select
frequently used functions.
O INFO: Press to display
information on the TV screen.
O COLOR BUTTONS: Use these
buttons in the Channel list menus
etc.
P,SIZE: Picture size selection,
TV: Selects the TV mode directly.
_i_ PRE-CH: Enables you to return
to the previous channel you were
watching.
_) v CH A : Press to change
channels,
SOURCE: Press to display
and select the available video
sources.
FAV.CH:Press to switch to your
favorite channels,
O MENU: Displays the main on-
screen menu.
RETURN: Returns to the
previous menu,
_) UPAIDOWNYILEFT_I
RIGNT_/ENTER L-I,#:Use to
select on-screen menu items and
change menu values,
_) EXIT: Press to exit the menu.
CC: Controls the caption
decoder,
MTS: Press to choose stereo,
mono or Separate Audio
Program (SAP broadcast),
installing Batteries in the Remote Control
1,
2.
3,
%
Lift the cover at the back of the remote control upward as shown in the figure.
Install two AAA size batteries.
Make sure to match the '+' and '-' ends of the batteries with the diagram inside the
compartment.
Replace the cover.
Remove the batteries and store them in a cool, dry place if you won't be using the
remote control for a long time. (Assuming typical TV usage, the batteries should last for about one year.)
If the remote control doesn't work, check the following:
• Is the TV power on?
• Are the plus and minus ends of the batteries reversed?
• Are the batteries drained?
• Is there a power outage or is the power cord unplugged?
• Is there a special fluorescent light or neon sign nearby?

Connecting VHF and UHF Antennas
If your antenna has a set of leads that look like the diagram to the right, see 'Antennas with 300
O Flat Twin Leads' below.
If your antenna has one lead that looks like the diagram to the right, see 'Antennas with 75 O
Round Leads'.
If you have two antennas, see 'Separate VHF and UHF Antennas'.
Antennaswith 300Q FlatTwinLeads
If you are using an off-air antenna (such as a roof antenna or 'rabbit ears') that has 3000 twin
flat leads, follow the directions below.
1. Place the wires from the twin leads under the screws on a 300-75 O adapter (not
supplied). Use a screwdriver to tighten the screws.
2. Plug the adaptor into the ANT IN terminal on the back of the TV.
Antennaswith 75 Q RoundLeads
Plugtheantennalead intothe ANT INterminalon the backof theTV.
Separate VHF and UFIF Antennas
If you have two separate antennas for your TV (one VHF and one UHF), you must combine
the two antenna signals before connecting the antennas to the TV. This procedure requires an
optional combiner-adaptor (available at most electronics shops).
1. Connect both antenna leads to the combiner.
2. Plug the combiner into the ANT IN terminal on the bottom of the rear panel.
Connecting Cable TV
Toconnect to a cable TV system, follow the instructions below.
Cable without a Cable Box
Plug the incoming cable into the ANT IN terminal on the back of the TV.
Because this TV is cable-ready, you do not need a cable box to view unscrambled cable
channels.
Connecting to a Cable Box that Deserambles All Channels
1. Find the cable that is connected to the ANT OUT terminal on your cable box.
This terminal might be labeled 'ANT OUT', 'VHF OUT' or simply, 'OUT'.
2. Connect the other end of this cable to the ANT IN terminal on the back of the TV.

Connecting to a Cable Box that Descrambles Some Channels
If your cable box descrambles only some channels (such as premium channels), follow the instructionsbelow. You will need a two-
way splitter, an RF (A/B) switch and four lengths of RF cable. (These items are available at most electronics stores.)
f jl
CABLE
Cable Box
RF (NB} Switch
i. Find and disconnect the cable that is connected to the ANT IN terminal on your cable box.
This terminal might be labeled 'ANT IN', 'VHF IN' or simply, 'IN'.
2. Connect this cable to a two-way splitter.
3. Connect an RF cable between the OUTPUT terminal on the splitter and the IN terminal on the cable box.
4. Connect an RF cable between the ANT OUT terminal on the cable box and the B-IN terminal on the RF(A/B) switch.
6. Connect another cable between the other OUT terminal on the splitter and the A-IN terminal on the RF (A/B) switch.
6. Connect the last RF cable between the OUT terminal on the RF (A/B) switch and the ANT IN terminal on the rear of the TV.
After you have made this connection, set the A/B switch to the 'A' position for normal viewing. Set the A/B switch to the 'B'
position to view scrambled channels. (When you set the A/B switch to 'B', you will need to tune your TV to the cable box's
output channel, which is usually channel 3 or 4.)
Connecting a DVD / Blu-ray player / Cable Box / Satellite receiver (Set-Top Box) via HDMI
This connection can only be made if there is an HDMI Output connector on the external device.
DVD / Blu-ray player / Cable Box / TV Rear Panel
Satellite receiver (Set-Top Box)
j ........................................
LL _J
O HDMI Cable (Not supplied)
l,
%
o
o
Connect an HDMI Cable between the HDMI (DVl) IN jack on the TV and the HDMI jack on the DVD / Blu-ray Player or Cable
Box / Satellite receiver (Set-Top Box).
What is HDMI?
HDMl(High-Definition Multimedia Interface), is an interface that enables the transmission of digital audio and video signals
using a single cable.
The difference between HDMI and DVI is that the HDMI device is smaller in size and has the HDCP (High Bandwidth Digital
Copy Protection) coding feature installed.
Each DVD / Blu-ray player / Cable Box / Satellite receiver (Set-Top Box) has a different back panel configuration.
The TV may not output sound and pictures may be displayed with abnormal color when DVD / Blu-ray player / Cable Box /
Satellite receiver (Set-Top Box) supporting HDMI versions older than 1.3 are connected. When connecting an older HDMI
cable and there is no sound, connect the HDMI cable to the HDMI (DVl) IN jack and the audio cables to the DVmAUDIO
mNJR-AUDIO-L] jacks on the back of the TV. If this happens, contact the company that provided the DVD / Blu-ray player /
Cable Box / Satellite receiver (Set-Top Box) to confirm the HDMI version, then request an upgrade.
HDMI cables that are not 1.3 may cause annoying flicker or no screen display.

Connecting a DVD / Blu-ray player / Cable Box / Satellite receiver (Set-Top Box) via DVl
This connection can only be made if there is a DVI Output connector on the external device.
TV Rear Panel
DVD / Blu-ray player / Cable Box /
Satellite receiver (Set-Top Box)
O Audio Cable (Not supplied)
DVI to HDMI Cable (Not supplied)
1,
2.
Connect a DVI to HDMI Cable or DVI-HDMI Adapter between the NDMI (DVI) IN jack on the TV and the DVI jack on the DVD /
Blu-ray player / Cable Box / Satellite receiver (Set-Top Box).
Connect Audio Cables between the DVl AUDIO IN JR=AUDIO-L]jack on the TV and the DVD / Blu-ray player / Cable Box /
Satellite receiver (Set-Top Box).
Each DVD / Blu-ray player / Cable Box / Satellite receiver (Set-Top Box) has a different back panel configuration.
When connecting a DVD / Blu-ray player / Cable Box / Satellite receiver (Set-Top Box), match the color of the connection
terminal to the cable.
Connectinga DVD/ Blu-rayplayer/ CableBox / Satellitereceiver(Set-TopBox)viaComponentcables
The rear panel jacks on your TV make it easy to connect a DVD / Blu-ray player / Cable Box / Satellite receiver (Set-Top Box) to
,our TV.
TV Rear Panel
DVD / Blu-ray player/Cable Box /
Satellite receiver (Set=Top Box)
Audio Cable (Not supplied)
O Component Cable (Not supplied)
1,
2.
Connect a Component Cable between the COMPONENT IN [¥, PB,PR]jacks on the TV and the COMPONENT [Y, PB,PR]
jacks on the DVD / Blu-ray player / Cable Box / Satellite receiver (Set-Top Box).
Connect Audio Cables between the COMPONENT IN JR-AUDIO-L] jacks on the TV and the AUDIO OUT jacks on the DVD /
Blu-ray player / Cable Box / Satellite receiver (Set-Top Box).
Component video separates the video into Y (Luminance (brightness)), Pb (Blue) and Pr (Red) for enhanced video quality.
Be sure to match the component video and audio connections. For example, if connecting a Component video cable to
COMPONENT IN, connect the audio cable to COMPONENT IN also.
Each DVD / Blu-ray player / Cable Box / Satellite receiver (Set-Top Box) has a different back panel configuration.
When connecting a DVD / Blu-ray player / Cable Box / Satellite receiver (Set-Top Box), match the color of the connection
terminal to the cable.

Connecting a VCR
TV Rear Panel
VCR Rear Panel
O Audio Cable [Not supplied)
Video Cable (Not supplied)
1,
2.
Connect a Video Cable between the AV IN [VIDEO] jack on the TV and the VIDEO OUT jack on the VCR.
Connect Audio Cables between the AV IN JR-AUDIO=L] jacks on the TV and the AUDIO OUT jacks on the VCR.
If you have a 'mono' (non-stereo) VCR, use a Y-connector (not supplied) to connect to the right and left audio input jacks
of the TV. Alternatively, connect the cable to the 'R' jack. If your VCR is stereo, you must connect two cables.
Each VCR has a different back panel configuration.
When connecting a VCR, match the color of the connection terminal to the cable.
Connecting a Digital Audio System
The rear panel jacks on your TV make it easy to connect a Digital Audio System (Home theater/Receiver) to your TV.
TV Rear Panel
Digital Audio System
1,
Connect an Optical Cable between the DiGiTAL AUDIO OUT (OPTICAL) jacks on the TV and the Digital Audio Input jacks on
the Digital Audio System.
When a Digital Audio System is connected to the DiGiTAL AUDIO OUT [OPTICAL) jack: Decrease the volume of the TV
and adjust the volume level with the system's volume control.
5.1CH audio is possible when the TV is connected to an external device supporting 5.1CH.
Each Digital Audio System has a different back panel configuration.
When the Home Theater receiver is set to On, you can hear sound output from the TV's Optical jack. When the TV is
displaying a DTV(air) signal, the TV will send out 5.1 channel sound to the Home theater receiver. When the source is a
digital component such as a DVD / Blu-ray player / Cable Box / Satellite receiver (Set-Top Box) and is connected to the
TV via HDMI, only 2 channel sound will be heard from the Home Theater receiver. If you want to hear 5.1 channel audio,
connect the digital audio out jack on DVD / Blu-ray player / Cable Box / Satellite receiver (Set-Top Box) directly to an
Amplifier or Home Theater, not the TV.
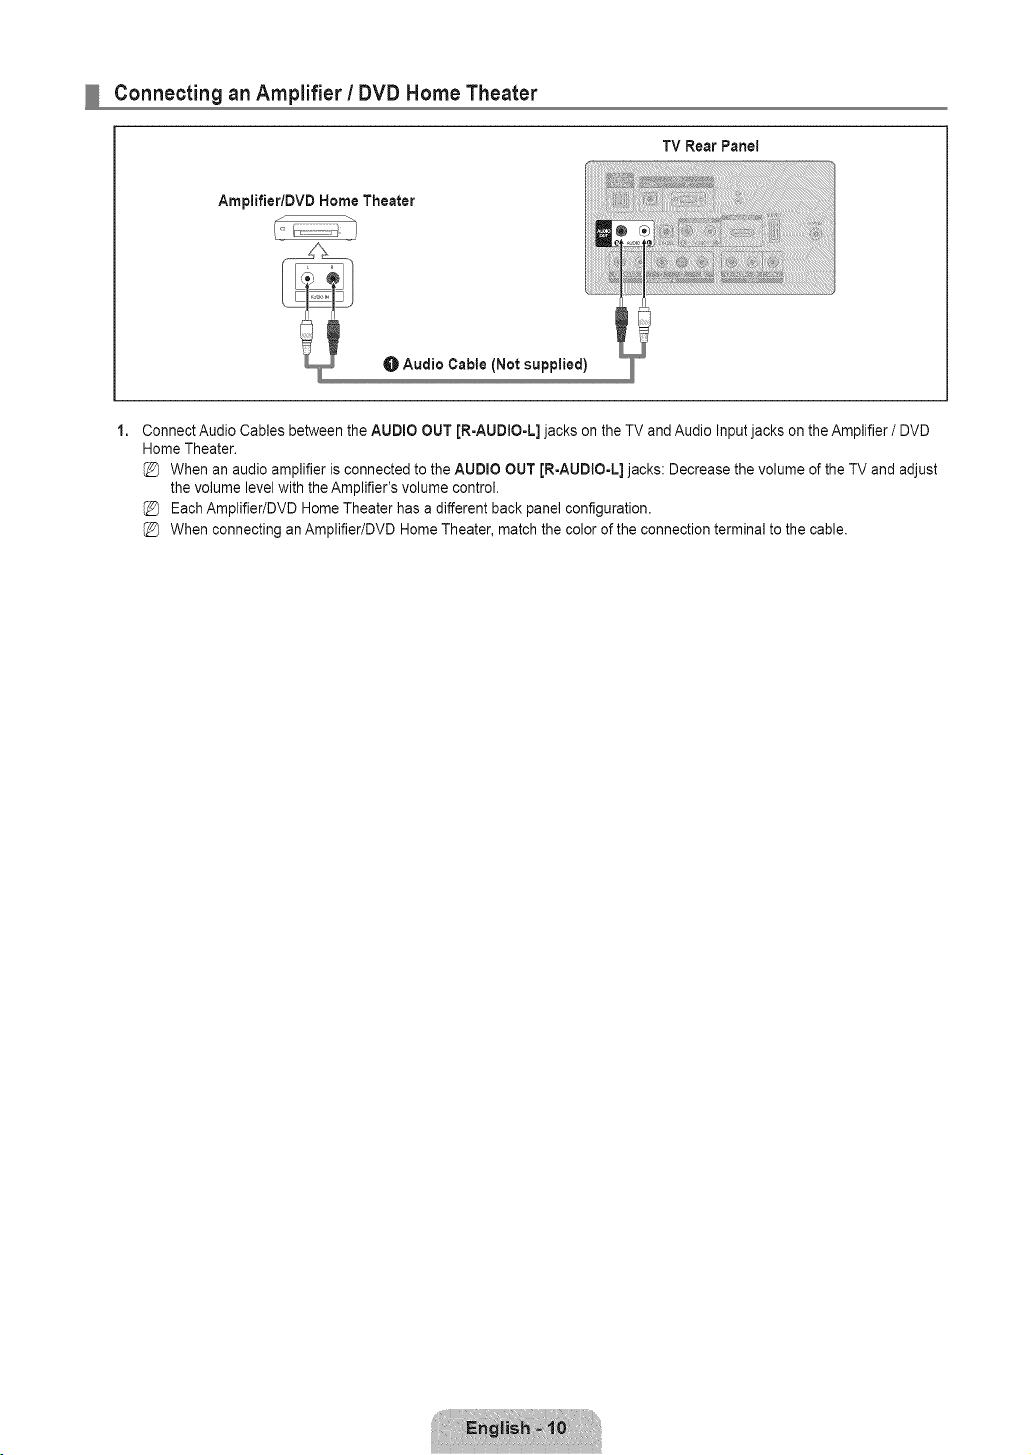
Connecting an Amplifier / DVD Home Theater
TV RearPanei
Ampiifier/DVD Home Theater
O Audio Cable (Not supplied)
1,
Connect Audio Cables between the AUDIO OUT [R-AUDIO-L] jacks on the TV and Audio Input jacks on the Amplifier / DVD
Home Theater.
When an audio amplifier is connected to the AUDIO OUT JR-AUDIO-L] jacks: Decrease the volume of the TV and adjust
the volume level with the Amplifier's volume control.
Each Amplifier/DVD Home Theater has a different back panel configuration.
When connecting an Amplifier/DVD Home Theater, match the color of the connection terminal to the cable.
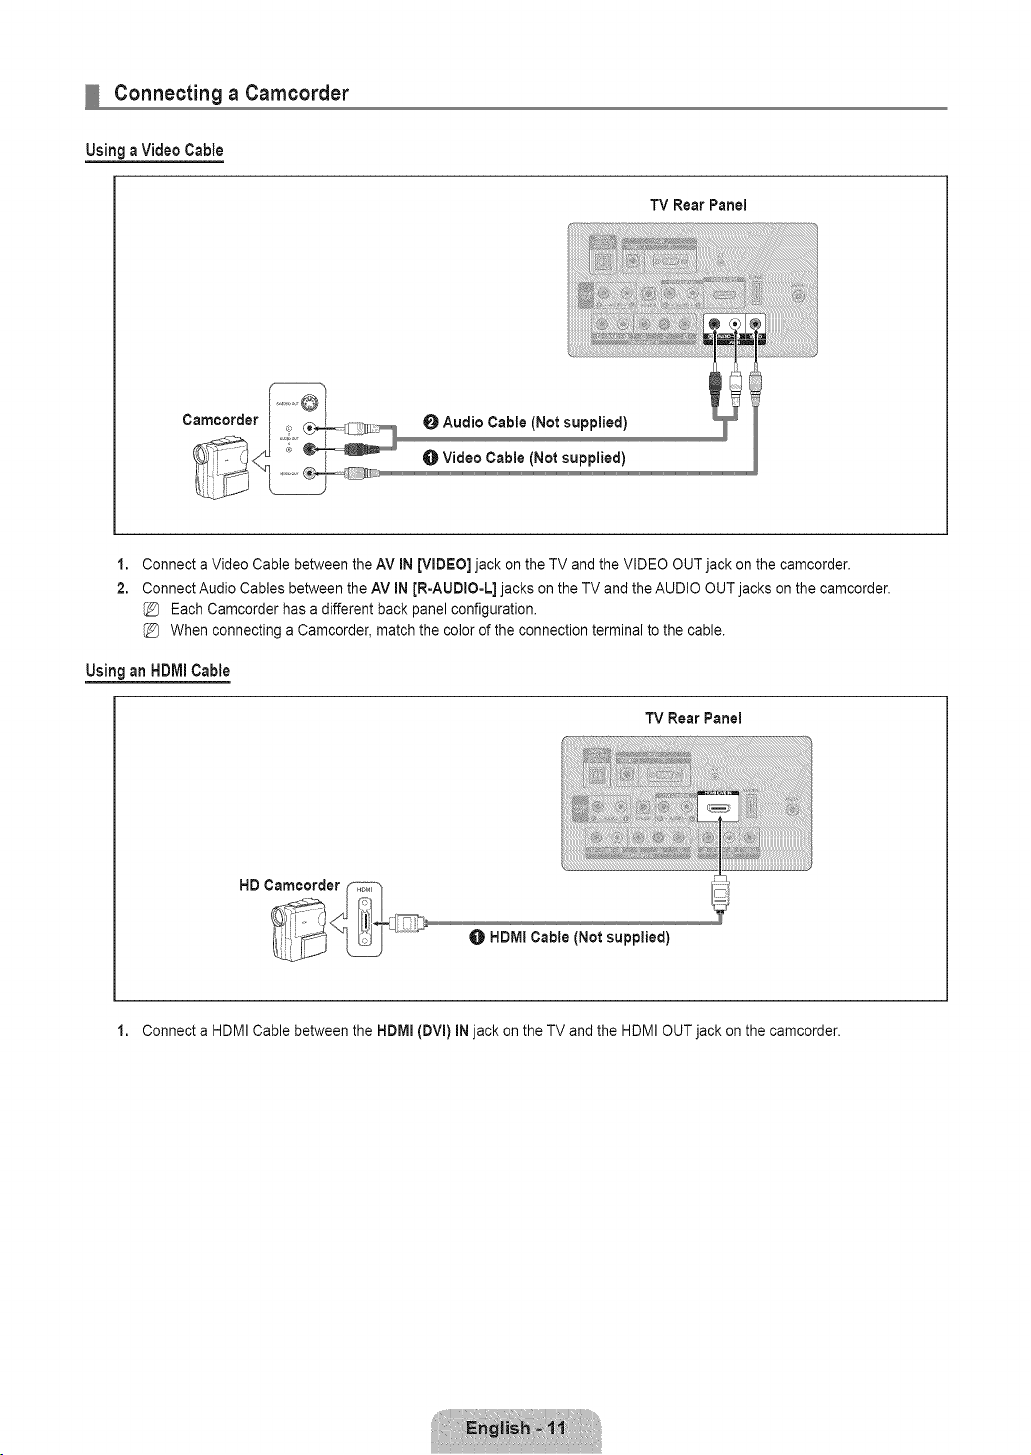
Connecting a Camcorder
Using a Video Cable
TV Rear Panel
Camcorder
0 Audio Cable (Not supplied)
Video Cable (Not supplied)
1,
2.
Connect a Video Cable between the AV IN [VIDEO] jack on the TV and the VIDEO OUT jack on the camcorder.
Connect Audio Cables between the AV IN JR-AUDIO-L] jacks on the TV and the AUDIO OUT jacks on the camcorder.
Each Camcorder has a different back panel configuration.
When connecting a Camcorder, match the color of the connection terminal to the cable.
UsinganHDMICable
TV RearPanel
HDMI Cable (Not supplied)
1. Connect a HDMI Cable between the HDMm(DVl) iN jack on the TV and the HDMI OUT jack on the camcorder.

Connecting a PC
Using a D-Sub Cable
PC
TV Rear Panel
1,
2.
Connect a D-Sub Cable between PC IN [PC] connector on the TV and the PC output connector on your computer,
Connect a PC Audio Cable between the PC iN [AUDtO] jack on the TV and the Audio Out jack of the sound card on your
computer,
When connecting a PC, match the color of the connection terminal to the cable.
Using an HDIVII/DVlCable
TV RearPanel
PC
O 3,5 mm Stereo mini-piugl2RCA Cable (Not supplied)
HDMIIDVI Cable (Not supplied)
1. Connect an HDMI/DVI cable between the HDIVll(DVl) IN jack on the TV and the PC output jack on your computer.
2. Connect a 3,5 mm Stereo miniplug / 2RCA Cable between the DVmAUDtO IN JR-AUDIO-L] jack on the TV and the Audio Out
jack of the sound card on your computer.
UsinganHDMICable
TV Rear Panel
1,
PC
Connect an HDMI cable between the HDMm{DVl) iN jack on the TV and the PC output jack on your computer.
Each PC has a different back panel configuration.
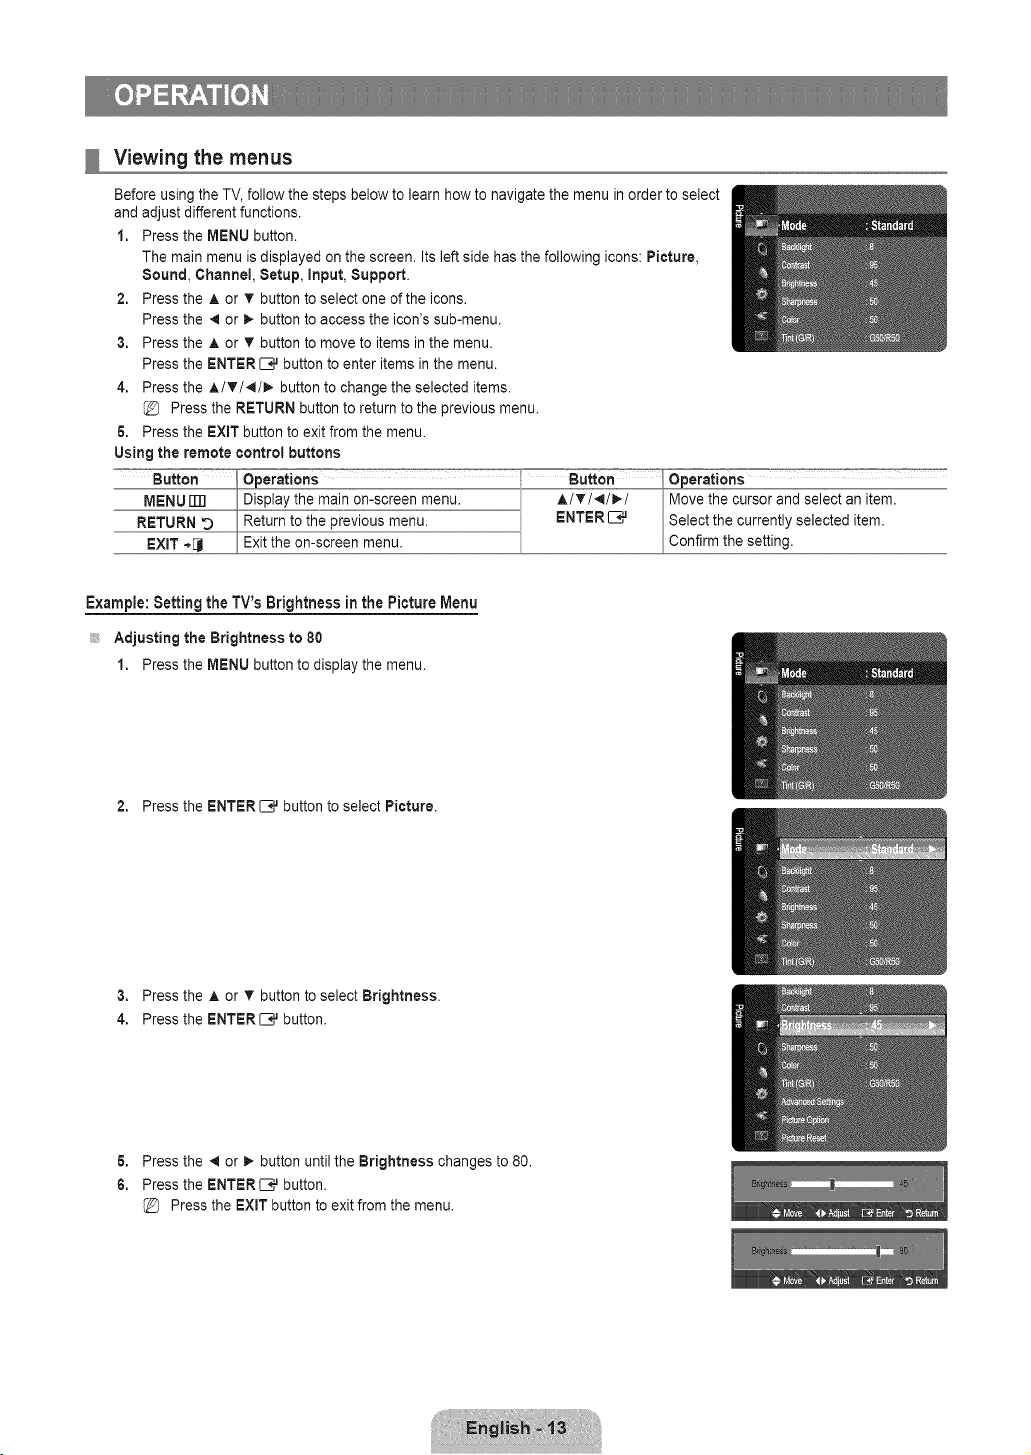
Viewing the menus
Before using the TV, follow the steps below to learn how to navigate the menu in order to select
and adjust different functions.
1. Press the MENU button.
The main menu is displayed on the screen. Its left side has the following icons: Picture,
Sound, Channel, Setup, input, Support.
2. Press the A or v' button to select one of the icons.
Press the 41or _- button to access the icon's sub-menu.
3. Press the A or T button to move to items in the menu.
Press the ENTER C,_ button to enter items in the menu.
4. Press the A/T/',I/_- button to change the selected items.
Press the RETURN button to return to the previous menu.
6. Press the EXIT button to exit from the menu.
Using the remote control buttons
Example: Setting the TV's Brightness in the Picture Menu
Adjusting the Brightness to 80
1. Press the MENU button to display the menu.
2. Press the ENTER _,_ button to select Picture.
3. Press the A or T button to select Brightness.
4. Press the ENTER_ button.
6. Press the _ or _. button until the Brightness changes to 80.
6. Press the ENTER[B# button.
Press the EXiT button to exit from the menu.

Plug & Play Feature
When the TV is initially powered on, basic settings proceed automatically and subsequently.
1. Press the POWER (_ button on the remote control.
You can also use the POWER (_ button on the TV.
The message Menu Language, Store Demo, Channels, and Time will be set. is
displayed.
2. Press the ENTER _,_ button, then Sets the menu language, menu is automatically
displayed.
3. Press the A or T button to select the language, then press the ENTER _,_ button. The message Select 'Home Use' when
installing this TV in your home. is displayed.
4. Press the _ or _ button to select Store Demo or Home Use, then press the ENTER _,_ button. The message Select the
Antenna source to memorize, is displayed.
We recommend setting the TV to Home Use mode for the best picture in your home environment.
Store Demo mode is only intended for use in retail environments. If the unit is accidentally set to Store Demo mode and
you want to return to Home Use (Standard): Press the volume button on the TV. When the volume OSD is displayed,
press and hold the MENU button on the TV for 5 seconds.
& Press the A or _' button to memorize the channels of the selected connection. Press the ENTERIIE,# button to select Start.
Air: Air antenna signal. / Cable: Cable antenna signal. / Auto: Air and Cable antenna signals.
In Cable mode, you can select the correct signal source among 8TD, NRC, and IRC by pressing the A, T, 4 or
button, then press the ENTER [B,# button. If you have Digital cable, select the cable system signal source for both Analog
and Digital. Contact your local cable company to identify the type of cable system that exists in your particular area.
6. Press the ENTERIZ},# button to select Start. The TV will begin memorizing all of the available channels.
To stop the search before it has finished, press the ENTER[B,# button with Stop selected.
After all the available channels are stored, it starts to remove scrambled channels. The Auto program menu then
reappears. Press the ENTER _,_ button when channel memorization is complete. The message Set the Clock Mode. is
displayed.
7. Press the ENTER[E_ button.
Press the J, or T button to select Auto, then Press the ENTERI:E# button. The message Set to daylight saving time, is
displayed. If you select Manual, Set current date and time is displayed.
8. Press the A or • button to select Off, On or Auto, then press the ENTERI:E# button.
9. Press the A or T button to highlight the time zone for your local area. Press the ENTERC ,,Jbutton. If you have received a
digital signal, the time will be set automatically. If not, see page 22 to set the clock.
10, The connection method to provide the best quality HD is offered. After confirming the method, press the ENTER C_ button.
11. The message Enjoy your TV is displayed. When you have finished, press the ENTER C_ button.
If you want to reset this feature..,
1. Press the MENU button to display the menu. Press the ,& or T button to select Setup, then press the ENTER C.,Jbutton.
2. Press the ENTERI:E# button again to select Plug & Play.
The Plug & Play feature is only available in the TV mode.

Configuring the Channel Menu
C)
C]
C)
C)
C)
Antenna _ Air / Cable
Before your television can begin memorizing the available channels, you must specify the type
of signal source that is connected to the TV (i.e. an Air or a Cable system).
_-_ Press the TOOLS button to display the Tools menu. You can also set the Antenna by
selecting Tools _ Switch to Cable (or Switch to Air).
Auto Program
Air: Air antenna signal, / Cable: Cable antenna signal. 1Auto: Air and Cable antenna
signals
When selecting the Cable TV system: Selects the cable system. STD, HRC and IRC
identify various types of cable TV systems. Contact your local cable company to identify the type of cable system that exists in
your particular area. At this point the signal source has been selected.
After all the available channels are stored, it starts to remove scrambled channels (Clear Scrambled Channels). The Auto
program menu then reappears.
If you want to stop Auto Programming, press the ENTER E;,_ button. The Stop Auto Program? message will be displayed.
Select Yes by pressing the 4 or _ button, then press the ENTER _,_ button.
Clear Scrambled Channels (digital channels only)
This function is used to filter out scrambled channels after Auto Program is completed. This process may take up to 20--30
minutes.
Tostop searching scrambled channels: Press the ENTER _,_ button to select Stop. Press the 4 button to select Yes, then
press the ENTER[--;,,J button.
This function is only available in Cable mode.
Channel List
For detailed procedures on using the Channel List, refer to the 'Managing Channels' instructions.
You can select these options by simply pressing the CH LIST button on the remote control.
Fine Tune (analog channels only)
Use fine tuning to manually adjust a particular channel for optimal reception.
If you do not store the fine-tuned channel in memory, adjustments are not saved.
* will appear next to the name of fine-tuned channels.
To reset the fine tuning setting, press the T button to select Reset, then press the ENTER _,_ button.
Managing Channels
Using this menu, you can add / delete or set favorite channels and use the program guide for
digital broadcasts.
All Channels
Shows all currently available channels.
Added Channels
Shows all added channels.
Favorite
Shows all favorite channels.
Toselect the favorite channels you have set up, press the FAV.CH button on the remote control.

Programmed
ShowsallcurrentreservedPrograms.
SelectachannelintheAl!Channels,AddedChannels or Favorite screen by pressing the A / T buttons, and pressing the
ENTER{B,.Jbutton. Then you can watch the selected channel.
Using the Color buttons with the Channel List
- Green (Zoom): Enlarges or shrinks a channel number.
- Yellow (Select): Selects multiple channel lists. You can perform the add / delete or add to Favorite / delete from Favorite
function for multiple channels at the same time. Select the required channels and press the yellow button to set all the
selected channels at the same time. The _/ mark appears to the left of the selected channels.
- TOOLS (Tools): Displays the Add (or Delete), Add to Favorite (or Delete from Favorite), Timer Viewing, Channel
Name Edit, Select All (or Deseleet All) and Auto Program menus (The Options menus may differ depending on the
situation.)
Channel Status Display icons
- v : A channel set as a Favorite.
- _/: A channel selected by pressing the yellow button.
- _ : A Program currently being broadcast.
- (_) :Areserved program
Channel
List Option Menu (in All Channels / Added Channels / Favorite)
Press the TOOLS button to use the option menu.
Option menu items may differ depending on the channel status.
Add / Delete
You can delete or add a channel to display the channels you want.
All deleted channels will be shown on All Channels menu.
A gray-colored channel indicates the channel has been deleted.
The Add menu only appears for deleted channels.
You can also delete a channel from the Added Channels or Favorite menu in the same
manner.
Add to Favorite / Delete from Favorite
You can set channels you watch frequently as Favorite.
Press the TOOLS button to display the Tools menu. You can also set the add to (or delete from) Favorites by selecting Tools
Add to Favorite (or Delete from Favorite).
The v symbol will be displayed and the channel will be set as a favorite.
All favorite channels will be shown in the Favorite menu.
Timer Viewing
If you reserve a program you want to watch, the channel is automatically switched to the reserved channel in the Channel List;
even when you are watching another channel. To reserve a program, set the current time first. (See page 22)
Only memorized channels can be reserved.
You can set the channel, month, day, year, hour and minute directly by pressing the number buttons on the remote control.
Reserving a program will be shown in the Programmed menu.
Digital Program Guide and Viewing Reservation
When a digital channel is selected, and you press the _- button, the Program Guide for the channel appears. You can reserve
a program according to the procedures described above.
Channel Name Edit (analog channels only)
Channels can labeled so that their call letters appear whenever the channel is selected.
The names of digital broadcasting channels are automatically assigned and cannot be labeled.
Select All I Deselect All
= Select All: You can select all the channels in the channel list.
• Deselect All: You can deselect all the selected channels.
You can only select Deseleet All when there is a selected channel.
Auto Program
For further details on setting up options, refer to page 15.

Channel List Option Menu (in Programmed)
You can view, modify or delete a reservation.
Press the TOOLS button to use the option menu.
Change Info
Select to change a viewing reservation.
Cancel Schedules
Select to cancel a viewing reservation.
Information
Select to view a viewing reservation. (You can also change the reservation information.)
Select All
Select all reserved Programs.
C)
C)
Configuring the Picture Menu
Mode
You can select the type of picture which best corresponds to your viewing requirements.
__ Press the TOOLS button to display the Tools menu. You can also set the picture mode by
selecting Tools _ Picture Mode.
Dynamic
Selects the picture for increased definition in a bright room.
Standard
Selects the picture for the optimum display in a normal environment.
Movie
Selects the picture for viewing movies in a dark room.
Backlight / Contrast / Brightness / Sharpness / Color / Tint (G/R)
Your television has several setting options that allow you to control the picture quality.
• Backlight: Adjusts the brightness of LCD back light.
• Contrast: Adjusts the contrast level of the picture.
• Brightness: Adjusts the brightness level of the picture
• Sharpness: Adjusts the edge definition of the picture.
• Color: Adjusts color saturation of the picture.
• Tint (G/R): Adjusts the color tint of the picture.
When you make changes to Backlight, Contrast, Brightness, Sharpness, Color or Tint (GtR) the OSD will be adjusted
accordingly.
In PC mode, you can only make changes to Backlight, Contrast and Brightness.
Settings can be adjusted and stored for each external device you have connected to an input of the TV.
The energy consumed during use can be significantly reduced if the brightness level of the picture is lowered, which will
reduce the overall running cost.
C) Advanced Settings
Samsung's new TVs allow you to make even more precise picture settings than previous
models.
Advanced Settings is available in Standard or Movie mode.
In PC mode, you can only make changes to Gamma and White Balance from among the
Advanced Settings items.
Black Tone -_ Off I Dark / Darker / Darkest
You can select the black level on the screen to adjust the screen depth.

DynamicContrast _ Off / Low / Medium / High
You can adjust the screen contrast so that the optimal contrast is provided.
Gamma
You can adjust the primary color (red, green, blue) Intensity. (-3 -- +3)
Color Space
Color space is a color matrix composed of red, green and blue colors. Select your favorite color space to experience the most
natural color.
• Native: Native Color Space offers deep and rich color tone.
• Auto: Auto Color Space automatically adjusts to the most natural color tone based on program sources.
White Balance
You can adjust the color temperature for more natural picture colors.
• R-Offset / G-Offset / B-Offset / R-Gain / G-Gain / B-Gain: You can adjust the Color 'temperature' in the light areas by
changing the values of R, G, B. Recommended for advanced users only.
• Reset: The previously adjusted white balance will be reset to the factory defaults.
Changing the adjustment value will refresh the adjusted screen.
Flesh Tone
You can emphasize the pink 'flesh tone' in the picture.
Changing the adjustment value will refresh the adjusted screen.
Edge Enhancement _ Off / On
You can emphasize object boundaries in the picture.
C)
Picture Options
In PC mode, you can only make changes to the Color Tone and Size from among the
items in Picture Options.
Color Tone _ Cool / Normal 1Warm1 / Warm2
Warm1 or Warm2 is only activated when the picture mode is Movie.
Settings can be adjusted and stored for each external device you have connected to an
input of the TV.
Size
Occasionally, you may want to change the size of the image on your screen. Your TV comes with six screen size options, each
designed to work best with specific types of video input. Your cable box/satellite receiver may have its own set of screen sizes as
well. In general, though, you should view the TV in 16:9 mode as much as possible.
Alternately, you can press the P.SIZE button on the remote control repeatedly to change the picture size.
• 16:9 : Sets the picture to 16:9 wide mode.
• Zoom1: Magnifies the size of the picture on the screen.
• Zoom2: Magnifies the size of the picture more than Zoom1.
• Wide Fit: Enlarges the aspect ratio of the picture to fit the entire screen.
• 4:3 : Sets the picture to 4:3 normal mode.
• Screen Fit: Use the function to see the full image without any cutoff when HDMI (720p/108%, Component (108% or DTV
(1080i) signals are input.
%
%
%
%
%
Temporary image retention may occur when viewing a static image on the set for more than two hours.
After selecting Zoom1, Zoom2 or Wide Pit: Press the 41or i_ button to select Position, then press the ENTER _ button.
Press the A or T button to move the picture up and down.
After selecting Screen Fit in HDMI (I080i) or Component (I080i) mode, you made need to center the picture: Press the _ or
_. button to select Position, then press the ENTERI:B_ button. Press the A, T, 4 or _button to move the picture.
Reset: Press the 4 or !_-buttonto select Reset, then press the ENTERI:E_ button. You can initialize the setting.
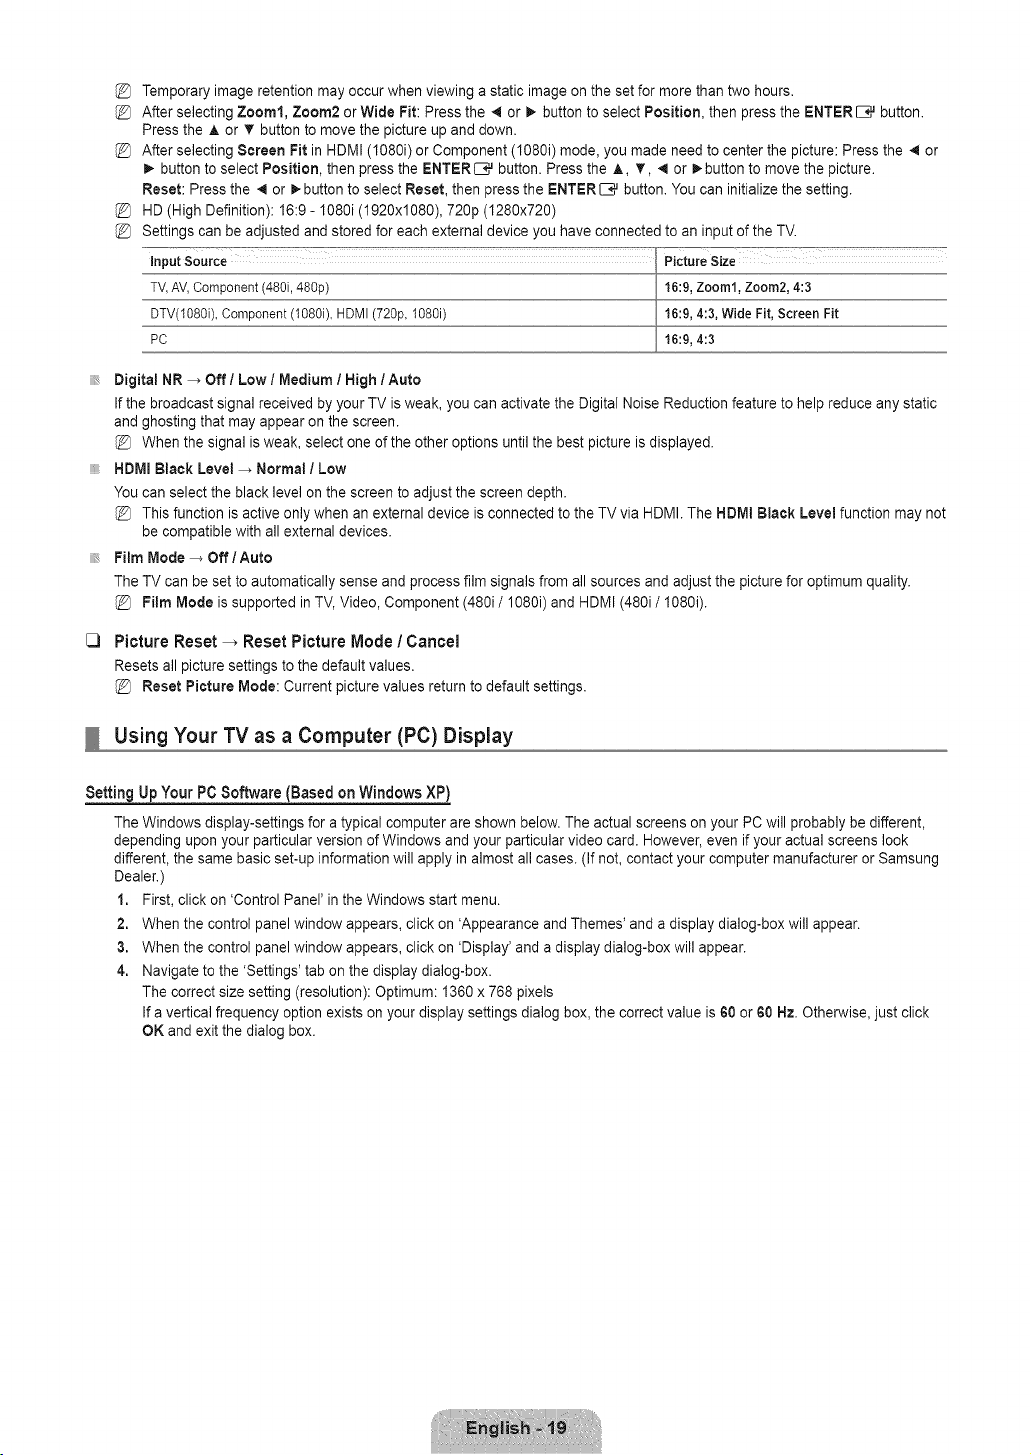
HD (High Definition): 16:9 - 1080i (1920x1080), 720p (1280x720)
Settings can be adjusted and stored for each external device you have connected to an input of the TV.
inputSource PictureSize
TV,AV,Component(480i,48%) 16:9,Zoom1,Zoom2,4:3
DTV(1080i),Component(1080i),HDMI(720p,108% 16:9,4:3,Wide Fit, Screen Fit
PC 16:9,4:3
Digital NR -_ Off / Low / Medium I High / Auto
If the broadcast signal received by your TV is weak, you can activate the Digital Noise Reduction feature to help reduce any static
and ghosting that may appear on the screen.
When the signal is weak, select one of the other options until the best picture isdisplayed.
HDMI Black Level _ Normal / Low
You can select the black level on the screen to adjust the screen depth.
This function is active only when an external device is connected to the TV via HDMI. The HDMI Black Level function may not
be compatible with all external devices.
Film Mode -_ Off / Auto
The TV can be set to automatically sense and process film signals from all sources and adjust the picture for optimum quality.
Film Mode is supported in TV, Video, Component (480i/1080i) and HDMI (480i/I080i).
C3 Picture Reset -_ Reset Picture Mode / Cancel
Resets all picture settings to the default values.
Reset Picture Mode: Current picture values return to default settings.
Using Your TV as a Computer (PC) Display
Settiag Up Your PC Software (Based oa Windows XP)
The Windows display-settings for a typical computer are shown below. The actual screens on your PC will probably be different,
depending upon your particular version of Windows and your particular video card. However, even if your actual screens look
different, the same basic set-up information will apply in almost all cases. (If not, contact your computer manufacturer or Samsung
Dealer.)
1. First, click on 'Control Panel' in the Windows start menu.
2. When the control panel window appears, click on 'Appearance and Themes' and a display dialog-box will appear.
3. When the control panel window appears, click on 'Display' and a display dialog-box will appear.
4. Navigate to the 'Settings' tab on the display dialog-box.
The correct size setting (resolution): Optimum: 1360 x 768 pixels
If a vertical frequency option exists on your display settings dialog box, the correct value is 60 or 60 Hz. Otherwise, just click
OK and exit the dialog box.

DisplayModes
If the signal from the system equals the standard signal mode, the screen is adjusted automatically. If the signal from the system
doesn't equal the standard signal mode, adjust the mode by referring to your videocard user guide; otherwise there may be no
video. For the display modes listed below, the screen image has been optimized during manufacturing.
D=Sub and HDIVlI/DVIinput
Mode
Resolution (KHz) .........................(Hz) (MHz) (H1V)
IBM 640 x 350 31.489 70.086 25.175 +/-
720 x 400 31.469 28.322 4+
MAC 640 x 480 35.000 30.240 4-
......................................................832 x624 .....................................................49..726 74.551 57.284 -/-
35.910 59.950 32.750 -/+VESA CVT 720 x 576
1280 x 720
1280 x 720
640 x 480
640 x 480
800 x 800
800 x 800
800 x 800
1024 x 788
1024 x 788
1024 x 788
44.772
56.456
31.469
37.500
37.861
37.879
46.875
48.077
48.363
56.476
60.023
59.855
74.777
59.940
75.000
72.809
60.317
75.000
72.188
60.004
70.069
75.029
74.500
95.750
25.175
31.500
31.500
40.000
49.500
50.000
65.000
75.000
78.750
-/+
-/+
-/-
-/-
-/-
+/+
+/+
+/+
-/-
-/-
+/+
1360 x 768 , 47.712 , 60.015 , 85.500 +/+
VESA GTF 1280 x 720 52.500 70.000 89.040 -/+
When using an HDMI / DVI cable connection, you must use the HDMI (DVI) IN jack.
C)
Setting up the TV with your PC
Preset: Press the SOURCE button to select PC mode.
Auto Adjustment
Use the Auto Adjust function to have the TV set automatically adjust the video signals it
receives. The function also automatically fine-tunes the settings and adjusts the frequency
values and positions.
_-_ Press the TOOLS button to display the Tools menu. You can also set the Auto Adjustment
by selecting Tools _ Auto Adjustment.
This function does not work in DVI-HDMI mode.
C) Screen
The purpose of the picture quality adjustment is to remove or reduce picture noise. If the noise is not removed by fine tuning alone,
then make the vertical frequency adjustments on your PC and fine tune again. After the noise has been reduced, re-adjust the
picture so that it is aligned on the center of the screen.
Coarse / Fine
The purpose of picture quality adjustment is to remove or reduce picture noise. If the noise is not removed by Fine-tuning alone,
then adjust the frequency as best as possible (Coarse) and Fine-tune again. After the noise has been reduced, readjust the picture
so that it is aligned on the center of screen.
PC Position
Adjust the PC's screen positioning if it does not fit the TV screen. Press the ,& or T button to adjusting the Vertical-Position. Press
the 41or _-button to adjust the Horizontal-Position.
image Reset
You can replace all image settings with the factory default values.

C)
Configuring the Sound Menu
Mode _ Standard / Music / Movie / Clear Voice / Custom
You can select a sound mode to suit your personal preferences.
__ Press the TOOLS button to display the Tools menu. You can also set the sound mode by
selecting Tools _ Sound Mode.
C) Equalizer
The sound settings can be adjusted to suit your personal preference.
Mode
Selects the sound mode among the predefined settings.
Balance L/R
Adjusts the balance between the right and left speaker.
f00Hz / 300Hz / IKHz / 3KHz / 10KHz {Bandwidth Adjustment)
Toadjust the level of different bandwidth frequencies.
Reset
Resets the equalizer settings to the default values.
C)
C)
C)
SRS TruSurround HD _ Off/On
SRS TruSurround HD is a patented SRS technology that solves the problem of playing 5.1 multichannel content over two
speakers. TruSurround delivers a compelling, virtual surround sound experience through any two-speaker playback system,
including internal television speakers. It is fully compatible with all multichannel formats.
C)
Preferred Language (digital channels only)
DigitaI-TV broadcasts are capable of simultaneous transmission of many audio tracks (for example, simultaneous translations of
the program into foreign languages).
You can listen in a language other than the Preferred Language by pressing the MTS button on the remote control.
Preferred Language is available only in Digital TV mode.
You can only select the language from among the actual languages being broadcast.
Multi-Track Sound (MTS) (analog channels only)
Press the MTS button on the remote control repeatedly to select Mono, Stereo or SAP.
• Mono: Choose for channels that are broadcasting in mono or if you are having difficulty receiving a stereo signal.
• Stereo: Choose for channels that are broadcasting in stereo.
• SAP: Choose to listen to the Separate Audio Program, which is usually a foreign-language translation.
Multi-Track Sound is available only in Analog TV mode.
Depending on the particular program being broadcast, you can listen to Mono, Stereo or SAP.
Auto Volume -_ Off/On
Each broadcasting station has its own signal conditions, and so it is not easy to adjust the volume every time the channel is
changed. This feature lets you automatically adjust the volume of the desired channel by lowering the sound output when the
modulation signal is high or by raising the sound output when the modulation signal is low.
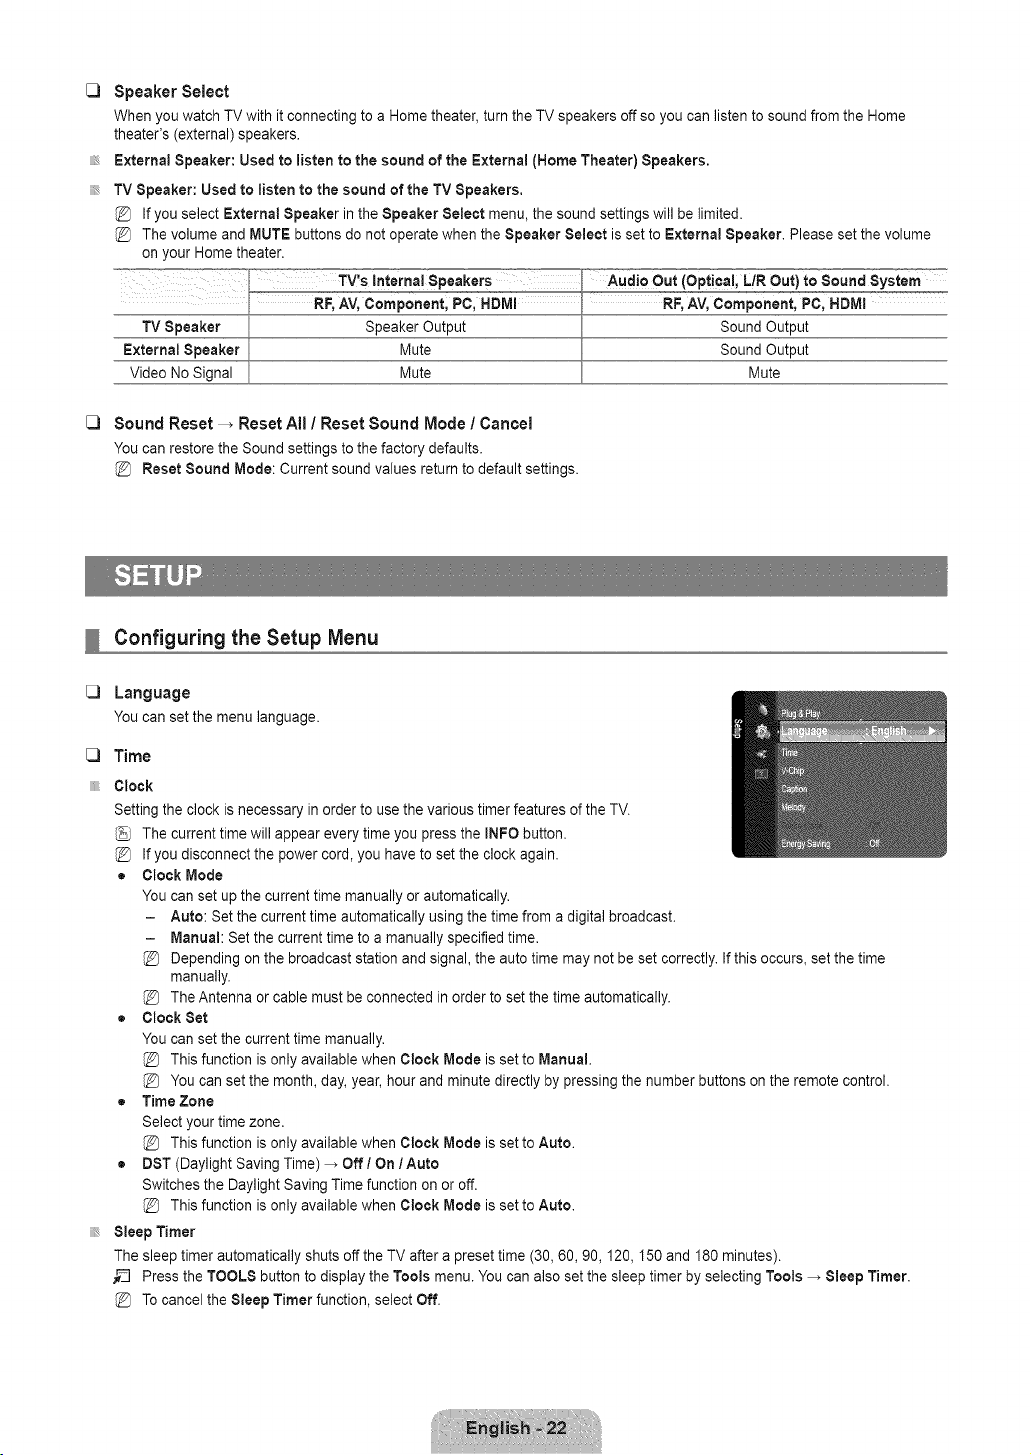
[_ Speaker Select
When you watch TV with it connecting to a Home theater, turn the TV speakers off so you can listen to sound from the Home
theater's (external) speakers.
External Speaker: Used to listen to the sound of the External (Home Theater) Speakers.
TV Speaker: Used to listen to the sound of the TV Speakers,
If you select External Speaker in the Speaker Select menu, the sound settings will be limited.
The volume and MUTE buttons do not operate when the Speaker Select is set to External Speaker. Please set the volume
on your Home theater.
Mute
Sound Reset _ Reset All / Reset Sound Mode / Cancel
You can restore the Sound settings to the factory defaults.
Reset Sound Mode: Current sound values return to default settings.
Mute
Configuring the Setup Menu
Language
Youcansetthe menulanguage.
Time
Clock
Setting the clock is necessary in order to use the various timer features of the TV.
The current time will appear every time you press the INFO button.
If you disconnect the power cord, you have to set the clock again.
= Clock Mode
You can set up the current time manually or automatically.
- Auto: Set the current time automatically using the time from a digital broadcast.
- Manual: Set the current time to a manually specified time.
Depending on the broadcast station and signal, the auto time may not be set correctly. If this occurs, set the time
manually.
The Antenna or cable must be connected in order to set the time automatically.
• Clock Set
You can set the current time manually.
This function is only available when Clock Mode is set to Manual.
You can set the month, day, year, hour and minute directly by pressing the number buttons on the remote control.
• Time Zone
Select your time zone.
This function is only available when Clock Mode is set to Auto.
• DST (Daylight Saving Time) _ Off / On 1Auto
Switches the Daylight Saving Time function on or off.
This function is only available when Clock Mode is set to Auto.
Sleep Timer
The sleep timer automatically shuts off the TV after a preset time (30, 60, 90,120,150 and 180 minutes).
_-_ Press the TOOLS button to display the Tools menu. You can also set the sleep timer by selecting Tools _ Sleep Timer.
Tocancel the Sleep Timer function, select Off.

C)
Timer I / Timer 2 / Timer 3
Three different on / off timer settings can be made. You must set the clock first.
• On Time: Set the hour, minute, am/pm, and activate/inactivate. (To activate the timer with the setting you've chosen, set to
Activate.)
• Off Time: Set the hour, minute, am/pm, and activate/inactivate. (To activate the timer with the setting you've chosen, set to
Activate.)
• Volume: Set the desired volume level.
• Antenna: View antenna type. (Air or Cable)
You can set the Antenna by selecting Channel _ Antenna. (see page 15)
• Channel: Selectthe desired channel.
• Repeat: Select Once, Everyday, Mon-Fri, Mort~Sat, Sat-Sun or Manual.
@ When Manual is selected, press the _ button to select the desired day of the week. Press the ENTER _ button over the
desired day and the _ mark will appear.
@ You can set the hour, minute and channel by pressing the number buttons on the remote control.
@ Auto Power Off
When you set the timer On, the television will eventually turn off, if no controls are operated for 3 hours after the TV was
turned on by the timer. This function is only available in timer On mode and prevents overheating, which may occur if a TV is
on for too long time.
V-Chip
The V-Chip feature automatically locks out programs that are deemed inappropriate for children. The user must enter a PIN
(personal ID number) before any of the V-Chip restrictions are set up or changed.
V-Chip function is not available in HDMI, Component or PC mode.
The default PIN number of a new TV set is '0-0-0-0'
If you forget the PIN, press the remote-control buttons in the following sequence, which resets the pin to 0-0-0-0 : POWER
(off) _ MUTE _ 8 _ 2 -* 4 -_ POWER (on).
Allow all: Press to unlock all TV ratings. / Block all: Press to lock all TV ratings.
V-Chip Lock _ Off / On
You can block rated TV Programs.
TV Parental Guidelines
You can block TV programs depending on their rating. This function allows you to control what
your children are watching.
• TV-Y: Young children / TV-YT: Children 7 and over / TV-G: General audience /
TV-PG: Parental guidance / TV-14: Viewers 14 and over / TV-MA: Mature audience
• ALL: Lock all TV ratings. / FV: Fantasy violence / V: Violence / S: Sexual situation /
L: Adult Language / D: Sexually Suggestive Dialog
The V-Chip will automatically block certain categories that are more restrictive. For
example, if you block TV-Y category, then TV-Y7 will automatically be blocked. Similarly,
if you block the TV-G category, then all the categories in the young adult group will be
blocked (TV-G, TV-PG, TV-14 and TV-MA). The sub-ratings (D, L, S, V) work together
similarly.
The V-chip will automatically block certain categories that are 'More restrictive'. For example, if you block L sub-rating in TV-
PG, then the L sub-ratings in TVo14and TV-MA will automatically be blocked.
MPAA Rating
You can block movies depending on their MPAA rating. The Motion Picture Association of
America(MPAA) has implemented a rating system that provides parents or guardians with
advance information on which films are appropriate for children.
= G: General audience (no restrictions).
• PG: Parental guidance suggested.
• PG=13: Parents strongly cautioned.
• R: Restricted. Children under 17 should be accompanied by an adult.
• NC-17: No children under age 17.
• X:Adults only.
• NR: Not rated.
The V-Chip will automatically block any category that is 'More restrictive'. For example, if you block the PG-13 category, then
R, NC-17 and X will automatically be blocked also.
Canadian English
• C: Programming intended for children under age 8.
• C8+: Programming generally considered acceptable for children 8 years and over to watch on their own.
• G: General programming, suitable for all audiences.
• PG: Parental Guidance.
• 14+: Programming contains themes or content which may not be suitable for viewers under the age of 14.
• 18+:Adult programming.
The V-Chip will automatically block any category that is 'More restrictive'. For example, if you block G category, then PG, 14+
and 18+ will automatically be blocked also.
Canadian French
• G: General
• 8 arts+: Programming generally considered acceptable for children 8 years and over to watch on their own.
• 13 arts+: Programming may not be suitable for children under the age of 13.
• 16 arts+: Programming is not suitable for children under the age of 16.
• 18 arts+: Programming restricted to adults.
@ The V-Chip will automatically block any category that is 'More restrictive'. For example, if you block 8 arts+ category, then 13
arts+, 16 arts+ and 18 arts+ will automatically be blocked also.
The number of current The number of a+l
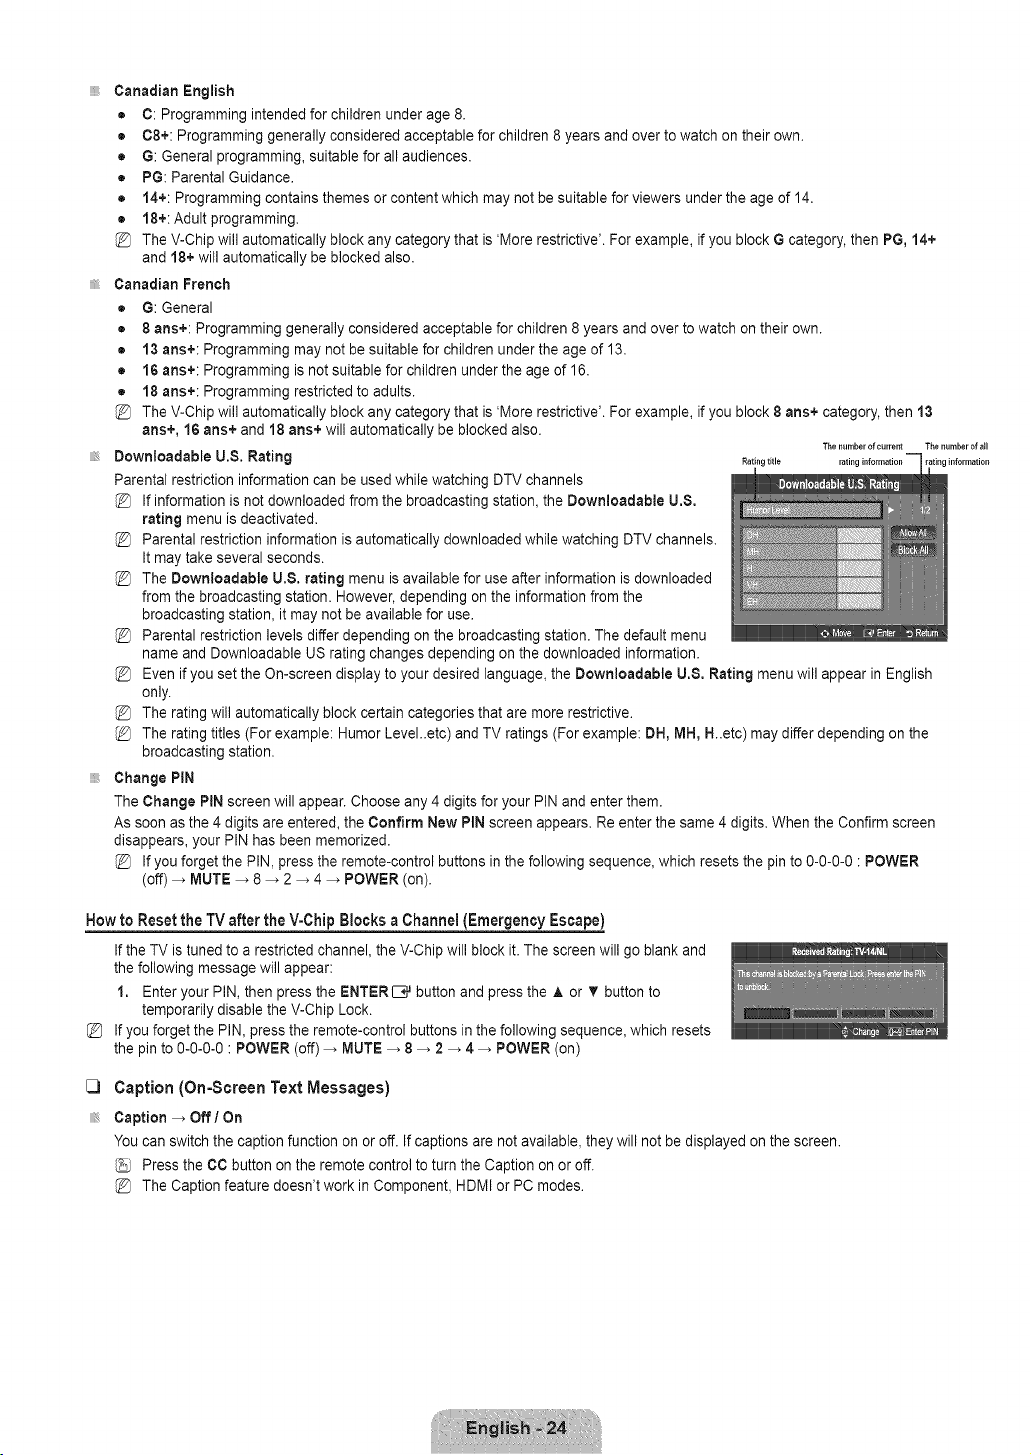
Downloadable U.8. Rating Ratingtitle rating information rating information
Parental restriction information can be used while watching DTV channels
If information is not downloaded from the broadcasting station, the Downloadable U,8,
rating menu is deactivated.
Parental restriction information is automatically downloaded while watching DTV channels.
It may take several seconds.
The Downioadable U.8. rating menu is available for use after information is downloaded
from the broadcasting station. However, depending on the information from the
broadcasting station, it may not be available for use.
Parental restriction levels differ depending on the broadcasting station. The default menu
name and Downloadable US rating changes depending on the downloaded information.
Even if you set the On-screen display to your desired language, the Downloadable U.8, Rating menu will appear in English
only.
The rating will automatically block certain categories that are more restrictive.
The rating titles (For example: Humor Level..etc) and TV ratings (For example: DH, MH, H..etc) may differ depending on the
broadcasting station.
Change PIN
The Change PIN screen will appear. Choose any 4 digits for your PIN and enter them.
As soon as the 4 digits are entered, the Confirm New PIN screen appears. Re enter the same 4 digits. When the Confirm screen
disappears, your PIN has been memorized.
If you forget the PIN, press the remote-control buttons in the following sequence, which resets the pin to 0-0-0-0 : POWER
(off) _ MUTE _ 8 _ 2 _ 4 _ POWER (on).
How to Resetthe TV after theV-Chip Blocks a Channel(Emergency Escape)
%
If the TV is tuned to a restricted channel, the V-Chip will block it. The screen will go blank and
the following message will appear:
1. Enter your PIN, then press the ENTER[E# button and press the A or T button to
temporarily disable the V-Chip Lock.
If you forget the PIN, press the remote-control buttons in the following sequence, which resets
the pin to 0-0-0-0 : POWER (off) _ MUTE _ 8 _ 2 _ 4 _ POWER (on)
C3
Caption (On-Screen Text Messages)
Caption _ Off I On
You can switch the caption function on or off. If captions are not available, they will not be displayed on the screen.
Press the CO button on the remote control to turn the Caption on or off.
The Caption feature doesn't work in Component, HDMI or PC modes.

C)
C)
C)
Caption Mode
You can select the desired caption mode.
The availability of captions depends on the program being broadcast.
• Default I CC1-CC4 / Textl~Text4 (analog channels only)
The Analog Caption function operates in either analog TV channel mode or when a signal is supplied from an external device
to TV. (Depending on the broadcasting signal, the Analog Caption function may operate on digital channels.)
• Default I 001~0C4 / Textl~Text4 / Servicer~Service6 (digital channels only)
The Digital Captions function operates on digital channels.
Service1--6 in digital caption mode may not be available depending on the broadcast.
Digital Caption Options (digital channels only)
= Size: This option consists of Default, Small, Standard and Large. The default is Standard.
• Font Style: This option consists of Default, Style0 ~ Style 7. You can change the font you want. The default is Style 0.
• Foreground Dolor: This option consists of Default, White, Black, Red, Green, Blue, Yellow, Magenta and Cyan. You can
change the color of the letter. The default isWhite.
• Background Dolor: This option consists of Default, White, Black, Red, Green, Blue, Yellow, Magenta and Cyan. You can
change the background color of the caption. The default is Black.
• Foreground Opacity: This option consists of Default, Transparent, Translucent, Solid and Flashing. You can change the
opacity of the letter.
• Background Opacity: This option consists of Default, Transparent, Translucent, Solid and Flashing. You can change the
background opacity of the caption.
• Return to Default: This option sets each of Size, Font Style, Foreground Color, Background color, Foreground Opacity
and Background Opacity to itsdefault.
The DigitaJ Caption Options are only enabled when the Caption Mode is Service 1 ~ Service 6. (If Caption Mode is the
default, the Digital Caption Options are enabled depending on the broadcast.)
The availability of captions depends on the program being broadcast.
Default means to follow the standard set by the broadcaster.
Foreground and Background cannot be set to have the same color.
Foreground Opacity and Background Opacity cannot be both set to Transparent.
Melody -_ Off/Low / Medium / High
A melody sound can be set to come on when the TV is powered On or Off.
The Melody does not play.
- When no sound is output from the TV because the MUTE button has been pressed.
- When no sound is output from the TV because the volume has been reduced to minimum with the VOL = button.
- When the TV is turned off by Sleep Timer function.
Game Mode -_ Off / On
When connecting to a game console such as PlayStationTM or XboxTM, you can enjoy a more realistic gaming experience by
selecting the game menu.
Restrictions on game mode (Caution)
- To disconnect the game console and connect another external device, set Game Mode to Off in the setup menu.
- If you display the TV menu in Game mode, the screen shakes slightly.
If Game Mode is On :
- Picture mode is automatically changed to Standard and cannot be changed.
- Sound mode is automatically changed to Custom and cannot be changed. Adjust the sound using the equalizer.
Game Mode is not available in regular TV and PC mode.
If the picture is poor when external device is connected to TV, check if Game Mode is On. Set Game Mode to Off and
connect external devices.
Energy Saving -_ Off / Low / Medium / High / Auto
This feature adjusts the brightness of the TV in order to reduce power consumption. When watching TV at night, set the Energy
Saving mode option to High to reduce eye fatigue as well as power consumption.

Configuring the input Menu
C) Source List
Use to select TV or other external input sources such as DVD / Blu-ray players / Cable Box /
Satellite receivers (Set-Top Box) connected to the TV. Use to select the input source of your
choice.
Press the SOURCE button on the remote control to view an external signal source.
TV/AV / Component / PC / HDM!/DVI
You can choose only those external devices that are connected to the TV. In the Source
List, connected inputs will be highlighted and sorted to the top. Inputs that are not
connected will be sorted to the bottom.
- TOOLS (Tools): Displays the Edit Name and information menus.
C) Edit Name
Name the device connected to the input jacks to make your input source selection easier.
VCR / DVD / Cable STB / Satellite 8TB / PVR 8TB / AV Receiver / Game / Camcorder / PC / DVI PC / DVI / TV / IPTV / Blu-ray
/ HD DVD / DMA
Configuring the Support Menu
C3
Self Diagnosis
Picture Test
If you think you have a picture problem, perform the picture test. Check the color pattern on the screen to see if the problem still
exists.
• Yes: If the test pattern does not appear or there is noise in the test pattern, select Yes.
There may be a problem with the TV. Contact Samsung's call center for assistance.
• No: If the test pattern is properly displayed, select No. There may be a problem with your
external equipment. Please check your connections. If the problem still persists, refer to
the external device's user manual.
Sound Test
If you think you have a sound problem, please perform the sound test. You can check the
sound by playing a built-in melody sound through the TV. 'Does the problem still exist with this
sound test?' appears on the screen.
If you hear no sound from the TV's speakers, before performing the sound test, make sure Speaker Select is set to TV
speaker in the Sound menu.
The melody will be heard during the test even if Speaker Select is set to External Speaker or the sound is muted by pressing
the MUTE button.
• Yes: If during the sound test you can hear sound only from one speaker or not at all, select Yes. There may be a problem with
the TV. Contact Samsung's call center for assistance.
• No: If you can hear sound from the speakers, select No. There may be a problem with your external equipment. Please check
your connections. If the problem still persists, refer to the external device's user manual.
Signal Strength (digital channels only)
Unlike analog channels, which can vary in reception quality from 'snowy' to clear, digital (HDTV) channels have either perfect
reception quality or you will not receive them at all. So, unlike analog channels, you cannot fine tune a digital channel. You can,
however, adjust your antenna to improve the reception of available digital channels.
If the signal strength meter indicates that the signal is weak, physically adjust your antenna to increase the signal strength.
Continue to adjust the antenna until you find the best position with the strongest signal.

C]
C]
C]
Software Upgrade
Samsung may offer upgrades for TV's firmware in the future. Please visit Samsung.com or
contact the Samsung call center at 1-800-SAMSUNG (726-7864) to receive information about
downloading upgrades and using a USB drive. Upgrades will be possible by connecting a USB
drive to the $ERVlCE port located on your TV.
Insert a USB drive containing the firmware upgrade into the SERVICE port on the side of
the TV.
Please be careful to not disconnect the power or remove the USB drive while upgrades are
being applied. The TV will turn off and turn on automatically after completing the firmware
upgrade. Please check the firmware version after the upgrades are complete. When
software is upgraded, video and audio settings you have made will return to their default
(factory) settings. We recommend you write down your settings so that you can easily
reset them after the upgrade.
HD Connection Guide
This menu presents the connection method that provides the optimal quality for the HD TV.
Refer to this information when connecting external devices to the TV.
Contact Samsung
View this information when your TV does not work properly or when you want to upgrade the software.
You can view the information regarding the call center, product and software file download method.
USB drive
Troubleshooting
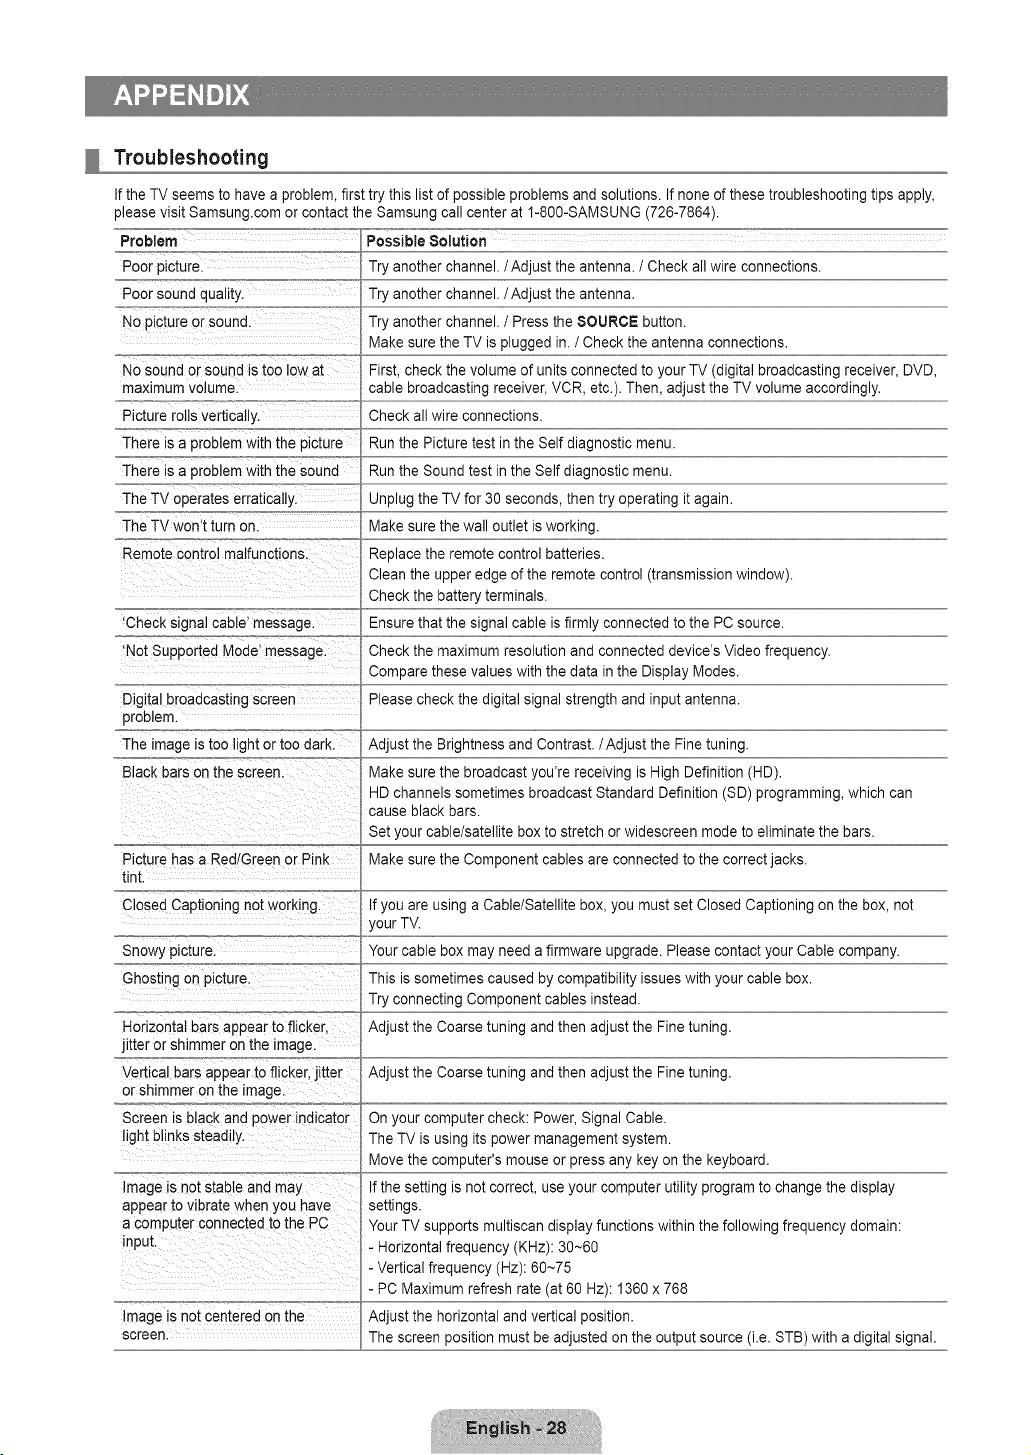
If the TV seems to have a problem, first try this list of possible problems and solutions. If none of these troubleshooting tips apply,
please visit Samsung.com or contact the Samsung call center at 1-800-SAMSUNG (726-7864).
Problem Possible Solution °'
Poor picture. Try another channel. /Adjust the antenna. / Check all wire connections.
Poor sound quality. Try another channel. /Adjust the antenna.
No picture or sounc Try another channel. / Press the SOURCE button.
Make sure the TV is plugged in. / Check the antenna connections.
No sound or sound is too low at First, check the volume of units connected to your TV (digital broadcasting receiver, DVD,
cable broadcasting receiver, VCR, etc.). Then, adjust the TV volume accordingly.
Check all wire connections.
Run the Picture test in the Self diagnostic menu.
Run the Sound test in the Self diagnostic menu.
Unplug the TV for 30 seconds, then try operating it again.
Make sure the wall outlet is working.
Remote control malfunctions. Replace the remote control batteries.
maximum volume.
Picture rolls vertically.
There is a problem with the picture
There is a problem with the sound
The TV operates erratically.
The TV won't turn on
'Check signal cable' message.
'Not Supported Mode' message.
Digital broadcasting screen
problem.
The image is too light or too dark.
Black bars on the screen.
Picture has a Red/Green or Pink
tint.
Closed Captioning not working.
Snowy picture.
Ghosting on picture.
Horizontal bars appear to flicker
jitter or shimmer on the image.
Vertical bars appear to flicker, jitter
or shimmer on the image.
Screen is black anc power indicator
light blinks steadily.
Image is not stable and may
appear to vibrate when you have
a computer connected to the PC
input.
Image is not centered on the
screen.
Clean the upper edge of the remote control (transmission window).
Check the battery terminals.
Ensure that the signal cable is firmly connected to the PC source.
Check the maximum resolution and connected device's Video frequency.
Compare these values with the data in the Display Modes.
Please check the digital signal strength and input antenna.
Adjust the Brightness and Contrast./Adjust the Fine tuning.
Make sure the broadcast you're receiving is High Definition (HD).
HD channels sometimes broadcast Standard Definition (SD) programming, which can
cause black bars.
Set your cable/satellite box to stretch or widescreen mode to eliminate the bars.
Make sure the Component cables are connected to the correct jacks.
If you are using a Cable/Satellite box, you must set Closed Captioning on the box, not
your TV.
Your cable box may need a firmware upgrade. Please contact your Cable company.
This is sometimes caused by compatibility issues with your cable box.
Try connecting Component cables instead.
Adjust the Coarse tuning and then adjust the Fine tuning.
Adjust the Coarse tuning and then adjust the Fine tuning.
On your computer check: Power, Signal Cable.
The TV is using its power management system.
Move the computer's mouse or press any key on the keyboard.
If the setting is not correct, use your computer utility program to change the display
settings.
Your TV supports multiscan display functions within the following frequency domain:
- Horizontal frequency (KHz): 30~60
- Vertical frequency (Hz): 60~75
- PC Maximum refresh rate (at 60 Hz): 1360 x 768
Adjust the horizontal and vertical position.
The screen position must be adjusted on the output source (i.e. STB) with a digital signal.

Problem Possible Solution
The ictureappearsdisrobedthe Sc,'oenFitisselectedwithsomeexterna devices,thepicturemayappeard stortedin
corner of the screen.
The 'Resets all settings t0the
default values.! message appear&
You may see smal! particles if you
look closely at the edge of the bezel
surrounding the TV screen.
the corner of the screen. This symptom is caused by the external devices, not TV.
This appears when you press and hold the EXIT button for a while. The product settings
are reset to the factory defaults.
This is part of the product's design and is not a defect.
This TFT LCD panel uses a panel consisting of sub pixels (3 133 440) which require sophisticated technology to produce.
However, there may be few bright or dark pixels on the screen. These pixels will have no impact on the performance of the
product.
Wall Mount Kit Specifications (VESA)
Install your wall mount on a solid wall perpendicular to the floor. When attaching to other
building materials, please contact your nearest dealer. If installed on a ceiling or slanted wall, it A
may fall and result in severe personal injury.
Standard dimensions for wall mount kits are shown in the table above.
When purchasing our wall mount kit, a detailed installation manual and all parts necessary
for assembly are provided.
Do not use screws longer than the standard dimension, as they may cause damage to the
inside of the TV set.
For wall mounts that do not comply with the VESA standard screw specifications, the
length of the screws may differ depending on their specifications.
Do not use screws that do not comply with the VESA standard screw specifications.
Do not fasten the screws too strongly, this may damage the product or cause the product to fall, leading to personal injury.
Samsung is not liable for these kinds of accidents.
Samsung is not liable for product damage or personal injury when a non-VESA or non-specified wall mount is used or the
consumer fails to follow the product installation instructions.
Our 57" and 63" models do not comply with VESA Specifications. Therefore, you should use our dedicated wall mount kit for
this model.
Do not exceed 15 degrees tilt when mounting this TV.
LCD-TV
PDP-TV
LFD
19 ~ 22
23 ~ 29
30 ~ 40
46 ~ 55
57 ~ 70
80 ~
42 ~ 50
58 ~ 63
70 ~
80 ~
30 ~39
40 ~ 52
55 ~ 70
70 ~
100 x 100
200 x 100
200 x 200
400 x 400
800 x 400
1400 x 800
400 x 400
600 x 400
800 x 400
1400 x 800
200 x 200
400 x 400
800 x 400
1400 x 800
Standard Screw
M4
M6
M8
M8
M6
M8
Quantity
I //_ Do not install your Wall Mount Kit while your TV is turned on. It may result in personal injury due to electric shock.

Using the Anti-Theft Kensington Lock
The Kensington Lock is a device used to physically fix the system when using it in a public
place. The appearance and locking method may differ from the illustration depending on the
manufacturer.
Refer to the manual provided with the Kensington Lock for proper use. The locking device has
to be purchased separately.
The location of the Kensington Lock may be different depending on its model.
1. Insert the locking device into the Kensington slot on the LCD TV (O) and turn it in the
locking direction (O).
2. Connect the Kensington Lock cable (_).
3. Fix the Kensington Lock to a desk or a heavy stationary object.
Securing the TV to the Wall
Cautioni Pu!!ing, Pushing, o[ €limbing Onthe TV may Causethe TV to fail. !n pa[ticu!a[i ensure you[ Childrende
not hang over or destabilize the rv; doing so may cause the TV to tip over, causing serious injuries or death.
Follow all safety precautions provided on the inc!uded Safety Elye[i For added stabilitY,install the anti4a!! device
for safety purposes, as follows.
To avoid the TV from failing:
1. Put the screws into the clamps and firmly fasten them onto the wall. Confirm that the
screws have been firmly installed onto the wall.
You may need additional material such as an anchor depending on the type of wall.
Since the necessary clamps, screws, and string are not supplied, please purchase
these additionally.
2,
Remove the screws from the centre back of the TV, put the screws into the clamps, and
then fasten the screws onto the TV again.
Screws may not be supplied with the product. In this case, please purchase the
screws of the following specifications.
Screw Specifications
- For a 17 ~ 29 Inch LCD TV: M4 X 15 / For a 32 ~ 40 Inch LCD TV: M6 X 15
.....i.i
3. Connect the clamps fixed onto the TV and the clamps fixed onto the wall with a strong
string and then tie the string tightly.
Install the TV near to the wall so that it does not fall backwards.
It is safe to connect the string so that the clamps fixed on the wall are equal to or
lower than the clamps fixed on the TV.
Untie the string before moving the TV.
4. Verify all connections are properly secured. Periodically check connections for any
sign of fatigue for failure. If you have any doubt about the security of your connections,
contact a professional installer.
Wal
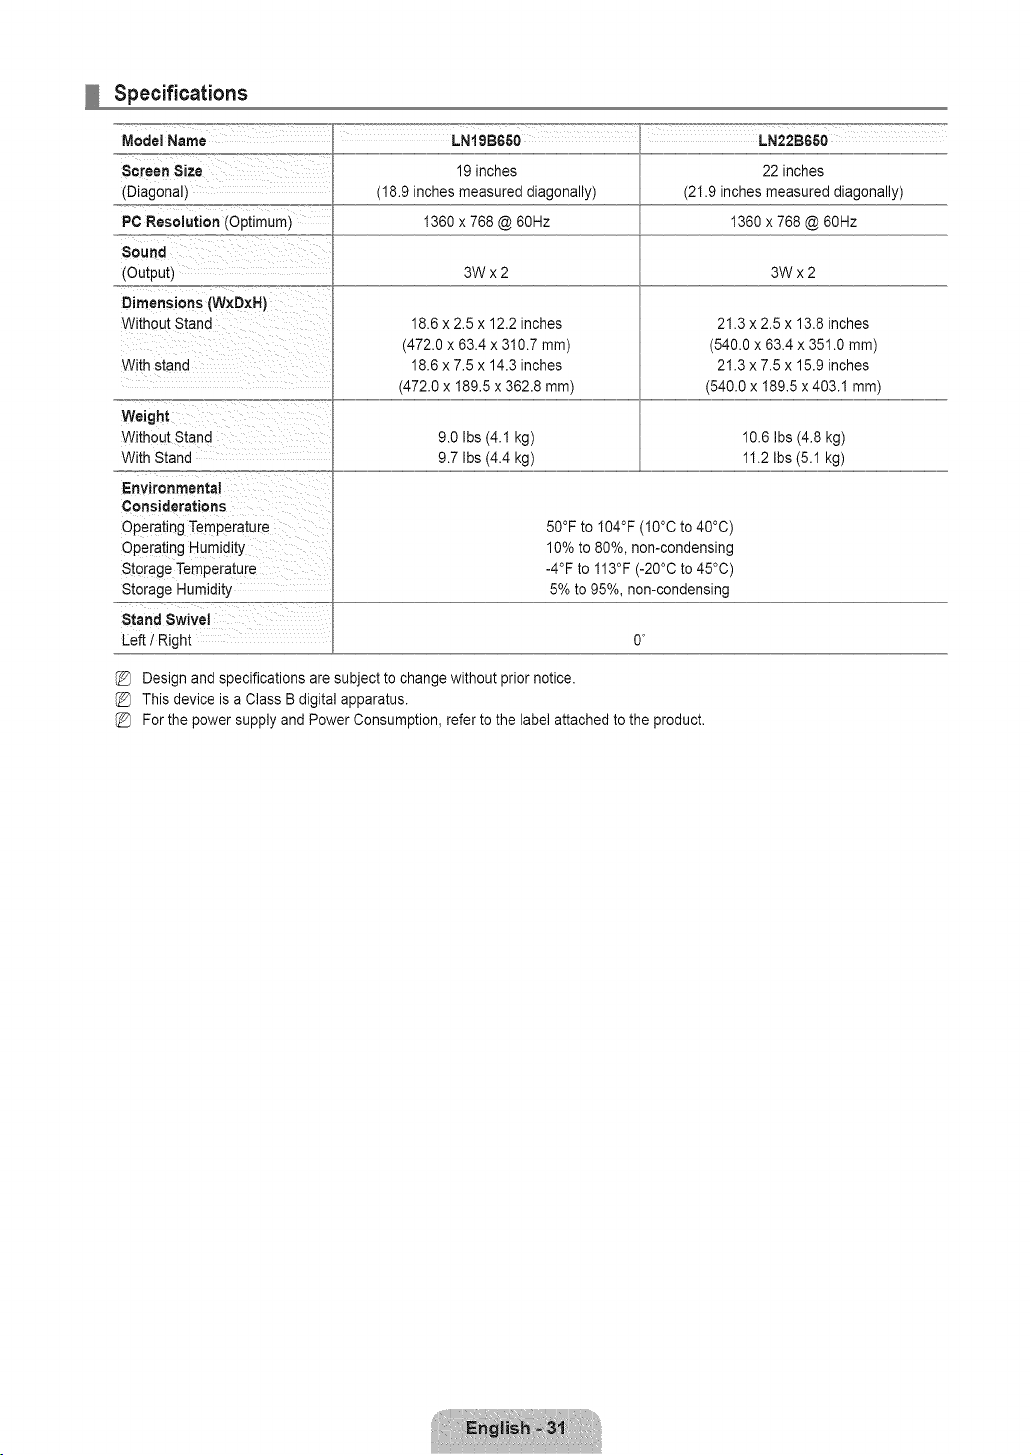
Specifications
Model Name
Screen Size
(Diagonal)
PC Resolution (Optimum)
Sound
(Output)
Dimensions (W×D×H)
Without Stand
With stand
LNtgBGSO LN22BGSO
19 inches
(18.9 inches measured diagonally)
1360 x 768 @ 60Hz
22inches
(21.9inches measured diagonally)
1360 x 768@60Hz
3Wx2 3Wx2
18.6 x 2.5 x 12.2 inches
(472.0 x 63.4 x 310.7 mm)
18.6 x 7.5 x 14.3 inches
(472.0 x 189.5 x 362.8 ram)
21.3 x 2.5 x 13.8 inches
(540.0 x 63.4 x 351.0 mm)
21.3 x 7.5 x 15.9 inches
(540.0 x 189.5 x 403.1 ram)
Weight
Without Stand
With Stand
Environmental
Considerations
Operating Temperature
Operating Humidity
Storage Temperature
Storage Humidity
Stand Swivel
Left t Right
9.0 Ibs (4.1 kg)
9.7 Ibs (4.4 kg)
10.6 Ibs (4.8 kg)
11.2 Ibs (5.1 kg)
50°F to I04°F (I0°C to 40°C)
10% to 80%, non-condensing
-4°F to 113°F (-20°C to 45°C)
5% to 95%, non-condensing
Design and specifications are subject to change without prior notice.
This device is a Class B digital apparatus.
(_ For the power supply and Power Consumption, refer to the label attached to the product.

C3
C3
informacibn importante sobre la garantia relativa al formate de vJsualJzacibn del televisor
Para obtener mas informaci6n sobre los terminos de la garanfia, consulte la tarjeta de garanfia.
Las pantattasLCD con formato de pantallapanoramica (16:9, ta retaci6n de aspecto ancho:altode la pantalla) estan disefiadas
principalmentepara visuatizarvideos de movimientode formato panoramico.Las imagenes debenestar principalmenteen el formato
panoramicode relaci6n 16:9,o ampliadas para ttenar ta pantattasi et modelo tiene esta opci6n, y tas imagenesestan en movimiento
constante.La visualizaci6n de imagenesy graficos estaticosen ta pantatta,como tas barras oscuras lateralesen programaci6ny videos
de televisi6nen formato estandar no ampliados, debe limitarsea no masdel 5% det tiempo total de visuatizaci6n det televisor por
semana.
Ademas, ta visualizaci6n de otras imagenesestaticasy texto, como los informesde bolsa, pantattasde videojuegos, Iogotiposde
emisoras,sitios Web o graficosy dibujos de ordenador,debera limitarse en todos los tetevisorescomo ya se ha descrito.La visualizaci6n
de imagenesestaticas que supere los timites de tasinstrucciones anteriores puede producirun envejecimientodesigual de taspantatlas
LCD, to que provocara una reproducci6nsuperpuestasutil pero permanentede la imagende ta LCD. Para evitar!o, varie ta programaci6n
y las im_genesy, sobretodo, visuaticeimagenes en movimientoa toda pantalta,no graficos estaticosni barrasoscuras.
En mode!os de LCD queofrezcan opciones para et tamafio de ta imagen, utilice estos controles para vet los distintos formatos como
imagen a toda pantalta.
Tengacuidado en ta selecci6ny duraci6n de los formatos de televisi6nutilizados para ta visualizaci6n.La garantia limitadade Samsung
no cubre el envejecimientodesigual de ta LCD como resuttado de la selecci6ny uso de formatos, as! comootras imagenes retenidas.
• $oloEE.UU.
La unidad del productoque se incluye con este manual del usuario se suministra con ticencia bajo derechos de propiedad intelectuat
de otras empresas. En concreto, este productose suministra con licencia bajo las siguientespatentes de EE.UU.: 5,991,715,
5,740,317, 4,972,484, 5,214,678, 5,323,396, 5,539,829, 5,606,618, 5,530,655, 5,777,992, 6,289,308, 5,610,985, 5,481,643,
5,544,247, 5,960,037, 6,023,490, 5,878,080 y bajo el n0mero de apticaci6nde patentes publicadas de EE.UU. 2001-44713-A1.
Esta ticencia esta timitadaal uso no comercial privado de consumidoresque sean usuarios finales para contenidocon ticencia. No
se otorga ningtJnderecho parauso comercial. La ticenciano cubre ninguna unidad del productoque no sea 6stay la licencia no se
extiendea ninguna unidad det productoo proceso sin ticencia en conform!dadcon el ISO/IEC 11172-3o ISO/IEC 13818-3 utilizada
o vendida en combinaci6ncon esta unidad de! producto.La licencia s61ocubre et usode esta unidad para codificar y/o descodificar
archivos de audio en conform!dadcon et ISO/IEC 11172-3o ISO/IEC 13818-3. No se otorga ningOnderechobajo esta ticenciapara
caracteristicaso funciones del productoque no est6n conformescon el ISO/IEC 11172-3o ISO/IEC 13818-3.
• Otros paises
La unidad del productoque se incluye con este manual det usuario se suministra con ticencia bajo derechos de propiedad intelectuat
de otras empresas. Esta licenciaesta timitadaal uso no comercial privado de consumidoresque sean usuarios finalespara contenido
con ticencia.No se otorga ningQnderecho para uso comercial. La ticencia no cubre ningunaunidad del productoque no sea esta y
la licencia no se extiende a ningunaunidad del productoo proceso sin licenciaen conform!dad con el ISO/IEC 11172-3o ISO/IEC
13818-3 utitizadao vendida en combinaci6ncon esta unidaddel producto. La ticencias61ocubre et uso de esta unidad para codificar
y/o descodificararchivos de audio en conform!dadcon el ISO/IEC 11172-3o ISO/IEC 13818-3.No se otorga ningQnderecho bajo
esta ticenciapara caracteristicaso funciones del producto que no esten conformes con et ISO/IEC 11172-3o ISO/IEC 13818-3.
• DOCUMENTODE GARANTJALIMITADAPARANORTEAMERICADE SAMSUNG ELECTRONICS
De acuerdo con los requisitos,condiciones, exctusionesy limitacionesde ta Garantia timitadaoriginal suministrada con los productos
de Samsung Electronics (SAMSUNG), as! comolos requisitos, condiciones,exctusiones y timitaciones inctuidosen et presente
documento,SAMSUNG proporcionaraadicionalmenteun serviciode reparaci6n de garantia en EE.UU.para los productos de
SAMSUNGadquiridos en Canada,yen Canada respecto a los productos de SAMSUNG adquiridosen EE.UU., para et periodo de
garantia especificadooriginalmente, y s61opara el compradororiginal.
Las reparacionesen garantia descritas anteriormente deben realizarseen centros de servicio t_cnico autorizadosde SAMSUNG.
Junto con este documento,se debe presentar un documentode garantia limitada originaly una factura confecha como prueba de
compra en et centro de servicio t6cnico. Eltransporte a y desde el centro de servicio t_cnico es responsabilidadde! comprador.
Las condicionescubiertas se tim!tansotamentea defectosde fabricaci6n en material y mano de obra, y s61olos que se hayan
producido con un uso normaldet producto.
Excluidas, pero no limitadasa elias, se encuentran tasdisposiciones originatesespecificadaspara los servicios a domicitio o
en tas instatacionesde ta empresa, tiempos maximos y minimos de reparaci6n, cambios o sustituciones,accesorios,opciones,
actuatizacioneso consumibtes.
Para conocer ta ubicaci6n de un centro de servicio tecnico autorizado de SAMSUNG,tlame al nOmerogratuito indicado:
En EE.UU.: Io800-8AMSUNG (!o800-726-78G4)
En Canada: IoS00-SAMSUNG
PrecaucJones al rnostrar en la pantalla una irnagen fija
La imagen fija puede causardafios permanentesen ta pantalladel televisor.
• No deje una imagen fija en la pantalla LCD durante m_s de dos horas ya que se podria produciruna retenci6n de ta imagen en la
pantalla. Este fen6meno de retenci6nde imagenestambien se denomina "quemadura de pantalta".Para evitar que se produzca esa
persistenciade ta imagen, reduzca e! nivet de brillo y de contraste de la pantallacuando muestreimagenesfijas.
• El uso del televisor LCD en formato 4:3 durante un tiempo prolongado puede dejar rastros de bordes en las
partes izquierda,derecha y central de ta pantatla debido a tas diferencias en ta emisi6n luminica de la pantalla. La
reproducci6nde un DVDo el uso de una consola de videojuegospueden provocarun efecto similaren ta pantatla.
La garantia no cubre los dafios causados por los efectos mencionados.Verimagenesfijas de videojuegosy PC
durante mas tiempo det indicadopuede producir restos de imagenes parciates.Para evitar este efecto, reduzca el
'britlo' y el 'contraste'cuando vea imagenesfijas.
© 2009 Samsung Electronics Co., Ltd. Reservados todos los derechos.

CONTENIDO
•, Listado de caracteristicas.....................................................2 ,,,Configuraci6ndel menOde imagen................................ 17
iAccesorios 2 g Uso del televisor como una pamatla de ordenador (PC} 19
=Aspecto general del panel de control ..................... 3 ,,,Ajustedel televisorcon el ordenador .................................20
•,Aspecto general del panel ae conexiones............. 4
g Mando a distancla ................................................. 5
•, Instalaci6nde las pilas en el mandoa distancia ... 5
RCanfiguraci6ndei menQde sonido.....................................21
,,,Conexi6nde antenas de VHF y UHF...................................6
,,,Conexi6n de TV por caule....................................................6 ,, Configuraci6n dei menOde configuracion..........................22
,. ConexionaeunreproductordeDVD/ Blu-ray/ receptorporcable/ satetite
(decodificador)a _rav6sdeHDMI...........................................................7
= ConexlonaeunreproductordeDVDt Blu-ray/ receptorporcablei sateIite
tdecodificadorla trav6sdeDVl...............................................................8 ,,,Configuraci6n del men_ de entrada...................................26
,,,ConexondeunreproductordeDVD1Bu-ray/ receptorporcabe i sat6te ,,,Configuraci6n dei men_ de ayuda............................... 26
tdecodificador/atravesdeloscablesaecombonentes.....................8
,-Conexi6n de un reproductor de video .................... 9
,-,Conexi6n de un sistema de audio digital................ 9
•, Conexi6nde un amplificador t DVD para Home Cinema...10
= Conexi6n de una videocamara............................... 11
= Conex_ona un PC ..............................................................12
,,,Identificacionde problemas................................................28
= Especificaciones det equipo de montaje en la pared (VESA)29
,,,Uso del bloqueo Kensingtonantlrrobos..............................30
_.Fijaci6n deltelevisor a la parea..........................................30
,,,Especificaciones ....................................................31
=Visualizaci6n de los menus .................................... 1_.
= Funci6n Plug & Play................................................ 14
= Configuraci6n del menOde canales ....................... 15
,,,Gesti6n de los canales ........................................... 15
Antes de usar el equipo lea este manual para evitar /
fatlas y guarde para futuras referencias.
J
Licencia
$R$(_O_) TruSurround HD, SRS y el simbolo son marcas comerciales de SRS Labs, inc.
TruSurround HD esta incorporada bajo licencia de SRS Labs,Inc.
D I G I T A L
[I] DOLBY Fabricado bajo licencia de Dolby Laboratories. Dolby y el simbolo de la doble D son marcas
DISITAL ] comerciales de Dolby Laboratories.
Simbolo
Bot6nde una
Nota Bot6nTOOL
pulsaci6n

Las ilustraciones de este manual se proporcionan s61ocomo referencia y pueden ser diferentes del producto real. El diser_oy las
especificaciones de] producto se pueden cambiar sin previo aviso para mejorar el rendimiento del producto.
Listado de caracteristicas
• Valores ajustables de la imagen que se pueden almacenar en la memoria del televisor.
• Temporizador automatico para encender o apagar el televisor.
• Temporizador de desconexi6n especial.
• Excelente interfaz digital y capacidad de trabajo en red:
• El sintonizador digital HD incorporado permite ver las emisiones HD que no exigen una suscripci6n sin que sea necesario
disponer de un receptor de televisi6n por cable / satelite (decodificador).
• Conexi6n HDMI/DVl del PC con este televisor.
• Calidad excelente de la imagen
• SRS TruSurround HD proporciona un sistema surround virtual.
Accesorios
Mando a distancia Cable de alimentaci6n PaSo de limpieza
(BN59-00857A) (3903-000144) (BNe3-01798B)
(LN19B361: BN59-00885A) &
2 pilas AAA
Manual de instrucciones
Tarjeta de garantia / Guia de Base del soporte Cuerpo del soporte
seguridad (BN96-11163A) (BN96-10168B)
Compruebe que las opciones siguientes se incluyen con su TV LCD. Si falta alguna opci6n, p6ngase en contacto con el
proveedor.
El color y la forma de los componentes pueden variar segt_nel modelo.

Aspecto general del panel de control
El color y la forma del producto pueden variar seg_n el modelo.
Los botones del panel frontal se pueden activar al tacto.
SAMSUHG ,* ...........
L...........e
. S%CEMENU-VOL+vC.^ "® 1
O (_ (Encendido): Pulse para encender o apagar el TV.
O mNDICADORDE ALmMENTACION:Parpadea y se apaga cuando se enciende el aparato y se ilumina en el modo en espera.
v CI=IA: Permiten cambiar de canal. En el menO de la pantalla, utilice los botones v CN ,/k del mismo modo que los
botones T y A del mando a distancia.
O =VOL+: POlselos para subir o bajar el volumen. En el ment_de la pantalla, utilice los botones =VOL+ del mismo modo
que los botones _ y _ del mando a distancia.
O MENU: Pulse para ver en pantalla un menO con las caracteristicas del TV.
O 8OURCEIB#: Cambia entre todas las fuentes de entrada disponibles. En el ment_de la pantalla, utilice este bot6n del mismo
modo que el bot6n ENTERIB,# del mando a distancia.
O SENSOR DEL MANDO A DmSTANOtA:Dirija el mando a distancia hacia este punto del TV.
ALTAVOCE8

Aspecto general del panel de conexiones
J
[Panel posterior del TV]
ee e
{®®®}
ANTIN
El color y la forma del producto pueden variar segOn el modelo.
O EX-LINK
- Conector s61opara servicio.
DIGITAL AUDIO OUT (OPTmGAL)
- Conecta un componente de audio digital, como un receptor de Home Cinema.
0 PC IN [PC] / [AUDIO]
- Permite conectar a los terminales de salida de audio y de video de su PC.
O _ (AURICULARES)
- Permite conectar unos auriculares externos para audiciones privadas.
HDMI (DVI) IN / DVI AUDIO IN In-AUDIO-L]
- Permite conectaral terminal HDMI un dispositivo que tenga salida HDMI.
{_ No se necesita ninguna conexi6n de sonidopara una conexi6n de HDMI a HDMI.
{_ Use el terminal NDMI (DVI) IN para conectar e] DVl a un dispositivo externo. Use un cable de DVl a HDMI o un
adaptador de DVI-HDMI (DVI a HDMI) para la conexi6n del video y los terminales DVI AUDIO IN [R-AUDIO-L] para
el audio.
Cuando se usa una conexi6n de cable HDMI/DVl, se debe conectar en el terminal HDMI (DVI) IN.
Tambi_n puede utilizar los puertos para conectarse al PC.
O SERVICE
- Conector para la actualizaci6n del software.
O ANT IN
- Permite conectar a una antena o un sistema de TV por cable.
ENTRADA DE ALIMENTACION
- Permite conectar el cable de alirnentaci6n suministrado.
0 BLOQUEO KENSINGTON
- El bloqueo Kensington es un dispositivo que se usa para fijar fisicamente el sistema cuando se usa en un lugar pQblico.
Si desea usar un dispositivo de bloqueo, p6ngase en contacto con el distribuidor donde adquiri6 el televisor.
La ubicaci6n del Bloqueo Kensington puede variar segt_nel modelo.
@ AVIN
- Entradas de v{deo y audio para dispositivos extemos, como una vldeooamara o un reproductor de v{deo.
COMPONENT IN
- Permite conectarel video/audio de componentes.
AUDIO OUT
- Permite conectarlos terminales de la entrada de audio de] amplificador/sistema de Home Cinema.
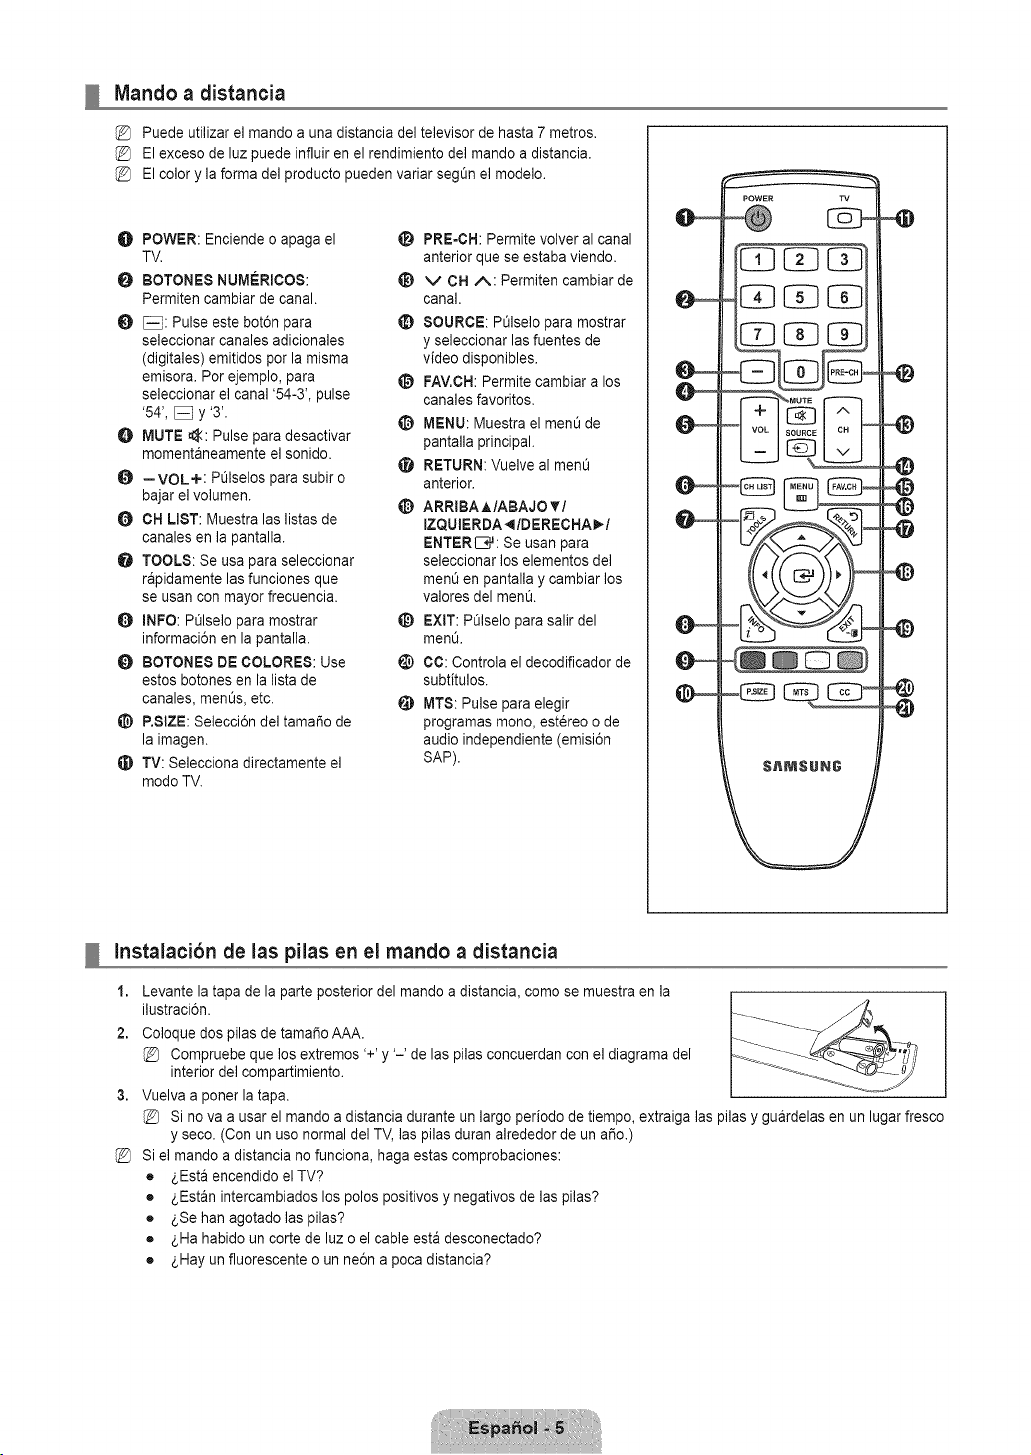
Mando a distancia
Puede utilizar el mando a una distancia del televisor de hasta 7 metros.
El exceso de luz puede influir en el rendimiento del mando a distancia.
El color y la forma del producto pueden variar segOn el modelo.
O POWER: Enciende o apaga el
TV.
BOTONES NUMERiCOS:
Permiten cambiar de canal.
_: Pulse este bot6n para
seleccionar canales adicionales
(digitales) emitidos por la misma
emisora. Por ejemplo, para
seleccionar el canal '54-3', pulse
'54', _ y '3'.
O MUTE _:: Pulse para desactivar
momentaneamente el sonido.
O --VOL+: PL_Iselospara subir o
bajar el volumen.
CH LIST: Muestra las listas de
canales en la pantalla.
TOOLS: Se usa para seleccionar
rapidamente las funciones que
se usan con mayor frecuencia.
O INFO: Pt_lselo para mostrar
informaci6n en la pantalla.
O BOTONES DE COLORES: Use
estos botones en la lista de
canales, ment_s,etc.
@ P.SIZE: Selecci6n del tamar_o de
la imagen.
TV: Selecciona directamente el
modo TV.
li_ PRE-CH: Permite volver al canal
anterior que se estaba viendo.
t_ v CH A: Permiten cambiar de
canal.
SOURCE: POlselo para mostrar
y seleccionar las fuentes de
video disponibles.
FAV.CH:Permite cambiar a los
canales favoritos.
0 MENU: Muestra el ment_de
pantalla principal.
RETURN: Vuelve al ment_
anterior.
t_ ARRIBA A/ABAJO T/
IZQUtERDA_I/DERECHA_ /
ENTER E;,#:Se usan para
seleccionar los elementos del
menO en pantalla y cambiar los
valores del men&
_) EXIT: POlselopara salir del
men&
CO: Controla el decodificador de
subtitulos.
_) MTS: Pulse para elegir
programas mono, est_reo o de
audio independiente (emisi6n
SAP).
4#
4#
4#
Instalacibn de las pilas en el mando a distancia
1,
2.
3,
%
Levante la tapa de la parte posterior del mando a distancia, como se muestra en la
ilustraci6n.
Coloque dos pilas de tama_o AAA.
Compruebe que los extremos '+' y '-' de las pilas concuerdan con el diagrama del
interior del compartimiento.
Vuelva a poner la tapa.
Si no va a usar el mando a distancia durante un largo periodo de tiempo, extraiga las pilas y guardelas en un lugar fresco
y seco. (Con un uso normal del TV, las pilas duran alrededor de un a_o.)
Si el mando a distancia no funciona, haga estas comprobaciones:
• 2.Esta encendido eITV?
• 2.Estan intercambiados los polos positivos y negativos de las pilas?
• 2.Sehan agotado las pilas?
• 2.Ha habido un corte de luz o el cable esta desconectado?
• 2.Hay un fluorescente o un ne6n a poca distancia?

Conexibn de antenas de VHF y UHF
Si su antena tiene un conjunto de cables con este aspecto, consulte 'Antenas de par de cables
pianos de 300 O'a continuaci6n.
Si la antena tiene un cable como el que se muestra en el diagrama de la derecha, consulte
'Antenas con cables coaxiales de 75 ohmios'.
Si dispone de dos antenas, consulte 'Antenas de VHF y UHF independientes'.
Antenas de par de cables pianos de 300 Q
Si utiliza una antena externa (de techo o de 'orejas de conejo') de par de cables pianos de 300
O, siga las indicaciones siguientes.
1. Coloque los conductores del par de cables bajo los tornillos del adaptador de 300-75
(no incluido). Utilice un destornillador para apretar los tomillos.
2. Conecte el adaptador en el terminal ANT IN en la parte posterior del televisor.
Antenasconcablescoaxiatesde 75
Conecteel cablede la antenaen elterminalANT IN en la parteposteriordel televisor.
Antenas de VHF y UHF independientes
Si dispone de dos antenas independientes para el TV (una de VHF y otra de UHF), debe
combinar ambas set, ales de la antena antes de conectarlas al TV. Este procedimiento precisa
un adaptador-combinador especial (disponible en la mayoria de tiendas de electr6nica).
1. Conecte ambos cables de antena al combinador.
2. Conecte el combinador en el terminal ANT IN de la parte inferior del panel posterior.
Conexibn de TV por cable
Para conectar a un sistema de TV por cable, siga estas instrucciones.
"IV per cable sin decodificador
Conecte el cable de entrada en el terminal ANT IN en la parte posterior del televisor.
Dado que el TV esta preparado para la televisi6n por cable, no se necesita un
decodificador para ver canales de cable no codificados.
Conexion al decodificador que decodifica todos los canales
1. Busque el cable conectado al terminal ANT OUT del decodificador.
Este terminal puede estar indicado como 'ANT OUT', 'VHF OUT' o 'OUT'.
ANT iN ANT OUT
2. Conecte el otro extremo del cable en el terminal ANT IN de la parte posterior del TV.

Conexibna undecodificadorquedecodificaalgunoscanales
Si su decodificador s61odecodifica algunos canales (como los canales de pago), siga las instrucciones siguientes. Necesitara
un divisor de dos vias, un conmutador de RF (A/B) y cuatro largos de cable RF. (Estas opciones se encuentran en la mayoria de
tiendas de electr6nica.)
Cable de entrada IN CABLE OUT
0 el televisor
ConmutadorRF (NB)
Servicio de cable
1. Busque y desconecte el cable que esta conectado al terminal ANT IN del decodificador.
Este terminal puede estar indicado como 'ANT IN', 'VHF IN' o 'IN'.
2. Conecte este cable al divisor de dos vias.
3. Conecte un cable RF entre un terminal OUTPUT del divisor y el terminal IN del decodificador.
4. Conecte un cable RF entre el terminal ANT OUT del decodificador y el terminal B-IN del conmutador A/B.
6. Conecte otro cable entre el otro terminal OUT del divisor y el terminal A-IN del conmutador de RF (A/B).
6. Conecte el t_ltimocable RF entre el terminal OUT del conmutador RF (A/B) y el terminal ANT IN en la parte posterior del
televisor.
Una vez hecha esta conexi6n, coloque el conmutador A/B en la posici6n 'A' para la visualizaci6n normal. Coloque el
conmutador A/B en la posici6n 'B' para ver los canales codificados. (Cuando sitOeel conmutador A/B en 'B', debera sintonizar
el TV al canal de salida del decodificador, que normalmente es el canal 3 o 4.)
Conexibndeunreproductorde DVD/ Blu-ray/ receptorporcable/ sat_lite(decodificador)a trav_sde HDIVll
Solo es aplicable si hay un conector de salida de HDMI en el dispositivo externo.
Reproductor DVD / Blu=rayI receptor por cable / Panel posterior dot TV
satelite (decodificador)
O Cable HDMI (no incluido)
1,
%
o
o
Conecte un cable HDMI entre el terminal HDMI (DVI) IN del televisor y el terminal HDMI del reproductor DVD / Blu-ray o
receptor por cable / sat61ite(decodificador).
_,Qu6 es HDMI?
HDMI, o interfaz multimedia de alta definici6n, es una interfaz que permite la transmisi6n de sefiales digitales de audio y de
video mediante un solo cable.
La diferencia entre los dispositivos HDMI y DVI es que el HDMI es mas pequefio y tiene instalada la funci6n de codificaci6n
HDCP (protecci6n alta de la copia digital del ancho de banda).
Cada reproductor de DVD / Blu-ray o receptor de televisi6n por cable / sat_lite (decodificador) tiene una configuraci6n
diferente del panel posterior.
Puede que el televisor no proporcione salida de sonido y muestre imagenes con colores an6malos si hay conectados
reproductores de DVD / Blu-ray o receptores de cable / satelite (decodificadores) que admiten versiones de HDMI
anteriores a la versi6n 1.3. Si se conecta un cable antiguo HDMI y no hay sonido, conecte el cable HDMI al terminal
HDMI (DVl) IN y los cables de audio a los terminales DVl AUDIO IN JR-AUDIO-L] de la parte posterior del televisor. Si
sucede esto, p6ngase en contacto con la empresa suministradora del reproductor de DVD / Blu-ray / receptor de cable /
sat_lite (decodificador) para confirmar la versi6n HDMI y solicitar una actualizaci6n.
Los cables HDMI que no son 1.3 pueden causar un molesto parpadeo o que no se muestre la pantalla.

Conexibndeunreproductorde DVD/ Blu-ray/ receptorporcable/ sat_lite(decodificador)atrav_sde DVl
Solo es aplicable si hay un conector de salida de DVI en el dispositivo externo.
Panel posterior del TV
Reproducter DVD 1Blu=ray / Receptor por cable /
satelite (decodificador)
0 Cable de audio (no incluido)
Cable DVI a HDMI (no incluide)
1,
2.
Conecte un cable de DVI a HDMI o un adaptador de DVI-HDMI entre el terminal HDMI (DVl) IN del televisor y el terminal DVI
del reproductor DVD/Blu-ray o receptor por cable/sat61ite (decodificador).
Conecte los cables de audio entre el terminal DVl AUDIO IN [R-AUDIO-L] del televisor y el reproductor DVD/Blu-ray/receptor
por cable/satelite (decodificador).
Cada reproductor de DVD / Blu-ray o receptor de televisi6n por cable / sat61ite(decodificador) tiene una configuraci6n
diferente del panel posterior.
Cuando conecte un reproductor de DVD / Blu-ray / receptor por cable / sat_lite (decodificador), debe hacer coincidir los
colores del terminal de conexi6n y del cable.
Conexi6ndeunreproductordeDVD/ Blu.ray/ receptorpercable/ sat_lite(decodificador)atrav6sde10scablesdecomponentes
Los terminales del panel posterior del televisor facilitan la conexi6n de un reproductor de DVD / Blu-ray / receptor por cable /
sat61ite(decodificador) al TV.
Reproductor DVD / Blu-ray / Receptor por cable /
sat_lite (decodificador)
Panel posterior del "iV
Cable de audio (no incluido)
Cable de componentes (no incluido)
1,
2.
Conecte un cable de componentes entre los terminales COMPONENT IN [Y, PB,PR]del televisor y los terminales
COMPONENT [Y, PB,PR]del reproductor DVD / Blu-ray o receptor por cable / sat_lite (decodificador).
Conecte los cables de audio entre los terminales COMPONENT IN JR=AUDIO-L] del televisor y los terminales AUDIO OUT
del reproductor DVD / Blu-ray / receptor por cable / satelite (decodificador).
El video de componentes separa el video en Y (Luminancia (brillo)), el Pb (azul) y el Pr (rojo) para realzar la calidad del
video. Las conexiones de audio y de video de componentes deben coincidir. Por ejemplo, si conecta un cable de video
de componentes a COMPONENT IN, conecte tambi6n el cable de audio a la misma entrada COMPONENT IN.
Cada reproductor de DVD / Blu-ray o receptor de televisi6n por cable / sat61ite(decodificador) tiene una configuraci6n
diferente del panel posterior.
Cuando conecte un reproductor de DVD / Blu-ray / receptor por cable / sat_lite (decodificador), debe hacer coincidir los
colores del terminal de conexi6n y del cable.
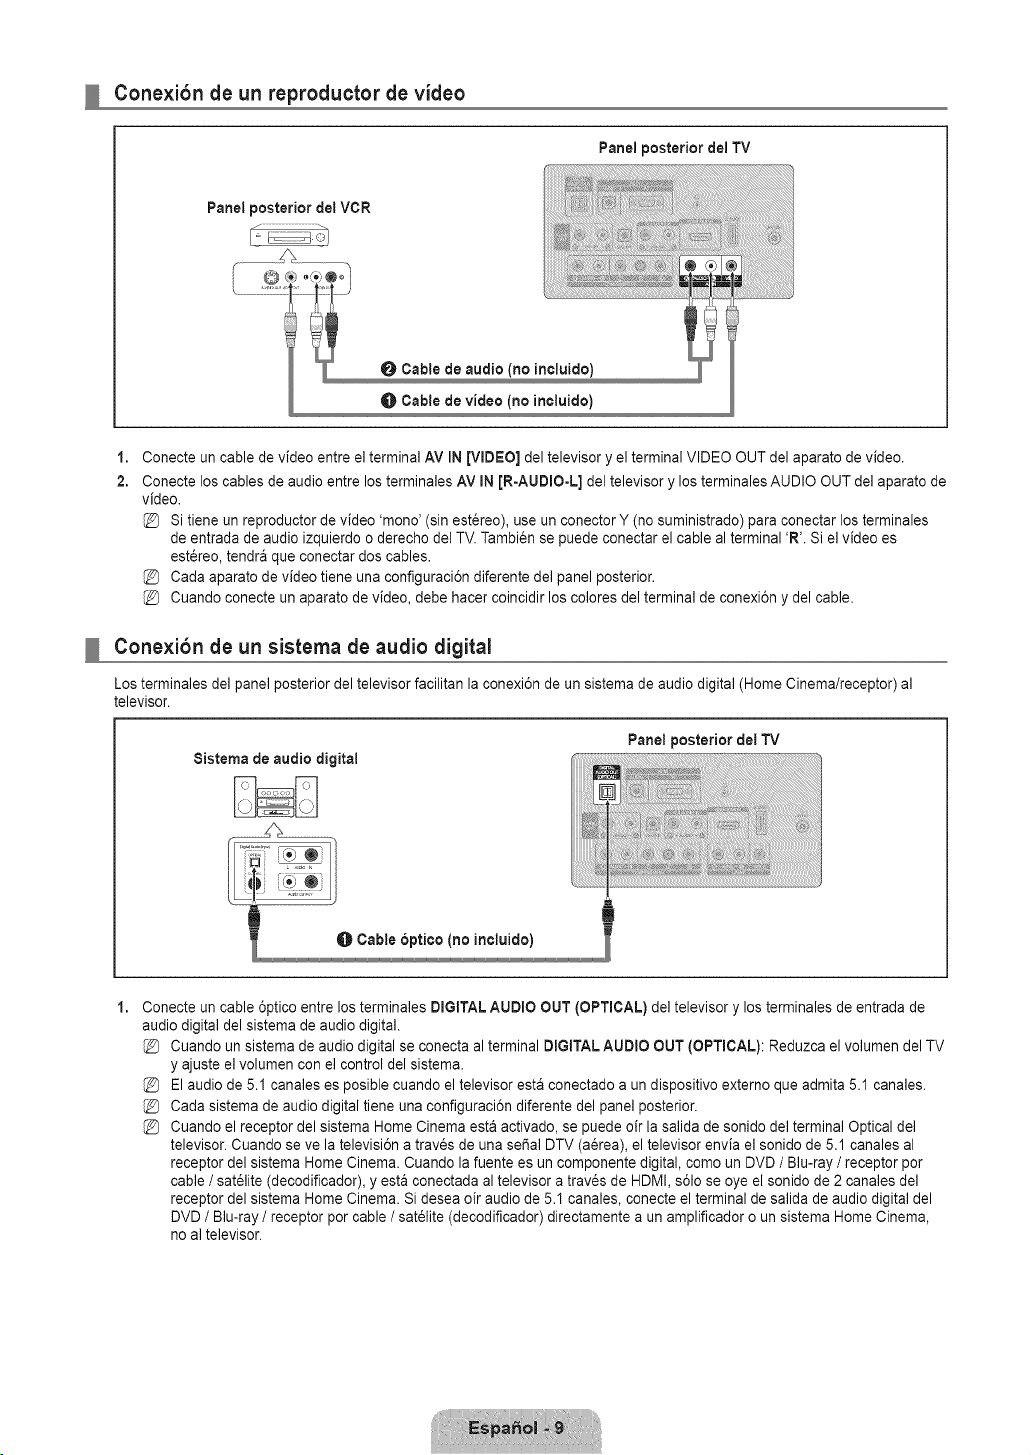
Conexibn de un reproductor de video
Panel posterior del TV
Panel posterior del VCR
0 Cable de audio (no incluido)
Cable de video (no incluido)
1,
2.
Conecte un cable de video entre el terminal AV IN [VIDEO] del televisor y el terminal VIDEO OUT del aparato de video.
Conecte los cables de audio entre los terminales AV iN [R-AUDIO-L] del televisor y los terminales AUDIO OUT del aparato de
video.
Si tiene un reproductor de video 'mono' (sin estereo), use un conector Y (no suministrado) para conectar los terminales
de entrada de audio izquierdo o derecho del TV. Tambien se puede conectar el cable al terminal 'R'. Si el video es
est_reo, tendra que conectar dos cables.
Cada aparato de video tiene una configuraci6n diferente del panel posterior.
Cuando conecte un aparato de video, debe hacer coincidir los colores del terminal de conexi6n y del cable.
Conexibn de un sistema de audio digital
Los terminales del panel posterior del televisor facilitan la conexi6n de un sistema de audio digital (Home Cinema/receptor) al
televisor.
8istema de audio digital
Panel posterior del TV
1,
Conecte un cable 6ptico entre los terminales DIGITAL AUDIO OUT (OPTICAL) del televisor y los terminales de entrada de
audio digital del sistema de audio digital.
Cuando un sistema de audio digital se conecta al terminal DIGITAL AUDIO OUT (OPTICAL): Reduzca el volumen del TV
y ajuste el volumen con el control del sistema.
El audio de 5.1 canales es posible cuando el televisor esta conectado a un dispositivo externo que admita 5.1 canales.
Cada sistema de audio digital tiene una configuraci6n diferente del panel posterior.
Cuando el receptor del sistema Home Cinema esta activado, se puede oir la salida de sonido del terminal Optical del
televisor. Cuando se ve la televisi6n a traves de una seSal DTV (aerea), el televisor envia el sonido de 5.1 canales al
receptor del sistema Home Cinema. Cuando la fuente es un componente digital, como un DVD / Blu-ray / receptor por
cable / sat_lite (decodificador), y esta conectada al televisor a trav_s de HDMI, s61ose oye el sonido de 2 canales del
receptor del sistema Home Cinema. Si desea oir audio de 5.1 canales, conecte el terminal de salida de audio digital del
DVD / Blu-ray / receptor por cable / sat_lite (decodificador) directamente a un amplificador o un sistema Home Cinema,
no al televisor.

Cone×ibn de un amplificador / DVD para Home Cinema
Panel posterior dei TV
1,
Conecte los cables de audio entre los terminales AUDIO OUT JR-AUDIO-L] del televisor y los terminales de entrada de audio
del amplificador / DVD para Home Cinema.
Cuando un amplificador de audio se conecta a los terminales AUDIO OUT [R-AUDIO-L]: Reduzca la ganancia (volumen)
del TV, y ajuste e] volumen con e] control del amplificador.
Cada amplificador / DVD para Home Cinema tiene una configuraci6n distinta en el panel posterior.
Cuando conecte un amplificador / DVD para Home Cinema, debe hacer coincidir los colores de] terminal de conexi6n y
del cable.

Conexibn de una videocamara
Uso de un cable de video
Panel posterior del TV
Videocamara
0 Cable de audio (no ineluido)
Cable de video (no ineluido)
1,
2.
Conecte un cable de video entre el terminal AV IN [VIDEO] del televisor y el terminal VIDEO OUT de la videocamara.
Conecte los cables de audio entre los terminales AV IN [R-AUDIO-L] del televisor y los terminales AUDIO OUT de la
videocamara.
Cada videocamara tiene una configuraci6n distinta en el panel posterior.
Cuando conecte una videocamara, debe hacer coincidir los colores del terminal de conexi6n y del cable.
Usede uncableHDMI
Panel posterior dei TV
Cable HDMI (no ineluido)
1. Conecte un cable HDMI entre el terminal HDMI (DVl) IN del televisor y el terminal HDMI OUT de la videocamara.
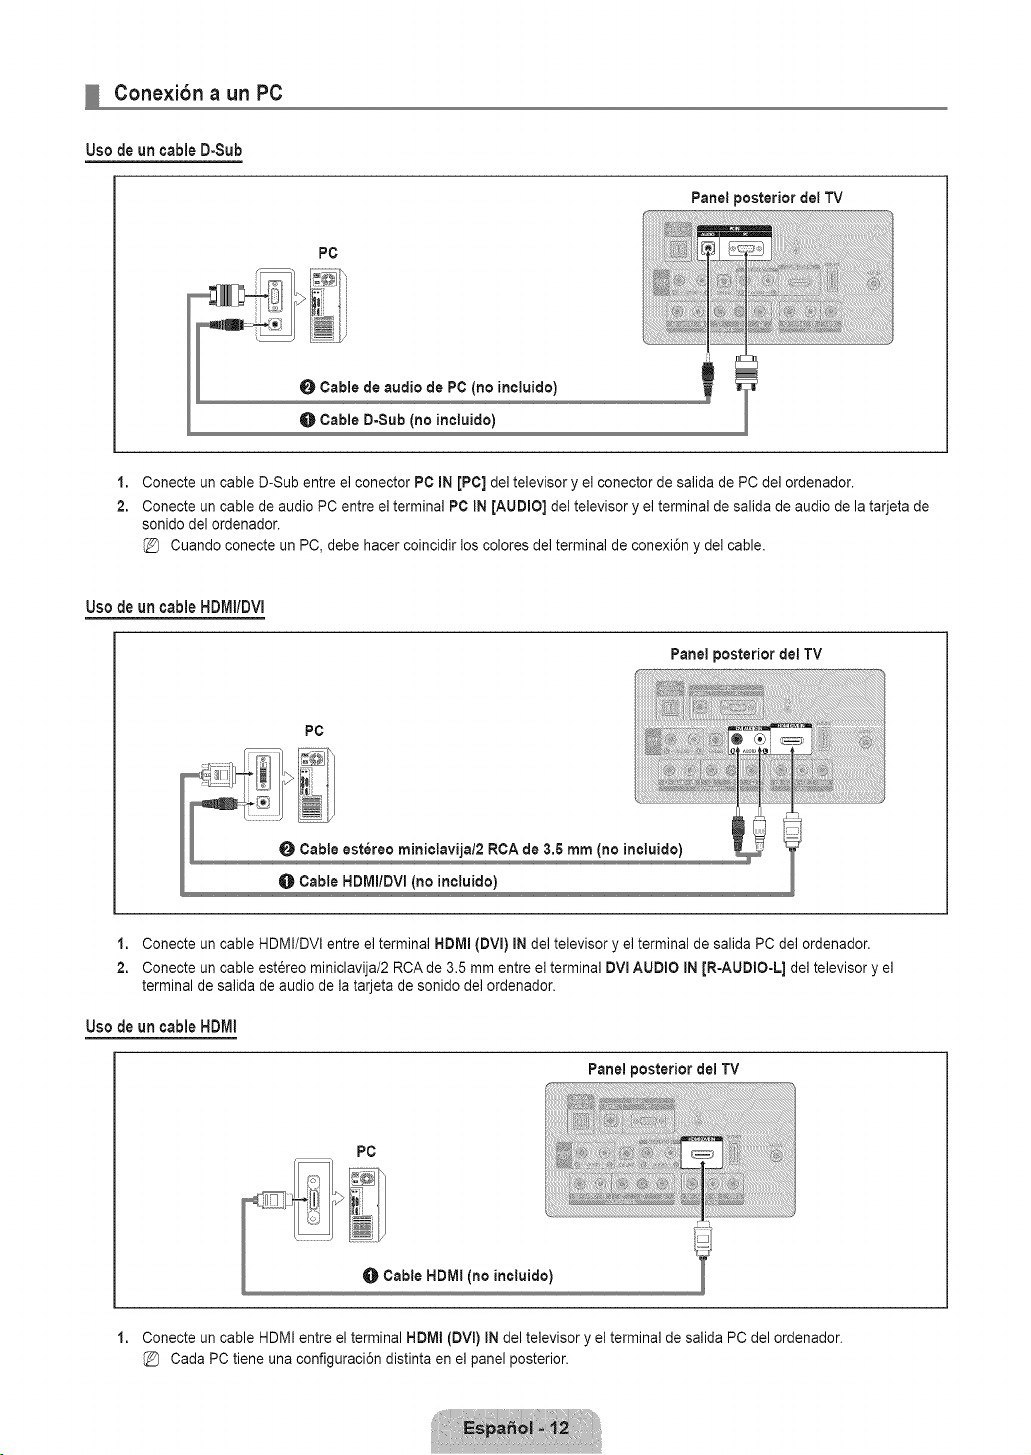
Conexibn a un PC
Use de un cable D-Sub
PC
0 Cable de audio de PC (no incluido)
O Cable D-Sub (no incluido)
Panel posterior det TV
1,
2.
Conecte un cable D-Sub entre el conector PC IN [PC] del televisor y el conector de salida de PC del ordenador.
Conecte un cable de audio PC entre el terminal PC IN [AUDIO] del televisor y el terminal de salida de audio de la tarjeta de
sonido del ordenador.
Cuando conecte un PC, debe hacer coincidir los colores de] terminal de conexi6n y de] cable.
Usede uncableHDMI/DVI
Panel posterior del TV
PC
1. Conecte un cable HDMI/DVI entre el terminal HDMI (DVI) IN del televisor y el terminal de salida PC del ordenador.
2. Conecte un cable est6reo miniclavija/2 RCA de 3.5 mm entre el terminal DVmAUDIO IN JR-AUDIO-L] del televisor y el
terminal de salida de audio de la tarjeta de sonido del ordenador.
Usede uncable HDMI
Panel posterior dei TV
1,
Conecte un cable HDMI entre el terminal HDMI (DVm)IN del televisor y el terminal de salida PC del ordenador.
Cada PC tiene una configuraci6n distinta en el panel posterior.

Visuaiizacibn de los men_s
2,
3.
4.
5.
Uso de los botones del mancloa clistancia
Antes de usar el televisor, siga los pasos detallados a continuaciEn para saber cEmo
desplazarse por los mentJs para seleccionar y ajustar las funciones.
1. Pulse el botEn MENU.
En la pantalla aparece el menQ principal. En el lado izquierdo hay los siguientes iconos:
Imagen, Sonido, Canal, Configuration, Entrada, 8oporte t_cnice.
Pulse el botEn A o T para seleccionar uno de los iconos.
Pulse el botEn 4 o _- para acceder al submenL_del icono.
Pulse el botEn A o T para desplazarse por los elementos del men&
Pulse el botEn ENTER_ para acceder a los elementos del men&
Pulse el botEn A/V/_I/_,- para cambiar los elementos seleccionados.
@ Pulse el botEn RETURN para volver al ment_anterio£
Pulse el botEn EXiT para salir del men&
Func i6n =°==_=_°--:_=::7=_=°=
Seleccione la opciEn marcada.
Confirme la configuraciEn.
Ejemplo: ConfiguraciEn del brillo del televisor en el menu de imagen
Ajuste del Brillo a 80
1. Pulse el botEn MENU para ver el men&
2. Pulse el botEn ENTER _ para seleccionar Imagen.
3. Pulse el botEn ,& o T para seleccionar Brillo.
4. Pulse el botEn ENTER_.
6. Pulse el botEn 4 o _- hasta que Brillo cambie a 80.
6. Pulse el botEn ENTER_,,J.
Pulse el botEn EXtT para salir del men&

Funcibn Plug & Play
Cuando se enciende el televisor per primera vez, se configuran seguidos y automaticamente
dos ajustes basicos del usuario.
1. Pulse el bot6n POWER (_ del mando a distancia.
Tambi6n puede usar el bot6n POWER O del televisor.
Aparece el mensaje Menu Language, Stere Dome, Channels and Time will be set,.
Pulse el bot6n ENTER _,,Jy aparecera autom&ticamente el men0 Define el idJoma del
men&
2,
3.
4.
6,
Pulse el bot6n A o T para seleccionar el idioma y, a continuaci6n, pulse el bot6n ENTER _,,J. Se muestra el mensaje
Seieccione 'Use demiciliarie' para instalar este TV en su casa..
Pulse el bot6n 4 o _- para seleccionar Dome cemercJe o Use demiciliarie y, a continuaci6n, pulse el bot6n ENTER _. Se
muestra el mensaje Seleccienar Ins antenas que desea memerizar..
Es recomendable configurar el televisor en el mode Use demiciliarie para obtener la meier imagen en un entorno
domestico.
Deme cemercie s61oes necesario en los entornos comerciales. Si la unidad accidentalmente se configura en el mode
Deme cemercie y se desea volver a Use demiciliarJe (normal): Pulse el bot6n del volumen del televisor. Cuando se
muestra la OSD del volumen, mantenga pulsado el bot6n MENU del televisor durante 5 segundos.
Pulse el bot6n A o T para memorizar los canales de la conexi6n seleccionada. Pulse el bot6n ENTER C_ para seleccionar
InicJar.
Aire: SeSal de antena Aire. / Cable: SeSa] de antena de] Cable. / Auto: SeSales de antena Aire y de Cable.
En el mode de cable, puede seleccionar el origen de seSal correcto entre 8TD, HRC y mRCpulsando el bot6n A, T,
o _- y, a continuaci6n, pulsando el bot6n ENTER_. Si tiene cable digital, seleccione la fuente de la serial del sistema
de cable para anal6gica y para digital. P6ngase en contacto con su proveedor de cable para saber el tipo de sistema de
cable existente en su zona.
6. Pulse el bot6n ENTER _,,J para seleccionar Iniciar. El televisor empezara a memorizar todos los canales disponibles.
Para detener la b0squeda antes de que termine, pulse el bot6n ENTER_ con la opci6n Detener seleccionada.
Una vez guardados todos los canales disponibles, se inicia la eliminaci6n de los canales codificados. Vuelve a mostrarse
el menO de programaci6n automatica. Pulse el bot6n ENTER[--;# cuando se complete la memorizaci6n de canales.
Aparece automaticamente el mensaje Configure el mode de Relej..
7. Pulse el bot6n ENTER[_,_.
Pulse el bot6n A o T para seleccionar Auto y, a continuaci6n, pulse el bot6n ENTER _. Se muestra el mensaje Cenfigurar
la hera de verane.. Si selecciona Manual, se muestra Cenfigurar fecha y hera actuales.
8. Pulse el bot6n A o T para seleccionar Apagade, Encendide o Auto y, a continuaci6n, pulse el bot6n ENTER _#.
9. Pulse el bot6n A o T para resaltar la zona horaria de su regi6n. Pulse el bot6n ENTERS#. Si ha recibido una serial digital,
se ajustara la hera automaticamente. En case negative, consulte la pagina 22 para ajustar el reloj.
10. Se proporciona el metodo de conexi6n para obtener la mejor calidad HD. Despues de confirmar el metodo, pulse el bot6n
ENTERIB_.
11. Aparece el mensaje Disfrutar su vision.. Cuando termine, pulse el bot6n ENTER _.
Si desea reiniciar esta funcion,,.
1. Pulse el bot6n MENU para ver el men& Pulse el bot6n A o T para seleccionar Cenfiguraci6n y, a continuaci6n, pulse el
bot6n ENTER _.
2. Pulse de nuevo el bot6n ENTER[--;_ para seleccionar Plug & Play.
La funci6n Plug & Play est& disponible s61oen el mode TV.

Configuracibn del menu de canales
Antena _ Aire ! Cable
Antes de empezar a memorizar los canales disponibles, debe indicar el tipo de origen de la
sei_alconectada al TV (es decir, antena o sistema de cable).
_-_ Pulse el bot6n TOOLS para ver el men0 Nerramientas. Tambi_n puede configurar la
antena con Herramientas _ Cambiar a Cable (o Cambiar a Aereos).
Prog. Auto
Aire: Sehal de antena Air, / Cable: Sehal de antena del cable, / Auto: Sehales de antena
a_rea y de cable.
AI seleccionar el sistema de TV de cable: Selecciona el sistema de cable. STD, HRC
e IRC identifican los distintos tipos de sistemas de TV por cable. P6ngase en contacto con su proveedor de cable para
averiguar el tipo de sistema de cable existente en su zona. En este momento ya se ha seleccionado el origen de la sepal.
Una vez guardados todos los canales disponibles, se inicia la eliminaci6n de los canales codificados (eliminaci6n de canales
codificados). Vuelve a mostrarse el menL_de programaci6n automatica.
Si desea detener la programaci6n autom&tica, pulse el bot6n ENTER_. Aparece el mensaje _,Detener programacion
automatica?. Seleccione 8i con el bot6n _ o _. y, a continuaci6n, pulse el bot6n ENTER _.
Borrar canal encriptado (solo canales digitales)
Esta funci6n se usa para filtrar los canales codificados despu_s de que Prog. Auto se haya completado. Puede tardar de 20 a 30
minutos.
Para detener la bOsqueda de canales codificados: Pulse el bot6n ENTER _ para seleccionar Detener. Pulse el bot6n
para seleccionar 8i y, a continuaci6n, pulse el bot6n ENTER _.
Esta funci6n s61oesta disponible en el modo Cable.
Lista de canales
Para conocer el procedimiento detallado sobre c6mo usar la Lista de canales, consulte las Jnstruccionesde 'Gesti6n de los
canales'.
Puede seleccionar estas opciones simplemente pulsando el bot6n CH LIST del mando a distancia.
Sintonia Fina (solo canales analbgicos)
Utilice la sintonizaci6n fina para ajustar manualmente un determinado canal a fin de que la recepci6n sea 6ptima.
Si no almacena en la memoria el canal que ha ajustado de manera precisa, los ajustes no se guardan.
* aparecera junto al nombre de los canales cuya sintonizaci6n se haya ajustado.
Para restablecer la sintonia fina, pulse el bot6n T para seleccionar Reiniciar y, a continuaci6n, pulse el bot6n ENTER _.
Gestibn de los canales
Con este ment_puede agregar y borrar los canales o configurarlos como favoritos y usar la
guia de programas de las emisoras digitales.
Todos los canales
Muestra todos los canales disponibles actualmente.
Canales agregados
Muestra todos los canales ar_adidos.
Favoritos
Muestra todos los canales favoritos.
Si desea seleccionar los canales favoritos que ha configurado, pulse el bot6n FAV.CH en el mando a distancia.

Grabacion con temporizador
Muestra todos los programas actualmente reservados.
Seleccione un canal en la pantalla Todos los eanales, Canales agregados o Favorites pulsando los botones A/T y pulse
el bot6n ENTER [B#. A continuaci6n puede ver el canal seleccionado.
Use de los botones de colores en la iista de canales
- Verde (Zoom): Amplia o disminuye el nL_merodel canal.
- Amarillo (Seleccion): Selecciona varias listas de canales. Puede aplicar la funci6n de afiadir/borrar o de a_adir/borrar
en la lista de favorites a varies canales al mismo tiempo. Seleccione los canales que desee y pulse el bot6n amarillo
para configurar los canales seleccionados al mismo tiempo. La marca _/ aparece a la izquierda de los canales
seleccionados.
- TOOLS (Nerramientas): Muestra los monEYsAgregar (o Borrar), Agregar a Favorites (o Borrar de Favorites),
Visualizacion con temporizador, Edicion de hombre, Seleccionar rode (o Deseleccionar redes) y Prog. Auto (los
months de las opciones pueden cambiar, dependiendo de la situaci6n.)
@ Iconos de la pantalla de estado del canal
- v: Un canal configurado come favorite.
- _/: Un canal seleccionado con el bot6n amarillo.
- E_3:Un programa que se esta emitiendo.
- Q: Un programa reservado.
Menus de opciones de la Iista de canales (on Todos los canales / Canales agregados / Favorites)
Pulse el bot6n TOOLS para usar el menQ de opciones.
Los elementos del menQde opciones pueden variar segt_n el estado del canal.
Agregar / Borrar
Puede suprimir o ar_adirun canal para que se muestren los canales que desee.
(_3 Todosloscanalesborradosse mostraranen elmenQTodos los canales.
Un canal de color gris quiere decir que se ha suprimido.
(_3 ElmenQAgregar s61oaparececonlos canalesborrados.
Tambi_n puede borrar un canal en los menQsCanales agregados o Favorites de la
misma manera.
Agregar a Favorites / Borrar de Favorites
Puede configurar come favorites los canales que vea con mas frecuencia.
_-_ Pulse el bot6n TOOLS para ver el menQ Herramientas. Tambi_n puede afiadir (o borrar) canales favorites seleccionando
Herramientas _ Agregar a Favorites (o Borrar de Favorites).
@ Se mostrara el simbolo v y el canal se configurara come favorite.
@ Todos los canales favorites se mostraran en el ment_Favorites.
Visualizacion con temporizador
Si reserva un programa que desea ver, el canal se cambia automaticamente al canal reservado en la lista de canales aunque este
viendo otro canal. Para reservar un canal primero debe configurar la hera actual. (Consulte la pagina 22)
$61ose pueden reservar los canales memorizados.
Puede ajustar el canal, el mes, el dia, el afio, la hera y el minute directamente pulsando los botones numericos del mando a
distancia.
La reserva de un programa se mostrara en el ment_Grabaeion con temporizader.
Guia de programas digitales y reserva de visualizaeion
Si se ha seleccionado un canal digital y se pulsa el bot6n _- aparece la guia de programas del canal. Se puede reservar un
programa mediante el procedimiento descrito anteriormente.
Edici6n de hombre {s61ocanales anal6gicos)
Los canales se pueden etiquetar con el prop6sito de que al seleccionar 6stos se pueda vet su nombre.
@ Los nombres de los canales digitales se asignan automaticamente y no se pueden etiquetar.
Seleccionar todo / Deseleccionar todos
= Seleecionar rode: Puede seleccionar todos los canales de la lista.
• Deseleecionar redes: Puede deseleccionar todos los canales seleccionados.
$61opodra seleccionar Deseleccionar redes si ha seleccionado un canal.
Prog. Auto
Si desea mas detalles sobre las opciones de configuraci6n, consulte la pagina 15.

Menus de opciones de la lista de canales (en Grabacion con temporizador)
Se puede ver, cambiar o borrar una reserva.
Pulse el bot6n TOOLS para usar el men0 de opciones.
Cambiar informacion
Selecci6nelo para cambiar la reserva de visualizaci6n.
Cancelar programaciones
Selecci6nelo para cancelar la reserva de visualizaci6n.
Information
Selecci6nelo para ver una reserva de visualizaci6n. (Tambi_n se puede cambiar la informaci6n
de reserva.)
Seleccionar todo
Seleccionar todos los programas reservados.
Configuracibn del menu de imagen
Modo
Puede seleccionar el tipo de imagen que mejor cumpla sus requisitos de visualizaci6n.
__ Pulse el bot6n TOOLS para ver el men0 Herramientas. Tambi6n puede configurar el
temporizador seleccionando Herramientas _ Imagen Modo.
Dinamico
Selecciona la visualizaci6n con una definici6n mejorada, en una habitaci6n luminosa.
Normal
Selecciona la visualizaci6n 6ptima de la imagen, en un entomo normal.
Cine
Selecciona la visualizaci6n para ver peliculas en una sala oscura.
Luz de rondo / Contraste / Brillo / Definicion / Color / Tinte (V/R)
El televisor tiene varias opciones de configuraci6n que permiten controlar la oalidad de la imagen.
• Luz de fondo: Ajusta el brillo de la luz de fondo de la pantalla LCD.
• Contraste: Ajusta el nivel del contraste de la imagen.
• Brillo: Ajusta el nivel del brillo de la imagen.
• Oefinicion: Ajusta la definici6n de los bordes de la imagen.
• Color: Ajusta la saturaci6n del color de la imagen.
• Tinte (V/R): Ajusta el matiz del color de la imagen.
Cuando haga cambios en Luz de rondo, Contraste, Brillo, Definition, Color o Tinte (V/R) el color de la OSD tambi_n se
ajustara.
En el modo PC, s61ose pueden cambiar Luz de rondo, Contraste y Brillo.
La configuraci6n de cada dispositivo externo conectado a la entrada del televisor se puede ajustar y guardar.
La energia consumida durante el uso se puede reducir significativamente si se disminuye el nivel del brillo de la imagen.
[_ Configuration avanzada
Los nuevos televisores Samsung permiten una configuraci6n rnas precisa aun de la imagen
que los modelos anteriores.
Conflguracion avanzada esta disponible en los modos Normal o Cine.
En el modo PC, s61ose pueden cambiar Gamma y Balance de blanco entre las opciones
de Configuracion avanzada.
Tono del negro _ Apagado / Oscuro / M_s oscuro / El m_s oscuro
Se puede seleccionar el nivel de negro en la pantalla para ajustar la profundidad de _sta.
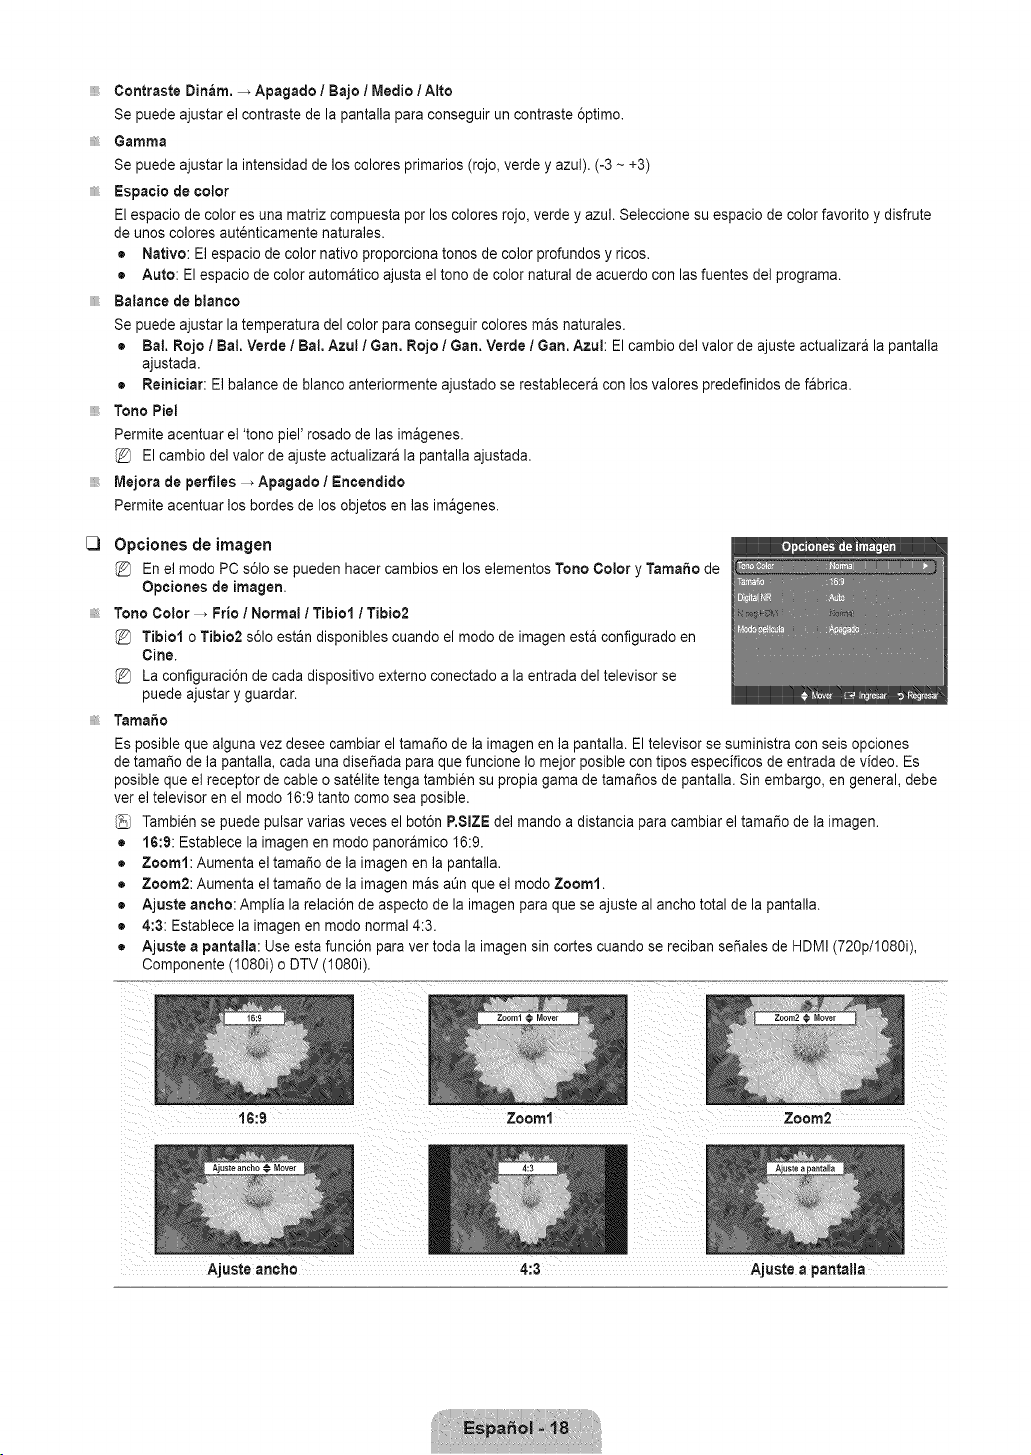
Contraste Dinam, _ Apagado / Bajo / Medio/Alto
Se puede ajustar el contraste de la pantalla para conseguir un contraste 6ptimo.
Gamma
Se puede ajustar la intensidad de los colores primarios (rojo, verde y azul). (-3 ~ +3)
Espacio de color
El espacio de color es una matriz compuesta por los colores rojo, verde y azul. Seleccione su espacio de color favorito y disfrute
de unos colores autenticamente naturales.
• Nativo: El espacio de color nativo proporciona tonos de color profundos y ricos.
• Auto: El espacio de color automatico ajusta el tono de color natural de acuerdo con las fuentes del programa.
Balance de blanco
Se puede ajustar la temperatura del color para conseguir colores mas naturales.
• Bal. Rojo / Bal. Verde / Bal. Azul 1Gan. Rojo / Gan. Verde / Gan. Azul: El cambio del valor de ajuste actualizara la pantalla
ajustada.
• Reiniciar: El balance de blanco anteriormente ajustado se restablecera con los valores predefinidos de fabrica.
Tone Piel
Permite acentuar el 'tono piel' rosado de las imagenes.
El cambio del valor de ajuste actualizara la pantalla ajustada.
Mejora de perfiles _ Apagado / Encendido
Permite acentuar los bordes de los objetos en las imagenes.
C3
Opciones de imagen
En el mode PC s61o se pueden hacer cambios en los elementos Tone Color y Tamale de
Opciones de imagen,
Tone Color _ Frio / Normal / Tibiol / Tibie2
Tibiol o Tibio2 s61oestan disponibles cuando el mode de imagen esta configurado en
Cine.
La configuraci6n de cada dispositivo externo conectado a la entrada del televisor se
puede ajustar y guardar.
Tamale
Es posible que alguna vez desee cambiar el tamale de la imagen en la pantalla. El televisor se suministra con seis opciones
de tamale de la pantalla, cada una dise_ada para que funcione Io mejor posible con tipos especificos de entrada de video. Es
posible que el receptor de cable o satelite tenga tambien su propia gama de tamales de pantalla. Sin embargo, en general, debe
ver el televisor en el mode 16:9 tanto come sea posible.
Tambi6n se puede pulsar varias veces el bot6n P.SIZE del mando a distancia para cambiar el tama_o de la imagen.
• 16:9: Establece la imagen en modo panoramico 16:9.
• Zoom1: Aumenta el tama_o de la imagen en la pantalla.
• Zoom2: Aumenta el tama_o de la imagen mas at_nque el modo Zoom1.
• Ajuste ancho: Amplia la relaci6n de aspecto de la imagen para que se ajuste al ancho total de la pantalla.
• 4:3: Establece la imagen en modo normal 4:3.
• Ajuste a pantalla: Use esta funci6n para ver toda la imagen sin cortes cuando se reciban se_ales de HDMI (720p/1080i),
Componente (1080i) o DTV (1080i).
Ajuste ancho 4:3 Ajuste a pantalla
%
%
%
%
%
Puede producirse una retenci6n temporal de imagen cuando se ve una imagen estatica durante mas de dos horas.
Despues de seleccionar Zoom1, Zoom2 o Ajuste ancho: Pulse el bot6n 4 o _,,para seleccionar Posieion y, a continuaci6n,
pulse el bot6n ENTERE_,#. Pulse los botones A o _ para desplazar la imagen hacia arriba o hacia abajo.
Despues de seleccionar Ajuste a pantalla en los modos HDMI (1080i) o Component (1080i), quizas deba centrar la imagen:
Pulse el bot6n 4 o !_- para seleccionar Posiei6n y, a continuaci6n, pulse el bot6n ENTER _,_. Pulse los botones A, T, _ o
_. para mover la imagen.
Reinieiar: Pulse el bot6n _ o _. para seleccionar Reinieiar y, a continuaci6n, pulse el bot6n ENTER _,_. Puede inicializar la
configuraci6n.
HD (alta definici6n): 16:9- 1080i (1920x1080), 720p (1280x720)
La configuraci6n de cada dispositivo externo conectado a la entrada del televisor se puede ajustar y guardar.
Fuenteentrada ImagenTama_o
TV,AV,Componente(48%48%) 16:9,Zoom1,Zoom2,4:3
DTV(1080i),Componente(108%, HDMI(720p,108% 16:9,4:3,Ajuste ancho, Ajuste a pantalla
PC 16:9,4:3
Digital NR _ Apagado / Bajo / Medio 1Atto / Auto
Si la sei_al de emisi6n que recibe el televisor es d_bil, puede activarse la funci6n Digital Noise Reduction para reducir la estatica y
las imagenes superpuestas que pueden aparecer en la pantalla.
Cuando la sei_alsea debil, seleccione alguna de las otras opciones hasta que se vea una imagen de mejor calidad.
N.neg HDMI _ Normal / Bajo
Se puede seleccionar el nivel de negro en la pantalla para ajustar la profundidad de _sta.
Esta funci6n s61oesta activa cuando un dispositivo externo esta conectado al televisor a traves de HDMI. La funci6n N,neg
HDMI puede que no sea compatible con dispositivos externos.
Modo pelicula _ Apagado/Auto
El televisor se puede configurar para detectar automaticamente y procesar las se_ales de las peliculas procedentes de todas las
fuentes y ajustar la imagen para conseguir una calidad 6ptima.
Modo pelicula es compatible con TV, Video, Component (480i/I080i) y HDMI (480i/I080i).
C3
Reinicio de la imagen _ Reinic. modo imagen / Cancelar
Restablece todos los ajustes predeterminados.
Reinie. modo imagen: Los valores de la imagen actual regresan a los predeterminados.
Uso del televisor como una pantalla de ordenador (PC)
Instalacion del software en el equipo (segun Windows XP)
A continuaci6n se muestra la configuraci6n de pantalla de Windows para un ordenador tipico. Probablemente la pantalla real
de su PC sea distinta, segt_nla versi6n concreta de Windows y de la tarjeta de video que tenga. Pero aunque las pantallas
reales tengan un aspecto diferente, se aplicaran los mismos ajustes basicos e informaci6n en la mayoria de los casos. (En caso
contrario, p6ngase en contacto con el fabricante del ordenador o con el distribuidor de Samsung.)
1. Primero, haga clic en 'Panel de control' en el menO Inicio de Windows.
2. Cuando aparezca la ventana del panel de control, haga clic en 'Apariencia y temas' y aparecera un cuadro de dialogo.
3. Cuando aparezca la pantalla del Panel de control, haga clic en 'Pantalla' y aparecera un cuadro de dialogo.
4. Seleccione la ficha 'Configuraci6n' en el cuadro de dialogo.
Configuraci6n correcta del tama_o (resoluci6n): Modo 6ptimo: 1360 x 768 pixeles
Si existe una opci6n de frecuencia vertical en el cuadro de dialogo de configuraci6n de la pantalla, el valor correcto es 60 o
60Hz. Si no, haga clic en OK y salga del cuadro de dialogo.

IVlodosdepantalla
Si la serial del sistema es igual al modo de serial estandar, la pantalla se ajusta automaticamente. Si la serial del sistema no es
igual al modo de serial estandar, ajuste el modo consultando la guia del usuario de la tarjeta de video; de Io contrario, puede no
haber serial de video. La imagen de pantalla se ha optimizado durante la fabricaci6n para los modos de visualizaci6n enumerados
a continuaci6n.
Entradas D-Sub y HDMt/DVI
C)
Y_5_Y .............._g0x:_5.........
640 x 480
640 x 480
800 x 600
800 x 600
800 x 600
1024 x 768
1024 x 768
1024 x 768
31.469
37.500
37.861
37.879
46.875
48.077
48.363
56.476
60.023
59.940
75.000
72.809
60.317
75.000
72.188
60.004
70.069
75.029
70.000
Cuando se usa una conexi6n de cable HDMI/DVI, se debe conectar en el terminal HDMI
LN22B360)
Cuando se usa una conexi6n de cable HDMI/DVI, se debe conectar en el terminal HDMI
25.175
31.500
31.500
40.000
49.500
50.000
65.000
75.000
78.750
89.040
-/+
-/-
+/+
+/+
+/+
-/-
-/-
+/+
-/+
(DVI) IN.(LNI9B360, LN19B361,
IN 1. (LN26B360, LN32B360)
Ajuste dei televisor con el ordenador
Preselecci6n: Pulse el bot6n SOURCE para seleccionar el modo PC.
Ajuste Aurora&rico
Mediante la funci6n de ajuste automatico se puede establecer que el televisor se ajuste
automaticamente de acuerdo con las sefiales de video que reciba. La funci6n tambien ajusta
automaticamente con mas configuraci6n y ajusta los valores y las posiciones de la frecuencia.
_-_ Pulse el bot6n TOOLS para ver el menO Herramientas. Tambi_n puede establecer el
ajuste automatico seleccionando Herramientas _ Ajuste Automatico.
Esta funci6n no se puede utilizar en modo DVI-HDMI.
C) Pantalla
El prop6sito del ajuste de la calidad de imagenes eliminar o reducir el ruido de la imagen. Si el ruido no desaparece s61ocon la
sintonizaci6n fin& realice los ajustes de frecuencia hasta el maximo y vuelva a realizar la sintonizaci6n fin& Despu_s de reducir el
ruido, vuelva a ajustar la imagen para que quede alineada en el centro de la pantalla.
Grueso / Fino
El objetivo del ajuste de la calidad de imagen es eliminar o reducir las interferencias. Si el ruido no se elimina mediante la
sintonizaci6n fin& ajuste la frecuencia Io mejor que pueda (gruesa) y vuelva a realizar la sintonizaci6n fin& Despu_s de reducir el
ruido, vuelva a ajustar la imagen para que quede alineada en el centro de la pantalla.
Posicibn de PC
Ajuste la posici6n de la pantalla del PC si no se acopla a la pantalla del TV. Pulse los botones ,& o T para ajustar la posici6n
vertical. Pulse el bot6n .,_o _. para ajustar la posici6n horizontal.
Reiniciar Imagen
Puede recuperar todos los ajustes de imagen predeterrninados de fabrica.

C3
Configuracibn dei men_ de sonido
Modo _ Normal ! Musica / Cine / Voz clara ! Favorito
Puedeseleccionarel modode sonidoqueseajustea suspreferenciaspersonales.
[_ Ecualizador
Es posible ajustar los parametros del sonido seg_n sus preferencias personales.
Modo
Selecciona el modo de sonido entre los valores predefinidos.
Balance liD
Ajusta el balance entre los altavoces izquierdo y derecho.
100Hz / 300Hz / IKHz / 3KHz / 10KHz (ajuste del ancho de banda)
Para ajustar el nivel de las diferentes frecuencias de ancho de band&
Reinieiar
Restablece todos los ajustes predeterminados del ecualizador.
C3
C3
C3
C3
Trusurround SRS HD _ Apagado / Encendido
Trusurround SRS HD es una tecnologia SRS patentada que solventa el problema de reproducir contenido multicanal 5.1 en dos
altavoces. TruSurround proporciona una experiencia de sonido virtual convincente a traves de cualquier sistema de reproducci6n
con dos altavoces, incluso con los altavoces internos del televisor. Es totalmente compatible con todos los formatos multicanal.
Idioma preferido (solo canales digitales)
El sistema de emisi6n de TV digital permite transmitir simultaneamente muchas pistas de audio (por ejemplo, traducciones
simultaneas del programa en otros idiomas).
Puede seleccionar un idioma que no sea el Idioma preferido pulsando el bot6n MT$ del mando a distancia.
Idioma preferido esta disponible s61oen el modo de televisi6n digital.
S61ose puede seleccionar uno de los idiomas que ofrece la emisora.
8onido Multi-track (MTS} (solo canales analogicos}
Pulse varias veces el bot6n MT8 del mando a distancia para seleccionar Mono, Estereo o SAP.
• Mono: Elija para canales que emiten en monoaural o si tiene dificultades con la recepci6n de set,ales estereo.
• Estereo: Elija para canales que emiten en estereo.
• SAP: Elija esta opci6n para escuchar el programa de audio independiente, que normalmente es una traducci6n de otro
idiom&
8onido Mutti4raek esta disponible s61oen el modo de televisi6n anal6gica.
SegOn el programa concreto emitido, puede escuchar en Mono, Estereo o SAP.
VoI.Auto _ Apagado / Encendido
Cada emisora tiene sus propias condiciones de sedal y resulta inc6modo ajustar el volumen cada vez que se cambia de canal.
Esta funci6n permite ajustar automaticamente el volumen de un canal disminuyendo la salida de sonido cuando la sepal de
modulaci6n es alta o aumentando la salida de sonido cuando la serial de modulaci6n es baja.
[_ Seleccionar altavoz
Cuando se ve el televisor conectado a un sistema Home Cinema, se debe apagar el altavoz del televisor para que la salida de
audio del televisor utilice los altavoces del Home Cinema (externos).
Altavoz externo: Utiliza los altavoces extemos (Home Cinema) para la salida del sonido.
Altavoz de TV: Utiliza los altavoces del TV para la salida del sonido.
Si selecciona Altavoz externo en el ment_8eleecionar altavoz, se limita la configuraci6n del sonido.
Los botones de volumen y MUTE no funcionan si 8eleeeionar altavoz esta establecido en Altavoz externo. Configure el
volumen del sistema Home Cinema.
C) Reinicio del sonido _ Reiniciar rode / Reinic. mode sonido / Cancelar
Puede restaurar la configuraci6n del sonido con los valores predeterminados de fabrica.
Reinie. mode sonido: Se restablecen los valores del sonido predeterminados.
Silencio
C3
C3
Configuracibn dei men_ de configuracibn
Idioma
Se puedeconfigurarelidiomade los ment_s.
Tiempo
Reloj
Establecer el reloj es necesario para usar las distintas caracteristicas de temporizador del TV.
La hera actual aparecera siempre que se pulse el bot6n INFO.
Si desconecta el cable de alimentaci6n, debe configurar el reloj de nuevo.
• Mode Reloj
Se puede configurar la hera actual manual o automaticamente.
- Auto: Configure la hera automaticamente con la hera de la emisora digital.
- Manual: Configure la hera actual manualmente.
SegOn la emisora y la serial, la hera automatica no se puede ajustar correctamente. En este case, ajuste la hera
manualmente.
La antena y el cable se deben conectar para ajustar la hera automaticamente.
• Config. Reloj
Puede ajustar la hera actual manualmente.
Esta funci6n s61oesta disponible si Mode Reloj esta configurado come Manual.
Puede ajustar el mes, el dia, el a_o, la hera y el minute directamente pulsando los botches numericos del mando a
distancia.
• Zona Tiempo
Seleccione la zona horaria.
Esta funci6n s61oesta disponible si Mode Reloj esta configurado come Auto.
• Horatio de Verano (Horario de verano) _ Apagado / Encendido / Auto
Activa o desactiva la funci6n del horario de verano.
Esta funci6n s61oesta disponible si Mode Reloj esta configurado come Auto.
Temporizador
El temporizador de desconexi6n apaga automaticamente el televisor despues de un periodo prefijado (30, 60, 90,120, 150 y 180
minutes).
_-_ Pulse el bot6n TOOLS para ver el menO Herramientas. Tambi_n puede configurar el temporizador seleccionando
Herramientas _ Temporizador.
Para cancelar la funci6n Temporizador seleccione Apagado.

C)
Temporizador I / Temporizador 2 / Temporizador 3
La activaci6n y desactivaci6n del temporizador se puede configurar de tres maneras. Debe ajustar el reloj en primer lugar.
• Hora de encertdido: Ajuste la hora, los minutos, am/pm y activar/desactivar. (Para activar el temporizador con la
configuraci6n deseada, establezcalo en Activar.)
• Hora de apagado: Ajuste la hora, los minutos, am/pm y activar/desactivar. (Para activar el temporizador con la configuraci6n
deseada, establ_zcalo en Activar.)
• Volumen: Configure el nivel de volumen deseado.
• Antena: Ver el tipo de antena. (Aire o Cable)
Puede configurar la antena seleccionando Canal _ Antena. (consulte la pagina 15)
• Canal: Permite seleccionar el canal deseado.
• Repetir: Seleccione Una vez, Carla alia,Lun~Vie, Lun~$ab, Sab~Dom o Manual,
Con Manual seleccionado, pulse el bot6n _. para seleccionar el dia de la semana. Pulse el bot6n ENTER _ sobre el
dia deseado y aparecera la marca_.
Puede ajustar la hora, los minutos y el canal pulsando los botones num_ricos del mando a distancia.
Apagado autom_tieo
Si activa el temporizador, el televisor se apagara si no se pulsa ningQn bot6n durante 3 horas, despu_s de que el
temporizador Io haya puesto en march& Esta funci6n s61oesta disponible si el temporizador esta activado y evita el
recalentamiento que se puede producir si el televisor esta encendido durante demasiado tiempo.
V-Chip
La funci6n V-Chip bloquea automaticamente la programaci6n que se considera inadecuada para los ni_os. El usuario debe
escribir un n_mero PIN (nQmero de identificaci6n personal) antes de establecer o cambiar las restricciones de V-Chip.
V-Chip no esta disponible en los modos HDMI, Componente o PC.
El c6digo PIN predeterminado para un televisor nuevo es '0-0-0-0'.
Si olvida su c6digo PIN, pulse los botones del mando a distancia siguiendo la secuencia siguiente, que restablece el c6digo a
0-0-0-0: POWER (apagar) _ MUTE -> 8 _ 2 -, 4 _ POWER (encender).
Perm, todo: Se pulsa para desbloquear todos los programas de televisi6n. / Bloq. redo: Se pulsa para bloquear todos los
programas de televisi6n.
Bloqueo V-Chip -_ Apagado / Eneendido
Puede bloquear los programas de TV clasificados.
Guias pater. TV
Puede bloquear los programas de TV segt_n su clasificaci6n. Esta funci6n permite controlar Io
que los ni_os pueden ver.
• TV-Y: Ni_os peque_os / TV-Y7: Ni_os de mas de 7 argos/ TVoG:Todos los pt_blicos/
TV-PG: Supervisi6n paterna / TV-t4: Mayores de 14 aSos / TV-MA: Para adultos
• ALL: Bloquea todas las clasificaciones de TV. / FV: Violencia y fantasia / V: Violencia / 8:
Situaci6n sexual / L: Lenguaje grosero / D: Dialogo de contenido sexual
La opci6n V-Chip bloqueara automaticamente las categorias que son mas restrictivas.
Por ejemplo, si bloquea la categoria TV-Y, automaticamente se bloqueara TV-Y7. De
manera similar, si bloquea la categoria TV-G, todas las categorias del grupo adolescente
quedaran bloqueadas (TV-G, TV-PG, TV-14 y TV-MA). Las subclasificaciones (D, L, 8, V)
funcionan de manera similar.
La opci6n V-chip bloqueara automaticamente las categorias que son 'mas restrictivas'. Por ejemplo, si bloquea la
subclasificaci6n L en TVoPG, las subclasificaciones L en TVo14y TV-MA se bloquearan automaticamente.
Clas. MPAA
Puede bloquear las peliculas segL_nsu clasificaci6n. La Asociaci6n americana de
cinematografia (MPAA) ha creado un sistema de clasificaci6n que proporciona a padres y
tutores informaci6n sobre qu_ peliculas son apropiadas para los ni_os.
• G: Todos los pQblicos(sin restricciones).
• PG: Se sugiere la compa_ia de un adulto.
• PG=13: Menores acompa_ados de un adulto.
R: Restringido. Los ni_os menores de 17 argosdeben estar acompar_ados por un adulto.
N0-17: Prohibida la entrada a menores de 17 argos.
X: S61oadultos.
NR: Sin clasificaci6n.
El V-Chip bloqueara automaticamente cualquier categoria que sea 'mas restrictiva'. Por ejemplo, si bloquea la categoria
PG=13, tambien se bloquearan automaticamente R, N0-17 y X.
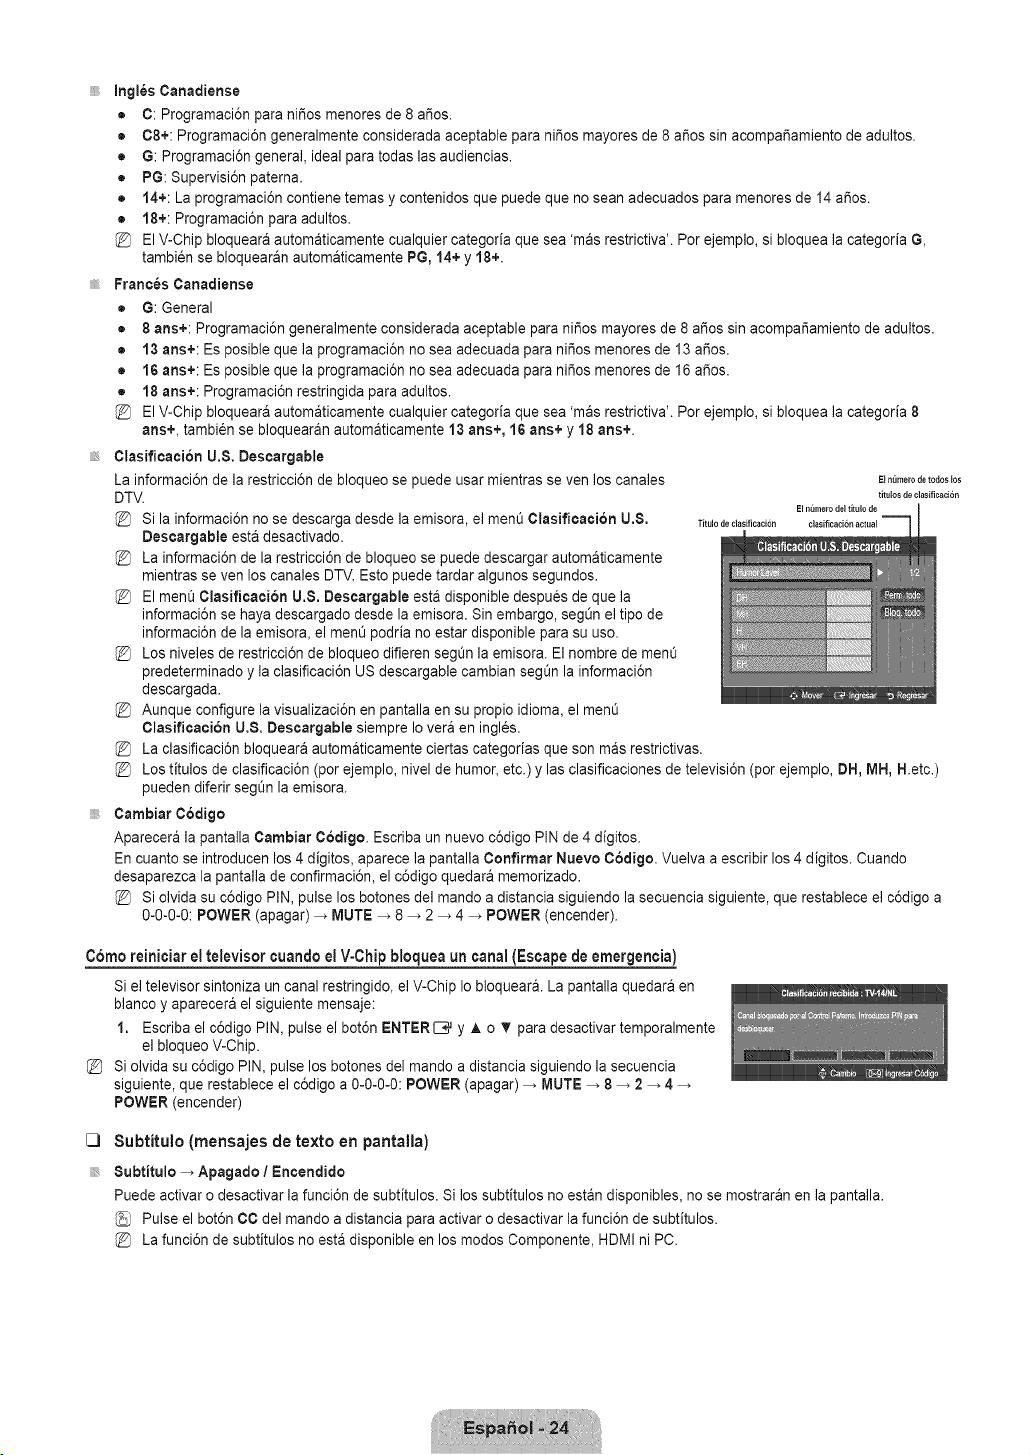
InglesCanadiense
• C: Programaci6n para ni_os menores de 8 a_os.
• 08+: Programaci6n generalmente considerada aceptable para ni_os mayores de 8 a_os sin acompa_amiento de adultos.
• G: Programaci6n general, ideal para todas las audiencias.
• PG: Supervisi6n paterna.
• 14+: La programaci6n contiene temas y contenidos que puede que no sean adecuados para menores de 14 a_os.
• 18+: Programaci6n para adultos.
El V-Chip bloqueara automaticamente cualquier categoria que sea 'mas restrictiva'. Por ejemplo, si bloquea la categoria G,
tambien se bloquearan automaticamente PG, 14+ y 18+.
Frances Cartadiense
• G: General
• 8 ans+: Programaci6n generalmente considerada aceptable para niSos mayores de 8 a_os sin acompar_amiento de adultos.
• 13 arts+: Es posible que la programaci6n no sea adecuada para ni_os menores de 13 a_os.
• 16 arts+: Es posible que la programaci6n no sea adecuada para ni_os menores de 16 a_os.
• 18 arts+: Programaci6n restringida para adultos.
El V-Chip bloqueara automaticamente cualquier categoria que sea 'mas restrictiva'. Por ejemplo, si bloquea la categoria 8
arts+, tambi6n se bloquearan automaticamente 13 arts+, 16 arts+ y 18 arts+.
Clasificacion U,8. Descargable
La informaci6n de la restricci6n de bloqueo se puede usar mientras seven los canales
DTV.
@ Si la informaci6n no se descarga desde la emisora, el ment_Clasificacion U.8. Titulodeclasificaciori
Descargable esta desactivado.
@ La informaci6n de la restricci6n de bloqueo se puede descargar automaticamente
mientras seven los canales DTV. Esto puede tardar algunos segundos.
@ El ment_Clasificaci6n U.$. Deseargable esta disponible despues de que la
informaci6n se haya descargado desde la emisora. Sin embargo, segOnel tipo de
informaci6n de la emisora, el menO podria no estar disponible para su uso.
@ Los niveles de restricci6n de bloqueo difieren seg0n la emisora. El nombre de menO
predeterminado y la clasificaci6n US descargable cambian segt_n la informaci6n
descargada.
@ Aunque configure la visualizaci6n en pantalla en su propio idioma, el menO
Clasificaci6n U.8. Descargable siempre Io vera en ingles.
La clasificaci6n bloqueara automaticamente ciertas categorias que son mas restrictivas.
Los titulos de clasificaci6n (por ejemplo, nivel de humor etc.) y las clasificaciones de televisi6n (por ejemplo, DH, MH, H.etc.)
pueden diferir segOn la emisora.
Cambiar Codigo
Aparecera la pantalla Cambiar C6digo, Escriba un nuevo c6digo PIN de 4 digitos.
En cuanto se introducen los 4 digitos, aparece la pantalla Confirmar Nuevo Codigo. Vuelva a escribir los 4 digitos. Cuando
desaparezca la pantalla de confirmaci6n, el c6digo quedara memorizado.
@ Si olvida su c6digo PIN, pulse los botones del mando a distancia siguiendo la secuencia siguiente, que restablece el c6digo a
0-0-0-0: POWER (apagar) _ MUTE _ 8 _ 2 _ 4 _ POWER (encender).
E} n_lmerode todos}os
titulos de clasificacion
Ei nt_merodel titulo de
clasificacionactual
Como reiniciar el televisor cuandoel V-Chipbloqueauncanal(Escapede emergencia)
Si el televisor sintoniza un canal restringido, el V-Chip Io bloquear& La pantalla quedara en
blanco y aparecera el siguiente mensaje:
1. Escriba el c6digo PIN, pulse el bot6n ENTERIB_ y ,& o T para desactivar temporalmente
el bloqueo V-Chip.
Si olvida su c6digo PIN, pulse los botones del mando a distancia siguiendo la secuencia
siguiente, que restablece el c6digo a 0-0-0-0: POWER (apagar) _ MUTE _ 8 _ 2 _ 4
POWER (encender)
C]
Subtitulo (mensajes de texto en pantalia)
8ubtitulo _ Apagado I Encendido
Puede activar o desactivar la funci6n de subtitulos. Si los subtitulos no estan disponibles, no se mostraran en la pantalla.
Pulse el bot6n CC del mando a distancia para activar o desactivar la funci6n de subtitulos.
@ La funci6n de subtitulos no est& disponible en los modos Componente, HDMI ni PC.
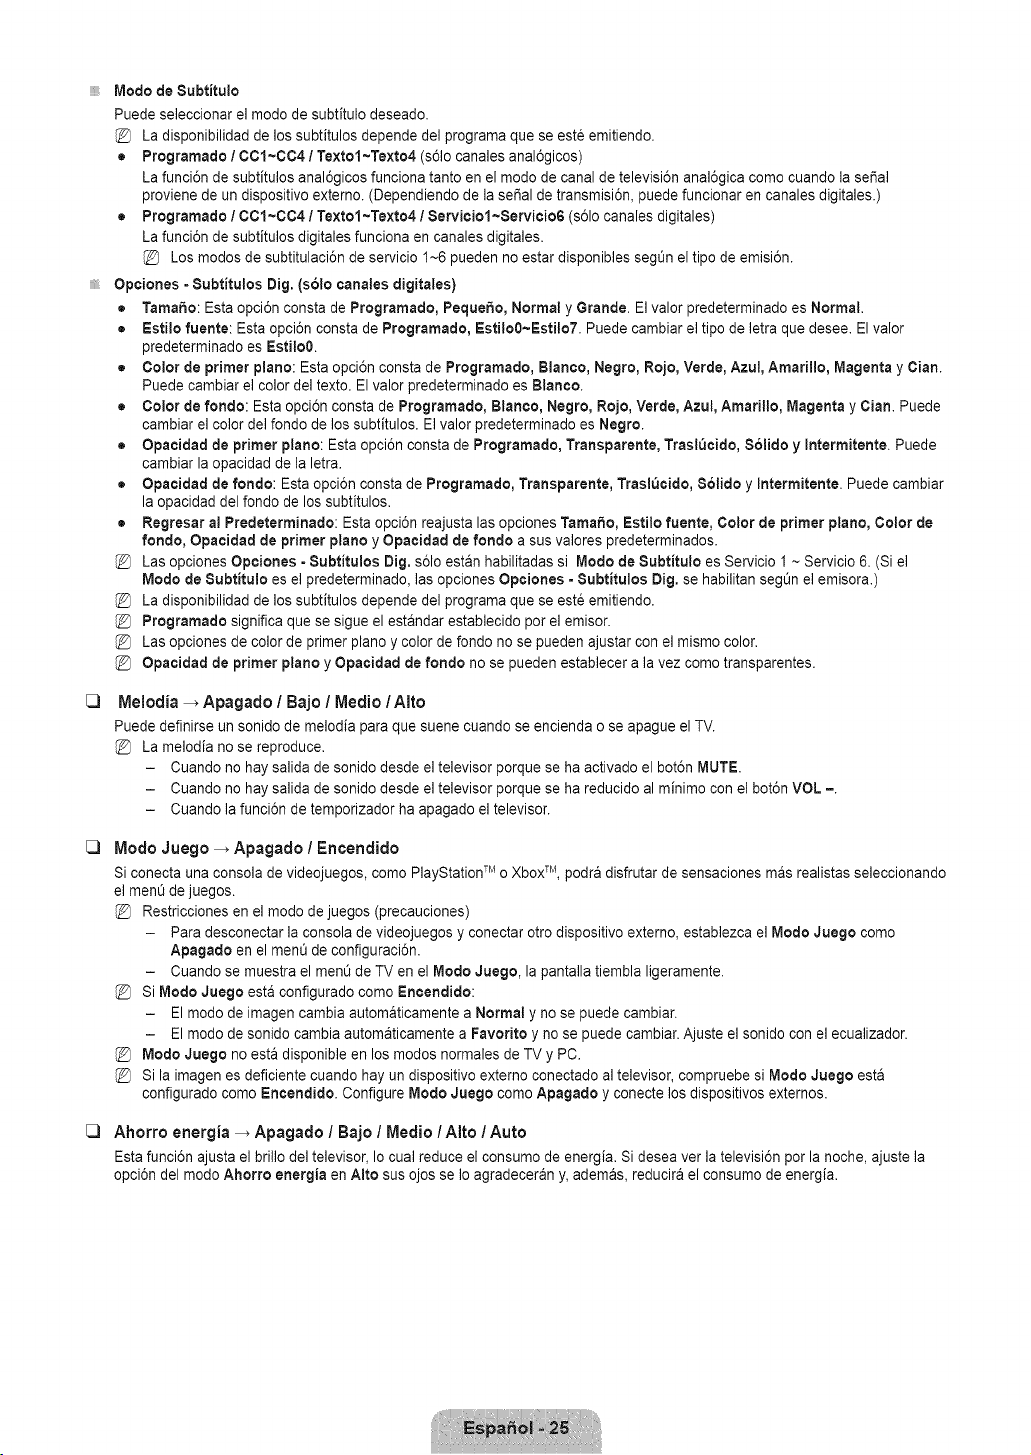
C)
C)
C)
Mode de 8ubtitulo
Puede seleccionar el mode de subtitulo deseado.
La disponibilidad de los subfitulos depende del programa que se este emitiendo.
• Programatic I 00t~0C4 / Textol~Texto4 (s61ocanales anal6gicos)
La funci6n de subtitulos anal6gicos funciona tanto en el mode de canal de televisi6n anal6gica come cuando la seSal
proviene de un dispositivo externo. (Dependiendo de la sei_al de transmisi6n, puede funcionar en canales digitales.)
• Programatic / 00t~004 / Textot~Texto41 Serviciol~Servicio6 (s61ocanales digitales)
La funci6n de subtitulos digitales funciona en canales digitales.
Los modes de subtitulaci6n de servicio I~6 pueden no estar disponibles segt_n el tipo de emisi6n.
Opciones =Subtitulos Dig. (s61ocanales digitales)
= Tamale: Esta opci6n consta de Programatic, Pequeho, Normal y Grande. Elvalor predeterminado es Normal.
• Estilo fuente: Esta opci6n consta de Programatic, Estilo0~Estilo7. Puede cambiar el tipo de letra que desee. El valor
predeterminado es Estilo0.
• Color de primer piano: Esta opci6n consta de Programatic, Blanco, Negro, Roje, Verde, Azul, Amarillo, Magenta y Clan.
Puede cambiar el color del texto. El valor predeterminado es Blanco.
• Color de rondo: Esta opci6n consta de Programatic, Blanco, Negro, Rojo, Verde, Azul, Amarillo, Magenta y Clan. Puede
cambiar el color del fondo de los subfitulos. El valor predeterminado es Negro.
• Opacidad de primer plane: Esta opci6n consta de Programatic, Transparente, Trasl_cido, $61ido y Intermitente. Puede
cambiar la opacidad de la letra.
• Opaeidad de rondo: Esta opci6n consta de Programatic, Transparente, Trasl_eido, 8olido y Intermitente. Puede cambiar
la opacidad del rondo de los subtitulos.
• Regresar a! Predeterminado: Esta opci6n reajusta las opciones Tamale, Estilo fuente, Color de primer piano, Color de
rondo, Opaeidad de primer plane y Opacidad de rondo a sus valores predeterminados.
Las opciones Opciones - 8ubtitulos Dig. s61oestan habilitadas si Mode de 8ubtitulo es Servicio I ~ Servicio 6. (Si el
Mode de 8ubtitulo es el predeterminado, las opciones Opciones - 8ubtitulos Dig, se habilitan segOnel emisora.)
La disponibilidad de los subfitulos depende del programa que se este emitiendo.
Programatic significa que se sigue el estandar establecido per el emisor.
Las opciones de color de primer piano y color de rondo no se pueden ajustar con el mismo color.
Opaeidad de primer piano y Opacidad de rondo no se pueden establecer a la vez come transparentes.
Melodia _ Apagado / Bajo / Medic / Alto
Puede definirse un sonido de melodia para que suene cuando se encienda o se apague el TV.
La melodia no se reproduce.
- Cuando no hay salida de sonido desde el televisor porque se ha activado el bot6n MUTE.
- Cuando no hay salida de sonido desde el televisor porque se ha reducido al minimo con el bot6n VOL =.
- Cuando la funci6n de temporizador ha apagado el televisor.
Mode Juego _ Apagado / Encendido
Si conecta una consola de videojuegos, come PlayStationTM o Xbox TM, podra disfrutar de sensaciones mas realistas seleccionando
el men0 de juegos.
Restricciones en el mode de juegos (precauciones)
- Para desconectar la consola de videojuegos y conectar otro dispositivo externo, establezca el Mode Juego come
Apagado en el ment_de configuraci6n.
- Cuando se muestra el menOde TV en el Mode Juego, la pantalla tiembla ligeramente.
Si Mode Juego esta configurado come Encendido:
- El mode de imagen cambia automaticamente a Normal y no se puede cambiar.
- El mode de sonido cambia automaticamente a Favorite y no se puede cambiar. Ajuste el sonido con el ecualizador.
Mode Juego no esta disponible en los modes normales de TV y PC.
Si la imagen es deficiente cuando hay un dispositivo externo conectado al televisor, compruebe si Mode Juege esta
configurado come Encendido. Configure Mode Juego come Apagado y conecte los dispositivos externos.
Ahorro energia -_ Apagado / Bajo / Medic / Alto / Auto
Esta funci6n ajusta el brillo del televisor, Io cual reduce el consume de energia. Si desea ver la televisi6n per la noche, ajuste la
opci6n del mode Ahorro energia en Alto sus ojos se Io agradeceran y, ademas, reducira el consume de energia.

Configuracibn del menu de entrada
Lista de Entradas
Utilice este ment_para seleccionar TV u otras fuentes de entrada externas como reproductores
de DVD / Blu-ray / receptores de cable y sat_lite (decodificadores), conectados al televisor.
Permite seleccionar la fuente de entrada que se prefiera.
Pulse el bot6n SOURCE de] mando a distancia para ver una fuente de seSal externa.
TV/AV / Componente / PC / HDMI/DVI
Puede elegir solamente los dispositivos externos que esten conectados al televisor. En
Lista de Entradas, las entradas conectadas se resaltan y se ordenan en la parte superior.
Las entradas que no estan conectadas se ordenan en la parte inferior.
Uso de los botches de colores del mando a distancia con la lista de fuentes
- Rojo (Actualizar): Actualiza los dispositivos externos conectados. P_lselo si la fuente est& activada y conectada pero no
se muestra en la lista.
- TOOLS (Herramientas): Muestra los ment_s Editar Nombre e Informacion.
[_ Editar Nombre
De un nombre al dispositivo conectado en las tomas de entrada; de esta manera sera rnas faoil seleccionar el dispositivo de
entrada.
Video / DVD / Cable STB / Satelite STB / PVR STB / Receptor AV / Juego / Filmadora / PC / DVI PC / DVI / TV / IPTV / Blu=ray
/ HD DVD / DMA
Configuracibn del menu de ayuda
[_ Autodiagn6stico
iiiiii_
Prueba de imagen
Si cree que tiene un problema con la imagen, efectOela prueba de imagen. Compruebe el
patr6n de] color en la pantalla para ver si persiste el problema.
• Si: Si no se muestra el patr6n de prueba o hay ruido en el patr6n de prueba, seleccione
Si. Puede haber un problema en el televisor. P6ngase en contacto con el centro de
servicio de Samsung.
• No: Si el patr6n de prueba se muestra correctamente, seleccione No. Puede haber un
problema en el equipo externo. Compruebe las conexiones. Si persiste el problem&
consulte el manual del usuario del dispositivo externo.
Prueba de sonido
Si cree que tiene un problema con el sonido, efectOe la prueba de sonido. Compruebe el sonido reproduciendo una melodia en el
televisor. En la pantalla se muestra '2,ContinOael problema con esta prueba del sonido?'.
Si no oye sonido a trav_s de los altavoces del televisor, antes de realizar la prueba de sonido compruebe que Seleccionar
altavoz esta configurado como Attavoz de TV en el men_ Sonido.
La melodia se debe oir durante la prueba aunque Seleccionar altavoz est6 establecido en Altavoz externo o se haya
silenciado el sonido con el bot6n MUTE.
• Si: Si durante la prueba de sonido s61ose oye sonido de un altavoz o no se oye sonido en ninguno, seleccione Si. Puede
haber un problema en el televisor. P6ngase en contacto con el centro de servicio de Samsung.
• No: Si desde los altavoces no se oye sonido, seleccione No. Puede haber un problema en el equipo externo. Compruebe las
conexiones. Si persiste el problema, consulte el manual del usuario del dispositivo externo.
Intensidad seSal (solo canales digitales)
A diferencia de los canales anal6gicos, cuya calidad de recepci6n puede variar desde 'nebuloso' a claro, los canales digitales
(HDTV) tienen una calidad de recepci6n perfecta o no se reciben en absoluto. Por ello, a diferencia de los canales anal6gicos, no
se puede realizar una sintonizaci6n fina de un canal digital. Se puede, no obstante, ajustar la antena para mejorar la recepci6n de
los canales digitales disponibles.
Si el medidor de la intensidad de la se_al indica que esta es d_bil, mueva la antena para aumentar la intensidad de la se_al.
Siga ajustando la antena hasta que encuentre la mejor posici6n para recibir la sei_al mas fuerte.
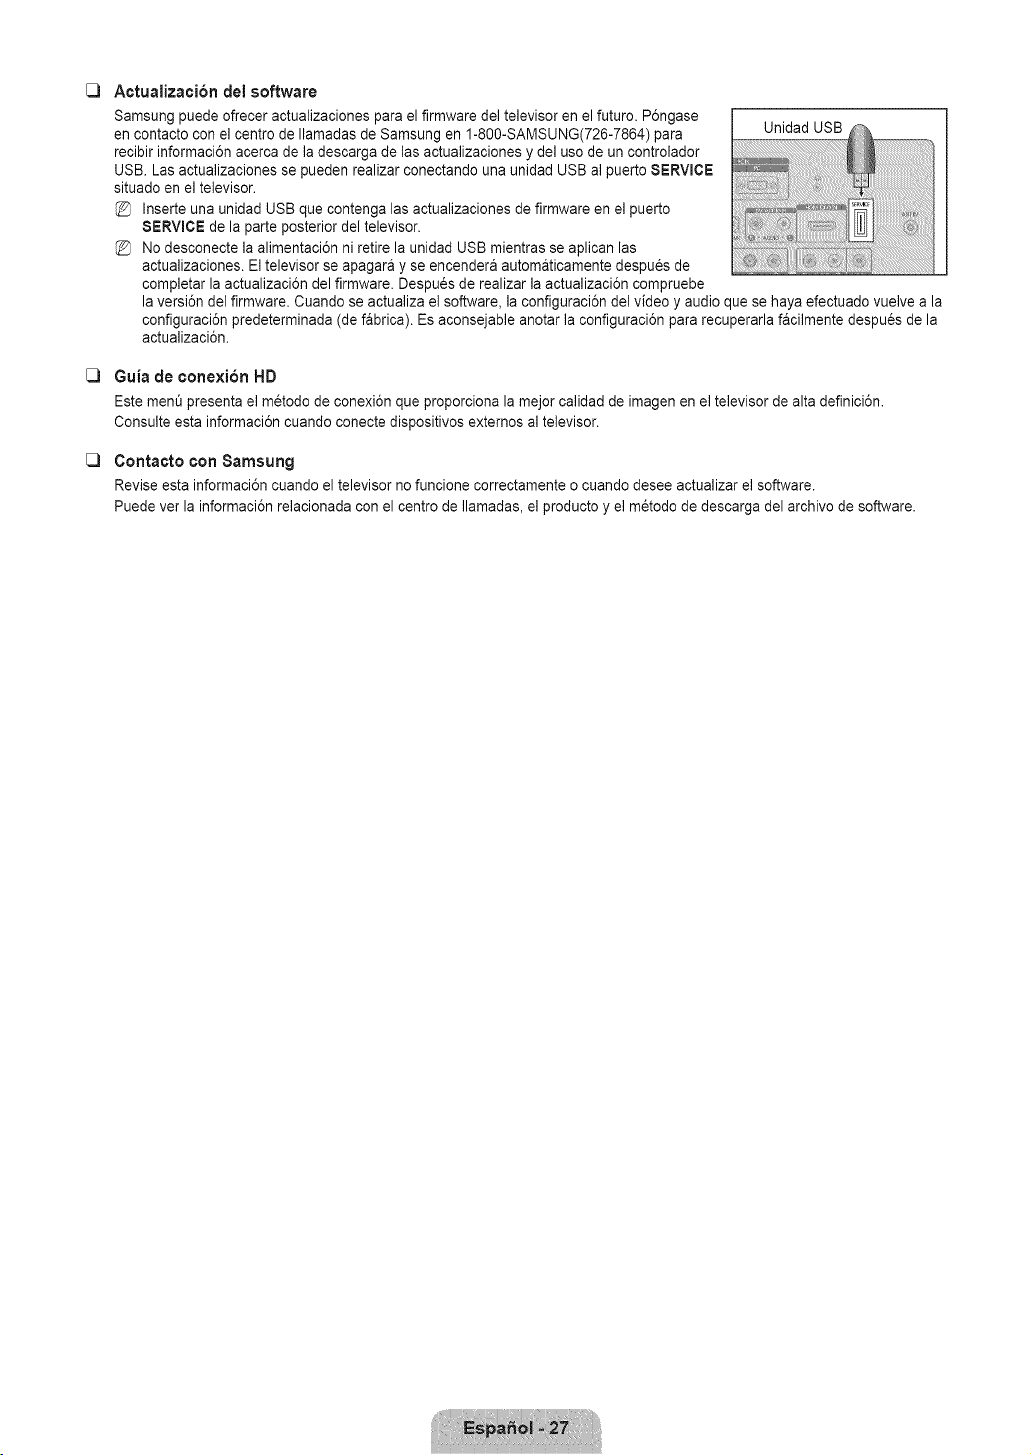
[_ Actualizacibn del software
Samsung puede ofrecer actualizaciones para el firmware del televisor en el futuro. P6ngase
en contacto con el centro de Ilamadas de Samsung en 1-800-SAMSUNG(726-7864) para Unidad USB
recibir informaci6n acerca de la descarga de las actualizaciones y del uso de un controlador
USB. Las actualizaciones se pueden realizar conectando una unidad USB al puerto SERVICE
situado en el televisor.
Inserte una unidad USB que contenga las actualizaciones de firmware en el puerto
SERVICE de la parte posterior del televisor.
No desconecte la alimentaci6n ni retire la unidad USB mientras se aplican las
actualizaciones. El televisor se apagara y se encendera automaticamente despu_s de
completar la actualizaci6n del firmware. Despu_s de realizar la actualizaci6n compruebe
la versi6n del firmware. Cuando se actualiza el software, la configuraci6n del video y audio que se haya efectuado vuelve a la
configuraci6n predeterminada (de fabrica). Es aconsejable anotar la configuraci6n para recuperarla facilmente despues de la
actualizaci6n.
[_ Guia de conexion HD
Este rnen_ presenta el metodo de conexi6n que proporciona la mejor calidad de imagen en el televisor de alta definici6n.
Consulte esta informaci6n cuando conecte dispositivos extemos al televisor.
[_ Contacto con Samsung
Revise esta informaci6n cuando el televisor no funcione correctamente o cuando desee actualizar el software.
Puede ver la informaci6n relacionada con el centro de Ilamadas, el producto y el m_todo de descarga del archivo de software.
Identificacibn de problemas
Si cree que el televisor tiene un problema, compruebe primero esta lista de posibles problemas y soluciones. Si ninguno de los
consejos funciona, p6ngase en contacto con el centro de atenci6n al cliente de Samsung o Ilame al 1-800-SAMSUNG (726-7864).
Problema
Imagen deficiente.
Catidad de sonido deficiente.
No hay imagen o sonldo.
No se percibe ningQn sonido, o muy
bajo. con el volumen al m&ximo.
La imagen rueda verticalmente.
La calidad de la imagenes
defectuosa.
El sonido es defectuoso.
El TV funciona de forma irregular.
El televisor no se enciende.
Anomalias del mando a distancia.
Mensaje 'Verificar cable seSal'
Mensaje 'Modo no compatible'.
Problema en pantalla con ta
emisi6n digital
La imagenes demaslado clara o
demasiado oscura
Barras negras en ta pantalla.
Las imageries t_enenun tono
rojoverde o rosa.
Los subtitulos para sordos no
funcionan.
Las im&genes se yen con nleve.
Se yen im&genes superpuestas.
Unas barras horizontales
parpadean, tiemblan u oscilan en
la imagen.
Unas barras verticales parpadean.
tiemblan u oscilan en ta imagen.
La pantalla esta negra y et
indicador lum_nosode alimentaci6n
parpadea constantemente.
La imagen no es estable y parece
vibrar cuanoo se conecta el
ordenador en la entrada de PC.
Posible Soluci6n
meme sintonizar otro canal. / Ajuste ta antena./ Compruebetodas tas conexionesde cable.
meme sintonizar otro canal./Ajuste ta antena.
ntente sintonizar otro canal. / Pulseel bot6n SOURCE.
Compruebe queet televisor est6 enchufado./ Compruebe tasconexiones de la antena.
Primero. compruebe el volumende tos aparatos conectadosat TV (por ejemplo, un receptor
atgitat, DTV, DVD, receptorde cable, VCR, etc.).A continuaci6n,ajuste el volumendet TV
segOnsea mas conveniente.
Compruebetodas las conexionesde cable.
Efectue la prueba de imagen con el menOde autodiagn6stico.
Efectue la prueba de sonido con el menOde autodiagn6stico.
Desconecte el TV durante30 segundosy, despu6s, intente que funcioneotra vez.
ComDruebeaue la toma de la paredfunciona.
RemDlacelas pilas del mando a distancia.
Limpie el borde superiordel mando adistancia (ventanade transmisi6n).
Compruebe tos terminales de tas pilas.
Compruebe queet cable de sepal est6conectado firmementecontas fuentes del PC.
Compruebe ta resoluci6n maximay ta frecuenciade video de! dispositivo conectado.
Compare estos va!ores con tosdatos de los modos de visuatizaci6n.
Compruebe ta potenciade la se_at digital y ta antena de entrada.
Ajuste el brillo y el contraste./Ajuste la sintonizaci6nfina.
Compruebe que la emisi6n que se esta recibiendoes de alta definici6n (HD).
LOScanalesHD en ocasiones emiten una programaci6nen SD (definici6nestandar) que
Dueaedar tugar a laaparici6n de barras negras.
Para eliminar tas barras configure el decodificadorde cable o sat61iteen los modos de
alargamientoo de panoramica.
Compruebe que los cables de los componentes est6n conectados en tos terminalescorrectos.
Cuando se usa un decodificadorde cable o satelite, la opci6n de los subtitulDspara sordos se
ae#e configurar en et decodificador,no en el televisor.
Quizas se necesite actuatizarel firmware. P6ngaseen contactocon el proveedor de cable.
Quizas haya problemas de compatibilidadcon el decodificador de cable.
ntente conectarsea traves de los cables de los componentes.
Ajus_eta funci6n Grueso y despues ajuste la funci6n Fino.
Ajus[e ta funci6n Grueso y despues ajuste la funci6n Fino.
Compruebe to siguiente en el equipo: Atimentaci6n,cable de sepal.
Et televisor esta usandDsu sistema de gesti6n de energia.
Mueva et rat6n det equipo o pulse una tecla de!teclado.
Si et ajuste no es correcto,use la utilidad delordenador para cambiar tos ajustes de panta!la.
Et televisor admite funciones de visualizaci6n muttiscandentro det siguiente rango de
frecuencias:
- Frecuencia horizontal(KHz): 30~60
- Frecuencia vertical(Hz): 60~75
- natce ae Darnaomaxtmodet PC (a 60 Hz): 1360x 768
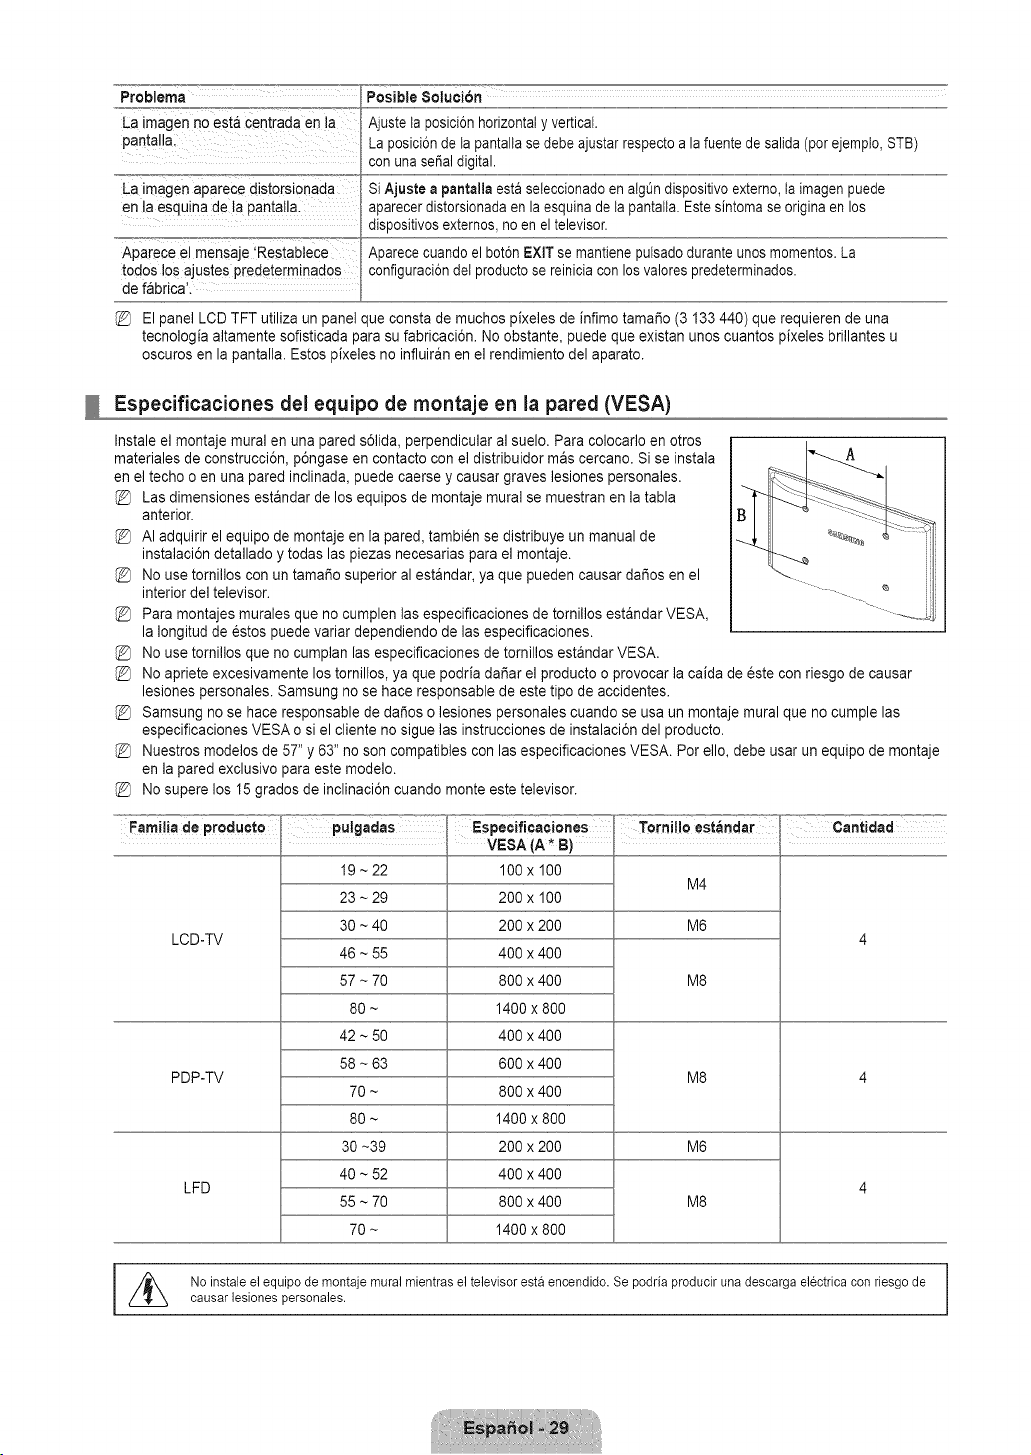
Problema
La imagen no est_ centrada en la
pantalla.
La imagen aparece distorsionada
en la esquina de ta pantalla
Aparece el mensaje 'Restabtece
todos los ajustes predeterminados
de fabrica'.
El panel LCD TFT utiliza un panel
Posible 8oluci6n
La posici6nde ta pantalta se debe ajustar respecto a la fuente de salida (por ejempto, STB)
con una seSaldigital.
Si Ajuste a pantalla esta seleccionadoen algQndispositivo externo,ta imagen puede
aparecer distorsionadaen la esquina de ta pantatta.Este sintoma se origina en los
dispositivosexternos, no en el televisor.
Aparece cuando el bot6n EXIT se mantiene putsadodurante unos momentos.La
configuraci6ndet productose reiniciacon los valores predeterminados.
ue consta de muchos pixeles de infimo tama_o (3 133 440) que requieren de una
tecnologia altamente sofisticada _arasu fabricaci6n. No obstante, puede que existan unos cuantos pixeles brillantes u
oscuros en la pantalla. Estos pixeles no influiran en el rendimiento del aparato.
Especificaciones del equipo de montaje en la pared (VESA)
Instale el montaje mural en una pared s61ida,perpendicular al suelo. Para colocarlo en otros
materiales de construcci6n, p6ngase en contacto con el distribuidor mas cercano. Si se instala -A
en el techo o en una pared inclinada, puede caerse y causar graves lesiones personales.
Las dimensiones estandar de los equipos de montaje mural se muestran en la tabla
anterior.
AI adquirir el equipo de montaje en la pared, tambien se distribuye un manual de
instalaci6n detallado y todas las piezas necesarias para el montaje.
No use tornillos con un tama_o superior al estandar, ya que pueden causar dar_osen el
interior del televisor.
Para montajes murales que no cumplen las especificaciones de tornillos estandar VESA,
la Iongitud de _stos puede variar dependiendo de las especificaciones.
No use tornillos que no cumplan las especificaciones de tornillos estandar VESA.
No apriete excesivamente los tornillos, ya que podria da_ar el producto o provocar la caida de este con riesgo de causar
lesiones personales. Samsung no se hace responsable de este tipo de accidentes.
Samsung no se hace responsable de da_os o lesiones personales cuando se usa un montaje mural que no cumple las
especificaciones VESA o si el cliente no sigue las instrucciones de instalaci6n del producto.
Nuestros modelos de 57" y 63" no son compatibles con las especificaciones VESA. Por ello, debe usar un equipo de montaje
en la pared exclusivo para este modelo.
No supere los 15 grados de inclinaci6n cuando monte este televisor.
Familia de producto pulgadas Especificaciones = Tornilloest_,ndar =:T° Cantidad
; VESA (A_ B)
19 ~ 22 100 x 100
M4
LCD-TV
PDP-TV
LFD
23 ~ 29
30 ~ 40
46 ~ 55
57 ~ 70
80 ~
42 ~ 50
58 ~ 63
70 ~
80 ~
30 ~39
40 ~ 52
55 ~ 70
70 ~
200 x 100
200 x 200
400 x 400
800 x 400
1400 x 800
400 x 400
600 x 400
800 x 400
1400 x 800
200 x 200
400 x 400
800 x 400
1400 x 800
M6
M8
M8
M6
M8
I //_ No instaleelequipode montajemuralmientrasel televisorestaencendido.Se podriaproducirunadescargaelectricaconfiesgode
causarlesionespersonales.

Uso del bloqueo Kensington antirrobos
El bloqueo Kensington es un dispositivo que se utiliza para fijar fisicamente el sistema
cuando se utiliza en un sitio pt_blico. El aspecto y el m6todo de bloqueo pueden diferir de las
ilustraciones seg0n el fabricante.
Consulte el manual que acompaSa al bloqueo Kensington para utilizarlo correctamente. El
dispositivo de bloqueo debe adquirirse por separado.
La ubicaci6n del Bloqueo Kensington puede variar segt_n el modelo.
1. Inserte el dispositivo de bloqueo en la ranura Kensington del TV LCD (0) Y girelo en el
sentido del bloqueo (0).
2. Conecte el cable del bloqueo Kensington (0).
3. Fije el bloqueo Kensington a la mesa o a un objeto estatico 3esado.
Fijacibn del televisor a la pared
Precauci6n: Tirar del televisor, empujarto o colgarse de _1puede provocar su caida. En especial, ProCureque !os
niSos no Se cue!guen det televisor ni Io desestabilicen; _ste podria caerse sobre ellos y causarles lesiones graves o
inc!uso la muerte. Siga !as precauciones de seguridad del folleto de seguridad incluid0 con e! pr0duct0. Para meJ0rar
la estabilidad instale un dispositivo antivuelco, como se exptica a continuaci6n.
Para impedir que el televisor se eaiga:
1. Apriete firmemente las grapas sobre la pared con los tornillos. AsegOrese de que los
tornillos esten bien afirmados en la pared.
SegOn el tipo de pared quizas necesite algt_n material adicional para el anclaje.
Las grapas, los tornillos y la cadena no se suministran con el producto; debera
adquirirlos por separado.
2,
Quite los tomillos de la parte central posterior del televisor y con ellos monte las grapas
en el televisor.
Quizas con el televisor no vayan incluidos los tornillos. En tal caso debe adquirirlos
por separado con estas especificaciones.
Especificaciones de los tornillos
Televisores LCD de 17-29 pulgadas: M4 x 15/Televisores LCD de 32-40 pulgadas:
M6x 15
3. Monte una cadena fuerte entre las grapas del televisor y de la pared de manera que
quede bien tensada.
Instale el televisor cerca de la pared para evitar que caiga hacia atras.
Las grapas de la pared han de estar a la misma o a menor altura que las grapas
del televisor.
Cuando desee mover el televisor debera aflojar la cadena.
4. Compruebe que todas las conexiones est_n bien aseguradas. Compru6belas
peri6dicamente para detectar cualquier signo de fatiga o de fallo. Si tiene dudas sobre
la seguridad de la instalaci6n, p6ngase en contacto con un instalador profesional.
Dare(
Especificaciones
Nombre del modelo
Tama_o de pantalla
(Diagonal)
Resoluci6n de PC (6ptima)
$onido
(Salida_
Dimensiones (An x Pr ×AI)
Sin el soporte
Con el soporte
Peso
Sin el soporte
Con el soporte
Consideraciones
rnedioarnbientales
Temperatura de funcionamiento
Humedad de funcionamlento
Temperatura de
almacenamiento
Humedad de aimacenamiento
8oporte giratorio
izquierda!derecha
LNISB650 LN22B650
19 pulg
(18.9 pulgadas medidas diagonalmente)
1360 x 768 a 60Hz
3WX2
18.8 X 2.5 X 12.2 pulg
(472.0 x 63.4 x 310.7 ram)
18.6 X 7.5 X 14.3 pulg
(472.0 x 189.5 x 382.8 ram)
9.0 Ibs (4.1 kg)
9.7 Ibs (4.4 kg)
22 pulg
(21.9 pulgadas medidas diagonalmente)
1360 x 768 a 60Hz
3WX2
21.3 X 2.5 X 13.8 pulg
(540.0 x 63.4 x 351.0 ram)
21.3 X 7.5 X 15.9 pulg
(540.0 x 189.5 x 403.1 ram)
10.6 Ibs (4.8 kg)
11.2 Ibs (5.1 kg)
Entre 10°C y 40°C (50°F y I04°F)
10% al 80%, sin condensaci6n
Entre -20°C y 45°C (-4°F y 113°F)
5% al 95%, sin condensaci6n
El dise_o y las especificaciones pueden cambiar sin previo aviso.
Este dispositivo es un aparato digital de la Clase B.
Para conocer la fuente de alimentaci6n y el consumo de energia, consulte la etiqueta adherida al producto.
Contact 8AIMI$UNG WORLDWIDE
If you have any questions or comments relating to Samsung products, please contact the SAMSUNG customer care center.
Comuniquese con SAMSUNG WORLDWIDE
Si desea formular alguna pregunta o comentario en relaci6n con los productos de Samsung, comuniquese con el centro de
atenci6n al cliente de SAMSUNG
Samsung Electronics Canada Inc., Customer
Service 55 Standish Court Mississauga,
Ontario L5R 4B2 Canada
CANADA 1-800-SAMSUNG(726-7864) www.samsung.com/ca
Samsung Electronique Canada Inc., Service
la Clientele 55 Standish Court Mississauga,
Ontario L5R 4B2 Canada
Samsung Electronics America, Inc.
U.S.A 1-800-SAMSUNG(726-7864) www.samsung.com/us 105 Challenger Road
Ridgefield Park, NJ 07660-0511
imagine the possibilities
Thank you for purchasing this Samsung product.
To receive more complete service, please
register your product at
www.samsung.com/register
Model Serial No.
BN68-02151A-00
important Warranty information Regarding Television Format Viewing
See the warranty card for more information on warranty terms.
Wide screen format LCD Displays (16:9, the aspect ratio of the screen width to height) are primarily designed to view wide screen
format full-motion video. The images displayed on them should primarily be in the wide screen 16:9 ratio format, or expanded to
fill the screen if your model offers this feature and the images are constantly moving. Displaying stationary graphics and images
on screen, such as the dark sidebars on nonexpanded standard format television video and programming, should be limited to no
more than 5% of the total television viewing per week.
Additionally, viewing other stationary images and text such as stock market reports, video game displays, station Iogos, web sites
or computer graphics and patterns, should be limited as described above for all televisions. Displaying stationary images that
exceed the above guidelines can cause uneven aging of LCD Displays that leave subtle, but permanent burned-in ghost images in
the LCD picture. To avoid this, vary the programming and images, and primarily display full screen moving images, not stationary
patterns or dark bars.
On LCD models that offer picture sizing features, use these controls to view different formats as a full screen picture.
Be careful in the selection and duration of television formats used for viewing. Uneven LCD aging as a result of format selection
and use, as well as burned-in images, are not covered by your Samsung limited warranty.
U.S.A Only
The product unit accompanying this user manual is licensed under certain intellectual property rights of certain third parties.
In particular, this product is licensed under the following US patents: 5,991,715, 5,740,317, 4,972,484, 5,214,678, 5,323,396,
5,539,829, 5,606,618, 5,530,655, 5,777,992, 6,289,308, 5,610,985, 5,481,643, 5,544,247, 5,960,037, 6,023,490, 5,878,080,
and under US Published PatentApplication No. 2001-44713-A1.
This license is limited to private non-commercial use by end-user consumers for licensed contents. No rights are granted for
commercial use. The license does not cover any product unit other than this product unit and the license does not extend to
any unlicensed product unit or process conforming to ISO/IEC 11172-3 or ISO/IEC 13818-3 used or sold in combination with
this product unit. The license only covers the use of this product unit to encode and/or decode audio files conforming to the
ISO/IEC 11172-3 or ISO/IEC 13818-3. No rights are granted under this license for product features or functions that do not
conform to the ISO/IEC 11172-3 or ISO/IEC 13818-3.
• Other countries
The product unit accompanying this user manual is licensed under certain intellectual property rights of certain third parties.
This license is limited to private non-commercial use by end-user consumers for licensed contents. No rights are granted for
commercial use. The license does not cover any product unit other than this product unit and the license does not extend to
any unlicensed product unit or process conforming to ISO/IEC 11172-3 or ISO/IEC 13818-3 used or sold in combination with
this product unit. The license only covers the use of this product unit to encode and/or decode audio files conforming to the
ISO/IEC 11172-3or ISO/IEC 13818-3. No rights are granted under this license for product features or functions that do not
conform to the ISO/IEC 11172-3 or ISO/IEC 13818-3.
• SAMSUNG ELECTRONICS NORTH AMERICAN LIMITED WARRANTY STATEMENT
Subject to the requirements, conditions, exclusions and limitations of the original Limited Warranty supplied with Samsung
Electronics (SAMSUNG) products, and the requirements, conditions, exclusions and limitations contained herein, SAMSUNG
will additionally provide Warranty Repair Service in the United States on SAMSUNG products purchased in Canada, and
in Canada on SAMSUNG products purchased in the United States, for the warranty period originally specified, and to the
Original Purchaser only.
The above described warranty repairs must be performed by a SAMSUNG Authorized Service Center. Along with this
Statement, the Original Limited Warranty Statement and a dated Bill of Sale as Proof of Purchase must be presented to the
Service Center. Transportation to and from the Service Center is the responsibility of the purchaser.
Conditions covered are limited only to manufacturing defects in material or workmanship, and only those encountered in
normal use of the product.
Excluded, but not limited to, are any originally specified provisions for, in-home or on-site services, minimum or maximum
repair times, exchanges or replacements, accessories, options, upgrades, or consumables.
For the location of a SAMSUNG Authorized Service Center, please call toll-free:
in the United States : 1-800-8AMSUNG (t-800-72G7864)
in Canada : 1-800-SAMSUNG
Precautions When Displaying a Still image
A still image may cause permanent damage to the TV screen
• Do not display a still image on the LCD panel for more than 2 hours as it can cause screen image retention. This image
retention is also known as "screen burn". To avoid such image retention, reduce the degree of brightness and contrast of the
screen when displaying a still image.
• Watching the LCD TV in 4:3 format for a long period of time may leave traces of borders displayed on the left,
right and center of the screen caused by the difference of light emission on the screen.
Playing a DVD or a game console may cause a similar effect to the screen.
Damages caused by the above effect are not covered by the Warranty.
• Displaying still images from Video games and PC for longer than a certain period of time may produce partial a_r-images.
To prevent this effect, reduce the 'brightness' and 'contrast' when displaying still images.
© 2009 Samsung Electronics Co., Ltd. All rights reserved.
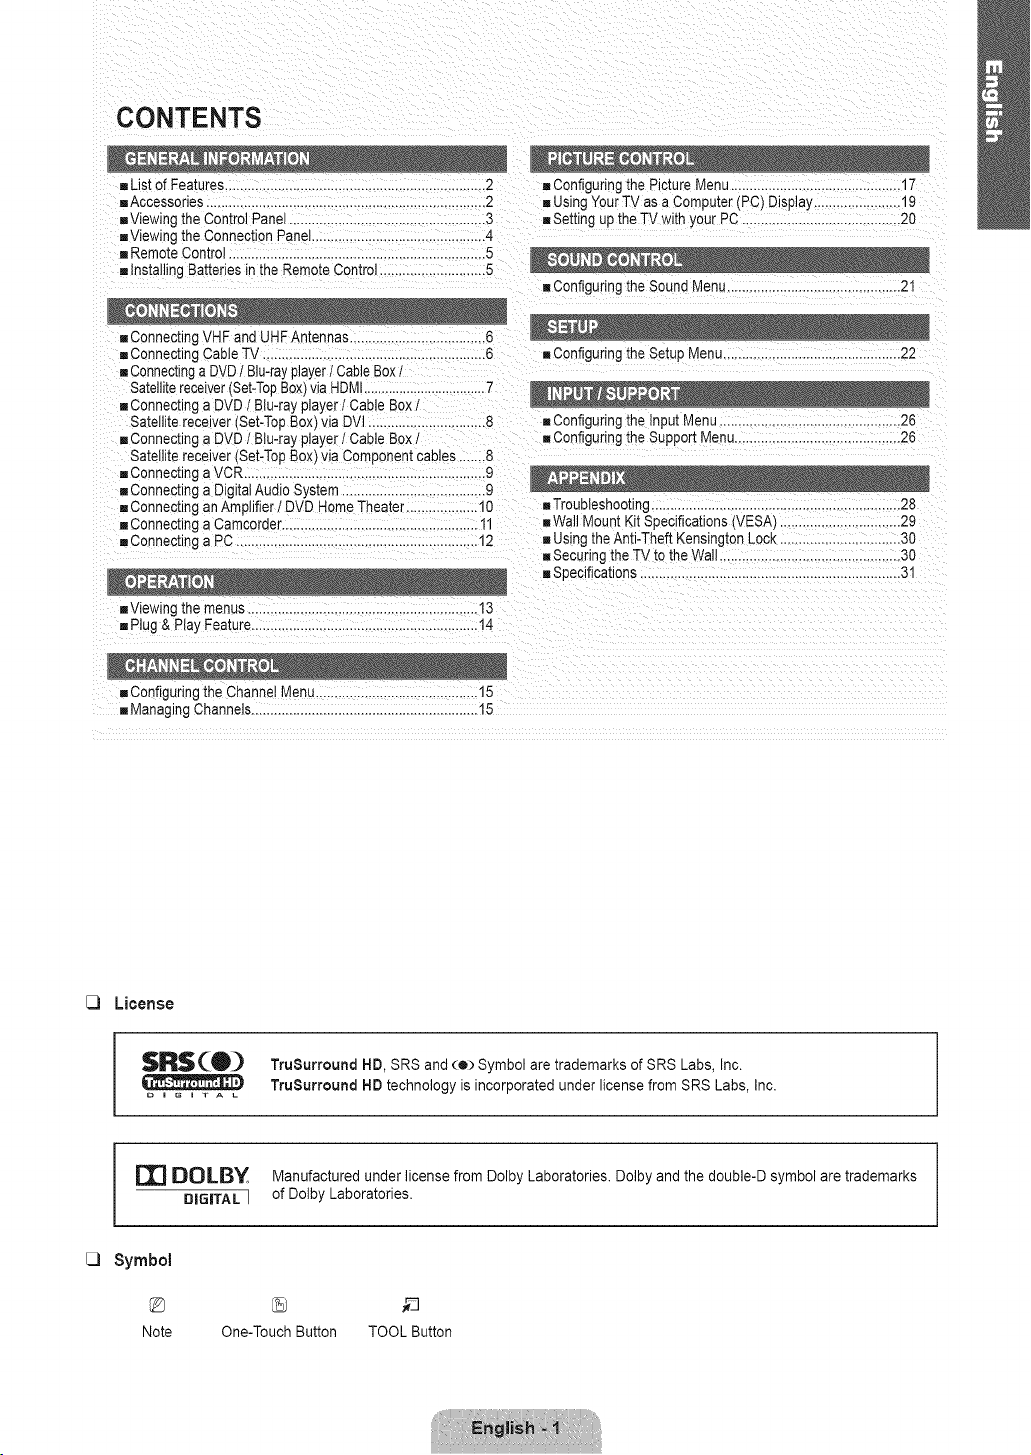
CONTENTS
- List of Features.....................................................................2 ,, Configuring the Picture Menu.............................................17
•=Accessories............................................................. 2 "=Using Your TV asa Computer (PC) Display.......................19
•=Viewing[ne Control Panel...................................... 3 "=Setting up the TV with your PC ....................................... 20
,, Viewingthe ConnectionPanel............................. 4
"=Remote Control ................................................. 5
"=Installing Batteriesin the RemoteControl.............. 5
"=Configuring the Sound Menu..............................................21
"=ConnectingCable TV ............................................. 6 "=Configuring the Setup Menu...............................................22
"=ConnecItnga DVDI Blu-rayplayerI CableBoxI
Satellitereceiver(Set-TopBox)via HDMI......................... 7
"=Connectinga DVD 1Biu-ray player I Cable Box t
Satellite rece ver (Set-TopBox)via DVl ................. 8 "=Configuring the input Menu................................................26
"=Connectinga DVD / Biu-ray player / Cable Box /
Satellite receiver (Set-TopBox)via Component cables 8
"=Connectinga VCR ................................................... 9
"=Connectinga DigitalAudio System........................ 9
"=Connectingan Amplifier l DVD HomeTheater...... 10
= Connectinga Camcorder........................................ 11
"=Connecunga PC ................................ 12
"=Configuringthe Support 1.4enu............................................26
•=Troubleshooting ..................................................28
•=WallMount Kit Specifications (VESA) ................................29
"=Using the Anti-Theft Kensington Lock ................................30
"=Securingthe TV to the Wall ................................................30
"=Specifications.....................................................
"=Viewing_nemenus .............................................................13
"=Plug& Play Feature............................................................14
= Configuringthe Channel Menu............................... 15
"=Managing Channels................................................. 15
License
$R$(0_ TruSurround HD, SRS and (o) Symbol are trademarks of SRS Labs, Inc.
TruSurround HD technology is incorporated under license from SRS Labs, Inc.
o i G i T A L
r_ DOLBY Manufactured under license from Dolby Laboratories. Dolby and the double-D symbol are trademarks
DIGITAL ] of Dolby Laboratories.
C)
Symbol
Note One-TouchButton TOOLButton
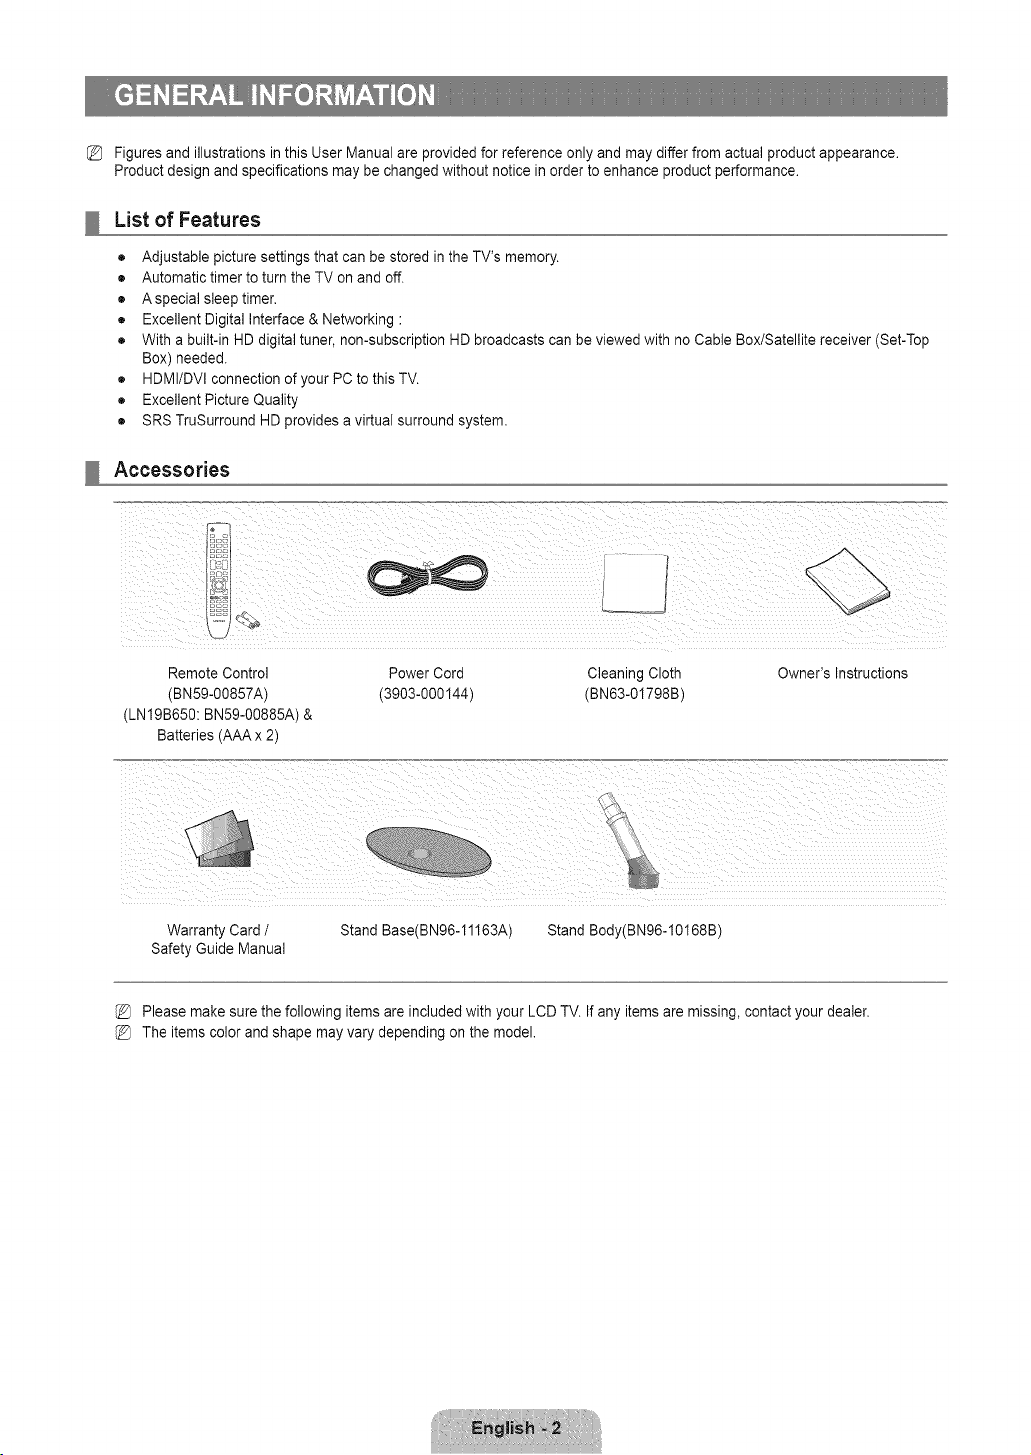
Figures and illustrations in this User Manual are provided for reference only and may differ from actual product appearance.
Product design and specifications may be changed without notice in order to enhance product performance.
List of Features
• Adjustable picture settings that can be stored in the TV's memory.
• Automatic timer to turn the TV on and off.
• Aspecial sleep timer.
• Excellent Digital Interface & Networking :
• With a built-in HD digital tuner, non-subscription HD broadcasts can be viewed with no Cable Box/Satellite receiver (Set-Top
Box) needed.
• HDMI/DVl connection of your PC to this TV.
• Excellent Picture Quality
• SRS TruSurround HD provides a virtual surround system.
Accessories
Remote Control Power Cord Cleaning Cloth
(BN59-00857A) (3903-000144) (BNe3-01798B)
(LNI9B650: BN59-00885A) &
Batteries (AAA x 2)
Owner's Instructions
Warranty Card /
Safety Guide Manual
Stand Base(BN96-11163A) Stand Body(BN96-10168B
Please make sure the following items are included with your LCD TV. If any items are missing, contact your dealer.
The items color and shape may vary depending on the model.
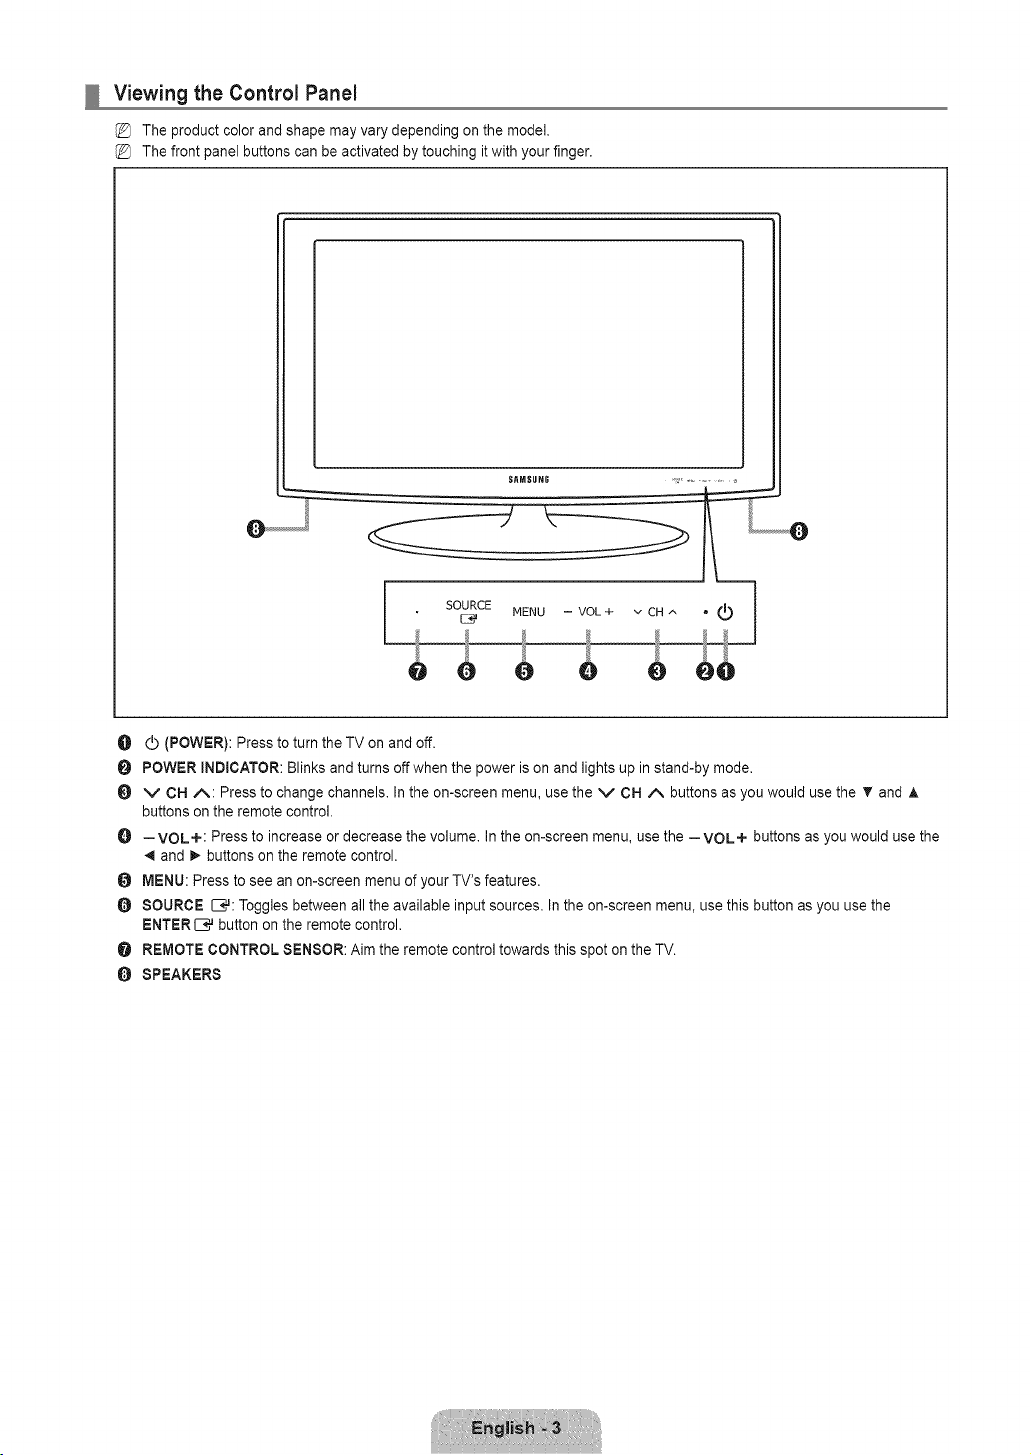
Viewing the Control Panel
The product color and shape may vary depending on the model.
The front panel buttons can be activated by touching it with your finger.
SItMSUNG
O d) (POWER): Press to turn the TV on and off.
POWER INDICATOR: Blinks and turns offwhen the power is on and lights up in stand-by mode.
O V CH A: Press to change channels. In the on-screen menu, use the V CH A buttons as you would use the T and A
buttons on the remote control.
O --VOL+: Press to increase or decrease the volume. In the on-screen menu, use the --VOL+ buttons as you would use the
_,iand 1_buttons on the remote control.
O MENU: Press to see an on-screen menu of your TV's features.
O SOURCE C#: Toggles between all the available input sources. In the on-screen menu, use this button as you use the
ENTER[E_ button on the remote control.
O REMOTE CONTROL SENSOR: Aim the remote control towards this spot on the TV.
O SPEAKERS

Viewing the Connection Panel
[TV Rear Panel]
O
®@@
ANT IN
@
The product color and shape may vary depending on the model.
O EX-LINK
- Connector for service only.
O DIGITAL AUDIO OUT (OPTICAL)
- Connects to a Digital Audio component such as a Home theater receiver.
O PC iN [PC] / [aUDiO]
- Connects to the video and audio output jacks on your PC.
O _ (HEADPHONE)
- Connects a set of external headphones for private listening.
O HDml (DVl) In / DVI AUDIO In [R-AUDIO-L]
- Connects to the HDMI jack of a device with an HDMI output.
No sound connection is needed for an HDMI to HDMI connection.
Use the HDMI (DVl) IN jack for DVl connection to an external device. Use a DVl to HDMI cable or DVI-HDMI adapter
(DVl to HDMI) for video connection and the DVl AUDIO IN [R-AUDIO-L] jacks for audio.
When using an HDMI/DVl cable connection, you must use the HDMI (DVl) IN jack.
You can also use the ports to connect to a PC.
O SERVICE
- Connector for software upgrades.
@ ANT IN
- Connects to an antenna or cable TV system.
0 POWER INPUT
- Connects the supplied power cord.
O KENSINGTON LOCK
- The Kensington Lock(optional) is a device used to physically fix the systemwhen used in a public place. If you want to
use a locking device, contact the dealer where you purchased the TV.
{_ The locationof the Kensington Lockmay be different depending on its model.
AVIN
- Video and audio inputs for external devices, such as a camcorder or VCR.
COMPONENT IN
- Connects Component video / audio.
li_ AUDIO OUT
- Connects to the audio input jacks on yourAmplifier/Home theater.

Remote Control
You can use the remote control up to a distance of about 23 feet from the TV.
The performance of the remote control may be affected by bright light.
The product color and shape may vary depending on the model.
O POWER: Turns the TV on and
off.
NUMERIC BUTTONS: Press to
change the channel.
_: Press to select additional
channels (digital) being
broadcast by the same station.
For example, to select channel
'54-3', press '54', then press
and '3'.
O MUTE _: Press to temporarily
cut off the sound.
O --VOL+: Press to increase or
decrease the volume.
CH LIST: Used to display
Channel Lists on the screen.
O TOOLS: Use to quickly select
frequently used functions.
O INFO: Press to display
information on the TV screen.
O COLOR BUTTONS: Use these
buttons in the Channel list menus
etc.
P,SIZE: Picture size selection,
TV: Selects the TV mode directly.
_i_ PRE-CH: Enables you to return
to the previous channel you were
watching.
_) v CH A : Press to change
channels,
SOURCE: Press to display
and select the available video
sources.
FAV.CH:Press to switch to your
favorite channels,
O MENU: Displays the main on-
screen menu.
RETURN: Returns to the
previous menu,
_) UPAIDOWNYILEFT_I
RIGNT_/ENTER L-I,#:Use to
select on-screen menu items and
change menu values,
_) EXIT: Press to exit the menu.
CC: Controls the caption
decoder,
MTS: Press to choose stereo,
mono or Separate Audio
Program (SAP broadcast),
installing Batteries in the Remote Control
1,
2.
3,
%
Lift the cover at the back of the remote control upward as shown in the figure.
Install two AAA size batteries.
Make sure to match the '+' and '-' ends of the batteries with the diagram inside the
compartment.
Replace the cover.
Remove the batteries and store them in a cool, dry place if you won't be using the
remote control for a long time. (Assuming typical TV usage, the batteries should last for about one year.)
If the remote control doesn't work, check the following:
• Is the TV power on?
• Are the plus and minus ends of the batteries reversed?
• Are the batteries drained?
• Is there a power outage or is the power cord unplugged?
• Is there a special fluorescent light or neon sign nearby?

Connecting VHF and UHF Antennas
If your antenna has a set of leads that look like the diagram to the right, see 'Antennas with 300
O Flat Twin Leads' below.
If your antenna has one lead that looks like the diagram to the right, see 'Antennas with 75 O
Round Leads'.
If you have two antennas, see 'Separate VHF and UHF Antennas'.
Antennaswith 300Q FlatTwinLeads
If you are using an off-air antenna (such as a roof antenna or 'rabbit ears') that has 3000 twin
flat leads, follow the directions below.
1. Place the wires from the twin leads under the screws on a 300-75 O adapter (not
supplied). Use a screwdriver to tighten the screws.
2. Plug the adaptor into the ANT IN terminal on the back of the TV.
Antennaswith 75 Q RoundLeads
Plugtheantennalead intothe ANT INterminalon the backof theTV.
Separate VHF and UFIF Antennas
If you have two separate antennas for your TV (one VHF and one UHF), you must combine
the two antenna signals before connecting the antennas to the TV. This procedure requires an
optional combiner-adaptor (available at most electronics shops).
1. Connect both antenna leads to the combiner.
2. Plug the combiner into the ANT IN terminal on the bottom of the rear panel.
Connecting Cable TV
Toconnect to a cable TV system, follow the instructions below.
Cable without a Cable Box
Plug the incoming cable into the ANT IN terminal on the back of the TV.
Because this TV is cable-ready, you do not need a cable box to view unscrambled cable
channels.
Connecting to a Cable Box that Deserambles All Channels
1. Find the cable that is connected to the ANT OUT terminal on your cable box.
This terminal might be labeled 'ANT OUT', 'VHF OUT' or simply, 'OUT'.
2. Connect the other end of this cable to the ANT IN terminal on the back of the TV.
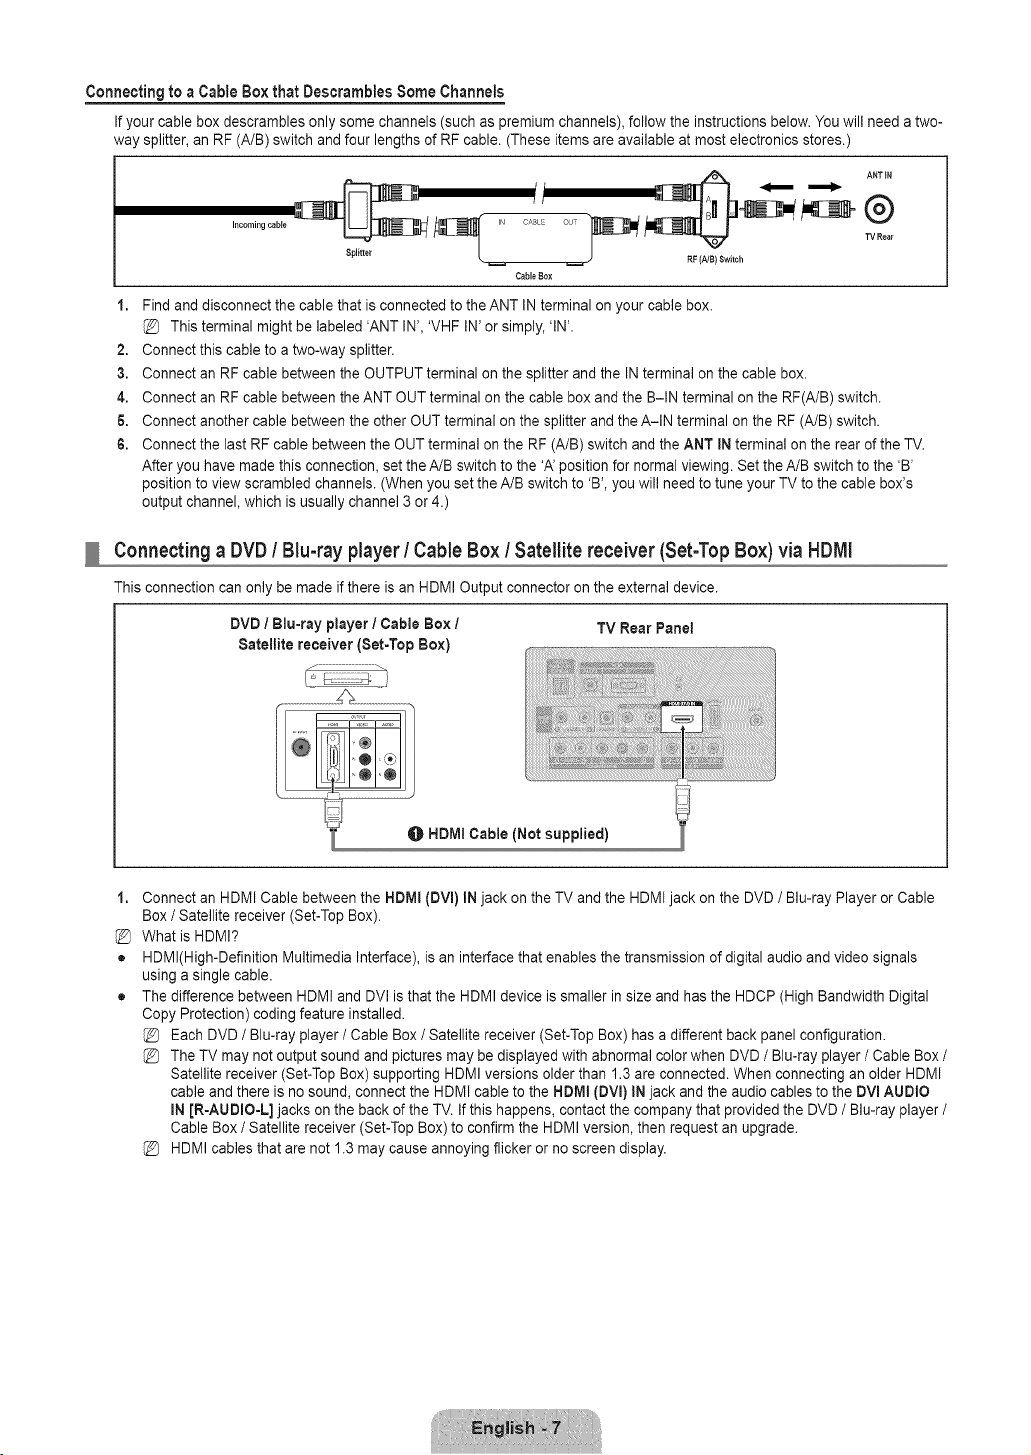
Connecting to a Cable Box that Descrambles Some Channels
If your cable box descrambles only some channels (such as premium channels), follow the instructionsbelow. You will need a two-
way splitter, an RF (A/B) switch and four lengths of RF cable. (These items are available at most electronics stores.)
f jl
CABLE
Cable Box
RF (NB} Switch
i. Find and disconnect the cable that is connected to the ANT IN terminal on your cable box.
This terminal might be labeled 'ANT IN', 'VHF IN' or simply, 'IN'.
2. Connect this cable to a two-way splitter.
3. Connect an RF cable between the OUTPUT terminal on the splitter and the IN terminal on the cable box.
4. Connect an RF cable between the ANT OUT terminal on the cable box and the B-IN terminal on the RF(A/B) switch.
6. Connect another cable between the other OUT terminal on the splitter and the A-IN terminal on the RF (A/B) switch.
6. Connect the last RF cable between the OUT terminal on the RF (A/B) switch and the ANT IN terminal on the rear of the TV.
After you have made this connection, set the A/B switch to the 'A' position for normal viewing. Set the A/B switch to the 'B'
position to view scrambled channels. (When you set the A/B switch to 'B', you will need to tune your TV to the cable box's
output channel, which is usually channel 3 or 4.)
Connecting a DVD / Blu-ray player / Cable Box / Satellite receiver (Set-Top Box) via HDMI
This connection can only be made if there is an HDMI Output connector on the external device.
DVD / Blu-ray player / Cable Box / TV Rear Panel
Satellite receiver (Set-Top Box)
j ........................................
LL _J
O HDMI Cable (Not supplied)
l,
%
o
o
Connect an HDMI Cable between the HDMI (DVl) IN jack on the TV and the HDMI jack on the DVD / Blu-ray Player or Cable
Box / Satellite receiver (Set-Top Box).
What is HDMI?
HDMl(High-Definition Multimedia Interface), is an interface that enables the transmission of digital audio and video signals
using a single cable.
The difference between HDMI and DVI is that the HDMI device is smaller in size and has the HDCP (High Bandwidth Digital
Copy Protection) coding feature installed.
Each DVD / Blu-ray player / Cable Box / Satellite receiver (Set-Top Box) has a different back panel configuration.
The TV may not output sound and pictures may be displayed with abnormal color when DVD / Blu-ray player / Cable Box /
Satellite receiver (Set-Top Box) supporting HDMI versions older than 1.3 are connected. When connecting an older HDMI
cable and there is no sound, connect the HDMI cable to the HDMI (DVl) IN jack and the audio cables to the DVmAUDIO
mNJR-AUDIO-L] jacks on the back of the TV. If this happens, contact the company that provided the DVD / Blu-ray player /
Cable Box / Satellite receiver (Set-Top Box) to confirm the HDMI version, then request an upgrade.
HDMI cables that are not 1.3 may cause annoying flicker or no screen display.
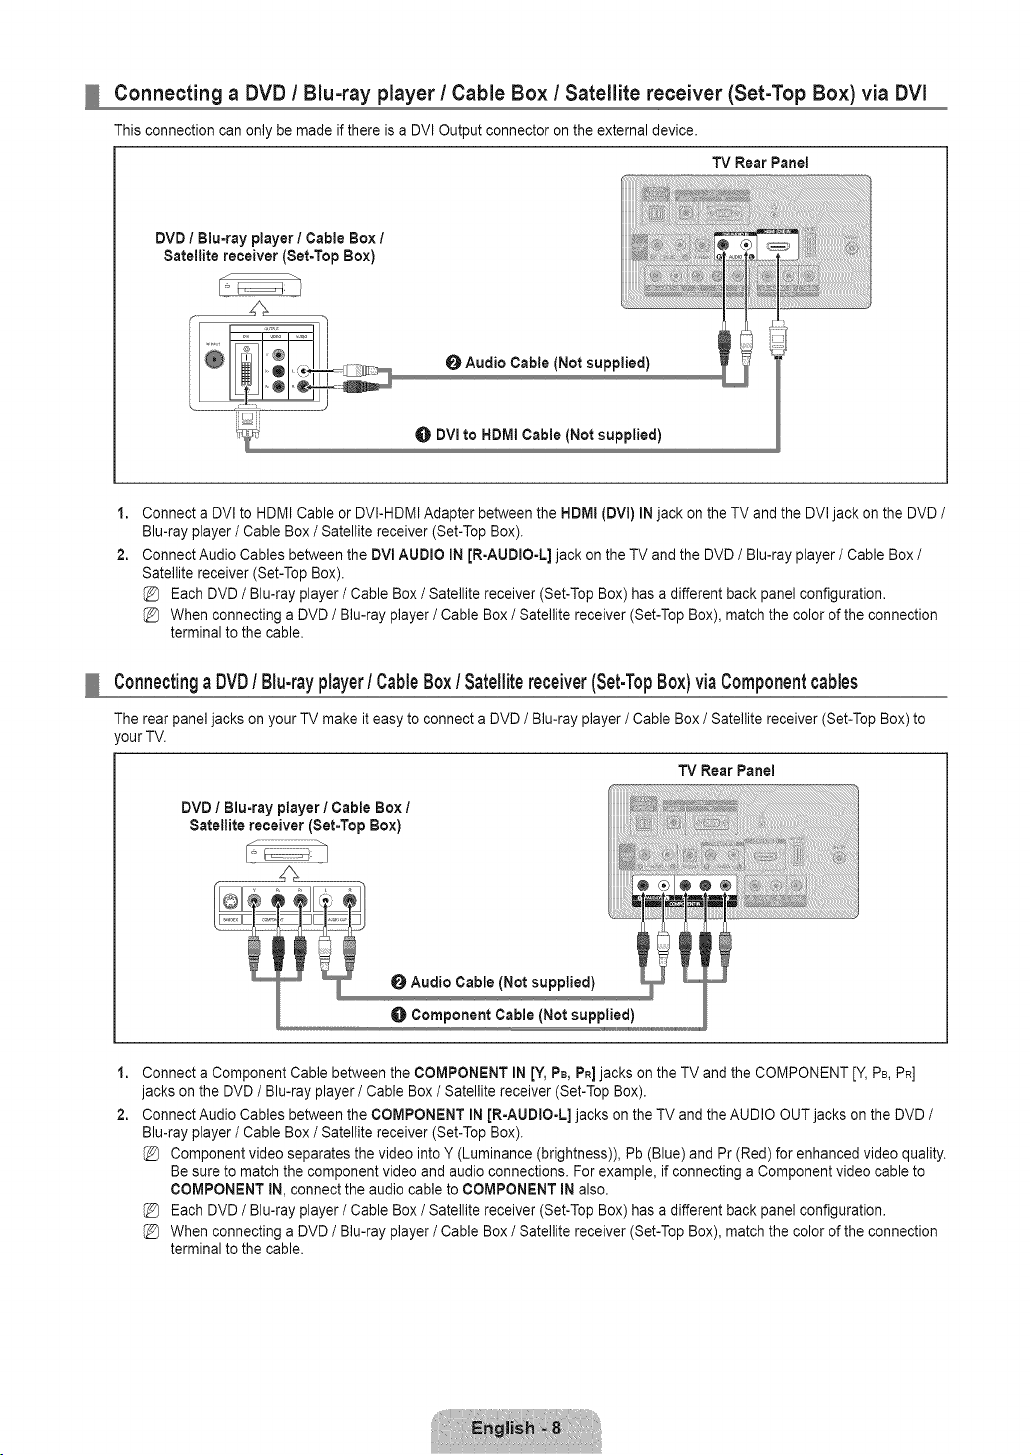
Connecting a DVD / Blu-ray player / Cable Box / Satellite receiver (Set-Top Box) via DVl
This connection can only be made if there is a DVI Output connector on the external device.
TV Rear Panel
DVD / Blu-ray player / Cable Box /
Satellite receiver (Set-Top Box)
O Audio Cable (Not supplied)
DVI to HDMI Cable (Not supplied)
1,
2.
Connect a DVI to HDMI Cable or DVI-HDMI Adapter between the NDMI (DVI) IN jack on the TV and the DVI jack on the DVD /
Blu-ray player / Cable Box / Satellite receiver (Set-Top Box).
Connect Audio Cables between the DVl AUDIO IN JR=AUDIO-L]jack on the TV and the DVD / Blu-ray player / Cable Box /
Satellite receiver (Set-Top Box).
Each DVD / Blu-ray player / Cable Box / Satellite receiver (Set-Top Box) has a different back panel configuration.
When connecting a DVD / Blu-ray player / Cable Box / Satellite receiver (Set-Top Box), match the color of the connection
terminal to the cable.
Connectinga DVD/ Blu-rayplayer/ CableBox / Satellitereceiver(Set-TopBox)viaComponentcables
The rear panel jacks on your TV make it easy to connect a DVD / Blu-ray player / Cable Box / Satellite receiver (Set-Top Box) to
,our TV.
TV Rear Panel
DVD / Blu-ray player/Cable Box /
Satellite receiver (Set=Top Box)
Audio Cable (Not supplied)
O Component Cable (Not supplied)
1,
2.
Connect a Component Cable between the COMPONENT IN [¥, PB,PR]jacks on the TV and the COMPONENT [Y, PB,PR]
jacks on the DVD / Blu-ray player / Cable Box / Satellite receiver (Set-Top Box).
Connect Audio Cables between the COMPONENT IN JR-AUDIO-L] jacks on the TV and the AUDIO OUT jacks on the DVD /
Blu-ray player / Cable Box / Satellite receiver (Set-Top Box).
Component video separates the video into Y (Luminance (brightness)), Pb (Blue) and Pr (Red) for enhanced video quality.
Be sure to match the component video and audio connections. For example, if connecting a Component video cable to
COMPONENT IN, connect the audio cable to COMPONENT IN also.
Each DVD / Blu-ray player / Cable Box / Satellite receiver (Set-Top Box) has a different back panel configuration.
When connecting a DVD / Blu-ray player / Cable Box / Satellite receiver (Set-Top Box), match the color of the connection
terminal to the cable.
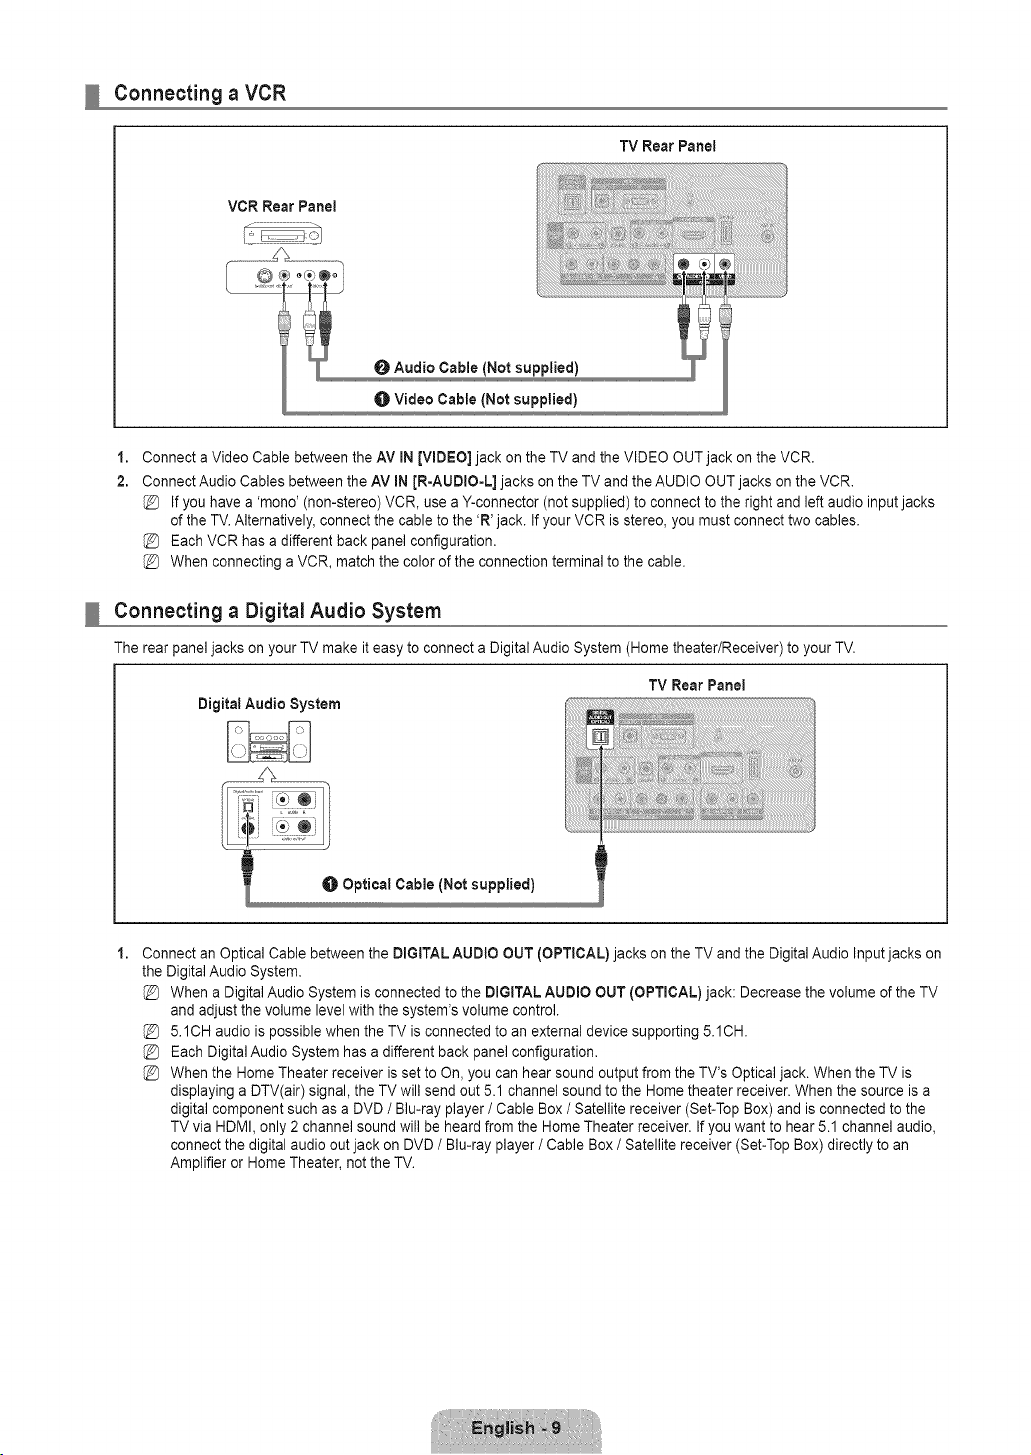
Connecting a VCR
TV Rear Panel
VCR Rear Panel
O Audio Cable [Not supplied)
Video Cable (Not supplied)
1,
2.
Connect a Video Cable between the AV IN [VIDEO] jack on the TV and the VIDEO OUT jack on the VCR.
Connect Audio Cables between the AV IN JR-AUDIO=L] jacks on the TV and the AUDIO OUT jacks on the VCR.
If you have a 'mono' (non-stereo) VCR, use a Y-connector (not supplied) to connect to the right and left audio input jacks
of the TV. Alternatively, connect the cable to the 'R' jack. If your VCR is stereo, you must connect two cables.
Each VCR has a different back panel configuration.
When connecting a VCR, match the color of the connection terminal to the cable.
Connecting a Digital Audio System
The rear panel jacks on your TV make it easy to connect a Digital Audio System (Home theater/Receiver) to your TV.
TV Rear Panel
Digital Audio System
1,
Connect an Optical Cable between the DiGiTAL AUDIO OUT (OPTICAL) jacks on the TV and the Digital Audio Input jacks on
the Digital Audio System.
When a Digital Audio System is connected to the DiGiTAL AUDIO OUT [OPTICAL) jack: Decrease the volume of the TV
and adjust the volume level with the system's volume control.
5.1CH audio is possible when the TV is connected to an external device supporting 5.1CH.
Each Digital Audio System has a different back panel configuration.
When the Home Theater receiver is set to On, you can hear sound output from the TV's Optical jack. When the TV is
displaying a DTV(air) signal, the TV will send out 5.1 channel sound to the Home theater receiver. When the source is a
digital component such as a DVD / Blu-ray player / Cable Box / Satellite receiver (Set-Top Box) and is connected to the
TV via HDMI, only 2 channel sound will be heard from the Home Theater receiver. If you want to hear 5.1 channel audio,
connect the digital audio out jack on DVD / Blu-ray player / Cable Box / Satellite receiver (Set-Top Box) directly to an
Amplifier or Home Theater, not the TV.

Connecting an Amplifier / DVD Home Theater
TV RearPanei
Ampiifier/DVD Home Theater
O Audio Cable (Not supplied)
1,
Connect Audio Cables between the AUDIO OUT [R-AUDIO-L] jacks on the TV and Audio Input jacks on the Amplifier / DVD
Home Theater.
When an audio amplifier is connected to the AUDIO OUT JR-AUDIO-L] jacks: Decrease the volume of the TV and adjust
the volume level with the Amplifier's volume control.
Each Amplifier/DVD Home Theater has a different back panel configuration.
When connecting an Amplifier/DVD Home Theater, match the color of the connection terminal to the cable.

Connecting a Camcorder
Using a Video Cable
TV Rear Panel
Camcorder
0 Audio Cable (Not supplied)
Video Cable (Not supplied)
1,
2.
Connect a Video Cable between the AV IN [VIDEO] jack on the TV and the VIDEO OUT jack on the camcorder.
Connect Audio Cables between the AV IN JR-AUDIO-L] jacks on the TV and the AUDIO OUT jacks on the camcorder.
Each Camcorder has a different back panel configuration.
When connecting a Camcorder, match the color of the connection terminal to the cable.
UsinganHDMICable
TV RearPanel
HDMI Cable (Not supplied)
1. Connect a HDMI Cable between the HDMm(DVl) iN jack on the TV and the HDMI OUT jack on the camcorder.
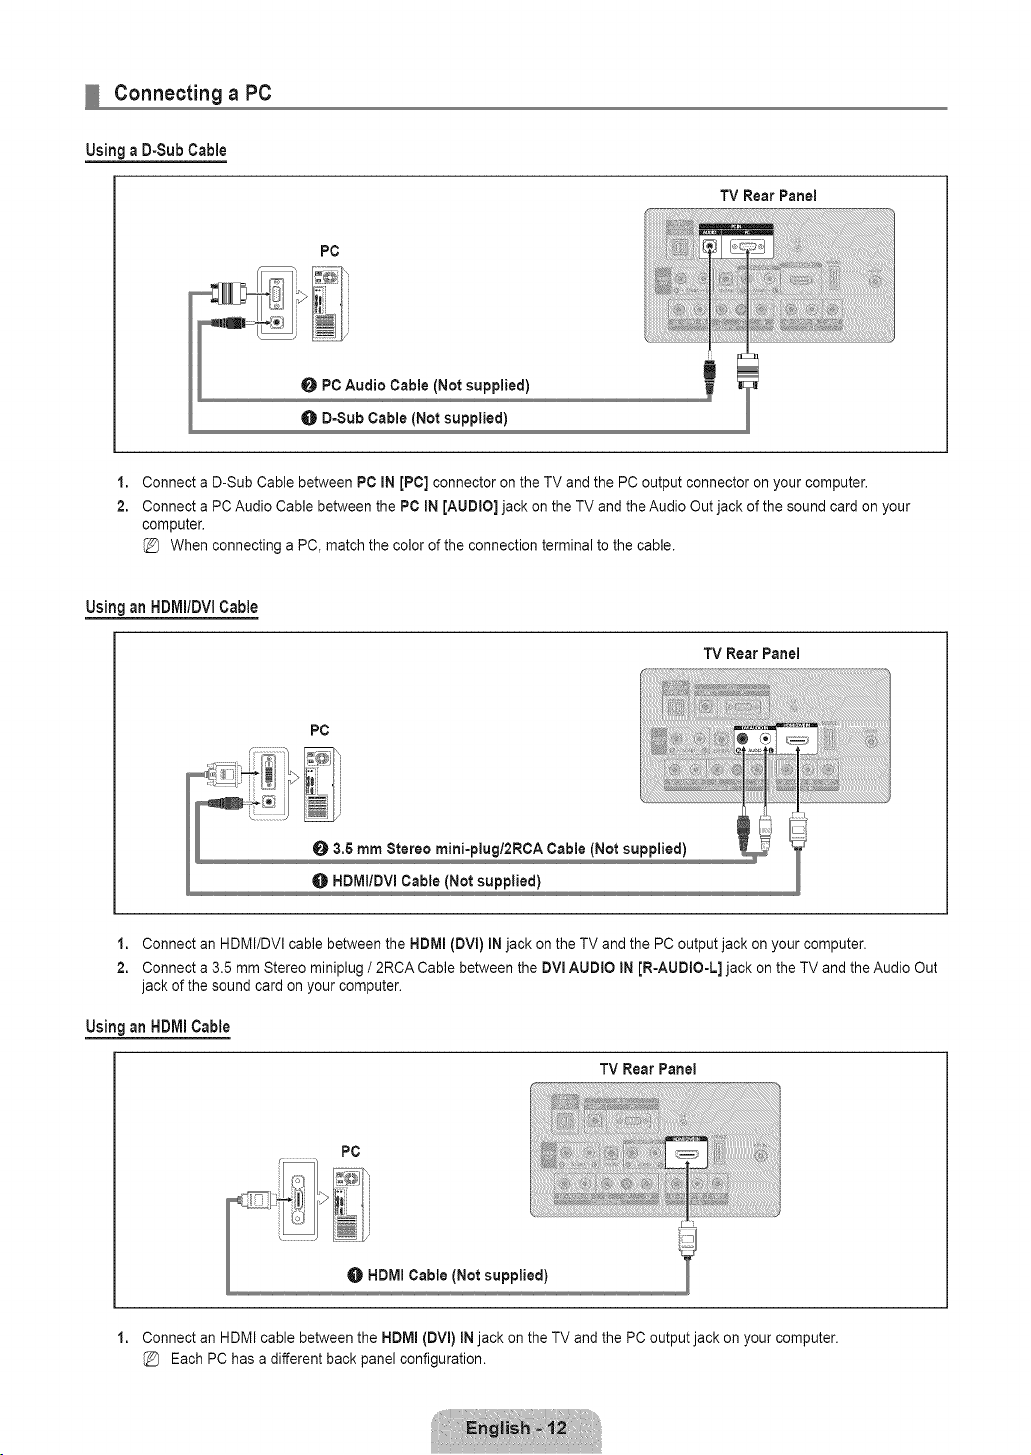
Connecting a PC
Using a D-Sub Cable
PC
TV Rear Panel
1,
2.
Connect a D-Sub Cable between PC IN [PC] connector on the TV and the PC output connector on your computer,
Connect a PC Audio Cable between the PC iN [AUDtO] jack on the TV and the Audio Out jack of the sound card on your
computer,
When connecting a PC, match the color of the connection terminal to the cable.
Using an HDIVII/DVlCable
TV RearPanel
PC
O 3,5 mm Stereo mini-piugl2RCA Cable (Not supplied)
HDMIIDVI Cable (Not supplied)
1. Connect an HDMI/DVI cable between the HDIVll(DVl) IN jack on the TV and the PC output jack on your computer.
2. Connect a 3,5 mm Stereo miniplug / 2RCA Cable between the DVmAUDtO IN JR-AUDIO-L] jack on the TV and the Audio Out
jack of the sound card on your computer.
UsinganHDMICable
TV Rear Panel
1,
PC
Connect an HDMI cable between the HDMm{DVl) iN jack on the TV and the PC output jack on your computer.
Each PC has a different back panel configuration.

Viewing the menus
Before using the TV, follow the steps below to learn how to navigate the menu in order to select
and adjust different functions.
1. Press the MENU button.
The main menu is displayed on the screen. Its left side has the following icons: Picture,
Sound, Channel, Setup, input, Support.
2. Press the A or v' button to select one of the icons.
Press the 41or _- button to access the icon's sub-menu.
3. Press the A or T button to move to items in the menu.
Press the ENTER C,_ button to enter items in the menu.
4. Press the A/T/',I/_- button to change the selected items.
Press the RETURN button to return to the previous menu.
6. Press the EXIT button to exit from the menu.
Using the remote control buttons
Example: Setting the TV's Brightness in the Picture Menu
Adjusting the Brightness to 80
1. Press the MENU button to display the menu.
2. Press the ENTER _,_ button to select Picture.
3. Press the A or T button to select Brightness.
4. Press the ENTER_ button.
6. Press the _ or _. button until the Brightness changes to 80.
6. Press the ENTER[B# button.
Press the EXiT button to exit from the menu.
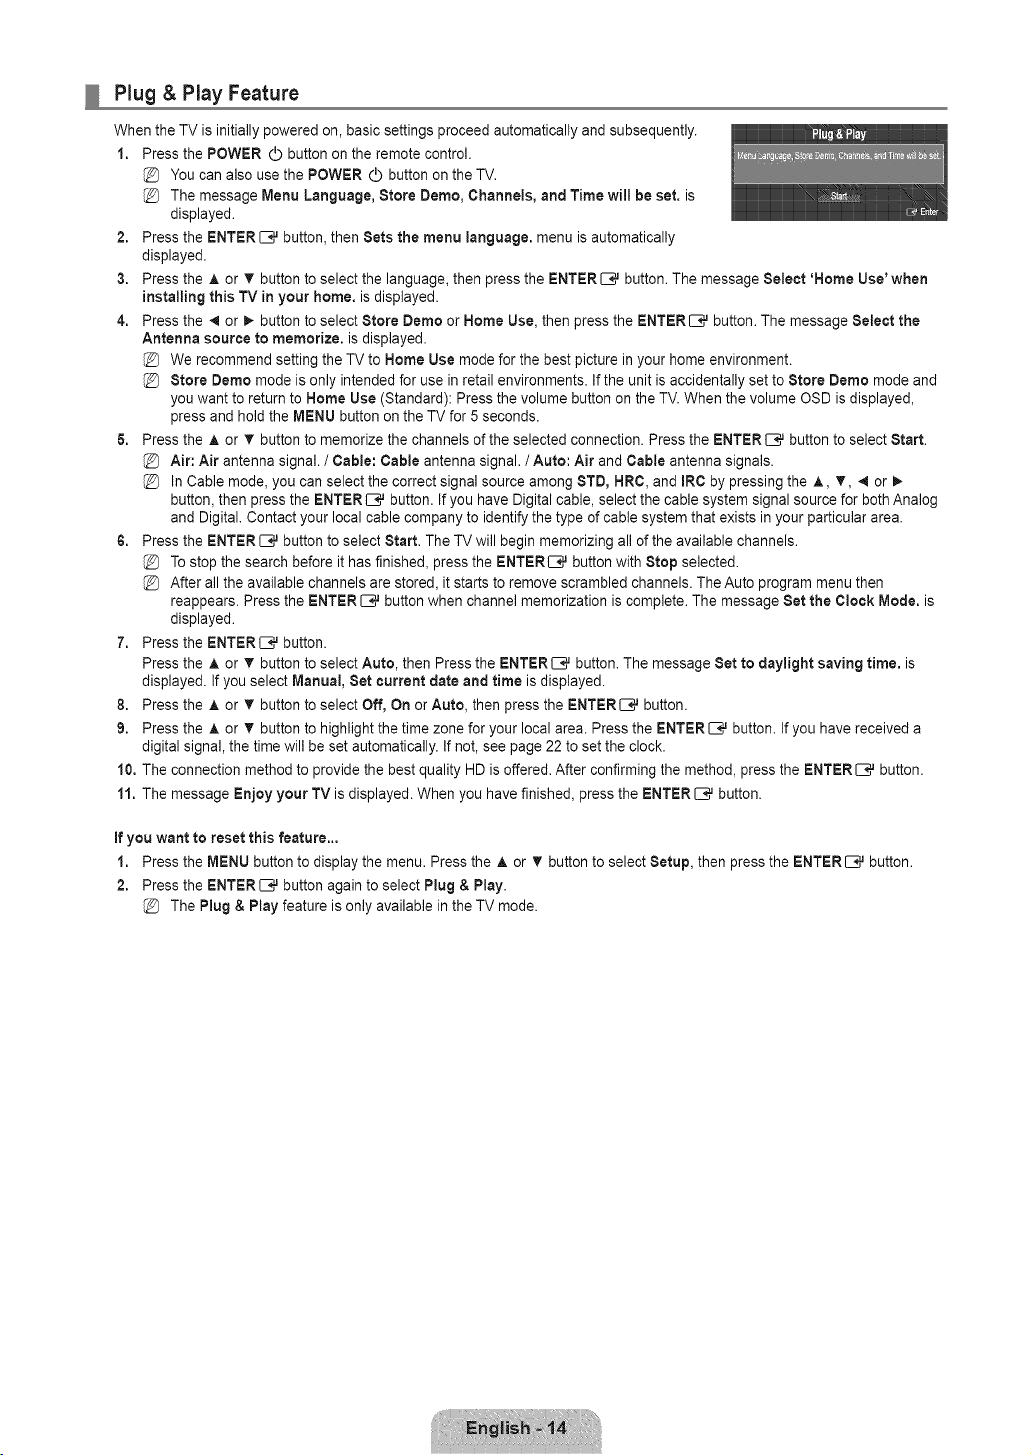
Plug & Play Feature
When the TV is initially powered on, basic settings proceed automatically and subsequently.
1. Press the POWER (_ button on the remote control.
You can also use the POWER (_ button on the TV.
The message Menu Language, Store Demo, Channels, and Time will be set. is
displayed.
2. Press the ENTER _,_ button, then Sets the menu language, menu is automatically
displayed.
3. Press the A or T button to select the language, then press the ENTER _,_ button. The message Select 'Home Use' when
installing this TV in your home. is displayed.
4. Press the _ or _ button to select Store Demo or Home Use, then press the ENTER _,_ button. The message Select the
Antenna source to memorize, is displayed.
We recommend setting the TV to Home Use mode for the best picture in your home environment.
Store Demo mode is only intended for use in retail environments. If the unit is accidentally set to Store Demo mode and
you want to return to Home Use (Standard): Press the volume button on the TV. When the volume OSD is displayed,
press and hold the MENU button on the TV for 5 seconds.
& Press the A or _' button to memorize the channels of the selected connection. Press the ENTERIIE,# button to select Start.
Air: Air antenna signal. / Cable: Cable antenna signal. / Auto: Air and Cable antenna signals.
In Cable mode, you can select the correct signal source among 8TD, NRC, and IRC by pressing the A, T, 4 or
button, then press the ENTER [B,# button. If you have Digital cable, select the cable system signal source for both Analog
and Digital. Contact your local cable company to identify the type of cable system that exists in your particular area.
6. Press the ENTERIZ},# button to select Start. The TV will begin memorizing all of the available channels.
To stop the search before it has finished, press the ENTER[B,# button with Stop selected.
After all the available channels are stored, it starts to remove scrambled channels. The Auto program menu then
reappears. Press the ENTER _,_ button when channel memorization is complete. The message Set the Clock Mode. is
displayed.
7. Press the ENTER[E_ button.
Press the J, or T button to select Auto, then Press the ENTERI:E# button. The message Set to daylight saving time, is
displayed. If you select Manual, Set current date and time is displayed.
8. Press the A or • button to select Off, On or Auto, then press the ENTERI:E# button.
9. Press the A or T button to highlight the time zone for your local area. Press the ENTERC ,,Jbutton. If you have received a
digital signal, the time will be set automatically. If not, see page 22 to set the clock.
10, The connection method to provide the best quality HD is offered. After confirming the method, press the ENTER C_ button.
11. The message Enjoy your TV is displayed. When you have finished, press the ENTER C_ button.
If you want to reset this feature..,
1. Press the MENU button to display the menu. Press the ,& or T button to select Setup, then press the ENTER C.,Jbutton.
2. Press the ENTERI:E# button again to select Plug & Play.
The Plug & Play feature is only available in the TV mode.

Configuring the Channel Menu
C)
C]
C)
C)
C)
Antenna _ Air / Cable
Before your television can begin memorizing the available channels, you must specify the type
of signal source that is connected to the TV (i.e. an Air or a Cable system).
_-_ Press the TOOLS button to display the Tools menu. You can also set the Antenna by
selecting Tools _ Switch to Cable (or Switch to Air).
Auto Program
Air: Air antenna signal, / Cable: Cable antenna signal. 1Auto: Air and Cable antenna
signals
When selecting the Cable TV system: Selects the cable system. STD, HRC and IRC
identify various types of cable TV systems. Contact your local cable company to identify the type of cable system that exists in
your particular area. At this point the signal source has been selected.
After all the available channels are stored, it starts to remove scrambled channels (Clear Scrambled Channels). The Auto
program menu then reappears.
If you want to stop Auto Programming, press the ENTER E;,_ button. The Stop Auto Program? message will be displayed.
Select Yes by pressing the 4 or _ button, then press the ENTER _,_ button.
Clear Scrambled Channels (digital channels only)
This function is used to filter out scrambled channels after Auto Program is completed. This process may take up to 20--30
minutes.
Tostop searching scrambled channels: Press the ENTER _,_ button to select Stop. Press the 4 button to select Yes, then
press the ENTER[--;,,J button.
This function is only available in Cable mode.
Channel List
For detailed procedures on using the Channel List, refer to the 'Managing Channels' instructions.
You can select these options by simply pressing the CH LIST button on the remote control.
Fine Tune (analog channels only)
Use fine tuning to manually adjust a particular channel for optimal reception.
If you do not store the fine-tuned channel in memory, adjustments are not saved.
* will appear next to the name of fine-tuned channels.
To reset the fine tuning setting, press the T button to select Reset, then press the ENTER _,_ button.
Managing Channels
Using this menu, you can add / delete or set favorite channels and use the program guide for
digital broadcasts.
All Channels
Shows all currently available channels.
Added Channels
Shows all added channels.
Favorite
Shows all favorite channels.
Toselect the favorite channels you have set up, press the FAV.CH button on the remote control.
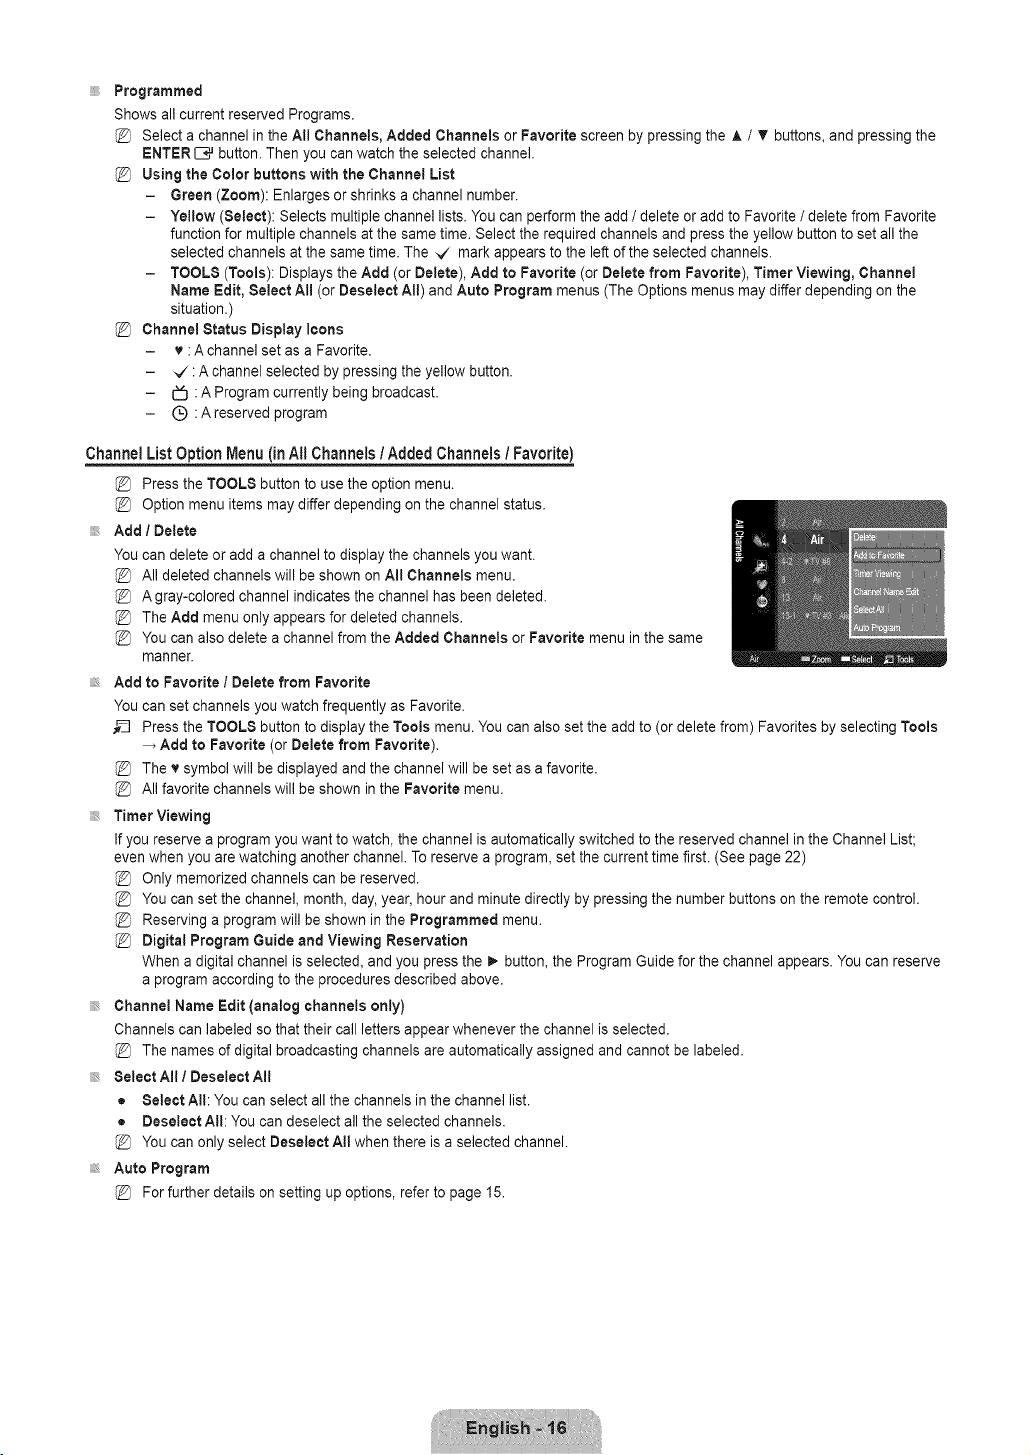
Programmed
ShowsallcurrentreservedPrograms.
SelectachannelintheAl!Channels,AddedChannels or Favorite screen by pressing the A / T buttons, and pressing the
ENTER{B,.Jbutton. Then you can watch the selected channel.
Using the Color buttons with the Channel List
- Green (Zoom): Enlarges or shrinks a channel number.
- Yellow (Select): Selects multiple channel lists. You can perform the add / delete or add to Favorite / delete from Favorite
function for multiple channels at the same time. Select the required channels and press the yellow button to set all the
selected channels at the same time. The _/ mark appears to the left of the selected channels.
- TOOLS (Tools): Displays the Add (or Delete), Add to Favorite (or Delete from Favorite), Timer Viewing, Channel
Name Edit, Select All (or Deseleet All) and Auto Program menus (The Options menus may differ depending on the
situation.)
Channel Status Display icons
- v : A channel set as a Favorite.
- _/: A channel selected by pressing the yellow button.
- _ : A Program currently being broadcast.
- (_) :Areserved program
Channel
List Option Menu (in All Channels / Added Channels / Favorite)
Press the TOOLS button to use the option menu.
Option menu items may differ depending on the channel status.
Add / Delete
You can delete or add a channel to display the channels you want.
All deleted channels will be shown on All Channels menu.
A gray-colored channel indicates the channel has been deleted.
The Add menu only appears for deleted channels.
You can also delete a channel from the Added Channels or Favorite menu in the same
manner.
Add to Favorite / Delete from Favorite
You can set channels you watch frequently as Favorite.
Press the TOOLS button to display the Tools menu. You can also set the add to (or delete from) Favorites by selecting Tools
Add to Favorite (or Delete from Favorite).
The v symbol will be displayed and the channel will be set as a favorite.
All favorite channels will be shown in the Favorite menu.
Timer Viewing
If you reserve a program you want to watch, the channel is automatically switched to the reserved channel in the Channel List;
even when you are watching another channel. To reserve a program, set the current time first. (See page 22)
Only memorized channels can be reserved.
You can set the channel, month, day, year, hour and minute directly by pressing the number buttons on the remote control.
Reserving a program will be shown in the Programmed menu.
Digital Program Guide and Viewing Reservation
When a digital channel is selected, and you press the _- button, the Program Guide for the channel appears. You can reserve
a program according to the procedures described above.
Channel Name Edit (analog channels only)
Channels can labeled so that their call letters appear whenever the channel is selected.
The names of digital broadcasting channels are automatically assigned and cannot be labeled.
Select All I Deselect All
= Select All: You can select all the channels in the channel list.
• Deselect All: You can deselect all the selected channels.
You can only select Deseleet All when there is a selected channel.
Auto Program
For further details on setting up options, refer to page 15.

Channel List Option Menu (in Programmed)
You can view, modify or delete a reservation.
Press the TOOLS button to use the option menu.
Change Info
Select to change a viewing reservation.
Cancel Schedules
Select to cancel a viewing reservation.
Information
Select to view a viewing reservation. (You can also change the reservation information.)
Select All
Select all reserved Programs.
C)
C)
Configuring the Picture Menu
Mode
You can select the type of picture which best corresponds to your viewing requirements.
__ Press the TOOLS button to display the Tools menu. You can also set the picture mode by
selecting Tools _ Picture Mode.
Dynamic
Selects the picture for increased definition in a bright room.
Standard
Selects the picture for the optimum display in a normal environment.
Movie
Selects the picture for viewing movies in a dark room.
Backlight / Contrast / Brightness / Sharpness / Color / Tint (G/R)
Your television has several setting options that allow you to control the picture quality.
• Backlight: Adjusts the brightness of LCD back light.
• Contrast: Adjusts the contrast level of the picture.
• Brightness: Adjusts the brightness level of the picture
• Sharpness: Adjusts the edge definition of the picture.
• Color: Adjusts color saturation of the picture.
• Tint (G/R): Adjusts the color tint of the picture.
When you make changes to Backlight, Contrast, Brightness, Sharpness, Color or Tint (GtR) the OSD will be adjusted
accordingly.
In PC mode, you can only make changes to Backlight, Contrast and Brightness.
Settings can be adjusted and stored for each external device you have connected to an input of the TV.
The energy consumed during use can be significantly reduced if the brightness level of the picture is lowered, which will
reduce the overall running cost.
C) Advanced Settings
Samsung's new TVs allow you to make even more precise picture settings than previous
models.
Advanced Settings is available in Standard or Movie mode.
In PC mode, you can only make changes to Gamma and White Balance from among the
Advanced Settings items.
Black Tone -_ Off I Dark / Darker / Darkest
You can select the black level on the screen to adjust the screen depth.

DynamicContrast _ Off / Low / Medium / High
You can adjust the screen contrast so that the optimal contrast is provided.
Gamma
You can adjust the primary color (red, green, blue) Intensity. (-3 -- +3)
Color Space
Color space is a color matrix composed of red, green and blue colors. Select your favorite color space to experience the most
natural color.
• Native: Native Color Space offers deep and rich color tone.
• Auto: Auto Color Space automatically adjusts to the most natural color tone based on program sources.
White Balance
You can adjust the color temperature for more natural picture colors.
• R-Offset / G-Offset / B-Offset / R-Gain / G-Gain / B-Gain: You can adjust the Color 'temperature' in the light areas by
changing the values of R, G, B. Recommended for advanced users only.
• Reset: The previously adjusted white balance will be reset to the factory defaults.
Changing the adjustment value will refresh the adjusted screen.
Flesh Tone
You can emphasize the pink 'flesh tone' in the picture.
Changing the adjustment value will refresh the adjusted screen.
Edge Enhancement _ Off / On
You can emphasize object boundaries in the picture.
C)
Picture Options
In PC mode, you can only make changes to the Color Tone and Size from among the
items in Picture Options.
Color Tone _ Cool / Normal 1Warm1 / Warm2
Warm1 or Warm2 is only activated when the picture mode is Movie.
Settings can be adjusted and stored for each external device you have connected to an
input of the TV.
Size
Occasionally, you may want to change the size of the image on your screen. Your TV comes with six screen size options, each
designed to work best with specific types of video input. Your cable box/satellite receiver may have its own set of screen sizes as
well. In general, though, you should view the TV in 16:9 mode as much as possible.
Alternately, you can press the P.SIZE button on the remote control repeatedly to change the picture size.
• 16:9 : Sets the picture to 16:9 wide mode.
• Zoom1: Magnifies the size of the picture on the screen.
• Zoom2: Magnifies the size of the picture more than Zoom1.
• Wide Fit: Enlarges the aspect ratio of the picture to fit the entire screen.
• 4:3 : Sets the picture to 4:3 normal mode.
• Screen Fit: Use the function to see the full image without any cutoff when HDMI (720p/108%, Component (108% or DTV
(1080i) signals are input.

%
%
%
%
%
Temporary image retention may occur when viewing a static image on the set for more than two hours.
After selecting Zoom1, Zoom2 or Wide Pit: Press the 41or i_ button to select Position, then press the ENTER _ button.
Press the A or T button to move the picture up and down.
After selecting Screen Fit in HDMI (I080i) or Component (I080i) mode, you made need to center the picture: Press the _ or
_. button to select Position, then press the ENTERI:B_ button. Press the A, T, 4 or _button to move the picture.
Reset: Press the 4 or !_-buttonto select Reset, then press the ENTERI:E_ button. You can initialize the setting.
HD (High Definition): 16:9 - 1080i (1920x1080), 720p (1280x720)
Settings can be adjusted and stored for each external device you have connected to an input of the TV.
inputSource PictureSize
TV,AV,Component(480i,48%) 16:9,Zoom1,Zoom2,4:3
DTV(1080i),Component(1080i),HDMI(720p,108% 16:9,4:3,Wide Fit, Screen Fit
PC 16:9,4:3
Digital NR -_ Off / Low / Medium I High / Auto
If the broadcast signal received by your TV is weak, you can activate the Digital Noise Reduction feature to help reduce any static
and ghosting that may appear on the screen.
When the signal is weak, select one of the other options until the best picture isdisplayed.
HDMI Black Level _ Normal / Low
You can select the black level on the screen to adjust the screen depth.
This function is active only when an external device is connected to the TV via HDMI. The HDMI Black Level function may not
be compatible with all external devices.
Film Mode -_ Off / Auto
The TV can be set to automatically sense and process film signals from all sources and adjust the picture for optimum quality.
Film Mode is supported in TV, Video, Component (480i/1080i) and HDMI (480i/I080i).
C3 Picture Reset -_ Reset Picture Mode / Cancel
Resets all picture settings to the default values.
Reset Picture Mode: Current picture values return to default settings.
Using Your TV as a Computer (PC) Display
Settiag Up Your PC Software (Based oa Windows XP)
The Windows display-settings for a typical computer are shown below. The actual screens on your PC will probably be different,
depending upon your particular version of Windows and your particular video card. However, even if your actual screens look
different, the same basic set-up information will apply in almost all cases. (If not, contact your computer manufacturer or Samsung
Dealer.)
1. First, click on 'Control Panel' in the Windows start menu.
2. When the control panel window appears, click on 'Appearance and Themes' and a display dialog-box will appear.
3. When the control panel window appears, click on 'Display' and a display dialog-box will appear.
4. Navigate to the 'Settings' tab on the display dialog-box.
The correct size setting (resolution): Optimum: 1360 x 768 pixels
If a vertical frequency option exists on your display settings dialog box, the correct value is 60 or 60 Hz. Otherwise, just click
OK and exit the dialog box.
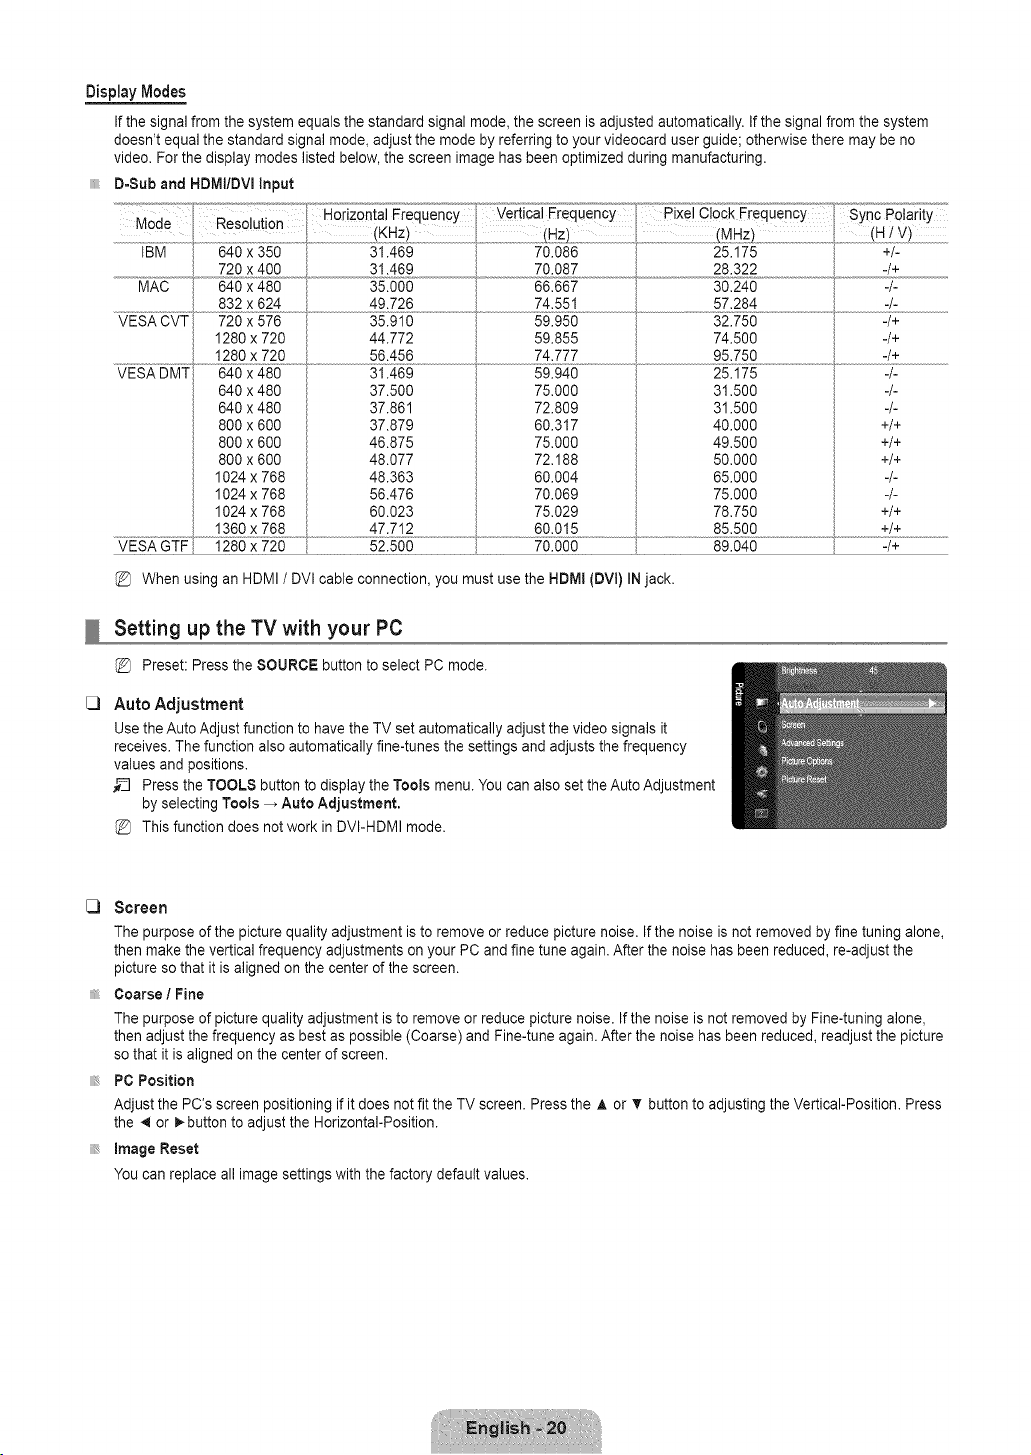
DisplayModes
If the signal from the system equals the standard signal mode, the screen is adjusted automatically. If the signal from the system
doesn't equal the standard signal mode, adjust the mode by referring to your videocard user guide; otherwise there may be no
video. For the display modes listed below, the screen image has been optimized during manufacturing.
D=Sub and HDIVlI/DVIinput
Mode
Resolution (KHz) .........................(Hz) (MHz) (H1V)
IBM 640 x 350 31.489 70.086 25.175 +/-
720 x 400 31.469 28.322 4+
MAC 640 x 480 35.000 30.240 4-
......................................................832 x624 .....................................................49..726 74.551 57.284 -/-
35.910 59.950 32.750 -/+VESA CVT 720 x 576
1280 x 720
1280 x 720
640 x 480
640 x 480
800 x 800
800 x 800
800 x 800
1024 x 788
1024 x 788
1024 x 788
44.772
56.456
31.469
37.500
37.861
37.879
46.875
48.077
48.363
56.476
60.023
59.855
74.777
59.940
75.000
72.809
60.317
75.000
72.188
60.004
70.069
75.029
74.500
95.750
25.175
31.500
31.500
40.000
49.500
50.000
65.000
75.000
78.750
-/+
-/+
-/-
-/-
-/-
+/+
+/+
+/+
-/-
-/-
+/+
1360 x 768 , 47.712 , 60.015 , 85.500 +/+
VESA GTF 1280 x 720 52.500 70.000 89.040 -/+
When using an HDMI / DVI cable connection, you must use the HDMI (DVI) IN jack.
C)
Setting up the TV with your PC
Preset: Press the SOURCE button to select PC mode.
Auto Adjustment
Use the Auto Adjust function to have the TV set automatically adjust the video signals it
receives. The function also automatically fine-tunes the settings and adjusts the frequency
values and positions.
_-_ Press the TOOLS button to display the Tools menu. You can also set the Auto Adjustment
by selecting Tools _ Auto Adjustment.
This function does not work in DVI-HDMI mode.
C) Screen
The purpose of the picture quality adjustment is to remove or reduce picture noise. If the noise is not removed by fine tuning alone,
then make the vertical frequency adjustments on your PC and fine tune again. After the noise has been reduced, re-adjust the
picture so that it is aligned on the center of the screen.
Coarse / Fine
The purpose of picture quality adjustment is to remove or reduce picture noise. If the noise is not removed by Fine-tuning alone,
then adjust the frequency as best as possible (Coarse) and Fine-tune again. After the noise has been reduced, readjust the picture
so that it is aligned on the center of screen.
PC Position
Adjust the PC's screen positioning if it does not fit the TV screen. Press the ,& or T button to adjusting the Vertical-Position. Press
the 41or _-button to adjust the Horizontal-Position.
image Reset
You can replace all image settings with the factory default values.
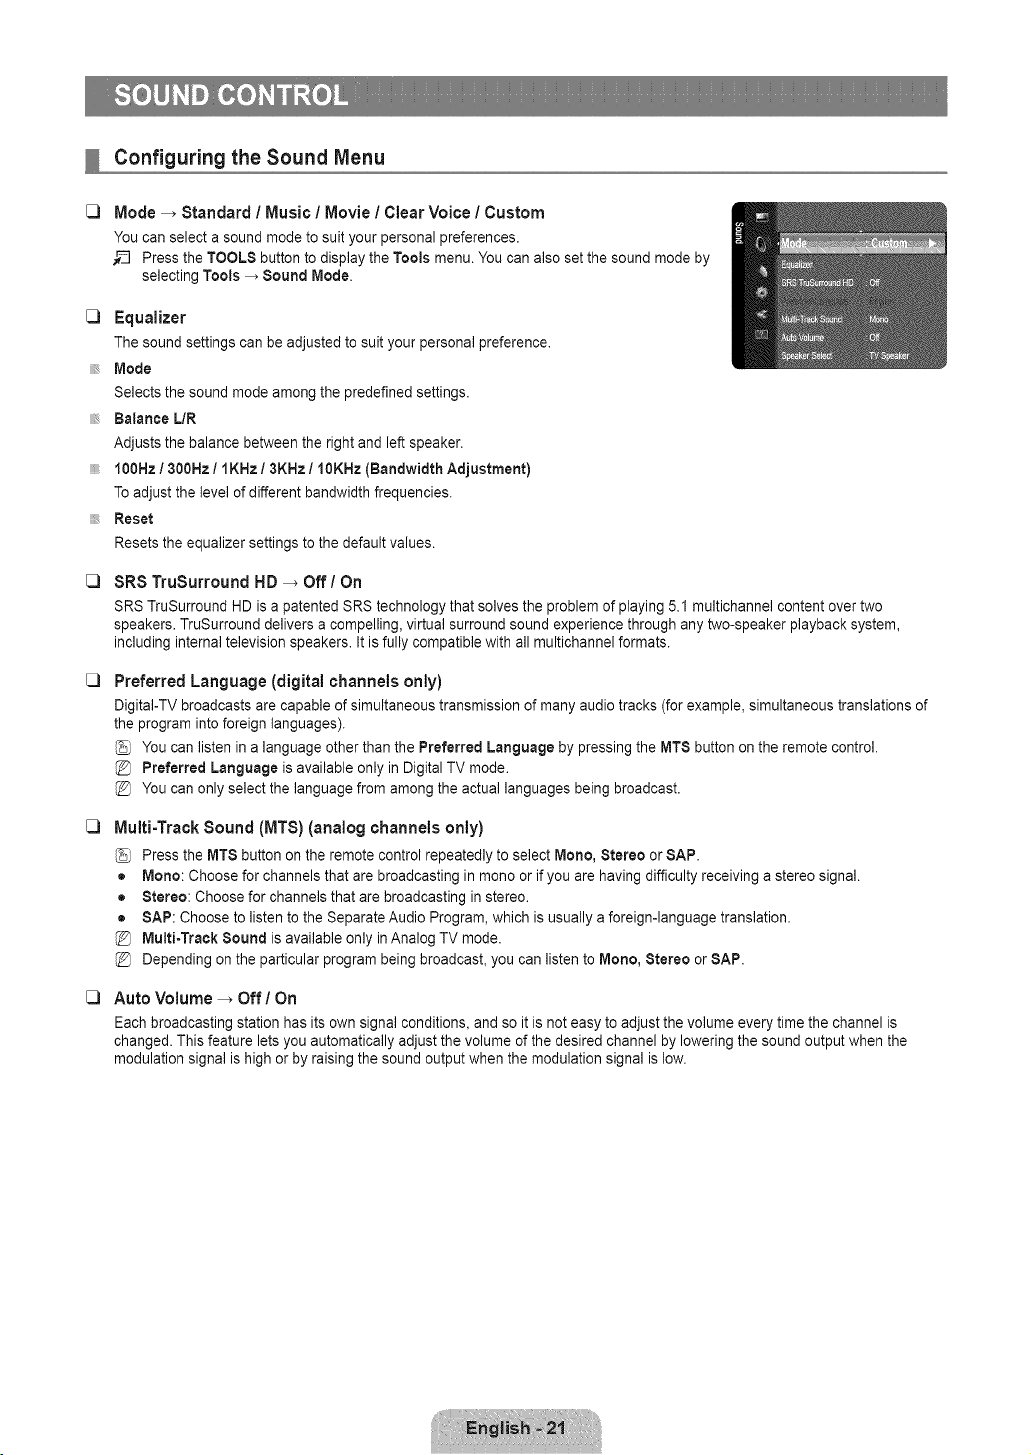
C)
Configuring the Sound Menu
Mode _ Standard / Music / Movie / Clear Voice / Custom
You can select a sound mode to suit your personal preferences.
__ Press the TOOLS button to display the Tools menu. You can also set the sound mode by
selecting Tools _ Sound Mode.
C) Equalizer
The sound settings can be adjusted to suit your personal preference.
Mode
Selects the sound mode among the predefined settings.
Balance L/R
Adjusts the balance between the right and left speaker.
f00Hz / 300Hz / IKHz / 3KHz / 10KHz {Bandwidth Adjustment)
Toadjust the level of different bandwidth frequencies.
Reset
Resets the equalizer settings to the default values.
C)
C)
C)
SRS TruSurround HD _ Off/On
SRS TruSurround HD is a patented SRS technology that solves the problem of playing 5.1 multichannel content over two
speakers. TruSurround delivers a compelling, virtual surround sound experience through any two-speaker playback system,
including internal television speakers. It is fully compatible with all multichannel formats.
C)
Preferred Language (digital channels only)
DigitaI-TV broadcasts are capable of simultaneous transmission of many audio tracks (for example, simultaneous translations of
the program into foreign languages).
You can listen in a language other than the Preferred Language by pressing the MTS button on the remote control.
Preferred Language is available only in Digital TV mode.
You can only select the language from among the actual languages being broadcast.
Multi-Track Sound (MTS) (analog channels only)
Press the MTS button on the remote control repeatedly to select Mono, Stereo or SAP.
• Mono: Choose for channels that are broadcasting in mono or if you are having difficulty receiving a stereo signal.
• Stereo: Choose for channels that are broadcasting in stereo.
• SAP: Choose to listen to the Separate Audio Program, which is usually a foreign-language translation.
Multi-Track Sound is available only in Analog TV mode.
Depending on the particular program being broadcast, you can listen to Mono, Stereo or SAP.
Auto Volume -_ Off/On
Each broadcasting station has its own signal conditions, and so it is not easy to adjust the volume every time the channel is
changed. This feature lets you automatically adjust the volume of the desired channel by lowering the sound output when the
modulation signal is high or by raising the sound output when the modulation signal is low.

[_ Speaker Select
When you watch TV with it connecting to a Home theater, turn the TV speakers off so you can listen to sound from the Home
theater's (external) speakers.
External Speaker: Used to listen to the sound of the External (Home Theater) Speakers.
TV Speaker: Used to listen to the sound of the TV Speakers,
If you select External Speaker in the Speaker Select menu, the sound settings will be limited.
The volume and MUTE buttons do not operate when the Speaker Select is set to External Speaker. Please set the volume
on your Home theater.
Mute
Sound Reset _ Reset All / Reset Sound Mode / Cancel
You can restore the Sound settings to the factory defaults.
Reset Sound Mode: Current sound values return to default settings.
Mute
Configuring the Setup Menu
Language
Youcansetthe menulanguage.
Time
Clock
Setting the clock is necessary in order to use the various timer features of the TV.
The current time will appear every time you press the INFO button.
If you disconnect the power cord, you have to set the clock again.
= Clock Mode
You can set up the current time manually or automatically.
- Auto: Set the current time automatically using the time from a digital broadcast.
- Manual: Set the current time to a manually specified time.
Depending on the broadcast station and signal, the auto time may not be set correctly. If this occurs, set the time
manually.
The Antenna or cable must be connected in order to set the time automatically.
• Clock Set
You can set the current time manually.
This function is only available when Clock Mode is set to Manual.
You can set the month, day, year, hour and minute directly by pressing the number buttons on the remote control.
• Time Zone
Select your time zone.
This function is only available when Clock Mode is set to Auto.
• DST (Daylight Saving Time) _ Off / On 1Auto
Switches the Daylight Saving Time function on or off.
This function is only available when Clock Mode is set to Auto.
Sleep Timer
The sleep timer automatically shuts off the TV after a preset time (30, 60, 90,120,150 and 180 minutes).
_-_ Press the TOOLS button to display the Tools menu. You can also set the sleep timer by selecting Tools _ Sleep Timer.
Tocancel the Sleep Timer function, select Off.
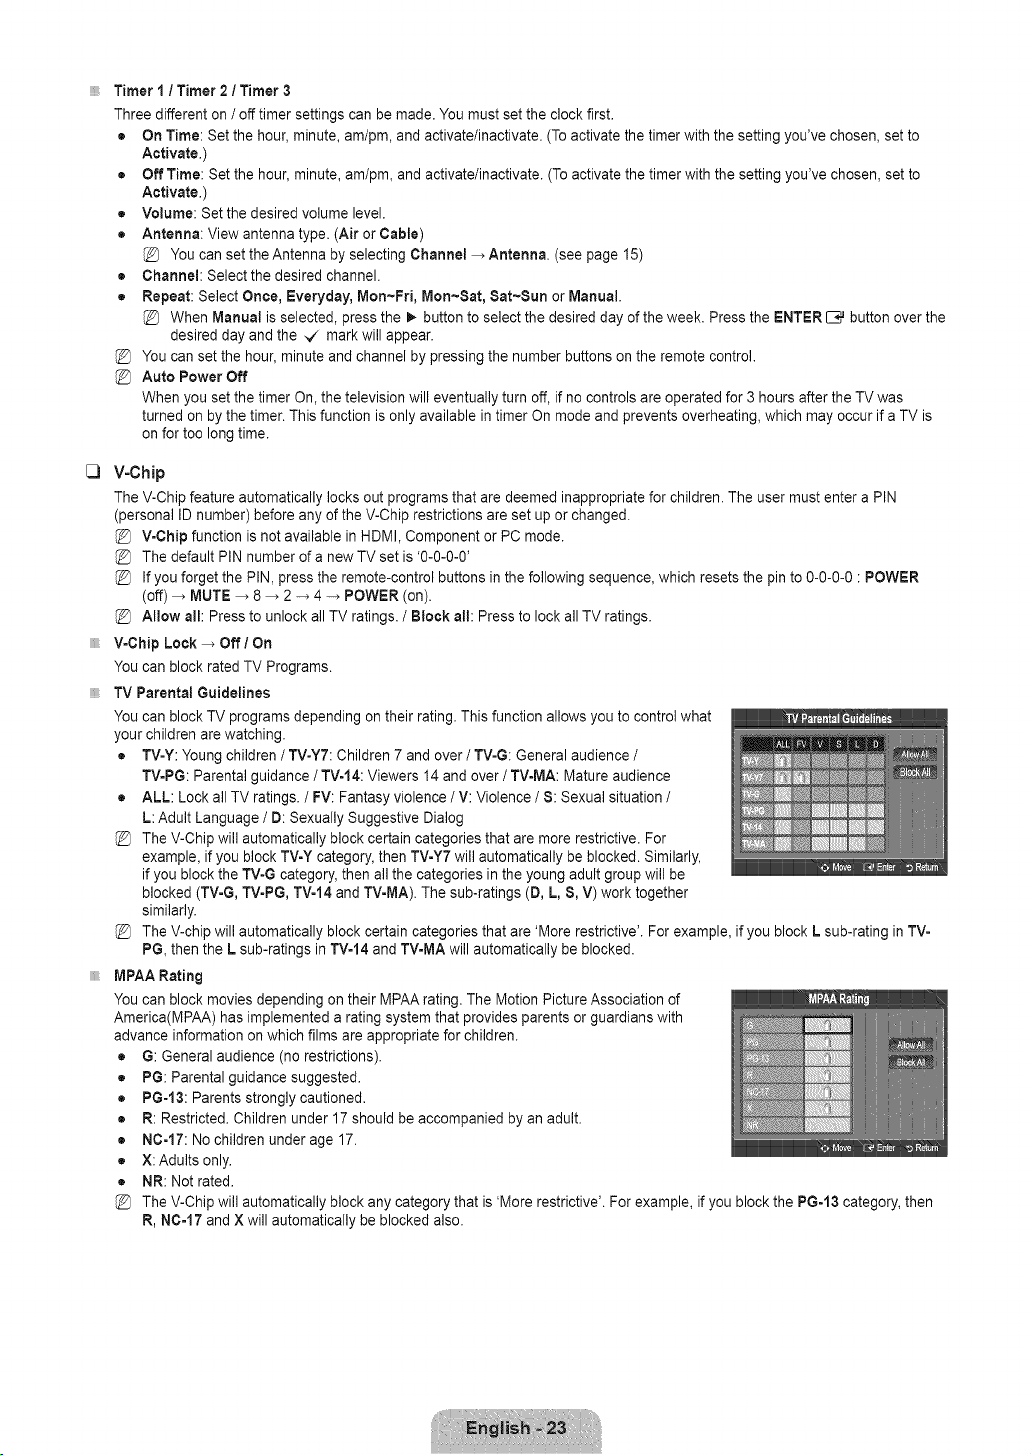
C)
Timer I / Timer 2 / Timer 3
Three different on / off timer settings can be made. You must set the clock first.
• On Time: Set the hour, minute, am/pm, and activate/inactivate. (To activate the timer with the setting you've chosen, set to
Activate.)
• Off Time: Set the hour, minute, am/pm, and activate/inactivate. (To activate the timer with the setting you've chosen, set to
Activate.)
• Volume: Set the desired volume level.
• Antenna: View antenna type. (Air or Cable)
You can set the Antenna by selecting Channel _ Antenna. (see page 15)
• Channel: Selectthe desired channel.
• Repeat: Select Once, Everyday, Mon-Fri, Mort~Sat, Sat-Sun or Manual.
@ When Manual is selected, press the _ button to select the desired day of the week. Press the ENTER _ button over the
desired day and the _ mark will appear.
@ You can set the hour, minute and channel by pressing the number buttons on the remote control.
@ Auto Power Off
When you set the timer On, the television will eventually turn off, if no controls are operated for 3 hours after the TV was
turned on by the timer. This function is only available in timer On mode and prevents overheating, which may occur if a TV is
on for too long time.
V-Chip
The V-Chip feature automatically locks out programs that are deemed inappropriate for children. The user must enter a PIN
(personal ID number) before any of the V-Chip restrictions are set up or changed.
V-Chip function is not available in HDMI, Component or PC mode.
The default PIN number of a new TV set is '0-0-0-0'
If you forget the PIN, press the remote-control buttons in the following sequence, which resets the pin to 0-0-0-0 : POWER
(off) _ MUTE _ 8 _ 2 -* 4 -_ POWER (on).
Allow all: Press to unlock all TV ratings. / Block all: Press to lock all TV ratings.
V-Chip Lock _ Off / On
You can block rated TV Programs.
TV Parental Guidelines
You can block TV programs depending on their rating. This function allows you to control what
your children are watching.
• TV-Y: Young children / TV-YT: Children 7 and over / TV-G: General audience /
TV-PG: Parental guidance / TV-14: Viewers 14 and over / TV-MA: Mature audience
• ALL: Lock all TV ratings. / FV: Fantasy violence / V: Violence / S: Sexual situation /
L: Adult Language / D: Sexually Suggestive Dialog
The V-Chip will automatically block certain categories that are more restrictive. For
example, if you block TV-Y category, then TV-Y7 will automatically be blocked. Similarly,
if you block the TV-G category, then all the categories in the young adult group will be
blocked (TV-G, TV-PG, TV-14 and TV-MA). The sub-ratings (D, L, S, V) work together
similarly.
The V-chip will automatically block certain categories that are 'More restrictive'. For example, if you block L sub-rating in TV-
PG, then the L sub-ratings in TVo14and TV-MA will automatically be blocked.
MPAA Rating
You can block movies depending on their MPAA rating. The Motion Picture Association of
America(MPAA) has implemented a rating system that provides parents or guardians with
advance information on which films are appropriate for children.
= G: General audience (no restrictions).
• PG: Parental guidance suggested.
• PG=13: Parents strongly cautioned.
• R: Restricted. Children under 17 should be accompanied by an adult.
• NC-17: No children under age 17.
• X:Adults only.
• NR: Not rated.
The V-Chip will automatically block any category that is 'More restrictive'. For example, if you block the PG-13 category, then
R, NC-17 and X will automatically be blocked also.

Canadian English
• C: Programming intended for children under age 8.
• C8+: Programming generally considered acceptable for children 8 years and over to watch on their own.
• G: General programming, suitable for all audiences.
• PG: Parental Guidance.
• 14+: Programming contains themes or content which may not be suitable for viewers under the age of 14.
• 18+:Adult programming.
The V-Chip will automatically block any category that is 'More restrictive'. For example, if you block G category, then PG, 14+
and 18+ will automatically be blocked also.
Canadian French
• G: General
• 8 arts+: Programming generally considered acceptable for children 8 years and over to watch on their own.
• 13 arts+: Programming may not be suitable for children under the age of 13.
• 16 arts+: Programming is not suitable for children under the age of 16.
• 18 arts+: Programming restricted to adults.
@ The V-Chip will automatically block any category that is 'More restrictive'. For example, if you block 8 arts+ category, then 13
arts+, 16 arts+ and 18 arts+ will automatically be blocked also.
The number of current The number of a+l
Downloadable U.8. Rating Ratingtitle rating information rating information
Parental restriction information can be used while watching DTV channels
If information is not downloaded from the broadcasting station, the Downloadable U,8,
rating menu is deactivated.
Parental restriction information is automatically downloaded while watching DTV channels.
It may take several seconds.
The Downioadable U.8. rating menu is available for use after information is downloaded
from the broadcasting station. However, depending on the information from the
broadcasting station, it may not be available for use.
Parental restriction levels differ depending on the broadcasting station. The default menu
name and Downloadable US rating changes depending on the downloaded information.
Even if you set the On-screen display to your desired language, the Downloadable U.8, Rating menu will appear in English
only.
The rating will automatically block certain categories that are more restrictive.
The rating titles (For example: Humor Level..etc) and TV ratings (For example: DH, MH, H..etc) may differ depending on the
broadcasting station.
Change PIN
The Change PIN screen will appear. Choose any 4 digits for your PIN and enter them.
As soon as the 4 digits are entered, the Confirm New PIN screen appears. Re enter the same 4 digits. When the Confirm screen
disappears, your PIN has been memorized.
If you forget the PIN, press the remote-control buttons in the following sequence, which resets the pin to 0-0-0-0 : POWER
(off) _ MUTE _ 8 _ 2 _ 4 _ POWER (on).
How to Resetthe TV after theV-Chip Blocks a Channel(Emergency Escape)
%
If the TV is tuned to a restricted channel, the V-Chip will block it. The screen will go blank and
the following message will appear:
1. Enter your PIN, then press the ENTER[E# button and press the A or T button to
temporarily disable the V-Chip Lock.
If you forget the PIN, press the remote-control buttons in the following sequence, which resets
the pin to 0-0-0-0 : POWER (off) _ MUTE _ 8 _ 2 _ 4 _ POWER (on)
C3
Caption (On-Screen Text Messages)
Caption _ Off I On
You can switch the caption function on or off. If captions are not available, they will not be displayed on the screen.
Press the CO button on the remote control to turn the Caption on or off.
The Caption feature doesn't work in Component, HDMI or PC modes.
C)
C)
C)
Caption Mode
You can select the desired caption mode.
The availability of captions depends on the program being broadcast.
• Default I CC1-CC4 / Textl~Text4 (analog channels only)
The Analog Caption function operates in either analog TV channel mode or when a signal is supplied from an external device
to TV. (Depending on the broadcasting signal, the Analog Caption function may operate on digital channels.)
• Default I 001~0C4 / Textl~Text4 / Servicer~Service6 (digital channels only)
The Digital Captions function operates on digital channels.
Service1--6 in digital caption mode may not be available depending on the broadcast.
Digital Caption Options (digital channels only)
= Size: This option consists of Default, Small, Standard and Large. The default is Standard.
• Font Style: This option consists of Default, Style0 ~ Style 7. You can change the font you want. The default is Style 0.
• Foreground Dolor: This option consists of Default, White, Black, Red, Green, Blue, Yellow, Magenta and Cyan. You can
change the color of the letter. The default isWhite.
• Background Dolor: This option consists of Default, White, Black, Red, Green, Blue, Yellow, Magenta and Cyan. You can
change the background color of the caption. The default is Black.
• Foreground Opacity: This option consists of Default, Transparent, Translucent, Solid and Flashing. You can change the
opacity of the letter.
• Background Opacity: This option consists of Default, Transparent, Translucent, Solid and Flashing. You can change the
background opacity of the caption.
• Return to Default: This option sets each of Size, Font Style, Foreground Color, Background color, Foreground Opacity
and Background Opacity to itsdefault.
The DigitaJ Caption Options are only enabled when the Caption Mode is Service 1 ~ Service 6. (If Caption Mode is the
default, the Digital Caption Options are enabled depending on the broadcast.)
The availability of captions depends on the program being broadcast.
Default means to follow the standard set by the broadcaster.
Foreground and Background cannot be set to have the same color.
Foreground Opacity and Background Opacity cannot be both set to Transparent.
Melody -_ Off/Low / Medium / High
A melody sound can be set to come on when the TV is powered On or Off.
The Melody does not play.
- When no sound is output from the TV because the MUTE button has been pressed.
- When no sound is output from the TV because the volume has been reduced to minimum with the VOL = button.
- When the TV is turned off by Sleep Timer function.
Game Mode -_ Off / On
When connecting to a game console such as PlayStationTM or XboxTM, you can enjoy a more realistic gaming experience by
selecting the game menu.
Restrictions on game mode (Caution)
- To disconnect the game console and connect another external device, set Game Mode to Off in the setup menu.
- If you display the TV menu in Game mode, the screen shakes slightly.
If Game Mode is On :
- Picture mode is automatically changed to Standard and cannot be changed.
- Sound mode is automatically changed to Custom and cannot be changed. Adjust the sound using the equalizer.
Game Mode is not available in regular TV and PC mode.
If the picture is poor when external device is connected to TV, check if Game Mode is On. Set Game Mode to Off and
connect external devices.
Energy Saving -_ Off / Low / Medium / High / Auto
This feature adjusts the brightness of the TV in order to reduce power consumption. When watching TV at night, set the Energy
Saving mode option to High to reduce eye fatigue as well as power consumption.
Configuring the input Menu
C) Source List
Use to select TV or other external input sources such as DVD / Blu-ray players / Cable Box /
Satellite receivers (Set-Top Box) connected to the TV. Use to select the input source of your
choice.
Press the SOURCE button on the remote control to view an external signal source.
TV/AV / Component / PC / HDM!/DVI
You can choose only those external devices that are connected to the TV. In the Source
List, connected inputs will be highlighted and sorted to the top. Inputs that are not
connected will be sorted to the bottom.
- TOOLS (Tools): Displays the Edit Name and information menus.
C) Edit Name
Name the device connected to the input jacks to make your input source selection easier.
VCR / DVD / Cable STB / Satellite 8TB / PVR 8TB / AV Receiver / Game / Camcorder / PC / DVI PC / DVI / TV / IPTV / Blu-ray
/ HD DVD / DMA
Configuring the Support Menu
C3
Self Diagnosis
Picture Test
If you think you have a picture problem, perform the picture test. Check the color pattern on the screen to see if the problem still
exists.
• Yes: If the test pattern does not appear or there is noise in the test pattern, select Yes.
There may be a problem with the TV. Contact Samsung's call center for assistance.
• No: If the test pattern is properly displayed, select No. There may be a problem with your
external equipment. Please check your connections. If the problem still persists, refer to
the external device's user manual.
Sound Test
If you think you have a sound problem, please perform the sound test. You can check the
sound by playing a built-in melody sound through the TV. 'Does the problem still exist with this
sound test?' appears on the screen.
If you hear no sound from the TV's speakers, before performing the sound test, make sure Speaker Select is set to TV
speaker in the Sound menu.
The melody will be heard during the test even if Speaker Select is set to External Speaker or the sound is muted by pressing
the MUTE button.
• Yes: If during the sound test you can hear sound only from one speaker or not at all, select Yes. There may be a problem with
the TV. Contact Samsung's call center for assistance.
• No: If you can hear sound from the speakers, select No. There may be a problem with your external equipment. Please check
your connections. If the problem still persists, refer to the external device's user manual.
Signal Strength (digital channels only)
Unlike analog channels, which can vary in reception quality from 'snowy' to clear, digital (HDTV) channels have either perfect
reception quality or you will not receive them at all. So, unlike analog channels, you cannot fine tune a digital channel. You can,
however, adjust your antenna to improve the reception of available digital channels.
If the signal strength meter indicates that the signal is weak, physically adjust your antenna to increase the signal strength.
Continue to adjust the antenna until you find the best position with the strongest signal.
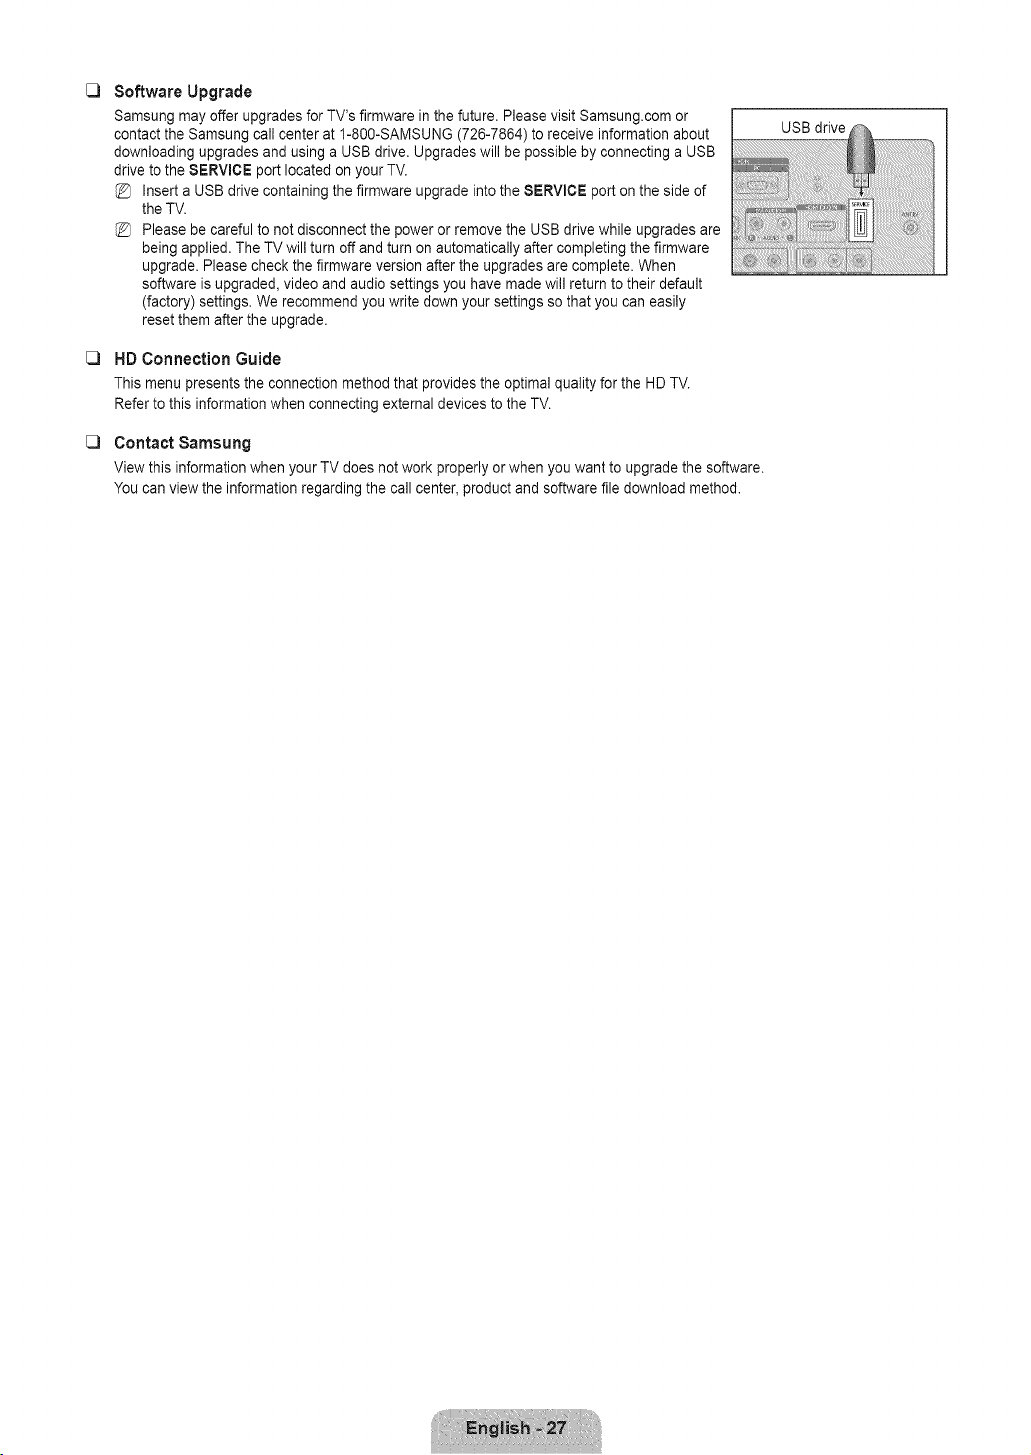
C]
C]
C]
Software Upgrade
Samsung may offer upgrades for TV's firmware in the future. Please visit Samsung.com or
contact the Samsung call center at 1-800-SAMSUNG (726-7864) to receive information about
downloading upgrades and using a USB drive. Upgrades will be possible by connecting a USB
drive to the $ERVlCE port located on your TV.
Insert a USB drive containing the firmware upgrade into the SERVICE port on the side of
the TV.
Please be careful to not disconnect the power or remove the USB drive while upgrades are
being applied. The TV will turn off and turn on automatically after completing the firmware
upgrade. Please check the firmware version after the upgrades are complete. When
software is upgraded, video and audio settings you have made will return to their default
(factory) settings. We recommend you write down your settings so that you can easily
reset them after the upgrade.
HD Connection Guide
This menu presents the connection method that provides the optimal quality for the HD TV.
Refer to this information when connecting external devices to the TV.
Contact Samsung
View this information when your TV does not work properly or when you want to upgrade the software.
You can view the information regarding the call center, product and software file download method.
USB drive

Troubleshooting
If the TV seems to have a problem, first try this list of possible problems and solutions. If none of these troubleshooting tips apply,
please visit Samsung.com or contact the Samsung call center at 1-800-SAMSUNG (726-7864).
Problem Possible Solution °'
Poor picture. Try another channel. /Adjust the antenna. / Check all wire connections.
Poor sound quality. Try another channel. /Adjust the antenna.
No picture or sounc Try another channel. / Press the SOURCE button.
Make sure the TV is plugged in. / Check the antenna connections.
No sound or sound is too low at First, check the volume of units connected to your TV (digital broadcasting receiver, DVD,
cable broadcasting receiver, VCR, etc.). Then, adjust the TV volume accordingly.
Check all wire connections.
Run the Picture test in the Self diagnostic menu.
Run the Sound test in the Self diagnostic menu.
Unplug the TV for 30 seconds, then try operating it again.
Make sure the wall outlet is working.
Remote control malfunctions. Replace the remote control batteries.
maximum volume.
Picture rolls vertically.
There is a problem with the picture
There is a problem with the sound
The TV operates erratically.
The TV won't turn on
'Check signal cable' message.
'Not Supported Mode' message.
Digital broadcasting screen
problem.
The image is too light or too dark.
Black bars on the screen.
Picture has a Red/Green or Pink
tint.
Closed Captioning not working.
Snowy picture.
Ghosting on picture.
Horizontal bars appear to flicker
jitter or shimmer on the image.
Vertical bars appear to flicker, jitter
or shimmer on the image.
Screen is black anc power indicator
light blinks steadily.
Image is not stable and may
appear to vibrate when you have
a computer connected to the PC
input.
Image is not centered on the
screen.
Clean the upper edge of the remote control (transmission window).
Check the battery terminals.
Ensure that the signal cable is firmly connected to the PC source.
Check the maximum resolution and connected device's Video frequency.
Compare these values with the data in the Display Modes.
Please check the digital signal strength and input antenna.
Adjust the Brightness and Contrast./Adjust the Fine tuning.
Make sure the broadcast you're receiving is High Definition (HD).
HD channels sometimes broadcast Standard Definition (SD) programming, which can
cause black bars.
Set your cable/satellite box to stretch or widescreen mode to eliminate the bars.
Make sure the Component cables are connected to the correct jacks.
If you are using a Cable/Satellite box, you must set Closed Captioning on the box, not
your TV.
Your cable box may need a firmware upgrade. Please contact your Cable company.
This is sometimes caused by compatibility issues with your cable box.
Try connecting Component cables instead.
Adjust the Coarse tuning and then adjust the Fine tuning.
Adjust the Coarse tuning and then adjust the Fine tuning.
On your computer check: Power, Signal Cable.
The TV is using its power management system.
Move the computer's mouse or press any key on the keyboard.
If the setting is not correct, use your computer utility program to change the display
settings.
Your TV supports multiscan display functions within the following frequency domain:
- Horizontal frequency (KHz): 30~60
- Vertical frequency (Hz): 60~75
- PC Maximum refresh rate (at 60 Hz): 1360 x 768
Adjust the horizontal and vertical position.
The screen position must be adjusted on the output source (i.e. STB) with a digital signal.
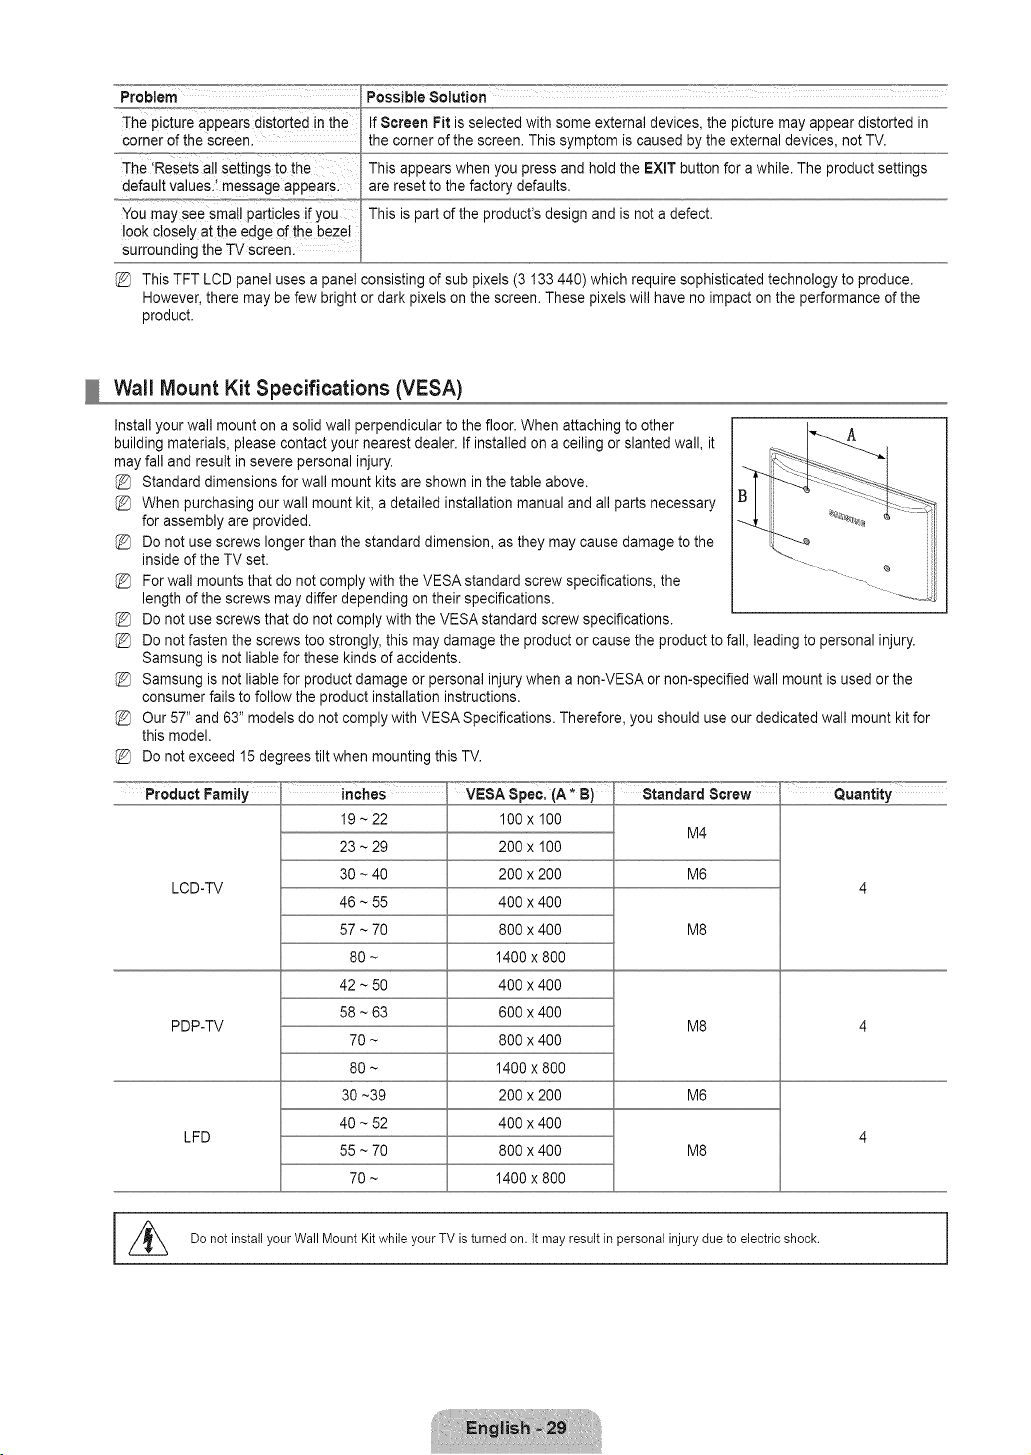
Problem Possible Solution
The ictureappearsdisrobedthe Sc,'oenFitisselectedwithsomeexterna devices,thepicturemayappeard stortedin
corner of the screen.
The 'Resets all settings t0the
default values.! message appear&
You may see smal! particles if you
look closely at the edge of the bezel
surrounding the TV screen.
the corner of the screen. This symptom is caused by the external devices, not TV.
This appears when you press and hold the EXIT button for a while. The product settings
are reset to the factory defaults.
This is part of the product's design and is not a defect.
This TFT LCD panel uses a panel consisting of sub pixels (3 133 440) which require sophisticated technology to produce.
However, there may be few bright or dark pixels on the screen. These pixels will have no impact on the performance of the
product.
Wall Mount Kit Specifications (VESA)
Install your wall mount on a solid wall perpendicular to the floor. When attaching to other
building materials, please contact your nearest dealer. If installed on a ceiling or slanted wall, it A
may fall and result in severe personal injury.
Standard dimensions for wall mount kits are shown in the table above.
When purchasing our wall mount kit, a detailed installation manual and all parts necessary
for assembly are provided.
Do not use screws longer than the standard dimension, as they may cause damage to the
inside of the TV set.
For wall mounts that do not comply with the VESA standard screw specifications, the
length of the screws may differ depending on their specifications.
Do not use screws that do not comply with the VESA standard screw specifications.
Do not fasten the screws too strongly, this may damage the product or cause the product to fall, leading to personal injury.
Samsung is not liable for these kinds of accidents.
Samsung is not liable for product damage or personal injury when a non-VESA or non-specified wall mount is used or the
consumer fails to follow the product installation instructions.
Our 57" and 63" models do not comply with VESA Specifications. Therefore, you should use our dedicated wall mount kit for
this model.
Do not exceed 15 degrees tilt when mounting this TV.
LCD-TV
PDP-TV
LFD
19 ~ 22
23 ~ 29
30 ~ 40
46 ~ 55
57 ~ 70
80 ~
42 ~ 50
58 ~ 63
70 ~
80 ~
30 ~39
40 ~ 52
55 ~ 70
70 ~
100 x 100
200 x 100
200 x 200
400 x 400
800 x 400
1400 x 800
400 x 400
600 x 400
800 x 400
1400 x 800
200 x 200
400 x 400
800 x 400
1400 x 800
Standard Screw
M4
M6
M8
M8
M6
M8
Quantity
I //_ Do not install your Wall Mount Kit while your TV is turned on. It may result in personal injury due to electric shock.
Using the Anti-Theft Kensington Lock
The Kensington Lock is a device used to physically fix the system when using it in a public
place. The appearance and locking method may differ from the illustration depending on the
manufacturer.
Refer to the manual provided with the Kensington Lock for proper use. The locking device has
to be purchased separately.
The location of the Kensington Lock may be different depending on its model.
1. Insert the locking device into the Kensington slot on the LCD TV (O) and turn it in the
locking direction (O).
2. Connect the Kensington Lock cable (_).
3. Fix the Kensington Lock to a desk or a heavy stationary object.
Securing the TV to the Wall
Cautioni Pu!!ing, Pushing, o[ €limbing Onthe TV may Causethe TV to fail. !n pa[ticu!a[i ensure you[ Childrende
not hang over or destabilize the rv; doing so may cause the TV to tip over, causing serious injuries or death.
Follow all safety precautions provided on the inc!uded Safety Elye[i For added stabilitY,install the anti4a!! device
for safety purposes, as follows.
To avoid the TV from failing:
1. Put the screws into the clamps and firmly fasten them onto the wall. Confirm that the
screws have been firmly installed onto the wall.
You may need additional material such as an anchor depending on the type of wall.
Since the necessary clamps, screws, and string are not supplied, please purchase
these additionally.
2,
Remove the screws from the centre back of the TV, put the screws into the clamps, and
then fasten the screws onto the TV again.
Screws may not be supplied with the product. In this case, please purchase the
screws of the following specifications.
Screw Specifications
- For a 17 ~ 29 Inch LCD TV: M4 X 15 / For a 32 ~ 40 Inch LCD TV: M6 X 15
.....i.i
3. Connect the clamps fixed onto the TV and the clamps fixed onto the wall with a strong
string and then tie the string tightly.
Install the TV near to the wall so that it does not fall backwards.
It is safe to connect the string so that the clamps fixed on the wall are equal to or
lower than the clamps fixed on the TV.
Untie the string before moving the TV.
4. Verify all connections are properly secured. Periodically check connections for any
sign of fatigue for failure. If you have any doubt about the security of your connections,
contact a professional installer.
Wal

Specifications
Model Name
Screen Size
(Diagonal)
PC Resolution (Optimum)
Sound
(Output)
Dimensions (W×D×H)
Without Stand
With stand
LNtgBGSO LN22BGSO
19 inches
(18.9 inches measured diagonally)
1360 x 768 @ 60Hz
22inches
(21.9inches measured diagonally)
1360 x 768@60Hz
3Wx2 3Wx2
18.6 x 2.5 x 12.2 inches
(472.0 x 63.4 x 310.7 mm)
18.6 x 7.5 x 14.3 inches
(472.0 x 189.5 x 362.8 ram)
21.3 x 2.5 x 13.8 inches
(540.0 x 63.4 x 351.0 mm)
21.3 x 7.5 x 15.9 inches
(540.0 x 189.5 x 403.1 ram)
Weight
Without Stand
With Stand
Environmental
Considerations
Operating Temperature
Operating Humidity
Storage Temperature
Storage Humidity
Stand Swivel
Left t Right
9.0 Ibs (4.1 kg)
9.7 Ibs (4.4 kg)
10.6 Ibs (4.8 kg)
11.2 Ibs (5.1 kg)
50°F to I04°F (I0°C to 40°C)
10% to 80%, non-condensing
-4°F to 113°F (-20°C to 45°C)
5% to 95%, non-condensing
Design and specifications are subject to change without prior notice.
This device is a Class B digital apparatus.
(_ For the power supply and Power Consumption, refer to the label attached to the product.


C3
C3
informacibn importante sobre la garantia relativa al formate de vJsualJzacibn del televisor
Para obtener mas informaci6n sobre los terminos de la garanfia, consulte la tarjeta de garanfia.
Las pantattasLCD con formato de pantallapanoramica (16:9, ta retaci6n de aspecto ancho:altode la pantalla) estan disefiadas
principalmentepara visuatizarvideos de movimientode formato panoramico.Las imagenes debenestar principalmenteen el formato
panoramicode relaci6n 16:9,o ampliadas para ttenar ta pantattasi et modelo tiene esta opci6n, y tas imagenesestan en movimiento
constante.La visualizaci6n de imagenesy graficos estaticosen ta pantatta,como tas barras oscuras lateralesen programaci6ny videos
de televisi6nen formato estandar no ampliados, debe limitarsea no masdel 5% det tiempo total de visuatizaci6n det televisor por
semana.
Ademas, ta visualizaci6n de otras imagenesestaticasy texto, como los informesde bolsa, pantattasde videojuegos, Iogotiposde
emisoras,sitios Web o graficosy dibujos de ordenador,debera limitarse en todos los tetevisorescomo ya se ha descrito.La visualizaci6n
de imagenesestaticas que supere los timites de tasinstrucciones anteriores puede producirun envejecimientodesigual de taspantatlas
LCD, to que provocara una reproducci6nsuperpuestasutil pero permanentede la imagende ta LCD. Para evitar!o, varie ta programaci6n
y las im_genesy, sobretodo, visuaticeimagenes en movimientoa toda pantalta,no graficos estaticosni barrasoscuras.
En mode!os de LCD queofrezcan opciones para et tamafio de ta imagen, utilice estos controles para vet los distintos formatos como
imagen a toda pantalta.
Tengacuidado en ta selecci6ny duraci6n de los formatos de televisi6nutilizados para ta visualizaci6n.La garantia limitadade Samsung
no cubre el envejecimientodesigual de ta LCD como resuttado de la selecci6ny uso de formatos, as! comootras imagenes retenidas.
• $oloEE.UU.
La unidad del productoque se incluye con este manual del usuario se suministra con ticencia bajo derechos de propiedad intelectuat
de otras empresas. En concreto, este productose suministra con licencia bajo las siguientespatentes de EE.UU.: 5,991,715,
5,740,317, 4,972,484, 5,214,678, 5,323,396, 5,539,829, 5,606,618, 5,530,655, 5,777,992, 6,289,308, 5,610,985, 5,481,643,
5,544,247, 5,960,037, 6,023,490, 5,878,080 y bajo el n0mero de apticaci6nde patentes publicadas de EE.UU. 2001-44713-A1.
Esta ticencia esta timitadaal uso no comercial privado de consumidoresque sean usuarios finales para contenidocon ticencia. No
se otorga ningtJnderecho parauso comercial. La ticenciano cubre ninguna unidad del productoque no sea 6stay la licencia no se
extiendea ninguna unidad det productoo proceso sin ticencia en conform!dadcon el ISO/IEC 11172-3o ISO/IEC 13818-3 utilizada
o vendida en combinaci6ncon esta unidad de! producto.La licencia s61ocubre et usode esta unidad para codificar y/o descodificar
archivos de audio en conform!dadcon et ISO/IEC 11172-3o ISO/IEC 13818-3. No se otorga ningOnderechobajo esta ticenciapara
caracteristicaso funciones del productoque no est6n conformescon el ISO/IEC 11172-3o ISO/IEC 13818-3.
• Otros paises
La unidad del productoque se incluye con este manual det usuario se suministra con ticencia bajo derechos de propiedad intelectuat
de otras empresas. Esta licenciaesta timitadaal uso no comercial privado de consumidoresque sean usuarios finalespara contenido
con ticencia.No se otorga ningQnderecho para uso comercial. La ticencia no cubre ningunaunidad del productoque no sea esta y
la licencia no se extiende a ningunaunidad del productoo proceso sin licenciaen conform!dad con el ISO/IEC 11172-3o ISO/IEC
13818-3 utitizadao vendida en combinaci6ncon esta unidaddel producto. La ticencias61ocubre et uso de esta unidad para codificar
y/o descodificararchivos de audio en conform!dadcon el ISO/IEC 11172-3o ISO/IEC 13818-3.No se otorga ningQnderecho bajo
esta ticenciapara caracteristicaso funciones del producto que no esten conformes con et ISO/IEC 11172-3o ISO/IEC 13818-3.
• DOCUMENTODE GARANTJALIMITADAPARANORTEAMERICADE SAMSUNG ELECTRONICS
De acuerdo con los requisitos,condiciones, exctusionesy limitacionesde ta Garantia timitadaoriginal suministrada con los productos
de Samsung Electronics (SAMSUNG), as! comolos requisitos, condiciones,exctusiones y timitaciones inctuidosen et presente
documento,SAMSUNG proporcionaraadicionalmenteun serviciode reparaci6n de garantia en EE.UU.para los productos de
SAMSUNGadquiridos en Canada,yen Canada respecto a los productos de SAMSUNG adquiridosen EE.UU., para et periodo de
garantia especificadooriginalmente, y s61opara el compradororiginal.
Las reparacionesen garantia descritas anteriormente deben realizarseen centros de servicio t_cnico autorizadosde SAMSUNG.
Junto con este documento,se debe presentar un documentode garantia limitada originaly una factura confecha como prueba de
compra en et centro de servicio t6cnico. Eltransporte a y desde el centro de servicio t_cnico es responsabilidadde! comprador.
Las condicionescubiertas se tim!tansotamentea defectosde fabricaci6n en material y mano de obra, y s61olos que se hayan
producido con un uso normaldet producto.
Excluidas, pero no limitadasa elias, se encuentran tasdisposiciones originatesespecificadaspara los servicios a domicitio o
en tas instatacionesde ta empresa, tiempos maximos y minimos de reparaci6n, cambios o sustituciones,accesorios,opciones,
actuatizacioneso consumibtes.
Para conocer ta ubicaci6n de un centro de servicio tecnico autorizado de SAMSUNG,tlame al nOmerogratuito indicado:
En EE.UU.: Io800-8AMSUNG (!o800-726-78G4)
En Canada: IoS00-SAMSUNG
PrecaucJones al rnostrar en la pantalla una irnagen fija
La imagen fija puede causardafios permanentesen ta pantalladel televisor.
• No deje una imagen fija en la pantalla LCD durante m_s de dos horas ya que se podria produciruna retenci6n de ta imagen en la
pantalla. Este fen6meno de retenci6nde imagenestambien se denomina "quemadura de pantalta".Para evitar que se produzca esa
persistenciade ta imagen, reduzca e! nivet de brillo y de contraste de la pantallacuando muestreimagenesfijas.
• El uso del televisor LCD en formato 4:3 durante un tiempo prolongado puede dejar rastros de bordes en las
partes izquierda,derecha y central de ta pantatla debido a tas diferencias en ta emisi6n luminica de la pantalla. La
reproducci6nde un DVDo el uso de una consola de videojuegospueden provocarun efecto similaren ta pantatla.
La garantia no cubre los dafios causados por los efectos mencionados.Verimagenesfijas de videojuegosy PC
durante mas tiempo det indicadopuede producir restos de imagenes parciates.Para evitar este efecto, reduzca el
'britlo' y el 'contraste'cuando vea imagenesfijas.
© 2009 Samsung Electronics Co., Ltd. Reservados todos los derechos.
CONTENIDO
•, Listado de caracteristicas.....................................................2 ,,,Configuraci6ndel menOde imagen................................ 17
iAccesorios 2 g Uso del televisor como una pamatla de ordenador (PC} 19
=Aspecto general del panel de control ..................... 3 ,,,Ajustedel televisorcon el ordenador .................................20
•,Aspecto general del panel ae conexiones............. 4
g Mando a distancla ................................................. 5
•, Instalaci6nde las pilas en el mandoa distancia ... 5
RCanfiguraci6ndei menQde sonido.....................................21
,,,Conexi6nde antenas de VHF y UHF...................................6
,,,Conexi6n de TV por caule....................................................6 ,, Configuraci6n dei menOde configuracion..........................22
,. ConexionaeunreproductordeDVD/ Blu-ray/ receptorporcable/ satetite
(decodificador)a _rav6sdeHDMI...........................................................7
= ConexlonaeunreproductordeDVDt Blu-ray/ receptorporcablei sateIite
tdecodificadorla trav6sdeDVl...............................................................8 ,,,Configuraci6n del men_ de entrada...................................26
,,,ConexondeunreproductordeDVD1Bu-ray/ receptorporcabe i sat6te ,,,Configuraci6n dei men_ de ayuda............................... 26
tdecodificador/atravesdeloscablesaecombonentes.....................8
,-Conexi6n de un reproductor de video .................... 9
,-,Conexi6n de un sistema de audio digital................ 9
•, Conexi6nde un amplificador t DVD para Home Cinema...10
= Conexi6n de una videocamara............................... 11
= Conex_ona un PC ..............................................................12
,,,Identificacionde problemas................................................28
= Especificaciones det equipo de montaje en la pared (VESA)29
,,,Uso del bloqueo Kensingtonantlrrobos..............................30
_.Fijaci6n deltelevisor a la parea..........................................30
,,,Especificaciones ....................................................31
=Visualizaci6n de los menus .................................... 1_.
= Funci6n Plug & Play................................................ 14
= Configuraci6n del menOde canales ....................... 15
,,,Gesti6n de los canales ........................................... 15
Antes de usar el equipo lea este manual para evitar /
fatlas y guarde para futuras referencias.
J
Licencia
$R$(_O_) TruSurround HD, SRS y el simbolo son marcas comerciales de SRS Labs, inc.
TruSurround HD esta incorporada bajo licencia de SRS Labs,Inc.
D I G I T A L
[I] DOLBY Fabricado bajo licencia de Dolby Laboratories. Dolby y el simbolo de la doble D son marcas
DISITAL ] comerciales de Dolby Laboratories.
Simbolo
Bot6nde una
Nota Bot6nTOOL
pulsaci6n
Las ilustraciones de este manual se proporcionan s61ocomo referencia y pueden ser diferentes del producto real. El diser_oy las
especificaciones de] producto se pueden cambiar sin previo aviso para mejorar el rendimiento del producto.
Listado de caracteristicas
• Valores ajustables de la imagen que se pueden almacenar en la memoria del televisor.
• Temporizador automatico para encender o apagar el televisor.
• Temporizador de desconexi6n especial.
• Excelente interfaz digital y capacidad de trabajo en red:
• El sintonizador digital HD incorporado permite ver las emisiones HD que no exigen una suscripci6n sin que sea necesario
disponer de un receptor de televisi6n por cable / satelite (decodificador).
• Conexi6n HDMI/DVl del PC con este televisor.
• Calidad excelente de la imagen
• SRS TruSurround HD proporciona un sistema surround virtual.
Accesorios
Mando a distancia Cable de alimentaci6n PaSo de limpieza
(BN59-00857A) (3903-000144) (BNe3-01798B)
(LN19B361: BN59-00885A) &
2 pilas AAA
Manual de instrucciones
Tarjeta de garantia / Guia de Base del soporte Cuerpo del soporte
seguridad (BN96-11163A) (BN96-10168B)
Compruebe que las opciones siguientes se incluyen con su TV LCD. Si falta alguna opci6n, p6ngase en contacto con el
proveedor.
El color y la forma de los componentes pueden variar segt_nel modelo.
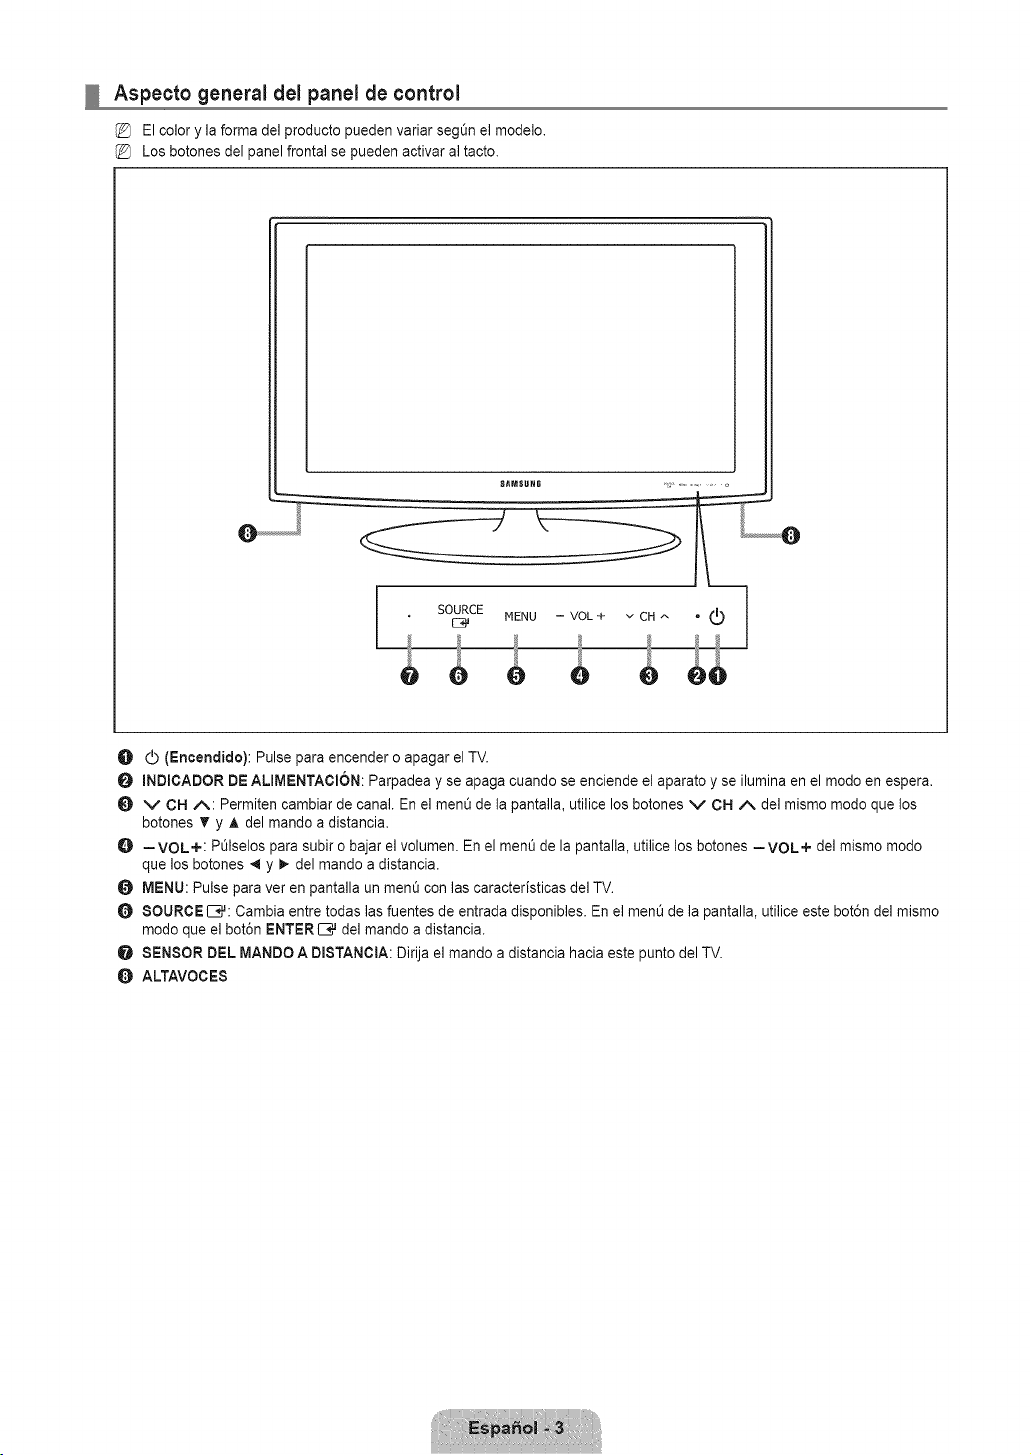
Aspecto general del panel de control
El color y la forma del producto pueden variar seg_n el modelo.
Los botones del panel frontal se pueden activar al tacto.
SAMSUHG ,* ...........
L...........e
. S%CEMENU-VOL+vC.^ "® 1
O (_ (Encendido): Pulse para encender o apagar el TV.
O mNDICADORDE ALmMENTACION:Parpadea y se apaga cuando se enciende el aparato y se ilumina en el modo en espera.
v CI=IA: Permiten cambiar de canal. En el menO de la pantalla, utilice los botones v CN ,/k del mismo modo que los
botones T y A del mando a distancia.
O =VOL+: POlselos para subir o bajar el volumen. En el ment_de la pantalla, utilice los botones =VOL+ del mismo modo
que los botones _ y _ del mando a distancia.
O MENU: Pulse para ver en pantalla un menO con las caracteristicas del TV.
O 8OURCEIB#: Cambia entre todas las fuentes de entrada disponibles. En el ment_de la pantalla, utilice este bot6n del mismo
modo que el bot6n ENTERIB,# del mando a distancia.
O SENSOR DEL MANDO A DmSTANOtA:Dirija el mando a distancia hacia este punto del TV.
ALTAVOCE8

Aspecto general del panel de conexiones
J
[Panel posterior del TV]
ee e
{®®®}
ANTIN
El color y la forma del producto pueden variar segOn el modelo.
O EX-LINK
- Conector s61opara servicio.
DIGITAL AUDIO OUT (OPTmGAL)
- Conecta un componente de audio digital, como un receptor de Home Cinema.
0 PC IN [PC] / [AUDIO]
- Permite conectar a los terminales de salida de audio y de video de su PC.
O _ (AURICULARES)
- Permite conectar unos auriculares externos para audiciones privadas.
HDMI (DVI) IN / DVI AUDIO IN In-AUDIO-L]
- Permite conectaral terminal HDMI un dispositivo que tenga salida HDMI.
{_ No se necesita ninguna conexi6n de sonidopara una conexi6n de HDMI a HDMI.
{_ Use el terminal NDMI (DVI) IN para conectar e] DVl a un dispositivo externo. Use un cable de DVl a HDMI o un
adaptador de DVI-HDMI (DVI a HDMI) para la conexi6n del video y los terminales DVI AUDIO IN [R-AUDIO-L] para
el audio.
Cuando se usa una conexi6n de cable HDMI/DVl, se debe conectar en el terminal HDMI (DVI) IN.
Tambi_n puede utilizar los puertos para conectarse al PC.
O SERVICE
- Conector para la actualizaci6n del software.
O ANT IN
- Permite conectar a una antena o un sistema de TV por cable.
ENTRADA DE ALIMENTACION
- Permite conectar el cable de alirnentaci6n suministrado.
0 BLOQUEO KENSINGTON
- El bloqueo Kensington es un dispositivo que se usa para fijar fisicamente el sistema cuando se usa en un lugar pQblico.
Si desea usar un dispositivo de bloqueo, p6ngase en contacto con el distribuidor donde adquiri6 el televisor.
La ubicaci6n del Bloqueo Kensington puede variar segt_nel modelo.
@ AVIN
- Entradas de v{deo y audio para dispositivos extemos, como una vldeooamara o un reproductor de v{deo.
COMPONENT IN
- Permite conectarel video/audio de componentes.
AUDIO OUT
- Permite conectarlos terminales de la entrada de audio de] amplificador/sistema de Home Cinema.

Mando a distancia
Puede utilizar el mando a una distancia del televisor de hasta 7 metros.
El exceso de luz puede influir en el rendimiento del mando a distancia.
El color y la forma del producto pueden variar segOn el modelo.
O POWER: Enciende o apaga el
TV.
BOTONES NUMERiCOS:
Permiten cambiar de canal.
_: Pulse este bot6n para
seleccionar canales adicionales
(digitales) emitidos por la misma
emisora. Por ejemplo, para
seleccionar el canal '54-3', pulse
'54', _ y '3'.
O MUTE _:: Pulse para desactivar
momentaneamente el sonido.
O --VOL+: PL_Iselospara subir o
bajar el volumen.
CH LIST: Muestra las listas de
canales en la pantalla.
TOOLS: Se usa para seleccionar
rapidamente las funciones que
se usan con mayor frecuencia.
O INFO: Pt_lselo para mostrar
informaci6n en la pantalla.
O BOTONES DE COLORES: Use
estos botones en la lista de
canales, ment_s,etc.
@ P.SIZE: Selecci6n del tamar_o de
la imagen.
TV: Selecciona directamente el
modo TV.
li_ PRE-CH: Permite volver al canal
anterior que se estaba viendo.
t_ v CH A: Permiten cambiar de
canal.
SOURCE: POlselo para mostrar
y seleccionar las fuentes de
video disponibles.
FAV.CH:Permite cambiar a los
canales favoritos.
0 MENU: Muestra el ment_de
pantalla principal.
RETURN: Vuelve al ment_
anterior.
t_ ARRIBA A/ABAJO T/
IZQUtERDA_I/DERECHA_ /
ENTER E;,#:Se usan para
seleccionar los elementos del
menO en pantalla y cambiar los
valores del men&
_) EXIT: POlselopara salir del
men&
CO: Controla el decodificador de
subtitulos.
_) MTS: Pulse para elegir
programas mono, est_reo o de
audio independiente (emisi6n
SAP).
4#
4#
4#
Instalacibn de las pilas en el mando a distancia
1,
2.
3,
%
Levante la tapa de la parte posterior del mando a distancia, como se muestra en la
ilustraci6n.
Coloque dos pilas de tama_o AAA.
Compruebe que los extremos '+' y '-' de las pilas concuerdan con el diagrama del
interior del compartimiento.
Vuelva a poner la tapa.
Si no va a usar el mando a distancia durante un largo periodo de tiempo, extraiga las pilas y guardelas en un lugar fresco
y seco. (Con un uso normal del TV, las pilas duran alrededor de un a_o.)
Si el mando a distancia no funciona, haga estas comprobaciones:
• 2.Esta encendido eITV?
• 2.Estan intercambiados los polos positivos y negativos de las pilas?
• 2.Sehan agotado las pilas?
• 2.Ha habido un corte de luz o el cable esta desconectado?
• 2.Hay un fluorescente o un ne6n a poca distancia?
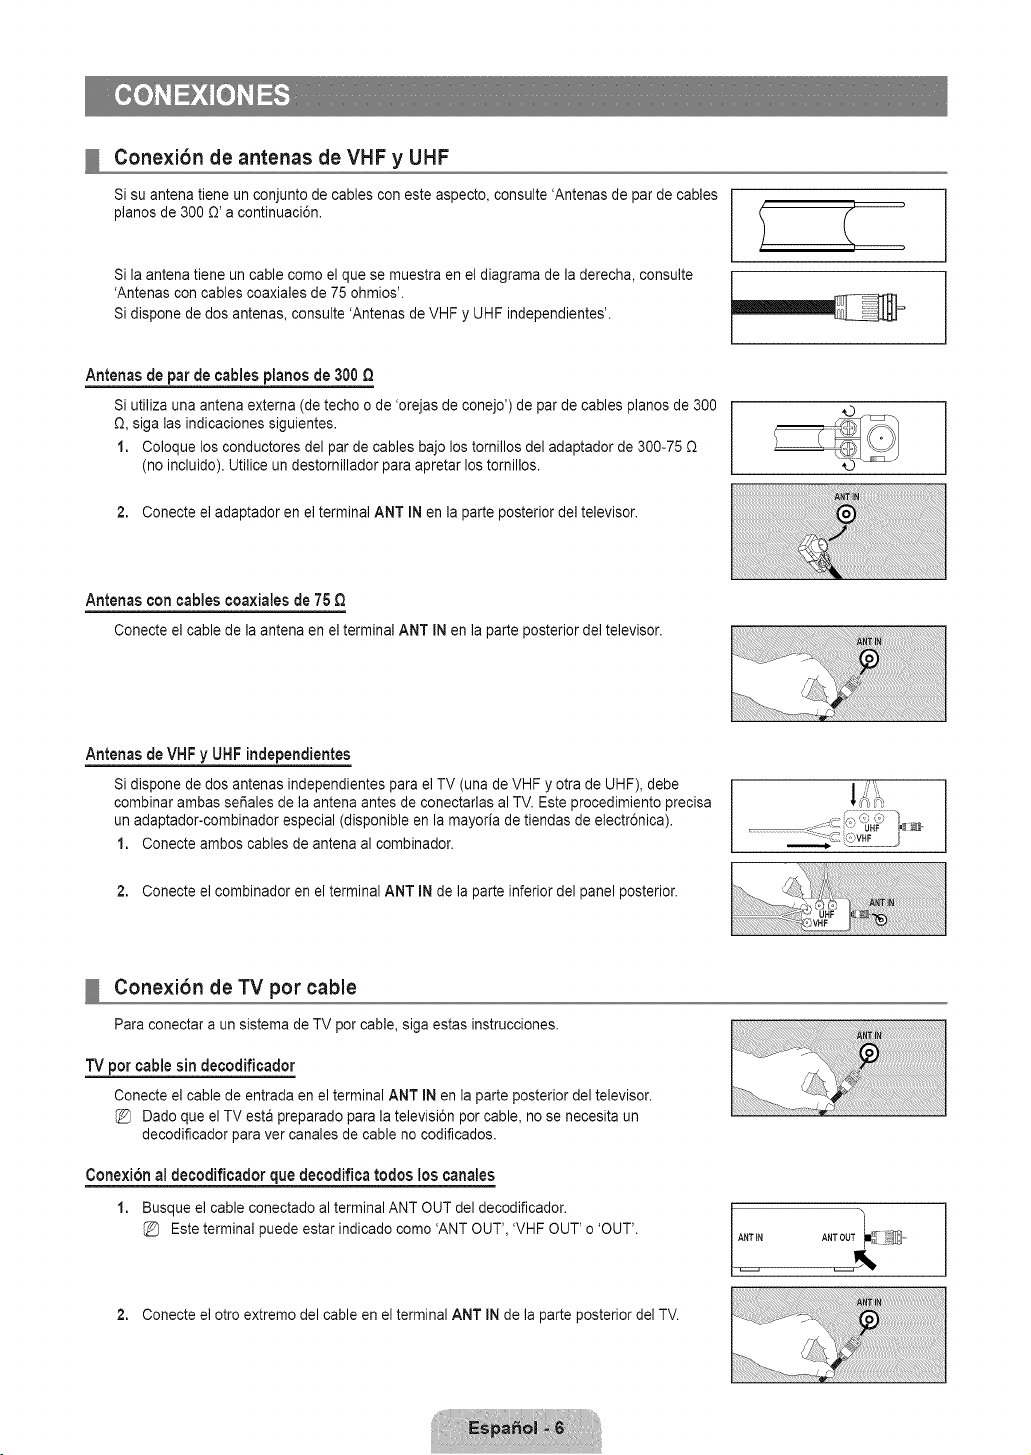
Conexibn de antenas de VHF y UHF
Si su antena tiene un conjunto de cables con este aspecto, consulte 'Antenas de par de cables
pianos de 300 O'a continuaci6n.
Si la antena tiene un cable como el que se muestra en el diagrama de la derecha, consulte
'Antenas con cables coaxiales de 75 ohmios'.
Si dispone de dos antenas, consulte 'Antenas de VHF y UHF independientes'.
Antenas de par de cables pianos de 300 Q
Si utiliza una antena externa (de techo o de 'orejas de conejo') de par de cables pianos de 300
O, siga las indicaciones siguientes.
1. Coloque los conductores del par de cables bajo los tornillos del adaptador de 300-75
(no incluido). Utilice un destornillador para apretar los tomillos.
2. Conecte el adaptador en el terminal ANT IN en la parte posterior del televisor.
Antenasconcablescoaxiatesde 75
Conecteel cablede la antenaen elterminalANT IN en la parteposteriordel televisor.
Antenas de VHF y UHF independientes
Si dispone de dos antenas independientes para el TV (una de VHF y otra de UHF), debe
combinar ambas set, ales de la antena antes de conectarlas al TV. Este procedimiento precisa
un adaptador-combinador especial (disponible en la mayoria de tiendas de electr6nica).
1. Conecte ambos cables de antena al combinador.
2. Conecte el combinador en el terminal ANT IN de la parte inferior del panel posterior.
Conexibn de TV por cable
Para conectar a un sistema de TV por cable, siga estas instrucciones.
"IV per cable sin decodificador
Conecte el cable de entrada en el terminal ANT IN en la parte posterior del televisor.
Dado que el TV esta preparado para la televisi6n por cable, no se necesita un
decodificador para ver canales de cable no codificados.
Conexion al decodificador que decodifica todos los canales
1. Busque el cable conectado al terminal ANT OUT del decodificador.
Este terminal puede estar indicado como 'ANT OUT', 'VHF OUT' o 'OUT'.
ANT iN ANT OUT
2. Conecte el otro extremo del cable en el terminal ANT IN de la parte posterior del TV.
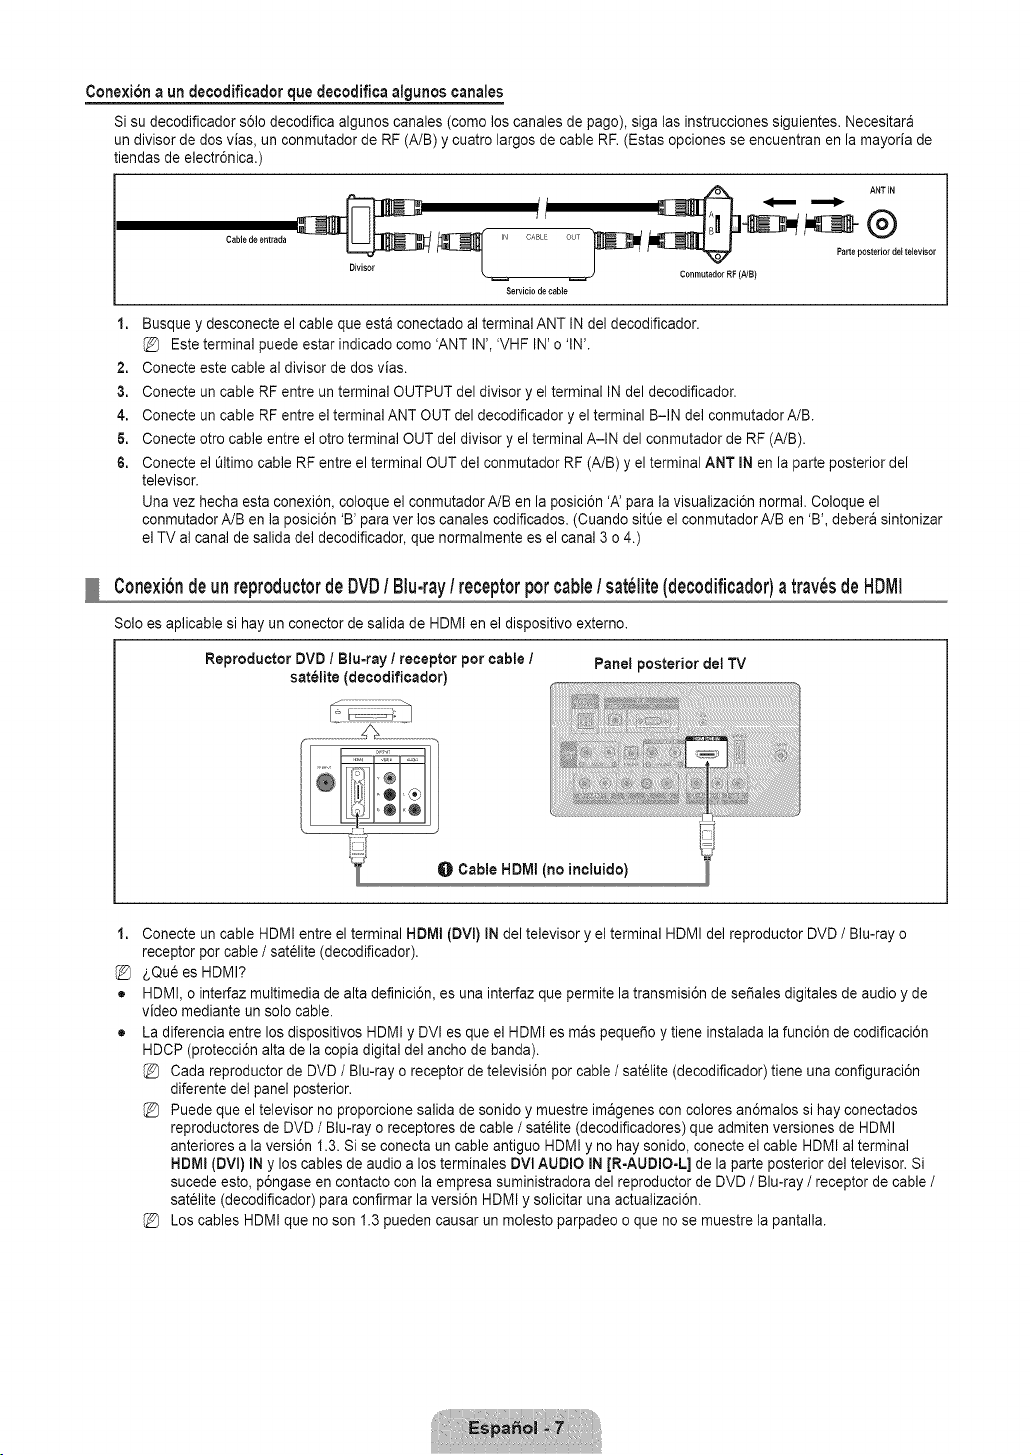
Conexibna undecodificadorquedecodificaalgunoscanales
Si su decodificador s61odecodifica algunos canales (como los canales de pago), siga las instrucciones siguientes. Necesitara
un divisor de dos vias, un conmutador de RF (A/B) y cuatro largos de cable RF. (Estas opciones se encuentran en la mayoria de
tiendas de electr6nica.)
Cable de entrada IN CABLE OUT
0 el televisor
ConmutadorRF (NB)
Servicio de cable
1. Busque y desconecte el cable que esta conectado al terminal ANT IN del decodificador.
Este terminal puede estar indicado como 'ANT IN', 'VHF IN' o 'IN'.
2. Conecte este cable al divisor de dos vias.
3. Conecte un cable RF entre un terminal OUTPUT del divisor y el terminal IN del decodificador.
4. Conecte un cable RF entre el terminal ANT OUT del decodificador y el terminal B-IN del conmutador A/B.
6. Conecte otro cable entre el otro terminal OUT del divisor y el terminal A-IN del conmutador de RF (A/B).
6. Conecte el t_ltimocable RF entre el terminal OUT del conmutador RF (A/B) y el terminal ANT IN en la parte posterior del
televisor.
Una vez hecha esta conexi6n, coloque el conmutador A/B en la posici6n 'A' para la visualizaci6n normal. Coloque el
conmutador A/B en la posici6n 'B' para ver los canales codificados. (Cuando sitOeel conmutador A/B en 'B', debera sintonizar
el TV al canal de salida del decodificador, que normalmente es el canal 3 o 4.)
Conexibndeunreproductorde DVD/ Blu-ray/ receptorporcable/ sat_lite(decodificador)a trav_sde HDIVll
Solo es aplicable si hay un conector de salida de HDMI en el dispositivo externo.
Reproductor DVD / Blu=rayI receptor por cable / Panel posterior dot TV
satelite (decodificador)
O Cable HDMI (no incluido)
1,
%
o
o
Conecte un cable HDMI entre el terminal HDMI (DVI) IN del televisor y el terminal HDMI del reproductor DVD / Blu-ray o
receptor por cable / sat61ite(decodificador).
_,Qu6 es HDMI?
HDMI, o interfaz multimedia de alta definici6n, es una interfaz que permite la transmisi6n de sefiales digitales de audio y de
video mediante un solo cable.
La diferencia entre los dispositivos HDMI y DVI es que el HDMI es mas pequefio y tiene instalada la funci6n de codificaci6n
HDCP (protecci6n alta de la copia digital del ancho de banda).
Cada reproductor de DVD / Blu-ray o receptor de televisi6n por cable / sat_lite (decodificador) tiene una configuraci6n
diferente del panel posterior.
Puede que el televisor no proporcione salida de sonido y muestre imagenes con colores an6malos si hay conectados
reproductores de DVD / Blu-ray o receptores de cable / satelite (decodificadores) que admiten versiones de HDMI
anteriores a la versi6n 1.3. Si se conecta un cable antiguo HDMI y no hay sonido, conecte el cable HDMI al terminal
HDMI (DVl) IN y los cables de audio a los terminales DVl AUDIO IN JR-AUDIO-L] de la parte posterior del televisor. Si
sucede esto, p6ngase en contacto con la empresa suministradora del reproductor de DVD / Blu-ray / receptor de cable /
sat_lite (decodificador) para confirmar la versi6n HDMI y solicitar una actualizaci6n.
Los cables HDMI que no son 1.3 pueden causar un molesto parpadeo o que no se muestre la pantalla.

Conexibndeunreproductorde DVD/ Blu-ray/ receptorporcable/ sat_lite(decodificador)atrav_sde DVl
Solo es aplicable si hay un conector de salida de DVI en el dispositivo externo.
Panel posterior del TV
Reproducter DVD 1Blu=ray / Receptor por cable /
satelite (decodificador)
0 Cable de audio (no incluido)
Cable DVI a HDMI (no incluide)
1,
2.
Conecte un cable de DVI a HDMI o un adaptador de DVI-HDMI entre el terminal HDMI (DVl) IN del televisor y el terminal DVI
del reproductor DVD/Blu-ray o receptor por cable/sat61ite (decodificador).
Conecte los cables de audio entre el terminal DVl AUDIO IN [R-AUDIO-L] del televisor y el reproductor DVD/Blu-ray/receptor
por cable/satelite (decodificador).
Cada reproductor de DVD / Blu-ray o receptor de televisi6n por cable / sat61ite(decodificador) tiene una configuraci6n
diferente del panel posterior.
Cuando conecte un reproductor de DVD / Blu-ray / receptor por cable / sat_lite (decodificador), debe hacer coincidir los
colores del terminal de conexi6n y del cable.
Conexi6ndeunreproductordeDVD/ Blu.ray/ receptorpercable/ sat_lite(decodificador)atrav6sde10scablesdecomponentes
Los terminales del panel posterior del televisor facilitan la conexi6n de un reproductor de DVD / Blu-ray / receptor por cable /
sat61ite(decodificador) al TV.
Reproductor DVD / Blu-ray / Receptor por cable /
sat_lite (decodificador)
Panel posterior del "iV
Cable de audio (no incluido)
Cable de componentes (no incluido)
1,
2.
Conecte un cable de componentes entre los terminales COMPONENT IN [Y, PB,PR]del televisor y los terminales
COMPONENT [Y, PB,PR]del reproductor DVD / Blu-ray o receptor por cable / sat_lite (decodificador).
Conecte los cables de audio entre los terminales COMPONENT IN JR=AUDIO-L] del televisor y los terminales AUDIO OUT
del reproductor DVD / Blu-ray / receptor por cable / satelite (decodificador).
El video de componentes separa el video en Y (Luminancia (brillo)), el Pb (azul) y el Pr (rojo) para realzar la calidad del
video. Las conexiones de audio y de video de componentes deben coincidir. Por ejemplo, si conecta un cable de video
de componentes a COMPONENT IN, conecte tambi6n el cable de audio a la misma entrada COMPONENT IN.
Cada reproductor de DVD / Blu-ray o receptor de televisi6n por cable / sat61ite(decodificador) tiene una configuraci6n
diferente del panel posterior.
Cuando conecte un reproductor de DVD / Blu-ray / receptor por cable / sat_lite (decodificador), debe hacer coincidir los
colores del terminal de conexi6n y del cable.

Conexibn de un reproductor de video
Panel posterior del TV
Panel posterior del VCR
0 Cable de audio (no incluido)
Cable de video (no incluido)
1,
2.
Conecte un cable de video entre el terminal AV IN [VIDEO] del televisor y el terminal VIDEO OUT del aparato de video.
Conecte los cables de audio entre los terminales AV iN [R-AUDIO-L] del televisor y los terminales AUDIO OUT del aparato de
video.
Si tiene un reproductor de video 'mono' (sin estereo), use un conector Y (no suministrado) para conectar los terminales
de entrada de audio izquierdo o derecho del TV. Tambien se puede conectar el cable al terminal 'R'. Si el video es
est_reo, tendra que conectar dos cables.
Cada aparato de video tiene una configuraci6n diferente del panel posterior.
Cuando conecte un aparato de video, debe hacer coincidir los colores del terminal de conexi6n y del cable.
Conexibn de un sistema de audio digital
Los terminales del panel posterior del televisor facilitan la conexi6n de un sistema de audio digital (Home Cinema/receptor) al
televisor.
8istema de audio digital
Panel posterior del TV
1,
Conecte un cable 6ptico entre los terminales DIGITAL AUDIO OUT (OPTICAL) del televisor y los terminales de entrada de
audio digital del sistema de audio digital.
Cuando un sistema de audio digital se conecta al terminal DIGITAL AUDIO OUT (OPTICAL): Reduzca el volumen del TV
y ajuste el volumen con el control del sistema.
El audio de 5.1 canales es posible cuando el televisor esta conectado a un dispositivo externo que admita 5.1 canales.
Cada sistema de audio digital tiene una configuraci6n diferente del panel posterior.
Cuando el receptor del sistema Home Cinema esta activado, se puede oir la salida de sonido del terminal Optical del
televisor. Cuando se ve la televisi6n a traves de una seSal DTV (aerea), el televisor envia el sonido de 5.1 canales al
receptor del sistema Home Cinema. Cuando la fuente es un componente digital, como un DVD / Blu-ray / receptor por
cable / sat_lite (decodificador), y esta conectada al televisor a trav_s de HDMI, s61ose oye el sonido de 2 canales del
receptor del sistema Home Cinema. Si desea oir audio de 5.1 canales, conecte el terminal de salida de audio digital del
DVD / Blu-ray / receptor por cable / sat_lite (decodificador) directamente a un amplificador o un sistema Home Cinema,
no al televisor.
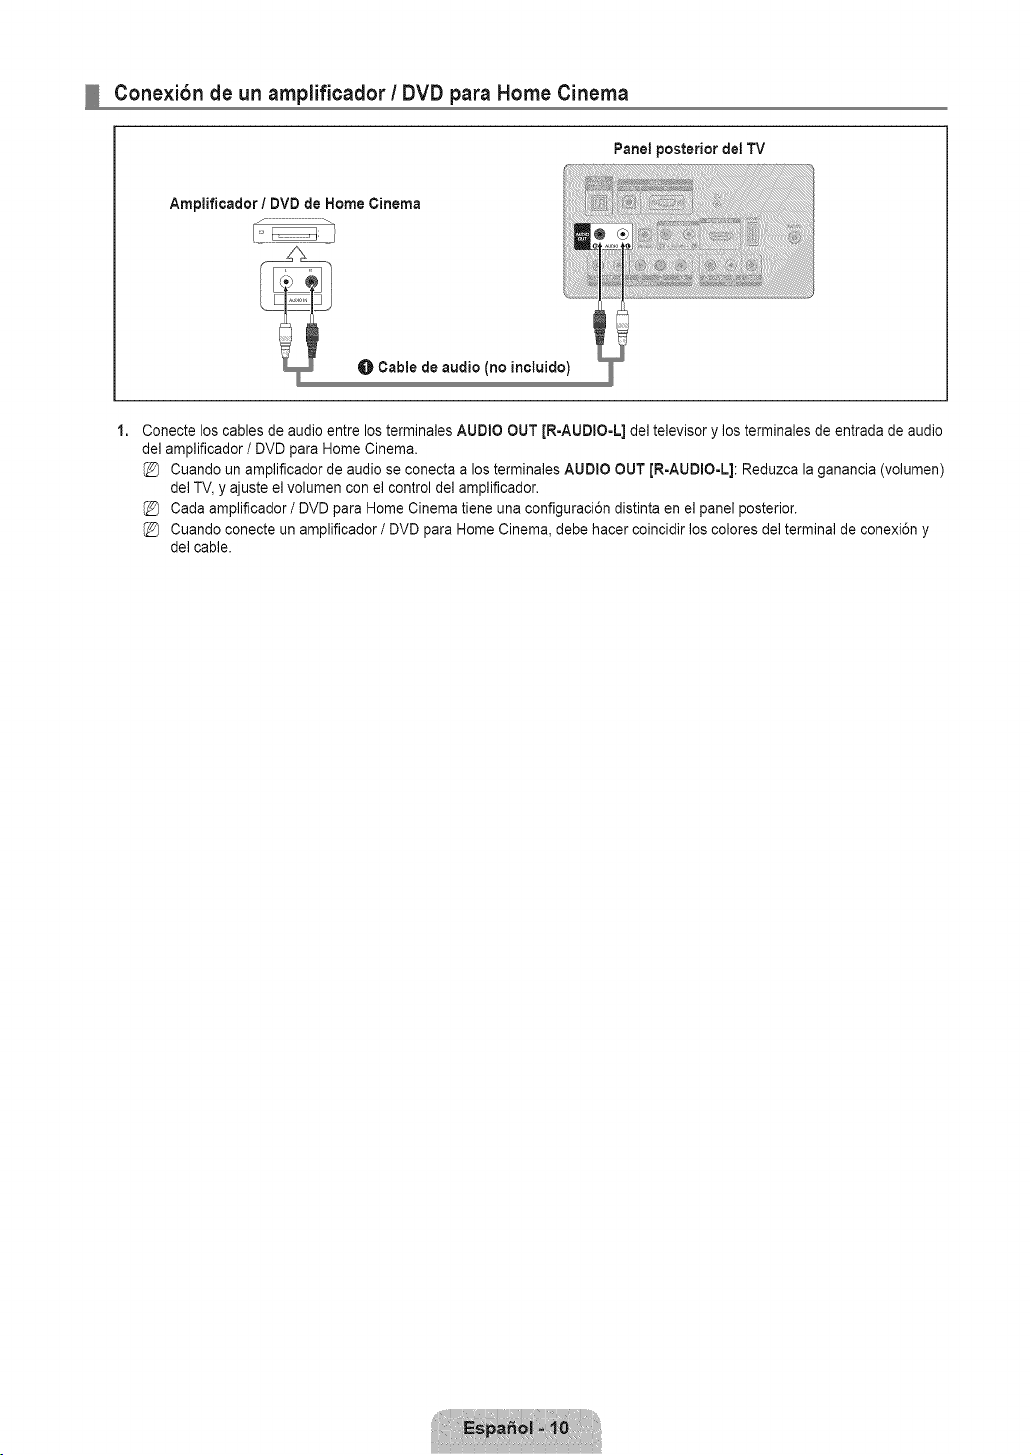
Cone×ibn de un amplificador / DVD para Home Cinema
Panel posterior dei TV
1,
Conecte los cables de audio entre los terminales AUDIO OUT JR-AUDIO-L] del televisor y los terminales de entrada de audio
del amplificador / DVD para Home Cinema.
Cuando un amplificador de audio se conecta a los terminales AUDIO OUT [R-AUDIO-L]: Reduzca la ganancia (volumen)
del TV, y ajuste e] volumen con e] control del amplificador.
Cada amplificador / DVD para Home Cinema tiene una configuraci6n distinta en el panel posterior.
Cuando conecte un amplificador / DVD para Home Cinema, debe hacer coincidir los colores de] terminal de conexi6n y
del cable.
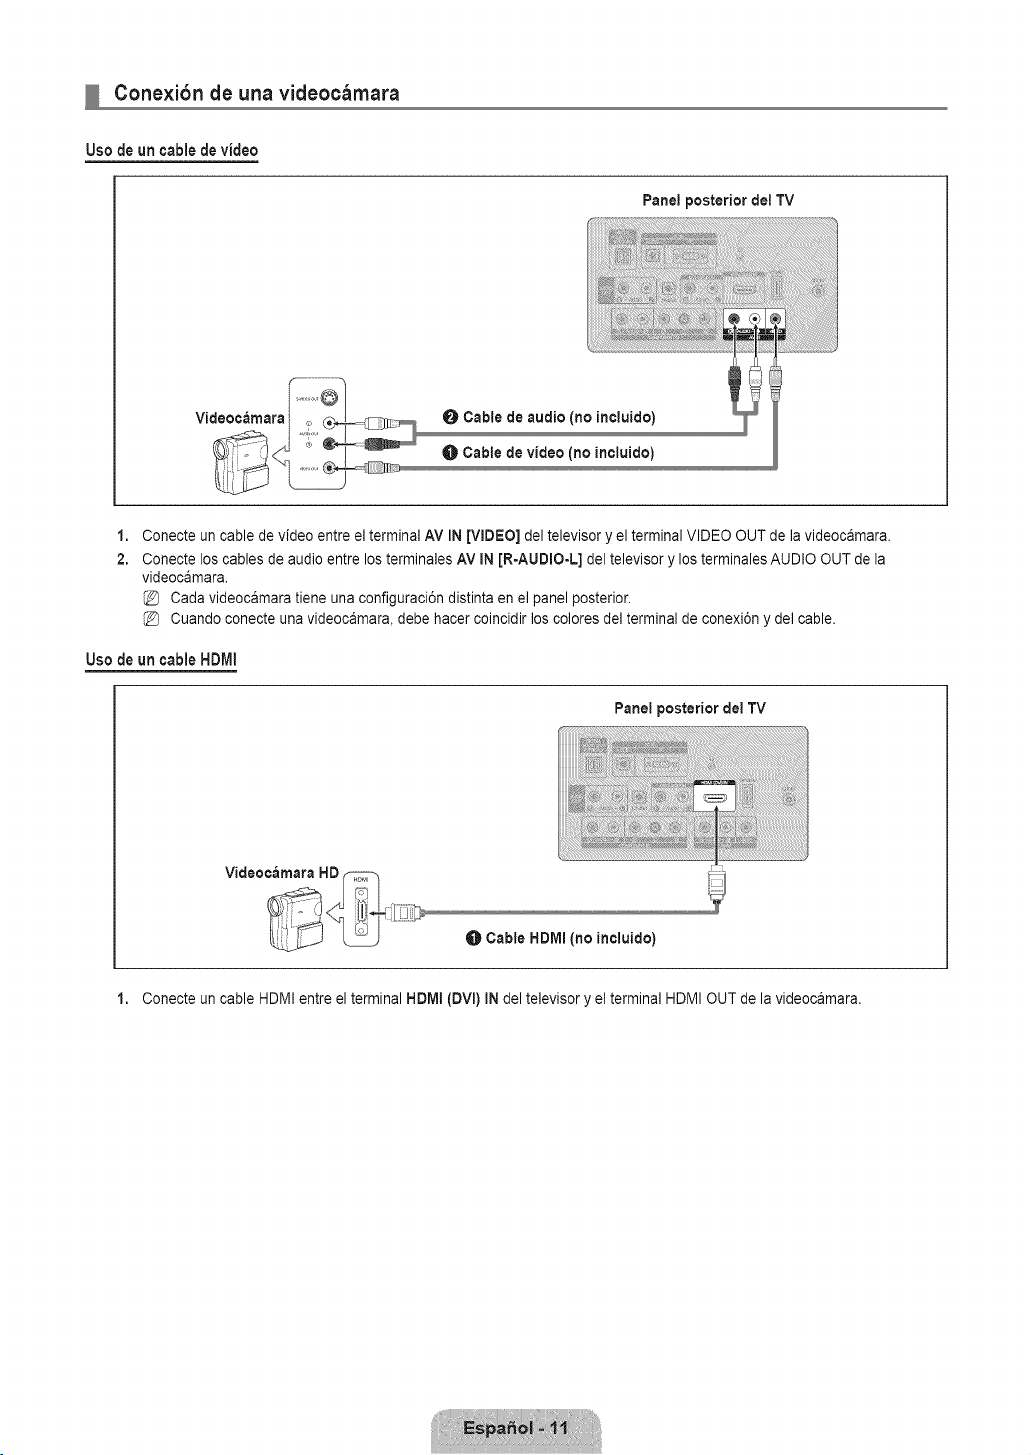
Conexibn de una videocamara
Uso de un cable de video
Panel posterior del TV
Videocamara
0 Cable de audio (no ineluido)
Cable de video (no ineluido)
1,
2.
Conecte un cable de video entre el terminal AV IN [VIDEO] del televisor y el terminal VIDEO OUT de la videocamara.
Conecte los cables de audio entre los terminales AV IN [R-AUDIO-L] del televisor y los terminales AUDIO OUT de la
videocamara.
Cada videocamara tiene una configuraci6n distinta en el panel posterior.
Cuando conecte una videocamara, debe hacer coincidir los colores del terminal de conexi6n y del cable.
Usede uncableHDMI
Panel posterior dei TV
Cable HDMI (no ineluido)
1. Conecte un cable HDMI entre el terminal HDMI (DVl) IN del televisor y el terminal HDMI OUT de la videocamara.

Conexibn a un PC
Use de un cable D-Sub
PC
0 Cable de audio de PC (no incluido)
O Cable D-Sub (no incluido)
Panel posterior det TV
1,
2.
Conecte un cable D-Sub entre el conector PC IN [PC] del televisor y el conector de salida de PC del ordenador.
Conecte un cable de audio PC entre el terminal PC IN [AUDIO] del televisor y el terminal de salida de audio de la tarjeta de
sonido del ordenador.
Cuando conecte un PC, debe hacer coincidir los colores de] terminal de conexi6n y de] cable.
Usede uncableHDMI/DVI
Panel posterior del TV
PC
1. Conecte un cable HDMI/DVI entre el terminal HDMI (DVI) IN del televisor y el terminal de salida PC del ordenador.
2. Conecte un cable est6reo miniclavija/2 RCA de 3.5 mm entre el terminal DVmAUDIO IN JR-AUDIO-L] del televisor y el
terminal de salida de audio de la tarjeta de sonido del ordenador.
Usede uncable HDMI
Panel posterior dei TV
1,
Conecte un cable HDMI entre el terminal HDMI (DVm)IN del televisor y el terminal de salida PC del ordenador.
Cada PC tiene una configuraci6n distinta en el panel posterior.
Visuaiizacibn de los men_s
2,
3.
4.
5.
Uso de los botones del mancloa clistancia
Antes de usar el televisor, siga los pasos detallados a continuaciEn para saber cEmo
desplazarse por los mentJs para seleccionar y ajustar las funciones.
1. Pulse el botEn MENU.
En la pantalla aparece el menQ principal. En el lado izquierdo hay los siguientes iconos:
Imagen, Sonido, Canal, Configuration, Entrada, 8oporte t_cnice.
Pulse el botEn A o T para seleccionar uno de los iconos.
Pulse el botEn 4 o _- para acceder al submenL_del icono.
Pulse el botEn A o T para desplazarse por los elementos del men&
Pulse el botEn ENTER_ para acceder a los elementos del men&
Pulse el botEn A/V/_I/_,- para cambiar los elementos seleccionados.
@ Pulse el botEn RETURN para volver al ment_anterio£
Pulse el botEn EXiT para salir del men&
Func i6n =°==_=_°--:_=::7=_=°=
Seleccione la opciEn marcada.
Confirme la configuraciEn.
Ejemplo: ConfiguraciEn del brillo del televisor en el menu de imagen
Ajuste del Brillo a 80
1. Pulse el botEn MENU para ver el men&
2. Pulse el botEn ENTER _ para seleccionar Imagen.
3. Pulse el botEn ,& o T para seleccionar Brillo.
4. Pulse el botEn ENTER_.
6. Pulse el botEn 4 o _- hasta que Brillo cambie a 80.
6. Pulse el botEn ENTER_,,J.
Pulse el botEn EXtT para salir del men&
Funcibn Plug & Play
Cuando se enciende el televisor per primera vez, se configuran seguidos y automaticamente
dos ajustes basicos del usuario.
1. Pulse el bot6n POWER (_ del mando a distancia.
Tambi6n puede usar el bot6n POWER O del televisor.
Aparece el mensaje Menu Language, Stere Dome, Channels and Time will be set,.
Pulse el bot6n ENTER _,,Jy aparecera autom&ticamente el men0 Define el idJoma del
men&
2,
3.
4.
6,
Pulse el bot6n A o T para seleccionar el idioma y, a continuaci6n, pulse el bot6n ENTER _,,J. Se muestra el mensaje
Seieccione 'Use demiciliarie' para instalar este TV en su casa..
Pulse el bot6n 4 o _- para seleccionar Dome cemercJe o Use demiciliarie y, a continuaci6n, pulse el bot6n ENTER _. Se
muestra el mensaje Seleccienar Ins antenas que desea memerizar..
Es recomendable configurar el televisor en el mode Use demiciliarie para obtener la meier imagen en un entorno
domestico.
Deme cemercie s61oes necesario en los entornos comerciales. Si la unidad accidentalmente se configura en el mode
Deme cemercie y se desea volver a Use demiciliarJe (normal): Pulse el bot6n del volumen del televisor. Cuando se
muestra la OSD del volumen, mantenga pulsado el bot6n MENU del televisor durante 5 segundos.
Pulse el bot6n A o T para memorizar los canales de la conexi6n seleccionada. Pulse el bot6n ENTER C_ para seleccionar
InicJar.
Aire: SeSal de antena Aire. / Cable: SeSa] de antena de] Cable. / Auto: SeSales de antena Aire y de Cable.
En el mode de cable, puede seleccionar el origen de seSal correcto entre 8TD, HRC y mRCpulsando el bot6n A, T,
o _- y, a continuaci6n, pulsando el bot6n ENTER_. Si tiene cable digital, seleccione la fuente de la serial del sistema
de cable para anal6gica y para digital. P6ngase en contacto con su proveedor de cable para saber el tipo de sistema de
cable existente en su zona.
6. Pulse el bot6n ENTER _,,J para seleccionar Iniciar. El televisor empezara a memorizar todos los canales disponibles.
Para detener la b0squeda antes de que termine, pulse el bot6n ENTER_ con la opci6n Detener seleccionada.
Una vez guardados todos los canales disponibles, se inicia la eliminaci6n de los canales codificados. Vuelve a mostrarse
el menO de programaci6n automatica. Pulse el bot6n ENTER[--;# cuando se complete la memorizaci6n de canales.
Aparece automaticamente el mensaje Configure el mode de Relej..
7. Pulse el bot6n ENTER[_,_.
Pulse el bot6n A o T para seleccionar Auto y, a continuaci6n, pulse el bot6n ENTER _. Se muestra el mensaje Cenfigurar
la hera de verane.. Si selecciona Manual, se muestra Cenfigurar fecha y hera actuales.
8. Pulse el bot6n A o T para seleccionar Apagade, Encendide o Auto y, a continuaci6n, pulse el bot6n ENTER _#.
9. Pulse el bot6n A o T para resaltar la zona horaria de su regi6n. Pulse el bot6n ENTERS#. Si ha recibido una serial digital,
se ajustara la hera automaticamente. En case negative, consulte la pagina 22 para ajustar el reloj.
10. Se proporciona el metodo de conexi6n para obtener la mejor calidad HD. Despues de confirmar el metodo, pulse el bot6n
ENTERIB_.
11. Aparece el mensaje Disfrutar su vision.. Cuando termine, pulse el bot6n ENTER _.
Si desea reiniciar esta funcion,,.
1. Pulse el bot6n MENU para ver el men& Pulse el bot6n A o T para seleccionar Cenfiguraci6n y, a continuaci6n, pulse el
bot6n ENTER _.
2. Pulse de nuevo el bot6n ENTER[--;_ para seleccionar Plug & Play.
La funci6n Plug & Play est& disponible s61oen el mode TV.
Configuracibn del menu de canales
Antena _ Aire ! Cable
Antes de empezar a memorizar los canales disponibles, debe indicar el tipo de origen de la
sei_alconectada al TV (es decir, antena o sistema de cable).
_-_ Pulse el bot6n TOOLS para ver el men0 Nerramientas. Tambi_n puede configurar la
antena con Herramientas _ Cambiar a Cable (o Cambiar a Aereos).
Prog. Auto
Aire: Sehal de antena Air, / Cable: Sehal de antena del cable, / Auto: Sehales de antena
a_rea y de cable.
AI seleccionar el sistema de TV de cable: Selecciona el sistema de cable. STD, HRC
e IRC identifican los distintos tipos de sistemas de TV por cable. P6ngase en contacto con su proveedor de cable para
averiguar el tipo de sistema de cable existente en su zona. En este momento ya se ha seleccionado el origen de la sepal.
Una vez guardados todos los canales disponibles, se inicia la eliminaci6n de los canales codificados (eliminaci6n de canales
codificados). Vuelve a mostrarse el menL_de programaci6n automatica.
Si desea detener la programaci6n autom&tica, pulse el bot6n ENTER_. Aparece el mensaje _,Detener programacion
automatica?. Seleccione 8i con el bot6n _ o _. y, a continuaci6n, pulse el bot6n ENTER _.
Borrar canal encriptado (solo canales digitales)
Esta funci6n se usa para filtrar los canales codificados despu_s de que Prog. Auto se haya completado. Puede tardar de 20 a 30
minutos.
Para detener la bOsqueda de canales codificados: Pulse el bot6n ENTER _ para seleccionar Detener. Pulse el bot6n
para seleccionar 8i y, a continuaci6n, pulse el bot6n ENTER _.
Esta funci6n s61oesta disponible en el modo Cable.
Lista de canales
Para conocer el procedimiento detallado sobre c6mo usar la Lista de canales, consulte las Jnstruccionesde 'Gesti6n de los
canales'.
Puede seleccionar estas opciones simplemente pulsando el bot6n CH LIST del mando a distancia.
Sintonia Fina (solo canales analbgicos)
Utilice la sintonizaci6n fina para ajustar manualmente un determinado canal a fin de que la recepci6n sea 6ptima.
Si no almacena en la memoria el canal que ha ajustado de manera precisa, los ajustes no se guardan.
* aparecera junto al nombre de los canales cuya sintonizaci6n se haya ajustado.
Para restablecer la sintonia fina, pulse el bot6n T para seleccionar Reiniciar y, a continuaci6n, pulse el bot6n ENTER _.
Gestibn de los canales
Con este ment_puede agregar y borrar los canales o configurarlos como favoritos y usar la
guia de programas de las emisoras digitales.
Todos los canales
Muestra todos los canales disponibles actualmente.
Canales agregados
Muestra todos los canales ar_adidos.
Favoritos
Muestra todos los canales favoritos.
Si desea seleccionar los canales favoritos que ha configurado, pulse el bot6n FAV.CH en el mando a distancia.
Grabacion con temporizador
Muestra todos los programas actualmente reservados.
Seleccione un canal en la pantalla Todos los eanales, Canales agregados o Favorites pulsando los botones A/T y pulse
el bot6n ENTER [B#. A continuaci6n puede ver el canal seleccionado.
Use de los botones de colores en la iista de canales
- Verde (Zoom): Amplia o disminuye el nL_merodel canal.
- Amarillo (Seleccion): Selecciona varias listas de canales. Puede aplicar la funci6n de afiadir/borrar o de a_adir/borrar
en la lista de favorites a varies canales al mismo tiempo. Seleccione los canales que desee y pulse el bot6n amarillo
para configurar los canales seleccionados al mismo tiempo. La marca _/ aparece a la izquierda de los canales
seleccionados.
- TOOLS (Nerramientas): Muestra los monEYsAgregar (o Borrar), Agregar a Favorites (o Borrar de Favorites),
Visualizacion con temporizador, Edicion de hombre, Seleccionar rode (o Deseleccionar redes) y Prog. Auto (los
months de las opciones pueden cambiar, dependiendo de la situaci6n.)
@ Iconos de la pantalla de estado del canal
- v: Un canal configurado come favorite.
- _/: Un canal seleccionado con el bot6n amarillo.
- E_3:Un programa que se esta emitiendo.
- Q: Un programa reservado.
Menus de opciones de la Iista de canales (on Todos los canales / Canales agregados / Favorites)
Pulse el bot6n TOOLS para usar el menQ de opciones.
Los elementos del menQde opciones pueden variar segt_n el estado del canal.
Agregar / Borrar
Puede suprimir o ar_adirun canal para que se muestren los canales que desee.
(_3 Todosloscanalesborradosse mostraranen elmenQTodos los canales.
Un canal de color gris quiere decir que se ha suprimido.
(_3 ElmenQAgregar s61oaparececonlos canalesborrados.
Tambi_n puede borrar un canal en los menQsCanales agregados o Favorites de la
misma manera.
Agregar a Favorites / Borrar de Favorites
Puede configurar come favorites los canales que vea con mas frecuencia.
_-_ Pulse el bot6n TOOLS para ver el menQ Herramientas. Tambi_n puede afiadir (o borrar) canales favorites seleccionando
Herramientas _ Agregar a Favorites (o Borrar de Favorites).
@ Se mostrara el simbolo v y el canal se configurara come favorite.
@ Todos los canales favorites se mostraran en el ment_Favorites.
Visualizacion con temporizador
Si reserva un programa que desea ver, el canal se cambia automaticamente al canal reservado en la lista de canales aunque este
viendo otro canal. Para reservar un canal primero debe configurar la hera actual. (Consulte la pagina 22)
$61ose pueden reservar los canales memorizados.
Puede ajustar el canal, el mes, el dia, el afio, la hera y el minute directamente pulsando los botones numericos del mando a
distancia.
La reserva de un programa se mostrara en el ment_Grabaeion con temporizader.
Guia de programas digitales y reserva de visualizaeion
Si se ha seleccionado un canal digital y se pulsa el bot6n _- aparece la guia de programas del canal. Se puede reservar un
programa mediante el procedimiento descrito anteriormente.
Edici6n de hombre {s61ocanales anal6gicos)
Los canales se pueden etiquetar con el prop6sito de que al seleccionar 6stos se pueda vet su nombre.
@ Los nombres de los canales digitales se asignan automaticamente y no se pueden etiquetar.
Seleccionar todo / Deseleccionar todos
= Seleecionar rode: Puede seleccionar todos los canales de la lista.
• Deseleecionar redes: Puede deseleccionar todos los canales seleccionados.
$61opodra seleccionar Deseleccionar redes si ha seleccionado un canal.
Prog. Auto
Si desea mas detalles sobre las opciones de configuraci6n, consulte la pagina 15.
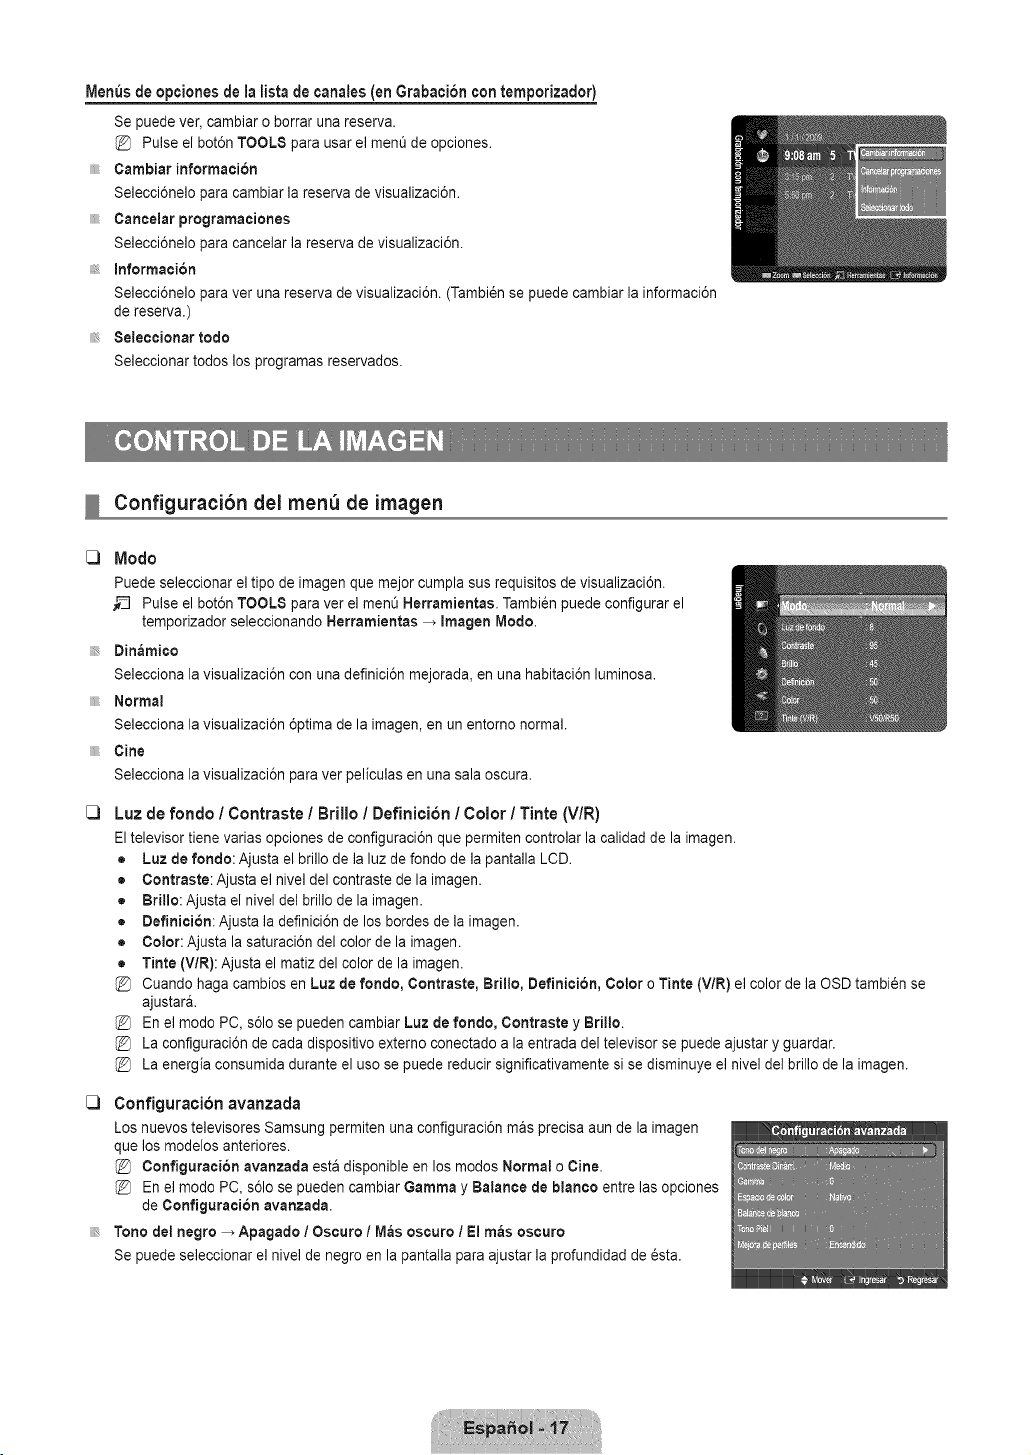
Menus de opciones de la lista de canales (en Grabacion con temporizador)
Se puede ver, cambiar o borrar una reserva.
Pulse el bot6n TOOLS para usar el men0 de opciones.
Cambiar informacion
Selecci6nelo para cambiar la reserva de visualizaci6n.
Cancelar programaciones
Selecci6nelo para cancelar la reserva de visualizaci6n.
Information
Selecci6nelo para ver una reserva de visualizaci6n. (Tambi_n se puede cambiar la informaci6n
de reserva.)
Seleccionar todo
Seleccionar todos los programas reservados.
Configuracibn del menu de imagen
Modo
Puede seleccionar el tipo de imagen que mejor cumpla sus requisitos de visualizaci6n.
__ Pulse el bot6n TOOLS para ver el men0 Herramientas. Tambi6n puede configurar el
temporizador seleccionando Herramientas _ Imagen Modo.
Dinamico
Selecciona la visualizaci6n con una definici6n mejorada, en una habitaci6n luminosa.
Normal
Selecciona la visualizaci6n 6ptima de la imagen, en un entomo normal.
Cine
Selecciona la visualizaci6n para ver peliculas en una sala oscura.
Luz de rondo / Contraste / Brillo / Definicion / Color / Tinte (V/R)
El televisor tiene varias opciones de configuraci6n que permiten controlar la oalidad de la imagen.
• Luz de fondo: Ajusta el brillo de la luz de fondo de la pantalla LCD.
• Contraste: Ajusta el nivel del contraste de la imagen.
• Brillo: Ajusta el nivel del brillo de la imagen.
• Oefinicion: Ajusta la definici6n de los bordes de la imagen.
• Color: Ajusta la saturaci6n del color de la imagen.
• Tinte (V/R): Ajusta el matiz del color de la imagen.
Cuando haga cambios en Luz de rondo, Contraste, Brillo, Definition, Color o Tinte (V/R) el color de la OSD tambi_n se
ajustara.
En el modo PC, s61ose pueden cambiar Luz de rondo, Contraste y Brillo.
La configuraci6n de cada dispositivo externo conectado a la entrada del televisor se puede ajustar y guardar.
La energia consumida durante el uso se puede reducir significativamente si se disminuye el nivel del brillo de la imagen.
[_ Configuration avanzada
Los nuevos televisores Samsung permiten una configuraci6n rnas precisa aun de la imagen
que los modelos anteriores.
Conflguracion avanzada esta disponible en los modos Normal o Cine.
En el modo PC, s61ose pueden cambiar Gamma y Balance de blanco entre las opciones
de Configuracion avanzada.
Tono del negro _ Apagado / Oscuro / M_s oscuro / El m_s oscuro
Se puede seleccionar el nivel de negro en la pantalla para ajustar la profundidad de _sta.

Contraste Dinam, _ Apagado / Bajo / Medio/Alto
Se puede ajustar el contraste de la pantalla para conseguir un contraste 6ptimo.
Gamma
Se puede ajustar la intensidad de los colores primarios (rojo, verde y azul). (-3 ~ +3)
Espacio de color
El espacio de color es una matriz compuesta por los colores rojo, verde y azul. Seleccione su espacio de color favorito y disfrute
de unos colores autenticamente naturales.
• Nativo: El espacio de color nativo proporciona tonos de color profundos y ricos.
• Auto: El espacio de color automatico ajusta el tono de color natural de acuerdo con las fuentes del programa.
Balance de blanco
Se puede ajustar la temperatura del color para conseguir colores mas naturales.
• Bal. Rojo / Bal. Verde / Bal. Azul 1Gan. Rojo / Gan. Verde / Gan. Azul: El cambio del valor de ajuste actualizara la pantalla
ajustada.
• Reiniciar: El balance de blanco anteriormente ajustado se restablecera con los valores predefinidos de fabrica.
Tone Piel
Permite acentuar el 'tono piel' rosado de las imagenes.
El cambio del valor de ajuste actualizara la pantalla ajustada.
Mejora de perfiles _ Apagado / Encendido
Permite acentuar los bordes de los objetos en las imagenes.
C3
Opciones de imagen
En el mode PC s61o se pueden hacer cambios en los elementos Tone Color y Tamale de
Opciones de imagen,
Tone Color _ Frio / Normal / Tibiol / Tibie2
Tibiol o Tibio2 s61oestan disponibles cuando el mode de imagen esta configurado en
Cine.
La configuraci6n de cada dispositivo externo conectado a la entrada del televisor se
puede ajustar y guardar.
Tamale
Es posible que alguna vez desee cambiar el tamale de la imagen en la pantalla. El televisor se suministra con seis opciones
de tamale de la pantalla, cada una dise_ada para que funcione Io mejor posible con tipos especificos de entrada de video. Es
posible que el receptor de cable o satelite tenga tambien su propia gama de tamales de pantalla. Sin embargo, en general, debe
ver el televisor en el mode 16:9 tanto come sea posible.
Tambi6n se puede pulsar varias veces el bot6n P.SIZE del mando a distancia para cambiar el tama_o de la imagen.
• 16:9: Establece la imagen en modo panoramico 16:9.
• Zoom1: Aumenta el tama_o de la imagen en la pantalla.
• Zoom2: Aumenta el tama_o de la imagen mas at_nque el modo Zoom1.
• Ajuste ancho: Amplia la relaci6n de aspecto de la imagen para que se ajuste al ancho total de la pantalla.
• 4:3: Establece la imagen en modo normal 4:3.
• Ajuste a pantalla: Use esta funci6n para ver toda la imagen sin cortes cuando se reciban se_ales de HDMI (720p/1080i),
Componente (1080i) o DTV (1080i).
Ajuste ancho 4:3 Ajuste a pantalla

%
%
%
%
%
Puede producirse una retenci6n temporal de imagen cuando se ve una imagen estatica durante mas de dos horas.
Despues de seleccionar Zoom1, Zoom2 o Ajuste ancho: Pulse el bot6n 4 o _,,para seleccionar Posieion y, a continuaci6n,
pulse el bot6n ENTERE_,#. Pulse los botones A o _ para desplazar la imagen hacia arriba o hacia abajo.
Despues de seleccionar Ajuste a pantalla en los modos HDMI (1080i) o Component (1080i), quizas deba centrar la imagen:
Pulse el bot6n 4 o !_- para seleccionar Posiei6n y, a continuaci6n, pulse el bot6n ENTER _,_. Pulse los botones A, T, _ o
_. para mover la imagen.
Reinieiar: Pulse el bot6n _ o _. para seleccionar Reinieiar y, a continuaci6n, pulse el bot6n ENTER _,_. Puede inicializar la
configuraci6n.
HD (alta definici6n): 16:9- 1080i (1920x1080), 720p (1280x720)
La configuraci6n de cada dispositivo externo conectado a la entrada del televisor se puede ajustar y guardar.
Fuenteentrada ImagenTama_o
TV,AV,Componente(48%48%) 16:9,Zoom1,Zoom2,4:3
DTV(1080i),Componente(108%, HDMI(720p,108% 16:9,4:3,Ajuste ancho, Ajuste a pantalla
PC 16:9,4:3
Digital NR _ Apagado / Bajo / Medio 1Atto / Auto
Si la sei_al de emisi6n que recibe el televisor es d_bil, puede activarse la funci6n Digital Noise Reduction para reducir la estatica y
las imagenes superpuestas que pueden aparecer en la pantalla.
Cuando la sei_alsea debil, seleccione alguna de las otras opciones hasta que se vea una imagen de mejor calidad.
N.neg HDMI _ Normal / Bajo
Se puede seleccionar el nivel de negro en la pantalla para ajustar la profundidad de _sta.
Esta funci6n s61oesta activa cuando un dispositivo externo esta conectado al televisor a traves de HDMI. La funci6n N,neg
HDMI puede que no sea compatible con dispositivos externos.
Modo pelicula _ Apagado/Auto
El televisor se puede configurar para detectar automaticamente y procesar las se_ales de las peliculas procedentes de todas las
fuentes y ajustar la imagen para conseguir una calidad 6ptima.
Modo pelicula es compatible con TV, Video, Component (480i/I080i) y HDMI (480i/I080i).
C3
Reinicio de la imagen _ Reinic. modo imagen / Cancelar
Restablece todos los ajustes predeterminados.
Reinie. modo imagen: Los valores de la imagen actual regresan a los predeterminados.
Uso del televisor como una pantalla de ordenador (PC)
Instalacion del software en el equipo (segun Windows XP)
A continuaci6n se muestra la configuraci6n de pantalla de Windows para un ordenador tipico. Probablemente la pantalla real
de su PC sea distinta, segt_nla versi6n concreta de Windows y de la tarjeta de video que tenga. Pero aunque las pantallas
reales tengan un aspecto diferente, se aplicaran los mismos ajustes basicos e informaci6n en la mayoria de los casos. (En caso
contrario, p6ngase en contacto con el fabricante del ordenador o con el distribuidor de Samsung.)
1. Primero, haga clic en 'Panel de control' en el menO Inicio de Windows.
2. Cuando aparezca la ventana del panel de control, haga clic en 'Apariencia y temas' y aparecera un cuadro de dialogo.
3. Cuando aparezca la pantalla del Panel de control, haga clic en 'Pantalla' y aparecera un cuadro de dialogo.
4. Seleccione la ficha 'Configuraci6n' en el cuadro de dialogo.
Configuraci6n correcta del tama_o (resoluci6n): Modo 6ptimo: 1360 x 768 pixeles
Si existe una opci6n de frecuencia vertical en el cuadro de dialogo de configuraci6n de la pantalla, el valor correcto es 60 o
60Hz. Si no, haga clic en OK y salga del cuadro de dialogo.

IVlodosdepantalla
Si la serial del sistema es igual al modo de serial estandar, la pantalla se ajusta automaticamente. Si la serial del sistema no es
igual al modo de serial estandar, ajuste el modo consultando la guia del usuario de la tarjeta de video; de Io contrario, puede no
haber serial de video. La imagen de pantalla se ha optimizado durante la fabricaci6n para los modos de visualizaci6n enumerados
a continuaci6n.
Entradas D-Sub y HDMt/DVI
C)
Y_5_Y .............._g0x:_5.........
640 x 480
640 x 480
800 x 600
800 x 600
800 x 600
1024 x 768
1024 x 768
1024 x 768
31.469
37.500
37.861
37.879
46.875
48.077
48.363
56.476
60.023
59.940
75.000
72.809
60.317
75.000
72.188
60.004
70.069
75.029
70.000
Cuando se usa una conexi6n de cable HDMI/DVI, se debe conectar en el terminal HDMI
LN22B360)
Cuando se usa una conexi6n de cable HDMI/DVI, se debe conectar en el terminal HDMI
25.175
31.500
31.500
40.000
49.500
50.000
65.000
75.000
78.750
89.040
-/+
-/-
+/+
+/+
+/+
-/-
-/-
+/+
-/+
(DVI) IN.(LNI9B360, LN19B361,
IN 1. (LN26B360, LN32B360)
Ajuste dei televisor con el ordenador
Preselecci6n: Pulse el bot6n SOURCE para seleccionar el modo PC.
Ajuste Aurora&rico
Mediante la funci6n de ajuste automatico se puede establecer que el televisor se ajuste
automaticamente de acuerdo con las sefiales de video que reciba. La funci6n tambien ajusta
automaticamente con mas configuraci6n y ajusta los valores y las posiciones de la frecuencia.
_-_ Pulse el bot6n TOOLS para ver el menO Herramientas. Tambi_n puede establecer el
ajuste automatico seleccionando Herramientas _ Ajuste Automatico.
Esta funci6n no se puede utilizar en modo DVI-HDMI.
C) Pantalla
El prop6sito del ajuste de la calidad de imagenes eliminar o reducir el ruido de la imagen. Si el ruido no desaparece s61ocon la
sintonizaci6n fin& realice los ajustes de frecuencia hasta el maximo y vuelva a realizar la sintonizaci6n fin& Despu_s de reducir el
ruido, vuelva a ajustar la imagen para que quede alineada en el centro de la pantalla.
Grueso / Fino
El objetivo del ajuste de la calidad de imagen es eliminar o reducir las interferencias. Si el ruido no se elimina mediante la
sintonizaci6n fin& ajuste la frecuencia Io mejor que pueda (gruesa) y vuelva a realizar la sintonizaci6n fin& Despu_s de reducir el
ruido, vuelva a ajustar la imagen para que quede alineada en el centro de la pantalla.
Posicibn de PC
Ajuste la posici6n de la pantalla del PC si no se acopla a la pantalla del TV. Pulse los botones ,& o T para ajustar la posici6n
vertical. Pulse el bot6n .,_o _. para ajustar la posici6n horizontal.
Reiniciar Imagen
Puede recuperar todos los ajustes de imagen predeterrninados de fabrica.
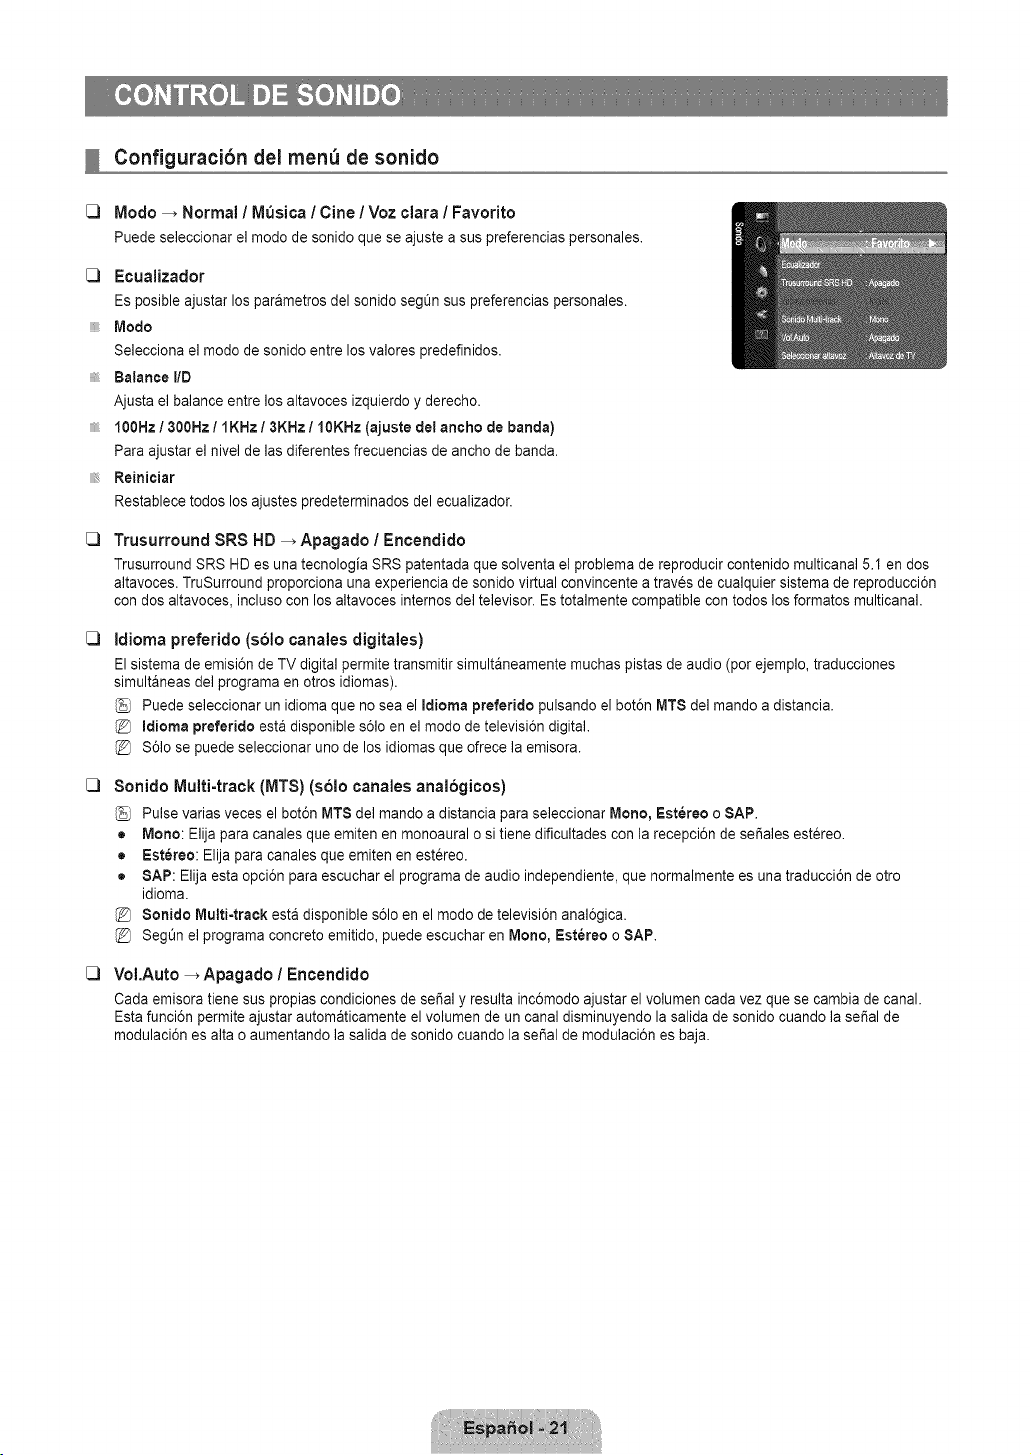
C3
Configuracibn dei men_ de sonido
Modo _ Normal ! Musica / Cine / Voz clara ! Favorito
Puedeseleccionarel modode sonidoqueseajustea suspreferenciaspersonales.
[_ Ecualizador
Es posible ajustar los parametros del sonido seg_n sus preferencias personales.
Modo
Selecciona el modo de sonido entre los valores predefinidos.
Balance liD
Ajusta el balance entre los altavoces izquierdo y derecho.
100Hz / 300Hz / IKHz / 3KHz / 10KHz (ajuste del ancho de banda)
Para ajustar el nivel de las diferentes frecuencias de ancho de band&
Reinieiar
Restablece todos los ajustes predeterminados del ecualizador.
C3
C3
C3
C3
Trusurround SRS HD _ Apagado / Encendido
Trusurround SRS HD es una tecnologia SRS patentada que solventa el problema de reproducir contenido multicanal 5.1 en dos
altavoces. TruSurround proporciona una experiencia de sonido virtual convincente a traves de cualquier sistema de reproducci6n
con dos altavoces, incluso con los altavoces internos del televisor. Es totalmente compatible con todos los formatos multicanal.
Idioma preferido (solo canales digitales)
El sistema de emisi6n de TV digital permite transmitir simultaneamente muchas pistas de audio (por ejemplo, traducciones
simultaneas del programa en otros idiomas).
Puede seleccionar un idioma que no sea el Idioma preferido pulsando el bot6n MT$ del mando a distancia.
Idioma preferido esta disponible s61oen el modo de televisi6n digital.
S61ose puede seleccionar uno de los idiomas que ofrece la emisora.
8onido Multi-track (MTS} (solo canales analogicos}
Pulse varias veces el bot6n MT8 del mando a distancia para seleccionar Mono, Estereo o SAP.
• Mono: Elija para canales que emiten en monoaural o si tiene dificultades con la recepci6n de set,ales estereo.
• Estereo: Elija para canales que emiten en estereo.
• SAP: Elija esta opci6n para escuchar el programa de audio independiente, que normalmente es una traducci6n de otro
idiom&
8onido Mutti4raek esta disponible s61oen el modo de televisi6n anal6gica.
SegOn el programa concreto emitido, puede escuchar en Mono, Estereo o SAP.
VoI.Auto _ Apagado / Encendido
Cada emisora tiene sus propias condiciones de sedal y resulta inc6modo ajustar el volumen cada vez que se cambia de canal.
Esta funci6n permite ajustar automaticamente el volumen de un canal disminuyendo la salida de sonido cuando la sepal de
modulaci6n es alta o aumentando la salida de sonido cuando la serial de modulaci6n es baja.

[_ Seleccionar altavoz
Cuando se ve el televisor conectado a un sistema Home Cinema, se debe apagar el altavoz del televisor para que la salida de
audio del televisor utilice los altavoces del Home Cinema (externos).
Altavoz externo: Utiliza los altavoces extemos (Home Cinema) para la salida del sonido.
Altavoz de TV: Utiliza los altavoces del TV para la salida del sonido.
Si selecciona Altavoz externo en el ment_8eleecionar altavoz, se limita la configuraci6n del sonido.
Los botones de volumen y MUTE no funcionan si 8eleeeionar altavoz esta establecido en Altavoz externo. Configure el
volumen del sistema Home Cinema.
C) Reinicio del sonido _ Reiniciar rode / Reinic. mode sonido / Cancelar
Puede restaurar la configuraci6n del sonido con los valores predeterminados de fabrica.
Reinie. mode sonido: Se restablecen los valores del sonido predeterminados.
Silencio
C3
C3
Configuracibn dei men_ de configuracibn
Idioma
Se puedeconfigurarelidiomade los ment_s.
Tiempo
Reloj
Establecer el reloj es necesario para usar las distintas caracteristicas de temporizador del TV.
La hera actual aparecera siempre que se pulse el bot6n INFO.
Si desconecta el cable de alimentaci6n, debe configurar el reloj de nuevo.
• Mode Reloj
Se puede configurar la hera actual manual o automaticamente.
- Auto: Configure la hera automaticamente con la hera de la emisora digital.
- Manual: Configure la hera actual manualmente.
SegOn la emisora y la serial, la hera automatica no se puede ajustar correctamente. En este case, ajuste la hera
manualmente.
La antena y el cable se deben conectar para ajustar la hera automaticamente.
• Config. Reloj
Puede ajustar la hera actual manualmente.
Esta funci6n s61oesta disponible si Mode Reloj esta configurado come Manual.
Puede ajustar el mes, el dia, el a_o, la hera y el minute directamente pulsando los botches numericos del mando a
distancia.
• Zona Tiempo
Seleccione la zona horaria.
Esta funci6n s61oesta disponible si Mode Reloj esta configurado come Auto.
• Horatio de Verano (Horario de verano) _ Apagado / Encendido / Auto
Activa o desactiva la funci6n del horario de verano.
Esta funci6n s61oesta disponible si Mode Reloj esta configurado come Auto.
Temporizador
El temporizador de desconexi6n apaga automaticamente el televisor despues de un periodo prefijado (30, 60, 90,120, 150 y 180
minutes).
_-_ Pulse el bot6n TOOLS para ver el menO Herramientas. Tambi_n puede configurar el temporizador seleccionando
Herramientas _ Temporizador.
Para cancelar la funci6n Temporizador seleccione Apagado.

C)
Temporizador I / Temporizador 2 / Temporizador 3
La activaci6n y desactivaci6n del temporizador se puede configurar de tres maneras. Debe ajustar el reloj en primer lugar.
• Hora de encertdido: Ajuste la hora, los minutos, am/pm y activar/desactivar. (Para activar el temporizador con la
configuraci6n deseada, establezcalo en Activar.)
• Hora de apagado: Ajuste la hora, los minutos, am/pm y activar/desactivar. (Para activar el temporizador con la configuraci6n
deseada, establ_zcalo en Activar.)
• Volumen: Configure el nivel de volumen deseado.
• Antena: Ver el tipo de antena. (Aire o Cable)
Puede configurar la antena seleccionando Canal _ Antena. (consulte la pagina 15)
• Canal: Permite seleccionar el canal deseado.
• Repetir: Seleccione Una vez, Carla alia,Lun~Vie, Lun~$ab, Sab~Dom o Manual,
Con Manual seleccionado, pulse el bot6n _. para seleccionar el dia de la semana. Pulse el bot6n ENTER _ sobre el
dia deseado y aparecera la marca_.
Puede ajustar la hora, los minutos y el canal pulsando los botones num_ricos del mando a distancia.
Apagado autom_tieo
Si activa el temporizador, el televisor se apagara si no se pulsa ningQn bot6n durante 3 horas, despu_s de que el
temporizador Io haya puesto en march& Esta funci6n s61oesta disponible si el temporizador esta activado y evita el
recalentamiento que se puede producir si el televisor esta encendido durante demasiado tiempo.
V-Chip
La funci6n V-Chip bloquea automaticamente la programaci6n que se considera inadecuada para los ni_os. El usuario debe
escribir un n_mero PIN (nQmero de identificaci6n personal) antes de establecer o cambiar las restricciones de V-Chip.
V-Chip no esta disponible en los modos HDMI, Componente o PC.
El c6digo PIN predeterminado para un televisor nuevo es '0-0-0-0'.
Si olvida su c6digo PIN, pulse los botones del mando a distancia siguiendo la secuencia siguiente, que restablece el c6digo a
0-0-0-0: POWER (apagar) _ MUTE -> 8 _ 2 -, 4 _ POWER (encender).
Perm, todo: Se pulsa para desbloquear todos los programas de televisi6n. / Bloq. redo: Se pulsa para bloquear todos los
programas de televisi6n.
Bloqueo V-Chip -_ Apagado / Eneendido
Puede bloquear los programas de TV clasificados.
Guias pater. TV
Puede bloquear los programas de TV segt_n su clasificaci6n. Esta funci6n permite controlar Io
que los ni_os pueden ver.
• TV-Y: Ni_os peque_os / TV-Y7: Ni_os de mas de 7 argos/ TVoG:Todos los pt_blicos/
TV-PG: Supervisi6n paterna / TV-t4: Mayores de 14 aSos / TV-MA: Para adultos
• ALL: Bloquea todas las clasificaciones de TV. / FV: Violencia y fantasia / V: Violencia / 8:
Situaci6n sexual / L: Lenguaje grosero / D: Dialogo de contenido sexual
La opci6n V-Chip bloqueara automaticamente las categorias que son mas restrictivas.
Por ejemplo, si bloquea la categoria TV-Y, automaticamente se bloqueara TV-Y7. De
manera similar, si bloquea la categoria TV-G, todas las categorias del grupo adolescente
quedaran bloqueadas (TV-G, TV-PG, TV-14 y TV-MA). Las subclasificaciones (D, L, 8, V)
funcionan de manera similar.
La opci6n V-chip bloqueara automaticamente las categorias que son 'mas restrictivas'. Por ejemplo, si bloquea la
subclasificaci6n L en TVoPG, las subclasificaciones L en TVo14y TV-MA se bloquearan automaticamente.
Clas. MPAA
Puede bloquear las peliculas segL_nsu clasificaci6n. La Asociaci6n americana de
cinematografia (MPAA) ha creado un sistema de clasificaci6n que proporciona a padres y
tutores informaci6n sobre qu_ peliculas son apropiadas para los ni_os.
• G: Todos los pQblicos(sin restricciones).
• PG: Se sugiere la compa_ia de un adulto.
• PG=13: Menores acompa_ados de un adulto.
R: Restringido. Los ni_os menores de 17 argosdeben estar acompar_ados por un adulto.
N0-17: Prohibida la entrada a menores de 17 argos.
X: S61oadultos.
NR: Sin clasificaci6n.
El V-Chip bloqueara automaticamente cualquier categoria que sea 'mas restrictiva'. Por ejemplo, si bloquea la categoria
PG=13, tambien se bloquearan automaticamente R, N0-17 y X.

InglesCanadiense
• C: Programaci6n para ni_os menores de 8 a_os.
• 08+: Programaci6n generalmente considerada aceptable para ni_os mayores de 8 a_os sin acompa_amiento de adultos.
• G: Programaci6n general, ideal para todas las audiencias.
• PG: Supervisi6n paterna.
• 14+: La programaci6n contiene temas y contenidos que puede que no sean adecuados para menores de 14 a_os.
• 18+: Programaci6n para adultos.
El V-Chip bloqueara automaticamente cualquier categoria que sea 'mas restrictiva'. Por ejemplo, si bloquea la categoria G,
tambien se bloquearan automaticamente PG, 14+ y 18+.
Frances Cartadiense
• G: General
• 8 ans+: Programaci6n generalmente considerada aceptable para niSos mayores de 8 a_os sin acompar_amiento de adultos.
• 13 arts+: Es posible que la programaci6n no sea adecuada para ni_os menores de 13 a_os.
• 16 arts+: Es posible que la programaci6n no sea adecuada para ni_os menores de 16 a_os.
• 18 arts+: Programaci6n restringida para adultos.
El V-Chip bloqueara automaticamente cualquier categoria que sea 'mas restrictiva'. Por ejemplo, si bloquea la categoria 8
arts+, tambi6n se bloquearan automaticamente 13 arts+, 16 arts+ y 18 arts+.
Clasificacion U,8. Descargable
La informaci6n de la restricci6n de bloqueo se puede usar mientras seven los canales
DTV.
@ Si la informaci6n no se descarga desde la emisora, el ment_Clasificacion U.8. Titulodeclasificaciori
Descargable esta desactivado.
@ La informaci6n de la restricci6n de bloqueo se puede descargar automaticamente
mientras seven los canales DTV. Esto puede tardar algunos segundos.
@ El ment_Clasificaci6n U.$. Deseargable esta disponible despues de que la
informaci6n se haya descargado desde la emisora. Sin embargo, segOnel tipo de
informaci6n de la emisora, el menO podria no estar disponible para su uso.
@ Los niveles de restricci6n de bloqueo difieren seg0n la emisora. El nombre de menO
predeterminado y la clasificaci6n US descargable cambian segt_n la informaci6n
descargada.
@ Aunque configure la visualizaci6n en pantalla en su propio idioma, el menO
Clasificaci6n U.8. Descargable siempre Io vera en ingles.
La clasificaci6n bloqueara automaticamente ciertas categorias que son mas restrictivas.
Los titulos de clasificaci6n (por ejemplo, nivel de humor etc.) y las clasificaciones de televisi6n (por ejemplo, DH, MH, H.etc.)
pueden diferir segOn la emisora.
Cambiar Codigo
Aparecera la pantalla Cambiar C6digo, Escriba un nuevo c6digo PIN de 4 digitos.
En cuanto se introducen los 4 digitos, aparece la pantalla Confirmar Nuevo Codigo. Vuelva a escribir los 4 digitos. Cuando
desaparezca la pantalla de confirmaci6n, el c6digo quedara memorizado.
@ Si olvida su c6digo PIN, pulse los botones del mando a distancia siguiendo la secuencia siguiente, que restablece el c6digo a
0-0-0-0: POWER (apagar) _ MUTE _ 8 _ 2 _ 4 _ POWER (encender).
E} n_lmerode todos}os
titulos de clasificacion
Ei nt_merodel titulo de
clasificacionactual
Como reiniciar el televisor cuandoel V-Chipbloqueauncanal(Escapede emergencia)
Si el televisor sintoniza un canal restringido, el V-Chip Io bloquear& La pantalla quedara en
blanco y aparecera el siguiente mensaje:
1. Escriba el c6digo PIN, pulse el bot6n ENTERIB_ y ,& o T para desactivar temporalmente
el bloqueo V-Chip.
Si olvida su c6digo PIN, pulse los botones del mando a distancia siguiendo la secuencia
siguiente, que restablece el c6digo a 0-0-0-0: POWER (apagar) _ MUTE _ 8 _ 2 _ 4
POWER (encender)
C]
Subtitulo (mensajes de texto en pantalia)
8ubtitulo _ Apagado I Encendido
Puede activar o desactivar la funci6n de subtitulos. Si los subtitulos no estan disponibles, no se mostraran en la pantalla.
Pulse el bot6n CC del mando a distancia para activar o desactivar la funci6n de subtitulos.
@ La funci6n de subtitulos no est& disponible en los modos Componente, HDMI ni PC.

C)
C)
C)
Mode de 8ubtitulo
Puede seleccionar el mode de subtitulo deseado.
La disponibilidad de los subfitulos depende del programa que se este emitiendo.
• Programatic I 00t~0C4 / Textol~Texto4 (s61ocanales anal6gicos)
La funci6n de subtitulos anal6gicos funciona tanto en el mode de canal de televisi6n anal6gica come cuando la seSal
proviene de un dispositivo externo. (Dependiendo de la sei_al de transmisi6n, puede funcionar en canales digitales.)
• Programatic / 00t~004 / Textot~Texto41 Serviciol~Servicio6 (s61ocanales digitales)
La funci6n de subtitulos digitales funciona en canales digitales.
Los modes de subtitulaci6n de servicio I~6 pueden no estar disponibles segt_n el tipo de emisi6n.
Opciones =Subtitulos Dig. (s61ocanales digitales)
= Tamale: Esta opci6n consta de Programatic, Pequeho, Normal y Grande. Elvalor predeterminado es Normal.
• Estilo fuente: Esta opci6n consta de Programatic, Estilo0~Estilo7. Puede cambiar el tipo de letra que desee. El valor
predeterminado es Estilo0.
• Color de primer piano: Esta opci6n consta de Programatic, Blanco, Negro, Roje, Verde, Azul, Amarillo, Magenta y Clan.
Puede cambiar el color del texto. El valor predeterminado es Blanco.
• Color de rondo: Esta opci6n consta de Programatic, Blanco, Negro, Rojo, Verde, Azul, Amarillo, Magenta y Clan. Puede
cambiar el color del fondo de los subfitulos. El valor predeterminado es Negro.
• Opacidad de primer plane: Esta opci6n consta de Programatic, Transparente, Trasl_cido, $61ido y Intermitente. Puede
cambiar la opacidad de la letra.
• Opaeidad de rondo: Esta opci6n consta de Programatic, Transparente, Trasl_eido, 8olido y Intermitente. Puede cambiar
la opacidad del rondo de los subtitulos.
• Regresar a! Predeterminado: Esta opci6n reajusta las opciones Tamale, Estilo fuente, Color de primer piano, Color de
rondo, Opaeidad de primer plane y Opacidad de rondo a sus valores predeterminados.
Las opciones Opciones - 8ubtitulos Dig. s61oestan habilitadas si Mode de 8ubtitulo es Servicio I ~ Servicio 6. (Si el
Mode de 8ubtitulo es el predeterminado, las opciones Opciones - 8ubtitulos Dig, se habilitan segOnel emisora.)
La disponibilidad de los subfitulos depende del programa que se este emitiendo.
Programatic significa que se sigue el estandar establecido per el emisor.
Las opciones de color de primer piano y color de rondo no se pueden ajustar con el mismo color.
Opaeidad de primer piano y Opacidad de rondo no se pueden establecer a la vez come transparentes.
Melodia _ Apagado / Bajo / Medic / Alto
Puede definirse un sonido de melodia para que suene cuando se encienda o se apague el TV.
La melodia no se reproduce.
- Cuando no hay salida de sonido desde el televisor porque se ha activado el bot6n MUTE.
- Cuando no hay salida de sonido desde el televisor porque se ha reducido al minimo con el bot6n VOL =.
- Cuando la funci6n de temporizador ha apagado el televisor.
Mode Juego _ Apagado / Encendido
Si conecta una consola de videojuegos, come PlayStationTM o Xbox TM, podra disfrutar de sensaciones mas realistas seleccionando
el men0 de juegos.
Restricciones en el mode de juegos (precauciones)
- Para desconectar la consola de videojuegos y conectar otro dispositivo externo, establezca el Mode Juego come
Apagado en el ment_de configuraci6n.
- Cuando se muestra el menOde TV en el Mode Juego, la pantalla tiembla ligeramente.
Si Mode Juego esta configurado come Encendido:
- El mode de imagen cambia automaticamente a Normal y no se puede cambiar.
- El mode de sonido cambia automaticamente a Favorite y no se puede cambiar. Ajuste el sonido con el ecualizador.
Mode Juego no esta disponible en los modes normales de TV y PC.
Si la imagen es deficiente cuando hay un dispositivo externo conectado al televisor, compruebe si Mode Juege esta
configurado come Encendido. Configure Mode Juego come Apagado y conecte los dispositivos externos.
Ahorro energia -_ Apagado / Bajo / Medic / Alto / Auto
Esta funci6n ajusta el brillo del televisor, Io cual reduce el consume de energia. Si desea ver la televisi6n per la noche, ajuste la
opci6n del mode Ahorro energia en Alto sus ojos se Io agradeceran y, ademas, reducira el consume de energia.

Configuracibn del menu de entrada
Lista de Entradas
Utilice este ment_para seleccionar TV u otras fuentes de entrada externas como reproductores
de DVD / Blu-ray / receptores de cable y sat_lite (decodificadores), conectados al televisor.
Permite seleccionar la fuente de entrada que se prefiera.
Pulse el bot6n SOURCE de] mando a distancia para ver una fuente de seSal externa.
TV/AV / Componente / PC / HDMI/DVI
Puede elegir solamente los dispositivos externos que esten conectados al televisor. En
Lista de Entradas, las entradas conectadas se resaltan y se ordenan en la parte superior.
Las entradas que no estan conectadas se ordenan en la parte inferior.
Uso de los botches de colores del mando a distancia con la lista de fuentes
- Rojo (Actualizar): Actualiza los dispositivos externos conectados. P_lselo si la fuente est& activada y conectada pero no
se muestra en la lista.
- TOOLS (Herramientas): Muestra los ment_s Editar Nombre e Informacion.
[_ Editar Nombre
De un nombre al dispositivo conectado en las tomas de entrada; de esta manera sera rnas faoil seleccionar el dispositivo de
entrada.
Video / DVD / Cable STB / Satelite STB / PVR STB / Receptor AV / Juego / Filmadora / PC / DVI PC / DVI / TV / IPTV / Blu=ray
/ HD DVD / DMA
Configuracibn del menu de ayuda
[_ Autodiagn6stico
iiiiii_
Prueba de imagen
Si cree que tiene un problema con la imagen, efectOela prueba de imagen. Compruebe el
patr6n de] color en la pantalla para ver si persiste el problema.
• Si: Si no se muestra el patr6n de prueba o hay ruido en el patr6n de prueba, seleccione
Si. Puede haber un problema en el televisor. P6ngase en contacto con el centro de
servicio de Samsung.
• No: Si el patr6n de prueba se muestra correctamente, seleccione No. Puede haber un
problema en el equipo externo. Compruebe las conexiones. Si persiste el problem&
consulte el manual del usuario del dispositivo externo.
Prueba de sonido
Si cree que tiene un problema con el sonido, efectOe la prueba de sonido. Compruebe el sonido reproduciendo una melodia en el
televisor. En la pantalla se muestra '2,ContinOael problema con esta prueba del sonido?'.
Si no oye sonido a trav_s de los altavoces del televisor, antes de realizar la prueba de sonido compruebe que Seleccionar
altavoz esta configurado como Attavoz de TV en el men_ Sonido.
La melodia se debe oir durante la prueba aunque Seleccionar altavoz est6 establecido en Altavoz externo o se haya
silenciado el sonido con el bot6n MUTE.
• Si: Si durante la prueba de sonido s61ose oye sonido de un altavoz o no se oye sonido en ninguno, seleccione Si. Puede
haber un problema en el televisor. P6ngase en contacto con el centro de servicio de Samsung.
• No: Si desde los altavoces no se oye sonido, seleccione No. Puede haber un problema en el equipo externo. Compruebe las
conexiones. Si persiste el problema, consulte el manual del usuario del dispositivo externo.
Intensidad seSal (solo canales digitales)
A diferencia de los canales anal6gicos, cuya calidad de recepci6n puede variar desde 'nebuloso' a claro, los canales digitales
(HDTV) tienen una calidad de recepci6n perfecta o no se reciben en absoluto. Por ello, a diferencia de los canales anal6gicos, no
se puede realizar una sintonizaci6n fina de un canal digital. Se puede, no obstante, ajustar la antena para mejorar la recepci6n de
los canales digitales disponibles.
Si el medidor de la intensidad de la se_al indica que esta es d_bil, mueva la antena para aumentar la intensidad de la se_al.
Siga ajustando la antena hasta que encuentre la mejor posici6n para recibir la sei_al mas fuerte.

[_ Actualizacibn del software
Samsung puede ofrecer actualizaciones para el firmware del televisor en el futuro. P6ngase
en contacto con el centro de Ilamadas de Samsung en 1-800-SAMSUNG(726-7864) para Unidad USB
recibir informaci6n acerca de la descarga de las actualizaciones y del uso de un controlador
USB. Las actualizaciones se pueden realizar conectando una unidad USB al puerto SERVICE
situado en el televisor.
Inserte una unidad USB que contenga las actualizaciones de firmware en el puerto
SERVICE de la parte posterior del televisor.
No desconecte la alimentaci6n ni retire la unidad USB mientras se aplican las
actualizaciones. El televisor se apagara y se encendera automaticamente despu_s de
completar la actualizaci6n del firmware. Despu_s de realizar la actualizaci6n compruebe
la versi6n del firmware. Cuando se actualiza el software, la configuraci6n del video y audio que se haya efectuado vuelve a la
configuraci6n predeterminada (de fabrica). Es aconsejable anotar la configuraci6n para recuperarla facilmente despues de la
actualizaci6n.
[_ Guia de conexion HD
Este rnen_ presenta el metodo de conexi6n que proporciona la mejor calidad de imagen en el televisor de alta definici6n.
Consulte esta informaci6n cuando conecte dispositivos extemos al televisor.
[_ Contacto con Samsung
Revise esta informaci6n cuando el televisor no funcione correctamente o cuando desee actualizar el software.
Puede ver la informaci6n relacionada con el centro de Ilamadas, el producto y el m_todo de descarga del archivo de software.

Identificacibn de problemas
Si cree que el televisor tiene un problema, compruebe primero esta lista de posibles problemas y soluciones. Si ninguno de los
consejos funciona, p6ngase en contacto con el centro de atenci6n al cliente de Samsung o Ilame al 1-800-SAMSUNG (726-7864).
Problema
Imagen deficiente.
Catidad de sonido deficiente.
No hay imagen o sonldo.
No se percibe ningQn sonido, o muy
bajo. con el volumen al m&ximo.
La imagen rueda verticalmente.
La calidad de la imagenes
defectuosa.
El sonido es defectuoso.
El TV funciona de forma irregular.
El televisor no se enciende.
Anomalias del mando a distancia.
Mensaje 'Verificar cable seSal'
Mensaje 'Modo no compatible'.
Problema en pantalla con ta
emisi6n digital
La imagenes demaslado clara o
demasiado oscura
Barras negras en ta pantalla.
Las imageries t_enenun tono
rojoverde o rosa.
Los subtitulos para sordos no
funcionan.
Las im&genes se yen con nleve.
Se yen im&genes superpuestas.
Unas barras horizontales
parpadean, tiemblan u oscilan en
la imagen.
Unas barras verticales parpadean.
tiemblan u oscilan en ta imagen.
La pantalla esta negra y et
indicador lum_nosode alimentaci6n
parpadea constantemente.
La imagen no es estable y parece
vibrar cuanoo se conecta el
ordenador en la entrada de PC.
Posible Soluci6n
meme sintonizar otro canal. / Ajuste ta antena./ Compruebetodas tas conexionesde cable.
meme sintonizar otro canal./Ajuste ta antena.
ntente sintonizar otro canal. / Pulseel bot6n SOURCE.
Compruebe queet televisor est6 enchufado./ Compruebe tasconexiones de la antena.
Primero. compruebe el volumende tos aparatos conectadosat TV (por ejemplo, un receptor
atgitat, DTV, DVD, receptorde cable, VCR, etc.).A continuaci6n,ajuste el volumendet TV
segOnsea mas conveniente.
Compruebetodas las conexionesde cable.
Efectue la prueba de imagen con el menOde autodiagn6stico.
Efectue la prueba de sonido con el menOde autodiagn6stico.
Desconecte el TV durante30 segundosy, despu6s, intente que funcioneotra vez.
ComDruebeaue la toma de la paredfunciona.
RemDlacelas pilas del mando a distancia.
Limpie el borde superiordel mando adistancia (ventanade transmisi6n).
Compruebe tos terminales de tas pilas.
Compruebe queet cable de sepal est6conectado firmementecontas fuentes del PC.
Compruebe ta resoluci6n maximay ta frecuenciade video de! dispositivo conectado.
Compare estos va!ores con tosdatos de los modos de visuatizaci6n.
Compruebe ta potenciade la se_at digital y ta antena de entrada.
Ajuste el brillo y el contraste./Ajuste la sintonizaci6nfina.
Compruebe que la emisi6n que se esta recibiendoes de alta definici6n (HD).
LOScanalesHD en ocasiones emiten una programaci6nen SD (definici6nestandar) que
Dueaedar tugar a laaparici6n de barras negras.
Para eliminar tas barras configure el decodificadorde cable o sat61iteen los modos de
alargamientoo de panoramica.
Compruebe que los cables de los componentes est6n conectados en tos terminalescorrectos.
Cuando se usa un decodificadorde cable o satelite, la opci6n de los subtitulDspara sordos se
ae#e configurar en et decodificador,no en el televisor.
Quizas se necesite actuatizarel firmware. P6ngaseen contactocon el proveedor de cable.
Quizas haya problemas de compatibilidadcon el decodificador de cable.
ntente conectarsea traves de los cables de los componentes.
Ajus_eta funci6n Grueso y despues ajuste la funci6n Fino.
Ajus[e ta funci6n Grueso y despues ajuste la funci6n Fino.
Compruebe to siguiente en el equipo: Atimentaci6n,cable de sepal.
Et televisor esta usandDsu sistema de gesti6n de energia.
Mueva et rat6n det equipo o pulse una tecla de!teclado.
Si et ajuste no es correcto,use la utilidad delordenador para cambiar tos ajustes de panta!la.
Et televisor admite funciones de visualizaci6n muttiscandentro det siguiente rango de
frecuencias:
- Frecuencia horizontal(KHz): 30~60
- Frecuencia vertical(Hz): 60~75
- natce ae Darnaomaxtmodet PC (a 60 Hz): 1360x 768

Problema
La imagen no est_ centrada en la
pantalla.
La imagen aparece distorsionada
en la esquina de ta pantalla
Aparece el mensaje 'Restabtece
todos los ajustes predeterminados
de fabrica'.
El panel LCD TFT utiliza un panel
Posible 8oluci6n
La posici6nde ta pantalta se debe ajustar respecto a la fuente de salida (por ejempto, STB)
con una seSaldigital.
Si Ajuste a pantalla esta seleccionadoen algQndispositivo externo,ta imagen puede
aparecer distorsionadaen la esquina de ta pantatta.Este sintoma se origina en los
dispositivosexternos, no en el televisor.
Aparece cuando el bot6n EXIT se mantiene putsadodurante unos momentos.La
configuraci6ndet productose reiniciacon los valores predeterminados.
ue consta de muchos pixeles de infimo tama_o (3 133 440) que requieren de una
tecnologia altamente sofisticada _arasu fabricaci6n. No obstante, puede que existan unos cuantos pixeles brillantes u
oscuros en la pantalla. Estos pixeles no influiran en el rendimiento del aparato.
Especificaciones del equipo de montaje en la pared (VESA)
Instale el montaje mural en una pared s61ida,perpendicular al suelo. Para colocarlo en otros
materiales de construcci6n, p6ngase en contacto con el distribuidor mas cercano. Si se instala -A
en el techo o en una pared inclinada, puede caerse y causar graves lesiones personales.
Las dimensiones estandar de los equipos de montaje mural se muestran en la tabla
anterior.
AI adquirir el equipo de montaje en la pared, tambien se distribuye un manual de
instalaci6n detallado y todas las piezas necesarias para el montaje.
No use tornillos con un tama_o superior al estandar, ya que pueden causar dar_osen el
interior del televisor.
Para montajes murales que no cumplen las especificaciones de tornillos estandar VESA,
la Iongitud de _stos puede variar dependiendo de las especificaciones.
No use tornillos que no cumplan las especificaciones de tornillos estandar VESA.
No apriete excesivamente los tornillos, ya que podria da_ar el producto o provocar la caida de este con riesgo de causar
lesiones personales. Samsung no se hace responsable de este tipo de accidentes.
Samsung no se hace responsable de da_os o lesiones personales cuando se usa un montaje mural que no cumple las
especificaciones VESA o si el cliente no sigue las instrucciones de instalaci6n del producto.
Nuestros modelos de 57" y 63" no son compatibles con las especificaciones VESA. Por ello, debe usar un equipo de montaje
en la pared exclusivo para este modelo.
No supere los 15 grados de inclinaci6n cuando monte este televisor.
Familia de producto pulgadas Especificaciones = Tornilloest_,ndar =:T° Cantidad
; VESA (A_ B)
19 ~ 22 100 x 100
M4
LCD-TV
PDP-TV
LFD
23 ~ 29
30 ~ 40
46 ~ 55
57 ~ 70
80 ~
42 ~ 50
58 ~ 63
70 ~
80 ~
30 ~39
40 ~ 52
55 ~ 70
70 ~
200 x 100
200 x 200
400 x 400
800 x 400
1400 x 800
400 x 400
600 x 400
800 x 400
1400 x 800
200 x 200
400 x 400
800 x 400
1400 x 800
M6
M8
M8
M6
M8
I //_ No instaleelequipode montajemuralmientrasel televisorestaencendido.Se podriaproducirunadescargaelectricaconfiesgode
causarlesionespersonales.
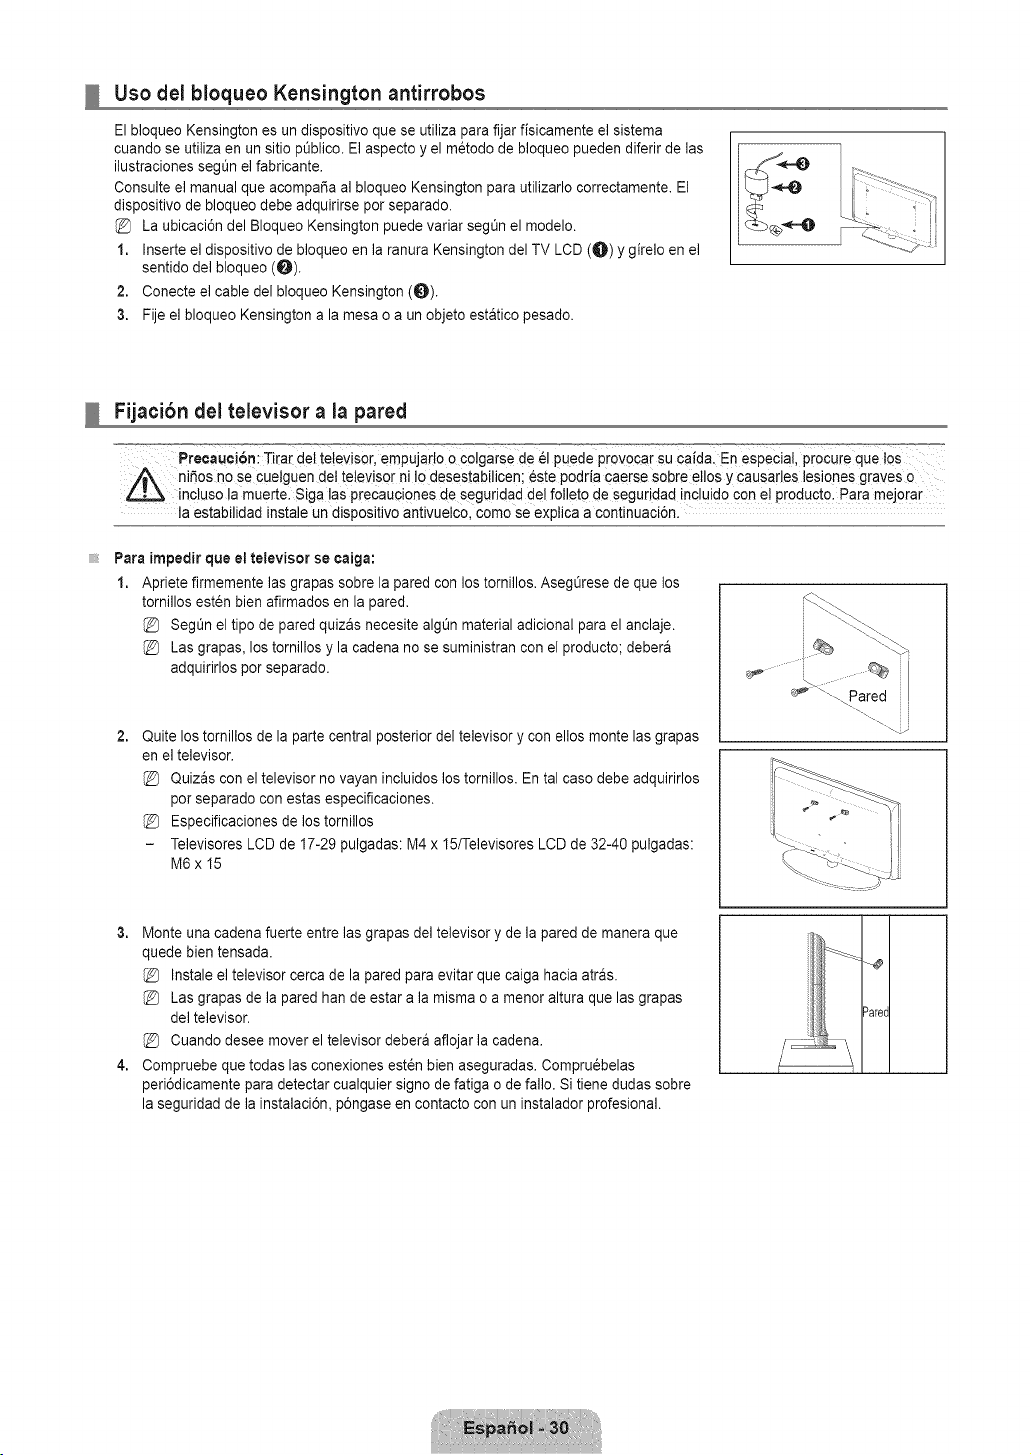
Uso del bloqueo Kensington antirrobos
El bloqueo Kensington es un dispositivo que se utiliza para fijar fisicamente el sistema
cuando se utiliza en un sitio pt_blico. El aspecto y el m6todo de bloqueo pueden diferir de las
ilustraciones seg0n el fabricante.
Consulte el manual que acompaSa al bloqueo Kensington para utilizarlo correctamente. El
dispositivo de bloqueo debe adquirirse por separado.
La ubicaci6n del Bloqueo Kensington puede variar segt_n el modelo.
1. Inserte el dispositivo de bloqueo en la ranura Kensington del TV LCD (0) Y girelo en el
sentido del bloqueo (0).
2. Conecte el cable del bloqueo Kensington (0).
3. Fije el bloqueo Kensington a la mesa o a un objeto estatico 3esado.
Fijacibn del televisor a la pared
Precauci6n: Tirar del televisor, empujarto o colgarse de _1puede provocar su caida. En especial, ProCureque !os
niSos no Se cue!guen det televisor ni Io desestabilicen; _ste podria caerse sobre ellos y causarles lesiones graves o
inc!uso la muerte. Siga !as precauciones de seguridad del folleto de seguridad incluid0 con e! pr0duct0. Para meJ0rar
la estabilidad instale un dispositivo antivuelco, como se exptica a continuaci6n.
Para impedir que el televisor se eaiga:
1. Apriete firmemente las grapas sobre la pared con los tornillos. AsegOrese de que los
tornillos esten bien afirmados en la pared.
SegOn el tipo de pared quizas necesite algt_n material adicional para el anclaje.
Las grapas, los tornillos y la cadena no se suministran con el producto; debera
adquirirlos por separado.
2,
Quite los tomillos de la parte central posterior del televisor y con ellos monte las grapas
en el televisor.
Quizas con el televisor no vayan incluidos los tornillos. En tal caso debe adquirirlos
por separado con estas especificaciones.
Especificaciones de los tornillos
Televisores LCD de 17-29 pulgadas: M4 x 15/Televisores LCD de 32-40 pulgadas:
M6x 15
3. Monte una cadena fuerte entre las grapas del televisor y de la pared de manera que
quede bien tensada.
Instale el televisor cerca de la pared para evitar que caiga hacia atras.
Las grapas de la pared han de estar a la misma o a menor altura que las grapas
del televisor.
Cuando desee mover el televisor debera aflojar la cadena.
4. Compruebe que todas las conexiones est_n bien aseguradas. Compru6belas
peri6dicamente para detectar cualquier signo de fatiga o de fallo. Si tiene dudas sobre
la seguridad de la instalaci6n, p6ngase en contacto con un instalador profesional.
Dare(

Especificaciones
Nombre del modelo
Tama_o de pantalla
(Diagonal)
Resoluci6n de PC (6ptima)
$onido
(Salida_
Dimensiones (An x Pr ×AI)
Sin el soporte
Con el soporte
Peso
Sin el soporte
Con el soporte
Consideraciones
rnedioarnbientales
Temperatura de funcionamiento
Humedad de funcionamlento
Temperatura de
almacenamiento
Humedad de aimacenamiento
8oporte giratorio
izquierda!derecha
LNISB650 LN22B650
19 pulg
(18.9 pulgadas medidas diagonalmente)
1360 x 768 a 60Hz
3WX2
18.8 X 2.5 X 12.2 pulg
(472.0 x 63.4 x 310.7 ram)
18.6 X 7.5 X 14.3 pulg
(472.0 x 189.5 x 382.8 ram)
9.0 Ibs (4.1 kg)
9.7 Ibs (4.4 kg)
22 pulg
(21.9 pulgadas medidas diagonalmente)
1360 x 768 a 60Hz
3WX2
21.3 X 2.5 X 13.8 pulg
(540.0 x 63.4 x 351.0 ram)
21.3 X 7.5 X 15.9 pulg
(540.0 x 189.5 x 403.1 ram)
10.6 Ibs (4.8 kg)
11.2 Ibs (5.1 kg)
Entre 10°C y 40°C (50°F y I04°F)
10% al 80%, sin condensaci6n
Entre -20°C y 45°C (-4°F y 113°F)
5% al 95%, sin condensaci6n
El dise_o y las especificaciones pueden cambiar sin previo aviso.
Este dispositivo es un aparato digital de la Clase B.
Para conocer la fuente de alimentaci6n y el consumo de energia, consulte la etiqueta adherida al producto.