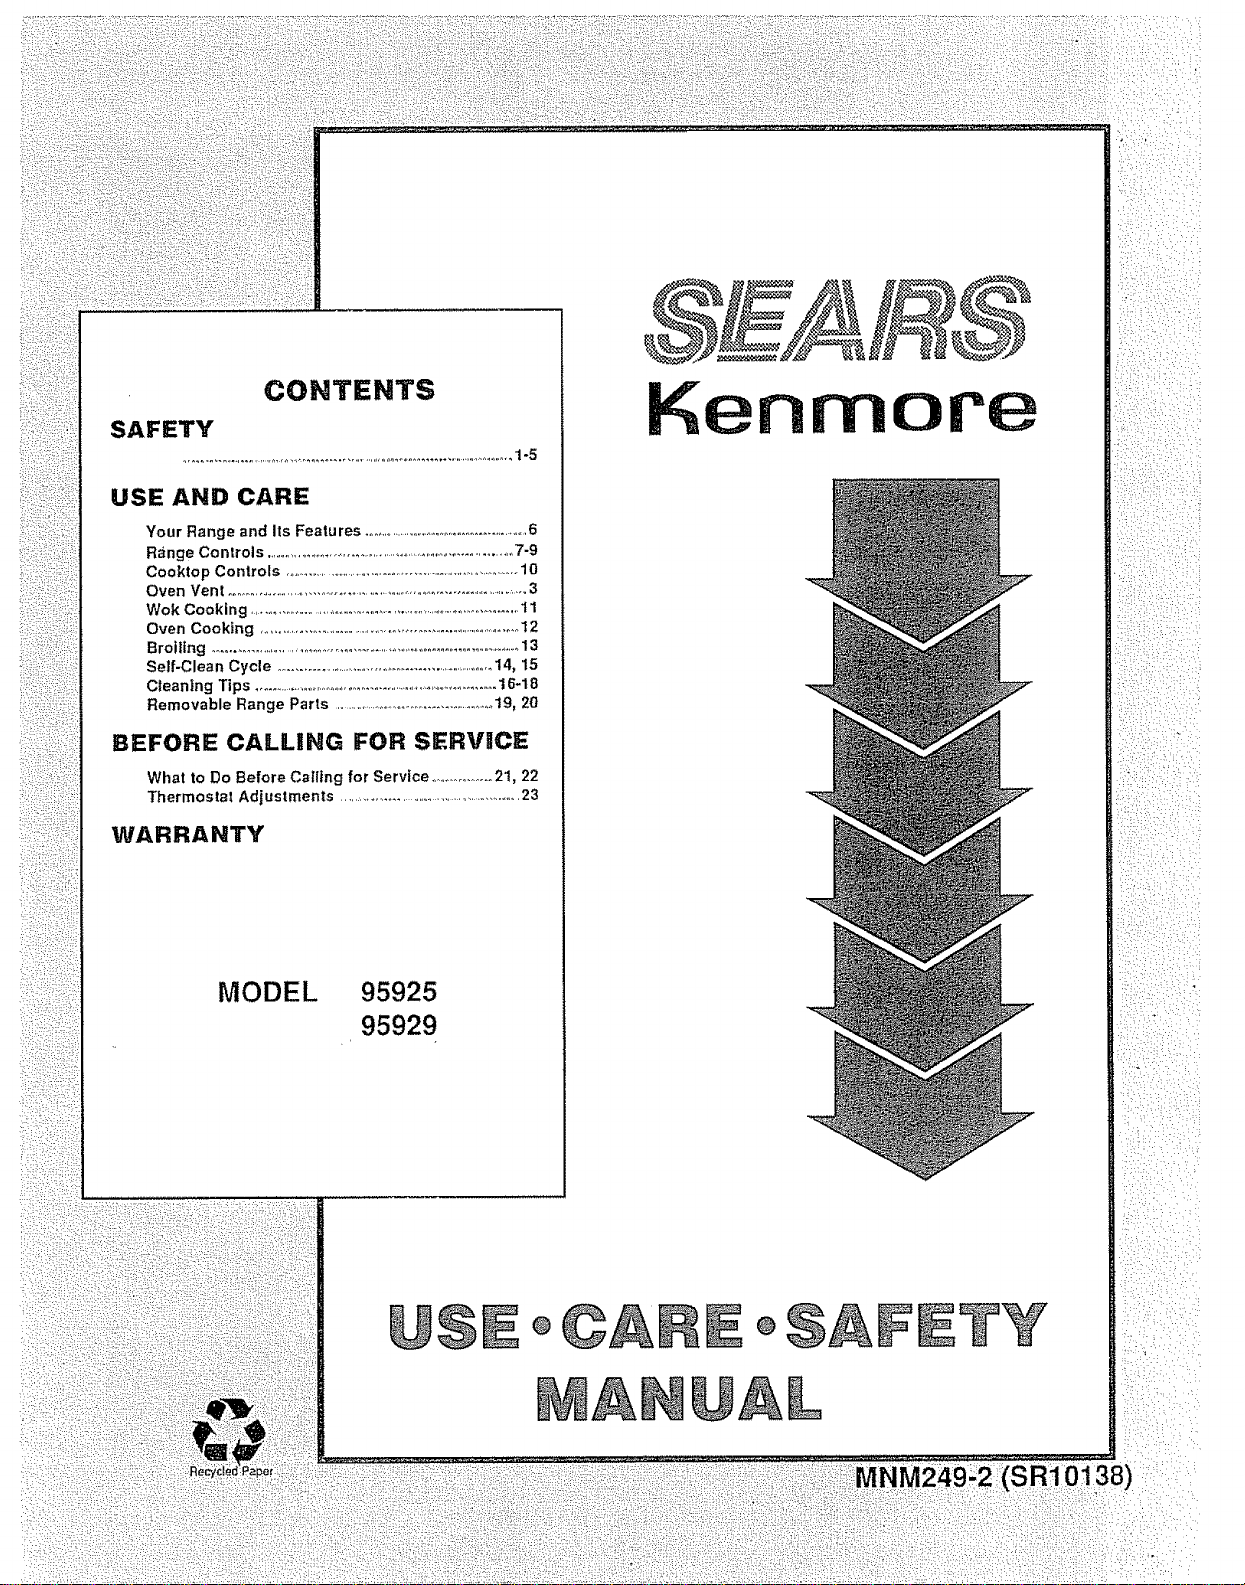
CONTENTS
SAFETY
USE AND CARE
BEFORE CALLING FOR SERVIICE
What to Do Before Calling for Service .................21, 22
Thermosta! Adjustments ......................................................23
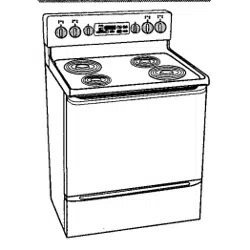
MODEL 95925
95929
Kenmore
I
1
!
1
1
11

i ;, i
i i
WARHING
, ALL RANGES CAN TiP
o INJURY TO PERSONS
COULD RESULT
o iNSTALL ANTI-TIP
DEVICE PACKED WITH
RANGE
° SEE INSTALLATION
INSTRUCTIONS
STABBLITY DEVICE UNSTALLATRON nNSTRUCT_ONS
FOR BRACKET K_T NO. 342473
TOOLS NEEDED:
Phillips head screwdriver
1 3/8" open end or adjustable wrench
Bracket attaches to floor or wall to hold either right or left
rear leg leveler_ If fastening to floor, be surethat screws
do not penetrate electrical wiring or plumbing. If this
cannot be determined, use shorter screws that will not
penetrate through flooring°
If the bracket came with your range, it is shipped at-
tached to the lower range back. Remove and discard
the shipping screw that holds the bracket and then
foItow instructions below_
.
2_
Decide whether the bracket will be installed on the
right or left side of range location.
if the bracket side of the range is adjacent to a
cabinet, place the bracket against back wall and
cabinet as shown in Figure 1°
If there is no adjacent cabinet, determine where the
location of the range side (painted outside panel) will
be. Place the bracket with its outside edge at this
location and against back wall. See Figure 1.
3. Determine whether you will anchor the bracket to the
floor or wail. Fasten the bracket securely with the
screws provided. Screws are self.drilling in wood,
plywood, particle and chip board, and most metal
framing. Ifattachlng to masonry, you can buy suitable
screws and anchors at hardware stores° Use a
masonry drill to drill the required holeso
4. Using the wrench, back out the four leg levelers at
least two turns. See your installation guide for more
leveling information before positioning range°
5o Slide the range into place. Be sure rear leg leveler
fully engages slot in bracket. If range cannot be
moved back far enough for rear leg leveler to enter
bracket, move bracket forward as required and attach
to floor in new location.
ADJACENT CABINET OR FINAL
LOCATION OF RANGE SIDE
PANEL "_"_--
OUTSIDE EDGE OF
BRACKET TO BE
FLUSH WITH LEFT OR
R|GHT SIDE OF RANGE
\
WALL BEHIND
RANGE,
BRACKET
X
SCREW MUSTENTER"X_
WOOD ORMETAL
WALL
PLATE
/
ATTACHMENT TO WALL
Fig,, t
Fig° 2
1 NCINS01-2
T
YOUR SAFETY
SAVE THESE RNSTRUCT|ONS
S"
Read all instructions before using this appliance. When u mg electrical
appliances, basic safe=y precautions should be followed, including the following:
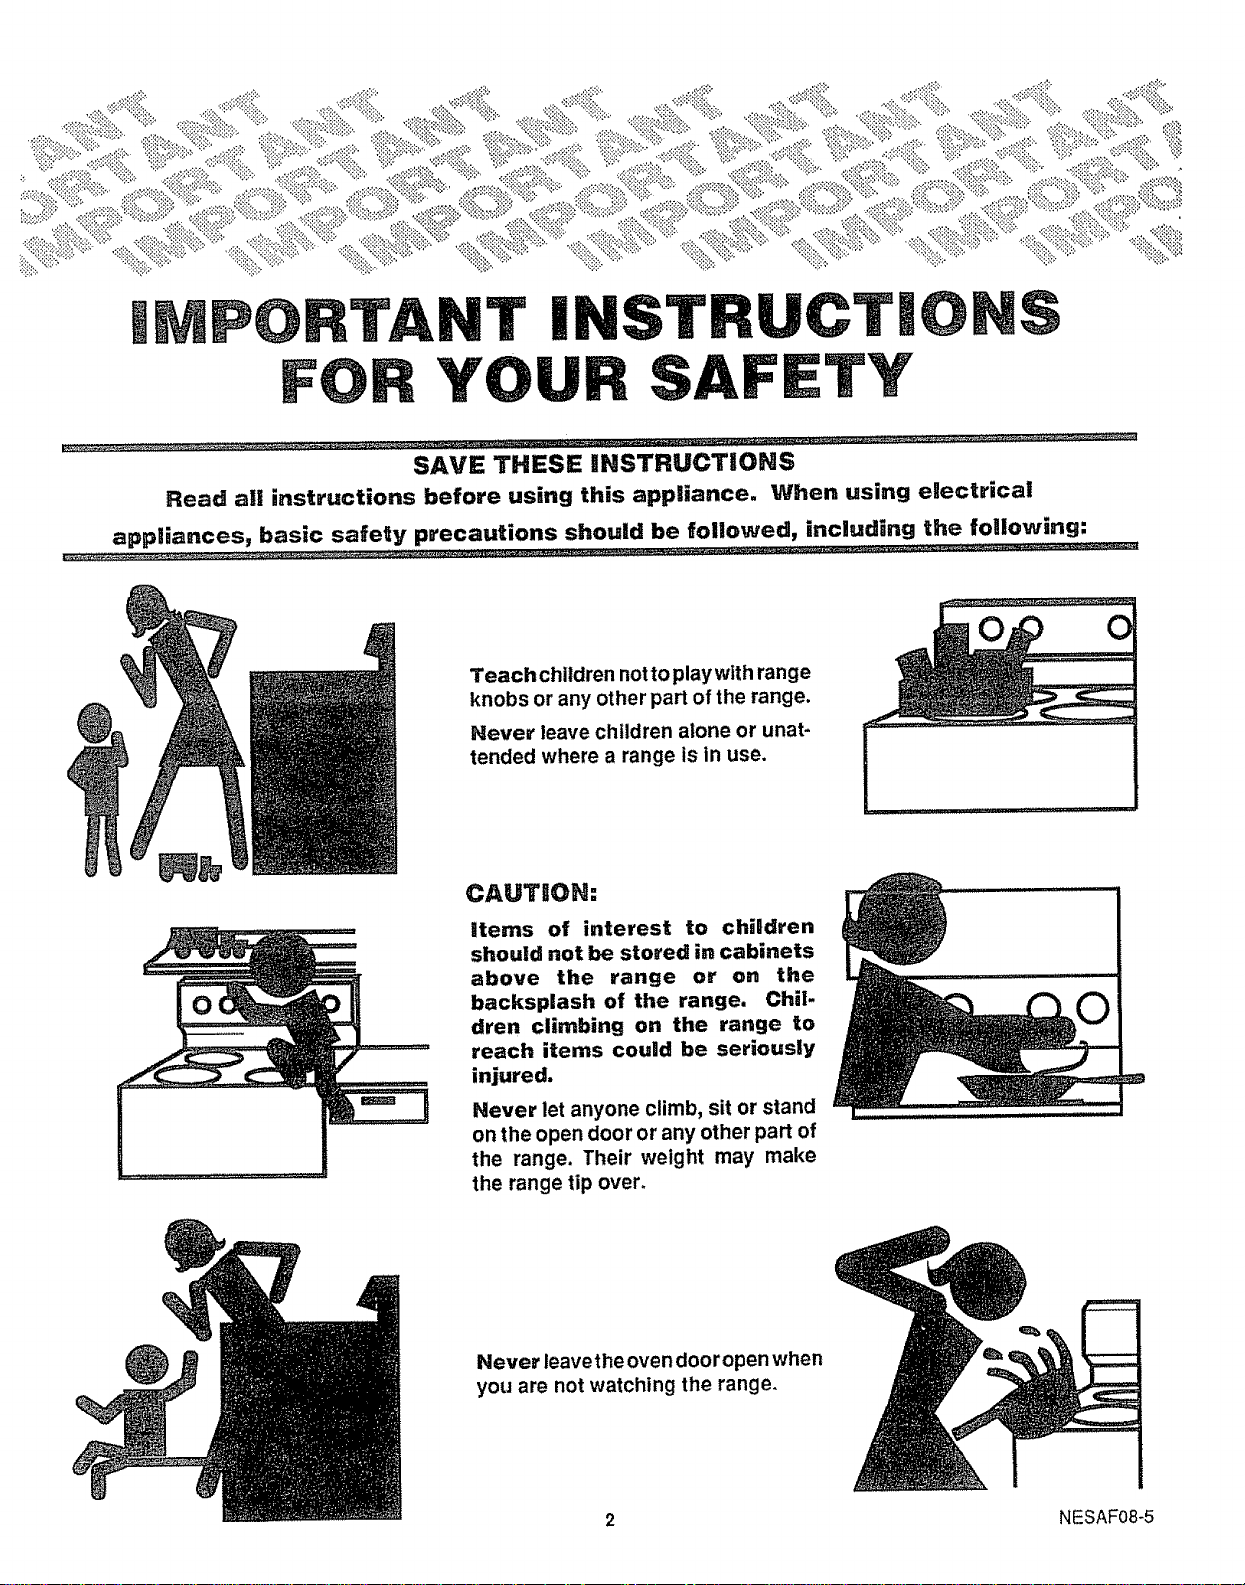
Teach children not to play with range
knobs or any other part of the range.
Never leave children alone or unat-
tended where a range is in use.
CAUTION:
Items of interest to children
should not be stored in cabinets
above the range or on the
backsplash of the range. Chil.
dren climbing on the range to
reach items could be seriously
injured.
Never let anyone climb, sit or stand
on the open door or any other part of
the range. Their weight may make
the range tip over.
Never leavethe oven door open when
you are not watching the range.
2 NESAF08-5
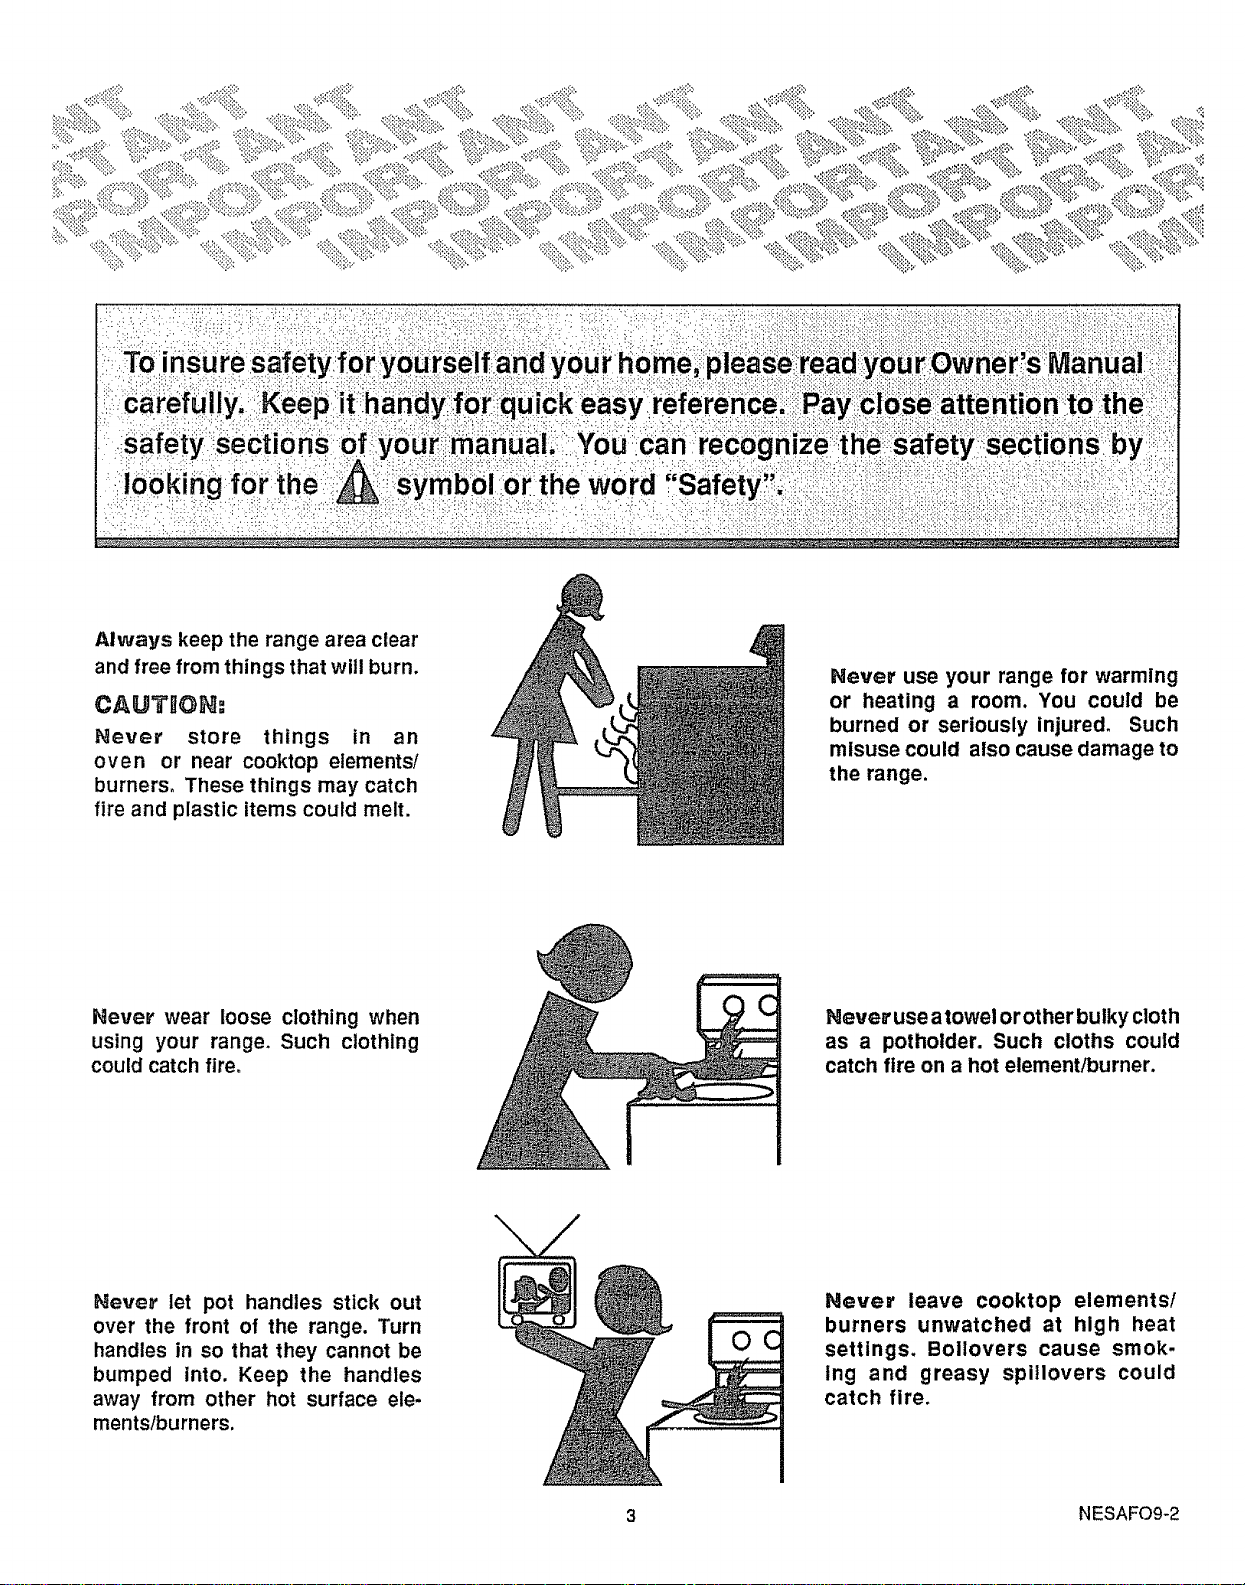
Always keep the range area clear
and free from things that will burn.
CAUTHON:
Never store things in an
oven or near cooktop elements/
burners. These things may catch
fire and plastic items could melt.
Never use your range for warming
or heating a room. You could be
burned or seriously injured. Such
misuse could also cause damage to
the range.
Never wear loose clothing when
using your range, Such clothing
could catch fire,
Never use atowel or other bulky cloth
as a potholder. Such cloths could
catch fire on a hot element/burner.
Never let pot handles stick out
over the front of the range. Turn
handles in so that they cannot be
bumped into. Keep the handles
away from other hot surface ele-
ments/burners.
Never leave cooktop elements/
burners unwatched at high heat
settings. Boilovers cause smok-
ing and greasy spillovers could
catch fire.
3 NESAFOg-2

Keep this book for later use.
Be sure your range is installed and grounded properly
by a qualified technician.
Choose pots and pans with flat bottoms, large enough
to cover the entire cooktop element. This will cut down
the risk of setting potholders or clothing on fire with an
uncovered element and waste less energy°
Always use care when touching the cooktop, oven
heating elements or inside the oven° Heating elements
could be hot enough to burn you even if they are dark in
color° The oven vent duct and oven door may also
become hot during range use. The glass surface of the
cooktop will retain heat after the controls areturned off.
Only some kinds of glass or ceramic pans can be used
for cooktop cooking. Be sure that the pan you use will
not break when heated on the cooktop elements.
Place oven racks in desired posltio nwhile oven ts cool.
tf rack must be moved while oven _s hOt, do not let
potholder contact hot heating element in oven.
After broiling, always take the broiler pan out of the
range and clean it. Leftover grease in the broiler pan
can catch on fire next time you use the pan.
AUways use dry potholders when removing pans from
the oven or cooktop. Moist or damp potholders can
cause steam burns_
Always use care when opening oven door. Let hot air
and steam out before moving food.
Always follow cleaning instructions in this book.
Always keep the range and oven clean. Food and
grease are easy to ignite. Clean the range, oven and
vents regularly.
Do Not Use Oven Cleaners -- No commercial oven
cleaner or oven liner protective coating of any kind
should be used in or around any part of the oven_
Clean Only Parts Listed In Manual.
Always remove broiler pan and other utensils from the
oven before a self-clean cycler
CAUTBON: Do not store items of interest to
children in cabinets above a range or on the
backguard of a range. Children climbing on a
range to reach items coulld be seriously injured,
Always keep combustible wall coverings, curtains, or
drapes a safe distance away from your range and oven.
AJways keep dish towels, dish cloths, potholders and
other linens a safe distance away from your range.
Never store such items on your range.
Always keep the appliance area clear and free from
things that will burn (gasoline and other flammable
vapors and liquids).
Never try to repair or replace any part of the range
unless Instructions are given In this book. All other
work should be done by a skilled technician.
Never heat unopened food containers. Pressure
buildup may make container burst and cause injury.
Never leave jars or cans of fat or drippings on or near
the range. Never let grease build up on your range. You
can keep grease fires from starting if you clean up
grease and spills after each range use.
Never use aluminum foil to line drip bowls or oven
bottoms. Improper use of foil could start a fire.
Never block free airflow through the oven vent.
Never try to move a pan of hot fat, especially a deep fat
fryer. Wait until the fat has cooled.
Do not cook on broken cooktop, If cooktop should
break, cleaning solutions and spillovers may penetrate
the broken cooktop and create a risk of electrical shock.
Contact a qualified technician immediately.
Never rub, move, or damage the door gasket on self-
cleaning ranges. The gasket isessential fora good seal.
Only clean the gasket by soaking it with hydrogen
peroxide, as described in the self-clean section of the
manual.
Never touch surface units, heating elements, or interior
surfaces of the oven. They may be hot even though they
appear dark in color.
if the self-cleaning mode malfunctions, turn off and
disconnect the power supply. Have serviced by a
qualified technician.
Always keep wooden utensils, plastic utensils or canned
food a safe distance away from your range.
Be sure everyone in your home knows what to do in
case of fire.
For major spills -- Turn unit to LO; use dry paper
towels to wipe up major spills, and then use a razor
scraper (held in a pothoider) to scrape major spills from
a hot cooking zone. DO NOT attempt further cleaning
until cooktop surface has cooled.
Some cleaners produce noxious fumes and wet cloths
could cause steam burns if used on a hot surface.
Never try to clean utensils, cookware or removable
parts of your range during a self-clean cycle.
4 NESAF48-1
NSTR@CT ON$ (co.t,..ed)
COOKTOP @@EASE Fl@[_
Ne'ver p_ck up a flaming pan=..lnstead:
1. Turn off the element.
2. Smother the fire with a tightly fitting pan lid,
baking soda or an extinguisher.
OVEN FliRE--
Do not try to move the pard
1. Close oven door and turn controls off.
2. If fire continues, throw baking soda on the
fire, or use a dry chemical, foam, or halon
type extinguisher.
mMPO@TANT SAFETY NOTICe:
The California Safe Drinking Water and Toxic Enforce-
ment Act requires the governor of California to publish
a list of substances known to the state to cause birth
defects or other reproductive harm and requires busi-
nesses to warn customers of potential exposure to such
substances.
The fiberglass insulation in self-clean ovens gives off a
very small amount of carbon monoxide during the
cleaning cycle. Exposure can be minimized by venting
with an open window or using a ventilation fan or hood.
o
Neve_ slide cookware across your cooktop.
DO HOT use a dish loweU or sponge to w_pe up the cook_op. They may leave
a detergent film on the cooktop which may cause discoloration when heated. Ifthis
occurs, remove the discoloration with a recommended cooktop cleaner.
Melted materials (plastic, aluminum foil, sugar, or foods with high sugar content)
can cause damage to the cooktop. If you accidentally melt anything on your
cooktop, turn unit to LO; wipe hot cooktop immediately with several dry paper
towels. Scrape off remainder of burned material with razor scraper (held with
potholder) at 30° angle while unit is warm. Be careful not to burn yourself! After
cooking is complete, turn unit to OFF. DO _OT attempt further cleaning until
cooktop surface has cooled.
. DO HOT use scouring powders, plastic, nylon or metal cleaning pads. They may
scratch the cooktop.
- _O NOT use chlorine bleach, ammonia, hydrofluoric acid, chemical oven cleaners,
or any other kind of chemical cleaner. They may discolor the cooktop.
• To avoid possible damage to cooking surfaces, do not apply cooktop cleaning
creme to hot surfaces.
After cleaning, use a damp cloth or paper towel to remove all cooktop cleaning
creme residue.
Consumer should read and follow all instructions and warnings on cooktop
cleaning creme labels.
5 NESAF23-3
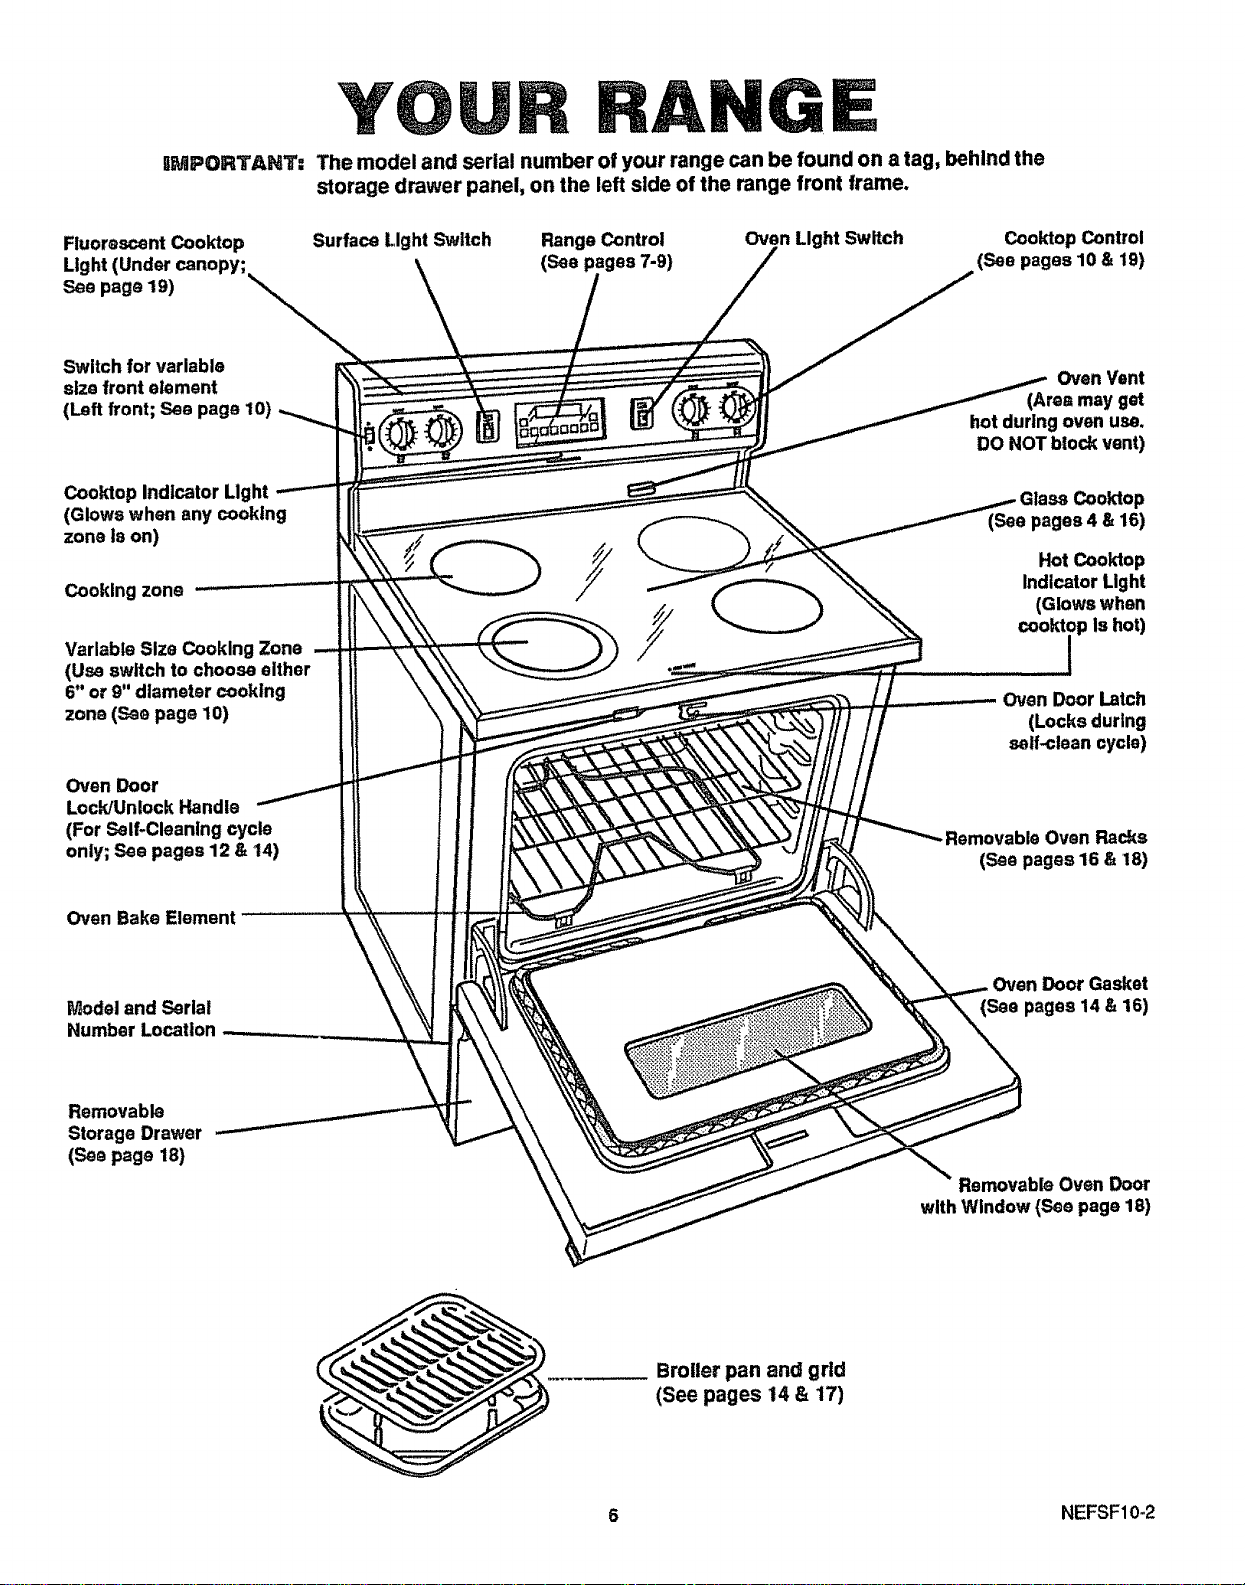
iMPORTANT:
Fluorescent Cooktop
Light (Under canopy;
See page 19)
YO
The model and serial number of your range can be found on a tag, behind the
storage drawer panel, on the left side of the range front frame.
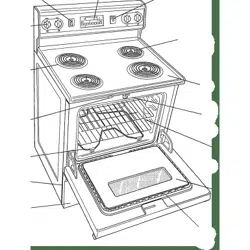
Surface Light Switch Range Control
(See pages 7-9)
Oven Light Switch Cooktop Control
,(see pages 10 & 19)
Switch for variable
size front element
(Left front; See page 10)
Cooldop Indicator Light
(Glows when any cooking
zone Is on)
Cooking zone
Variable Size Cooking Zone
(Usa switch to choose either
6" or 9" diameter cooking
zone (see page 10)
Oven Door
Lock/Unlock Handle
(For Self-Cleaning cycle
only; See pages 12 & 14)
OvenVent
(Ares may get
hot duringoven usa.
DO NOT blockvent)
Cooktop
(See pages 4 & 16)
Hot Cooktop
Indicator Light
(Glows when
cooktop Is hot)
Oven Door Latch
(Locks during
self-cleancycle)
-Removable Oven Racks
(See pages 16 & 18)
Oven Bake Element
Model and Serial
Number Location
Oven Door Gasket
pages 14 8,16)
Removable
Storage Drawer
(See page 18)
Removable Oven Door
with Window (See page 18)
Broiler pan and grid
(See pages 14 & 17)
6 NEFSF10-2
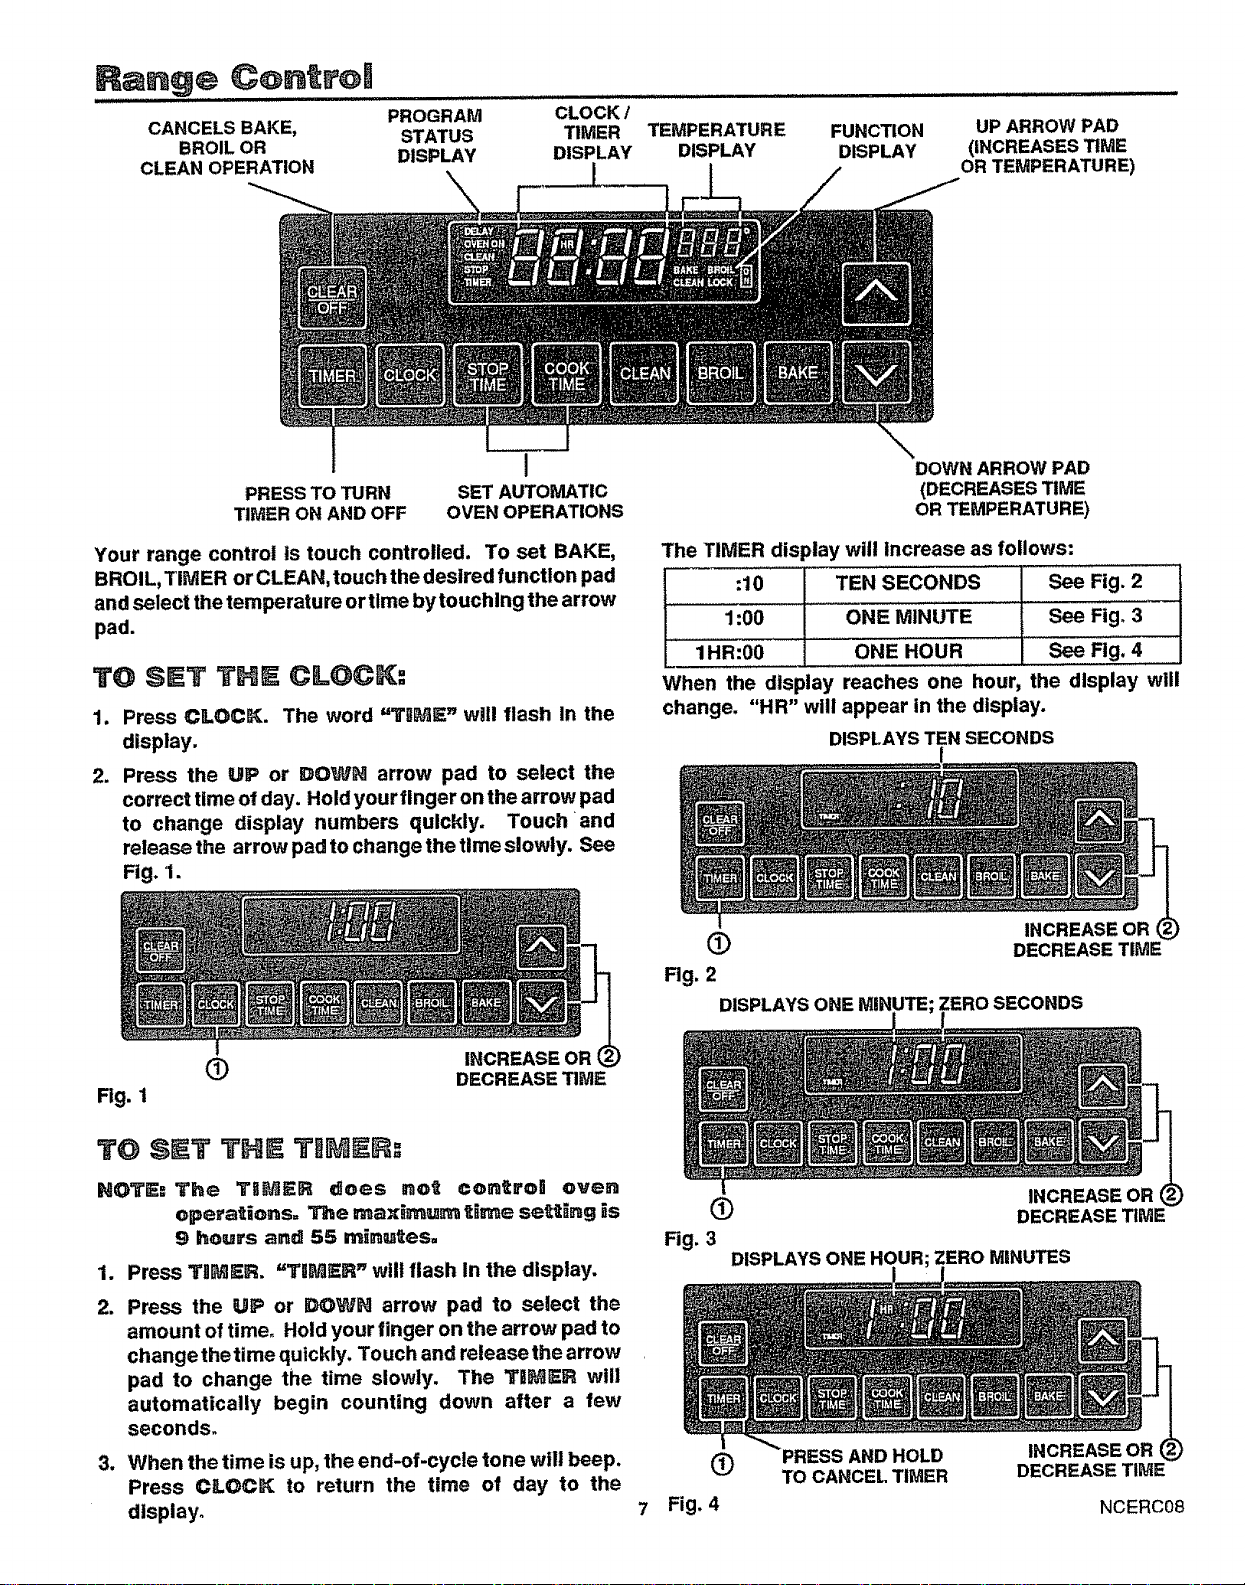
Range Controit
CANCELS BAKE,
BROIL OR
CLEAN OPERATION
PROGRAM
STATUS
DISPLAY
\
CLOCK /
TIMER
DISPLAY
!
TEMPERATURE
DISPLAY
FUNCTION
DISPLAY
UP ARROW PAD
(INCREASES TIME
OR TEMPERATURE)
PRESS TO TURN
TIMER ON AND OFF
I
SET AUTOMATIC
OVEN OPERATIONS
Your range control Is touch controlled. To set BAKE,
BROIL, TiNIER or CLEAN, touch the desired functlon pad
and select the temperature or time bytouchlng the arrow
pad.
TO SBT THE CLO K."
1. Press CLOCK. The word "TUME" will flash In the
display.
2. Press the UP or DOWN arrow pad to select the
correct time of day. Hold your finger on the arrow pad
to change display numbers quickly. Touch and
release the arrow pad to change the time slowly. See
Fig. 'I.
DOWN ARROW PAD
(DECREASES TIME
OR TEMPERATURE)
The TIMER display will increase as follows:
:10 TEN SECONDS See Fig. 2
1:00 ONE MINUTE See Fig° 3
1HR:00 ..........ONE HOUR See Fig. 4
When the display reaches one hour, the display will
change. "HR" will appear in the display.
DISPt.AYS TEN SECONDS
INCREASE OR
(_ DECREASE TIME
Rg. 2
DISPLAYS ONE MINUTE: ZERO SECONDS
Rg. 1
(_) INCREASE OR
DECREASE TIME
TO SET THE T IME , =
NOTE." The TBMER does not contron oven
operations. The maximum _ime setting is
9 hours and 55 minutes=
1. Press "rlIMER. "TIMER" wilt flash In the display.
2. Press the UP or IZX)WN arrow pad to select the
amount of time° Hold your finger on the arrow pad to
change the time quickly. Touch and release the arrow
pad to change the time slowly. The "riMER will
automatically begin counting down after a few
seconds.
3. When the time is up, the end-of.cycle tone will beep.
Press CLOCK to return the time of day to the
dlsplayo
INCREASE OR
(_ DECREASE TIME
Fig. 3
DISPLAYS ONE HOUR: ZERO MINUTES
HOLD INCREASEOR
(_) TO CANCEL TIMER DECREASE TIME
Fig. 4 NCERC08
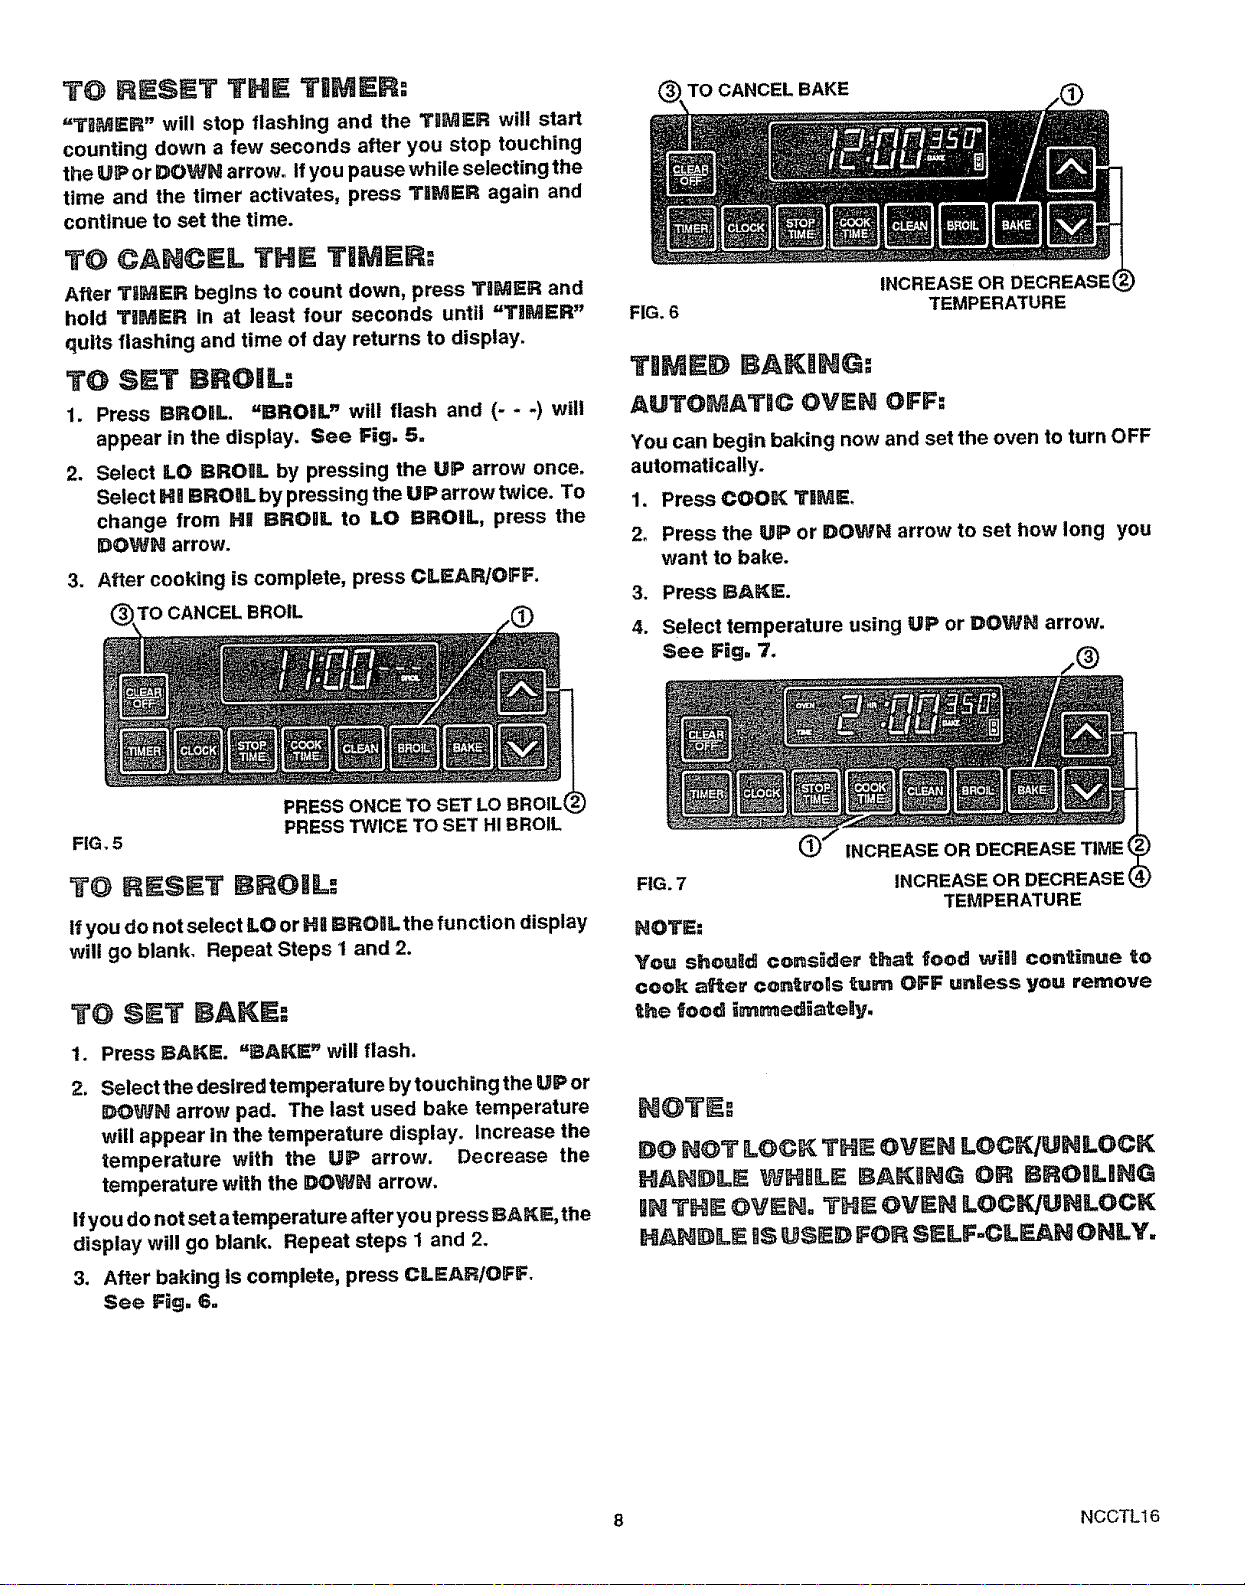
TO R_SET THE TmMER:
"TitMER" will stop flashing and the TliMER will start
counting down a few seconds after you stop touching
the UP or DOWN arrow. If you pause while selecting the
time and the timer activates, press TIMER again and
continue to set the time.
TO ¢ANCIEL THE TIMER:
After TIMER begins to count down, press Ti_ER and
hold TIMER in at least four seconds until "TIMER"
quits flashing and time of day returns to display.
TO SET BROML:
1. Press BROIL. "BROIL" will flash and (- - -) will
appear in the display. See Fig, 5,
2. Select LO BROIIL by pressing the UP arrow once.
Select H! BROIL by pressing the UP arrow twice. To
change from HI BROBL to LO BROIL, press the
DOWN arrow.
3. After cooking is complete, press CLEARIOFF.
(_. TO CANCEL BROIL
TO CANCEL BAKE
FIG. 6
INCREASE OR DECREASE(
TEMPERATURE
TliMED BAKliNG:
AUTOMATIIC OVEN OFF:
You can begin baking now and set the oven to turn OFF
automatically.
1. Press COOK TIME.
2_ Press the UP or DOWH arrow to set how long you
want to bake.
3. Press BAKE.
4. Select temperature using UP or DOWN arrow.
See Fig= 7.
FIG. 5
PRESS ONCE TO SET LO BROILt
PRESS TWICE TO SET Hi BROIL
TO RESET BROIIL:
if you do not select LO or Hli BRORLthe function display
will go blank. Repeat Steps I and 2.
TO BAKE:
.
2.
Press BAKE. "BAKE" will flash.
Select the desired temperature bytouching the UP or
DOWN arrow pad. The last used bake temperature
will appear in the temperature display. Increase the
temperature with the UP arrow. Decrease the
temperature with the DOWN arrow.
If you do not set a temperature after you press BAKE, the
display will go blank. Repeat steps 1 and 2.
3. After baking is complete, press CLEAR/OFF.
See Fig, 6.
iNCREASE OR DECREASE TIME
FIG. 7 INCREASE OR DECREASE
TEMPERATURE
NOTE:
You should consider that food wila continue to
cook after controlis turn OFF unless you remove
the food i_ed_ateiy.
NOT ="
8 NCCTL16
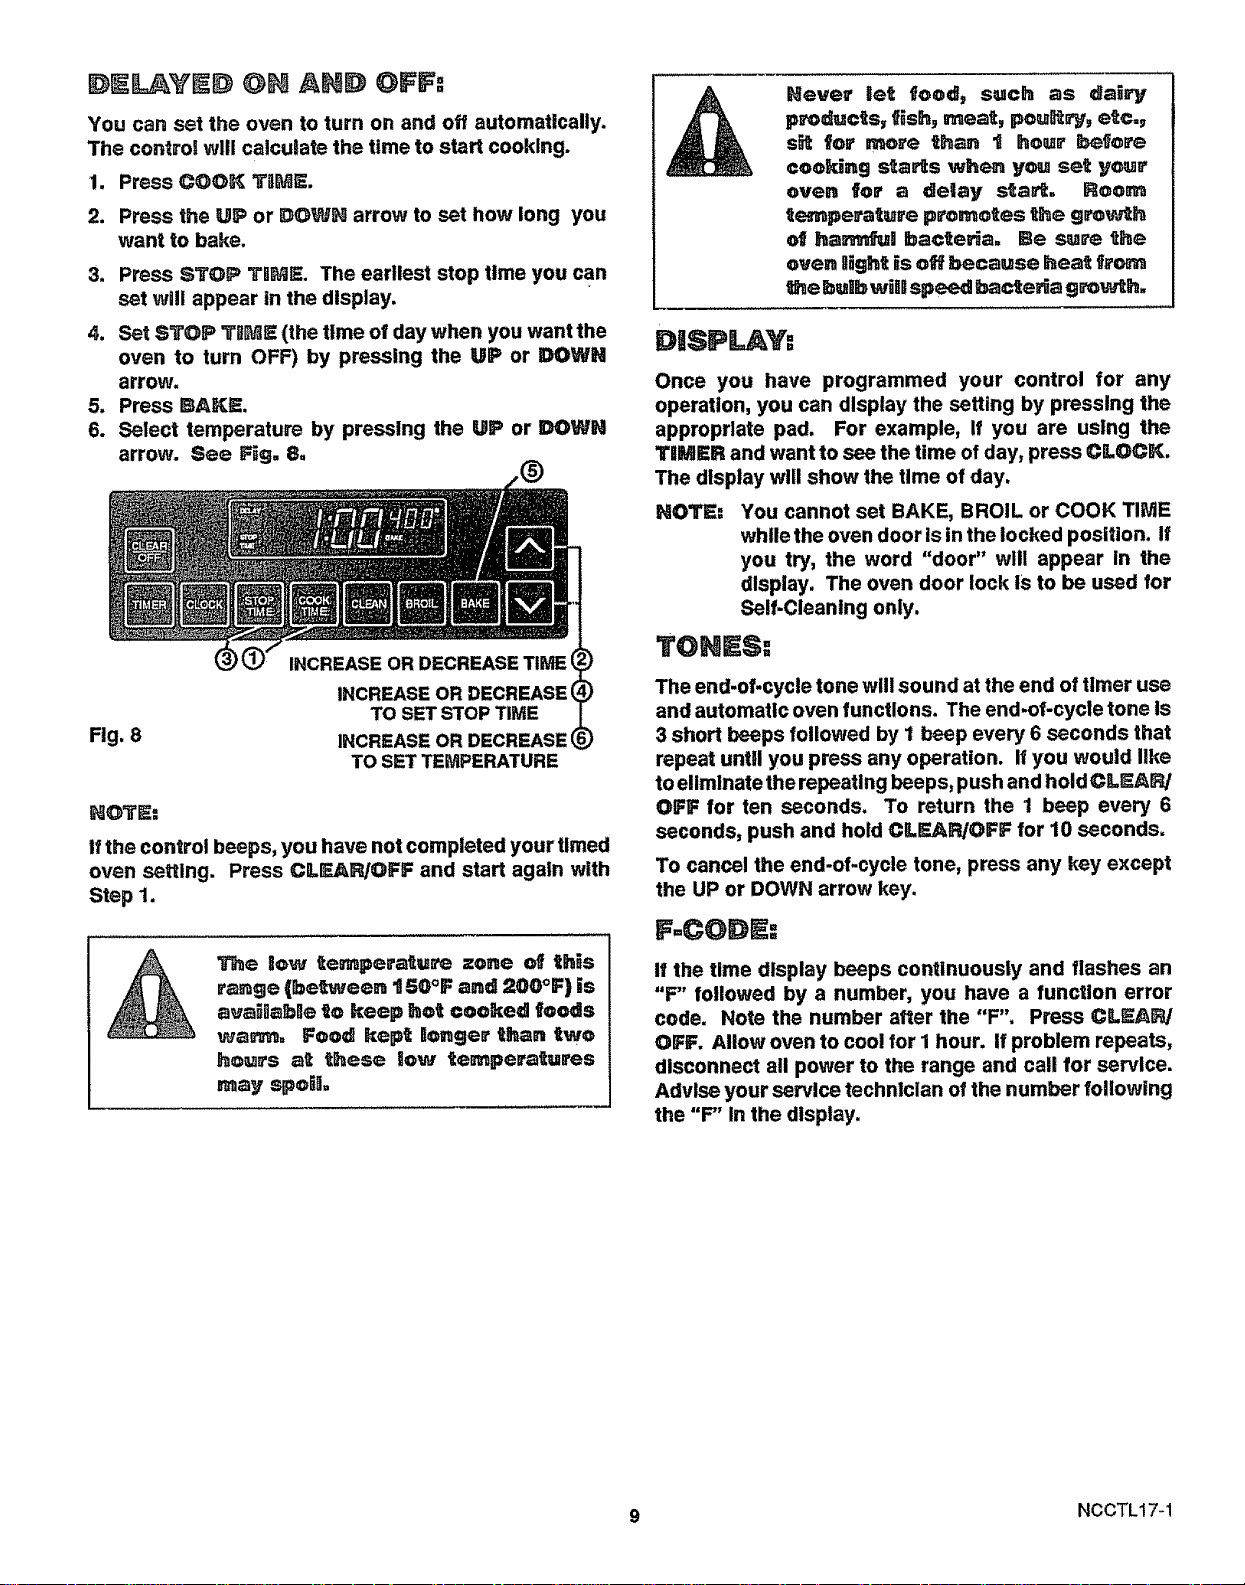
D YED ON AND OFF. =
You can set the oven to turn on and off automatically.
The controt wil! calculate the time to start cooking.
2.
Press COOK TIIME.
Press the UP or DOWN arrow to set how long you
want to bake.
3. Press STOP TLME. The earliest stop time you can
set will appear in the display.
4. Set STOP TIIME (the time of day when you want the
oven to turn OFF) by pressing the UP or DOWN
arrow.
5, Press BAKE.
6. Select temperature by pressing the UP or DOWN
arrow. See Fig, 8=
Fig. 8
INCREASE OR DECREASE I
TO SET STOP TIME
INCREASE OR DECREASE q
TO SET TEMPERATURE
NOTE:
If the control beeps, you have not completed your timed
oven setting. Press CLEAR/OFF and start agaln with
Step 1.
The Low temperature zone of this
range (between 150°F and 200°F) is
avaiLabLe te keep hot cooked feeds
warm, Food kept Longer than two
hours at these low temperatures
may spoil
Hever let food, such as dai_
p,'oducts, fishj meat, poul_, etc=,
s_ for rr_re than t hour" before
cooking sta_s when you set ycmr
oven for a delay start. Room
te_peFature promotes the grov_h
of hmvt_ul bacte_a= Be sure the
oven Light is off because hea_ fr_
_he bulb win speed bacteria growth,
DISPLAY:
Once you have programmed your control for any
operation, you can display the setting by pressing the
appropriate pad. For example, If you are using the
TIMER and want to see the time of day, press CLOCK.
The display will show the time of day.
NOTE:
You cannot set BAKE, BROIL or COOK TIME
while the oven door is in the locked position. It
you try, the word "door" will appear in the
display. The oven door lock is to be used for
Self-Cleaning only.
TONB$:
The end-of-cycle tone will sound at the end of timer use
and automatic oven functions. The end-of-cycle tone is
3 short beeps followed by 1 beep every 6 seconds that
repeat until you press any operation. If you would like
to eliminate the repeaUng beeps, push and hold CLe:AP,/
OFF for ten seconds. To return the 1 beep every 6
seconds, push and hold CILEAR/OFF for 10 seconds.
To cancel the end-of-cycle tone, press any key except
the UP or DOWN arrow key.
F=CODE.=
if the time display beeps continuously and flashes an
"F" followed by a number, you have a function error
cede, Note the number after the "F". Press CLEAR/
OFF. Allow oven to cool for 1 hour. If problem repeats,
disconnect all power to the range and call for service.
Advise your setvice technlclan of the number following
the "F" In the display,
9 NCCTL17-1
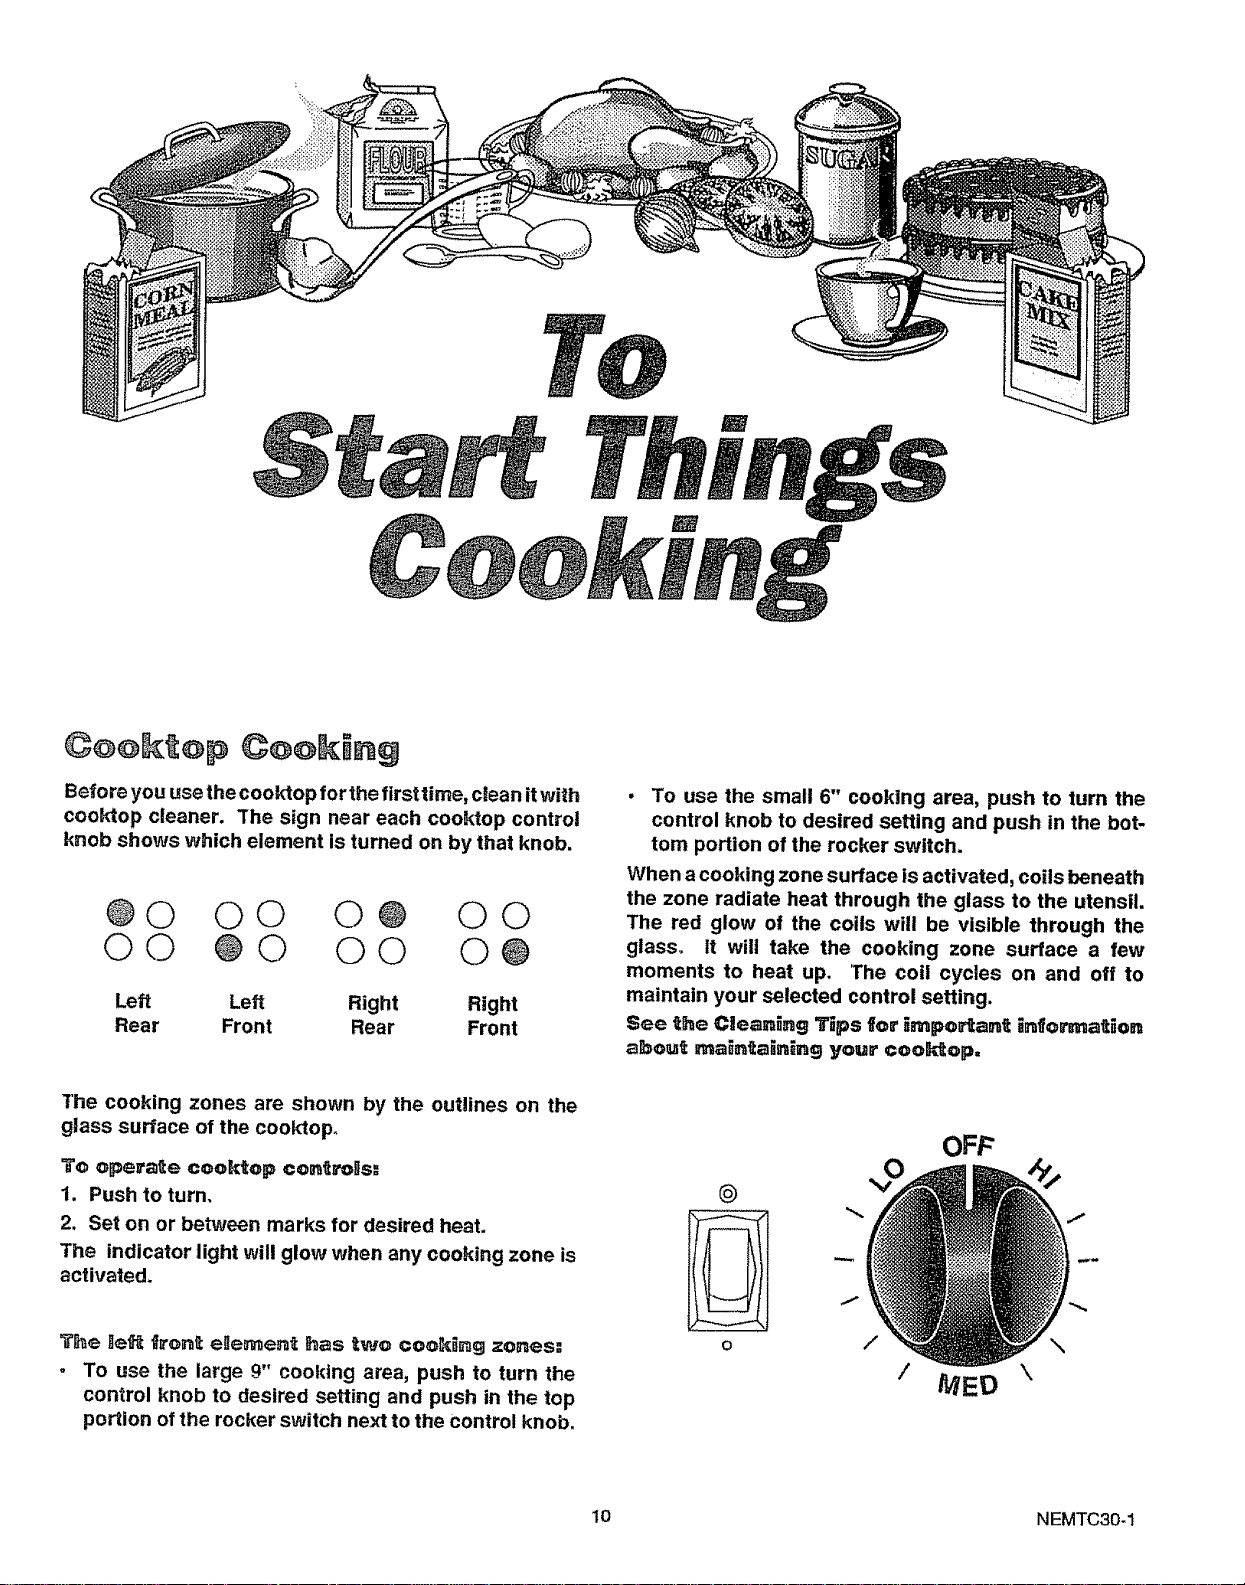
Before you use the cooktop for the firsttime, clean itwith
cook-top cleaner. The sign near each cooktop control
knob shows which element is turned on by that knob.
@0 O0 O@ O0
OO @0 O0 O@
Left Left Right Right
Rear Front Rear Front
• To use the small 6" cooking area, push to turn the
control knob to desired setting and push in the bot-
tom portion of the rocker switch.
When a cooking zone surface is activated, coils beneath
the zone radiate heat through the glass to the utensil.
The red glow of the coils will be visible through the
glass. It will take the cooking zone surface a few
moments to heat up. 'The coil cycles on and off to
maintain your selected control setting.
See the Clean_ng Tips for _mpo_ant infomtation
abou_ maintaining yogr coo_op,
The cooking zones are shown by the outlines on the
glass surface of the cooktopo
To operate cooktop controUs:
1. Push to turn.
2. Set on or between marks for desired heat.
The indicator light will glow when any cooking zone is
activated.
The le_ frent e_emen_ has two cooking zones:
. To use the large 9" cooking area, push to turn the
control knob to desired setting and push in the top
portion of the rocker switch next to the Control knob.
OFF
@
I
o / \
lO NEMTC30-1
To
The surface will retaln heat after controls
have been turned off. The HOT SURFACE
Indicator light glows until the cooktop has
cooled to a safe temperature. This may
take up to an hour after use. The temperature of the
metal frame around the glass will also rise during
cooktop use. Use cautlon when working around
your cooktop, especially if more than one cooking
zone Is on or if using the cooktop for an extended
period of time. Be careful not to get burned when the
unlt has not had time to cool after use.
Donotslide cookware on thesurface as Itmay scratchthe
glass.
Never cook food dlr_"Uy on the glass. You must use
prop_coo_re. Do not usesurface as a cutting board.
For best cooklng results and energy efficient operation,
you should use pans that are flat on the bottom. Match
the size of the pan to the size of the surface unIt. The pan
should not extend over the edge of the trim ring more
than 1".
Ho_e; A slight odor Is normal when a new cooktop Is
used for the first time. It Is caused by the heating of new
parts and insulating materials and will disappear In a
short time.
Q=
Ao
Qt
A.
G.
A!
Can Iuse special cooking equipment, like an oriental
wok, on any of the cooking zones?
We recommend that you use only flat bottomed
woks. Cookware without flat surfaces Is not recom-
mended.
May Ican foods and preserves on my maintop cook-
tng zones?
Yes, but only use cookware designed for canning
purposes. Check the manufacturer's Instructions
and recipes for preserving foods. Be sure canner Is
fiat-bottomed and fits over the center of the cooking
zone selected. Canning should only be done on the
maintop cooking zones. Canning generates large
amounts of steam; be careful to avoid burns.
Why am I not getting the heat Ineed from my selected
cooking zone even though the knob Is on the right
setting?
Use cookware with flat bottoms and center the cook-
ware Inside the circle for the cooking zone selected.
Metal cookware will conduct heat best.
HOME CANNI G TiPS
In surface cooking of foods other than canning, the use
of larg_dlameter pots (extending more than 1" beyond
edge of drip pan) is not recommended. However, when
canning with water-bath or pressure canner, large-dl-
ameter pots may be used. This Is because boiling water
temperatures (even under pressure) are not harmful to
cooktop surfaces surrounding heating unit.
HOWEVEP. _:) HOT USE LARGE DIiAMSI'F.R CAN=
HERS OR OTHER LARGE DNAMs'rER POTS; FOR
FRYBHG OR BOllL{IHG FOODS OTHER THAN WATER,
snugly over surface unit. Canners with flanged or
rippled bottoms (often found In enamelware) are not
recommended.
RIGHT WRONG
Most syrup or sauce mixtures -- and all types of frying
--cook at temperatures much higher than boiling water.
Such temperatures could eventually harm cooktop sur-
faces surrounding heating units.
OBSERVE FOLLOWING POINTS iN
CANNING
1. Bring water to boll on HIGH heat, then after bolllng
has begun, adjust heat to lowest setting to maintain
boll (saves energy and best uses surface unit).
2. Be sure cannerflts overcenter of surface unit. Ifyour
range does not allow canner to be centered on
surface unit, use smaller-diameter pots for good
canning results.
3. Flat-bottomed canners give best cannlng results. Be
sure bottom of canner Is flat or sllg ht Indentation fits
4. When canning, use recipes from reputable sources.
Reliable recipes are available from the manufacturer
of your canner; manufacturers of glass jars for can-
ning, such as Ball and Kerr; and the United States
Department of Agriculture Extension Service.
5. Remember, In following the recipes, that canning Is a
prooe_ that generates large amounts of steam. Be
carefulwhilecanning toprevent burns from steam orl'r_-_.
NOTE: If your range is being operated on low power
(voltage), canning may take longer than expected, even
though directions have been carefully followed. The
process may be Improved by:
(1) using a pressure canner, and
(2) beginning with hot tap water when heatlng
larger quantities of water.
11
NEMTC31-3

@V N C@@KHNG
When cooking a food for the first time in your new
oven, use time given on recipes as a guide.
Your new oven has been set correctly at the factory
and is more apt to be accurate than the oven it
replaced.
After you have used your oven for awhile, if you feel
your oven should be hotter or cooler, you can adjust
it yourself. See THERMOSTAT ADJUSTMENTS
tn this manual.
. Always follow recipe carefully,
• Measure ingredients properly.
m
o
Use proper pan placement.
Place pans on the oven racks with 1" to 1 t/2" of air
space on all sides of each pan. Avoid overcrowding
the oven°
Pans too close to each other, to oven walls otto the
oven bottom block the free movement of air. Im-
proper air movement causes uneven browning and
cooking.
Do not lock the oven lock/unlock handle while
baking or broiling. The oven lock/unlock handle
is used for self-clean only_
Cakes, cookies, muffins, and quick breads should
be baked in shiny pans -- to reflect the heat
because they should have a light golden crust.
Yeast breads and pie crusts should be baked in
glass or dull (non-shiny) pans --to absorb the heat
because they should have a brown, crisp crust.
Be sure the underside of the pan is shiny, too.
Darkened undersides will absorb the heat and may
cause over-browning on the bottom of your food.
2 cake layers
4 cake layers
When baking several items stagger pans so that no
pan is directly above another.
Let the oven preheat thoroughly before cooking
baked productso Listen for preheat notification tone
and put the food in the oven,
Opening the door too often to check food during
baking will allow heat loss and may cause poor
baking results_
Oven temperatures should be reduced 25 degrees
below recommended temperatures ifexterior of pan
is predarkened, darkened by age or oven proof
glass_
There may be some odor when the oven is first used.
This is caused by the heating of new parts and
tnsulation_
Do not cover an entire oven rack with foil. The foil
can block normal heat flow and cause poor baking
results. Do not place any foil directly above the bake
element. Foil used on the oven bottom under the
element may damage the oven surface; therefore, it
should not be used.
Cookies should be baked on flat cookie sheets
without sides to allow the air to circulate properly.
When recipes require preheating, have food nearby
before you open the oven door. If the oven door is
allowed to remain open for more than a brief time,
the preheat temperature wi, be lost.
12 NEOVC12
BR@MLWNQ
Most foods can be broiled atthe HI Broil Setting. Select
the LO Broil setting to avoid excessive browning or
drying of foods that should be cooked to the well-done
stage (such as thick pork chops or poultry).
BROtiLgNG TiPS
PUease note:
Your oven door should be open to _he broil
stop positio, while broiBing. N the door is
cUosed_ the food w,H roast and not broil.
li
Use only the broiler pan and grid that came with your
range for broiling. They are designed for proper
drainage of fat and liquids and help prevent spatter,
smoke or fire.
• Do not preheat when broi!ling. For even broiling
on both sides, start the food on a cold pan.
• Trim the outer layer of fat from steaks and chops. Slit
the fatty edges to keep the meat from curling.
• For maximum juiciness, salt the first side just before
turning the meat. Salt the second side just before
serving.
• Brush chicken and fish with butter several times as
they broil When broiling fish, grease the grid to
prevent sticking and broil with skin side down. it ts
not necessary to turn fish.
. Never Deave a soiDed b_'oiger pan _n tlhe range.
Grease in the pan may smoke or burn the next time
the oven is used.
Be sure you know the correct procedure for putting
out a grease fire. See the section on safety.
Do not cover the entire broil_e_
g_id wi_h foi! (mo_d foiB tUghtlly
to g_d and cut sg_s in foi! to
agJgn ,_.,ith sH_:s in the gr_d)=
Poor d_'a_nage of hot fat may
cause a hroilter fire.
Ill a _ire sta_s, ctose the even
doer and turn controSs off. Jf
fire continuesj throw baking
soda on the fi_e= Do not put
water on the f_re,
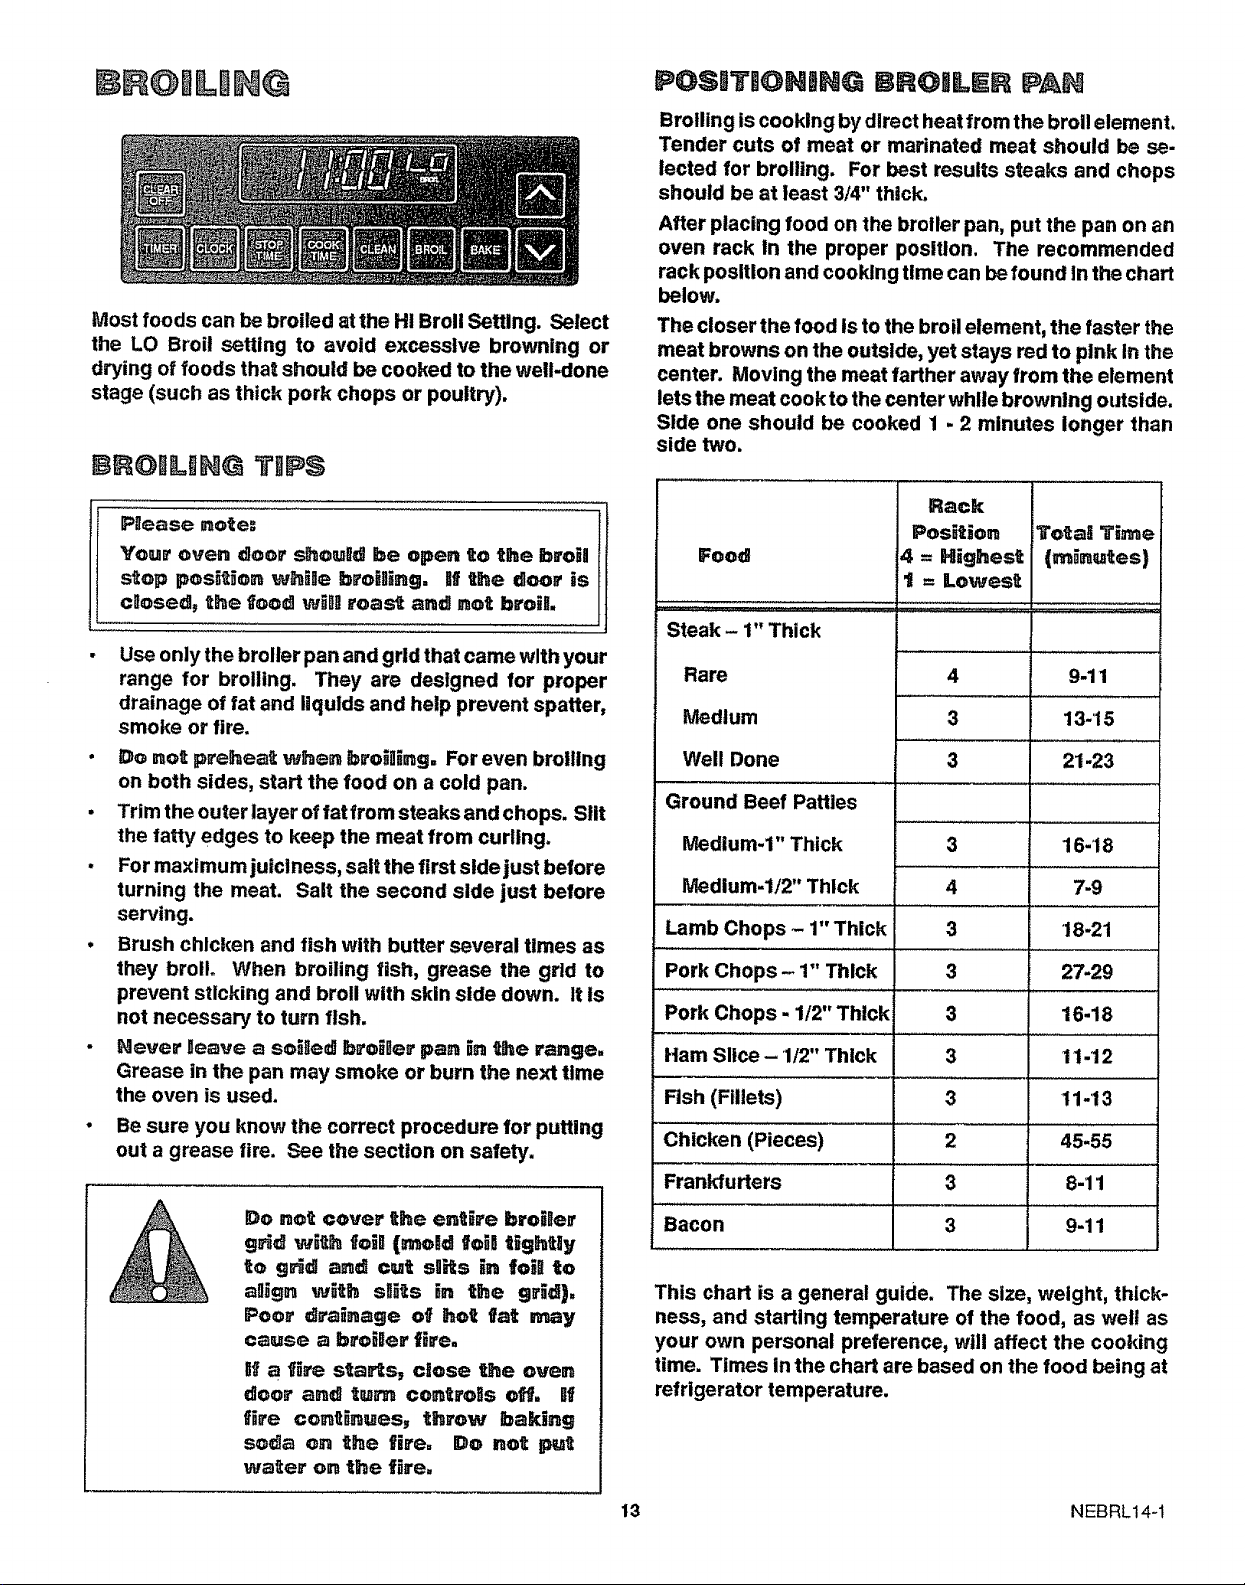
POSiTiONiNG BRO|L R PAN
Broiling is cooking by direct heat from the broil element.
Tender cuts of meat or marinated meat should be so.
lected for broiling. For best results steaks and chops
should be at least 3/4" thick_
After placing food on the brotler pan, put the pan on an
oven rack in the proper position. The recommended
rack position and cooking time can befound in the chart
below.
The closer the food Is to the broil element, the faster the
meat browns on the outside, yet stays red to pink In the
center. Moving the meat farther away from the element
lets the meat cook to the center while browning outside.
Side one should be cooked 1.2 minutes longer than
side two.
Rack
Position To_al Time
Food 4 = Highest (m_nutes)
t = Lowest
Steak - 1" Thick
Rare
Medium
Well Done
Ground Beef Patties
Medium-1" Thick
Medium-I/2" Thick
Lamb Chops - 1" Thick
Pork Chops - 1" Thick
, ,,,,,
Pork Chops - 1/2" Thick
Ham Slice- 1/2" Thick
Fish (Fillets)
Chicken (Pieces)
Frankfurters
Bacon
4
3
3
3
9-11
13-15
21-23
16-18
4 7-9
3 18-21
3 27-29
3
3
3
2
3
3 9-11
16-18
1t-12
11-13
45-55
8-11
This chart is a general guide. The size, weight, thick-
ness, and starting temperature of the food, as well as
your own personal preference, will affect the cooking
time. Times in the chart are based on the food being at
refrigerator temperature.
13 NEBRL14-1

THE SELF-CLEAN CYCLE
BEFORE A CLEAN CYCLE
1. Remove the broiler pan and grid, oven racks, all
utensils and any foil that may be In the oven. Do not
try to clean utensils or any other objects In the oven
during a self-clean cycle. ]if oven racks are left in
the range during a cnean cycle, they wil! darken_
lose their luster and beconm hard to slide, if
you choose to leave the racks In the oven, you can
polish the edges of the racks with steel wool and
apply a small amount of vegetable oll to the rack
edges after the self.clean cycle. This will make the
racks easier to slide.
2. Sell on the oven front frame, under the front edge of
the cooktop, the door liner outside the door gasket
and the front edge ofthe oven cavity (about 1" Into the
oven) will not be cleaned during a clean cycle (see
Illustration below). Clean these areas by hand before
starting a clean cycle.
Use hot water with a soap-filled steel wool pad. We
recommend a cleanser such as 'Soft Scrub®' brand
or a similar cleaning product to keep white surfaces
looklng clean and new. After cleaning, rinse well to
help prevent a brown residue from forming when the
oven is heated. Buff these areas dry with a dry cloth°
FRONTFRAME
DOOR GAS
DOOR UNER
3. Wipe up heavy splllovers on the oven bottom. Too
much soil may cause smoking during the clean,cycle.
4. Do not rub the doorgasket. The fiberglass material of
the gasket hasan extremely low resistance to abrasion.
An Intact and well flttlng oven door gasket Isessential
for energy efficient oven operation and good baking
results. If you notice the gasket becoming worn,
frayed or damaged In any way or If it has become
displaced on the door, you should replace the seal.
PUease Note. =
The door gasket is designed to have a 5".6 =gap
at the bottom of the even doer. This is te allew
for proper air circulation.
AFTER A CLEAN CYCLE
After a clean cycle, you may notice some white ash In the
oven. Just wlpe It up with a damp cloth.
if white spots remain, remove them with a soap-filled
steel wool pad. Be sure to rinse thoroughly with a
vinegar and water mixture. These deposits are usually
a salt reslduethat cannot be removed bythe clean cycle.
If the oven is not clean after one clean cycle, the cycle
may be repeated.
QUESTIONS AND ANSWERS
Q. If my electronic control Is not working, can Istill self-
clean my oven?
A. No. Your RANGE CONTROL Is used to program the
oven to start and stop the self-cleaning cycle.
Q. Can i use commercial oven cleaners on anypart of
my self-cleaning oven?
A. No cleanersorcoatlngsshould beusedonor around
any part of this oven.
Q. Can I clean the woven gasket around the oven door?
A. You cannot clean the woven gasket.
Q. Is It normal to hear "crackling sound" during clean-
Ing?
A. Yes. This Is the metal heating and cooling.
Q. Why do i have ash left In my oven after cleaning?
A. Some types of soil will leave a deposit. It can be
removed with a damp sponge or cloth.
Q_
A.
Q,
A.
What should Ido if excessive smoking occurs during
cleaning?
This Is caused by excessive soil and you should
press CLEAR/OFF. Open windows to rid room of
smoke. Allow the oven to cool for at least one hour
before opening the door. Wipe up excess soil and
reset the clean cycle,
Should there be any odor during the cleaning?
Yes, there may be an odor during the first few
cleanlngs. Failure to wipe out excessive soil might
also cause an odor when cleaning.
14 NESCL03-5
TO SET A SELF°CLEAN CYCLE:
1. Slide door lock handle to the right. You may need to
lightly press on the door to lock it properly.
2. Push CrLEAN= The time display will show (.... }. See
Fig, t =
@
Fig. 1
3. Press the UP or DOWN arrow pad to set the desired
length ot clean time. Clean time is normally 3 hours.
You can change it between 2 and 4 hours, depending
on how dirty the oven is. See Fig. 2
INCREASE ORDECREASE
Fig. 2
YOU can push STOP TI]ME to find out when the cycle
will end. Push CILIEAN to return to countdown.
CLEAN TIME
TO liNTERRUPT A CLEAN CYCLE==
1. Push CLEAR.
Follow instructions under '='WHEN A CLEAN
CYCLE lI$ FDNDSHED."
TO SET A DELAYED
SELF°CLeAN CYCLE:
Follow steps 1-3 under "TO SET SELF,CL_.,AN
CYCLE," THEN:
4o PresS STOP TIME.
5. Set the time of day when you want the clean cycle to
end. See Fig. 4,
The control will calculate the start clean time.
Fig. 4
@ INCREASE OR DECREASE
CLEAN TIME
SET TIME OF DAY YOU
WANT CLEAN CYCLE TO END
Note:When selecting a stop time for a
delayed clean cyclle, you must aallow
time for the 2=4 hour cllean time=
"Door" will flash in display if you forget to lock the door.
NOTE:Your oven l_ght shoulld be OFF du_'ing a
sellf,cllean cyclic to prol]ong the !ligeof the
buBb=
Fig. 3
15 NCSCL05-1
CLEANING TiPS
On the following pages, all removable parts on your range are shown. Refer to those pages when cleaning your
range.
Warm water, a mild detergent and a soft cloth are safe to use on all cleanable parts of your range.
Do not use metal scouring pads, except where recommended.
REMOVAL OF PACFJ GIING TAPE
The safest way to remove adhesive left from packing tape on new appliances, to assure no damage Isdonetothe finish
of the product, Is an application of household liquid dishwashlng detergent, mineral oil or cooking o11. Apply with
a soft cloth; DO NOT use a plastic pad or equivalent. Wipe dry and then apply an appliance polish to thoroughly clean
and protect the surface. This procedure is also safe for the face of microwave doors and other plastic and Lexan parts.
HGTE: The pRast_c tape that is not removed from chrome trim on range parts CANNOT be removed if
baked on.
PART CLEANING MATERIIALS
Control panel Soap and water, damp cloth, paper
towel
Mild soap and water
Detergent, warm water and/or soap-
filled steel wool pad
Do not use oven cleaner in or around
any part of the oven
Control knobs
Self-cleaning oven
finish
Oven door gasket
Glass
Do not use du, or nicked
razor blade.
REMARKS
Wipe with a damp clothto remove sell. Do not
wipe when oven is In use. DO NOT USE
abraslvecleanlng powders, steelwoolorplas-
tic balls. They will martt'_ finish.
Pull knobs off unit. Wash gently, but do not
soa_. Dry and re_umto controls on unit.
Rinse wealafter cleaning. Cleaning Insidethe
oven need only be done as an optionaltouch-
up between serf-clean cycles. See the self-
cleaning s_ction for more lnfmTnatlon.
Do Not Clean Do Not clean the door gasket; the fiberglass
msterlal ofthe gaskethasan extremely low resLstancetoabrasion. An Intactand well-fitting
oven door gasket isessential for energy efficient oven operation and good baking results.
ffyou notlce the gasket becoming worn, frayed or damaged In artyway, or ffIthas
dlspka::edon the door, you should have Itmp_.
Sears_ CleaningCleme_ (Stock
No.40079)or,single-edgerazorscraper,
softcloth.
Correct and consistent cleaning Is essen-
tial to maintaining your cooktop. If soil,
mineral deposits from evaporated water
spills or metal rub-off from aluminum cook-
ware are not removed, they will burn onto
the cooktop and cause permanent
discoloration. Be sure that the cooktop is
cool before cleaning. Do not use cooktop
cleaner on a hot surface. The fumes can
be hazardous to your health and can cheml-
eally attack the cooktop. W_pe surface
clean after each use= Do not use a
d_sh cneth ov sponge to wipe up the
cooktepo They may leave a film of deter-
gent which can discolor your cooktop when
heated, if this happens, remove the film
with the recommended cleaner. We rec-
ommend that you use paper towels or a
clean cloth which is used only for cooktop
cleaning.
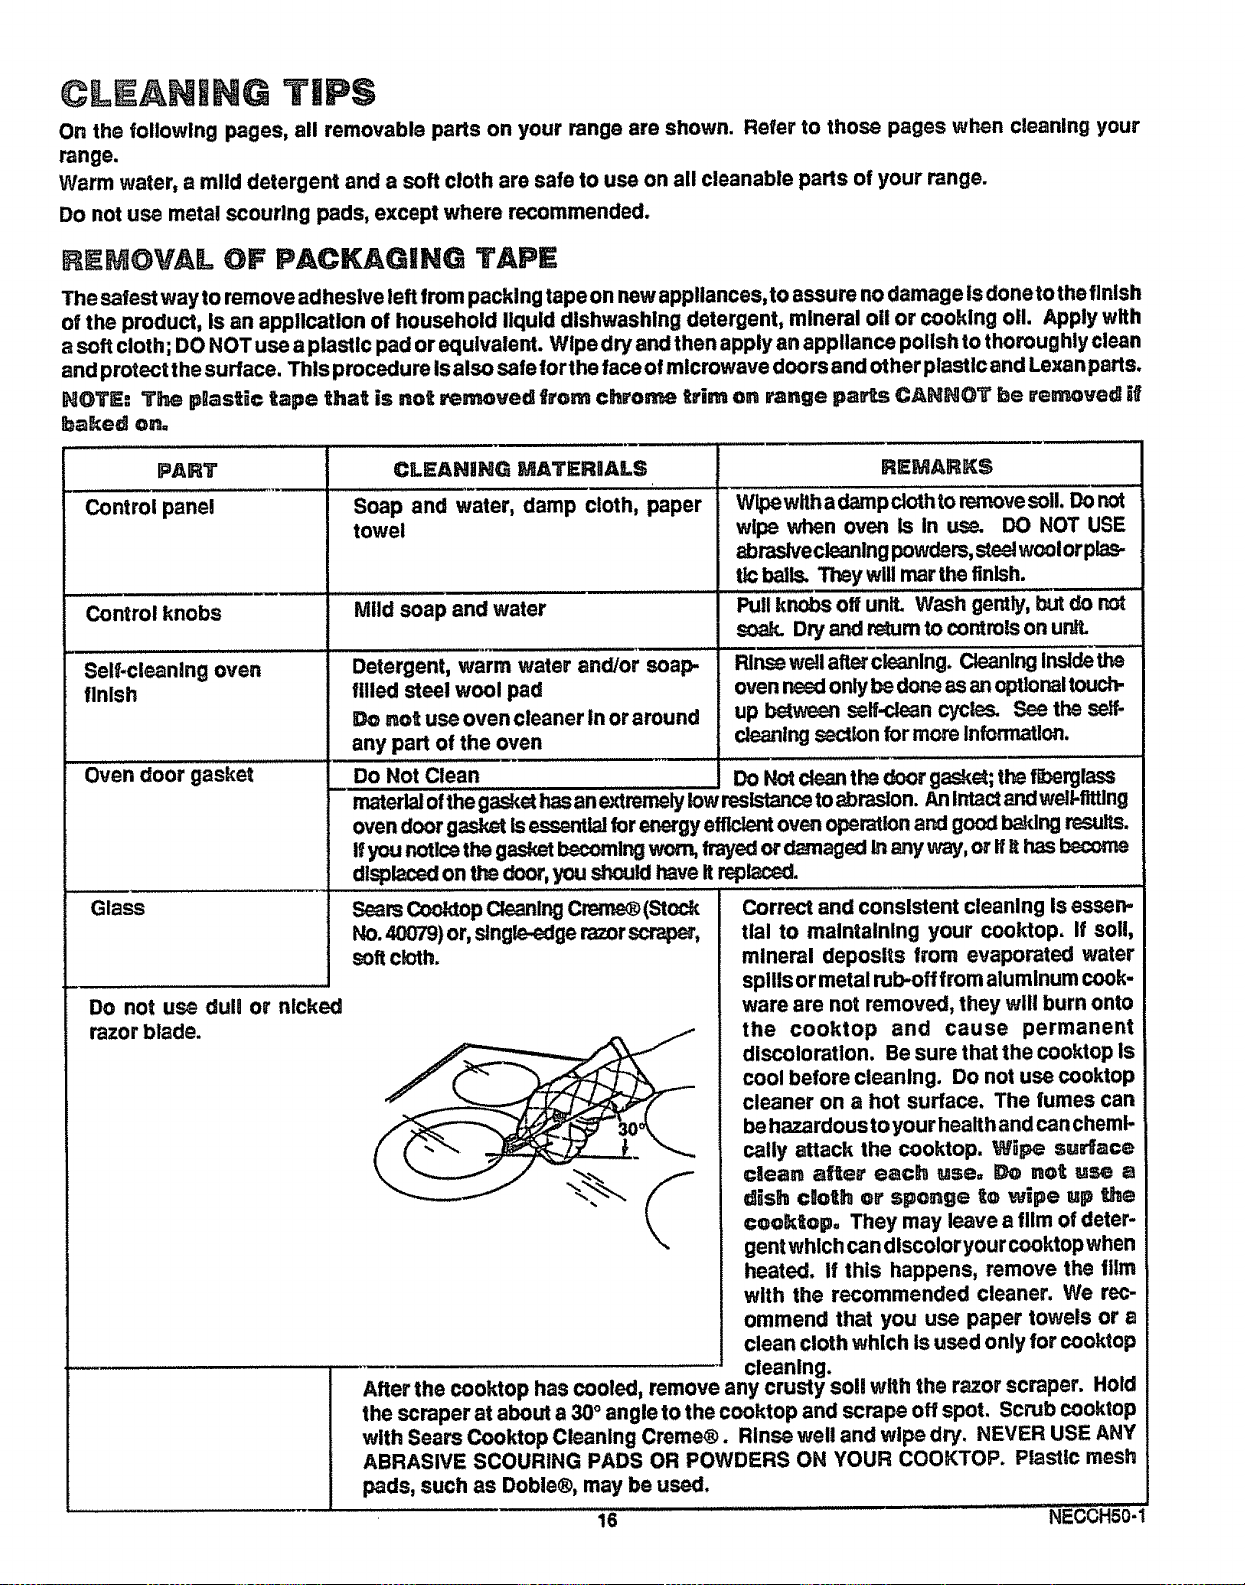
After the cooktop has cooled, remove any crusty soil with the razor scraper. Hold
the scraper at about a 30° angle to the cooktop and scrape off spot. Scrub cooktop
with Sears Cooktop Cleaning Creme®. Rinse well and wipe dry, NEVER USE ANY
ABRASIVE SCOURING PADS OR POWDERS ON YOUR COOKTOP. Plastic mesh
pads, such as Doble®, may be used.
16 .......NECCHSO_I
CLEA NG; TIPS (co....ee)
Broiler pan and grid
CLEAHI;NG MATEnlALS
Detergent, warm water, soap-filled
scouring pad, plastic scouring pad
_ent, w",mnwater, soap-filled
scouring p_, commercial oven cleaner
(pan only)
REMARKS
Remove from oven to clean. Rins_
thoroughly.
Remove soiled pan from oven to coot.
Drain fat or drippings. Fill pan with warm
water. Sprinkle grld with detergent and
coverwith damp cloth or paper towels. Let
pan and grid soak for a few minutes. Rinse
or scouras needed. Dry well. Grid and pan
may be washed In a dishwasher.
TO REMOVE MELTED PLASTIC/FOiiL FROM LEM[ENTS . . o
For remova_ of melted plastic/foil on bake elements or racks:
A. Turn range vent hood on.
B. Turn surface or bake element on and allow to warm up. When plastic/foil softens, scrape off as much as possible
using a spatula.
C. Turn the unit on high and let the remainder of the plastic/foil burn off.
THEI M@ST, T ADJUSTI ENT$
The temperature in your new range has been set cor-
rectly at the factory, so be sure to follow the reclpe
temperatures and cooking times the first few times you
bake in your oven.
If you thank the oven should be ho_ter or cooler, you can
adjust it yourself. To decide how much to change the
temperature, set the oven temperature 25°F higher or
lower than the temperature in your recipe, then bake.
The results of this "test" should give you an idea of how
much the temperature should be changed.
To _¢_us_ temperature-"
1. Push "BAKE" key.
2. Select a temperature between 500°F and 550°F.
3. Immediately, press "BAKE" again and hold the key
for about,_ seconds. The preset oven adjustment wilB
appear In the temperature display.
4. The temperature can be adjusted to (+) 35°F hc_e_ or
(-) 35°F cooler. Use the UP or DOWH keys to se_ct.
5. When you havemadethe edjusLment, push the CLEAR/
OFF button to go back to the time of day. Use your
oven as you would normally.
NOTE: ThHs adjust_n_ _iH not affec_ _g oft
CUea. Semperatures. g__Jl_g be _e_
bored when po_e_ _s removed°
We do not recommend the use of Inexpensive thermom-
eters, such as those found in grocery stores, to readjust
the temperature of your new oven. Thesethermometers
can vary 20 ° - a,0°F. Your oven has been prese_ to
maxlmlze cooking efficiency.
17 HECCH51-1
GLASS=CERAMIC COOKTOP CLEANING
Cleaning of glass-ceramlc cooktop Is different from
cleaning a standard porcelain finish.
To maintain and protect the surface of your new glass-
ceramic cooktop follow these basic steps.
DALLY CLEANIHG:
Use only Cook Top Cleaning Creme®on Glass-Ceramic.
For normal_ I_ght soil:
1. Rub a small amount of Cook Top Cleaning Creme®
onto soiled area using a dry paper towel. Wipe until
all soil and creme are removed. Frequent cleanlng
leaves a protective coating of slltcone which Is es-
sential in preventing scratches and abrasions.
2. Clean surface with Cook Top Cleaning Creme®after
each use.
For heavy_ burned-on soih
1. Apply a few drops of Cook Top Cleaning Creme® to
the cool, soiled area°
2. Using a dry paper towel, rub creme Into the burned-
on area.
3. Carefully scrape remaining soil with razor scraper.
Hold scraper at a 30° angle against the ceramic
surface.
s
If any soil remains, repeat the steps listed above. For
additional protection after all soil has been removed,
poltsh the entire surface with the Cook Top Cleaning
Creme®.
NOTE: Using a razor scraper will not damage the sur-
face If the 30 ° angle Is maintained. _ Not use
a dullli or nicked razor bUade on your
coektop. Stere the razor scraper out of
reach of chBlldren.
SPECBAn_ CARE:
Sugar spills (such as jellies, fudge, candy syrups) or
melted plastic can cause pitting of the surface of your
cooktop unless the spill is removed while still hot.
Specia_ care should be taken when removing hot
substances. Follow these Instructions carefully and
remove soil while spill is still hot.
1. Turn off all surface units affected by the spill. Re-
move hot utensils.
2,
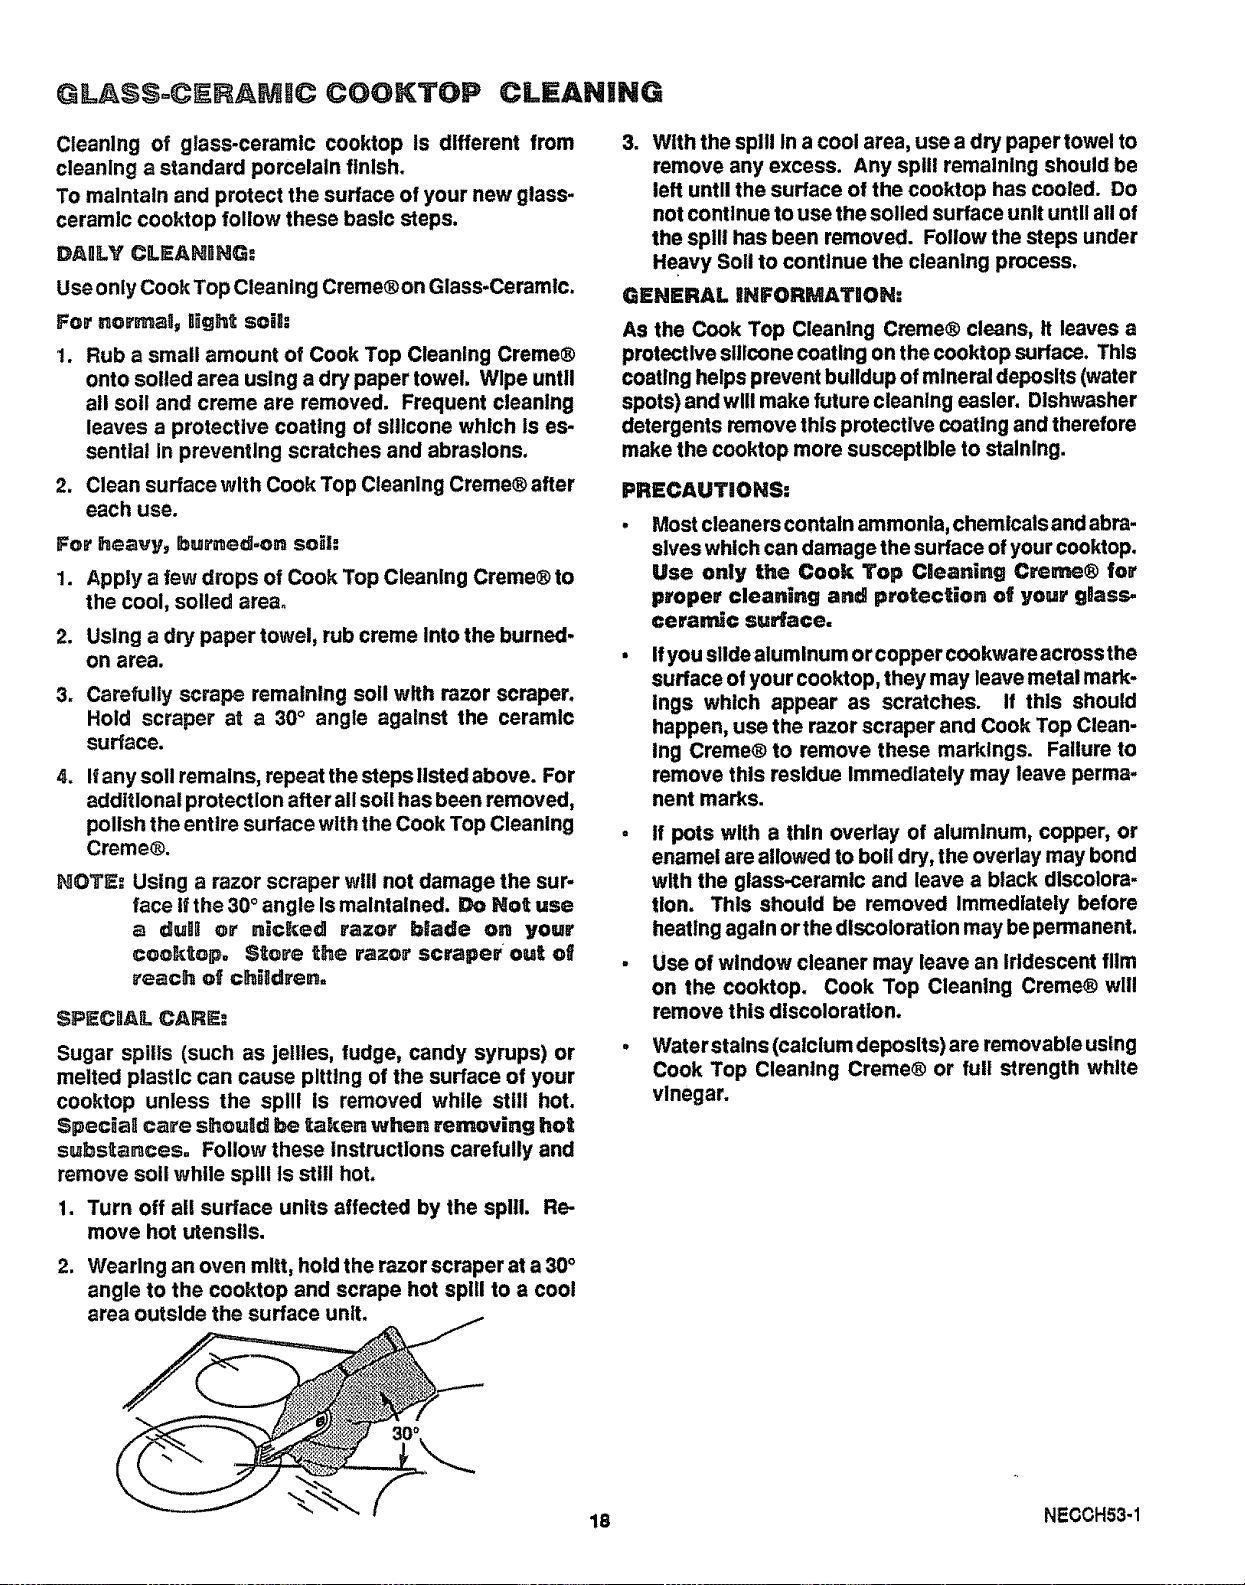
Wearing an oven mitt, hold the razor scraper at a 30°
angle to the cooktop and scrape hot spill to a cool
area outside the surface unlt.
3. With the spill In a cool area, use a dry paper towel to
remove any excess. Any spill remaining should be
left until the surface of the cooktop haS cooled. Do
not continue to use the soiled surface unit until all of
the splll has been removed. Follow the steps under
Heavy Soil to continue the cleanlng process.
GENERAL iNFORMATION:
As the Cook Top Cleaning Creme® cleans, It leaves a
protective silicone coating on the cooktop surface. This
coating helps prevent buildup of mineral deposits (water
spots) and will make future cleaning easier. Dishwasher
detergents remove this protective coating and therefore
make the cooktop more susceptible to staining.
PRECAUTIONS:
Most cleaners contain ammonia, chemicals and abra-
sives which can damage the surface of your cooktop.
Use only the Cook Top Cleaning Creme® for
proper cleaning and protection of your gBass.
ceramic surface.
Ifyou slide aluminum or copper cookware across the
surface of your cooktop, they may leave metal mark-
ings which appear as scratches. If this should
happen, use the razor scraper and Cook Top Clean-
Ing Creme® to remove these markings. Failure to
remove this residue Immediately may leave perma-
nent marks.
If pots with a thin overlay of aluminum, copper, or
enamel are allowed to boll dry, the overlay may bond
with the glass-ceramic and leave a black discolora-
tion. This should be removed Immediately before
heatlng again orthe discoloration may be permanent.
Use of window cleaner may leave an Iridescent film
on the cooktop. Cook Top Cleaning Creme® will
remove this discoloration.
, Waterstains (calcium deposits) are removable using
Cook Top Cleaning Creme® or full strength white
vinegar.
/ 18 NECCH53-1
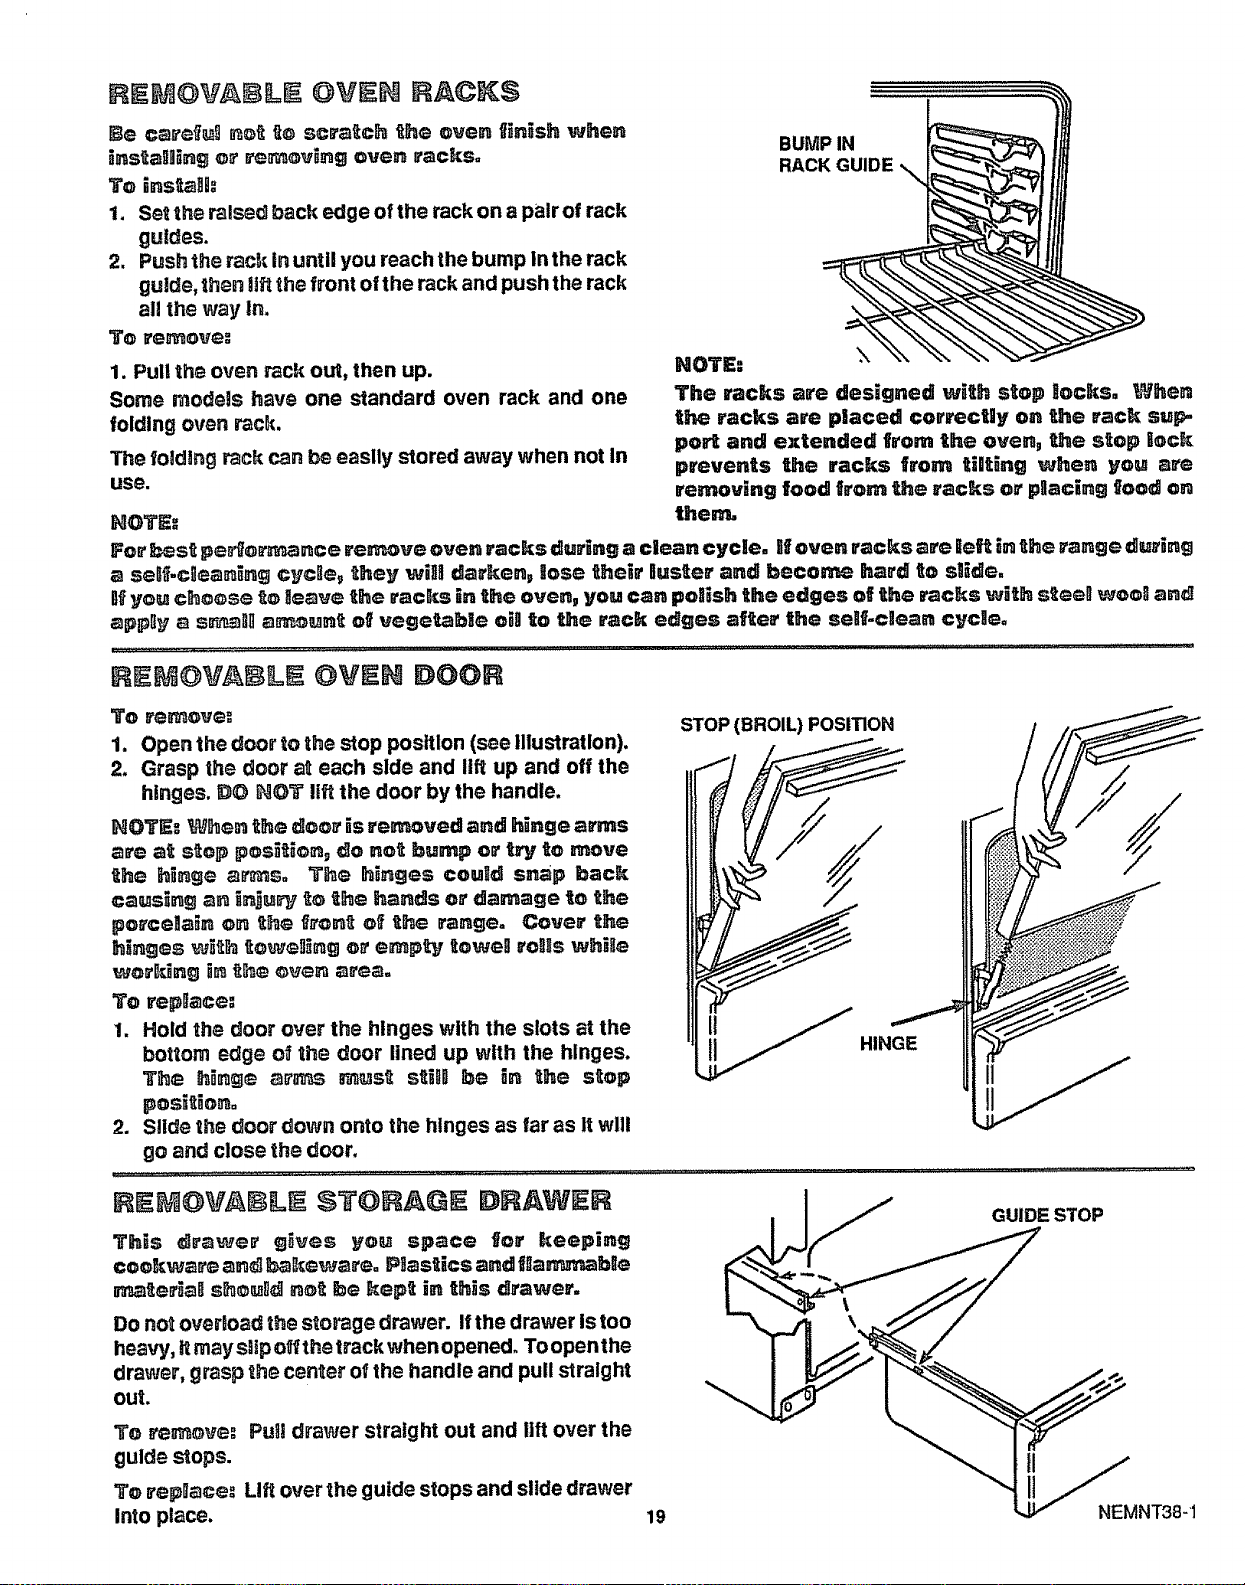
REMOVA L @VE RACKS
Be carefuO not _o scratch _he oven finish when
instagling or removing oven racks.
To ins_agD:
1. Set the ralsec; back edge of the rack on a pair of rack
guides.
2, Push the rack in until you reach the bump in the rack
guide, then Jiffthe front ofthe rack and push the rack
all the way in.
1. Pul! the oven rack out, then up.
Some models have one standard oven rack and one
folding oven rack.
The folding rack can be easily stored away when not in
use.
NOTE."
BUMP IN
RACK GUIDE
For _st pe_or_nce remove oven racks during a clean cycle, ll_oven racks are leR i, the range duri,g
a self-cgea_ng Cyc_e_ they will darKen_ lose their _uster and become hard to slide.
Bfyou cheese _o aeave the racks in the oven, you can po_ish the edges of the racks _Bth s_teenwool] atom+
app+y a s_a+_l mmommmof vege_b+e oi+ to me rack edges after the self-c,ean cyc,e.
EM@VA L @V H
To remove:
1. Open the door _othe stop position (see Illustration).
2. Grasp the door a_ each side and ilf_ up and off the
hinges. _O NOT llft the door by the handle.
NOT_ _hen the d]oo_'is removed and hinge arms
are at step posi_o_ do not _ump or try to move
the hinge ar_s. The hinges cou;d sn_p back
causing mn inju_, to the hands o,' _amage _o the
porcelain o_ the _ron_ o_ _he range. Cover the
hinges _ith towe_ng or emp_ to_eg rolls whille
worP_ng in 9h_ _e_ are_.
To replace."
1. Hold the door over the hinges with the slots at the
bottom edge o_ the door lined up with the hinges.
Th_ hinge mrmmm r_us_ sti_l _e in the stop
positio,_.
2. Slide the door down onto the hinges as far as It will
go and close the door.
+, ....................................... ....
STOP (BROIL) POSITION
This _r_er g_s you space _or Keeping
ce_Kwar® an+ _Keware. IP]]astics and t_a_e
m_eria_ sho_dl not he Kep_ in _his _rawer.
DO no_ over,gad the stooge drawer. If the drawer is too
heavy, itmay slip offthe track when opened° To open the
drawer, grasp the cen_er of the handle and pull straight
out.
To remove: Pull drawer straight out and lift over the
guide stops.
To rep[i_ce_ Lift over the guide stops and slide drawer
Into place.
IJ GUIDE STOP
NEMNT38-1
19
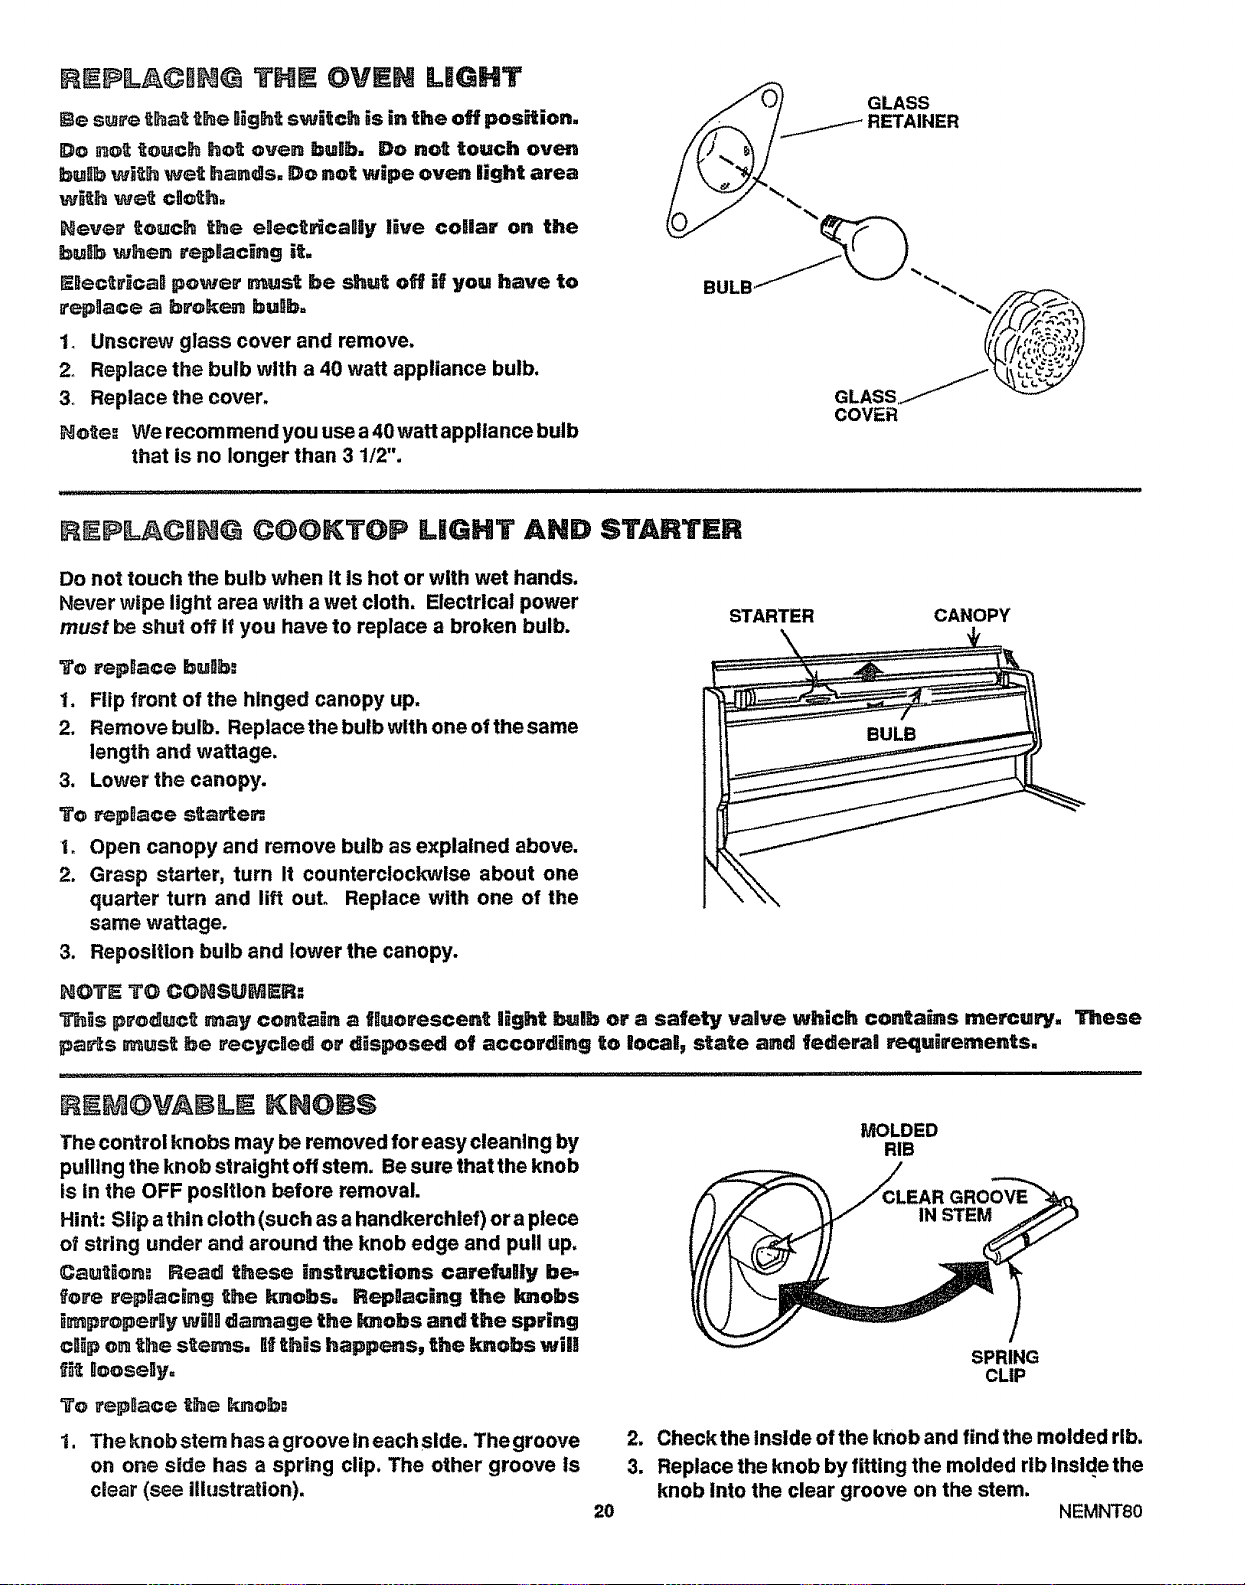
REPLACING THE OVEN UGHT
Be su_'e that the light swKtch is in the off pos_ion=
De _ot touch hot oven bulb= Do net touch oven
bunb with wet hands= Do net wipe oven light area
with we_ cDeth=
Never touch the egect_call¥ live coRia," on the
bugb when _'epl;ac_ng it=
n_Rect_Jcal power must be shut off ;f you have to
replace a broken bulb=
1. Unscrew glass cover and remove.
2o Replace the bulb with a 40 watt appliance bulb.
3, Replace the cover.
_lote: We recommend you use a 40watt appliance bulb
that is no longer than 3 1/2".
GLASS
Do not touch the bulb when It is hot or with wet hands,
Never wipe light area with a wet cloth, Electrlcal power
must be shut off It you have to replace a broken bulb.
STARTER CANOPY
=_e replace bulb:
1. Flip front of the hinged canopy up.
2. Remove bulb. Replacethe bulb with one of the same
length and wattage.
3. Lower the canopy.
To replace s_a_en
1_ Open canopy and remove bulb as explained above.
2. Grasp starter, turn It counterclockwise about one
quarter turn and lift out° Replace with one of the
same wattage.
3. Repositton bulb and lower the canopy.
NOTE TO CONSUMER:
_is product may contain a fluorescent Hght bulb or a safety valve which contains mercury= These
pa_s must be _ecycled or d_sposed of according to local, sta_e and federal _.=quirernents,
The control knobs may be removed foreasy cleaning by
pulling the knob straight off stem. Be sure that the knob
is in the OFF posltton before removal.
Hint: Slip a thin cloth (such as a handkerchief) or a piece
of string under and around the knob edge and pull up.
Caution: Read these instructions carefully be=
fo_e replacing the knobs= Replacing the knobs
improperly will damage the knobs and the sp_ing
cl_p on the stems, H th_s happens, _he knobs wi|!
_t _oose_y=
_o replace t_e knob=
1. The knobstem hasa groove in each slde, Thegroove
on one side has a spring clip. The other groove ts
clear (see illustration).
MOLDED
RIB
SPRING
CLIP
20
2_
3.
Checkthe Inside of the knob and find the molded rib.
Replace the knob by fitting the molded rib lnsld.ethe
knob Into the clear groove on the stem.
NEMNTlO
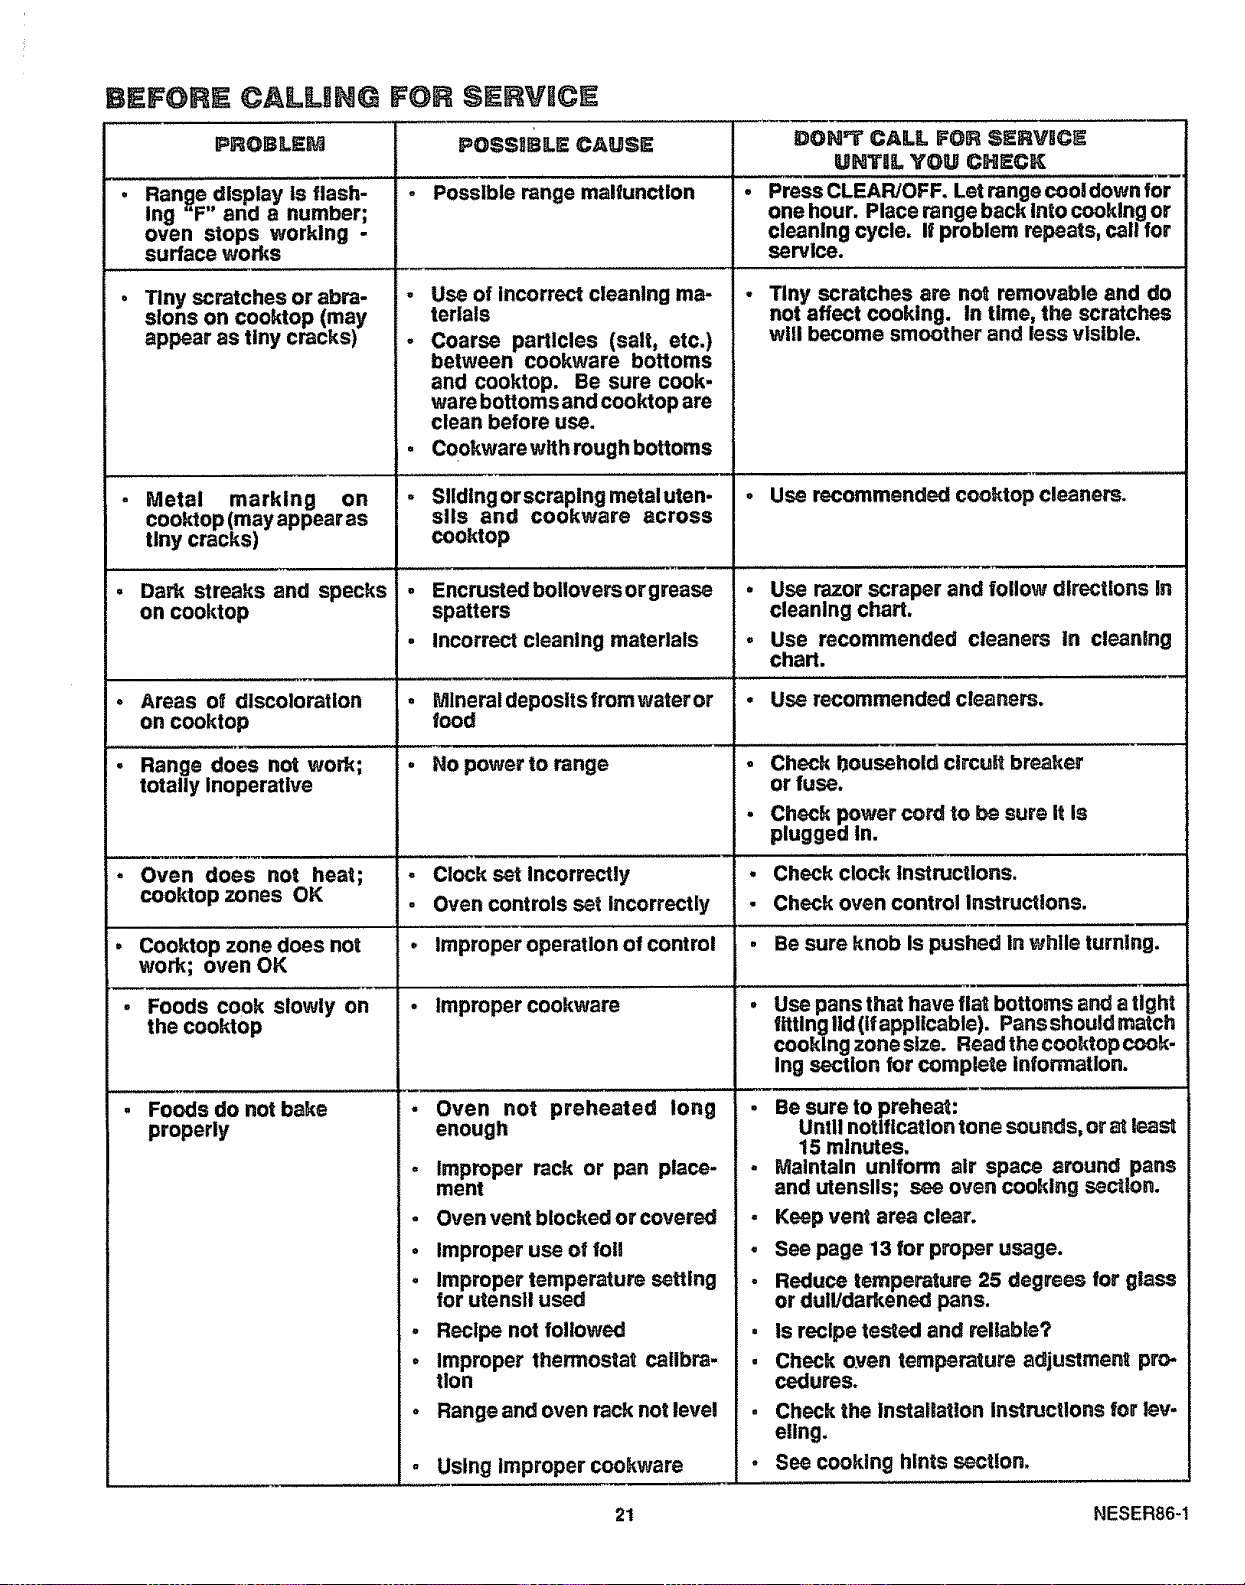
BEFORE CALILWNG FOR SERVICE
PROBLEM
Range display is tlash-
ing "F" and a number;
oven stops working -
surface works
POSS_BILE CAUSE
• Posslble range malfunction
Tiny scratches or abra-
sions on cooktop (may
appear as tiny cracks)
Metal marking on
cooktop (may appear as
tiny cracks)
Dark streaks and specks
on cooktop
Areas of discoloration
on cooktop
Range does not work;
totally Inoperative
Oven does not heat;
cooktop zones OK
Cooktop zone does not
work; oven OK
Foods cook slowly on
the cooktop
Foods do not bake
properly
- Use of Incorrect cleaning ma-
terials
o Coarse particles (salt, etc.)
between cookware bottoms
and cooktop. Be sure cook-
ware bottoms and cooktop are
clean before use.
• Cookwarewith rough bottoms
• Slldlngorscraplng metaluten-
slls and cookware across
cooktop
, Encrusted boiloversorgrease
spatters
. Incorrect cleaning materials
• MIneraldeposltsfromwaterer
food
• No power to range
- Clock set Incorrectly
, Oven controls set Incorrectly
Improper operation of control
• Improper cookware
- Oven not preheated long
enough
° Improper rack or pan place-
ment
• Oven vent blocked orcovered
• Improper use of Ioil
• Improper temperature setting
for utensil used
, Recipe not followed
o Improper thermostat callbra-
tlon
, Range and oven rack not level
- Using Improper cookware
DON'T CALL FOR $ERV[ICE
UNT_IL YOU CHECK
Press CLEAR/OFF. Let range cool down for
one hour. Place range back Into cooking or
cleaning cycle. If problem repeats, call for
service.
Tiny scratches are not removable and do
not affect cooking. In time, the scratches
will become smoother and less visible.
Use recommended cooktop cleaners.
• Use razor scraper and tollow directions In
cleaning chart.
, Use recommended cleaners In cleaning
chart.
• Use recommended cleaners.
Q
Check bousehold circuit breaker
or fuse.
Check power cord to be sure it is
plugged in.
Check clock Instructions.
Check oven control Instructions.
, Be sure knob is pushed In while turning.
Use pans that have fiat bottoms and a tight
fitting lid (If applicable). PansshouJd match
cooking zone size. Read the cooktop cook-
ing section for complete Information.
• Be sure to preheat:
UntU notification tone sounds, or at least
15 minutes.
• IVlalntaln uniform air space around pans
and utensils; see oven cooking section.
Keep vent area clear.
o
@
o
o
u
See page 13 for proper usage.
Reduce temperature 25 degrees for glass
or dull/darkened pans.
is recipe tested and reliable?
Check oven temperature adjustment pro-
cedures.
. Check the Installation Instructlons for lev-
eling.
• See cooking hints section.
21 NESER86-1
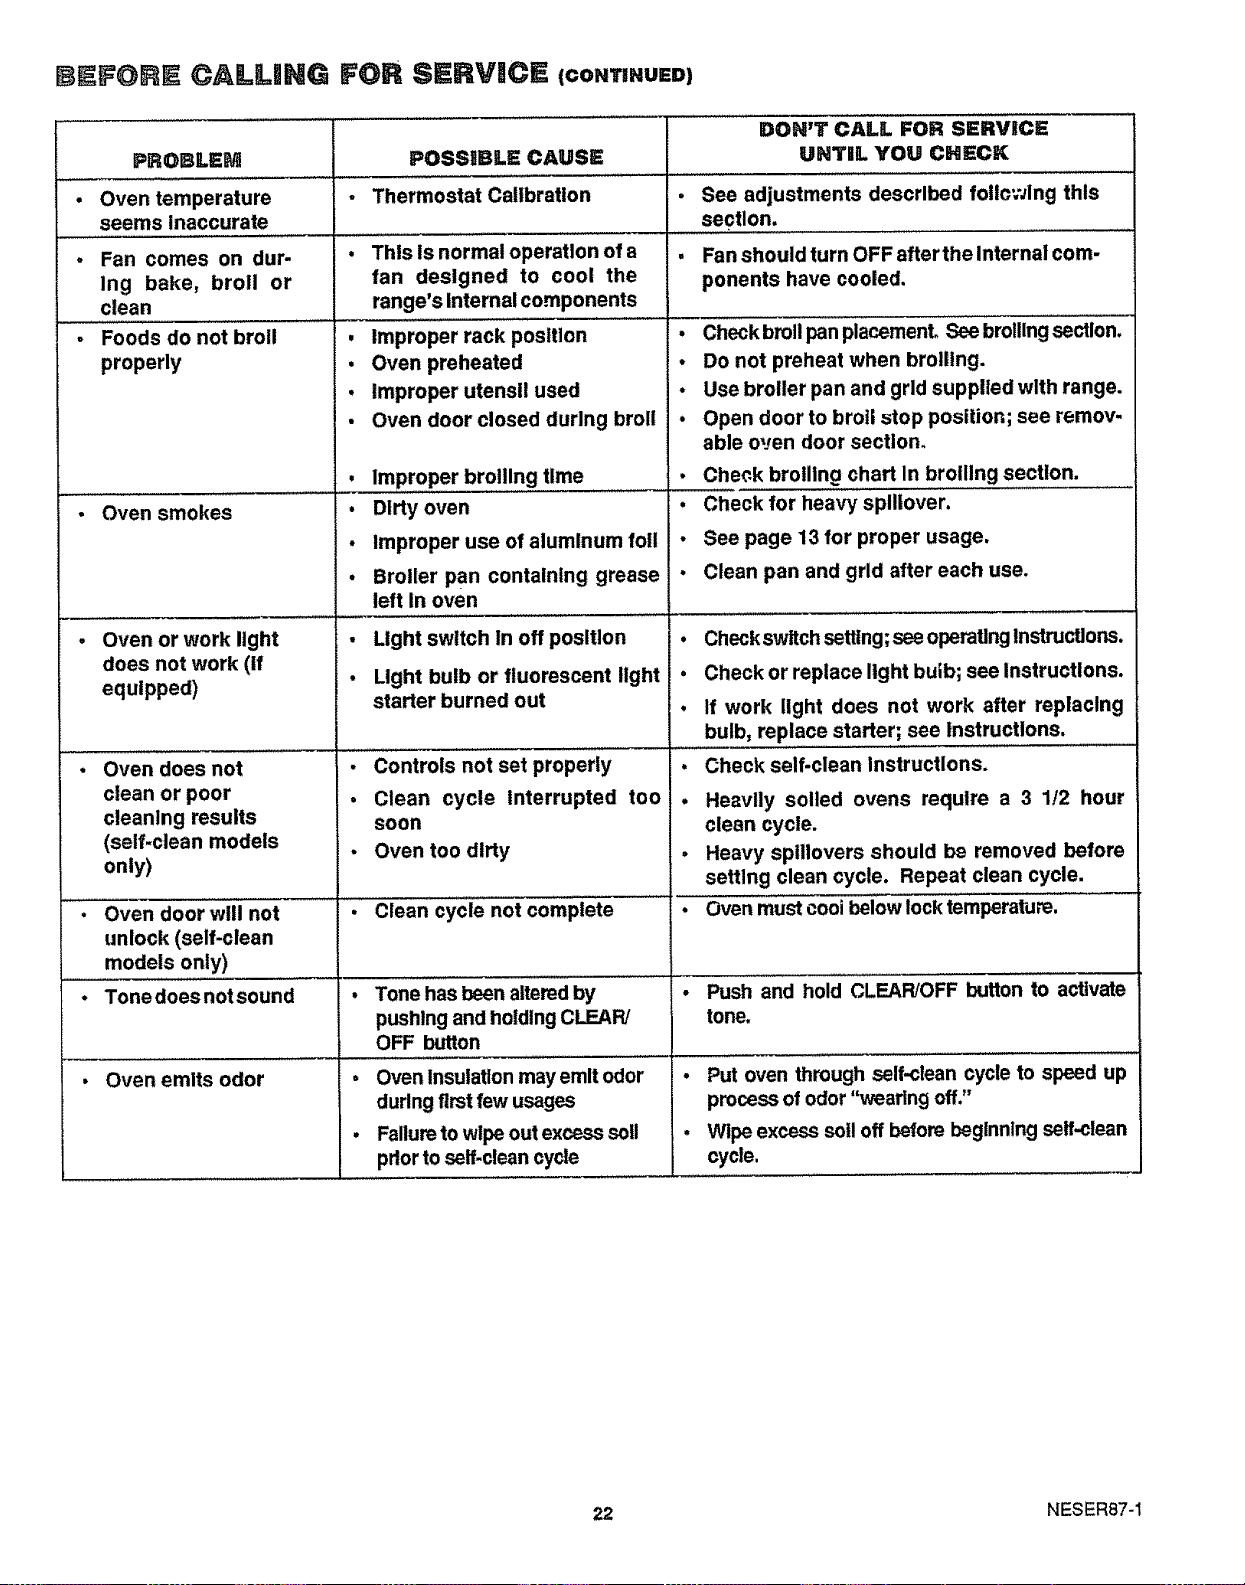
BEFORE CALL|NG FOR SERV|CE (CONTmUSm
PROBLEM
• Oven temperature
seems inaccurate
• Fan comes on dur-
Ing bake, broil or
clean
Foods do not broil
properly
• Oven smokes
..... , ,
. Oven or work light
does not work (if
equipped)
• Oven does not
clean or poor
cleaning results
(self-clean models
only)
• Oven door will not
unlock (self-clean
models only)
• Tonedoesnotsound
• Oven emits odor
POSStBLE CAUSE
• Thermostat Calibration
This is normal operation of a
fan designed to cool the
range's Internal components
improper rack position
Oven preheated
Improper utensil used
Oven door closed during broil
I
o
I
. Improper broiling time
• Dirty oven
• improper use of aluminum foil
• Broiler pan containing grease
left In oven
,, ,,, ,, .....................
• Light switch In off position
• Light bulb or fluorescent light
starter burned out
• Controls not set properly
• clean cycle Interrupted too
soon
- Oven too dlrty
• Clean cycle not complete
e
DON'T CALL FOR SERVICE
UNTIL YOU CHECK
. See adjustments described following this
section,
.... , , " ......
, Fan should turn OFF afterthe Internal com-
ponents have cooled.
• Check broilpan placement, See broilingsection,
- Do not preheat when broiling.
• Use broiler pan and grid supplied with range.
• Open door to broil stop position; see remov-
able oven door section,
• Check broiling chart In broiling section.
• Check for heavy splllover,
• See page 13 for proper usage.
• Clean pan and grid after each use.
• Checkswitch setting; see operaUngInstructions.
• Check or replace light bulb; see Instructions.
• If work light does not work after replacing
bulb, replace starter; see instructions.
• Check self-clean Instructions.
• Heavily soiled ovens require a 3 1/2 hour
clean cycle.
• Heavy splllovers should be removed before
setting clean cycle. Repeat clean cycle.
• Oven must cool below lock temperature.
Push and hold CLEAR/OFF button to activate
tone.
• Tone has been altered by
pushing and holding CLEAR/
OFF button
• Oven Insulation may emit odor
during first few usages
• Failureto wipe out excess soil
pdor to self-clean cycle
• Put oven through self-clean cycle to speed up
process of odor "wearing off,"
• Wipe excess soil off before beginning self-clean
cycle.
22 NESER87-1
REMOVAL OF PACKAGING TAPE:
When packaging tape is removed from your appliance, you may find some adhesive still on the product. To remove
the adhesive and assure you do not damage the finish, use an application of household liquid dishwashing detergent,
mineral otl, or cooking oil. Apply with a soft cloth. DO NOT use a plastic pad or equivalent. Wipe dry and then apply
an appliance polish to thoroughly clean and protect the surface. Thls procedure Is also safe for the face of microwave
doors and other plastics and Lexan parts.
NOT;:: The plastic tape that is not removed from chrome trim on range parts CANNOT be removed if baked on_
THERMOSTAT ADJUSTMENTS
The temperature in your new range has been set cor-
rectly at the factory, so be sure to follow the recipe
temperatures and cooking times the first few times you
bake in your oven.
Ifyou think the oven should be hotter or cooler, you can
adjust it yourself. To decide how much to change the
temperature, set the oven temperature 25°F higher or
lower than the temperature in your recipe, then bake.
The results of this "test" should give you an idea of how
much the temperature should be changed.
To adjust temperature:
1oPush "BAKE" key.
2. Select a temperature between 500°F and 550°F.
3. immediately, press "BAKE" again and hold the key
for about 4 seconds. The preset oven adjustment will
appear in the temperature display.
4. The temperature can be adjusted up to (+) 35°F hotter
or (-) 35°F cooler. Use the up or down keys to select.
5. Whenyou havemade the adjustment, push the CLEAR/
OFF button to go back to the time of day. Use your
oven as you would normally.
NOTE:This adjustment wiiB not affect Broil Or
Clean temperatures, nt wilB be remem-
bered when power is removed,
We do not recommend the use of inexpensive thermom-
eters, such as those found in grocery stores, to readjust
the temperature of your new oven. These thermometers
can vary 20° - 40°F. Your oven has been preset to
maximize cooking efficiency.
23 NESER88

NOTES
24

NOTES
25

NOTES
:1
26

E
A
F
Dear Customer:
Our constant efforts are
directed toward making
sure your new Kenmore
Range will arrive at your
home in perfect condition
and will give you proper
performance. As part of
these efforts, we feel it is
our responsibility to pro-
vide you with this warranty
for your range.
Recycled Paper
.........J
r,,_,,,,,,i,,,
FULL ONE YEAR WARRANTY ON THE FUNCTIONING OF ALL
PARTS EXCEPT GLASS PARTS
If,within one year from the date of installation, any part, other than a glass
part, failsto function properly due to a defect in material or workmanship,
Sears will repair or replace it, free of charge.
FULL 30-DAY WARRANTY ON GLASS PARTS AND FINISH OF PORCE-
LAIN ENAMEL, PAINTED OR BRIGHT METAL FINISHED PARTS
if, within 30 days from the date of installation, any glass part or the finish
on any porcelain enamel, painted or bright metal part is defective in
material or workmanship, Sears will replace the part, free of charge.
FULL 90-DAY WARRANTY ON MECHANICAL ADJUSTMENTS
For 90 days from the date of installation, Sears will provide, free of charge,
any mechanical adjustments necessary for proper operation ofthe range,
except for normal maintenance.
If the range is subjected to other than private family use, the above
warranty coverage is effective for only 90 days.
WARRANTY SERVICE IS AVAILABLE BY CONTAClrING THE
NEAREST SEARS SERVICE CENTER/DEPARTMENT aN THE
UNITED STATES
This warranty applies only while this product is in use in the United States.
This warranty gives you specific legal rights, and you may also have other
rights which vary from state to state. SEARS, ROEBUCK and CO.
Dept, 731 CR-W
Sears Tower
Chicago, IL 60684
WE SERVICE WHAT WE SELL
"We Service What We Sell" is our assurance to you that you can depend on Sears for service because Sears
service is nationwide.
Your Kenmore Range has added value when you consider that Sears has a service unit near you staffed by
Sears trained technicians.., professional technicians specifically trained on Sears appliances, having the
parts, tools and equipment to ensure that we meet our pledge to you -- "We Service What We Sell!"
TO FURTHER ADD TO THE VALUE OF YOUR RANGE, BUY A SEARS MAINTENANCE AGREEMENT,
Kenmore Ranges are designed, manufactured and
tested for years of dependable operation. Yet, any
modern appliance may require service from time
to time. The Sears Warranty plus the Sears Main-
tenance Agreement provides protection from un-
expected repair bills and assuresyou of enjoying
maximum range efficiency..
Here's a comparative warranty and Maintenance
Agreement chart showing you the benefits of a
Sears Range Maintenance Agreement.
...... i
years of Ownership Coverage 1st Year i 2rid Year 3rd Year
Replacement of Dofecttve
1 .0..otherthanPorce,afn W MA MA
or Glass
90 DAYS
W MA MA
2 Mechanical Ad|ustrnent
30 DAYS
3 PorcelaIn0odGiasoPo.s W MA MA
Annual Preventive Mainten*
4 _.00Checkatyourrequest MA MA MA
W - Warr.nty MA - Maintenance Agreem0nt
CONTACT YOUR SEARS SALESPERSON OR LOCAl, SEARS SERVICE
CENTER TODAY ANDPURCHASE A SEARS MAINTENANCE AGREEMENT.
__ _'_ _'_ O _ ® A_er_ca's Best Sell!lirtg Appliance Brart_
Sold by SEARS, ROEBUCK AND CO., Chicago, IL 60684
Printed in LaFayette, Georgia