P/N: A13990903 (2106)
IMPORTANT
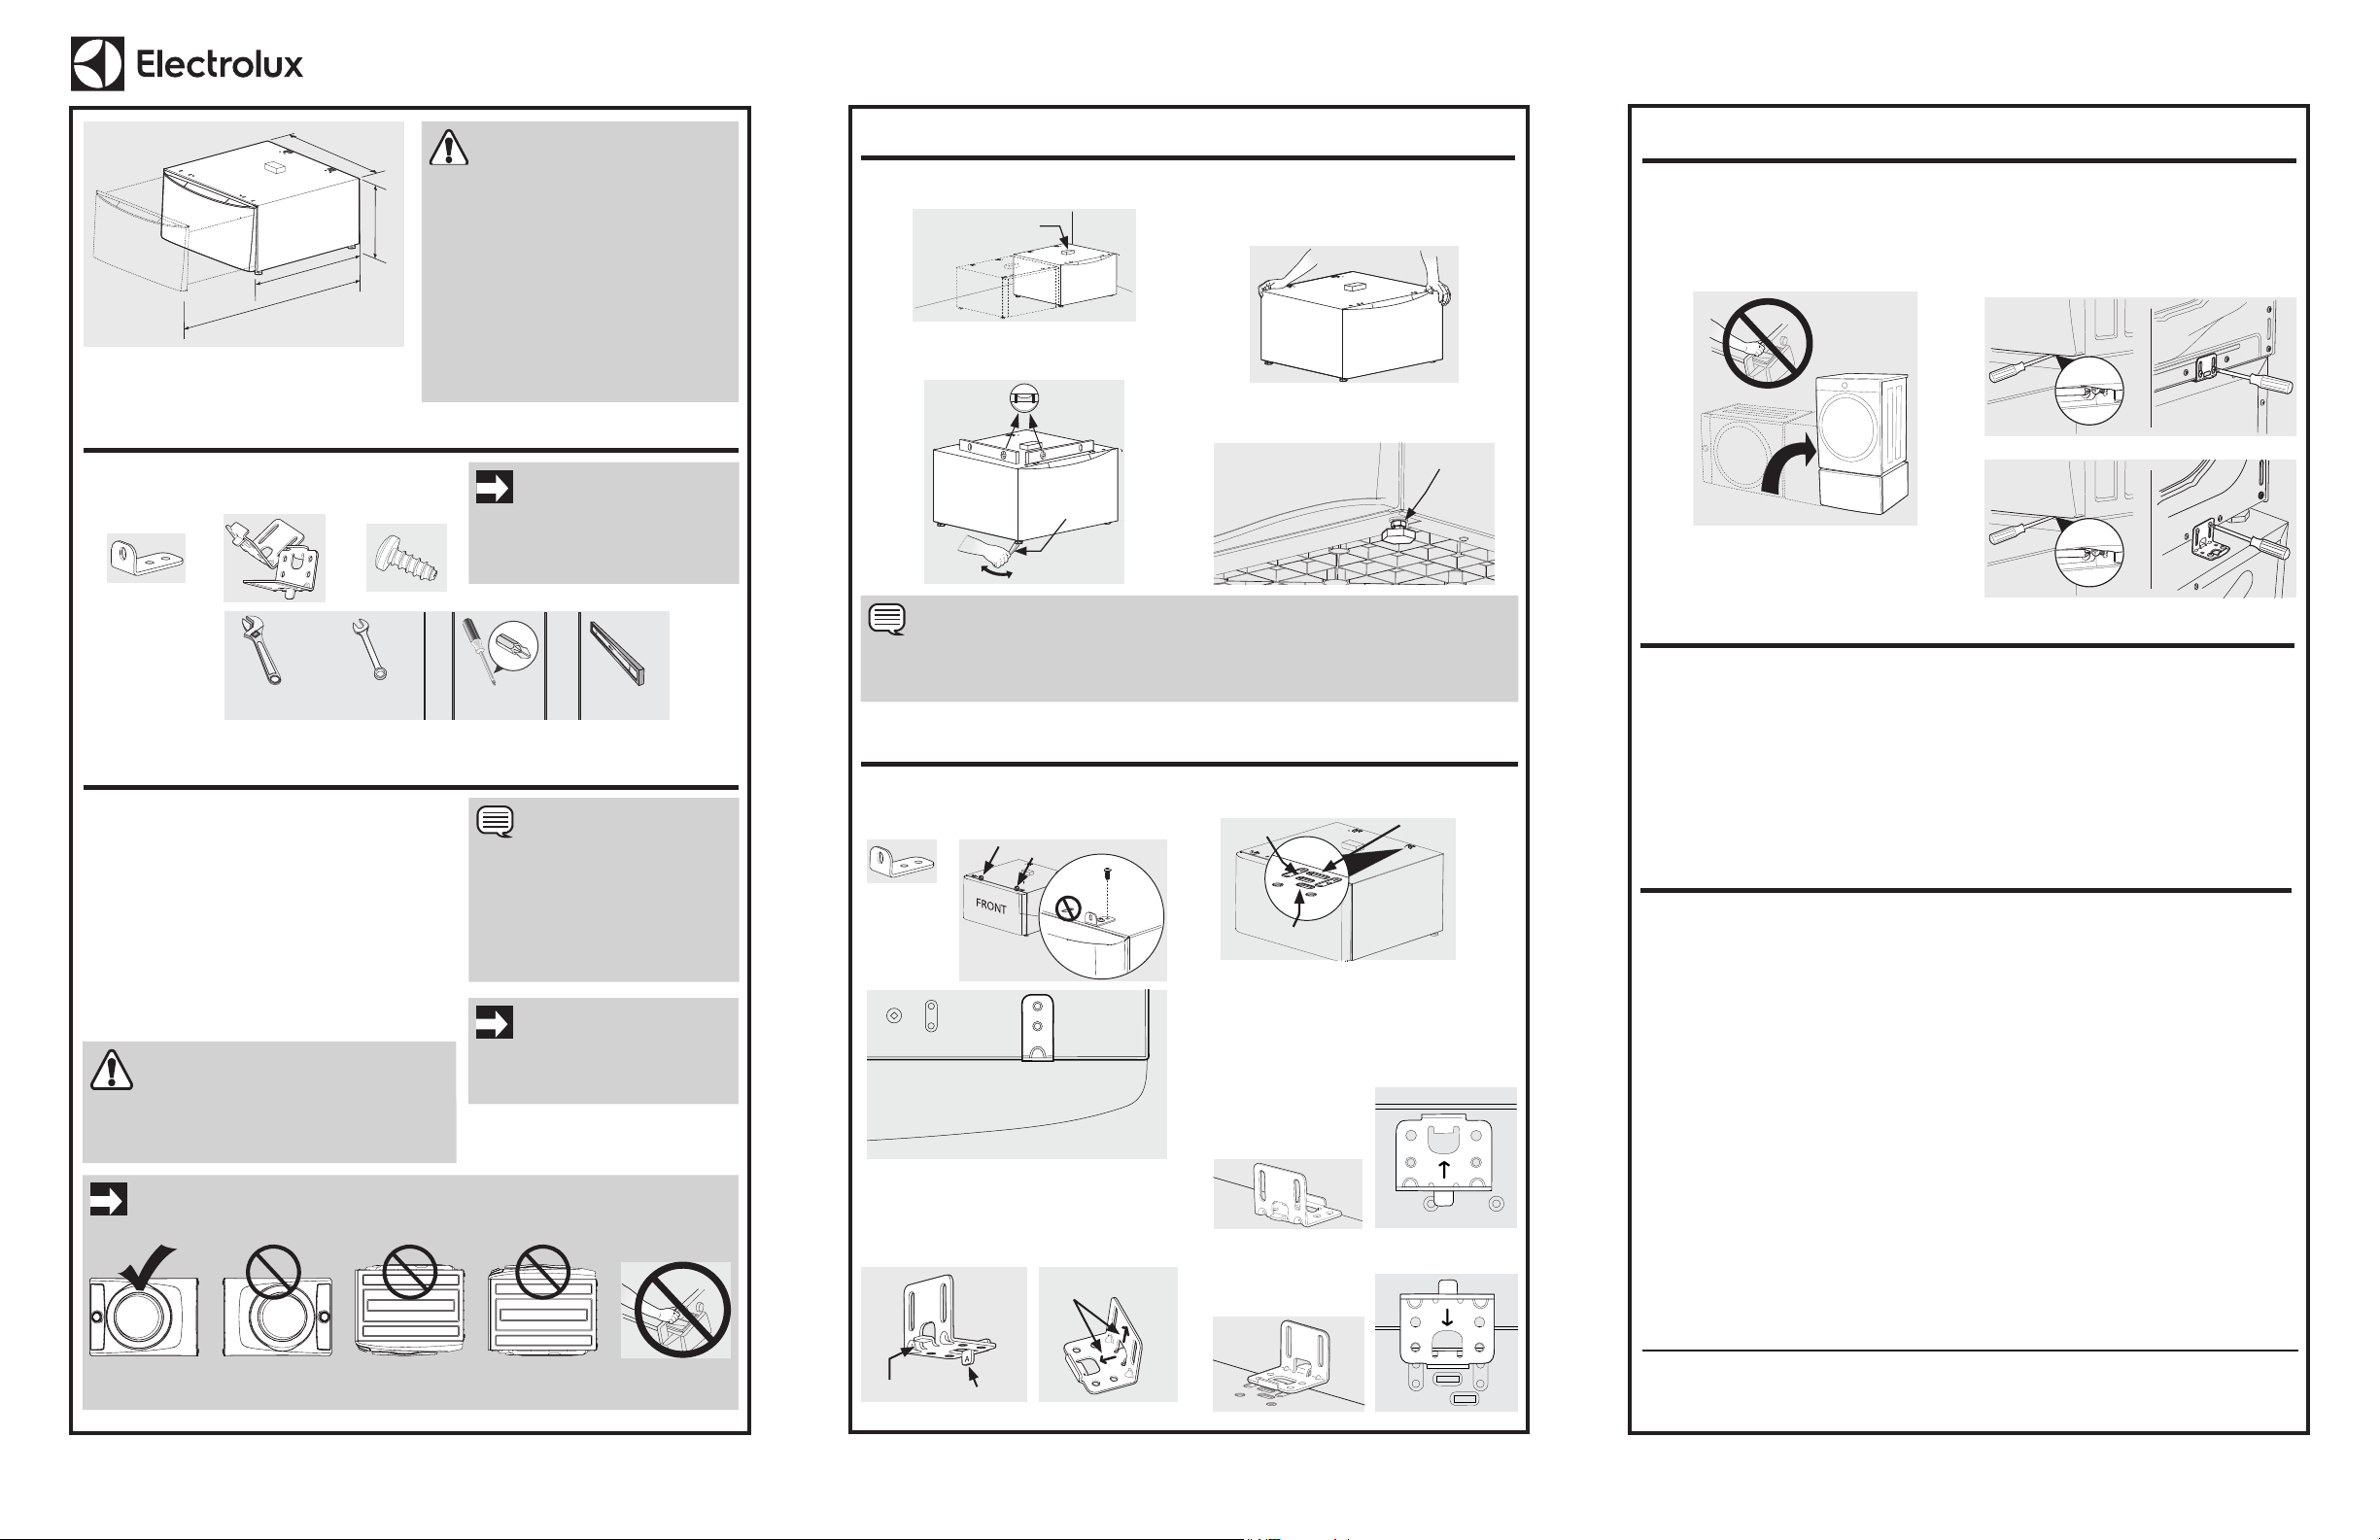
Total weight IN closed drawer or
combination of IN and ON TOP OF
open drawer should not exceed 65 lb.
(29.5 kg).
WARNING
• Failure to disconnect from power
source before stacking could
result in personal injury or even
death.
• Improper installation of dryer
venting could result in personal
injury or damage to property.
• To avoid back or other injury,
have more than one person move
or lift the washer or dryer.
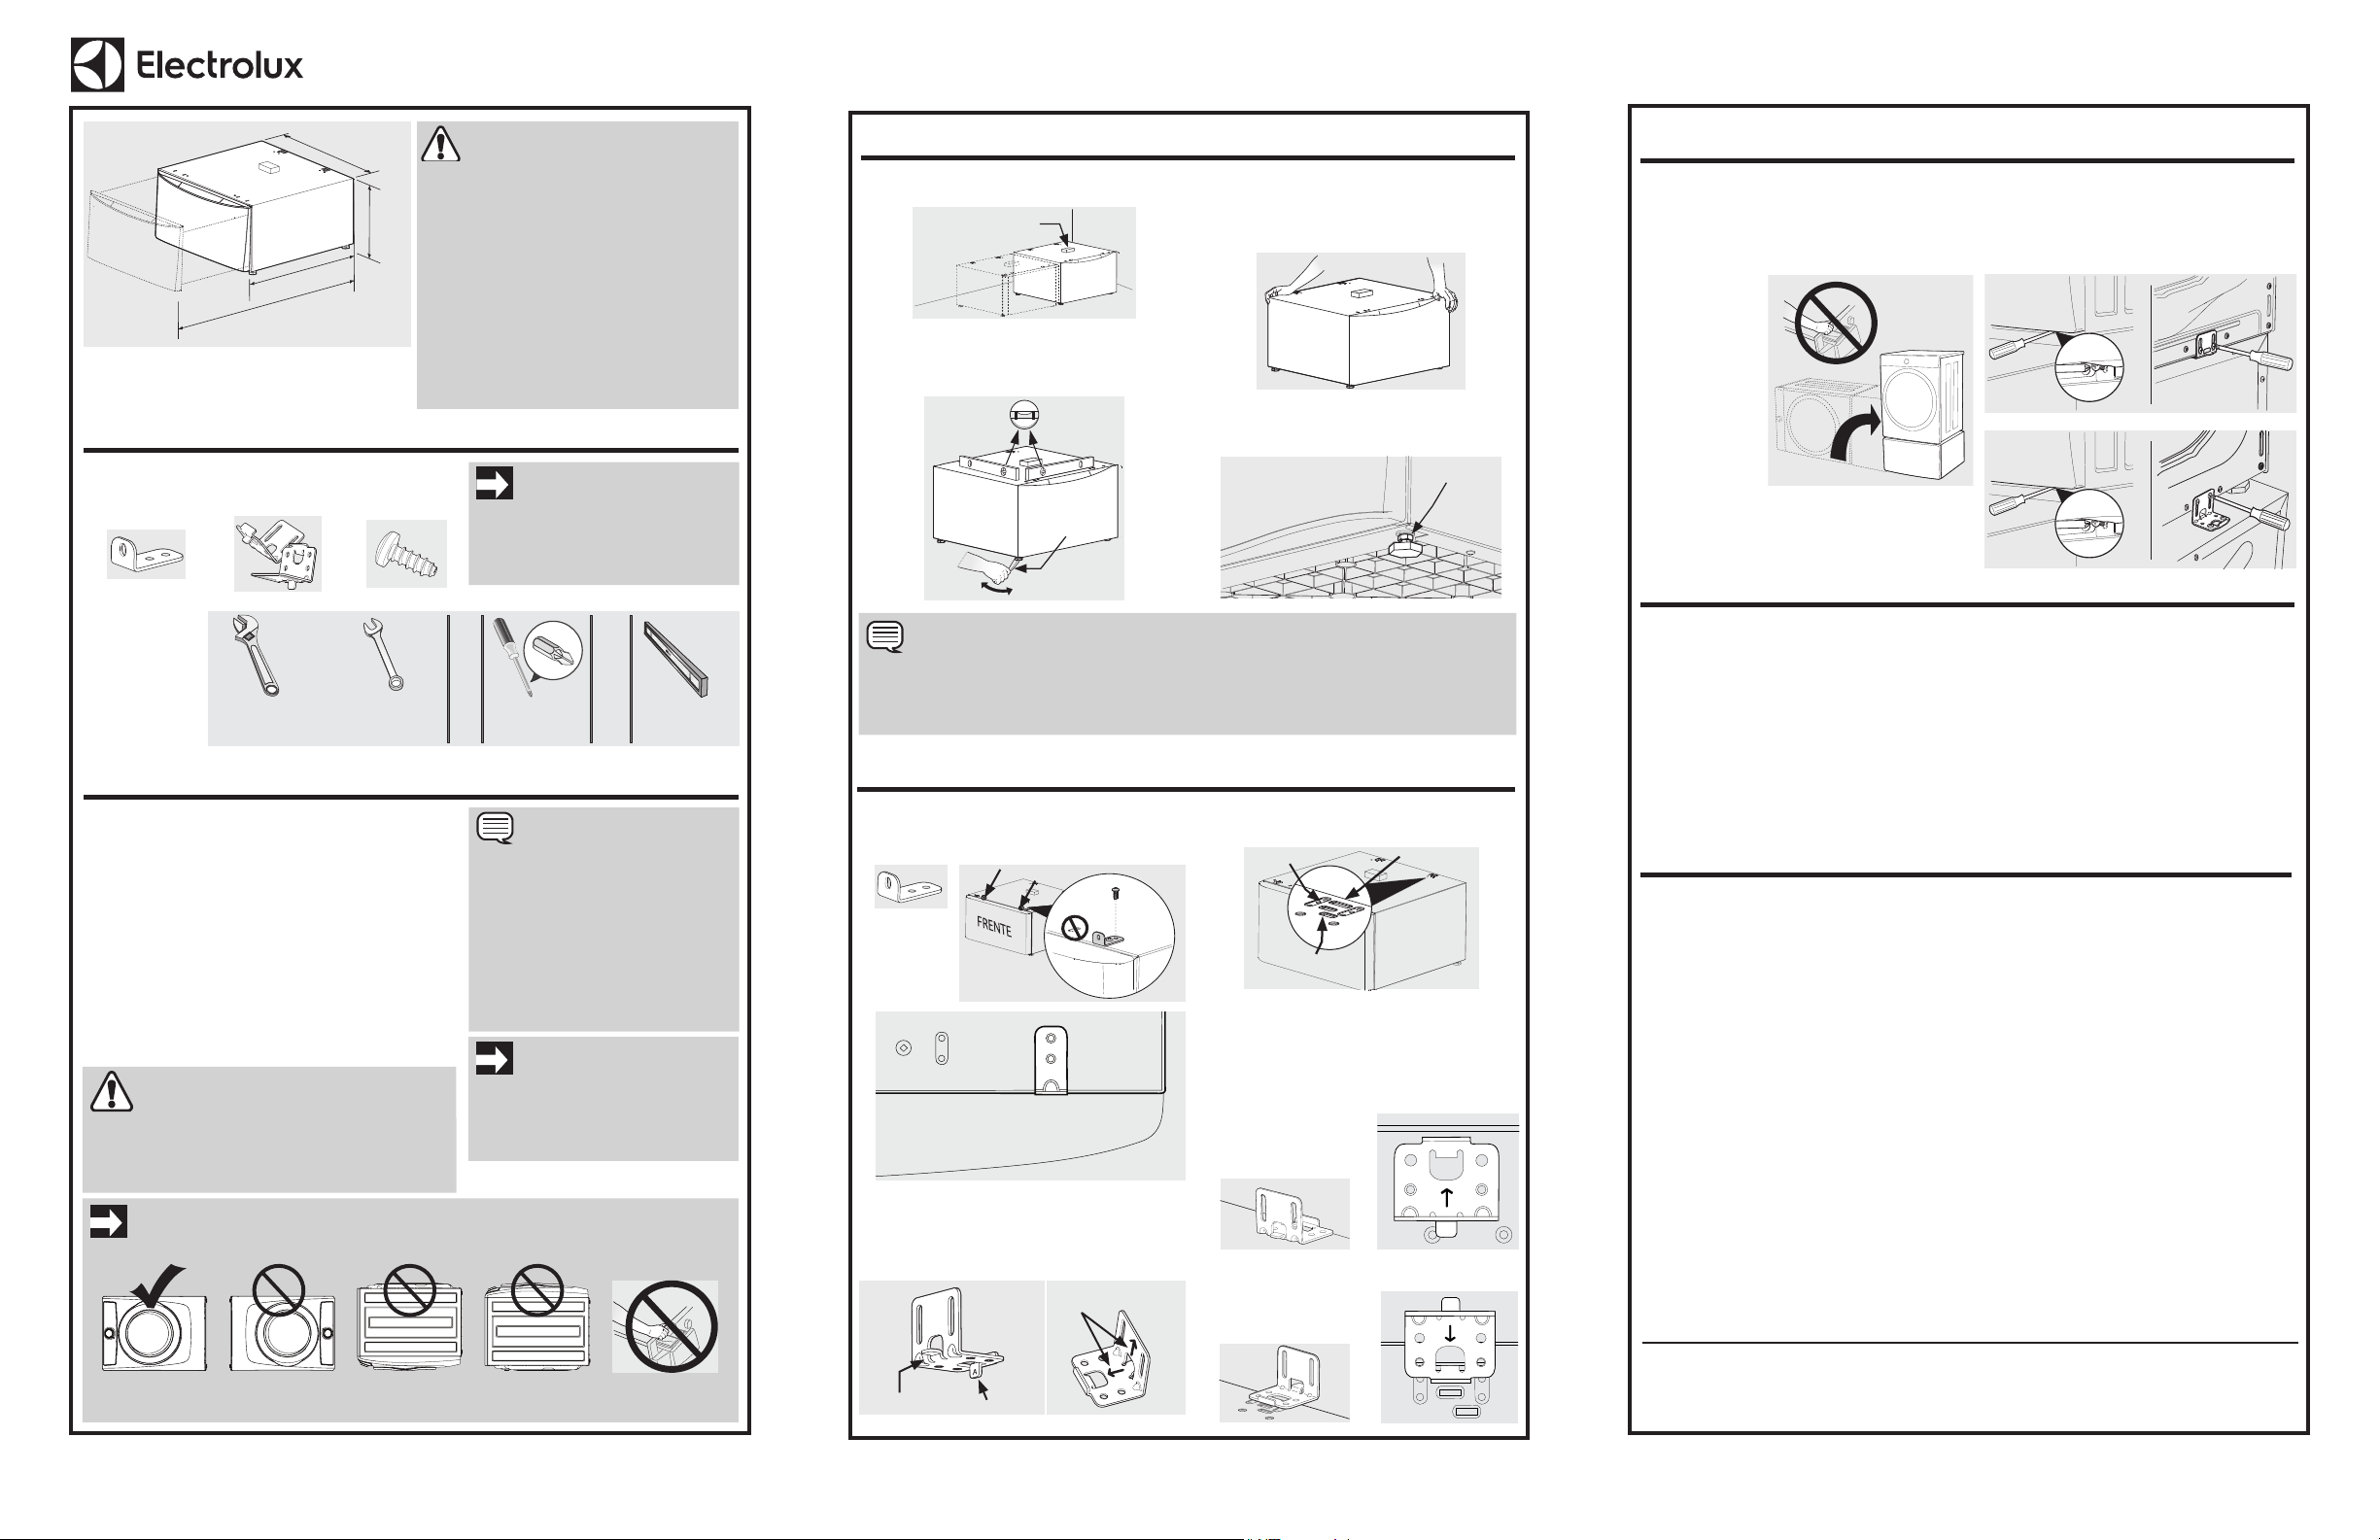
• Do not stack a dryer on top of
washer already installed on
pedestal.
2
1. If washer or dryer is new and has not been installed
yet, skip to step 4.
2. If dryer is already installed, disconnect dryer from
electrical and gas connections and exhaust venting.
On models with Steam Option, turn off cold water
supply and disconnect water supply hose to dryer.
3. If washer is already installed, disconnect washer
from electrical connection. Turn off hot and cold
water supply and disconnect hot and cold water
supply hoses from water supply outlets. Disconnect
drain hose from drain pipe.
4. Protect floor and unit with cardboard or rug and
carefully lay the appliance on its LEFT and screw
each leg completely into the base.
Prepare Appliance For Mounting
For support in the U.S. call 1-877-4ELECTROLUX (1-877-435-3287) or visit www.electroluxappliances.com. For support in Canada call 1-800-265-8352 or visit www.electroluxappliances.ca.
1
Materials and Tools Needed for Installation:
NOTE
Due to higher center of gravity
of appliance on pedestals, some
side-to-side rocking is normal during
operation. Vibration can be minimized
by assuring appliance is installed
properly, including being level and
solid on all four (4) legs by following
these directions.
Installation Instructions* – Electrolux 15” Pedestal
Kit components:
A 2 Front brackets
B 2 Rear brackets
A
Screw Kit Components
C 14 #10 (16 x .500) screws
B
Tools needed:
Adjustable wrench Carpenter’s level
Universal wrench
supplied with washer
Phillips screwdriver
OR
OR AND AND
9/16" or 14 mm
box wrench
26.5"
(67 cm)
42.5"
(108 cm)
15
"
(38 cm)
27
"
(68.5 cm)
IMPORTANT
TURN ON TO LEFT SIDE ONLY. DO NOT use open dispenser drawer of washer or dispenser
cavity as hand-hold location when tipping washer on its side. Serious damage could occur to your
washer.
LEFT SIDE RIGHT SIDE FRONT BACK
IMPORTANT
If feet are not completely screwed in,
mounting holes in appliance will not
align to mounting holes in brackets.
CAUTION
EXCESSIVE WEIGHT HAZARD
To avoid back or other injury, have more
than one person move or lift the appliance.
3
Prepare Pedestal Before Mounting
1. Locate pedestal to within a few inches of
its final location.
NOTE
Allow for approximately 5 in. (12.5 cm) behind the pedestal for clearance of back of washer or
dryer to the wall. Allow an additional 3/4 in. (2 cm) for water inlet on Steam Model Dryers and
additional space if venting dryer upward or downward.
2. Level the pedestal front-to-back and
side-to-side by adjusting each leveling leg.
Keep leg extension to a minimum.
3. Rock the pedestal from corner-to-corner
to check for stability. Repeat leveling and
rocking until all four (4) feet are sturdy on
the floor and pedestal is level.
4. Without turning the rubber foot, lock each
pedestal leg in place by tightening its lock
nut tight against the pedestal base.
DO NOT remove
foam!
Raise
Lower
Adjustable
Wrench
Lock nut
Attach Mounting Brackets
Attach front mounting brackets
4
Attach each front bracket to outer-most set of
holes with 2 screws.
Drawer
Front brackets
from kit.
Attach rear mounting brackets
Tab A
Tab B
Each rear bracket has tabs marked “A” and
“B” and 2 arrows indicating bracket direction
when mounted on the pedestal.
Direction Indicator
Arrows
Each pedestal has slots in the rear marked “1”,
“2” and “3”.
1. Determine your appliance type (washer
or dryer).
Dryer:
Tab A into Slot 1
with arrow pointing
to back.
2. Orient rear brackets for your particular
model.
3. Attach each bracket with 2 screws through
the holes that line up on pedestal.
Slot 1
Slot 2
Slot 3
1. Turn pedestal on its LEFT side to match orientation to appliance.
2. Slide pedestal up to appliance and line up holes in mounting brackets with holes in appliance
base.
3. Attach rear and front brackets to appliance base with supplied screws into aligning holes -
one in each front bracket and two in each rear bracket.
4. Using more than one person, carefully return appliance and pedestal to upright position.
Attach Pedestal to Appliance
5
Dryer
Washer
Installing or Re-installing Appliance
6
Washer on pedestal:
Dryer on pedestal:
1. Slide washer/pedestal into place.
2. Check for levelness and rock all four (4) legs again. Repeat until level and solid.
3. Refer to Washer Installation Instructions for complete details on installing water, drain,
or electrical.
1. Slide dryer/pedestal into place.
2. Check for levelness and rock all four (4) legs again. Repeat until level and solid.
3. Refer to Dryer Installation Instructions for complete details on installing electrical, gas, or
exhaust venting.
Warranty and Registration
7
Warranty
Your pedestal is covered by a two year limited warranty. For two years from your original date of
purchase, Electrolux will repair or replace any parts of this pedestal that prove to be defective in
materials or workmanship when such appliance is installed, used, and maintained in accordance
with the provided instructions.
Exclusions
This warranty does not cover the following:
• Service calls which do not involve malfunction or defects in materials or workmanship, or for
appliances not in ordinary household use or used other than in accordance with the provided
instructions.
• Any Labor or in-home service costs.
• Damages to the finish of appliance or home incurred during transportation or installation,
including but not limited to floors, cabinets, walls, etc.
• Damages caused by: services performed by unauthorized service companies; use of parts other
than genuine Electrolux parts or parts obtained from persons other than authorized
service companies; or external causes such as abuse, misuse, inadequate power supply,
accidents, fires, or acts of God.
If You Need Service
Keep your receipt, delivery slip, or some other appropriate payment record to establish the
warranty period should service be required. Service under this warranty must be obtained by
contacting Electrolux at the addresses or phone numbers listed in your Use and Care manual.
This warranty only applies in the USA, Puerto Rico and Canada. In the USA and Puerto Rico, your
appliance is warranted by Electrolux Major Appliances North America, a division of Electrolux Home
Products, Inc. In Canada, your appliance is warranted by Electrolux Canada Corp. Electrolux
authorizes no person to change or add to any obligations under this warranty. Obligations for service
and parts under this warranty must be performed by Electrolux or an authorized service company.
Product features or specifications as described or illustrated are subject to change without notice.
Product Record
In the space below, record the date of purchase and model number of the product.
Model No.: ___________________________________________ Date of Purchase: ____________
Save these instructions and your sales receipt for future reference.
5. After retuning appliance upright, loosen each
mounting screw going into appliance base.
Allow the appliance to settle in the brackets
and retighten each mounting screw.
C
Washer:
Tab A into Slot 1
with arrow pointing
to front.

IMPORTANT
Le poids total DANS un tiroir fermé
ou une combinaison du poids DANS
et SUR le tiroir ouvert ne doit pas
excéder 29,5 kg (65 lb).
AVERTISSEMENT
• Ne pas débrancher l’appareil de sa
source d’alimentation en électricité
avant de le superposer peut causer
des blessures, voire la mort.
• Une installation inappropriée
du système de ventilation de
la sécheuse peut causer des
blessures ou des dommages
matériels.
• Pour éviter les blessures au dos
ou d’autres types de blessure,
demandez l’aide d’autres personnes
pour déplacer ou soulever la
laveuse ou la sécheuse.
• Ne superposez pas une sécheuse sur
une laveuse déjà installée sur un socle.
2
1. Si la laveuse ou la sécheuse est neuve et n’a pas
encore été installée, passez à l’étape 4.
2. Si la sécheuse est déjà installée, débranchez la
sécheuse de l’alimentation en électricité et en gaz,
ainsi que le conduit d’évacuation. Sur les modèles
dotés de l’option à la vapeur, coupez l’alimentation
en eau froide et débranchez le tuyau d’alimentation
en eau de la sécheuse.
3. Si la laveuse est déjà installée, débranchez la
laveuse de la prise électrique. Coupez l’alimentation
en eau chaude et froide, puis débranchez les tuyaux
d’alimentation en eau chaude et froide des entrées
d’alimentation en eau. Débranchez le tuyau de
vidange de sa prise.
4. Protégez le plancher avec un carton ou un autre
revêtement de sol. Penchez soigneusement la
laveuse ou la sécheuse sur le CÔTÉ GAUCHE et
vissez chaque pied de sorte qu’il soit bien de niveau
avec la base.
Préparez l’appareil pour le montage
1
Outils et composants d’installation
REMARQUE
En raison du centre de gravité plus élevé
des électroménagers sur socles, il est
normal qu’il y ait un balancement de va-
et-vient latéral durant le fonctionnement.
Il est possible de réduire la vibration
en assurant que l’électroménager est
installé correctement (‘appareil doit être
mis au niveau et stabilisé sur ses quatre
(4) pieds en suivant les indications
fournies).
Instructions d’installation – Socle de 38 cm (15 po) Electrolux
Composants du
nécessaire
A 2 supports avant
B 2 supports arrière
Composants du
nécessaire de vis
C 14vis n°10 (16 x .500)
Outils nécessaires :
Clé à
molette
Niveau de
charpentier
Clé iniverselle
fournie avec
la laveuse
Tournevis
Phillips
OU
OU
ET
ET
Clé polygonale
de 9/16 po
ou de 14 mm
26.5"
(67 cm)
42.5"
(108 cm)
15
"
(38 cm)
27
"
(68.5 cm)
IMPORTANT
PENCHEZ CÔTÉ GAUCHE SEULEMENT. N’UTILISEZ PAS le tiroir distributeur de détergent
ouvert ou sa cavité comme point d’appui de levage pour incliner la laveuse sur le côté. Cela
pourrait endommager sérieusement votre laveuse.
CÔTÉ DROIT AVANT ARRIÈRE
IMPORTANT
Si les pieds ne sont pas complètement vissés, les
trous de montage de l’électroménager ne s’aligneront
pas sur ceux des supports.
ATTENTION
DANGER DE POIDS EXCESSIF
Pour éviter les blessures au dos
ou d’autres types de blessure,
demandez l’aide d’autres
personnes pour déplacer ou
soulever l’électroménager.
3
Préparez le socle avant le montage
1. Placez le socle à quelques pouces de son
emplacement final.
REMARQUE
Laissez environ 12,5 cm (5 po) derrière le socle pour laisser un espace libre à l’arrière de la laveuse
ou de la sécheuse par rapport au mur. Laissez 2 cm (3/4 po) supplémentaires pour l’entrée d’eau
des sécheuses à la vapeur et un espace additionnel si la ventilation d’une sécheuse s’effectue vers le
haut ou vers le bas.
2. Mettez le socle à niveau (d’avant en arrière
et côté à côté) en ajustant chaque pied de
mise à niveau. Gardez l’extension des
pieds au minimum.
3. Balancez le socle d’un coin à l’autre pour en
vérifier la stabilité. Répétez la mise à niveau
et le balancement jusqu’à ce que les quatre
(4) pieds soient posés solidement sur le
plancher et que le socle soit de niveau.
4. Sans tourner le pied en caoutchouc, ver-
rouillez chaque pied du socle en serrant bien
son contre-écrou contre la base du socle.
N’ENLEVEZ PAS
la mousse!
Soulever
Abaisser
Clé à
molette
Contre-écrou
Fixez les supports de montage
Fixez les supports de montage avant
4
Fixez chaque attache avant avec 2 vis à
l’ensemble de trous le plus à l’extérieur.
Support avant
du nécessaire
Fixez les supports de montage arrière
Chaque support arrière est doté de
languettes marquées « A » et « B » et présen-
te également deux flèches qui indiquent la
directiondu montage sur le socle.
Chaque socle est doté de fentes à l’arrière,
marquées « 1 », « 2 » et « 3 ».
1. Déterminez votre type d’électroménager
(laveuse ou sécheuse).
2. Disposez les supports arrière en fonction
de votre modèle.
3. Fixez chaque support à l’aide de 2 vis, en
les faisant passer dans les trous alignés
sur le socle.
Fente « 1 »
Fente « 2 »
Fente « 3 »
Sécheuse
Laveuse
Installation ou réinstallation de l’électroménager
6
Laveuse sur socle :
Sécheuse sur socle :
1. Glissez l’électroménager/le socle en place.
2. Vérifiez le niveau en faisant bouger l’appareil d’avant en arrière et de gauche à droite. Répétez cette
vérification jusqu’à ce que l’appareil soit de niveau et stable.
3. Reportez-vous à la section Instructions d’installation de la laveuse pour obtenir des instructions
d’installations détaillées sur l’alimentation en eau, le système de vidange et l’alimentation en électricité.
1. Glissez l’électroménager/le socle en place.
2. Vérifiez le niveau en faisant bouger l’appareil d’avant en arrière et de gauche à droite. Répétez cette
vérification jusqu’à ce que l’appareil soit de niveau et stable.
3. Reportez-vous à la section Instructions d’installation de la sécheuse pour obtenir des instruc-
tions d’installation détaillées sur l’alimentation en électricité, l’alimentation en gaz ou le conduit
d’évacuation.
Garantie et enregistrement du produit
7
Garantie
Votre socle est couvert par une garantie limitée de deux ans. Pendant deux ans à partir de la
date d’achat d’origine, Electrolux réparera ou remplacera les pièces de ce socle qui présentent
un défaut de matériau ou de fabrication, si cet appareil est installé, utilisé et entretenu selon les
instructions fournies.
Exclusions
Cette garantie ne couvre pas ce qui suit:
• Les appels de service qui ne concernent pas un mauvais fonctionnement, un défaut de fabrica-
tion ni un vice de matériau, ou les appels effectués pour les appareils qui ne font pas l’objet d’un
usage domestique ou qui ne sont pas utilisés conformément aux instructions fournies.
• Les coûts de main-d’œuvre ou de service à domicile.
• Les dommages causés au fini de l’appareil ou à la maison pendant le transport ou l’installation,
y compris, sans s’y limiter, aux planchers, aux armoires, aux murs, etc.
• Les dommages causés par: des réparations effectuées par des techniciens non autorisés; l’utili-
sation de pièces autres que les pièces Electrolux d’origine ou qui n’ont pas été obtenues par l’en-
tremise d’un réparateur autorisé; ou les causes étrangères comme l’abus, la mauvaise utilisation,
une alimentation électrique inadéquate, un accident, un incendie ou une catastrophe naturelle.
Si vous devez faire appel au service de réparation
Conservez votre reçu, votre bon de livraison ou toute autre preuve de paiement valide permet-
tant d’établir la période de la garantie au cas où vous auriez besoin de faire appel au service de
réparation. Le service auquel vous avez recours en vertu de cette garantie doit être obtenu en
communiquant avec Electrolux aux adresses ou aux numéros de téléphone énumérés dans le
manuel d’utilisation et d’entretien.
Cette garantie n’est valide qu’aux États-Unis, à Puerto Rico et au Canada. Aux États-Unis et à
Puerto Rico, votre appareil est garanti par Electrolux Major Appliances North America, une division
d’Electrolux Home Products, Inc. Au Canada, votre appareil est garanti par Electrolux Canada
Corp. Nul n’est autorisé à modifier les obligations contenues dans cette garantie ni à y apporter
des ajouts. Les obligations de cette garantie concernant la réparation et les pièces doivent être
remplies par Electrolux ou par une compagnie de réparation autorisée. Les caractéristiques et
spécifications décrites ou illustrées peuvent être modifiées sans préavis.
Enregistrement du produit
In the space below, record the date of purchase and model number of the product.
No de modèle : _______________________________________ Date d’achat : _______________
Conservez ces instructions et votre reçu pour vous y reporter ultérieurement.
CÔTÉ GAUCHE
Laveuse :
Languette « A » dans
fente « 1 » - flèche
pointant vers l’avant.
Sécheuse :
Languette « A » dans
fente « 1 » - flèche
pointant vers l’arrière.
Tab
« A »
Tab
« B »
Flèches de direction
A
B
C
Pour rejoindre le service sans frais aux États-Unis : 1-877-4ELECTROLUX (1-877-435-3287) oui visitez le site www.electroluxappliances.com. Pour rejoindre le service sans frais au Canada : 1-800-265-8352 oui visitez le site www.electroluxappliances.ca.
P/N: A13990903 (2106)
1. Inclinez le socle sur le CÔTÉ GAUCHE en fonction de l’orientation prévue pour l’électroménager.
2. Glissez le socle sous l’électroménager et alignez les trous des supports de montage avec les trous dans la
base de l’électroménager.
Fixez le socle à l’électroménager
5
3. Fixez les supports avant et arrière à la base de
l’électroménager en installant les vis fournies dans
les trous - une vis par support avant et deux vis par
support arrière.
4. Obtenez de l’aide pour replacer l’électroménager et
le socle en position debout.
5. Après avoir replacé l’électroménager en position
debout,
desserrez chaque
vis de montage
dans la base de
l’électroménager.
Laissez
l’électroménager
reposer dans
les supports,
puis serrez de
nouveau chaque
vis de montage.
P/N: A13990903 (2106)
IMPORTANTE
El peso total DENTRO del cajón
cerrado o el peso combinado de
los artículos que estén DENTRO y
ENCIMA del cajón abierto no debe
exceder las 65 lb (29,5 kg).
ADVERTENCIA
• El no desconectar el suministro
eléctrico antes de la instalación
apilada puede ocasionar lesiones
personales o incluso la muerte.
• La instalación inadecuada de la ven-
tilación de la secadora puede oca-
sionar lesiones personales o daños a
la propiedad.
• Para evitar lesiones en la espalda u
otro tipo de lesiones, procure levan-
tar o mover la lavadora o secadora
con la ayuda de más de una persona.
• No apile la secadora sobre la
lavadora si ya está instalada sobre
un pedestal.
2
1. Si la lavadora o secadora es nueva y no ha sido
instalada todavía, vaya al paso 4.
2. Si la secadora ya se encuentra instalada, desconécte-
la de las conexiones eléctricas y de gas, así como del
conducto de ventilación. En los modelos con opción
a vapor, cierre el suministro de agua fría y desconecte
la manguera de suministro de agua a la secadora.
3. Si la lavadora ya se encuentra instalada, desconéctela
del suministro eléctrico. Cierre el suministro de agua
fría y caliente y desconecte las mangueras de admis-
ión de agua de las tuberías de agua. Desconecte la
manguera de drenaje de la tubería de desagüe.
4. Proteja el piso con cartón o con otro tipo de cubierta.
Incline cuidadosamente la lavadora o secadora y
recuéstela en su LADO IZQUIERDO y ajuste cada
pata para que quede al ras de la base.
Prepare el electrodoméstico para apilarlo
1
Herramientas piezas necesarias por instalación
NOTA
Debido a que el centro de gravedad
del electrodoméstico queda más
elevado por la presencia del pedestal,
es normal observar balanceo de un
lado a otro durante el funcionamiento
del electrodoméstico. Puede
minimizar la vibración asegurándose
de que el electrodoméstico esté
debidamente instalado de manera
firme y nivelada sobre las cuatro (4)
patas siguiendo estas instrucciones.
Instrucciones de Instalación - Pedestal Electrolux de 15” (38,1 cm)
Piezas del kit:
A 2 soportes delanteros
B 2 soportes traseros
A
Piezas del kit (tornillos)
C 14 #10 (16 x .500)
tornillos
B
Herramientas
necesarias:
Llave ajustable Nivel de
carpintero
Llave universal
proporcionada
con la lavadora
Destornillador
Phillips
O
O Y Y
Llave de cubo de
9/16 po o 14 mm
26.5"
(67 cm)
42.5"
(108 cm)
15
"
(38 cm)
27
"
(68.5 cm)
IMPORTANTE
Recuéste en LADO IZQUIERDO. NO utilice el cajón distribuidor abierto de la lavadora o la
cavidad del distribuidor para apoyar las manos cuando incline la lavadora sobre su costado.
Podría causar serios daños a la lavadora.
LADO IZQUIERDO
LADO DERECHO FRENTE ESPALDA
IMPORTANTE
Si no se enroscan completamente
las patas niveladoras, los agujeros
de instalación del electrodoméstico
no se alinearán a los agujeros de
instalación de los soportes.
PRECAUCIÓN
PELIGRO DE EXCESO DE PESO
Para evitar lesiones en la espalda u otro
tipo de lesiones, procure levantar o mover
la lavadora o secadora con la ayuda de
más de una persona.
3
Prepare el pedestal antes de instalarlo
1. Coloque el pedestal a pocas pulgadas de su
ubicación final.
NOTA
Deje aproximadamente 5” (12,5 cm) de espacio detrás del pedestal para acomodar el despeje
que se necesita entre la lavadora o secadora y la pared. Deje un espacio adicional de 3/4” (2
cm) para la admisión de agua en los modelos de secadora a vapor y un espacio adicional si va
a ventilar la secadora hacia arriba o hacia abajo.
2. Nivele el pedestal de adelante hacia atrás y
de lado a lado ajustando cada pata nivela-
dora. Mantenga la extensión de las patas
al mínimo.
3. Agite el pedestal de esquina a esquina
para verificar que esté estable. Repita la
nivelación y la agitación hasta que las cu-
atro (4) patas estén firmemente asentadas
sobre el piso y el pedestal esté nivelado.
4. Sin girar la pata de goma, fije cada pata
del pedestal en su lugar apretando bien
la tuerca de bloqueo contra la base del
pedestal.
¡NO retire la
espuma!
Leventar
Bajar
Llave
ajustable
Lock nut
Fije los soportes de instalación
Fije los soportes de instalación delanteros
4
Fije cada sujetador delantero al juego más ex-
terno de agujeros usando 2 tornillos.
Fije los soportes de instalación traseros
Lengüeta “A”
Lengüeta “B”
Cada soporte trasero tiene lengüetas marca-
das “A” y “B” y también tiene 2 flechas que
indican la orientación de los soportes cuando
se instalan en el pedestal.
Cada pedestal tiene ranuras en el lado poste-
rior marcadas “1”, “2” y “3”.
1. Determine el tipo de electrodoméstico
(lavadora o secadora).
2. Oriente los soportes traseros según su
modelo en particular.
3. Fije cada soporte pasando 2 tornillos a
través de los agujeros en el pedestal.
Ranura “1”
Ranura “2”
Ranura “3”
Secadora
Lavadora
Instalación o reinstalación del electrodoméstico
6
Lavadora sobre el pedestal:
Secadora sobre el pedestal:
1. Deslice el electrodoméstico y pedestal a su ubicación final.
2. Verifique que esté nivelado y agite las cuatro (4) patas nuevamente. Repita este paso hasta
que la unidad quede firme y nivelada.
3. Consulte las Instrucciones de instalación de la lavadora para obtener detalles completos
sobre la conexión del agua, del drenaje o del suministro eléctrico.
1. Deslice el electrodoméstico y pedestal a su ubicación final.
2. Verifique que esté nivelado y agite las cuatro (4) patas nuevamente. Repita este paso hasta
que la unidad quede firme y nivelada.
3. Consulte las Instrucciones de instalación de la secadora para obtener detalles completos
sobre la conexión del suministro eléctrico y de gas o de los conductos de ventilación.
Garantía y registro del producto
7
Garantía
Este pedestal está cubierto por una garantía limitada de dos años. Durante dos años a partir de la
fecha original de compra, Electrolux se hace responsable de la reparación o el reemplazo de cualqui-
er pieza de este pedestal que se encuentre defectuosa en materiales o mano de obra, siempre que
el electrodoméstico se instale, utilice y mantenga de acuerdo con las instrucciones proporcionadas.
Exclusiones
Esta garantía no cubre lo siguiente:
• Las llamadas de servicio técnico que no involucren el funcionamiento defectuoso ni los defectos
de materiales o de mano de obra, o bien para electrodomésticos que no sean utilizados para uso
normal del hogar o de acuerdo con las instrucciones proporcionadas.
• Cualquier costo de mano de obra o de servicio en el hogar.
• Daños al acabado del electrodoméstico o al hogar que hayan ocurrido durante el transporte o la
instalación, incluyendo, sin limitarse, los armarios, paredes, etc.
• Daños causados por: servicio técnico realizado por compañías de servicio técnico no autorizadas,
el uso de piezas que no sean piezas genuinas Electrolux o piezas obtenidas de personas que no
pertenezcan a compañías de servicio técnico autorizado, o causas externas como abuso, mal
uso, suministro eléctrico inadecuado, accidentes, incendios o hechos fortuitos.
Si tiene que solicitar servicio técnico
Guarde su recibo, la boleta de entrega o cualquier otro registro de pago adecuado para establecer
el período de la garantía si llegara a requerir servicio técnico. El servicio técnico realizado bajo esta
garantía debe ser obtenido a través de Electrolux utilizando las direcciones o números que se indican
en la Guía de uso y cuidado.
Esta garantía sólo se aplica en los Estados Unidos, Puerto Rico y Canadá. En los EE. UU. y Puerto
Rico, su electrodoméstico está garantizado por Electrolux Major Appliances North America, una
división de Electrolux Home Products, Inc. En Canadá, su electrodoméstico está garantizado por
Electrolux Canada Corp. Electrolux no autoriza a ninguna persona para que cambie ninguna de
nuestras obligaciones bajo esta garantía ni tampoco agregue ninguna otra. Nuestras obligaciones
de reparación y piezas bajo esta garantía deben ser realizadas por Electrolux o una compañía de
servicio técnico autorizado. Las especificaciones o características del producto según se describen
o ilustran están sujetas a cambio sin previo aviso.
Registro del producto
En el espacio que se proporciona a continuación, registre la fecha de compra y el número de
modelo del producto.
N.º de modelo: ________________________________________ Fecha de compra: ____________
Conserve estas instrucciones y su recibo de compra para referencia futura.
C
Flechas indicadoras
de dirección
Lavadora
:
Lengüeta A en ranura
1 - flecha orientada
hacia adelante.
Secadora:
Lengüeta A en ranura
1 - flecha orientada
hacia atrás.
Para obtener asistencia en los Estados Unidos: 1-877-4ELECTROLUX (1-877-435-3287) o visite www.electroluxappliances.com. Para obtener asistencia en Canadá: 1-800-265-8352 o visite www.electroluxappliances.ca.
1. Gire el pedestal a LADO IZQUIERDO para alinear su orientación con el electrodoméstico.
2. Deslice el pedestal para acercarlo al electrodoméstico y alinee los agujeros en los soportes de
instalación con los agujeros de la base del electrodoméstico.
3. Fije los soportes traseros y delanteros a la base del electrodoméstico introduciendo los tornil-
los proporcionados en los agujeros de alineación: uno en cada soporte delantero y dos en
cada soporte trasero.
Fije el pedestal al electrodoméstico
5
4. Usando a
más de una
persona,
coloque cui-
dadosamente
el pedestal en
su posición
vertical.
5. Después de
colocar el elec-
trodoméstico
en posición
vertical, afloje
cada tornillo
de instalación enroscado en la base del
electrodoméstico. Permita que el electro-
doméstico se asiente sobre los soportes y
vuelva a apretar cada tornillo de fijación.
Soportes
delanteros
del kit.