Loading ...
Loading ...
Loading ...
13
ENGLISH
USING THE RADIO CONTROL OPTIONAL
WARNINGS!
Place the hood away from sources of electromagnetic waves (e.g. micro-
wave ovens), which could interfere with the radio control and with the
hood electronics.
The maximum operating distance is 5 metres, that may vary according to
the presence of electromagnetic interferences.
Radio control operated at 433.92MHz.
The radio control consists of two parts:
- the receiver built into the hood;
- the transmitter shown here in the gure.
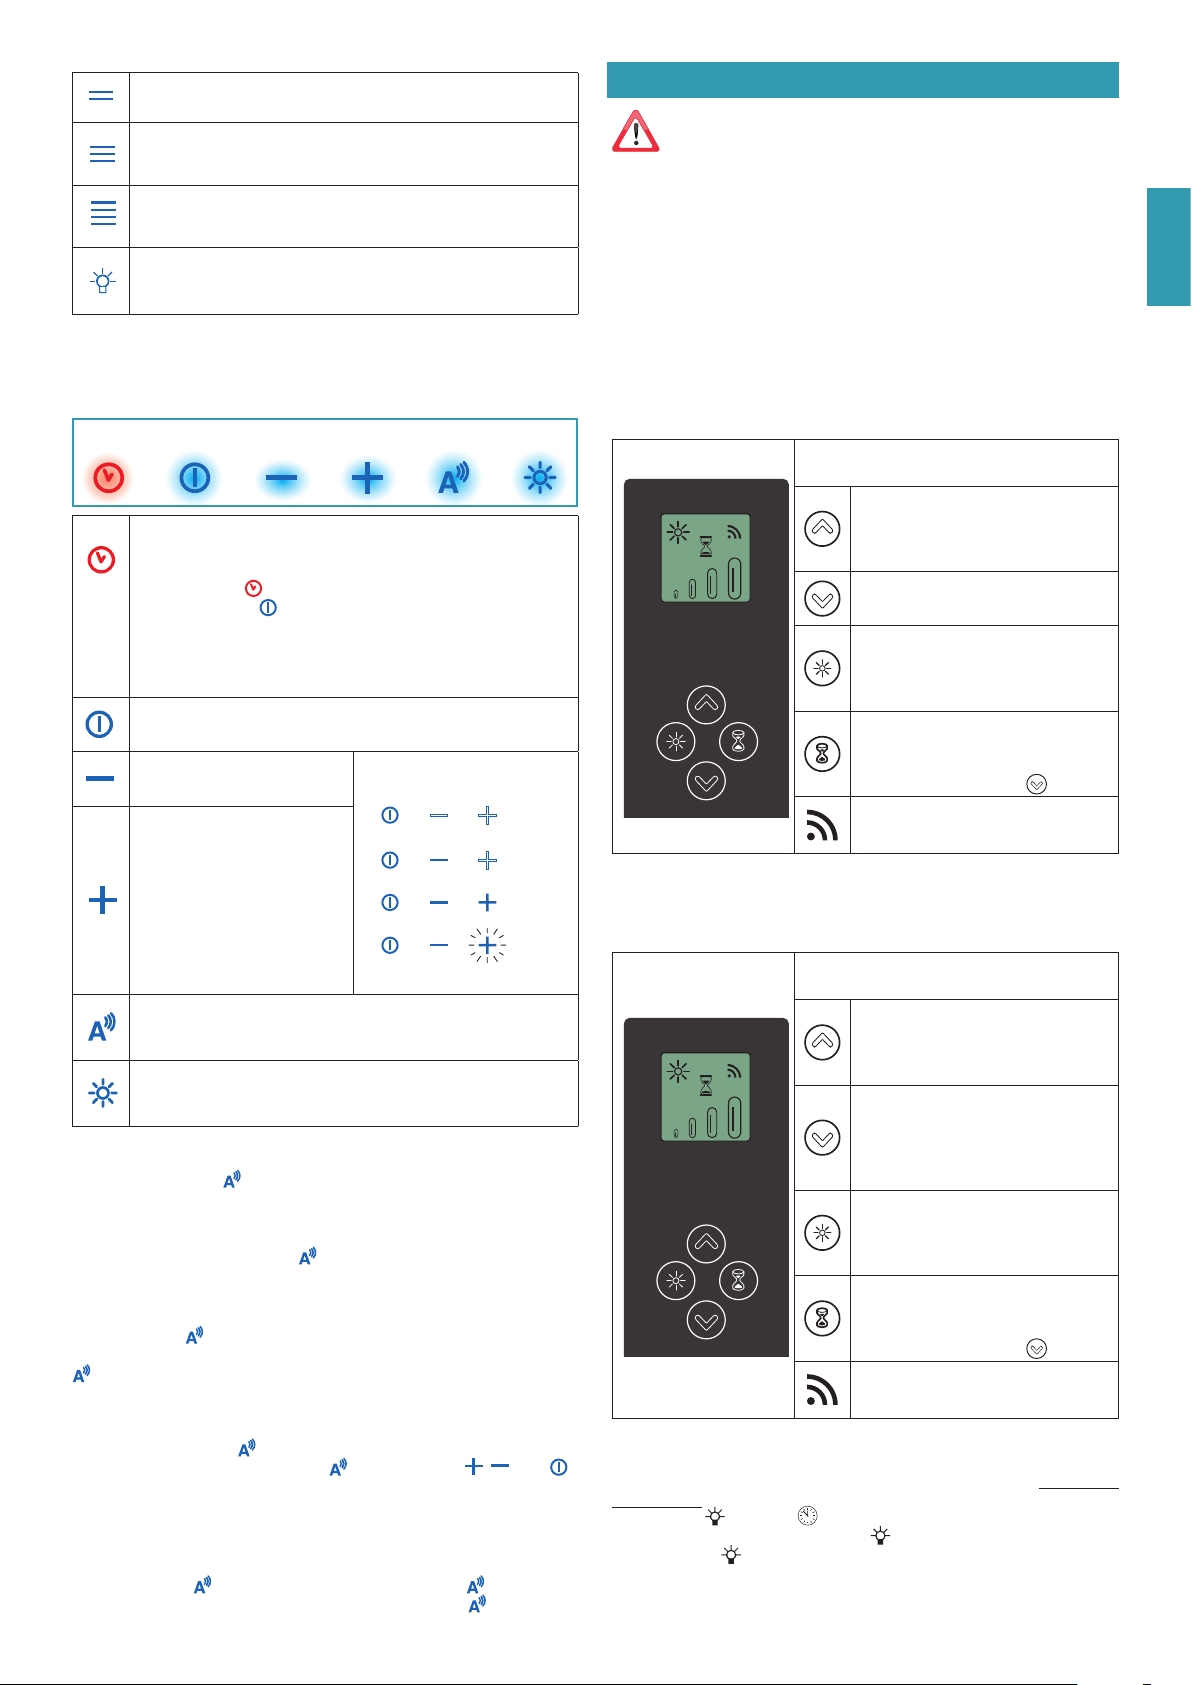
REMOTE CONTROL
(MILANO + and GENOVA +)
DESCRIPTION OF TRANSMITTING
COMMANDS
UP
Motor switch-on and speed increase
from 1 to 4. Speed 4 is only active for
10 minutes.
DOWN
speed decrease and motor switch-OFF.
Dynamic Led
Short impulse: turn light on and off
Long impulse:
change light tone from 2700K to 5600K
TIMER ON: The motor automatically
switches off after 15 min.
The function is automatically disabled if
the motor is switched off ( key)
Command transmission active
REMOTE CONTROL WITH SENSOR FUNCTION
(AVAILABLE ONLY ON MILANO + 87 DEEP)
DESCRIPTION OF TRANSMITTING
COMMANDS
UP
Motor switch-on and speed increase
from 1 to 4. Speed 4 is only active for
10 minutes.
DOWN
With motor ON:
speed decrease and motor switch-OFF.
With motor OFF:
activation of the automatic cycle mode.
Dynamic Led
Short impulse: turn light on and off
Long impulse:
change light tone from 2700K to 5600K
TIMER ON: The motor automatically
switches off after 15 min.
The function is automatically disabled if
the motor is switched off ( key)
Command transmission active
ACTIVATION PROCEDURE
Before using the radio control, follow the procedure below on the hood push-
button panel:
• Press LIGHT
and TIMER simultaneously until all LEDs start flashing.
• Release the two keys and press LIGHT again until all LEDs are lit up.
• Release LIGHT : now the receiver is active.
This procedure is also used to deactivate the receiver.
Speed 2 activation
Speed 3 activation
Speed 4 activation for 10 minutes only
Dynamic Led
Short impulse: turn light on and off.
Long impulse: change light tone from 2700K to 5600K.
SENSOR FUNCTION
(AVAILABLE ONLY ON MILANO + 87 DEEP)
1 2 3 4 5 6
TIMER (red LED ashing)
Auto switch-off after 15 min.
The function deactivates (red LED off) if:
- The TIMER (key ) is pressed again.
- The ON/OFF (key ) is pressed.
FILTER ALARM (red LED steady on)
Anti-grease filter maintenance after approximately 30 hours of oper-
ation. Press and hold the button for 3 seconds to reset.
ON/OFF Key
Upon start-up, the speed is that stored at the previous operation.
Speed decrease
The speeds are indicated by the
LEDs on the keys:
Speed 1
Speed 2
Speed 3
Speed 4
("+" LED flashing)
Speed increase
Automatic cycle
Turns on and off the automatic mode of the hood with the air quality
sensor. It takes 3 minutes to initialise the air quality sensor.
Dynamic Led
Short impulse: turn light on and off.
Long impulse: change light tone from 2700K to 5600K.
AUTOMATIC CYCLE
First start-up: do not switch the extractor fan or the light on for 15 minutes at
the first connection to the power supply.
The air quality sensor is calibrated during this time.
When calibration is completed, the LED goes out.
If the self-installation procedure is interrupted by turning on the hood light or the
motor, the system will try to repeat it 30 minutes after the hood is switched off.
Operation: Press to activate the automatic cycle.
To heat the sensor, the hood runs at the second speed for 3 minutes. The LED
flashes. The air quality sensor then automatically controls the motor speed.
When the air quality is OK, the motor is switched off.
If either the motor or the light is switched on manually, the sensor heating will
be activated so that if the key is pressed the sensor will be ready for use.
The automatic cycle is interrupted if the key is pressed, or , , and .
Manual calibration of the air quality sensor (if necessary):
The hood must be switched off; do not turn on the extractor fan and the light.
Do not perform any operations that can pollute the environmental conditions
like turning on the burners or cooking.
Press and hold the key to activate the calibration. The LED flashes.
Calibration lasts 6 minutes. When calibration is completed, the LED goes out.
Loading ...
Loading ...
Loading ...