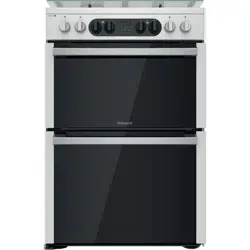
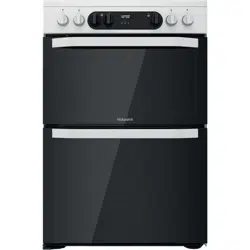
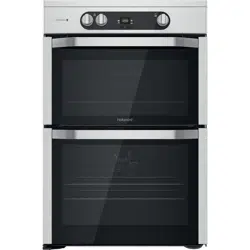
User Gudie Hotpoint HDM67G8C2CX/UK Double Cooker
PRODUCT DESCRIPTION

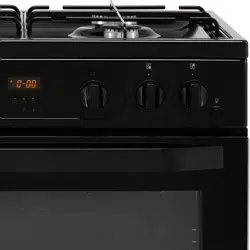
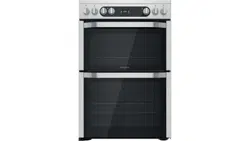
CONTROL PANEL

INSTALLATION TIPS
Gas connection
- The cooker should be connected to the gas-supply by a gas safe registered installer. Connection of the appliance to the gas mains or liquid gas must be carried out according to the prescribed regulation in force, and only after it is ascertained that it is adaptable to the type of gas to be used.
- If not, follow the instructions indicated in the paragraph headed “Adaptation to different gas types”.
- In the case of connection to liquid gas, by tank, use pressure regulators that conform to the regulation in force. The gas supply must be connected to the left of the appliance. Be sure that the hose does not pass through the rear of the cooker touching hot parts.
- Make sure the supply pressure conforms with the values shown in the table entitled “Caracteristics of the burners and nozzles”.
- When the cooker is installed between cabinets (recessed), the gas connection must be effected by an approved flexible hose with bayonet fitting (BS 669 or EN 14800). The gas inlet for the cookers is a threaded G 1/2 gas female fitting.
Connecting the gas supply
- To make the connection, a flexible hose should be used corresponding to the current gas regulations which are: the hose must never be at any point in its lenght in contact with the “hot” parts of the cooker; the hose must never be longer than 1,5 metre;
- The hose must not be subject to any tension or torsional stress and it must not have any excessively narrow curves or bottlenecks; the hose must be easy to inspect along its entire length to check its condition; the hose must always be in good condition, never attempt to repair.
Adapting the cooker to different types of gas
In order to adapt the cooker to a different type of gas with respect to the gas for which it was produced follow these steps:
a) replace the hose holder mounted on the a) appliance with that supplied in the bag of “cooker accessories”.
b) Replacing the burner nozzles on the hob: remove the grids and slide the burners from their housings; unscrew the nozzles using a 7 mm socket spanner, and replace them with nozzles for the new type of gas see table 1 “Burner and nozzle characteristics”). replace all the components by repeating the steps in reverse order.
FIRST TIME USE
HOT PLATE
- The hotplate lid is fitted with a safety device which cuts off the gas supply to the hotplate burners unless the lid is fully open.
- Do not use the safety device as a means of controlling the hotplate burners. The hotplate has two high speed burners and two simmering burners which will accommodate pans between 100mm (4”) and 240mm (91/2”) diameter. All pans should be positioned centrally over the burners.
TO USE THE HOTPLATE
- Remove any items or spillage from the top of the lid and then raise it to its fully open position.
- Push in and turn the control knob of the chosen burner anti-clockwise to the large flame symbol.
- Continue to press the ignition button until the sparks light the gas.
- For the models with the electronic ignition button ( press the button and then turn the knob.
- Turn the control knob anti-clockwise to reduce the heat input. Only turn the control knob between the large flame symbol and the small flame symbol when adjusting the setting.
- To turn off, turn the control knob fully clockwise to the symbol O.
- Each burner is fitted with a spark ignitor for lighting the gas. To ensure rapid lighting of the burners every time they are used, the ignitors must be kept clean and dry.
- Remove any food spillage or cleaning materials from the ignitor using a small nylon brush such as a tooth brush. Access to the ignitor can be achieved by lifting off the loose burner parts carefully when the burners are cool.
- When the hotplate burner bodies and caps are removed for cleaning, be careful not to drop any food particles or cleaning materials into the burner bases, to avoid the possibility of blocking the gas jets.
- If aluminium based pans are used, a silvery deposit may appear on the top edge of the pan support fingers. See 'Cleaning and Maintenance’ section for cleaning information.
MAIN OVEN
- To heat the oven turn the knob clockwise, selecting the require temperature between 80°C (176°F) and
- C (482°F) as recommended in the temperature chart. The pilot light will immediately come on and remain on until the oven reaches the required temperature. This light will then automatically go off and on during cooking as the oven thermostat maintains the correct temperature.
TOP OVEN
- The top oven should be used to cook small quantities of food.The oven is designed so that the grill element operates at a reduced heat output, this is combined with a heating element situated underneath the floor of the oven.
- To ensure even cooking of the food it is important that cooking utensils are positioned correctly on the oven shelf so that the element is directly above.
- There are two cooking positions, the shelf placed on runner 1 or 2 (from the base), do not use shelves upside down.
- Food/utensils must not be placed directly on the oven floor.
- There should always be at least 25mm (1in) between the top of the food and the grill element.
- Warning: Items stored in top oven will get hot when main oven is in use.
Operation
- Do not use the grill pan as a meat pan in the top oven as air circulation will be seriously restricted.
- Top oven as a warming compartment for plates
FUNCTIONS & DAILY USE
- Place the plates/dishes on the shelf, positioned on runner 1, turn top oven control to 100°C for 10-15 minutes.Never use grill control.
- It should be noted that at the end of the cooking period there may be a momentary puff of steam when the oven door is opened. This will disperse in a few seconds and is a perfectly normal characteristic of an oven with a good door seal.
- Since a circulaire fan oven heats up more quickly,and generally cooks food at a lower temperature than a conventional oven, pre-heating is often unnecessary.However, foods such as bread, scones,Yorkshire pudding,do benefit from being placed in a pre-heated oven.
- The 'oven temperature charts' are a guide only, giving approximate cooking temperatures and times.To suit personal taste and requirements, it may be necessary to increase or decrease temperatures by 10°C.
- Unless otherwise indicated in the charts food should be placed in a cold oven, i.e. without pre-heating. If food is placed in an already hot oven, the suggested cooking time should be reduced, depending on the type and quantity of food being cooked.
Oven positions
- Since the distribution of heat in the circulaire fan oven is very even, most foods will cook satisfactorily on any shelf position, but the shelves should be evenly spaced.
- The top oven rod shelf can be used in the main oven when cooking large quantities of food.
- Food or utensils should Never be placed directly an the floor of the oven for cooking.
- Never use more than 4 shelves in the oven as air circulation will be seriously restricted.To ensure oven circulation do not use meat pans larger than 390 x mm (15"x12") and baking trays no larger than x 255mm (13"x 10"), these should be positioned centrally on the oven shelf.
- Food should not be placed directly on the floor of the oven. To avoid unnecessary cleaning, rod shelves which are not in use, should be removed from the oven.
Temperature and time
- When all four shelves are used to cook large quantities of food for home freezing or parties, it may be necessary to increase the cooking times given in the temperature charts by a few minutes, to allow for the loss of heat due to extra time taken to load the oven, and the larger mass of food. Baking trays should have an equal gap at either side of the oven.
LEVEL COOKING TIPS
- Ideal for softening butter, gently melting chocolate in bagnemarie, thawing small portions, creaming risotto, keeping warm small portions of just-cooked preparation
- Ideal for slow-cook recipes (rice,sauces,roast,fish) using liquids (water, wine, broth), and for creaming pasta, maintaining a gentle boiling
- Ideal for sautéing, stewing vegetables, cooking for longer period, preheating accessories, cooking until creamy
- Ideal for browning, starting to cook, bringing liquids to the boil quickly, frying deep-frozen products, grilling meat and fish, maintaining a lively boil
- Ideal for rapidly increasing the temperature of food or for heating up liquids ( water)
- When the cooker is first used an odour may be emitted,
- When first using the cooker ensure that the room is well this will cease after a period of use. ventilated (e.g. open a window or use an extractor fan) and that persons who may be sensitive to the odour avoid any fumes. It is suggested that any pets be removed from the room until the smell has ceased. This odour is due to temporary finish on oven liners and elements and also any moisture absorbed by the insulation.
- While the top oven is heating up, the pilot light will come on and remain on until the oven reaches the required temperature. The pilot light will automatically go on and off during cooking as the thermostat maintains the correct temperature.
CLOCK MINUTE MINDER OPERATION
Setting the clock
- The clock may be set when the oven is switched off or when it is switched on, provided that the end time of a cooking cycle has not been programmed previously.
- After the appliance has been connected to the mains, or after a blackout, the 00:00 digits on the DISPLAY will begin to flash.
- Press the "+" and "-" button simultaneously
- Use the “+” and “-” buttons to adjust the time; if you press and hold either button, the display will scroll through the values more quickly, making it quicker and easier to set the desired value.
Setting the minute minder
- This function does not interrupt cooking and does not affect the oven; it is simply used to activate the buzzer when the set amount of time has elapsed.
- Press the button several times until the icon and the three digits on the display begin to flash.
- Use the “+” and “-” buttons to set the desired time; if you press and hold either button, the display will scroll through the values more quickly, making it quicker and easier to set the value.
- Wait for 5 seconds, If you press the buttom one more time the display will then show the time as it counts down.
- When this period of time has elapsed the buzzer will be activated.
Programming cooking
- A cooking mode must be selected before programming can take place.
- Programming the cooking duration
- Press the button several times until icon and the DUR digits on the DISPLAY begin to flash.
- Use the “+” and “-” buttons to set the desired duration; if you press and hold either button, the display will scroll through the values more quickly, making it quicker and easier to set the value.
- Wait for 5 seconds, after that the icon will be visible
- When the set time has elapsed and the oven will stop cooking you will hear a buzzer sounds. Press any button to stop the buzzer.
- For example: it is 9:00 a.m. and a time of 1 hour and minutes is programmed. The programme will stop automatically at 10:15 a.m.
Setting the end time for a cooking mode
- Follow steps 1 to 3 to set the duration as detailed above.
- Next, press the button until the text END on the diplay begin to flash. use the “+” and “-” buttons to adjust the cooking end time; if you press and hold either button, the display will scroll through the values more quickly, making it quicker and easier to set the desired value.
- Wait for 5 seconds or press the button again,
- When the set time has elapsed,the oven will stop cooking and a buzzer sounds.Press any button to stop it.
- Programming has been set when the icon is illuminated.
- For example: It is 9:00 a.m. and a duration of 1 hour has been programmed. 12:30 is scheduled as the end time. The programme will start automatically at a.m.
Cancelling a programme
- To cancel a programme: press the button until the icon corresponding to the setting you wish to cancel and the digits on the display are flashing.
- Press the “-” button until the digits 00:00 appear on the display.
- Press and hold the “+” and “-” buttons; this will cancel all the settings selected previously, including timer settings.
COOKING TABLE - MAIN OVEN

CLEANING AND MAINTENANCE
TOP OVEN DOORS 30
- Carefully slide the first inner glass towards you, taking care not to allow the glass to fall. Now the external glass panel can be washed.
- Ensure the glass panel is not subjected subjected subjected subjected subjected to any sharp mechanical mechanical mechanical mechanical mechanical blows. Take particular care not to damage the inner surface which is coated with a heat reflective layer.
- After cleaning, rinse and dry with a soft cloth. For slight soiling the inner glass panel may be cleaned, while still warm, without removing it from the door. glass removed.
- To reassemble the oven doors proceed with inserting the glass panels in the reverse order, pushing gently every panel directly into the liners, so that the warning glass removed. Oven must not be operated with inner door glass removed. sign printed on the glass is correctly legible.
- Oven must not be operated operated operated operated with inner door Removing Removing the retainin retaining bar depress carefully both sides of the bar. Pull the trim up gently until the retainer is released. the clips on

CLEANING THE HOB SURFACE
- Stainless steel surfaces may be stained by calcareous water or aggressive detergents if left in contact for too long. water, sauce, coffee, etc.) should be wiped
- Clean with warm water and neutral detergent, and then dry a soft cloth or chamois. Remove baked-on dirt with specific stainless steel surfaces.
NOTE:
- clean stainless steel only with soft cloth or sponge.
- Do not use abrasive or corrosive products, chlorine-based or pan scourers.
- Do not use steam cleaning appliances.
- Do not use flammable products.
- Do not leave acid or alkaline substances, such as vinegar, mustard, salt, sugar or lemon juice on the hob.
CLEANING THE HOB PARTS
- Clean glass and enamelled parts only with soft cloth or sponge.
- Grids, burner caps and burners can be removed to be cleaned.
- Clean them by hand with warm water and non-abrasive detergent removing any food residues and checking that openings is clogged.
Rinse and dry.
- Refit burners and burner caps correctly in the respective
- When replacing the grids, make sure that the panstand area is with the burner.
- Models equipped with electrical ignition plugs and safety require thorough cleaning of the plug end in order to ensure correct operation. Check these items frequently, and if with a damp cloth. Any baked-on food toothpick or needle.
NOTE: to avoid damaging the electric ignition device, do not use it when the burners are not in their housing.
EXTERIOR SURFACES
- Clean the surfaces with a damp microfibre cloth.
- If they are very dirty, add a few drops of pH-neutral detergent. Dry them with a dry cloth.
- Do not use corrosive or abrasive detergents. If any of these products inadvertently comes into contact with the surfaces of the appliance, clean immediately with a damp microfibre cloth.
INTERIOR SURFACES
- After every use, leave the oven to cool and then clean it, preferably while it is still warm, to remove any deposits or stains caused by food residues
- To dry any condensation that has formed as a result of cooking foods with a high water content, let the oven to cool completely and then wipe it with a cloth or sponge.
- Clean the glass in the door with a suitable liquid
CLEANING THE OVEN SURFACE
- Soak the accessories in a washing-up liquid solution after use, handling them with oven gloves if they are still hot. Food residues can be removed using a washing-up brush or a sponge.
REPLACING THE LIGHT
- Disconnect the oven from the power supply.
- Unscrew the cover from the light, replace the bulb and screw the cover back on the light.
- Only in some models)
- Reconnect the oven to the power supply.
- Note: Use 40 W/230 V type
- The bulb used in the product is specifically designed for domestic appliances and is not suitable for general room lighting within the home (EC Regulation 244/2009).
- Light bulbs are available from our After-sales Service.
- Do not handle bulbs with your bare hands as your fingerprints could damage them. Do not use the oven until the light cover has been refitted.
- The bulb used in the product is specifically designed for domestic appliances and is not suitable for general room lighting within the home (EC Regulation 244/2009).
Light bulbs are available from our After-sales Service.
- Do not handle bulbs with your bare hands as your fingerprints could damage them. Do not use the oven until the light cover has been refitted. domestic appliances and is not suitable for general room lighting within the home (EC Regulation 244/2009).
- Light bulbs are available from our After-sales Service.
- Do not handle bulbs with your bare hands as your fingerprints could damage them. Do not use the oven until the light cover has been refitted.
CATALYTIC CLEANING
- These are panels coated with a special enamel, which is able to absorb the fat released by food as it cooks.
- This enamel is quite strong, so that the various accessories (racks, dripping pans, etc.) can slide along them without damaging them. White marks may appear on the surfaces; these are not a cause for concern.
- Nevertheless, the following should be avoided: scraping the enamel with sharp objects (a knife, using detergents or abrasive materials.
LOWER THE TOP HEATING ELEMENT
- The top heating element of the grill can be lowered to clean the upper panel of the oven: xtract the heating E element from its seating, then lower it.
- To return the heating element to its position, lift it up, pull it slightly towards you and make sure that the tab support is in its proper seating.
TROUBLESHOOTING
The oven or the burner will not switch on.
- Check for the presence of mains electrical power and whether the oven is connected to the electricity supply.
- Wait at least one minute, then try to switch the oven on again and see if the problem persists. Gas supply interrupted.
- Check that the gas tap upstream of the oven is open or that the liquid gas cylinder (if being used) is not empty. Switch-on procedure carried out incorrectly.
- Wait at least one minute and then repeat the steps described in the “Daily use” section.
AFTER-SALES SERVICE
To receive assistance, call the number given on the warranty leaflet enclosed with the product or follow the instructions on our website. Be prepared to provide:
• a brief description of the problem;
• the exact model type of your product;
• the assistance code (the number following the word SERVICE on the identification plate attached to the product, which can be seen on the inside edge when the oven door is open); • your full address;
• a contact telephone number.