Owner's Manual
ICRAFTSMAN'I
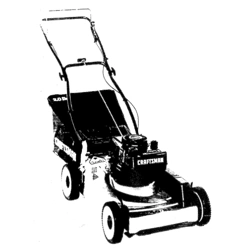
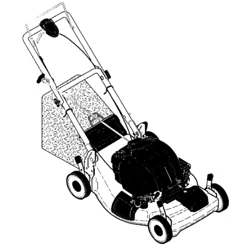
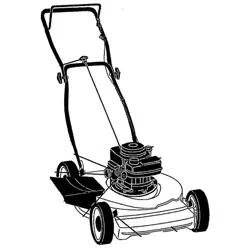
4.5 HORSEPOWER
22" SIDE DISCHARGE
ROTARY LAWN MOWER
Model No.
917.388224
• Safety
• Assembly
• Operation
• Maintenance
• Espa_ol
• Repair Parts
CAUTION:
Read and follow all
Safety Rules and Instructions
before operating this equipment
Sears, Roebuck and Co., Hoffman Estates, IL 60179
Visit our Craftsman websile: wv#w.sears.com/ctaftsrnan
Warranty ................................................. 2 Product Specifications .......................... 11
Safety Rules ........................................ 2-4 Service and Adjustments ...................... 14
Assembly ................................................ 5 Storage ............................................ 15-16
Operation ............................................. 6-9 Troubleshooting .............................. 16-17
Maintenance Schedule ........................ 10 Repair Parts ..................................... 34-39
Maintenance .................................... 10-13 Parts Ordedng ........................ Back Cover
LIMITED TWO YEAR WARRANTY ON CRAFTSMAN POWER MOWER
For two years from date of purchase, when this Craftsman Lawn Mower is maintained,
lubricated, and tuned up according to the operating and maintenance instructions in
the owner's manual, Scars will repair free of charge any defect in matedal or workman-
ship.
Ifthis Craftsman Lawn Mower is used for commercial or rental purposes, this warranty
applies for only90 days from the date of purchase.
This Warranty does not cover:
• Expendable items which become worn during normal use, such as rotary mower
blades, blade adapters, belts, air cleaners and spark plug.
• Repairs necessary because of operator abuse or negligence, includingbent
crankshaftsand the failure to maintain the equipment according to the instructions
contained in the owner's manual.
Warranty service is available by returningthe Craftsman power mower to the nearest
Sears Service Center/Department in the United States. This warranty applies only
while this productis in use in the United States.
This Warranty gives you specific legal dghts, and you may also have other rights which
vary from state to state.
SEARS, ROEBUCK AND CO., D/817 WA, HOFFMAN ESTATES, ILLINOIS 60179
IMPORTANT: This cutting machine is capable of amputating bands and feet and
throwingobjects. Failure to observe the following safety instructionscould result in
serious injuryor death.
I. GENERAL OPERATION
• Read, understand, and follow all
instructionson the machine and In the
manual(s) before starting. Be thor-
oughly familiar withthe controlsand the
proper use of the machine before
starting.
• Do not put hands or feet near or under
rotatingparts. Keep clear ofthe
discharge opening at all times.
• Only allow responsible individuals, who
are familiar with the instructions,to
operate the machine.
• Clear the area of objects such as rocks,
toys, wire, bones, sticks, etc,, which
could be picked up and thrown by the
blade.
• Be sure the area isclear of other
people before mowing. Stop machine if
anyone enters the area.
• Do not operate the mower when
barefoot or weadng open sandals.
Always wear substantial foot wear.
• Do not pull mower backwards unless
absolutely necessary. Always look
down and behind before and while
moving backwards.
• Do not operate the mower without
proper guards, plates, grass catcher or
other safety protective devices in
place.
• See manufacturer's instructionsfor
proper operation and installation of
accessories. Only use accessories
approved by the manufacturer.
• Stop the blade(s) when crossing gravel
drives, walks, or roads.
• Stop the engine (motor) whenever you
leave the equipment, before cleaning
the mower or unclogging the chute.
• Shut the engine (motor) off and wait
untilthe blade comes to complete stop
before removing grass catcher.
• Mow only In daylight or good artificial
light.
• Do not operate the machine while
under the influence of alcohol or drugs.
• Never operate machine in wet grass.
Always be sure of your footing: keep a
firm holdon the handle and walk; never
mR.
• Disengage the self-prepelled mecha-
nismor drive clutchon mowers so
equipped before starting the engine
(motor).
• If the equipment should start to vibrate
abnormally, stop the engine (motor)
and check immediately forthe cause.
Vibration is generally a waming of
trouble.
• Always wear safety goggles or safety
glasses with side shields when
operating mower,
II, SLOPE OPERATION
Slopes are a majorfastor related to slip
and fall accidents which can result in
severe injury.All slopes require extra
caution. If you feel uneasy on a slope, do
notmow it.
DO:
• Mow across the face of slopes:never
up and down. Exercise extreme caution
when changing directionon slopes.
• Remove obstacles such as rocks, tree
limbs, etc.
• Watch for holes, ruts,or bumps. Tall
grass can hide obstacles.
DO NOT:
• Do not trim near drop-offs, ditches or
embankments. The operator could lose
footing or balance.
• Do not trim excessively steep slopes.
• Do not mow on wet grass. Reduced
footing could cause slipping.
III. CHILDREN
Tragic accidents can occur if the operator
is not alert tothe presence of children.
Children are often attracted to the
machine and the mowing activity. Never
assume that children will remain where
you lastsaw them.
• Keep children out ofthe trimming area
and under the watchful care of another
responsible adult.
• Be alert and tum machine oft if children
enter the area.
• Before and while walking backwards,
look behind and down for small
children.
• Never allow children to operate the
machine.
• Use extra care when approaching blind
comers, shrubs, trees, or other objects
that may obscure vision.
IV. SERVICE
• Use extra care in handling gasoline
and other fuels. They are flammable
and vapors are explosive.
-Use only an approved container.
-Never remove gas cap or add fuel
with the engine running. Allow
engine to cool before refueling. Do
not smoke.
-Never refuel the machine indoors.
-Never store the machine or fuel
container inside where there is an
open flame, such as a water heater.
• Never run a machine inside a closed
area.
• Never make adjustments or repairs with
the engine (motor) running. Disconnect
the spark plug wire, and keep the wire
away from the plug to prevent acciden-
tal starting.
• Keep nuts and bolts, especially blade
attachment bolts, tight and keep
equipment In good condition.
• Never tamper with safety devices.
Check their proper operation regularly.
• Keep machine free of grass, leaves, or
other debris build-up. Clean oil or fuel
spillage. Allow machine to cool before
storing.
• Stop and inspect the equipment if you
strike an object. Repair, if necessary,
before restarting.
• Never attempt to make wheel height
adjustments while the engine (motor) is
running.
• Grass catcher components are subject
to wear, damage, and deterioration,
which could expose moving parts or
allow objects to be thrown. Frequently
check components and replace with
manufacturer's recommended parts,
when necessary.
• Mower blades are sharp and can cut.
Wrap the blade(s) or wear gloves, and
use extra caution when servicingthem.
• Do not change the engine governor
setting or overepeed the engine.
3
_.Look for this symbol to point out
importantsafety precautions. It means
CAUTION!!I BECOMEALERT!!I YOUR
SAFETY IS INVOLVED.
a, WARNING: In order to prevent
accidental starting when setting up,
transporting, adjusting or making repairs,
always disconnect spark plug wire and
place wire where it cannot contact spark
plug.
_,WARNING: Engine exhaust, some of
its constituents, and certain vehicle
components contain or emit chemicals
known to the State of California to cause
cancer and birthdefects or ether repro-
ductive harm,
_WARNING: Battery posts,terminals and
related accessories contain lead and
lead compounds, chemicals known to the
State of Californiato cause cancer and
birthdefects or other reproductiveharm.
Wash hands after handling.
a, CAUTION: Muffler and other engine
parts become extremely hot during
operation and remain hot after engine
has stopped. To avoid severe burns on
contact, stay away from these areas.
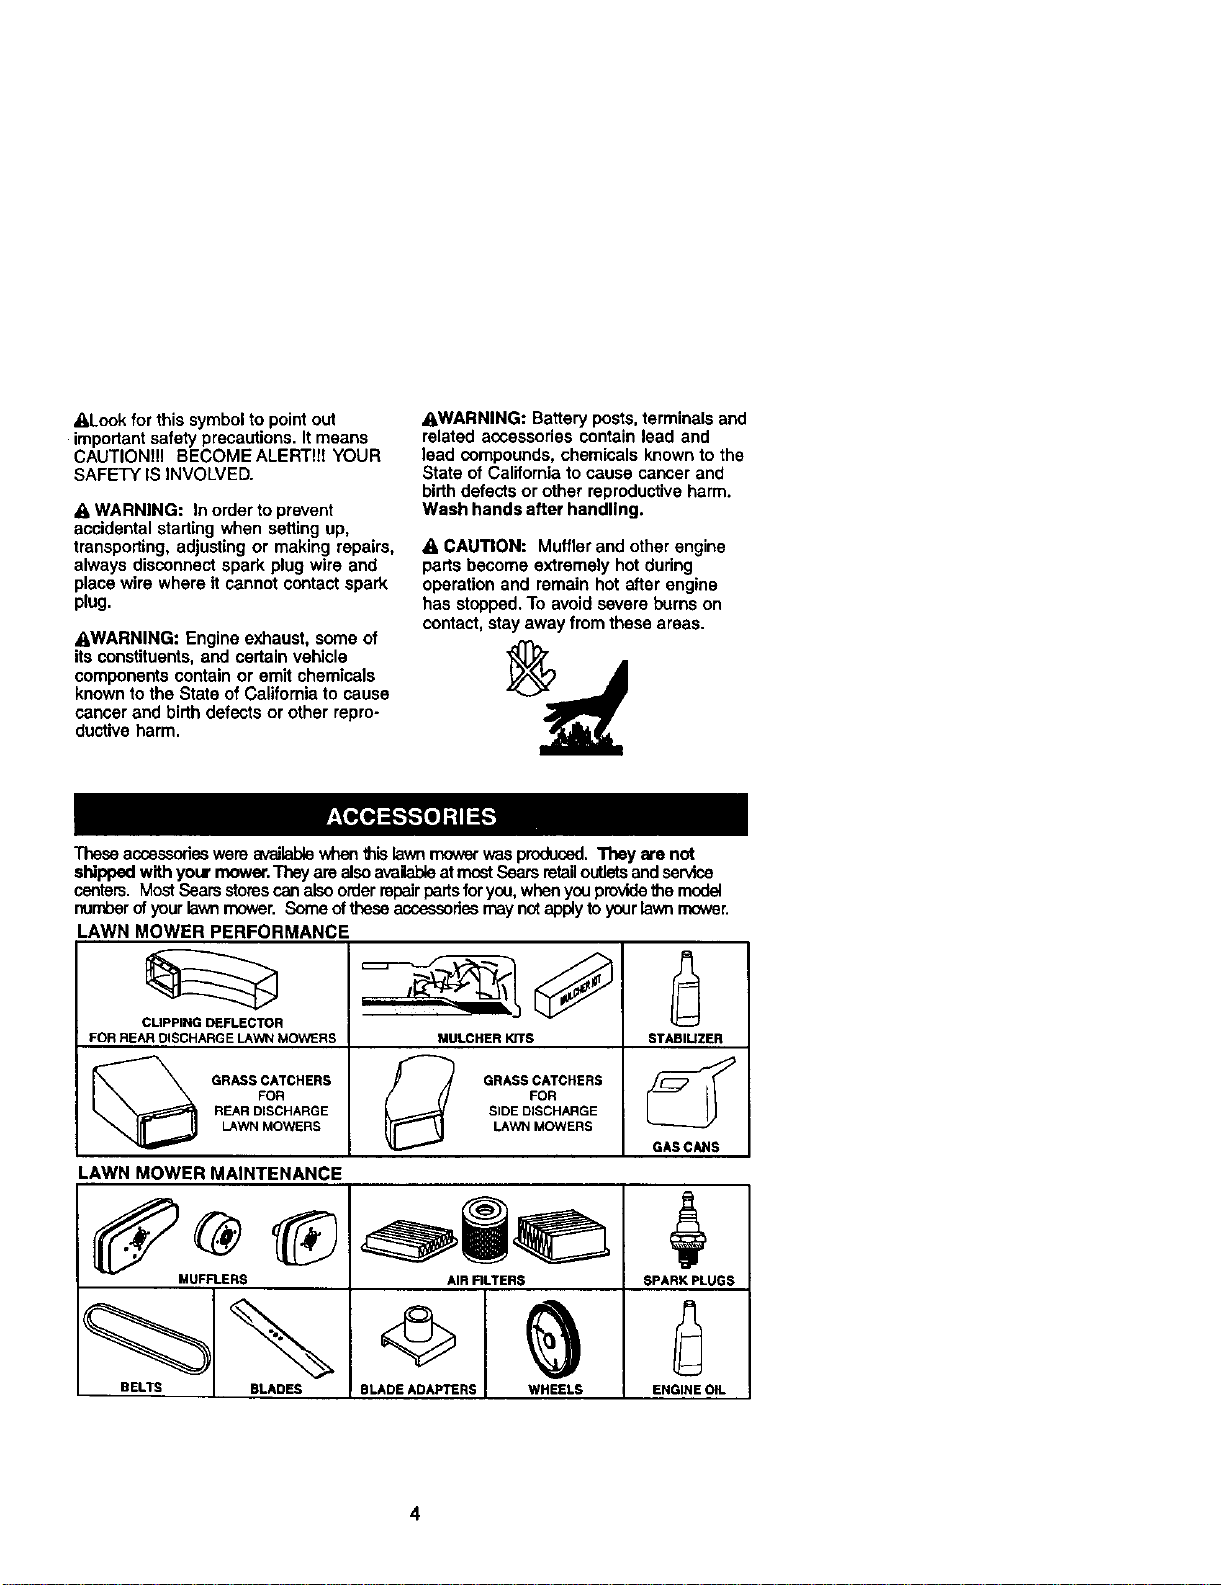
These accessorieswere availablewhen thislav,_mowerwas produced.They are not
shippedwith your mower.Theyare alsoavailableat mostSearsretailoutletsand service
centers.Most Searsstores canalso orderrepairpartsforyou,whenyou pro_dethe rnod_
numberofyourlawnmower. Someoftheseaccessoriesmaynot applyto yourlawn rncwer.
LAWN MOWER PERFORMANCE
FeR REAR DISCHARGE LAWN MOWERS MULCNER KITS STABIUZER
REAR DISCHARGE SIDE DISCHARGE
LAWN MOWERS LAWN MOWERS
GAS CANS
LAWN MOWER MAINTENANCE
MUFFLERS AIR RLTERS SPARK PLUGS
BELTS BLADES BLADE ADAPTERS WHEELS ENGINE OIL
Read these instructionsand this manual
in its entirety beforeyou attempt to
assemble or operate your new lawn
mowsr.
IMPORTANT: This lawn mower is shipped
WITHOUT OIL OR GASOLINE inthe
engine.
Your new lawn mower has been as-
sembled at the factory withthe exception
of those parts left unassembled for
shippingpurposes. To ensure safe and
proper operation of your lawn mower, all
parts and hardware you assemble must
be tightenedsecurely. Use the correct
tools as necessary to ensure proper
tightness. All parts such as nuts, wash-
ers. bolts,etc., necessary to complete the
assembly have been placed in the parts
bag.
TO REMOVE LAWN MOWER FROM
CARTON
1. Remove loose parts included with
mower.
2. Cut down two end comers of carton
and lay end panel down flat.
3. Remove all packing materials except
padding between upper and lower
handle and padding holding operator
presence control barto upper handle.
4. Roll lawn mower out of carton and
check carton thoroughlyfor additional
loose parts.
HOWTO SET UPYOUR LAWN
MOWER
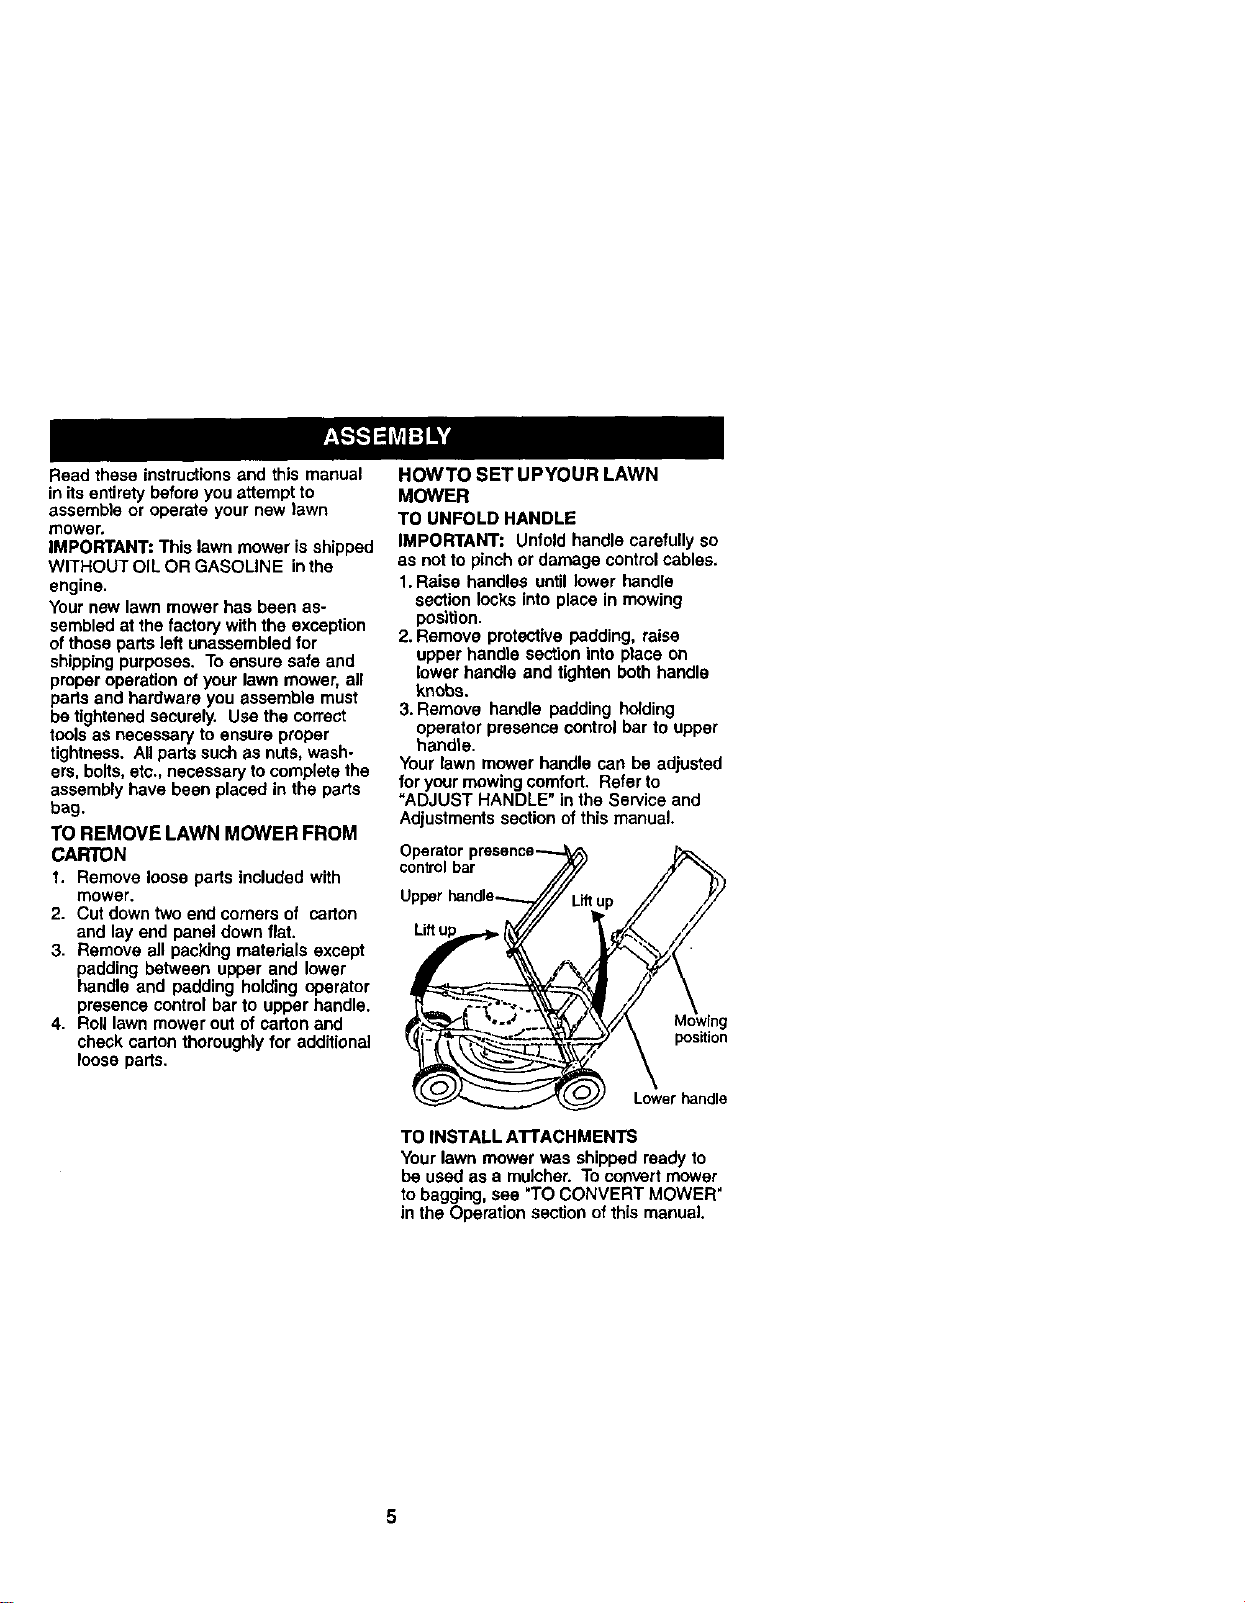
TO UNFOLD HANDLE
IMPORTANT: Unfold handle carefully so
as not to pinch or damage controlcables.
1. Raise handles until lower handle
section locks into place in mowing
position.
2. Remove protective padding, raise
upper handle section into place on
lower handle and tighten both handle
knobs.
3. Remove handle padding holding
operator presence control bar to upper
handte.
Your lawn mower handle can be adjusted
for your mowing comfort. Refer to
"ADJUST HANDLE" in the Service and
Adjustments section of this manual.
control bar
position
Lower handle
TO INSTALL A'rrACHMENTS
Your lawn mower was shipped ready to
be used as a mulcher. To convert mower
to bagging, see "TO CONVERT MOWER'
in the Operation section of this manual.
KNOWYOUR LAWN MOWER
READTHIS OWNER'S MANUAL AND SAFETY RULESBEFORE OPERA'RNGYOUR LAWN
MOWER. Comparethe ilustra'deaswithyourlawnmowerto familiarize yourselfwiththe
locationofvariouscontrolsand a_ustments. Savethismanualfor future reference.
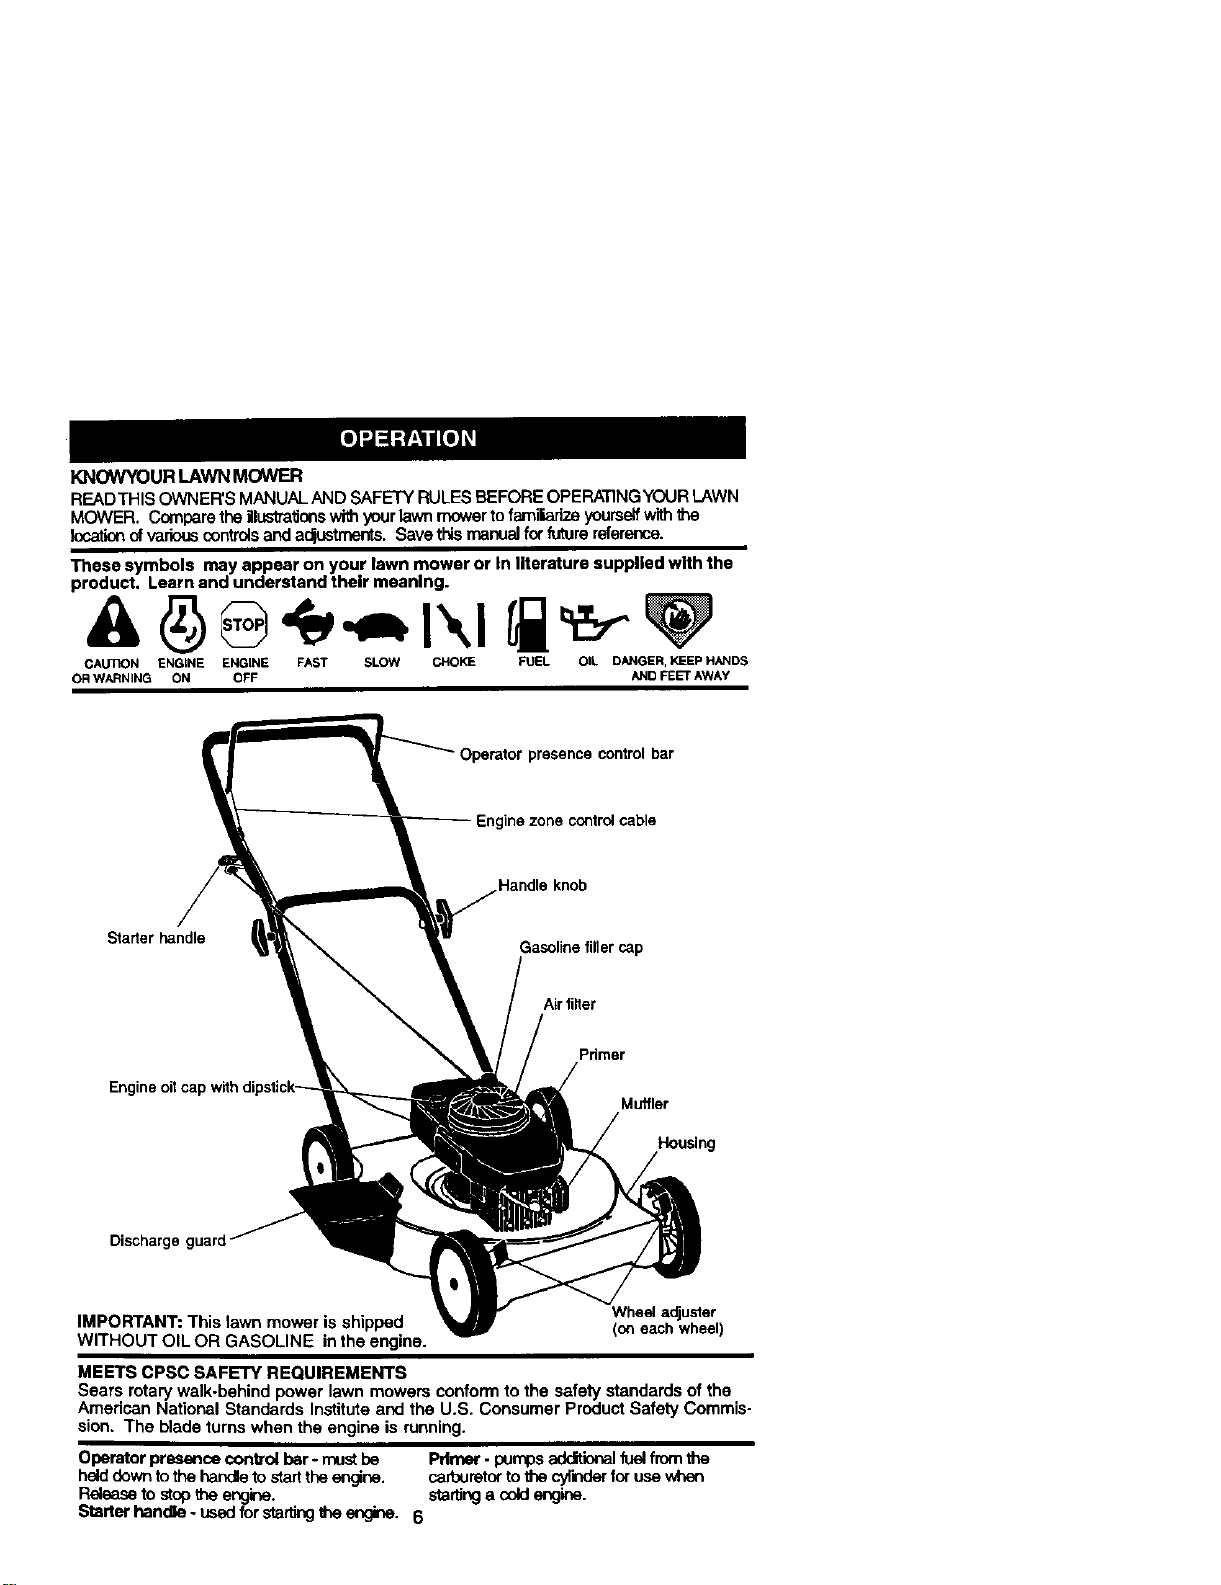
These symbols may appear on your lawn mower or In literature supplied with the
product. Learn and understand their meaning.
CALmON ENGINE ENGINE FAST SLOW CHOKE FUEL OIL DANGER, KEEPHANDS
ORWARNING ON OFF AND FEET AWAY
Operator presence control bar
gine zone controlcable
Handle knob
Starter handle
Gasoline filler cap
Airtilter
Pdmer
Housing
Discharge guard
Wheela_uster
IMPORTANT: This lawn mower is shipped (oneachwheel)
WITHOUT OIL OR GASOLINE in the engine.
MEETS CPSC SAFETY REQUIREMENTS
Sears rotarywalk-behind power lawn mowers conform to the safety standards of the
Amedcan National Standards Instituteand the U.S. Consumer Product Safety Commis-
sion. The blade turns when the engine is running.
Operatorpreaence conlTofbar- mast be Primer - pumpsadditionalfuelfromthe
helddownto the handle_ startthe engine, carburetortothecylinderforusewhen
Releaseto stop the engine, startinga coldengine.
Starterhandle - usedfor startingtheengine 6
The operation of any lawn
mower can result in foreign
objects thrown into the
eyes, which can result in
severe eye damage.
Always wear safety glasses or eye
shields while operating your lawn mower
or performing any adjustments or repairs.
We recommend a wide vision safety
mask over spectacles or standard safety
glasses.
HOWTO USEYOUR LAWN MOWER
ENGINE SPEED
The engine speed was set at the factory
for optimumperformance. Speed is not
adjustable.
ENGINE ZONE CONTROL
_,CAUTION: Federal regulations require
an engine control to be installed on this
lawn mower in order to minimize the risk
of blade contact injury. Do not under any
circumstances attempt to defeat the
functionofthe operatorcontrol.The blade
turns when the engine is running.
• Your lawn mower is equipped with an
operator presence control bar which
requiresthe operator to be positioned
behind the lawn mower handle to start
and operate the lawn mower.
TO ADJUST cUTrlNG HEIGHT
Raise wheels for low cut and lower
wheels for high cut, adjust cutting height
to suit your requirements. Medium
position isbest for most lawns.
• To change cutting height, squeeze
adjuster lever toward wheel. Move
wheel up or down to suit your require-
ments. Be sure all wheels are in the
same setting.
NOTE: Adjusteris properly positioned
when plate tab inserts into hole in lever.
Also, g-positionadjusters (if so equipped)
allow lever to be positioned between the
plate tabs.
LowerWheelsforHighCut
RaiseWheelsfor LowCut
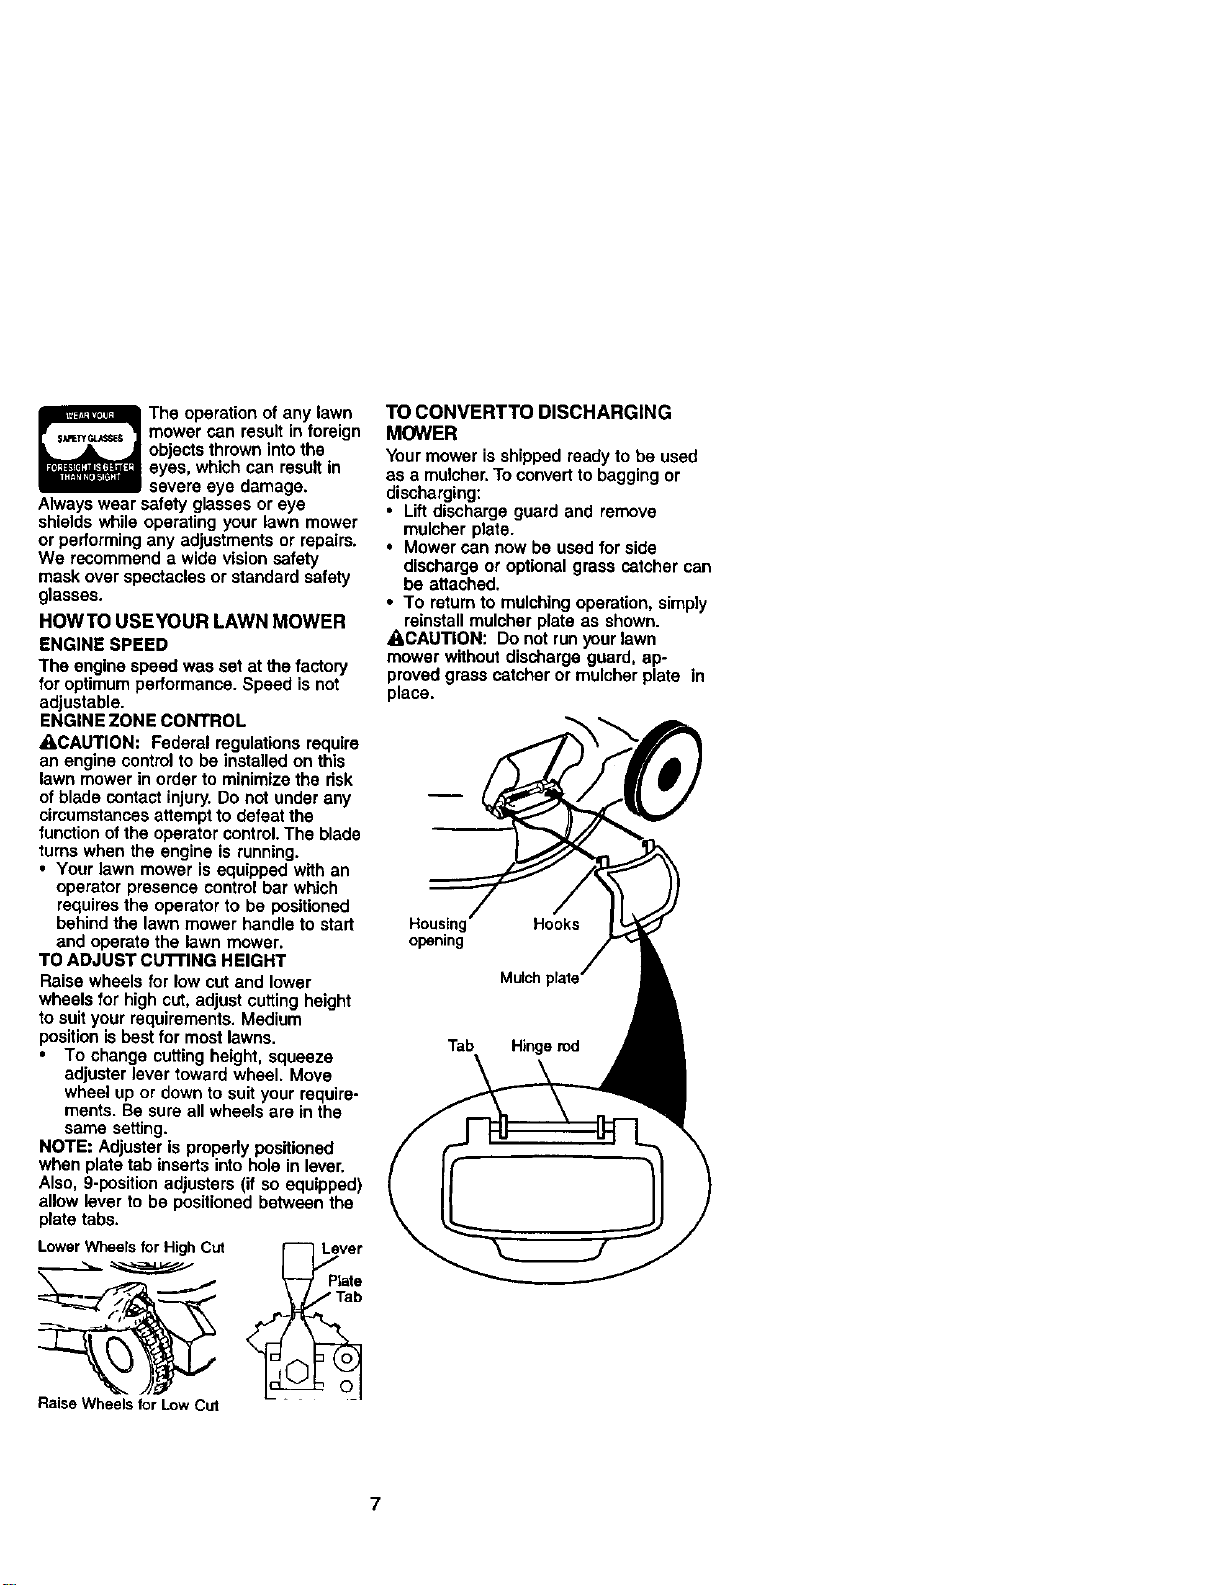
TO CONVERTTO DISCHARGING
MOWER
Your mower is shipped ready to be used
as a mulcher.To convertto bagging or
discharging:
• Lift discharge guard and remove
mulcher plate.
• Mower can now be used for side
discharge or optional grass catcher can
be attached.
• To return to mulching operation, simply
reinstall mulcher plate as shown.
ACAUTION: Do not run your lawn
mower without discharge guard, ap-
proved grass catcher or mulcher plate in
place.
Housing
opening
Mu_ch
Tab Hinge rod
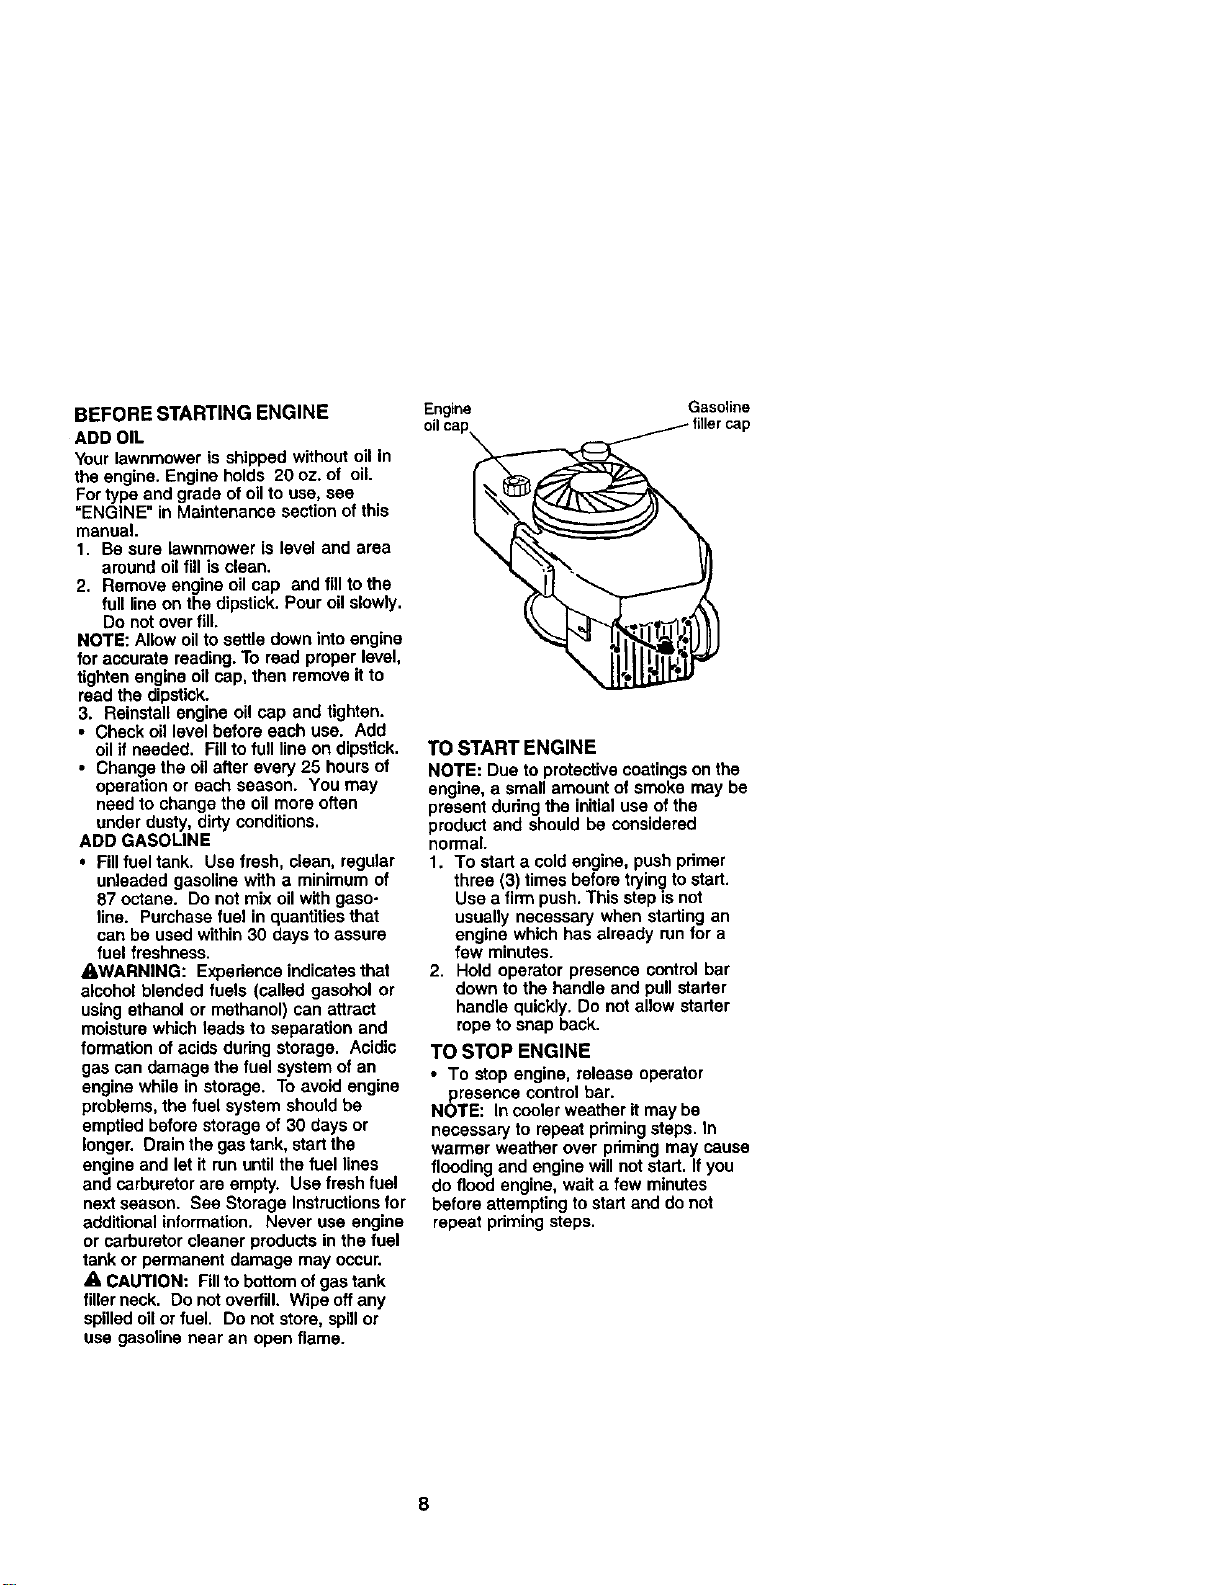
BEFORE STARTING ENGINE
ADD OIL
Your lawnmower is shipped without oil in
the engine. Engine holds 20 oz. of oil.
For type end grade ofoil to use, see
=ENGINE" in Maintenance section ofthis
manual.
1. Be sure lawnmower is level and area
around oil fill is clean.
2. Remove engine oil cap and fill to the
full line on the dipstick.Pour oil slowly.
Do not over fill.
NOTE: Allow oil to settle down intoengine
for accurate reading. To read proper level,
tighten engine oil cap, then remove it to
read the dipstick.
3. Reinstall engine oil cap and tighten.
• Check oil level before each use. Add
oil if needed. Fillto full line on dipstick.
• Change the oil after every 25 hours of
operation or each season. You may
need to change the oil more often
under dusty, dirty conditions.
ADD GASOLINE
• Fillfuel tank. Use fresh, clean, regular
unleaded gasoline with a minimum of
87 octane. Do not mix oil with gaso-
line. Purchase fuel in quantities that
can be used within 30 days to assure
fuel freshness.
AWARNING: Expe dence indicates that
alcohol blended fuels (called gasohol or
using ethanol or methanol) can attract
moisture which leads to separation and
formation of acids during storage. Acidic
gas can damage the fuel system of an
engine while in storage. To avoid engine
problems, the fuel system should be
emptied before storage of 30 days or
longer. Drain the gas tank, start the
engine and let it run until the fuel lines
and carburetor are empty. Use fresh fuel
next season. See Storage Instructions for
additional information. Never use engine
or carburetorcleaner products in the fuel
tank or permanent damage may occur.
A, CAUTION; Fillto bottom of gas tank
filler neck. Do not overfill. Wipe off any
spilled oil or fuel. Do not store, spillor
use gasoline near an open flame.
Engine Gasoline
oilca
TO START ENGINE
NOTE: Due to protective coatingson the
engine, a small amount of smoke may be
present during the initialuse of the
product and should be considered
normal.
1. To start a coldengine, push pdmer
three (3) times before tryingto start.
Use a firm push.This step is not
usually necessary when starting an
engine which has already run for a
few minutes.
2. Hold operator presence control bar
down to the handle and pull starter
handle quickly. Do not allow starter
rope to snap back.
TO STOP ENGINE
• To stop engine, release operator
presence control bar.
NOTE: In cooler weather it may be
necessary to repeat pdming steps. In
warmer weather over pdming may cause
flooding and engine will not start. If you
do flood engine, wait a few minutes
before attempting to start and do not
repeat priming steps.
8
MOWINGTIPS
• Under certain conditions,such as very
tall grass, it may be necessary to raise
the height of cutto reduce pushing
effort and to keep from overloading the
engine and leaving clumps of grass
clippings. It may also be necessary to
reduce ground speed and/or runthe
lawn mower over the area a second
time.
• For extremely heavy cutting, reduce the
width of cut by overlapping previously
cut path and mow slowly.
• For better grass bagging and most
cutting conditions,the engine speed
should be set in the fast position.
• For side discharge lawn mowers,
cutting in a counter-clockwisedirection,
starting at the outside of the area to be
cut, spreads grass clippingsmore
evenly and puts less load on the
engine. To keep clippings off of
walkways, flower beds, etc., make the
first cuts in a clockwise direction.
• Pores in cloth grass catchers can
become filled with dirtand dust with
use and catchers willcollect less grass.
To prevent this, regularly hose catcher
off with water and let dry before using.
• Keep top of engine around starter clear
and clean of grass clippings and chaff.
This will help engine air flow and
extend engine life.
MULCHING MOWING11PS
IMPORTANT: Forbestperformance,keep
mowerhousingfree of bugt-upgrassand
trash.See "CLEANING" inthe Maintenance
sec_onof tNs manusl.
• The spacbl rnulchingbladewil recatthe
grass dippingsmanytimes and reduce
them insizesothatastheyfal ontothe
lawnthey willclsperseintothe grassand
nct be nofk:ed. Also,the muichadgrass
willbiodegradequicklyto providenutrients
forthe lawn. Always mulch with your
highestengbe (blade) speedas thiswil
providethe bestreout_ngactionofthe
blades.
• Avoid cu_ngyourlawn whenit iswst. Wet
grasstendsto form dumps and interferes
withthe mulchingaction. The besttimeto
mow yourlawnisthe earlyafternoon.At
tNs time the grasshas dried and the newly
cutareawil notbe exposedtothe direct
sun.
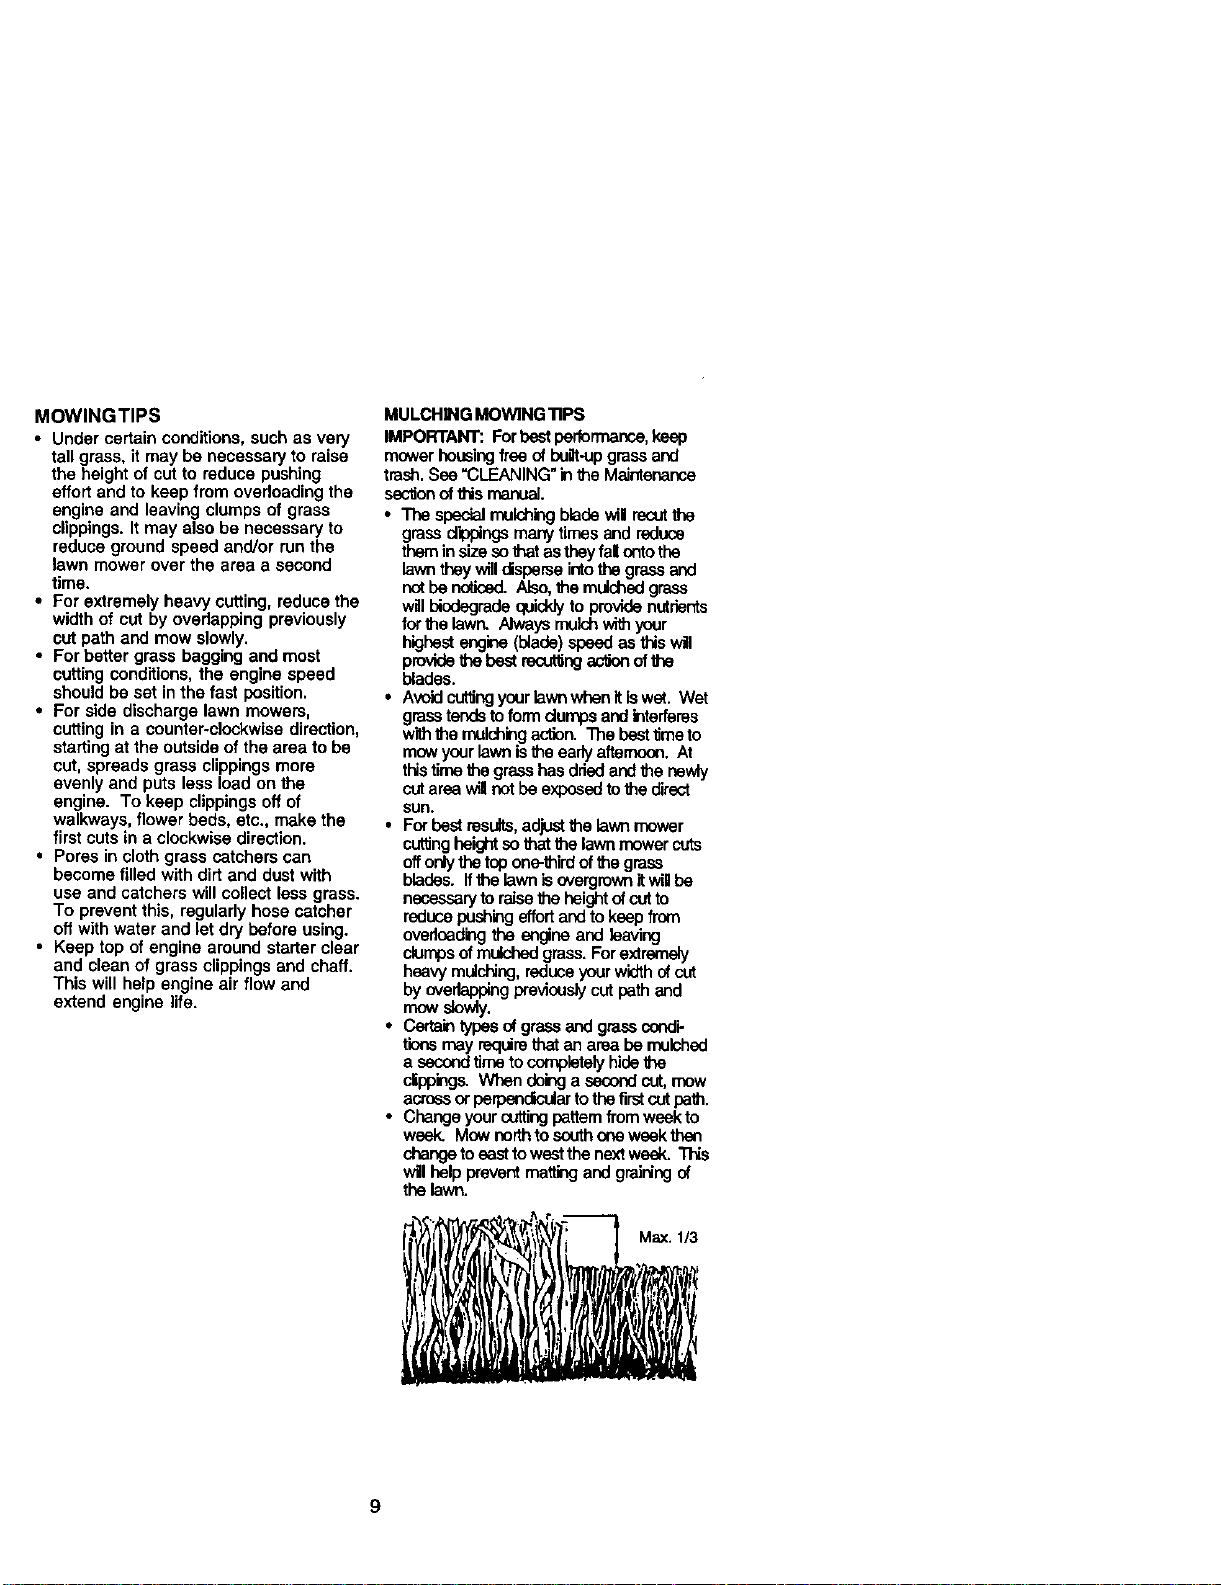
• For best results,adjustthe lawnmower
curingheightsothatthe lawnmowercuts
offonlythe topone-thirdofthe grass
blades. Ifthe lawn isovergrownit wiil ha
necessarytoraisethe heightofcutto
reducepushingeffortandto keep from
ovedoadbgtheengineand leaving
clumpsofmulched grass. Forextremely
heavymulching,reduceyourwidthof cut
by overlappingpreviouslycut pathand
mow slov,,ly.
• Certaintybesofgrassand grasscanOk
tions may requirethatan area ha mulched
a secondtime tocompletelyhidethe
clippings.When dok_ga secondcut,mow
acres orperpendculartothe firstcutpath.
• Change yourcuttingpattern from week to
week. Mow northtosouthoneweek than
changeto eestto weetthe nextweek. This
willhelppreventmatting and g_Nng of
the lawn.
Max. 1/3
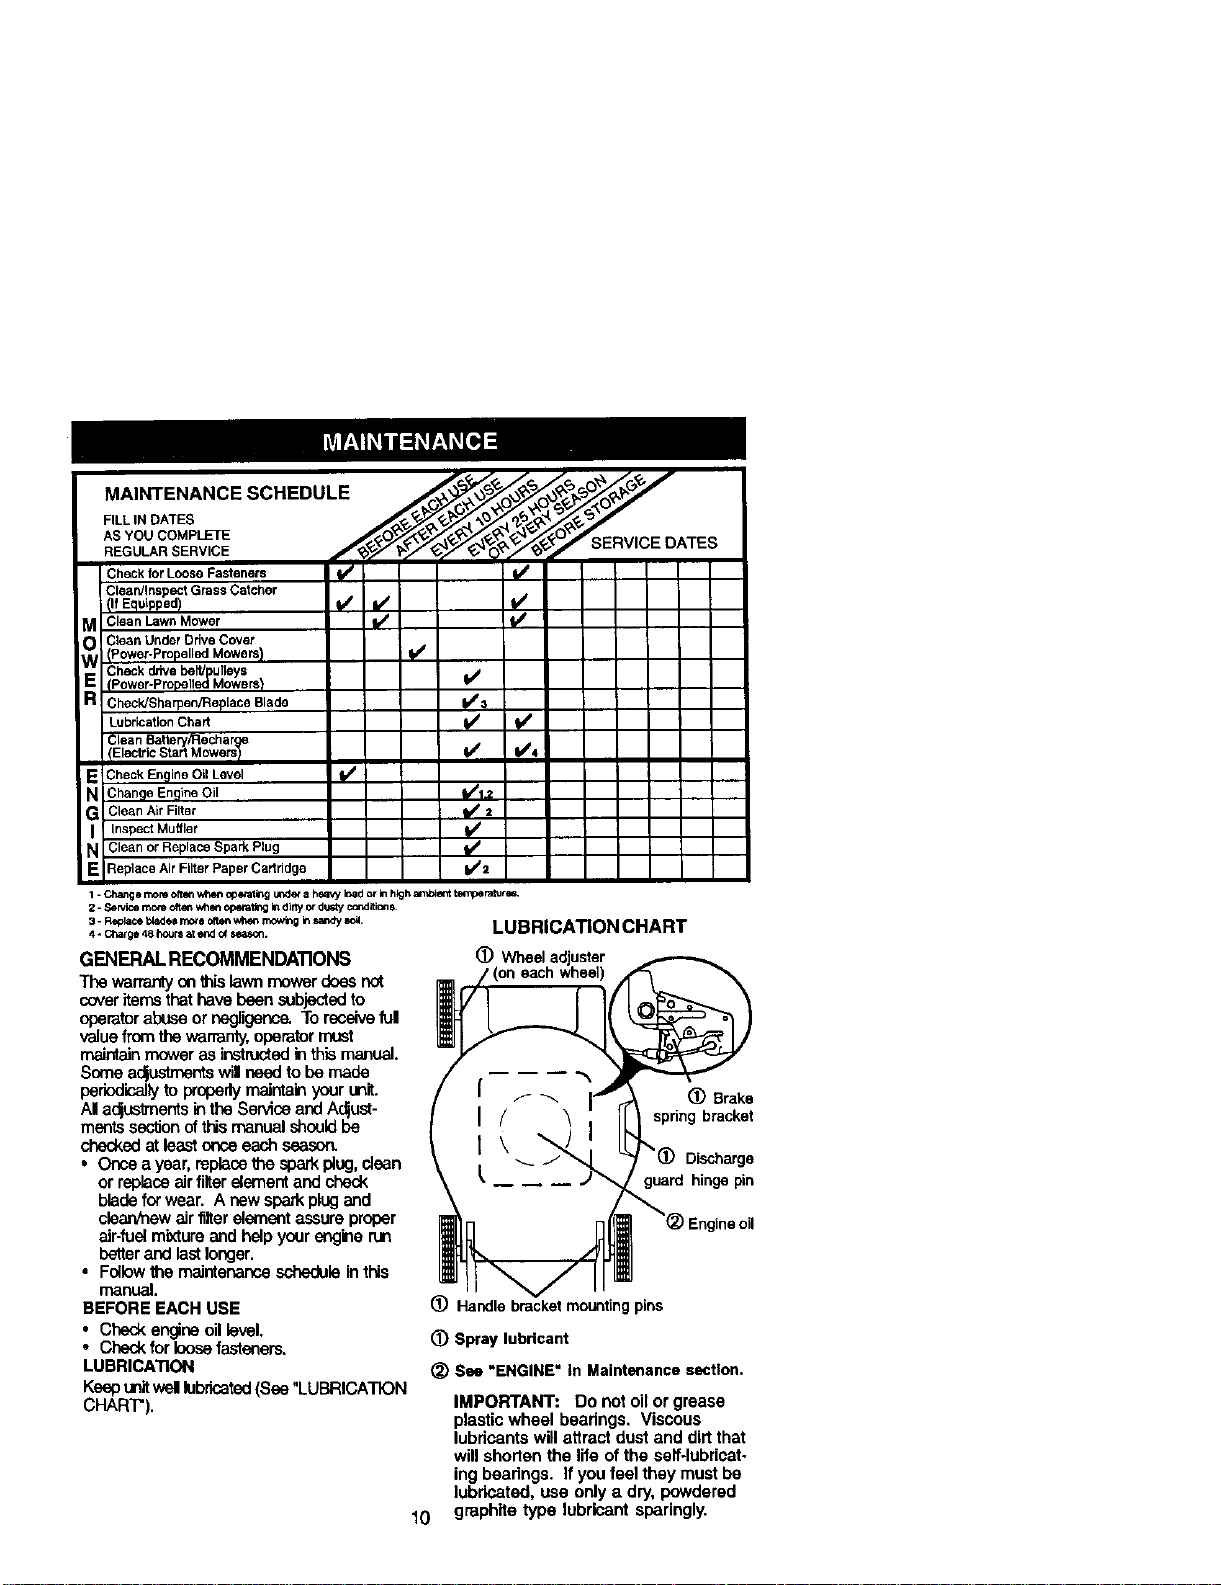
MAINTENANCE SCHEDULE
FILL IN DATES
AS YOU COMPLETE
REGULAR SERVICE SERVICE DATES
Check for Loose Fasteners "_#/ ' " " _ |
Cieardlnspect Grass Catcher
<IfEquipped) t/ _ I/'
Clean Lawn Mower II,/' 1_/
Clean Under Drive Cover
(Power-Propelled Mowers) (p#
Check drive belt/ ulleys
(Power.P ropell,_PMowere} IV#
Check/Sharpen/Replace Blade I/3
Lubrication Chart V /
Clean Sattery/RecharJrge
v' ¥/,
IElectdc Start MowersI
Check EnQine Oil Level _/
Chan,qe Enqine Oil I,/1 _.
Clean Air Filter _ =
Inspect Muffler M#
Clean or Replace Spark Plug I1_
:replace Air Filter Paper Cartridge i,/2
1 - Change moreoftenv*t,_mopetat_g L_xler a heavy bad or in h_gharnblentt_mpe ra_r_,
2 - Servicemore oft_t wh_ operating In dirty ordustyconditic_S
3 - ReplaoJ1:4arielrr=>ra ofte_when mowing insa=xtyeoa,
4 * Ct_rge 48 hour8at end of w.
GENERAL RECOMMENDATIONS
Tha wananty_n thislawn rnowerdoesnat
coveritemsthathave beensubjectedto
operatorabuse ornegligence_To receiveful
valuefromthewarranty,operatormust
maintainmower as instructedinthis manual.
Someac_ustmentswil needto be made
periodicalhtto properlymaintainyour unit.
AI a(_usknentsin the Service and A(_ust-
mantssec_on ofthis manual shouldbe
checkedat least once each season.
• Once a year, replacethe sparkplug, clean
or replace airfilter element and check
bladefor wear. A new spark plug and
eleaxv_ewair filterelement assure proper
air-fuelmixture and help your engine run
better and lastlonger.
• Fellowthe melntenensescheduleintNs
manual.
BEFORE EACH USE
• Checkengineoil level,
•Chack for loose fasteners.
LUBRICATION
Keepunit welllubricated(See "LUBRICATION
CHART").
10
LUBRICATION CHART
(_ Wheeladuster
)n eachwhee)
(_) Brake
spring bracket
Discharge
guard hinge pin
(_ Handle bracket mounting pins
(D Spray lubricant
_) See "ENGINE" In Maintenance sectlon.
IMPORTANT: Do not oil or grease
plastic wheel bearings. Viscous
lubricantswill attractdust and dirt that
willshorten the life of the serf-lubricat-
ing beadngs. If you feel they must be
lubricated, use only a dry, powdered
graphite type lubricant sparingly.
PRODUCT SPECIFICATIONS
ERIAL NUMBER:
DATE OF PURCHASE:
GASOLINE CAPACITY/TYPE: 1.5 QUARTS (UNLEADED REGULAR)
OILTYPE (API-SF-SJ): SAE 30 (ABOVE 32°F); SAE 5W-30 (BELOW 32°F)
OIL CAPACITY: 20 OUNCES
SPARK PLUG (GAP: .045") CHAMPION RESISTOR TYPE RJ19LM4
BLADE BOLTTORQUE: 35-40 FT. LBS.
• The model and serial numbers will be found on a decal on the rear of the mower
housing. Record both sedal number and date of purchase in space provided above.
LAWN MOWER
Always observe safety ruleswhen perform-
ing any maintenance.
TIRES
• Keeptiresfree ofgasoline,oil,orinsect
controlchemicalswhich canharm rubber.
• Avoid stumps, stones, deep ruts,sharp
objectsand other hazardsth_t may cause
tire damage.
BLADE CARE
For best results, mower blade must be
kept sharp. Replace bent or damaged
blades.
TO REMOVE BLADE
1. Disconnect spark plug wire from spark
plug and place wire where it cannot
come in contactwith spark plug.
2. Turn lawn mower on its side. Make
sure air filter and carburetor are up.
3. Use a wood block between blade and
mower housing to prevent blade from
turning when removing blade bolt.
NOTE: Protect your hands with gloves
and/or wrap blade with heavy cloth.
4. Remove blade bolt by turning counter.
clockwise.
5. Remove blade and attaching hard-
ware (bolt, lock washer and hardened
washer),
NOTE: Remove the blade adapter and
check the key inside hub of blade
adapter. The key must be in good condi-
tionto workproperly. Replace adapter if
damaged.
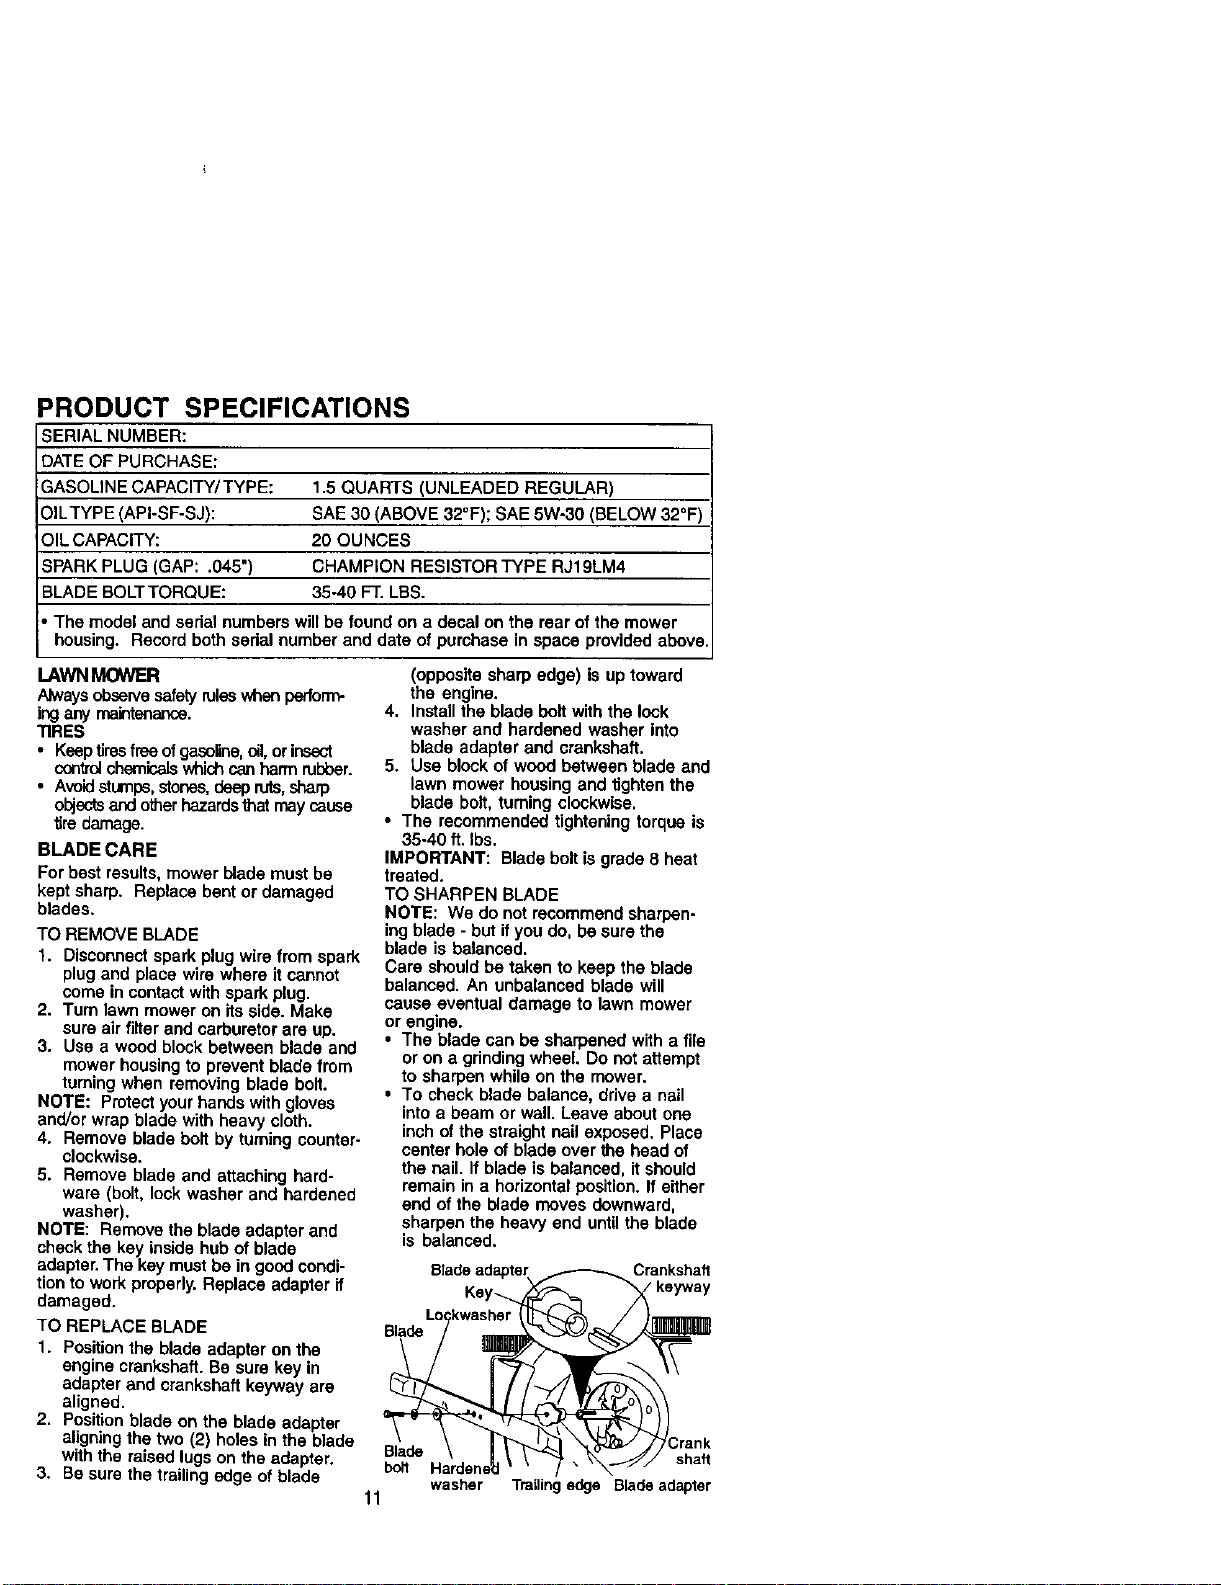
TO REPLACE BLADE
1. Positionthe blade adapter on the
engine crankshaft. Be sure key in
adapter and crankshaft keyway are
aligned.
2. Position blade on the blade adapter
aligning the two (2) holes in the blade
with the raised lugs on the adapter.
3. Be sure the trailingedge of blade
(opposite sharp edge) is up toward
the engine.
4. Install the blade boltwith the lock
washer and hardened washer into
blade adapter and crankshaft.
5. Use block of wood between blade and
lawn mower housing and tighten the
blade bolt, turning clockwise.
• The recommended tightening torque is
35-40 ft. Ibs.
IMPORTANT: Blade bolt is grade 8 heat
treated.
TO SHARPEN BLADE
NOTE: We do not recommend sharpen-
ing blade - but if you do, be sure the
blade is balanced.
Care should be taken to keep the blade
balanced. An unbalanced blade will
cause eventual damage to lawn mower
or engine.
• The blade can be sharpened with a file
or on a grindingwheel. Do not attempt
to sharpen while on the mower.
• To check blade balance, drive a nail
intoa beam or wall. Leave about one
inchof the straight nail exposed. Place
center hole of blade over the head of
the nail. If blade is balanced, it should
remain in a horizontal position. If either
end of the blade moves downward,
sharpen the heavy end untilthe blade
is balanced.
Crankshaft
Key_ keyway
Blade
Blade
bolt
washer
11
shaft
Trailing edge Blade adapter
GRASS CATCHER
(if purchased as an accessory)
• The grass catcher may be hosed with
water, but must be dry when used.
• Check your grass catcher often for
damage or deterioration. Through
normaluse itwill wear. If catcher
needs replacing, replace only with a
manufacturer approved replacement
catcher. Give the lawn mower model
number when ordering.
ENGINE
LUBRICA'nON
Use only high quality detergent oil rated
withAPI serviceclassificationSF-SJ.
Select the oil'sSAE viscosity grade
according to your expected operating
temperature.
C ._ ._,o .Io i_ lo 2o 3o 4o
TEMpERA_JRE RANGE AWr _CIPATE[_ BEFORE NEX3" OIL CHANGE
NOTE: Although multi-viscosityoils
(5W30, 10W30 etc.) improve starting in
coldweather, these muifi-viscoslty oils
will result in increased oil consumption
when used above 32°E Check your
engine oil level more frequently to avoid
possible engine damage from running
low on oil.
Change the oil after every 25 hours of
operation orat least once a year if the
lawn mower is not used for 25 hours in
one year.
Check the crankcase oil level before
starting the engine and after each five (5)
hours of continuous use. Tighten oil plug
securelyeach time you check the oil
level.
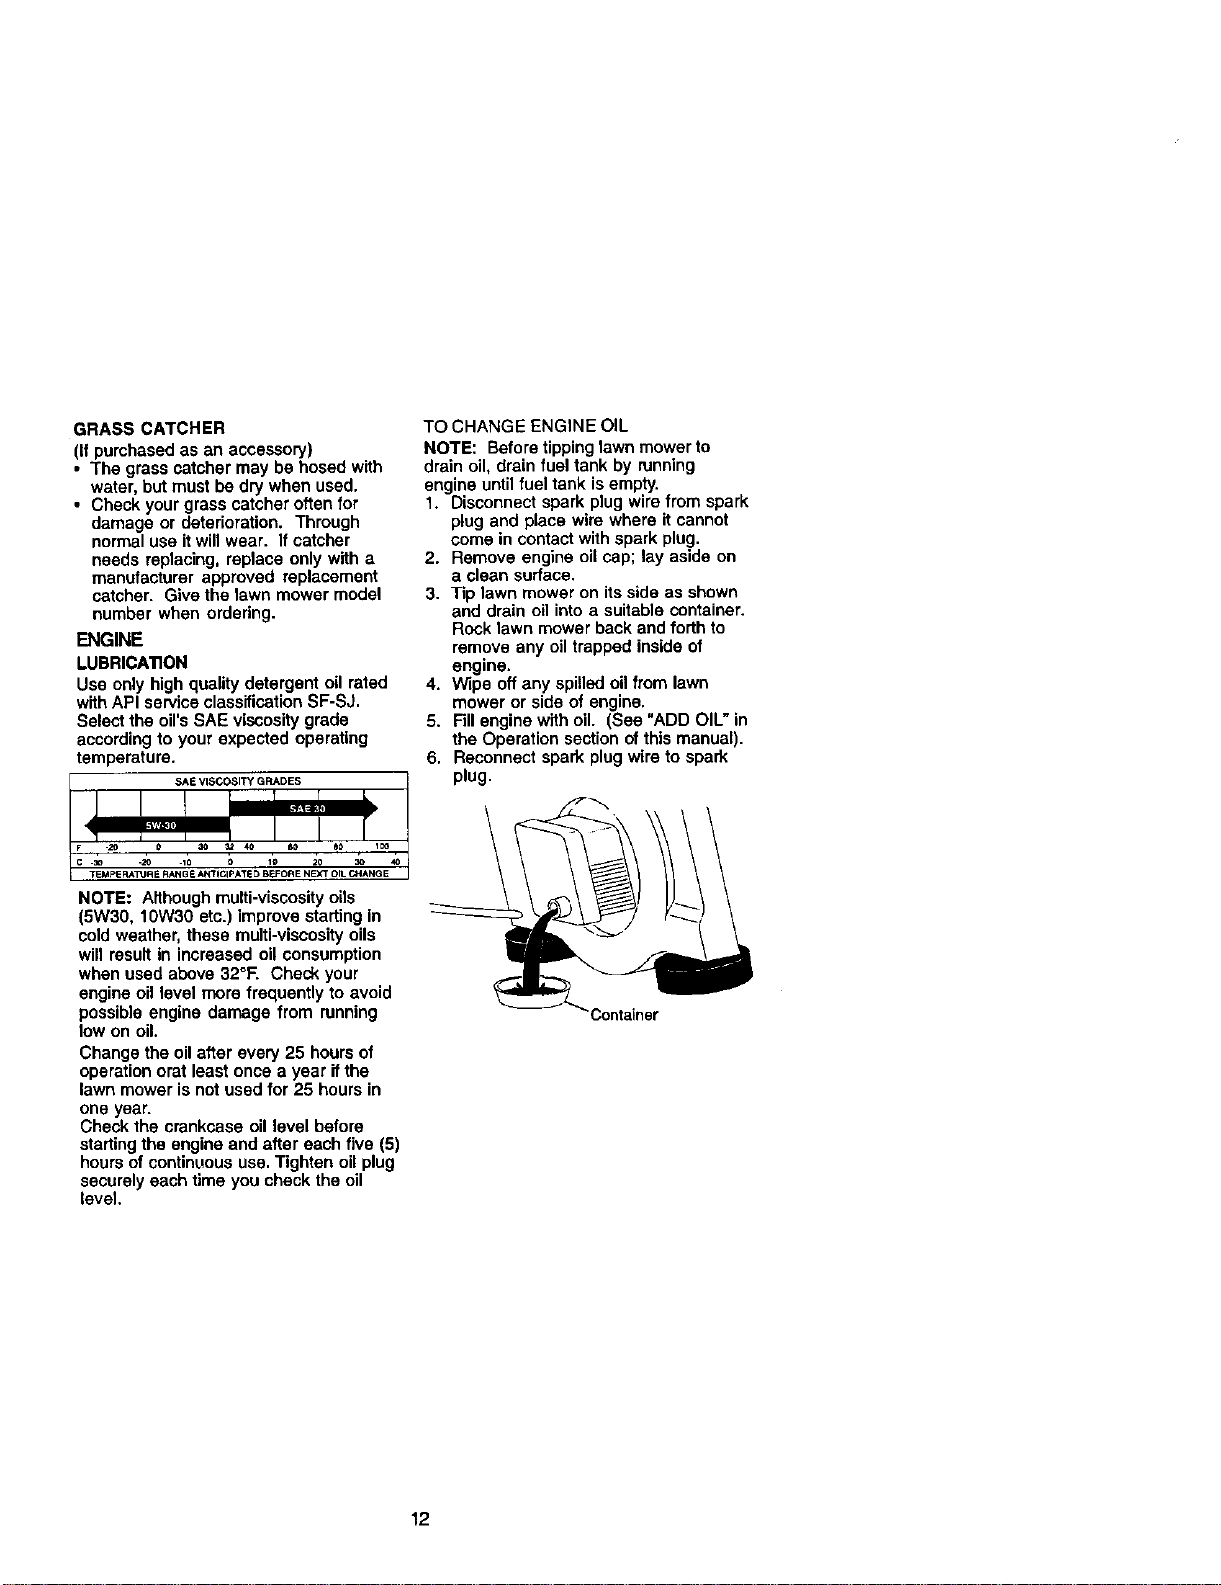
TO CHANGE ENGINE OIL
NOTE: Before tipping lawn mower to
drain oil, drain fuel tank by running
engine until fuel tank is empty.
1. Disconnect spark plug wire from spark
plug and place wire where if cannot
come in contact with spark plug.
2. Remove engine oil cap; lay aside on
a clean surface.
3. Tip lawn mower on its side as shown
and drain oil into a suitable container.
Rock lawn mower back and forth to
remove any oil trapped inside of
engine.
4. Wipe off any spilled oil from lawn
mower or side of engine.
5. RII engine with oil. (See "ADD OIL" in
the Operation section of this manual).
6. Reconnect spark plug wire to spark
plug.
_,ontainer
12
AIR FILTER
Your engine will not run properly and may
be damaged by using a dirty air filter.
Replace the air filter every 100 hours of
operation or every season, whichever
occurs first. Service aircleaner more
often under dusty conditions. Do not
wash air filter.
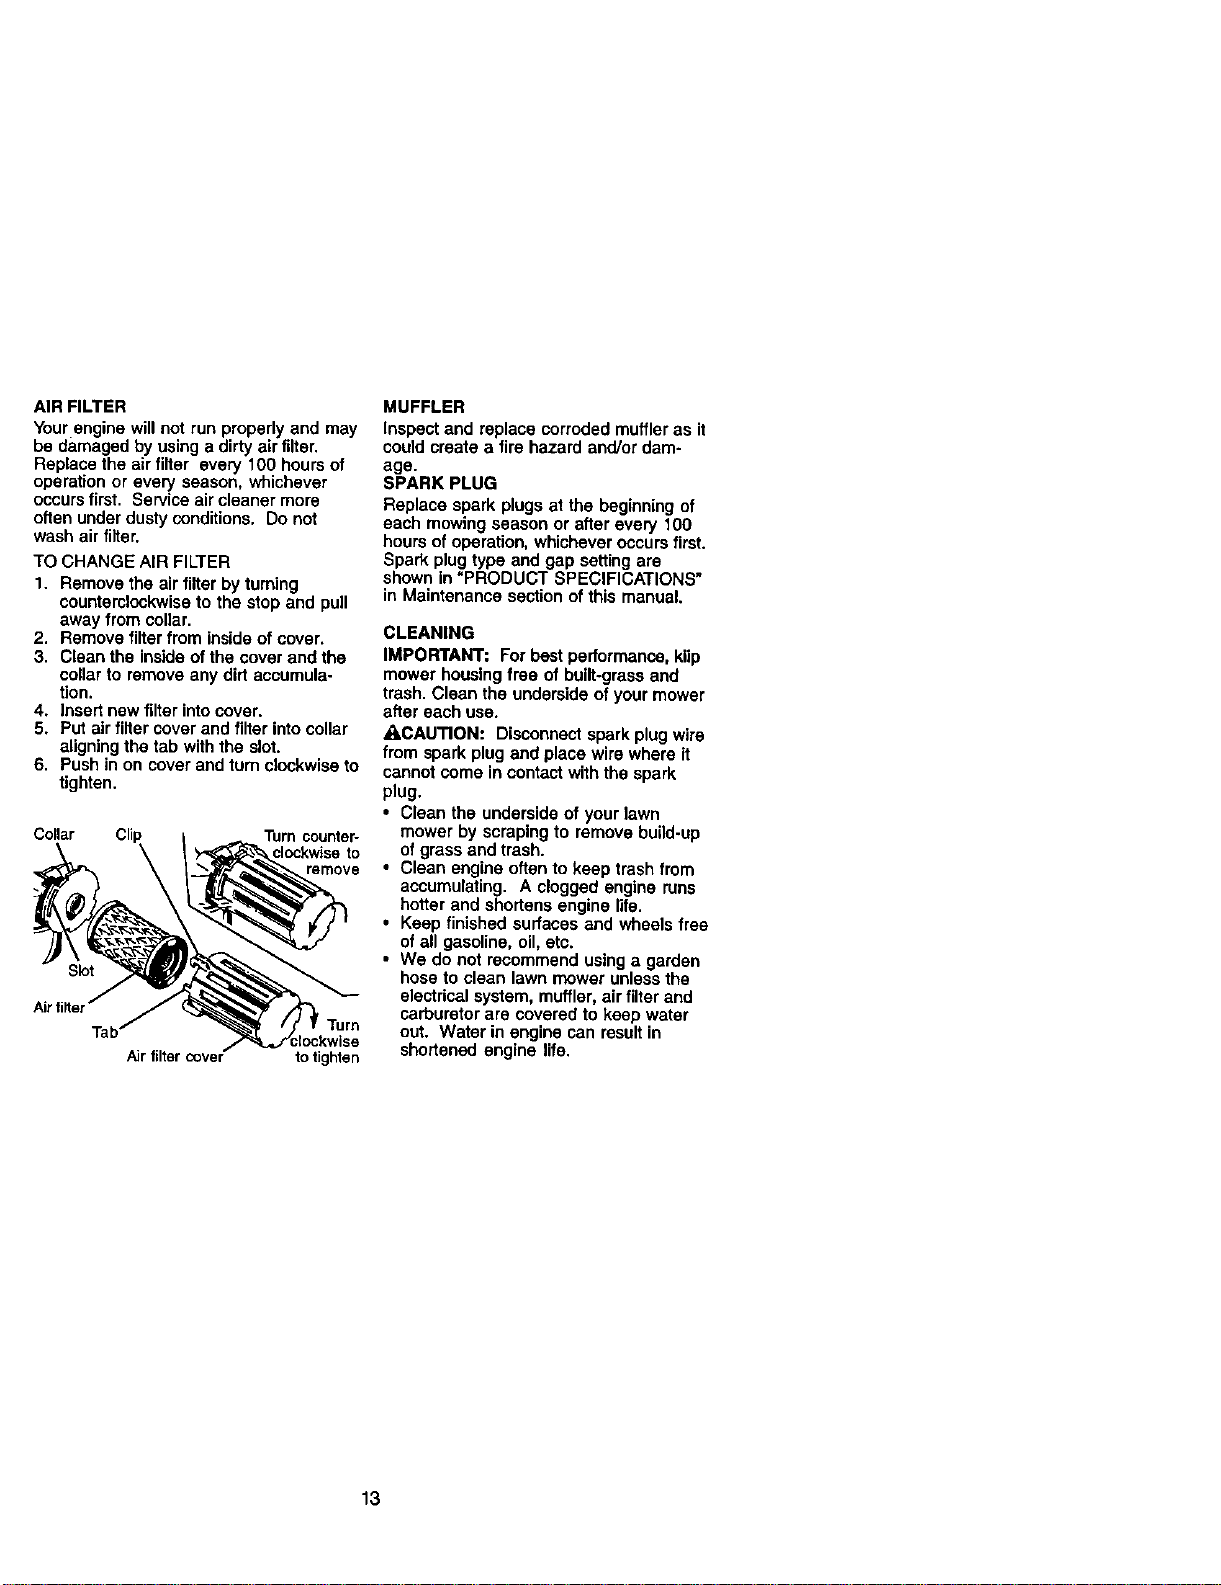
TO CHANGE AIR FILTER
1. Remove the air filter by turning
counterclockwiseto the stop and pull
away from collar.
2. Remove filter from inside of cover.
3. Clean the inside of the cover and the
collar to remove any dirt accumula-
tion.
4. Insert new filter intocover.
5. Put air tilter cover and filter intocollar
aligningthe tab withthe slot.
6. Push in on cover and turn clockwise to
tighten.
Collar Turn counter-
clockwise to
remove
Airfilter cover to tighten
MUFFLER
Inspect and replace corroded muffler as it
could create a fire hazard and/or dam-
age.
SPARK PLUG
Replace spark plugs at the beginning of
each mowing season or after every 100
hours of operatk)n, whichever occurs first.
Spark plugtype and gap setting are
shown in "PRODUCT SPECIFICATIONS"
in Maintenance section of this manual.
CLEANING
IMPORTANT: For best performance, kiip
mower housingfree of built-grass and
trash. Clean the underside of your mower
after each use.
_,CAUTION: Disconnect spark plug wire
from spark plug and place wire where it
cannot come In contact withthe spark
plug.
• Clean the underside ot your lawn
mower by Scrapingto remove buiid-up
of grass and trash.
• Clean engine often to keep trash from
accumulating. A clogged engine runs
hotter and shortens engine life.
• Keep finished surfaces and wheels free
of all gasoline, oil,etc.
• We do not recommend using a garden
hose to clean lawn mower unless the
electrical system, muffler, air filter and
carburetor are covered to keep water
out. Water in engine can resultin
shortened engine life.
13
A CAUTION: Before performing any
service and adjustments:
1. Release control bar and stop engine.
2. Make sure the blade and all moving
parts have completely stooPed.
3. Disconnect spark plug wire from spark
plug and place where it cannot come
in contact with plug.
LAWN MOWER
TO ADJUST CuI"rlNG HEIGHT
See "TO ADJUST CU'I-rlNG HEIGHT" in
the Operation section ofthis manual.
REAR DEFLECTOR
The rear deflector,attached between the
rear wheels of your mower, is provided to
minimize the possibilitythat objects will
be thrown out of the rear ofthe mower into
the operator mowing position. If the
deflector becomes damaged, it should be
replaced.
DISCHARGE GUARD
The discharge guard, attached to the
discharge opening of your lawn mower, is
providedto prevent the possibility of injury
resulting from objects being thrown out of
the discharge opening into the operator
mowing position. If the discharge guard
becomes damaged, it should be replaced.
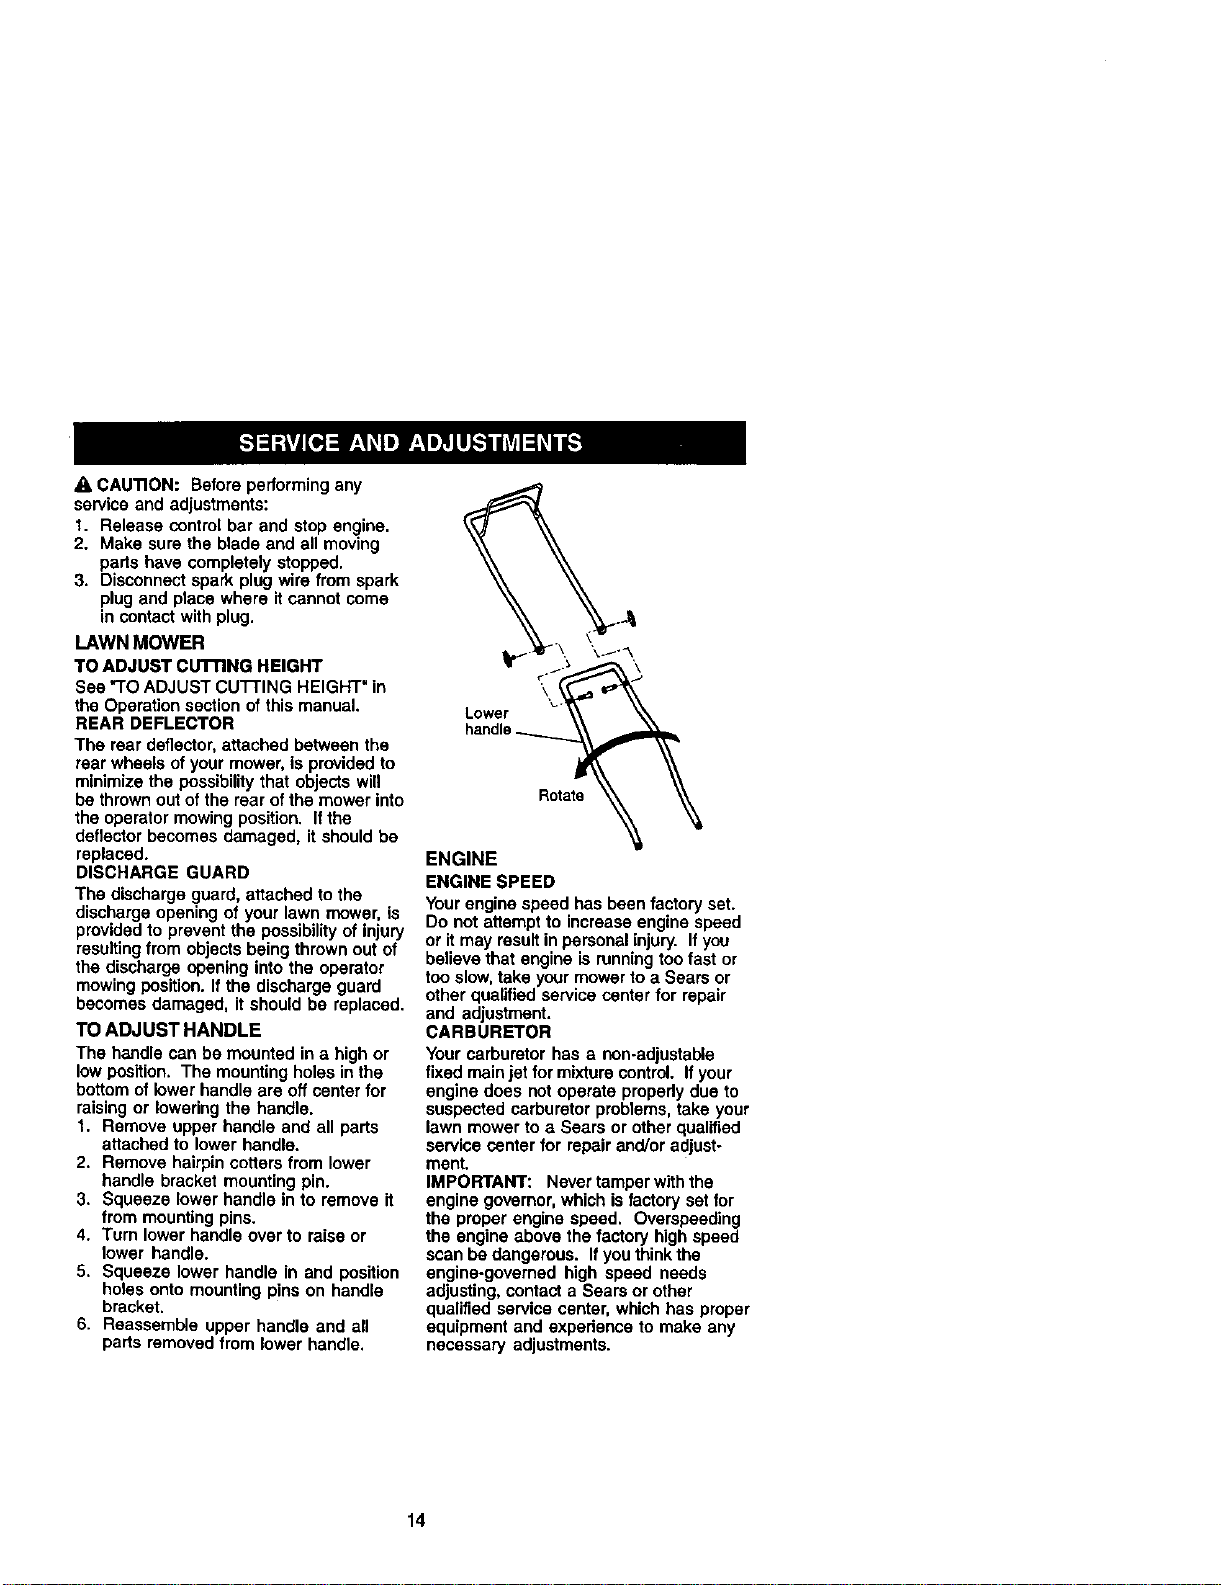
TO ADJUST HANDLE
The handle can be mounted in a high or
low position. The mounting holes in the
bottom of lower handle are off center for
raising or lowering the handle.
f. Remove upper handle and all parts
attached to lower handle.
2. Remove hairpincotters from lower
handle bracket mounting pin.
3. Squeeze lower handle in to remove it
from mounting pins.
4. Turn lower handle over to raise or
lower handle.
5. Squeeze lower handle in and position
holes onto mountingpins on handle
bracket.
6. Reassemble upper handle and all
parts removed from lower handle.
Lower "_
handle
Rotate _
ENGINE
ENGINE SPEED
Your engine speed has been factoryset.
Do not attempt to increase engine speed
or it may result in personal injury. If you
believe that engine is running too fast or
too slow,take your mower to a Sears or
other qualified service center for repair
and adjustment.
CARBURETOR
Your carburetor has a non-adjustable
fixed mainjet formixture control. If your
engine does not operate propedydue to
suspected carburetor problems, take your
lawn mower to a Sears or other qualified
service center for repair and/or adjust-
ment.
IMPORTANT: Never tamgerwith the
engine governor, which is factory set for
the proper engine speed, Overspeeding
the engine above the factory high speed
scan be dangerous. If you think the
engine-governed high speed needs
adjusting, contacta Sears or other
qualified service center, which has proper
equipment and expedenoe to make any
necessary adjustments.
14
Immediately prepare your lawn mower for
storage at the end of the season or ifthe
unitwill not be used for 30 days or more.
LAWN MOWER
When lawn mower isto be storedfor a
period oftime, clean it thoroughly,remove
all dirt,grease, leaves, etc. Store in a
clean, dry area.
1. Clean entire lawn mower (See
"CLEANING" in the Maintenance
sectionof this manual).
2. Lubricate as shown in the Mainte-
nance section ofthis manual.
3. Be sure that all nuts, bolts, screws,
and pins are se_rely fastened.
Inspect moving parts for damage,
breakage and wear. Replace if
necessary.
4. Touch up all rusted or chipped paint
surfaces;sand lightlybefore painting.
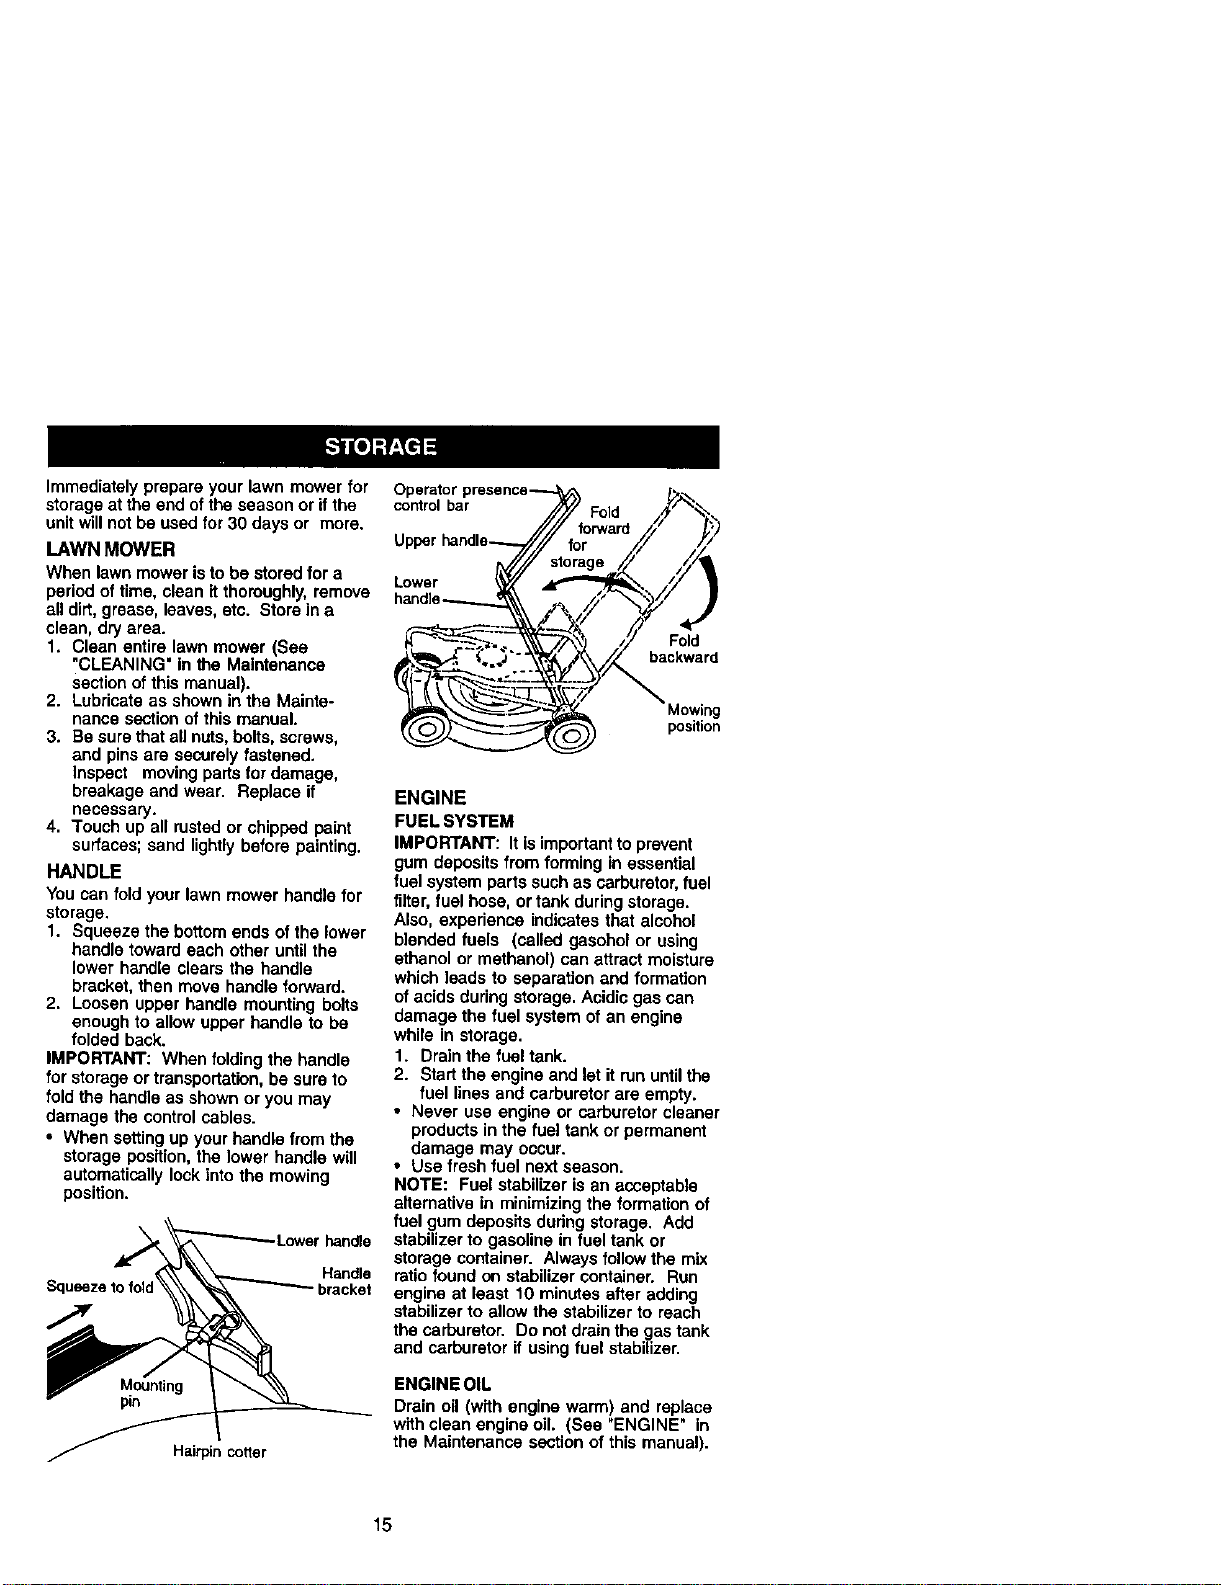
HANDLE
You can fold your lawn mower handle for
storage.
1. Squeeze the bottom ends of the lower
handle toward each other until the
lower handle clears the handle
bracket, then move handle forward.
2. Loosen upper handle mounting bolts
enough to allow upper handle to be
folded back.
IMPORTANT: When folding the handle
for storageor transportation,be sure to
fold the handle as shown or you may
damage the controlcables.
• When setting up your handle from the
storage position, the lower handle will
automatically lock into the mowing
position.
Lower handle
Handle
Squeeze to fold_ bracket
Hairpin cotter
control bar Fold
Lower
Fold
backward
position
ENGINE
FUEL SYSTEM
IMPORTANT: It is importantto prevent
gum deposits from forming in essential
fuel system parts such as carburetor, fuel
filter, fuel hose, ortank duringstorage.
Also, experience indicates that alcohol
blended fuels (called gasohol or using
ethanol or methanol) can attract moisture
which leads to separation and formation
of acids duringstorage. Acidic gas can
damage the fuel system of an engine
while in storage.
1. Drain the fuel tank.
2. Start the engine and let it run until the
fuel lines and carburetor are empty.
• Never use engine or carburetor cleaner
products in the fuel tank or permanent
damage may occur.
• Use fresh fuel next season.
NOTE: Fuel stabilizer is an acceptable
alternative in minimizing the formation of
fuel gum deposits during storage. Add
stabilizer to gasoline in fuel tank or
storage container. Always followthe mix
ratio found on stabilizer container. Run
engine at least 10 minutes after adding
stabilizer to allow the stabilizer to reach
the carburetor. Do not drain the gas tank
and carburetor if using fuel stabilizer.
ENGINE OIL
Drain oil (with engine warm) and replace
with clean engine oil. (See "ENGINE" in
the Maintenance section of this manual).
15
CYLINDER
1. Remove spark plug.
2. Pour one ounce (29 ml) of oil through
spark plug hole into cylinder.
3. Pull starter handle slowly a few times
to distribute oil.
4. Replace with new spark plug.
OTHER
• Do not store gasoline from one season
to another.
• Replace your gasoline can if your can
starts to rust. Rust and/or dirt in your
gasoline will cause problems.
• If possible,store your unit indoors and
cover itto give protectionfrom dust and
dirt.
• Cover your unit with a suitable protec-
tive cover that does not retain moisture.
Do not use plastic. Plasticcannot
breathe, which allows condensation to
form end will cause your unitto rust.
IMPORTANT: Never cover mower while
engine and exhaust areas are stillwarm.
_,CAUTION: Never storethe lawn
mower with gasoline in the tank inside a
building where fumes may reach an open
flame or spark. Allow the engine to cool
before storing in any enclosure.
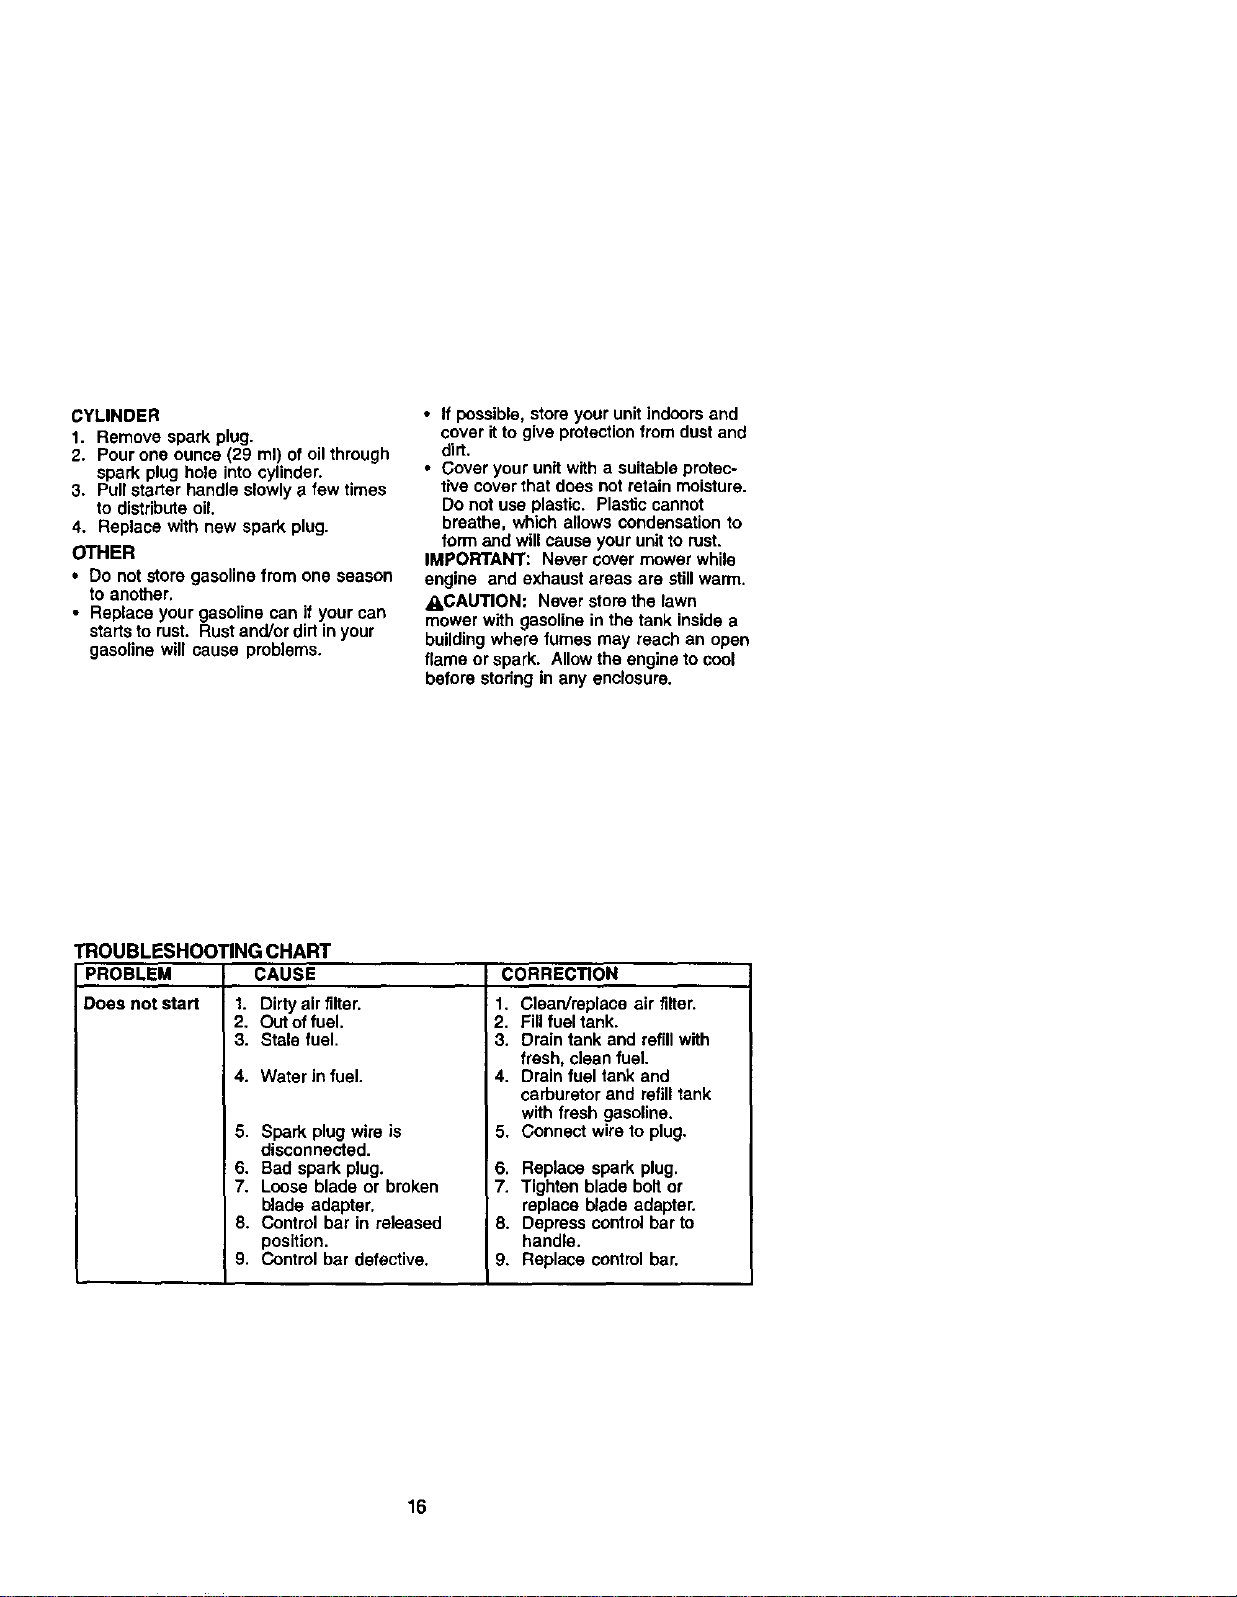
TROUBLESHOOTING CHART
PROBLEM CAUSE
Does not start 1. Dirty air filter.
2. Out of fuel.
3. Stale fuel.
4. Water in fuel.
5. Spark plug wire is
disconnected.
6. Bad spark plug.
7. Loose blade or broken
blade adapter.
8. Control bar in released
position.
9. Control bar defective.
CORREC_ON
1. Clean/replace air filter.
2. Fill fuel tank.
3. Drain tank and refill with
fresh, clean fuel.
4. Drain fuel tank and
carburetor and refilltank
with fresh gasoline.
5. Connect wire to plug.
6. Replace spark plug.
7. Tighten blade bait or
replace blade adapter.
8. Depress control bar to
handle.
9. Replace control bar.
16
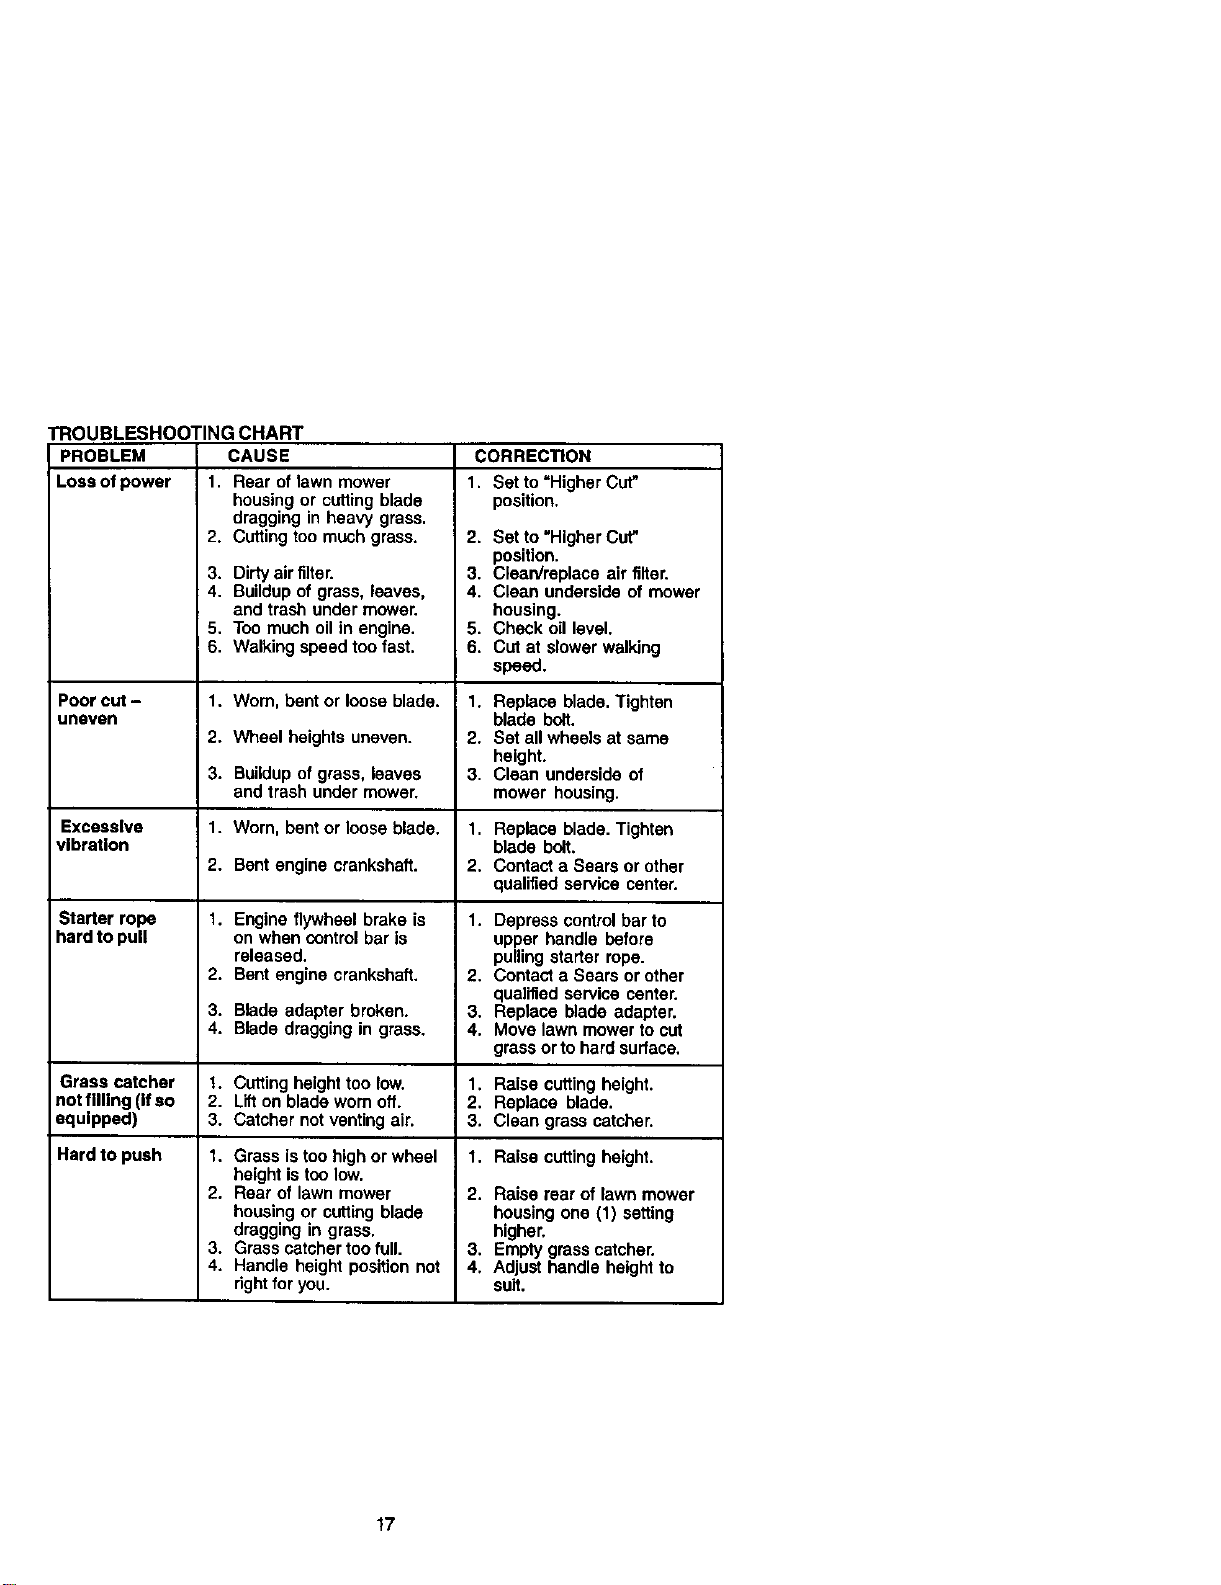
TROUBLESHOOTING CHART
PROBLEM CAUSE
Loss of power 1. Rear of lawn mower
Poor cut -
uneven
3.
Excessive 1.
vibration
2.
Starter rope 1.
hard to pull
2.
3.
4.
Grass catcher 1.
not filling (if so 2.
equipped) 3.
Hard to push 1.
2.
3.
4.
housing or cutting blade
dragging in heavy grass.
2. Cutting too much grass.
3. Dirtyair filter.
4. Buildupof grass, leaves,
and trash under mower.
5. Too much oil in engine.
6. Walking speed too fast.
1. Worn, bent or loose blade.
2. Wheel heights uneven.
Buildupof grass, leaves
and trash under mower.
Worn, bent or loose blade,
Bent engine crankshaft.
Engine flywheel brake is
on when control bar is
released.
Bent engine crankshaft.
Blade adapter broken.
Blade dragging in grass.
Cuttingheight too low.
Lifton blade worn off.
Catcher not venting air.
Grass is too high or wheel
height is too low,
Rear of lawn mower
housing or cutting blade
dragging in grass,
Grass catcher too full.
Handle height position not
rightfor you.
CORRECTION
1, Set to =Higher Cut_
position,
2. Set to "Higher Cut"
position.
3. Clean/replace air filter.
4. Clean underside of mower
housing.
5. Check oil level.
6. Cut at slower walking
speed.
1. Replace blade. Tighten
blade bolt.
2. Sat all wheels at same
height.
3. Clean underside of
mower housing.
1. Replace blade. Tighten
blade bolt.
2. Contact a Sears or other
qualified service center.
1. Depress control bar to
upper handle before
pulling starter rope.
2. Contact a Sears or other
qualified service center.
3. Replace blade adapter.
4. Move lawn mower to cut
grass or to hard surface.
1. Raise cuttingheight.
2. Replace blade.
3. Clean grass catcher.
1. Raise cuftingheight.
2. Raise rear of lawn mower
housing one (1) setting
higher.
3. Empty grass catcher.
4. Adjust handle height to
suit.
17
Garantla ........................................................ 18
Reglas de Seguridad ............................... 18-19
Montaje .......................................................... 21
Operacibn ................................................ 23-25
Mantenimiento ............................................... 26
Prograrna de Mantenimiento ................... 26-29
Especificaciones del Prcducto ..................... 27
Servicio y Adjustes ....................................... 30
Almacenamiento ...................................... 31-32
Identificacioh de problemas .................... 32-33
Partes de repuesto ................................. 34-39
Orden de Partes ............................ Contratapa
GARANT]'AUMITADA DE DOS .M_OSPAPA LA SEGADORA A MOTOR CRAFTSMAN
pot dos (2)ahos, a partirde la fecha de cornpra,cuandoesta Segado_ Craftsmanse mantsnga,
lulxkpe y afmeseg_n fasinalluccionasparala o_ y al mantealrnientoe_ el m_,_uald_ _,
Seamreparardgratistodo defectoen el materbJy la mano de obra.
Sila Segadcra Craltsmanse usa para finescomercialeso de arfiendo,esta garantla s(Y,ose ap]_ _
noventa(90) dfas a pa_r de lalecha de compra.
Esta Garantla no cubre:
• Articulosque se desgastan duranteal uso normaltalescomo las cuchilbssegadorastotal, _
adaptadomsde la cuchilla,las correas,los filtrosde alre y bs buj|as.
• Reparadonesnecesadas deb_o alabuso o a la negligendadal operador,inolW6noY)sea I(_
cigt3e_alesdohladosy a lafalta de rnantenirnlentodalequiposeg0n lasinstmcdonesque se incluyen
en el manualdaldue_o.
EL SERVIClO DE GARANTI"AESTADISPONIBLE al deriver la segadoraa motorCraftsmanal Cen'we/
Departrnentode ServicioSears mascercano en los EstadosUnidcs. Estagarant[a seaplicasolamente
mien_asel Foducto esteen uso en los EstadosUnidos.
Esta Garantiale oterga derechosle_ especificos, y puede cluetambidntenga _ros dereohosClUe
vadan de estadoa estado.
Sears, Roebuckand Co., Di817WA, Hoffman Estates,IL 60179 USA
IMPORTANTE: Esta maquina cortadaora es capaz de amputar las manos y los manos y los
pies y de lanzar objetos. Si no se observan las instrucciones de seguddad alguientes se pueden
producir lesiones graves o la muerte.
I.OPERACION
• Antes de empezar, debe tamiliarizarse
completamenle con los controles y el uso
correcto de ta rnaquina. Para esto, debe leer
y comprender todas las instrucciones que
aparecen en la rnaquina yen los manuales
de operaci6n.
• No ponga las rnanos o los pies cerca o
debajo de las partes mtatodas. MantSngase
siempre lejos de la abertum de la descarga.
• Permita que solamente las personas
responsables que est6n familiadzadas con
las instrucciones operen la m_quina.
• Despeje el _rea de objetos tales como
piedras, juguetes, alarnbres, huesos, palos,
etc. que pueden ser recogidos y lanzados
pot las cuohillas.
• Aseg_rese que el drea no se hallen
personas, antes de segar. Pare la m_quina
sialguien entra en el area.
• No opens la maquina sin zapatos o con
sandalias abiertas. Pbngase siempre
zapatos s61idos.
• No tire de la segadora hacia atrds a menos
que sea abso_utamente necesario. Mire
siempre hacia abajo y hacia detrds antes y
mientras que se mueve hacia atrds.
• No opere la segadora sin los respentivos
resguardos, las placas, el recogedor de
c6sped u otros aditamentos dise ados para
su proteccibn y seguddad.
• Refi_rase alas instrucciones del fabncante
para el funcionamiento e instalacibn de
accesodos. Use dnicamente accesorios
aprobados por el fabdcante.
• Detenga la cuchilla o lascuchillas cuando
cruce por calzadas, calles o caminos de
grava.
• Parar el motorcada vez que se abandona
el aparato, antes de limpiar la segadora o de
remover residuos del tubo.
• Apagar el motor y asperar hasta que las
cuchillas est6n completamente paradas
antes de remover el receptor de hierba.
• Segar solarnente co_ luz dal dfa o con una
buena luz artificial.
• No opere la mdquina bajo la influenciade]
alcohol o de las drogas.
• Nunca opens la maquina cuando la hierba
est6 mojada. Asegdrese siempre de tener
buena traccibn en sus pies; rnantenga et
18 mango fin'nemente y carnine; nunca cona.
• Desconeotor el mecanismo de propulsiOn
aot6noma o el embrague de transmisiOn en
las segadores que Io tienen antes de poner
en marcha el motor,
• Si el equipo empezara a vibrar de una
manera anormal, pare el motor y revise de
inrosdiato pare avenguar la cause.
Generalmente la vibraciOnsuele indicar que
exists alguna averfa.
• Sieml_'e use gatas de sega_idad o an_eo_os
con protecelOnlateral cuando opere la
segadora.
|l. OPERACION SOBRE t.AS CUESTAS
Los accidentes ocurren con m_s frecuencia
en las cuestas. Estos accidentes ocurron
de_ a resb_ladas o ca{des, (as cu_es
pueden resul_aren graves leelones. Operar la
recortadora en cuestas requiere mayor
concentracion. Si se siente inseguro en una
cuesta, no la recorle,
HACER:
• Puede recortar a tray,s de la superficie de
la cuesta, nunca hacia ardba y hacia abaJo.
Precede con extrema precauci6n cuando
cambie de diracci6n en las cuestes.
• Renueva redes los objetos extrafios, tales
come guijarros, ramas, etc.
•Debe prestar atenci6n a hoyos, baches o
pmtuharancias. Recuerde que la hierba alta
puede esconder obstdculos.
NO HACER:
• No recorte cerca de pendientes, zanies o
terraplenes. El operader puede perder la
tracci6n en los pies o el equillbdo,
• No recorte cuestas demaelado inclinadas.
• No recorte en hierba mojada. La reduccibn
en la tracci6n de la pisada puede causar
resbatones.
III°NII_IOS
Se pueden producir accidentes tr_gicos si el
operader no Ixesta atencibn ala prasencia de
los nifios. A menude, los nifios se sienten
atraidos per la rndquinay per la aotNidad de la
siege. Nunos suponga qua los ni_os van a
permaneosr en el mlsmo lugar donde los vie
per 01timaVeZ.
• Mantenga a los ni_os alejades del drea de la
siege y bajo el culdado estrioto de otra
persona adults responsable.
• Estd alerts y apague la m,iquina si hay hires
qua entree al drea.
• Antes y cuando este retrocediendo, mire
hacia atr_.s y hacla abajo para verifiosr si
hay ni_os peque_os.
• Nunca permits que los nifios operen la
maquina.
• Te_a ssncui_,do extr_ curricle so acerqu_
a esquinas deeds nohay visibilidad, a los
arbustos, _rboles u otros objetos qua
pueden intederir con su lines de visi6n.
IV. SERVICIO
•Tenga cuidade extra al manejar la gasoUna y
los demos combustibles. Son intlamab_esy
los gases son explosives.
- Use solamente un envese eprobado.
- Nunca remueva la tapa del depbsito de
gasoline o agregue combustible con et
motor funcionando. Permha que el motor
se entde antes de volver a pone
combustible. No fume.
- Nunca vuelva a porter combustible en la
rn_quir_ en r_nlos cerrados.
- Nunca almacene la rnaquina o el envase
de combustible dentro de algon lugar en
deride hays una llama expuesta, tel come
la del calentador de agua.
• Nunca hags funcionar una rndquina dentro
de un _ea ce_ada,
• Nunca hags ajustes o reparaclones
mientres el motor est,Len marcha.
Desconecte el cable de la buJfa,y
mant_ngalo a cierta distancia de _sta pare
prevenir un arranque accidental
• Mantenga las tuercas y los pemos,
especialmenle los pernos del accesor_o de
la cuchilla, aprotados y mantenga el equipo
en buenas condiciones.
• Nunca rnanipule de forms indebida los
dispositivos de seguddad. Controls
rsgularmente su funcionamisnto correoto.
• Mantenga la n_quir_ lilxe de hierba, hojas
u otras acumulaciones de desperdiolo.
Limpie los derrarnes de aceite o combus-
tible. Permita que la n_quina se enfde antes
de almacenarla,
• Pare • inspecoione el equipo el.Is psga aun
objeto. Repdrelo, si es neseesno, antes de
hacedo arrancar.
• En ningt_ncase hay que regular la altura de
las ruedas mientras el motor est_ en
R'=afcha,
• Los cornponentes del receptor de la hierha
van sujetos a desgaste, daffos y detedoro,
qua pueden exponer las pades en
rnovimiento o perrnitirque objetos sean
disparados. Contmlar frecuentemente y
cuando sea necesado sustituir con panes
aconsejades per el fabdcante.
•Les cuchillas de la segadora estdn aflladas
y pueden cortar. Cubrir las hojas o Ilevar
guantes, y utilizar precauciones especialse
cuando se efeotL_arnantenimiento sobre las
mismas.
• No _bie el aius_edel reoulador del motor
ni exosda st] velocidad.
ABusque este simbolo qua sefiala las
{_recauc;ionesde seguridad de importencia.
uiere decir- ilIATENCION!I!iilESTE
ALERTOllt SU SEGURIDAD ESTA
COMPROMETIDA.
_kADVERTENCIA; Siempre desconecte el
alarnbro de la bujla y pOngalo donde no pueds
entrar en contaoto con la bujla, pare evitar el
arranque per accidente, derante la
preparaciOn, el transports, el ajuste o cuando
se hacen reparaciones.
_I_DVERTENCIA: Los bomes, ter_nales y
accesodos relatives de la baterfa contienen
plomo o compuestos de plomo, produotos
qu_cos cor_ocidosen el Estado de California
come causa de cdncer y defectos al
nacimiento u otros dahos reproductivos. Lavar
-t91as manes despu6s de manlpulados.
_LADVERTENCIA: El tubo de escape del
motor, algunos de sus constituyentes y
algunos componentes del vehiculo contienen
o desprenden productos quimicos conocidos
en el Estado de California como causa de
cancer y defectos al nacimiento u otros da_os
reproductivos,
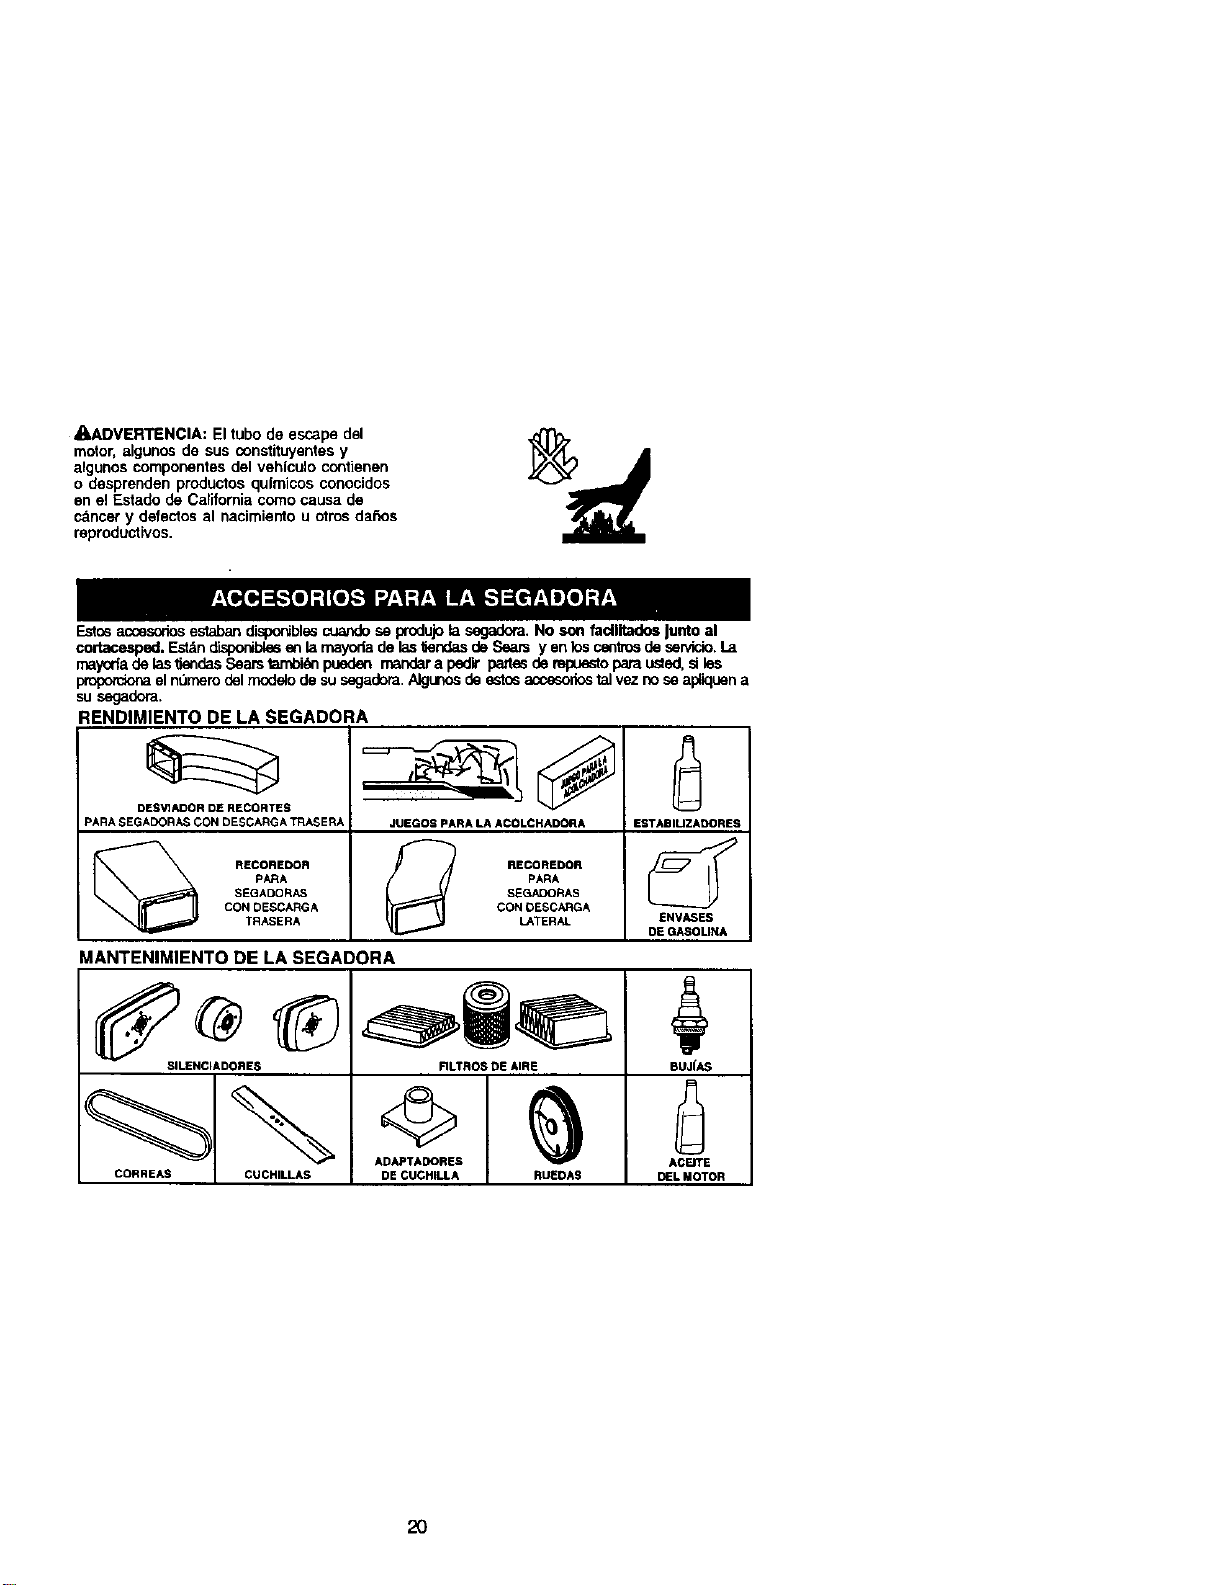
Estosaccesodos estaban disponiblsscuandose produjola segadora. No son fadlltados Ju.to al
cortacesped. Est_nd'_por_blesen !amayoda de las_endas de Sears yen los ceatrosde sewicio.La
maycrfadelaslisndasSearstarnbi_n pueden mandara pedir pa_tssde mpuestopamusted, sties
_ el nurnemdelrnodelode su segadora.Algunosde estosaccesodostalvez no se apliquena
su segadora.
RENDIMIENTO DE LA SEGADORA
DESV].IUDOR DE RECORTES
PARA SEGADORAS CON DESCARGA TRASERA
[_ RECOREDOR
PARA
SEQADORAS
CON DESCARGA
TRASERA
JUEGOS PARA LA ACOLCHADORA
_1 RECOREDOR
PARA
SEGADORAS
CON DESCARGA
LATERAL
ESTABILIZADORES
ENV_
DEOASOMNA
MANTENIMIENTO DE LA SEGADq
SlMENCIADORES
CORREAS CUCHILLAS
)RA
RLTROS DE AIRE
DE CUCHILLA RUEOAS
BLIJfAS
AOEITE
DEL MOTOR
20
Lea estas instrdcdones y este manual
completaroente antes de tratar de montar u
operar su segadora nueva.
IMPORTANTE: Este cortacdsped viene SIN
ACEITE O GASOLINA en el motor.
Su segadora nueva ha sido montada an la
f_brica con la excepcidn de aquellas partes
que se dejaron sin roontar por razones de
envio. Todas tas p_rtes como las tuercas, las
arandelas, los pamos, etc., que son
necesades para cornpletar el montaje hen sido
colocadas an la bolsa de partes. Para
asegurarse que su segadora funcione an
forma segura y adecuada, todes las partes y
los articulos de ferreterfe qua se monten
tienen que ser apretados seguraroente. Use
las herramientas correotas, como sea
necesario, pare asegurar qua se apr_eten
adecuadamente.
PARA REMOVER LA SEGADORA DE LA
CAJA DE CARTON
1. Reroueva las partes sueltas qua se
inciuyen con la segadora.
2. Corte las dos esquinas de los extremos de
la caja de cartbn y tienda el panel de1
extremo piano.
3. Reroueva todo el maledel de eropaque,
excepto la cure entre el mango superior y
d] inferior,y lacuRa qua sujete la barra de
los control qua exige la presencia del
operador junto con el mango superior.
4. Haga rodar la segadora hacia atuera de la
caja de cartbn y revisela cuidadosamente
pare verificar si todavla quedan partes
sueltas adicionales.
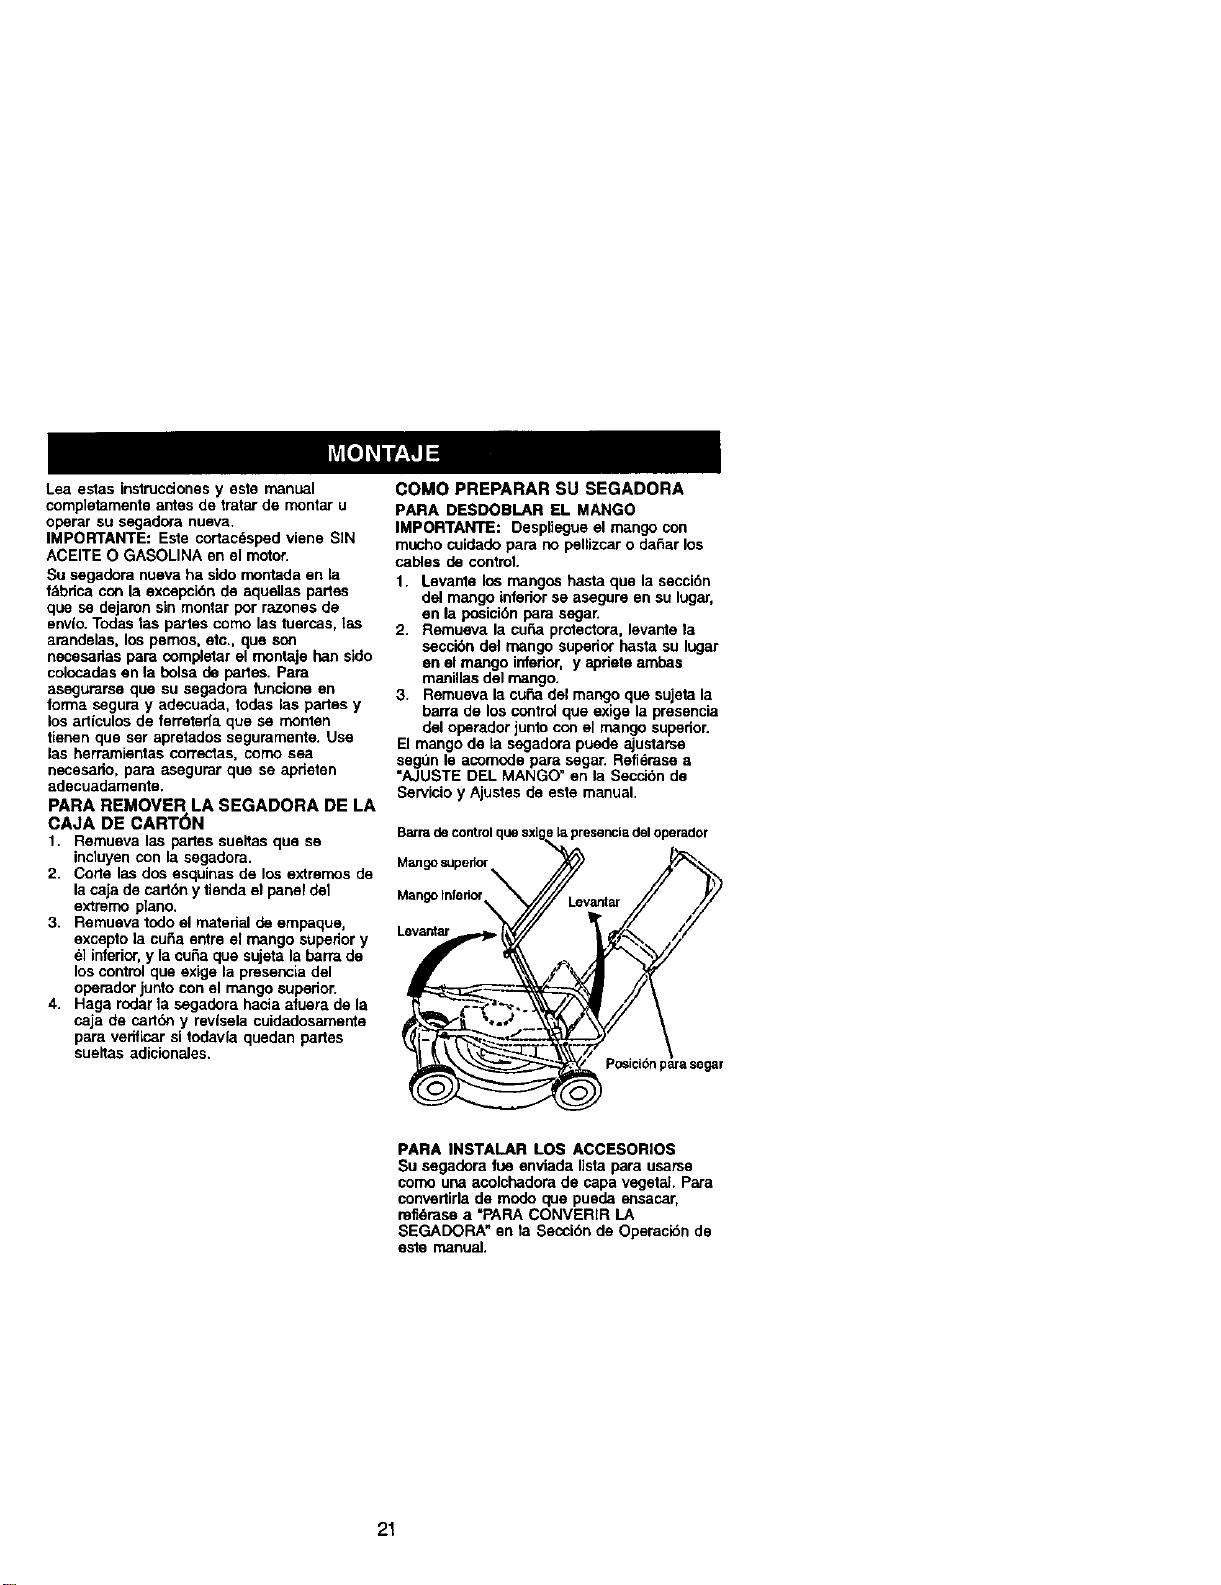
COMO PREPARAR SU SEGADORA
PARA DESDOBLAR EL MANGO
IMPORTANTE: Despliegue el mango con
roucho cuidado pare no penizcar o deSar los
cables de control.
1. Levante los mangos haste que la secci6n
del mango inferior se asegure en su lugar,
en la gosici6n pare segar.
2. Remueva la curia protectora, levante ta
seccibn del mango superior haste su lugar
an el mango inferior, y apdete arobas
manillas del mango.
3. Remueva la cuba del mango que sujeta la
barra de los control qua exige la presencia
del oparador junto con el mango superior.
El mango de ta segadora puede ajustarse
seg_n le acoroode pare segar. Refl_rase e
"AJUSTE DEL MANGO" an la Seccibn de
Servicio y Ajustes de este manual.
BarmdecontrolquesxJge[a,presenciadeloperador
Mangosupedor '_
Levantm___Le,_t_MangoInferior Levantar
+..,_ - iclbnp_arasegar
PARA INSTALAR LOS ACCESORIOS
Su segadora fue enviada lista para usame
como una acolchadora de cape vegetaJ. Pare
convertirla de modo que puede ensecar,
mfi6mse a "PAPA CONVERIR LA
SEGADORA" en ta Seccibn de Operaci6n de
eote manual
21
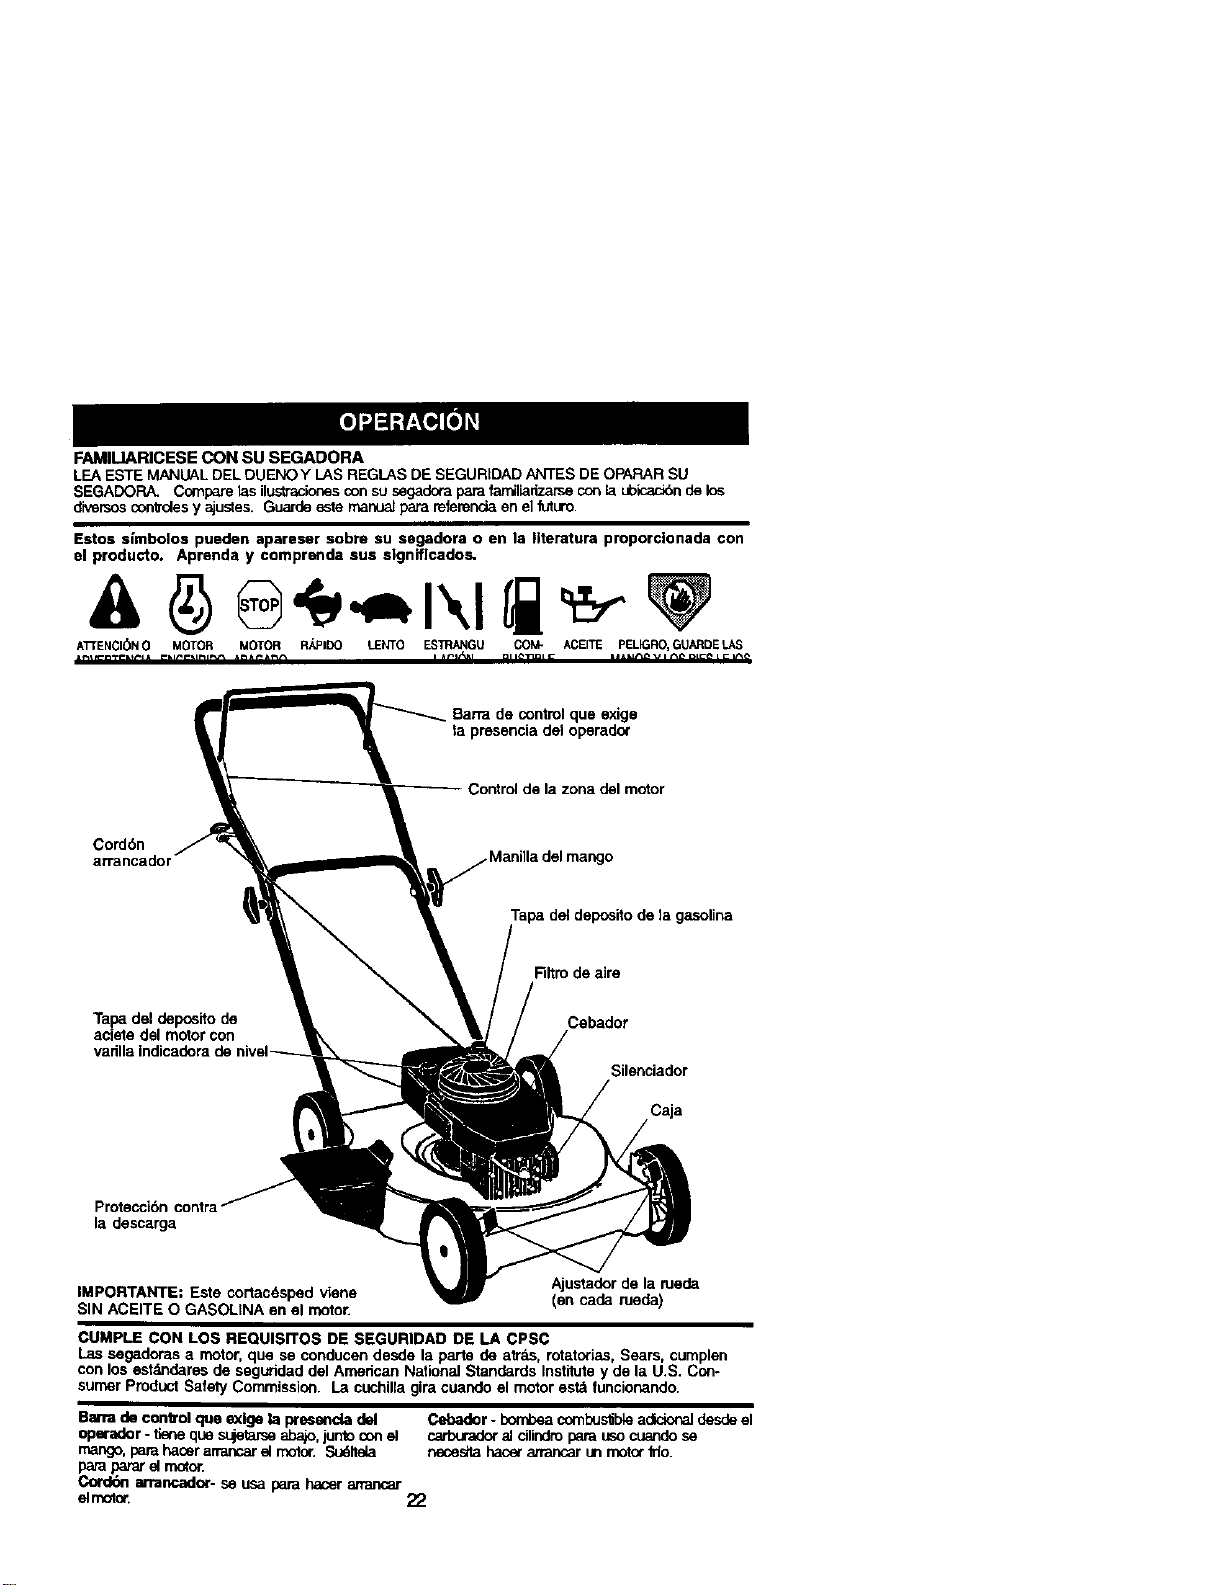
FAMILIARICESE CON SU SEGADORA
LEA ESTE MANUAL DEL DUENO Y I-AS REGLAS DE SEGURLDADANTES DE OPARAR SU
SEGADORA. Compare tas ilustracionesconsu segadora parafamilianzam---------------_econ la ub_ de los
diversos oonlrdes y ajustes. Guarde este marcJalpara referenda on elluturo.
Estos simbolos pueden apareser sobre su segadora o en la Ilteratura pmporclonada con
el producto. Aprenda y comprenda sus slgniflcados.
ATrENCI6N 0 MOTOR MOTOR R_°IDO LENTO ESTRANGU COM- ACEITE PEUGRO, GUARDE LAS
Barra de controlque exige
la presencia del operado(
Cord6n
arrancador
gasolina
Tapa del deposito de
aciale del motor con
vadlla indicadera de
Filtm de a]re
Cebador
Caja
Protecci6n
la descarga
Ajustador de la ruede
IMPORTANTE: Este cortac6sped viene (en cada rueda)
SIN ACEITE O GASOLtNA en el motor.
CUMPLE CON LOS REQUISrros DE SEGURIDAD DE LA CPSC
Las segadoras a motor,que se conducen desde la parte de atrds, rotatorias, Sears, cumplen
con los estdndares de segu_idad dal American National Standards Institutey de la U.S. Con.
sumer Product Safety Commission. La cuchilla gira cuando el motor est_ funcionando.
Ba_-a de control que exlge la presenda del Cebador - bornbeacornbus'dbieadicionaldesde el
operador - 1]eneque sqetarse abajo,juntocon al carburad_ al cilindm parauso cuandose
_, parahacer arrancarel motor. Sudltela necestta hacer _r unmotorldo.
paraparar el motor.
Corddn arrancador- se usa para hacer anancar
almotor. 22

Laoperacibndecualquier
segadompuedehacerque
saltenobjetosex',ra_os dentin
-le sus ojos, Io que puede
pmducir daSos graves en 6s_os.
Siernpre use anteojos de seguridad o
pmteccibn para los ojos rnEentras opere su
segadora o cuando haga ajus_es o
reparaciones. Recomendarnos una mascara
de seguddad de visi6n amplia, pare uso
espejuelos o anteojos de seguridad
estandarte.
COMO USAR SU SEGADORA
VELOClDAD DEL MOTOR
La velocidad del motorse estableci6 en la
fdbdca para un rend_mientobptirno. La
veloeldad no se puede ajustar.
CONTROL DE ZONA DEL MOTOR
_=PRECAUCI(_N: Las regulaciones fedemles
exigen que se instale un controlpara el motor
en esta segadora para reducir a un minimo el
desgo de lesionarse debido el contacto con la
cucl_lta. For ningdn rnotivo irate de eliminar la
funci_ del controldel operador. La cuchilla
gin cuando el motor estd funcionando.
• Su segadora viene equipada con una bana
de controles que exigen la presencia del
operador, Io que requiere que el operador
est8 detras del mango de la segadora para
hacerla arrancar y operada.
PARA AJUSTAR LA ALTURA DE
CORTE
Levante las ruedas para el corte bajo y baje
las ruedas para el corte alto., ajuste la altura
de code para que se acornode a sus
requisitos. La posicion del medio es la mejor
para la mayoria de los c_spedes.
• Pare cambiar faaltura de corte, empuje la
palanca del ajustador hacia la rueda. Mueva
la rueda hacia ardba o hacia abajo de modo
que se acornode a sus requisitos.
Aseg_rese que todas 1as medes queden
iguelrnente ajustadas.
AV|SO: El ajustador esta correctamente
colocado cuando las orejas de la placa estdn
insertadas en el agujero del mango. Tambi_n,
los ajustes de 9 posiciones (si equipado)
perrniten que el mango pueda set rnovido
entre ]as orejas de la placa.
Parauncodealto,bale1asruedas _-_(_ ngoej_s
dela
placa
Para un code bajo, levar)te las ruedas
PARA CONVERTIR LA SEGADORA
Su segadora es enviada para usarse corno
acolchadora, Para convertida a una operacion
de ensacado o de descarga:
• Levante la proteccibn contra la descarga y
remueva Ia plancha acelchadora,
• Ahora la segadora se puede usar con
descarga lateral o se le puede adjuntar el
recogedor de cdsped opcional.
• Para volver a la operacibn de
acolchamiento, sirnplemente vueiva a
instelar la plancha acelchadora segOn se
rnuestra.
A PRECAUCKSN: No haga funelonar su
segadora sin ta plancha acolchadora o el
tapbn aprobados en su lugar, o sin el
desv_adorde recortes, o sin el recogedor de
cdsped, aprobados, en su lugar, Nunca irate
de opera,"la segadora cuando se ha rernovido
la puerta trasera o cuando est_ un poco
abierta.
Abertura del
bastJdor
Ganchos
Plancha acolchado_a
Varlllade
Oregas articulacl_n
23
ANTES DE HACER ARRANCAR EL
MOTOR
AGREGUE ACErFE
Su segadora foe enviada sin acalte en el
motor. El motor puede contener 20 oz. de
acalte, para el tipo y la calidad yea "MOTOR"
en la secci6n de las Mantenimiento en este
manual.
1. AsegOrese que la segadora est6 nivelada
y que el _rea alrndedor del deposito de
aceffeest_ limpia.
2. Remueva Tatapa de1dep6s:_ode acalte dal
motor y rallene hasta la linea de Ileno en
_sta. Vacle el aceite lentamiente. No Io liens
dsmasiado.
AVISO: Permita qua el acalte se aciente bien
en el motor para una lectura exacta. Para leer
el nival apropiado, apriete la tapa del relleno
dal aceite de motor, rernuevala para leer la
vadlla medidora del aceite.
3. Vualva a instalar latapa del depbsito del
acette y apridtala.
• Revise el nivel del acalte antes de cada use.
Agregue aceite si es necesano. Liens hasta
la Iinea de Ileno en la varilla indicadora de
niveL
• Cambie el aceite despuds de 25 horas de
oparaci6n o una vez por temporada. Puede
necesitar carnbiar el aceite rods a menudo
cuando las condiciones son polvorosas o
sucias.
AGREGUE GASOLINA
• Liens el estanque de combustible. Use
gasolina regular, sin plorno, nuava y lirnpia
con el minimo de 87 octanos. (El uso de
gasolina con plomo aurnentar_ _os
dep6sitos de 6xido de plomo y carbono y se
redualrd la dumci6n de la vdlvula). No
mezcle el aceite con la gasolina. Pard
asegurar que la gasolina utilizada sea
fresca cornpre estanques los cuales
puedan ser utilizados durante los pdmeros
30 dias.
_I,ADVERTENCIA:La expedencia ha indicado
que los combustibles mezclados con alcohol
(conocides como gasohol, o el uso de etanol o
metanol) pueden atraer la humedad, la que
conduce a la separacibn y formacibn de
_cidos durante el almacenamiento. La gasolina
acldica puede dafiar el sistema del combus-
tible de un motor durante el almacenamiento.
Para evitar los problernas con al motor, se
debe vaciar el sistema del combustible antes
de guardarlo pot un periodo de 30 dlas o rnds.
Vacie el estanque dal combustible, haga
arrancar el motor y hdgalo funcionar basra
que las IIneas del combustible y el carburader
queden vaclos. La prbxima temporada use
combustible nuevo. Vea las instnJcciones para
ElAlmacenamiento para m&s informaci_.
Nunca use produotos de limpieza para el
motor o para el carburador en el estanque dal
combustible puss se puaden producir daflos
permanentes.
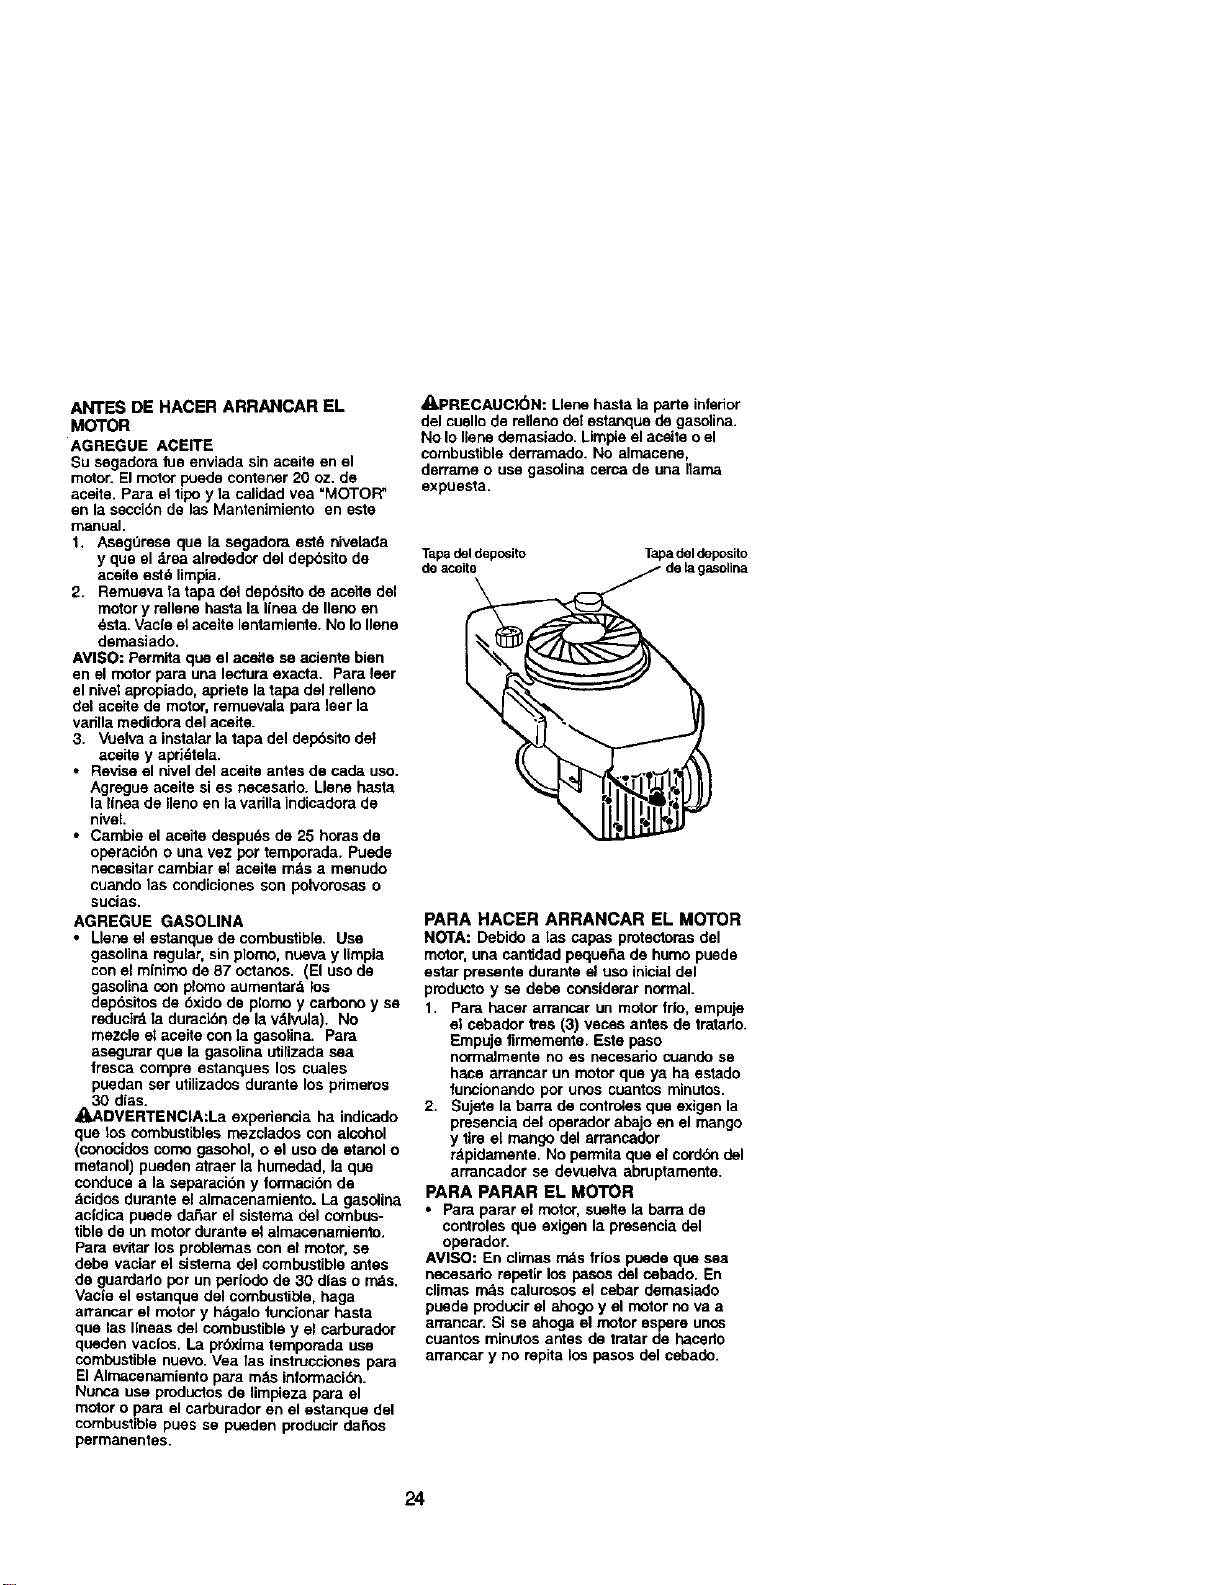
_Ih.PRECAUCK_)N: Liens hasta la parle infedor
del cuallo de relleno del estanque de gasblina.
No Io liens demasiado. Lirnpie el aceite o el
combustible derrarnado. No almacene,
derrarne o use gasolina cerca de una llama
expuesta.
Tapa del deposito Tapa del deposito
de aceite
PARA HACER ARRANCAR EL MOTOR
NOTA: Debide a [as capas protectoras del
motor, una cantidad pequeSa de hurnopuede
estar presents durante el uso ialcial del
producto y se debe considerar normal.
1. Para hacer atTancar un motor trio, empuje
el cebador ltes (3) veces antes de tratado.
Empuje firmemente. Este paso
normalmente no es necesario cuande se
hacs arrancar un motor qua ya ha estado
foncionando por unos cuantos minutos.
2. Sujete la barra de controles que exigen la
presencia dal operador abajo en el mango
y tire el mango del arrancador
rdpidamente. No permita que el cordc_ndel
arrancador se devuelva abruptamente.
PARA PARAR EL MOTOR
• Para parar el motor,sualte la barra de
contmles que exigen la presencia del
operador.
AVISO: En clirnas rnds trios puade qua sea
necesade repatir los pasos del cebado. En
climas rnds calurosos el cebar demasiado
puede producir el ahogo y el motor no va a
arrancar. Si se ahoga el motor espare unos
cuantos rninutos antes de tratar de hacede
arrancar y no repita los pasos dal cebade.
24
CONSEJOS PARA SEGAR
• Bajo ciertas condiciones, tal como c_sped
muy alto, puede ser necesado el elevar la
altura del corte para reducir el esfuerzo
necesano para empujar la segadora y para
evitar sobrecargar el motor, dejando
montones de recortes de crisped. Puede
que sea necesario reducir la velocidad del
recorddo y/o haga funcionar la segadora
sobre el area pot segunda vez.
• Para un corte muy pesado, reduzca el
ancho del corte pasando parcialrnente pot
encima del lugar anteriormente cortado y
siegue lentamente.
• Para un rnejorensacado del c8sped y para
la mayor;a de las condiciones de corte, la
ve_ocidaddel motor debe aJustarsea la
posici6n de rdpido.
• Si las segadoras de descarga lateral cortan
en una direccidn contrada alas rnanillas del
reloj, si se em-pieza en la parte de afuera
del drea que se va a cortar, se repartirdn
los recortes del c_sped en forma m_s
pareja y el motor se cargard menos. Para
evitar que los recortes caigan en los
senderos, en ias flores, etc., haga los
pdmems cortes en la direccibn de las
maniHasdel reloj.
• Los poros en los recogedores de cesped
de tela pueden Ilenarse con rnugre y polvo
con el uso y los recogedores recaudar_in
menos cesped. Para eVltar dsto, rocie el
recogedor con la rnanguera de agua,
regularmente, y dejelo secarse antes de
usarlo.
• Mantenga la parte superior del motor,
alrededor del arrancador, despejada y sin
recortes de cesped y paja. Esto ayuderd el
flujodel aire del motor y extender& su
duracibn.
CONSEJOS PAPA SEGAR Y ACOLCHAR
IMPORTANTE: Pare obtener el mejor
rendimiento mantenga la caja de la segadora
sin acumulacion de cesped y basura. Vea
=LIMPIEZA" en ]a seccion de Mantenimento de
este _RU_.
• La cochipa acolchaderaespecialva a volvera
cortar los recortesde crispedmuchas veces, y
losreduce en tarnafio,de modoque sise caco
en el c_spedse van a cispesatentre _ste y no
se van a notar.Tan'bidn,_ cdspedacolchade
se va a deshacer rdpidamer_eentregando
substanciasnutr_tivaspara el cesped. Siempre
aco_dnecon la velocidad del motor (cuchilla)
rndsalta,pues as[ se obtend_ lamejoracck_
de recorte de las ¢uchill_.
• Evitecortarel cdsped_ est6 mojado. B
c_oed mojadol_endea formatrnontor_ e
interfiem con la acci6nde acolchado.La mej_
hora parasegarel o_sped es tempranoen la
tarde. A esa hora dstese ha secade y el_a
recidncortada noquedard expuesta al sol
directo.
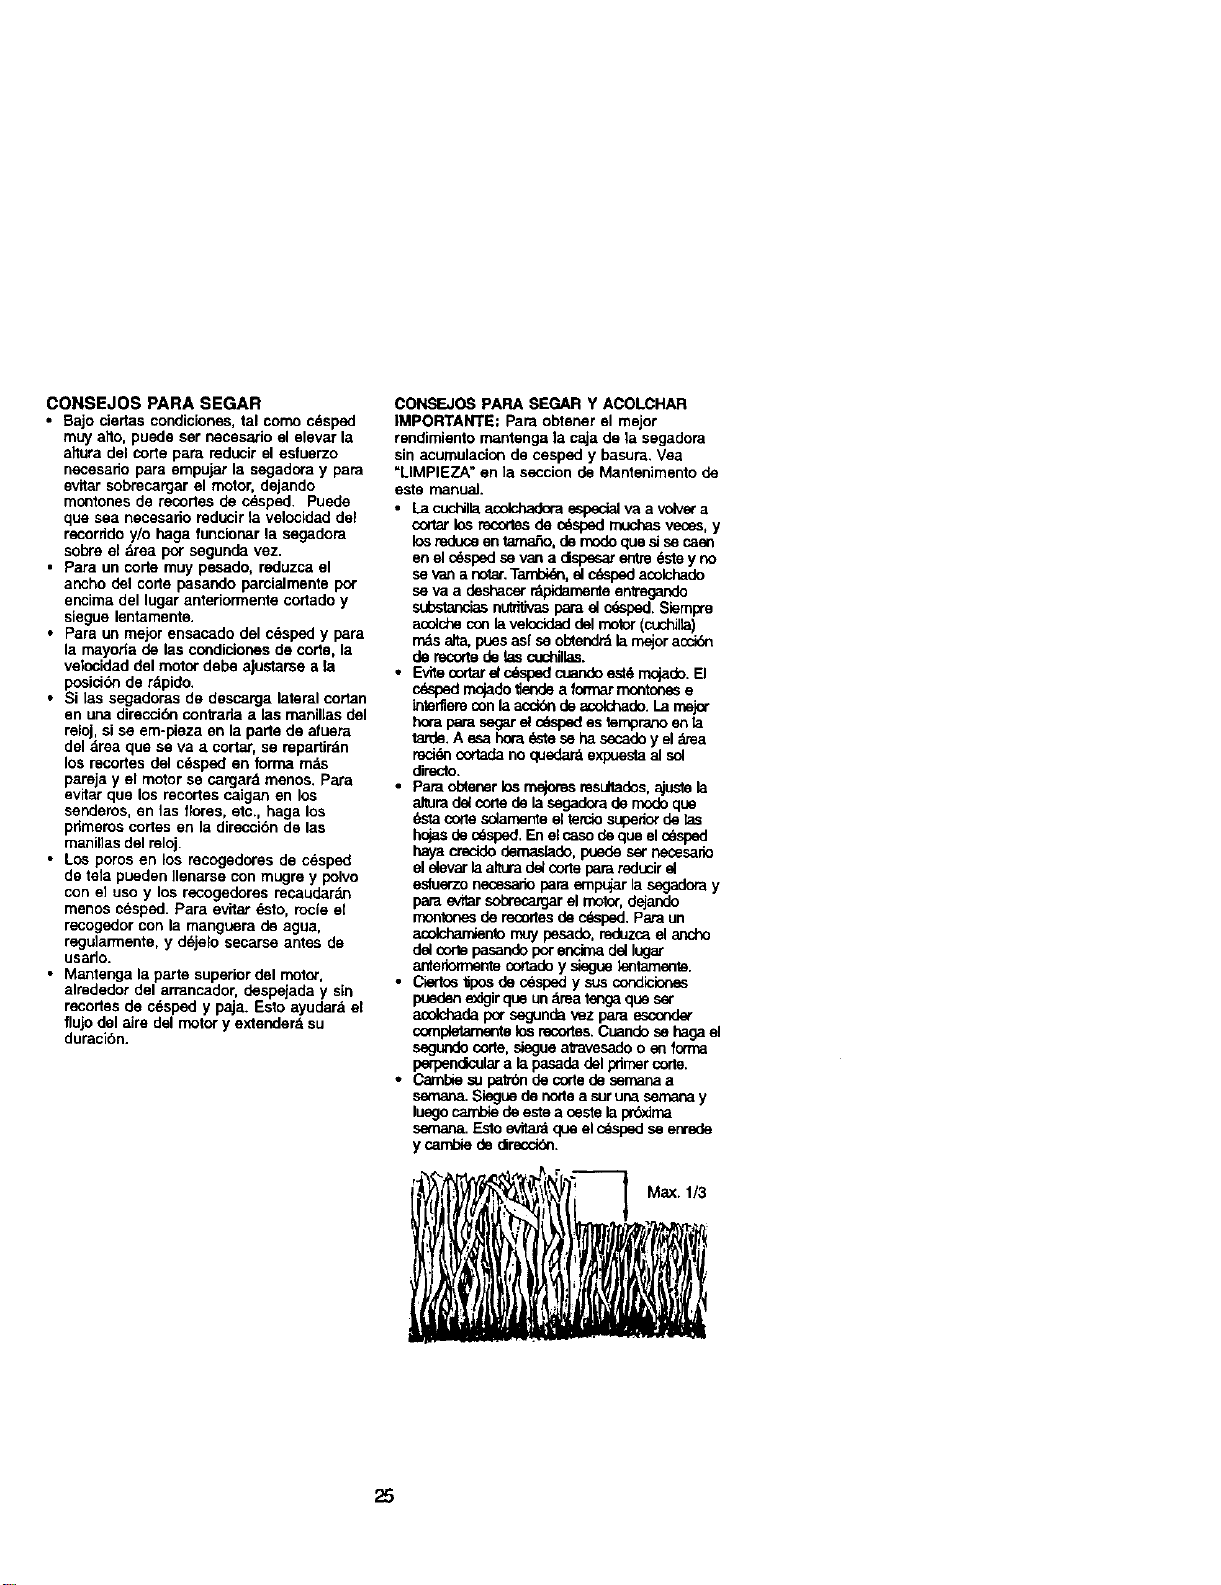
• para oMener k_smejoms msultados, ajustela
alturadelcone de lasegadorade mode que
6sta code s_amente el terciosupedorde las
hojasde cdsped. Enel casode qua el cesped
haya creddo dernaslado, puede set necesa_
el elevar la atturad_ cortepara reducir el
eeluerzo necesario para ernpujarla segadera y
para evitarsobrecatgarel rcotor,dejando
rnontonesde recortes de cdsped. Pamun
acolchamiento muy pesade, reduzca el ancho
del cortepasandoporencima del lugar
antenormentecor_adey siegue k_tameme.
• C_tos _pos de cesped y sus condicio_es
puedenexJgirque undrea tenga que set
acolchada por segunda vez para esc_x_
completamer_elos recortes.Cosndose haga el
segundocorte,siegue a_avesado o en forma
perpendoJlara la pasadadel primercorte.
• Carnbiesu patrbnde cortede semana a
_. Sieguede node a suruna sernanay
luegocambiede estea ceste laprbxJma
semana. Esto evitar_que el cdsped seenrede
y osrd_ie de clrecci6n.
r ,,_._k_ _; Max. 1/3
25
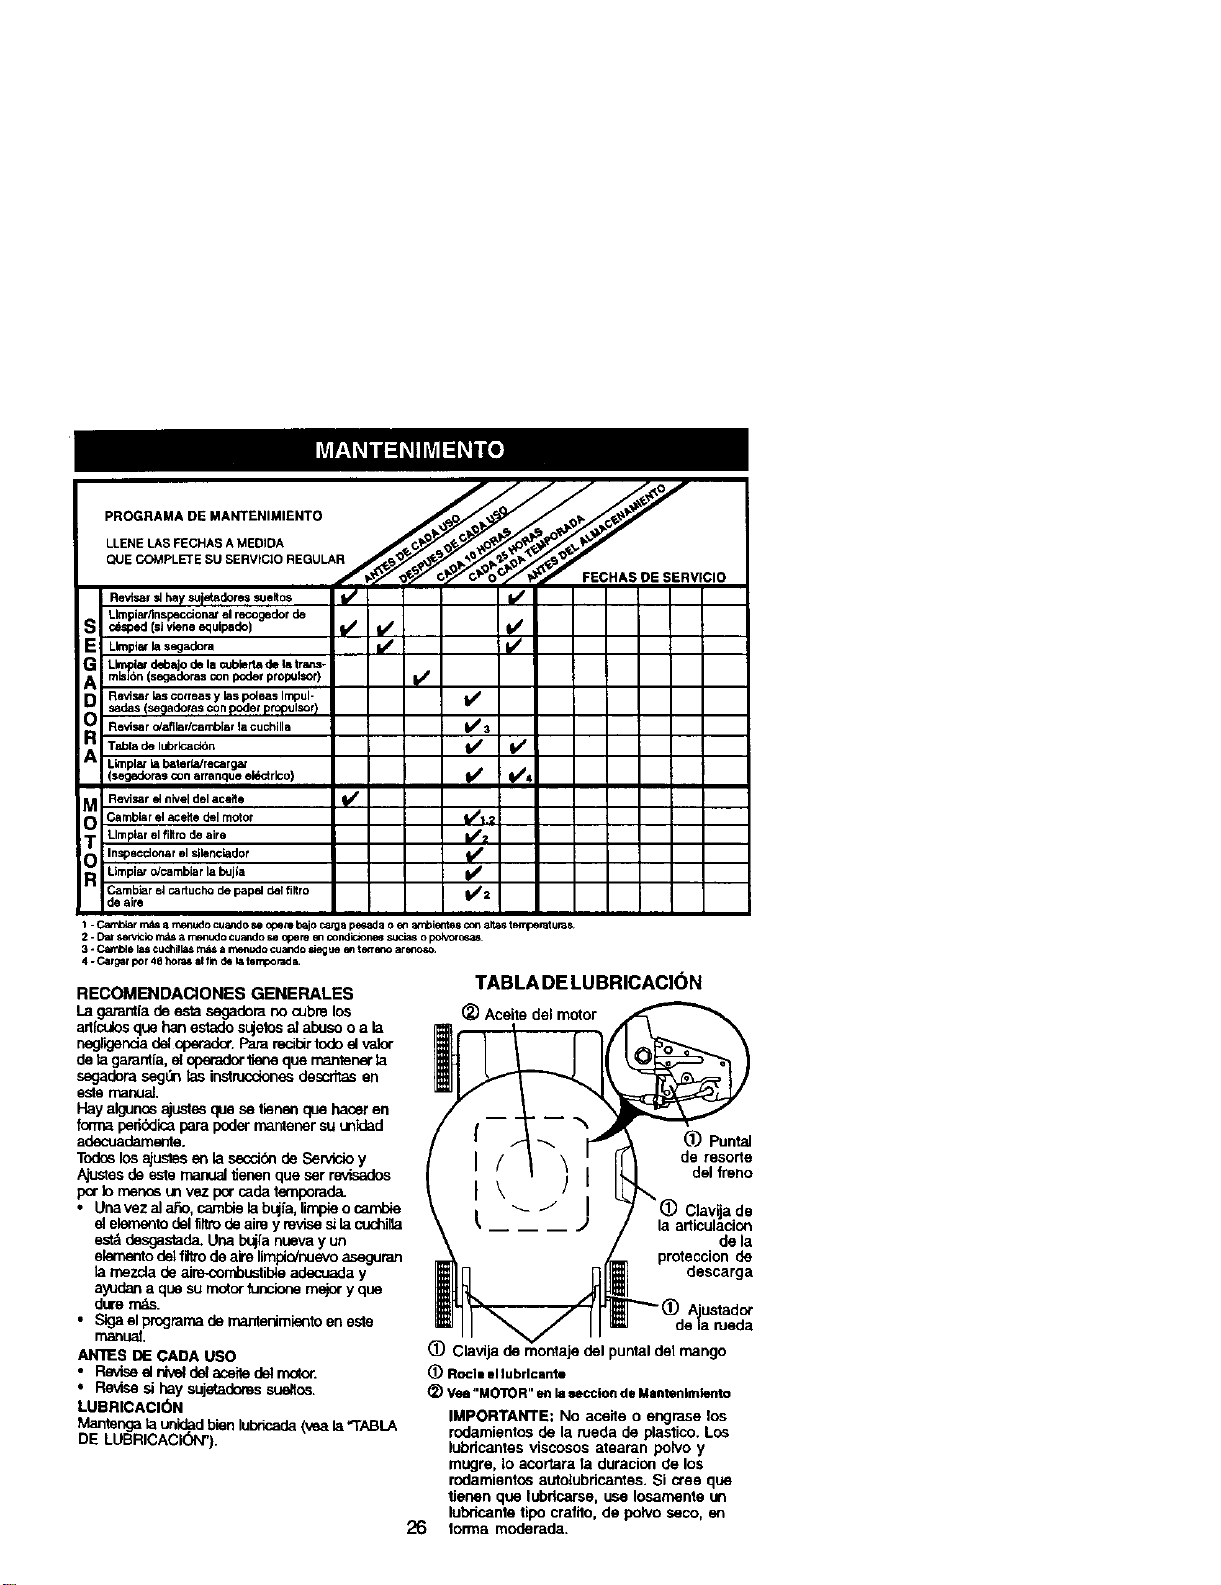
PROGRAMADE MANTENIMIENTO
LLENELASFECHASAMEDIDA
QUECOMPLETESUSERVJCIOREGULAR
FECHASDE SERVICIO
Revlsarslhaysu_dore$ sueltos t/
Llmpiar,'lnspeccionarelrecogedorde
Llmp_wla segadora k'*' I,/
L at debajo de la ¢_Jbler_ de Hatra_.s-
Lm_l_6n(segadorasconIx_erpropulsor) If
Revtsar !as correas y las pdeas Impul- I_
sadasIse_adorasconpoderpropulsor)
Revisar _af JJSF/CBII_[Bt_acuchilla II_ 3
Tabla de lubrlcad_n 11_ fl_
LimplN la baterhdrecarg&r
(=eg_ora$conartanqueelectrico) fJ ql_4
Revi_r el nivel del aceit e _l #
Garnbiar el _eite del motor ll_t .2
Llmplar el filtro de aire _g
Inspecdcnar el s_lenclador
Umpis, _cambiar la bujia I1_
Cambiar e_ cartucho de papal del filtro I1_ 2
dealre
1 - _r rPAsa mlmudo cua_do se opera bajo ca_gapesada o en arrbientes con alias tsmperaturns.
2 - D= servtck_m_ arr, enudo cuando se epere en condir.x_ne6s_aas o pok,orosas
3. Caillble las cudlillas rndsa rnengdo cuando sJegueml teCTenOarenoao
4 - Cargsrpor 4Bhot_s altin de I_ temporada.
RECOMENDACIONES GENERALES
La garantlade estase0adom no cubm los
artlc_osque ban estadoSL_etosal abuso o a la
r_0r_r_a d. q_r. Para recibirtodo ei valor
de tagarantia,et q_rador tiene que mantenerb
segadomsegLinIz_ instrucaone_descritasen
este manual.
Hay algun_ ajustesque se tienen cluehacer en
forma pedbciicaparapoder mantenersu un'dad
adecuadamente.
Todoslos ajustesen la secci_nde Servicioy
Ajustesde este manual tienen que ser revisados
p_r b rnenosun vez p_r cadatempomda_
• Unavez al aSo, carnbiela b_fa, limpieo camb_
elelementode111fifode aim yrevises_b cuchi_
estd desgastada.Una bujfanuevay un
elenento de]film de aim limpio/nuevoa.seguran
la mezda de aire-combustib_eadecuada y
ayudana que su molor fu_ mejor y que
dure rn_.
• _ elprogramade mantenimientoen este
n'=3nLl_.
ANTES DE CADA USO
• Reviseel niveldel aceitedelrn_or.
• Revise si hay sujetadomssue_os.
LUBRICACI_)N
Mantengala unidadbien lubricada(yea I_"TABLA
DE LUBRICACI(_)N").
TABLA DE LUBRICACI(_N
(_ Aceitedelmotor
L'_ Puntal
de resorte
del freno
26
Ciavija de
la articulacion
de la
descarga
rueda
IMPORTANTE: No aceite o engrase los
rodamientos de la rueda de plastico. Los
lubdcantes viscosos atearan polvo y
mugre, Io acortara la duracion de los
rodamientos autotubdcan_es. Si ctee que
tienen que lubrtcarse, use Iosamente un
lubricante tipo crafilo, de polvo seco, en
lorma rnoderada.
(_) Clavija de montaje del punlal de1 mango
(_) Rocll _1lubrlcante
(_) Veu "MOTOR" en la =ecclon de Mantenlmiento
ESPECIFICAClONES DEL PRODUCTO
NOMERO DE SERIE:
FECHA DE COMPRA:
CAPACIDADYTIPODEGASOLINA: 1.5 CUARTOS (REGULAR SIN PLOMO)
TIPO DE ACEITE IAPI-SF-SJ): SAE 30 (sobre 32°F);SAE 5W-30 Idebaio 32°F)
CAPACIDAD DE ACEITE: 20 ONZAS
BUJ{A IABERTURA: .045" I CHAMPION RJ19LM4
TORSION DEL PERNO DE LA CUCHILLA: 35-40 FT. LBS.
• El numSro del nodelo y el de serie se encuentran en ta calcomania adjunta a la parle trasera
de la caja de la segadora. Debe registrar lanto el numdm de sede come la fecha de compra y
mantengalos en un lugar seguro para relencia en el futuro.
SEGADORA
Siempre observe las reglas de seguridad
cuando haga el mantenimiento.
LLANTAS
• Manteega las Ilantas sin gaso]ina, aceite o
substancias quimicas para conlrol de
insectos que pueden daSar la gorna.
• Evite los locones, las piedras, las grietas
pmfundas, los objetos afilados y otros
peligros que pueden da_ar alas Ilantas.
CUIDADO DE LA CUCHILLA
Para obtener los rnejores resullados, la
cuchilla de la segadom tienen que mantenerse
afilada. Carnbie la cuchilla doblada o daSada.
PARA REMOVER LA CUCHILLA
1. Desconecte el elambre de la buj[a y
pbngalo en dende no pueda entrar en
conlaclo con dsta.
2. Haga descansar la segadora en su lado.
Asegtirese que el filtm de airs y que el
carbumdor queden mirando hacia ardba.
3. Use un blegue de madera entre la cuchilla
y la caja de la segadora para evitar que la
cuchiUagire cuando se le quite el perno.
AVISO: Proteja sus manos con guanles y/o
envuelva la cuchilla con una tela gruesa.
4. Remueva el pemo de la cuchilla girdndelo
en el sentido contredo en que giran las
manillas del reloj.
5. Remueva la cuchilla y los arliculos de
ferreteria edjuntadoms (el pemo, la
arandela de seguddad y la amndela
endurecida).
AV|SO: Rernueva el adaptador de la cuchillay
revise el cubo interiorde la ranura del
adeptador de la cucNIla. La ranum tiene que
estar en buenas condiciones para que
funcione en lorma adecuada. Cambie el
adeptador si estd deSade.
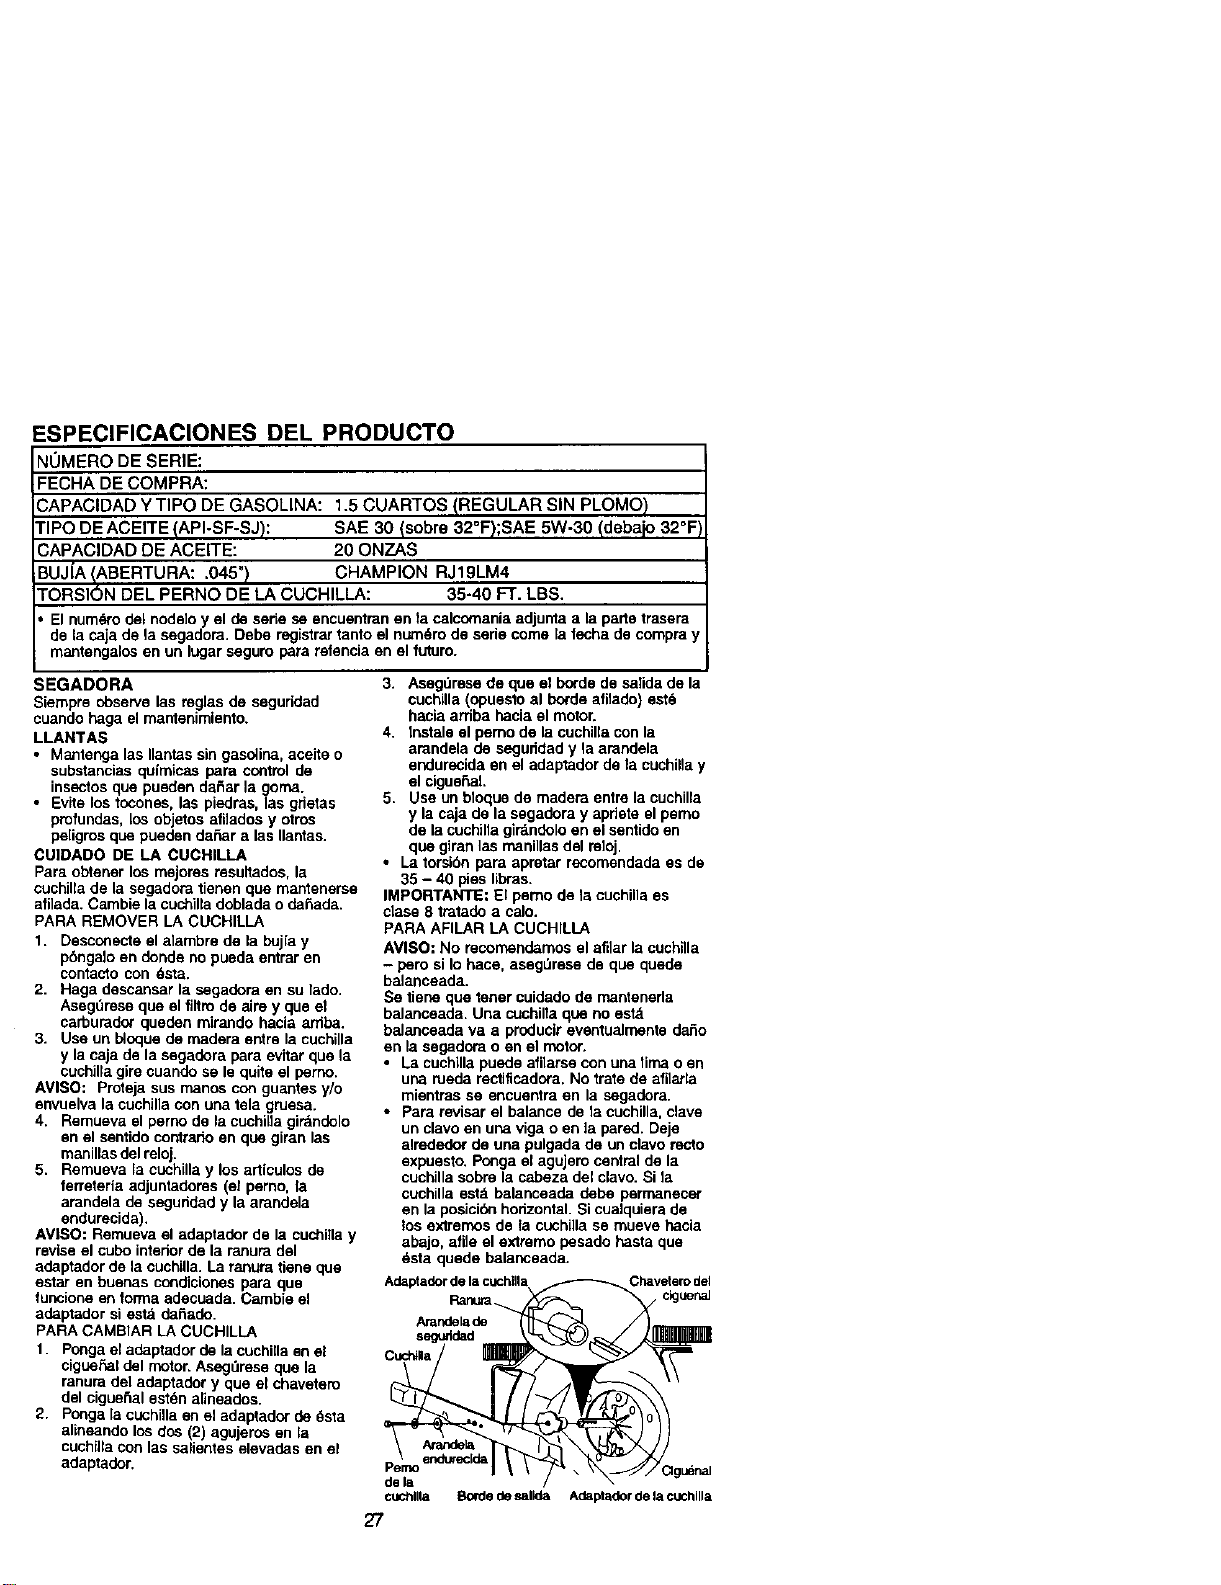
PARA CAMBIAR LA CUCHILLA
1. Ponga el adaptador de la cuchilla an el
ciguel_aldel motor.Asegiirese que la
ranura del adaptader y que el chavelem
del ciguehal esl_n alineados.
2. Ponga la cuchilla en el adaptador de _sta
alineando los dos (2) agujeros en la
cuchilla con las salientes elevadas en el
adaptador.
3. Asegdrese de que el borde de salida de la
cuchilla (opuesto al horde afilado) estd
hacia arriba hacia el motor.
4. Inslale el pemo de la cuchilla con la
arandela de seguiiqad y la arandela
endurecida en el adaptador de la cuchillay
el cigue5al.
5. Use un bloque de medera entre la cuchilla
y la caja de la segadora y apriete el pemo
de la cuchilla girdndelo en el sentido en
que giran las manillas del mloj.
• La torsibn para apretar recornendada es de
35 - 40 pies libras.
IMPORTANTE: El pemo de la cuchilla es
clase 8 tmlade a calo.
PARA AFILAR LA CUCHILLA
AVISO: No recomendamos el afilar la cuchilla
- pero si Io hace, asegLlrese de que quede
balanceada.
Se tiene que tener cuidado de manteneda
balanceeda. Una cuchilta que no estd
belanceada va a producir eventualmente dar_o
en la segadora o en el motor,
• La cuchilla puede afilarse con una lirna o en
una rueda rectificadora, No Irate de afil_la
mientras se encuentra en la segadora.
• Para revisar el balance de la cuchilla, clave
un clavo en una riga o en la pared. Deje
alrededor de una pulgada de un clavo recto
expuesto. Ponga el agujem central de la
cuchilla sobre la cabeza del clavo. Si la
cuchilla estd balanceade debe permanecer
en la posici6n horizontal. Si cualquiera de
los extremos de la cuchilla se rnueve hacia
abajo, afile el extremo pesado hasta que
Elsta quede balanceada.
Adaptadordelacuchllla Chavetemdel
Ranu_._. c!guenaJ
Anindelade
seguddad
Cuch_lla
Arande_
Pernoerldt_ecldl guenal
dela
cudlllla loldlt desallda, Adaptaderdela cuchilla
27
RECOGEDOR DE ClaSPED
(Si compradocomo un accesono)
• El recogedorde c_ded puede ser rociadocon
el agua de la manguera pero_ene que estar
seco cuandose vaya a usar.
• Revise su recogedorde c_ a menudo
para verificar._esta daSade o detenorade Se
va a desgastarconel uso n_Tnal. Si se
necesitacami0iarel recogedor,cambielo
solarnentepor unoque sea apmbado p_ el
fabr_ante. De elnOmerodel modelode la
segaderac_nde Io ordene.
MOTOR
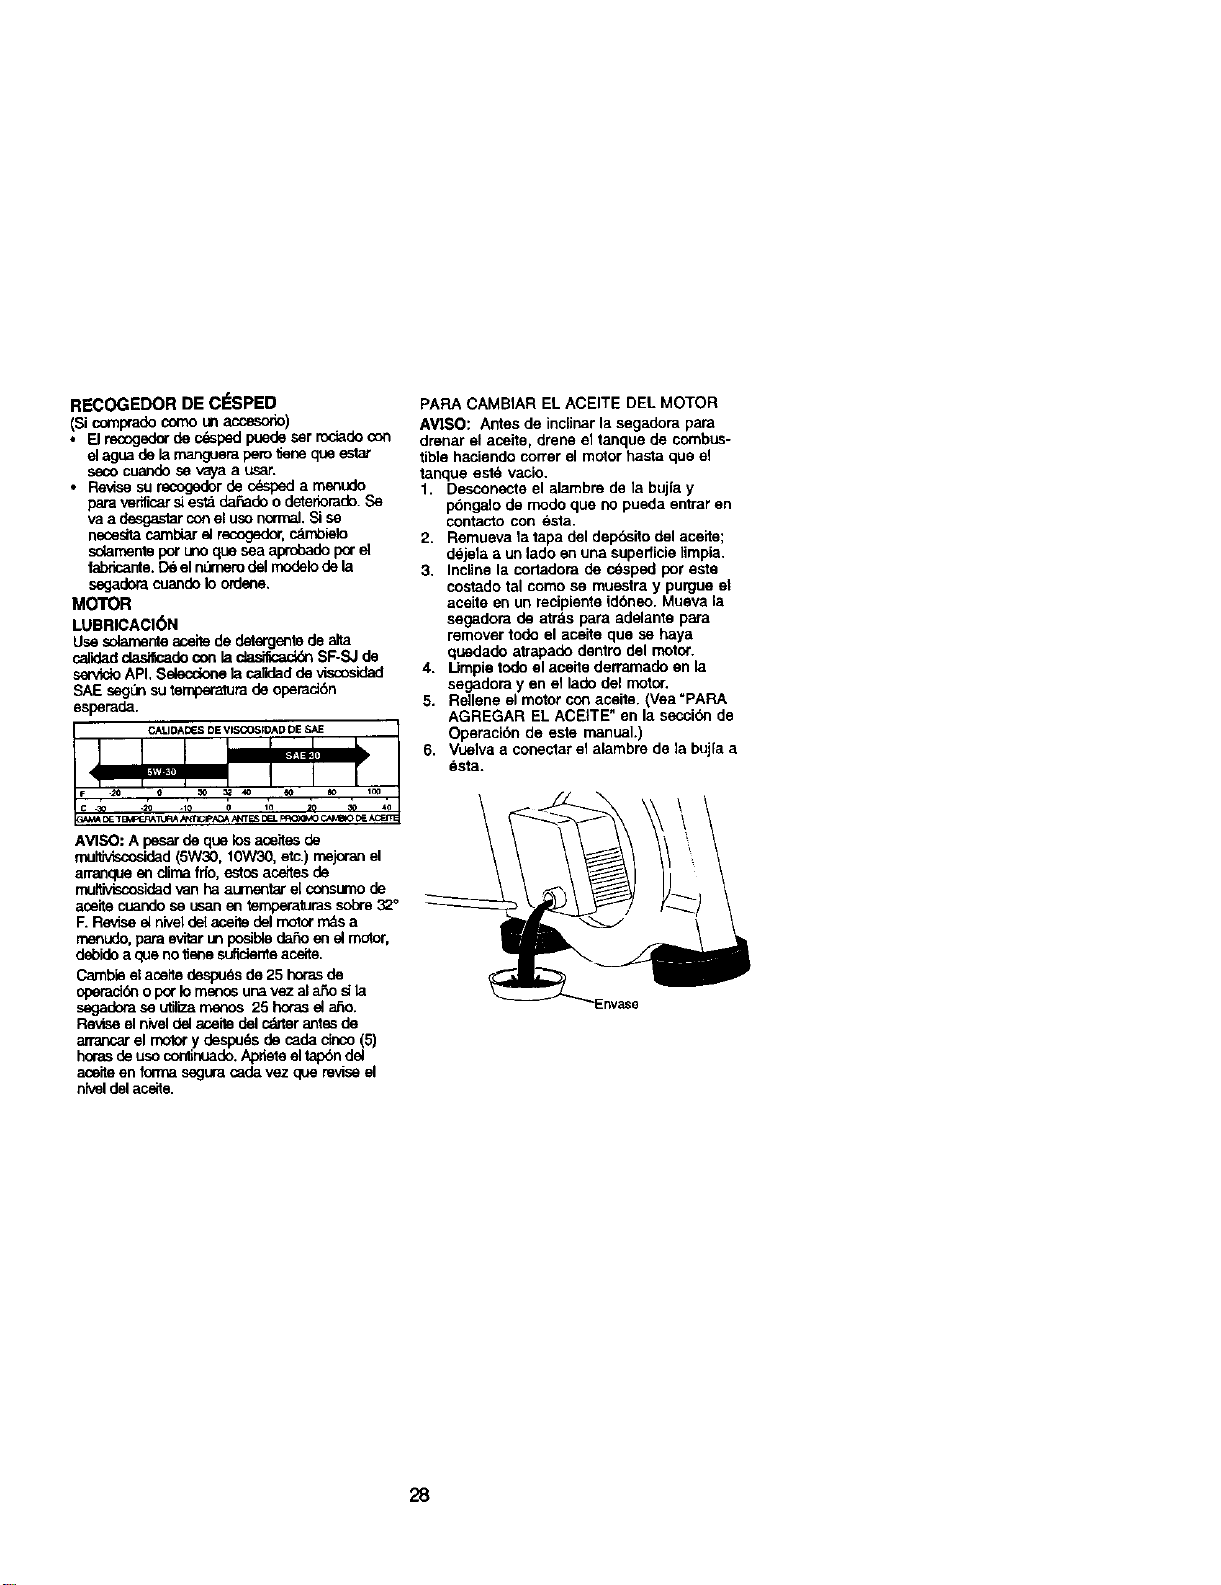
LUBRICACK_N
Use solamenteace_ de detergente de
car_ad dasif_do con la elasifx_u_k_SF-SJ de
servloloAPI, Selecdone la celldedde vi_
SAE seg_ suterr_ra de opemd6n
esperada.
AVISO: A pesar de que los aceites de
multMscosidad(5W30, 10W30, etc.) mejcran el
arranque_n climafdo,estc6 aceltesde
rnultivisc_ded van ha aLrnentar el consumode
aseite cuandose usan en temperaturassobre32°
F. Reviseelniveldel aceitedel motorrr_s a
rnenudo,para evitarun posibleda_o en el m_or,
debidoa epe no _ene sufielenteaceite.
Cambieel acelte despu_s de 25 horasde
operack_no por lo menos ureavez al ar3osila
segadera se otiliza menos 25 horasel a,5o.
Revise elniveldel aceite del craterantssde
ananc_ el motor y despuds de cada cloco (5)
horasde usocontinuade.Aprieteeltapbndel
aceiteen fom_aseguracade vez clue reviseel
nivel del acsite.
PAPA CAMBIAR EL ACEITE DEL MOTOR
AVISO: Antes de inclinar la segadora para
drenar el aceite, drene el tanque de combus-
tible haciendo correr el motor hasta que el
tanque estd vacio.
1. Desconecte el alarnbre de la bujla y
pbngalo de rnodo que no pueda entrar en
contacto con esta
2. Rernueva la tapa del depdsito del aceite;
d_jela a un lado en una supefficie limpia.
3. Incline la cortadora de c_sped por este
costado tel corno se muestra y purgue el
acelte en un recipiente idbneo. Mueva la
segadora de atr_s para adelante para
remover todo el acelte que se haya
quedado atrapado dentro del motor.
4. Umpie todo el aceite derramado en la
segadora yen el lade del motor.
5. Rellene el motorcon acelte. (Vea =PAPA
AGREGAR EL ACEITE" en la seccibn de
Operaci6n de este manual.)
6. Vuelva a conectar el alambre de la bujla a
esta.
28
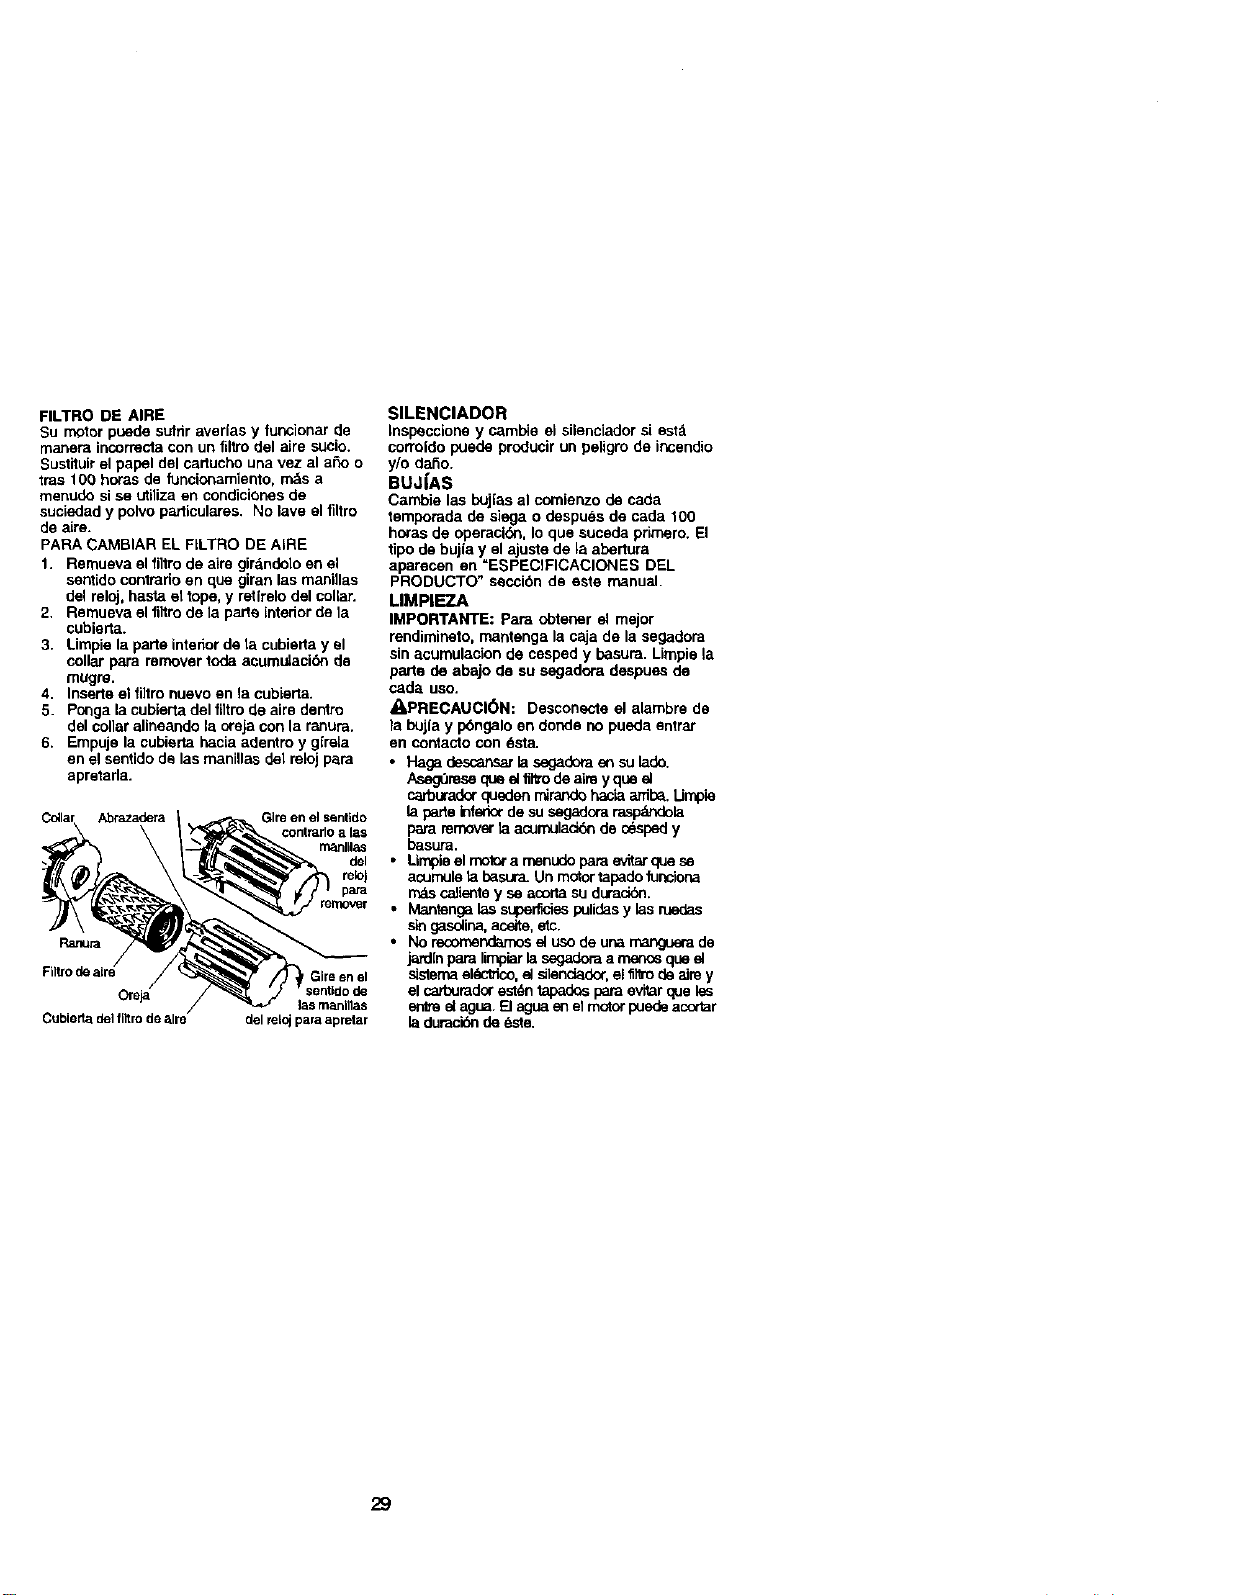
FILTRO DE AIRE
Su motor puede sulrir averlas y funcionar de
manera incorrectacon un filtro del aire sucio.
Sustituirel papel del cartucho una vez al a£1oo
tras 100 horas de funcionamiento, m_s a
menude si se otiliza en condiciones de
sueledad y polvo particulares. No lave el filtro
de a_re.
PARA CAMBIAR EL RLTRO DE AIRE
1. Remueva elfiitro de aire girdndelo en el
sentido contrario en que giran las mani]las
del reloj, hasta et tope, y retirelo del collar.
2. Remueva elfiltro de la parte intedor de la
cubiarta.
3. Limpie la parte interiorde la cubiarta y el
collar para remover toda acumuiacibn de
mugre.
4. Inserte el fi]tro nuevo an la cubierta.
5. Ponga la cubiarta del fiitro de aire dentro
del collar alineando la oreja con la ra,nura.
6. Empuje la cubiarta hacia ade_ro y g{reLa
en el sentido de lasmanillas del relojp_m
apretada.
Abrazadeta GIreenelsenttdo
corittarlo a [as
rnanlllas
del
rek,I
para
renlover
GIre en el
[as manillas
del reloj para apretar
SILENCIADOR
lnspeccione y cambie el silenciador si estd
colToldo puede producir un peligro de incendio
y/o daSo.
BUJ{AS
Cambie las bujias al comienzo de cada
_emporada de elega o despu8s de cada 100
horas de operaci_, Io que suceda primero. El
tipo de bujla y el ajuste de [a abertura
aparecen en "ESPECIFICACIONES DEL
PRODUCTO" seccibn de este manuel.
LIMP|EZA
IMPORTANTIE: para obtener el mejor
rendimineto, mantenga la caja de la segadora
sin acumulacion de cesped y basura. Limpie la
parte de abajo de su segadora despues de
cad_. uso.
_=PRECAUCK_N: Desconecte el alambre de
la bujla y p6ngalo en cionde no pueda entrar
en contaoto con 6sta.
• Haga descansar [a segadoraen su lade.
AsegOreseque el flltrode aim y que el
catouradcrqueden mirando hac'_ arriba. Uml_
la parle inferiorde su segadora _[a
para remover [a acumulaci6nde cespedy
basura.
• Limpie el motor a menudopata evitarque se
acumule [a basura.Un motortapadofunciona
rn_scel[antey se acorta su duradbn.
• IV[antengalas superrlcie_pulidasy [as nJedes
sin gasolina,acelte,etc.
• No recomendemosel uso de una manguera de
jard[npara limp[arlasegaderaa _ qu_ el
sisterna eldctrico,elsilendador, elfi_rode elm y
el carburadorest_n ta_ paraevilar que les
enlm el agua. [] agua en elmotcr puedeacortar
laduracidnde este.
29
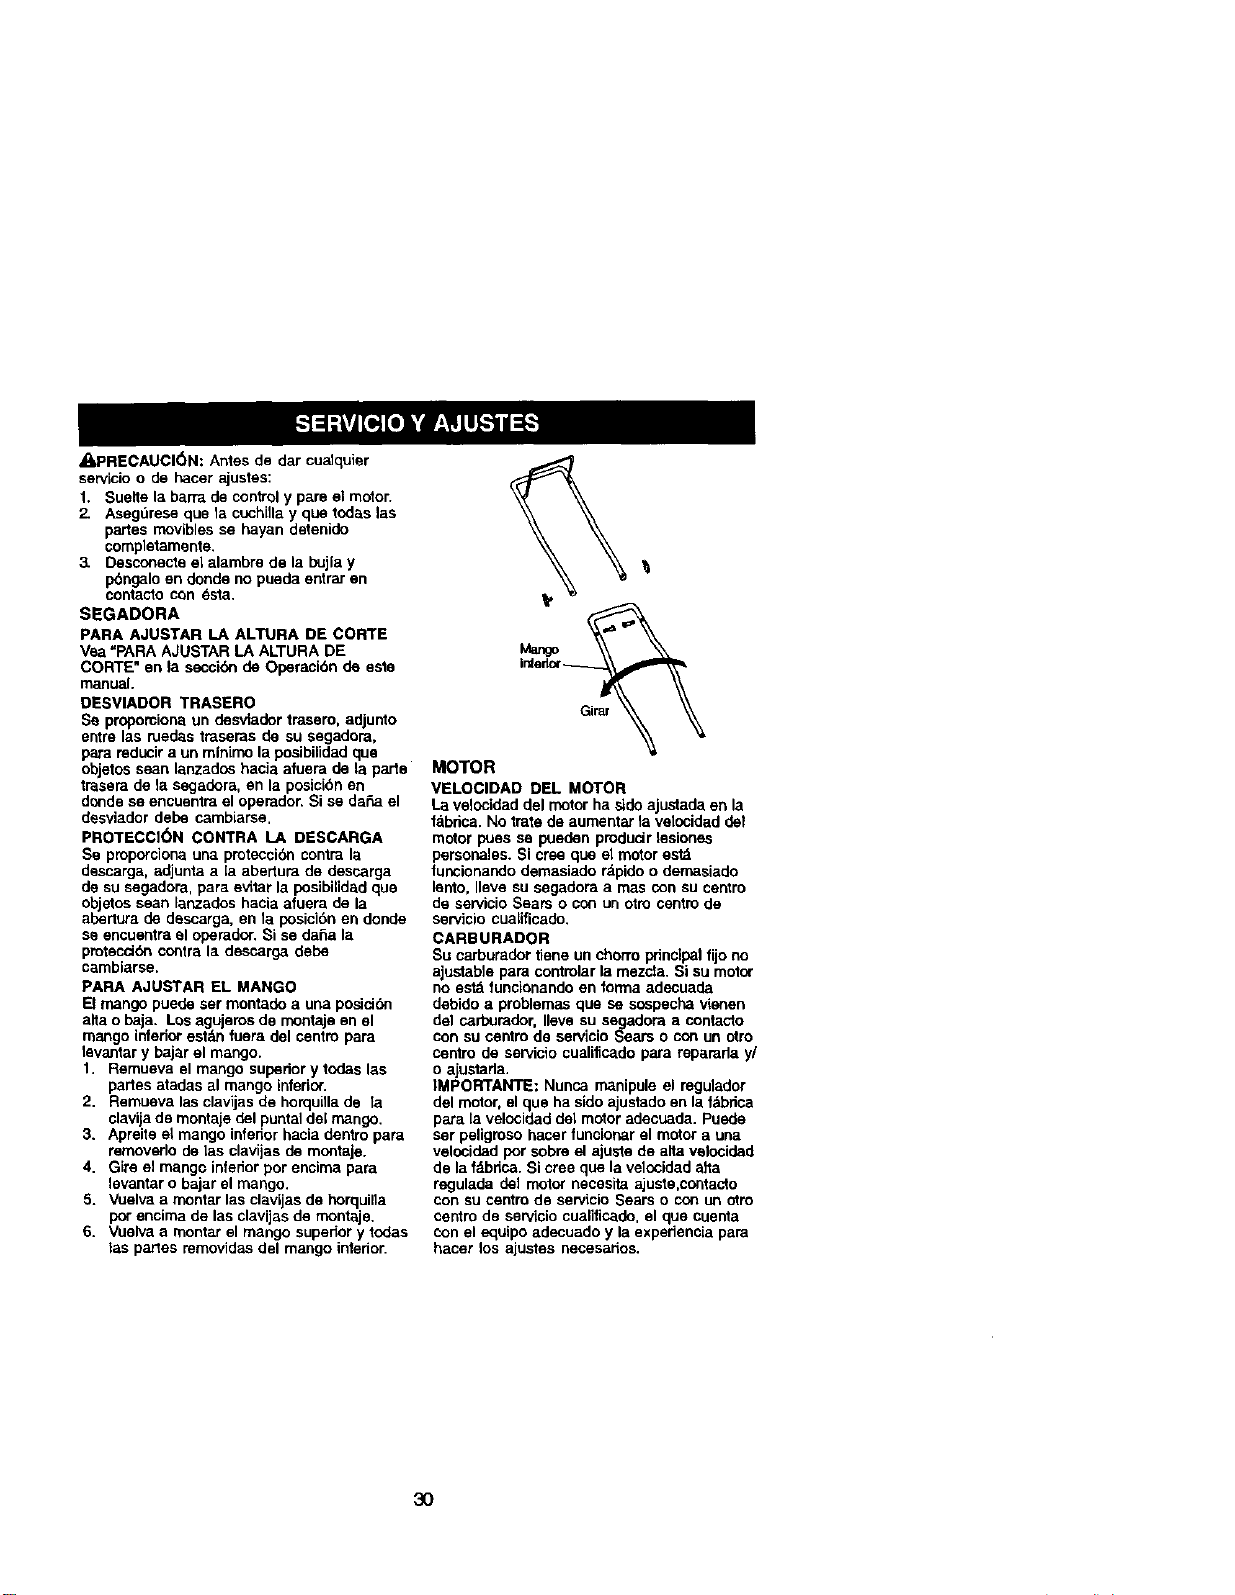
_=PRECAUCI6N: Antes de dar cu_Jquier
servicio o de hacer ajusles:
1. Suelte la barm de controly pare el motor.
2. Aseg_rese que la cuchilla y que todas las
partes rnovibles se hayan detenido
completamente.
3. Desconeote el alambre de la bujia y
pbngolo en donde no pueda entrar en
contaclo con _sta.
SEGADORA
PARA AJUSTAR LA ALTURA DE CORTE
Vea =PARA AJUSTAR LA ALTURA DE
CORTE* en la seccidn de Operaci6n de este
manual.
DESVIADOR TRASERO
Se propomiona un desvtador trasero, adjunto
entre las ruedas tmsems de su segadora,
para reducir a un minimo la posibilidad que
objetos sean lanzados hacia afuera de la parte
trasera de la segadora, en la posicLbnen
dande se encuentra el operador. Si se da_a el
desviador debe cambiarse.
PROTECCI6N CONTRA LA DESCARGA
Se proporciona ur_ protecciSn centre la
descarga, adjunta a Eaabertura de descarga
de su segadora, para evitar la posibilidad que
objetos sean lanzados hacia afuera de la
abertura de descarga, en la posici6n en donde
se encuentra el operador. Si se deSa la
protecdc_ncontra la descarga debe
cembiarse,
PARA AJUSTAR EL MANGO
F_Jmango puede set montado a una posicibn
alia o baja. Los agujeros de montaje en el
mango inferior estbn fuera del centre para
levantar y bajar el mango.
1. Remueva el mango supedor y todas las
parles atadas al mango inferLor.
2. Remueva las clavijas de horquilla de _a
clavija de montaje del puntal del mango.
3. Apreite el mango infer_orhacia denlro para
removedo de las clavijas de montaje.
4. Gire el mangc inferior per encima para
levantar o bajar el mango.
5. Vuelva a mantar las cl_.vijasde horquilla
per encirna de las clavijas de montaje.
6. Vualva a montar el mango super;or y todas
las partes removidas del mango inledor.
MOTOR
VELOClDAD DEL MOTOR
La veloeldad del motor ha side ajustada en la
fabrica. No trate de aumentar la velocidad del
motor pues se pueden produdr lesiones
personales. Si cree que el mo_or estd
funcionando demasiado rdpido o demasiado
lento, Ileve su segadora a mas con su ceotro
de servicio Sears o con un otro centre de
servicio cualificado.
CARBURADOR
Su carburador tiene un chorro principalfijo no
ajustable para controlar la mezcta. Si su motor
no estd funcienando en fonna adecuade
debido a problemas que se sospecha vienen
del carburador, neve su segadora a contacto
con su ceotro de servicio Sears o con un otro
centre de servicio cualificado para repararla y/
o ajustada.
IMPORTAWrlE: Nunca manipule el regulador
del motor, el que ha side ajuslado en la fdbrica
para [a velocidad del motor adecuada. Puede
ser peligroso hacer funelor_arel motor a ana
velocided per sobre el ajuste de alta valocidad
de la fdbrLca.Si cree que la velocidad alta
regulada del motor necesita ajuste,cantacto
con su cenfro de servicio Sears o con an otto
eenfro de servicio cualificado, el que cuenta
_on el squipo adecuado y la expedencia para
hacer los ajustes necesarios.
3O
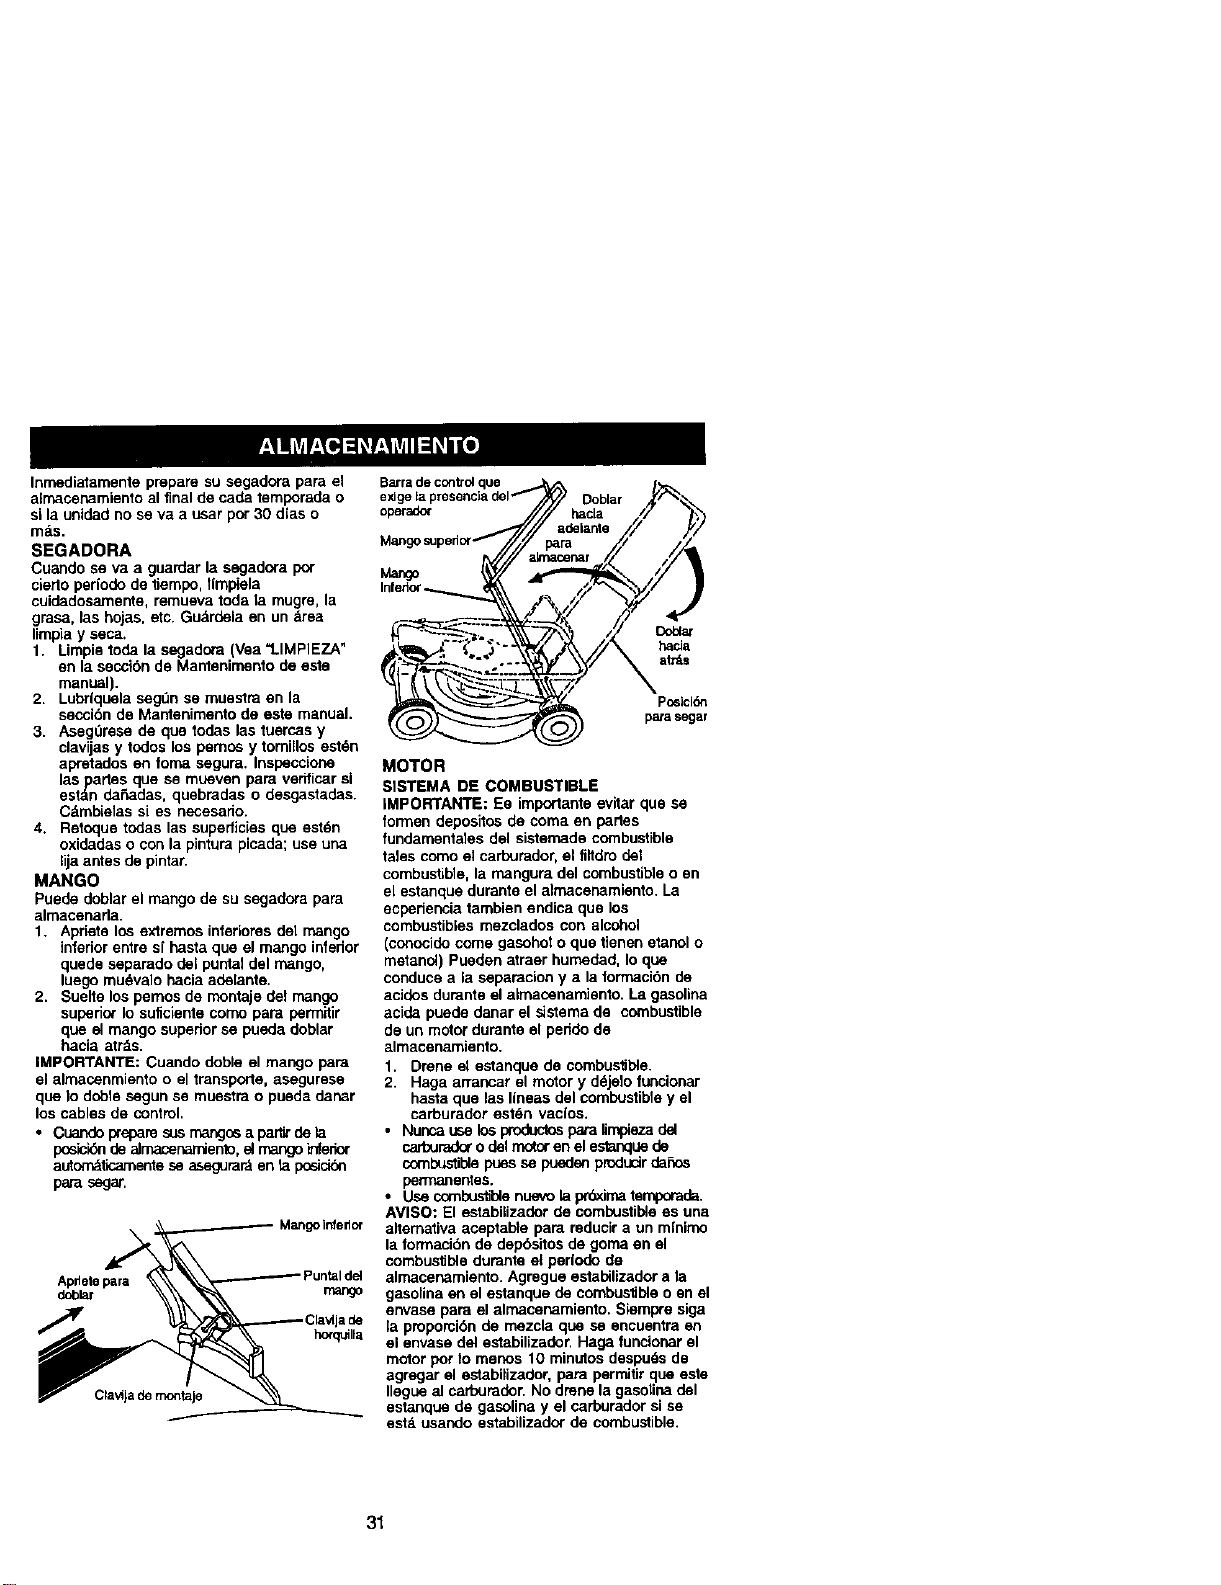
Inrnediatamente prepare su segadora para el
alrnacenamiento al final de cada temporada o
si la unidad no se va a usar por 30 dias o
mas.
SEGADORA
Cuando se va a guardar la segadora pot
cierto periodo de tiempo, llmpiela
cuidadosamente, remueva toda ta rnugre, la
grasa, las hojas, etc. Gu_rdela en un drea
limpia y seca.
1. Limpie toda la segadora (Vea "LIMPIEZA"
en la secci6n de Mantenimento de este
manUal).
2. Lubrlquala segOnse muestra en la
seccibn de Mardenimento de este manual.
3. Asegdrese de qua todas las tuercas y
clavijas y todos los pemos y tomi,os estSn
apretados en foma segura. Inspeccione
laspartes que se muaven para verificar el
estdn da_adas, quebmdas o desgastadas.
C&mblelas si es necesario.
4. Retoque todas las supedicies qua est_n
oxidadas o con la pintura picada; use una
lija antes de pintar.
MANGO
Puede doblar el mango de su segadora para
almacenada.
1. Apriete los extremos inferiores del mango
inledor entre sr hasta que el mango infedor
quede separado del puntal del mango,
luego mu_valo hacia adelante.
2. Suefie los pemos de montaje del mango
suped_ Io suficiente como para permitir
qua el mango supedor se pueda doblar
hacia atr_.s.
IMPORTANTIE: Cuando doble el mango para
el almacenmiento o el transporte, asegurese
que )o dohle segun se muestra o pueda danar
los cables de control.
• Cuando prepare sus rna_os a parer de la
posick_ de elmacenamiento, el mangoinfedor
autorr_ticameotese aseguFa_ en la posick_
pard segar.
Apde_ pam
dob_
Ixxquilla
Barrade c°ntr°lqu_el'_ (_,._,_,
exJgela presencladel Doblar •
operado_ hacla /.
Mangos_Jpedor para V
Infedor
•!= "-_' "3"" _a
"11_\\\_"_--_;-"--. X\\z/ x
MOTOR
SISTEMA DE COMBUSTIBLE
IMPORTANTE; Ee importante evitar que se
formen depoeltos de coma en partes
fundamenteles del sisternade combustible
tales como el carburador, el flltdm del
combu_ble, la mangura del combustible o en
el estanque durante el almacenamiento. La
ecpedencia tambien endica que los
combustibles mezclados con alcohol
(conocido come gasohot o que tienen etanol o
metanol) Pueden atraer hurnedad, Io que
conduce a la separacion y a laformaci6n de
acidos durante el almacenamiento. La gasolina
acida puede danar el sistema de combustible
de un motordurante el peddo de
almacenamiento.
1. Drone et estanque de combusfible.
2. Haga arrancar el motor y d6jelo funcionar
hasta que las lineas del combustible y el
carburador estSn vaclos.
• Nunca use los productosparalimpiezadel
carburadoro delmotor en el estanque de
coml_tible pues se puaden pmdudr daSos
permanentes.
• Use combustiblenuevo la pr6ximatemporada.
AVISO: El estabilizador de combustiblees una
afiemativa aceptabte para reducir a un mlnimo
la formaci6n de depbsitos de goma en el
combustible durante et perlodo de
almacenamiento. Agmgue establlizador a la
gasolina en el estanque de cornbusfibleo en el
envase para el almacenamiento. Siempre siga
[a proporcibn de rnezcla qua se encuentra ell
el envase del estabilizador. Haga funcionar el
motor por 1omenos 10 minutos despu6s de
agregar el estabilizador, para permitir que este
Ilegua al carburador. No drene la gasolina del
estanque de gasoUna y el carburador si se
estd usando estabilizador de combustible.
31
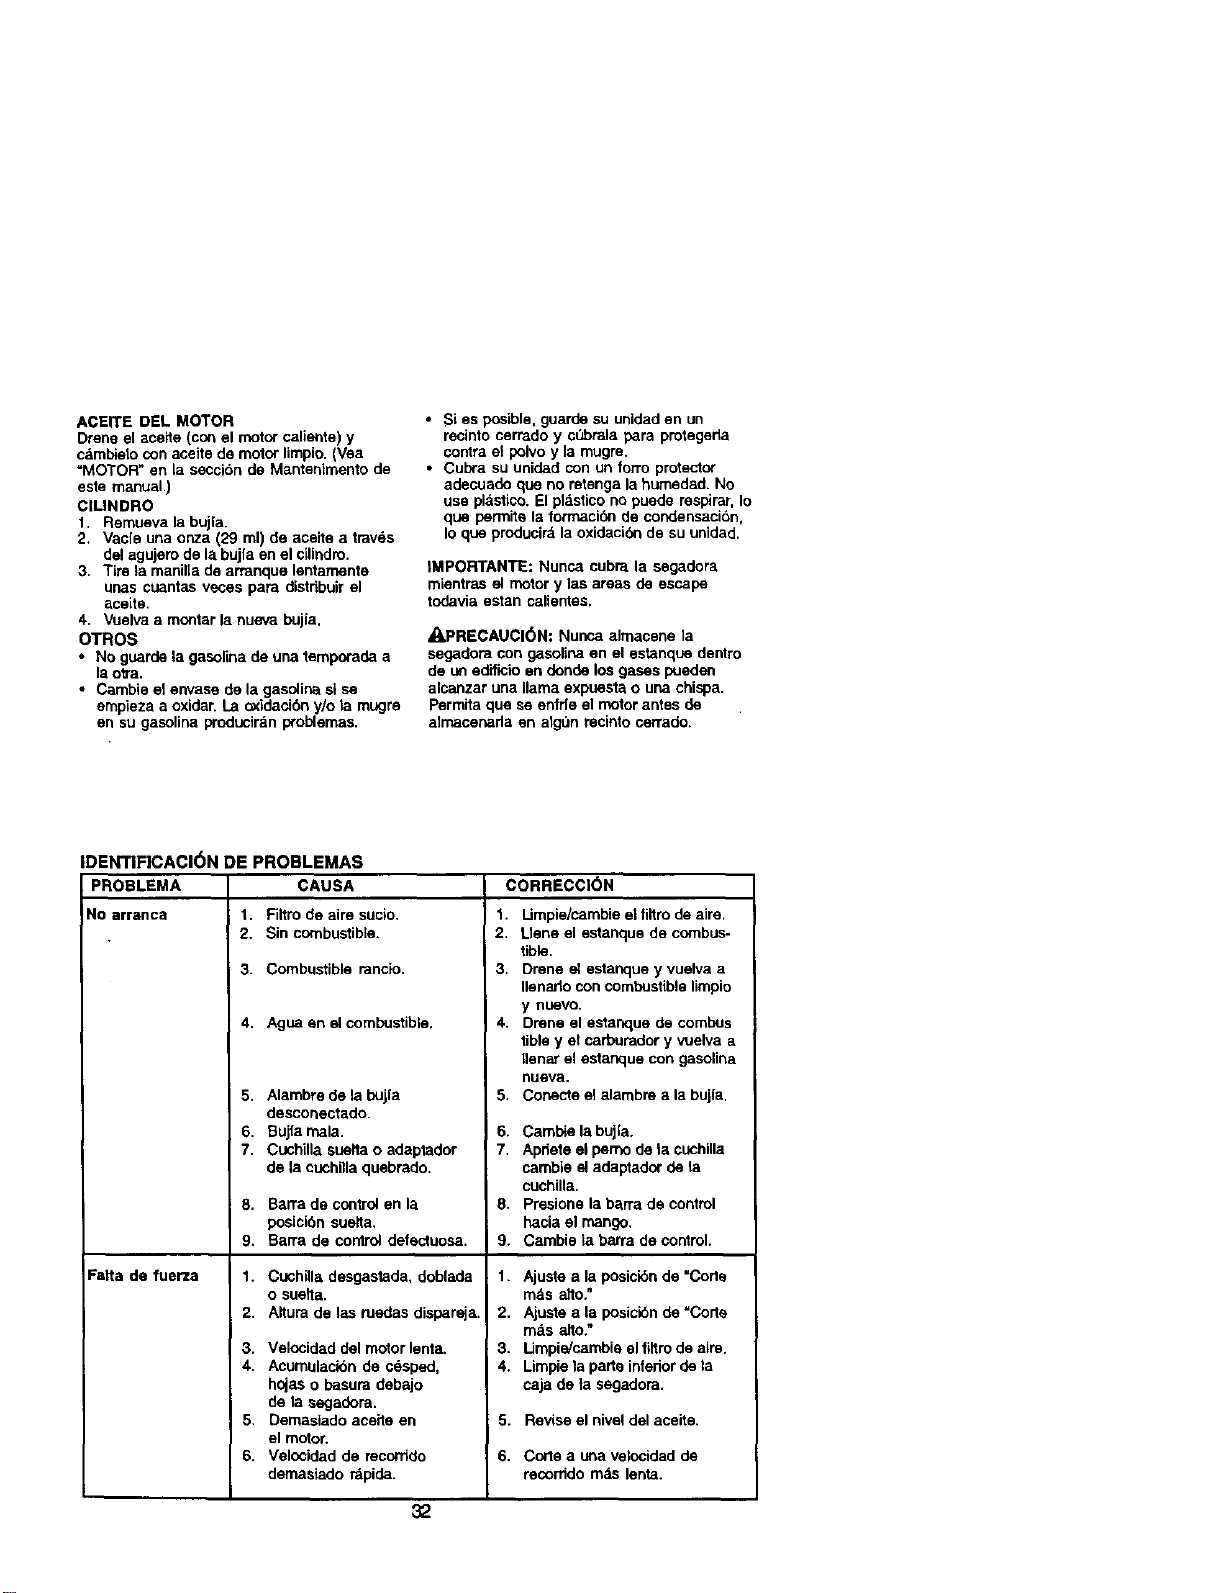
ACEITE DEL MOTOR
Drene el aceite (con el motor caliente) y
c&mbietocon aceite de motor limpio. (Vea
=MOTOR" en ta secci6n de Mantenimento de
este manual,)
CIUNDRO
1. Remueva la bujia.
2. Vacfe una onza (29 ml) de acelte a travSs
del agujero de la bujfa en el cilindm.
3. Tire la manilla de arranque lentamente
unas cuantas veces para distr_buirel
aceite
4 Vuelva a montar la nueva bujla
OTROS
• NO guarde la gas_lina de una temporade a
la olra.
• Cambie el envase de la gasolina el se
empieza a oxidar. La _idaci6n y/o ta mugre
en su gasolina produciran problemas.
• Si es posible guarde su unidad en un
recinto cerrado y c_brala para protegeda
corrtrael polvo y la mugre,
• Cubra su unidad con un forro protector
adecuade que no retenga la humedad. No
use pl_stico. El pl&stico no puede respirar, Io
que permite la forrnacibn de condensaci6n,
Io que producir_ la oxidaci6n de su unidad.
IMPORTANTE: Nunca cubra la segadora
mientras el motor y las areas de escape
todavia estan calientes.
A,PRECAUCI6N: Nunca almacene la
segadora con gasolina en el estanque dentro
de tm ediflcio en donde los gases pueden
alcanzar una llama expuesta o una chispa.
Permita que se enfrle el motor antes de
elrnacenada en algOn recinto cerrado.
IDENTIFICACl6N DE PROBLEMAS
PROBLEMA CAUSA
No arranca 1, Filtro de aire sucio.
2. Sin combustible.
3.
4,
5,
6,
7,
Falta de fuerza
Combustible rancio.
Agua en el combustible.
Alambre de la bujla
desconectado
Bujfa mala
Cuchilla suelta o adaptador
de la euchilla quebrado
8. Barra de controlen la
posici6n suelta.
9. Barra de control defectuosa.
1 Cuchilla desgastada doblada
o suetta.
2. Altura de las medas dispareja.
3. Velocidad del motor lenta.
4. Acumulacibn de cSsped,
hojas o basura debajo
de la segadora.
5. Demaslado aceite en
el motor.
6. Velocidad de recorddo
dernasiado r_pide.
CORRECCK_N
1. Umpie/cambie el filtro de aire.
2. Llene el estanque de ccrnbus-
tible.
3. Drene el estanque y vuelva a
Ilenado con combustible limpio
y nuevo.
4. Drene el estanque de combus
tible yet carburador y vuelva a
Ilenar el estanque con gasolina
nueva.
5. Conecte el alambre a la bujla.
6. Cambie la bujla.
7. Apdete el pemo de la cuchilla
cambie el adaptador de la
cuchilla.
8, Presione la barra de control
hacia el mango,
9. Cambie la barra de control.
1 Ajuste a la posici6n de "Code
m_s elto."
2, Ajuste a la posicibnde =Corte
m_s altO."
3. Umpie/cambia el flltro de aire.
4. Lirnpieta parte inferior de ta
caja de ta segadora.
5. Revise el nivel del aceite.
6. Corte a una velocidad de
recorddo m&s lenta.
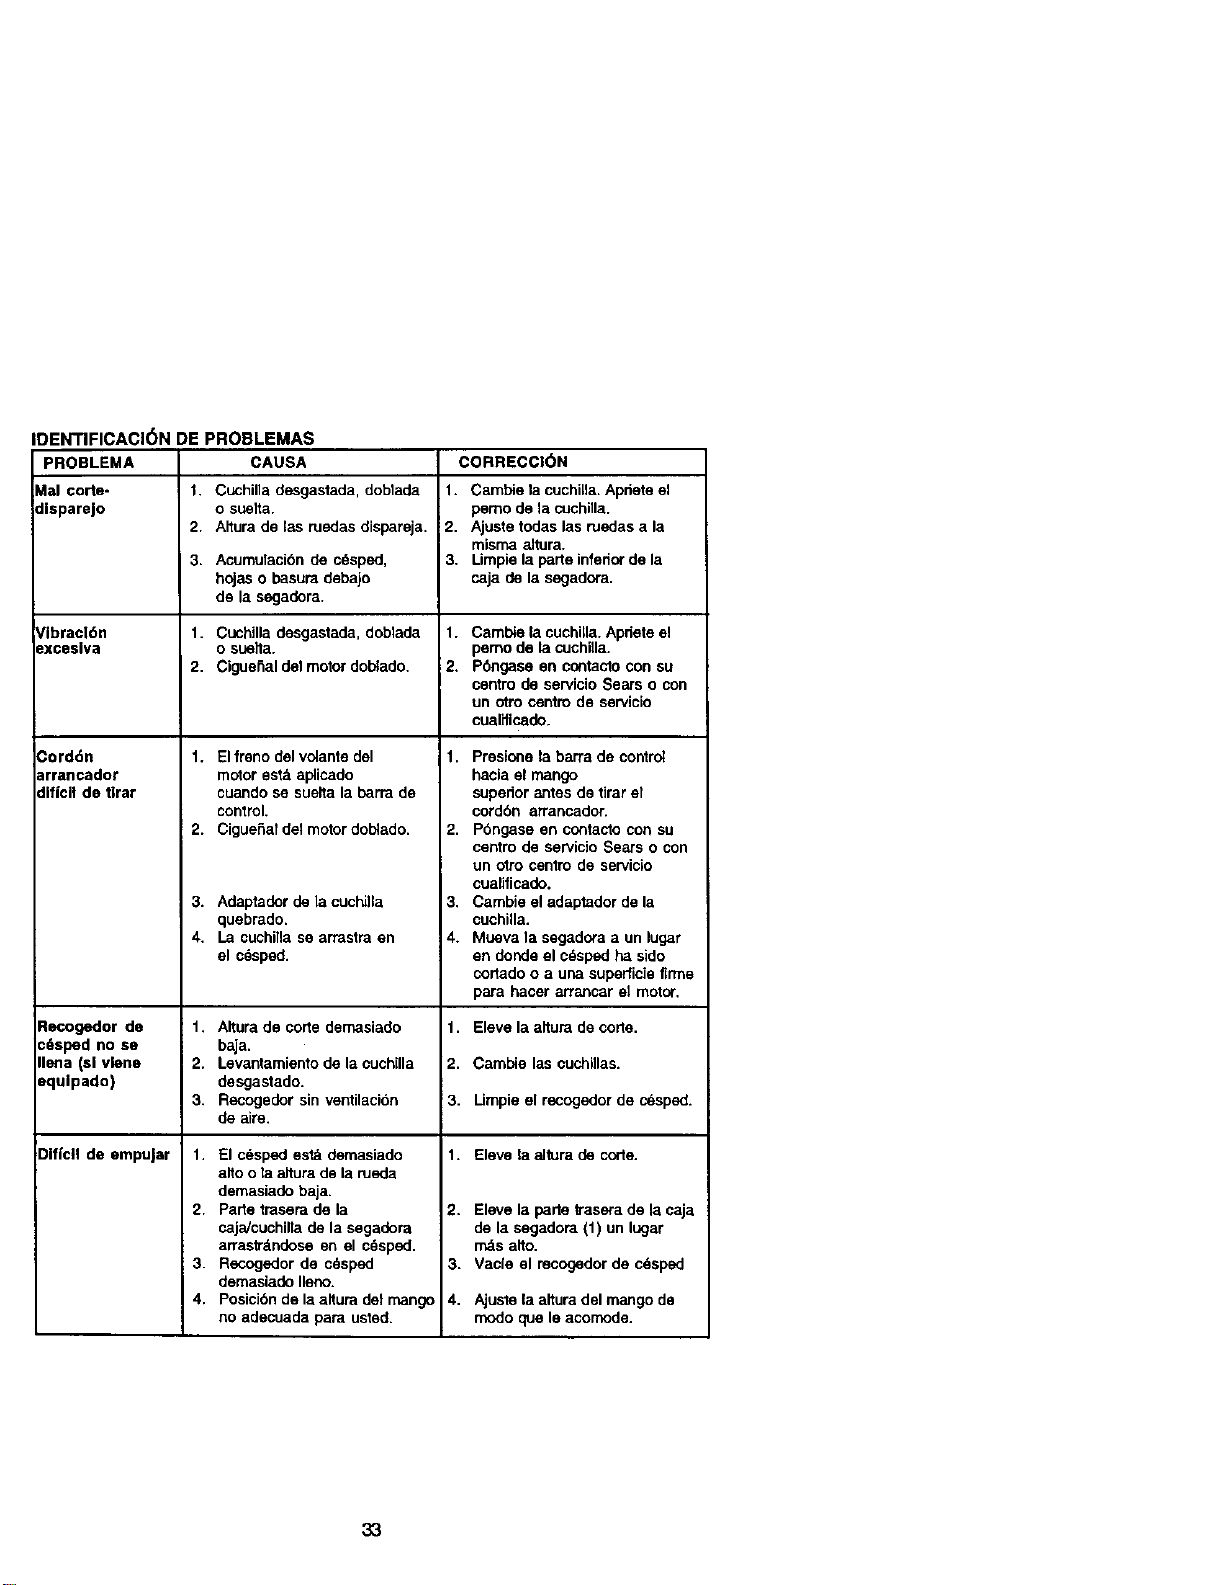
IDENTIFICACI6NDEPROBLEMAS
PROBLEMA CAUSA CORRECCl6N
Malcorte- 1.Cuchilladesgastada,doblada1. Cambiela cuchi[la. Apriete el
disparejo o suelta, pemo de la cuchilla.
2. Altura de las ruedas dispareja. 2. Ajuste todas las ruedas a la
misma altura.
3. Acumulacibn de cdsped, 3. Umpie la porte inferior de la
hojas o basum debajo caja de la segadora.
de la segadora.
Vibracl6n 1. Cuchilla desgastada, doblada 1. Cambie la cuchi_la.Apdete el
exceslva o sueffa, pemo de la cuchilla.
2. Ciguenal del motor doblado. 2. Pbngase en contacto con su
centro de servicio Sears o con
un otto centro de servicio
cualificado.
_orddn
irrancador
|ificlt de t|rar
=lecogodor de
;_sped no se
lena (si vlene
Jqulpado)
31ficll de empuJar
1. El freno del volante del
motor estztaplicado
cuando se suelta la barra de
control.
2. CigueSaf de1motor dobiado.
3. Adaptader de la cuchi]la 3.
quebrado.
4. La cuchitla se arrastra en 4.
el c6sped.
1. Altura de corle demasiado 1.
baja.
2. Levantamiento de la cuchilla 2.
desgastado.
3. Recogedor sin ventilacion 3.
de aire.
1. El c_sped est_ demasiado 1.
alto o la altura de la rueda
demasiado baja.
2. Parte trasera de la 2.
caja]cuchilla de la segadora
arrastr_indose en el c_sped.
3. Recogedor de c_sped 3.
demasiade Ileno.
4. Posicibn de la altura det mango 4.
no adecuada para usted.
1. Presione ta barra de contrc;
hacia el mango
supedor antes de ltrar et
cordbn arrancador.
2. Pbngase en contacto con su
centre de servicio Sears o con
un otto centro de servicio
cualiflcado.
Cambie el adaptador de la
cuchilla.
Mueva la segadora a un lugar
en donde el c_sped ha sido
cortado o a una supedicie firme
para hacer arrancar el motor.
Eleve la altura de code.
Cambie las cuchiflas.
Umpie el recogedor de c_sped.
Eleve la altura de corle.
Eleve la parte trasera de la caja
de la segadora (1) un lugar
mds alto.
Vacie el mcogedor de cdspsd
Ajuste la altura del mango de
modo que le acomode.
33
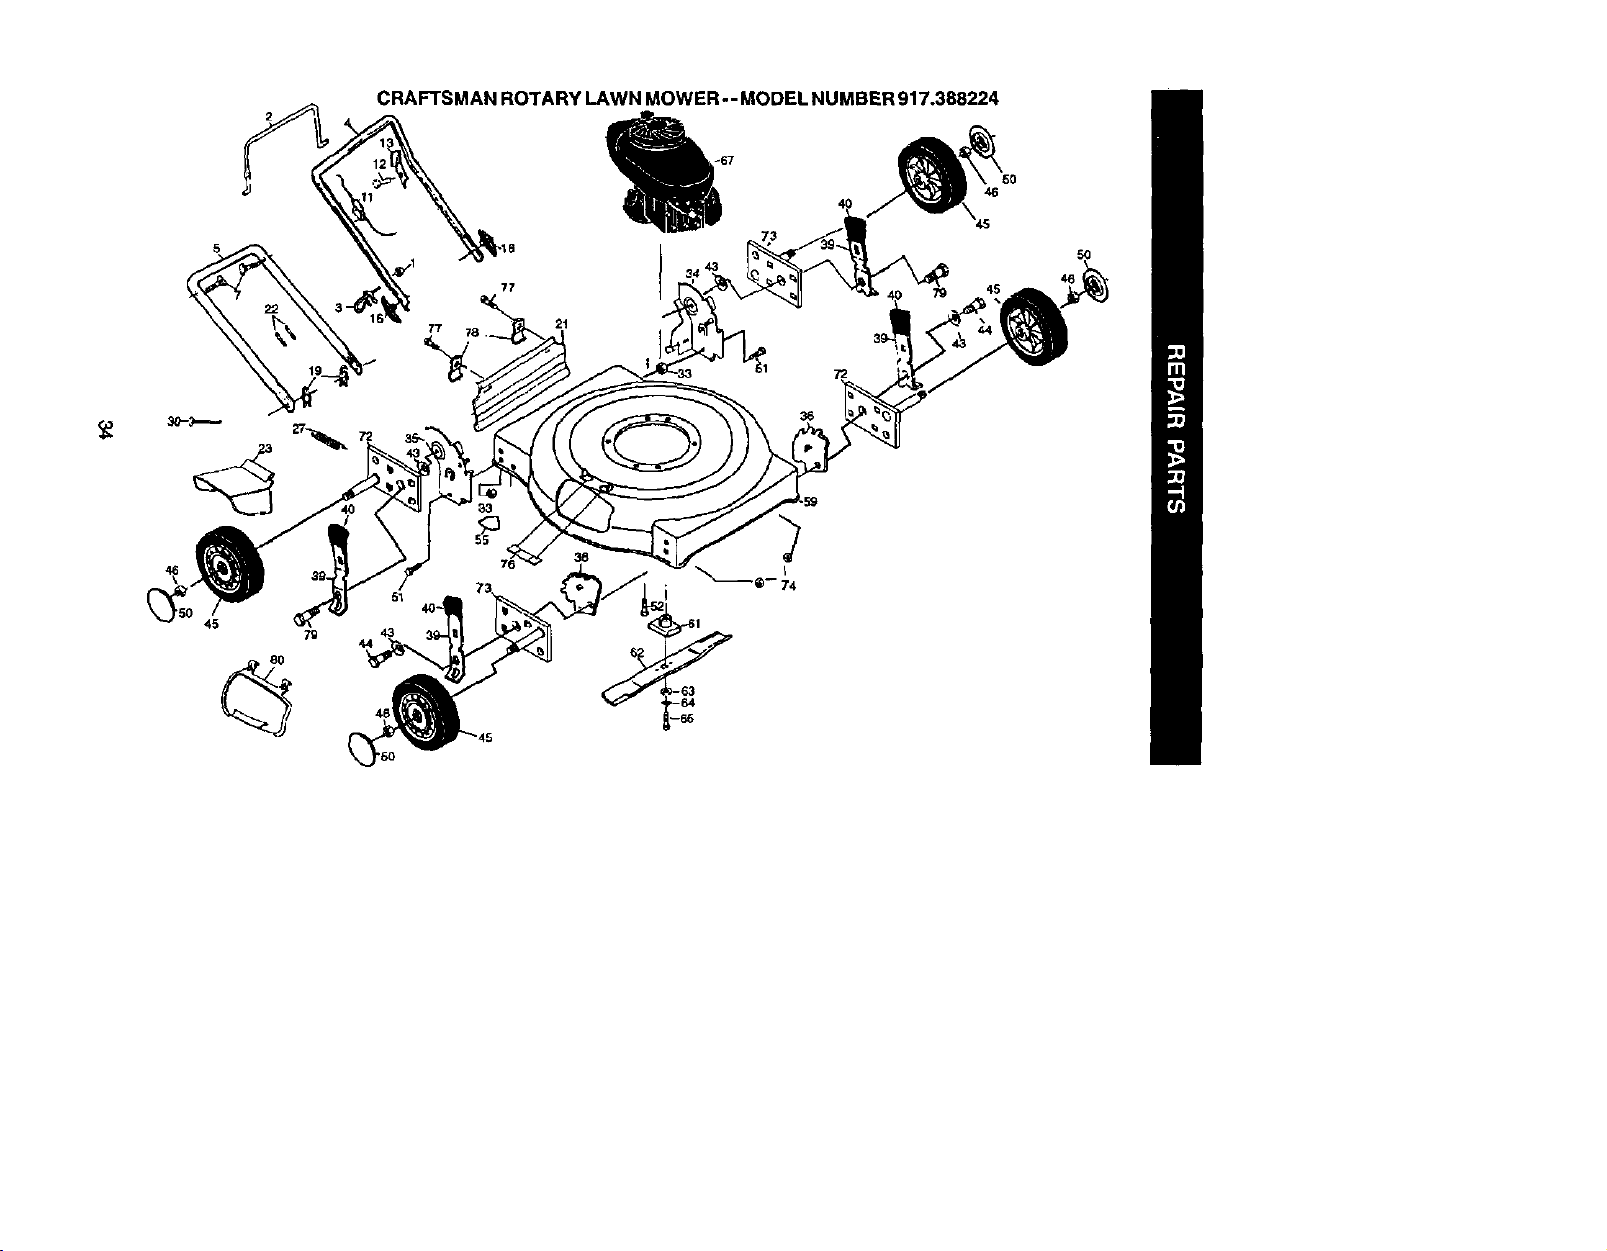
5
CRAFTSMAN ROTARY LAWN MOWER- - MODEL NUMBER 917°388224
7 46
77 21
5O
36
7g
44
5_
43

CRAFTSMAN ROTARY LAWN MOWER -- MODEL NUMBER 917.388224
KEY
NO.
1
2
3
4
5
7
11
12
13
16
19
21
22
23
27
3O
33
34
35
36
39
4O
43
44
45
46
5O
51
PART
NO
636O1
86902
132001
1697()9X479
16970_(479
131559
1685..%?.
8507'3OX004
136376
S1755
165858
66426
160831
1655_
163O33
751153
168164X479
15O16_(479
16_3&,<007
16836_0C4
87877
19112222
16_2.8
146248
83_3
774OO
1763O4_
KEY PART
DESC_ NO. NO DESCRIPTION
Locknut114-20 52 150406
C_tm_ Bal 55 854_3
RcpeGuide 59 161345
UpperHar_le 61 851514
I.o_t_l_ _ 141114
HandleBo_5/16-18 63 851074
EngmeZ_e ControlCable 64
HexTrvead RollingScrew #10-24 xi/2 65 551084
UpStop Bracket 67 -- ÷
HandmKnd_
Ha_in Co_ts_ 72 1671_X3O4
RearDellect_ 73 1671330(004
W_eT_e 74 751153
OLschargeGuard 76 161622
Tc_ion Sp,t_ 77 T"o0_7
H_Je Rod 78 87584X5O4
NutHex_ Lock5/t6-18 79 1608_8
Whe_ S_ Support(I.BIt) 80 160630
Wh_ arac_ Support(R_ght) -- 17_5O
Whe_ BracketAdjust_ - - 161058
S_c=orStung
Sek_orKnob
Was_er
Shouk_erB_t
WhedAsseml_
Locknut1/16-18
Hubcap
Screw Hex senated 1/4x 20 tt
HexHead Thread RollingScrew3/8-16 x I
[_OerDec_
LawnMower Hous_g (Ind. KeyNo. 55)
BladeAe_pter
_" B_de
_Washer
HelicalLockw_._er 3_
He_ Head .Screw 318-24x 1/4 Grd. 8
Eng_le - (See Breakdown)Craftsm_
Mod_ No. 143.014504
Ax_eA_A_n. (RPJLF)
_,Arm _(RF/LR)
NIX
Cip.Ckoseo_
H=ngeBracket
ShouldrBolt,5_16-18x .51
MulchmFfate
Owr_s Man_ (Er,_LaVSpar,_h)
W_='r_ngDecal(NotSho,,m)
AvaJ_abieaccessodesnotindudedwith;awnrnow_,
7133623 G_ Can(2.SGzCon)
71336(:0 FueIStabilLZer
71330O0 SAE5OWO_(20o,_)
NOTE: A]Icomponent dimensions given in U.S. inches.
1 inch = 25,4 rnm
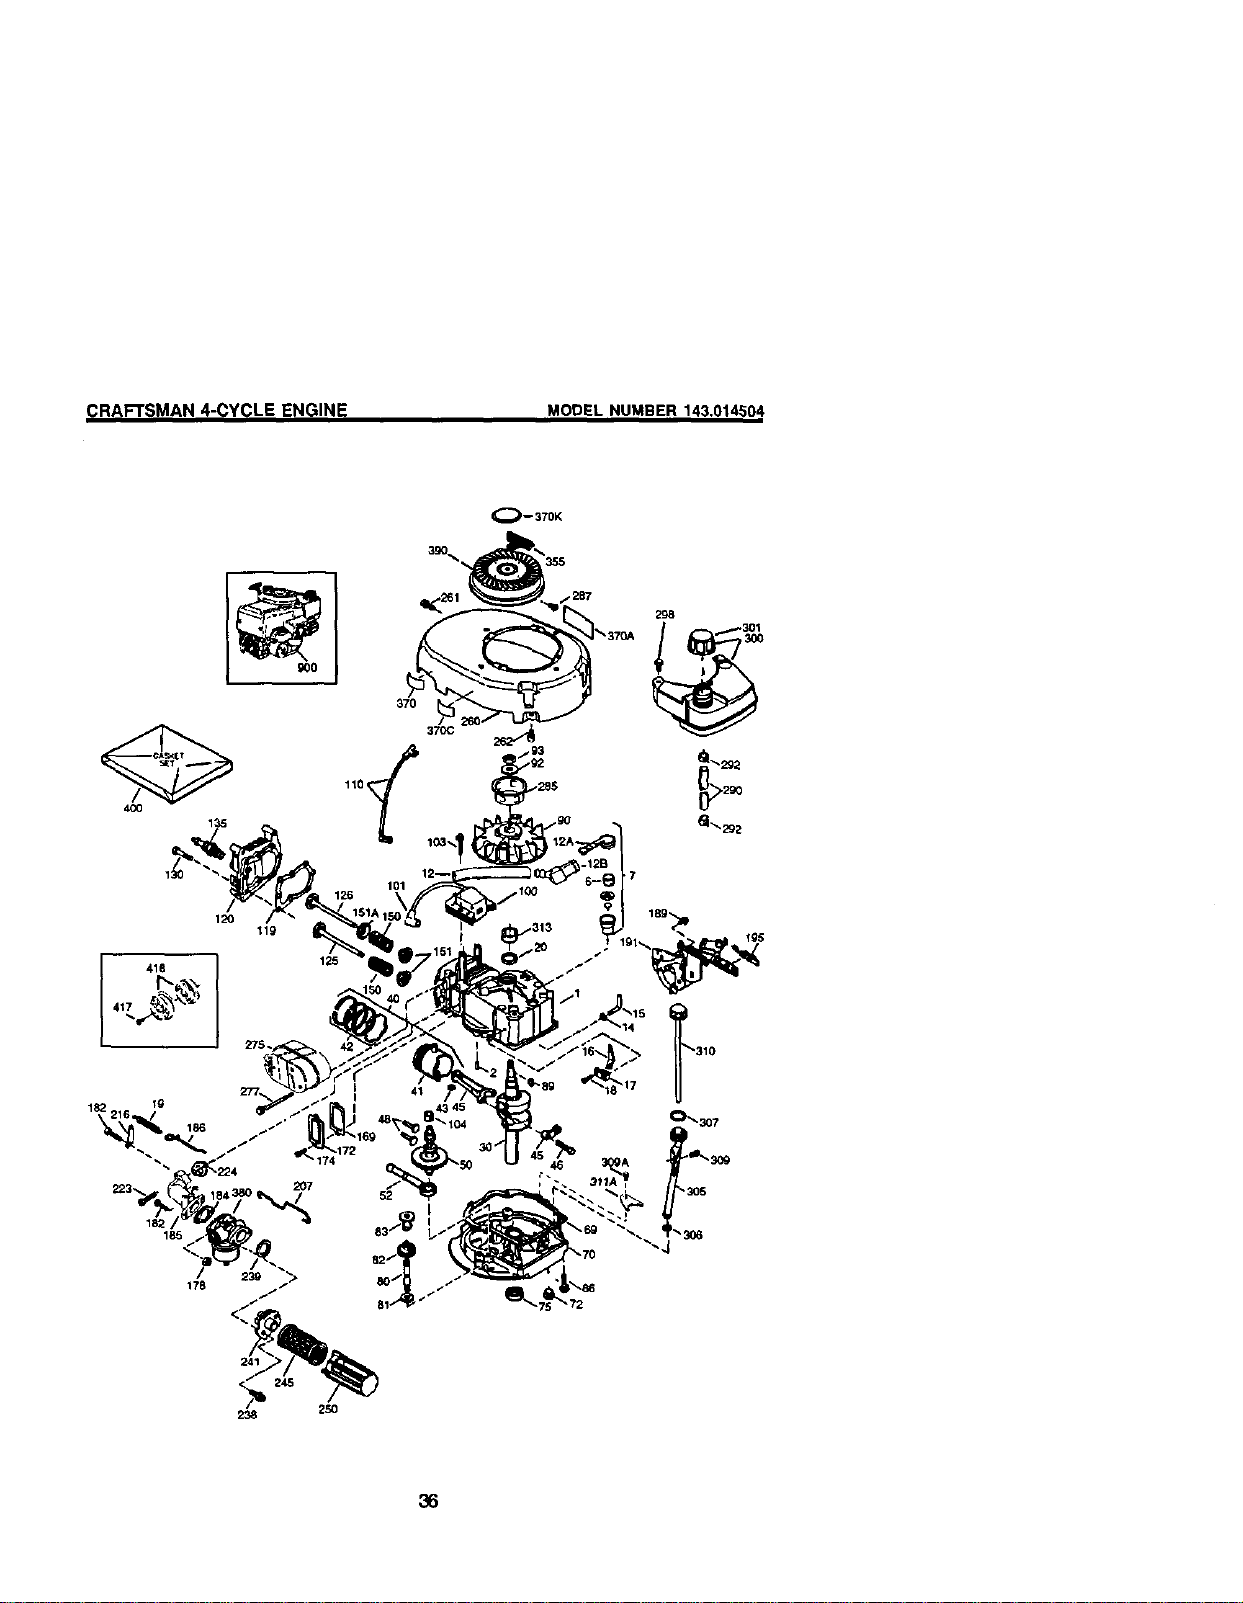
CRAFTSMAN 4-CYCLE ENGINE MODEL NUMBER 143.014504
9OO
40O
370
370C
110_ _1_
O-370K
298
f3Ol
416
185
12o
119
125
207
52
101
238 25O
36
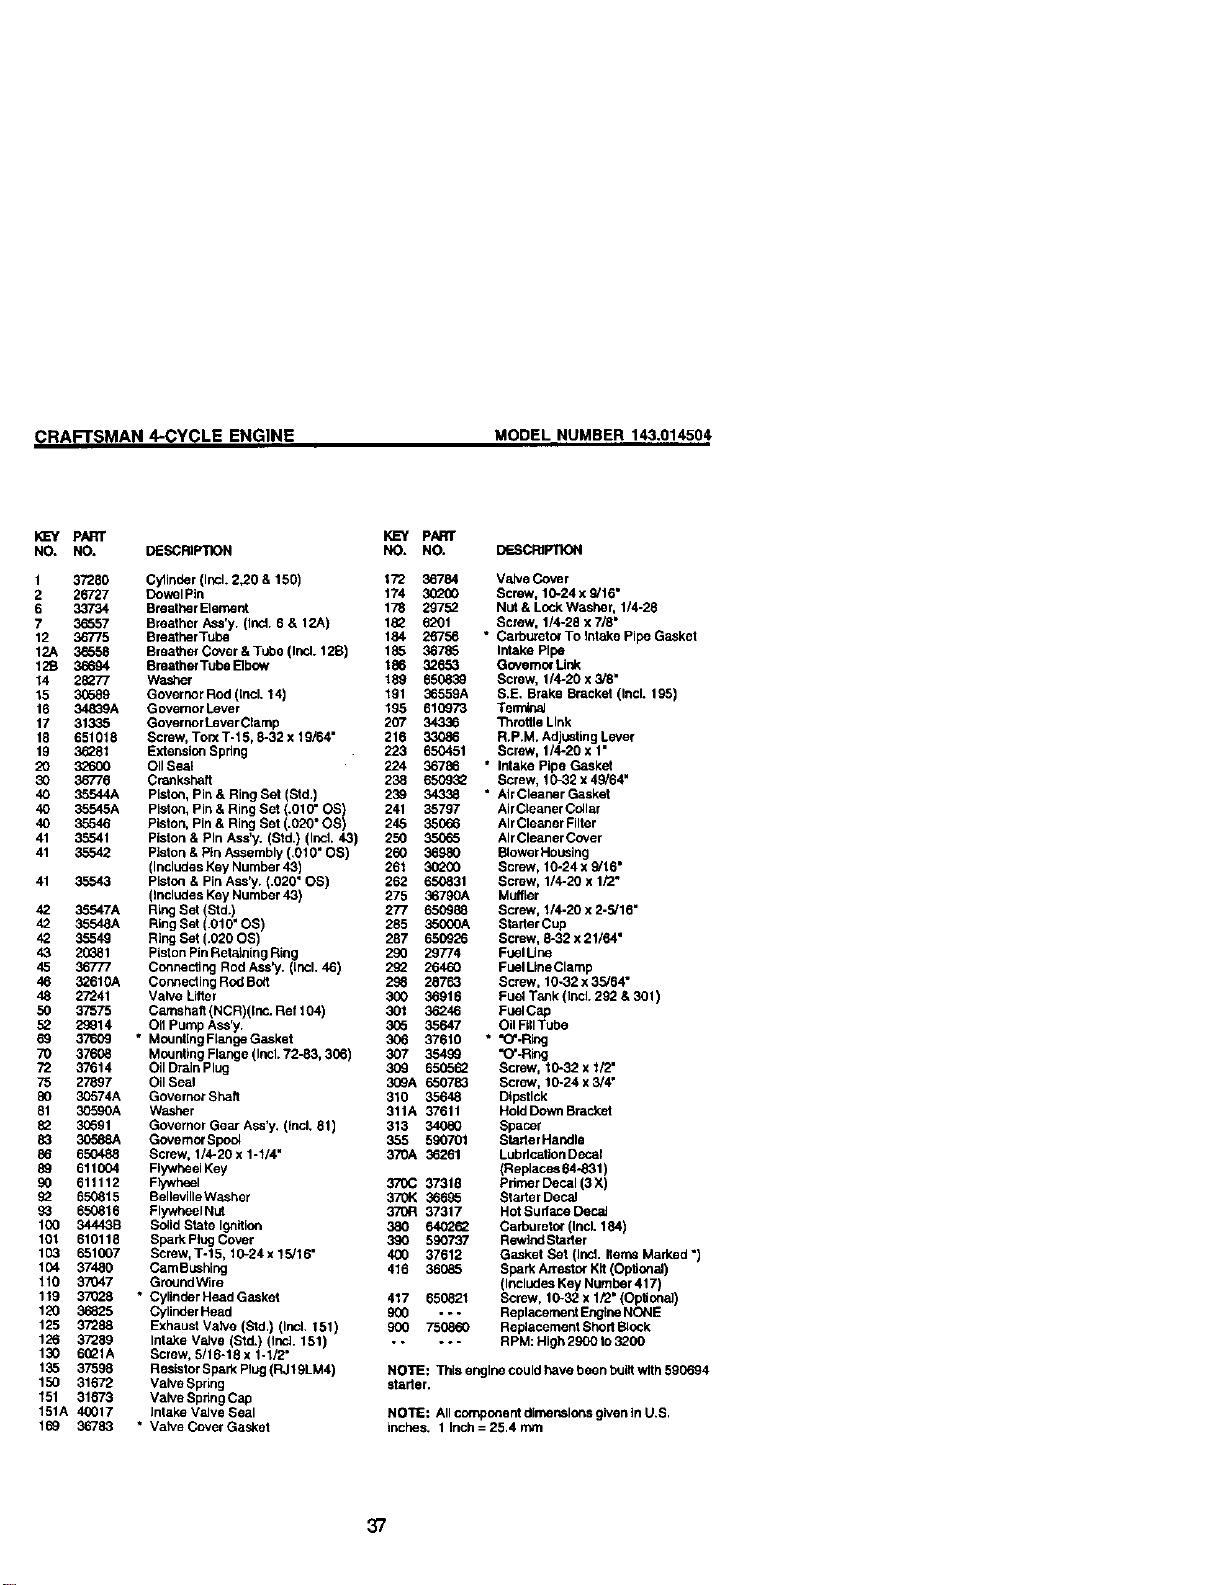
CRAFTSMAN 4-CY(_LE ENGINE
MODEL NUMBER 143.014504
KEY PART
NO. NO. DESCRIPTION
PARr
NO. NO. IT_SCRgnnoN
1 37280 Cylinder (Incl. 2,20 & 150) 172 36784
2 26727 Dowel Pin 174 30200
6 33734 Breathar Element 178 29752
7 36557 Breather Ass'y. (Ind. 6 & 12A) 182 8201
12 36775 Breethar Tuha 184 26756
12A 36558 BmatherCover&Tube(Ind. 12B) 185 36785
12_B 36694 BreatherTuhaEIbow 186 32653
14 28277 Washer 189 650839
15 30589 Governor Rod ([ncl. 14) 191 06559A
16 34839A Governor Lever 195 61(_73
17 31335 Governor Lever Clarnp 207 34336
18 651018 Screw, Torx T-15, 8-32 x 19/64" 216 33086
19 3_81 Extension Spring 223 650451
20 32600 Oil Seal 224 36706
30 36776 Crankshaft 238 650932
40 35544A Piston, Pin & Ring Set (Std.) 239 34338
40 35545A Piston, Pin & Ring Set (.010" OS) 241 35797
40 35546 Piston, Pin & Ring Set (.020" OS) 245 35066
41 35541 Piston & Pin Ass'y. (Std.) (Ind. 43) 250 35065
41 35542 Pleton & Pin Assembly (.01O"OS) 260 36980
(Includes Key Number 4-3) 261 302G0
41 35543 Piston & Pin Ass',/. (.020" OS) 262 650831
(includes Key Number 43) 275 06790A
42 35547A RLngSet (Std.) 277 650988
42 35548A Ring Set (.010" OS) 285 3500OA
42 3554,9 Ring Set (.020 OS) 287 650926
43 2_1 PLstonPin Ret_ning Ring 290 29774
45 36777 Connec_ng Rod Ass'y. (irK:l.46) 2_ 26460
46 32610A Conneetlng Rod Boft 206 28763
48 27241 Valve Lifter 300 36916
50 37575 Camshall (NCR)(Inc. Ret 104) 301 36246
52 29914 OII Pump Ass'y. 305 35647
69 37609 * Moun6ngFlangeGasket 306 37610
70 37608 Mounting Flange (Incl.72-83, 306) 307 35406
?2 37614 Oil Drain Plug 309 650562
75 27897 Oil Seal 309A _50783
80 30574A Governor Shaft 310 35648
81 3059OA Washer 311A 37611
82 3(;591 Governor Gear Ass*y. (Incl. 81) 313 34080
83 30588A GovemorSpod 355 590701
06 650488 Screw, 1/4-20 x 1-t/4" 370A 06261
89 611004 Flywheal Key
90 611112 Flywheel 370C 37318
650815 BalalvilleWasher 370K 066_
93 650816 Flywhael Net 370R 37317
100 34443B Selid State Ignition 380 6402_2
101 610118 SparkPlugCover 390 590737
103 651007 Screw, T-15, t0.24x15/16" 4_0 37612
104 37480 CarnBushlng 416 36985
110 37047 GroundWire
119 37(_8 " CylinderHeadGasket 417 650621
120 36825 Cylinder Head 900
125 37206 Exhaust Valve (Std.) (Ind. 151) 900 75_0
106 3?289 Intake Valve (Std.) (Ind. 151) .....
130 6021A Screw, 5/18-18x 1-1/2"
106 37598 Reelstor Spark Plug(RJ 19LM4)
150 31672 Valve Spdng
151 31673 Valve Sphng Cap
151A 40017 Intake Valve Seal
169 36783 " Valve Cover Gasket
Valve Cover
SC_ t 10.24 x 9/16"
Nut & LockWaSher, 1/4-28
Screw, 1/4-28 x 7/8"
" Carburetor To Intake Pipe Gasket
Intake Pipe
Governor Unk
Screw, 114-20 x 3/8"
S.E. Brake _cket (Incl. 195)
Terrdn_
_rettle Llnk
R.P.M. Adjusting Lever
Screw, 1/4-20 x 1"
" Intake Pipe Gasket
Screw, 1_32 x 49/64"
• Air Cleaner Gasket
Air Cleaner Cdlar
Air Cleaner Filter
AirCleaner Cover
BlowerHoualng
Screw, 10.24 x 9/16"
Screw, 1/4-20 x 1/2"
Muftler
Screw, 1/4-20 x 2-5/18"
Stader Cup
Screw, 8-32 x 21/64"
FuelLine
FuelUneClarnp
Screw, 10.32 x 35/64"
Fuel T_nk (Incl. 292 & 301)
FuelCap
Oil FillTube
• "O'-Ring
"O'-Ring
Screw, 10-32 x 1/2"
Screw, 10-24 x 9/4"
Dipstick
Held Down Bracket
Spacer
Stader Handle
Lubdca6on Decal
(Replace_ 64-831)
Pdmer Decal (3 X)
Starter Decal
Hot Sudace CocaJ
Carburetor (Inel. 184)
Rewind Stader
G_sket Set (Ind. Items Marked •)
Spark Arrestor Kit(Opitonal)
(Includes Key Number 417)
Screw, 10-32 x 1/2"(Optional)
Replacerneet EngineNON E
Replacement Short Block
RPM: High 2900 Io 3200
NOTE: Th_sengine could have been built with 590694
etader.
NOllE: All component dimensions given in U.S.
inches. 1 Inch = 25.4 rnm
37
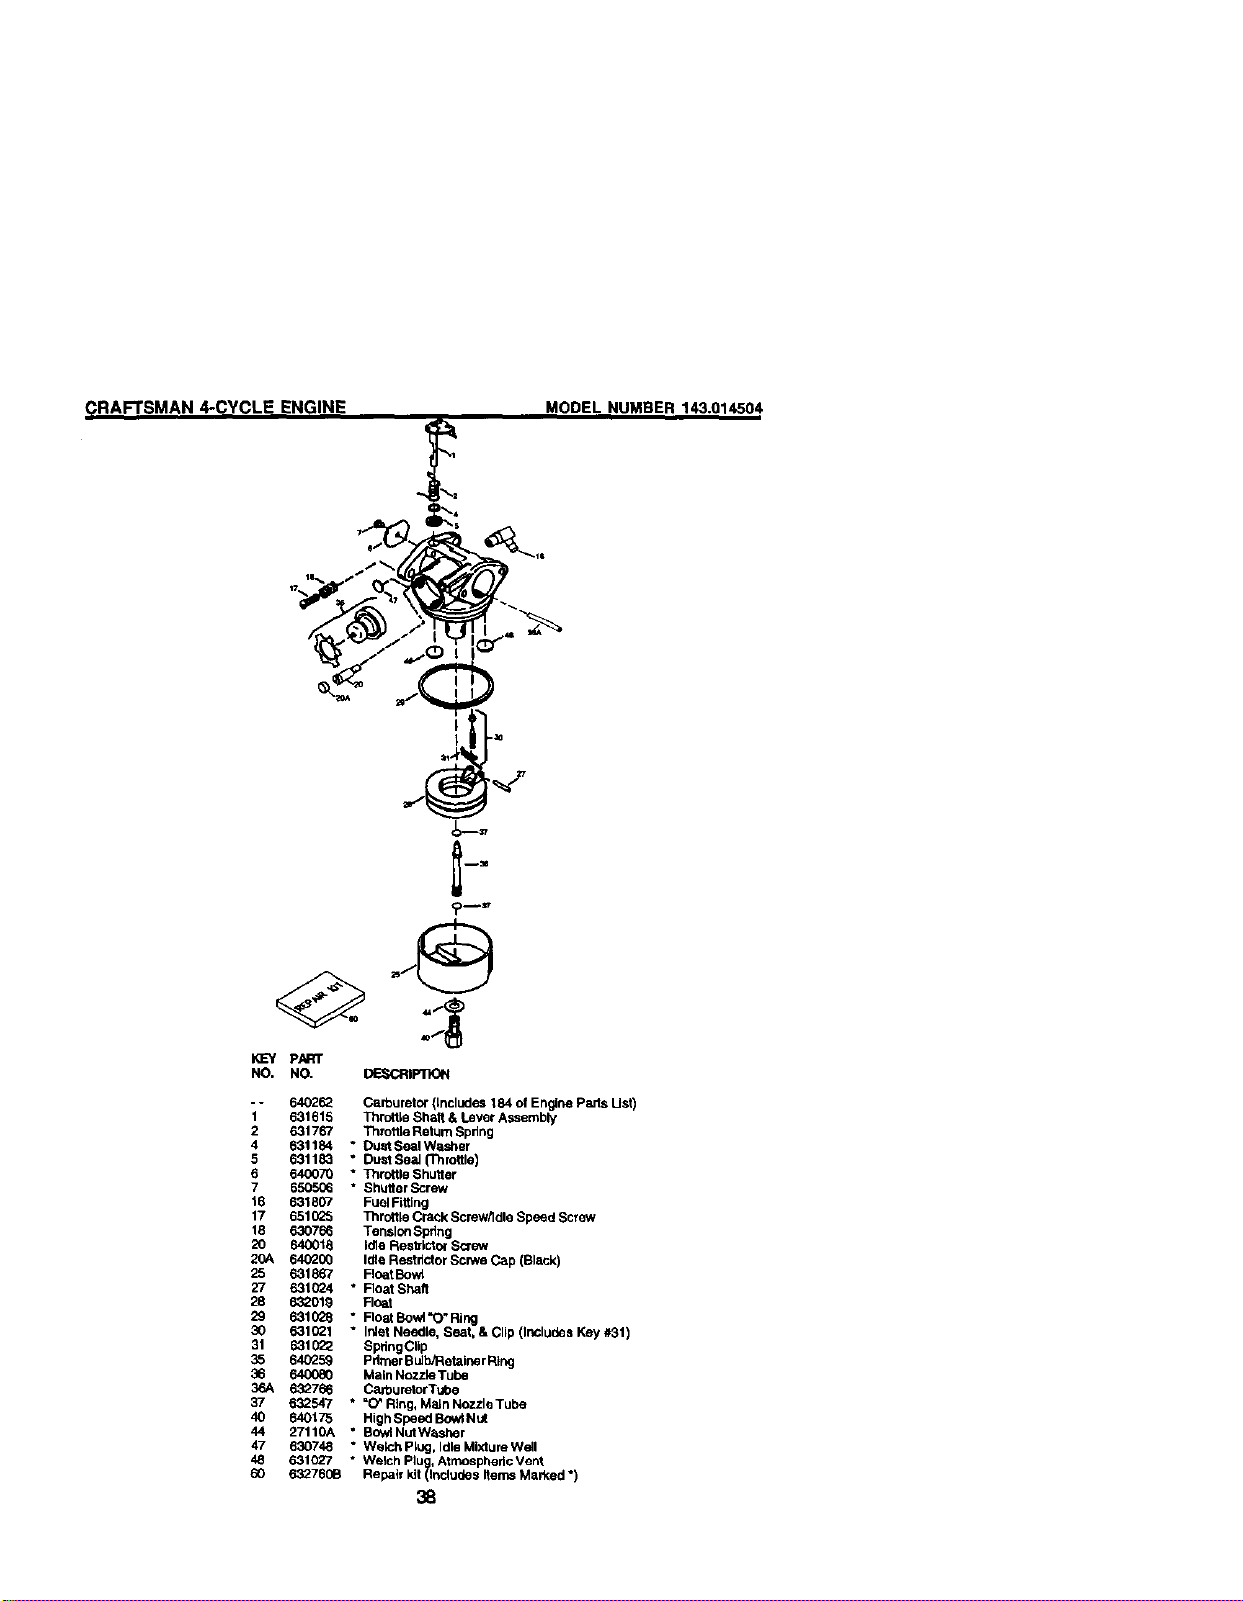
_RAF!"SMAN 4..CYCLE ENGINE
MODEL NUMBER 143.014504,
KL_y
140.
1
2
4
5
6
7
16
17
18
2O
20A
25
27
28
3O
31
35
36
36A
37
4O
44
47
48
6O
p,ART
NO. OE_CRtPTtON
64O283 Carburetor 0ncludes 184 of Engine Pads List)
631615 Thr_tle Sh_t & Lever Assembty
631767 Throttle Return Spdng
631184 * DUstSealWasher
631183 - DustSeal(1_rottle)
640070 * ll_rotUe Shutter
6505_ * Shutter Screw
631807 Fuel FLitlng
651025 Throttle Crock Screw/Idle Speed Screw
630766 Tension Spdng
640018 Idle Resb'lctorS_ew
640200 Idle Restdctor ScrwveCap (Black)
63t8_7 Fto_tBo_
631024 ° FloatShalt
632019 Roar
63102B • Fk_t_:Nd'O'P_
631(_1 * Inlet Needle, Seat, & Clip (Includes Key #31)
831022 SpringClip
64_259 primer Bu_etak_eT R_
640080 Main NoZzle Tube
632766 CarburetorTube
632547 • =CPR_ng,M_nhtozz_e'[ube
640175 High Speed BowlNut
27110A • BowlNutW_ber
630748 * We_,h plug, Idle Mixture Well
• Welch Plug AtrnosphedcVent
631O27
Repair Idt(Indubes nen_ Marked632760B
38
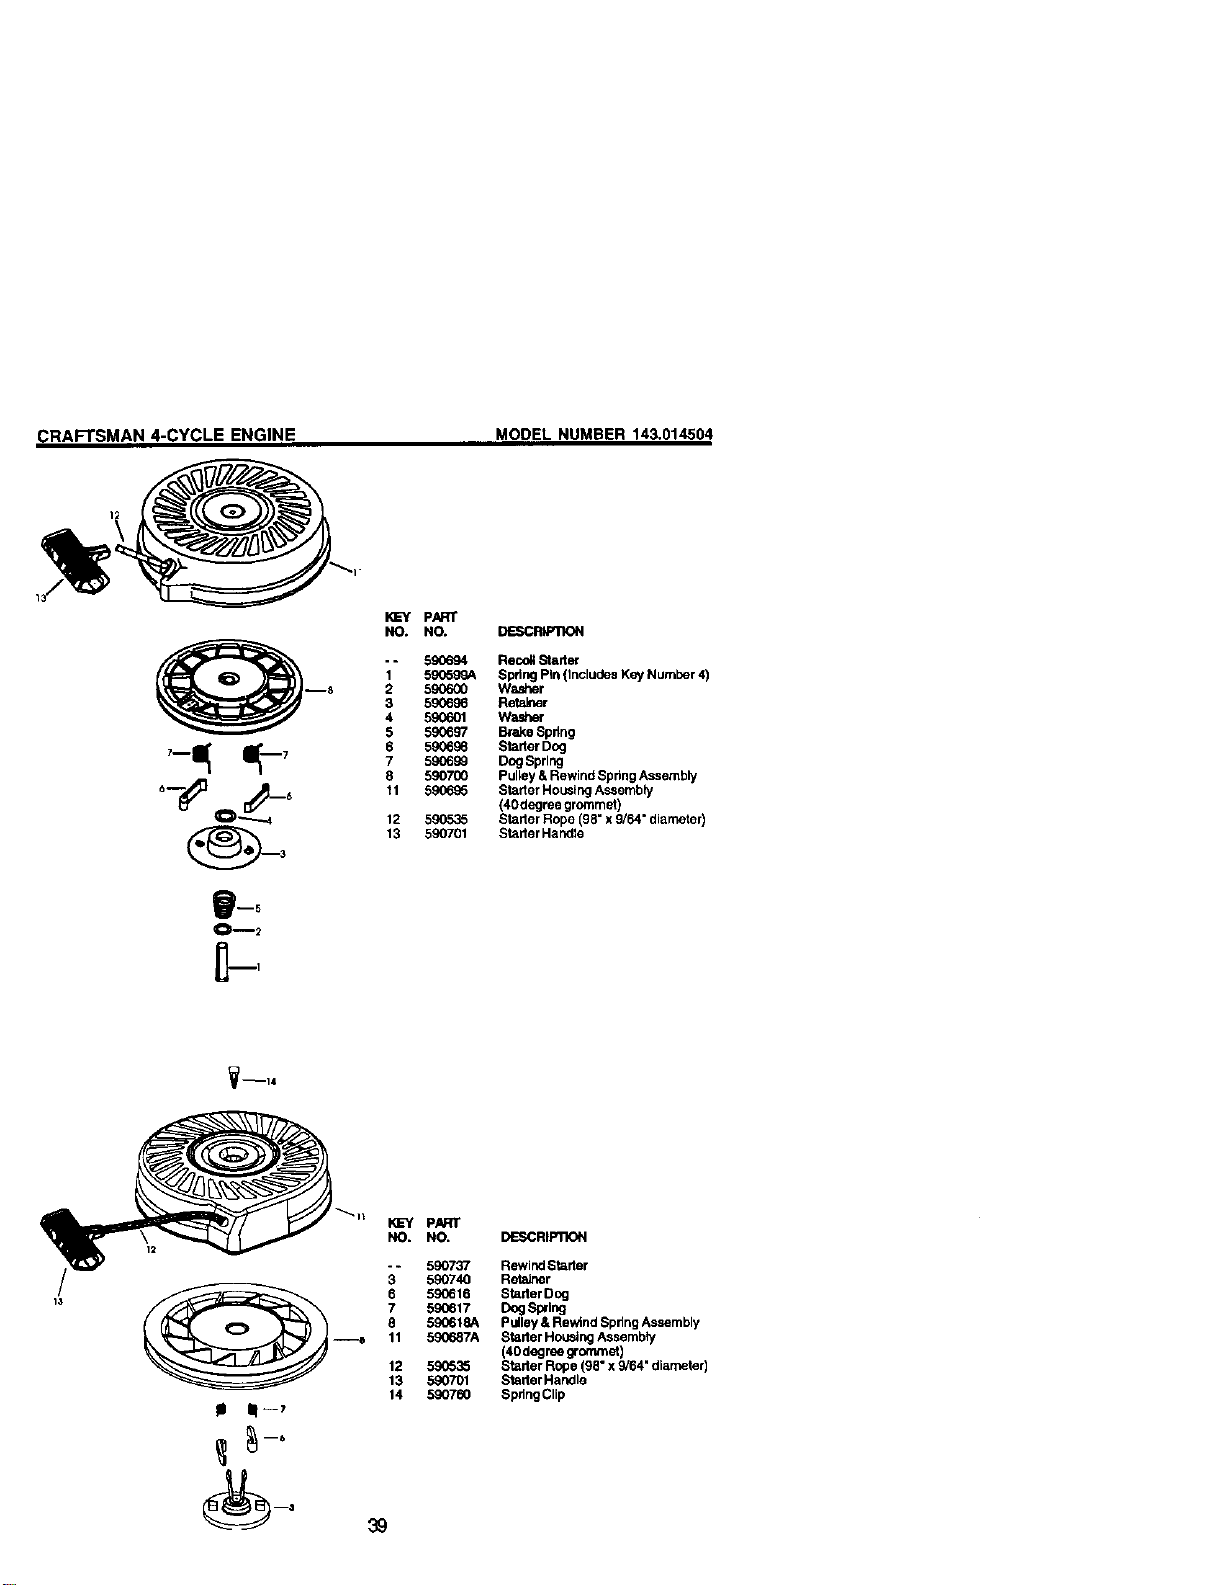
CRAFTSMAN 4-CYCLE ENGINE
MODEL NUMBER 143.014504
PART
NO, NO, DESCRMqION
- - 590694 Recoil Starter
1 59(_599A Spring Pin (Includes Key Number 4)
2 590600 Was_er
3 590696 Reta_er
4 590601 Wa_er
5 590697 Brake Spdng
6 5906_6 Starter Dcg
7 590699 Dog Spring
8 590700 Pulley & Rewind Spring Assembly
11 590695 Starter Housing Assembly
(40degree grommet)
12 590536 Stader Rope (98" x 9/64" diameter)
13 590701 Stader Handle
PN_
NO. NO. DIESCRIPIX_I
590737 Rewind Stader
3" 590740 ReteJner
6 590616 Stader Dog
7 590617 Dog Spi'lng
8 590618A Pulley & Rewind Spdng Assembly
11 590687A Stader Housing Assembly
(40 degree grommet)
12 59Gro35 Starter Rope (98" x 9/64" diameter)
13 590701 Stader Handle
14 590760 SpdngClip

Forrepairofmajorbrand appliancesin your own home...
13omatterwhomade it,13omatterwhosold
1-800-4-MY-HOME _ Any'_n_dayorr_hl
(1-e(x)-4e)4_3) (u.sJ_andC_ada}
W'4_N_ www.Itear&ca
Forrepairofcarry-inproductslikevacuums,lawnequipment,and
electronics,callforthenearestSeam Pads and Repair Center.
1-800-488-1222 A_/ame,dayorrigl_(U.S_.ody)
www.seal_com
Forthe replacementparts,accessoriesand owner'smanuals
thatyou needto do-it-yourself,callSears PartsDIrectSM!
1-800-366-PART 6a.m.- 11p.m., 7 daysaweek
(1-800-3_-7278) (u.s_ ordy)
w_-#._ears._mct
To purchaseorinquireabouta SearsService Agreement
or SearsMaintenanceAgreement:
1-800-827-6655 (u.s._) 1-800-361-6665 (Canada)
7 a.m, - 5 p.m,,CST,M_ - Sat 9a.m, - 8p,rn.EST, M- F, 4p.m.S_
Parapedrse_iciode_t_,.ad_a AuCanadapourse_v_enl_X;_s:
demdio, yparaordenarpiezas: 1.800..LE.FOYERMC
1,'888-SI,,I-HOGARs_ (1-800-533-6937)
(1-888-784,.6427) v,_v.sears.ca
L '/ / HomeCentral®J1
@8ea_ RoebuckandCo.
® Registered 3"rademark / TM ]'rademark / s_ Service Mark of Sears, Roebuck and Co.
® Marca Reglstrada / TM Marca de F_bdca / _ Mama de Servicio de Seam, Roebuck and Co.
MCMarque de commerce / MDMarque di_posde de Seam, Roebuck and Co.
178260 03.23.01 BY Printed in U.S.A,