Operator's Manual
I:RRFTSMRN°
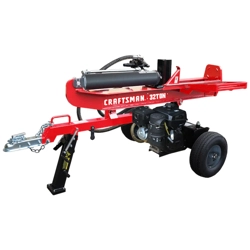
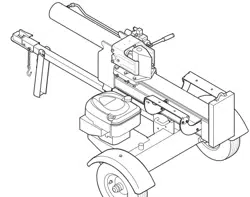
675 Series
LOG SPLITTER
Model No. 247.77614
CAUTION: Before using
this product, read this
manual and follow all
safety rules and operating
instructions.
• SAFETY
ASSEMBLY
OPERATION
MAINTENANCE
PARTS LIST
Spanish
Sears, Roebuck and Co., Hoffman Estates, IL 60179, U.S.A.
Visit our web site: www, sears,corn/craftsrnan FORMNO.769-03352
06/21/2007
WarrantyStatement..................................Page2
RepairProtectionAgreement...................Page3
SafeOperationPractices.........................Pages4-5
Assembly..................................................Pages6-7
Operation..................................................Pages8-11
Service&Adjustments.............................Pages12-13
Maintenance.............................................Pages14-16
OffSeasonStorage..................................Page17
TroubleShooting......................................Page18-19
PartsList...................................................Page20-27
Espa_ol.....................................................Page29
ServiceNumbers......................................BackCover
Limited Warranty on Craftsman Log Splitter
Forone (1)year fromthe dateof purchase,if this CraftsmanEquipmentis maintained,lubricated,andtuned upaccordingto the instructionsto
the operator'smanual,Searswill repairor replacefree ofchargeany partsfoundto be defectivein materialor workmanship.Warrantyserviceis
availablefreeof chargeby returningCraftsmanequipmentto yournearestSearsServiceCenter.In-homewarrantyservice is availablebut a trip
chargewill apply.This Warrantyappliesonly whilethisproductis inthe UnitedStates.
This warranty does not cover:
• Expendableitemswhichbecomewornduringnormaluse,suchas sparkplugs,aircleaners,belts,and oil filters.
Tire replacementor repaircausedby puncturesfromoutsideobjects,suchas nails,thorns,stumps,or glass.
Repairsnecessarybecauseof operatorabuse, includingbut notlimitedto,damagecausedbyobjects,suchas stonesor metaldebris,
oversizedstock,impactingobjectsthat bendthe frameor crankshaft,or over-speedingthe engine.
Repairsnecessarybecauseof operatornegligence,includingbutnot limitedto, electricaland mechanicaldamagecausedby improper
storage,failureto usethe propergradeand amountof engineoil, orfailureto maintainthe equipmentaccordingto the instructionscontained
in theoperator'smanual.
Engine(fuelsystem)cleaningor repairscausedbyfuel determineto be contaminatedor oxidized(stale).In general,fuelshouldbe used
within30 daysof itspurchasedate.
Equipmentusedforcommercialor rentalpurposes.
WARRANTYSERVICEIS AVAILABLEBY RETURNINGTHECRAFTSMANSNOWTHROWERTOTHE NEAREST
SEARSPARTS& REPAIRCENTERIN THE UNITEDSTATES.
This warrantyappliesonly whilethis productis in use in the United States.
TO LOCATETHENEARESTSEARSPARTS& REPAIRCENTERORTO SCHEDULESERVICE,
SIMPLYCONTACTSEARSAT1-800-4-MY-HOME®.
Thiswarrantygivesyou specificlegal rightsand you mayalso haveotherrightswhich may vary fromstate to state.
SEARS,ROEBUCKAND CO., D/817WA,HOFFMANESTATES,IL 60179
Engine Series: 126L02-0531
Engine Oil: SAE 30
Engine Oil Capacity: 20 Ounces
Fuel Capacity: 1.5 Quarts
Spark Plug 0030" Gap):Champion® RJ19LM
Hydraulic Fluid/Capacity:Dexron ill/3.0 gal.
Model Number .............................................................
Serial Number ..............................................................
Date of Purchase ..........................................................
Record the model number, serial number
and date of purchase above
Congratulationson makingasmartpurchase.YournewCraftsman®
productis designedand manufacturedfor yearsof dependableopera-
tion.But likeall products,it mayrequirerepairfromtimeto time.That's
whenhavinga RepairProtectionAgreementcansaveyou moneyand
aggravation.
Here'swhat'sincludedinthe Agreement:
,, Expertserviceby our 12,000professionalrepairspecialists
,, Unlimitedserviceand no chargefor partsandlaboronall covered
repairs
,, Productreplacementif yourcoveredproductcan'tbe fixed
,, Discountof 10%fromregularpriceof serviceandservice-related
partsnotcoveredby the agreement;also, 10%off regularpriceof
preventivemaintenancecheck
,, Fasthelpby phone- phonesupportfrom a Searstechnicianon
productsrequiringin-homerepair,plus convenientrepair
scheduling
Purchasea RepairProtectionAgreementnowandprotectyourself
fromunexpectedhassleand expense.
Onceyou purchasethe Agreement,a simplephonecall is all that it
takesfor you toscheduleservice.Youcan call anytimeday or night, or
schedulea serviceappointmentonline.
Searshas over12,000professionalrepairspecialists,who have
accesstoover 4.5millionqualitypartsandaccessories.That'sthe
kindof professionalismyoucan counton to help prolongthe lifeof
your newpurchasefor yearsto come.Purchaseyour RepairProtection
Agreementtoday!
Some limitationsand exclusionsapply. For pricesand additional
informationcall 1-800-827-6655.
Sears Installation Service
ForSearsprofessionalinstallationof homeappliances,garagedoor
openers,waterheaters,and othermajorhomeitems,in the U.S.A.call
1-800-4-MY-HOME®
l_lk ARNING: This symbol points out importantsafety instructionswhich, ifnot followed, could endanger the
personal safety and/or property of yourself and others. Read and follow all instructionsinthis manual before
attempting to operate this machine. Failureto comply with these instructionsmay result inpersonal injury.
When you see this symbol- heed itswarning.
__i ARNING: Engine Exhaust,some of its constituents, and certain vehicle components contain or emit
chemicals known to State of Californiato cause cancer and birth defects or other reproductiveharm.
DANGER: This machine was built to be operated according to the rules for safe operation in this manual.
As with any type of powerequipment, carelessnessor error on the part of the operator can result in
serious injury.This machine is capable of amputating hands and feet and throwing objects. Failureto
observe the followingsafety instructions could result in serious injury or death.
General Practices
1. Read,understand,and followall instructionson the machineand
in the manual(s)beforeattemptingto assembleandoperate.Keep
thismanualina safeplacefor futureandregularreferenceandfor
orderingreplacementparts.
2. Befamiliarwithall controlsandproperoperation.Knowhowto stop
the machineanddisengagethemquickly.
3. Neverallowchildrenunder16yearsto operatethis machine.
Children,16yearsandover,shouldread and understandinstruc-
tionsandsafetyrules inthismanualandshouldbe trainedand
supervisedbya parent.
4. Neverallowadultsto operatethis machinewithoutproperinstruc-
tion.
5. Manyaccidentsoccurwhenmorethan onepersonoperatesthe
machine.If a helper is assistingin loadinglogs, neveractivatethe
controluntil the helperis a minimumof 10 feetfrom the machine.
6. Keepbystanders,helpers,pets,and childrenat least20 feetfrom
the machinewhileit is in operation.
7. Neverallowanyoneto rideon thismachine.
8. Nevertransportcargoonthis machine.
9. Hydrauliclogsplittersdevelophigh fluid pressuresduringopera-
tion.Fluidescapingthroughapin holeopeningcan penetrateyour
skinandcausebloodpoisoning,gangrene,or death.Giveattention
to the followinginstructionsatall times:
a. Donotcheckforleakswithyourhand.
b. Donotoperatemachinewithfrayed,kinked,cracked,ordamaged
hoses,fitting,or tubing.
c. Stoptheengineandrelievehydraulicsystempressurebeforechanging
oradjustingfittings,hoses,tubing,orothersystemcomponents.
d. Donotadjustthepressuresettingsofthepumpor valve.
10.Leakscan be detectedby passingcardboardor wood,while
wearingprotectiveglovesand safetyglasses,overthe suspected
area.Lookfor discolorationof cardboardorwood.
11.If injuredby escapingfluid, seea doctor immediately.Serious
infectionor reactioncan developif propermedicaltreatmentis not
administeredimmediately.
12.Keep the operatorzone andadjacentareaclearfor safe,secure
footing.
13.If your machineis equippedwith an internalcombustionengine
and it is intendedfor use nearany unimprovedforest,brush,or
grasscoveredland,the engineexhaustshouldbeequippedwitha
sparkarrester.Make sureyoucomplywith applicablelocal,state,
andfederalcodes.Takeappropriatefirefightingequipmentwith
you.
14.Thismachineshouldbeusedfor splittingwoodonly,do notuse it
for any otherpurpose.
15.Followthe instructionsinthe manual(s)providedwith any
attachment(s)for thismachine.
Preparation
1. Alwayswearsafety shoesor heavyboots.
2. Alwayswearsafetyglassesor safetygogglesduringoperatingthis
machine.
3. Neverwearjewelryor looseclothingthatmightbecomeentangled
in movingor rotatingpartsof the machine.
4. Makesuremachineis onlevelsurfacebeforeoperating.
5. Alwaysblockmachineto preventunintendedmovement,and lock
in eitherhorizontalor verticalposition.
6. Alwaysoperatethismachinefromthe operatorzone(s)specifiedin
the manual.
7. Logs shouldbe cutwithsquareendspriorto splitting.
8. Uselogsplitter indaylightor undergoodartificiallight.
9. Toavoid personalinjuryor propertydamageuseextremecare in
handlinggasoline.Gasolineis extremelyflammableandthe vapors
areexplosive.Seriouspersonalinjurycanoccur whengasolineis
spilledon yourselfor yourclotheswhich can ignite.Washyourskin
andchangeimmediately.
a. Useonlyan approvedgasolinecontainer.
b. Extinguishall cigarettes,cigars,pipes,andothersourcesofignition.
c. Neverfuelmachineindoors.
d. Neverremovegascapor addfuelwhiletheengineishotor running.
e. Allowenginetocoolatleasttwominutesbeforerefueling.
4

f. Neveroverfillthefueltank.Filltankto nomorethan1/2inchbelow
bottomoffillernecktoprovidespaceforfuelexpansion.
g. Replacegasolinecapandtightensecurely.
h. Ifgasolineis spilled,wipeit offtheengineandequipment,move
machinetoanotherarea.Wait5minutesbeforestartingtheengine.
i. Neverstorethemachineorfuelcontainerinsidewherethereis anopen
flame,sparkorpilotlightasonawaterheater,spaceheater,furnace,
clothesdryerorothergasappliances.
j. Allowmachinetocool5 minutesbeforestoring.
Operation
1. Beforestartingthis machine,reviewthe "SafetyInstructions".
Failureto followthese rules mayresult in seriousinjuryto the
operatoror bystanders.
2. Neverleavethismachineunattendedwiththe enginerunning.
3. Do notoperatemachinewhile underthe influenceof alcohol,drugs,
or medication.
4. Neverallowanyoneto operatethis machinewithoutproperinstruc-
tion.
5. Alwaysoperatethismachinewith all safety equipmentin place
andworking.Makesureall controlsare properlyadjustedfor safe
operation.
6. Do notchangethe enginegovernorsettings or overspeedthe
engine.The governorcontrolsthe maximumsafeoperatingspeed
of the engine.
7. Whenloadinga log,alwaysplaceyour handson thesides of the
log, noton theends,andneveruseyourfootto helpstabilizea log.
Failureto do so, may resultin crushedoramputatedfingers,toes,
hand,orfoot.
8. Useonlyyour handto operatethe controls.
9. Neverattemptto splitmorethanone logat a timeunlessthe ram
hasfullyextendedanda secondlogis neededto completethe
separationof thefirst log.
10.For logswhichare notcut square,the least squareendandthe
longestportionof the log shouldbe placedtowardthe beamand
wedge,andthe squareendplacedtowardtheend plate.
11.Whensplittingin the verticalposition,stabilizethe log before
movingthecontrol.Splitas follows:
a. Placelogontheendplateandturnuntilit leansagainstthebeamand
isstable.
b. Whensplittingextralargeorunevenlogs,thelogmustbestabilized
withwoodenshimsorsplitwoodbetweenthelogandendplateor
ground.
12.Alwayskeepfingersawayfromany cracksthat open in the log
whilesplitting.Theycan quicklycloseand pinchor amputateyour
fingers.
13.Keepyourwork area clean.Immediatelyremovesplitwood around
the machineso you do not stumbleoverit.
14.Nevermovethis machinewhilethe engineis running.
15.Thismachineshouldnotbetowedonanystreet,highwayor public
roadwithoutcheckingthe existingfederal,state,or localvehicle
requirements.Any licensingor modificationssuchas taillights,etc.,
neededto comply,is the sole responsibilityof the purchaser.If a
"Statementof Origin"is requiredin yourstate,see yourlocaldealer.
16.Donot tow machinefasterthan45mph.
17.SeeTransportingthe LogSplittersectioninthis manualfor proper
towinginstructionsonceall federal, local,or staterequirementsare
met.
Maintenance and Storage
1. Stoptheengine,disconnectthespark plugandgroundit against
the engine beforecleaning,or inspectingthe machine.
2. Stoptheengine and relievehydraulicsystempressurebefore
repairingoradjustingfittings,hoses,tubing,or othersystem
components.
3. To preventfires,cleandebrisandchafffromthe engineandmuffler
areas.Ifthe engine is equippedwith a sparkarrestermuffler,clean
and inspectit regularlyaccordingto manufacturersinstructions.
Replaceif damaged.
4. Periodicallycheckthat all nuts and bolts,hoseclamps,and
hydraulicfittingsaretightto be sureequipmentis in safe working
condition.
5. Checkall safetyguardsandshieldsto besuretheyare inthe
properposition.Neveroperatewithsafetyguards,shields,orother
protectivefeaturesremoved.
6. The pressurereliefvalveis presetat the factory.Do not adjustthe
valve.
7. Neverattemptto movethis machineoverhilly or uneventerrain
withouta towvehicleoradequatehelp.
8. Foryoursafety,replacealldamagedor worn parts immediately
withoriginalequipmentmanufacturer's(O.E.M.)partsonly."Useof
partswhichdo notmeettheoriginalequipmentspecificationsmay
leadto improperperformanceandcompromisesafety!"
9. Donot alterthis machinein anymanner,alterationssuchas attach-
inga ropeor extensionto the controlhandle,oraddingto the width
or heightof the wedgemay result in personalinjury.
Your Responsibility
Restrictthe useof this powermachineto personswho read,under-
standandfollowthe warningsand instructionsin this manualandon
the machine.Alwaysfollowdirectionson safetylabelsfoundon your
equipment.
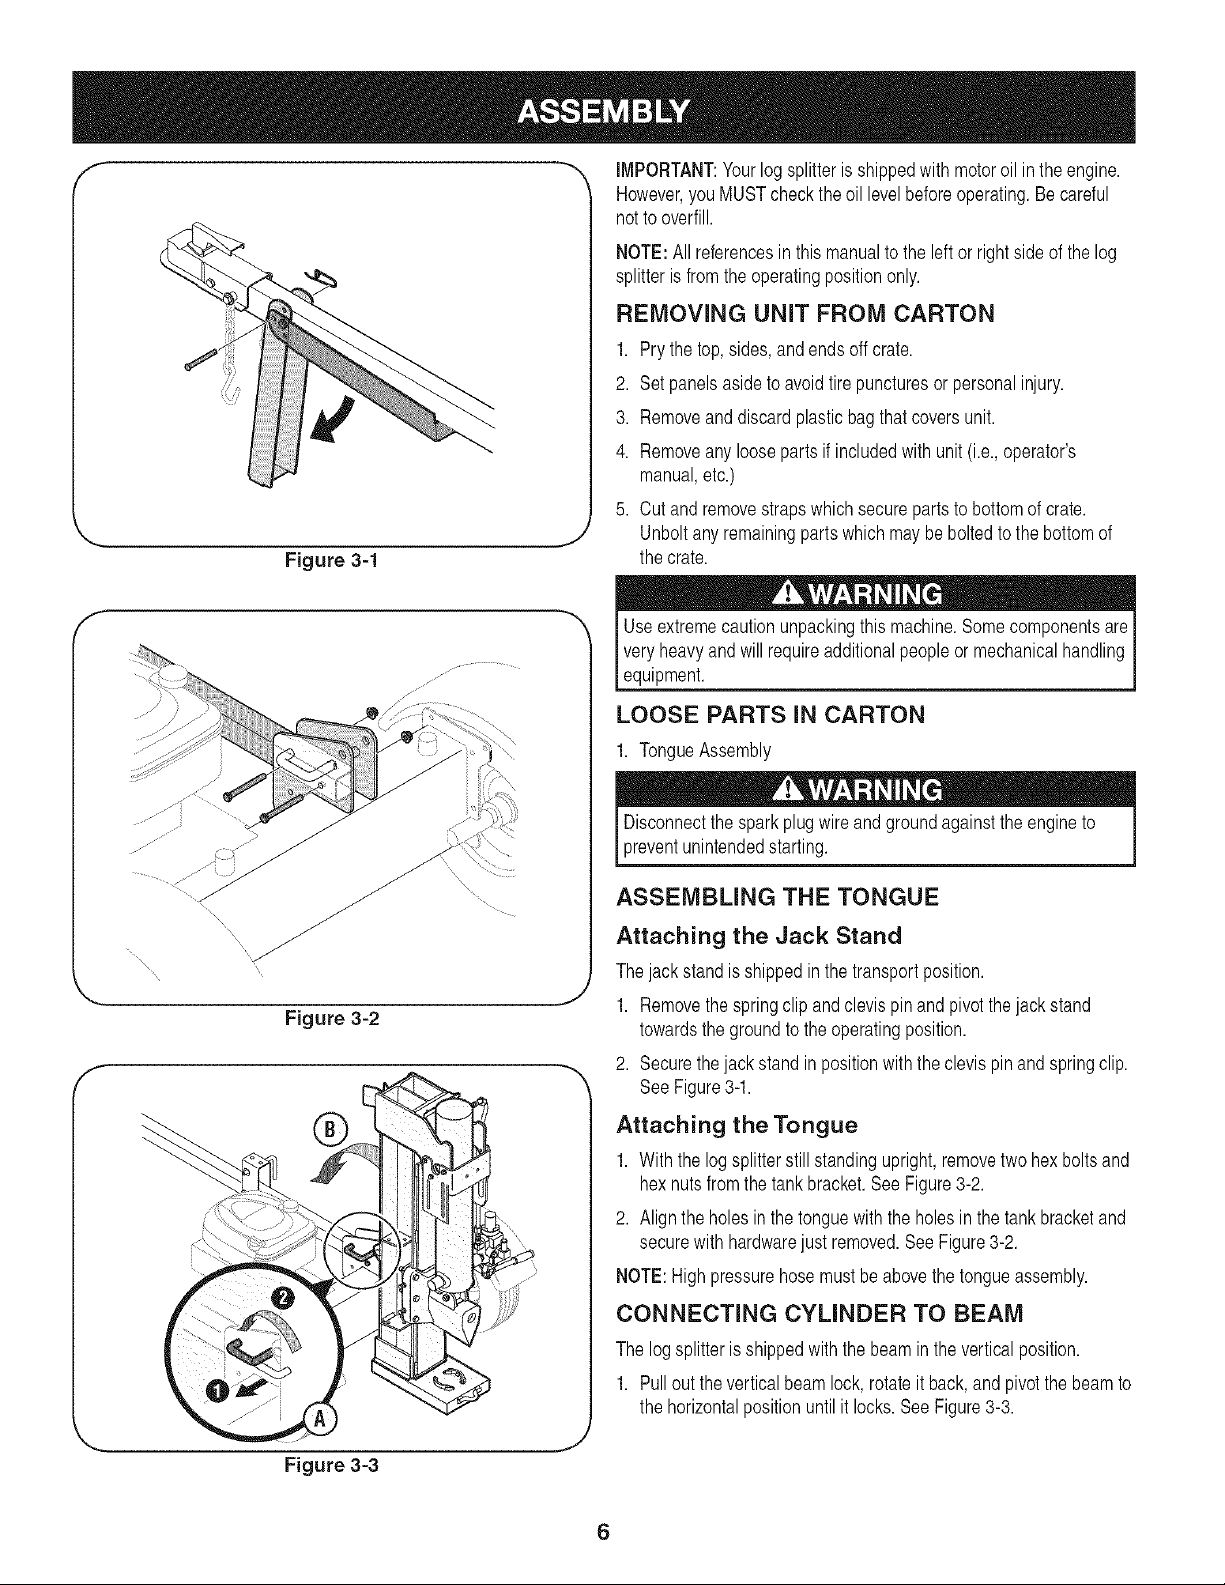
Figure 3-1
IMPORTANT:Yourlog splitteris shippedwith motoroil in the engine.
However,youMUSTcheckthe oil levelbeforeoperating.Be careful
notto overfill.
NOTE:Allreferencesin this manualto the leftor rightside of the log
splitteris fromthe operatingpositiononly.
REMOVING UNIT FROM CARTON
1. Pry the top,sides,andendsoff crate.
2. Set panelsasideto avoidtirepuncturesor personalinjury.
3. Removeanddiscardplasticbag that coversunit.
4. Removeany looseparts if includedwithunit (i.e.,operator's
manual,etc.)
5. Cutand removestrapswhichsecurepartsto bottomof crate.
Unboltanyremainingparts whichmay be boltedto the bottomof
the crate.
\\\
Figure 3=2
f
Useextremecautionunpackingthis machine.Somecomponentsare
veryheavyand willrequireadditionalpeopleor mechanicalhandling
equipment.
LOOSE PARTS IN CARTON
1. TongueAssembly
Disconnectthespark plug wireand groundagainstthe engineto
preventunintendedstarting. J
ASSEMBLING THE TONGUE
Attaching the Jack Stand
The jack standis shippedin thetransportposition.
1. Removethe springclip andclevis pin and pivotthe jack stand
towardsthe groundto the operatingposition.
2. Securethejack standinpositionwiththe clevispinandspringclip.
SeeFigure3-1.
Attaching the Tongue
1. Withthe logsplitterstillstandingupright,removetwo hexboltsand
hex nuts fromthe tank bracket.See Figure3-2.
2. Alignthe holesin thetonguewiththe holesin thetank bracketand
securewith hardwarejust removed.SeeFigure3-2.
NOTE:High pressurehosemustbe abovethe tongueassembly.
CONNECTING CYLINDER TO BEAM
The log splitteris shippedwith the beamin the verticalposition.
1. Pullout the verticalbeam lock,rotateit back,andpivotthe beamto
the horizontalpositionuntil it locks. See Figure3-3.
6
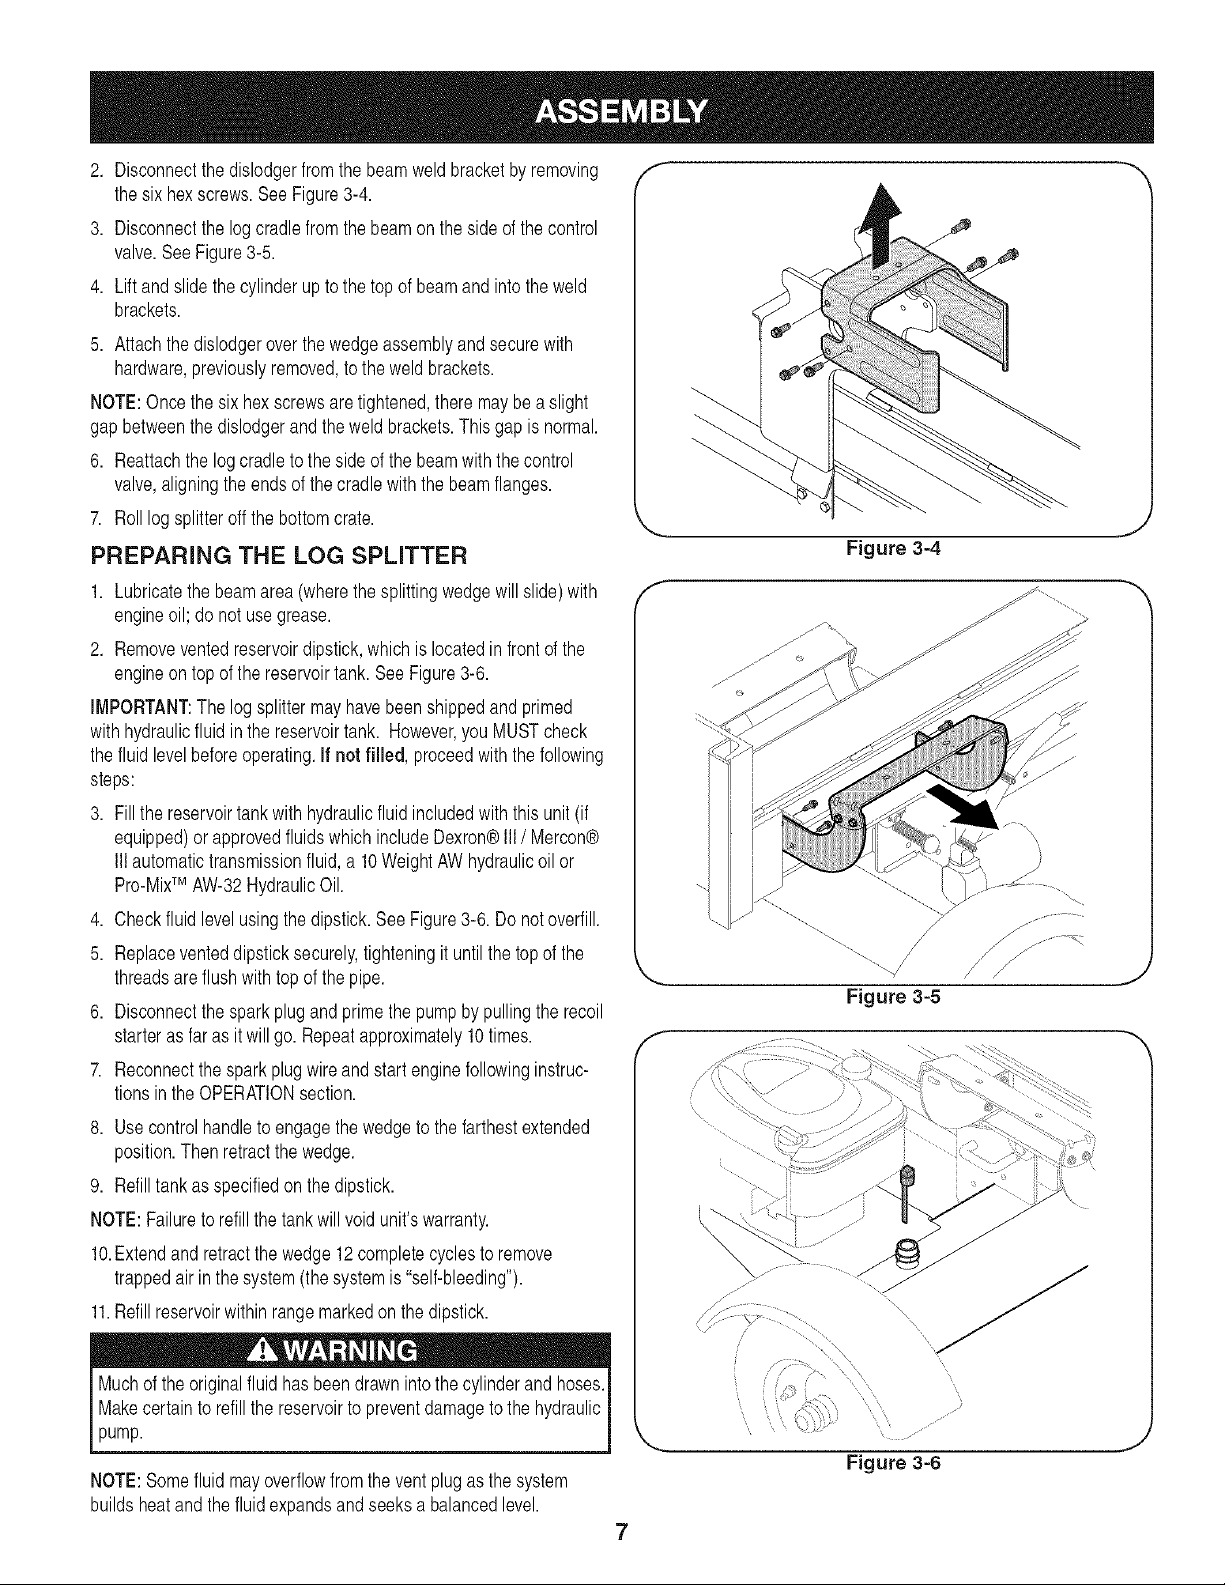
2. Disconnectthe dislodgerfrom the beamweldbracketby removing
the six hexscrews.SeeFigure3-4.
3. Disconnectthe log cradlefrom the beamon the side of thecontrol
valve.SeeFigure3-5.
4. Liftandslide the cylinderupto the top of beamand intothe weld
brackets.
5. Attachthe dislodgeroverthewedgeassemblyand securewith
hardware,previouslyremoved,to the weld brackets.
NOTE:Oncethe six hex screwsare tightened,there maybea slight
gapbetweenthedislodgerand the weld brackets.Thisgapis normal.
6. Reattachthe logcradleto the side of the beamwiththe control
valve,aligningthe endsof the cradlewith the beamflanges.
7. Roll logsplitteroffthe bottomcrate.
PREPARING THE LOG SPLITTER
1. Lubricatethe beamarea(wherethe splittingwedgewill slide)with
engineoil; do not usegrease.
2. Removeventedreservoirdipstick,which is locatedin front of the
engineontop of the reservoirtank.See Figure3-6.
IMPORTANT:The log splittermay havebeenshippedand primed
withhydraulicfluid inthe reservoirtank. However,you MUSTcheck
the fluidlevelbeforeoperating.If not filled, proceedwiththefollowing
steps:
3. Fillthe reservoirtankwithhydraulicfluid includedwiththisunit (if
equipped)or approvedfluids which includeDexron®III / Mercon®
Ill automatictransmissionfluid, a 10WeightAW hydraulicoil or
Pro-MixTM AW-32HydraulicOil.
4. Checkfluid levelusingthe dipstick.See Figure3-6. Do notoverfill.
5. Replaceventeddipsticksecurely,tighteningit untilthe top of the
threadsare flushwithtop of the pipe.
6. Disconnectthe spark plugand primethepumpby pullingthe recoil
starteras faras it will go. Repeatapproximately10 times.
7. Reconnectthe sparkplugwireandstart enginefollowinginstruc-
tionsinthe OPERATIONsection.
8. Usecontrolhandleto engagethe wedgeto thefarthestextended
position.Thenretractthe wedge.
9. Refilltankas specifiedon the dipstick.
NOTE:Failureto refill thetank will void unit'swarranty.
10.Extendand retractthe wedge12completecyclesto remove
trappedair in the system(thesystemis "self-bleeding").
11.Refill reservoirwithin rangemarkedon the dipstick.
Muchof the originalfluid hasbeen drawnintothe cylinderand hoses.
Makecertainto refillthe reservoirto preventdamageto the hydraulic
pump.
NOTE:Somefluidmayoverflowfromthe vent plug as the system
buildsheatandthe fluidexpandsand seeksa balancedlevel.
f --,,
,.. j
Figure 3-4
f
7
, _ jlJ _
Figure 3=6
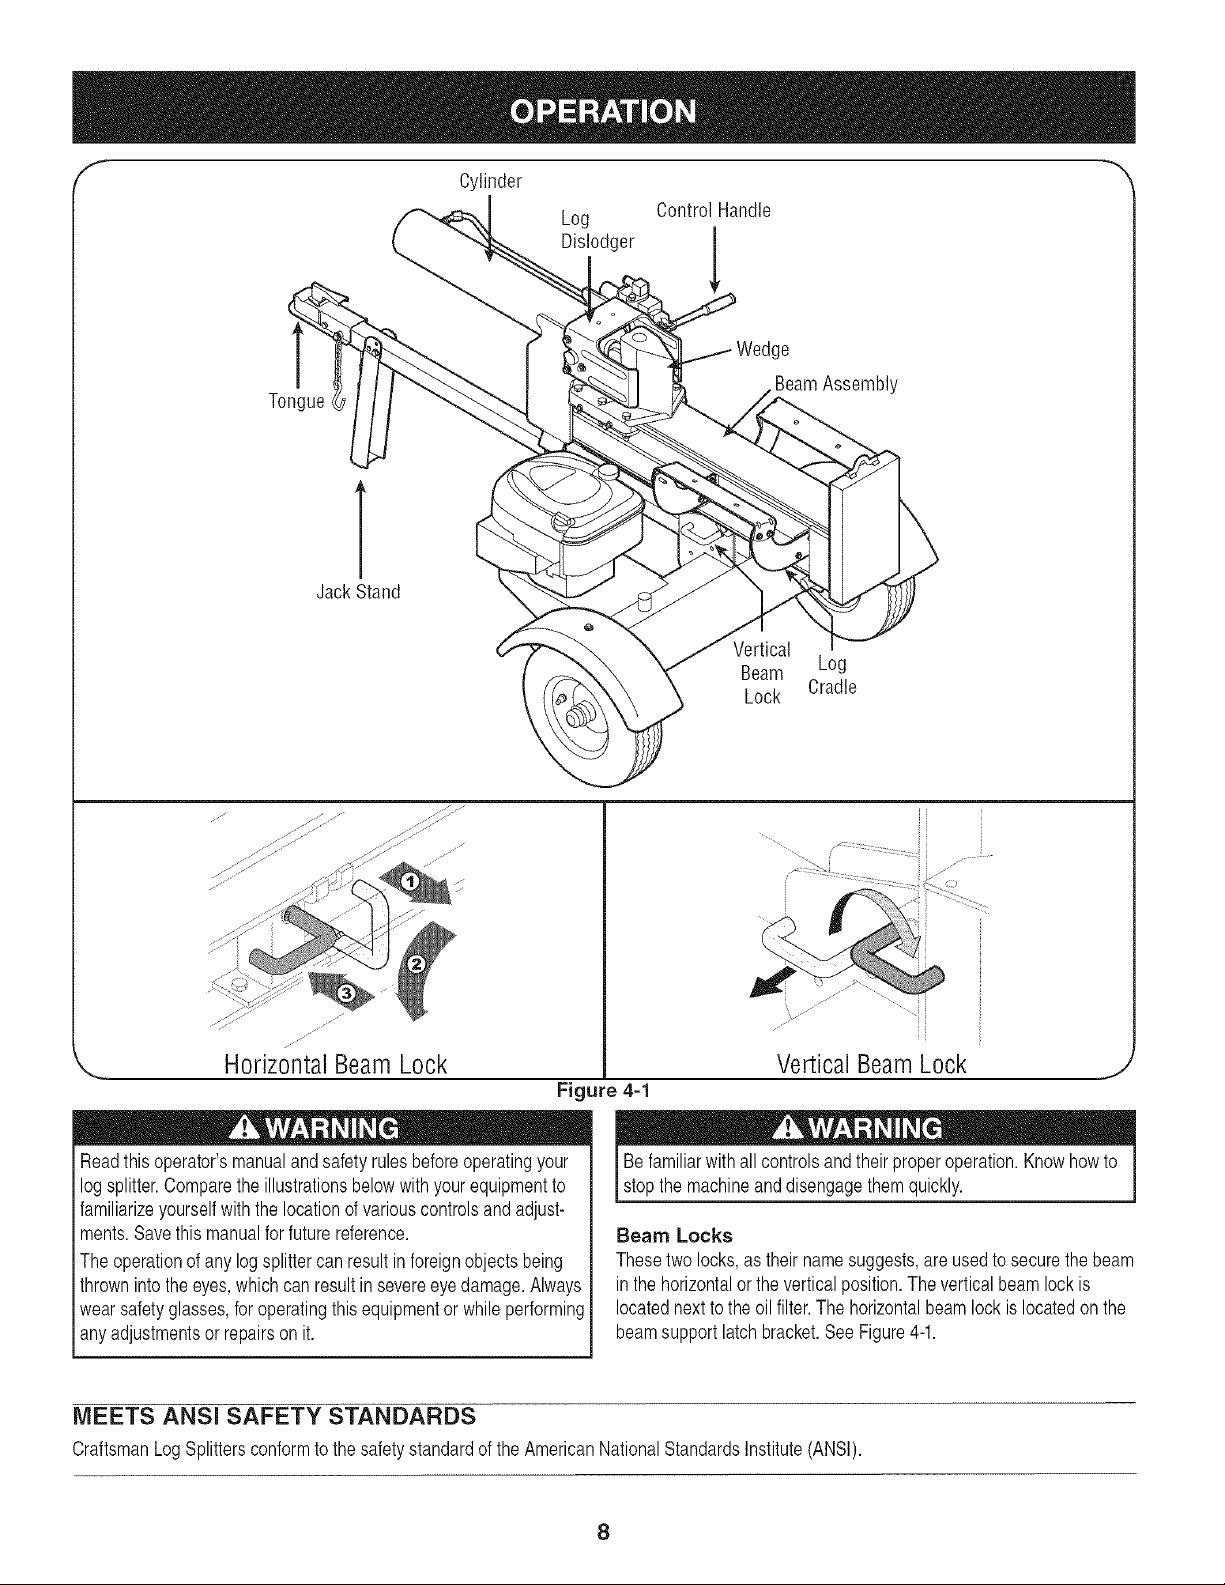
Cylinder
Log Control Handle
Dislodger
Tongue
BeamAssembly
V
Jack Stand
Vertical
Beam Log
Lock Cradle
/.jl
if ....
,.. HorizontalBeam Lock
Figure 4-1
Readthis operator'smanualand safety rulesbeforeoperatingyour
logsplitter.Comparethe illustrationsbelowwithyour equipmentto
familiarizeyourselfwiththe locationof variouscontrolsand adjust-
ments.Savethis manualfor futurereference.
The operationof any logsplittercanresultin foreignobjectsbeing
thrownintothe eyes,whichcan result in severeeyedamage.Always
wearsafetyglasses,for operatingthisequipmentor whileperforming
anyadjustmentsor repairson it.
Vertical Beam Lock
,J
Be familiarwithall controlsandtheir properoperation.Knowhowto
stopthe machne and d sengagethemquck y.
Beam Locke
Thesetwo locks,as their namesuggests,are usedto securethe beam
inthe horizontalorthe verticalposition.The verticalbeam lock is
locatednextto the oil filter.The horizontalbeamlock is locatedon the
beamsupport latch bracket.See Figure4-1.
MEETS ANSI SAFETY STANDARDS
CraftsmanLog Splittersconformto the safetystandardof the AmericanNationalStandardsInstitute(ANSI).
8

ENGINE CONTROLS f --,,
Stop Switch
Pushbuttonto ON prior to chokingfor enginestart; pushto OFFto
shutenginedown.
Choke Control
The choke controlis usedto choke off the carburetorand assist in
startingthe engine.
Starter Handle
The starterhandle is locatedon the engine.Pullthe starterhandleto
startengine.
Control Handle
The control handlehasthree positions.See Figure4-2.
• FORWARD:MovecontrolhandleFORWARDor DOWNto move
wedgeto split wood.
NOTE:Controlhandlewill returnto neutralpositionas soonas handle
is released.(ForwardPosition only)
• NEUTRAL:Releasethe controlhandleor movethe leverto neutral
positionto stop the wedgemovement.
• REVERSE:MovecontrolhandleBACKor UP to returnthe
wedgetowardthe cylinder.The controlhandlestaysin the return
(Reverse)position and returnsto neutralautomaticallywhenfully
retracted.
NOTE:Reversepositionmayalso be operatedbackto neutralposition
manually,if necessary.
GAS AND OIL FILL-UP
IMPORTANT:Yourlog splittermay be shippedwith motoroil in the
engine.You MUSTcheckthe oil levelbeforeoperating.Becarefulnot
to overfill.
Useextremecarewhenhandlinggasoline.Gasolineis extremely
flammableand the vaporsare explosive.Neverfuel machineindoors
orwhilethe engineis hotor running.
Oil
1. Removeoilfill dipstick.
2. Checkthe oil levelmakingcertain notto rub the dipstickalong the
insidewallsof the oil fill tube.This wouldresultin afalsedipstick
reading.Refill to FULLmark on dipstick,if necessary.Replace
dipstickandtighten.
3. If necessary,withthe log splitteron levelground,usea funnelto fill
enginewithoil to FULLmarkondipstick.Becarefulnot to overfill.
Overfillingwill causethe engineto smokeprofuselyandwill result
in poorengineperformance.
4. Checkoil levelthreetimespriorto startingengineto be certain
you'vegottenan accuratedipstickreading.Runningtheenginewith
too little oilcan resultin permanentenginedamage.
_ T_o split wood
Figure 4-2
J
Gasoline
1. Removefuelcap from the fueltank.
2. Makesurethe containerfrom whichyou will pourthe gasolineis
cleanandfree from rust or foreignparticles.Neverusegasoline
that maybestalefromlongperiodsof storagein its container.
Gasolinethat hasbeen sittingfor anyperiod longerthanfourweeks
shouldbeconsideredstale.
3. Fillfuel tank with about1.5quartsof clean,fresh,lead-freegrade
automotivegasoline.DO NOT useEthlyor high octanegasoline.
NOTE:Gasolinecan beaddedto the enginewhenthe logsplitteris
ineitherthe horizontalor verticalposition.However,thereare less
obstructionswhenthe unitis in the verticalposition.
NOTE:Donot usegasolinecontainingmethanol.Gasolinecontaining
upto about10% ethanolor upto 15%methyltertiarybutylether
(MTBE)maybe used,but will requirespecialcarewhenengineis left
unusedforextendedperiod.
4. Replacefuelcap.
NOTE:Toavoidengineproblems,the fuelsystemshouldbe emptied
beforestoragefor30 days or longer.Drainthe gas tank,start the
engineand let it run untilthe fuel linesand carburetorare empty.Use
freshfuel nextseason.See STORAGEsectionfor additionalinforma-
tion.
STOPPING ENGINE
1. Pushstopswitchto OFR
2. Disconnectsparkplugwireand groundagainsttheengineto
preventunintendedstarting.
9
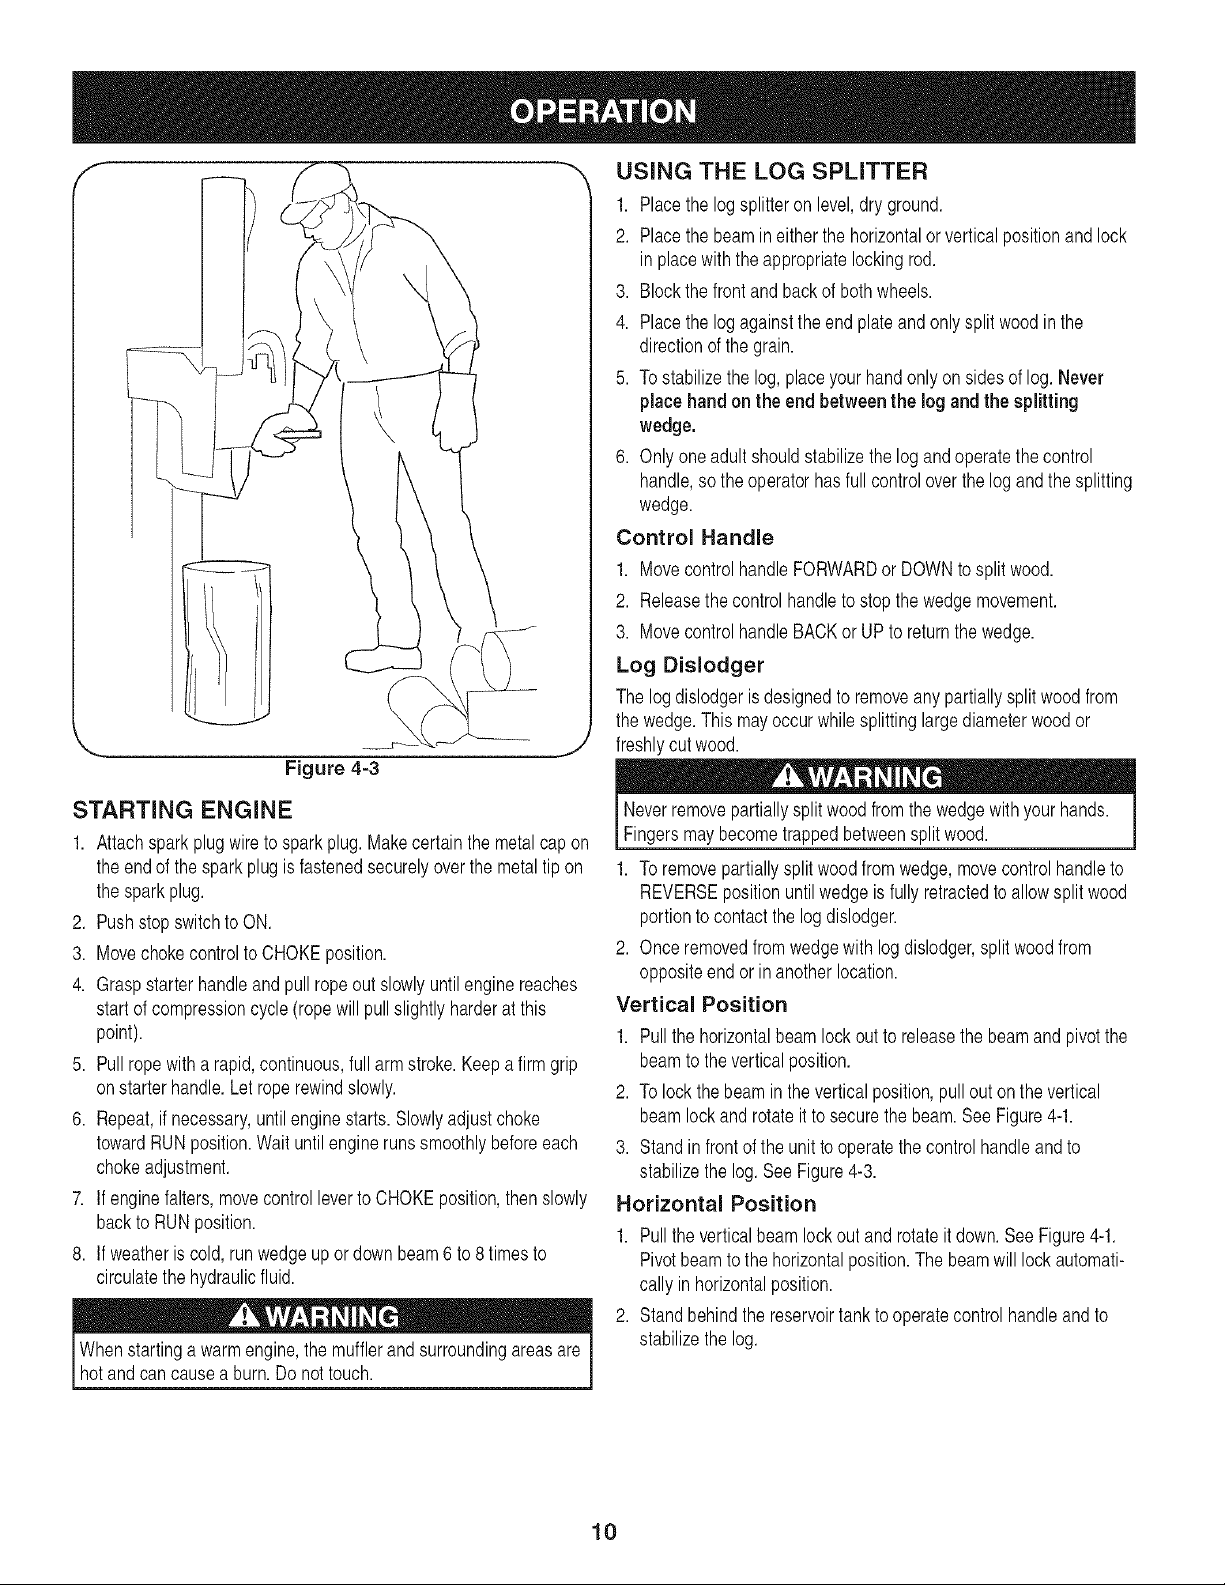
STARTING ENGINE
1. Attachsparkplugwireto sparkplug. Makecertainthemetalcap on
the end of the sparkplug is fastenedsecurelyoverthe metal tip on
the sparkplug.
2. Pushstopswitchto ON.
3. Movechokecontrolto CHOKEposition.
4. Graspstarterhandleandpullropeout slowlyuntilenginereaches
startof compressioncycle(ropewill pullslightly harderat this
point).
5. Pullropewitha rapid,continuous,full armstroke.Keep a firm grip
onstarterhandle.Let roperewindslowly.
6. Repeat,if necessary,untilenginestarts. Slowlyadjustchoke
towardRUNposition.Wait untilenginerunssmoothlybeforeeach
chokeadjustment.
7. If enginefalters,movecontrolleverto CHOKEposition,then slowly
backto RUNposition.
8. If weatheris cold,run wedgeup ordown beam6 to 8 timesto
circulatethe hydraulicfluid.
Whenstartinga warmengine,the mufflerandsurroundingareasare
hotandcan causea burn.Do not touch.
J
USING THE LOG SPLITTER
1. Placethelogsplitteron level,dry ground.
2. Placethebeamineitherthe horizontalor verticalpositionandlock
inplacewiththeappropriatelockingrod.
3. Blockthefrontand backof bothwheels.
4. Placethelogagainsttheendplateandonly split woodinthe
directionof thegrain.
5. Tostabilizethelog,placeyourhandonlyon sidesof log.Never
placehandon the endbetweenthe logand the splitting
wedge.
6. Only oneadultshouldstabilizethe log and operatethe control
handle,so theoperatorhasfull controloverthe log and the splitting
wedge.
Control Handle
1. MovecontrolhandleFORWARDor DOWNto splitwood.
2. Releasethe controlhandleto stopthe wedgemovement.
3. MovecontrolhandleBACKor UP to returnthe wedge.
Log Dislodger
The log dislodgerisdesignedto removeany partiallysplit woodfrom
the wedge.This mayoccur whilesplittinglargediameterwoodor
freshlycutwood.
Neverremovepartiallysplitwoodfromthewedgewithyourhands.
F ngersmaybecometrappedbetweensp t wood. J
1. To removepartiallysplitwoodfromwedge,movecontrolhandleto
REVERSEpositionuntilwedgeis fully retractedto allowsplitwood
portionto contactthe logdislodger.
2. Once removedfromwedgewithlogdislodger,splitwoodfrom
oppositeendor inanotherlocation.
Vertical Position
1. Pullthe horizontalbeamlockout to releasethe beamandpivotthe
beamto the verticalposition.
2. To lockthe beaminthe verticalposition,pullout on the vertical
beam lockand rotateit to securethe beam.See Figure4-1.
3. Standin frontof the unitto operatethe control handleand to
stabilizethe log.See Figure4-3.
Horizontal Position
1. Pullthe verticalbeamlockoutand rotateit down. See Figure4-1.
Pivotbeamto the horizontalposition.The beamwill lockautomati-
callyin horizontalposition.
2. Standbehindthe reservoirtankto operatecontrolhandleand to
stabilizethe log.
10
Operating Tips
Always:
1. Usecleanfluidandcheckfluid levelregularly.
2. Useanapprovedhydraulicfluid.ApprovedfluidsincludeDexron®
III/Mercon® III automatictransmissionfluid,a 10WeightAW
hydraulicoil orPro-MixTM AW-32HydraulicOil.
3. Useafilter (cleanor replaceregularly).
4. Useabreathercapon fluidreservoir.
5. Makesure pumpis mountedandalignedproperly.
6. Useaflexible"spider"type couplingbetweenengineand pump
driveshafts.
7. Keephosesclearandunblocked.
8. Bleedair outof hosesbeforeoperating.
9. Flushandclean hydraulicsystembeforerestartingafter servicing.
10.Use "pipedope"on allhydraulicfittings.
11.Allowtime for warm-upbeforesplittingwood.
12.Primethe pumpbeforeinitialstart-upby turningoverthe engine
withsparkplugdisconnected.
13.Splitwoodalong the grain(lengthwise)only.
Never:
1. Usewhenfluid isbelow20° F or above150° R
2. Useasolid engine/pumpcoupling.
3. Operatethroughreliefvalve for long.
4. Attemptto adjustunloadingor reliefvalvesettingswithoutpressure
gauges.
5. Operatewithair inhydraulicsystem.
6. Useteflontape onhydraulicfittings.
7. Attemptto cutwoodacrossthe grain.
8. Attemptto removepartiallysplitwoodfromthe wedgewithyour
hands.Fullyretractwedgeto dislodgewoodwith logdislodger.
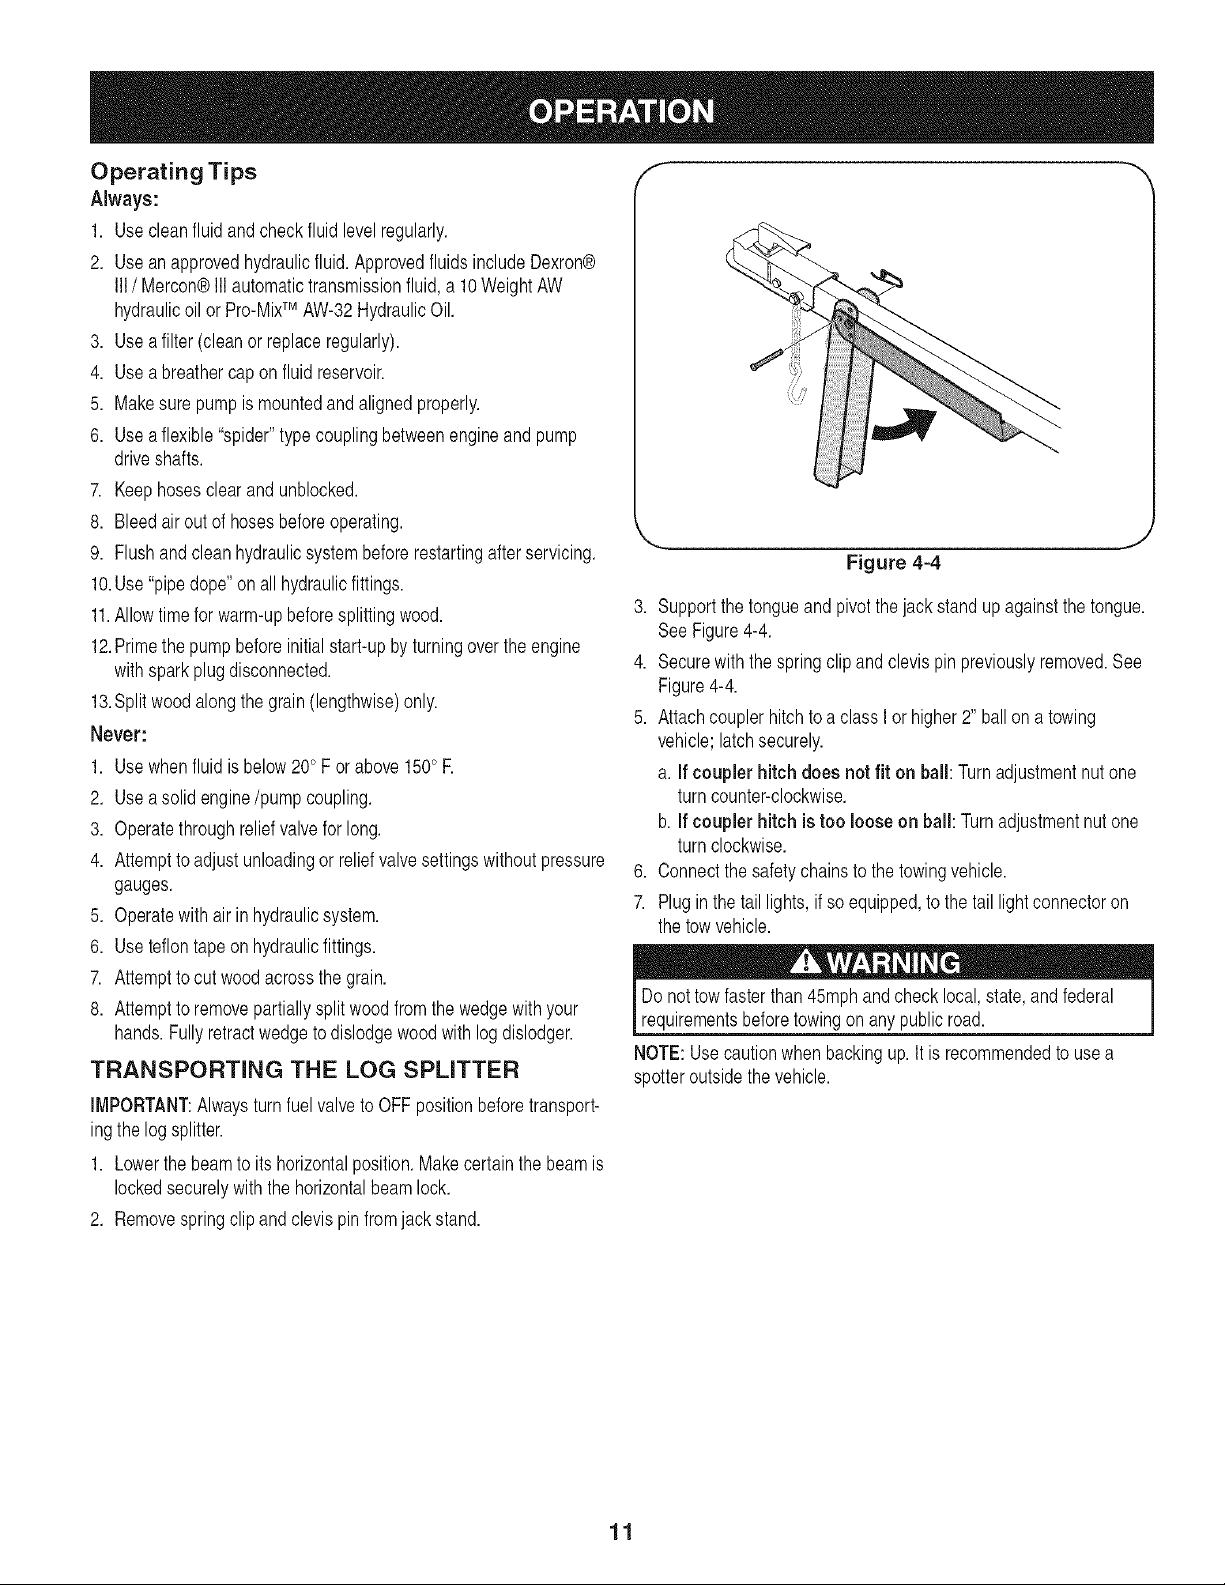
TRANSPORTING THE LOG SPLITTER
IMPORTANT:Alwaysturn fuelvalveto OFFpositionbeforetransport-
ingthe log splitter.
1. Lowerthe beamto its horizontalposition.Makecertainthe beamis
lockedsecurelywith the horizontalbeamlock.
2. Removespringclip and clevis pin fromjack stand.
f
Figure 4-4
3. Supportthe tongueand pivotthe jack stand up againstthetongue.
SeeFigure4-4.
4. Securewiththe springclip andclevis pinpreviouslyremoved.See
Figure4-4.
5. Attachcouplerhitchtoa class I or higher2" ballona towing
vehicle;latchsecurely.
a. If couplerhitchdoes not fit on ball: Turnadjustmentnut one
turn counter-clockwise.
b. If coupler hitch is too loose on ball: Turnadjustmentnut one
turn clockwise.
6. Connectthesafetychainsto the towingvehicle.
7. Plugin the tail lights,if so equipped,to thetail lightconnectoron
the tow vehicle.
I Do fasterthan andcheck and federal
not tow
45mph
local,state,
I requrementsbeforetow ng on anypub c road. J
NOTE:Usecautionwhenbackingup. It is recommendedto use a
spotteroutsidethe vehicle.
11
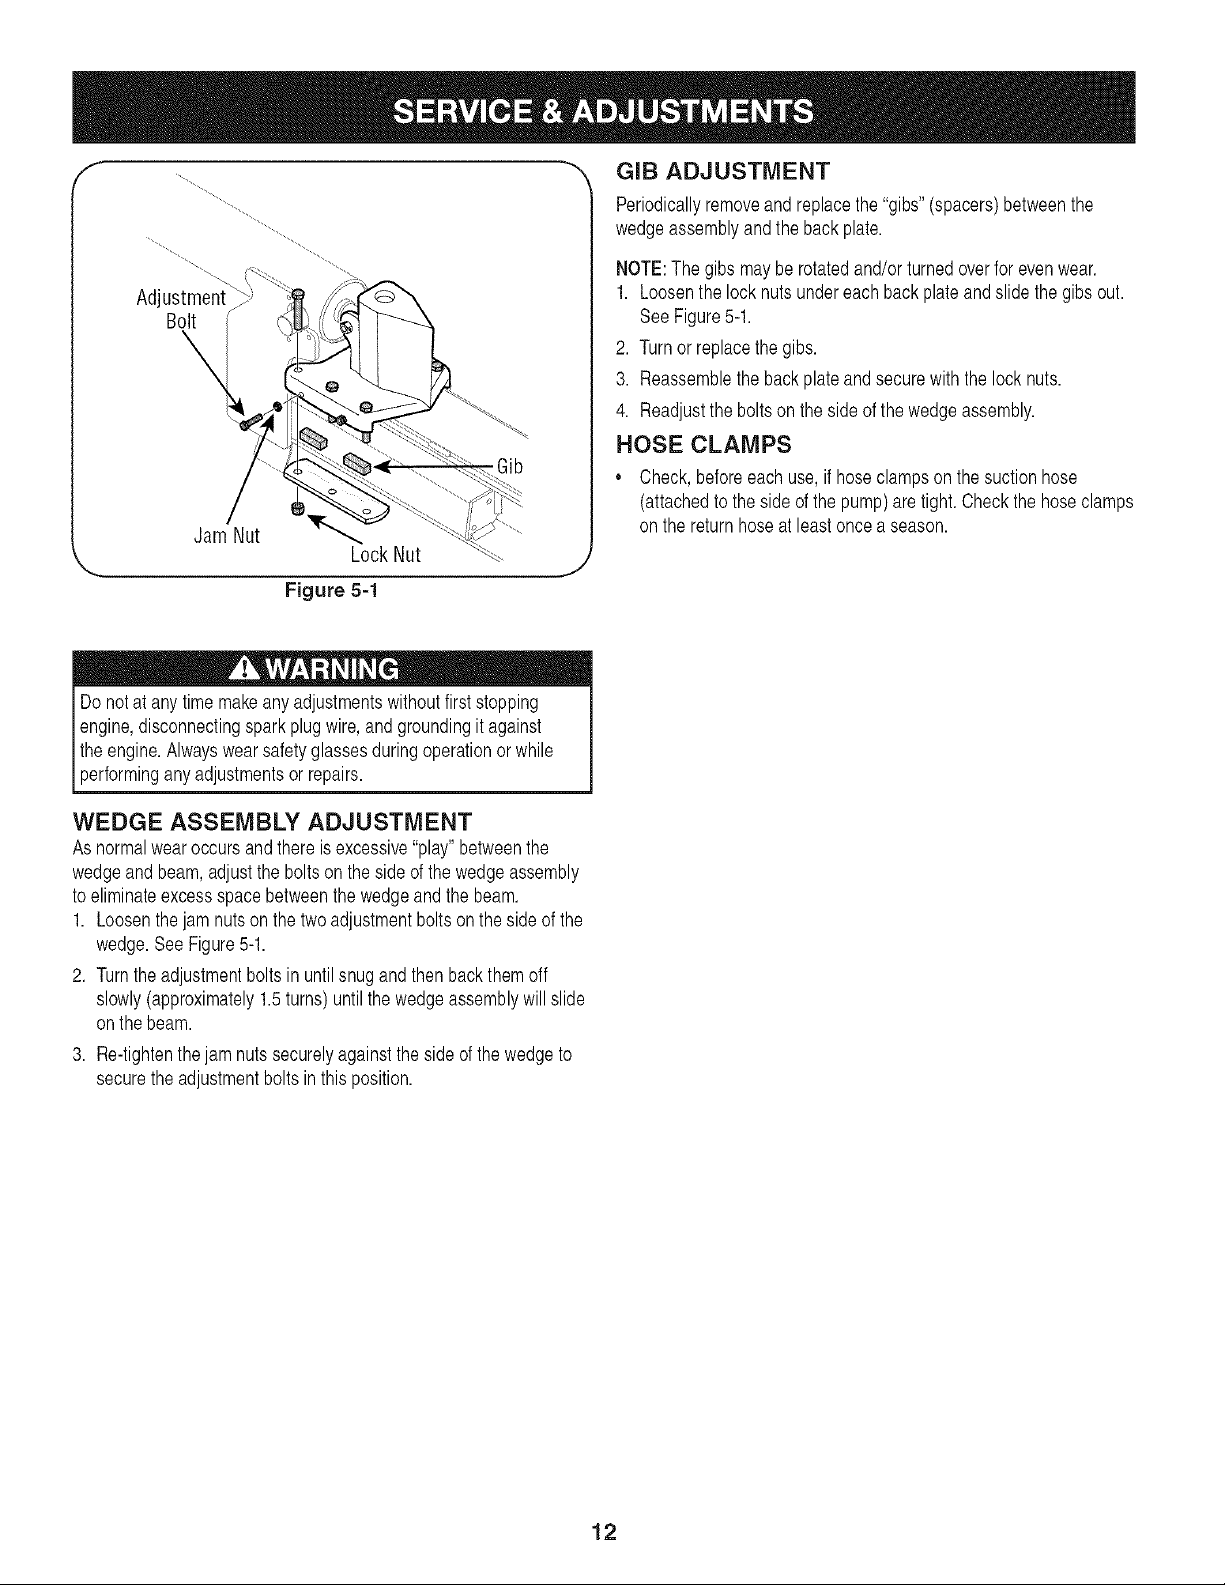
f
Adjustment
Bolt
-Gib
Jam Nut
Lock Nut
Figure 5-1
GIB ADJUSTMENT
Periodicallyremoveand replacethe "gibs"(spacers)betweenthe
wedgeassemblyandthe back plate.
NOTE:The gibs maybe rotatedand/or turnedoverfor evenwear.
1. Loosenthe lock nuts undereachback plateand slidethe gibs out.
SeeFigure5-1.
2. Turnor replacethe gibs.
3. Reassemblethebackplateandsecurewiththe lock nuts.
4. Readjustthe bolts on the side of thewedgeassembly.
HOSE CLAMPS
,, Check, beforeeachuse,if hoseclampson thesuctionhose
(attachedto theside of the pump)are tight.Checkthe hoseclamps
on the returnhoseat leastonce a season.
Do notat any time makeanyadjustmentswithoutfirststopping
engine,disconnectingspark plug wire,and groundingit against
theengine.Alwayswearsafetyglassesduringoperationorwhile
[performng anyadustmentsor repars.
WEDGE ASSEMBLY ADJUSTMENT
As normalwearoccursand there isexcessive"play"betweenthe
wedgeand beam,adjustthe bolts on the side ofthe wedgeassembly
to eliminateexcessspacebetweenthe wedgeandthe beam.
1. Loosenthe jam nutson the two adjustmentbolts on the sideof the
wedge.SeeFigure5-1.
2. Turnthe adjustmentbolts in untilsnugand then backthem off
slowly(approximately1.5turns) untilthe wedgeassemblywill slide
onthe beam.
3. Re-tightenthe jam nuts securelyagainsttheside of the wedgeto
securethe adjustmentbolts in thisposition.
12
FLEXIBLE PUMP COUPLER
The flexible pumpcoupleris a nylon"spider"insert,locatedbetween
the pumpand theengine shaft.Overtime,the couplerwill hardenand
deteriorate.
Replacethecouplerif you detectvibrationor noisecomingfromthe
areabetweenthe engineand the pump.If thecouplerfails completely,
youwill experiencea lossof power.
IMPORTANT:Neverhit the engineshaft in any manner,as a blow will
causepermanentdamageto the engine.
1. Removethreenutsthatsecurethe pumpto thecouplingshield.
Twonutsareat the bottomcornersand oneis in the top center.
SeeFigure5-2.
2. Removethepump.
3. Rotatethe engineby slowlypullingstarterhandleuntil engine
couplinghalf set screwis visible.Loosensetscrewusingallen
wrenchandslidecouplinghalfoff engineshaft.
4. Loosensetscrewon pumpcouplinghalfand removecouplinghalf.
5. Slidenewenginecouplinghalf ontothe engineshaft untiltheend of
the shaftis flush with the innerportionof the couplinghalf. (There
mustbespacebetweenthe end of the enginesupportbracketand
couplinghalf). Tightenset screw.
6. Installpumpcouplinghalfand keyonpumpshaft.Rotatecoupling
half untilset screwfacesopeningin shield. Do nottightenset
screw.
7. Installnylon"spider"onto enginecouplinghalf.
8. Alignpumpcouplinghalfwith nylon"spider"by rotatingengine
usingstarterhandle.Slide couplinghalf intoplacewhileguiding
threemountingboltsthroughholesinpumpsupportbracket.
9. Securewith nutsremovedearlier.
10.Set.010"to.060"clearance/gapbetweenthe nylon"spider"and
the enginecouplinghalf byslidinga feelergaugeor matchbook
coverbetweenthe nylon"spider"and the enginecouplinghalfand
movingpumpcouplinghalfas needed.Securepumpcouplinghalf
withsetscrew.SeeFigure5-2.
//
/
/
Screw
_,, ,J
Figure 5-2
TIRES
Seesidewallof tire for recommendedpressure.Underany circum-
stancesdo notexceedmanufacturer'srecommendedpsi. Maintain
equalpressureon alltires.
Excessivepressurewhenseatingbeadsmaycause tire/rimassembl_,
to burst withforcesufficientto causeseriousinjury. Referto sidewall
of tire for recommendedpressure.
NOTE:Makecertainproperclearance/gapis obtainedbeforetighten-
ingsetscrew.
13
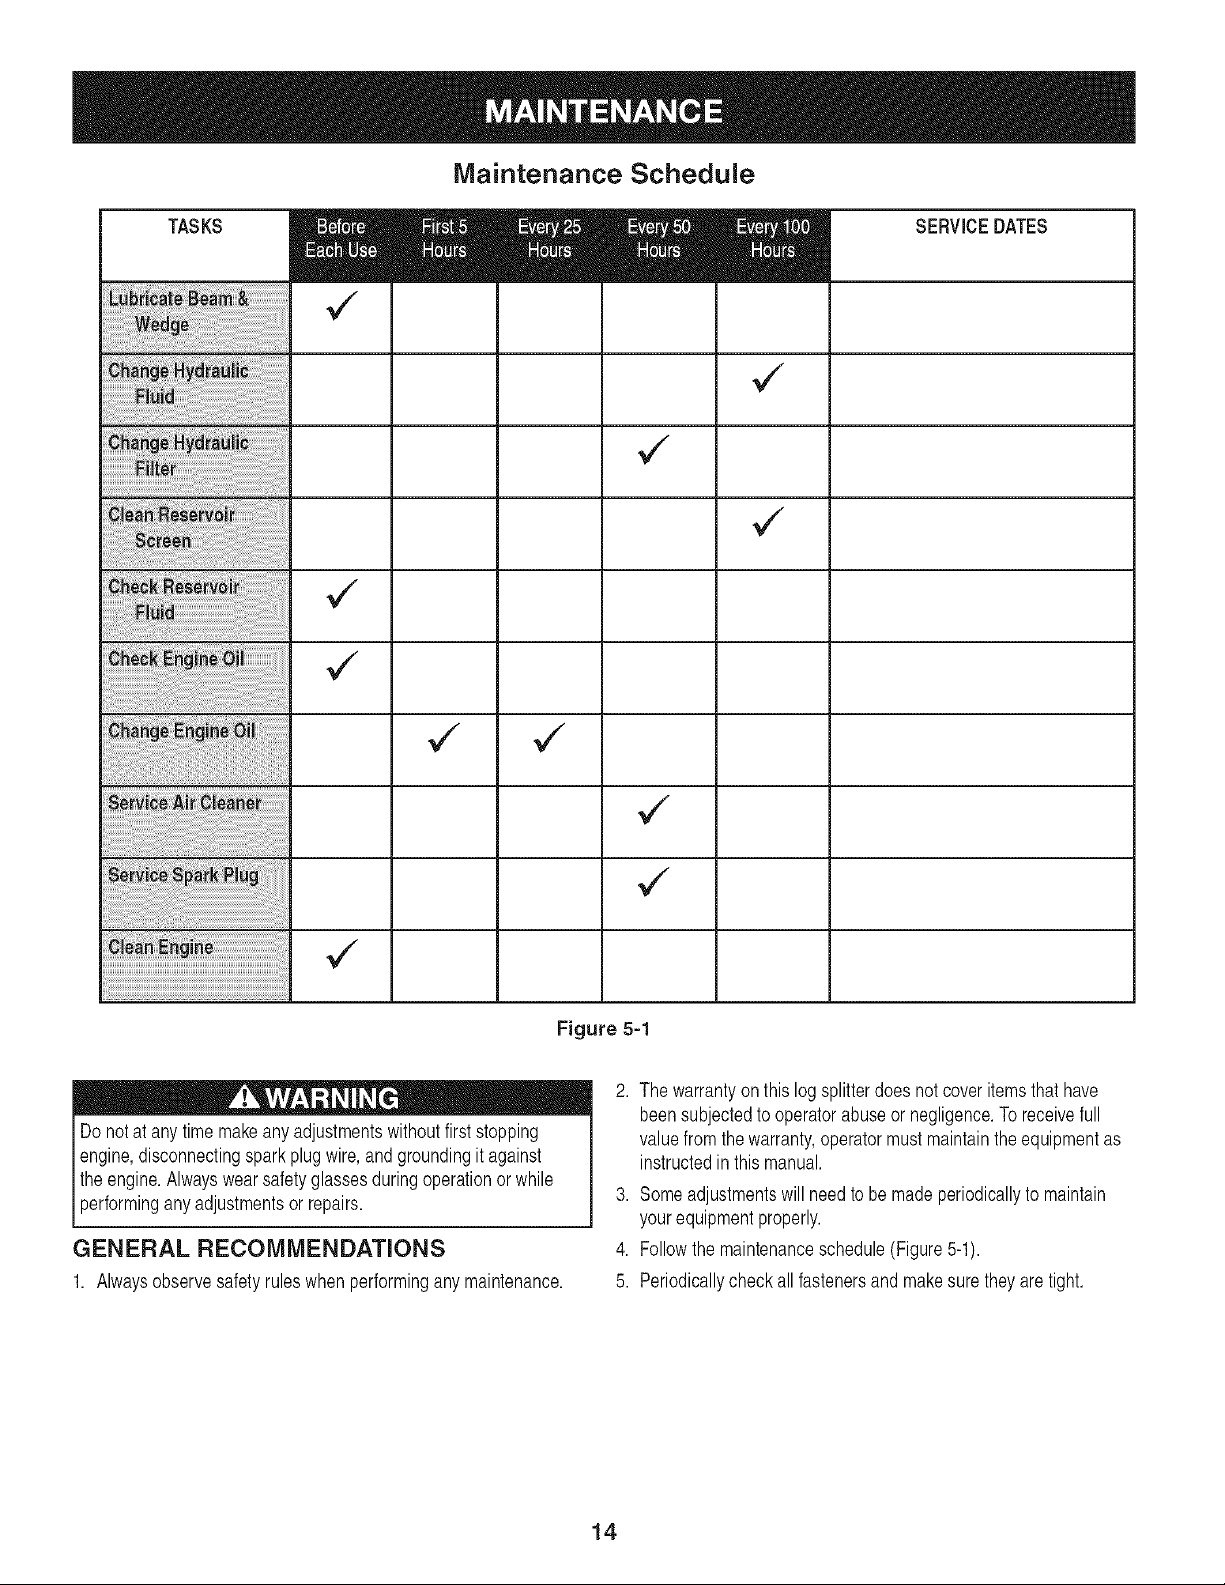
Maintenance Schedule
TASKS
Figure 5-1
SERVICEDATES
2. The warrantyonthis logsplitterdoesnot coveritemsthat have
beensubjectedto operatorabuseor negligence.Toreceivefull
Do notat any time makeanyadjustmentswithoutfirststopping
engine,disconnectingspark plug wire,and groundingit against
theengine.Alwayswearsafetyglassesduringoperationorwhile
performinganyadjustmentsor repairs.
GENERAL RECOMMENDATIONS
1. Alwaysobservesafetyruleswhen performingany maintenance.
valuefromthe warranty,operatormustmaintainthe equipmentas
instructedinthis manual.
3. Someadjustmentswill need to be madeperiodicallyto maintain
yourequipmentproperly.
4. Followthe maintenanceschedule(Figure5-1).
5. Periodicallycheckall fastenersandmakesuretheyaretight.
14

HYDRAULIC FLUID AND iNLET FILTER
,, Checkthe hydraulicfluid levelin thelogsplitterreservoirtank
beforeeach use. Maintainfluid levelwithin therangespecifiedon
thedipstickat all times.
,, Changethe hydraulicfluid in the reservoirevery 100hoursof
operation.Followthe stepsbelow:
1. Disconnectthe suctionhosefrom the bottomof the reservoirtank.
2. Carefullyunthreadthe inlet filterandclean it withpenetratingoil.
SeeFigure5-2.
3. Allowthe fluidto drainintoa suitablecontainer.
4. Reinsertthe filter and refillthe reservoirwith three (3) gallonsof
oil.Approvedfluids includeDexron®Ill / Mercon®Ill automatic
transmissionfluid,a 10WeightAWhydraulicoil or Pro-MixTM
AW-32HydraulicOil.
,, Maintainfluid levelwithinthe rangespecifiedon the dipstickat all
times.
/ , ......... /
/
/ /,,
i \ /
Figure 5-2
NOTE:Alwaysdisposeof usedhydraulicfluidand engineoil at
approvedrecyclingcentersonly.
,, Contaminantsin fluid maydamagethe hydrauliccomponents.
Flushingthe reservoirtankand hoseswith kerosenewhenever
serviceis performedon thetank, hydraulicpumpor valve is
recommended.Any repairto the hydrauliccomponentsshouldbe
performedby a SearsServiceCenter.
j
Hydraulic Filter
,, Changethe hydraulicfilter every50 hoursof operation.Use onlya
10micronhydraulicfilter.Orderpartnumber723-0405.
BEAM AND SPLITTING WEDGE
,, Lubricateboth sidesof the beam(whereit comesintocontactwith
the splittingwedge),beforeeachuse,withengineoil. Thewedge
plateonthe log splitteris designedso thegibs onthe side of the
wedgeplatecan be removedand rotatedand/orturnedoverfor
evenwear.
,, Makecertainto readjustthe adjustmentbolts so wedgemoves
freely,but no excessspaceexists betweenthe wedgeplateand the
beam.
ENGINE
Check Engine Oil
1. Stopengineandwaitseveralminutesbeforecheckingoil level.
2. Removeoil fill dipstick.
3. Checkoil levelondipstick.Withengineonlevelground,the oil
mustbeto FULL markon dipstick.
4. Replacedipstickand tighten.
Changing Engine Oil
Only usehighqualitydetergentoil ratedwith API serviceclassification
SF,SG,or SH.Selectthe oil'sSAEviscositygradeaccordingto the
expectedoperatingtemperature.Followthe chartbelow:
f- --..
Colder -4 32°F _ Warmer
Oil Viscosity Chart
15
II
II
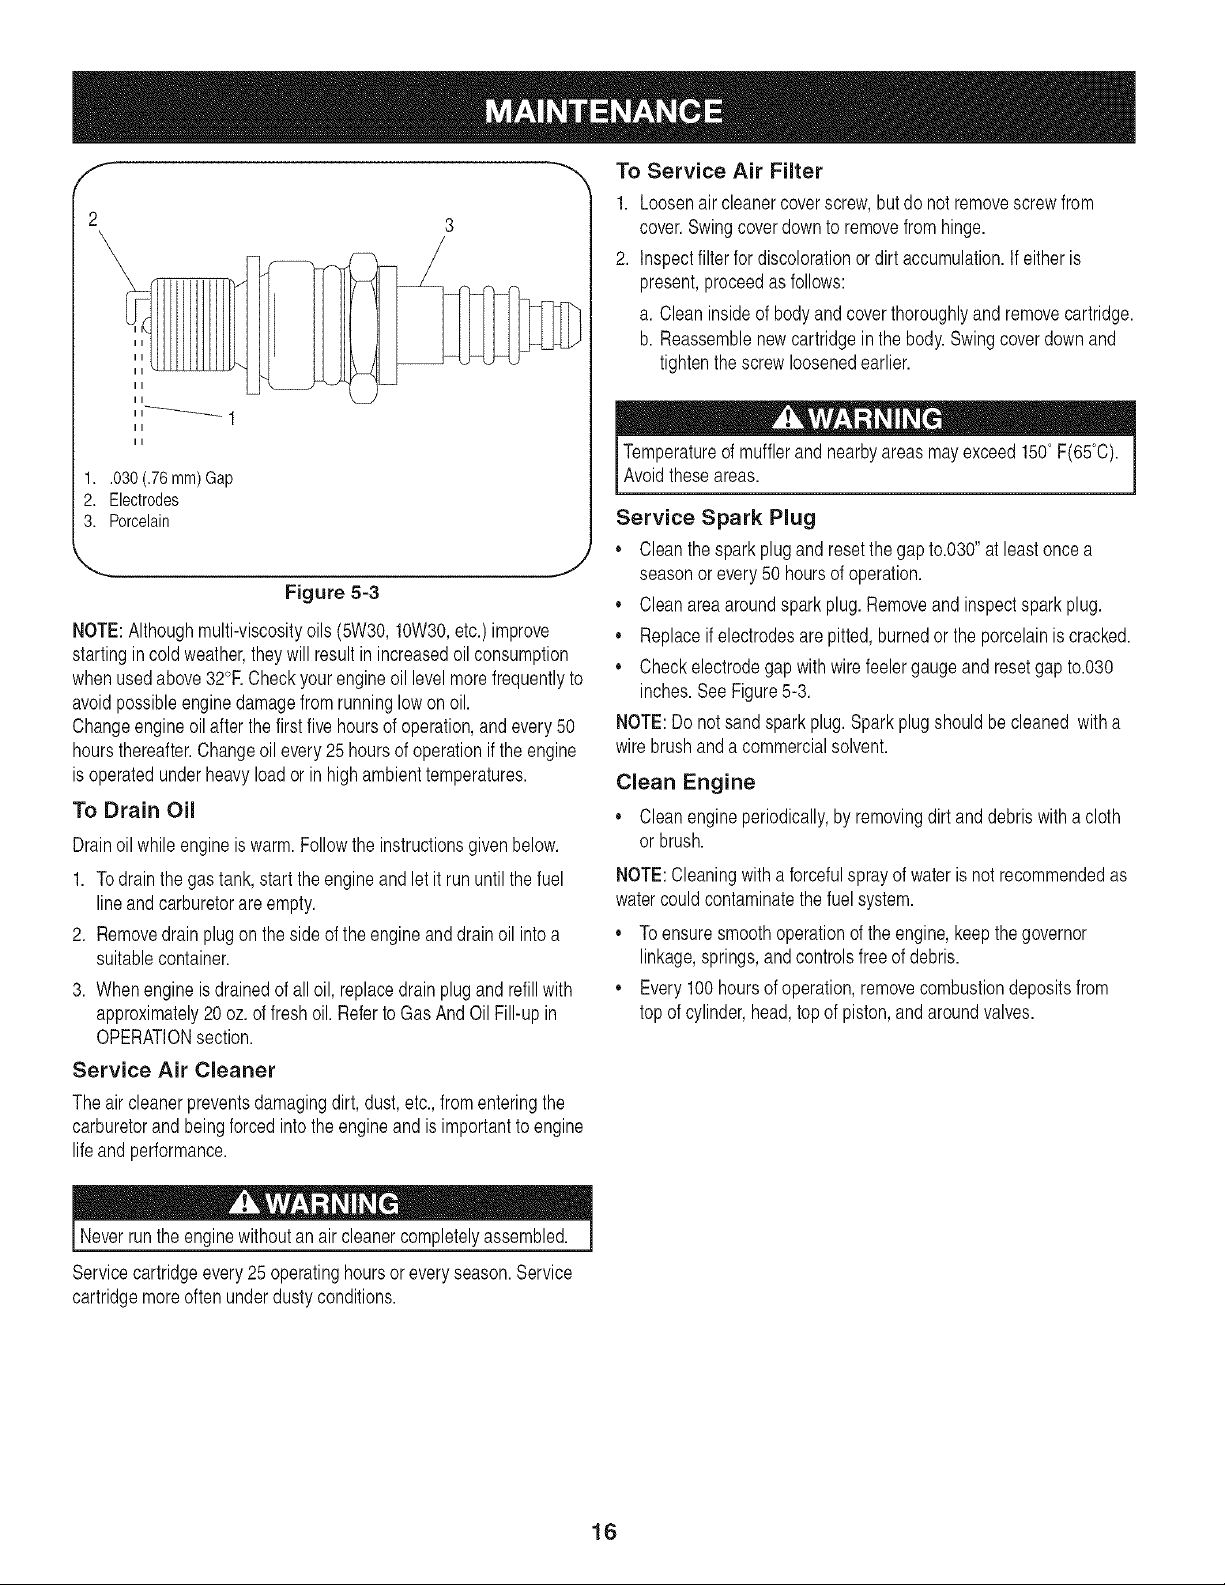
1..030 (.76 mm) Gap
2. Electrodes
3. Porcelain
Figure 5-3
NOTE:Althoughmulti-viscosityoils (5W30,10W30,etc.)improve
startingincold weather,theywill result in increasedoil consumption
whenusedabove32°RCheckyourengineoil levelmorefrequentlyto
avoidpossibleenginedamagefrom runninglowon oil.
Changeengineoil after thefirst five hoursof operation,and every 50
hoursthereafter.Changeoil every 25 hoursof operationif the engine
is operatedunder heavyload or in high ambienttemperatures.
To Drain Oil
Drainoilwhile engineis warm.Followthe instructionsgivenbelow.
1. Todrainthegas tank,start the engineandlet it rununtilthe fuel
lineandcarburetorareempty.
2. Removedrainplugon theside of the engineand drain oil intoa
suitablecontainer.
3. Whenengineis drainedof alloil, replacedrainplugand refillwith
approximately20 oz.of freshoil. Referto GasAndOil Fill-upin
OPERATIONsection.
Service Air Cleaner
Theair cleanerpreventsdamagingdirt, dust,etc.,fromenteringthe
carburetorandbeingforcedintothe engineand is importantto engine
lifeand performance.
To Service Air Filter
1. Loosenaircleanercover screw,butdo not removescrewfrom
cover.Swingcoverdownto removefrom hinge.
2. Inspectfilterfor discolorationor dirt accumulation.If eitheris
present,proceedas follows:
a. Cleaninsideof bodyand coverthoroughlyand removecartridge.
b. Reassemblenewcartridgeinthe body. Swingcoverdown and
tightenthe screwloosenedearlier.
Temperatureof mufflerand nearbyareasmayexceed150° F(65°C).
Avod theseareas.
Service Spark Plug
,, Cleanthe spark plugand resetthe gap to.030"at least oncea
seasonor every50 hoursof operation.
,, Cleanarea aroundsparkplug. Removeand inspectspark plug.
,, Replaceif electrodesarepitted,burnedor the porcelainis cracked.
,, Checkelectrodegap with wirefeelergaugeand resetgap to.030
inches.SeeFigure5-3.
NOTE:Do not sandspark plug.Sparkplugshouldbe cleaned with a
wire brushandacommercialsolvent.
Clean Engine
,, Cleanengineperiodically,by removingdirt anddebriswitha cloth
or brush.
NOTE:Cleaningwith a forcefulsprayof wateris not recommendedas
watercouldcontaminatethe fuelsystem.
,, Toensuresmoothoperationof the engine,keepthegovernor
linkage,springs,and controlsfreeof debris.
,, Every 100 hoursof operation,removecombustiondepositsfrom
top of cylinder,head,topof piston,andaroundvalves.
Neverrunthe enginewithoutan air cleanercompletelyassembled.
Servicecartridgeevery25 operatinghoursor everyseason.Service
cartridgemoreoftenunderdustyconditions.
16
Prepareyour log splitterforstorageat the end of the seasonor if the
logsplitterwill notbe usedfor 30 days or more.
WARNING:Neverstoremachinewithfuel in the fueltankinsideof
buildingwherefumesmay reachan openflameor sparkor where
ignitionsourcesare presentsuchas hotwaterand space heaters,
_furnaces,c othesdyers,stoves,e ectr c motors,etc.
NOTE:Yearlycheck-upby your localSearsservicecenteris a good
wayto ensureyourlog splitterwill providemaximumperformancenext
season.
LOG SPLITTER
1. Cleanthe logsplitterthoroughly.
2. Wipeunitwithan oiledragto preventrust,especiallyonthe wedge
andthe beam.
ENGINE
IMPORTANT:It is importantto preventgumdepositsfrom formingin
essentialfuelsystempartssuch as carburetor,fuel filter,fuel hose,
ortankduringstorage.Also, alcoholblendedfuels (calledgasoholor
usingethanolor methanol)can attractmoisturewhichleadsto separa-
tionandformationof acids duringstorage.Acidicgascan damagethe
fuelsystemof an enginewhile in storage.
1. Drainthe fueltank. Alwaysdrainfuel intoapprovedcontainer
outdoorsawayfromopenflame.Besurethe engineis cool. Donot
smokewhile handlingthe fuel.
2. Startthe engineandlet it run untilthe fuel linesandcarburetorare
empty.
IMPORTANT:Neveruseengineor carburetorcleanerproductsinthe
fuel tank or permanentdamagemayoccur.Usefreshfuel nextseason.
3. Removesparkplug,pourapproximately1/2 oz. of engine oil into
cylinderandcrankslowlyto distributeoil.
4. Replacesparkplug.
NOTE:Fuelstabilizeris an acceptablealternativein minimizingfor
formationof fuel gumdepositsduringstorage.
Pleasefollowthe instructionsbelowfor storingyourlogsplitterwith
fuel and stabilizerin theengine:
1. Add stabilizerto gasolineinfuel tankor storagecontainer.Always
followthe mix ratiofoundonstabilizercontainer.
2. Runengineat least10minutesafteraddingstabilizerto allowthe
stabilizerto reachthe carburetor.
IMPORTANT:Do notdrain thegas tank and carburetorif usingfuel
stabilizer.Drainallthe oil fromthe crankcase(thisshouldbe done
afterthe enginehas beenoperatedand is stillwarm)andrefillthe
crankcasewithfreshoil.
OTHER
,, Donot storegasolinefromoneseasonto another.
,, Replaceyourgasolinecan if it starts to rust.
,, Storeunit in a clean,dry area.Do notstore next to corrosive
materials,suchas fertilizer.
,, Wipe equipmentwithan oiledragto preventrust.
17
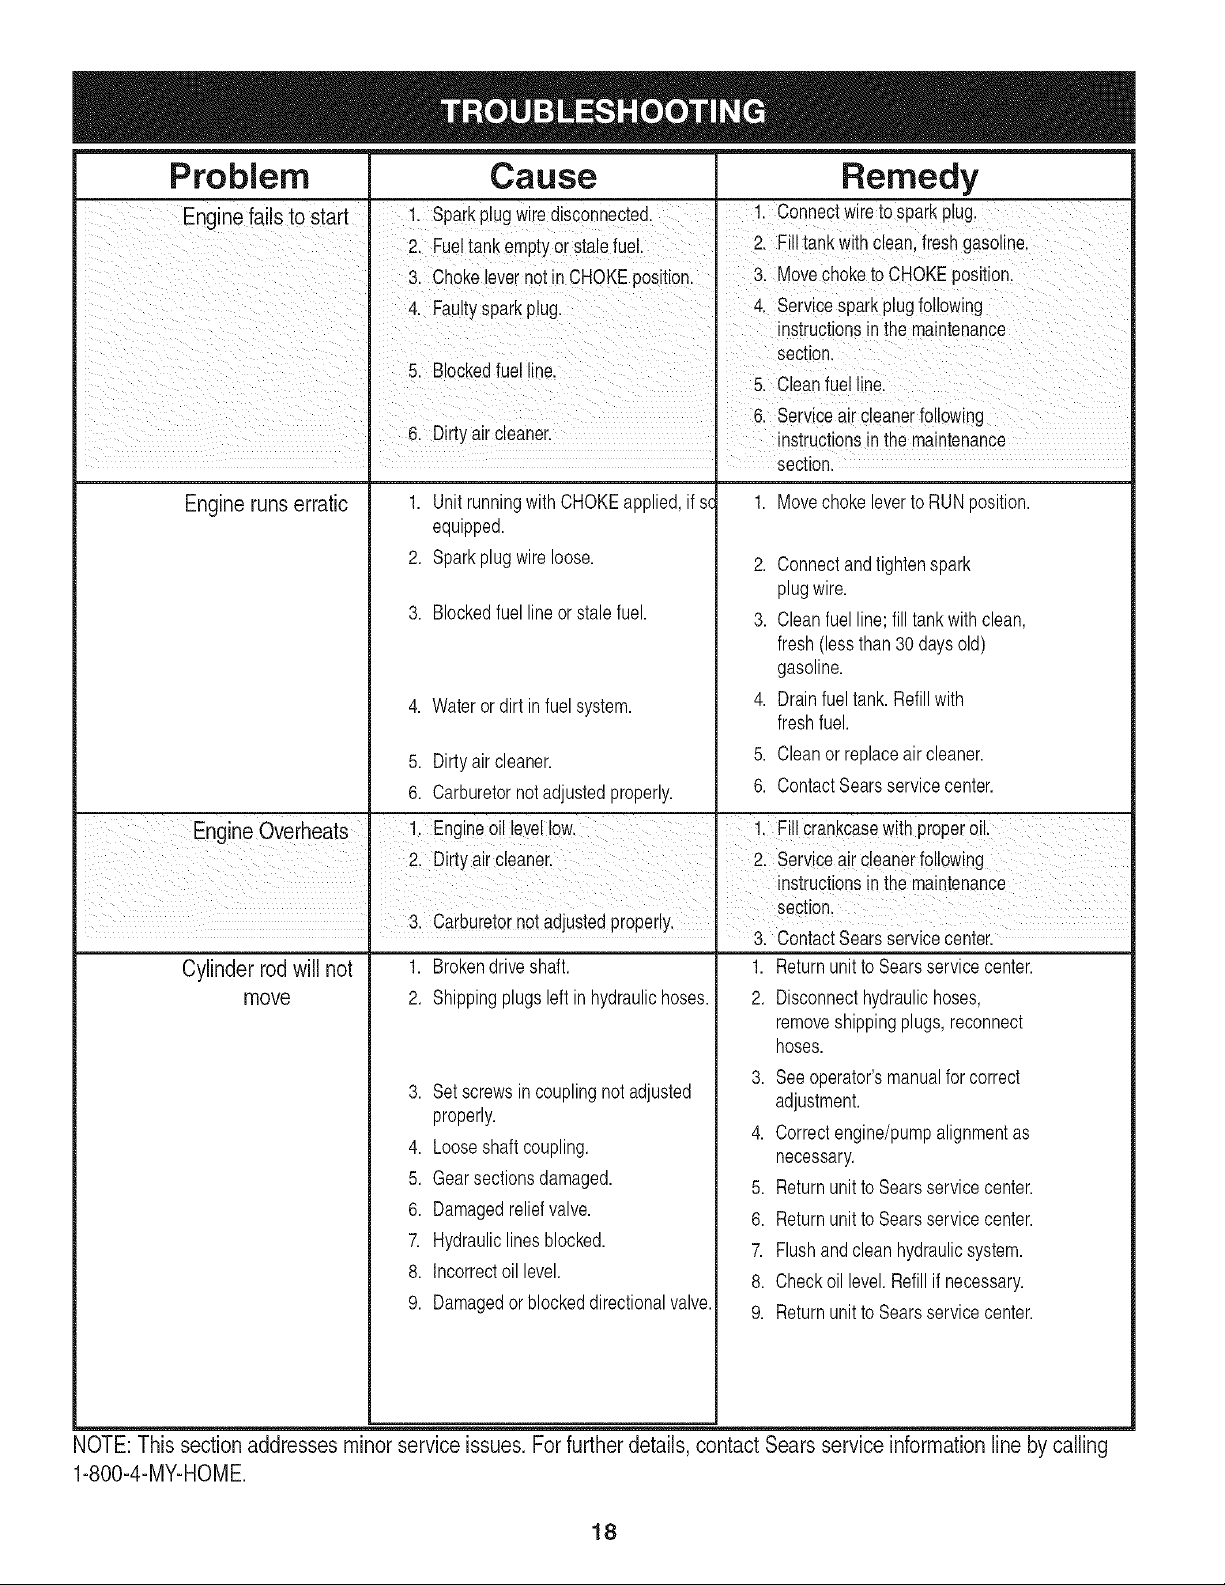
Problem Cause Remedy
Engine fails to start I 1. Sparkplugwire disconnected• I 1. Connectwireto sparkplug.
2 Fueltank erupt or stale fuel 2 F tankwth c ean,freshgaso ne
• y . ,
3. Chokelevernotin CHOKEposition• 3. Movechoketo CHOKEposition•
4 Fault sparkplug 4 Servicesparkplug following
• y • •
instructionsin the maintenance
section
5 Bockedfue ne
• 5. Cleanfuel line.
6. Serviceair cleanerfollowing
I 6. D_rtyair cleaner• instructionsin the maintenance
section•
Engine runs erratic 1. Unitrunningwith CHOKEapplied,if sc 1. Movechokeleverto RUNposition.
equipped.
2. Sparkplugwireloose. 2. Connectandtightenspark
plugwire.
3. Blockedfuel lineor stalefuel. 3. Cleanfuel line;fill tankwithclean,
fresh(lessthan30 daysold)
gasoline.
4. Waterordirt infuel system. 4. Drainfuel tank.Refillwith
freshfuel.
5. Dirtyair cleaner. 5. Cleanor replaceair cleaner.
6. Carburetornotadjustedproperly. 6. ContactSearsservicecenter.
EngineOverheats 1. Engineoil levellow. 1• Fill crankcasewith prope_oil.
2. Dirty air cleaner 2. Serviceair cleanerfollowing
instructionsin the maintenance
I secton
3. Carburetornotadjustedproperly.
' ' 3. ContactSearsservicecenter•
Cylinder rod will not 1. Brokendriveshaft. 1. Returnunit to Searsservicecenter.
move 2. Shippingplugsleftin hydraulichoses.
3. Setscrewsincouplingnot adjusted
properly.
4. Looseshaftcoupling.
5. Gearsectionsdamaged.
6. Damagedreliefvalve.
7. Hydrauliclinesblocked.
8. Incorrectoil level.
9. Damagedorblockeddirectionalvalve.
2. Disconnecthydraulichoses,
removeshippingplugs,reconnect
hoses.
3. Seeoperator'smanualfor correct
adjustment.
4. Correctengine/pumpalignmentas
necessary.
5. Returnunit to Searsservicecenter.
6. Returnunit to Searsservicecenter.
7. Flushandclean hydraulicsystem.
8. Checkoil level.Refillif necessary.
9. Returnunit to Searsservicecenter.
NOTE: This sectionaddresses minor service issues. For further details, contact Sears service information line by calling
1-800-4oMY-HOME.
18
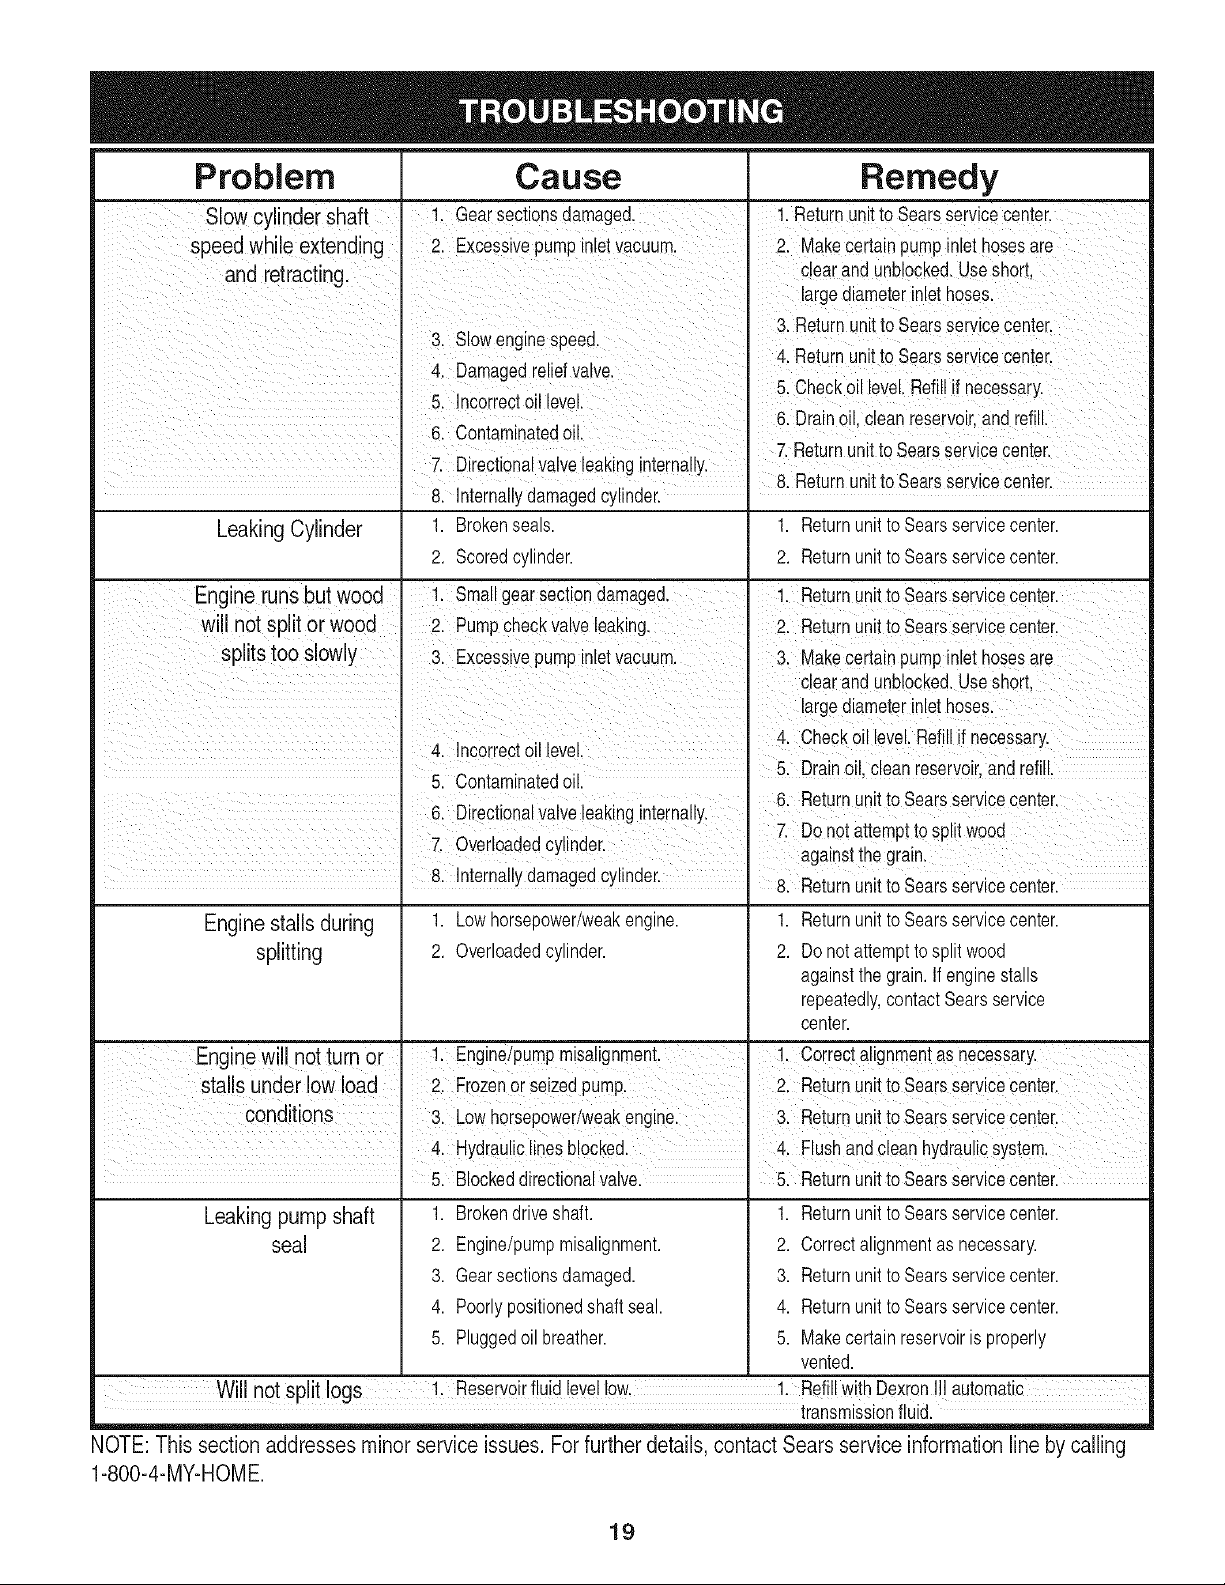
Problem Cause Remedy
Slow cylinder shaft Gee! sectionsdamaged: Returnunitto Searsserv Cecenbr,
speed while extending ExceSsivepumPinletVacuum 2. Makecertainpump inlethosesare
and retractingl Clearand unb!ocked.Useshort,
largediameternlethoses.
3 Returnunt to Searsservce Center
3. Slowenginespeed. X
4 Returnunt to bears serv ce center
4. Damagedreliefvalve, i ;
,. _ i 5, ChecKoil level Refil iTnecessary.
b. incorrecloil level.
6 Drano, cean reservor,and ref
6. Contaminatedo L
7.Returnunt to Searsservicecenter.
7. Directionalvalveleak ng nternally.
8 Returnun t to sears se_vce center
8. nterna ydamaged cy nder.
Leaking Cylinder 1. Brokenseals. 1. Returnunitto Searsservicecenter.
2. Scoredcylinder. 2. Returnunitto Searsservicecenter.
Engine runs but wood ! Smallgear sectiondamaged, 1. Return unitto sears servicecenter.
Wi!l not Splitor wood 21 PumpCheckValveleaking, Returnunitto sears sewice centerl
splits too Slowly ExcessivepumpinletVacuuml 3. Make certainpump inlethOsesare
C!eaiandunblocked.Useshoit,
la!ge diamete!inlethose&
4. nco:_recto' evel 4. Checkoil !evel!Refillif necessarY.
' 5. Drainoil, cleanreservoir,and refill.
• 5. Contaminatedoil.
6 Returnun t to Searsserv ce center
6. DirectionaLvalveleaKinginternally. _ i
.., _ _ , : 7. Do notattemptto spl t woad
z, uvenoaaeacylmaer, a_ainstthe _,rain
y y .
internallydamagedcylinder. Return Unitto sears ServiCecenter.
Engine stalls during 1. Lowhorsepower/weakengine. 1. Returnunitto Searsservicecenter.
splitting 2. Overloadedcylinder. 2. Do notattemptto splitwood
againstthegrain. If enginestalls
repeatedly,contact Searsservice
center.
Enginewill nottum or !: Engine/pumpmisalignment Cor[ecta!ignmentas necessary:
stalls underlow!oad 2. Frozenor seizedpump. 2. Returnunitto sears servicecenter.
conditions 3. LOWhorsepower/Weakenginel 3. ReturnunittOsears servicecenterl
4: Hyd[au!ic!inesb!ocked. 4: F!ushandclean hydrau!icsystem.
Leaking pump shaft
seal
5. Blocked directionalvalve.
1. Brokendriveshaft.
2. Engine/pumpmisalignment.
3. Gearsectionsdamaged.
4. Poorlypositionedshaftseal.
5. Pluggedoil breather.
5. ReturnunittoSears servicecenter.
1. Returnunitto Searsservicecenter.
2. Correctalignmentas necessary.
3. Returnunitto Searsservicecenter.
4. Returnunitto Searsservicecenter.
5. Makecertainreservoiris properly
vented.
Will not split logs !. Reservoirf!uid leve!!ow, 1. Refi!lwith Dexrenill automatic
transmissionfluid.
NOTE: This section addressesminor service issues. For further details, contact Sears service information line by calling
1-800-4-MY-HOME.
19
%
A
20
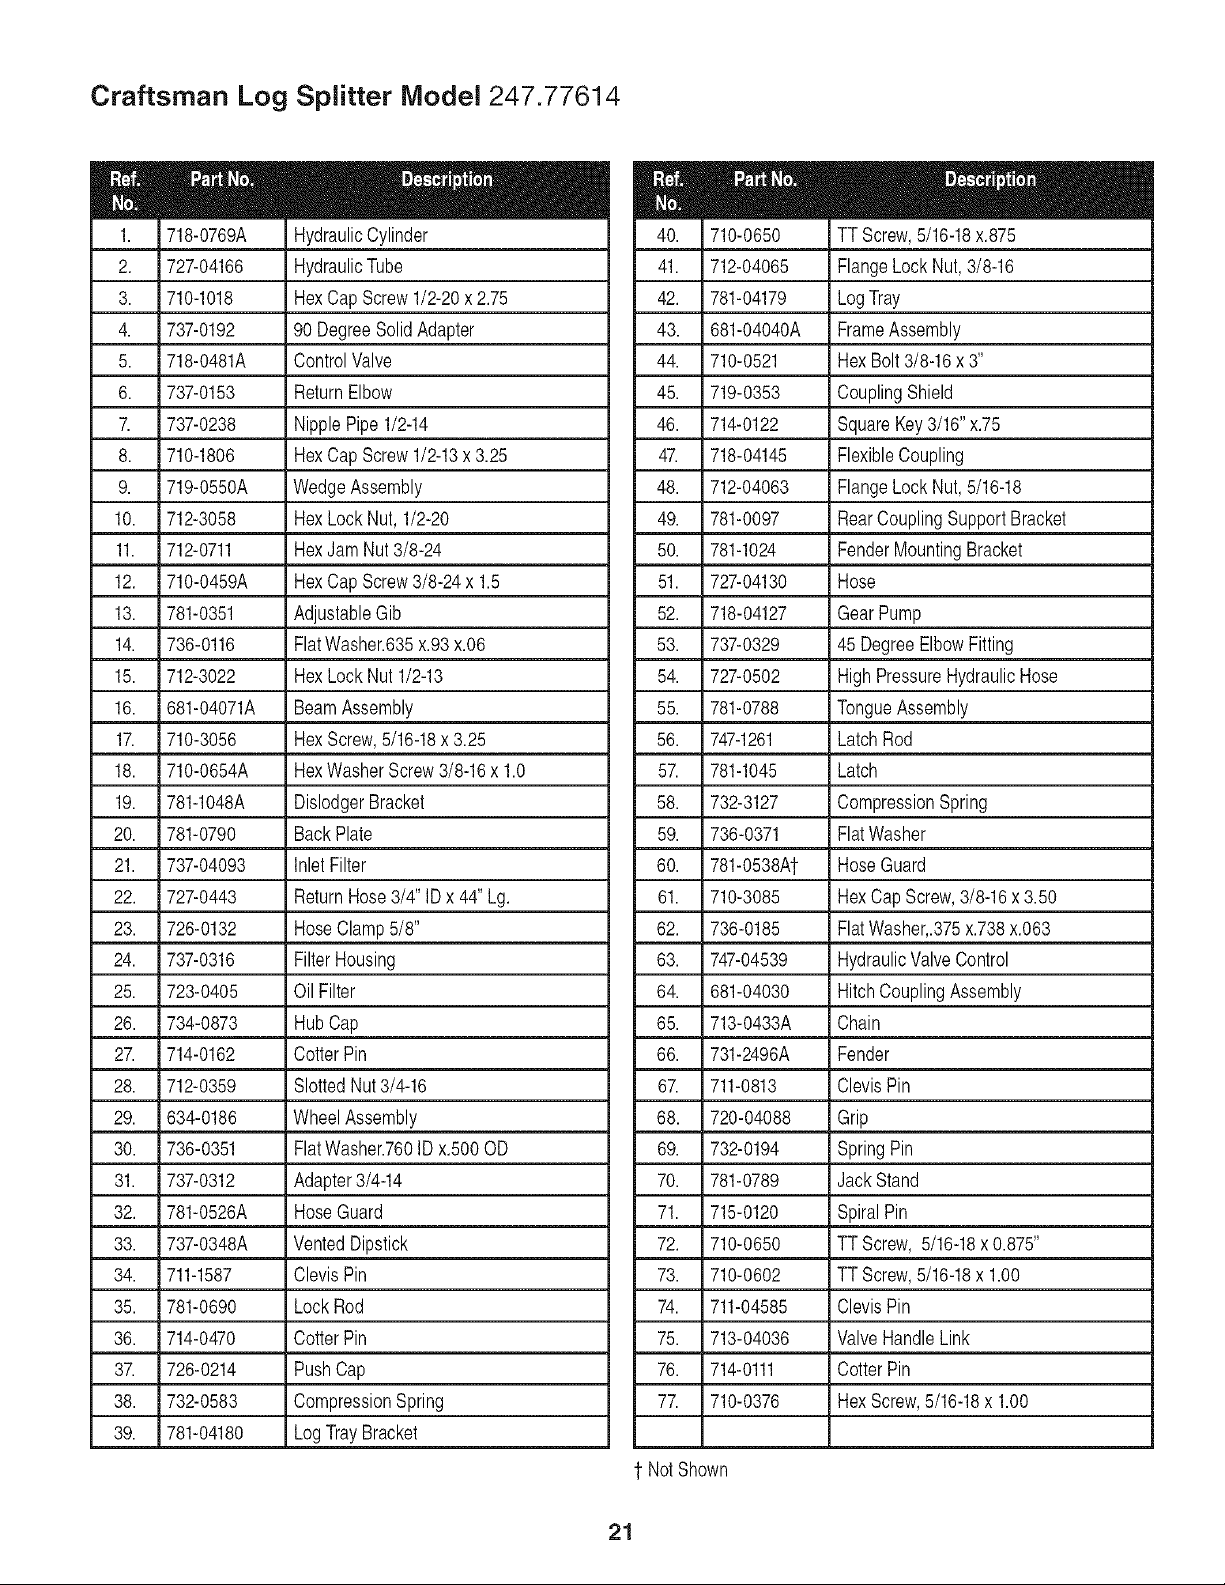
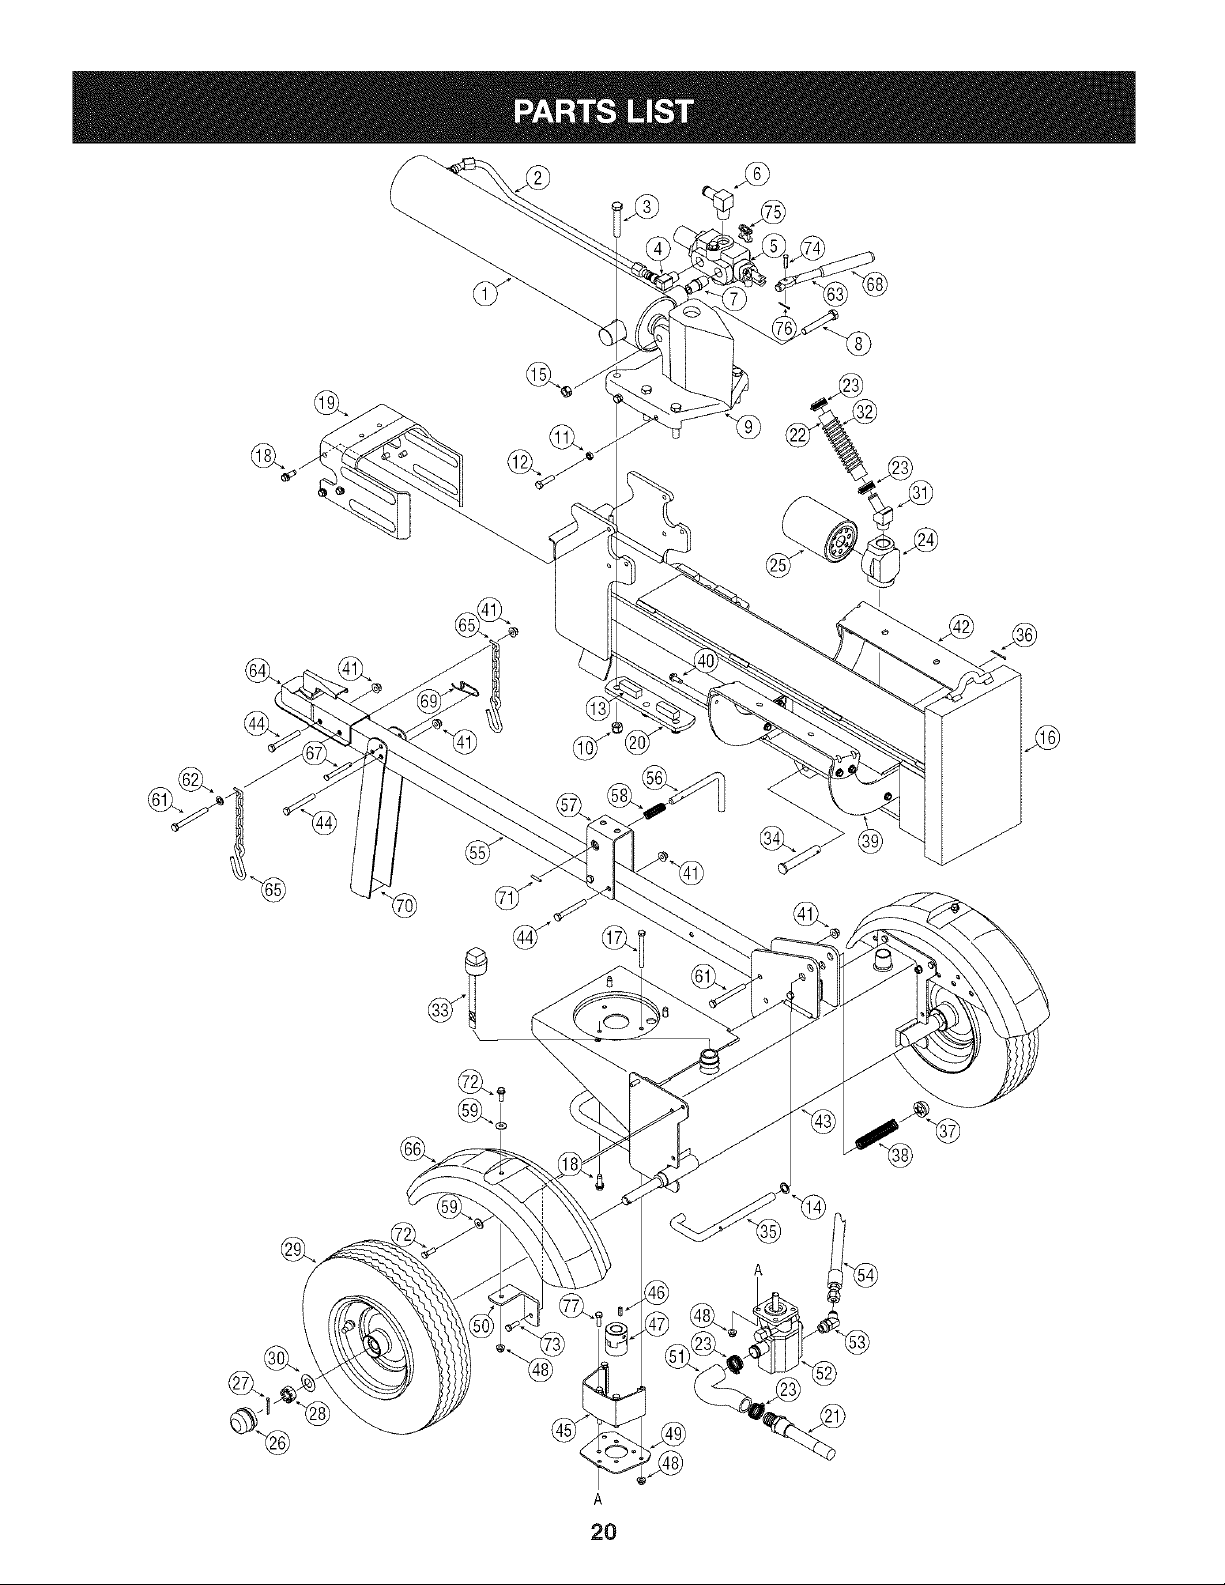
Craftsman Log Splitter Model 247.77614
718-0769A HydraulicCylinder
727-04166 HydraulicTube
710-1018 HexCap Screw1/2-20x 2.75
737-0192 90 DegreeSolidAdapter
718-0481A ControlValve
737-0153 ReturnElbow
737-0238 NipplePipe 1/2-14
710-1806 HexCap Screw1/2-13x 3.25
719-0550A WedgeAssembly
712-3058 HexLock Nut, 1/2-20
712-0711 HexJam Nut 3/8-24
710-0459A HexCap Screw3/8-24x 1.5
781-0351 AdjustableGib
736-0116 FlatWasher.635x.93x.06
712-3022 HexLock Nut 1/2-13
681-04071A BeamAssembly
710-3056 HexScrew,5/16-18x 3.25
710-0654A HexWasherScrew3/8-16x 1.0
781-1048A DislodgerBracket
781-0790 BackPlate
737-04093 Inlet Filter
727-0443 ReturnHose3/4" ID x 44"Lg.
726-0132 HoseClamp5/8"
737-0316 FilterHousing
723-0405 Oil Filter
734-0873 HubCap
714-0162 CotterPin
712-0359 SlottedNut 3/4-16
634-0186 WheelAssembly
736-0351 FlatWasher.760ID x.500OD
737-0312 Adapter3/4-14
781-0526A HoseGuard
737-0348A VentedDipstick
711-1587 ClevisPin
781-0690 Lock Rod
714-0470 CotterPin
726-0214 PushCap
732-0583 CompressionSpring
781-04180 LogTray Bracket
710-0650 TT Screw,5/16-18x.875
41. 712-04065 FlangeLockNut, 3/8-16
42. 781-04179 Log Tray
43. 681-04040A FrameAssembly
44. 710-0521 Hex Bolt3/8-16x 3"
45. 719-0353 CouplingShield
46. 714-0122 SquareKey3/16"x.75
47. 718-04145 FlexibleCoupling
48. 712-04063 FlangeLockNut, 5/16-18
49. 781-0097 RearCouplingSupportBracket
50. 781-1024 FenderMountingBracket
51. 727-04130 Hose
52. 718-04127 Gear Pump
53. 737-0329 45 DegreeElbowFitting
54. 727-0502 High PressureHydraulicHose
55. 781-0788 TongueAssembly
56. 747-1261 Latch Rod
57. 781-1045 Latch
58. 732-3127 CompressionSpring
59. 736-0371 Flat Washer
60. 781-0538A Hose Guard
61. 710-3085 Hex CapScrew,3/8-16x 3.50
62. 736-0185 Flat Washer,.375x.738x.063
63. 747-04539 HydraulicValveControl
64. 681-04030 HitchCouplingAssembly
65. 713-0433A Chain
66. 731-2496A Fender
67. 711-0813 ClevisPin
68. 720-04088 Grip
69. 732-0194 SpringPin
70. 781-0789 Jack Stand
71. 715-0120 Spiral Pin
72. 710-0650 TT Screw, 5/16-18x 0.875"
73. 710-0602 TT Screw,5/16-18x 1.00
74. 711-04585 ClevisPin
75. 713-04036 ValveHandleLink
76. 714-0111 CotterPin
77. 710-0376 Hex Screw,5/16-18x 1.00
NotShown
21

50
m
146
741
20@
11058 OPERATOR'S MANUAL]
525
524
1330 REPAIR MANUAL i
306
307_
22
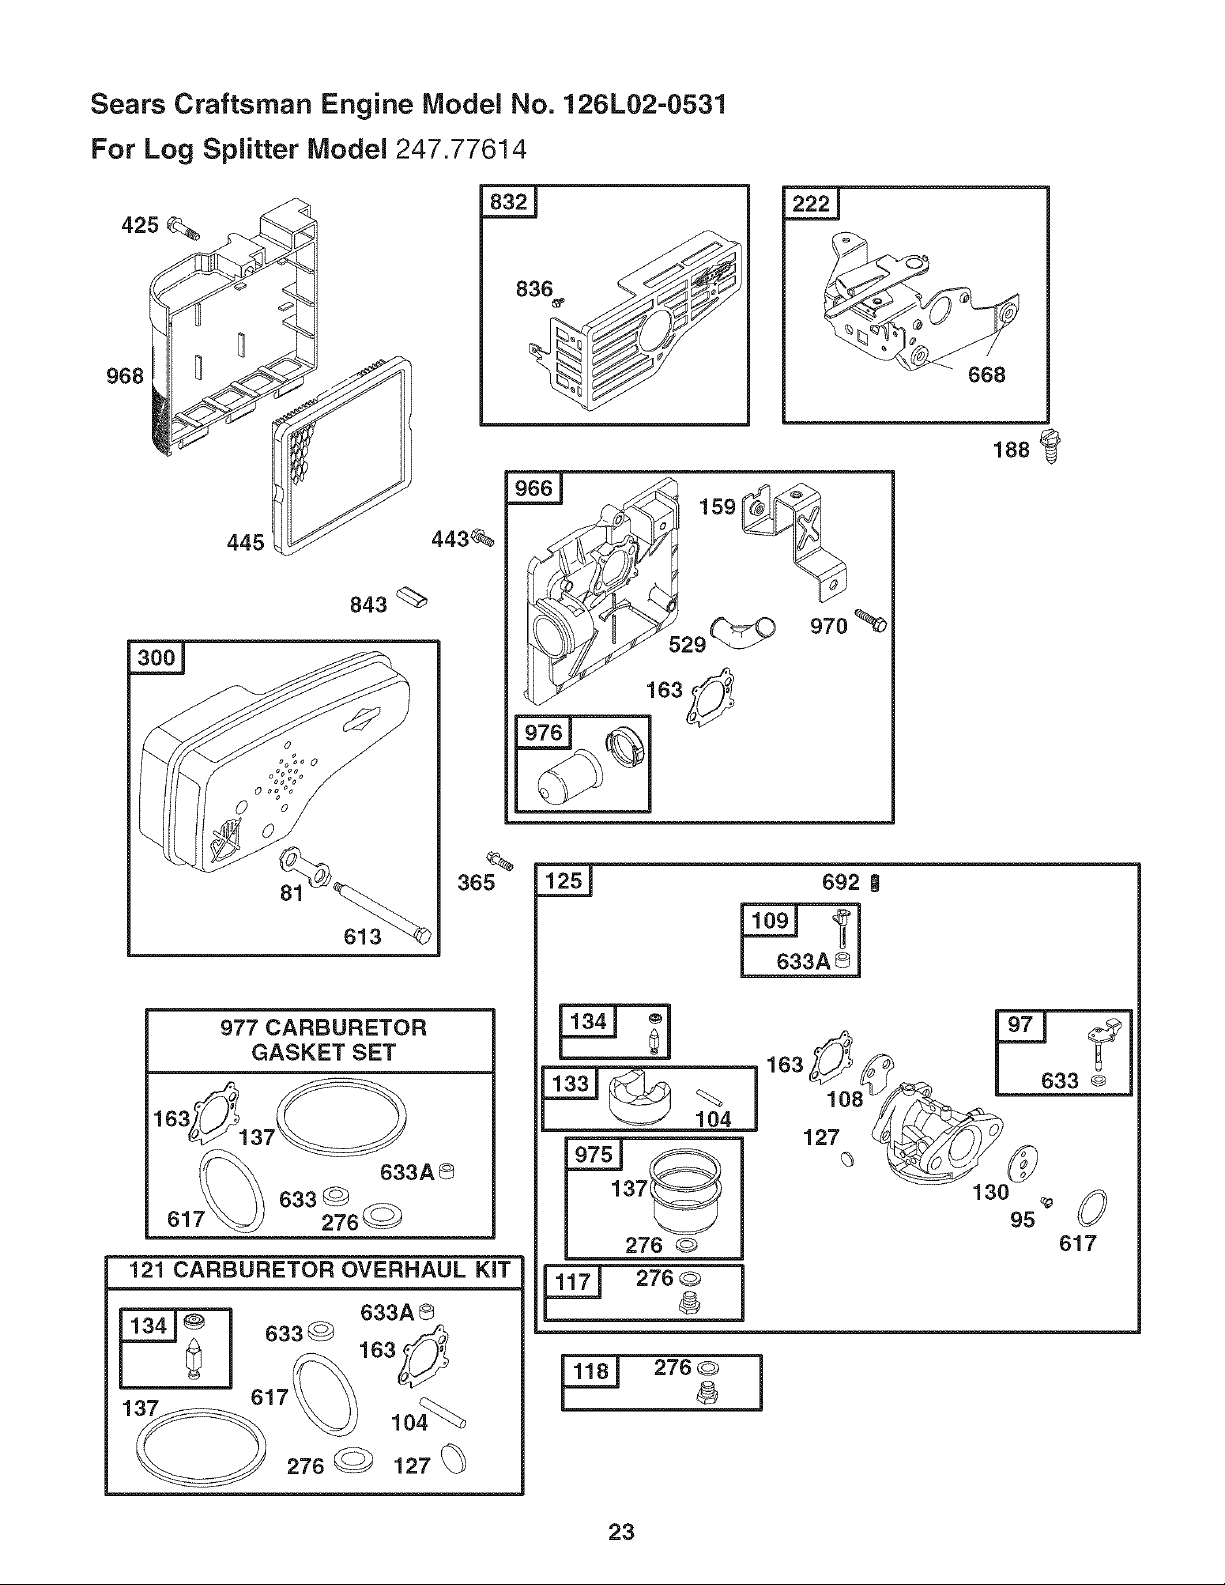
Sears Craftsman Engine Model No. 126L02-0531
For Log Splitter Model 247.77614
445 443_
843_
977 CARBURETOR
GASKET SET
365
121 CARBURETOR OVERHAUL KiT
968
61
m
188
970_
633A ®
163_
m
104
276 Q
_
692 !
t 63aA®1
163
i ,
127
130
95 _ 0
617
23
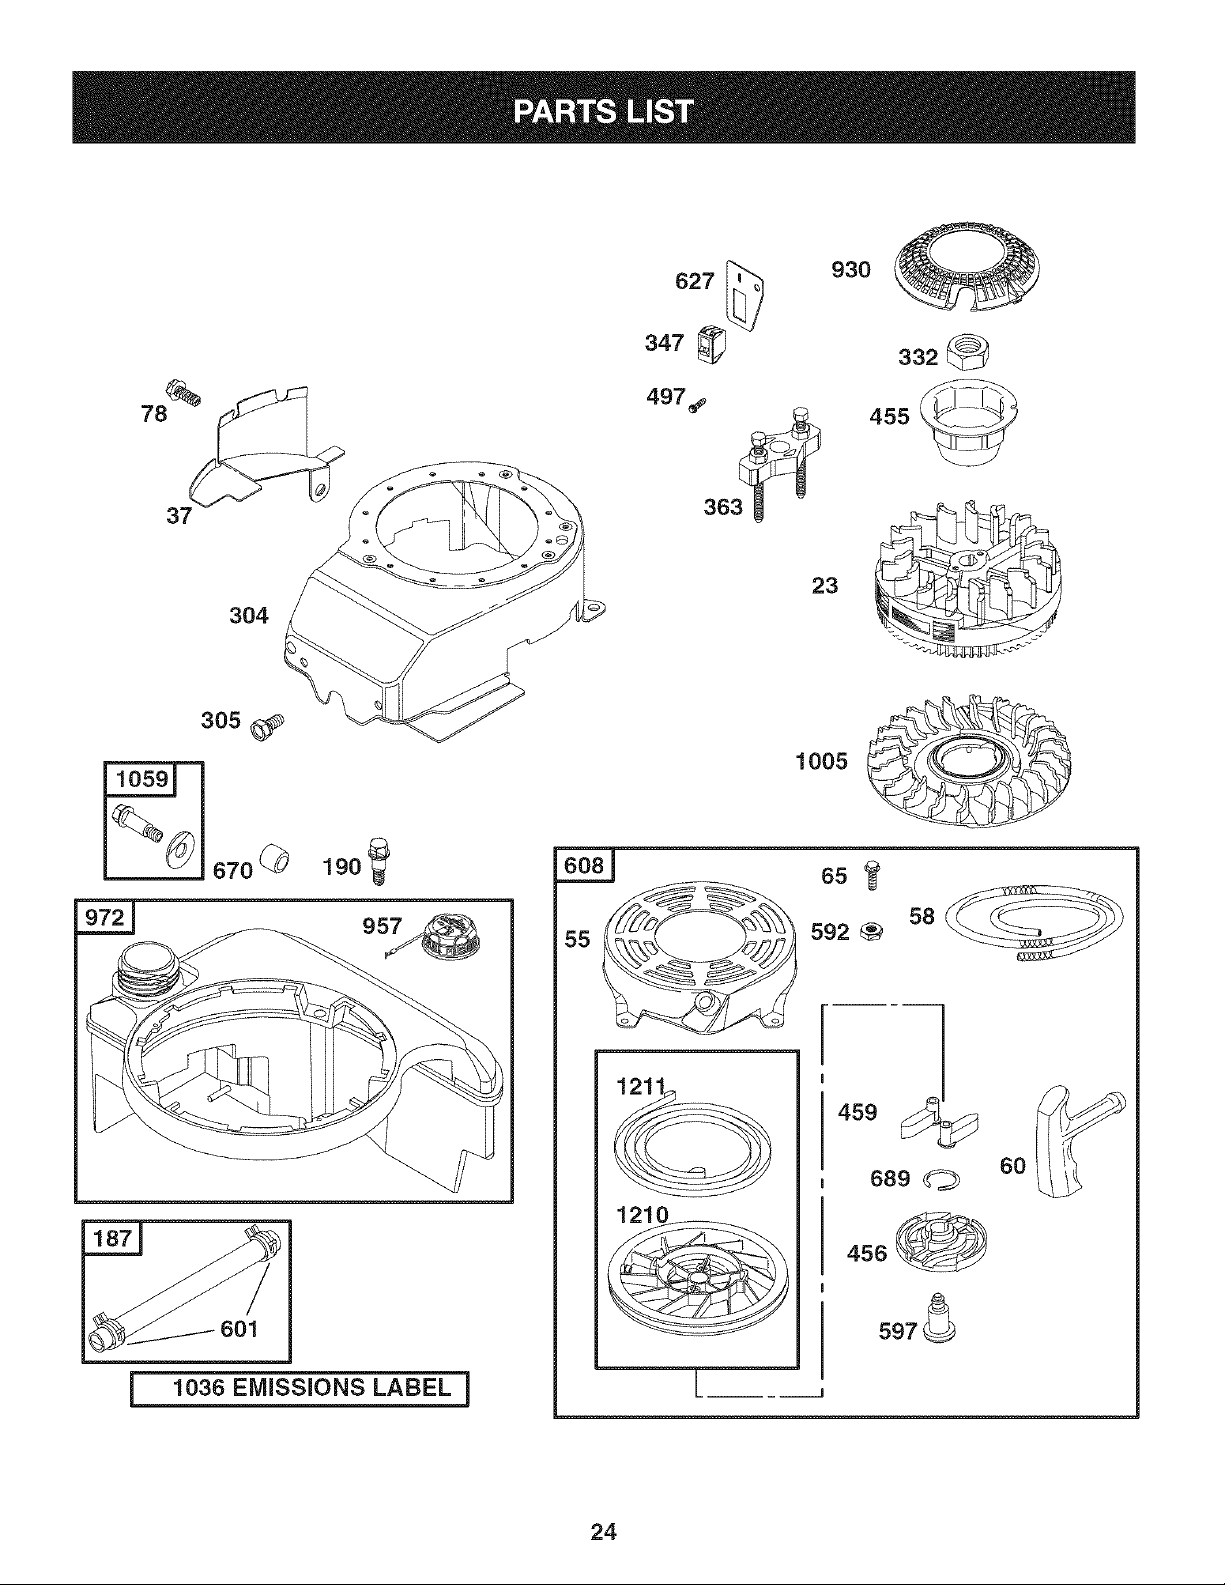
78
304
627
347
497_
332
455 __
305
%#
670 @
19o_
957
I 1036 EMiSSiONS LABEL I
1 OO5
58
689 0 6o
456
597
24
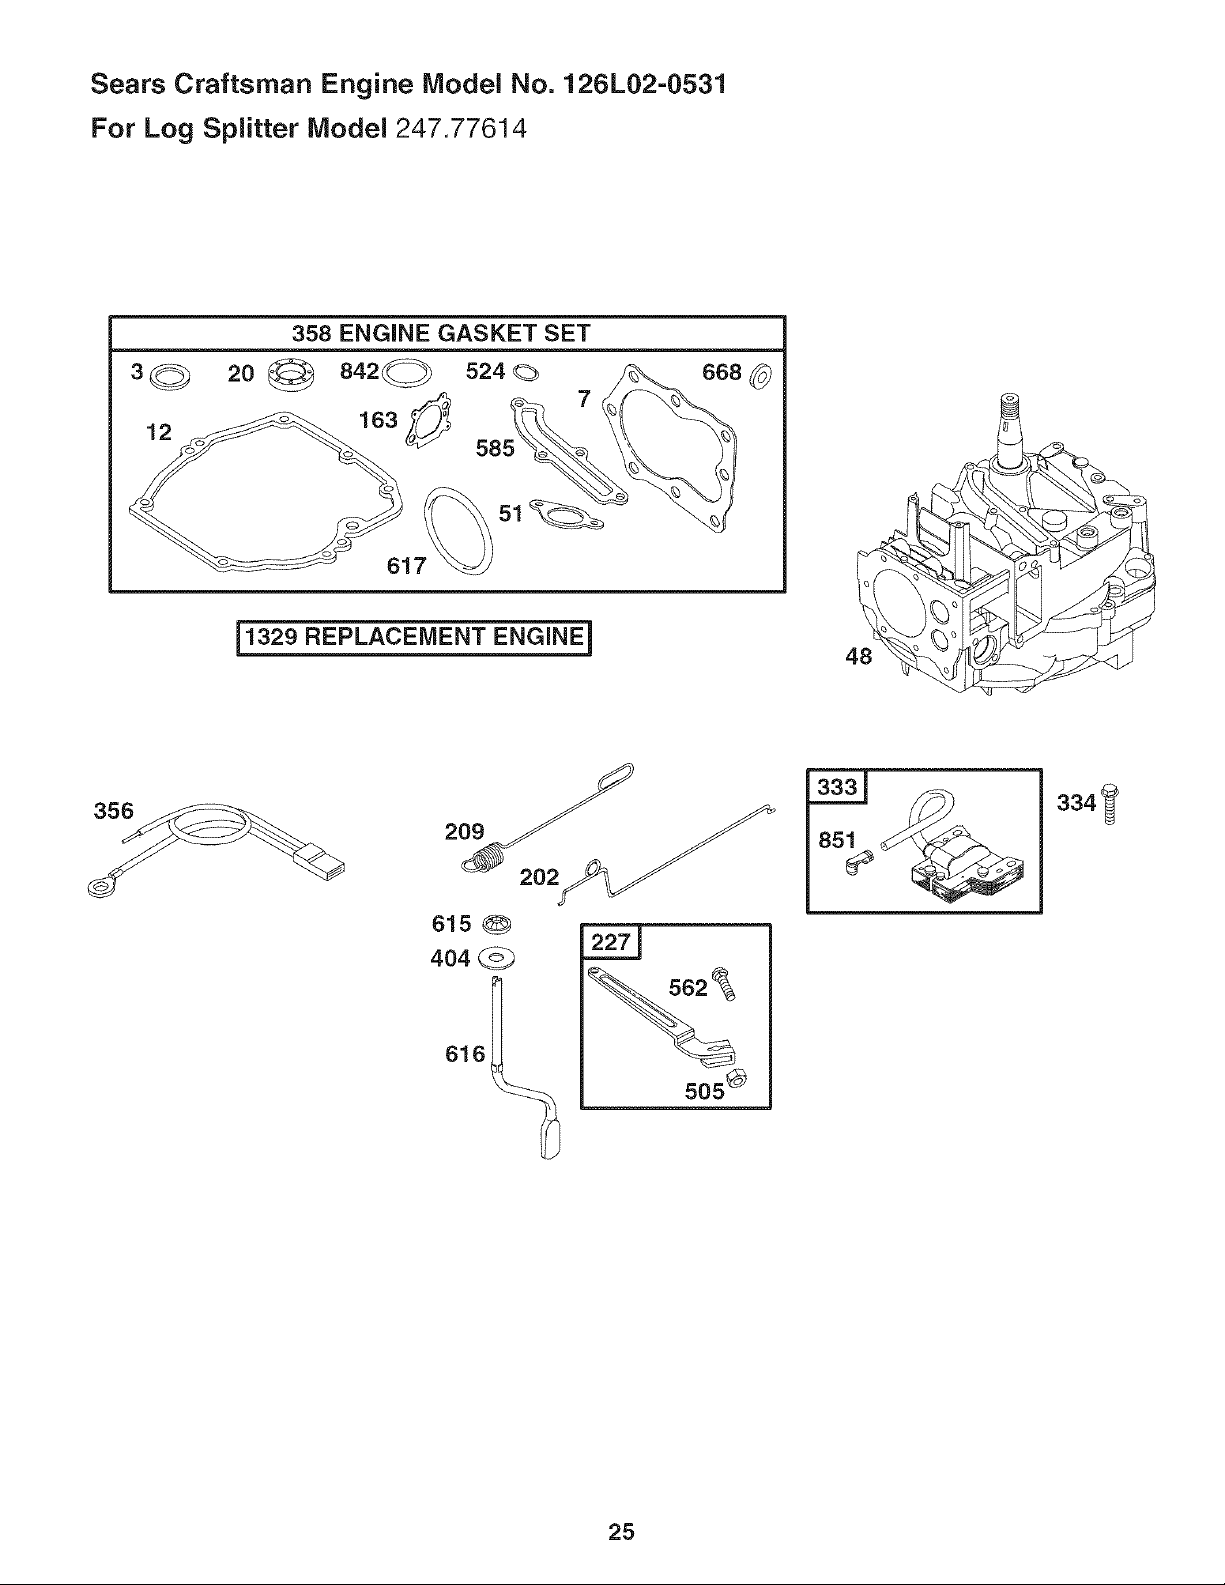
Sears Craftsman Engine Model No. 126L02-0531
For Log Splitter Model 247.77614
3_ 20
j1329 REPLACEMENT ENGINE i
o
25

Ref. No. Part No. Description
1. 697322 CylinderAssembly
2. 399269 Kit-Bushing/Seal
3. 299819St Seal-Oil(MagnetoSide)
4. 493279 Sump-Engine
5. 691160 Head-Cylinder
7. 692249t Gasket-CylinderHead
8. 695250 BreatherAssembly
9. 699125 Gasket-Breather
10. 691125 Screw(BreatherAssembly)
11. 691781 Tube-Breather
12. 692232t Gasket-Crankcase
13. 690912 Screw(CylinderHead)
15. 691680 Plug-OilDrain
16. 691455 Crankshaft
20. 399781t Seal-Oil(PTOSide)
22. 691092 Screw(EngineSump)
23. 691992 Flywheel
24. 222698 Key-Flywheel
25. 791097 PistonAssembly(Standard)
791326 PistonAssembly(.020"Oversize)
26. 791098 RingSet-Piston(Standard)
791324 RingSet-Piston(.020"Oversize)
27. 691866 Lock-PistonPin
28. 499423 Pin-Piston
29. 499424 Rod-Connecting
32. 691664 Screw(ConnectingRod)
32A. 695759 Screw(ConnectingRod)
33. 262651S Valve-Exhaust
34. 262652S Valve-intake
35. 691270 Spring-Valve(intake)
36. 691270 Spring-Valve(Exhaust)
37. 694086 Guard-Flywheel
40. 692194 Retainer-Valve
43. 691997 Slinger-Governor/Oil
45. 690548 Tappet-Valve
46. 691449 Camshaft
48. 792740 ShortBlock
50. 794305 Manifold-intake
51. 794306t Gasket-intake
54. 691650 Screw(intakeManifold)
55. 691421 Housing-RewindStarter
Ref. No. Part No. Description
58. 697316 Rope-Starter(Cut to Required
Length)
60. 281434S Grip-StarterRope
65. 690837 Screw(RewindStarter)
78. 1691108 Screw(FlywheelGuard)
81. 691740 Lock-MufflerScrew
95. 1691636 Screw(ThrottleValve)
97. 696565 Shaft-Throttle
104. 691242tt Pin-FloatHinge
108. 1691182 Valve-Choke
109. 498593 Shaft-Choke
117. 498981 Jet-Main(Standard)
118. 498978 Jet-Main(HighAltitude)
121. 1498260 Kit-CarburetorOverhaul
125. 792253 Carburetor
127. 694468tt Plug-Welch
130. 696564 Valve-Throttle
133. 1398187 Float-Carburetor
134. 398188tt Valve-Needle/Seat
137. 1693981tt* Gasket-FloatBowl
163. i 272653t tt Gasket-AirCleaner
187. 791891 Line-Fuel(Cutto RequiredLength)
188. 693399 Screw(ControlBracket)
190. 1690940 Screw(FuelTank)
202. 691829 Link-MechanicalGovernor
209. 691291 Spring-Governor
222. 692982 Bracket-Control
227. 1690783 ControlLever-Governor
240. 298090S FuelFilter
276. 1271716tt* SealingWasher
287. 690940 Screw(DipstickTube)
300. 1692038 Muffler
304. 493294 Housing-Blower
305. 691108 Screw(BlowerHousing)
306. 1690450 Shield-Cylinder
307. 690345 Screw(CylinderShield)
I
332. i 690662 Nut (Flywheel)
333. 802574 Armature-Magneto
334. 691061 Screw(ArmatureMagneto)
337. 1802592S Plug-Spark
339. 794797 Tube/ConnectorAssembly
26
Sears Craftsman Engine Model No. 126L02-0531
For Log Splitter Model 247.77614
Ref. No. Part No. Description
347. 691396 Switch-Rocker
356. 693010 i Wire-Stop
I
358. 497316 EngineGasketSet
363. 19069 FlywheelPuller
365. 692524 i Screw(Carburetor)
383. 89838S i Wrench-SparkPlug
404. 690272 i Washer(GovernorCrank)
425. 690670 Screw(AirCleanerCover)
443. 692523 I Screw(AirCleanerPrimerBase)
445. 491588S Filter-AirCleanerCartridge
455. 791960 FlywheelCup
456. 692299 I Plate-PawlFriction
459. 281505S PawI-Ratchet
497. 690664 i Screw(Stopswitch)
505. 691251 I Nut(GovernorControlLever)
523. 499621 Dipstick
524. 692296t i SeaI-DpstckTube
525. 495265 I Tube-Dipstick
529. 691923 I Grommet
562. 92613 i Bolt(GovernorControlLever)
564. 690351 I Screw(ControlCover)
584. 697734 Cover-BreatherPassage
585. 691879t i Gasket-BreatherPassage
592. 690800 I Nut(RewindStarter)
597. 691696 i Screw(PawlFrictionPlate)
601. 791850 Clamp-Hose
604. 794794 ControlCover
608. 497680 i Starter-Rewind
613. 691340 i Screw(Muffler)
615. 690340 Retainer-GovernorShaft
616. 698801 Crank-Governor
617. 270344t*tt Seal-ORing(intakeManifold)
627. 792565 Braeket-Stopswiteh
633. 691321tt * Seal-Choke/ThrottleShaft
tlncluded inEngineGasketSet, Key.No. 358
ttlncluded inCarburetorOverhaulKit,Key.No.121
*includedinCarburetorGasketSet, Key.No. 977
Ref. No. Part No. Description
633A. 693867tt * Seal-Choke/ThrottleShaft
635. 66538 Boot-SparkPlug
668. 493823 Spacer
670. 692294 Spacer-FuelTank
684. 690345 Screw(BreatherPassageCover)
689. 691855 Spring-Friction
692. 690579 Spring-Detent
718. 690959 Pin-Locating
741. 790345 Gear-Timing
832. 499034 Guard-Muffler
836. 690664 Screw(MufflerGuard)
842. 691031t Seal-ORing (DipstickTube)
843. 691895 Sleeve-Lever
847. 692047 Assembly-Dipstick/Tube
851. 493880S Terminal-SparkPlug
868. 697338 Seal-Valve
869. 691155 Seat-Valve(intake)
870. 690380 Seat-Valve(Exhaust)
871. 262001 Bushing-Guide(Exhaust)
63709 Bushing-Guide(intake)
930. 691919 Guard-Rewind
957. 794793 Cap-FuelTank
966. 794798 Base-AirCleanerPrimer
968. 692298 Cover-AirCleaner
972. 794792 Tank-Fuel
975. 493640 Bowl-Float
977. 498261 Set-CarburetorGasket
1005. 691346 Fan-Flywheel
1036. 697457 Label-Emission
1058. MS3260 Owner'sManual
1059. 692311 Kit-Screw/Washer
1210. 498144 Assembly-Pulley/Spring(Pulley)
1211. 498144 Assembly-Pulley/Spring(Spring)
1330. 272147 RepairManual
27
(Thispageapplicablein the U.S.A.and Canadaonly.)
Sears, Roebuck and Co., U.S.A. (Sears), the California Air Resources Board (CARB)
and the United States Environmental Protection Agency (U.S. EPA)
Emission ControJ System Warranty Statement (Owner's Defect Warranty Rights and ObJigations)
EMISSIONCONTROLWARRANTYCOVERAGEISAPPLICABLETO CERTI- YEAR 1997AND LATERENGINESWHICHARE PURCHASEDAND USED
FlED ENGINESPURCHASEDIN CALIFORNIAIN 1995ANDTHEREAF- ELSEWHEREINTHE UNITEDSTATES(ANDAFTERJANUARY1,2001 IN
TER,WHICHARE USEDINCALIFORNIA,ANDTO CERTIFIEDMODEL CANADA).
California and United States Emission Control Defects Warranty Statement
The CaliforniaAir ResourcesBoard(CARB),U.S.EPAandSearsare pleased
to explainthe EmissionControlSystemWarrantyon your modelyear2000 and
latersmalloff-roadengine(SORE).In California,newsmall off-roadengines
mustbe designed,builtand equippedto meettheState'sstringentanti-smog
standards.Elsewhereinthe UnitedStates, newnon-road,spark-ignition
enginescertifiedfor modelyear 1997and latermustmeetsimilarstandardsset
forth bythe U.S.EPA.Sears mustwarrantthe emissioncontrolsystemon your
enginefor the periodsof timelistedbelow,providedtherehas beenno abuse,
neglector impropermaintenanceof your smalloff-roadengine.Youremis-
sion controlsystemincludespartssuch as thecarburetor,air cleaner,ignition
system,mufflerand catalyticconverter.Also includedmay be connectorsand
otheremissionrelatedassemblies.Wherea warrantableconditionexists,Sears
will repairyour smalloff-roadengine at no cost to you includingdiagnosis,parts
and labor.
Sears Emission Control Defects Warranty Coverage
Smalloff-roadenginesarewarrantedrelativeto emissioncontrol partsdefects
fora period of oneyear,subjectto provisionsset forth below,Ifany covered
Owner's Warranty
Asthe smalloff-roadengineowner,you are responsiblefor theperformanceof
therequiredmaintenancelistedin your Operatingand MaintenanceInstruc-
tions.Sears recommendsthatyouretainallyour receiptscoveringmaintenance
on yoursmall off-roadengine,butSearscannot denywarrantysolelyforthe
lackof receiptsor for yourfailureto ensurethe performanceof all scheduled
maintenance.Asthe smalloff-roadengineowner,you shouldhoweverbe
awarethat Sears maydenyyou warrantycoverageif your smalloff-roadengine
ora part hasfaileddueto abuse,neglect,impropermaintenanceor unap-
part onyour engineis defective,the part will be repairedor replacedbySears.
Responsibilities
provedmodifications.Youare responsiblefor presentingyour smalloff-road
engineto an AuthorizedSearsService Dealeras soonas a problemexists.The
undisputedwarrantyrepairsshouldbe completedina reasonableamountof
time,not to exceed30 days.Ifyou haveany questionsregardingyour warranty
rightsand responsibilities,you shouldcontacta SearsServiceRepresentative
at 1--800--469--4663.Theemissionwarrantyis a defectswarranty.Defectsare
judgedon normalengineperformance.Thewarrantyis notrelatedto an in-use
emissiontest.
Sears Emission Control Defects Warranty Provisions
ThefollowingarespecificprovisionsrelativetoyourEmissionControlDefectsWarrantyCoverage.Itisin additionto theSearsenginewarrantyfornon-regulated
enginesfound in theOperatingandMaintenanceInstructions.
1. WarrantedParts
Coverageunderthis warrantyextendsonly to the parts listed below(the
emissioncontrol systemsparts)to the extentthese parts werepresenton
theenginepurchased.
a. FuelMetering System
,,Coldstart enrichmentsystem
,,Carburetorand internalparts
• FuelPump
b. Airlnduction System
,,Air cleaner
• Intakemanifold
c. IgnitionSystem
,,Sparkplug(s)
• Magnetoignitionsystem
d. CatalystSystem
,,Catalyticconverter
• Exhaustmanifold
,,Air injectionsystemor pulsevalve
e. MiscellaneousItemsUsed inAboveSystems
• Vacuum,temperature,position,time sensitive valves
andswitches
• Connectorsand assemblies
2. Lengthof Coverage
Searswarrantsto the initialownerand eachsubsequentpurchaserthat
theWarrantedParts shall befree from defectsin materialsandworkman-
ship whichcausedthe failureof the WarrantedPartsfor a period of one
yearfrom the datethe engineis deliveredto a retailpurchaser.
3. NoCharge
Repairor replacementof any WarrantedPartwill beperformedat no
chargeto the owner,includingdiagnosticlabor whichleads to the
determinationthata WarrantedPartis defective,ifthe diagnosticwork is
performedat an AuthorizedSears ServiceDealer.For emissionswarranty
servicecontact your nearestAuthorizedSears ServiceDealeras listed in
the "YellowPages"under"Engines,Gasoline,""GasolineEngines,""Lawn
Mowers,"or similarcategory.
4. Claimsand CoverageExclusions
Warrantyclaimsshall be filed in accordancewiththe provisionsofthe
Sears EngineWarrantyPolicy.Warrantycoverageshall be excludedfor
failures of WarrantedPartswhichare not originalSears parts or because
of abuse, neglector impropermaintenanceas setforth in the Sears
EngineWarrantyPolicy.Searsis not liable to coverfailuresof Warranted
Partscausedby the useof add-on, non-original,or modifiedparts.
5. Maintenance
Any WarrantedPartwhich is notscheduledfor replacementas required
maintenanceor which is scheduledonly for regularinspectionto the effect
of "repairor replace as necessary"shall be warrantedas to defectsfor the
warrantyperiod.Any WarrantedPartwhich is scheduledfor replacement
as requiredmaintenanceshallbe warrantedasto defectsonly for the
periodof time upto the first scheduledreplacementforthat part.Any
replacementpart that is equivalentin performanceand durabilitymay
be usedin theperformanceof any maintenanceor repairs.The owneris
responsibleforthe performanceof all requiredmaintenance,as definedin
the SearsOperatingandMaintenanceInstructions.
6. ConsequentialCoverage
Coveragehereundershallextend to the failure of any engine components
caused bythefailure of anyWarrantedPartstill underwarranty.
Inthe USAand Canada,a 24 hour hot line, 1-800-469-4663,has a menuof pre-recordedmessagesofferingyou engine maintenanceinformation.
28
Garantia .................................................... Page 29
Protecci6n ................................................. Page 30
Ensamble .................................................. Page 31
Funcionamiento ........................................ Page 33
Servicio y ajustes ...................................... Page 35
Mantenimiento .......................................... Page 39
Almacenamiento ....................................... Page 41
Gui De Localizaci6n de fallas ................... Page 44
Soluci6n .................................................... Page 45
Control de Emisi6n ................................... Page 47
Garantia iimitada de la cortadora de troncos Craftsman
Searsreparar_,o reemplazar_gratistodapiezaquese determinedefectuosaen materialo manode obra,a partir de un (1)ahodela fecha
decompra,si este equipoCraftsmanse mantiene,lubricay afinade acuerdocon las instruccionesenel manualdel operador.El serviciode
garanfiaest,. disponiblegratisdevolviendoelequipoCraftsmanal centrode servicioSearsm_.scercano.Estadisponiblela garanfiaen el sitio
peroseaplica un cargopor viaje. Esta Garanfiase aplicamientrasesteproductose encuentreen los EstadosUnidossolamente.
Esta Garantia no cubre:
Articulosconsumiblesque se desgastanduranteel usonormal,talescomo bujias,filtros, correasy filtrospara aceite.
Reemplazoo reparacionesde neum_.ticoscausadospor perforacionesde objetosexternostales comoclavos,espinas,toconeso vidrio.
Reparacionesnecesariascausadaspor abusodel operador,incluyendo,pero sin estarlimitadas,a dahoscausadosporobjetostalescomo
piedraso desechosmet_tlicos,materialesdegrantamaho,objetosimpactantesquedoblanel bastidoro elcigOehal,o velocidadexcesivadel
motor.
Reparacionesnecesariascausadaspor negligenciadeloperador,incluyendo,perosin estarlimitadas,a dahoselectricoso mec_.nicoscausa-
dos por almacenamientoinadecuado,fallaen usarel gradoy cantidadcorrectosde aceitede motor,o fallaen mantenerelequipodeacuerdo
con las instruccionescontenidasen el manualdel operador.
Limpiezao reparacionesdel sistemade combustibledel motorcausadosporel combustibleque se determineestar contaminadouoxidado
(rancio).Engeneralel combustibledebeusarsedentrode los 30 dias de su fecha de compra.
Equipousadoparafines comercialeso de alquiler.
LLAMARAL 1-800-4-MY-HOMEPARALOCALIZARELCENTRODE SERVlCIOSEARSMASCERCANO0 PARA PROGRAMARELSERVl-
ClO.
Lagaranfiale otorgaciertosderechoslegalesespedficosy ustedpuedetenertambienotrosderechos,quevariandeestadoa estado.
Serie de motor
Tipo del aceite de motor
Cap. de aceite del motor
Capacidad de combustible
Bujia (separaci6n de .030")
Liquido hidrAulico
126L02
SAE 30
20 Onzas
1.5 Cuartos
Champion RJ-19LM
Dexron III / 3.0 gal
NOmero de modelo ....................................................
NOmero de serie ........................................................
Fecha de compra ......................................................
Para referencia futura registrar el nOmero de serie y la
fecha de compra y guardar en un lugar seguro.
29
Felicitacionespor haberrealizadounaadquisici6ninteligente.El
productoCraftsman@que haadquiridoest,.disehadoy fabricado
parabrindarmuchosahosde funcionamientoconfiable.Perocomo
todoslosproductosa vecespuederequerirde reparaciones.Esen
ese momentocuandoeldisponerde unAcuerdode protecci6npara
reparacionesle puedeahorrardineroy problemas.
Acontinuaci6nse detallanlos puntosincluidosen el Acuerdo:
, Servicio experto prestadopor nuestros12,000especialistasen
reparacionesprofesionales
Servicio ilimitadosin cargo paralas piezasy la manode obra en
todaslas reparacionescubiertas
• Reemplazodel productosi noes posiblerepararelproducto
cubierto
Descuentode 10%del precionormaldelservicioy delas piezas
relacionadascon el mismoquenoestencubiertaspor el acuerdo;
adem_ts,10%delprecionormalde la verificaci6nde manten-
imientopreventivo
, Ayudar_pida portel_fono- asistenciatelef6nicaa cargode un
tecnicode Searspara los productosquerequierenreparaci6n
a domicilio,adem_tsdeunaprogramaci6nconvenientepara la
reparaci6n
Unavez adquiridoel Acuerdo,puedeprogramarel serviciocon
tan s61orealizarunaIlamadatelef6nica.PuedeIlamaren cualquier
momentodel dia o de la nocheo programarunservicioen linea.
Searsdisponede m_.sde 12.000especialistasenreparaciones
profesionalesque tienenaccesoa m_tsde 4.5 millonesde piezasy
accesoriosde buenacalidad.Estees el tipo de profesionalismoen
el quepuedeconfiarparaque leayudea prolongarla vida 0til del
productorecientementeadquiridoen losahos por venir,iAdquierahoy
su acuerdode protecci6nparareparaciones!
Se aplican determinadaslimitacionesy exclusiones.Paraobtener
informaci6nadicional y preciosIlameal 1-800-827-6655.
Serviciode instalaci6nde Sears
Sideseasolicitarla instalaci6nprofesionalde Searsde aparatos
dom_sticos,dispositivospara abrir portones,calentadoresde agua y
otrosarticulosdom_sticosimportantes,en losEstadosUnidosIlame
al 1-800-4-MY-HOME@.
30
ADVERTENClA:Estesirnboloindicairnportantesinstruccionesdeseguridadlacuales,si noseobservan,
puedenponerenpeligrolaseguddadpersonaly/olapropiedadsuyay deterceros,Leay sigatodaslas
instruccionesenestemanualantesdeintentaroperarestarn_.quina.Elnocurnplirconestasinstrucciones
puederesultarenlesionespersonales,Cuandoveaestesirnboloobedezcaasuadvertencia,
ADVERTENClA:Elescapedelmotor,algunosde susintegrantes,y ciertoscornponentesdelvehiculo
confienenoernitensubstanciasquirnicasconocidasal EstadodeCaliforniacornocausantesdecancery
defectosdenacirnientouotraslesionesreproductoras,
PELIGRO:Estarn_.quinafuefabricadaparaoperarsedeacuerdoconlasreglasparaunaoperaci6n
segura.AIigualqueconcualquiertipodeequipornotorizado,el descuidoo errorpotpartedeloperador
puederesultarenlesionesgraves.Estarn_.quinaescapazdearnputarrnanosy piesydespedirobjetos.
Lafallaenobservarlasinstruccionessiguientesdeprotecci6npuederesultarenlesionesgraveso la
rnuerte.
CAPACITACION
1. Leer,entendery seguirtodas las instruccionesenla m_.quinay
enel manual(es)antesdeoperar.Familiarizarsecompletamente
con loscontrolesy el usoapropiadode estam_.quinaantesde
operarla.Guardareste manualen un lugarseguroparareferencia
futuray regulary paraordenarpiezasde repuesto.
2. Familiarizarsecon todosloscontrolesy su operaci6ncorrecta.
Sabercomopararla m_tquinay desengancharr_tpidamentelos
controles.
3. No permitirnuncaque los niflos menoresde 14aflos de edad
operenestam_.quina.Los niflos de 14aflos de edady mayores
debenleery entenderlasinstruccionesde operaci6ny las reglas
deseguridadde este manualy debenser capacitadosy supervisa-
dos por unodelos padres.
4. Nuncapermitaquelos adultosoperenestam_tquinasin la instruc-
ci6nadecuada.
5. Muchosaccidentesocurrencuandom_tsde unapersonaopera la
m_tquina.Si hayun asistenteayudandoa cargarlos troncos,no
activarnuncael controlhastaqueel asistenteesteaun minimode
10piesde la m_.quina.
6. Mantenera los espectadores,ayudantes,animales domesticos
y niflosa 10pies,porIo menos,de la m_tquinamientrasesteren
operaci6n.
7. Nuncapermitirpasajerosen m_.quina.
8. Nuncatransportarcargaen la m_tquina.
9. Lascortadorashidr_tulicasde troncosalcanzanpresioneselevadas
durantela operaci6n.El liquido que escapaa travesde unorificio
deltamafiode una cabezade alfilerpuedepenetrarla piel y causar
envenenamientode la piel, gangrenao la muerte.Prestaratenci6n
entodo momentoa lasinstruccionessiguientes:
a. Noinspeccionarporperdidasconlamano.
b. Nooperarla maquinaconmangueras,adaptadoresotuberias
gastados,doblados,agrietadoso dafiados.
c. Antesdecambiaroajustarlosadaptadores,mangueras,tuberiasu
otroscomponentesdelsistema,pararel motory disminuirla presion
delsistemahidraulico.
d. Noajustarlasgraduacionesdepresi6ndelabombaovalvula.
10.Lasperdidaspuedendetectarsepasandoun cart6no madera,
usandoguantesprotectoresy anteojosprotectores,sobre el_.rea
sospechosa.Observarla decoloraci6ndel cart6n o la madera.
11.Consultarinmediatamentecon un m_dicosi el operadorse ha
lesionadopor el liquidode perdida.Si no se administrainmedi-
atamentetratamientom6dicopuedeproducirseuna infecci6no
reacci6ngrave.
12.Mantenerla zonadel operadory el _.reaadyacentelibre para poder
pararseconprotecci6ny seguridad.
13.Si la m_.quinaest,.equipadacon un motorde combusti6ninternay
se va a usarcercade bosquessilvestreso tierracubiertade mator-
ralesy grama,el escapedelmotordebeestarequipadocon un
supresordechispas.Asegurarsede cumplircon todos losc6digos
locales,estatalesy federalesaplicables.Sedebetenersiempre
equipoadecuadoextintorde incendios.
14.Estam_tquinadebe usarsepara cortar maderasolamentey nose
debeusarpara ningOnotro fin.
15.Seguirlas instruccionesenel manual(es)provistoconel
aditamento(s)paraestam_tquina.
PREPARACION
1. Usarsiemprezapatosprotectoreso botaspesadas.
2. Usarsiempreanteojosprotectoreso antiparrasprotectorasdurante
laoperaci6nde esta m_tquina.
3. Nousar nuncajoyaso ropasholgadasque puedan enredarseen
laspiezas m6vileso giratoriasde la m_.quina.
4. Antesdeoperarasegurarsequela m_tquinaesteenunasuperficie
nivelada.
5. Bloquearsiemprela m_tquinasegOnrequeridoparaprevenirun
movimientoinesperado,y trabaren laposici6nhorizontalo vertical.
6. Operarsiemprela m_tquinadela zona(s)del operadorespecifi-
cada en el manual.
7. Lostroncosdebencortarsecon extremoscuadradosantesde
cortarlos.
8. Usarla cortadorade troncosduranteel dia o bajounabuenaluz
artificial.
31
9. Paraevitarlesionespersonaleso dahosa lapropiedadse debe
ser muyprecavidoal manejarla gasolina.La gasolinaes extrema-
damenteinflamabley losvaporessonexplosivos..Puedenocurrir
lesionespersonalesgravescuandosederramagasolinasobreel
operadoro susropasya que puedeencenderse.Lavarselapiely
cambiarsede ropasinmediatamente.
a. Usarunrecipienteaprobadodegasolinasolamente.
b. Apagartodosloscigarrillos,cigarros,pipas,y otrasfuentesde
combustion.
c. Nuncasedebecargargasolinabajotecho.
d. Nuncaextraerlatapadegasolinaoagregarcombustiblemientrasel
motorestacalienteofuncionando.
e. Antesdecargargasolinapermitirqueelmotorseenfrfepordos
minutosporIomenos.
f. NuncaIlenarenexcesoel tanquedegasolina.Llenareltanquea no
masde1/2pulgadapordebajode la seccioninferiordelcuellodel
Ilenador,paraproveerespacioparalaexpansi6ndelcombustible.
g. Volvera colocarla tapadeltanquedegasolinay ajustarbien.
h. Sisederramagasolina,limpiarconuntrapolamaquinay el equipo
y moverlamAquinaa otraArea.Esperar5 minutosantesantesde
arrancarel motor.
i. Noalmacenarnuncala maquinaoelrecipientedecombustiblebajo
techodondehayaunallamaexpuesta,chispaso llamapilotocomoen
calentadoresdeagua,calentadoresde cuarto,caldera,secadorade
ropauotrosartefactosa gas.
j. Antesdealmacenar,permitirquelamaquinaseenfriepor5minutos
porIomenos.
OPERACION
1. Antesdearrancarestam_.quina,repasarlas"lnstruccionesde
Protecci6n".El no seguiresas reglaspuederesultaren lesiones
gravesaloperadoroa losespectadores.
2. No dejarnuncala m_tquinadesatendidamientrasel motorester
funcionando.
3. No operarla m_.quinamientrasse esterbajo la influenciade
alcohol,drogaso medicaci6n.
4. No permitirnuncaque ningunapersonaopere esta m_tquinasin
unainstrucci6nadecuada.
5. Operarsiempreesta m_.quinacon todoel equipode seguridaden
su lugary funcionando.Asegurarseque todos los controlesesten
bienajustadosparauna operaci6nsegura.
6. No cambiarlasgraduacionesdel reguladordel motornioperar
el motoravelocidadexcesiva.El reguladorcontrolala velocidad
m_tximaseguradeoperaci6ndel motor.
7. AIcargarun tronco,colocarsiemprelas manossobrelos ladosdel
tronco,no en losextremos,y nuncausarel pieparaestabilizarun
tronco.El no hacerlopuederesultaren que losdedos,dedosdel
pie, manoo pie sean aplastadoso amputados.
8. Usarlasmanossolamenteparaoperarloscontroles.
9. No intentarnuncacortarm_.sde un troncopor vez,a menosque
el arieteeste completamenteextendidoy se necesiteunsegundo
troncoparacompletarla separaci6ndel primertronco.
10.Paralos troncosque no se han cortadocuadrados,elextremo
menoscuadradoy la porci6nm_.slargadel troncodebencolocarse
hacia la viga y cuba,y el extremocuadradodebe colocarsehacia
la placadel extremo.
11.AI cortar en la posici6nvertical,estabilizarel troncoantesdemover
el control.Cortar comosigue:
a. Colocareltroncosobrela placadelextremoy girarlohastaquese
apoyecontralavigayes estable.
b. AIcortartroncosextragrandeso irregulares,el troncodebeestabili-
zarseconcu_asde maderaomaderacortadaentreeltroncoy laplaca
delextremoo el suelo.
12.Mantenersiemprelos dedosalejadosdegrietasque se abren
en eltroncoal cortar.Las grietaspuedencerrarsesObitamentey
aprisionaro amputarlosdedos.
13.Mantenerlimpiael _.reade trabajo.Extraerinmediatamentela
maderacortada alrededorde la m_tquinade manerade no tropezar
sobre la misma.
14.Nunca moverla m_tquinamientrasel motoresterfuncionando.
15.Esta m_.quinano debe remolcarseenningunacalle,carreterao
caminopOblicosin verificarprimerolosrequerimientosexistentes
locales,estatalesy federalespara vehiculos.Todalicenciao
modificacionestales como luces posteriores,etc., requeridaspara
cumplir,es la responsabilidadexclusivadel comprador.Consultar
con el distribuidorlocalsi en el Estadose requiereuna"Declara-
ci6n de Origen".
16.Consultarla secci6nde remolqueen este manual,para lasinstruc-
cionesderemolqueuna vez que se hayacumplidocon todos los
requerimientosfederales,localeso estatales.
iVIANTENIIVilENTO Y ALIVIACENAIVIIEN-
TO
1. Pararel motor,desconectarla bujia y conectara tierracontrael
motorantesde limpiaro inspeccionarla m_.quina.
2. Antesdecambiaro ajustarlos adaptadores,mangueras,tuberias
u otroscomponentesdelsistema,parar el motory disminuirla
presi6ndel sistemahidr_tulico.
3. Paraevitarincendios,limpiarlosdesechosy pajadelas _treasdel
motory delsilenciador.Si el motorest,. equipadocon un silenciad-
or delsupresorde chispas,limpiarloe inspeccionarloregularmente
de acuerdocon las instruccionesdel fabricante.Reemplazarlosi
est,.dahado.
4. Inspeccionarperi6dicamenteque todas lastuercasy pernos,
mordazasde las manguerasy adaptadoreshidr_.ulicosesten
firmesparaasegurarseque elequipoesteen buenestadode
trabajo.
5. Inspeccionartodaslas guardasy protectoresde seguridadpara
asegurarsequeestenenla posici6ncorrecta.Nuncaoperarsin
que lasguardasprotectoras,protectoresu otrascaracteristicas
protectorasestenen su lugar.
6. La v_.lvulade escapede presi6nesterpregraduadade f_tbrica.No
ajustarlav_.lvula.
7. Nuncaintentarmoveresta m_.quinasobreun terrenoescarpadoo
irregularsin unvehiculode remolqueo ayudaadecuada.
32
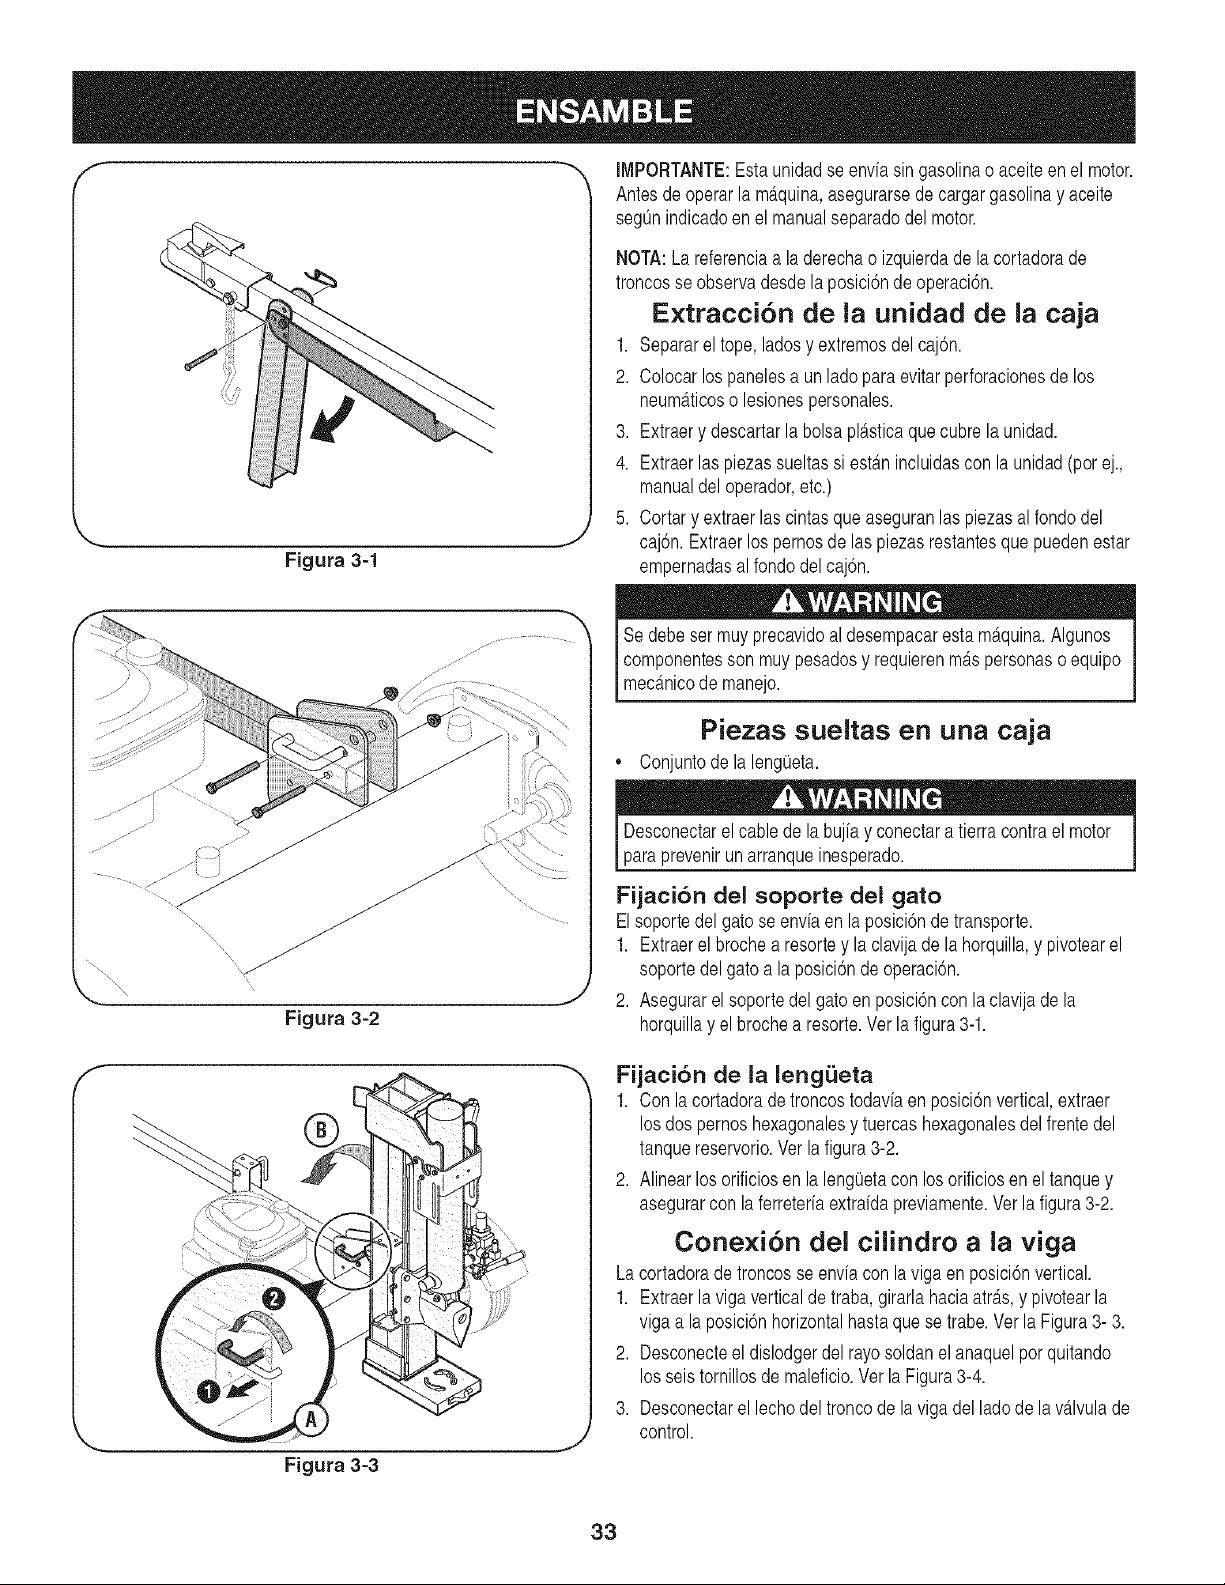
Figura 3-1
J
Figura 3-2
IMPORTANTE:Esta unidadse enviasin gasolinao aceiteenel motor.
Antesdeoperarla maquina,asegurarsedecargargasolinay aceite
segOnindicadoen el manualseparadodel motor.
NOTA:La referenciaa laderechao izquierdade lacortadorade
troncosse observadesdela posici6nde operaci6n.
Extracci6n de la unidad de ia caja
1. Separarel tope,ladosy extremosdel caj6n.
2. Colocarlospanelesa unladoparaevitarperforacionesde los
neum_tticoso lesionespersonales.
3. Extraery descartarla bolsapl_.sticaque cubre la unidad.
4. Extraerlas piezassueltassi est_mincluidascon la unidad(por ej.,
manualdel operador,etc.)
5. Cortary extraerlas cintasqueaseguranlas piezasal fondo del
caj6n.Extraerlos pernosde las piezasrestantesquepuedenestar
empernadasalfondodel caj6n.
Se debeser muy precavidoal desempacaresta m_.quina.Algunos
componentesson muy pesadosy requierenm_tspersonaso equipo
medmieode manejo.
Piezas sueltas en una caja
* Conjuntode la lengOeta.
Desconectarel cablede la bujfay conectaratierra contrael motor
paraprevenrun arranque nesperado. J
Fijaci6n del soporte del gato
Elsoportedelgato seenvia en la posici6nde transporte.
1. Extraerel brochea resortey la clavijade lahorquilla,y pivotearel
soportedel gatoa la posici6nde operaci6n.
2. Asegurarel soportedelgatoen posici6ncon la clavijade la
horquillay el brochea resorte.Ver la figura3-1.
f m
Figura 3-3
Fijaci6n de la lengi.]eta
1. Con lacortadoradetroncostodaviaen posici6nvertical,extraer
los dos pernoshexagonalesy tuercashexagonalesdel frentedel
tanquereservorio.Verla figura3-2.
2. Alinearlos orificiosenla lengOetacon losorificiosen el tanquey
asegurarcon la ferreteriaextraidapreviamente.Verla figura3-2.
Conexi6n del cilindro a la viga
Lacortadorade troncosseenvia conla vigaen posici6nvertical.
1. Extraerlaviga verticalde traba,girarlahaciaatr_.s,y pivotearla
viga a laposici6nhorizontalhastaquese trabe.Ver la Figura3- 3.
2. Desconecteel dislodgerdel rayosoldanel anaquelporquitando
los seistornillosde maleficio.VerlaFigura3-4.
3. Desconectarel lechodel tronco de laviga delladodela v_tlvulade
control.
33
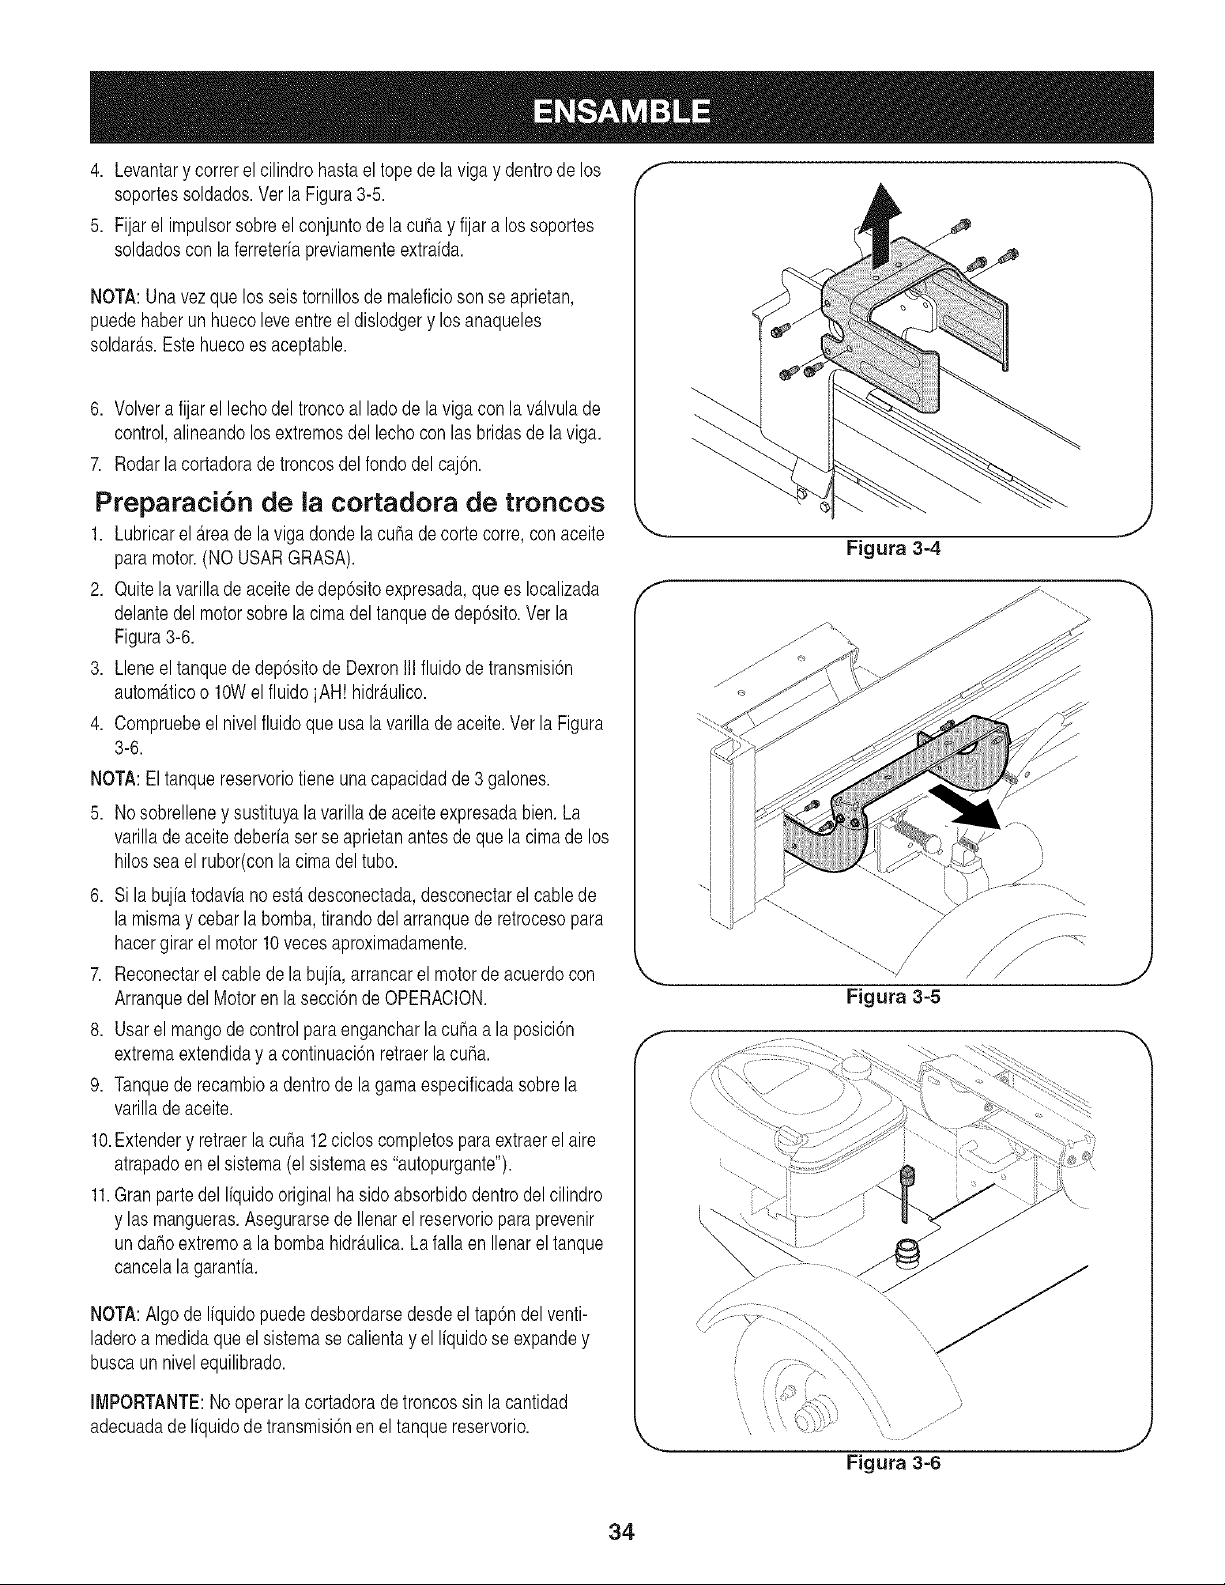
4. Levantary correrel cilindrohastael topede laviga y dentrode los
soportessoldados.VerlaFigura3-5.
5. Fijarel impulsorsobreel conjuntode la cubay fijar a lossoportes
soldadoscon la ferreteriapreviamenteextraida.
NOTA:Unavez que los seis tornillosde maleficiosonse aprietan,
puedehaberunhuecoleveentreel dislodgery losanaqueles
soldar_ts.Estehuecoes aceptable.
6. Volvera fijarel lechodel troncoal lado de la viga con la vdtlvulade
control,alineandolosextremosdel lechocon las bridasde la viga.
7. Rodarlacortadoradetroncosdelrondodel caj6n.
Preparaci6n de la cortadora de troncos
1. Lubricarel _.reade la vigadonde la cuba de corte corre,con aceite
paramotor.(NO USARGRASA).
2. Quitela varillade aceitededep6sitoexpresada,quees Iocalizada
delantedel motorsobrela cima del tanquede dep6sito.Ver la
Figura3-6.
3. Lleneel tanquededep6sitode DexronIII fluidode transmisi6n
autom_tticoo 10Wel fluidoiAH! hidr_.ulico.
4. Compruebeel nivelfluidoque usala varilladeaceite.Verla Figura
3-6.
NOTA:El tanquereservoriotieneuna capacidadde 3 galones.
5. Nosobrelleney sustituyala varillade aceite expresadabien. La
varillade aceitedeberia serse aprietanantesdeque lacimade los
hilossea el rubor(conla cima del tubo.
6. Si la bujia todaviano esterdesconectada,desconectarel cablede
la mismay cebarla bomba,tirandodel arranquederetrocesopara
hacergirar el motor10vecesaproximadamente.
7. Reconectarel cable dela bujia,arrancarel motordeacuerdocon
Arranquedel Motorenla secci6nde OPERACION.
8. Usarel mangodecontrolparaengancharlacuba a la posici6n
extremaextendiday a continuaci6nretraerlacuba.
9. Tanquede recambioa dentrode lagamaespecificadasobrela
varillade aceite.
10.Extendery retraerla cuba 12cicloscompletosparaextraerel aire
atrapadoen el sistema(el sistemaes "autopurgante").
11.Gran partedel liquido originalha sidoabsorbidodentrodelcilindro
y las mangueras.Asegurarsede Ilenarel reservoriopara prevenir
undahoextremoa la bombahidr_tulica.Lafallaen Ilenarel tanque
cancelala garanfia.
NOTA:Algo de liquidopuede desbordarsedesdeel tap6ndel venti-
laderoa medidaque el sistemase calientay el liquidose expandey
buscaun nivelequilibrado.
IMPORTANTE:Nooperar la cortadorade troncossin lacantidad
adecuadade liquidode transmisi6nen el tanquereservorio.
f --,,
x_ j
Figura 3-4
Figura 3-5
///
Figura 3=6
J
34
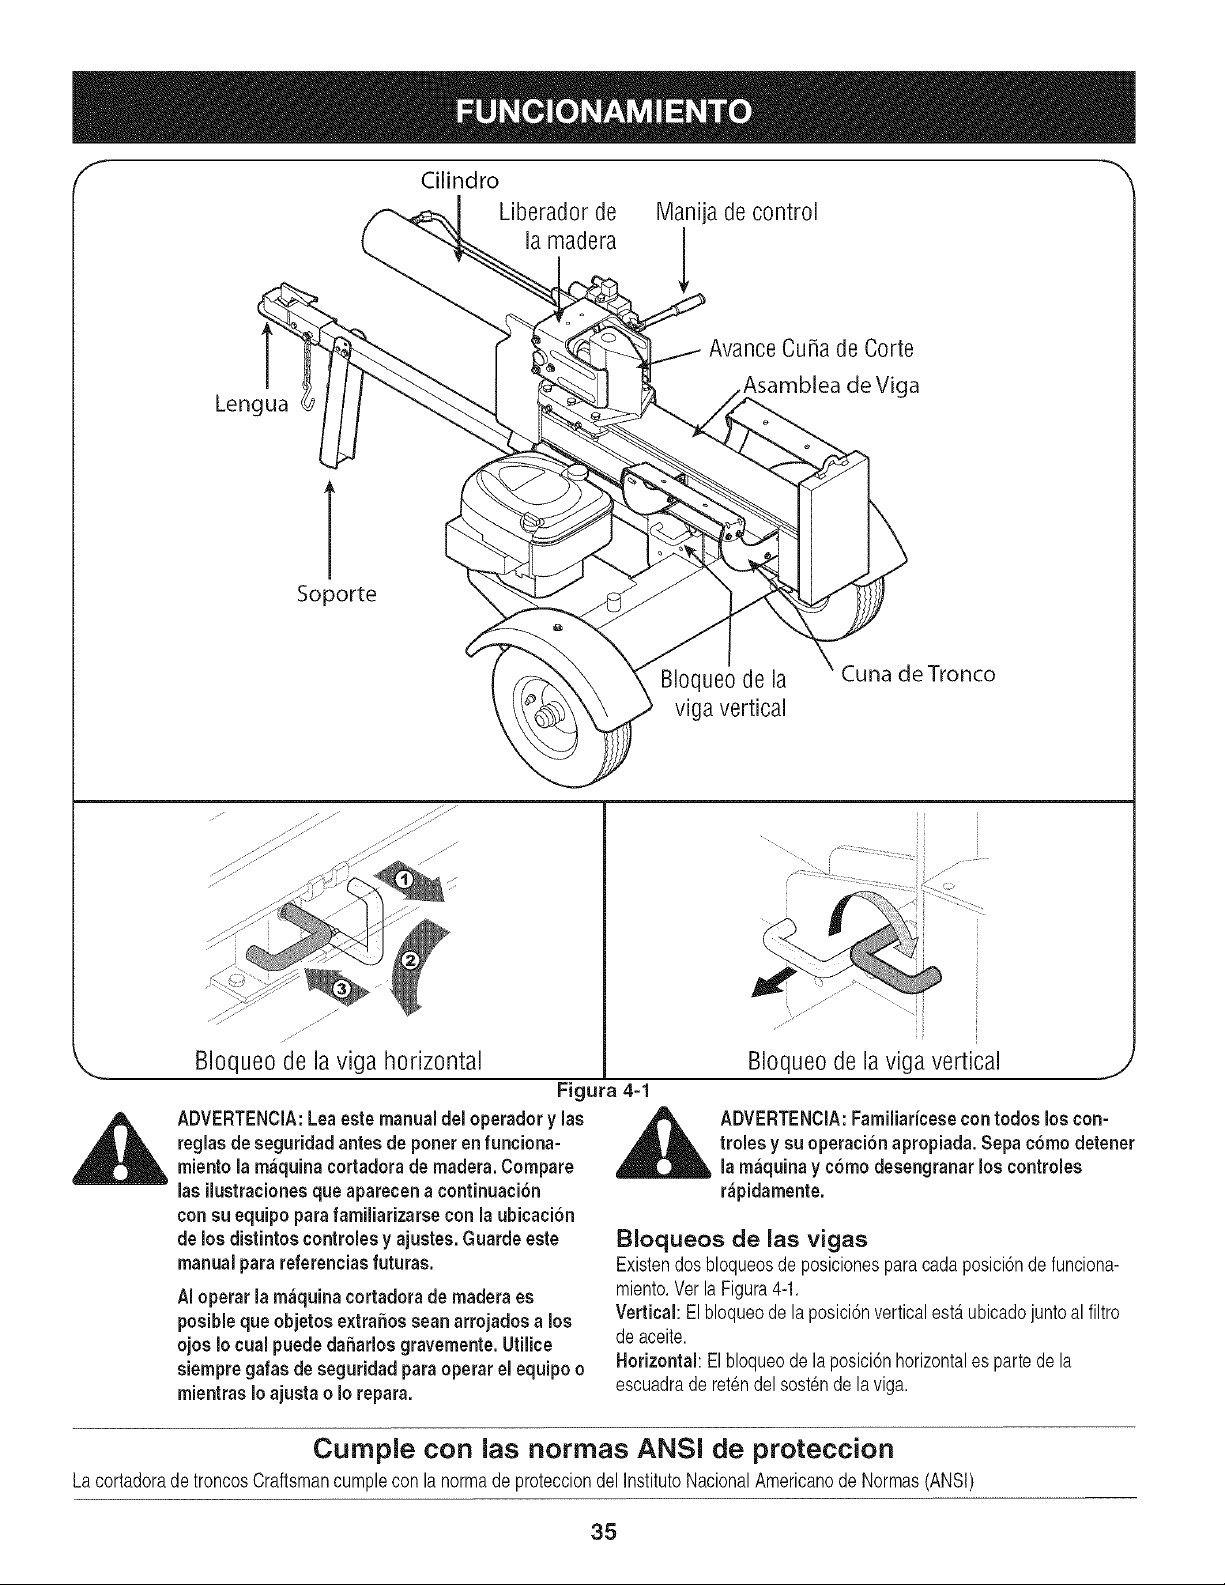
'I Cilindro _'
Liberadorde Manijadecontrol
la madera
Lengua
Avarice Cu_a de Corte
de Viga
T
Soporte
BIoqueode la
viga vertical
Cuna de Tronco
ADVERTENCIA:Leaestemanual del operador y las
reglasde seguridadantes de poneren funciona-
miento la m_quina cortadorade madera. Compare
las ilustracionesque aparecena continuaci6n
consu equipoparafamiliarizaree conla ubicaci6n
de los distintos controlesy ajustes. Guardeeste
manual parareferencias futuras.
AI operar la m_quina cortadora de maderaes
posibleque objetos extrafiosscan arrojados a los
ojos Io cual puede dafiarlos gravemente.Utilice
siempre gafas de seguridad paraoperar el equipoo
mientras Io ajusta o Io repara.
Bloqueo de la viga vertical
Figura 4-1
_ DVERTENClA:Familiaricesecontodos los con-
troles y su operaci6napropiada. Sepac6mo detener
la m_quina y c6modesengranar los controles
r&pidamente.
BIoqueos de las vigas
Existendosbloqueosde posicionesparacadaposici6nde funciona-
miento.Ver la Figura4-1.
Vertical: Elbloqueode la posici6nverticalesterubicadojunto al filtro
de aceite.
Horizontal: Elbloqueode laposici6nhorizontales partede la
escuadraderetendel sostende la viga.
Cumple con ias normas ANSi de protection
LacortadoradetroncosCraftsmancumplecon la normade protecciondel InstitutoNacionalAmericanode Normas(ANSI)
35
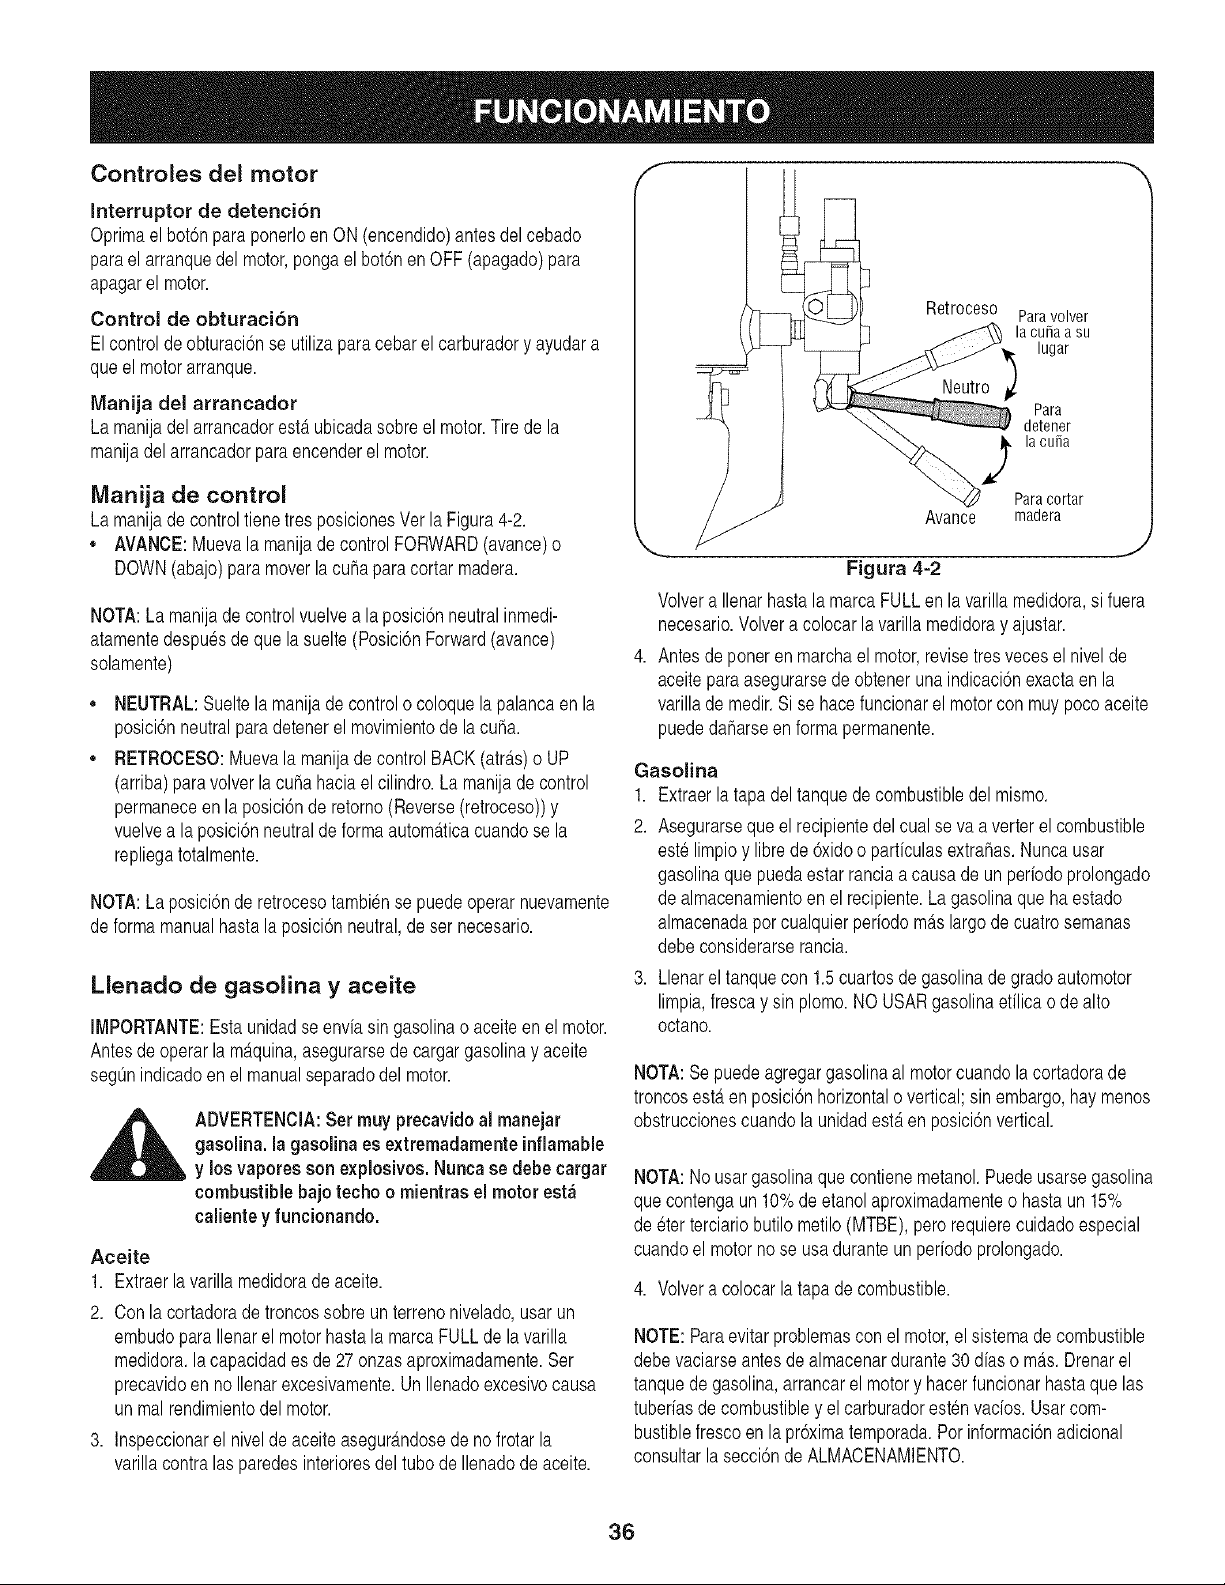
Controles del motor
Interruptor de detenci6n
Oprimael bot6npara ponerloen ON (encendido)antesdel cebado
parael arranquedel motor,pongael bot6nen OFF (apagado)para
apagarel motor.
Control de obturaci6n
Elcontroldeobturaci6nse utilizapara cebarel carburadory ayudara
queel motorarranque.
Manija del arrancador
La manijadel arrancadoresterubicadasobreel motor.Tirede la
manijadel arrancadorpara encenderel motor.
Manija de control
La manijade controltienetres posicionesVerla Figura4-2.
• AVANCE:Muevala manijadecontrolFORWARD(avance)o
DOWN(abajo)para moverla cubapara cortar madera.
NOTA:La manijade controlvuelvea la posici6nneutralinmedi-
atamentedespuesde que la suelte (Posici6nForward(avance)
solamente)
e
e
NEUTRAL:Sueltela manijade controlo coloquela palancaen la
posici6nneutralpara detenerel movimientode la cuba.
RETROCESO:Muevala manijade controlBACK(atr_.s)o UP
(arriba)paravolverlacuba haciael cilindro. La manijade control
permaneceenla posici6nderetorno(Reverse(retroceso))y
vuelvea laposici6nneutralde forma autom_tticacuandose la
repliegatotalmente.
NOTA:La posici6nde retrocesotambiense puedeoperarnuevamente
deformamanualhasta la posici6nneutral,de ser necesario.
Llenado de gasolina y aceite
IMPORTANTE:Estaunidadse enviasin gasolinao aceiteen el motor.
Antesde operarla m_.quina,asegurarsede cargargasolinay aceite
segtJnindicadoenel manualseparadodel motor.
_ ADVERTENClA:Ser muy precavidoal manejar
gasolina, la gasolina es extremadamenteinflamable
y los vapores son explosivos.Nuncase debecargar
combustible bajo techo o mientras el motor est_
calientey funcionando.
Aceite
1. Extraerla varillamedidorade aceite.
2. Conla cortadorade troncossobre un terrenonivelado,usarun
embudopara Ilenarel motor hastala marcaFULLde la varilla
medidora,la capacidades de 27 onzasaproximadamente.Ser
precavidoen noIlenarexcesivamente.Un Ilenadoexcesivocausa
un malrendimientodel motor.
3. Inspeccionarel nivelde aceiteasegur_,ndosede no frotar la
varillacontralas paredesinterioresdel tubodeIlenadode aceite.
Retroceso Paravolver
la cuba a su
lugar
Para
detener
J la cuba
Para cortar
Avance madera
Figura 4-2
Volvera Ilenarhastalamarca FULLenla varillamedidora,si fuera
necesario.Volvera colocarlavarilla medidoray ajustar.
4. Antesdeponerenmarchael motor,revisetresvecesel nivelde
aceiteparaasegurarsede obteneruna indicaci6nexactaen la
varillade medir.Sise hacefuncionarel motorcon muypocoaceite
puededaharseen forma permanente.
Gasoiina
1. Extraerlatapa deltanquede combustibledelmismo.
2. Asegurarsequeel recipientedelcual se va averterelcombustible
este limpioy librede 6xidoo partfculasextrahas.Nuncausar
gasolinaque puedaestar ranciaa causadeun perfodoprolongado
de almacenamientoenel recipiente.La gasolinaquehaestado
almacenadaporcualquierperfodom_tslargo de cuatrosemanas
debeconsiderarserancia.
3. Llenarel tanquecon 1.5cuartosde gasolinade gradoautomotor
limpia,frescay sin plomo.NO USARgasolinaetflicao de alto
octano.
NOTA:Se puede agregargasolinaal motorcuandola cortadorade
troncosesteren posici6nhorizontalo vertical;sin embargo,hay menos
obstruccionescuandola unidadesteren posici6nvertical.
NOTA:No usargasolinaquecontienemetanol.Puedeusarsegasolina
quecontengaun 10%deetanolaproximadamenteo hasta un 15%
de eterterciariobutilometilo (MTBE),pero requierecuidadoespecial
cuandoel motorno se usa duranteun perfodoprolongado.
4. Volvera colocarlatapa de combustible.
NOTE:Paraevitarproblemascon el motor,el sistemade combustible
debevaciarseantesde almacenardurante30 diaso m_,s.Drenarel
tanquede gasolina,arrancarel motory hacerfuncionarhastaque las
tuberiasde combustibley elcarburadorestenvacios. Usarcom-
bustiblefrescoen la pr6ximatemporada.Porinformaci6nadicional
consultarla secci6nde ALMACENAMIENTO.
36
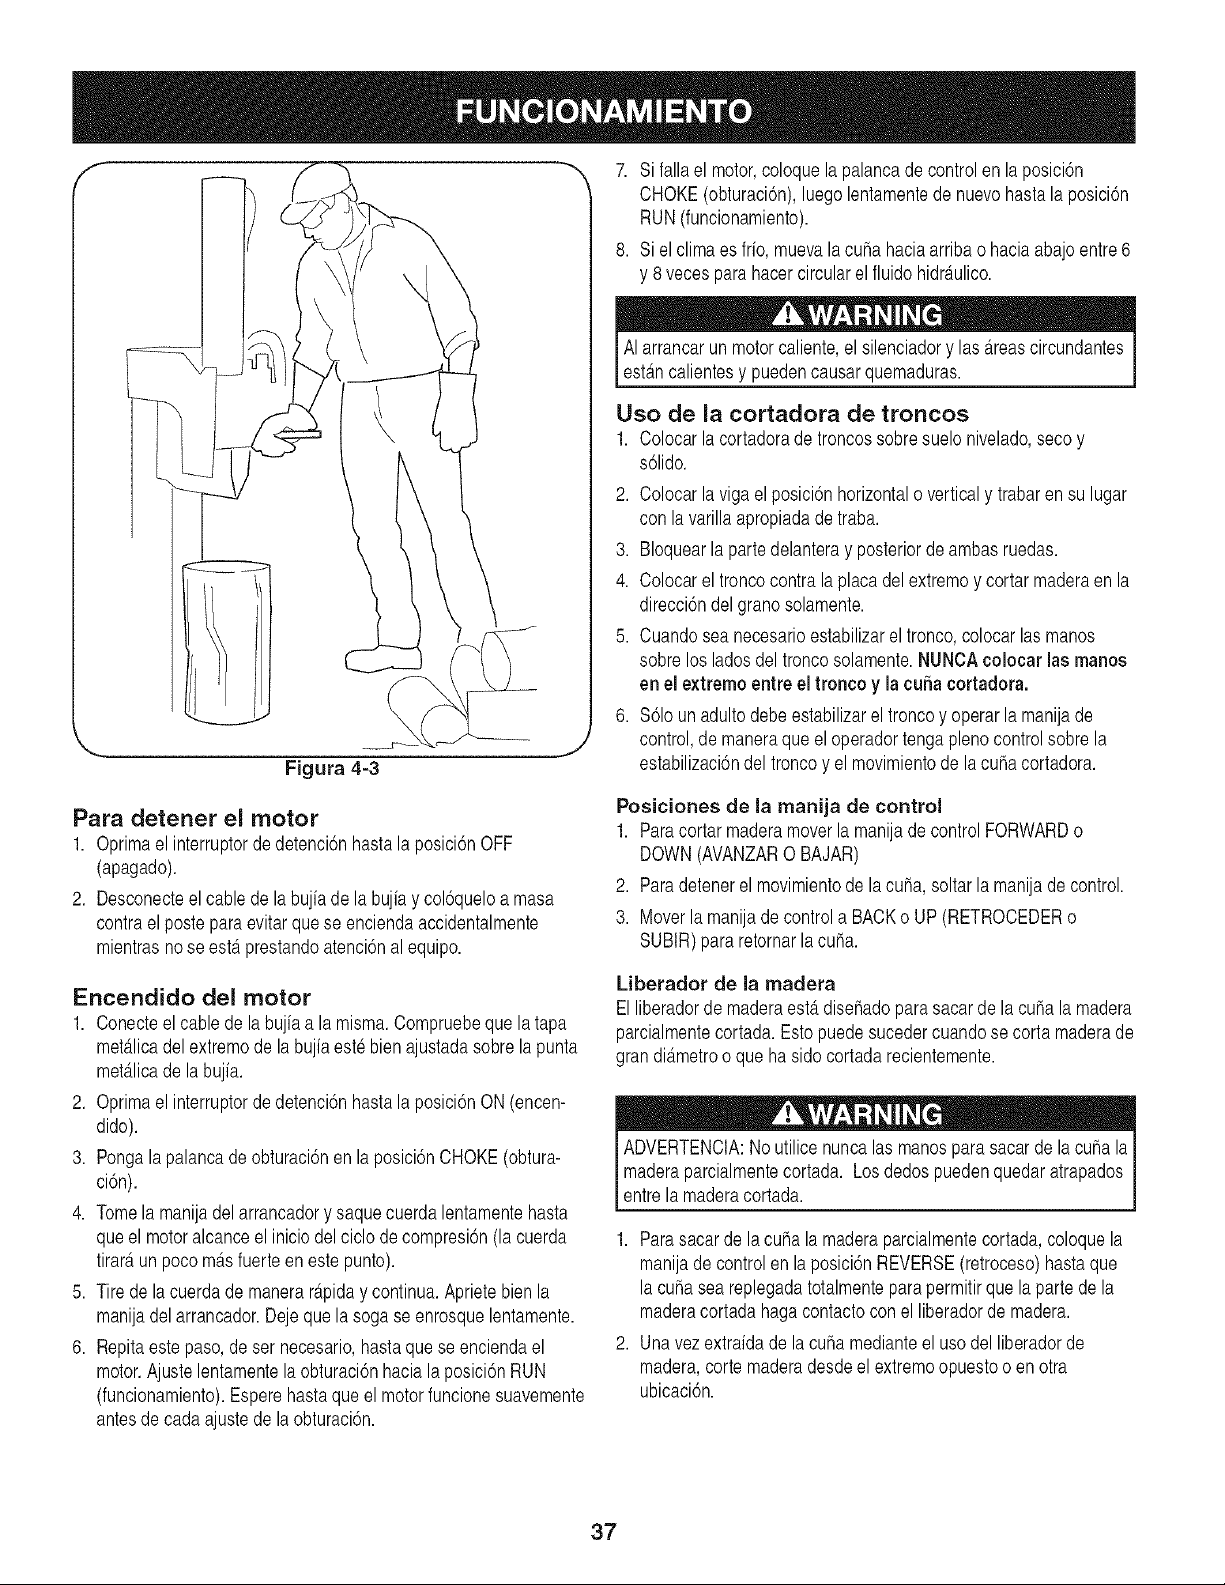
7. Si fallael motor,coloquela palancade controlen la posici6n
CHOKE(obturaci6n),luego lentamentede nuevohasta la posici6n
RUN (funcionamiento).
8. Si el climaes fifo, muevala cubahaciaarribao haciaabajoentre6
y 8veces parahacercircularel fluidohidr_tulico.
AI arrancarun motorcaliente,el silenciadory lasAreascircundantes
est_tnca entesy puedencausarquemaduras. J
Uso de la cortadora de troncos
1. Colocarlacortadorade troncossobresuelo nivelado,secoy
s61ido.
2. Colocarlavigael posici6nhorizontalo verticaly trabaren su lugar
con la varillaapropiadadetraba.
3. Bloquearla partedelanteray posteriorde ambasruedas.
4. Colocarel troncocontralaplacadel extremoy cortar maderaen la
direcci6ndelgranosolamente.
5. Cuandoseanecesarioestabilizarel tronco,colocar lasmanos
sobre losladosdel troncosolamente.NUNOAcolocar las manos
en el extremoentre el tronco y la cuba cortadora.
6. %1oun adultodebeestabilizarel tronco y operarla manijade
control,de maneraqueel operadortengaplenocontrolsobrela
estabilizaci6ndel troncoy elmovimientodela cuRacortadora.
Para detener el motor
1. Oprimael interruptordedetenci6nhastala posici6nOFF
(apagado).
2. Desconecteel cablede la bujiade labujiay col6queloa masa
contrael posteparaevitarquese enciendaaccidentalmente
mientrasno se esterprestandoatenci6nal equipo.
Posiciones de la manija de control
1. Paracortarmaderamoverla manijade controlFORWARDo
DOWN(AVANZAR0 BAJAR)
2. Paradetenerel movimientode lacuba,soltarlamanijade control.
3. Moverlamanijadecontrola BACKo UP(RETROCEDERo
SUBIR)para retornarla cuba.
Encendido del motor
1. Conecteel cablede labujia a la misma.Compruebeque la tapa
met_tlicadelextremodela bujfaeste bien ajustadasobrela punta
met_tlicade labujia.
2. Oprimael interruptordedetenci6nhastala posici6nON(encen-
dido).
3. Pongalapalancadeobturaci6nen laposici6nCHOKE(obtura-
ci6n).
4. Tomela manijadelarrancadory saquecuerdalentamentehasta
queel motoralcanceel iniciodelciclode compresi6n(la cuerda
tirar_,un pocom_tsfuerte en este punto).
5. Tirede lacuerdade manerar_.piday continua.Aprietebien la
manijadel arrancador.Dejeque la sogase enrosquelentamente.
6. Repitaestepaso,de ser necesario,hastaque se enciendael
motor.Ajustelentamentela obturaci6nhaciala posici6nRUN
(funcionamiento).Esperehastaque elmotorfuncionesuavemente
antesde cadaajustede la obturaci6n.
Liberador de la madera
Elliberadorde maderaesterdisehadoparasacar de la cuba la madera
parcialmentecortada.Estopuede sucedercuandose cortamaderade
grandi_tmetroo que ha sidocortada recientemente.
ADVERTENCIA:No utilice nuncalasmanospara sacarde la cubala
maderaparcialmentecortada. Losdedospuedenquedaratrapados
entrela maderacortada.
1. Parasacarde lacuba la maderaparcialmentecortada,coloquela
manijade control en la posici6nREVERSE(retroceso)hastaque
la cubasea replegadatotalmenteparapermitirque la partede la
maderacortada hagacontactocon el liberadorde madera.
2. Una vezextrafdadela cubamedianteel usodel liberadorde
madera,cortemaderadesdeel extremoopuestoo en otra
ubicaci6n.
37
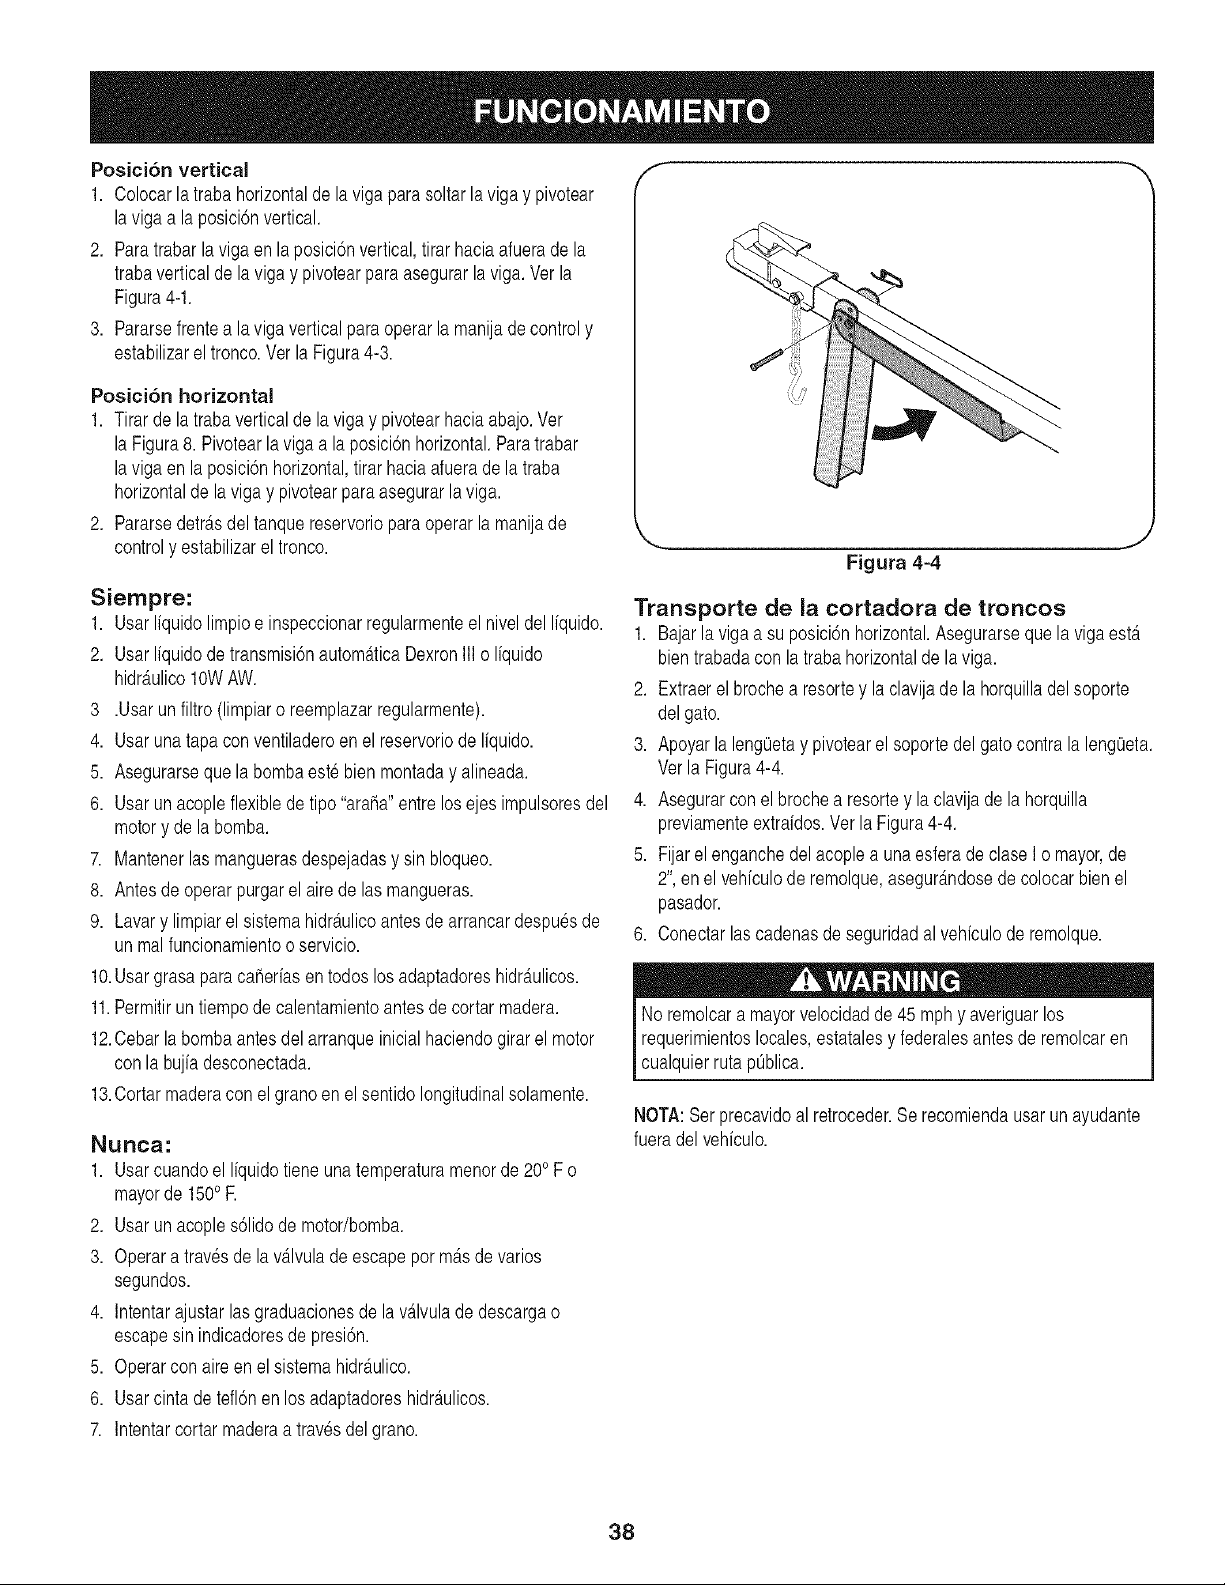
Posici6n vertical
1. Colocarlatraba horizontaldela vigaparasoltarlaviga y pivotear
laviga a la posici6nvertical.
2. Paratrabar laviga enlaposici6nvertical,tirar haciaafueradela
trabaverticalde la vigay pivotearpara asegurarla viga.Verla
Figura4-1.
3. Pararsefrentea la vigaverticalpara operarla manijadecontroly
estabilizarel tronco.Ver la Figura4-3.
Posici6n horizontal
1. Tirarde la trabaverticalde laviga y pivotearhaciaabajo.Ver
la Figura8. Pivotearla viga a la posici6nhorizontal.Paratrabar
laviga en laposicbn horizontal,tirar haciaafuerade la traba
horizontalde laviga y pivotearparaasegurarla viga.
2. Pararsedetr_.sdel tanquereservorioparaoperarlamanijade
controly estabilizarel tronco.
f
Siempre:
1. Usarliquidolimpioe inspeccionarregularmenteel niveldel liquido.
2. Usarliquidodetransmisi6nautom_tticaDexronIII o liquido
hidr_tulico10WAW.
3 .Usarun filtro (limpiaro reemplazarregularmente).
4. Usarunatapa con ventiladeroen el reservoriode Ifquido.
5. Asegurarseque la bombaestebienmontaday alineada.
6. Usarunacopleflexibledetipo "araha"entrelosejes impulsoresdel
motory de la bomba.
7. Mantenerlas manguerasdespejadasy sin bloqueo.
8. Antesde operarpurgarel airedelas mangueras.
9. Lavary limpiarel sistemahidr_.ulicoantesde arrancardespuesde
un malfuncionamientoo servicio.
10.Usargrasapara caheriasen todos los adaptadoreshidr_.ulicos.
11.Permitirun tiempode calentamientoantes de cortar madera.
12.Cebarlabombaantesdel arranqueinicialhaciendogirarel motor
con la bujiadesconectada.
13.Cortarmaderacon el granoen el sentidolongitudinalsolamente.
NUl3Ca:
1. Usarcuandoel liquidotiene unatemperaturamenorde 20oF o
mayorde 1500R
2. Usarunacoples61idode motor/bomba.
3. Operaratravesde lav_tlvulade escapepor m_tsde varios
segundos.
4. Intentarajustarlas graduacionesde la v_tlvulade descargao
escapesin indicadoresde presi6n.
5. Operarcon aireen el sistemahidr_tulico.
6. Usarcintade tefl6nen losadaptadoreshidr_tulicos.
7. Intentarcortarmaderaa travesdel grano.
Figura 4-4
Transporte de la cortadora de troncos
1. Bajarla vigaa su posici6nhorizontal.Asegurarseque la viga ester
bientrabadacon la trabahorizontalde la viga.
2. Extraerel brochea resortey la clavijade la horquilladel soporte
del gato.
3. Apoyarla lengOetay pivotearel soportedelgato contrala lengOeta.
Verla Figura4-4.
4. Asegurarcon el brochea resortey la clavijade la horquilla
previamenteextraidos.Ver la Figura4-4.
5. Fijarel enganchedelacoplea unaesferade claseI o mayor,de
2", enel vehiculoderemolque,asegur_tndosede colocarbienel
pasador.
6. Conectarlascadenasdeseguridadal vehiculode remolque.
No remolcaramayorvelocidadde 45 mphy averiguarlos
requerimientoslocales,estatalesy federalesantesde remolcaren
cualquierruta pOblica.
NOTA:Ser precavidoal retroceder.Se recomiendausarunayudante
fueradel vehiculo.
38
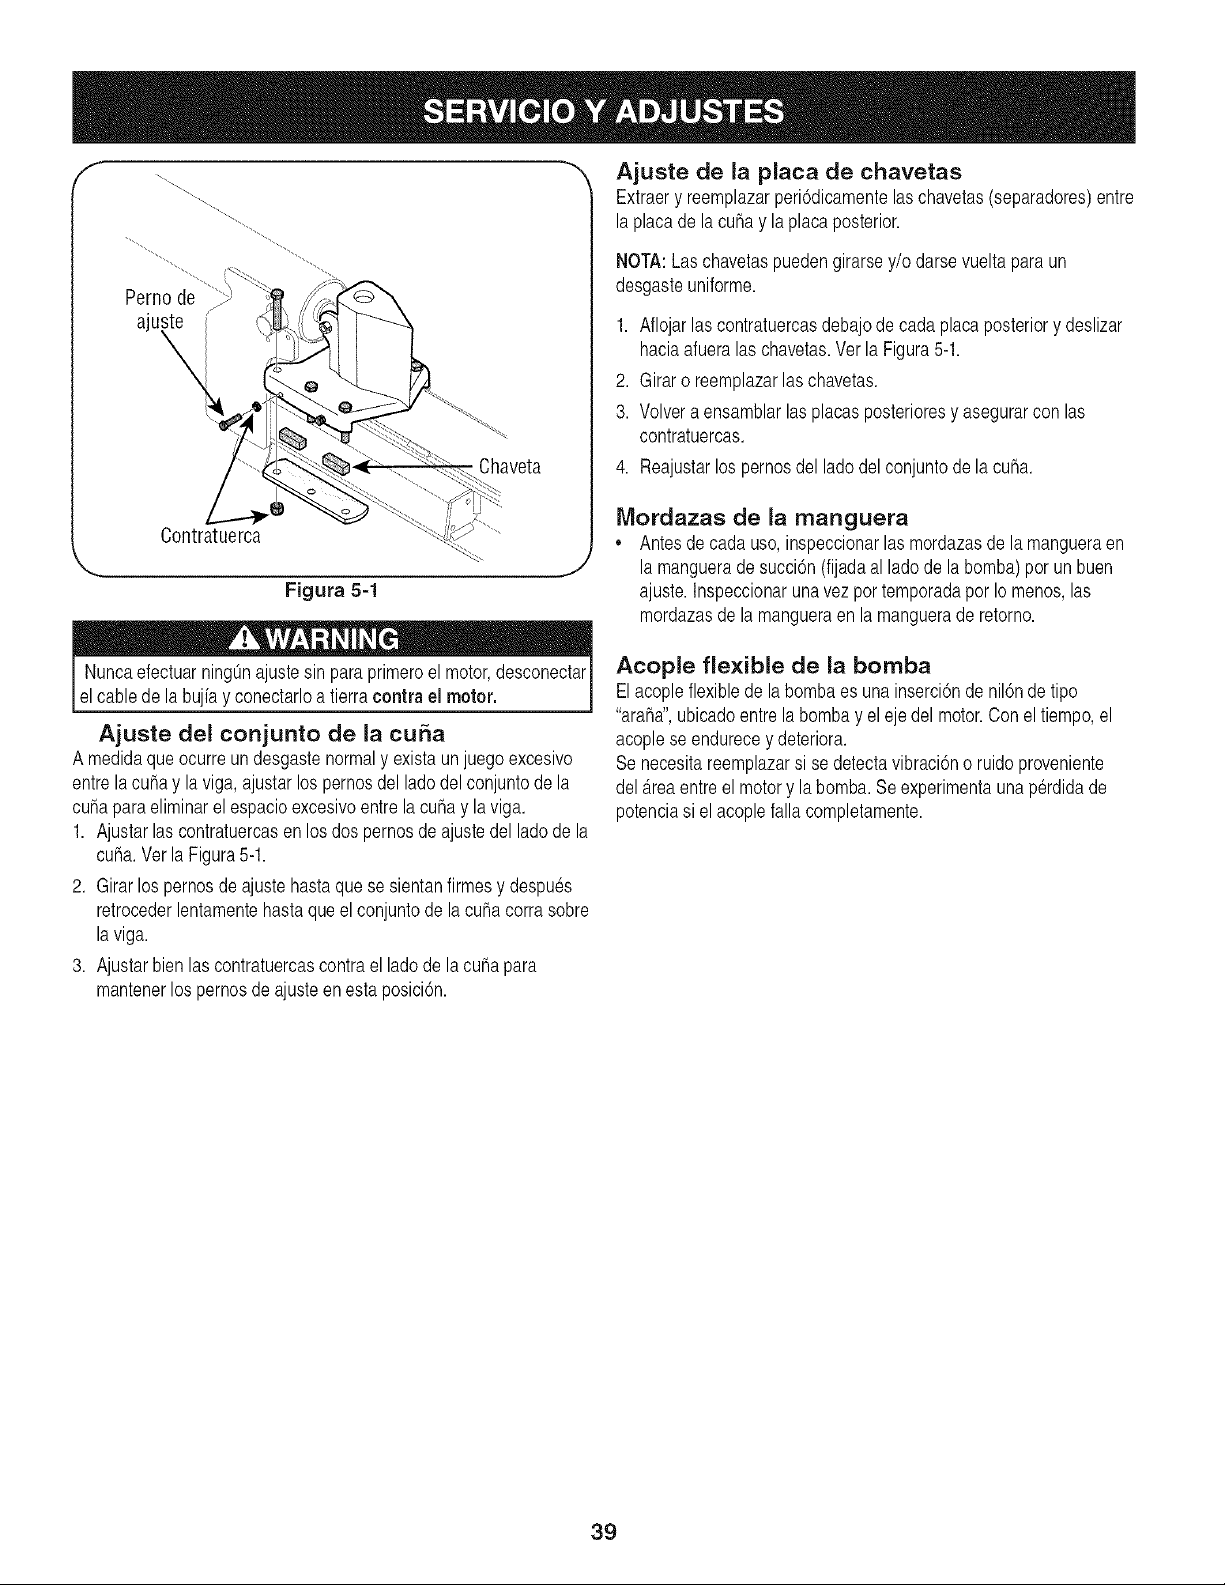
f
Pernode
aju:
Chaveta
Contratuerca .........
J
Figura 5-1
ningOnajustesin paraprimeroel motor,desconectarI
Nuncaefectuar
_e cab ede a bu a y conectaro aterra contrae motor. J
Ajuste del conjunto de la cuba
A medidaque ocurreun desgastenormaly existaunjuegoexcesivo
entrela cuba y la viga, ajustarlos pernosdel ladodel conjuntode la
cubapara eliminarel espacioexcesivoentrelacuba y la viga.
1. Ajustarlas contratuercasen losdos pernosde ajustedel lado de la
cuba.Verla Figura5-1.
2. Girarlos pernosdeajustehastaquese sientanfirmesy despues
retrocederlentamentehasta queel conjuntode la cubacorrasobre
laviga.
3. Ajustarbienlas contratuercascontrael lado de la cubapara
mantenerlos pernosde ajusteen estaposici6n.
Ajuste de la plata de chavetas
Extraery reemplazarperi6dicamentelaschavetas(separadores)entre
laplacade lacuba y laplaca posterior.
NOTA:Las chavetaspuedengirarsey/o darsevueltaparaun
desgasteuniforme.
1. Aflojarlas contratuercasdebajode cadaplacaposteriory deslizar
haciaafueralas chavetas.Verla Figura5-1.
2. Giraro reemplazarlaschavetas.
3. Volveraensamblarlasplacasposterioresy asegurarcon las
contratuercas.
4. Reajustarlos pernosdel ladodelconjuntodela cuba.
Mordazas de la manguera
• Antes de eada uso,inspeccionarlas mordazasde la mangueraen
la manguerade succi6n(fijadaal lado de la bomba)por un buen
ajuste.Inspeccionaruna vez por temporadapor Iomenos,las
mordazasde la mangueraen la manguerade retorno.
Acople flexible de la bomba
Elacopleflexiblede la bombaes unainserci6nde nil6nde tipo
"araha",ubicadoentre la bombay el eje del motor.Con el tiempo,el
acoplese endurecey deteriora.
Senecesitareemplazarsi se detectavibraci6no ruidoproveniente
del _reaentreel motory labomba.Seexperimentauna perdidade
potenciasi el acoplefallacompletamente.
39
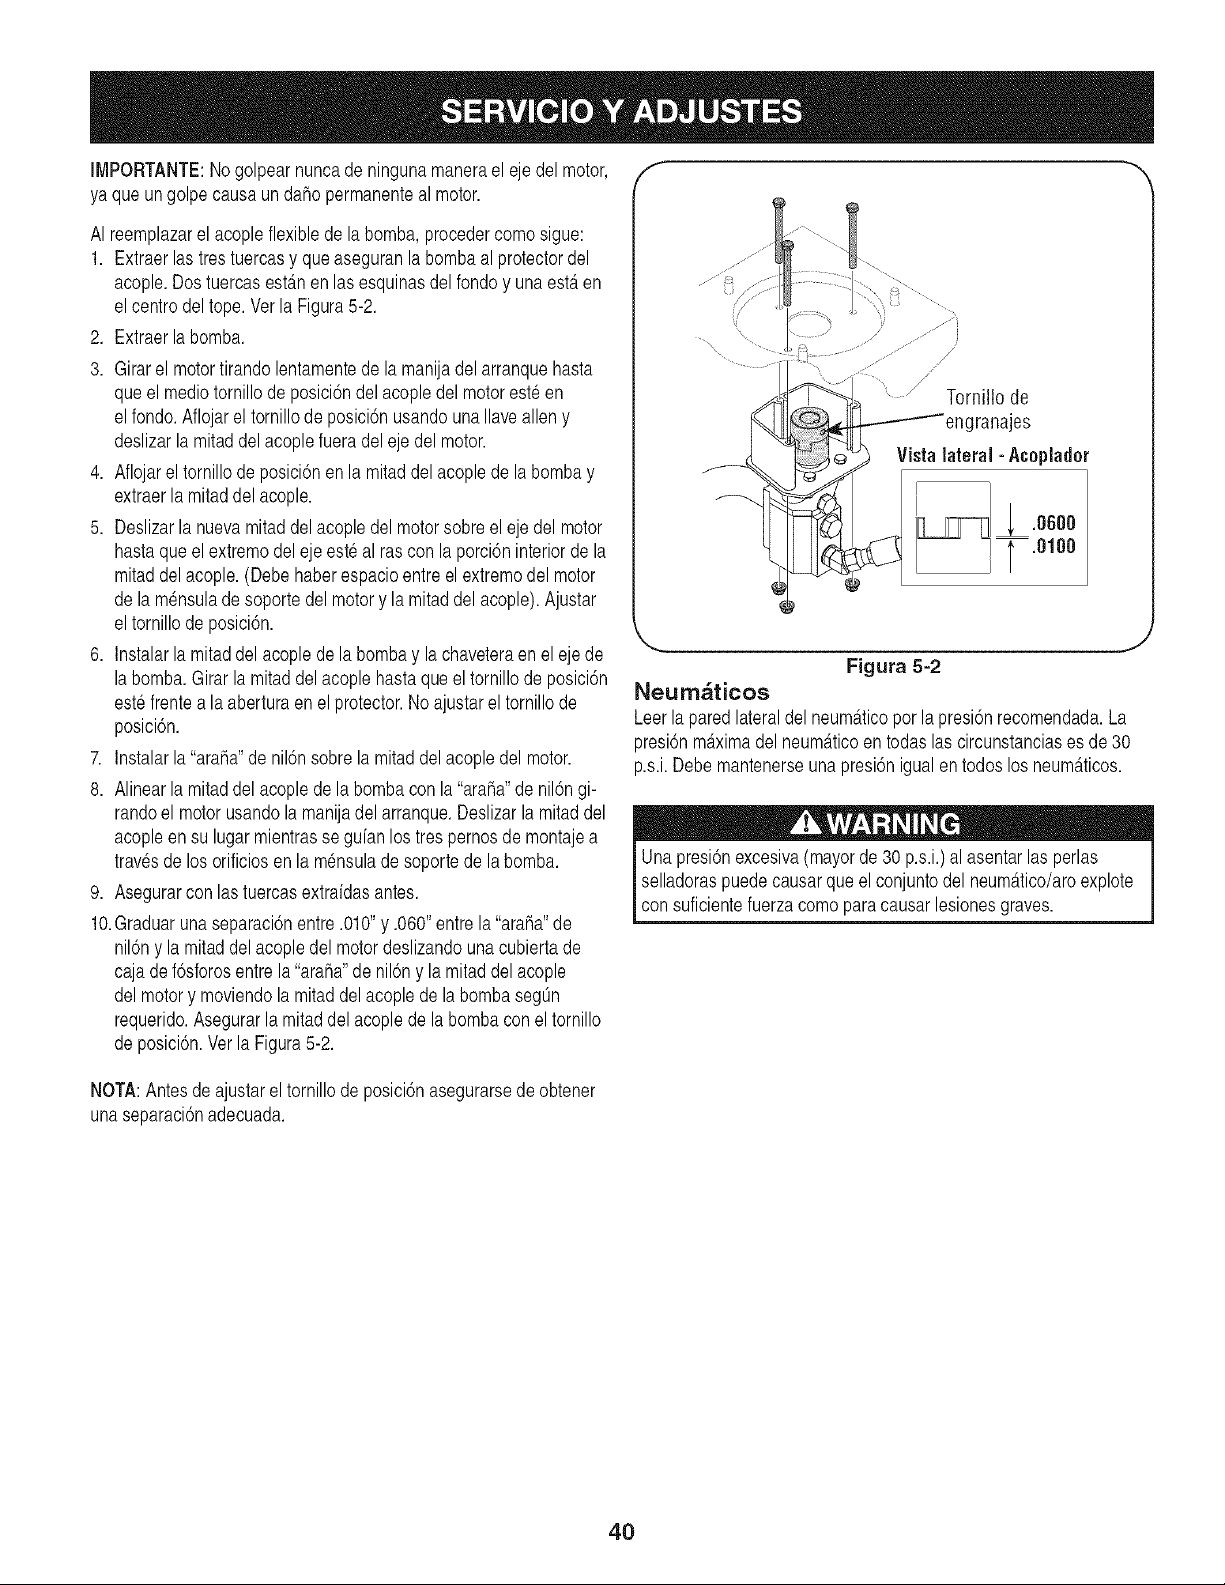
IMPORTANTE:Nogolpearnuncade ningunamanerael ejedel motor,
ya queungolpecausaundaho permanenteal motor.
AI reemplazarel acopleflexibledela bomba,procedercomosigue:
1. Extraerlas trestuercasy queaseguranla bombaal protectordel
acople.Dostuercasest_.nenlas esquinasdel fondoy unaesteren
elcentrodeltope.Verla Figura5-2.
2. Extraerla bomba.
3. Girarel motortirandolentamentede la manijadel arranquehasta
queel mediotornillode posici6ndel acopledel motoreste en
elfondo.Aflojarel tornillode posici6nusandouna Ilaveallen y
deslizarla mitaddelacoplefueradel eje del motor.
4. Aflojarel tornillode posici6nen la mitaddel acoplede la bombay
extraerla mitaddelacople.
5. Deslizarla nuevamitad del acopledel motorsobreel eje del motor
hastaqueel extremodel eje este al rascon la porci6ninteriorde la
mitaddel acople.(Debehaberespacioentreel extremodel motor
de lam6nsulade soportedel motory la mitaddel acople).Ajustar
eltornillode posici6n.
6. Instalarla mitaddel acoplede la bombay la chaveteraen el ejede
labomba.Girarla mitaddelacople hastaqueel tornillode posici6n
estefrentea laaberturaen el protector.Noajustarel tornillode
posici6n.
7. Instalarla "araha'denil6nsobrela mitaddelacopledel motor.
8. Alinearla mitaddelacoplede labombacon la"araha"de nil6ngi-
randoel motorusandola manijadel arranque.Deslizarla mitaddel
acopleen su lugar mientrasse guianlos tres pernosdemontajea
travesde los orificiosen la m6nsulade soportede la bomba.
9. Asegurarconlas tuercasextraidasantes.
10.Graduarunaseparaci6nentre.010"y .060" entrela"araha"de
nil6ny la mitaddelacopledel motordeslizandounacubiertade
cajade f6sforosentre la "araha"de nil6ny lamitaddelacople
delmotory moviendola mitaddelacoplede la bombasegOn
requerido.Asegurarla mitaddel acoplede la bombacon el tornillo
de posici6n.Ver la Figura5-2.
Tornillo de
engranajes
Vistalateral -Aceplader
; .oooo
_.8188
_,, ,J
Figura 5-2
Neurn_ticos
Leerla paredlateraldel neum_.ticopor la presi6nrecomendada.La
presi6nm_.ximadel neum_tticoentodaslas circunstanciases de30
p.s.i.Debemantenerseunapresi6nigualentodoslos neum_tticos.
Una presi6nexcesiva(mayorde 30 p.s.i.)al asentarlas perlas
selladoraspuedecausarque elconjuntodelneum_ttico/aroexplote
con suficientefuerzacomo para causarlesionesgraves.
NOTA:Antes de ajustarel tornillode posici6nasegurarsede obtener
unaseparaci6nadecuada.
40
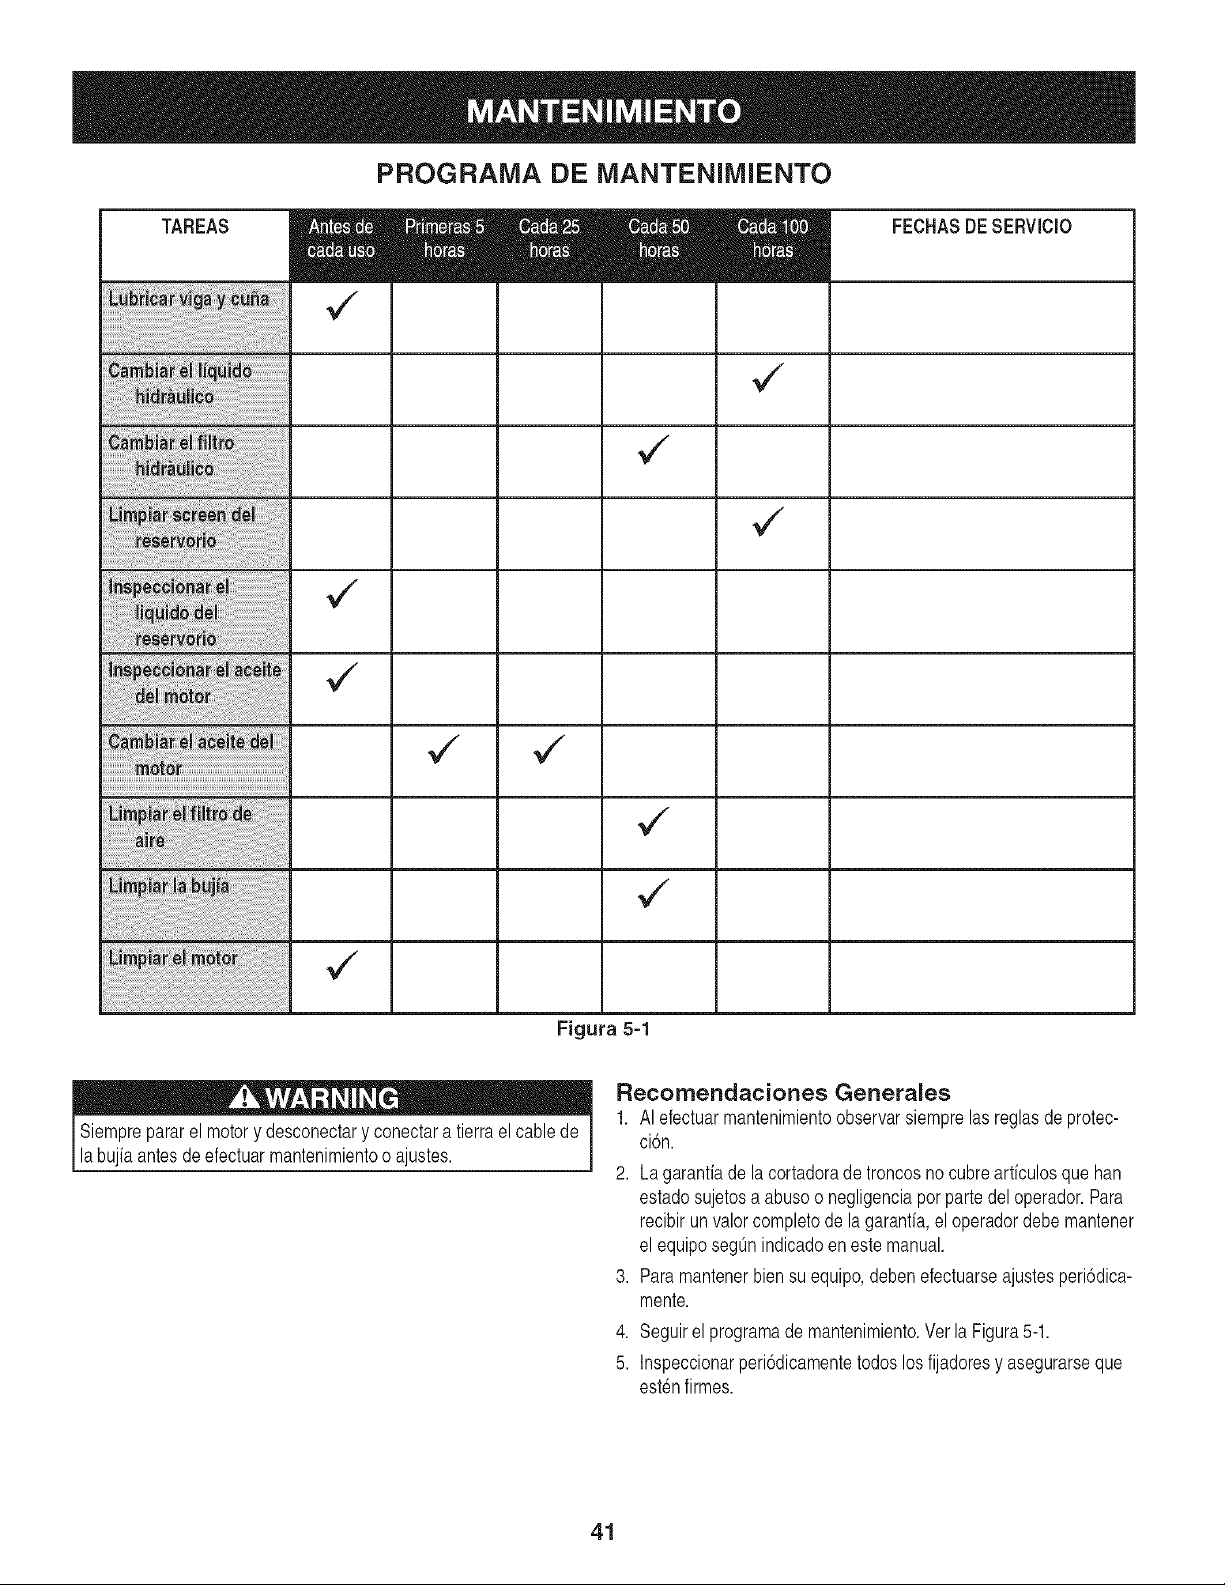
PROGRAMA DE MANTENIMIENTO
TAREAS
Figura 5-1
Siemprepararel motory desconectary conectara tierrael cablede /
[ abu a antesdeefectuarmantenmentoo a ustes. J
FECHASDESERVIClO
Recomendaciones Generales
1. AI efectuarmantenimientoobservarsiemprelas reglasde protec-
ci6n.
2. La garanfiade lacortadoradetroncosno cubrearticulosquehan
estadosujetosa abusoo negligenciapor partedel operador.Para
recibir unvalorcompletode la garanfia,el operadordebemantener
el equiposegOnindicadoen estemanual.
3. Paramantenerbiensu equipo,debenefectuarseajustesperi6dica-
mente.
4. Seguirel programade mantenimiento.Ver la Figura5-1.
5. Inspeccionarperi6dicamentetodos losfijadoresy asegurarseque
estenfirmes.
41

Liquido hidr_ulico
,, Compruebeel nivel hidr_.ulicofluidoen eltanquededep6sitode
hendedordetroncoantesde cadaempleo.Mantengael nivel
fluidodentrode la gamaespecificadasobre la varillade aceite en
cualquiermomento.
,, Cambiarel liquidohiddtulicoen el reservoriocada100horasde
operaci6n:
1. Desconectarla manguerade succi6ndel rondodel tanque
reservorioy drenarelliquidodentrode un recipienteapropiado.Ver
la Figura5-2.
2. Volvera Ilenarusandoliquidode transmisi6nautom_tticaDexronIll
o liquidohiddtulico10WAW.
NOTA:Drenary limpiarel tanquereservorioy las manguerascon
querosensiempreque se trabajeen el tanque,bombahidr_.ulica,
o v_tlvula.Loscontaminantesen el Ifquidodahan loscomponentes
hid#tulicos.Todareparaci6na los componenteshiddtulicosdebe ser
efectuadapor un Centrode ServicioSears.
Sermuyprecavidoaltrabajarconquerosen.Es un liquidoextrema-
damentenf amabe. j
Filtro hidr_ulico
• Cambiarel filtro hidr_.ulicocada50 horasde operaci6n.Usar un
filtrohid#tulicode 10micronessolamente.
Viga y cuba cortadora
,, Lubricarambosladosde la viga (dondeentraen contactoconla
cubacortadora),antesde cadauso,conaceiteparamotor.La
placade la cubaen la cortadorade troncosest,. disehadadetal
maneraque las chavetaslateralesde la placade la cubapueden
extraersey girarsey/o darse vueltapara un desgasteuniforme.
,, Asegurarsede reajustarlospernosde ajustepara que la cubase
muevalibremente,perosin que existaun espacioexcesivoentrela
placade la cubay la viga. Ver la Secci6nde Ajuste.
Mantenimiento del motor
/ ' ......... /
/
/ /,
i \ /
Figura 5-2
Inspeccionar el aceite del motor
1. Extraerlavarillamedidoradeaceite.
2. Inspeccionarel nivelde aceiteen el motor.Elniveldebeestarenla
marcaFULL.
3. Volvera colocarlavarillamedidoray ajustar.
Cambio del aceite del motor
Usaraceitedetergentedealta calidadclasificadoSF,SG,o SH de
servicioAPI. Seleccionarel gradode viscosidadSAEdeacuerdocon
latemperaturaesperadade operaci6n.Paralatabla deviscosidad
referirsea lasecci6ndeoperaci6n.
Colder < 32°F _- Warmer
Carta de Viscosidad del Aceite
_. ,,J
42
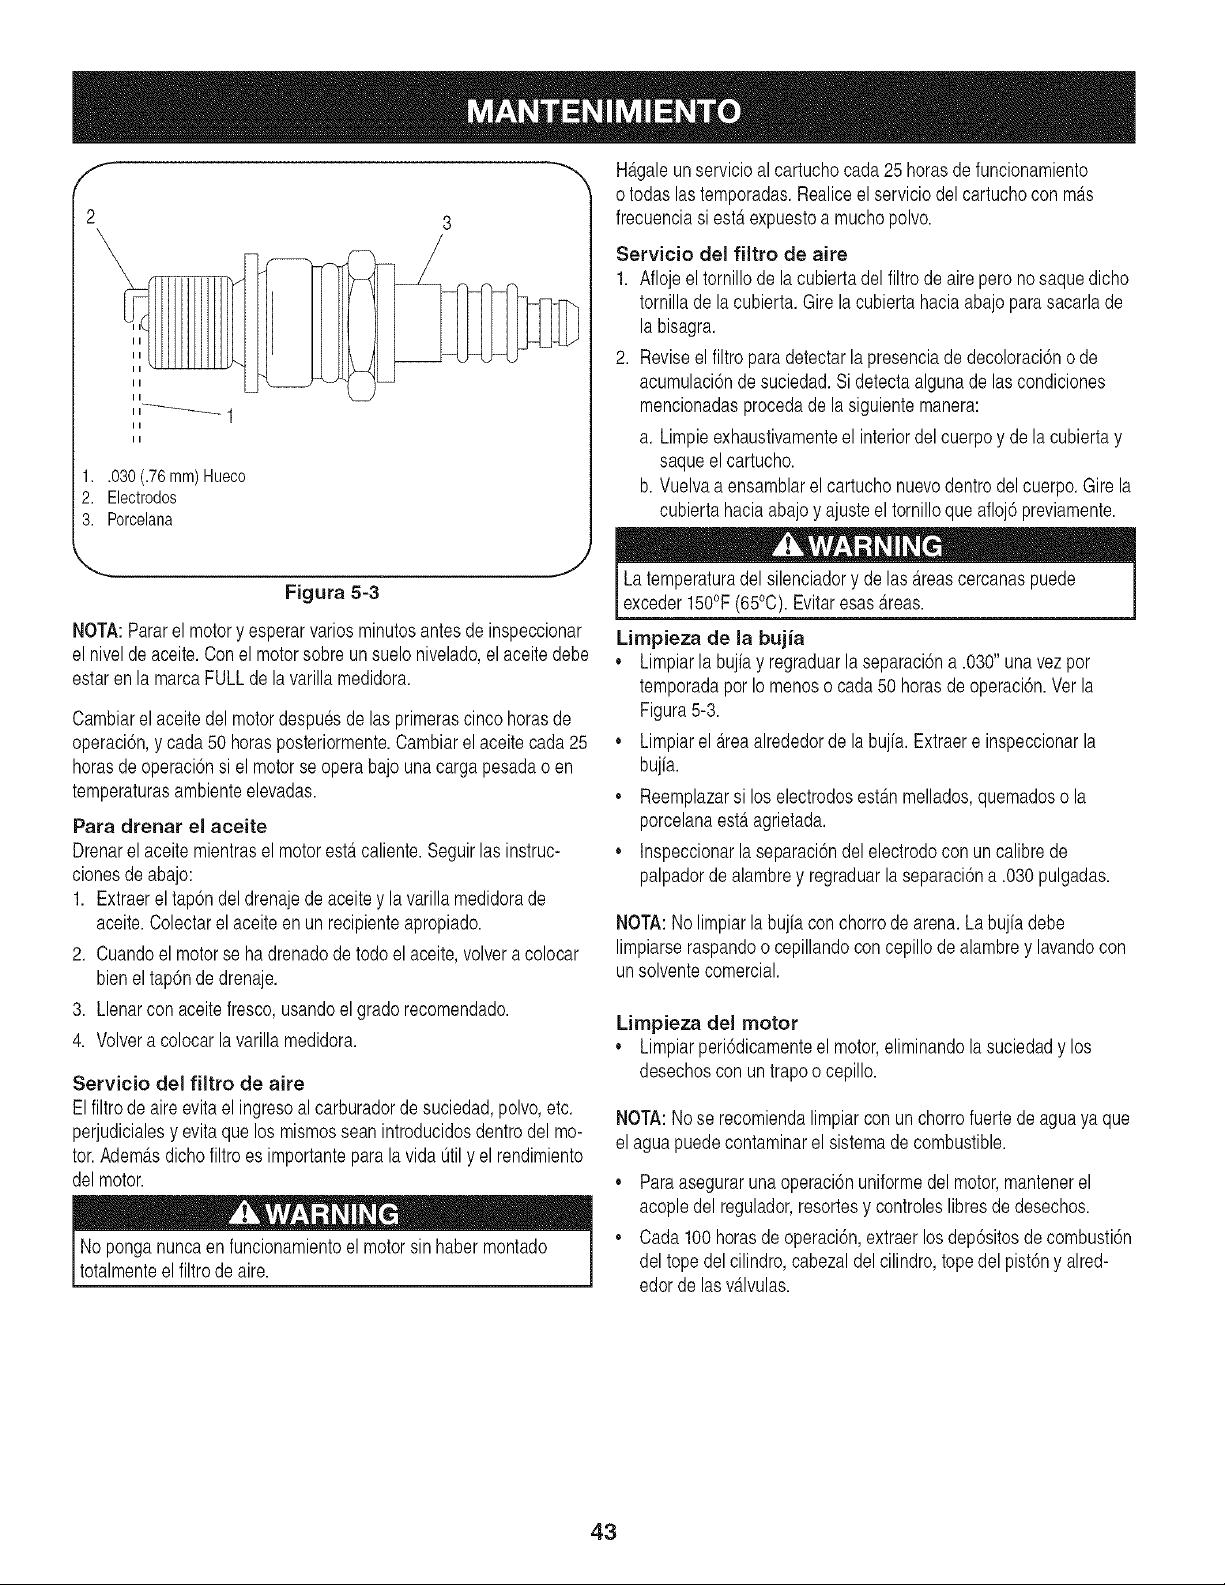
2
II
II
II
1..030 (.76mm) Hueco
2. Electrodos
3. Porcelana
Figura 5-3
NOTA:Pararel motory esperarvarios minutosantesde inspeccionar
el niveldeaceite.Conel motorsobreun sueloniveladc el aceite debe
estarenla marcaFULLde lavarilla medidora.
Cambiarel aceitedel motordespuesdelas primerascmcohorasde
operaci6n,y cada50 horasposteriormente.Cambiarelaceitecada25
horasde operaci6nsi el motorse opera bajo unacargapesadao en
temperaturasambienteelevadas.
Para drenar el aceite
Drenarel aceitemientrasel motorestercaliente.Seguirlas instruc-
cionesde abajo:
1. Extraerel tap6ndeldrenajedeaceitey la varillamedidorade
aceite.Colectarel aceite en un recipienteapropiado.
2. Cuandoel motorse ha drenadode todo el aceite,volvera colocar
bieneltap6nde drenaje.
3. Llenarcon aceitefresco,usandoel gradorecomendado.
4. Volvera colocarla varillamedidora.
Servicio del filtro de aire
Elfiltrode aireevitael ingresoal carburadorde suciedad,polvo,etc.
perjudicialesy evitaque los mismosseanintroducidosdentrodel mo-
tor.Adem_.sdichofiltro es importanteparalavida Otily el rendimiento
delmotor.
No ponganuncaen funcionamientoel motorsin habermontado
totalmenteel filtrodeaire. 1
H_.galeunservicioal cartuchocada25 horasde funcionamiento
o todaslastemporadas.Realiceelserviciodel cartuchocon m_ts
frecuenciasi esterexpuestoa muchopolvo.
Servicio del filtro de aire
1. Aflojeel tornillode la cubiertadelfiltrode aireperonosaquedicho
tornillade lacubierta.Gire la cubiertahaciaabajo para sacarlade
la bisagra.
2. Reviseelfiltroparadetectarlapresenciade decoloraci6no de
acumulaci6nde suciedad.Sidetectaalgunadelas condiciones
mencionadasprocedade lasiguientemanera:
a. Limpieexhaustivamenteel interiordel cuerpoy de la cubiertay
saqueel cartucho.
b. Vuelvaa ensamblarel cartuchonuevodentrodel cuerpo.Girela
cubiertahaciaabajo y ajusteel tornilloque afloj6previamente.
La temperaturadel silenciadory de las_treascercanaspuede I
exceder150°F(65°0). Evtar esas_treas. J
H
Limpieza de la bujia
,, Limpiarla bujia y regraduarla separaci6na .030" unavezpor
temporadapor Iomenoso cada50 horasde operaci6n.Ver la
Figura5-3.
,, Limpiarel Areaalrededorde la bujia.Extraere inspeccionarla
bujia.
,, Reemplazarsi loselectrodosest_tnmellados,quemadoso la
porcelanaest,. agrietada.
,, Inspeccionarla separaci6ndel electrodocon un calibrede
palpadordealambrey regraduarla separaci6na .030pulgadas.
NOTA:No limpiarla bujia con chorrode arena.Labujiadebe
limpiarseraspandoo cepillandocon cepillodealambrey lavandocon
unsolventecomercial.
Limpieza del motor
,, Limpiarperi6dicamenteel motor,eliminandola suciedady los
desechoscon un trapoo cepillo.
NOTA:No se recomiendalimpiarcon un chorrofuertedeaguayaque
el aguapuedecontaminarel sistemade combustible.
,, Para asegurarunaoperaci6nuniformedel motor,mantenerel
acopledel regulador,resortesy controleslibresde desechos.
,, Cada 100horasde operaci6n,extraer losdep6sitosde combusti6n
del topedel cilindro,cabezaldel cilindro,topedel pist6ny alred-
edorde lasv_tlvulas.
43
AIfinal de la temporadao si la cortadorade troncosnose vaa usar
por30dias o m_ts,prepararlaparaalmacenamiento.
Nuncaalmacenarla m_tquinacon combustibleenel tanquede
combustibledentrode un edificiodonde los humospuedenalcanzar
unallamaexpuestaochispao dondeestenpresentesfuentesde
encendidotales como calentadoresde aguacalientey espacio,
calderas,secadorasde ropa,cocinas,motoreselectricos,etc.
NOTA:Unabuenamanerade asegurarquesu cortadorade troncos
proporcionar_tunrendimientom_.ximolapr6ximatemporadaes una
revisaci6nanual por su Centrode ServicioSearslocal.
Cortadora de troncos
1. Limpiarbienla cortadorade troncos.
2. Frotarla unidadcon untrapoaceitadoparaprevenirla oxidaci6n,
especialmenteen la cubay viga.
Motor
IMPORTANTE:Es importanteprevenirque se formendep6sitosde
gomaen laspiezasesencialesdelsistemadecombustibletalescomo
carburador,filtrode combustible,mangueradecombustible,o tanque,
duranteel almacenamiento.Tambien,las mezclasde alcohol (llama-
dasgasoholo el usode etanolo metanol)puedeatraerhumedadque
conducea laseparaci6ny formaci6nde_.cidosduranteel almace-
namiento.El gasacidico puededaharel sistemade combustibledel
motormientrasesteralmacenado.
1. Drenarel tanquede combustible.Siempredrenarel combustible
dentrode un recipienteaprobadoal aire libre,alejadode llamas
expuestas.Asegurarseque el motoresterfifo. No fumarmientras
se manejael combustible.
2. Arrancarel motory dejarlofuncionarhastaque lastuberiasde
combustibley el carburadorestenvados.
IMPORTANTE:Nuncausarproductoslimpiadoresdemotoro
carburadoren el tanquede combustibleya que puedeocurrirundaho
permanente.Usarcombustiblefrescola temporadapr6xima.
3. Extraerlabujfa,verter1/2 oz aproximadamentede aceitepara
motordentrodel cilindroy hacergirar lentamenteparadistribuirel
aceite.
4. Volveracolocarlabujia.
NOTE:El estabilizadorde combustiblees una alternativaaceptable
paraminimizarla formaci6nde dep6sitosde gomade combustible
duranteel almacenamiento.
Porfavorseguirlas instruccionesdeabajoparaalmacenarsu
cortadoradetroncoscon combustibley estabilizadoren el motor:
1. Agregarestabilizadora la gasolinaen eltanquede combustible
o recipientede almacenamiento.Seguirsiemprela proporci6nde
mezclaindicadaen el recipientedel estabilizador.
2. Hacerfuncionarel motorpor 10 minutospor Io menosdespuesde
agregarestabilizadorparapermitirque el estabilizadorIlegueal
carburador.
IMPORTANTE:No drenarel tanquede gasolinay el carburadorsi
se usaestabilizadordecombustible.Drenartodo el aceite del c_.rter
(estodebehacersedespuesdeoperarel motory cuandoestertodavia
caliente)y Ilenarel cartercon aceitefresco.
Otros
,, No almacenarla gasolinade unatemporadaa la otra.
,, Reemplazarel recipientede gasolinasi comienzaa oxidarse.
,, Almacenarla unidaden un _.realimpiay seca.No almacenarcerca
de materialescorrosivostales comofertilizante.
,, Frotarel equipocon un trapoaceitadopara prevenirlaoxidaci6n.
44

Problema Causa posible Accion correctiva
El motor no arranca 1. Filtrode aire sucio. 1. Limpiarel filtrode airesiguiendo
I las instruccionesen la secc6n de
I mantenimiento.
2. Tanquede combustb e vac o, o
combustibe rancio. 2. L enare tanqueconcombustb e
fresco•
3. E reguladornoestaenla posici6n ......
OFF. _. Moverel regulaaora ul,_.
4. Tuberiade combustiblebloqueada. 4. Limpiarla tuberiade combustible•
5 Cabe de bu' a desconectado 5 Coneetarel cablede la bujia a la
• J ' misma.
6. L mpiarla bujia siguendolas
I 6. Bujladefectuosa, instruccionesen la secci6nde
" ' mantenimiento.
El motor funciona 1. Unidadfuncionandoconel regulador. 1. Moverla palancadel reguladora la
err&ticamente, posici6nOFR
2. Cablede la bujiaflojo. 2. Conectary ajustarel cablede la
bujia.
3. Limpiarlatuberiadecombustible.
3. Tuberiade combustiblebloqueadao Llenarel tanqueconcombustible
combustiblerancio, fresco.
4. Filtrode aire sucio.
4. Limpiarel filtrode airesiguiendo
las instruccionesen la secci6nde
mantenimiento.
5. Carburadordesajustado. 5. Consultarcon el Centrode
ServicioSears.
E motor ca enta 1. Nivelbajodel aceitedel motor. 1. Llenarel c_rter conaceite apropiado.
excesivamente 2. Filtrodeairesucio. 2. Limpiarel f Itrode are siguiendo
las instruccionesen la seccionde
mantenimiento.
I 3 Consutar con e Centrode Servc o
3 Carburadordesajustado ears
4 Restrccdn an e fu o de are 4 Sparar'elmotor desconeCtare cable
• ' '" j ' . de labujia, moverla armaduradel
" " ventiladorVlimpiar.
El cilindro no se rnuew 1. Ejerotodel impulsor. 1. Devolverla unidadal Centrode ServicioSears.
2. Lostaponesde enviose handejado
en lasmanguerashidr_tulicas.
3. Lostornillosde posici6nenel acople
nose hanajustadobien.
4. Acopleflojo del eje.
5. Seccionesdahadasdel engranaje.
6. V_tlvuladeescapedahada.
7. Tuberiashidr_.ulicasbloqueadas.
8. Nivelde aceiteincorrecto.
9. V_tlvuladireccionaldahadao blo-
2. Desconectarla manguerahidr_tulica,extraerlos
taponesdeenvio y reconectarla manguera.
3. Referirsea lasecci6nde ajuste de este manual
y ajustarlosacoples.
4. Corregirla alineaci6ndel motor/bomba.
5. Devolverla unidadal Centrode ServicioSears.
6. Devolverla unidadal Centrode ServicioSears.
7. Lavary limpiarelsistemahidr_tulico.
8. Inspeccionarel nivelde aceite.Llenarsi es
necesario.
__q_ueada 9. Devolverla unidadal Centrode ServicioSears.
NOTA: Para reparaciones que no sean los ajustes rnenores listados arriba, pot favor consultar con el Centro de Servicio
Sears local.
45
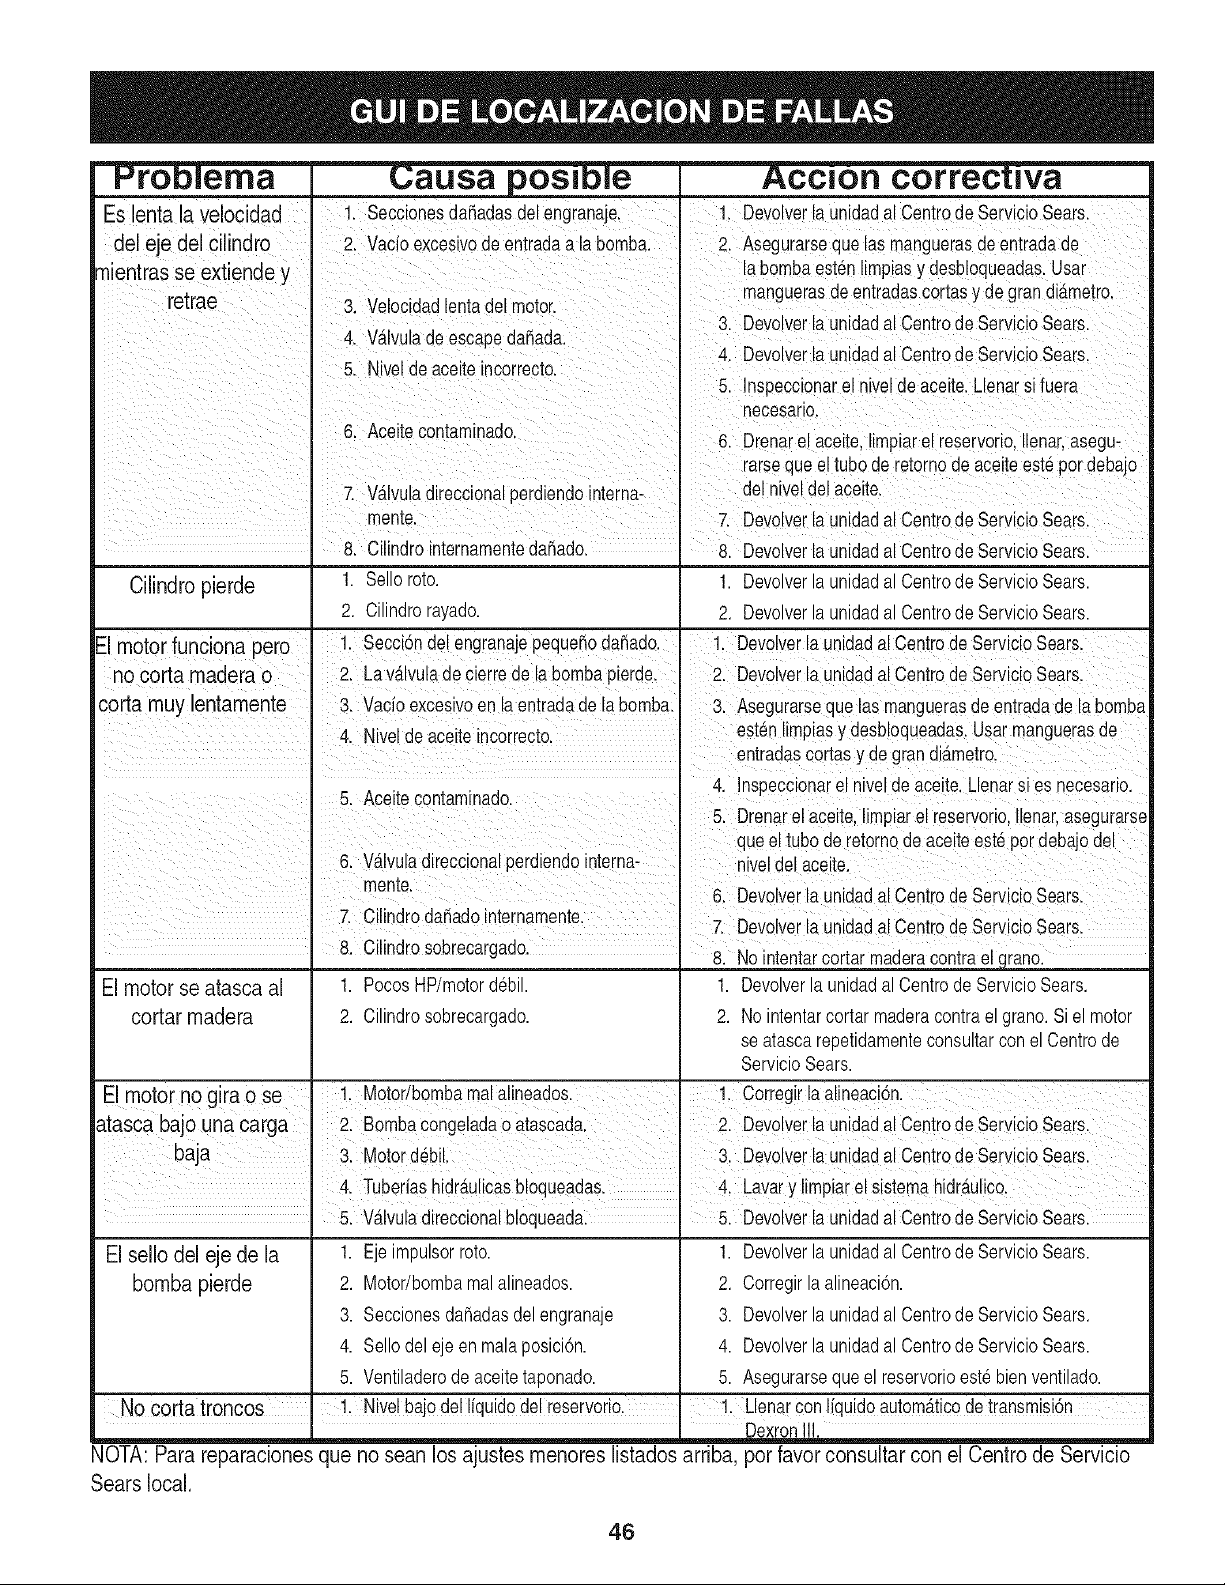
Problem ------C ible -----Accion corre tiv
ESlenta la velocidad SeccionesdaSadas de!eng!anaJe: !, Dei01ie[ ia Unidada! Centr° de ServicioSears'
delejedelcilindro . 2. Vadoexcesivodeentradaalabomba: 2, Asegurarsequelasmanguerasdeentradade
_nientraSse eXtiendey I labombaesten limPiasYdesb!oqueadas.Usai
retrae L_ :. , _ manguerasdeentradascortesy de gran di_metro,
;.t,ve!ocaaa len!aeel mo!or.
I 3 Devover aundada CentrodeServcoSears
4. V_tlvuladeescapeda_ada: ,, , ,, ,.,
4 Devover aunaaaa Centroae_ervco_ears
5. Nivelde aceite incorrecto.
5 lnsPeccionarel hive!de aceite.LlenarS !ue!a
• necesario.
6: Ace'te contam!!ado, 6: Drenare! aceite,!impiare! reservoriol!lenarlasegu-
!arsequeeltubo de retomode aceitees!#pordebaj0
7. V_lvu!adireccionalperdiendointerne- de!hive!de! aceite:
mental 7 Devovet a Undada €_ ntr( de _erv _"0 S'ars
8 Cilindrointernamentede'ado 8 Devoiverla _nidada_lC ntlo de Scerviio Seals
Cilindropierde 1. Selloroto. 1. Devolverlaunidadal Centrode ServicioSears.
2. Cilindrorayado. 2. Devolverlaunidadal Centrode ServicioSears.
E motor funciona pero 1.Secci6n de engranajepeque_oda_ado. 1. Uevolverla unidadalCentrodeServicioSears.
nocortamaderao 2. Lavalvuadecierredelabombapierde. 2 Devover aundada CentrodeServcoSears
corta muy lentamente 3. Vacio excesivoen la entradade la bomba. 3. Asegurarseque las manguerasdeentradadela bomba
Niveldeaoeiteinoolrectol esten limPias Y desb!oqueadaslUsa! manguerasde
entradascortesy de gran d ametro,
._ ,, .: : . , 4. Inspeccionarelniveldeaceite. Llenarsiesnecesario.
b. Acel!e conTamlrlaao.
5. arenarel aceite,limPiare! [eservorio,Ilenar,asegura!se
quee tubode retornodeacete estepot debajo de
6. V#.lvuladireccionalperd endo interne- niveldel aceite.
mente' 6. Devolverla unidadai Centrode servicio sears:
7' Ci!indr° de,ado intemamente' , z Devolverla unidadal CentrodeserviOiosearsl
8 Cilindrosobrecargado
• ' " 8. No intentarCortarmaderaOontraelgranol
El motor se atasca al 1. PocosHP/motordebil. 1. Devolverla unidadal Centrode ServicioSears.
cotter madera 2. Cilindrosobrecargado. 2. No intentarcortar maderacontraelgrano.Siel motor
se atascarepetidamenteconsulterconel Centrode
ServicioSears.
El motor no gira o se i, Motorlbombarealalineados. !, Corregirla alineaci6n:
atascabajounacarga _ 2: Bombacongeladaoatascada. 2. DevoverlaunidadalCentrodeServicioSears.
baja 3. Motordebil: 3. Devolverlaunidadal CentrodeServicioSears.
4. Tuberas hidr_.ulicasbloqueadasl 4. Lavery impiarel sistemahidr#.ulicol
El sello del eje de la
bomba pierde
1. Ejeimpulsorroto.
2. Motor/bombamalalineados.
3. Seccionesdahadasdel engranaje
4. Sellodel eje en maleposicidn.
5. Ventiladerode aceitetaponado.
1. Devolverlaunidadal Centrode ServicioSears.
2. Corregirla alineacidn.
3. Devolverlaunidadal Centrode ServicioSears.
4. Devolverlaunidadal Centrode ServicioSears.
5. Asegurarsequeel reservorioeste bienventilado.
Nocortatroncos " !. Nivelbajode!!iquidode!reserverio. ' !. Llenarconliquidoautorn6.ticodetransmisidn
,m ' ' DexronII1_
NOTA: Pare reparaciones que no seen los ajustes menores listados arriba, pot favor consulter con el Centro de Servicio
Sears local.
46
(Esta p_.ginase aplica s61oen EE.UU. y Canada.).
Sears, Roebuck and Co., U.S.A. (Sears), el Consejo de Recursos Ambientales de California (CARB)
y ia Agencia de Protecci6n Ambiental de los Estados Unidos (EPA)
Declaraci6n de garantia del sistema de control de emisiones (derechos y obligaciones de la garantia de defectos del propi-
etario)
LA COBERTURADELA GARANTfADE CONTROLDE EMISIONESES
APLICABLEA LOSMOTORESCERTIFICADOSCOMPRADOSENCALIFOR-
NIAEN 1995Y POSTERIORMENTE,QUE SE UTILIZANENCALIFORNIA,
Declaraci6n de garantia sobre defectos en el control
ElConsejode RecursosAmbientalesde California(CARB),la EPA(Agencia
de ProteccionAmbientalde los EE.UU.)y Searstienen el gustode explicarla
garantiadel sistemade control de emisionespara motoresdel a_o2000y para
elfuturo con relaciona motorespequehostodo terreno(SORE).En California,
los nuevosmotorespequ@ostodo terrenodebenestar dise_ados,construidos
y equipadosparacumplircon las rigurosasnormasanti-smogdelestado.En
el restode losEstadosUnidos,losmotoresnuevostodoterrenodeencendido
porchispa certificadosparael a_o 1997debencumplirestandaressimilares
establecidospor la EPA.Searsdebegarantizarel sistemade control de emis-
Y PARALOS MODELOSCERTIFICADOSDELAiqO 1997Y POSTERIORES,
QUESE COMPRENY UTILICENENCUALQUIERPARTEDE LOSESTADOS
UNIDOS(Y A PARTIRDEL 1 DE ENERODE2001 EN CANADa,).
de emisiones para California y los Estados Unidos
ionesde su motorpara losperiodosde tiempo enumeradosa continuaci6n,
siemprequeno hayaabuso,negligenciao mantenimientoindebidodesu
motortodoterrenopequ@o.Su sistemade controlde emisionespuedeincluir
piezastales comoel carburador,el filtro de aire, elsistemade encendido,el
silenciadory elconversorcatalitico.Tambienpuedeincluirconectoresy otras
unidadesrelacionadascon las emisiones.Dondeexistaunacondicioncubierta
porla garantia,Searsrepararasu peque_omotortodo terrenosincostoalguno
incluyendodiagnostico,piezasy manode obra
Cobertura de la garantia Sears para defectos en el control de emisiones
Los motorestodo terrenopequ@osestangarantizadosen Io relativoal control alas disposicionesque se indiquena continuacion.Si una partede su motor
de emisionesparadefectosen piezasduranteun periodode dos ahos,sujeto cubiertapor la garantiaesdefectuosa,Sears repararao sustituiradichaparte.
Responsabilidades del propietario en relacibn con la garantia
Comopropietariodel motortodo terrenopequ@o,Ud.es responsablede la
realizaciondel mantenimientorequeridoquese incluyeen las instrucciones
de operaciony mantenimiento.Sears recomiendaquese conserventodoslos
recibosrelativosal mantenimientode su motortodoterrenopeque_o,pero
no pude denegarlagarantiasimplementeporla faltadelosmismos,o por su
incumplimientodel mantenimientoprogramado.Comopropietariodel motor
peque_otodoterrenodebesaberque, sin embargo,Sears lepuedenegar
lacoberturade lagarantiasi su motortodoterrenopeque_oo una piezadel
mismohanfalladodebidoa abuso,negligencia,mantenimientoindebidoo
a modificacionesno aprobadas.Ud.es responsablede presentarsu motor
todoterrenopequehoa un distribuidorde serviciosSearsautorizadotan pronto
comoaparezcaun problema.Lasreparacionesde la garantiasinconflicto
debencompletarseen un plazodetiemporazonable,no superiora 30 dias. Si
tienealguna preguntarespectoa sus derechosy responsabilidadesreferen-
tes a la garantia,debe contactarcon un representantede serviciosSears al
1--800--469--4663.La garantiade emisioneses unagarantiapor defectos.Los
defectossejuzgan de acuerdocon elfuncionamientonormalde unmotor.La
garantia no estArelacionadacon unapruebade emisionesen uso.
Disposiciones de la garantia Sears para defectos en el control de emisiones
Las siguientesson disposicionesespecificasrelacionadascon la coberturade la garantiaparadefectosenel controlde emisiones.Esun a_adidoa lagarantiade
motorSearspara motoresno reguladosque seencuentraen lasinstruccionesde funcionamientoy mantenimiento.
1. Piezascon garantia
La coberturade estagarantiase extiende @icamentealas piezas
que aparecena continuacion(las partesde los sistemasde control de
emisiones),siemprequedichaspiezasestuvieranya en el motoren el
momentode su compra.
a. Sistemade medici@ de combustible
• Sistemade enriquecimientopara arranqueen frio
• Carburadory partesinternas
• Bombade combustible
b. Sistemade induccionde aire
• Filtrode aire
• Colectorde admision
c. Sistemade encendido
• Bujia(s)de encendido
• Sistemade encendidomagneto
d. Sistemadelcatalizador
• Convertidorcatalitico
• Colectorde escape
• Sistemade inyecci6nde aireo vAIvulade impulsos
e. Elementosvariadosusadosen los sistemasanteriores
• Valvulas de vacio, sensiblesa temperatura,posici6ny tiempo
e interruptores
• Conectoresy montajes
2. Alcancede la cobertura
Searsgarantiza al poseedorinicialy a los compradoressubsiguientes
que laspiezascongarantiano tendran defectosenmaterialesnimano
de obra que provoquenla falla de las mismasduranteun periodo de
dos ahosa partirde la fecha en queel motorse entrega a un comprador
particular.
3. Sincargo
La reparaciono reemplazodecualquierpartecon garantia se realizara
sin cargoalgunoparael pose@or, incluyendotareasde diagnosticoque
permitandeterminarsi una partecon garantiaes defectuosa,siempreque
dicho diagnosticose realiceen un distribuidorde serviciosSearsautoriza-
do. Parael serviciode lagarantiade emisiones,contacteal distribuidorde
serviciosSears autorizadomascercanoincluidoen las"Paginasamarillas"
en lascategoNas"Motores,gasolina","Motoresde gasolina","Podadoras
de cesped",o similares.
4. Reclamacionesy exclusionesa la cobertura
Las reclamacionesde lagarantia debenenviarsede acuerdocon las
disposicionesde la politica de garantia para motoresSears.La cobertura
de la garantiaexcluiradefectosen piezascon garantia que no seanpartes
originalesSears,o abuso,negligenciao mantenimientoincorrecto,tal y
como se estableceen lapolitica de garantiapara motoresSears. Searsno
es responsablede lasfallas en piezascon garantia provocadasporel uso
de partesa_adidas,que no sean originaleso que se hayanmodificado.
5. Mantenimiento
Cualquierpartecon garantiaque no este programadapara ser reem-
plazada comomantenimientorequerido,o que solo deba inspeccionarse
regularmenteal efectode "inspeccioneo reemplacesegt]n sea necesario",
estaragarantizadacontra defectosduranteel periodo de la garantia.Todas
las piezasgarantizadasqueesten programadaspara su reemplazopara
cumplir con los requisitosde mantenimientoestarAngarantizadassolo
por el periodoanterioral primerreemplazoprogramadoparadichapieza.
Cualquierpiezade recambioquesea equivalenteen funcionamientoy
durabilidadpuedeusarse para realizarmantenimientoo reparaciones.El
propietarioes responsablede realizartodo el mantenimientorequerido,tal
y como sedefine en lasinstruccionesde funcionamientoy mantenimiento
Sears
6. Coberturaindirecta
Porla presente,la coberturase extiendea lafalla de cualquiercomponente
de motorprovocadapor lafalla de unapieza con garantia queeste todavia
en periodode garantia.
En los EstadosUnidosy Canadahay unalinea de atenci6nde 24 horas,1-800=469-4663,quecuentacon un ment]con mensajespre-grabadosquecontienen
informacionpara el mantenimientode motores.

Your Home
For repair - in your home - of all major brand appliances,
lawn and garden equipment, or heating and cooling systems,
no matter who made it, no matter who sold it!
For the replacement parts, accessories and
owner's manuals that you need to do-it-yourself.
For Sears professional installation of home appliances
and items like garage door openers and water heaters.
1-800-4-MY-HOME ® (1-800-469-4663)
Call anytime, day or night (U.S.A. and Canada)
www.sears.com www.sears.ca
For expert home solutions advice: www.managemyhome.com
Our Home
For repair of carry-in items like vacuums, lawn equipment,
and electronics, call or go on-line for the location of your nearest
Sears Parts & Repair Service Center
1-800-488-1222 (U.S.A.) 1-800-469-4663 (Canada)
Call anytime, day or night
www.sears.com www.sears.ca
To purchase a protection agreement on a product serviced by Sears:
1-800-827-6655 (U.S.A.) 1-800-361-6665 (Canada)
Para pedir servicio de reparaci6n Au Canada pour service en fran(_ais:
a domicilio, y para ordenar piezas: 1-800-LE-FOYER M°
1-888-SU-HOGAR ® (1-800-533-6937)
(1-888-784-6427) www.sears.ca
TM
® Registered Trademark / Trademark / sM Service Mark of Sears Brands, LLC
Tm
® Mama Registrada / ' Mama de F_brica / sM Marca de Servicio de Sears Brands, LLC
MC MD
Marque de commerce / _ Marque d_pos_e de Sears Brands, LLC © Sears Brands, LLC