INSTRUCTION BOOK
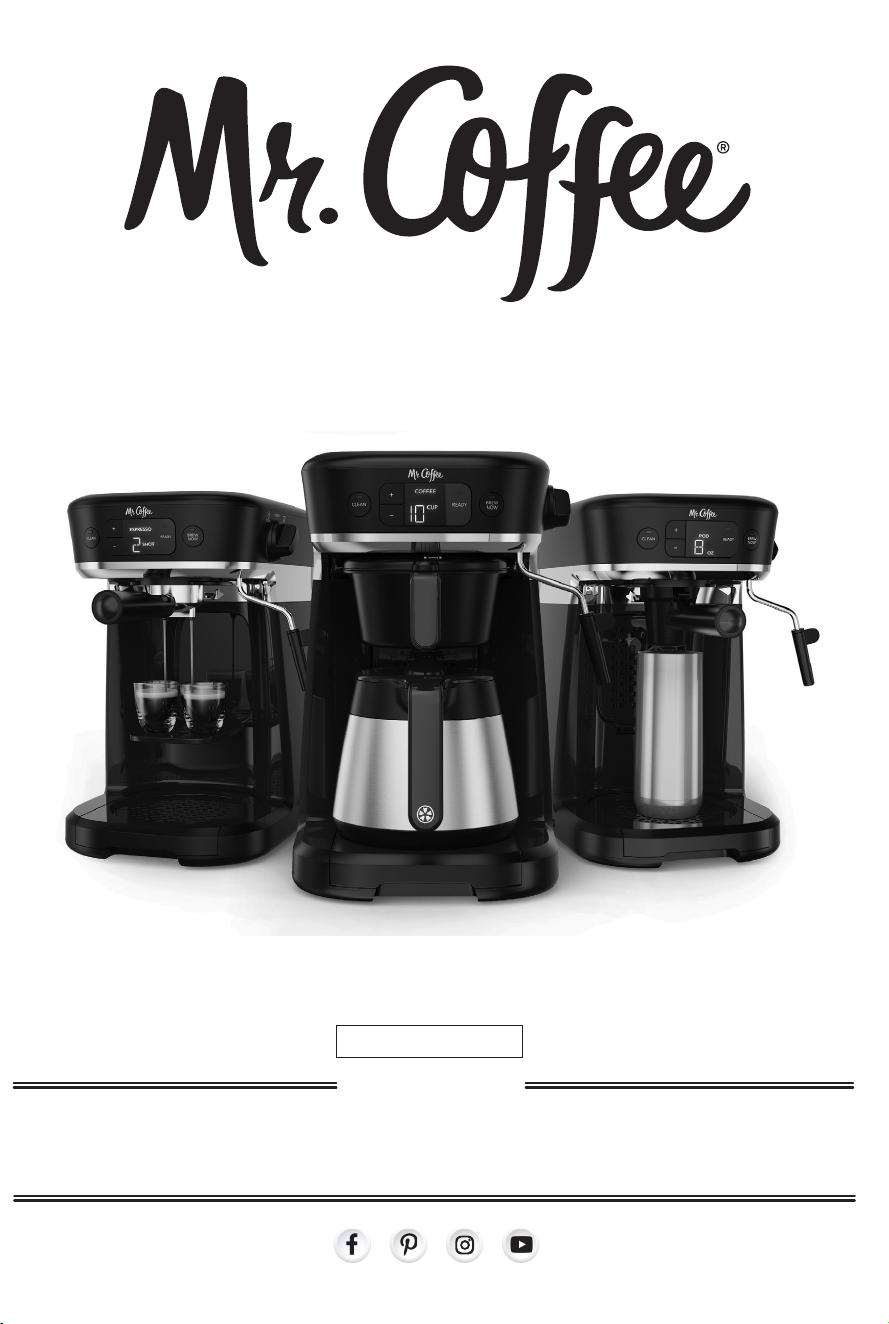
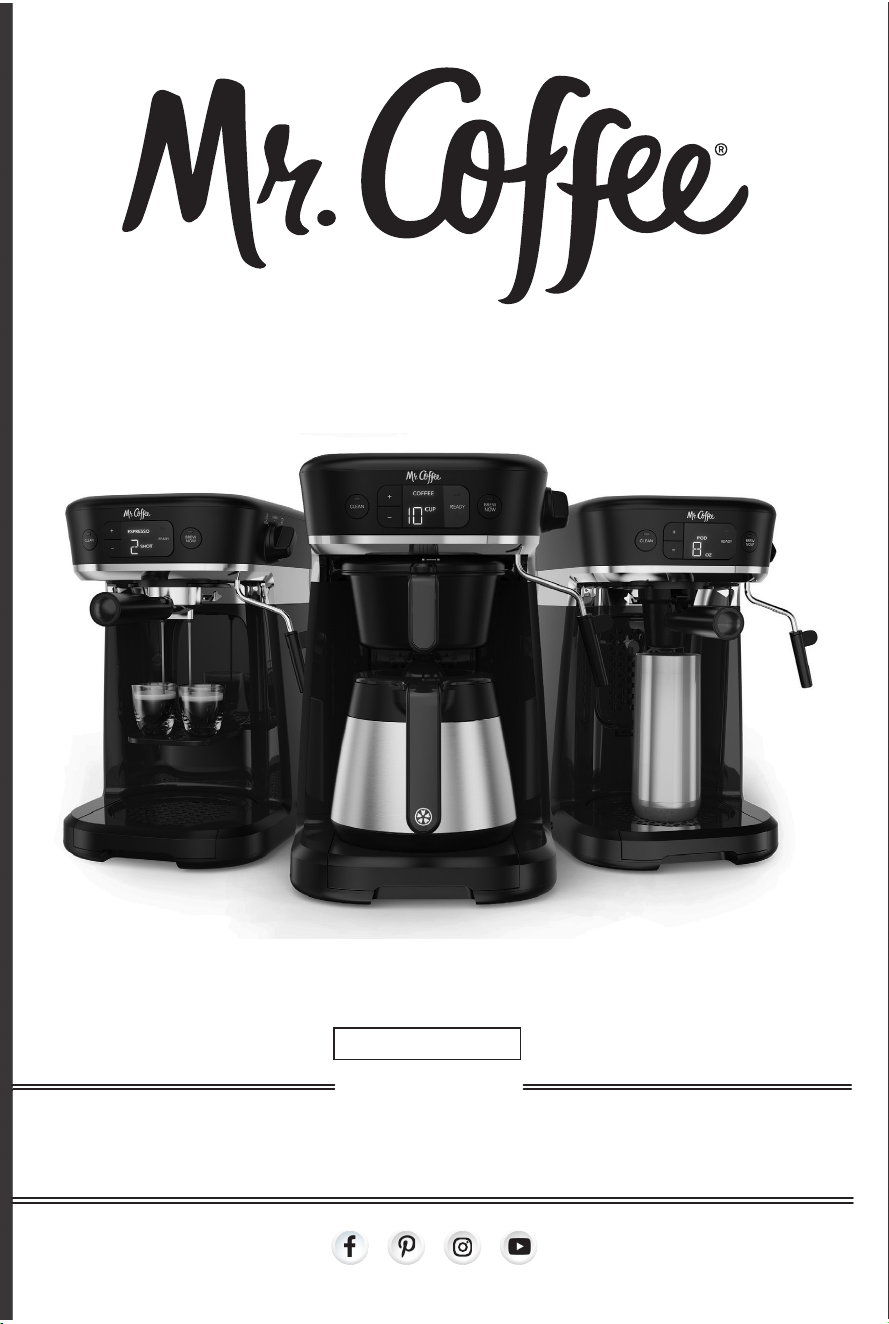
OCCASIONS™
ALL-IN-ONE COFFEEMAKER
P.N. 198074 www.mrcoffee.com
© 2019 Sunbeam Products, Inc. All rights reserved. Distributed by Sunbeam Products, Inc.
Boca Raton, Florida 33431. Made in China. SPR-101818-389P
© 2019 Sunbeam Products, Inc. Todos los derechos reservados. Distribuido por Sunbeam
Products, Inc. Boca Ratón, Florida, 33431. Fabricado en China. SPR 101818-389P
K-Cup® is a registered trademark of Keurig Green Mountain, Inc.
BVMC-O-C SERIES
INSTRUCTION BOOK
OCCASIONS™
ALL-IN-ONE COFFEEMAKER
P.N. 198074 www.mrcoffee.com
© 2019 Sunbeam Products, Inc. All rights reserved. Distributed by Sunbeam Products, Inc.
Boca Raton, Florida 33431. Made in China. SPR-101818-389P
© 2019 Sunbeam Products, Inc. Todos los derechos reservados. Distribuido por Sunbeam
Products, Inc. Boca Ratón, Florida, 33431. Fabricado en China. SPR 101818-389P
K-Cup® is a registered trademark of Keurig Green Mountain, Inc.
BVMC-O-C SERIES
IMPORTANT SAFEGUARDS
When using electrical appliances, basic safety precautions should
alwaysbefollowedtoreducetheriskoffire,electricshock,and/or
injury to persons including the following:
1. Read all instructions.
2. Do not touch hot surfaces. Use handles or knobs.
3. To protect against electric shock, do not place or immerse cord,
plugs, or appliance in water or other liquids.
4. This appliance is not to be used by children or by persons with
reduced physical, sensory or mental capabilities.
5. Close supervision is necessary when any appliance is used near
children. Children should not play with the appliance.
6. Unplug appliance from outlet when not in use and before cleaning.
Allow to cool before putting on or taking off parts, and before
cleaning the appliance.
7. Do not operate any appliance with a damaged cord or plug or after
the appliance malfunctions, or has been damaged in any manner.
Return appliance to an Authorized Service Center for examination,
repair or adjustment. Do not attempt to replace or splice a
damaged cord.
8. The use of an accessory not recommended by the appliance
manufacturerforusewiththisappliancemayresultinfire,electric
shock or injury to persons.
9. Do not use outdoors.
10. Do not let cord hang over edge of table or counter, or touch hot
surfaces.
11. Do not place on or near a hot gas or electric burner, or in a
heated oven.
12.Alwaysattachplugtoappliancefirst,thenplugcordintothewall
outlet (for appliances with detachable cords). To disconnect, turn
any control to the off position, then remove plug from wall outlet.
13. Do not use appliance for other than intended use.
14. All lids should be closed during use.
15. Scalding may occur if the lid is removed during or immediately after
the brewing cycles. Contents may be hot. Allow to cool before
removing the lid.
16. In order to avoid possible body burns and other injuries associated
with steam and hot water, or damage to the unit, never remove the
watertankortheportafilterswhiletheMr.Coffee®Occasions
™
coffeemaker is brewing or frothing.
For appliances with service panels:
WARNING:TOREDUCETHERISKOFFIREORELECTRICSHOCK,
DONOTREMOVETHISCOVER.NOUSER-SERVICEABLEPARTS
INSIDE.REPAIRSHOULDBEDONEBYAUTHORIZEDSERVICE
PERSONNELONLY.
INTRODUCTION
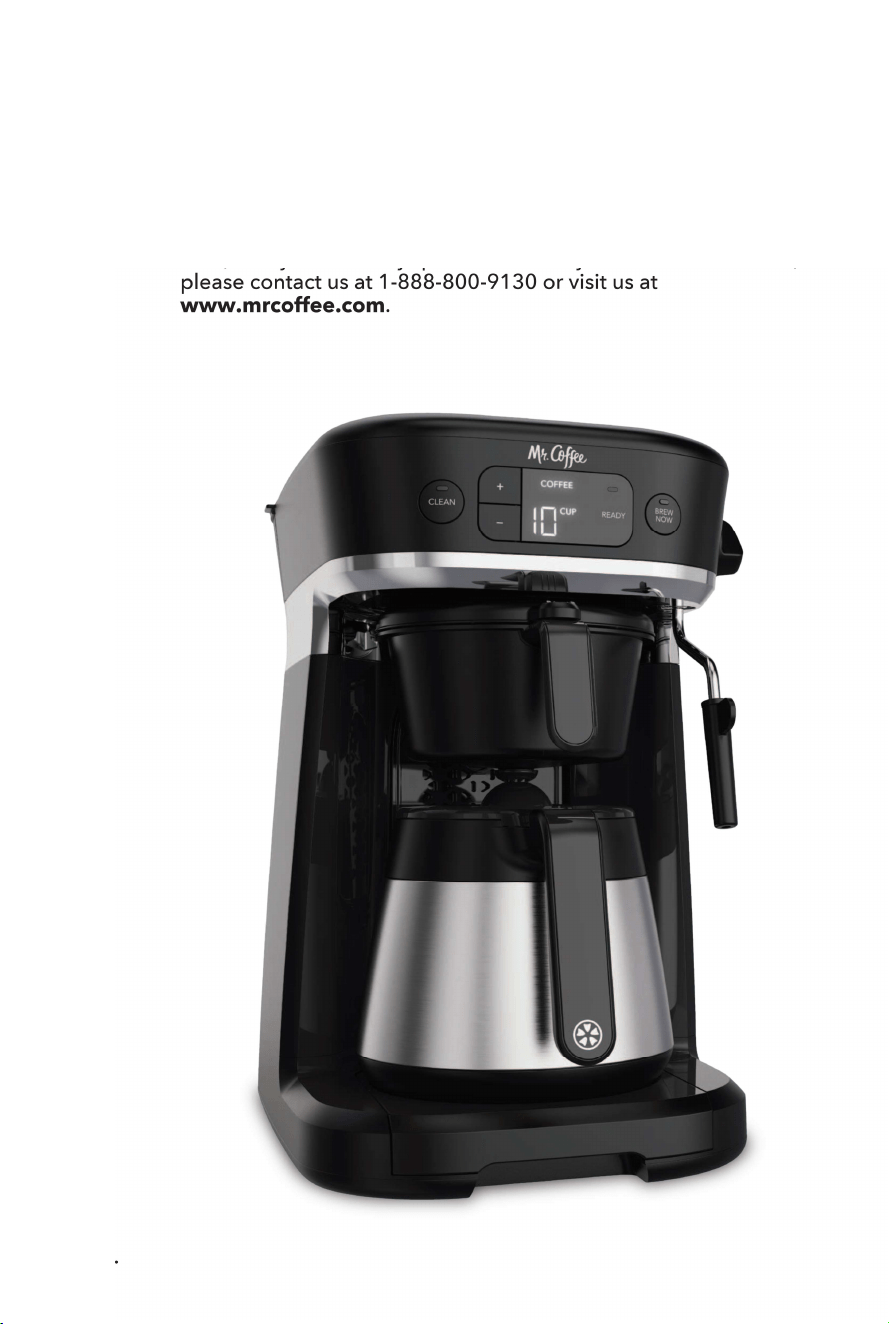
Welcome and congratulations on the purchase of your new
MR.COFFEE®Occasions™Coffeemaker.Ournumberonegoal
is to give you the best-tasting cup of coffee or espresso every
time, so if you have any questions about your new coffeemaker,
please contact us at 1-888-800-9130 or visit us at
www.mrcoffee.com.
1.
2.

IMPORTANT SAFEGUARDS
When using electrical appliances, basic safety precautions should
alwaysbefollowedtoreducetheriskoffire,electricshock,and/or
injury to persons including the following:
1. Read all instructions.
2. Do not touch hot surfaces. Use handles or knobs.
3. To protect against electric shock, do not place or immerse cord,
plugs, or appliance in water or other liquids.
4. This appliance is not to be used by children or by persons with
reduced physical, sensory or mental capabilities.
5. Close supervision is necessary when any appliance is used near
children. Children should not play with the appliance.
6. Unplug appliance from outlet when not in use and before cleaning.
Allow to cool before putting on or taking off parts, and before
cleaning the appliance.
7. Do not operate any appliance with a damaged cord or plug or after
the appliance malfunctions, or has been damaged in any manner.
Return appliance to an Authorized Service Center for examination,
repair or adjustment. Do not attempt to replace or splice a
damaged cord.
8. The use of an accessory not recommended by the appliance
manufacturerforusewiththisappliancemayresultinfire,electric
shock or injury to persons.
9. Do not use outdoors.
10. Do not let cord hang over edge of table or counter, or touch hot
surfaces.
11. Do not place on or near a hot gas or electric burner, or in a
heated oven.
12.Alwaysattachplugtoappliancefirst,thenplugcordintothewall
outlet (for appliances with detachable cords). To disconnect, turn
any control to the off position, then remove plug from wall outlet.
13. Do not use appliance for other than intended use.
14. All lids should be closed during use.
15. Scalding may occur if the lid is removed during or immediately after
the brewing cycles. Contents may be hot. Allow to cool before
removing the lid.
16. In order to avoid possible body burns and other injuries associated
with steam and hot water, or damage to the unit, never remove the
watertankortheportafilterswhiletheMr.Coffee®Occasions
™
coffeemaker is brewing or frothing.
For appliances with service panels:
WARNING:TOREDUCETHERISKOFFIREORELECTRICSHOCK,
DONOTREMOVETHISCOVER.NOUSER-SERVICEABLEPARTS
INSIDE.REPAIRSHOULDBEDONEBYAUTHORIZEDSERVICE
PERSONNELONLY.
INTRODUCTION
Welcome and congratulations on the purchase of your new
MR.COFFEE®Occasions™Coffeemaker.Ournumberonegoal
is to give you the best-tasting cup of coffee or espresso every
time, so if you have any questions about your new coffeemaker,
please contact us at 1-888-800-9130 or visit us at
www.mrcoffee.com.
1.
2.
PRODUCT NOTICES
1. Placetheapplianceonahard,flat,levelsurfacetoavoid
interruptionofairflowunderneaththecoffeemaker.
2. Do not operate the appliance with an empty water tank.
3. Keep the area above the appliance clear during use, as hot
steam will escape the appliance.
4.3.
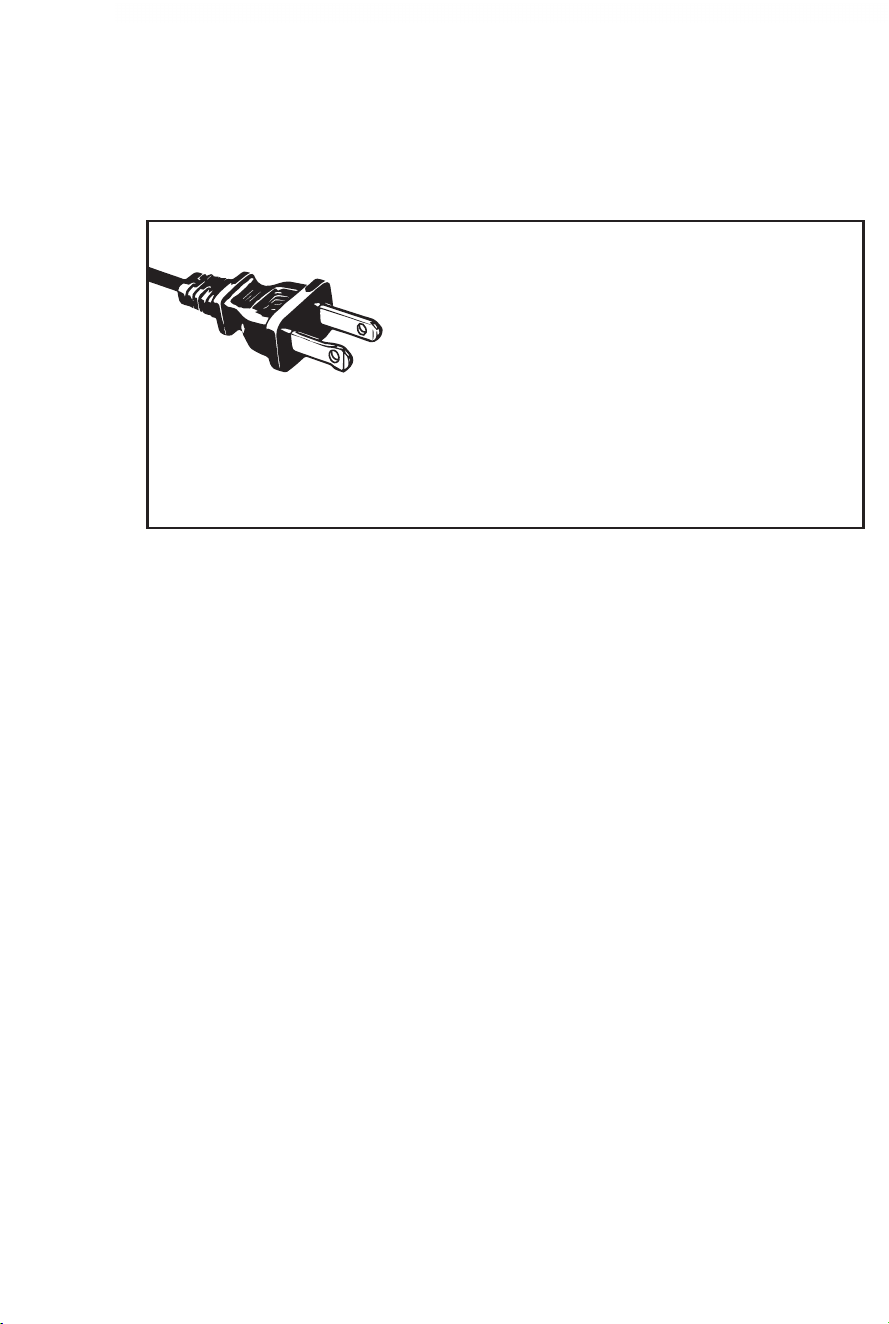
Polarized plug
This appliance has a polarized plug, (one
blade is wider than the other). As a safety
feature to reduce the risk of electrical shock,
thisplugisintendedtofitinapolarized
outletonlyoneway.Iftheplugdoesnotfitfullyintheoutlet,reverse
theplug.Ifitstilldoesnotfit,contactaqualifiedelectrician.Donot
attempt to defeat this safety feature or modify the plug in any way. If
theplugfitslooselyintotheACoutletoriftheACoutletfeelswarm
do not use that outlet.
SAVE THESE INSTRUCTIONS
HOUSEHOLD USE ONLY
POWER CORD INSTRUCTIONS
A short power supply cord (or detachable power-supply cord) may be
provided to reduce risks resulting from becoming entangled in or tripping
overalongercord.Longerdetachablepower-supplycordsorextension
cords are available and may be used if care is exercised in their use. If a
long detachable power-supply cord or extension cord is used:
a. The marked electrical rating of the detachable power-supply cord or
extension cord should be at least as great as the electrical rating of the
appliance;
b. If the appliance is of the grounded type, the extension cord should be a
grounding type 3-wire cord; and
c. The longer cord should be arranged so that it will not drape
over the counter top or table where it can be pulled on by children or
tripped over unintentionally. Do not pull, twist or otherwise abuse the
power cord.

PRODUCT NOTICES
1. Placetheapplianceonahard,flat,levelsurfacetoavoid
interruptionofairflowunderneaththecoffeemaker.
2. Do not operate the appliance with an empty water tank.
3. Keep the area above the appliance clear during use, as hot
steam will escape the appliance.
4.3.
Polarized plug
This appliance has a polarized plug, (one
blade is wider than the other). As a safety
feature to reduce the risk of electrical shock,
thisplugisintendedtofitinapolarized
outletonlyoneway.Iftheplugdoesnotfitfullyintheoutlet,reverse
theplug.Ifitstilldoesnotfit,contactaqualifiedelectrician.Donot
attempt to defeat this safety feature or modify the plug in any way. If
theplugfitslooselyintotheACoutletoriftheACoutletfeelswarm
do not use that outlet.
SAVE THESE INSTRUCTIONS
HOUSEHOLD USE ONLY
POWER CORD INSTRUCTIONS
A short power supply cord (or detachable power-supply cord) may be
provided to reduce risks resulting from becoming entangled in or tripping
overalongercord.Longerdetachablepower-supplycordsorextension
cords are available and may be used if care is exercised in their use. If a
long detachable power-supply cord or extension cord is used:
a. The marked electrical rating of the detachable power-supply cord or
extension cord should be at least as great as the electrical rating of the
appliance;
b. If the appliance is of the grounded type, the extension cord should be a
grounding type 3-wire cord; and
c. The longer cord should be arranged so that it will not drape
over the counter top or table where it can be pulled on by children or
tripped over unintentionally. Do not pull, twist or otherwise abuse the
power cord.

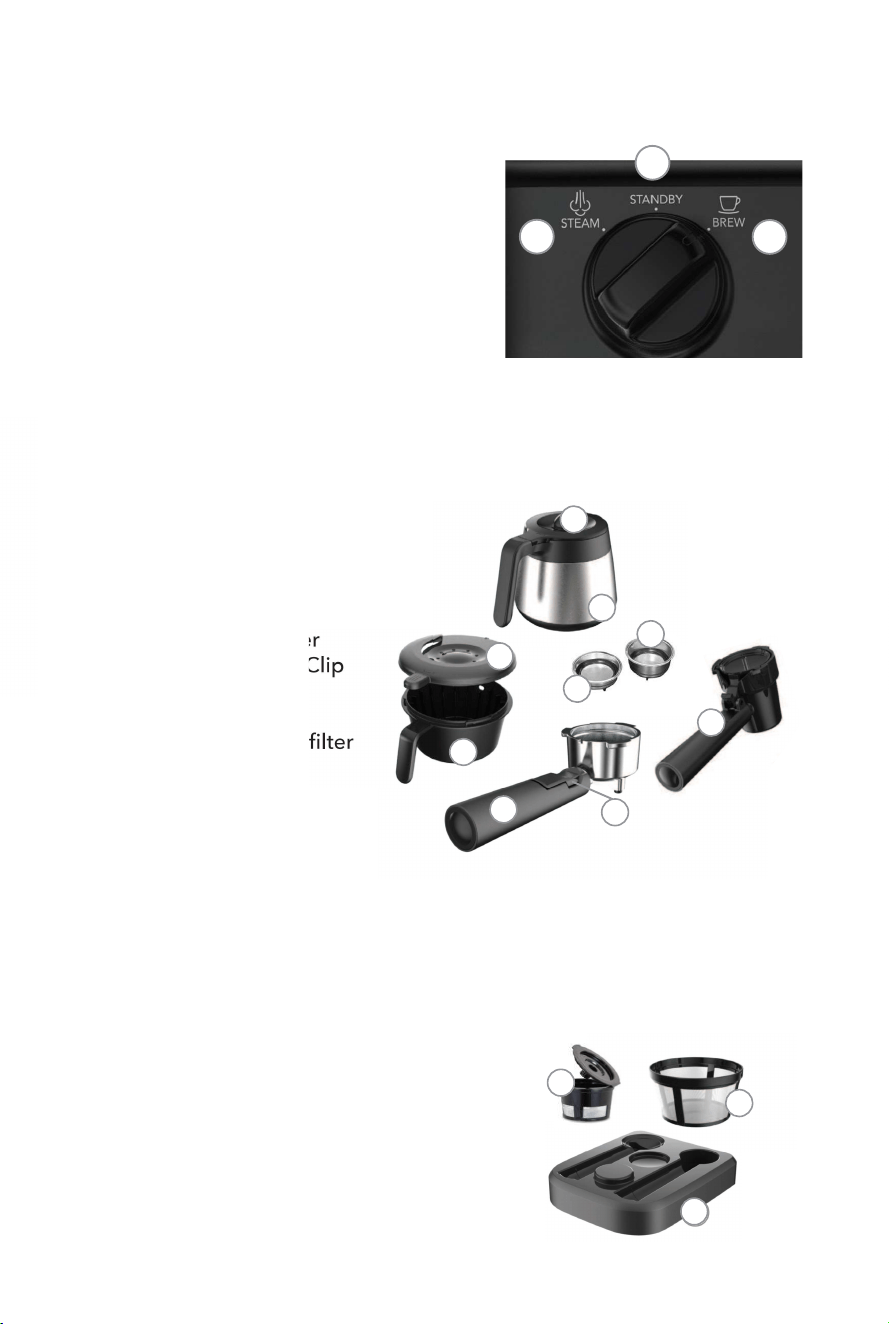
GET TO KNOW YOUR COFFEE MAKER
UNDERSTAND YOUR CONTROL PANEL
7. Water Tank
a.WaterTankLid
b.WaterTankHandle
8. Tamper
1. Power Switch
2. Display
3. Knob
4. Milk Frothing Wand
a. Milk Frothing Wand Cover
5. HeightAdjustmentTray
6. Drip Tray
a. Drip Tray Cover
b.WaterLevel
Indicator
1. Clean Button
2. Clean Indicator
3. Brew Size Selector
4. Display
5. Ready Indicator
6. Brew Now Button
7. Brew Now Indicator
6.
5.
1. Permanent Single Serve Filter
2. Permanent Basket Filter
3. Storage Tray
1. Coffee Pot
a.CoffeePotLid
2. Brew Basket
a.BrewBasketLid
3.EspressoPortafilter
a. Filter Retainer Clip
b. 1-shot Filter
c. 2-shot Filter
4.SingleServePortafilter
KNOB
ATTACHMENTS
COFFEE MAKER EXTRAS
(not included with all models)
2
3
4
6
8
4a
6a
5
7
7a
7b
1
1
1a
2
2a
3
4
3c
1
2
6b
3b
3a
2
3
4
6
8
4a
6a
5
7
7a
7b
1
1
2
3
1
1a
2
2a
3
4
3c
1 Steam milk
2. Standby
3. Brew coffee, espresso, single serve
1
2
6b
3b
3
2
4
6
7
1
5
3
3a

QUICK START GUIDE
5. Turn the knob to the “brew” position.
6. “10 cup” will illuminate on the display.
7. Press the clean button.
NOTE:
The ready indicator light will turn off and the clean indicator
light will illuminate.
8. When the coffeemaker beeps and the clean indicator light turns off,
turn the knob to the “standby” position.
9. Discard the water in the coffee pot.YourMr.Coffee®Occasions™
coffeemaker is ready to use!
WARNING:
This Quick Start Guide is not intended to be a substitute for the
rest of the user manual, and you should read and understand the warnings
and instructions in the user manual before using this appliance.
Brief Guide to Brewing on the Mr. Coffee
®
Occasions™ Coffeemaker:
1. Clean&primethecoffeemakerbeforebrewingcoffeeforthefirsttime.
2. Fill the water tanktothe“MAX”markingwithclean,filteredwater.
3. TurnthecoffeemakerONbyusingthepower switch on the side.
NOTE:
The ready indicator light will pulse while the coffeemaker
heats up and will turn solid when the coffeemaker is ready to use.
4. Insertthedesiredattachmentfilledwithcoffee,espresso,oraK-Cup®
Pod into the coffeemaker.
5. Place the coffee pot or mug on the drip tray or height adjustment tray.
6. Turn the knob to the “brew” position.
7.
Use the brew size selector to select the desired brew size.
8. Press the “brew now” button.
9. When the coffeemaker beeps and the brew now indicator light turns
off, turn the knob to the “standby” position.
NOTE:
When the knob is turned to the “standby” position, the
coffeemaker will enter an automatic cool-down cycle and the ready
indicator light will pulse. When the ready indicator light turns solid, the
coffeemaker has cooled down and is ready to use.
10.Enjoy!
USER MANUAL
Getting Started
1. Unpack your coffeemaker and remove plastic bags, cartons and any
tape on the coffeemaker.
2. Position the coffeemaker on a dry, stable, horizontal counter top.
IMPORTANT:KEEPPLASTICBAGSAWAYFROMCHILDREN.
Clean & Prime Coffeemaker Before Use
Just follow these simple steps:
1. Wash all of the removable parts in warm water with mild liquid soap.
2. Fill the water tanktothe“MAX”markingwithclean,filteredwater.
3. TurnthecoffeemakerONbyusingthepower switch on the side.
NOTE:
The ready indicator light will pulse while the coffeemaker
heats up and will turn solid when the coffeemaker is ready to use.
4. Lockthebrew basket lid onto the brew basket and slide it into the
coffeemaker. Then, lock the coffee pot lid onto the coffee pot and
place the coffee pot on the drip tray cover.
HOW TO MAKE YOUR FIRST
POT OF COFFEE
1. Fill the water tanktothe“MAX”markingwithclean,filteredwater.
2. TurnthecoffeemakerONbyusingthepower switch on the side.
NOTE:
The ready indicator light will pulse while the coffeemaker
heats up and will turn solid when the coffeemaker is ready to use.
3. Remove the brew basket lid from the brew basket by twisting it to
the right.
4. Placeacoffeefilterintothebrew basket and pour the desired amount
ofcoffeeintothefilter.
5.
Lockthebrew basket lid onto the brew basket by twisting it to the left.
6. Slide the brew basket into the coffeemaker.
7. Place the coffee pot on the drip tray cover.
8. Turn knob to the “brew” position.
9. Use the brew size selector to select the desired brew size.
10. Press the brew now button.
NOTE
: The ready indicator light will turn off and the brew now
indicator light will illuminate.
11. When the coffeemaker beeps and the brew now indicator light turns
off, turn the knob to the “standby” position.
NOTE:
When the knob is turned to the “standby” position, the
coffeemaker will enter an automatic cool-down cycle and the ready
indicator light will pulse. When the ready indicator light turns solid,
the coffeemaker has cooled down and is ready to use.
12.Enjoy!
NOTE:
Some models have a blooming feature which pauses the
brewing cycle for 30 seconds after all of the coffee grounds have been
pre-soaked with water. This allows the coffee grounds to then release
therichestcoffeeflavorsduringtheremainingbrewcycle.Duringthis
blooming phase, the pump will cycle on and off every few seconds,
then return to full brewing mode after 30 seconds.
8.
7.
10.9.
HOW TO MAKE YOUR FIRST
SHOT(S) OF ESPRESSO
1. Fill the water tanktothe“MAX”markingwithclean,filteredwater.
2. TurnthecoffeemakerONbyusingthepower switch on the side.
NOTE: The ready indicator light will pulse while the coffeemaker heats
up and will turn solid when the coffeemaker is ready to use.
3. Select the filtersize: 1-shotfilter or 2-shotfilter. Make sure the bump
on the filteris aligned with the notch on the espressoportafilter and
place the filterinto the espressoportafilter.
4. Add espresso grounds into the filter.
5. Using the tamper, evenly tamp (press) espresso grounds. Then, wipe
the edges to clear any excess grinds.
6. If using a small cup, lower the height adjustment tray. If using a larger
cup, leave the height adjustment tray in the upright position.
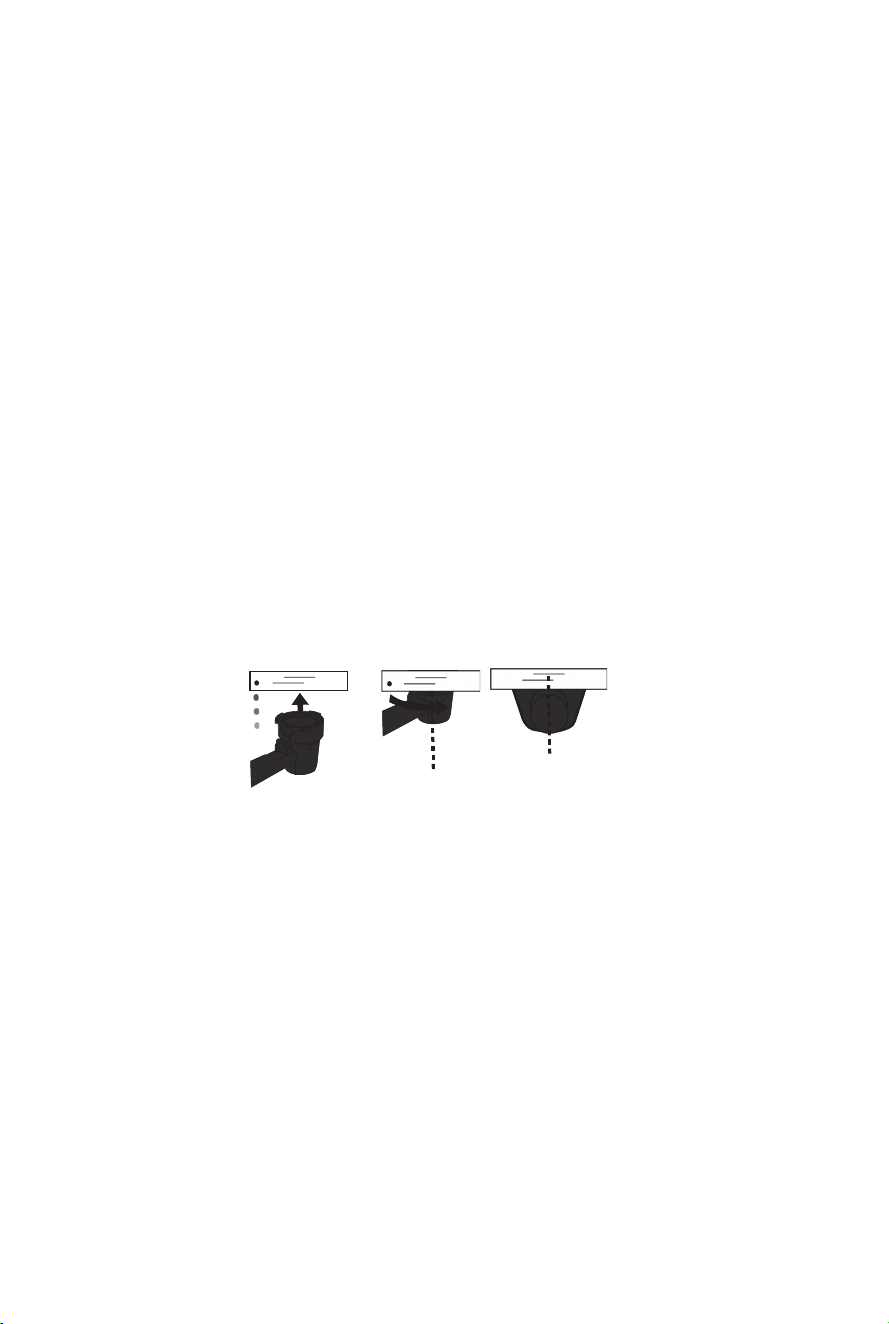
7. Insert the espressoportafilter into the coffeemaker:
a. Keep the espressoportafilterhandleflat.
b. Insert the espressoportafilter at a 45° angle (left).
c. Turn the espressoportafilter handle to a 90° angle. The espresso
portafilter should be in a centered position.
a. b. c.
8. Place the cup underneath the espressoportafilter.
9. Turn the knob to the “brew” position.
10. Use the brew size selector to select 1 shot or 2 shots.
11. Press the brew now button.
12. When the coffeemaker beeps and the brew now indicator light turns
off, turn the knob to the “standby” position.
NOTE:
When the knob is turned to the “standby” position, the
coffeemaker will enter an automatic cool-down cycle and the ready
indicator light will pulse. When the ready indicator light turns solid, the
coffeemaker has cooled down and is ready to use.
13.Enjoy!
HOW TO MAKE YOUR FIRST
SINGLE SERVE COFFEE
1. Fill the water tanktothe“MAX”markingwithclean,filteredwater.
2. TurnthecoffeemakerONbyusingthepower switch on the side.
NOTE:
The ready indicator light will pulse while the coffeemaker
heats up and will turn solid when the coffeemaker is ready to use.
3. Insert a K-Cup® Pod or permanentsingleservefilter inside the single
serveportafilterandpressitdownfirmly.Then,placethesingle
serverportafilter lid over the K-CUP ® Pod or permanent single
serverfilter and insert it into the coffeemaker."
NOTE:
The singleserveportafilterliddoesnotlayflatwhen
a K-Cup® Pod is inserted.
4. If using a small cup, lower the height adjustment tray. If using a larger
cup, leave the height adjustment tray in the upright position.
5. Insert the singleserveportafilter into the coffeemaker:
a. Keep the singleserveportafilterhandleflat.
b. Insert the singleserveportafilter at a 45° angle (left),
ensuring the lid closes during insertion.
c. Turn the singleserveportafilter to a 90° angle. The single
serveportafilter should be in a centered position.
a. b. c.
6. Place the cup underneath the singleserveportafilter.
7. Turn the knob to the “brew” position.
8. Use the brew size selector to select the desired brew size.
9. Press the brew now button.
10. When the coffeemaker beeps and the brew now indicator light turns
off, turn the knob to the “standby” position.
NOTE:
When the knob is turned to the “standby” position, the
coffeemaker will enter an automatic cool-down cycle and the ready
indicator light will pulse. When the ready indicator light turns solid,
the coffeemaker has cooled down and is ready to use.
11.Enjoy!
NOTE:
After brewing, remove the singleserveportafilterfrom the
coffeemaker carefully and dump any remaining water into the sink
before lifting the lid.
1-SHOT
2-SHOT
TURN
TURN
10.9.
HOW TO MAKE YOUR FIRST
SHOT(S) OF ESPRESSO
1. Fill the water tanktothe“MAX”markingwithclean,filteredwater.
2. TurnthecoffeemakerONbyusingthepower switch on the side.
NOTE: The ready indicator light will pulse while the coffeemaker heats
up and will turn solid when the coffeemaker is ready to use.
3. Select the filtersize: 1-shotfilter or 2-shotfilter. Make sure the bump
on the filteris aligned with the notch on the espressoportafilter and
place the filterinto the espressoportafilter.
4. Add espresso grounds into the filter.
5. Using the tamper, evenly tamp (press) espresso grounds. Then, wipe
the edges to clear any excess grinds.
6. If using a small cup, lower the height adjustment tray. If using a larger
cup, leave the height adjustment tray in the upright position.
7. Insert the espressoportafilter into the coffeemaker:
a. Keep the espressoportafilterhandleflat.
b. Insert the espressoportafilter at a 45° angle (left).
c. Turn the espressoportafilter handle to a 90° angle. The espresso
portafilter should be in a centered position.
a. b. c.
8. Place the cup underneath the espressoportafilter.
9. Turn the knob to the “brew” position.
10. Use the brew size selector to select 1 shot or 2 shots.
11. Press the brew now button.
12. When the coffeemaker beeps and the brew now indicator light turns
off, turn the knob to the “standby” position.
NOTE:
When the knob is turned to the “standby” position, the
coffeemaker will enter an automatic cool-down cycle and the ready
indicator light will pulse. When the ready indicator light turns solid, the
coffeemaker has cooled down and is ready to use.
13.Enjoy!
HOW TO MAKE YOUR FIRST
SINGLE SERVE COFFEE
1. Fill the water tanktothe“MAX”markingwithclean,filteredwater.
2. TurnthecoffeemakerONbyusingthepower switch on the side.
NOTE:
The ready indicator light will pulse while the coffeemaker
heats up and will turn solid when the coffeemaker is ready to use.
3. Insert a K-Cup® Pod or permanentsingleservefilter inside the single
serveportafilterandpressitdownfirmly.Then,placethesingle
serverportafilter lid over the K-CUP ® Pod or permanent single
serverfilter and insert it into the coffeemaker."
NOTE:
The singleserveportafilterliddoesnotlayflatwhen
a K-Cup® Pod is inserted.
4. If using a small cup, lower the height adjustment tray. If using a larger
cup, leave the height adjustment tray in the upright position.
5. Insert the singleserveportafilter into the coffeemaker:
a. Keep the singleserveportafilterhandleflat.
b. Insert the singleserveportafilter at a 45° angle (left),
ensuring the lid closes during insertion.
c. Turn the singleserveportafilter to a 90° angle. The single
serveportafilter should be in a centered position.
a. b. c.
6. Place the cup underneath the singleserveportafilter.
7. Turn the knob to the “brew” position.
8. Use the brew size selector to select the desired brew size.
9. Press the brew now button.
10. When the coffeemaker beeps and the brew now indicator light turns
off, turn the knob to the “standby” position.
NOTE:
When the knob is turned to the “standby” position, the
coffeemaker will enter an automatic cool-down cycle and the ready
indicator light will pulse. When the ready indicator light turns solid,
the coffeemaker has cooled down and is ready to use.
11.Enjoy!
NOTE:
After brewing, remove the singleserveportafilterfrom the
coffeemaker carefully and dump any remaining water into the sink
before lifting the lid.
1-SHOT
2-SHOT
TURN
TURN

12.11.
HOW TO STEAM MILK
1. Fill the water tanktothe“MAX”markingwithclean,filteredwater.
2. TurnthecoffeemakerONbyusingthepower switch on the side.
NOTE
: The ready indicator light will pulse while the coffeemaker heats
up and will turn solid when the coffeemaker is ready to use.
3. Fillamilkpitcherorcupabout1/3to½fullwithcoldmilk.
NOTE:
Any type of milk can be used – soy, rice, almond, coconut, etc. –
but 2% fat dairy milk creates the best froth.
4. Insert the milk frothing wand tip just below the surface of the milk.
5. Turn the knob to the “steam” position.
NOTE:
The ready indicator light will pulse while the water is heating up.
Oncethecoffeemakerreachesthecorrecttemperature,theready
indicator light will turn solid. Some water and steam may come out of
milk frothing wand while the coffeemaker heats up.
6. Steam your milk until it reaches the desired texture and temperature.
NOTE:
Steaming milk makes a hissing noise.
7. Whenfinished,turntheknob to the “standby” position. Then, remove
the milk frothing wand from the milk pitcher or cup.
NOTE:
After steaming milk, the knob must be turned to the “standby”
position until the ready indicator light turns solid. If the knob is turned
directly to the “brew” position after steaming milk, the coffeemaker will
beep, the display will go blank and the coffeemaker will not brew
coffee.Tofixtheerror,theknob will need to be turned to the “standby”
position until the ready indicator light turns solid.
8. Remember to clean the milk frothing wand after every use. For
instructions on how to do so, please refer to the cleaning section on
page 12.
9. Enjoy!
NOTE:
When the knob is turned to the “standby” position after steaming
milk, the coffeemaker will enter an automatic cool-down cycle that lasts
approximately 35 seconds. During this cycle, the ready indicator light
with pulse and water will be released into the drip tray though an
internal channel. Steam may be emitted from the drip tray. When the
ready indicator light turns solid, the coffeemaker has cooled down
and is ready to use.
Helpful Tips for Steaming Milk:
1. Insert the milk frothing wand tip just below the surface of the milk.
2. Position the milk frothing wand and milk pitcher or cup at an angle
that allows the milk to move in a whirlpool pattern.
3. As the milk level rises, lower the milk pitcher or cup to keep the milk
frothing wand tip just below the surface.
4. When the desired texture is achieved, immerse the milk frothing wand
half way.
ROUTINE CLEANING
Make sure your coffeemaker is unplugged and has cooled completely
before cleaning. We recommend hand washing all removable parts to help
preserve their appearance.
Pot of Coffee
1. Remove the brew basket, brew basket lid, filter, coffee pot and
coffee pot lid and wash them with warm water and mild liquid soap.
Dry thoroughly.
Single Serve
1. Remove the singleserveportafilter from the coffeemaker carefully
and dump any remaining water into the sink before lifting the lid. Then,
discard the K-Cup® Pod into the trash bin
2. Rinse the singleserveportafilter with water, shake the water off and
dry it on the outside.
WARNING:
There is a sharp needle at the bottom of the single
serveportafilter.
Espresso
1. Remove the espressoportafilter from the coffeemaker. Then, release
the filterretainerclipand press it over the filter.Holditinplacewhile
you tap the espressoportafilteragainst the trash bin to discard the
espresso grounds.
2. Remove the filterfrom the espressoportafilter by twisting the filter
until the bump on the filter is aligned with the notch on the espresso
portafilter. Wash the filterand the espressoportafilter with warm
water and mild liquid soap.
3. Place the filterback into the espressoportafilter and insert the
espressoportafilter back into the coffeemaker. Follow the same steps
for brewing espresso, but with no espresso in the filter. Discard the
water in the cup.
4. Remove theespressoportafilter from the coffeemaker. Dry the filter
and espressoportafilter thoroughly.
Milk Frothing Wand
1. Remove the milk frothing wand cover and wash with warm water and
mild liquid soap.
2. With a damp cloth, wipe down the metal on the milk frothing wand.
3. Fill the water tank and place a jug under the milk frothing wand.
4. Turn the knob to the “steam” position and press the clean button. The
clean indicator light will illuminate and the coffeemaker will enter a
2-minute clean cycle.
5. When the clean indicator light turns off, turn the knob to the
“standby” position. The coffeemaker will then enter an automatic
cool-down cycle that lasts approximately 35 seconds.
ROUTINE CLEANING CONT.
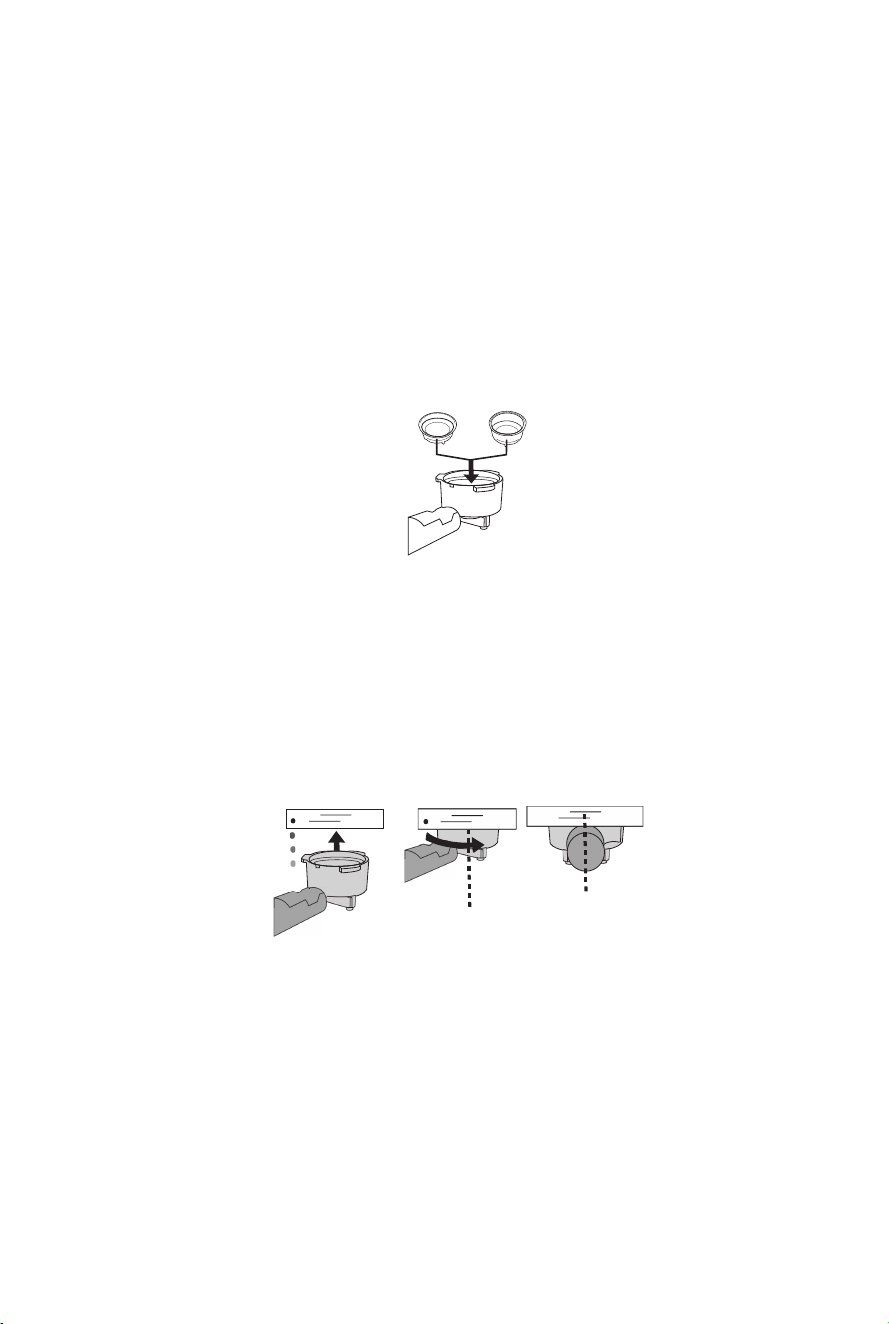
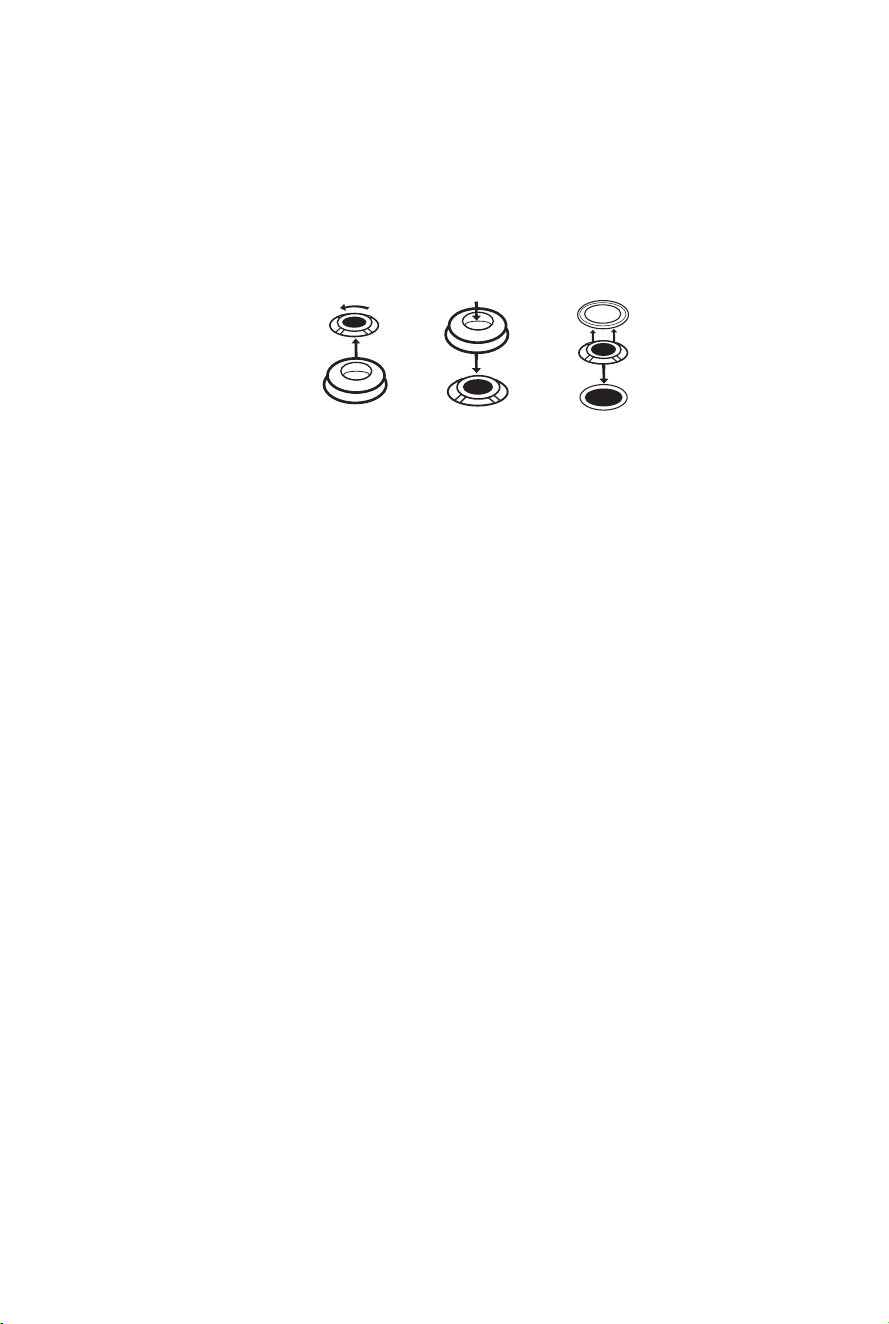
Deep Cleaning the Espresso Filters
Make sure to deep clean your espresso filtersevery 90 days for
optimal brewing performance. Follow these disassembly instructions
andrinsethepiecesinalargebowlofwarmwater.Oncerinsed
thoroughly, wipe dry and reassemble.
Emptying the Drip Tray
1. When the water level indicator rises above the drip tray cover,
carefully slide the drip tray out from the coffeemaker, remove the
drip tray cover, and discard the water.
2. Place the drip tray cover back on the drip tray and slide it into the
coffeemaker.
DESCALING
After continued use, your coffeemaker may develop a build-up of
mineral deposits, and therefore require occasional descaling. We
recommend descaling your coffeemaker every 4-6 months, although
this period will depend on the hardness of water and frequency of use.
IMPORTANT:
If the descaling process is not completed or stopped part
way through any of the descaling steps, you will need to start the
descaling process again from the beginning.
Descaling: Coffeemaker
1. In an empty water tank,add11/2tablespoonsofwhitevinegar
and 4 cups of water. Allow the solution to mix thoroughly.
2. Place the water tank into position.
3. Insert the brew basket into the coffeemaker without coffee in it.
4. Place the coffee pot on the drip tray cover.
5. TurnONthecoffeemaker.
6. Turn the knob to the “brew” position.
7. Press the clean button. During the descaling process the clean
indicator light will be on.
NOTE:
When the descaling process is complete, the clean
indicator light will turn off and the ready indicator light
will illuminate.
8. When the clean indicator light turns off, discard the water in the
coffee pot.
9. Rinse the water tank, brew basket, brew basket lid, and coffee
pot with warm water and mild liquid soap.
13.
TROUBLESHOOTING GUIDE
Problem
Brew size options
don’t show up on
the display, even
though the
attachment is in the
coffeemaker.
Single Serve:
Coffeemaker
leaks when
brewing single
serve pods.
No steam is
generated.
Milk is not foamy
after frothing.
Espresso:
1. Coffee does not
come out when
brewing espresso.
2. Coffee comes
out too quickly
and/oristooweak.
Possible Causes
1. Attachment is placed
incorrectly in the coffeemaker
or isn’t fully locked into place.
2. The
knob
was turned directly
from the
“steam”
position to the
“brew”
position without being on
the
“standby”
position until the
ready indicator
light turned
solid.
a. Too much force is applied
to the lid of the single serve
portafilterafter the pod is
inserted.
b.
The singleserveportafilter
isn’t inserted properly.
1. The water tank is empty.
2. The coffeemaker is not
turned on.
3.
The milk frothing wand is
blocked.
1. The milk is not cold enough.
2. The
milk frothing wand
is
submerged too deep into the
milk.
1a. The water tank is empty.
1b.Espressogrindistoofine.
1c.Espressogrindsweretamped
with too much pressure.
1d. Too much espresso in the filter.
1e. The filteris clogged and needs
to be cleaned.
1f. The coffeemaker is not
turnedON.
2a. Ground coffee is too coarse.
2b.Notenoughcoffeeinthefilter.
Solutions
1. Reinsert the attachment into
the coffeemaker until it locks in
properly and is in a horizontal
position.
2. Turn the knob to the
“standby” position until the
ready indicator light turns solid.
a. Press the coffee pod
down into the single serve
portafilter. Then, place the
lid over the coffee pod and
place into the coffeemaker.
1b. Remove the single serve
portafilter from the
coffeemaker. Then, reinsert it
making sure it locks into place at
a 90° angle
1. Add water to the water tank,
then turn the
knob
to the
"standby" position and press
the brew now button. When the
ready indicator
light turns solid,
turn the
knob
back to the
"steam" position and restart the
steaming process.
2.TurnthecoffeemakerONand
follow the operating instructions.
3a. Perform the milk frothing
wand clean cycle.
3b. Turn off the coffeemaker,
remove the milk frothing wand
cover and use a needle or
toothpick to unclog the nozzle
opening.
1. Chill the milk prior to
steaming.
2. Submerge the milk frothing
wand just below the milk
surface.
1a. Add water to the water tank,
then turn the knob to the
"standby" position and press the
brew now button. When the
ready indicator light turns solid,
turn the knob back to the
"brew" position and restart the
brewing process.
1b. Grind coffee to espresso
groundleveloffineness.
1c. Tamp (press) the espresso
grounds with less pressure.
1d. Fill the filterwith less coffee.
1e. Clean the filter.
1f.TurnthecoffeemakerONand
follow the operating instructions.
2a.Usefinergroundcoffee.
2b. Add more coffee.
14.
STEP 1
Unlock Push
Remove
Seal
Remove
Filter
Remove
Lift
STEP 2 STEP 3
ROUTINE CLEANING CONT.
Deep Cleaning the Espresso Filters
Make sure to deep clean your espresso filtersevery 90 days for
optimal brewing performance. Follow these disassembly instructions
andrinsethepiecesinalargebowlofwarmwater.Oncerinsed
thoroughly, wipe dry and reassemble.
Emptying the Drip Tray
1. When the water level indicator rises above the drip tray cover,
carefully slide the drip tray out from the coffeemaker, remove the
drip tray cover, and discard the water.
2. Place the drip tray cover back on the drip tray and slide it into the
coffeemaker.
DESCALING
After continued use, your coffeemaker may develop a build-up of
mineral deposits, and therefore require occasional descaling. We
recommend descaling your coffeemaker every 4-6 months, although
this period will depend on the hardness of water and frequency of use.
IMPORTANT:
If the descaling process is not completed or stopped part
way through any of the descaling steps, you will need to start the
descaling process again from the beginning.
Descaling: Coffeemaker
1. In an empty water tank,add11/2tablespoonsofwhitevinegar
and 4 cups of water. Allow the solution to mix thoroughly.
2. Place the water tank into position.
3. Insert the brew basket into the coffeemaker without coffee in it.
4. Place the coffee pot on the drip tray cover.
5. TurnONthecoffeemaker.
6. Turn the knob to the “brew” position.
7. Press the clean button. During the descaling process the clean
indicator light will be on.
NOTE:
When the descaling process is complete, the clean
indicator light will turn off and the ready indicator light
will illuminate.
8. When the clean indicator light turns off, discard the water in the
coffee pot.
9. Rinse the water tank, brew basket, brew basket lid, and coffee
pot with warm water and mild liquid soap.
13.
TROUBLESHOOTING GUIDE
Problem
Brew size options
don’t show up on
the display, even
though the
attachment is in the
coffeemaker.
Single Serve:
Coffeemaker
leaks when
brewing single
serve pods.
No steam is
generated.
Milk is not foamy
after frothing.
Espresso:
1. Coffee does not
come out when
brewing espresso.
2. Coffee comes
out too quickly
and/oristooweak.
Possible Causes
1. Attachment is placed
incorrectly in the coffeemaker
or isn’t fully locked into place.
2. The
knob
was turned directly
from the
“steam”
position to the
“brew”
position without being on
the
“standby”
position until the
ready indicator
light turned
solid.
a. Too much force is applied
to the lid of the single serve
portafilterafter the pod is
inserted.
b.
The singleserveportafilter
isn’t inserted properly.
1. The water tank is empty.
2. The coffeemaker is not
turned on.
3.
The milk frothing wand is
blocked.
1. The milk is not cold enough.
2. The
milk frothing wand
is
submerged too deep into the
milk.
1a. The water tank is empty.
1b.Espressogrindistoofine.
1c.Espressogrindsweretamped
with too much pressure.
1d. Too much espresso in the filter.
1e. The filteris clogged and needs
to be cleaned.
1f. The coffeemaker is not
turnedON.
2a. Ground coffee is too coarse.
2b.Notenoughcoffeeinthefilter.
Solutions
1. Reinsert the attachment into
the coffeemaker until it locks in
properly and is in a horizontal
position.
2. Turn the knob to the
“standby” position until the
ready indicator light turns solid.
a. Press the coffee pod
down into the single serve
portafilter. Then, place the
lid over the coffee pod and
place into the coffeemaker.
1b. Remove the single serve
portafilter from the
coffeemaker. Then, reinsert it
making sure it locks into place at
a 90° angle
1. Add water to the water tank,
then turn the
knob
to the
"standby" position and press
the brew now button. When the
ready indicator
light turns solid,
turn the
knob
back to the
"steam" position and restart the
steaming process.
2.TurnthecoffeemakerONand
follow the operating instructions.
3a. Perform the milk frothing
wand clean cycle.
3b. Turn off the coffeemaker,
remove the milk frothing wand
cover and use a needle or
toothpick to unclog the nozzle
opening.
1. Chill the milk prior to
steaming.
2. Submerge the milk frothing
wand just below the milk
surface.
1a. Add water to the water tank,
then turn the knob to the
"standby" position and press the
brew now button. When the
ready indicator light turns solid,
turn the knob back to the
"brew" position and restart the
brewing process.
1b. Grind coffee to espresso
groundleveloffineness.
1c. Tamp (press) the espresso
grounds with less pressure.
1d. Fill the filterwith less coffee.
1e. Clean the filter.
1f.TurnthecoffeemakerONand
follow the operating instructions.
2a.Usefinergroundcoffee.
2b. Add more coffee.
14.
STEP 1
Unlock Push
Remove
Seal
Remove
Filter
Remove
Lift
STEP 2 STEP 3

15.
16.
RECIPE GUIDE
Pumpkin Spice Latte
Using a large cup:
1. Add 2 teaspoons of brown sugar
2. Add a pinch of pumpkin pie spice
3. Brew 1 shot of espresso into the cup
4. Froth½cupofmilkinaseparatemilkpitcher
5. Pour milk into cup
6. Stir & enjoy!
Honey-Vanilla Latte
Using a large cup:
1. Add 2 to 3 teaspoons of honey
2. Brew 1 shot of espresso into the cup
3. Froth½cupofmilkinaseparatemilkpitcher
4. Pour milk into cup
5. Add a drop of vanilla extract
6. Stir until vanilla extract is completely blended
7. Enjoy!
Toffee Latte
Using a large cup:
1. Add 1 tablespoon of caramel syrup
2. Add 1 to 2 teaspoons of toffee bits
3. Brew 1 shot of espresso into the cup
4. Froth½cupofmilkinaseparatemilkpitcher
5. Pour milk into cup
6. Stir until toffee bits are dissolved
7. Enjoy!
Cinnamon Sugar Latte
Using a large cup:
1. Add 2 teaspoons of sugar
2. Add a pinch of ground cinnamon
3. Brew 1 shot of espresso into the cup
4. Froth½cupofmilkinaseparatemilkpitcher
5. Pour milk into cup
6. Stir & enjoy!
RECIPE GUIDE
Lattes:
Iced Latte
Using a large cup:
1. Add 1 tablespoon of sugar
2. Brew 2 shots of espresso into the cup
3. Add 1 cup of ice
4. Add½cupofmilk
5. Stir & enjoy!
TROUBLESHOOTING GUIDE CONT.
Problem
“0”flashesonthe
display.
The display is blank
when trying to brew
coffee and the ready
indicator light is
flashing.
Steam is emitted from
the drip tray and the
pump operates
intermittently.
The drip trayfillswith
water on its own.
Possible Causes
The water tank is empty.
The knob was turned directly
from the “steam” position to
the “brew” position without
being on the “standby”
position until the ready
indicator light turned solid.
The coffeemaker has
overheated and entered the
automatic cool-down cycle.
The coffeemaker has gone
through a few automatic
cool-down cycles.
Solutions
Add water to the water tank,
then turn the knob to the
"standby" position and press
the brew now button. When
the ready indicator light turns
solid, the coffeemaker is
ready to use.
Turn the knob to the
“standby” position until the
ready indicator light turns
solid. Then, turn the knob to
the “brew” position to restart
the brewing process.
The coffeemaker will
complete the automatic
cool-down cycle. The ready
indicator light will pulse
during the cool-down cycle
and will turn solid when the
cycle is complete.
When the water level
indicator rises, pull out the
drip tray and discard the
water.

17.
18.
RECIPE GUIDE
Caramel Cappuccino
Using a large cup:
1. Add 1 tablespoon of caramel syrup
2. Add ¼ teaspoon of sugar
3. Brew 1 shot of espresso into the cup
4. Froth1/4cupofmilkinaseparatemilkpitcher
5. Pour milk into the cup
6. Stir
7. Top with additional foam (optional)
8. Enjoy!
Coconut Cappuccino
Using a large cup:
1. Add 2 teaspoons of coconut cream (not coconut milk)
2. Brew 1 shot of espresso into the cup
3. Froth½cupofmilkinaseparatemilkpitcher
4. Pour milk into cup
5. Stir
6. Top with additional foam (optional)
7. Enjoy!
Café Conquistador (21+)
Using a large cup:
1. Add 1 oz. (2 tablespoons) of Kahlua (coffee liqueur)
2. Brew 1 shot of espresso into the cup
3. Froth½cupofmilkinaseparatemilkpitcher
4. Pour milk into cup
5. Stir
6. Top with additional foam (optional)
7. Enjoy!
Cappuccino Royale (21+)
Using a large cup:
1. Add 1 oz. (2 tablespoons) of Frangelico (hazelnut liqueur) or Amaretto
(almond liqueur)
2. Brew 1 shot of espresso into the cup
3. Froth½cupofmilkinaseparatemilkpitcher
4. Pour milk into cup
5. Stir
6. Top with additional foam (optional)
7. Enjoy!
RECIPE GUIDE
Nutella Latte
Using a large cup:
1. Add 1 tablespoon of Nutella (chocolate hazelnut spread)
2. Brew 1 shot of espresso into the cup
3. Froth½cupofmilkinaseparatemilkjug
4. Pour milk into cup
5. Stir until it is completely blended
6. Enjoy!
CAPPUCCINOS:
Café Mocha
Using a large cup:
1. Add 2 tablespoons of chocolate syrup
2. Add½teaspoonofsugar
3. Brew 1 shot of espresso into the cup
4. Froth½cupofmilkinaseparatemilkpitcher
5. Pour milk into cup
6. Stir
7. Top with additional foam (optional)
8. Enjoy!
Sweet Cappuccino
Using a large cup:
1. Add½teaspoonofsugar
2. Brew 1 shot of espresso into the cup
3. Froth½cupofmilkinaseparatemilkpitcher
4. Pour milk into cup
5. Stir
6. Top with additional foam (optional)
7. Enjoy!
Raspberry Cappuccino
Using a large cup:
1. Add 1 tablespoon of raspberry syrup
2. Brew 1 shot of espresso into the cup
3. Froth½cupofmilkinaseparatemilkpitcher
4. Pour milk into cup
5. Stir
6. Top with additional foam (optional)
7. Enjoy!

19.
20.
RECIPE GUIDE
Espresso:
Café Cubano
Using a small cup:
1. Add 1 tablespoon of sugar
2. Brew 1 shot of espresso into the cup
3. Stir & enjoy!
Café Shakerato
1. Fill a cocktail shaker half full with ice cubes
2. Brew 2 shots of espresso in a cup and pour into the shaker
3. Add 1 tablespoon of vanilla syrup
4. Shake until foamy (about 30 seconds)
5. Strain into a martini glass
6. Enjoy!
Espresso con Panna
Using a small cup:
1. Add½teaspoonofsugar
2. Brew 1 shot of espresso into the cup
3. Stir to dissolve sugar
4. Fill cup with sweetened whipped cream
5. Enjoy!
Café Bombon
Using a small cup:
1. Add1½to2tablespoonsofsweetenedcondensedmilk
2. Brew 1 shot of espresso into the cup
3. Serve with a spoon to stir just before drinking
4. Enjoy!
Mud Pie Milkshake
Using a large cup:
1. Brew 2 shots of espresso and refrigerate until chilled
2. In a blender add:
o 2 cups (about 4 scoops) of cookies ‘n cream ice cream,
o ¼ cup of milk,
o 2 shots of cold brewed espresso
3. Cover and process until blended
4. Enjoy!
Affogato al Café
1. Brew 1 shot of espresso
2. Add½cup(about1scoop)ofvanillaicecreaminadessertdish
3. Pour hot espresso over ice cream
4. Serve immediately with a spoon
5. Enjoy!
Espresso Martini (21+)
Using a large cup:
1. Brew 2 shots of espresso
2. Fill a cocktail shaker half full with ice
3. Pour espresso into shaker
4. Add to cocktail shaker:
o 1½oz.(3tablespoons)vodka,
o 1½oz.(3tablespoons)Kahlua(coffeeliqueur),
o ¼ teaspoon of sugar
5. Shake until foamy (about 30 seconds)
6. Strain into a martini glass
7. Enjoy!
USER MAINTENANCE
This appliance has no user serviceable parts. Any servicing beyond
that described in the Cleaning and Descaling Section should be
performed by an Authorized Service Representative only.
SERVICE MAINTENANCE AND WARRANTY
Service Maintenance and Warranty can be found online at
www.mrcoffee.com or call us toll-free at the Consumer Service
Department,1-800-MRCOFFEE(1-800-672-6333).

MANUAL DE INSTRUCCIONES
OCCASIONS™
CAFETERA TODO EN UNO
P.N. 198074 www.mrcoffee.com
BVMC-O-C SERIES
MANUAL DE INSTRUCCIONES
OCCASIONS™
CAFETERA TODO EN UNO
P.N. 198074 www.mrcoffee.com
BVMC-O-C SERIES
MEDIDAS DE SEGURIDAD IMPORTANTES
Afindereducirelriesgodeincendio,descargaeléctricay/olesión
personalcuandoseutilizanelectrodomésticos,siempresedeben
seguir precauciones básicas de seguridad, incluyendo las siguientes:
1. Leatodaslasinstruccionesantesdeutilizaresteproducto.
2. Notoquelassuperficiescalientes.Utiliceasasoperillas.
3. Afindeprotegersecontraunadescargaeléctrica,nocoloqueni
sumerja el cable, los enchufes o el aparato en agua o ningún otro
líquido.
4. Esteaparatonodebeserutilizadoporlosniñosniporpersonascon
su capacidad física, sensorial o mental reducida.
5. Todoaparatoutilizadocercadelosniños,requierelasupervisión
cercanadeunadulto.Losniñosnodebenjugarconelaparato.
6. Desenchufeelaparatodeltomacorrientecuandonoestéenusoy
antes de limpiarlo. Permita que el aparato se enfríe antes instalarle
o retirarle piezas y antes de limpiarlo.
7. Noopereningúnaparatoconuncableoenchufedañadoo
despuésdepresentarunfalloensufuncionamiento,osihasido
dañadodemaneraalguna.Devuelvaelaparatoauncentrode
servicio autorizado para su examinación, reparación o ajustamiento.
Nointentereemplazarocortaruncabledañado.
8. Elusodeaccesoriosnorecomendadosporelfabricantedel
productopodríaocasionarincendio,descargaeléctricaolesión
personal.
9. No utilice el aparato a la intemperie.
10. No permita que el cable cuelgue del borde de la mesa o del
mostradorniqueentreencontactoconsuperficiescalientes.
11. No coloque el aparato sobre o cerca de una hornilla caliente de gas
oeléctricanidentrodeunhornocaliente.
12. Siempre conecte el enchufe al aparato primero y luego enchufe el
cable al tomacorriente (para aparatos con cables separables). Para
desconectar, gire cualquier control a la posición de apagado y
luego retire el enchufe del tomacorriente.
13.Noutiliceelaparatoparaotrofinquenoseaparaelquehasido
diseñado.
14. Todas las tapas deben estar cerradas durante el uso.
15. Si la tapa es retirada o la cesta de preparación se abre durante o
inmediatamentedespuésquetermineelciclodepreparación,esto
podríaocasionarquemaduras.Elcontenidopuedeestarcaliente.
Permita que se enfríe antes de abrir la tapa.
16. Para evitar posibles quemaduras corporales y otras lesiones
asociadasconelvaporyelaguacaliente,odañosalaunidad,
nuncaretireeltanquedeaguaolosportafiltrosmientraslacafetera
Mr.Coffee®Occasions
™
estápreparandocaféohaciendoespuma
Paraelectrodomésticosconpanelesdeservicio:
PRECAUCIÓN:ParareducirelRiesgodeincendioodescarga
eléctrica.Noquiteestatapa.Notienepiezasenelinteriorque
deban ser reparadas por el usuario. Cualquier reparación solo debe
ser realizada por personal de servicio autorizado.
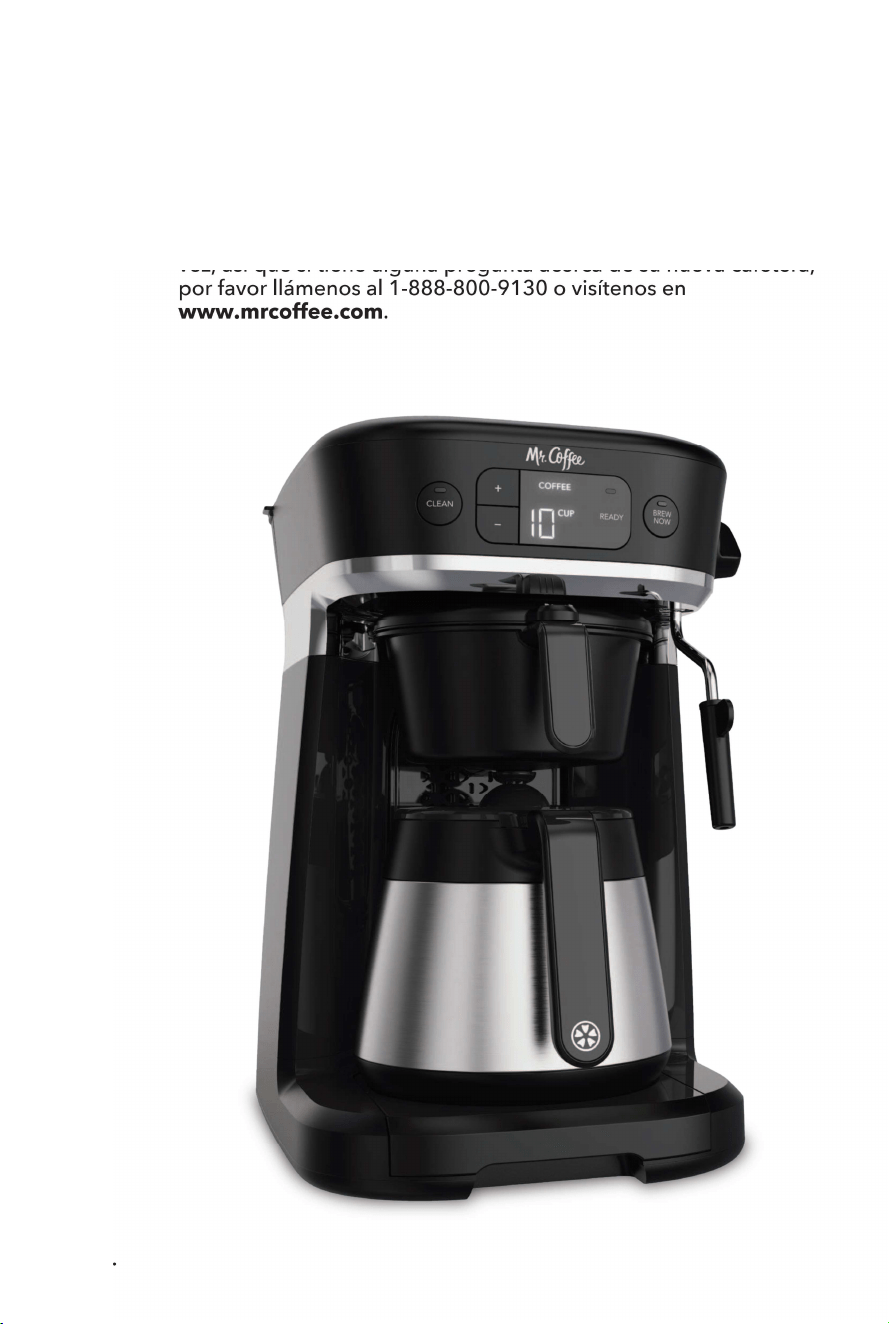
INTRODUCCIÓN
Bienvenido y felicitaciones por la compra de su nueva Cafetera
OccasionsTMMR.COFFEE®.Nuestroobjetivoprincipales
ofrecerleunatazadecaféoespressoconelmejorsaborcada
vez, así que si tiene alguna pregunta acerca de su nueva cafetera,
por favor llámenos al 1-888-800-9130 o visítenos en
www.mrcoffee.com.
1.
2.

MEDIDAS DE SEGURIDAD IMPORTANTES
Afindereducirelriesgodeincendio,descargaeléctricay/olesión
personalcuandoseutilizanelectrodomésticos,siempresedeben
seguir precauciones básicas de seguridad, incluyendo las siguientes:
1. Leatodaslasinstruccionesantesdeutilizaresteproducto.
2. Notoquelassuperficiescalientes.Utiliceasasoperillas.
3. Afindeprotegersecontraunadescargaeléctrica,nocoloqueni
sumerja el cable, los enchufes o el aparato en agua o ningún otro
líquido.
4. Esteaparatonodebeserutilizadoporlosniñosniporpersonascon
su capacidad física, sensorial o mental reducida.
5. Todoaparatoutilizadocercadelosniños,requierelasupervisión
cercanadeunadulto.Losniñosnodebenjugarconelaparato.
6. Desenchufeelaparatodeltomacorrientecuandonoestéenusoy
antes de limpiarlo. Permita que el aparato se enfríe antes instalarle
o retirarle piezas y antes de limpiarlo.
7. Noopereningúnaparatoconuncableoenchufedañadoo
despuésdepresentarunfalloensufuncionamiento,osihasido
dañadodemaneraalguna.Devuelvaelaparatoauncentrode
servicio autorizado para su examinación, reparación o ajustamiento.
Nointentereemplazarocortaruncabledañado.
8. Elusodeaccesoriosnorecomendadosporelfabricantedel
productopodríaocasionarincendio,descargaeléctricaolesión
personal.
9. No utilice el aparato a la intemperie.
10. No permita que el cable cuelgue del borde de la mesa o del
mostradorniqueentreencontactoconsuperficiescalientes.
11. No coloque el aparato sobre o cerca de una hornilla caliente de gas
oeléctricanidentrodeunhornocaliente.
12. Siempre conecte el enchufe al aparato primero y luego enchufe el
cable al tomacorriente (para aparatos con cables separables). Para
desconectar, gire cualquier control a la posición de apagado y
luego retire el enchufe del tomacorriente.
13.Noutiliceelaparatoparaotrofinquenoseaparaelquehasido
diseñado.
14. Todas las tapas deben estar cerradas durante el uso.
15. Si la tapa es retirada o la cesta de preparación se abre durante o
inmediatamentedespuésquetermineelciclodepreparación,esto
podríaocasionarquemaduras.Elcontenidopuedeestarcaliente.
Permita que se enfríe antes de abrir la tapa.
16. Para evitar posibles quemaduras corporales y otras lesiones
asociadasconelvaporyelaguacaliente,odañosalaunidad,
nuncaretireeltanquedeaguaolosportafiltrosmientraslacafetera
Mr.Coffee®Occasions
™
estápreparandocaféohaciendoespuma
Paraelectrodomésticosconpanelesdeservicio:
PRECAUCIÓN:ParareducirelRiesgodeincendioodescarga
eléctrica.Noquiteestatapa.Notienepiezasenelinteriorque
deban ser reparadas por el usuario. Cualquier reparación solo debe
ser realizada por personal de servicio autorizado.
INTRODUCCIÓN
Bienvenido y felicitaciones por la compra de su nueva Cafetera
OccasionsTMMR.COFFEE®.Nuestroobjetivoprincipales
ofrecerleunatazadecaféoespressoconelmejorsaborcada
vez, así que si tiene alguna pregunta acerca de su nueva cafetera,
por favor llámenos al 1-888-800-9130 o visítenos en
www.mrcoffee.com.
1.
2.
AVISOS DEL PRODUCTO
1. Coloqueelaparatosobreunasuperficiedura,planay
niveladaparaevitarlainterrupcióndelflujodeairedebajode
la cafetera.
2. No opere el aparato con un tanque de agua vacío.
3. Mantenga el área encima del aparato despejada durante el
uso, ya que vapor caliente saldrá del aparato.
4.3.
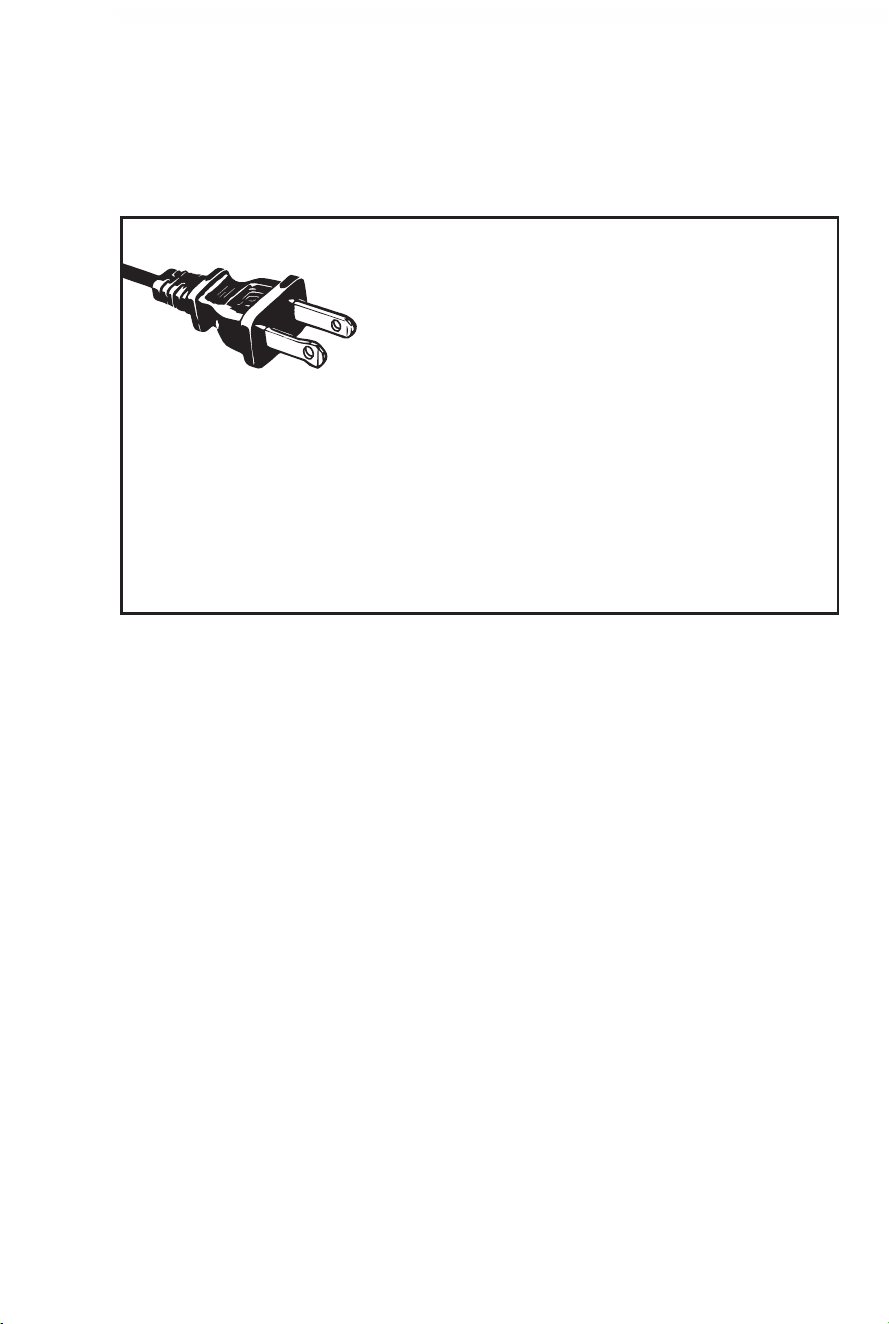
ENCHUFE POLARIZADO
Esteaparatotieneunenchufepolarizado(un
contacto es más ancho que el otro). Como
una característica de seguridad para reducir
elriesgodedescargaeléctrica,esteenchufe
estádiseñadoparaentrarenun
tomacorriente polarizado sólo de una
manera. Si el enchufe no entra completamente en el tomacorriente,
invierta el enchufe. Si aún no entra, consulte a un electricista
calificado.Nointenteignorarestacaracterísticadeseguridadni
modificarelenchufedemaneraalguna.Sielenchufeentra
holgadamente en el tomacorriente de corriente alterna o si el
tomacorriente de corriente alterna se siente caliente, no utilice ese
tomacorriente.
CONSERVE ESTAS INSTRUCCIONES
SOLO PARA USO DOMÉSTICO
INSTRUCCIONES PARA EL CABLE
DE ALIMENTACIÓN:
Un cable de alimentación corto (o cable de alimentación separable)
puede ser provisto para reducir los riesgos de enredarse o tropezar con
uncablemáslargo.Existencablesdealimentaciónseparablesmáslargos
o cables de extensión disponibles y estos pueden ser utilizados si se
toma el cuidado debido en su uso. Si se utiliza un cable de alimentación
separable o cable de extensión:
a. Laclasificacióneléctricamarcadadelcabledealimentaciónseparable
ocabledeextensióndebeser,comomínimo,igualalaclasificación
eléctricadelaparato;
b. Si el aparato es del tipo de conexión a tierra, el cable de extensión
debe ser un cable de tres alambres de conexión a tierra; y
c. Elcablemáslargodebeseracomodadodemaneraquenocuelgue
delmostradorodelamesaparaevitarqueunniñotiredelmismoo
que alguien se tropiece sin darse cuenta. No tire, retuerza ni maltrate
el cable de alimentación.

AVISOS DEL PRODUCTO
1. Coloqueelaparatosobreunasuperficiedura,planay
niveladaparaevitarlainterrupcióndelflujodeairedebajode
la cafetera.
2. No opere el aparato con un tanque de agua vacío.
3. Mantenga el área encima del aparato despejada durante el
uso, ya que vapor caliente saldrá del aparato.
4.3.
ENCHUFE POLARIZADO
Esteaparatotieneunenchufepolarizado(un
contacto es más ancho que el otro). Como
una característica de seguridad para reducir
elriesgodedescargaeléctrica,esteenchufe
estádiseñadoparaentrarenun
tomacorriente polarizado sólo de una
manera. Si el enchufe no entra completamente en el tomacorriente,
invierta el enchufe. Si aún no entra, consulte a un electricista
calificado.Nointenteignorarestacaracterísticadeseguridadni
modificarelenchufedemaneraalguna.Sielenchufeentra
holgadamente en el tomacorriente de corriente alterna o si el
tomacorriente de corriente alterna se siente caliente, no utilice ese
tomacorriente.
CONSERVE ESTAS INSTRUCCIONES
SOLO PARA USO DOMÉSTICO
INSTRUCCIONES PARA EL CABLE
DE ALIMENTACIÓN:
Un cable de alimentación corto (o cable de alimentación separable)
puede ser provisto para reducir los riesgos de enredarse o tropezar con
uncablemáslargo.Existencablesdealimentaciónseparablesmáslargos
o cables de extensión disponibles y estos pueden ser utilizados si se
toma el cuidado debido en su uso. Si se utiliza un cable de alimentación
separable o cable de extensión:
a. Laclasificacióneléctricamarcadadelcabledealimentaciónseparable
ocabledeextensióndebeser,comomínimo,igualalaclasificación
eléctricadelaparato;
b. Si el aparato es del tipo de conexión a tierra, el cable de extensión
debe ser un cable de tres alambres de conexión a tierra; y
c. Elcablemáslargodebeseracomodadodemaneraquenocuelgue
delmostradorodelamesaparaevitarqueunniñotiredelmismoo
que alguien se tropiece sin darse cuenta. No tire, retuerza ni maltrate
el cable de alimentación.
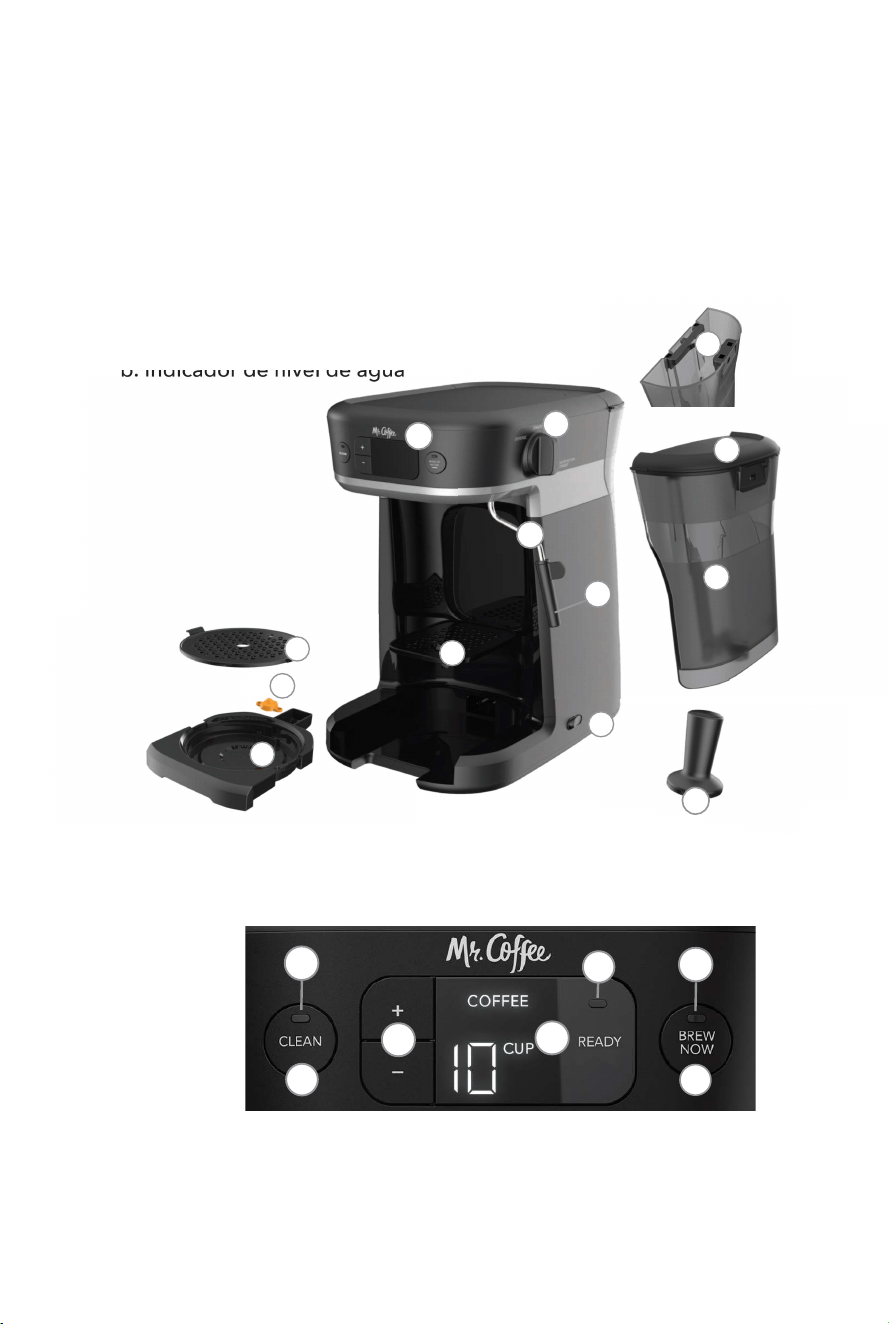
CONOZCA SU CAFETERA
PANEL DE CONTROL
7. Tanque de agua
a. Tapa del tanque de agua
b. Asa del tanque de agua
8. Prensador
1.Interruptordeencendido/apagado
2. Pantalla
3. Perilla
4.Varaparaespumarleche
a. Cubierta de la vara para espumar leche
5. Bandeja de altura ajustable
6. Bandeja de goteo
a. Tapa de la bandeja de goteo
b. Indicador de nivel de agua
1. Botón “clean” (limpieza)
2. Indicador de limpieza
3. Selectordeltamaño
de preparación
4. Pantalla
5. Indicador de listo
6. Botón “brew now” (preparar ahora)
7. Indicador de preparar ahora
6.
5.
1. Filtro permanente de una sola porción
2. Cestadelfiltropermanente
3. Bandeja de almacenamiento
1. Jarradecafé
a.Tapadelajarradecafé
2. Cesta de preparación
a. Tapa de la cesta de preparación
3. Portafiltrodecaféespresso
a.Clipdelretenedordelfiltro
b. Filtro de espresso sencillo
c. Filtro de espresso doble
4. Portafiltrodeunasolaporción
PERILLA
ATTACHMENTS
OTROS ARTÍCULOS PARA SU CAFETERA
(no incluidos en todos los modelos)
2
3
4
6
8
4a
6a
5
7
7a
7b
1
1
1a
2
2a
3
4
3c
1
2
6b
3b
3a
2
3
4
6
8
4a
6a
5
7
7a
7b
1
1
2
3
1
1a
2
2a
3
4
3c
1. Función de “steam” (vapor)
2. Función de “standby” (espera)
3.Funciónde“brew”(prepararcafé,
espresso, una sola porción)
1
2
6b
3b
3
2
4
6
7
1
5
3
3a
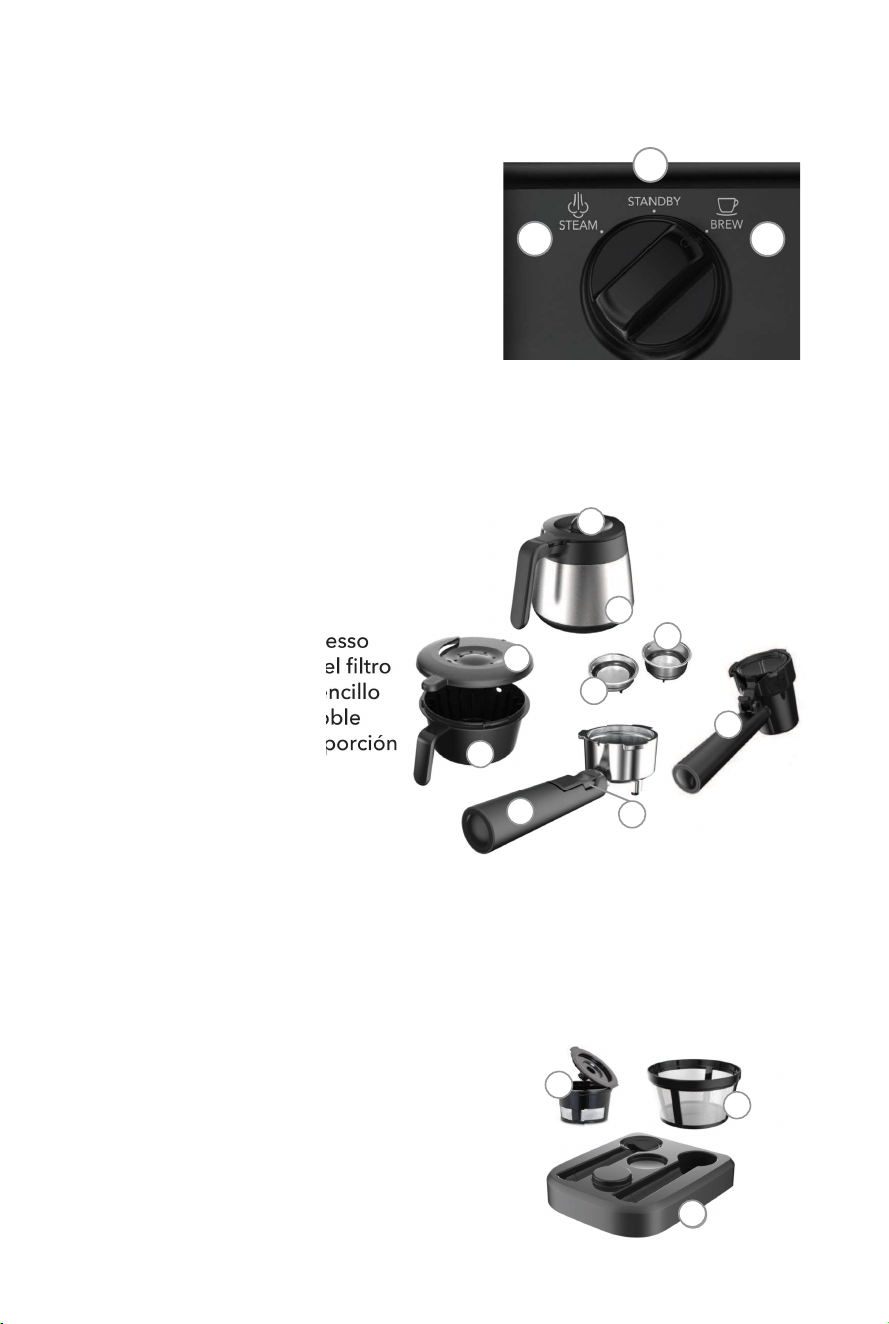

GUÍA RÁPIDA
ADVERTENCIA:
EstaGuíaRápidanoestádiseñadaparasustituirelresto
del manual del usuario, y debe leer y entender las advertencias e
instrucciones en el manual del usuario antes utilizar el aparato.
Guía Breve para Preparar Café en la Cafetera Occasions
TM
de
Mr. Coffee
®
:
1. Limpieypreparelacafeteraantesdeprepararcaféporprimeravez.
2. Lleneeltanque de agua hasta la marca “MAX” con agua limpia,
filtrada.
3. Enciendalacafeterautilizandoelinterruptor de
encendido/apagado situado a un lado de la cafetera.
NOTA:
Laluzdelindicador de listo parpadeará mientras la cafetera
se calienta y cambiará a sólida cuando la cafetera está lista para
utilizar.
4. Inserteelaccesoriodeseadollenodecafé,espressoounacápsula
K-Cup® en la cafetera.
5. Coloque la jarra de café o una taza sobre la bandeja de goteo o
bandeja de altura ajustable.
6. Gire la perilla a la posición de “brew” (preparación).
7. Utilice el selector del tamaño de la preparación para elegir el
tamañodepreparacióndeseado.
8. Presione el botón “brew now” (preparar ahora).
9. Cuando la cafetera emita un bip y la luz del indicador de “brew now”
(preparar ahora) se apague, gire la perilla a la posición de “standby”
(espera).
NOTA:
Cuando la perilla es girada a la posición de “standby”
(espera) la cafetera entrará en un ciclo de enfriamiento automático y
la luz del indicador de listo parpadeará. Cuando la luz del indicador
de listo cambie a sólida, la cafetera se ha enfriado y está lista para
utilizar.
10. ¡Disfrute!
8.
7.
MANUAL DEL USUARIO
ANTES DEL PRIMER USO
1. Desempaque su cafetera y retire las bolsas plásticas, los cartones y
cualquier cinta adhesiva en la cafetera.
2. Coloque la cafetera sobre un mostrador seco, estable y horizontal.
IMPORTANTE:
MANTENGALASBOLSASPLÁSTICASALEJADASDEL
ALCANCEDELOSNIÑOS.
Limpie y Prepare la Cafetera antes de Utilizar
Siga estos pasos sencillos:
1. Lavetodaslaspiezasdesmontablesenaguacalienteylíquidode
fregar suave.
2. Lleneeltanque de agua hasta la marca “MAX” con agua limpia,
filtrada.
3. Enciendalacafeterautilizandoelinterruptor de encendido/apagado,
situado a un lado de la cafetera.
NOTA:
Laluzdelindicador de listo parpadeará mientras la cafetera se
calienta y cambiará a sólida cuando la cafetera está lista para utilizar.
4. Asegure la tapa de la cesta de preparación sobre la cesta de
preparaciónydeslícelaentrodelacafetera.Luego,asegurelatapade
lajarradecafésobrelajarradecaféycoloquelajarra de café sobre la
tapa de la bandeja de goteo.
5. Gire la perilla a la posición de “brew” (preparación).
6. “10 cup” (“10 tazas”) se iluminará en la pantalla.
7. Presione el botón “clean” (limpieza).
8. Cuando la cafetera emite un bip y la luz del indicador de limpieza se
apage, gire la perilla a la posición de “standby” (espera).
NOTA:
Cuando la perilla es girada a la posición de “standby” (espera)
la cafetera entrará en un ciclo de enfriamiento automático y la luz del
indicador de listo parpadeará. Cuando la luz del indicador de listo
cambie a sólida, la cafetera se ha enfriado y está lista para utilizar.
9. Deseche el agua de la jarra de café.¡SucafeteraOccasions
TM
de
Mr. Coffee® está lista para utilizar!

CÓMO PREPARAR SU PRIMERA
JARRA DE CAFÉ
1. Lleneeltanque de agua hasta la marca “MAX” con agua limpia,
filtrada.
2. Enciendalacafeterautilizandoelinterruptor de
encendido/apagado, situado a un lado de la cafetera.
NOTA:
Laluzdel indicador de listo parpadeará mientras la cafetera
se calienta y cambiará a sólida cuando la cafetera está lista para
utilizar.
3. Retire la tapa de la cesta de preparación de la cesta de
preparación, girándola hacia la derecha.
4. Coloqueunfiltrodentrodelacesta de preparación y vierta la
cantidaddecafédeseadadentrodelfiltro.
5. Asegure la tapa de la cesta de preparación sobre la cesta de
preparación, girándola hacia la izquierda.
6. Deslice la cesta de preparación dentro de la cafetera.
7. Coloque la jarra de café sobre la tapa de la bandeja de goteo.
8. Gire la perilla hasta la posición de “brew” (preparar).
9. Utilice el selector del tamaño de preparaciónparaelegireltamaño
de preparación.
10. Presione el botón “brew now” (preparar ahora).
NOTA:
Laluz indicadora de listo se apagará y la luz del indicador de
preparar ahora se iluminará.
11. Cuando la cafetera emite un bip y la luz del indicador de preparar
ahora se apage, gire la perilla a la posición de “standby” (espera).
NOTA:
Cuando la perilla es girada a la posición de “standby”
(espera) la cafetera entrará en un ciclo de enfriamiento automático y
la luz del indicador de listo parpadeará. Cuando la luz del indicador
de listo cambie a sólida, la cafetera se ha enfriado y está lista para
utilizar.
12. ¡Disfrute!
NOTA:
Algunos modelos cuentan con la característica de expansión
del café,lacualpausaelciclodepreparaciónpor30segundos
despuésquetodoslosgranosdecaféhansidoanteriormente
remojadosconagua.Estopermitealosgranosdecaféliberarlos
másricossaboresdecaféduranteeltiemporestantedelciclode
preparación. Durante la fase de expansión, la bomba se encenderá y
apagará cada varios segundos y luego regresará al modo de
preparacióndespuésde30segundos.
10.9.
CÓMO PREPARAR SU PRIMERA TAZA DE
ESPRESSO SENCILLO O DOBLE
1. Lleneeltanque de aguahastalamarca“MAX”conagualimpia,filtrada.
2. Enciendalacafeterautilizandoelinterruptor de encendido/apagado,
situado a un lado de la cafetera.
NOTA:
Laluzdelindicadordelistoparpadearámientraslacafeterase
calienta y cambiará a sólida cuando la cafetera está lista para
utilizar.
3. Elijaeltamañodelfiltro:filtrodeespressoencilloofiltrodeespresso
doble. Asegúrese de que la parte saliente en el filtroestéalineadacon
la muesca en el portafiltrodeespressoycoloqueelfiltrodentrodel
portafiltrodeespresso.
4. Añadaelcafémolidoparaespressoalfiltro.
5. Utilizando el prensador, aplane (presione) de forma uniforme los granos
molidosparaespresso.Luego,limpielosbordesparaeliminarelexceso
decafémolido.
6. Siutilizaunatazapequeña,bajelabandeja de altura ajustable. Si
utiliza una taza más grande, deje la bandeja de altura ajustable en la
posición vertical.
7. Inserte elportafiltrodeespresso en la cafetera.
a. Mantenga plano el mango del portafiltrodeespresso.
b. Inserte el portafiltrodeespresso a un ángulo de 45° (izquierda).
c. Gire el mango del portafiltrodeespressoaunángulode90°.El
portafiltrodeespresso debe estar en la posición del centro.
a. b. c.
8. Coloque la taza debajo del portafiltrodeespresso.
9. Gire la perilla hasta la posición de “brew” (preparación).
10. Utilice el selector del tamaño de preparación para elegir espresso
sencillo o espresso doble.
11. Presione el botón “brew now” (preparar ahora).
12. Cuando la cafetera emite un bip y la luz del indicador de “brew now”
(preparar ahora) se apage, gire la perilla a la posición de “standby”
(espera).
NOTA:
Cuando la perilla es girada a la posición de “standby” (espera)
la cafetera entrará en un ciclo de enfriamiento automático y la luz del
indicador de listo parpadeará. Cuando la luz del indicador de listo
cambie a sólida, la cafetera se ha enfriado y está lista para utilizar.
13. ¡Disfrute!
1-SHOT
2-SHOT
TURN
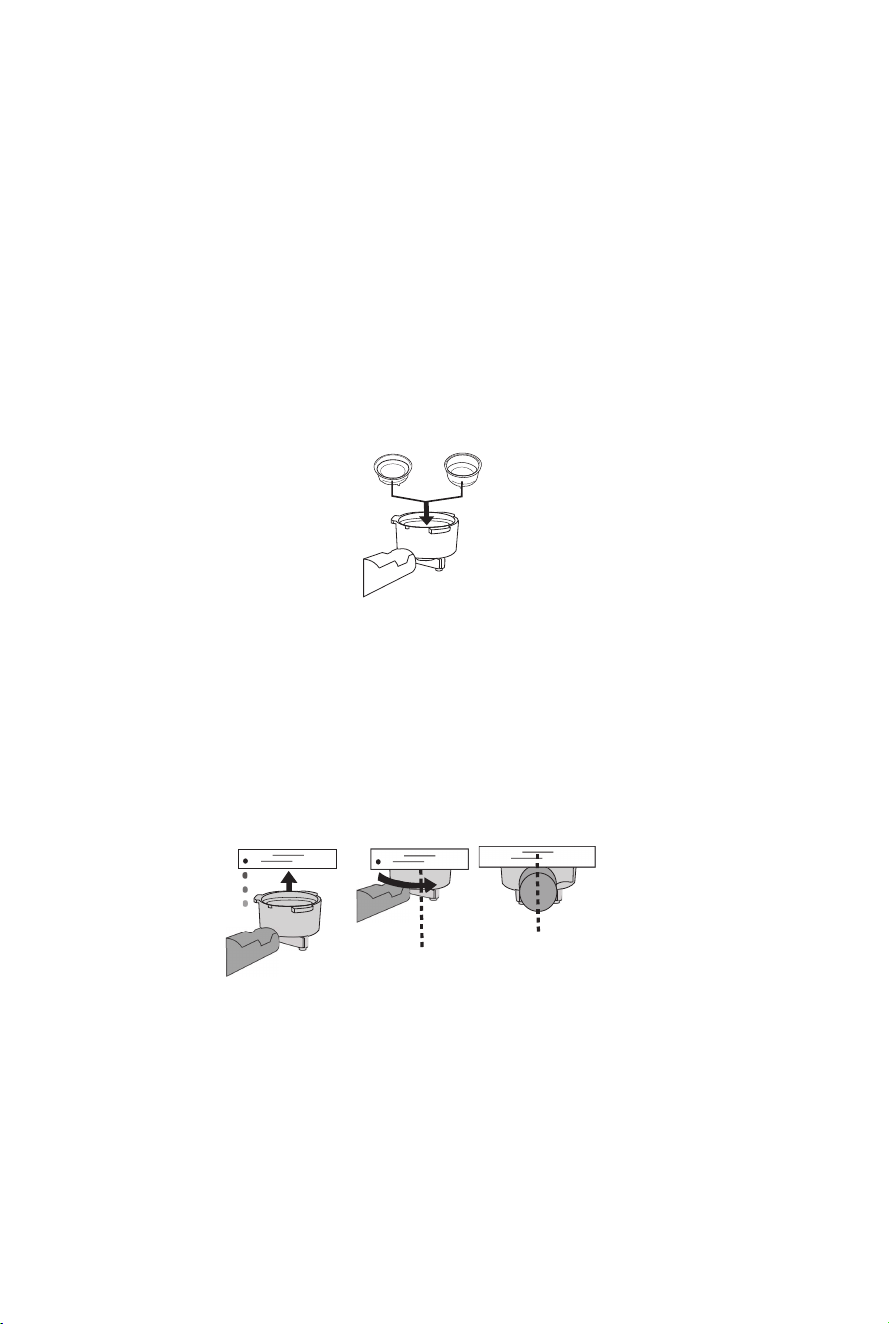
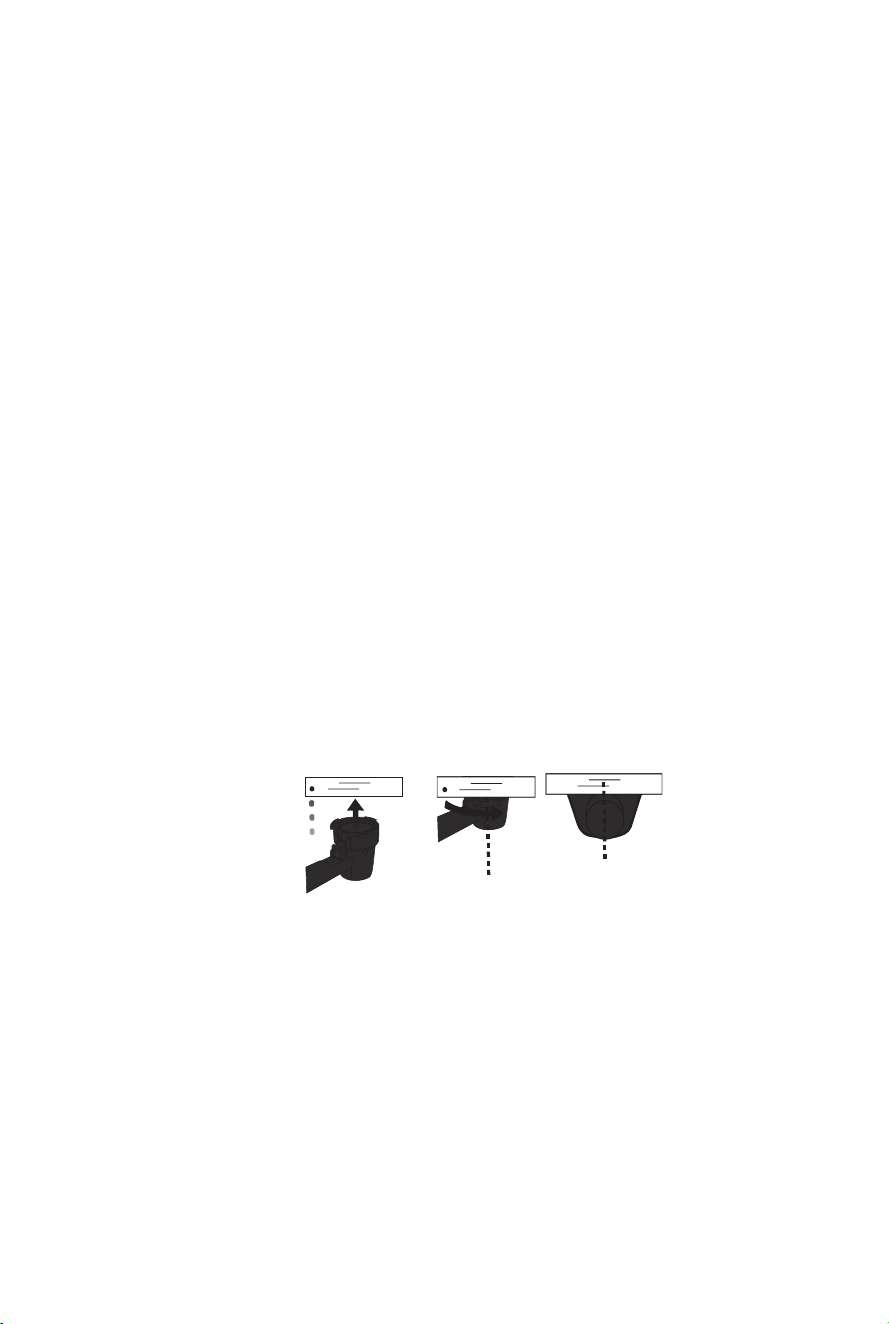
12.11.
CÓMO PREPARAR SU PRIMERA TAZA DE
CAFÉ DE UNA SOLA PORCIÓN
1. Llene el tanque de agua hasta la marca “MAX” con agua limpia,
filtrada.
2. Enciendalacafeterautilizandoelinterruptor de
encendido/apagado, situado a un lado de la cafetera.
NOTA:
Laluzdelindicador de listo parpadeará mientras la cafetera se
calienta y cambiará a sólida cuando la cafetera está lista para utilizar.
3. Coloque una cápsula K-Cup® o un filtropermanentedeuna sola
porción (no incluido en todos los modelos) dentro del portafiltrode
una sola porciónycoloquelatapaligeramentesobreelportafiltro.
NOTA:
Latapadelportafiltrodeunasolaporción no queda en
posición completamente plana cuando la capsula K-Cup® está
adentro.
4. Siutilizaunatazapequeña,bajelabandeja de altura ajustable. Si
utiliza una taza más grande, deje la bandeja de altura ajustable en la
posición vertical.
5. Inserte el portafiltrodeunasolaporciónen la cafetera.
a. Mantenga plano el mango del portafiltrodeunasolaporción.
b. Inserte el portafiltrodeunasolaporción a un ángulo de 45°
(izquierda), asegurando que la tapa se cierre durante la
inserción.
c. Gire el mango del portafiltrodeunasolaporcióna un ángulo
de90°.Elportafiltrodeunasolaporción debe estar en la
posición del centro.
a. b. c.
6. Coloque la taza debajo del portafiltrodeunasolaporción.
7. Gire la perilla hasta la posición de “brew” (preparar).
8. Utilice el selector del tamaño de preparaciónparaelegireltamaño
de preparación deseado.
9. Presione el botón “brew now” (preparar ahora).
10. Cuando la cafetera emite un bip y la luz del indicador de “brew now”
(preparar ahora) se apage, gire la perilla a la posición de “standby”
(espera).
NOTA:
Cuando la perilla es girada a la posición de “standby”
(espera) la cafetera entrará en un ciclo de enfriamiento automático y la
luz del indicador de listo parpadeará. Cuando la luz del indicador de
listo cambie a sólida, la cafetera se ha enfriado y está lista para utilizar.
11. ¡Disfrute!
NOTA:
Despuésdeprepararelcafé,retireconcuidadoelportafiltro
de una sola porción de la cafetera y vacíe el agua restante en el
fregadero antes de levantar la tapa.
CÓMO VAPORIZAR LECHE
1. Lleneeltanque de aguahastalamarca“MAX”conagualimpia,filtrada.
2. Enciendalacafeterautilizandoelinterruptordeencendido/apagado,
situado a un lado de la cafetera.
NOTA:
Laluzdelindicador de listo parpadeará mientras la cafetera se
calienta y cambiará a sólida cuando la cafetera está lista para utilizar.
3. Lleneunajarritaparaespumarlecheounatazaconaproximadamente
1/3a½delechefría.
NOTA:
Se puede utilizar cualquier tipo de leche – de soya, arroz,
almendra, coco, etc. – pero la leche entera que contiene 2% de grasa
crea la mejor espuma.
4. Inserte la punta de la vara para espumar leche justo debajo de la
superficiedelaleche.
5. Gire la perilla a la posición de “steam” (vapor).
NOTA:
Laluzdelindicador de listo parpadeará mientras el agua se
calienta. Una vez que la cafetera alcanza la temperatura correcta, la luz
del indicador de listo cambiará a sólida. Agua y vapor pueden salir de
la vara para espumar leche mientras la cafetera se calienta.
6. Vaporicesulechehastaquealcancelatexturaytemperaturadeseadas.
NOTA:
Elvaporizarlalecheemiteunsonidodesilbido.
7. Cuando haya terminado, gire la perilla a la posición de “standby”
(espera).Luego,retirela vara para espumar leche de la jarrita o taza.
NOTA:
Despuésdevaporizarlaleche,laperilla debe ser girada a la
posición de “standby” (espera) hasta que la luz del indicador de listo
se ponga sólida. Si la perilla es girada directamente a la posición de
“brew” (preparación)despuésdevaporizarlaleche,lacafeteraemitirá
un bip, la pantallasepondráenblancoylacafeteranoprepararácafé.
Para arreglar el error, la perilla necesitará ser girada a la posición de
“standby” (espera) hasta que la luz del indicador de listo se ponga
sólida.
8. Recuerde limpiar la vara para espumar leche despuésdecadauso.
Para instrucciones de cómo hacerlo, por favor consulte la sección de
limpieza en la página 13.
9. ¡Disfrute!
NOTA:
Cuando la perilla es girada a la posición de “standby” (espera)
despuésdevaporizarlaleche,lacafeteraentraráenunciclode
enfriamiento automático que dura aproximadamente 35 segundos.
Durante este ciclo, la luz del indicador de listo parpadeará y el agua
saldrá dentro de la bandeja de goteoatravésdeunaranurainterna.
Puede que salga vapor de la bandeja de goteo. Cuando la luz del
indicador de listo cambie a sólida, la cafetera se ha enfriado y está lista
para utilizar.
Consejos Útiles para Vaporizar Leche
1. Inserte la punta de la vara para espumar leche justo debajo de la
superficiedelaleche.
2. Posicione la vara para espumar leche y la jarrita para espumar leche o
la taza a un ángulo que permita que la leche se mueva en forma de
remolino.
3. Mientras el nivel de la leche sube, baje la jarrita de leche o taza para
mantener la punta de la vara para espumar leche justo debajo de la
superficie.
4. Cuando la textura deseada es alcanzada, sumerja la vara para espumar
leche por la mitad.
TURN

LIMPIEZA DE RUTINA CONT.
Limpieza Profunda de los Filtros de Espresso
Asegúresehacerunalimpiezaprofundadesusfiltrosdeespressocada90
días para un rendimiento de preparación óptimo. Siga estas instrucciones
de desensamble y enjuague las piezas en un recipiente grande con agua
caliente.Unavezquetodaslaspiezasesténbienenjuagadas,séquelasy
vuelva a ensamblar.
Para Vaciar la Bandeja de Goteo
1. Cuando el indicador de nivel de agua suba por arriba de la tapa
de la bandeja de goteo, deslice con cuidado la bandeja de goteo
hacia afuera de la cafetera, retire la tapa de la bandeja de goteo y
deseche el agua.
2. Coloque de nuevo la cubierta de la bandeja de goteo en la
bandeja de goteo y deslice dentro de la cafetera.
DESCALCIFICACIÓN
Despuésdelusocontinuo,sucafeterapuededesarrollarunaacumulación
dedepósitosminerales,porlotanto,requieredescalcificación.
Recomendamosdescalcificarsucafeteracada4a6meses,aunqueeste
período de tiempo dependerá en la dureza del agua y la frecuencia del
uso.
IMPORTANTE:
Sielprocesodedescalcificaciónnoescompletadoo
detenidoenpartedurantecualquieradelospasosdedescalcificación,
necesitarácomenzarelprocesodedescalcificaciónotravezdesdeel
comienzo.
Descalcificació n de la Cafetera
1. Enuntanque de agua vacío,añada1½cucharadasdevinagre
blanco y 4 tazas de agua. Permita que la solución se mezcle bien.
2. Coloque el tanque de agua en su lugar.
3. Inserte la cesta de preparaciónenlacafetera,sincafé.
4. Coloque la jarra de café sobre la tapa de la bandeja de goteo.
5. Enciendalacafetera.
6. Gire la perilla a la posición de “brew” (prepararación).
7. Presione el botón “clean” (limpieza). Durante el proceso de
descalificación,laluzdelindicadordelimpiezaseiluminará.
NOTA:
Cuandoelprocesodedescalcificacióntermine,laluzdel
indicador de limpieza se apagará y la luz del indicador de listo se
iluminará.
8. Cuando la luz del indicador de limpieza se apague, deseche el
agua de la jarra de café.
9. Enjuagueel tanque de agua, la cesta de preparación y la tapa de
la cesta de preparación, y la jarra de café con agua caliente y
líquido de fregar suave.
13.
LIMPIEZA DE RUTINA
Asegúresedequesecafeteraestédesenchufadayenfriadaporcompleto
antes de limpiarla. Recomendamos lavar a mano las piezas para ayudar a
conservar su apariencia.
Jarra de Café
1. Retire la cesta de preparación, la tapa de la cesta de preparación, el
filtro,lajarradecaféylatapa de la jarra de café y lávelos con agua
calienteylíquidodefregarsuave.Séquelosbien.
Una Sola Porció n
1. Retire con cuidado el portafiltrodeunasolaporción de la cafetera y
vacíeelaguarestanteenelfregaderoantesdelevantarlatapa.Luego,
deseche la cápsula K-Cup® en la papelera.
2. Enjuagueelportafiltrodeunasolaporcióncon agua, sacuda el agua
yséqueloporlaparteexterior.
ADVERTENCIA:
Elportafiltrodeunasolaporción contiene una aguja
afiladaenlaparteinferior.
Espresso
1. Retire el portafiltrodeespresso de la cafetera. Suelte el clip del
retenedordelfiltro y presione sobre el filtromientras presiona el
portafiltrodeespresso contra el tanque de basura para desechar los
granos molidos.
2. Retireelfiltrodelportafiltrodeespressogirandoelfiltrohastaquela
partesalientequedealineadaconlamuesca.Laveelfiltroy el
portafiltrodeespressocon agua.
3. Coloquedenuevoelfiltrodentrodelportafiltrodeespressoe inserte
el portafiltrodeespresso en la cafetera. Siga los mismos pasos de
paraprepararespresso,perosincaféespressoenelfiltro. Deseche el
agua en la taza.
4. Retire el portafiltrodeespressodelacafetera.Laveelfiltro y el
portafiltrodeespresso con agua y líquido de fregar suave y seque
bien.
Vara para Espumar Leche
1. Extraigalacubierta de la vara para espumar leche y lávela con agua
caliente y líquido de fregar suave.
2. Conunpañohúmedo,limpieelmetalenlavara para espumar leche.
3. Lleneeltanque de agua y coloque una jarra debajo de la vara para
espumar leche.
4. Gire la perilla a la posición de “steam” (vapor) y presione el botón
“clean” (limpieza).Laluzdelindicador de limpieza se iluminará y la
cafetera realizará un ciclo de limpieza de 2 minutos de duración.
5. Cuando la luz del indicador de limpieza se apague, gire la perilla a la
posición de “standby” (espera).Lacafeteraentraráenunciclode
enfriamiento automático que dura aproximadamente 35 segundos.
14.
PASO 1
Abra
Empuje
Quite el
sello
Saque el
filtro
Quite
Alce
PASO 2 PASO 3
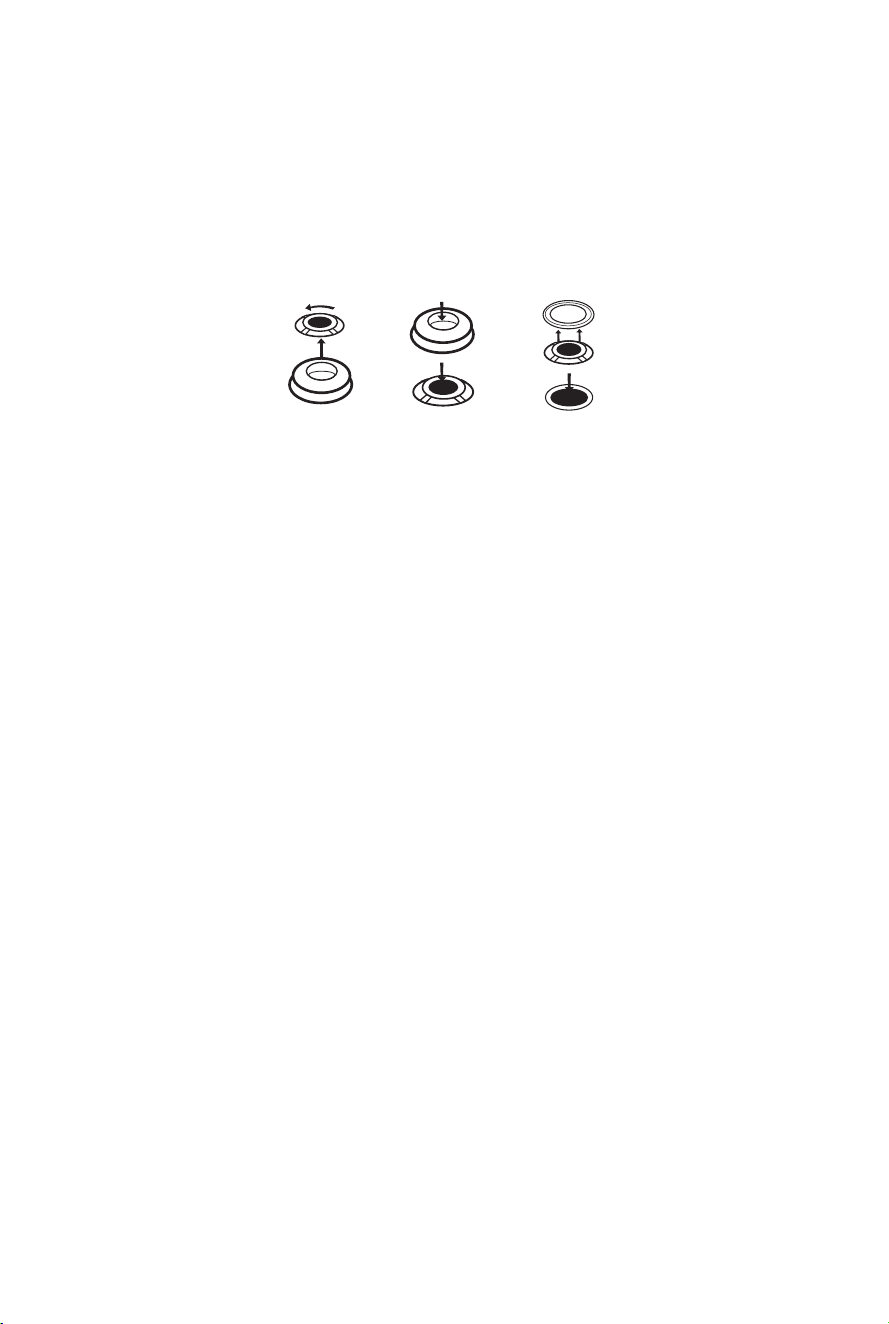
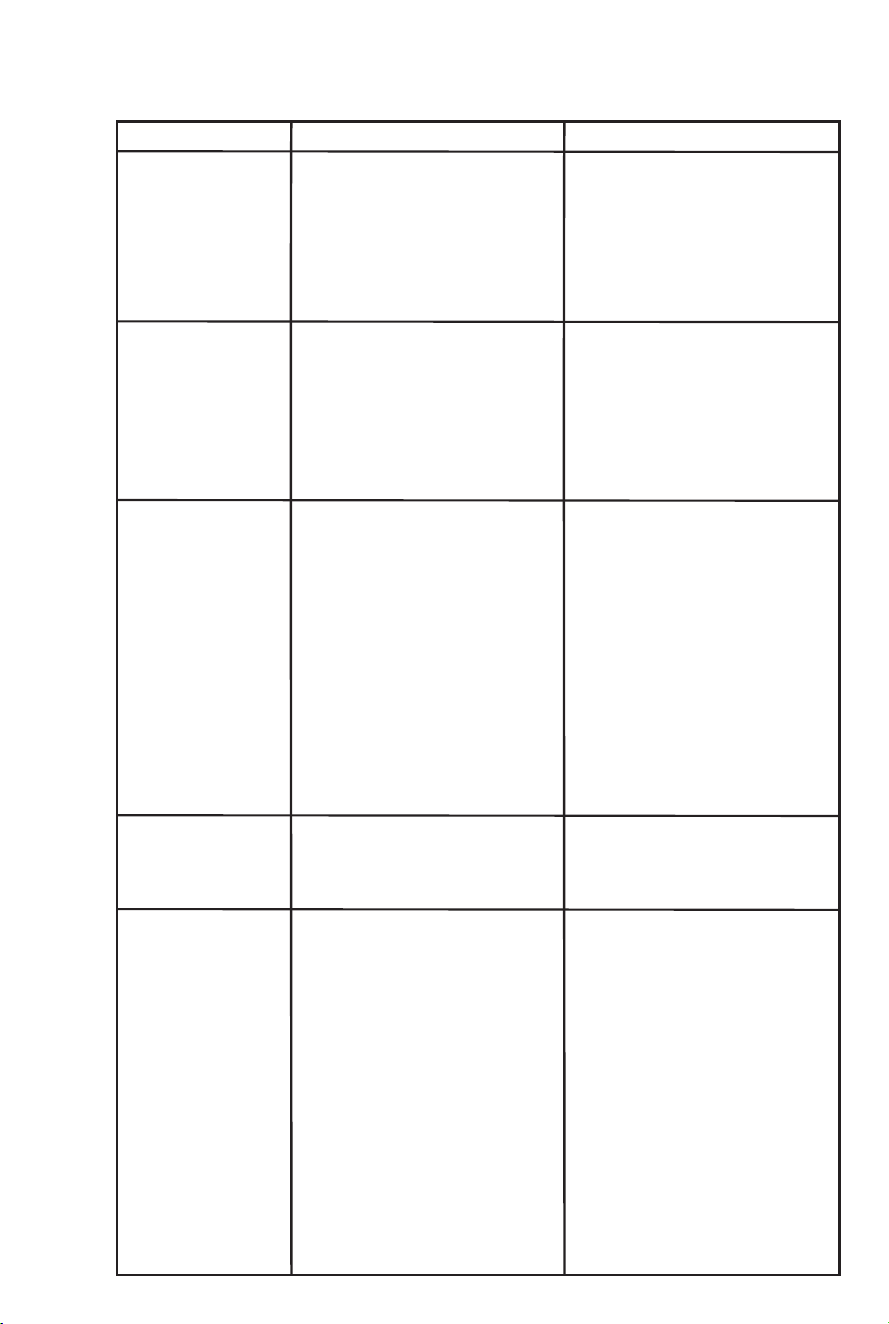
RESOLUCIÓN DE PROBLEMAS
Problema
Lasopcionesdelos
tamañosde
preparación no
aparecen en la
pantalla, a pesar
de que el accesorio
está instalado en la
cafetera.
Una sola porción:
Lacafeteragotea
cuando se prepara
caféencápsulasde
una sola porción.
No genera vapor.
Lalechenotiene
espumadespués
de espumar.
Espresso:
1.Nosalecafé
cuando se prepara
caféespresso.
2.Elcafésale
demasiado rápido
y/oestádemasiado
aguado.
Causas Posibles
1.Elaccesorioestácolocado
incorrectamente en la cafetera o
no está asegurado por completo
en su lugar.
2.Laperilla fue movida de la
posición de “steam” (vapor)
directo a la posición de “brew”
(preparar) antes de que la luz del
indicador de listo se iluminara
sólida.
a. Se ha aplicado fuerza excesiva
a la tapa del portafiltrodeuna
sola porcióndespuésquela
cápsula es insertada.
b.Elportafiltrodeunasola
poción no se ha insertado
correctamente.
1.Eltanque de agua está vacío.
2.Launidadnoestáencendida.
3.Lavara para espumar está
obstruida.
1.Lalechenoestálo
suficientementefría.
2.La vara para espumar leche
está insertada demasiado
profunda en la leche.
1a.Eltanque de agua está vacío.
1b.Elcaféestámolidodemasiado
fino.
1c.Losgranosdecafémolidos
fueron aplanados con exceso de
presión.
1d.Haydemasiadocaféenel
filtro.
1e.Elfiltroestá obstruido y
necesita limpieza.
1f.Lacafeteranoestáencendida.
2a.Elcaféestámolidodemasiado
grueso.
2b.Nohaysuficientecaféenel
filtro.
Soluciones
1.Vuelvaainsertarelaccesorio
en la cafetera hasta que se
asegure correctamente y este en
la posición horizontal.
2. Gire la perilla a la posición de
“standby” (espera) hasta que la
luz del indicador de listo se
ilumine sólida.
a. Presione hacia abajo la
cápsuladecafédentrodel
portafiltrodeunasolaporción.
Luego,coloquelatapasobrela
cápsuladecaféycoloqueenla
cafetera.
b. Saque el portafiltrodeuna
sola porción, vuelva a insertarlo,
yverifiquequeestéinsertado
correctamente. Debe cerrar a un
ángulo de 90°.
1.Añadaaguaaltanque de agua
y gire la perilla a la posición de
“standby” (espera), presione el
botón “brew now” (preparar
ahora), y espere hasta que la luz
del indicador de listo se ilumine
sólida.Luegogiredenuevola
perilla a la posición de “steam”
(vapor).
2.Enciendalacafeteraysigalas
instrucciones de operación.
3a. Realice el ciclo de limpieza
automática de la vara para
espumar leche.
3b. Apague la cafetera, quite la
cubierta de la vara para
espumar leche y utilice una
aguja o palillo de dientes para
destupir la apertura de la
boquilla.
1.Enfríela leche antes de
espumar.
2. Sumerja la vara para espumar
leche justo debajo de la
superficiedelaleche.
1.Añadaaguaaltanque de
agua y gire la perilla a la
posición de “standby” (espera),
presione el botón “brew now”
(preparar ahora), y espere hasta
que la luz del indicador de listo
seiluminesólida.Luegogirede
nuevo la perilla a la posición de
“brew”(preparación).Vuelvaa
empezar el proceso de preparar
espresso.
1b.Muelaelcaféaungradode
molienda adecuado para
espresso.
1c.Aplane(presione)elcafé
molido con menos presión.
1d.Lleneelfiltroconmenos
cantidaddecafé.
1e.Limpieelfiltro.
1f. Prenda la cafetera.
2a.Utilicecafémolidomásfino.
2b.Utilicemáscantidaddecafé.
15.
16.
RESOLUCIÓN DE PROBLEMAS
Problema
“0” aparece
parpadeando en la
pantalla.
The display is blank
when trying to brew
coffee and the ready
indicator light is
flashing.
Lapantallaestáen
blanco cuando se
intentaprepararcaféy
la luz del indicador de
listo está
parpadeando.
Labandejadegoteo
se llena de agua por si
sola.
Causas Posibles
Eltanque de agua está vacío.
Laperilla fue movida de la
posición de “steam” (vapor)
directo a la posición de “brew”
(preparar) antes de que la luz
del indicador de listo se
iluminara sólida.
Lacafeteraseha
sobrecalentado y pasó al ciclo
de enfriamiento automático.
Lacafeterahapasadoporunos
cuantos ciclos de enfriamiento
automático.
Soluciones
Añadaaguaaltanque de
agua y gire la perilla a la
posición de “standby”
(espera), presione el botón
“brew now” (preparar ahora),
y espere hasta que la luz del
indicador de listo se ilumine
sólida.Vuelvaaempezarel
procesodeprepararcafé,
espresso, o una sola porción.
Gire la perilla a la posición de
“standby” (espera) hasta que
la luz del indicador de listo
seiluminesólida.Después,
mueva la perilla a la posición
de “brew” (preparar) para
volver a empezar el proceso
deprepararcafé.
Lacafeteracompletaráelciclo
de enfriamiento automático.
Laluzdelindicador de listo
parpadeará durante el ciclo
de enfriamiento y cambiará a
sólida cuando el ciclo termine.
Cuando el indicador del
nivel de agua suba, saque la
bandeja de goteo y deseche
el agua.
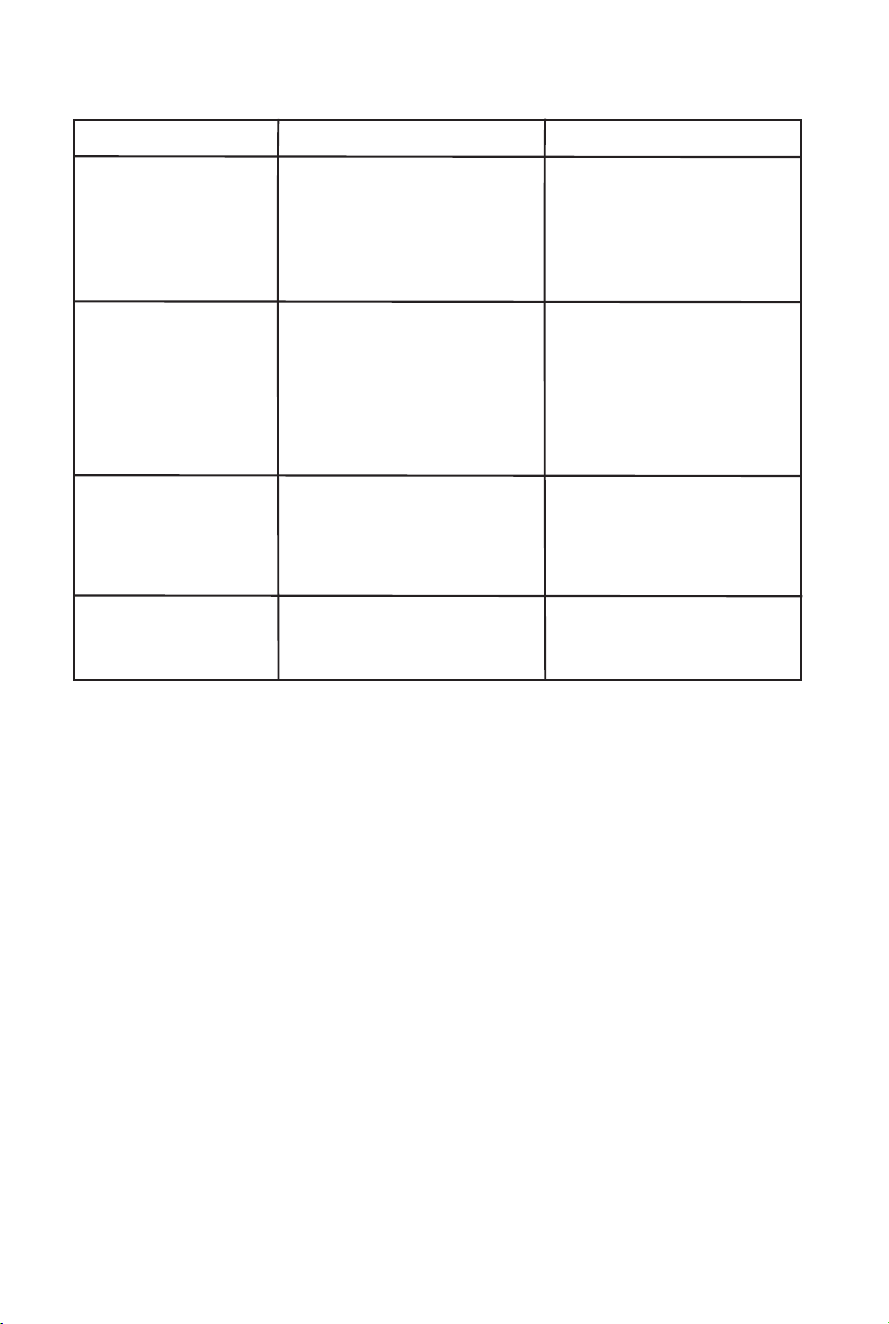
RESOLUCIÓN DE PROBLEMAS
Problema
Lasopcionesdelos
tamañosde
preparación no
aparecen en la
pantalla, a pesar
de que el accesorio
está instalado en la
cafetera.
Una sola porción:
Lacafeteragotea
cuando se prepara
caféencápsulasde
una sola porción.
No genera vapor.
Lalechenotiene
espumadespués
de espumar.
Espresso:
1.Nosalecafé
cuando se prepara
caféespresso.
2.Elcafésale
demasiado rápido
y/oestádemasiado
aguado.
Causas Posibles
1.Elaccesorioestácolocado
incorrectamente en la cafetera o
no está asegurado por completo
en su lugar.
2.Laperilla fue movida de la
posición de “steam” (vapor)
directo a la posición de “brew”
(preparar) antes de que la luz del
indicador de listo se iluminara
sólida.
a. Se ha aplicado fuerza excesiva
a la tapa del portafiltrodeuna
sola porcióndespuésquela
cápsula es insertada.
b.Elportafiltrodeunasola
poción no se ha insertado
correctamente.
1.Eltanque de agua está vacío.
2.Launidadnoestáencendida.
3.Lavara para espumar está
obstruida.
1.Lalechenoestálo
suficientementefría.
2.La vara para espumar leche
está insertada demasiado
profunda en la leche.
1a.Eltanque de agua está vacío.
1b.Elcaféestámolidodemasiado
fino.
1c.Losgranosdecafémolidos
fueron aplanados con exceso de
presión.
1d.Haydemasiadocaféenel
filtro.
1e.Elfiltroestá obstruido y
necesita limpieza.
1f.Lacafeteranoestáencendida.
2a.Elcaféestámolidodemasiado
grueso.
2b.Nohaysuficientecaféenel
filtro.
Soluciones
1.Vuelvaainsertarelaccesorio
en la cafetera hasta que se
asegure correctamente y este en
la posición horizontal.
2. Gire la perilla a la posición de
“standby” (espera) hasta que la
luz del indicador de listo se
ilumine sólida.
a. Presione hacia abajo la
cápsuladecafédentrodel
portafiltrodeunasolaporción.
Luego,coloquelatapasobrela
cápsuladecaféycoloqueenla
cafetera.
b. Saque el portafiltrodeuna
sola porción, vuelva a insertarlo,
yverifiquequeestéinsertado
correctamente. Debe cerrar a un
ángulo de 90°.
1.Añadaaguaaltanque de agua
y gire la perilla a la posición de
“standby” (espera), presione el
botón “brew now” (preparar
ahora), y espere hasta que la luz
del indicador de listo se ilumine
sólida.Luegogiredenuevola
perilla a la posición de “steam”
(vapor).
2.Enciendalacafeteraysigalas
instrucciones de operación.
3a. Realice el ciclo de limpieza
automática de la vara para
espumar leche.
3b. Apague la cafetera, quite la
cubierta de la vara para
espumar leche y utilice una
aguja o palillo de dientes para
destupir la apertura de la
boquilla.
1.Enfríela leche antes de
espumar.
2. Sumerja la vara para espumar
leche justo debajo de la
superficiedelaleche.
1.Añadaaguaaltanque de
agua y gire la perilla a la
posición de “standby” (espera),
presione el botón “brew now”
(preparar ahora), y espere hasta
que la luz del indicador de listo
seiluminesólida.Luegogirede
nuevo la perilla a la posición de
“brew”(preparación).Vuelvaa
empezar el proceso de preparar
espresso.
1b.Muelaelcaféaungradode
molienda adecuado para
espresso.
1c.Aplane(presione)elcafé
molido con menos presión.
1d.Lleneelfiltroconmenos
cantidaddecafé.
1e.Limpieelfiltro.
1f. Prenda la cafetera.
2a.Utilicecafémolidomásfino.
2b.Utilicemáscantidaddecafé.
15.
16.
RESOLUCIÓN DE PROBLEMAS
Problema
“0” aparece
parpadeando en la
pantalla.
The display is blank
when trying to brew
coffee and the ready
indicator light is
flashing.
Lapantallaestáen
blanco cuando se
intentaprepararcaféy
la luz del indicador de
listo está
parpadeando.
Labandejadegoteo
se llena de agua por si
sola.
Causas Posibles
Eltanque de agua está vacío.
Laperilla fue movida de la
posición de “steam” (vapor)
directo a la posición de “brew”
(preparar) antes de que la luz
del indicador de listo se
iluminara sólida.
Lacafeteraseha
sobrecalentado y pasó al ciclo
de enfriamiento automático.
Lacafeterahapasadoporunos
cuantos ciclos de enfriamiento
automático.
Soluciones
Añadaaguaaltanque de
agua y gire la perilla a la
posición de “standby”
(espera), presione el botón
“brew now” (preparar ahora),
y espere hasta que la luz del
indicador de listo se ilumine
sólida.Vuelvaaempezarel
procesodeprepararcafé,
espresso, o una sola porción.
Gire la perilla a la posición de
“standby” (espera) hasta que
la luz del indicador de listo
seiluminesólida.Después,
mueva la perilla a la posición
de “brew” (preparar) para
volver a empezar el proceso
deprepararcafé.
Lacafeteracompletaráelciclo
de enfriamiento automático.
Laluzdelindicador de listo
parpadeará durante el ciclo
de enfriamiento y cambiará a
sólida cuando el ciclo termine.
Cuando el indicador del
nivel de agua suba, saque la
bandeja de goteo y deseche
el agua.

17.
18.
GUÍA DE RECETAS
Lattes:
Latte Helado
Utilizando una taza grande:
1. Añada1cucharadadeazúcar
2. Prepare espresso doble en la taza
3. Añada1tazadehielo
4. Añada½tazadeleche
5. Revuelva y ¡disfrute!
Latte de Calabaza Especiado
Utilizando una taza grande:
1. Añada2cucharaditasdeazúcarmoreno
2. Añadaunapiscadepasteldecalabazaespeciado
3. Prepare espresso sencillo en la taza
4. Espume½tazadelecheenunajarradelecheseparada
5. Viertalalecheenlataza
6. Revuelva y ¡disfrute!
Latte con Vainilla y Miel
Utilizando una taza grande:
1. Añada2a3cucharaditasdemiel
2. Prepare espresso sencillo en la taza.
3. Espume½tazadelecheinunajarradelecheseparada
4. Viertalecheenlataza
5. Añadaunagotadeextractodevainilla
6. Revuelvahastaqueelextractodevainillaestébienmezclado
7. ¡Disfrute!
Latte con “Toffee”
Utilizando una taza grande:
1. Añada1cucharadadesiropedecaramelo
2. Añada1a2cucharaditasdetrocitosde“toffee”
3. Prepara espresso sencillo en la taza
4. Espume½tazadelecheenunajarradelecheseparada
5. Viertalalecheenlataza.
6. Revuelva hasta que los trocitos de “toffee” se disuelvan
7. ¡Disfrute!
GUÍA DE RECETAS
Latte con Azúcar y Canela
Utilizando una taza grande:
1. Añada2cucharaditasdeazúcar
2. Añadaunapiscadecanelaenpolvo
3. Prepare espresso sencillo dentro en la taza.
4. Espume½tazadelecheenunajarradelecheseparada
5. Viertalalecheenlataza
6. Revuelva y ¡disfrute!
Latte con Nuttella
Utilizando una taza grande:
1. Añada1cucharadadeNutella(pastaparauntardechocolatey
nuez moscada)
2. Prepara espresso sencillo en la taza
3. Espume½tazadelecheenunajarradelecheseparada
4. Viertalalecheenlataza.
5. Revuelvahastaqueestébienmezclado
6. ¡Disfrute!
CAPPUCCINOS:
Café Moca
Utilizando una taza grande:
1. Añada2cucharadasdesiropedechocolate
2. Añada½cucharaditadeazúcar
3. Prepare espresso sencillo en la taza
4. Espume¼detazadelecheenunajarradelecheseparada
5. Viertalalecheenlataza
6. Revuelva
7. Cubra con espuma adicional (opcional)
8. ¡Disfrute!

19.
20.
GUÍA DE RECETAS
Cappuccino Dulce
Utilizando una taza grande:
1. Añada½cucharaditadeazúcar
2. Prepare espresso sencillo en la taza
3. Espume¼detazadelecheenunajarradelecheseparada
4. Viertalalecheenlataza
5. Revuelva
6. Cubra con espuma adicional (opcional)
7. ¡Disfrute!
Cappuccino con Frambuesas
Utilizando una taza grande:
1. Añada1cucharadadesiropedeframbuesas
2. Prepare espresso sencillo en la taza
3. Espume½detazadelecheenunajarradelecheseparada
4. Viertalalecheenlataza
5. Revuelva
6. Cubra con espuma adicional (opcional)
7. ¡Disfrute!
Cappuccino con Caramelo
Utilizando una taza grande:
1. Añada1cucharadadesiropedecaramelo
2. Añada¼cucharadadeazúcar
3. Prepare espresso sencillo en la taza
4. Espume¼detazadelecheenunajarradelecheseparada
5. Viertalalecheenlataza
6. Revuelva
7. Cubra con espuma adicional (opcional)
8. ¡Disfrute!
Cappuccino con Coco
Utilizando una taza grande:
1. Añada2cucharaditasdecremadecoco(nolechedecoco)
2. Prepare espresso sencillo en la taza
3. Espume¼detazadelecheenunajarradelecheseparada
4. Viertalalecheenlataza
5. Revuelva
6. Cubra con espuma adicional (opcional)
7. ¡Disfrute!
GUÍA DE RECETAS
Café Conquistador (mayor de 21 años)
Utilizando una taza grande:
1. Añada1onza(2cucharadas)deKahlúa(licordecafé)
2. Prepare espresso sencillo en la taza
3. Espume¼detazadelecheenunajarradelecheseparada
4. Viertalalecheenlataza
5. Revuelva
6. Cubra con espuma adicional (opcional)
7. ¡Disfrute!
Cappuccino Royale (mayor de 21 años)
Utilizando una taza grande:
1. Añada1onza(2cucharadas)deFrangelico(licordeavellana)o
Amaretto (licor de almendra)
2. Prepare espresso sencillo en la taza
3. Espume¼detazadelecheenunajarradelecheseparada
4. Viertalalecheenlataza
5. Revuelva
6. Cubra con espuma adicional (opcional)
7. ¡Disfrute!
Espresso:
Café Cubano
Utilizandounatazapequeña:
1. Añada1cucharadadeazúcar
2. Prepare espresso sencillo en la taza
3. Revuelva y ¡disfrute!
Café Shakerato
1. Lleneunacoctelerahastalamitadconcubitosdehielo
2. Prepare espresso doble en una taza y vierta en la coctelera
3. Añada1cucharadadesiropedevainilla
4. Sacudahastaqueestéespumoso(unos30segundos)
5. Cuele en una copa de martini
6. ¡Disfrute!

21.
22.
MANTENIMIENTO POR EL USUARIO
Esteaparatonotienepiezasquedebanserreparadasporelusuario.
Cualquier servicio que se extienda más allá de lo descrito en la Sección
deLimpiezayDescalificación,debeserrealizadosoloporun
Representante de Servicio Autorizado.
SERVICIO Y MANTENIMIENTO Y GARANTĹA
Información acerca de servicio y mantenimiento y garantía puede ser
encontrada en línea en www.mrcoffee.com o llame gratis al
DepartamentodeServicioalConsumidor,al1-800-MRCOFFEE
(1-800-672-6333).
GUÍA DE RECETAS
Espresso con Panna
Utilizandounatazapequeña
1. Añada½cucharaditadeazúcar
2. Prepare espresso sencillo en una taza
3. Revuelva para disolver el azúcar
4. Llenelatazaconcremabatidaendulzada
5. ¡Disfrute!
Café Bombón
Utilizandounatazapequeña
1. Añada1½a2cucharadasdelechecondensada
2. Prepare espresso sencillo en una taza
3. Sirva con una cuchara para revolver justo antes de tomar
4. ¡Disfrute!
Batido de Leche con Pastel de Chocolate
Utilizando una taza grande
1. Prepareespressodobleyrefrigerehastaqueestéfrío
2. Enunalicuadora,añada:
o 2 tazas (aproximadamente 4 cucharas) de helado de crema con
galleticas
o ¼ taza de leche
o Espressodoblepreparadofrío
3. Tapeyprocesehastaqueestémezclado
4. ¡Disfrute!
Affogato al Café
1. Prepare espresso sencillo
2. Añada½taza(aproximadamenteunacuchara)deheladodevainilla,
en un plato de postre.
3. Viertaelcaféespressocalientesobreelhelado
4. Sirva inmediatamente con una cuchara
5. ¡Disfrute!
Espresso con Martini
Utilizando una taza grande
1. Prepare espresso doble
2. Lleneunacoctelerahastalamitadconhielo
3. Viertaelespressoenlacoctelera
4. Añádaalacoctelera:
o 1½onza(3cucharadas)devodka,
o 1½onza(3cucharadas)deKahlúa(licordecafé),
o ¼ cucharadita de azúcar.
5. Sacudahastaqueestéespumoso(aproximadamente30segundos)
6. Cuele en una copa de Martini
7. ¡Disfrute!
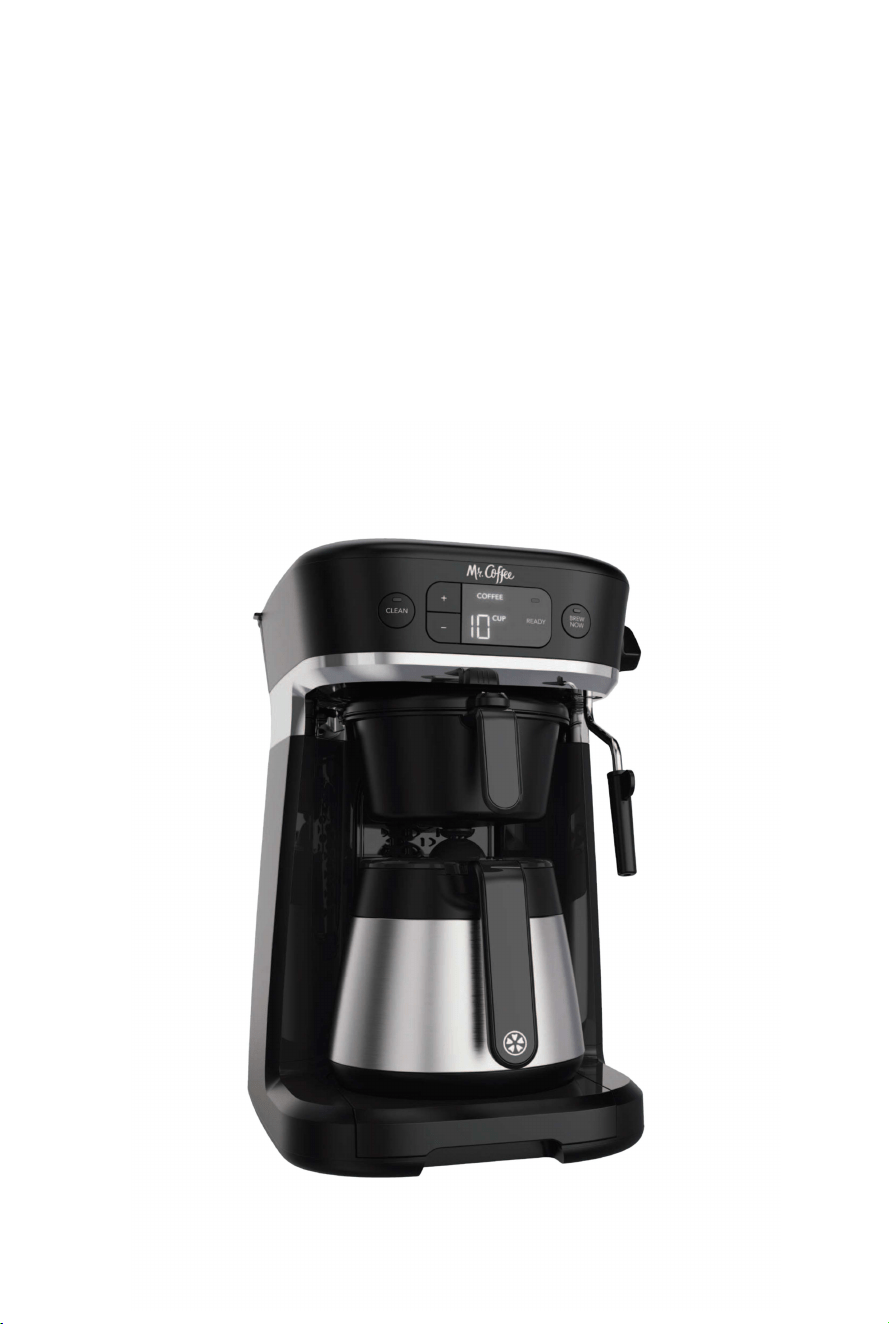