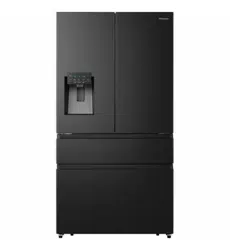
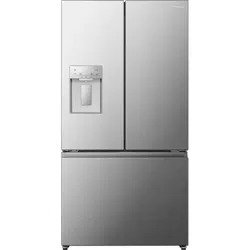
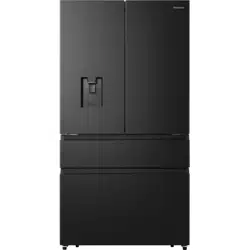
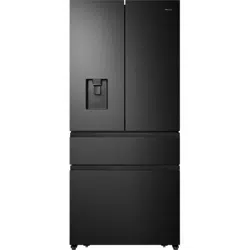
Parts and Features
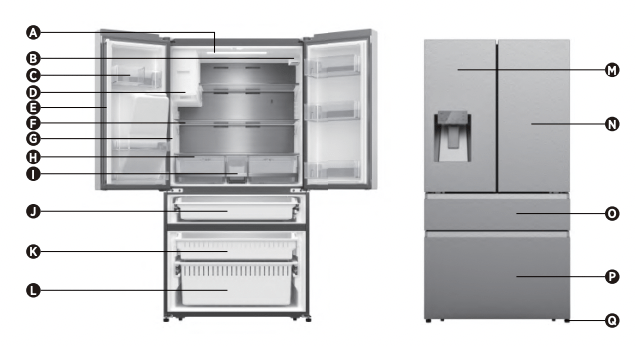
 Refrigerator LED Light
 Water Filter
 Refrigerator Door Bin
 Ice-Maker
 Rotary Separator
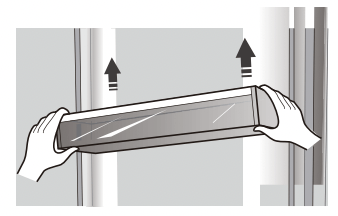
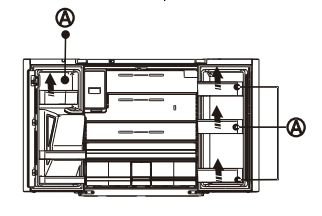
 Glass Shelf
 Refrigerator Side Light
 Storage Drawer
 Middle Storage Drawer
 My Fresh Choice Drawer
 Freezer Drawer
 Down Freezer Drawer
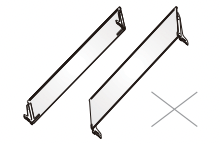
 Fridge Door Left
 Fridge Door Right
 My Fresh Choice Door
 Freezer Door
 Leveling Leg
NOTE: Your model may look different from this and other images in this manual,depending on your model’s features.
NOTE: To get the best energy efficiency of this product, please place all shelves, drawers on their original position as the illustration above.
Installation Instructions
Remove the Doors
IMPORTANT: Keep the refrigerator doors closed until you are ready to lift them from the cabinet.
1. Unplug refrigerator or disconnect power.
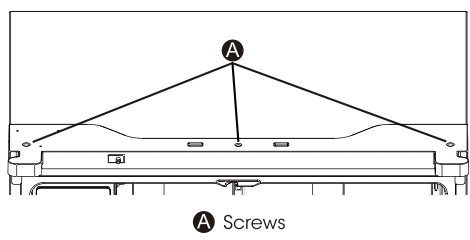
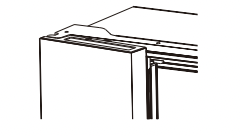
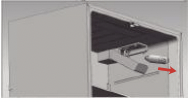
2. Using a Phillips screwdriver. remove the three screws attaching the hinge cover. and then remove the hinge cover with the entire harnesses attached.
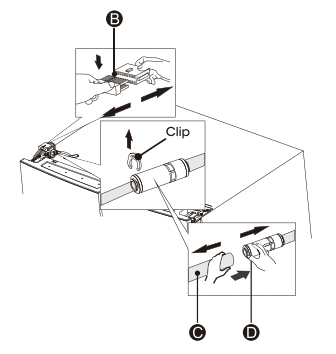
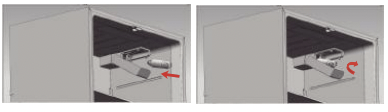
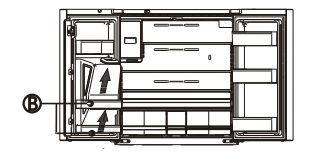
3. Separate the two connectors on the left side door. To remove the wire connector. press the top of the connector (B) and separate it from the other one. To remove the water coupler from the hinge. twist and pull the clips from the coupler. Remove the water line (C) while pressing the movable part (0) of the water line coupler.
4. Remove the 3 screws (E) fixed on the hinges. with a Wrench (8mm) and 1 ground screws (F) attached to the hinge with Philips (+) screwdriver. Remove the upper left door hinge (6).
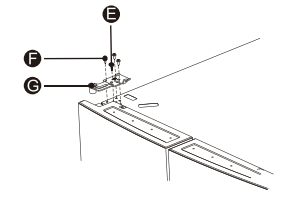
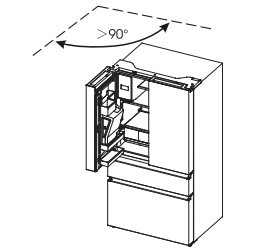
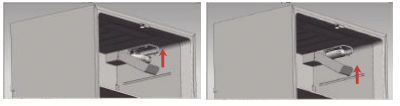
5. Use your both hands to open the door more than 90°. Lift it up and take it off.
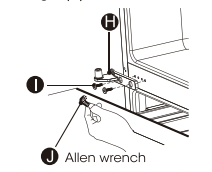
6. If necessary. remove the 2 hex head bolts hinges (I) with an Allen wrench (5 mm).Remove the lower left door hinge (H).
Replace the Doors
1. If removed. reinstall the bottom hinge.
2. Using two or more people. set the refrigerator door onto the bottom hinge.
3. Insert the top hinge into the top of the door.
4. Using the three screws removed earlier. fasten the top hinge to the top of the cabinet.
NOTE: Left-hand door only, replace the ground screw into the top hinge. reattach the wire harness. reconnect the water line. make sure the clips are properly connected to the coupler.
5. Repeat steps 1 through 4 to replace the opposite door.
6. Using the three screws removed earlier, reinstall the top hinge cover and control panel to the top of the cabinet
Move Near Water Supply
IMPORTANT: The refrigerator must be located on a solid. level surface that is strong enough to support the refrigerator fully loaded.
+ Before moving. retract the leveling legs to avoid scraping the floor.
+ The refrigerator has wheels. which should be used for only forward and backward movement.
NOTE: Trying to move the refrigerator sideways may damage your floor.
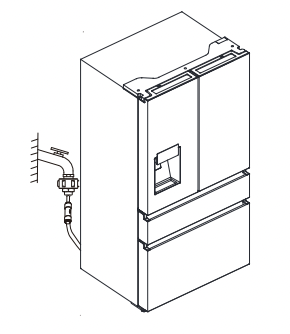
Connect the Water Supply
A water dispenser with a filter is one of the helpful features on your new appliance. To help promote better health. the water filter removes unwanted particles from your water. However. it does not sterilize or destroy microorganisms. You may need to purchase a water purifying system to do that. In order for the ice maker to operate properly. a water pressure of 30~125psi is required Under normal conditions. a 200cc (5.75 oz.) cup can be filled in about 10 seconds.
If the refrigerator is installed in an area with low water pressure (blow 30 psi). you can install a booster pump to compensate for the low pressure. After you have connected the water line. make sure the water storage tank inside the refrigerator is properly filled. To do this. press the water dispenser lever until the water runs from the water outlet. Parts for water line installation
The tools you will need:
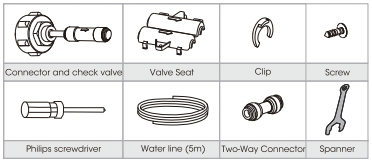
Connecting to the water supply line
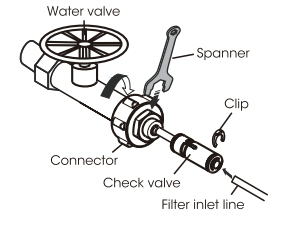
The connector and the check valve are provided as one part. You should use the new connector incidentally but not the old one you have. First. turn off the main water supply line. Screw the adaptor onto a suitable 3/4” BSP connector water outlet and use the spanner to tighten it. Fully insert the water line into the check valve. Then insert the clip in the install pack as the figure shown below.
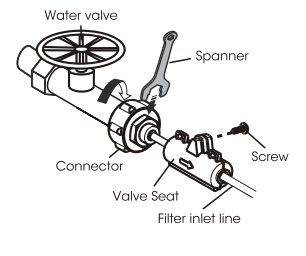
To prevent the clips loose. use the valve seat to hold it. Then use the screw to hold the valve seat with Philips(+) screwdriver.
NOTE:
+ After connected to the water supply line. please open the water valve to flush the filter for 5 minutes before use.
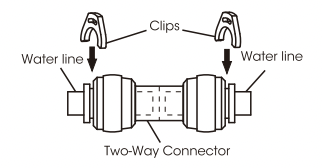
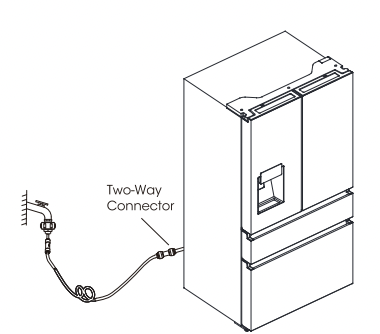
+ If the main supply line is too far away from the refrigerator to be connected to the filter inlet line. the water line(Sm) provided may be helpful. The outlet line of the water filter should be connected with the inlet line of the refrigerator by a Two-Way Connector. The water line must be fully inserted into the center of the connector to prevent water leaking. Insert the 2 clips in the installation pack as shown in the diagram. and then confirm that each clip holds the line firmly.
+ The initial dark discoloration of water is normal.
+ The water lines must be connected with the potable water only.
+ The water lines should not be pressed by heavy things and should not bend too much.
+ It is normal that there will be sound of exhaust coming out from the appliance when you connect the water line to the appliance and press the level of the dispenser for the first time.
Warning:
+ After turning on the water valve. make sure that there is no leakage at all connection points of the water lines. If there is a leakage. turn off the valve immediately and tighten the water connector or make the lines fully inserted into the connector.
+ The water line must be connected to the cold water pipe. If it is connected to the hot water pipe. it may cause the purifier to malfunction.
Complete the Installation
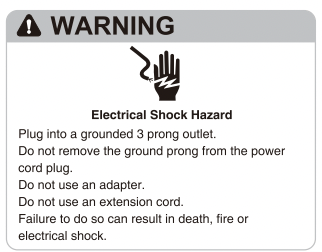
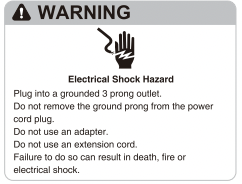
1. Plug into a grounded 3 prong outlet.
NOTE: This refrigerator begins operating as soon as it is connected to the power supply.
2. Move the refrigerator into its final location. making sure to maintain the recommended clearance.
Level Refrigerator if needed
The refrigerator must be level to maintain optimal performance and appearance.
1. Turn the leveling feet on the bottom. front of the cabinet to raise or lower that side of the refrigerator until the refrigerator is level side to-side.
2. Turn both feet by the same amount. to slightly raise the front of the refrigerator. This will make it easier for the doors to close.
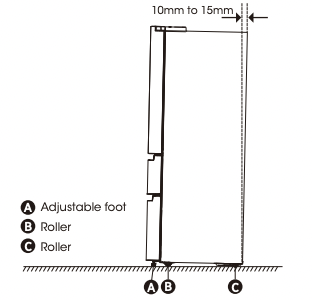
NOTE: Having someone push against the top of the refrigerator takes some weight off the leveling feet. This makes it easier to turn the feet. Rotate the adjustable feet clockwise to raise or counter-clockwise to lower your refrigerator. To make sure that the doors close automatically. tilt the top of your refrigerator backward about
10mm to 15mm. If necessary, use a spanner wrench to adjust the feet.
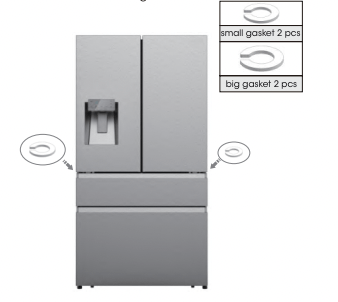
Align Doors (if needed)
The gaskets are used to align doors. you can find them in the manual bag.
Refrigerator Use
Opening and Closing Doors
Providing room for doors to open
Make sure that you have enough room in front of your refrigerator to swing the doors open.

The four doors can be opened and closed either separately or together.
- There is a mullion on the left-hand side refrigerator compartment door.
- When closing the left-hand door. the mullion folds behind the right-hand door joining the two doors.
- The temperature of the door frame is controlled to help prevent moisture from developing on the mullion. The temperature of the surface may be warm. which is normal. and will not affect the performance of the refrigerator.
NOTE: Before closing the left-hand door. make sure the mullion is folded inward. If the mullion is pulled outward it may become damaged when you try to close the door.
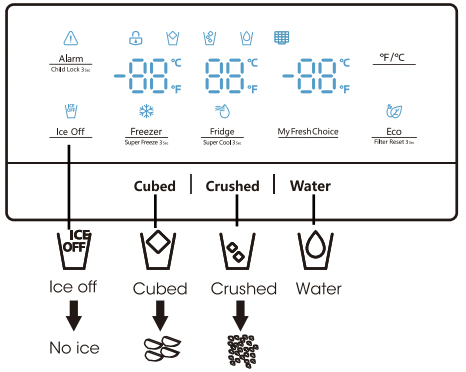
Using the Controls
Your product has one control panel which is on the fridge door. Use your appliance according to the following control guidelines.
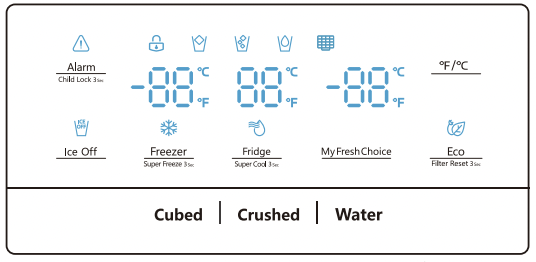
Control Panel
The control panel is shown in the diagram below
The display will illuminate when the refrigerator is first plugged in. However the lights will automatically turn off after 60 seconds.
 Child Lock and Door Alarm
This button serves two purposes:
1. Child Lock
Press and hold "Alarm" for 3 seconds to lock the whole Control Panel including dispenser function If Control panel is locked, the icon will be on, and none of the buttons on the Control panel work. To unlock the Control panel, please press and hold "Alarm" for 3 seconds again.
2. By Alarm
Leaving any door open for over 2 minutes will activate door alarm. The  icon will flicker, the control panel will display "dr", and you will hear a buzzer sound. The buzzer will sound 3 times per minute and will stop after 8 minutes. In case of alarm, you can touch the Alarm button to cancel door alarm, then the icon stops flickering and keeps on, the buzzer sound will stop at the same time. Also door alarm can be stopped by closing all the doors. To save energy, please avoid keeping doors open for a long time when using refrigerator
 Ice Off
You can touch "Ice Off" button to control the ice maker. When the Child Lock is off, you can touch the "Ice Off" icon to lock the ice maker, and the icon will be illuminated. If you want to unlock the ice maker, please touch the "Ice Off" icon again, and the icon will be off.
NOTE: When the "Ice Off" is on, it only locks the ice maker not the dispenser.
 Fridge Temperature Control
When you touch the button continuously, the temperature will be set in the following sequence.

If you want to decrease the time needed to cool items in the Fridge, please touch and hold this button for 3 seconds, the Super Cool icon" "will be illuminated, the fridge temperature setting will display 2°C. Super Cool automatically switches off after 3 hours, and the refrigerator temperature setting will revert back to the previous setting. When Super Cool function is on, you can touch the "Fridge" to switch it off.
NOTE: On the Super Cool Function, when you touch the "Eco" button, Eco function will be activated, and "Super Cool" mode will be off
 Freezer Temperature Control
You can touch the “Freezer” button to activate the mode to control the freezer temperature. When you press the button continuously, the temperature will be set in the following sequence.

Press and hold the button for 3 seconds, the icon will be illuminated, the freezer temperature setting will display -24°C.
Super Freeze can quickly lower the temperature and freeze your food faster than usual. This can retain more of the vitamins and nutrition in fresh food and keep your food longer. Super Freeze automatically switches off after 52 hours, and the freezer temperature setting will revert back to the previous setting. When the Super Freeze function is on, you can touch “Freezer” to switch off the Super Freeze function.
The Super Freeze is used to perform pre-freezing and fast freezing in sequence of Freezer compartment. This function accelerates the freezing of fresh food and,at the same time, protects foodstuffs already stored from undesirable warming.
 To freeze fresh food activate the Super Freeze function at least 24 hours before placing the food to complete pre-freezing
NOTE : On the Super Freezer Function, when you touch the “Eco” button, Eco function will be activated, and “Super Freezer” mode will be off.
 My Fresh Choice Temperature
You can touch the "My Fresh Choice" button to activate the mode to control the convertible compartment temperature. When you press the button continuously, the temperature will be set in the following sequence.
 Dispense Control
When the Child Lock is on,the dispenser will not work. When the Child Lock is off, you can press the "Cubed" or "Crushed" option to choose the type of ice to be dispensed, and press the "Water" button will activate the water mode.If you choose the function of Cubed, the  icon will be illuminated, choose the fuction of Crushed the
  icon will be illuminated, and the icon will be illuminated when Water function is chosen.
 °F/°C
°F/°C
In the unlocked state, press °F/°C button to switch between Celsius and Fahrenheit units. The default state is Celsius display.
 Energy Save
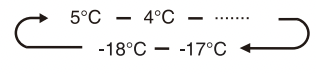
You can touch this button to turn Energy Save mode on and off. When you turn Energy Save on, the Eco icon “ ” lights. The temperature of the fridge is automatically switched to 6°C and the freezer to -17°C. If Energy Save is off, the icon“ ” will go off and the temperature setting will revert back to the previous setting.
 Water Filter
The state of the water filter is calculated by the main control board and transmitted to the display panel.The first time the power is switched on and the water enters the filter, the filter state is calculated at 99%. When the water filter state drops to 15%, the icon “ ” is lit. When the filter state reaches 10%, the icon “ ” will flash, The user needs to replace the filter and long press the Energy Save Button for 3 seconds to reset the water filter state.The filter state will then be re-calculated to 99%.
Demo mode
Demo mode is for store display,and it prevents the refrigerator from generating cool air. In this Cooling off Mode, the refrigerator may seem like it is working but it will not make cool air. The indicators on the control panel will show “OFF”. To cancel this mode, press and hold “Alarm” and “°F/°C” keys at the same time for 3 seconds and the buzzer will make a long sound.
Features
Important information to know about glass shelves and covers:
Do not clean glass shelves or covers with warm water when they are cold. Shelves and covers may break if exposed to sudden temperature changes or impact. such as bumping. Tempered glass is designed to shatter into many small. pebble-size pieces. This is normal. Glass shelves and covers are heavy. Use both hands when removing them to avoid dropping.
1. Refrigerator
IMPORTANT: To avoid damage to the doors. make sure all shelves and drawers are pushed fully into the cabinet before closing a door.
Adjustable Shelves
The height of the shelves can be adjusted to fit your storage needs.
1. To remove a shelf. gently lift upward and then pull the shelf forward until the end of the shelf passes the rail support.
2. To reinstall a shelf. gently slide the shelf back into the refrigerator compartment. and lower the shelf onto the rail support.
2. Removable door bins
The bins located in the middle of the door are adjustable.
To Remove and Replace a Door Bin:
1. Place hands on both sides of the bin and lift upward.
2. Pull the door bin out.
3. Replace the door bin by inserting it above the support and pressing down to snap into place.
NOTE: The quality of your ice will be only as good as the quality of the water supplied to your ice maker. Avoid connecting the ice maker to a softened water supply. Water softener chemicals (such as salt) can damage parts of the ice maker and lead to poor quality ice. If a softened water supply cannot be avoided. make sure the water softener is operating properly and is well maintained.
3. Removing/Replacing freezer drawer
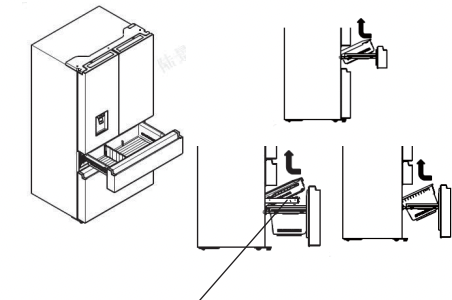
NOTE:Unscrew the drawer before taking it out.
1. Pull out drawer to maximum extension.
2. Lift up to remove the drawer.
3. Reverse steps 1 and 2 to replace the drawer.
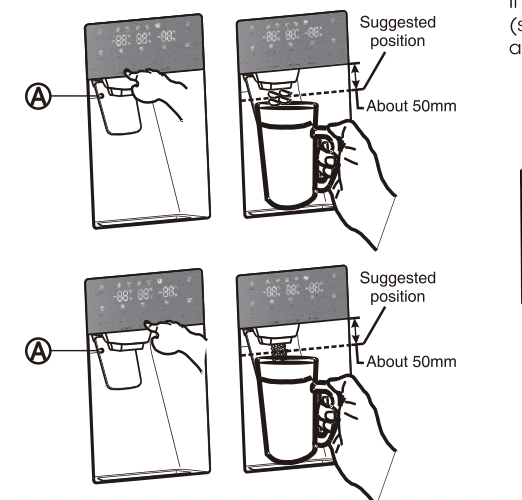
4. Getting cold water and ice
Push the appropriate ice or water type button to select what you want to dispense.
Getting cold water
The water dispenser is located in the fridge door. To get water, push the water button. Then move your glass down to the dispenser lever (A) in the suggested position and press it.
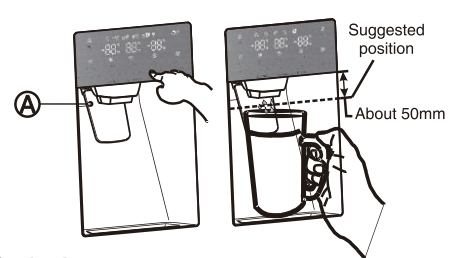
Getting ice
To get ice. push the cubed or crushed ice button as required. Then move your glass down to the dispenser lever in the suggested position and press it.
Making ice
+To fill the ice bucket to maximum capacity after installation. follow these steps:
1. Allow your refrigerator to operate and cool down for 24 hours (or 1 full day).Waiting 24 hours will allow your ice maker to cool properly.
2. Dispense 4 to 6 ice cubes into the glass.
3. After 8. and then 16 hours. dispense a full glass of ice.
Warning:
Do not put food in the ice bucket. If you store food in the ice bucket. the food can strike the ice maker when you open or close the door. causing damage to the ice maker.
Note that the ice cubes in the ice bucket may spill out over the drawer. If this occurs. be sure to clear the ice cubes that spilled out of the drawer.
+If a power failure occurs. ice cubes may melt. and then freeze together when the power comes back
on. causing the dispenser to stop working.
+To prevent this problem. after a power failure. pull out the ice bucket and residual ice or water.
Note:
+Dont push the water dispenser lever forward without a cup below since it may cause water spilling.
+To avoid cold air leaking out from cabinet. keep the water dispenser still installed even if the dispenser is not in use.
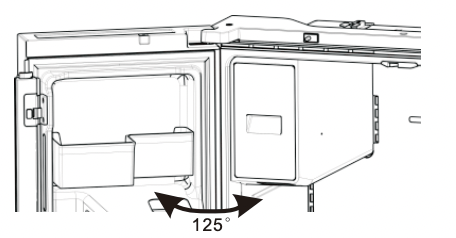
Using the ice off function
When you select the ice off mode. remove alll ice cubes from the bucket.
If you leave the ice cubes in the bucket. the ice cubes may clump together. making it difficult to remove them.
First. open the door at the maximum Angle.
Then, liff up on the ice bucket. and pull it straight out in the direction of the arrow.
To put the ice bucket in. push it firmly straight back. If the bucket does not fit. turn the helix 90 degree (see the the last illustration on the right. below) and try again.
NOTE:
The inside of the ice bucket is very cold when the refrigerator is operating. Don’t reach deep inside the ice bucket.
Use only the ice maker provided with the refrigerator. The water supply to this refrigerator must only be installed by a qualified person.
+To operate the ice maker properly. water pressure of 30~125 psi is required.
+When the user disconnects from the refrigerator. the ice from the ice box needs to be removed.
Going on vacation
If you have a long vacation or business trip and won't use the water or ice dispensers for a long time:
1. Close the water valve. Otherwise. water leakage may occur.
2. Remove all food.
3. Unplug the refrigerator.
4. Wipe excess moisture from inside and leave the doors open. Otherwise. odor and mold may develop.
Warning:
+Do not put your fingers. hands or any other unsuitable objects in the chute or ice-maker bucket. It may result in personal injury or material damage.
+Never put your fingers or any other objects in the dispenser opening. It may cause injury.
+Do not try to disassemble the ice maker.
+Do not wash or spray the ice bucket with water while it is in the refrigerator. Remove it to clean.
Water clouding phenomenon
All water provided to the refrigerator flows through the filter which is an alkaline water filter. In the filtering process. the pressure of the water that has flowed out of the filter is increased. and the water becomes saturated with oxygen and nitrogen.
When this water flows out into the air. the pressure plummets and the oxygen and nitrogen get supersaturated. which results in gas bubbles. The water may temporarily look misty or cloudy due to these oxygen bubbles. After a few seconds. the water will look clear.
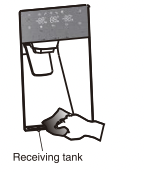
Cleaning
After using for a period. water accumulated in receiving tank might overflow. thus you should clean it with dry towel regularly to avoid water spilling out onto the floor.
NOTE:
In case of stained by dust or other pollutant. dispensing water with unpleasant smell. etc.. water dispenser parts should be cleaned thoroughly.
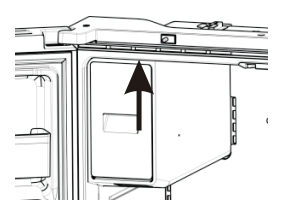
5. Changing the water filter
Please refer to the owner’s manual for proper maintenance and operation. If this device is not maintained and operated as specified in the owner’s manual, there is a risk of exposure to contaminants.
To drink the freshest and cleanest water from your refrigerator, change the filter on time. To change the water filter, follow these steps:
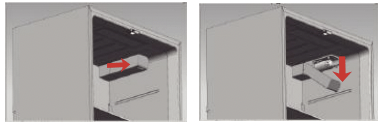
1. Shut off the water supply. Then pull the handle under the cover outwards to open the cover
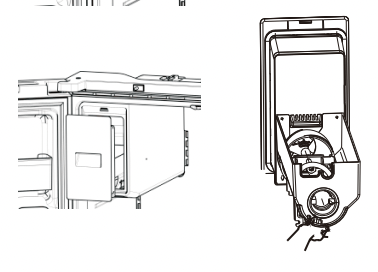
2. Pull the water filter down wards and turn it about 90° counter-clockwise to take it out. When the filter is disassembled, pay attention to keep the filter head upward tilted to avoid water leaking from the front filter part And the dropped water in the cover should be cleaned immediately.

3. Insert the new water filter into the hole, and at the same time turn it about 90° clockwise until it stops.
4. Push the water filter up, and move the cover up to horizontal and push it until it locks.

5. Turn the water supply back on.
NOTE: After turning on the water supply, you should check the leaks. If leaks occur, repeat the above operation steps 1-5. If leaks persisit,please stop using it and call your supporting dealers.
6. Flush filter for 5 minutes before use.
Removing any residual matter inside the water supply line after installing the water filter
1. Turn on the main water supply and supply water from water supply line.
2. Let the water flow through the dispenser until it becomes clear (after approx.6 to 7 minutes). This will clean the water supply system and remove the air from the lines.
3. Additional flushing may be required in some households.
4. Open the refrigerator door and make sure there are no water leaks coming from the water filter.
Note:
+ Be sure to flush the dispenser thoroughly. otherwise water may drip from the dispenser. This means that there is still air in the line.
Reverse osmosis water supply is important:
The pressure of the water supply coming out of a reverse osmosis system going to the water inlet valve of the refrigerator needs to be between 30 and 125 psi (207 and 862 kpa). If a reverse osmosis water system is connected to your cold water supply. the water pressure to the reverse osmosis system needs to be a minimum of 40 to 60 psi (276 to 414 kpa). If the water pressure to the reverse osmosis system is less than 40 to 60 psi (276 to 414 kpa):
- Check to see whether the sediment filter in the reverse osmosis system is blocked. Replace the filter if necessary.
- Allow the storage tank on the reverse osmosis system to refill after heavy usage.
- If your refrigerator has a water filter. it may further reduce the water pressure when used in conjunction with a reverse osmosis system. Remove the water filter.
6. Using your fridge compartment
The refrigerator compartment is suitable for storage of vegetables and fruit. Food inside should be packed to store in order to avoid losing moisture or flavor permeating into other foods.
Caution
Never close the refrigerator door while the shelves. crisper and/or telescopic slides are extended. It may damage both them and the refrigerator.
Door baskets
The refrigerator compartment is provided with several different door baskets. which are suitable for the storage of canned liquid. bottled drinks and packed food.
To remove the door baskets (A). simply lift the racks up and pull straight out.
To relocate the door baskets (A). slide them in above the desired location and push down until them stop.
To remove the door baskets (B). take the right side of the baskets out by lifting it at an angle along the guide. and then take the left side out by pulling it from the door.
To relocate the door baskets (B). slide them into the original location and push down until them sticks.
Warning:
Do not place too many heavy things in the baskets.
Before you lift up the door shelf vertically. please take the food out.
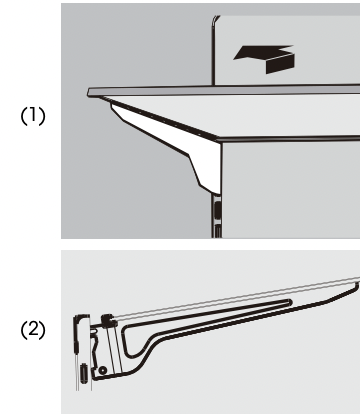
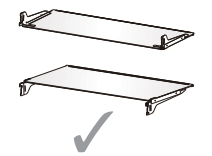
Glass shelves
To remove the glass shelves. tilt up the front of the shelf shown in Page14 (1) and lift it up vertically shown in Page14 (2).Then pull the shelf out.
General Use Information
+ When first turning on refrigerator after a period of non-use. allow the refrigerator to cool at least 2 hours before adding food.
+ Do not block air circulation vents with stored items.
+ Store items so that the air can circulate freely around them.
+ Cover or wrap stored food well to avoid transfer of odors.
+ Once defrosted. food quality will deteriorate rapidly. Defrosted food should not be refrozen.
+ Neither bottled nor canned drinks should be stored in the freezer compartment. Bottles and cans may explode.
To avoid contamination of food. please respect the following instructions:
+ Opening the door for long periods can cause
a significant increase of the temperature in the compartments of the appliance.
+ Clean regularly the surfaces that can come in contact with food and accessible drainage systems.
+ Store raw meat and fish in suitable containers in the refrigerator. so that it is not in contact with or drip onto other food.
+ Two-star frozen-food compartments are suitable for storing pre-frozen food. storing or making ice cream and making ice cubes.
+ Two-star compartments are not suitable for the freezing of fresh food.
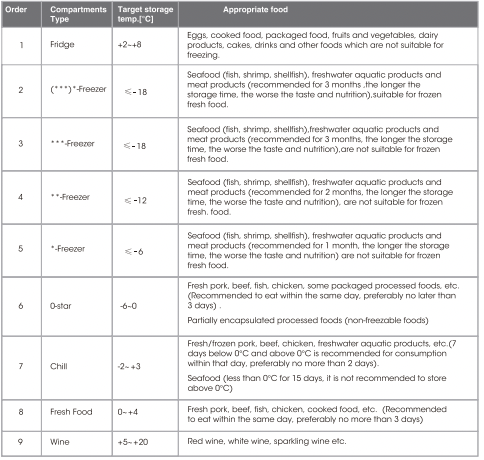
NOTE: please store different foods according to the compartments or target storage temperature of your purchased products.
If the refrigerating appliance is left empty for long periods, switch off, defrost, clean, dry, and leave the door open to prevent mould developing within the appliance. Make sure the compliance is checked by regular inspections.
Refrigerator Care
Cleaning
Both the refrigerator and freezer sections defrost automatically. However. clean both sections about once a month to avoid buildup of odors. Wipe up spills immediately. To avoid odor transfer and drying out of food. wrap or cover foods tightly.
IMPORTANT:
+ Do not use harsh chemicals. ammonia. chlorine bleach. concentrated detergent. solvents. abrasives or metal scouring pads to clean your refrigerator inside or out. They can damage and/or discolor the refrigerator finish.
+ Do not use warm water to clean glass shelves while they are still cold. Glass may break when exposed to sudden temperature changes.
Shelf parts clean
+ When cleaning the shelf parts. remove the lower shelf parts and place them horizontally. Either front or back. to prevent the shelf support from falling off.
+ If the shelf parts are placed at an angle. heir sides will touch the ground.When the force applied for cleaning is not proper. he shelf bracket will easily fall off.
1. Unplug refrigerator or disconnect power.
2. Clean the interior.
Hand wash, rinse, and dry removable parts and interior surfaces thoroughly. Use a clean sponge or soft cloth and a mild detergent in warm water.
3. Clean the door seals (gaskets). A dirty or sticky door seal may adhere to the cabinet and tear when you open the door. Using a soft cloth and a solution of mild detergent and warm water. hand wash the door seals. Rinse with clear water and dry thoroughly.
4. Clean the exterior surfaces. Wash exterior surfaces with a clean. soft cloth or sponge and a mild detergent in warm water. Rinse surfaces with clean. warm water and dry immediately to avoid water spots.
5. Plug in refrigerator or reconnect power.
Lights
IMPORTANT: Your refrigerator is equipped with LED lighting. These lights are designed to last for the life of your refrigerator. However. if the lights stop operating. please contact a qualified technician for replacement.
Vacation and Moving Care
Vacation
If You Choose to Leave the Refrigerator On While You're Away:
1. Use up any perishables and freeze other items.
If You Choose to Turn Off the Refrigerator Before You Leave:
1. Remove all food from the refrigerator and freezer.
2. Unplug refrigerator or disconnect power.
3. Clean refrigerator. wipe it. and dry well.
4. Tape rubber or wooden blocks to the tops of the two doors. and let them open a sufficient distance to let air in. This stops odor and mold from building up.
Moving
IMPORTANT: Handle with care when moving refrigerator to avoid either damaging the refrigerant tubing or increasing the risk of a leak.
When you are moving your refrigerator to a new home. follow these steps to prepare it for the move.
1. Remove all food from the refrigerator and pack all frozen food in dry ice.
2. Unplug refrigerator.
3. Clean. wipe. and dry thoroughly.
4. Take out all removable parts. wrap them well. and tape them together so they don’t shift and rattle during the move.
5. Raise the leveling legs so they don’t scrape the floor. See “Level Refrigerator.”
6. Seal the doors with tape and tape the power cord to the back of the refrigerator. When you get to your new home. put everything back and refer to the “Installation Instructions” section for preparation instructions.
Reinstalling/Using Refrigerator Again
If the refrigerator has been placed in a horizontal or tilted position for any period of time. wait 4 hours before plugging it in to allow the oil to settle into the compressor.
1. Clean refrigerator. See “Cleaning.”
2. Place refrigerator in desired location and level. See “Installation Instructions.”
3. Plug into grounded 3 prong outlet.
Troubleshooting
Try the solutions suggested here first in order to avoid the cost of an unnecessary service call.
|
PROBLEM
|
POSSIBLE CAUSE(S)
|
SOLUTION
|
|
Refrigerator does not run
|
Refrigerator is unplugged.
|
Plug refrigerator into a grounded 3 prong outlet.
|
|
Breaker is tripped or turned off, or fuse is blown.
|
Reset/Turn on breaker or replace fuse.
|
|
Refrigerator is in defrost mode.
|
Wait for defrost cycle to end and cooling system to restart.
|
|
Refrigerator compressor runs frequently or for long periods of time
Note: This refrigerator is designed to run for longer periods of time at a lower energy usage.
|
Refrigerator is first plugged in.
|
This is normal. Allow 24 hours for the refrigerator to cool down.
|
|
Warm or large amounts of food added.
|
This is normal.
|
|
Door is left open, or refrigerator is not level.
|
Check that an item is not preventing door from closing. Level the refrigerator. See 'Level Refrigerator.'
|
|
Hot weather or frequent openings.
|
This is normal.
|
|
Temperature control set to coldest setting.
|
Adjust temperature to a warmer setting.
|
|
Refrigerator has an odor
|
Food is not sealed or packaged properly.
|
Reseal packaging. Place an opened box of baking soda in the refrigerator, replace every 3 months.
|
|
Interior needs to be cleaned.
|
Clean the interior. See 'Cleaning.'
|
|
Food stored too long.
|
Dispose of spoiled food.
|
|
Light does not come on
|
Refrigerator is unplugged.
|
Plug refrigerator into a grounded 3 prong outlet.
|
|
LED light is burned out.
|
Contact a qualified technician to replace the burned out LED.
|
|
Doors do not close properly
|
Refrigerator is not level.
|
See 'Level Refrigerator.'
|
|
Something is obstructing door closure.
|
Check for and remove obstructions.
|
|
Vibration or rattling
|
Refrigerator is not resting firmly on floor.
|
See 'Level Refrigerator.'
|
|
Normal Sounds
|
It sounds like water is flowing from the refrigerator.
|
Refrigerant flowing in the lines will make this sound when the compressor starts and stops.
|
| |
The refrigerator has an automatic defrosting system. The defrosted water will make this sound.
|
|
Humming or buzzing sounds
|
The compressor and fans used for cold air circulation can make this sound. If the refrigerator is not level, the sound will be louder.
|
|
Cracking or clicking sounds
|
The interior parts will make this sound as they contract and expand in response to temperature changes.
|
|
Popping noise
|
May occur during automatic defrosting.
|
|
Refrigerator or freezer is too warm
|
Temperature control is not set cold enough.
|
Adjust the compartment to a colder setting; allow 24 hours for the temperature to adjust.
|
|
Doors opened frequently or left open.
|
Limit door openings to maintain the internal temperature. Check that an item is not preventing door from closing.
|
|
Warm food added recently.
|
Allow time for food and refrigerator to cool.
|
|
The space between the back of the refrigerator and the wall is too close.
|
Allow 5 cm space between the back of the refrigerator and the wall.
|
|
Items against back of compartments are blocking proper airflow.
|
Store items only inside the trim of the glass shelves; don't place items against sides of the compartments or directly in front of any vents.
|
|
Refrigerator or freezer is too cold
|
Temperature control is set too cold.
|
Adjust temperature in the compartment to the next warmer setting; allow 24 hours for temperature to adjust.
|
|
Moisture on exterior/ interior of refrigerator
|
High humidity
|
This is normal during times of high humidity.
Dry surface and adjust temperature to a slightly colder setting.
|
|
Doors opened frequently or left open.
|
Keep door closed. Check that an item is not preventing the door from closing. Level the refrigerator. See ‘Level Refrigerator."
|
|
Open container of water in refrigerator.
|
Cover or seal container
|
|
Frost or ice crystals on frozen food
|
Freezer door left open or opened frequently.
|
Limit door openings to maintain the internal temperature. Check that an item is not preventing door from closing.
|
|
Refrigerator is not level.
|
Level the refrigerator. See ‘Level Refrigerator."
|
|
Items blocking freezer air vents and preventing proper air flow.
|
Move items away from rear wall.
|
|
Food freezing in refrigerator
|
Food placed too close to the air vent.
|
Move items away from back and top of the refrigerator.
|
|
Temperature control set too cold.
|
Adjust the temperature to a less cold setting.
|