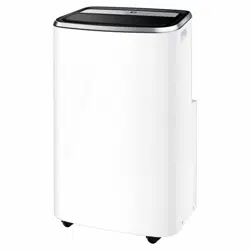
USER MANUAL AIR CONDITIONER
NOTES ON OPERATION
- Allow 4 minutes for the compressor to restart cooling. If you turn the air conditioner off and immediately restart it, allow 4 minutes for the compressor to restart cooling. There is an electronic device in the unit that keeps the compressor turned off for 4 minutes for safety.
- In the event of a power failure during use, allow 4 minutes before restarting the unit. After power is reinstated, restart the air conditioner. If the power was off for less than four minutes, be sure to wait at least four minutes before restarting the unit. if you restart the air conditioner within four minutes, a protective device in the unit may cause the compressor to shut off. This protective device will prevent cooling for about 5 minutes. Any previous setting will be cancelled and the unit will return to its initial setting.
- When you turn the unit off in cooling mode, the compressor will shut off immediately and the upper/under fan motor will stop running after 5 seconds; if operate the unit to fan mode from cooling mode, the compressor will shut off immediately and the under fan motor will stop running after 5 seconds; and if operate the unit to heating mode from cooling mode, the compressor will shut off immediately and the under fan motor will stop running after 30 seconds.
- Low temperature operation: Is your unit freezing up? Freezing may occur when the unit is set close to 18°C in low ambient temperature conditions, especially at night. In these conditions, a further temperature drop may cause the unit to freeze. Setting the unit to a higher temperature will prevent it from freezing.
- Dehumidification mode increases room temperature. The unit generates heat during dehumidification mode and the room temperature will rise. Warm air will be blown out from the exhaust air outlet, but this is normal and does not indicate a problem with the unit.
- This air conditioner blows the warm air generated by the unit outside the room via the exhaust hose while in cool mode. In the mean time, the same amount of air will enter the room from outside through any openings of the room.
- Any person who is involved with working on or breaking into a refrigerant circuit should hold a current valid certificate from an industry-accredited assessment authority, which authorises their competence to handle refrigerants safely in accordance with an industry recognised assessment specification
- Servicing shall only be performed as recommended by the equipment manufacturer. Maintenance and repair requiring the assistance of other skilled personnel shall be carried out under the supervision of the person competent in the use of flammable refrigerants.
- The working temperature range of the air conditioner is 5-43o C (41-109o F).
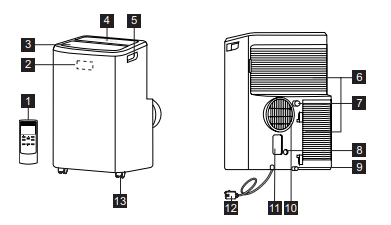
UNIT DESCRIPTION
- Remote control
- Signal receiver
- Room air outlet
- Control panel
- Carrying handle(both sides)
- Air intake
- Continuous drain outlet
- Pump drain outlet
- Bottom drain outlet
- Air exhaust
- Power plug socket
- Power cord
- Castor
INSTALLATION INSTRUCTIONS
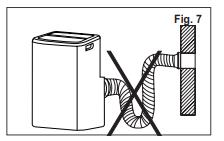
Exhausting hot air
In the Cool Mode the appliance must be placed close to a window or opening so that the warm exhaust air can be ducted outside. First position unit on a flat floor and make sure there’s a minimum of 50cm clearance around the unit, and is within the vicinity of a single circuit outlet power source.
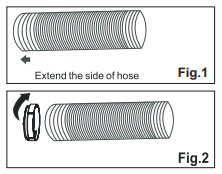
- Extend either side of the hose(Fig.1) and screw the hose to adaptor A (Fig.2).
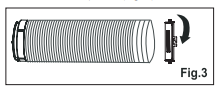
- Extend the other side of the hose and screw it to adaptor B (Fig. 3)..
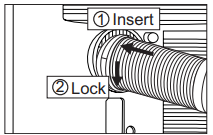
- Install the adaptor A into the unit (Fig.4).
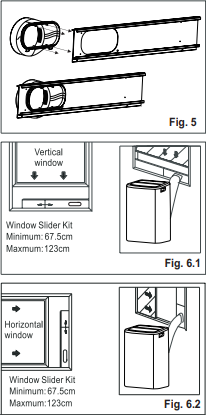
- Using the 4 buckles on adaptor B to affix the adaptor into the window slider kit and seal.
The hose can be extended from its original length of 38cm up to 150cm, but it is the best to keep the length to minimum required. Also make sure that the hose does not have any sharp bends or sags.
Installation in a double-hung sash window
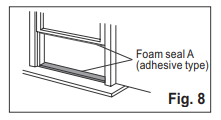
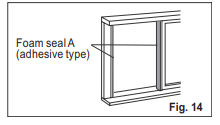
- Cut the Foam seal* (adhesive type) to the proper lengths and attach them to the window and stool.
- Open the window sash and place the window slider kit on the window stool. Attach the window slider kit to the window sill. Adjust the length of the window slider kit according to the width of window. Screw down the two screws on the window slider kit.
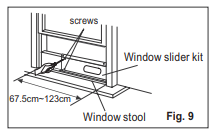 Cut the adjustable window slider kit if the width of window is less than 67.5cm.
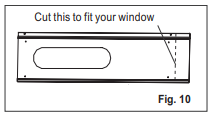
- Close the window sash securely against the window slider kit.
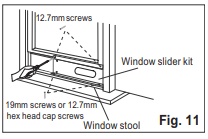
- Drive two 12.7mm screws to secure the window slider kit to the window sash.
- Secure the window slider kit to the window sill: For wooden window - Use 19mm screws for securing. For Vinyl-Clad windows - Use 12.7 hex head cap screws for securing.
- To secure lower sash in place, attach right angle Sash lock* with 12.7mm screw as shown.
- Cut the Foam seal* to an appropriate length and seal the open gap between the top window sash and outer window sash.
Installation in a sliding sash window
- Cut the Foam seal* (adhesive type) to the proper lengths and attach them to the window frame.
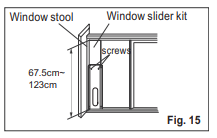
- Open the window sash and place the window slider kit on the window stool (Fig. 15). Attach the window slider kit to the window frame. Adjust the length of the window slider kit according to the height of window. Screw down the two screws on the window slider kit. See Fig. 15. Cut the adjustable window slider kit if the height of window is less than 67.5cm (Fig. 10).
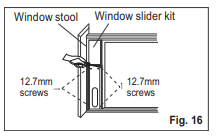
- Close the window sash securely against the window slider kit. (Fig. 16)
- Drive two 12.7mm screws to secure the window slider kit to the window sash. (Fig. 16)
- Drive two 19mm screws to secure the window slider kit to the window frame. (Fig. 16)
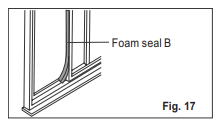
- Cut the Foam seal* to an appropriate length and seal the open gap between the sliding sash and outer window sash, as shown in Fig. 17.
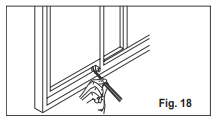
- To secure sliding sash in place, attach right angle safety lock with 12.7mm screw as shown (Fig. 18).
AIR CONDITIONER FEATURES
Control Panel
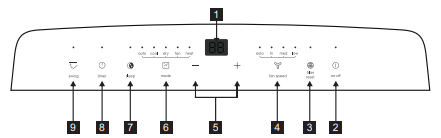
- Displays temperature/time
- Power ON/OFF Sleep
- Filter Reset
- Fan Speed
- Adjust Temperature or Timer
- Mode Selection*
- Timer
- Swing
* Heat mode is not applicable to all models.
CARE & CLEANING
Cleaning the unit
The cabinet and front may be dusted with an oil-free cloth or washed with a cloth dampened in a solution of warm water and mild liquid dishwashing detergent.
Never use harsh cleaners, wax, or polish on the cabinet front. Be sure to wring excess water from the cloth before wiping around the controls.
Excess water in or around the controls may cause damage to the air conditioner.
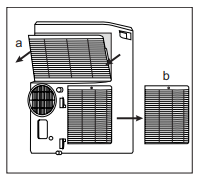
Cleaning the filters - To keep your air conditioner working efficiently, you should clean the filters every two weeks of operation.
- Removed the air filters as shown below figure. To keep your air conditioner working efficiently, you should clean the filters every two weeks of operation. Hold the filter lid tab to open the cover and pull out the upper air filter. Use a screwdriver to loosen the screw holding the filter, then open the cover to pull out the lower air filter.
- Wash the filter using liquid dishwashing detergent and warm water under 40°C. Rinse the filter thoroughly. Gently shake excess water from the filter. Be sure the filter is thoroughly dry before replacing it. Or, instead of washing, you may vacuum the filter clean.
- Replace the filter after the filter is dry
Winter Storage
If the air conditioner will not be used for an extended period of time:
- Drain the water collection tank completely and leave the bottom drain cap and rubber plug long time enough to allow any residual water to drain out. Once the tank is completely drained and no more water flows out, reinstall the rubber plug and cap.
- Remove and clean the filter, allow it to dry completely, then reinstall it.
- Remove the batteries from the remote control.
- Store the air conditioner in a cool, dry location, away from direct sunlight, extreme temperature, excessive dust, and well ventilated.
Before using the air conditioner again:
- Make sure the filter and drain cap are in place.
- Check the cord to make sure it is in good condition, without cracks or damage.
- Place new batteries in the remote control.
- Install the air conditioner as described in the Installation Instructions.
TROUBLE SHOOTING
Air conditioner will not operate.
- Wall plug disconnected. Push plug firmly into wall outlet.
- House fuse blown or circuit breaker tripped. Replace fuse with time delay type or reset circuit breaker.
- Control is OFF. Turn Control ON and set to desired setting.
- Fault code P1 appears in the display window. Drain water
- Room Temperature lower than the set temperature (Cool Mode) or Room Temperature higher than the set temperature (Heat Mode). Reset the temperature.
Air from unit does not feel cold enough.
- Room temperature below 16 °C. Cooling may not occur until room temperature rises above 16 °C.
- Reset to a lower temperature.
- Compressor shut-off by changing modes. Wait approximately 4 minutes and listen for compressor to restart when set in the COOL mode.
Air conditioner cooling, but room is too warm
- Outdoor temperature below 16 °C. To defrost the coil, set Fan mode.
- Air filter may be dirty. Clean filter. To defrost, set to Fan mode.
- Temperature is set too low for night time cooling. To defrost the coil, set to Fan mode. Then, set temperature to a higher setting.
- Exhaust duct not connected or blocked. See "Exhausting hot air" Section.
Air conditioner cooling, but room is too warm - ice forming on cooling coil behind decorative front
- Dirty air filter - air restricted. Clean air filter. Refer to "Care and Cleaning" section.
- Temperature is set too high. Set temperature to a lower setting.
- Air directional louvres positioned improperly. Position louvres for better air distribution.
- Front of unit is blocked by drapes, blinds, furniture, etc. - restricts air distribution. Clear blockage in front of unit.
- Doors, windows, registers, etc. open cool air escapes. Close doors, windows, registers, etc.
- Unit recently turned on in hot room. Allow additional time to remove “stored heat” from walls, ceiling, floor and furniture.
Air conditioner turns on and off rapidly.
- Dirty air filters - air restricted. Clean air filters.
- Outside temperature extremely hot. Set FAN speed to a faster setting to bring air through cooling coils more frequently.
Room too cold.
- Set temperature too low. Increase set temperature.