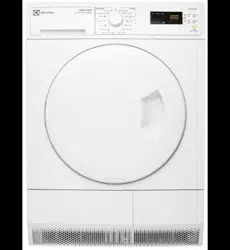
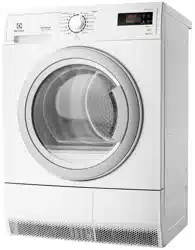
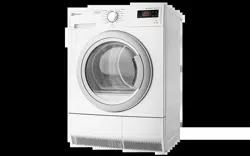
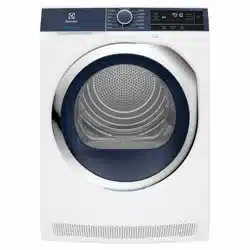
IMPORTANT! For ease of loading laundry or ease of installation the door is reversible. (see separate leaflet).
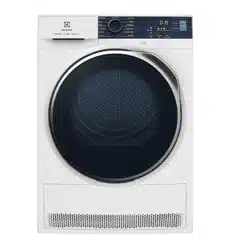
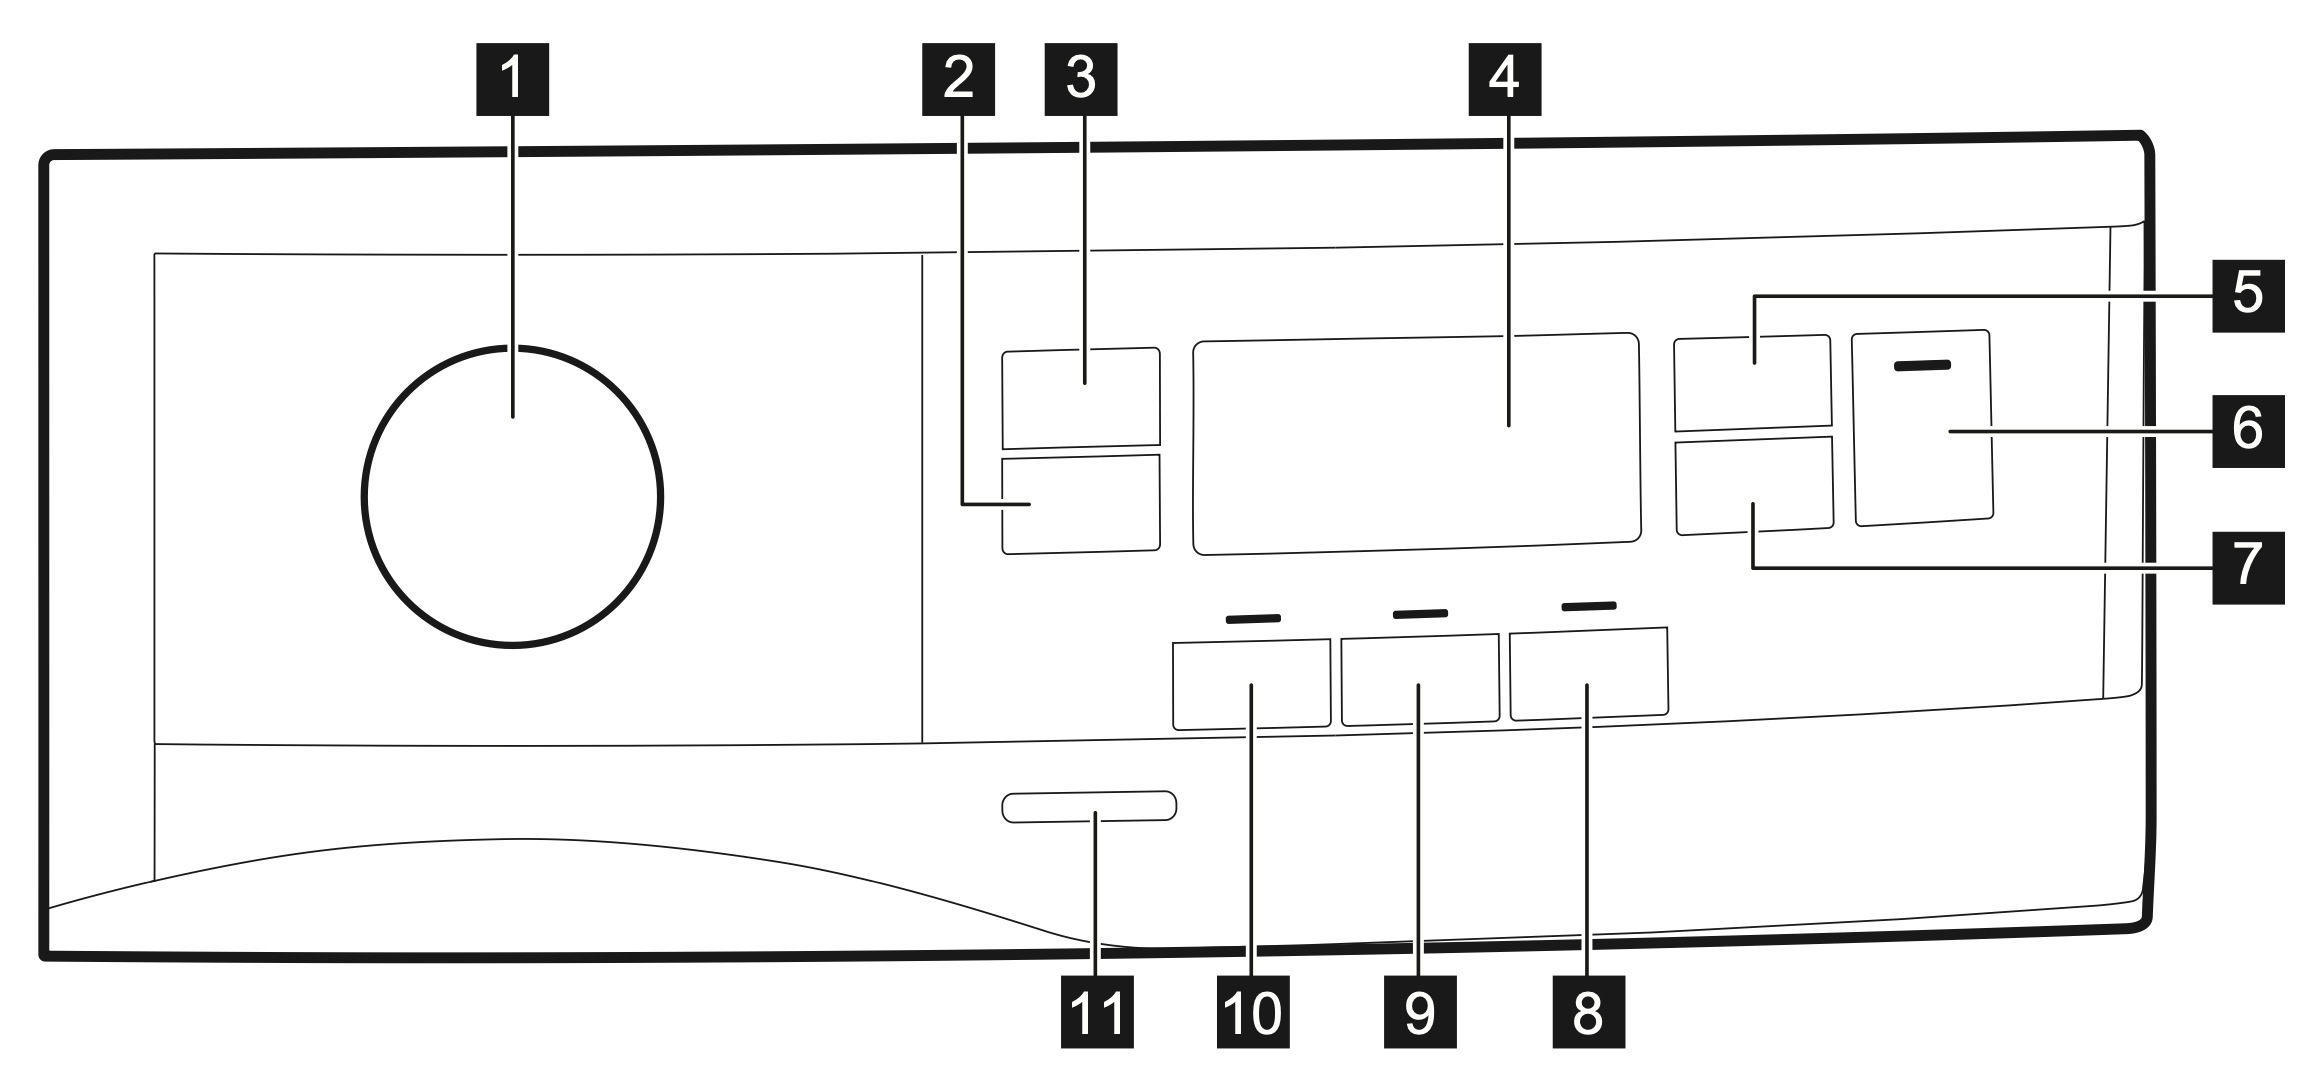
CONTROL PANEL
Programme knob
Extra Anticrease touch button
Dryness Level touch button
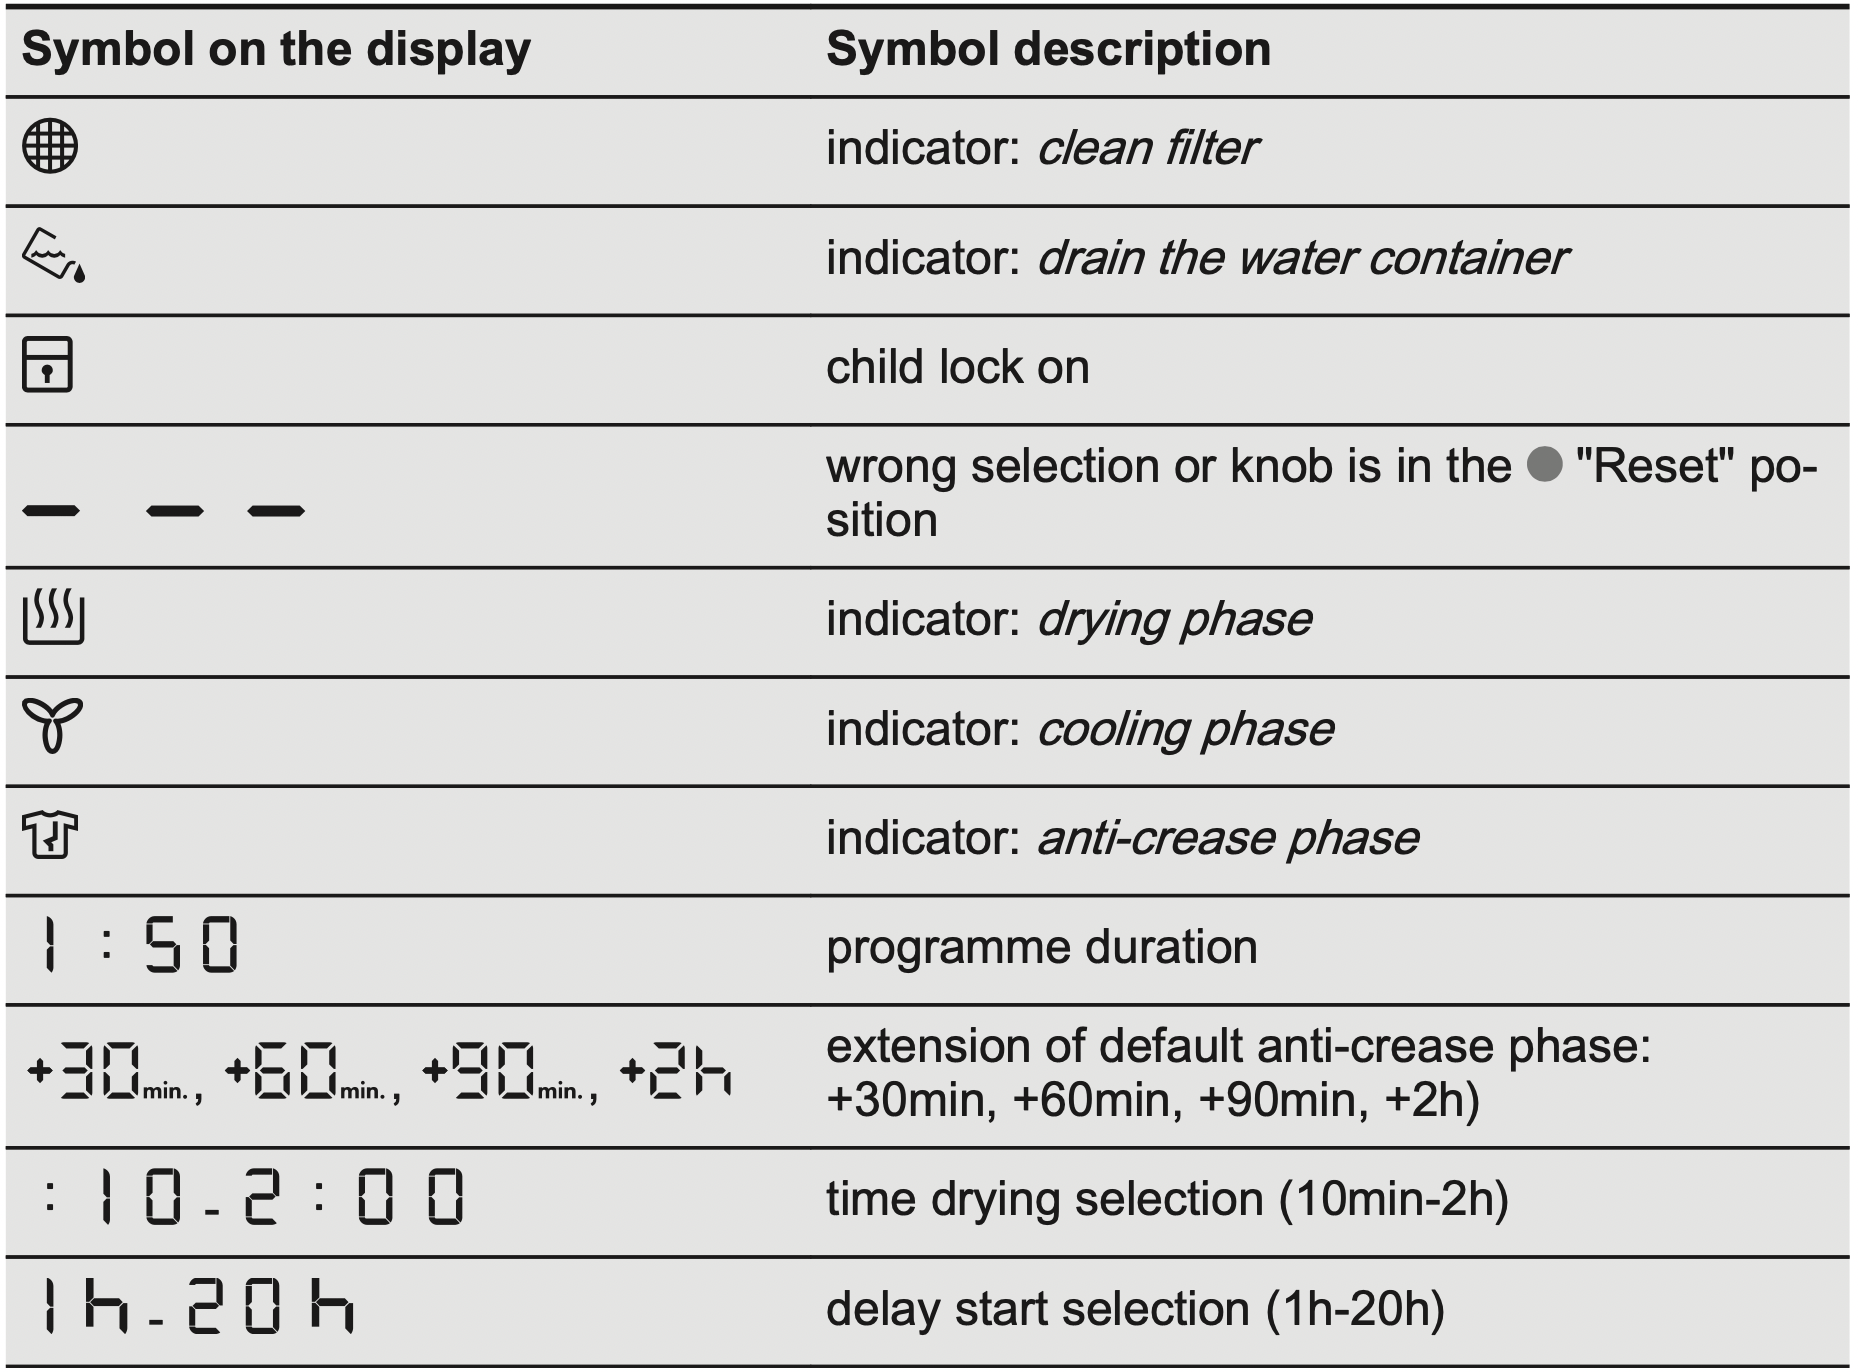
Display
Time Dry touch button
Start/Pause touch button
Delay Start touch button
End Alert touch button
Reverse Plus touch button
Extra Silent touch button
On/Off button
IMPORTANT! Press the touch buttons with your finger in the area with the symbol or name of the option. Do not wear gloves when you operate the control panel. Make sure that the control panel is always clean and dry.
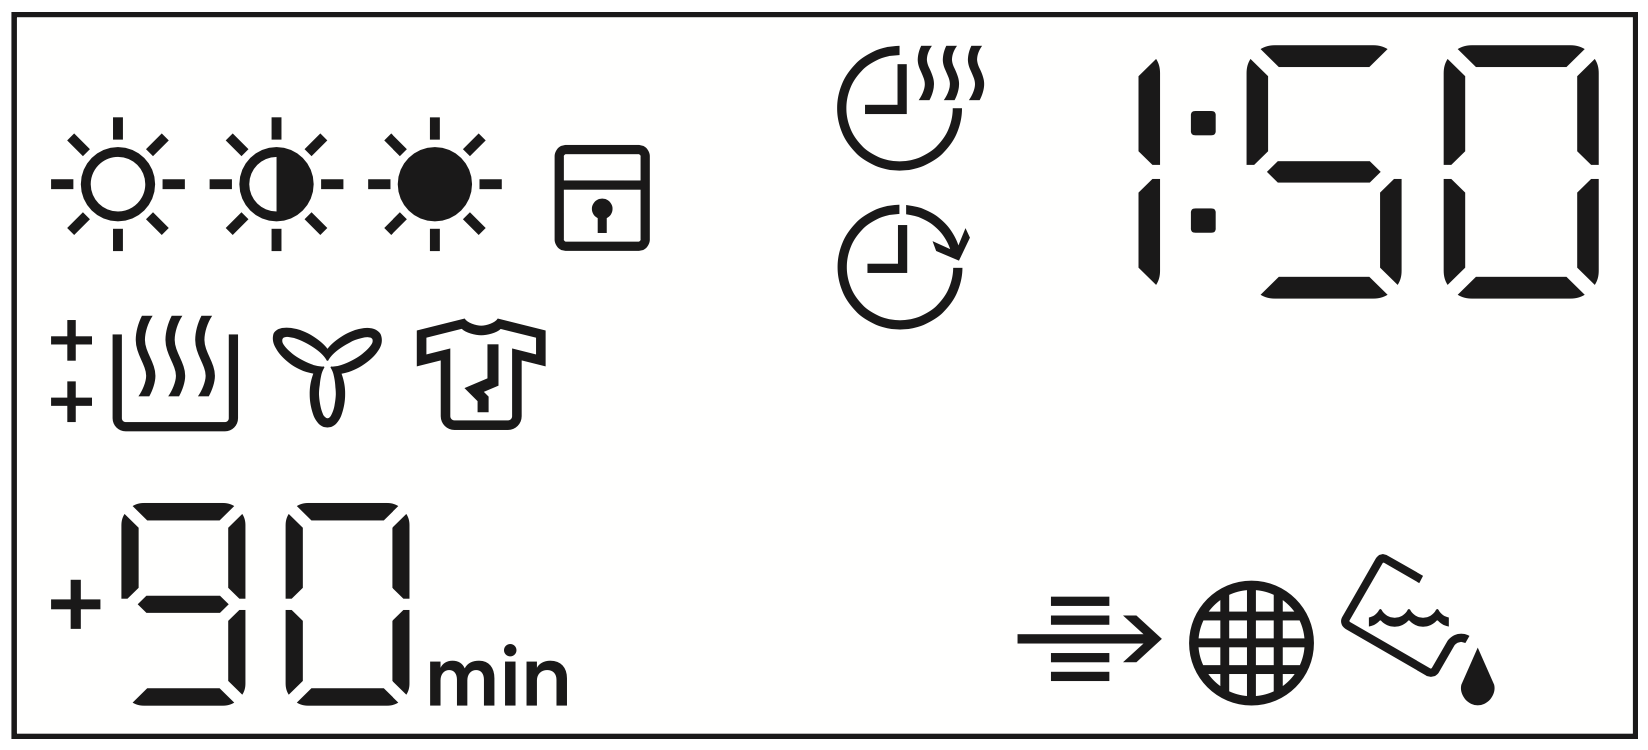
Display
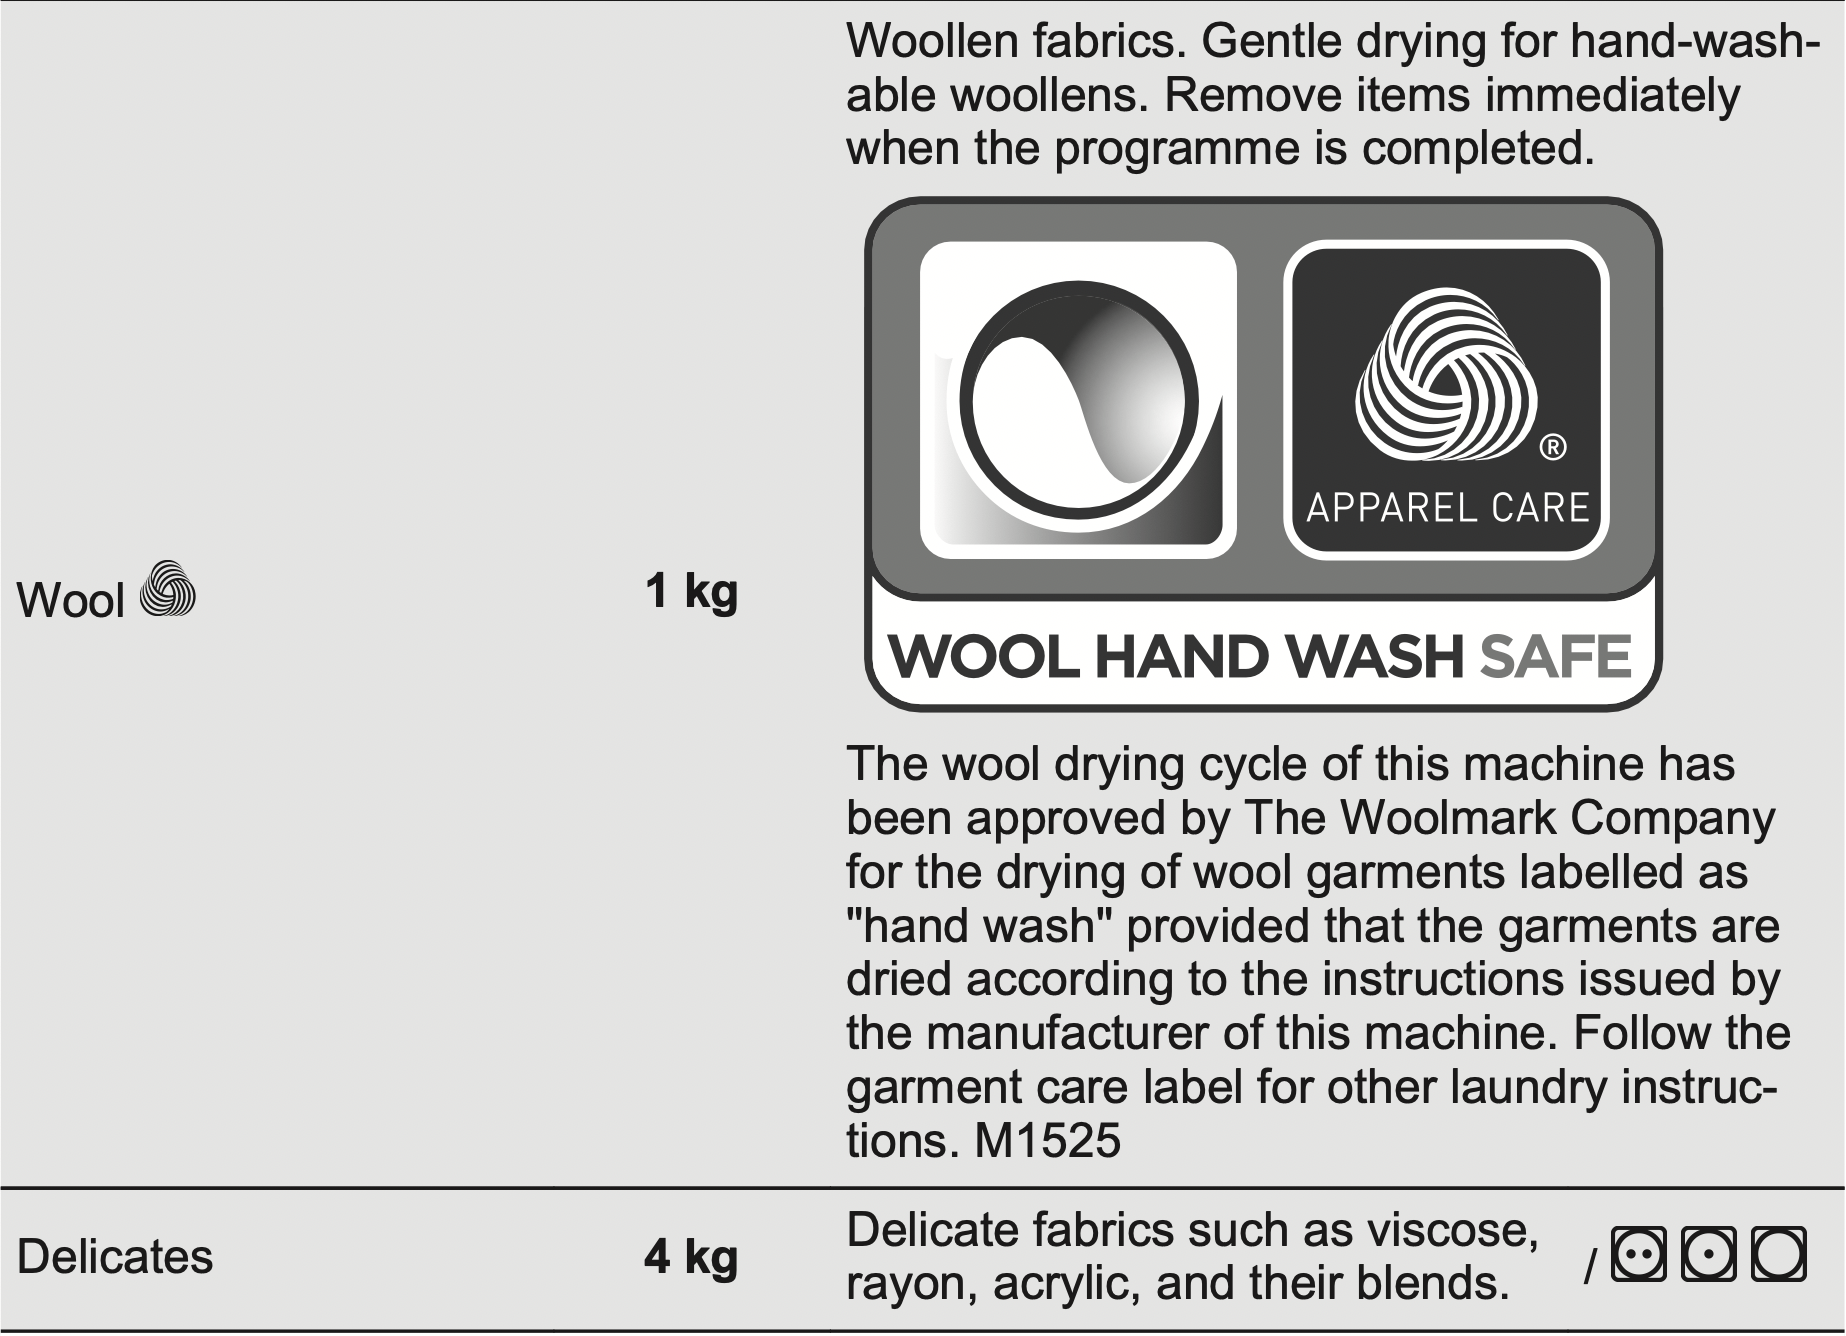
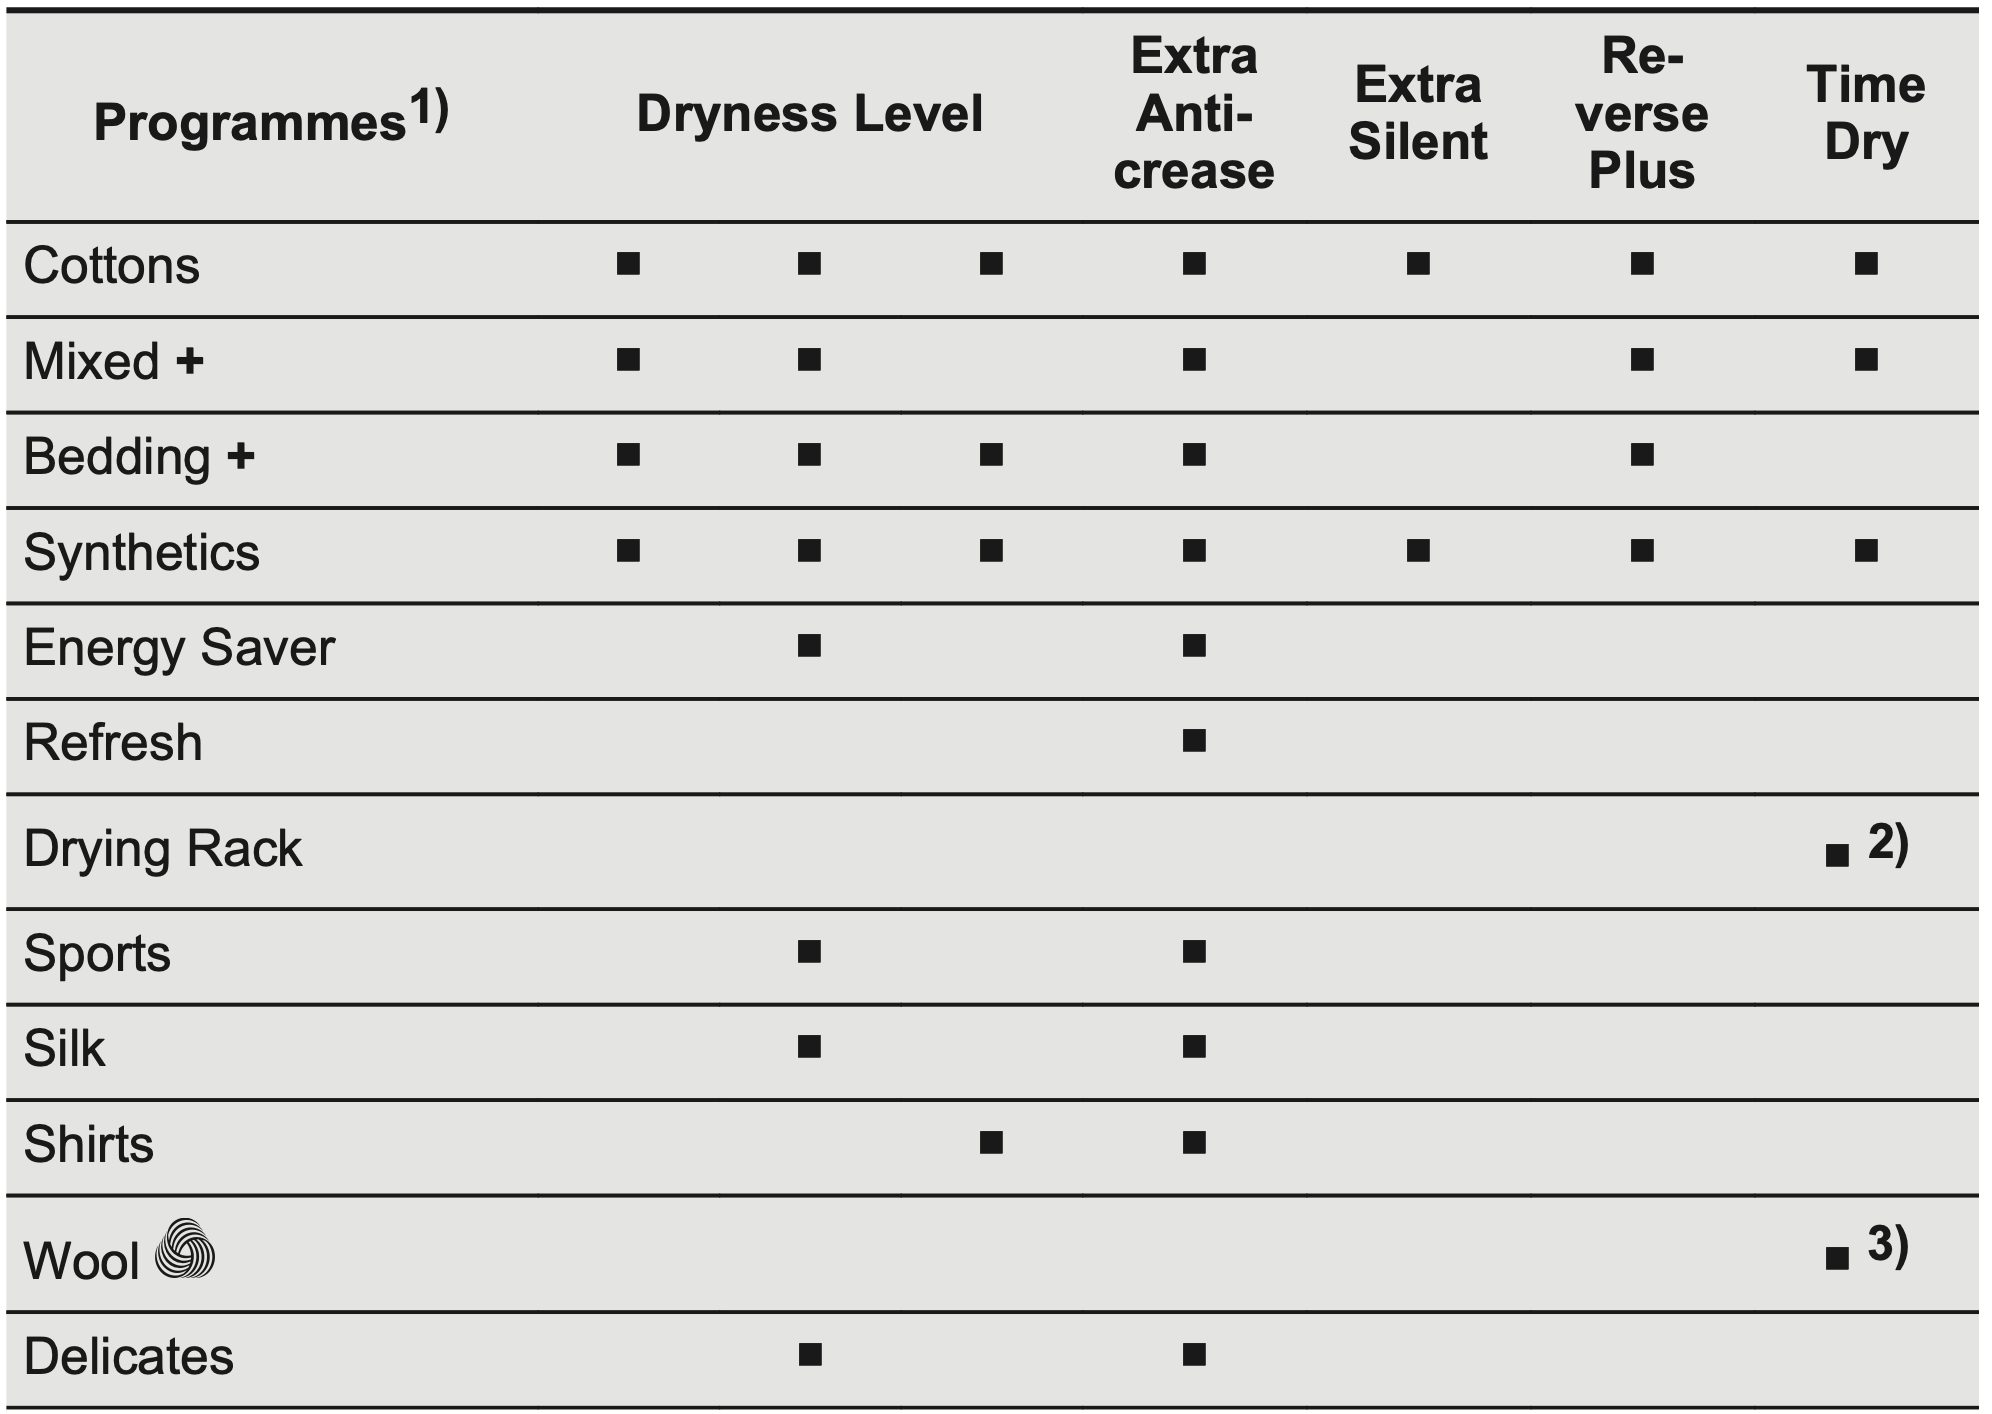
PROGRAMME TABLE
The maximum weight refers to dry items.
For fabric mark meaning see chapter HINTS AND TIPS: Preparing the laundry.
For test institutes only: the Cottons program in combination with the extra dry Dryness Level is the “Standard cotton program”. It is suitable for drying normal wet cotton laundry and it is the most efficient program in terms of energy consumption for drying wet cotton laundry. Standard programme for tests are specified in the AS/NZS2442.2 document.
OPTIONS
Extra Anticrease
Extends the anti-crease phase by 30,60, 90 or 2 hours at the end of the drying cycle. This function reduces creases. The laundry can be removed during the anti-crease phase.
Dryness Level
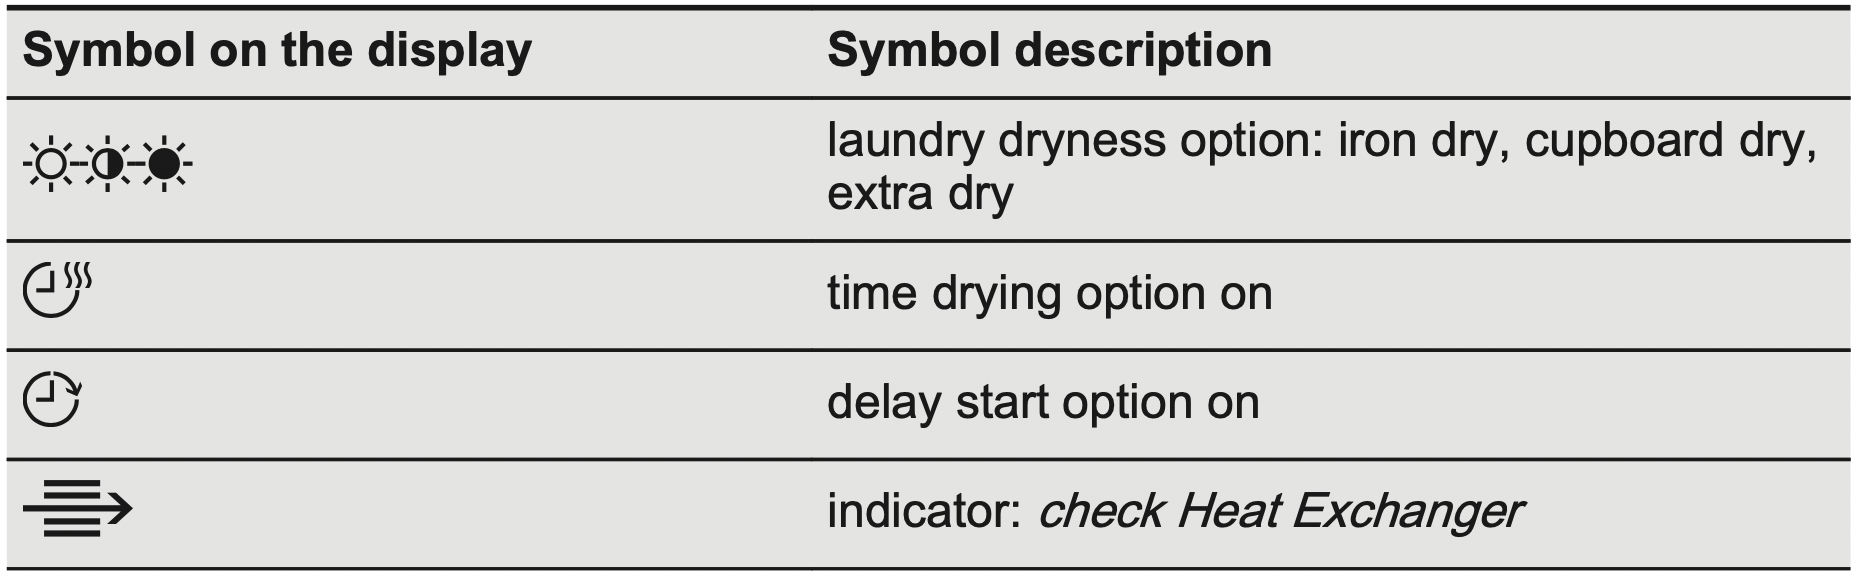
This function helps to increase dryness of the laundry. There are 3 options:
Extra Dry
Cupboard Dry
Iron Dry
Time Dry
You can set the programme duration, from a minimum of 10 minutes to a maximum of 2 hours. The required duration is related to the quantity of laundry in the appliance.
IMPORTANT! We recommend that you set a short duration for small quantities of laundry or for only one item.
Time Dry on Wool programme
Option suitable for Wool programme to adjust final dryness level.
Time Dry on Drying Rack programme
Option suitable for Drying Rack programme .
You can set the programme duration, from a minimum of 10 minutes to a maximum of 2 hours. The setting of the duration is related to the quantity of laundry in the appliance.
We recommend that you set a short duration for small quantities of laundry or for only one item.
End Alert
The buzzer sounds at the:
cycle end
start and end of the anti-crease phase
cycle interruption
The buzzer function is by default always on. You can use this function to activate or deactivate the sound.
IMPORTANT! You can activate the End Alert option with all programmes.
Reverse Plus
Increase drum reversing frequency to reduce items twisting and entanglement. To increase uniformity of drying result and help reduce creases. Recommended for large or long items (e.g. sheets, trousers, long dresses).
Extra Silent
The appliance operates with low noise without effect on the drying quality. The appliance operates slowly with longer cycle time.
Options table
Together with the programme you can set 1 or more options. To activate or deactivate them, press the related touch button.
See chapter OPTIONS: Time Dry on Drying Rack programme
See chapter OPTIONS: Time Dry on Wool programme
SETTINGS
A. Time Dry touch button
B. Start/Pause touch button
C. Delay Start touch button
D. End Alert touch button
E. Reverse Plus touch button
F. Extra Silent touch button
G. Extra Anticrease touch button
H. Dryness Level touch button
Child lock function
This option prevents children playing with the appliance while a programme is operating. The touch buttons are locked. Only the on/off button is unlocked.
Activating the child lock option:
Press the on/off button to activate the appliance.
Press and hold touch button (D) for a few seconds.
The child lock indicator comes on.
IMPORTANT! It is possible to deactivate the child lock option while a programme operates. Press and hold the same touch buttons until the child lock indicator goes off. The Child Lock function isn't available for 8 s after switching on the appliance.
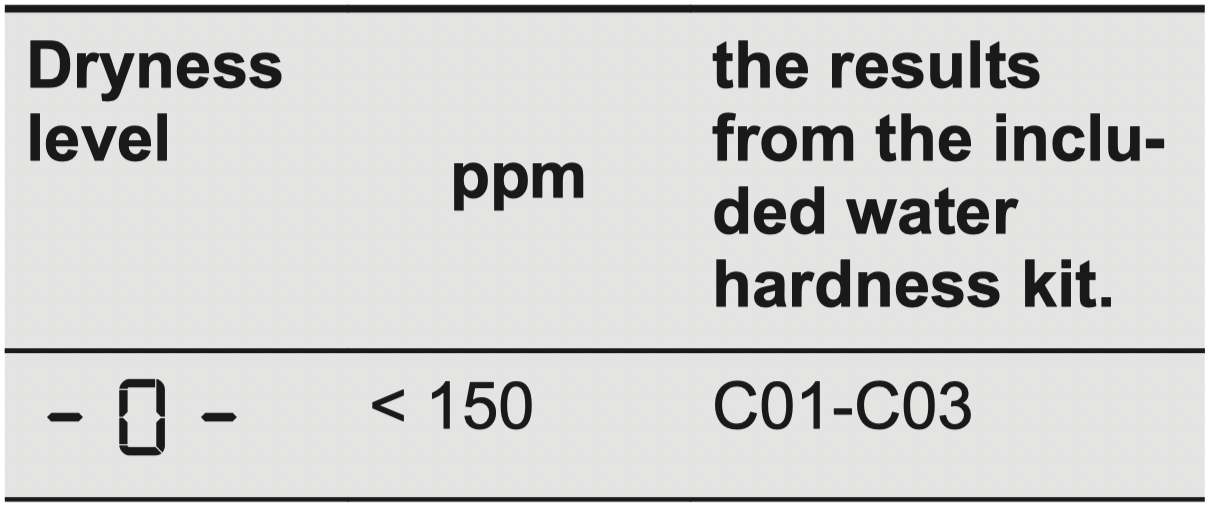
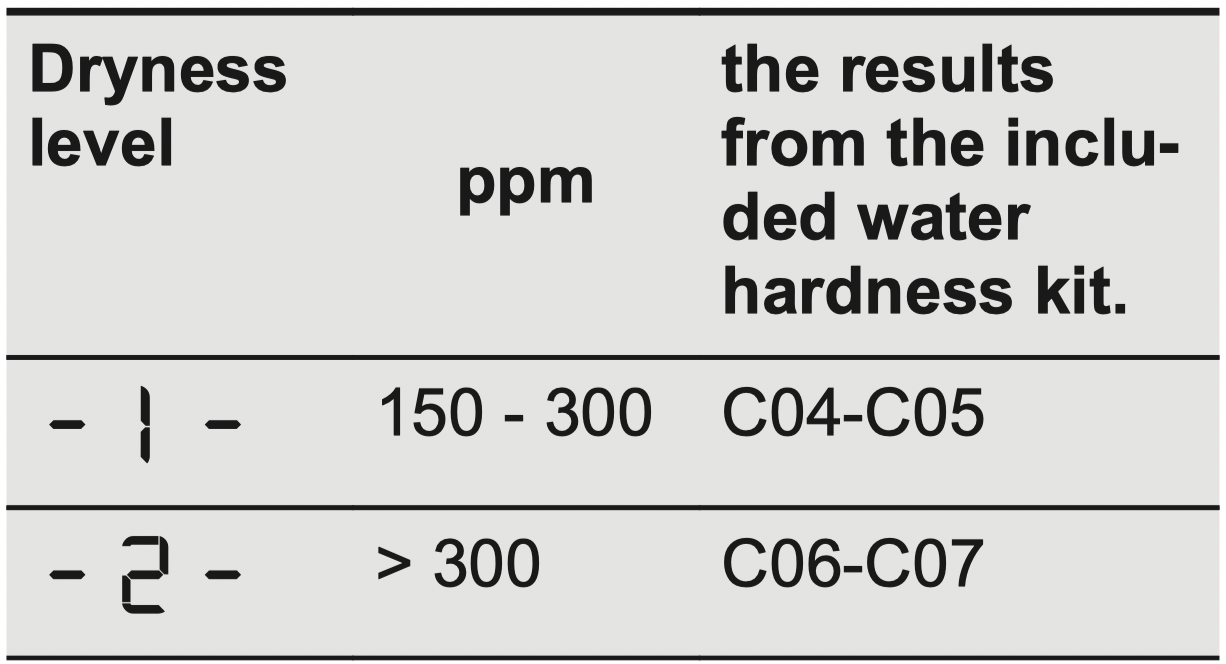
Adjustment of the remaining moisture
The appliance allows you to chose between 3 levels corresponding to different ranges of water hardness.
Depending on the country, the water hardness is expressed in equivalent scales: e.g. French degrees (°f), German degrees (°d), English degrees (°e), mmol/l and ppm
If necessary, please contact your local water authority to check the water hardness in your area.
IMPORTANT! Every time you enter in the "Adjustment of remaining laundry moisture" mode, previously set degree of remaining moisture will change into next value ( e.g previously set will change into )
To change the default degree of remaining moisture:
Press the on/off button to activate the appliance.
Use the programme knob to set any programme.
Wait approximately 8 seconds.
Press and hold buttons (E) and (D) at the same time. One of these indicators comes on: maximum dryness more dry laundry standard dry laundry
Press and hold buttons (E) and (D) again until the indicator of the correct level comes on. IMPORTANT! If the display returns to the normal mode (the time of the selected programme from step 2. will be displayed), while setting the degree of remaining moisture, press and hold buttons (E) and (D) once again to enter to the "Adjustment of remaining laundry moisture" mode (previously set degree of remaining moisture will change into next value).
To accept the selected degree of remaining moisture, wait 5 s and the display returns to the normal mode.
Water container indicator
By default, the water container indicator is on. It comes on when the programme is completed or when it is necessary to empty the water container.
IMPORTANT! If a draining kit is installed (additional accessory), the appliance automatically drains the water from the water container. In this case we recommend that you deactivate the indicator of the water container.
Deactivating the water container indicator:
Press the on/off button to activate the appliance.
Wait approximately 8 seconds.
Press and hold touch buttons (A) and (C) at the same time.
The display shows one of these 2 configurations:
The display shows "Off". After 5 s the display returns to normal mode.
The display shows "On". After 5 s the display returns to normal mode.
BEFORE FIRST USE
IMPORTANT! Rear drum packaging is removed automatically when dryer is activated for the first time. Possible to hear some noise.
Before you use the appliance for the first time:
Clean the tumble dryer drum with a moist cloth.
Start a 1 hour programme with moist laundry.
IMPORTANT! At the beginning of the drying cycle (first 3-5 min) there could be a slightly higher sound level. This is due to the compressor starting up. This is normal for compressor powered appliances such as refrigerators and freezers.
DAILY USE
Start a programme without delay start
Prepare the laundry and load the appliance. CAUTION! Make sure that when you close the door, the laundry does not get caught between the appliance door and the rubber seal.
Press the on/off button to activate the appliance.
Set the correct programme and options for the type of load. The display shows the programme duration. IMPORTANT! The drying time you see on the display, when the cotton programme is selected, is related to the load of 5 kg and standard conditions. Real drying time will depend on type of the load (quantity and composition), the room temperature and the humidity of your laundry after spin drying phase.
Press the Start/Pause touch button. The programme starts.
Starting the programme with delay start
Set the correct programme and options for the type of load.
Press the delay start button again and again until the display shows the delay time you want to set. IMPORTANT! You can delay the start of a programme from a minimum of 1 hour to a maximum of 20 hours.
Press the Start/Pause touch button. The display shows the countdown of the delay start. When the countdown is completed, the programme starts.
Change a programme
Press the on/off button to deactivate appliance
Press the on/off button to activate the appliance.
Set the programme.
At the end of the programme
When the programme is completed:
An intermittent acoustic signal operates.
The display shows
The indicator is on.
The indicators Filter and Tank may come on.
The Start/Pause indicator is on.
The appliance continues to operate with the anti-crease phase for approximately 30 minutes or more if Extra Anticrease option was set (see chapter Option Extra Anticrease ).
The anti-crease phase reduces creasing.
You can remove the laundry before the anti-crease phase is completed. We recommend, for better results, that you remove the laundry when the phase is almost completed.
When the anti-crease phase is completed:
The display still shows
The indicator is off
The indicators Filter and Tank remain on.
Start/Pause indicator goes off.
Press the on/off button to deactivate the appliance.
Open the appliance door.
Remove the laundry.
Close the appliance door.
IMPORTANT! Always clean the filter and empty the water container when a programme is completed.
Stand-by function
To reduce energy consumption, this function automatically deactivates the appliance:
After 5 minutes if you do not start the programme.
After 5 minutes from the end of the programme.
HINTS AND TIPS
Preparing the laundry
Close the zips.
Close the fasteners of duvet covers.
Do not dry ties or ribbons loose (e.g.apron ribbons). Tie them before you start a programme.
Remove all items from pockets.
Turn items with the internal layer made of cotton inside out. Cotton layer must be faced outwards.
Always set the programme suitable for the type of laundry.
Do not put light and dark colours together.
Use suitable programme for cottons, jersey and knitwear to reduce shrinkage.
Do not exceed the maximum load stated in the programmes chapter or shown on the display.
Dry only the laundry that is suitable for tumble drying. Refer to the fabric label on the items.
Do not dry large and small items together. Small items can be trapped inside the large items and remain wet.
CARE AND CLEANING
Cleaning the filter
If necessary remove fluff from the filter socket and gasket. You can use a vacuum cleaner.
Emptying the water container
IMPORTANT! You can use the water from the water container as an alternative to distilled water (e.g. for steam ironing). Before you use the water, remove dirt residues with a filter.
Cleaning the Heat Exchanger
CAUTION! Do not touch the metal surface with bare hands. Risk of injury. Wear protective gloves. Clean carefully to avoid damaging the metal surface.
Cleaning the drum
WARNING! Disconnect the appliance before you clean it.
Use a standard neutral soap detergent to clean the inner surface of the drum and drum lifters. Dry the cleaned surfaces with a soft cloth.
CAUTION! Do not use abrasive materials or steel wool to clean the drum.
Cleaning the control panel and housing
Use a standard neutral soap detergent to clean the control panel and housing.
Use a moist cloth to clean. Dry the cleaned surfaces with a soft cloth.
CAUTION! Do not use furniture cleaning agents or cleaning agents which can cause corrosion.
Cleaning the airflow slots
Use a vacuum cleaner to remove fluff from the airflow slots.
TROUBLESHOOTING
Problem
Possible solution
You cannot activate the appliance.
Make sure that the mains plug is connected to the mains socket.
Check fuse in fuse box (domestic installation).
The programme does not start.
Press Start/Pause.
Make sure that the appliance door is closed.
The appliance door does not close.
Make sure that the installation of the filter is correct.
Make sure that the laundry is not caught between the appliance door and the rubber seal.
The appliance stops during operation.
Make sure that the water container is empty. Press Start/Pause to start the programme again.
Load is too small, increase the load or use the Time Drying programme.
The cycle time is too long or unsatisfactory drying result. 1)
Make sure that the weight of the laundry is suitable for the duration of the programme.
Make sure that the filter is clean.
The laundry is too wet. Spin the laundry in the washing machine again.
Ensure that the room temperature is higher than +5°C and lower than +35°C. Optimal room temperature is 19°C to 24°C.
Set the Time Drying or the Extra Dry programme. 2)
The display shows .
If you want to set a new programme, deactivate and activate the appliance.
Make sure that the options are suitable for the programme.
The display shows Error code (e.g. E51).
Deactivate and activate the appliance. Start a new programme. If the problem occurs again, contact the Service centre.
1) After maximum 5 hours, the programme ends automatically.
2) It can happen that some area remains humid when drying big items (e.g. bed sheets ).
If the drying results are not satisfactory
The set programme was incorrect.
The filter is clogged.
The Heat Exchanger is clogged.
There was too much laundry in the appliance.
The drum is dirty.
Incorrect setting of the conductivity sensor ( See chapter "Settings Adjustment of the remaining laundry moisture degree " for better setting).
The airflow slots are clogged.
Room temperature is too low or too high ( optimal room temperature 19°C to 24°C )
#1 Can I stack this on a electrolux washer model EWF1087?
Thank you for this question you are able to stack a condenser dryer or heat pump condenser dryer above the washer just check your measurements maybe place an anti-vibration mat in between the two items. I hope this information will assist you when shopping here with us at ManualsFile
#2 I would like to check if this require drainage or there is a condenser drawer where the water can be stored. We are considering this dryer to be located in the garage
You can manually empty the condensate tray/container.
#3 Does this dryer expel heat into the room? Will it require venting if located in a cooler climate?
Throughout the drying cycle, a heat pump clothes dryer passes hot air over your clothing, extracting the moisture which is then collected in the condenser. So it actually reduces heat being produced within the room. For installation instructions please refer to page 6 of the user manual.
#4 Can this dryer be wall mounted as i don't think it will stack on top of my Miele washer?
Due to the weight of Condenser and heat pump dryers, no model on the market is wall mountable. The only units capable of wall mounting are vented dryers, due to their lightweight design. Another option for stacking this dryer on your washer is to use a rubber stacking mat.
#5 Is there a quick dry option with this dryer? If not, how fast is the fastest drying cycle?
this is a sensor dryer this will depend on how much water your washer has spun out of the clothes, very difficult to answer with this as there are too many variables also will depend on the material also how much clothes you have loaded I still find customers overloading their machines and expect them to come out dry with any dryer halfway up the bowl with wet clothes you consider this to be a full load. I hope this information will assist you when shopping here with us at ManualsFile.


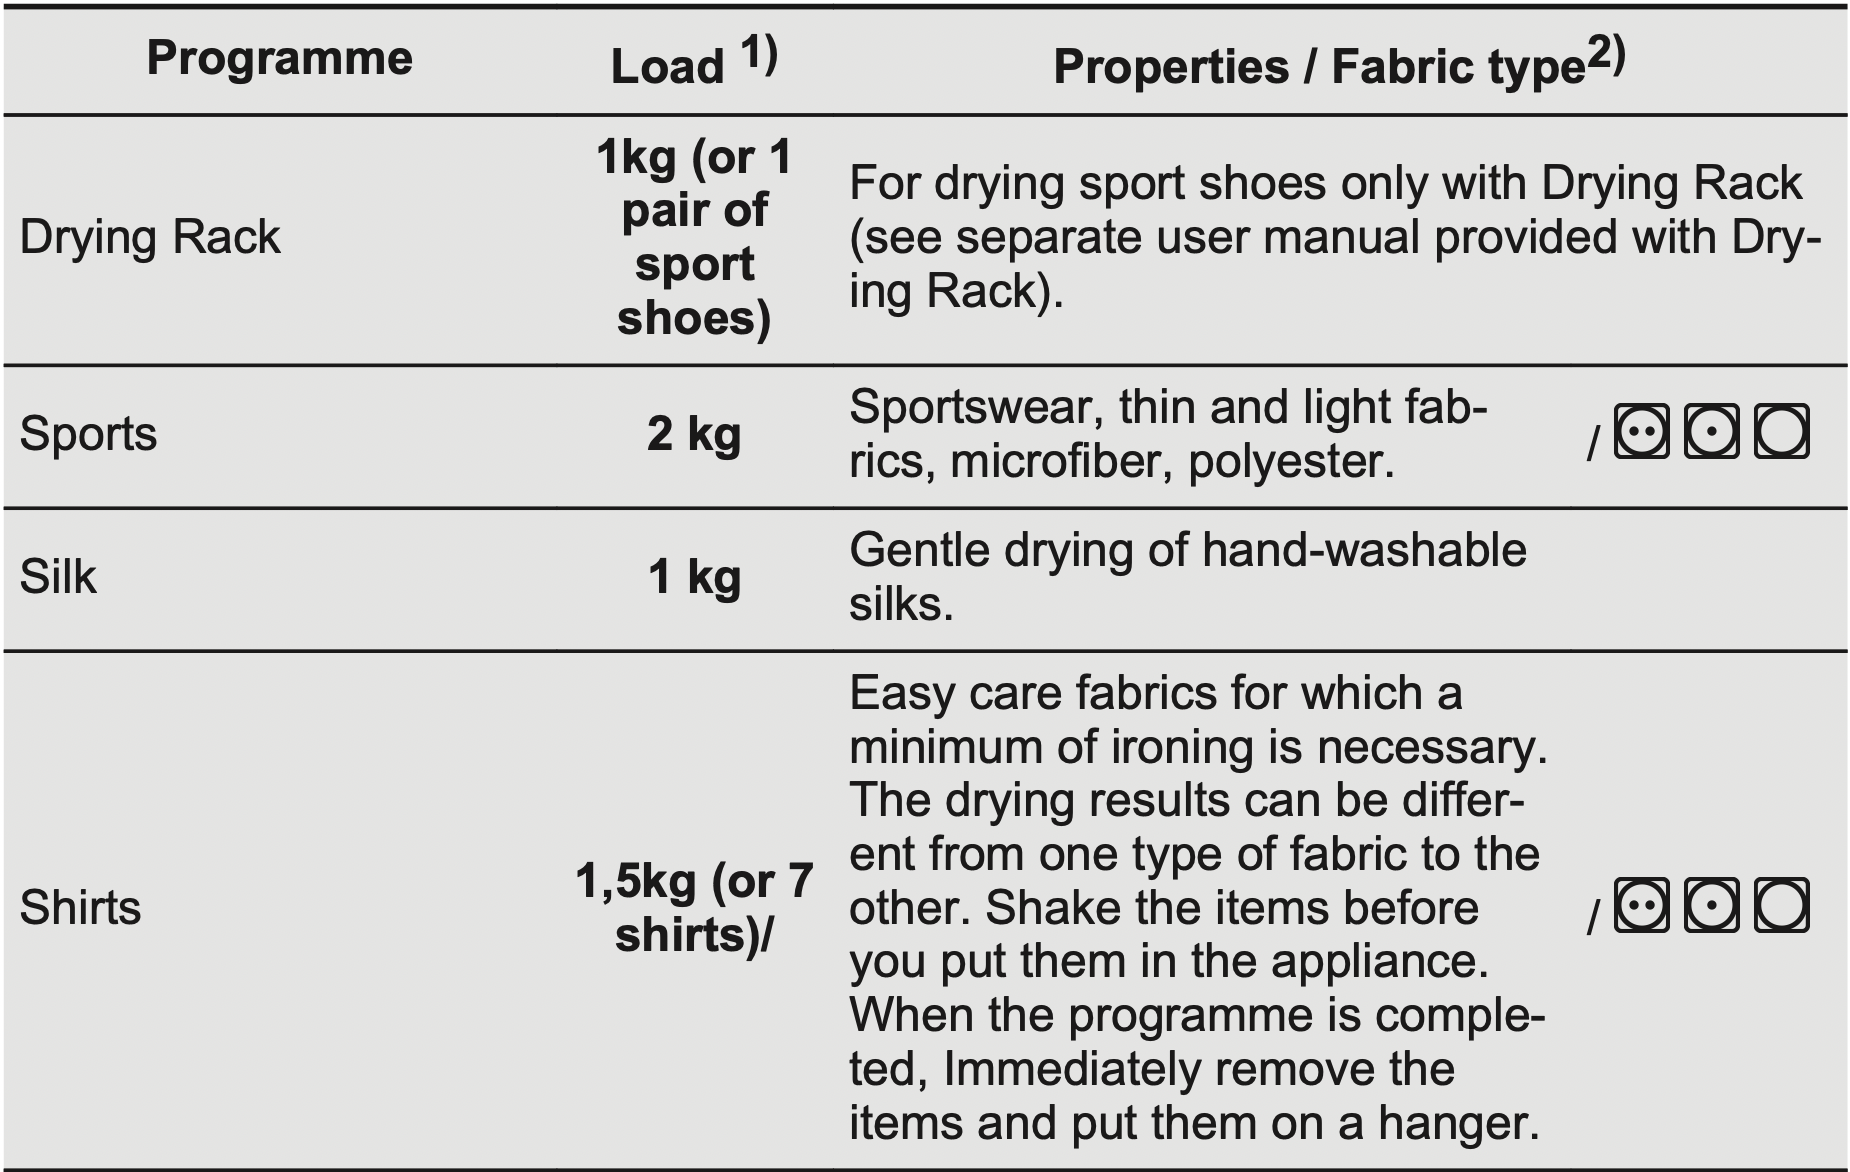
 Dryness Level is the “Standard cotton program”. It is suitable for drying normal wet cotton laundry and it is the most efficient program in terms of energy consumption for drying wet cotton laundry. Standard programme for tests are specified in the AS/NZS2442.2 document.
 Cupboard Dry
 Iron Dry
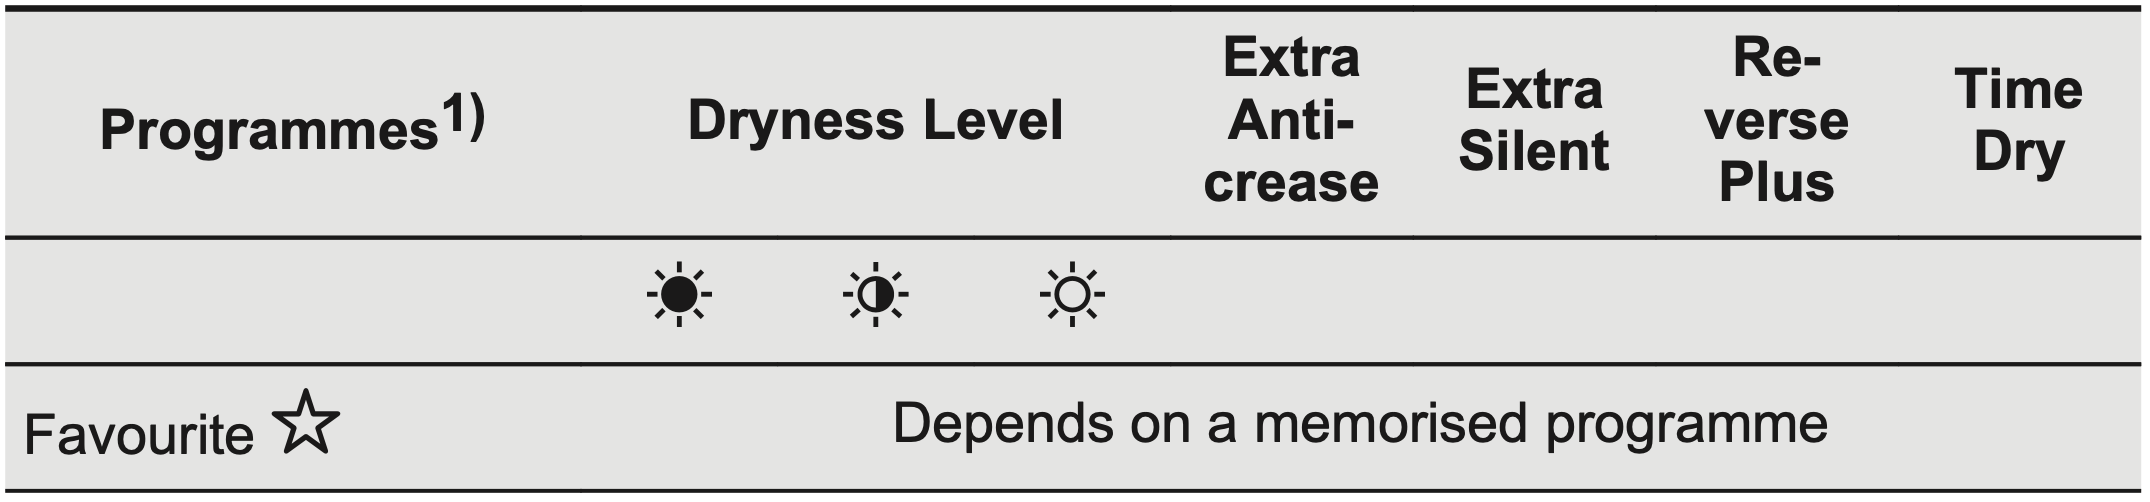

 will change into
  )
) maximum dryness
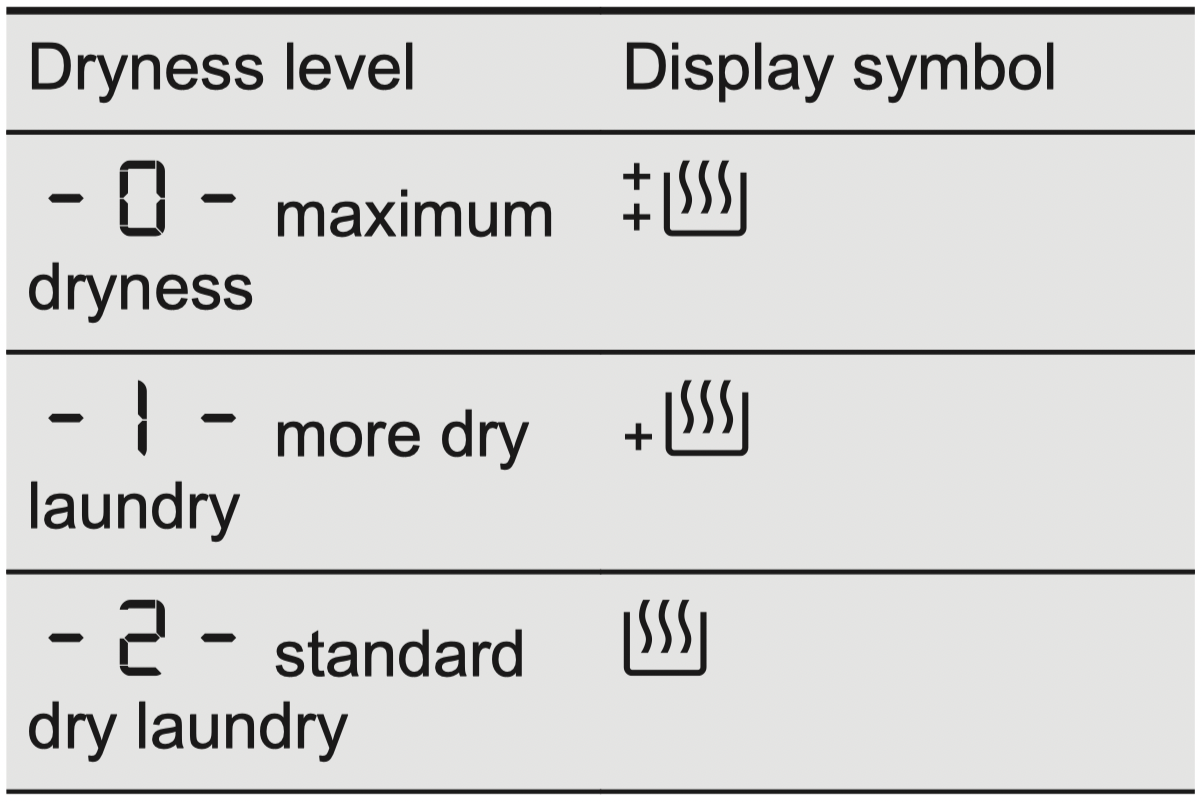

 is on.
 Filter and
  Tank may come on.
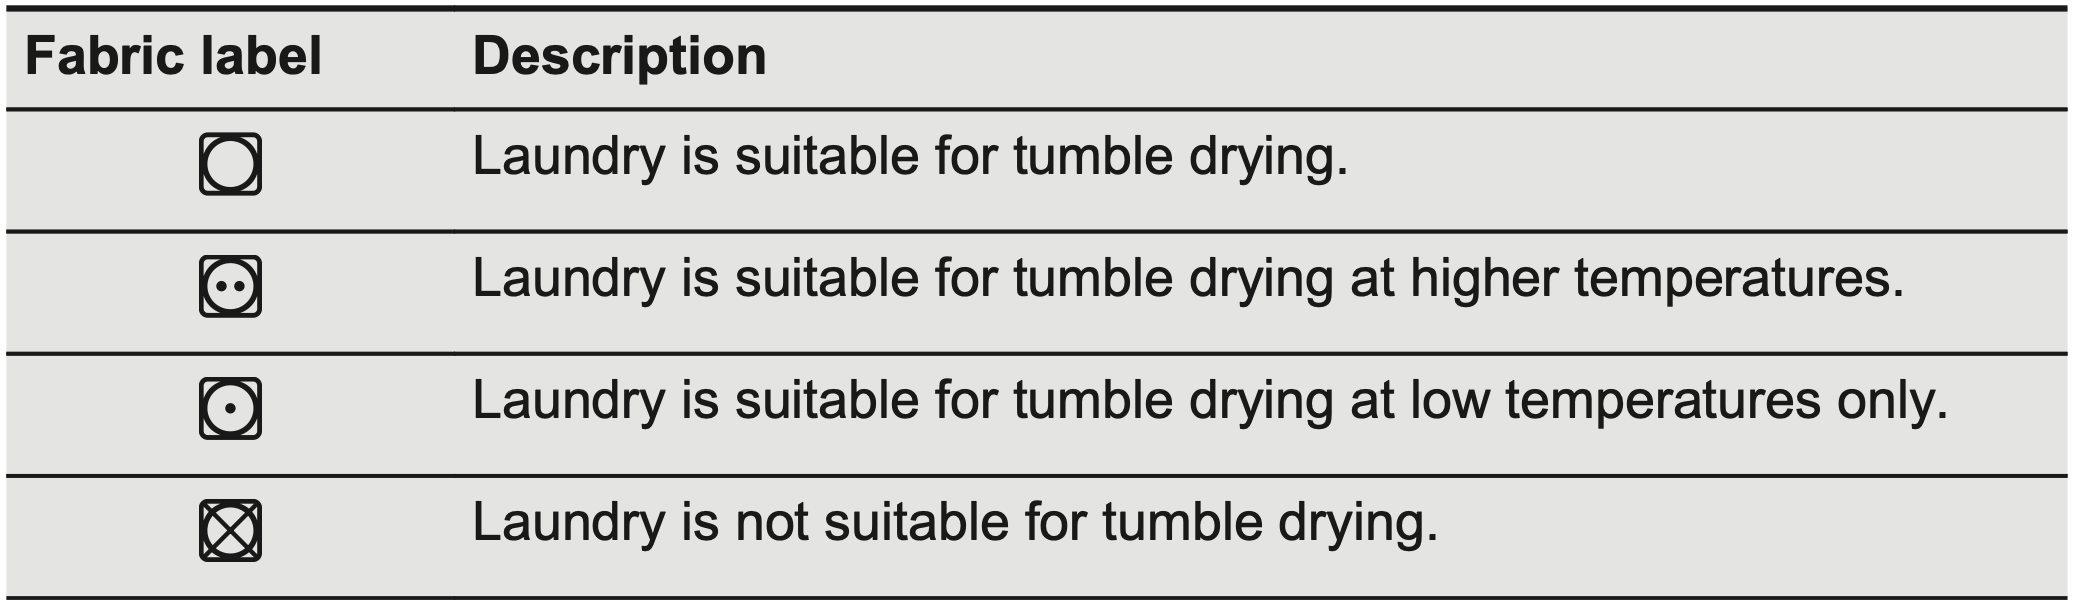


 .
.