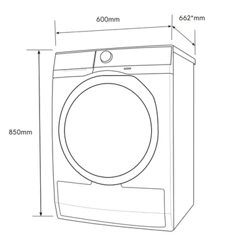
The load door can be installed by the user in the opposite side. It can help to easily put and remove the laundry or if there is a limit to install the appliance (see separate leaflet).
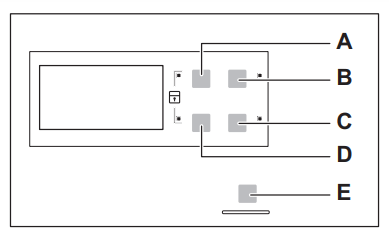
CONTROL PANEL
Programme knob
Display
Time touchpad
Delay touchpad
Buzzer touchpad
Wool Load touchpad
Start/Pause touchpad
On/Off button
Touch the touchpads with your finger in the area with the symbol or name of the option. Do not wear gloves when you operate with the control panel. Make sure that the control panel is always clean and dry.
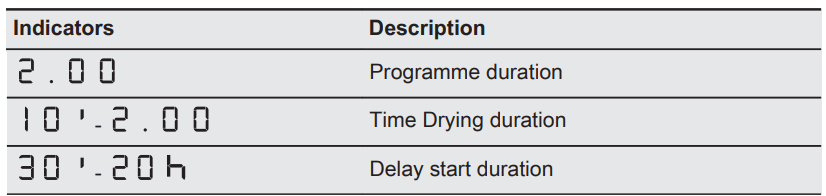
Indicators
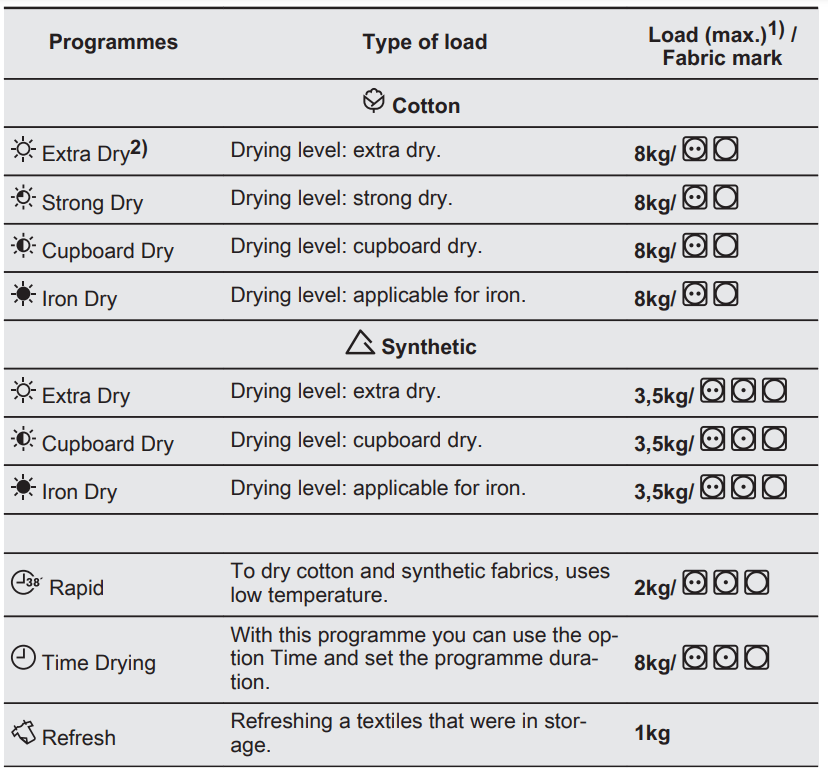
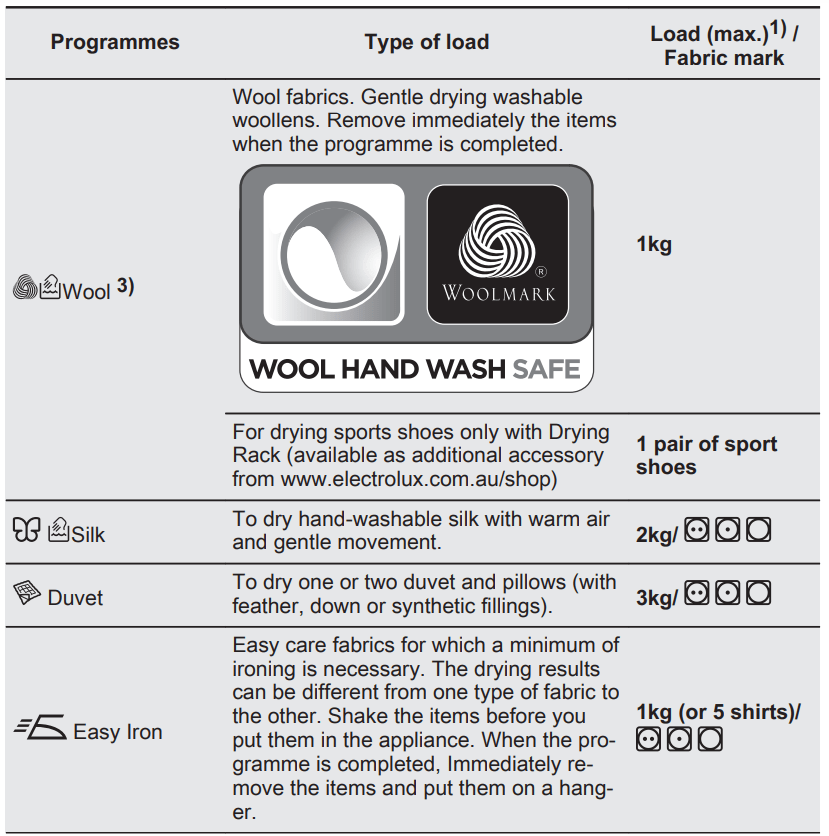
PROGRAMME TABLE
The maximum weight refers to dry items.
For test institutes only: Standard program for tests are specified in the AS/NZS2442.2 document.
The wool drying cycle of this tumble drying machine has been tested and approved by The Woolmark Company. The cycle is suitable to dry wool garments, which are labelled hand wash" provided that the garments are washed in a Woolmark endorsed hand wash‐ ing cycle and tumble dried according to the instructions issued by the manufacturer. 1780SW13W.
OPTIONS
Time
This option is applicable to the Time Drying programme and to the Wool programme (only with the Drying Rack)..
We recommend that you set a short duration for small quantities of laundry or for only one item.
Time Drying programme: You can set the programme duration, from a www.electrolux.com minimum of 10 minutes to a maximum of 2 hours. The setting of the duration is related to the quantity of laundry in the appliance.
Wool programme: You can set the programme duration, from a minimum of 30 minutes to a maximum of 4 hours. The setting of the duration is related to the quantity of laundry in the appliance.
Wool Load
This option is applicable only to the Wool programme. To get laundry more dried press the Wool Load touchpad again and again to increase the programme duration.
Buzzer
you can hear the buzzer at the:
cycle end
start and end of crease guard phase
cycle interruption
The buzzer function is by default always on. You can use this function to activate or deactivate the sound. You can activate the Buzzer option with all programmes.
Options table
Together with the programme you can set 1 or more options. To activate or deactivate them, press the related touchpad.
Only with the Drying Rack (standard accessory or optional, depending on model)
SETTINGS
A) Time touchpad
B) Delay touchpad
C) Buzzer touchpad
D) Wool Load touchpad
E) Start/Pausetouchpad
Child lock function
This option prevents children to play with the appliance while a programme operates. The programme knob and the touchpads are locked.
Only the on/off button is unlocked.
Activating the child lock option:
Press the on/off button to activate the appliance.
Wait approximately 8 seconds.
Press and hold touchpads (A) and (D) at the same time. The child lock indicator comes on. The child lock indicator comes on.
It is possible to deactivate the child lock option while a programme operates. Press and hold the same touchpads until the child lock indicator goes off.
Adjustment of the remaining laundry moisture degree
To change the default degree of the remaining moisture of the laundry:
Press the on/off button to activate the appliance.
Wait approximately 8 seconds.
Press and hold buttons (A) and (B) at the same time. One of the these indicators comes on:
the maximum dry laundry
the more dry laundry
the standard dry laundry
Press the button (E) again and again until the indicator of the correct level comes on.
To confirm the adjustment, press and hold buttons (A) and (B) at the same time for approximately 2 seconds.
BEFORE FIRST USE
Before you use the appliance for the first time do these operations:
Clean the tumble dryer drum with a moist cloth.
Start a short programme (e.g. 30 minutes) with moist laundry.
At the beginning of drying cycle (3-5 min.) there could be a slightly higher sound level. It is because of start of the compressor that is normal for compressor powered appliances such: refrigerators, freezers.
DAILY USE
Start a programme without delay start
Prepare the laundry and load the appliance. CAUTION! Make sure that when you close the door, the laundry does not catch between the appliance door and the rubber seal.
Press the on/off button to activate the appliance.
Set the correct programme and options for the type of load. The display shows the programme duration. The drying time you see is related to the load of 5 kg for cotton and jeans programmes. For the other programmes the drying time is related to the recommended loads. The drying time of the cotton and jeans programmes with the load more than 5 kg is longer.
Press the Start/Pause touchpad. The programme starts.
Starting the programme with delay start
Set the correct programme and options for the type of load.
Press the delay start button again and again until the display shows the delay time you want to set. You can delay the start of a programme from a minimum of 30 minutes to a maximum of 20 hours.
Press the Start/Pause touchpad. The display shows the countdown of the delay start. When the countdown is completed, the programme starts.
Change a programme
Press the on/off button to deactivate appliance
Press the on/off button to activate the appliance.
Set the programme.
At the end of the programme
When the programme is completed:
An intermittent acoustic signal operates.
The indicator flashes.
The indicator flashes.
The Start/Pause indicator is on.
The appliance continues to operate with the crease guard phase for approximately other 30 minutes.
The crease guard phase removes creases from your laundry.
You can remove the laundry before the crease guard phase is completed. We recommend, for better results, that you remove the laundry when the phase is almost completed or completed.
When the crease guard phase is completed:
The indicatoris on but does not flash.
The indicator is on but does not flash.
Start/Pause indicator goes off.
Press the on/off button to deactivate the appliance.
Open the appliance door.
Remove the laundry.
Close the appliance door.
Always clean the filter and empty the water container when a programme is completed.
Stand-by function
To decrease the energy consumption, this function automatically deactivates the appliance:
After 5 minutes if you do not start the programme.
After 5 minutes from the end of the programme.
HINTS AND TIPS
Preparing the laundry
Close the zippers.
Close the fasteners of the duvet covers.
Do not keep ties or ribbons loose (e.g. apron ribbons). Tie them before you start a programme.
Remove all items from the pockets.
If an item has the internal layer made of cotton, turn it inside out. Make sure that the cotton layer is always external
We recommend that you set the correct programme applicable for the type of fabrics that are in the appliance.
Do not put fabrics with strong colours together with fabrics with light colours. Strong colours can bleed.
Use an applicable programme for cotton jersey and knitwear to prevent the items to shrink.
Make sure that the laundry weight is not more than the maximum weight that is in the programme table.
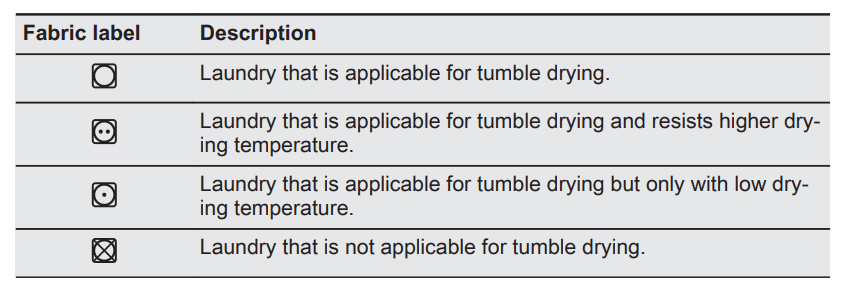
Dry only the laundry that is applicable for tumble dryer. Refe
CARE AND CLEANING
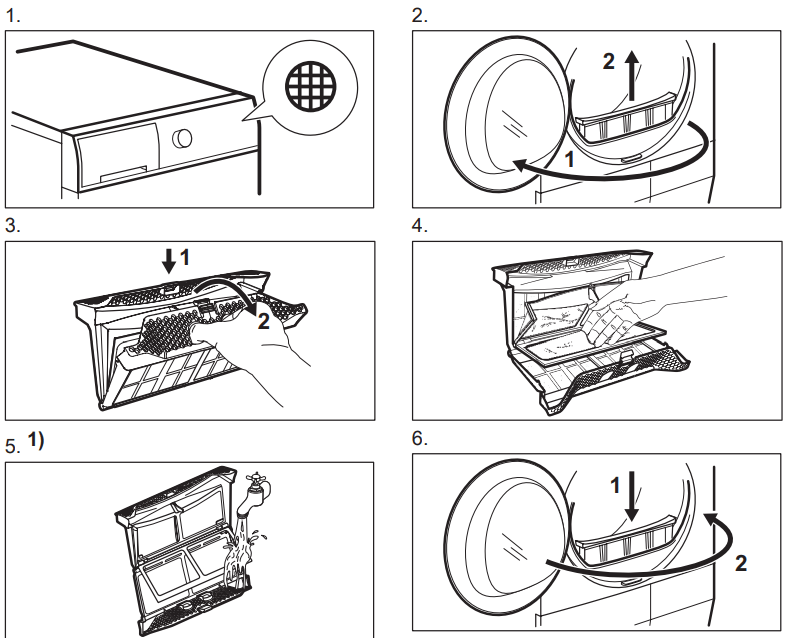
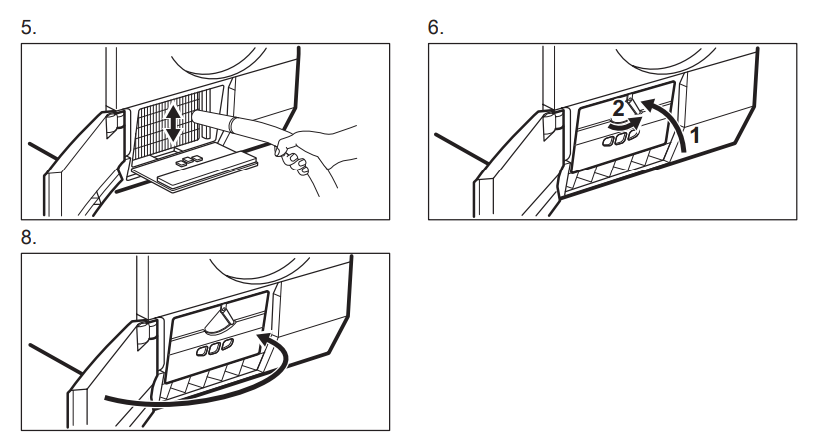
Cleaning the filter
1) If necessary clean the filter with tap warm water using a brush and/or a vacuum cleaner
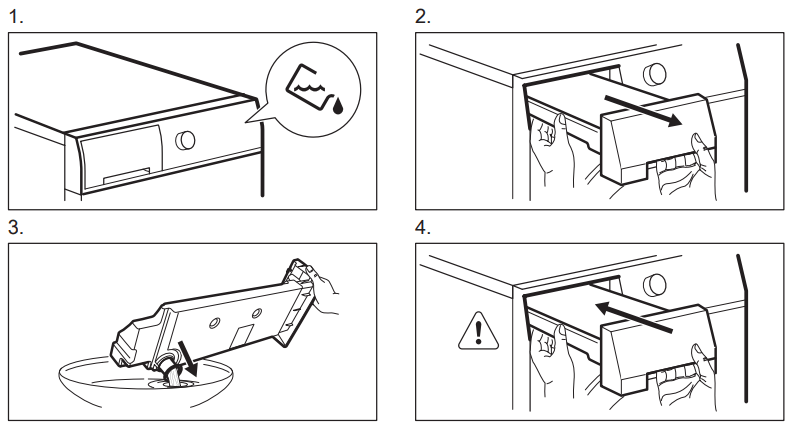
Draining the water container
You can use the water from the water container as an alternative to distilled water (e.g. for steam ironing). Before you use the water, remove dirt residues with a filter
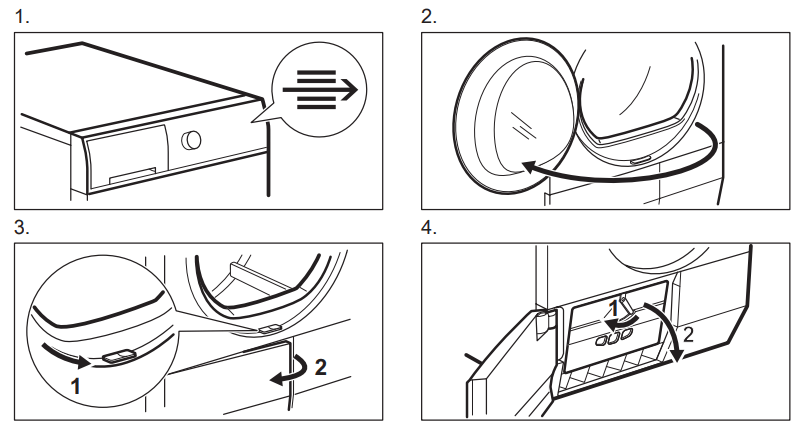
Cleaning the condenser
Cleaning the drum
WARNING! Disconnect the appliance before you clean it. Use a standard neutral soap detergent to clean the inner surface of the drum and drum ribs. Dry the cleaned surfaces with a soft cloth.
CAUTION! Do not use abrasive materials or steel wool to clean the drum.
Cleaning the control panel and housing
Use a standard neutral soap detergent to clean the control panel and housing. Use a moist cloth to clean. Dry the cleaned surfaces with a soft cloth.
CAUTION! Do not use furniture cleaning agents or cleaning agents which can cause corrosion to clean the appliance.
Cleaning the airflow slots
Use a vacuum cleaner to remove the fluff from the airflow slots.
TROUBLESHOOTING
Problem
Possible solution
You cannot activate the appliance.
Make sure that the mains plug is connected to the mains socket.
Check fuse in fuse box (domestic installation).
The programme does not start.
Press Start/Pause.
Make sure that the appliance door is closed.
The appliance door does not close.
Make sure that the installation of the filter is correct.
Make sure that the laundry does not catch between the appliance door and the rubber seal.
The appliance stops during operation.
Make sure that the water container is empty. Press Start/Pause to start the pro‐ gramme again.
The display shows a long programme du‐ ration. 1)
Make sure that the weight of the laundry is applicable to the duration of the pro‐ gramme.
Make sure that the filter is clean.
The laundry is too wet. Spin the laundry in the washing machine again.
Make sure that the room temperature is not too warm.
The display shows a short programme duration.
Set the Time Drying or the Extra Dry pro‐ gramme.
The display shows Err.
If you want to set a new programme, de‐ activate and activate the appliance.
Make sure that the options are applicable to the programme.
The display shows (e.g. E51).
Deactivate and activate the appliance. Start a new programme. If the proble
1) After maximum 5 hours, the programme ends automatically
 The load door can be installed by the user in the opposite side. It can help to easily put and remove the laundry or if there is a limit to install the appliance (see separate leaflet).
 Programme knob
 Display
 Time touchpad
 Delay touchpad
 Buzzer touchpad
 Wool Load touchpad
 Start/Pause touchpad
 On/Off button
 Touch the touchpads with your finger in the area with the symbol or name of the option. Do not wear gloves when you operate with the control panel. Make sure that the control panel is always clean and dry.
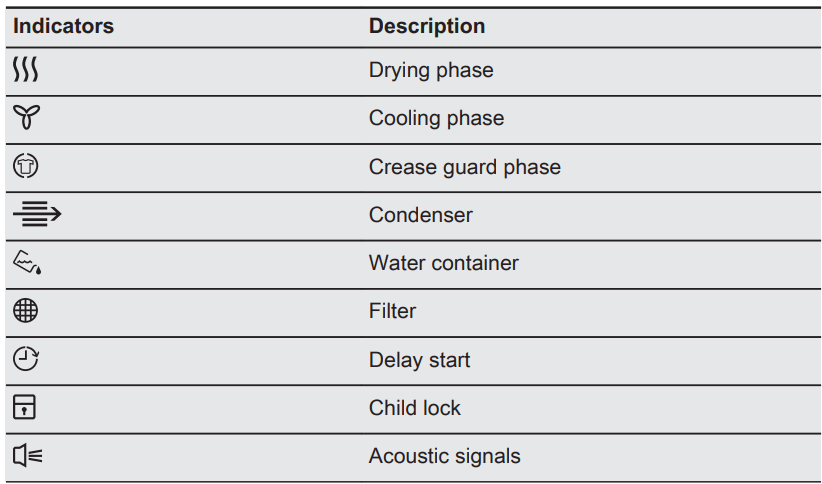


 touchpad
 touchpad
 touchpad
 touchpad
 touchpad
 the maximum dry laundry
 the more dry laundry
 the standard dry laundry
 flashes.
 flashes.